Documentation for Crowd 4.4
576
Documentation for Crowd 4.4 1
-
Upload
khangminh22 -
Category
Documents
-
view
5 -
download
0
Transcript of Documentation for Crowd 4.4
Documentation for Crowd 4.4
1

2
Contents Crowd documentation . . . . . . . . . . . . . . . . . . . . . . . . . . . . . . . . . . . . . . . . . . . . . . . . . . . . . . . . . . . 7
Getting started with Crowd . . . . . . . . . . . . . . . . . . . . . . . . . . . . . . . . . . . . . . . . . . . . . . . . . . . . . 8 Installation and Upgrade Guide . . . . . . . . . . . . . . . . . . . . . . . . . . . . . . . . . . . . . . . . . . . . . . . . 13
Installing Crowd . . . . . . . . . . . . . . . . . . . . . . . . . . . . . . . . . . . . . . . . . . . . . . . . . . . . . . . . . . 14 Supported Platforms . . . . . . . . . . . . . . . . . . . . . . . . . . . . . . . . . . . . . . . . . . . . . . . . . . . 15
Setting JAVA_HOME . . . . . . . . . . . . . . . . . . . . . . . . . . . . . . . . . . . . . . . . . . . . . . . . 18 End of support announcements for Crowd . . . . . . . . . . . . . . . . . . . . . . . . . . . . . . . . 19
Installing Crowd and CrowdID . . . . . . . . . . . . . . . . . . . . . . . . . . . . . . . . . . . . . . . . . . . . 20 Connecting Crowd to a Database . . . . . . . . . . . . . . . . . . . . . . . . . . . . . . . . . . . . . . . 22
Connecting CrowdID to a Database . . . . . . . . . . . . . . . . . . . . . . . . . . . . . . . . . . . . . 29 Specifying your Crowd Home Directory . . . . . . . . . . . . . . . . . . . . . . . . . . . . . . . . . . 39
Running the Setup Wizard . . . . . . . . . . . . . . . . . . . . . . . . . . . . . . . . . . . . . . . . . . . . . . . 40 Troubleshooting your Configuration on Setup . . . . . . . . . . . . . . . . . . . . . . . . . . . . . 49
Configuring Crowd . . . . . . . . . . . . . . . . . . . . . . . . . . . . . . . . . . . . . . . . . . . . . . . . . . . . . 51 Important directories and files . . . . . . . . . . . . . . . . . . . . . . . . . . . . . . . . . . . . . . . . . 52
Changing the Port that Crowd uses . . . . . . . . . . . . . . . . . . . . . . . . . . . . . . . . . . . . . 64 Configuring Crowd to Work with SSL . . . . . . . . . . . . . . . . . . . . . . . . . . . . . . . . . . . . 66
Installing Crowd as a Windows Service . . . . . . . . . . . . . . . . . . . . . . . . . . . . . . . . . . 69 Setting Crowd to Start Automatically on Mac OS X . . . . . . . . . . . . . . . . . . . . . . . . . 76
Setting Crowd to Run Automatically and Use an Unprivileged System User on UNIX 79
Upgrading Crowd . . . . . . . . . . . . . . . . . . . . . . . . . . . . . . . . . . . . . . . . . . . . . . . . . . . . . . . . 81 Upgrading Crowd via Automatic Database Upgrade . . . . . . . . . . . . . . . . . . . . . . . . . . . 82
Upgrading Crowd via XML Data Transfer . . . . . . . . . . . . . . . . . . . . . . . . . . . . . . . . . . . 84 Crowd 4.4 Upgrade Notes . . . . . . . . . . . . . . . . . . . . . . . . . . . . . . . . . . . . . . . . . . . . . . . 87 Migrate to Another Database . . . . . . . . . . . . . . . . . . . . . . . . . . . . . . . . . . . . . . . . . . . . . . . 88
Migrating Crowd Between Servers . . . . . . . . . . . . . . . . . . . . . . . . . . . . . . . . . . . . . . . . . . . 89 Migrating from OnDemand to a Crowd installed site . . . . . . . . . . . . . . . . . . . . . . . . . . . . . . 90
Installing Crowd Data Center . . . . . . . . . . . . . . . . . . . . . . . . . . . . . . . . . . . . . . . . . . . . . . . 91 Migrate from Server to Data Center . . . . . . . . . . . . . . . . . . . . . . . . . . . . . . . . . . . . . . . . . . 95
Crowd 4.4 Release Notes . . . . . . . . . . . . . . . . . . . . . . . . . . . . . . . . . . . . . . . . . . . . . . . . . . 99 Administration Guide . . . . . . . . . . . . . . . . . . . . . . . . . . . . . . . . . . . . . . . . . . . . . . . . . . . . . . . 102
Getting Started . . . . . . . . . . . . . . . . . . . . . . . . . . . . . . . . . . . . . . . . . . . . . . . . . . . . . . . . . 105 Concepts . . . . . . . . . . . . . . . . . . . . . . . . . . . . . . . . . . . . . . . . . . . . . . . . . . . . . . . . . . . 106
Supported Applications and Directories . . . . . . . . . . . . . . . . . . . . . . . . . . . . . . . . . . . . 108 About the Crowd Administration Console . . . . . . . . . . . . . . . . . . . . . . . . . . . . . . . . . . 109
Managing Directories . . . . . . . . . . . . . . . . . . . . . . . . . . . . . . . . . . . . . . . . . . . . . . . . . . . . 110 Using the Directory Browser . . . . . . . . . . . . . . . . . . . . . . . . . . . . . . . . . . . . . . . . . . . . 111
Adding a Directory . . . . . . . . . . . . . . . . . . . . . . . . . . . . . . . . . . . . . . . . . . . . . . . . . . . . 112 Configuring an Internal Directory . . . . . . . . . . . . . . . . . . . . . . . . . . . . . . . . . . . . . . 114
Configuring an LDAP Directory Connector . . . . . . . . . . . . . . . . . . . . . . . . . . . . . . . 116 Configuring a Remote Crowd Directory . . . . . . . . . . . . . . . . . . . . . . . . . . . . . . . . . 129
Configuring a Custom Directory Connector . . . . . . . . . . . . . . . . . . . . . . . . . . . . . . 134 Configuring a Delegated Authentication Directory . . . . . . . . . . . . . . . . . . . . . . . . . 136
Configuring Azure Active Directory . . . . . . . . . . . . . . . . . . . . . . . . . . . . . . . . . . . . . 139 Configuring Caching for an LDAP Directory . . . . . . . . . . . . . . . . . . . . . . . . . . . . . . . . 143
Using Naive DN Matching . . . . . . . . . . . . . . . . . . . . . . . . . . . . . . . . . . . . . . . . . . . . . . 148 Specifying Directory Permissions . . . . . . . . . . . . . . . . . . . . . . . . . . . . . . . . . . . . . . . . 150
Importing Users and Groups into a Directory . . . . . . . . . . . . . . . . . . . . . . . . . . . . . . . . 153 Importing Users from Atlassian Confluence . . . . . . . . . . . . . . . . . . . . . . . . . . . . . . 154
Importing Users from Atlassian Jira . . . . . . . . . . . . . . . . . . . . . . . . . . . . . . . . . . . . 156 Importing Users from Atlassian Bamboo . . . . . . . . . . . . . . . . . . . . . . . . . . . . . . . . 158
Importing Users from Jive Forums . . . . . . . . . . . . . . . . . . . . . . . . . . . . . . . . . . . . . 160 Importing Users from CSV Files . . . . . . . . . . . . . . . . . . . . . . . . . . . . . . . . . . . . . . . 162
Importing Users from One Crowd Directory into Another . . . . . . . . . . . . . . . . . . . . 171 Configuring directories for failover authentication . . . . . . . . . . . . . . . . . . . . . . . . . . . . 173
Pruning delegated directories . . . . . . . . . . . . . . . . . . . . . . . . . . . . . . . . . . . . . . . . . . . 175 Managing Applications . . . . . . . . . . . . . . . . . . . . . . . . . . . . . . . . . . . . . . . . . . . . . . . . . . . 176
2

3
Using the Application Browser . . . . . . . . . . . . . . . . . . . . . . . . . . . . . . . . . . . . . . . . . . . 177 Adding an Application . . . . . . . . . . . . . . . . . . . . . . . . . . . . . . . . . . . . . . . . . . . . . . . . . 181
Integrating Crowd with Atlassian Bamboo . . . . . . . . . . . . . . . . . . . . . . . . . . . . . . . 185 Integrating Crowd with Atlassian Confluence . . . . . . . . . . . . . . . . . . . . . . . . . . . . . 190
Integrating Crowd with Atlassian CrowdID . . . . . . . . . . . . . . . . . . . . . . . . . . . . . . . 198 Integrating Crowd with Atlassian Crucible . . . . . . . . . . . . . . . . . . . . . . . . . . . . . . . 201 Integrating Crowd with Atlassian FishEye . . . . . . . . . . . . . . . . . . . . . . . . . . . . . . . 202
Integrating Crowd with Atlassian Jira . . . . . . . . . . . . . . . . . . . . . . . . . . . . . . . . . . . 209 Integrating Crowd with Atlassian Bitbucket Server . . . . . . . . . . . . . . . . . . . . . . . . . 218
Integrating Crowd with Acegi Security . . . . . . . . . . . . . . . . . . . . . . . . . . . . . . . . . . 220 Integrating Crowd with Jive Forums . . . . . . . . . . . . . . . . . . . . . . . . . . . . . . . . . . . . 225
Integrating Crowd with Spring Security . . . . . . . . . . . . . . . . . . . . . . . . . . . . . . . . . 232 Integrating Crowd with a Custom Application . . . . . . . . . . . . . . . . . . . . . . . . . . . . . 244
Integrating Crowd with Atlassian HipChat . . . . . . . . . . . . . . . . . . . . . . . . . . . . . . . 246 Configuring the Google Apps Connector . . . . . . . . . . . . . . . . . . . . . . . . . . . . . . . . . . . 252
Mapping a Directory to an Application . . . . . . . . . . . . . . . . . . . . . . . . . . . . . . . . . . . . . 258 Specifying the Directory Order for an Application . . . . . . . . . . . . . . . . . . . . . . . . . . 260 Specifying an Application's Directory Permissions . . . . . . . . . . . . . . . . . . . . . . . . . 262
Viewing Users in Directories Mapped to an Application . . . . . . . . . . . . . . . . . . . . . 266 Specifying which Groups can access an Application . . . . . . . . . . . . . . . . . . . . . . . 267
Syncing users based on their access rights . . . . . . . . . . . . . . . . . . . . . . . . . . . . . . 268 Effective memberships with multiple directories . . . . . . . . . . . . . . . . . . . . . . . . . . . . . 270
Specifying an Application's Address or Hostname . . . . . . . . . . . . . . . . . . . . . . . . . . . 273 Testing a User's Login to an Application . . . . . . . . . . . . . . . . . . . . . . . . . . . . . . . . . . . 275
Enforcing Lower-Case Usernames and Groups for an Application . . . . . . . . . . . . . . . 277 Managing an Application's Session . . . . . . . . . . . . . . . . . . . . . . . . . . . . . . . . . . . . . . . 279
Deleting or Deactivating an Application . . . . . . . . . . . . . . . . . . . . . . . . . . . . . . . . . . . . 280 Configuring Caching for an Application . . . . . . . . . . . . . . . . . . . . . . . . . . . . . . . . . . . . 283
Overview of SSO . . . . . . . . . . . . . . . . . . . . . . . . . . . . . . . . . . . . . . . . . . . . . . . . . . . . . 285 Configuring Options for an Application . . . . . . . . . . . . . . . . . . . . . . . . . . . . . . . . . . . . 289
Enabling OpenID client app . . . . . . . . . . . . . . . . . . . . . . . . . . . . . . . . . . . . . . . . . . . . . 290 Allowing applications to create user tokens . . . . . . . . . . . . . . . . . . . . . . . . . . . . . . . . . 291
Disabling the OpenID client app . . . . . . . . . . . . . . . . . . . . . . . . . . . . . . . . . . . . . . . . . 292 Configuring how users log in . . . . . . . . . . . . . . . . . . . . . . . . . . . . . . . . . . . . . . . . . . . . 293
Managing Users and Groups . . . . . . . . . . . . . . . . . . . . . . . . . . . . . . . . . . . . . . . . . . . . . . 294 Using the User Browser . . . . . . . . . . . . . . . . . . . . . . . . . . . . . . . . . . . . . . . . . . . . . . . . 295
Adding a User . . . . . . . . . . . . . . . . . . . . . . . . . . . . . . . . . . . . . . . . . . . . . . . . . . . . . . . 296 Editing a User's Details and Password . . . . . . . . . . . . . . . . . . . . . . . . . . . . . . . . . . . . 297
Deleting or Deactivating a User . . . . . . . . . . . . . . . . . . . . . . . . . . . . . . . . . . . . . . . . . . 298 Case Sensitivity of Usernames and Groups . . . . . . . . . . . . . . . . . . . . . . . . . . . . . . . . 299
Specifying a User's Aliases . . . . . . . . . . . . . . . . . . . . . . . . . . . . . . . . . . . . . . . . . . . . . 300 Editing a User's Group Membership . . . . . . . . . . . . . . . . . . . . . . . . . . . . . . . . . . . . . . 302
Managing Groups . . . . . . . . . . . . . . . . . . . . . . . . . . . . . . . . . . . . . . . . . . . . . . . . . . . . 303 Deleting a Group . . . . . . . . . . . . . . . . . . . . . . . . . . . . . . . . . . . . . . . . . . . . . . . . . . 304
Adding a Group . . . . . . . . . . . . . . . . . . . . . . . . . . . . . . . . . . . . . . . . . . . . . . . . . . . 305 Managing Group Members . . . . . . . . . . . . . . . . . . . . . . . . . . . . . . . . . . . . . . . . . . . . . 306
Automatically Assigning Users to Groups . . . . . . . . . . . . . . . . . . . . . . . . . . . . . . . 308 Adding Users to a Group . . . . . . . . . . . . . . . . . . . . . . . . . . . . . . . . . . . . . . . . . . . . 313
Removing Users from a Group . . . . . . . . . . . . . . . . . . . . . . . . . . . . . . . . . . . . . . . . 315 Nested Groups in Crowd . . . . . . . . . . . . . . . . . . . . . . . . . . . . . . . . . . . . . . . . . . . . 317
Adding a Sub-Group . . . . . . . . . . . . . . . . . . . . . . . . . . . . . . . . . . . . . . . . . . . . . . . . 321 Group-level administration . . . . . . . . . . . . . . . . . . . . . . . . . . . . . . . . . . . . . . . . . . . 323
Removing a Sub-Group . . . . . . . . . . . . . . . . . . . . . . . . . . . . . . . . . . . . . . . . . . . . . 326 Specifying a User's Attributes . . . . . . . . . . . . . . . . . . . . . . . . . . . . . . . . . . . . . . . . . . . 327
Granting Crowd Administration Rights to a User . . . . . . . . . . . . . . . . . . . . . . . . . . . . . 328 Granting Crowd User Rights to a User . . . . . . . . . . . . . . . . . . . . . . . . . . . . . . . . . . . . 329
Managing a User's Session . . . . . . . . . . . . . . . . . . . . . . . . . . . . . . . . . . . . . . . . . . . . . 330 System Administration . . . . . . . . . . . . . . . . . . . . . . . . . . . . . . . . . . . . . . . . . . . . . . . . . . . 331
Configuring Server Settings . . . . . . . . . . . . . . . . . . . . . . . . . . . . . . . . . . . . . . . . . . . . . 332 Deployment Title . . . . . . . . . . . . . . . . . . . . . . . . . . . . . . . . . . . . . . . . . . . . . . . . . . 333
Domain . . . . . . . . . . . . . . . . . . . . . . . . . . . . . . . . . . . . . . . . . . . . . . . . . . . . . . . . . . 334 Session configuration . . . . . . . . . . . . . . . . . . . . . . . . . . . . . . . . . . . . . . . . . . . . . . . 336 Authorization Caching . . . . . . . . . . . . . . . . . . . . . . . . . . . . . . . . . . . . . . . . . . . . . . 338
Licensing . . . . . . . . . . . . . . . . . . . . . . . . . . . . . . . . . . . . . . . . . . . . . . . . . . . . . . . . 339
3

4
Crowd SSO 2.0 . . . . . . . . . . . . . . . . . . . . . . . . . . . . . . . . . . . . . . . . . . . . . . . . . . . . 341 Finding your SEN . . . . . . . . . . . . . . . . . . . . . . . . . . . . . . . . . . . . . . . . . . . . . . . . . . 346
SSO Cookie . . . . . . . . . . . . . . . . . . . . . . . . . . . . . . . . . . . . . . . . . . . . . . . . . . . . . . 347 Configuring your Mail Server . . . . . . . . . . . . . . . . . . . . . . . . . . . . . . . . . . . . . . . . . . . . 348
Creating an Email Notification Template . . . . . . . . . . . . . . . . . . . . . . . . . . . . . . . . . . . 352 Configuring Trusted Proxy Servers . . . . . . . . . . . . . . . . . . . . . . . . . . . . . . . . . . . . . . . 354
Viewing Crowd's System Information . . . . . . . . . . . . . . . . . . . . . . . . . . . . . . . . . . . . . 355 Backing Up and Restoring Data . . . . . . . . . . . . . . . . . . . . . . . . . . . . . . . . . . . . . . . . . 356
Logging and Profiling . . . . . . . . . . . . . . . . . . . . . . . . . . . . . . . . . . . . . . . . . . . . . . . . . . 358 Performance Profiling . . . . . . . . . . . . . . . . . . . . . . . . . . . . . . . . . . . . . . . . . . . . . . . 362
Draft - Troubleshooting and Requesting Technical Support . . . . . . . . . . . . . . . . . . . . 363 Configuring the LDAP Connection Pool . . . . . . . . . . . . . . . . . . . . . . . . . . . . . . . . . . . . 366
Browsing the audit log . . . . . . . . . . . . . . . . . . . . . . . . . . . . . . . . . . . . . . . . . . . . . . . . . 369 Look and feel . . . . . . . . . . . . . . . . . . . . . . . . . . . . . . . . . . . . . . . . . . . . . . . . . . . . . . . . 371
Overview of Caching . . . . . . . . . . . . . . . . . . . . . . . . . . . . . . . . . . . . . . . . . . . . . . . . . . 372 Crowd Security Advisories and Fixes . . . . . . . . . . . . . . . . . . . . . . . . . . . . . . . . . . . . . . . . 374
Crowd Security Advisory 2010-07-05 . . . . . . . . . . . . . . . . . . . . . . . . . . . . . . . . . . . . . 375 Crowd Security Advisory 2010-05-04 . . . . . . . . . . . . . . . . . . . . . . . . . . . . . . . . . . . . . 377
Crowd Security Advisory 2008-10-14 - Parameter Injection Vulnerability . . . . . . . . . . 379 Crowd Security Advisory 2012-05-17 . . . . . . . . . . . . . . . . . . . . . . . . . . . . . . . . . . . . . 380
Crowd Security Notice 2013-07-01 . . . . . . . . . . . . . . . . . . . . . . . . . . . . . . . . . . . . . . . 382 Crowd Security Advisory 2013-07-16 . . . . . . . . . . . . . . . . . . . . . . . . . . . . . . . . . . . . . 383 Crowd Security Advisory 2014-05-21 . . . . . . . . . . . . . . . . . . . . . . . . . . . . . . . . . . . . . 385 Crowd Security Advisory 2016-10-19 . . . . . . . . . . . . . . . . . . . . . . . . . . . . . . . . . . . . . 387 Crowd Security Advisory 2017-03-10 . . . . . . . . . . . . . . . . . . . . . . . . . . . . . . . . . . . . . 391 Crowd Security Advisory 2019-05-22 . . . . . . . . . . . . . . . . . . . . . . . . . . . . . . . . . . . . . 394 Constructing cron expressions in Crowd . . . . . . . . . . . . . . . . . . . . . . . . . . . . . . . . . . . . . . 400
User Guide . . . . . . . . . . . . . . . . . . . . . . . . . . . . . . . . . . . . . . . . . . . . . . . . . . . . . . . . . . . . . . . 402 Introduction to Crowd . . . . . . . . . . . . . . . . . . . . . . . . . . . . . . . . . . . . . . . . . . . . . . . . . . . . 404
Logging in to Crowd . . . . . . . . . . . . . . . . . . . . . . . . . . . . . . . . . . . . . . . . . . . . . . . . . . . . . 406 Logging out of Crowd . . . . . . . . . . . . . . . . . . . . . . . . . . . . . . . . . . . . . . . . . . . . . . . . . . . . 408
Changing or Resetting your Password . . . . . . . . . . . . . . . . . . . . . . . . . . . . . . . . . . . . . . . 409 Changing your Password . . . . . . . . . . . . . . . . . . . . . . . . . . . . . . . . . . . . . . . . . . . . . . . 410
Resetting Forgotten Passwords . . . . . . . . . . . . . . . . . . . . . . . . . . . . . . . . . . . . . . . . . . 411 Requesting usernames . . . . . . . . . . . . . . . . . . . . . . . . . . . . . . . . . . . . . . . . . . . . . . . . . . . 412
Updating your User Profile . . . . . . . . . . . . . . . . . . . . . . . . . . . . . . . . . . . . . . . . . . . . . . . . 413 Viewing your Group Membership . . . . . . . . . . . . . . . . . . . . . . . . . . . . . . . . . . . . . . . . . . . 414
Viewing your Applications . . . . . . . . . . . . . . . . . . . . . . . . . . . . . . . . . . . . . . . . . . . . . . . . . 415 Crowd User's Glossary . . . . . . . . . . . . . . . . . . . . . . . . . . . . . . . . . . . . . . . . . . . . . . . . . . . 416
Alias . . . . . . . . . . . . . . . . . . . . . . . . . . . . . . . . . . . . . . . . . . . . . . . . . . . . . . . . . . . . . . . 418 Authorization to Use Crowd . . . . . . . . . . . . . . . . . . . . . . . . . . . . . . . . . . . . . . . . . . . . . 419
Crowd Administrator . . . . . . . . . . . . . . . . . . . . . . . . . . . . . . . . . . . . . . . . . . . . . . . . . . 420 Crowd-Connected Application . . . . . . . . . . . . . . . . . . . . . . . . . . . . . . . . . . . . . . . . . . . 421
Directory . . . . . . . . . . . . . . . . . . . . . . . . . . . . . . . . . . . . . . . . . . . . . . . . . . . . . . . . . . . 422 Group . . . . . . . . . . . . . . . . . . . . . . . . . . . . . . . . . . . . . . . . . . . . . . . . . . . . . . . . . . . . . . 423
Role . . . . . . . . . . . . . . . . . . . . . . . . . . . . . . . . . . . . . . . . . . . . . . . . . . . . . . . . . . . . . . . 424 Self-Service Console . . . . . . . . . . . . . . . . . . . . . . . . . . . . . . . . . . . . . . . . . . . . . . . . . . 425
Single Sign-On . . . . . . . . . . . . . . . . . . . . . . . . . . . . . . . . . . . . . . . . . . . . . . . . . . . . . . . 426 Monitoring license usage . . . . . . . . . . . . . . . . . . . . . . . . . . . . . . . . . . . . . . . . . . . . . . . . . 427
Password encryption . . . . . . . . . . . . . . . . . . . . . . . . . . . . . . . . . . . . . . . . . . . . . . . . . . . . . 429 CrowdID Administration Guide . . . . . . . . . . . . . . . . . . . . . . . . . . . . . . . . . . . . . . . . . . . . . . . . 431
1. About CrowdID . . . . . . . . . . . . . . . . . . . . . . . . . . . . . . . . . . . . . . . . . . . . . . . . . . . . . . . 432 1.1 How CrowdID works with Crowd . . . . . . . . . . . . . . . . . . . . . . . . . . . . . . . . . . . . . . 433
1.1.1 Determining the name of the CrowdID application . . . . . . . . . . . . . . . . . . . . 434 1.1.2 Locating the Crowd Server that CrowdID is using . . . . . . . . . . . . . . . . . . . . . 436
1.2 How OpenID sites interact with CrowdID . . . . . . . . . . . . . . . . . . . . . . . . . . . . . . . . 438 1.3 Lightweight OpenID server . . . . . . . . . . . . . . . . . . . . . . . . . . . . . . . . . . . . . . . . . . 439
2. Allowing users to access CrowdID . . . . . . . . . . . . . . . . . . . . . . . . . . . . . . . . . . . . . . . . 440 2.1 Granting CrowdID access rights to a user . . . . . . . . . . . . . . . . . . . . . . . . . . . . . . . 441
2.2 Granting CrowdID Administration Rights to a User . . . . . . . . . . . . . . . . . . . . . . . . 443 3. Specifying the sites to which users can log in . . . . . . . . . . . . . . . . . . . . . . . . . . . . . . . . 444
3.1 Allowing all hosts . . . . . . . . . . . . . . . . . . . . . . . . . . . . . . . . . . . . . . . . . . . . . . . . . . 445 3.2 Allowing all except specified hosts ('Blacklist') . . . . . . . . . . . . . . . . . . . . . . . . . . . . 446
3.3 Allowing specified hosts only ('Whitelist') . . . . . . . . . . . . . . . . . . . . . . . . . . . . . . . . 447
4
5
3.4 Approval Whitelist . . . . . . . . . . . . . . . . . . . . . . . . . . . . . . . . . . . . . . . . . . . . . . . . . 449 4. Configuring CrowdID system settings . . . . . . . . . . . . . . . . . . . . . . . . . . . . . . . . . . . . . . 450
4.1 Specifying the CrowdID URL . . . . . . . . . . . . . . . . . . . . . . . . . . . . . . . . . . . . . . . . . 451 4.2 Enabling localhost authentication . . . . . . . . . . . . . . . . . . . . . . . . . . . . . . . . . . . . . 452
4.3 Enabling immediate authentication requests . . . . . . . . . . . . . . . . . . . . . . . . . . . . . 454 4.4 Enabling communication with stateless clients . . . . . . . . . . . . . . . . . . . . . . . . . . . 456
CrowdID User Guide . . . . . . . . . . . . . . . . . . . . . . . . . . . . . . . . . . . . . . . . . . . . . . . . . . . . . . . 458 1. Getting started with CrowdID . . . . . . . . . . . . . . . . . . . . . . . . . . . . . . . . . . . . . . . . . . . . 459
1.1 What is OpenID? . . . . . . . . . . . . . . . . . . . . . . . . . . . . . . . . . . . . . . . . . . . . . . . . . . 460 1.2 What is CrowdID? . . . . . . . . . . . . . . . . . . . . . . . . . . . . . . . . . . . . . . . . . . . . . . . . . 461
1.3 What is an OpenID URL or identifier? . . . . . . . . . . . . . . . . . . . . . . . . . . . . . . . . . . 462 1.4 Viewing the CrowdID page . . . . . . . . . . . . . . . . . . . . . . . . . . . . . . . . . . . . . . . . . . 463
2. Logging in to a website using OpenID . . . . . . . . . . . . . . . . . . . . . . . . . . . . . . . . . . . . . 465 2.1 Does the website support OpenID? . . . . . . . . . . . . . . . . . . . . . . . . . . . . . . . . . . . . 466
2.2 Entering your OpenID URL . . . . . . . . . . . . . . . . . . . . . . . . . . . . . . . . . . . . . . . . . . 467 2.3 Logging in to CrowdID . . . . . . . . . . . . . . . . . . . . . . . . . . . . . . . . . . . . . . . . . . . . . . 468
2.4 Allowing or denying a login . . . . . . . . . . . . . . . . . . . . . . . . . . . . . . . . . . . . . . . . . . 469 2.5 Providing additional profile information to a website . . . . . . . . . . . . . . . . . . . . . . . 471
3. Viewing your always-approved websites . . . . . . . . . . . . . . . . . . . . . . . . . . . . . . . . . . . 472 4. Viewing your login history . . . . . . . . . . . . . . . . . . . . . . . . . . . . . . . . . . . . . . . . . . . . . . . 474
5. Updating your profile . . . . . . . . . . . . . . . . . . . . . . . . . . . . . . . . . . . . . . . . . . . . . . . . . . . 476 6. Using more than one profile . . . . . . . . . . . . . . . . . . . . . . . . . . . . . . . . . . . . . . . . . . . . . 478
6.1 Adding a profile . . . . . . . . . . . . . . . . . . . . . . . . . . . . . . . . . . . . . . . . . . . . . . . . . . . 479 6.2 Choosing a profile for a website . . . . . . . . . . . . . . . . . . . . . . . . . . . . . . . . . . . . . . . 481
6.3 Setting a default profile . . . . . . . . . . . . . . . . . . . . . . . . . . . . . . . . . . . . . . . . . . . . . 482 6.4 Deleting a profile . . . . . . . . . . . . . . . . . . . . . . . . . . . . . . . . . . . . . . . . . . . . . . . . . . 484
7. Changing or resetting your password . . . . . . . . . . . . . . . . . . . . . . . . . . . . . . . . . . . . . . 486 7.1 Changing your password . . . . . . . . . . . . . . . . . . . . . . . . . . . . . . . . . . . . . . . . . . . . 487 7.2 Resetting your password . . . . . . . . . . . . . . . . . . . . . . . . . . . . . . . . . . . . . . . . . . . . 489
8. Requesting Forgotten Usernames . . . . . . . . . . . . . . . . . . . . . . . . . . . . . . . . . . . . . . . . 490 Crowd FAQ . . . . . . . . . . . . . . . . . . . . . . . . . . . . . . . . . . . . . . . . . . . . . . . . . . . . . . . . . . . . . . . 491
Crowd Resources . . . . . . . . . . . . . . . . . . . . . . . . . . . . . . . . . . . . . . . . . . . . . . . . . . . . . . . 495 Deployment FAQ . . . . . . . . . . . . . . . . . . . . . . . . . . . . . . . . . . . . . . . . . . . . . . . . . . . . . . . . 496
Deploying Multiple Atlassian Applications in a Single Tomcat Container . . . . . . . . . . 497 Finding the atlassian-crowd.log File . . . . . . . . . . . . . . . . . . . . . . . . . . . . . . . . . . . . . . . 498
Finding your Crowd home and shared directories . . . . . . . . . . . . . . . . . . . . . . . . . . . . 499 Removing the 'crowd' Context from the Application URL . . . . . . . . . . . . . . . . . . . . . . 500
Resetting the Domain Cookie Value . . . . . . . . . . . . . . . . . . . . . . . . . . . . . . . . . . . . . . 501 Restarting the Setup Wizard from Scratch . . . . . . . . . . . . . . . . . . . . . . . . . . . . . . . . . . 502
Self Signed Certificate . . . . . . . . . . . . . . . . . . . . . . . . . . . . . . . . . . . . . . . . . . . . . . . . . 503 Guides, Hints and Tips . . . . . . . . . . . . . . . . . . . . . . . . . . . . . . . . . . . . . . . . . . . . . . . . . . . 504
How to Print Only Tomcat Logs into Crowd's catalina.out . . . . . . . . . . . . . . . . . . . . . . 505 Principals and Users . . . . . . . . . . . . . . . . . . . . . . . . . . . . . . . . . . . . . . . . . . . . . . . . . . 507
Using Apache Directory Studio for LDAP Configuration . . . . . . . . . . . . . . . . . . . . . . . 508 Creating a Connection to your LDAP Directory . . . . . . . . . . . . . . . . . . . . . . . . . . . 509
Getting an LDIF Export of a User or Group . . . . . . . . . . . . . . . . . . . . . . . . . . . . . . 514 Restricting LDAP Scope for User and Group Search . . . . . . . . . . . . . . . . . . . . . . . 515
Integration FAQ . . . . . . . . . . . . . . . . . . . . . . . . . . . . . . . . . . . . . . . . . . . . . . . . . . . . . . . . . 519 All Integrations . . . . . . . . . . . . . . . . . . . . . . . . . . . . . . . . . . . . . . . . . . . . . . . . . . . . . . . 520
If I delete a user from Crowd, how will this affect integrated applications? . . . . . . 521 Passing the crowd.properties File as an Environment Variable . . . . . . . . . . . . . . . 522
Atlassian Product Integration . . . . . . . . . . . . . . . . . . . . . . . . . . . . . . . . . . . . . . . . . . . . 523 Application Caching . . . . . . . . . . . . . . . . . . . . . . . . . . . . . . . . . . . . . . . . . . . . . . . . 524
Jira integration . . . . . . . . . . . . . . . . . . . . . . . . . . . . . . . . . . . . . . . . . . . . . . . . . . . . 525 Public Signup Setup . . . . . . . . . . . . . . . . . . . . . . . . . . . . . . . . . . . . . . . . . . . . . . . . 526
IBM Lotus Domino Integration . . . . . . . . . . . . . . . . . . . . . . . . . . . . . . . . . . . . . . . . . . . 527 IBM Websphere Integration . . . . . . . . . . . . . . . . . . . . . . . . . . . . . . . . . . . . . . . . . . . . . 528
Support Policies . . . . . . . . . . . . . . . . . . . . . . . . . . . . . . . . . . . . . . . . . . . . . . . . . . . . . . . . 529 Bug Fixing Policy . . . . . . . . . . . . . . . . . . . . . . . . . . . . . . . . . . . . . . . . . . . . . . . . . . . . . 530
How to Report a Security Issue . . . . . . . . . . . . . . . . . . . . . . . . . . . . . . . . . . . . . . . . . . 535 New Features Policy . . . . . . . . . . . . . . . . . . . . . . . . . . . . . . . . . . . . . . . . . . . . . . . . . . 536
Security Advisory Publishing Policy . . . . . . . . . . . . . . . . . . . . . . . . . . . . . . . . . . . . . . . 539 Security Bugfix Policy . . . . . . . . . . . . . . . . . . . . . . . . . . . . . . . . . . . . . . . . . . . . . . . . . 540 Security Patch Policy . . . . . . . . . . . . . . . . . . . . . . . . . . . . . . . . . . . . . . . . . . . . . . . . . . 541
5
6
Severity Levels for Security Issues . . . . . . . . . . . . . . . . . . . . . . . . . . . . . . . . . . . . . . . 542 Troubleshooting . . . . . . . . . . . . . . . . . . . . . . . . . . . . . . . . . . . . . . . . . . . . . . . . . . . . . . . . 543
Finding Known Issues . . . . . . . . . . . . . . . . . . . . . . . . . . . . . . . . . . . . . . . . . . . . . . . . . 544 Characters in User or Group DN's that will cause problems when using Crowd . . . . . 545
Problems when Importing Users into MySQL . . . . . . . . . . . . . . . . . . . . . . . . . . . . . . . 547 Troubleshooting LDAP Error Codes . . . . . . . . . . . . . . . . . . . . . . . . . . . . . . . . . . . . . . 548
Active Directory LDAP Errors . . . . . . . . . . . . . . . . . . . . . . . . . . . . . . . . . . . . . . . . . 549 Troubleshooting LDAP User Management . . . . . . . . . . . . . . . . . . . . . . . . . . . . . . . . . 550
Troubleshooting SSL certificates and Crowd . . . . . . . . . . . . . . . . . . . . . . . . . . . . . . . . 559 How to Optimize Crowd Client Caching . . . . . . . . . . . . . . . . . . . . . . . . . . . . . . . . . . . . 560
Troubleshooting Crowd Performance . . . . . . . . . . . . . . . . . . . . . . . . . . . . . . . . . . . . . 561 Troubleshooting SSO with Crowd . . . . . . . . . . . . . . . . . . . . . . . . . . . . . . . . . . . . . . . . 563
Debugging SSO in environments with Proxy Servers . . . . . . . . . . . . . . . . . . . . . . 564 Troubleshooting CrowdID . . . . . . . . . . . . . . . . . . . . . . . . . . . . . . . . . . . . . . . . . . . . . . 566
Provide Crowd Information to Atlassian Support . . . . . . . . . . . . . . . . . . . . . . . . . . . . . 567 Contributing to the Crowd Documentation . . . . . . . . . . . . . . . . . . . . . . . . . . . . . . . . . . . . 568
Tips of the Trade . . . . . . . . . . . . . . . . . . . . . . . . . . . . . . . . . . . . . . . . . . . . . . . . . . . . . 569 Crowd Documentation in Other Languages . . . . . . . . . . . . . . . . . . . . . . . . . . . . . . . . . 572
Crowd Data Center . . . . . . . . . . . . . . . . . . . . . . . . . . . . . . . . . . . . . . . . . . . . . . . . . . . . . . . . . 573 Crowd user management . . . . . . . . . . . . . . . . . . . . . . . . . . . . . . . . . . . . . . . . . . . . . . . . . . . . 575
6

Crowd documentationManage users from multiple directories - Active Directory, LDAP, Crowd - via a single admin console, and control application permissions from the same place.
Get started
New to Crowd? Check out our guides for new administrators and users.
View guides
Whats new
Time to upgrade? Get the low down on the latest and greatest in .Crowd 4.4
View latest changes
7

1. 2. 3. 4.
5.
6.
7. 8.
1. 2.
3. 4.
5.
6.
7. 8.
1. 2. 3.
Getting started with CrowdThank you for choosing Crowd. To help you get up and running quickly, we have compiled some quick-start instructions on configuring and using Crowd with your and applications.Jira Confluence
This quick-start guide assumes that you have installed and set up a Jira application and/or Confluence and now wish to set up Crowd for user management in one or both of them.
If you want to use a Jira application or Confluence but have not yet installed them, please follow the instructions in and/or before configuring Crowd.Installing Jira applications Confluence Installation GuideIf you want to use Crowd with other applications but not a Jira application or Confluence, please follow the detailed Crowd rather than this getting started guide.installation and setup guide
Getting Started
1. Installing Crowd
Go to the .Crowd download pageDownload the ZIP archive file for the Crowd distribution (not EAR-WAR).Unzip the zip archive into a directory of your choice, avoiding spaces in the directory name.Tell Crowd where to find its Crowd Home directory, by editing the file as crowd-init.propertiesdescribed in the .installation guideSet up your database as described in the .database configuration guide
This quick-start page assumes that you have an existing a Jira application or Confluence application. So we recommend that you connect Crowd to a production-ready database and not HSQLDB. But if you are evaluating Crowd, it is fine to use HSQLDB and then move to a different database later. In that case, you do not need to do anything in this step, because Crowd contains everything you need.Start your Crowd server by going to the directory where you unzipped Crowd and running start_cro
.wd.batTo access Crowd, go to your web browser and type this address: .http://localhost:8095/crowdFollow the . This will guide you through the process of setting up your Crowd server and Setup Wizardcreating an admin user.
For more help on the technical procedures in this section, please refer to the .Crowd installation guide
If you need assistance, please .create a support ticket
Go to the the Crowd download page.Click the 'Mac OS X' tab and download the TAR.GZ archive file for the Crowd distribution (not EAR-WAR).Unzip the archive into a directory of your choice, avoiding spaces in the directory name.Tell Crowd where to find its Crowd Home directory, by editing the file as crowd-init.propertiesdescribed in the .installation guideSet up your database as described in the .database configuration guide
This quick-start page assumes that you have an existing Jira or Confluence application. So we recommend that you connect Crowd to a production-ready database and not HSQLDB. But if you are evaluating Crowd, it is fine to use HSQLDB and then move to a different database later. In that case, you do not need to do anything in this step, because Crowd contains everything you need.Start your Crowd server by going to the directory where you unzipped Crowd and double-clicking sta
.rt_crowd.shTo access Crowd, go to your web browser and type this address: .http://localhost:8095/crowdFollow the . This will guide you through the process of setting up your Crowd server and Setup Wizardcreating an admin user.
For more help on the technical procedures in this section, please refer to the .Crowd installation guide
If you need assistance, please .create a support ticket
Go to the Crowd download page.Click the 'Linux' tab and download the TAR.GZ Archive file for the Crowd distribution (not EAR-WAR).Unzip the archive into a directory of your choice, avoiding spaces in the directory name.
8

Documentation for Crowd 4.4 2
Created in 2021 by Atlassian. Licensed under a .Creative Commons Attribution 2.5 Australia License
4.
5.
6.
7. 8.
1. 2.
3.
4. 5.
1.
2.
3.
4.
1.
2.
3.
Tell Crowd where to find its Crowd Home directory, by editing the file as crowd-init.propertiesdescribed in the .installation guideSet up your database as described in the .database configuration guide
This quick-start page assumes that you have an existing Jira or Confluence application. So we recommend that you connect Crowd to a production-ready database and not HSQLDB. But if you are evaluating Crowd, it is fine to use HSQLDB and then move to a different database later. In that case, you do not need to do anything in this step, because Crowd contains everything you need.Start your Crowd server by going to the directory where you unzipped Crowd and double-clicking sta
.rt_crowd.shTo access Crowd, go to your web browser and type this address: .http://localhost:8095/crowdFollow the . This will guide you through the process of setting up your Crowd server and Setup Wizardcreating an admin user.
For more help on the technical procedures in this section, please refer to the .Crowd installation guide
If you need assistance, please .create a support ticket
2. Adding Users and Groups
Crowd is designed to help you manage users and groups across multiple applications. Your next step is to configure a user directory in Crowd to contain your Jira application and/or Confluence users and groups.
Add a Crowd directory Add a Crowd Internal directory to contain all your Jira and Confluence users.Add the Confluence groups Add the 'confluence-users' and 'confluence-administrators' groups to your new directory.Add the JIRA groups Add the 'jira-users', 'jira-developers' and 'jira-administrators' groups to your new directory.Import your users from a CSV file or .add them manuallyAdd the users to the groups Use Crowd's bulk user management to add all the users to the 'confluence-users' and 'jira-users' groups. Also add any administrators to the administration groups and add the developers to the 'jira-developers' group. For more details about the permissions applicable to each group, refer to the and documentation.Confluence Jira
If your Jira users are currently managed via Jira's internal management and your Confluence users are managed separately via Confluence's internal management, you can use Crowd to simplify and centralize your user and group management:
Add a Crowd directory Use the Crowd Administration Console to add a Crowd Internal directory to contain all your Jira and Confluence users.Import the users and groups from Confluence Use the Crowd importer to copy your users and groups from Confluence into the new Crowd directory. This process will also copy the group memberships into Crowd.Import the users and groups from JIRA Use the Crowd importer to copy your users and groups from Jira into the same Crowd directory as the Confluence users. This process will add any additional users and groups from Jira and update the existing Confluence users with their Jira group memberships.Check your users and groups in Crowd Use Crowd's group browser to check that your users, groups and group memberships are available as expected in Crowd.
If your Jira and Confluence users are currently all managed via Jira's internal management, you can use Crowd to simplify and centralize your user and group management:
Add a Crowd directory Use the Crowd Administration Console to add a Crowd Internal directory to contain all your Jira and Confluence users.Import the users and groups from JIRA Use the Crowd importer to copy your users and groups from Jira into the new Crowd directory. This process will also copy the group memberships into Crowd.Check your users and groups in Crowd Use Crowd's group browser to check that your users, groups and group memberships are available as expected in Crowd.
If your users are in a corporate LDAP directory, you can choose whether you want to store your groups in LDAP or in Crowd.
9

Documentation for Crowd 4.4 3
Created in 2021 by Atlassian. Licensed under a .Creative Commons Attribution 2.5 Australia License
1.
2.
1.
2.
3.
4.
1.
2.
a. b.
c.
d.
1.
2.
3.
4.
If you want to store your users and groups in LDAP:Add a Crowd LDAP directory connector Choose the options for your specific version of LDAP, such as or . Crowd supports a number of LDAP Microsoft Active Directory Novell eDirectoryflavors, as listed in the .documentationCheck your users and groups in Crowd Use Crowd's group browser to check that your users, groups and group memberships are available as expected in Crowd.
If you want to store your users in LDAP and your groups in Crowd:Add a Crowd Delegated Authentication directory Choose the options for your specific version of LDAP, such as or . Crowd supports a number of Microsoft Active Directory Novell eDirectoryLDAP flavors, as listed in the .documentationAdd the Confluence groups Add the 'confluence-users' and 'confluence-administrators' groups to your new Crowd Delegated Authentication directory.Add the JIRA groups Add the 'jira-users', 'jira-developers' and 'jira-administrators' groups to your new Crowd Delegated Authentication directory.Add the users to the groups Use Crowd's bulk user management to add all the users to the 'confluence-users' and 'jira-users' groups. Also add any administrators to the administration groups and add the developers to the 'jira-developers' group. For more details about the permissions applicable to each group, refer to the and documentation.Confluence JIRA
Take the following steps, choosing your directory and other options as indicated in the linked documentation:
Add a Crowd directory Choose the directory type you need to contain all your JIRA and Confluence users.Add your users and groups either via Crowd's importer or manually:
Import your users and groups into Crowd.Or do it manually:
Add the users.Add the Confluence groups Add the 'confluence-users' and 'confluence-administrators' groups to your new directory.Add the JIRA groups Add the 'jira-users', 'jira-developers' and 'jira-administrators' groups to your new directory.Add the users to the groups Use Crowd's bulk user management to add all the users to the 'confluence-users' and 'jira-users' groups. Also add any administrators to the administration groups and add the developers to the 'jira-developers' group. For more details about the permissions applicable to each group, refer to the and Confluence JIRAdocumentation.
If you have Confluence or JIRA, but not both, pick the scenario above that best matches your requirements, then just skip the steps for the application that you do not need.
3. Connecting the Applications
Crowd manages your users' access to your applications and makes single sign-on (SSO) possible. (More about SSO .) For this to happen, you need to tell Crowd about the applications and to copy some Crowd belowlibraries into the applications' installation folders.
Add Confluence Add the Confluence application to Crowd, following the instructions in the Add .Application Wizard
Choose 'Confluence' as the application type.In the 'Directories' step, choose the user directory you added for Confluence.In the 'Authorization' step, allow all users to authenticate.
Configure the Crowd libraries in Confluence Copy the Crowd client libraries into your Confluence folders and configure the properties files as described on the .Confluence integration pageNow Add the JIRA application to Crowd, following the instructions in the add JIRA Add Application
.WizardChoose 'JIRA' as the application type.In the 'Directories' step, choose the user directory you added for JIRA.In the 'Authorization' step, allow all users to authenticate.
Configure the Crowd libraries in JIRA Copy the Crowd client libraries into your JIRA folders and configure the properties files as described on the .JIRA integration page
We will call these your 'Crowd-connected applications'.
Mastering the Basics
10

Documentation for Crowd 4.4 4
Created in 2021 by Atlassian. Licensed under a .Creative Commons Attribution 2.5 Australia License
1. 2.
4. Examining your Crowd Server Setup
Go to the screen in Crowd's Administration Console to find useful information about your System InformationCrowd server, such as the location of your Crowd Home directory, information about your database and JVM, and your license server ID.
5. Managing SSO
If you have configured single sign-on (SSO) when setting up your Crowd-connected applications (JIRA and Confluence) in step 3 above, your users will only need to log in or log out once, to Crowd or any Crowd-connected application. When they start another Crowd-connected application, they will be logged in automatically. Similarly, when they log out of Crowd or one of the Crowd-connected applications, they will be logged out of Crowd and the other application(s) at the same time.
Overview of SSO An overview of Crowd's SSO capabilities, plus links to detailed information.Configuring Trusted Proxy Servers If you are running applications behind one or more proxy servers, you may find it useful to configure Crowd to trust the proxies' IP addresses.
Managing your Users' Experience of Crowd
Your users will need to access Crowd at (not http://<Crowd machine name>:8095/crowd http://lo).calhost:8095/crowd
6. Testing a User's LoginYou may want to test a user's login to a specific application if the user has reported problems with logging in, or if you have just set up the first user to access a new application. The test verifies whether a user will be able to log in to a given application, based on the application, directory and group associations in Crowd.
Go to the application's 'Authentication Test' tab in the Crowd Administration Console, as described in the doc. The documentation also describes the possible error messages and the steps you can take to umentation
resolve any problems.
7. Changing or Resetting a User's PasswordYou may need to change or reset someone's password, if they have forgotten their password or if someone else has come to know the password.
Crowd users can change or reset their own passwords too. See the . To allow this, user documentationyou need to grant them Crowd user rights, as described .below
Go to the 'User Details' screen in the Crowd Administration Console, as described in the .documentation
If you have configured an and a , Crowd will send the user an emailabout email server notification templatetheir new password.
8. Setting Up User AliasesAliases are useful if the same person has different usernames in JIRA and Confluence. You can define the user just once in Crowd, and allocate one or more aliases for the different applications that the user can access.
The has the full details. In summary:documentation
Make sure that aliasing is enabled for JIRA and Confluence, on the application's 'Options' screen.Add the appropriate alias for each user, on the user's 'Applications' screen.
9. Granting Crowd User Rights to SomeoneYou can give your users access to Crowd's Self-Service Console, where they can edit their own profile, change their password and see the applications they are allowed to access. They can read the User Guidefor guidance.
Make sure that the person's username is in a user directory where all users are authorized to use Crowd. Please refer to the for details.documentation
10. Granting Crowd Administrator Rights to Someone
11
Documentation for Crowd 4.4 5
Created in 2021 by Atlassian. Licensed under a .Creative Commons Attribution 2.5 Australia License
When you first set up Crowd, you will define a single Crowd administrator. It is advisable to give other people administration rightstoo,so that you do not run into problems when the single administrator is unavailable.
Make sure that the person is a member of the 'crowd-administrators' group. Please refer to the documentation.
Important Next Steps
11. Setting Up your Applications' Host Names
When you set up your applications in step 3 above, you will have specified an IP address for each application. If JIRA, Confluence or any Crowd-connected application resides on a server that passes Crowd a host name instead of an IP address, you will need to tell Crowd the host name. Please refer to the .documentation
12. Connecting to an External Database
If you decided to use the default HSQLDB database when you set up Crowd, you need to switch to a production-ready database before using Crowd as a production system. HSQLDB is provided for evaluation purposes only. Please refer to the .documentation
13. Backing Up your Crowd Data
To back up your Crowd data and establish processes for regular backups, please refer to the .documentation
Thank you for choosing Crowd.
We are always happy to help. Feel free to or with any questions you may have.email call us
12

Installation and Upgrade GuideCrowd Release NotesInstalling CrowdUpgrading CrowdMigrate to Another DatabaseMigrating Crowd Between ServersMigrating from OnDemand to a Crowd installed siteInstalling Crowd Data CenterMigrate from Server to Data Center
13
Installing CrowdInstalling Crowd
You can download Crowd .here
Supported PlatformsInstalling Crowd and CrowdIDRunning the Setup WizardConfiguring Crowd
Warning: Some unzip programs cause errors
Some archive-extract programs cause errors when unzipping the Crowd archive file.
Linux or users can use any unzip program.UnixSolaris users must use instead of Solaris Tar.GNU TarWindows users should use a third-party unzip program like 7Zip or Winzip. If you do not have one, please download and install one before continuing:
7Zip Recommended. If in doubt, download the '32-bit .exe' versionWinzip
14

Supported PlatformsBefore installing Crowd, make sure you have the right software and infrastructure to run it. If a platform and version is not listed on this page, it means we don't test it, fix bugs or provide assistance for it.All platforms are shared between Crowd Server and Crowd Data Center, unless they're clearly marked as Data Center only.
Definitions:
Supported - you can use with this platform.Crowd 4.4
Limited - you can evaluate on this platform, but you can't run a production site on it.Crowd 4.4
Deprecated - you can use with this platform, but we're planning to end support in an upcoming Crowd 4.4release.
Java
Oracle JRE / JDK
Java 8
Java 11
OpenJDK
Java 8
Java 11
Oracle JRE / JDK:
JDK versions earlier than 8u65 might have problems connecting to LDAP servers over SSL. For more details, see -CWD-4444 Secure LDAP connections are broken when using Java 1.8u51, 1.8u60, 1.7.0_85+ and 1.6.0_101+ RESOLVED
JDK 1.8u151 might have problems with gzip compression of static resources. For more details, see .CWD-5001
OpenJDK:
Our Support and Engineering teams useAdoptOpenJDKto replicate any issues raised with OpenJDK. If youre using a different distribution of OpenJDK (e.g. Zulu), well still provide support for our products. However, if the bug is caused by a problem in Java distribution, well ask you to reach out to the Java distributor for help.
Operating systems
Operating systems
Microsoft Windows
Linux
Mac OS X
Good to know:
Crowd is a pure Java application and should run on any platform provided the Java runtime platform requirements are satisfied.
Browsers
Browsers
Chrome (latest stable version)
Microsoft Edge (Chromium)
This page is for Crowd 4.4. If you're looking for a different version, select it at the top-right.
15

Documentation for Crowd 4.4 2
Created in 2021 by Atlassian. Licensed under a .Creative Commons Attribution 2.5 Australia License
Mozilla Firefox(all platforms)
Safari (latest stable version)
Databases
Embedded database
HSQLDB
Good to know:
Crowd ships with a built-in HSQL database, which is fine for evaluation purposes but is somewhat susceptible to data loss during system crashes. For production environments we recommend that you configure Crowd to use anexternal database.
MySQL
MySQL 8.0
MySQL 5.7
Good to know:
Please ensure that you set transaction isolation to 'read-committed' instead of the default 'repeatable-read', as described in thedatabase configuration guide.
Oracle
Oracle 19c
Oracle 12c R2
PostgreSQL
PostgreSQL 12
PostgreSQL 11
PostgreSQL 10
PostgreSQL 9.6
Microsoft SQL Server
SQL Server 2019
SQL Server 2017
SQL Server 2016
Infrastructure
JDK:
It is not enough to have the JRE only. Please ensure that you have the full JDK. You can download the Java SE Development Kit (JDK) from the .Oracle websiteOnce the JDK is installed, you will need to set the environment variable, pointing to the JAVA_HOMEroot directory of the JDK. Some JDK installers set this automatically (check by typing 'echo %JAVA_HOME%' in a DOS prompt, or 'echo $JAVA_HOME' in a shell). If it is not set, please seeSetting
.JAVA_HOME
Hardware:
The hardware required to run Crowd depends significantly on the number of applications and users that your installation will have, as well as the maximum number of concurrent requests that the system will experience during peak hours.
16

Documentation for Crowd 4.4 3
Created in 2021 by Atlassian. Licensed under a .Creative Commons Attribution 2.5 Australia License
During evaluation Crowd will run well on any reasonably fast workstation computer (eg. 1.5+Ghz processor). Memory requirements depend on how many applications and users you will store, but 256MB is enough for most evaluation purposes.
Most users start by downloading Crowd, and running it on their local computer. It is easy to migrate Crowd to your enterprise infrastructure later.
We would appreciate if you let us know what hardware configuration works for you. Please create a support request in with your hardware specification and mention the number of applications and users in your JiraCrowd installation.
While some of our customers run Crowd on SPARC-based hardware, Atlassian only officially supports Crowd running on x86 hardware and 64-bit derivatives of x86 hardware.
17

1. 2. 3. 4. 5. 6. 7.
1. 2. 3. 4. 5. 6.
1. 2. 3. 4. 5. 6.
Setting JAVA_HOMEOnce you have installed the JDK (see ), you need to set the JAVA_HOME environment Supported Platformsvariable.
Right click on the ' ' icon on your desktop and select ' '.My Computer PropertiesClick the ' ' tab.AdvancedClick the ' ' button.Environment VariablesClick ' '.NewIn the ' ' field, enter 'JAVA_HOME'.Variable nameIn the ' ' field, enter the directory (including its full path) where you installed the JDK.Variable valueRestart the computer.
For your current user:
Open up a shell / terminal windowvi ~/.profile(replace vi with your favorite text editor)Add on its own line at the end of the fileexport JAVA_HOME=/path/to/java/home/dirAdd on its own line immediately afterexport PATH=$JAVA_HOME/bin:$PATHSave, and restart your shellRunning should give you the desired resultsjava -version
For all users in the system:
Open up a shell / terminal windowvi /etc/profile(replace vi with your favorite text editor)Add on its own line at the end of the fileexport JAVA_HOME=/path/to/java/home/dirAdd on its own line immediately afterexport PATH=$JAVA_HOME/bin:$PATHSave, and restart your shellRunning should give you the desired resultsjava -version
If you are using a GUI, you may not need to open up the shell. Instead, you might be able to open the file directly in a graphical text editor.
18

End of support announcements for CrowdThis page contains announcements of the end of support for various platforms and browsers used with Crowd.
The table below summarizes the end of support announcements for Crowd releases.upcoming
Platform/Functionality Crowd end of support
Internet Explorer 11 With Crowd 4.2 ( )announcement
Deprecated browsers for Crowd
Announced 24 September 2019
In 2015 Microsoft released Edge as the browser to supersede Internet Explorer, and in recent timesMicrosoft . To allow us to continue to take advantage of has discouraged the use of Internet Explorer as a default browser
modern web standards to deliver improved functionality and the best possible user experience across all of our products, we have decided to end support for Internet Explorer 11.
End of support means we will not fix bugs specific to Internet Explorer 11, and will begin to introduce features that aren't compatible with this browser.
When is this happening?
The last Crowd version to support Internet Explorer 11 will be confirmed soon.Subsequent versions will not support Internet Explorer 11.
What this means for you
We recommend switching to one of our , such as Google Chrome, or Mozilla Firefox.supported browsers
If you have questions or concerns regarding this announcement, please email eol-announcement at atlassian dot com.
Why is Atlassian ending support for these platforms?
Atlassian is committed to delivering improvements and bug fixes as fast as possible. We are also committed to providing world class support for all the platforms our customers run our software on. However,as new versions of databases, web browsers, etc, are released, the cost of supporting multiple platforms grows exponentially,making it harder to provide the level of support our customers have come to expect from us. Therefore, we no longer support platform versions marked as end-of-life by the vendor, or very old versions that are no longer widely used.
19

1. 2.
3.
4.
Installing Crowd and CrowdIDThe instructions below tell you how to install the , which includes Apache Tomcat.Crowd distribution
Crowd versions 1.1 and later include . Installing Crowd, as described below, will also install CrowdID.CrowdID
1. Prerequisites
Java. You will need to install a Java Development Kit (JDK) on your operating system before before proceeding with a Crowd installation. Please note that Crowd requires the full installation of a JDK. It is not enough to run Crowd on a Java Runtime Environment (JRE) alone. For instructions on installing the Sun JDK and setting , please refer to .JAVA_HOME Supported Platforms
2. Install Crowd
Download Crowd.Please check your unzip program before extracting the downloaded archive see the note on the Crowd
.installation front pageUnzip the download archive into a directory of your choice. Note: Do not specify directory names that contain spaces.
We'll refer to this installation directory as . {CROWD_INSTALL}
Specify your Crowd Home directory by editing the configuration file at: {CROWD_INSTALL}\crowd-. The directory is where Crowd webapp\WEB-INF\classes\crowd-init.properties Crowd Home
will store its configuration information. If you are using the embedded HSQL database, supplied for evaluation purposes, Crowd will also store its database in this directory. (Note however that the CrowdID database will be in the installation directory, not the Home directory.) To specify the Crowd Home directory:
Open the file. This is found at crowd-init.properties <crowd_install_directory>/crowd-webapp/WEB-INF/classes/crowd-init.propertiesChoose the appropriate line in the file, depending upon your operating system (see below).Remove the at the beginning of the line.#Enter the name of the directory you want Crowd to use as its Home directory. For example,
On Windows:
crowd.home=c:/data/crowd-home
Note: On Windows, make sure you use forward slashes as shown above, not backward slashes.On Mac and UNIX-based systems:
crowd.home=/var/crowd-home
Save the file.crowd-init.properties
Hint: If you are evaluating Crowd or you are unsure which version to install, just follow the simple instructions on this page.
Important
Please, ensure that the Crowd Home directory will not match the Crowd installation directory it is writable by the user executing the initialization script.AND
20

Documentation for Crowd 4.4 2
Created in 2021 by Atlassian. Licensed under a .Creative Commons Attribution 2.5 Australia License
1.
2.
3.Prepare your Database
If you wish to set up Crowd and/or CrowdID with an external database, see:
Connecting Crowd to a DatabaseConnecting CrowdID to a Database
4. Start Crowd and Complete the Setup Wizard
Run the start-up script, found in your {CROWD_INSTALL} directory:start_crowd.bat for Windows.start_crowd.sh for Mac and Unix-based systems.
Point a web browser at where you will see the http://localhost:8095/crowd Crowd Setup Wizard. Follow the instructions in the Wizard. You can also read .more information about the Setup Wizard
Next Steps
If you are running Crowd on UNIX/Linux, consider setting Crowd to run automatically on startup and use .an unprivileged system user
If you are running Crowd on Windows, consider setting Crowd to .run automatically on startup
Installing Crowd on Windows with 64-bit JVM
If you intend to run Crowd on a Windows system with a 64-bit JVM, be aware that Crowd bundles both 32 and 64 bit Tomcat binaries and uses the 32-bit binaries by default. The 32-bit binaries and their 64-bit counterparts are listed below:
32-bit 64-bit
{CROWD_INSTALL}/apache-tomcat/bin/tomcat.exe
{CROWD_INSTALL}/apache-tomcat/bin/tomcat.exe.x64
{CROWD_INSTALL}/apache-tomcat/bin/tcnative-1.dll
{CROWD_INSTALL}/apache-tomcat/bin/tcnative-1.dll.x64
In order to use the 64-bit binaries, they must be renamed to the names used by 32-bit binaries, while the 32-bit binaries must be either renamed or deleted. This can be accomplished with a simple script:
cd {CROWD_INSTALL}/apache-tomcat/binrename tomcat8.exe tomcat8.exe.x86rename tcnative-1.dll tcnative-1.dll.x86rename tomcat8.exe.x64 tomcat8.exerename tcnative-1.dll.x64 tcnative-1.dll
The script above adds the .x86 suffix to the 32-bit binaries and removes the .x64 suffix from the 64-bit binaries, making them usable.
For evaluators
This step applies to installations. If you are Crowd and are happy to use the production evaluatingdatabase supplied, you can skip this step.
21

Connecting Crowd to a DatabaseYou can configure your database connection as part of the . It will make things easier if you Crowd Setup Wizardhave created the database and deployed the database driver before you start.
Select the page corresponding to your database, for help on setting up an external database:
HSQLDBMS SQL ServerMySQLOraclePostgreSQL
HSQLDB database is supplied for evaluation purposes
The Crowd distribution (not EAR-WAR) is shipped with an embedded database. You can HSQLDBchoose this embedded database during the Crowd setup process. The embedded database is fine for evaluation purposes, but for production installations you should connect Crowd to an enterprise database. This also lets you take advantage of existing database backup and recovery procedures.
22
HSQLDBThe Crowd distribution (not EAR-WAR) is shipped with an embedded database. When you run the HSQLDB Cro
, you will be asked to choose a database. If you choose the embedded database, the data files wd Setup Wizardwill be stored in the Crowd Home directory, as configured during .installation
Also see .http://hsqldb.sourceforge.net/doc/guide/ch01.html#N101C2
HSQLDB periodically must update its files to represent changes made in the database. In doing so, it must delete the current file on the file system (beneath the folder in your Crowd home crowddb.data /databasedirectory) and replace it with a new one.
If an administrator issues a shutdown on Crowd while this update is happening, data can be lost and typically all configuration data for your Crowd server will be lost.
HSQLDB should not be used as a production database. It is included for evaluation purposes only.
23

1.
2. 3. 4.
MS SQL Server
When you run the , you will be asked to choose a database and provide configuration Crowd Setup Wizardsettings for that database. It will make things easier if you have created the database and deployed the database driver before you start the Setup Wizard.
Follow the instructions below to set up MS SQL Server for Crowd.
1. Configure SQL Server
Create a database user which Crowd will connect as (e.g. ).crowduser
Create a database for Crowd to store data in (e.g. ).crowddbEnsure that the user has permission to connect to the database, and create and populate tablesEnsure that the new database was set to use Read Committed with Row Versioning as its isolation level.You can apply the new isolation by executing the following query:
ALTER DATABASE <database name> SET READ_COMMITTED_SNAPSHOT ON WITH ROLLBACK IMMEDIATE;
To verify the changes, use this query which should result in '1':
SELECT sd.is_read_committed_snapshot_onFROM sys.databases AS sdWHERE sd.[name] = '<database name>';
Next Steps
Complete the Crowd installation, then start Crowd and run the Setup Wizard as described in the Installation .Guide
Supported Versions
Crowd supports the versions of MS SQL Server listed on the page.Supported Platforms
In SQL Server, the database user ( above) should not be the database owner, but crowdusershould be in the .db_owner roleAdditionally, you should .create the database with case sensitive collation
Configuring Unicode Support in MS SQL Server
To configure Crowd to support in , enter the following in the ' 'Unicode MS SQL Server Hibernate Dialectfield on the Crowd Setup Wizard's Database Configuration screen:com.atlassian.crowd.util.persistence.hibernate.SQLServerIntlDialect
24

1. 2.
3.
4.
5.
1. 2.
MySQL
When you run the , you will be asked to choose a database and provide configuration Crowd Setup Wizardsettings for that database. It will make things easier if you have created the database and deployed the database driver before you start the Setup Wizard.
Follow the instructions below to set up MySQL for Crowd.
1. Configure MySQL
Create a database user which Crowd will connect as (e.g. ).crowduserCreate a database for Crowd to store data in (e.g. ). For a UTF-8 encoded database:crowd
create database crowd character set utf8 collate utf8_bin;
Ensure that the user has permission to connect to the database, and create and populate tables:
GRANT ALL PRIVILEGES ON crowd.* TO 'crowduser'@'localhost' IDENTIFIED BY 'crowdpass';
Edit the file (often named on Windows operating systems) in your MySQL server. Locate my.cnf my.inithe section in the file, and add or modify the following parameters(Refer to f[mysqld] MySQL Option Filesor detailed instructions on editing and .):my.cnf my.ini
Specify the default character set to be UTF-8:
[mysqld]...character-set-server=utf8collation-server=utf8_bin...
Set the default storage engine to InnoDB:
[mysqld]...default-storage-engine=INNODB...
set to t .ransaction-isolation= READ-COMMITTED
[mysqld]...transaction-isolation = READ-COMMITTED...
Notes:
The above configuration will prevent errors when you import directory information into Crowd. See .CWD-1505
Restart your MySQL server for the configuration change to take effect.
2. Copy the MySQL Driver to your Application Server
Download the driver.MySQL Connector/J JDBC driverAdd the MySQL JDBC driver jar ( ) to the following directory:mysql-connector-java-5.x.x-bin.jar
Crowd 2.0.2 or later: { .CROWD_INSTALL}/apache-tomcat/lib/
Supported Versions
Crowd supports the versions of MySQL listed on the page.Supported Platforms
25

Documentation for Crowd 4.4 2
Created in 2021 by Atlassian. Licensed under a .Creative Commons Attribution 2.5 Australia License
2.
Crowd 2.0.1 or earlier: { .CROWD_INSTALL}/apache-tomcat/common/lib/
Next Steps
Complete the Crowd installation, then start Crowd and run the Setup Wizard as described in the Installation .Guide
Do not place Debug Driver on CLASSPATH
Do not place the Debug Driver ( ) on the mysql-connector-java-5.x.x-bin-g.jar CLASSPATHas this can cause issues. See ( ).JRA-8674
26

1.
2.
a.
b.
OracleWhen you run the , you will be asked to choose a database and provide configuration Crowd Setup Wizardsettings for that database. For smoother setup process, we recommend that you create the database and deploy the database driver before you start the Crowd Setup Wizard.
To prepare Oracle for Crowd:
Install the Oracle database server.
If you don't already have an operational Oracle server,downloadand install it now. See theOracle documentationfor instructions.Create an Oracle database user.
Create a database user which Crowd will connect as (e.g. crowduser):
create user <user> identified by <password> default tablespace <tablespace_name> quota unlimited on <tablespace_name>;
Grant user permission to connect to the database, create and populate tables:
grant connect, resource to <user>;
Next Steps
Once you've completed the Crowd installation, start Crowd and run the Setup Wizard as described in theInstallat.ion Guide
It is recommended to create a separate database user for Crowd to use. Connecting as the SYS user is not supported.
27
1. 2. 3.
PostgreSQL
When you run the , you will be asked to choose a database and provide configuration Crowd Setup Wizardsettings for that database. It will make things easier if you have created the database and deployed the database driver before you start the Setup Wizard.
Follow the instructions below to set up PostgreSQL for Crowd.
1. Configure PostgreSQL
Create a database user which Crowd will connect as (for example, ).crowduserCreate a database for Crowd to store data in (for example, ).crowddbEnsure that the user has permission to login to the database and can create database objects.
Next Steps
Complete the Crowd installation, then start Crowd and run the Setup Wizard as described in the Installation .Guide
Supported Versions
Crowd supports the versions of PostgreSQL listed on the page.Supported Platforms
28

Connecting CrowdID to a DatabaseCrowdID is a free add-on that ships with Crowd versions 1.1 and later.
By default, CrowdID in the Crowd distribution (not EAR-WAR) is shipped preconfigured with . This is fine HSQLfor evaluation purposes, but for production installations, you should connect CrowdID to an enterprise database. This also lets you take advantage of existing database backup and recovery procedures.
The following instructions will allow you to configure CrowdID to an external database:
HSQLDB for CrowdIDMS SQL Server for CrowdIDMySQL for CrowdIDOracle for CrowdIDPostgreSQL for CrowdID
Database Overview
CrowdID in the Crowd distribution (not EAR-WAR) includes the Apache Tomcat application server and an in-memory HSQL database engine. This JNDI reference ( ) can be adjusted to use your custom CrowdIDDSdatabase and driver by editing the deployment description.crowd.xml
CrowdID database connection is not yet part of Setup Wizard
This page describes the procedure for connecting to an external database. You'll notice that CrowdIDthe procedure for connecting to a database is simpler, because the Crowd database Crowd itselfconnection is configured by the . The CrowdID database configuration cannot be Crowd Setup Wizarddone as part of the Setup Wizard. We hope to improve the CrowdID integration soon. In the meantime, please follow the steps below.
29
HSQLDB for CrowdIDThe default version of CrowdID uses an embedded HSQLDB database.
HSQLDB periodically must update its files to represent changes made in the database. To do so, it must delete the current file on the filesystem, located in the folder, and replace it with a new crowddb.data /databaseone.
If an administrator issues a shutdown on CrowdID in this period, data can be lost, and typically all configuration data for your CrowdID server will be lost.
HSQLDB should not be used as a production database. It is included for evaluation purposes only.
30

1.
2.
3.
1.
2.
1.
2.
1.
2.
MS SQL Server for CrowdIDFollow the steps below to connect CrowdID to MS SQL Server.
1. Configure SQL Server
Create a database user which CrowdID will connect as (e.g. ).crowduser
Create a database for CrowdID to store data in (e.g. ). This must be a different database to crowdiddbthe one used by Crowd.Ensure that the user has permission to connect to the database, and create and populate tables.
2. Copy the SQL Server Driver to your Application Server
Download the SQL Server JDBC driver from (recommended, assumed below), or (coJTDS I-net softwaremmercial).
Add the SQL Server JDBC driver JAR ( ) to the following directory:jtds-[version].jarCrowd 2.0.2 or later: { .CROWD_INSTALL}/apache-tomcat/lib/Crowd 2.0.1 or earlier: { .CROWD_INSTALL}/apache-tomcat/common/lib/
3. Configure your Application Server to Connect to SQL Server
Edit the file and customize the , conf/Catalina/localhost/openidserver.xml username passwo, and parameters for the Datasource.rd driverClassName url
<Context path="/openidserver" docBase="../../crowd-openidserver-webapp" debug="0">
<Resource name="jdbc/CrowdIDDS" auth="Container" type="javax.sql.DataSource"username="[enter db username here]"password="[enter db password here]"driverClassName="net.sourceforge.jtds.jdbc.Driver"url="jdbc:jtds:sqlserver://localhost:1433/crowdiddb"[ delete the minEvictableIdleTimeMillis, timeBetweenEvictionRunsMillis and maxActive params here ]/>
<Manager className="org.apache.catalina.session.PersistentManager" saveOnRestart="false"/>
</Context>
Delete the , and attributes minEvictableIdleTimeMillis timeBetweenEvictionRunsMillis maxActive(which are only needed for HSQL, and degrade performance otherwise).
4. Configure CrowdID to use MS SQL Server
Edit the file (located in the root of the Crowd distribution) and modify the build.properties hibernate.to the following:dialect
hibernate.dialect=org.hibernate.dialect.SQLServerDialect
Then run or . This will configure CrowdID to use the MS SQL Server dialect../build.sh build.bat
In SQL Server, the database user ( above) should not be the database owner, but crowdusershould be in the .db_owner role
Microsoft have their own JDBC driver but we strongly recommend avoiding it after our Jira customers have reported various connection errors ( , [JRA-6872|http://jira.atlassian.JRA-5760com/browse/JRA-6872), workflow problems ( ) and Chinese character problems (JRA-8443 JRA-
).5054
31
Documentation for Crowd 4.4 2
Created in 2021 by Atlassian. Licensed under a .Creative Commons Attribution 2.5 Australia License
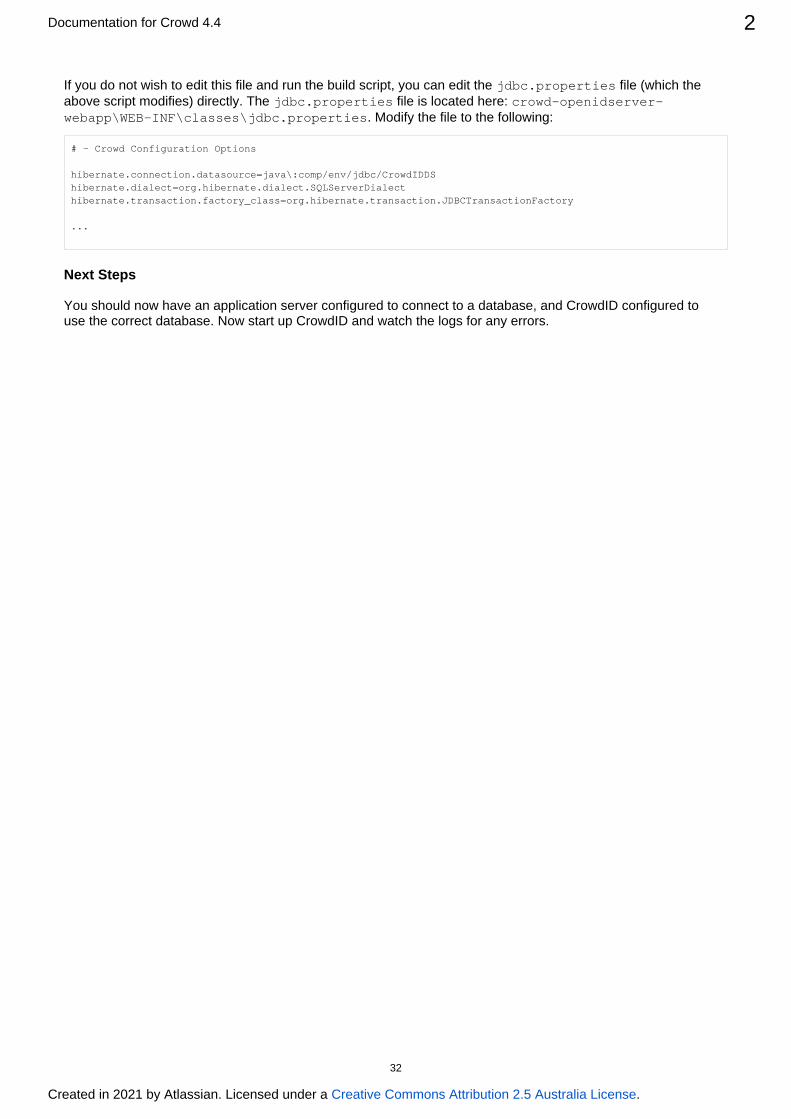
If you do not wish to edit this file and run the build script, you can edit the file (which the jdbc.propertiesabove script modifies) directly. The file is located here: jdbc.properties crowd-openidserver-
. Modify the file to the following:webapp\WEB-INF\classes\jdbc.properties
# - Crowd Configuration Options
hibernate.connection.datasource=java\:comp/env/jdbc/CrowdIDDShibernate.dialect=org.hibernate.dialect.SQLServerDialecthibernate.transaction.factory_class=org.hibernate.transaction.JDBCTransactionFactory
...
Next Steps
You should now have an application server configured to connect to a database, and CrowdID configured to use the correct database. Now start up CrowdID and watch the logs for any errors.
32

1. 2.
3.
1. 2.
1.
2.
1.
MySQL for CrowdIDFollow the steps below to connect CrowdID to MySQL.
1. Configure MySQL
Create a database user which CrowdID will connect as (e.g. ).crowduserCreate a database for CrowdID to store data in (e.g. ).crowdiddb
This must be a different database from the one used by Crowd.For a UTF-8 encoded database:
create database crowdiddb character set utf8;
Ensure that the user has permission to connect to the database, and create and populate tables.
2. Copy the MySQL Driver to your Application Server
Download the latest .MySQL Connector/J JDBC driverAdd the MySQL JDBC driver jar ( ) to the following directory:mysql-connector-java-3.x.x-bin.jar
Crowd 2.0.2 or later: { .CROWD_INSTALL}/apache-tomcat/lib/Crowd 2.0.1 or earlier: { .CROWD_INSTALL}/apache-tomcat/common/lib/
3. Configure your Application Server to Connect to MySQL
Edit the file and apache-tomcat-X.X.XX/conf/Catalina/localhost/openidserver.xmlcustomize the , , and parameters for the Datasource.username password driverClassName url
<Context path="/openidserver" docBase="../../crowd-openidserver-webapp" debug="0">
<Resource name="jdbc/CrowdIDDS" auth="Container" type="javax.sql.DataSource"username="[enter db username here]"password="[enter db password here]"driverClassName="com.mysql.jdbc.Driver"url="jdbc:mysql://localhost/crowdiddb?autoReconnect=true&useUnicode=true&characterEncoding=utf8"[ delete the minEvictableIdleTimeMillis, timeBetweenEvictionRunsMillis and maxActive params here ]/>
<Manager className="org.apache.catalina.session.PersistentManager" saveOnRestart="false"/>
</Context>
The URL above assumes a UTF-8 database i.e. created with create database crowdiddb .character set utf8;
Delete the , and attributes minEvictableIdleTimeMillis timeBetweenEvictionRunsMillis maxActive(which are only needed for HSQL, and degrade performance otherwise).
4. Configure CrowdID to use MySQL
Edit the file (located in the root of the Crowd distribution) and modify the build.properties hibernate. to the following.dialect
Do not place the Debug Driver ( ) on the as this can mysql-connector-java-3.x.x-bin-g.jar CLASSPATHcause issues. ( ).JRA-8674
MySQL closes idle connections after 8 hours, so the is necessary to tell autoReconnect=truethe driver to reconnect.
33

Documentation for Crowd 4.4 2
Created in 2021 by Atlassian. Licensed under a .Creative Commons Attribution 2.5 Australia License
1.
2.
hibernate.dialect=org.hibernate.dialect.MySQL5InnoDBDialect
Then run or . This will configure CrowdID to use the MySQL dialect../build.sh build.bat
If you do not wish to edit this file and run the build script, you can edit the (which the above jdbc.propertiesscript modifies) directly. The file is located here: jdbc.properties crowd-openidserver-webapp\WEB-
. Modify the file to the following:INF\classes\jdbc.properties
# - Crowd Configuration Options
hibernate.connection.datasource=java\:comp/env/jdbc/CrowdIDDShibernate.dialect=org.hibernate.dialect.MySQL5InnoDBDialecthibernate.transaction.factory_class=org.hibernate.transaction.JDBCTransactionFactory
...
Next steps
You should now have an application server configured to connect to a database, and CrowdID configured to use the correct database. Now start up CrowdID and watch the logs for any errors.
RELATED TOPICS
Supported PlatformsSetting JAVA_HOMEEnd of support announcements for Crowd
Installing Crowd and CrowdIDConnecting Crowd to a Database
HSQLDBMS SQL ServerMySQLOraclePostgreSQL
Connecting CrowdID to a DatabaseHSQLDB for CrowdIDMS SQL Server for CrowdIDMySQL for CrowdIDOracle for CrowdIDPostgreSQL for CrowdID
Specifying your Crowd Home DirectoryRunning the Setup Wizard
Troubleshooting your Configuration on SetupConfiguring Crowd
Important directories and filesDRAFT - .Important Directories and Files vCROWD_3.0The crowd.properties file
Changing the Port that Crowd usesConfiguring Crowd to Work with SSLInstalling Crowd as a Windows Service
Specifying Startup Order of Windows ServicesChanging the User for the Crowd Windows ServiceRemoving the Crowd Windows ServiceTroubleshooting Crowd as a Windows Service
Setting Crowd to Start Automatically on Mac OS XSetting Crowd to Run Automatically and Use an Unprivileged System User on UNIX
34

1. 2.
3.
1.
2.
1.
2.
1.
2.
Oracle for CrowdIDFollow the steps below to connect CrowdID to Oracle.
1. Configure Oracle
Create a database user which CrowdID will connect as (e.g. ).crowduserCreate a database for CrowdID to store data in (e.g. ). This must be a different database to crowdiddbthe one used by Crowd.Ensure that the user has permission to connect to the database, and create and populate tables.
2. Copy the Oracle Driver to your Application Server
Download the Oracle JDBC driver from http://www.oracle.com/technology/software/tech/java/sqlj_jdbc./index.html
Add the Oracle JDBC driver jar to the following directory:Crowd 2.0.2 or later: { .CROWD_INSTALL}/apache-tomcat/lib/Crowd 2.0.1 or earlier: { .CROWD_INSTALL}/apache-tomcat/common/lib/
3. Configure your Application Server to Connect to Oracle
Edit the file and apache-tomcat-X.X.XX/conf/Catalina/localhost/openidserver.xmlcustomize the , , and parameters for the Datasource.username password driverClassName url
<Context path="/openidserver" docBase="../../crowd-openidserver-webapp" debug="0">
<Resource name="jdbc/CrowdIDDS" auth="Container" type="javax.sql.DataSource"username="[enter db username here]"password="[enter db password here]"driverClassName="oracle.jdbc.driver.OracleDriver"url="jdbc:oracle:thin:@localhost:1521:crowdiddb"[ delete the minEvictableIdleTimeMillis, timeBetweenEvictionRunsMillis and maxActive params here ]/>
<Manager className="org.apache.catalina.session.PersistentManager" saveOnRestart="false"/>
</Context>
Delete the , and attributes minEvictableIdleTimeMillis timeBetweenEvictionRunsMillis maxActive(which are only needed for HSQL, and degrade performance otherwise).
4. Configure CrowdID to use Oracle
Edit the (located in the root of the Crowd distribution) and modify the build.properties file hibernto the followingate.dialect
hibernate.dialect=org.hibernate.dialect.Oracle10gDialect
Then run or . This will configure CrowdID to use the Oracle dialect. There is ./build.sh build.bata problem with in Crowd version 1.2.0. To fix the problem, please apply the patch described build.batin .CWD-638
If you do not wish to edit this file and run the build script, you can edit the (which the above jdbc.propertiesscript modifies) directly. The file is located here: jdbc.properties crowd-openidserver-webapp\WEB-
. Modify the file to the following:INF\classes\jdbc.properties
# - Crowd Configuration Options
hibernate.connection.datasource=java\:comp/env/jdbc/CrowdIDDShibernate.dialect=org.hibernate.dialect.OracleDialecthibernate.transaction.factory_class=org.hibernate.transaction.JDBCTransactionFactory
...
35

Documentation for Crowd 4.4 2
Created in 2021 by Atlassian. Licensed under a .Creative Commons Attribution 2.5 Australia License
Next Steps
You should now have an application server configured to connect to a database, and CrowdID configured to use the correct database. Now start up CrowdID and watch the logs for any errors.
RELATED TOPICS
Supported PlatformsSetting JAVA_HOMEEnd of support announcements for Crowd
Installing Crowd and CrowdIDConnecting Crowd to a Database
HSQLDBMS SQL ServerMySQLOraclePostgreSQL
Connecting CrowdID to a DatabaseHSQLDB for CrowdIDMS SQL Server for CrowdIDMySQL for CrowdIDOracle for CrowdIDPostgreSQL for CrowdID
Specifying your Crowd Home DirectoryRunning the Setup Wizard
Troubleshooting your Configuration on SetupConfiguring Crowd
Important directories and filesDRAFT - .Important Directories and Files vCROWD_3.0The crowd.properties file
Changing the Port that Crowd usesConfiguring Crowd to Work with SSLInstalling Crowd as a Windows Service
Specifying Startup Order of Windows ServicesChanging the User for the Crowd Windows ServiceRemoving the Crowd Windows ServiceTroubleshooting Crowd as a Windows Service
Setting Crowd to Start Automatically on Mac OS XSetting Crowd to Run Automatically and Use an Unprivileged System User on UNIX
36
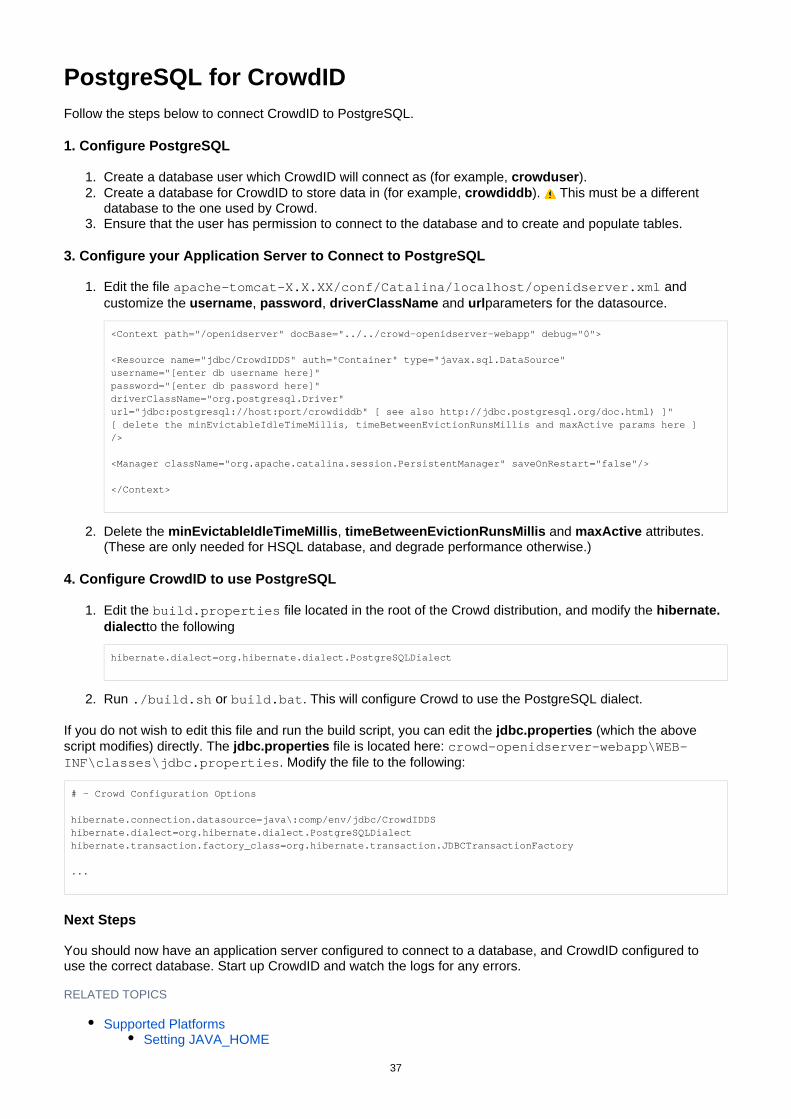
1. 2.
3.
1.
2.
1.
2.
PostgreSQL for CrowdIDFollow the steps below to connect CrowdID to PostgreSQL.
1. Configure PostgreSQL
Create a database user which CrowdID will connect as (for example, ).crowduserCreate a database for CrowdID to store data in (for example, ). This must be a different crowdiddbdatabase to the one used by Crowd.Ensure that the user has permission to connect to the database and to create and populate tables.
3. Configure your Application Server to Connect to PostgreSQL
Edit the file and apache-tomcat-X.X.XX/conf/Catalina/localhost/openidserver.xmlcustomize the , , and parameters for the datasource.username password driverClassName url
<Context path="/openidserver" docBase="../../crowd-openidserver-webapp" debug="0">
<Resource name="jdbc/CrowdIDDS" auth="Container" type="javax.sql.DataSource"username="[enter db username here]"password="[enter db password here]"driverClassName="org.postgresql.Driver"url="jdbc:postgresql://host:port/crowdiddb" [ see also http://jdbc.postgresql.org/doc.html) ]"[ delete the minEvictableIdleTimeMillis, timeBetweenEvictionRunsMillis and maxActive params here ]/>
<Manager className="org.apache.catalina.session.PersistentManager" saveOnRestart="false"/>
</Context>
Delete the , and attributes. minEvictableIdleTimeMillis timeBetweenEvictionRunsMillis maxActive(These are only needed for HSQL database, and degrade performance otherwise.)
4. Configure CrowdID to use PostgreSQL
Edit the file located in the root of the Crowd distribution, and modify the build.properties hibernate.to the followingdialect
hibernate.dialect=org.hibernate.dialect.PostgreSQLDialect
Run or . This will configure Crowd to use the PostgreSQL dialect../build.sh build.bat
If you do not wish to edit this file and run the build script, you can edit the (which the above jdbc.propertiesscript modifies) directly. The file is located here: jdbc.properties crowd-openidserver-webapp\WEB-
. Modify the file to the following:INF\classes\jdbc.properties
# - Crowd Configuration Options
hibernate.connection.datasource=java\:comp/env/jdbc/CrowdIDDShibernate.dialect=org.hibernate.dialect.PostgreSQLDialecthibernate.transaction.factory_class=org.hibernate.transaction.JDBCTransactionFactory
...
Next Steps
You should now have an application server configured to connect to a database, and CrowdID configured to use the correct database. Start up CrowdID and watch the logs for any errors.
RELATED TOPICS
Supported PlatformsSetting JAVA_HOME
37

Documentation for Crowd 4.4 2
Created in 2021 by Atlassian. Licensed under a .Creative Commons Attribution 2.5 Australia License
End of support announcements for CrowdInstalling Crowd and CrowdID
Connecting Crowd to a DatabaseHSQLDBMS SQL ServerMySQLOraclePostgreSQL
Connecting CrowdID to a DatabaseHSQLDB for CrowdIDMS SQL Server for CrowdIDMySQL for CrowdIDOracle for CrowdIDPostgreSQL for CrowdID
Specifying your Crowd Home DirectoryRunning the Setup Wizard
Troubleshooting your Configuration on SetupConfiguring Crowd
Important directories and filesDRAFT - .Important Directories and Files vCROWD_3.0The crowd.properties file
Changing the Port that Crowd usesConfiguring Crowd to Work with SSLInstalling Crowd as a Windows Service
Specifying Startup Order of Windows ServicesChanging the User for the Crowd Windows ServiceRemoving the Crowd Windows ServiceTroubleshooting Crowd as a Windows Service
Setting Crowd to Start Automatically on Mac OS XSetting Crowd to Run Automatically and Use an Unprivileged System User on UNIX
38

Specifying your Crowd Home DirectoryThe directory is where Crowd will store its configuration information. If you are using the Crowd Homeembedded HSQL database, supplied for evaluation purposes, Crowd will also store its database in this directory. (Note however that the CrowdID database will be in the installation directory, not the Home directory.) To specify the Crowd Home directory:
Open the file. This is found at crowd-init.properties <crowd_install_directory>/crowd-webapp/WEB-INF/classes/crowd-init.propertiesChoose the appropriate line in the file, depending upon your operating system (see below).Remove the at the beginning of the line.#Enter the name of the directory you want Crowd to use as its Home directory. For example,
On Windows:
crowd.home=c:/data/crowd-home
Note: On Windows, make sure you use forward slashes as shown above, not backward slashes.On Mac and UNIX-based systems:
crowd.home=/var/crowd-home
Save the file.crowd-init.properties
Advanced Usage
It is also possible to define the property as a Java system or parameter.crowd.home Servlet Context
Java System Parameter
Use the following format for your Java parameter:
-Dcrowd.home=/var/crowd-home
Where should you put this value?
You could add it to the or file supplied with the Crowd distribution (not Crowd EAR-setenv.sh setenv.batWAR).
Servlet Context Parameter
The following configuration XML can be added to the crowd-standalone-install/apache-tomcat/conf context file /Catalina/localhost/crowd.xml
to set the property:crowd.home
<Parameter name="crowd.home" value="/var/crowd-home" override="false"/>
Important
Please, ensure that the Crowd Home directory will not match the Crowd installation directory it is writable by the user executing the initialization script.AND
39
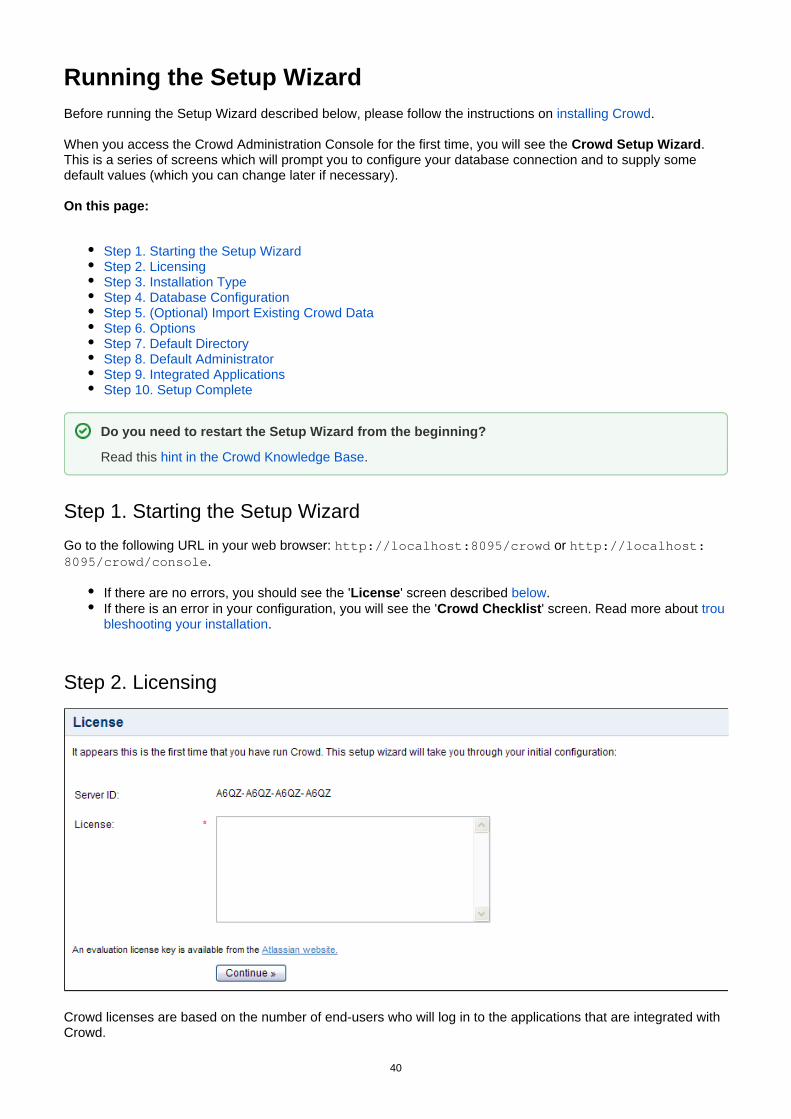
Running the Setup WizardBefore running the Setup Wizard described below, please follow the instructions on .installing Crowd
When you access the Crowd Administration Console for the first time, you will see the . Crowd Setup WizardThis is a series of screens which will prompt you to configure your database connection and to supply some default values (which you can change later if necessary).
On this page:
Step 1. Starting the Setup WizardStep 2. LicensingStep 3. Installation TypeStep 4. Database ConfigurationStep 5. (Optional) Import Existing Crowd DataStep 6. OptionsStep 7. Default DirectoryStep 8. Default AdministratorStep 9. Integrated ApplicationsStep 10. Setup Complete
Step 1. Starting the Setup Wizard
Go to the following URL in your web browser: or http://localhost:8095/crowd http://localhost:.8095/crowd/console
If there are no errors, you should see the ' ' screen described .License belowIf there is an error in your configuration, you will see the ' ' screen. Read more about Crowd Checklist trou
.bleshooting your installation
Step 2. Licensing
Crowd licenses are based on the number of end-users who will log in to the applications that are integrated with Crowd.
Do you need to restart the Setup Wizard from the beginning?
Read this .hint in the Crowd Knowledge Base
40

Documentation for Crowd 4.4 2
Created in 2021 by Atlassian. Licensed under a .Creative Commons Attribution 2.5 Australia License
You can obtain an evaluation license from the website. When you obtain an evaluation license or Atlassianpurchase, renew or upgrade your license you will receive a license key via email or on the Atlassian website.
Type or paste your license key into the ' ' field, shown on the screenshot above.License
Step 3. Installation Type
In this step, you will choose whether to set up a new Crowd database or restore an existing database. Choose an option as follows:
' ' Set up a new Crowd database.New Installation Hint: Choose this option if you are evaluating Crowd.
' ' Import your Crowd data from an XML backup file, which has been Import data from an XML Backupexported from your existing Crowd installation.
Step 4. Database Configuration
The ' ' screen allows you to choose the type of database connection, as described Database Configurationbelow.
When you click 'Continue' after choosing your database options, there may be a short wait while Crowd writes the information to the database tables. Please be patient.
Database Option 1: Embedded HSQLDB (For Evaluation Purposes Only)
If in any doubt, choose the default '*Embedded*' option for evaluation purposes.
41

Documentation for Crowd 4.4 3
Created in 2021 by Atlassian. Licensed under a .Creative Commons Attribution 2.5 Australia License
The Crowd distribution (not EAR-WAR) is shipped with an embedded database. If you choose the 'HSQLDB Em' option, the data files are stored in the Crowd Home directory, as configured on .bedded installation
The HSQLDB database is fine for evaluation purposes, but for production installations you should connect Crowd to an enterprise database using the JDBC or JNDI datasource connections described below. This also lets you take advantage of your existing database backup and recovery procedures.
Database Option 2: JDBC Connection
42

Documentation for Crowd 4.4 4
Created in 2021 by Atlassian. Licensed under a .Creative Commons Attribution 2.5 Australia License
Select the ' ' if you want to connect to an external database via a JDBC connection. (If you JDBC Connectionhave not yet created your database for Crowd, follow the .)database setup instructions
Supply the details for your database:
Field Description
Database
Select your database server type.
DriverClass Name
Enter the class name for your database driver. Make sure that the class is in the class path on your application server. See guidelines on creating your .specific database
JDBCURL
Enter the URL at which Crowd can access the database JDBC connection. Do note that if you wish to change the default database name, you can specify it in the URL as well. E.g. for SQL Server, the default URL is , and if you wish to connect jdbc:jtds:sqlserver://localhost:1433/crowdto crowddb instead, modify the URL so that it looks like this: jdbc:jtds:sqlserver://localhost:1433/crowddb
Username
Enter the username which Crowd will use to access the database.
43

Documentation for Crowd 4.4 5
Created in 2021 by Atlassian. Licensed under a .Creative Commons Attribution 2.5 Australia License
Password
Enter the password corresponding to the above username.
Hibernate Dialect
This is the Hibernate configuration for the selected database type. The Crowd installation will supply a default dialect for the database type you have chosen. You should only alter this dialect if you need an alternative for the database type or are using an unsupported database type.
To configure Crowd to support in , enter the following in the 'Unicode MS SQL Server Hibernate ' field on the Crowd Setup Wizard's Database Configuration screen:Dialect
com.atlassian.crowd.util.persistence.hibernate.SQLServerIntlDialect
Overwrite Existing Data
Crowd will ask you to confirm that existing data should be overwritten, if both of the following are true:
You chose ' ' or ' ' in , andNew Installation Import data from an XML Backup Step 3 aboveThe database configured on the already exists and contains Crowd data.above screen
Database Option 3: JNDI Datasource
Select the ' ' if you want to connect to an external database via a datasource managed by your JNDI Datasourceapplication server.
Supply the details for your database:
Field Description
Database
Select your database server type.
JNDI Name
Enter the datasource name, e.g. or .jdbc/CrowdDS java:comp/env/jdbc/CrowdDS
44
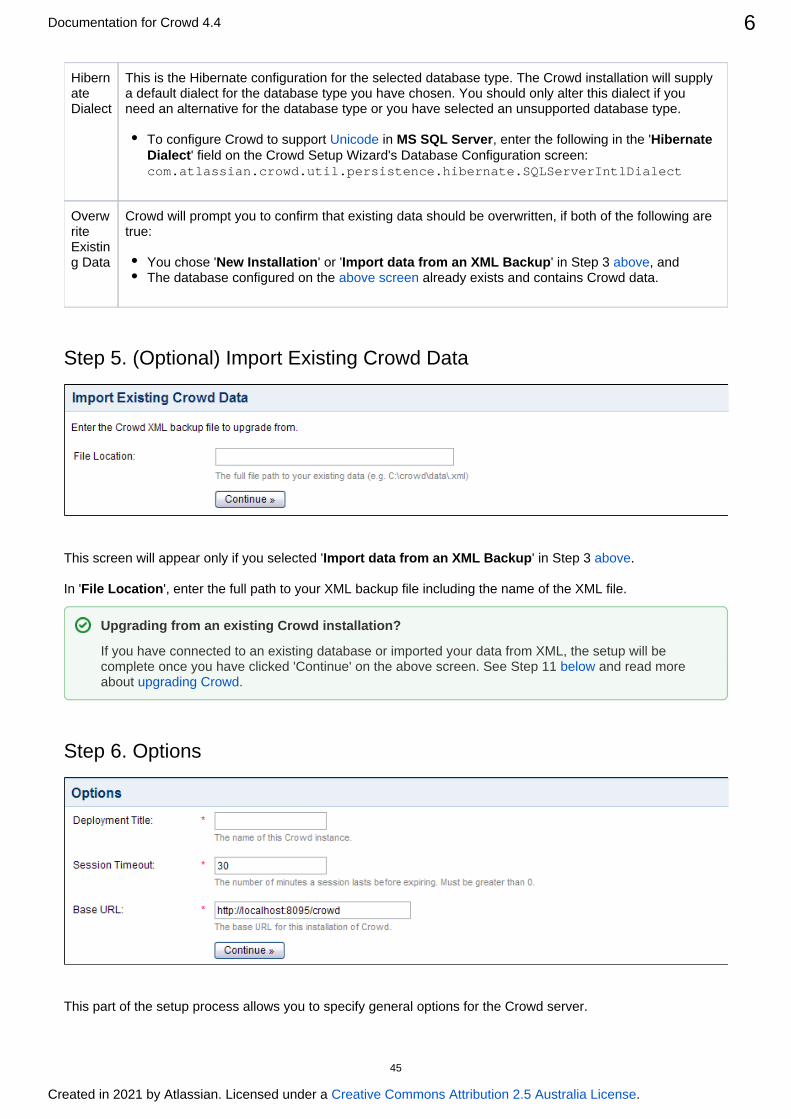
Documentation for Crowd 4.4 6
Created in 2021 by Atlassian. Licensed under a .Creative Commons Attribution 2.5 Australia License
Hibernate Dialect
This is the Hibernate configuration for the selected database type. The Crowd installation will supply a default dialect for the database type you have chosen. You should only alter this dialect if you need an alternative for the database type or you have selected an unsupported database type.
To configure Crowd to support in , enter the following in the 'Unicode MS SQL Server Hibernate ' field on the Crowd Setup Wizard's Database Configuration screen:Dialect
com.atlassian.crowd.util.persistence.hibernate.SQLServerIntlDialect
Overwrite Existing Data
Crowd will prompt you to confirm that existing data should be overwritten, if both of the following are true:
You chose ' ' or ' ' in , andNew Installation Import data from an XML Backup Step 3 aboveThe database configured on the already exists and contains Crowd data.above screen
Step 5. ( ) Import Existing Crowd DataOptional
This screen will appear only if you selected ' ' in .Import data from an XML Backup Step 3 above
In ' ', enter the full path to your XML backup file including the name of the XML file.File Location
Step 6. Options
This part of the setup process allows you to specify general options for the Crowd server.
Upgrading from an existing Crowd installation?
If you have connected to an existing database or imported your data from XML, the setup will be complete once you have clicked 'Continue' on the above screen. See and read more Step 11 belowabout .upgrading Crowd
45
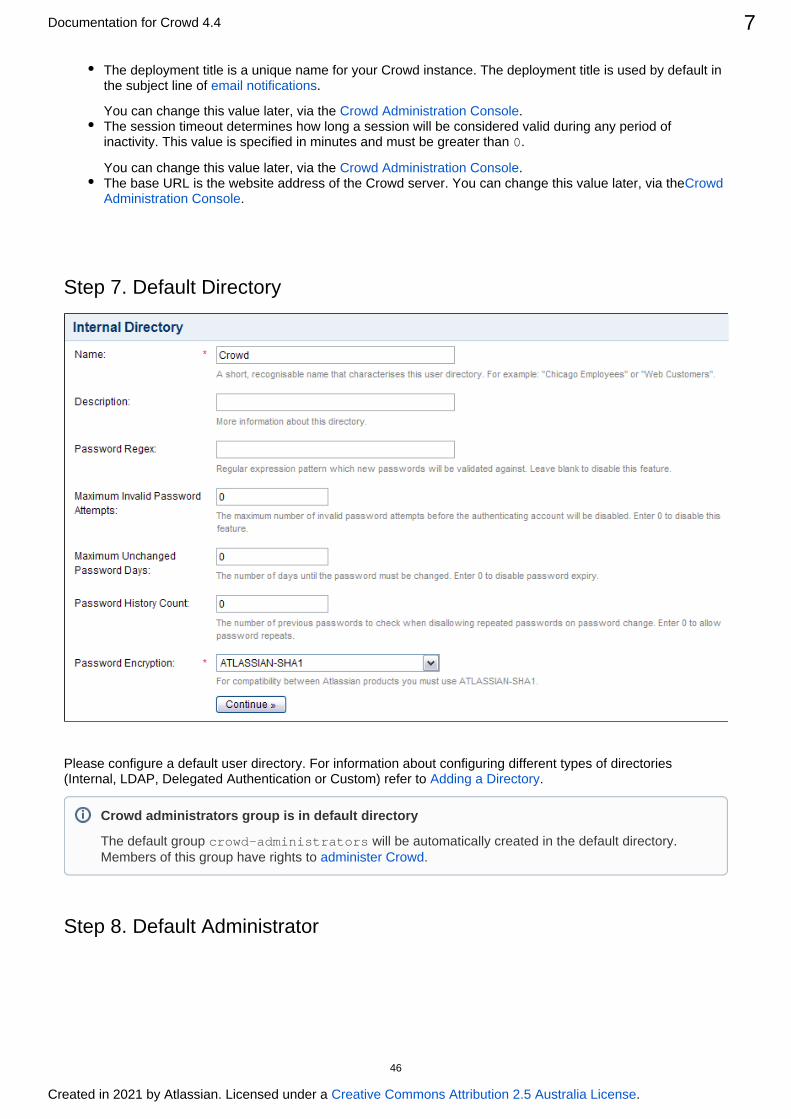
Documentation for Crowd 4.4 7
Created in 2021 by Atlassian. Licensed under a .Creative Commons Attribution 2.5 Australia License
The deployment title is a unique name for your Crowd instance. The deployment title is used by default in the subject line of .email notifications
You can change this value later, via the .Crowd Administration ConsoleThe session timeout determines how long a session will be considered valid during any period of inactivity. This value is specified in minutes and must be greater than .0
You can change this value later, via the .Crowd Administration ConsoleThe base URL is the website address of the Crowd server. You can change this value later, via theCrowd
.Administration Console
Step 7. Default Directory
Please configure a default user directory. For information about configuring different types of directories (Internal, LDAP, Delegated Authentication or Custom) refer to .Adding a Directory
Step 8. Default Administrator
Crowd administrators group is in default directory
The default group will be automatically created in the default directory. crowd-administratorsMembers of this group have rights to .administer Crowd
46
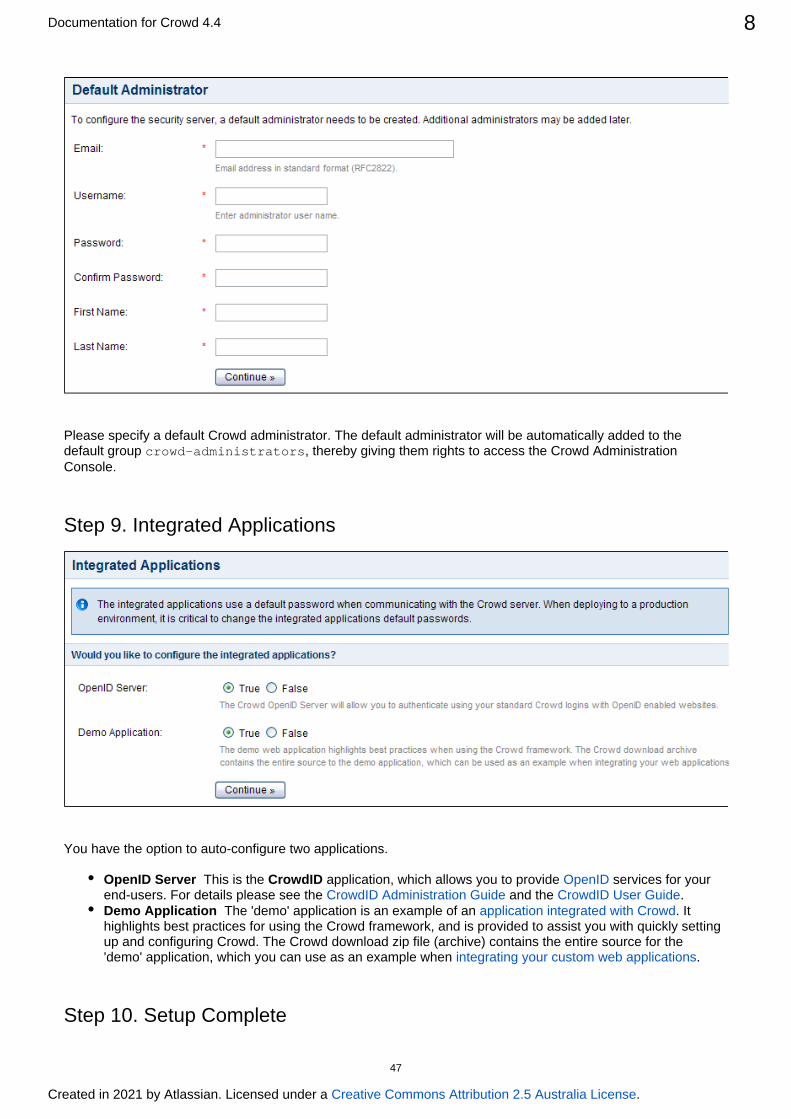
Documentation for Crowd 4.4 8
Created in 2021 by Atlassian. Licensed under a .Creative Commons Attribution 2.5 Australia License
Please specify a default Crowd administrator. The default administrator will be automatically added to the default group , thereby giving them rights to access the Crowd Administration crowd-administratorsConsole.
Step 9. Integrated Applications
You have the option to auto-configure two applications.
OpenID Server This is the application, which allows you to provide services for your CrowdID OpenIDend-users. For details please see the and the .CrowdID Administration Guide CrowdID User GuideDemo Application The 'demo' application is an example of an . It application integrated with Crowdhighlights best practices for using the Crowd framework, and is provided to assist you with quickly setting up and configuring Crowd. The Crowd download zip file (archive) contains the entire source for the 'demo' application, which you can use as an example when .integrating your custom web applications
Step 10. Setup Complete
47
Documentation for Crowd 4.4 9
Created in 2021 by Atlassian. Licensed under a .Creative Commons Attribution 2.5 Australia License
You are now ready to log in with the default administrator account you have just created, and use the Crowd . For details, please see the .Administration Console Administration Guide
RELATED TOPICS
Supported PlatformsInstalling Crowd and CrowdIDRunning the Setup WizardConfiguring Crowd
48
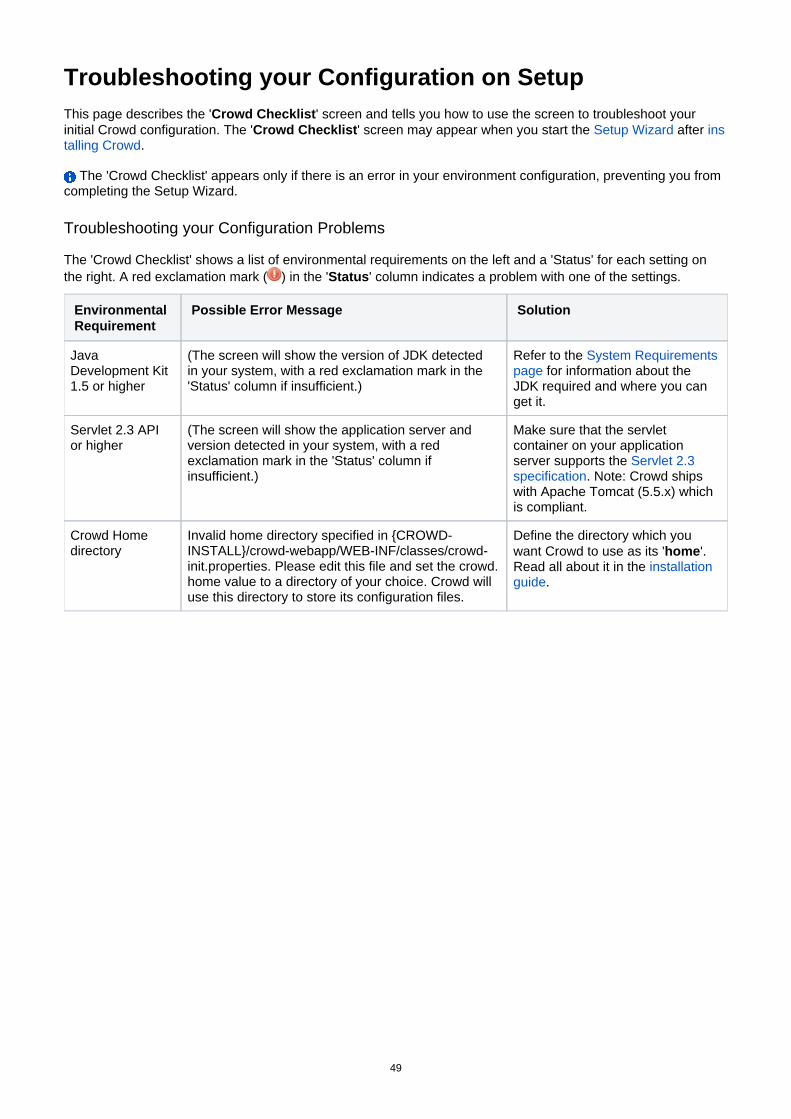
Troubleshooting your Configuration on SetupThis page describes the ' ' screen and tells you how to use the screen to troubleshoot your Crowd Checklistinitial Crowd configuration. The ' ' screen may appear when you start the after Crowd Checklist Setup Wizard ins
.talling Crowd
The 'Crowd Checklist' appears only if there is an error in your environment configuration, preventing you from completing the Setup Wizard.
Troubleshooting your Configuration Problems
The 'Crowd Checklist' shows a list of environmental requirements on the left and a 'Status' for each setting on the right. A red exclamation mark ( ) in the ' ' column indicates a problem with one of the settings.Status
Environmental Requirement
Possible Error Message Solution
Java Development Kit 1.5 or higher
(The screen will show the version of JDK detected in your system, with a red exclamation mark in the
)'Status' column if insufficient.
Refer to the System Requirements for information about the page
JDK required and where you can get it.
Servlet 2.3 API or higher
(The screen will show the application server and version detected in your system, with a red exclamation mark in the 'Status' column if
)insufficient.
Make sure that the servlet container on your application server supports the Servlet 2.3
. Note: Crowd ships specificationwith Apache Tomcat (5.5.x) which is compliant.
Crowd Home directory
Invalid home directory specified in {CROWD-INSTALL}/crowd-webapp/WEB-INF/classes/crowd-init.properties. Please edit this file and set the crowd.home value to a directory of your choice. Crowd will use this directory to store its configuration files.
Define the directory which you want Crowd to use as its ' '. homeRead all about it in the installation
.guide
49
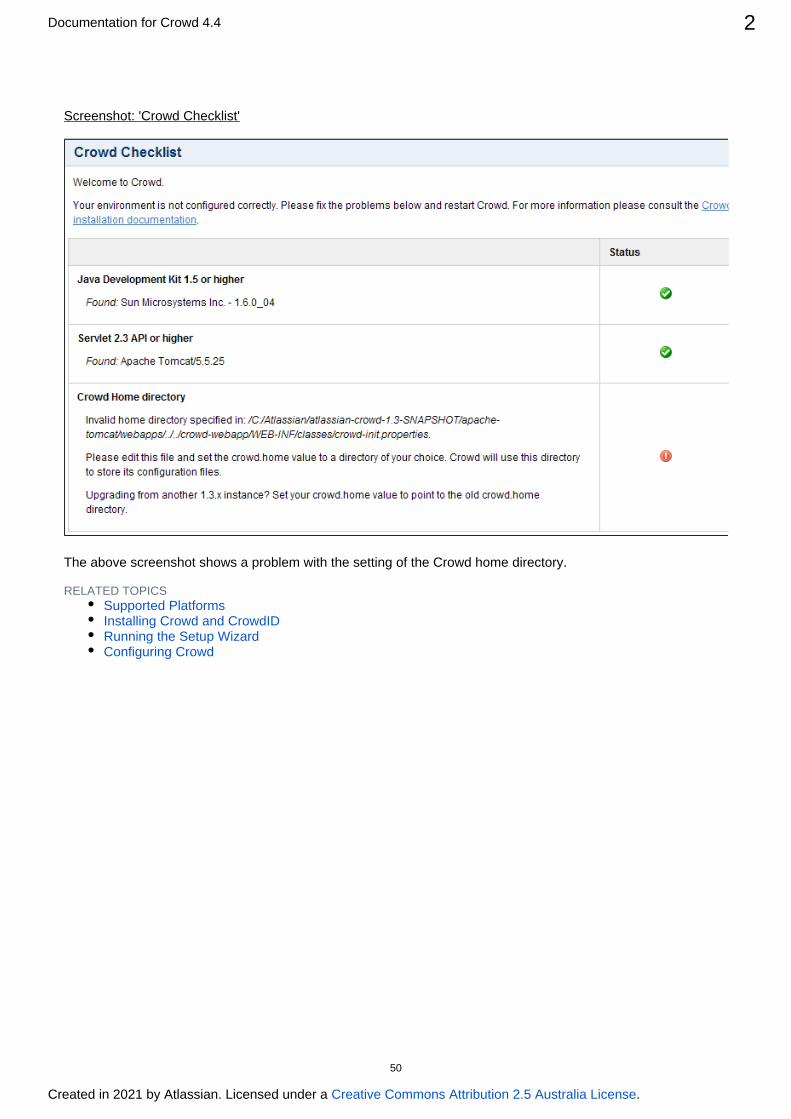
Documentation for Crowd 4.4 2
Created in 2021 by Atlassian. Licensed under a .Creative Commons Attribution 2.5 Australia License
Screenshot: 'Crowd Checklist'
The above screenshot shows a problem with the setting of the Crowd home directory.
RELATED TOPICSSupported PlatformsInstalling Crowd and CrowdIDRunning the Setup WizardConfiguring Crowd
50

Configuring CrowdYou can configure Crowd to suit your environment, as described on the following pages:
Important directories and filesChanging the Port that Crowd usesConfiguring Crowd to Work with SSLInstalling Crowd as a Windows ServiceSetting Crowd to Start Automatically on Mac OS XSetting Crowd to Run Automatically and Use an Unprivileged System User on UNIX
RELATED TOPICS
Specifying your Crowd Home DirectoryConfiguring an SSL Certificate for Microsoft Active DirectoryTroubleshooting your Configuration on Setup
Supported PlatformsInstalling Crowd and CrowdIDRunning the Setup WizardConfiguring Crowd
51
Important directories and filesThis page contains information about the important directories and files to be aware of when configuring Crowd.
On this page:
Home directoryShared directory
crowd.cfg.xmlfileplugins directorybackupsdirectory
Installation directory
Home directory
The Crowd home directory is where Crowd stores its configuration information. If you're using the embedded HSQL database, supplied for evaluation purposes, Crowd will also store its database in this directory (note however that the CrowdID database will be in the Crowd installation directory, not the home directory.)
The location of this directory is specified in the file described . You can set crowd-init.properties belowthe location during .installation
You can check the location of your Crowd home directory on the screen.System Information
Important files and directories in the Crowd home directory:
bundled-plugins directorycaches directorydatabase directoryplugin-data directory
bundled-plugins directory
The directory is a sub-directory of your Crowd home directory. It contains plugins which are bundled-pluginsshipped with your Crowd installation, such as:
The SAML integration plugin which provides the .Google Apps SSO featureThe plugins.Shared Access Layer (SAL)The plugin.REST moduleAnd more.
The plugins are a collection of jars generated when you install the Crowd web application. The jars are obtained by unzipping from {atlassian-bundled-plugins.zip CROWD_INSTALL}\crowd-webapp\WEB-
.INF\classes
caches directory
The directory is a sub-directory of your Crowd home directory. It contains various files that Crowd cachescaches to improve performance. The files in sub-directories of this directory are either created or updated when you install or restart the Crowd web application.
Do not modify or remove these files while Crowd is running. It should be safe for you to delete these files between application restarts.
It may improve Crowd's performance if you link this sub-directory to a fast disk.
database directory
52

Documentation for Crowd 4.4 2
Created in 2021 by Atlassian. Licensed under a .Creative Commons Attribution 2.5 Australia License
If you are using the embedded HSQL database, supplied for evaluation purposes, Crowd will store its database in this directory (note however that the CrowdID database will be in the Crowd Installation directory, not the Crowd home directory.)
plugin-data directory
The directory is a sub-directory of your Crowd home directory. Plugins developed for Crowd 2.12 plugin-dataand older will store their data here. The directory will be created the first time a plugin needs it.
Shared directory
This directory contains common data for all nodes in your Crowd installation. If you are using Crowd Data Center, this directory is expected to be a network share accessible from every node. If you are not using Crowd Data Center, this will be an ordinary local directory. By default it is located in the sub-directory of your sharedCrowd home directory.
crowd.cfg.xmlfile
This file stores configuration information for the Crowd Administration Console application, including:
License informationServer IDDatabase configuration propertiesSetup phase reached
The contents of this file is automatically generated when you run the .Crowd Setup Wizard
Here's an example of the content of , when the embedded HSQL database was specified at crowd.cfg.xmlsetup:
<?xml version="1.0" encoding="UTF-8"?>
<application-configuration> <setupStep>complete</setupStep> <setupType>install.new</setupType> <buildNumber>320</buildNumber> <properties> <property name="crowd.server.id">B9AN-B9AN-B9AN-B9AN</property> <property name="hibernate.c3p0.acquire_increment">1</property> <property name="hibernate.c3p0.idle_test_period">100</property> <property name="hibernate.c3p0.max_size">15</property> <property name="hibernate.c3p0.max_statements">0</property> <property name="hibernate.c3p0.min_size">0</property> <property name="hibernate.c3p0.timeout">30</property> <property name="hibernate.connection.driver_class">org.hsqldb.jdbcDriver</property> <property name="hibernate.connection.password"></property> <property name="hibernate.connection.url">jdbc:hsqldb:C:/data/crowd-home-15/database/defaultdb</property> <property name="hibernate.connection.username">sa</property> <property name="hibernate.dialect">org.hibernate.dialect.HSQLDialect</property> <property name="hibernate.setup">true</property> <property name="license">AAABGQ0ODAoPeNpdkF1LwzAUhu/plus-some-more-stuff</property> </properties></application-configuration>
crowd.properties
Crowd 3.0.0 and newer versions don't use the crowd.properties file any more. When upgrading from an older version, the required settings from your crowd.properties file will be migrated to the database, and the file will be renamed to . The crowd.properties.old crowd.properties file is still used by CrowdID, and other external integrations.
53

Documentation for Crowd 4.4 3
Created in 2021 by Atlassian. Licensed under a .Creative Commons Attribution 2.5 Australia License
plugins directory
The directory is a sub-directory of your Crowd shared directory. This directory will contain plugins that pluginsare not shipped with Crowd and that you have installed separately onto your Crowd instance.
backupsdirectory
The directory is a sub-directory of your Crowd shared directory. This is the default location of Crowd backupsbackups.
Installation directory
This is the directory into which the downloaded Crowd application has been unzipped during .installation
Important files in the Crowd installation directory:
crowd-init.properties filebuild.properties filebuild.xml filedatabase directory
crowd-init.properties file
This is where you specify your Crowd home directory (described ). You can set the location during above installat.ion
The file is located in the Crowd installation directory at {crowd-init.properties CROWD_INSTALL}.\crowd-webapp\WEB-INF\classes\crowd-init.properties
The file content looks something like this before it has been customized:
## You can specify your crowd.home property here or in your system environment variables.
# On Windows-based operating systems, uncomment the following # line and set crowd.home to a directory Crowd should use to # store its configuration.# NOTE: use forward slashes instead of backward slashes
#crowd.home=c:/data/crowd-home
# On Unix-based operating systems, uncomment the following# line and set crowd.home to a directory Crowd should use to # store its configuration.
#crowd.home=/var/crowd-home
build.properties file
This configuration file stores various deployment properties of Crowd and the . 'demo' application
The file is located at the root of your Crowd installation directory (described ).above
The default file will look similar to the following:build.properties
54

Documentation for Crowd 4.4 4
Created in 2021 by Atlassian. Licensed under a .Creative Commons Attribution 2.5 Australia License
# Modify the attributes of this file to quickly adjust the deployment values of Crowd.
# The Hibernate database dialect to use.hibernate.dialect=org.hibernate.dialect.HSQLDialect
# The Hibernate transaction factory to use.hibernate.transaction.factory_class=org.hibernate.transaction.JDBCTransactionFactory
# The http port you wish to run crowd from, ie: http://localhost:8095/crowdcrowd.tomcat.connector.port=8095
# Tomcat requires a unique port for shutdowncrowd.tomcat.shutdown.port=8020
# Crowd context rootcrowd.url=http://localhost:8095/crowd
# Demo context rootdemo.url=http://localhost:8095/demo
# OpenID server context rootopenidserver.url=http://localhost:8095/openidserver
Parameter Description
hibernate.dialect
This parameter controls the database dialect that the Hibernate persistence system will use when executing commands against your database server.
hibernate.transaction.factory_class
This parameter controls the transaction factory to use when executing transactions at run-time: Hibernate provides two generic options, additional application server specific options are available:
org.hibernate.transaction.JDBCTransactionFactory delegates to database (JDBC) transactions (default).org.hibernate.transaction.JTATransactionFactory delegates to JTA (if an existing transaction is under way, the work performed is done in that context. Otherwise a new transaction is started).
crowd.url The path and port for the root of the web-application.Crowd Administration Console
demo.url The path and port for the root of the web-applicationCrowd demo
openidserver.url
The path and port for the root of the web-applicationCrowdID
build.xml file
This is an Ant script that loads properties from the configuration file.build.properties
The file is located at the root of your Crowd installation directory (described ).above
If configuring Crowd and/or the demo application to run on a port and context path other than the default, you will need to run the command (or ) against the configuration file. This build.sh build.bat build.xmlprocess will then edit all of the necessary Crowd configuration files for your deployment.
The sample output from running will look similar to the following:build.xml
55

Documentation for Crowd 4.4 5
Created in 2021 by Atlassian. Licensed under a .Creative Commons Attribution 2.5 Australia License
shamid@mocha:~/atlassian-crowd-1.1.0$ ./build.shBuildfile: build.xml
init:
assistant: Changing Tomcat's connector port to 8095 Changing Tomcat's shutdown port to 8020Configuring the Crowd ConsoleCopying crowd.properties to: crowd-webapp/WEB-INF/classesCopying 1 file to /home/shamid/atlassian-crowd-1.1.0/crowd-webapp/WEB-INF/classesConfiguring the Crowd hibernate configurationUpdating the HibernateDialect and TransactionFactory in crowd-webapp/WEB-INF/classes/jdbc.propertiesUpdating property file: /home/shamid/atlassian-crowd-1.1.0/crowd-webapp/WEB-INF/classes/jdbc.propertiesConfiguring the demo applicationRenaming and copying demo.properties to: demo-webapp/WEB-INF/classes/crowd.propertiesCopying 1 file to /home/shamid/atlassian-crowd-1.1.0/demo-webapp/WEB-INF/classesConfiguring the OpenID server applicationRenaming and copying openidserver.properties to: crowd-openidserver-webapp/WEB-INF/classes/crowd.propertiesCopying 1 file to /home/shamid/atlassian-crowd-1.1.0/crowd-openidserver-webapp/WEB-INF/classesConfiguring the OpenID hibernate configurationUpdating the HibernateDialect and TransactionFactory in crowd-openidserver-webapp/WEB-INF/classes/jdbc.propertiesUpdating property file: /home/shamid/atlassian-crowd-1.1.0/crowd-openidserver-webapp/WEB-INF/classes/jdbc.properties
BUILD SUCCESSFULTotal time: 2 seconds
database directory
If you are using the embedded HSQL database, supplied for evaluation purposes, CrowdID will store its database in this directory (note however that the Crowd database will be in the Crowd home directory, not the installation directory.)
RELATED TOPICS
Finding the atlassian-crowd.log File
Supported PlatformsInstalling Crowd and CrowdIDRunning the Setup WizardConfiguring Crowd
56

DRAFT - .Important Directories and Files vCROWD_3.0This page contains information about the important directories and files to be aware of when configuring Crowd.
On this page:
Crowd Home DirectoryCrowd Shared Directory
crowd.cfg.xmlfileplugins directorybackups directory
Crowd Installation Directory
When configuring an application to work with Crowd, you will be interested in the .crowd.properties file
Crowd Home Directory
The Crowd Home directory is where Crowd will store its configuration information. If you are using the embedded HSQL database, supplied for evaluation purposes, Crowd will also store its database in this directory. (Note however that the CrowdID database will be in the Crowd Installation directory, not the Home directory.)
The location of this directory is specified in the file described . You can set crowd-init.properties belowthe location during .installation
Crowd's screen shows the location of your Crowd Home directory.System Information
Important files and directories in the Crowd Home directory, listed here and described below:
crowd.properties filebundled-plugins directorycaches directorydatabase directoryplugin-data directory
crowd.properties file
As of Crowd 3.0.0 the crowd.properties file is not used by the Crowd application itself. During the initial run the required setting from your crowd.properties file will be migrated to the database. The crowd.properties file is still used by CrowdID, and other external integrations
For more information, refer to the page about .the crowd.properties File
bundled-plugins directory
The directory is a sub-directory of your Crowd Home directory. It contains plugins which bundled-pluginsare shipped with your Crowd installation, such as:
The SAML integration plugin which provides the .Google Apps SSO featureThe plugins.Shared Access Layer (SAL)The plugin.REST moduleAnd more.
The plugins are a collection of jars generated when you install the Crowd web application. The jars are obtained by unzipping from {atlassian-bundled-plugins.zip CROWD_INSTALL}\crowd-webapp\WEB-
.INF\classes
caches directory
57

Documentation for Crowd 4.4 2
Created in 2021 by Atlassian. Licensed under a .Creative Commons Attribution 2.5 Australia License
The directory is a sub-directory of your Crowd Home directory. It contains various files that Crowd cachescaches to improve performance. The files in sub-directories of this directory are either created or updated generated when you install or restart the Crowd web application.
Do not modify or remove these files while Crowd is running. It should be safe for you to delete these files between application restarts.
It may improve Crowd's performance if you link this sub-directory to a fast disk.
database directory
If you are using the embedded HSQL database, supplied for evaluation purposes, Crowd will store its database in this directory. (Note however that the CrowdID database will be in the Crowd Installation directory, not the Crowd Home directory.)
plugin-data directory
The directory is a sub-directory of your Crowd Home directory. Plugins developed for Crowd plugin-data2.12 and older will store their data here. The directory will be created the first time a plugin needs it.
Crowd Shared Directory
This directory contains common data for all nodes in your Crowd installation. If you are using Crowd Data Center, this directory is expected to be a network share accessible from every node. If you are not using Crowd Data Center, this will be an ordinary local directory. By default it is located in the sub-directory of your sharedCrowd Home directory.
crowd.cfg.xmlfile
This file stores configuration information for the Crowd Administration Console application, including:
License informationServer IDDatabase configuration propertiesSetup phase reached.
The contents of this file is automatically generated when you run the .Crowd Setup Wizard
Here's an example of the content of , when the embedded HSQL database was specified at crowd.cfg.xmlsetup:
58
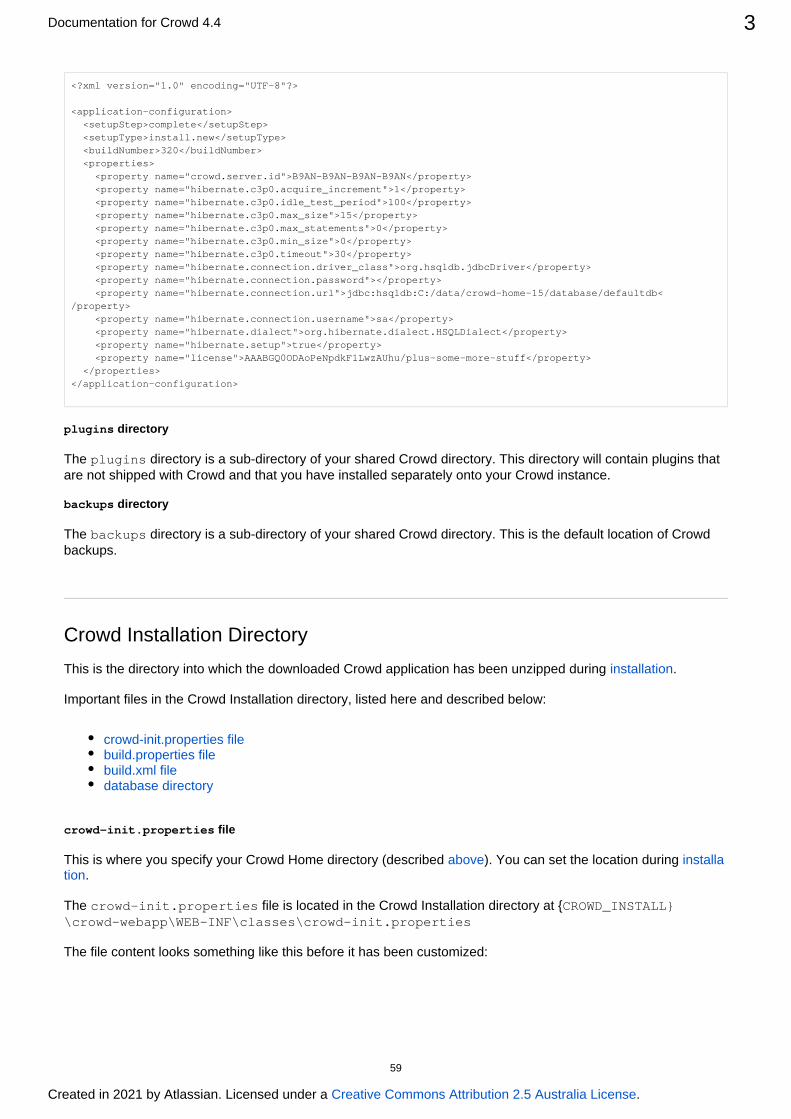
Documentation for Crowd 4.4 3
Created in 2021 by Atlassian. Licensed under a .Creative Commons Attribution 2.5 Australia License
<?xml version="1.0" encoding="UTF-8"?>
<application-configuration> <setupStep>complete</setupStep> <setupType>install.new</setupType> <buildNumber>320</buildNumber> <properties> <property name="crowd.server.id">B9AN-B9AN-B9AN-B9AN</property> <property name="hibernate.c3p0.acquire_increment">1</property> <property name="hibernate.c3p0.idle_test_period">100</property> <property name="hibernate.c3p0.max_size">15</property> <property name="hibernate.c3p0.max_statements">0</property> <property name="hibernate.c3p0.min_size">0</property> <property name="hibernate.c3p0.timeout">30</property> <property name="hibernate.connection.driver_class">org.hsqldb.jdbcDriver</property> <property name="hibernate.connection.password"></property> <property name="hibernate.connection.url">jdbc:hsqldb:C:/data/crowd-home-15/database/defaultdb</property> <property name="hibernate.connection.username">sa</property> <property name="hibernate.dialect">org.hibernate.dialect.HSQLDialect</property> <property name="hibernate.setup">true</property> <property name="license">AAABGQ0ODAoPeNpdkF1LwzAUhu/plus-some-more-stuff</property> </properties></application-configuration>
plugins directory
The directory is a sub-directory of your shared Crowd directory. This directory will contain plugins that pluginsare not shipped with Crowd and that you have installed separately onto your Crowd instance.
backups directory
The directory is a sub-directory of your shared Crowd directory. This is the default location of Crowd backupsbackups.
Crowd Installation Directory
This is the directory into which the downloaded Crowd application has been unzipped during .installation
Important files in the Crowd Installation directory, listed here and described below:
crowd-init.properties filebuild.properties filebuild.xml filedatabase directory
crowd-init.properties file
This is where you specify your Crowd Home directory (described ). You can set the location during above installa.tion
The file is located in the Crowd Installation directory at {crowd-init.properties CROWD_INSTALL}\crowd-webapp\WEB-INF\classes\crowd-init.properties
The file content looks something like this before it has been customized:
59
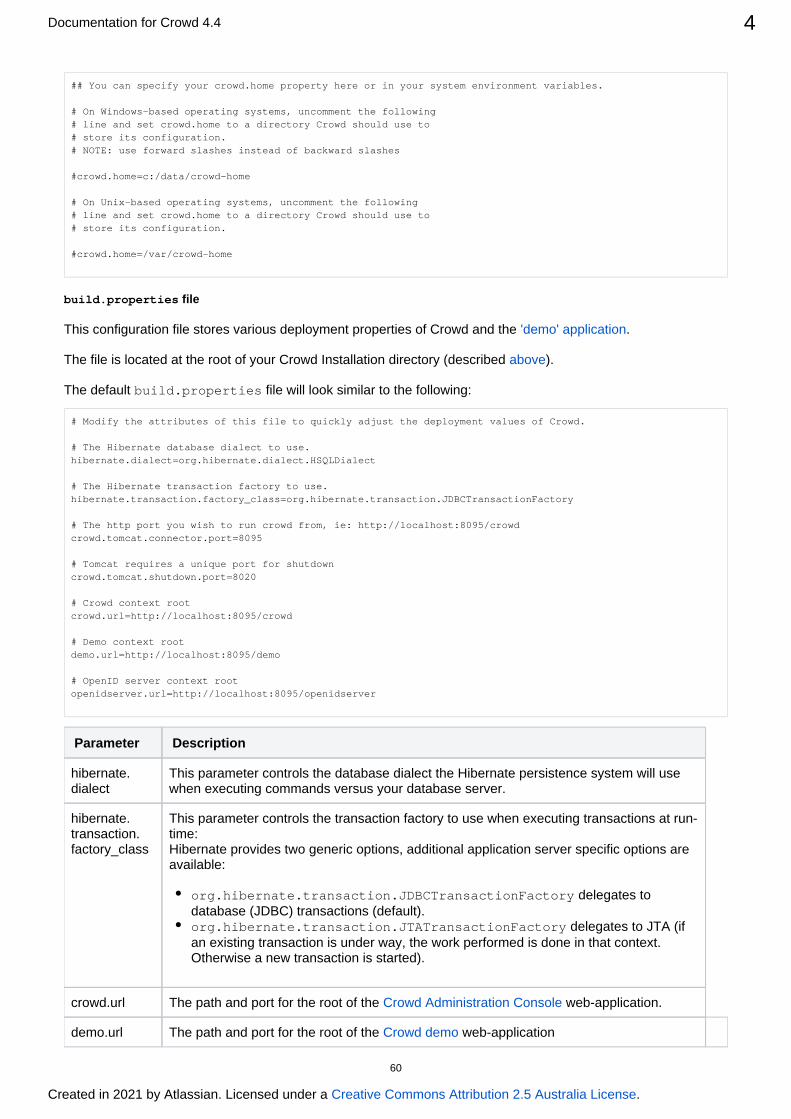
Documentation for Crowd 4.4 4
Created in 2021 by Atlassian. Licensed under a .Creative Commons Attribution 2.5 Australia License
## You can specify your crowd.home property here or in your system environment variables.
# On Windows-based operating systems, uncomment the following # line and set crowd.home to a directory Crowd should use to # store its configuration.# NOTE: use forward slashes instead of backward slashes
#crowd.home=c:/data/crowd-home
# On Unix-based operating systems, uncomment the following# line and set crowd.home to a directory Crowd should use to # store its configuration.
#crowd.home=/var/crowd-home
build.properties file
This configuration file stores various deployment properties of Crowd and the . 'demo' application
The file is located at the root of your Crowd Installation directory (described ).above
The default file will look similar to the following:build.properties
# Modify the attributes of this file to quickly adjust the deployment values of Crowd.
# The Hibernate database dialect to use.hibernate.dialect=org.hibernate.dialect.HSQLDialect
# The Hibernate transaction factory to use.hibernate.transaction.factory_class=org.hibernate.transaction.JDBCTransactionFactory
# The http port you wish to run crowd from, ie: http://localhost:8095/crowdcrowd.tomcat.connector.port=8095
# Tomcat requires a unique port for shutdowncrowd.tomcat.shutdown.port=8020
# Crowd context rootcrowd.url=http://localhost:8095/crowd
# Demo context rootdemo.url=http://localhost:8095/demo
# OpenID server context rootopenidserver.url=http://localhost:8095/openidserver
Parameter Description
hibernate.dialect
This parameter controls the database dialect the Hibernate persistence system will use when executing commands versus your database server.
hibernate.transaction.factory_class
This parameter controls the transaction factory to use when executing transactions at run-time: Hibernate provides two generic options, additional application server specific options are available:
org.hibernate.transaction.JDBCTransactionFactory delegates to database (JDBC) transactions (default).org.hibernate.transaction.JTATransactionFactory delegates to JTA (if an existing transaction is under way, the work performed is done in that context. Otherwise a new transaction is started).
crowd.url The path and port for the root of the web-application.Crowd Administration Console
demo.url The path and port for the root of the web-applicationCrowd demo
60
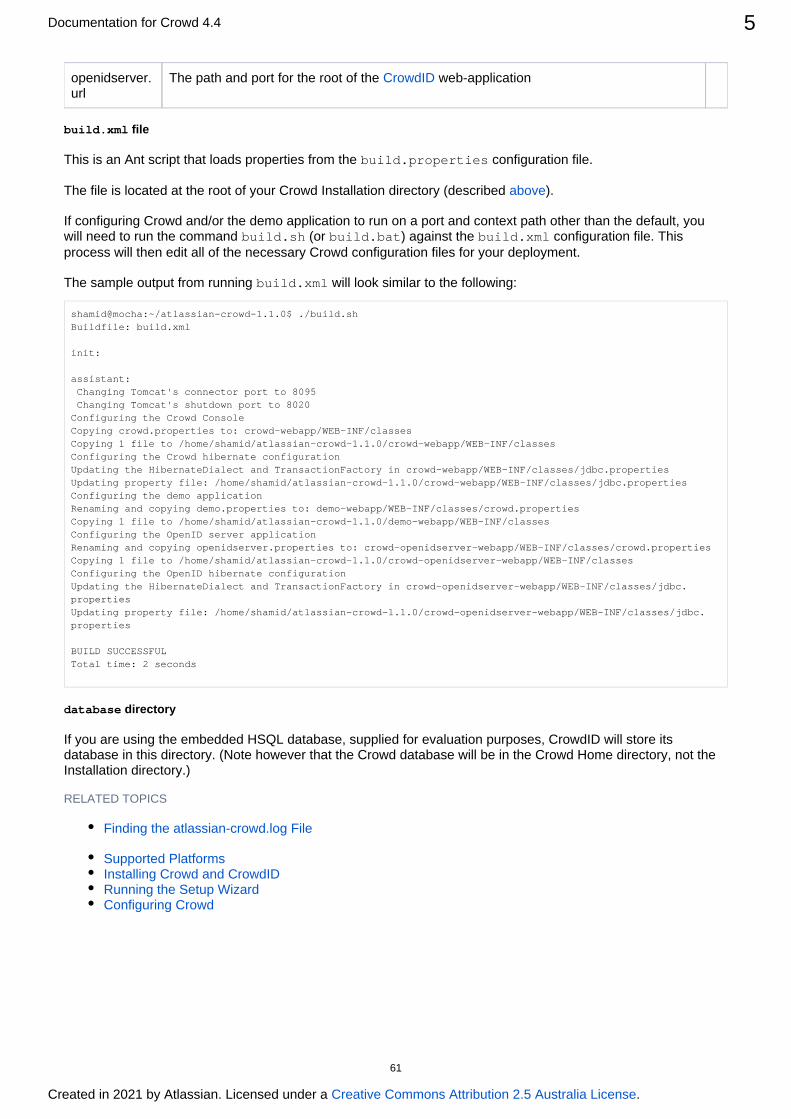
Documentation for Crowd 4.4 5
Created in 2021 by Atlassian. Licensed under a .Creative Commons Attribution 2.5 Australia License
openidserver.url
The path and port for the root of the web-applicationCrowdID
build.xml file
This is an Ant script that loads properties from the configuration file.build.properties
The file is located at the root of your Crowd Installation directory (described ).above
If configuring Crowd and/or the demo application to run on a port and context path other than the default, you will need to run the command (or ) against the configuration file. This build.sh build.bat build.xmlprocess will then edit all of the necessary Crowd configuration files for your deployment.
The sample output from running will look similar to the following:build.xml
shamid@mocha:~/atlassian-crowd-1.1.0$ ./build.shBuildfile: build.xml
init:
assistant: Changing Tomcat's connector port to 8095 Changing Tomcat's shutdown port to 8020Configuring the Crowd ConsoleCopying crowd.properties to: crowd-webapp/WEB-INF/classesCopying 1 file to /home/shamid/atlassian-crowd-1.1.0/crowd-webapp/WEB-INF/classesConfiguring the Crowd hibernate configurationUpdating the HibernateDialect and TransactionFactory in crowd-webapp/WEB-INF/classes/jdbc.propertiesUpdating property file: /home/shamid/atlassian-crowd-1.1.0/crowd-webapp/WEB-INF/classes/jdbc.propertiesConfiguring the demo applicationRenaming and copying demo.properties to: demo-webapp/WEB-INF/classes/crowd.propertiesCopying 1 file to /home/shamid/atlassian-crowd-1.1.0/demo-webapp/WEB-INF/classesConfiguring the OpenID server applicationRenaming and copying openidserver.properties to: crowd-openidserver-webapp/WEB-INF/classes/crowd.propertiesCopying 1 file to /home/shamid/atlassian-crowd-1.1.0/crowd-openidserver-webapp/WEB-INF/classesConfiguring the OpenID hibernate configurationUpdating the HibernateDialect and TransactionFactory in crowd-openidserver-webapp/WEB-INF/classes/jdbc.propertiesUpdating property file: /home/shamid/atlassian-crowd-1.1.0/crowd-openidserver-webapp/WEB-INF/classes/jdbc.properties
BUILD SUCCESSFULTotal time: 2 seconds
database directory
If you are using the embedded HSQL database, supplied for evaluation purposes, CrowdID will store its database in this directory. (Note however that the Crowd database will be in the Crowd Home directory, not the Installation directory.)
RELATED TOPICS
Finding the atlassian-crowd.log File
Supported PlatformsInstalling Crowd and CrowdIDRunning the Setup WizardConfiguring Crowd
61
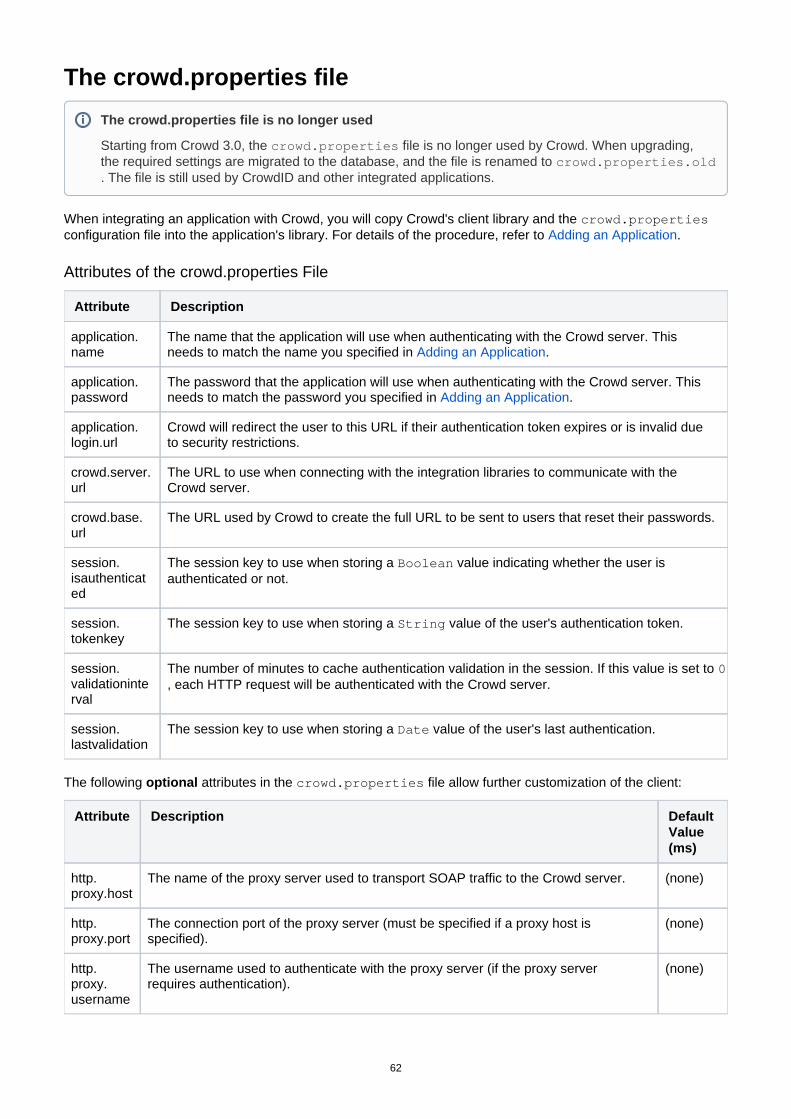
The crowd.properties file
When integrating an application with Crowd, you will copy Crowd's client library and the crowd.propertiesconfiguration file into the application's library. For details of the procedure, refer to .Adding an Application
Attributes of the crowd.properties File
Attribute Description
application.name
The name that the application will use when authenticating with the Crowd server. This needs to match the name you specified in .Adding an Application
application.password
The password that the application will use when authenticating with the Crowd server. This needs to match the password you specified in .Adding an Application
application.login.url
Crowd will redirect the user to this URL if their authentication token expires or is invalid due to security restrictions.
crowd.server.url
The URL to use when connecting with the integration libraries to communicate with the Crowd server.
crowd.base.url
The URL used by Crowd to create the full URL to be sent to users that reset their passwords.
session.isauthenticated
The session key to use when storing a value indicating whether the user is Booleanauthenticated or not.
session.tokenkey
The session key to use when storing a value of the user's authentication token.String
session.validationinterval
The number of minutes to cache authentication validation in the session. If this value is set to 0, each HTTP request will be authenticated with the Crowd server.
session.lastvalidation
The session key to use when storing a value of the user's last authentication.Date
The following attributes in the file allow further customization of the client:optional crowd.properties
Attribute Description Default Value (ms)
http.proxy.host
The name of the proxy server used to transport SOAP traffic to the Crowd server. (none)
http.proxy.port
The connection port of the proxy server (must be specified if a proxy host is specified).
(none)
http.proxy.username
The username used to authenticate with the proxy server (if the proxy server requires authentication).
(none)
The crowd.properties file is no longer used
Starting from Crowd 3.0, the file is no longer used by Crowd. When upgrading, crowd.propertiesthe required settings are migrated to the database, and the file is renamed to crowd.properties.old. The file is still used by CrowdID and other integrated applications.
62

Documentation for Crowd 4.4 2
Created in 2021 by Atlassian. Licensed under a .Creative Commons Attribution 2.5 Australia License
http.proxy.password
The password used to authenticate with the proxy server (if the proxy server requires authentication).
(none)
http.max.connections
The maximum number of HTTP connections in the connection pool for communication with the Crowd server.
20
http.timeout
The HTTP connection timeout (milliseconds) used for communication with the Crowd server. A value of zero indicates that there is no connection timeout.
5000
cookie.domain
A domain to use when setting cookies, overriding the SSO Domain set in Crowd (since Crowd 2.5.2).
When an SSO Domain is set in Crowd, all client applications must be in the same domain so cookies can be shared.
A Crowd deployment may have hosts with no common domain suffix, for example 'domain.example.com' and 'domain.internal'. Even though a user has already logged in to 'domain.example.com' and has a cookie set, applications running under 'domain.internal' will not receive this cookie since the domains differ, and users will be unable to log in.
Set this property in the crowd client application to override the domain. Applications within the same domain will then be able to share SSO sessions.
(none)
cookie.tokenkey
When using Crowd for single sign-on (SSO), you can specify the SSO cookie name for each application. Under the standard configuration, Crowd will use a single, default cookie name for all Crowd-connected applications. You can override the default with your own cookie name. As well as allowing you to define the SSO cookie name, this feature also allows you to divide your applications into different SSO groups. For example, you might use one SSO token for your public websites and another for your internal websites.
crowd.token_key
socket.timeout
The socket timeout in milliseconds. You may wish to override the default value if the .latency to the Crowd server is high
20000
Passing crowd.properties as an Environment Variable
You can pass the location of a client application's file to the client application as an crowd.propertiesenvironment variable when starting the client application. This means that you can choose a suitable location for the file, instead of putting it in the client application's directory.crowd.properties WEB-INF/classes
Example:
-Dcrowd.properties={FILE-PATH}/crowd.properties
RELATED TOPICS
Passing the crowd.properties File as an Environment VariableImportant directories and filesAdding an Application
63

1.
2. a.
b.
c.
d.
3. 4.
Changing the Port that Crowd usesBy default, Crowd is configured to use port 8095. If this port is already in use within your network, you will need to change the port that Crowd uses.
Follow these steps:
Change the Ports which Crowd Listens On
Default <Crowd-Installation>/apache-tomcat/conf/server.xml file
<Server port="8020" shutdown="SHUTDOWN">
<Service name="Catalina">
<Connector acceptCount="100" connectionTimeout="20000" disableUploadTimeout="true" enableLookups="false" maxHttpHeaderSize="8192" maxThreads="150" minSpareThreads="25" port="8095" redirectPort="8443" useBodyEncodingForURI="true" URIEncoding="UTF-8"/>...
Modified <Crowd-Installation>/apache-tomcat/conf/server.xml file - using server port 8021 and connector port 8093
<Server port="8021" shutdown="SHUTDOWN">
<Service name="Catalina">
<Connector acceptCount="100" connectionTimeout="20000" disableUploadTimeout="true" enableLookups="false" maxHttpHeaderSize="8192" maxThreads="150" minSpareThreads="25" port="8093" redirectPort="8443" useBodyEncodingForURI="true" URIEncoding="UTF-8"/>...
Edit the file, as described in .build.properties Important Directories and FilesChange the to the new port on which the crowd.tomcat.connector.port Crowd
will be accessed.Administration ConsoleChange the property to the new port on which the will crowd.url Crowd Administration Consolebe accessed.Change the property to the new port on which the will be demo.url Crowd 'demo' applicationaccessed.Change the property to the new port on which the will be openidserver.url CrowdID Serveraccessed.
Run the (or ) script, as described in .build.sh build.bat Important Directories and FilesChange your Crowd Server Base URL to reflect the port changes as per outlined in ourHow To Change
KB.The Crowd Base URL
RELATED TOPICS
Supported PlatformsSetting JAVA_HOMEEnd of support announcements for Crowd
Installing Crowd and CrowdIDConnecting Crowd to a Database
HSQLDBMS SQL ServerMySQLOraclePostgreSQL
Connecting CrowdID to a DatabaseHSQLDB for CrowdIDMS SQL Server for CrowdIDMySQL for CrowdID
e.g. in this case, the updated Crowd's Server Base URL would be http://localhost:8093
64

Documentation for Crowd 4.4 2
Created in 2021 by Atlassian. Licensed under a .Creative Commons Attribution 2.5 Australia License
Oracle for CrowdIDPostgreSQL for CrowdID
Specifying your Crowd Home DirectoryRunning the Setup Wizard
Troubleshooting your Configuration on SetupConfiguring Crowd
Important directories and filesDRAFT - .Important Directories and Files vCROWD_3.0The crowd.properties file
Changing the Port that Crowd usesConfiguring Crowd to Work with SSLInstalling Crowd as a Windows Service
Specifying Startup Order of Windows ServicesChanging the User for the Crowd Windows ServiceRemoving the Crowd Windows ServiceTroubleshooting Crowd as a Windows Service
Setting Crowd to Start Automatically on Mac OS XSetting Crowd to Run Automatically and Use an Unprivileged System User on UNIX
65
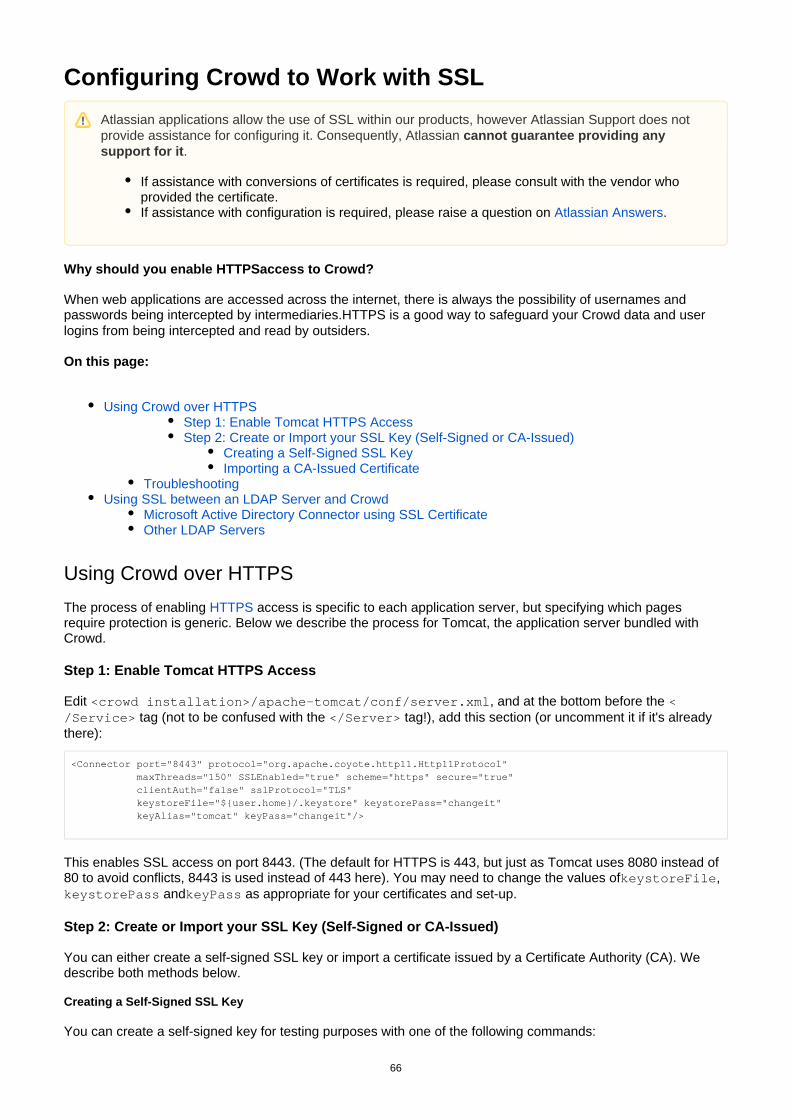
Configuring Crowd to Work with SSL
Why should you enable HTTPSaccess to Crowd?
When web applications are accessed across the internet, there is always the possibility of usernames and passwords being intercepted by intermediaries.HTTPS is a good way to safeguard your Crowd data and user logins from being intercepted and read by outsiders.
On this page:
Using Crowd over HTTPSStep 1: Enable Tomcat HTTPS AccessStep 2: Create or Import your SSL Key (Self-Signed or CA-Issued)
Creating a Self-Signed SSL KeyImporting a CA-Issued Certificate
TroubleshootingUsing SSL between an LDAP Server and Crowd
Microsoft Active Directory Connector using SSL CertificateOther LDAP Servers
Using Crowd over HTTPS
The process of enabling access is specific to each application server, but specifying which pages HTTPSrequire protection is generic. Below we describe the process for Tomcat, the application server bundled with Crowd.
Step 1: Enable Tomcat HTTPS Access
Edit , and at the bottom before the <crowd installation>/apache-tomcat/conf/server.xml < tag (not to be confused with the tag!), add this section (or uncomment it if it's already /Service> </Server>
there):
<Connector port="8443" protocol="org.apache.coyote.http11.Http11Protocol" maxThreads="150" SSLEnabled="true" scheme="https" secure="true" clientAuth="false" sslProtocol="TLS" keystoreFile="${user.home}/.keystore" keystorePass="changeit" keyAlias="tomcat" keyPass="changeit"/>
This enables SSL access on port 8443. (The default for HTTPS is 443, but just as Tomcat uses 8080 instead of 80 to avoid conflicts, 8443 is used instead of 443 here). You may need to change the values of ,keystoreFile
and as appropriate for your certificates and set-up.keystorePass keyPass
Step 2: Create or Import your SSL Key (Self-Signed or CA-Issued)
You can either create a self-signed SSL key or import a certificate issued by a Certificate Authority (CA). We describe both methods below.
Creating a Self-Signed SSL Key
You can create a self-signed key for testing purposes with one of the following commands:
Atlassian applications allow the use of SSL within our products, however Atlassian Support does not provide assistance for configuring it. Consequently, Atlassian cannot guarantee providing any
.support for it
If assistance with conversions of certificates is required, please consult with the vendor who provided the certificate.If assistance with configuration is required, please raise a question on .Atlassian Answers
66

Documentation for Crowd 4.4 2
Created in 2021 by Atlassian. Licensed under a .Creative Commons Attribution 2.5 Australia License
1. 2.
1.
2.
%JAVA_HOME%\bin\keytool -genkey -alias tomcat -keyalg RSA (Windows)$JAVA_HOME/bin/keytool -genkey -alias tomcat -keyalg RSA (Unix / Mac OS)
When you are asked for your "first and last name", instead supply the hostname for the Crowd server, e.g.:
What is your first and last name? [Unknown]: localhost
The keytool utility will prompt you for two passwords: the keystore password and the key password for Tomcat. You can use either of:
'changeit' (this is the default value Tomcat expects), orAny value other than 'changeit', and you must also specify it as the value of in keystorePass conf
./server.xml
You will then need to import your certificate into the truststore:
First, export the key you generated to a file:
$JAVA_HOME/bin/keytool -export -alias tomcat -file tomcat.cert
Import the key into the JRE keystore (you will need permission to write to the keystore specified, and may need elevated privileges):
$JAVA_HOME/bin/keytool -import -alias tomcat -file tomcat.cert -keystore $JAVA_HOME/jre/lib/security/cacerts
For information on adding a key pair issued by a Certificate Authority (CA), refer to the Apache Tomcat .documentation
Importing a CA-Issued Certificate
When using certificates issued by a Certificate Authority, you also need to import the certificate using the keyto command, rather than generating a self-signed key.ol
Here is an example of the command:
keytool -import -alias tomcat -file certificate.cer -keystore some/path/to/file -storepass something.secure
The is your certificate and the is an optional destination, but it will guarantee that you know -file -keystorewhere your keystore is. By default, the keystore is placed in your user home directory. You can refer to the following Oracle documentation for more information on the keytool:
Solaris and LinuxWindows
Now edit the file as described in section 'Edit the Tomcat Configuration File' in the server.xml Apache . Basically, you'll need to add the and to the SSL Tomcat documentation keystoreFile keystorePass
Connector definition to match your keystore settings.
Now start (or restart) your Crowd instance. You should be able to access Crowd at this URL:
67

Documentation for Crowd 4.4 3
Created in 2021 by Atlassian. Licensed under a .Creative Commons Attribution 2.5 Australia License
https://localhost:8443/crowd/console
Troubleshooting
Here are some troubleshooting tips if you are using a self-signed key created by keytool, as described above.
When you enter 'https://localhost:8443' in your browser, if you get a message such as 'Cannot establish a connection to the server at localhost:8443', look for error messages in your log file. Here logs/catalina.outare some possible errors with explanations:
Can't Find the Keystore
java.io.FileNotFoundException: /home/<username>/.keystore (No such file or directory)
This indicates that Tomcat cannot find the keystore. The keytool utility creates the keystore as a file called . in the current user's home directory. For Unix/Linux the home directory is likely to be keystore /home
. For Windows it is likely to be ./<username> C:\Documents And Settings\<UserName>
Make sure you are running Crowd as the same user who created the keystore. If this is not the case, or if you are running Crowd on Windows as a service, you will need to specify where the keystore file is in conf
. Add the following attribute to the connector tag you uncommented: /server.xml keystoreFile="<location of keystore file>"
Incorrect Password
java.io.IOException: Keystore was tampered with, or password was incorrect
You used a different password than 'changeit'. You must either use 'changeit' for both the keystore password and for the key password for Tomcat, or if you want to use a different password, you must specify it using the ke
attribute of the Connector tag, as described above.ystorePass
Passwords don't Match
java.io.IOException: Cannot recover key
You specified a different value for the keystore password and the key password for Tomcat. Both passwords must be the same.
To find out more about the options that Tomcat offers, please take a look at the .Apache Tomcat documentation
Using SSL between an LDAP Server and Crowd
Microsoft Active Directory Connector using SSL Certificate
Please refer to .Configuring an SSL Certificate for Microsoft Active Directory
Other LDAP Servers
For other LDAP servers, please consult your LDAP server documentation.
On the Crowd side, when , you will have to simply check the ' ' configuring the connector properties Secure SSLbox and make sure you use the correct port in the ' ' field (usually 636).URL
RELATED TOPICS
Configuring an SSL Certificate for Microsoft Active DirectoryConfiguring Crowd
68
1.
2.
3.
4.
5.
Installing Crowd as a Windows Service
For long-term use, you should configure Crowd to restart automatically when the operating system restarts. For Windows servers, this means configuring Crowd to run as a Windows service.
Running Crowd as a Windows service has other advantages. When Crowd is started manually, a console window opens - there is a risk that someone may accidentally shut down Crowd by closing the window. Also, the Crowd logs are properly managed by the Windows service (reliably found in in \atlassian-crowd.logthe root Crowd directory, and rotated by file size).
Installing Crowd as a Windows Service
Open a DOS Command prompt as Administrator (search for "cmd" in the start menu/screen, right click and "Run as Administrator").'cd' to your Crowd directory, and then the Tomcat subdirectory, e.g. {bin CROWD_INSTALL}\apache-tomcat\binIf a directory in the path has spaces (e.g. ), please convert it to its eight-C:\Program Files\..character equivalent (e.g. ).c:\Progra~1\..Ensure the variable is set to the JDK base directory. Use to confirm JAVA_HOME echo %JAVA_HOME%this.Run the following command:
service.bat install Crowd
If you are trying to set up Crowd as a Windows Service on a 64 bit machine, you should ensure that Crowd uses 64-bit Tomcat binaries. See the for more details.Crowd installation guide
69
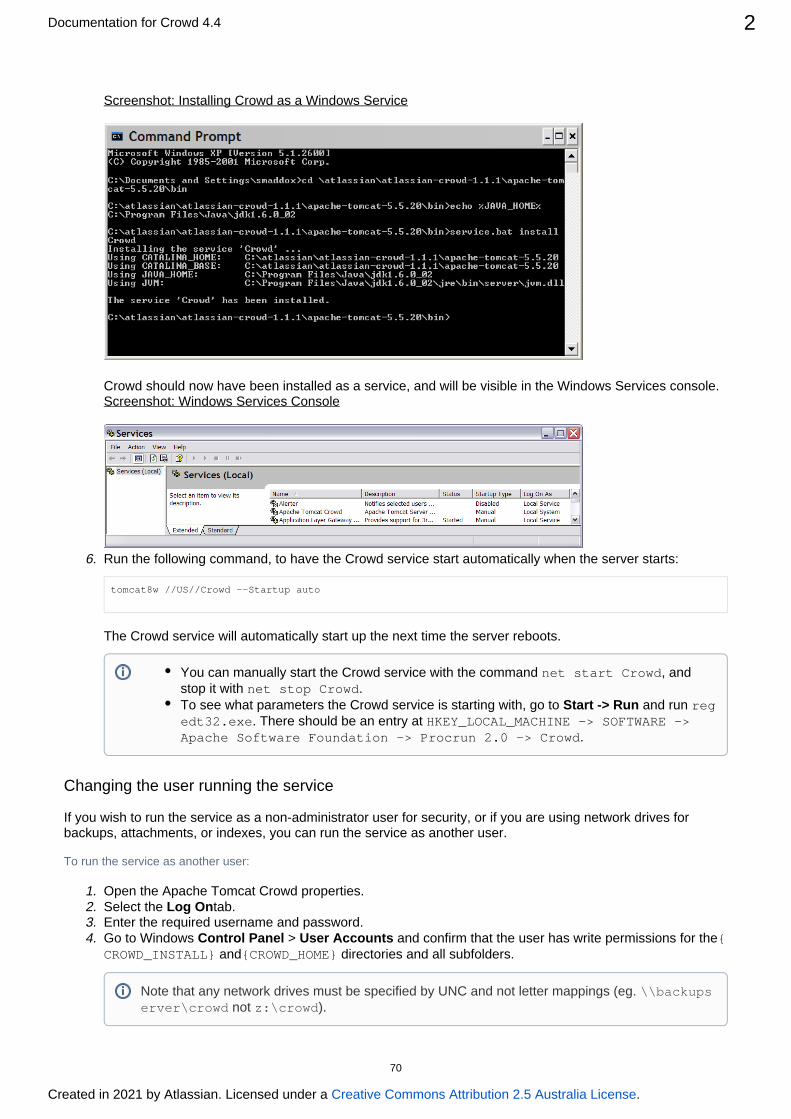
Documentation for Crowd 4.4 2
Created in 2021 by Atlassian. Licensed under a .Creative Commons Attribution 2.5 Australia License
5.
6.
1. 2. 3. 4.
Screenshot: Installing Crowd as a Windows Service
Crowd should now have been installed as a service, and will be visible in the Windows Services console.Screenshot: Windows Services Console
Run the following command, to have the Crowd service start automatically when the server starts:
tomcat8w //US//Crowd --Startup auto
The Crowd service will automatically start up the next time the server reboots.
Changing the user running the service
If you wish to run the service as a non-administrator user for security, or if you are using network drives for backups, attachments, or indexes, you can run the service as another user.
To run the service as another user:
Open the Apache Tomcat Crowd properties.Select the tab.Log OnEnter the required username and password.Go to Windows > and confirm that the user has write permissions for theControl Panel User Accounts {
and directories and all subfolders.CROWD_INSTALL} {CROWD_HOME}
You can manually start the Crowd service with the command , and net start Crowdstop it with .net stop CrowdTo see what parameters the Crowd service is starting with, go to and run Start -> Run reg
. There should be an entry at edt32.exe HKEY_LOCAL_MACHINE -> SOFTWARE -> .Apache Software Foundation -> Procrun 2.0 -> Crowd
Note that any network drives must be specified by UNC and not letter mappings (eg. \\backups not ).erver\crowd z:\crowd
70

Documentation for Crowd 4.4 3
Created in 2021 by Atlassian. Licensed under a .Creative Commons Attribution 2.5 Australia License
1. 2.
Additional Crowd Setup Options (Optional)
To increase the maximum memory Crowd can use (the default will be 256MB), run:
tomcat8w //US//Crowd --JvmMx 512
If you are running Crowd with Jira and/or Confluence in the same JVM, increase the MaxPermSize to 512 MB:
tomcat8w //US//Crowd ++JvmOptions="-XX:MaxPermSize=512m"
Occasionally, it may be useful to view Crowd's Garbage Collection information. This is especially true when investigating memory issues.
To turn on the Verbose GC (garbage collection) logging, execute the following command in the command prompt
tomcat8w //US//Crowd ++JvmOptions="-Xloggc:path\to\logs\atlassian-gc.log"
The path (denoted by \path\to) refers to the directory in which Crowd is currently installed. For example:
tomcat8w //US//Crowd ++JvmOptions="-Xloggc:c:\crowdinstall\logs\atlassian-gc.log"
In order to check all the configurations for the service, you can access:
HKEY_LOCAL_MACHINE -> SOFTWARE -> Apache Software Foundation -> Procrun 2.0 -> Crowd -> Parameters -> Java -> Options
If you are using HSQL as your database server: after installing Crowd as a Windows service, you will need to copy your database files.
Create a folder called c:\windows\system32\databaseCopy over the database files from your .atlassian-crowd-1.1.2/database
We recommend strongly that you use an external database server rather than the HSQL database supplied with Crowd for evaluation purposes.
RELATED TOPICS
Specifying Startup Order of Windows ServicesChanging the User for the Crowd Windows ServiceRemoving the Crowd Windows ServiceTroubleshooting Crowd as a Windows Service
Refer to the for further service options.Tomcat documentation
71
Specifying Startup Order of Windows ServicesThis page is relevant if you have .installed Crowd as a Windows service
If you have multiple Windows services that depend on each other, it is important that they are started in the correct order. For example, if you are running both and Crowd, it is important to start Crowd first, so that JiraCrowd is running before people try to login to JIRA.
For information about specifying the startup order for multiple services, please refer to http://support.microsoft..com/kb/193888
Related Topics
Specifying Startup Order of Windows ServicesChanging the User for the Crowd Windows ServiceRemoving the Crowd Windows ServiceTroubleshooting Crowd as a Windows Service
Installing Crowd as a Windows Service
72

1. 2. 3.
Changing the User for the Crowd Windows ServiceThis page is relevant if you have . You may want to change the user installed Crowd as a Windows serviceunder which the Crowd Windows service is running, for security reasons.
Changing the Windows User for the Crowd Service
Navigate to the service: -> -> .Control Panel Administrative Tools ServicesLocate the ' ' service, right-click and view the ' '.Apache Tomcat Crowd PropertiesGo to the ' ' tab and change the user as desired. Log OnScreenshot: Changing the User for the Windows Service
RELATED TOPICSSpecifying Startup Order of Windows ServicesChanging the User for the Crowd Windows ServiceRemoving the Crowd Windows ServiceTroubleshooting Crowd as a Windows Service
Installing Crowd as a Windows Service
73

1. 2.
3.
Removing the Crowd Windows ServiceThis page is relevant if you have installed Crowd as a Windows service
To remove the Crowd Windows service:
Open a DOS prompt.'cd' to your Crowd directory, and then the Tomcat subdirectory, e.g. {bin CROWD_INSTALL}\apache-tomcat-5.5.20\binRun one of the following commands:
Either:
service.bat remove Crowd
Or if the above does not work, use
tomcat5 //DS//Crowd
RELATED TOPICSSpecifying Startup Order of Windows ServicesChanging the User for the Crowd Windows ServiceRemoving the Crowd Windows ServiceTroubleshooting Crowd as a Windows Service
Installing Crowd as a Windows Service
74

Troubleshooting Crowd as a Windows ServiceThis page is relevant if you have .installed Crowd as a Windows service
Problem with JDK 6
Problems may occur when trying to set up Crowd to run as a Windows service with JDK 1.6. The problem is caused by a failure to locate , which can be found in your . There are two MSVCR71.DLL %JAVA_HOME%/binoptions to resolve this problem:
Add to , then restart the server.%JAVA_HOME%/bin PATHOr copy to system path: either or MSVCR71.DLL C:\WINDOWS\SYSTEM32 C:\WINNT\SYSTEM32
Please refer to our if you need more details of this issue.Knowledge Base article
Notes for Windows 64-bit Operating Systems
If you are running 64-bit Windows, please note that Apache Tomcat cannot run as a Windows service if you are using a 64-bit JDK. This is the recommended solution.Please ensure that you are using a 32-bit JDK.
Alternatively, you can install a and set JAVA_HOME to its location. Then follow the same steps 64-bit JDKabove for . You'll need to replace {Installing Crowd as a Windows Service CROWD_INSTALL}\apache-tomcat-
with one compiled for 64-bit from these locations:5.5.20\bin\tomcat.exe
http://svn.apache.org/viewvc/tomcat/tc5.5.x/tags/TOMCAT_5_5_24/connectors/procrun/bin/http://svn.apache.org/viewvc/tomcat/tc6.0.x/tags/TOMCAT_6_0_16/res/procrun/
RELATED TOPICSSpecifying Startup Order of Windows ServicesChanging the User for the Crowd Windows ServiceRemoving the Crowd Windows ServiceTroubleshooting Crowd as a Windows Service
Installing Crowd as a Windows Service
75

Setting Crowd to Start Automatically on Mac OS XFor long-term use, you should configure Crowd to restart automatically when the operating system restarts. On Mac OS X, the system startup program called manages long running processes daemons or services.launchd
Apple provides an . Below we tell you how to use launchd to start Crowd automatically on introduction to launchdMac OS X when running Tomcat.
On this page:
Using launchd with TomcatStep 1. Add a Wrapper Shell ScriptStep 2. Add a launchd Property ListStarting and Stopping Crowd ManuallyTroubleshooting
Using launchd with Tomcat
The Crowd distribution (not EAR-WAR) ships with Tomcat. There is a mismatch between how launchd expects a daemon to behave, and how the default startup scripts for Tomcat operate:
OS X's launchd expects the process it starts to run forever, but ' ' starts the JVM to catalina.sh startrun Tomcat and then exits.Tomcat provides ' ' to shut down Tomcat cleanly by connecting to a socket which catalina.sh stopTomcat listens on, but launchd stops daemons by sending them a signal that kills the process immediately if no specific handling is included.
You will need a wrapper shell script and properties list to make launchd work with Tomcat.
Step 1. Add a Wrapper Shell Script
Add the following wrapper shell script to :$CATALINA_HOME/bin
launchd_wrapper.sh
#!/bin/bash
function shutdown(){ date echo "Shutting down Crowd" $CATALINA_HOME/bin/catalina.sh stop}
dateecho "Starting Crowd"export CATALINA_PID=/tmp/$$
# Uncomment to increase Tomcat's maximum heap allocation# export JAVA_OPTS=-Xmx512M $JAVA_OPTS
. $CATALINA_HOME/bin/catalina.sh start
# Allow any signal that would kill a process to stop Tomcattrap shutdown HUP INT QUIT ABRT KILL ALRM TERM TSTP
echo "Waiting for `cat $CATALINA_PID`"wait `cat $CATALINA_PID`
The above shell script starts Tomcat and then waits for the process to complete, so launchd is happy that Tomcat is still running. The script also installs a signal handler, which calls the function to cleanly shutdown()shut down Tomcat when launchd signals the script.
76

Documentation for Crowd 4.4 2
Created in 2021 by Atlassian. Licensed under a .Creative Commons Attribution 2.5 Australia License
1.
2.
3.
You can try this script manually: Start the script, watch Crowd start, and then type and see Crowd shut ctrl-Cdown cleanly. (Note that it will shut down cleanly if Tomcat has not started yet. It takes a few seconds for notTomcat to start listening on the shutdown socket.)
Step 2. Add a launchd Property List
The launchd property list ( ) tells launchd how to start Tomcat..plist
Add the following plist file to , which is the location for system-wide services which /Library/LaunchDaemonsare not part of base OS X:
crowd.plist
<?xml version="1.0" encoding="UTF-8"?><!DOCTYPE plist PUBLIC "-//Apple Computer//DTD PLIST 1.0//EN" "http://www.apple.com/DTDs/PropertyList-1.0.dtd"><plist version="1.0"><dict> <key>Disabled</key> <false/> <key>EnvironmentVariables</key> <dict> <key>CATALINA_HOME</key> <string>/Users/myname/conf/crowd-x.x.x</string> <key>JAVA_HOME</key> <string>/Library/Java/Home</string> </dict> <key>Label</key> <string>com.atlassian.crowd</string> <key>OnDemand</key> <false/> <key>ProgramArguments</key> <array> <string>/Users/myname/conf/crowd-x.x.x/bin/launchd_wrapper.sh</string> </array> <key>RunAtLoad</key> <true/> <key>ServiceDescription</key> <string>Crowd</string> <key>StandardErrorPath</key> <string>/Users/myname/conf/crowd-x.x.x/logs/launchd.stderr</string> <key>StandardOutPath</key> <string>/Users/myname/conf/crowd-x.x.x/logs/launchd.stdout</string> <key>UserName</key> <string>root</string></dict></plist>
Notes:
Replace ' ' with the path to your Crowd installation. The string /Users/myname/conf/crowd-x.x.xoccurs four times in the above script.JAVA_HOME is set to use the default JDK. On OS X version 10.4.4, the default JDK is 1.4.2. You will need to change this value if you want to use a different version of Java. For example, if you want to use JDK 1.5, you will need to change JAVA_HOME to /System/Library/Frameworks/JavaVM.
.framework/Versions/1.5In the above script, we have specified ' ' as the . If necessary, change the UserName to root UserNamethe user you want Tomcat to run as.
Starting and Stopping Crowd Manually
To start and stop Crowd manually, use the following commands:
Start:cd /Library/LaunchDaemonssudo launchctl load -w crowd.plist
77

Documentation for Crowd 4.4 3
Created in 2021 by Atlassian. Licensed under a .Creative Commons Attribution 2.5 Australia License
Stop:cd /Library/LaunchDaemonssudo launchctl unload -w crowd.plist
Troubleshooting
Make sure both files and have the necessary file privileges.launch_wrapper.sh crowd.plistCheck the console logging and log file for any abnormalities.
RELATED TOPICS
Configuring Crowd
78

1.
Setting Crowd to Run Automatically and Use an Unprivileged System User on UNIXThis page contains some useful information about running Crowd under Linux/UNIX:
Dedicated system user. For security reasons, and to keep your system administrator happy, you should probably create a dedicated non-root user to run Crowd.Automatic startup. It is useful to set up Crowd to run automatically on UNIX startup.
Running Crowd as an Unprivileged User
Here is an example of some of the changes you can make to the directory and file permissions for harden upCrowd to run as a non-root user.
You will need to update the environment variables to suit your installation. This is also for use in BASH. If you are using a different shell, you might need to tweak some things.
#!/bin/bashCROWD_USER="crowd"CROWD_GROUP="crowd"INSTALL_BASE="/opt/crowd/atlassian-crowd-3.5.1"CROWD_HOME="/var/crowd-home"sudo chgrp ${CROWD_GROUP} ${INSTALL_BASE}/{*.sh,apache-tomcat/bin/*.sh}sudo chmod g+x ${INSTALL_BASE}/{*.sh,apache-tomcat/bin/*.sh}sudo chown -R ${CROWD_USER} ${CROWD_HOME} ${INSTALL_BASE}/apache-tomcat/{logs,work,temp}sudo touch -a ${INSTALL_BASE}/atlassian-crowd-openid-server.logsudo mkdir ${INSTALL_BASE}/databasesudo chown -R ${CROWD_USER} ${INSTALL_BASE}/{database,atlassian-crowd-openid-server.log}
Getting Crowd to Start Automatically
Create an (for example, 'crowd.init.d') inside your { } directory:init.d file CROWD_INSTALL
79
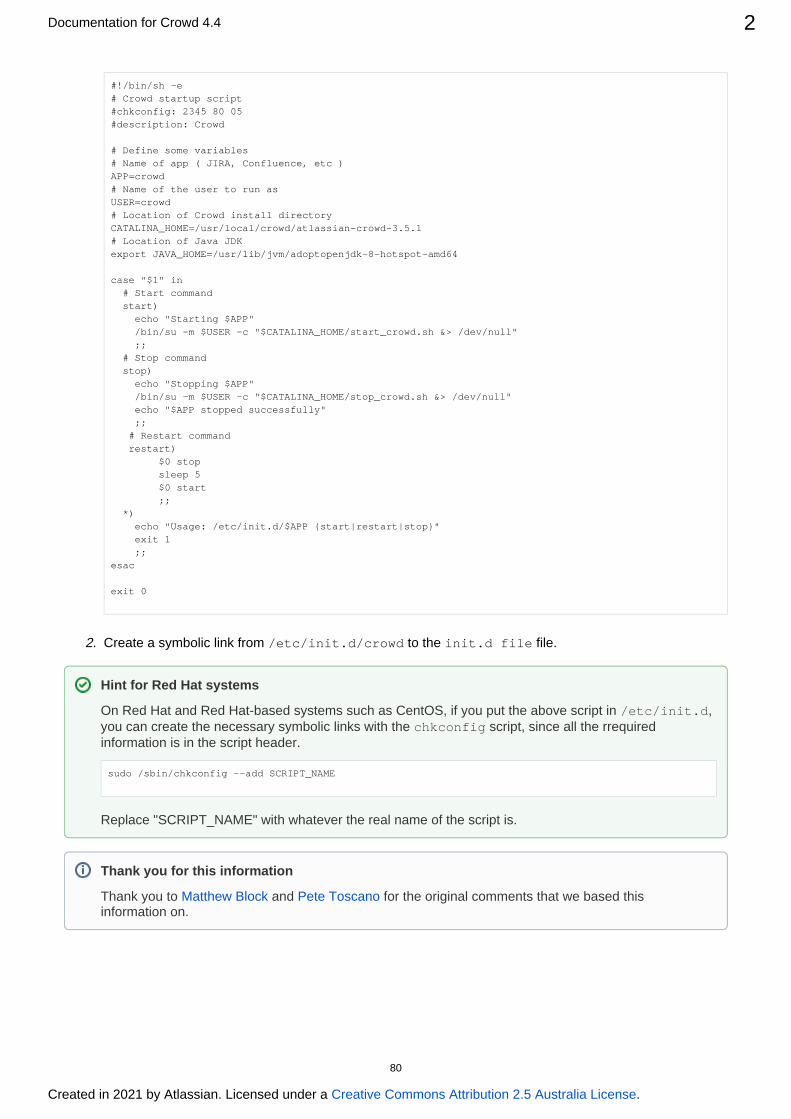
Documentation for Crowd 4.4 2
Created in 2021 by Atlassian. Licensed under a .Creative Commons Attribution 2.5 Australia License
1.
2.
#!/bin/sh -e# Crowd startup script#chkconfig: 2345 80 05#description: Crowd
# Define some variables# Name of app ( JIRA, Confluence, etc )APP=crowd# Name of the user to run asUSER=crowd# Location of Crowd install directoryCATALINA_HOME=/usr/local/crowd/atlassian-crowd-3.5.1# Location of Java JDKexport JAVA_HOME=/usr/lib/jvm/adoptopenjdk-8-hotspot-amd64
case "$1" in # Start command start) echo "Starting $APP" /bin/su -m $USER -c "$CATALINA_HOME/start_crowd.sh &> /dev/null" ;; # Stop command stop) echo "Stopping $APP" /bin/su -m $USER -c "$CATALINA_HOME/stop_crowd.sh &> /dev/null" echo "$APP stopped successfully" ;; # Restart command restart) $0 stop sleep 5 $0 start ;; *) echo "Usage: /etc/init.d/$APP {start|restart|stop}" exit 1 ;;esac
exit 0
Create a symbolic link from to the file./etc/init.d/crowd init.d file
Hint for Red Hat systems
On Red Hat and Red Hat-based systems such as CentOS, if you put the above script in , /etc/init.dyou can create the necessary symbolic links with the script, since all the rrequired chkconfiginformation is in the script header.
sudo /sbin/chkconfig --add SCRIPT_NAME
Replace "SCRIPT_NAME" with whatever the real name of the script is.
Thank you for this information
Thank you to and for the original comments that we based this Matthew Block Pete Toscanoinformation on.
80
1. 2.
Upgrading CrowdBelow are instructions on upgrading an existing Crowd installation to the latest version of Crowd. There are two upgrade procedures to choose from:
Method 1: Automatic database upgrade. Install the new version of Crowd and simply point it at your existing home directory. The upgrade procedure automatically updates your Crowd database.Method 2: Data transfer via XML backup. Back up your Crowd database to XML before starting the upgrade, install the new version of Crowd and then import the data into your new Crowd installation.
Recommended Upgrade Procedure
Upgrading from Crowd 2.0 or later
If you are upgrading from Crowd 2.0 or later, you can use or method 1, automatic database upgrade method 2, .data transfer via XML backup
Upgrading from Crowd 1.6 or earlier
If you are upgrading from a version of Crowd prior to 2.0, please make your choice based on your database server, the version of Crowd you are upgrading from and the version you are upgrading to.
If you are using , or and:PostgreSQL MySQL Microsoft SQL ServerUpgrading from Crowd 1.3 or later, to Crowd 2.0.4 or later use method 1, automatic database
.upgradeUpgrading from Crowd 1.2 or earlier, to Crowd 2.0.4 or later use method 2, data transfer via XML
.backupIf you are using use any other database server method 2, data transfer via XML backup
Alternatives
These are some options you may like to consider:
If you prefer , you can choose that option for any database method 2, data transfer via XML backupserver and no matter which version of Crowd you are upgrading from or to.If you are upgrading from Crowd 1.2 or earlier, are using PostgreSQL, MySQL or Microsoft SQL Server, and cannot perform an XML backup:
Upgrade to Crowd 1.6 first, following the instructions in the .Crowd 1.6 upgrade guideThen upgrade from Crowd 1.6 to Crowd 2.0.4 or later, using the automatic database upgrade as described in the .Crowd 2.0 upgrade guide
If for some reason you must upgrade to Crowd 2.0.0, 2.0.1, 2.0.2 or 2.0.3 (and cannot upgrade to Crowd 2.0.4), follow .method 2, data transfer via XML backup
81

1.
2.
3.
1. 2.
3.
Upgrading Crowd via Automatic Database UpgradeBelow are instructions on upgrading an existing Crowd installation to the latest version of Crowd, using the automatic database upgrade.
Before you beginDecided on a .recommended upgrade procedure for your database server and Crowd versionThe for the version you are upgrading to, andRelease NotesThe for any versions you are skipping as well as the version you are upgrading to.Upgrade Notes
Step 1. Shut Down Crowd and All Integrated Applications
Shut down Crowd and all Crowd-connected applications.
Step 2. Back Up your Crowd Files
Use your database backup tools to back up your and your . We Crowd database CrowdID database highl this step, in case something goes wrong during the upgrade process and you need to y recommend
restore your data from backup.Make backup copies of the following files:
Back up your , in the location specified in the Crowd Home directory crowd-init.propertiesfile recommended in case something goes wrong during the upgrade process.If your existing Crowd installation is version 1.3.x or 1.4.x: Back up the for the crowd.properties fileCrowd Administration Console application, located at{ you will need CROWD_INSTALL}\crowd-webapp\WEB-INF\classes\crowd.propertiesto copy this file to your new Crowd installation.
This step is not required if your current Crowd installation is 1.5 or later.Back up the for the , located atcrowd.properties file CrowdID application{ CROWD_INSTALL}/crowd-openidserver-webapp/WEBINF/classes/crowd.properties you will need to copy this file to your new Crowd installation.Back up your Crowd JDBC Driver if you have configured .Crowd with a database
We recommend that you rename your existing {CROWD_INSTALL} directory, because legacy files may cause problems if you unzip the new Crowd installation into an existing directory.
Step 3. Re-Install Crowd
Download Crowd.Unzip the download archive into a directory of your choice, taking note of the following:
Please make sure that your new {CROWD_INSTALL} directory has a different name from your old {CROWD_INSTALL} directory.Please check your unzip program before extracting the downloaded archive see the note on the Cr
.owd installation front pageDo not specify directory names that contain spaces.We will refer to this installation directory, where you unzipped the archive, as .{CROWD_INSTALL}
Point the new Crowd installation at your existing directory by editing the configuration file Crowd Homeat { .CROWD_INSTALL}\crowd-webapp\WEB-INF\classes\crowd-init.propertiesThe directory is where Crowd will store its configuration information. If you are using the Crowd Homeembedded HSQL database, supplied for evaluation purposes, Crowd will also store its database in this directory. (Note however that the CrowdID database will be in the installation directory, not the Home directory.) To specify the Crowd Home directory:
Open the file. This is found at crowd-init.properties <crowd_install_directory>/crowd-webapp/WEB-INF/classes/crowd-init.propertiesChoose the appropriate line in the file, depending upon your operating system (see below).Remove the at the beginning of the line.#Enter the name of the directory you want Crowd to use as its Home directory. For example,
On Windows:
82

Documentation for Crowd 4.4 2
Created in 2021 by Atlassian. Licensed under a .Creative Commons Attribution 2.5 Australia License
3.
4.
1.
2.
3.
1.
2.
crowd.home=c:/data/crowd-home
Note: On Windows, make sure you use forward slashes as shown above, not backward slashes.On Mac and UNIX-based systems:
crowd.home=/var/crowd-home
Save the file.crowd-init.properties
Copy the following files, saved in , to your new Crowd installation:Step 2 aboveIf your existing Crowd installation is version 1.3.x or 1.4.x: Copy the file for crowd.propertiesthe Crowd Administration Console to the root of your Crowd Home directory.
As from Crowd 1.5, the file is located in the Home directory and not the crowd.propertiesInstallation directory. This step is not required if your current Crowd installation is 1.5 or later.Copy the file for the to your new {crowd.properties CrowdID application CROWD_INSTALL}
directory./crowd-openidserver-webapp/WEBINF/classesCopy your Crowd JDBC Driver if you have configured .Crowd with a database
Step 4. Update your Integrated Applications
If you have installed Crowd on a new server, or changed Crowd's URL or port number, you will need to update Crowd's Base URL in the General settings section of the admin menuIf you are using with an external database, you will will need to use the manual JNDI CrowdIDdatasource configuration method to .configure an external database connectionIf you are using CrowdID with the default HSQL database, copy the directory from your old database/installation directory into your new installation directory. Please note that the HSQL database is not suitable for production environments. describes how to migration to Connecting CrowdID to a Databasean enterprise database.
Step 5. Start Crowd
Run the start-up script, found in your {CROWD_INSTALL} directory:start_crowd.bat for Windows.start_crowd.sh for Mac and Unix-based systems.
Point a web browser at . You should now be able to use the http://localhost:8095/crowd Crowd .Administration Console
Troubleshooting
If you have any problems during upgrade, please raise a support request at and https://support.atlassian.com/attach your file so that we can help you find out what's gone wrong.atlassian-crowd.log
Important
Please, ensure that the Crowd Home directory will not match the Crowd installation directory it is writable by the user executing the initialization script.AND
Use the same Crowd Home directory as used in your previous Crowd installation
Make sure you point the new Crowd installation at your Crowd Home directory so that existingthe new Crowd can use your existing configuration.
83

1. 2.
1.
1.
2.
3.
1. 2.
3.
Upgrading Crowd via XML Data TransferBelow are instructions on upgrading an existing Crowd installation to the latest version of Crowd, using the procedure that transfers your Crowd data via XML backup.
Before you beingDecided on arecommended upgrade procedure for your database server and Crowd versionRead the for the version you are upgrading to.Release NotesRead the for any versions you are skipping as well as the version you are upgrading to.Upgrade Notes
Step 1. Export your Crowd Database to XML
In the top-right corner, click > .BackupFollow the screen prompts to back up your Crowd database to an XML file. For full instructions, see our guide on .backing up data
Step 2. Shut down Crowd and All Integrated Applications
Shut down Crowd and all Crowd-connected applications.
Step 3. Back Up your Crowd Files
Use your database backup tools to back up your and your . We Crowd database CrowdID database highl this step, in case something goes wrong during the upgrade process and you need to y recommend
restore your data from backup.Make backup copies of the following files:
The for the application, located atcrowd.properties file CrowdID{CROWD_INSTALL}/crowd-openidserver-webapp/WEB-INF/classes/crowd.
You will need to copy this file to your new Crowd installation.propertiesYour Crowd JDBC Driver if you have configured You will need to copy this Crowd with a databasefile to your new Crowd installation.Your , in the location specified in the file Crowd Home directory crowd-init.propertiesRecommended in case something goes wrong during the upgrade process.
Rename your existing {CROWD_INSTALL} directory, because legacy files may cause problems if you unzip the new Crowd installation into an existing directory.
Step 4. Download and Re-Install Crowd
Download Crowd.Unzip the downloaded archive into a directory of your choice.
Make sure that your new {CROWD_INSTALL} directory has a different name from your old {CROWD_INSTALL} directory.Check your unzip program before extracting the downloaded archive see the note on the
.Crowd installation front pageDo not use empty spaces in directory names.We will refer to this installation directory, where you unzipped the archive, as {CROWD_IN
.STALL}
84

Documentation for Crowd 4.4 2
Created in 2021 by Atlassian. Licensed under a .Creative Commons Attribution 2.5 Australia License
3.
4.
1.
2. 3. 4.
5.
6.
7.
1.
2.
3.
Specify a directory for your new Crowd installation by editing the configuration file at {new Crowd Home. The CROWD_INSTALL}\crowd-webapp\WEB-INF\classes\crowd-init.properties Crowd
directory is where Crowd will store its configuration information. If you are using the embedded HomeHSQL database, supplied for evaluation purposes, Crowd will also store its database in this directory. (Note however that the CrowdID database will be in the installation directory, not the Home directory.) To specify the Crowd Home directory:
Open the file. This is found at crowd-init.properties <crowd_install_directory>/crowd-webapp/WEB-INF/classes/crowd-init.propertiesChoose the appropriate line in the file, depending upon your operating system (see below).Remove the at the beginning of the line.#Enter the name of the directory you want Crowd to use as its Home directory. For example,
On Windows:
crowd.home=c:/data/crowd-home
Note: On Windows, make sure you use forward slashes as shown above, not backward slashes.On Mac and UNIX-based systems:
crowd.home=/var/crowd-home
Save the file.crowd-init.properties
Copy the following files, saved in , to your new Crowd installation folder:Step 3 aboveCopy the file for the application to your new {crowd.properties CrowdID CROWD_INSTALL}
directory./crowd-openidserver-webapp/WEB-INF/classesCopy your Crowd JDBC Driver if you have configured .Crowd with a database
Step 5. Start Crowd and Run the Setup Wizard
Run the start-up script, found in your {CROWD_INSTALL} directory:start_crowd.bat for Windows.start_crowd.sh for Mac and Unix-based systems.
Point a web browser at where you will see the .http://localhost:8095/crowd Crowd Setup WizardEnter your license key on the ' ' screen, as described in the instructions on the .License Setup WizardWhen asked for your , choose ' '. This step is Installation Type Import data from an XML Backuprequired, to import your Crowd data from the XML file which you created in .Step 1 aboveThe Setup Wizard will now ask you to . Supply the JNDI datasource or JDBC configure your databaseconnection details of a .new databaseThe screen will appear. Enter the location of your XML backup file and click 'Import Existing Crowd Data
'.ContinueThe Setup Wizard is now complete. You are now ready to log in to the , Crowd Administration Consoleusing your administrator account from your earlier Crowd installation.
Step 6. Update your Integrated Applications
If you have installed Crowd on a new server, or changed Crowd's URL or port number, you will also need to edit the file in each integrated application accordingly.crowd.propertiesIf you are using with an external database, you will need to use the manual JNDI datasource CrowdIDconfiguration method to .configure an external database connection
Important
Please, ensure that the Crowd Home directory will not match the Crowd installation directory it is writable by the user executing the initialization script.AND
Make sure you point the new Crowd installation to a Crowd Home directory, so that Crowd newwill do a clean installation. Do not point it at your existing Crowd Home directory.
85
Documentation for Crowd 4.4 3
Created in 2021 by Atlassian. Licensed under a .Creative Commons Attribution 2.5 Australia License
3. If you are using CrowdID with the default HSQL database, copy the directory from your old database/installation directory into your new installation directory. Please note that the HSQL database is not suitable for production environments. describes how to migration to Connecting CrowdID to a Databasean enterprise database.
Troubleshooting
If you have any problems during upgrade, please raise a support request at and https://support.atlassian.com/attach your file so that we can help you find out what's gone wrong.atlassian-crowd.log
86

Crowd 4.4 Upgrade NotesHere are some important notes on upgrading to .To learn about new features, see theCrowd 4.4 release
.notes
Upgrade notes
Here's some important information you should know about:
Applications are no longer allowed to change the email addresses of Crowd users
Crowd 4.4 improves security by requiring that new email addresses are verified by their users. To avoid working around this requirement, Crowd will reject any requests for changing email addresses coming from connected applications.
Supported platforms
We're ending support for the following platforms:
PostreSQL 9.6
87
1. 2.
3.
4.
1.
Migrate to Another DatabaseThis guide applies to situations when you may need to migrate Crowd to another database.
Before you beginSelect a new database from one of ourSupported PlatformsPerform an of your existing Crowd server. Make sure that you check the ' ' XML backup Reset Domaincheckbox, otherwise you may be prevented from logging in to the new Crowd Administration Console.If you are also migrating the instance to a new server, please also refer to Migrating Crowd Between Servers
From this point on, we will call your existing Crowd server the 'original' server.
Migration
Copy the XML backup over to the target server.Install Crowd on the target server using our .installation guide
The Crowd version can be the same or higher than the version on the original Crowd server.When specifying your , make sure you choose a new location and your Crowd Home directory notoriginal Crowd Home directory.
Run the .Setup WizardWhen asked for the , choose ' '. Provide the type of installation Import data from an XML backupfull path to your XML backup file and import the data.When given the option of configuring Crowd to target a database, make sure you choose a new one and your original Crowd database.not
When the import finishes, shut down Crowd.
Post Migration Verification
Start Crowd on the new server. You should be able to authenticate and access Crowd using the same credentials as on your original Crowd server.
Applications and Customizations
For any application you are going to test against this new Crowd server, you will need to modify the application'sfile to point to this new server.crowd.properties
If you have installed any or added other customizations, you will need to re-apply them on the new Crowd pluginsserver.
88

1.
2. 3.
1. 2.
3.
1.
2.
1.
2.
Migrating Crowd Between ServersThis guide applies to situations when you may need to migrate Crowd to a new server, because:
Your Crowd server hardware is changing.You are cloning your production server for a staging, test or development instance.
Preparation
Make sure you have a Crowd license for the new server you are targeting. Developer/staging licenses are available for any commercial or academic license. or for help.Create a developer license contact usPerform a file system backup of the Crowd Home and Crowd Installation directories.Perform a full database backup.
From this point on, we will call your existing Crowd server the 'original' server.
Migration
Restore the file system and database backups on to the targetserver.Locate the file in the target server's Crowd Home directory. Modify itto point to shared/crowd-cfg.xmlthe new database, if the name/location of it has changed, in this property:<property name="hibernate.connection.url">Locate the file in your target server's Crowd Installation directory. Modify itto crowd-init.propertiespoint to the new Crowd Home if the location of it has changed.
Post Migration Verification
If your original server serves using HTTPS and the migrated server is on HTTP, you would need to turn off secure cookie with the following SQL query :
UPDATE CWD_PROPERTY SET PROPERTY_VALUE = 'false' WHERE PROPERTY_NAME = 'secure.cookie' AND PROPERTY_KEY = 'crowd';
Start Crowd on the new server. You should be able to authenticate and access Crowd using the same credentials as on your original Crowd server.
Applications and Customizations
For any application you are going to test against this new Crowd server, you will need to modify the application's file to point to this new server, if the URL is different from the original crowd.propertiesserver's URL.If you have installed any or added other customizations, you will need to re-apply them on Crowd pluginsthe new server.
If you encounter any difficulties, please feel free to contact and let us know which step you are having supportproblems with.
89

1. 2. 3.
Migrating from OnDemand to a Crowd installed siteYou can extract your user data from a Confluence or Jira application installed site instance. Use these queries to export your users and memberships to CSV, and then import them into Crowd.
Migrate Jira Cloud orConfluence Cloud
First you'll need to migrate Jira/Confluence Cloud to your server versions:
Migrate from Confluence Cloud to Server
Migrating from Jira Cloud to Server applications
Exporting user data
If you are using Postgres as your database with Jira or Confluence, you can generate the required CSV files from either of those systems, with the following queries. If you are using a different database, you may need to tweak these.
To generate users.csv
// Run on JIRA/Confluencecopy (SELECT user_name AS "Username", first_name AS "First Name", last_name AS "Last Name", email_address AS "Email Address", credential AS "Password" FROM cwd_user) to '/tmp/users.csv' csv header;
To generate group_memberships.csv
// Run on JIRA/Confluencecopy (SELECT DISTINCT child_name AS "Username", parent_name AS "Groupname" FROM cwd_membership) to '/tmp/group_memberships.csv' csv header;
Retrieving the backup data
The files will be generated in /tmp, or in the folder specified in the query above.
What data is backed up
The backup includes the following data:
User accountsGroupsMemberships
Importing the data into Crowd
Follow the instructions inImporting Users from CSV FilesConnect Crowd to your applications:Adding an ApplicationEnsure that the Crowd Directory is placed above the Internal Directory in your User Directories in all downstream applications: . This is important because you will have the same Configuring User Directoriesusers in both directories, and the users will authenticate against the highest directory in the hierarchy.
Make sure that CSV files are encoded in UTF-8 (Unicode) to ensure compatibility for user data containing special or accented characters.
90
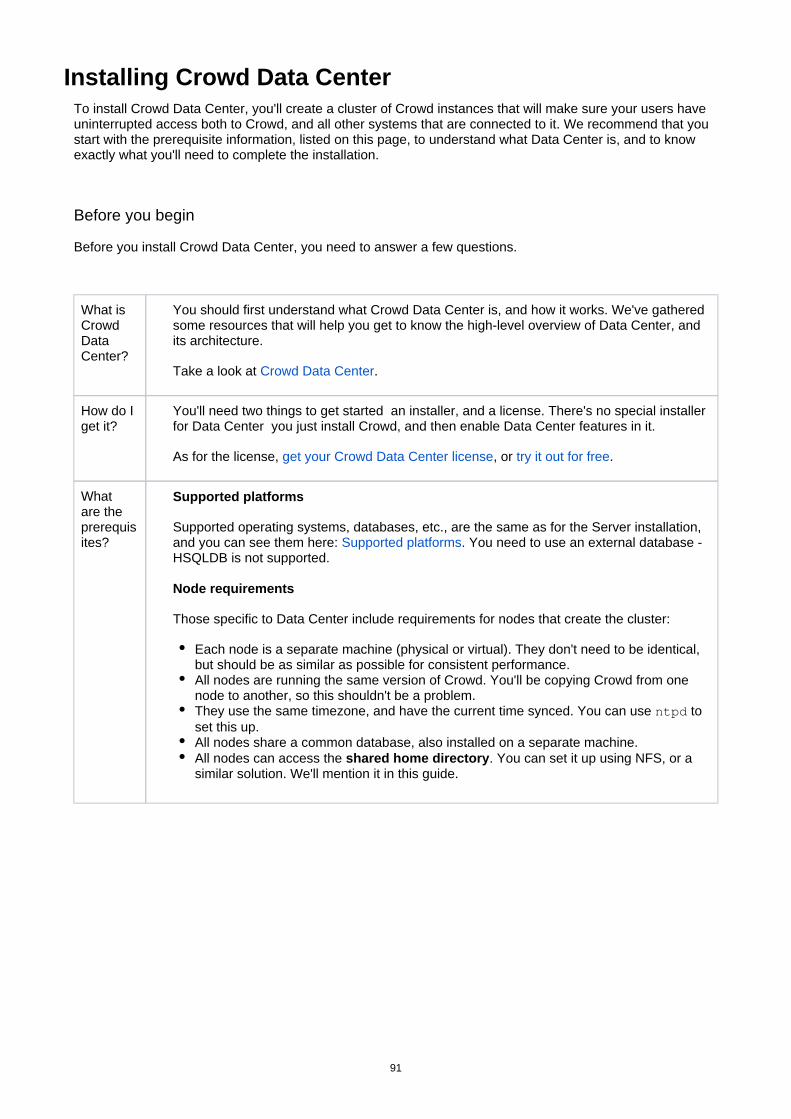
Installing Crowd Data CenterTo install Crowd Data Center, you'll create a cluster of Crowd instances that will make sure your users have uninterrupted access both to Crowd, and all other systems that are connected to it. We recommend that you start with the prerequisite information, listed on this page, to understand what Data Center is, and to know exactly what you'll need to complete the installation.
Before you begin
Before you install Crowd Data Center, you need to answer a few questions.
What is Crowd Data Center?
You should first understand what Crowd Data Center is, and how it works. We've gathered some resources that will help you get to know the high-level overview of Data Center, and its architecture.
Take a look at .Crowd Data Center
How do I get it?
You'll need two things to get started an installer, and a license. There's no special installer for Data Center you just install Crowd, and then enable Data Center features in it.
As for the license, , or .get your Crowd Data Center license try it out for free
What are the prerequisites?
Supported platforms
Supported operating systems, databases, etc., are the same as for the Server installation, and you can see them here: . You need to use an external database - Supported platformsHSQLDB is not supported.
Node requirements
Those specific to Data Center include requirements for nodes that create the cluster:
Each node is a separate machine (physical or virtual). They don't need to be identical, but should be as similar as possible for consistent performance.All nodes are running the same version of Crowd. You'll be copying Crowd from one node to another, so this shouldn't be a problem.They use the same timezone, and have the current time synced. You can use to ntpdset this up.All nodes share a common database, also installed on a separate machine.All nodes can access the . You can set it up using NFS, or a shared home directorysimilar solution. We'll mention it in this guide.
91
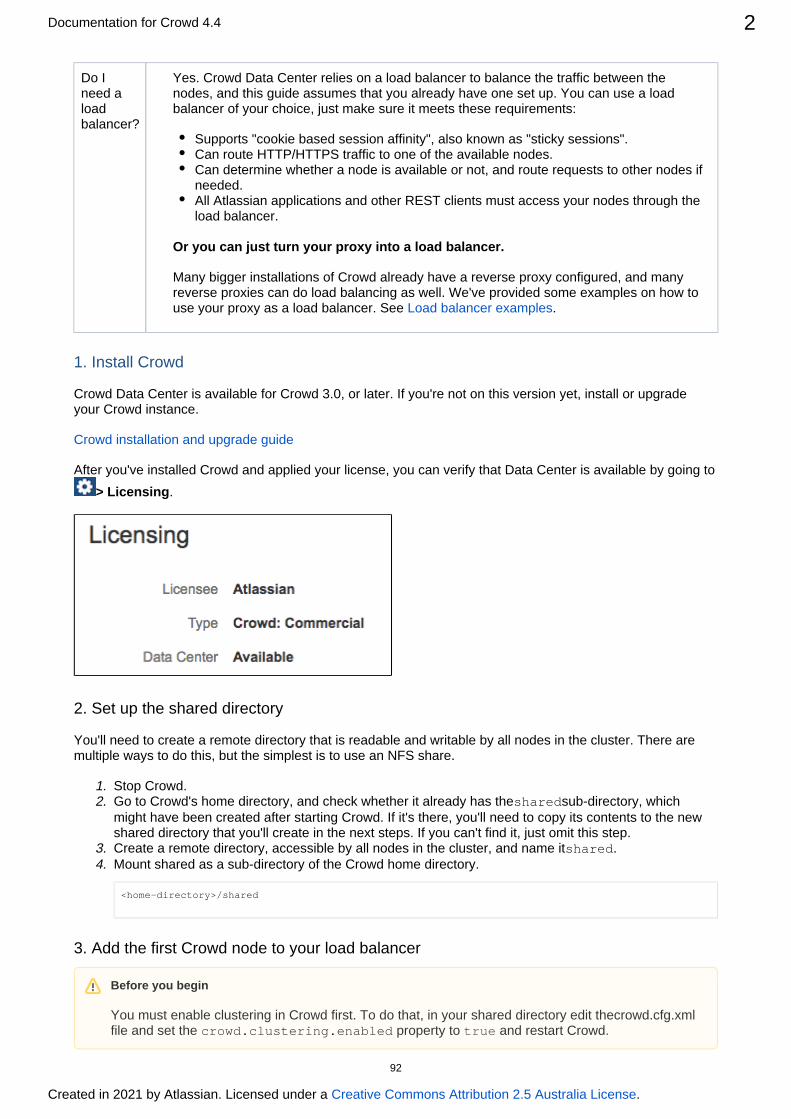
Documentation for Crowd 4.4 2
Created in 2021 by Atlassian. Licensed under a .Creative Commons Attribution 2.5 Australia License
1. 2.
3. 4.
Do I need a load balancer?
Yes. Crowd Data Center relies on a load balancer to balance the traffic between the nodes, and this guide assumes that you already have one set up. You can use a load balancer of your choice, just make sure it meets these requirements:
Supports "cookie based session affinity", also known as "sticky sessions".Can route HTTP/HTTPS traffic to one of the available nodes.Can determine whether a node is available or not, and route requests to other nodes if needed.All Atlassian applications and other REST clients must access your nodes through the load balancer.
Or you can just turn your proxy into a load balancer.
Many bigger installations of Crowd already have a reverse proxy configured, and many reverse proxies can do load balancing as well. We've provided some examples on how to use your proxy as a load balancer. See .Load balancer examples
1. Install Crowd
Crowd Data Center is available for Crowd 3.0, or later. If you're not on this version yet, install or upgrade your Crowd instance.
Crowd installation and upgrade guide
After you've installed Crowd and applied your license, you can verify that Data Center is available by going to
.> Licensing
2. Set up the shared directory
You'll need to create a remote directory that is readable and writable by all nodes in the cluster. There are multiple ways to do this, but the simplest is to use an NFS share.
Stop Crowd.Go to Crowd's home directory, and check whether it already has the sub-directory, which sharedmight have been created after starting Crowd. If it's there, you'll need to copy its contents to the new shared directory that you'll create in the next steps. If you can't find it, just omit this step.Create a remote directory, accessible by all nodes in the cluster, and name it .sharedMount shared as a sub-directory of the Crowd home directory.
<home-directory>/shared
3. Add the first Crowd node to your load balancer
Before you begin
You must enable clustering in Crowd first. To do that, in your shared directory edit thecrowd.cfg.xml file and set the property to and restart Crowd.crowd.clustering.enabled true
92

Documentation for Crowd 4.4 3
Created in 2021 by Atlassian. Licensed under a .Creative Commons Attribution 2.5 Australia License
1.
2. 3.
4.
5.
1. 2. 3.
4.
5. 6.
The load balancer distributes the traffic between the nodes. If a node stops working, the remaining nodes will take over its workload, and your users won't even notice it.
First, add your load balancer as a trusted proxy server in Crowd. SeeConfiguring Trusted Proxy .Servers
Add the first node to the load balancer.Restart the node, and then try opening different pages in Crowd. If the load balancer is working properly, you should have no problems with accessing Crowd.
In Crowd, go to The node should be listed as part of the cluster.> Clustering.
After you've added the node to the load balancer, configure the Crowd's base URL to also point to the
load balancer. Go to , and enter the URL of your load balancer as .> General Base URL
4. Add the remaining nodes to the cluster
Copy the Crowd installation directory to the new node.Create a home directory, like you did for the first node, and mount as its sub-directory.sharedEdit , and enter the path to the home directory that you just created.crowd-init.properties
The file is in crowd-init.properties <installation-directory>\crowd-webapp\WEB-.INF\classes\
Go to , and delete <installation-directory>/apache-tomcat/conf/Catalina/localhostthe file. This is needed because currently the component doesn't openidserver.xml CrowdIDsupport clustering, and it must be enabled only on the first node. The component will work as usual.Start Crowd. It will read the configuration from the shared directory, and start without any extra setup.Take a look around the new Crowd instance. Verify that user and group management, directory synchronization, and any custom integrations all work as expected.
If your load balancer supports health checks, configure it to perform a check on http://<cr,where is the node's owd-node>:8095/<context-path>/status <crowd-node>
hostname or IP address, and is the Crowd's context path (e.g. ). If <context-path> /crowdthe node doesn't respond with a response within a reasonable time, the load 200 OK balancer shouldn't direct any traffic to this node.
93
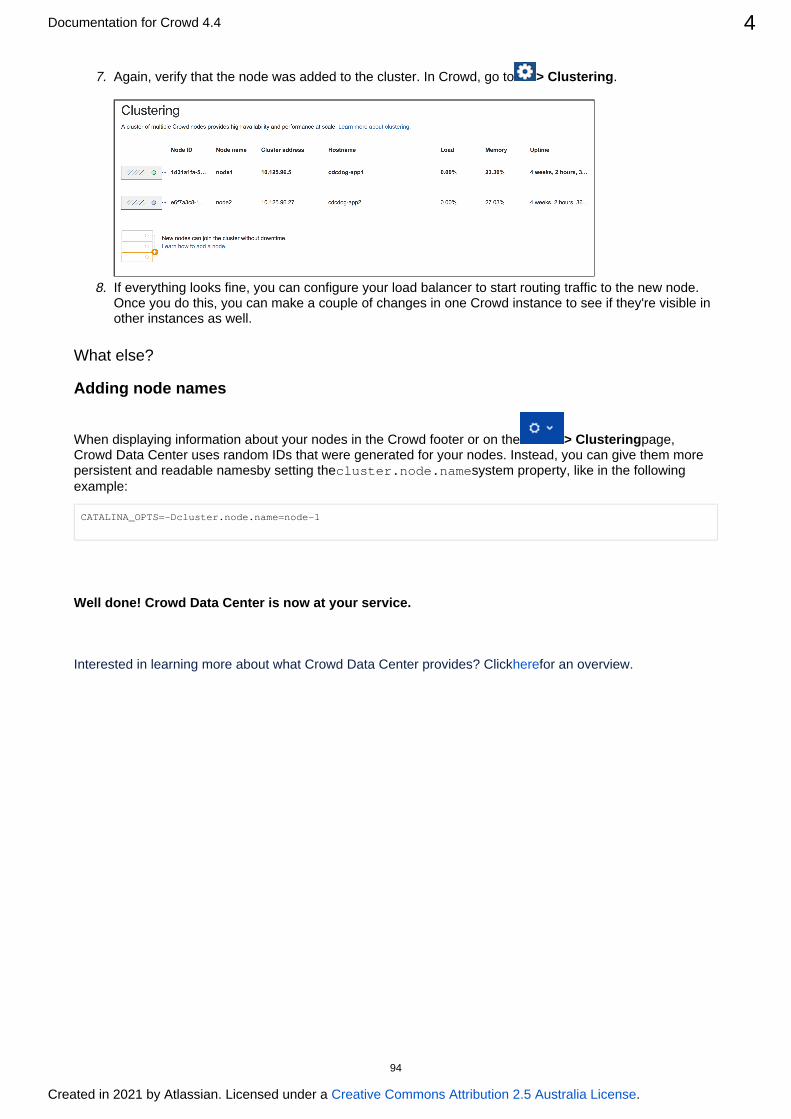
Documentation for Crowd 4.4 4
Created in 2021 by Atlassian. Licensed under a .Creative Commons Attribution 2.5 Australia License
7.
8.
Again, verify that the node was added to the cluster. In Crowd, go to .> Clustering
If everything looks fine, you can configure your load balancer to start routing traffic to the new node. Once you do this, you can make a couple of changes in one Crowd instance to see if they're visible in other instances as well.
What else?
Adding node names
When displaying information about your nodes in the Crowd footer or on the page, > ClusteringCrowd Data Center uses random IDs that were generated for your nodes. Instead, you can give them more persistent and readable namesby setting the system property, like in the following cluster.node.nameexample:
CATALINA_OPTS=-Dcluster.node.name=node-1
Well done! Crowd Data Center is now at your service.
Interested in learning more about what Crowd Data Center provides? Clickherefor an overview.
94

Migrate from Server to Data CenterBelow is the process for migrating from Crowd Server to Crowd Data Center.
If you're installing Crowd for the first time and you don't have any existing Crowd data to migrate, seeInstallin.g Crowd Data Center
Before you begin
Before you install Crowd Data Center, you need to answer a few questions.
What is Crowd Data Center?
You should first understand what Crowd Data Center is, and how it works. We've gathered some resources that will help you get to know the high-level overview of Data Center, and its architecture.
Take a look at .Crowd Data Center
How do I get it?
You'll need two things to get started an installer, and a license. There's no special installer for Data Center you just install Crowd, and then enable Data Center features in it.
As for the license, , or .get your Crowd Data Center license try it out for free
What are the prerequisites?
Supported platforms
Supported operating systems, databases, etc., are the same as for the Server installation, and you can see them here: . You need to use an external database - Supported platformsHSQLDB is not supported.
Node requirements
Those specific to Data Center include requirements for nodes that create the cluster:
Each node is a separate machine (physical or virtual). They don't need to be identical, but should be as similar as possible for consistent performance.All nodes are running the same version of Crowd. You'll be copying Crowd from one node to another, so this shouldn't be a problem.They use the same timezone, and have the current time synced. You can use to ntpdset this up.All nodes share a common database, also installed on a separate machine.All nodes can access the . You can set it up using NFS, or a shared home directorysimilar solution. We'll mention it in this guide.
95
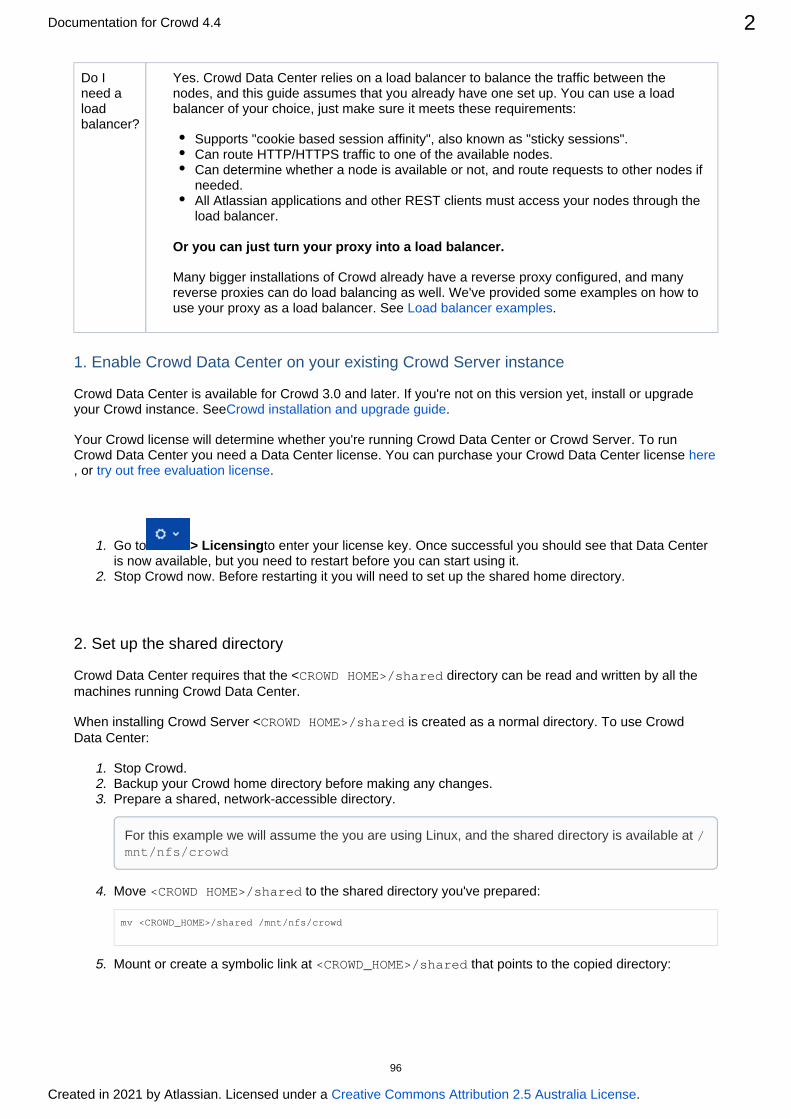
Documentation for Crowd 4.4 2
Created in 2021 by Atlassian. Licensed under a .Creative Commons Attribution 2.5 Australia License
1.
2.
1. 2. 3.
4.
5.
Do I need a load balancer?
Yes. Crowd Data Center relies on a load balancer to balance the traffic between the nodes, and this guide assumes that you already have one set up. You can use a load balancer of your choice, just make sure it meets these requirements:
Supports "cookie based session affinity", also known as "sticky sessions".Can route HTTP/HTTPS traffic to one of the available nodes.Can determine whether a node is available or not, and route requests to other nodes if needed.All Atlassian applications and other REST clients must access your nodes through the load balancer.
Or you can just turn your proxy into a load balancer.
Many bigger installations of Crowd already have a reverse proxy configured, and many reverse proxies can do load balancing as well. We've provided some examples on how to use your proxy as a load balancer. See .Load balancer examples
1. Enable Crowd Data Center on your existing Crowd Server instance
Crowd Data Center is available for Crowd 3.0 and later. If you're not on this version yet, install or upgrade your Crowd instance. See .Crowd installation and upgrade guide
Your Crowd license will determine whether you're running Crowd Data Center or Crowd Server. To run Crowd Data Center you need a Data Center license. You can purchase your Crowd Data Center license here, or .try out free evaluation license
Go to to enter your license key. Once successful you should see that Data Center > Licensingis now available, but you need to restart before you can start using it.Stop Crowd now. Before restarting it you will need to set up the shared home directory.
2. Set up the shared directory
Crowd Data Center requires that the < directory can be read and written by all the CROWD HOME>/sharedmachines running Crowd Data Center.
When installing Crowd Server < is created as a normal directory. To use Crowd CROWD HOME>/sharedData Center:
Stop Crowd.Backup your Crowd home directory before making any changes.Prepare a shared, network-accessible directory.
Move to the shared directory you've prepared:<CROWD HOME>/shared
mv <CROWD_HOME>/shared /mnt/nfs/crowd
Mount or create a symbolic link at that points to the copied directory:<CROWD_HOME>/shared
For this example we will assume the you are using Linux, and the shared directory is available at /mnt/nfs/crowd
96

Documentation for Crowd 4.4 3
Created in 2021 by Atlassian. Licensed under a .Creative Commons Attribution 2.5 Australia License
5.
6.
7.
1.
2. 3.
4.
5.
Check if exists and is accessible from the machine <CROWD_HOME>/shared/crowd.cfg.xmlrunning Crowd to verify you have configured the directory correctly.Start Crowd again.
3. Add the first Crowd node to your load balancer
The load balancer distributes the traffic between the nodes. If a node stops working, the remaining nodes will take over its workload, and your users won't even notice it.
First, add your load balancer as a trusted proxy server in Crowd. SeeConfiguring Trusted Proxy .Servers
Add the first node to the load balancer.Restart the node, and then try opening different pages in Crowd. If the load balancer is working properly, you should have no problems with accessing Crowd.
In Crowd, go to The node should be listed as part of the cluster.> Clustering.
After you've added the node to the load balancer, configure the Crowd's base URL to also point to the
load balancer. Go to , and enter the URL of your load balancer as .> General Base URL
4. Add the remaining nodes to the cluster
ln -s /mnt/nfs/crowd/shared <CROWD_HOME>/shared
Before you begin
You must enable clustering in Crowd first. To do that, in your shared directory edit thecrowd.cfg.xml file and set the property to and restart Crowd.crowd.clustering.enabled true
If your load balancer supports health checks, configure it to perform a check on http://<cr,where is the node's owd-node>:8095/<context-path>/status <crowd-node>
hostname or IP address, and is the Crowd's context path (e.g. ). If <context-path> /crowdthe node doesn't respond with a response within a reasonable time, the load 200 OK balancer shouldn't direct any traffic to this node.
97

Documentation for Crowd 4.4 4
Created in 2021 by Atlassian. Licensed under a .Creative Commons Attribution 2.5 Australia License
1. 2. 3.
4.
5. 6.
7.
8.
Copy the Crowd installation directory to the new node.Create a home directory, like you did for the first node, and mount as its sub-directory.sharedEdit , and enter the path to the home directory that you just created.crowd-init.properties
The file is in crowd-init.properties <installation-directory>\crowd-webapp\WEB-.INF\classes\
Go to , and delete <installation-directory>/apache-tomcat/conf/Catalina/localhostthe file. This is needed because currently the component doesn't openidserver.xml CrowdIDsupport clustering, and it must be enabled only on the first node. The component will work as usual.Start Crowd. It will read the configuration from the shared directory, and start without any extra setup.Take a look around the new Crowd instance. Verify that user and group management, directory synchronization, and any custom integrations all work as expected.
Again, verify that the node was added to the cluster. In Crowd, go to .> Clustering
If everything looks fine, you can configure your load balancer to start routing traffic to the new node. Once you do this, you can make a couple of changes in one Crowd instance to see if they're visible in other instances as well.
What else?
Adding node names
When displaying information about your nodes in the Crowd footer or on the page, > ClusteringCrowd Data Center uses random IDs that were generated for your nodes. Instead, you can give them more persistent and readable namesby setting the system property, like in the following cluster.node.nameexample:
CATALINA_OPTS=-Dcluster.node.name=node-1
98
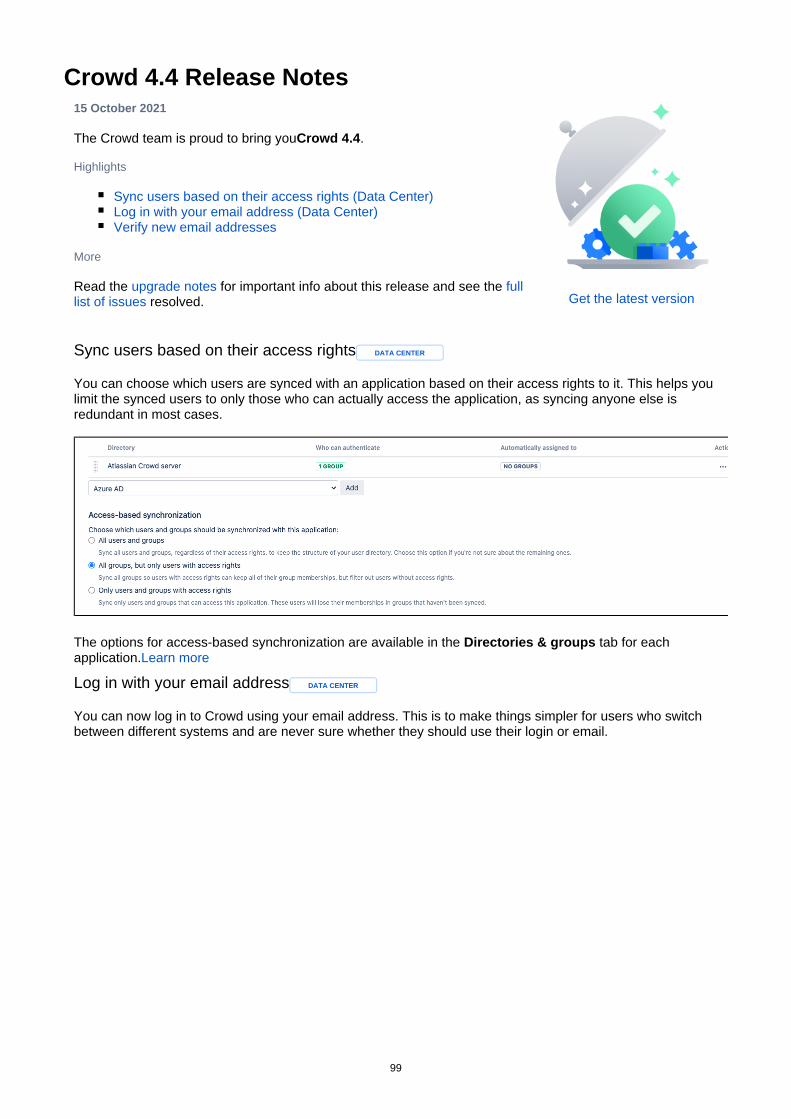
Crowd 4.4 Release Notes15 October 2021
The Crowd team is proud to bring you .Crowd 4.4
Highlights
Sync users based on their access rights (Data Center)Log in with your email address (Data Center)Verify new email addresses
More
Read the for important info about this release and see the upgrade notes full resolved.list of issues Get the latest version
Sync users based on their access rights DATA CENTER
You can choose which users are synced with an application based on their access rights to it. This helps you limit the synced users to only those who can actually access the application, as syncing anyone else is redundant in most cases.
The options for access-based synchronization are available in the tab for each Directories & groupsapplication.Learn more
Log in with your email address DATA CENTER
You can now log in to Crowd using your email address. This is to make things simpler for users who switch between different systems and are never sure whether they should use their login or email.
99
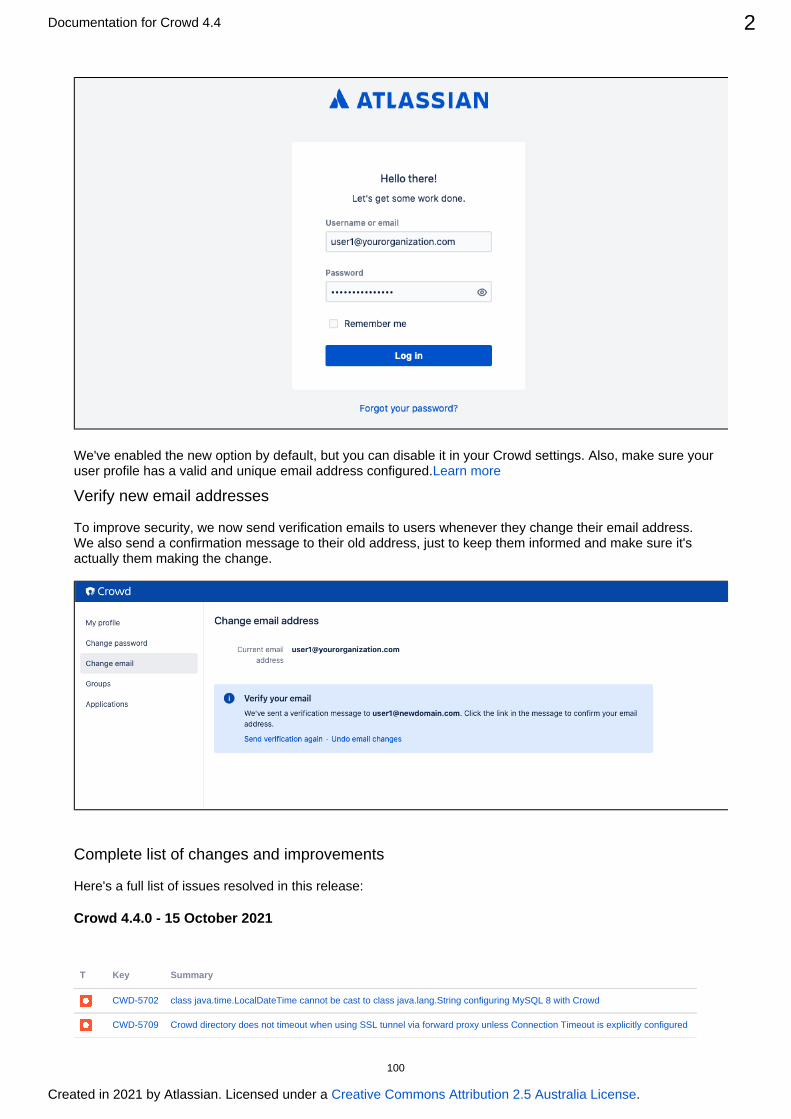
Documentation for Crowd 4.4 2
Created in 2021 by Atlassian. Licensed under a .Creative Commons Attribution 2.5 Australia License
We've enabled the new option by default, but you can disable it in your Crowd settings. Also, make sure your user profile has a valid and unique email address configured.Learn more
Verify new email addresses
To improve security, we now send verification emails to users whenever they change their email address. We also send a confirmation message to their old address, just to keep them informed and make sure it's actually them making the change.
Complete list of changes and improvements
Here's a full list of issues resolved in this release:
Crowd 4.4.0 - 15 October 2021
T Key Summary
CWD-5702 class java.time.LocalDateTime cannot be cast to class java.lang.String configuring MySQL 8 with Crowd
CWD-5709 Crowd directory does not timeout when using SSL tunnel via forward proxy unless Connection Timeout is explicitly configured
100
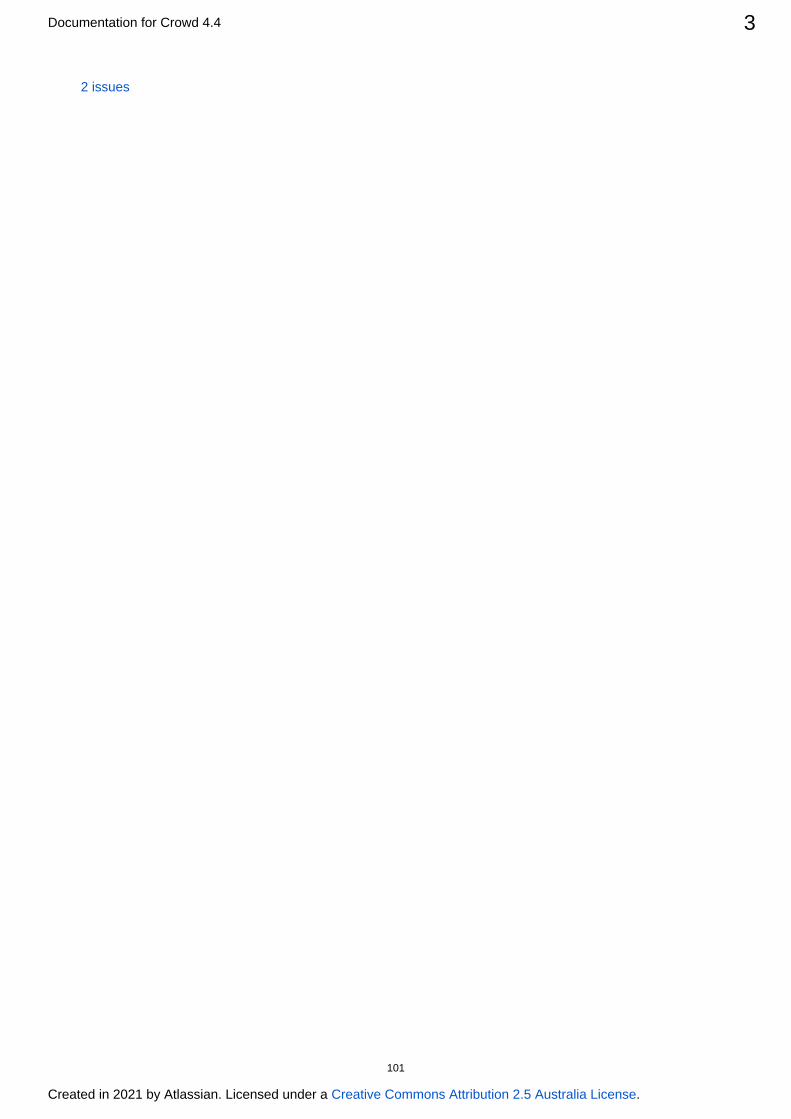
Documentation for Crowd 4.4 3
Created in 2021 by Atlassian. Licensed under a .Creative Commons Attribution 2.5 Australia License
2 issues
101
Administration GuideThe is for people who have .Crowd Administration Guide Crowd administration rights
Table of Contents
Getting StartedConceptsSupported Applications and DirectoriesAbout the Crowd Administration Console
Managing DirectoriesUsing the Directory BrowserAdding a Directory
Configuring an Internal DirectoryConfiguring an LDAP Directory Connector
LDAP Object StructuresConfiguring an SSL Certificate for Microsoft Active Directory
Configuring a Remote Crowd DirectoryConfiguring a Custom Directory ConnectorConfiguring a Delegated Authentication DirectoryConfiguring Azure Active Directory
Configuring Caching for an LDAP DirectoryUsing Naive DN MatchingSpecifying Directory PermissionsImporting Users and Groups into a Directory
Importing Users from Atlassian ConfluenceImporting Users from Atlassian JiraImporting Users from Atlassian BambooImporting Users from Jive ForumsImporting Users from CSV Files
Configuring the CSV ImporterMapping CSV Fields to Crowd FieldsConfirming the CSV Importer ConfigurationViewing the Results of the Import
Importing Users from One Crowd Directory into AnotherConfiguring directories for failover authenticationPruning delegated directories
Managing ApplicationsUsing the Application BrowserAdding an Application
Integrating Crowd with Atlassian BambooIntegrating Crowd with Atlassian Confluence
Integrating Crowd with Atlassian Confluence 3.4 or earlierUpdating Files in a Confluence Evaluation Distribution
Integrating Crowd with Atlassian CrowdIDIntegrating Crowd with Atlassian CrucibleIntegrating Crowd with Atlassian FishEye
Configuring FishEye earlier than 4.0 with CrowdIntegrating Crowd with Atlassian Jira
Integrating Crowd with Atlassian Jira 4.2 or earlierIntegrating Crowd with Atlassian Bitbucket ServerIntegrating Crowd with Acegi Security
Integrating AppFuse - a Crowd-Acegi Integration TutorialIntegrating Crowd with Jive Forums
Jive SSOIntegrating Crowd with Spring Security
Integrating AppFuse - a Crowd-Spring Security Integration TutorialIntegrating Crowd with a Custom ApplicationIntegrating Crowd with Atlassian HipChat
Configuring the Google Apps ConnectorMapping a Directory to an Application
Specifying the Directory Order for an ApplicationSpecifying an Application's Directory Permissions
102

Documentation for Crowd 4.4 2
Created in 2021 by Atlassian. Licensed under a .Creative Commons Attribution 2.5 Australia License
Example of Directory PermissionsViewing Users in Directories Mapped to an ApplicationSpecifying which Groups can access an ApplicationSyncing users based on their access rights
Effective memberships with multiple directoriesSpecifying an Application's Address or HostnameTesting a User's Login to an ApplicationEnforcing Lower-Case Usernames and Groups for an ApplicationManaging an Application's SessionDeleting or Deactivating an ApplicationConfiguring Caching for an ApplicationOverview of SSOConfiguring Options for an ApplicationEnabling OpenID client appAllowing applications to create user tokensDisabling the OpenID client appConfiguring how users log in
Managing Users and GroupsUsing the User BrowserAdding a UserEditing a User's Details and PasswordDeleting or Deactivating a UserCase Sensitivity of Usernames and GroupsSpecifying a User's AliasesEditing a User's Group MembershipManaging Groups
Deleting a GroupAdding a Group
Managing Group MembersAutomatically Assigning Users to GroupsAdding Users to a GroupRemoving Users from a GroupNested Groups in CrowdAdding a Sub-GroupGroup-level administration
Adding Group Level AdminsRemoving Group Level Admins
Removing a Sub-GroupSpecifying a User's AttributesGranting Crowd Administration Rights to a UserGranting Crowd User Rights to a UserManaging a User's Session
System AdministrationConfiguring Server Settings
Deployment TitleDomainSession configurationAuthorization CachingLicensingCrowd SSO 2.0Finding your SENSSO Cookie
Configuring your Mail ServerCreating an Email Notification TemplateConfiguring Trusted Proxy ServersViewing Crowd's System InformationBacking Up and Restoring DataLogging and Profiling
Performance ProfilingDraft - Troubleshooting and Requesting Technical SupportConfiguring the LDAP Connection PoolBrowsing the audit logLook and feelOverview of Caching
103

Documentation for Crowd 4.4 3
Created in 2021 by Atlassian. Licensed under a .Creative Commons Attribution 2.5 Australia License
Crowd Security Advisories and FixesCrowd Security Advisory 2010-07-05Crowd Security Advisory 2010-05-04Crowd Security Advisory 2008-10-14 - Parameter Injection VulnerabilityCrowd Security Advisory 2012-05-17Crowd Security Notice 2013-07-01Crowd Security Advisory 2013-07-16Crowd Security Advisory 2014-05-21Crowd Security Advisory 2016-10-19Crowd Security Advisory 2017-03-10Crowd Security Advisory 2019-05-22
Constructing cron expressions in Crowd
104
Getting StartedConceptsSupported Applications and DirectoriesAbout the Crowd Administration Console
105

ConceptsCrowd is an application security framework that handles authentication and authorization for your web-based applications. With Crowd you can quickly integrate multiple web applications into a single security architecture that supports single sign-on (SSO) and centralized identity management.
Crowd has the following components:
The is a clean and powerful web-interface for managing directories, Crowd Administration Consoleusers (known in Crowd as 'principals') and their security rights ('permissions'). Refer to the Crowd
for details.Administration GuideThe allows authorized users to maintain their user profiles and passwords Crowd Self-Service Consoleand to view their usernames, groups, roles and applications. Refer to the for details.Crowd User GuideThe provides a platform-neutral way to integrate web applications into a single Crowd integration APIsecurity architecture. With the ,applications can quickly access user information and integration APIperform security checks.
Designed for ease of use, Crowd can be deployed with your existing infrastructure. Crowd supports:
Java, .NET and PHP .applicationsPopular such as Microsoft Active Directory, Sun ONE and OpenLDAP. Additionally, directory servers cust
may be developed using the Crowd integration API.om directory connectors
See the of supported applications and directories.list
Architectural Overview
Crowd is a middleware application that integrates web applications into a single security architecture, supporting single sign-on and centralized identity management. Crowd works by dispatching authentication and authorization calls from configured applications to configured directories.
A typical deployment may be similar to the following:
When an application needs to validate a security or authentication request (e.g. when a user attempts to log in to the application) the application will make a simple API call to the Crowd framework, which will then forward the call to the appropriate directory.
About Applications
Crowd integrates and provisions applications. Once , an application is to a directory(s), whose defined mappedusers are then to the application. Note that an application can only communicate with Crowd granted accesswhen the application uses a known .host address
About Directories
Crowd supports an unlimited number of user directories. A directory can be one of the following types:
Internal to Crowd.Connected to Crowd via an LDAP connector (e.g. for Active Directory), with all authentication and user/group management in LDAP.
106

Documentation for Crowd 4.4 2
Created in 2021 by Atlassian. Licensed under a .Creative Commons Attribution 2.5 Australia License
A Crowd internal directory for user/group management but with authentication delegated to LDAP (e.g. Active Directory).Connected via a custom directory connector (e.g. for a legacy database).
Once you have a directory in Crowd, you can it to applications. Crowd will then pass authentication defined mapand authorization requests to the directory, for all applications that are mapped to that directory. Modification of directory entities ( ) can be done via the Crowd Administration Console or via the application, users and groupsdepending on the application's capabilities.
You can even map multiple directories to an application, providing the application with a single view of multiple directories in a specified .order
107
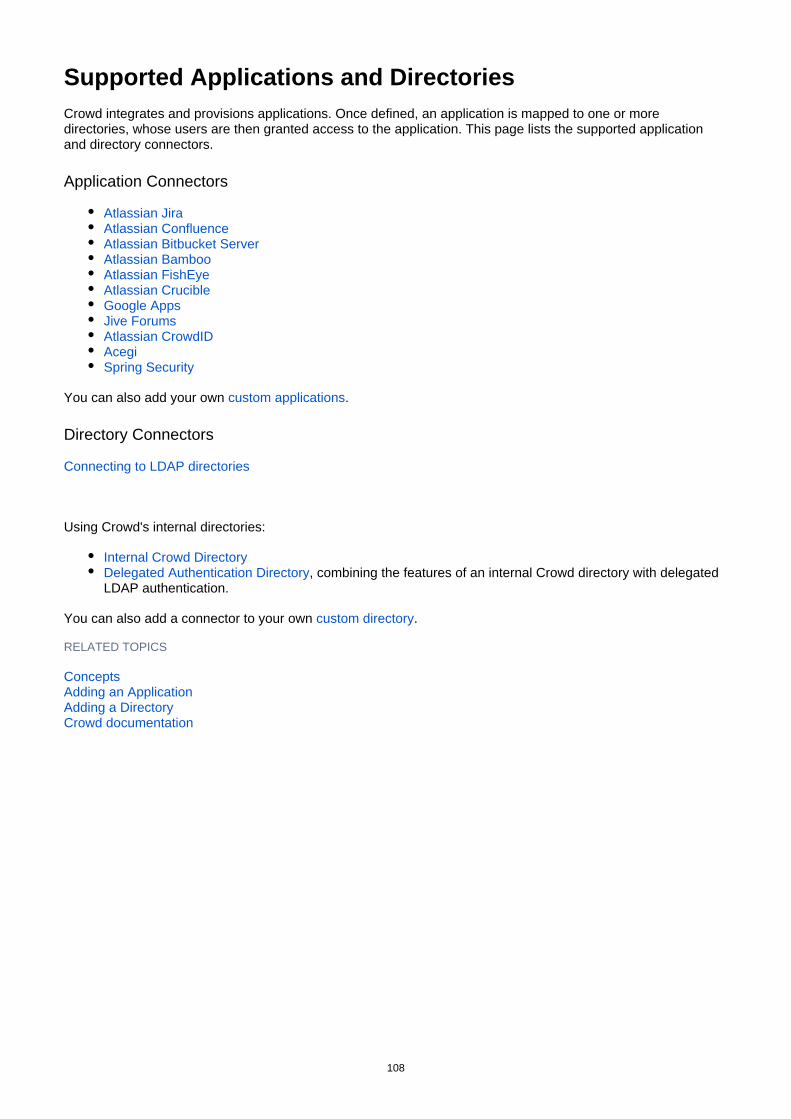
Supported Applications and DirectoriesCrowd integrates and provisions applications. Once defined, an application is mapped to one or more directories, whose users are then granted access to the application. This page lists the supported application and directory connectors.
Application Connectors
Atlassian JiraAtlassian ConfluenceAtlassian Bitbucket ServerAtlassian BambooAtlassian FishEyeAtlassian CrucibleGoogle AppsJive ForumsAtlassian CrowdIDAcegiSpring Security
You can also add your own .custom applications
Directory Connectors
Connecting to LDAP directories
Using Crowd's internal directories:
Internal Crowd DirectoryDelegated Authentication Directory, combining the features of an internal Crowd directory with delegated LDAP authentication.
You can also add a connector to your own .custom directory
RELATED TOPICS
Concepts Adding an Application
Adding a DirectoryCrowd documentation
108

1.
About the Crowd Administration ConsoleThe presents the full range of Crowd administration functionality to authorized Crowd Administration Console
.Crowd administrators
Authorized Crowd users who are administrators can also access the Crowd Console. They will see a subset notof functionality, which we call the ' '. Refer to the for details.Self-Service Console Crowd User Guide
If you are a , the Crowd Administration Console allows you to perform the following Crowd administratorfunctions:
Configure to access the Crowd framework.applicationsCreate and manage and adjust their group membership.usersMap to allow users to access integrated applications.directoriesAdjust , including those configured during the setup process.server deployment propertiesBack up and restore your Crowd data.View active and manually expire sessions.sessionsView Crowd .system informationUpdate your user profile and password and view the groups and applications associated with your username. Refer to the for details.User Guide
To access the Crowd Administration Console:
Go to the URL or .http://localhost:8095/crowd http://localhost:8095/crowd/console
The welcome screen will appear, looking something like this:
Please refer to the link below in order to grant administrators rights to Crowd user(s):
Granting Crowd Administration Rights to a User
The Crowd Administration Console is a web application provisioned by Crowd you can see it in the list of applications shown in the .Application Browser
109
Managing DirectoriesCrowd supports an unlimited number of user directories. A directory can be one of the following types:
Internal to Crowd.Connected to Crowd via an LDAP connector (e.g. for Active Directory), with all authentication and user/group management in LDAP.A Crowd internal directory for user/group management but with authentication delegated to LDAP (e.g. Active Directory).Connected via a custom directory connector (e.g. for a legacy database).
Once you have a directory in Crowd, you can it to applications. Crowd will then pass authentication defined mapand authorization requests to the directory, for all applications that are mapped to that directory. Modification of directory entities ( ) can be done via the Crowd Administration Console or via the application, users and groupsdepending on the application's capabilities.
You can even map multiple directories to an application, providing the application with a single view of multiple directories in a specified .order
110

1. 2.
3.
Using the Directory BrowserAbout Directories
Crowd supports an unlimited number of user directories. A directory can be one of the following types:
Internal to Crowd.Connected to Crowd via an LDAP connector (e.g. for Active Directory), with all authentication and user/group management in LDAP.A Crowd internal directory for user/group management but with authentication delegated to LDAP (e.g. Active Directory).Connected via a custom directory connector (e.g. for a legacy database).
Once you have a directory in Crowd, you can it to applications. Crowd will then pass authentication defined mapand authorization requests to the directory, for all applications that are mapped to that directory. Modification of directory entities ( ) can be done via the Crowd Administration Console or via the application, users and groupsdepending on the application's capabilities.
You can even map multiple directories to an application, providing the application with a single view of multiple directories in a specified .order
About the Directory Browser
The Directory Browser allows you to view and search for configured directories.
To use the Directory Browser
Log in to the .Crowd Administration ConsoleIn the top navigation bar, click .DirectoriesThis displays the Directory Browser which shows all the directories that exist in your Crowd system. You can refine your search by specifying a (note that this is case-sensitive), or / Name Active Inactivedirectories.
An Inactive directory cannot be used by any applications, regardless of whether or not they are mapp to it.ed
To view or edit a directory's details, click on the directory's name
You created one default directory when you . To add more directories, see set up Crowd Adding a Directory
Screenshot: 'Directory Browser'
111

1. 2. 3.
4.
Adding a DirectoryDirectories contain authentication and authorization information about users, groups and roles. Crowd supports an unlimited number of directories. Administrators can use different directories to create silos of users. For example, you might store your customers in one directory and your employees in another.
Crowd supports the following types of directory:
Crowd Internal DirectoryInternal directories use the Crowd database to store user, group and role information. Internal directories are stored in Crowd's .database serverDelegated Authentication DirectoryA Delegated Authentication directory combines the features of an internal Crowd directory with delegated LDAP authentication. This means that you can have your users authenticated via an external LDAP directory while managing the users and groups in Crowd. You can use Crowd's flexible and simple group management when the LDAP groups do not suit your requirements. Alternatively, you can have Crowd import users' group memberships from LDAP each time they authenticate.LDAP Directory ConnectorRemote Crowd Directory ConnectorRemote Crowd directories allow Crowd to Crowd connections. In other words, one Crowd server can obtain users and groups from another Crowd server.Custom Directory ConnectorCustom directory connectors allow developers to connect Crowd to custom user-stores, such as existing databases or legacy systems.
You can add as many directories of each type as you need.
To add a directory,
Log in to the .Crowd Administration ConsoleIn the top navigation bar, click .DirectoriesClick .Add DirectoryThis will display the Select Directory Type screen ( ).screenshot belowSelect the type of directory you want to add:
' ' see Internal Configuring an Internal Directory' ' see Delegated Authentication Configuring a Delegated Authentication Directory' ' see (e.g. Microsoft Active Directory)Connector Configuring an LDAP Directory Connector' ' see Remote Crowd Configuring a Remote Crowd Directory' ' see Custom Configuring a Custom Directory Connector
Once a directory has been configured, you will need to specify for its users. You can then permissions mapthe directory to appropriate applications.
112

Documentation for Crowd 4.4 2
Created in 2021 by Atlassian. Licensed under a .Creative Commons Attribution 2.5 Australia License
Screenshot: 'Select Directory Type'
113

1. 2.
3. 4. 5. 6.
Configuring an Internal DirectoryInternal directories use the Crowd database to store user, group and role information. Internal directories are stored in Crowd's .database server
To configure an internal directory,
Log in to the .Crowd Administration ConsoleIn the top navigation bar, click .DirectoriesThis will display the .Directory BrowserIn the left-hand menu, click .Add directorySelect as the directory type and click .internal NextComplete the fields as described in the table below.Click the button to configure the directory's .Continue permissions
Once you have configured the directory's permissions, you will have finished configuring your new directory. You can then the directory to appropriate applications.map
Screenshot: Create internal directory
Internal Directory Attributes
Description
Name The name used to identify the directory within Crowd. This is useful when there are multiple directories configured, e.g. Chicago Employees or Web Customers.
114

Documentation for Crowd 4.4 2
Created in 2021 by Atlassian. Licensed under a .Creative Commons Attribution 2.5 Australia License
Description Details about this specific directory.
Active Only deselect this if you wish to prevent all users within the directory from accessing all map. If a directory is not marked as 'Active', it is . Inactive directories:ped applications inactive
are not included when searching for users, groups or memberships.are still displayed in the Crowd Administration Console screens.
Password Regex
Regex pattern which new passwords will be validated against. The regular expression format used is the . For example, for an alphanumeric password of at java.util.regex.Patternleast 8 characters, you could use the pattern:
[A-Za-z0-9]{8,}
Leave blank to disable this feature.
Password Complexity Message
A message shown when a user is resetting a password to explain custom complexity requirements set with Password Regex (since Crowd 2.5.2).
Maximum Invalid Password Attempts
The maximum number of invalid password attempts before the authenticating account will be locked. Enter 0 to disable this feature.
Maximum Unchanged Password Days
The number of days until the password must be changed. This value is in days, enter 0 to disable this feature.
Password History Count
The number of previous passwords to prevent the user from using. Enter 0 to disable this feature.
Password Encryption
If you wish to into this directory from another Atlassian product, specify 'import users ATLAS' in order to ensure password compatibility.SIAN-SECURITY
Use Nested Groups
Enable or disable support for on the internal user directory.nested groups
Next Step
See .Specifying Directory Permissions
115

1. 2.
3. 4. 5.
Configuring an LDAP Directory ConnectorCrowd provides built-in connectors for the most popular LDAP directory servers:
Apache Directory Server (ApacheDS)Apple Open DirectoryFedora Directory ServerGeneric LDAP DirectoriesMicrosoft Active DirectoryNovell eDirectoryOpenDSOpenLDAPOpenLDAP Using Posix SchemaPosix Schema for LDAPSun Directory Server Enterprise Edition (DSEE)
Before you begin configuring the directory, check for any that affect the directory type directory-specific notesyou're using.
Configuring an LDAP directory connector
Log in to the .Crowd Administration ConsoleIn the top navigation bar, click .DirectoriesThe opens.Directory BrowserClick .Add DirectorySelect .ConnectorComplete the configuration information required on each of the tabs to finish setting up the connector and click
General configuration notes
By default, the setting on the 'Details' tab is selected. We recommend you leave this Cache Enabledsetting selected. For more information, see .Configuring Caching for an LDAP DirectoryIf you select the setting on the 'Connector' tab (available only if you've selected Manage Groups Locallythe check box), new groups are created and updated in the Crowd database and not Cache Enabledpropagated to the LDAP server. Memberships of local groups are also stored locally. This makes it possible to augment the group structure with new groups even with a read-only LDAP server. When this option is enabled, only local groups can be created and updated, while groups synchronized from the remote directory cannot be locally modified.If you select the setting on the 'Connector' tab, Crowd will use the group Use the User Membershipmembership attribute on the user when it retrieves the members of a given group, which will result in a more efficient retrieval.If you select the setting , Crowd will use Use 'memberOf for Group Membership on the 'Connector' tabthe 'memberOf' attribute when it retrieves the list of groups a users belongs to, which will result in a more efficient retrieval. If you don't select this setting, Crowd will use the members attribute on the group ('member' by default) for the search.Crowd will synchronize user renames made in the LDAP server, provided that the User Unique
is set in the 'Configuration' tab. If this attribute is not set and a user is renamed in the Identifier AttributeLDAP server, Crowd will not be able to track the user's identity, and will delete the user with the old name and create a new user with the new name. Crowd does not support group renames.If the directory type you're using guarantees the format of DNs, we recommend selecting the Use Naive
setting to allow Crowd to do a direct, case-insensitive, string DN Matching on the 'Connector' tabcomparison when it compares DNs. This setting can significantly improve performance.Specify the in the following format: Username on the 'Connector' tab cn-adminstrator, cn=users,
. dc=ad, dc=acmecorp, dc=comIf you specify the , the DN for each LDAP entry is composed of two parts: the User Name RDN attributeRDN and the location within the RDN directory where the recored resides. The RDN is the portion of your DN that is not related to the directory tree structure.
116

Documentation for Crowd 4.4 2
Created in 2021 by Atlassian. Licensed under a .Creative Commons Attribution 2.5 Australia License
By default the option is set toSynchronise group memberships when logging in For newly added users. This will synchronize group memberships for users who have been created in the LDAP directory, only
but not yet synchronized to Crowd. This is recommended for convenience, without sacrificing performance. Other options are to synchronize the memberships , which was the Every time a user logs inbehaviour in Crowd 2.7, 2.8 and 2.9, and to synchronise the memberships, which was how Crowd Neverbehaved before version 2.7.If you are connecting to the LDAP directory as a user affected byquerylimits (for example using a DN that is not a RootDN in OpenLDAP, with olcSizeLimit set) some operations might not return all results. Currently it is recommended to connect as a user that is unaffected by limits.If you have successfully added your connector, but aren't able to see any data when you browse the LDAP directory, make sure that any non-standard object types and filters are .configured correctly
You can also configure site-wide LDAP connection pool settings. See .Configuring the LDAP Connection Pool
Directory-specific configuration notes
Apache Directory Server (ApacheDS)
There are two known issues with ApacheDS and Crowd:ApacheDS 1.0.2 does not support password resets without a restart. This is an ApacheDS limitation.ApacheDS does not support paged results. CWD-1109: Cannot browse users or groups if Use
. Again, this is an ApacheDS limitation.Paged Results is enabled
Apple Open Directory
Crowd's Apple Open Directory support is read-only. You cannot add or update user details or group details in a Crowd-connected OS X Open Directory server. Users will not be able to change their passwords from Crowd or from Crowd-connected applications.Crowd will check both the and the attributes to determine if a user is a member gidNumber memberUidof a group. The name of the attribute is not configurable Crowd will always use this attribute gidNumberto determine membership.The does not support nesting of groups, so Crowd does not support nested groups in RFC 2307 schemaApple Open Directory.
Fedora Directory Server
Crowd supports read-only connections to Fedora DS using the Posix/NIS schema . You cannot RFC 2307add or update user details or group details in a Crowd-connected Fedora Directory server. Users will not be able to change their passwords from Crowd or from Crowd-connected applications.Crowd will check both the and the attributes to determine if a user is a member gidNumber memberUidof a group. The name of the attribute is not configurable Crowd will always use this attribute gidNumberto determine membership.The does not support nesting of groups, so Crowd does not support nested groups in RFC 2307 schemaFedora DS.
Microsoft Active Directory
If you want to use a secure SSL connection, make sure you before enabling configure an SSL Certificatethis setting.We recommend selecting the Enable Incremental Sync setting to allow Crowd to retrieve changes made after the last synchronization when possible.
By default, the setting on the 'Details' tab is selected. Only clear this setting if you want to Activeprevent all users within the directory from accessing . Inactive directories:mapped applications
Are not included when Crowd searches for users, groups, or membershipsStill appear in the Crowd Administration Console screens
117
Documentation for Crowd 4.4 3
Created in 2021 by Atlassian. Licensed under a .Creative Commons Attribution 2.5 Australia License
Specify the in the following format: . You will need to replace the Base DN dc=domain1,dc=local doma and for your specific configuration. Microsoft Server provides a tool called which is in1 local ldp.exe
useful for finding out and configuring the the LDAP structure of your server.If you want to use Crowd to add users or change passwords in Microsoft Active Directory, you will need to install an SSL certificated generated by your Active Directory server and then install the certificate into your JVM keystore. Please read the instructions: Configuring an SSL Certificate for Microsoft Active
.DirectoryCrowd will synchronize the user status with Active Directory. If a user account is disabled in Active Directory, the user will be deactivated in Crowd, and reciprocally, if a user is deactivated in Crowd, the user account will be disabled in Active Directory. To prevent this synchronization, use Manage User
in the 'Connector' tab.Status LocallyUsers' primary groups in Active Directory will be displayed as regular memberships in Crowd. However, you will not be able to change or remove the user's primary group through Crowd's user interface.If you are using a single Active Directory domain, you should disable "Use node referrals" in the directory configuration. If you have a forest, you should read User lookup fails with PartialResultException in Jira
and ensure your DNS server is configured appropriately.serverWe have not tested Crowd integration with Active Directory Application Mode ( ). However, ADAM ADAMand Active Directory share the same code base, LDAP interface and API. So ADAM should work with Crowd, following the same integration instructions as above. If you try it, we'd be interested to hear of your experiences.Crowd's feature requires an LDAP connection that exposes the Filter out expired users accountExpiresattribute. Care should be taken when connecting to the Active Directory Global Catalog as it does not replicate the aforementioned attribute by default. This may cause inconsistent user status in Crowd.
Posix Schema for LDAP or Open LDAP
Currently, Crowd supports read-only access to the directory based on the Posix schema. You cannot add or update user details.Crowd supports read-only connections to an LDAP directory using the Posix/NIS schema. This is useful if you have a Unix installation and want to integrate with an LDAP directory. The Posix/NIS schema allows integration between an LDAP directory and the Unix NIS (Network Information Service).
Crowd will check both the and the attributes to determine if a user is a member gidNumber memberUidof a group. The name of the attribute is not configurable Crowd will always use this attribute gidNumberto determine membership.The does not support nesting of groups, so Crowd does not support nested groups in RFC 2307 schemathe Posix schema.
118
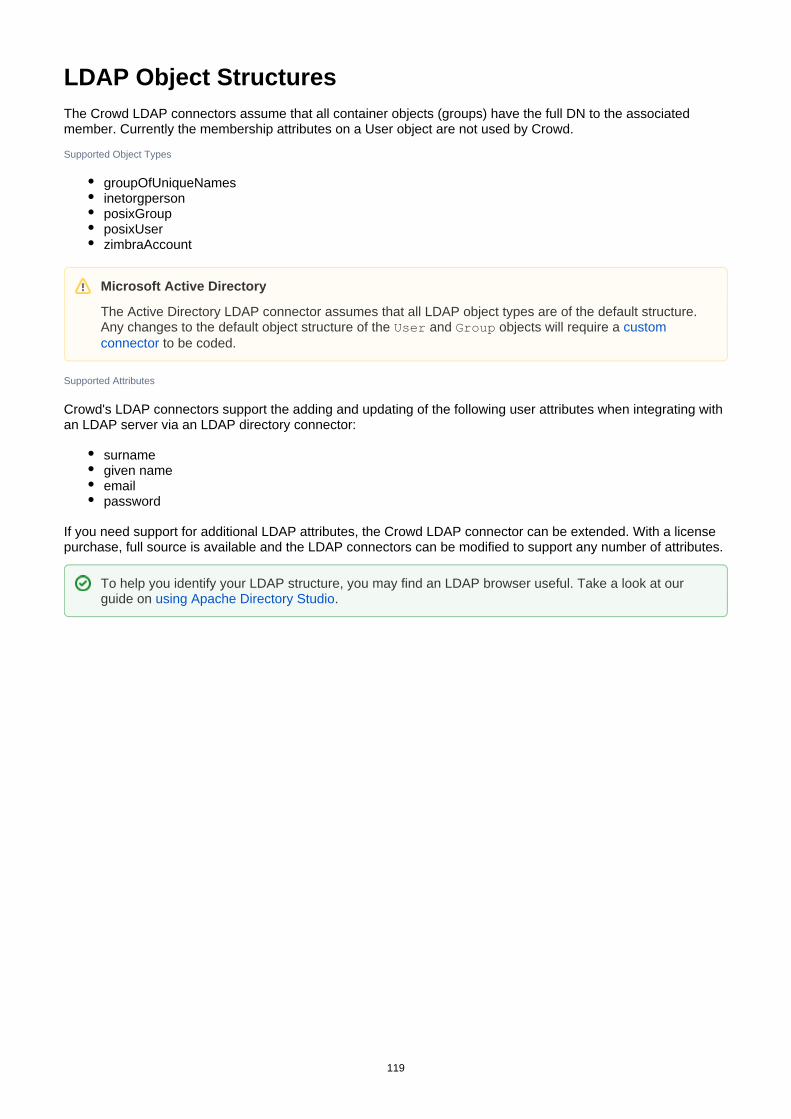
LDAP Object StructuresThe Crowd LDAP connectors assume that all container objects (groups) have the full DN to the associated member. Currently the membership attributes on a User object are not used by Crowd.
Supported Object Types
groupOfUniqueNamesinetorgpersonposixGroupposixUserzimbraAccount
Supported Attributes
Crowd's LDAP connectors support the adding and updating of the following user attributes when integrating with an LDAP server via an LDAP directory connector:
surnamegiven nameemailpassword
If you need support for additional LDAP attributes, the Crowd LDAP connector can be extended. With a license purchase, full source is available and the LDAP connectors can be modified to support any number of attributes.
Microsoft Active Directory
The Active Directory LDAP connector assumes that all LDAP object types are of the default structure. Any changes to the default object structure of the and objects will require a User Group custom
to be coded.connector
To help you identify your LDAP structure, you may find an LDAP browser useful. Take a look at our guide on .using Apache Directory Studio
119

1. 2.
Configuring an SSL Certificate for Microsoft Active DirectoryYou can configure Crowd to work with Microsoft Active Directory by setting up an in Crowd. If LDAP connectoryou wish to use Crowd to add users or change passwords in Active Directory, you will need to install an SSL certificate generated by your Active Directory server and then install the certificate into your JVM keystore.
On this page:
PrerequisitesStep 1. Install the Active Directory Certificate ServicesStep 2. Obtain the Server CertificateStep 3. Import the Server Certificate
Updating user, group, and membership details in Active Directory requires that your Atlassian application be running in a JVM that trusts the AD server. To do this, we generate a certificate on the Active Directory server, then import it into Java's .keystore
Prerequisites
To generate a certificate, you need the following components installed on the Windows Domain Controller to which you're connecting.
Required Component Description
Internet Information Services (IIS)
This is required before you can install Windows Certificate Services.
Windows Certificate Services This installs a certification authority (CA) which is used to issue certificates. Step 1, below, explains this process.
Windows 2000 Service Pack 2 Required if you are using Windows 2000
Windows 2000 High Encryption Pack (128-bit)
Required if you are using Windows 2000. Provides the highest available encryption level (128-bit).
Step 1. Install the Active Directory Certificate Services
If Certificate Services are already installed, skip to step 2, below. The screenshots below are from Server 2008, but the process is similar for Server 2000 and 2003.
Log in to your Active Directory server as an administrator.Click , point to , and then click .Start Administrative Tools Server Manager
120

Documentation for Crowd 4.4 2
Created in 2021 by Atlassian. Licensed under a .Creative Commons Attribution 2.5 Australia License
3.
4.
In the section, click . Roles Summary Add Roles
On the page, select the check box. Click Select Server Roles Active Directory Certificate Services Ne twice. xt
121
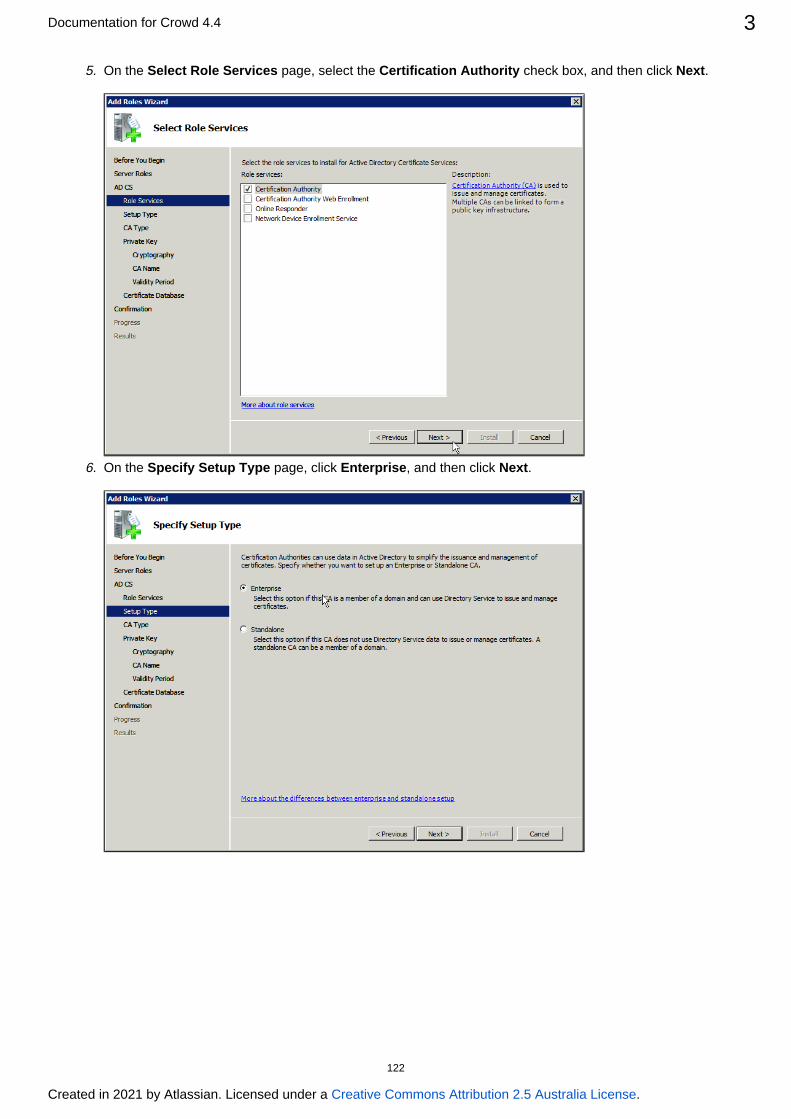
Documentation for Crowd 4.4 3
Created in 2021 by Atlassian. Licensed under a .Creative Commons Attribution 2.5 Australia License
5.
6.
On the page, select the check box, and then click . Select Role Services Certification Authority Next
On the page, click , and then click . Specify Setup Type Enterprise Next
122
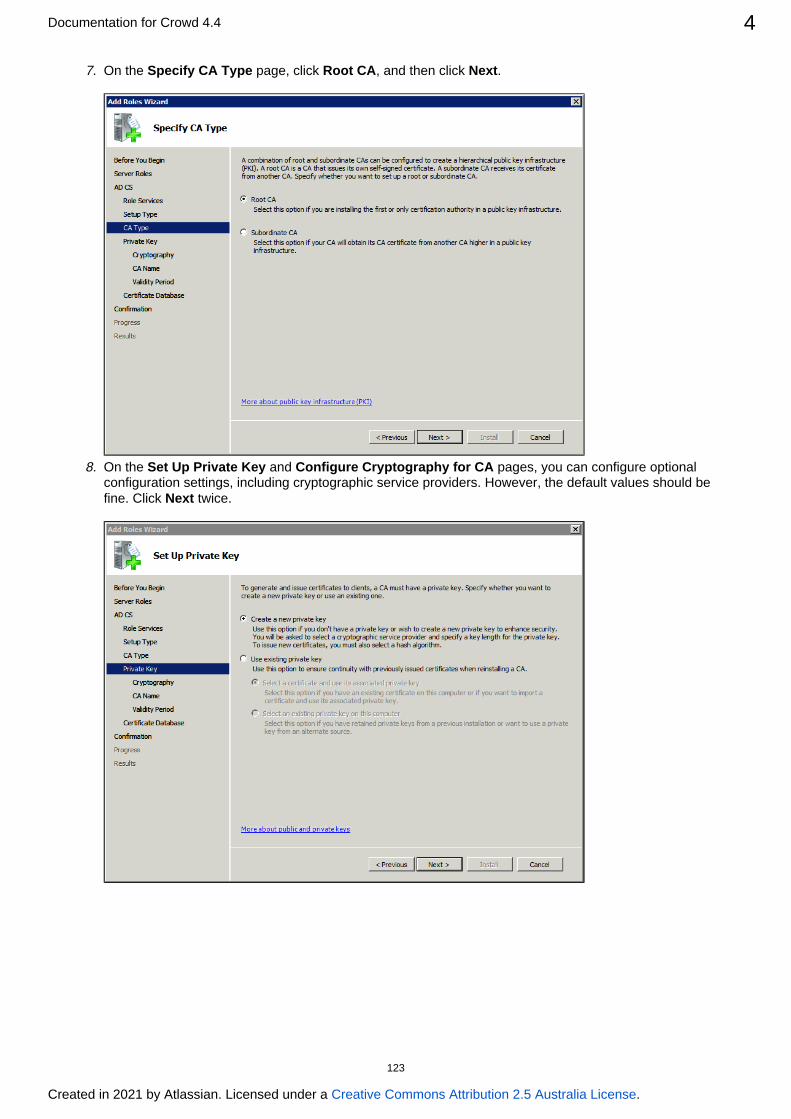
Documentation for Crowd 4.4 4
Created in 2021 by Atlassian. Licensed under a .Creative Commons Attribution 2.5 Australia License
7.
8.
On the page, click , and then click . Specify CA Type Root CA Next
On the and pages, you can configure optional Set Up Private Key Configure Cryptography for CAconfiguration settings, including cryptographic service providers. However, the default values should be fine. Click twice. Next
123

Documentation for Crowd 4.4 5
Created in 2021 by Atlassian. Licensed under a .Creative Commons Attribution 2.5 Australia License
9.
10.
In the box, type the common name of the CA, and then click . Common name for this CA Next
On the page, accept the default values or specify other storage locations for the Set Validity Periodcertificate database and the certificate database log, and then click . Next
124
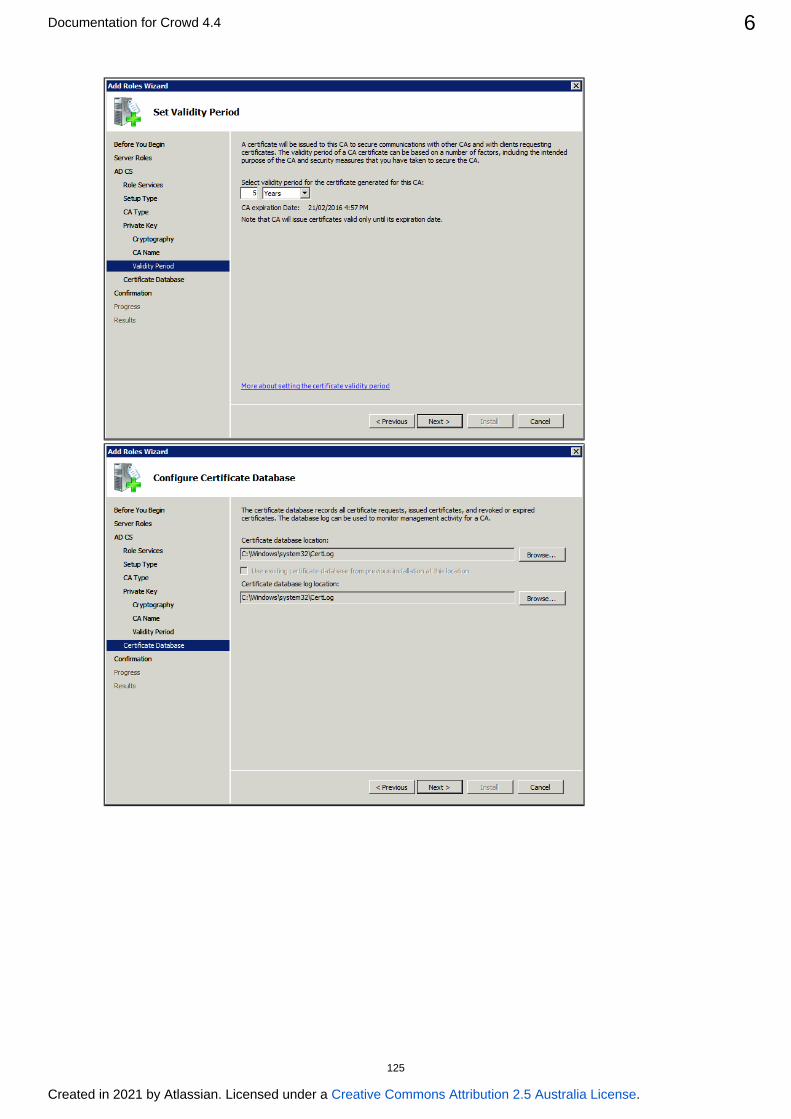
Documentation for Crowd 4.4 6
Created in 2021 by Atlassian. Licensed under a .Creative Commons Attribution 2.5 Australia License
10.
125
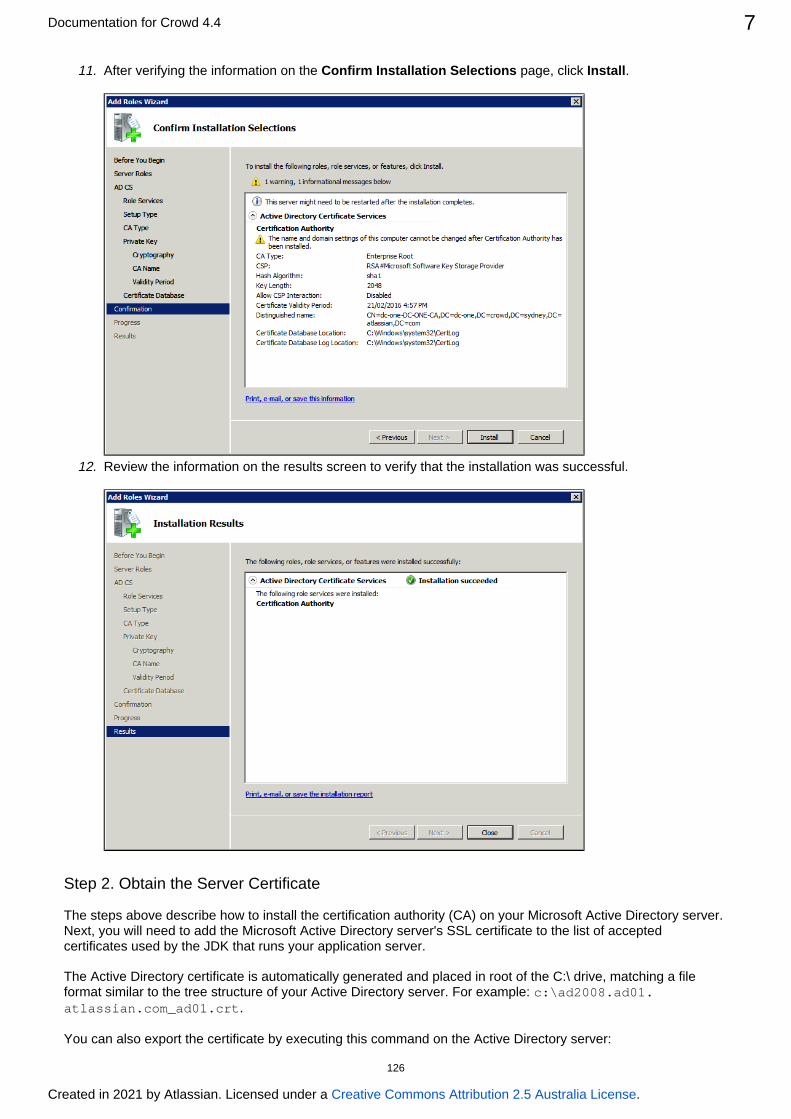
Documentation for Crowd 4.4 7
Created in 2021 by Atlassian. Licensed under a .Creative Commons Attribution 2.5 Australia License
11.
12.
After verifying the information on the page, click . Confirm Installation Selections Install
Review the information on the results screen to verify that the installation was successful.
Step 2. Obtain the Server Certificate
The steps above describe how to install the certification authority (CA) on your Microsoft Active Directory server. Next, you will need to add the Microsoft Active Directory server's SSL certificate to the list of accepted certificates used by the JDK that runs your application server.
The Active Directory certificate is automatically generated and placed in root of the C:\ drive, matching a file format similar to the tree structure of your Active Directory server. For example: c:\ad2008.ad01.
.atlassian.com_ad01.crt
You can also export the certificate by executing this command on the Active Directory server:
126

Documentation for Crowd 4.4 8
Created in 2021 by Atlassian. Licensed under a .Creative Commons Attribution 2.5 Australia License
1.
2.
1.
2.
3. 4.
5. 6.
1.
2.
certutil -ca.cert client.crt
You might still fail to be authenticated using the certificate file above. In this case, Microsoft'sLDAP over SSL page might help. Note that you need to:(LDAPS) Certificate
Choose "No, do not export the private key" in step-10 of Exporting the LDAPS Certificate and Importing for use with AD DS sectionChoose "DER encoded binary X.509 (.CER)" in step-11 ofExporting the LDAPS Certificate and Importing for use with AD DSsection. This file will be used in the following step.
Step 3. Import the Server Certificate
For an application server to trust your directory's certificate, the certificate must be imported into your Java runtime environment. The JDK stores trusted certificates in a file called a keystore. The default keystore file is called and it lives in the sub-directory of your Java installation.cacerts jre\lib\security
In the following examples, we use to represent the certificate file exported by your server-certificate.crtdirectory server. You will need to alter the instructions below to match the name actually generated.
Once the certificate has been imported as per the below instructions, you will need to restart the application to pick up the changes.
Windows
Navigate to the directory in which Java is installed. It's probably called something like C:\Program .Files\Java\jdk1.5.0_12
cd /d C:\Program Files\Java\jdk1.5.0_12
Run the command below, where is the name of the file from your directory server-certificate.crtserver:
keytool -importcert -keystore .\jre\lib\security\cacerts -file server-certificate.crt
keytool will prompt you for a password. The default keystore password is .changeitWhen prompted enter to confirm the key import:Trust this certificate? [no]: yes
Enter keystore password: changeitOwner: CN=ad01, C=USIssuer: CN=ad01, C=USSerial number: 15563d6677a4e9e4582d8a84be683f9Valid from: Tue Aug 21 01:10:46 ACT 2007 until: Tue Aug 21 01:13:59 ACT 2012Certificate fingerprints: MD5: D6:56:F0:23:16:E3:62:2C:6F:8A:0A:37:30:A1:84:BE SHA1: 73:73:4E:A6:A0:D1:4E:F4:F3:CD:CE:BE:96:80:35:D2:B4:7C:79:C1Trust this certificate? [no]: yesCertificate was added to keystore
Restart the application to take up the cacerts changes.You may nowchange 'URL' to use LDAP over SSL (i.e.ldaps://<HOSTNAME>:636/) anduse the 'Secure SSL' optionwhen connecting your application to your directory server.
UNIX
Navigate to the directory in which the Java used by JIRA is installed. If the default JAVA installation is used, then it would be
cd $JAVA_HOME
127
http://social.technet.microsoft.com/wiki/contents/articles/2980.ldap-over-ssl-ldaps-certificate.aspx

Documentation for Crowd 4.4 9
Created in 2021 by Atlassian. Licensed under a .Creative Commons Attribution 2.5 Australia License
2.
3. 4.
5. 6.
1.
2.
3. 4.
5. 6.
Run the command below, where is the name of the file from your directory server-certificate.crtserver:
sudo keytool -importcert -keystore ./jre/lib/security/cacerts -file server-certificate.crt
keytool will prompt you for a password. The default keystore password is .changeitWhen prompted enter to confirm the key import:Trust this certificate? [no]: yes
Password:Enter keystore password: changeitOwner: CN=ad01, C=USIssuer: CN=ad01, C=USSerial number: 15563d6677a4e9e4582d8a84be683f9Valid from: Tue Aug 21 01:10:46 ACT 2007 until: Tue Aug 21 01:13:59 ACT 2012Certificate fingerprints: MD5: D6:56:F0:23:16:E3:62:2C:6F:8A:0A:37:30:A1:84:BE SHA1: 73:73:4E:A6:A0:D1:4E:F4:F3:CD:CE:BE:96:80:35:D2:B4:7C:79:C1Trust this certificate? [no]: yesCertificate was added to keystore
Restart the application to take up the cacerts changes.You may nowchange 'URL' to use LDAP over SSL (i.e.ldaps://<HOSTNAME>:636/) anduse the 'Secure SSL' optionwhen connecting your application to your directory server.
Mac OS X
Navigate to the directory in which Java is installed. This is usually
cd /Library/Java/Home
Run the command below, where is the name of the file from your directory server-certificate.crtserver:
sudo keytool -importcert -keystore ./jre/lib/security/cacerts -file server-certificate.crt
keytool will prompt you for a password. The default keystore password is .changeitWhen prompted enter to confirm the key import:Trust this certificate? [no]: yes
Password:Enter keystore password: changeitOwner: CN=ad01, C=USIssuer: CN=ad01, C=USSerial number: 15563d6677a4e9e4582d8a84be683f9Valid from: Tue Aug 21 01:10:46 ACT 2007 until: Tue Aug 21 01:13:59 ACT 2012Certificate fingerprints: MD5: D6:56:F0:23:16:E3:62:2C:6F:8A:0A:37:30:A1:84:BE SHA1: 73:73:4E:A6:A0:D1:4E:F4:F3:CD:CE:BE:96:80:35:D2:B4:7C:79:C1Trust this certificate? [no]: yesCertificate was added to keystore
Restart the application to take up the cacerts changes.You may nowchange 'URL' to use LDAP over SSL (i.e.ldaps://<HOSTNAME>:636/) anduse the 'Secure SSL' optionwhen connecting your application to your directory server.
RELATED TOPICS
Configuring Crowd to Work with SSL
128

1.
2.
1. 2.
3. 4. 5. 6. 7.
8. 9.
10. 11.
Configuring a Remote Crowd DirectoryRemote Crowd directories allow Crowd to Crowd connections. In other words, one Crowd server can obtain users and groups from another Crowd server.
Two things need to be done in order to configure the local Crowd server to obtain users and groups from a remote Crowd server:
The local Crowd server needs to be given access to the remote Crowd server. This is achieved by adding a new application on the remote Crowd server.The new Remote Crowd directory needs to be added to the local Crowd server with details on how to connect to the remote Crowd server.
In our local testing, we found that it took about 4 minutes to sync to external Crowd with 10 000 users, 1 000 groups, and 200 000 memberships.
To configure a Remote Crowd directory:
Log in to the on the remote Crowd server.Crowd Administration ConsoleAdd a new application which will be the local Crowd server. The application name and password entered here will be used later by the local Crowd server to connect to the remote Crowd server.Log in to the on the local Crowd server.Crowd Administration ConsoleIn the top navigation bar, click .DirectoriesI lick .n the left-hand menu, c Add DirectorySelect , and click .Remote Crowd NextEnter the name and the description.We recommend that you leave ' ' at its default setting (enabled). Remote Crowd Cache Enableddirectory caching works the same way as it does for LDAP directories. For more information, see Confi
.guring Caching for an LDAP DirectoryClick the tab. See below.Connection screenshot 2Fill in the basic connection information for your remote Crowd server.Click to verify that Crowd can successfully connect to the directory.Test ConnectionClick the tab to configure the directory's .Permissions permissions
Configuring Directory Details
Screenshot 1: Directory details
Roles are not supported in Remote Crowd Directories.
129

Documentation for Crowd 4.4 2
Created in 2021 by Atlassian. Licensed under a .Creative Commons Attribution 2.5 Australia License
Attribute Description
Name The name used to identify the directory within Crowd. This is useful when there are multiple directories configured, e.g. 'Chicago Employees' or 'Web Customers'.
Description Details about this specific directory.
Active Only deselect this if you wish to prevent all users within the directory from accessing all mapped . If a directory is not marked as 'Active', it is . Inactive directories are:applications inactive
not included when searching for users, groups or memberships.still displayed in the Crowd Administration Console screens.
Cache Enabled
We recommend that you turn on caching. Remote Crowd directory caching works the same way as it does for LDAP directories. For more information, see Configuring Caching for an LDAP
.Directory
Use Nested Groups
Enable or disable support for on the Remote Crowd directory.nested groups
Configuring Connection Details
Screenshot 2: Connection details
130

Documentation for Crowd 4.4 3
Created in 2021 by Atlassian. Licensed under a .Creative Commons Attribution 2.5 Australia License
Attribute Description
URL The connection URL to use when connecting to the directory server. The URL should be in the following format: .http://domainname:port/crowd
Application Name
Application name used to authenticate to the remote Crowd server.
131

Documentation for Crowd 4.4 4
Created in 2021 by Atlassian. Licensed under a .Creative Commons Attribution 2.5 Australia License
Application Password
Application password used to authenticate to the remote Crowd server.
Connection Timeout
The time, in seconds, to wait for a connection to be established. If there is no connection within the specified time period, the connection attempt will be aborted. A value of 0 (zero) means there is no limit.
Max Connections
The maximum number of simultaneous connections to remote Crowd server.
Proxy Host
HTTP proxy server domain name. This field is required if the remote Crowd server is behind a HTTP proxy.
Proxy Port
HTTP proxy server port number. This field is required if the remote Crowd server is behind a HTTP proxy.
Proxy Username
HTTP proxy server username. This field is required if the HTTP proxy server requires authentication.
Proxy Password
HTTP proxy server password. This field is required if the HTTP proxy server requires authentication.
Enable Incremental Sync
We recommend that you turn on incremental synchronization. It will cause only changes since the last synchronization to be queried when synchronizing, thus significantly reducing synchronization resource usage.
Polling Interval
Crowd will synchronize with the remote Crowd server every x minutes, where 'x' is the number specified here. Remote Crowd directory caching works the same way as it does for LDAP directories, for which there is more information in .Configuring Caching for an LDAP Directory
Next Step
Specify the directory permissions, which allow you to restrict the way in which applications can use the directories. See .Specifying Directory Permissions
Once you have configured the directory's permissions, you have finished configuring your new directory. You can then the directory to the appropriate applications.map
RELATED TOPICS
Using the Directory BrowserAdding a Directory
Configuring an Internal DirectoryConfiguring an LDAP Directory Connector
LDAP Object StructuresConfiguring an SSL Certificate for Microsoft Active Directory
Configuring a Remote Crowd DirectoryConfiguring a Custom Directory ConnectorConfiguring a Delegated Authentication DirectoryConfiguring Azure Active Directory
Configuring Caching for an LDAP DirectoryUsing Naive DN MatchingSpecifying Directory PermissionsImporting Users and Groups into a Directory
Importing Users from Atlassian ConfluenceImporting Users from Atlassian JiraImporting Users from Atlassian BambooImporting Users from Jive ForumsImporting Users from CSV Files
Configuring the CSV ImporterMapping CSV Fields to Crowd FieldsConfirming the CSV Importer Configuration
132
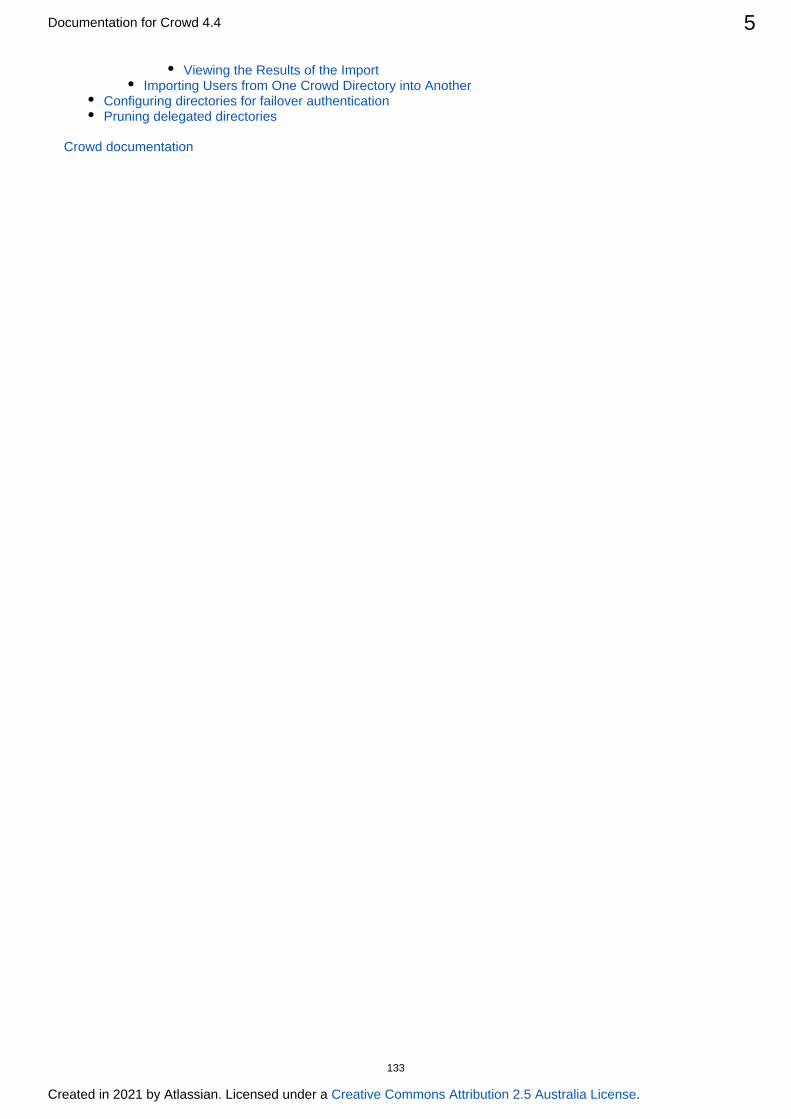
Documentation for Crowd 4.4 5
Created in 2021 by Atlassian. Licensed under a .Creative Commons Attribution 2.5 Australia License
Viewing the Results of the ImportImporting Users from One Crowd Directory into Another
Configuring directories for failover authenticationPruning delegated directories
Crowd documentation
133
1. 2. 3. 4. 5. 6.
Configuring a Custom Directory ConnectorCustom directory connectors allow developers to connect Crowd to custom user-stores, such as existing databases or legacy systems.
First you need to create a custom directory connector. The simplest way to accomplish this is to add a JAR file with the necessary classes to the Crowd folder. For details, please see WEB-INF/lib Creating a Custom
.Directory Connector
Once you have added your JAR file to the Crowd folder, you are ready to configure a Custom WEB-INF/libDirectory Connector, as described below.
To configure a Custom Directory Connector,
Log in to the .Crowd Administration ConsoleIn the top navigation bar, click .DirectoriesClick .Add DirectorySelect the directory type and click .Custom NextComplete the fields as described in the table below.Click the button to configure the directory's .Continue permissions
Once you have configured the directory's permissions, you will have finished configuring your new directory. You can then the directory to appropriate applications.map
Screenshot: 'Create Custom Directory'
Custom Directory Store Attributes
Description
Name The name used to identify the directory within Crowd. This is useful when there are multiple directories configured, e.g. Chicago Employees or Web Customers.
Description Details about this specific directory.
Active Only deselect this if you wish to prevent all users within the directory from accessing all m. If a directory is not marked as 'Active', it is . Inactive apped applications inactive
directories:
are not included when searching for users, groups or memberships.are still displayed in the Crowd Administration Console screens.
134

Documentation for Crowd 4.4 2
Created in 2021 by Atlassian. Licensed under a .Creative Commons Attribution 2.5 Australia License
Implementation Class
Implementation of Java com.atlassian.crowd.directory.RemoteDirectoryinterface. Must be in the Crowd CLASSPATH.
Next Step:
See Specifying Directory Permissions
135
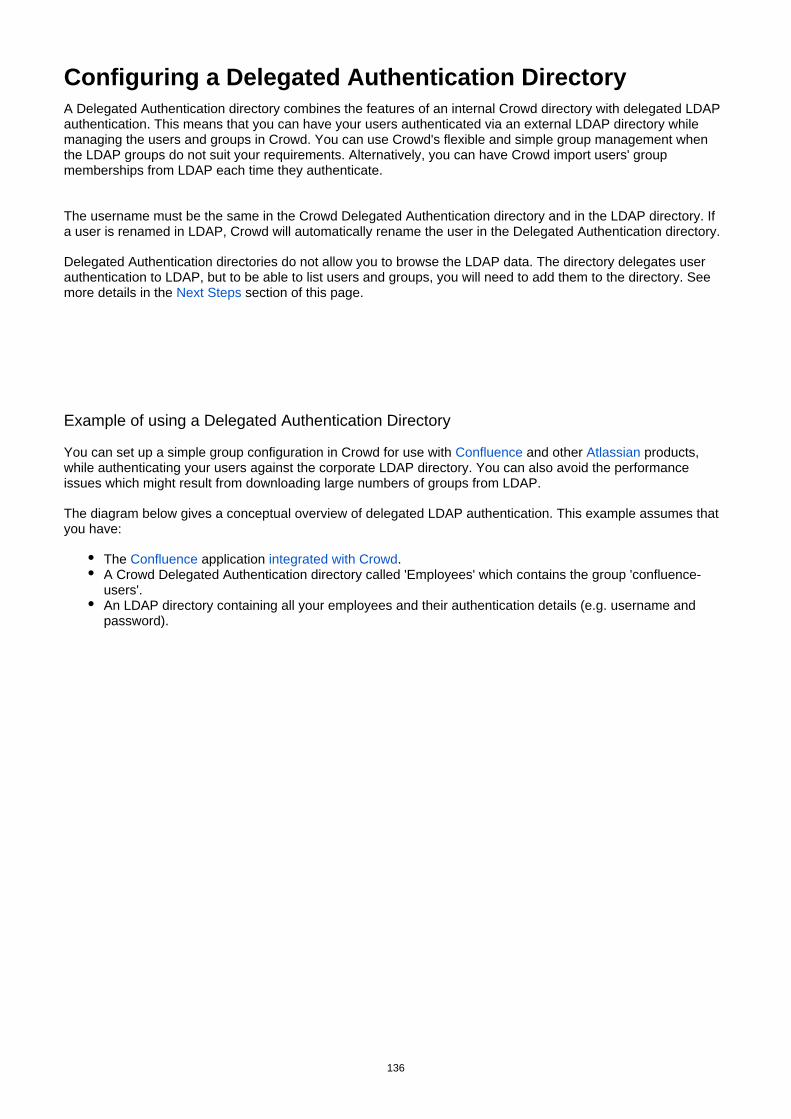
Configuring a Delegated Authentication DirectoryA Delegated Authentication directory combines the features of an internal Crowd directory with delegated LDAP authentication. This means that you can have your users authenticated via an external LDAP directory while managing the users and groups in Crowd. You can use Crowd's flexible and simple group management when the LDAP groups do not suit your requirements. Alternatively, you can have Crowd import users' group memberships from LDAP each time they authenticate.
The username must be the same in the Crowd Delegated Authentication directory and in the LDAP directory. If a user is renamed in LDAP, Crowd will automatically rename the user in the Delegated Authentication directory.
Delegated Authentication directories do not allow you to browse the LDAP data. The directory delegates user authentication to LDAP, but to be able to list users and groups, you will need to add them to the directory. See more details in the section of this page.Next Steps
Example of using a Delegated Authentication Directory
You can set up a simple group configuration in Crowd for use with and other products, Confluence Atlassianwhile authenticating your users against the corporate LDAP directory. You can also avoid the performance issues which might result from downloading large numbers of groups from LDAP.
The diagram below gives a conceptual overview of delegated LDAP authentication. This example assumes that you have:
The application .Confluence integrated with CrowdA Crowd Delegated Authentication directory called 'Employees' which contains the group 'confluence-users'.An LDAP directory containing all your employees and their authentication details (e.g. username and password).
136

Documentation for Crowd 4.4 2
Created in 2021 by Atlassian. Licensed under a .Creative Commons Attribution 2.5 Australia License
1. 2.
3. 4. 5.
Configuration Steps
Before setting up a new Delegated Authentication Directory, please review to the notes on LDAP object structures in the page about .LDAP connectors
To configure a Delegated Authentication directory:
Log in to the .Crowd Administration ConsoleIn the top navigation bar, click .DirectoriesThe will open.Directory BrowserClick .Add DirectorSelect button.Delegated AuthenticationComplete the configuration information required on each of the tabs to finish setting up the directory.
137
Documentation for Crowd 4.4 3
Created in 2021 by Atlassian. Licensed under a .Creative Commons Attribution 2.5 Australia License
1. 2.
Next Steps
After configuring your new directory:
Map the directory to the appropriate applications.Consider how you would like to add your users to Crowd's Delegated Authentication directory. There are a few options:
Manually to the Crowd directory.add the usersUse Crowd's to copy your LDAP users into your Delegated Authentication Directory importerdirectory.Let Crowd do it for you, at login time by enabling the option when you Synchronize User Detailsconfigure the directory.
If a user logs in successfully via LDAP authentication but does not yet exist in Crowd, Crowd will automatically add them to the Delegated Authentication directory. You will then need to add the user to any necessary groups, to allow them to access applications where group membership is required. If you have enabled the "Synchronize Group Memberships" option, groups and group memberships from LDAP will be automatically imported each time a user authenticates.
138

1. 2. 3.
1. 2. 3.
4.
5. 6.
1. 2. 3.
Configuring Azure Active DirectoryYou can configure your Microsoft Azure Active Directory (Azure AD) as a directory in Crowd. All changes to your users, groups, and memberships will be synced between Azure AD and Crowd periodically, or whenever you request it. You'll be able to view information about your users directly in Crowd by using the User Browser and Group Browser.
Before you begin
Before you configure your Azure AD, you should know about the following restrictions:
In Azure AD, you can have multiple groups with the same name ( ), but it's not supported displayNameinCrowdand results in a failing synchronization. Make sure you change your Azure AD group names to unique ones.Crowd doesn't support multi-factor authentication. You'll need to disable it for your users in Azure AD, or they will not be able to log in to Crowd or any integrated applications.If you need to make any changes to your users, make them directly in Azure AD. You can't edit your Azure AD users in Crowd.
Configuring Azure Active Directory
To configure Azure AD, youll need to create two applications in your Azure Portal, and then use them to add Azure AD to Crowd.
1.In Azure web application.
1.Create a web application to allow Crowd to communicate with Azure AD:
Log in to your Azure Portal.Go to > .Azure Active Directory App registrationsCreate a new application registration with the following details:
Application type: (Option is available under Redirect URI sub-section)WebSign-on URL: <Crowd's base URL>
In Crowd, go to , and check the value of .> General Base URL
After the application is created, note down the assigned to it. You will need it later on Application (client) IDto configure the integration in Crowd.
2. Configure permissions for the web application to allow Crowd to read data from Azure AD:
In your web application, click .API permissionsIn the section, click .API permissions Add a permissionUnder select and select for the type of Microsoft APIs Microsoft Graph, Application permissionspermissions required for this applicationAdd the following permission from:
Directory.Read.AllClick and then, under Grant consent section, click button.Add Permissions Grant admin consentClick and confirm.Yes
3. Create a key for the web application.Crowdwill use this key to authenticate to Azure AD:
Click your web application.In the section, click .Certificates & secrets New client secretChoose a description and an expiry date for your key then save it.
139

Documentation for Crowd 4.4 2
Created in 2021 by Atlassian. Licensed under a .Creative Commons Attribution 2.5 Australia License
3.
4.
1.
1. 2. 3. 4.
1. 2. 3. 4.
1. 2.
1.
2.
Copy and store the key value.
2. In Azure native application4. Create a native application that will be used by Crowd to validate user credentials:
Go to App registrations, and create a new application registration with the following details:
Type: (Option is available under Redirect URI sub-section)NativeRedirect URL:<Crowd's base URL>
Note down the assigned to it. You will need it later on to configure the integration in Application IDCrowd.
5. Configure permissions for the native application to allow Crowd to validate user credentials:
Click your native application.ClickAPI PermissionsUnder Grant consent section, click button.Grant admin consentClick and confirm.Yes
6. Configure manifest for the native application to allow Crowd to validate user credentials:
Click your native application.ClickManifestIn the manifest editor,set theallowPublicClientproperty totrueIn the bar above the manifest editor, clickSave
7. Get the Tenant ID to configure the integration in Crowd:
Go to the main Azure Active Directory blade.Click .PropertiesNote down the - this is the you will need later on to configure the integration in Directory ID Tenant IDCrowd.
3. Steps in Crowd8. Add Azure AD to Crowd.
Log in to the .Crowd Administration Console
Keep in mind that when the key expires and you don't replace it, Crowd will not be able to communicate with Azure AD.
You will not be able to view it after navigating away from the key settings.
140

Documentation for Crowd 4.4 3
Created in 2021 by Atlassian. Licensed under a .Creative Commons Attribution 2.5 Australia License
2. 3. 4.
5.
6.
7.
8.
In the top navigation bar, click .DirectoriesClick , and then select as type.Add Directory Azure Active DirectoryFill out the required fields. You will need to specify theTenant ID, Web application ID, Web application key and Native
that you received when you configured Azure Active directory.application IDIf you are integrating with an Azure Active DIrectory region that uses alternative API URLs (for example ), you can pick the region from the drop-down. Azure Germany RegionIf your region is not listed, you can pick , and enter the appropriate API URLs manually.Custom( In the section, instead of adding the whole user directory to optional) DATA CENTER ONLY Group filteringCrowd, you can choose specific groups from Azure AD. Only members of these groups will be added to Crowd.(o ) Modify the default synchronization settings to match your needs.ptional
( )optional Click Test Connection to verify if data you entered is correct.
You've added your Azure AD to Crowd. You should now see a brief summary of your directory, and details about the synchronization.
Crowd will automatically pull data from Azure AD. If that doesn't happen, you can clickSynchronise now.Once the synchronization is complete,you can check your users and groups from Azure AD by going to iUsers/Groupsn the top navigation bar.
Field mapping
The following tables show how fields in Azure AD are mapped to those in Crowd. We're comparing Azure AD's A fields with Crowd's fields.PI UI
Users
Azure AD Crowd
userPrincipalName Username
displayName Display name
givenName First name
familyName Last name
accountEnabled Active
id External ID
Mail E-mail address
Groups
Azure AD field Crowd field
displayName Name
description Description
DATA CENTER ONLY If you check Enable group filtering and checkboxes, Enable nested groupsthe setting is automatically set to Synchronize group memberships when logging Neverand can't be changed.
In some cases, the synchronization might be failing at first because the new permission wasn't yet propagated in Azure AD. Just wait a few minutes, the problem will fix itself.
141

Documentation for Crowd 4.4 4
Created in 2021 by Atlassian. Licensed under a .Creative Commons Attribution 2.5 Australia License
id External ID
142
Configuring Caching for an LDAP DirectoryCrowd manages a cache of LDAP directory information stored in the Crowd database, to ensure fast recurrent access to user and group data. We call this 'database-backed LDAP caching'.
This page describes the caching of user and group information in the Crowd database. For a description of the other types of caching offered by Crowd, please refer to .Overview of Caching
On this page:
Features of LDAP Caching in CrowdSupported LDAP DirectoriesConfiguring the CacheFinding the time taken to synchronizeManually Synchronizing the CacheNotes
Features of LDAP Caching in Crowd
For all LDAP directories with caching enabled, Crowd will keep an up-to-date cache of user and group information retrieved from the LDAP directory. Use of the cache should improve performance particularly in directories which are slow or off site.
Please refer to the below, especially regarding the for which the caching is optimized.notes number of users
Summary of the caching functionality:
The caches are held in the Crowd database.When you add the directory connector to Crowd, Crowd will start a synchronization task in the background to copy all the required users, groups and membership information from LDAP to the Crowd database. This task may take a while to complete, depending on the size and complexity of your user base.Crowd will perform a periodic synchronization to update the database with any changes made to LDAP. The default sync interval, or polling interval, is one hour (60 minutes). You can change the polling interval on the directory connector configuration screen.You can manually synchronize the database-backed cache if necessary.Whenever an update is made to the users, groups or membership information via Crowd, Crowd will update both the database-backed cache and the LDAP directory immediately.For all authentication requests, Crowd performs calls to the LDAP directory itself. The Crowd database-backed cache does not store user passwords.Crowd performs all other queries against the database-backed cache.
The diagram below gives a conceptual overview of the caches supported by Crowd, including the LDAP database-backed caching discussed on this page. For a description of the other types of caching offered by Crowd, please refer to the .overview of caching
Passwords are not cached
The Crowd cache does not store user passwords. All authentication is performed by calls to the LDAP directory itself.
143

Documentation for Crowd 4.4 2
Created in 2021 by Atlassian. Licensed under a .Creative Commons Attribution 2.5 Australia License
1.
Supported LDAP Directories
Crowd's database-backed caching is available for all the LDAP directories that Crowd supports. See Configuring for the list of supported directories.an LDAP Directory Connector
Configuring the Cache
144

Documentation for Crowd 4.4 3
Created in 2021 by Atlassian. Licensed under a .Creative Commons Attribution 2.5 Australia License
1. 2. 3. 4.
In the top navigation, click .DirectoriesClick on the directory for which you want to configure cache.In the tab, select .Details Cache EnabledIn the tab, set the polling interval optionConnectorThe polling interval is the period of time, in minutes, that Crowd will wait between its requests for updates from LDAP.
The length of your polling interval depends on the length of time you can tolerate stale data, the amount of load you want to put on Crowd and the LDAP server, and the size of your user base. If you poll more frequently, then your data will be more up to date. The downside of polling more frequently is that you may overload your LDAP server with requests.If in doubt, we recommend that you start with an interval of 60 minutes (this is the default setting) and reduce the value incrementally. You will need to experiment with your setup.
Finding the time taken to synchronize
You can find the time take to synchronize on the tab of your directory.Details
The directory connector's ' ' tab shows information about the last sync operation, including the length of Detailstime it took.
Manually Synchronizing the Cache
145

Documentation for Crowd 4.4 4
Created in 2021 by Atlassian. Licensed under a .Creative Commons Attribution 2.5 Australia License
1.
2.
3.
4.
1.
Screenshot: Manually syncing the cache
You can manually synchronize the cache by clicking the button on the the directory Synchronize Nowconnector's tab. If a sync operation is already in progress, you cannot start another until the first has Detailsfinished.
Notes
General Notes
Be aware of the optimal number of users. We have optimized the database caching for directories containing approximately 10 000 (ten thousand) users. If your directory is significantly larger, the new caching may not be as beneficial. For really large user bases, we recommend that you leave the caching disabled.You can reduce the number of LDAP users visible to Crowd. You can narrow the LDAP user/group filter to control the size of the userbase visible to Crowd.Delegated Authentication directories are not cached. are not Delegated Authentication directoriescached, because only the authentication is delegated to the directory, and authentication itself is not cached.Synchronization errors are shown in the logs. If there are any errors during the synchronization process, they will appear in the logs (not the UI). If one user fails to sync for some reason, the process will write the error to the logs, skip that user and continue with the remaining users.
Additional Notes for Active Directory
When Crowd synchronizes with Active Directory, Crowd requests only the changes from the LDAP server rather than the entire user base. This optimizes the synchronization process and gives much faster performance on the second and subsequent requests.
On the other hand, this synchronization method results in a few limitations:
Externally moving objects out of scope or renaming objects causes problems in AD. If you move objects out of scope, this will result in an inconsistent cache. We recommend that you do not use the
146
Documentation for Crowd 4.4 5
Created in 2021 by Atlassian. Licensed under a .Creative Commons Attribution 2.5 Australia License
1.
2.
3.
4.
external LDAP directory interface to move objects out of the scope of the sub-tree, as defined on Crowd's Directory Connector screen. If you do need to make structural changes to your LDAP directory, manually synchronize the directory cache after you have made the changes to ensure cache consistency.Syncing between AD servers is not supported. Microsoft Active Directory does not replicate the uSNCh
attribute across instances. For that reason, Crowd does not support connecting a single directory angedto different AD servers for syncing.You must restart Crowd after restoring AD from backup. On restoring from backup of an AD server, the timestamps are reverted to the backup time. To avoid the resulting confusion, you will uSNChangedneed to flush the directory cache after a Active Directory restore operation.Obtaining AD object deletions requires administrator access. Active Directory stores deleted objects in a special container called . By default, to access this container you need to cn=Deleted Objectsconnect as an administrator and so, for Crowd to be aware of deletions, you must use administrator credentials. Alternatively, it's possible to change the permissions on the cn=Deleted Objectscontainer. If you wish to do so, please see .this Microsoft KB Article
Our Test Results
We performed internal testing of synchronization with an AD server on our local network consisting of 10 000 users, 1000 groups and 200 000 memberships.
We found that the initial synchronization took about 5 minutes. Subsequent synchronizations with 100 modifications on the AD server took a couple of seconds to complete.
Please keep in mind that a number of factors come into play when trying to tune the performance of the synchronization process, including:
Size of userbase. Use LDAP filters to keep this to the minimum that suits your requirements.Type of LDAP server. We currently support change detection in AD, so subsequent synchronizations are much faster for AD than for other LDAP servers.Network topology. The further away your LDAP server is from your application server, the more latent LDAP queries will be.Database performance. As the synchronization process caches data in the database, the performance of your database will affect the performance of the synchronization.JVM heap size. If your heap size is too small for your userbase, you may experience heavy garbage collection during the synchronization process which could in turn slow down the synchronization.
147

1.
2.
Using Naive DN MatchingWhen configuring an in Crowd, you can turn 'naive DN matching' on or off. A 'DN' is a LDAP directory connectordistinguished name. Naive DN matching is also known as 'relaxed DN standardization'. This page gives some background to the setting of this option.
Crowd needs to compare DNs (distinguished names) to check a number of things, such as whether a user is a member of a group. Some directories guarantee that DNs will always be in a standard format, and some return slight variants with changes such as extra whitespace. If we know that, in a specific directory, DNs are case insensitive and are always returned in a compact format (that is, the separators are commas without spaces) then we can convert both the attribute names and values to lower case and just do a direct string comparison.
Using naive DN matching provides significant performance benefits. For that reason, we recommend enabling it where possible.
Effect of Turning Naive DN Matching On or Off
Naive DN Matching in Crowd
Processing in Crowd Comments
Off Crowd will perform the full DN parsing and compare the parsed version.
See below for default settings for each directory type.
On Crowd will perform a toLoweroperation and then do a direct comparison of the two DN strings.
If this setting is 'off' by default for your directory type (see below) then you may be able to turn it on. Both of the following two statements need to be true:
The directory server always returns memberDNs in a compact format i.e. the separators are commas without spaces. For example:
Compact format: ' 'cn=bob,dc=example,dc=comNot compact: ' 'cn=bob, dc=example, dc=com
The attribute names in the RDN are always lower case, or all searches for DNs and memberDN attributes are case insensitive.
Default Settings in Crowd
Crowd ships with the following default settings, as determined by the characteristics of each directory type.
Directory Type Naive DN Matching
ApacheDS 1.0.x Off
ApacheDS 1.5.x Off
Apple Open Directory On
FedoraDS On
Generic LDAP Off
Microsoft Active Directory On
Novell eDirectory Off
OpenDS Off
OpenLDAP On
148

Documentation for Crowd 4.4 2
Created in 2021 by Atlassian. Licensed under a .Creative Commons Attribution 2.5 Australia License
OpenLDAP Posix On
Generic Posix On
Sun Directory Server DSEE Off
149

1.
2.
1.
2.
Specifying Directory PermissionsDirectory permissions allow you to restrict the way in which directories can be used by . mapped applicationsOften, administrators need to limit applications to only being able to read not modify directory entity data, i.e. the users and groups contained within the directory. You can achieve this by disabling the relevant directory permissions.
Directory permissions are defined at two levels:
Directory-level permissions are defined on the 'Permissions' tab of the 'View Directory' screen. These permissions apply to each application mapped to the directory, unless the application has its own application-level permissions.Application-level directory permissions are defined on the 'Permissions' tab of the 'View Application' screen. If a permission is enabled at directory level, you can enable it for a specific application. For example, you could enable the 'Add User' permission on the 'Customers' directory in Jira but disable the permission for Confluence.
Take a look at an .example
Disabling a directory-level permission will override any permissions enabled at application level. If a permission is enabled at application level and then subsequently disabled at directory level, the directory-level permission will apply. (The application-level permissions will be 'remembered' and will apply again if re-enabled at directory level.)
You can also read more about .application-level directory permissions
When you , all of its permissions are enabled by default.add a new directory
To specify directory permissions
Configure a new directory as described in select an existing directory from the Adding a Directory or Direc.tory Browser
In the directory, click the tab. PermissionsThis will display a list of permissions as shown in the screenshot below.
How do directory permissions affect the Crowd application (Crowd Administration Console)?
If a particular permission is turned off at directory level, then application can perform the norelated function - not even the Crowd application. So, for example, if you disable the 'Remove User' permission for a directory, then the Crowd Administration Console will not allow you to delete a user from that directory.The Crowd application is not bound by application-level permissions, because any user who could log into the Crowd application could change the application-level permissions for the Crowd application anyway.
Need to grant users permission to access an application?
To control which users within a directory may access a , see mapped application Specifying which .Groups can access an Application
150

Documentation for Crowd 4.4 2
Created in 2021 by Atlassian. Licensed under a .Creative Commons Attribution 2.5 Australia License
Screenshot: Directory permissions
Permission Description
Add Group Allows applications to add groups to the directory.
Add User Allows applications to add users to the directory.
Modify Group
Allows applications to modify groups in the directory.
Modify User Allows applications to modify users in the directory.
Modify Group Attributes
Allows applications to modify group attributes in the directory.
Modify User Attributes
Allows applications to modify user attributes in the directory including the active option.
Remove Group
Allows applications to delete groups from the directory.
Remove User
Allows applications to delete users from the directory. Consider carefully whether you allow the deletion of users, as some applications
contain historical data, e.g. documents that the user has created. Read .more
151
Documentation for Crowd 4.4 3
Created in 2021 by Atlassian. Licensed under a .Creative Commons Attribution 2.5 Australia License
152

1. 2. 3.
4.
5. 6.
Importing Users and Groups into a DirectoryOnce you have , you can import groups and users into it from external user-stores or from added a directoryanother directory defined in Crowd. This can reduce the number of user-stores within your organization, and give you a consolidated, centralized point of user management. Once you have imported users into a Crowd directory, you can manage them via the Crowd Administration Console (assuming the directory's permissionsallow this).For example, your organization might currently have user IDs for Atlassian Jira users stored within Jira's database, and user IDs for Jive Forums users stored within Jive's database. You could use Crowd to import all the user IDs from both places into Microsoft Active Directory.
You can import from different user-stores into a single Crowd directory, or into different Crowd directories, depending on your needs.
To import users into a directory:
Log in to the .Crowd Administration ConsoleIn the top navigation bar, click .UsersClick .Import UsersThis displays the Import Type screen (see screenshot below).Select the type of user-store or file from which you want to import external users into Crowd:
Atlassian Importer see , Importing Users from Atlassian Confluence Importing Users from and Atlassian Jira Importing Users from Atlassian Bamboo
Directory Importer see Importing Users from One Crowd Directory into AnotherCSV Importer see Importing Users from CSV FilesJIVE see Importing Users from Jive Forums
Click .NextFinish the import configuration.
Screenshot: 'Select Import Type'
153

1.
2. 3. 4.
5. 6. 7.
8.
Importing Users from Atlassian ConfluenceIf you have already been using Atlassian Confluence, and are now configuring Confluence as a Crowd
, you will probably want to import your existing Confluence users and groups into a Crowd directory.application
It is recommended that you import your Confluence users into an that has its 'Internal Directory Password ' set to ' '. Otherwise, users' passwords will not be copied across to Crowd.Encryption ATLASSIAN-SHA1
To import users and groups from Atlassian Confluence into a Crowd directory:
Ensure that the database driver for the Confluence database is on Crowd's classpath. Copy the JDBC driver jar for your particular Confluence database across to in your apache-tomcat/common/libCrowd installation directory.Restart Crowd.Log in to the .Crowd Administration ConsoleFrom the top navigation bar, click .UsersThe displays.User BrowserIn the left-hand side, click .Import UsersSelect the type.Atlassian Importer Complete the fields as follows:
Atlassian Product Select 'Confluence'.Directory Select the directory that you have created for your Confluence users.Import Passwords Select this checkbox if you wish to import the users' passwords from Confluence. You can only import passwords if the Crowd directory is using the 'Atlassian SHA1' encryption method.Product Database URL Type the URL of your Confluence instance's database. The exact syntax will depend on which database you are using; see in the Database Configuration Confluence
.Configuration GuideDatabase Driver type the name of your Confluence instance's database JDBC driver (e.g. for MYSQL, type ).com.mysql.jdbc.DriverUsername Type the username of the database user that Crowd will use to login to your Confluence instance's database.Password Type the password of the database user Crowd will use to login to your Confluence instance's database.
The import process will log in to the database, not into Confluence.Click button to import the users from your Confluence instance into your Crowd directory.Continue
The results screen will be displayed, showing how many users and groups have been imported into your Crowd directory.Click the ' ' button to the imported users and groups via the Crowd Administration Users view and manageConsole (assuming the directory's allow this).permissions
154
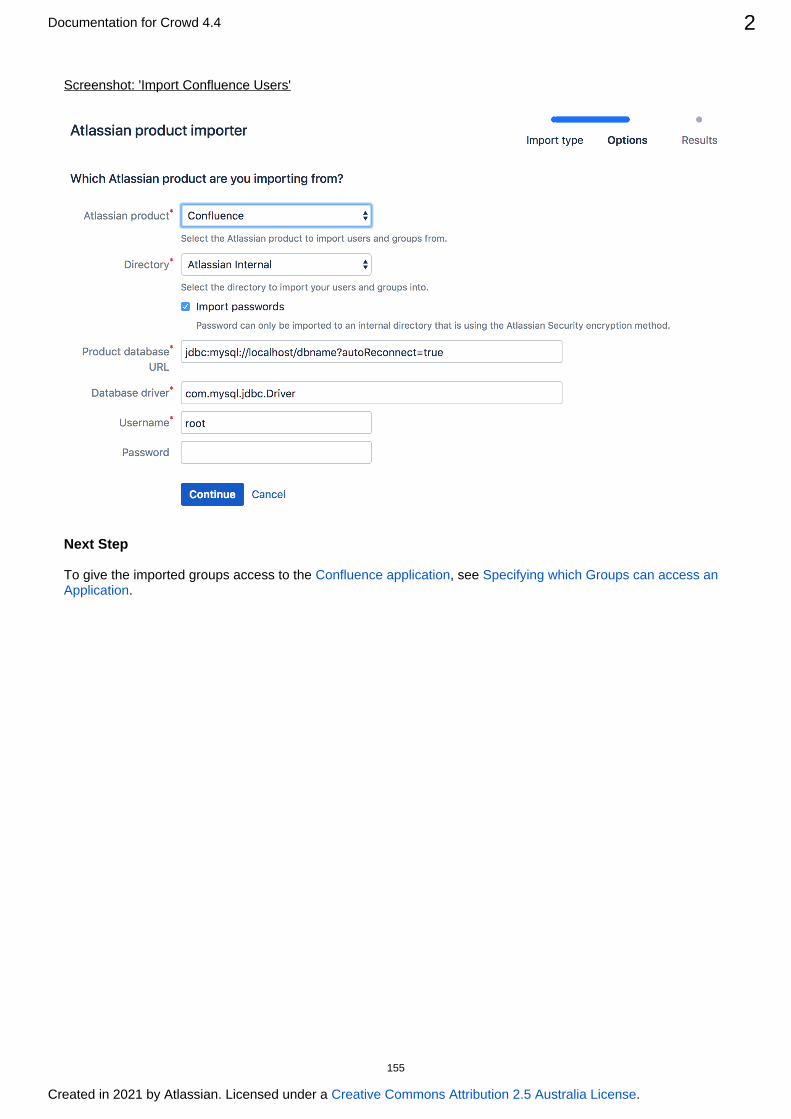
Documentation for Crowd 4.4 2
Created in 2021 by Atlassian. Licensed under a .Creative Commons Attribution 2.5 Australia License
Screenshot: 'Import Confluence Users'
Next Step
To give the imported groups access to the , see Confluence application Specifying which Groups can access an .Application
155

1.
2. 3.
4. 5. 6.
7.
Importing Users from Atlassian JiraIf you have already been using Atlassian Jira, and are now , you will configuring Jira as a Crowd applicationprobably want to import your existing Jira users and groups into a Crowd directory.
It is recommended that you import your Jira users into an that has its ' ' Internal Directory Password Encryptionset to ' '. Otherwise, users' passwords will not be copied across to Crowd.ATLASSIAN-SECURITY
To import users and groups from Atlassian Jira into a Crowd directory
Ensure that the database drivers for the Jira database are on Crowd's classpath. To do this, simply copy the JDBC driver jar for your particular Jira database across to in your apache-tomcat/common/libCrowd installation directory. Then restart Crowd.Log in to the .Crowd Administration ConsoleIn the top navigation bar, click .UsersThe displays.User BrowserFrom the left-hand side, click .Import UsersSelect the type and click .Atlassian Importer NextComplete the fields as follows:
Atlassian Product Select 'Jira'.Directory Select the directory that you have created for your Jira users.Import Passwords Select this checkbox if you wish to import the users' passwords from Jira. You can only import passwords if the Crowd directory is using the 'Atlassian SHA1' encryption method.Product Database URL Type the URL of your Jira instance's database. The exact syntax will depend on which database you are using; see in the Connecting Jira to a Database Jira
.Installation GuideDatabase Driver Type the name of your Jira instance's database JDBC driver, e.g.
For MySQL, type com.mysql.jdbc.DriverFor PostgreSQL type org.postgresql.DriverFor Oracle type oracle.jdbc.OracleDriverFor MS SQL Server type net.sourceforge.jtds.jdbc.DriverFor HSQLDB type org.hsqldb.jdbcDriver
Username Type the username of the database user that Crowd will use to log in to your Jira instance's database.Password Type the password of the database user Crowd will use to log in to your Jira instance's database.
The import process will log in to the database, not into Jira.Continueto import the users from your Jira instance into your Crowd directory.
The results screen displays, showing how many users and groups have been imported into your Crowd directory.Click the ' ' button to the imported users and groups via the Crowd Administration Users view and manageConsole (assuming the directory's allow this).permissions
156

Documentation for Crowd 4.4 2
Created in 2021 by Atlassian. Licensed under a .Creative Commons Attribution 2.5 Australia License
Screenshot: 'Import Jira Users'
Next Step
To give the imported groups access to the , see Jiraapplication Specifying which Groups can access an .Application
157
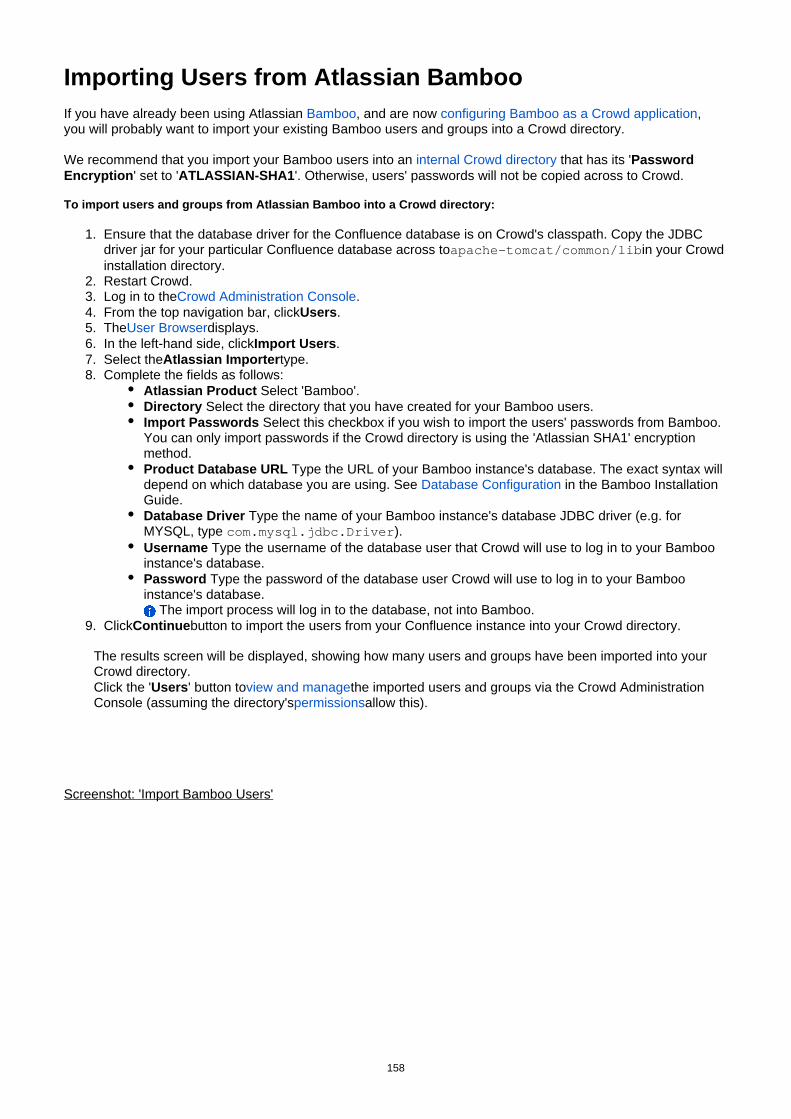
1.
2. 3. 4. 5. 6. 7. 8.
9.
Importing Users from Atlassian BambooIf you have already been using Atlassian , and are now , Bamboo configuring Bamboo as a Crowd applicationyou will probably want to import your existing Bamboo users and groups into a Crowd directory.
We recommend that you import your Bamboo users into an that has its 'internal Crowd directory Password ' set to ' '. Otherwise, users' passwords will not be copied across to Crowd.Encryption ATLASSIAN-SHA1
To import users and groups from Atlassian Bamboo into a Crowd directory:
Ensure that the database driver for the Confluence database is on Crowd's classpath. Copy the JDBC driver jar for your particular Confluence database across to in your Crowd apache-tomcat/common/libinstallation directory.Restart Crowd.Log in to the .Crowd Administration ConsoleFrom the top navigation bar, click .UsersThe displays.User BrowserIn the left-hand side, click .Import UsersSelect the type.Atlassian ImporterComplete the fields as follows:
Atlassian Product Select 'Bamboo'.Directory Select the directory that you have created for your Bamboo users.Import Passwords Select this checkbox if you wish to import the users' passwords from Bamboo. You can only import passwords if the Crowd directory is using the 'Atlassian SHA1' encryption method.Product Database URL Type the URL of your Bamboo instance's database. The exact syntax will depend on which database you are using. See in the Database Configuration Bamboo Installation
.GuideDatabase Driver Type the name of your Bamboo instance's database JDBC driver (e.g. for MYSQL, type ).com.mysql.jdbc.DriverUsername Type the username of the database user that Crowd will use to log in to your Bamboo instance's database.Password Type the password of the database user Crowd will use to log in to your Bamboo instance's database.
The import process will log in to the database, not into Bamboo.Click button to import the users from your Confluence instance into your Crowd directory.Continue
The results screen will be displayed, showing how many users and groups have been imported into your Crowd directory.Click the ' ' button to the imported users and groups via the Crowd Administration Users view and manageConsole (assuming the directory's allow this).permissions
Screenshot: 'Import Bamboo Users'
158
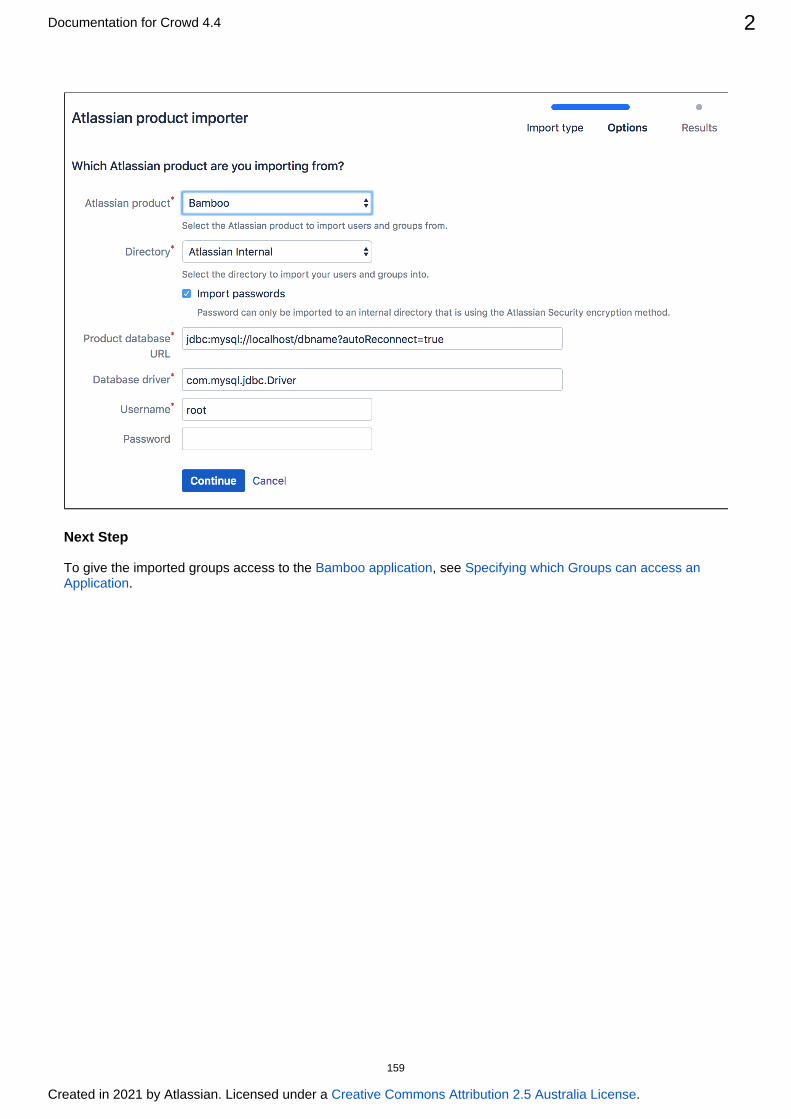
Documentation for Crowd 4.4 2
Created in 2021 by Atlassian. Licensed under a .Creative Commons Attribution 2.5 Australia License
Next Step
To give the imported groups access to the , see Bamboo application Specifying which Groups can access an .Application
159

1. 2. 3. 4. 5.
6. 7.
8.
Importing Users from Jive ForumsIf you have already been using Jive Forums, and are now , you configuring Jive Forms as a Crowd applicationwill probably want to import your existing Jive users and groups into a Crowd directory.
To import users and groups from Jive Forums into a Crowd directory,
Login to the .Crowd Administration ConsoleClick the ' ' link in the top navigation bar.UsersThis will display the . Click the ' ' link.User Browser Import UsersThis will display the ' ' screen. Click the ' ' button.Import Type JIVEThis will display the ' ' screen. Complete the fields as follows:Options
' ' select the directory that is to the .Directory mapped Jive Forums application' ' type the URL of Jive's database.DB URL' ' type the name of Jive's database JDBC driver.DB Driver' ' type the username of the database user that Crowd will use to login to Jive's Usernamedatabase.' ' type the password of the database user Crowd will use to login to Jive's database.Password
The import process will log in to the database, not to Jive Forums.Click the ' ' button to import the users from Jive Forums into your Crowd directory.ContinueThe ' ' screen will be displayed, showing how many users and groups have been imported into Statusyour Crowd directory.Click the ' ' button to the imported users and groups via the Crowd Users view and manageAdministration Console (assuming the directory's allow this).permissions
Screenshot: 'Import Jive Users'
Before you begin:
The database drivers for the Jive Forums database will need to be on Crowd's classpath. To do this, simply copy the database driver JAR for your particular Jive database across to CROWD/apache-
and restart Crowd.tomcat/common/lib
Note: the passwords for users in Jive will not be copied across to Crowd as they are stored as hashes in Jive's internal database.
160
Documentation for Crowd 4.4 2
Created in 2021 by Atlassian. Licensed under a .Creative Commons Attribution 2.5 Australia License
Next Step
To give the imported groups access to the , see Jive Forums application Specifying which Groups can access an .Application
Related Topics Using the Directory BrowserAdding a Directory
Configuring an Internal DirectoryConfiguring an LDAP Directory Connector
LDAP Object StructuresConfiguring an SSL Certificate for Microsoft Active Directory
Configuring a Remote Crowd DirectoryConfiguring a Custom Directory ConnectorConfiguring a Delegated Authentication DirectoryConfiguring Azure Active Directory
Configuring Caching for an LDAP DirectoryUsing Naive DN MatchingSpecifying Directory PermissionsImporting Users and Groups into a Directory
Importing Users from Atlassian ConfluenceImporting Users from Atlassian JiraImporting Users from Atlassian BambooImporting Users from Jive ForumsImporting Users from CSV Files
Configuring the CSV ImporterMapping CSV Fields to Crowd FieldsConfirming the CSV Importer ConfigurationViewing the Results of the Import
Importing Users from One Crowd Directory into AnotherConfiguring directories for failover authenticationPruning delegated directories
Crowd documentation
161
1.
2.
1. 2. 3.
Importing Users from CSV FilesYou can copy users from an external directory or user base into Crowd via a CSV (comma-separated values) file. There are two phases involved:
Export your existing users and their group memberships from your external directory into a CSV file or files.Import the users, groups and group memberships into a Crowd directory from the CSV files.
The CSV importer is available with Crowd 1.1.1 and later.
How the CSV Importer Handles Data
The CSV Importer to the Crowd directory, but does not update or delete existing information:adds
If the Username already exists in Crowd, the CSV Importer does not overwrite the information for that user even if the Username exists in the CSV file with different user information.The CSV Importer does not remove users from Crowd.If your 'Group Membership' CSV file contains additional group(s) for a user, the additional group(s) and group membership(s) will be imported.Existing group memberships will not be changed or removed.
Preparing the CSV import directory
Starting from Crowd 4.2.4 and 4.3.5, any CSV files that you want to import to Crowd must be added to the impo directory. You need to create this directory manually and make it readable to the user that is running Crowd.rt
To create the directory:import
Go to your Crowd shared home directory.Create a directory and name it .importAdd the CSV files to this directory.
Example
Here's an example, just to show you the hierarchy:
/var/atlassian/crowd/home/shared/import.
Preparing your CSV Files
You will need:
a CSV file containing user information, andoptionally, another CSV file containing group memberships.
Attached are simple examples of the CSV files:
Example user CSV fileExample group membership CSV file
The CSV Importer's allows you to match the CSV fields to Crowd's User and Group 'File Mappings' screenfields.
Formatting and location of the CSV files:
Requirement Description
Location The CSV files must be on the local drive (e.g. C:) of the Crowd server. If you're using Crowd 4.2.4, 4.3.5, or newer, CSV files must additionally be placed within the subdirectory 'import'of the shared Crowd home.
162

Documentation for Crowd 4.4 2
Created in 2021 by Atlassian. Licensed under a .Creative Commons Attribution 2.5 Australia License
1.
2.
1. 2.
3. 4. 5.
Supported attributes
The CSV Importer does not support custom attributes. The supported attributes are shown in the drop-down lists on the .'File Mappings' screen
Header row The first row in each CSV file must be a header row. The CSV Importer will not import the information in the first row. The information in the first row is displayed in the column labeled 'CSV Header Row' on the 'File Mappings' screen
Delimiter The fields in the CSV file must be separated by a single-character delimiter. The CSV Importer's lets you tell Crowd which delimiter you have used.'Configuration' screen
Passwords You will need to decide whether to import your passwords into Crowd. And if you do import the passwords, you must choose to import them as either encrypted or clear text. Check the password encryption in the directory you are exporting users from, and compare it with the encryption method of the Crowd directory you want to import the users into. You can use Crowd's to view the directory's configuration details, including the Directory Browserencryption method. The CSV Importer's lets you tell the CSV Importer 'Configuration' screenwhether to encrypt the passwords.
To export information from your user directory into a CSV file:
Export the users from your external user directory or database into a CSV file. Your directory or user base should have an option to allow you to do this.If you want to copy your existing group memberships into Crowd, export the groups and group memberships into another CSV file.
Importing the CSV Files into Crowd
Once you have prepared your CSV file(s), you can import the users and groups into a Crowd directory.
To import users and groups from CSV files:
Log in to the .Crowd Administration ConsoleIn the top navigation bar, click .UsersThis will display the User Browser.Click .Import UsersIn the Import type screen, select and click .CSV Importer NextEnter the details of the CSV files as described in and click .'Configuring the CSV Importer' Continue
RELATED TOPICS
Configuring the CSV ImporterMapping CSV Fields to Crowd FieldsConfirming the CSV Importer ConfigurationViewing the Results of the Import
Crowd documentation
163
1. 2.
3.
Configuring the CSV ImporterOnce you have , the ' ' screen allows you to specify information about started the CSV Importer Configurationthe Crowd directory and CSV file(s) involved in the import.
Refer to information on .preparing your CSV files
To configure the CSV importer
Start the .CSV ImporterComplete the following fields:
Directory Select the Crowd user directory into which you want to import the users.Are your passwords encrypted?
Select if the passwords in your CSV file are already encrypted. Crowd will not re-Yesencrypt the passwords during the import.Select if the passwords in your CSV file are not encrypted. Crowd will encrypt the Nopasswords during the import, using the encryption method of the Crowd directory you are importing into.
User state after import Select the default state for users imported with the CSV file.Delimiter Type the single-character delimiter used to separate the fields in your CSV file(s).User File Type the location of the CSV file containing the users you wish to import. If you're using Crowd 4.2.4, 4.3.5, or newer, the file path must be relative to the subdirectory of 'import'the shared Crowd home.Group Membership File If you want to import groups and group memberships of your users, type the location of the CSV file containing the group membership information. If you're using Crowd 4.2.4, 4.3.5, or newer, the file path must be relative to the subdirectory of the 'import'shared Crowd home.
Click the button to .Continue map the CSV fields to the Crowd directory fields
Screenshot: 'CSV Importer - Configuration'
The CSV files to import (the one that are entered in the 'User File' and 'Group Membership File' fields must be in a path readable by the Crowd server performing the import.
164

Documentation for Crowd 4.4 2
Created in 2021 by Atlassian. Licensed under a .Creative Commons Attribution 2.5 Australia License
RELATED TOPICS
Using the Directory BrowserAdding a Directory
Configuring an Internal DirectoryConfiguring an LDAP Directory Connector
LDAP Object StructuresConfiguring an SSL Certificate for Microsoft Active Directory
Configuring a Remote Crowd DirectoryConfiguring a Custom Directory ConnectorConfiguring a Delegated Authentication DirectoryConfiguring Azure Active Directory
Configuring Caching for an LDAP DirectoryUsing Naive DN MatchingSpecifying Directory PermissionsImporting Users and Groups into a Directory
Importing Users from Atlassian ConfluenceImporting Users from Atlassian JiraImporting Users from Atlassian BambooImporting Users from Jive ForumsImporting Users from CSV Files
Configuring the CSV ImporterMapping CSV Fields to Crowd FieldsConfirming the CSV Importer ConfigurationViewing the Results of the Import
Importing Users from One Crowd Directory into AnotherConfiguring directories for failover authenticationPruning delegated directories
Crowd documentation
165

Mapping CSV Fields to Crowd FieldsOnce you have entered details on the , the ' ' screen Configuration screen of the CSV Importer File Mappingsallows you to match the CSV fields to the User and Group fields in Crowd. Crowd will use these mappings to import the information from the CSV file(s) into your Crowd directory.
Refer to information on .preparing your CSV files
The ' ' screen has two main sections:File Mappings
' ' Use this section to map the fields in your 'User' CSV file.User Mappings' ' Use this section to map the fields in your 'Group Membership' CSV file, if you have Group Mappingsone. This section will only appear if you have specified a 'Group Membership File' on the Configuration
.screen
Each section has the following columns:
Column Description
CSV Header Row
This column shows the text from each field in the first row of your CSV file. The CSV Importer assumes that the first row is a header row.
Sample Row
This column shows the text from each field in the second row of your CSV file. This is done to help you with the mapping process.
Mapping Each row in this column contains a drop-down list of the Crowd field names available for mapping. To map a Crowd field to a CSV field, select the appropriate Crowd field name from the drop-down list to match the CSV field shown in the 'CSV Header Row' column.
In the ' ' section, the 'Mapping' drop-down lists contain the following Crowd field names:User Mappings
Crowd field
Description
Username
Required. One of the rows on the screen must map this value to the CSV field containing the usernames.
First Name
Required. One of the rows on the screen must map this value to the CSV field containing the users' first names.
Last Name
Required. One of the rows on the screen must map this value to the CSV field containing the users' last names.
Email Address
Required. One of the rows on the screen must map this value to the CSV field containing the users' email addresses.
Status Required. You can modify this field only if you selected the import status to be Same as in the . One of the rows on the screen must map this value to the CSV field containing the CSV file
status. Crowd recognizes the following status values:
for active status: "active", "true", "t", "1"for inactive status: "inactive", "false", "f", "0"
Display Name
Optional. One of the rows on the screen can map this value to the CSV field containing the users' display name.
Password If your CSV file contains passwords, map this value to the CSV field containing the passwords.
None Select 'None' if the CSV field displayed under 'CSV Header Row' is not to be mapped to any Crowd fields. These CSV fields will not be imported into Crowd.
166

Documentation for Crowd 4.4 2
Created in 2021 by Atlassian. Licensed under a .Creative Commons Attribution 2.5 Australia License
1. 2. 3.
4.
5.
In the ' ' section (if present), the 'Mapping' drop-down lists contain the following Crowd field Group Mappingsnames:
Crowd field
Description
Group Name
Required. One of the rows on the screen must map this value to the CSV field containing the names of the groups.
Username
Required. One of the rows on the screen must map this value to the CSV field containing the usernames.
None Select 'None' if the CSV field displayed under 'CSV Header Row' is not to be mapped to any Crowd fields. These CSV fields will not be imported into Crowd.
To map the CSV fields to Crowd fields,
Start the .CSV ImporterComplete the details on the and click the 'Continue' button.'Configuration screen'This will display the ' ' screen. Complete the mappings in the ' ' section File Mappings User Mappingsas follows:
In the 'CSV Header Row' column, find the field which contains your users' first names select 'Fir' from the drop-down list in the 'Mapping' column.st Name
In the 'CSV Header Row' column, find the field which contains your users' last names select 'La' from the drop-down list in the 'Mapping' column.st Name
In the 'CSV Header Row' column, find the field which contains your users' email addresses select ' ' from the drop-down list in the 'Mapping' column.Email AddressIn the 'CSV Header Row' column, find the field which contains the usernames select 'Username' from the drop-down list in the 'Mapping' column.In the 'CSV Header Row' column, find the field which contains your users' passwords select 'Pa
' from the drop-down list in the 'Mapping' column.sswordSelect ' ' from the drop-down lists for all unmatched rows.None
Complete the mappings in the ' ' section (if present) as follows:Group MappingsIn the 'CSV Header Row' column, find the field which contains the group names select 'Group
' from the drop-down list in the 'Mapping' column.NameIn the 'CSV Header Row' column, find the field which contains the usernames select 'Username' from the drop-down list in the 'Mapping' column.Select ' ' from the drop-down lists for all unmatched rows.None
Click the ' ' button to .Continue confirm the CSV configuration
Screenshot: 'CSV Importer - File Mappings'
167

Documentation for Crowd 4.4 3
Created in 2021 by Atlassian. Licensed under a .Creative Commons Attribution 2.5 Australia License
168

1. 2. 3.
Confirming the CSV Importer ConfigurationThe ' ' screen allows you to review your and before performing the Confirmation configuration mapping CSV
.import
To confirm the CSV configuration and mapping,
Review the information shown on the 'Confirmation' screen.Click the ' ' button to import the users from your CSV file into your Crowd directory.ContinueOnce the import is complete, Crowd will display the .'Results' screen
Screenshot: 'CSV Importer - Confirmation'
169

Viewing the Results of the ImportThe ' ' screen shows the outcome of the .Results CSV import
Screenshot: 'CSV Importer - Results'
The CSV Importer to the Crowd directory, but does not update or delete existing information:adds
If the Username already exists in Crowd, the CSV Importer does not overwrite the information for that user even if the Username exists in the CSV file with different user information.The CSV Importer does not remove users from Crowd.If your 'Group Membership' CSV file contains additional group(s) for a user, the additional group(s) and group membership(s) will be imported.Existing group memberships will not be changed or removed.The 'Results' screen will show number of duplicate usernames in the CSV file which were ignored i.e. not imported.The 'Results' screen will show number of duplicate group names in the CSV file which were ignored i.e. not imported.
170
1. 2. 3. 4. 5. 6. 7.
8. 9.
10.
Importing Users from One Crowd Directory into Another
Once you have , you can import users and groups into it from an external system or from added a directoryanother directory defined in Crowd. To learn about importing from external systems, refer to Importing Users
. Below we tell you how to import from one Crowd directory to another.and Groups into a Directory
You can copy users, groups and memberships:
From an to a .LDAP directory Delegated Authentication directoryFrom one to another internal Crowd directory.internal Crowd directory
Things to be aware of:
The ' ' method must be the same in both directories, otherwise you will not be able Password Encryptionto copy the users across.The directory importer does not support nested groups when importing users and groups from LDAP into a directory. See .delegated authentication CWD-1334The ' ' is the directory you want to copy users and groups from. The 'source directory destination
' is where you want to copy them to. Both directories must be defined in Crowd before you start directorythe import process.
To import users and groups from one Crowd directory into another,
Log in to the .Crowd Administration ConsoleIf not already defined, to Crowd.add the source directoryIf not already defined, to Crowd.add the destination directoryClick the ' ' link in the top navigation bar.UsersThis will display the . Click the ' ' link.User Browser Import UsersThis will display the ' ' screen. Click the ' ' button.Import Type Directory ImporterThis will display the ' ' screen, shown below. Complete the fields as follows:Options
' ' Select the directory that contains the users and groups you want to copy.Source Directory' ' Select the directory that you want to copy the users and groups into.Destination Directory' ' Tick the box if you want to delete and replace all the details Overwrite Destination Directoryand memberships for any user who exists in both source and destination directories:
If the checkbox is empty, Crowd will not update the user details for that username in the destination directory, but will add any new group memberships for that username.If the checkbox is ticked, Crowd will remove all the details and memberships for that username from the destination directory and replace them with the details and memberships from the source directory.
Click the ' ' button.ContinueThe ' ' screen will be displayed. Check the details and click the ' ' button.Confirmation ContinueThe ' ' screen will be displayed, showing how many users and groups have been imported into Resultsyour Crowd directory.If the import of any users or groups failed, please check the log files to find out why.
Warning
Please take in mind that this does not work for Remote Directories e.g. From one Crowd to another Crowd
171

Documentation for Crowd 4.4 2
Created in 2021 by Atlassian. Licensed under a .Creative Commons Attribution 2.5 Australia License
Screenshot: 'Import users from one directory to another'
Next Steps
To allow the users to log in to the via Crowd:integrated application(s)
Map the directory to the application(s), if not already done. See .Mapping a Directory to an ApplicationGive the imported groups access to the application(s). See Specifying which Groups can access an
.Application
RELATED TOPICS
Using the Directory BrowserAdding a Directory
Configuring an Internal DirectoryConfiguring an LDAP Directory Connector
LDAP Object StructuresConfiguring an SSL Certificate for Microsoft Active Directory
Configuring a Remote Crowd DirectoryConfiguring a Custom Directory ConnectorConfiguring a Delegated Authentication DirectoryConfiguring Azure Active Directory
Configuring Caching for an LDAP DirectoryUsing Naive DN MatchingSpecifying Directory PermissionsImporting Users and Groups into a Directory
Importing Users from Atlassian ConfluenceImporting Users from Atlassian JiraImporting Users from Atlassian BambooImporting Users from Jive ForumsImporting Users from CSV Files
Configuring the CSV ImporterMapping CSV Fields to Crowd FieldsConfirming the CSV Importer ConfigurationViewing the Results of the Import
Importing Users from One Crowd Directory into AnotherConfiguring directories for failover authenticationPruning delegated directories
Crowd documentation
172

1. 2. 3. 4.
5. 6.
1. 2. 3.
Configuring directories for failover authenticationAdding an extra user directory for failover authentication means that when the primary directory is unavailable (e.g. due to a connection timeout), Crowd will authenticate your users by trying the next directory from the list. It works like a backup directory for authenticationand ensures that your users can log in even if the primary directory is not working.
To add a failover authentication directory:
Log in to the .Crowd Administration ConsoleClick the ' ' link in the top navigation bar.DirectoriesThis will display the . Click the ' ' link.Directory Browser Add DirectoryThis will display the ' ' screen. Choose the ' ' directory Select Directory Type Delegated Authenticationtype.For details on how to configure this type of directory, see Configuring a Delegated Authentication
.DirectoryMap the failover directory to the right application that already uses the primary directory.The failover directory will appear at the bottom of the list. Use the blue up-arrow or down-arrow to move it right after the primary directory.
Example
The following example shows a simple scenario, where a failover directory is added to Crowd.
A remote directory is defined in Crowd.Directory 1Two applications are using this directory Jira and Confluence.A replica of this directory is in your infrastructure, but it hasn't been added to Crowd yet.
Note
Map the failover directory to each application youd like to use it for.Specify the same user access rights for the primary and failover directories (either all users can log in, or only specific groups.)
173

Documentation for Crowd 4.4 2
Created in 2021 by Atlassian. Licensed under a .Creative Commons Attribution 2.5 Australia License
You define an extra directory in Crowd that points to the replica. If is down, Crowd will use the replica Directory 1to authenticate your users. Your setup should then look like in the image below:
174

1. 2.
3. 4.
5.
6.
Pruning delegated directoriesOptimize your user database by cleaninginactive users from your delegated directories. After configuring pruning for a delegated directory, Crowd will periodically check if the directory contains any users who have been deactivated or removed from the remote directory.
By default such users will be deactivated in Crowd. It is also possible to enable "hard delete" mode, in which users who have been deleted in the remote directory will also be deleted in Crowd.
Delegated directory pruning feature is Crowd's native feature starting from version . If you use 4.3
version of Crowd lower than 4.3, you must install the Delegated Directory Pruning plugin from Atlassian to be able to use this functionality.Marketplace
To enable pruning for your delegated directory
Go to a delegated directory for which you want to enable pruningGo toConfigure pruning.
Enable pruning by selecting the togglePruningChoose the pruning mode:
- when a user is deactivated or deleted in a remote directory, it is also disabled in Deactivate userCrowd.
- when a user is deleted in a remote directory, it is also deleted in Crowd.Delete user
Choose what pruning should do with users that don't have an external ID specified:
This is a user that was manually added to delegated directory by in Crowd or using Crowd's Add userREST API. Such user will not have anexternalID because they have no link to the corresponding user in the remote directory.
don't do anything with a user that doesn't have an external ID.Do Nothing-Deactivate user- deactivate a user that doesn't have an external ID.Delete user - delete a user that doesn't have an external ID.
Click .Save
User deactivated in remote directory will be disabled in Crowd.
Changes made to users in delegated directories are reflected in Crowd with a delay. Pruning is being run periodically - everyday at 03:00 AM server time.
175

Managing ApplicationsCrowd integrates and provisions applications. Once , an application is to a directory(s), whose defined mappedusers are then to the application. Note that an application can only communicate with Crowd granted accesswhen the application uses a known .host address
176
1. 2.
3.
Using the Application BrowserThis page describes the Application Browser and gives an overview of the types of application you may find in Crowd.
On this page:
About the Application BrowserAbout Applications
Default ApplicationsApplication Types
About the Application Browser
The Application Browser allows you to view and search for integrated applications.
To use the Application Browser,
Log in to the .Crowd Administration ConsoleIn the top navigation bar, click . ApplicationsThis will display the Application Browser, showing all the applications that exist in your Crowd system. You can refine your search by specifying a (note that this is case sensitive), or / Name Active Inactiveapplications.To view or edit an application's details, click the application name or the link next to the specific Viewapplication.
177
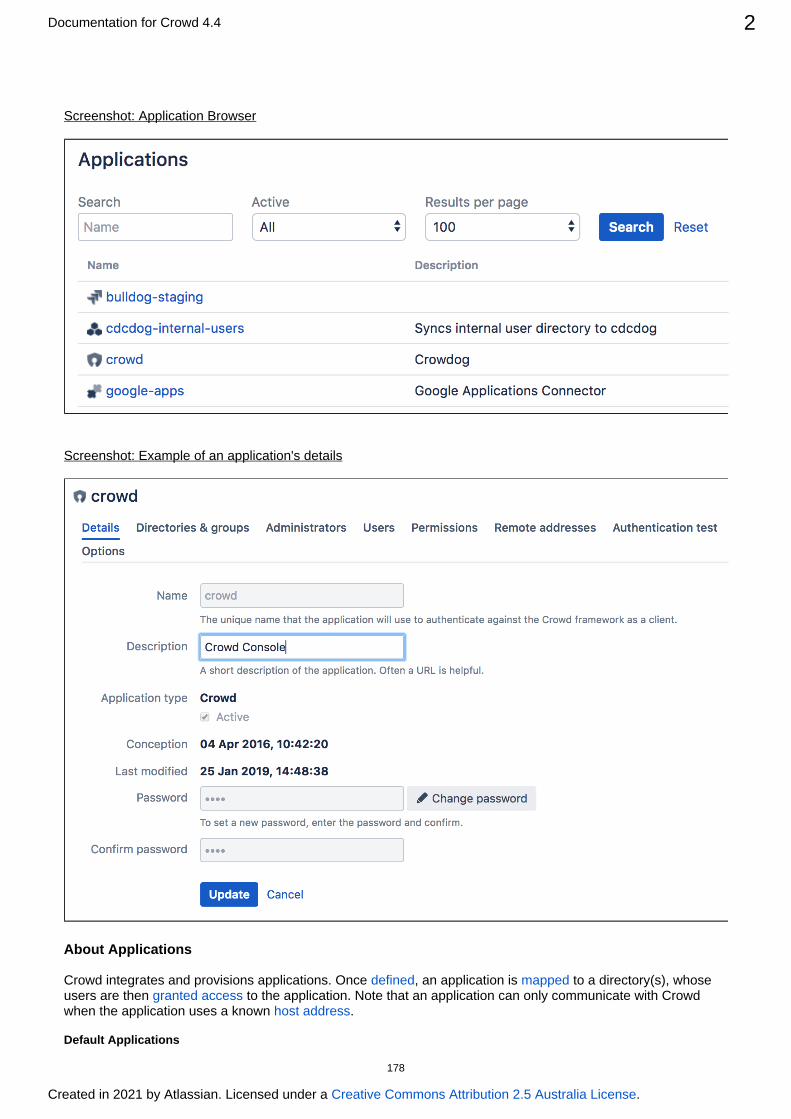
Documentation for Crowd 4.4 2
Created in 2021 by Atlassian. Licensed under a .Creative Commons Attribution 2.5 Australia License
Screenshot: Application Browser
Screenshot: Example of an application's details
About Applications
Crowd integrates and provisions applications. Once , an application is to a directory(s), whose defined mappedusers are then to the application. Note that an application can only communicate with Crowd granted accesswhen the application uses a known .host address
Default Applications
178
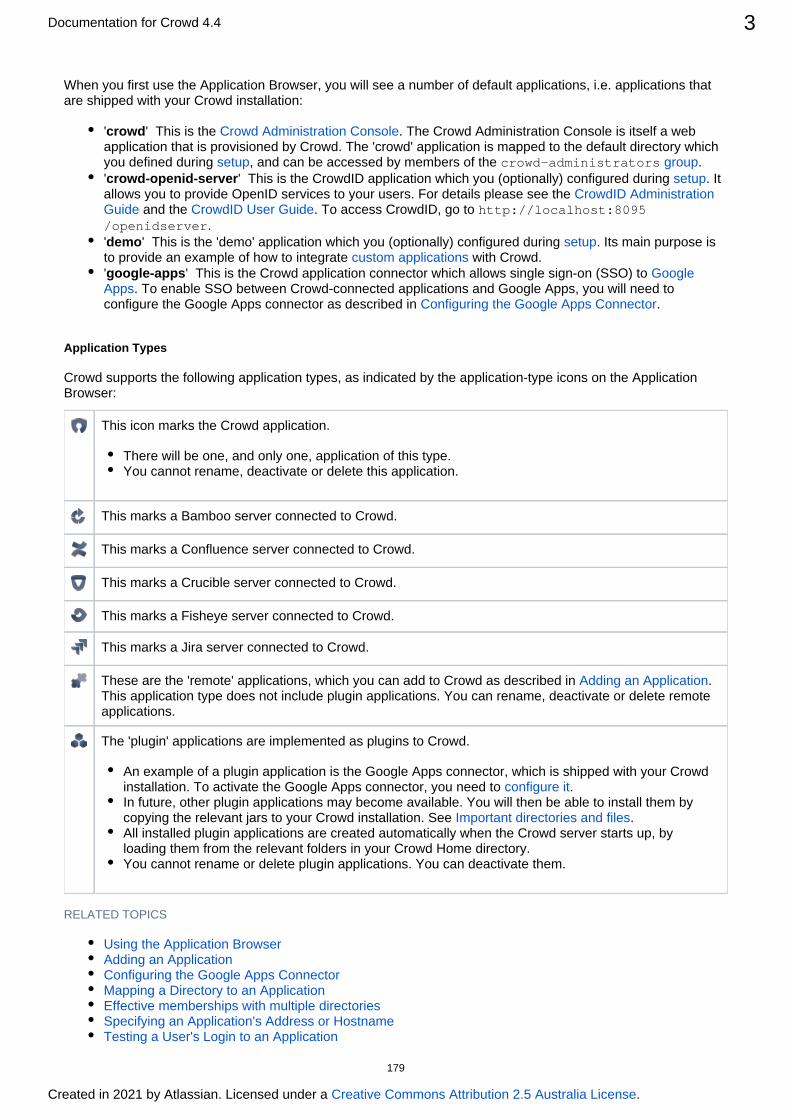
Documentation for Crowd 4.4 3
Created in 2021 by Atlassian. Licensed under a .Creative Commons Attribution 2.5 Australia License
When you first use the Application Browser, you will see a number of default applications, i.e. applications that are shipped with your Crowd installation:
' ' This is the . The Crowd Administration Console is itself a web crowd Crowd Administration Consoleapplication that is provisioned by Crowd. The 'crowd' application is mapped to the default directory which you defined during , and can be accessed by members of the .setup crowd-administrators group' ' This is the CrowdID application which you (optionally) configured during . It crowd-openid-server setupallows you to provide OpenID services to your users. For details please see the CrowdID Administration
and the . To access CrowdID, go to Guide CrowdID User Guide http://localhost:8095./openidserver
' ' This is the 'demo' application which you (optionally) configured during . Its main purpose is demo setupto provide an example of how to integrate with Crowd.custom applications' ' This is the Crowd application connector which allows single sign-on (SSO) to google-apps Google
. To enable SSO between Crowd-connected applications and Google Apps, you will need to Appsconfigure the Google Apps connector as described in .Configuring the Google Apps Connector
Application Types
Crowd supports the following application types, as indicated by the application-type icons on the Application Browser:
This icon marks the Crowd application.
There will be one, and only one, application of this type.You cannot rename, deactivate or delete this application.
This marks a Bamboo server connected to Crowd.
This marks a Confluence server connected to Crowd.
This marks a Crucible server connected to Crowd.
This marks a Fisheye server connected to Crowd.
This marks a Jira server connected to Crowd.
These are the 'remote' applications, which you can add to Crowd as described in . Adding an ApplicationThis application type does not include plugin applications. You can rename, deactivate or delete remote applications.
The 'plugin' applications are implemented as plugins to Crowd.
An example of a plugin application is the Google Apps connector, which is shipped with your Crowd installation. To activate the Google Apps connector, you need to .configure itIn future, other plugin applications may become available. You will then be able to install them by copying the relevant jars to your Crowd installation. See .Important directories and filesAll installed plugin applications are created automatically when the Crowd server starts up, by loading them from the relevant folders in your Crowd Home directory.You cannot rename or delete plugin applications. You can deactivate them.
RELATED TOPICS
Using the Application BrowserAdding an ApplicationConfiguring the Google Apps ConnectorMapping a Directory to an ApplicationEffective memberships with multiple directoriesSpecifying an Application's Address or HostnameTesting a User's Login to an Application
179

Documentation for Crowd 4.4 4
Created in 2021 by Atlassian. Licensed under a .Creative Commons Attribution 2.5 Australia License
Enforcing Lower-Case Usernames and Groups for an ApplicationManaging an Application's SessionDeleting or Deactivating an ApplicationConfiguring Caching for an ApplicationOverview of SSOConfiguring Options for an ApplicationEnabling OpenID client appAllowing applications to create user tokensDisabling the OpenID client appConfiguring how users log in
Crowd documentation
180
1. 2.
3. 4. 5.
Adding an ApplicationThis page gives an overview of the process for adding an application to Crowd, It refers to the application-specific pages for detailed instructions.
Overview
There are two main steps to integrating an application with Crowd:
Step 1. Configure Crowd to talk to your application that is, set up a directory in Crowd containing your users and groups, and then add the application to Crowd using the 'Add Application' wizard, as described . The application will now be allowed to authenticate against Crowd.belowStep 2. Configure the application to talk to Crowd that is, install the Crowd client into the application and configure the application to forward users' authentication and security requests to Crowd.
Detailed Instructions
Please refer to the details for your specific application:
Integrating Crowd with Atlassian BambooIntegrating Crowd with Atlassian ConfluenceIntegrating Crowd with Atlassian CrowdIDIntegrating Crowd with Atlassian CrucibleIntegrating Crowd with Atlassian FishEyeIntegrating Crowd with Atlassian JiraIntegrating Crowd with Atlassian Bitbucket ServerIntegrating Crowd with Acegi SecurityIntegrating Crowd with Jive ForumsIntegrating Crowd with Spring SecurityIntegrating Crowd with a Custom ApplicationIntegrating Crowd with Atlassian HipChat
Using Crowd's 'Add Application' Wizard
Log in to the .Crowd Administration ConsoleConsider whether you need to add any directories, users and groups. If so, see the detailed instructions for your application.In the top navigation bar, click .ApplicationsClick Add Application.Complete the form:
Attribute Description
Application Type
This is used to define the type of application you are adding to Crowd. If you cannot see a matching application type, please choose the 'Generic Application' option.
Name The username which the application will use when it authenticates against the Crowd framework as a client. This value must be unique, i.e. it cannot be used by more than one application client.
Description A short description of the application. Note: A URL is often helpful.
Password The password which the application will use when it authenticates against the Crowd framework as a client.
Confirm Password
Retype the same password as above, to confirm it.
181
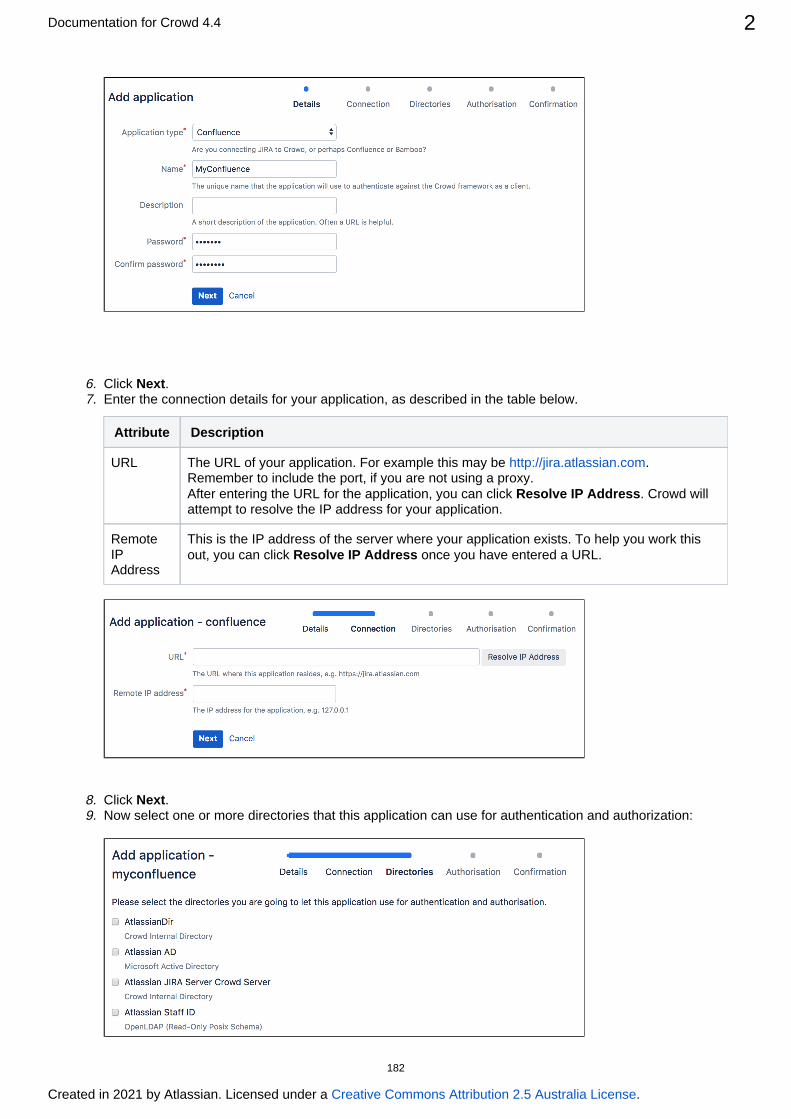
Documentation for Crowd 4.4 2
Created in 2021 by Atlassian. Licensed under a .Creative Commons Attribution 2.5 Australia License
5.
6. 7.
8. 9.
10.
Click .NextEnter the connection details for your application, as described in the table below.
Attribute Description
URL The URL of your application. For example this may be . http://jira.atlassian.comRemember to include the port, if you are not using a proxy.After entering the URL for the application, you can click . Crowd will Resolve IP Addressattempt to resolve the IP address for your application.
Remote IP Address
This is the IP address of the server where your application exists. To help you work this out, you can click once you have entered a URL.Resolve IP Address
Click .NextNow select that this application can use for authentication and authorization: one or more directories
182
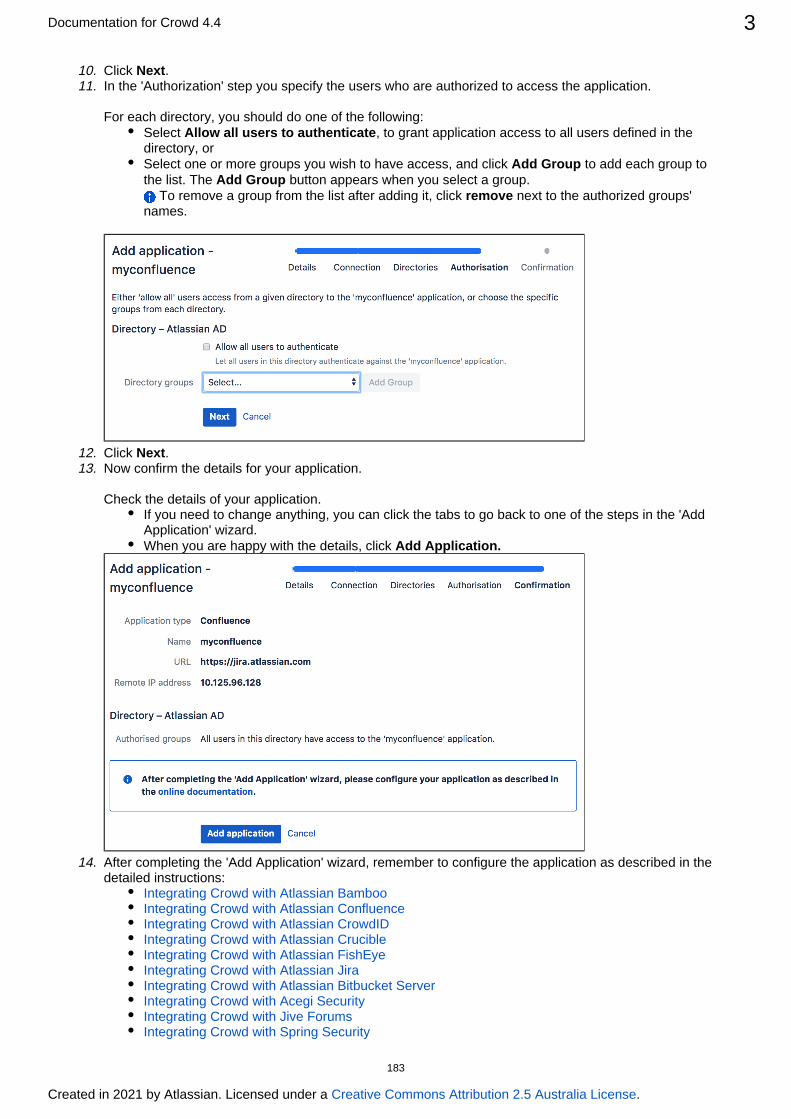
Documentation for Crowd 4.4 3
Created in 2021 by Atlassian. Licensed under a .Creative Commons Attribution 2.5 Australia License
10. 11.
12. 13.
14.
Click .NextIn the 'Authorization' step you specify the users who are authorized to access the application.
For each directory, you should do one of the following:Select , to grant application access to all users defined in the Allow all users to authenticatedirectory, orSelect one or more groups you wish to have access, and click to add each group to Add Groupthe list. The button appears when you select a group. Add Group
To remove a group from the list after adding it, click next to the authorized groups' removenames.
Click .NextNow confirm the details for your application.
Check the details of your application.If you need to change anything, you can click the tabs to go back to one of the steps in the 'Add Application' wizard.When you are happy with the details, click Add Application.
After completing the 'Add Application' wizard, remember to configure the application as described in the detailed instructions:
Integrating Crowd with Atlassian BambooIntegrating Crowd with Atlassian ConfluenceIntegrating Crowd with Atlassian CrowdIDIntegrating Crowd with Atlassian CrucibleIntegrating Crowd with Atlassian FishEyeIntegrating Crowd with Atlassian JiraIntegrating Crowd with Atlassian Bitbucket ServerIntegrating Crowd with Acegi SecurityIntegrating Crowd with Jive ForumsIntegrating Crowd with Spring Security
183
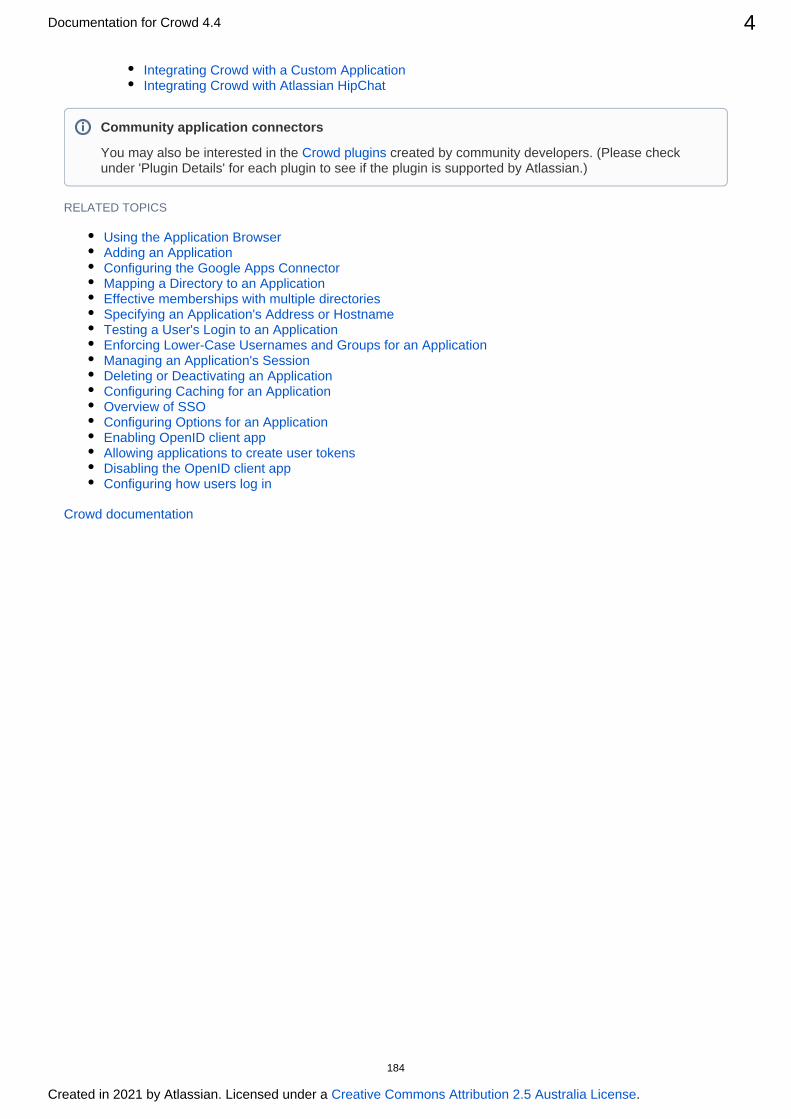
Documentation for Crowd 4.4 4
Created in 2021 by Atlassian. Licensed under a .Creative Commons Attribution 2.5 Australia License
14.
Integrating Crowd with a Custom ApplicationIntegrating Crowd with Atlassian HipChat
RELATED TOPICS
Using the Application BrowserAdding an ApplicationConfiguring the Google Apps ConnectorMapping a Directory to an ApplicationEffective memberships with multiple directoriesSpecifying an Application's Address or HostnameTesting a User's Login to an ApplicationEnforcing Lower-Case Usernames and Groups for an ApplicationManaging an Application's SessionDeleting or Deactivating an ApplicationConfiguring Caching for an ApplicationOverview of SSOConfiguring Options for an ApplicationEnabling OpenID client appAllowing applications to create user tokensDisabling the OpenID client appConfiguring how users log in
Crowd documentation
Community application connectors
You may also be interested in the created by community developers. (Please check Crowd pluginsunder 'Plugin Details' for each plugin to see if the plugin is supported by Atlassian.)
184
1.
2.
3.
4.
Integrating Crowd with Atlassian BambooThis page tells you how to connect Atlassian's to one or more directory servers Bamboo integration serverthrough Crowd.
Currently Crowd supports centralized authentication and single sign-on for Bamboo versions 1.2.2 and later.
PrerequisitesStep 1. Configuring Crowd to Talk to Bamboo
1.1 Prepare Crowd's Directories/Groups/Users for Bamboo1.2 Define the Bamboo Application in Crowd1.3 Specify which Users can Log In to Bamboo1.4 Specify the Address from which Bamboo can Log In to Crowd
Step 2. Configuring Bamboo to Talk to Crowd2.1 Install the Crowd Client Libraries into Bamboo2.2 Edit Bamboo's crowd.properties file2.3 Configure Bamboo to use Crowd's Authenticator2.4 Configure External User Management in Bamboo2.5 (Optional) Enable Single Sign-On2.6 (Optional) Tune the Cache
See Crowd in Action
Prerequisites
Deploying multiple Atlassian applications in a single Tomcat container is We do not test this not supported.configuration and upgrading any of the applications (even for point releases) is likely to break it. There are also a number of known issues with this configuration. See for more information.this FAQ
There are also a number of practical reasons why we do not support deploying multiple Atlassian applications in a single Tomcat container. Firstly, you must shut down Tomcat to upgrade any application and secondly, if one application crashes, the other applications running in that Tomcat container will be inaccessible.
Finally, we recommend not deploying to the same Tomcat container that runs Crowd, any other applicationsespecially if these other applications have large memory requirements or require additional libraries in Tomcat's
subdirectory.lib
Download and install Crowd. Refer to the for instructions. We will refer to the Crowd installation guideCrowd root folder as .CROWDDownload and install Bamboo (version 1.2.2 or later). Refer to the for Bamboo installation guideinstructions. We will refer to the Bamboo root folder as . For the purposes of this document, we BAMBOOwill assume that you have used the Bamboo distribution (not EAR-WAR) (ie. the easier) installation method of Bamboo. If you need to install Bamboo as an EAR/WAR, simply explode the EAR/WAR and make the necessary changes as described below, then repackage the EAR/WAR.Run the Bamboo Setup Wizard, as described in the . During this setup process, Bamboo documentationyou will define the Bamboo administrator's username and password. It is easier to do this before you integrate Bamboo with Crowd.
Please check that this documentation applies to your version of Crowd
Please check the Crowd release number in this documentation against your version of Crowd. If you are using a different version of Crowd, you can find the appropriate documentation under 'Previous Versions' on the .Crowd documentation homepage
Due to incompatible atlassian-user libraries, Bamboo releases prior to 1.2.2 are not compatible with latest version of Crowd. Please upgrade to the latest version of Bamboo before attempting to integrate Crowd.
Do not deploy multiple Atlassian applications in a single Tomcat container.
185
Documentation for Crowd 4.4 2
Created in 2021 by Atlassian. Licensed under a .Creative Commons Attribution 2.5 Australia License
4.
1.
2.
1. 2.
After you have installed and set up Bamboo, shut Bamboo down before you begin the integration process described below.
Step 1. Configuring Crowd to Talk to Bamboo
1.1 Prepare Crowd's Directories/Groups/Users for Bamboo
Create a Crowd directory: The Bamboo application will need to authenticate users against a directory configured in Crowd. You will need to set up a directory in Crowd for Bamboo. For more information on how to do this, see . We will assume that the directory is called Adding a Directory Crowd Bamboo
for the rest of this document. It is possible to assign more than one directory for an application, Directorybut for the purposes of this example, we will use to house Bamboo users.Crowd Bamboo DirectoryAdd users and groups: You can either import them from your Bamboo deployment or add them manually.
Importing users and groups from Bamboo: If you have an existing Bamboo deployment and would like to import existing users and groups into Crowd, use the Bamboo Importer tool by navigating to > > . Select 'Bamboo' as the Atlassian Users Import Users Atlassian ImporterProduct and the as the directory into which Bamboo users will be Crowd Bamboo Directoryimported. For details please see . If you are going to Importing Users from Atlassian Bambooimport users into Crowd, you need to do this now, before you proceed any further.Adding users and groups manually: Bamboo needs an administrative group to exist in the directory in order to access the administration features. You can also create an optional additional group for other users. Create the groups in the :Crowd Bamboo Directory
bamboo-adminbamboo-user ( )optionalSee the documentation on for more information on how to define these Creating Groupsgroups.Create at least one user in the and assign the user(s) to both the Crowd Bamboo Directory
and the groups. The Crowd documentation has more bamboo-user bamboo-admininformation on , and .creating groups creating users assigning users to groups
1.2 Define the Bamboo Application in Crowd
Crowd needs to be aware that the Bamboo application will be making authentication requests to Crowd. We need to add the Bamboo application to Crowd and map it to the Crowd Bamboo Directory:
Log in to the and navigate to > .Crowd Administration Console Applications Add ApplicationComplete the for the Bamboo application. See the . The 'Add Application' wizard instructions Nameand values you specify in the 'Add Application' wizard must match the and Password application.name
that you will set in the file. You can find the application.password crowd.properties crowd. file in either (Bamboo 3.1 and earlier) or properties Bamboo/webapp/WEB-INF/classes/ $BAMBOO
(Bamboo 3.2 or later). See Step 2 below._HOME/xml-data/configuration
1.3 Specify which Users can Log In to Bamboo
Once Crowd is aware of the Bamboo application, Crowd needs to know which users can authenticate (log in) to Bamboo via Crowd. As part of the 'Add Application' wizard, you will set up your directories and group authorizations for the application. If necessary, you can adjust these settings after completing the wizard. Below are some examples.
You can either allow entire directories to authenticate, or just particular groups within the directories. In our example, we will allow the and groups within the to bamboo-user bamboo-admin Crowd Bamboo Directoryauthenticate.
If you are not using a group as a security restriction, you will need to set 'bamboo-user Allow all to ' to 'true' when , otherwise only group members will be able authenticate mapping the directory bamboo-admin
to log in to Bamboo.
1.4 Specify the Address from which Bamboo can Log In to Crowd
As part of the 'Add Application' wizard, you will set up Bamboo's IP address. This is the address which Bamboo will use to authenticate to Crowd. If necessary you can add a hostname, in addition to the IP address, after completing the wizard. See .Specifying an Application's Address or Hostname
186

Documentation for Crowd 4.4 3
Created in 2021 by Atlassian. Licensed under a .Creative Commons Attribution 2.5 Australia License
1.
2.
1.
Step 2. Configuring Bamboo to Talk to Crowd
2.1 Install the Crowd Client Libraries into Bamboo
Bamboo needs Crowd's client libraries in order to be able to delegate user authentication to the Crowd application. In some cases, you will need to modify the Bamboo application, which is stored in .BAMBOO/webapp
Please check your versions of Crowd and Bamboo:If you are using to , you will need to update the Bamboo libraries as described Bamboo 1.2.2 1.2.4in this step below.If you are using or later, the Crowd client libraries and file are Bamboo 2.0 crowd.propertiesincluded in the Bamboo 2.0 installation download. Please check if your version of Crowd is the same version as the Crowd client library included in the Bamboo 2.x.x installation download (e.g. Bamboo 2.0 currently includes the client library for Crowd 1.3).
If the Crowd library versions are different, you will need to update the Bamboo libraries as described in this step below.If the Crowd library versions are the same, you can skip this step.
Please, copy into CROWD/client/crowd-integration-client-X.X.X.jar BAMBOOdirectory./atlassian-bamboo/WEB-INF/lib
If you are using the Crowd WAR distribution, then you will need to get the CROWD client libraries from the Crowd distribution, available on our .download siteCopy the Crowd client libraries and configuration files to Bamboo:
Copy From Copy To
CROWD/client/crowd-integration-client-X.X.X.jar
BAMBOO/webapp/WEB-INF/lib (No need to copy any crowd .jar files over for the latest Bamboo versions (after 4.0) as they already contain the needed jar files to work with Crowd)
CROWD/client/conf/crowd.properties
BAMBOO/webapp/WEB-INF/classes (Bamboo 3.1 and earlier) or $BAMBOO_HOME/xml-data/configuration (Bamboo 3.2 or later)
CROWD/client/conf/crowd-ehcache.xml
BAMBOO/webapp/WEB-INF/classes (Bamboo 3.1 and earlier) or $BAMBOO_HOME/xml-data/configuration (Bamboo 3.2 or later)
For only: You will need to remove the file from Bamboo's Bamboo 1.2.4 seraph-0.7.23.jar WEB-INF directory and replace it with the following file:/lib/
http://repository.atlassian.com/maven2/com/atlassian/seraph/atlassian-seraph/0.10/atlassian-seraph-0.10.jar(Note: the 0.10 version of the Seraph JAR is newer than 0.7.23.)
2.2 Edit Bamboo's crowd.properties file
Configure the Bamboo application's properties to determine how Crowd will interact with Bamboo.
Edit found in (Bamboo 3.1 and earlier) or crowd.properties BAMBOO/webapp/WEB-INF/classes $(Bamboo 3.2 or later). Change the following properties:BAMBOO_HOME/xml-data/configuration
Key Value
Before you begin Step 2
If you are using , please refer to the Bamboo instructions on Bamboo 3.2 or later Integrating and skip Step 2 (and all sub-steps) on this page.Bamboo with Crowd
If your Bamboo version is , please upgrade to the latest stable version of earlier than 1.2.2Bamboo.
187
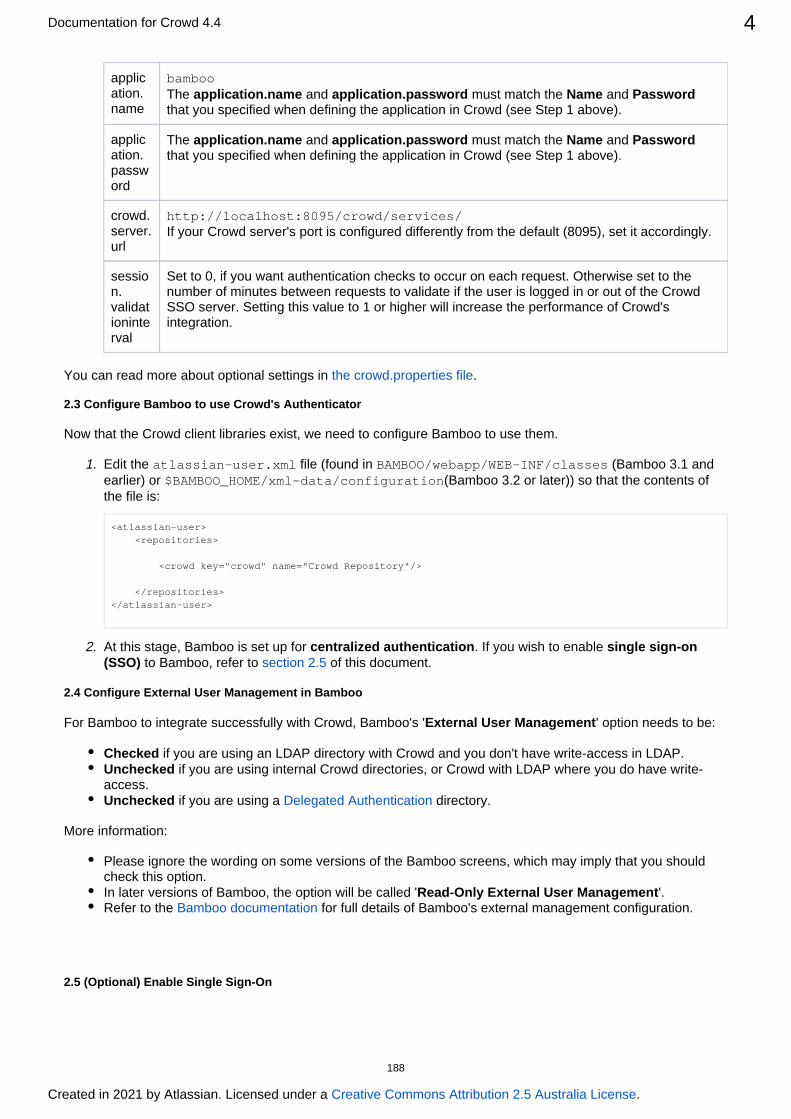
Documentation for Crowd 4.4 4
Created in 2021 by Atlassian. Licensed under a .Creative Commons Attribution 2.5 Australia License
1.
1.
2.
application.name
bambooThe and must match the and application.name application.password Name Passwordthat you specified when defining the application in Crowd (see Step 1 above).
application.password
The and must match the and application.name application.password Name Passwordthat you specified when defining the application in Crowd (see Step 1 above).
crowd.server.url
http://localhost:8095/crowd/services/If your Crowd server's port is configured differently from the default (8095), set it accordingly.
session.validationinterval
Set to 0, if you want authentication checks to occur on each request. Otherwise set to the number of minutes between requests to validate if the user is logged in or out of the Crowd SSO server. Setting this value to 1 or higher will increase the performance of Crowd's integration.
You can read more about optional settings in .the crowd.properties file
2.3 Configure Bamboo to use Crowd's Authenticator
Now that the Crowd client libraries exist, we need to configure Bamboo to use them.
Edit the file (found in (Bamboo 3.1 and atlassian-user.xml BAMBOO/webapp/WEB-INF/classesearlier) or (Bamboo 3.2 or later)) so that the contents of $BAMBOO_HOME/xml-data/configurationthe file is:
<atlassian-user> <repositories>
<crowd key="crowd" name="Crowd Repository"/>
</repositories></atlassian-user>
At this stage, Bamboo is set up for . If you wish to enable centralized authentication single sign-on to Bamboo, refer to of this document.(SSO) section 2.5
2.4 Configure External User Management in Bamboo
For Bamboo to integrate successfully with Crowd, Bamboo's ' ' option needs to be:External User Management
Checked if you are using an LDAP directory with Crowd and you don't have write-access in LDAP.Unchecked if you are using internal Crowd directories, or Crowd with LDAP where you do have write-access.Unchecked if you are using a directory.Delegated Authentication
More information:
Please ignore the wording on some versions of the Bamboo screens, which may imply that you should check this option.In later versions of Bamboo, the option will be called ' '.Read-Only External User ManagementRefer to the for full details of Bamboo's external management configuration.Bamboo documentation
2.5 Enable Single Sign-On(Optional)
188
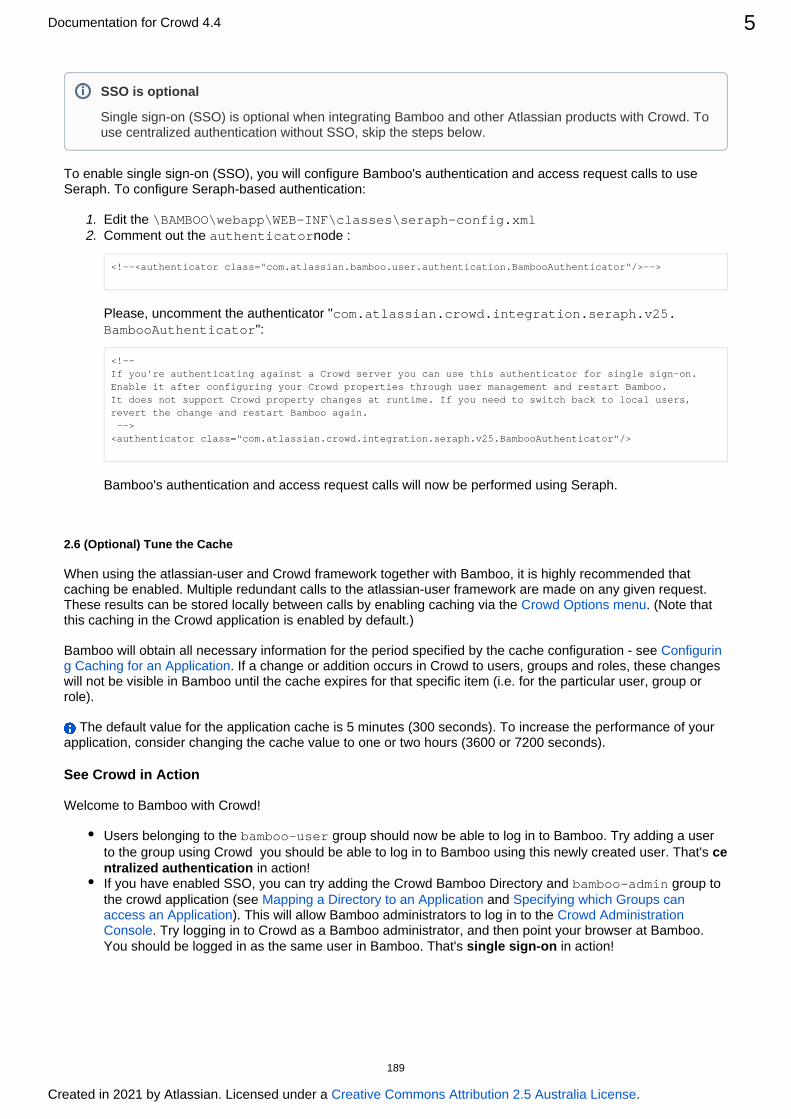
Documentation for Crowd 4.4 5
Created in 2021 by Atlassian. Licensed under a .Creative Commons Attribution 2.5 Australia License
1. 2.
To enable single sign-on (SSO), you will configure Bamboo's authentication and access request calls to use Seraph. To configure Seraph-based authentication:
Edit the \BAMBOO\webapp\WEB-INF\classes\seraph-config.xmlComment out the node :authenticator
<!--<authenticator class="com.atlassian.bamboo.user.authentication.BambooAuthenticator"/>-->
Please, uncomment the authenticator "com.atlassian.crowd.integration.seraph.v25.":BambooAuthenticator
<!--If you're authenticating against a Crowd server you can use this authenticator for single sign-on.Enable it after configuring your Crowd properties through user management and restart Bamboo.It does not support Crowd property changes at runtime. If you need to switch back to local users,revert the change and restart Bamboo again. --><authenticator class="com.atlassian.crowd.integration.seraph.v25.BambooAuthenticator"/>
Bamboo's authentication and access request calls will now be performed using Seraph.
2.6 Tune the Cache(Optional)
When using the atlassian-user and Crowd framework together with Bamboo, it is highly recommended that caching be enabled. Multiple redundant calls to the atlassian-user framework are made on any given request. These results can be stored locally between calls by enabling caching via the . (Note that Crowd Options menuthis caching in the Crowd application is enabled by default.)
Bamboo will obtain all necessary information for the period specified by the cache configuration - see Configurin. If a change or addition occurs in Crowd to users, groups and roles, these changes g Caching for an Application
will not be visible in Bamboo until the cache expires for that specific item (i.e. for the particular user, group or role).
The default value for the application cache is 5 minutes (300 seconds). To increase the performance of your application, consider changing the cache value to one or two hours (3600 or 7200 seconds).
See Crowd in Action
Welcome to Bamboo with Crowd!
Users belonging to the group should now be able to log in to Bamboo. Try adding a user bamboo-userto the group using Crowd you should be able to log in to Bamboo using this newly created user. That's ce
in action!ntralized authenticationIf you have enabled SSO, you can try adding the and group to Crowd Bamboo Directory bamboo-adminthe application (see and crowd Mapping a Directory to an Application Specifying which Groups can
). This will allow Bamboo administrators to log in to the access an Application Crowd Administration . Try logging in to Crowd as a Bamboo administrator, and then point your browser at Bamboo. Console
You should be logged in as the same user in Bamboo. That's in action!single sign-on
SSO is optional
Single sign-on (SSO) is optional when integrating Bamboo and other Atlassian products with Crowd. To use centralized authentication SSO, skip the steps below.without
189

1.
2.
3.
4.
Integrating Crowd with Atlassian ConfluenceAtlassian's popular can quickly be configured to use for user and group management.Confluence wiki Crowd
Compatibility of Confluence and Crowd Versions
Please ensure that your Crowd and Confluence versions are compatible:
Confluence Version
Supported Crowd Version
Notes
Lower than 2.6.2
N/A Confluence does not support Crowd - please .upgrade Confluence
Between 2.6.2 and 2.7.4
1.2 and later Confluence 2.6.1 is not supported - the earliest supported version is 2.6.2
Between 2.8 and 3.4.8
Between 1.3.2 and 2.2.7
In Confluence 2.8, the interface for changed. Crowd 1.3.2 atlassian-useris the earliest version to support this change.
Note: As per
, - CWD-2542 Remove atlassian-user-1 implementation CLOSED atlas
support was removed as per Crowd 2.3. Thus, Crowd 2.2.7 is sian-userthe latest version that will run with Confluence 3.4.8.
Confluence 3.5 and above
Crowd 2.1 or Later
In Confluence 3.5 and above, the communication between Confluence and Crowd has been changed from SOAP to REST.
Prerequisites
Deploying multiple Atlassian applications in a single Tomcat container is We do not test this not supported.configuration and upgrading any of the applications (even for point releases) is likely to break it. There are also a number of known issues with this configuration. See for more information.this FAQ
There are also a number of practical reasons why we do not support deploying multiple Atlassian applications in a single Tomcat container. Firstly, you must shut down Tomcat to upgrade any application and secondly, if one application crashes, the other applications running in that Tomcat container will be inaccessible.
Finally, we recommend not deploying to the same Tomcat container that runs Crowd, any other applicationsespecially if these other applications have large memory requirements or require additional libraries in Tomcat's
subdirectory.lib
Download and install Crowd. Refer to the for instructions. We will refer to the Crowd installation guideCrowd root folder as .CROWDDownload and install Confluence (version 2.6.2 or later). Refer to the for Confluence installation guideinstructions. We will refer to the Confluence root folder as . For the purposes of this CONFLUENCEdocument, we will assume that you have used the Crowd distribution (not EAR-WAR) (i.e. the easier) installation method of Confluence. If you need to install Confluence as an EAR/WAR, simply explode the EAR/WAR and make the necessary changes as described below, then repackage the EAR/WAR.Run the Confluence Setup Wizard, as described in the . During this setup Confluence documentationprocess, you will define the Confluence administrator's username and password. It is easier to do this before you integrate Confluence with Crowd.After setting up Confluence, shut down Confluence before you begin the integration process described below.
Do not deploy multiple Atlassian applications in a single Tomcat container.
190
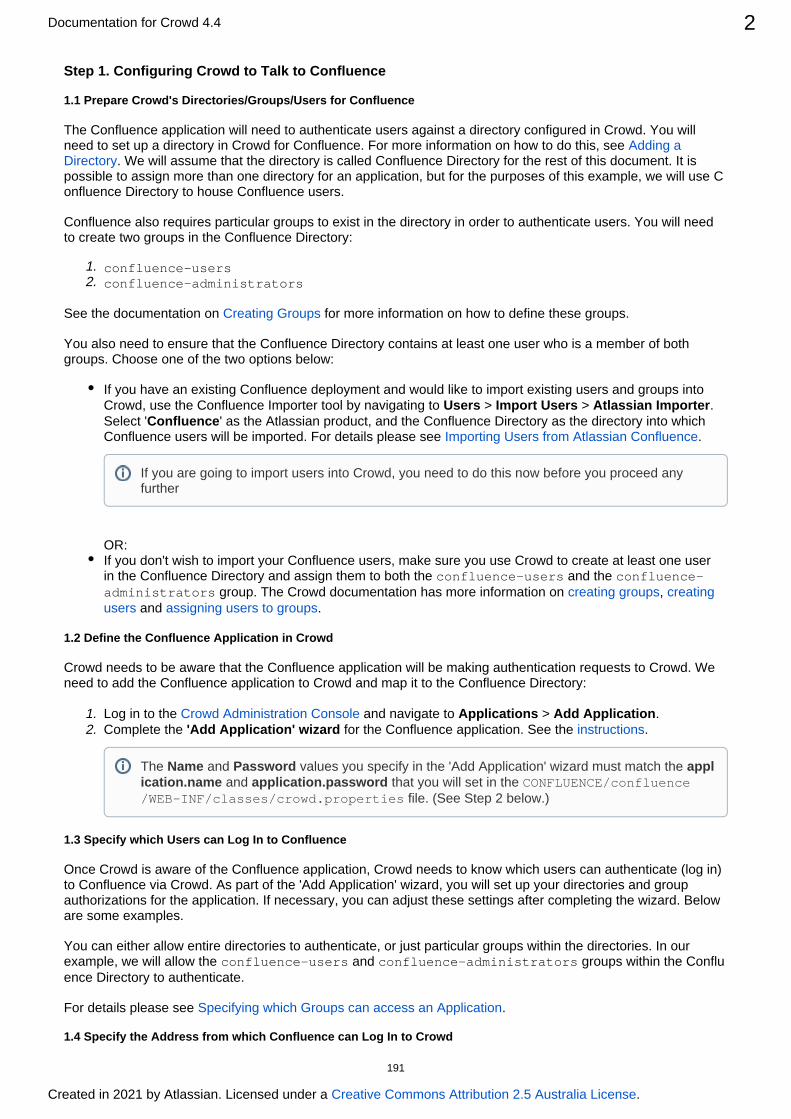
Documentation for Crowd 4.4 2
Created in 2021 by Atlassian. Licensed under a .Creative Commons Attribution 2.5 Australia License
1. 2.
1. 2.
Step 1. Configuring Crowd to Talk to Confluence
1.1 Prepare Crowd's Directories/Groups/Users for Confluence
The Confluence application will need to authenticate users against a directory configured in Crowd. You will need to set up a directory in Crowd for Confluence. For more information on how to do this, see Adding a
. We will assume that the directory is called for the rest of this document. It is Directory Confluence Directorypossible to assign more than one directory for an application, but for the purposes of this example, we will use C
to house Confluence users.onfluence Directory
Confluence also requires particular groups to exist in the directory in order to authenticate users. You will need to create two groups in the :Confluence Directory
confluence-usersconfluence-administrators
See the documentation on for more information on how to define these groups.Creating Groups
You also need to ensure that the contains at least one user who is a member of both Confluence Directorygroups. Choose one of the two options below:
If you have an existing Confluence deployment and would like to import existing users and groups into Crowd, use the Confluence Importer tool by navigating to > > . Users Import Users Atlassian ImporterSelect ' ' as the Atlassian product, and the as the directory into which Confluence Confluence DirectoryConfluence users will be imported. For details please see .Importing Users from Atlassian Confluence
OR:If you don't wish to import your Confluence users, make sure you use Crowd to create at least one user in the and assign them to both the and the Confluence Directory confluence-users confluence-
group. The Crowd documentation has more information on , administrators creating groups creating and .users assigning users to groups
1.2 Define the Confluence Application in Crowd
Crowd needs to be aware that the Confluence application will be making authentication requests to Crowd. We need to add the Confluence application to Crowd and map it to the :Confluence Directory
Log in to the and navigate to > .Crowd Administration Console Applications Add ApplicationComplete the for the Confluence application. See the .'Add Application' wizard instructions
1.3 Specify which Users can Log In to Confluence
Once Crowd is aware of the Confluence application, Crowd needs to know which users can authenticate (log in) to Confluence via Crowd. As part of the 'Add Application' wizard, you will set up your directories and group authorizations for the application. If necessary, you can adjust these settings after completing the wizard. Below are some examples.
You can either allow entire directories to authenticate, or just particular groups within the directories. In our example, we will allow the and groups within the confluence-users confluence-administrators Conflu
to authenticate.ence Directory
For details please see .Specifying which Groups can access an Application
1.4 Specify the Address from which Confluence can Log In to Crowd
If you are going to import users into Crowd, you need to do this now before you proceed any further
The and values you specify in the 'Add Application' wizard must match the Name Password appl and that you will set in the ication.name application.password CONFLUENCE/confluence
file. (See Step 2 below.)/WEB-INF/classes/crowd.properties
191
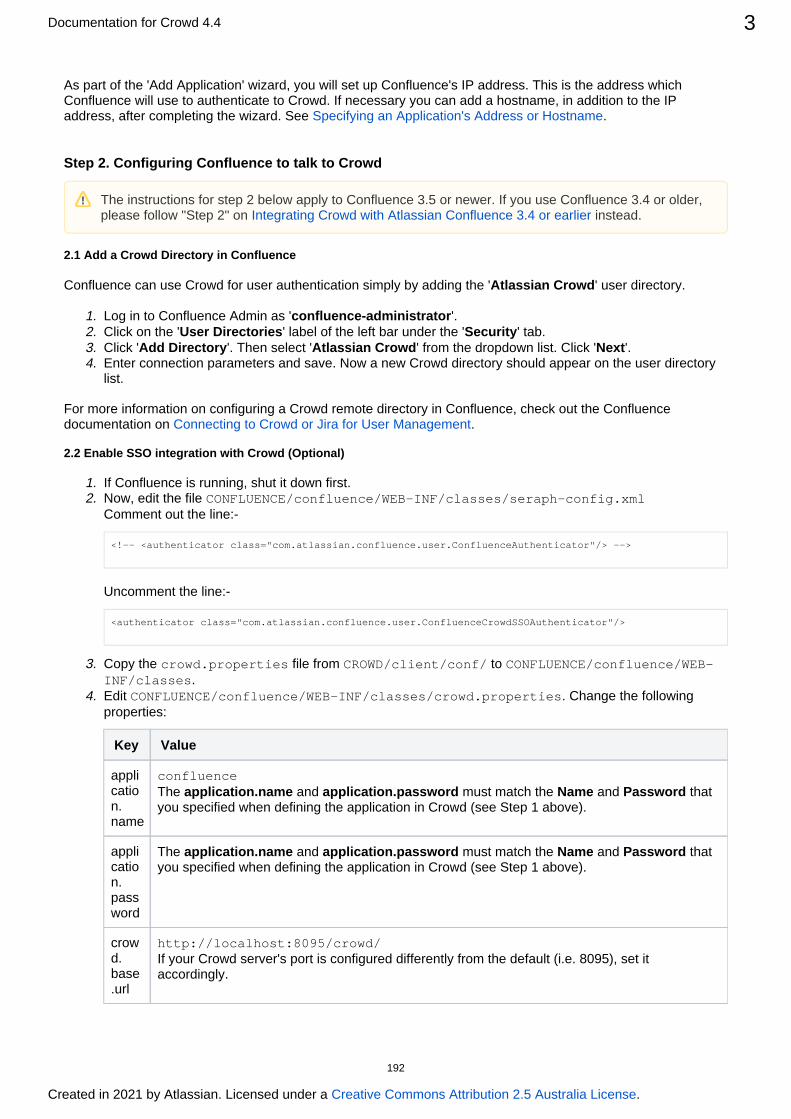
Documentation for Crowd 4.4 3
Created in 2021 by Atlassian. Licensed under a .Creative Commons Attribution 2.5 Australia License
1. 2. 3. 4.
1. 2.
3.
4.
As part of the 'Add Application' wizard, you will set up Confluence's IP address. This is the address which Confluence will use to authenticate to Crowd. If necessary you can add a hostname, in addition to the IP address, after completing the wizard. See .Specifying an Application's Address or Hostname
Step 2. Configuring Confluence to talk to Crowd
2.1 Add a Crowd Directory in Confluence
Confluence can use Crowd for user authentication simply by adding the ' ' user directory.Atlassian Crowd
Log in to Confluence Admin as ' '.confluence-administratorClick on the ' ' label of the left bar under the ' ' tab.User Directories SecurityClick ' '. Then select ' ' from the dropdown list. Click ' '.Add Directory Atlassian Crowd NextEnter connection parameters and save. Now a new Crowd directory should appear on the user directory list.
For more information on configuring a Crowd remote directory in Confluence, check out the Confluence documentation on .Connecting to Crowd or Jira for User Management
2.2 Enable SSO integration with Crowd (Optional)
If Confluence is running, shut it down first.Now, edit the file CONFLUENCE/confluence/WEB-INF/classes/seraph-config.xmlComment out the line:-
<!-- <authenticator class="com.atlassian.confluence.user.ConfluenceAuthenticator"/> -->
Uncomment the line:-
<authenticator class="com.atlassian.confluence.user.ConfluenceCrowdSSOAuthenticator"/>
Copy the file from to crowd.properties CROWD/client/conf/ CONFLUENCE/confluence/WEB-.INF/classes
Edit . Change the following CONFLUENCE/confluence/WEB-INF/classes/crowd.propertiesproperties:
Key Value
application.name
confluence The and must match the and that application.name application.password Name Passwordyou specified when defining the application in Crowd (see Step 1 above).
application.password
The and must match the and that application.name application.password Name Passwordyou specified when defining the application in Crowd (see Step 1 above).
crowd.base.url
http://localhost:8095/crowd/ If your Crowd server's port is configured differently from the default (i.e. 8095), set it accordingly.
The instructions for step 2 below apply to Confluence 3.5 or newer. If you use Confluence 3.4 or older, please follow "Step 2" on instead.Integrating Crowd with Atlassian Confluence 3.4 or earlier
192

Documentation for Crowd 4.4 4
Created in 2021 by Atlassian. Licensed under a .Creative Commons Attribution 2.5 Australia License
4.
session.validationinterval
This is the number of minutes between validation requests, when Crowd validates whether the user is logged in to or out of the Crowd SSO server. Set to the required number of minutes between validation requests. The recommended default is 2 minutes. Setting this value to 1 or higher will increase the performance of Crowd's integration.
You can read more about optional settings in .the crowd.properties file
See Crowd in Action
Users belonging to the group should now be able to log in to Confluence.confluence-usersTry adding a user to the group using Crowd you should be able to log in to confluence-usersConfluence using this newly created user. That's in action!centralized authenticationIf you have enabled SSO, you can try adding the and Confluence Directory confluence-
group to the application (see and administrators crowd Mapping a Directory to an Application Specify). This will allow Confluence administrators to log in to the ing which Groups can access an Application Cr
. Try logging in to Crowd as a Confluence administrator, and then point your owd Administration Consolebrowser at Confluence. You should be logged in as the same user in Confluence. That's single sign-onin action!
Setting this value to 0 will cause the application to perform authentication checks on each request but can cause poor performance, especially with Crowd 2.1 - Crowd 2.3.2 using REST due to .CWD-2646
1. 2. 3.
It is possible to define multiple user directories in Confluence. However, if you enable Crowd SSO integration, you will only be able to authenticate as users from the Crowd server defined in the crowd.
file.properties
To log in using a user from another directory, such as the Confluence Internal Directory, you will need to either:
in the Confluence admin console, go to and disable the User Directories Crowd Serverdirectory, ordisable Crowd SSO by reverting back to the default Confluence authenticator.
Steps to disable Crowd SSO:
Shut down Confluence if it is currently runningEdit the fileCONFLUENCE/confluence/WEB-INF/classes/seraph-config.xmlUncomment the default Confluence authenticator:
<authenticator class="com.atlassian.confluence.user.ConfluenceAuthenticator"/>
Comment out the Crowd SSO Authenticator:
<!-- <authenticator class="com.atlassian.confluence.user.ConfluenceCrowdSSOAuthenticator"/> -->
Restart Confluence
193

1.
2.
3.
4.
5.
Integrating Crowd with Atlassian Confluence 3.4 or earlier
Step 2. Configuring Confluence to talk to Crowd
2.1 Install the Crowd Client Library into Confluence
Confluence needs Crowd's client library and configuration file in order to be able to delegate user authentication to the Crowd application. As stated earlier, we will modify the Confluence application by editing the application, which is an exploded WAR stored in .CONFLUENCE/confluence
If you are using the Crowd WAR distribution, then you will need to get the CROWD client libraries from the Crowd distribution, available on our .download siteIf you are using the Windows Evaluation distribution of Confluence, please see this page on how to
.update the crowd.properties file in ConfluenceCopy the Crowd client library and configuration file to Confluence:
Copy From Copy To
CROWD/client/crowd-integration-client-X.X.X.jar CONFLUENCE/confluence/WEB-INF/lib
CROWD/client/conf/crowd.properties CONFLUENCE/confluence/WEB-INF/classes
There is no need to copy across anything from . All the required libraries from that CROWD/client/libdirectory already exist in Confluence versions 2.3 and later.
A note about older Confluence versions:Confluence are not compatible with Crowd 1.2 and later. We recommend that you upgrade 2.5.6 to 2.6.1to Confluence . If you can not upgrade your Confluence instance, you will need to remove 2.6.2 or laterthe file from Confluence's seraph-X.X.X.jar <CONFLUENCE-INSTALLATION>/confluence/WEB-
and replace it with the following file:INF/lib/seraph-X.X.X.jarhttp://repository.atlassian.com/maven2/com/atlassian/seraph/atlassian-seraph/0.10/atlassian-seraph-
.0.10.jarReplace Confluence's cache configuration file:
Copy From Replace File
CROWD/client/conf/crowd-ehcache.xml
CONFLUENCE/confluence/WEB-INF/classes/crowd-ehcache.xml
Edit . Change the following CONFLUENCE/confluence/WEB-INF/classes/crowd.propertiesproperties:
This is an alternate step to "Step 2" defined in for users Integrating Crowd with Atlassian Confluencewanting to integrate Crowd with Confluence 3.4 or earlier.
If you are using Confluence 3.5 or later, please follow the guide on Integrating Crowd with .Atlassian Confluence
If you are using Confluence 3.4 or earlier, please complete "Step 1" from Integrating Crowd with before attempting the alternate "Step 2" below.Atlassian Confluence
Crowd 2.3.3 or later requires Confluence 3.2.1 at minimum. See also .CWD-2680
Be sure that there is file in the lib only one crowd-integration-client-x.x.x.jardirectory. Otherwise, it would cause library incompatibilities.
194

Documentation for Crowd 4.4 2
Created in 2021 by Atlassian. Licensed under a .Creative Commons Attribution 2.5 Australia License
5.
1.
2.
Key Value
application.name
confluence The and must match the and that application.name application.password Name Passwordyou specified when defining the application in Crowd (see Step 1 above).
application.password
The and must match the and that application.name application.password Name Passwordyou specified when defining the application in Crowd (see Step 1 above).
crowd.server.url
http://localhost:8095/crowd/services/ If your Crowd server's port is configured differently from the default (i.e. 8095), set it accordingly.
session.validationinterval
This is the number of minutes between validation requests, when Crowd validates whether the user is logged in to or out of the Crowd SSO server. Set to the required number of minutes between validation requests. The recommended default is 2 minutes. Setting this value to 1 or higher will increase the performance of Crowd's integration.
You can read more about optional settings in .the crowd.properties file
2.2 Configure Confluence to use Crowd's Authenticator
Now that the Crowd client libraries exist, we need to configure Confluence to use them.
Edit the file so that the CONFLUENCE/confluence/WEB-INF/classes/atlassian-user.xmlcontent of the file is:
<atlassian-user> <repositories>
<crowd key="crowd" name="Crowd Repository"/>
</repositories></atlassian-user>
At this stage, Confluence is set up for . If you wish to enable centralized authentication single sign-on or if you are using , take the following steps to ensure that Confluence's (SSO) Confluence 3.2.1 or later
authentication and access request calls will be performed using Seraph:
Edit the file. Comment out the CONFLUENCE/confluence/WEB-INF/classes/seraph-config.xml node:authenticator
<!--<authenticator class="com.atlassian.confluence.user.ConfluenceAuthenticator"/>-->
Add a new authenticator, choosing the one relevant to your version of Confluence:
Setting this value to 0 will cause the application to perform authentication checks on each request but can cause poor performance, especially with Crowd 2.1 - Crowd 2.3.2 using REST due to .CWD-2646
Make sure the content of the file is only what is indicated above, otherwise you may get this error
195

Documentation for Crowd 4.4 3
Created in 2021 by Atlassian. Licensed under a .Creative Commons Attribution 2.5 Australia License
2.
If you are using Confluence 3.4 or later:
<authenticator class="com.atlassian.crowd.integration.seraph.v22.ConfluenceAuthenticator"/>
If you are using Confluence 3.3.3 or earlier:
<authenticator class="com.atlassian.crowd.integration.seraph.ConfluenceAuthenticator"/>
2.3 Enable Confluence's External User Management
Once the setup is complete, you may wish to turn 'External User Management' in Confluence. This will onprevent Confluence administrators from being able to add or update users. For more information please see the Confluence documentation regarding .External User Management
Note:
If you are using Confluence , this step is required i.e. you must turn on external user 2.6.2 or earliermanagement in Confluence.If your are configured so that Confluence cannot update the Crowd Crowd directory permissionsdirectories, this step is required i.e. you must turn on external user management in Confluence. Otherwise, an error will occur when Confluence attempts to write data into Crowd.If you have , you may want to delay turning on 'External User imported Confluence users into CrowdManagement' for a week or two, to give users time to reset their passwords. (Because users' passwords are encrypted in Confluence's database, they will not be copied across to Crowd.)
2.4 Tune the Cache(Optional)
Enabling caching on the Crowd server: When using the Atlassian-User and Crowd framework together with Confluence, it is highly recommended that caching be enabled on the Crowd server. Multiple redundant calls to the Atlassian-User framework are made on any given request. These results can be stored locally between calls by enabling caching via the . Note that this caching on the Crowd server is enabled by Crowd Options menudefault.
Enabling application caching for Confluence: If application caching is enabled for Confluence, Confluence will obtain all necessary information for the period specified by the cache configuration. See Configuring
. If a change or addition occurs to Crowd users, groups and roles, these changes will Caching for an Applicationnot be visible in Confluence until the cache expires for that specific item, i.e. for the particular user, group or role.
The default period for the application cache is 5 minutes (300 seconds). To increase the performance of your application, consider changing the cache value to one or two hours (3600 or 7200 seconds).
196
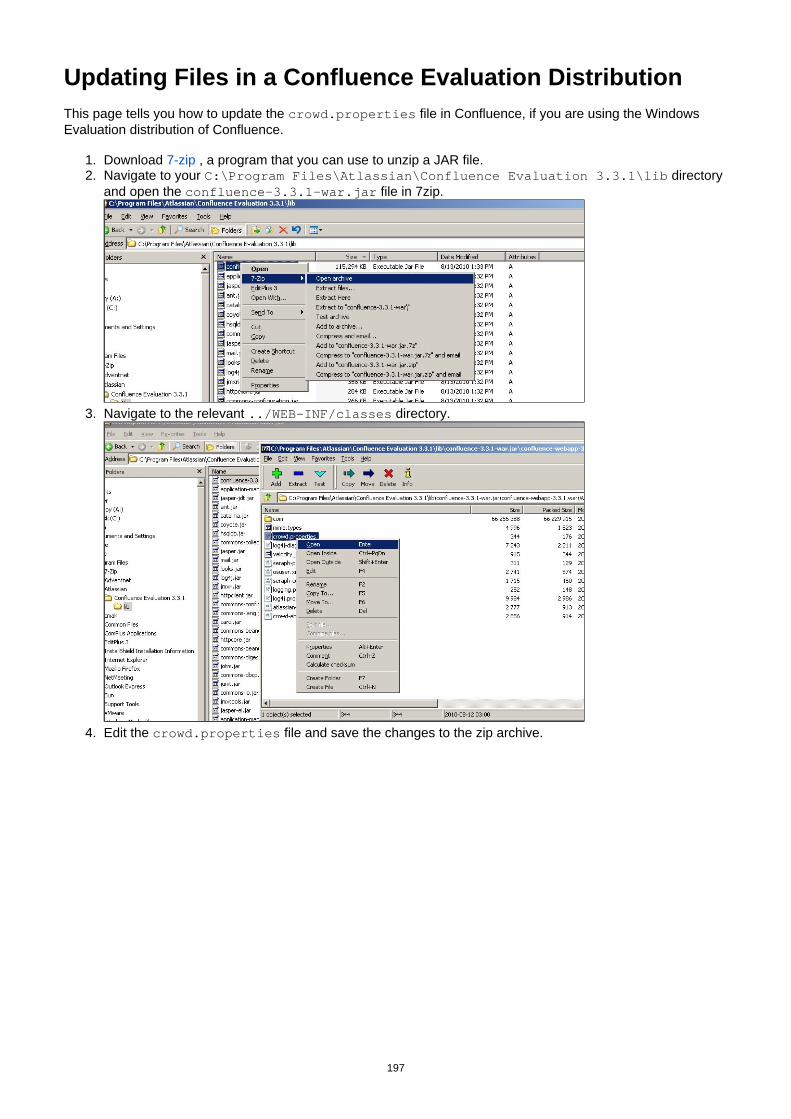
1. 2.
3.
4.
Updating Files in a Confluence Evaluation DistributionThis page tells you how to update the file in Confluence, if you are using the Windows crowd.propertiesEvaluation distribution of Confluence.
Download , a program that you can use to unzip a JAR file.7-zip Navigate to your directory C:\Program Files\Atlassian\Confluence Evaluation 3.3.1\liband open the file in 7zip.confluence-3.3.1-war.jar
Navigate to the relevant directory.../WEB-INF/classes
Edit the file and save the changes to the zip archive.crowd.properties
197

1.
2.
1. 2.
Integrating Crowd with Atlassian CrowdIDAtlassian CrowdID is a free add-on to Crowd. It gives administrators a secure way to provide accounts OpenIDfor their users.
If you have not already installed CrowdID, follow the instructions below to install it now.
Prerequisites
Download and install Crowd. Refer to the for detailed information on how to do Crowd installation guidethis. We will refer to the Crowd root folder as .CROWDThis guide assumes that CrowdID was NOT installed with the installation of Crowd. If CrowdID was installed using the , there is no need for further configuration.Crowd Setup Wizard
Step 1. Configuring Crowd to Talk to CrowdID
1.1 Prepare Crowd's Directories/Groups/Users for CrowdID
The CrowdID application will need to locate users from a directory configured in Crowd. You will need to set up a directory in Crowd for CrowdID. For information on how to do this, see . We will assume Adding a Directorythat the directory is called for the rest of this document. It is possible to assign more than one CrowdID Directorydirectory for an application, but for the purposes of this example, we will use to house CrowdID DirectoryCrowdID users.
CrowdID also requires an administrator group to exist in the directory. You need to ensure that a crowd- groups exist in the . Any user in this group will have CrowdID administrators CrowdID Directory
administrator access.
The Crowd documentation has more information on , and creating groups creating users assigning users to .groups
1.2 Define the CrowdID Application in Crowd
Crowd needs to be aware that the CrowdID application will be making authentication requests to Crowd. We need to add the CrowdID application to Crowd and map it to the .CrowdID Directory
Log in to the and navigate to > .Crowd Administration Console Applications Add ApplicationComplete the for the CrowdID application.'Add Application' wizard
For the select 'Application type Generic Application'For and ,the values you specify must match the andName Password application.name application.
that you will set in thepassword CROWD/crowd-openidserver-webapp/WEB-INF/classesfile. (See Step 2 below.)/crowd.properties
Need more help? See the for the Add application wizard.full instructions
1.3 Specify which Users can Log In to CrowdID
Once Crowd is aware of the CrowdID application, Crowd needs to know which users can authenticate (log in) to CrowdID via Crowd. As part of the 'Add Application' wizard, you will set up your directories and group authorizations for the application. If necessary, you can adjust these settings after completing the wizard. Below are some examples.
You can either allow entire directories to authenticate, or just particular groups within the directories. In our example, we will allow the entire to authenticate:CrowdID Directory
When installing Crowd 1.1+ the allows you to install CrowdID with Crowd. If you Crowd Setup Wizardchose to install CrowdID as part of the Setup Wizard, there is no need for further configuration. The CrowdID server will be up and running at http://localhost:8095/openidserver
198

Documentation for Crowd 4.4 2
Created in 2021 by Atlassian. Licensed under a .Creative Commons Attribution 2.5 Australia License
For details please see .Specifying which Groups can access an Application
1.4 Specify the Address from which CrowdID can Log In to Crowd
As part of the 'Add Application' wizard, you will set up CrowdID's IP address. This is the address which CrowdID will use to authenticate to Crowd. If necessary you can add a hostname, in addition to the IP address, after completing the wizard. See .Specifying an Application's Address or Hostname
Step 2. Configuring CrowdID to Talk to Crowd
Edit . Change the CROWD/crowd-openidserver-webapp/WEB-INF/classes/crowd.propertiesfollowing properties:
Key Value
application.name
crowd-openid-server The and must match the and that you application.name application.password Name Passwordspecified when you defined the application in Crowd (see Step 1 above).
application.password
The and must match the and that you application.name application.password Name Passwordspecified when you defined the application in Crowd (see Step 1 above).
application.login.url
http://localhost:8095/openidserverThe should point to the correct host and port of the CrowdID application.application.login.url
crowd.server.url
http://localhost:8095/crowd/services/If your Crowd server's port is configured differently from the default (i.e. 8095), set it accordingly.
session.validationinterval
This is the number of minutes between validation requests, when Crowd validates whether the user is logged in to or out of the Crowd SSO server. Set this value to 0 if you want authentication checks to occur on each request. Otherwise set to the required number of minutes between validation requests. Setting this value to 1 or higher will increase the performance of Crowd's integration.
You can read more about optional settings in .the crowd.properties file
199
Documentation for Crowd 4.4 3
Created in 2021 by Atlassian. Licensed under a .Creative Commons Attribution 2.5 Australia License
After editing these properties, you must restart your CrowdID container before the changes will take effect.
See CrowdID in Action
Go to and log in with any user in the .http://localhost:8095/openidserver CrowdID Directory
RELATED TOPICS
Using the Application BrowserAdding an Application
Integrating Crowd with Atlassian BambooIntegrating Crowd with Atlassian Confluence
Integrating Crowd with Atlassian Confluence 3.4 or earlierUpdating Files in a Confluence Evaluation Distribution
Integrating Crowd with Atlassian CrowdIDIntegrating Crowd with Atlassian CrucibleIntegrating Crowd with Atlassian FishEye
Configuring FishEye earlier than 4.0 with CrowdIntegrating Crowd with Atlassian Jira
Integrating Crowd with Atlassian Jira 4.2 or earlierIntegrating Crowd with Atlassian Bitbucket ServerIntegrating Crowd with Acegi Security
Integrating AppFuse - a Crowd-Acegi Integration TutorialIntegrating Crowd with Jive Forums
Jive SSOIntegrating Crowd with Spring Security
Integrating AppFuse - a Crowd-Spring Security Integration TutorialIntegrating Crowd with a Custom ApplicationIntegrating Crowd with Atlassian HipChat
Configuring the Google Apps ConnectorMapping a Directory to an Application
Specifying the Directory Order for an ApplicationSpecifying an Application's Directory Permissions
Example of Directory PermissionsViewing Users in Directories Mapped to an ApplicationSpecifying which Groups can access an ApplicationSyncing users based on their access rights
Effective memberships with multiple directoriesSpecifying an Application's Address or HostnameTesting a User's Login to an ApplicationEnforcing Lower-Case Usernames and Groups for an ApplicationManaging an Application's SessionDeleting or Deactivating an ApplicationConfiguring Caching for an ApplicationOverview of SSOConfiguring Options for an ApplicationEnabling OpenID client appAllowing applications to create user tokensDisabling the OpenID client appConfiguring how users log in
Crowd documentation
200
1.
2.
3.
Integrating Crowd with Atlassian CrucibleYou can use Crowd to provide external authentication and authorization for Atlassian's code review Crucibletool.
Prerequisites
Download and install Crowd. Refer to the for detailed information on how to do Crowd installation guidethis. We will refer to the Crowd root folder as .CROWDDownload and install Crucible. Refer to the for detailed information on how to Crucible Installation Guidedo this.Follow the instructions on . integrating Crowd with FishEyeFor , refer to the instructions for FishEye 1.4. For Crucible versions 1.2.x and later Crucible 1.1.x and
, refer to the the instructions for FishEye 1.3.earlier
Configure Authorization in Crucible Projects (If Required)
Optionally, you can now use the Crowd users and/or groups in the permission schemes for your Crucible projects. If you have created groups in the Crowd directory which is mapped to your FishEye application (see Int
), the Crowd groups can be seen in Crucible.egrating Crowd with Atlassian FishEye
Please refer to the Crucible documentation for instructions on:
Creating projects in Crucible ( ).hereCreating permission schemes and assigning them to users and/or groups ( ).hereLinking the permission scheme to a Crucible project ( ).here
RELATED TOPICSUsing the Application BrowserAdding an ApplicationConfiguring the Google Apps ConnectorMapping a Directory to an ApplicationEffective memberships with multiple directoriesSpecifying an Application's Address or HostnameTesting a User's Login to an ApplicationEnforcing Lower-Case Usernames and Groups for an ApplicationManaging an Application's SessionDeleting or Deactivating an ApplicationConfiguring Caching for an ApplicationOverview of SSOConfiguring Options for an ApplicationEnabling OpenID client appAllowing applications to create user tokensDisabling the OpenID client appConfiguring how users log in
Crowd documentation
Crucible and FishEye
When you purchase and install Crucible, you may also purchase Atlassian's source-repository FishEyeviewer. If you have both FishEye and Crucible, they will share a common authentication mechanism and integration with Crowd. Crucible and FishEye will authenticate to Crowd using the same application name and password. See . If you have Crucible only (available Integrating Crowd with Atlassian FishEyefrom ), you will need to set up the Crowd directory and application in the same way, Crucible 1.6following the instructions in .Integrating Crowd with Atlassian FishEye
201

1.
2.
3.
1.
2.
Integrating Crowd with Atlassian FishEyeYou can use Crowd to provide external authentication and authorization for Atlassian's source-FishEyerepository viewer.
Crowd supports centralized authentication and single sign-on (SSO) for .FishEye versions 1.3.1 and later
On this page:
PrerequisitesStep 1. Configuring Crowd to talk to FishEye
1.1 Prepare Crowd's directories/groups/users for FishEye1.2 Define the FishEye application in Crowd1.3 Specify which users can log in to FishEye1.4 Specify the address from which FishEye can log in to Crowd
Step 2. Configuring FishEye to talk to CrowdNext step for Crucible users
Prerequisites
Download and install Crowd. Refer to the for detailed information on how to do Crowd installation guidethis. We will refer to the Crowd root folder as .CROWDDownload and install FishEye. Refer to the for detailed information on how to FishEye Installation Guidedo this. We will refer to the FishEye root folder as .FISHEYEIf you have the standalone version of Crucible (available from ), there is no need to Crucible 1.6download or install FishEye.After FishEye is set up, make sure FishEye is not running when you begin the integration process described below.
Step 1. Configuring Crowd to talk to FishEye
1.1 Prepare Crowd's directories/groups/users for FishEye
The FishEye application will need to authenticate users against a directory configured in Crowd. You will need to set up a directory in Crowd for FishEye. For more information on how to do this, see . We Adding a Directorywill assume that the directory is called for the rest of this document. It is possible to assign FishEye Directorymore than one directory for an application, but for the purposes of this example, we will use to FishEye Directoryhouse FishEye users.
If you wish to use Crowd groups to control access to your FishEye repositories, you should set up your groups in Crowd. See the documentation on for more information on how to define these groups.Creating Groups
Use Crowd to create at least one user in the . If you are using groups, assign your user(s) to FishEye Directorythe appropriate groups. The Crowd documentation has more information on and creating users assigning users
.to groups
1.2 Define the FishEye application in Crowd
Crowd needs to be aware that the FishEye application will be making authentication requests to Crowd. We need to add the FishEye application to Crowd and map it to the FishEye Directory:
Log in to the and navigate to > .Crowd Administration Console Applications Add Application
Crucible and FishEye
If you are using Atlassian's code review tool, you will need to follow the instructions below on Crucibleintegrating Crowd with FishEye. If you have the standalone version of Crucible without FishEye (available from ), please follow the instructions below to set up the Crowd directory and Crucible 1.6application for Crucible instead of FishEye. If preferred, you can change the name of your Crowd application and directory to 'Crucible' rather than 'FishEye'. Then follow the further instructions to integrat
.e Crowd with Crucible
202
Documentation for Crowd 4.4 2
Created in 2021 by Atlassian. Licensed under a .Creative Commons Attribution 2.5 Australia License
2. Complete the Add Application wizard for the FishEye application. See the . ' ' instructionsThe and values you specify in the 'Add Application' wizard must match the Name Password Application
and that you will set in FishEye's 'Crowd Authentication Settings' screen. name Application password(See Step 2 below.)
1.3 Specify which users can log in to FishEye
Once Crowd is aware of the FishEye application, Crowd needs to know which users can authenticate (log in) to FishEye via Crowd. As part of the 'Add Application' wizard, you will set up your directories and group authorizations for the application. If necessary, you can adjust these settings after completing the wizard. Below are some examples.
You can either allow entire directories to authenticate, or just particular groups within the directories. In our example, we will allow the entire to authenticate:FishEye Directory
If you wish to authorize specific groups only, please see and Mapping a Directory to an Application Specifying .which Groups can access an Application
1.4 Specify the address from which FishEye can log in to Crowd
As part of the 'Add Application' wizard, you will set up FishEye's IP address. This is the address which FishEye will use to authenticate to Crowd. If necessary you can add a hostname, in addition to the IP address, after completing the wizard. See .Specifying an Application's Address or Hostname
Step 2. Configuring FishEye to talk to Crowd
Click here for instructions for older versions of FishEye(before 4.0.0).
To set up FishEyeto use Crowd authentication, follow the instructions in the .FishEye documentation
If you have groups in the Crowd directory that is mapped to your FishEye application (see Step 1 above), the Crowd groups can be seen in FishEye. You can use those groups to control access to your FishEye repositories.
See in the FishEye documentation for details.Permissions
Next step for Crucible users
If you are using Atlassian's code review tool, please take a look at the further instructions on Crucible integrating .Crowd with Crucible
RELATED TOPICS
Using the Application BrowserAdding an ApplicationConfiguring the Google Apps ConnectorMapping a Directory to an ApplicationEffective memberships with multiple directories
203

Documentation for Crowd 4.4 3
Created in 2021 by Atlassian. Licensed under a .Creative Commons Attribution 2.5 Australia License
Specifying an Application's Address or HostnameTesting a User's Login to an ApplicationEnforcing Lower-Case Usernames and Groups for an ApplicationManaging an Application's SessionDeleting or Deactivating an ApplicationConfiguring Caching for an ApplicationOverview of SSOConfiguring Options for an ApplicationEnabling OpenID client appAllowing applications to create user tokensDisabling the OpenID client appConfiguring how users log in
Crowd documentation
204

1.
2.
3.
Configuring FishEye earlier than 4.0 with CrowdYou can use Crowd to provide external authentication and authorization for Atlassian's source-FishEyerepository viewer.
Crowd supports centralized authentication and single sign-on (SSO) for . If FishEye versions 1.3.1 up to 3.10you are using FishEye 4.0 or later, see .Integrating Crowd with Atlassian FishEye
On this page:
PrerequisitesStep 1. Configuring Crowd to talk to FishEye
1.1 Prepare Crowd's directories/groups/users for FishEye1.2 Define the FishEye application in Crowd1.3 Specify which users can log in to FishEye1.4 Specify the address from which FishEye can log in to Crowd
Step 2. Configuring FishEye to talk to Crowd2.1 Change the details of your existing FishEye users2.2 Configure FishEye to use Crowd's authenticator2.3 Configure group authorization in FishEye (if required)
Step 3. Override Crowd default properties (optional)Next step for Crucible users
Prerequisites
Download and install Crowd. Refer to the for detailed information on how to do Crowd installation guidethis. We will refer to the Crowd root folder as .CROWDDownload and install FishEye. Refer to the for detailed information on how to FishEye Installation Guidedo this. We will refer to the FishEye root folder as .FISHEYE
If you have the standalone version of Crucible (available from ), there is no need to Crucible 1.6download or install FishEye.After FishEye is set up, make sure FishEye is not running when you begin the integration process described below.
Step 1. Configuring Crowd to talk to FishEye
1.1 Prepare Crowd's directories/groups/users for FishEye
The FishEye application will need to authenticate users against a directory configured in Crowd. You will need to set up a directory in Crowd for FishEye. For more information on how to do this, see . We Adding a Directorywill assume that the directory is called for the rest of this document. It is possible to assign FishEye Directorymore than one directory for an application, but for the purposes of this example, we will use to FishEye Directoryhouse FishEye users.
Crucible and FishEye
If you are using Atlassian's code review tool, you will need to follow the instructions below on Crucibleintegrating Crowd with FishEye. If you have the standalone version of Crucible without FishEye (available from ), please follow the instructions below to set up the Crowd directory and Crucible 1.6application for Crucible instead of FishEye. If preferred, you can change the name of your Crowd application and directory to 'Crucible' rather than 'FishEye'. Then follow the further instructions to integrat
.e Crowd with Crucible
Crowd Client JAR
Please make sure you use the default Crowd client JAR that ships with FishEye. In particular, FishEye is not compatible with the that is bundled with Crowd crowd-integration-client-2.0.7.jar2.0.7. See the .Crowd 2.0.7 Release Notes
205
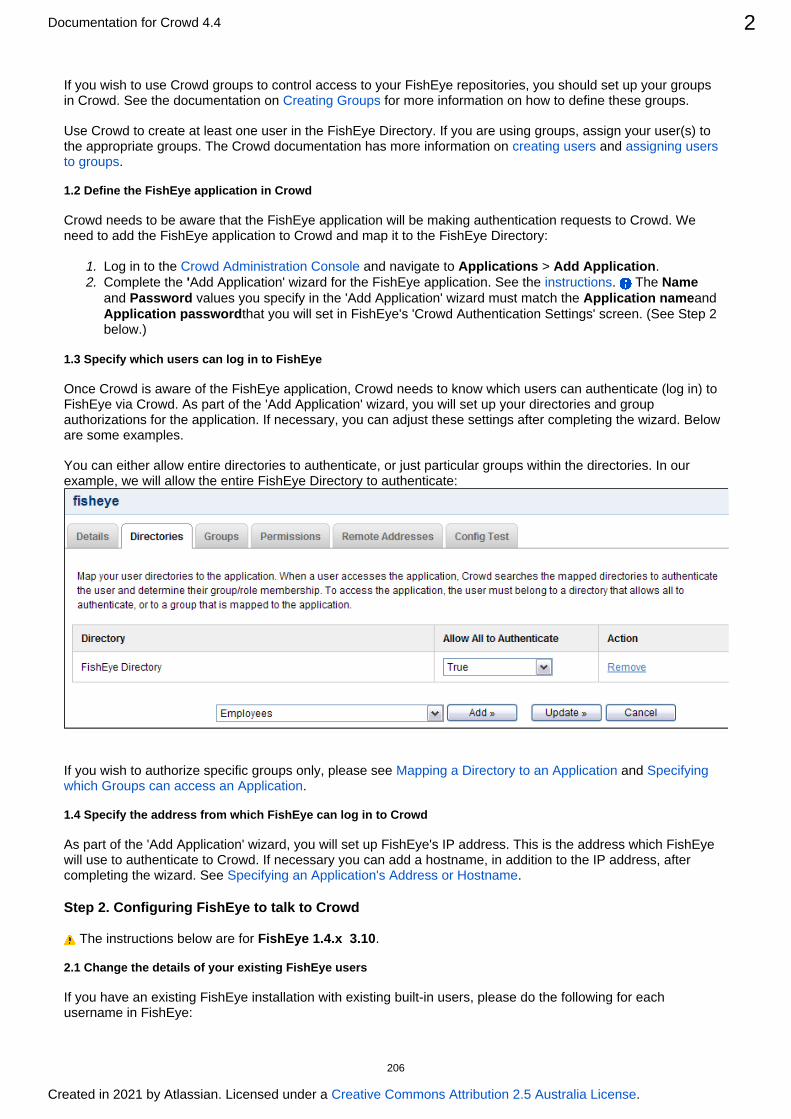
Documentation for Crowd 4.4 2
Created in 2021 by Atlassian. Licensed under a .Creative Commons Attribution 2.5 Australia License
1. 2.
If you wish to use Crowd groups to control access to your FishEye repositories, you should set up your groups in Crowd. See the documentation on for more information on how to define these groups.Creating Groups
Use Crowd to create at least one user in the . If you are using groups, assign your user(s) to FishEye Directorythe appropriate groups. The Crowd documentation has more information on and creating users assigning users
.to groups
1.2 Define the FishEye application in Crowd
Crowd needs to be aware that the FishEye application will be making authentication requests to Crowd. We need to add the FishEye application to Crowd and map it to the FishEye Directory:
Log in to the and navigate to > .Crowd Administration Console Applications Add ApplicationComplete the Add Application' wizard for the FishEye application. See the . The ' instructions Nameand values you specify in the 'Add Application' wizard must match the and Password Application name
that you will set in FishEye's 'Crowd Authentication Settings' screen. (See Step 2 Application passwordbelow.)
1.3 Specify which users can log in to FishEye
Once Crowd is aware of the FishEye application, Crowd needs to know which users can authenticate (log in) to FishEye via Crowd. As part of the 'Add Application' wizard, you will set up your directories and group authorizations for the application. If necessary, you can adjust these settings after completing the wizard. Below are some examples.
You can either allow entire directories to authenticate, or just particular groups within the directories. In our example, we will allow the entire to authenticate:FishEye Directory
If you wish to authorize specific groups only, please see and Mapping a Directory to an Application Specifying .which Groups can access an Application
1.4 Specify the address from which FishEye can log in to Crowd
As part of the 'Add Application' wizard, you will set up FishEye's IP address. This is the address which FishEye will use to authenticate to Crowd. If necessary you can add a hostname, in addition to the IP address, after completing the wizard. See .Specifying an Application's Address or Hostname
Step 2. Configuring FishEye to talk to Crowd
The instructions below are for .FishEye 1.4.x 3.10
2.1 Change the details of your existing FishEye users
If you have an existing FishEye installation with existing built-in users, please do the following for each username in FishEye:
206

Documentation for Crowd 4.4 3
Created in 2021 by Atlassian. Licensed under a .Creative Commons Attribution 2.5 Australia License
1. 2.
3.
Change the account type from to . This is required for the new authorization through Crowd built-in crowdto work properly. For details please see the .FishEye documentationEnsure that the username in FishEye is the same as in Crowd. If necessary, rename the user in FishEye. See the for details.FishEye documentation
2.2 Configure FishEye to use Crowd's authenticator
Log in to the FishEye Administration area and click (under 'Security Settings').AuthenticationClick under 'JIRA/Crowd Authentication'.Edit
FishEye allows only one authentication method to be configured at any one time. If you have already configured a different authentication source, click to remove that authentication method. You will Removethen be presented with the options for different authentication methods one will be the option to set up Crowd authentication.The 'Crowd Authentication Settings' screen will appear, as shown below. Enter the following information:
Application name The name for the FishEye application you specified in Step 1 above.Application password The password you specified in Step 1 above.Crowd URL http://localhost:8095/crowd/services/ \(i) The trailing slash is required.Auto-add Select (default) to ensure that your Crowd Create a FishEye user on successful loginusers will be automatically enrolled into FishEye when they first log in via Crowd.Single sign on (SSO) Controls whether FishEye should attempt to participate in a single sign on (SSO) environment.
This SSO option is available only with and later.FishEye 1.5.1Select (default) if you want FishEye to use Crowd's SSO capability.EnabledSelect if you want FishEye to use Crowd to check username/passwords and Disabledgroup membership, without participating in SSO. In this mode, FishEye will not read or set c
cookies. This is useful in environments where you want FishEye to ignore rowd.token cro cookies set by other Crowd-enabled applications.wd.token
For more information, please see the on configuring external authentication sources.FishEye documentation
2.3 Configure group authorization in FishEye (if required)
If you have groups in the Crowd directory that is mapped to your FishEye application (see Step 1 above), the Crowd groups can be seen in FishEye. You can use those groups to control access to your FishEye repositories.
See in the FishEye documentation for details.Permissions
Step 3. Override Crowd default properties (optional)
You set the basic Crowd properties, such as the application name, password and URL, using the FishEye adminstration screens (described above). You can also fine tune your Crowd integration by overriding the default Crowd properties, such as the session validation interval and SSO cookie name, by manually editing the
file in your FishEye installation directory.config.xml
To override the default Crowd properties:
207

Documentation for Crowd 4.4 4
Created in 2021 by Atlassian. Licensed under a .Creative Commons Attribution 2.5 Australia License
1. 2.
3. 4.
5.
Shutdown the application.Backup and then open the file in your (the folder where config.xml <FishEye home directory>you installed FishEye).Add a new element to the file.<crowd-properties>Override the default values for any of the Crowd properties (described in ) by the crowd.properties fileadding the property desired value. in the section with the <crowd-properties>For example, if you want to set the your file should look like this,config.xml session.
to 20 minutes:validationinterval
<config control-bind="127.0.0.1:8059" version="1.0"> <crowd-properties> session.validationinterval=20 </crowd-properties></config>
Note that FishEye 2.8, and later, overrides the Crowd defaults with these values:
Property Crowd Default FishEye 2.8+
http.timeout 5000 (millisecs) 5000 (millisecs)
socket.timeout 600000 (milliseconds) 20000 (millisecs)
Save the file and restart FishEye.
Next step for Crucible users
If you are using Atlassian's code review tool, please take a look at the further instructions on Crucible integrating .Crowd with Crucible
RELATED TOPICS
Using the Application BrowserAdding an ApplicationConfiguring the Google Apps ConnectorMapping a Directory to an ApplicationEffective memberships with multiple directoriesSpecifying an Application's Address or HostnameTesting a User's Login to an ApplicationEnforcing Lower-Case Usernames and Groups for an ApplicationManaging an Application's SessionDeleting or Deactivating an ApplicationConfiguring Caching for an ApplicationOverview of SSOConfiguring Options for an ApplicationEnabling OpenID client appAllowing applications to create user tokensDisabling the OpenID client appConfiguring how users log in
Crowd documentation
208

1.
2.
3.
Integrating Crowd with Atlassian JiraCurrently Crowd supports centralized authentication and single sign-on for Jira versions 3.7.4 and later.
On this page:
Compatibility of Jira and Crowd VersionsPrerequisitesStep 1. Configuring Crowd to talk to Jira
1.1 Prepare Crowd's Directories/Groups/Users for Jira1.2 Define the Jira Application in Crowd1.3 Specify which users can log in to Jira1.4 Specify the address from which Jira can log in to Crowd
Step 2. Configuring Jira to talk to Crowd2.1 Add a Crowd Directory in Jira2.2 Configure Jira to use Crowd's Authenticator to enable SSO (Optional)2.3 (Optional) Disable the Auto-Complete Function in Jira's User Picker
See Crowd in ActionKnown Limitations
Compatibility of Jira and Crowd Versions
Please ensure that your Crowd and Jira versions are compatible:
If you are using please upgrade to Crowd 2.0.7 or later. (watch out for Crowd 2.4 though: Jira 4.2
) - JRASERVER-27890 Crowd 2.4 is not compatible with JIRA 4.2.4 CLOSED
If you are using , please upgrade to Crowd 2.1 or later.Jira 4.3 or laterExplanation: With Jira 4.3 and higher, the communication between Jira and Crowd has been changed from SOAP to REST.
Prerequisites
Deploying multiple Atlassian applications in a single Tomcat container is We do not test this not supported.configuration and upgrading any of the applications (even for point releases) is likely to break it. There are also a number of known issues with this configuration. See for more information.this FAQ
There are also a number of practical reasons why we do not support deploying multiple Atlassian applications in a single Tomcat container. Firstly, you must shut down Tomcat to upgrade any application and secondly, if one application crashes, the other applications running in that Tomcat container will be inaccessible.
Finally, we recommend not deploying to the same Tomcat container that runs Crowd, any other applicationsespecially if these other applications have large memory requirements or require additional libraries in Tomcat's
subdirectory.lib
Download and install Crowd. Refer to the for instructions. We will refer to the Crowd installation guideCrowd root folder as .CROWDDownload and install Jira (version 3.7.4 or later). Refer to the for instructions. We Jira installation guidewill refer to the Jira root folder as . For the purposes of this document, we will assume that you have JIRAused the 'Crowd distribution (not EAR-WAR)' (i.e. the easier and recommended) installation method of Jira. If you need to install Jira as an EAR/WAR, simply explode the EAR/WAR and make the necessary changes as described below, then repackage the EAR/WAR.
Please check that this documentation applies to your version of Crowd
Please check the Crowd release number in this documentation against your version of Crowd. If you are using a different version of Crowd, you can find the appropriate documentation under 'Previous Versions' on the .Crowd documentation homepage
Do not deploy multiple Atlassian applications in a single Tomcat container.
209

Documentation for Crowd 4.4 2
Created in 2021 by Atlassian. Licensed under a .Creative Commons Attribution 2.5 Australia License
3.
4.
1.
2.
3.
1. 2.
Run the Jira Setup Wizard, as described in the . During this setup process, you will Jira documentationdefine the JIRA administrator's username and password. It is easier to do this before you integrate Jira with Crowd.For Jira 4.2 or earlier: after setting up Jira, shut down Jira before you begin the integration process described below.
Step 1. Configuring Crowd to talk to Jira
1.1 Prepare Crowd's Directories/Groups/Users for Jira
The Jira application will need to locate users from a directory configured in Crowd. You will need to set up a directory in Crowd for Jira. This directory may be any Crowd-configured directory, such as an LDAP directory hooked up to Crowd or a Crowd internal directory. For information on how to do this, see Adding
. a Directory
We will assume that the directory is called for the rest of this document. It is Jira Directory in Crowdpossible to assign more than one directory for an application, but for the purposes of this example, we will use to house Jira users.Jira Directory in CrowdJira also requires particular groups to exist in the directory in order to authenticate users. You need to ensure that these three groups exist in the :Jira Directory in Crowd
jira-usersjira-developersjira-administrators
You also need to ensure that the contains at least one user who is a member of all Jira Directory in Crowdthree groups. You can either:
If you have an existing Jira deployment and would like to import existing groups and users into Crowd, use the Jira Importer tool by navigating to > > . Users Import Users Atlassian ImporterSelect 'Jira' as the Atlassian Product and the as the directory into which Jira Directory in CrowdJira users will be imported. For details please see . If you Importing Users from Atlassian Jiraare going to import users into Crowd, you need to do this now before you proceed any further. OR:If you don't wish to import your Jira users, use the Crowd Administration Console to create the three groups, then create at least one user in the and add them to the Jira Directory in Crowdthree Jira-specific groups (above). The Crowd documentation has more information on creating
, and .groups creating users assigning users to groups
1.2 Define the Jira Application in Crowd
Crowd needs to be aware that the Jira application will be making authentication requests to Crowd. We need to add the Jira application to Crowd and map it to the .Jira Directory in Crowd
Log in to the and navigate to > .Crowd Administration Console Applications Add ApplicationComplete the for the Jira application. See the . The and 'Add Application' wizard instructions Name P
values you specify in the 'Add Application' wizard must match the and assword application.name applic
If you are using Jira as a User Directory in any other applications such as Fisheye or Confluence these will be inaccessible while Jira is shut down. You can avoid this by configuring these applications to use Crowd prior to integrating Crowd with Jira.
Error will occur in JIRA if the required groups do not exist
JIRA expects that the group names mentioned above will exist. If you need to use different group names, you may want to remove the above pre-existing groups from . If the Jira's Global Permissionsabove groups do not exist somewhere in Crowd, you will receive an error when you try to remove the groups from Jira's Global Permissions.
If multiple versions of Jira are being connected to Crowd, ensure you define an application in Crowd for each one
210
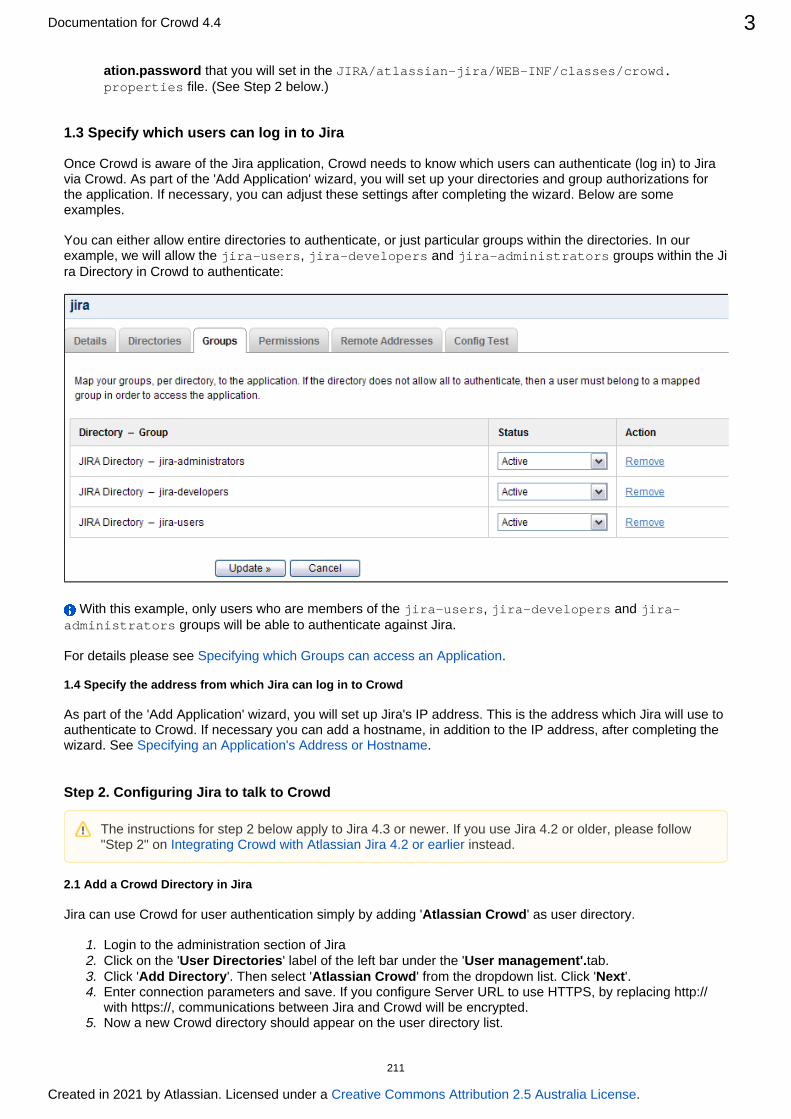
Documentation for Crowd 4.4 3
Created in 2021 by Atlassian. Licensed under a .Creative Commons Attribution 2.5 Australia License
2.
1. 2. 3. 4.
5.
that you will set in the ation.password JIRA/atlassian-jira/WEB-INF/classes/crowd. file. (See Step 2 below.)properties
1.3 Specify which users can log in to Jira
Once Crowd is aware of the Jira application, Crowd needs to know which users can authenticate (log in) to Jira via Crowd. As part of the 'Add Application' wizard, you will set up your directories and group authorizations for the application. If necessary, you can adjust these settings after completing the wizard. Below are some examples.
You can either allow entire directories to authenticate, or just particular groups within the directories. In our example, we will allow the , and groups within the jira-users jira-developers jira-administrators Ji
to authenticate:ra Directory in Crowd
With this example, only users who are members of the , and jira-users jira-developers jira- groups will be able to authenticate against Jira.administrators
For details please see .Specifying which Groups can access an Application
1.4 Specify the address from which Jira can log in to Crowd
As part of the 'Add Application' wizard, you will set up Jira's IP address. This is the address which Jira will use to authenticate to Crowd. If necessary you can add a hostname, in addition to the IP address, after completing the wizard. See .Specifying an Application's Address or Hostname
Step 2. Configuring Jira to talk to Crowd
2.1 Add a Crowd Directory in Jira
Jira can use Crowd for user authentication simply by adding ' ' as user directory.Atlassian Crowd
Login to the administration section of JiraClick on the ' ' label of the left bar under the ' tab.User Directories User management'.Click ' '. Then select ' ' from the dropdown list. Click ' '.Add Directory Atlassian Crowd NextEnter connection parameters and save. If you configure Server URL to use HTTPS, by replacing http:// with communications between Jira and Crowd will be encrypted.https://,Now a new Crowd directory should appear on the user directory list.
The instructions for step 2 below apply to Jira 4.3 or newer. If you use Jira 4.2 or older, please follow "Step 2" on instead.Integrating Crowd with Atlassian Jira 4.2 or earlier
211

Documentation for Crowd 4.4 4
Created in 2021 by Atlassian. Licensed under a .Creative Commons Attribution 2.5 Australia License
1. 2.
3.
4.
For more information on configuring a Crowd directory in Jira, check out the Jira documentation on Connecting .to Crowd or Another Jira Server for User Management
2.2 Configure Jira to use Crowd's Authenticator to enable SSO (Optional)
At this stage, Jira is set up for . If you wish, you can now enable centralized authentication single sign-on to Jira. This will ensure that Jira's authentication and access request calls will be performed using Seraph.(SSO)
Note: if you are migrating/upgrading a Jira instance that already uses Crowd, you will need to merge these files (not overwrite them).
If Jira is running, shut it down first.Edit the file. Comment out the JIRA/atlassian-jira/WEB-INF/classes/seraph-config.xml au
node:thenticator
<!--<authenticator class="com.atlassian.jira.security.login.JiraSeraphAuthenticator"/>-->
Uncomment the line that contains the new authenticator:
<authenticator class="com.atlassian.jira.security.login.SSOSeraphAuthenticator"/>
Copy the file from to crowd.properties CROWD/client/conf/ JIRA/atlassian-jira/WEB-INF./classes
Edit . Change the following JIRA/atlassian-jira/WEB-INF/classes/crowd.propertiesproperties:
Key Value
application.name
jira The application name must match the name that you specified when you defined the application in Crowd (see above).Step 1
212

Documentation for Crowd 4.4 5
Created in 2021 by Atlassian. Licensed under a .Creative Commons Attribution 2.5 Australia License
4.
application.password
The password must match the one that you specified when you defined the application in Crowd (see above).Step 1
crowd.base.url
eg. (http://localhost:8095/crowd/)If your Crowd server's port is configured differently from the default (i.e. 8095), set it accordingly.
crowd.base.urlmust be the same URL used to access Crowd in your Browser.
session.validationinterval
Set to 0, if you want authentication checks to occur on each request. Otherwise set to the number of minutes between request to validate if the user is logged in or out of the Crowd SSO server. Setting this value to 1 or higher will increase the performance of Crowd's integration.
You can read more about optional settings in .the crowd.properties file
2.3 Disable the Auto-Complete Function in Jira's User Picker(Optional)
To improve performance on page-loading in Jira, we recommend that you disable the auto-complete function in Jira's 'User Picker' popup screens. Follow the instructions in the .Jira documentation
More information: In our experience, disabling this feature in Jira helps performance for customers with extremely large user bases. If you leave this feature enabled and have adequate performance results in Jira, feel free to leave it enabled.
See Crowd in Action
You should now be able to login using users belonging to the group. Try adding a user to jira-usersthe group using Crowd you should be able to login to Jira using this newly created user. That's centralize
in action!d authenticationIf you have enabled SSO, you can try adding the and JIRA Directory in Crowd jira-administratorsgroup to the application (see and crowd Mapping a Directory to an Application Specifying which Groups
). This will allow Jira administrators to log in to the can access an Application Crowd Administration . Try logging in to Crowd as a Jira administrator, and then point your browser at Jira. You should Console
be logged in as the same user in Jira. That's in action!single sign-on
Known Limitations
If you are using , a problem occurs in Jira if a user is removed after that user has participated in an Jira 4.2issue i.e. if Jira refers to the user. If the user is internally managed by Jira, Jira will prevent the removal of the user but if the user is managed by an external system such as Crowd, Jira will throw a DataAccessException. We recommend upgrading Jira or deactivating the user's account by removing them from the groujira-usersp.
If you are using , this problem has been , allowing the removal of users that are Jira 4.3 or later resolvedexternally managed, despite existing data associations. When a user managed by an external system such as Crowd is removed, any user associations in Jirawill continue to be associated, with the username acting as a placeholder. This username will not be listed in the User Browser and no profile exists for that user.
RELATED TOPICS
Using the Application BrowserAdding an Application
Integrating Crowd with Atlassian BambooIntegrating Crowd with Atlassian Confluence
Integrating Crowd with Atlassian Confluence 3.4 or earlier
It is possible to define multiple user directories in Jira. However, if you enable SSO integration, you will only be able to authenticate as users from the Crowd server defined in the file.crowd.properties
213

Documentation for Crowd 4.4 6
Created in 2021 by Atlassian. Licensed under a .Creative Commons Attribution 2.5 Australia License
Updating Files in a Confluence Evaluation DistributionIntegrating Crowd with Atlassian CrowdIDIntegrating Crowd with Atlassian CrucibleIntegrating Crowd with Atlassian FishEye
Configuring FishEye earlier than 4.0 with CrowdIntegrating Crowd with Atlassian Jira
Integrating Crowd with Atlassian Jira 4.2 or earlierIntegrating Crowd with Atlassian Bitbucket ServerIntegrating Crowd with Acegi Security
Integrating AppFuse - a Crowd-Acegi Integration TutorialIntegrating Crowd with Jive Forums
Jive SSOIntegrating Crowd with Spring Security
Integrating AppFuse - a Crowd-Spring Security Integration TutorialIntegrating Crowd with a Custom ApplicationIntegrating Crowd with Atlassian HipChat
Configuring the Google Apps ConnectorMapping a Directory to an Application
Specifying the Directory Order for an ApplicationSpecifying an Application's Directory Permissions
Example of Directory PermissionsViewing Users in Directories Mapped to an ApplicationSpecifying which Groups can access an ApplicationSyncing users based on their access rights
Effective memberships with multiple directoriesSpecifying an Application's Address or HostnameTesting a User's Login to an ApplicationEnforcing Lower-Case Usernames and Groups for an ApplicationManaging an Application's SessionDeleting or Deactivating an ApplicationConfiguring Caching for an ApplicationOverview of SSOConfiguring Options for an ApplicationEnabling OpenID client appAllowing applications to create user tokensDisabling the OpenID client appConfiguring how users log in
Crowd documentation
214
1.
2.
3.
4.
5.
6.
Integrating Crowd with Atlassian Jira 4.2 or earlier
Step 2. Configuring Jira to talk to Crowd
2.1 Install the Crowd Client Libraries into Jira
Jira needs Crowd's client libraries in order to be able to delegate user authentication to the Crowd application. As stated earlier, we are going to be modifying the Jira application by editing the application, which is an exploded WAR stored in .Jira/atlassian-Jira
If you are using the Crowd WAR distribution, then you will need to get the CROWD client libraries from the Crowd distribution, available on our .download siteCopy the Crowd client libraries and configuration files to Jira:
Copy From Copy To
CROWD/client/crowd-integration-client-X.X.X.jar JIRA/atlassian-jira/WEB-INF/lib
CROWD/client/conf/crowd.properties JIRA/atlassian-jira/WEB-INF/classes
If you are using , you will need to remove the file from Jira's Jira 3.11 or earlier seraph-0.7.12.jar WE directory and replace it with the following file:B-INF/lib/
http://repository.atlassian.com/maven2/com/atlassian/seraph/atlassian-seraph/0.10/atlassian-seraph-0.10.jarIf you are using , you will need to update Jira's xfire libraries:Jira 3.12.2 or earlier
Remove the file from Jira's directory.xfire-all-1.2.1.jar WEB-INF/lib/Copy the following two files from Crowd's directory to Jira's directorclient/lib/ WEB-INF/lib/y:
xfire-aegis-1.2.6.jarxfire-core-1.2.6.jar
Replace Jira's cache configuration file:
Copy From Replace File
CROWD/client/conf/crowd-ehcache.xml JIRA/atlassian-jira/WEB-INF/classes/crowd-ehcache.xml
Edit . Change the following JIRA/atlassian-jira/WEB-INF/classes/crowd.propertiesproperties:
This is an alternate step to "Step 2" defined in for users wanting to Integrating Crowd with Atlassian Jiraintegrate Crowd with Jira 4.2 or earlier.
If you are using Jira 4.3 or later, please follow the guide on .Integrating Crowd with Atlassian JiraIf you are using Jira 4.2 or earlier, please complete "Step 1" from Integrating Crowd with
before attempting the alternate "Step 2" below.Atlassian Jira
Use the client libraries from to integrate with Jira 4.2 or earlier even when the Crowd Crowd 2.2.7server is more recent. The client libraries from Crowd 2.2.7 remain compatible with later releases of the Crowd server.
Duplicate Crowd Client libraries in your classpath
Jira should only have a single copy of crowd-integration-client installed. Therefore you need to delete the existing crowd-integration-client-X.X.X.jar file from Jira's WEB-INF/lib directory and replace it with CROWD/client/crowd-integration-client-X.X.X.jar instead of just copying it over. Also, renaming the existing crowd-integration-client jar will not work as Jira will start with duplicate Crowd Client libraries in its classpath.
215

Documentation for Crowd 4.4 2
Created in 2021 by Atlassian. Licensed under a .Creative Commons Attribution 2.5 Australia License
6.
1.
2.
Key Value
application.name
jira The application name must match the name that you specified when you defined the application in Crowd (see above).Step 1
application.password
The password must match the one that you specified when you defined the application in Crowd (see above).Step 1
crowd.server.url
http://localhost:8095/crowd/services/If your Crowd server's port is configured differently from the default (i.e. 8095), set it accordingly.
session.validationinterval
Set to 0, if you want authentication checks to occur on each request. Otherwise set to the number of minutes between request to validate if the user is logged in or out of the Crowd SSO server. Setting this value to 1 or higher will increase the performance of Crowd's integration.
You can read more about optional settings in .the crowd.properties file
2.2 Configure Jira to use Crowd's Authenticator
Now that the Crowd client libraries exist, we need to configure Jira to use them.
Note: if you are migrating/upgrading a Jira instance that already uses Crowd, you will need to merge these files (not overwrite them).
Edit the Jira config file . Comment out any JIRA/atlassian-jira/WEB-INF/classes/osuser.xmlexisting authentication providers and uncomment/insert the Crowd providers:
<!-- This is where JIRA's credentials checking can be configured. For instance, seehttp://www.atlassian.com/software/jira/docs/latest/ldap.html --><opensymphony-user> <authenticator class="com.opensymphony.user.authenticator.SmartAuthenticator" />
<!-- You will need to uncomment the Crowd providers below to enable Crowd integration --> <provider class="com.atlassian.crowd.integration.osuser.CrowdCredentialsProvider"/> <provider class="com.atlassian.crowd.integration.osuser.CrowdAccessProvider"/> <provider class="com.atlassian.crowd.integration.osuser.DelegatingProfileProvider"> <property name="provider-1">com.atlassian.crowd.integration.osuser.CrowdProfileProvider</property> <property name="provider-2">com.atlassian.jira.user.ExternalEntityJiraProfileProvider</property> <property name="provider-2-exclusive-access">true</property> </provider>
<!-- CROWD:START - The providers below here will need to be commented out for Crowd integration --><!-- <provider class="com.atlassian.core.ofbiz.osuser.CoreOFBizCredentialsProvider"> <property name="exclusive-access">true</property> </provider>
<provider class="com.opensymphony.user.provider.ofbiz.OFBizProfileProvider"> <property name="exclusive-access">true</property> </provider>
<provider class="com.opensymphony.user.provider.ofbiz.OFBizAccessProvider"> <property name="exclusive-access">true</property> </provider>--><!-- CROWD:END -->
</opensymphony-user>
216

Documentation for Crowd 4.4 3
Created in 2021 by Atlassian. Licensed under a .Creative Commons Attribution 2.5 Australia License
2.
3.
View . If there is no entry for the Jira/atlassian-jira/WEB-INF/classes/propertyset.xmlCrowdPropertySet, add the following <propertyset> item at the end of the file as the last <propertyset> item:
<propertyset name="crowd" class="com.atlassian.crowd.integration.osuser.CrowdPropertySet"/>
At this stage, Jira is set up for . If you wish, you can now enable centralized authentication single sign- to Jira. This will ensure that Jira's authentication and access request calls will be performed on (SSO)
using Seraph. When authentication or access request calls are performed versus the OSUser framework, the Jira stack will call the Crowd providers and propertyset implementations.
Edit the file. Comment out the JIRA/atlassian-jira/WEB-INF/classes/seraph-config.xml au node:thenticator
<!--<authenticator class="com.atlassian.jira.security.login.JiraOsUserAuthenticator"/>-->
Add a new authenticator, choosing the one relevant to your version of Jira:
If you are using Jira 4.2.x:
<authenticator class="com.atlassian.crowd.integration.seraph.v22.JIRAAuthenticator"/>
If you are using Jira 4.1.2 or earlier:
<authenticator class="com.atlassian.crowd.integration.seraph.JIRAAuthenticator"/>
2.3 Tune the Cache(Optional)
Enabling caching on the Crowd server: When using the Atlassian-User and Crowd framework together with Jira, it is highly recommended that caching be enabled on the Crowd server. Multiple redundant calls to the Atlassian-User framework are made on any given request. These results can be stored locally between calls by enabling caching via the . Note that this caching on the Crowd server is enabled by default.Crowd Options menu
Enabling application caching for Jira: If application caching is enabled for Jira, Jira will obtain all necessary information for the period specified by the cache configuration. See . If a Configuring Caching for an Applicationchange or addition occurs to Crowd users, groups and roles, these changes will not be visible in Jira until the cache expires for that specific item, i.e. for the particular user, group or role.
From Jira 3.13, the default cache is two hours. In earlier versions, the default value for the application cache is 5 minutes (300 seconds) increasing this to one or two hours (3600 or 7200 seconds) will improve the performance of your Jira site.
2.4 Disable the Auto-Complete Function in Jira's User Picker(Optional)
To improve performance on page-loading in Jira, we recommend that you disable the auto-complete function in Jira's 'User Picker' popup screens. Follow the instructions in the .Jira documentation
More information: In our experience, disabling this feature in Jira helps performance for customers with extremely large user bases. If you leave this feature enabled and have adequate performance results in Jira, feel free to leave it enabled.
217

1.
2.
1. 2.
Integrating Crowd with Atlassian Bitbucket ServerYou can use Crowd to provide external authentication, and to determine group memberships for authorization, for Atlassian's .Bitbucket Server
On this page:
PrerequisitesStep 1. Configuring Crowd to talk toBitbucket ServerStep 2. Configuring Bitbucket Server to talk to Crowd
Prerequisites
Download and install Crowd. Refer to the for detailed information on how to do Crowd installation guidethis. We will refer to the Crowd root folder as .CROWDDownload and install Bitbucket Server. Refer toeither (if running the Bitbucket Getting started
for detailed information on how to do this. Serverinstaller) or ,Install Bitbucket Server from an archive fileWe will refer to the Bitbucket Serverroot folder as .Bitbucket
Step 1. Configuring Crowd to talk toBitbucket Server
1.1 Prepare Crowd's directories/groups/users forBitbucket Server
The Bitbucket Server application will need to authenticate users against a directory configured in Crowd. You will need to set up a directory in Crowd for Bitbucket Server. For more information on how to do this, see Adding
. We will assume that the directory is called for the rest of this document. It is a Directory Bitbucket Directorypossible to assign more than one directory for an application, but for the purposes of this example, we will use Bi
to house Bitbucket Server users.tbucket Directory
If you wish to use Crowd groups to control access to your Bitbucket Server projects, you should set up your groups in Crowd. See the documentation on for more information on how to define these Creating Groupsgroups.
Use Crowd to create at least one user in the . If you are using groups, assign your user(s) to Bitbucket Directorythe appropriate groups. The Crowd documentation has more information on and creating users assigning users
.to groups
1.2 Define the Bitbucket Server application in Crowd
Crowd needs to be aware that the Bitbucket Server application will be making authentication requests to Crowd. We need to add the Bitbucket Server application to Crowd and map it to the Bitbucket Directory:
Log in to the and navigate to > .Crowd Administration Console Applications Add ApplicationComplete the 'Add Application' wizard for the Bitbucket Server application. See the . instructionsWhen prompted for an , choose if the option is Application Type Generic Application Bitbucket Servernot available.Note that the and values you specify in the 'Add Application' wizard must match those Name Passwordfor and that you will set in Bitbucket Server's 'Configure Application Name Application PasswordAtlassian Crowd Server' screen (see Step 2 below).
1.3 Specify which users can log in to Bitbucket Server
Once Crowd is aware of the Bitbucket Server application, Crowd needs to know which users can authenticate (log in) to Bitbucket Server via Crowd. As part of the 'Add Application' wizard, you will set up your directories and the group memberships that Bitbucket Server will use for authorization. If necessary, you can adjust these settings after completing the wizard.
Crowd Client JAR
Please make sure you use the default Crowd client JAR that ships with Bitbucket Server.
218

Documentation for Crowd 4.4 2
Created in 2021 by Atlassian. Licensed under a .Creative Commons Attribution 2.5 Australia License
You can either allow entire directories to authenticate, or just particular groups within the directories. If you only specific groups to be able to log in, please see and Mapping a Directory to an Application Specifying which
.Groups can access an Application
1.4 Specify the address from which Bitbucket Server can log in to Crowd
As part of the 'Add Application' wizard, you will need to tell Crowd the IP address and/or hostname of the server that Bitbucket Server is connecting from. See .Specifying an Application's Address or Hostname
Step 2. Configuring Bitbucket Server to talk to Crowd
2.1 Connecting Bitbucket Server to Crowd
To set up Bitbucket Server to use Crowd authentication, follow the instructions in .Connect Bitbucket to Crowd
2.2 Configure group permissions in Bitbucket Server (if required)
If you have created groups in the Crowd directory which is mapped to your Bitbucket Server application (see Step 1 above), the Crowd groups can be seen in Bitbucket Server. Now you can set up group permissions for your Bitbucket Server projects. See .Creating projects
2.3 Configure Bitbucket Server to enable SSO with Crowd (optional)
Once the Crowd directory has been set up, you can enable Crowd SSO integration in Bitbucket Server. SeeCon for details.necting to Crowd
219

Integrating Crowd with Acegi Security
Using the Application BrowserAdding an ApplicationConfiguring the Google Apps ConnectorMapping a Directory to an ApplicationEffective memberships with multiple directoriesSpecifying an Application's Address or HostnameTesting a User's Login to an ApplicationEnforcing Lower-Case Usernames and Groups for an ApplicationManaging an Application's SessionDeleting or Deactivating an ApplicationConfiguring Caching for an ApplicationOverview of SSOConfiguring Options for an ApplicationEnabling OpenID client appAllowing applications to create user tokensDisabling the OpenID client appConfiguring how users log in
Crowd documentation
Crowd 2.6 ( ). Please upgrade to or removed support for Acegi Security Upgrade Notes Spring Securityuse an .older release of Crowd
220
1.
2.
3.
4.
5.
6.
Integrating AppFuse - a Crowd-Acegi Integration TutorialAppFuse provides a sweet starting point for developing web applications. You choose the frameworks, AppFuse generates the skeleton application.
At its core, the web security of AppFuse 2.0.1 and earlier applications relies on the modular and extensible Acegi authentication framework. In this tutorial, we look at a basic integration of Crowd with Acegi, using an application generated by AppFuse.
Step 1. Get AppFuse
In this tutorial, we will be using the Struts2-basic archetype to create the project, but the other types should be similar. For more information, consult the AppFuse . In particular, it outlines the database quickstart guiderequirements for AppFuse.
Create the project.
mvn archetype:create -DarchetypeGroupId=org.appfuse.archetypes \-DarchetypeArtifactId=appfuse-basic-struts \-DremoteRepositories=http://static.appfuse.org/releases -DarchetypeVersion=2.0 \-DgroupId=com.mycompany.app -DartifactId=myproject
Since we will be editing the core Acegi configuration, we will need the full source code of the application.
cd myprojectmvn appfuse:full-source
Build it.
mvn clean install
Run it.
mvn jetty:run-war -Dmaven.test.skip
Play with it.
http://localhost:8080/
Shut it down.
ctrl+c
Step 2. Let Crowd Know about AppFuse
Add as an application via the Crowd Console. See for more information.appfuse Adding an Application
Step 3. Add the Crowd Acegi Connector to AppFuse
Open up the and add the Crowd client libraries as a project dependency:pom.xml
If you're working with AppFuse 2.0.2 or later, it uses Spring Security instead of Acegi. Please see our se.parate tutorial
This tutorial assumes you have installed Crowd 1.5.1 or later.
221
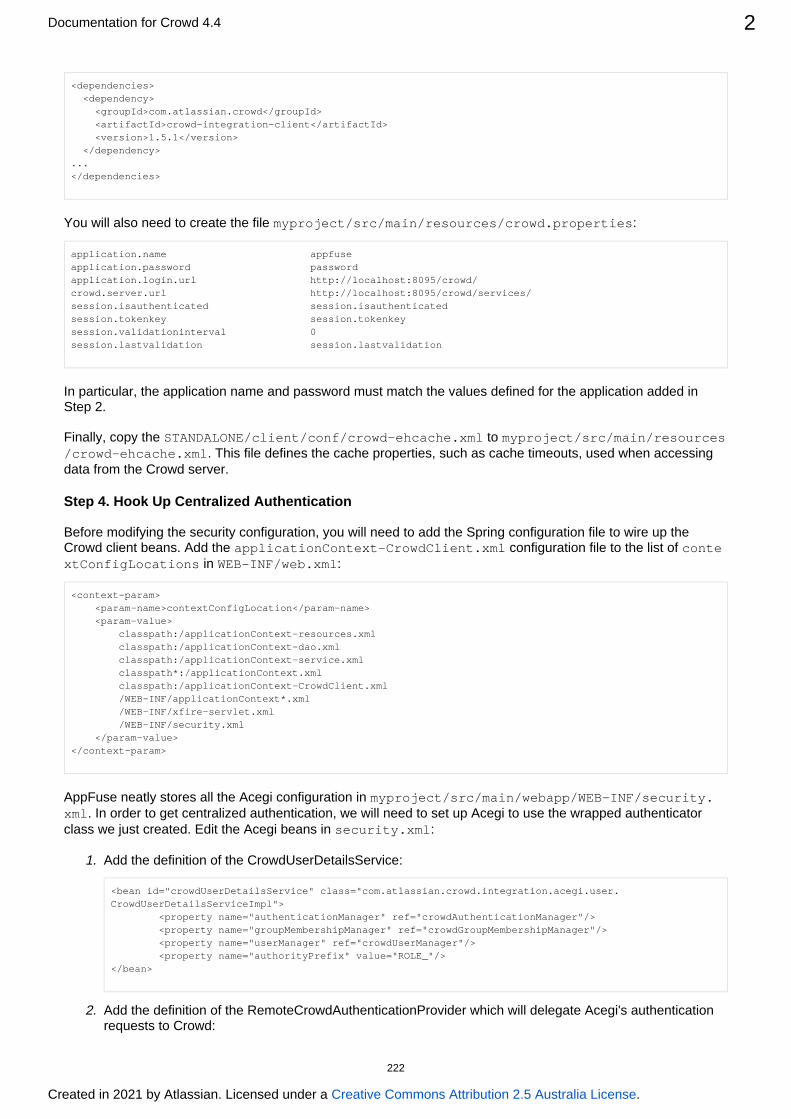
Documentation for Crowd 4.4 2
Created in 2021 by Atlassian. Licensed under a .Creative Commons Attribution 2.5 Australia License
1.
2.
<dependencies> <dependency> <groupId>com.atlassian.crowd</groupId> <artifactId>crowd-integration-client</artifactId> <version>1.5.1</version> </dependency>...</dependencies>
You will also need to create the file :myproject/src/main/resources/crowd.properties
application.name appfuseapplication.password passwordapplication.login.url http://localhost:8095/crowd/crowd.server.url http://localhost:8095/crowd/services/session.isauthenticated session.isauthenticatedsession.tokenkey session.tokenkeysession.validationinterval 0session.lastvalidation session.lastvalidation
In particular, the application name and password must match the values defined for the application added in Step 2.
Finally, copy the to STANDALONE/client/conf/crowd-ehcache.xml myproject/src/main/resources. This file defines the cache properties, such as cache timeouts, used when accessing /crowd-ehcache.xml
data from the Crowd server.
Step 4. Hook Up Centralized Authentication
Before modifying the security configuration, you will need to add the Spring configuration file to wire up the Crowd client beans. Add the configuration file to the list of applicationContext-CrowdClient.xml conte
in :xtConfigLocations WEB-INF/web.xml
<context-param> <param-name>contextConfigLocation</param-name> <param-value> classpath:/applicationContext-resources.xml classpath:/applicationContext-dao.xml classpath:/applicationContext-service.xml classpath*:/applicationContext.xml classpath:/applicationContext-CrowdClient.xml /WEB-INF/applicationContext*.xml /WEB-INF/xfire-servlet.xml /WEB-INF/security.xml </param-value></context-param>
AppFuse neatly stores all the Acegi configuration in myproject/src/main/webapp/WEB-INF/security.. In order to get centralized authentication, we will need to set up Acegi to use the wrapped authenticator xml
class we just created. Edit the Acegi beans in :security.xml
Add the definition of the CrowdUserDetailsService:
<bean id="crowdUserDetailsService" class="com.atlassian.crowd.integration.acegi.user.CrowdUserDetailsServiceImpl"> <property name="authenticationManager" ref="crowdAuthenticationManager"/> <property name="groupMembershipManager" ref="crowdGroupMembershipManager"/> <property name="userManager" ref="crowdUserManager"/> <property name="authorityPrefix" value="ROLE_"/></bean>
Add the definition of the RemoteCrowdAuthenticationProvider which will delegate Acegi's authentication requests to Crowd:
222

Documentation for Crowd 4.4 3
Created in 2021 by Atlassian. Licensed under a .Creative Commons Attribution 2.5 Australia License
2.
3.
4.
5.
1.
<bean id="crowdAuthenticationProvider" class="com.atlassian.crowd.integration.acegi.RemoteCrowdAuthenticationProvider"> <constructor-arg ref="crowdAuthenticationManager"/> <constructor-arg ref="httpAuthenticator"/> <constructor-arg ref="crowdUserDetailsService"/></bean>
Replace the DaoAuthenticationProvider with our authenticator in the authentication manager:
<bean id="authenticationManager" class="org.acegisecurity.providers.ProviderManager"> <property name="providers"> <list> <ref local="crowdAuthenticationProvider"/> <!--ref local="daoAuthenticationProvider"--> <ref local="anonymousAuthenticationProvider"/> <ref local="rememberMeAuthenticationProvider"/> </list> </property></bean>
Now do a:
mvn jetty:run-war -Dmaven.test.skip
Head over to .http://localhost:8080/You should now be able to authenticate the users in your Crowd repository that meet all of the
:following conditions
They are in a Crowd directory assigned to the AppFuse application in Crowd. See .more informationThey are in Crowd groups named and . You will need to and assign the USER ADMIN add these groupsuser as a . These Crowd group names map to the Acegi authorization roles member of the groupsdefined in the AppFuse application.They are allowed to authenticate with the AppFuse application because EITHER they are in a group allowed to authenticate with Crowd OR their container directory allows all users to authenticate see more
.see more
Congratulations. You have centralized authentication
Step 5. Hook Up Single Sign-On
Enabling single sign-on (SSO) requires a little more tweaking of the :security.xml
Change the default processing filter to Crowd's SSO filter:
Application-level centralized user management
One quirk you may notice is that you can't view the profile details of users who exist in Crowd, but did not exist in AppFuse prior to the Crowd integration. Although it's possible to authenticate a Crowd user 'dude' and still run AppFuse as 'dude', 'dude' will not be in AppFuse's local database. AppFuse makes use of a database-backed user management system. In order to achieve application-level centralized
, AppFuse will need to delegate its calls to create, retrieve, update and delete users user managementto Crowd using This will prevent data redundancy and eliminate the hassle of data Crowd's remote API.synchronization. This is beyond the scope of this short tutorial.
223

Documentation for Crowd 4.4 4
Created in 2021 by Atlassian. Licensed under a .Creative Commons Attribution 2.5 Australia License
1.
2.
3.
4.
5.
<bean id="authenticationProcessingFilter" class="com.atlassian.crowd.integration.acegi.CrowdSSOAuthenticationProcessingFilter"> <property name="httpAuthenticator" ref="httpAuthenticator"/> <property name="authenticationManager" ref="authenticationManager"/> <property name="authenticationFailureUrl" value="/login.jsp?error=true"/> <property name="defaultTargetUrl" value="/"/> <property name="filterProcessesUrl" value="/j_security_check"/> <property name="rememberMeServices" ref="rememberMeServices"/></bean>
Add the definition of the CrowdLogoutHandler:
<bean id="crowdLogoutHandler" class="com.atlassian.crowd.integration.acegi.CrowdLogoutHandler"> <property name="httpAuthenticator" ref="httpAuthenticator"/></bean>
Update the definition of the LogoutFilter to use the CrowdLogoutHandler. You may need to uncomment the logout filter.
<bean id="logoutFilter" class="org.acegisecurity.ui.logout.LogoutFilter"> <constructor-arg value="/index.jsp"/> <constructor-arg> <list> <ref bean="rememberMeServices"/> <ref bean="crowdLogoutHandler"/> <bean class="org.acegisecurity.ui.logout.SecurityContextLogoutHandler"/> </list> </constructor-arg> <property name="filterProcessesUrl" value="/logout.jsp"/></bean>
If the logout filter is not defined in the filter invocation list, you will need to add it:
<bean id="filterChainProxy" class="org.acegisecurity.util.FilterChainProxy"> <property name="filterInvocationDefinitionSource"> <value> ... /**=httpSessionContextIntegrationFilter,logoutFilter,authenticationProcessingFilter,securityContextHolderAwareRequestFilter,rememberMeProcessingFilter,anonymousProcessingFilter,exceptionTranslationFilter,filterInvocationInterceptor </value> ...
Now repeat:
mvn jetty:run-war -Dmaven.test.skip=true
SSO will only work for users that are able to with both appplications and are to use authenticate authorizedboth applications. Try out the following:
Log in to Crowd you should be logged in to AppFuse.Log out of AppFuse you should be logged out of Crowd.Log in to AppFuse; log out of Crowd; log in to Crowd as another user; refresh AppFuse you should be logged in as the new user.
Congratulations, you have SSO
224

1.
2.
1. 2.
Integrating Crowd with Jive ForumsJive Forums allows you to specify an implementation that provides authentication and authorization external to the application. This document outlines how to integrate Crowd's authenticator with Jive Forums.
Prerequisites
Download and configure Crowd. Refer to the for detailed information on how to Crowd installation guidedo this. We will refer to the Crowd root folder as .CROWDInstall/configure Jive Forums. Refer to the relevant Jive Forums documentation for information regarding this installation process. The documentation is usually supplied with the software distribution. Do not attempt to use Crowd as the authentication system during the installation process (use the default authentication system for the installation process).
Step 1. Tell Crowd about Jive Forums
1.1 Prepare Crowd's Directory/Users for Jive Forums
The Jive Forums application will need to locate users from a directory configured in Crowd. You will need to set up a directory in Crowd for Jive. For more information on how to do this, see . We will Adding a Directoryassume that the directory is called for the rest of this document. It is possible to assign Jive Forum Directorymore than one directory for an application, but for the purposes of this example, we will use Jive Forum Directoryto house Jive Forum users.
If you have an existing Jive Forums deployment and would like to import existing users into Crowd, use the Jive Importer tool by navigating > > . Select the as the directory into Users Import Users JIVE Jive Forum Directorywhich Jive Forum users will be imported. For details please see . If you are Importing Users from Jive Forumsgoing to import users into Crowd, you need to do this now before you proceed any further.
1.2 Define the Jive Forums Application in Crowd
Crowd needs to be aware that the Jive Forums application will be making authentication requests to Crowd. We need to add the Jive Forums application to Crowd and map it to the Jive Forums Directory:
Log in to the and navigate to > .Crowd Administration Console Applications Add ApplicationComplete the for the Jive Forums application. See the . The 'Add Application' wizard instructions Na
and values you specify in the 'Add Application' wizard must match the me Password application.nameand that you will set in the application.password JIVEFORUMS/WEB-INF/classes/crowd.
file. (See Step 2 below.)properties
1.3 Specify which Users can Log In to Jive Forums
Once Crowd is aware of the Jive Forums application, Crowd needs to know which users can authenticate (log in) to Jive Forums via Crowd. As part of the 'Add Application' wizard, you will set up your directories and group authorizations for the application. If necessary, you can adjust these settings after completing the wizard. Below are some examples.
You can either configure entire directories to authenticate or allow particular groups. In our example, we can simply allow the entire directory to authenticate:
Support for Jive Forums version 5.5.13 only
Crowd provides centralized authentication and single sign-on (SSO) for Jive Forums version 5.5.13only. Jive have announced that Jive Forums has evolved into a new product, Jive Social Business
. We have no plans to update Crowd to support later versions of Jive Forums.Software (SBS)
225

Documentation for Crowd 4.4 2
Created in 2021 by Atlassian. Licensed under a .Creative Commons Attribution 2.5 Australia License
1.
2.
3.
4.
Alternatively, we can use the tab to restrict the application to only authenticate particular groups of Groupsusers. For details please see .Specifying which Groups can access an Application
1.4 Specify the Address from which Jive Forums can Log In to Crowd
As part of the 'Add Application' wizard, you will set up Jive Forums's IP address. This is the address which Jive Forums will use to authenticate to Crowd. If necessary you can add a hostname, in addition to the IP address, after completing the wizard. See .Specifying an Application's Address or Hostname
Step 2. Tell Jive Forums about Crowd
2.1 Install the Crowd Client Libraries into the Jive Forums WebApp
Jive Forums may be deployed on an application server as a single WAR file or a an exploded WAR folder. For the rest of the installation process, we will assume that Jive Forums has been set up as an exploded war file. If you need Jive Forums to be installed as a single WAR file, simply expand the WAR to a directory, make the changes as described below, and zip up the directory to form the WAR file. We will refer to the root folder of the Jive Forums web-app as .JIVEFORUMS
Copy the Crowd integration libraries and configuration files (this is described in the Client Configurationdocumentation). This is summarized below:
Copy From Copy To
CROWD/client/crowd-integration-client-X.X.X.jar JIVEFORUMS/WEB-INF/lib
CROWD/client/lib/log4j-1.2.8.jar JIVEFORUMS/WEB-INF/lib/
CROWD/client/lib/ehcache-1.2.3.jar JIVEFORUMS/WEB-INF/lib/
CROWD/client/conf/crowd.properties JIVEFORUMS/WEB-INF/classes/
CROWD/client/conf/crowd-ehcache.xml JIVEFORUMS/WEB-INF/classes/
Replace the XFire libraries in your Jive Forums installation with the later version shipped with Crowd:Remove all files from your folder.xfire*.jar JIVEFORUMS/WEB-INF/libCopy the XFire libraries from Crowd:
Copy From Copy To
CROWD/client/xfire*.jar JIVEFORUMS/WEB-INF/lib/
Examine the folder and delete any duplicate JARs. Duplicate JARs JIVEFORUMS/WEB-INF/librepresent common libraries used by both the Crowd client and Jive Forums.Edit . Change the following properties:JIVEFORUMS/WEB-INF/classes/crowd.properties
Key Value
226
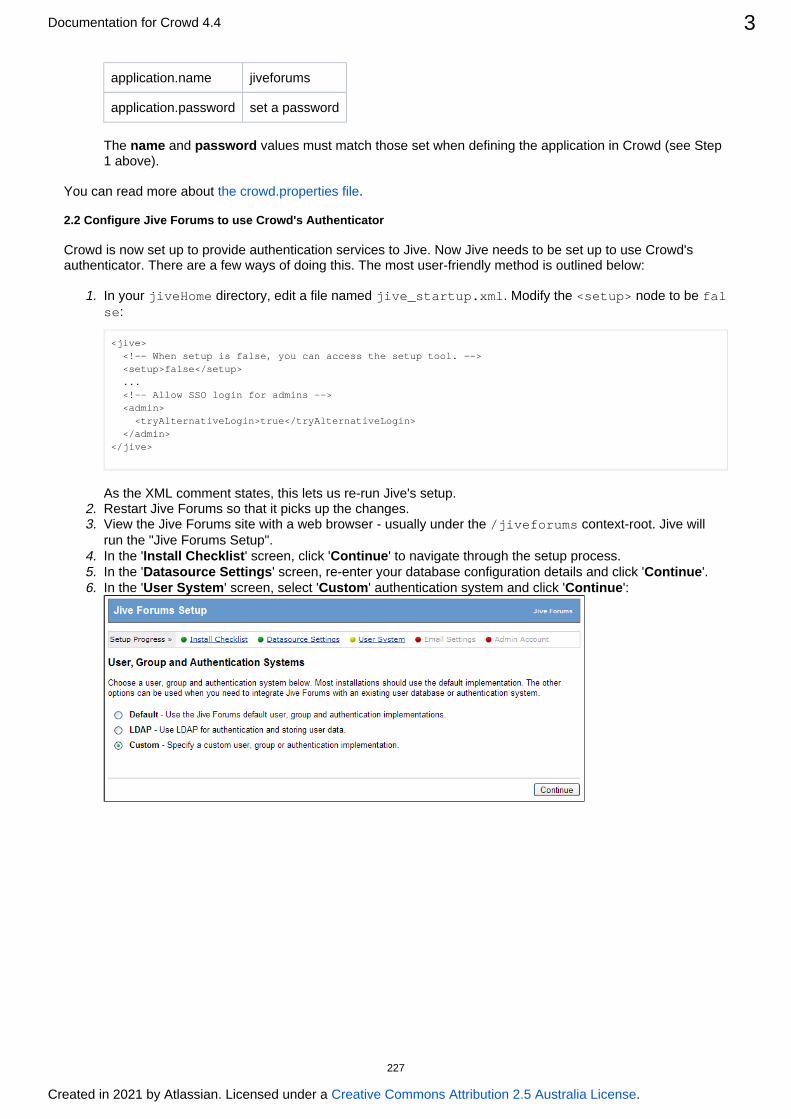
Documentation for Crowd 4.4 3
Created in 2021 by Atlassian. Licensed under a .Creative Commons Attribution 2.5 Australia License
4.
1.
2. 3.
4. 5. 6.
7.
application.name jiveforums
application.password set a password
The and values must match those set when defining the application in Crowd (see Step name password1 above).
You can read more about .the crowd.properties file
2.2 Configure Jive Forums to use Crowd's Authenticator
Crowd is now set up to provide authentication services to Jive. Now Jive needs to be set up to use Crowd's authenticator. There are a few ways of doing this. The most user-friendly method is outlined below:
In your directory, edit a file named . Modify the node to be jiveHome jive_startup.xml <setup> fal:se
<jive> <!-- When setup is false, you can access the setup tool. --> <setup>false</setup> ... <!-- Allow SSO login for admins --> <admin> <tryAlternativeLogin>true</tryAlternativeLogin> </admin></jive>
As the XML comment states, this lets us re-run Jive's setup.Restart Jive Forums so that it picks up the changes.View the Jive Forums site with a web browser - usually under the context-root. Jive will /jiveforumsrun the "Jive Forums Setup".In the ' ' screen, click ' ' to navigate through the setup process.Install Checklist ContinueIn the ' ' screen, re-enter your database configuration details and click ' '.Datasource Settings ContinueIn the ' ' screen, select ' ' authentication system and click ' ': User System Custom Continue
227

Documentation for Crowd 4.4 4
Created in 2021 by Atlassian. Licensed under a .Creative Commons Attribution 2.5 Australia License
7.
8. 9.
10.
You should be at the ' ' screen. Enter the following details which specify Crowd as Custom User Systemthe custom authenticator:
:UserManager implementation
com.atlassian.crowd.integration.jive.CrowdUserManager
GroupManager implementation: If you would like Crowd to manage your user groups, add the following group manager:
com.atlassian.crowd.integration.jive.CrowdGroupManager
You can safely leave this field empty if you do not want Crowd to manage your groups. :AuthFactory implementation
com.atlassian.crowd.integration.jive.CrowdAuthFactory
Click ' '. ContinueIf you have any errors at this stage, it is very likely that there is a classpath issue (eg. the Crowd client libraries aren't being properly loaded by Jive). Please read the documentation regarding Crowd Client
for help identifying the problem.LibrariesIn the ' ' screen, re-enter your email configuration details and click ' '.Email Settings ContinueIn the ' ' screen, . Click ' '.Admin Account Setup do not enter any details Skip this step
Bounce the server and test that Crowd is authenticating users for Jive. You can do this by creating users (users) via the Crowd Administration Console and verifying that they are able to log in to Jive Forums.
Check out the page for more details on Jive SSO Integration and corresponding use cases.Jive SSO
Warning
The default administrator for Jive Forums is the user . This user will need to exist in your adminmapped directory (i.e. the ) in Crowd. Without this user, you will not be able Jive Forums Directoryto access the administration console of Jive Forums.
Jive Forums Documentation
For further information regarding Jive Forums Authentication Integration, check out the Jive Forums Documentation at http://www.jivesoftware.com/builds/docs/latest/documentation/developer-guide.html#userintegration
228
https://developer.atlassian.com/display/CROWDDEV/Creating+a+Crowd+Client+for+your+Custom+Application

Documentation for Crowd 4.4 5
Created in 2021 by Atlassian. Licensed under a .Creative Commons Attribution 2.5 Australia License
RELATED TOPICS
Using the Application BrowserAdding an Application
Integrating Crowd with Atlassian BambooIntegrating Crowd with Atlassian Confluence
Integrating Crowd with Atlassian Confluence 3.4 or earlierUpdating Files in a Confluence Evaluation Distribution
Integrating Crowd with Atlassian CrowdIDIntegrating Crowd with Atlassian CrucibleIntegrating Crowd with Atlassian FishEye
Configuring FishEye earlier than 4.0 with CrowdIntegrating Crowd with Atlassian Jira
Integrating Crowd with Atlassian Jira 4.2 or earlierIntegrating Crowd with Atlassian Bitbucket ServerIntegrating Crowd with Acegi Security
Integrating AppFuse - a Crowd-Acegi Integration TutorialIntegrating Crowd with Jive Forums
Jive SSOIntegrating Crowd with Spring Security
Integrating AppFuse - a Crowd-Spring Security Integration TutorialIntegrating Crowd with a Custom ApplicationIntegrating Crowd with Atlassian HipChat
Configuring the Google Apps ConnectorMapping a Directory to an Application
Specifying the Directory Order for an ApplicationSpecifying an Application's Directory Permissions
Example of Directory PermissionsViewing Users in Directories Mapped to an ApplicationSpecifying which Groups can access an ApplicationSyncing users based on their access rights
Effective memberships with multiple directoriesSpecifying an Application's Address or HostnameTesting a User's Login to an ApplicationEnforcing Lower-Case Usernames and Groups for an ApplicationManaging an Application's SessionDeleting or Deactivating an ApplicationConfiguring Caching for an ApplicationOverview of SSOConfiguring Options for an ApplicationEnabling OpenID client appAllowing applications to create user tokensDisabling the OpenID client appConfiguring how users log in
Crowd documentation
229

1. 2.
1. 2.
3.
4. 5. 6.
7.
8.
9. 10.
Jive SSOThis page details the nuts and bolts of Jive SSO. If you are having issues with Jive SSO, this page should be able to give you a better idea of what's going on behind the scenes and help you diagnose any common problems.
For Crowd-Jive integration, the incoming request must:
be authenticated with Crowd (have a Crowd SSO token in session or as a cookie)be authenticated with Jive (have a CrowdAuthToken stored in HttpSession for Jive)
To authenticate with Crowd: simply log in to Crowd via any Crowd-SSO enabled application. This includes Jive's login page.
To authenticate with Jive: you need to be authenticated with Crowd as a user "allowed to be authenticated" by Jive. This means, the user must belong to a group or directory which Jive is authorized to authenticate. This user also needs to NOT be on any user/IP ban lists within the Jive application. The Crowd integration will honor the ban list. See note below.
Enumeration of Use Cases
User views Jive Forums and:
request is not authenticated with Crowd -> appears as guest user in Jive.request is authenticated with Crowd, but user is not in directory/group allowed to authenticate with Jive -> appears as guest user in Jive.request is authenticated with Crowd, user allowed to authenticate with Jive, user not on any ban list -> appears as logged-in user in Jive.authenticated Jive user clicks logout from Jive -> user is logged out of Jive and Crowd.authenticated Jive user logs out of Crowd using another SSO app -> user eventually times out of Jive.request is authenticated with Crowd, user banned from logging into Crowd -> user appears as guest in Jive.admin authenticated with Crowd and attempts to access Jive admin console -> admin appears logged in to Jive admin console.authenticated Jive admin attempts to log out from Jive's admin console -> admin is still logged in(support issue filed with Jive Forums).authenticated Jive admin attempts to log out from Jive Forums -> admin is logged out of Jive and Crowd.request is authenticated with Crowd but user is banned from Jive Forums -> user is still authenticated with Crowd, but not allowed to log in to Jive Forums
Special Cases
It is known that the "remember me" functionality of Jive will cease to function. This has been intentionally disabled. Jive's "remember me" functionality will need to be replaced by a more general "remember me" from within Crowd. Once this is implemented in Crowd, the Jive integration libraries can utilize Crowd's "remember me", so that "remember me" is centralized.
It is recommended that admins do not use ban lists. Rather, you should manage access control based on Crowd's groups. So it's best to disable Ban Users from within Ban Settings inside the Jive admin console. There is nothing wrong with using ban lists, as they will be honored by the Crowd-Jive integration libraries. So they will make it hard for a banned user to switch to a non-banned user. The only way a banned Jive user, authenticated with Crowd for Jive, will be able to switch to a different user that Jive will pick up, is when the Jive's Crowd authentication cache clears, so that Jive recognizes a new user is signing in. This is because there is no way to log out a banned user from Jive, as they will always appear to be "guest". So basically, if you have users with multiple identities, if one is banned and attempts to log in, the user will have to wait until the client cache is cleared before he/she can log in with a different identity. Note: it's easy for non-banned users to switch identities as the client authentication cache is cleared when they click "logout" from within Jive.
Related TopicsUsing the Application BrowserAdding an Application
Integrating Crowd with Atlassian Bamboo
230

Documentation for Crowd 4.4 2
Created in 2021 by Atlassian. Licensed under a .Creative Commons Attribution 2.5 Australia License
Integrating Crowd with Atlassian ConfluenceIntegrating Crowd with Atlassian Confluence 3.4 or earlierUpdating Files in a Confluence Evaluation Distribution
Integrating Crowd with Atlassian CrowdIDIntegrating Crowd with Atlassian CrucibleIntegrating Crowd with Atlassian FishEye
Configuring FishEye earlier than 4.0 with CrowdIntegrating Crowd with Atlassian Jira
Integrating Crowd with Atlassian Jira 4.2 or earlierIntegrating Crowd with Atlassian Bitbucket ServerIntegrating Crowd with Acegi Security
Integrating AppFuse - a Crowd-Acegi Integration TutorialIntegrating Crowd with Jive Forums
Jive SSOIntegrating Crowd with Spring Security
Integrating AppFuse - a Crowd-Spring Security Integration TutorialIntegrating Crowd with a Custom ApplicationIntegrating Crowd with Atlassian HipChat
Configuring the Google Apps ConnectorMapping a Directory to an Application
Specifying the Directory Order for an ApplicationSpecifying an Application's Directory Permissions
Example of Directory PermissionsViewing Users in Directories Mapped to an ApplicationSpecifying which Groups can access an ApplicationSyncing users based on their access rights
Effective memberships with multiple directoriesSpecifying an Application's Address or HostnameTesting a User's Login to an ApplicationEnforcing Lower-Case Usernames and Groups for an ApplicationManaging an Application's SessionDeleting or Deactivating an ApplicationConfiguring Caching for an ApplicationOverview of SSOConfiguring Options for an ApplicationEnabling OpenID client appAllowing applications to create user tokensDisabling the OpenID client appConfiguring how users log in
Crowd documentation
231
1.
2.
1. 2. 3.
Integrating Crowd with Spring Security
Crowd provides and connectors for the web security frameworkcentralized authentication single sign-on Spring . Spring Security provides a modular and highly configurable approach to authentication and Security
authorization for J2EE applications.
If your web application already makes use of the Spring Security framework for authentication and authorization, you can use the Crowd Spring Security connector to allow your application to easily delegate authentication and authorization requests to Crowd.
Please consult the Spring Security or for a thorough insight into the Spring suggested steps reference guideSecurity framework. You might also find useful information in our .Appfuse integration tutorial
Prerequisites
Download and configure Crowd. Refer to the for detailed information on how to Crowd Installation Guidedo this. We will refer to the Crowd root folder as .CROWDHave your Spring Security-based custom application ready for tweaking. We will refer to your custom application as ' '.SpringSecApp
Step 1. Configuring Crowd to Talk to your Spring Security Application
Crowd needs to be aware that SpringSecApp will be making authentication requests to Crowd. In brief, you will need to do the following:
Add the SpringSecApp applicationto Crowd.Addand the directories visible to SpringSecApp.configureAddand the groups which are allowed to authenticate with SpringSecApp.map
Please see for a detailed guide.Adding an Application
Step 2. Installing the Crowd Spring Security Connector
2.1 Adding the Crowd Spring Security Connector to your Spring Security Application
You will need to add the Crowd Spring Security connector library and its associated dependencies to your Spring Security application. You can do this manually by copying over the JAR files to your Spring Security application or, if your Spring Security application is a project, you can add the Crowd Spring Security Mavenconnector as a project dependency. Both methods are described below.
The content on this page relates to platforms which are not supported for Crowd. Consequently, Atlassian . Please can not guarantee providing any support for the steps described on this pagebe aware that this material is provided for your information only and that you use it at your own risk.
Spring, Acegi and Crowd versions
Spring Security was formerly known as Acegi. There is a separate tutorial for integrating Acegi with . The connector is developed and tested with from . Crowd Spring Security 3.1 Crowd 2.5 and later
Please use a previous supported release of Crowd if you require compatibility with Spring Security .2.0.4
This guide assumes developer-level knowledge and a Spring Security-based web application
This guide is for developers rather than administrators. This guide assumes you have or Crowd 2.5later installed and that you want to integrate your Spring Security-based web application with Crowd's security server. The documentation below describes how to integrate Crowd with your own application that uses the Spring Security framework. It assumes you already use Spring Security in your application. If you need help integrating the Spring Security framework with your web application, have look at some of the .Spring Security documentation
232

Documentation for Crowd 4.4 2
Created in 2021 by Atlassian. Licensed under a .Creative Commons Attribution 2.5 Australia License
2.1.1 Manually Adding the Crowd Spring Security Connector Libraries
Follow 2.1.1 2.1.2 (not both).either or
Copy the Crowd integration libraries and configuration files. This is described in the documenClient Configurationtation. You will need to copy at least the following file to your Spring Security application:
Copy From Copy To
crowd-integration-springsecurity-X.X.X
(this file is not included in the crowd distribution, you need to download it from packages.atlassian.com)
SpringSecApp/WEB-INF/lib
CROWD/client/lib/*.jar SpringSecApp/WEB-INF/lib
2.1.2 Adding the Crowd Spring Security Connector as a Maven Dependency
Follow 2.1.1 2.1.2 (not both).either or
Add to your :pom.xml
<properties> <crowd.version>2.5.0</crowd.version> <spring.version>3.1.0.RELEASE</spring.version></properties>
<dependencies> ...
<dependency> <groupId>com.atlassian.crowd</groupId> <artifactId>crowd-integration-springsecurity</artifactId> <version>${crowd.version}</version> <scope>runtime</scope> </dependency>
<!-- Crowd needs at runtime --> <dependency> <groupId>org.springframework</groupId> <artifactId>spring-context</artifactId> <version>${spring.version}</version> <scope>runtime</scope> </dependency> <dependency> <groupId>org.springframework</groupId> <artifactId>spring-core</artifactId> <version>${spring.version}</version> <scope>runtime</scope> </dependency> <dependency> <groupId>org.springframework</groupId> <artifactId>spring-beans</artifactId> <version>${spring.version}</version> <scope>runtime</scope> </dependency> ...</dependencies>
Ensure you have dependencies on the modules to pick up the versions of Spring required by Crowd spring-rather than the possibly lower version specified by Spring Security.
2.2 Adding the Cache Configuration File
Copy the following file into your application's classpath:
Copy From Copy To
233

Documentation for Crowd 4.4 3
Created in 2021 by Atlassian. Licensed under a .Creative Commons Attribution 2.5 Australia License
1.
2.
CROWD/client/conf/crowd-ehcache.xml SpringSecApp/WEB-INF/classes/crowd-ehcache.xml
This file can be tweaked to change the cache behavior.
2.3 Configuring the Crowd Spring Security Connector Properties
The Crowd Spring Security connector needs to be configured with the details of the Crowd server.
Copy the default file to the classpath of your Spring Security application:crowd.properties
Copy From Copy To
CROWD/client/conf/crowd.properties SpringSecApp/WEB-INF/classes
Edit and populate the following fields appropriately:crowd.properties
Key Value
application.name
Same as application name defined when adding the application to Crowd in Step 1.
application.password
Same as application password defined when adding the application to Crowd in Step 1.
crowd.server.url
http://localhost:8095/crowd/services/
session.validationinterval
This is the time interval between requests which validate whether the user is logged in or out of the Crowd SSO server. Set to 0, if you want authentication checks to occur on each request. Otherwise set to the number of minutes you wish to wait between requests. Setting this value to 1 or higher will increase the performance of Crowd's integration.
You can read more about .the crowd.properties file
Step 3. Configuring your Spring Security Application to Use the Crowd Spring Security Connector
There are two ways you can integrate your application with Crowd:
Centralized user management: The user repository available to your application will be the user repository allocated to your application via Crowd. This means that your application will use the centralized user repository for retrieving user details as well as performing authentication.Single sign-on: In addition to centralized authentication, SSO will be available to your application. If any other SSO-enabled applications (such as , , or your own custom applications) are Jira Confluenceintegrated with Crowd, then SSO behavior will be established across these applications. If you sign in to one application, you are signed in to all applications. If you sign out of one application, you are signed out of all applications.
First, you will need to add the Crowd client application context to wire up the Crowd beans that manage the communication to Crowd. You can do this by including the SpapplicationContext-CrowdRestClient.xmlring configuration file, found in . For example, if you are configuring crowd-integration-client-rest.jarSpring using a context listener, you can add the following parameter in your your Spring Security application'sWE
:B-INF/web.xml
234

Documentation for Crowd 4.4 4
Created in 2021 by Atlassian. Licensed under a .Creative Commons Attribution 2.5 Australia License
1.
2.
<context-param> <param-name>contextConfigLocation</param-name> <param-value> ... classpath:/applicationContext-CrowdRestClient.xml ... </param-value> </context-param>
3.1 Configuring Centralized User Management
The following sections assume that you have the Spring Security schema mapped to the namespace. securityPerform the following updates to your Spring Security configuration:
Add the definition of the CrowdUserDetailsService:
<bean id="crowdUserDetailsService" class="com.atlassian.crowd.integration.springsecurity.user.CrowdUserDetailsServiceImpl"> <property name="crowdClient" ref="crowdClient"/> <property name="authorityPrefix" value="ROLE_"/></bean>
Add the definition of the RemoteCrowdAuthenticationProvider:
<bean id="crowdAuthenticationProvider" class="com.atlassian.crowd.integration.springsecurity.RemoteCrowdAuthenticationProvider"> <constructor-arg ref="crowdClient"/> <constructor-arg ref="crowdHttpAuthenticator"/> <constructor-arg ref="crowdUserDetailsService"/></bean>
Controlling granted authority names
Rather than taking the group name and setting a prefix, you can define a mapping to grant specific authorities when a user belongs to Crowd groups:
<util:map id="groupToAuthorityMappings"> <beans:entry key="crowd-administrators" value="ROLE_crowd-administrators" /> <beans:entry key="some-other-group" value="specific-authority-for-other-group" /> </util:map>
and then set it on the :crowdUserDetailsService
<beans:bean id="crowdUserDetailsService" class="com.atlassian.crowd.integration.springsecurity.user.CrowdUserDetailsServiceImpl"> ... <beans:property name="groupToAuthorityMappings"> <beans:bean factory-bean="groupToAuthorityMappings" factory-method="entrySet" /> </beans:property>
Further extensions
If you have an existing user data model, then you can extend or wrap the CrowdDetailsService to cater for user objects within your application domain.If you require users within Crowd to be created in your application's persistence model so that you can store application-specific user data, you can extend the CrowdAuthenticationProvider to create records for successfully authenticated Crowd users.
235
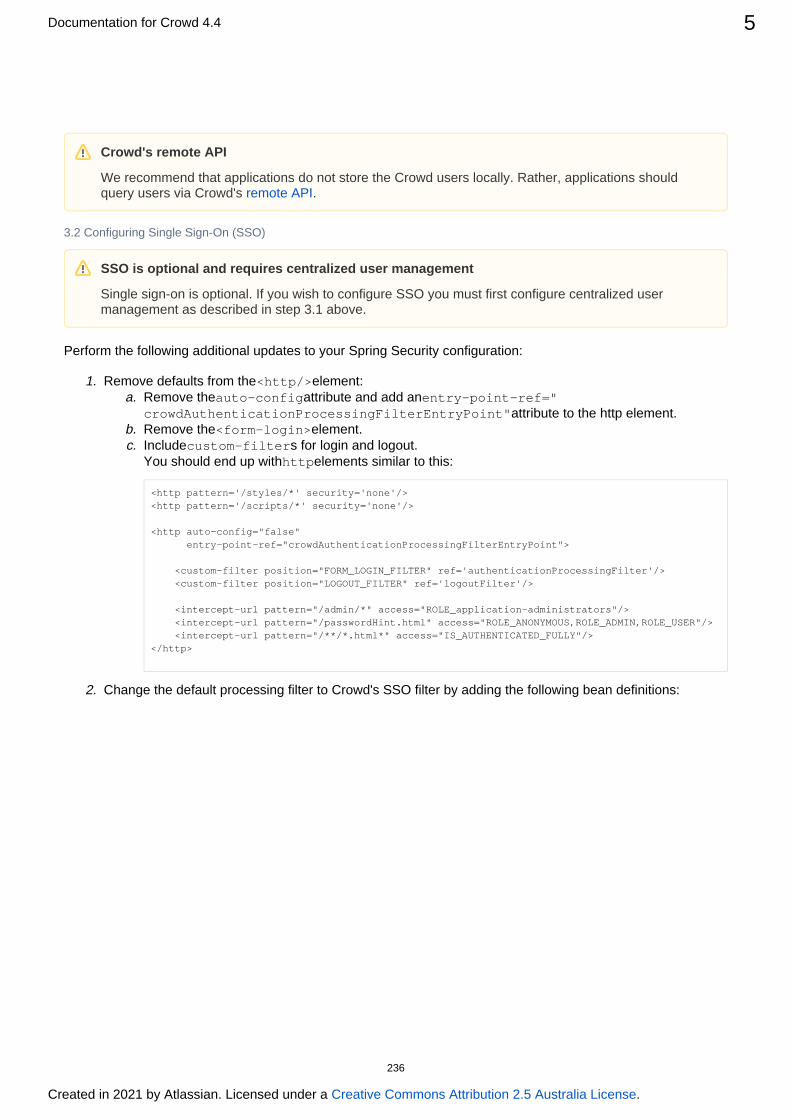
Documentation for Crowd 4.4 5
Created in 2021 by Atlassian. Licensed under a .Creative Commons Attribution 2.5 Australia License
1. a.
b. c.
2.
3.2 Configuring Single Sign-On (SSO)
Perform the following additional updates to your Spring Security configuration:
Remove defaults from the element:<http/>Remove the attribute and add anauto-config entry-point-ref="
attribute to the http element.crowdAuthenticationProcessingFilterEntryPoint"Remove the element.<form-login>Include s for login and logout.custom-filterYou should end up with elements similar to this:http
<http pattern='/styles/*' security='none'/><http pattern='/scripts/*' security='none'/>
<http auto-config="false" entry-point-ref="crowdAuthenticationProcessingFilterEntryPoint">
<custom-filter position="FORM_LOGIN_FILTER" ref='authenticationProcessingFilter'/> <custom-filter position="LOGOUT_FILTER" ref='logoutFilter'/>
<intercept-url pattern="/admin/*" access="ROLE_application-administrators"/> <intercept-url pattern="/passwordHint.html" access="ROLE_ANONYMOUS,ROLE_ADMIN,ROLE_USER"/> <intercept-url pattern="/**/*.html*" access="IS_AUTHENTICATED_FULLY"/></http>
Change the default processing filter to Crowd's SSO filter by adding the following bean definitions:
Crowd's remote API
We recommend that applications do not store the Crowd users locally. Rather, applications should query users via Crowd's .remote API
SSO is optional and requires centralized user management
Single sign-on is optional. If you wish to configure SSO you must first configure centralized user management as described in step 3.1 above.
236
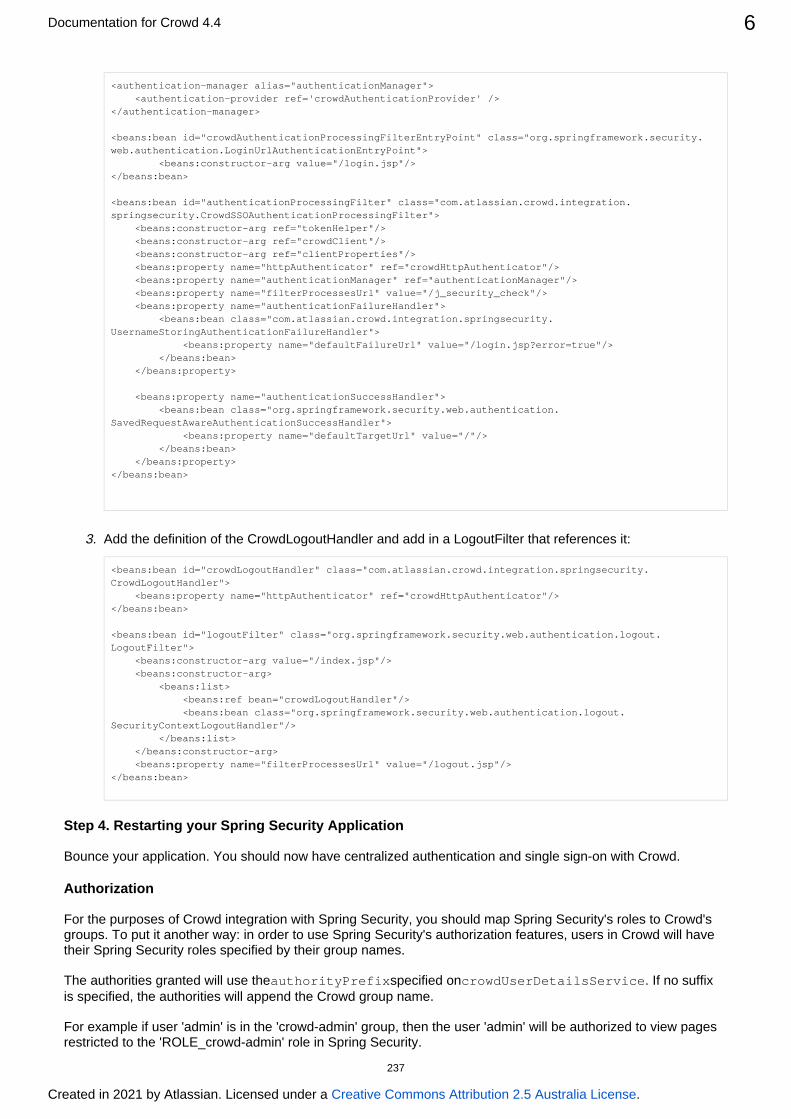
Documentation for Crowd 4.4 6
Created in 2021 by Atlassian. Licensed under a .Creative Commons Attribution 2.5 Australia License
2.
3.
<authentication-manager alias="authenticationManager"> <authentication-provider ref='crowdAuthenticationProvider' /></authentication-manager>
<beans:bean id="crowdAuthenticationProcessingFilterEntryPoint" class="org.springframework.security.web.authentication.LoginUrlAuthenticationEntryPoint"> <beans:constructor-arg value="/login.jsp"/></beans:bean> <beans:bean id="authenticationProcessingFilter" class="com.atlassian.crowd.integration.springsecurity.CrowdSSOAuthenticationProcessingFilter"> <beans:constructor-arg ref="tokenHelper"/> <beans:constructor-arg ref="crowdClient"/> <beans:constructor-arg ref="clientProperties"/> <beans:property name="httpAuthenticator" ref="crowdHttpAuthenticator"/> <beans:property name="authenticationManager" ref="authenticationManager"/> <beans:property name="filterProcessesUrl" value="/j_security_check"/> <beans:property name="authenticationFailureHandler"> <beans:bean class="com.atlassian.crowd.integration.springsecurity.UsernameStoringAuthenticationFailureHandler"> <beans:property name="defaultFailureUrl" value="/login.jsp?error=true"/> </beans:bean> </beans:property>
<beans:property name="authenticationSuccessHandler"> <beans:bean class="org.springframework.security.web.authentication.SavedRequestAwareAuthenticationSuccessHandler"> <beans:property name="defaultTargetUrl" value="/"/> </beans:bean> </beans:property></beans:bean>
Add the definition of the CrowdLogoutHandler and add in a LogoutFilter that references it:
<beans:bean id="crowdLogoutHandler" class="com.atlassian.crowd.integration.springsecurity.CrowdLogoutHandler"> <beans:property name="httpAuthenticator" ref="crowdHttpAuthenticator"/></beans:bean>
<beans:bean id="logoutFilter" class="org.springframework.security.web.authentication.logout.LogoutFilter"> <beans:constructor-arg value="/index.jsp"/> <beans:constructor-arg> <beans:list> <beans:ref bean="crowdLogoutHandler"/> <beans:bean class="org.springframework.security.web.authentication.logout.SecurityContextLogoutHandler"/> </beans:list> </beans:constructor-arg> <beans:property name="filterProcessesUrl" value="/logout.jsp"/></beans:bean>
Step 4. Restarting your Spring Security Application
Bounce your application. You should now have centralized authentication and single sign-on with Crowd.
Authorization
For the purposes of Crowd integration with Spring Security, you should map Spring Security's roles to Crowd's groups. To put it another way: in order to use Spring Security's authorization features, users in Crowd will have their Spring Security roles specified by their group names.
The authorities granted will use the specified on . If no suffix authorityPrefix crowdUserDetailsServiceis specified, the authorities will append the Crowd group name.
For example if user 'admin' is in the 'crowd-admin' group, then the user 'admin' will be authorized to view pages restricted to the 'ROLE_crowd-admin' role in Spring Security.
237

Documentation for Crowd 4.4 7
Created in 2021 by Atlassian. Licensed under a .Creative Commons Attribution 2.5 Australia License
<http> ... <intercept-url pattern="/console/secure/**" access="ROLE_crowd-administrators"/> <intercept-url pattern="/console/info/**" access="ROLE_crowd-users"/> <intercept-url pattern="/console/user/**" access="IS_AUTHENTICATED_FULLY"/> ...</http>
If is also specified, any user in the mapped groups configured in crowd will be granted "authoritySuffix auth+ " (for example, ROLE_ADMIN).orityPrefix authoritySuffix
<beans:bean id="crowdUserDetailsService" ...> ... <beans:property name="authorityPrefix" value="ROLE_"/> <beans:property name="authorityPrefix" value="ADMIN"/></beans:bean>
<http> ... <intercept-url pattern="/console/secure/**" access="ROLE_ADMIN"/> <intercept-url pattern="/console/user/**" access="IS_AUTHENTICATED_FULLY"/> ...</http>
RELATED TOPICS
Integrating AppFuse - a Crowd-Spring Security Integration TutorialIntegrating Crowd with Acegi Security
Using the Application BrowserAdding an ApplicationConfiguring the Google Apps ConnectorMapping a Directory to an ApplicationEffective memberships with multiple directoriesSpecifying an Application's Address or HostnameTesting a User's Login to an ApplicationEnforcing Lower-Case Usernames and Groups for an ApplicationManaging an Application's SessionDeleting or Deactivating an ApplicationConfiguring Caching for an ApplicationOverview of SSOConfiguring Options for an ApplicationEnabling OpenID client appAllowing applications to create user tokensDisabling the OpenID client appConfiguring how users log in
Crowd documentation
238

1.
2.
3.
4.
5.
6.
Integrating AppFuse - a Crowd-Spring Security Integration TutorialAppFuse provides a sweet starting point for developing web applications. You choose the frameworks, AppFuse generates the skeleton application.
At its core, the web security of AppFuse 2.0.2+ applications relies on the modular and extensible Spring Securityauthentication framework. In this tutorial, we look at a basic integration of Crowd with Spring Security, using an application generated by AppFuse.
Step 1. Get AppFuse
In this tutorial, we will be using the Struts2-basic archetype to create the project, but the other types should be similar. For more information, consult the AppFuse . In particular, it outlines the database quickstart guiderequirements for AppFuse.
Create the project.
mvn archetype:create -DarchetypeGroupId=org.appfuse.archetypes \-DarchetypeArtifactId=appfuse-basic-struts \-DremoteRepositories=http://static.appfuse.org/releases -DarchetypeVersion=2.0.2 \-DgroupId=com.mycompany.app -DartifactId=myproject
Since we will be editing the core Spring Security configuration, we will need the full source code of the application.
cd myprojectmvn appfuse:full-source
Build it.
mvn clean install
Run it.
mvn jetty:run-war -Dmaven.test.skip
Play with it.
http://localhost:8080/
Shut it down.
Spring Security was formerly known as Acegi
The Acegi security framework changed its name to Spring Security with its 2.0 release.Appfuse 2.0.2 changed from Acegi to Spring Security for authentication. Earlier versions of Appfuse use Acegi.If you are working with Acegi in an earlier version of Appfuse, we have a .separate tutorialCrowd 1.6 and above provide support for both Spring Security and Acegi. Earlier versions of Crowd only supported Acegi.We recommend all new projects use Spring Security as it is being actively maintained.
Prerequisites
This tutorial assumes you have installed Crowd 1.6 or later and are using Appfuse 2.0.2 or later.
239

Documentation for Crowd 4.4 2
Created in 2021 by Atlassian. Licensed under a .Creative Commons Attribution 2.5 Australia License
6.
1.
ctrl+c
Step 2. Let Crowd Know about AppFuse
Add as an application via the Crowd Console. See for more information.appfuse Adding an Application
Step 3. Add the Crowd Spring Security Connector to AppFuse
Open up the and add the Crowd client libraries as a project dependency:pom.xml
<dependencies> <dependency> <groupId>com.atlassian.crowd</groupId> <artifactId>crowd-integration-client</artifactId> <version>1.6</version> </dependency>...</dependencies>
You will also need to create the file :myproject/src/main/resources/crowd.properties
application.name appfuseapplication.password passwordapplication.login.url http://localhost:8095/crowd/crowd.server.url http://localhost:8095/crowd/services/session.isauthenticated session.isauthenticatedsession.tokenkey session.tokenkeysession.validationinterval 0session.lastvalidation session.lastvalidation
In particular, the application name and password must match the values defined for the application added in Step 2.
Finally, copy the to STANDALONE/client/conf/crowd-ehcache.xml myproject/src/main/resources. This file defines the cache properties, such as cache timeouts, used when accessing /crowd-ehcache.xml
data from the Crowd server.
Step 4. Hook Up Centralized Authentication
Before modifying the security configuration, you will need to add the Spring configuration file to wire up the Crowd client beans. Add the configuration file to the list of applicationContext-CrowdClient.xml conte
in :xtConfigLocations myproject/src/main/webapp/WEB-INF/web.xml
<context-param> <param-name>contextConfigLocation</param-name> <param-value> classpath:/applicationContext-resources.xml classpath:/applicationContext-dao.xml classpath:/applicationContext-service.xml classpath*:/applicationContext.xml classpath:/applicationContext-CrowdClient.xml /WEB-INF/applicationContext*.xml /WEB-INF/xfire-servlet.xml /WEB-INF/security.xml </param-value></context-param>
AppFuse neatly stores all the Spring Security configuration in myproject/src/main/webapp/WEB-INF. In order to get centralized authentication, we will need to set up Spring Security to use Crowd /security.xml
components for user information. Edit the beans in :security.xml
Add the definition of the CrowdUserDetailsService:
240

Documentation for Crowd 4.4 3
Created in 2021 by Atlassian. Licensed under a .Creative Commons Attribution 2.5 Australia License
1.
2.
3.
4.
5.
<beans:bean id="crowdUserDetailsService" class="com.atlassian.crowd.integration.springsecurity.user.CrowdUserDetailsServiceImpl"> <beans:property name="authenticationManager" ref="crowdAuthenticationManager"/> <beans:property name="groupMembershipManager" ref="crowdGroupMembershipManager"/> <beans:property name="userManager" ref="crowdUserManager"/> <beans:property name="authorityPrefix" value="ROLE_"/></beans:bean>
Add the definition of the RemoteCrowdAuthenticationProvider that delegates Spring Security authentication requests to Crowd:
<beans:bean id="crowdAuthenticationProvider" class="com.atlassian.crowd.integration.springsecurity.RemoteCrowdAuthenticationProvider"> <custom-authentication-provider /> <beans:constructor-arg ref="crowdAuthenticationManager"/> <beans:constructor-arg ref="httpAuthenticator"/> <beans:constructor-arg ref="crowdUserDetailsService"/></beans:bean>
Comment out the default authentication provider, as we've replaced it with Crowd:
<!-- <authentication-provider user-service-ref="userDao"> <password-encoder ref="passwordEncoder"/> </authentication-provider>-->
Now do a:
mvn clean install
This will pick up the configuration changes and add the Crowd client library into your app. Then run:
mvn jetty:run-war -Dmaven.test.skip
Head over to .http://localhost:8080/You should now be able to authenticate the users in your Crowd repository that meet all of the
:following conditions
They are in a Crowd directory assigned to the AppFuse application in Crowd. See .more informationThey are in Crowd groups named and . You will need to and assign the USER ADMIN add these groupsuser as a . These Crowd group names map to the Spring Security authorization member of the groupsroles defined in the AppFuse application.They are allowed to authenticate with the AppFuse application because EITHER they are in a group allowed to authenticate with Crowd ( ) OR their container directory allows all users to click for detailsauthenticate ( ).click for details
Congratulations. You have centralized authentication
Step 5. Hook Up Single Sign-On
Application-level centralized user management
One quirk you may notice is that you can't view the profile details of users who exist in Crowd, but did not exist in AppFuse prior to the Crowd integration. Although it's possible to authenticate a Crowd user 'dude' and still run AppFuse as 'dude', 'dude' will not be in AppFuse's local database. AppFuse makes use of a database-backed user management system. In order to achieve application-level centralized
, AppFuse will need to delegate its calls to create, retrieve, update and delete users user managementto Crowd using . This will prevent data redundancy and eliminate the hassle of data Crowd's remote APIsynchronization. This is beyond the scope of this short tutorial.
241

Documentation for Crowd 4.4 4
Created in 2021 by Atlassian. Licensed under a .Creative Commons Attribution 2.5 Australia License
1. a.
b.
2.
3.
4.
Enabling single sign-on (SSO) requires quite a bit more tweaking of the :security.xml
Remove defaults from the element:<http/>Remove the attribute and add an auto-config entry-point-ref="
attribute to the http element.crowdAuthenticationProcessingFilterEntryPoint"Remove the element.<form-login>You should end up with an http element similar to this:
<http lowercase-comparisons="false" entry-point-ref="crowdAuthenticationProcessingFilterEntryPoint"> <!-- note: no auto-config attribute! --> <!--intercept-url pattern="/images/*" filters="none"/> <intercept-url pattern="/styles/*" filters="none"/> <intercept-url pattern="/scripts/*" filters="none"/--> <intercept-url pattern="/admin/*" access="ROLE_ADMIN"/> <intercept-url pattern="/passwordHint.html*" access="ROLE_ANONYMOUS,ROLE_ADMIN,ROLE_USER"/> <intercept-url pattern="/signup.html*" access="ROLE_ANONYMOUS,ROLE_ADMIN,ROLE_USER"/> <intercept-url pattern="/a4j.res/*.html*" access="ROLE_ANONYMOUS,ROLE_ADMIN,ROLE_USER"/> <!-- APF-737, OK to remove line below if you're not using JSF --> <intercept-url pattern="/**/*.html*" access="ROLE_ADMIN,ROLE_USER"/><!-- <form-login login-page="/login.jsp" authentication-failure-url="/login.jsp?error=true" login-processing-url="/j_security_check"/> --> <remember-me user-service-ref="userDao" key="e37f4b31-0c45-11dd-bd0b-0800200c9a66"/></http>
Change the default processing filter to Crowd's SSO filter by adding the following bean definitions:
<authentication-manager alias="authenticationManager"/> <beans:bean id="crowdAuthenticationProcessingFilterEntryPoint" class="org.springframework.security.ui.webapp.AuthenticationProcessingFilterEntryPoint"> <beans:property name="loginFormUrl" value="/login.jsp"/></beans:bean> <beans:bean id="crowdAuthenticationProcessingFilter" class="com.atlassian.crowd.integration.springsecurity.CrowdSSOAuthenticationProcessingFilter"> <custom-filter position="AUTHENTICATION_PROCESSING_FILTER"/> <beans:property name="httpAuthenticator" ref="httpAuthenticator"/> <beans:property name="authenticationManager" ref="authenticationManager"/> <beans:property name="authenticationFailureUrl" value="/login.jsp?error=true"/> <beans:property name="defaultTargetUrl" value="/"/> <beans:property name="filterProcessesUrl" value="/j_security_check"/></beans:bean>
Add the definition of the CrowdLogoutHandler and add in a LogoutFilter that references it:
<beans:bean id="crowdLogoutHandler" class="com.atlassian.crowd.integration.springsecurity.CrowdLogoutHandler"> <beans:property name="httpAuthenticator" ref="httpAuthenticator"/></beans:bean>
<beans:bean id="logoutFilter" class="org.springframework.security.ui.logout.LogoutFilter"> <custom-filter position="LOGOUT_FILTER"/> <beans:constructor-arg value="/index.jsp"/> <beans:constructor-arg> <beans:list> <beans:ref bean="crowdLogoutHandler"/> <beans:bean class="org.springframework.security.ui.logout.SecurityContextLogoutHandler"/> </beans:list> </beans:constructor-arg> <beans:property name="filterProcessesUrl" value="/logout.jsp"/></beans:bean>
Now repeat:
mvn jetty:run-war -Dmaven.test.skip=true
242

Documentation for Crowd 4.4 5
Created in 2021 by Atlassian. Licensed under a .Creative Commons Attribution 2.5 Australia License
SSO will only work for users that are able to with both appplications and are to use authenticate authorizedboth applications. Try out the following:
Log in to Crowd you should be logged in to AppFuse.Log out of AppFuse you should be logged out of Crowd.Log in to AppFuse; log out of Crowd; log in to Crowd as another user; refresh AppFuse you should be logged in as the new user.
Congratulations, you have SSO
243
1.
2.
3.
Integrating Crowd with a Custom ApplicationCrowd ships with out-of-the-box support for a number of . You can also integrate Crowd with other applicationsapplications as follows:
Step 1. Configuring Crowd to talk to your Application
Please see .Adding an Application
Step 2. Configuring your Application to talk to Crowd
2.1 Developing a Crowd ClientIf your application is not listed in then you will need to create your own Supported Applications and DirectoriesCrowd client for your application, using the Crowd REST APIs.
For assistance, please see the developer's guide to .creating a Crowd client for your custom application
2.2 Configuring your Application
The integration libraries and configuration files are included in the Crowd download, in the folder. You clientwill find the Crowd integration library, and the client libraries on which the framework depends, in the folder. libAn example client properties file is located in the folder.crowd.properties conf
To configure your application, perform the following:
Copy the Crowd client and supporting libraries to your application's classpath, typically .WEB-INF/libThese files will be in Crowd's folder, with a name similar to client crowd-integration-client-X.
and all supporting JARs in the folder.X.X.jar client/libCopy the client properties file to your application's deployment directory, typically crowd.properties W
.EB-INF/classesEdit the file to reflect the values of your deployment parameters. Refer to the crowd.propertiesdescription of the .attributes in the filecrowd.properties
RELATED TOPICS
Using the Application BrowserAdding an Application
Integrating Crowd with Atlassian BambooIntegrating Crowd with Atlassian Confluence
Integrating Crowd with Atlassian Confluence 3.4 or earlierUpdating Files in a Confluence Evaluation Distribution
Integrating Crowd with Atlassian CrowdIDIntegrating Crowd with Atlassian CrucibleIntegrating Crowd with Atlassian FishEye
Configuring FishEye earlier than 4.0 with CrowdIntegrating Crowd with Atlassian Jira
Integrating Crowd with Atlassian Jira 4.2 or earlierIntegrating Crowd with Atlassian Bitbucket ServerIntegrating Crowd with Acegi Security
Passing crowd.properties as an environment variable
You can pass the location of a client application's file to the client application as crowd.propertiesan environment variable when starting the client application. This means that you can choose a suitable location for the file, instead of putting it in the client application's crowd.properties WEB-INF
directory./classes
Example:
-Dcrowd.properties={FILE-PATH}/crowd.properties
244

Documentation for Crowd 4.4 2
Created in 2021 by Atlassian. Licensed under a .Creative Commons Attribution 2.5 Australia License
Integrating AppFuse - a Crowd-Acegi Integration TutorialIntegrating Crowd with Jive Forums
Jive SSOIntegrating Crowd with Spring Security
Integrating AppFuse - a Crowd-Spring Security Integration TutorialIntegrating Crowd with a Custom ApplicationIntegrating Crowd with Atlassian HipChat
Configuring the Google Apps ConnectorMapping a Directory to an Application
Specifying the Directory Order for an ApplicationSpecifying an Application's Directory Permissions
Example of Directory PermissionsViewing Users in Directories Mapped to an ApplicationSpecifying which Groups can access an ApplicationSyncing users based on their access rights
Effective memberships with multiple directoriesSpecifying an Application's Address or HostnameTesting a User's Login to an ApplicationEnforcing Lower-Case Usernames and Groups for an ApplicationManaging an Application's SessionDeleting or Deactivating an ApplicationConfiguring Caching for an ApplicationOverview of SSOConfiguring Options for an ApplicationEnabling OpenID client appAllowing applications to create user tokensDisabling the OpenID client appConfiguring how users log in
Crowd documentation
245

1.
2. 3. 4. 5. 6. 7.
Integrating Crowd with Atlassian HipChatYou can connect Hipchat Server to Atlassian Crowd or to a Jira application (version 4.3 or later) for management of users and for authentication (verification of a user's login).
Connecting Hipchat Server to Crowd
You can connect Hipchat Server to Atlassian Crowd for user management and authentication.For more information on Crowd, see theCrowd Administration
.Guide
When to use this option:Connect to Crowd if you want to import and synchronize users from and authenticate those users against Crowd.
On this page:
Connecting Hipchat Server to CrowdConnecting Hipchat Server to Jira applicationsDiagrams of some possible configurations
To connect Hipchat Server to Crowd:
Go to your and define the Hipchat Server to Crowd. See the Crowd Crowd Administration Consoledocumentation: .Adding an ApplicationBrowse to your server'sfully qualified domain name, for example .https://hipchat.yourcompany.com/Log into the Hipchat Server web user interface (UI) using your administrator email and password.Click > > .Group admin Authentication External directoryChoose then choose . Enter the settings as described below. Add Directory Atlassian CrowdSave the directory settings.Define the by clicking the blue up and down arrows next to each directory in the directory order User
list.Here is a summary of how the directory order affects the processing:DirectoriesThe order of the directories is the order in which they will be searched for users and groups.Changes to users and groups will be made only in the first directory where the application has permission to make changes.
For details see .Managing Multiple Directories
Settings in Hipchat Server for the Crowd directory type
Setting Description
Name A meaningful name that will help you to identify this Crowd server amongst your list of directory servers. Examples:
Crowd ServerExample Company Crowd
You can't filter users. When you sync users, you'll sync all users in Atlassian Crowd. (Learn the ) Hipchat Server marks inactive users from Crowd as deactivated users and doesn't workaround.
count them towards your license.
Crowd does not provide SSO functionality for Hipchat.A feature request to support SSO is available to be watched and up-voted:
- Jira issue doesn't exist or you don't have permission to view HCPUB-304
it.
246

Documentation for Crowd 4.4 2
Created in 2021 by Atlassian. Licensed under a .Creative Commons Attribution 2.5 Australia License
Server URL
The web address of your Crowd console server. Examples:
http://www.example.com:8095/crowd/http://crowd.example.com
Application Name
The name of your application, as recognized by your Crowd server. Note that you will need to define the application in Crowd too, using the Crowd administration Console. See the Crowd documentation on .adding an application
Application Password
The password which the application will use when it authenticates against the Crowd framework as a client. This must be the same as the password you have registered in Crowd for this application. See the Crowd documentation on .adding an application
Crowd permissions
Setting Description
Read Only
The users, groups and memberships in this directory are retrieved from Crowd and can only be modified via Crowd. You cannot modify Crowd users, groups or memberships via the application administration screens.
Note: There are no user group structures within Hipchat Server. Group data is synchronized, but not used.
Read/Write
Not applicable to Hipchat Server.
Advanced Crowd settings
Setting Description
Enable Nested Groups
Not applicable to Hipchat Server.
When you sync your users, you'll sync every user that exists in the directory.
Synchronization Interval (minutes)
Synchronization is the process by which the application updates its internal store of user data to agree with the data on the directory server. The application will send a request to your directory server every x minutes, where 'x' is the number specified here. The default value is 60 minutes.
Connecting Hipchat Server to Jira applications
Subject to certain limitations, you can connect a number of Atlassian applications to a single JIRA application for centralized user management.
When to use this option: You can connect to a server running or later or laterJira 4.3 , Jira Software 7.0 , or later or or later. Choose this Jira Core 7.0 , Jira Service Management (formerly Jira Service Desk) 3.0
option as an alternative to Atlassian Crowd, for simple configurations with a limited number of users.
To connect Hipchat Server to a Jira application:
You can't filter users. When you sync users, you'll sync all users in the Jira application. Hipchat Server marks inactive users from the Jira application as deactivated users and doesn't count them towards your license.
247

Documentation for Crowd 4.4 3
Created in 2021 by Atlassian. Licensed under a .Creative Commons Attribution 2.5 Australia License
1. a.
b.
c. d.
e. f.
2. a.
b.
c. d. e.
f. g.
Configure theJiraapplication to recognize Hipchat Server:Log in to the Jira application as a user with the .'Jira Administrators'global permission
Choose .> User Management> User Server: start typing .Keyboard shortcut 'g' + 'g' + 'jira user'
Addan application.Enter the and that Hipchat Server will use when accessing the Jira application name passwordapplication.Enter the or addresses of Hipchat Server.IP addressSavethe new application.
Configure Hipchat Server to connect to a Jira application:Browse to your server'sfully qualified domain name, for examplehttps://hipchat.yourcompany.
.com/Log into the Hipchat Server web user interface (UI) using your administrator email and password.Click > > .Group admin Authentication External directoryChoose then choose . Enter the settings as described below.Add Directory Atlassian JiraEnter the settings as described below. When asked for the and , application name passwordenter the values that you defined in the settings onthe Jira application.Save the directory settings.Define the by clicking the blue up- and down-arrows next to each directory in directory orderthe list.User Directories
Here is a summary of how the directory order affects the processing:
The order of the directories is the order in which they will be searched for users.Changes to users will be made only in the first directory where the application has permission to make changes.
For details see .Managing Multiple Directories
Settings for the Jira directory type
Setting Description
Name A meaningful name that will help you to identify this Jira server in the list of directory servers. Examples:
JIRA Service Desk ServerMy Company JIRA
Server URL The web address of your Jira server. Examples:
http://www.example.com:8080http://jira.example.com
Application Name The application name that Hipchat Server will use when accessing the Jira application.
Application Password
The password that Hipchat Server will use when accessing the Jira server that acts as user manager.
Permissions for the Jira directory type
Setting Description
248
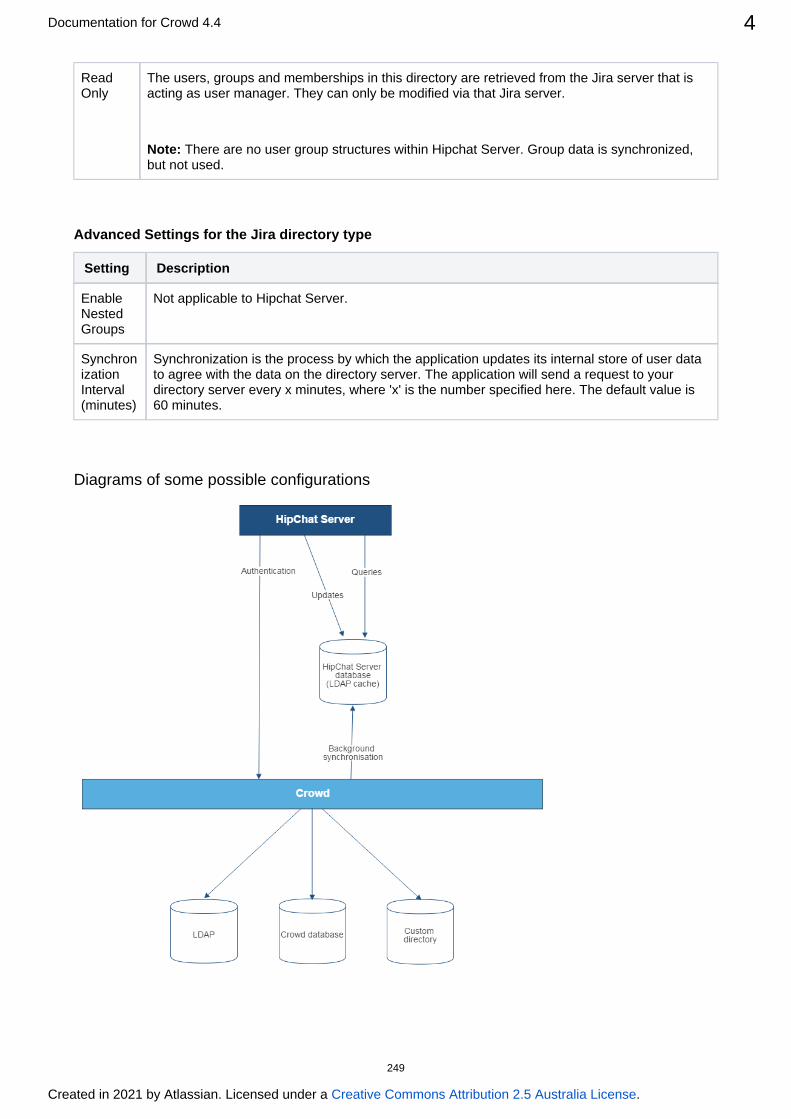
Documentation for Crowd 4.4 4
Created in 2021 by Atlassian. Licensed under a .Creative Commons Attribution 2.5 Australia License
Read Only
The users, groups and memberships in this directory are retrieved from the Jira server that is acting as user manager. They can only be modified via that Jira server.
Note: There are no user group structures within Hipchat Server. Group data is synchronized, but not used.
Advanced Settings for the Jira directory type
Setting Description
Enable Nested Groups
Not applicable to Hipchat Server.
Synchronization Interval (minutes)
Synchronization is the process by which the application updates its internal store of user data to agree with the data on the directory server. The application will send a request to your directory server every x minutes, where 'x' is the number specified here. The default value is 60 minutes.
Diagrams of some possible configurations
249

Documentation for Crowd 4.4 5
Created in 2021 by Atlassian. Licensed under a .Creative Commons Attribution 2.5 Australia License
Diagram above: Hipchat Server connecting to Crowd for user management.
Diagram above: Hipchat Server connecting to a Jira application for user management. The Jira application does the user management, storing the user data in its internal directory.
250
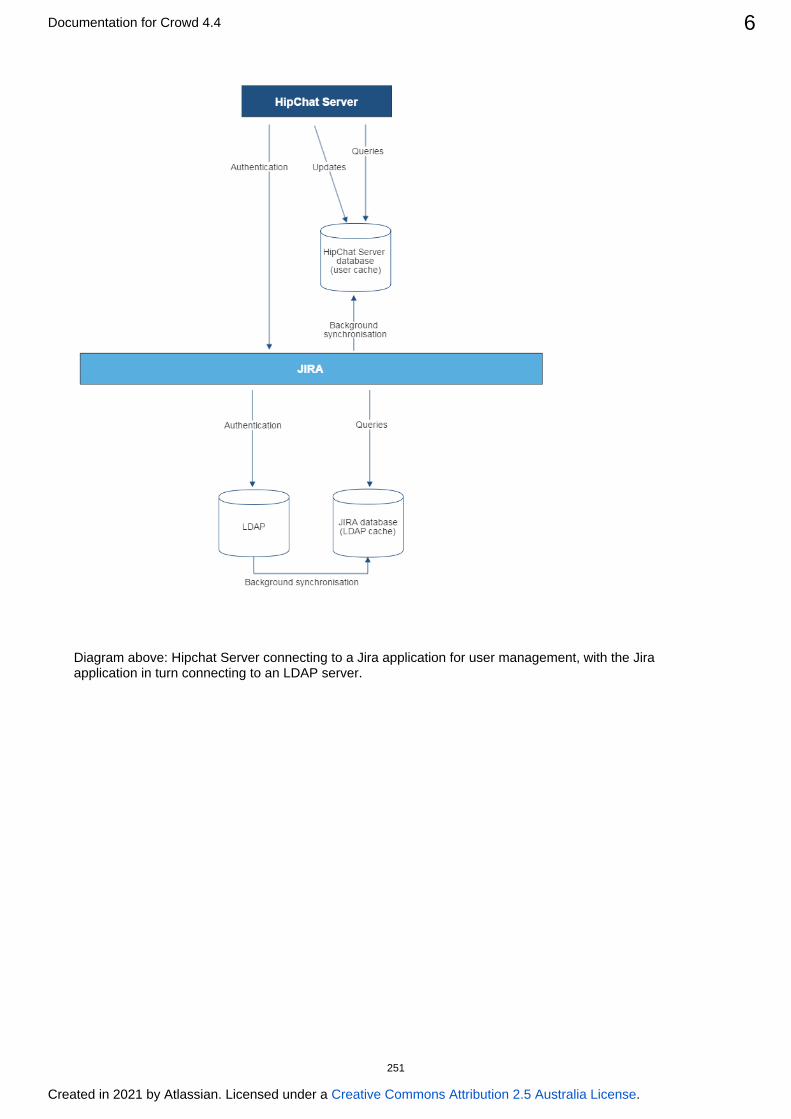
Documentation for Crowd 4.4 6
Created in 2021 by Atlassian. Licensed under a .Creative Commons Attribution 2.5 Australia License
Diagram above: Hipchat Server connecting to a Jira application for user management, with the Jira application in turn connecting to an LDAP server.
251

Configuring the Google Apps ConnectorThe Google Apps connector is shipped with your Crowd installation. This is a Crowd application connector which allows single sign-on (SSO) to . If you wish to activate SSO between Crowd-connected Google Appsapplications and Google Apps, you will need to configure the Google Apps connector as described below.
On this page:
BackgroundPrerequisitesStep 1. Configuring the Crowd Application, Directory and Group DetailsStep 2. Generating your SSO KeysStep 3. Configuring Google Apps to Recognize CrowdStep 4. Verifying that a User can Log in to Google AppsMore Information about the Google Apps Connector
Deleting the KeysThe Ins and Outs of SSO with Google AppsUsernames must be the Same in Google Apps and CrowdOther Authentication Frameworks and SAML Support
An Example of Google Apps SSO in Action
Background
When people refer to (SSO) they are usually refering to two things.Single sign-on
Authentication - which userid and which password is used to confirm that a user is who they say they areSSO - authenticating for one application means that you don't have to authenticate to access another application (at least for a while and if you are using the same browser)
So in the case of Google Apps, the authentication is your Google Apps userid and password. Google Apps handles the SSO part with its site. When you log into Gmail in the morning you are actually Google Accountsbeing asked to enter your authentication information at the Google Accounts site, which then redirects your browser back to Gmail if you successfully authenticate. The Google Accounts remembers that you successfully authenticated this morning so that when you go to a Google Docs page later on that day, the redirect happens again without needing to reauthenticate. This all happens unseen by most Google Apps users.
Now Google Apps has the ability to change where it goes for its SSO functionality. A Google Apps administrator can just their Google Apps instance to use a different SSO. This could be Crowd, or any other SSO configureservice. Crowd then becomes the master SSO service instead of Google Accounts. This means that logging into Gmail in the morning will take you to a Crowd authentication screen, the Google Accounts. The notredirection back to Gmail after a successful authentication happens just as before.
However this is not how OnDemand . In that case the SSO functionality remains integrates with Google Appswith Google Accounts.
Prerequisites
Please note the following before you start:
Google Apps support for SSO: To enable single sign-on in Google Apps, you will need the Premier, Education, or Partners edition of Google Apps. The free Standard Edition of Google Apps does not support SSO. See the .Google Apps documentation
Step 1. Configuring the Crowd Application, Directory and Group Details
In this step, you will enter the application details for the Google Apps application connector in Crowd. You will manage access to Google Apps by associating Crowd directories and/or groups with the Google Apps application.
To define the Google Apps application details in Crowd:
252

Documentation for Crowd 4.4 2
Created in 2021 by Atlassian. Licensed under a .Creative Commons Attribution 2.5 Australia License
1. 2. 3. 4. 5.
6.
7. 8.
9.
1.
2.
Log in to the .Crowd Administration ConsoleClick the tab in the top navigation bar.ApplicationsClick the link on the 'google-apps' application name.If required, you can change the description. Please ensure that the checkbox remains ticked.ActiveClick the tab and select one or more user that contain the users who should Directories directorieshave access to Google Apps.To choose which users within the directory may authenticate against the application, either:
On the tab, change to . This will allow all users in Directories Allow all to authenticate Truethat directory to log in to Google Apps. (The default is .)FalseOROn the tab, use to select one or more of users.Groups the Add button groups
Click the tab and set the .Permissions directory permissions for the applicationIf required, you can change the application options on the tab:Options
Lower Case Output See .Enforcing Lower-Case Usernames and Groups for an ApplicationEnable Aliasing See .Specifying a User's Aliases
Click the tab and generate your SSO keys as described in below.Configuration Step 2
Screenshot: Google Apps application details in Crowd
Step 2. Generating your SSO Keys
Now you will ask Crowd to generate a public and a private key for use in authenticating Crowd to Google Apps. (Google Apps calls the public key a 'verification certificate'.)
To generate your SSO keys:
In the Crowd Application Browser, as described in above, click the tab for the Step 1 ConfigurationGoogle Apps application.Click .Generate New Keys
Crowd will generate a public key and a private key, placing them in the When the keys have database.been generated, you will see a message ' 'DSA keys successfully generated and stored.
253

Documentation for Crowd 4.4 3
Created in 2021 by Atlassian. Licensed under a .Creative Commons Attribution 2.5 Australia License
1. 2. 3. 4. 5.
6.
7.
8.
Screenshot: Configuring the Google Apps connector in Crowd
Step 3. Configuring Google Apps to Recognize Crowd
In this step, you will log in to Google Apps as an administrator and enter the information required for Crowd to authenticate to Google Apps. This information consists of some Crowd URLs and the public key which you generated from Crowd.
To configure Google Apps to recognize Crowd:
Log in to your as a .Google Apps Dashboard Google Apps administratorIn Google Apps, click .SecurityClick .Advanced SettingsClick .Set up single sign-on (SSO)Copy the URLs from the Crowd configuration screen (see ) and paste them into the Google Apps abovescreen.Now you will upload the public key which Crowd generated for you in above:Step 2
Still in Google Apps, click under 'Verification certificate'.BrowseNavigate in Crowd to google-aps configuration and download the public key clicking on button Download next to the Public Key label.Select the public key certificate (file name ) and upload it to Google Apps.DSAPublic.key
If necessary for your network configuration, check and enter any Use a domain specific issuerrequired network masks in Google Apps. Please refer to the Google Apps documentation for guidance on these settings.Save your changes in Google Apps.
254

Documentation for Crowd 4.4 4
Created in 2021 by Atlassian. Licensed under a .Creative Commons Attribution 2.5 Australia License
Screenshot: Setting up SSO in Google Apps
Step 4. Verifying that a User can Log in to Google Apps
It is a good idea now to check that your users can log in to Google Apps.
To test a user's authentication to Google Apps:
255
Documentation for Crowd 4.4 5
Created in 2021 by Atlassian. Licensed under a .Creative Commons Attribution 2.5 Australia License
1.
2.
In the Crowd Application Browser, as described in above, click the tab for Step 2 Authentication Testthe Google Apps application.Enter a user's login details and verify the login. For more details, you can refer to Testing a User's
.Login to an Application
Congratulations! You have now configured Crowd for SSO with Google Apps.
More Information about the Google Apps Connector
Deleting the Keys
Once you have generated the keys, a button will appear on Crowd's configuration screen. Click this Delete Keysbutton to remove the keys from the database. This will disable SSO with Google Apps.
The Ins and Outs of SSO with Google Apps
Single sign-on (SSO) applies only to the applications within Google Apps. The Google Apps administration section (control panel) does not support SSO.When you sign out of Google Apps, you will also be signed out of Crowd and all Crowd-connected applications. This is the usual SSO behavior.But when you sign out of Crowd, you will remain logged in to Google Apps even though you will be logged out of other Crowd-connected applications. (Reason: Google does not rely on a cookie, so there is no easy way for Crowd to tell Google you have signed out.)
It would take some additional development to support single sign-out from Google Apps. If you would like to see this work undertaken, please vote for issue .CWD-1238If you go directly to a Google Apps application without logging in to Crowd, Google Apps direct you to a Crowd login screen.The Crowd login screen for Google Apps will not offer a 'Forgotten your password' link. You cannot change your Crowd password via Google Apps. Instead, if you need to change your password please log in to Crowd directly, by going to this URL: http://YOUR-CROWD-LOCATION:8095/crowd/
Usernames must be the Same in Google Apps and Crowd
Usernames must exist in Google Apps as well as Crowd and a person's username must be the same in both Google Apps and Crowd. The Crowd Google Apps connector does not support the automatic adding of users. If a user exists in Crowd but not in Google Apps, then the user will not be able to log in to Google Apps.
Other Authentication Frameworks and SAML Support
Crowd currently supports SSO via SAML with Google Apps only. The following information is relevant to developers who may want to use Crowd's classes to develop a plugin that supports SAML authentication with other frameworks.
Crowd's SAML implementation meets the requirements for Google Apps SSO. As Google Apps supports a subset of the SAML 2.0 spec, any authentication framework that relies on the same subset should also be compatible. The Crowd implementation is capable of servicing SAML 2.0 authentication requests using the HTTP-Redirect binding. For more information on the Google Apps authentication protocol, check out their SSO
.documentation
An Example of Google Apps SSO in Action
Here's one example of how it might work:
John raises an issue in Jira. In the issue description, he adds a link to a Google Apps document containing more details.He assigns the issue to Sarah.Sarah clicks the link and opens the document directly in Google Apps. No need to log in again, no need to remember a different password.
256
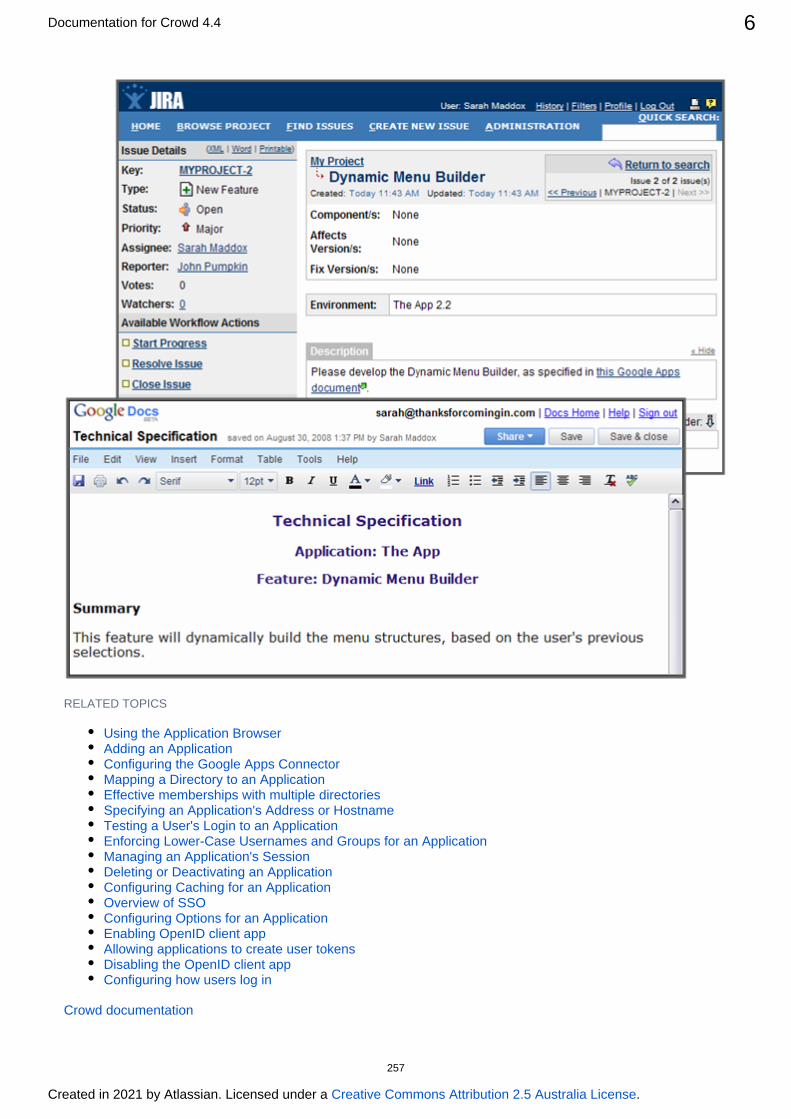
Documentation for Crowd 4.4 6
Created in 2021 by Atlassian. Licensed under a .Creative Commons Attribution 2.5 Australia License
RELATED TOPICS
Using the Application BrowserAdding an ApplicationConfiguring the Google Apps ConnectorMapping a Directory to an ApplicationEffective memberships with multiple directoriesSpecifying an Application's Address or HostnameTesting a User's Login to an ApplicationEnforcing Lower-Case Usernames and Groups for an ApplicationManaging an Application's SessionDeleting or Deactivating an ApplicationConfiguring Caching for an ApplicationOverview of SSOConfiguring Options for an ApplicationEnabling OpenID client appAllowing applications to create user tokensDisabling the OpenID client appConfiguring how users log in
Crowd documentation
257

1. 2. 3. 4. 5.
6.
7.
i. ii.
8.
Mapping a Directory to an ApplicationMapping a to an application defines the user-base for an application. Directory mappings determine directorywhich user directories will be used when authenticating and authorizing a user's access request. Read more about .users and groups
When you , you chose a default directory for that application to use. Crowd also allows defined an applicationyou to map multiple directories to each application. This allows each of your applications to view multiple user directories as a single repository.
To map a directory to an application:
Log in to the .Crowd Administration ConsoleIn the top navigation bar, click .ApplicationsClick the application you wish to map.Select the tab.Directories & groupsSelect the new directory from the drop-down list and click .AddThe new directory will be added to the bottom of the list of mapped directories. You can drag & drop the newly created row to move a directory higher or lower in the order. ?Why is directory order important
In the tab, check Directories & groups Determine the users' group membership using all directories..Learn more
Choose which users within the directory may authenticate against the application. Select one of the following:
Allowall users within the directory to authenticate against the application:In the column, click the meatballs icon and select .Actions Configure authenticationEnable the check box, and click .Allow all users from this directory to authenticate Save
Allow within the directory to authenticate against the application, see only specific groups of users.Specifying which Groups can access an Application
Click the tab and set the .Permissions directory permissions for the applicationNote that updates are handled differently, depending on the membership aggregation scheme you selected. See .Directory update operations
Want to speed up authentication?
You can optimize the authentication process by selectingOptimize priority of cached . Once you select this option, Crowd will go through its cache for all the directories directories
listed in this screen looking for information on the authenticating user. If there's no such information in Crowd's cache, Crowd will automatically lower the priority of such directory on the list. If a user was added recently, these directories might stay at the end of the list until Crowd's cache is updated.
258

Documentation for Crowd 4.4 2
Created in 2021 by Atlassian. Licensed under a .Creative Commons Attribution 2.5 Australia License
Screenshot: 'Application Map Directories'
For each directory mapped to the application you can also define groups that users will be automatically assigned to, when they first log in to the application. See for more Automatically Assigning Users to Groupsdetails.
259

1. 2. 3. 4.
5.
Specifying the Directory Order for an ApplicationWhen you map multiple directories to an application, you also need to define the directory priority order.The directory order is used for the following:
Authentication
Authentication only relies on the groups you mapped to the application.Users are authenticated if they belong to a group mapped to the application in the first directory where they exist, or if that directory is mapped to the application using the option.Allow all users from this directory to authenticate
Authorization
When multiple directories are mapped to an integrated application, andduplicated usernames and group names are used across those directories, the effective group memberships for are determined on the authorizationbasis of themembership aggregation scheme that has been applied.
In particular, the non-aggregating membership scheme depends on the directory order to determine access permissions for a user.
See for more information.Effective memberships with multiple directories
Directory updates
When a user is addedto a group, Crowd adds them to the first directory it has access to in priority order. This applies to both the aggregating and non-aggregating membership schemes.
When a user is removed from a group, the behavior depends on the membership scheme:
With non-aggregatingmembership, the user is only removedfrom the group in the first directory the user is found in.With aggregating membership, the user is removed from the group in directories the user is found in.all
See for an explanation of themembership aggregation schemes.Directory update operations
Specify the directory order
Log in to the .Crowd Administration ConsoleIn the top navigation bar, click the tab.ApplicationsClick for the application.ViewClick the tabto display a list of directories that are currently mapped to the Directories & groupsapplication.Drag & drop rows to move a directory higher or lower in the order:
260

Documentation for Crowd 4.4 2
Created in 2021 by Atlassian. Licensed under a .Creative Commons Attribution 2.5 Australia License
261

1.
2.
Specifying an Application's Directory PermissionsWhen you , you can also define the application's ability to add/update/delete map a directory to an applicationusers and groups in the directory. To do this, use the ' ' tab in the 'View Application' screen.Permissions
Directory permissions are defined at two levels:
Directory-level permissions are defined on the 'Permissions' tab of the 'View Directory' screen. These permissions apply to each application mapped to the directory, unless the application has its own application-level permissions.Application-level directory permissions are defined on the 'Permissions' tab of the 'View Application' screen. If a permission is enabled at directory level, you can enable it for a specific application. For example, you could enable the 'Add User' permission on the 'Customers' directory in Jira but disable the permission for Confluence.
Take a look at an .example
Disabling a directory-level permission will override any permissions enabled at application level. If a permission is enabled at application level and then subsequently disabled at directory level, the directory-level permission will apply. (The application-level permissions will be 'remembered' and will apply again if re-enabled at directory level.)
For details on directory-level permissions, refer to the instructions on . Below specifying directory permissionsare instructions on setting the application-level directory permissions.
Permission Description
Add Group Allows the application to add groups to the selected directory.
Add User Allows the application to add users to the selected directory.
Modify Group
Allows the application to modify groups in the selected directory.
Modify User Allows the application to modify users in the selected directory.
Remove Group
Allows the application to delete groups from the selected directory.
Remove User
Allows the application to delete users from the selected directory. Consider carefully whether you allow the deletion of users, as some applications contain
historical data, e.g. documents that the user has created. Read .more
When you initially , all of the application's permissions are enabled by default. map a directory to an applicationBut note that disabling a directory-level permission will override any permissions enabled at application level.
To set the directory permissions for an application,
How do directory permissions affect the Crowd application (Crowd Administration Console)?
If a particular permission is turned off at directory level, then application can perform the norelated function - not even the Crowd application. So, for example, if you disable the 'Remove User' permission for a directory, then the Crowd Administration Console will not allow you to delete a user from that directory.The Crowd application is not bound by application-level permissions, because any user who could log into the Crowd application could change the application-level permissions for the Crowd application anyway.
262

Documentation for Crowd 4.4 2
Created in 2021 by Atlassian. Licensed under a .Creative Commons Attribution 2.5 Australia License
1. 2. 3. 4.
5. 6.
Log in to the .Crowd Administration ConsoleIn the top navigation bar, c .lick ApplicationsClick the application you want to edit.Click the tab.PermissionsThis displaya a list of directories that are currently mapped to the application, and a set of permission check-boxes.From the drop-down list, select a .directorySelect permissions you wish to allow this application to perform on the selected directory.
Screenshot: Setting directory permissions for an application
On the application permissions screen, the words ' ' will appear next to any permission (disabled globally)that is disabled at directory level.
263
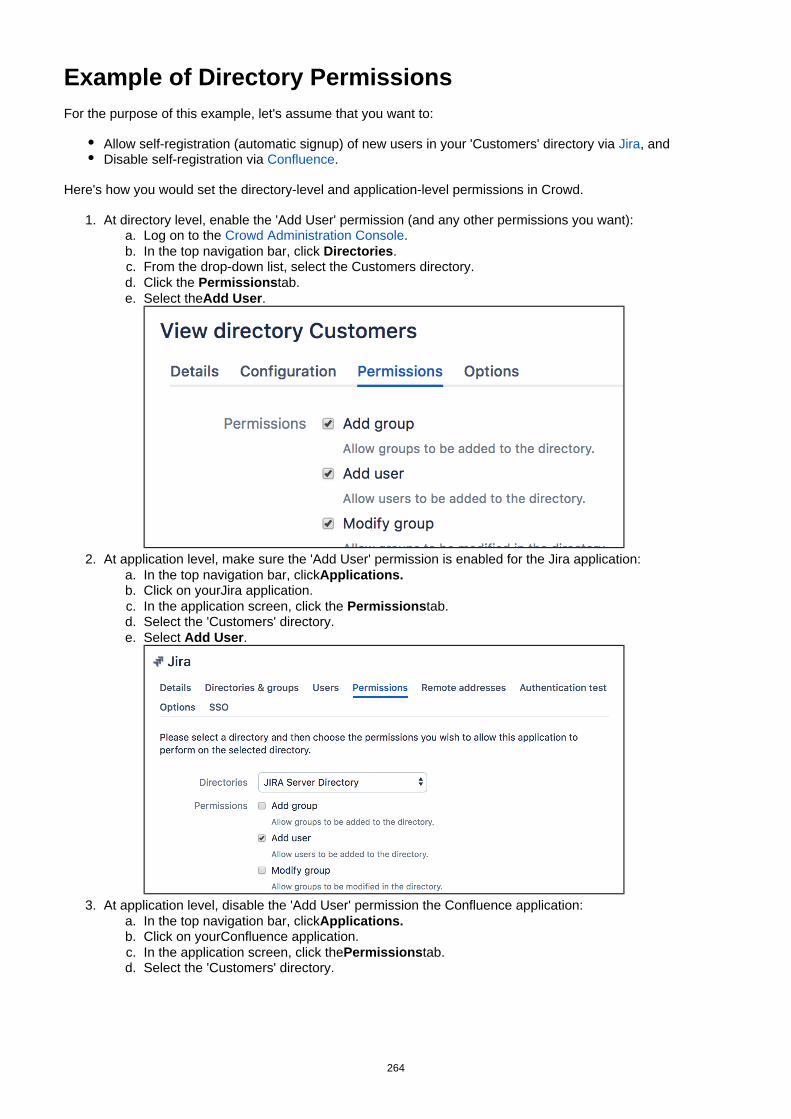
1. a. b. c. d. e.
2. a. b. c. d. e.
3. a. b. c. d.
Example of Directory PermissionsFor the purpose of this example, let's assume that you want to:
Allow self-registration (automatic signup) of new users in your 'Customers' directory via , andJiraDisable self-registration via .Confluence
Here's how you would set the directory-level and application-level permissions in Crowd.
At directory level, enable the 'Add User' permission (and any other permissions you want):Log on to the .Crowd Administration ConsoleIn the top navigation bar, click .DirectoriesFrom the drop-down list, select the Customers directory.Click the tab.PermissionsSelect the .Add User
At application level, make sure the 'Add User' permission is enabled for the Jira application:In the top navigation bar, clickApplications.Click on yourJira application.In the application screen, click the tab.PermissionsSelect the 'Customers' directory.Select .Add User
At application level, disable the 'Add User' permission the Confluence application:In the top navigation bar, clickApplications.Click on yourConfluence application.In the application screen, click the tab.PermissionsSelect the 'Customers' directory.
264

Documentation for Crowd 4.4 2
Created in 2021 by Atlassian. Licensed under a .Creative Commons Attribution 2.5 Australia License
3.
e. Deselect .Add User
In summary:With the above application permissions, a person will be able to sign up for a user account via JIRA and this user will be created in the 'Customers' directory, but they will not be able to sign up for an account via Confluence.
265

1. 2. 3.
4. 5.
6.
Viewing Users in Directories Mapped to an ApplicationThe application ' ' tab shows all the users in all the directories mapped to the selected application. You will Usersalso see basic information for each user, including the user's full name, username and email address. If the user has an for the selected application, the alias will appear too.alias
To see the users visible to an application,
Log in to the .Crowd Administration ConsoleIn the top navigation bar, click .Applications Click the name of the application you want to view. The View Application screen appears.Click the tab.UsersEnter your search criteria in the ' ' textbox. You can enter all or part of the user's name, email Searchaddress or username. Leave the search box empty to match all users.Click button.Search
Screenshot: Viewing users for an application
Effect of access-based synchronization on displayed users
The data displayed in the Users tab depends on whether you use access-based synchronization. If this feature is enabled, then the tab will include only users who have access to the particular application. If it's disabled (which means that all users are synced from the mapped directories), then we'll show all users, even if your application only allows access for some of them.
266
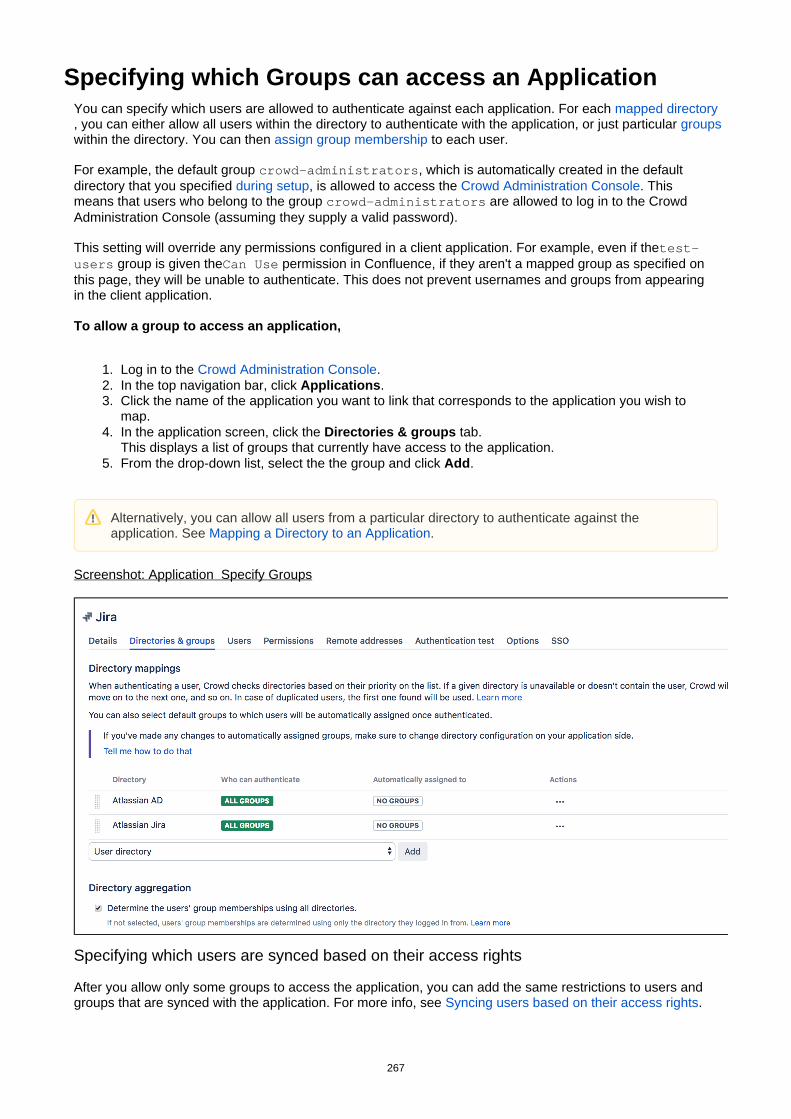
1. 2. 3.
4.
5.
Specifying which Groups can access an ApplicationYou can specify which users are allowed to authenticate against each application. For each mapped directory, you can either allow users within the directory to authenticate with the application, or just particular all groupswithin the directory. You can then to each user.assign group membership
For example, the default group , which is automatically created in the default crowd-administratorsdirectory that you specified , is allowed to access the . This during setup Crowd Administration Consolemeans that users who belong to the group are allowed to log in to the Crowd crowd-administratorsAdministration Console (assuming they supply a valid password).
This setting will override any permissions configured in a client application. For example, even if thetest- group is given the permission in Confluence, if they aren't a mapped group as specified on users Can Use
this page, they will be unable to authenticate. This does not prevent usernames and groups from appearing in the client application.
To allow a group to access an application,
Log in to the .Crowd Administration ConsoleIn the top navigation bar, click .ApplicationsClick the name of the application you want to link that corresponds to the application you wish to map.In the application screen, click the tab.Directories & groupsThis displays a list of groups that currently have access to the application.From the drop-down list, select the the group and click .Add
Screenshot: Application Specify Groups
Specifying which users are synced based on their access rights
After you allow only some groups to access the application, you can add the same restrictions to users and groups that are synced with the application. For more info, see Syncing users based on their access rights.
Alternatively, you can allow users from a particular directory to authenticate against the allapplication. See .Mapping a Directory to an Application
267

1. 2. 3. 4.
1.
2.
3.
Syncing users based on their access rightsWhen you map a user directory to an application in Crowd, you can choose which users are synced with the application based on their access rights to it. It might be useful to limit the synced users to only those who can actually access the application, as syncing anyone else is redundant in most cases.
To choose which users will be synced with your application:
L in to the .og Crowd Administration ConsoleIn the top navigation bar, click , and choose your application.ApplicationsSelect the tab.Directories & groupsScroll down to , and choose one of the options.Access-based synchronization
Good to know
Heres some additional details:
Your settings will apply to all Crowd APIs used by your applicationsMembership aggregation and nested groups are supported.If a user exists in multiple directories, their access rights in the first one will decide whether theyre synced or not.You can only use full synchronization, the incremental one isnt supported.When is enabled, applications will not be able to create All groups, but only users with access rightsusers in Crowd.When is enabled,applications will not be able to create Only users and groups with access rightsusers and groups in Crowd.
How syncing works with aggregated group memberships
You might encounter some confusing cases if youre using aggregated group memberships. If something isnt synced the way you expect it, have a look at the use cases weve described below.
Sample scenario
You have two directories mapped to an application. In Directory 1, the user belongs to , while in john group ADirectory 2 . You also have the optiogroup B Determine the users' group memberships using all directoriesn enabled.
Here's some use cases to show you which groups the user will belong to after syncing. Note that we're changing syncing and authentication options for each case:
Syncing:All users and groupsWho can authenticate:N/AIn this case, will be a member of and , as everything is synchronized.john group A group BSyncing:All groups, but only users with access rightsWho can authenticate: Directory 1: ; Directory 2: .group A group BIn this case, will be a member of and . Both of these groups are allowed to john group A group Bauthenticate, so hes treated as a user with access rights in both directories, keeping all of his group memberships.
268

Documentation for Crowd 4.4 2
Created in 2021 by Atlassian. Licensed under a .Creative Commons Attribution 2.5 Australia License
3.
4.
5.
Syncing:All groups, but only users with access rightsWho can authenticate: Directory 1: ; Directory 2: (some other group doesnt group A group C johnbelong to)In this case, and will be synchronized, but will be a member of only. group A group B john group AThats because isnt allowed to authenticate so from Directory 2 is treated as a user group B johnwithout access rights hes a member of , but not thats allowed for this directory.group B group CSyncing:Only users and groups with access rightsWho can authenticate: Directory 1: ; Directory 2: group A group BIn this case, will be a member of and . Both of these groups are allowed to john group A group Bauthenticate, so hes treated as a user with access rights in both directories, keeping all of his group memberships.Syncing:Only users and groups with access rightsWho can authenticate: Directory 1: ; Directory 2: (some other group doesnt group A group C johnbelong to)In this case, wont be synchronized at all, because it doesnt have access rights. Likewise, group B johnfrom Directory 2 is treated as a user without access rights, similarly to Case 3 above. will be Group Asynchronized and will be a member of it.john
We want to bring your attention to Case 3 that might appear confusing. In this case, the users should be treated as separate one with access rights, and one without them. As from Directory 2 doesnt have johnaccess rights ( cant authenticate for this directory), he isnt synced and his group memberships arent group Btaken into account.
Troubleshooting
Having problems? Check the details below:
This might be because of the following reasons:
You have a Server license. This feature is only in Data Center.You allow all groups from all directories to authenticate. In this case, theres no reason to limit synced users as all of them need access.
Missing users:
Make sure the user belong to at least one of the groups with access rights.Make sure its not a shadowed user (see Limitations)
Missing groups and group memberships:
If you chose , make sure the group actually have access Only users and groups with access rightsrights.
269

Effective memberships with multiple directoriesThis page describes how Crowd determines group memberships for an integrated application that is mapped to multiple directories, where duplicate user names and group names are used across those directories.
In Crowd 2.8, and later versions, there aretwo different schemes that Crowd can use with multiple directories. We have called these ' ' and ' ', and have aggregating membership non-aggregating membershipdescribed them below.
These schemes are only used to determine the autgroup memberships that the integrated application uses forhorization purposes. Authentication is determined on the basis of the group mappings for an integrated
See .application. Specifying which Groups can access an Application
When you map multiple directories to an integrated application (with duplicate user names),non-aggregating membership is applied by default. You can easily configure the application to use aggregating membership, as .described below
Non-aggregating membership
This is the 'masking' case Crowd seesthe directories mapped to an application from the top down,and will detbased on the of a user , working from the ermine the effective groupmemberships first instance that is detected
highest priority directory to the lowest. Occurrences of the user in a lower priority directory are down'masked', and are not effective.
For example,Crowd will only considerSamto be a member of theAdmingroup if that membership exists in the first directory in whichSamis found. IfSamis not a member oftheAdmingroup in the first directory in which Sam is found, Crowd will not consider that membership even ifSamis a member of Admin in a directorylower .
Note that the priority order of the mapped directories is essential to this scheme. SeeSpecifying the Directory .Order for an Application
In the diagram of below, users or groups in a directory 'mask' themselves in non-aggregating membershiplower priority directories.
For non-aggregating memberships:
A user effectively belongs to only those groups where the user is a group member in the highest directory that contains the user.
So, in the diagram:
User A is only a member of Group A.User B is only a member of Group A.User C is only a member of Group B.
A group's members are all the 'top-most' users that belong to the group. If a group contains the user in a 'lower' directory, that membership is 'masked out' and is not effective.
So, in the diagram:
Group A contains Users A and B.Group B only contains User C.
Information gathered in this page do not apply to application which useonlyone directory. With more than one directory, this page applies both to user memberships in groups, and group memberships in other groups (nested groups).
270

Documentation for Crowd 4.4 2
Created in 2021 by Atlassian. Licensed under a .Creative Commons Attribution 2.5 Australia License
Aggregating membership
This is the 'blending' case - Crowd sees across all the directories mapped to an application, andwilldeterminethe effective groupmembershipsbased on aunionof the directories.
For example, ifSamis a member of the Admingroup in any directory, Crowd will considerSamto be a member of the Admingroup.
In the diagram of aggregating membership below, effective membership is a blend of the memberships in all mapped directories.
For aggregating memberships:
A user effectively belongs to the groups of which allthe user is a member, in directory.any
So, in the diagram:
User A is a member of Groups A and B.User B is a member of Groups A and B.User C is a member of Group B.
A group effectively contains all the users that belong to that group in any directory.
So, in the diagram:
Group A contains Users A and B.Group B contains Users A, B and C.
Understand how access-based synchronization affects membership aggregation
If you're using aggregated group memberships and also sync users based on their access rights to the application, we recommend that you have a look at , where we've Syncing users based on their access rightsdescribed and explained a few cases that might appear confusing.
Configure the aggregation scheme for an application
271

Documentation for Crowd 4.4 3
Created in 2021 by Atlassian. Licensed under a .Creative Commons Attribution 2.5 Australia License
When you map multiple directories to an integrated application in Crowd, non-aggregating membership is applied by default.
You can change the aggregation scheme for each integrated application by checking, or clearing, the Aggre checkbox on the tab for the application:gate group memberships... Directories
The aggregation scheme applies across all the directories mapped to the application.
Directory update operations
When a user is addedto a group, they are only added to the first writeable directory available, in priority order. This applies for both the aggregating and non-aggregating membership schemes.
When a user is removed from a group, the behavior depends on the membership scheme:
With non-aggregatingmembership, the user is only removedfrom the group in the first directory the user is found in.With aggregating membership, the user is removed from the group in directories the user is found in.all
Inactive users
The membership schemes described above are not used when Crowd determines if a user should be able to authenticate.
Crowd only checks if the user is active in the first (highest priority) directory in which they are foundwhen determining authentication.
For example, an application in Crowd is mapped to two directories: Crowd Internal Directory (primary) and an AD Delegated Authentication Directory (secondary).
User A is inactive in the primary directoryUser A is active in secondary directory
Result: Crowd rejects access (authentication), because user A is first found in the primary directory, and the user is inactive there.
272

1. 2. 3. 4.
5.
6.
Specifying an Application's Address or HostnameTo ensure that your Crowd server can be used by legitimate applications only, Crowd will allow applications to log in only from known addresses. This means that you need to specify the IP address(es) and/or hostname(s) of each application.
When you , you will specify the application's IP address. After adding the application, you add a new applicationcan update the IP address if necessary, as described below. In some cases, you may need to add the applicable host name as well as the IP address.
To specify an application's IP address or hostname:
Log in to the .Crowd Administration ConsoleIn the top navigation bar, click .ApplicationsIn the , click the name of the application you wish to updateApplication BrowserIn the screen, click the tab.View Application Remote AddressesYou will see a list of IP addresses and hostnames that are currently mapped to the application.Type the new IP address or hostname in the Address field. Possible values are:
A full IP address, e.g. .192.168.10.12A wildcard IP range, using CIDR notation, e.g. . For more information, see 192.168.10.1/16the introduction to and .CIDR notation on Wikipedia RFC 4632A host name, e.g. .myhost.com
Note: If an application running on the same server needs to access Crowd, you may need to add 'localhost' as well as '127.0.0.1' to the list of IP addresses and hostnames.
Click Add.The new address will be added to the bottom of the list.
Screenshot: Application addresses
Troubleshooting
IP address and/or host name?
You should always specify the application's IP address. In addition, you may need to give a host name as well as the IP address. Some application servers may pass the host name to Crowd, instead of the IP address. If this happens, Crowd will not grant the application's authorization request unless Crowd recognizes the host name.
273

Documentation for Crowd 4.4 2
Created in 2021 by Atlassian. Licensed under a .Creative Commons Attribution 2.5 Australia License
A common problem: Application not connecting with Crowd. For an application to be able to use Crowd, the application's address must be valid and the application must be active. Ensure the 'Active' check box is ticked on the application 'Details' tab.
274

1. 2.
3. 4. 5. 6.
7.
1. 2.
3. 4. 5. 6. 7.
Testing a User's Login to an ApplicationYou can use an application's ' ' tab to verify that a user will be able to log in to a given Authentication Testapplication, based on the user, directory and group associations in Crowd.
How does the test work?
You enter the username and password of the user you wish to verify has access to a given application.Crowd searches for the user with that username in the application's , and verifies the mapped directoriespassword.If the user is not found or the password is invalid, the authentication fails the test.Crowd checks whether the directory is set to .allow all to authenticateIf all can authenticate, the test passes.Else, Crowd checks the group(s) to which the and verifies whether those groups have user belongs acces
.s to the applicationIf the user belongs to an allowed group, the test passes, otherwise it fails.
How do I do it?
Log in to the .Crowd Administration ConsoleIn the top navigation bar, click .ApplicationsThe displays.Application BrowserClick the name of the application you want to verify.In the screen, click tab.View Application Authentication Test Enter the and that you wish to verify.Username PasswordClick the ' ' button.UpdateA message appears above the 'Username', displaying one of the following:
' ' The authentication has passed the test.Successful verification' ' The authentication has failed the test.Invalid verification
Below are some suggestions for the next steps you can take in each case.
Screenshot: Authentication test showing successful verification
Successful Verification
If this test is successful, but the user is having trouble authenticating to an application, then the problem is caused by the connection between the application and Crowd rather than by user authentication.
Next step: Check the ' ' tab in the to see if the application is connected Application Sessions Session Browserto Crowd.
Failed Verification
If the test declares the login to be invalid, this means that the configuration is incorrect within Crowd.
275
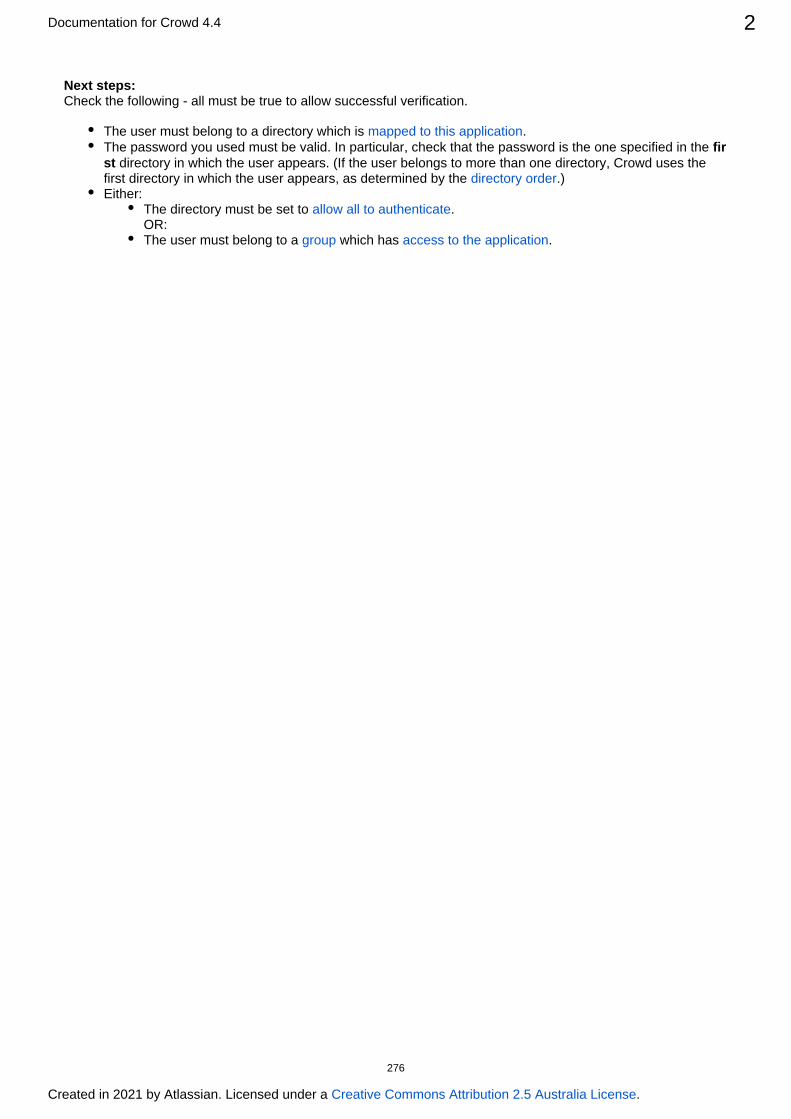
Documentation for Crowd 4.4 2
Created in 2021 by Atlassian. Licensed under a .Creative Commons Attribution 2.5 Australia License
Next steps: Check the following - all must be true to allow successful verification.
The user must belong to a directory which is .mapped to this applicationThe password you used must be valid. In particular, check that the password is the one specified in the fir
directory in which the user appears. (If the user belongs to more than one directory, Crowd uses the stfirst directory in which the user appears, as determined by the .)directory orderEither:
The directory must be set to .allow all to authenticateOR:The user must belong to a which has .group access to the application
276

1.
2.
1. 2.
3. 4. 5. 6.
Enforcing Lower-Case Usernames and Groups for an ApplicationIn some cases you may wish to convert usernames and group names to lower case when passing them to an application. You can set an option for each application, as described below. When the option is set, Crowd will convert upper-case and mixed-case information obtained from your user directory to lower case before passing the information to the application. The conversion is applied to the following information:
UsernamesGroup namesGroup memberships
If you set this option for an application, the conversion will apply to directories .all mapped to the application
This option is useful in the following situations:
First situation: Existing application-to-directory integration:You have previously integrated an application that enforces lower-case usernames (e.g. ) jsmithwith a corporate directory which allows mixed-case usernames (e.g. ). Examples of such JSmithapplications are and .Jira ConfluenceYou have existing usernames in the application, which are therefore all lower case.Now you want to integrate the application with Crowd.
Second situation: You have a custom application which demands lower-case usernames and cannot do the conversion itself.
To enforce lower-case conversion for an application,
Log in to the .Crowd Administration ConsoleIn the top navigation bar, click .ApplicationsThe Application Browser appears.Click the name of the application you want to configure.In , click the tab.View Application OptionsSelect .Lower Case OutputClick .Update
Check your options carefully
You should only enforce lower-case conversion if you are in a situation as described above. There is no need to enforce lower-case conversion if you are starting out afresh with a Crowd-to-Jira or Crowd-to-Confluence integration. When lower-case conversion is not enforced, Crowd's behavior is case-
it will ignore case when comparing usernames etc ('JSmith' = insensitive but case-preserving'jsmith') and it will preserve case when passing information between applications and directories ('JSmith' remains 'JSmith'). This results in the expected behavior in the Crowd-integrated directories as well as the Crowd-integrated applications such as Jira and Confluence.
277
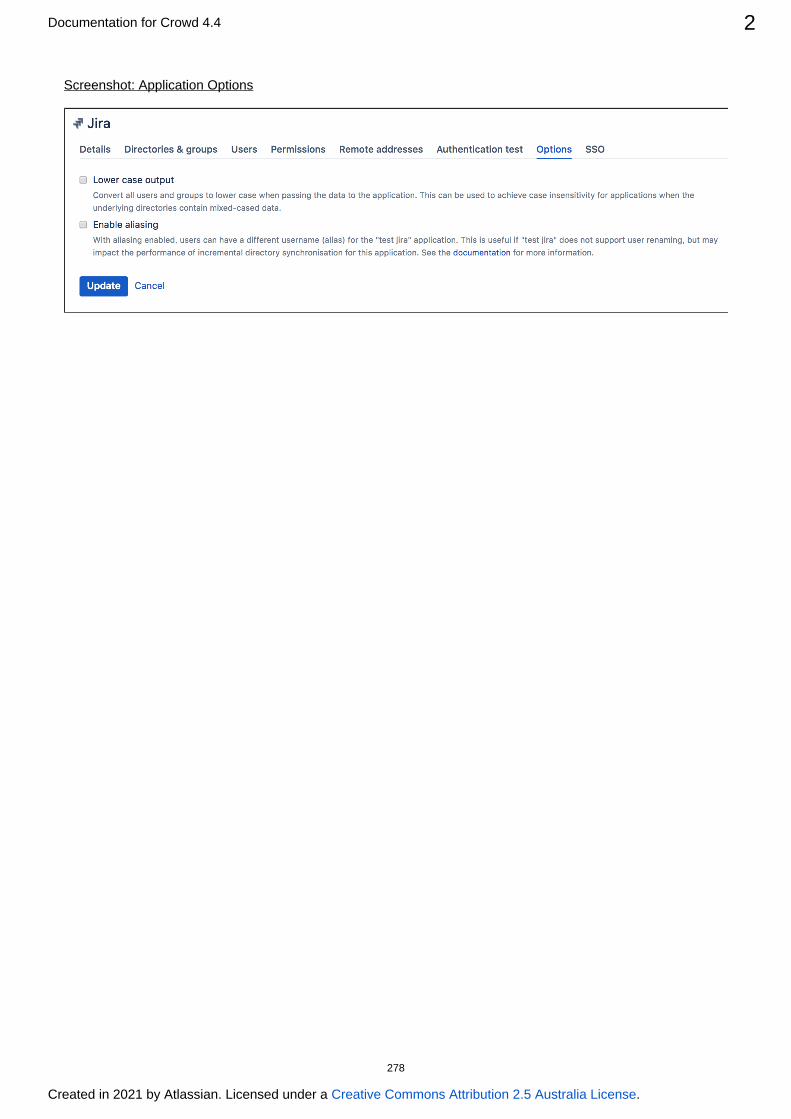
Documentation for Crowd 4.4 2
Created in 2021 by Atlassian. Licensed under a .Creative Commons Attribution 2.5 Australia License
Screenshot: Application Options
278

1. 2. 3. 4.
1.
2. 3.
4.
Managing an Application's SessionCrowd allows you to see a list of all applications currently logged in to the . This is effectively a Crowd frameworklist of the applications which currently have users logged in to them, since an application will only ever log in to the Crowd framework when it needs to authenticate a user.
You can also force any session to expire, that is, you can log the application out of Crowd.
To see which applications are currently logged in to Crowd:
Log in to the .Crowd Administration ConsoleIn the top navigation bar, click .AdministrationClick ' ' in the left-hand menu.Current SessionsThis will display the ' ' screen, showing a list of all applications which are Application Sessionscurrently logged in to the Crowd framework. For example, the screenshot below shows that the crowdapplication (i.e. the ) is currently logged in to the Crowd framework.Crowd Administration Console
You can refine your search by specifying an application's ' '. (Note that this is case sensitive.)Name
To force an application to log out of Crowd:
Log in to the .Crowd Administration Console
In the top navigation bar, click .In the left-hand menu, click .Current SessionsYou can see a list of all applications which are currently logged in to the Crowd framework.Next to the application you want to log out of Crowd, click .Expire
Screenshot: 'Sessions Applications'
If you want to prevent an application from logging in to Crowd, please see permanently Deleting or .Deactivating an Application
279

1. 2. 3.
4.
1. 2. 3.
4.
Deleting or Deactivating an ApplicationDeactivating an application prevents users from logging in to the application. You might do this if you are making changes to an application and need to temporarily keep users out of it.
Deleting an application removes the application's and its . You would typically only do details directory mappingsthis if the application is no longer required.
To deactivate an application,
Log in to the .Crowd Administration ConsoleClick the ' tab in the top navigation bar.ApplicationsThis will display the . Click the ' ' link that corresponds to the application you Application Browser Viewwish to deactivate.This will display the ' ' screen. Deselect the ' ' check-box, then click the 'Application Details Active Upda
' button. No users will now be able to log in to the application.te
To reactivate the application, follow the same steps but the ' ' check-box.select Active
To delete an application,
Log in to the .Crowd Administration ConsoleClick the ' tab in the top navigation bar.ApplicationsThis will display the . Click the ' ' link that corresponds to the application you Application Browser Viewwish to deactivate.This will display the ' ' screen. Click ' ' in the left-hand menu.Application Details Remove Application
The application will be removed from Crowd and will no longer appear in the .Application Browser
You cannot delete or deactivate the ' ' application (i.e. the ).crowd Crowd Administration Console
280

Documentation for Crowd 4.4 2
Created in 2021 by Atlassian. Licensed under a .Creative Commons Attribution 2.5 Australia License
Screenshot: 'Deleting or Deactivating an Application'
RELATED TOPICSUsing the Application BrowserAdding an Application
Integrating Crowd with Atlassian BambooIntegrating Crowd with Atlassian Confluence
Integrating Crowd with Atlassian Confluence 3.4 or earlierUpdating Files in a Confluence Evaluation Distribution
Integrating Crowd with Atlassian CrowdIDIntegrating Crowd with Atlassian CrucibleIntegrating Crowd with Atlassian FishEye
Configuring FishEye earlier than 4.0 with CrowdIntegrating Crowd with Atlassian Jira
Integrating Crowd with Atlassian Jira 4.2 or earlierIntegrating Crowd with Atlassian Bitbucket ServerIntegrating Crowd with Acegi Security
Integrating AppFuse - a Crowd-Acegi Integration TutorialIntegrating Crowd with Jive Forums
Jive SSOIntegrating Crowd with Spring Security
Integrating AppFuse - a Crowd-Spring Security Integration TutorialIntegrating Crowd with a Custom ApplicationIntegrating Crowd with Atlassian HipChat
Configuring the Google Apps ConnectorMapping a Directory to an Application
Specifying the Directory Order for an ApplicationSpecifying an Application's Directory Permissions
Example of Directory PermissionsViewing Users in Directories Mapped to an ApplicationSpecifying which Groups can access an ApplicationSyncing users based on their access rights
Effective memberships with multiple directoriesSpecifying an Application's Address or Hostname
281
Documentation for Crowd 4.4 3
Created in 2021 by Atlassian. Licensed under a .Creative Commons Attribution 2.5 Australia License
Testing a User's Login to an ApplicationEnforcing Lower-Case Usernames and Groups for an ApplicationManaging an Application's SessionDeleting or Deactivating an ApplicationConfiguring Caching for an ApplicationOverview of SSOConfiguring Options for an ApplicationEnabling OpenID client appAllowing applications to create user tokensDisabling the OpenID client appConfiguring how users log in
Crowd documentation
282

Configuring Caching for an ApplicationCaching is used to store run-time authentication and authorization rules, which can be expensive to calculate.
This page describes the cache that can be configured in each of the Crowd-connected applications, such as Jira, Confluence and Bamboo. For an overview of the other types of caching offered by Crowd, please refer to O
.verview of Caching
Crowd application caching is also referred to as 'client caching'.
Explanation of Crowd Application Caching
Crowd-integrated applications can store user, group and role data in a local cache. This helps improve the performance of Crowd since these applications do not have to repeatedly request information from Crowd. Generally, it is not necessary to configure application caching, although this depends on the size of your application deployments.
Enabling Application Caching
To enable application caching:
Edit the file, which is located in the directory of your crowd-ehcache.xml WEB-INF/classesapplication's . The two main properties are:Crowd client
diskStore: If you have enabled disk persistence ( ) this is the diskPersistent="true"location on the file system where Ehcache will store its caching information. By default it uses ja
which is Java's default temporary file location.va.io.tmpdirdefaultCache: This property has configurable options. Please read the many documentation
to fully understand the implications and possibilities with this property. provided by EhcacheSome basic features are described below.
Extract from the ehcache.xml file
Below is a small snippet of the file.crowd-ehcache.xml
<ehcache>
<diskStore path="java.io.tmpdir"/>
<defaultCache maxElementsInMemory="4096" eternal="false" overflowToDisk="false" timeToIdleSeconds="300" timeToLiveSeconds="300" diskPersistent="false" diskExpiryThreadIntervalSeconds="120"/>
</ehcache>
Basic Cache Attributes
Some applications may enable/disable caching based on the Crowd server setting
The Crowd API allows an application to query whether caching is enabled on the Crowd server (isCach). The Crowd Java client does not make use of this API feature, because it makes more eEnabled
sense to have application caching configured entirely on the application side. If you have a Crowd-integrated custom application which does make use of this API call, then the setting on the Crowd serverwill affect your application-side caching as well.
283
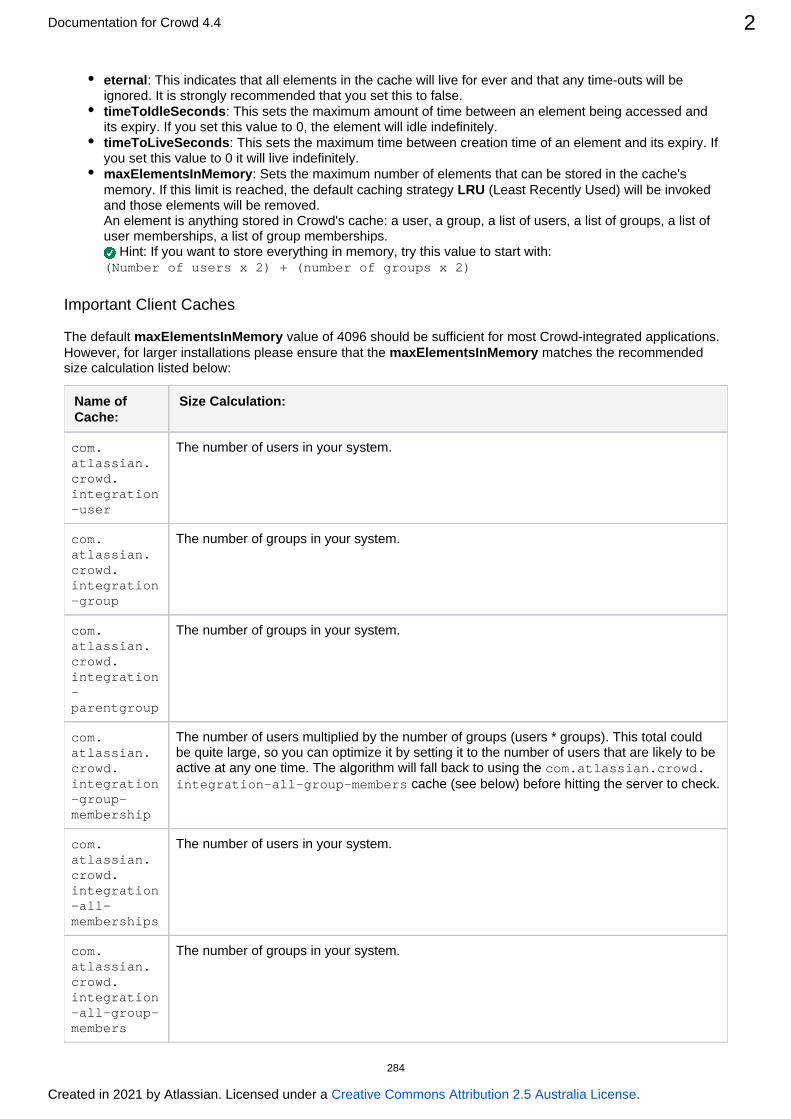
Documentation for Crowd 4.4 2
Created in 2021 by Atlassian. Licensed under a .Creative Commons Attribution 2.5 Australia License
eternal: This indicates that all elements in the cache will live for ever and that any time-outs will be ignored. It is strongly recommended that you set this to false.timeToIdleSeconds: This sets the maximum amount of time between an element being accessed and its expiry. If you set this value to , the element will idle indefinitely.0timeToLiveSeconds: This sets the maximum time between creation time of an element and its expiry. If you set this value to it will live indefinitely.0maxElementsInMemory: Sets the maximum number of elements that can be stored in the cache's memory. If this limit is reached, the default caching strategy will be invoked LRU (Least Recently Used)and those elements will be removed. An element is anything stored in Crowd's cache: a user, a group, a list of users, a list of groups, a list of user memberships, a list of group memberships.
Hint: If you want to store everything in memory, try this value to start with:(Number of users x 2) + (number of groups x 2)
Important Client Caches
The default value of 4096 should be sufficient for most Crowd-integrated applications. maxElementsInMemoryHowever, for larger installations please ensure that the matches the recommended maxElementsInMemorysize calculation listed below:
Name of Cache:
Size Calculation:
com.atlassian.crowd.integration-user
The number of users in your system.
com.atlassian.crowd.integration-group
The number of groups in your system.
com.atlassian.crowd.integration-parentgroup
The number of groups in your system.
com.atlassian.crowd.integration-group-membership
The number of users multiplied by the number of groups . This total could (users * groups)be quite large, so you can optimize it by setting it to the number of users that are likely to be active at any one time. The algorithm will fall back to using the com.atlassian.crowd.
cache (see below) before hitting the server to check.integration-all-group-members
com.atlassian.crowd.integration-all-memberships
The number of users in your system.
com.atlassian.crowd.integration-all-group-members
The number of groups in your system.
284
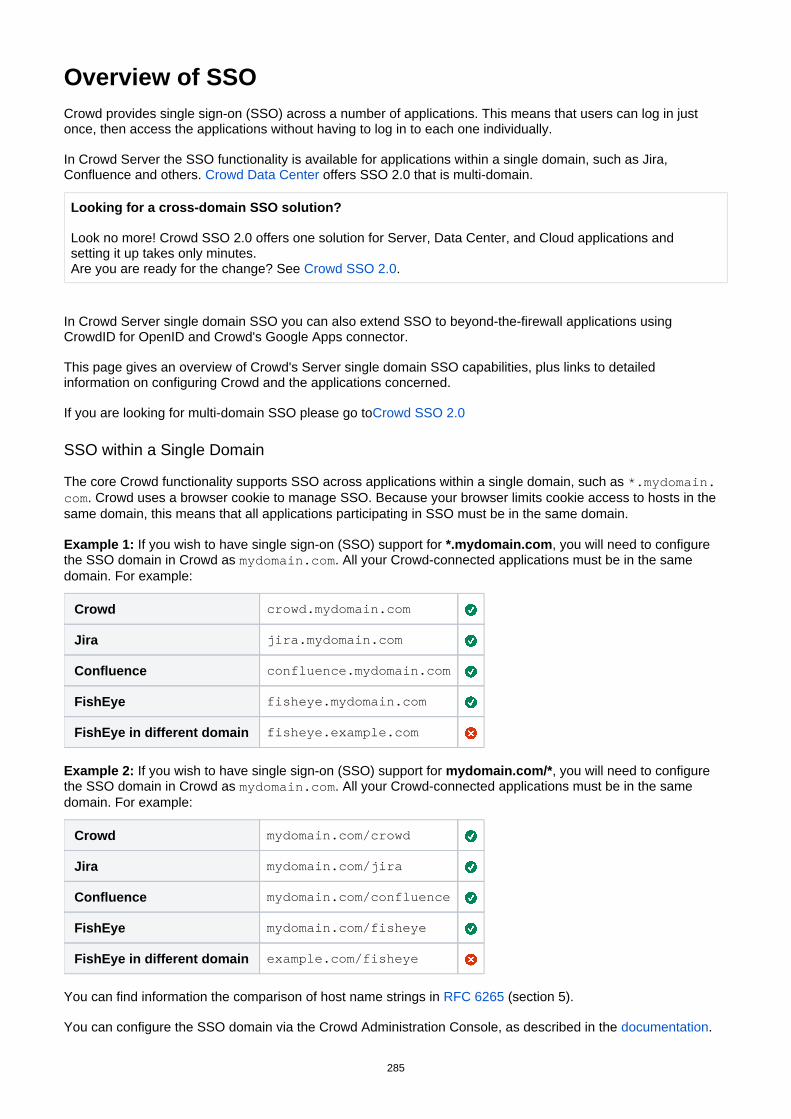
Overview of SSOCrowd provides single sign-on (SSO) across a number of applications. This means that users can log in just once, then access the applications without having to log in to each one individually.
In Crowd Server the SSO functionality is available for applications within a single domain, such as Jira, Confluence and others. offers SSO 2.0 that is multi-domain.Crowd Data Center
Looking for a cross-domain SSO solution?
Look no more! Crowd SSO 2.0 offers one solution for Server, Data Center, and Cloud applications and setting it up takes only minutes.Are you are ready for the change? See .Crowd SSO 2.0
In Crowd Server single domain SSO you can also extend SSO to beyond-the-firewall applications using CrowdID for OpenID and Crowd's Google Apps connector.
This page gives an overview of Crowd's Server single domain SSO capabilities, plus links to detailed information on configuring Crowd and the applications concerned.
If you are looking for multi-domain SSO please go toCrowd SSO 2.0
SSO within a Single Domain
The core Crowd functionality supports SSO across applications within a single domain, such as *.mydomain.. Crowd uses a browser cookie to manage SSO. Because your browser limits cookie access to hosts in the com
same domain, this means that all applications participating in SSO must be in the same domain.
Example 1: If you wish to have single sign-on (SSO) support for , you will need to configure *.mydomain.comthe SSO domain in Crowd as . All your Crowd-connected applications must be in the same mydomain.comdomain. For example:
Crowd crowd.mydomain.com
Jira jira.mydomain.com
Confluence confluence.mydomain.com
FishEye fisheye.mydomain.com
FishEye in different domain fisheye.example.com
Example 2: If you wish to have single sign-on (SSO) support for , you will need to configure mydomain.com/*the SSO domain in Crowd as . All your Crowd-connected applications must be in the same mydomain.comdomain. For example:
Crowd mydomain.com/crowd
Jira mydomain.com/jira
Confluence mydomain.com/confluence
FishEye mydomain.com/fisheye
FishEye in different domain example.com/fisheye
You can find information the comparison of host name strings in (section 5).RFC 6265
You can configure the SSO domain via the Crowd Administration Console, as described in the .documentation
285
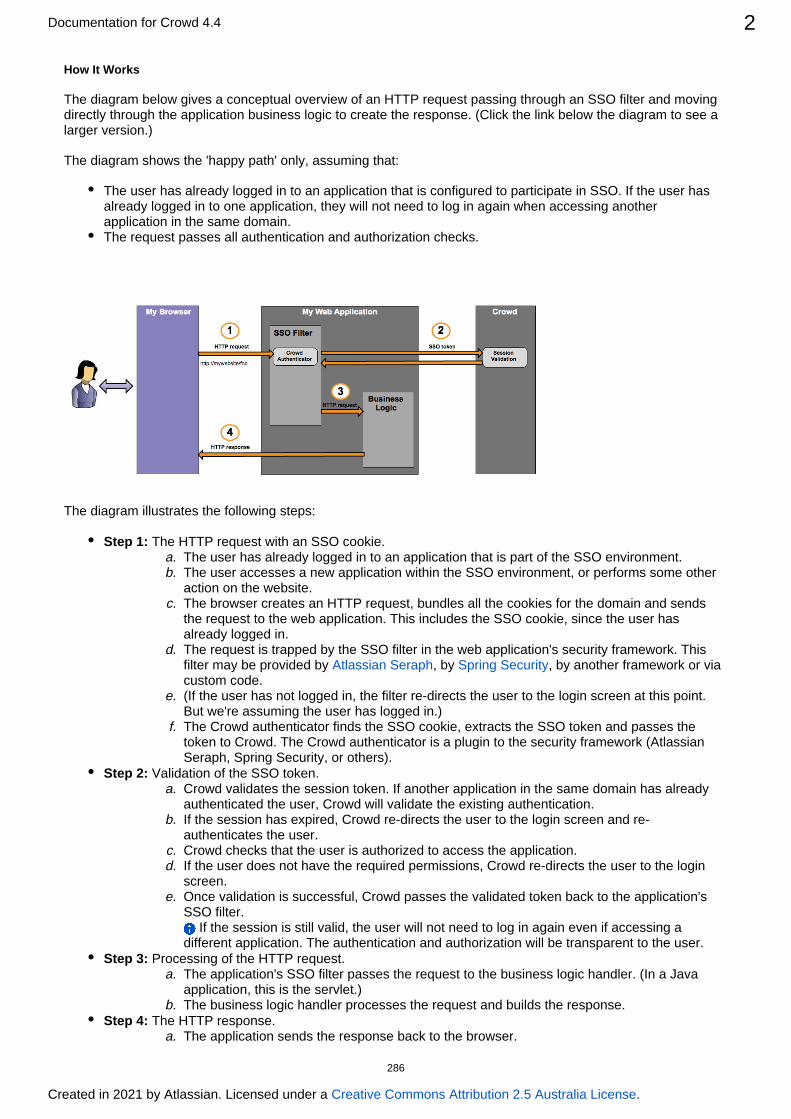
Documentation for Crowd 4.4 2
Created in 2021 by Atlassian. Licensed under a .Creative Commons Attribution 2.5 Australia License
a. b.
c.
d.
e.
f.
a.
b.
c. d.
e.
a.
b.
a.
How It Works
The diagram below gives a conceptual overview of an HTTP request passing through an SSO filter and moving directly through the application business logic to create the response. (Click the link below the diagram to see a larger version.)
The diagram shows the 'happy path' only, assuming that:
The user has already logged in to an application that is configured to participate in SSO. If the user has already logged in to one application, they will not need to log in again when accessing another application in the same domain.The request passes all authentication and authorization checks.
The diagram illustrates the following steps:
Step 1: The HTTP request with an SSO cookie.The user has already logged in to an application that is part of the SSO environment.The user accesses a new application within the SSO environment, or performs some other action on the website.The browser creates an HTTP request, bundles all the cookies for the domain and sends the request to the web application. This includes the SSO cookie, since the user has already logged in.The request is trapped by the SSO filter in the web application's security framework. This filter may be provided by , by , by another framework or via Atlassian Seraph Spring Securitycustom code.(If the user has not logged in, the filter re-directs the user to the login screen at this point. But we're assuming the user has logged in.)The Crowd authenticator finds the SSO cookie, extracts the SSO token and passes the token to Crowd. The Crowd authenticator is a plugin to the security framework (Atlassian Seraph, Spring Security, or others).
Step 2: Validation of the SSO token.Crowd validates the session token. If another application in the same domain has already authenticated the user, Crowd will validate the existing authentication.If the session has expired, Crowd re-directs the user to the login screen and re-authenticates the user.Crowd checks that the user is authorized to access the application.If the user does not have the required permissions, Crowd re-directs the user to the login screen.Once validation is successful, Crowd passes the validated token back to the application's SSO filter.
If the session is still valid, the user will not need to log in again even if accessing a different application. The authentication and authorization will be transparent to the user.
Step 3: Processing of the HTTP request.The application's SSO filter passes the request to the business logic handler. (In a Java application, this is the servlet.)The business logic handler processes the request and builds the response.
Step 4: The HTTP response.The application sends the response back to the browser.
286
Documentation for Crowd 4.4 3
Created in 2021 by Atlassian. Licensed under a .Creative Commons Attribution 2.5 Australia License
Here is a an from Oracle and a useful from O'Reilly.overview of servlet filters tutorial
The SSO filter may be provided by a security framework or by custom code as follows:
Security Framework or Custom Code
Comments
Framework: Atlassian Seraph
Most of the Atlassian applications use Seraph. The Crowd documentation tells you how to integrate SSO into , , , etc. If you are Confluence Jira Bamboo integrating a custom
with Crowd, you may also decide to use Seraph as your security framework.application
Framework: Spring Security
You may have a web application that uses the Spring Security framework and that you are now integrating with Crowd. The Crowd documentation tells you how to integrate
. SSO into a Spring Security-based applicationA point of interest: Crowd uses the Spring Security framework, and so does the Crowd
.'demo' application
Framework: Acegi Security (old)
You may have a web application that uses the Acegi Security framework and that you are now integrating with Crowd. The Crowd documentation tells you how to integrate
. SSO into an Acegi-based applicationNote that Acegi Security is an earlier version of .Spring Security
Custom authentication for
Atlassian Fisheyeand Crucible
Crowd provides a custom integration with Fisheye and/or Crucible, including SSO. See the .Crowd documentation
Crowd API for your custom application
When integrating your own web application with Crowd, you can use the Crowd API to implement SSO.
We recommend that you use the for long-term compatibility.Crowd REST APIsIf you have a Java application, you can use the shipped Java Integration Librarieswith Crowd, but please be aware that they may change between releases. You may need to re-compile your source and possibly change a package name.There are a number of third-party language bindings and application connectors developed by Crowd users. You can see them in the .Atlassian Marketplace
Configuring Crowd for SSO
Below are the configuration settings which affect SSO:
Short Description More Information
Set your SSO domain Set the domain via the Crowd Administration Console, as described in the .documentation
Optional: Configure Trusted Proxy Servers
Configure Crowd to trust a proxy's IP address, if you are running applications behind one or more proxy servers. See the documentation.
Optional: Enforce a secure connection, such as SSL, for all SSO requests
You can specify that the 'secure' flag is set on the SSO cookie, as described in the . documentation
Unsecured connections will be rejected, including the Crowd Administration Console if not accessed via SSL.
Configuring the Applications for SSO
When integrating an application with Crowd, you will configure the application to use Crowd as a centralized authentication repository. For most applications, , you can also choose to configure SSO. This is but not alldescribed in detail for each application:
287

Documentation for Crowd 4.4 4
Created in 2021 by Atlassian. Licensed under a .Creative Commons Attribution 2.5 Australia License
Integrating Crowd with Atlassian BambooIntegrating Crowd with Atlassian ConfluenceIntegrating Crowd with Atlassian CrowdIDIntegrating Crowd with Atlassian CrucibleIntegrating Crowd with Atlassian FishEyeIntegrating Crowd with Atlassian JiraIntegrating Crowd with Atlassian Bitbucket ServerIntegrating Crowd with Acegi SecurityIntegrating Crowd with Jive ForumsIntegrating Crowd with Spring SecurityIntegrating Crowd with a Custom ApplicationIntegrating Crowd with Atlassian HipChat
Troubleshooting SSO
See .Troubleshooting SSO with Crowd
SSO Beyond the Firewall
Crowd allows you to extend SSO to beyond-the-firewall applications using CrowdID and Crowd's Google Apps connector.
Using CrowdID as an OpenID Provider
Crowd allows you to host an OpenID provider, called CrowdID, so that your users have a single point of authentication for all OpenID-enabled websites. Refer to the and CrowdID Administration Guide CrowdID User
.Guide
OpenID is an open, free protocol which allows a user to have a single identifier for logging in to any OpenID-enabled website. The website will communicate with a specific OpenID provider (in this case, your CrowdID server) when attempting to verify the user's login. For example, if your team uses 37signals' CRM tool , Highrizeusing Crowd's OpenID provider means you can get SSO between Highrize and your behind-the-firewall applications for all your team.
Using SSO with Google Apps
Crowd offers SSO with via the shipped with your Crowd installation. This Google Apps Google Apps connectormeans that your users can log in just once and then move between Google Apps and other applications like Jira, Confluence, etc.
288

Configuring Options for an ApplicationOnce you have to Crowd, you can configure various options for that application in the added an application Opti
tab. Click the links below for information about each option:ons
Lower Case OutputEnable Aliasing
Screenshot: Application Options
289

1.
2.
3.
4.
Enabling OpenID client appStarting from Crowd version 3.6.2, OpenID client application will be disabled from deployment by default. However, you can still reenable this app on your staging environment by following steps bellow.
Note regarding DC versions: Following procedure is related to a single node. If youre running cluster with many nodes then to deploy OpenID client app on every of them you need to perform following procedure on each node.
Stop Tomcat container (if running) by executing following script:
{CROWD_INSTALL}/stop_crowd.sh
Create following file by running:
touch {CROWD_INSTALL}/apache-tomcat/conf/Catalina/localhost/openidclient.xml
and fill the newly created file with the following content:
<Context docBase="../../crowd-openidclient-webapp" />
Start Tomcat container by running following script:
{CROWD_INSTALL}/start_crowd.sh
OpenID client app should be now accessible on the following endpoint:
http://{CROWD_HOST}:{PORT_NUMBER}/openidclient
For security reasons OpenID client app shouldnt be deployed on production environment.
290

1. 2.
Allowing applications to create user tokensAll applications connected to Crowd can generate Crowd tokens for any user that can authenticate into that application. This can be useful, for example, for the remember me functionality as the app will not have to ask
For security reasons, by default, applications connected to Crowd are not for credentials upon every login.allowed to create user tokens.
To allow applications to create such tokens:
In Crowd, go to > < > .Applications your_application_name OptionsCheck .Allow to generate user tokens
There is a possibility for applications connected to Crowd to generate Crowd tokens for users without passing their passwords in a request.
Such token can later be used to impersonate user in other SSO version 1 applications if they have similar directory setup.
User tokens can be used to impersonate user in Crowd web application if Crowd application has similar directory setup.
For this reason, it is important to connect only trusted applications to Crowd. Additionally, it's recommended that you keep the setting disabled unless your Allow to generate user tokens application and setup clearly requires this setting to be turned on.
291
1.
2.
3.
4.
Disabling the OpenID client app
OpenID client is a testing app used as a starting point to develop OpenID-enabled Java applications. Its bundled with standard Crowd distribution and it is deployed by default. However, its not required for Crowd or OpenID server to work correctly.OpenID client/server should not be confused with OpenID Connect.
In version 3.6.2, 3.7.1, 4.0.0 Crowd hadthe OpenID client app disabled from deploying by default.To prevent the on versions of Crowd before the mentioned above, follow the procedure OpenID client app from deploying
bellow.
This procedure should also be put as part of your upgrade procedure in case youre upgrading toany version of Crowd other than 3.6.2, 3.7.1, 4.0.0 or later.
Note regarding DC versions: If youre running a cluster with more than one node you should perform following procedure on each node.
Before you begin
Check if the OpenID client app is running in your Crowd Tomcat container. With Crowd running, go to:
http://{CROWD_HOST}:{PORT_NUMBER}/openidclient
If the result is , it means the OpenID Connect client app is not running in the HTTP Status 404 - Not Foundspecified environment.
If you see the OpenID Client app page, proceed with the following steps to disable it.
To disable the OpenID client app
Stop Tomcat container by running following script:
{CROWD_INSTALL}/stop_crowd.sh
Backup and delete the following file which is responsible for deploying the OpenID client app. Backup of the file will allow you to reenable the app in the future. Remember that you shouldnt enable this application on production environment.
{CROWD_INSTALL}/apache-tomcat/conf/Catalina/localhost/openidclient.xml
Start Tomcat container by running following script:
{CROWD_INSTALL}/start_crowd.sh
Again, verify that the OpenID client app is disabled. Go to:
http://{CROWD_HOST}:{PORT_NUMBER}/openidclient
You should see which means the app is not running anymore.HTTP Status 404 - Not Found,
The following procedure will require scheduling a downtime of Crowd.
292

1. 2. 3.
Configuring how users log inUsers can log in to Crowd using their logins or email addresses. Using email addresses has been introduced in Crowd 4.4 and enabled by default, but you can change these settings.
To change how users log in:
Go to your Crowd administration console.Select the Crowd application and switch to the tab.OptionsSelect whether users can log in with email addresses.
Limitations
In some cases, Crowd is unable to verify that the email belongs to the user and wont allow them to log in by using it. To describe these cases, lets assume that Crowd is configured with two directories and Directory 1
, defined in that exact order.Directory 2
Example 1: Ambiguous email ownership
If there are multiple Crowd users with the same email address, none of them will be able to log in.
Example 2: Shadowed email owner
In this example, each of your two directories has a user called John. John from Directory 2 uses an email address , while John from Directory 1 uses a different email address. When [email protected] [email protected] during authentication, the user won't be able to log in. This is because John 1 is the canonical user in Crowd and he doesn't use this address.Check out to learn Effective memberships with multiple directoriesmore about canonical and shadowed users.
Example 3: Overlapping emails and usernames
In this example, we have two Crowd users with the same email address. But, for , the email address john oneis actually a username.
Crowd first checks the provided value against usernames and only then emails. In this case, Crowd will attempt to log in John 1 as the provided value is his username.
293
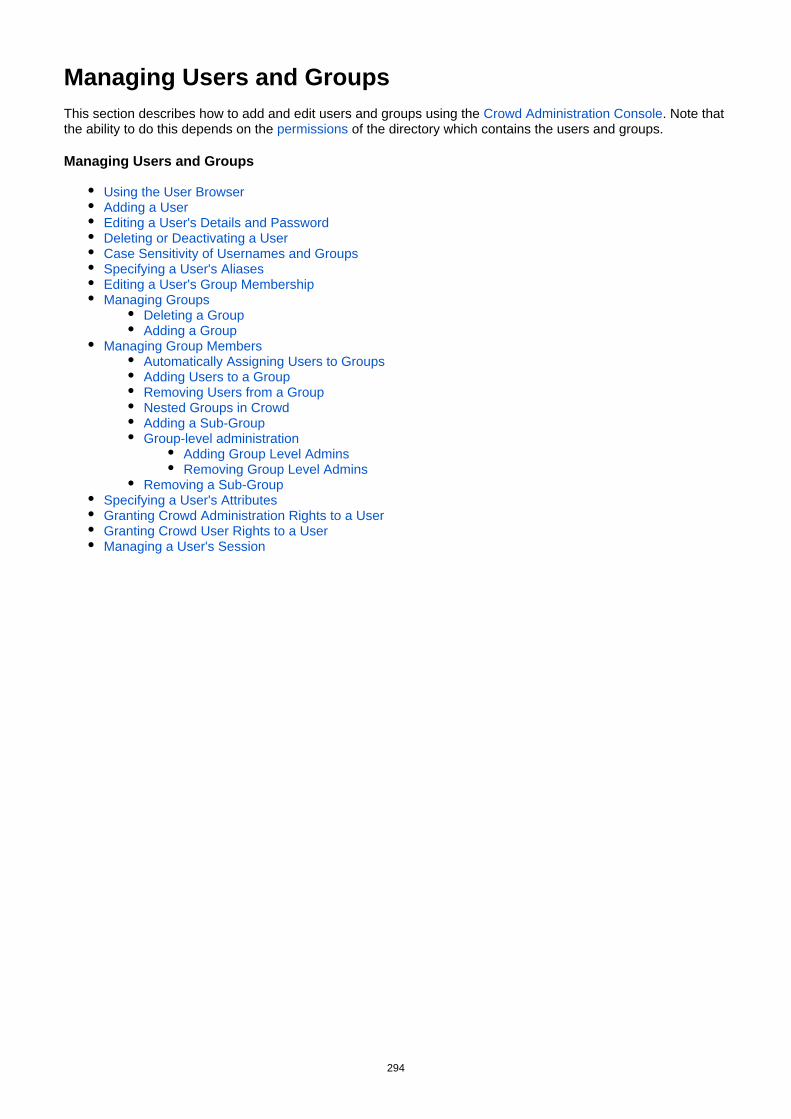
Managing Users and GroupsThis section describes how to add and edit users and groups using the . Note that Crowd Administration Consolethe ability to do this depends on the of the directory which contains the users and groups.permissions
Managing Users and Groups
Using the User BrowserAdding a UserEditing a User's Details and PasswordDeleting or Deactivating a UserCase Sensitivity of Usernames and GroupsSpecifying a User's AliasesEditing a User's Group MembershipManaging Groups
Deleting a GroupAdding a Group
Managing Group MembersAutomatically Assigning Users to GroupsAdding Users to a GroupRemoving Users from a GroupNested Groups in CrowdAdding a Sub-GroupGroup-level administration
Adding Group Level AdminsRemoving Group Level Admins
Removing a Sub-GroupSpecifying a User's AttributesGranting Crowd Administration Rights to a UserGranting Crowd User Rights to a UserManaging a User's Session
294
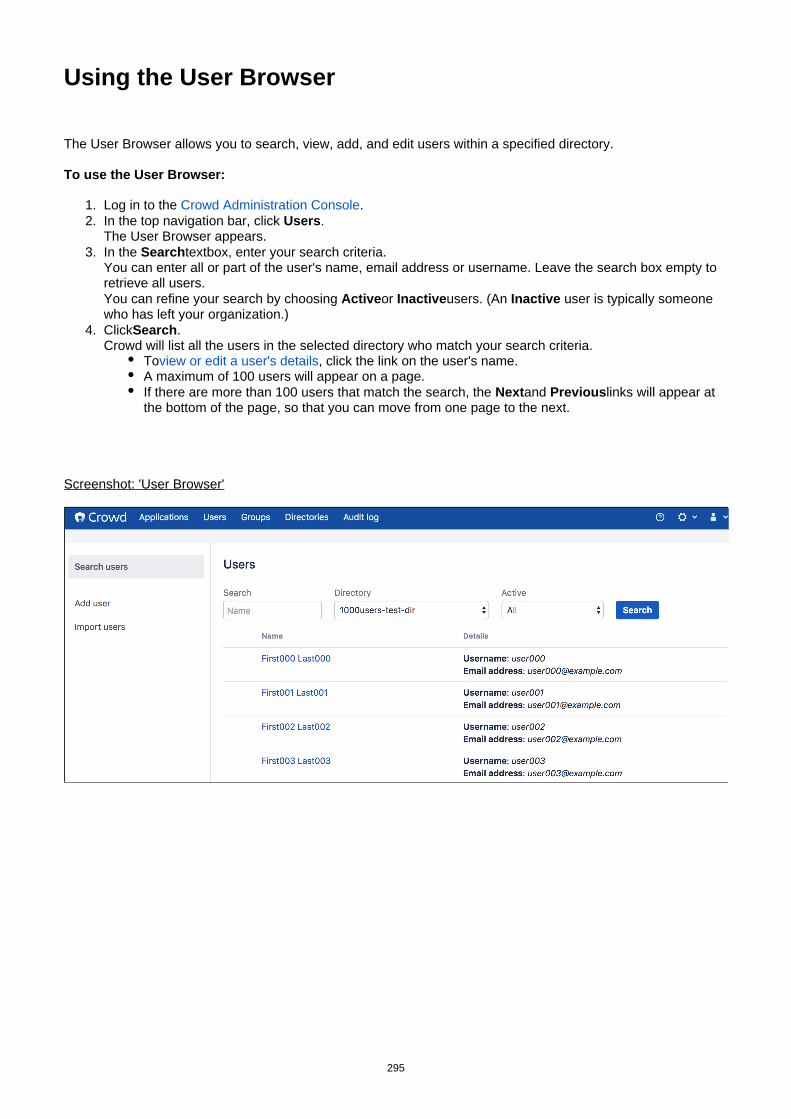
1. 2.
3.
4.
Using the User Browser
The User Browser allows you to search, view, add, and edit users within a specified directory.
To use the User Browser:
Log in to the .Crowd Administration ConsoleIn the top navigation bar, click .UsersThe User Browser appears.In the textbox, enter your search criteria.SearchYou can enter all or part of the user's name, email address or username. Leave the search box empty to retrieve all users.You can refine your search by choosing or users. (An user is typically someone Active Inactive Inactivewho has left your organization.)Click .SearchCrowd will list all the users in the selected directory who match your search criteria.
To , click the link on the user's name.view or edit a user's detailsA maximum of 100 users will appear on a page.If there are more than 100 users that match the search, the and links will appear at Next Previousthe bottom of the page, so that you can move from one page to the next.
Screenshot: 'User Browser'
295

1. 2. 3. 4.
5.
Adding a UserTo add users in Crowd, you can either import users into Crowd in bulk (see Importing Users and Groups into a
), or add them individually as described below.Directory
To add a user:
Log in to the .Crowd Administration ConsoleIn the top navigation bar, click .UsersIn the left-hand menu, click .Add userFill in user details.
Email The email address of the user. Email addresses must follow the RFC2822 format.
Active Only deselect this if you wish to deny the user access to the Crowd-integrated applications.
Username The user's login name. Within a given directory, the username must be unique. Note that you cannot change the username once the user has been created.
Password The user's password.
Confirm Password Enter the same password again, to ensure that you have typed it correctly.
First Name The user's first name.
Last Name The user's last name.
Directory The directory to which the user will be added. Note that the user cannot be moved to a different directory once the user has been created.
Click to add the user.Create
Next steps
Once you've added a user to Crowd, you are able to specify their and . If you wish, attributes group membershipyou can also appropriate applications.verify that the user can log in to
Automatically adding users to Jira or other groups
You can configure your directory to automatically add users to one or more groups. Define the default groups on the directory as described in . For example, Automatically Assigning New Users to Groupsyou can add Jira groups as default groups for your LDAP directory connector. Whenever a new user is added to LDAP, they will automatically get access to Jira.
296

1. 2. 3. 4. 5.
1. 2. 3. 4. 5.
1. 2. 3. 4.
Editing a User's Details and PasswordCrowd administrators can edit a user's details, rename users, mark a user as active or inactive, and change or reset a user's password.
Log in to the .Crowd Administration ConsoleIn the top navigation bar, click .UsersSelect the relevant directory, search for the user you want to update, and click the user's name.Edit the details as required.Click .Update
Note: Not all directories support user rename. Crowd will inform you in the event where a user cannot be renamed
Log in to the .Crowd Administration ConsoleIn the top navigation bar, click Users.Select the relevant directory, search for the user you want to update, and click the user's name.Edit the .UsernameClick .Update
Log in to the .Crowd Administration ConsoleIn the top navigation bar, click Users.Select the relevant directory, search for the user you want to update, and click the user's name.You can :either
Click in the left-hand menu. Crowd will generate a random, unique URL and Reset Passwordemail it to the user. The user can then click the link and choose their own new password.OREnter a new password then click . Crowd will email the user in this case.Update not
You will need to configure an so that Crowd can send the user an email notification email serverwhen you reset their password.You can edit the to determine the content of the email sent to the user.email notification templateUsers can update their own profiles. Authorized Crowd users can log in to the Self Service Console and update their own user profiles, as described in the .User Guide
297
1. 2. 3.
4. 5.
1. 2.
3. 4.
Deleting or Deactivating a UserDeactivating a user prevents the user from logging in to any that use the and applications Crowd frameworkalso excludes the user from the license count. You would typically do this when a user leaves your organization.
Deleting a user removes the user completely from the relevant .directory
Deactivating instead of Deleting
We recommend that you deactivate a user rather than delete them, in case some applications contain historical data, such as documents that the user has created. Read .more
For Microsoft Active Directory servers, LDAP Connector Directories and Delegated Authentication Directories will synchronize the status of userswith the remote server,if the option has been Synchronize User Detailsenabled. In other words, if a user account is disabled in Active Directory, it will be deactivated in Crowd on the next synchronization. Likewise, if a user is deactivatedthrough Crowd, the user account will be disabled in Active Directory. If you want to prevent this synchronization, enable the option in Manage User Status Locallythe directory configuration.
To deactivate a user:
Log in to the .Crowd Administration ConsoleIn the top navigation bar, click .UsersSelect the relevant directory, search for the user you wish to deactivate, and click the user's name.The screen appears.User DetailsDeselect the ' checkbox.ActiveClick .Update
The user will now be unable to log in to any applications that use the Crowd framework.
To delete a user:
Log in to the .Crowd Administration ConsoleIn the top navigation bar, click .Select the relevant directory, search for the user you wish to Usersdeactivate, and click the user's name.The screen appears.User DetailsIn the left-hand menu, click .Remove UserConfirm the deletion when prompted.
The user will be removed from the relevant directory and will no longer appear in the .User Browser
Deactivating a user that resides in LDAP
For applications that need users to exist for historical data (such as Jira), you should recreate the user and mark it inactive in a Crowd Internal Directory before deleting from your LDAP directory.
298

Case Sensitivity of Usernames and GroupsThis page summarizes the way Crowd handles case sensitivity for usernames and group names when storing, matching and searching data and when passing data between directories and applications.
Terminology:
Case insensitive Upper-case and lower-case letters are assumed to have the same meaning: JSmithis the same as .jsmithCase preserving Upper and lower case are retained when passing or storing information: JSmithremains .JSmith
Outside Crowd
External to Crowd:
Most LDAP directory schemas specify the user and group names as case insensitive for matching and searching, but case preserving when storing the data and passing it back to the requestor.Applications behave in different ways. Some, like and , insist on lower-case usernames Jira Confluenceand groups and store all user-related data in lower case.
The Crowd Solution
Crowd's application caches and LDAP directory caches are case insensitive but case preserving. Crowd will ignore case when comparing usernames, etc ( = ) and it will preserve case when passing JSmith jsmithinformation between applications and directories ( remains ).JSmith JSmith
In addition, Crowd and directories:Internal Delegated Authentication
Are case preserving, i.e. they store usernames and group names in mixed case.Support case-insensitive matching and searching.
Importing Users and Groups into Crowd Internal Directories
When you import user information into a Crowd or directory, the case of Internal Delegated Authenticationusernames and group names will be preserved.
Enforcing Lower-Case Usernames and Groups for an Application
In some cases you may wish to convert user and group names to lower case when passing them to an application. You can set an option for each application, as described in Enforcing Lower-Case Usernames and
. When the option is set, Crowd will convert upper-case and mixed-case information Groups for an Applicationobtained from your user directory to lower case before passing the information to the application.
299
1. 2. 3. 4. 5. 6.
1. 2. 3.
4.
1.
2. 3.
Specifying a User's AliasesA single user can have different usernames in different applications. These different usernames are called 'aliases'. As a Crowd administrator, you can manage each user's aliases for the applications the user is authorized to access.
Enabling User Aliasing for an Application:
You can choose to enable or disable aliasing for each application. By default, user aliasing is disabled.
User aliasing can reduce the performance of your user directory, especially on user searches.
Log in to the .Crowd Administration ConsoleClick the ' ' tab in the top navigation bar.ApplicationsThe will appear. Click the link on the name of the application you wish to configure.Application BrowserThe ' ' screen will appear. Click the ' ' tab.View Application OptionsPut a tick in the checkbox labeled ' '.Enable AliasingClick the ' ' button.Update
Specifying a User's Aliases:
You can add and remove aliases via the user management screens in the Crowd Administration Console.
Log in to the .Crowd Administration ConsoleClick the ' ' link in the top navigation bar.UsersThis will display the . Select the relevant directory, find the user in that you want to update, User Browserthen click the link on the user's name.The ' ' screen will appear. Click the ' ' tab.User Details Applications
To add an alias for the user,Scroll down until you find the application to which the alias applies.
For example, if the user's primary username is 'adent' but he has a username of 'arthur' in Confluence, then you need to find your Confluence application.Type the value of the new alias (e.g. 'arthur') into the ' ' field next to the application.AliasClick the ' ' button.Update
To edit an existing alias, update the corresponding field in the ' ' column, then click the ' ' Alias Updatebutton.To remove an alias, click the corresponding ' ' link in the ' ' column.Remove Alias Action
Examples and Use Cases
An example: Arthur Dent might have username '[email protected]' in your issue tracker, 'arthur' in your Jirainternal wiki and 'adent' in your public-facing wiki.Confluence Confluence
Using Crowd, you can link a number of usernames as aliases of Arthur's primary login ID.Arthur can log in just once, to any Crowd-connected application. He will be automatically logged into the other applications via single sign-on (SSO).When logging in to a specific application (e.g. Confluence), Arthur must use the specific username (alias) for that application, e.g. 'arthur'.When logging in to Crowd, Arthur must use his primary login i.e. the one in the directory, e.g. 'adent'.
Here are some cases where Crowd's user aliasing may be useful:
Aliasing allows you to work around the problem that occurs when you want to implement a single user base for a number of existing systems, where users may have different usernames in each system.When someone gets married or changes their name, you may wish to rename a user in your LDAP directory, such as Microsoft Active Directory. To avoid problems in applications which do not allow user renaming, you can now link the new LDAP username to an alias in Crowd.Some systems may use email addresses as usernames, while in others this may expose users to email spambots. Using Crowd aliasing, you can use different username formats to suit your application requirements.
300

Documentation for Crowd 4.4 2
Created in 2021 by Atlassian. Licensed under a .Creative Commons Attribution 2.5 Australia License
301

Editing a User's Group MembershipWithin any given , you can choose the groups to which each user belongs.directory
When you add a user to a group, that user will be authorized to use any applications thatuse the group to .control access
Furthermore, that group membership may be used to determine authorization permissions seeEffective .memberships with multiple directories
Groups
The Crowd Administration Console provides two ways of adding users to, or removing them from, a group:
The group management screen for a specific group here you can add many users at once to the selected group.The user management screen for a specific user here you can add a user to one or more groups at a time.
Full instructions are in and .Adding Users to a Group Removing Users from a Group
302

1. 2. 3.
4. 5.
6.
Managing GroupsThis page introduces you to groups in Crowd.
About Groups
Groups are known as permission container objects. Groups are particularly important in Crowd, as they are often used to control access to applications. Note also that the crowd-administrators group confers Crowd administration rights to its members.Support for roles, , in Crowd 2.5. previously deprecated has been removedThe implementation of roles in Crowd was identical to the implementation of groups and did not provide any extra functionality.
Nested Groups
Some user directories allow you to define a group as a member of another group. Groups in such a structure are called ' '. In Crowd, you can , including a group which nested groups map any group to an applicationcontains other groups. Crowd supports nested groups for LDAP directory connectors, Crowd internal directories, Delegated Authentication directories and custom directories. You can support for enable or disablenested groups on each directory individually. For more information, refer to the documentation on configuring a
. For more details about nested groups, refer to .directory Nested Groups in Crowd
About the Group Browser
The Group Browser allows you to search, view, add and edit the various groups stored within a specified directory.
To use the Group Browser:
Log in to the .Crowd Administration ConsoleIn the top navigation bar, click .GroupsSelect the directory in which you are interested, and click button to list all the groups that exist in Search that directory. You can refine your search by specifying a ' ' or by choosing ' ' or ' ' groups.Name Active InactiveTo view or edit a group's details, click the link on the group name.Click the tab to view the immediate members of the group, including users and other Direct Membersgroups.Click the tab to view all users who are included in the group and in its sub-groupsNested Members
You can read more about group members in .Managing Group Members
303
1. 2. 3. 4. 5. 6.
Deleting a GroupDeleting a group removes it completely from the relevant .directory
To delete a group:
Log in to the .Crowd Administration ConsoleIn the top navigation bar, click the .GroupsSelect the relevant directory, and locate the group you wish to deactivate.Click the name of the group you want to delete.In the left-hand side of the screen, click .Group Details Remove GroupClick .Continue
304

1. 2. 3. 4.
5.
Adding a GroupAdding a Group via the Administration Console
To add a group:
Log in to the .Crowd Administration ConsoleIn the top navigation bar, click .GroupsIn the left-hand menu, click .Add GroupComplete the fields as described in the table below.
Name The unique name of the group. Within a given directory, the Name must be unique. Note that the Name cannot be changed once the group is created.
Description
A short description of the group.
Directory
The directory to which the group will be added. Note that the group cannot be moved to a different directory after it is created.
Active Only deselect this if you wish to deny access to all members of the group.
Click .Create You can now to the new group. If your directory supports , you can now add users nested groups add
.sub-groups
Adding a local group with the same name as a group in remote directory
If you add a group to a directory which has the option enabled, there's a possibility Manage Groups Locallythat Crowd will use a local group that you added instead of the group in the remote directory. This will happen if you the local group you're adding has the same name as a group on the remote server, and the remote group hasn't been synchronized yet.
However, if the remote group has already been synchornized, and exists in Crowds cache, when adding a local group of the same name, you will see an error: .Another group with this name already exists
Importing Groups from Other Applications
You can also add groups via Crowd's migration tools. See .Importing Users and Groups into a Directory
Group Authorization
See .Specifying which Groups can access an Application
Roles have been Removed
Support for roles, , in Crowd 2.5. The implementation of roles in previously deprecated has been removedCrowd was identical to the implementation of groups and did not provide any extra functionality.
Crowd documentation
305

1. 2. 3.
4. 5.
6.
Managing Group MembersGroups are known as . Groups are particularly important in Crowd, as they are permission container objectsoften used to control . Note also that the 'crowd-administrators' group confers access to applications Crowd
to its members.administration rights
This page tells you how to view the members of a group in Crowd. The list of group members may take a while to load, depending upon the size of your user base.
Other things you can do from the group browser:
Add users to a groupRemove users from a groupAdd sub-groups (nested groups)Remove sub-groups (nested groups)
To view the members of a group:
Log in to the .Crowd Administration ConsoleIn the top navigation bar, click .GroupsIn the , selectthe directory and click the ' button to list all the groups that exist in Group Browser Searchthat directory. You can refine your search by specifying a or by choosing or groups.Name Active InactiveClick the link on a specific group name to view the group's details.The ' ' screen will appear. Click the ' ' tab to view the immediate View Group Details Direct Membersmembers of the group, as shown in .screenshot 2 below
If your user directory allows , users and other groups may be members of the nested groupsselected group. The 'Direct Members' tab shows all the immediate members of the group, including users and other groups.If the group you are viewing does not contain other groups as members, the 'Direct Members' tab will show only users.
Click the ' tab (if present) to view all users who are included in the group and in its sub-Nested Membersgroups, as shown in .screenshot 3 below
About nested groups
Some user directories allow you to define a group as a member of another group. Groups in such a structure are called ' '. In Crowd, you can , including a nested groups map any group to an applicationgroup which contains other groups. Crowd supports nested groups for LDAP directory connectors, Crowd internal directories, Delegated Authentication directories and custom directories. You can enable
support for nested groups on each directory individually. For more information, refer to the or disabledocumentation on . For more details about nested groups, refer to configuring a directory Nested Groups
.in Crowd
306
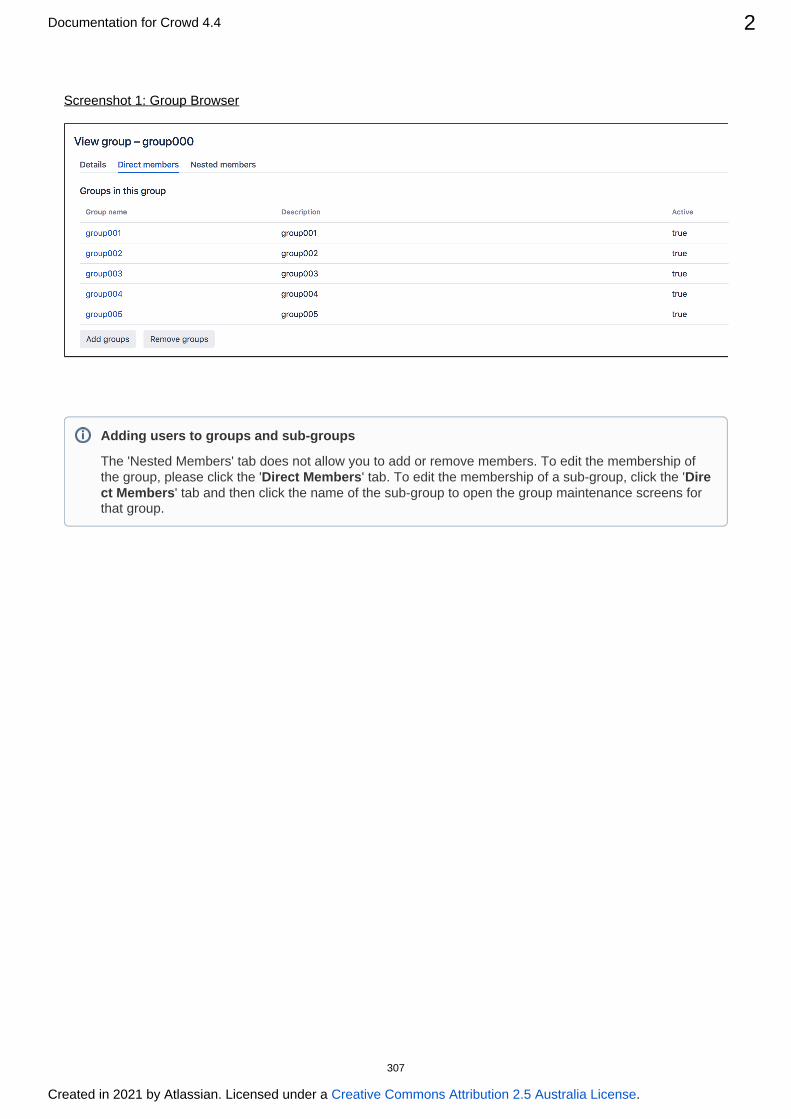
Documentation for Crowd 4.4 2
Created in 2021 by Atlassian. Licensed under a .Creative Commons Attribution 2.5 Australia License
Screenshot 1: Group Browser
Adding users to groups and sub-groups
The 'Nested Members' tab does not allow you to add or remove members. To edit the membership of the group, please click the ' ' tab. To edit the membership of a sub-group, click the 'Direct Members Dire
' tab and then click the name of the sub-group to open the group maintenance screens for ct Membersthat group.
307

Automatically Assigning Users to GroupsFor each directory in the application you may definea set of groups that will be automatically assigned to the user upon first successful login to this application using such directory.
If the directory is shared among different application in Crowd, you may define a different set of auto-assigned groups per application.
Example
Here's an example that will help you understand the concept of automatically assigned groups better:
There are two products, Jira and Confluence, which are mapped to the same remote directory using Crowd. In Crowd, there is only one definition of this remote directory.
The administrator has defined two local groups called jira and in the directory and -users conf-usersmapped these groups to applications:jira to Jira and to Confluence.-users conf-users
Now, when users log in to Jira for the first time, they will be assigned to thejira group upon -userssuccessfully authenticating with the remote directory.
Use case scenario
Whenever you have multiple applications connected to Crowd and some of these applications have different sets of users that have access to it, you might want to optimize your license usage so that only users actually using these products consume product licenses.You could achieve that by manually assigning your users to groups per product, however, this solution does not scale with growing number of users.
Using automatically assigned groups per application allows you to optimize yours products license usage, as only users that authenticated to an application would be assigned a license.
Defining automatically assigned groups per application
To add new automatically assigned groups per application:
308

Documentation for Crowd 4.4 2
Created in 2021 by Atlassian. Licensed under a .Creative Commons Attribution 2.5 Australia License
1. 2. 3. 4. 5. 6. 7.
8.
1. 2. 3.
Log in to the .Crowd Administration ConsoleIn the top navigation bar, click .ApplicationsSearch for the application you wish to update, and click the link on the application name.Select the tab.Directories & GroupsIn the Actions menu, click .Configure automatically assigned groupsSearch for your groups.Select the groups by clicking on it or hitting Enter.After selecting a group you may select another one by repeating steps 6 to 8Click and then confirm your configuration by clicking .Add Save
To remove automatically assigned groups per application
In the Automatically assigned groups screen, find your group/Click ' ' icon next to the groupxClick .Save
Screenshot: Application directory mapping - configuring automatically assigned groups per application
per applicationScreenshot: Dialog for adding default groups
This instruction assumes that you have already defined directory mappings for your applications. If not, please consider the following .guide
309

Documentation for Crowd 4.4 3
Created in 2021 by Atlassian. Licensed under a .Creative Commons Attribution 2.5 Australia License
Configuring product
Once automatically assigned groups are defined for application in Crowd, make sure that theUpdate group advanced option is set to for Crowd directory in memberships when logging in Every time the user logs in
the product represented by this application in Crowd.
This option can be set on the directory configuration screen. See the following documentation with instructions how to configure Crowd directory in products:
Integrating Crowd with Atlassian JiraIntegrating Crowd with Atlassian ConfluenceIntegrating Crowd with Atlassian Bitbucket ServerIntegrating Crowd with Atlassian FishEye
Automatically assigning groups per directory
You can configure Crowd to assign new users to specific groups automatically. You can define default groups for each directory so that every user that logs in becomes a member of these groups automatically.
To add new default groups for a directory:
Groups will be automatically assigned to users only when they first log in to a product connected to Crowd.When you remove or add a group to the list, users who have already been added to a default group will not be added to the new groups, or removed from the old ones.
310

Documentation for Crowd 4.4 4
Created in 2021 by Atlassian. Licensed under a .Creative Commons Attribution 2.5 Australia License
1. 2. 3. 4. 5. 6.
7. 8.
1. 2.
Log in to the .Crowd Administration ConsoleIn the top navigation bar, click .DirectoriesSearch for the directory you wish to update, and click the link on the directory name.Select the ' ' tab.OptionsClick the ' ' button.Add GroupsSearch for your groups.Crowd will list the groups in the selected directory that match your search criteria but excluding groups that are already defined as default groups for the selected directory.
Crowd will display a maximum number of groups as specified in the ' ' field. If Maximum Resultstoo many groups match the search, you can change the search criteria and click 'Search' again. (There is no way to move to the next page of matching groups.)Select your groups.Click .Add Selected groups
To remove a group from the list of default groups for a directory:
In the tab, fOptions ind the group on the list.Click the ' ' button next to the group name.x
Once you have removed the group from the list, users will not be added automatically to the group when they log in. Existing users will remain members of the group.
Screenshot: Default groups for a directory
Screenshot: Popup for adding default groups
311

Documentation for Crowd 4.4 5
Created in 2021 by Atlassian. Licensed under a .Creative Commons Attribution 2.5 Australia License
RELATED TOPICS
Managing GroupsManaging Group MembersManaging DirectoriesCrowd documentation
312

1. 2. 3. 4.
5. 6.
7.
8.
9.
1. 2. 3. 4.
5. 6.
7.
Adding Users to a GroupWhen you add a user to a group, that user will be authorized to use any applications that use this group to
.control access
Group membership may be used to determine authorization permissions seeEffective memberships with .multiple directories
You can add users to a group in two places:
The group management screen for a specific group Here you can add to the many users at onceselected group.
Using the group management screen for a specific group, you can add many users at once to the selected group.
Log in to the .Crowd Administration ConsoleIn the top navigation bar, click .GroupsLocate the group you want to add users to and click the group name.In the screen, click the tab.Group Details Direct membersThis will display a list of the selected group's members, both the groups and the users that are direct members of the group.Click .Add UsersEnter your search criteria in the textbox.Search
Click .SearchCrowd will list the users in the selected directory who match your search criteria, but excluding users who are already members of the selected group.
Crowd will display a maximum number of users as specified in the field. If Maximum resultstoo many users match the search, you can change the search criteria and click again. Search(There is no way to move to the next page of matching users.)Select the users by putting a tick in the checkbox next to one or more users. To select all users, you can put a tick in the checkbox at the top of the table.Click the button to add the selected users to the group.Add selected users
The user management screen for a specific user Here you can add the selected user to one or more at a time.groups
Using the user management screen for a specific user, you can add the selected user to one or more groups at a time.
Log in to the .Crowd Administration ConsoleIn the top navigation bar, click .UsersLocate the user you wish to add, and click the link on the user's name.In the screen, click the tab.User Details GroupsA list of the user's current groups (if any) will appear.Click Add groups.Enter your search criteria in theSearchtextbox. Leave the search box empty to match all groups.You can refine your search by choosing Active or Inactive groups.You can also set the Maximum Results, i.e. the number of groups to be retrieved.Click .SearchCrowd will list the groups in the selected directory that match your search criteria, but excluding groups that the user already belongs to.
You can enter all or part of the user's email address or username. Leave the search box empty to match all usernames and email addresses.You can refine your search by choosing or users. (An 'Inactive' user is Active Inactivetypically someone who has left your organization.)You can also set the , i.e. the number of users to be retrieved.Maximum Results
313
Documentation for Crowd 4.4 2
Created in 2021 by Atlassian. Licensed under a .Creative Commons Attribution 2.5 Australia License
7.
8.
9.
Crowd will display a maximum number of groups as specified in the Maximum Resultsfield. If too many groups match the search, you can change the search criteria and click Searchagain. (There is no way to move to the next page of matching groups.)Select the groups by putting a tick in the checkbox next to one or more groups. To select all groups, you can put a tick in the checkbox at the top of the table.Click to add the user to the selected groups.Add selected groups
314
1. 2. 3. 4.
5. 6.
7.
8.
9.
1. 2. 3. 4.
5.
6.
7.
8.
Removing Users from a GroupIf you remove a user from a group, the user will no longer be able to log in to any applications that use this
.group to control access
Removing a user from a group does not delete the user from the directory. See .Deleting or Deactivating a User
You can remove users from a group in two places:
The group management screen for a specific group Here you can remove from the many users at onceselected group.
Using the group management screen for a specific group, you can remove from many users at oncethe selected group.
Log in to the .Crowd Administration ConsoleIn the top navigation bar, click .GroupsLocate the group you want to add users to and click the group name.In theGroup Detailsscreen, click theDirect memberstab.This will display a list of the selected group's members, both the groups and the users that are direct members of the group.Click .Remove usersEnter your search criteria in the ' ' textbox. Search
Click . SearchCrowd will list the users in the selected directory who match your search criteria and are members of the selected group.
Crowd will display a maximum number of users as specified in the ' ' field. Maximum ResultsIf too many users match the search, you can change the search criteria and click 'Search' again. (There is no way to move to the next page of matching users.)Select the users by putting a tick in the checkbox next to one or more names. To select all users, you can put a tick in the checkbox at the top of the table.Click the button to remove the selected users from the group.Remove selected users
The user management screen for a specific user Here you can remove the selected user from one or at a time.more groups
Using the user management screen, you can remove a specific user from the groups that that user belongs to.
Log in to the .Crowd Administration ConsoleIn the top navigation bar, click .UsersLocate the user you wish to remove, and click the link on the user's name.In the User details screen, click the Groups tab.A list of the user's current groups (if any) will appear.Click .Remove groupsThe popup screen will appear.Remove groupsEnter all or part of the group name in the ' ' textbox, or leave the search box empty to Searchmatch all groups.You can refine your search by choosing ' ' or ' ' groups.Active InactiveYou can also set the ' ', i.e. the number of groups to be retrieved.Maximum ResultsClick .SearchCrowd will list the groups that the user belongs to, matching your search criteria in the selected directory.
Crowd will display a maximum number of groups as specified in the field. Maximum resultsIf too many groups match the search, you can change the search criteria and click 'Search' again. (There is no way to move to the next page of matching groups.)
You can enter all or part of the user's email address or username. Leave the search box empty to match all usernames and email addresses.You can refine your search by choosingActiveorInactiveusers. (An 'Inactive' user is typically someone who has left your organization.)You can also set theMaximum Results, i.e. the number of users to be retrieved.
315

Documentation for Crowd 4.4 2
Created in 2021 by Atlassian. Licensed under a .Creative Commons Attribution 2.5 Australia License
8.
9.
Select the groups by putting a tick in the checkbox next to one or more groups. To select all groups, you can put a tick in the checkbox at the top of the table.Click to remove the user from the selected groups.Remove selected groups
316

Nested Groups in CrowdThis page describes the way Crowd handles , i.e. groups that contain other groups or that nested groupsbelong to groups.
Summary of Nested Groups in Crowd
Some user directories allow you to define a group as a member of another group. Groups in such a structure are called ' '. In Crowd, you can , including a group which nested groups map any group to an applicationcontains other groups. Crowd supports nested groups for LDAP directory connectors, Crowd internal directories, Delegated Authentication directories and custom directories. You can support for enable or disablenested groups on each directory individually. For more information, refer to the documentation on configuring a
.Here's the effect on authorization and presentation of group members to integrated applications:directory
When verifying a user's login to an integrated application, Crowd will search the plus all its mapped groupsub-groups.When an requests a list of users, Crowd will present a flat list of users gathered integrated applicationfrom the requested group and its sub-groups.
The rest of this page describes the above functionality in more detail.
In addition, you can follow the instructions to:
Add a sub-group (nested group)Remove a sub-group (nested group)
Definition of Nested Groups
A 'nested group' is a group which is a member of another group. If you are using groups to manage permissions, you can create nested groups to allow inheritance of permissions from one group to its sub-groups.
In an LDAP directory, a nested group is defined as a child group entry whose DN (Distinguished Name) is referenced by an attribute contained within a parent group entry.
For example, a parent group ' ' might have an attribute and one or more Group One objectClass=group me attributes, where the DN can be that of a user that of a group elsewhere in the LDAP tree:mber=DN or
member=CN=John Smith,OU=Users,OU=OrgUnitA,DC=sub,DC=domainmember=CN=Group Two,OU=OrgUnitBGroups,OU=OrgUnitB,DC=sub,DC=domain
Supported Directory Types
Crowd supports nested groups for the following directory types:
LDAP directory connectorsInternal directoriesDelegated Authentication directoriesCustom directories, provided that the customization meets the interface requirements of the RemoteDire
API.ctory
The does support nested groups when importing users, groups and roles from LDAP into directory importer nota directory. See .delegated authentication CWD-1334
Group Management via the Crowd Administration Console
The Crowd administrator can , a group as a member of another group, and view group memberships add removea group's membership of another group.
Verifying a User's Access to an Application
317
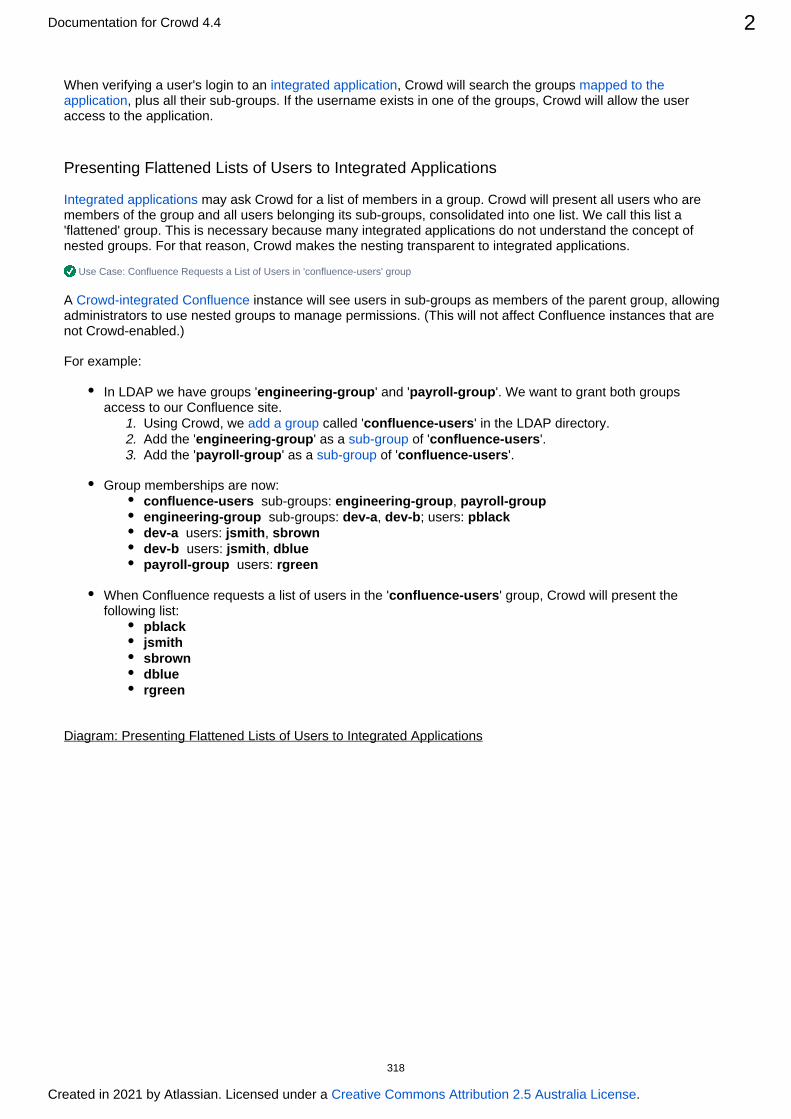
Documentation for Crowd 4.4 2
Created in 2021 by Atlassian. Licensed under a .Creative Commons Attribution 2.5 Australia License
1. 2. 3.
When verifying a user's login to an , Crowd will search the groups integrated application mapped to the , plus all their sub-groups. If the username exists in one of the groups, Crowd will allow the user application
access to the application.
Presenting Flattened Lists of Users to Integrated Applications
Integrated applications may ask Crowd for a list of members in a group. Crowd will present all users who are members of the group and all users belonging its sub-groups, consolidated into one list. We call this list a 'flattened' group. This is necessary because many integrated applications do not understand the concept of nested groups. For that reason, Crowd makes the nesting transparent to integrated applications.
Use Case: Confluence Requests a List of Users in 'confluence-users' group
A instance will see users in sub-groups as members of the parent group, allowing Crowd-integrated Confluenceadministrators to use nested groups to manage permissions. (This will not affect Confluence instances that are not Crowd-enabled.)
For example:
In LDAP we have groups ' ' and ' '. We want to grant both groups engineering-group payroll-groupaccess to our Confluence site.
Using Crowd, we called ' ' in the LDAP directory.add a group confluence-usersAdd the ' ' as a of ' '.engineering-group sub-group confluence-usersAdd the ' ' as a of ' '.payroll-group sub-group confluence-users
Group memberships are now:confluence-users sub-groups: , engineering-group payroll-groupengineering-group sub-groups: , ; users: dev-a dev-b pblackdev-a users: , jsmith sbrowndev-b users: , jsmith dbluepayroll-group users: rgreen
When Confluence requests a list of users in the ' ' group, Crowd will present the confluence-usersfollowing list:
pblackjsmithsbrowndbluergreen
Diagram: Presenting Flattened Lists of Users to Integrated Applications
318

Documentation for Crowd 4.4 3
Created in 2021 by Atlassian. Licensed under a .Creative Commons Attribution 2.5 Australia License
User Management via Integrated Applications
Use Case: Application Adds a User to a Group
If an adds a user to a group, the user is added to the named group and not to integrated application flattenedany of its sub-groups.
Use Case: Application Removes a User from a Group
If an attempts to remove a user from a group, Crowd will do the following:integrated application flattened
If the user is a member of the top group in the hierarchy (tree) of groups contained in the flattened list (e.g. ), Crowd will remove the user.confluence-usersOtherwise, Crowd will return an error stating that the user is not a direct member of the group.
Further Notes on Crowd's Processing
Crowd handles circular/cyclical references For example, ' ' is a member of ' ', ' ' is a group1 group2 group2member of ' ', and ' ' is in turn a member of ' '.group3 group3 group1
Recommendation: Enable External User Management
If you have , , , , or connected to Crowd, and Jira Confluence Bitbucket Server Bamboo FishEye Crucibleyou have nested groups in your directory, we recommend that you turn external user management, onvia the administration screen of the integrated application. This will avoid confusion in the user-management screens of the integrated application, since these applications do not understand the concept of nested groups.
319
Documentation for Crowd 4.4 4
Created in 2021 by Atlassian. Licensed under a .Creative Commons Attribution 2.5 Australia License
Crowd ignores members which are not users or groups Group members might be computers, printers, etc.Crowd gracefully handles unreachable groups There may be references to groups or members that Crowd cannot enumerate. This might be because the referenced group no longer exists, or the LDAP group structure is not entirely consistent. Crowd will ignore such groups and print a warning to the .log file
320

1.
2. 3.
4.
5. 6.
7.
8.
9.
10.
Adding a Sub-GroupIf your directory supports , you can add a group as a member of another group. This page tells nested groupsyou how to add such a sub-group.
To add a sub-group,
Log in to the . First, via the Crowd Administration Console enable nested groups directory screen, the 'Add Groups' button will not appear if nested groups are not enabled for configuration
your directory.In the top navigation bar, click the .GroupsSelect a directory and click to list all the groups that exist in that directory. SearchYou can refine your search by specifying a or by choosing or groups.Name Active InactiveNow, you need to edit the parent group which will contain the sub-group:
If the parent group does not yet exist, .add it nowIf the parent group already exists, find it in the list of groups and click the link on the group name to view the group details.
In the screen, click the tab.View Group Details Direct MembersThis will display a list of the selected group's members, both the groups and the users that are direct members of the group. See the . Click the ' ' button.screenshot below Add Groups
The 'Add Groups' button will not appear if nested groups are not enabled for your directory. You can enable nested groups via the directory configuration screen.Enter your search criteria in the textbox.Search
Click .SearchCrowd lists the groups in the selected directory that match your search criteria, but excluding groups that are already sub-groups of the selected group.
Crowd displays a maximum number of groups as specified in the field. If too Maximum Resultsmany groups match the search, you can change the search criteria and click 'Search' again. (There is no way to move to the next page of matching groups.)Select the groups by putting a tick in the checkbox next to one or more group names. To select all groups, you can put a tick in the checkbox at the top of the table.Click button to add the selected groups to the group.Add Selected groups
About nested groups
Some user directories allow you to define a group as a member of another group. Groups in such a structure are called ' '. In Crowd, you can , including a nested groups map any group to an applicationgroup which contains other groups. Crowd supports nested groups for LDAP directory connectors, Crowd internal directories, Delegated Authentication directories and custom directories. You can enable
support for nested groups on each directory individually. For more information, refer to the or disabledocumentation on . For more details about nested groups, refer to configuring a directory Nested Groups
.in Crowd
You can enter all or part of the group name. Leave the search box empty to match all group names.You can refine your search by choosing ' ' or ' ' groups.Active InactiveYou can also set the ' ', i.e. the number of groups to be retrieved.Maximum Results
321

Documentation for Crowd 4.4 2
Created in 2021 by Atlassian. Licensed under a .Creative Commons Attribution 2.5 Australia License
Screenshot: Direct members of a group
Screenshot: Popup for adding sub-groups
322

Group-level administrationStarting from version 3.3, Crowd Data Center allows administrators to delegate some of their responsibilities over groups with Group Level Admins. Group Level Admins have rights to manage members of the groups they were allowed to administer. This also include groups and their members that are not in the same directories as Group Level Admins.
Group Level Administrators can add users to groups and remove them from groups. Group Level Administrators can't create new users nor can they delete users. Changes made by Group Level Administrators might take extra time to be reflected in the applications.
Group-level administration rights are can be given by only by Crowd administrators and they can be assigned both to individual users as well as groups.
Once logged in as a Group Level Administrator, in the section you're able to see all the groups you can Groupsmanage. Click on the group name, to see a list of all group members.
Users in a group in the group-level admin view
323

1. 2.
3.
Adding Group Level Admins
To add Group Level Admins:
In the top navigation, click .UsersSelect the tab. Group administrationA list of current group administrators is displayed. The list does not include groups from uncached Connector directories, Custom directories, and Azure AD directories which cannot be administered by Group Level Admins.
Add a new Group Level Admins by using the autocomplete text box.Remember that group administration rights can be assigned both to users as well as groups so you can save yourself some time selecting multiple users and select the whole group instead.
Group-level administration exists only in Crowd Data Center.
Group Level Admins and nested groups
When a group in a directory with nested groups becomes a group administrator of another group, all effective members of the administering group will be allowed to administer the group.
However Group Level Admins of a group with child groups will only be able to administer the group they are directly assigned administrative rights to.
324
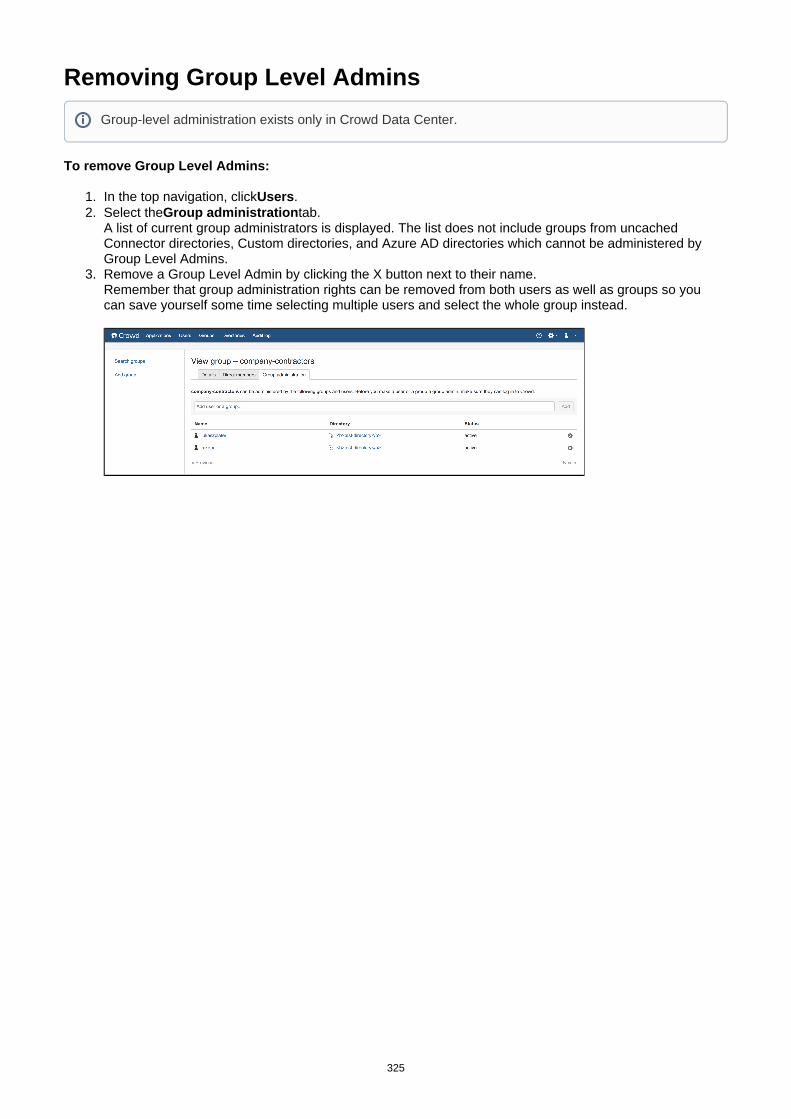
1. 2.
3.
Removing Group Level Admins
To remove Group Level Admins:
In the top navigation, click .UsersSelect the tab.Group administrationA list of current group administrators is displayed. The list does not include groups from uncached Connector directories, Custom directories, and Azure AD directories which cannot be administered by Group Level Admins.Remove a Group Level Admin by clicking the X button next to their name.Remember that group administration rights can be removed from both users as well as groups so you can save yourself some time selecting multiple users and select the whole group instead.
Group-level administration exists only in Crowd Data Center.
325

1. 2. 3.
4. 5.
6.
7.
8.
9. 10.
Removing a Sub-GroupIf your directory supports , the directory may contain groups which are members of other groups. nested groupsThis page tells you how to remove a group's membership of another group. Note that removing a sub-group does .not delete the group
To remove a sub-group:
Log in to the .Crowd Administration ConsoleIn the top navigation bar, click .GroupsSelect the directory in which you are interested, then click . SearchYou can refine your search by specifying a or by choosing or groups.Name Active InactiveFind the parent group in the list of groups and click the link on the group name to view the group details.Click the tab.Direct Members This will display a list of the selected group's members, both the groups and the users that are direct members of the group.Click .Remove Groups
The 'Remove Groups' button will not appear if nested groups are not enabled for your directory. You can enable nested groups via the directory configuration screen.Enter your search criteria in the textbox.Search You can enter all or part of the group name. Leave the search box empty to match all group names. You can refine your search by choosing or groups. You can also set the , i.Active Inactive Maximum Resultse. the number of groups to be retrieved.Click button.Search Crowd will list the groups in the selected directory that match your search criteria and are sub-groups of the selected group.
Crowd will display a maximum number of groups as specified in the ' ' field. If too Maximum Resultsmany groups match the search, you can change the search criteria and click 'Search' again. (There is no way to move to the next page of matching groups.)Select the groups by putting a tick in the checkbox next to one or more group names.Click to remove the selected sub-groups from the group.Remove Selected Groups
About nested groups
Some user directories allow you to define a group as a member of another group. Groups in such a structure are called ' '. In Crowd, you can , including a nested groups map any group to an applicationgroup which contains other groups. Crowd supports nested groups for LDAP directory connectors, Crowd internal directories, Delegated Authentication directories and custom directories. You can enable
support for nested groups on each directory individually. For more information, refer to the or disabledocumentation on . For more details about nested groups, refer to configuring a directory Nested Groups
.in Crowd
326

1. 2.
3. 4.
1. 2. 3.
Specifying a User's AttributesA user's default are specific to the to which the user belongs. You can add other attributes (e.attributes directoryg. address, phone number, date of birth) manually as required.
To edit a user's attributes
Log in to the .Crowd Administration ConsoleIn the top navigation bar, click .UsersThe will appear.User BrowserSearch for the user you want to update, and the the user's name.In screen, click the tab.User Details Attributes
To add a new attribute, You cannot add an attribute to an LDAP directory see note above.
Enter the name of the new attribute (e.g. ) in the field.phone AttributeEnter the value of the new attribute (e.g. ) in the field.0123456789 ValueClick .Add
To edit an existing attribute, edit the corresponding field in the column, then click .Values UpdateTo delete an attribute, click the corresponding link in the column.Remove Action
Note that some attributes may correspond to particular fields on the screen. However, attributes User Detailsare optional whereas the 'Details' fields are all required.
Cannot add attributes to LDAP directories
You cannot add new attributes to directories connected via Crowd's , although you can LDAP connectorupdate the existing supported attributes as described in our . Any new LDAP connector documentationattributes added via the Crowd Administration Console will simply not appear in the directory, even though they are stored locally on the Crowd server.
327

1. 2.
3.
4.
5.
Granting Crowd Administration Rights to a UserMembers of the ' ' group have administration privileges that is, they can:crowd-administrators
Access the and perform the functions described in the Crowd Administration Console Administration .Guide
Access the CrowdID ' ' menu and perform the functions described in the Administration CrowdID .Administration Guide
The ' ' group is automatically created in your default directory when you install Crowd. crowd-administrators(See .) If you need to grant Crowd administration rights to users in other directories, Running the Setup Wizardyou can create a ' ' group in any or all of your other directories and to crowd-administrators map the directoriesthe ' ' application.crowd
To grant administration privileges to a user
Log in to the .Crowd Administration ConsoleIn the top navigation bar, click .UsersThe will appear.User BrowserSelect the relevant directory, search for the user you want to update, and click the user's name.The screen will appear.User DetailsClick the tab.GroupsA list of the user's current groups (if any) will appear.From the drop-down list, Select the group, and click .crowd-administrators Add
If you wish, you can use a different or additional group to contain your Crowd administrators. To do this, map your chosen group(s) to the ' ' application as described in crowd Specifying which Groups can
. Note that CrowdID administrators, however, must always belong to the 'crowd-access an Applicationadministrators' groups.
328

1. 2. 3. 4.
Granting Crowd User Rights to a UserThis page tells you how to authorize users to access Crowd, without giving them Crowd administration rights. Only can authorize other users to access Crowd.Crowd administrators
Administrators and Non-Administrators
The presents the full range of Crowd administration functionality to authorized Crowd Administration Console Cr.owd administrators
Authorized Crowd users who are administrators can also access the Crowd Console. They will see a subset notof functionality, which we call the 'Self-Service Console'. Refer to the for details of this functionality.User Guide
Authorizing Non-Administrators to Use the Crowd Self-Service Console
To authorize a non-administrator to use Crowd, you should ensure that both of the following are true:
The person's username is in a user directory where all users are authorized to use Crowd. See the instructions below.The person is a member of a group mapped to the 'crowd' application. (Group members will have not Cro
.)wd administration rights
To grant an entire directory access to Crowd
Log in to the .Crowd Administration ConsoleMap your chosen user directory to the application.crowdOn the tab, set the option to .Directories Allow All to Authenticate TrueAdd the user(s) to the directory, if not already added.
Non-administrators cannot affect other users or the Crowd installation
Granting Crowd user rights will give your users the power to update their own profiles and passwords and view their authorization details. But they will not be able to view or update other user profiles, nor perform any Crowd administration functions.
329
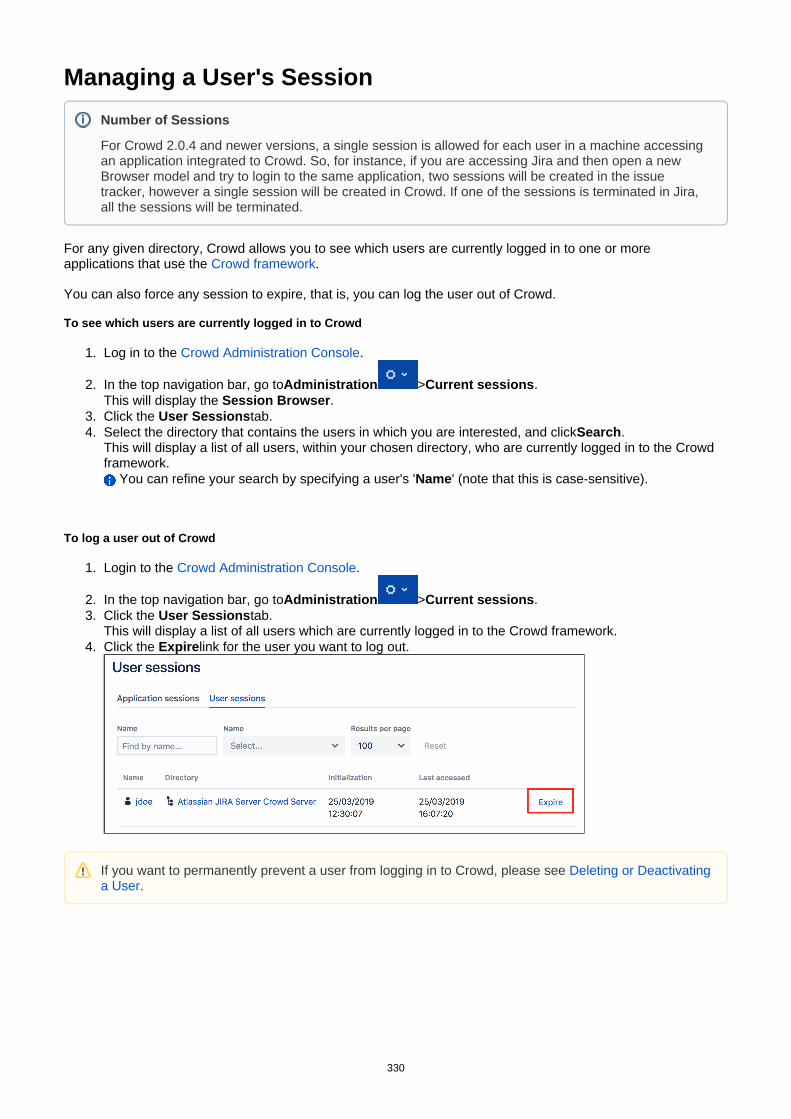
1.
2.
3. 4.
1.
2. 3.
4.
Managing a User's Session
For any given directory, Crowd allows you to see which users are currently logged in to one or more applications that use the .Crowd framework
You can also force any session to expire, that is, you can log the user out of Crowd.
To see which users are currently logged in to Crowd
Log in to the .Crowd Administration Console
In the top navigation bar, go to > .Administration Current sessionsThis will display the .Session BrowserClick the tab.User SessionsSelect the directory that contains the users in which you are interested, and click .SearchThis will display a list of all users, within your chosen directory, who are currently logged in to the Crowd framework.
You can refine your search by specifying a user's ' ' (note that this is case-sensitive).Name
To log a user out of Crowd
Login to the .Crowd Administration Console
In the top navigation bar, go to > .Administration Current sessionsClick the tab.User SessionsThis will display a list of all users which are currently logged in to the Crowd framework.Click the link for the user you want to log out.Expire
Number of Sessions
For Crowd 2.0.4 and newer versions, a single session is allowed for each user in a machine accessing an application integrated to Crowd. So, for instance, if you are accessing Jira and then open a new Browser model and try to login to the same application, two sessions will be created in the issue tracker, however a single session will be created in Crowd. If one of the sessions is terminated in Jira, all the sessions will be terminated.
If you want to prevent a user from logging in to Crowd, please see permanently Deleting or Deactivating .a User
330

System AdministrationConfiguring Server Settings
Deployment TitleDomainSession configurationAuthorization CachingLicensingCrowd SSO 2.0Finding your SENSSO Cookie
Configuring your Mail ServerCreating an Email Notification TemplateConfiguring Trusted Proxy ServersViewing Crowd's System InformationBacking Up and Restoring DataLogging and Profiling
Performance ProfilingDraft - Troubleshooting and Requesting Technical SupportConfiguring the LDAP Connection PoolBrowsing the audit logLook and feelOverview of Caching
Other Related Security Resources
System Administration
How to Report a Security Issue
Security Advisory Publishing Policy
Security Patch Policy
Severity Levels for Security Issues
Crowd Security Notice 2013-07-01
Administration Guide
Crowd Security Advisories and Fixes
331
Configuring Server SettingsYou can alter the settings which were specified when your Crowd server was installed:
Deployment TitleDomainSession configurationAuthorization CachingLicensingCrowd SSO 2.0Finding your SENSSO Cookie
332

1.
2.
3. 4.
Deployment TitleThe deployment title is a unique name for your Crowd instance. The deployment title is used by default in the subject line of .email notifications
To specify the deployment title
Log in to the .Crowd Administration Console
In the top navigation bar, click .The screen appears.General OptionsType the new name into the field.Deployment TitleClick .Save
333

1.
2. 3. 4.
DomainThe is used when setting HTTP authentication cookies in a user's browser. If this attribute is not SSO domaincorrect, single sign-on (SSO) will not work when the user switches between applications.
Overview
The core Crowd functionality supports SSO across applications within a single domain, such as *.mydomain.. Crowd uses a browser cookie to manage SSO. Because your browser limits cookie access to hosts in the com
same domain, this means that all applications participating in SSO must be in the same domain.
Example 1: If you wish to have single sign-on (SSO) support for , you will need to configure *.mydomain.comthe SSO domain in Crowd as . All your Crowd-connected applications must be in the same mydomain.comdomain. For example:
Crowd crowd.mydomain.com
Jira jira.mydomain.com
Confluence confluence.mydomain.com
FishEye fisheye.mydomain.com
FishEye in different domain fisheye.example.com
Example 2: If you wish to have single sign-on (SSO) support for , you will need to configure mydomain.com/*the SSO domain in Crowd as . All your Crowd-connected applications must be in the same mydomain.comdomain. For example:
Crowd mydomain.com/crowd
Jira mydomain.com/jira
Confluence mydomain.com/confluence
FishEye mydomain.com/fisheye
FishEye in different domain example.com/fisheye
You can find information the comparison of host name strings in (section 5).RFC 6265
When developing on your local machine, you should set the domain to .localhost
Setting the SSO Domain
To specify the domain:
Log in to the .Crowd Administration Console
In the top navigation bar, click .Type the new domain into the field.SSO DomainClick .Save
Setting the SSO Domain when Crowd is behind a Proxy Server
If Crowd is being run behind a proxy server, before setting the SSO domain value, make sure that the domain specified in the proxy (that is currently being used to access the Crowd console) was specified in the Tomcat connector attribute. Example:proxyName
334

Documentation for Crowd 4.4 2
Created in 2021 by Atlassian. Licensed under a .Creative Commons Attribution 2.5 Australia License
File: Apache-Tomcat/conf/server.xml
<Connector acceptCount="100" connectionTimeout="20000" disableUploadTimeout="true" enableLookups="false"maxHttpHeaderSize="8192" maxSpareThreads="75" maxThreads="150" minSpareThreads="25" port="8095" redirectPort="8443" useBodyEncodingForURI="true"
/>proxyName="mycompany.com"
Notes
Avoiding problems with old cookie versions. In order to avoid problems with hosts or domains defined in old cookie versions, after setting the SSO Domain in Crowd, log out of Crowd and the integrated applications and delete all the web browser cookies.
SSO domain. The 'SSO Domain' field will accept only values based on the domain that is used to access the Crowd console. For instance, if you are using ' ' to access the www.mycrowd.com/crowd/consoleconsole in the web browser, this field will accept the following values:
Emptymycrowd.com.mycrowd.com
If you enter any other value, Crowd will show an error message: The supplied domain is invalid.
IP addresses. SSO will not operate when sites are accessed using IP addresses rather than domain names. This is a limitation of the cookie technology implemented in web browsers.
335

1.
2. 3.
4.
1.
2. 3.
4. 5.
Session configurationThis page tells you how to set the and how to enable/disabletimeout period for a session token in-memory token
.storage
Session Timeout
When a successful authentication occurs, for either an application or a user, a unique token is assigned. Tokens are valid for the period of time specified as the 'Session Timeout' attribute.
The session timeout determines how long a session will be considered valid during any period of inactivity. This value is specified in minutes and must be greater than .0
To specify the session timeout:
Log in to the .Crowd Administration Console
In the upper-right corner, click .In the left-hand men, .Session ConfigurationThe 'Session Config' screen will appear, as shown below.Type the new value into the ' ' field, then click the ' ' button.Session Timeout Update
Require Consistent Client IP Address
(Available since Crowd 2.5.2.)
Authenticated sessions can be tied to the IP address they were created from.This means that an attempt to use that session from another machine will fail,which will force mobile clients to reauthenticate whentheir IP address changes.
This setting can be disabled to relax that requirement, so a sessioncan be used from any IP address. Note that changing this settingwill invalidate any existing sessions, soyou will be logged out after making this change.
To allow sessions to be used from any IP address,
Log in to the .Crowd Administration Console
In the upper-right corner, click .In the left-hand men, .Session ConfigurationThe 'Session Config' screen will appear, as shown below.Check or uncheck as required.Require Consistent Client IP AddressClick .Update
Authentication Token Storage
Authentication tokens are used to validate application and user sessions. A token is stored for each active session. By default, they're kept in the Crowd database. Storing these tokens in memory can benefit performance, but with one significant drawback, that sessions will not be saved across Crowd restarts. If you restart Crowd, all your users will have to log in again.
In-memory token management is not available in Crowd Data Center
Switching from database to in-memory token management does not require a restart of Crowd; nor will sessions be lost or validations failed. However, if you have lots of active sessions, and therefore lots of tokens, it can take some time to copy the token information. During this time, validation requests will be queued and Crowd will appear unresponsive to client applications.
336
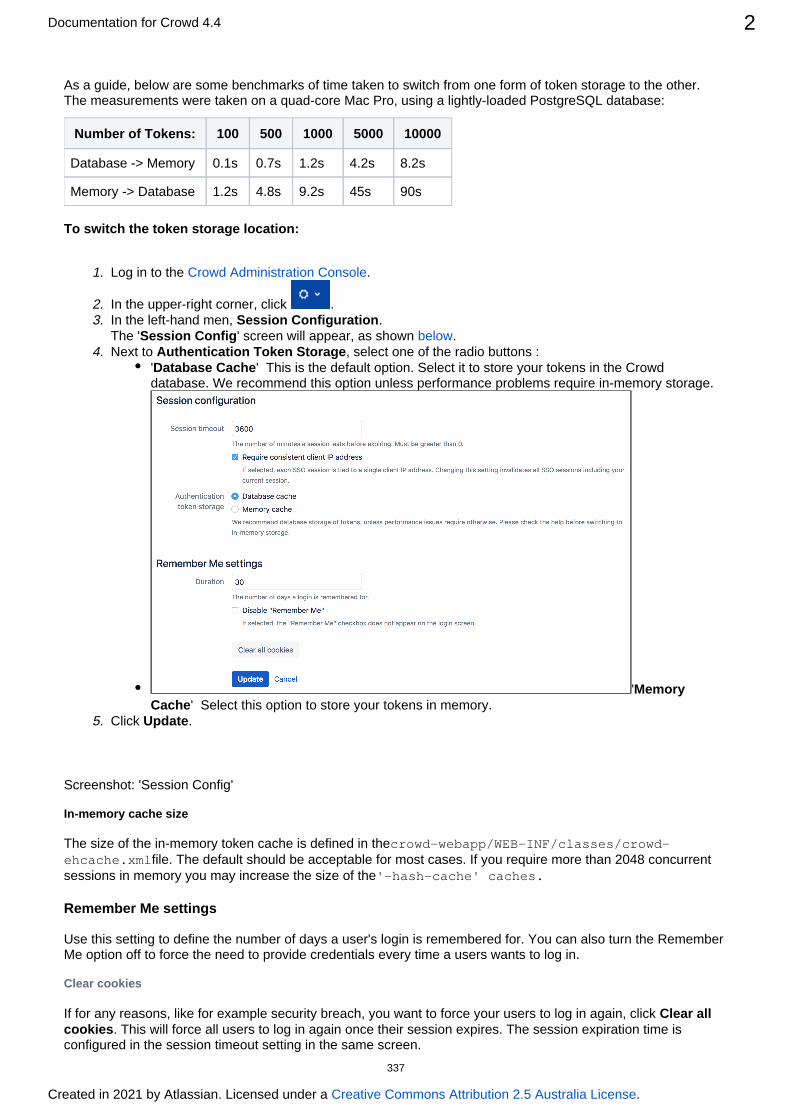
Documentation for Crowd 4.4 2
Created in 2021 by Atlassian. Licensed under a .Creative Commons Attribution 2.5 Australia License
1.
2. 3.
4.
5.
As a guide, below are some benchmarks of time taken to switch from one form of token storage to the other. The measurements were taken on a quad-core Mac Pro, using a lightly-loaded PostgreSQL database:
Number of Tokens: 100 500 1000 5000 10000
Database -> Memory 0.1s 0.7s 1.2s 4.2s 8.2s
Memory -> Database 1.2s 4.8s 9.2s 45s 90s
To switch the token storage location:
Log in to the .Crowd Administration Console
In the upper-right corner, click .In the left-hand men, .Session ConfigurationThe ' ' screen will appear, as shown .Session Config belowN elect one of the radio buttons :ext to , sAuthentication Token Storage
' ' This is the default option. Select it to store your tokens in the Crowd Database Cachedatabase. We recommend this option unless performance problems require in-memory storage.
'Memory ' Select this option to store your tokens in memory.Cache
Click . Update
Screenshot: 'Session Config'
In-memory cache size
The size of the in-memory token cache is defined in thecrowd-webapp/WEB-INF/classes/crowd-file. The default should be acceptable for most cases. If you require more than 2048 concurrent ehcache.xml
sessions in memory you may increase the size of the'-hash-cache' caches.
Remember Me settings
Use this setting to define the number of days a user's login is remembered for. You can also turn the Remember Me option off to force the need to provide credentials every time a users wants to log in.
Clear cookies
If for any reasons, like for example security breach, you want to force your users to log in again, click Clear all . This will force all users to log in again once their session expires. The session expiration time is cookies
configured in the session timeout setting in the same screen.
337

1.
2. 3. 4.
Authorization CachingCaching is used to store run-time authentication and authorization rules, which can be expensive to calculate.
This page describes the cache that can be configured on the Crowd server, to store users' authentication and per-application permissions for a specified period. For an overview of the other types of caching offered by Crowd, please refer to .Overview of Caching
Caching of Users' Application Permissions on the Crowd Server The Authorization Cache
Crowd can store users' authentication and per-application permissions in a local cache for a specified period after retrieving the information from the directory and application data. The cached data will answer the following questions:
For a particular user: Is the user authenticated?For a particular user and application: Does the user have access to the application?
You might call this the 'has access' cache, or the ' '.authorization cache
Recommended setting: . For performance reasons, we recommend that the cache be enabled on the EnabledCrowd server. This is the default setting.
The effect of caching the data is that users will retain access to applications for a period after their username or permission has been removed, i.e. until the server-side cache expires. You should disable the cache only if you need immediate results when removing users or their permissions.
To enable caching of user-to-application permissions on the Crowd server,
Log in to the .Crowd Administration Console
In the top navigation bar, click .Select .Enable Authorization CachingClick .Save
Some applications may enable/disable caching based on the Crowd server setting
The Crowd API allows an application to query whether caching is enabled on the Crowd server (isCach). The Crowd Java client does not make use of this API feature, because it makes more eEnabled
sense to have application caching configured entirely on the application side. If you have a Crowd-integrated custom application which does make use of this API call, then the setting on the Crowd serverwill affect your application-side caching as well.
338

1.
2. 3. 4. 5.
LicensingCrowd licenses are based on the number of end-users who will log in to the applications that are integrated with Crowd.
You can obtain an evaluation license from the website. When you obtain an evaluation license or Atlassianpurchase, renew or upgrade your license you will receive a license key via email or on the Atlassian website.You will need to enter your license key into your Crowd server as described below.
Entering your License Key
To enter your license key,
Log in to the .Crowd Administration Console
In the top navigation bar, click .Click .LicensingFill in the field.License KeyClick .Save
Warning when Number of Users approaches License Limit
Whenever the number of users reaches 90% of the number allowed by the license, Crowd will send an email informing the administrator about the license limit and the current number of users. The email is sent to the email notification address, as defined on the ' ' screen in the Crowd Administration Console. Mail Configuration(See .)Configuring your Mail Server
It is important to avoid exceeding the license limit, because once the user limit has been exceeded, no one can log in (including administrators).
What to Do if the Number of Users Exceeds your License Limit
If the number of users who are allowed to log in to the Crowd console exceeds the user license limit, no one will be able to log in to any applications. When you try to access Crowd, you'll be redirected to a page where you can update your license key. On this page, you can either:
Enter a new license key for a . (Purchase one .)higher user count hereEnter a 30-day evaluation license key. (Create one .) The 30-day evaluation key lets an unlimited herenumber of users sign in during the trial period. You can use the 30 days to clean up the users in the system or a license key for a higher user count.purchase
Minimizing your Licensing Cost
If you have more than one directory, ensure that the same user does not exist in multiple directories.
We recommend that you allow only to log in to each application, rather than entire directories.particular groups
Note that a mapped application can 'see' all users in a directory, even if not all of them can log in to the application. For example, a Human Resources application might be mapped to your entire Active Directory server, but only the HR group is allowed to log in to the application.
Important changes to our server and Data Center products
Weve ended sales for new server licenses, and will end support for server on February 2, 2024. Were continuing our investment in Data Center with several key improvements. Learn what this means for you
339

Documentation for Crowd 4.4 2
Created in 2021 by Atlassian. Licensed under a .Creative Commons Attribution 2.5 Australia License
1.
2. 3. 4. 5.
1. 2.
Recalculating your User Total
The Licensing screen shows the number of users who currently count towards your license. This total is updated automatically at regular intervals. If you have recently added or removed users, the total may not be up to date when you view the screen. You can update the count immediately, as described below.
To recalculate your user total:
Log in to the .Crowd Administration Console
In the top navigation bar, click .Click .LicensingClick .Recalculate your user totalThe recalculation may take a while, depending on the size of your user base.
List all users who count toward the Crowd license
To list users who consume license in Crowd:
Enable in the DEBUG levelcom.atlassian.crowd.manager.licenseRecalculate your User Total.
Once the calculation is ready, you will be able to see the license count, list of users (and the directories those users are from) in log files.
Example:
2018-03-28 07:12:15,789 Caesium-2-2 DEBUG [crowd.manager.license.CrowdLicenseManagerImpl] Finished counting licensed users, 9 total2018-03-28 07:12:15,790 Caesium-2-2 DEBUG [crowd.manager.license.CrowdLicenseManagerImpl] Licensed users are: [leela (131074), professor (131074), test (753665), zoidberg (131074), admin (131073), hermes (131074), bender (131074), amy (131074), fry (131074)]
Server ID and Support Entitlement Number
Your is generated automatically, based on your license key.License Server ID
The will appear only on newer licenses. If your License Server ID starts with a Support Entitlement Number'B', you should also have a Support Entitlement Number. This number is not currently used, but will be used by Atlassian Support in the future.
340
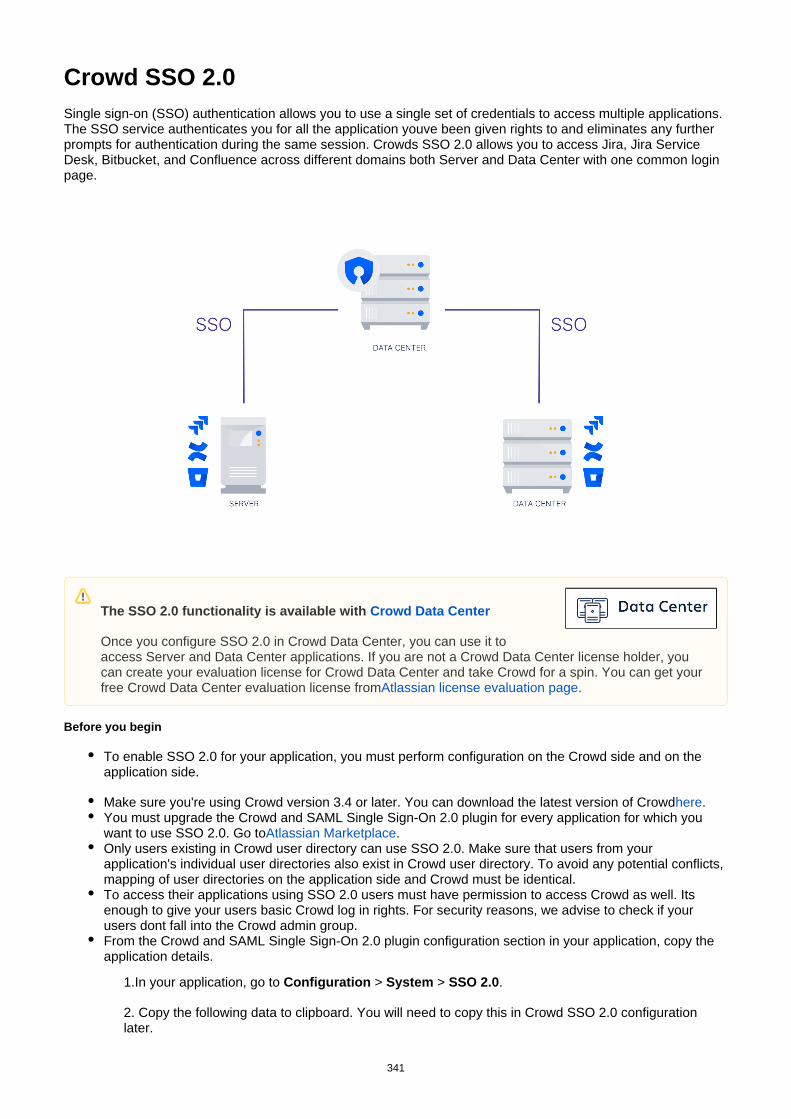
Crowd SSO 2.0Single sign-on (SSO) authentication allows you to use a single set of credentials to access multiple applications. The SSO service authenticates you for all the application youve been given rights to and eliminates any further prompts for authentication during the same session. Crowds SSO 2.0 allows you to access Jira, Jira Service Desk, Bitbucket, and Confluence across different domains both Server and Data Center with one common login page.
Before you begin
To enable SSO 2.0 for your application, you must perform configuration on the Crowd side and on the application side.
Make sure you're using Crowd version 3.4 or later. You can download the latest version of Crowd .hereYou must upgrade the Crowd and SAML Single Sign-On 2.0 plugin for every application for which you want to use SSO 2.0. Go to .Atlassian MarketplaceOnly users existing in Crowd user directory can use SSO 2.0. Make sure that users from your application's individual user directories also exist in Crowd user directory. To avoid any potential conflicts, mapping of user directories on the application side and Crowd must be identical.To access their applications using SSO 2.0 users must have permission to access Crowd as well. Its enough to give your users basic Crowd log in rights. For security reasons, we advise to check if your users dont fall into the Crowd admin group.From the Crowd and SAML Single Sign-On 2.0 plugin configuration section in your application, copy the application details.
1.In your application, go to > > .Configuration System SSO 2.0
2. Copy the following data to clipboard. You will need to copy this in Crowd SSO 2.0 configuration later.
The SSO 2.0 functionality is available with Crowd Data Center
Once you configure SSO 2.0 in Crowd Data Center, you can use it to access Server and Data Center applications. If you are not a Crowd Data Center license holder, you can create your evaluation license for Crowd Data Center and take Crowd for a spin. You can get your free Crowd Data Center evaluation license from .Atlassian license evaluation page
341

Documentation for Crowd 4.4 2
Created in 2021 by Atlassian. Licensed under a .Creative Commons Attribution 2.5 Australia License
1. 2. 3.
4. 5.
Assertion Consumer Service URLEntity ID
To enableSSO 2.0 in Crowd:
In Crowd top navigation, clickApplications.Select the application you want to perform the SSO configuration for.In the application settings, click the tab.SSO
Select the SSO checkbox.EnabledCopy the Application Details from your configuration section in your Crowd and SAML Single Sign-On 2.0application.
1.In your application, go to > > .Configuration System SSO 2.0
2. Copy the following data to clipboard.
Assertion Consumer Service URLEntity ID
3.Paste copied data to the Application details section in Crowd SSO tab for your application.
342
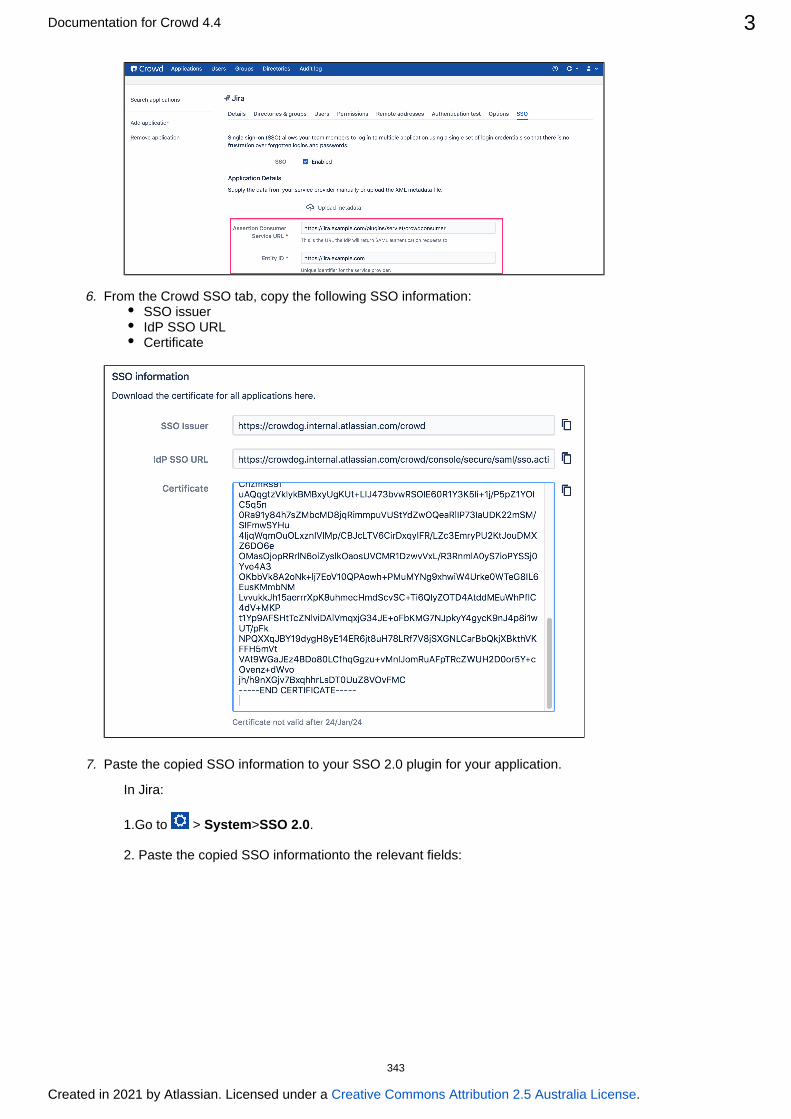
Documentation for Crowd 4.4 3
Created in 2021 by Atlassian. Licensed under a .Creative Commons Attribution 2.5 Australia License
5.
6.
7.
From the Crowd SSO tab, copy the following SSO information:SSO issuerIdP SSO URLCertificate
Paste the copied SSO information to your SSO 2.0 plugin for your application.
In Jira:
1.Go to > > .System SSO 2.0
2. Paste the copied SSO informationto the relevant fields:
343

Documentation for Crowd 4.4 4
Created in 2021 by Atlassian. Licensed under a .Creative Commons Attribution 2.5 Australia License
7.
8. Click .Save
Next steps
To access their applications using SSO 2.0 users must also have the permission to access Crowd. Its enough to give your users basic Crowd login rights. We advice taking extra care when copying permissions from your application to Crowd so that the group does unauthorized users don't get admin permissions.You can test SSO 2.0 before enabling it for all users.
1.In you application configuration, go to the SSO 2.0 plugin settings.
2. For logging in mode, select Crowd SSO 2.0 behaviour Use Crowd SSO 2.0 as secondary .authentication
This will allow you to test if the configuration works properly before redirecting all your users to the new flow.
3. Save configuration.
Once the settings are saved, you can try to log in as one of the users using the link provided in the Crowd SSO 2.0 behaviorconfiguration under the secondary authentication option. See the screenshot.
The link redirects you through to the common https://jira.yourdomain.com/plugins/servlet/external-loginlogin page provided by Crowd SSO 2.0 that will be used for every user to accessJira, Confluence, Bitbucket or any other application connected and configured in CrowdSSO 2.0 once Crowd SSO 2.0 is selected as primary authentication.
Crowd's certificate is by default valid for 5 years. After that time, you'll have to regenerate the certificate and manually copy it over to individual applications for which you want to use SSO 2.0. In case of a security breach, for safety reasons we suggest that you regenerate the certificate and copy it to your applications immediately. For information on how to reset the certificate, see C
.rowd REST API Reference
Remember that a regenerated certificate needs to be again provided in all application you want to use SSO with.
344

Documentation for Crowd 4.4 5
Created in 2021 by Atlassian. Licensed under a .Creative Commons Attribution 2.5 Australia License
Once you can log in successful through that new common login page from Crowd, you can go back to your application configuration in section SSO 2.0 and change the settings for CrowdSSO 2.0 behavior to: and save your configuration.Use Crowd SSO 2.0 as primary authentication From now on everyone using this application will log in through Crowd SSO 2.0 common login screen.
345

Finding your SENThere are three ways to find your Support Entitlement Number (SEN).
Method 1: View the license details in the Crowd Administration Console
Go to > . Sen is displayed in the Licensing screen.Licensing
Method 2: Log in to my.atlassian.com as the account holder or technical contact
Your Support Entitlement Number is available at .http://my.atlassian.com
Method 3: Look at your Atlassian Invoice
Your Support Entitlement Number (SEN) appears on the third page of your Atlassian invoice.
More information
See in the support space for more general information about how Finding Your Support Entitlement NumberAtlassian Support uses this number.
346
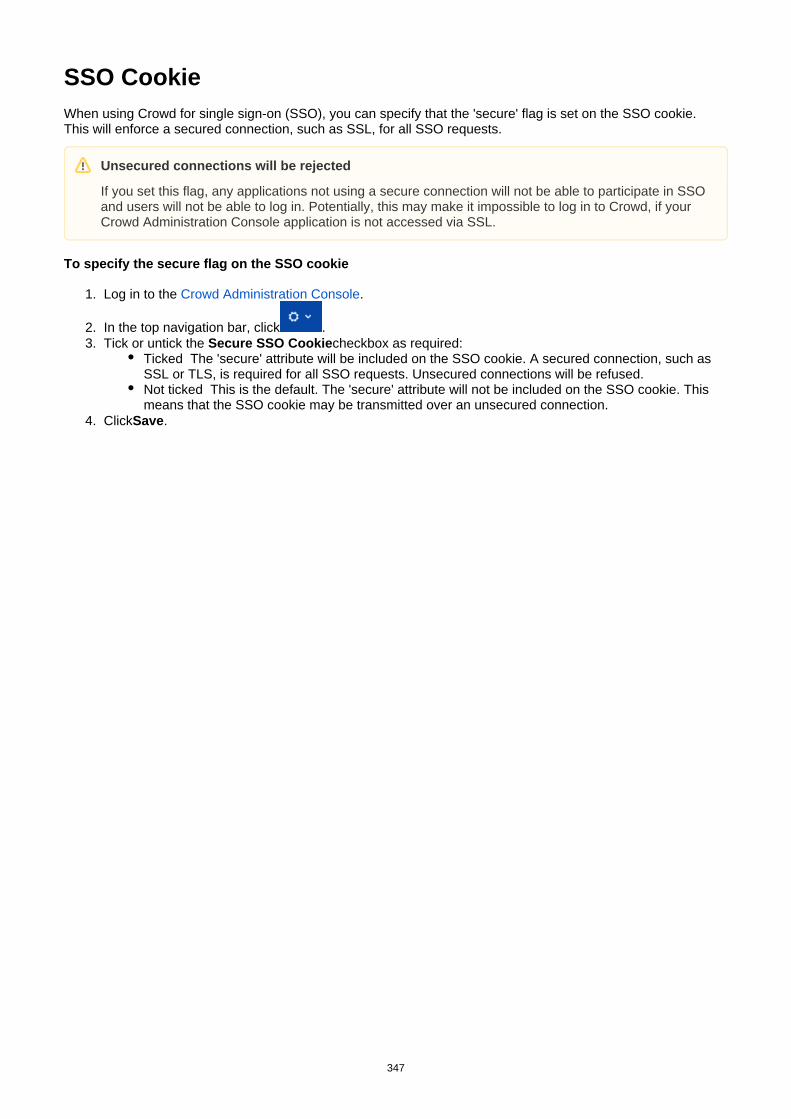
1.
2. 3.
4.
SSO CookieWhen using Crowd for single sign-on (SSO), you can specify that the 'secure' flag is set on the SSO cookie. This will enforce a secured connection, such as SSL, for all SSO requests.
To specify the secure flag on the SSO cookie
Log in to the .Crowd Administration Console
In the top navigation bar, click .Tick or untick the checkbox as required:Secure SSO Cookie
Ticked The 'secure' attribute will be included on the SSO cookie. A secured connection, such as SSL or TLS, is required for all SSO requests. Unsecured connections will be refused.Not ticked This is the default. The 'secure' attribute will not be included on the SSO cookie. This means that the SSO cookie may be transmitted over an unsecured connection.
Click .Save
Unsecured connections will be rejected
If you set this flag, any applications not using a secure connection will not be able to participate in SSO and users will not be able to log in. Potentially, this may make it impossible to log in to Crowd, if your Crowd Administration Console application is not accessed via SSL.
347

1.
2. 3. 4.
Configuring your Mail ServerOnce you have configured your mail server as described below, Crowd can send email notifications to users at specific events, such as when a user requests a or a server event occurs.password reset
On this page:
Accessing the Mail Configuration ScreenMail Server Option 1: SMTPMail Server Option 2: JNDI Location
Accessing the Mail Configuration Screen
To configure SMTP email,
Log in to the .Crowd Administration Console
In the top navigation bar click, > .Mail configurationEnter the details of your mail server as described below.Click .Update
Mail Server Option 1: SMTP
348

Documentation for Crowd 4.4 2
Created in 2021 by Atlassian. Licensed under a .Creative Commons Attribution 2.5 Australia License
Enter the details as follows:
Server alert email The email address which will receive notifications about server events. For example, Crowd will send an email message to this address when the number of users approaches the license limit.From Email Address Crowd will add this email address as the 'sender' on the emails generated by Crowd and sent to users.Subject Prefix The prefix which will appear at the start of the email subject, for all emails generated by Crowd. This can be useful for email client programs that offer filtering rules.Mail Server Type Select the ' ' radio button.SMTP ServerSMTP Host The hostname of the SMTP mail server, e.g. 'localhost' or 'smtp.acme.com'.SMTP Port The port on which the SMTP mail server listens. The default is '25'.Username The username that your Crowd server will use when it logs in to your mail server.Password The password that your Crowd server will use when it logs in to your mail server.Timeout Maximum time Crowd tries to send messages. The default is '60' seconds.Use Secure Sockets Layer (SSL) Select this check-box if you want to access your mail server over SSL (Secure Sockets Layer). This ensures that all email communications between Crowd and your mail server are encrypted, provided your mail server supports SSL.
Additionally, as you are connecting to an SSL service, you will need to import the SMTP server certificate into a Java keystore. The process is described in .Configuring Crowd to Work with SSL
349

Documentation for Crowd 4.4 3
Created in 2021 by Atlassian. Licensed under a .Creative Commons Attribution 2.5 Australia License
Mail Server Option 2: JNDI Location
Select the ' ' if you want to connect to a mail server via a datasource managed by your JNDI Locationapplication server.
Enter the details as follows:
Server alert email The email address which will receive notifications about server events.From Email Address Crowd will add this email address as the 'sender' on the emails generated by Crowd and sent to users.Subject Prefix The prefix which will appear at the start of the email subject, for all emails generated by Crowd. This can be useful for email client programs that offer filtering rules.Mail Server Type Select the ' ' radio button.JNDI LocationJNDI Location The datasource name of a object which has been set up by javax.mail.Sessionyour application server.
Configuring the JNDI Resource
For example, in Tomcat 5.5 (the default application server that is bundled with the Crowd distribution (not EAR-WAR)), your JNDI location would be , and you would add the java:comp/env/mail/CrowdMailServerfollowing section in or , inside the conf/server.xml conf/Catalina/localhost/crowd.xml <Context>node:
<Context path="/crowd" docBase="${CATALINA_HOME}/crowd-webapp" reloadable="false"> <Resource name="mail/CrowdMailServer" auth="Container" type="javax.mail.Session" mail.smtp.host="yourmailserver.example.com" mail.smtp.port="25" mail.transport.protocol="smtp" mail.smtp.auth="true" mail.smtp.user="your_userid" password="your_password" /></Context>
350

Documentation for Crowd 4.4 4
Created in 2021 by Atlassian. Licensed under a .Creative Commons Attribution 2.5 Australia License
If you have problems connecting, add a parameter, which will let you see SMTP-level mail.debug="true"details when testing the connection.
You will also need to ensure that the and are present in JavaMail classes Java Beans Activation Frameworkyour application server's classpath.
If JavaMail is not present in your application server installation, you will receive the following error in your log file:
java.lang.NoClassDefFoundError: javax/mail/Authenticator
If the Activation Framework is not present in your application server installation, you will receive the following error in your log file:
java.lang.NoClassDefFoundError: javax/activation/DataSource
Notes
To customize the password notification message, see the page about .email notification templates
351
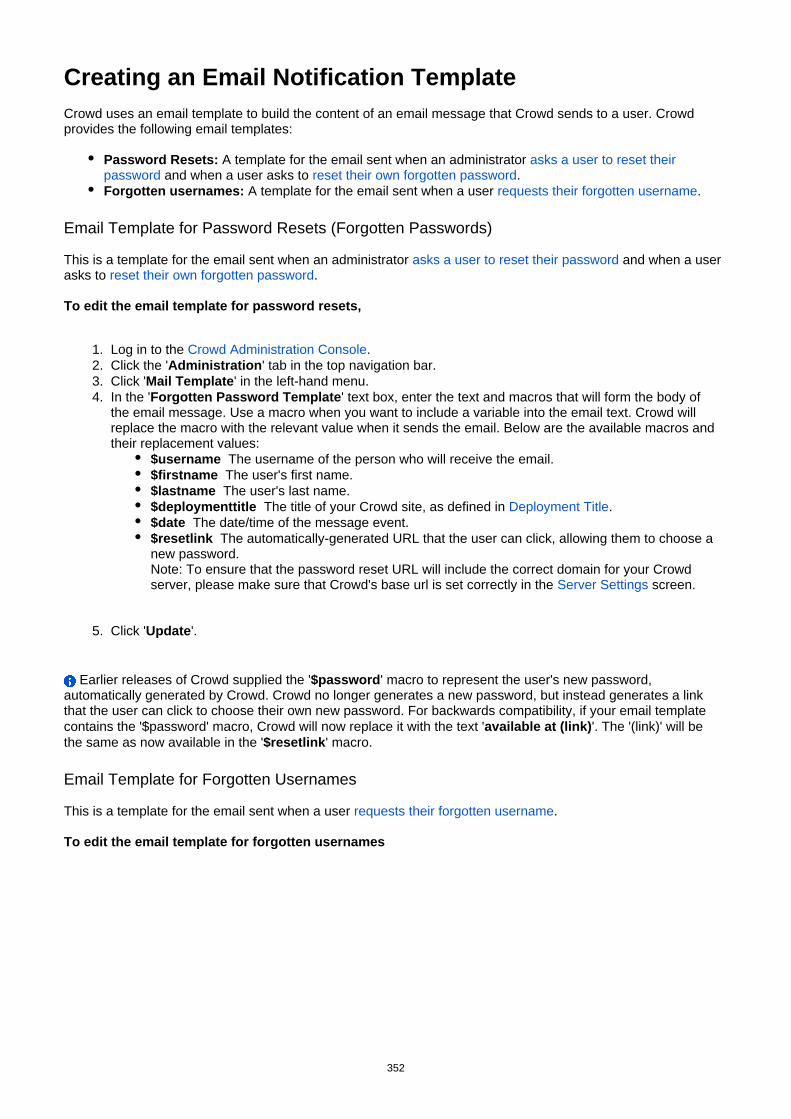
1. 2. 3. 4.
5.
Creating an Email Notification TemplateCrowd uses an email template to build the content of an email message that Crowd sends to a user. Crowd provides the following email templates:
Password Resets: A template for the email sent when an administrator asks a user to reset their and when a user asks to .password reset their own forgotten password
Forgotten usernames: A template for the email sent when a user .requests their forgotten username
Email Template for Password Resets (Forgotten Passwords)
This is a template for the email sent when an administrator and when a user asks a user to reset their passwordasks to .reset their own forgotten password
To edit the email template for password resets,
Log in to the .Crowd Administration ConsoleClick the ' ' tab in the top navigation bar.AdministrationClick ' ' in the left-hand menu.Mail TemplateIn the ' ' text box, enter the text and macros that will form the body of Forgotten Password Templatethe email message. Use a macro when you want to include a variable into the email text. Crowd will replace the macro with the relevant value when it sends the email. Below are the available macros and their replacement values:
$username The username of the person who will receive the email.$firstname The user's first name.$lastname The user's last name.$deploymenttitle The title of your Crowd site, as defined in .Deployment Title$date The date/time of the message event.$resetlink The automatically-generated URL that the user can click, allowing them to choose a new password.
To ensure that the password reset URL will include the correct domain for your Crowd Note:server, please make sure that Crowd's base url is set correctly in the screen.Server Settings
Click ' '.Update
Earlier releases of Crowd supplied the ' ' macro to represent the user's new password, $passwordautomatically generated by Crowd. Crowd no longer generates a new password, but instead generates a link that the user can click to choose their own new password. For backwards compatibility, if your email template contains the '$password' macro, Crowd will now replace it with the text ' '. The '(link)' will be available at (link)the same as now available in the ' ' macro.$resetlink
Email Template for Forgotten Usernames
This is a template for the email sent when a user .requests their forgotten username
To edit the email template for forgotten usernames
352
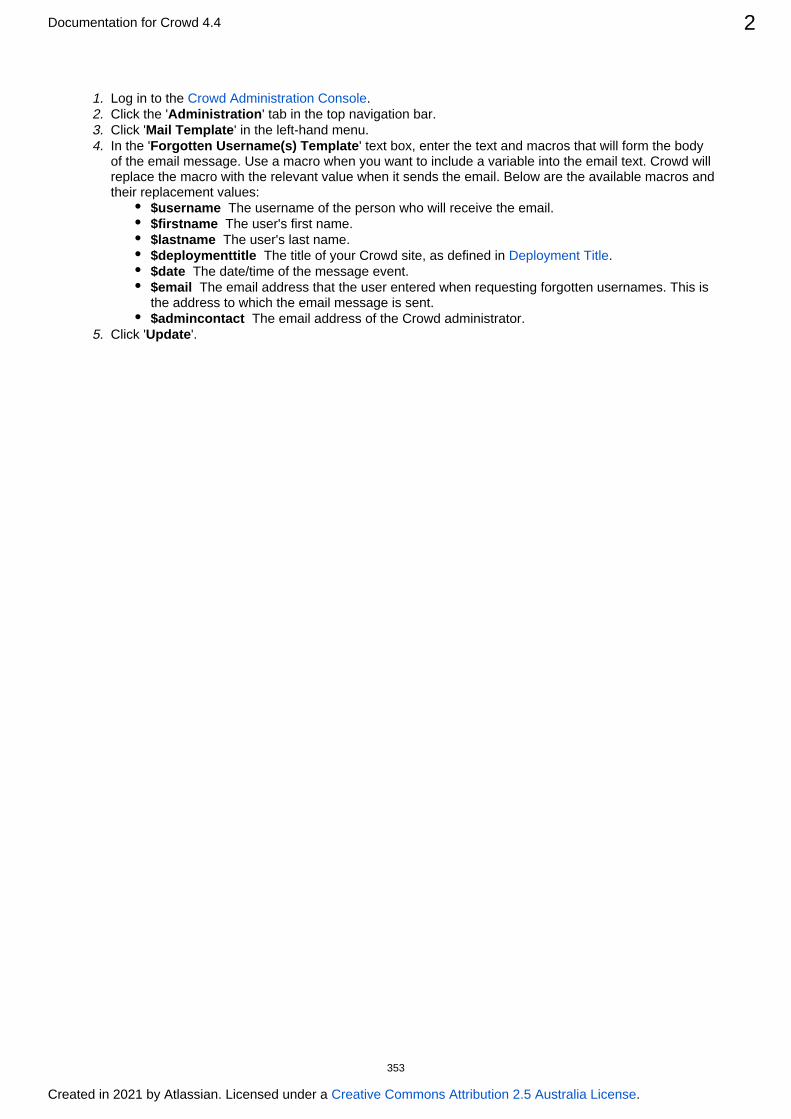
Documentation for Crowd 4.4 2
Created in 2021 by Atlassian. Licensed under a .Creative Commons Attribution 2.5 Australia License
1. 2. 3. 4.
5.
Log in to the .Crowd Administration ConsoleClick the ' ' tab in the top navigation bar.AdministrationClick ' ' in the left-hand menu.Mail TemplateIn the ' ' text box, enter the text and macros that will form the body Forgotten Username(s) Templateof the email message. Use a macro when you want to include a variable into the email text. Crowd will replace the macro with the relevant value when it sends the email. Below are the available macros and their replacement values:
$username The username of the person who will receive the email.$firstname The user's first name.$lastname The user's last name.$deploymenttitle The title of your Crowd site, as defined in .Deployment Title$date The date/time of the message event.$email The email address that the user entered when requesting forgotten usernames. This is the address to which the email message is sent.$admincontact The email address of the Crowd administrator.
Click ' '.Update
353
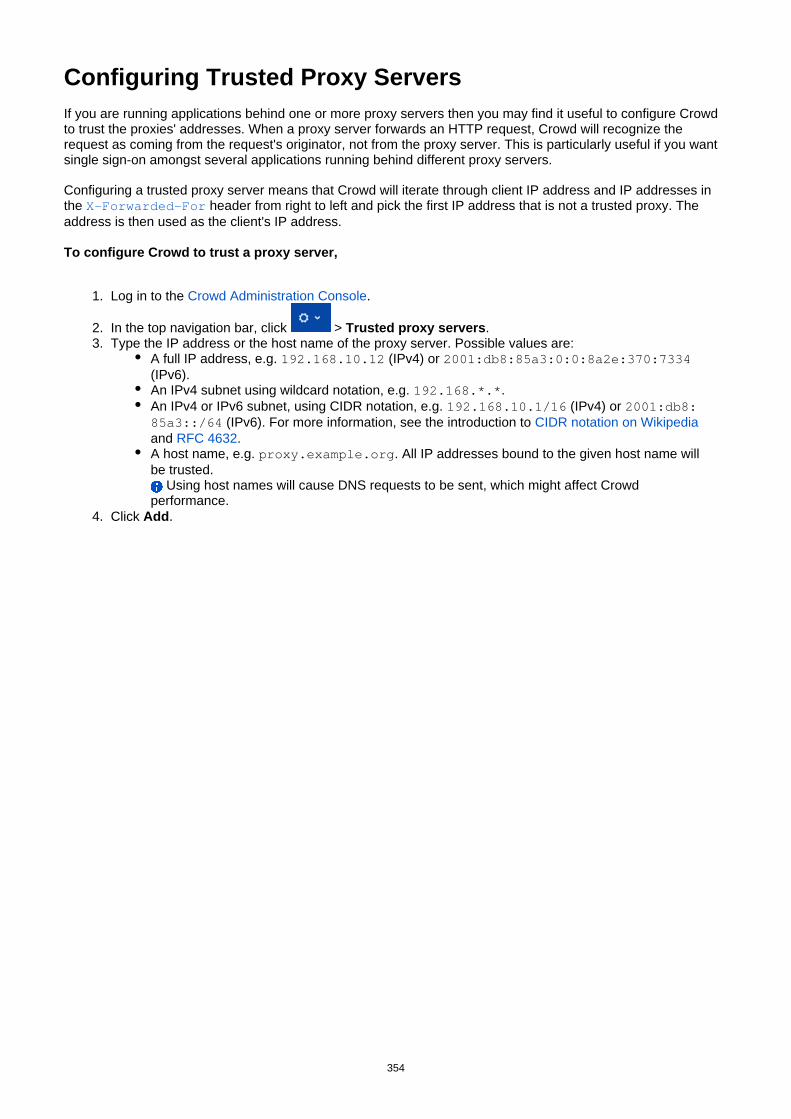
1.
2. 3.
4.
Configuring Trusted Proxy ServersIf you are running applications behind one or more proxy servers then you may find it useful to configure Crowd to trust the proxies' addresses. When a proxy server forwards an HTTP request, Crowd will recognize the request as coming from the request's originator, not from the proxy server. This is particularly useful if you want single sign-on amongst several applications running behind different proxy servers.
Configuring a trusted proxy server means that Crowd will iterate through client IP address and IP addresses in the header from right to left and pick the first IP address that is not a trusted proxy. The X-Forwarded-Foraddress is then used as the client's IP address.
To configure Crowd to trust a proxy server,
Log in to the .Crowd Administration Console
In the top navigation bar, click > .Trusted proxy serversType the IP address or the host name of the proxy server. Possible values are:
A full IP address, e.g. (IPv4) or 192.168.10.12 2001:db8:85a3:0:0:8a2e:370:7334(IPv6).An IPv4 subnet using wildcard notation, e.g. .192.168.*.*An IPv4 or IPv6 subnet, using CIDR notation, e.g. (IPv4) or 192.168.10.1/16 2001:db8:
(IPv6). For more information, see the introduction to 85a3::/64 CIDR notation on Wikipediaand .RFC 4632A host name, e.g. . All IP addresses bound to the given host name will proxy.example.orgbe trusted.
Using host names will cause DNS requests to be sent, which might affect Crowd performance.
Click .Add
354

1.
2.
Viewing Crowd's System InformationCrowd provides a useful summary of your server's system information, including:
Time and date informationJava versionLocation of your directoryCrowd HomeMemory usageApplication server detailsDatabase informationServer ID (see for more details)Licensing
To view your Crowd server's system information,
Log in to the .Crowd Administration Console
In the top navigation bar, click > .System Info
355
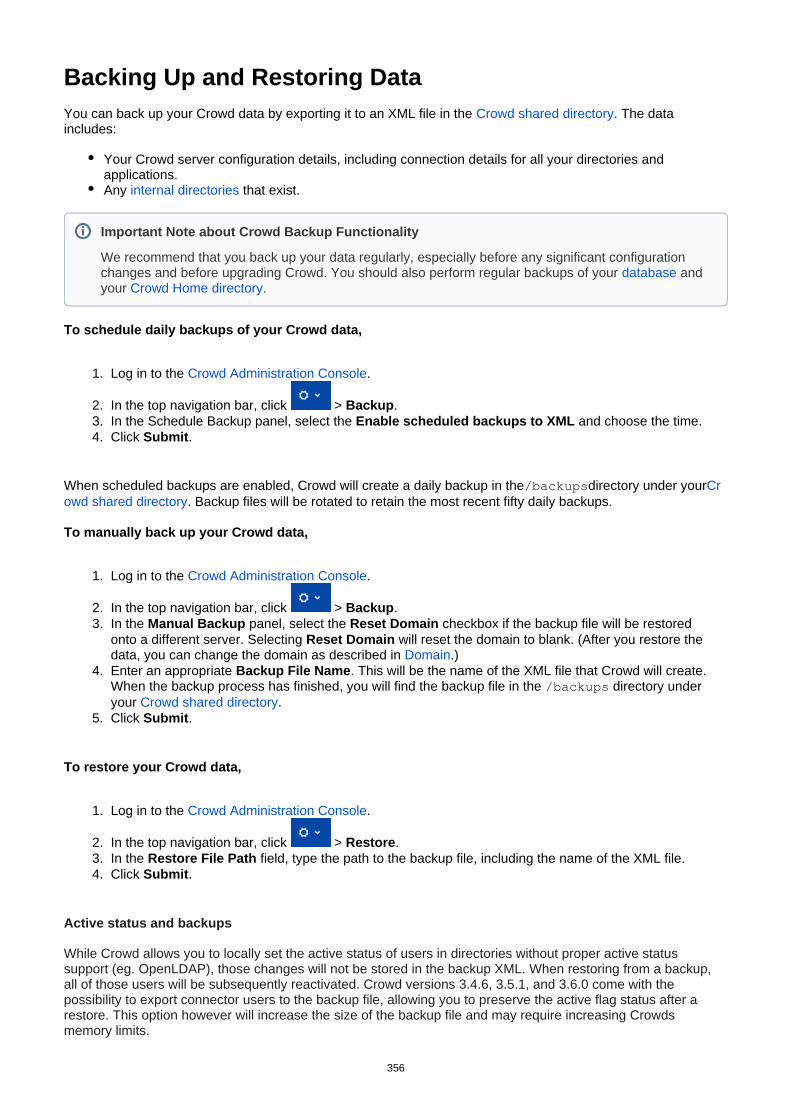
1.
2. 3. 4.
1.
2. 3.
4.
5.
1.
2. 3. 4.
Backing Up and Restoring DataYou can back up your Crowd data by exporting it to an XML file in the . The data Crowd shared directoryincludes:
Your Crowd server configuration details, including connection details for all your directories and applications.Any that exist.internal directories
To schedule daily backups of your Crowd data,
Log in to the .Crowd Administration Console
In the top navigation bar, click > .BackupIn the Schedule Backup panel, select the and choose the time.Enable scheduled backups to XMLClick .Submit
When scheduled backups are enabled, Crowd will create a daily backup in the directory under your/backups Cr. Backup files will be rotated to retain the most recent fifty daily backups.owd shared directory
To manually back up your Crowd data,
Log in to the .Crowd Administration Console
In the top navigation bar, click > .BackupIn the panel, select the checkbox if the backup file will be restored Manual Backup Reset Domainonto a different server. Selecting will reset the domain to blank. (After you restore the Reset Domaindata, you can change the domain as described in .)DomainEnter an appropriate . This will be the name of the XML file that Crowd will create. Backup File NameWhen the backup process has finished, you will find the backup file in the directory under /backupsyour .Crowd shared directoryClick .Submit
To restore your Crowd data,
Log in to the .Crowd Administration Console
In the top navigation bar, click > .RestoreIn the field, type the path to the backup file, including the name of the XML file.Restore File PathClick .Submit
Active status and backups
While Crowd allows you to locally set the active status of users in directories without proper active status support (eg. OpenLDAP), those changes will not be stored in the backup XML. When restoring from a backup, all of those users will be subsequently reactivated. Crowd versions 3.4.6, 3.5.1, and 3.6.0 come with the possibility to export connector users to the backup file, allowing you to preserve the active flag status after a restore. This option however will increase the size of the backup file and may require increasing Crowds memory limits.
Important Note about Crowd Backup Functionality
We recommend that you back up your data regularly, especially before any significant configuration changes and before upgrading Crowd. You should also perform regular backups of your and databaseyour .Crowd Home directory
356
Documentation for Crowd 4.4 2
Created in 2021 by Atlassian. Licensed under a .Creative Commons Attribution 2.5 Australia License
For this feature to work, new backup files must be generated with the Backup connector directories option enabled.
357
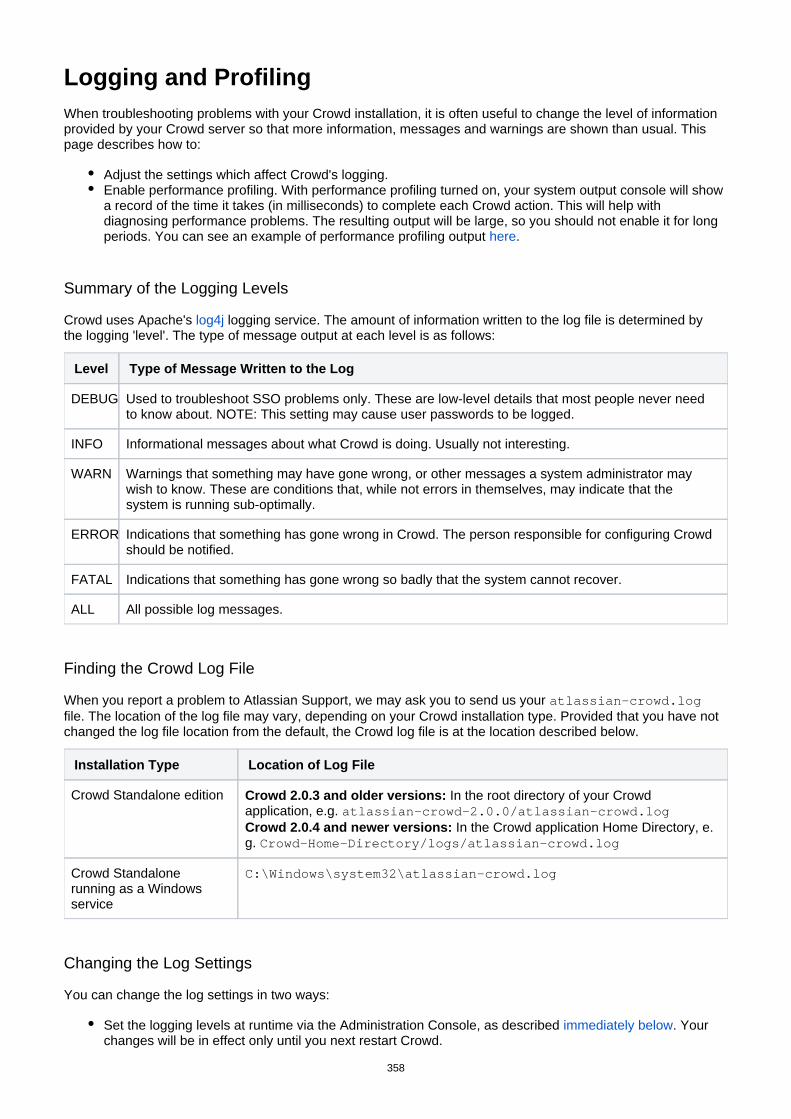
Logging and ProfilingWhen troubleshooting problems with your Crowd installation, it is often useful to change the level of information provided by your Crowd server so that more information, messages and warnings are shown than usual. This page describes how to:
Adjust the settings which affect Crowd's logging.Enable performance profiling. With performance profiling turned on, your system output console will show a record of the time it takes (in milliseconds) to complete each Crowd action. This will help with diagnosing performance problems. The resulting output will be large, so you should not enable it for long periods. You can see an example of performance profiling output .here
Summary of the Logging Levels
Crowd uses Apache's logging service. The amount of information written to the log file is determined by log4jthe logging 'level'. The type of message output at each level is as follows:
Level Type of Message Written to the Log
DEBUG Used to troubleshoot SSO problems only. These are low-level details that most people never need to know about. NOTE: This setting may cause user passwords to be logged.
INFO Informational messages about what Crowd is doing. Usually not interesting.
WARN Warnings that something may have gone wrong, or other messages a system administrator may wish to know. These are conditions that, while not errors in themselves, may indicate that the system is running sub-optimally.
ERROR Indications that something has gone wrong in Crowd. The person responsible for configuring Crowd should be notified.
FATAL Indications that something has gone wrong so badly that the system cannot recover.
ALL All possible log messages.
Finding the Crowd Log File
When you report a problem to Atlassian Support, we may ask you to send us your atlassian-crowd.logfile. The location of the log file may vary, depending on your Crowd installation type. Provided that you have not changed the log file location from the default, the Crowd log file is at the location described below.
Installation Type Location of Log File
Crowd Standalone edition Crowd 2.0.3 and older versions: In the root directory of your Crowd application, e.g. atlassian-crowd-2.0.0/atlassian-crowd.log
In the Crowd application Home Directory, e.Crowd 2.0.4 and newer versions:g. Crowd-Home-Directory/logs/atlassian-crowd.log
Crowd Standalone running as a Windows service
C:\Windows\system32\atlassian-crowd.log
Changing the Log Settings
You can change the log settings in two ways:
Set the logging levels at runtime via the Administration Console, as described . Your immediately belowchanges will be in effect only until you next restart Crowd.
358
Documentation for Crowd 4.4 2
Created in 2021 by Atlassian. Licensed under a .Creative Commons Attribution 2.5 Australia License
1.
2.
3.
Edit the log configuration file, as described in the section below. Your changes will take effect Advancednext time you start Crowd, and for all subsequent sessions.
Configuring the Log Settings and Performance Profiling via the Administration Console
The ' ' screen tells you whether performance profiling is currently on or off, and shows a list Logging & Profilingof all currently defined loggers. On this screen you can:
Turn on or off. With performance profiling turned on, your system output console performance profilingwill show a record of the time it takes (in milliseconds) to complete each Crowd action. This will help with diagnosing performance problems. The resulting output will be large, so you should not enable it for long periods. You can see an example of performance profiling output .hereSet the for each class or package name, or reset all logging levels to the default setting.logging levelRefer to the section on logging levels . Any changes made in this way will apply only to the abovecurrently-running Crowd lifetime.
To configure profiling and logging,
Log in to the .Crowd Administration Console
In the top navigation bar, click > .Logging & ProfilingThe screen appears, as shown below. The screen has the following sections:Logging and Profiling
Performance Profiling Click the button to turn profiling on, or Enable Profiling Disable ' to turn it off. (You will only see one of these buttons.)Profiling
Log4j Logging This section shows the loggers currently in action for your Crowd instance.You can change the logging level by selecting a value from the dropdown list. New Level
is a definition of each level. You can also read the for Above Apache documentationmore information.You can click the button if you want to reset the logging levels to the Revert to Defaultvalues shipped with your Crowd installation.
Click the button to save any changes you have made in the section.Update Logging Log4j Logging
Description of the loggers:
Logger Description
com.atlassian.crowd
This is the parent of the package loggers. Any children which do not have crowda level assigned to them will inherit the level from their parent. This logger should be set to DEBUG you are investigating SSO issues.only if
Crowd Data Center
For Crowd Data Center, you'll need to change the log settings on each node.
If necessary, you can edit the configuration file directly
If you change the log settings via the Administration Console, the changes are not written to the log4j. file and are therefore discarded when you next stop Crowd. Also, not all logging behavior properties
can be changed via the Administration Console. For logging configuration not mentioned below, or to change the log settings permanently, you will need to stop Crowd and then edit the log configuration fileinstead.
359
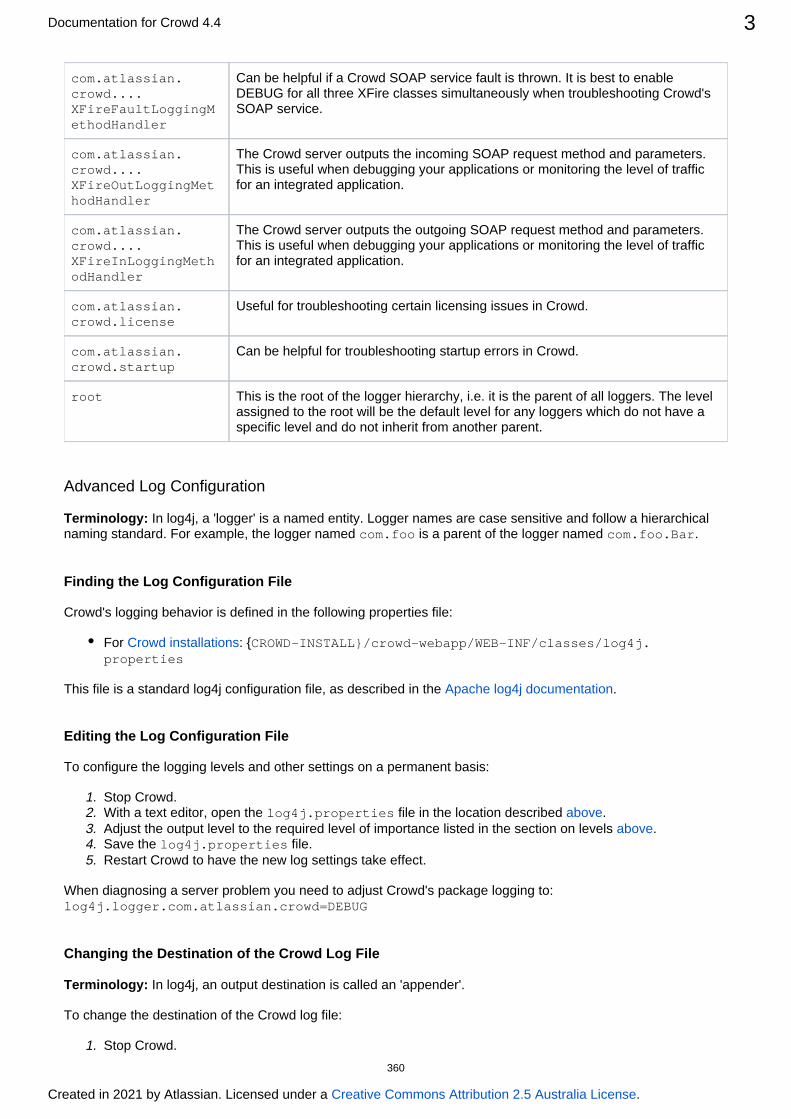
Documentation for Crowd 4.4 3
Created in 2021 by Atlassian. Licensed under a .Creative Commons Attribution 2.5 Australia License
1. 2. 3. 4. 5.
1. 2.
com.atlassian.crowd....XFireFaultLoggingMethodHandler
Can be helpful if a Crowd SOAP service fault is thrown. It is best to enable DEBUG for all three XFire classes simultaneously when troubleshooting Crowd's SOAP service.
com.atlassian.crowd....XFireOutLoggingMethodHandler
The Crowd server outputs the incoming SOAP request method and parameters. This is useful when debugging your applications or monitoring the level of traffic for an integrated application.
com.atlassian.crowd....XFireInLoggingMethodHandler
The Crowd server outputs the outgoing SOAP request method and parameters. This is useful when debugging your applications or monitoring the level of traffic for an integrated application.
com.atlassian.crowd.license
Useful for troubleshooting certain licensing issues in Crowd.
com.atlassian.crowd.startup
Can be helpful for troubleshooting startup errors in Crowd.
root This is the root of the logger hierarchy, i.e. it is the parent of all loggers. The level assigned to the root will be the default level for any loggers which do not have a specific level and do not inherit from another parent.
Advanced Log Configuration
Terminology: In log4j, a 'logger' is a named entity. Logger names are case sensitive and follow a hierarchical naming standard. For example, the logger named is a parent of the logger named .com.foo com.foo.Bar
Finding the Log Configuration File
Crowd's logging behavior is defined in the following properties file:
For : {Crowd installations CROWD-INSTALL}/crowd-webapp/WEB-INF/classes/log4j.properties
This file is a standard log4j configuration file, as described in the .Apache log4j documentation
Editing the Log Configuration File
To configure the logging levels and other settings on a permanent basis:
Stop Crowd.With a text editor, open the file in the location described .log4j.properties aboveAdjust the output level to the required level of importance listed in the section on levels .aboveSave the file.log4j.propertiesRestart Crowd to have the new log settings take effect.
When diagnosing a server problem you need to adjust Crowd's package logging to:log4j.logger.com.atlassian.crowd=DEBUG
Changing the Destination of the Crowd Log File
Terminology: In log4j, an output destination is called an 'appender'.
To change the destination of the Crowd log file:
Stop Crowd.
360

Documentation for Crowd 4.4 4
Created in 2021 by Atlassian. Licensed under a .Creative Commons Attribution 2.5 Australia License
2. 3.
4.
5. 6.
With a text editor, open the file in the location described .log4j.properties aboveLook for the entry in the ' ' section of org.apache.log4j.RollingFileAppender Log File Locationsthe file. This appender controls the default logging destination described .aboveEdit the following line, and replace with the full path and file name for the atlassian-crowd.logrequired logging destination:
.log4j.appender.filelog.File=atlassian-crowd.logSave the file.log4j.propertiesRestart Crowd to have the new log settings take effect.
Note:If you change the location of your log files, they will no longer be included when you generate a support zip. This means you'll need to attach your logs to any support requests manually.
Adjusting the Log Settings for CrowdID
The Crowd Administration Console does not give access to the log settings. To adjust the logging CrowdIDlevels of the CrowdID OpenID server, you will need to modify the configuration file at this location:
For of CrowdID: {Crowd installations CROWDID-INSTALL}/crowd-openidserver-webapp/WEB-INF/classes/log4j.properties
361

Performance ProfilingWhen troubleshooting problems with your Crowd installation, it is often useful to turn on performance profiling.
To enable profiling, in the top navigation bar, go to > . Full instructions are in the Logging & profilingsection on .logging and profiling
With performance profiling turned on, your system output console will show a record of the time it takes (in milliseconds) to complete each Crowd action. This will help with diagnosing performance problems. The resulting output will be large, so you should not enable it for long periods.Here is an example of the performance profiling output, when search for and viewing a user via the Crowd Administration Console:
[15ms] - AOP: SecurityServer.findPrincipalByToken()
[15ms] - AOP: SecurityServer.isValidPrincipalToken()
[15ms] - AOP: SecurityServer.isValidPrincipalToken() [15ms] - AOP: SOAPService.validateSOAPService()
[15ms] - AOP: SecurityServer.isValidPrincipalToken()
[16ms] - AOP: SecurityServer.getDomain() [16ms] - AOP: SOAPService.validateSOAPService()
362

1.
2. 3. 4.
Draft - Troubleshooting and Requesting Technical SupportThis page is visible to . It will be published when the functionality is available in Crowd.Atlassian staff only
This document tells you how to troubleshoot problems and obtain technical support for Crowd.
On this page:
Troubleshooting a ProblemRaising a Support Request
Raising a Support Ticket via the Crowd Support Request FormRaising a Support Ticket via the Internet
Logging a Bug Report
Troubleshooting a Problem
If you have a problem with Crowd, please follow these steps:
If you are not a Crowd administrator, report your problem to the person in charge of your Crowd installation and ask them to follow up on the issue.Check Crowd's .system requirementsSearch our for a solution to your problem.Knowledge BaseIf you are having problems configuring Crowd, please take a look at the appropriate guides:
Installation GuideSetup GuideConfiguration GuideAdministration Guide
If the above documentation does not solve your problem, you should create a support request. If you believe you have found a bug, you may wish to create a bug report instead. This page contains instructions for both:
Support requestsBug reports
Raising a Support Request
There are two ways to raise a support request with Atlassian:
Complete the support request form via your Crowd . The advantage of this Administration Consolemethod is that Crowd will create the support ticket and attach the relevant system information and logs for you. See .belowRaise a support ticket directly via our internet support site. See .below
Raising a Support Ticket via the Crowd Support Request Form
Page must be updated if ever published
If we ever publish this page, we must update it to bring it in line with the new . And add Support Policiesa link from Creating a Support Issue
Plugin support
If you have a plugin-related issue, please check whether the plugin is supported by Atlassian. Visit the plugin's home page in the Atlassian Plugin Exchangeand check the support details in the ' ' panel. If the plugin is not supported by Atlassian, Plugin Detailsyou will need to contact the plugin author directly.
363

Documentation for Crowd 4.4 2
Created in 2021 by Atlassian. Licensed under a .Creative Commons Attribution 2.5 Australia License
1. 2. 3. 4.
5. 6.
7.
1.
2. 3. 4. 5. 6.
This method is recommended, provided that is set up on your Crowd instance.SMTP email
The advantage of this method is that Crowd will create the support ticket and attach the relevant system information and logs for you. You can also use this method to append system information to an existing support ticket.
To raise a support request via the Crowd Administration Console,
Log in to the .Crowd Administration ConsoleClick the ' ' tab in the top navigation bar.AdministrationClick ' ' in the left-hand menu. The ' ' form will appear.Support Request Raise Support RequestPlease provide as much information as possible, following these guidelines:
' ' This is an email address, named the 'Site Support Address' and configured on the 'To General ' screen of your Crowd instance. It points to a instance (usually the Configuration JIRA Atlassian
) which is configured to receive and handle support requests by email.Support System' ' Any email address(es) entered here will receive a copy of the support request, including all CCsystem information. You can enter more than one email address, separated by commas (e.g. jo
)[email protected], [email protected], [email protected]' ' Enter a short and meaningful description of the problem.Subject' ' Please enter as much information as possible, including any error messages that Descriptionare appearing and any steps the support team can take to reproduce the problem.' ' If you have previously raised a support request for the problem, Existing Support Requestplease type the issue key here (e.g. CSP-12345). The information on this form will be appended to the existing support ticket.' ' This will default to the name of the logged-in user.Contact Name' ' This will default to the email address of the logged-in user.Contact Email
This email address will be used to find your support account on the Note: Atlassian Support . If no matching account is found, a new account will be created. Crowd will also send all System
further notifications and updates to this address.' ' Please enter a telephone number where our support staff can reach Contact Phone Numberyou. Include international and city codes.
Click the ' ' button.SendCrowd will submit your request via email to the JIRA instance referenced by the 'To' email address on the form. If you do not already have a support account, Crowd will automatically request one for you. The submitted request will include all the system and environment information which you see on the support request form. It will also include a zipped copy of your Crowd log file. Refer to Logging and
for information about the log files. JIRA will create a support ticket including the submitted Profilinginformation.
Log files can be very big it is possible that your email server may bounce the message if too large. With the default log4j configuration, the log file could be up to 20Mb in size. If you have customized the log settings, the maximum size could be much larger still. Please check whether the email message has been successfully sent, and consult your email administrator if you need special provisions for this email message.Once you have submitted your support request, you will receive email updates about its progress. These emails will give you the support ticket number.
You can view the status of your support request and add any additional information required by visiting the Atl at any time.assian Support System
Raising a Support Ticket via the Internet
If your Crowd instance is not configured with SMTP mail or your Crowd instance is not running, you can raise a support ticket via the :Atlassian Support System
Create a zip of your Crowd logs to attach to the ticket. Refer to for information Logging and Profilingabout the log files.If you do not already have a free Atlassian support account, .create one hereLog in to and select ' '.https://support.atlassian.com Create New IssueLodge a detailed description of your problem in the new support ticket.Fill in all applicable information about your system, such as application server, database, etc.
364
Documentation for Crowd 4.4 3
Created in 2021 by Atlassian. Licensed under a .Creative Commons Attribution 2.5 Australia License
6.
7.
1. 2. 3.
4.
If Crowd is running, go to the ' ' screen in your and copy System Information Administration Consolethe text of your system information into the ticket.Once your ticket is lodged, wait to be notified by email of updates. If your production instance of Crowd is experiencing a critical problem, jump on and ask to have your issue reviewed immediately.Live Support
Logging a Bug Report
If you have found a bug, the easiest way to report it is to:
Create numbered instructions on how to reproduce the bug.Log them as a .support requestThe Atlassian support team will confirm your bug and lodge a bug report.
Alternatively, you can log a bug report directly by confirming it according to these instructions:
Visit the .Crowd bug trackerOn the left under ' ', type keywords for your problem into the ' ' field.Text Search QueryClick ' ' and browse the summaries of the unresolved bugs. If any summary appears to describe your Viewproblem, check whether the bug matches yours. If it is the same, you may wish to set a watch to be notified of updates or apply your vote towards having it resolved.If your bug has not been reported already, log the new bug along with the information you used to hereduplicate it.
RELATED TOPICS
Configuring Server SettingsDeployment TitleDomainSession configurationAuthorization CachingLicensingCrowd SSO 2.0Finding your SENSSO Cookie
Configuring your Mail ServerCreating an Email Notification TemplateConfiguring Trusted Proxy ServersViewing Crowd's System InformationBacking Up and Restoring DataLogging and Profiling
Performance ProfilingDraft - Troubleshooting and Requesting Technical SupportConfiguring the LDAP Connection PoolBrowsing the audit logLook and feelOverview of Caching
Crowd documentation
365

1. 2. 3. 4.
5. 6.
Configuring the LDAP Connection PoolWhen connection pooling is enabled, the LDAP service provider maintains a pool of connections and assigns them as needed. When a connection is closed, LDAP returns the connection to the pool for future use. This can improve performance significantly.
This page describes the site-wide settings for LDAP connection pooling in Crowd.
To configure the LDAP connection pooling in Crowd,
Log in to the .Crowd Administration ConsoleClick the ' ' tab in the top navigation bar.AdministrationClick ' ' in the left-hand menu.LDAP Connection PoolThe ' ' screen appears. Enter the details for each setting, as described in the LDAP Connection Pooltable below.Click the ' ' button.UpdateRestart Crowd to put the changes into effect.
Connection Pool Setting
Description Default Value
Initial Pool Size
The number of LDAP connections created when initially connecting to the pool. 1
Preferred Pool Size
The optimal pool size. LDAP will remove idle connections when the number of connections grows larger than this value. A value of (zero) means that there is 0no preferred size, so the number of idle connections is unlimited.
10
Maximum Pool Size
The maximum number of connections. When the number of connections reaches this value, LDAP will refuse further connections. As a result, requests made by an application to the LDAP server will be blocked. A value of (zero) means that 0the number of connections is unlimited.
0
Pool Timeout The length of time, in seconds, that a connection may remain idle before being removed from the pool. When the application is finished with a pooled connection, the connection is marked as idle, waiting to be reused. A value of 0(zero) means that the idle time is unlimited, so connections will never be timed out.
30
Pool Protocol Only these protocol types are allowed to connect to LDAP. If you want to allow multiple protocols, enter the values separated by a space. Valid values are:
plainssl
plain ssl(Both plain and ssl)
Pool Authentication
Only these authentication types are allowed to connect to LDAP. If you want to allow multiple authentication types, enter the values separated by a space. See R
for details of LDAP authentication methods. Valid values are:FC 2829
nonesimpleDIGEST-MD5
simple
366
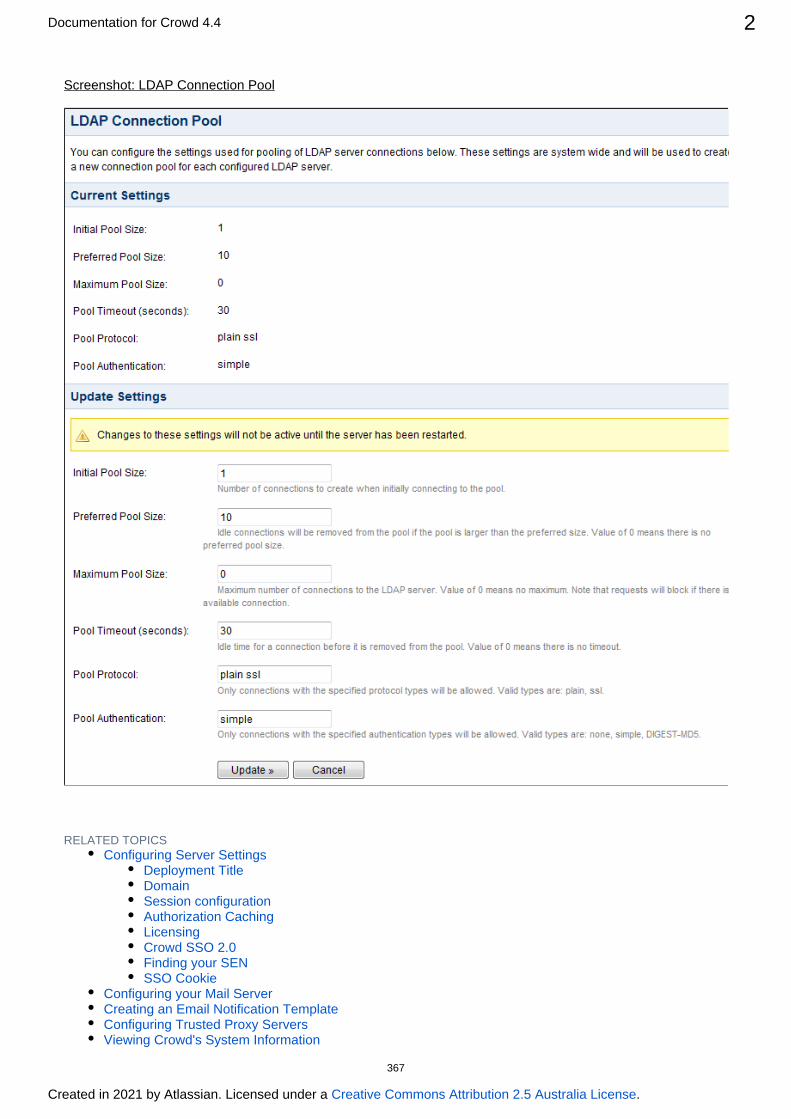
Documentation for Crowd 4.4 2
Created in 2021 by Atlassian. Licensed under a .Creative Commons Attribution 2.5 Australia License
Screenshot: LDAP Connection Pool
RELATED TOPICSConfiguring Server Settings
Deployment TitleDomainSession configurationAuthorization CachingLicensingCrowd SSO 2.0Finding your SENSSO Cookie
Configuring your Mail ServerCreating an Email Notification TemplateConfiguring Trusted Proxy ServersViewing Crowd's System Information
367

Documentation for Crowd 4.4 3
Created in 2021 by Atlassian. Licensed under a .Creative Commons Attribution 2.5 Australia License
Backing Up and Restoring DataLogging and Profiling
Performance ProfilingDraft - Troubleshooting and Requesting Technical SupportConfiguring the LDAP Connection PoolBrowsing the audit logLook and feelOverview of Caching
Crowd documentation
368
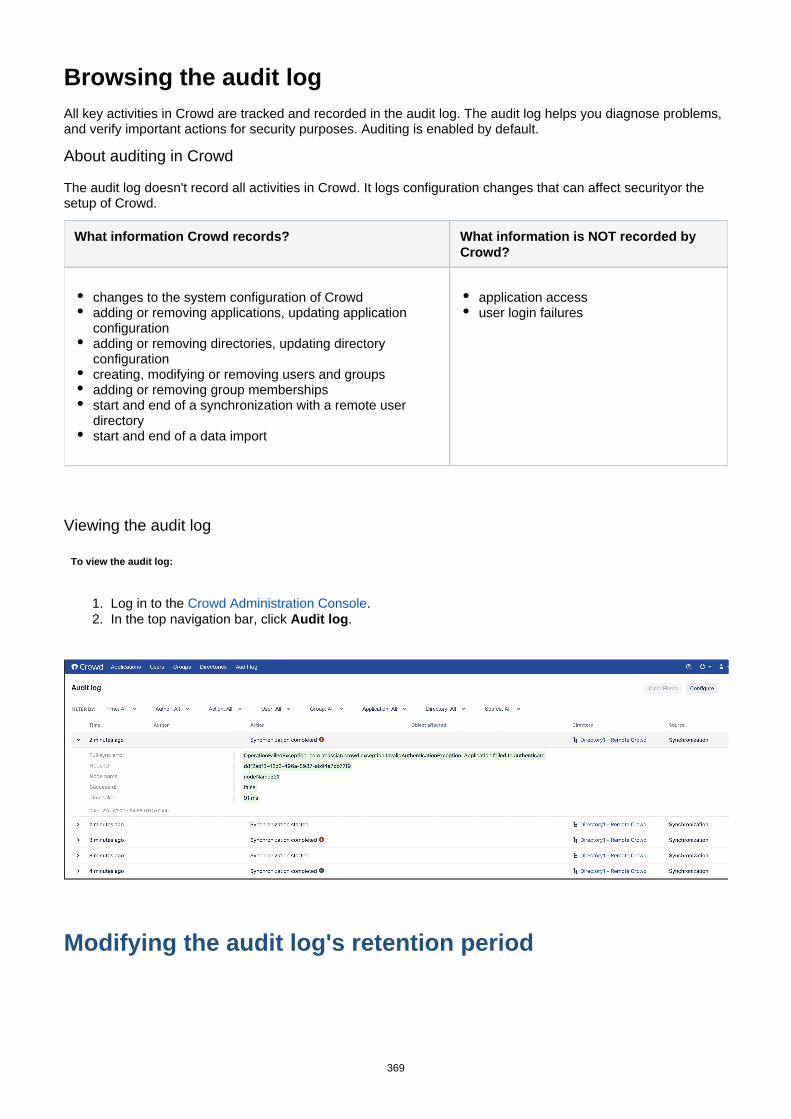
1. 2.
Browsing the audit logAll key activities in Crowd are tracked and recorded in the audit log. The audit log helps you diagnose problems, and verify important actions for security purposes. Auditing is enabled by default.
About auditing in Crowd
The audit log doesn't record all activities in Crowd. It logs configuration changes that can affect securityor the setup of Crowd.
What information Crowd records? What information is NOT recorded by Crowd?
changes to the system configuration of Crowdadding or removing applications, updating application configurationadding or removing directories, updating directory configurationcreating, modifying or removing users and groupsadding or removing group membershipsstart and end of a synchronization with a remote user directorystart and end of a data import
application accessuser login failures
Viewing the audit log
To view the audit log:
Log in to the .Crowd Administration ConsoleIn the top navigation bar, click .Audit log
Modifying the audit log's retention period
369

Documentation for Crowd 4.4 2
Created in 2021 by Atlassian. Licensed under a .Creative Commons Attribution 2.5 Australia License
1. 2. 3. 4.
You can choose how long the recorded activities are stored in Crowd.
Log in to the .Crowd Administration ConsoleClick the ' ' link in the top navigation bar.Audit logClick the ' ' button.ConfigureChoose the retention period.
Auditing and the REST API
The audit log can also be accessed via the REST API. You can use it to:
Search the recorded activitiesExport the audit logAdd events from external applications to the audit log
For more information about using the REST API, see .Crowd REST documentation
370

1. 2.
3.
Look and feelYou can use the configuration panel to customize you login screen.
Before you begin
Only Crowd administrators can make changes to the look and feel of the login screen.
To make changes to the login screen
Go to .>Look and feelMake changes the following login screen elements:
logo - the image displayed at the top of the login screen; supported file formats: JPG, PNG.welcome text - the text displayed above the credentials.accent color - the color of the button and the the checbox.Remember me
Click .Save
The login screen with your changes will be displayed to logging users from now on. If you want to go back to the default settings, click the button next to the button.Restore defaults Save
371
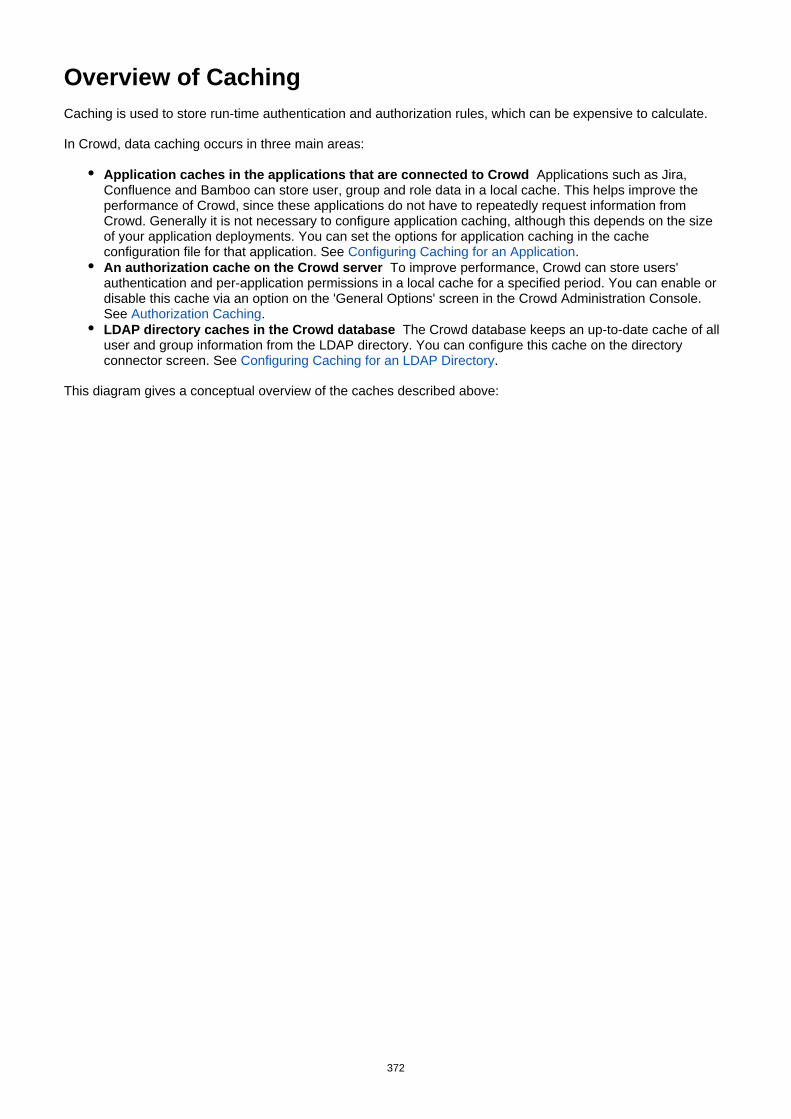
Overview of CachingCaching is used to store run-time authentication and authorization rules, which can be expensive to calculate.
In Crowd, data caching occurs in three main areas:
Application caches in the applications that are connected to Crowd Applications such as Jira, Confluence and Bamboo can store user, group and role data in a local cache. This helps improve the performance of Crowd, since these applications do not have to repeatedly request information from Crowd. Generally it is not necessary to configure application caching, although this depends on the size of your application deployments. You can set the options for application caching in the cache configuration file for that application. See .Configuring Caching for an ApplicationAn authorization cache on the Crowd server To improve performance, Crowd can store users' authentication and per-application permissions in a local cache for a specified period. You can enable or disable this cache via an option on the 'General Options' screen in the Crowd Administration Console. See .Authorization CachingLDAP directory caches in the Crowd database The Crowd database keeps an up-to-date cache of all user and group information from the LDAP directory. You can configure this cache on the directory connector screen. See .Configuring Caching for an LDAP Directory
This diagram gives a conceptual overview of the caches described above:
372

Documentation for Crowd 4.4 2
Created in 2021 by Atlassian. Licensed under a .Creative Commons Attribution 2.5 Australia License
373

Crowd Security Advisories and FixesThis page has information on how to report any security bugs you might find in Crowd, and what we will do to fix the problem and announce the solution.
On this page:
Finding and Reporting a Security VulnerabilityPublication of Security AdvisoriesSeverity LevelsPatches and FixesPublished Security Advisories
Finding and Reporting a Security Vulnerability
Atlassian's approach to reporting security vulnerabilities is detailed in .How to Report a Security Issue
Publication of Security Advisories
Atlassian's approach to releasing security advisories is detailed in .Security Advisory Publishing Policy
Severity Levels
Atlassian's approach to ranking security issues is detailed in .Severity Levels for Security Issues
Patches and Fixes
Atlassian's approach to releasing patches for security issues is detailed in .Security Patch Policy
Published Security Advisories
Crowd Security Advisory 2019-05-22Crowd Security Advisory 2017-03-10Crowd Security Advisory 2016-10-19Crowd Security Advisory 2014-05-21Crowd Security Advisory 2013-07-16Crowd Security Notice 2013-07-01Crowd Security Advisory 2012-05-17Crowd Security Advisory 2010-07-05Crowd Security Advisory 2010-05-04Crowd Security Advisory 2008-10-14 - Parameter Injection Vulnerability
374

1.
2.
Crowd Security Advisory 2010-07-05This advisory announces a security vulnerability in earlier versions of Crowd that we have found and fixed in Cro
.wd 2.0.5
In this advisory:
XSS VulnerabilitySeverityRisk AssessmentVulnerabilityRisk MitigationFix
XSS Vulnerability
Severity
Atlassian rates the severity level of this vulnerability as , according to the scale published in high Severity Levels . The scale allows us to rank the severity as critical, high, moderate or low.for Security Issues
Risk Assessment
We have identified and fixed a cross-site scripting (XSS) vulnerability that may affect Crowd instances in a public environment. This vulnerability may allow an attacker to embed their own JavaScript into the Crowd login page. An attacker's text and script might be displayed to other people viewing the page. This is potentially damaging to your company's reputation.
You can read more about XSS attacks at , and other places on the web.cgisecurity CERT
Vulnerability
The Crowd login form may be vulnerable to XSS attacks. This vulnerability is tracked in .CWD-1952
This vulnerability exists in up to and including Crowd 2.0.4.all versions of Crowd
Risk Mitigation
To address the issue, we recommend that you upgrade Crowd. If you cannot upgrade immediately, you can fix the XSS vulnerability by editing your configuration to disallow request parameters in generated URLs. Details are below.
Alternatively, if you are not in a position to upgrade or edit your configuration immediately, you should configure your firewall to block Internet access to Crowd.
Fix
Crowd 2.0.5 fixes the security flaw and other bugs. See the . You can download Crowd 2.0.5 from release notesthe .download centre
If you cannot upgrade immediately, you can fix this XSS vulnerability by disallowing request parameters in generated URLs. You can globally turn off the inclusion of request parameters in generated URLs by editing your WebWork properties file:
Edit the file located at {webwork.properties CROWD-INSTALLATION-DIRECTORY}\crowd-.webapp\WEB-INF\classes\webwork.properties
Add the following property as a new line in the file:
375
Documentation for Crowd 4.4 2
Created in 2021 by Atlassian. Licensed under a .Creative Commons Attribution 2.5 Australia License
2.
3. 4.
webwork.url.includeParams=none
Save the file.Restart Crowd.
The WebWork documentation has more about the .webwork.properties file
376

Crowd Security Advisory 2010-05-04This advisory announces a number of security vulnerabilities in earlier versions of Crowd that we have found and fixed in . In addition to releasing Crowd 2.0.4, we also provide point releases for earlier Crowd 2.0.4versions of Crowd to fix the vulnerabilities reported here.
In this advisory:
XSS VulnerabilitiesSeverityRisk AssessmentVulnerabilityRisk MitigationFix
XSS Vulnerabilities
Severity
Atlassian rates these vulnerabilities as , according to the scale published in high Severity Levels for Security . The scale allows us to rank a vulnerability as critical, high, moderate or low.Issues
Risk Assessment
We have identified and fixed a number of cross-site scripting (XSS) vulnerabilities which may affect Crowd instances in a public environment.
An attacker might take advantage of the vulnerability to steal other users' session cookies or other credentials, by sending the credentials back to such an attacker's own web server.An attacker's text and script might be displayed to other people viewing the Crowd page. This is potentially damaging to your company's reputation.
You can read more about XSS attacks at , and other places on the web.cgisecurity CERT
Vulnerability
The table below lists the affected areas of Crowd. These XSS vulnerabilities exist in , up all versions of Crowdto and including Crowd 2.0.3.
Crowd Feature Issue Tracking
Crowd Administration Console
CWD-1888
Error page CWD-1889
Risk Mitigation
To address the issues, you should upgrade Crowd as soon as possible. If you cannot upgrade immediately, you should configure your firewall to block Internet access to Crowd.
Fix
Crowd 2.0.4 fixes all of these issues and introduces some nice improvements too. See the . You release notescan download Crowd 2.0.4 from the .download centre
377

Documentation for Crowd 4.4 2
Created in 2021 by Atlassian. Licensed under a .Creative Commons Attribution 2.5 Australia License
If you cannot upgrade to Crowd 2.0.4, please download the relevant upgrade file for your version of Crowd from the :download centre
If you have Crowd 1.6.x upgrade to (see the and ).Crowd 1.6.3 release notes upgrade guideIf you have Crowd 1.5.x upgrade to (see the and ).Crowd 1.5.3 release notes upgrade guideIf you have Crowd 1.4.x upgrade to (see the and ).Crowd 1.4.8 release notes upgrade guide
378
Crowd Security Advisory 2008-10-14 - Parameter Injection VulnerabilityIn this advisory:
Parameter Injection Vulnerability in CrowdSeverityRisk AssessmentRisk MitigationVulnerabilityFix
Parameter Injection Vulnerability in Crowd
Severity
Atlassian rates this vulnerability as , according to the scale published in critical Crowd Security Advisories and . The scale allows us to rank a vulnerability as critical, high, moderate or low.Fixes
Risk Assessment
We have identified and fixed a flaw which would allow a malicious user (hacker) to inject their own values into a Crowd request by adding parameters to the URL string. This would allow a hacker to bypass Crowd's security checks and perform actions that they are not authorised to perform.
Risk Mitigation
To address the issue, you should upgrade Crowd as soon as possible. Please follow the instructions in the 'Fix' section below. If you judge it necessary, you can block all untrusted IP addresses from accessing Crowd.
Vulnerability
A hacker can design a URL string containing parameters which perform specific actions on the Crowd server, bypassing Crowd's security checks. This is because Crowd does not adequately sanitise user input before applying it as an action on the server.
Exploiting this issue could allow an attacker to access or modify data and compromise the Crowd application.
The following Crowd versions are vulnerable: All versions from inclusive.1.0 to 1.5.0
Fix
Please download the relevant upgrade file for your version of Crowd from the as follows:download centre
If you have Crowd 1.5.0 upgrade to (see the and ).Crowd 1.5.1 release notes upgrade guideIf you have Crowd 1.4.x upgrade to (see the and ).Crowd 1.4.7 release notes upgrade guideIf you have Crowd 1.3.x upgrade to (see the and ).Crowd 1.3.3 release notes upgrade guideIf you have Crowd 1.2.x upgrade to (see the and ).Crowd 1.2.4 release notes upgrade guide
379

Crowd Security Advisory 2012-05-17This advisory discloses a security vulnerability that exists in critical all versions of Crowd up to and including 2.4.0. Customers should upgrade their existing Crowd installations to fix this vulnerability. We also provide a patch that you will be able to apply to existing installations of Crowd to fix this vulnerability. However, we recommend that you upgrade your complete Crowd installation rather than applying the patch.
Our thanks to Will Caput and Trevor Hartman who reported the vulnerability in this advisory. Atlassian is committed to improving product security. We and we appreciate it fully support the reporting of vulnerabilitieswhen people work with us to identify and solve the problem.
If you have questions or concerns regarding this advisory, please raise a support request at http://support..atlassian.com/
In this advisory:
Critical XML Parsing VulnerabilitySeverityDescriptionRisk MitigationFix
Critical XML Parsing Vulnerability
Severity
Atlassian rates the severity level of this vulnerability as , according to the scale published in critical Severity . The scale allows us to rank the severity as critical, high, moderate or low.Levels for Security Issues
This is an independent assessment and you should evaluate its applicability to your own IT environment.
Description
We have identified and fixed a vulnerability in Crowd that results from the way third-party XML parsers are used in Crowd.
This vulnerability allows an attacker to:
execute denial of service attacks against the Crowd server, orread all local files readable to the system user under which Crowd runs.
All versions of Crowd are affected by this vulnerability. This issue can be tracked up to and including 2.4.0
here: - CWD-2797 XML Vulnerability in Crowd CLOSED
Risk Mitigation
We recommend that you upgrade your Crowd installation to fix this vulnerability.
Alternatively, if you are not in a position to upgrade or apply patches immediately, you should do of the allfollowing until you can upgrade or patch. Please note, these measures will only limit the impact of the vulnerability, they will not mitigate it completely.
Ensure that Crowd URLs cannot be reached from untrusted sources, e.g. configure appropriate firewall or proxy settings.Ensure that the operating system user under which Crowd process runs is restricted.
Fix
Upgrade (recommended)
380

Documentation for Crowd 4.4 2
Created in 2021 by Atlassian. Licensed under a .Creative Commons Attribution 2.5 Australia License
1.
2.
Upgrade to Crowd 2.4.1 or later which fixes this vulnerability. For a full description of this release, see theCrowd . T2.4.1 Release Notes he following releases have also been made available to fix these issues in older Crowd
You can download these versions of Crowd from the .versions. download centre
2.3.7 for Crowd 2.32.2.9 for Crowd 2.22.1.2 for Crowd 2.12.0.9 for Crowd 2.0
Patches (not recommended)
We recommend patching only when you can neither upgrade nor apply external security controls. Patches are usually only provided for vulnerabilities of critical severity (as per our ), as an interim Security Patch Policysolution until you can upgrade. You should not expect that you can continue patching your system instead of upgrading. Our patches are often non-cumulative we do not recommend that you apply multiple patches from different advisories on top of each other, but strongly recommend upgrading to the most recent version regularly.
If for some reason you cannot upgrade to the latest version of Crowd, you must apply the patch provided for the relevant version of Crowd below to fix the vulnerability described in this advisory.
Download the patch file for your version of Crowd. Note, the patches are only available for the point release indicated. If you are using an earlier point release for a major version, you must upgrade to the latest point release first.
Version Patch
Crowd 2.4.0 patch-CWD-2797-2.4.0.zip
Crowd 2.3.6 patch-CWD-2797-2.3.6.zip
Unzip the patch file to the (where is the Crowd version) directory, atlassian-crowd-x.x.x x.x.xoverwriting the existing files.
381

Crowd Security Notice 2013-07-01On 30th of June 2013, an article was uploaded to Slashdot regarding two vulnerabilities in Atlassian Crowd. We had already identified and fixed the first vulnerability, which affects only standalone Crowd servers and which the author had labeled CVE-2013-3925. Patches and updated packages are available at https://jira.atlassian.
.com/browse/CWD-3366
We have been unable to substantiate the existence of the second alleged vulnerability. The author of the article has not contacted Atlassian and has provided no details to us, making it difficult to validate the claim.
While we have been unable to confirm the existence of the second vulnerability, designated CVE-2013-3926, we are taking it seriously and have reached out to the author directly for more details. If we can confirm that there is a vulnerability, a patch will be issued and all Crowd customers will be emailed details on how to update.
382
Crowd Security Advisory 2013-07-16This advisory discloses security vulnerabilities that we have found in standalone Crowd server and fixed in a recent version of Crowd.
Customerswho have downloaded and installed standalone Crowd serversshould upgrade their existing Crowd installations to fix this vulnerability.Atlassian OnDemand customersare not affected by any of the issues described in this advisory.No type of Crowd deployment other than is impacted.standalone servers
Atlassian is committed to improving product security.
thatThe vulnerability listed in this advisory is avulnerability in a third party framework - Struts 2 / WebWork 2is used by Crowd. The vulnerability has been independently discovered by Atlassian and reported to the Struts maintainers.
More details about the underlying Struts vulnerability CVE-2013-2251 areavailable atCVE databaseand in theStruts advisory.
If you have questions or concerns regarding this advisory, please raise a support request athttp://support.atlassian.com/.
OGNL injection in WebWork 2
Severity
Atlassian rates the severity level of this vulnerability as , according to the scale published incritical Severity .Levels for Security Issues The scale allows us to rank the severity as critical, high, moderate or low.
This is an independent assessment and you should evaluate its applicability to your own IT environment.
Description
We have fixed a vulnerability in WebWork 2, which is a part of the Struts web framework.In specific circumstances, attackers can use this vulnerability to execute Java code of their choice on systems that use these frameworks.In the case of Crowd, the attacker needs to be able to access web interface. A the Crowdvalid user account is not required to exploit this vulnerability.
Customers should be advised that this affects all versions of , exceptOnDemand, 2.3.9, Crowd Crowd Crowd2.4.10, Crowd 2.5.5 and 2.6.4 or later.The issue can be tracked here: Crowd
- CWD-3430 Webwork 2 code injection vulnerability CLOSED
Risk Mitigation
If you are unable to upgrade or patch your Crowd server:as a , you can do the following:temporaryworkaround
Block access to all URLs on a Web Application Firewall or a reverse proxy that contain any of the following strings: " ", " " or " " strings. A partial example for anredirect: action: redirect-action: ng
server is below. Note that the example only covers the " "prefix and does not account for inx redirect:any URL encoding that may be present.
location ~* ^/<path to your Crowd>/ { if ($args ~* "redirect:") { return 403; } proxy_pass http://$host.internal$request_uri;}
or
383

Documentation for Crowd 4.4 2
Created in 2021 by Atlassian. Licensed under a .Creative Commons Attribution 2.5 Australia License
Block access to your Crowd server's web interface from untrusted networks, such as the Internet.
Fix
This vulnerability can be fixed by upgrading Crowd. There are no patches available for this vulnerability for any questions, please raise a support request at .http://support.atlassian.com/
The describes when and how we release security patches and security upgrades for our Security Patch Policyproducts.
Upgrade
The vulnerabilities and fix versions are described in the 'Description' section above.
We recommend that you upgrade to the latest version of Crowd, if possible. For a full description of the latest version of , see the . You can download the latest version of from the .Crowd release notes Crowd download centre
384

Crowd Security Advisory 2014-05-21This advisory discloses a critical security vulnerability that we have found in Crowd and fixed in a recent version of Crowd.
Customerswho have downloaded and installed Crowdshould upgrade their existing Crowd installations or apply the patch to fix this vulnerability. Atlassian OnDemand customershave been upgraded with the fix for the issue described in this advisory.No other Atlassian products are affected.
The vulnerability affects all versions of Crowd up to and including2.7.1.
Atlassian is committed to improving product security. We and we fully support the reporting of vulnerabilitiesappreciate it when people work with us to identify and solve the problem.
If you have questions or concerns regarding this advisory, please raise a support request athttp://support..atlassian.com
ClassLoader manipulation vulnerability
Severity
Atlassian rates the severity level of this vulnerability as , according to the scale published incritical Severity .The scale allows us to rank the severity as critical, high, moderate or low.Levels of Security Issues
This is an independent assessment and you should evaluate its applicability to your own IT environment.
Description
We have fixed a vulnerability in our fork of .Attackers can use this vulnerability to execute Java Apache Strutscode of their choice on systems that use these frameworks. The attacker needs to be able to accessthe Crowd web interface.In cases when anonymous access is enabled, a valid user account is not required to exploit this vulnerability.
We have discovered this vulnerability during our review of the recent Struts security advisories. This vulnerability is specific to Crowd.
The vulnerability affects all versions of Crowd earlier than and and including 2.7.Crowd 2.5.7, 2.6.7, 2.7.2are not
vulnerable. The issue is tracked in - CWD-3904 ClassLoader manipulation vulnerability CLOSED .
Risk Mitigation.
If you are unable to upgrade your Crowd serveryou can do the following as a :temporaryworkaround
Block at a reverse proxy or a firewall all requests matching the following regular expression pattern in URI parameters.Note that the exampledoes not account for any URL encoding that may be present.
.*[?&](.*\.||.*|\[('|"))(c|C)lass(\.|('|")]|\[).*
Fix
This vulnerability can be fixed by upgrading Crowd. There are no patches available for this vulnerability.
The describes when and how we release security patches and security upgrades for our Security Patch Policyproducts.
Upgrading Crowd
385

Documentation for Crowd 4.4 2
Created in 2021 by Atlassian. Licensed under a .Creative Commons Attribution 2.5 Australia License
Upgrade to Crowd 2.5.7, 2.6.7, 2.7.2,or a later version, which fixes this vulnerability. We recommend that you upgrade to the latest version of Crowd, if possible.For a full description of these releases, see theCrowd
. You can download these versions of Crowd from the .Release Notes download center
386
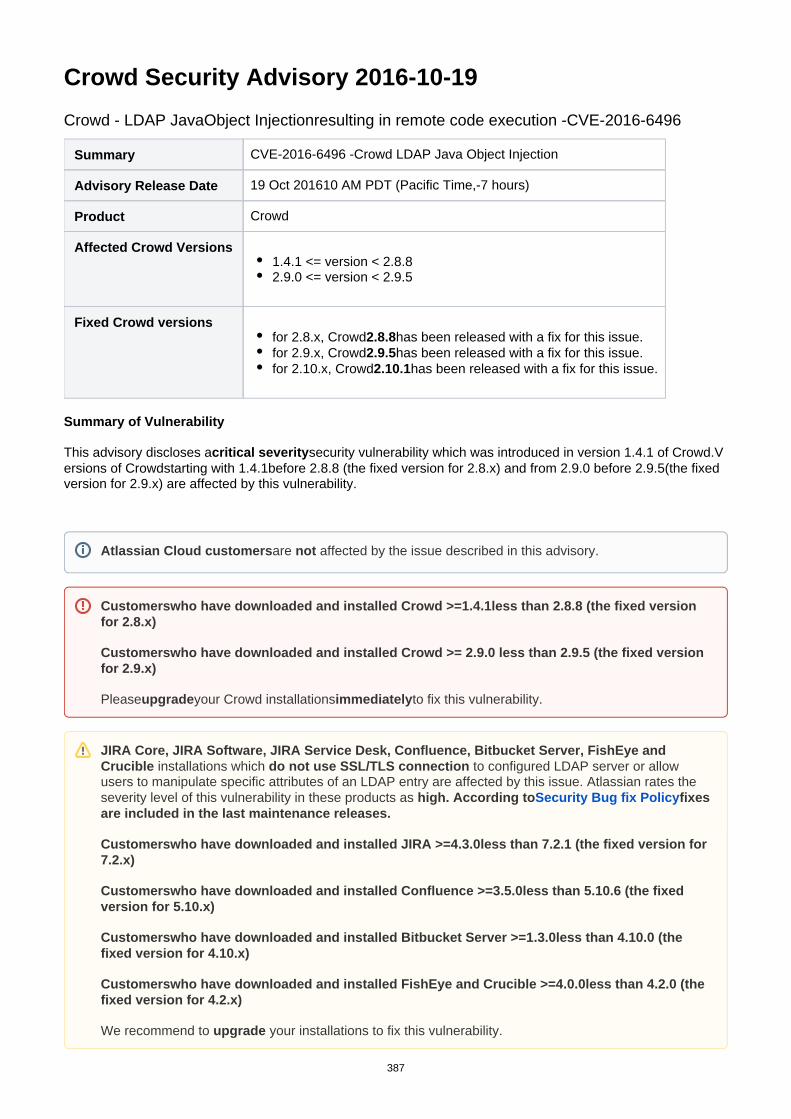
Crowd Security Advisory 2016-10-19
Crowd - LDAP JavaObject Injectionresulting in remote code execution -CVE-2016-6496
Summary CVE-2016-6496 -Crowd LDAP Java Object Injection
Advisory Release Date 19 Oct 201610 AM PDT (Pacific Time,-7 hours)
Product Crowd
Affected Crowd Versions1.4.1 <= version < 2.8.82.9.0 <= version < 2.9.5
Fixed Crowd versionsfor 2.8.x, Crowd has been released with a fix for this issue.2.8.8for 2.9.x, Crowd has been released with a fix for this issue.2.9.5for 2.10.x, Crowd has been released with a fix for this issue.2.10.1
Summary of Vulnerability
This advisory discloses a security vulnerability which was introduced in version 1.4.1 of Crowd.Vcritical severityersions of Crowdstarting with 1.4.1before 2.8.8 (the fixed version for 2.8.x) and from 2.9.0 before 2.9.5(the fixed version for 2.9.x) are affected by this vulnerability.
Atlassian Cloud customersare affected by the issue described in this advisory.not
Customerswho have downloaded and installed Crowd >=1 less than 2.8.8 (the fixed version .4.1for 2.8.x)
Customerswho have downloaded and installed Crowd >= 2.9.0 less than 2.9.5 (the fixed version for 2.9.x)
Please your Crowd installations to fix this vulnerability.upgrade immediately
JIRA Core, JIRA Software, JIRA Service Desk, Confluence, Bitbucket Server, FishEye and Crucible installations which to configured LDAP server or allow do not use SSL/TLS connectionusers to manipulate specific attributes of an LDAP entry are affected by this issue. Atlassian rates the severity level of this vulnerability in these products as high. According to fixes Security Bug fix Policyare included in the last maintenance releases.
Customerswho have downloaded and installed JIRA >=4 less than 7.2.1 (the fixed version for .3.07.2.x)
Customerswho have downloaded and installed Confluence >=3 less than 5.10.6 (the fixed .5.0version for 5.10.x)
Customerswho have downloaded and installed Bitbucket Server >=1 less than 4.10.0 (the .3.0fixed version for 4.10.x)
Customerswho have downloaded and installed FishEye and Crucible >=4 less than 4.2.0 (the .0.0fixed version for 4.2.x)
We recommend to your installations to fix this vulnerability.upgrade
387

Documentation for Crowd 4.4 2
Created in 2021 by Atlassian. Licensed under a .Creative Commons Attribution 2.5 Australia License
1. 2. 3. 4. 5. 6. 7.
Crowd LDAP Java Object Injection (CVE-2016-6496)
Severity
Atlassian rates the severity level of this vulnerability as , according to the scale published incritical our Atlassian .The scale allows us to rank the severity as critical, high, moderate or low.severity levels
This is an independent assessment and you should evaluate its applicability to your own IT environment.
Description
The Crowd LDAP directory connector allowed an attacker togain remote code execution in Crowd by injecting malicious attributes in LDAP entries. To exploit this issue, attackers either need to modify an entry in an LDAP directory that Crowd is configured to use or successfully execute a between an LDAP Man-in-The-Middle attackserver and Crowd. Crowd installations configured to communicate with an LDAP server using the protocolLDAPSwith the option enabled are (Secure SSL immune to the vector onlyMan-in-The-Middle attack unless an attacker is
).able to obtain the private key of the SSL/TLS certificate used to secure the communication
All versions of from1.4.1before 2.8.8 (the fixed version for 2.8.x) and from 2.9.0 before 2.9.5(the fixed Crowdversion for 2.9.x)are affected by this vulnerability.This issue can be tracked here:
- CWD-4790 CVE-2016-6496: LDAP Java Object Injection in Crowd CLOSED
Acknowledgements
We would like to credit and of HPE SecurityFortifyfor reporting this issue to us.Alvaro Munoz Alexander Mirosh
Fix
We have taken the following steps to address this issue:
Crowdversion 2.10.1 has been released with a fix for this issue.Crowdversion 2.9.5 has been released with a fix for this issue.Crowdversion 2.8.8 has been released with a fix for this issue.JIRA Core version 7.2.1 has been released with a fix for this issueConfluenceversion 5.10.6has been released with a fix for this issueBitbucket Serverversion 4.10.0 has been released with a fix for this issueFishEye and Crucible version 4.2.0 has been released with a fix for this issue
What You Need to Do
Upgrade (recommended)
The vulnerabilities and fix versions are described in the description section above.Atlassian recommends that you upgrade to the latest version.
Upgrade Crowd to version 2 or higher..10.1
If you are running andCrowd 2.9.x cannot upgrade to Crowd 2.10.1thenupgrade to version 2.9.5.
If you are running andCrowd 2.8.x cannot upgrade to Crowd 2.9.5thenupgrade to version 2.8.8.
388

Documentation for Crowd 4.4 3
Created in 2021 by Atlassian. Licensed under a .Creative Commons Attribution 2.5 Australia License
1.
2.
For a full description of the latest version of Crowd, see .You can download the latest version of the release notesCrowd from the .download center
Upgrade JIRA Core (this is also required if you are running JIRA Software or JIRA Service Desk) to version 7.2.1 or higher.
For a full description of the latest version of JIRA Core, see .You can download the latest the release notesversion of JIRA from the .download center
Upgrade Confluence to version 5.10.6or higher.
For a full description of the latest version of Confluence, see .You can download the latest the release notesversion of Confluence from the .download center
Upgrade Bitbucket Serverto version 4.10.0 or higher.
For a full description of the latest version of Bitbucket Server, see .You can download the latest the release notesversion of Bitbucket Server from the .download center
Upgrade FishEye and Crucible to version 4.2.0 or higher.
For a full description of the latest version of FishEye and Crucible,see .You can download the the release noteslatest version of FishEye and Cruciblefrom the .download center
Mitigation
The issue can be mitigated by restricting modifications of LDAP entries by LDAP users andconfiguringSSL/TLS connection between an LDAP Server and Crowd.
If you are running and to 2.8.8 or 2.9.5then you can follow these steps to mitigate Crowd 2.8.x cannot upgradethe issue:
Configure the SSL/TLSconnection between an LDAP server and Crowd.SeeConfiguring Crowd to Work for information on setting up secure transport.with SSL
Restrict modification of LDAP entries by LDAP users.The following restrictions should be implemented:The users to their LDAP entries should not be able to add additional object classes("javaContainer", "javaObject", "javaNamingReference", "javaSerializedObject", "javaMarshalledObject")The users related to storing Java objects in an LDAP should not be able to manipulate attributesdirectory ("javaSerializedData", "javaClassName", "javaFactory", "javaCodeBase", "javaReferenceAddress", "javaClassNames", "javaRemoteLocation")
Support
If you have questions or concerns regarding this advisory, please raise a support request athttps://support..atlassian.com/
References
Security Bug fix Policy
As per our new policy critical security bug fixes will be back ported to major software versions for up to 12 months for JIRA and Confluence. We will release new maintenance releases for the versions covered by the new policy instead of binary patches.
Binary patches will no longer be released.
389

Documentation for Crowd 4.4 4
Created in 2021 by Atlassian. Licensed under a .Creative Commons Attribution 2.5 Australia License
Severity Levels for security issues
Atlassian security advisories include a severity level and a CVE identifier. This severity level is based on our self-calculated CVSS score for each specific vulnerability. CVSS is an industry standard vulnerability metric. You can also learn more about CVSS at .FIRST.org
End of Life Policy
Our end of life policy varies for different products. Please refer to our EOL Policy for details.
390

Crowd Security Advisory 2017-03-10
Crowd -CVE-2017-5638
Summary CVE-2017-5638 - Remote code execution in Crowd
Advisory Release Date 10 Mar 201710 AM PDT (Pacific Time,-7 hours)
Product Crowd. (CrowdID is also affected but EmbeddedCrowd is affected)not
Affected Crowd Versions2.8.3 <= version < 2.9.72.10.1 <= version < 2.10.32.11.0 <= version < 2.11.1
CVE ID(s)CVE-2017-5638
Summary of vulnerability
This advisory discloses a security vulnerability that was introduced in version of Crowd.Versicritical severity 2.8.3ons of Crowdfrom 2.8.3 before 2.9.7 (the fixed version for 2.9.x), from version 2.10.1 before 2.10.3 (the fixed
before 2.11.1 (the fixed version for 2.11.x) are affected by this version for 2.10.x) and from version 2.11.0vulnerability.
Remote code execution through Apache (CVE-2017-5638)Struts 2
Severity
Atlassian Cloudinstances aren't affected by the issue described on this page.
If you have , you are upgraded Crowdto version2.9.7 or 2.10.3 or 2.11.1 not affected by this issue.
Customerswho have downloaded and installed >= and less than 2.9.7 (the fixed Crowd 2.8.3version for 2.9.x)
Customerswho have downloaded and installed >= and less than 2.10.3 (the fixed Crowd 2.10.1version for 2.10.x)
Customerswho have downloaded and installed >= 2.11.0 and less than 2.11.1 (the fixed Crowdversion for )2.11.x
Please to fix this vulnerability. upgrade your Crowd installations immediately
391

Documentation for Crowd 4.4 2
Created in 2021 by Atlassian. Licensed under a .Creative Commons Attribution 2.5 Australia License
We rate the severity level of this vulnerability as , according to .The critical our Atlassian severity levelsscaleallows us to rank the severity as critical, high, moderate or low.
This is an independent assessment. You should evaluate its applicability to your own IT environment.
Description
Crowduseda version of ApacheStruts 2that was vulnerable to . Attackers can use this CVE-2017-5638vulnerability to executeJava code of their choice without prior authentication on systems that have a vulnerable version of Crowd.
All versions of Crowdfrom 2.8.3 before 2.9.7 (the fixed version for 2.9.x), from version 2.10.1 before 2.10.3 (the fixed version for 2.10.x) and from version 2.11.0before 2.11.1(the fixed version for 2.11.x)are affected by this vulnerability.You can track this issue here:
- CWD-4879 Apache Struts 2 Remote Code Execution (CVE-2017-5638) CLOSED
Fix
To address thisissue, we have released the following versions containing a fix:
Crowd version 2.9.7Crowdversion 2.10.3Crowdversion 2.11.1
What you need to do
Upgrade Crowd to version 2.11.1 or higher
The vulnerabilities and fix versions are described above.If affected, you should upgrade to the latest version immediately.
If you're running andCrowd 2.10.x cannot upgrade to 2.11.1,upgrade to version 2.10.3.
If you're running andCrowd 2.9.x cannot upgrade to 2.11.1,upgrade to version 2.9.7.
For a full description of the latest version of Crowd, see the .You can download the latest Crowd release notesversion of Crowd from the .download centre
Detection
Given that we have confirmed exploitation in the wild, we recommend customers look for signs of compromise even if they upgrade immediately. Detection of such attacks is very environment-specific but below are some indicators that customers may find useful in their investigations.
The same expression can be used across all log types, which is especially useful if you are using a SIEM or log aggregator to analyze the logs all at once:
grep -E 'InvalidContentTypeException.+multipart\/form\-data' *.log
If remote code was executed, you will see an OGNL expression being evaluated on the server.These commands will typically start with `#cmd=` or `#cmds=` such as:
392

Documentation for Crowd 4.4 3
Created in 2021 by Atlassian. Licensed under a .Creative Commons Attribution 2.5 Australia License
(#cmd='ls')(#cmds=(#iswin?{'cmd.exe','/c',#cmd}:{'/bin/bash','-c',#cmd}))
Crowd logs all its application events inside `atlassian-crowd.log`. The default path is: `<CROWD_HOME>/logs/atlassian-crowd.log`.
017-03-10 10:27:29,340 http-bio-8095-exec-22 WARN [struts2.dispatcher.multipart.JakartaMultiPartRequest] Unable to parse requestorg.apache.commons.fileupload.FileUploadBase$InvalidContentTypeException: the request doesn't contain a multipart/form-data or multipart/mixed stream, content type header is %{(#nike='multipart/form-data').(#[email protected]@DEFAULT_MEMBER_ACCESS).(#_memberAccess?(#_memberAccess=#dm):((#container=#context['com.opensymphony.xwork2.ActionContext.container']).(#ognlUtil=#container.getInstance(@com.opensymphony.xwork2.ognl.OgnlUtil@class)).(#ognlUtil.getExcludedPackageNames().clear()).(#ognlUtil.getExcludedClasses().clear()).(#context.setMemberAccess(#dm)))).(#cmd='touch /tmp/pwned').(#iswin=(@java.lang.System@getProperty('os.name').toLowerCase().contains('win'))).(#cmds=(#iswin?{'cmd.exe','/c',#cmd}:{'/bin/bash','-c',#cmd})).(#p=new java.lang.ProcessBuilder(#cmds)).(#p.redirectErrorStream(true)).(#process=#p.start()).(#ros=(@org.apache.struts2.ServletActionContext@getResponse().getOutputStream())).(@org.apache.commons.io.IOUtils@copy(#process.getInputStream(),#ros)).(#ros.flush())}...
Support
If you have questions or concerns regarding this advisory, please raise a support request athttps://support..atlassian.com/
References
Security Bug fix Policy
As per our new policy, critical security bug fixes will be back-ported to major software versions for up to 12 months for JIRA and Confluence.We'll release new maintenance releases for the versions covered by the new policy instead of binary patches.
Binary patches will no longer be released.
Severity Levels for security issues
Atlassian security advisories include a severity level and a CVE identifier. This severity level is based on our self-calculated CVSS score for each specific vulnerability. CVSS is an industry standard vulnerability metric. You can also learn more about CVSS at .FIRST.org
End of Life Policy
Our end-of-life policy varies for each product. Please refer to our EOL Policy for details.
393
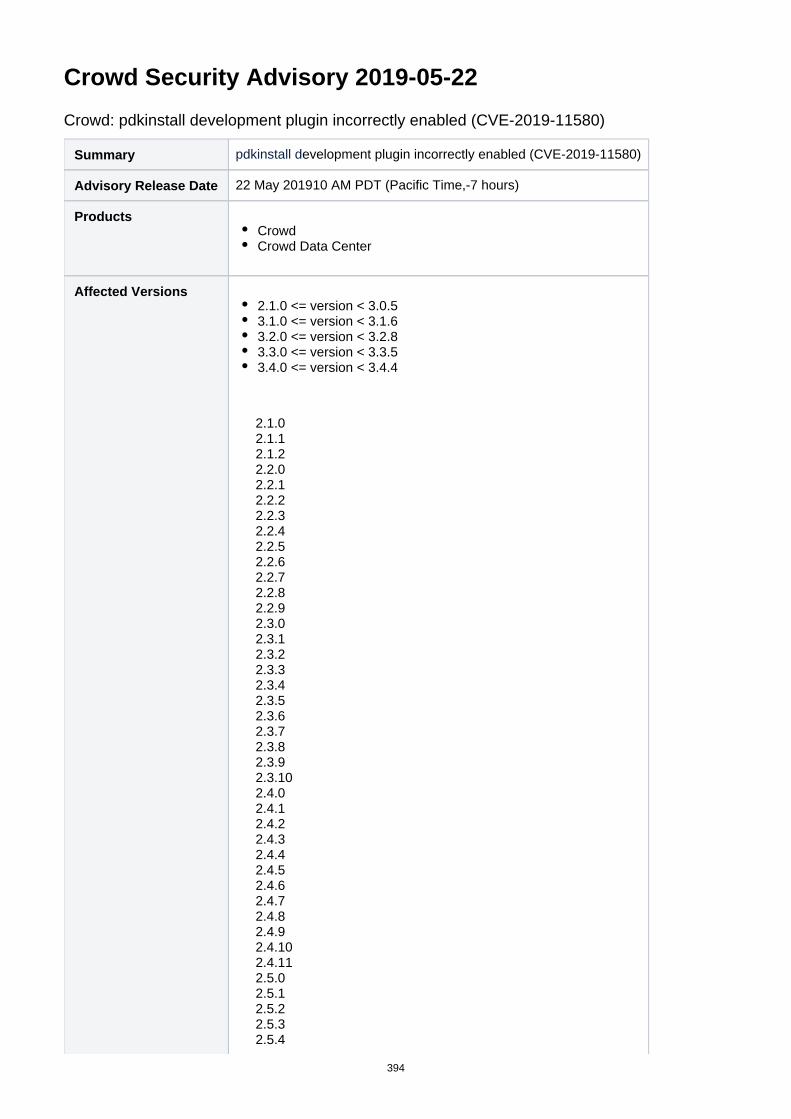
Crowd Security Advisory 2019-05-22
Crowd: pdkinstall development plugin incorrectly enabled (CVE-2019-11580)
Summary pdkinstall development plugin incorrectly enabled (CVE-2019-11580)
Advisory Release Date 22 May 201910 AM PDT (Pacific Time,-7 hours)
ProductsCrowdCrowd Data Center
Affected Versions2.1.0 <= version < 3.0.53.1.0 <= version < 3.1.63.2.0 <= version < 3.2.83.3.0 <= version < 3.3.53.4.0 <= version < 3.4.4
2.1.02.1.12.1.22.2.02.2.12.2.22.2.32.2.42.2.52.2.62.2.72.2.82.2.92.3.02.3.12.3.22.3.32.3.42.3.52.3.62.3.72.3.82.3.92.3.102.4.02.4.12.4.22.4.32.4.42.4.52.4.62.4.72.4.82.4.92.4.102.4.112.5.02.5.12.5.22.5.32.5.4
394

Documentation for Crowd 4.4 2
Created in 2021 by Atlassian. Licensed under a .Creative Commons Attribution 2.5 Australia License
2.5.52.5.62.5.72.6.02.6.12.6.22.6.32.6.42.6.52.6.62.6.72.7.02.7.12.7.22.8.02.8.12.8.22.8.32.8.42.8.62.8.72.8.82.9.12.9.22.9.32.9.42.9.52.9.62.9.72.10.12.10.22.10.32.10.42.11.02.11.12.11.22.12.02.12.13.0.03.0.13.0.23.0.33.1.03.1.13.1.23.1.33.1.43.1.53.2.03.2.13.2.23.2.33.2.43.2.53.2.63.2.73.3.03.3.13.3.23.3.33.3.43.4.03.4.13.4.2
395

Documentation for Crowd 4.4 3
Created in 2021 by Atlassian. Licensed under a .Creative Commons Attribution 2.5 Australia License
3.4.3
Fixed Versions3.0.53.1.63.2.83.3.53.4.4
CVE ID(s) CVE-2019-11580
Summary of Vulnerability
This advisory discloses a security vulnerability which was introduced in version 2.1.0 of Crowd critical severityand Crowd Data Center.Versions of Crowdand Crowd Data Centerstarting with (the version 2.1.0 before 3.0.5fixed version for 3.0.x), from version 3.1.0 before 3.1.6 (the fixed version for 3.1.x), from version 3.2.0 before 3.2.8(the fixed version for 3.2.x), from version 3.3.0 before 3.3.5 (the fixed version for 3.3.x), and from version 3.4.0 before 3.4.4 (the fixed version for 3.4.x) are affected by this vulnerability.
evelopment plugin incorrectly enabled (CVE-2019-11580)pdkinstall d
Severity
Atlassian rates the severity level of this vulnerability as , according to the scale published incritical our Atlassian .The scaleallows us to rank the severity as critical, high, moderate or low.severity levels
This is our assessment and you should evaluate its applicability to your own IT environment.
Description
Crowd and Crowd Data Center had thepdkinstall development plugin incorrectly enabled in release builds. Attackers who can send unauthenticated or authenticated requests to a Crowd or Crowd Data Center instance can exploit this vulnerability to install arbitrary plugins, which permits remote code execution on systems running a vulnerable versionof Crowd orCrowd Data Center.
All versions of Crowd from version (the fixed version for 3.0.x), from version 2.1.0 before 3.0.5 3.1.0 before 3.1.6(the fixed version for 3.1.x), from version (the fixed version for 3.2.x), from version 3.2.0 before 3.2.8 3.3.0
(the fixed version for 3.3.x), and from version (the fixed version for 3.4.x) are before 3.3.5 3.4.0 before 3.4.4affected by this vulnerability.
Customerswho have upgraded Crowd or Crowd Data Center to version3.0.5 or 3.1.6 or 3.2.8 or 3.3.5 or 3.4.4arenot affected.
Customerswho :are currently running
Crowd or Crowd Data Center (the fixed version for 3.0.x)from version 2.1.0before 3.0.5Crowd or Crowd Data Center (the fixed version for 3.1.x)from version3.1.0 before 3.1.6Crowd or Crowd Data Center (the fixed version for 3.2.x)from version3.2.0 before 3.2.8Crowd or Crowd Data Center (the fixed version for 3.3.x)from version3.3.0 before 3.3.5Crowd or Crowd Data Center (the fixed version for 3.4.x)from version3.4.0 before 3.4.4
Please installations to fix this vulnerability.upgrade your Crowdor Crowd Data Center immediately
396
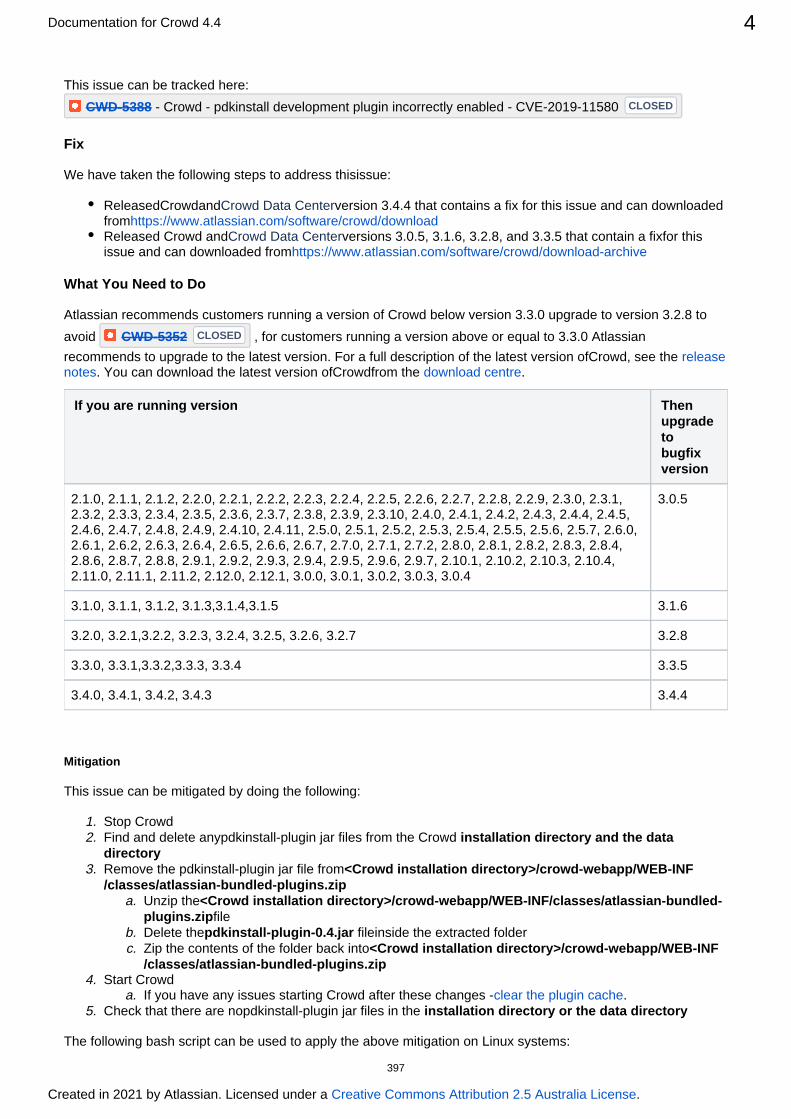
Documentation for Crowd 4.4 4
Created in 2021 by Atlassian. Licensed under a .Creative Commons Attribution 2.5 Australia License
1. 2.
3.
a.
b. c.
4. a.
5.
This issue can be tracked here:
- CWD-5388 Crowd - pdkinstall development plugin incorrectly enabled - CVE-2019-11580 CLOSED
Fix
We have taken the following steps to address thisissue:
ReleasedCrowdand version 3.4.4 that contains a fix for this issue and can downloaded Crowd Data Centerfromhttps://www.atlassian.com/software/crowd/downloadReleased Crowd and versions 3.0.5, 3.1.6, 3.2.8, and 3.3.5 that contain a fixfor this Crowd Data Centerissue and can downloaded fromhttps://www.atlassian.com/software/crowd/download-archive
What You Need to Do
Atlassian recommends customers running a version of Crowd below version 3.3.0 upgrade to version 3.2.8 to
avoid , for customers running a version above or equal to 3.3.0 Atlassian CWD-5352 CLOSED
recommends to upgrade to the latest version. For a full description of the latest version ofCrowd, see the release. You can download the latest version ofCrowdfrom the .notes download centre
If you are running version Then upgrade to bugfix version
2.1.0, 2.1.1, 2.1.2, 2.2.0, 2.2.1, 2.2.2, 2.2.3, 2.2.4, 2.2.5, 2.2.6, 2.2.7, 2.2.8, 2.2.9, 2.3.0, 2.3.1, 2.3.2, 2.3.3, 2.3.4, 2.3.5, 2.3.6, 2.3.7, 2.3.8, 2.3.9, 2.3.10, 2.4.0, 2.4.1, 2.4.2, 2.4.3, 2.4.4, 2.4.5, 2.4.6, 2.4.7, 2.4.8, 2.4.9, 2.4.10, 2.4.11, 2.5.0, 2.5.1, 2.5.2, 2.5.3, 2.5.4, 2.5.5, 2.5.6, 2.5.7, 2.6.0, 2.6.1, 2.6.2, 2.6.3, 2.6.4, 2.6.5, 2.6.6, 2.6.7, 2.7.0, 2.7.1, 2.7.2, 2.8.0, 2.8.1, 2.8.2, 2.8.3, 2.8.4, 2.8.6, 2.8.7, 2.8.8, 2.9.1, 2.9.2, 2.9.3, 2.9.4, 2.9.5, 2.9.6, 2.9.7, 2.10.1, 2.10.2, 2.10.3, 2.10.4, 2.11.0, 2.11.1, 2.11.2, 2.12.0, 2.12.1, 3.0.0, 3.0.1, 3.0.2, 3.0.3, 3.0.4
3.0.5
3.1.0, 3.1.1, 3.1.2, 3.1.3,3.1.4,3.1.5 3.1.6
3.2.0, 3.2.1,3.2.2, 3.2.3, 3.2.4, 3.2.5, 3.2.6, 3.2.7 3.2.8
3.3.0, 3.3.1,3.3.2,3.3.3, 3.3.4 3.3.5
3.4.0, 3.4.1, 3.4.2, 3.4.3 3.4.4
Mitigation
This issue can be mitigated by doing the following:
Stop CrowdFind and delete anypdkinstall-plugin jar files from the Crowd installation directory and the data directoryRemove the pdkinstall-plugin jar file from<Crowd installation directory>/crowd-webapp/WEB-INF/classes/atlassian-bundled-plugins.zip
Unzip the<Crowd installation directory>/crowd-webapp/WEB-INF/classes/atlassian-bundled-fileplugins.zip
Delete the fileinside the extracted folderpdkinstall-plugin-0.4.jar Zip the contents of the folder back into<Crowd installation directory>/crowd-webapp/WEB-INF/classes/atlassian-bundled-plugins.zip
Start CrowdIf you have any issues starting Crowd after these changes - .clear the plugin cache
Check that there are nopdkinstall-plugin jar files in the installation directory or the data directory
The following bash script can be used to apply the above mitigation on :Linux systems
397
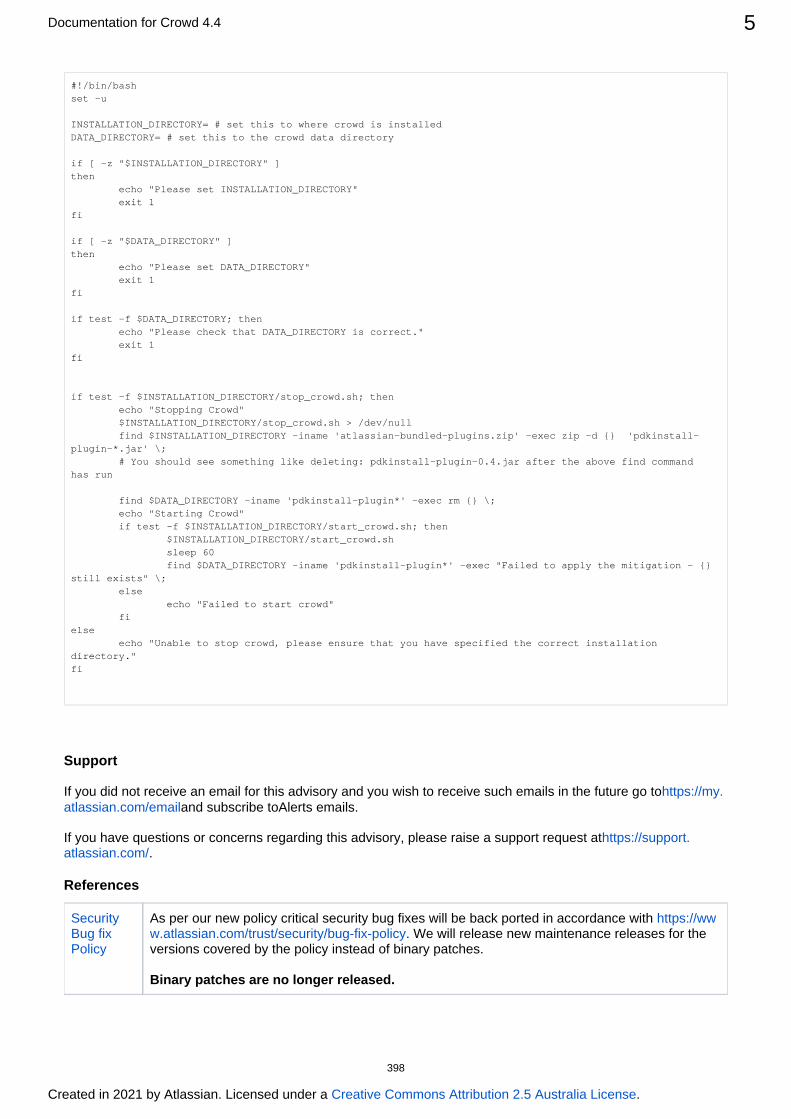
Documentation for Crowd 4.4 5
Created in 2021 by Atlassian. Licensed under a .Creative Commons Attribution 2.5 Australia License
#!/bin/bashset -u
INSTALLATION_DIRECTORY= # set this to where crowd is installedDATA_DIRECTORY= # set this to the crowd data directory
if [ -z "$INSTALLATION_DIRECTORY" ]then echo "Please set INSTALLATION_DIRECTORY" exit 1fi
if [ -z "$DATA_DIRECTORY" ]then echo "Please set DATA_DIRECTORY" exit 1fi
if test -f $DATA_DIRECTORY; then echo "Please check that DATA_DIRECTORY is correct." exit 1fi
if test -f $INSTALLATION_DIRECTORY/stop_crowd.sh; then echo "Stopping Crowd" $INSTALLATION_DIRECTORY/stop_crowd.sh > /dev/null find $INSTALLATION_DIRECTORY -iname 'atlassian-bundled-plugins.zip' -exec zip -d {} 'pdkinstall-plugin-*.jar' \; # You should see something like deleting: pdkinstall-plugin-0.4.jar after the above find command has run
find $DATA_DIRECTORY -iname 'pdkinstall-plugin*' -exec rm {} \; echo "Starting Crowd" if test -f $INSTALLATION_DIRECTORY/start_crowd.sh; then $INSTALLATION_DIRECTORY/start_crowd.sh sleep 60 find $DATA_DIRECTORY -iname 'pdkinstall-plugin*' -exec "Failed to apply the mitigation - {} still exists" \; else echo "Failed to start crowd" fielse echo "Unable to stop crowd, please ensure that you have specified the correct installation directory."fi
Support
If you did not receive an email for this advisory and you wish to receive such emails in the future go tohttps://my.and subscribe toAlerts emails.atlassian.com/email
If you have questions or concerns regarding this advisory, please raise a support request athttps://support..atlassian.com/
References
Security Bug fix Policy
As per our new policy critical security bug fixes will be back ported in accordance with https://ww. We will release new maintenance releases for the w.atlassian.com/trust/security/bug-fix-policy
versions covered by the policy instead of binary patches.
Binary patches are no longer released.
398

Documentation for Crowd 4.4 6
Created in 2021 by Atlassian. Licensed under a .Creative Commons Attribution 2.5 Australia License
Severity Levels for security issues
Atlassian security advisories include a severity level and a CVE identifier. This severity level is based on our self-calculated CVSS score for each specific vulnerability. CVSS is an industry standard vulnerability metric. You can also learn more about CVSS at .FIRST.org
End of Life Policy
Our end of life policy varies for different products. Please refer to our EOL Policy for details.
399

Constructing cron expressions in CrowdA cron expression gives you more control when scheduling directory synchronization comparing to polling interval. For example, you could define a cron expression to run directory synchronization at8:15 am on the second Friday of every month.This page describes how to construct a cron expression.
Constructing a cron expression
A cron expression is a string of fields separated by spaces. The following table displays the fields of a cron expression, :in the order that they must be specified (from left to right)
Second Minute Hour Day-of-month
Month Day-of-week
Year (optional)
Allowed values
0-59 0-59 0-23 1-31 1-12 or JAN-DEC
1-7 or SUN-SAT
1970-2099
Allowed specialcharacters
, - * / , - * / , - * / , - * / ? L W C
, - * / , - * / ? L C # , - * /
Note, cron expressions are not case-sensitive.
Here is an example:
0 15 8 ? JAN MON 2014
This literally translates to 0 second, 15 minute, 8 hour, any day of the month, January, Monday, 2014.
In plain English, this represents 8:15am onevery Monday during January of 2014. Note, the ? character means "no particular value". In this example, we've set the Day-of-month to no particular value. We don't need to specify it, as we've specified a Day-of-week value. Read more about special characters in the next section.
More examples of cron expressions are explained in the examples sectionat the bottom of this page.
Special characters
Special character
Usage
, Specifies a list of values. For example, in the field, 'MON,WED,FRI' means 'every Day-of-weekMonday, Wednesday, and Friday'.
- Specifies a range of values. For example, in the field, 'MON-FRI' means 'every Day-of-weekMonday, Tuesday, Wednesday, Thursday and Friday'.
* Specifies all possible values. For example, in the field, '*' means 'every hour of the day'.Hour
/ Specifies increments to the given value. For example, in the field, '0/15' means 'every 15 Minuteminutes during the hour, starting at minute zero'.
? Specifies no particular value. This is useful when you need to specify a value for one of the two fields or but not the other.Day-of-month Day-of-week,
This functionality is available forCrowd Data Center only
400
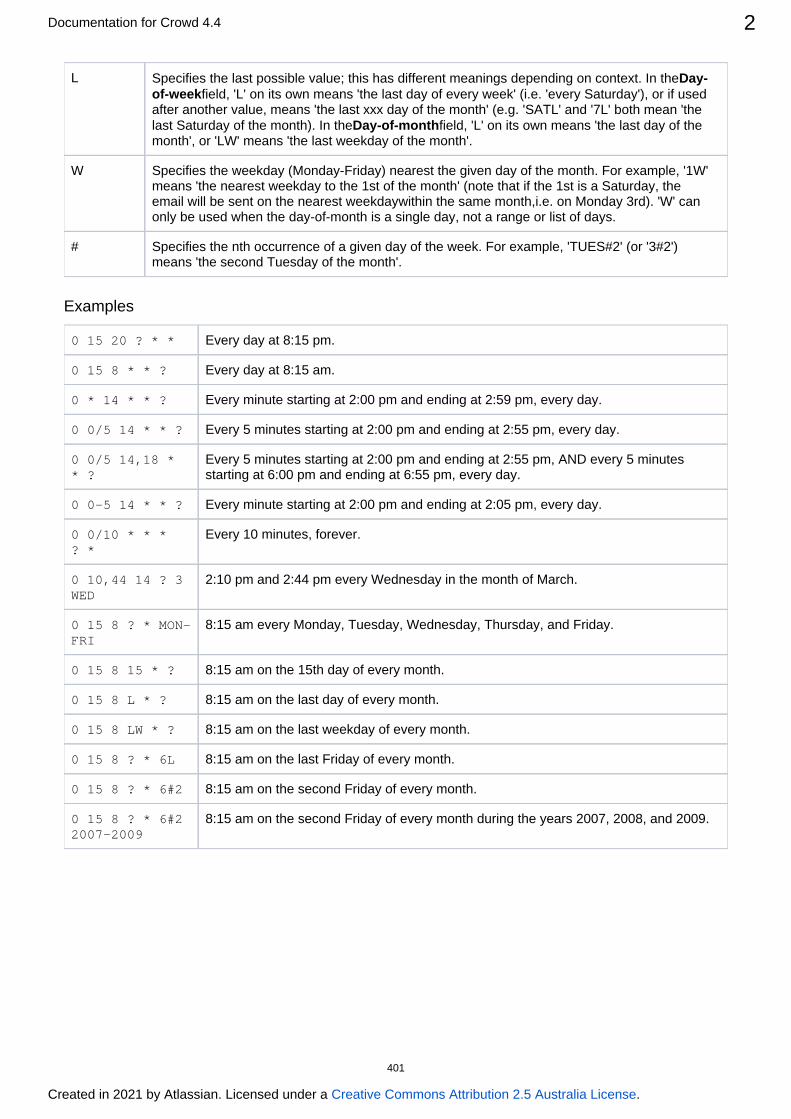
Documentation for Crowd 4.4 2
Created in 2021 by Atlassian. Licensed under a .Creative Commons Attribution 2.5 Australia License
L Specifies the last possible value; this has different meanings depending on context. In theDay-field, 'L' on its own means 'the last day of every week' (i.e. 'every Saturday'), or if used of-week
after another value, means 'the last xxx day of the month' (e.g. 'SATL' and '7L' both mean 'the last Saturday of the month). In the field, 'L' on its own means 'the last day of the Day-of-monthmonth', or 'LW' means 'the last weekday of the month'.
W Specifies the weekday (Monday-Friday) nearest the given day of the month. For example, '1W' means 'the nearest weekday to the 1st of the month' (note that if the 1st is a Saturday, the email will be sent on the nearest weekday i.e. on Monday 3rd). 'W' can within the same month,only be used when the day-of-month is a single day, not a range or list of days.
# Specifies the nth occurrence of a given day of the week. For example, 'TUES#2' (or '3#2') means 'the second Tuesday of the month'.
Examples
0 15 20 ? * * Every day at 8:15 pm.
0 15 8 * * ? Every day at 8:15 am.
0 * 14 * * ? Every minute starting at 2:00 pm and ending at 2:59 pm, every day.
0 0/5 14 * * ? Every 5 minutes starting at 2:00 pm and ending at 2:55 pm, every day.
0 0/5 14,18 * * ?
Every 5 minutes starting at 2:00 pm and ending at 2:55 pm, AND every 5 minutes starting at 6:00 pm and ending at 6:55 pm, every day.
0 0-5 14 * * ? Every minute starting at 2:00 pm and ending at 2:05 pm, every day.
0 0/10 * * * ? *
Every 10 minutes, forever.
0 10,44 14 ? 3 WED
2:10 pm and 2:44 pm every Wednesday in the month of March.
0 15 8 ? * MON-FRI
8:15 am every Monday, Tuesday, Wednesday, Thursday, and Friday.
0 15 8 15 * ? 8:15 am on the 15th day of every month.
0 15 8 L * ? 8:15 am on the last day of every month.
0 15 8 LW * ? 8:15 am on the last weekday of every month.
0 15 8 ? * 6L 8:15 am on the last Friday of every month.
0 15 8 ? * 6#2 8:15 am on the second Friday of every month.
0 15 8 ? * 6#2 2007-2009
8:15 am on the second Friday of every month during the years 2007, 2008, and 2009.
401

User Guide
About Crowd
Atlassian's is a software application installed Crowdby the system administrator. The administrator will also connect one or more of your organization's applications to Crowd. When you log in to a Crowd-
, Crowd will verify your connected applicationpassword and login permissions.
Using Crowd for single sign-on (SSO), each person needs only one username and password to access all web applications. You can host your own OpenID provider to include external applications.
You only need to log in once, to Crowd or a Crowd-connected application. When you start another Crowd-connected application, you will be logged in automatically.When you log out of Crowd or one of the Crowd-connected applications, you will be logged out of Crowd and the other application(s) at the same time.
Crowd also manages the information held about you as a user of other software applications:
Your login permissions to various applications.The password you use to log in to those applications.The groups and roles you belong to, which are used by the applications to decide which functions you can perform within the applications.The user directories which hold your information.
Search the User Guide
About the User Guide
The contains information for Crowd User Guidepeople who use Crowd to update their user profiles and passwords and to view their groups, roles and applications.
If you need information about installing Crowd, configuring your Crowd server or using the Crowd Administration Console, please visit the Crowd
.documentation home page
If you have a question about using Crowd that hasn't been answered here, please .let us know
Download
You can in PDF, download the Crowd documentationHTML or XML formats.
402
Documentation for Crowd 4.4 2
Created in 2021 by Atlassian. Licensed under a .Creative Commons Attribution 2.5 Australia License
Getting Help
Support | | Feature requests and bug reports Answers| Knowledge base
403
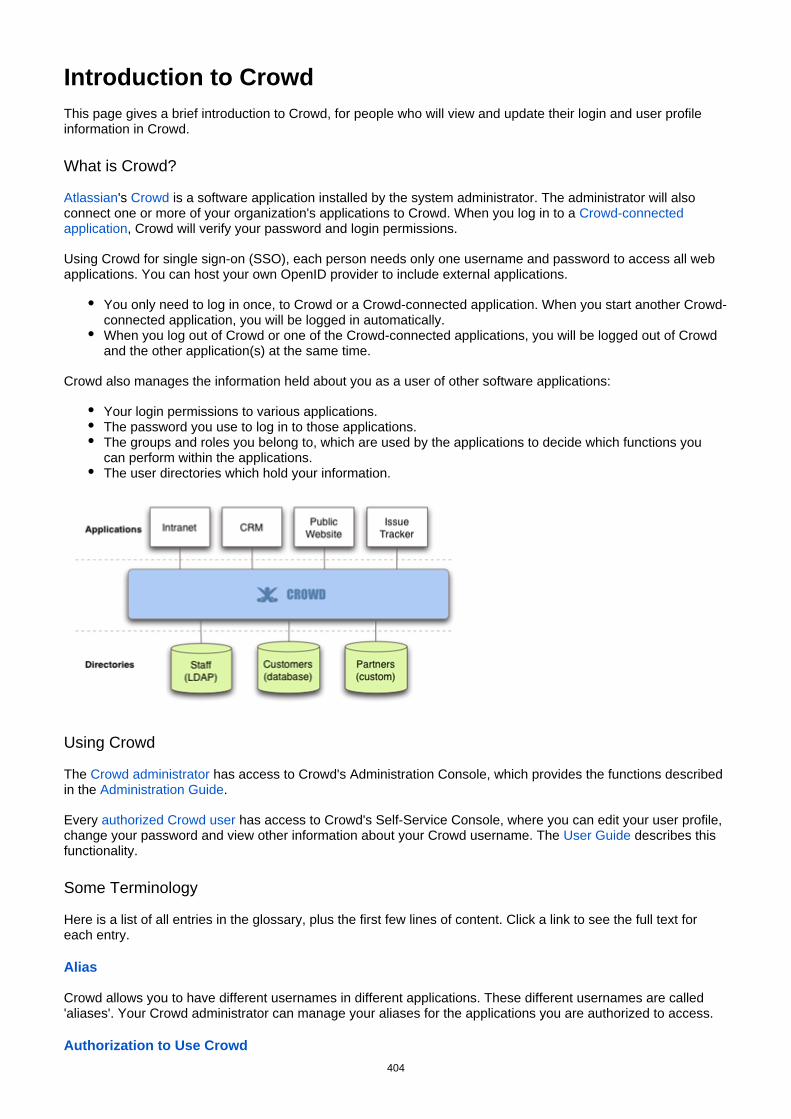
Introduction to CrowdThis page gives a brief introduction to Crowd, for people who will view and update their login and user profile information in Crowd.
What is Crowd?
Atlassian's is a software application installed by the system administrator. The administrator will also Crowdconnect one or more of your organization's applications to Crowd. When you log in to a Crowd-connected
, Crowd will verify your password and login permissions.application
Using Crowd for single sign-on (SSO), each person needs only one username and password to access all web applications. You can host your own OpenID provider to include external applications.
You only need to log in once, to Crowd or a Crowd-connected application. When you start another Crowd-connected application, you will be logged in automatically.When you log out of Crowd or one of the Crowd-connected applications, you will be logged out of Crowd and the other application(s) at the same time.
Crowd also manages the information held about you as a user of other software applications:
Your login permissions to various applications.The password you use to log in to those applications.The groups and roles you belong to, which are used by the applications to decide which functions you can perform within the applications.The user directories which hold your information.
Using Crowd
The has access to Crowd's Administration Console, which provides the functions described Crowd administratorin the .Administration Guide
Every has access to Crowd's Self-Service Console, where you can edit your user profile, authorized Crowd userchange your password and view other information about your Crowd username. The describes this User Guidefunctionality.
Some Terminology
Here is a list of all entries in the glossary, plus the first few lines of content. Click a link to see the full text for each entry.
Alias
Crowd allows you to have different usernames in different applications. These different usernames are called 'aliases'. Your Crowd administrator can manage your aliases for the applications you are authorized to access.
Authorization to Use Crowd
404

Documentation for Crowd 4.4 2
Created in 2021 by Atlassian. Licensed under a .Creative Commons Attribution 2.5 Australia License
If you are authorized to use Crowd, you can log in to Crowd's Self-Service Console to update your user profile and view other information about your username. The Crowd administrator can grant people access to the Self-Service Console, as described in the Crowd Administration Guide. Basically, the administrator should ensure that your username is in a user directory which is mapped to the Crowd application.
Crowd Administrator
A Crowd administrator is a user who has access to the Crowd Administration Console, which provides the functions described in the Administration Guide. The first administrator is defined during the installation of Crowd. A Crowd administrator can grant administration rights to other users, as described in the Crowd Administration Guide.
Crowd-Connected Application
A 'Crowd-connected application' is a software application which has been designed and configured to use Crowd for user logins. These applications pass all login requests to Crowd for authentication. Depending on the integration level, the application may also make use of the groups and roles defined in Crowd for authorization purposes, and allow single sign-on across the Crowd domain. The Crowd Administration Guide tells you how to connect an application to Crowd.
Directory
Crowd uses the term 'directory', or 'user directory', to refer to a store of information about a user. Typically, a directory will hold your username, name, password, email address, and so on. Your Crowd administrator can define one or more directories internally in Crowd or connect one or more external directories to Crowd.
Group
A group is a collection of users. Administrators create groups so that the administrator can assign permissions to a number of people at once. For example, it is quicker to give group 'X' access to Jira, rather than giving every team member access individually. In Crowd, each group belongs to a specific directory. It is possible to have two groups with the same name, such as 'X', in two different directories. A user can be a member of group 'X' in one directory, in both directories or in neither
Role
Support for roles, previously deprecated, was removed in Crowd 2.5.
Self-Service Console
Authorized Crowd users can access the Crowd Console, even if they are not Crowd administrators. Non-administrators will see a subset of the Crowd Console functionality, which we call the 'Self-Service Console'. The User Guide describes this functionality. The Crowd Administration Console presents the full range of Crowd administration functionality to authorized Crowd administrators.
Single Sign-On
Single sign-on (SSO) is a feature offered by Crowd. Your Crowd administrator can choose to enable this feature for the Crowd-connected applications. If SSO is enabled, you will only need to log in or log out once.
405
1.
2.
3.
Logging in to CrowdIf you are authorized to use Crowd, you can log in to Crowd's Self-Service Console to update your user profile and view other information about your username. The can grant people access to the Self-Crowd administratorService Console, as described in the . Basically, the administrator should ensure Crowd Administration Guidethat your username is in a user directory which is mapped to the Crowd application.
If your administrator has configured Crowd to allow (SSO), then you only need to log in once. single sign-onWhen you start another , you will be logged in automatically.Crowd-connected application
On this page:
How to Log InUser AliasesSSO and Google Apps
How to Log In
To log in to Crowd,
Open Crowd in your web browser. In most cases, you will do this by typing an address like this one into the browser's address bar:
http://YOUR-CROWD-LOCATION:8095/crowd/
Replace ' ' with the address of your Crowd server. (Ask your Crowd YOUR-CROWD-LOCATIONadministrator for this address.)The Crowd login screen will appear, as shown in the screenshot below. Enter your username and password.Click the ' ' button.Log In
If you have forgotten your password or your username, you can click the link labeled 'Can't access your '. Read more about or .account? resetting your password requesting a forgotten username
User Aliases
Crowd allows you to have different usernames in different applications. These different usernames are called 'aliases'. Your Crowd administrator can manage your aliases for the applications you are authorized to access.
When you log in to Crowd itself, you must use your primary username i.e. the one registered in Crowd.If you choose to log in to another Crowd-connected application directly, such as Confluence or Jira, instead of logging in via Crowd, then you must log in using the alias registered in that application (Confluence, Jira, or whatever.)If is enabled you will only need to log in or log out once, to Crowd or a Crowd-connected SSOapplication. When you start another Crowd-connected application, you will be logged in automatically.
SSO and Google Apps
These notes are relevant if your Crowd administrator has enabled single sign-on between Crowd and Google Apps:
Single sign-on (SSO) applies only to the applications within Google Apps. The Google Apps administration section (control panel) does not support SSO.When you sign out of Google Apps, you will also be signed out of Crowd and all Crowd-connected applications. This is the usual SSO behavior.
406

Documentation for Crowd 4.4 2
Created in 2021 by Atlassian. Licensed under a .Creative Commons Attribution 2.5 Australia License
But when you sign out of Crowd, you will remain logged in to Google Apps even though you will be logged out of other Crowd-connected applications. (Reason: Google does not rely on a cookie, so there is no easy way for Crowd to tell Google you have signed out.)
It would take some additional development to support single sign-out from Google Apps. If you would like to see this work undertaken, please vote for issue .CWD-1238If you go directly to a Google Apps application without logging in to Crowd, Google Apps direct you to a Crowd login screen.The Crowd login screen for Google Apps will not offer a 'Forgotten your password' link. You cannot change your Crowd password via Google Apps. Instead, if you need to change your password please log in to Crowd directly, by going to this URL: http://YOUR-CROWD-LOCATION:8095/crowd/
407
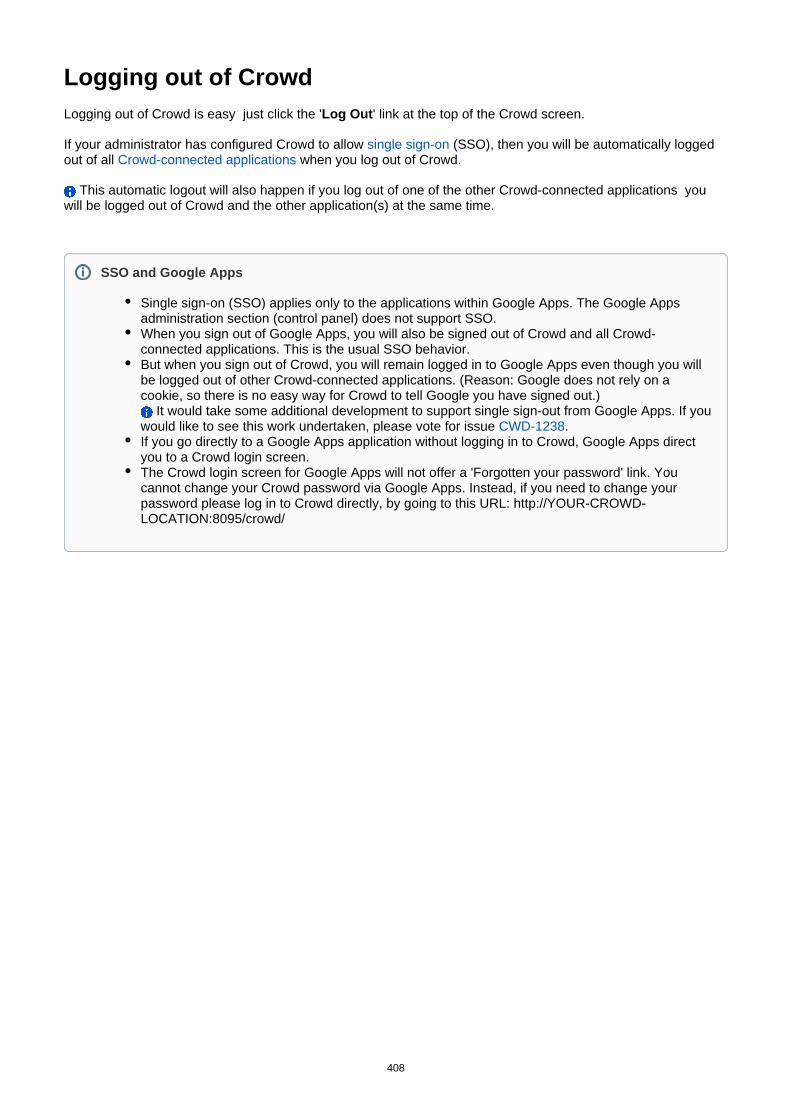
Logging out of CrowdLogging out of Crowd is easy just click the ' ' link at the top of the Crowd screen.Log Out
If your administrator has configured Crowd to allow (SSO), then you will be automatically logged single sign-onout of all when you log out of Crowd.Crowd-connected applications
This automatic logout will also happen if you log out of one of the other Crowd-connected applications you will be logged out of Crowd and the other application(s) at the same time.
SSO and Google Apps
Single sign-on (SSO) applies only to the applications within Google Apps. The Google Apps administration section (control panel) does not support SSO.When you sign out of Google Apps, you will also be signed out of Crowd and all Crowd-connected applications. This is the usual SSO behavior.But when you sign out of Crowd, you will remain logged in to Google Apps even though you will be logged out of other Crowd-connected applications. (Reason: Google does not rely on a cookie, so there is no easy way for Crowd to tell Google you have signed out.)
It would take some additional development to support single sign-out from Google Apps. If you would like to see this work undertaken, please vote for issue .CWD-1238If you go directly to a Google Apps application without logging in to Crowd, Google Apps direct you to a Crowd login screen.The Crowd login screen for Google Apps will not offer a 'Forgotten your password' link. You cannot change your Crowd password via Google Apps. Instead, if you need to change your password please log in to Crowd directly, by going to this URL: http://YOUR-CROWD-LOCATION:8095/crowd/
408

Changing or Resetting your PasswordIf you are authorized to use Crowd, you can log in to Crowd's Self-Service Console and .change your password
When attempting to log in to Crowd, you can also ask to . This is useful if you have reset your passwordforgotten the old one.
Password change applies to one user directory only
In most cases, your username will be defined in one only. But some organizations may user directoryhave more than one user directory. For example, your username may be defined in Crowd for Jira use, and also in another Crowd-connected directory (e.g. LDAP) for use in another application. If you change your password, the new password will apply only in one directory: the directory mapped to the ' ' crowdapplication and defined as in the directory sequence. Your Crowd administrator can define the firstorder of the directories, as described in the .Crowd Administration Guide
409

1. 2.
3. 4. 5.
6. 7.
Changing your PasswordIf you are , you can log in to Crowd's Self-Service Console and change your password, authorized to use Crowdas described below. If you have forgotten your password or your username, you can ask Crowd to email your
and .username reset your password
To change your password
Log in to Crowd.If you are not a , you can skip this step because you will go directly to the Crowd Self-Crowd administratorService Console.
If you are a Crowd administrator, the will open. Click the 'Crowd Administration Console My ' link in the top navigation bar.Profile
The will open.Crowd Self-Service ConsoleClick ' ' in the left-hand menu.Change PasswordThe ' ' screen will appear, as shown in the screenshot below. Enter the following Change Passwordinformation:
Current Password Your current password.New Password The new password you would like to start using.Confirm Password Your new password again, to verify that you typed it correctly the first time.
Click the ' ' button.UpdateIf the change is successful, a ' ' message will appear on the screen.Password updated
Password change applies to one user directory only
In most cases, your username will be defined in one only. But some organizations may user directoryhave more than one user directory. For example, your username may be defined in Crowd for Jira use, and also in another Crowd-connected directory (e.g. LDAP) for use in another application. If you change your password, the new password will apply only in one directory: the directory mapped to the ' ' crowdapplication and defined as in the directory sequence. Your Crowd administrator can define the firstorder of the directories, as described in the .Crowd Administration Guide
410
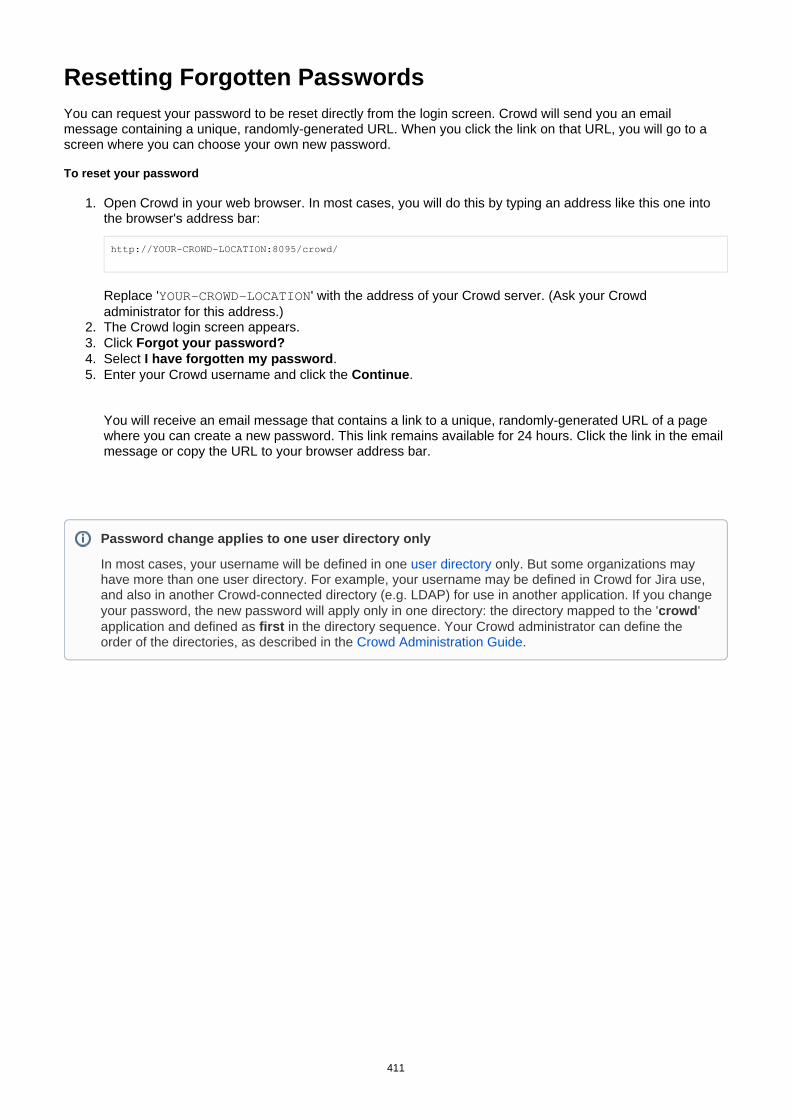
1.
2. 3. 4. 5.
Resetting Forgotten PasswordsYou can request your password to be reset directly from the login screen. Crowd will send you an email message containing a unique, randomly-generated URL. When you click the link on that URL, you will go to a screen where you can choose your own new password.
To reset your password
Open Crowd in your web browser. In most cases, you will do this by typing an address like this one into the browser's address bar:
http://YOUR-CROWD-LOCATION:8095/crowd/
Replace 'YOUR-CROWD-LOCATION' with the address of your Crowd server. (Ask your Crowd administrator for this address.)The Crowd login screen appears.Click Forgot your password?Select .I have forgotten my passwordEnter your Crowd username and click the .Continue
You will receive an email message that contains a link to a unique, randomly-generated URL of a page where you can create a new password. This link remains available for 24 hours. Click the link in the email message or copy the URL to your browser address bar.
Password change applies to one user directory only
In most cases, your username will be defined in one only. But some organizations may user directoryhave more than one user directory. For example, your username may be defined in Crowd for Jira use, and also in another Crowd-connected directory (e.g. LDAP) for use in another application. If you change your password, the new password will apply only in one directory: the directory mapped to the ' ' crowdapplication and defined as in the directory sequence. Your Crowd administrator can define the firstorder of the directories, as described in the .Crowd Administration Guide
411

1.
2. 3. 4. 5.
Requesting usernamesYou can go to the Crowd ' ' screen and ask Crowd to email you your username(s). This is useful when you Loginhave forgotten your username. Crowd will send a message to the email address you specify, containing all the usernames that are registered for that email address.
To request your username(s)
Open Crowd in your web browser. In most cases, you will do this by typing an address like this one into the browser's address bar:
http://YOUR-CROWD-LOCATION:8095/crowd/
Replace ' ' with the address of your Crowd server. (Ask your Crowd YOUR-CROWD-LOCATIONadministrator for this address.)The Crowd login screen appears.ClickForgot your password?Select .I have forgotten my usernameEnter your Crowd username and click the .Continue
If you email address is recognized, you will receive a message with your username in it.
412

1. 2.
3. 4.
Updating your User ProfileProvided that you are , you can change the profile information for your username.authorized to use Crowd
To update your user profile
Log in to Crowd.If you are not a , you can skip this step because you will go directly to the Crowd Self-Crowd administratorService Console.
If you are a Crowd administrator, the will open. Click the 'Crowd Administration Console My ' link in the top navigation bar.Profile
The screen will open, as shown in the screenshot below.My ProfileUpdate your profile information where necessary:
First Name Your first name.Last Name Your last name or surname.Email Crowd will use this email address when sending you messages, such as a new password if you .reset your password
Which user directories are updated?
In most cases, your username will be defined in one only. But some organizations may user directoryhave more than one user directory. For example, your username may be defined in Crowd for Jira use, and also in another Crowd-connected directory (e.g. LDAP) for use in another application. If you change your profile details, the change will be applied to directories which the ' ' application has all crowdpermission to update. Your Crowd administrator defines the application permissions, as described in the
.Crowd Administration Guide
413

1. 2.
3. 4.
Viewing your Group MembershipProvided that you are , you can see a list of the groups to which your username authorized to use Crowdbelongs.
To see which groups you belong to
Log in to Crowd.If you are not a , you can skip this step because you will go directly to the Crowd Self-Crowd administratorService Console.
If you are a Crowd administrator, the will open. Click the Crowd Administration Console My link in the top navigation bar.Profile
The will open. Click in the left-hand menu.Crowd Self-Service Console GroupsThe screen will appear, as shown in the screenshot below.Groups
What is a Group?
A group is a collection of users. Administrators create groups so that the administrator can assign permissions to a number of people at once. For example, it is quicker to give group 'X' access to Jira, rather than giving every team member access individually. In Crowd, each group belongs to a specific . It is possible to directoryhave two groups with the same name, such as 'X', in two different directories. A user can be a member of group 'X' in one directory, in both directories or in neither directory. Two groups called 'X' will be presented to an application as a single group with membership lists aggregated. Groups are particularly important in Crowd, as they are used to .control access to applications
Each group appears only once
Even if you are a member of the same group in more than one directory, the group name will appear only once on this screen. In most cases, your username will be defined in one More explanation: user
only. But some organizations may have more than one user directory. For example, your directoryusername may be defined in Crowd as a Crowd administrator, and also in another Crowd-connected directory (e.g. LDAP). In addition, you may then be a member of the same group (e.g. 'confluence-users') in both directories. On the Crowd ' ' screen, the group 'confluence-users' will appear only Groupsonce.
414
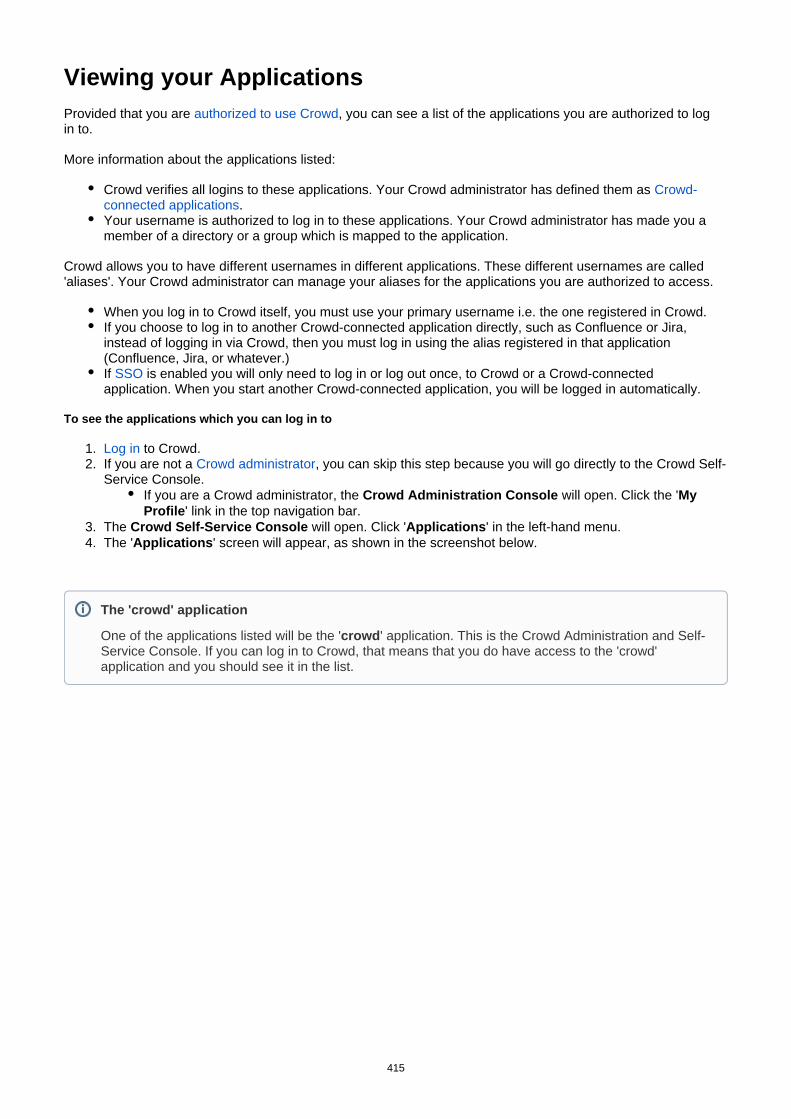
1. 2.
3. 4.
Viewing your ApplicationsProvided that you are , you can see a list of the applications you are authorized to log authorized to use Crowdin to.
More information about the applications listed:
Crowd verifies all logins to these applications. Your Crowd administrator has defined them as Crowd-.connected applications
Your username is authorized to log in to these applications. Your Crowd administrator has made you a member of a directory or a group which is mapped to the application.
Crowd allows you to have different usernames in different applications. These different usernames are called 'aliases'. Your Crowd administrator can manage your aliases for the applications you are authorized to access.
When you log in to Crowd itself, you must use your primary username i.e. the one registered in Crowd.If you choose to log in to another Crowd-connected application directly, such as Confluence or Jira, instead of logging in via Crowd, then you must log in using the alias registered in that application (Confluence, Jira, or whatever.)If is enabled you will only need to log in or log out once, to Crowd or a Crowd-connected SSOapplication. When you start another Crowd-connected application, you will be logged in automatically.
To see the applications which you can log in to
Log in to Crowd.If you are not a , you can skip this step because you will go directly to the Crowd Self-Crowd administratorService Console.
If you are a Crowd administrator, the will open. Click the 'Crowd Administration Console My ' link in the top navigation bar.Profile
The will open. Click ' ' in the left-hand menu.Crowd Self-Service Console ApplicationsThe ' ' screen will appear, as shown in the screenshot below.Applications
The 'crowd' application
One of the applications listed will be the ' ' application. This is the Crowd Administration and Self-crowdService Console. If you can log in to Crowd, that means that you do have access to the 'crowd' application and you should see it in the list.
415

Crowd User's GlossaryHere is a list of all entries in the glossary, plus the first few lines of content. Click a link to see the full text for each entry.
Alias
Crowd allows you to have different usernames in different applications. These different usernames are called 'aliases'. Your Crowd administrator can manage your aliases for the applications you are authorized to access.
Authorization to Use Crowd
If you are authorized to use Crowd, you can log in to Crowd's Self-Service Console to update your user profile and view other information about your username. The Crowd administrator can grant people access to the Self-Service Console, as described in the Crowd Administration Guide. Basically, the administrator should ensure that your username is in a user directory which is mapped to the Crowd application.
Crowd Administrator
A Crowd administrator is a user who has access to the Crowd Administration Console, which provides the functions described in the Administration Guide. The first administrator is defined during the installation of Crowd. A Crowd administrator can grant administration rights to other users, as described in the Crowd Administration Guide.
Crowd-Connected Application
A 'Crowd-connected application' is a software application which has been designed and configured to use Crowd for user logins. These applications pass all login requests to Crowd for authentication. Depending on the integration level, the application may also make use of the groups and roles defined in Crowd for authorization purposes, and allow single sign-on across the Crowd domain. The Crowd Administration Guide tells you how to connect an application to Crowd.
Directory
Crowd uses the term 'directory', or 'user directory', to refer to a store of information about a user. Typically, a directory will hold your username, name, password, email address, and so on. Your Crowd administrator can define one or more directories internally in Crowd or connect one or more external directories to Crowd.
Group
A group is a collection of users. Administrators create groups so that the administrator can assign permissions to a number of people at once. For example, it is quicker to give group 'X' access to Jira, rather than giving every team member access individually. In Crowd, each group belongs to a specific directory. It is possible to have two groups with the same name, such as 'X', in two different directories. A user can be a member of group 'X' in one directory, in both directories or in neither
Role
Support for roles, previously deprecated, was removed in Crowd 2.5.
Self-Service Console
Authorized Crowd users can access the Crowd Console, even if they are not Crowd administrators. Non-administrators will see a subset of the Crowd Console functionality, which we call the 'Self-Service Console'. The User Guide describes this functionality. The Crowd Administration Console presents the full range of Crowd administration functionality to authorized Crowd administrators.
Single Sign-On
Single sign-on (SSO) is a feature offered by Crowd. Your Crowd administrator can choose to enable this feature for the Crowd-connected applications. If SSO is enabled, you will only need to log in or log out once.
416
Documentation for Crowd 4.4 2
Created in 2021 by Atlassian. Licensed under a .Creative Commons Attribution 2.5 Australia License
RELATED TOPICS
Introduction to CrowdUser Guide
417
AliasCrowd allows you to have different usernames in different applications. These different usernames are called 'aliases'. Your Crowd administrator can manage your aliases for the applications you are authorized to access.
When you log in to Crowd itself, you must use your primary username i.e. the one registered in Crowd.If you choose to log in to another Crowd-connected application directly, such as Confluence or Jira, instead of logging in via Crowd, then you must log in using the alias registered in that application (Confluence, Jira, or whatever.)If is enabled you will only need to log in or log out once, to Crowd or a Crowd-connected SSOapplication. When you start another Crowd-connected application, you will be logged in automatically.
418

Authorization to Use CrowdIf you are authorized to use Crowd, you can log in to Crowd's Self-Service Console to update your user profile and view other information about your username. The can grant people access to the Self-Crowd administratorService Console, as described in the . Basically, the administrator should ensure Crowd Administration Guidethat your username is in a user directory which is mapped to the Crowd application.
419

Crowd AdministratorA Crowd administrator is a user who has access to the , which provides the Crowd Administration Consolefunctions described in the . The first administrator is defined during the installation of Administration GuideCrowd. A Crowd administrator can grant administration rights to other users, as described in the Crowd
.Administration Guide
420
Crowd-Connected ApplicationA 'Crowd-connected application' is a software application which has been designed and configured to use Crowd for user logins. These applications pass all login requests to Crowd for authentication. Depending on the integration level, the application may also make use of the groups and roles defined in Crowd for authorization purposes, and allow across the Crowd domain. The tells you how to single sign-on Crowd Administration Guideconnect an application to Crowd.
421

DirectoryCrowd uses the term 'directory', or 'user directory', to refer to a store of information about a user. Typically, a directory will hold your username, name, password, email address, and so on. Your can Crowd administratordefine one or more directories internally in Crowd or connect one or more external directories to Crowd.
The external directory may be a corporate directory such as Microsoft's Active Directory. To learn more about Crowd's directory management, please refer to the .Crowd Administration Guide
422
GroupA group is a collection of users. Administrators create groups so that the administrator can assign permissions to a number of people at once. For example, it is quicker to give group 'X' access to Jira, rather than giving every team member access individually. In Crowd, each group belongs to a specific . It is possible to directoryhave two groups with the same name, such as 'X', in two different directories. A user can be a member of group 'X' in one directory, in both directories or in neither directory. Two groups called 'X' will be presented to an application as a single group with membership lists aggregated. Groups are particularly important in Crowd, as they are used to .control access to applications
423

RoleSupport for roles, , in Crowd 2.5. The implementation of roles in previously deprecated has been removedCrowd was identical to the implementation of groups and did not provide any extra functionality.
424

Self-Service ConsoleAuthorized Crowd users can access the Crowd Console, even if they are not . Non-Crowd administratorsadministrators will see a subset of the Crowd Console functionality, which we call the 'Self-Service Console'. The describes this functionality. The presents the full range of Crowd User Guide Crowd Administration Consoleadministration functionality to authorized Crowd administrators.
425

Single Sign-OnSingle sign-on (SSO) is a feature offered by Crowd. Your Crowd administrator can choose to enable this feature for the . If SSO is enabled, you will only need to log in or log out once.Crowd-connected applications
Specifically:
You only need to log in once, to Crowd or a Crowd-connected application. When you start another Crowd-connected application, you will be logged in automatically.When you log out of Crowd or one of the Crowd-connected applications, you will be logged out of Crowd and the other application(s) at the same time.
426
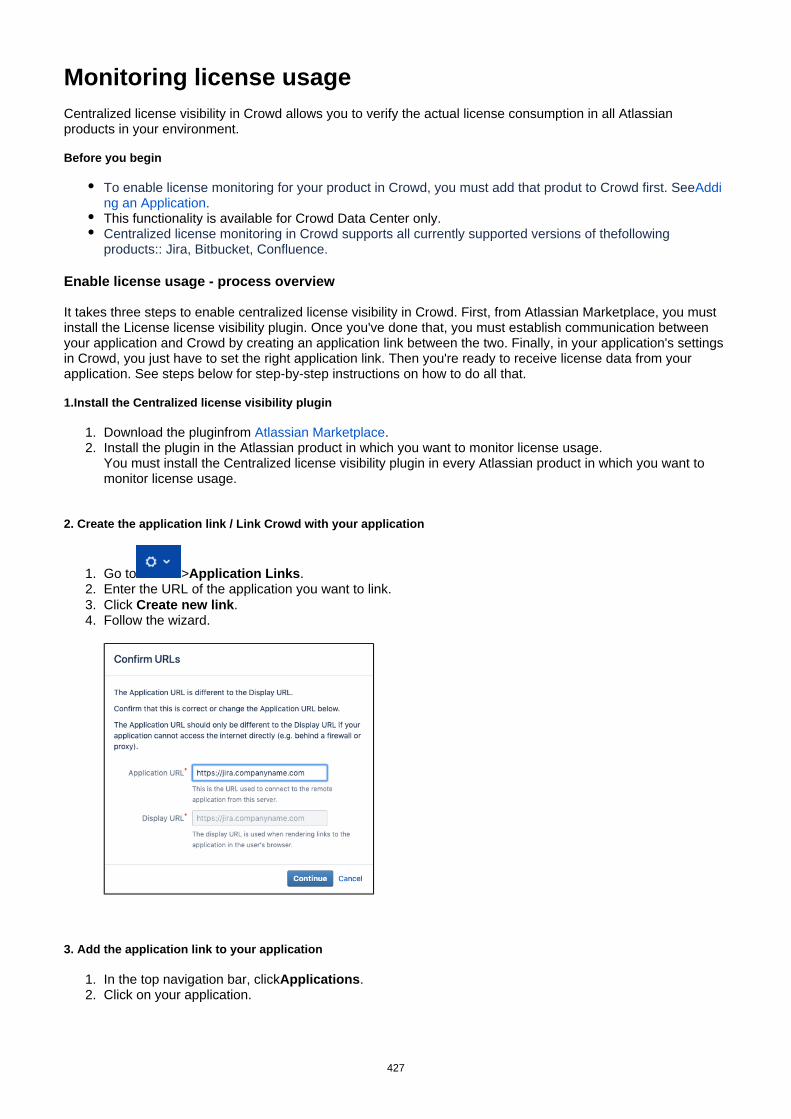
1. 2.
1. 2. 3. 4.
1. 2.
Monitoring license usageCentralized license visibility in Crowd allows you to verify the actual license consumption in all Atlassian products in your environment.
Before you begin
To enable license monitoring for your product in Crowd, you must add that produt to Crowd first. SeeAddi.ng an Application
This functionality is available for Crowd Data Center only.Centralized license monitoring in Crowd supports all currently supported versions of thefollowing products:: Jira, Bitbucket, Confluence.
Enable license usage - process overview
It takes three steps to enable centralized license visibility in Crowd. First, from Atlassian Marketplace, you must install the License license visibility plugin. Once you've done that, you must establish communication between your application and Crowd by creating an application link between the two. Finally, in your application's settings in Crowd, you just have to set the right application link. Then you're ready to receive license data from your application. See steps below for step-by-step instructions on how to do all that.
1.Install the Centralized license visibility plugin
Download the pluginfrom .Atlassian MarketplaceInstall the plugin in the Atlassian product in which you want to monitor license usage.You must install the Centralized license visibility plugin in every Atlassian product in which you want to monitor license usage.
2. Create the application link / Link Crowd with your application
Go to > .Application LinksEnter the URL of the application you want to link.Click .Create new linkFollow the wizard.
3. Add the application link to your application
In the top navigation bar, click .ApplicationsClick on your application.
427

Documentation for Crowd 4.4 2
Created in 2021 by Atlassian. Licensed under a .Creative Commons Attribution 2.5 Australia License
3.
4. 5. 6.
In the tab, go to the Application link section.Details
From the dropdown list, select the application link you previously created.Set the .Synchronisation intervalClick .Save
Results
You have set up license monitoring for your application. You can view license consumption for the application by clicking the tab in your application details.Licenses
428
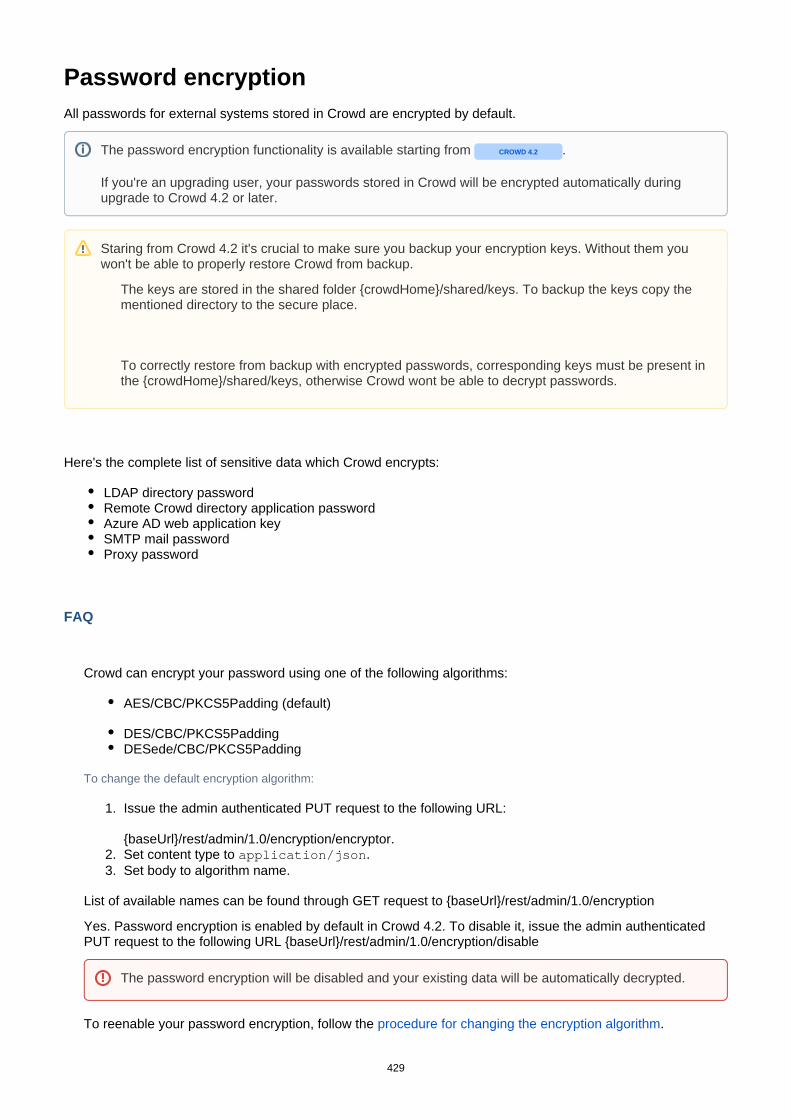
1.
2. 3.
Password encryptionAll passwords for external systems stored in Crowd are encrypted by default.
Here's the complete list of sensitive data which Crowd encrypts:
LDAP directory passwordRemote Crowd directory application passwordAzure AD web application keySMTP mail passwordProxy password
FAQ
Crowd can encrypt your password using one of the following algorithms:
AES/CBC/PKCS5Padding (default)
DES/CBC/PKCS5PaddingDESede/CBC/PKCS5Padding
To change the default encryption algorithm:
Issue the admin authenticated PUT request to the following URL:
{baseUrl}/rest/admin/1.0/encryption/encryptor.Set content type to .application/jsonSet body to algorithm name.
List of available names can be found through GET request to {baseUrl}/rest/admin/1.0/encryption
Yes. Password encryption is enabled by default in Crowd 4.2. To disable it, issue the admin authenticated PUT request to the following URL {baseUrl}/rest/admin/1.0/encryption/disable
To reenable your password encryption, follow the .procedure for changing the encryption algorithm
The password encryption functionality is available starting from .CROWD 4.2
If you're an upgrading user, your passwords stored in Crowd will be encrypted automatically during upgrade to Crowd 4.2 or later.
Staring from Crowd 4.2 it's crucial to make sure you backup your encryption keys. Without them you won't be able to properly restore Crowd from backup.
The keys are stored in the shared folder {crowdHome}/shared/keys. To backup the keys copy the mentioned directory to the secure place.
To correctly restore from backup with encrypted passwords, corresponding keys must be present in the {crowdHome}/shared/keys, otherwise Crowd wont be able to decrypt passwords.
The password encryption will be disabled and your existing data will be automatically decrypted.
429

Documentation for Crowd 4.4 2
Created in 2021 by Atlassian. Licensed under a .Creative Commons Attribution 2.5 Australia License
Issue admin authenticated PUT request to the following url {baseUrl}/rest/admin/1.0/encryption/changeKey .
Existing data will be automatically re-encrypted using new encryption key.
Rest endpoints support both basic authentication and Crowd token key (usually ). crowd.token_keyDepending on configuration, Crowd might not allow to re-use token key cookie on IP address different than the initial one.
If the encryption key is missing, Crowd wont be able to decrypt passwords. All passwords will have to be restored manually.
If your admin account comes from remote directory, admin wont be able to authenticate. In such case Crowd will need to be started in recovery mode to restore passwords manually. See .Using recovery mode
To disable password encryption during upgrade:
Start Crowd with the following flag -Dcrowd.encryption.upgrade.disabled=true
For higher security, please restrict filesystem permission for {crowdHome}/shared/keys so that only Crowd user (on all nodes) have access to this directory.
For security reasons, we recommend rotating the encryption key at least once per year. If the security key is leaked, you must rotate it immediately.
You should consider disabling password encryption only if you notice that this functionality is causing you problems with the upgrade.
430

CrowdID Administration GuideCrowdID is a free add-on that ships with Crowd versions 1.1 and later. It gives administrators a secure way to provide accounts for their users.OpenIDThe is for people who have . For instructions on CrowdID Administration Guide CrowdID administration rightsusing CrowdID to access OpenID-enabled websites, please see the .CrowdID User Guide
Table of Contents
1. About CrowdID1.1 How CrowdID works with Crowd
1.1.1 Determining the name of the CrowdID application1.1.2 Locating the Crowd Server that CrowdID is using
1.2 How OpenID sites interact with CrowdID1.3 Lightweight OpenID server
2. Allowing users to access CrowdID2.1 Granting CrowdID access rights to a user2.2 Granting CrowdID Administration Rights to a User
3. Specifying the sites to which users can log in3.1 Allowing all hosts3.2 Allowing all except specified hosts ('Blacklist')3.3 Allowing specified hosts only ('Whitelist')3.4 Approval Whitelist
4. Configuring CrowdID system settings4.1 Specifying the CrowdID URL4.2 Enabling localhost authentication4.3 Enabling immediate authentication requests4.4 Enabling communication with stateless clients
Please note that CrowdID does not support clustering. When using CrowdID with Crowd Data Center you will need to make sure that only one node is running CrowdID. Please see Installing Crowd Data
for detailsCenter
431

1. About CrowdIDCrowdID is a free add-on that ships with Crowd versions 1.1 and later. It gives administrators a secure way to provide accounts for their users.OpenID
Crowd is a middleware application that connects web applications (such as CrowdID, Jira and Confluence) to specified directories (e.g. Microsoft Active Directory, OpenLDAP). For details please see in the Concepts Admini
.stration Guide
1.1 How CrowdID works with Crowd1.1.1 Determining the name of the CrowdID application1.1.2 Locating the Crowd Server that CrowdID is using
1.2 How OpenID sites interact with CrowdID1.3 Lightweight OpenID server
To access CrowdID, go to .http://localhost:8095/openidserver
432
1.1 How CrowdID works with CrowdCrowdID is a free add-on that ships with Crowd versions 1.1 and later. It gives administrators a secure way to provide accounts for their users.OpenID
Crowd is a middleware application that connects web applications (such as CrowdID, Jira and Confluence) to specified directories (e.g. Microsoft Active Directory, OpenLDAP). For details please see in the Concepts Admini
.stration Guide
This means that:
CrowdID is a Crowd-connected application.CrowdID users are authenticated against Crowd-connected directories.If a user has already logged into any other Crowd-connected application (and single sign-on is enabled), they will not be prompted for any further login once they have entered their OpenID URL at an OpenID-enabled website.Multiple CrowdID instances can use one Crowd instance. Large organizations often find this useful.
CrowdID is automatically installed when you install Crowd. When you start Crowd for the first time and run the S, you will be offered the option of configuring CrowdID. If you choose not to setup CrowdID at that etup Wizard
time, you can always set it up later as described in . Note that you will 4. Configuring CrowdID system settingsalso need to define the CrowdID application in Crowd, and map it to an appropriate directory for details please see the .To access CrowdID, go to .Administration Guide http://localhost:8095/openidserver
RELATED TOPICS
1.1 How CrowdID works with Crowd1.1.1 Determining the name of the CrowdID application1.1.2 Locating the Crowd Server that CrowdID is using
1.2 How OpenID sites interact with CrowdID1.3 Lightweight OpenID server
Crowd documentation
433

1. 2. 3. 4.
1.1.1 Determining the name of the CrowdID applicationCrowdID is a Crowd-connected application (for more information please see in the Managing Applications Admin
).istration Guide
To change the details or users of your CrowdID application within Crowd, you will need to know the name by which your Crowd application is defined in your Crowd server.
To see the name of your CrowdID application,
Login to CrowdID.Click the ' ' link in the top navigation bar.AdministrationClick the ' ' link in the left navigation column.Crowd ServerThis will display the ' ' details.Crowd ServerThe ' ' field contains the name by which your CrowdID application is known to your Application NameCrowd server.
Screenshot: 'Application Name'
RELATED TOPICS
1.1 How CrowdID works with Crowd1.1.1 Determining the name of the CrowdID application1.1.2 Locating the Crowd Server that CrowdID is using
1.2 How OpenID sites interact with CrowdID1.3 Lightweight OpenID server
Crowd documentation
434
Documentation for Crowd 4.4 2
Created in 2021 by Atlassian. Licensed under a .Creative Commons Attribution 2.5 Australia License
435
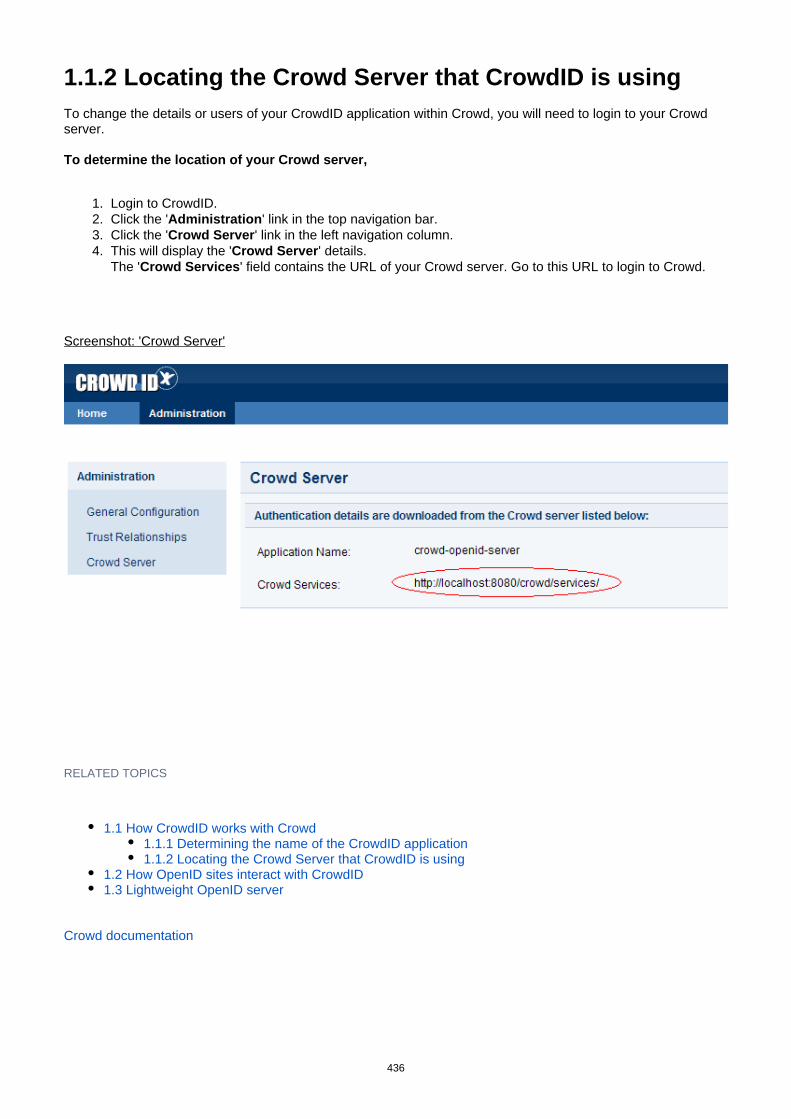
1. 2. 3. 4.
1.1.2 Locating the Crowd Server that CrowdID is usingTo change the details or users of your CrowdID application within Crowd, you will need to login to your Crowd server.
To determine the location of your Crowd server,
Login to CrowdID.Click the ' ' link in the top navigation bar.AdministrationClick the ' ' link in the left navigation column.Crowd ServerThis will display the ' ' details.Crowd ServerThe ' ' field contains the URL of your Crowd server. Go to this URL to login to Crowd.Crowd Services
Screenshot: 'Crowd Server'
RELATED TOPICS
1.1 How CrowdID works with Crowd1.1.1 Determining the name of the CrowdID application1.1.2 Locating the Crowd Server that CrowdID is using
1.2 How OpenID sites interact with CrowdID1.3 Lightweight OpenID server
Crowd documentation
436

Documentation for Crowd 4.4 2
Created in 2021 by Atlassian. Licensed under a .Creative Commons Attribution 2.5 Australia License
437
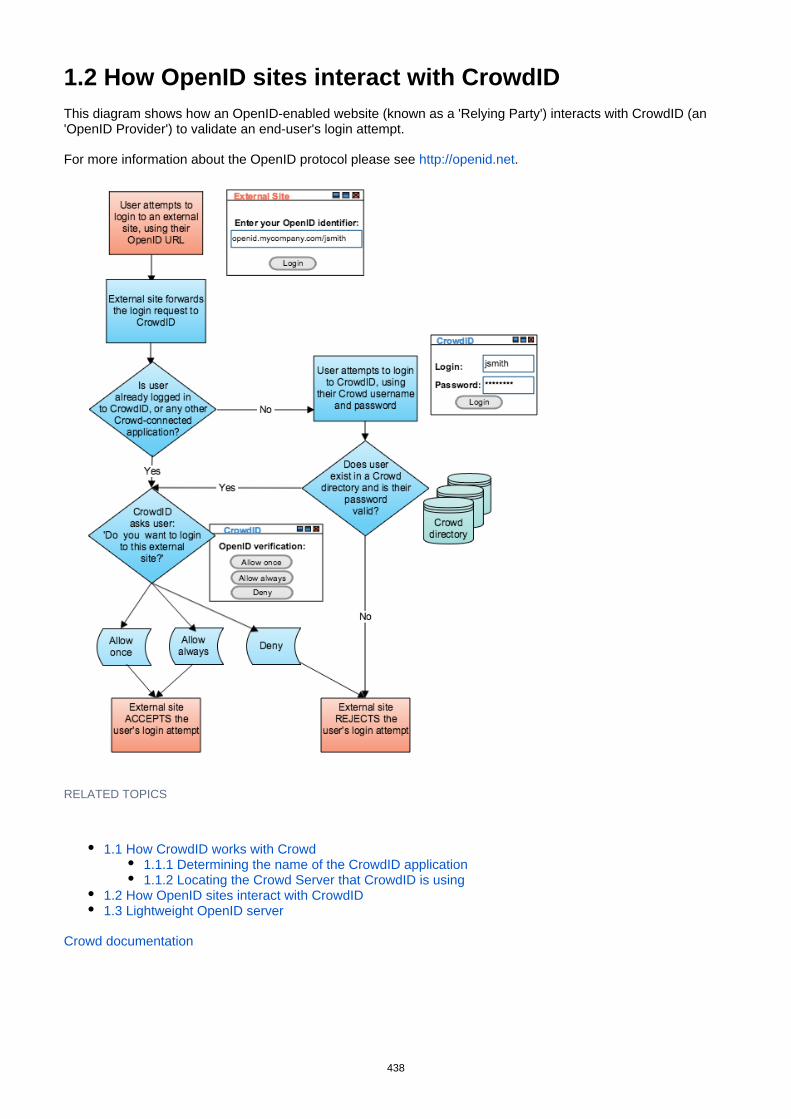
1.2 How OpenID sites interact with CrowdIDThis diagram shows how an OpenID-enabled website (known as a 'Relying Party') interacts with CrowdID (an 'OpenID Provider') to validate an end-user's login attempt.
For more information about the OpenID protocol please see .http://openid.net
RELATED TOPICS
1.1 How CrowdID works with Crowd1.1.1 Determining the name of the CrowdID application1.1.2 Locating the Crowd Server that CrowdID is using
1.2 How OpenID sites interact with CrowdID1.3 Lightweight OpenID server
Crowd documentation
438

1.3 Lightweight OpenID serverCrowd 2.8 introduces a new lightweight UI-free OpenID server, in addition to the existing that OpenID serverships with Crowd.
It uses persistent identifiers unaffected by renaming, and can be accessed at/openidserver/v2/op. It isautomatically installed when you install Crowd, and no database setup is necessary.
The OpenID server is a Crowd-connected application which authenticates against the directories configured in Crowd. If a user has already logged into any other Crowd-connected application (and single sign-on is enabled), they will not be prompted for any further login once they have entered their OpenID URL at an OpenID-enabled website.
You can deploy multiple OpenID servers against a single Crowd instance, which may be useful in larger deployments.
Configuration
The Lightweight OpenID server has no admin UI. You control the server using its approval whitelistconfiguration file. By default, the whitelist is empty so until you add URLs.no authentication will succeed
For communication with Crowd, see the file located by default incrowd.properties crowd-openidserver-. You may also set the system property to point to another webapp/WEB-INF/classes crowd.openid.home
directory holding this configuration file.
439

2. Allowing users to access CrowdIDGranting access to CrowdID is done through Crowd. You can grant people rights to:
CrowdIDuse Granting CrowdID access rights to a user allows them to use CrowdID to access OpenID websites and perform all the actions described in the .CrowdID User Guide
CrowdIDadminister Granting administration rights to a user allows them to use the ' ' Administrationmenu within CrowdID, which enables them to perform the actions described in the CrowdID
.Administration Guide
440

1. 2.
3.
4.
1. 2.
1. 2.
2.1 Granting CrowdID access rights to a userGranting CrowdID access rights to a user allows them to use CrowdID to access OpenID websites and perform all the actions described in the .CrowdID User GuideAccess to CrowdID is managed via Crowd. A user can only access CrowdID if they belong to a directory that is
to the CrowdID application within Crowd.mapped
To grant CrowdID access rights to a particular user,
Login to your Crowd server.View your CrowdID application as described in in the Using the Application Browser Administration
.GuideClick the ' ' tab to see a list of directories that are mapped to your CrowdID application. You Directorieswill need to add the user to one of these directories.If your directory capabilities permit, add the user to the directory via Crowd as described in Adding a
in the . (Otherwise you may need to use your specific directory-management User Administration Guidetool, instead of Crowd, to add the user to the directory.)
To grant CrowdID access rights to all the users in a particular directory,
Login to your Crowd server.Map the directory to your CrowdID application as described in in Mapping a Directory to an Applicationthe .Administration Guide
To grant CrowdID access rights to a particular group of users within a directory,
Login to your Crowd server.Map the group to your CrowdID application as described in Specifying which Groups can access an
in the .Application Administration Guide
To find your Crowd server's URL, see .1.1.2 Locating the Crowd Server that CrowdID is using To identify the name by which your CrowdID application is known within Crowd, see 1.1.1 Determining the
.name of the CrowdID application
RELATED TOPICS2.1 Granting CrowdID access rights to a user2.2 Granting CrowdID Administration Rights to a User
Crowd documentation
RELATED TOPICS2.1 Granting CrowdID access rights to a user2.2 Granting CrowdID Administration Rights to a User
441
Documentation for Crowd 4.4 2
Created in 2021 by Atlassian. Licensed under a .Creative Commons Attribution 2.5 Australia License
Crowd documentation
442

1. 2. 3.
4. 5. 6.
2.2 Granting CrowdID Administration Rights to a UserGranting administration rights to a user allows them to use the ' ' menu within CrowdID, which Administrationenables them to perform the actions described in the .CrowdID Administration Guide
CrowdID administration rights are managed via Crowd. To grant administration rights to a user, you need to add them to the ' ' group as described below.crowd-administrators
Note:
Adding a user to the ' ' group will also give them Crowd administration rights crowd-administrators(unless you choose to use a different group to contain Crowd administrators). See Granting Crowd
in the .Administration Rights to a User Administration GuideThe ' ' group always contains CrowdID administrators, regardless of whether you crowd-administratorsare using it to contain Crowd administrators.
To grant administration rights to a user,
Log in to your Crowd server.Click the ' ' tab in the top navigation bar.UsersThis will display the . Select the directory that contains the user to whom you wish to User Browsergrant administration rights.Use the ' ' to locate the user, then click the ' ' link that corresponds to the user.Search ViewThis will display the ' ' screen. Click the ' ' tab.User Details GroupsA list of the user's current groups (if any) will be displayed. Select the ' ' group crowd-administratorsfrom the drop-down box below the list, then click the ' ' button.Add
To find your Crowd server's URL, see .1.1.2 Locating the Crowd Server that CrowdID is using
Screenshot: Granting Crowd administration rights
RELATED TOPICS2.1 Granting CrowdID access rights to a user2.2 Granting CrowdID Administration Rights to a User
Crowd documentation
443

3. Specifying the sites to which users can log inThere are three ways to specify which OpenID hosts (i.e. websites or IP addresses) your users can log in to using their CrowdID:
No restriction your CrowdID users can log in to any OpenID hostBlacklist your CrowdID users can log in to any OpenID host except the one(s) that you specifyWhitelist your CrowdID users can log in to only those OpenID host(s) that you specify
In addition, you may configured an for trusted sites,Approval Whitelist
444

1. 2. 3. 4.
3.1 Allowing all hostsThere are three ways to specify which OpenID hosts (i.e. websites or IP addresses) your users can log in to using their CrowdID:
No restriction your CrowdID users can log in to any OpenID hostBlacklist your CrowdID users can log in to any OpenID host except the one(s) that you specifyWhitelist your CrowdID users can log in to only those OpenID host(s) that you specify
To allow users to login to any OpenID host,
Login to CrowdID.Click the ' ' link in the top navigation bar.AdministrationClick the ' ' link in the left navigation column.Trust RelationshipsFor ' ', select ' '.Restriction Type None
Screenshot: 'Restriction Type None'
RELATED TOPICS
3.1 Allowing all hosts3.2 Allowing all except specified hosts ('Blacklist')3.3 Allowing specified hosts only ('Whitelist')3.4 Approval Whitelist
Crowd documentation
445

1. 2. 3. 4. 5. 6.
a. b.
3.2 Allowing all except specified hosts ('Blacklist')There are three ways to specify which OpenID hosts (i.e. websites or IP addresses) your users can log in to using their CrowdID:
No restriction your CrowdID users can log in to any OpenID hostBlacklist your CrowdID users can log in to any OpenID host except the one(s) that you specifyWhitelist your CrowdID users can log in to only those OpenID host(s) that you specify
To specify an OpenID blacklist,
Login to CrowdID.Click the ' ' link in the top navigation bar.AdministrationClick the ' ' link in the left navigation column.Trust RelationshipsFor ' ', select ' '.Restriction Type BlacklistWait for a section titled ' ' to appear on the screen.Blacklist mode: hosts that can not loginFor each site to which you want to prevent users logging in,
Type the URL or IP address in the ' ' field.AddressClick the ' ' button.Add
Screenshot: 'Restriction Type Blacklist'
RELATED TOPICS
3.1 Allowing all hosts3.2 Allowing all except specified hosts ('Blacklist')3.3 Allowing specified hosts only ('Whitelist')3.4 Approval Whitelist
Crowd documentation
446
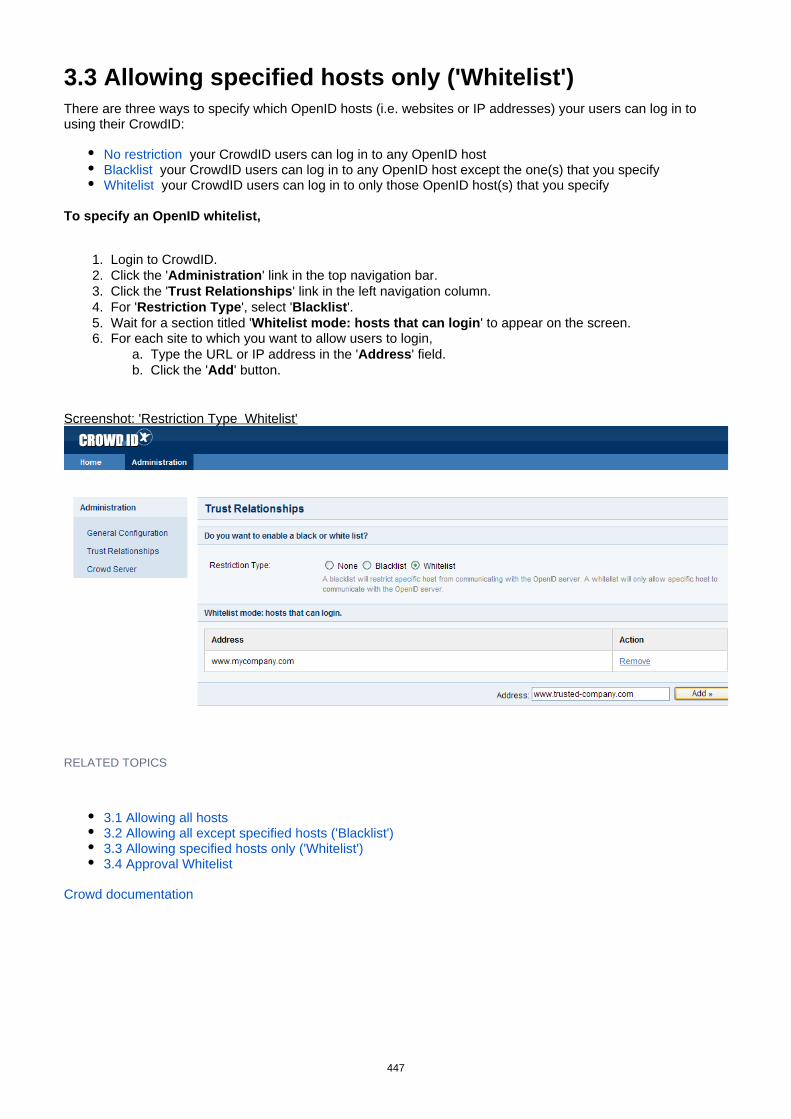
1. 2. 3. 4. 5. 6.
a. b.
3.3 Allowing specified hosts only ('Whitelist')There are three ways to specify which OpenID hosts (i.e. websites or IP addresses) your users can log in to using their CrowdID:
No restriction your CrowdID users can log in to any OpenID hostBlacklist your CrowdID users can log in to any OpenID host except the one(s) that you specifyWhitelist your CrowdID users can log in to only those OpenID host(s) that you specify
To specify an OpenID whitelist,
Login to CrowdID.Click the ' ' link in the top navigation bar.AdministrationClick the ' ' link in the left navigation column.Trust RelationshipsFor ' ', select ' '.Restriction Type BlacklistWait for a section titled ' ' to appear on the screen.Whitelist mode: hosts that can loginFor each site to which you want to allow users to login,
Type the URL or IP address in the ' ' field.AddressClick the ' ' button.Add
Screenshot: 'Restriction Type Whitelist'
RELATED TOPICS
3.1 Allowing all hosts3.2 Allowing all except specified hosts ('Blacklist')3.3 Allowing specified hosts only ('Whitelist')3.4 Approval Whitelist
Crowd documentation
447

Documentation for Crowd 4.4 2
Created in 2021 by Atlassian. Licensed under a .Creative Commons Attribution 2.5 Australia License
448

3.4 Approval WhitelistFor trusted sites, such as internal services, you may wish to simplify the user experience by automatically approving authentication requests. Users will not be prompted to verify authentication requests from these realms.
The OpenID Verification page ( ) shows the realm that a host is using.2.4 Allowing or denying a login
This configuration is stored in a file:
crowd-openidserver-webapp/WEB-INF/classes/crowdid.approval-whitelist
Each line is a single OpenID realm. If an authentication request is received from a site on that list it will automatically be approved as if the user had selected 'Allow Always'.
Example
In the default configuration, using the demo OpenID client to authenticate, the OpenID server will present an Op:enID verification page
The following site:http://localhost:8095/openidclienthas requested that you confirm the following address as your personal identity
Adding:
http://localhost:8095/openidclient
to the approval whitelist would automatically approve the demo OpenID client for all users.
RELATED TOPICS
3.1 Allowing all hosts3.2 Allowing all except specified hosts ('Blacklist')3.3 Allowing specified hosts only ('Whitelist')3.4 Approval Whitelist
Crowd documentation
449

4. Configuring CrowdID system settings4.1 Specifying the CrowdID URL4.2 Enabling localhost authentication4.3 Enabling immediate authentication requests4.4 Enabling communication with stateless clients
450
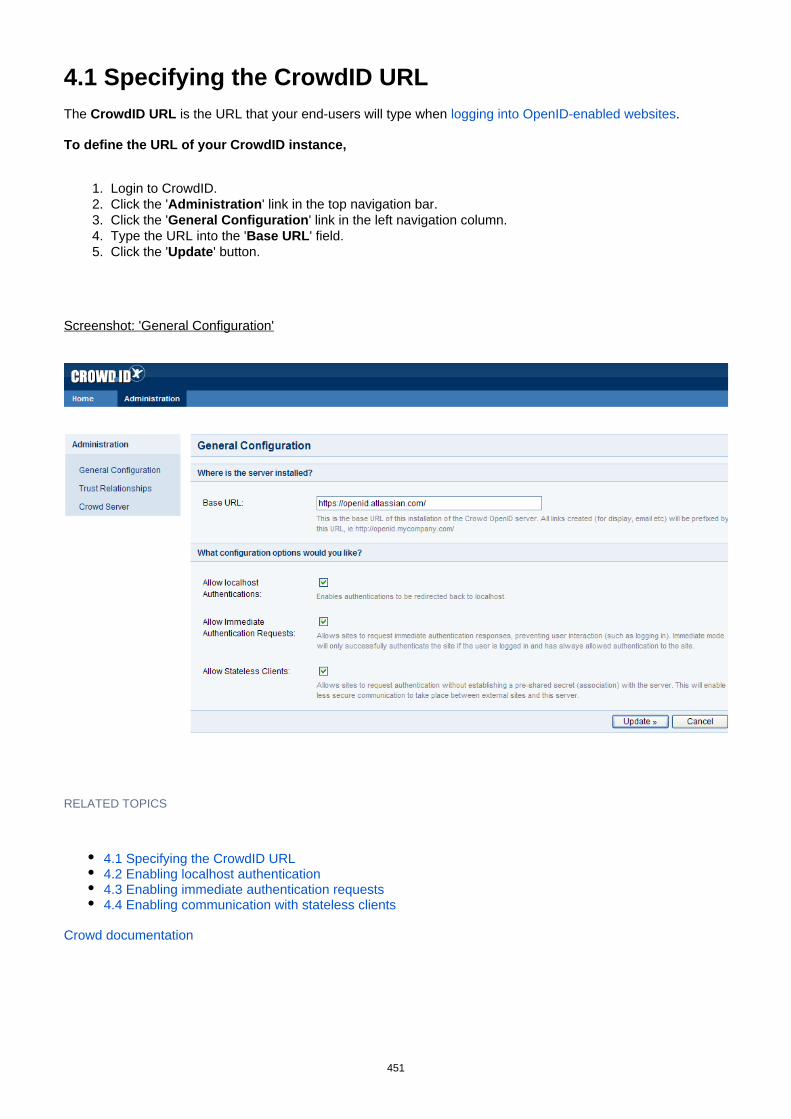
1. 2. 3. 4. 5.
4.1 Specifying the CrowdID URLThe is the URL that your end-users will type when . CrowdID URL logging into OpenID-enabled websites
To define the URL of your CrowdID instance,
Login to CrowdID.Click the ' ' link in the top navigation bar.AdministrationClick the ' ' link in the left navigation column.General ConfigurationType the URL into the ' ' field.Base URLClick the ' ' button.Update
Screenshot: 'General Configuration'
RELATED TOPICS
4.1 Specifying the CrowdID URL4.2 Enabling localhost authentication4.3 Enabling immediate authentication requests4.4 Enabling communication with stateless clients
Crowd documentation
451

1. 2. 3. 4. 5.
4.2 Enabling localhost authenticationEnabling prevents OpenID-enabled sites from directly accessing your end-users' localhost authenticationlocal machines.
To enable localhost authentication,
Login to CrowdID.Click the ' ' link in the top navigation bar.AdministrationClick the ' ' link in the left navigation column.General ConfigurationSelect the ' ' checkbox.Allow localhost authenticationsClick the ' ' button.Update
Screenshot: 'General Configuration'
RELATED TOPICS
4.1 Specifying the CrowdID URL4.2 Enabling localhost authentication4.3 Enabling immediate authentication requests4.4 Enabling communication with stateless clients
Crowd documentation
452

Documentation for Crowd 4.4 2
Created in 2021 by Atlassian. Licensed under a .Creative Commons Attribution 2.5 Australia License
RELATED TOPICS
4.1 Specifying the CrowdID URL4.2 Enabling localhost authentication4.3 Enabling immediate authentication requests4.4 Enabling communication with stateless clients
Crowd documentation
453
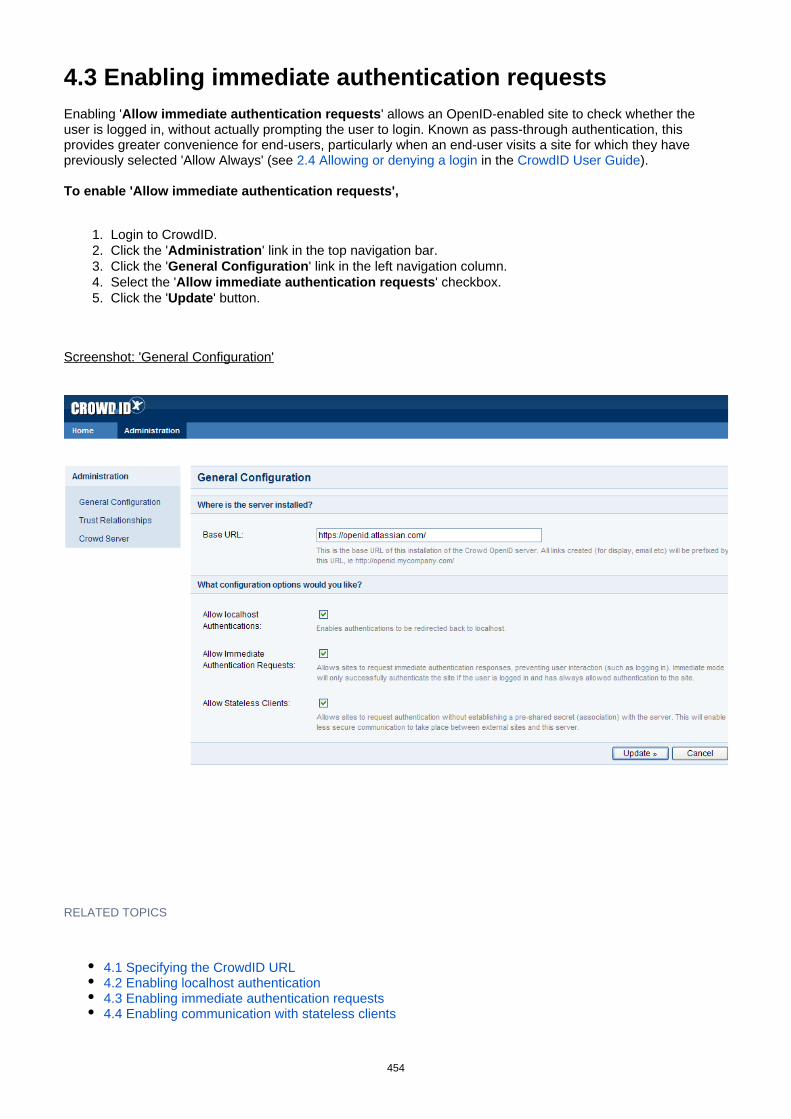
1. 2. 3. 4. 5.
4.3 Enabling immediate authentication requestsEnabling ' ' allows an OpenID-enabled site to check whether the Allow immediate authentication requestsuser is logged in, without actually prompting the user to login. Known as , this pass-through authenticationprovides greater convenience for end-users, particularly when an end-user visits a site for which they have previously selected 'Allow Always' (see in the ).2.4 Allowing or denying a login CrowdID User Guide
To enable 'Allow immediate authentication requests',
Login to CrowdID.Click the ' ' link in the top navigation bar.AdministrationClick the ' ' link in the left navigation column.General ConfigurationSelect the ' ' checkbox.Allow immediate authentication requestsClick the ' ' button.Update
Screenshot: 'General Configuration'
RELATED TOPICS
4.1 Specifying the CrowdID URL4.2 Enabling localhost authentication4.3 Enabling immediate authentication requests4.4 Enabling communication with stateless clients
454

Documentation for Crowd 4.4 2
Created in 2021 by Atlassian. Licensed under a .Creative Commons Attribution 2.5 Australia License
Crowd documentation
RELATED TOPICS
4.1 Specifying the CrowdID URL4.2 Enabling localhost authentication4.3 Enabling immediate authentication requests4.4 Enabling communication with stateless clients
Crowd documentation
455
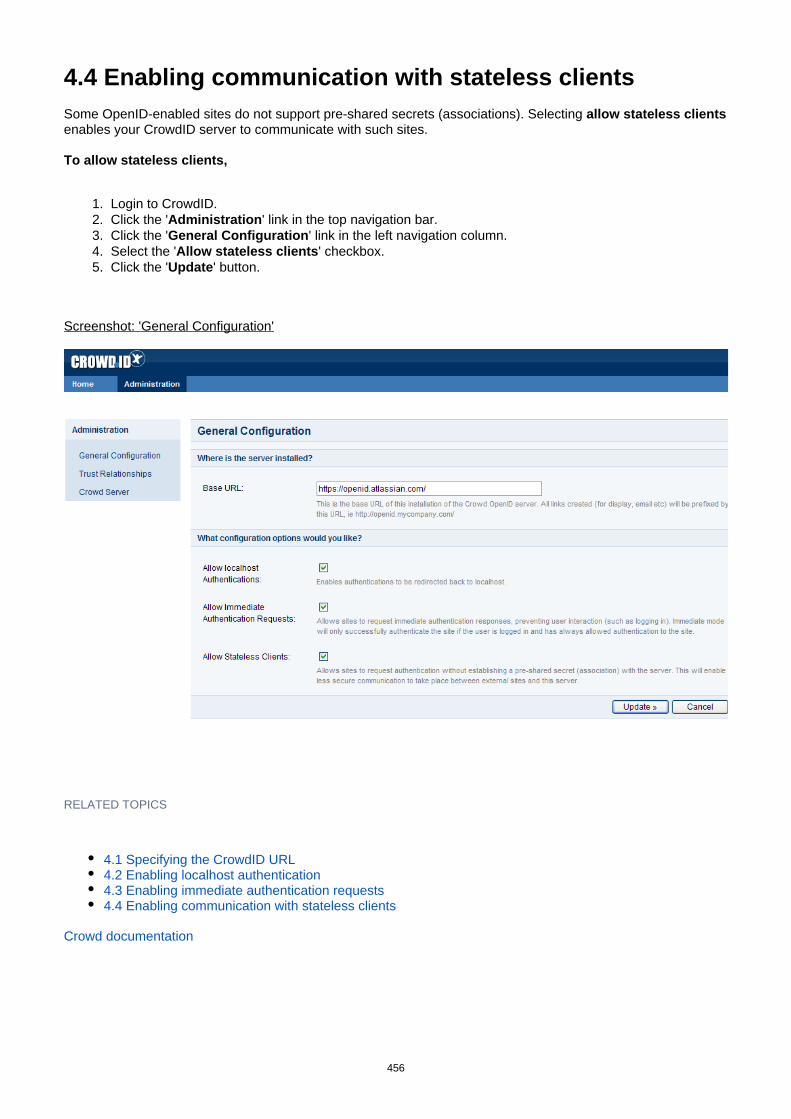
1. 2. 3. 4. 5.
4.4 Enabling communication with stateless clientsSome OpenID-enabled sites do not support pre-shared secrets (associations). Selecting allow stateless clientsenables your CrowdID server to communicate with such sites.
To allow stateless clients,
Login to CrowdID.Click the ' ' link in the top navigation bar.AdministrationClick the ' ' link in the left navigation column.General ConfigurationSelect the ' ' checkbox.Allow stateless clientsClick the ' ' button.Update
Screenshot: 'General Configuration'
RELATED TOPICS
4.1 Specifying the CrowdID URL4.2 Enabling localhost authentication4.3 Enabling immediate authentication requests4.4 Enabling communication with stateless clients
Crowd documentation
456

Documentation for Crowd 4.4 2
Created in 2021 by Atlassian. Licensed under a .Creative Commons Attribution 2.5 Australia License
RELATED TOPICS
4.1 Specifying the CrowdID URL4.2 Enabling localhost authentication4.3 Enabling immediate authentication requests4.4 Enabling communication with stateless clients
Crowd documentation
457
CrowdID User Guide With Crowd comes , your OpenID provider. is an product which allows you to CrowdID CrowdID Atlassian
use a single login for all OpenID-enabled websites.
This means that you don't have to remember a separate username and password for each different site that you visit. You can just use your OpenID for all of them.
You can use CrowdID if your administrator has installed it for your organization.For instructions on setting up CrowdID, please see the . CrowdID Administration Guide
The tells you how toCrowdID User Guide
Log in to websites using CrowdID.Instruct CrowdID to always allow login to a specific site.Set up your own profile(s) within CrowdID.Use CrowdID to change your password.
Contents of the CrowdID User Guide
1. Getting started with CrowdID1.1 What is OpenID?1.2 What is CrowdID?1.3 What is an OpenID URL or identifier?1.4 Viewing the CrowdID page
2. Logging in to a website using OpenID2.1 Does the website support OpenID?2.2 Entering your OpenID URL2.3 Logging in to CrowdID2.4 Allowing or denying a login2.5 Providing additional profile information to a website
3. Viewing your always-approved websites4. Viewing your login history5. Updating your profile6. Using more than one profile
6.1 Adding a profile6.2 Choosing a profile for a website6.3 Setting a default profile6.4 Deleting a profile
7. Changing or resetting your password7.1 Changing your password7.2 Resetting your password
8. Requesting Forgotten Usernames
458
1. Getting started with CrowdIDCrowdID is an product which allows you to use a single login for all OpenID-enabled websites.Atlassian
This means that you don't have to remember a separate username and password for each different site that you visit. You can just use your OpenID for all of them.
You can use CrowdID if your administrator has installed it for your organization.
1.1 What is OpenID?1.2 What is CrowdID?1.3 What is an OpenID URL or identifier?1.4 Viewing the CrowdID page
459
1.1 What is OpenID?The term ' ' has two meanings:OpenID
The OpenID protocol, described below.Your own .identifier or URL
OpenID is an open, free protocol which allows you to use a single to log in to any OpenID-enabled identifierwebsite. OpenID allows the website to communicate with your OpenID provider (e.g. your organization's CrowdIDserver) when attempting to verify your login.
RELATED TOPICS
1.1 What is OpenID?1.2 What is CrowdID?1.3 What is an OpenID URL or identifier?1.4 Viewing the CrowdID page
CrowdID User Guide
Do you have a zillion usernames and passwords, which you use for logging in to blogs and websites all over the place? allows you to throw them all away, for all websites that support it. More and OpenIDmore sites are coming on board.
460

1.2 What is CrowdID?CrowdID is an product which makes use of the protocol to allow you to use a single login for a Atlassian OpenIDnumber of websites. To put it another way: CrowdID is an ' '. You can use CrowdID if your OpenID provideradministrator has installed it for your organization.
This means that you can:
Securely store your username and password on your organization's server.Use your as a single identifier to log in to all websites which support OpenID.OpenIDControl how you allow or deny login requests from websites.
RELATED TOPICS
1.1 What is OpenID?1.2 What is CrowdID?1.3 What is an OpenID URL or identifier?1.4 Viewing the CrowdID page
CrowdID User Guide
Your organization can use to set up an internal OpenID provider. There are also other OpenID CrowdIDproviders, where you can get a free OpenID.
461

1.3 What is an OpenID URL or identifier?To log in to an OpenID-enabled website you need an OpenID identifier, also called an OpenID URL or simply an OpenID. Your OpenID is a URL (web address) which points to your organization's CrowdID server. Here are some examples of what your OpenID may look like:
http://my.server.name/mynamehttp://myname.mysite.com
To find your OpenID URL, you can:
Ask your system administrator, orClick the 'My OpenID' link on the 'Home' tab of the .CrowdID page
Endpoint URLs
You can also use CrowdID's to log in to OpenID-enabled websites. The OpenID URLs for endpoint URLspecific users may look like:
http://my.server.name/openidserver/users/mynamehttp://my.server.name/openidserver/users/anothername
Crowd also provides an endpoint URL that you can pass to login sites to have your identifier automatically selected:
http://my.server.name/openidserver/op
RELATED TOPICS
1.1 What is OpenID?1.2 What is CrowdID?1.3 What is an OpenID URL or identifier?1.4 Viewing the CrowdID page
CrowdID User Guide
462
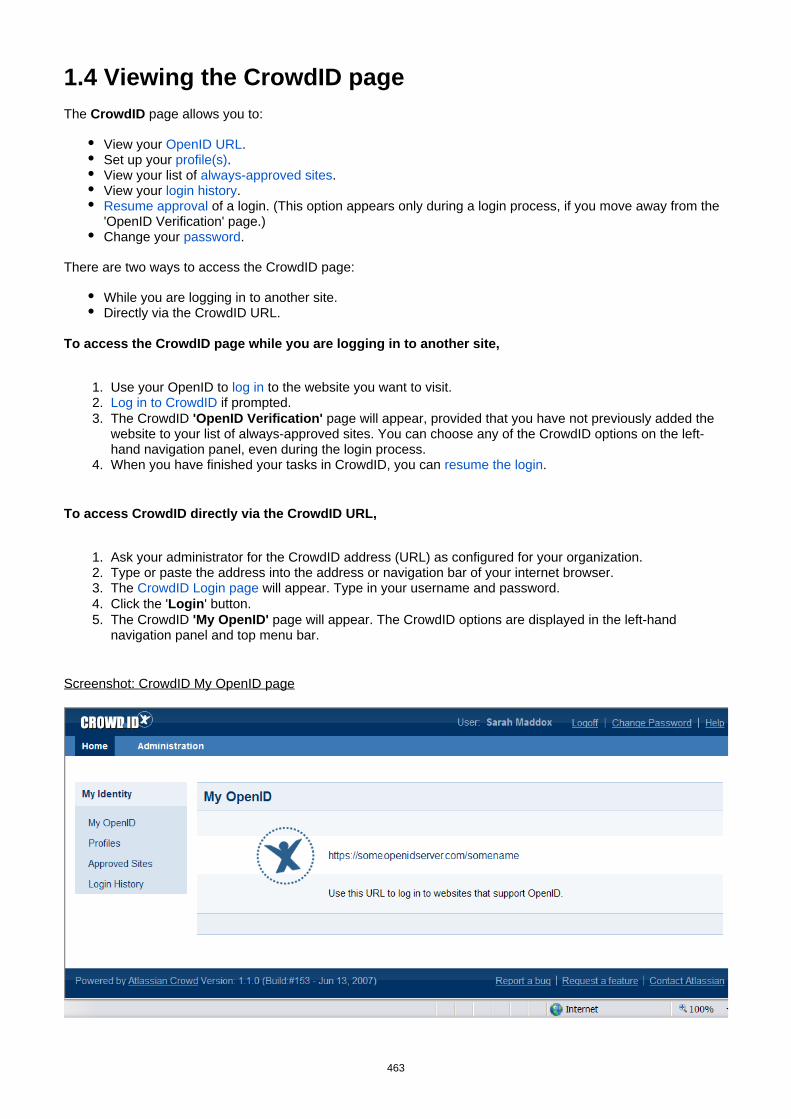
1. 2. 3.
4.
1. 2. 3. 4. 5.
1.4 Viewing the CrowdID pageThe page allows you to:CrowdID
View your .OpenID URLSet up your .profile(s)View your list of .always-approved sitesView your .login historyResume approval of a login. (This option appears only during a login process, if you move away from the 'OpenID Verification' page.)Change your .password
There are two ways to access the CrowdID page:
While you are logging in to another site.Directly via the CrowdID URL.
To access the CrowdID page while you are logging in to another site,
Use your OpenID to to the website you want to visit.log inLog in to CrowdID if prompted.The CrowdID page will appear, provided that you have not previously added the 'OpenID Verification'website to your list of always-approved sites. You can choose any of the CrowdID options on the left-hand navigation panel, even during the login process.When you have finished your tasks in CrowdID, you can .resume the login
To access CrowdID directly via the CrowdID URL,
Ask your administrator for the CrowdID address (URL) as configured for your organization.Type or paste the address into the address or navigation bar of your internet browser.The will appear. Type in your username and password.CrowdID Login pageClick the ' ' button.LoginThe CrowdID page will appear. The CrowdID options are displayed in the left-hand 'My OpenID'navigation panel and top menu bar.
Screenshot: CrowdID My OpenID page
463

Documentation for Crowd 4.4 2
Created in 2021 by Atlassian. Licensed under a .Creative Commons Attribution 2.5 Australia License
RELATED TOPICS
1.1 What is OpenID?1.2 What is CrowdID?1.3 What is an OpenID URL or identifier?1.4 Viewing the CrowdID page
CrowdID User Guide
464
1. 2. 3.
4.
5.
2. Logging in to a website using OpenIDCrowdID enables you to log in to a website using your . The login process depends upon the following:OpenID
Have you logged in to CrowdID already during this browser session?Have you previously added the website to your list of always-approved sites?Does the website you are visiting require additional profile information?
Steps in the login process:
Find the OpenID login page or section on the website you want to visit.Enter your OpenID and click the login button.If prompted, . (Required if you have not already logged in during this browser log in to CrowdIDsession.)If prompted, instruct CrowdID to . (Required if you have not previously added allow the website loginthe website to your list of always-approved sites.)If prompted, . (Required if the website you are visiting wants more supply additional profile informationinformation.)
The login process can be very simple: just the first two steps above, provided that you have already logged in to CrowdID this session and have already added the website to your list of always-approved sites.
465

2.1 Does the website support OpenID?You can only use your OpenID (also called an ) to log in to a website if the site OpenID URL or identifiersupports the protocol. The number of websites that support OpenID is growing rapidly.OpenID
To see if a particular website supports OpenID, check the site's login page for one or more of the following:
The word 'OpenID'.
The OpenID logo
RELATED TOPICS
2.1 Does the website support OpenID?2.2 Entering your OpenID URL2.3 Logging in to CrowdID2.4 Allowing or denying a login2.5 Providing additional profile information to a website
CrowdID User Guide
466
1. 2.
3.
4.
2.2 Entering your OpenID URLWith CrowdID, you can use your ' ' (also called an ) to log in to a website that OpenID OpenID URL or identifier su
.pports the OpenID protocol
To log in to a website which supports OpenID,
Go to the login page of the website you want to visit.Look for the OpenID login section.
Sometimes the OpenID login will be on the same page as the standard login. Other sites will have a separate OpenID login page.Type or paste into the login text box.your OpenID
Usually, you must enter the full OpenID. In some sites, you can enter the OpenID without 'http://'Click the login button. The button will probably be labeled 'Log in', 'Sign in' or 'Go'.
One of the following things will happen now:
If you have not already logged in to CrowdID during this browser session, you will see the CrowdID login .page
If you have already logged in to CrowdID and you have previously instructed CrowdID to allow this website always, then you will be logged straight into the website.If you have already logged in to CrowdID but have not previously set this site to "Allow Always", then CrowdID will ask you to .approve the loginIf your administrator has blocked access to this website, CrowdID will display an 'OpenID Verification Error' message.
RELATED TOPICS
2.1 Does the website support OpenID?2.2 Entering your OpenID URL2.3 Logging in to CrowdID2.4 Allowing or denying a login2.5 Providing additional profile information to a website
CrowdID User Guide
467
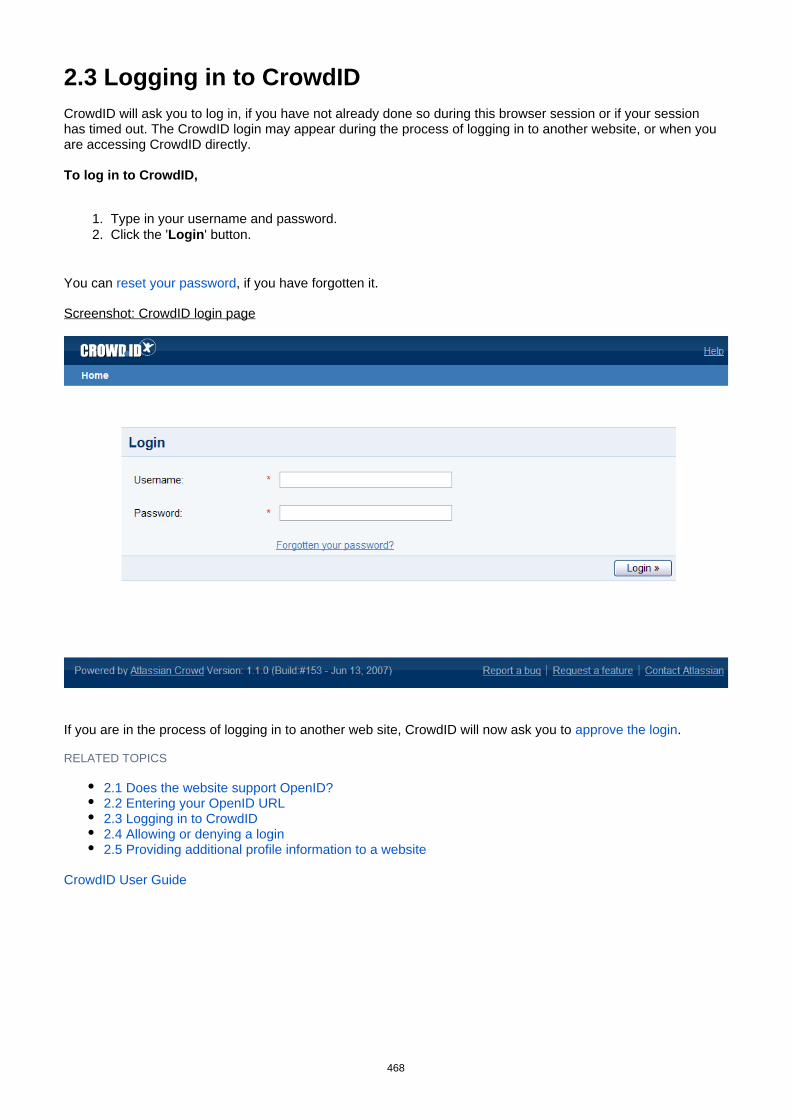
1. 2.
2.3 Logging in to CrowdIDCrowdID will ask you to log in, if you have not already done so during this browser session or if your session has timed out. The CrowdID login may appear during the process of logging in to another website, or when you are accessing CrowdID directly.
To log in to CrowdID,
Type in your username and password.Click the ' ' button.Login
You can , if you have forgotten it.reset your password
Screenshot: CrowdID login page
If you are in the process of logging in to another web site, CrowdID will now ask you to . approve the login
RELATED TOPICS
2.1 Does the website support OpenID?2.2 Entering your OpenID URL2.3 Logging in to CrowdID2.4 Allowing or denying a login2.5 Providing additional profile information to a website
CrowdID User Guide
468
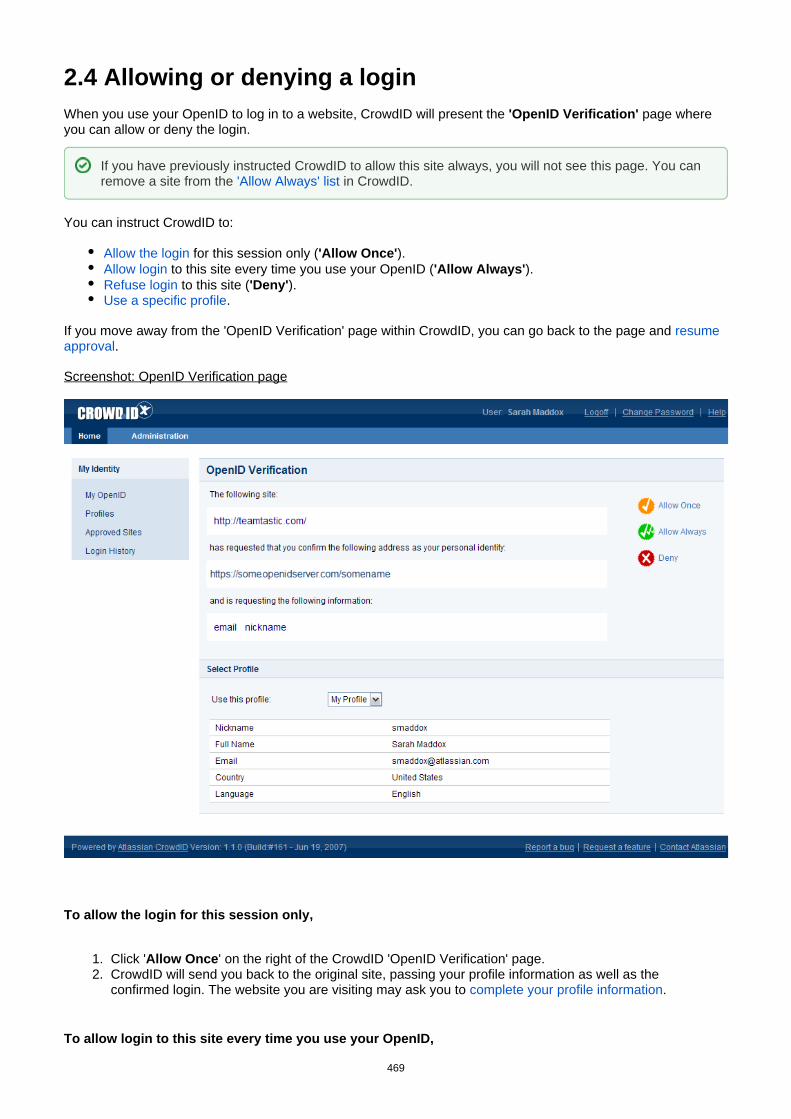
1. 2.
2.4 Allowing or denying a loginWhen you use your OpenID to log in to a website, CrowdID will present the page where 'OpenID Verification'you can allow or deny the login.
You can instruct CrowdID to:
Allow the login for this session only ( ).'Allow Once'Allow login to this site every time you use your OpenID ( ).'Allow Always'Refuse login to this site ( ).'Deny'Use a specific profile.
If you move away from the 'OpenID Verification' page within CrowdID, you can go back to the page and resume .approval
Screenshot: OpenID Verification page
To allow the login for this session only,
Click ' ' on the right of the CrowdID 'OpenID Verification' page.Allow OnceCrowdID will send you back to the original site, passing your profile information as well as the confirmed login. The website you are visiting may ask you to .complete your profile information
To allow login to this site every time you use your OpenID,
If you have previously instructed CrowdID to allow this site always, you will not see this page. You can remove a site from the in CrowdID.'Allow Always' list
469

Documentation for Crowd 4.4 2
Created in 2021 by Atlassian. Licensed under a .Creative Commons Attribution 2.5 Australia License
1. 2.
1. 2.
1.
2.
1.
2.
Click ' ' on the right of the CrowdID 'OpenID Verification' page.Allow AlwaysCrowdID will add the website to your list of and send you back to the original site, approved sitespassing your profile information as well as the confirmed login. The website you are visiting may ask you to .complete your profile information
To refuse login to this site,
Click ' ' on the right of the CrowdID 'OpenID Verification' page.DenyCrowdID will send you back to the original site and refuse the login. The original site will probably show a message something like 'Verification canceled'.
To use a specific profile,
If you have defined , you can choose a specific profile for the website you are more than one profilevisiting. Select a profile from the dropdown list labeled ' ' on the CrowdID 'OpenID Use this profileVerification' page.The profile details will change in the 'Select Profile' section of the page. CrowdID will pass these profile details to the website when you .allow the login
To go back to the 'OpenID Verification' page and resume approval,
Click ' ' in the left-hand navigation panel.Resume Approval This option will appear if you move away from the 'OpenID Verification' page during the login
process.CrowdID will return to the ' ' page, where you can .OpenID Verification allow the login
RELATED TOPICS
2.1 Does the website support OpenID?2.2 Entering your OpenID URL2.3 Logging in to CrowdID2.4 Allowing or denying a login2.5 Providing additional profile information to a website
CrowdID User Guide
470
1. 2.
2.5 Providing additional profile information to a websiteWhen you to a website using your OpenID, CrowdID passes your to the website. Some log in profile informationwebsites will then log you in immediately, while other websites may ask you to confirm or complete the profile information.
You are now outside CrowdID. Any dialog here is between you and the website you are visiting.
To provide additional profile information to a website,
Check the profile information displayed, and add extra information as you wish.Click the button or other option supplied by the website to complete the login process.
RELATED TOPICS
2.1 Does the website support OpenID?2.2 Entering your OpenID URL2.3 Logging in to CrowdID2.4 Allowing or denying a login2.5 Providing additional profile information to a website
CrowdID User Guide
You can and in CrowdID.change your profile information define more than one profile
471
1. 2.
1. 2.
3.
4. 5.
1. 2. 3.
4. 5.
3. Viewing your always-approved websitesWhen logging in to a website, you can instruct CrowdID to to the site every time you use your allow loginOpenID ( ).'Allow Always'
The CrowdID ' ' page allows you to:Approved Sites
View your list of always-approved sites.Remove a site from the list.Choose a profile for use when logging in to a site.
To view your list of always-approved sites,
Access CrowdID.Click ' ' in the left-hand navigation panel.Approved Sites
To remove a site from the list,
Access CrowdID.Click ' ' in the left-hand navigation panel.Approved Sites
Your list of always-approved sites will appear. Click the remove button next to the site which you want to remove.Click the ' ' button.Apply' ' message is displayed.Update Successful
If you do not click the 'Apply' button, your changes will be canceled.
To choose a profile for use when logging in to a site,
Access CrowdID.Click ' ' in the left-hand navigation panel.Approved SitesYour list of always-approved sites will appear. Select the profile you want from the dropdown list next to the applicable site.Click the ' ' button.Apply' ' message is displayed.Update Successful
If you do not click the 'Apply' button, your changes will be canceled.
If you have never instructed CrowdID to for any sites, The 'Approved Sites' page 'Allow Always'will display a message like ' 'You currently have no approved sites.You can on the CrowdID 'Profiles' page.add profiles
472

Documentation for Crowd 4.4 2
Created in 2021 by Atlassian. Licensed under a .Creative Commons Attribution 2.5 Australia License
Screenshot: CrowdID Approved Sites page
RELATED TOPICS
1. Getting started with CrowdID2. Logging in to a website using OpenID3. Viewing your always-approved websites4. Viewing your login history5. Updating your profile6. Using more than one profile7. Changing or resetting your password8. Requesting Forgotten Usernames
473

1. 2.
4. Viewing your login historyThe CrowdID ' ' page displays a list of the sites you have visited and the type of approval you Login Historygave on each visit:
' ' - At the time of this login, you instructed CrowdID to allow login to the site every time you Allow Alwaysuse your OpenID.' ' - This login was allowed automatically, because you have previously instructed (Auto) Allow AlwaysCrowdID to allow login to the site every time you use your OpenID.' ' - You instructed CrowdID to allow login to the site at that time only.Allow Once' ' - You instructed CrowdID to refuse the login to the site at that time.Deny
To view your login history,
Access CrowdID.Click ' ' in the left-hand navigation panel.Login History
If you have used your OpenID many times, the login history items will be shown on more than one page. To move from one page to another, click the page numbers or the ' ' and ' ' links at the bottom of the Next Prevpage.
474

Documentation for Crowd 4.4 2
Created in 2021 by Atlassian. Licensed under a .Creative Commons Attribution 2.5 Australia License
Screenshot: CrowdID Login History page
RELATED TOPICS
1. Getting started with CrowdID2. Logging in to a website using OpenID3. Viewing your always-approved websites4. Viewing your login history5. Updating your profile6. Using more than one profile7. Changing or resetting your password8. Requesting Forgotten Usernames
475
1. 2. 3. 4. 5.
5. Updating your profileWhen you log in to a website using your OpenID, CrowdID will pass some information to the website. The information is copied from your profile on CrowdID. When your profile is first created, CrowdID will auto-fill the information where possible, by copying:
Country and language from the language information in your browser.Name and email address from your organization's user directory.
You can update your profile information on CrowdID, as described below.
You can also:
Add a new profile.Choose a profile for a website.Set a profile as default.Delete a profile.
To update your profile,
Access CrowdID.Click ' ' in the left-hand navigation panel.ProfilesSelect the required profile from the ' ' dropdown list, if you have .Profile more than one profileUpdate the profile details then click the ' ' button.Save' ' message is displayed at the top of the page.Profile updated
476
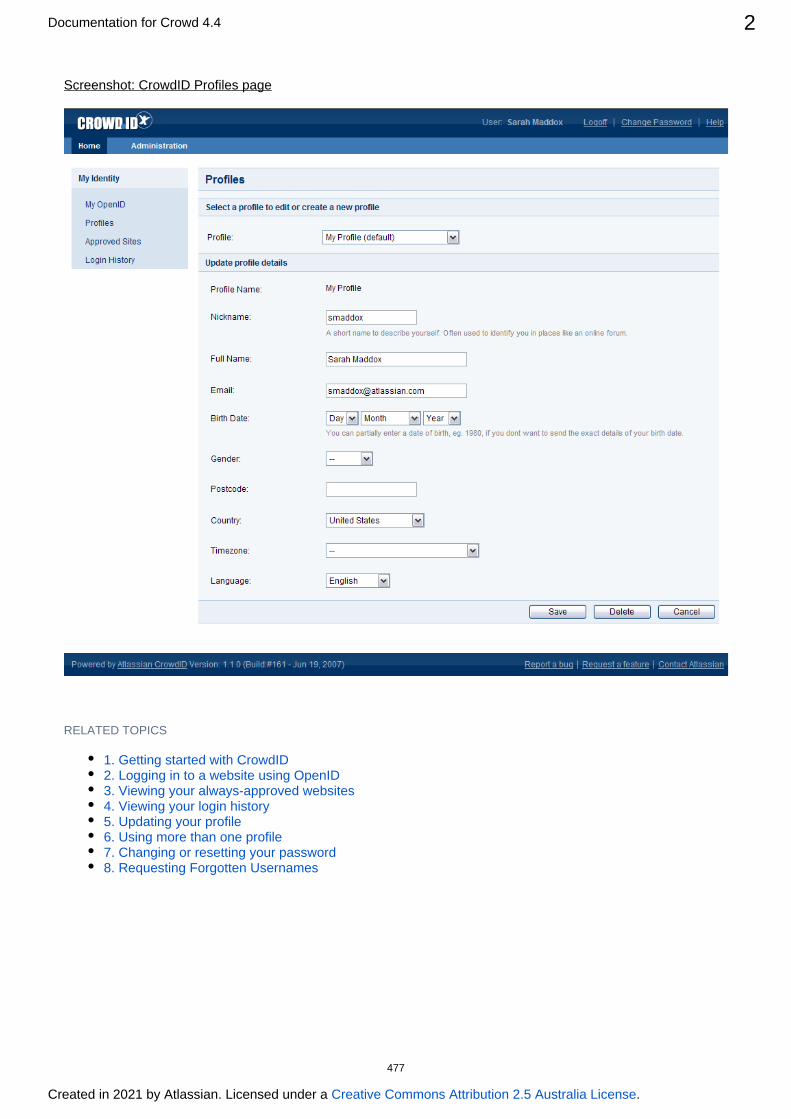
Documentation for Crowd 4.4 2
Created in 2021 by Atlassian. Licensed under a .Creative Commons Attribution 2.5 Australia License
Screenshot: CrowdID Profiles page
RELATED TOPICS
1. Getting started with CrowdID2. Logging in to a website using OpenID3. Viewing your always-approved websites4. Viewing your login history5. Updating your profile6. Using more than one profile7. Changing or resetting your password8. Requesting Forgotten Usernames
477
6. Using more than one profileYou can create multiple profiles in CrowdID and then allocate specific profiles to specific websites.
6.1 Adding a profile6.2 Choosing a profile for a website6.3 Setting a default profile6.4 Deleting a profile
478
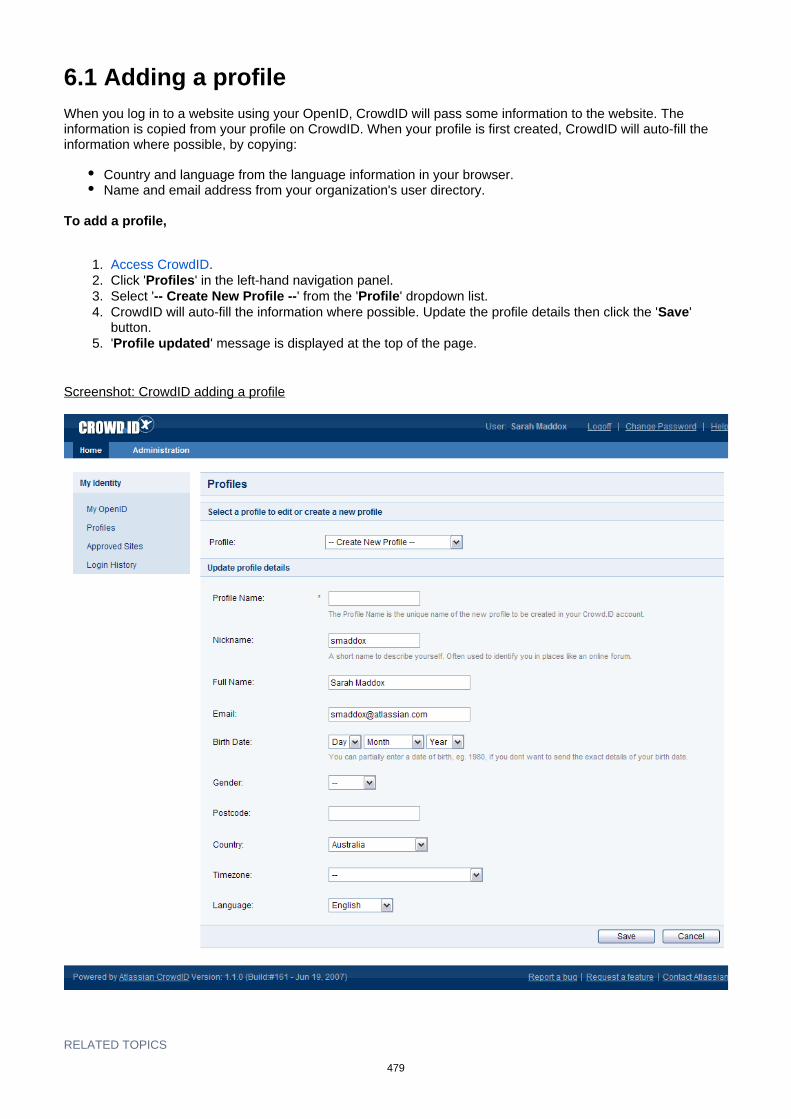
1. 2. 3. 4.
5.
6.1 Adding a profileWhen you log in to a website using your OpenID, CrowdID will pass some information to the website. The information is copied from your profile on CrowdID. When your profile is first created, CrowdID will auto-fill the information where possible, by copying:
Country and language from the language information in your browser.Name and email address from your organization's user directory.
To add a profile,
Access CrowdID.Click ' ' in the left-hand navigation panel.ProfilesSelect ' ' from the ' ' dropdown list.-- Create New Profile -- ProfileCrowdID will auto-fill the information where possible. Update the profile details then click the ' ' Savebutton.' ' message is displayed at the top of the page.Profile updated
Screenshot: CrowdID adding a profile
RELATED TOPICS
479
Documentation for Crowd 4.4 2
Created in 2021 by Atlassian. Licensed under a .Creative Commons Attribution 2.5 Australia License
6.1 Adding a profile6.2 Choosing a profile for a website6.3 Setting a default profile6.4 Deleting a profile
CrowdID User Guide
480

6.2 Choosing a profile for a websiteYou can choose a specific profile for use when logging in to a website. There are different ways to choose a profile:
Choose a profile for a specific login, during the . You can do this for sites which you have login processnot set to 'Allow Always'.Choose a profile for a specific website, on the CrowdID . You can do this for sites 'Approved Sites' pagewhich you have set to 'Allow Always'.Set your default profile on the CrowdID ' ' page. Profiles
RELATED TOPICS
6.1 Adding a profile6.2 Choosing a profile for a website6.3 Setting a default profile6.4 Deleting a profile
CrowdID User Guide
481
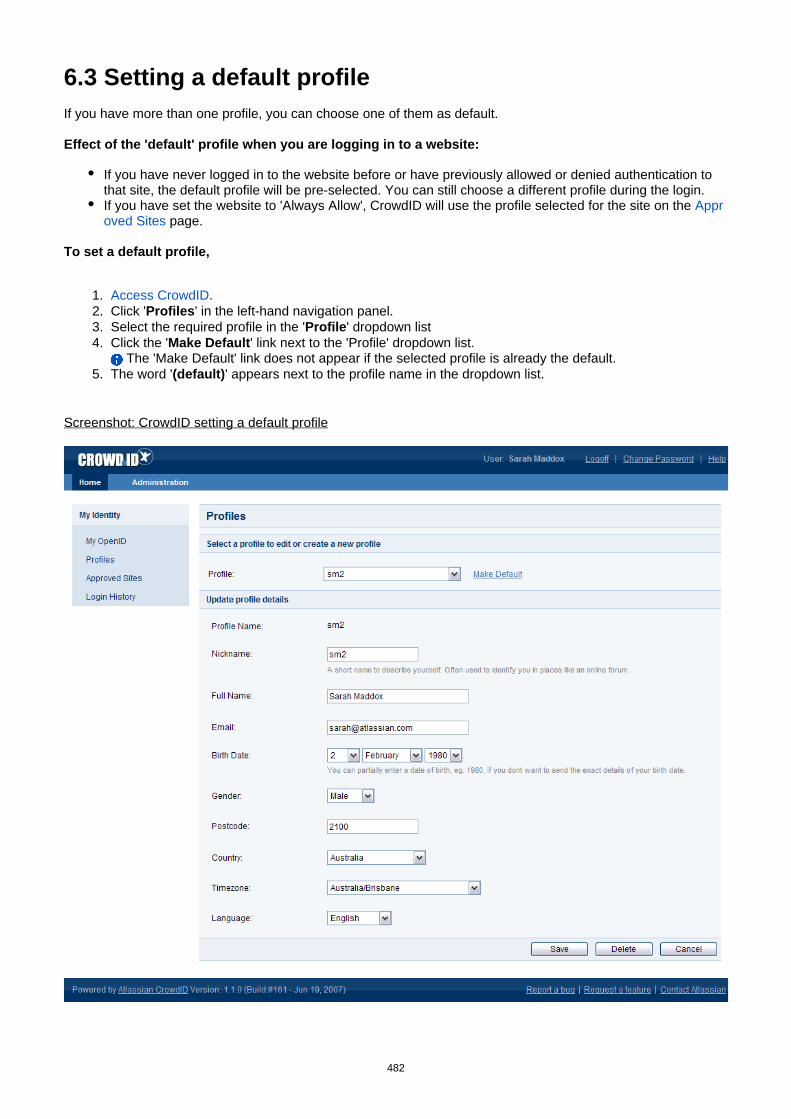
1. 2. 3. 4.
5.
6.3 Setting a default profileIf you have more than one profile, you can choose one of them as default.
Effect of the 'default' profile when you are logging in to a website:
If you have never logged in to the website before or have previously allowed or denied authentication to that site, the default profile will be pre-selected. You can still choose a different profile during the login.If you have set the website to 'Always Allow', CrowdID will use the profile selected for the site on the Appr
page.oved Sites
To set a default profile,
Access CrowdID.Click ' ' in the left-hand navigation panel.ProfilesSelect the required profile in the ' ' dropdown listProfileClick the ' ' link next to the 'Profile' dropdown list.Make Default
The 'Make Default' link does not appear if the selected profile is already the default.The word ' ' appears next to the profile name in the dropdown list.(default)
Screenshot: CrowdID setting a default profile
482
Documentation for Crowd 4.4 2
Created in 2021 by Atlassian. Licensed under a .Creative Commons Attribution 2.5 Australia License
RELATED TOPICS
6.1 Adding a profile6.2 Choosing a profile for a website6.3 Setting a default profile6.4 Deleting a profile
CrowdID User Guide
483

1. 2. 3. 4. 5.
6.4 Deleting a profileYou can delete one of your profiles on CrowdID, provided that it is not your .default profile
To delete a profile,
Access CrowdID.Click ' ' in the left-hand navigation panel.ProfilesSelect the required profile in the ' ' dropdown listProfileClick the ' ' button.Delete' ' message is displayed at the top of the page.Profile deleted
Screenshot: CrowdID profiles page
RELATED TOPICS
6.1 Adding a profile
If you delete a profile which is linked to one or more of your , CrowdID will always-approved websitesremove the affected website(s) from the list.
484

Documentation for Crowd 4.4 2
Created in 2021 by Atlassian. Licensed under a .Creative Commons Attribution 2.5 Australia License
6.2 Choosing a profile for a website6.3 Setting a default profile6.4 Deleting a profile
CrowdID User Guide
485
7. Changing or resetting your passwordIf your administrator has allowed it, you can use CrowdID to across all Crowd change your passwordapplications. Note that you will need to be logged in to Crowd before you can do this.
When attempting to log in to Crowd, you can also . This is useful when you have forgotten reset your passwordthe password. Crowd will send you an email message containing a unique, randomly-generated URL. When you click the link on that URL, you will go to a screen where you can choose your own new password.
RELATED TOPICS1. Getting started with CrowdID2. Logging in to a website using OpenID3. Viewing your always-approved websites4. Viewing your login history5. Updating your profile6. Using more than one profile7. Changing or resetting your password8. Requesting Forgotten Usernames
486

1. 2. 3.
4. 5.
7.1 Changing your passwordThe CrowdID ' ' page allows you to change your password across all applications in Change Your Passwordyour organization, provided that the application is linked to .Crowd
Note:
Crowd will attempt to change your password in all the user directories linked to Crowd. This will be successful where the directory allows it.Your administrator may disable password-change via CrowdID. In that case, you will receive an error message when you apply the change.
To change your password,
Access CrowdID.Click ' ' in the top menu bar.Change PasswordThe ' ' page will appear. Type in your old password once, and the new Change Your Passwordpassword twice.Click the ' ' button.UpdateThe ' ' message is displayed.Password updated
Screenshot: CrowdID Change Your Password page
RELATED TOPICS
1. Getting started with CrowdID2. Logging in to a website using OpenID3. Viewing your always-approved websites4. Viewing your login history5. Updating your profile6. Using more than one profile7. Changing or resetting your password8. Requesting Forgotten Usernames
If the change is successful, your password may also have changed in other Crowd-connected applications.
487
Documentation for Crowd 4.4 2
Created in 2021 by Atlassian. Licensed under a .Creative Commons Attribution 2.5 Australia License
488
1. 2. 3.
4.
5.
6.
7.2 Resetting your passwordThe CrowdID ' ' page allows you to reset your password. This is useful when you have forgotten the Loginpassword. Crowd will send you an email message containing a unique, randomly-generated URL. When you click the link on that URL, you will go to a screen where you can choose your own new password.
To reset your password,
Access CrowdID.The CrowdID login page will appear. Click the link labeled ' '.Can't access your account?The ' ' screen appears. Select the option labeled 'Help! I forgot my login details I have forgotten my
'.passwordA panel opens where you can enter your username. Enter your Crowd username and click the 'Contin
' button.ueYou will receive an email message containing a link to a unique, randomly-generated URL. This link remains available for 24 hours. Click the link in the email message or copy the URL to your browser address bar.The ' ' screen appears. Change your password to one you can remember easily.Reset Password
The password reset email will contain a link based on the from the . If crowd.server.url crowd.properties filethe public address is different you may set .crowd.base.url
RELATED TOPICS
1. Getting started with CrowdID2. Logging in to a website using OpenID3. Viewing your always-approved websites4. Viewing your login history5. Updating your profile6. Using more than one profile7. Changing or resetting your password8. Requesting Forgotten Usernames
This will reset your password across all applications that are connected to Crowd.
489

1. 2. 3.
4.
5.
6.
8. Requesting Forgotten UsernamesYou can go to the CrowdID ' ' screen and ask CrowdID to email you your username(s). This is useful when Loginyou have forgotten your username. CrowdID will send a message to the email address you specify, containing all the usernames that are registered for that email address.
To request your username(s),
Access CrowdID.The CrowdID login page appears. Click the link labeled ' '.Can't access your account?The ' ' screen appears. Select the option labeled 'Help! I forgot my login details I have forgotten my
'.usernameA panel opens where you can enter your email address. Enter the email address that you used when you registered with CrowdID and click the ' ' button.ContinueYou will receive an email message containing the usernames registered in CrowdID for that email address.If you have forgotten your password too, you can now ask to .reset your password
RELATED TOPICS1. Getting started with CrowdID2. Logging in to a website using OpenID3. Viewing your always-approved websites4. Viewing your login history5. Updating your profile6. Using more than one profile7. Changing or resetting your password8. Requesting Forgotten Usernames
490

Crowd FAQKnown issues, hints and tips and answers to commonly asked questions about Crowd:
Concepts:
What is single sign-on (SSO)?What is authorization?What is authentication?What is centralized authentication?What is identity management?What is a directory?
Technical:
How does Crowd work? How is Crowd an "application security framework"?What is an application connector?What is a directory connector?How many users can Crowd manage?How many applications can be used with Crowd?We already have an LDAP server for Confluence and/or Jira. Do we really need Crowd?
Compatibility:
What are Crowd's system requirements?What directories and applications does Crowd support out of the box?How can Crowd be connected to new or currently unsupported applications?How does Crowd integrate with other Atlassian products?Does Crowd include Kerberos integration?
Common Evaluator Questions:
Unable to render {children}. Page not found: CONFEVAL:Frequently Asked Questions For Crowd.
Crowd Resources
Deployment FAQ
Deploying Multiple Atlassian Applications in a Single Tomcat ContainerFinding the atlassian-crowd.log FileFinding your Crowd home and shared directoriesRemoving the 'crowd' Context from the Application URLResetting the Domain Cookie ValueRestarting the Setup Wizard from ScratchSelf Signed Certificate
Guides, Hints and Tips
How to Print Only Tomcat Logs into Crowd's catalina.outPrincipals and UsersUsing Apache Directory Studio for LDAP Configuration
Creating a Connection to your LDAP DirectoryGetting an LDIF Export of a User or GroupRestricting LDAP Scope for User and Group Search
Integration FAQ
All IntegrationsIf I delete a user from Crowd, how will this affect integrated applications?Passing the crowd.properties File as an Environment Variable
Atlassian Product IntegrationApplication CachingJira integrationPublic Signup Setup
IBM Lotus Domino IntegrationIBM Websphere Integration
Support Policies
Unable to render {children}.
491
Documentation for Crowd 4.4 2
Created in 2021 by Atlassian. Licensed under a .Creative Commons Attribution 2.5 Australia License
Bug Fixing PolicyHow to Report a Security IssueNew Features PolicySecurity Advisory Publishing PolicySecurity Bugfix PolicySecurity Patch PolicySeverity Levels for Security Issues
Troubleshooting
Finding Known IssuesCharacters in User or Group DN's that will cause problems when using CrowdProblems when Importing Users into MySQLTroubleshooting LDAP Error Codes
Active Directory LDAP ErrorsTroubleshooting LDAP User ManagementTroubleshooting SSL certificates and CrowdHow to Optimize Crowd Client CachingTroubleshooting Crowd PerformanceTroubleshooting SSO with Crowd
Debugging SSO in environments with Proxy ServersTroubleshooting CrowdIDProvide Crowd Information to Atlassian Support
Contributing to the Crowd Documentation
Tips of the TradeCrowd Documentation in Other Languages
What is single sign-on?
Single sign-on enables users to authenticate (login) once and gain access to multiple web applications within a single domain. See also .centralized authentication
What is authorization?
Authorization is the act of deciding whether a person is allowed to access a specific resource or web application. This often comes in the form of groups, roles and permissions.
What is authentication?
Authentication is the act of verifying that a user is who they say they are. This is often done through a credential such as and .user name password
What is centralized authentication?
Centralized authentication is when an end-user has the same username and password used across all web applications, even if the application cannot participate in . This is often a major milestone before single sign-onsingle sign-on is achieved within an organization.
Crowd provides centralization authentication and/or single sign-on depending on your application's capabilities.
What is identity management?
Identity management is the process of defining a user (a 'principal') and managing their attributes. In addition to username and credentials (e.g. password), attributes might include phone number, address, etc.
Identity management also includes assigning users to relevant groups and roles, so that users can access appropriate applications and resources.
Another important part of identity management is managing the entire user lifecycle, for example, disabling the user account when someone leaves the organization.
What is a directory?
492

Documentation for Crowd 4.4 3
Created in 2021 by Atlassian. Licensed under a .Creative Commons Attribution 2.5 Australia License
A directory is a repository of information containing user identities, their attributes and their group and role memberships.
How does Crowd work? How is Crowd an "application security framework"?
Crowd is made up of two parts:
Administration console: a brilliantly simple and powerful web interface that manages directories, users, and their security rights.Integration API: a single security architecture where multiple web applications are integrated. With the integration API, applications can quickly access user information or perform security checks.
What is an application connector?
An is the link between Crowd and one of your applications. An application connector application connectormakes it possible to connect, say, Crowd and Jira. When you download and install Crowd, you'll automatically get its application connectors, along with an integration API so that you can code your own application connectors too.
What is a directory connector?
A is the link between Crowd and one of your directories. It makes it possible to connect, directory connectorsay, Crowd and Active Directory. When you download and install Crowd, you'll automatically get its directory connectors, along with an integration API so that you can code your own directory connectors too.
How many users can Crowd manage?
Crowd can support over 500 users depending upon which license you purchase. View the licensing and pricingbreakdown for more information. We have customers using Crowd successfully with tens of thousands of users.
How many applications can be used with Crowd?
So long as they're compatible with Crowd, you can add in as many as your organization needs.applications
We already have an LDAP server for Confluence and/or Jira. Do we really need Crowd?
If one or more of the following apply, Crowd will be of benefit to you:
your organization uses multiple and they have not yet been integrated into the LDAP serverapplicationsyou are looking for an easy way to manage all your Jira and Confluence users in one database with one or more directory serversyour organization has not yet implemented single sign-onyou are looking for a way to help save you and your organization time, frustration, and much more!
What are Crowd's system requirements?
For information on compatible databases, application servers, and operating systems, read the Supported page.Platforms
What directories and applications does Crowd support out-of-the-box?
A complete list of currently supported applications and directories can be found in Crowd's . documentationCheck back often, as new connectors will be added regularly.
How can Crowd be connected to new or currently unsupported applications?
Crowd provides a simple and intuitive API (backed by ) that allows you to connect in integration REST orSOAPyour new or existing applications. This makes it easy to choose how much or how little to integrate based on your needs.
How does Crowd integrate with other Atlassian products?
493

Documentation for Crowd 4.4 4
Created in 2021 by Atlassian. Licensed under a .Creative Commons Attribution 2.5 Australia License
Crowd ships with for Atlassian products.connectors
Using the out-of-the-box connectors you can all of your users into a single repository giving you the consolidateability to all of your users in a single location. Users can then take advantage of , giving manage single sign-onthem one username and password to access all of your applications.
Does Crowd include kerberos integration?
Crowd does not currently support kerberos-based authentication.
For licensing and pricing please see the Purchasing FAQ.
494
Crowd ResourcesResources for Evaluators
Free TrialFeature Tour
Resources for Administrators
Crowd Knowledge BaseTips of the TradeGuide to Installing an Atlassian Integrated Suite
Downloadable Documentation
Crowd documentation in PDF, HTML or XML formats
Plugins and Extensions
Atlassian Plugin Exchange
Support
Atlassian SupportSupport Policies
Forums and Announcements
Crowd AnnouncementsAnswers from the community
Mailing Lists
Visit to sign up for mailing lists relating to Atlassian products, such as technical http://my.atlassian.comalerts, product announcements and developer updates.
Feature Requests
Issue Tracker and Feature Requests for Crowd
495
Deployment FAQDeploying Multiple Atlassian Applications in a Single Tomcat ContainerFinding the atlassian-crowd.log FileFinding your Crowd home and shared directoriesRemoving the 'crowd' Context from the Application URLResetting the Domain Cookie ValueRestarting the Setup Wizard from ScratchSelf Signed Certificate
496
Deploying Multiple Atlassian Applications in a Single Tomcat ContainerDeploying multiple Atlassian applications in a single Tomcat container is . We do not test this not supportedconfiguration and upgrading any of the applications (even for point releases) is likely to break it. There are also a number of known issues with this configuration:
You may not be able to start up all of the applications in the container, due to class conflicts (in 3rd party libraries bundled with our application) that result from the Atlassian applications sharing a single JVM in the Tomcat container.You will not be able to determine the startup order of the applications. Hence, you may experience problems such as JIRA starting before Crowd, rather than vice versa.Memory problems are also common as one application may allocate all of the memory in the Tomcat JVM to itself, starving the other applications.
We also do not support deploying multiple Atlassian applications to a single Tomcat container for a number of practical reasons. Firstly, you must shut down Tomcat to upgrade any application and secondly, if one application crashes, the other applications running in that Tomcat container will be inaccessible.
Finally, we recommend not deploying to the same Tomcat container that runs the any other applicationsAtlassian application, especially if these other applications have large memory requirements or require additional libraries in Tomcat's subdirectory.lib
497
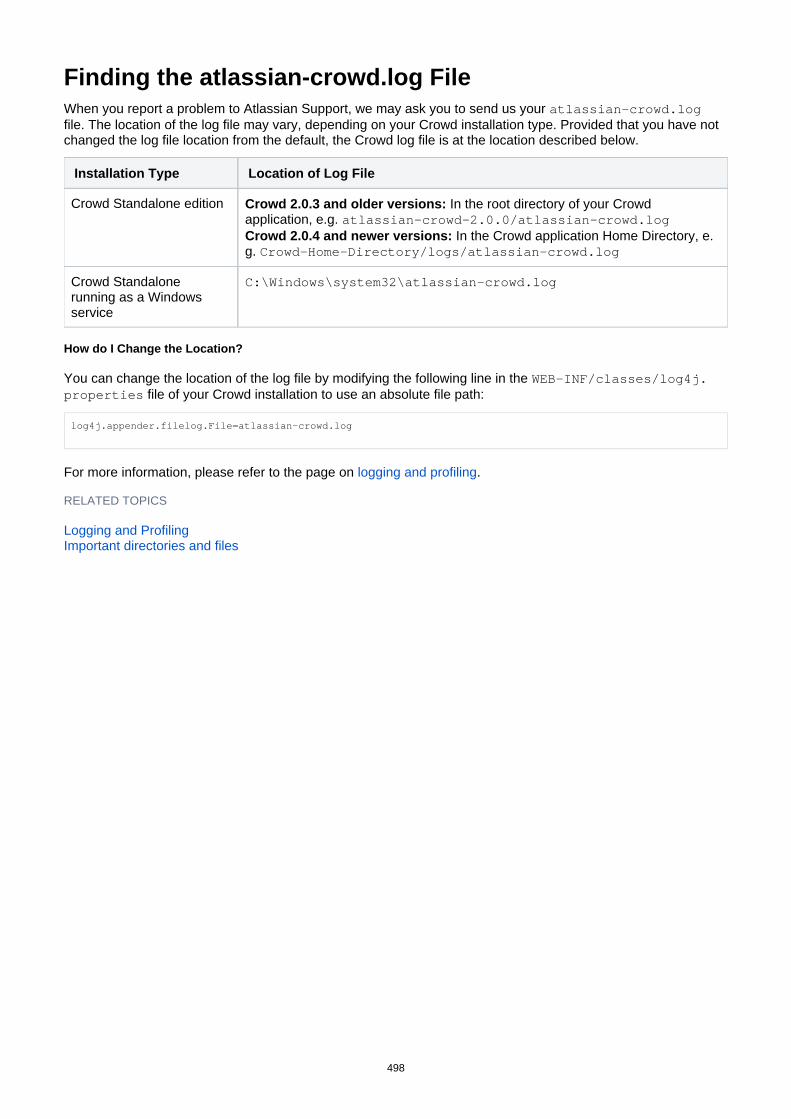
Finding the atlassian-crowd.log FileWhen you report a problem to Atlassian Support, we may ask you to send us your atlassian-crowd.logfile. The location of the log file may vary, depending on your Crowd installation type. Provided that you have not changed the log file location from the default, the Crowd log file is at the location described below.
Installation Type Location of Log File
Crowd Standalone edition Crowd 2.0.3 and older versions: In the root directory of your Crowd application, e.g. atlassian-crowd-2.0.0/atlassian-crowd.log
In the Crowd application Home Directory, e.Crowd 2.0.4 and newer versions:g. Crowd-Home-Directory/logs/atlassian-crowd.log
Crowd Standalone running as a Windows service
C:\Windows\system32\atlassian-crowd.log
How do I Change the Location?
You can change the location of the log file by modifying the following line in the WEB-INF/classes/log4j. file of your Crowd installation to use an absolute file path:properties
log4j.appender.filelog.File=atlassian-crowd.log
For more information, please refer to the page on .logging and profiling
RELATED TOPICS
Logging and ProfilingImportant directories and files
498

Finding your Crowd home and shared directoriesYou can check the location of your Crowd home directory on the screen.System Information
Home directory this is where Crowd stores its configuration information. If you're using the embedded HSQLDB database supplied for evaluation purposes, it will also be there (note however that the CrowdID database will be in the installation directory, not the home directory).
Shared directory this is a sub-directory of the Crowd home directory. It contains common data for your Crowd installation, such as database configuration and plugins. If you're using Crowd Data Center, content of this directory will be shared by each node in the cluster.
Read more:
Setting your home directory during .installationThe location and function of the Crowd home directory and other .important files and directories
499
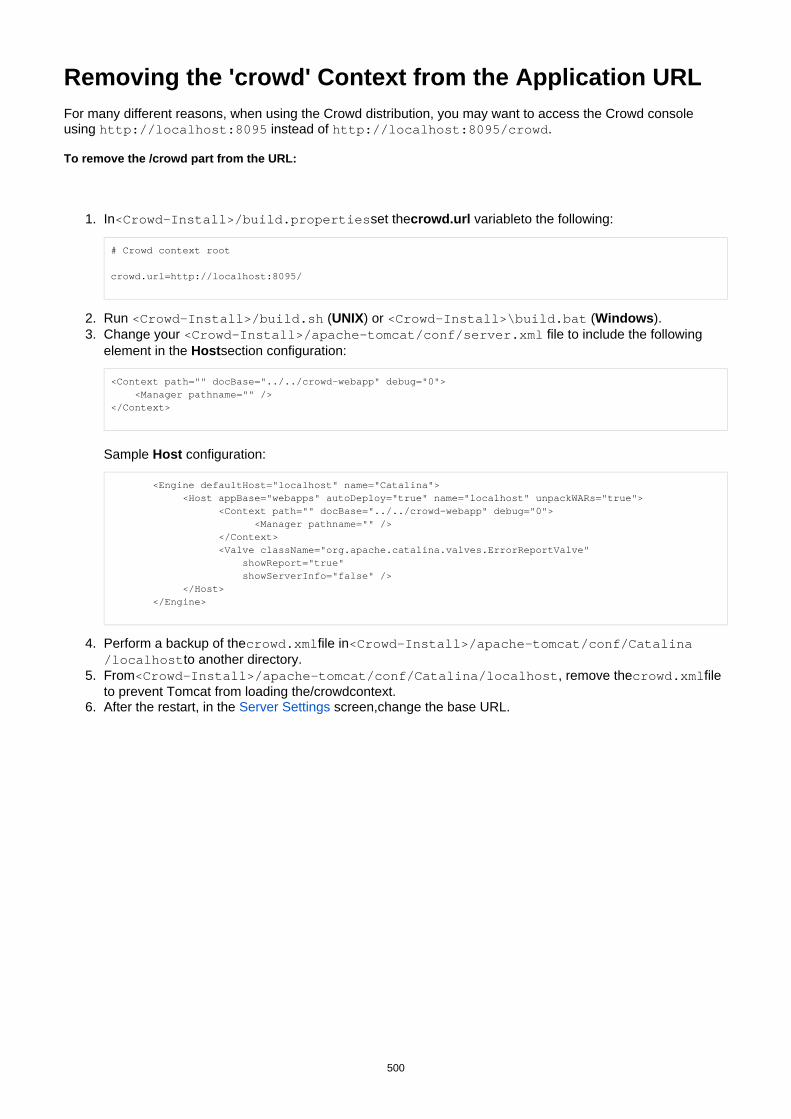
1.
2. 3.
4.
5.
6.
Removing the 'crowd' Context from the Application URLFor many different reasons, when using the Crowd distribution, you may want to access the Crowd console using instead of .http://localhost:8095 http://localhost:8095/crowd
To remove the part from the URL:/crowd
In set the variableto the following:<Crowd-Install>/build.properties crowd.url
# Crowd context root
crowd.url=http://localhost:8095/
Run ( ) or ( ).<Crowd-Install>/build.sh UNIX <Crowd-Install>\build.bat WindowsChange your file to include the following <Crowd-Install>/apache-tomcat/conf/server.xmlelement in the section configuration:Host
<Context path="" docBase="../../crowd-webapp" debug="0"> <Manager pathname="" /></Context>
Sample configuration:Host
<Engine defaultHost="localhost" name="Catalina"> <Host appBase="webapps" autoDeploy="true" name="localhost" unpackWARs="true"> <Context path="" docBase="../../crowd-webapp" debug="0"> <Manager pathname="" /> </Context> <Valve className="org.apache.catalina.valves.ErrorReportValve" showReport="true" showServerInfo="false" /> </Host> </Engine>
Perform a backup of the file incrowd.xml <Crowd-Install>/apache-tomcat/conf/Catalinato another directory./localhost
From , remove the file <Crowd-Install>/apache-tomcat/conf/Catalina/localhost crowd.xmlto prevent Tomcat from loading the/crowdcontext.After the restart, in the screen,change the base URL.Server Settings
500

Resetting the Domain Cookie ValueIf you have set the to an invalid value, you may be prevented from authenticating to the Crowd SSO DomainConsole.
To reset the SSO (single sign-on) cookie domain, run the following SQL command on the Crowd database:
update cwd_property set property_value = '' where property_name = 'domain';
Once you have done this you will need to restart Crowd, clear your browser's cache and then log in. This will reset any domain SSO token misconfiguration.
501

1. 2. 3. 4. 5.
Restarting the Setup Wizard from ScratchIf you get part-way through the and then decide you want to start again from scratch, you Crowd Setup Wizardcan delete the directory. (See .)Crowd Home Important directories and files
Crowd uses the file, stored in the Crowd Home directory, to 'remember' the step you have crowd.cfg.xmlreached in the setup procedure. Clearing the file will cause the Setup Wizard to start at the beginning again.
This strategy is useful if you want to re-do your setup without having to download Crowd again.
To restart the Crowd Setup Wizard:
Shut down Crowd.Delete your directory.Crowd HomeStart Crowd again.Go go .http://localhost:8095/crowdThe Crowd Setup Wizard will start. Follow the steps from the beginning, as described in Running the
.Setup Wizard
Embedded database will disappear too
If you are using the , the database files are stored in the Crowd Home embedded databasedirectory too. Deleting the Crowd Home directory will remove all your Crowd Administration Console data as well (users, groups, roles, directories, applications and other configuration data).
502

Self Signed CertificateI have a self Signed Certificate
You will need to add the self-signed certificate to your JDK truststore using the JDK keytool: https://docs.oracle.com/javase/8/docs/technotes/tools/windows/keytool.html
503

Guides, Hints and TipsHow to Print Only Tomcat Logs into Crowd's catalina.outPrincipals and UsersUsing Apache Directory Studio for LDAP Configuration
504

How to Print Only Tomcat Logs into Crowd's catalina.outCrowd writes its logs into and Tomcat logs as well. However, this might only be noticed for atlassian-crowd.logCrowd installed in *nix based server, as in Windows these are printed in the console. Below is the start-up process written in where it describe the start-up process of all applications bundled inside catalina.out,Crowd standalone, such as Crowd OpenID and Crowd itself:
Crowd OpenID Start-up
ay 31, 2012 6:20:03 PM org.apache.coyote.http11.Http11Protocol initINFO: Initializing Coyote HTTP/1.1 on http-9424May 31, 2012 6:20:03 PM org.apache.catalina.startup.Catalina loadINFO: Initialization processed in 265 msMay 31, 2012 6:20:03 PM org.apache.catalina.realm.JAASRealm setContainerINFO: Set JAAS app name CatalinaMay 31, 2012 6:20:03 PM org.apache.catalina.core.StandardService startINFO: Starting service CatalinaMay 31, 2012 6:20:03 PM org.apache.catalina.core.StandardEngine startINFO: Starting Servlet Engine: Apache Tomcat/6.0.32May 31, 2012 6:20:03 PM org.apache.catalina.startup.HostConfig deployDescriptorINFO: Deploying configuration descriptor crowd.xml2012-05-31 18:20:12,341 main INFO [com.atlassian.crowd.startup] System Information:2012-05-31 18:20:12,342 main INFO [com.atlassian.crowd.startup] Timezone: Malaysia Time2012-05-31 18:20:12,342 main INFO [com.atlassian.crowd.startup] Java Version: 1.6.0_312012-05-31 18:20:12,342 main INFO [com.atlassian.crowd.startup] Java Vendor: Sun Microsystems Inc.2012-05-31 18:20:12,342 main INFO [com.atlassian.crowd.startup] JVM Version: 20.6-b012012-05-31 18:20:12,342 main INFO [com.atlassian.crowd.startup] JVM Vendor: Sun Microsystems Inc.2012-05-31 18:20:12,342 main INFO [com.atlassian.crowd.startup] JVM Runtime: Java HotSpot(TM) 64-Bit Server VM2012-05-31 18:20:12,342 main INFO [com.atlassian.crowd.startup] Username: sultan2012-05-31 18:20:12,342 main INFO [com.atlassian.crowd.startup] Operating System: Linux3.2.0-23-generic2012-05-31 18:20:12,342 main INFO [com.atlassian.crowd.startup] Architecture: amd642012-05-31 18:20:12,342 main INFO [com.atlassian.crowd.startup] File Encoding: UTF-82012-05-31 18:20:12,342 main INFO [com.atlassian.crowd.startup] JVM Statistics:2012-05-31 18:20:12,342 main INFO [com.atlassian.crowd.startup] Total Memory: 124MB2012-05-31 18:20:12,342 main INFO [com.atlassian.crowd.startup] Used Memory: 34MB2012-05-31 18:20:12,342 main INFO [com.atlassian.crowd.startup] Free Memory: 89MB2012-05-31 18:20:12,342 main INFO [com.atlassian.crowd.startup] Runtime Information:2012-05-31 18:20:12,342 main INFO [com.atlassian.crowd.startup] Version: 2.4.22012-05-31 18:20:12,342 main INFO [com.atlassian.crowd.startup] Build Number: 5632012-05-31 18:20:12,342 main INFO [com.atlassian.crowd.startup] Build Date: 07-05-20122012-05-31 18:20:12,342 main INFO [crowd.console.listener.StartupListener] Upgrades not performed since the application has not been setup yet.2012-05-31 18:20:12,368 main INFO [ContainerBase.[Catalina].[localhost].[/crowd]] org.tuckey.web.filters.urlrewrite.UrlRewriteFilter INFO: loaded (conf ok)May 31, 2012 6:20:12 PM org.apache.catalina.startup.HostConfig deployDescriptorINFO: Deploying configuration descriptor openidserver.xmlSLF4J: Class path contains multiple SLF4J bindings.SLF4J: Found binding in [jar:file:/home/sultan/atlassian/CROWD/atlassian-crowd-2.4.2/crowd-openidserver-webapp/WEB-INF/lib/slf4j-jcl-1.0.1.jar!/org/slf4j/impl/StaticLoggerBinder.class]SLF4J: Found binding in [jar:file:/home/sultan/atlassian/CROWD/atlassian-crowd-2.4.2/crowd-openidserver-webapp/WEB-INF/lib/slf4j-log4j12-1.5.8.jar!/org/slf4j/impl/StaticLoggerBinder.class]SLF4J: See http://www.slf4j.org/codes.html#multiple_bindings for an explanation.2012-05-31 18:20:14,313 main INFO [com.atlassian.crowd.startup] Starting Crowd OpenID Server, Version: 2.4.2 (Build:#563 - 07-05-2012)
505

Documentation for Crowd 4.4 2
Created in 2021 by Atlassian. Licensed under a .Creative Commons Attribution 2.5 Australia License
Crowd Start-up
2012-05-31 21:17:17,314 main INFO [com.atlassian.crowd.startup] System Information:2012-05-31 21:17:17,314 main INFO [com.atlassian.crowd.startup] Timezone: Malaysia Time2012-05-31 21:17:17,314 main INFO [com.atlassian.crowd.startup] Java Version: 1.6.0_312012-05-31 21:17:17,314 main INFO [com.atlassian.crowd.startup] Java Vendor: Sun Microsystems Inc.2012-05-31 21:17:17,314 main INFO [com.atlassian.crowd.startup] JVM Version: 20.6-b012012-05-31 21:17:17,314 main INFO [com.atlassian.crowd.startup] JVM Vendor: Sun Microsystems Inc.2012-05-31 21:17:17,315 main INFO [com.atlassian.crowd.startup] JVM Runtime: Java HotSpot(TM) 64-Bit Server VM2012-05-31 21:17:17,315 main INFO [com.atlassian.crowd.startup] Username: sultan2012-05-31 21:17:17,315 main INFO [com.atlassian.crowd.startup] Operating System: Linux3.2.0-23-generic2012-05-31 21:17:17,315 main INFO [com.atlassian.crowd.startup] Architecture: amd642012-05-31 21:17:17,315 main INFO [com.atlassian.crowd.startup] File Encoding: UTF-82012-05-31 21:17:17,315 main INFO [com.atlassian.crowd.startup] JVM Statistics:2012-05-31 21:17:17,315 main INFO [com.atlassian.crowd.startup] Total Memory: 124MB2012-05-31 21:17:17,315 main INFO [com.atlassian.crowd.startup] Used Memory: 24MB2012-05-31 21:17:17,315 main INFO [com.atlassian.crowd.startup] Free Memory: 99MB2012-05-31 21:17:17,315 main INFO [com.atlassian.crowd.startup] Runtime Information:2012-05-31 21:17:17,315 main INFO [com.atlassian.crowd.startup] Version: 2.4.22012-05-31 21:17:17,315 main INFO [com.atlassian.crowd.startup] Build Number: 5632012-05-31 21:17:17,315 main INFO [com.atlassian.crowd.startup] Build Date: 07-05-20122012-05-31 21:17:17,315 main INFO [com.atlassian.crowd.startup] Application Server: Apache Tomcat/6.0.322012-05-31 21:17:17,315 main INFO [com.atlassian.crowd.startup] Database Information:2012-05-31 21:17:17,315 main INFO [com.atlassian.crowd.startup] JDBC URL: jdbc:mysql://localhost/crowddb242?autoReconnect=true&characterEncoding=utf8&useUnicode=true2012-05-31 21:17:17,315 main INFO [com.atlassian.crowd.startup] JDBC Driver: com.mysql.jdbc.Driver2012-05-31 21:17:17,315 main INFO [com.atlassian.crowd.startup] JDBC Username: root2012-05-31 21:17:17,315 main INFO [com.atlassian.crowd.startup] Hibernate Dialect: org.hibernate.dialect.MySQL5InnoDBDialect2012-05-31 21:17:17,316 main INFO [com.atlassian.crowd.startup] License Information:2012-05-31 21:17:17,316 main INFO [com.atlassian.crowd.startup] License Server ID: BTFR-LW5O-LYA5-W1IT2012-05-31 21:17:17,316 main INFO [com.atlassian.crowd.startup] Directories:2012-05-31 21:17:17,359 main INFO [com.atlassian.crowd.startup] CROWD242 (InternalDirectory) JIRA504 (InternalDirectory)
This might be a redundant information as they've been written into .atlassian-crowd.log
In order to get Crowd print only Tomcat logs into , please modify these files:catalina.out
<Crowd_Install_Directory>/crowd-webapp/WEB-INF/classes/log4j.properties<Crowd_Install_Directory>/crowd-openidserver-webapp/WEB-INF/classes/log4j.properties<Crowd_Install_Directory>/crowd-openidclient-webapp/WEB-INF/classes/log4j.properties<Crowd_Install_Directory>/demo-webapp/WEB-INF/classes/log4j.properties
modify this line:
DEFAULT
log4j.rootLogger=INFO, console, crowdlog
into:
Modify it to
log4j.rootLogger=INFO, crowdlog
Save all of the modified and restart Crowdlog4j.properties .
506
Principals and UsersAs far as Crowd is concerned, the terms ' ' and ' ' are equivalent they mean the same thing. principals usersEarlier versions of Crowd used the term 'principals'. From Crowd 1.3 onwards, we call them 'users'.
507
Using Apache Directory Studio for LDAP ConfigurationThis is a basic tutorial on using a wonderful Eclipse-based LDAP browser, known as , Apache Directory Studioto gather the information you need for your .LDAP configuration
Before you Start
Step 1. Get Apache Directory Studio
Download and install .Apache Directory Studio
Step 2. ( ) Do Some Background ReadingOptional
If you are an LDAP newbie, there are two great articles that may help you gain a better understanding of LDAP and LDAP search filters before you begin using Apache Directory Studio:
An Introduction to LDAPHow to write an LDAP search filter
Table of Contents
Creating a Connection to your LDAP Directory
Getting an LDIF Export of a User or Group
Restricting LDAP Scope for User and Group Search
RELATED TOPICS
Configuring an LDAP Directory Connector
508
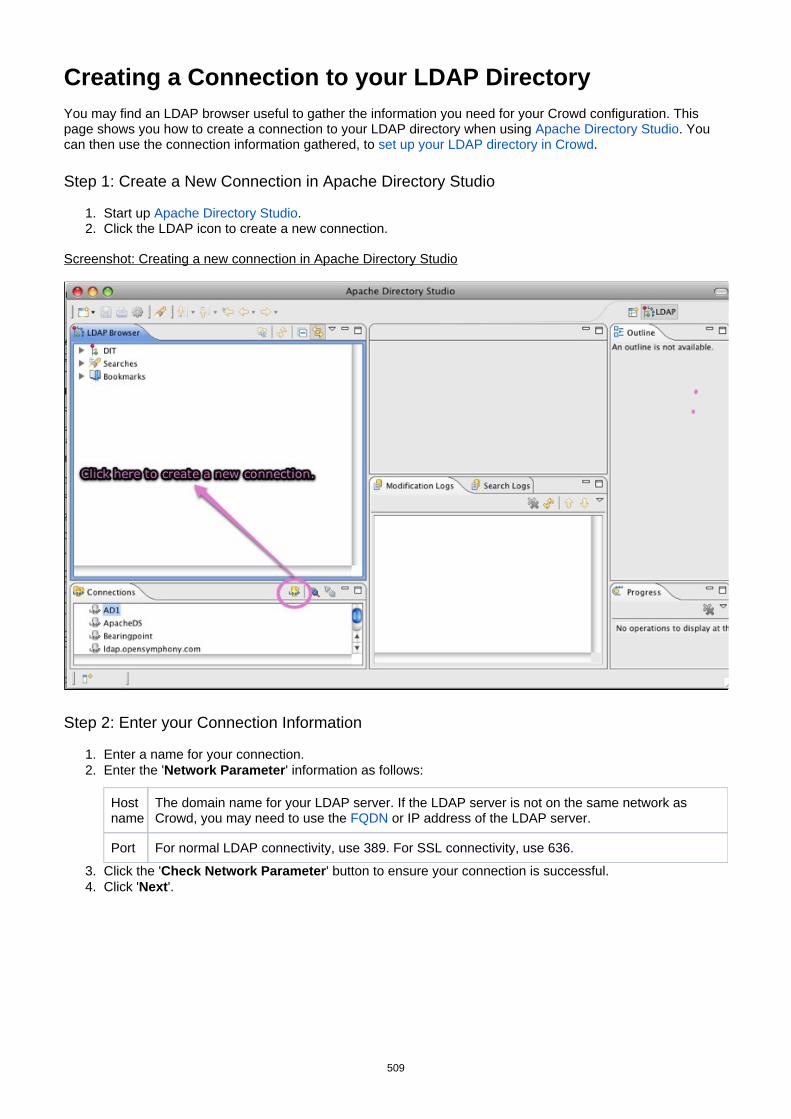
1. 2.
1. 2.
3. 4.
Creating a Connection to your LDAP DirectoryYou may find an LDAP browser useful to gather the information you need for your Crowd configuration. This page shows you how to create a connection to your LDAP directory when using . You Apache Directory Studiocan then use the connection information gathered, to .set up your LDAP directory in Crowd
Step 1: Create a New Connection in Apache Directory Studio
Start up .Apache Directory StudioClick the LDAP icon to create a new connection.
Screenshot: Creating a new connection in Apache Directory Studio
Step 2: Enter your Connection Information
Enter a name for your connection.Enter the ' ' information as follows:Network Parameter
Hostname
The domain name for your LDAP server. If the LDAP server is not on the same network as Crowd, you may need to use the or IP address of the LDAP server.FQDN
Port For normal LDAP connectivity, use 389. For SSL connectivity, use 636.
Click the ' ' button to ensure your connection is successful.Check Network ParameterClick ' '.Next
509

Documentation for Crowd 4.4 2
Created in 2021 by Atlassian. Licensed under a .Creative Commons Attribution 2.5 Australia License
1.
2.
3. 4.
Screenshot: Entering the connection information in Apache Directory Studio
Step 3: Enter your Authentication Information
Choose the ' ' from the dropdown list.Authentication Method Some LDAP servers allow anonymous access. If your LDAP server allows this, you can change the
'Authentication Method' dropdown from 'Simple Authentication' to 'Anonymous Authentication' and click 'Fi' to go straight to .nish Step 4
Enter the ' ' information as follows:Authentication Parameter
Bind DN or user
Enter the of the account that will be used to connect to the LDAP directory. This full DNaccount should have the ability to browse the entire LDAP directory tree.
Bind password
Enter the password for the Bind DN account.
Click the ' ' button to ensure this account can authenticate.Check AuthenticationIf this authentication is successful, click ' '. Finish
510

Documentation for Crowd 4.4 3
Created in 2021 by Atlassian. Licensed under a .Creative Commons Attribution 2.5 Australia License
4.
5.
Screenshot: Entering the authentication information in Apache Directory Studio
If you are prompted for a 'Referral Connection', select the same directory.
Screenshot: Selecting a referral connection in Apache Directory Studio
Step 4: See the Base DNs
If the configuration is successful, you should now have a list of the base DNs available under this LDAP directory's root DSE.
Screenshot: Viewing the base DNs in Apache Directory Studio
511

Documentation for Crowd 4.4 4
Created in 2021 by Atlassian. Licensed under a .Creative Commons Attribution 2.5 Australia License
Step 5: Use the Same Connection Information in Crowd
Use the same connection information to .set up your LDAP directory in Crowd
512
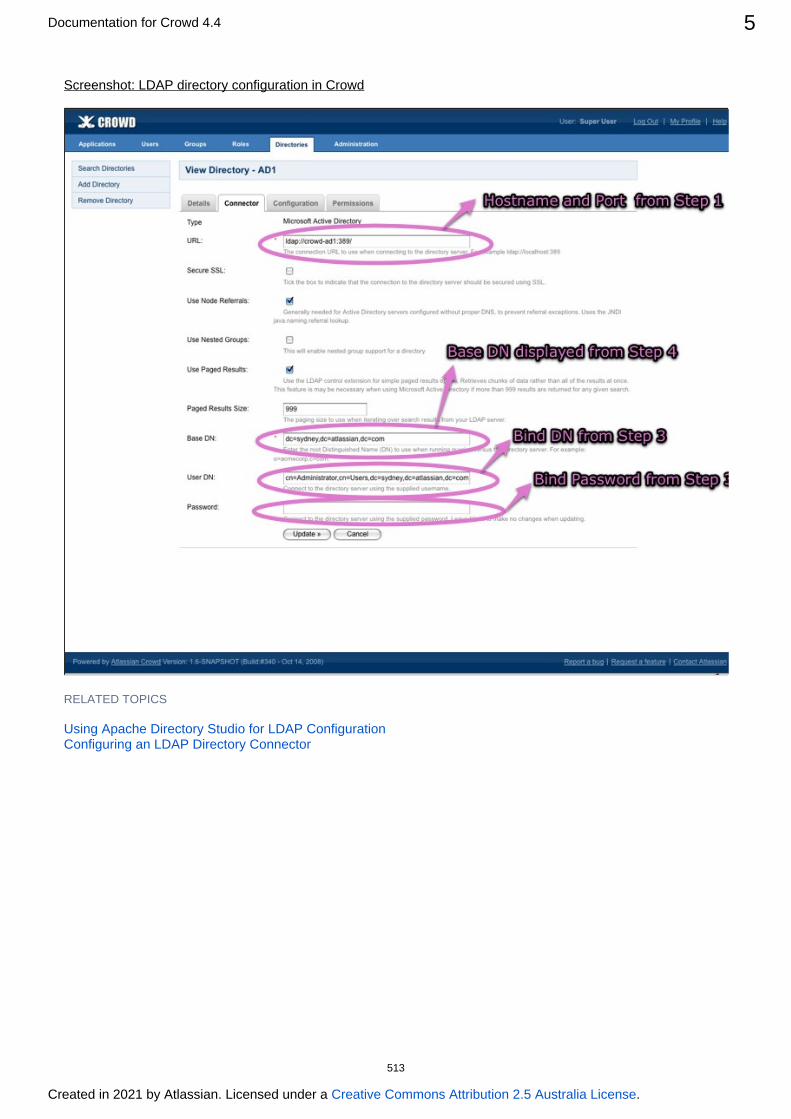
Documentation for Crowd 4.4 5
Created in 2021 by Atlassian. Licensed under a .Creative Commons Attribution 2.5 Australia License
Screenshot: LDAP directory configuration in Crowd
RELATED TOPICS
Using Apache Directory Studio for LDAP ConfigurationConfiguring an LDAP Directory Connector
513
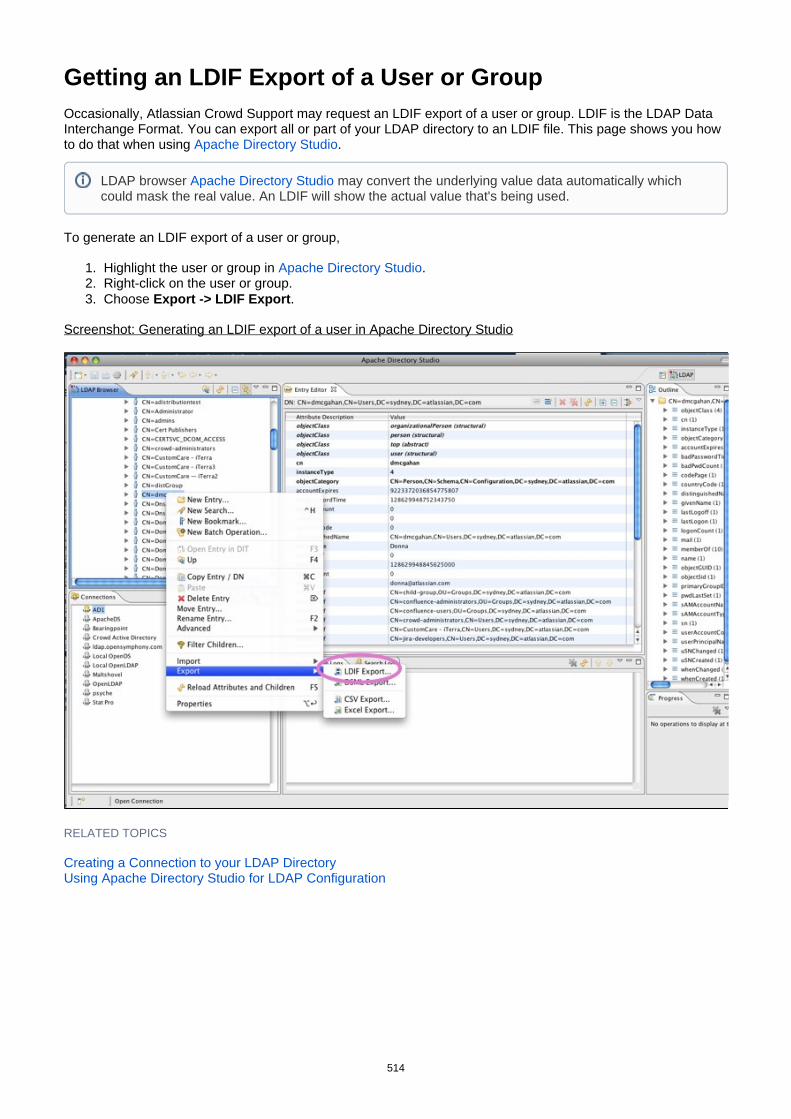
1. 2. 3.
Getting an LDIF Export of a User or GroupOccasionally, Atlassian Crowd Support may request an LDIF export of a user or group. LDIF is the LDAP Data Interchange Format. You can export all or part of your LDAP directory to an LDIF file. This page shows you how to do that when using .Apache Directory Studio
To generate an LDIF export of a user or group,
Highlight the user or group in .Apache Directory StudioRight-click on the user or group.Choose .Export -> LDIF Export
Screenshot: Generating an LDIF export of a user in Apache Directory Studio
RELATED TOPICS
Creating a Connection to your LDAP DirectoryUsing Apache Directory Studio for LDAP Configuration
LDAP browser may convert the underlying value data automatically which Apache Directory Studiocould mask the real value. An LDIF will show the actual value that's being used.
514

1.
Restricting LDAP Scope for User and Group SearchWhile you should already know the user DN (Distinguished Name) you are using for your LDAP connection, it can be helpful to review the users and groups in to determine the best scope for your Apache Directory StudioCrowd LDAP directory configuration.
Crowd comes with default configurations that will work for most customers. In the examples below, we illustrate some common options for changing your user and group configurations.
There are a number of other attributes, not shown here, that can also be used to narrow the scope of users and groups.
On this page:
Example 1. Using a User's DN for Crowd ConfigurationExample 2: Using a Group's DN for Crowd Configuration
Example 1. Using a User's DN for Crowd Configuration
Find a user in the scope you wish to use for Crowd. Highlight that user in . Apache Directory Studio
Important Search Filter Notes
If you are unfamiliar with LDAP search filter syntax, please review .this guideSee for details of how to connect Apache Creating a Connection to your LDAP DirectoryDirectory Studio to your LDAP directory.In order to use Object Filters larger than 255 characters, you will need to upgrade to Crowd to
, by installing a new Crowd instance (with a new database) and restoring an XML 1.5.1 or laterbackup from your previous Crowd installation. For more information on upgrading Crowd please review the Upgrade GuideIf you are using , your group filter must include all sub-groups to pick up Nested Groups in Crowdthe sub-group members
515
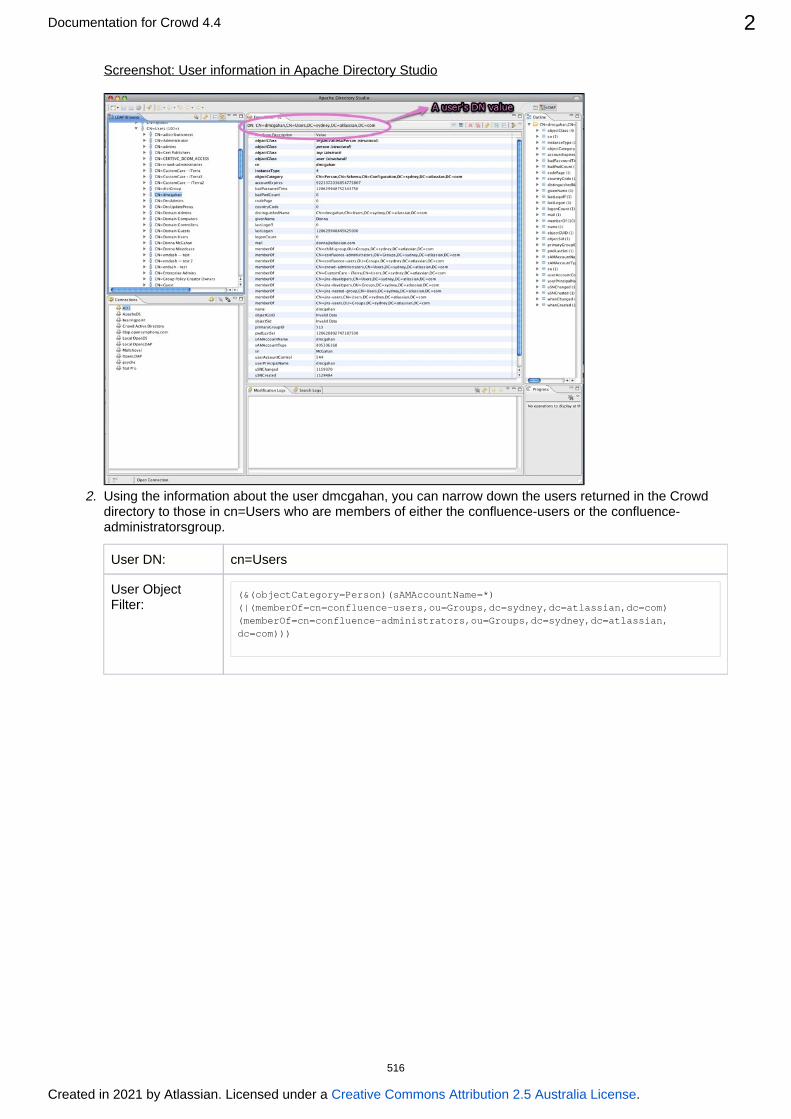
Documentation for Crowd 4.4 2
Created in 2021 by Atlassian. Licensed under a .Creative Commons Attribution 2.5 Australia License
1.
2.
Screenshot: User information in Apache Directory Studio
Using the information about the user , you can narrow down the users returned in the Crowd dmcgahandirectory to those in who are members of either the or the cn=Users confluence-users confluence-
group.administrators
User DN: cn=Users
User Object Filter:
(&(objectCategory=Person)(sAMAccountName=*)(|(memberOf=cn=confluence-users,ou=Groups,dc=sydney,dc=atlassian,dc=com)(memberOf=cn=confluence-administrators,ou=Groups,dc=sydney,dc=atlassian,dc=com)))
516

Documentation for Crowd 4.4 3
Created in 2021 by Atlassian. Licensed under a .Creative Commons Attribution 2.5 Australia License
2.
1.
2.
Screenshot: The resulting user configuration in Crowd
Example 2: Using a Group's DN for Crowd Configuration
Find a group in the scope you wish to use for Crowd. Highlight that group in . Apache Directory Studio
Screenshot: Group information in Apache Directory Studio
Using the information about the group , you can narrow down the groups returned in the confluence-usersCrowd directory to those in and return only the or the ou=Groups confluence-users confluence-
group. Under most circumstances, it is best to apply any changes to both group and role administratorsconfiguration for consistency.
517
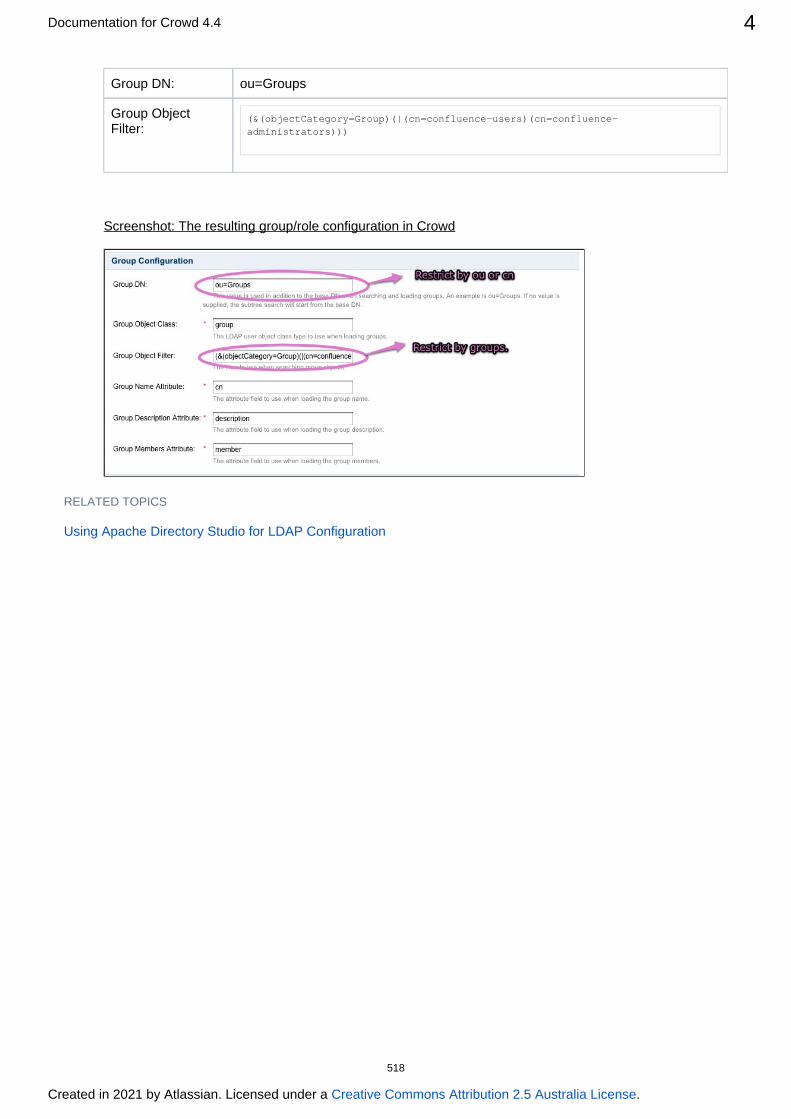
Documentation for Crowd 4.4 4
Created in 2021 by Atlassian. Licensed under a .Creative Commons Attribution 2.5 Australia License
2.
Group DN: ou=Groups
Group Object Filter:
(&(objectCategory=Group)(|(cn=confluence-users)(cn=confluence-administrators)))
Screenshot: The resulting group/role configuration in Crowd
RELATED TOPICS
Using Apache Directory Studio for LDAP Configuration
518

Integration FAQAll Integrations
If I delete a user from Crowd, how will this affect integrated applications?Passing the crowd.properties File as an Environment Variable
Atlassian Product IntegrationApplication CachingJira integrationPublic Signup Setup
IBM Lotus Domino IntegrationIBM Websphere Integration
519

All IntegrationsIf I delete a user from Crowd, how will this affect integrated applications?Passing the crowd.properties File as an Environment Variable
520
If I delete a user from Crowd, how will this affect integrated applications?We recommend that you a user rather than deleting them, in case some applications contain deactivatehistorical data, e.g. documents that the user has created.
For example, a user may be a participant in a issue. If you remove the user from the directory managed by JIRACrowd, JIRA will not be able to find the user details when referencing the issue. If you do need to remove the user from Crowd, you must first remove the user's involvement in any JIRA issues, as described in the JIRA
.documentation
Read more about in Crowd.deleting or deactivating users
521

Passing the crowd.properties File as an Environment VariableWhen with Crowd, you need a file containing configuration integrating a client application crowd.propertiesdetails for that application. (See .)Important directories and files
You can pass the location of a client application's file to the client application as an crowd.propertiesenvironment variable when starting the client application. This means that you can choose a suitable location for the file, instead of putting it in the client application's directory.crowd.properties WEB-INF/classes
Example:
-Dcrowd.properties={FILE-PATH}/crowd.properties
522
Atlassian Product IntegrationThis section covers general questions around Crowd's integration with other Atlassian products.
General Integration Questions
Why don't my Groups and Users show up in Bamboo, Confluence, Fisheye or JIRA?
I want to allow public signups, but don't what 'public' users in my company LDAP repository. How should I configure Crowd?
Confluence Integration
JIRA Integration
What is the difference between JIRA's direct LDAP integration & Crowd's JIRA integration?If I delete a user from Crowd, how will this affect JIRA?
Bamboo Integration
Fisheye Integration
523

Application CachingWhen Crowd is deployed into Bamboo, Confluence, Fisheye or JIRA, the Crowd client may be using caching. If you notice that changes made in Crowd do not appear in one of Crowd's configured applications, this will most likely mean that the changes have not yet propagated into the client caches.
For more information, refer to:
An overview of the different caching options in Crowd.Configuring caching for an application.Caching of user permissions on the Crowd server.Caching for LDAP directories.
The Crowd development team has opened for this issue. Please an improvement request (CWD-1283)vote on this issue and add it to your for future updates.JIRA watch list
524

Jira integrationWhat is the difference between Jira's LDAP integration and Crowd's JIRA integration?
Jira's LDAP integration only delegates authentication to LDAP. This means that you still need to create groups and users in JIRA, and those users must have usernames that match your users in LDAP.
When you use , all user and group management is delegated to Crowd. This means that Crowd's Jira integrationyou no longer have to create users and groups in Jira. Crowd gives you access to all these users and groups in your underlying LDAP directories.
525

1. a. b.
2.
3.
4.
5.
Public Signup SetupThis tip applies if you:
Have public-facing JIRA, Confluence and Bamboo servers and private LDAP repositories.Allow public signup via Jira, Confluence and/or Bamboo.Want to partition where users are created via the public signup functionality.
Crowd allows for multiple directories to be assigned to an application. Follow these steps to direct all public signups into your chosen Crowd directory:
Define two directories in Crowd:An internal directory for 'public' users.An LDAP directory for staff and contractors.
Assign both these directories to the 'Jira' application in Crowd. (See Mapping a Directory to an Application.)Use the 'ordering' arrows to move the internal 'public' directory into the first position. (See Specifying the
.)Directory Order for an ApplicationGrant the 'Add User' permission to the 'Jira' application in the internal 'public' directory. (See Specifying
.)an Application's Directory PermissionsEnsure that the 'Add User' permission is disabled for the 'Jira' application in the private LDAP directory.
Using this configuration, when Crowd receives a request from Jira to create a user, Crowd will create the user in the 'public' internal directory only.
Unless otherwise instructed, Crowd will add the user to directories assigned to the 'Jira' application. allThe above steps allow you to ensure that the signed-up users are added to your 'public' directory only.
526

IBM Lotus Domino IntegrationCustomers have reported successful Crowd integration with . For more information, take a IBM Lotus Dominolook at .CWD-125
The Atlassian Crowd team does not officially support this integration, because we do not have test environments set up for Lotus Domino.
527

IBM Websphere IntegrationIf your client application is running in Websphere, there is a known problem with Websphere's XML libraries.
Crowd uses to handle the requests between the client application (Jira, Confluence, Bamboo etc.) and XFireCrowd, XFire requires a newer version of an XML library than what is shipped with Websphere 5.1.
More information and a link to a newer version of the relevant JAR file is available on the XFire website
You will need to add the file to the directory and remove the old file.qname.jar WebSphere\AppServer\lib
----
Some users have also reported errors like the following:
java.lang.VerifyError: (class: org/codehaus/xfire/aegis/type/basic/ObjectType, method: writeSchema signature: (Lorg/jdom/Element;)V) Incompatible argument to method
This is related to the following the suggested fix for this is to upgrade the version of JDOM that is XFire issueshipped with Websphere to something greater than 1.0 (Websphere ships with JDOM Beta 6).
If you add a later version of to the directory and remove the old version, JDOM WebSphere\AppServer\libthis should fix the above problem.
528
Support PoliciesWelcome to the support policies index page. Here, you'll find information about how Atlassian Support can help you and how to get in touch with our helpful support engineers. Please choose the relevant page below to find out more.
Bug Fixing PolicyHow to Report a Security IssueNew Features PolicySecurity Advisory Publishing PolicySecurity Bugfix PolicySecurity Patch PolicySeverity Levels for Security Issues
To request support from Atlassian, please raise a support issue in our online support system. To do this, visit su, log in (creating an account if need be) and create an issue under Crowd. Our friendly pport.atlassian.com
support engineers will get right back to you with an answer.
529

Bug Fixing PolicySummary
Our Support team will help with workarounds and bug reportingWe'll generally fix critical bugs in the next maintenance releaseWe schedule non-critical bugs according to a variety of considerations
Report a bug
Developing an app (add-on) for an Atlassian product or using one of our APIs? Report any related bugs in our Jira.Ecosystem
On this page:
SummaryBug fixes for server productsBug reportsSearch existing bug reportsHow we approach bug fixing
Severity 1 - CriticalSeverity 2 - MajorSeverity 3 - Minor
About our bug fix workflowHow to get access to bug fixesRelease terminology for Data Center and server products
Long Term Support releases
Bug fixes for server products
Well continue to provide bug fixes for server products until February 2, 2022 PT. After this, well only provide security bug fixes for critical vulnerabilities until the end of support date on February 2, 2024 PT. Learn more about these changes
Bug reports
Atlassian Support is eager and happy to help verify bugswe take pride in it! Create an issue in oursupport ,providing as much information as you can about how to replicate the problem you're experiencing. system
We'll replicate the bug to verify, then lodge the report for you. We'll also try to construct workarounds if possible.
Search existing bug reports
Use our to search for existing bugs, add your report, and watch the ones that are public issue trackerimportant to you. When you watch an issue, we'll send you an e-mail notification when the issue's updated.
How we approach bug fixing
Important changes to our server and Data Center products
Weve ended sales for new server licenses, and will end support for server on February 2, 2024. Were continuing our investment in Data Center with several key improvements. Learn what this means for you
530

Documentation for Crowd 4.4 2
Created in 2021 by Atlassian. Licensed under a .Creative Commons Attribution 2.5 Australia License
Bug fix releases are more frequent than feature releases, and target the most critical bugs affecting customers. The notation for a bug fix release is the final number in the version (the 1 in 6.0.1, for example).
We assess each bug based on the symptom severity (that is,whenthis bug causes symptoms, how severe There are three levels of symptom severity.are those symptoms).
Severity 1 - Critical
Your application is unavailable.Users aren't able to perform their job function, and no workarounds are available.
login failure affecting all usersall or most pages don't displayout of memory errors cause application failuresignificant data lossnode communication failuresadministration tools fail.
Severity 2 - Major
A feature is unavailable, applicationperformance is significantly degraded, or users job functions are impaired.
the application performs slowly and fails intermittentlyapplication is functional, but frequently used gadgets or macros don't workapplication links failspecific editing features failor a Severity 1 (critical) issue where there is a viable workaround.
Severity 3 - Minor
The application or specific feature isn't working as expected, but there is a workaround available. Users experience is impacted, but their job function is not impaired.
some searches failsections of pages load slowlyadministrative features fail intermittently, but a workaround is availablevisual defects, that don't affect functionminor translation or localization problemskeyboard shortcuts not functioning as expected.
Assessing bugs using symptom severity makes sure that we prioritise the most impactful fixes.We give high priority to .security issues
About our bug fix workflow
If you watch or mark a bug as affecting your team, its useful to understand how we review, prioritize, and resolve them in our public issue tracker .jira.atlassian.com
We prioritize issues using a metric called User Impact Score (UIS), which is individually calculated for every issue. It takes into account the number of affected users, the severity of the issue, recent interest, and the percentage of users affected per instance. The higher the UIS score, the more pervasive and severe the issue is.
We have also standardised our workflow statuses across Data Center and server products to make it easy for you to see where an issue is at. Heres the current workflow, and a description of each status.
531
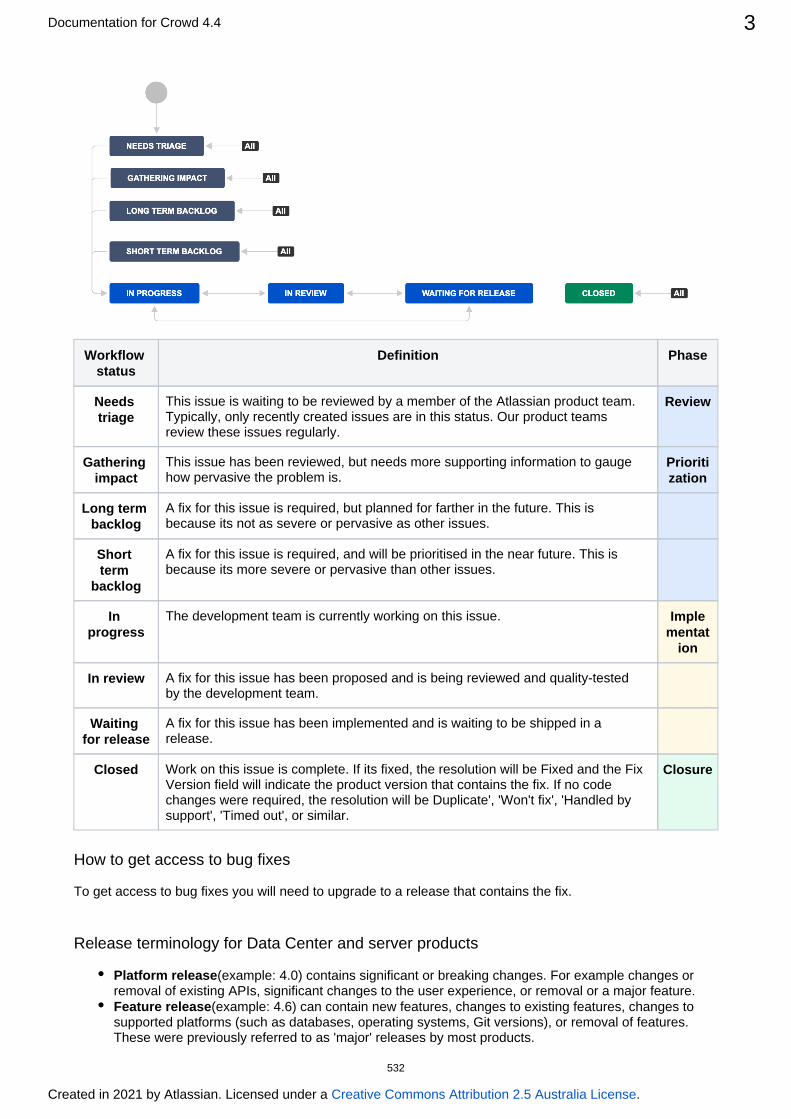
Documentation for Crowd 4.4 3
Created in 2021 by Atlassian. Licensed under a .Creative Commons Attribution 2.5 Australia License
Workflow status
Definition Phase
Needs triage
This issue is waiting to be reviewed by a member of the Atlassian product team. Typically, only recently created issues are in this status. Our product teams review these issues regularly.
Review
Gathering impact
This issue has been reviewed, but needs more supporting information to gauge how pervasive the problem is.
Prioritization
Long term backlog
A fix for this issue is required, but planned for farther in the future. This is because its not as severe or pervasive as other issues.
Short term
backlog
A fix for this issue is required, and will be prioritised in the near future. This is because its more severe or pervasive than other issues.
In progress
The development team is currently working on this issue. Implementat
ion
In review A fix for this issue has been proposed and is being reviewed and quality-tested by the development team.
Waiting for release
A fix for this issue has been implemented and is waiting to be shipped in a release.
Closed Work on this issue is complete. If its fixed, the resolution will be Fixed and the Fix Version field will indicate the product version that contains the fix. If no code changes were required, the resolution will be Duplicate', 'Won't fix', 'Handled by support', 'Timed out', or similar.
Closure
How to get access to bug fixes
To get access to bug fixes you will need to upgrade to a release that contains the fix.
Release terminology for Data Center and server products
Platform release(example: 4.0) contains significant or breaking changes. For example changes or removal of existing APIs, significant changes to the user experience, or removal or a major feature.Feature release(example: 4.6) can contain new features, changes to existing features, changes to supported platforms (such as databases, operating systems, Git versions), or removal of features. These were previously referred to as 'major' releases by most products.
532

Documentation for Crowd 4.4 4
Created in 2021 by Atlassian. Licensed under a .Creative Commons Attribution 2.5 Australia License
Bugfix release(example: 4.6.2) can contain bug fixes and stability and performance improvements. Depending on the nature of the fixes they may introduce minor changes to existing features, but do not include new features or high-risk changes, so can be adopted quickly. We recommend regularly upgrading to the latest bugfix release for your current version. These were previously referred to as 'maintenance' releases by most products.
In addition to the three main release types, a feature release can also be designated aLong Term Support (formerly known as an Enterprise release), which means it will receive bug fixes for a longer period release
of time than a standard feature release.
Long Term Support releases
Long Term Support releases (formerly known as Enterprise releases) are for Server and Data Center customers who prefer to allow more time to prepare for upgrades to new feature versions, but still need to receive critical bug fixes. If you only upgrade to a new feature version about once a year, a Long Term Support release may be a good fit for your organisation. For Jira Software and Confluence we will:
Designate a feature release as a Long Term Support release,at least every 12 months.Backport critical security fixes, as outlined in our current security bug fix policy, and fixes relating to stability, data integrity or critical performance issues.Make bug fix releases available for the designated version until it reaches end of life.Provide a change log of all changes between one Long Term Support release and the next to make upgrading easier.
Not all bug fixes will be backported. We'll target the bugs and regressions that we deem most critical, focusing on stability, data integrity, or performance issues. There may also be some fixes that we choose not to backport due to risk, complexity or because the fix requires changes to an API, code used by third party apps (also known as add-ons), or infrastructure that we would usually reserve for a platform release.
For Jira Software Data Center customers, we'll endeavour to allow zero downtime upgrades between one Long Term Support release and the next Long Term Support release, but can't guarantee that down time will not be required, depending on the nature of the changes. The change log will indicate if zero downtime upgrade will be available.
In the example below, version 4.2 has been designated a Long Term Support release. The number of bug fix releases and timing illustrated below is just an example, your product's release cadence may differ.
Long Term Support changes for server customers
If you have a server license, youll only be eligible to upgrade to versions released prior to February 2, 2024 PT, when we officially .end support for our server product line
533

Documentation for Crowd 4.4 5
Created in 2021 by Atlassian. Licensed under a .Creative Commons Attribution 2.5 Australia License
Further reading
See for more support-related information.Atlassian Support Offerings
534
How to Report a Security IssueWe've moved!
Go to for the latest information.Atlassian.com/security
Further reading
See for more support-related information.Atlassian Support Offerings
535
New Features Policy
How we choose what to implement
There are many factors that influence our product roadmaps and determine the features we implement. When making decisions about what to prioritize and work on, we combine your feedback and suggestions with insights from our support teams, product analytics, research findings, and more. This information, combined with our medium- and long-term product and platform vision, determines what we implement and its priority order.
How to track when features are implemented
Cloud products
We're our Cloud products. To , thecontinuously improving and updating see the latest changes take a look at Atla.ssian Cloud release notes blog
Data Center products
When a new feature or improvement is scheduled, we'll update the fix version on the relevant Jira issue to indicate the earliest product version that will include the change. This update often happens close to the product release date.
For a summary of changes, see the release notes for your product:
Jira Software| | |Jira Service Desk Jira platform Advanced Roadmaps for JiraConfluence| |Questions for Confluence Team Calendars for ConfluenceBitbucket| | |Bamboo Fisheye Crucible
Server products
Were simplifying our self-managed offerings and sharpening our focus to our cloud and Data Center products. This means weve discontinued new feature development in our server product line. Learn more about these changes
Well still be offering bug fixes for server customers with active maintenance. For details, see our Atlassian Data .Center and Server bug fix policy
Product roadmaps
We publish a for Jira Cloud products, Confluence Cloud, Bitbucket Cloud, and our Cloud public roadmapPlatform. This lets you know whats coming soon and what were thinking about for future updates.
The and may contain information on upcoming Atlassian Cloud release notes blog Bitbucket Cloud blog alsochanges.
We dont provide specific release dates for upcoming changes.
Feature and improvement suggestions
We encourage you to suggest improvements and new features for our products. You can create feature suggestions, orvote, watch, and comment on existing suggestions, at .https://jira.atlassian.com/
We get a large number of suggestions and feature requests. Your comments and votes on suggestions help us understand what youre passionate about and how you want our products to support you and your team. The most helpful information you can provide us when commenting on issues is how a particular suggestion would help you. If you describe your use-case to us, and how the suggested change would benefit you and your team, it lets us gain a much deeper understanding of the need behind the suggestion.
This policy does not apply to bugs. See ourServer Bug Fix PolicyorCloud Bug Fix Policyto learn about our approach to bug fixing.
536
Documentation for Crowd 4.4 2
Created in 2021 by Atlassian. Licensed under a .Creative Commons Attribution 2.5 Australia License
Suggestions often have an impact on what we work on, even if we ultimately choose not to implement a suggestion exactly as its described. Our ultimate goal is to understand what you and all of our customers need and to create products that meet those needs. Occasionally, thatll mean implementing a suggestion as described, but it usually means working to understand the need behind the suggestion and how we can meet that need for as many users as possible.
While we endeavor to to popular suggestions, the volume we receive means there update and respond will when we cant provide an update or response. We dont provide any compensation or credit often be occasions
for feature suggestions that we implement.
Join the conversation on Atlassian Community
Our Product Managers regularly to the . You post articles about new features and changes Atlassian Communitycan comment on these posts, ask questions, and discuss with our PMs and other Atlassian users.
Release terminology for Data Center and server products
Platform release(example: 4.0) contains significant or breaking changes. For example changes or removal of existing APIs, significant changes to the user experience, or removal or a major feature.Feature release(example: 4.6) can contain new features, changes to existing features, changes to supported platforms (such as databases, operating systems, Git versions), or removal of features. These were previously referred to as 'major' releases by most products.Bugfix release(example: 4.6.2) can contain bug fixes and stability and performance improvements. Depending on the nature of the fixes they may introduce minor changes to existing features, but do not include new features or high-risk changes, so can be adopted quickly. We recommend regularly upgrading to the latest bugfix release for your current version. These were previously referred to as 'maintenance' releases by most products.
In addition to the three main release types, a feature release can also be designated aLong Term Support (formerly known as an Enterprise release), which means it will receive bug fixes for a longer period of release
time than a standard feature release.
Long Term Support releases
Long Term Support releases (formerly known as Enterprise releases) are for Server and Data Center customers who prefer to allow more time to prepare for upgrades to new feature versions, but still need to receive critical bug fixes. If you only upgrade to a new feature version about once a year, a Long Term Support release may be a good fit for your organisation. For Jira Software and Confluence we will:
Designate a feature release as a Long Term Support release,at least every 12 months.Backport critical security fixes, as outlined in our current security bug fix policy, and fixes relating to stability, data integrity or critical performance issues.Make bug fix releases available for the designated version until it reaches end of life.Provide a change log of all changes between one Long Term Support release and the next to make upgrading easier.
Not all bug fixes will be backported. We'll target the bugs and regressions that we deem most critical, focusing on stability, data integrity, or performance issues. There may also be some fixes that we choose not to backport due to risk, complexity or because the fix requires changes to an API, code used by third party apps (also known as add-ons), or infrastructure that we would usually reserve for a platform release.
For Jira Software Data Center customers, we'll endeavour to allow zero downtime upgrades between one Long Term Support release and the next Long Term Support release, but can't guarantee that down time will not be required, depending on the nature of the changes. The change log will indicate if zero downtime upgrade will be available.
In the example below, version 4.2 has been designated a Long Term Support release. The number of bug fix releases and timing illustrated below is just an example, your product's release cadence may differ.
537

Documentation for Crowd 4.4 3
Created in 2021 by Atlassian. Licensed under a .Creative Commons Attribution 2.5 Australia License
Further reading
See for more support-related information.Atlassian Support Offerings
Long Term Support changes for server customers
If you have a server license, youll only be eligible to upgrade to versions released prior to February 2, 2024 PT, when we officially .end support for our server product line
538

Security Advisory Publishing PolicySee for more information.https://www.atlassian.com/trust/security
539

Security Bugfix PolicySee for more information on our security bugfix policy.Security @ Atlassian
540

Security Patch PolicyWe've moved!
Go to for the latest information.Atlassian.com/security
Further reading
See for more support-related information.Atlassian Support Offerings
541

Severity Levels for Security IssuesWe've moved!
Go to for the latest informationhttps://www.atlassian.com/trust/security/security-severity-levels
Further reading
See for more support-related information.Atlassian Support Offerings
542

TroubleshootingFinding Known IssuesCharacters in User or Group DN's that will cause problems when using CrowdProblems when Importing Users into MySQLTroubleshooting LDAP Error Codes
Active Directory LDAP ErrorsTroubleshooting LDAP User ManagementTroubleshooting SSL certificates and CrowdHow to Optimize Crowd Client CachingTroubleshooting Crowd PerformanceTroubleshooting SSO with Crowd
Debugging SSO in environments with Proxy ServersTroubleshooting CrowdIDProvide Crowd Information to Atlassian Support
Troubleshooting your Configuration on Setup
543

1. 2. 3. 4. 5.
Finding Known IssuesWe track the feature requests and bug reports in the . To find a known issue:Crowd project on our JIRA site
Browse the list of .unresolved bugs and requestsClick the ' ' button on the left.EditUnder ' ', type keywords for your problem into the ' ' field.Text Search QueryClick ' ' and browse the summaries of the unresolved issues.ViewClick an issue key to view the details of the issue and any fixes or workarounds.
544

Characters in User or Group DN's that will cause problems when using Crowd
At present, the used by Crowd, JIRA and Confluence silently translates certain AbstractEncodingFilter'dangerous' characters. The exists because Microsoft Word uses some special AbstractEncodingFilterUnicode characters for text (e.g. curly quotes). Not all fonts on non-Windows systems contain these characters. This causes issues in JIRA and Confluence when users copy and paste text from Word into a page or issue. Users on non-Windows systems will see question marks or other odd characters if their fonts don't have these characters.
http://jira.atlassian.com/browse/CORE-100
Unfortunately, these translations obviously cause problems when querying for users or groups in Crowd which contain these characters.
http://jira.atlassian.com/browse/CWD-1152
There is another ticket tracking problems with certain characters, eg '/':
- CWD-2042 Forward slashes not escaped correctly in DNs etc. CLOSED
Until we are able to resolve this issue, customers should be aware that user or group DN's that contain the following characters will not work in Crowd:
UTF-8
Decimal ASCII value
AbstractEncodingFilter Replacement Value
Description
183 "- " Middle dot, Georgian comma, Greek middle dot
8211 "-" En dash
8216 "'" Left single quotation mark
8217 "'" Right single quotation mark
8220 "\"" Left double quotation mark
8221 "\"" Right double quotation mark
8230 "..." Horizontal ellipsis, three dot leader
ISO-8859-1
Decimal ASCII value AbstractEncodingFilter Replacement Value Description
133 "..." Horizontal ellipsis, three dot leader
145 "'" Left single quotation mark
146 "'" Right single quotation mark
147 "\"" Left double quotation mark
As of Crowd 2.5.1, is - CWD-2042 Forward slashes not escaped correctly in DNs etc. CLOSED
resolved. This document is now historical.
545

Documentation for Crowd 4.4 2
Created in 2021 by Atlassian. Licensed under a .Creative Commons Attribution 2.5 Australia License
148 "\"" Right double quotation mark
150 "-" En dash
546

Problems when Importing Users into MySQLIf your Crowd installation is using a , you may find that the mySQL database user and group import processdoes not perform a complete import.
To solve this problem, please check the transaction level in your MySQL startup options, as defined in the my. configuration file. See the for instructions.cnf Crowd MySQL configuration guide
547
Troubleshooting LDAP Error CodesUseful Links for translating LDAP Error codes:
LDAP Error Codes
How LDAP Error Codes Map to JNDI Exceptions
Active Directory LDAP Errors
Novell eDirectory or NDS Error Code List
548
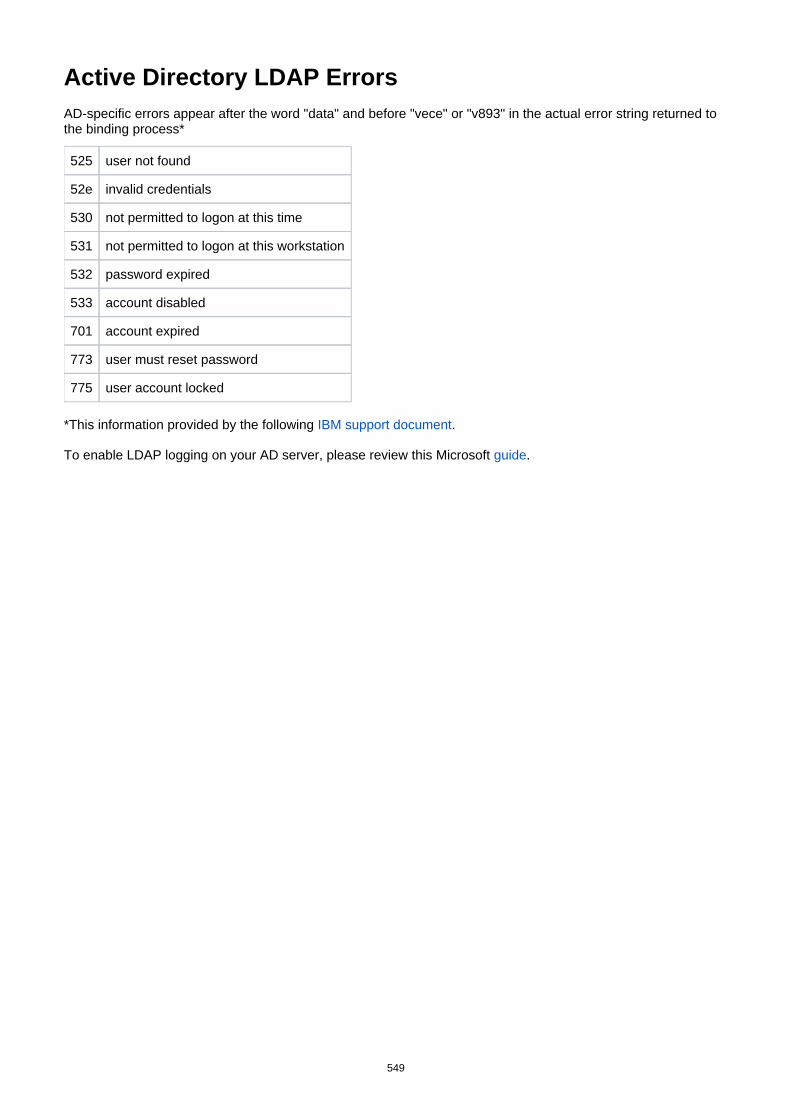
Active Directory LDAP ErrorsAD-specific errors appear after the word "data" and before "vece" or "v893" in the actual error string returned to the binding process*
525 user not found
52e invalid credentials
530 not permitted to logon at this time
531 not permitted to logon at this workstation
532 password expired
533 account disabled
701 account expired
773 user must reset password
775 user account locked
*This information provided by the following .IBM support document
To enable LDAP logging on your AD server, please review this Microsoft .guide
549

Troubleshooting LDAP User ManagementScope
This page describes troubleshooting LDAP user management configurations and setup in JIRA Software. Note other specific documents:
Page Description
Troubleshooting User Management Upgrade Issues
Describes user management issues encountered during an upgrade to JIRA 4.3.x or later.
Connecting to an LDAP Directory
Atlassian's primary documentation on LDAP Directory configuration.
About Apache Directory Studio
Apache Directory Studiois an open source project of the Apache Software Foundation. It includes an LDAP browser/editor, a schema browser, an LDIF editor, a DSML editor and more. It is a highly useful tool for troubleshooting integration problems with JIRA Software and Confluence. It is an Eclipse RCP application that is cross-platform or run within Eclipse itself as a plugin. For more information on Eclipse, please refer tothe Wikipedia article on Eclipse
.Software
We recommend using it for testing as a method of isolating where the problem with an integration exists. It allows you to test if an application other than JIRA Software or Confluence can connect to the LDAP/AD server. If a successful connection cannot be established it can indicate problems on the side of the directory, if it can connect it can indicate problems with the configuration of JIRA Software or Confluence.
On this page:
Installation and Set UpBrowsing the Directory
Directory AttributesGo to DN
TroubleshootingIdentify Active Directory DNsTesting the LDAP/ADServer Connectivity
WindowsLinux
Common LDAP ErrorsCommon Configuration Problems
Providing Additional InformationGenerating an LDIF Export of a User or Group
Installation and Set Up
It is recommended to install Directory Studio on a computer other than the server that hosts the LDAP/ADserver (a local workstation is usually best). Directory Studio is able to connect to the directory using the LDAP protocol and display the contents of the directory using its built-in browser. To establish the connection, please refer to the section in the Directory Studio user guide.Create connection
550

Documentation for Crowd 4.4 2
Created in 2021 by Atlassian. Licensed under a .Creative Commons Attribution 2.5 Australia License
If Directory Studio is unable to initiate a connection it can indicate there is a problem with the LDAP/AD server connection. Refer to the troubleshooting section below.
Browsing the Directory
Using the Browser functionality in Directory Studio you can navigate through the Directory tree to see where users and groups are stored. It will also allow you to identify how data is stored within the directory, including the names of attributes and specific values.
This is a comparison between the Active Directory and Apache Directory Studio. Below is Active Directory:
And this is how it would look in Directory Studio:
551
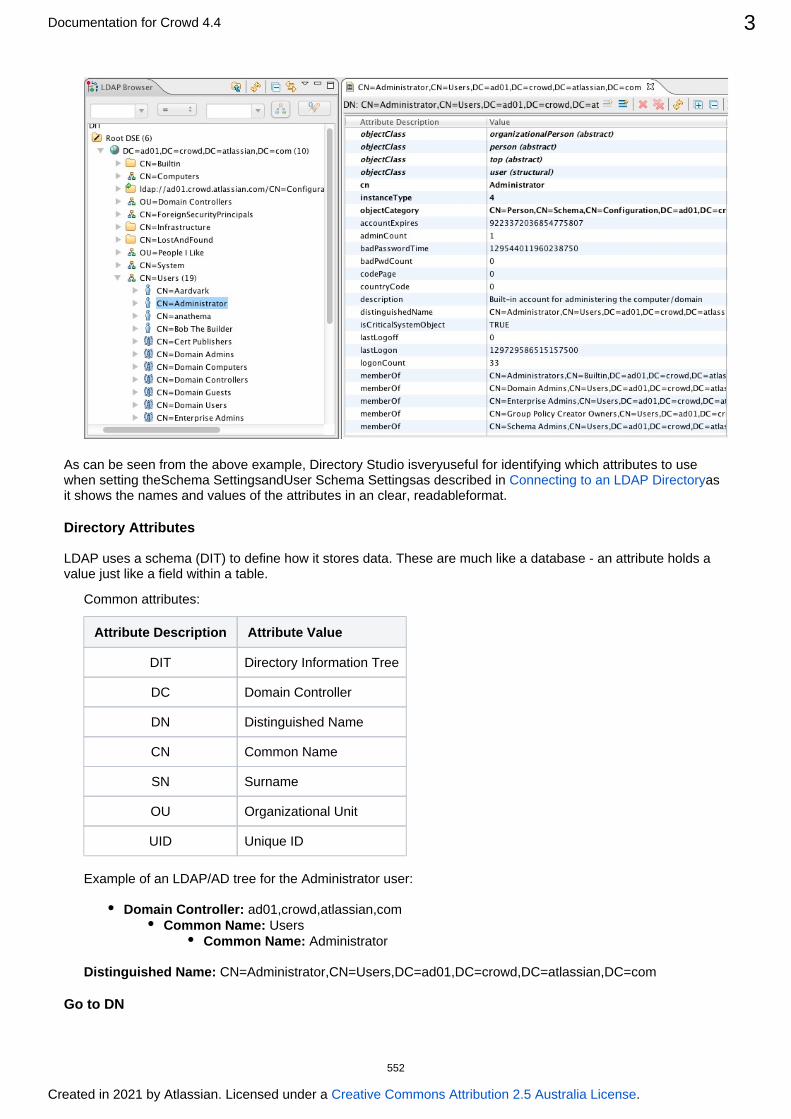
Documentation for Crowd 4.4 3
Created in 2021 by Atlassian. Licensed under a .Creative Commons Attribution 2.5 Australia License
As can be seen from the above example, Directory Studio is useful for identifying which attributes to use verywhen setting theSchema SettingsandUser Schema Settingsas described in as Connecting to an LDAP Directoryit shows the names and values of the attributes in an clear, readableformat.
Directory Attributes
LDAP uses a schema (DIT) to define how it stores data. These are much like a database - an attribute holds a value just like a field within a table.
Common attributes:
Attribute Description Attribute Value
DIT Directory Information Tree
DC Domain Controller
DN Distinguished Name
CN Common Name
SN Surname
OU Organizational Unit
UID Unique ID
Example of an LDAP/AD tree for the Administrator user:
Domain Controller: ad01,crowd,atlassian,comCommon Name: Users
Common Name: Administrator
Distinguished Name: CN=Administrator,CN=Users,DC=ad01,DC=crowd,DC=atlassian,DC=com
Go to DN
552
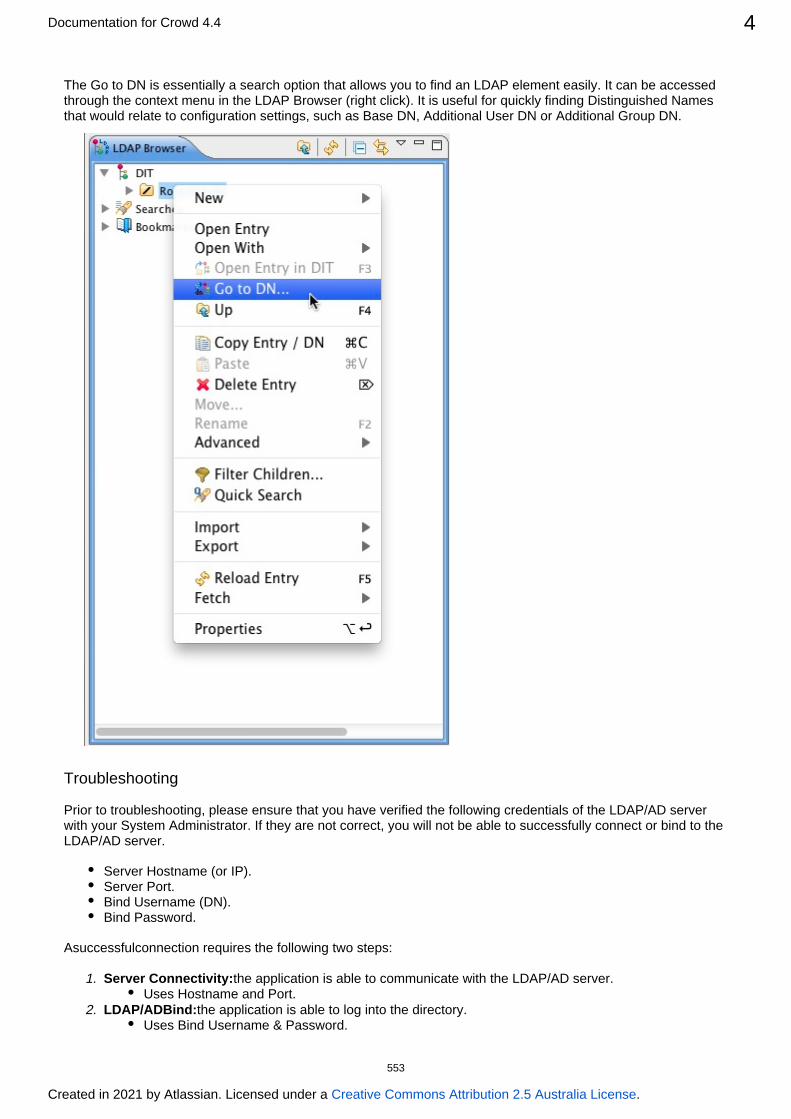
Documentation for Crowd 4.4 4
Created in 2021 by Atlassian. Licensed under a .Creative Commons Attribution 2.5 Australia License
1.
2.
The Go to DN is essentially a search option that allows you to find an LDAP element easily. It can be accessed through the context menu in the LDAP Browser (right click). It is useful for quickly finding Distinguished Names that would relate to configuration settings, such as Base DN, Additional User DN or Additional Group DN.
Troubleshooting
Prior to troubleshooting, please ensure that you have verified the following credentials of the LDAP/AD server with your System Administrator. If they are not correct, you will not be able to successfully connect or bind to the LDAP/AD server.
Server Hostname (or IP).Server Port.Bind Username (DN).Bind Password.
Asuccessfulconnection requires the following two steps:
Server Connectivity:the application is able to communicate with the LDAP/AD server.Uses Hostname and Port.
LDAP/ADBind:the application is able to log into the directory.Uses Bind Username & Password.
553

Documentation for Crowd 4.4 5
Created in 2021 by Atlassian. Licensed under a .Creative Commons Attribution 2.5 Australia License
Identify Active Directory DNs
If using Active Directory, the command can be executed on the command-line to identify DNs to dsqueryparticular objects, as per this article. Please refer to the examples below for further Dsquery Windows Serverinformation.
Access the command line and execute the following to identify the DN for a user:
C:\>dsquery user -name Administrator"CN=Administrator,CN=Users,DC=sydney,DC=atlassian,DC=com"
In the above example, this breaks down to:
Domain Controller:sydney,atlassian,comCommon Name:Users
Common Name:Administrator
The following can then be used to identify the DN for any groups:
C:\>dsquery group -name jira-administrators"CN=jira-administrators,OU=Groups,DC=sydney,DC=atlassian,DC=com"
In the above example, this breaks down to:
Domain Controller:sydney,atlassian,comOrganizational Unit:Groups
Common Name:jira-administrators
Using the the above results, when entering the configuration for an Active Directory Connector in JIRA Software, the following DNs would be used:
Configuration Parameter
Base DN DC=sydney,DC=atlassian,DC=com
Additional User DN CN=Users
Additional Group DN OU=Groups
The above settings would synchronize all users in CN=Users,DC=sydney,DC=atlassian,DC=com and all groups in OU=Groups, .DC=sydney,DC=atlassian,DC=com
Testing the LDAP/ADServer ConnectivityIf any of the below tests fail it indicates there is most likely a problem with the LDAP/AD Server or the port/IP is not correct. Troubleshooting those problems is outside of the scope of this document.
Testing the LDAP/AD Bind is done through Directory Studio.
WindowsTest that the server is reachable by pinging it.
C:\>ping -n 1 ldap-hostPinging ldap-host.example.com [192.168.1.100] with 32 bytes of data:Reply from 192.168.1.100: bytes=32 time=4ms TTL=127Ping statistics for 172.20.4.167: Packets: Sent = 1, Received = 1, Lost = 0 (0% loss),Approximate round trip times in milli-seconds: Minimum = 4ms, Maximum = 4ms, Average = 4ms
554

Documentation for Crowd 4.4 6
Created in 2021 by Atlassian. Licensed under a .Creative Commons Attribution 2.5 Australia License
Check that the port is open (typically 389). A successful connection to the port indicates it is open. If a successful connection is made, the screen will go blank. If not, the below message will be generated. To exit telnet, use CTRL+C.
C:\>telnet ldap-host 389Connecting To ldap-host...Could not open connection to the host, on port 389: Connect failed
LinuxTest that the server is reachable by pinging it.
$ ping -c1 ldap-hostPING ldap-host (192.168.1.100): 56 data bytes64 bytes from 192.168.1.100: icmp_seq=0 ttl=127 time=0.521 ms
--- crowd-ad1 ping statistics ---1 packets transmitted, 1 packets received, 0.0% packet lossround-trip min/avg/max/stddev = 0.521/0.521/0.521/0.000 ms
Check that the port is open (typically 389). A successful connection to the port indicates it is open. To exit telnet, use CTRL+C.
$ telnet ldap-host 389Trying 192.168.1.100...Connected to crowd-ad1.Escape character is '^]'.
Common LDAP Errors
These are a list of errors returned from Directory Studio and Embedded Crowd that can help identify configuration issues with the LDAP/AD server.
Error Possible Cause(s)
simple bind failed: ldap-host:389
This is a very general error, and it means something went wrong when trying to bind to LDAP/AD. Check to see if the LDAP/AD server name and/or port number you have specified is incorrect or an incorrect DN was specified as the administrator username.
It could also indicate the Encryption method was specified incorrectly in the Network Parameter tab of the connector properties in Directory Studio.
Connection refused (ldap-host:
)389No connection
The port number specified for the LDAP/AD server is incorrect or a firewall/network configuration is blocking the connection.
555

Documentation for Crowd 4.4 7
Created in 2021 by Atlassian. Licensed under a .Creative Commons Attribution 2.5 Australia License
Unknown Host: ldap-hostNo connection
The LDAP/AD server name/IP specified is incorrect.
LDAP: error code 2InvalidSearchFilterException
Invalid search filter passed to the LDAP/AD server or the filter is malformed (e.g.: it's missing a open and closing of parenthesis).
Please refer to this article for further information on LDAP Query Basics Microsoft TechNetLDAP/AD queries.
LDAP: error code 3
The application is timing out when waiting on a response from LDAP. Check the LDAP filters are correct, the LDAP engine is working correctly. The default timeout can be increased in the configuration.
LDAP: error code 4
The Active Directory/LDAP Server that JIRA Software is synchronizing with has a limitation on the number of objects it can return with one query. Enable 'Use Paged Results'.
LDAP: error code 34
The DN is most likely incorrect - confirm this by checking it against Directory Studio or using ds if using Active Directory.query
LDAP: error code 48
The Authentication Method in the Authentication tab of the connector properties is incorrect.
LDAP: error code 32
LDAP_NO_SUCH_OBJECT - Indicates the target object cannot be found. This code is not returned on following operations: Search operations that find the search base but cannot find any entries that match the search filter. Bind operations.
LDAP: error code 49
The Bind Username (DN) or Password is incorrect. This could also be caused by the following:
Pointed to non-user DN.Pointed to a non-existent DN.Pointed to an incorrect admin DN (might be using UID instead of CN).Pointed to a non administrator user.Pointed to a valid administrator user, however the password is incorrect.
A DN describes a path to the object in the database, so the CN may be correct however the OUs and DCs in the DN specified may be incorrect or in the wrong order.
NoSuchAttributeException
This can be caused by providing a name for an attribute that is not correct or does not exist.
InvalidNameException
This can be caused by a bad prefix specified in the Settings tab on most LDAP/AD systems.
This could mean you did not specify a prefix at all, which means the LDAP/AD server did not receive a full DN from CPS or that you did not specify a correct prefix, such as CN instead of UID, which results in the LDAP/AD server not receiving a correct DN from CPS.
Can also be caused by a missing comma at the beginning of the suffix or an extra comma at the end of the suffix. This error could also mean the authentication type is incorrect.
AuthenticationException
Could not authenticate the user trying to login. This can be the result of an incorrect username or password or an incorrect prefix and/or suffix specified in the Settings tab, depending on the type of LDAP/AD system. Could also mean the authentication type is incorrect.
Common Configuration Problems
556
Documentation for Crowd 4.4 8
Created in 2021 by Atlassian. Licensed under a .Creative Commons Attribution 2.5 Australia License
Problem Possible Cause(s) Possible Fix
JIRA Software runs out of memory, experiences slow performance or high CPU load during User Directory sync.Users are imported, however groups are not.Groups are imported, however users are not.
The may be Schema Settingsincorrect causing JIRA Software to attempt to import unnecessary or incorrect data from the LDAP/AD server.
Verify by browsing with Directory Studio (using 'Go to DN' is recommended) and ensure the following settings are correct within the in JIRA Schema SettingsSoftware:
Base DNAdditional User DNAdditional Group DN
User details (e.g.: Username, Email, Full Name, Password) are not correct after a successful sync.
The may User Schema Settingsbe incorrect or the value within the attributes is incorrect.
If this applies to only one user, it is likely the user details are incorrect.If it applies to multiple, it is likely the JIRA Software configuration is incorrect.
Verify by browsing with Directory Studio (using 'Go to DN' is recommended) and ensure the following attributes are correct within the in JIRA User Schema SettingsSoftware:
User NameUser First NameUser Last NameUser Display NameUser Email
Users and Groups are imported, however Users aren't automatically added to the Groups they belong to.
The Membership Schema may be incorrect.Settings
If this applies to only one user, it is likely the user details are incorrect.If it applies to multiple, it is likely the JIRA Software configuration is incorrect.
Verify by browsing with Directory Studio (check with a sample user) and ensure the following attributes are correct within the in JIRA Membership Schema SettingsSoftware:
Group Members AttributeUser Membership Attribute
Unable to add/delete Users or make changes to their Groups, Project Roles or Edit them.
The LDAP/AD User Directory is set to Read Only.
Verify the are Permissions Settingscorrect for the external User Directory.
If you want to make changes, Read/Write will need to be activated. If using Active Directory, please refer to this page on Con
.figuring an SSL Certificate
Providing Additional Information
Often when the above troubleshooting steps don't resolve the problem and in particularly complicated scenarios, further information will need to be provided so Atlassian can investigate further.
Generating an LDIF Export of a User or Group
Occasionally, Atlassian Crowd Support may request an LDIF export of a user or group. LDIF is the LDAP Data Interchange Format. You can export all or part of your LDAP directory to an LDIF file. This page shows you how to do that when using .Apache Directory Studio
LDAP browser may convert the underlying value data automatically which Apache Directory Studiocould mask the real value. An LDIF will show the actual value that's being used.
557

Documentation for Crowd 4.4 9
Created in 2021 by Atlassian. Licensed under a .Creative Commons Attribution 2.5 Australia License
1. 2. 3.
To generate an LDIF export of a user or group,
Highlight the user or group in .Apache Directory StudioRight-click on the user or group.Choose .Export -> LDIF Export
Screenshot: Generating an LDIF export of a user in Apache Directory Studio
RELATED TOPICS
Creating a Connection to your LDAP DirectoryUsing Apache Directory Studio for LDAP Configuration
558

Troubleshooting SSL certificates and Crowd1. Ensure that you are not using any parameters in the variable that refer to your keystore. For JAVA_OPTSexample,
-Djavax.net.ssl.trustStore="/my/key/store"
The variable is normally located in the Crowd distribution's apache-tomcat/bin/setenv.sh or setenv.JAVA_OPTSbat file (depending on the OS you are using). Remove these references and restart Crowd.
2. Run this command on the Crowd server, replacing <ip address of LDAP server> with your LDAP server's IP address:
openssl s_client -connect <ip address of LDAP server>:636
3. Save the certificate (including the and lines) of the response into BEGIN CERTIFICATE END CERTIFICATEa local file called tmp.pem.
4. Run this command on the local tmp.pem file. This should return an MD5 Fingerprint value.
openssl x509 -fingerprint -md5 -noout -in tmp.pem
5. Run this command on the Crowd server. This assumes you are using the default keystore and the $JAVA_HOME (or for Windows %JAVA_HOME%) variable has been set. If not, please specify the correct keystore path.
keytool -list -keystore $JAVA_HOME/jre/lib/security/cacerts
6. Ensure that the MD5 Fingerprint from step 3 is listed in your keystore. If it is not, you will need to import the tmp.pem certificate into your keystore.
If you continue to experience issues with your SSL configuration and Crowd, please . open a new support issueAttach the /atlassian-crowd.log file and the output of the tests above to the CROWD APPLICATION DIRECTORYsupport issue.
559
How to Optimize Crowd Client CachingCrowd-integrated applications can store user, group and role data in a local cache. This helps improve the performance of Crowd since these applications do not have to repeatedly request information from Crowd. Generally, it is not necessary to configure application caching, although this depends on the size of your application deployments. But for larger installations, you may need to configure the application caching. Please refer to more information about:
An overview of the different caching options in CrowdConfiguring caching for an application.Troubleshooting the caching for Atlassian integrated applications.Caching of user permissions on the Crowd server.Caching for LDAP directories
560

1. 2.
3. 4. 5. 6.
7.
8.
1. 2.
3.
4.
1. 2.
3. 4.
5. 6.
7. 8.
9.
1. 2. 3.
4.
Troubleshooting Crowd Performance
1. The Crowd application is slow!
Ensure you are running of Crowd.the latest versionUnder > in Crowd:Admin Logging & Profiling
Change the com.atlassian.crowd package to DEBUG.Enable profiling.
Replicate the performance issues you are seeing in Crowd (e.g. log out and log in, browse users, etc.)Attach the resulting file to your support ticket.CROWD_DIRECTORY/atlassian-crowd.logList the directories and applications active in your Crowd instance.Provide rough estimates of the number of users and groups that are available in each LDAP directory configuration.Provide information about the network location of any LDAP servers in respect to the Crowd server (e.g. same subnet, different networks, different states).If using Active Directory, is SSL enabled?
2. Jira/Confluence is slow!
Confirm that in Crowd.data caching is enabledConfirm that the only crowd-integration-client JAR in the directory Jira/Confluence WEB-INF/libmatches the version of Crowd you are running (e.g. ).crowd-integration-client-1.5.jarConfirm that the file located in the crowd-ehcache.xml Jira/ConfluenceWEB-INF/classesdirectory matches the one in the directory.CROWD/client/confIf your Crowd installation contains more than 50,000 users, review the guide at Configuring Caching for
.an Application
a. Jira/Confluence still slow?
Stop Jira/Confluence.Temporarily replace the WEB-INF/lib/crowd-integration-client-1.x.JAR file with the appropriate version from this .issueRestart Jira/Confluence.Under > in Jira/Confluence:Admin Logging & Profiling
Change the com.atlassian package to DEBUG.Enable profiling.
Perform actions in Jira/Confluence that are slow to respond (e.g. log out and log in, browse users, etc).Attach the resulting or . If Confluence, also Jira/Confluence logs/catalina.out stdout.logattach the file in the Confluence home directory (specified in the atlassian-confluence.log conflu
file at setup).ence-init.propertiesList the directories and applications active in your Crowd instance for the Jira/Confluence application.Provide rough estimates of the number of users and groups that are available in each LDAP directory configuration for the Jira/Confluence application.Provide information about the network location of any LDAP servers in respect to the Crowd server (e.g. same subnet, different networks, different states).
b. Using Active Directory?
Is SSL enabled?Are you using nested groups (is the Use Nested Groups box checked in Crowd)?If login is slow, please connect to your AD server using and highlight the Apache Directory Studiousername used for this login. Provide a screenshot of this user especially the list of attributes memberOffor this account (should contain full DNs).Please also confirm that all domain controllers referenced in these groups are resolvable/reachable from the Crowd server using ping:
Please note:
This guide assumes you have already opened a Crowd support issue at http://support.atlassian.comand wish to provide additional information about your Crowd configuration in this issue.
561

Documentation for Crowd 4.4 2
Created in 2021 by Atlassian. Licensed under a .Creative Commons Attribution 2.5 Australia License
ping ad1.mycompany.comping ad2.mycompany.au
RELATED TOPICS
Overview of CachingConfiguring Caching for an ApplicationAuthorization CachingConfiguring Caching for an LDAP Directory
562

1.
2.
3.
4.
5.
6.
7.
1.
2. 3.
Troubleshooting SSO with CrowdPlease follow the steps below to troubleshoot problems with SSO (single sign-on) in Crowd:
Confirm that you can log in to each application with the same username and password.In Crowd, click ' ' to view the Application Browser.ApplicationsClick ' ' next to the application.ViewClick the ' ' tab and follow .Authentication Test these instructions
Set each application to use centralized SSO authentication, as follows. Ensure that each Atlassian application's file is using the Crowd's com.atlassian.crowd WEB-INF/classes/seraph-config.xmlauthenticator class. For example in Jira, instead of this:
<authenticator class="com.atlassian.jira.security.login.JiraSeraphAuthenticator"/>
you should have this:
<authenticator class="com.atlassian.jira.security.login.SSOSeraphAuthenticator"/>
Please, see our page to check the SSO authenticator classes for other Adding an Application Tutorialapplications.
If you are using a reverse proxy in front of any of the applications, you'll need to make sure that the host header is preserved in the forward. For example, in an Apache reverse proxy, you need to enable the "ProxyPreserveHost" option, and in IIS you need to use "Application Request Routing" to achieve the same.Once each application is using centralized authentication, confirm you can log in to each application with the same username and password.Inside of Crowd, ensure that each application is configured to use the same user directory. SSO will not work if you log in to Confluence through one user directory, but Jira through a different user directory, eve
.n if the usernames are identicalEnsure that each application is using the same sub-domain. For example:
Jira -> jira.example.comConfluence -> confluence.example.comCrowd -> crowd.example.com
SSO will only work with applications on the same sub-domain. Why? Crowd uses a cookie to manage SSO and your browser only has access to cookies in the same sub domain, e.g. *. .example.com
This is the value that you set in the Domain property (e.g. . ) for Crowd to enable SSO. This example.comis covered in the documentation on .configuring the domainCheck if the "Require Consistent Client IP Address" is enabledin the . If it is, try Session configurationdisabling it and test SSO.
Still having trouble?
If the above steps have not solved your problem, please gather some debugging information as described below before contacting Atlassian support:
In Crowd, go to ' ' -> ' '. Change the Administration Logging & Profiling com.atlassian.crowdpackage to DEBUG.Replicate the SSO problem you are having.Please raise a support issue on our , attaching your {Support System CROWD HOME}/logs/atlassian-
file with the debug information gathered.crowd.log
RELATED TOPICS
Overview of SSO
563
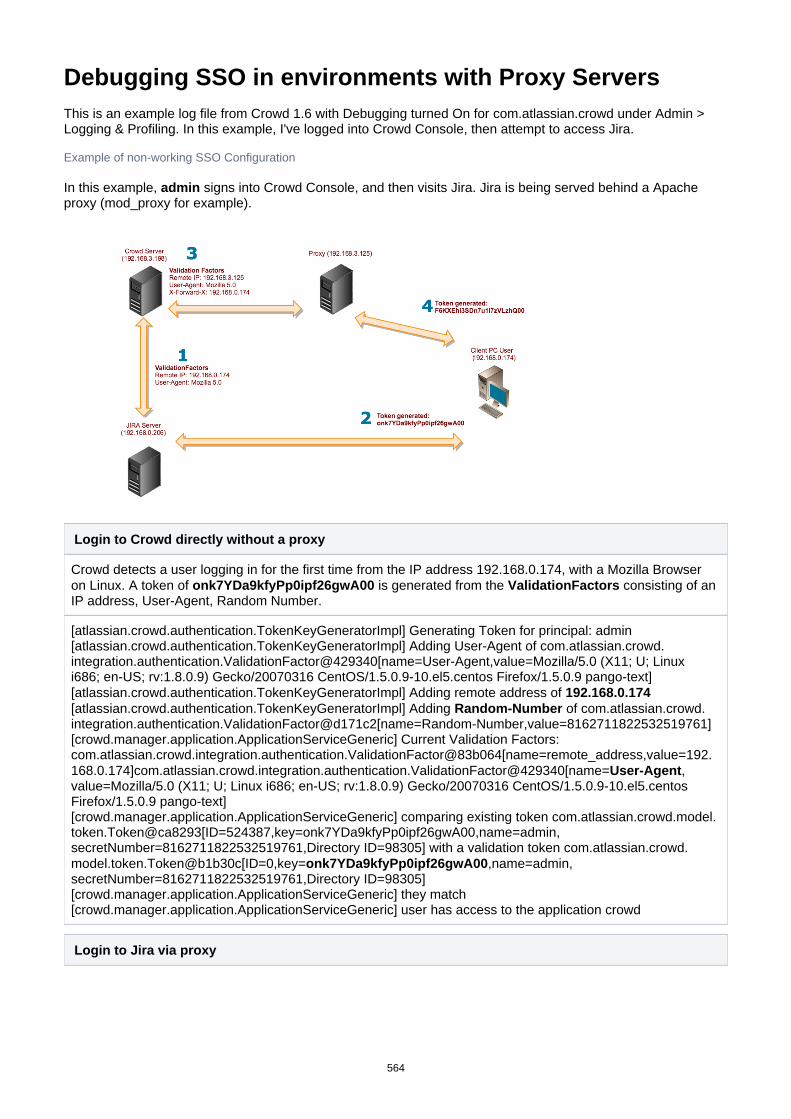
Debugging SSO in environments with Proxy ServersThis is an example log file from Crowd 1.6 with Debugging turned On for under Admin > com.atlassian.crowdLogging & Profiling. In this example, I've logged into Crowd Console, then attempt to access Jira.
Example of non-working SSO Configuration
In this example, signs into Crowd Console, and then visits Jira. Jira is being served behind a Apache adminproxy (mod_proxy for example).
Login to Crowd directly without a proxy
Crowd detects a user logging in for the first time from the IP address 192.168.0.174, with a Mozilla Browser on Linux. A token of is generated from the consisting of an onk7YDa9kfyPp0ipf26gwA00 ValidationFactorsIP address, User-Agent, Random Number.
[atlassian.crowd.authentication.TokenKeyGeneratorImpl] Generating Token for principal: admin[atlassian.crowd.authentication.TokenKeyGeneratorImpl] Adding User-Agent of com.atlassian.crowd.integration.authentication.ValidationFactor@429340[name=User-Agent,value=Mozilla/5.0 (X11; U; Linux i686; en-US; rv:1.8.0.9) Gecko/20070316 CentOS/1.5.0.9-10.el5.centos Firefox/1.5.0.9 pango-text][atlassian.crowd.authentication.TokenKeyGeneratorImpl] Adding remote address of 192.168.0.174[atlassian.crowd.authentication.TokenKeyGeneratorImpl] Adding of com.atlassian.crowd.Random-Numberintegration.authentication.ValidationFactor@d171c2[name=Random-Number,value=8162711822532519761][crowd.manager.application.ApplicationServiceGeneric] Current Validation Factors: com.atlassian.crowd.integration.authentication.ValidationFactor@83b064[name=remote_address,value=192.168.0.174]com.atlassian.crowd.integration.authentication.ValidationFactor@429340[name= ,User-Agentvalue=Mozilla/5.0 (X11; U; Linux i686; en-US; rv:1.8.0.9) Gecko/20070316 CentOS/1.5.0.9-10.el5.centos Firefox/1.5.0.9 pango-text][crowd.manager.application.ApplicationServiceGeneric] comparing existing token com.atlassian.crowd.model.token.Token@ca8293[ID=524387,key=onk7YDa9kfyPp0ipf26gwA00,name=admin,secretNumber=8162711822532519761,Directory ID=98305] with a validation token com.atlassian.crowd.model.token.Token@b1b30c[ID=0,key= ,name=admin,onk7YDa9kfyPp0ipf26gwA00secretNumber=8162711822532519761,Directory ID=98305][crowd.manager.application.ApplicationServiceGeneric] they match[crowd.manager.application.ApplicationServiceGeneric] user has access to the application crowd
Login to Jira via proxy
564

Documentation for Crowd 4.4 2
Created in 2021 by Atlassian. Licensed under a .Creative Commons Attribution 2.5 Australia License
After my visit to the Crowd Console, I then visit Jira through a proxy. It detects my same User-Agent, but now sees that my IP is which is really the proxy's. This results in a token that doesn't match my 192.168.3.125existing one: as compared to and thus, I'm F6KXEhI3SDn7u1I7zVLzhQ00 onk7YDa9kfyPp0ipf26gwA00prompted to login again. A clue that I was going through the proxy is the header. It also X-Forwarded-Forcontains my real IP. The way to fix this is to add to my list of .192.168.3.125 Trusted Proxies
[atlassian.crowd.authentication.TokenKeyGeneratorImpl] Generating Token for principal: admin[atlassian.crowd.authentication.TokenKeyGeneratorImpl] Adding of com.atlassian.crowd.User-Agentintegration.authentication.ValidationFactor@31f633[name=User-Agent,value=Mozilla/5.0 (X11; U; Linux i686; en-US; rv:1.8.0.9) Gecko/20070316 CentOS/1.5.0.9-10.el5.centos Firefox/1.5.0.9 pango-text][atlassian.crowd.authentication.TokenKeyGeneratorImpl] Adding remote address of 192.168.3.125[atlassian.crowd.authentication.TokenKeyGeneratorImpl] Adding Random-Number of com.atlassian.crowd.integration.authentication.ValidationFactor@1a99a7[name=Random-Number,value=8162711822532519761][crowd.manager.application.ApplicationServiceGeneric] Current Validation Factors: com.atlassian.crowd.integration.authentication.ValidationFactor@5db889[name=remote_address,value=192.168.3.125]com.atlassian.crowd.integration.authentication.ValidationFactor@fe4748[name=X-Forwarded-For,
]com.atlassian.crowd.integration.authentication.ValidationFactor@31f633[name=User-value=192.168.0.174Agent,value=Mozilla/5.0 (X11; U; Linux i686; en-US; rv:1.8.0.9) Gecko/20070316 CentOS/1.5.0.9-10.el5.centos Firefox/1.5.0.9 pango-text][crowd.manager.application.ApplicationServiceGeneric] comparing existing token com.atlassian.crowd.model.token.Token@417bf8[ID=524387,key=onk7YDa9kfyPp0ipf26gwA00,name=admin,secretNumber=8162711822532519761,Directory ID=98305] with a validation token com.atlassian.crowd.model.token.Token@f9d0af[ID=0,key=F6KXEhI3SDn7u1I7zVLzhQ00,name=admin,secretNumber=8162711822532519761,Directory ID=98305][crowd.manager.application.ApplicationServiceGeneric] The token keys don't match
565

Troubleshooting CrowdIDIf you are experiencing issues with Crowd's OpenID server (CrowdID), please take the following steps to help diagnose the problem:
Step 1: Change the logging for Crowd's OpenID server and client.
Change the openid package from INFO to DEBUG in CROWD/crowd-openidserver-webapp/WEB-INF/classes/log4j.properties
###################################################### CROWD - CLASS-SPECIFIC LOGGING LEVELS#####################################################
# Set the following lines to DEBUG to enable logging on incoming, outgoing and fault SOAP messageslog4j.logger.com.atlassian.crowd.integration.service.soap.xfire.XFireInLoggingMethodHandler=WARNlog4j.logger.com.atlassian.crowd.integration.service.soap.xfire.XFireOutLoggingMethodHandler=WARNlog4j.logger.com.atlassian.crowd.integration.service.soap.xfire.XFireFaultLoggingMethodHandler=WARN
log4j.logger.com.atlassian.crowd.openid=DEBUG
log4j.logger.com.atlassian.crowd=INFO
Change the openid package from INFO to DEBUG in CROWD/crowd-openidclient-webapp/WEB-INF/classes/log4j.properties
###################################################### CROWD - CLASS-SPECIFIC LOGGING LEVELS#####################################################
log4j.logger.com.atlassian.crowd.openid=DEBUG
log4j.logger.com.atlassian.crowd=INFO
Step 2: Test CrowdID with the bundled OpenID client:
http://<your Crowd URL>:<Crowd port>/openidclient/
If these tests are not successful, attach the and atlassian-crowd-openid-client.log atlassian- files (in the same location specified by ) to a support issue at crowd.openid-server.log this guide http://sup
. Note the username of the account tested.port.atlassian.com
Step 3: Test CrowdID with your OpenID application:
If these tests are not successful, attach the and atlassian-crowd-openid-client.log atlassian- files (in the same location specified by ) to a support issue at crowd.openid-server.log this guide http://sup
. Note the username of the account tested and the OpenID application you are attempting to port.atlassian.comuse.
566
Provide Crowd Information to Atlassian Support
Purpose
Sending us your log files and configuration details will speed up resolution of your issue.
Solution
Please provide these artifacts when you create a ticket:
A zip archive of <crowd_home>/logs/A zip archive of <crowd_install>/apache-tomcat/logs/All the text from .Crowd Admin > System Information > Support Information
The <crowd_home> directory is the path defined in <crowd_install>/crowd-webapp/WEB-INF/classes/crowd-init.properties.
The text can be attached in a file or pasted into the description or comment of your ticket at https://support.atlassian.com.
If the zip files are less than 125MB you can attach them to your ticket. For larger files please request a transfer account and your support agent create one for you.
567

Contributing to the Crowd DocumentationWould you like to share your Crowd hints, tips and techniques with us and with other Crowd users? We welcome your contributions.
On this page:
Blogging your Technical Tips and Guides Tips of the TradeContributing Documentation in Other LanguagesUpdating the Documentation Itself
Getting Permission to Update the DocumentationOur Style GuideHow we Manage Community Updates
Blogging your Technical Tips and Guides Tips of the Trade
Have you written a blog post describing a specific configuration of Crowd or a neat trick that you have discovered? Let us know, and we will link to your blog from our documentation. .More...
Contributing Documentation in Other Languages
Have you written a guide to Crowd in a language other than English, or translated one of our guides? Let us know, and we will link to your guide from our documentation. .More...
Updating the Documentation Itself
Have you found a mistake in the documentation, or do you have a small addition that would be so easy to add yourself rather than asking us to do it? You can update the documentation page directly.
Getting Permission to Update the Documentation
Please submit the .Atlassian Contributor License Agreement
Our Style Guide
Please read our short .guidelines for authors
How we Manage Community Updates
Here is a quick guide to how we manage community contributions to our documentation and the copyright that applies to the documentation:
Monitoring by technical writers. The Atlassian technical writers monitor the updates to the documentation spaces, using RSS feeds and watching the spaces. If someone makes an update that needs some attention from us, we will make the necessary changes.Wiki permissions. We use wiki permissions to determine who can edit the documentation spaces. We ask people to sign the (ACLA) and submit it to us. That allows Atlassian Contributor License Agreementus to verify that the applicant is a real person. Then we give them permission to update the documentation.Copyright. The Atlassian documentation is published under a Creative Commons CC BY license. Specifically, we use a . This means that anyone can Creative Commons Attribution 2.5 Australia Licensecopy, distribute and adapt our documentation provided they acknowledge the source of the documentation. The CC BY license is shown in the footer of every page, so that anyone who contributes to our documentation knows that their contribution falls under the same copyright.
RELATED TOPICS
Tips of the TradeAuthor GuidelinesAtlassian Contributor License Agreement
568

Tips of the TradeBelow are some links to external blog posts and articles containing technical tips and instructions on setting up and using Crowd. This page presents an opportunity for customers and community authors to share information and experiences.
The references here are specific to Crowd and are technical 'how to' guides written by bloggers who use Crowd. For more general information on identity management solutions, best practices and business cases, please refer to the .Atlassian website
On this page:
omniauth_crowdIntegrating Enterprise Tester with Crowd A .Net IntegrationThree's a Crowd - securing a Grails application with Acegi and CrowdSSO for RoundCube Webmail with Atlassian CrowdNexus Crowd Plugin IntroductionIntegrating Crowd with SubversionInstall Crowd Apache2 ModuleVideo Configuring a Delegated Authentication DirectoryVideo Configuring a Custom Directory ConnectorBulk User Management with Crowd's Remote APICrowd Caching in 1.6Hammering Crowd
Please be aware that these are external blogs and articles.
Most of the links point to external sites, and some of the information is relevant to a specific release of Crowd. Atlassian provides these links because the information is useful and relevant at the time it was written. Please check carefully whether the information is still relevant when you read it, and whether it is relevant to your version of Crowd. , Atlassian does not offer support for third-Unless explicitly statedparty extensions or plugins. The information in the linked blog posts has not been tested or reviewed by Atlassian. We recommend that you test all solutions on a server before trying them on your testproduction site.
569

Documentation for Crowd 4.4 2
Created in 2021 by Atlassian. Licensed under a .Creative Commons Attribution 2.5 Australia License
Application Connectors
omniauth_crowd
By: Rob Di Marco, on GitHubAbout: Integrating Crowd with OmniAuth to allow Rack-based applications (such as Rails, Sinatra) to use Crowd as an authentication sourceDate and Crowd version: March 2011, Crowd 2.2
Integrating Enterprise Tester with Crowd A .Net Integration
By: Catch Limited, on the 'Atlassian Blog'About: Integrating Enterprise Tester, a .Net application, with Crowd. Enterprise Tester is a test management solution from Catch Limited.Date and Crowd version: 8 July 2010Related documentation: Microsoft .NET Client
Three's a Crowd - securing a Grails application with Acegi and Crowd
By: Kate Ellingburg, on the 'Atlassian Blog'About: How to get Grails, Acegi and Crowd going togetherDate and Crowd version: 4 March 2008; Crowd 1.3Related documentation: Integrating Crowd with Spring Security
SSO for RoundCube Webmail with Atlassian Crowd
By: Stefan Reuter, on the 'Stefan Reuter' blogAbout: Integrating a webmail system (RoundCube Webmail 0.2.2) with CrowdDate and Crowd version: 24 June 2009; Crowd 1.6Related documentation: Creating a Crowd Client for your Custom Application
Nexus Crowd Plugin Introduction
By: Justin Edelson, on the 'Sonatype Blog'About: Using Crowd with Sonatype Nexus, via a new plugin for NexusDate and Crowd version: 28 February 2009; Crowd 1.6Related documentation: Creating a Crowd Client for your Custom Application
Integrating Crowd with Subversion
By: Trisummit TechnologiesAbout: Integrating Crowd with Subversion and ApacheDate and Crowd version: 4 April 2010
Install Crowd Apache2 Module
By: Scott Herdman, on blog 'swherdman.com'About: Integrating Crowd with Apache on DebianDate and Crowd version: 22 July 2009
Directory Connectors
Video Configuring a Delegated Authentication Directory
By: Brendan Patterson, on Screencast.comAbout: Configuring a Delegated Authentication directory and an LDAP directory connectorDate and Crowd version: August 2010; Crowd 2.0Related documentation: Configuring a Delegated Authentication Directory
Video Configuring a Custom Directory Connector
By: Brendan Patterson, on Screencast.comAbout: Creating a custom directory connectorDate and Crowd version: August 2010; Crowd 2.0Related documentation: Configuring a Custom Directory Connector
570
https://developer.atlassian.com/display/CROWDDEV/Creating a Crowd Client for your Custom Application

Documentation for Crowd 4.4 3
Created in 2021 by Atlassian. Licensed under a .Creative Commons Attribution 2.5 Australia License
Remote API
Bulk User Management with Crowd's Remote API
By: Andreas Knecht, on the 'Atlassian Blog'About: Adding multiple users to a group in Crowd, using Crowd's remote API and RubyDate and Crowd version: 11 September 2008; Crowd 1.5Related documentation: Managing Group Members
Performance and Load Testing
Crowd Caching in 1.6
By: Shihab Hamid, on the 'Atlassian Blog'About: Caching in Crowd 1.6Date and Crowd version: 4 January 2009; Crowd 1.6Related documentation:
Overview of CachingConfiguring Caching for an LDAP Directory
Hammering Crowd
By: Shihab Hamid, on the 'Atlassian Blog'About: Tips for and finding from Crowd performance and load testingDate and Crowd version: 30 March 2008; Crowd 1.3Related documentation:
Overview of CachingPerformance ProfilingTroubleshooting Crowd Performance
Other Sources of Information
Crowd documentationAtlassian websiteAnswers from the communityAtlassian BlogCrowd plugins
Have you written a technical tip for Crowd?
Add a comment to this page, linking to your blog post or article. We will include it if the content fits the requirements of this page.
Feedback?
Your first port of call should be the author of the linked blog post. If you want to let us know how useful (or otherwise) a linked post is, please add a comment to this page.
571

Crowd Documentation in Other LanguagesBelow are some links to Crowd documentation written in other languages. In some cases, the documentation may be a translation of the English documentation. In other cases, the documentation is an alternative guide written from scratch in another language. This page presents an opportunity for customers and community authors to share documentation that they have written in other languages.
On this page:
No guides yet
None
No guides yet
We do not yet have any guides to link here. Be the first to suggest one!
Adding Your Own Guide to this Page
Have you written a guide for Crowd in another language? Add a comment to this page, linking to your guide. We will include it if the content fits the requirements of this page.
Giving Feedback about One of the Guides
If you have feedback on one of the guides listed above, please give the feedback to the author of the linked guide.
If you want to let us know how useful (or otherwise) one of these guides is, please add a comment to this page.
Other Sources of Information
Crowd documentationAtlassian websiteAtlassian blogCrowd plugins and connectors
Please be aware that these are external guides.
Most of the links point to external sites, and some of the information is relevant to a specific release of Crowd. Atlassian provides these links because the information is useful and relevant at the time it was written. Please check carefully whether the information is still relevant when you read it, and whether it is relevant to your version of Crowd. The information in the linked guides has not been tested or reviewed by Atlassian.
572
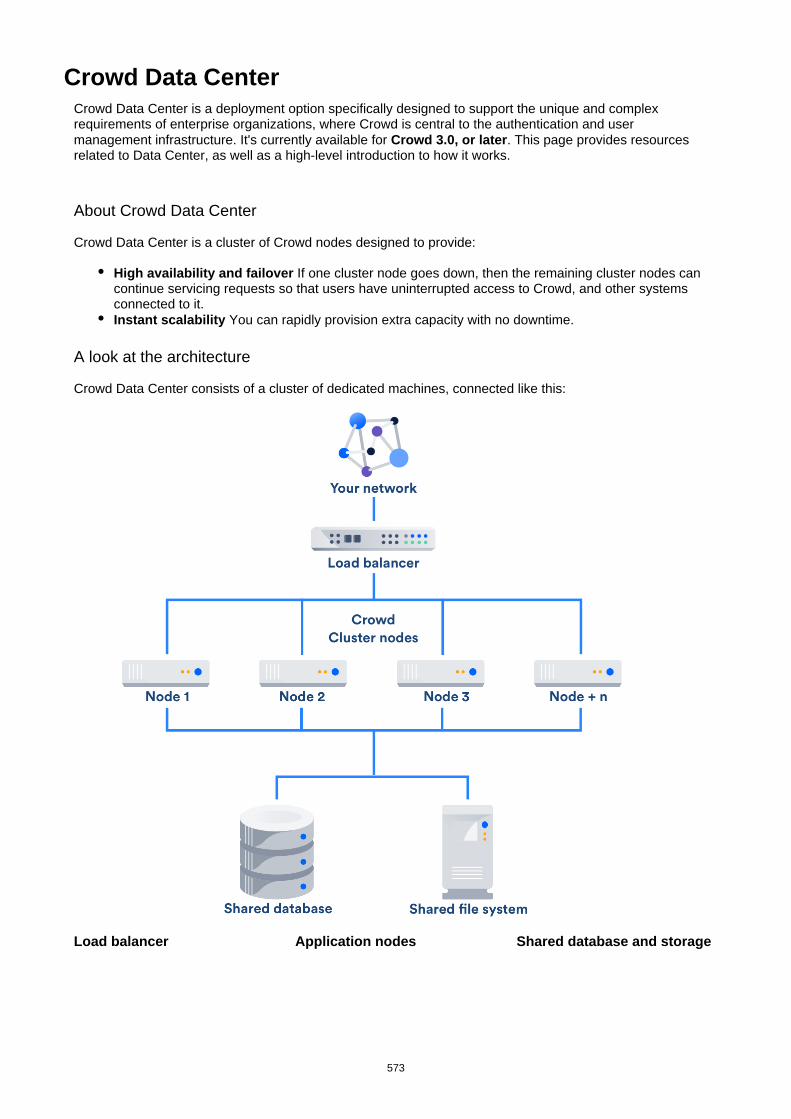
Crowd Data CenterCrowd Data Center is a deployment option specifically designed to support the unique and complex requirements of enterprise organizations, where Crowd is central to the authentication and user management infrastructure. It's currently available for . This page provides resources Crowd 3.0, or laterrelated to Data Center, as well as a high-level introduction to how it works.
About Crowd Data Center
Crowd Data Center is a cluster of Crowd nodes designed to provide:
High availability and failover If one cluster node goes down, then the remaining cluster nodes can continue servicing requests so that users have uninterrupted access to Crowd, and other systems connected to it.Instant scalability You can rapidly provision extra capacity with no downtime.
A look at the architecture
Crowd Data Center consists of a cluster of dedicated machines, connected like this:
Load balancer Application nodes Shared database and storage
573

Documentation for Crowd 4.4 2
Created in 2021 by Atlassian. Licensed under a .Creative Commons Attribution 2.5 Australia License
The load balancerdistributes requests fromyourusers to the cluster nodes.If a cluster node goes down, the load balancer immediately detects the failure and automatically directs requests to the other nodes within seconds.You can use any load balancer that supports session affinity.
The cluster of Data Center nodes share the workload of incoming requests. Failure of a cluster node causes virtually no loss of availability for users, because requests are immediately directed to other nodes.
Data Center supports thesame databases that are supported for Crowd Server.It also supports any shared file system, which stores: import/export files, plugins, shared caches, and any data directory which includes attachments, avatars and icons.
Get started with Crowd Data Center
Ready to get started?
Learn more about Crowd Data Centerandpurchase a licenseorobtain an evaluation license.
Once you're there, you might want to look at these pages:
Crowd Data Center resourcesInstalling Crowd Data CenterFAQ
574

Crowd user managementDoes this scenario ring a bell?
I have 2+ Atlassian products
Products are on-premise; some are Data Center and
some - Server
I have a growing pool of users
I already have or I'm expecting more than 500 unique users in
every app
I cannot afford downtime
I must keep my services available and up and running
at all times
Meet Crowd
PacCrowd allows you to manage your users for all of your Atlassian Server and Data Center applications. ked with critical features such as single sign-on, audit logs, and delegated administration, Crowd allows
you to manage users and their authentication permissions from . Crowd easily multiple directoriesintegrates with your existing environment be it big or small.
Benefits of Crowd
To stay on top of all user management trends, an increasing number of users opt for Crowd Data Center to have one central place to manage users from Atlassian products but of failure all all without the riskdue to high availability.
In-product user management Crowd Data Center
User management done per app or in Jira One place to manage all users
When users are managed in Jira, when Jira's down, users cannot log in to other apps
High availability - admins have uninterrupted access to user management and all users to apps
User management fixes and features need to be implemented per app Fixes and features can easily be
implemented
No prime features - high availability or delegated user SSO, high availability, delegated user
- all prime features included
In-product user management can have different versions One app to upgrade and manage
575
Documentation for Crowd 4.4 2
Created in 2021 by Atlassian. Licensed under a .Creative Commons Attribution 2.5 Australia License
OK, sounds good. What do I do next?
1.
Read about the hardware and software requirements in our documentation.
Check installation requirements
2.
Download a free 30-day trial of Crowd Data Center with all latest features.
Evaluate Crowd Data Center for free
3.
Generate a Data Center license. (Yes, even if you use Crowd Server.)
Generate Data Center licence
Talk to us
Thinking about implementing Crowd or looking for a place to leave feedback?Check out these resources for more information or to get in touch.
Ask us a question in our community.
Crowd feedback community
Review the product's FAQ.
Check out Crowd FAQ
Stay on top of the latest features.
Check out release notes
576