DFFS: Installation manual
17
Compatibility Upgrading from a previous version Install DFFS Step-by-step Set up the installer in a web part page (Local installer) Install custom version Video installation guide DFFS Installer APP Change the location of the SPJS document library Please note Override the default overlay timeout SharePoint 2007 manual CEWP installation In depth step-by-step guide: part 1 for SP 2007 – CEWP setup Download the les Create a document library Upload les In depth step-by-step guide: part 2 for SP 2007 – CEWP setup Correct links and add backend page Add CEWP’s to the forms Enter edit mode Manually set the location of the conguration list Why would you want to do this? Pros Cons License code How is the license code validated? Buy the license rst License code challenge for site or site collection What is the challenge code created from? Why is this necessary? SharePoint 2007 License code textarea Upgrade an existing license Manage the license code centrally DFFS Installer v1 DFFS Installer v2 Developer license DFFS: Installation manual SharePoint JavaScripts
-
Upload
khangminh22 -
Category
Documents
-
view
2 -
download
0
Transcript of DFFS: Installation manual

Compatibility
Upgrading from a previous version
Install DFFS
Step-by-step
Set up the installer in a web part page (Local installer)
Install custom version
Video installation guide
DFFS Installer APP
Change the location of the SPJS document library
Please note
Override the default overlay timeout
SharePoint 2007 manual CEWP installation
In depth step-by-step guide: part 1 for SP 2007 – CEWP setup
Download the �les
Create a document library
Upload �les
In depth step-by-step guide: part 2 for SP 2007 – CEWP setup
Correct links and add backend page
Add CEWP’s to the forms
Enter edit mode
Manually set the location of the con�guration list
Why would you want to do this?
Pros
Cons
License code
How is the license code validated?
Buy the license �rst
License code challenge for site or site collection
What is the challenge code created from?
Why is this necessary?
SharePoint 2007
License code textarea
Upgrade an existing license
Manage the license code centrally
DFFS Installer v1
DFFS Installer v2
Developer license
DFFS: Installation manual
SharePoint JavaScripts

Troubleshooting
File a bug reports
Priority support
Are you missing something?
Last updated: November 28, 2019.
Compatibility
DFFS v4 is compatible with WSS / Moss 2007, SP 2010, 2013 and 2016 – both foundation,
server and online 365.
The solution is 100% client side, and you can set it up with only “Design” or “Owner” rights to the
SharePoint Site.
Upgrading from a previous version
Dynamic Forms for SharePoint is backwards compatibility with DFFS v3.x, but if you are
upgrading from an early 3.x version, you must edit each of the forms DFFS con�guration after
updating to ensure your rules still work properly. This is because some of the updates may have
changed how some rules are processed.
You �nd the change log here
You should always test a new version in a development site or in a copy of the list to ensure it
works as expected.
If you decide to test it in a production environment, you must at least back up the con�guration
before you start. You can export the setup from the “Misc” tab (moved to Export, import and
restore tab in later versions).
Upgrading from v3.x will require that you reinstall DFFS by using the “local installer” as
described below. It will also require that you enter the DFFS con�g for each form to ensure your
rules are correctly set up.
This will most likely only affect rules set up on multiselect �elds as the con�guration for this type
of rule has changed to give you a list of the options to choose from rather than a text �led to
write the options in.
Please look at the “Install custom version” below the “Local installer” section to learn how to
install the new DFFS version in parallel with the old version. This will let you upgrade safely by
reinstalling one form at the time.

If you have trouble, look at the troubleshooting section at the bottom of this document.
Install DFFS
You �nd a video installation guide below the step-by-step guide.
Step-by-step1. Download the DFFS �les from here
2. Create a document library named “SPJS” on the root of the site (or optionally the root of the
site collection).
3. Open the the document library in “Explorer view” and drag-and-drop the �les from step 1
over on the root of this document library. Please note that you must unzip the �les �rst.
If you use SP 2007 you must use the manual CEWP installation method.
Set up the installer in a web part page (Local installer)
Images from DFFS Installer v2. First time you set it up you are presented with this screen. You
can add license code, CSS and JS if you like, but it is optional. Click Create loader �le to create
the �le /SPJS/DFFS/loader/DFFS_loader_v2.html used to load DFFS in the forms when installing.
1. Create a classic WebPartPage in the DFFS folder created in step 3 above. To get to the create
new web part page form, go to All site contents and change the URL from:
/_layouts/15/viewlsts.aspx
to
/_layouts/15/spcf.aspx
2. In this new page, add a ContentEditorWebPart (CEWP). In the “Content link” option in the
CEWP, insert a link to the desired installer:
Installer v2 (recommended): Link to /SPJS/DFFS/installer/DFFS_Installer_v2.html
Installer v1: Link to /SPJS/DFFS/installer/Installer_CEWP_code.html
3. Reload the page and follow the instructions to prepare the installer (in v2) and then select the
list you want to install DFFS in from the dropdown.
4. When you have added DFFS to a list, go to this list and click the Enhanced with DFFS link
below the form (NewForm, DispForm and EditForm) to start con�guring DFFS.

When the �rst time setup is done, select the list you like to install DFFS in by �rst selecting the
site, hit Load lists and then select the list.
Install DFFS in NewForm, DispForm and EditForm.
The installer will detect any existing JSLink installation or older CEWP installations, and will let
you remove this directly to replace it with the new DFFS Installer.
If you want to use the installer APP (SP 2013 / 2016 / Online) you can skip to this section. Please
note that the APP is not as updated as the recommended installer you set up in a web part page
as described above.
Install custom version

You can “side load” different versions of DFFS. To do this, add a custom version of DFFS with a
new folder name – like DFFS_yyyy-MM-dd to the SPJS library, and specify this folder name in the
DFFS Installer (currently only the local installer has this feature) like this:
This is a great way to upgrade to a new version of DFFS one list at the time.
Please note that if you have an older version without the “loader” folder in your primary “DFFS”
folder structure, you must copy the �le “DFFS_loader.html” from the new DFFS version into the
existing DFFS folder structure in this path:
/SPJS/DFFS/loader/DFFS_loader.html
Video installation guide
DFFS InstallationDFFS Installation

When using the new DFFS Installer, it is essential that the document library is named SPJS, and
that the DFFS folder is placed in the root of this document library.
DFFS Installer APP
Please note that I recommend the local installer over the APP.
This installer if for SP 2013 and SharePoint Online. If you use SP 2010 you must follow the next
step “DFFS installer local version”.
Unfortunately you cannot get the APP from Of�ce store. It hasn’t been approved in it’s current
state because it doesn’t include all the DFFS �les in the APP-package (these are located in the
host web and cannot be included in the APP web).
Therefore you must get the APP from my site, and add it to your APP-Catalog manually.
When you have �nished the installation and trusted the APP, you will see a button in the
“Customize” section of the ribbon menu, or directly in the list heading for the “new experience”
layout in all lists and libraries.
Please note that the APP is site scoped. This mean you must add it to every site you want to use
it.
Change the location of the SPJS document libraryThis applies only to DFFS installer v1.
The default location for the SPJS library is in the current SITE. You can change this to refer to the
SITE COLLECTION root or the parent of the site you are setting it up in if you change the
variable “dffs_folder_location” from “current” to “root” or “parent” in the �le
“/SPJS/DFFS/loader/DFFS_loader.html” and in “/SPJS/DFFS/vLookup_ListView.html”.
If you opt to add the source �les in the root of the site collection, you can either add the installer
in a web part page in the root site, or in a subsite – linking to the “Installer_CEWP_code.html” �le
from the “/SPJS/DFFS/installer” folder in the root site.
Please note
If you change the location of the SPJS document library after you have already installed DFFS
from a different location (locally in a subsite), you must use the DFFS installer you set up in the
root site to uninstall and reinstall DFFS in the forms in the subsites to ensure they link to the
correct �les – and also inherits the license code added to the loader �le.

Override the default overlay timeoutThe loading overlay has the default max time before “This tool forever” shows set to 6000
(60seconds).
You can now override this loading overlay timeout entirely (if you know your form uses longer
than 60seconds to load) by adding this to the custom js in each DFFS enabled form:
clearTimeout(dffs_overlay_timeout);
SharePoint 2007 manual CEWP installation
This is the method where you add code using Content Editor Web Parts in NewForm, DispForm
and EditForm to link to the script �les.
When you choose this approach, you must edit the �les in the
“/Sites/YourSite/SPJS/DFFS/CEWP” folder.
You must edit the <script> src and the <link> href to point to the �les from the “css” and “js”
folders in “/Sites/YourSite/SPJS/DFFS/”.
Add a web part page to the SPJS library where you uploaded the DFFS �les. If you have trouble
�nding the “new web part page” options, you can go to “All site content” and edit the URL like
this:
https://yourdomain.com/Sites/YourSite/_layouts/SPCF.aspx
Name the new page for example “DFFS_Backend”, and add a Content Editor Web Part to the
“Left Column” web part zone. Edit this CEWP and use the “Content link” option to link to the
backend �le like this:
/Sites/YourSite/SPJS/DFFS/CEWP/DFFS_backend_CEWP.html
When this is done, you will see a orange box with an error message – this is OK. Copy the URL to
the WebPartPage from the URL �eld in the browser, and add it to the
�le “DFFS_frontend_CEWP.html” like this:
var spjs_dffs_backend = "/Sites/YourSite/SPJS/DFFS_Backend.aspx";
If you plan to load custom JS �les in the Custom JS tab, you need to set another variable in the
CEWP:

var spjs_path = "/SPJS/spjs/dffs";
You are now �nished with the con�guration and can start adding the CEWP’s to the forms.
Add “DFFS_frontend_overlay.html” above and “DFFS_frontend_CEWP.html” below the form web
part in NewForm, DispForm and EditForm using a CEWP and the content link option.
If you want to change the text in the overlay, edit the variable “dffsLoaderOverlayText” in the
“DFFS_frontend_overlay.html” �le.
When you have �nished the setup, you enter setup for each form (NewForm, DispForm and
EditForm) by hitting the “Enhanced with DFFS” link at the bottom of the form.
See more details below, or see this video tutorial:
In depth step-by-step guide: part 1 for SP 2007 – CEWP setup
Download the �les
Download the DFFS �les from here
Create a document library
Create a document library named “SPJS” on the root of the site (or optionally the root of the site
collection).
Upload �les
Open the folder where you downloaded the �les in your local computer using Windows Explorer
(or equivalent), and unzip the �les.
DFFS CEWP SetupDFFS CEWP Setup

Open the document library in Windows Explorer from the “Actions” menu in SP 2007.
With the two Windows Explorer windows side-by-side, drag the downloaded �les and folders
over to the “SPJS” document library.
If opening in Windows Explorer is not available, you can create the folders manually, and upload
one and one �le.
Optionally you can use SharePoint designer to drag-and-drop the �les to the document library.
In depth step-by-step guide: part 2 for SP 2007 – CEWP setup
This part applies to the CEWP setup option only. See previous section for the SharePoint 2010
and 2013 DFFS Installer option.
Correct links and add backend page
You must edit the �les “DFFS_backend_CEWP.html” and “DFFS_frontend_CEWP.html” from the
“CEWP” folder in “/Sites/YourSite/SPJS/DFFS/”.
The best method is to edit the downloaded �les on your local computer and upload them again
when you have changed them.
You must edit the <script> src and the <link> href to point to the �les from the “css” and “js”
folders in “/Sites/YourSite/SPJS/DFFS/”.
Add the variable to the CEWP like this:
<script type="text/javascript"> _spPageContextInfo = {"pageListId":"{CE2C4401-0C2F-446B-944B-C28922BD0B42}"}</script>
You �nd an example on how to add support for using the same CEWP �le for multiple lists in SP
2007 in the �le “DFFS_frontend_CEWP.html”.
How to �nd the correct list GUID
Go to a list view of the list. Right click and select “view source”. Search for “ctx.listName” and you
will �nd it like this:
ctx.listName = "{CE2C4401-0C2F-446B-944B-C28922BD0B42}";
Then you must add a WebPartPage to the SPJS document library – for example named
“DFFS_Backend”. When this page is added, go into edit mode, add a CEWP and link to the �le
“/Sites/YourSite/SPJS/DFFS/CEWP/DFFS_backend_CEWP.html” using the “Content link” option.
When this is done, you will see a orange box with an error message – this is OK. Copy the URL to
the WebPartPage from the URL �eld in the browser, and add it to the
�le “DFFS_frontend_CEWP.html” like this:
var spjs_dffs_backend = "/Sites/YourSite/SPJS/DFFS_Backend.aspx";
Add CEWP’s to the forms
Add “DFFS_frontend_overlay.html” above and “DFFS_frontend_CEWP.html” below the form web
part in NewForm, DispForm and EditForm using a CEWP and the content link option.
Enter edit mode
Go to the form you want to add the solution to, and modify the URL like this:
/Sites/MySite/Lists/MyList/NewForm.aspx?toolpaneview=2
/Sites/MySite/Lists/MyList/DispForm.aspx?toolpaneview=2
/Sites/MySite/Lists/MyList/EditForm.aspx?toolpaneview=2
Manually set the location of the con�guration list
By default, the con�guration for the forms you activate DFFS for is stored in a list named “SPJS-
DynamicFormsForSharePoint” on the same site as you set up the DFFS_frontend. When you enter the
backend, the baseUrl of the frontend site is passed as a parameter in the URL. This way you can have
the backend in a centralized location, but still save the con�guration for your forms in a list in the site
where the current form is located.
If you want set a �xed location of the con�guration list in for example a sub site or the root site,
you must add a variable to both the “DFFS_frontend_CEWP.html” and the
“DFFS_backend_CEWP.html” �les or the “DFFS_loader.html” �le like this:
var dffs_configListBaseUrl = "/SubsiteForDFFSConfig";
“SubsiteForDFFSCon�g” is the relative URL to the site where the con�guration is located. If you
want to use the root site (and you are not on a managed path), the variable would be an empty
string like this:
var dffs_configListBaseUrl = "";
This will force all lists using this current backend location to share a con�guration list. Ensure all
users have read access to this location.
Why would you want to do this?You can use this option if you have DFFS con�gured for a list that is part of a site template, and
you want all the new sites created from this template to share the con�guration for the lists.
Pros
You can manage the DFFS con�guration for all sites created from this template in one location.
Cons
You cannot add site-speci�c modi�cations to a list.
License code
How is the license code validated?There is no “phone home” to validate any of the license types. This is done locally in the DFFS
JavaScript �les.
Buy the license �rstIf you don’t already have a valid license you want to upgrade, you must buy a license �rst. Then
generate and send the challenge codes to the address you �nd in the page where you generate
the code.
You must use DFFS v4.350 or above to be able to generate the challenge code.
License code challenge for site or site collectionThis step in used only for site or site collection scoped licenses. If you have a Company license of
any sort, this step is not used and you can paste the license code you got when you purchased
DFFS directly in the “License code” textarea.
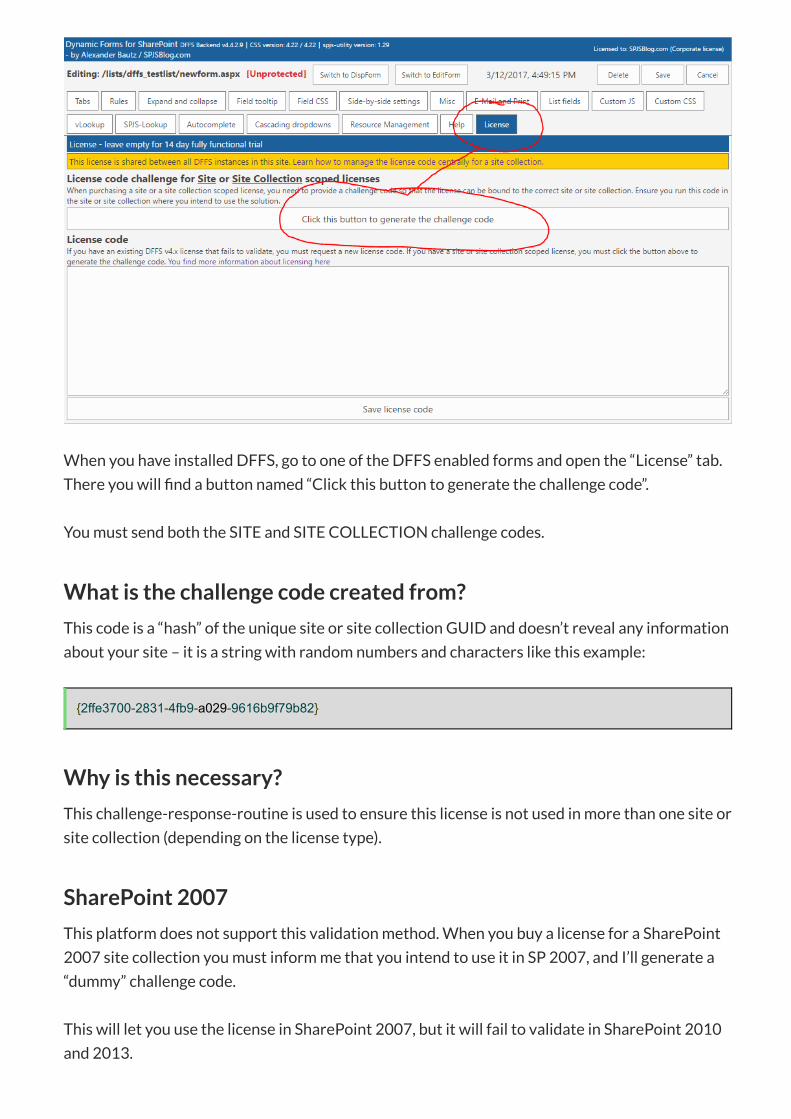
When you have installed DFFS, go to one of the DFFS enabled forms and open the “License” tab.
There you will �nd a button named “Click this button to generate the challenge code”.
You must send both the SITE and SITE COLLECTION challenge codes.
What is the challenge code created from?
This code is a “hash” of the unique site or site collection GUID and doesn’t reveal any information
about your site – it is a string with random numbers and characters like this example:
{2ffe3700-2831-4fb9-a029-9616b9f79b82}
Why is this necessary?
This challenge-response-routine is used to ensure this license is not used in more than one site or
site collection (depending on the license type).
SharePoint 2007
This platform does not support this validation method. When you buy a license for a SharePoint
2007 site collection you must inform me that you intend to use it in SP 2007, and I’ll generate a
“dummy” challenge code.
This will let you use the license in SharePoint 2007, but it will fail to validate in SharePoint 2010
and 2013.

License code textareaWhen you have receive the license code, you paste it in this textarea and hit Save license code.
Upgrade an existing licenseIf you have an existing license code that fails to validate in a new version of DFFS you can get it
updated if you send me the old license code. Please note that a site or site collection license is
bound to the site or site collection it was originally associated with. This means you cannot
change the challenge code used to generate the code.
If you have an older license, please contact me to see what kind of update options you have.
Manage the license code centrallyThis option should NOT be used with a site license.
DFFS Installer v1
If you are using the new DFFS Loader and have the source �les located in the root of your site
collection, you can manage the license code centrally by entering the license code in this variable
in the /SPJS/DFFS/loader/DFFS_loader.html �le (installer v1)
var dffs_master_licensecode = "Put your license code here";
DFFS Installer v2
In the installer v2.0.0.6 and above you can add the license code in a text �le located here:
/SPJS/DFFS/loader/DFFS_License.txt.
Please note that ONLY the license code string must be added to this �le. This will pre�ll the
license code in the License code �eld in the setup page of the DFFS Installer. The Update loader
�le button must be clicked to write the license code to the proper location.
This will be a way of preloading the license if you have a company license and want to make a
template out of the SPJS document library to ease the setup process in new site collections.
Developer licenseIf you buy a site collection license or better you can request a developer license for use in a DEV
or UAT environment. This license is fully functional, but has a banner below the form showing
that it’s not for production use.

Troubleshooting
Problem Solution
I have updated from a previous version and thecon�guration will not load.
Hit F12 in the browser to bring up the developer console.Select “Console” and reload the web page to look forerrors.
Report any errors to the email address found in the “Filea bug reports” section below.
When you have �led the bug report, roll back to theprevious version of the script while waiting for myresponse.
If you have saved the con�guration already, look at thenext “problem” below.
I have saved the con�guration, but now it iscorrupted.
The “last good con�guration” is automatically preserved.You can roll back like this:
Go to the con�guration list in all site contents.Locate the correct form.Edit the list item and copy from “lastGoodCon�g” to“blob”.Reload the form to verify that it is OK.
I have an InfoPath form, or a form customizedin SharePoint Designer and I cannot get DFFSto work.
Sorry, but DFFS is designed for out of the box SharePointforms and although you might get it working for acustomized form, I cannot help you with it.
Nothing happens, or the overlay shows “Thistook forever”.
Ensure you have referred all the scripts correctly. Try thescript src or the css href link in the URL �eld of thebrowser to verify it is correct.
Hit F12 in the browser to bring up the developer console.Select “Console” and reload the web page to look forerrors.
If you see ‘$’ is unde�ned you are missing a reference tojQuery.
If you receive another error message that you do notknow how to handle, please send it to the email addressfound in the “File a bug reports” section below.
It works for me, but not for the other users. Ensure all users have read access to the library whereyou uploaded the *.js and *.css �les.
All the scripts are OK, the overlay �ashes anddisappears, but the button to enter the setup
If you use the old CEWP installation method you mustensure you have added the DFFS Frontend CEWP below

does not show. the form web part.
If you use the DFFS installer, hit F12 to see if you see anyerrors in the console. If not, try uninstalling andreinstalling DFFS in this form (your con�guration will notbe affected).
The tabs appear as bulleted lists. If you use the old CEWP installation method the CSS �leis not loaded. Verify the href to the CSS �le in the CEWP.
The form �ashes “unformatted” before DFFSkicks in.
If you use the old CEWP installation method you aremissing the “DFFS Overlay” web part, or you have placedit below and not above the form.
I try to save the con�guration in the DFFSBackend, but receive “ERROR: JSON.stringifyis not supported in your browser!”
You are using an older version of Internet Explorer.Either update the browser, or use a modern browser likeFirefox or Chrome to con�gure the DFFS solution.
If you are using SP2007 and your Internet Explorerversion is above version 8, you can hit F12 and changethe Document mode and User agent string to 9 or 10.
You must switch this back when you have saved thecon�guration, as SP2007 does not behave well if theDocument mode is not set to “Quirks”.
The frontend of DFFS is not affected.
You get a 404 error on lists.asmx in the F12Console and DFFS fails to load
There is a know incompatibility with Infowise Smart ListPro used ON PREMISES (Of�ce 365 is not affected)because this solution modi�es the shared/_vti_bin/lists.asmx �le. This is not a DFFS speci�c issue,but affects all calls to /_vti_bin/lists.asmx (webservicecalls).
The solution is to uninstall Infowise Smart List Pro.
Other issues? Search the forum for a solution, or post a new topic.
You �nd the forum here.
File a bug reports
To �le a bug report, send the following:
A detailed description of your problem.
Any error messaged from the developer console (hit F12 and select “Console”. Refresh the
page and look for error messages).
Information about your SharePoint version.
Information about your browser version.
Other information that may be relevant.
Use the forum for general request and “small bugs”. You �nd the forum here.
Priority support
For priority support, please include the name of the person that holds the license to DFFS.
Use the subject “Bug”, and send to [email protected]
Are you missing something?
Please let me know if you have trouble following this guide. Let me know which part I need to
elaborate.