Dell Coexistence Manager for GroupWise 1.5.6 User Guide
128
Dell TM Coexistence Manager for GroupWise 1.5.6 User Guide
-
Upload
khangminh22 -
Category
Documents
-
view
0 -
download
0
Transcript of Dell Coexistence Manager for GroupWise 1.5.6 User Guide

DellTM Coexistence Manager for GroupWise 1.5.6User Guide

CMG User Guide
Updated - April 2015 (Doc ID 112) Software Version - 1.5.6
© 2015 Dell Inc. ALL RIGHTS RESERVED.
This guide contains proprietary information protected by copyright. The software described in this guide is furnished under a software license or nondisclosure agreement. This software may be used or copied only in accordance with the terms of the applicable agreement. No part of this guide may be reproduced or transmitted in any form or by any means, electronic or mechanical, including photocopying and recording for any purpose other than the purchaser’s personal use without the written permission of Dell Inc.
The information in this document is provided in connection with Dell products. No license, express or implied, by estoppel or otherwise, to any intellectual property right is granted by this document or in connection with the sale of Dell products. EXCEPT AS SET FORTH IN THE TERMS AND CONDITIONS AS SPECIFIED IN THE LICENSE AGREEMENT FOR THIS PRODUCT, DELL ASSUMES NO LIABILITY WHATSOEVER AND DISCLAIMS ANY EXPRESS, IMPLIED OR STATUTORY WARRANTY RELATING TO ITS PRODUCTS INCLUDING, BUT NOT LIMITED TO, THE IMPLIED WARRANTY OF MERCHANTABILITY, FITNESS FOR A PARTICULAR PURPOSE, OR NON-INFRINGEMENT. IN NO EVENT SHALL DELL BE LIABLE FOR ANY DIRECT, INDIRECT, CONSEQUENTIAL, PUNITIVE, SPECIAL OR INCIDENTAL DAMAGES (INCLUDING, WITHOUT LIMITATION, DAMAGES FOR LOSS OF PROFITS, BUSINESS INTERRUPTION OR LOSS OF INFORMATION) ARISING OUT OF THE USE OR INABILITY TO USE THIS DOCUMENT, EVEN IF DELL HAS BEEN ADVISED OF THE POSSIBILITY OF SUCH DAMAGES. Dell makes no representations or warranties with respect to the accuracy or completeness of the contents of this document and reserves the right to make changes to specifications and product descriptions at any time without notice. Dell does not make any commitment to update the information contained in this document.
If you have any questions regarding your potential use of this material, contact:
Dell Inc. Attn: LEGAL Dept 5 Polaris Way Aliso Viejo, CA 92656
Refer to our web site (software.dell.com) for regional and international office information.
Trademarks
Dell and the Dell logo are trademarks of Dell Inc. and/or its affiliates.
Microsoft, Windows, Outlook and Active Directory are registered trademarks of Microsoft Corporation in the United States and other countries. Office 365 is a trademark of Microsoft Corporation in the United States and other countries. Novell, GroupWise and NetWare are registered trademarks of Novell, Inc.
Other trademarks and trade names may be used in this document to refer to either the entities claiming the marks and names or their products. Dell disclaims any proprietary interest in the marks and names of others.
Legend
CAUTION: A CAUTION icon indicates potential damage to hardware or loss of data if instructions are not followed.
WARNING: A WARNING icon indicates a potential for property damage, personal injury, or death.
IMPORTANT NOTE, NOTE, TIP, MOBILE, or VIDEO: An information icon indicates supporting information.

Contents
About the CMG documentation suite . . . . . . . . . . . . . . . . . . . . . . . . . . . . . . . . . . . 6
Introduction . . . . . . . . . . . . . . . . . . . . . . . . . . . . . . . . . . . . . . . . . . . . . . . . . . . 7Welcome to Dell Coexistence Manager for GroupWise (CMG) . . . . . . . . . . . . . . . . . . . . 7
CMG’s three primary components . . . . . . . . . . . . . . . . . . . . . . . . . . . . . . . . . . . 7Installing two or more CMG components . . . . . . . . . . . . . . . . . . . . . . . . . . . . . . 8About Dell license keys . . . . . . . . . . . . . . . . . . . . . . . . . . . . . . . . . . . . . . . . . . 8
The CMG Management Console . . . . . . . . . . . . . . . . . . . . . . . . . . . . . . . . . . . . . . . 9Navigation in CMG’s Management Console . . . . . . . . . . . . . . . . . . . . . . . . . . . . .10Save and Activate buttons . . . . . . . . . . . . . . . . . . . . . . . . . . . . . . . . . . . . . . . .10Management Console menus . . . . . . . . . . . . . . . . . . . . . . . . . . . . . . . . . . . . . .11The Common group of Console screens . . . . . . . . . . . . . . . . . . . . . . . . . . . . . . .12
CMG performance counters for Windows’ System Monitor . . . . . . . . . . . . . . . . . . . . . .14CMG system requirements . . . . . . . . . . . . . . . . . . . . . . . . . . . . . . . . . . . . . . . . . .15
CMG Directory Connector . . . . . . . . . . . . . . . . . . . . . . . . . . . . . . . . . . . . . . . . . 20Directory Connector overview . . . . . . . . . . . . . . . . . . . . . . . . . . . . . . . . . . . . . . . .20Installation and configuration . . . . . . . . . . . . . . . . . . . . . . . . . . . . . . . . . . . . . . . .22
Directory Connector installation . . . . . . . . . . . . . . . . . . . . . . . . . . . . . . . . . . . .22Directory Connector configuration . . . . . . . . . . . . . . . . . . . . . . . . . . . . . . . . . .23
DC Management Console . . . . . . . . . . . . . . . . . . . . . . . . . . . . . . . . . . . . . . . . . . .27Connector Creation Wizard . . . . . . . . . . . . . . . . . . . . . . . . . . . . . . . . . . . . . . . . . .31
Starting the Connector Creation Wizard . . . . . . . . . . . . . . . . . . . . . . . . . . . . . . .31Screens for an Exchange-to-GroupWise ("E-to-G") connector . . . . . . . . . . . . . . . . .32Screens for a GroupWise-to-Exchange ("G-to-E") connector . . . . . . . . . . . . . . . . . .35Other options you can set per connector . . . . . . . . . . . . . . . . . . . . . . . . . . . . . .39
Connector Advanced Settings . . . . . . . . . . . . . . . . . . . . . . . . . . . . . . . . . . . . . . . .40Advanced Settings tab: General . . . . . . . . . . . . . . . . . . . . . . . . . . . . . . . . . . . .41Advanced Settings tab: Address Book . . . . . . . . . . . . . . . . . . . . . . . . . . . . . . . . .42Advanced Settings tabs for object types . . . . . . . . . . . . . . . . . . . . . . . . . . . . . .43
Running and stopping the Directory Connector service . . . . . . . . . . . . . . . . . . . . . . . .55
CMG Mail Connector . . . . . . . . . . . . . . . . . . . . . . . . . . . . . . . . . . . . . . . . . . . . . 57Mail Connector overview . . . . . . . . . . . . . . . . . . . . . . . . . . . . . . . . . . . . . . . . . . .57
Mail Connector performance counters . . . . . . . . . . . . . . . . . . . . . . . . . . . . . . . .57Coexistence mail routing basics . . . . . . . . . . . . . . . . . . . . . . . . . . . . . . . . . . . .58
Mail Connector deployment options . . . . . . . . . . . . . . . . . . . . . . . . . . . . . . . . . . . .61Simple configurations . . . . . . . . . . . . . . . . . . . . . . . . . . . . . . . . . . . . . . . . . . .62Redundant CMG Mail Connectors . . . . . . . . . . . . . . . . . . . . . . . . . . . . . . . . . . . .62Message distribution among multiple servers . . . . . . . . . . . . . . . . . . . . . . . . . . .63CMG and hosted Exchange environments . . . . . . . . . . . . . . . . . . . . . . . . . . . . . .63
Coexistence Manager for GroupWise 1.5.6User Guide
3
Mail Connector installation and configuration . . . . . . . . . . . . . . . . . . . . . . . . . . . . . .63Step 1: Install CMG Mail Connector software . . . . . . . . . . . . . . . . . . . . . . . . . . . .64Step 2 (conditional): Configure DNS server for CMG . . . . . . . . . . . . . . . . . . . . . . .64Step 3: Run the Management Console for the Mail Connector . . . . . . . . . . . . . . . . .65Step 4 (optional): Review and update other Mail Connector configuration options . . .65Step 5: Start the Mail Connector . . . . . . . . . . . . . . . . . . . . . . . . . . . . . . . . . . . .66Step 6: Reconfigure GroupWise and Exchange mail servers for CMG . . . . . . . . . . . .67Step 7: Configure TLS/SSL encryption . . . . . . . . . . . . . . . . . . . . . . . . . . . . . . . .68
Management Console for Mail Connector . . . . . . . . . . . . . . . . . . . . . . . . . . . . . . . . .71
CMG Free/Busy Connector . . . . . . . . . . . . . . . . . . . . . . . . . . . . . . . . . . . . . . . . . 76Free/Busy Connector overview . . . . . . . . . . . . . . . . . . . . . . . . . . . . . . . . . . . . . . .76
Typical scenario . . . . . . . . . . . . . . . . . . . . . . . . . . . . . . . . . . . . . . . . . . . . . .76CMG subcomponents . . . . . . . . . . . . . . . . . . . . . . . . . . . . . . . . . . . . . . . . . . .78Configuration options . . . . . . . . . . . . . . . . . . . . . . . . . . . . . . . . . . . . . . . . . . .79Free/Busy Connector performance counters . . . . . . . . . . . . . . . . . . . . . . . . . . . .83Mobile IT . . . . . . . . . . . . . . . . . . . . . . . . . . . . . . . . . . . . . . . . . . . . . . . . . . .84
Installation and configuration . . . . . . . . . . . . . . . . . . . . . . . . . . . . . . . . . . . . . . . .85Step 1: Plan your F/B Connector installation and configuration . . . . . . . . . . . . . . .85Step 2: Install subcomponent software . . . . . . . . . . . . . . . . . . . . . . . . . . . . . . .86Step 3: Synchronize Exchange and GroupWise directories . . . . . . . . . . . . . . . . . . .88Step 4: Send instructions to end users for shared address books . . . . . . . . . . . . . . .88Step 5 (optional): Configure network load balancing . . . . . . . . . . . . . . . . . . . . . .89Step 6: Direct traffic for Autodiscover services . . . . . . . . . . . . . .89Step 7: Obtain and install web services certificates . . . . . . . . . . . . . . . . . . . . . . .90Step 8: Prepare GroupWise for the CMG Free/Busy Connector . . . . . . . . .93Step 9: Configure Exchange server link to CMG web server . . . . . . . . . . . . . . . . . .94Step 10: Configure trusted sites for computers hosting F/B Connector components . .95Step 11 (optional): Configure CMG logging . . . . . . . . . . . . . . . . . . . . . . . . . . . . .95Step 12: Configure F/B subcomponents . . . . . . . . . . . . . . . . . . . . . . . . . . . . . . .95
CMG Management Console for the Free/Busy Connector . . . . . . . . . . . . . . . . . . . . . . .95Configuring and troubleshooting the F/B Connector with PowerShell . . . . . . . . . . . . . .99
Commands to configure the F/B Connector . . . . . . . . . . . . . . . . . . . . . . . . . . . .99Commands to troubleshoot the F/B Connector . . . . . . . . . . . . . . . . . . . . . . . . . 101
The Log Viewer . . . . . . . . . . . . . . . . . . . . . . . . . . . . . . . . . . . . . . . . . . . . . . . 103Log Viewer menus and toolbar . . . . . . . . . . . . . . . . . . . . . . . . . . . . . . . . . . . . . . . 103How to ... . . . . . . . . . . . . . . . . . . . . . . . . . . . . . . . . . . . . . . . . . . . . . . . . . . . . 104
Appendix A: Known limitations . . . . . . . . . . . . . . . . . . . . . . . . . . . . . . . . . . . . 106
Appendix B: Troubleshooting . . . . . . . . . . . . . . . . . . . . . . . . . . . . . . . . . . . . . . 111Standard approach to troubleshooting . . . . . . . . . . . . . . . . . . . . . . . . . . . . . . . . . 111Directory Connector . . . . . . . . . . . . . . . . . . . . . . . . . . . . . . . . . . . . . . . . . . . . . 111Mail Connector . . . . . . . . . . . . . . . . . . . . . . . . . . . . . . . . . . . . . . . . . . . . . . . . . 114Free/Busy Connector . . . . . . . . . . . . . . . . . . . . . . . . . . . . . . . . . . . . . . . . . . . . . 115
Coexistence Manager for GroupWise 1.5.6User Guide
4

Appendix C: Configuring CMG logging . . . . . . . . . . . . . . . . . . . . . . . . . . . . . . . . 119To add the UdpAppender to an existing log file . . . . . . . . . . . . . . . . . . . . . . . . . . . . 121
About Dell . . . . . . . . . . . . . . . . . . . . . . . . . . . . . . . . . . . . . . . . . . . . . . . . . . . 122Contacting Dell . . . . . . . . . . . . . . . . . . . . . . . . . . . . . . . . . . . . . . . . . . . . . . . . . 122Technical Support Resources . . . . . . . . . . . . . . . . . . . . . . . . . . . . . . . . . . . . . . . . 122
Index . . . . . . . . . . . . . . . . . . . . . . . . . . . . . . . . . . . . . . . . . . . . . . . . . . . . . . 123
Coexistence Manager for GroupWise 1.5.6User Guide
5

Coexistence Manager for GroupWise 1.5.6User Guide
6
About the CMG documentation suite
The documentation for Dell Coexistence Manager for GroupWise (CMG) includes:
• Release Notes (printable PDF): Describes the current CMG release—any new and enhanced features, resolved issues, and known issues. Also documents minimum and recommended installation requirements, and provides Dell contact information.
• Quick-Start Guide (printable PDF): An orientation to the product's basic purposes, features and capabilities, with brief case studies showing how its primary components are most commonly used within a typical coexistence scenario. Also documents System Requirements, and explains how to download and install the software.
• CMG User Guide (printable PDF): Process instructions and application notes for installing, configuring, starting and running the CMG Directory Connector, Mail Connector and Free/Busy Connector. The User Guide also explains how to configure the GroupWise, Exchange and Active Directory servers to work with CMG.
• CMG Program Parameters Reference (printable PDF): Listing of all CMG program parameters that are not associated with UI fields in CMG’s Management Console (which should not be edited manually in the Configuration.xml files), with descriptions and default values and usage/application notes.
• Management Console Online Help (three compiled Windows Help files, one for each CMG component): Context-sensitive instructions and application notes for the various screens and features of CMG’s Management Console utility.
Information and instructions for installing CMG software appear in the Quick-Start Guide (the Getting Started section). After installation, all component configuration procedures and operating instructions are in one place, the CMG User Guide. In short, use the Quick-Start Guide to install it, and then use the User Guide for everything else.
All CMG documentation is intended for network administrators, consultants, analysts, and any other IT professionals who will install or use the product components, or who may help plan for their use in a coexistence scenario. All of these documents, including the online Help, are bundled and installed with the product, and all except the Help files are also available separately at Dell's Support Portal.

1
Introduction
• Welcome to Dell Coexistence Manager for GroupWise (CMG)
• The CMG Management Console
• CMG performance counters for Windows’ System Monitor
• CMG system requirements
Welcome to Dell Coexistence Manager for GroupWise (CMG)Dell Coexistence Manager for GroupWise (CMG) provides rich directory, email and calendar coexistence features between Novell GroupWise and Microsoft Exchange—both on-premises servers, and hosted Exchange environments such as Microsoft’s Office 365. CMG can be deployed either for a finite transition period, as when migrating from GroupWise to Exchange, or for indefinite or even permanent coexistence.
Effective coexistence should include these three primary functions:
• Directory coexistence: Most organizations routinely experience staff additions, departures and transfers. These changes introduce data inconsistencies between the two environments. A directory update reconciles these differences by updating the contents of one directory to match the contents of another. A bidirectional update ensures that both directories contain all of the organization’s users, resources and groups.
• Mail coexistence: SMTP mail routing does not address substantial cross-platform fidelity issues with message and calendar content. The GroupWise and Exchange environments offer similar email and calendar capabilities, but implement many features differently. Outlook therefore does not handle certain message types that originate in GroupWise, and vice versa. The recipient client may display the pertinent information correctly, but not perform the calendar updates. Or sometimes the receiving client can perform automatic calendar updates, but introduces errors—incorrect times, missing dates, or extraneous meetings, etc.
• Free/Busy coexistence: The GroupWise and Exchange environments implement calendar free/busy differently, making the status of users on the other system unavailable. Both applications need assistance to determine the free/busy status of users within the other environment.
CMG’s three primary componentsTo accommodate these aspects of GroupWise–Exchange coexistence, Dell Coexistence Manager for GroupWise includes three primary components:
• Directory Connector: Updates directory data between GroupWise’s Global Address Book and Active Directory.
• Mail Connector: Provides calendar-email remediation features to permit delivery of messages with calendar data—event invitations, acceptances, declines, cancellations, and reschedules, including for complex recurring meeting patterns.
• Free/Busy Connector: Facilitates the exchange of calendar free/busy data between users in the two different environments.
Coexistence Manager for GroupWise 1.5.6User Guide
7

The three CMG components are independent, but designed to work together in any combination to suit a broad range of coexistence needs. The components are described in full detail in the remaining chapters of this User Guide—what they do, how to install and configure them, and what you can do with them once they are up and running.
Installing two or more CMG componentsYou can install, configure and run one, two or three CMG components in any order you like, although the Directory Connector provides directory updates the other Connectors may need.
Installation instructions for CMG components appear in the Getting Started sections of the Release Notes and the CMG Quick-Start Guide. After installation, CMG components must be configured before they can be used, and those instructions appear in the remaining chapters of this User Guide.
About Dell license keysCoexistence Manager for GroupWise will run only after applying a valid license key. Dell Inc. sells CMG license keys by numbers of users served within the combined GroupWise-Exchange environment. A single license key is valid for all three CMG components.
You can obtain license keys by contacting your Dell sales representative. When you obtain a license key, you must install it to enable the product. A license key is installed in the CMG Management Console. The installation of a valid license key authorizes and enables the use of all CMG components.
NOTE: Dell strongly recommends you review the System Requirements, deployment options and configuration instructions for all of the CMG components you intend to use before installing the first component.
Coexistence Manager for GroupWise 1.5.6User Guide
8

The CMG Management ConsoleCMG components are configured within CMG’s Management Console application, where you specify the names and locations of mail servers and directories, locations of web services, comm port numbers, scope of operations, operational preferences, scheduled runs, and so forth. The Management Console is used to configure all three CMG components. Different components’ settings are managed on different screens.
The CMG Management Console is a friendly interface between you and a set of configuration files that CMG components read every time they are started. Configuration settings for CMG’s different components are saved in separate configuration files: a Configuration.xml file for each of the Directory Connector and Mail Connector (two files saved in the different CMG component subfolders), and another set of configuration files for the Free/Busy Connector. The Management Console provides GUI screens with labeled fields to simplify entering and editing the configuration settings in those files.
The next few pages describe the basic operating concepts of the CMG Management Console. Field notes for the three components appear in later chapters, with the component configuration instructions.
To start the CMG Management Console:
• Select the Management Console start-up shortcut from your Windows Start menu. The CMG installer copies this shortcut to the submenu of every installed CMG component (use any of these shortcuts):
• Start | Programs | Coexistence Manager for GroupWise | Directory Connector | Coexistence Manager for GroupWise Management Console
• Start | Programs | Coexistence Manager for GroupWise | Mail Connector | Coexistence Manager for GroupWise Management Console
• Start | Programs | Coexistence Manager for GroupWise | Free/Busy Connector | Coexistence Manager for GroupWise Management Console
When you start the Management Console, CMG automatically loads the currently active configuration values for all three CMG components. Once the Management Console is running, however, component configuration data is saved and opened separately, for one component at a time, as shown here.
Coexistence Manager for GroupWise 1.5.6User Guide
9

Navigation in CMG’s Management ConsoleThe Management Console runs in a window with a navigation sidebar down the left side (see sample screen below). The list of the Console’s screens in the sidebar lets you select which screen you want to display. Console screens are grouped by component, and you may view them and work on them in any order. The screens in the Common group (bottom of the sidebar list) contain features that pertain to all three components.
Save and Activate buttonsThe Save and Activate buttons, in the bottom-left corner of the Management Console, let you Save and Activate the current configuration settings as they now appear within the Management Console for a single CMG component. These features are also available on the File menu (as noted in Management Console menus below), but many users prefer having them available at a single click.
When you select either option, a submenu prompts you to specify the component whose configuration data you want to save or activate.
For the Save button:
• If you select Directory Connector or Mail Connector: The Save command presents a standard Windows Save As... dialog box. Click Save to save the data to the default configuration file, or specify some other filename and click Save. For the Directory Connector (DC), Save also saves the configuration data for any DC connector that has been created or edited by DC’s Connector Creation Wizard in the current Console session.
• If you select Free/Busy Connector, the Console saves the configuration data to the F/B Connector configuration files. (The F/B Connector configuration filenames cannot be changed from their defaults.)
The Activate button: Restarts the selected CMG component, and loads the settings currently open in the Console as the active configuration for the component. If the currently open settings have not yet been saved to disk, CMG prompts you to Save them before it will execute the Activate command.)
The Console then prompts you to confirm or cancel the Activate command, since it requires restarting (interrupting) the selected component. If you choose to not restart the service or save the open configuration file now, the current configuration settings will remain in effect until the next component restart.
IMPORTANT: A new or updated DC connector definition is saved to disk only when the DC configuration file that contains it is saved, from the Management Console (by the Save button, or by selecting Save Configuration File from the File menu). The Connector Creation Wizard itself does not save its definitions, so a connector definition will be lost if you do not explicitly Save the entire configuration file from the Management Console.
Coexistence Manager for GroupWise 1.5.6User Guide
10

Management Console menus
File menu
The CMG Management Console File menu options are:
• Open Configuration File: Discards any unsaved settings within the Management Console (from the current Console session) for a single CMG component, and reloads the last-saved configuration settings for that component. When you select this Open option, a submenu (as shown above) prompts you to specify the component whose configuration file you want to open.
If you select Directory Connector or Mail Connector, the Console presents a standard Windows Open dialog box, with the currently active configuration file selected by default. Click Open to open the selected file, or specify some other configuration file and click Open.
If you select Free/Busy Connector, the Console opens the Free/Busy Connector configuration data into the Console screens. (The F/B Connector configuration files cannot be renamed from their defaults.)
• Save Configuration File: Saves the current configuration settings as they now appear within the Management Console for a single CMG component. When you select this Save option, a submenu prompts you to specify the component whose configuration data you want to save.
If you select Free/Busy Connector, the Console saves the F/B Connector configuration data to the F/B Connector configuration files. (The F/B Connector configuration filenames cannot be changed from their defaults.)
If you select Directory Connector or Mail Connector: This Save command presents a standard Windows Save As... dialog box. Click Save to save the data to the default configuration file, or specify some other filename and click Save. For CMG’s Directory Connector (DC), the Save command also saves the configuration data for any DC connector that has been created or edited by DC’s Connector Creation Wizard in the current Console session.
• Activate Configuration File: Restarts the selected CMG component, and loads the settings currently open in the Console as the active configuration for the component. When you select this Activate option, a submenu prompts you to specify the component whose settings you want to activate. (If the currently open settings have not yet been saved to disk, CMG prompts you to Save them before it will execute the Activate command.) The Console then prompts you to confirm or cancel the Activate command, since it requires restarting (interrupting) the selected component. If you choose to not restart the service or save the open configuration file now, the current configuration settings will remain in effect until the next component restart.
IMPORTANT: A new or updated DC connector definition is saved to disk only when the DC configuration file that contains it is saved, from the Management Console (Save Configuration File on the File menu). The Connector Creation Wizard itself does not save its definitions, so a connector definition will be lost if you do not explicitly Save the entire configuration file from the Management Console.
Coexistence Manager for GroupWise 1.5.6User Guide
11
Help menuThe Help menu offers direct access to the on-line Help file for the Management Console—different Help files for the three different CMG components. In addition to the Help Topics option, the Help menu also offers:
• Search Support Portal and Knowledgebase: Opens a browser window to visit the Dell website for CMG’s online Support Portal and Knowledgebase, where you can browse and search more information about Coexistence Manager for GroupWise.
• Visit the Community: Opens a browser window to visit the Dell website for the CMG Online Community, an interactive community dedicated to issues relating to coexistence. The community is designed to foster collaboration between Dell coexistence experts and users, where you can:
• Learn about product releases and betas before anyone else.
• Get access to Dell product leaders and subject matter experts on coexistence and migration.
• Participate in discussion forums, share insights and ideas, and get common questions answered.
You can browse the forums and the library, but you must become a registered member to take full advantage of the community, post new threads, respond to messages from others, and rate our documents and downloads. If you already have a Dell account or are a member of another Dell community, simply log in. The Login and Register features are both available from links in the top-left corner of the page.
• Check for Updates: Opens a browser window to visit the Dell web page showing all available versions of the CMG product, where you can optionally download a later version.
• About: Identifies the specific release of the software, and declares Dell’s intellectual property rights for the software. The dialog box also shows information about your Coexistence Manager for GroupWise installation, including details about your license. You can view and update license information here.
The Common group of Console screensThe features on these screens apply to CMG as a whole, rather than to any particular CMG component:
• Management Console screen: Common | Services
• Management Console screen: Common | Licenses
• Management Console screen: Common | Health
Management Console screen: Common | ServicesThis screen lets you start and stop any of the CMG component services: the Directory Connector, Mail Connector and Free/Busy Connector.
The table lists all installed services by Service Name, and shows the Status of each: Running or Stopped.
To immediately start, stop or restart a service:
• Select the service in the list, and click a button at the bottom of the screen: Start Service, Stop Service, or Restart Service.
NOTE: The Start, Stop and Restart commands issued from this screen are provided here as a convenience, and are not parts of any component configuration file. The command is executed immediately when you click the button, although if you have changed any of the configuration data, CMG will require that you Save your changes before it will execute a Start command.
Coexistence Manager for GroupWise 1.5.6User Guide
12

Management Console screen: Common | LicensesThis screen lets you install or update a Dell license key to enable the CMG components. You can obtain a license key from your Dell sales representative. A license key is an .asc-type file that is saved to your hard disk, and must be installed on this Common | Licenses screen.
The table in this screen shows your previously installed licenses, the status of each, and the software and maintenance license expiration dates.
To install or update a Dell license key:
1 Click the Update License... button. The Management Console then presents a standard Windows Open dialog box.
2 Locate and specify the License File. Select the file so its name appears in the File name field, and then click Open.
Management Console screen: Common | HealthThe Health and Performance Monitoring screen is divided into separate sections for performance monitoring and logs.
The Performance Monitoring section shows performance counters in real time for the Mail Connector and Free/Busy modules. Performance counters are color coded and can be turned on and off for various modules from this screen. Information about each performance counter is also displayed on the screen.
The Log section of this screen displays live log data broadcast via UDP from different modules. The most recent 1000 lines logged are displayed. Users can view specific logs by clicking the Open Log File button to view a list of log files that can be opened. In the File section of the screen, users can select a log file and click OK to open the log in the Dell Log File viewer.
See The Log Viewer for more information.
NOTE: The Open Log File button in this screen is enabled only when the UdpAppender is defined in the log42net.config file of at least one module. During a new installation, the Log Viewer installer installs a file with the required UdpAppender. During an upgrade, however, the installer does not overwrite the log42net.config file, so the UdpAppender is not present, and this makes the Open Log File button invisible. To correct this, see To Add the UdpAppender to an Existing Log File at the end of the Configuring CMG Logging Appendix.
Coexistence Manager for GroupWise 1.5.6User Guide
13

To control Log Viewer level of detailCMG is installed with the log42net utility to generate log files of CMG components’ system activity. The level of detail captured in CMG log files is controlled by a <threshold value="____" /> setting in a component's logging configuration file, as described in Appendix C of the CMG User Guide.
The data captured in a CMG log file is also displayed in the Logs Table of this Health and Performance Monitoring screen, and in the Dell Log Viewer application that comes with the CMG product. The Levels button at the top of the Logs Table lets you select which log-file details you want to view in this screen and in the Log Viewer. That is, the Levels button lets you further filter the contents of these log views (beyond the filter already imposed by the threshold value setting) by specifying only certain types of information to be included.
To set the level of logging detail to appear in the Dell Log Viewer and CMG's Health and Performance Monitoring screen: Click the Levels button near the top-right corner of the Logs Table. The Levels button opens a dialog box with several checkboxes corresponding to different levels of logging details. Mark the checkboxes for the levels you want the view to include, and unmark the levels you do not want to include, and then click OK.
CMG performance counters for Windows’ System MonitorDell CMG generates sets of performance counters for its Mail Connector and Free/Busy Connector that feed live data to Windows' Performance Monitor feature. To start Windows' System Monitor:
1 Click Windows’ Start button, and then click Run....
2 In the Run dialog box: Type perfmon and click OK.
If you are unfamiliar with Windows' Performance Monitor feature, see your Microsoft documentation and/or visit the Performance Monitor online Help for more information. These procedures vary a little among different operating system versions.
Within Windows’ Performance Monitor, you can:
• Add Dell CMG counters to the System Monitor view.
• Change graph scales, to view each type of CMG performance data at its optimum display scale.
• Configure System Monitor alerts for certain CMG performance criteria.
The available performance counters for CMG’s Mail Connector and Free/Busy Connector are listed and defined in the introductory sections of those chapters (chapters 3 and 4) in this Guide.
Coexistence Manager for GroupWise 1.5.6User Guide
14

CMG system requirements
CMG supports environments that meet the listed specifications for:
• GroupWise server(s)
• GroupWise client on end-user workstations
• Exchange server(s)
• Active Directory server
• SQL server
• Outlook end-user workstations
• Outlook Web Access host server
• Admin CMG servers (running CMG components)
GroupWise server(s)
IMPORTANT: When configuring CMG for coexistence with a hosted Exchange (such as Office 365), it is particularly important to involve your IT security specialists early in the project planning, to accommodate all of the account permissions and configuration requirements that are unique to the hosted system.
Requirements for particular environments
Supported GroupWise versions (for all CMG components)
GroupWise 2014: RTM and SP1
GroupWise 2012: RTM, SP1, SP2 and SP3
GroupWise 8.0.0–8.0.3 (and see below)
GroupWise 7.0.1–7.0.4 (and see below)
For GroupWise 7 support The GroupWise API Gateway and GroupWise Proxy GWIA must be installed to support the newer router/postoffice configuration option, which is required for connection to GroupWise 7.
For GroupWise 8 support Admins may choose between the router/postoffice configuration (requiring the GroupWise API Gateway and GroupWise Proxy GWIA, as noted above for GroupWise 7), and the original shared-address-book configuration.
For mixed GroupWise 7 and 8 environment
If CMG's Free/Busy Connector is configured, the API Gateway and Proxy GWIA must be installed and running in a version 7 domain. If only the Directory Connector is configured, however, CMG can connect to GroupWise 8 via SOAP in a mixed 7/8 environment.
For CMG Directory Connector Requirements for particular environments
For GroupWise 8.0.x (only) The GroupWise SOAP web service, enabled on the GroupWise Post Office where the CMG service account resides. To enable and configure SOAP, see this Novell article, and this one too.
A GroupWise admin account with valid Internet Address and Name attributes, and sufficient permissions to:
• own the shared address book (to serve as repository for the contacts created from AD object data), and
• access the GW domain files specified by the GW path.
(For multiple GroupWise servers, DC requires one such account for each server.)
Coexistence Manager for GroupWise 1.5.6User Guide
15

GroupWise client on end-user workstations
Note: CMG does not support GroupWise Web Access.
For GroupWise 7.0.x (only) A non-GroupWise domain and non-GroupWise post office.
An account with:
• GroupWise admin rights to the External Domain and Post Office to which CMG’s Exchange-to-GroupWise Directory Connector will write.
• GroupWise rights to be able to see all requisite objects in the GroupWise domain (including but not limited to all trees in the Novell environment), to be used for CMG’s GroupWise-to-Exchange Directory Connector.
An account to permit the assignment of the rights cited above.
For CMG Mail Connector Requirements for particular environments
General requirements Smart hosts required, if not using internal routing domains. (If necessary see Email coexistence before and after CMG in User Guide chapter 3.)
GroupWise Default message encoding (on the SMTP/MIME tab of GWIA Properties) must be set to MIME, not Basic RFC-822.
For GroupWise 8.0.x (only) Flat forwarding enabled in the GWIA.
For GroupWise 7.0.x (only) A defined non-GroupWise domain and non-GroupWise post office.
A Novell Netware server version 6.0–6.5 running the API Gateway version 4.1v2.
For CMG Free/Busy Connector Requirements for particular environments
General requirement The GroupWise SOAP web service, enabled on the GroupWise Post Office where the CMG service account resides. To enable and configure SOAP, see this Novell article, and this one too.
For GroupWise 7.0.x (only) A non-GroupWise domain and non-GroupWise post office.
A Novell Netware server version 6.0–6.5 running the API Gateway version 4.1v2.
A proxy GWIA: Copy the entire GWIA folder (the “real” GWIA) to a new proxy GWIA directory, and then delete the \wpcsout\gwiaXXXX subfolder (where XXXX is the gateway unique ID), and delete the \wpcsin subfolder. Do not start/enable the proxy GWIA, since the F/B Connector must process the files in the proxy GWIA folders. The proxy GWIA in turn requires:
• Account rights with a minimum of Read, Write and Delete rights for all folders in the proxy GWIA. These rights may vary depending on the OS to which the proxy GWIA is installed. For example, the equivalent rights on Netware are Read, Write, Create, Modify, Erase and Filescan [RWCEMF].
• A GroupWise mailbox for use with the F/B Connector and associated services.
CMG components Supported GroupWise clients
CMG Mail Connector and/or Free/Busy Connector
GroupWise 2014: RTM and SP1
GroupWise 2012: RTM, SP1, SP2 and SP3
GroupWise 8.0.0–8.0.3
GroupWise 7.0.1–7.0.4
Coexistence Manager for GroupWise 1.5.6User Guide
16

Exchange server(s)The CMG Directory Connector, Mail Connector and Free/Busy Connector support these Exchange target types:
Apple iPhone support: CMG processes GroupWise-to-Exchange messages so they will be compatible with Apple iPhone's iOS6 and iOS7.
Active Directory server
SQL server
Exchange environments Supported by
Exchange 2003 All CMG components
Exchange 2007: RTM Directory Connector and Mail Connector, but not F/B Connector
Exchange 2007: SP1, SP2 or SP3 All CMG components
Exchange 2010: RTM, SP1, SP2 or SP3 All CMG components
Exchange 2010 CAS Array: RTM or SP1 All CMG components
Exchange 2013: RTM or SP1 All CMG components
Office 365 Mail Connector and F/B Connector, but not Directory Connector
CMG components Requirements for particular components
Directory Connector An Exchange user account with membership in Exchange View-Only Administrators (for Exchg 2007) or Organization Management (Exchg 2010/2013). This user must be added to the ACL for the Windows domain, and must have Create and Delete All Child Objects object permissions applied onto This object and all descendant objects (domain object Properties | Security tab | Advanced Security Settings | Edit).
Mail Connector Smart hosts, if not using internal routing domains. (If necessary, see Email coexistence before and after CMG in User Guide chapter 3.)
Free/Busy Connector A special configuration, as described in User Guide chapter 4.
CMG component Requirements for particular components
Directory Connector The Exchange schema extensions on the AD server.
Read/write access rights for the account configured to run the Directory Connector service. At a minimum, the target OU must be delegated to this account.
CMG component Requirements for particular components
Directory Connector Access to a Microsoft SQL Server, installed on the CMG workstation or by connecting to an existing SQL instance, with a minimum of 20GB free disk space. Note:
• You may use an existing (installed) Microsoft SQL Server version 2012, 2008 or 2008 Express, 2008 R2, 2005 or 2005 Express, or 2000, or you can download and install a free copy from Microsoft, from the link provided in the CMG AutoRun installer.
For best performance, particularly at sites with large numbers of groups or domains, Dell recommends a full-featured (non-Express) SQL Server edition.
• CMG running with SQL Server 2008 requires the SQL 2005 Native Client on the admin server to communicate with SQL. The SQL 2008 Native Client is not supported at this time.
• Any account used for SQL access must be configured (in SQL) with sysadmin and dbcreator permissions. If the DC will connect to SQL via Windows Authentication, the account must also have "logon as a service" permission.
Coexistence Manager for GroupWise 1.5.6User Guide
17

Outlook end-user workstations
Outlook Web Access host serverCMG supports Outlook Web Access 2007, 2010 or 2013.
Admin CMG servers (running CMG components)
Supported Client Versions:
Outlook2003
—— Outlook 2007 —— Outlook 2010x86 or x64
Outlook 2013x86 or x64, RTMRTM SP1 SP2
Mail Connector ● ● ● ● ● ●
Free/Busy Connector ● ● ● ●
IMPORTANT: CMG components must reside on separate machines from the Exchange and GW servers.
Windows operating systems supported:
DirectoryConnector
MailConnector
Free/BusyConnector
Windows Server 2008 32-bit, SP1 or SP2 * ● ● ●
64-bit, SP1 or SP2 ● ● ●
Windows Server 2008 R2 RTM or SP1 ● ● ●
Windows Server 2012 RTM ● ● ●
Windows Server 2012 R2 RTM ● ● ●
* Win Server 2008 32-bit SP2 is not supported for coexistence with Office 365.
Hardware specifications Minimum required Recommended
Directory Connector • 500MB disk space
• 2GHz processor
• 4GB memory
• 1+GB disk space
• 2- or 4-core processor
• 8GB memory
Mail Connector and/or Free/Busy Connector (each)
• 20GB disk space
• 4-core 3+GHz processor
• 4GB memory
• 20GB disk space
• 4-core 3+GHz processor
• 8-16GB memory
CMG components Requirements for particular components
Any/all CMG components (per host computer)
Microsoft .NET Framework 2.0, and 4.0 Full Framework. (The CMG Installer provides links to these, for your convenience if they are not already installed.)
Coexistence Manager for GroupWise 1.5.6User Guide
18

Directory Connector GroupWise client installed, version 7.0.4 (for any supported 7.0.x server), or version 8.0.x or GW 2012 (to match the version of the installed GroupWise server).
Novell NetWare client installed: NetWare client ver 2 SP2 (IR2A) for Server 2008 or Server 2012.
If running under Win Server 2008, Data Execution Prevention (DEP) must be disabled in Windows system settings.
No drives may be mapped to NetWare.
For GroupWise 8.0.x (only): Computer cannot contain a mapped drive pointing to the same location (wpdomain.db) as the UNC path for a GroupWise-to-Exchange connector. (DC connectors will not run if a mapped drive points to that location.)
Mail Connector Any antivirus software running on the host CMG admin server must be turned off prior to running the Mail Connector.
Free/Busy Connector Microsoft PowerShell 2.0, 32- or 64-bit (a component of Windows Management Framework, downloadable at this Microsoft link).
Also: Depending on your environment, you may need to run this command to enable the PowerShell layer using remote PowerShell:
get-executionpolicy | set-executionpolicy $unrestricted
For CMG’s Autodiscover, EWS and F/B Bridge: Microsoft IIS version 7.0–8.5, configured and enabled to use ASP.NET 4.0.
Web services certificates on any server with CMG’s Free/Busy Connector Web Server components.
Port assignments on CMG servers
Requirements for particular components
All CMG components DNS port 53 (uses UDP protocol, not TCP)
Directory Connector LDAP 389: read/write both directions
LDAP 3268: read to AD
If the SQL DB is running on a separate server, the corresponding port must be open to CMG
Mail Connector SMTP port 25: both directions
Free/Busy Connector 1352: outbound to GroupWise
TCP 8961: inbound from GroupWise (default port, update if modified)
TCP 8960: CMG to CMG (default port, update if modified)
SSL 443: inbound from Exchange
For Office 365 scenarios: Ports 80 and 443 out, and port 443 inbound
Port 7191: outbound to GroupWise web services
Coexistence Manager for GroupWise 1.5.6User Guide
19

2
CMG Directory Connector
• Directory Connector overview
• Installation and configuration
• DC Management Console
• Connector Creation Wizard
• Connector Advanced Settings
• Running and stopping the Directory Connector service
Directory Connector overviewThe Dell CMG Directory Connector (DC) updates directory information between the Novell Global Address Book and Active Directory (AD). Within the DC component, one or more individual connectors are defined, each to copy directory data in only one direction. A bidirectional update is accomplished by defining a pair of connectors to run sequentially in opposite directions.
Note that while Directory Connector is the name of the CMG component as a whole, and of the Windows service that performs directory updates, the term connector also refers to the individual processes within the compo-nent, each defined to perform a particular directory update in just one direction. Think of the Directory Con-nector service as the engine that does the actual work, while the individual connectors are the instructions that tell the engine how to apply its capabilities. A connector definition tells the DC service the direction of the update, where the source objects reside, which object types to include, where within the target server the objects should be copied, access credentials to both servers, when to run updates, and so forth.
For each defined connector, the CMG Directory Connector sends a query to the source directory (step 1 in both illustrations below, for GroupWise 8 and later), which then (2) replies by transmitting its object data back to the Directory Connector. The first illustration shows the process for a GroupWise-to-Exchange connector.
External contact objects in the Novell directory reside in a shared address book, reserved for CMG use to keep contact records for external AD objects separate from Novell’s own local users, and thereby prevent directory loops between the two systems. In this first example, for a connector that updates AD with Novell objects, the Novell source data is drawn only from the Global Address Book.
The Directory Connector then (3) maps the attributes of the GroupWise source objects to the corresponding contact attributes in AD. If an object in the source already exists in the target, a configuration setting tells the connector whether data collected in the source should overwrite corresponding data in the target.
Finally (4), the DC passes the data to the reserved cn=cmg container within Active Directory. If a target container by that name does not already exist, CMG will create it, within a target OU that you specify. The cn=cmg container thus is a subset of the specified target container ("ou=users" in the illustration).
IMPORTANT: CMG provides directory coexistence solutions for several GroupWise versions, whose directory services are variously named NDS and eDirectory. CMG's Directory Connector supports both NDS and eDirectory. For simplicity, our CMG documentation uses the more generic term "Novell directory" to specify either NDS or eDirectory.
IMPORTANT: Note also that the GroupWise Global Address Book (also called Global Address List, or GAL) is different from the Novell directory. The GAL is a separate entity, periodically refreshed from the Novell directory, but the GAL is then an independent data source until it is next refreshed. This is an important distinction for understanding the data flows facilitated by CMG's Directory Connector.
Coexistence Manager for GroupWise 1.5.6User Guide
20

When a connector is defined to run from Exchange to GroupWise, the process works approximately the same way in reverse. CMG’s Directory Connector queries the source Active Directory (step 1 here), which then (2) replies by transmitting its object data back to the DC:
In an Exchange-to-GroupWise update as shown here (for GroupWise 8 and later), AD sends object records for its entire ou=users container, which in AD includes the contact records in cn=cmg, a subcontainer within ou=users. The Directory Connector therefore (3) filters (removes from the data) the objects that were in the source cn=cmg container, to prevent object looping, before finally (4) passing the filtered object data on to a shared address book in GroupWise. As noted above, the GroupWise shared address book is reserved for CMG use, to keep external AD objects separate from Novell’s own local users, and prevent directory looping. As with target containers in AD, a separate GroupWise shared address book must be designated for each connector.
Each of the query–reply processes illustrated above is defined within the CMG Directory Connector as one connector. CMG’s DC lets you define as many connectors as you need to facilitate separate directory updates for different administrative entities or geographic locations, etc., and/or for updates among multiple directory servers on either or both sides.
IMPORTANT: CMG’s Directory Connector does not support direct coexistence between GroupWise and a hosted Exchange environment (such as Office 365). You could, however, establish a "two-step" coexistence between GroupWise and a hosted AD:
1 Configure the CMG Directory Connector for bidirectional updates between GroupWise and a local, proprietary Active Directory.
2 Configure Microsoft’s Online Services Directory Synchronization ("DirSync") tool to synchronize the local AD with the hosted AD.
The combination of the two, run sequentially in tandem, would configure an effective coexistence between GroupWise and a hosted AD.
Coexistence Manager for GroupWise 1.5.6User Guide
21

Individual DC connectors also can be configured to perform any number and combination of the Directory Connector’s three primary operations:
• Provision: If no object in the target corresponds to an object in the source, the connector will create the new object in the target.
• Update: If an existing object in the target corresponds to an object in the source but the object’s attribute data differs, the connector will overwrite target object data with corresponding source object data—or—will append source data to target data for some attribute(s) if so configured by the <AppendAttributes> parameter for the connector (as described in step 1 of the Installation and configuration instructions below).
• Delete: If the connector sees no object in the source that had been in the source at the last connector update, it will delete the corresponding object in the target. For example, if User XYZ is copied from source to target, and then is deleted from the source, the next run of the same connector will remove User XYZ from the target.
CMG’s Directory Connector provides a Connector Creation Wizard, which presents a short series of screens to configure each connector. Each connector is defined by specifying the source and target directories, the names and locations of object containers, and other pertinent information. A connector definition also specifies a schedule for its automatic execution, and lets you specify other DC connectors (previously defined) that must run prior to the execution of this connector. These features let you require a particular order of execution when two or more connectors are defined.
CMG’s Directory Connector service is started manually, and once started it runs continuously. The DC service is idle most of the time except for periodic momentary checks to determine whether a defined connector is scheduled to run. If so, the service verifies that any prerequisite connectors have already run, and then launches the connector. When the connector finishes, the DC service returns to its idle state, waiting for the next scheduled connector.
Installation and configuration
Directory Connector installationThe CMG Directory Connector is installed by the same AutoRun installer that installs all components of the Coexistence Manager for GroupWise product. If you have already installed one or more other components of this same CMG version, just run the AutoRun installer again to install the Directory Connector. The AutoRun installer must be run on the computer where you want the CMG component to reside.
Verify that every computer hosting any CMG Directory Connector subcomponent(s) meets the current System Requirements as specified in the Release Notes, in the Quick-Start Guide, and in User Guide chapter 1.
For complete installation instructions, and important notes about upgrading from earlier versions of the CMG Directory Connector, see the Getting Started section of either the Quick-Start Guide or the associated Release Notes.
IMPORTANT: Note also that a single DC connector cannot connect to a multi-tree Novell environment with multiple authentication credentials. As a result, a separate DC connector must be defined and configured for each set of authentication credentials required to extract data from each tree.
Coexistence Manager for GroupWise 1.5.6User Guide
22

Directory Connector configuration• Step 1: Devise a strategy for your directory updates
• Step 2: Prepare Your Exchange/AD and GroupWise environments
• Step 3 (if necessary): Preempt object collisions in environments with multiple source SMTP domains
• Step 4 (optional): Configure CMG logging
• Step 5: Run the DC Management Console and Connector Creation Wizard to create connector(s)
• Step 6 (optional): Configure Dell MFG for use with CMG Directory Connector
• Step 7 (if necessary): Verify Exchange DL configuration
Step 1: Devise a strategy for your directory updatesCMG’s Directory Connector lets you define as many connectors as you need to facilitate separate directory updates among multiple directory servers on either or both sides, and/or for different administrative entities in your organization, or for different geographic locations, etc. If two or more connectors are defined for the same direction, you must direct them to copy their data to different, separate containers (in AD) or shared address books (in GroupWise).
Individual DC connectors can be configured to perform any number and combination of three primary operations:
• Provision: If no object in the target corresponds to an object in the source, the connector will create the new object in the target.
• Update: If an existing object in the target corresponds to an object in the source but the object’s attribute data differs, the connector will overwrite target object data with corresponding source object data—or—will append source data to target data for some attribute(s) if so configured by the <AppendAttributes> parameter for the connector (see below).
Note that a manual change to an entry in a CMG target container will persist unupdated through subsequent connector runs if the corresponding source object record has not also been changed. A connector compares the source object data to a copy of the source object record from the preceding connector run, and updates the target object only if the source object has changed.
• Delete: If the connector sees no object in the source that had been in the source at the last connector update, it will delete the object in the target. For example, if User XYZ is copied from source to target, and then is deleted from the source, the next run of the same connector will remove User XYZ from the target.
Think through your strategic options and decide now, before you define any connectors, how you want your directories to be updated. Decide in advance the number and scope of DC connectors you will need to accommodate your particular environment, circumstances and preferences, and the number and names of GroupWise shared address books and AD target OUs you will need.
Step 2: Prepare Your Exchange/AD and GroupWise environments
Verify Exchange schema extensions and admin account permissionsCMG’s Directory Connector requires that the target Active Directory server have the Exchange schema extensions.
The account configured to run the DC service must be an Exchange domain user account with membership in Exchange View-Only Administrators, and delegated full control to the target OU, and full control of the OUs/containers where the AD user objects currently reside—to ensure CMG has access to properly join to the merged user objects and prevent the creation of duplicate contacts.
Coexistence Manager for GroupWise 1.5.6User Guide
23

Verify GroupWise admin account permissionsCMG’s Directory Connector requires a non-admin GroupWise user account (for GroupWise 2014) or a GroupWise admin account (for any other GroupWise version) with valid Internet Address and Name attributes, and sufficient permissions to:
• Own the shared address book (to serve as repository for the contacts created from AD object data), and
• Access the GW domain files specified by the GW path.
For multiple GroupWise servers, one such account is required for each server.
Make the showInAddressBook attribute visible in GroupWise Global CatalogCMG requires replication of this attribute to the Global Catalog so that ou=users will appear in the source list of OUs in the Connector Creation Wizard, when creating an Exchange-to-GroupWise connector. The procedure:
1 Open Microsoft's Active Directory Schema snap-in.
2 In the console tree, under Active Directory Schema/Attributes: Click Attributes.
3 In the details pane: Right-click the showInAddressBook attribute, and select Properties.
4 Select Replicate this attribute to the Global Catalog checkbox.
Conditional: Change communications portThe Directory Connector needs to know which communications port to use for data transmissions between the DC service and the DC Management Console, on the server where these applications reside. The port number for this is set to 9081 by default, and this will be the correct setting in almost all environments.
But if port 9081 is assigned to some other service or function in your environment, you must change the communications port setting in the Directory Connector configuration file. To do this (if necessary):
1 Find and open the Directory Connector configuration file, in CMG’s \Directory Connector\ folder (named Configuration.xml by default).
2 Find the <ServicePort>####</ServicePort> parameter, usually at or near the end of the <DirectoryConnectorSettings> section.
3 Change the value of the <ServicePort>####</ServicePort> parameter to the port number you want to designate as the CMG Directory Connector communications port.
4 Save and close the Directory Connector configuration file.
Optional: Consider creating a special GroupWise user account as the owner of shared address booksThe Console asks you to designate a GroupWise Username as the "owner" of all new shared address books that CMG will create for Exchange-to-GroupWise connectors. The Username you specify will be identified as the sender of the emails GroupWise will generate to invite other users to share the address books. For connections with GroupWise 2014 (only), note that this account must not be a GroupWise admin account (use any non-admin user for this purpose).
You may want to create a special GroupWise user account in whose name CMG’s DC will create any new shared address books that need to be created.
IMPORTANT: The CMG Management Console must be closed before you open this configuration file. When you select File|Save in the Management Console, the Console saves all of its open data to the Configuration.xml file, and this will overwrite any manual changes to the file that may have been saved while the Console was open.
CAUTION: Be very careful when manually entering or editing values in the Configuration.xml file, where incorrect syntax or even a single-character typo could disable a connector or the DC service altogether.
Coexistence Manager for GroupWise 1.5.6User Guide
24

Optional: Create GroupWise shared address books in advanceWhen GroupWise creates a new shared address book, it can take several minutes to generate invitations to all other GroupWise users to share the address book. The time required depends on the size of your Global Address List.
To prevent such delays during your organization’s routine work day, consider manually creating all of the shared address books you will need before you run any of CMG’s DC connectors. You could, for example, create your new shared address books after hours some evening, so the invitations would be generated during off hours, and in that way preempt the need for the Directory Connector to create them when the connectors are running.
Note that every Exchange-to-GroupWise connector is defined with a shared address book name, which must be unique. CMG will not let you assign a given shared address book to more than one DC connector.
Step 3 (if necessary): Preempt object collisions in environments with multiple source SMTP domainsMany organizations prefer to use alternate or subdomains to enable mail routing between systems during a coexistence period. CMG’s Directory Connector automates the required address updates (if configured to do so) by replacing the domain side of the target address in AD and mail address in GroupWise. Mail routing through the resulting contacts will then use the subdomain addresses. This approach isolates incoming mail from internally routed mail.
For environments with a single SMTP domain in the source and no existing users in the target, this approach can be implemented with minimal additional consideration. The subdomain address can be applied with little concern for address collisions.
However, in environments with multiple source SMTP domains, applying a constant subdomain to all users could result in collisions. Address collisions are possible If multiple SMTP domains are used within a single OU (in a GroupWise-to-Exchange connector) or within the GroupWise Global Address Book (Exchange-to-GroupWise connector). These scenarios require additional consideration and configuration to avoid duplicate addresses.
For many organizations the easiest solution is to create multiple connectors (one for each source SMTP domain) with separate subdomains for each, and then define object filters for the different connectors (see Advanced Settings tab: object filtering features later in this chapter). Use the object filters to have each connector pull users only from the specified SMTP domain. This will allow a different subdomain to be used for each source SMTP domain and eliminate any chance of address conflicts between domains.
Step 4 (optional): Configure CMG loggingBy default, CMG is installed with the log42net utility to generate log files of CMG components’ system activity. This information is critical to diagnosing any problems that may arise. Logging is enabled by default for all CMG components.
The log42net utility may be configured to work a particular way with each CMG component. The default configurations will be suitable for most organizations and circumstances, but you can customize logging features if you like. Configuration instructions are nearly identical from one component to another, so we present the instructions separately, in Appendix C of the User Guide.
Coexistence Manager for GroupWise 1.5.6User Guide
25

Step 5: Run the DC Management Console and Connector Creation Wizard to create connector(s)
Use CMG’s DC Management Console and its Connector Creation Wizard to define and manage the connectors that will update the directories you want to keep current, and to schedule the connectors to run.
The Connector Creation Wizard is run separately for each DC connector you want to create (or edit), as shown in the diagram below. The Management Console’s DC screens and Connector Creation Wizard are described in the remaining sections of this chapter.
Note that this step alone does not start the Directory Connector service, and that the defined connectors will run only if the Directory Connector service is running. See Running and stopping the Directory Connector service later in this chapter.
Optional, per connector: Configure the <AppendAttributes> parameterThe <AppendAttributes> parameter lets you specify a list of one or more target attributes whose values will be appended to, rather than replaced by, a connector running in Update mode. That is, for each object in the directory, the value of each designated attribute in the source will be added to any existing value in the target.
This parameter is optional, and is configured separately for each DC connector in the connector's section of the DC Configuration.xml file. To designate the attribute(s) that should function this way in Update mode for a particular connector, find (or add) the <AppendAttributes> tags for the connector, and enter the names of the target attributes separated by a pipe character ("|") between the tags, like this:
<AppendAttributes>cn|mail|proxyaddresses</AppendAttributes>
Optional, per connector: Configure lists of object attributes to copyThree DC connector parameters let you control which attributes a GroupWise-to-Exchange connector will capture and copy for different object types (users vs. groups vs. resources):
<GwUserAttributeList>…</GwUserAttributeList> <GwGroupAttributeList>…</GwGroupAttributeList> <GwResourceAttributeList>…</GwResourceAttributeList>
This feature can improve connector performance, perhaps dramatically, in an environment with slow response times and long distribution lists. The feature can be configured only by these parameters (not in the Connector Creation Wizard), and are available only for existing connectors in the GroupWise-to-Exchange direction.
If a GwXxxxAttributeList parameter is unspecified, the connector copies all attributes for that object type by default. But if particular attributes (one or more) are unnecessary for a particular object type, these parameters let you specify which attributes to include for a particular connector. (Any attribute not listed for the parameter will be excluded.)
The parameters are set in the Configuration.xml file for the Directory Connector (in CMG's DC subfolder), and are set (or not) separately for each defined connector. For each connector, enter the parameter name with a list of all attributes to be included, all in one continuous line and separated by pipe characters ("|"), with no spaces between. For example:
<GwUserAttributeList>UserAttr1|UserAttr2|UserAttr3|UserAttr4 </GwUserAttributeList>
Coexistence Manager for GroupWise 1.5.6User Guide
26

To create a suitable list of attributes for the parameter value:
1 Open the file Directory Connector\attributes\groupwiseConnector_XXX, where XXX is the object type (user or group or resource). The attributes in this file appear listed one attribute per line.
2 Copy all the attributes from the file into a text editor. In the text editor, delete the lines for attributes you want to exclude from the connector's operations.
3 For the remaining attributes in the list (the ones you want to include), replace all the hard returns with pipe characters ("|"), to produce a single-line continuous list (no spaces) of attributes separated by pipe characters.
Then you can insert that list as the parameter value in the DC configuration.xml file:
1 Find the section for the connector you want to modify by this parameter, and its <ConnectorSettings> section, and add a new line for the <GwXxxxAttributeList>...</GwXxxxAttributeList> parameter.
2 Select and copy the single-line list of attributes from the text editor (step 3 above), and paste it into the parameter value in the configuration.xml.
Step 6 (optional): Configure Dell MFG for use with CMG Directory ConnectorIf you will be using CMG for coexistence during a migration project with Dell’s Migrator for GroupWise (MFG), you may want to configure these MFG program parameters to make MFG features more compatible with CMG’s Directory Connector:
For more information about these parameters, see their listings in the MFG Program Parameters Reference.
Step 7 (if necessary): Verify Exchange DL configurationCheck the Message Delivery Restrictions settings for any Exchange group to which you want GroupWise users to be able to send messages. Any such Exchange group must be of the universal distribution type to be mail-enabled. To change the settings, beginning in the Exchange Management Console:
1 Select the group under Recipient Configuration | Distribution Group, then double-click the group you want to edit.
2 Click the Mail Flow Settings tab, and highlight Message Delivery Restrictions, then click Properties above.
3 De-select (unmark) the check box for Require that all senders are authenticated.
4 Save, and then restart the MS Exchange transport service.
DC Management ConsoleThe CMG Directory Connector (DC) includes a configuration tool, called the Management Console, that directs the Directory Connector’s features and functions according to field entries in the Console application: source and target directories, access credentials, update scope, scheduled runs, and so forth. One of the Console’s GUI screens also lets you launch a Connector Creation Wizard— a separate application to create or modify the configuration details for individual DC connectors that will copy directory data from one environment to the other.
In adobjmerge.ini:
[ActiveDirectory] MergeFindbySMTP=1 MergeReqProxyAddress=0 MergeReqImportedFrom=0
In gwmigapp.ini:
[Exchange] RunUpdateEmailAddressPolicy=1
Coexistence Manager for GroupWise 1.5.6User Guide
27

The configuration data for both the DC service as a whole and its individually defined connectors is saved in a configuration file named Configuration.xml (by default), in CMG’s \Directory Connector\ folder. The DC configuration file may be opened, modified and saved as needed, by any XML editor, but CMG’s Management Console provides a "friendlier" interface for managing configuration settings. The Console also makes DC configuration safer, since a single typo in the xml file (when hand-editing) can cause unintended consequences or even disable a connector altogether.
The relationships among the CMG Directory Connector Management Console, its Connector Creation Wizard, and the Configuration.xml file are shown in the illustration above and in this chart:
The DC configuration file controls only the Directory Connector, not CMG’s Mail Connector or Free/Busy Connector—which are controlled by their own, separate configuration files.
Chapter 1 of the User Guide explains the basic operating concepts for the CMG Management Console. This DC chapter provides the field notes for the Console screens that pertain to DC configuration, and for the Connector Creation Wizard.
The Management Console contains these screens for the Directory Connector:
• Directory Connector | Connector Settings: Create, change or delete a connector definition, or run it immediately (rather than waiting for its next scheduled execution).
• Directory Connector | Service Settings: Specify the information the DC service needs to perform its functions, such as the comm port the service will use, Novell access credentials, etc.
• Directory Connector | SQL Settings: Specify the information the DC service needs to communicate with the required SQL database.
Management Console screen: Directory Connector | Connector SettingsThe Connector Settings screen shows a list of all defined Connectors for CMG’s Directory Connector as defined in the currently open configuration file. The Connectors table lists the connectors by name, and shows the Direction, Source and Target Servers, and the Last Started and Last Completed times for each.
Coexistence Manager for GroupWise 1.5.6User Guide
28

From this screen you can launch the Connector Creation Wizard to create a new connector or edit an existing one, or open a dialog box of Advanced Settings for an existing connector definition.
To create a new connector and add it to the displayed Connectors table:
• Click the Add button (to start the Connector Creation Wizard), and complete the Wizard. See Connector Creation Wizard below for screen-by-screen field notes.
To change the definition and/or execution schedule of a connector:
• Select the connector you want to change, and click the Edit button (to start the Connector Creation Wizard in its Edit mode). See Connector Creation Wizard below for screen-by-screen field notes.
To delete an existing connector definition (remove it from the Connectors table):
• Select the connector you want to delete, and click the Remove button.
To run a connector immediately (rather than waiting for its next scheduled run):
1 Select the connector you want to run.
2 Click Run Connector Now.
Advanced SettingsThe Connectors table also provides access to a dialog box of Advanced Settings that can be applied to existing connector definitions (one connector at a time). The Advanced Settings govern several connector functions whose default configurations are suitable in most environments, but may be modified as needed for local circumstances.
See Connector Advanced Settings later in this chapter to see whether any of the features in the tabbed panels of the Advanced Settings dialog box might be necessary or useful in your local environment.
Management Console screen: Directory Connector | Service SettingsThe Service Settings screen collects the information the DC service needs to perform its functions. Enter these values to identify servers and programs, and provide the necessary access credentials.
Novell Login Information:
• Novell Server: The internet name (e.g., acctg.xyzcorp.com) or IP address of the Novell directory server.
• Novell Tree and Novell Context: The Tree and Context values for this connector’s login account, as shown in the Novell login form, on the eDirectory tab of the Advanced section.
• Novell Account: Novell account username, by which the connector will access Global Address Book data. For coexistence with GroupWise 2014: This must be a non-admin account (can be any non-admin user).
• Novell Password: Password associated with the Novell Account cited above.
• Test (optional): Click the Test button to test Novell access by the values entered into these fields. The Management Console will post a dialog box with the test results. Click OK to clear the dialog box.
Free/Busy Host (appears only for GroupWise 8 or later): Enter the URL for the host where the Bridge subcomponent of CMG's F/B Connector's resides (or will reside). This value is added to objects written to the GroupWise shared address book, to facilitate GroupWise users' F/B queries to Exchange.
NOTE: The Directory Connector service creates a folder for each defined connector (under ...\Directory Connector\Connections\) to hold connector information that the DC service reads when the connector runs. The Remove feature does not remove this corresponding connector folder, so you may want to delete it manually.
NOTE: This Test of the credentials will be valid only if you are not already logged into your desktop with the Novell login.
Coexistence Manager for GroupWise 1.5.6User Guide
29

In a typical configuration, the Bridge is installed on the same computer as the Exchange F/B Connector service. (You can enter this value later if CMG's F/B Connector has not yet been installed and configured, or leave the field empty if the F/B Connector will not be used for GroupWise-to-Exchange F/B queries.)
• Test (optional): Click the Test button if you want to test the connection to the Free/Busy Host URL entered into the adjacent field. The Management Console will post a dialog box with the test results. Click OK to clear the dialog box.
GroupWise Web Service Settings (appears only for GroupWise 8 or later):
• GroupWise Soap Server Url: The URL for the GroupWise SOAP server—the server that runs the web access service for the post office. You must have the SOAP web service enabled, and designate the port number used. For example: http://groupwise.xyzcorp.com:7191/soap
• Trusted API Key: An authentication code that permits access to CMG shared address books by the Novell Account specified above. This Trusted API Key is associated with a particular Trusted Application Name, specified in the next field below. You can create the key with ConsoleOne (in GroupWise 8.01 SP1 or later), or run a command from the Windows command prompt:
• For GroupWise 7 or 8, enter: \Dell\Coexistence Manager for GroupWise\TrustedApplication\GroupWise8\CreateTrustedKey8.exe
• For GroupWise 2012, enter: \Dell\Coexistence Manager for GroupWise\TrustedApplication\GroupWise2012\CreateTrustedKey2012.exe
• Trusted Application Name: The name of the Trusted Application by which the Novell Account specified above will access CMG shared address books.
• Test (optional): Click the Test button if you want to test the Trusted App values entered into these fields. The Management Console will post a dialog box with the test results. Click OK to clear the dialog box.
Directory Connector | SQL SettingsCMG’s Directory Connector requires access to a Microsoft SQL database to facilitate data transfers between the source and target directories. The information in this screen tells CMG how your required SQL database is configured, so the Directory Connector and SQL database can communicate.
Most of the information in this screen identifies and characterizes a SQL configuration that exists independently of CMG, and that is saved in a SQL configuration file identified in the Configuration File field here. CMG’s Directory Connector needs this information to communicate with the SQL database.
• SQL Server Path: Specify the location of the SQL server (e.g., win7\sqldb).
• [ ] Use Existing Configuration: Mark this checkbox if you want to use a previously created SQL configuration file, and enter (or Browse to) the existing Configuration File you want to use for CMG. Leave this checkbox unmarked if you want to create a new SQL config file for use with CMG’s DC, and specify:
• Configuration File: The filename to be assigned to this SQL configuration file (e.g., DirectoryConnectorDBConfig).
• Configuration Database (unused/grayed-out if using an existing configuration): The name of the SQL server configuration database to use for CMG DC functions (e.g., ConfigDb).
• Execution Database (unused/grayed-out if using an existing configuration): The name of the SQL server execution database to use for CMG DC functions (e.g., ExecDb).
• [ ] Use Windows Authentication: Mark this checkbox if you want CMG to connect to the SQL database via Windows Authentication, or leave it unmarked if you want CMG to use the SQL Database Account to connect to the SQL database. This checkbox determines which of the following pairs of fields will be active (rather than grayed-out) for you to enter the necessary credentials:
• Account Sync Service Uses: Enter the Windows Account name (e.g., mustang\administrator) and Windows Password associated with this account, which CMG will use to connect to the SQL database.
Coexistence Manager for GroupWise 1.5.6User Guide
30

• SQL Database Account: Enter the SQL Account name and the Windows Password associated with this account, which CMG will use to connect to the SQL database.
• Sync Service: You can click one of these buttons to Stop or Start CMG’s Directory Connector "engine" (the underlying code that DC connectors call to execute their functions).
• Set Configuration: Saves the settings on this screen to the SQL Configuration File named above, and renames the DC "engine" service for the specified Windows account (if selected) or network services account. You must click this button to create the new file whenever you create a new configuration file, including whenever you install or upgrade the CMG Directory Connector.
Connector Creation WizardThe Connector Creation Wizard lets you configure a DC connector in a series of friendly GUI screens. As noted above, the Management Console and Connector Creation Wizard perform different but related functions as shown in this chart:
The Connector Creation Wizard presents a short series of screens to configure each connector. A connector definition also specifies a schedule for its automatic execution, and lets you specify other DC connectors (previously defined) that must run prior to the execution of this connector. These features let you require a particular order of execution when two or more connectors are defined.
You may define as many connectors as you need for separate directory updates for different administrative entities or geographic locations, etc., and/or for updates among multiple directory servers on either or both sides. The Connector Creation Wizard is run separately for each connector you want to define or edit.
Starting the Connector Creation WizardTo start the Connector Creation Wizard to create a new connector (from within the Management Console, on the Connector Settings screen):
• Click Add.
To start the Connector Creation Wizard to edit an existing connector:
• Select the connector you want to edit, and click Edit.
The Wizard presents the same screens, in the same order, in both the Add and Edit modes. The only difference is that the Edit mode shows the fields already filled with the previously entered values for the selected connector.
NOTE: An "access to the registry key" error that occurs when clicking Set Configuration can be dismissed with no disruption to the SQL setup by clicking OK in the error dialog box. This appears to be an OS issue that occurs only with Windows Server 2003 R2, and occurs only once.
IMPORTANT: If upgrading from an earlier version of CMG’s Directory Connector: The DC database rebuilds itself when upgrading, and needs a few minutes to complete that step before it will permit connections. This is the likely cause of any "could not connect" error you may encounter upon clicking this Set Configuration button soon after upgrading. In that case, allow 5-10 minutes for the database to rebuild, and then try again.
NOTE: Remember, a single DC connector cannot connect to a multi-tree Novell environment with multiple authentication credentials. As a result, a separate DC connector must be defined and configured for each set of authentication credentials required to extract data from each tree.
Coexistence Manager for GroupWise 1.5.6User Guide
31

To abort a run of the Connector Creation Wizard, and discard any data you may have already entered or changed:
• Click the Cancel button from any screen in the Wizard.
The Connector Creation Wizard presents a short series of screens to collect the information it needs to define and schedule a single connector. Since some screens appear only when defining a connector in a particular direction (Exchange-to-GroupWise vs. vice-versa), the Wizard is documented in two separate sections here, one for each direction.
Screens for an Exchange-to-GroupWise ("E-to-G") connectorThese sections describe the screens to configure an Exchange-to-GroupWise ("E-to-G") Connector:
• E-to-G: Connector Information
• E-to-G: Source Server Information
• E-to-G: Source Object Selection
• E-to-G: GroupWise Target Information (for GW7, or GW8 with postoffice configuration)
• E-to-G: GroupWise Target Information (for shared-address-book configuration)
• E-to-G: Connector Order Management
• E-to-G: Connector Scheduling
E-to-G: Connector InformationThis first screen asks you to name the connector and specify the direction:
• Connector Name: The name of the connector, as you want it to appear in the table on the Connector Settings screen. Note that the connector name cannot include any characters that are disallowed for a Windows file or folder name, such as \ / : * ? " < > |
• Direction: Select Exchange to GroupWise as the connector type.
Click Next to advance to the next screen.
E-to-G: Source Server InformationEnter this information and access credentials for the Exchange source server:
• Domain or Server (the field name depends on the setting of the Use specific domain controller checkbox below): The name of the source server (in a form sufficiently qualified that it can be identified from the CMG Directory Connector server) or Active Directory domain. For example: Mustang or mustang.engineering.
A set of three radio buttons to the right of this Domain or Server field lets you further characterize the source:
O Domain Controller O Domain O Forest
• Use specific domain controller: Checkbox to determine whether the Wizard will connect to a specific designated Server (named in the preceding field), or to any server within a designated Domain (named in the preceding field). If you mark the checkbox, the name of the adjacent field changes from Domain to Server, so you can require a specific server for the connection.
• Username: The username by whose authority the Directory Connector will access the source server:
Coexistence Manager for GroupWise 1.5.6User Guide
32

• For coexistence with GroupWise 2012 or GW 8 or 7: This must be a domain administrator account with sufficient rights/permissions to access the source server.
• For coexistence with GroupWise 2014: This must be a non-admin account (any non-admin user).
• Password: Enter the password associated with the Username above.
• Port: The port number that the source (AD) server will use to communicate with CMG’s Directory Connector. Dell recommends you leave this value set to its default, unless the host AD system is not using the default ports.
• use SSL: Mark this checkbox if you want the CMG DC communications to use a Secure Socket Layer.
When these fields are filled as you want them, click Next (or you can click Back to revisit the preceding screen in the sequence).
E-to-G: Source Object SelectionUse the fields on this screen to specify the objects in the Exchange source server to be processed.
• Mark one or more checkboxes to indicate the type(s) of objects you want to process:[ ] Resources [ ] Groups [ ] Users [ ] Contacts
• Source Server: The name of the source server. CMG prefills this field with the value you entered for Server on the preceding Source Server Information screen.
• Source OU: In the adjacent container subtree display box, select the OU(s) that you want to be the root(s) of the subtree(s) containing the objects this connector will copy to the target directory. (You can select one or more OUs.) Each subdomain and adjacent domain appear here with their own checkboxes, and must be explicitly selected to be included with this connector's source OUs. Selecting a higher-level OU does not include all of its lower-level OUs.
When these fields are filled with the correct information, click Next to advance to the next screen (or click Back to revisit an earlier screen in the sequence).
E-to-G: GroupWise Target Information (for GW7, or GW8 with postoffice configuration)This screen appears differently depending on whether you are connecting to GroupWise 7 or 8 and, if connecting to GroupWise 8, whether you have chosen to install its new postoffice configuration or the original shared-address-book configuration. This version of this screen is for a connector to GroupWise 7, or to GroupWise 8 configured for its new postoffice configuration. The other version of this screen is documented separately below.
Enter the requested GroupWise information, and click Next to advance to the next screen (or click Back to revisit an earlier screen in the sequence).
NOTE: It is possible (but uncommon) that access will fail even if you enter the correct credentials here, since the Username can be expressed differently in different contexts. To solve this problem, see in the User Guide’s Troubleshooting Appendix: Novell directory or Active Directory server denies access to Directory Connector account.
NOTE: To update resources in an Exchange 2003-to-GroupWise connector: An Exchange 2003-to-GroupWise connector cannot create a Resources address book in GroupWise, and therefore cannot update resources when the Resources box is checked here. (CMG was originally designed for Exchange versions 2007 and later, and those later versions, unlike Exchange 2003, treat resources as "users" with an extra attribute set.) Therefore, to update resources by an Exchange 2003-to-GroupWise connector you must delete the msExchResourceSearchProperties conditions that appear (by default) in both filters of both the Provision Filters and Update Filters tabs. See Advanced Settings tab: object filtering features below.
Coexistence Manager for GroupWise 1.5.6User Guide
33

• GroupWise Domain Path: UNC path to your GroupWise domain file wpdomain.db, as specified during the GroupWise installation. Enter this value in UNC form, and use the raw server name (i.e., not fully qualified) within the path. For example, use \\GWISE1\sys\mail\gwdom rather than \\GWISE1.dell.local\sys\mail\gwdom.
• Account: Account name for the GroupWise Domain Path cited above.
• Password: Password associated with the Account user name above.
• GroupWise Domain Name: A non-GroupWise domain where GroupWise will hold the contacts created or modified by this connector.
• GroupWise Post Office Name: An external post office accessed via the GroupWise Domain Name cited above.
• GroupWise SMTP Domains: The SMTP domain name (or names) for the GroupWise mail server.
• Enable Domain Routing: Mark this checkbox if you will use subdomains for mail routing. If you mark this checkbox, you must also enter the target’s subdomain name (for example, sub1.xyzcorp.com) into the associated Routing Domain text box. This is the subdomain portion of the addresses (after the @ symbol) that will route mail from the target environment back to the source.
E-to-G: GroupWise Target Information (for shared-address-book configuration)This screen appears differently depending on whether you are connecting to GroupWise 7 or 8 and, if connecting to GroupWise 8, whether you have chosen to install its new postoffice configuration or the original shared-address-book configuration. This version of this screen is for a connector to GroupWise 8 with the original shared-address-book configuration. The other version of this screen is documented separately above.
Enter the information the connector will need to process object records for copying into the GroupWise target:
• Shared Address Book: The name of the GroupWise shared address book that CMG will use to hold the contacts collected by this connector from Active Directory. (Note that every E-to-G connector is defined with a shared address book name, which must be unique. CMG will detect and disallow a shared address book name if another shared address book already exists with the same name.)
• GroupWise Username: If the Shared Address Book cited above does not already exist when this connector runs, the Username entered here will tell GroupWise to create it, and will be identified as the sender of email invitations to other GroupWise users to share it.
• Enable Domain Routing: Mark this checkbox if you will use subdomains for mail routing. If you mark this checkbox, you must also enter the target’s subdomain name (for example, sub1.xyzcorp.com) into the associated Routing Domain text box. This is the subdomain portion of the addresses (after the @ symbol) that will route mail from the target environment back to the source.
• Manage shared address book (checkbox): Determines whether the connector will generate invitations to all GroupWise users to share the address book. If the checkbox is marked, the connector will:
• send invitations to GroupWise users to share the address book;
• update the contents of the shared address book; and
• add GroupWise users to the sharing list, and roll over to a new identical copy of the address book when the invitation list exceeds 5000.
If the checkbox is unmarked, the connector will update the contents of the address book(s), and will not invite new users. Note that these invitation emails will work only with the native GroupWise client; GroupWise web clients are not supported.
When these fields are filled with the correct information, click Next to advance to the next screen (or click Back to revisit an earlier screen in the sequence).
Coexistence Manager for GroupWise 1.5.6User Guide
34

E-to-G: Connector Order ManagementThis screen provides a table of all previously defined connectors, with a checkbox corresponding to each connector in the list. Mark the checkbox for each connector that must complete its run before the current connector will be permitted to start.
Then click Next to advance to the next screen (or click Back to revisit an earlier screen in the sequence).
E-to-G: Connector SchedulingThis screen lets you schedule this connector’s runs in much the same way that you define a recurring meeting in GroupWise or Exchange. You can define more than one recurrence pattern for any single connector; if you do, the scheduled runs will be the sum of all such recurrence patterns defined here. That is, if more than one recurrence pattern appears in the table (bottom half of this screen), the connector will run for all of the scheduled patterns that appear in the table.
To add a recurrence pattern to the table:
1 Use the fields in the top half of the screen to define the recurrence pattern, as you would in GroupWise or Exchange.
2 Click the Add button.
To remove a recurrence pattern from the table:
• Select it in the table, and click the Delete button.
To change some element of a previously defined recurrence pattern:
• Simply Delete it from the table, and then Add a new recurrence pattern to replace it.
Note that it is possible to define a connector without scheduling it for automatic recurring runs. For example, some admins like to have one or more unscheduled connectors defined that can be run as-needed, by the Run Connector Now feature in the Management Console.
When the table appears as you want it, click Next to complete the Wizard and create (or edit) the connector, or click Back to revisit an earlier screen.
Remember too ...Be sure to see Other options you can set per connector, to see if any of the feature options described there may be useful or necessary to your coexistence scenario.
Screens for a GroupWise-to-Exchange ("G-to-E") connectorThe following sections describe the screens to configure a GroupWise-to-Exchange ("G-to-E") Connector:
• G-to-E: Connector Information
• G-to-E: GroupWise Source Info [for GW 2012, or GW 7 or 8]
• G-to-E: Exchange Target Information
• G-to-E: Target Location Information
• G-to-E: Connector Order Management
• G-to-E: Connector Scheduling
IMPORTANT: For a GroupWise 7-to-Exchange connector, you must define an object filter to exclude the GroupWise Post Office to which you synched the Exchange user. This is accomplished in the Connector Advanced Settings tab: object filtering features, as described below.
Coexistence Manager for GroupWise 1.5.6User Guide
35

G-to-E: Connector InformationThis first screen asks you to name the connector and specify the direction:
• Connector Name: The name of the connector, as you want it to appear in the table on the Connector Settings screen. Note that the connector name cannot include any characters that are disallowed for a Windows file or folder name, such as \ / : * ? " < > |
• Direction: Select GroupWise to Exchange.
Click Next to proceed to the next screen.
G-to-E: GroupWise Source Info [for GW 2012, or GW 7 or 8]
Use the fields on this screen to specify the objects in the source server to be processed, and specify the identity and location of the GroupWise source server.
• Mark one or more checkboxes to indicate the types of objects you want to process:[ ] Resources [ ] Groups [ ] Users [ ] Contacts
• GroupWise SMTP Domains: The SMTP domain name (or names) for the GroupWise mail server.
• Path to GroupWise Database: The UNC path to your GroupWise domain file wpdomain.db, as specified during the GroupWise installation. Enter this value in UNC form, and use the raw server name (i.e., not fully qualified) within the path. For example, use \\GWISE1\sys\mail\gwdom rather than \\GWISE1.dell.local\sys\mail\gwdom.
• Account: The account username by whose authority the Directory Connector will access the share containing the GroupWise domain files.
• Password: Enter the password associated with the Account above.
When these fields are correctly filled, click Next to advance to the next screen (or click Back to revisit an earlier screen in the sequence).
G-to-E: GroupWise Source Info [for GW 2014]
Use the fields on this screen to specify the objects in the source server to be processed, and specify the identity and location of the GroupWise Soap Service.
• Mark one or more checkboxes to indicate the types of objects you want to process:[ ] Resources [ ] Groups [ ] Users [ ] Contacts
• SOAP Service:
• Server URL: URL for the GroupWise SOAP server—i.e., the server that runs the web access service for the post office. You must have the SOAP web service enabled, and designate the port number used. For example: http://groupwise.sitraka.com:7191/soap
• Account: The account username by whose authority the Directory Connector will access the SOAP server—for example: ElvisMugwump
NOTE: This screen appears differently depending on whether you have installed the DC for GroupWise 2014 or some other GroupWise version. This topic describes the screen for a GroupWise 2012 or GW 7 or 8 source. See the next topic below for a GroupWise 2014 source.
NOTE: It is possible (but uncommon) that access will fail even if you enter the correct credentials here, since the username can be expressed differently in different contexts. To solve this problem, see in the Troubleshooting Appendix: Novell directory or Active Directory server denies access to Directory Connector account.
NOTE: This screen appears differently depending on whether you have installed the DC for GroupWise 2014 or some other GroupWise version. This topic describes the screen for a GroupWise 2014 source. See the preceding topic for GroupWise 2012 or GW 7 or 8 source.
Coexistence Manager for GroupWise 1.5.6User Guide
36

• Password: The password associated with the above Account name.
• Test: Click this button to test the connection defined by your entries in the above fields.
When these fields are correctly filled, click Next to advance to the next screen (or click Back to revisit an earlier screen in the sequence).
G-to-E: Exchange Target InformationEnter the information needed to identify and access the Exchange target server:
• Domain or Server (the field name depends on the radio-button selection for Domain Controller vs. Domain vs. Forest): The name of the target server (in a form sufficiently qualified that it can be identified from the CMG Directory Connector server) or Active Directory domain. For example: Mustang or mustang.engineering. A set of three radio buttons to the right of this field lets you further characterize the source:
O Domain Controller O Domain O Forest
• Username: The username by whose authority the Directory Connector will access the target server. This must be a domain administrator account with sufficient rights/permissions to access the source server.
• Password: The password associated with the above Username.
• Port: The port number that the target (AD) server will use to communicate with CMG’s Directory Connector. Dell recommends you leave this value set to its default, unless the host AD system is not using the default ports.
When these fields are filled with the correct information, click Next to advance to the next screen (or click Back to revisit an earlier screen in the sequence).
G-to-E: Target Location InformationEnter this information to characterize data destination(s) in the target server:
• Target Domain: The name of the Active Directory server. CMG prefills this field with the same value you entered for it on the Exchange Target Information screen.
• Target OU: In the adjacent container tree, select (click) the container in the target directory that you want to contain the CMG target container (cn=cmg)—into which this connector will copy objects from the Novell source. CMG names its AD target container cn=cmg as a subcontainer within the OU you select here. (CMG will create cn=cmg if it doesn't already exist in this Target OU.)
• Target Search Base Dn: An OU subtree root that defines the scope of the connector’s searches for target objects. Use the Browse button (at right) to open a pop-up list of available target base DNs, with checkboxes, so you can select one or more. If you want to include users in the sync process, to check for existing objects in multiple target domains, each target base DN must be explicitly selected to be included in the comparisons. Selecting a higher-level OU does not include all of its lower-level OUs. You
NOTE: It is possible (but uncommon) that access will fail even if you enter the correct credentials here, since the Username can be expressed differently in different contexts. See the Troubleshooting topic Novell directory or Active Directory server denies access to Directory Connector account.
NOTE: Remember: CMG’s DC connectors can be configured to facilitate destructive directory updates—that is, after a connector’s first run, a subsequent run can be told to remove an object from the target if the corresponding object no longer exists in the source. For this reason, no two G-to-E connectors can share the same destination container. (If two such connectors were directed to the same container, each connector run would remove the contacts for users who were copied in the last run of the other connector, but who are not part of the source population for the current connector.) For two or more G-to-E connectors, you can name their Target OUs ou=users1, ou=users2, ou=users3, etc.
Coexistence Manager for GroupWise 1.5.6User Guide
37

can improve search performance by excluding OUs that do not contain any objects relevant to these searches. The OU selected here must contain the Target OU specified in the preceding field.
• [ ] Enable Internal Routing Domain (only if using subdomains for mail routing): Mark this checkbox and enter the target’s subdomain name (for example, sub1.xyzcorp.com) into the associated text box. This is the subdomain portion of the addresses (after the @ symbol) that will route mail from the target environment back to the source.
• Legacy Exchange Dn: Base Dn for the Legacy Exchange Dn (_________/CN=Recipients/CN=[UserValue]). Use the Load from AD button (see below) or type the value into the text box.
• Address Books Container Dn: Base Dn for the Address Books Container Dn. Use the Load from AD button (see below) or type the value into the text box.
• Global Address List Dn: Base Dn for the Global Address List Dn. Use the Load from AD button (see below) or type the value into the box.
• Load from AD button (to the right of the three Dn text boxes listed above): Tells CMG to search Active Directory for these values, show them to you (in a pop-up dialog box), and then let you choose which value(s) you want to insert into the Target Location Information screen. To use this feature: Click Load from AD, review the values as CMG finds them in AD, mark the checkbox of each value you want to insert into Target Location Information, and then click OK.
When these fields are filled with the correct information, click Next to advance to the next screen (or click Back to revisit an earlier screen in the sequence).
G-to-E: Connector Order ManagementThis screen provides a table of all previously defined connectors, with a checkbox corresponding to each connector in the list. Mark the checkbox for each connector that must complete its run before the current connector will be permitted to start.
Then click Next to advance to the next screen (or click Back to revisit an earlier screen in the sequence).
G-to-E: Connector SchedulingThis screen lets you schedule this connector’s runs in much the same way that you define a recurring meeting in GroupWise or Exchange. You can define more than one recurrence pattern for any single connector; if you do, the scheduled runs will be the sum of all such recurrence patterns defined here. That is, if more than one recurrence pattern appears in the table (bottom half of this screen), the connector will run for all of the scheduled patterns that appear in the table.
To add a recurrence pattern to the table:
1 Use the fields in the top half of the screen to define the recurrence pattern, as you would in GroupWise or Exchange.
2 Click the Add button.
To remove a recurrence pattern from the table:
• Select it in the table, and click the Delete button.
To change some element of a previously defined recurrence pattern:
• Simply Delete it from the table, and then Add a new recurrence pattern to replace it.
Note that it is possible to define a connector without scheduling it for automatic recurring runs. Some admins, for example, like to have one or more unscheduled connectors defined that can be run as-needed, by the Run Connector Now feature in the Management Console.
When the table appears as you want it, click Next to complete the Wizard and create (or edit) the connector, or click Back to revisit an earlier screen.
Coexistence Manager for GroupWise 1.5.6User Guide
38

Remember: For a GroupWise 7-to-Exchange connector, you must also define an object filter to exclude the GroupWise Post Office to which you synched the Exchange user. This is accomplished in the Connector Advanced Settings tab: object filtering features (described later in this chapter).
Remember too ...Be sure to see Other options you can set per connector, to see if any of the feature options described there may be useful or necessary to your coexistence scenario.
Other options you can set per connectorMost of a connector’s configuration settings are entered and edited in the Connector Creation Wizard, as described in the preceding section, but a few other settings can be entered in a separate Advanced Settings dialog box (see Connector Advanced Settings below), and still other features can be set or enabled/disabled as described in the subtopics here.
Configuring the <AppendAttributes> parameterThe <AppendAttributes> parameter lets you specify a list of one or more target attributes whose values will be appended to, rather than replaced by, a connector running in Update mode. That is, for each object in the directory, the value of each designated attribute in the source will be added to any existing value in the target.
This parameter is optional, and is configured separately for each DC connector in the connector's section of the DC Configuration.xml file. To designate the attribute(s) that should function this way in Update mode, find (or add) the <AppendAttributes> tags for the connector, and enter the names of the target attributes separated by a pipe character ("|") between the tags, like this:
<AppendAttributes>cn|mail|proxyaddresses</AppendAttributes>
To limit connector scope to only particular GroupWise 7 domains and postofficesThe Directory Connector lets you limit the scope of a Groupwise 7-to-Exchange connector to include only particular GroupWise domains and postoffices. (The option is available only for G-to-E connectors with GroupWise 7.) This feature is configured by the <GwDomainPoRules> parameter in the <ConnectorSetting> section of each connector definition in the Directory Connector's configuration file (configuration.xml). The parameter accepts multiple domain and postoffice values, separated by pipe ("|") characters, as in this example:
<ConnectorSetting> <GwDomainPoRules>domain1|domain3|domain4.po2|domain4.po7</GwDomainPoRules> </ConnectorSetting>
By default (if the parameter is omitted from a connector definition) the connector will include all GroupWise domains and postoffices. Likewise, if no postoffice is specified for any given domain, the connector wil include all postoffices for the domain. Note that the scope of domains and postoffices defined by this parameter precedes (is at a higher level than) the Source Scope feature (described under Advanced Settings tab: object filtering features).
To synchronize other (non-user) object typesCMG’s Directory Connector lets you synchronize dynamic distribution lists and other non-user object types between the source and target directories. This feature is enabled (or not) and configured independently per connector, by modifying the connector’s section in the Directory Connector configuration.xml file.
The following xml attributes can be used to overwrite the default values for the source or target object type used during synchronization:
Coexistence Manager for GroupWise 1.5.6User Guide
39

To use one of these values to change the default source or target object type:
1 Create a new connector that will be used to change the source or target object type. Save the new connector.
2 Stop the Configuration Console.
3 Edit the Configuration.xml file located in the Directory Connector directory.
Find the configuration section (<ConnectorSetting>) for the connector you intend to modify and add a line for the desired xml attribute as shown in the example below. The new line is shown here in bold red, italicized. In this example, the SourceGroupObject is used to modify the default value Groups to the value msExchDynamicDistribList:
<ConnectorSetting> ... <SourceGroupObject>msExchDynamicDistribList</SourceGroupObject> ... </ConnectorSetting> </ConnectorSettingsList>
4 Restart the Configuration Console.
5 Save the modified configuration.
6 Run the DC connector.
Connector Advanced SettingsMost of a connector’s configuration settings are entered and edited in the Connector Creation Wizard, as described in the preceding section, but a few other settings can be entered in a separate Advanced Settings dialog box. CMG’s Directory Connector lets you fine-tune the attribute mappings, object-selection filters, and attribute associations (for source-target object matching)—individually for each defined connector.
Typically these Advanced Settings control connector functions whose default settings are suitable for most environments, but may be modified as needed for your own local circumstances.
For any selected connector, the Advanced Settings let you:
• Edit the search string used with the Exchange exclusion attribute to prevent looping of objects during a directory update (if your expected use of the attribute would collide with the default settings).
• Enable or disable the Provision (add), Update (edit) and/or Delete functions of the designated connector.
• Set limits on the number of objects that can be deleted or added during a single directory update.
• Define how GroupWise 8 handles its email invitations to users to share the address books copied from AD in an Exchange-to-GroupWise 8 (only) connector update.
• For each object type (Users, Contacts, Groups and Resources):
• Attribute Mapping Features: Define how directory attributes in the source correspond to attributes in the target.
• Object Filtering Features: Define object selection filters that tell a connector which objects to include when provisioning, updating or deleting objects.
• Object Association Features: Define how a connector matches objects in the source directory to their corresponding objects in the target.
SourceUserObject SourceGroupObject SourceResourceObject SourceContactObject
TargetUserObject TargetGroupObject TargetResourceObject TargetContactObject
Coexistence Manager for GroupWise 1.5.6User Guide
40

The Advanced Settings dialog box can contain any number and combination of six tabbed panels (all six shown here), depending on which objects you have selected for processing by this connector. Also, the Address Book tab appears only for an Exchange-to-GroupWise 8 or GroupWise 2012 connector.
The Advanced Settings dialog box is launched from the Connectors table in the Connector Settings screen of the Management Console. From that Connectors table: Right-click on the connector whose Advanced Settings you want to edit, and click Advanced Settings to open the dialog box.
Advanced Settings tab: GeneralThe General tab lets you modify any or all of these connector configuration functions, as necessary:
• Exclusion Mapping Value: The search string used with the Exchange exclusion attribute to prevent looping of objects during a directory update — if your expected actual use of the attribute would collide with the default setting. The default string appears here, but can be changed if it collides with other uses of the attribute.
• [ ] Provision — [ ] Update — [ ] Delete: These three checkboxes let you enable or disable the Provision (add), Update (edit), and/or Delete objects functions for the selected connector. These functions are enabled and disabled independently for each connector:
• [ ] Provision: If enabled [X], and no object in the target corresponds to an object in the source, the connector will create the new object in the target.
• [ ] Update: If enabled [X], and an existing object in the target corresponds to an object in the source but the object’s attribute data differs, the connector will overwrite target object data with corresponding source object data— or—will append source data to target data for some attribute(s) if so configured by the <AppendAttributes> parameter for the connector (as described in step 1 of the Installation and configuration instructions above).
• [ ] Delete: If enabled [X], and the connector sees no object in the source that had been in the source at the last connector update, it will delete the object in the target. For example, if User XYZ is copied from source to target, and then is deleted from the source, the next run of the same connector will remove User XYZ from the target.
• Overwrite Object Names (checkbox, enabled only if the Update function is selected for this connector): If marked, the connector will overwrite object names on corresponding objects discovered in the target. By default, object names are not overwritten (checkbox is unmarked).
NOTE: Remember that Advanced Settings are entered and/or edited for one connector at a time — only for the single connector that was selected when you opened the Advanced Settings.
NOTE: A manual change to an entry in a CMG target container will persist unupdated through subsequent connector runs if the corresponding source object record has not also been changed. A connector compares the source object data to a copy of the source object record from the preceding connector run, and updates the target object only if the source object has changed.
IMPORTANT: If you are upgrading from an earlier version connector and attempting to update Users as well as Contacts: You must also remove the filter condition that excludes user objects from the Update function. See the instructions below on the Update Filters tab of Advanced Settings.
Coexistence Manager for GroupWise 1.5.6User Guide
41

• Enable Add/Delete Verification (applies only for a GroupWise-to- Exchange connector): Use these two checkboxes to trap probable error conditions that might otherwise cause inadvertent object additions or deletions during a directory update.
For example: Sometimes the source system does not return all objects on a query, and these "missing" objects are then presumed to have been deleted from GroupWise. In that case, a G-to-E connector in Delete mode would delete those objects from Active Directory, trying to match the apparent state of the GroupWise source. But such inadvertent deletions can be avoided by setting a limit on the number of objects that may be deleted. This feature assumes that if the limit number is reached, an error has likely occurred, so the connector will abort the process without deleting any objects. Add Verification works similarly for object additions in a target directory.
These checkboxes and the associated text boxes let you set add and/or delete limits for a DC connector:
• Enable Add Verification: Mark this box to set a limit on the number of objects that can be added to AD during a directory update. If the number to be added exceeds this threshold, the add operation is canceled and the update is aborted. Default = 2 billion.
• Enable Delete Verification: Mark this box to set a limit on the number of objects that can be deleted from AD during a directory update. If the number to be deleted exceeds this threshold, the delete operation is canceled and the update is aborted. Default = 25.
• Update LDAP Attributes: [ Update Source ] and [ Update Target ]: These buttons let you query the source and target directories (respectively) for lists of their current, actual attributes— which CMG’s DC needs to know if either or both directories contain any customized attributes. CMG can establish the initial connections with its known lists of default attributes, but thereafter must know the actual attributes for any of the attribute mapping, object filtering or object association features available in a connector’s Advanced Settings.
Advanced Settings tab: Address BookThe Address Book tab appears only for an Exchange-to-GroupWise 8 connector. This tab lets you define, for each DC connector, how GroupWise 8 should handle invitations to users to share address books copied from Exchange to GroupWise during a connector update. Remember that these invitation emails will work only in the native GroupWise client; GroupWise web clients are not supported.
When a CMG directory update copies an address book from Active Directory to GroupWise 8, GroupWise tries to recreate the access rights from AD by inviting the end users with access to the original AD address book to also share the copy in GroupWise. GroupWise sends an invitation to those users who had access to the list in Exchange, and the invitation appears in each user’s GroupWise Inbox. The invitation opens as a dialog box, with buttons that let the recipient either Accept or Decline the invitation.
The fields on the Address Book tab ask you to specify how GroupWise should handle these invitations:
• Address Book Sharing limit: Maximum number of users to include in a share list (GroupWise users to be invited to share the address book). If a share list exceeds the number specified here, GroupWise will divide the list into two or more separate lists. The valid range is 10–5000. The default is 5000, which is the maximum GroupWise 8 will allow in a share list, but the Exchange ACL list may be larger.
• Invitation Subject: Text of the invitation Subject line.
• Invitation Body: Text of the invitation message. GroupWise will insert this text into the Message portion of its invitations.
Many organizations find it helpful to users to include these instructions in the Invitation Body:
1 In your GroupWise email application, select Tools menu option Address Book.
2 In the Address Book window, select File menu option Name Completion Search Order.
3 In the Name Completion Search Order dialog box:
a Select the name of the CMG shared address book in the Available books list (left), and click the Add button to add it to the Selected books list (right).
b Select the CMG shared address book in the Selected books list, and click Up as often as necessary to move it to the top of the list.
Coexistence Manager for GroupWise 1.5.6User Guide
42
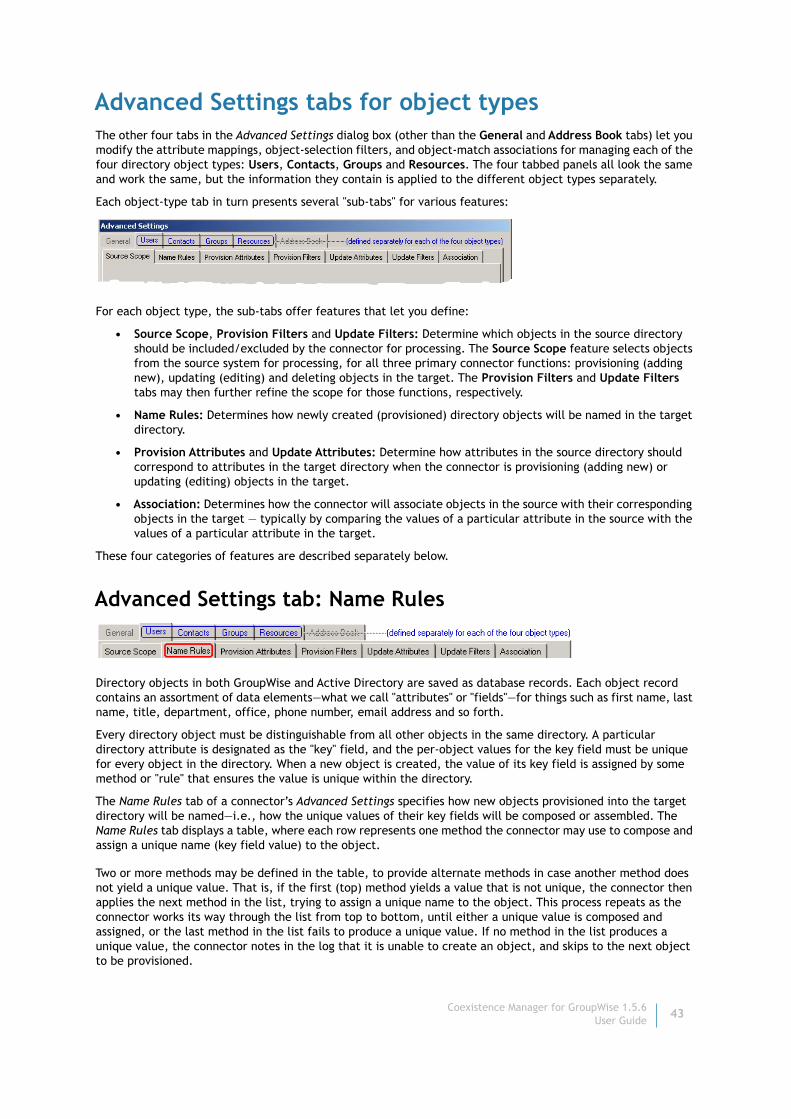
Advanced Settings tabs for object typesThe other four tabs in the Advanced Settings dialog box (other than the General and Address Book tabs) let you modify the attribute mappings, object-selection filters, and object-match associations for managing each of the four directory object types: Users, Contacts, Groups and Resources. The four tabbed panels all look the same and work the same, but the information they contain is applied to the different object types separately.
Each object-type tab in turn presents several "sub-tabs" for various features:
For each object type, the sub-tabs offer features that let you define:
• Source Scope, Provision Filters and Update Filters: Determine which objects in the source directory should be included/excluded by the connector for processing. The Source Scope feature selects objects from the source system for processing, for all three primary connector functions: provisioning (adding new), updating (editing) and deleting objects in the target. The Provision Filters and Update Filters tabs may then further refine the scope for those functions, respectively.
• Name Rules: Determines how newly created (provisioned) directory objects will be named in the target directory.
• Provision Attributes and Update Attributes: Determine how attributes in the source directory should correspond to attributes in the target directory when the connector is provisioning (adding new) or updating (editing) objects in the target.
• Association: Determines how the connector will associate objects in the source with their corresponding objects in the target — typically by comparing the values of a particular attribute in the source with the values of a particular attribute in the target.
These four categories of features are described separately below.
Advanced Settings tab: Name Rules
Directory objects in both GroupWise and Active Directory are saved as database records. Each object record contains an assortment of data elements—what we call "attributes" or "fields"—for things such as first name, last name, title, department, office, phone number, email address and so forth.
Every directory object must be distinguishable from all other objects in the same directory. A particular directory attribute is designated as the "key" field, and the per-object values for the key field must be unique for every object in the directory. When a new object is created, the value of its key field is assigned by some method or "rule" that ensures the value is unique within the directory.
The Name Rules tab of a connector’s Advanced Settings specifies how new objects provisioned into the target directory will be named—i.e., how the unique values of their key fields will be composed or assembled. The Name Rules tab displays a table, where each row represents one method the connector may use to compose and assign a unique name (key field value) to the object.
Two or more methods may be defined in the table, to provide alternate methods in case another method does not yield a unique value. That is, if the first (top) method yields a value that is not unique, the connector then applies the next method in the list, trying to assign a unique name to the object. This process repeats as the connector works its way through the list from top to bottom, until either a unique value is composed and assigned, or the last method in the list fails to produce a unique value. If no method in the list produces a unique value, the connector notes in the log that it is unable to create an object, and skips to the next object to be provisioned.
Coexistence Manager for GroupWise 1.5.6User Guide
43

The buttons below the table let you define new object-naming methods or edit existing methods in any of three ways:
• Add Script: Define a script to determine the values to assign to the object’s key field. (See the sample script in this screenshot.)
Note that a script can be used to assign different values conditionally (per object), whereas a rule (next option below) cannot. A script can test environmental conditions (per object), as shown above, and then assign different values depending on the outcome of the test.
Click OK to add the script to the Name Rules table of methods, and dismiss this Add Script dialog box.
• Add Rule: Define a rule to determine how object names will be composed, assembled or otherwise derived. A DC connector evaluates an attribute value rule as an expression, and for each object assigns the result to the object’s key field.
A rule assembles an assignment value for each object from any number, combination and sequence of source attribute values and text strings, which in turn may be processed by:
• Keeping only a specified portion of the string (defined by the starting and ending character positions), and discarding the rest.
• Appending a string of "fill" characters to fill the capacity of the attribute field (character may be a space or any other specified character).
• Trimming a string of repetitive "fill" characters (e.g., spaces) that follow an attribute value.
• Setting a capitalization preference for alphabetic characters in the value.
Click OK to add the rule to the Name Rules table of methods, and dismiss this Add Rule dialog box.
• Add Attribute: Select an attribute from the drop-down list box, whose value (per object) will be assigned to the object’s key field. Use the drop-down list to specify the attribute, and click OK.
Coexistence Manager for GroupWise 1.5.6User Guide
44

After you have defined a method (when it appears in the table), you can move its position in the list, copy it, edit its defintion, or delete it altogether:
• Move Up: Move the selected method up one position in the list.
• Copy: Make a copy of the selected method, and then Edit the copy via the Edit button.
• Edit: Edit the definition of a selected method. (In the table: Select the method you want to edit, and click Edit.)
• Remove: Delete the definition of a selected method. (In the table: Select the method you want to delete, and click Remove.)
Advanced Settings tab: attribute mapping features
Directory objects in both GroupWise and Active Directory are saved as database records. Each object record contains an assortment of data elements—what we call "attributes" or "fields"—for things such as first name, last name, title, department, office, phone number, email address and so forth. GroupWise and AD save many of the same object attributes, although they often don’t identify them by the same attribute names, and each directory contains some attributes that the other does not. Also, both GroupWise and AD offer several undefined attributes that you can customize (assign and name) for your own purposes.
When objects are copied from one directory to the other, or object data is sync between the two directories, the updating process must be told how the object attributes in the two environments correspond to one another— for example, so users’ middle names in one directory don’t appear as phone numbers in the other.
CMG’s Directory Connector knows how the default GroupWise and AD object attributes correspond to one another, and these default attribute mappings are suitable in most environments. But since many organizations customize their use of directory object attributes, the DC’s Advanced Settings tab lets you customize a connector’s attribute mappings to meet your own local needs.
Attribute mapping is necessary when copying entire objects from one directory to another (provisioning) or when copying the field contents of an object in one directory to the corresponding field of the same object in the target directory (updating). Attribute mapping isn’t used when deleting objects, since deletions occur at the object level, not at the field (attribute) level.
The DC Advanced Settings tab for each of the four object types offers two sub- tabs for attribute-mapping features. Both tabs (features) define how attributes in the source directory will correspond to attributes in the target directory, but:
• Provision Attribute: Defines these attribute mappings for when the connector is provisioning (adding new) objects in the target.
• Update Attribute: Defines these attribute mappings for when the connector is updating (editing) objects in the target.
Either tab opens the same panel for attribute mappings. The Attribute Mappings panel shows a table that lists the defined mappings for the selected connector— for either the provisioning or updating function. Each line in the table is independent of the others. No two lines can define mapping for the same single-valued target without creating a synchronization error. Two or more Source mapping methods may assign different values to a single multivalue Target attribute.
NOTE: The GroupWise API can sync no more than ten admin-defined fields, although the Novell directory can be configured for more than ten. If more than ten are defined, the GroupWise API will transmit only the first ten, so a CMG G-to-E connector can sync only those ten to Active Directory.
Coexistence Manager for GroupWise 1.5.6User Guide
45
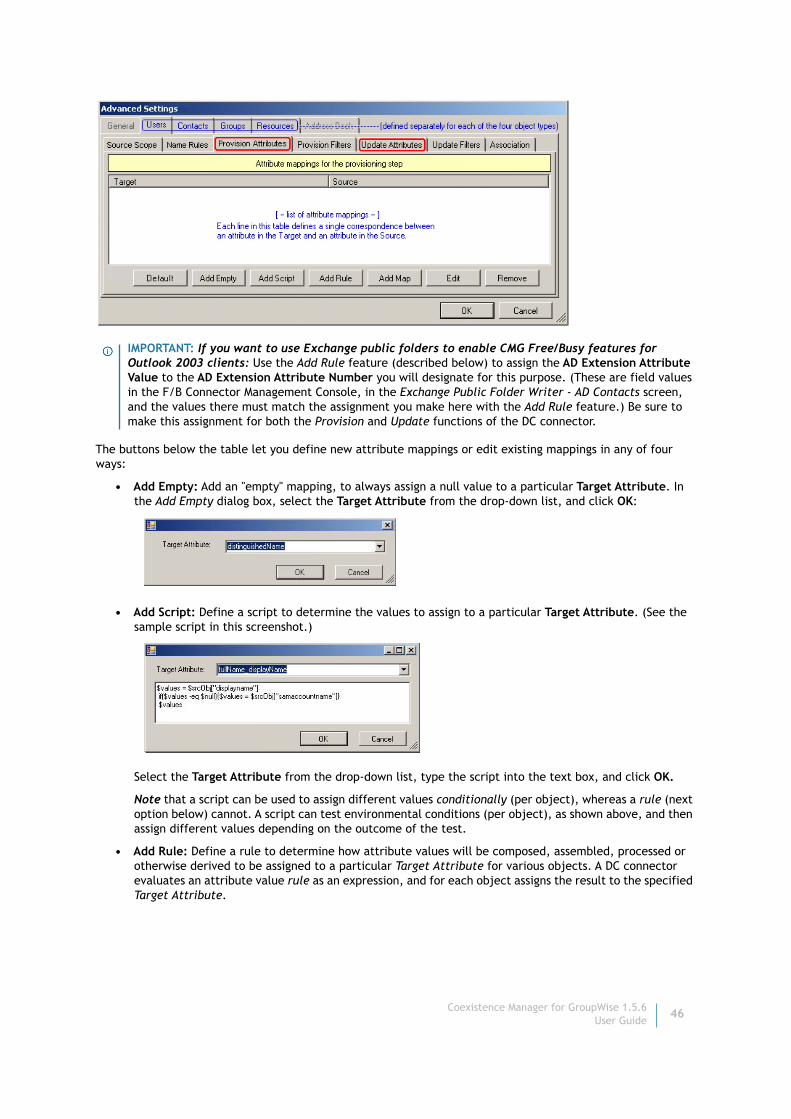
The buttons below the table let you define new attribute mappings or edit existing mappings in any of four ways:
• Add Empty: Add an "empty" mapping, to always assign a null value to a particular Target Attribute. In the Add Empty dialog box, select the Target Attribute from the drop-down list, and click OK:
• Add Script: Define a script to determine the values to assign to a particular Target Attribute. (See the sample script in this screenshot.)
Select the Target Attribute from the drop-down list, type the script into the text box, and click OK.
Note that a script can be used to assign different values conditionally (per object), whereas a rule (next option below) cannot. A script can test environmental conditions (per object), as shown above, and then assign different values depending on the outcome of the test.
• Add Rule: Define a rule to determine how attribute values will be composed, assembled, processed or otherwise derived to be assigned to a particular Target Attribute for various objects. A DC connector evaluates an attribute value rule as an expression, and for each object assigns the result to the specified Target Attribute.
IMPORTANT: If you want to use Exchange public folders to enable CMG Free/Busy features for Outlook 2003 clients: Use the Add Rule feature (described below) to assign the AD Extension Attribute Value to the AD Extension Attribute Number you will designate for this purpose. (These are field values in the F/B Connector Management Console, in the Exchange Public Folder Writer - AD Contacts screen, and the values there must match the assignment you make here with the Add Rule feature.) Be sure to make this assignment for both the Provision and Update functions of the DC connector.
Coexistence Manager for GroupWise 1.5.6User Guide
46

A rule assembles an assignment value for each object from any number, combination and sequence of source attribute values and text strings, which in turn may be processed by:
• Keeping only a specified portion of the string (defined by the starting and ending character positions), and discarding the rest.
• Appending a string of "fill" characters to fill the capacity of the attribute field (character may be a space or any other specified character).
• Trimming a string of repetitive "fill" characters (e.g., spaces) that follow an attribute value.
• Setting a capitalization preference for alphabetic characters in the value.
Select the Target Attribute from the drop-down list, use the on-screen controls to enter the rule into the text box, and click OK.
• Add Map: Define a simple mapped association to assign (for each object) the value of a particular Source Attribute to the object’s particular corresponding Target Attribute. Use the drop-down lists to specify the source and target attributes, and click OK.
After you have defined an attribute mapping (when it appears in the table), you can edit its definition or delete it altogether:
• Edit: Edit the definition of a selected mapping. (In the table: Select the mapping line you want to edit, and click Edit.)
• Remove: Delete the definition of a selected mapping. (In the table: Select the mapping line you want to delete, and click Remove.)
Restoring default attribute mappingsAttribute associations that have been changed from their defaults appear highlighted in the table by a gray bar. To restore a default mapping that has been changed:
• Right-click the highlighted line to open a confirmation prompt (“Replace with default value?”), and click Yes to confirm your command (or click No to cancel it).
Attribute associations that have been Removed simply do not appear in the table. To restore a default mapping that was previously Removed:
• Click the Defaults button to open a dialog box showing the default attribute mappings (if any) that have been Removed. In the Defaults dialog box, select (click on) the line you want to restore, and click OK.
In either case, remember that multivalue attributes in the source can appear twice or more in the table—once for each value assigned in the target—so be careful to select the correct line to restore.
Coexistence Manager for GroupWise 1.5.6User Guide
47

Advanced Settings tab: object filtering features
A CMG DC connector can be configured to include in its operations only certain objects that meet certain conditions, or that meet any of a list of conditions. These object filters are defined independently for the four object types: Users, Contacts, Groups and Resources. For each object type, object filter sets also are defined separately for a connector’s different operations: provisioning or updating objects and defining Source Scope.
The Directory Connector Advanced Settings tab offers three sub-tabs to control object scope and filtering:
• Source Scope: Selects objects from the source system for processing. During synchronization, the Provision and Update filters may further refine the objects included.
• Provision Filters: Prior to the selected connector operation, defines the objects within the Source Scope that will be provisioned (added).
• Update Filters: Prior to the selected connector operation, defines the objects within the Source Scope that will be updated.
Any of the three tabs opens this same panel for object filtering:
This Object Filtering panel shows a table that lists the defined filter(s) for the selected operation (tab) for the selected object type (tab) of the selected connector. Each line in the table defines a single filter, telling the connector to include in its operation only objects that satisfy the filter’s defined condition(s).
Buttons below the table let you:
• Add Filter: Add a new filter to the table list.
• Edit: Edit the definition of a selected filter. (Select the filter you want to edit, and click Edit.)
• Remove: Delete the definition of a selected filter. (Select the filter to delete, and click Remove.)
The Add and Edit buttons both open the Filter Definition dialog box (described below), which lets you define a single new filter.
IMPORTANT: Existing target objects excluded by the Provision and Update filters do not cause deletion of corresponding target objects. Only manual deletion of source objects or changing the Source Scope will delete the corresponding target objects.
IMPORTANT: If two or more filters appear in the table, they are logically associated by the OR operator. That is, an object is included in the connector’s scope if it passes any of the individual filters in the list. Each additional filter in the list makes the overall set of filters less restrictive.
Coexistence Manager for GroupWise 1.5.6User Guide
48

Filter Definition dialog boxThe Filter Definition dialog box is designed to help you compose one or more conditions to make up an object filter.
A DC connector filter condition is defined in the form of an expression that evaluates to either true or false, and that is composed of at least one operand ("A" in the illustration below) with an operator ("B"). For many conditions a second operand ("C") is also required to define the limit or scope of the operator ("B").
Note that a second operand ("C") is required for any operator ("B") other than Present or Not present, since only expressions with one of those two operators can be evaluated without a second, comparative operand value. Any of the other eight operators would be meaningless without a second operand to compare to the value of the first operand ("A").
To define a new filter (beginning on the Object Filtering panel)
The flow chart below illustrates this process.
To define a new object filter:
1 Click Add Filter to open the Filter Definition dialog box (shown above).
2 Enter a Name for the filter, as you want it to appear in the filters table in the Object Filtering panel (for visual identification purposes only).
3 Use the Attribute or Rule or Script feature (buttons in the top-right corner of the dialog box) to define the required operand. Clicking any of these buttons pops up the associated dialog box, in which you can
IMPORTANT: If you are upgrading from an earlier version connector and want to update Users as well as Contacts, and have chosen to Overwrite Object Names (on the General tab of Advanced Settings): You must also remove the filter condition that excludes user objects from the Update function, here in the Update Filters tab. Select the Filter Name for the filter definition that contains this condition:
%script% Equals,contact
Then click the Edit button to open the Filter Definition dialog box, select the [%script% Equals,contact] line, click Remove, and click OK to save the filter.
IMPORTANT: To update resources from Exchange 2003 to GroupWise: An Exchange 2003-to-GroupWise connector cannot create a Resources address book in GroupWise, and therefore cannot update resources when the Resources box is checked in the Source Object Selection screen of the Connector Creation Wizard. (CMG was originally designed for Exchange versions 2007 and later, and those later versions, unlike Exchange 2003, treat resources as "users" with an extra attribute set.) Therefore, to update resources by an Exchange 2003-to-GroupWise connector you must delete the msExchResourceSearchProperties conditions that appear (by default) in both filters of both the Provision Filters and Update Filters tabs here.
Coexistence Manager for GroupWise 1.5.6User Guide
49

define the attribute, rule or script that you want to use to determine the required operand of the expression.
To use the Attribute or Rule and Script features:
• Attribute: Select a Source Attribute from the drop-down list box, whose value (per object) will be inserted as the required operand of this conditional expression. Use the drop-down lists to specify the source and target attributes, and click OK:
Coexistence Manager for GroupWise 1.5.6User Guide
50

• Rule: Define a rule to determine how values will be composed, assembled, processed or otherwise derived (per object) for the required operand of this expression. A DC connector evaluates this rule as a "sub-expression," and inserts the result for each object into the conditional expression as the required operand.
A rule assembles an assignment value for each object from any number, combination and sequence of source attribute values and text strings, which in turn may be processed by:
• Keeping only a specified portion of the string (defined by the starting and ending character positions), and discarding the rest.
• Appending a string of "fill" characters to fill the capacity of the attribute field (character may be a space or any other specified character).
• Trimming a string of repetitive "fill" characters (e.g., spaces) that follow an attribute value.
• Setting a capitalization preference for alphabetic characters in the value.
Use the on-screen controls to enter the rule into the text box, and click OK.
• Script: Enter a script (see sample script in screenshot below) to determine the values to assign to the required operand for the condition. Type the script into the text box, and click OK.
Note that a script can be used to assign different values conditionally (per object), whereas a rule (preceding option above) cannot. A script can test environmental conditions (per object), as shown in this example, and then assign different values depending on the outcome of the test.
Clicking OK from the Attribute, Rule or Script dialog box tells the program to dismiss the dialog box and insert the newly defined attribute, rule or script into the Operand field of the Filter Definition dialog box.
4 Click one of the Specify Operation radio buttons to specify the operator to be used in this expression.
5 If this condition requires a comparative operand (i.e., following any operator other than Present or Not present) to set the limit or scope of the condition: Type the operand value into the Value text box.
6 Click the Add button to compile the operand(s) and operator into a conditional true/false expression. The program then inserts a one-line summary of the condition into the list to the left of the Add and Remove buttons. For example:
mail IsPresent, postoffice NotContain,Birmingham postoffice NotContain,Denver
Coexistence Manager for GroupWise 1.5.6User Guide
51

7 Repeat steps 3–6 for each condition you want to define as part of this same filter.
A filter may contain one or more conditions. Each condition defined for this filter will appear as one line in the list to the left of the Add and Remove buttons.
Remember: Multiple conditions defined for a single filter (in the same displayed list) are logically associated by the AND operator. That is, the filter is deemed satisfied for a given object only if all of the conditions in the list are met.
Advanced Settings tab: object association features
A CMG DC connector needs to be told how to determine which objects in the source directory correspond to which objects in the target. The method for this object association (or object matching) must be specified to every DC connector, together with any other information the connector will need to perform the actual match-ups by that method.
Object association is usually accomplished by finding an object attribute in the source whose values are unique per object, and also reliably match the values of some attribute in the target directory, which also must be unique per object. The two such attributes are called "matching" attributes, and they must be specified to the CMG DC connector if this is the association/matching method the connector will use. Typically these key fields are the SMTP email addresses on both sides, but the matching attributes may vary in environments where source and/or target attributes have been customized.
A DC connector associates source and target objects by comparing per-object values in the source to per-object values in the target. These per-object values can be defined as simple attribute values, as described above, and can also be defined by rules and/or scripts. Also, the source and target comparison values need not be derived in the same way—that is, the source value may be a simple attribute value, while the connector may derive target values by a rule or script.
Note that the Object Association dialog box may contain one or more defined associations:
If two or more associations are defined in the list, the connector considers them one at a time, sequentially, top to bottom. That is, for each source object, the connector first applies the first method in the list and, if no match is found, will then try the second, and then the third, and so forth until a match is found.
NOTE: When a Does Not Contain rule is defined for an object filter (such that an object will be included only if a particular attribute Does not contain a particular value), the connector also excludes an object if the attribute itself does not exist for that object. You can define such a filter so that objects without the attribute are included, by either of two methods:
• Add another filter to the Object Filtering table (in addition to the Does Not Contain test), to test for the non-existence of the attribute—so that the object will pass the test if the attribute itself is Not present. Since multiple filters in the Object Filtering table are logically associated by the OR operator, an object will be included if it passes either/any of the individual filters in the table.
• Instead of a Does Not Contain rule, write a script to echo the missing attribute and check its value. The script will echo null for an object without the attribute, so the NotContain rule is unnecessary.
Coexistence Manager for GroupWise 1.5.6User Guide
52

When a match is found, a connector configured to Update objects then compares attribute values in the source to the corresponding (mapped) attribute values in the target, and updates the target values as necessary.
If no match is found in the target for an object in the source, the connector concludes that it is a new source object (previously unprovisioned), and copies it to the target, or not—depending on whether the connector is configured to Provision new objects.
In any case, the connector then advances to the next source object in the list.
When all source objects have been processed in this way, any remaining, unmatched target objects are presumed to correspond to objects that have been removed from the source. If the connector is configured to perform the Delete operation, it then deletes such objects from the target.
To define the object-association method(s) for a connector:
1 Beginning in the Advanced Settings | Association panel: Click Add Association to open the Object Association dialog box.
2 Enter an Association Name, as you want it to appear in the table list in the preceding Association panel (for visual identification purposes).
3 Use the Attribute or Rule or Script features (top-right corner of the dialog box) to define the comparative values for both the Source (left) and Target (right) objects. Clicking any of these buttons pops up the associated dialog box, in which you can define the attribute, rule or script that you want to use to yield per-object values for comparison:
• Attribute: Select an Attribute from the drop-down list box, whose value (per object) will be inserted as the source or target comparative element of this association. Use the drop-down list to specify the attribute, and click OK
:
Coexistence Manager for GroupWise 1.5.6User Guide
53

• Rule: Define a rule to determine how comparative values will be composed, assembled, processed or otherwise derived (per object) for source or target comparative element of this association. A DC connector evaluates this rule as a "sub-expression," and inserts the result for each object into the conditional expression as the source or target comparative element.
A rule assembles an assignment value for each object from any number, combination and sequence of source attribute values and text strings, which in turn may be processed to:
• Keep only a specified portion of the string (defined by the starting and ending character positions), and discard the rest.
• Append a string of "fill" characters to fill the capacity of the attribute field (character may be a space or any other specified character).
• Trim a string of repetitive "fill" characters (e.g., spaces) that follow an attribute value.
• Set a capitalization preference for alphabetic characters in the value.
Use the on-screen controls to enter the rule into the text box, and click OK.
• Script: Enter a script (as in the figure here) to determine the values to assign as the source or target comparative element of this association. Type the script into the text box, and click OK:
Note: A script can assign different values conditionally (per object), whereas a rule (preceding option above) cannot. A script can test environmental conditions (per object), as shown in the example here and then assign different values depending on the outcome of the test.
Clicking OK from the Attribute, Rule or Script dialog box tells the program to dismiss the dialog box and insert the attribute name or the newly defined rule or script into the appropriate comparative-element field of the Object Association dialog box.
4 Back in the Object Association dialog box: Click the Add button (bottom-left corner) to add the displayed source-target pair of comparative elements into the table list as a single condition of this association definition.
Coexistence Manager for GroupWise 1.5.6User Guide
54

5 If you want to add another condition (source-target pair) to the list, repeat steps 3 and 4.
Two or more such pairs listed within a single association definition are logically associated by the AND operator. That is, a source object and target object will be deemed associated by this method only if the object pair satisfies all of the conditions in this list.
6 Still in the Object Association dialog box: When you have defined all of the conditions (source-target pairs) you want to include in this association definition, click OK to dismiss the Object Association dialog box and add the newly defined association method into the table list on the Advanced Settings | Association panel.
Repeat this procedure for each such association you want to add to the list. Remember that if multiple associations are defined in the list, the connector considers them one at a time, sequentially, top to bottom.
Running and stopping the Directory Connector serviceThe Directory Connector service is started manually, and thereafter runs continuously until explicitly stopped. CMG’s Directory Connector service performs many of its features by calling functions that are coded in a separate underlying "engine" application (another Windows service) called the Quick Connect service. Since the Directory Connector and Quick Connect services communicate with each other, both must be stopped and started together.
To start or stop the Directory Connector and Quick Connect services
The CMG Directory Connector service can be started and stopped directly from the CMG Directory Connector Management Console, but the underlying Dell Quick Connect service can be stopped and started only from the Windows Control Panel Administrative Tools | Services, as described here:
1 Use Windows’ Services console: Open the Windows Control Panel Administrative Tools, and then open (double-click on) Windows’ Services.
2 Select the service from the list (Dell Directory Connector or Dell Quick Connect), and click the Stop or Start or Restart link that appears in the margin to the left of the list of services.
To configure the service’s behavior upon Windows startup:
Select the service from the list (Dell Directory Connector or Dell Quick Connect), and verify or change the value in the Startup Type column:
NOTE: CMG’s Directory Connector service must be running to enable the operation of its connectors. If the service is turned off, it will be unable to track scheduled run times, and no connectors will run.
NOTE: If CMG’s Directory Connector service is inadvertently interrupted or disabled by some processing error, the Quick Connect service must always be restarted whenever the Directory Connector service is restarted.
Coexistence Manager for GroupWise 1.5.6User Guide
55

• Automatic: If you want this service to automatically start when the operating system boots (or reboots—e.g., after a system restart).
• Manual: If you do not want this service to automatically start when the operating system boots.
To change the setting, double-click anywhere on the selected service row, and change the value in the Startup type drop-down list box. Then click OK.
NOTE: If you choose Manual here, and if the host computer is shut down or restarted while the service is running, you will have to manually restart the service after the computer is restarted.
Coexistence Manager for GroupWise 1.5.6User Guide
56

3
CMG Mail Connector
• Mail Connector overview
• Mail Connector deployment options
• Mail Connector installation and configuration
• Management Console for Mail Connector
Mail Connector overviewThe CMG Mail Connector is a Windows service that monitors SMTP traffic between GroupWise and Exchange to resolve incompatibilities. This service detects and converts messages as necessary to facilitate (for example):
• Invitations to recurring meetings.
• Requests to reschedule meetings, or series of recurring meetings.
• Cancellations of single meetings, or entire series of recurring meetings.
• Attachments to single meetings or series of recurring meetings.
The Mail Connector functions as a passive SMTP proxy between GroupWise and Exchange. That is, the Mail Connector does not store output of processed messages. The Mail Connector translates message elements that would otherwise be lost or misunderstood by the other mail system, and converts messages containing calendar data, while other messages simply pass through to the destination server.
CMG occasionally encounters an incompatibility between GroupWise and Exchange that it cannot correct by any practical means. CMG is able to detect most such instances and insert a brief note into the message body notifying the recipient and recommending a manual resolution. For example:
If this invitee is on an Exchange server in a different time zone from your GroupWise server: The counterproposed date shown here may be a day off from the actual date, due to incompatibilities between the GroupWise and Exchange servers.
Your calendar will process the counterproposal correctly, but you should then check your calendar to verify the date for your own information.
Mail Connector performance countersDell CMG generates sets of performance counters for its Mail Connector that feed live data to Windows' System Monitor feature. If you are unfamiliar with Windows' System Monitor feature, or how to add Dell CMG counters to the System Monitor view, see your Microsoft documentation and/or visit the System Monitor online Help for more information.
The Dell CMG Mail Connector generates these performance counters:
• GroupWise to Exchange Calendar Processing Throughput: Number of calendars processed per second (GroupWise to Exchange).
• GroupWise to Exchange Message Processing Throughput: Number of messages processed per second (GroupWise to Exchange).
• GroupWise to Exchange Message Processing Bytes Throughput: Number of message bytes processed per second (GroupWise to Exchange).
Coexistence Manager for GroupWise 1.5.6User Guide
57

• Exchange to GroupWise Calendar Processing Throughput: Number of calendars processed per second (Exchange to GroupWise).
• Exchange to GroupWise Message Processing Throughput: Number of messages processed per second (Exchange to GroupWise).
• Exchange to GroupWise Message Processing Bytes Throughput: Number of message bytes processed per second (Exchange to GroupWise).
• Calendar Processing Throughput: Number of calendars processed per second.
• Message Processing Throughput: Number of messages processed per second.
• Message Processing Bytes Throughput: Number of message bytes processed per second.
Coexistence mail routing basicsEmail coexistence, with or without CMG, can be configured within a single domain ("single namespace"), or can be accomplished by differentiating the two environments with different domains or subdomains—for example, gwise.xyzcorp.com vs. exchg.xyzcorp.com. The CMG Mail Connector integrates easily into either method.
By the multi-domain/subdomain method, GroupWise and Exchange are assigned different subdomains to differentiate the two internally (within your network), so email can be routed between the two servers by SMTP addressing and the DNS configuration. To insert CMG’s Mail Connector into this scheme, point the outbound traffic from each server to the CMG Mail Connector server, and point the CMG Mail Connector’s outbound mail to the appropriate GroupWise or Exchange server, depending on the domain/subdomain name in the address.
The multi-domain/subdomain methods are straightforward, but configuration is more complicated than with single-namespace methods. Single-namespace mail coexistence is accomplished by using smart hosts in both directions.
Single-namespace message routing without CMGThe next three diagrams illustrate email routing in a single-namespace mail coexistence between GroupWise and Exchange—without CMG. This is native functionality and does not involve any Dell product.
Internet message routing (via GroupWise)
The step numbers here correspond to the numbers in the accompanying diagram:
1 Messages arrive from the Internet.
2 GroupWise delivers a message for a native GroupWise user locally.
3 A message for a user familiar to GroupWise, but who has a mailbox in Exchange, is sent through the smart host to Exchange via SMTP. (The Novell directory lets you specify the recipient’s Exchange mailbox, most likely when the Exchange user has been migrated from GroupWise.)
Coexistence Manager for GroupWise 1.5.6User Guide
58

A message for a native Exchange mailbox that is unknown to GroupWise beyond the domain name, is sent through smart host to Exchange via SMTP. (GroupWise is unaware of the native mailbox in Exchange.)
4 Exchange delivers the message to the Exchange user.
Inbound traffic is routed to GroupWise first in this example, but could just as easily be routed to Exchange first.
GroupWise message routing
Again, the step numbers correspond to the numbers in the diagram:
1 Message sent from one native GroupWise user to another. Delivered locally: GroupWise recognizes the recipient’s valid local (GroupWise) address, so routes it internally rather than sending to the smart host.
2 Message sent from native GroupWise user to Exchange user. Two possibilities: The Exchange user either is unknown to GroupWise, or is represented in GroupWise only as an external contact. In either case, GroupWise cannot find a local mail file for the recipient, so routes the message to the smart host for relay to Exchange, where a recipient lookup permits delivery to the appropriate mailbox. If the recipient is present in the Novell directory, then GroupWise found the forwarding address in the contact document (mail system is also set to "Other Internet Mail") and sent it with the message to the smart host.
Exchange message routingThis diagram labels the Exchange smart host as the Send Connector, which is the Exchange brand of smart host.
Again the step numbers correspond to the numbers in the diagram above:
1 Message sent from one native Exchange user to another. Delivered locally: Exchange recognizes a valid local mailbox for the message, so routes it internally (doesn’t send it to the Send Connector for external delivery).
2 Message sent from native Exchange user to GroupWise user. Two possibilities: The GroupWise user either is represented in Active Directory as an external contact, or is simply unknown to Exchange. In the first case, Exchange finds a forwarding address associated with the contact (targetaddress attribute in AD), and sends the message via the Send Connector to GroupWise, where it is delivered to the appropriate mail file. In the second case, the message is still routed to GroupWise via the Send Connector, but GroupWise will be able to deliver it only if the appropriate mail file exists.
Coexistence Manager for GroupWise 1.5.6User Guide
59

Email coexistence before and after CMGRemember that email coexistence can be configured either within a single namespace, or by differentiating the two environments with different domains (or subdomains—e.g., gwise.xyzcorp.com vs. exchg.xyzcorp.com). The CMG Mail Connector is easily integrated into either strategy, but most admins prefer the single-namespace approach because it is usually simpler to configure.
The sections below explain and illustrate how Dell's CMG Mail Connector integrates into a single-namespace coexistence between GroupWise and Exchange. Round-robin traffic distribution can be used for load balancing and redundancy among multiple CMG servers.
Single-namespace coexistence without CMG
SMTP mail routing within a single domain is accomplished using smart hosts in both directions, as shown in the illustration below. Exchange can be configured to route mail to a smart host (the Exchange Send Connector) if Exchange determines the recipient isn’t in its local Internet domain. Exchange reads the targetAddress attribute in AD to route mail for such recipients to the Send Connector. Meanwhile, GroupWise is configured to do the same thing in reverse for a recipient whose local internet domain address is not defined in the Novell directory.
The step numbers here correspond to the numbers in the diagram above.
1 The routing for inbound external messages is pointing to GroupWise.
2 Smart host routes mail to Exchange for any user without a native GroupWise mail file—represented in GroupWise by an external contact.
3 Send Connector routes mail back to GroupWise for a user without a native Exchange mailbox—represented in AD by an external contact.
Coexistence Manager for GroupWise 1.5.6User Guide
60
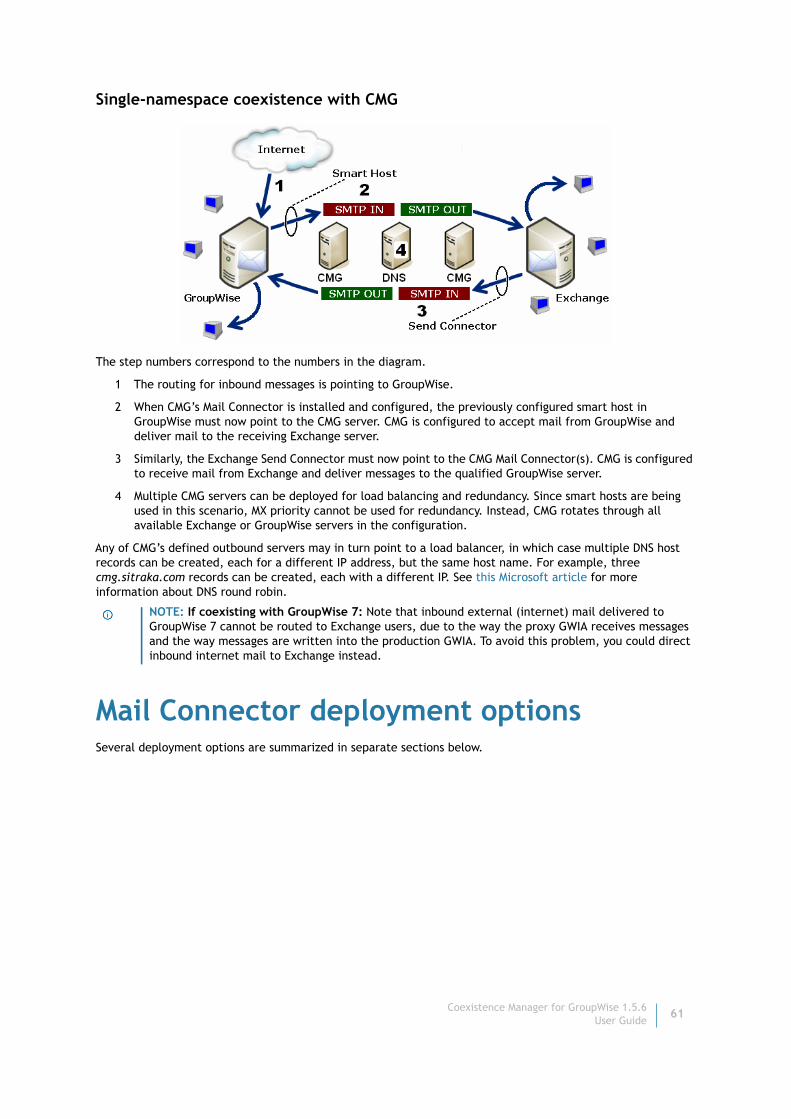
Single-namespace coexistence with CMG
The step numbers correspond to the numbers in the diagram.
1 The routing for inbound messages is pointing to GroupWise.
2 When CMG’s Mail Connector is installed and configured, the previously configured smart host in GroupWise must now point to the CMG server. CMG is configured to accept mail from GroupWise and deliver mail to the receiving Exchange server.
3 Similarly, the Exchange Send Connector must now point to the CMG Mail Connector(s). CMG is configured to receive mail from Exchange and deliver messages to the qualified GroupWise server.
4 Multiple CMG servers can be deployed for load balancing and redundancy. Since smart hosts are being used in this scenario, MX priority cannot be used for redundancy. Instead, CMG rotates through all available Exchange or GroupWise servers in the configuration.
Any of CMG’s defined outbound servers may in turn point to a load balancer, in which case multiple DNS host records can be created, each for a different IP address, but the same host name. For example, three cmg.sitraka.com records can be created, each with a different IP. See this Microsoft article for more information about DNS round robin.
Mail Connector deployment optionsSeveral deployment options are summarized in separate sections below.
NOTE: If coexisting with GroupWise 7: Note that inbound external (internet) mail delivered to GroupWise 7 cannot be routed to Exchange users, due to the way the proxy GWIA receives messages and the way messages are written into the production GWIA. To avoid this problem, you could direct inbound internet mail to Exchange instead.
Coexistence Manager for GroupWise 1.5.6User Guide
61

Simple configurations
A single instance of CMG’s Mail Connector may connect through a single GroupWise server and a single Exchange server, or between multiple mail servers on either or both sides of the CMG service. Regardless of the number of servers or your preferred routing scheme, all mail servers on both sides must be defined in the CMG Mail Connector configuration file. Inbound and outbound servers may be specified to CMG by their DNS names, IP addresses, or MX record notations. For receipt of inbound messages (from the Internet), CMG distributes the traffic among multiple mail servers on either side in a round-robin array.
Redundant CMG Mail ConnectorsMultiple instances of the Mail Connector can be deployed for load balancing and to provide redundant mail paths. As illustrated below, any CMG server can receive messages from any mail server defined in the configuration file, and likewise can relay messages to any of the defined destination servers.
In multiple-CMG schemes, the CMG servers can be load-balanced by MX-record priority designations used by the source mail system or a more formal load-balancing mechanism.
Coexistence Manager for GroupWise 1.5.6User Guide
62

Message distribution among multiple serversCMG's Mail Connector interprets and honors MX priority settings to intelligently distribute messages in prioritized round-robin fashion. Priority designations run in reverse-numerical order, where the highest priority is 0, and higher priority numbers represent less preferred servers.
When MX resolution is enabled for CMG’s outbound servers, the Mail Connector attempts a connection at the highest priority level, and if unsuccessful attempts a connection with another server (if any) at the same priority level, or at the next lower priority level only if no server at the higher priority level is available. Within each group of servers at the same priority level, the Mail Connector randomly selects a server in the group for its first connection attempt, and then if unsuccessful proceeds to the other servers in random round-robin fashion.
If MX resolution is not enabled for the CMG servers, messages are distributed in random round-robin fashion among all configured servers.
CMG and hosted Exchange environmentsCMG’s Mail Connector is easily configured to work with a hosted Exchange environment such as Microsoft’s Office 365. A CMG connection with a hosted environment is configured in the Management Console for Mail Connector, and also requires some minor accommodations in server configurations, as noted in the Mail Connector installation and configuration instructions.
There are no performance tips unique to a hosted Exchange configuration with CMG. Hosted Exchange is a slight variation in CMG’s server connection validation code; everything else is treated just like regular message traffic.
Mail Connector installation and configuration
The process of installing, configuring and activating the CMG Mail Connector consists of these general steps, all of which are explained in more detail below. This process begins with the assumption that the GroupWise and Exchange environments are operational, and that the environments conform to the CMG system requirements specified for the current release of CMG.
1 Install the CMG Mail Connector software.
2 If necessary: Configure DNS Server for CMG.
This step applies only if you will use MX priorities to distribute message traffic among multiple mail servers. Add MX records for both the GroupWise and Exchange servers to specify the mail servers responsible for handling emails. If you intend to connect CMG with a hosted Exchange environment (e.g., Office 365), be sure to allow inbound routing from the internet to CMG on port 25, and set up MX records or change the internal inbound routing to point to CMG instead of pointing directly to GroupWise.
3 Run the CMG Management Console.
CMG includes a Management Console to configure the Mail Connector service (and the other CMG components) for your environment. Since these settings control the Mail Connector’s functions and scope, the Management Console must be run before the service can be started.
4 Review and (optionally) update other Mail Connector configuration options.
Other configuration options may be set in the .xml configuration file, and elsewhere, although they are all optional.
NOTE: If coexisting with GroupWise 7: Note that inbound external (internet) mail delivered to GroupWise 7 cannot be routed to Exchange users, due to the way the proxy GWIA receives messages and the way messages are written into the production GWIA. To avoid this problem, you could direct inbound internet mail to Exchange instead.
Coexistence Manager for GroupWise 1.5.6User Guide
63

5 Start the Mail Connector.
The CMG Mail Connector is typically run as a Windows service, but can also be run as a console application. In either case, once started, the application runs with no further input until it is stopped.
6 Reconfigure the mail servers for CMG.
Coexistence Manager for GroupWise runs in conjunction with one or more GroupWise and Exchange mail servers. As such, the mail servers must be configured to recognize and route mail via CMG.
7 Optional: Configure TLS/SSL encryption.
The Mail Connector supports the TLS encryption protocol (SSL 3.1).
Step 1: Install CMG Mail Connector softwareVerify that Microsoft .NET Framework 2.0, and 4.0 Full Framework are installed on the computer that will host the Mail Connector. (The CMG Installer provides a link to these, in case they are not already installed.)
The CMG Mail Connector is installed by the same AutoRun installer that installs all components of the Coexistence Manager for GroupWise product. If you have already installed one or more other components, just run the AutoRun installer again to install the Mail Connector. The AutoRun installer must be run on the computer where you want to the CMG component to reside.
For complete installation instructions, see the Getting Started section of either the Quick-Start Guide or the associated Release Notes.
Step 2 (conditional): Configure DNS server for CMG
Add MX records for both the GroupWise and Exchange servers to specify the mail servers responsible for handling emails. More than one MX record can be entered for a single domain name using more than one mail server, so the MX records can be prioritized to indicate the order in which the mail servers should be used. For example:
You will configure the Mail Connector for DNS MX resolution in a later step below.
For CMG with a Hosted Exchange Environment
If you intend to connect CMG with a hosted Exchange environment (e.g., Office 365):
IMPORTANT: These server reconfigurations should occur only after CMG is started (preceding step). Otherwise the mail servers would (at least briefly) be trying to send mail to a non-existent destination.
NOTE: Conditional Step: This step applies only if you will use MX priority ranking to distribute message traffic among multiple mail servers. Skip this step if MX priorities will not be used.
Coexistence Manager for GroupWise 1.5.6User Guide
64

1 Allow inbound routing from the Internet to CMG on port 25 (so CMG can receive connection requests from hosted servers).
2 Set up MX records or change the internal inbound routing to point to CMG instead of pointing directly to GroupWise as it is ordinarily configured. (Alternatively, you may continue to route mail directly to GroupWise from outside, and then configure CMG for remediation only in the GroupWise-to-hosted-Exchange direction.
Connection with a hosted Exchange environment also requires two slight changes within the Management Console for Mail Connector, as explained in the field notes later in this chapter.
Step 3: Run the Management Console for the Mail ConnectorCMG includes a Management Console to help you configure the CMG Mail Connector. The MC Management Console edits the component’s configuration file according to your entries in the GUI screens.
Most of the processing options for your Mail Connector can be configured in the Mail Connector Management Console. Other operational options can be set manually, by entering or changing settings in the active configuration file, as described below in the next step of this process.
A later section of this chapter provides screen-by-screen field notes for the Mail Connector screens in the Console. Run the Management Console now, working through all the program screens, and then return here to continue.
Step 4 (optional): Review and update other Mail Connector configuration options
Configure CMG logging (optional)By default, CMG is installed with the log42net utility to generate log files of CMG components’ system activity. This information is critical to diagnosing any problems that may arise. Logging is enabled by default for all CMG components.
The log42net utility may be configured to work a particular way with each CMG component. The default configurations will be suitable for almost all organizations and circumstances, but you can customize logging features if you like.
Configuration instructions for logging are nearly identical from one component to another. See User Guide Appendix C.
Configure Cache-Update Interval for DNS MX Resolution (Optional)DNS MX resolution may be enabled or disabled by a checkbox in the Mail Connector Management Console (on the Network Settings screen). If you will configure CMG to enable DNS MX resolution, you may also want to reset the associated cache-update interval, by updating the <mxcacheupdateinterval> parameter value in CMG's active .xml configuration file. This parameter sets the number of seconds you want MX lookups to be cached, and the default is 300 seconds (5 mins). You may want to increase this value to reduce the load on the DNS server and/or the network. You may want to decrease the value if you want changes to take effect faster or to allow for round-robin resolution.
To reset the cache-update interval for the DNS MX Resolution feature:
1 Use an XML editor to open CMG's active .xml configuration file.
2 Find the <mxcacheupdateinterval> parameter, in the <root> node. If the <mxcacheupdateinterval> parameter does not already exist, create it as explained in the next step.
3 Set the <mxcacheupdateinterval> parameter value to the number of seconds you want MX lookups to be cached. For example:
Coexistence Manager for GroupWise 1.5.6User Guide
65

<mxcacheupdateinterval>300</mxcacheupdateinterval>
This feature is applied separately per host. (For example, if server A is resolved at 12:00PM, it will be cached until 12:05, while if server B is resolved at at 12:01PM, it will be cached until 12:06, and so forth. There is no setting that causes all hosts to expire at the same time.
4 Close and Save the configuration file under the same filename.
The new settings will take effect the next time the CMG service is restarted.
Configure socket channels (optional)By default, the Mail Connector waits up to 5 seconds for an available socket channel before opening a new one (if none are then available). This is a "throttling" feature to enforce a time interval for CMG to conclude its communications protocol with a channel before opening another. The actual delay, in seconds, is a "delay factor" (5 by default) x the ratio of the number of open channels to the maximum allowed number of channels. If you want to change the delay factor, you can manually edit the setting in CMG’s active configuration file:
1 Use an XML editor to open the active configuration file.
2 Find the <routerwaitsec> parameter in the <root> node of the CMG Configuration file and update its value to suit your circumstances. The value specified (default=5) is the "delay factor."
3 Close and Save the configuration file under the same filename.
The new settings will take effect the next time the CMG Mail Connector service is restarted.
Configure maximum message size (optional)By default CMG will ignore any message larger than 30MB (including attachments), but you can change this value if you want to allow larger messages, or to prevent smaller messages. The <maxbodysize> parameter lets you set the maximum message size, in bytes, that CMG will accept to process. The default is 31457280 bytes (30MB = 30 x 1024 x 1024).
To change the value:
1 Use an XML editor to open the active configuration file.
2 Find the <maxbodysize> parameter in the <root> node of the CMG Configuration file and update its value to suit your needs.
3 Close and Save the configuration file under the same filename.
The new setting will take effect the next time the CMG Mail Connector service is restarted.
Step 5: Start the Mail ConnectorBe sure to prepare the CMG Mail Connector configuration and verify your settings for CMG logging (optional) before starting the CMG Mail Connector.
The CMG Mail Connector typically runs as a Windows service for long-term, continuous operation. However, it can also be run as a console application— usually for shorter-term uses, as in testing and diagnostics. In the event of a system reboot, the Mail Connector running as a Windows service would automatically restart. But when running as a console app, it will require a manual restart after a system reboot.
NOTE: CMG processing may marginally increase or decrease the size of a message, so may rarely push a message over a receiving server’s maximum allowable size even though the original message was smaller than the server’s configured limit. For example, a message that was originally 9.99 MB may become 10.01 MB after CMG processing, and the server will refuse the message if it is configured to disallow messages > 10 MB.
IMPORTANT: The CMG Mail Connector uses port 25 by default, so make sure that no other mail servers or virus scanners are using port 25 on the CMG server.
Coexistence Manager for GroupWise 1.5.6User Guide
66

To start the Mail Connector as a Windows service:
• Use the Windows Service Control Manager.
To start the Mail Connector as a console application:
• Use Windows Explorer or a command prompt to find and run CMGMailConnectorConsole.exe.
Multiple instances of CMG’s Mail Connector cannot run concurrently on a single workstation, because they would both require the same port.
To stop the Mail Connector as a Windows service:
• Use the Windows Service Control Manager.
To stop the Mail Connector as a console application:
• Press Esc from the console window.
The CMG Mail Connector can also be started and stopped (as a Windows service) in the CMG Management Console, in the Common | Services screen.
Optional "pass-through" modeCMG offers an optional "pass-through" mode that disengages CMG’s message- processing features while CMG continues to pass mail between the servers. This feature is off by default, but can be enabled by setting the <disableprocessing> boolean parameter value to true in the CMG Mail Connector configuration XML file. This parameter can only be set manually.
If left undefined, the pass-through feature defaults to false (the pass-through mode is disabled, so CMG processes messages normally).
To enable or disable the CMG pass-through mode:
1 Use an XML editor to open your active CMG Mail Connector configuration file.
2 In the configuration file, add this line in the <root> node, or change its true/false value to false:
<disableprocessing>false</disableprocessing>
3 Save the configuration file.
Step 6: Reconfigure GroupWise and Exchange mail servers for CMG
The CMG Mail Connector runs in conjunction with one or more Novell GroupWise and Microsoft Exchange servers, or with a local GroupWise server and a hosted Exchange environment. As such, the GroupWise and Exchange environments must be configured to recognize and route messages via CMG.
Configure GroupWise environment for CMGConfigure GroupWise to direct Exchange-bound mail to CMG for processing:
• For a single-namespace environment: Be sure to configure your GroupWise smart host. If necessary, see Email coexistence before and after CMG earlier in this chapter.
NOTE: The CMG Installer configures Windows to automatically start the Mail Connector Windows service upon Windows start-up.
IMPORTANT: These server reconfigurations should occur only after the CMG service is started, in the preceding step. Otherwise the mail servers would (at least briefly) be trying to send mail to a non-existent destination.
Coexistence Manager for GroupWise 1.5.6User Guide
67

• For a multi-domain or subdomains environment: Use MX records to change the destination server to the IP for CMG, and use MX priority designations for load balancing.
The CMG Mail Connector requires that GroupWise Default message encoding (on the SMTP/MIME tab of GWIA Properties) must be set to MIME, not Basic RFC-822.
If you want to configure GroupWise to accept Exchange mail to GroupWise distribution lists: In GWIA Properties, on the SMTP/MIME tab: Address Handling | Inbound Settings (Section), mark the checkbox for Expand distribution lists on incoming messages.
Configure Exchange server for CMGConfigure Exchange to direct GroupWise-bound mail to CMG for processing:
• For a single-namespace environment: Be sure to configure your Exchange smart host (Send Connector). In the Organization Configuration | Hub Transport | Send Connector tab | GroupWise Send Connector Properties | Network tab: Add the IP or the FQDN for CMG as a "smart host" through which to route mail. You may use MX priority designations for load balancing. If necessary, see Email coexistence before and after CMG earlier in this chapter.
• For a multi-domain or subdomains environment: Use MX records to change the destination server to the IP for CMG, and use MX priority designations for load balancing.
Also: Check the Message Delivery Restrictions settings for any Exchange group to which you want GroupWise users to be able to send messages. Any such Exchange group must be of the universal distribution type to be mail-enabled. To change the settings, beginning in the Exchange Management Console:
1 Select the group under Recipient Configuration | Distribution Group, then double-click the group you want to edit.
2 Click the Mail Flow Settings tab, and highlight Message Delivery Restrictions, then click Properties above.
3 De-select (unmark) the check box for Require that all senders are authenticated.
4 Save, and then restart the MS Exchange transport service.
Step 7: Configure TLS/SSL encryptionCMG's Mail Connector supports the TLS encryption protocol (SSL 3.1). TLS support requires a valid server certificate, which must be installed on the CMG server, and selected in CMG's Mail Connector Management Console. A new screen has been added to the MC Management Console for this purpose. The GroupWise and Exchange servers must also be configured for TLS/SSL support.
To enable and configure TLS/SSL encryption with CMG's Mail Connector:
1 Obtain a server security certificate. Note:
• If you already have a valid certificate for some other security function (e.g., for CMG's Free/Busy Connector), you can use the same certificate to enable TLS in the Mail Connector (and skip ahead to step 2).
• A new certificate is generated with information in a standardized CSR (Certificate Signing Request). GroupWise contains a GroupWise CSR Generator utility (GWCSRGEN.EXE) that will generate the CSR for you. To use GWCSRGEN.EXE:
a Find and run the GWCSRGEN.EXE executable file in the Software Distribution Directory (SDD), in ADMIN\UTILITY\GWCSRGEN.
b Fill in the information requested in the dialog box:
• Choose a suitable Key filename, with a .KEY extension.
• Use a .CSR extension for the CSR filename.
• The Key password is case-sensitive.
• Use the official two-letter abbreviation for your Country.
Coexistence Manager for GroupWise 1.5.6User Guide
68

• Enter the full name of your Organization, and the Division of your organization that is requesting the certificate.
• For Hostname of Server, enter the DNS name of the host server that will use this certificate.
c Click Create.
• If there is no interaction with external GroupWise domains (such as POA-to-POA communications), you can generate your own certificate for free using Novell's Console One:
a Select a container in the ConsoleOne tree. The selected container should be in your organization, and probably should be the container where your server is located in the tree.
b Select menu option Tools | Issue Certificate.
c For the Filename, enter the name of the CSR you created above, and click Next.
d Specify Organizational Certificate Authority, and click Next.
e On the Key Type screen, specify Custom for the Type, and select all three options under Key Usage. Then click Next to continue.
This is very important as GroupWise agents must have both Data Encipherment and Key Encipherment. The agents will not properly load the certificates (Error 8209) if you don't pick the correct options.
f Specify your certificate validity period. For GroupWise agents, you may want to make this longer than one year.
g On the Summary screen, check your information and select Finish.
h On the Save Certificate screen, select File in Base64 format and specify a certificate filename. Use the default extension of .b64. Don't use filenames longer than 8 characters for any certificates or key names.
2 In CMG's Mail Connector Management Console, on the new TLS Settings screen:
a Click the Enable TLS radio button.
b In the Certificate Store drop-down list, select the location in your network where the certificate resides. If the certificate location does not appear in the list, you must copy the certificate to one of the listed locations using the Microsoft Certificates Management Console, into a LOCAL-SYSTEM account (not a personal account).
c The table on the bottom half of the screen then shows a list of all certificates found in the designated Certificate Store, with the Issuer, the Effective and Expiration Dates, and the certificate Thumbprint.
d In the table, select the certificate you want to install.
e Remember to Save Configuration (on the File menu).
3 Secure communications between GroupWise and the POA. Configuring this connection requires no action on the GroupWise client, but you must take these steps with the GroupWise POA:
a Add the Certificate to the POA:
• From ConsoleOne, bring up the properties of the POA.
• From the GroupWise tab select SSL Settings.
• Fill in the fields, specifying the certificate file and key file.
• Click on Set Password and enter the case-sensitive password you chose when you created the key file.
• Select Apply to save the POA properties.
b Enable SSL Communications on the POA:
• From the GroupWise tab of the POA, select Network Address.
Coexistence Manager for GroupWise 1.5.6User Guide
69

• Select SSL Enabled for Local Intranet Client/Server.
• Select SSL Enabled for Internet Proxy Client/Server.
• Click OK to save changes and exit the POA properties screen.
c Test for SSL support: Log in to the GroupWise client, and confirm that you see a padlock icon in the lower right-hand corner of the client.
4 Secure GWIA (GroupWise Internet Agent) sessions with STARTTLS.
We can now secure Internet mail connections using SSL or Transport Layer Security (TLS). GroupWise supports both SSL and TLS. Keep in mind that you only have control over your end of the SMTP transaction. Both SMTP servers (yours and the other end) must support TLS for messages to be encrypted. Once configured, your GWIA will send all messages using TLS if the other host supports the protocol; otherwise, the message will be sent using plain SMTP. To configure GWIA for TLS:
a Add the Certificate to GWIA:
• From ConsoleOne, bring up the properties of GWIA.
• From the GroupWise tab select SSL Settings.
• Complete the fields, specifying the certificate file and key file.
• Click on Set Password and enter the case-sensitive password.
• Click Apply to save the GWIA properties.
b Enable SSL communications for GWIA:
• From the GroupWise tab for GWIA, select Network Address.
• Select Enabled under SSL for SMTP.
• Click OK to save the changes and exit the GWIA properties screen.
• Restart GWIA.
c Use any TELNET client to verify that your GWIA or any other SMTP host supports TLS. These steps use the Windows 2000 standard TELNET client:
• Start the TELNET client from a DOS Command Prompt window and issue the command TELNET.
• From the Microsoft Telnet> prompt, type:
OPEN DA1.digitalairlines.com 25
(Replace DA1.digitalairlines.com with the registered host name of the SMTP server.) Then press Enter.
After a few seconds you should get a response with the identity of the host. Then issue the command EHLO. (Depending on your TELNET settings, the command you type may not be visible on the screen.)
You should get the response 250-STARTTLS to confirm the host supports TLS.
5 Configure the Exchange server to require TLS encryption for the receive connector. You can enable/disable TLS encryption for the receive connector either by PowerShell commands or by settings in the Exchange Management Console:
• To enable TLS encryption for the Exchange receive connector by PowerShell:
Get-receiveconnector | set-receiveconnector -requiretls $true
(And then restart the Exchange Transport Service.)
NOTE: Both the Local Intranet Client/Server and Internet Proxy Client/Server fields have an SSL Required choice. The SSL Required option effectively disables all access from non-GroupWise clients and any GroupWise WebAccess Agents that don't have SSL enabled.
Coexistence Manager for GroupWise 1.5.6User Guide
70

• To enable TLS encryption for the Exchange receive connector in the Exchange Management Console:
In Server Configuration | Hub Transport | Properties | Authentication: Mark the checkbox for Transport Layer Security (TLS), and also the checkbox for either Externally Secured (for the default receive connector) or Integrated Windows Authentication (for a client receive connector). (And then restart the Exchange Transport Service.)
(To disable TLS encryption for the receive connector by PowerShell, enter the same command substituting $false for $true. To disable it in the Exchange Management Console, unmark the same checkboxes.)
6 Configure the Exchange server to require TLS encryption for the send connector. You can enable/disable TLS encryption for the send connector by PowerShell commands only:
To enable: Get-sendconnector | set-sendconnector -requiretls $true
To disable: Get-sendconnector | set-sendconnector -requiretls $false
And then restart the Exchange Transport Service.
7 Check the CMG log to verify that TLS is enabled and working properly. In the detailed log entries you should see STARTTLS, and another entry that provides much more information:
Secured connection from CMG to Destination Exchange server: Cipher Algorithm: Rc4 - Cipher Strength: 128 - Is Authenticated: True - Is Encrypted: True - Is Mutually Authenticated: False - Key Exchange Algorithm: RsaKeyX - Key Exchange Strength: 2048 - Protocol: Tls
Management Console for Mail ConnectorCMG includes a Management Console for configuring CMG components, including the Mail Connector. This chapter presents screen-by-screen field notes for the screens used to configure the Mail Connector. If necessary, see The CMG Management Console in User Guide chapter 1 for an introduction to basic operating concepts.
Management Console screen: Mail Connector | Servers: InboundThe Inbound settings define the valid GroupWise and Exchange servers whose message traffic the Mail Connector will accept.
A checkbox appears near the top of the screen, just above the servers table:
NOTE: The terms "Inbound" and "Outbound" as used in the Management Console Mail Connector are relative to the Mail Connector itself: An "Inbound" server is one from which CMG receives messages, and an "Outbound" server is one to which CMG relays messages.
Coexistence Manager for GroupWise 1.5.6User Guide
71

• Enable hosted Exchange (if connecting with a remote hosted Exchange server, like Office 365): Tells CMG to accept transmissions from a server not defined in the table below, and to assume that the undefined server is a hosted Exchange server.
All other (non-hosted) servers are defined in the table, where each row defines one server. You must specify at least one Inbound server each for Exchange and GroupWise. However, you may specify two or more for either or both.
Click Add to define a new server in the table, or select an existing server and click Edit to change its configuration, or click Remove to delete a selected server from the table. The Add and Edit features open a popup dialog box in which you can enter or edit the values that define a particular server.
Each server is defined by values in these columns:
• System Type: Select Microsoft Exchange or Novell GroupWise (with the version number of GroupWise installed on this server).
• Server Name / IP Address: The name of the server, which may be designated as the DNS name of the physical box, or by the IP address associated with the server, or by its MX record notation, which can rank physical server names by a priority usage preference.
Management Console screen: Mail Connector | Servers: OutboundThe Outbound settings define the valid Exchange and GroupWise mail servers to which the Mail Connector will try to route mail. You may specify two or more servers for either or both sides—in which case CMG will distribute the outbound traffic among all of the servers defined for any single side (Exchange or GroupWise) in round-robin fashion.
Click Add to define a new server in the table, or select an existing server and click Edit to change its configuration, or click Remove to delete a selected server from the table. The Add and Edit features open a popup dialog box in which you can enter or edit the values that define a particular server.
The Copy From Inbound Servers button copies the entire Inbound Servers list to this Outbound Servers table, all in one click—to save you the trouble of having to retype all that information.
Each server is defined by values in these columns:
• Server Name or IP Address: The name of the server, which may be designated as the DNS name of the physical box, by the IP address associated with the server, or by MX record notation.
• Server Type: Select Microsoft Exchange or Novell GroupWise.
The Server Type drop-down list for a GroupWise outbound server offers an assortment of GroupWise versions. Your selection determines how CMG will process certain message types for delivery to that server. (Remember that GroupWise implements some features differently in different versions, so CMG processes messages differently to accommodate those differences. Your System Type designation tells CMG how to process messages bound for this server.)
Management Console screen: Mail Connector | Network SettingsThe settings on this screen control how the Mail Connector will process message traffic and how to maximize processing performance:
• Port Number to Listen On: The SMTP port that CMG will monitor. The default is 25, but you may specify any port from 1–65535.
NOTE: If defining a remote hosted Exchange (e.g., Office 365) outbound server: Enter the SMTP MTA for the Server Name / IP Address. You should be able to find the correct value in the admin interface of your hosted provider or by contacting the provider directly.
NOTE: If defining a remote hosted Exchange (e.g., Office 365) outbound server: Select the Microsoft Exchange value here.
Coexistence Manager for GroupWise 1.5.6User Guide
72

• Resolve MX Records for Inbound and Outbound Servers: Check this box to enable DNS MX resolution to determine the real addresses and priorities of the servers defined in the Inbound and Outbound Server lists. If a server lacks an MX record, the standard A record (host address) will be used instead.
• Performance Tuning:
• Maximum Connections: Number of simultaneous open channels CMG will allow. Default=600.
• Maximum Processing Threads: Maximum number of threads CMG will use to process message bodies. Default=16. In most environments, this setting should be 4x the number of CPU cores.
Management Console screen: Mail Connector | TLS SettingsThe settings on this screen let you configure the Mail Connector to support transport-layer security (TLS) encryption when communicating with inbound and outbound servers:
Disable TLS vs. Enable TLS: Select the appropriate radio button to indicate your choice.
Certificate Store: From the drop-down list, select the location in your network where the certificate resides. If the certificate location does not appear in the list, copy the certificate to one of the listed locations using the Microsoft Certificates Management Console, into a LOCAL-SYSTEM account (not a personal account).
The Choose Certificate table on the bottom half of the screen then shows a list of all certificates found in the designated Certificate Store, with the Issuer, the Effective and Expiration Dates, and the certificate Thumbprint.
In the Choose Certificate table, select the certificate you want to install.
Remember to Save Configuration (on the File menu) for any changes here to take effect.
Management Console screen: Mail Connector | Advanced Message SettingsThis screen offers performance-tuning features.
Send Keep-Alives During Processing: CMG’s Mail Connector is configured to send an SMTP NOOP every 30 seconds, to keep the server from timing out when processing larger messages. You can disable and enable this feature by the checkbox here, and/or set the time interval to some other value:
• Send Keep-Alive Message Every __ Seconds: Number of seconds CMG will wait before sending the first NOOP and each successive NOOP (if Send Keep-Alives is enabled). Default=30.
• Response Message Mail From Address: The email address that will appear as the sender of CMG’s NOOP messages.
Performance Tuning:
• Maximum Message Process Time: Maximum time, in minutes, that CMG will spend processing a message before reporting a failure. Default=4 minutes.
• Message Connection Inactivity Time: Maximum time, in minutes, that CMG will wait for a data reply before giving up and terminating the connection. Default=30 seconds.
• Maximum Memory Usage Per Message: If a message is larger than the value (in kilobytes) you specify here, the remaining data will overflow into a temp file, residing in the Temporary File Directory specified in the accompanying text box. Default=32 kilobytes.
NOTE: If you mark this checkbox to enable DNS MX resolution, you may also want to reset the associated cache-update interval, by updating the <mxcacheupdateinterval> parameter value in CMG's active .xml configuration file. The <mxcacheupdateinterval> parameter sets the number of seconds you want MX lookups to be cached, and the default is 300 seconds (5 mins). You may want to increase this value to reduce the load on the DNS server and/or the network. Or you may want to decrease the value if you want changes to take effect faster or to allow for round-robin resolution. See step 4 in Mail Connector installation and configuration above for instructions to change the <mxcacheupdateinterval> parameter.
Coexistence Manager for GroupWise 1.5.6User Guide
73

Management Console screen: Mail Connector | Address RewritingThese settings specify how email addresses should be changed in messages processed by CMG.
Rewrite GroupWise Addresses (checkbox, only for coexistence with GroupWise 7): Determines whether the Mail Connector will rewrite addresses sent from GroupWise 7, to replace them with reply-able SMTP format addresses.
To enable this rewrite feature, mark the checkbox and then enter values for:
• Internet Domains: The domain name that CMG should use when rewriting addresses to SMTP form (e.g., contoso.com). CMG will parse the GroupWise source address (e.g., jsmith.gwpo.gwdomain@osh- kosh.contoso.com) to obtain the user name portion of the address (preceding the "@" symbol) and, if the SMTP domain matches this specified rewrite domain, will form the new SMTP address by appending this domain to the user name. For the above examples, CMG would rewrite the source address as [email protected]. Note that you may enter multiple domain names here, separated by commas.
• GroupWise Domains: The names of GroupWise domains in GroupWise addresses to be rewritten by this feature. For example, a GroupWise address [email protected] or [email protected], will be rewritten if gwdomain is specified as a GroupWise Domain. Note that you may enter multiple domain names here, separated by commas.
SMTP Address Rewriting (available only if Rewrite GroupWise Addresses above is enabled): These features let you tell CMG to automatically remove undesirable portions of the left-hand sides of email addresses as they are emitted from some GroupWise environments. This feature can be applied independently (by separate checkboxes) to either, neither or both of MAIL FROM (Sender) and/or RCPT TO (Recipients) commands. Note that the Rewrite GroupWise Addresses feature above applies only to MIME (internal message content) and not to addresses used in SMTP transmissions unless either or both of these SMTP options are selected.
Management Console screen: Mail Connector | Message Content LimitsThese limits let CMG enforce certain compatibilities between the GroupWise and Exchange environments.
Maximum Subject Line Length: The longest message Subject line CMG will permit, in number of characters. If a Subject line exceeds this length, the Mail Connector will truncate the line and insert ellipsis (...). The default of 1975 is the maximum allowed by a local Microsoft Exchange, and should be plenty in most local-Exchange environments. But if coexisting with Office 365, this limit should be set much lower, to 255.
Maximum Number of MIME Parts: The maximum number of MIME bodies CMG will allow in multipart messages. CMG will bounce a message with more than this number of MIME bodies. The default limit of 5000 is very high. If coexisting with Office 365, the limit should be lowered to 250.
Management Console screen: Mail Connector | Notification MessagesYou can customize the notices CMG inserts to notify recipients of conversion issues, which may include suggestions to compensate for known limitations. For example, a message may suggest that the recipient manually update his/her calendar, or verify that a particular appointment has been added.
IMPORTANT: This rewrite feature should be used only when coexisting with a GroupWise 7 environment. The GroupWise configuration required to support coexistence with version 7 produces the source addresses that require translating. This feature will not be used with GroupWise 8 servers.
NOTE: Remember that any new information or changes entered in this screen are saved to the Messages File only when you save the configuration file—by selecting Save Configuration File on the File menu. If you exit the Management Console without saving the configuration, any new information or changes entered in this screen (or any other Management Console screen) will be lost.
Coexistence Manager for GroupWise 1.5.6User Guide
74

All of the notification message information is saved in a separate .xml file, which you must specify as the:
• Messages File: The path (including filename) of the .xml file containing the CMG notification messages. The other values on this screen are saved in the file you specify, and the CMG Mail Connector draws your preferred message from this file.
To view or customize notification messages:
Repeat this process for as many message types as you want to customize.
1 In the folder tree to the left of the Description, Plain Text Message and HTML Message fields, select the message you want to view or customize. When you select the message in the folder tree, the fields show the associated current values for:
• Description (uneditable, FYI only): A name and/or brief description of the circumstances that would cause this message to be sent.
• Plain Text Message: The message, in plain-text format, CMG should insert into plain-text emails to notify recipients.
• HTML Message: The message, in HTML format, CMG should insert into HTML emails to notify recipients. Note: This field appears grayed-out and uneditable for NDR-type messages and some other message types.
2 To customize either or both the Plain Text Message and HTML Message fields: Click your cursor into the text box, and use familiar text-editing features to add, delete and/or edit the text box contents.
While you are editing, two buttons at the bottom of the screen let you:
• Insert Variable...: Calls a pop-up list of defined variables (for the date, time, message sender, etc.) from which you may select one to insert inline into the text of a Plain Text Message or HTML Message (see above). A message may, for example, cite the proposed date and time of a meeting invitation, which will vary with every instance of the message.
• Use Default Message: Restores the default message values into the Plain Text and HTML Message fields above. Any custom message data that may already appear in the fields will be lost.
Coexistence Manager for GroupWise 1.5.6User Guide
75

4
CMG Free/Busy Connector
• Free/Busy Connector overview
• Installation and configuration
• CMG Management Console for the Free/Busy Connector
• Configuring and troubleshooting the F/B Connector with PowerShell
Free/Busy Connector overviewGroupWise and Exchange implement calendar free/busy queries differently, and neither side can read the availability status of users on the other system without some intermediary to interpret and translate the queries and replies. CMG’s Free/Busy (F/B) Connector is a coordinated set of services that let Exchange and GroupWise users query calendar availability across both systems.
Exchange and GroupWise both require services to facilitate data communications with external data sources and destinations. Exchange 2007 and later use Exchange Web Services (EWS) to enable communications with other, external applications, and also require an Autodiscover service to track and report the location (URL) of the EWS. Microsoft provides EWS and Autodiscover services that are suitable for incoming queries and outbound replies. GroupWise uses protocols similar to the Exchange EWS for the same purpose. But the complete bidirectional flow of queries and replies between the two environments requires additional services, and these are provided by CMG’s Free/Busy (F/B) Connector.
Typical scenarioThis section illustrates how F/B queries and replies flow through CMG’s Free/ Busy Connector in a typical scenario, for F/B coexistence between GroupWise 8 or later, and Exchange 2007 or later (without public folders).
Exchange user requests F/B data from GroupWiseThe illustration below shows how three Free/Busy Connector subcomponents work together when an Exchange user requests free/busy data for a GroupWise user. The step numbers in this simplified process narrative correspond to the circled numbers in the illustration.
In this scenario Sally, an Exchange user, wants to book a meeting with Joe, a GroupWise user. Joe’s email address is [email protected]. Exchange resolves "gwdomain.com" through DNS. DNS has a zone gwdomain.com with a host autodiscover.gwdomain.com. The host name must match the common name (of the certificate you requested) where CMG is installed.
1 The Exchange server asks the CMG Autodiscover Web Service: "Where is the service that can gather F/B information from GroupWise?" And the CMG Autodiscover Web Service replies with the URL for CMG’s EWS.
2 The Exchange server sends its F/B query to the CMG EWS, at the designated URL.
3 The CMG EWS relays the query to the GroupWise F/B Service.
4 The GroupWise F/B Service performs the lookup in GroupWise. GroupWise accepts and processes the query, and replies with Joe’s F/B information, directed back to the GroupWise F/B Service.
Coexistence Manager for GroupWise 1.5.6User Guide
76

5 The GroupWise F/B Service translates Joe’s GroupWise F/B data into Exchange form, and passes the information back to the CMG EWS.
6 The CMG EWS receives the F/B data and relays it to the Exchange server, which passes it on to Sally.
GroupWise user requests F/B data from ExchangeGroupWise-to-Exchange is similar, although the GroupWise interface to external data is different. Again, the step numbers in this simplified process narrative correspond to the circled numbers in the illustration below.
In this scenario, Joe (a GroupWise user) wants to book a meeting with Sally, an Exchange user, whose email address is [email protected].
1 The GroupWise server passes its query for Sally’s free/busy information to CMG’s Free/Busy Bridge, which facilitates communications between GroupWise and external entities.
2 The CMG F/B Bridge relays the query to CMG’s Exchange F/B Windows Service.
3 CMG’s Exchange F/B Service asks the Exchange Autodiscover Web Service: "Where is the EWS to provide free/busy information for Exchange users?" The Autodiscover Service replies with the URL for the Exchange EWS.
4 The CMG Exchange F/B Service queries the Exchange EWS, at the designated URL.
5 The Exchange EWS relays the query to the Exchange server, which replies with Sally’s free/busy information.
6 The Exchange EWS passes the data back to CMG’s Exchange F/B Service, which translates the data into GroupWise form.
7 CMG’s Exchange F/B Service passes the translated information back to the CMG Free/Busy Bridge.
8 The Free/Busy Bridge relays the F/B information back to the GroupWise server, where it is passed on to Joe.
Coexistence Manager for GroupWise 1.5.6User Guide
77

CMG subcomponentsCMG’s Free/Busy Connector includes the subcomponents listed below. Most of these are referenced in the Typical scenario above, and all appear in the Configuration options described in the next section below.
• For Exchange queries of GroupWise users:
• CMG GroupWise Free/Busy Service (required for all scenarios): Translates Exchange F/B queries into a form that GroupWise can understand and process, and then translates GroupWise F/B data (the GroupWise reply to a query) into a form that Exchange can process.
• CMG Autodiscover Web Service (required for E2007 or later w/Outlook 2007 or later, or for Office 365): Tracks the location of the CMG EWS (see below), reporting the EWS URL to Exchange for each outbound F/B query—which tells Exchange where to send its query.
• CMG EWS (required for E2007 or later w/Outlook 2007 or later, or for Office 365): Facilitates communications between Exchange and CMG’s GroupWise Free/Busy Service (see above), for transmission of Exchange F/B queries to GroupWise, and GroupWise F/B information back to Exchange.
• CMG Public Folder Writer Service (required for E2003 or E2007 w/Outlook 2003 via public folders): Contacts GroupWise (via CMG’s GroupWise FBC Service) at specified regular intervals to get GroupWise F/B information, and then writes that information to the Exchange public folders. The service also communicates with Active Directory to get a current list of GroupWise contacts in the Exchange system, communicating with Exchange via MAPI.
• For GroupWise queries of Exchange users:
• CMG Free/Busy Bridge (required for GW8 or later via an Internet F/B URL): Facilitates communications between GroupWise and CMG’s Exchange F/B Service (see below) or CMG’s
Coexistence Manager for GroupWise 1.5.6User Guide
78

Public Folder Reader Service (see below), to transmit GroupWise F/B queries to Exchange, and Exchange F/B info back to GroupWise.
• CMG Exchange Free/Busy Service (required for E2007 or later with Outlook 2007 or later, or for Office 365): Performs F/B lookups into Exchange, and then translates Exchange F/B data (the Exchange reply to a query) into a form GroupWise can understand and process.
• CMG Public Folder Reader Service (required for E2003 or E2007 w/Outlook 2003): Accepts a F/B query originating from GroupWise and relays it to Exchange F/B public folders, then relays Exchange F/B data from public folders back to CMG. Communicates with Exchange via WebDAV (Web Distributed Authoring and Versioning) component of IIS.
• CMG Router Service (required for connection to GroupWise via an API Gateway): Facilitates communications between the GroupWise API Gateway and the CMG Server File System.
• CMG API Gateway Bridge Service (required for connection to GroupWise via an API Gateway): Facilitates communications between the CMG Server File System (configured for connection to a GroupWise API Gateway) and the CMG Exchange F/B Service or the CMG Public Folder Reader Service.
CMG’s Free/Busy Connector also includes Free/Busy Connector performance counters and Mobile IT administrative tools as described separately below.
Configuration optionsCMG’s Free/Busy Connector can facilitate free/busy coexistence for several combinations of GroupWise and Exchange/Outlook configurations:
• GroupWise 8 or later with an Internet F/B URL, coexisting with:
• Exchange 2007 or later with Outlook 2007 or later, or with Microsoft’s Office 365
• Exchange 2007 w/Outlook 2003, via public folders w/MS Autodiscover and EWS
• Exchange 2003 or 2007 w/Outlook 2003, via public folders w/out MS Autodiscover and EWS
• GroupWise 7 or later with the API Gateway, coexisting with:
• Exchange 2007 or later with Outlook 2007 or later, or with Microsoft’s Office 365
• Exchange 2007 w/Outlook 2003, via public folders w/MS Autodiscover and EWS
• Exchange 2003 or 2007 w/Outlook 2003, via public folders w/out MS Autodiscover and EWS
For F/B coexistence with Office 365: Follow the configuration instructions in this chapter for "Exchange 2007 or later with Outlook 2007 or later."
GroupWise 7 vs. GroupWise 8 and laterGroupWise versions 8 and later can communicate with external applications via an Internet URL, as shown in the top half of the diagram below, which shows the CMG components required for configuration with an Internet F/B URL. GroupWise 7 can communicate with external applications only by an API Gateway, as shown in the bottom half of the illustration, also with the CMG components necessary for that configuration.
Note that GroupWise versions 8 and later can also be configured with an API Gateway, although configuration with an Internet F/B URL usually delivers better performance.
NOTE: If you are configuring F/B for Exchange 2003: Exchange 2003 does not support CMG's F/B Bridge or PowerShell. The AutoRun installer installs these subcomponents anyway, because it doesn't know how you intend to configure your F/B services, but the F/B Bridge and PowerShell will not be used in your configuration.
Coexistence Manager for GroupWise 1.5.6User Guide
79

Coexistence Manager for GroupWise 1.5.6User Guide
80

Outlook 2007 and later vs. Outlook 2003 clientsCMG's Free/Busy Connector supports F/B coexistence with Outlook 2007 or later clients (connected to Exchange 2007 or later), or with Outlook 2003 clients (connected to Exchange 2003 or 2007). These different scenarios require different CMG F/B subcomponents, because the implementation of Exchange F/B features changed between Exchange 2003 and Exchange 2007. The more common scenario is with Outlook 2007 or later clients, as shown here:
This configuration is also suitable for coexistence with Microsoft’s Office 365.
Older versions of Exchange (e.g., Exchange 2000 and 2003) stored free/busy information in system public folders. Beginning with Exchange 2007, F/B information is stored by default in object mailboxes, although Exchange 2007 also permits storing F/B information in public folders, making Exchange 2007 backward-compatible with Outlook 2003 clients.
CMG's Free/Busy Connector was originally designed to function in a direct, immediate query-and-response model, as shown above for Outlook 2007 and later clients. CMG FBC subcomponents facilitate processes by which an end-user client in system "A" asks system "B" for the free/busy info for one of its users, and system "B" replies with the requested info. This model was designed to facilitate F/B coexistence with Outlook 2007 or later, but the same approach does not work for Outlook 2003, because that version can communicate F/B information with external systems only if the information is relayed through Exchange public folders.
CMG supports the public-folders option too, by alternate configurations with different subcomponents to facilitate F/B communications with Outlook 2003 clients connected to either Exchange 2003 or Exchange 2007 servers. In these scenarios, Exchange queries for GroupWise F/B data (see the right halves of the CMG servers in these diagrams) are not send to GroupWise, but rather are directed internally to Exchange’s own public folders, which CMG regularly refreshes by its CMG Public Folder Writer Service. For GroupWise queries to Exchange, however, CMG supports two options as described below.
F/B Connector for Outlook 2003 via CMG Public Folder Reader ServiceFor either Exchange 2003 or 2007, GroupWise queries for Exchange F/B data (the left halves of these diagrams) can pass through CMG’s Public Folder Reader Service. The Public Folder Reader Service relays GroupWise F/B queries to Exchange public folders, and then relays the F/B info back to GroupWise. Outlook users’ queries for GroupWise F/B info are routed directly to Exchange public folders (internally within the Exchange environment), and the public folders transmit the F/B info directly to the Outlook users. (No CMG components are used for that query-reply portion of the F/B functionality.) But CMG’s Public Folder Writer Service collects
Coexistence Manager for GroupWise 1.5.6User Guide
81

GroupWise users’ current F/B info from GroupWise and, at regular intervals, refreshes the corresponding F/B info held in the Exchange public folders. The Public Folder Writer Service also communicates with Active Directory to get and maintain a current list of GroupWise contacts in the Exchange system.
F/B Connector for Outlook 2003 via Microsoft’s Autodiscover and EWSCMG can connect to Exchange 2007 public folders either via its Public Folder Reader Service (as described above), or via Microsoft’s Autodiscover and EWS, as shown here. Connecting via the Microsoft services is not an option with Exchange 2003.
Coexistence Manager for GroupWise 1.5.6User Guide
82
This configuration uses CMG’s Exchange Free/Busy Connector Service to relay GroupWise F/B queries to Microsoft’s Autodiscover and EWS on the Exchange server, and relay the F/B info back from MS Autodiscover and EWS to GroupWise. (Microsoft’s Autodiscover and EWS in turn relay GroupWise F/B queries to Exchange public folders, and receive the public folders’ F/B info.)
CMG uses its Public Folder Writer Service to get GroupWise users’ current F/B info from GroupWise and, at regular intervals, to refresh the corresponding F/B info held in the Exchange public folders. The Public Folder Writer Service also communicates with Active Directory to get and maintain a current list of GroupWise contacts in the Exchange system. Outlook users’ queries for GroupWise F/B info are routed directly to Exchange public folders (internally within the Exchange environment), while the public folders transmit the F/B info directly to the Outlook users.
Implications of F/B coexistence with Outlook 2003 clientsNote that the F/B Connector’s public-folders models for Outlook 2003 clients are not direct query-and-response systems when Outlook users seek GroupWise users’ F/B info. Exchange public folders instead function like a holding tank that must be repeatedly refreshed with updated data, so at any given moment the public folders data will lag some interval (typically several minutes) behind the true current state of GroupWise F/B data as it exists in the GroupWise environment. The polling interval is configurable, so the latency period can be minimized by a shorter interval, although an increased polling frequency places greater demands on system resources.
The public-folders FBC model does, however, support a direct query-response process in the other direction—when GroupWise users seek Outlook users’ F/B info. The Exchange public folders serve as a repository for F/B info for both systems’ users, but the information for Outlook users is very nearly current, almost continuously refreshed (internally, by Exchange), whereas the F/B info for GroupWise users must be explicitly obtained and relayed by CMG's F/B Connector, at less frequent intervals.
Free/Busy Connector performance countersDell CMG generates sets of performance counters for its Free/Busy Connector that feed live data to Windows' System Monitor feature. If you are unfamiliar with Windows' System Monitor feature, or how to add Dell CMG counters to the System Monitor view, see your Microsoft documentation and/or visit the System Monitor online Help for more information.
The Dell CMG Free/Busy Connector includes these performance counters:
• Dell CMG To Exchange Free/Busy [queries from GroupWise users for Exchange users’ F/B data]:
• Number of free/busy requests to Exchange during last minute.
• Average free/busy to Exchange response times during last minute.
• Maximum number of free/busy requests to Exchange for one minute.
• Maximum average free/busy to Exchange response times for one minute.
• Dell CMG To GroupWise Free/Busy [queries from Exchange users for GroupWise users’ F/B data]:
• Number of free/busy requests to GroupWise during last minute.
• Average free/busy to GroupWise response times during last minute.
• Maximum number of free/busy requests to GroupWise for one minute.
• Maximum average free/busy to GroupWise response times for one minute.
• Dell CMG Router:
• Requests directory file count.
• Bad Requests directory file count.
• Results directory file count.
• API Gateway API In directory file count.
Coexistence Manager for GroupWise 1.5.6User Guide
83

• API Gateway API Out directory file count.
• API Gateway WPCSOut subdirectory file count.
• Proxy GWIA WPCSOut subdirectory file count.
• Production WPCSOut subdirectory file count.
Performance counters in the CMG Free/Busy Connector for GroupWise 7 can be viewed on your mobile device using Mobile IT. Mobile IT requires the following tools to be installed. Installers are provided in the AutoRun application for CMG.
Mobile ITThe Dell CMG Mobile IT package uses Mobile IT alerts to notify users of potential problems in the movement of files by the CMG Router Service. The Mobile IT package also provides reports to help you manage Free/Busy-related Windows Services, and to view Free/Busy Performance Counters data.
PrerequisitesMobile IT requires installation of the following tools. Installers are provided in the AutoRun application for CMG.
• Mobile IT Server. This can be found in the Downloads section of the Dell Mobile IT Community site.
• CMG Free/Busy Connector for GroupWise 7.
• The Dell Mobile IT Agent.
• Coexistence Manager for GroupWise Free/Busy Mobile Pack (32-bit or 64-bit). Must be installed after the F/B Connector and Mobile IT Agent.
The Mobile IT Agent plugin folder resides in the Plugins subdirectory under the directory where you installed the Mobile IT Agent. The mobile pack installer automatically locates this directory and suggests that the user install the Mobile Pack there. The user can change the installation directory of the Mobile Pack, but then the Mobile Pack will not be detected by the Mobile IT Agent.
For general information about using Mobile IT and its features, please refer to the Dell Mobile IT Community site. The next two topics here highlight the primary Mobile IT features as they pertain to CMG’s FBC Router Service.
Using Mobile IT for CMG FBC Router Service alertsWith the Dell CMG Mobile IT package, your Android device receives alerts pertaining to the status of the CMG FBC Router Service. A summary of received alerts appears on the device in a chronological list, with the most recent Alerts on top. Each alert appears in one of these status categories:
• New: Alert either has not yet been seen, or has been seen only briefly.
• Acknowledged: Alert has been reviewed by the recipient.
• Resolved: The issue reported by the alert has been resolved.
From this list you can select a single alert to view more details about it, and/or to change its status designation. The status designation shown on the device does not indicate any changes that have actually occurred in CMG, but shows only any changes you have made to the status on the Mobile IT History page.
To change the status of a New alert: Select the Actions button (bottom of the display), and then select the status you want from the pop-up list.
Using Mobile IT for CMG FBC Router Service reportsAvailable reports include Services and Performance Counters.
The Services report lists all of the CMG FBC component services and shows the status of each. The Services report lets you start, restart or stop a service from your Mobile IT device.
Coexistence Manager for GroupWise 1.5.6User Guide
84

To start, restart or stop a service in the list: Select the service from the reports list, then select the Actions button (bottom of the display), and then select the action you want to perform on the selected service. The available options in the pop-up list depend on the current status of the selected service.
The Performance Counters report shows the three Performance Counter categories associated with CMG Free/Busy services: To GroupWise Free/ Busy, To Exchange Free/Busy, and Router File Counters. (See Free/Busy Connector performance counters above for lists of the specific counters within each of these three categories.) From the Performance Counters report you can select a category of counters to view the current values for all the counters in the selected category.
Installation and configurationYou can make CMG’s Free/Busy Connector ready to run by working through these steps:
• Step 1: Plan your F/B Connector installation and configuration
• Step 2: Install subcomponent software
• Step 3: Synchronize Exchange and GroupWise directories
• Step 4: Send instructions to end users for shared address books
• Step 5 (optional): Configure network load balancing
• Step 6: Direct traffic for Autodiscover services
• Step 7: Obtain and install web services certificates
• Step 8: Prepare GroupWise for the CMG Free/Busy Connector
• Step 9: Configure Exchange server link to CMG web server
• Step 10: Configure trusted sites for computers hosting F/B Connector components
• Step 11 (optional): Configure CMG logging
• Step 12: Configure F/B subcomponents
Step 1: Plan your F/B Connector installation and configurationReview the Free/Busy Connector overview earlier in this chapter, and determine which configuration describes your environment:
• GroupWise 8 or later with an Internet F/B URL, coexisting with:
• Exchange 2007 or later using MS Autodiscover and EWS (w/out public folders)
• Exchange 2007 w/Outlook 2003, via public folders w/MS Autodiscover and EWS
• Exchange 2003 or 2007 w/Outlook 2003, via public folders w/out MS Autodiscover and EWS
• GroupWise 7 or later with the API Gateway, coexisting with:
• Exchange 2007 or later using MS Autodiscover and EWS (w/out public folders)
• Exchange 2007 w/Outlook 2003, via public folders w/MS Autodiscover and EWS
• Exchange 2003 or 2007 w/Outlook 2003, via public folders w/out MS Autodiscover and EWS
Remember, for F/B coexistence with Office 365: Follow the configuration instructions for "Exchange 2007 or later with Outlook 2007 or later."
Review the CMG system requirements, and be sure to read the Deployment Considerations in the Getting Started section of the CMG Release Notes or CMG Quick-Start Guide. Anticipate any special circumstances or issues, and decide now how you will handle them when they occur.
Coexistence Manager for GroupWise 1.5.6User Guide
85

Step 2: Install subcomponent softwareFor any given scenario and configuration, it is possible to install all CMG F/B Connector components on a single server, as shown in the first few illustrations in this chapter. However, many production environments experience sufficient query volume to warrant separate servers to ensure optimal performance. The installation instructions here therefore describe how to install CMG’s F/B Connector on two servers, as shown in this illustration.
If you prefer that all subcomponents reside on a single server, simply combine the contents of CMG Server 1 and CMG Server 2 as listed below.
All CMG Free/BusyConnector subcomponents are installed by the AutoRun utility included in the CMG product kit. The subcomponents required for various scenario configurations are listed below for your reference.
Use the AutoRun utility now to install all the necessary CMG F/B Connector subcomponents on the computer(s) where you want them installed. If necessary, see the Getting Started section of the Release Notes or Quick-Start Guide for step-by-step installation instructions.
IMPORTANT: Remember, the CMG AutoRun installer must be run on the computer where you want to install a particular subcomponent. If you choose to deploy CMG’s F/B Connector on two different computers, you must run the AutoRun installer twice—once on each computer.
IMPORTANT: Before you install, on any computer that will host any CMG F/B web subcomponent, remove the IIS DefaultWebSite: In the navigation tree at left, right- click DefaultWebSite, and then select Remove from the pop-up menu. CMG requires a dedicated server for its own web subcomponents.
NOTE: The AutoRun installer automatically checks your environment to verify CMG prerequisites, but you can bypass the prerequisites check by running the installer from the command line and appending ignoreprerequisites=1 to the command string.
NOTE: If you are configuring F/B for Exchange 2003: Exchange 2003 does not support CMG's F/B Bridge subcomponent or PowerShell. The AutoRun installer installs these subcomponents anyway, because it doesn't know how you intend to configure your F/B services, but the CMG F/B Bridge and PowerShell will not be used in your configuration.
Coexistence Manager for GroupWise 1.5.6User Guide
86

Required CMG subcomponents for GroupWise 8 or later with an Internet F/B URLTo coexist with Exchange 2007 or later with Outlook 2007 or later, or with Microsoft’s Office 365:
• On CMG Server 1 (for GroupWise queries to Exchange):
• CMG Free/Busy Bridge
• CMG Exchange Free/Busy Service
• On CMG Server 2 (for Exchange queries to GroupWise):
• CMG GroupWise Free/Busy Service
• CMG Autodiscover
• CMG EWS
To coexist with Exchange 2007 w/Outlook 2003, via public folders w/MS Autodiscover and EWS:
• On CMG Server 1 (for GroupWise queries to Exchange):
• CMG Free/Busy Bridge
• CMG Exchange Free/Busy Service
• On CMG Server 2 (for Exchange queries to GroupWise):
• CMG GroupWise Free/Busy Service
• CMG Public Folder Writer Service
To coexist with Exchange 2003 or 2007 w/Outlook 2003, via public folders w/out MS Autodiscover and EWS:
• On CMG Server 1 (for GroupWise queries to Exchange):
• CMG Free/Busy Bridge
• CMG Public Folder Reader Service
• On CMG Server 2 (for Exchange queries to GroupWise):
• CMG GroupWise Free/Busy Service
• CMG Public Folder Writer Service
Required CMG Subcomponents for GroupWise 7 or Later with the API GatewayTo coexist with Exchange 2007 or later with Outlook 2007 or later, or with Microsoft’s Office 365:
• On CMG Server 1 (for GroupWise queries to Exchange):
• CMG Router Service
• CMG API Gateway Bridge Service
• CMG Exchange Free/Busy Service
• On CMG Server 2 (for Exchange queries to GroupWise):
• CMG GroupWise Free/Busy Service
• CMG Autodiscover
• CMG EWS
To coexist with Exchange 2007 w/Outlook 2003, via public folders w/MS Autodiscover and EWS:
• On CMG Server 1 (for GroupWise queries to Exchange):
• CMG Router Service
• CMG API Gateway Bridge Service
• CMG Exchange Free/Busy Service
Coexistence Manager for GroupWise 1.5.6User Guide
87
• On CMG Server 2 (for Exchange queries to GroupWise):
• CMG GroupWise Free/Busy Service
• CMG Public Folder Writer Service
To coexist with Exchange 2003 or 2007 w/Outlook 2003, via public folders w/out MS Autodiscover and EWS:
• On CMG Server 1 (for GroupWise queries to Exchange):
• CMG Router Service
• CMG API Gateway Bridge Service
• CMG Public Folder Reader Service
• On CMG Server 2 (for Exchange queries to GroupWise):
• CMG GroupWise Free/Busy Service
• CMG Public Folder Writer Service
Step 3: Synchronize Exchange and GroupWise directoriesBefore running any of CMG’s Free/Busy Connector subcomponents, you must synchronize GroupWise users as Exchange contacts, and Exchange users to GroupWise. For best performance, Dell recommends using the CMG Directory Connector. The Directory Connector is another CMG component that you may have already installed and configured, or you can install it now. For complete information, see User Guide chapter 2: CMG Directory Connector.
If you are facilitating a coexistence with a local, on-premises Exchange environment, use CMG’s Directory Connector to define a bidirectional update (a pair of single-direction updates, in opposite directions, run sequentially). You may want to schedule the pair to run automatically at regular intervals to keep both directories current throughout the coexistence period. Be sure that at least one bidirectional update has completed before continuing.
CMG’s Directory Connector does not support directory synchronizations directly between GroupWise and a hosted Exchange environment such as Office 365. You could, however, facilitate a directory synchronization between GroupWise and a hosted Exchange by this "two-step" approach:
1 Configure the CMG Directory Connector for bidirectional updates between GroupWise and a local, proprietary Active Directory, and then
2 Use Microsoft’s Online Services Directory Synchronization ("DirSync") tool to synchronize the local AD with the hosted AD.
The combination of the two, run in tandem, would configure an effective directory coexistence between GroupWise and a hosted AD.
Whatever method you choose to synchronize directories, make sure that the GroupWise SOAP web service is enabled, since that is also an environmental requirement for CMG’s Free/Busy Connector.
Step 4: Send instructions to end users for shared address booksGroupWise invites end users to share every shared address book that is created for a CMG DC connector, and end users must accept those shares. Each end user must then also add the new address book to his/her Name Completion Search Order, and move it to the top of the list. This is necessary for GroupWise to be able to identify an invitee in the event of a re-query—where a GroupWise meeting organizer queries the F/B status of one or more Exchange users for a meeting, and then adds another invitee, triggering another query.
NOTE: GroupWise sometimes mistakenly generates F/B queries for addresses in the form [email protected] (instead of [email protected]). Queries to such addresses will fail if AD does not recognize the address, so be sure to add that address form as an alias in AD for each Exchange user.
Coexistence Manager for GroupWise 1.5.6User Guide
88

Many coexistence admins simply send out an email with these instructions:
1 In your GroupWise email application, select Tools menu option Address Book.
2 In the Address Book window, select File menu option Name Completion Search Order.
3 In the Name Completion Search Order dialog box:
a Select the name of the CMG shared address book in the Available books list (left), and click the Add button to add it to the Selected books list (right).
b Select the CMG shared address book in the Selected books list, and click Up as often as necessary to move it to the top of the list.
Step 5 (optional): Configure network load balancingYou can use Network Load Balancing to permit multiple web servers to handle requests to autodiscover.<smtpdomain> or <smtpdomain>. This is an optional step, not required to deploy CMG’s Free/Busy Connector. For more information, see http://technet.microsoft.com/en-us/library/cc962172.aspx.
Step 6: Direct traffic for Autodiscover services
This step applies only if your configuration includes the CMG Autodiscover web service for Exchange F/B queries to GroupWise. Skip this step if you are configuring a F/B coexistence for Outlook 2003 with Exchange public folders.
For On-Premise Exchange Server, Multi- or Sub-Domain ConfigurationOn the Exchange server, configure your DNS host entries to point to the computer where CMG’s Autodiscover (not Microsoft’s Autodiscover) is installed. For each subdomain, Exchange connects to the predefined Autodiscover URL using DNS host entries.
Define one zone for each subdomain, and in each zone create an A Record for Autodiscover pointing to the IP address of the CMG F/B server. The zone must match your SMTP domain.
To create a zone:
1 Locate DNS in Administrative Tools.
2 Right-click Forward Lookup Zone and select New Zone.
3 Select Primary zone. Depending on your environment, you may also want to de-select the Store the zone in Active Directory (available only if DNS is a domain controller) checkbox. Then click Next.
4 Enter a zone name (i.e., <smtpdomain>), and click Next.
5 Accept the remaining defaults, and click Finish.
6 Repeat steps 2–5 for each subdomain supported by the Domain server.
Once the zone is created, you can add a DNS host to the zone:
1 Right-click the new zone, and select New Host.
2 Enter the name of the host and its IP address. Leave this box blank if you are using <smtpdomain>, or enter autodiscover if you are using <autodiscover.smtpdomain>. The click Add Host.
NOTE: Conditional Step: This step applies only if your configuration includes the CMG Autodiscover web service for Exchange F/B queries to GroupWise. Skip this step if you are configuring a F/B coexistence for Outlook 2003 with Exchange public folders.
NOTE: Use this method if you are using Microsoft DNS.
Coexistence Manager for GroupWise 1.5.6User Guide
89

For On-Premise Exchange Server, Single-Namespace ConfigurationEdit the CAS Windows hosts file (in windows\system32\drivers\etc\hosts) to point to the computer where CMG’s Autodiscover (not Microsoft’s Autodiscover) is installed. For example:
10.4.162.7 gwise1 gwise1.xyzcorp.com gwise1.demo.xyzcorp.com
Then create a single-namespace SAN certificate, as described in To Create a SAN Certificate below. This certificate must list both Autodiscover and your root domain.
For Hosted-Exchange (e.g., Office 365) ConfigurationYou must register each domain and subdomain name (in the form smtpdomain or autodiscover.smtpdomain) with a public Internet registrar, and assign them to the IP address of the computer on which the CMG Free/Busy Connector service is installed. The computer must have port 443 exposed to the Internet.
For more information about registering and verifying a domain, see this Microsoft article.
Step 7: Obtain and install web services certificatesCMG Web Server components must support HTTPS to accept SSL connections. The server on which these components are installed must have a certificate that Exchange trusts. The single certificate must cover the primary domain and all subdomains supported by the GroupWise Server. The certificate covers the Autodiscover and EWS web services.
CMG includes an Autodiscover Certificate Wizard to automate much of the process of installing this necessary certificate for the Free/Busy Connector. The wizard can be launched from CMG’s Management Console, on the Dell Web Services screen (under GroupWise Free/Busy Connector), as described in the procedure documented in the next subtopic below (see Using the Autodiscover Certificate Wizard to Obtain and Install a Certificate). Alternatively you can manually request and install a certificate, as described in the second subtopic below (see To Manually Request and Install a Certificate Using IIS 7.0–8.5).
Using the Autodiscover Certificate Wizard to Obtain and Install a CertificateEven when using the wizard, you will still have to manually request the certificate, and then tell the wizard where the certificate file resides, so the wizard can install it for use with CMG.
To use the Autodiscover Certificate Wizard to install the necessary web services certificate using IIS 7.0–8.5:
1 In CMG’s Management Console, on the Dell Web Services screen (under GroupWise Free/Busy Connector): Click the Autodiscover Certificate Wizard button to launch the wizard.
2 Enter the information requested by the wizard until the wizard displays a window of data for you to copy to a certificate request form. Copy (Ctrl+a) the data.
At this point the wizard will remain open, waiting for you to obtain the certificate. You can obtain a certificate from a local certification authority (CA) if you are using an on-premises Exchange server, or from a public CA (like Verisign or Microsoft Active Directory Certificate Services) if you are using Exchange in a hosted environment (e.g., Office 365).
NOTE: The CMG Free/Busy Connector fully supports retrieving free/busy information for users registered in the hosted Exchange.
For your hosted Exchange users to see F/B information for your on-premise GroupWise users, run the Add-AvailabilityAddressSpace cmdlet on the hosted Exchange server (see Step 9: Configure Exchange server link to CMG web server below).
NOTE: If you need a multi-domain certificate: See To Create a SAN Certificate below.
NOTE: You can request a certificate using Web enrollment pages. For more information, see http://support.microsoft.com/kb/931351.
Coexistence Manager for GroupWise 1.5.6User Guide
90

3 Request and obtain the certificate (while the CMG wizard waits).
To get a certificate from a public CA: Go to the web site of the public CA, and follow their instructions to request a certificate. At some point you will paste into the request form the text you copied from the wizard (in step 2 above).
To request a certificate from a local CA:
a From a web browser, enter https://<Local_Certification_Authority_computer>/certsrv
b Click Request a certificate, then click Advanced certificate request.
c Select Submit a certificate request by using a base-64-encoded CMC or PKCS #10 file, or submit a renewal request by using a base-64- encoded PKCS #7 file.
d Paste the text you copied from the wizard (in step 2 above) into the certificate request form.
e In the Certificate Template box, select Web Server.
f Click Submit.
g Select Base 64 Encoded, then select Download certificate.
4 Back in the Autodiscover Certificate Wizard: Click Next.
5 Specify the path and filename of the certificate file downloaded in step 3 above, and click Finish to register the file and dismiss the wizard.
To Manually Request and Install a Certificate Using IIS 7.0–8.5
To manually request a certificate using IIS 7.0–8.5:
1 From Internet Information Services, click Server Certificates.
2 From the Actions Pane, select Create Certificate Request.
3 Enter autodiscover.<smtpdomain> or <smtpdomain> for the primary domain and all required subdomains. Then click Next.
4 Accept the defaults, and click Next.
5 Specify the file name, and click Finish.
6 Request a certificate using a local CA or public CA.
To get a certificate from a public CA: Go to the web site of the public CA, and follow their instructions to request a certificate.
To request a certificate from a local CA:
a From a web browser, enter https://<Local_Certification_Authority_computer>/certsrv
b Click Request a certificate, then click Advanced certificate request.
c Select Submit a certificate request by using a base-64-encoded CMC or PKCS #10 file, or submit a renewal request by using a base-64- encoded PKCS #7 file.
d Open the text file where you save the certificate request.
e Copy and paste the text from the certificate request into the Saved Request box when you selected Submit a certificate request by using a base-64-encoded CMC or PKCS #10 file, or submit a renewal request by using a base-64-encoded PKCS #7 file.
f In the Certificate Template box, select Web Server.
g Click Submit.
h Select Base 64 Encoded, then select Download certificate.
Coexistence Manager for GroupWise 1.5.6User Guide
91
To manually install the certificate using IIS 7.0–8.5:
1 From Internet Information Services, click Server Certificates.
2 From the Actions Pane, select Complete Certificate Request.
3 Select the saved certificate file, and enter a friendly name for the certificate, then click OK.
To Create a SAN CertificateThis procedure lets you configure a single certificate to answer for multiple addresses. This is obviously necessary for a multi-/subdomain configuration, but also, for a single-namespace environment, to create a certificate that will cover both Autodiscover and the root domain.
First, you must enable the SAN (Subject Alternate Name) flag on your CA. On the machine running CA services, run these commands at the command prompt to enable the flag:
certutil -setreg policy\EditFlags +EDITF_ATTRIBUTESUBJECTALTNAME2 net stop certsvc net start certsvc
When the SAN flag is enabled, you can create the certificate:
1 Open IIS on the machine running F/B and select the server. Scroll to the bottom, open Server Certificates, and click on Create Certificate Request.
2 For the common name, enter something appropriate for your larger domain. For example, for a domain alejandro.xyzcorp.com, the common name on the certificate is *.xyzcorp.com. (This is somewhat generic, as we will later add specific namespaces to the certificate.)
3 Accept the defaults and enter a name for the request.
4 Open the certificate request you just created, and select and copy all of the text.
5 Open the certificate web enrollment page for the CA of your domain— e.g., https://hostname/certsrv. Then select Request a Certificate, and then select Advanced Certificate Request.
6 Select Submit a certificate request by using a base-64-encoded CMC or PKCS #10 file, or submit a renewal request by using a base-64-encoded PKCS #7 file.
7 In the Base-64-encoded certificate request box, paste all of the text that you copied from the text file in step 4 above.
8 For the Certificate Template, select Web Server.
9 In the Additional Attributes box, enter any alternate-domain information in this format:
san:dns=dns.name[&dns=dns.name]
... with &dns=dns.name appended for each alternate domain you want the certificate to handle.
For a single-namespace environment: Enter the autodiscover and root domain, like this:
san:dns=autodiscover.xyzcorp.com&dns=xyzcorp.com
For a multi-/subdomain environment: You can enter as many domains as you like:
san:dns=autodiscover.sub1.xyzcorp.com &dns=autodiscover.sub2.xyzcorp.com &dns=autodiscover.sub3.xyzcorp.com &dns=autodiscover.sub[...].xyzcorp.com &dns=autodiscover.sub[n].xyzcorp.com
NOTE: To create an https binding for the web site using IIS 7.0–8.5:
1 From the Connection Pane in IIS, select DellFreeBusy.2 From the Actions Pane, select Bindings.3 Select Add. Select https as the type for a secure site, and enter the IP address and port
number.
4 Select the SSL certificate to pass the certificate into the computer account, and click View to view any certificate information.
Coexistence Manager for GroupWise 1.5.6User Guide
92
When you are finished, click Submit.
10 Select the DER encoded radio button, and then select Download certificate chain.
11 Enter a name for this.
12 Go back to IIS and click Complete Certificate Request.
13 For the Filename containing the certification authority’s response, click the Browse button and select the certificate you just saved. (Be sure to change the file type to *.* instead of *.cer, or you won’t see the file you saved—since it is a .P7B extension.) Type a friendly name that is easy to remember and identify so you can find your certificate on the list later. You should then see your new certificate on the list.
14 Select your new certificate and click View.
15 Click the Details tab, and scroll down to Subject Alternative Name. Highlight this field, and you should see all of your domains in the Details box.
Now bind your certificate to the HTTPS protocol on the DellFreeBusy website:
1 On the CMG F/B computer, in IIS Manager: Select DellFreeBusy.
2 In the Actions pane on the right, select Bindings.
3 Select https and click Edit.
4 In the Edit Site Binding window, in the SSL certificate drop-down list: Select the certificate you just created.
5 Click OK.
Step 8: Prepare GroupWise for the CMG Free/Busy Connector
Free/Busy coexistence with GroupWise 7 requires the GroupWise API Gateway and GroupWise Proxy GWIA. These components must be installed to support the newer router/postoffice configuration option, required for connection to GroupWise 7. GroupWise 8 admins may choose between the router/postoffice configuration and the original shared-address-book configuration.
For F/B coexistence with a mixed GroupWise 7 and 8 environment, the GroupWise 8 domain must be the primary domain, GroupWise 7 and the API Gateway must be secondary domains, and GroupWise 7 must be the bridgehead between CMG and GroupWise.
Create a proxy GWIA in ConsoleOne (see CMG System Requirements).
1 Manually create an empty gateway folder called GWIAFB (e.g., ..\WPGATE\GWIAFB).
2 Create a GroupWise Internet Agent called GWIAFB, and point it to the GWIAFB directory that was just created. (This new GroupWise Internet Agent will need to have a Gateway Type of Internet Agent.)
3 Leave the version as 4.x, as this is the only version that is supported by the API Gateway.
4 Change the API agent Idle Sleep Duration to 5 seconds.
5 Reconfigure the GW domain to use GWIAFB as the default. To do this: Select the Non-GroupWise domain in ConsoleOne and then, on the Tools menu: Select GroupWise System Options | Internet Addressing to open the Internet Addressing dialog box. Then select GWIAFB from the Internet Agent for outbound SMTP/MIME messages drop-down list. Click OK to save the changes.
NOTE: Conditional Step: This step applies only if you are configuring a F/B coexistence with GroupWise 7, or with a mixed GroupWise 7 and 8 environment.
Coexistence Manager for GroupWise 1.5.6User Guide
93

Step 9: Configure Exchange server link to CMG web serverFollow these steps to configure and test the link from the Exchange Server to the domain and subdomains supported by the GroupWise Server, through the CMG Web Server. This procedure tests whether the certificate on the CMG Web Server is trusted by the Exchange server.
For coexistence with an Exchange server other than Office 365:
1 At the Exchange Server, open Exchange Management Shell and enter the following cmdlet:Add-AvailabilityAddressSpace -ForestName <YourDomain.com> -AccessMethod OrgWideFB -UseServiceAccount $true
... where <YourDomain.com> is the name of the GroupWise domain.
2 Open a Web browser and enter this URL:https://[autodiscover.]<smtpdomain>/autodiscover/autodiscover.xml
... to ensure that the Exchange server resolves it to the CMG FBC EWS without any certification errors.
3 Ensure the certificate created earlier is trusted by Exchange. If it is not, see Step 7: Obtain and install web services certificates.
4 If GroupWise Server subdomains have been configured, repeat the above steps for each subdomain.
For coexistence with an Office 365 Exchange environment: Run Enable-OrganizationCustomization, and then create the availability address space by opening a PowerShell session and using the following commands:
$Credential = Get-Credential
$Session = New-PSSession -Credential $Credential -AllowRedirection -ConnectionUri https://ps.outlook.com/PowerShell -Authentication Basic -ConfigurationName Microsoft.Exchange
Import-PSSession $Session
New-AvailabilityConfig –OrgWideAccount <[email protected]> [replace <[email protected]> with your O365 admin account]
$domain = "<domain.onmicrosoft.com>" [replace <domain.onmicrosoft.com> with your SMTP domain name in Office 365]
$adminUserId = "<[email protected]>" [replace <[email protected]> with your O365 admin account]
$adminCredsId = "<[email protected]>" [replace <[email protected]> with your O365 admin account]
$adminCredsPassword = "<YourPassword>" [replace <YourPassword> with your Office 365 admin password]
$securePassword = ConvertTo-SecureString $adminCredsPassword -AsPlainText -Force
$adminCreds = New-Object System.Management.Automation.PSCredential($adminCredsId,$securePassword)
Add-AvailabilityAddressSpace -AccessMethod OrgWideFB -ForestName <domain.com> -Credentials $adminCreds –TargetAutodiscoverEpr
NOTE: If you created a self-signed certificate and a certification error appears in the Web browser:
1 Click the SSL button in the Web browser.
2 Click View Certificates.3 Right-click the certificate to open the Import Certificate Wizard dialog box.
4 Install the certificate in Trusted Root Certification Authorities, and click Next.5 Click Import, then Finish.
NOTE: If you requested a certificate from a public CA, the certificate is already trusted by Exchange.
Coexistence Manager for GroupWise 1.5.6User Guide
94

'https://autodiscover.<domain.com>/autodiscover/autodiscover.xml' [replace <Domain.com> with your SMTP domain name]
If Exchange has sites that are handled by Exchange 2003:
• These domains must be added to the 2007/2010/2013 servers’ availability address space as PublicFolders (not OrgWideFB).
Step 10: Configure trusted sites for computers hosting F/B Connector componentsLog in as the CMG account to be used with the F/B Connector (if you haven’t already). Then, in Internet Options (via Windows Control Panel or IE Tools):
1 Click the Security tab, then select Trusted sites and click the Custom level... button.
2 In Settings, scroll down to User Authentication | Logon, and click the radio button for Automatic logon with current user name and password.
3 Click OK to save the selection and return to the Security tab.
4 Add the Exchange Server EWS and Autodiscover URLs to the Trusted Sites.
5 Click OK to save your new Security settings and dismiss the Internet Options dialog box.
Step 11 (optional): Configure CMG loggingBy default, CMG is installed with the log42net utility to generate log files of CMG components’ system activity. This information is critical to diagnosing any problems that may arise. Logging is enabled by default for all CMG components.
The default configurations will be suitable for almost all organizations and circumstances, but you can customize logging features if you like. The log42net utility may be configured to work a particular way with each CMG component. Configuration instructions are nearly identical from one component to another, so we present the details and instructions separately, in User Guide Appendix C.
Step 12: Configure F/B subcomponentsUse CMG’s Management Console to configure the Free/Busy Connector’s subcomponents—to identify the participating servers and their locations, register the necessary account access credentials, set up their logging features, and set other operating parameters.
See CMG Management Console for the Free/Busy Connector below for screen-by-screen field notes.
CMG Management Console for the Free/Busy ConnectorThe CMG Management Console contains four screens for configuring the Free/Busy Connector. The Management Console saves its F/B Connector configuration data, including individual connector definitions, in several different data files. The Free/Busy Connector configuration files, unlike the config files for the DC and Mail
NOTE: You may use PowerShell commands to configure CMG Free/Busy Connector subcomponents, instead of using CMG’s Management Console as described here. For information about using PowerShell to configure the Free/Busy Connector, see Configuring and troubleshooting the F/B Connector with PowerShell at the end of this chapter.
Coexistence Manager for GroupWise 1.5.6User Guide
95

Connector, are fixed at their default filenames and locations, and should not be opened or edited except by CMG’s Management Console.
Note that the Free/Busy Connector actually facilitates two separate, independent processes: one for the query-reply path in each direction. The subcomponents that facilitate GroupWise asking Exchange for F/B information are different from those that facilitate Exchange asking GroupWise for F/B information. The Management Console therefore groups its F/B Connector configuration screens into two subgroups:
• Exchange Free Busy Connector screens configure CMG subcomponents that facilitate GroupWise queries for Exchange F/B info.
• GroupWise Free Busy Connector screens configure CMG subcomponents that facilitate Exchange queries for GroupWise F/B info.
User Guide chapter 1 explains the basic operating concepts for the CMG Management Console. This chapter 4 (next sections below) provides the field notes for the Management Console screens that pertain to the Free/Busy Connector.
Management Console screen: GroupWise CMG Router | CMG Router ServiceThis screen appears only if you are connecting to GroupWise 7, or if you have GroupWise 8 and have chosen to install the new Router configuration.
The first fields here specify the folders where the CMG Router will send or look for various items for its routing functions. For each field asking for a directory, use the Browse button to find and select a directory by a pop-up Browse for Folder dialog box.
• Novell Account: Novell account login user name.
• Password: Password associated with the Novell Account cited above.
• Check For New Requests Every __ Seconds: Polling frequency for F/B queries. The interval (in seconds) the Router will wait between successive checks to see if there is a new query to process.
• Request Retry Duration: Number of minutes the CMG Router Service will continue trying to move a file (message), if preceding attempt(s) have failed. The service repeats such attempts at intervals specified by the Check For New Requests value above, until successful or until the Request Retry Duration is reached.
• Update Performance Counters Every __ Seconds: Update frequency for the F/B performance counters that feed Windows’ System Monitor feature.
• Enable Performance Counters: A checkbox to indicate whether you want the F/B Connector performance counters to run.
Management Console screen: Exchange F/B Connector | BridgeThis screen appears only for an Exchange-to-GroupWise connector, and only if you are connecting to GroupWise 8 and have chosen the original, shared-address-book configuration.
CMG uses the information on this screen to configure its Bridge web service, for GroupWise queries for Exchange F/B information.
Requests Directory: Specify the folder where F/B requests will be held. You may use the Browse button to find and select a directory by a pop-up Browse for Folder dialog box.
Results Directory: Specify the folder where F/B results will be held. You may use the Browse button to find and select a directory by a pop-up Browse for Folder dialog box.
Check For New Requests Every __ Seconds: Polling frequency for F/B queries. The interval (in seconds) the Bridge will wait between successive checks to see if there is a new query to process.
Time Zone for GroupWise API Gateway server: Use the drop-down list box to select the correct time zone.
Coexistence Manager for GroupWise 1.5.6User Guide
96

Dell Exchange Free/Busy Connector Host Name is prefilled by CMG with localhost—the appropriate value for a typical CMG configuration. In a typical configuration, the CMG Bridge subcomponent is installed on the same computer as the CMG Exchange Free/Busy Connector service, so the generic relative value localhost will suffice in this context. If the CMG Bridge is installed on a different computer, then enter the correct Host Name here.
In either case, CMG derives the Endpoint field value from the Host Name value. The Endpoint field value cannot be edited.
Management Console screen: Exchange F/B Connector | Exchange Free/BusyThe fields on this screen are necessary to configure CMG’s Exchange F/B Connector service, for GroupWise queries for Exchange F/B information.
Exchange Server Location: Select one of these three radio buttons to tell CMG’s F/B Connector how to route free/busy queries to the coexisting Exchange environment—by EWS Endpoint, by Autodiscover Endpoint, or by Autodiscover Only.
Specify your choice by selecting one of these methods:
• EWS Endpoint: Select this option if you have an on-premises Exchange environment with a single Exchange EWS whose location (URL) is fixed relative to CMG’s Exchange FBC service. This approach typically yields the best performance of the three options, but is the least flexible since the connection will fail if the Exchange EWS is not at the specified URL. If you select this option, you must also specify:
• Exchange EWS Host Name: Name of the Exchange server where EWS requests should be sent.
• EWS URL: Location of Microsoft EWS web service on the Exchange server.
• Autodiscover Endpoint: Select this option if you have an on-premises Exchange environment with multiple Exchange EWS endpoints (for example, in a load-balanced environment) and you have an Exchange Autodiscover service that can determine which EWS endpoint to use. This can also be the best choice if you want to coexist with Microsoft's hosted Office 365 (see the Office 365 notes below). Performance will be slower than if you direct the FBC service to a fixed-location EWS (above), but will still be faster than if neither the EWS nor the Autodiscover value is specified (below). If you select this option, you must also specify:
• Exchange Autodiscover URL: Location of the Autodiscover service on the Exchange server (or, for Office 365, of Microsoft's Autodiscover URL, as noted below).
• Autodiscover Only: Select this option if you will coexist with an Exchange environment where you don't know the location of either the EWS or Autodiscover. In this case, the FBC service will search the network
NOTE: All queries for Exchange users' F/B information must pass through an Exchange EWS, which facilitates communications between Exchange and the CMG Exchange FBC service.
In an Exchange environment with a single EWS at a known fixed location (URL), you can point the FBC service directly to the EWS by specifying the EWS URL and host name. If there is no single Exchange EWS with a known fixed location, the FBC service can query the Exchange Autodiscover service, which tracks and reports the current location of an available EWS.
If you will coexist with an Exchange environment where you don't know the location of either the EWS or the Autodiscover endpoint, the CMG FBC service will have to search the network for the connection it needs.
NOTE: If coexisting with Microsoft’s Office 365: Select the Autodiscover Endpoint option and set the Exchange Autodiscover URL to Microsoft’s Autodiscover URL:
https://autodiscover-s.outlook.com/autodiscover/autodiscover.svc
Note, however, that this is a Microsoft URL that is subject to change, in which case this connection would fail and the Free/Busy Connector would fail. Remember this if you set the Exchange Autodiscover URL to the Microsoft URL, and CMG’s F/B Connector works fine for a time but then suddenly and consistently fails. The most likely cause is a change in Microsoft’s Autodiscover URL. Contact Microsoft to get the new URL, or select the Autodiscover Only option (below) instead.
Coexistence Manager for GroupWise 1.5.6User Guide
97

for the connection it needs, so this is the most flexible option, but it is also much slower than either alternative above.
Regardless of your selection for Exchange Server Location, all of the fields listed below appear on this screen.
Exchange Online: Mark this checkbox only if you are configuring coexistence with Microsoft’s Office 365 hosted Exchange services. If you are configuring coexistence with a local, on-premises Exchange server, make sure this checkbox is unmarked.
Exchange Username (only if the CMG admin computer and the Exchange environment are in different domains): The Username for the administrator account the F/B Connector will use to access data and features in Exchange.
Exchange Password (only if the CMG admin computer and the Exchange environment are in different domains): The Password associated with the Exchange Username cited above.
Show Tentative As Busy: Select Yes or No to determine whether Tentative F/B status in Outlook should appear as Busy in GroupWise.
Management Console screen: GroupWise F/B Connector | GroupWise Free/BusyThe fields on this screen are necessary to configure CMG’s GroupWise F/B Connector service, for Exchange queries for GroupWise F/B information.
GroupWise Soap Service Host Name: IP address or full DNS hostname for the GroupWise server.
GroupWise Soap Service Port Number: The SOAP port for the GroupWise server. CMG prefills this field with the GroupWise default, 7191, but be sure to change it if your SOAP service is assigned to a different port.
GroupWise Request Retry Delay: Number of seconds to wait between retrying Free/Busy requests to the GroupWise system. This number should be significantly less than the GroupWise Request Timeout value (below).
GroupWise Request Timeout: Number of seconds the GroupWise Free/Busy Connector should run before timing out and returning the results it has obtained up until the timeout. Note that Outlook Free/Busy requests timeout at about 25 seconds so this number should be a few seconds less than that.
GroupWise User Name: User name for the GroupWise SOAP logon process.
GroupWise Trusted Application Name: Name of the trusted application (for example, DellFreeBusy) by which the GroupWise User Name specified above will access the GroupWise Post Office.
• GroupWise Trusted Application Key: An authentication code that permits access to GroupWise data and features by the GroupWise User Name specified above. This Key is associated with a particular Trusted Application Name, specified in the field above. You can create the key with ConsoleOne (in GroupWise 8.01 SP1 or later), or simply run a command from the Windows command prompt:
• For GroupWise 7 or 8, enter: \Dell\Coexistence Manager for GroupWise\TrustedApplication\GroupWise8\CreateTrustedKey8.exe
• Or for GroupWise 2012, enter: \Dell\Coexistence Manager for GroupWise\TrustedApplication\GroupWise2012\CreateTrustedKey2012.exe
SMTP Domain Mappings: Used when the domain specified in GroupWise for a GroupWise user's email address is different from the domain specified for the same GroupWise user on an Exchange system. For example, if the user’s email address in GroupWise is [email protected], and his email address in Exchange is [email protected], then an SMTP domain mapping would be created for exchgdomain.com = gwdomain.com. Then when Outlook does a F/B search for [email protected], the CMG F/B Connector translates it as a request to GroupWise for [email protected]. SMTP Domain Mappings are used only for Exchange-to-GroupWise F/B queries.
IMPORTANT: Leave these Exchange Username and Exchange Password fields empty unless you are coexisting with a hosted Exchange (such as Office 365), or with a local on-premises Exchange that isn't in the same domain as the CMG admin server. But if CMG resides in a different domain from Exchange, then entries here are mandatory.
Coexistence Manager for GroupWise 1.5.6User Guide
98

Management Console screen: GroupWise F/B Connector | Dell Web ServicesThe fields on this screen are necessary to configure CMG’s Autodiscover web service, for Exchange queries for GroupWise F/B information.
• Web Service Prefix: The first element of the Autodiscover Url (below) for CMG's Autodiscover web service. The default value is autodiscover, but you can designate an alternate web service prefix for the GroupWise Free/Busy Connector. This field accommodates F/B coexistence with Exchange 2013 or Office 365 (Wave 14 or 15), where the prefix is configurable.
• Web Service Host Name: From the Autodiscover Host A Record, this is the Host Name obtained from your DNS configuration entries in an earlier step of the configuration. (See Step 6: Direct traffic for Autodiscover services for more information.) This field is prefilled by CMG, assuming the Autodiscover service is installed on the same computer as the CMG GroupWise Free/Busy Connector service, but the value may be edited for a non-standard configuration.
• The Dell Autodiscover Url and Dell EWS Url fields are both filled by CMG, derived from the Web Service Prefix and Web Service Host Name values (above), and cannot be changed.
• Autodiscover Certificate Wizard: Button to launch the wizard, which automates much of the process of installing the necessary autodiscover certificate for the Free/Busy Connector. (For more information about this wizard, see step 7 of the FBC configuration instructions: Step 7: Obtain and install web services certificates.)
• Dell GroupWise Free/Busy Connector Host Name: Prefilled by CMG with localhost—the appropriate value for a typical CMG configuration. In a typical configuration, the CMG EWS subcomponent is installed on the same computer as the CMG GroupWise Free/Busy Connector service, so the generic relative value localhost will suffice in this context. If the CMG EWS is installed on a different computer, then enter the correct Host Name here.
In either case, CMG derives the Endpoint field value from the Host Name value. The Endpoint field value cannot be edited.
Configuring and troubleshooting the F/B Connector with PowerShellYou may use these PowerShell commands (instead of CMG’s Management Console) to configure CMG Free/Busy Connector subcomponents and/or troubleshoot F/B Connector issues.
• Commands to configure the F/B Connector
• Commands to troubleshoot the F/B Connector
Commands to configure the F/B ConnectorNote that for every set-cmg* command listed here, there is a corresponding get-cmg* command that takes no parameters.
Command Parameter
Set-CmgAutodiscoverConfig [-DellEwsUrl] <String> [-IsRedirectEnabled]
• DellEwsUrl: The URL of the EWS (i.e., Availability) service.
• IsRedirectEnabled: $True or $False. Is Autodiscover redirection enabled or not?
Coexistence Manager for GroupWise 1.5.6User Guide
99

Command Parameter
Set-CmgAvailabilityConfig [[-HostName] <String>] [[-PortNumber] <Int32>]
• HostName: Name of server hosting the GroupWise F/B Connector Service.
• PortNumber: Port number the GroupWise F/B Connector Service is located on.
Command Parameter
Set-CmgExchangeFreeBusyConfig [[-HostName] <String>] [[-PortNumber] <Int32>] [-ShowTentativeAsBusy] [[-ExchangeEwsUrl] <String>] [[-Credentials] <PSCredential>] [-ValidateRedirect] [[-ValidRedirectUrlList] <String[]>]
• HostName: Name of the server hosting Exchange F/B Connector Service.
• PortNumber: Port number the Exchange F/B Connector Service is located on.
• ShowTentativeAsBusy: $True or $False. Show Tentative Busy as Busy?
• ExchangeEwsUrl: The URL of the Exchange Web Service.
• Credentials: Credentials to access the Exchange Service. Use Get-Credential to get the credentials.
• ValidateRedirect: $True or $False. Can Autodiscover redirect to a different domain?
• ValidRedirectUrlList: Comma-separated list of valid EWS URLs to which Autodisover can redirect.
Command Parameter
Set-CmgFreeBusyBridgeConfig [[-ExchangeFreeBusyServiceHostName] <String>] [[-ExchangeFreeBusyPortNumber] <Int32>] [[-DaysOfFreeBusy] <UInt32>]
• ExchangeFreeBusyServiceHostName: Name of the server hosting the Exchange F/B Connector Svc.
• ExchangeFreeBusyPortNumber: Port number of the Exchange F/B Connector Service.
• DaysOfFreeBusy: Number of days of F/B to be retrieved from Exchange.
Coexistence Manager for GroupWise 1.5.6User Guide
100

Commands to troubleshoot the F/B Connector
To get F/B info for an Exchange user via the FreeBusyBridge Web Service:
To get F/B info for an Exchange user via the Exchange F/B Connector Service:
Command Parameter
Set-CmgGroupWiseFreeBusyConfig [[-DellFreeBusyServiceHostName] <String>] [[-DellFreeBusyServicePortNumber] <Int32>] [[-GroupWiseSoapServiceHostName] <String>] [[-GroupWiseSoapServicePortNumber] <Int32>] [[-SmtpDomainMappings] <String[]>] [[-SessionLoginName] <String>] [[-TrustedApplicationKey] <SecureString>] [[-TrustedApplicationName] <String>] [[-GroupWiseRetryDelayInSeconds] <Int32>] [[-GroupWiseTimeoutInSeconds] <Int32>]
• DellFreeBusyServiceHostName: Name of the server where the GroupWise F/B Connector Svc resides.
• DellFreeBusyServicePortNumber: Port for the GroupWise F/B Connector Service.
• GroupWiseSoapServiceHostName: Name of the server hosting the GroupWise SOAP service.
• GroupWiseSoapServicePortNumber: Port for the GroupWise SOAP service.
• SmtpDomainMappings: Comma separated list of SMTP domain mappings.
• SessionLoginName: User name for the GroupWise SOAP logon.
• TrustedApplicationKey: The key must be entered as a SecureString, so use the following PowerShell command to create the key:
$key = Read-Host "Enter Key" –AsSecureString
• TrustedApplicationName: Name of the Trusted Application.
• GroupWiseRetryDelayInSeconds: Number of seconds to wait between retrying F/B requests to GroupWise. This number should be significantly less than the GroupWiseTimeoutInSeconds value.
• GroupWiseTimeoutInSeconds: Number of seconds the GroupWise connector service should run before timing out and returning the results it has obtained up until the timeout. Note that Outlook Free/Busy requests timeout at 25 seconds, so this number should be a few seconds less than that.
Command Parameter
Get-CmgFreeBusyBridge [-WebServerName] <String> [-UserEmailAddress] <String>
• WebServerName: Name of server where FreeBusyBridge Web Service resides.
• UserEmailAddress: Email address for whom to get F/B info from Exchange.
Command Parameter
Get-CmgExchangeFreeBusy [-UserEmailAddress] <String> [-StartDate] <DateTime> [-EndDate] <DateTime>
• UserEmailAddress: Email address of an Exchange user.
• StartDate: Starting date for the F/B search.
• EndDate: Ending date for the F/B search.
Coexistence Manager for GroupWise 1.5.6User Guide
101
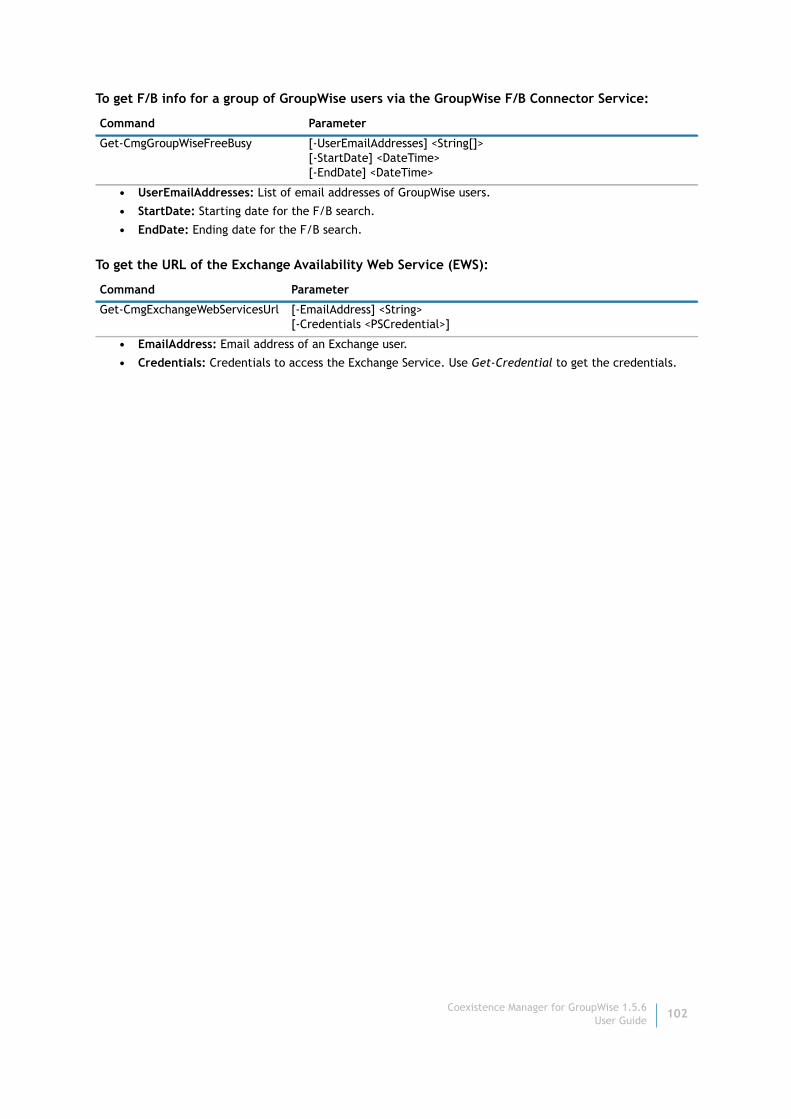
To get F/B info for a group of GroupWise users via the GroupWise F/B Connector Service:
To get the URL of the Exchange Availability Web Service (EWS):
Command Parameter
Get-CmgGroupWiseFreeBusy [-UserEmailAddresses] <String[]> [-StartDate] <DateTime> [-EndDate] <DateTime>
• UserEmailAddresses: List of email addresses of GroupWise users.
• StartDate: Starting date for the F/B search.
• EndDate: Ending date for the F/B search.
Command Parameter
Get-CmgExchangeWebServicesUrl [-EmailAddress] <String> [-Credentials <PSCredential>]
• EmailAddress: Email address of an Exchange user.
• Credentials: Credentials to access the Exchange Service. Use Get-Credential to get the credentials.
Coexistence Manager for GroupWise 1.5.6User Guide
102

5
The Log Viewer
The Log Viewer utility simplifies the viewing and interpretation of program log files, which document errors and warnings in Dell programs. The same Log Viewer is used for Dell’s MFG, CMG, MFNE and CMN products.
• Log Viewer menus and toolbar
• How to ...
Log Viewer menus and toolbarMost Log Viewer features are accessible by the program’s menus and/or the program tool bar, which share a horizontal band across the top of the screen:
Several features are also available directly from the keyboard, and those keyboard shortcuts are displayed in the menus and noted here.
File menu• Open Log File... (or Ctrl+O): Opens a standard Windows Open dialog box, from which you can specify the
file you want to open into the Log Viewer. The Log Viewer can open and display MFNE/MFG (compressed) files, and tsv, csv and plain text files.
• Save Copy Of Log File As... (appears only when a file is open): Opens a standard Windows Save As dialog box, from which you can specify the filename and location where you want the open file to be saved. The Log Viewer lets you edit the contents of an open file, but will not replace the original on disk with the edited version (you cannot save it under the same name in the same location).
• Recent Files: Shows a list of recently opened files, from which you can select a file to re-open (to quickly re-open a file you have recently viewed and closed).
• Exit: Closes the Log Viewer window.
Edit menu• Copy (or Ctrl+C): Copies the selected string to the Windows clipboard.
• Find... (or Ctrl+F): Opens a Find dialog box that lets you specify a text string to search for within the open file.
Coexistence Manager for GroupWise 1.5.6User Guide
103

The Find feature highlights the entire line that contains the target string:
View menu• Show Line Numbers (or Ctrl+L): Toggles the display of line numbers (within the open file) on and off.
• Show Complete Log Entry (or F5): Opens a Log Detail window that shows the entire error string for the selected error—useful when the error text overruns the Log Viewer’s maximum line length (maximum 259 characters), or if the line extends beyond the right edge of the viewer window without wrapping.
• Enable Internet Access: Toggles the Internet connection on and off.
Help menu• Online Help... (or F1): Opens Dell’s online Help file for the Log Viewer, which documents its features.
• About...: Opens a window of information about the Log Viewer—identifying the current release, and asserting Dell’s intellectual property rights to the software.
How to ...This section describes how to complete various tasks in the Log Viewer.
To Open a Specific Log
• Click the Open Log File button to view a list of log files that can be opened. In the File section of the screen, select a log file and click OK to open the log in the Dell Log File Viewer.
To Find a Particular Text String Within an Open File:
• Edit menu | Find... (or Ctrl+F): Opens a Find dialog box that lets you specify a text string to search for within the open file. The Find feature highlights the entire line that contains the target string.
To Re-Open a Recently Viewed File:
• File menu | Recent Files: Shows a list of recently opened files, from which you can select a file to re-open (to quickly re-open a file you have recently viewed and closed).
To Save a Copy of a File:
• File menu | Save Copy Of Log File As... (appears only when a file is open): Opens a standard Windows Save As dialog box, from which you can specify the filename and location where you want the open file to be saved. (This feature does not permit any revisions to the open file. It simply lets you save the file in its original form to a new filename and/or a new location.)
NOTE: The Open Log File button in the Management Console’s Health screen is enabled only when the UdpAppender is defined in the log42net.config file of at least one module. During a new installation, the Log Viewer installer installs a file with the required UdpAppender. During an upgrade, however, the installer does not overwrite the log42net.config file, so the UdpAppender is not present, and this makes the Open Log File button invisible. To correct this, see To Add the UdpAppender to an Existing Log File at the end of the Configuring CMG Logging Appendix.
Coexistence Manager for GroupWise 1.5.6User Guide
104

To Show or Hide Line Numbers:
• View menu | Show Line Numbers (or Ctrl+L): Toggles the display of line numbers (within the open file) on and off.
To View an Entire Untruncated Log Entry:
• View menu | Show Complete Log Entry (or F5): Opens a Log Detail window that shows the entire error string for the selected error—useful when the error text overruns the Log Viewer’s maximum line length (maximum 259 characters), or if the line extends beyond the right edge of the viewer window without wrapping.
To Turn Internet Access On or Off:
• View menu | Enable Internet Access: Toggles the Internet connection on and off.
To Copy a Selected Text String to the Clipboard:
• Edit menu | Copy (or Ctrl+C): Copies the selected string to the Windows clipboard.
To Close the Log Viewer
• File menu | Exit: Closes the Log Viewer window, or click the Log Viewer Close box ([X]) to dismiss the window and return to the previous display.
Coexistence Manager for GroupWise 1.5.6User Guide
105

A
Appendix A: Known limitations
The known limitations of any coexistence method are usually due to feature inconsistencies between the two environments. That is, features that are available in one environment may not have an equivalent function in an alternate environment. Other limitations are due to feature incompatibilities, where similar features are available in both environments, but their implementations are so different that remediation is impractical.
Many of the known limitations listed here are inherent to the process and, as such, may not be resolved. Other items we expect to resolve in upcoming releases are itemized in the CMG Release Notes, under Known Issues.
Directory Connector issues• A single DC connector cannot connect to a multi-tree Novell environment with multiple authentication
credentials. As a result, a separate DC connector must be defined and configured for each set of authentication credentials required to extract data from each tree.
• The GroupWise API can sync no more than ten admin-defined fields, although the Novell directory can be configured for more than ten. If more than ten are defined, the GroupWise API will transmit only the first ten, so a CMG G-to-E connector can sync only those first ten to Active Directory.
• A GroupWise-to-Exchange connector will not update Active Directory with a contact for a GroupWise group with no internet mail address. GroupWise may insert a mail attribute for a group when the internet address field is empty, in which case the group will be copied into AD, although the internet address field will remain empty in GroupWise.
• When a Exchange-to-GroupWise connector updates the Novell directory with a contact that contains no SN attribute in Active Directory, the object's CN attribute is copied to the SN attribute field in the Novell directory contact.
• CMG does not synchronize an email address enclosed within quotation marks on the left side of the @ symbol in an address (for example, "Larry White"@mustang.contoso.com).
• CMG cannot sync into Exchange a GroupWise distribution list whose name is exactly the maximum length allowed by GroupWise (63 characters), and the attempt generates a "constraint violation" error in the CMG log. An admin can solve the problem by manually shortening the list name by a single character or more. (Dell believes most organizations will prefer that remedy over the program arbitrarily truncating the list names.)
• A G-to-E connector between GroupWise 7 (only) and Exchange 2007 (only) does not sync a user or contact whose middle initial field contains a "." character (period) in the source. The easiest work-around is to use the Name Rules feature of the connector's Advanced Features to assign some value other than the cn common name to the object name. For example, you could change the object name to the given name, or surname, or could assemble and/or process values from some combination of other attributes to generate a unique object name without a period.
• An "access to the registry key ... denied" error that occurs when clicking the Set Configuration button (on the SQL Settings screen) can be dismissed with no disruption to the SQL setup by clicking OK in the error dialog box. This appears to be an OS issue that occurs only with Windows Server 2012 R2, and occurs only the first time SQL Settings are configured. If Set Configuration still generates the error after you have dismissed the error notice once, reboot the computer and try again.
• When an AD user has been associated with a GroupWise user in a G-to-E DC connector, but the associating attributes and proxyaddress are then removed from the AD object record, the objects
NOTE: Many of the Known Limitations documented here are due to known or suspected problems with the connected systems, rather than any inherent limitation of the coexistence process with CMG. We list them here as a courtesy, with known solutions (upgrades and hotfixes) where they exist.
Coexistence Manager for GroupWise 1.5.6User Guide
106

nevertheless remain associated in future connector runs. This behavior is by design, but the association can be broken by this procedure:
1 Drop CMG DC database, and recreate database.2 Edit the connector: Go through all the pages, Save, and Activate.3 Remove mail and proxyAddress values from the AD user record.
The AD user thereafter will not be updated by connector updates.
• An attempt to uninstall CMG's Directory Connector immediately after installing it may fail due to a latency issue where the QuickConnect DC engine, installed as Network Services, does not stop before the installer determines that its process is finished.
Workarounds (either of these should resolve this issue):
• Use the Management Console to configure the DC's SQL settings, which stops the service and sets the run account to localsystem. Then retry the uninstallation.
• Stop the QuickConnect service (you may have to use Task Manager to kill the service process), and then retry the uninstallation.
Mail Connector issues
Custom meeting invitations• When a custom meeting invitation is sent from a GroupWise organizer to an Exchange invitee using an
older release of Outlook 2007 (only), the attendee may mistakenly appear as the meeting organizer. This is a known Microsoft problem in Outlook 2007, which may be corrected by applying either Microsoft's Hotfix 941275, or SP2 of Office 2007.
• When a custom meeting invitation is sent from a GroupWise organizer to an Exchange 2010 invitee using an Outlook 2007 12.0.4518.1014 (RTM version) client, an .ics file arrives in Outlook with a blank message body. This is a known Microsoft problem that has been found only in the particular combination of Exchange 2010 with the above-cited Outlook 2007 release. The problem may be corrected by applying either Microsoft's Hotfix 939596, or SP1 of Office 2007.
• When a GroupWise user schedules a custom meeting with exactly three instances, the invitation in Exchange may show and schedule the wrong dates (the third date is most likely to be incorrect). This is a known limitation of GroupWise.
• A custom meeting invitation originating from GroupWise will not open in OWA, since the .ics attachment CMG creates to facilitate the invitation in Outlook can be opened only with Outlook (not with OWA).
• Some custom recurring meetings created in GroupWise versions earlier than GW 2012 with complex, obscure recurrence patterns arrive in Exchange without the .ics attachment, and can be incorrectly entered into an Outlook invitee's calendar. For example, a recurring series of weekly Tuesday, Wednesday and Friday meetings may appear in Outlook calendars with the Friday meetings dropped from the series. This appears to be a GroupWise issue in versions earlier than GroupWise 2012, where it appears to have been resolved.
Meetings/appointments originating in GroupWise, sent to Exchange recipients• When an invitation originating in GroupWise is sent to an Exchange recipient, any inline image in the
original invitation does not appear in Outlook. This appears to be an Outlook issue rather than a CMG issue.
• An invitation for a recurring meeting with more than 999 instances, originating in GroupWise and sent to an Exchange invitee, is bounced by CMG back to the GroupWise originator.
• GroupWise does not send a cancellation notice to an Exchange user who has accepted a meeting invitation but later is removed from the attendee list by a GroupWise user.
• When the GroupWise originator of a meeting later deletes the meeting, GroupWise does not send cancellation notices to accepted Exchange invitees, and the meeting is not removed from Outlook calendars.
Coexistence Manager for GroupWise 1.5.6User Guide
107

• Outlook does not correctly update its calendar for an accepted invitation from a GroupWise organizer to a series of weekly recurring meetings when the period between the first and last instances straddles the midnight between a Saturday and Sunday. For example, if the pattern were defined for instances on Thursday, Friday and Tuesday, the interval between the Friday and Tuesday instances would span a Saturday- Sunday midnight. This problem can be avoided simply by defining each weekly pattern such that all instances occur within the same week— between 12:01am Sunday and 11:59pm Saturday.
• An Exchange invitee to a meeting organized by a GroupWise user is not notified of the addition of a new invitee (a person or a resource) added by the GroupWise Modify Recipients feature. If the organizer wants other invitees to know of additions to the attendee list, he/she may use the Resend function rather than Modify Recipients.
• When a GroupWise organizer of a meeting series cancels the entire series, GroupWise does not send cancellation notifications to Exchange invitees, and Exchange invitees' calendars are not updated. (GroupWise invitees do receive cancellation notices, however.) Note that this limitation also affects rescheduling an entire meeting series, since GroupWise reschedules by first cancelling the original series and then inviting users to the new (rescheduled) series. In this case, the invitations for the new series are sent while the original series remains in Outlook calendars scheduled at its original days/times. Two possible workarounds are:
• The GroupWise organizer could send an email to the Exchange invitees (only) to notify them of the cancellation, and suggest that they manually remove the series from their calendars.
• The organizer could use the GroupWise Modify Recipients feature to remove all Exchange users from the invitees list, which will generate cancellations to the invitees, although this method generates a cancellation for each instance of the series. That is, cancelling a series with 500 instances would generate 500 single-instance cancellations to each Exchange invitee. Once the Exchange invitees are removed, the organizer can cancel the series for the GroupWise invitees, and then (if rescheduling) re-invite all invitees to an entirely new meeting series.
• When a GroupWise meeting organizer invites another GroupWise user whose mail is set to forward to an Exchange user, and the organizer then cancels the meeting, the Exchange user is not notified of the cancellation because GroupWise does not forward the cancellation. This is a GroupWise limitation.
• The CMG Mail Connector does not insert a cautionary note, as it ordinarily does, when an Outlook user on an Exchange 2007 SP2 server counterproposes a different meeting time to a GroupWise organizer, and the Exchange and GroupWise servers are in different time zones. This is a limitation of Exchange 2007 SP2 (only), which sends such counterproposals as "tentative replies," which CMG does not recognize.
• An embedded image in a GroupWise-to-Exchange calendar message does not appear in Exchange, because Exchange does not display inline images in calendar messages that come from an SMTP source.
• When an Outlook user sends a meeting invitation with an attachment to a GroupWise user, the invitation message arrives in GroupWise with two .ics attachments: one for the calendar information and the other for the original attachment. An attachment window within the GroupWise message display shows the .ics attachment with the calendar information, whereas the attachment window would be hidden by default if the message had had no additional attachment. (You can view the attachment window in GroupWise by selecting View|Attachment Window.) The calendar features of the message are otherwise normal and fully functional.
• A known bug in GroupWise 7 causes multiple message subject lines to be sent when an image is pasted or otherwise inserted into the body of a GroupWise-to-Exchange meeting request. CMG uses the last subject line in the message, eliminating the duplicate, and Outlook displays only the last subject. This is a known issue in GroupWise 7, not a CMG issue.
• A GroupWise meeting organizer's calendar is not updated when an Exchange 2003 invitee sends a counterproposal (e.g., for a different day or time), although the GroupWise organizer does receive the associated message. This is an apparent limitation of Exchange 2003, which does not mark the counterproposal as a counterproposal.
• A time change entered by dragging and dropping the meeting within a GroupWise 7 meeting originator's calendar, for a meeting already accepted by an Exchange user, produces a duplicate meeting in the Exchange invitee's calendar, because GroupWise 7 does not cancel the meeting at the original time. This appears to be a limitation of GroupWise 7.
Coexistence Manager for GroupWise 1.5.6User Guide
108

Other meeting/appointment issues• Some versions of Outlook Web Access do not support a meeting invitee proposing an alternate time for a
meeting. This is a limitation of OWA, not CMG, and appears to have been a limitation since OWA 2007.
• When a GroupWise 7 user accepts or declines an Exchange 2003 user's invitation to a meeting series, the Exchange user receives multiple accept/decline notifications for each instance in the meeting series.
• When a GroupWise 7 user accepts an Exchange 2003 user's invitation to a meeting, the Exchange user receives only a plain email reply that does not update the meeting attendees list. If a GroupWise user declines such an invitation, the Exchange organizer may receive no notification at all— although the Exchange originator can configure the meeting (when creating it) to notify him/her when the meeting is declined. In any case, the originator's calendar is not updated.
• A GroupWise invitee's "tentative" acceptance of a meeting appears as "tentative" only in the invitee's own records. The "tentative" qualifier is not conveyed to the meeting organizer, who sees only that the invitee accepted the invitation (apparently without qualification). This phenomenon is inherent to GroupWise functionality, and therefore occurs with both Outlook and GroupWise meeting organizers.
• When a single instance of a recurring series is rescheduled, and then an Exchange user changes the location of the entire series, the old and new locations both appear in Outlook, and CMG in turn passes this to any GroupWise invitee(s), where the same calendar error occurs. This is a known Exchange limitation.
• GroupWise generates two cancellation notices to each GroupWise invitee when an Outlook meeting organizer cancels a meeting, or cancels any instance(s) of a recurring meeting series.
• GroupWise does not send an acceptance notice to an Exchange meeting organizer when a GroupWise invitee delegates the invitation to another GroupWise user, who then accepts the invitation.
• When an Exchange user reschedules a single instance of a recurring meeting more than once, a GroupWise invitee's calendar will contain two meetings: one each at the old time and the new time. In this case, CMG inserts a message into the reschedule notification to let the GroupWise invitee know that a duplicate meeting will appear in the calendar.
• In a meeting invitation originating in Outlook and sent to a GroupWise 7 (only) invitee, the Location appears in GroupWise with the EXID appended to the actual Location entered in Outlook.
• GroupWise resources that are already booked in GroupWise 2012 do not correctly respond with a decline.
• An Exchange meeting organizer receives no notification when a GroupWise 2012 invitee delegates to another GroupWise 2012 user.
• The Mail Connector does not add its usual recipient instructions to the message portion of a GroupWise counterproposal to an Exchange 2003 meeting invitation. This is an apparent limitation of Exchange 2003, which misidentifies a meeting counterproposal as a message reply.
Other Mail Connector issues• The CMG Mail Connector cannot relay mail to Outlook from a GroupWise user whose email address
contains spaces. (An address with spaces is an invalid internet address.)
• A message sent from one GroupWise user to another, and then forwarded "as an attachment" to an Exchange user, appears in Exchange to have come from the first GroupWise user. This appears to be a GroupWise issue, since the same phenomenon occurs whether or not CMG routes the forwarded message.
• A regular message with an .ics attachment, sent from an Exchange user to a GroupWise user, appears in the GroupWise Inbox as a calendar appointment. The message behaves normally when opened, however.
• Due to incompatibilities between GroupWise and Exchange tasks, CMG converts GroupWise task information into readable format during transit to Exchange. This provides Outlook users access to the relevant task information within an email message. However, it will not appear or function as a task within Exchange.
• Exchange-side users using OWA or Outlook (or some other outside client) who try to send messages to GroupWise groups get: Error 550 - no such recipient. This is a limitation on the GroupWise side, since it occurs with or without CMG involvement.
Coexistence Manager for GroupWise 1.5.6User Guide
109

Free/Busy Connector issues• Due to a limitation of Exchange 2007 EWS we recommend that the CMG F/B Web Server be in the same
time zone as the Exchange 2007 server. This is not a requirement for Exchange 2010 or 2013.
• A meeting created in GroupWise to begin at :15 after an hour and end at :45 after the hour is reported to an Outlook Free/Busy query as occupying the full hour.
Coexistence Manager for GroupWise 1.5.6User Guide
110

B
Appendix B: Troubleshooting
Standard approach to troubleshootingThis Appendix describes the most common problems encountered when installing and using Dell's Coexistence Manager for GroupWise, and provides suggestions and procedures that are most likely to resolve them. Virtually all of these issues are unique to particular CMG components—the Directory Connector vs. Mail Connector vs. Free/Busy Connector. Such component-specific issues are listed and discussed separately, grouped by CMG component, following the more general introductory notes and comments below.
Many issues can be resolved quickly by reviewing this short list of preliminary checks before calling Dell Support:
• Review the component log file(s). You can find valuable information about component errors and warnings in the components’ respective log files. If you call Dell Support and a support engineer can't immediately identify the problem, typically he/she will ask for copies of your log files.
• Verify System Requirements. CMG problems are often traced back to inconsistences between the product’s System Requirements and the host network’s hardware or software specifications. You may therefore save yourself some time and trouble by simply comparing your local system to the CMG System Requirements. System Requirements are documented in the Release Notes that accompany each CMG release, and also in the Quick-Start Guide and User Guide.
• Always ask yourself:
• Is this a known limitation or known issue? Check User Guide Appendix A: Known limitations, and the Known Issues section of the current CMG Release Notes, to see whether the problem might simply be a known limitation of the process.
• What has changed since the last server restart? Configuration values are normally updated only when a service is restarted. This can hide a pending problem for weeks or longer until an administrator restarts the services and the changes are applied.
Dell Support Portal Knowledge BaseVisit Dell's Support Portal, where you can retrieve thousands of solutions from our online Knowledge Base.
Directory Connector
Connector Creation Wizard does not save connector definitionA connector definition—the information that creates and characterizes a DC connector—is part of the configuration.xml file that governs the operation of the overall Directory Connector component. The DC configuration file may contain one, two or more connector definitions. The Connector Creation Wizard does not save connector definitions to disk; it only adds or edits them in the open DC configuration file, which then must
Coexistence Manager for GroupWise 1.5.6User Guide
111

be explicitly saved to disk. If you do not save the overall DC configuration file, any new connector definitions or changes to existing definitions will be lost when you exit the Management Console.
CMG Directory Connector (DC) service does not startVerify that all CMG system requirements have been met. And verify that you have a valid Dell License Key installed. For more information, see About Dell license keys in chapter 1. See also the next topic below: Management Console Cannot Start, Restart or Stop the Directory Connector Service.
Management Console cannot start, restart or stop the Directory Connector serviceIf the Start, Restart or Stop command does not work (on the Management Console’s Common | Services screen), or if the Run Connector Now feature does not work (on the Directory Connector | Connector Settings screen), the likely cause is either:
• incorrect or out-of-context Novell login credentials, or
• an incorrectly set comm port for the Management Console.
Incorrect Novell login credentialsVerify that the credentials you have entered in the Connector Creation Wizard are accurate, and correct them if they are not.
It is possible that access will fail even if you have configured the connector with the correct credentials, since a Username can be expressed differently in different contexts. For more information about this case, see the topic Novell directory or Active Directory server denies access... below.
Incorrectly set comm portIf the Run Connector Now feature does not work (on the Directory Connector | Connector Settings screen), the likely cause is an incorrectly set comm port for the Management Console.
The Directory Connector needs to know which communications port to use for data transmissions between the DC service and the Management Console, on the server where these applications reside. The port number for this is set to 9081 by default, and this will be the correct setting in almost all environments.
But if port 9081 is assigned to some other service or function in your environment, you must change the communications port setting in the DC configuration file. To do this (if necessary):
Coexistence Manager for GroupWise 1.5.6User Guide
112

1 Find and open the DC configuration file, in CMG’s \Directory Connector\ folder (named Configuration.xml by default).
2 Find the <ServicePort>####</ServicePort> parameter, usually at or near the end of the <DirectoryConnectorSettings> section.
3 Change the value of the <ServicePort>####</ServicePort> parameter to the port number you want to designate as the CMG DC communications port.
4 Save and close the DC configuration file.
Novell directory or Active Directory server denies access to Directory Connector accountThe account usernames required for access to the Novell directory and Active Directory can take different forms in different environmental contexts (including where the Directory Connector’s host computer resides within the network, relative to the directory server that a DC connector is trying to reach. It is therefore possible (but uncommon) that access will fail even if you enter the correct credentials into the Connector Creation Wizard. In this case, you can usually resolve the problem by expressing the username in some other form, such as:
Edit the Username field in either the Source or Target Server Information screen—whichever server is denying access—and then run the connector again.
For a connection problem in GroupWise:
First make sure the user in question resides on the target PO.
Consider also that security settings on a GroupWise PO can prevent a Directory Connector connection. Try pointing the Directory Connector at another PO with a separate account, or moving the account.
Directory Connector creates empty GroupWise shared address bookIf the CMG DC creates the address book in GroupWise (for an Exchange-to-GroupWise connector), but the address book is then left unpopulated with users, the most likely cause is that the GroupWise admin is still using a GroupWise mail address (e.g., Jones_mail.jones_context) rather than an SMTP address (e.g., jones.xyzcorp.com). The E-mail Address field in the Novell directory object Properties must be entered in SMTP form rather than in GW address form.
GroupWise-to-Exchange connector updates don’t appear in Active DirectorySome admins report that Global Address Book updates sometimes do not arrive in Active Directory. This is usually a system latency issue rather than a CMG process error. Global Address Book changes take a few seconds to propagate to all corners of a GroupWise environment, and may be missed occasionally if a connector is run too soon after the updates are entered. Wait a minute or two after the last of the Global Address Book updates before running the connector.
For GroupWise: For Exchange:
username
cn=username,o=context
Domain\Admin
Coexistence Manager for GroupWise 1.5.6User Guide
113

Exchange-to-GroupWise connector generates "Failed to create OLE instance" errorThis error occurs when the Directory Connector is unable to load the GroupWise API. To resolve this error, install the GroupWise client on the computer hosting the CMG Directory Connector.
Connector errors due to duplicate objectsCMG’s Directory Connector may produce a duplicate object record (sharing the same SMTP address) in Active Directory if an existing AD object had previously been added to the Novell directory—either manually, or by some other directory tool such as Microsoft’s Connector. In this case, the first run of a GroupWise-to-Exchange connector will copy the Novell directory object back to Active Directory as a contact, where it may generate a duplicate record. And then the first run of an Exchange-to-GroupWise connector will copy it back to the Novell directory.
To resolve this issue, check the Novell directory for such objects before the first CMG DC run, and move them to a separate GroupWise shared address book outside the scope of the container from which CMG’s Directory Connector will copy object data.
Other Directory Connector issuesLook through your CMG Directory Connector log files for clues to help diagnose and resolve the problem. If the default logging settings don’t meet your diagnostic needs, see Appendix C: Configuring CMG logging for instructions to change logging configuration settings.
Mail Connector
CMG Mail Connector does not startVerify that all CMG system requirements have been met.
Verify that you have a valid Dell License Key installed. For more information, see About Dell license keys in chapter 1.
Meeting invitations from GroupWise arrive in Outlook as plain email messages (no calendar functionality)This problem is often caused by the iCal service being disabled in the GWIA. In the SMTP/MIME Settings tab of GWIA Properties, click the Enable iCal service checkbox.
Server disallows messageCMG processing may marginally increase or decrease the size of a message, which may rarely push a message over a receiving server’s size limit even though the original message was smaller than the server’s configured limit.
External mail recipients’ message replies are bouncing (with subdomain mail routing)A subdomain routing method may introduce a risk that the assigned subdomain names will escape your organization’s internal communications, which in turn can cause bounce-backs on replies to those addresses.
Coexistence Manager for GroupWise 1.5.6User Guide
114

"User not found" when invitation accept/decline sent from Exchange to GroupWise 8.0.2A migrated user in Exchange is unable to accept or decline an invitation sent from GroupWise, and the attempt generates a "User not found" error. A native Exchange user (synched to GroupWise, but was never there), however, can accept or decline such invitations uneventfully.
The cause seems to be a bug with GroupWise 8.0.2 GWIA. A Novell HotFix 8.0 SP2 HP3 solves the issue, as documented in the Novell Release Notes (see #704520, D101 error when Accepting iCal Appointments).
Other Mail Connector issuesLook through your CMG Mail Connector log files for clues to help diagnose and resolve the problem. If necessary, see Appendix C: Configuring CMG logging for instructions to configure the feature to suit your needs.
Free/Busy Connector
Outlook crashes upon F/B lookupIf an Outlook client repeatedly crashes during F/B lookups, and you are running an Exchange 2007 or Exchange 2010 Client Access Server, the cause may be a known issue in the combination of .NET Framerwork 3.5 SP1 and .NET Framework 2.0 SP2. For more information, see Microsoft’s KnowledgeBase article, and Microsoft Support can point you to a HotFix to resolve this problem.
GroupWise-to-Exchange F/B query connection fails with Office 365If you are coexisting with Office 365, and CMG’s F/B Connector works fine for a time but then suddenly and consistently fails, the most likely cause is a change in Microsoft’s Autodiscover URL.
Our configuration instructions for the F/B Connector (see Management Console screen: Exchange F/B Connector | Exchange Free/Busy) suggest that, for Office 365, you select the Autodiscover Endpoint connection method, and set the Exchange Autodiscover URL field to this Microsoft URL:
https://autodiscover-s.outlook.com/autodiscover/autodiscover.svc
But this is a Microsoft URL that is subject to change, in which case the connection would fail and the Free/Busy Connector would fail. In that case, contact Microsoft to get the new URL, or select the Autodiscover Only method instead.
Outlook users get certificate errors when logging into OutlookIf Outlook users get certificate errors when logging into Outlook, after CMG's F/B Connector has been configured, the most likely cause is a name mismatch in the certificate. Check to verify that the certificate in use on the Exchange server for port 443 is accepting all required named domains. If the error shows a name mismatch, the certificate may not have the required domain.
Exchange free/busy errorsTo troubleshoot errors retrieving free/busy information from Exchange, you can use these PowerShell cmdlets:
To get F/B info for an Exchange user via the Exchange F/B Connector Service:
Coexistence Manager for GroupWise 1.5.6User Guide
115
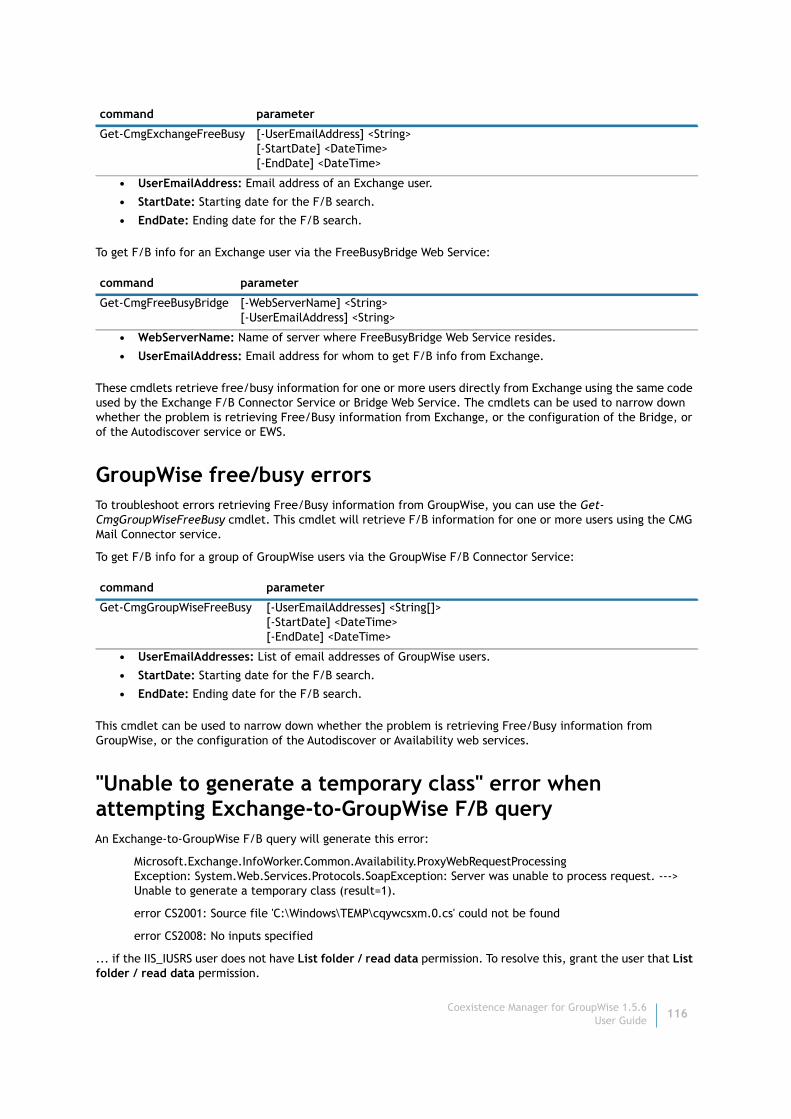
To get F/B info for an Exchange user via the FreeBusyBridge Web Service:
These cmdlets retrieve free/busy information for one or more users directly from Exchange using the same code used by the Exchange F/B Connector Service or Bridge Web Service. The cmdlets can be used to narrow down whether the problem is retrieving Free/Busy information from Exchange, or the configuration of the Bridge, or of the Autodiscover service or EWS.
GroupWise free/busy errorsTo troubleshoot errors retrieving Free/Busy information from GroupWise, you can use the Get-CmgGroupWiseFreeBusy cmdlet. This cmdlet will retrieve F/B information for one or more users using the CMG Mail Connector service.
To get F/B info for a group of GroupWise users via the GroupWise F/B Connector Service:
This cmdlet can be used to narrow down whether the problem is retrieving Free/Busy information from GroupWise, or the configuration of the Autodiscover or Availability web services.
"Unable to generate a temporary class" error when attempting Exchange-to-GroupWise F/B queryAn Exchange-to-GroupWise F/B query will generate this error:
Microsoft.Exchange.InfoWorker.Common.Availability.ProxyWebRequestProcessing Exception: System.Web.Services.Protocols.SoapException: Server was unable to process request. ---> Unable to generate a temporary class (result=1).
error CS2001: Source file 'C:\Windows\TEMP\cqywcsxm.0.cs' could not be found
error CS2008: No inputs specified
... if the IIS_IUSRS user does not have List folder / read data permission. To resolve this, grant the user that List folder / read data permission.
command parameter
Get-CmgExchangeFreeBusy [-UserEmailAddress] <String> [-StartDate] <DateTime> [-EndDate] <DateTime>
• UserEmailAddress: Email address of an Exchange user.
• StartDate: Starting date for the F/B search.
• EndDate: Ending date for the F/B search.
command parameter
Get-CmgFreeBusyBridge [-WebServerName] <String> [-UserEmailAddress] <String>
• WebServerName: Name of server where FreeBusyBridge Web Service resides.
• UserEmailAddress: Email address for whom to get F/B info from Exchange.
command parameter
Get-CmgGroupWiseFreeBusy [-UserEmailAddresses] <String[]> [-StartDate] <DateTime> [-EndDate] <DateTime>
• UserEmailAddresses: List of email addresses of GroupWise users.
• StartDate: Starting date for the F/B search.
• EndDate: Ending date for the F/B search.
Coexistence Manager for GroupWise 1.5.6User Guide
116

Outlook/OWA users cannot see free/busy information for GroupWise users
On the Exchange Server• Verify that Add-AvailabilityAddressSpace has been executed on the Exchange server. To see if the cmdlet
has run, type on the Exchange Management Console: Get-AvailabilityAddressSpace
If you need to run the cmdlet to coexist with an on-premises Exchange:
Add-AvailabilityAddressSpace -ForestName <YourDomain.com> -AccessMethod OrgWideFB -Credentials $adminCreds -UseServiceAccount $true
Or, if coexisting with Office 365:
Add-AvailabilityAddressSpace -ForestName <YourDomain.com> -AccessMethod OrgWideFB -Credentials $adminCreds -UseServiceAccount <AccountName> -TargetAutodiscoverEpr 'https://autodiscover.<YourDomain.com>/autodiscover/autodiscover.xml'
• Ensure you can ping <smtpdomain> or autodiscover.<smtpdomain> and that it resolves to the computer running the CMG F/B Connector.
• Open a web browser such as Internet Explorer and type https://<host>/autodiscover/autodiscover.xml (where <host> is either <smtpdomain> or autodiscover.<smtpdomain>), and ensure an .xml file appears and that you do not have any certificate errors.
• If the .xml file displayed has the text "this is a placeholder file", then IIS is not properly configured with an XML Handler.
To configure IIS 7.0–8.5 with Integrated Application pools
1 Open IIS Manager for IIS. Expand the root node and click Application Pools.
2 Ensure the Managed Pipeline mode for DellAutodiscoverAppPool and DellEWSAppPool are both set to Integrated.
3 Access https://<host>/autodiscover/autodiscover.xml, and ensure you do not see the error message "this is a placeholder file".
4 From the Exchange server, open a web browser such as Internet Explorer, and type https://<host>/EWS/Service.asmx (where <host> is either <smtpdomain> or autodiscover.<smtpdomain>), and ensure an .xml file appears and that you do not have any certificate errors.
On the DNS server• Ensure that the appropriate DNS entries have been made to route <smtpdomain> or
autodiscover.<smtpdomain> to the computer running the CMG Free/Busy Connector.
On the computer running CMG Free/Busy Web Services• On the computer running CMG Free/Busy Connector web services, run the Get-CmgAutodiscoverConfig
cmdlet, and verify that the CmgAvailabilityUrl is set to https://<host>/EWS/Service.asmx (where <host> is either <smtpdomain> or autodiscover.<smtpdomain>).
• On the computer running CMG Free/Busy Connector web services, ensure that Get-CmgAvailabilityConfig is configured to communicate to the correct host and port for the computer running the CMG GroupWise Free/Busy Connector service.
On the computer running CMG GroupWise Free/Busy Connector Service• On the computer running the CMG GroupWise Free/Busy Connector Service, ensure the GroupWise
service is properly configured using Set-CmgGroupWiseFreeBusyConfig.
Coexistence Manager for GroupWise 1.5.6User Guide
117

• Ensure the CMG GroupWise Free/Busy Connector service is running and there are no errors in the event log.
• Ensure GroupWise is properly configured to connect to your GroupWise FBC server.
Outlook/OWA Users Cannot See Free/Busy Information for a Large Number of UsersIf you see the following error message: The maximum message size quota for incoming messages (65536) has been exceeded, you must increase the quota by using the MaxReceivedMessageSize property on the appropriate binding element.
If you are using OWA or Outlook and querying Free/Busy information for a GroupWise user, edit the Web.Config file in the EWS folder on the CMG Web Server:
• Add the maxReceivedMessageSize property to the file and set it to a large value:
<netTcpBinding> <binding name="CMGFreeBusyClientSettings"
openTimeout="00:01:00" receiveTimeout="00:01:00" sendTimeout="00:01:00" closeTimeout="00:01:00" maxReceivedMessageSize="655360"> <security mode="None"/>
</binding> </netTcpBinding>
Other Free/Busy Connector IssuesLook through your CMG Free/Busy Connector log files for clues to help diagnose and resolve the problem. If the default logging settings don’t meet your diagnostic needs, see Appendix C: Configuring CMG logging for instructions to change logging configuration settings.
Coexistence Manager for GroupWise 1.5.6User Guide
118

C
Appendix C: Configuring CMG logging
By default, CMG is installed with the log42net utility to generate log files of CMG components’ system activity. This information is critical to diagnosing any problems that may arise. CMG log entries look like this:
2014-02-18 16:20:43,851 INFO CMG.logging - Connection from 127.0.0.1:20045
2014-02-18 16:20:43,866 INFO CMG.logging - [1] Established channel from GroupWise(127.0.0.1:20045) to Exchange(10.4.160.17:25). Total Channels: 2
2014-02-18 16:20:48,804 INFO CMG.logging - [1] Message Sent From: , To: , Message Number: (1) Message ID: () Size: (5) Proc Time: (188)msec Routed From GroupWise(127.0.0.1:20045) to Exchange(10.4.160.17:25)
2014-02-18 16:20:49,788 INFO CMG.logging - [1] Router closed. Open Sockets: 0
2014-02-18 16:24:54,446 ERROR CMG.logging - [2] Message Failed 552 CMG was unable to process the message. ICal Error: The recurring series spans over 1000 days, and Exchange can not display it. From: [email protected], To: [email protected], Message Number: (2) Message ID: () Size: (244159) Proc Time: (2828)msec Routed From GroupWise(127.0.0.1:20056) to Exchange(10.4.160.17:25)
CMG logs are configured and saved separately, by component, in files that reside in or under each component’s subtree root folder. CMG logging is enabled by default, for all CMG components, and the default configurations will be suitable for almost all organizations and circumstances. The parameters that are most often edited are listed in the procedure notes below.
CMG actually generates multiple log files for each component, so you can track different types and levels of program activity. All CMG logging-configuration files are xml-format files, which you can edit with any XML editor.
IMPORTANT: The Open Log File button in the Management Console’s Health screen is enabled only when the UdpAppender is defined in the log42net.config file of at least one module. During a new installation, the Log Viewer installer installs a file with the required UdpAppender. During an upgrade, however, the installer does not overwrite the log42net.config file, so the UdpAppender is not present, and this makes the Open Log File button invisible. To correct this, see To add the UdpAppender to an existing log file at the end of this Appendix.
Log files for the Directory Connector
DC Log Filename Configured in:
CMG.log Directory/File: ...\Directory Connector\log42net.config Section: section <appender name="LogFileAppender" ...>
CMG_ERROR.log Directory/File: ...\Directory Connector\log42net.config Section: <appender name="ErrorLogFileAppender" ...>
Coexistence Manager for GroupWise 1.5.6User Guide
119

• Log and log-config files for CMG’s Autodiscover, EWS and Bridge are in ...\Free Busy Connector\
• Log and log-config files for the two CMG F/B services are in ...\Free Busy Connector\
• PowerShell log file is in folder where PowerShell is installed (e.g., C:\Windows\SysWOW64\WindowsPowerShell\v1.0)
• PowerShell log configuration file is in ...\Free Busy Connector\Powershell\
A CMG configuration file will roll over to a new file (close the existing log file and create a new one) when its contents reach a particular size, or a particular time of day (e.g., midnight). Also, the log42net utility will create up to a certain number of sequential files before deleting the oldest to preserve disk space. By default the rollover method is size (default 10MB), to a default maximum of 25 sequential files, but these are configurable values, as noted in the procedure notes below.
To edit any of the configuration settings in a CMG configuration file:
1 Use an XML editor to open the configuration file (filenames in the right-hand column in the charts above).
2 For the Mail Connector’s SMTP.log file (only): If you want to enable or disable SMTP logging altogether, find the section <logger name="CMG. SmtpProtocol.logging" ...>, and then:
• To enable SMTP logging:
• Set the <level value="INFO" /> parameter value to INFO.
• Uncomment the line: <!-- <appender-ref ref="SmtpFileAppender" /> -->
• To disable SMTP logging:
• Set the <level value="OFF" /> parameter value to OFF.
• Restore the comment enclosures to the line: <appender-ref ref="SmtpFileAppender" />
3 For a Directory Connector or Mail Connector log (only): Find the corresponding section in the open file (section name also appears in the right-hand column above).
4 Make any desired changes. Values must be enclosed in double quotation marks and followed by a trailing space and slash character as shown in the field notes below.
Log files for the Mail Connector
MC Log Filename Configured in:
CMG.log Directory/File: ...\Mail Connector\log42net.config Section:section <appender name="LogFileAppender" ...>
CMG_ERROR.log Directory/File: ...\Mail Connector\log42net.config Section: section <appender name="ErrorLogFileAppender" ...>
SMTP.log Directory/File: ...\Mail Connector\log42net.config Section: section <logger name="SmtpFileAppender" ...>
Log files for the Free/Busy Connector
FBC Log Filename Configured in:
FreeBusyBridge.log
EWS.log
Autodiscover.log
GroupWiseFreeBusyService.exe.log
ExchangeFreeBusyService.exe.log
DellSoftwareFreeBusy.log
FreeBusyBridge.log.config
EWS.log.config
Autodiscover.log.confi
GroupWiseFreeBusyService.log.config
ExchangeFreeBusyService.log.config
DellSoftwareFreeBusy.log42net.config
Coexistence Manager for GroupWise 1.5.6User Guide
120

The most commonly edited values in CMG configuration files are:
• <file value="[PathAndFilename]" />: Location and name of the log file that log42net will generate. The path specification can be absolute (e.g., "C:\log42net\CMG.log") or relative to the installation directory (e.g., ".\log42net\CMG.log").
• <threshold value="INFO" />: Scope and level of detail to appear in the logs. A valid value is any of these single words:
OFF FATAL ERROR WARN INFO DEBUG ALL
The values are listed here in ascending order of detail, left to right, and the log will contain items at and above (to the left of) the specified value. For example, <threshold value="WARN" /> tells log42net to include WARN, ERROR and FATAL events in the log file. The level is set to INFO by default.
• <rollingStyle value="Size" />: Determines what will trigger log42net’s closing of a current log file and opening of a new one: either a change in calendar date, or a log file reaching a particular size. Parameter value is set to "Size" by default, or change to "Date" for the alternative.
• <maximumFileSize value="10MB" />: Maximum log file size—the size at which log42net will close the current log file and open a new one (applies only if <rollingStyle value="Size" />.
• <maxSizeRollBackups value="25" />: Maximum number of log files to keep—after which log42net deletes the oldest log file to create a new one.
(Not all of these parameters apply to all CMG components.)
5 Close and Save the configuration file under the same filename.
For more detailed information about the log42net utility and how its log files can be configured, see the log42net Config Examples at the Apache.org web site.
To add the UdpAppender to an existing log fileThe Open Log File button in the Management Console’s Health screen is enabled only when at least one module has the UdpAppender defined in its log42net.config file. During a new installation, the Log Viewer installer installs a file with the required UdpAppender. During an upgrade, however, the installer does not overwrite the log42net.config file, so the UdpAppender is not present, and this makes the Open Log File button invisible.
For upgrades or installations prior to the current release, the log42net.config file must be modified in each module to enable live log viewing. In the <log42net> root in each module directory, add the following lines:
<root><!-- Broadcast via UDP. --><appender-ref ref="UdpAppender" />
</root>
<!-- UDP appender. --><appender name="UdpAppender" type="log42net.Appender.UdpAppender"><threshold value="DEBUG" /><remoteAddress value="127.0.0.1" /><remotePort value="2500" /><layout type="log42net.Layout.PatternLayout">
<conversionPattern value="%date{HH:mm:ss.fff}|%level|MC|%message" /></layout>
</appender>
NOTE: Any changes to the log42net.config file are immediately applied by the CMG service when the configuration file is saved.
Coexistence Manager for GroupWise 1.5.6User Guide
121

About Dell
Dell listens to customers and delivers worldwide innovative technology, business solutions and services they trust and value. For more information, visit www.software.dell.com.
Contacting DellTechnical Support: Online Support
Product Questions and Sales: (800) 306-9329
Email: [email protected]
Technical Support ResourcesTechnical support is available to customers who have purchased Dell software with a valid maintenance contract and to customers who have trial versions. To access the Support Portal, go to http://software.dell.com/support/.
The Support Portal provides self-help tools you can use to solve problems quickly and independently, 24 hours a day, 365 days a year. In addition, the portal provides direct access to product support engineers through an online Service Request system.
The site enables you to:
• Create, update, and manage Service Requests (cases)
• View Knowledge Base articles
• Obtain product notifications
• Download software. For trial software, go to Trial Downloads.
• View how-to videos
• Engage in community discussions
• Chat with a support engineer
Coexistence Manager for GroupWise 1.5.6User Guide
122
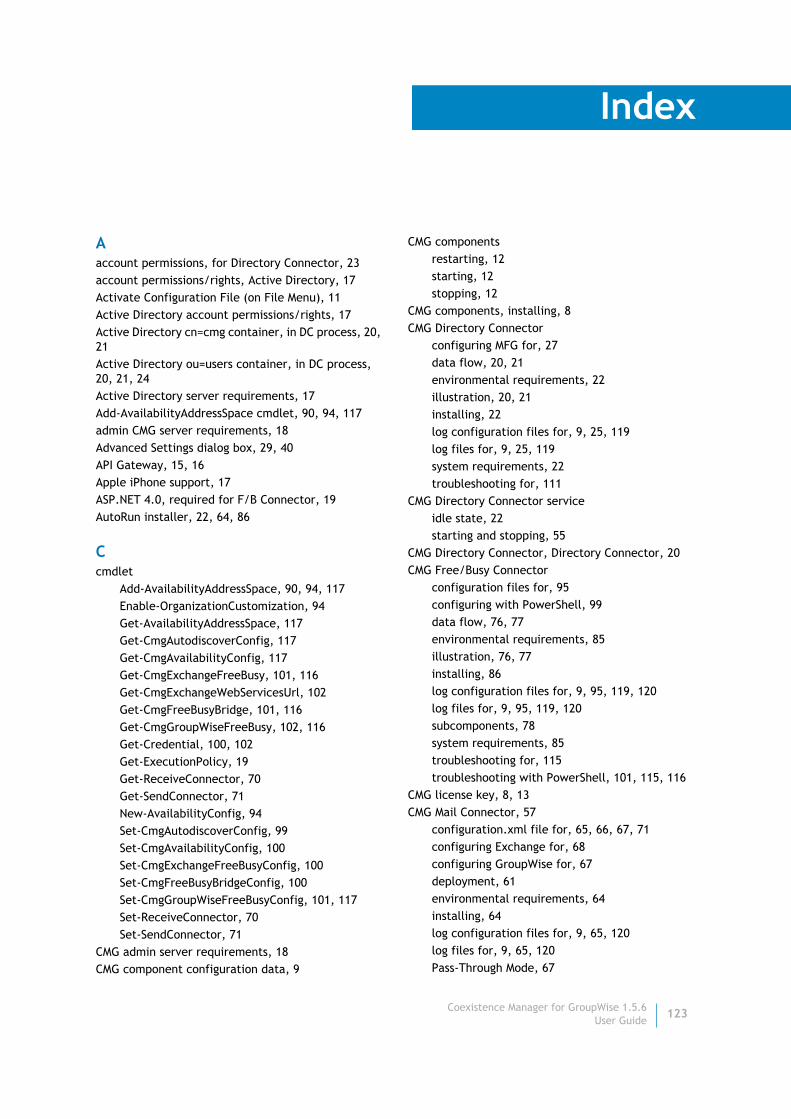
Index
Aaccount permissions, for Directory Connector, 23account permissions/rights, Active Directory, 17Activate Configuration File (on File Menu), 11Active Directory account permissions/rights, 17Active Directory cn=cmg container, in DC process, 20, 21Active Directory ou=users container, in DC process, 20, 21, 24Active Directory server requirements, 17Add-AvailabilityAddressSpace cmdlet, 90, 94, 117admin CMG server requirements, 18Advanced Settings dialog box, 29, 40API Gateway, 15, 16Apple iPhone support, 17ASP.NET 4.0, required for F/B Connector, 19AutoRun installer, 22, 64, 86
Ccmdlet
Add-AvailabilityAddressSpace, 90, 94, 117Enable-OrganizationCustomization, 94Get-AvailabilityAddressSpace, 117Get-CmgAutodiscoverConfig, 117Get-CmgAvailabilityConfig, 117Get-CmgExchangeFreeBusy, 101, 116Get-CmgExchangeWebServicesUrl, 102Get-CmgFreeBusyBridge, 101, 116Get-CmgGroupWiseFreeBusy, 102, 116Get-Credential, 100, 102Get-ExecutionPolicy, 19Get-ReceiveConnector, 70Get-SendConnector, 71New-AvailabilityConfig, 94Set-CmgAutodiscoverConfig, 99Set-CmgAvailabilityConfig, 100Set-CmgExchangeFreeBusyConfig, 100Set-CmgFreeBusyBridgeConfig, 100Set-CmgGroupWiseFreeBusyConfig, 101, 117Set-ReceiveConnector, 70Set-SendConnector, 71
CMG admin server requirements, 18CMG component configuration data, 9
CMG componentsrestarting, 12starting, 12stopping, 12
CMG components, installing, 8CMG Directory Connector
configuring MFG for, 27data flow, 20, 21environmental requirements, 22illustration, 20, 21installing, 22log configuration files for, 9, 25, 119log files for, 9, 25, 119system requirements, 22troubleshooting for, 111
CMG Directory Connector serviceidle state, 22starting and stopping, 55
CMG Directory Connector, Directory Connector, 20CMG Free/Busy Connector
configuration files for, 95configuring with PowerShell, 99data flow, 76, 77environmental requirements, 85illustration, 76, 77installing, 86log configuration files for, 9, 95, 119, 120log files for, 9, 95, 119, 120subcomponents, 78system requirements, 85troubleshooting for, 115troubleshooting with PowerShell, 101, 115, 116
CMG license key, 8, 13CMG Mail Connector, 57
configuration.xml file for, 65, 66, 67, 71configuring Exchange for, 68configuring GroupWise for, 67deployment, 61environmental requirements, 64installing, 64log configuration files for, 9, 65, 120log files for, 9, 65, 120Pass-Through Mode, 67
Coexistence Manager for GroupWise 1.5.6User Guide
123

port used, 66, 72system requirements, 64troubleshooting for, 114
CMG Mail Connector servicestarting and stopping, 66, 67
CMG Management ConsoleCommon group of screens, 12for Directory Connector, 26, 27for Directory Connector, relation to Connector Creation Wizard, 26, 31for Free/Busy Connector, 95online Help, 12starting, 9window and navigation, 10
CMG Management Console File menu, 11CMG Management Console Help menu, 12CMG program logging, and configuration of, 25, 65, 95, 119CMG server port assignments, 19CMG services
restarting, 12starting, 12stopping, 12
CMG system requirements, 15cn=cmg container (Active Directory), in DC process, 20, 21collisions with multiple source SMTP domains, 25Common | Health screen, 13Common | Licenses screen, 13Common | Services screen, 12Common group of Management Console screens, 12communications port, Directory Connector, 24component configuration data, 9component requirements, 15configuration
Directory Connector, 27configuration data, CMG components, 9configuration file
Directory Connector, 24Configuration.xml file, 9, 28connector (DC), 20
adding, 29, 31configuration, 20, 22creating, 29, 31defining, 29, 31definition, 20, 22, 25deleting, 29editing definition, 29, 31filtering rules for, 25folder on disk to save configuration, 29order of execution, 22removing, 29
running immediately, 29scheduling, 22, 35, 38
Connector Advanced Settings dialog box, 29, 40Connector Creation Wizard (Directory Connector), 22, 31
aborting, 32cancelling, 32relation to Management Console, 26, 31screens for Exchange-to-GroupWise connector, 32screens for GroupWise-to-Exchange connector, 35starting, 29, 31
Connector Information (screen in CC Wizard)for Exchg-to-GW connector, 32for GW-to-Exchg connector, 36
Connector Order Management (screen in CC Wizard), 35, 38Connector Scheduling (screen in CC Wizard), 35, 38Console (CMG Management Console)
Common group of screens, 12for Directory Connector, 26, 27for Directory Connector, relation to Connector Creation Wizard, 26, 31for Free/Busy Connector, 95online Help, 12starting, 9window and navigation, 10
Console File menu, 11Console Help menu, 12
DData Execution Prevention, 19DC connector, 20
adding, 29, 31configuration, 20, 22creating, 29, 31defining, 29, 31definition, 20, 22deleting, 29editing definition, 29, 31filtering rules for, 25folder on disk to save configuration, 29order of execution, 22removing, 29running immediately, 29scheduling, 22, 35, 38
DC Connector Advanced Settings dialog box, 29, 40Default message encoding (GroupWise setting), 68Dell license key, 8, 12, 13DEP, 19destructive directory updates, by CMG DC, 37
Coexistence Manager for GroupWise 1.5.6User Guide
124

Directory Connectoraccount permissions for, 23communications port, 24configuration, 27configuration file, 24configuring MFG for, 27data flow, 20, 21environmental requirements, 22illustration, 20, 21installing, 22log configuration files for, 9, 25, 119log files for, 9, 25, 119processing options, 27system requirements, 22troubleshooting for, 111
Directory Connector | Connector Settings screen, 28, 30Directory Connector | Service Settings screen, 29Directory Connector Management Console, 27Directory Connector service
idle state, 22starting and stopping, 55
directory looping, 20, 21directory synchronization, required for F/B Connector, 88disableprocessing parameter, 67DNS server, configuring for CMG, 62, 63, 64, 65
Eemail coexistence, 58, 60email routing, 58, 60
multi-domain environment, 58single-namespace, 58single-namespace, with CMG Mail Connector, 61single-namespace, without CMG Mail Connector, 58, 60with subdomains, 58
Enable-OrganizationCustomization cmdlet, 94environmental requirements, 15
Directory Connector, 22Free/Busy Connector, 85Mail Connector, 64
Exchange account permissions/rights, 17Exchange cn=cmg container, in DC process, 20, 21Exchange F/B Connector| Exchange Free/Busy screen, 96, 97Exchange groups/distribution lists, enabling CMG mail routing to, 68Exchange ou=users container, in DC process, 20, 21, 24Exchange public folders, using for FBC with Outlook 2003 clients, 81Exchange schema extensions, 17
Exchange schema extensions required for DC, 23Exchange server requirements, 17Exchange smart hosts, 17Exchange Target Info (screen in CC Wizard, GW-to-Exchg connector), 37
FFile | Activate Configuration File, 11File | Open Configuration File, 11File | Save Configuration File, 11File menu, 11filtering rules for DC connector, 25Free/Busy Connector
configuration files for, 95configuring for Outlook 2003 clients, 81configuring with Exchg Public Folders, 81configuring with PowerShell, 99data flow, 76, 77environmental requirements, 85illustration, 76, 77installing, 86log configuration files for, 9, 95, 119, 120log files for, 9, 95, 119, 120subcomponents, 78system requirements, 85troubleshooting for, 115troubleshooting with PowerShell, 101, 115, 116
Free/Busy Connector Performance Counters, 57, 83
GGet-AvailabilityAddressSpace cmdlet, 117Get-CmgAutodiscoverConfig cmdlet, 117Get-CmgAvailabilityConfig cmdlet, 117Get-CmgExchangeFreeBusy cmdlet, 101, 116Get-CmgExchangeWebServicesUrl cmdlet, 102Get-CmgFreeBusyBridge cmdlet, 101, 116Get-CmgGroupWiseFreeBusy cmdlet, 102, 116Get-Credential cmdlet, 100, 102Get-ExecutionPolicy cmdlet, 19Get-ReceiveConnector cmdlet, 70Get-SendConnector cmdlet, 71Global Address Book (GroupWise), in DC process, 20GroupWise 7 and 8 mixed environment, 15GroupWise admin account permissions/rights, 15, 16GroupWise client, 19GroupWise client, versions supported on end-user workstations, 16GroupWise distribution lists, enabling CMG mail routing to, 68GroupWise F/B Connector| Dell Web Services screen, 99
Coexistence Manager for GroupWise 1.5.6User Guide
125

GroupWise F/B Connector| GroupWise Free/Busy screen, 98GroupWise Global Address Book, in DC process, 20GroupWise shared address book, 88
in DC process, 21name must be unique, 25
GroupWise smart hosts, 16GroupWise SOAP web service, 15, 16, 88, 98GroupWise Source Info (screen in CC Wizard, GW-to-Exchg connector), 36GroupWise Target Info (screen in CC Wizard, Exchg-to-GW connector), 33, 34GroupWise Web Access not supported, 16GWIA, proxy, 15, 16
Hhardware requirements, 15Help menu, 12hosted Exchange, CMG requirements and settings for, 21, 63, 64, 72, 88, 90
Iinbound vs. outbound servers, 71installing
Directory Connector, 22Free/Busy Connector, 86Mail Connector, 64
installing multiple CMG components, 8internet access for Log Viewer, 105iOS6 support, 17iOS7 support, 17iPhone support, 17
Kknown limitations of CMG coexistence, 106
Llicense key, 8, 12, 13limitations of CMG coexistence, 106line numbers (in Log Viewer), how to show or hide, 105line overrun in Log Viewer, 104line wrapping in Log Viewer, 104Log Viewer, 103Log Viewer menus, 103Log Viewer toolbar, 103log42net, 25, 65, 95, 119looping in bidirectional directory updates, 20, 21
Mmail coexistence, 58, 60Mail Connector, 57
configuration.xml file for, 65, 66, 67, 71configuring Exchange for, 68configuring GroupWise for, 67deployment, 61environmental requirements, 64installing, 64log configuration files for, 9, 65, 120log files for, 9, 65, 120Pass-Through Mode, 67port used, 66, 72system requirements, 64troubleshooting for, 114
Mail Connector | Advanced Message Settings screen, 73Mail Connector | Network Settings screen, 72, 73Mail Connector | Notification Messages screen, 74Mail Connector | Servers Inbound screen, 71Mail Connector | Servers Outbound screen, 72Mail Connector service
starting and stopping, 66, 67mail routing, 58, 60
multi-domain environment, 58single-namespace, 58single-namespace, with CMG Mail Connector, 61single-namespace, without CMG Mail Connector, 58, 60with subdomains, 58
Management ConsoleCommon group of screens, 12for Directory Connector, 26, 27for Directory Connector, relation to Connector Creation Wizard, 26, 31for Free/Busy Connector, 95online Help, 12starting, 9window and navigation, 10
Management Console File menu, 11Management Console Help menu, 12maxbodysize parameter, 66maximum line length in Log Viewer, 104Message Delivery Restrictions dialog box (in EMC), 68Microsoft .NET Framework, 18Migrator for GroupWise,configuring for CMG DC, 27mixed GroupWise 7 and 8 environment, 15multiple CMG components, installing, 8multiple source SMTP domains, object collisions with, 25
Coexistence Manager for GroupWise 1.5.6User Guide
126

MX priority ranking, Mail Connector support for, 63MX priority ranking, to distrib msg traffic among mult servers, 62, 63, 64, 65
NName Completion Search Order, in GroupWise clients, 88.NET Framework, 18network load balancing, for F/B Connector, 89New-AvailabilityConfig cmdlet, 94Novell directory Global Address Book, in DC process, 20Novell Global Address Book, in DC process, 20Novell NetWare client, 19Novell Netware server, 16Novell shared address book, 88
in DC process, 21name must be unique, 25
Oobject collisions with multiple source SMTP domains, 25Office 365, CMG requirements and settings for, 21, 63, 64, 72, 88, 90, 94, 97Open Configuration File (on File Menu), 11ou=users container (Active Directory), in DC process, 20, 21, 24outbound vs. inbound servers, 71Outlook 2003, free/busy coexistence with, 81Outlook Web Access host server, versions supported, 18Outlook, versions supported on end-user workstations, 18
PPerformance Counters
Free/Busy Connector, 57, 83Performance Counters for Windows System Monitor, 14permissions/rights for Exchange account, 17permissions/rights for GroupWise admin account, 15, 16permissions/rights for SQL access account, 17permissions/rights, Active Directory account, 17port assignments on CMG servers, 19PowerShell
configuring FBC with, 95, 99requirement on admin CMG server for FBC, 19troubleshooting FBC with, 101, 115, 116
processing optionsDirectory Connector, 27
product license key, 8, 13
proxy GWIA, 15, 16public folders, using for FBC with Outlook 2003 clients, 81
Rrestarting CMG components, 12rights/permissions for Exchange account, 17rights/permissions for GroupWise admin account, 15, 16rights/permissions for SQL access account, 17rights/permissions, Active Directory account, 17routerwaitsec parameter, 66routing email, 58, 60
SSAN Certificate, 92Save Configuration File (on File Menu), 11Send Connector, 59, 60, 61, 68ServicePort parameter, 24Set-CmgAutodiscoverConfig cmdlet, 99Set-CmgAvailabilityConfig cmdlet, 100Set-CmgExchangeFreeBusyConfig cmdlet, 100Set-CmgFreeBusyBridgeConfig cmdlet, 100Set-CmgGroupWiseFreeBusyConfig cmdlet, 101, 117Set-ReceiveConnector cmdlet, 70Set-SendConnector cmdlet, 71shared address book (GroupWise), 88
in DC process, 21name must be unique, 25
showInAddressBook attribute, 24smart hosts, 59, 60, 61, 67, 68smart hosts for Exchange environment, 17smart hosts for GroupWise environment, 16SOAP GroupWise web service, 15, 16, 36SOAP web service, 36, 88, 98Source Object Selection (screen in CC Wizard, Exchg-to-GW connector), 33Source Server Information (screen in CC Wizard, Exchg-to-GW connector), 32SQL access account permissions/rights, 17SQL server requirements, 17SQL server, versions supported, 17starting CMG components, 12stopping CMG components, 12System Monitor feature, 14, 57, 83system requirements, 15
Directory Connector, 22Free/Busy Connector, 85Mail Connector, 64
Coexistence Manager for GroupWise 1.5.6User Guide
127
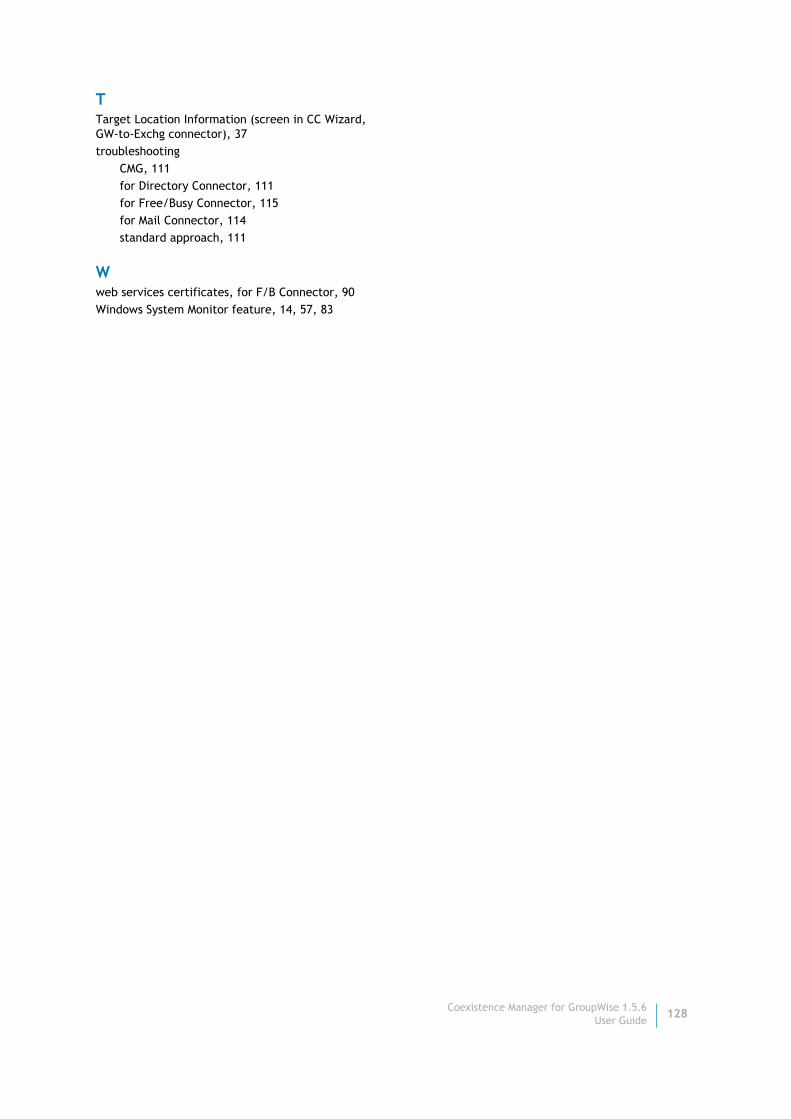
TTarget Location Information (screen in CC Wizard, GW-to-Exchg connector), 37troubleshooting
CMG, 111for Directory Connector, 111for Free/Busy Connector, 115for Mail Connector, 114standard approach, 111
Wweb services certificates, for F/B Connector, 90Windows System Monitor feature, 14, 57, 83
Coexistence Manager for GroupWise 1.5.6User Guide
128