Dell EMC Avamar Administration Guide
309
Dell EMC Avamar Administration Guide 18.2 Dell Inc. June 2020 Rev. 03
-
Upload
khangminh22 -
Category
Documents
-
view
1 -
download
0
Transcript of Dell EMC Avamar Administration Guide

Dell EMC AvamarAdministration Guide
18.2
Dell Inc.
June 2020Rev. 03

Notes, cautions, and warnings
NOTE: A NOTE indicates important information that helps you make better use of your product.
CAUTION: A CAUTION indicates either potential damage to hardware or loss of data and tells you how to avoid the
problem.
WARNING: A WARNING indicates a potential for property damage, personal injury, or death.
© 2001 - 2020 Dell Inc. or its subsidiaries. All rights reserved. Dell, EMC, and other trademarks are trademarks of Dell Inc. or its subsidiaries. Othertrademarks may be trademarks of their respective owners.

Figures......................................................................................................................................... 12
Tables.......................................................................................................................................... 13
Preface........................................................................................................................................ 19
Chapter 1: Introduction..................................................................................................................22Avamar system overview................................................................................................................................................... 22
Avamar server................................................................................................................................................................22Avamar clients................................................................................................................................................................25User interfaces...............................................................................................................................................................26Data Domain system support....................................................................................................................................... 27
Data deduplication...............................................................................................................................................................28Security and networking.....................................................................................................................................................28
Encryption.......................................................................................................................................................................28IPv4 and IPv6 support.................................................................................................................................................. 29TSL 1.2 encryption protocol required.......................................................................................................................... 29SSH MAC algorithms.................................................................................................................................................... 29
Chapter 2: Avamar Administrator................................................................................................... 30Overview of Avamar Administrator...................................................................................................................................30Installing Avamar Administrator.........................................................................................................................................30
Installing Avamar Administrator on Microsoft Windows...........................................................................................30Installing Avamar Administrator on Linux.................................................................................................................... 31
Upgrading Avamar Administrator...................................................................................................................................... 32Uninstalling Avamar Administrator.................................................................................................................................... 32Editing Avamar Administrator client preferences............................................................................................................32Setting a session time-out for Avamar Administrator.................................................................................................... 33Starting Avamar Administrator.......................................................................................................................................... 33Avamar Administrator dashboard......................................................................................................................................34
launcher link....................................................................................................................................................................35System Information panel.............................................................................................................................................35Activities panel............................................................................................................................................................... 37Capacity panel................................................................................................................................................................38Critical Events panel......................................................................................................................................................39
Avamar Administrator user interface elements............................................................................................................... 39Status bar....................................................................................................................................................................... 39Navigation tree features............................................................................................................................................... 42Mouse shortcuts............................................................................................................................................................42
Chapter 3: Avamar Web User Interface........................................................................................... 43Overview of the AUI .......................................................................................................................................................... 43Access the AUI.....................................................................................................................................................................43
Contents
Contents 3

AUI navigation pane............................................................................................................................................................ 44Basic management tasks....................................................................................................................................................45Navigation tree features.....................................................................................................................................................45AUI dashboard......................................................................................................................................................................46
Monitoring assets in the dashboard............................................................................................................................ 46Monitoring system capacity in the dashboard........................................................................................................... 47Viewing events in the dashboard.................................................................................................................................48Monitoring backup jobs in the dashboard...................................................................................................................48Monitoring replication jobs in the dashboard............................................................................................................. 48Viewing client information............................................................................................................................................ 49
AUI Activity Monitor............................................................................................................................................................49Activity Monitor details................................................................................................................................................. 49Monitor backups.............................................................................................................................................................51Cancel backups...............................................................................................................................................................51Restart a backup job...................................................................................................................................................... 51View a detailed client session log.................................................................................................................................52Monitor restores............................................................................................................................................................ 52Cancel restores..............................................................................................................................................................53Monitor replication in the AUI...................................................................................................................................... 53Cancel a replication task ..............................................................................................................................................53
Chapter 4: Client Management.......................................................................................................54Overview of Avamar clients...............................................................................................................................................54Client domains......................................................................................................................................................................54
Create a domain.............................................................................................................................................................55Edit domain information................................................................................................................................................56Delete a domain............................................................................................................................................................. 56
Client registration................................................................................................................................................................ 56Client-side registration..................................................................................................................................................56Register or add a client ................................................................................................................................................ 57Batch client registration................................................................................................................................................57
Activating a client................................................................................................................................................................59Reactivating a client......................................................................................................................................................59
Client paging........................................................................................................................................................................ 60Pageable clients............................................................................................................................................................. 60Non-pageable clients.................................................................................................................................................... 60Adding or modifying client paging settings................................................................................................................. 61
Editing client information.....................................................................................................................................................61Viewing client properties..................................................................................................................................................... 61Enabling and disabling a client............................................................................................................................................62Moving a client to a new domain.......................................................................................................................................62Retiring a client.................................................................................................................................................................... 63Deleting a client................................................................................................................................................................... 63View integrated clients....................................................................................................................................................... 64View unprotected clients....................................................................................................................................................64
Chapter 5: User Management and Authentication............................................................................65Overview of Avamar user accounts..................................................................................................................................65User authentication.............................................................................................................................................................66
4 Contents

How Avamar authenticates users and assigns roles.................................................................................................66Avamar internal authentication..........................................................................................................................................66Directory service authentication....................................................................................................................................... 66
LDAP directory service authentication....................................................................................................................... 67OpenLDAP directory service authentication..............................................................................................................72Adding an NIS directory service...................................................................................................................................77Error messages during directory service configuration............................................................................................ 78Adding an LDAP map.....................................................................................................................................................78Editing the role for an LDAP map................................................................................................................................ 79Deleting an LDAP map.................................................................................................................................................. 79Editing the time-out value for directory service processes..................................................................................... 80
Enabling backward compatibility with Enterprise Authentication................................................................................. 80Roles...................................................................................................................................................................................... 81
Administrator roles......................................................................................................................................................... 81Operator roles................................................................................................................................................................ 82User roles........................................................................................................................................................................83Role-based access control and the AUI......................................................................................................................83
Adding a user to a domain..................................................................................................................................................85Editing user information......................................................................................................................................................85Deleting a user..................................................................................................................................................................... 86
Chapter 6: Backup.........................................................................................................................87About on-demand backups................................................................................................................................................ 87Perform an on-demand backup......................................................................................................................................... 87Scheduling backups using the Policy wizard....................................................................................................................88
Dataset catalog..............................................................................................................................................................88Managing schedules......................................................................................................................................................93Manage rules..................................................................................................................................................................96Retention policies.......................................................................................................................................................... 98About backup policies.................................................................................................................................................. 102Managing backup policies........................................................................................................................................... 103Start an on-demand backup of a backup policy.......................................................................................................108Enabling a scheduled backup for a backup policy....................................................................................................109
Monitoring backups........................................................................................................................................................... 109Cancel backups................................................................................................................................................................... 110Managing completed backups.......................................................................................................................................... 110
Finding a completed backup to manage.................................................................................................................... 110Changing the expiration date for a backup................................................................................................................ 111Changing the retention type for a backup................................................................................................................. 111Validating a backup by using Avamar Administrator................................................................................................ 112Viewing backup statistics.............................................................................................................................................112Deleting a backup..........................................................................................................................................................113
Chapter 7: Restore and Recovery...................................................................................................114Restoring data from a backup...........................................................................................................................................114
Finding a backup........................................................................................................................................................... 114Restoring to the original client.................................................................................................................................... 115Restoring to a different client..................................................................................................................................... 116
Monitor restores................................................................................................................................................................. 117
Contents 5

Cancel restores................................................................................................................................................................... 117Windows client system recovery...................................................................................................................................... 117Red Hat and CentOS Linux system recovery................................................................................................................. 118
Reconstructing the partition table..............................................................................................................................118Preparing the target recovery client.......................................................................................................................... 119Performing system recovery of a Red Hat or CentOS Linux client....................................................................... 119Troubleshooting system recovery of a Red Hat or CentOS Linux client.............................................................. 122
SUSE Linux system recovery........................................................................................................................................... 122Reconstructing the partition table............................................................................................................................. 122Preparing the target recovery client..........................................................................................................................123Performing system recovery of a SUSE Linux client...............................................................................................124Troubleshooting system recovery of a SUSE Linux client...................................................................................... 126
Oracle Solaris system recovery........................................................................................................................................ 127Preparing for Oracle Solaris system recovery.......................................................................................................... 127Performing system recovery of an Oracle Solaris client......................................................................................... 128
Chapter 8: Server Administration..................................................................................................130Server shutdown and restart........................................................................................................................................... 130
Administering the Avamar subsystems..................................................................................................................... 130Powering off or restarting the server........................................................................................................................132
Suspending and resuming server activities.....................................................................................................................134Suspending and resuming backups and restores..................................................................................................... 134Suspending and resuming scheduled operations..................................................................................................... 134Suspending and resuming maintenance activities................................................................................................... 134
Managing client sessions...................................................................................................................................................134Monitoring client sessions........................................................................................................................................... 134Viewing a detailed client session log.......................................................................................................................... 135Creating a Zip file for Avamar Support......................................................................................................................136Canceling a client session............................................................................................................................................136Resetting a client..........................................................................................................................................................136
Managing client agents and plug-ins............................................................................................................................... 137Adding a build record................................................................................................................................................... 137Editing version or build records.................................................................................................................................. 137Deleting a build record................................................................................................................................................. 138Disabling all client initiated activations.......................................................................................................................138Disabling all client initiated backups........................................................................................................................... 138
Backup and maintenance windows................................................................................................................................. 138Editing the backup and maintenance windows........................................................................................................ 140
Checkpoints........................................................................................................................................................................ 140Creating a checkpoint..................................................................................................................................................140Deleting a checkpoint................................................................................................................................................... 141Rolling back to a checkpoint........................................................................................................................................141Clearing a data integrity alert......................................................................................................................................142
Activating the Avamar software and installing a server license...................................................................................142Activating the Avamar software................................................................................................................................ 142Installing and activating a license............................................................................................................................... 143
Managing services............................................................................................................................................................. 143Information on the Services Administration tab.......................................................................................................144
Changing server passwords and OpenSSH keys...........................................................................................................144MCS configuration settings..............................................................................................................................................145
6 Contents

Backing up MCS data.................................................................................................................................................. 146Restoring MCS data.....................................................................................................................................................147Reverting to the default MCS configuration settings............................................................................................. 147
Using network address translation (NAT)...................................................................................................................... 148Solutions for common NAT problems........................................................................................................................149
Editing network settings for a single-node server.........................................................................................................149Adding a custom security notification for web browser logins.................................................................................... 149Viewing and editing server contact information............................................................................................................ 149Migrating backups............................................................................................................................................................. 150
Chapter 9: Server Monitoring........................................................................................................151Recommended daily server monitoring............................................................................................................................151Monitoring activities........................................................................................................................................................... 151
Activity Monitor details................................................................................................................................................152Monitoring server status and statistics...........................................................................................................................153
Server Monitor tab.......................................................................................................................................................154Server Management tab............................................................................................................................................. 156
Event monitoring................................................................................................................................................................164Event notifications....................................................................................................................................................... 164Event profiles................................................................................................................................................................166Viewing events in the Event Monitor........................................................................................................................ 170Viewing the event catalog........................................................................................................................................... 171Acknowledging system events.................................................................................................................................... 171Customizing error events.............................................................................................................................................171
Server monitoring with syslog........................................................................................................................................... 171Configuring local syslog............................................................................................................................................... 172Configuring remote syslog.......................................................................................................................................... 173
Server monitoring with SNMP......................................................................................................................................... 176Configuring server monitoring with SNMP...............................................................................................................176
Viewing Avamar server log files........................................................................................................................................178Audit logging....................................................................................................................................................................... 179
Viewing the Audit Log..................................................................................................................................................179Automatic notifications to Avamar Support................................................................................................................... 179
Usage Intelligence........................................................................................................................................................ 180Email Home.................................................................................................................................................................... 181ConnectEMC................................................................................................................................................................ 182
Verifying system integrity................................................................................................................................................. 185
Chapter 10: Capacity Management................................................................................................ 186Capacity utilization information........................................................................................................................................186Capacity limits and thresholds..........................................................................................................................................186Capacity forecasting..........................................................................................................................................................187Customizing capacity limits and behavior....................................................................................................................... 187
Editing capacity settings for Avamar Administrator................................................................................................ 187
Chapter 11: Replication.................................................................................................................189Overview of Avamar replication.......................................................................................................................................189
Types of replication......................................................................................................................................................189Replication scheduling................................................................................................................................................. 190
Contents 7

Replication authentication...........................................................................................................................................190Location of replicas on a destination Avamar system.............................................................................................. 191Replicas at Source........................................................................................................................................................ 191Retention of replicas....................................................................................................................................................193Replication with Data Domain systems..................................................................................................................... 193
Enable Replicas at Source.................................................................................................................................................194Configuring policy-based replication................................................................................................................................194
Replication destinations...............................................................................................................................................195Replication groups........................................................................................................................................................197
Performing on-demand replication in the AUI................................................................................................................201Perform on-demand replication from the Policy window....................................................................................... 201
Performing command line replication.............................................................................................................................. 201Command reference....................................................................................................................................................201CLI examples.................................................................................................................................................................210
Monitoring replication.........................................................................................................................................................211Monitor replication in the AUI......................................................................................................................................211
Cancel a replication task in the AUI..................................................................................................................................211Restore a backup from a replica on a destination system............................................................................................ 212MCS configuration parameters to support Replicas at Source................................................................................... 213
Changing the configuration of Replicas at Source.................................................................................................. 214Restore Replicas at Source.........................................................................................................................................215
Chapter 12: Server Updates and Hotfixes.......................................................................................216Overview of the Avamar server software update process.......................................................................................... 216
Avamar Downloader Service.......................................................................................................................................216AvInstaller and Avamar Installation Manager............................................................................................................217
Installing and configuring the Avamar Downloader Service......................................................................................... 218Configuring the Avamar Downloader Service.......................................................................................................... 218
Downloading new packages from the EMC repository.................................................................................................219Downloading and installing packages on the Avamar server........................................................................................219Viewing a list of installation packages on the Avamar server......................................................................................220
Uploading installation packages to the Avamar server...........................................................................................220Repository tab headings..............................................................................................................................................221
Deleting packages from the Avamar server................................................................................................................... 221Viewing the history of installations..................................................................................................................................222
Installation history information...................................................................................................................................222Using the legacy Avamar Downloader Service..............................................................................................................223
Legacy Avamar Downloader Service installation requirements.............................................................................223Downloading the legacy Avamar Downloader Service software...........................................................................224Installing the legacy Avamar Downloader Service software.................................................................................. 224Enabling HTTPS...........................................................................................................................................................225Configuring the legacy Avamar Downloader Service............................................................................................. 225Updating the legacy Avamar Downloader Service software................................................................................. 226Uninstalling the legacy Avamar Downloader Service..............................................................................................226Downloading new packages from the EMC repository.......................................................................................... 227Viewing a list of packages available for download...................................................................................................227Verifying connectivity with the EMC repository..................................................................................................... 227Monitoring Avamar Downloader Service status...................................................................................................... 227Stopping and starting the Avamar Downloader Service monitor..........................................................................228
Troubleshooting Avamar Downloader Service issues...................................................................................................229
8 Contents

Chapter 13: Avamar Client Manager.............................................................................................. 230Overview of Avamar Client Manager............................................................................................................................. 230
Connection security.................................................................................................................................................... 230Apache web server authentication........................................................................................................................... 230Editing the session time-out period.......................................................................................................................... 230Increasing the JavaScript time-out period................................................................................................................231Avamar Client Manager configuration properties................................................................................................... 232
Starting Avamar Client Manager.....................................................................................................................................233Login page.................................................................................................................................................................... 233
Global tools.........................................................................................................................................................................233Adding an Avamar server........................................................................................................................................... 234Removing an Avamar server......................................................................................................................................234Changing the settings for an Avamar server...........................................................................................................234Selecting a server........................................................................................................................................................235Filters............................................................................................................................................................................ 235Viewing details............................................................................................................................................................. 240Exporting data............................................................................................................................................................. 240Setting the entries per page limit...............................................................................................................................241Viewing tool tips........................................................................................................................................................... 241
Overview............................................................................................................................................................................. 241Server Summary...........................................................................................................................................................241Dashboard.................................................................................................................................................................... 242
Clients................................................................................................................................................................................. 244Client and server tools................................................................................................................................................ 245Add Clients................................................................................................................................................................... 250Registered Clients....................................................................................................................................................... 253Activated Clients......................................................................................................................................................... 254Failed Clients................................................................................................................................................................256Idle Clients.................................................................................................................................................................... 256Upgrade Clients........................................................................................................................................................... 257
Policies................................................................................................................................................................................259Adding clients to a group............................................................................................................................................259Removing clients from a group..................................................................................................................................260Viewing the dataset policy of a group...................................................................................................................... 260Viewing the retention policy of a group................................................................................................................... 260Viewing the schedule policy of a group.....................................................................................................................261
Queues................................................................................................................................................................................ 261Canceling a task........................................................................................................................................................... 261
Logs.....................................................................................................................................................................................262Viewing the client log after upgrading an Avamar client........................................................................................262Clearing all log entries in a section............................................................................................................................ 263
Chapter 14: Avamar Desktop/Laptop.............................................................................................264Overview of Avamar Desktop/Laptop........................................................................................................................... 264Requirements for Avamar Desktop/Laptop.................................................................................................................. 265
Client computer requirements...................................................................................................................................265Web browser requirements........................................................................................................................................266Network requirements................................................................................................................................................ 267
Contents 9

Avamar client software installation................................................................................................................................. 267Supported systems management tools.................................................................................................................... 267Push installation on Windows computers.................................................................................................................268Push installation on Macintosh computers.............................................................................................................. 268Local client installation................................................................................................................................................ 269Avamar client software uninstall............................................................................................................................... 269
Avamar Desktop/Laptop user authentication............................................................................................................... 270Pass-through authentication..................................................................................................................................... 270LDAP authentication................................................................................................................................................... 270Avamar authentication................................................................................................................................................272Mixed authentication...................................................................................................................................................273
Avamar Desktop/Laptop user interfaces.......................................................................................................................273Client UI........................................................................................................................................................................ 273Web UI.......................................................................................................................................................................... 274
Backup with Avamar Desktop/Laptop........................................................................................................................... 278Scheduled backups......................................................................................................................................................278Add data option........................................................................................................................................................... 279Single-click backups.................................................................................................................................................... 279Interactive backups..................................................................................................................................................... 279Disabling on-demand backups.................................................................................................................................... 281Changing the retention policy for on-demand backups..........................................................................................281
Restore with Avamar Desktop/Laptop.......................................................................................................................... 282Finding data to restore............................................................................................................................................... 282Restore types...............................................................................................................................................................282Restore requirements................................................................................................................................................. 283Restore limits............................................................................................................................................................... 284Restore of replicated backups...................................................................................................................................285
Client backup and restore activity history..................................................................................................................... 285Editing Avamar Desktop/Laptop parameters................................................................................................................285
Avamar Desktop/Laptop parameters.......................................................................................................................285Client log locations............................................................................................................................................................ 287
Chapter 15: Data Domain System Integration.................................................................................288Overview of Data Domain system integration...............................................................................................................288
Integration of Avamar with Data Domain.................................................................................................................288File system backups on a Data Domain system.......................................................................................................288Application backups on a Data Domain system.......................................................................................................289Data Domain Cloud Disaster Recovery.....................................................................................................................289VMware instant access.............................................................................................................................................. 289Cloud tier...................................................................................................................................................................... 290Checkpoints on a Data Domain system....................................................................................................................290Data Domain system streams....................................................................................................................................290Replication with Data Domain systems.................................................................................................................... 290Monitoring and reporting Data Domain system status............................................................................................291Security with Data Domain system integration........................................................................................................291Data migration to an attached Data Domain system...............................................................................................291Enforcement of backups to Data Domain................................................................................................................292
Preparing to add a Data Domain system........................................................................................................................292System requirements for Data Domain system integration...................................................................................292Creating a DD Boost user account............................................................................................................................294
10 Contents

Adding a Data Domain system.........................................................................................................................................294
Appendix A: Command Shell Server Logins.................................................................................... 297User accounts....................................................................................................................................................................297Starting command shell sessions.....................................................................................................................................297Switching user IDs.............................................................................................................................................................297Using sudo..........................................................................................................................................................................298
Prefixing commands with sudo................................................................................................................................. 298
Appendix B: Plug-in Options.........................................................................................................299How to set plug-in options...............................................................................................................................................299Backup options.................................................................................................................................................................. 299Restore options.................................................................................................................................................................. 301
Appendix C: Adding Files to the Avamar Web Restore Page............................................................ 305Adding files to the Avamar Web Restore Downloads page.........................................................................................305Adding files to the Avamar Web Restore Documentation page................................................................................. 306
Glossary..................................................................................................................................... 307
Contents 11

1. Avamar server nodes, stripes, and objects......................................................................................................... 22
2. Avamar server functional block diagram............................................................................................................. 24
3. Avamar client agent and plug-ins........................................................................................................................... 25
4. Data deduplication......................................................................................................................................................... 28
5. Avamar Administrator dashboard...........................................................................................................................35
6. Avamar Administrator status bar............................................................................................................................39
7. Navigation tree features............................................................................................................................................. 42
8. AUI navigation pane...................................................................................................................................................... 44
9. AUI dashboard.................................................................................................................................................................46
10. Avamar domain example...........................................................................................................................................55
11. Users in Avamardomains........................................................................................................................................... 65
12. Schedule start time, end time, and duration....................................................................................................94
13. Default backup and maintenance windows.................................................................................................... 139
14. Multi-node server configuration with NAT..................................................................................................... 148
15. Replication domain structure example...............................................................................................................191
16. View after uploading the example CSV file....................................................................................................252
17. Replaceable graphics on the Avamar client web UI....................................................................................276
Figures
12 Figures

1. Revision history................................................................................................................................................................ 19
2. Typographical conventions........................................................................................................................................20
3. MCS functions................................................................................................................................................................ 24
4. Supported plug-ins........................................................................................................................................................25
5. Avamar system management features of Backup & Recovery Manager........................................... 26
6. Dashboard launcher link..............................................................................................................................................35
7. System State fields on the Avamar Administrator dashboard.................................................................. 36
8. Backup job fields in the Avamar Administrator dashboard..........................................................................37
9. System alerts in the Critical Events panel.......................................................................................................... 39
10. Launcher shortcut icons on the status bar...................................................................................................... 39
11. Scheduler and backup dispatching status messages................................................................................... 40
12. Status messages for unacknowledged events............................................................................................... 40
13. Operational status messages for Avamaror Data Domain.........................................................................40
14. AUI navigation pane.................................................................................................................................................... 44
15. System alerts................................................................................................................................................................. 48
16. Session details available in the Activity Monitor ........................................................................................... 49
17. Client details available in the Activity Monitor................................................................................................ 50
18. Policy details available in the Activity Monitor................................................................................................50
19. Attributes for each entry in a clients definition file.......................................................................................58
20. Client Summary Information.................................................................................................................................. 62
21. Avamar user account information........................................................................................................................ 65
22. Supported directory service types...................................................................................................................... 67
23. Required Key Distribution Center ports............................................................................................................ 68
24. Parameter requirements for LDAP base functionality.................................................................................71
25. Additional parameter for LDAP base functionality .......................................................................................71
Tables
Tables 13

26. OpenLDAP directory service parameters.........................................................................................................75
27. Error messages during directory service configuration'.............................................................................78
28. Administrator roles...................................................................................................................................................... 81
29. Operator roles...............................................................................................................................................................82
30. User roles........................................................................................................................................................................ 83
31. AUI feature pane access by administrator user role.................................................................................... 84
32. AUI feature pane access by operator user role............................................................................................. 84
33. Directories excluded from Default Dataset backups ................................................................................. 89
34. Directories excluded from UNIX Dataset backups ..................................................................................... 89
35. Directories excluded from Windows Dataset backups ............................................................................. 89
36. Schedule types............................................................................................................................................................. 93
37. Schedule catalog..........................................................................................................................................................94
38. Settings for each type of schedule.....................................................................................................................95
39. Basic retention settings............................................................................................................................................99
40. Retention policy catalog...........................................................................................................................................99
41. VMware groups........................................................................................................................................................... 103
42. Settings for each type of schedule................................................................................................................... 105
43. Jobs | Backups pane................................................................................................................................................. 112
44. Backup statistics dialog box information..........................................................................................................113
45. Target locations for system recovery backups of an Oracle Solaris client......................................127
46. Session Monitor tab properties........................................................................................................................... 134
47. Avamar server maintenance activities..............................................................................................................139
48. Checkpoint states..................................................................................................................................................... 140
49. Services Administration tab information......................................................................................................... 144
50. Default live file directory for MCS configuration files............................................................................... 145
51. MCS backup timestamp files................................................................................................................................ 146
52. Solutions for common NAT problems.............................................................................................................. 149
14 Tables

53. Read-only fields on the View/Edit Contact Information dialog box................................................... 150
54. Editable fields on the View/Edit Contact Information dialog box....................................................... 150
55. System monitoring tools and tasks.................................................................................................................... 151
56. Session details available in the Activity Monitor .........................................................................................152
57. Client details available in the Activity Monitor.............................................................................................. 152
58. Policy details available in the Activity Monitor............................................................................................. 152
59. Node details on the Avamar tab of the Server Monitor.......................................................................... 154
60. CPU details on the Avamar tab of the Server Monitor............................................................................154
61. Network details on the Avamar tab of the Server Monitor.................................................................... 154
62. Disk details on the Avamar tab of the Server Monitor............................................................................. 154
63. Node details on the Data Domain tab of the Server Monitor............................................................... 155
64. CPU details on the Data Domain tab of the Server Monitor................................................................. 155
65. Disk (KB/S) details on the Data Domain tab of the Server Monitor................................................. 155
66. Network (KB/S) details on the Data Domain tab of the Server Monitor........................................155
67. Data display based on selections on the Server Management tab..................................................... 156
68. Bytes Protected Summary properties on the Server Management tab.......................................... 156
69. Server Details on the Server Management tab........................................................................................... 157
70. Maintenance Activities Details on the Server Management tab.......................................................... 157
71. Garbage Collection Details on the Server Management tab...................................................................158
72. Module properties on the Server Management tab ................................................................................. 158
73. Status indicators on the Node Information part of Server Management........................................ 159
74. Server details on the Node Information part of Server Management...............................................159
75. OS details on the Node Information part of Server Management...................................................... 160
76. Hardware details on the Node Information part of Server Management........................................ 160
77. Status indicators on the Partition Information part of Server Management...................................161
78. Server Details on the Node Information part of Server Management............................................... 161
79. Data Domain system properties on the Server Management tab....................................................... 162
Tables 15
80. Event information...................................................................................................................................................... 164
81. Example of a batch email notification message............................................................................................165
82. Mappings of syslog fields to Avamar event data.........................................................................................172
83. Locations for the Avamar MIB definition file................................................................................................. 176
84. Capacity limits and thresholds ............................................................................................................................186
85. Capacity settings in mcserver.xml..................................................................................................................... 187
86. Replicas at Source features available through the source Avamar server...................................... 191
87. Descriptions of the integration of Replicas at Source into Avamar tasks........................................192
88. Replication configurations for Avamar replication using DD Boost.................................................... 193
89. Replicas at Source.....................................................................................................................................................197
90. Account options for the avrepl command.....................................................................................................202
91. Logging options for the avrepl command.......................................................................................................203
92. Replication options for the avrepl command................................................................................................203
93. Avamar-only advanced options for the avrepl command...................................................................... 206
94. Numeric plug-in descriptors.................................................................................................................................208
95. Required options for the avrepl command.....................................................................................................210
96. MCS configuration parameters to support Replicas at Source............................................................213
97. Information on the Repository tab..................................................................................................................... 221
98. Information on the History tab............................................................................................................................222
99. Details on the History tab......................................................................................................................................222
100. Installation requirements for the legacy Avamar Downloader Service........................................... 223
101. Avamar Downloader Service monitor status messages ........................................................................228
102. Avamar Client Manager configuration properties.................................................................................... 232
103. Characters not allowed in search strings..................................................................................................... 236
104. Columns used in the Server Summary section..........................................................................................242
105. Server information on the Server panel........................................................................................................243
106. Settings on the Advanced tab of Client Details........................................................................................ 247
16 Tables

107. Relationship states during client activation................................................................................................. 252
108. Failed client filters................................................................................................................................................... 256
109. Task types on the Queues page........................................................................................................................261
110. Task types on the Logs page..............................................................................................................................262
111. Avamar Desktop/Laptop hardware requirements..................................................................................... 266
112. Supported web browsers forAvamar Desktop/Laptop..........................................................................266
113. Environment variables for launching a web browser in Avamar Desktop/Laptop..................... 267
114. Avamar Desktop/Laptop network requirements.......................................................................................267
115. Push install launch command arguments......................................................................................................268
116. Avamar Desktop/Laptop client UI functionality......................................................................................... 273
117. Avamar Desktop/Laptop web UI functionality............................................................................................274
118. Descriptions of methods for starting an Avamar Desktop/Laptop client backup......................278
119. Datasets for single-click on-demand backups............................................................................................ 279
120. Supported values for the restrictBackupsPerDay property................................................................. 281
121. Avamar Desktop/Laptop data restore filtering.......................................................................................... 283
122. Requirements to restore from a different computer with Avamar Desktop/Laptop.............. 283
123. Avamar Desktop/Laptop parameters............................................................................................................ 285
124. Available client logs.................................................................................................................................................287
125. Paths to logs on Windows computers ..........................................................................................................287
126. Paths to logs on Linux and Mac computers .............................................................................................. 287
127. Replication configurations for Avamar replication using DD Boost.................................................. 290
128. Data Domain system requirements................................................................................................................. 292
129. Backup plug-in options......................................................................................................................................... 299
130. Backup plug-in options for (NetWare only) SMS Authentication.................................................... 300
131. Backup plug-in options for logging...................................................................................................................300
132. Backup plug-in options for file system traversal.......................................................................................300
133. Backup plug-in options for pre-script............................................................................................................ 300
Tables 17

134. Backup plug-in options for post-script..........................................................................................................300
135. Backup plug-in client cache options................................................................................................................301
136. Backup plug-in advanced options ................................................................................................................... 301
137. Quota limit per backup ..........................................................................................................................................301
138. File system plug-in restore options................................................................................................................. 302
139. NetWare only) SMS Authentication restore plug-in options.............................................................. 302
140. Logging restore plug-in options........................................................................................................................302
141. Pre-script restore plug-in options.....................................................................................................................303
142. Post-script restore plug-in options................................................................................................................. 303
143. Client cache restore plug-in options...............................................................................................................303
144. Advanced restore plug-in options....................................................................................................................303
18 Tables

As part of an effort to improve the product lines, revisions of the software and hardware are periodically released. Therefore, somefunctions that are described in this document might not be supported by all versions of the software or hardware currently in use. Theproduct release notes provide the most up-to-date information on product features.
Contact the technical support professional when a product does not function correctly or does not function as described in thisdocument.
NOTE: This document was accurate at publication time. To find the latest version of this document, go to Online
Support (https://www.dell.com/support).
PurposeThis guide describes how to configure, administer, monitor, and maintain the Avamar system.
AudienceThe information in this guide is primarily intended for system administrators who are responsible for maintaining servers and clients on anetwork, as well as operators who monitor daily backups and storage devices.
Revision historyThe following table presents the revision history of this document.
Table 1. Revision history
Revision Date Description
03 June, 2020 Updated the following sections:
• Plug-ins• Creating a custom event profile for an SNMP trap
Added the following sections:
• Enforcing a minimum retention setting• Automatically retaining the last backup
02 January, 2020 Added references to Azure and vCenter to Data Domain Cloud Disaster Recovery.
01 December 14, 2018 GA release of Avamar 18.2
Related documentationThe following publications provide additional information:
• E-lab Navigator at https://elabnavigator.emc.com/eln/modernHomeDataProtection• Avamar Release Notes• Avamar Operational Best Practices Guide• Avamar and Data Domain System Integration Guide• Avamar Reports Guide• All Avamar client and plug-in user guides
Preface
Preface 19

Typographical conventionsThese type style conventions are used in this document.
Table 2. Typographical conventions
Bold Used for names of interface elements, such as names of windows, dialog boxes, buttons, fields, tabnames, key names, and menu paths (what the user specifically selects or clicks)
Italic Used for full titles of publications that are referenced in text
Monospace Used for:
• System code• System output, such as an error message or script• Pathnames, filenames, prompts, and syntax• Commands and options
Monospace italic Used for variables
Monospace bold Used for user input
[ ] Square brackets enclose optional values
| Vertical bar indicates alternate selections - the bar means "or"
{ } Braces enclose content that the user must specify, such as x or y or z
... Ellipses indicate nonessential information that is omitted from the example
Where to get helpThe Avamar support page provides access to licensing information, product documentation, advisories, and downloads, as well as how-toand troubleshooting information. This information may resolve a product issue before contacting Customer Support.
To access the Avamar support page:
1. Go to https://www.dell.com/support.2. Type a product name in the Enter a Service Tag, Serial Number, Service Request, Model, or Keyword search box.3. Select the product from the list that appears. When you select a product, the Product Support page loads automatically.4. (Optional) Add the product to the My Products list by clicking Add to My Saved Products in the upper right corner of the Product
Support page.
DocumentationThe Avamar product documentation provides a comprehensive set of feature overview, operational task, and technical referenceinformation. To supplement the information in product administration and user guides, review the following documents:
• Release notes provide an overview of new features and known limitations for a release.• Technical notes provide technical details about specific product features, including step-by-step tasks, where necessary.• White papers provide an in-depth technical perspective of a product or products as applied to critical business issues or requirements.
KnowledgebaseThe Knowledgebase contains applicable solutions that you can search for either by solution number (for example, KB000xxxxxx) or bykeyword.
To search the Knowledgebase:
1. Go to https://www.dell.com/support.2. Under the Support tab, click Knowledge Base.3. Type either the solution number or keywords in the search box. Optionally, you can limit the search to specific products by typing a
product name in the search box and then selecting the product from the list that appears.
20 Preface
Online CommunitiesGo to Community Network at https://www.dell.com/community for peer contacts, conversations, and content on product support andsolutions. Interactively engage online with customers, partners, and certified professionals for all products.
Live chatTo engage Customer Support by using live interactive chat, click Join Live Chat on the Service Center panel of the Avamar supportpage.
Service RequestsFor in-depth help from Customer Support, submit a service request by clicking Create Service Requests on the Service Center panelof the Avamar support page.
NOTE: To open a service request, you must have a valid support agreement. Contact a sales representative for details
about obtaining a valid support agreement or with questions about an account.
To review an open service request, click the Service Center link on the Service Center panel, and then click View and manageservice requests.
Enhancing supportIt is recommended to enable ConnectEMC and Email Home on all Avamar systems:
• ConnectEMC automatically generates service requests for high priority events.• Email Home sends configuration, capacity, and general system information to Customer Support.
Comments and suggestionsComments and suggestions help to continue to improve the accuracy, organization, and overall quality of the user publications. Sendcomments and suggestions about this document to [email protected].
Please include the following information:
• Product name and version• Document name, part number, and revision (for example, 01)• Page numbers• Other details to help address documentation issues
Preface 21

Introduction
Topics:
• Avamar system overview• Data deduplication• Security and networking
Avamar system overviewAn Avamar system is a client/server network backup and restore solution.
An Avamar system consists of one or more Avamar servers and the network servers or desktop clients that back up data to those servers.The Avamar system provides centralized management through the Avamar Administrator graphical management console softwareapplication.
Avamar serverAvamar is a hard disk based IP network backup and restore solution. Avamar servers use internal hard disk storage. An Avamar server is alogical grouping of one or more nodes that is used to store and manage client backups.
Hardware manufacturers typically call their equipment servers (for instance, the Dell PowerEdge 2950 server). In the context of anAvamar system, this equipment is called a node. An Avamar node is a self-contained, rack-mountable, network-addressable computer thatruns Avamar server software on the Linux operating system.
Avamar ensures fault tolerance by managing disk drive space in units of space called stripes.
In the Avamar system, an object is a single instance of deduplicated data. Each Avamar object inherently has a unique ID. Objects arestored and managed within stripes on the Avamar server.
Figure 1. Avamar server nodes, stripes, and objects
1. Avamar server.2. Avamar node.
1
22 Introduction

3. Disk drive storage on the node.4. Stripe on the disk drive.5. Object on the stripe.
All Avamar servers store client backups and also provide essential processes and services that are required for client access and remotesystem administration.
Avamar servers are available in either single-node or scalable multi-node configurations. For the most part, when using AvamarAdministrator management console software, all Avamar servers look and behave the same. The main differences among Avamar serverconfigurations are the number of nodes and disk drives that are reported in the server monitor.
Documenting specific differences in Avamar server hardware configurations is beyond the scope of this guide. Whenever specificlimitations and best practices for certain configurations are known, they are noted. However, these occasional notes should not beconsidered definitive or exhaustive. Consult an Avamar Sales representative or an Avamar reseller for more information about specifichardware.
NodesThe primary building block in any Avamar server is a node. Each node is a self-contained, rack-mountable, network-addressable computerthat runs Avamar server software on the Linux operating system.
Nodes can also contain internal storage in the form of hard disk drives. If the node is configured with internal storage (that is, a single-node server), it is internally mirrored to provide robust fault tolerance.
There are three types of nodes.
Utility node
A utility node is dedicated to scheduling and managing background Avamar server jobs. In scalable multi-node Avamar servers, a singleutility node provides essential internal services for the server, such as:
• Management Console Server (MCS)• External authentication• Network Time Protocol (NTP)• Web access
Because utility nodes are dedicated to running these essential services on multi-node Avamar servers, they cannot be used to storebackups. Single-node Avamar servers combine all of the features and functions of utility and storage nodes on a single node.
Storage nodes
Storage nodes are nodes that store backup data. Multiple storage nodes are configured with multi-node Avamar servers which are basedon performance and capacity requirements. You can add storage nodes to an Avamar server over time to expand performance with nodowntime.
Avamar clients connect directly with Avamar storage nodes. Client connections and data are load that is balanced across storage nodes.
NDMP Accelerator
An NDMP Accelerator node is a specialized node that uses NDMP to provide data protection for certain NAS devices, including the EMCCelerra® IP storage systems and Network Appliance filers.
Avamar server functional blocksThe major Avamar server functional blocks include the data server, Management Console Server (MCS), and the EM Tomcat server(EMT). The following figure illustrates the interaction of these components within the server and with other Avamar components.
Introduction 23

Avamar server 01
Management Console Server (MCS)
PostgreSQL
database
Data
Server
Client
registry
Account
management
Scheduler/
dispatcher Reporting
Events
EM
Tomcat
(EMT)
Avamar
server 02
Avamar
server 03
Avamar
server 04
Avamar
backup client
Avamar Administrator
(management console)
Avamar
Client Manager
Figure 2. Avamar server functional block diagram
Data serverWhen performing a backup, restore, or validation, Avamar backup clients communicate directly with the data server. All scheduledbackups are initiated by the MCS scheduler.
Management Console Server (MCS)The Management Console Server (MCS) provides centralized administration (scheduling, monitoring, and management) for the Avamarserver. The MCS also runs the server-side processes that are used by the Avamar Administrator graphical management console.
The following table provides details on the functions that the MCS provides.
Table 3. MCS functions
Function Description
Client registry Controls client registration and activation.
Account management Used to create and manage domains, clients, users, and groups.
Reporting Used to create and export system reports. The Avamar ReportsGuide provides more information.
Events Displays system events and activities.
Scheduler/dispatcher Controls when backup and restore operations occur, or if theoperations can be queued for processing.
PostgreSQL database Stores Avamar server data. PostgreSQL is an open architecturedatabase management system. Information in the MCS database isaccessible through any PostgreSQL-compliant ODBC interface.The MCS database file name is mcdb, and it is on the utility node inthe /usr/local/avamar/var/mc/server_data/postgres directory. The MCS database contents are fully backedup on the Avamar server and can be restored when the MCS fails.
NOTE: The MCS database is intended for read-onlyaccess for reporting or query purposes. Do not manuallymodify any data in mcdb tables unless instructed to do
so by Avamar Support. Directly modifying MCS
24 Introduction

Table 3. MCS functions (continued)
Function Description
operational data can cause loss of referential integrity,which could result in irretrievable loss of data.
EM Tomcat server (EMT)The Avamar EM Tomcat server (EMT) provides essential services that are required to display, and work with Avamar server information.
The EMT also communicates directly with MCS. This communication is a required part of all Avamar systems.
Avamar clientsAvamar provides client software for various computing platforms. Each client comprises a client agent and one or more plug-ins.
Avamar client
Avamar server
File system
plug-in
Application
plug-in
Agent Management Console Server
(MCS)
Figure 3. Avamar client agent and plug-ins
AgentsAvamar agents are platform-specific software processes that run on the client and communicate with the Management Console Server(MCS) and any plug-ins that are installed on that client.
Plug-insThere are two types of Avamar plug-ins:
• File system plug-ins that are used to browse, back up, and restore files or directories on a specific client file system.• Application plug-ins that support backup and restore of databases or other special applications.
The following table lists the file system and application plug-ins that Avamar supports.
Table 4. Supported plug-ins
Type of plug-in Supported file systems and applications
File system • HP-UX• IBM AIX• Linux• Mac OS X• Microsoft Windows• Microsoft Windows Volume Shadow Copy Service (VSS)• Oracle Solaris• VMware
Application • IBM DB2• Lotus Domino• Microsoft Exchange
Introduction 25

Table 4. Supported plug-ins (continued)
Type of plug-in Supported file systems and applications
• Microsoft Hyper-V• Microsoft Office SharePoint Server (MOSS)• Microsoft SQL Server• NDMP for NAS devices, including EMC Celerra IP storage
systems and Network Appliance filers• Oracle• SAP with Oracle• Sybase ASE
See the E-lab Navigator at https://elabnavigator.emc.com/eln/modernHomeDataProtection for client compatibility requirements andsupported operating systems and application versions.
The Avamar file system client and the plug-ins that you install on the host must have the same version number.
User interfacesSeveral user interfaces are available in the Avamar system to enable management and monitoring.
Avamar Web User InterfaceThe Avamar Web User Interface (AUI) is a web management application that is used to administer an Avamar server.
Avamar AdministratorAvamar Administrator is a graphical management console software application that is used to administer an Avamar system from asupported Windows client computer.
Avamar Backup & Recovery ManagerBackup & Recovery Manager manages all Avamar systems in the enterprise. Backup & Recovery Manager also has an integrated userinterface to manage the enterprise’s NetWorker servers and Data Domain backup targets.
The following table lists some of the enterprise management capabilities of Backup & Recovery Manager. The table does not includeadditional features in Backup & Recovery Manager that are specific to NetWorker servers and to Data Domain backup targets.
Table 5. Avamar system management features of Backup & Recovery Manager
Feature Backup & Recovery Manager
Software host VMware vSphere client
At-a-glance dashboard Select between consolidated and individual status views of Avamarsystems, NetWorker servers, and Data Domain systems
Detailed backup and capacity information for Avamar systems Yes
Monitor backups Yes, through an Activity Monitor screen. Use the Activity Monitorscreen to view backup and replication details, and to start, stop,and restart tasks.
Replication management Yes
Launch other management applications • Avamar Administrator• Avamar Client Manager• Avamar Installation Manager• AvInstaller service
Display warnings, errors, and system alerts Yes, in a quick-look graphical display and in detailed text. Filter theview by product, system, and category.
26 Introduction

Table 5. Avamar system management features of Backup & Recovery Manager (continued)
Feature Backup & Recovery Manager
Management reports: select, view, and export • Backup• System• Configuration
The Backup & Recovery Manager product documentation provides complete details on the user interface.
Avamar Client ManagerAvamar Client Manager is a web-based management application that provides centralized Avamar client administration capabilities forlarger businesses and enterprises. Avamar Client Manager helps with the management of large numbers of Avamar clients.
Avamar Client Manager works with Avamar clients on a supported native operating system and Avamar clients on a supported operatingsystem running in a VMware virtual machine. Avamar Client Manager cannot work with Avamar clients through virtual center, virtualmachine, or virtual proxy configurations. The Avamar Client Manager UI displays supported Avamar clients and hides all unsupportedclients.
Avamar Desktop/LaptopAvamar Desktop/Laptop is a version of the Avamar client software that adds enhanced features for enterprise desktop and laptopcomputers.
The Avamar Desktop/Laptop features are designed to improve the functionality of Avamar client for Windows and Macintosh desktopsand laptops. Many of the features are also supported on qualifying Linux computers.
Avamar Desktop/Laptop functionality is available through two user interfaces:
• The client local user interface (client UI) is installed on the client computer when you install either the Avamar Client for Windows orthe Avamar Client for Mac OS X. With the client UI, an Avamar icon appears in the notification area ("system tray") on Windowscomputers or on the menu bar on Mac computers. Right-click the icon on Windows or click the icon on Mac to open the client menu,which provides access to backup, restore, program settings, and logs.
• Use the web browser user interface (web UI) to start an on-demand backup or restore, view backup and restore activity for a clientcomputer, or configure other backup settings for a client computer.
Avamar Installation ManagerThe Avamar Installation Manager user interface is part of the AvInstaller software that Customer Support installs on the utility node duringan Avamar server software installation or upgrade. Use the Avamar Installation Manager to install and upgrade software on the Avamarserver.
Avamar Downloader ServiceThe Avamar Downloader Service manages the process of checking for and downloading Avamar server software updates. The AvamarDownloader Service software runs on a stand-alone Microsoft Windows server that allows network access to Avamar sites on theInternet and to all Avamar servers at a site.
Avamar Web RestoreAvamar Web Restore provides access to the following functionality:
• Search for or browse backed up directories and files to restore.• Download Avamar client software.• View Avamar product documentation that is stored on the Avamar server.• Open the Avamar Administrator management console software.
Data Domain system supportYou can store backups on either the Avamar server or a Data Domain system. Backup metadata is stored on the Avamar server.
Before you can store backups on a Data Domain system, add the Data Domain system to the Avamar configuration by using AvamarAdministrator. Then select the Data Domain system in the plug-in options when you perform an on-demand backup or when you create adataset for a scheduled backup. You can also use the command line interface (CLI) to perform backups to a Data Domain system.
Introduction 27

The steps to restore backups are the same whether you restore from the Avamar server or a Data Domain system. The restore processdetermines the location of the backup and restores the backup.
Support for Data Domain Cloud Tier was initiated in Avamar 7.4. DD Cloud Tier moves data from Data Domain to the cloud. From theAvamar Administrator, you can configure cloud tier to move Avamar backups from Data Domain to the cloud, and perform seamlessrecovery of these backups.
Data Domain Cloud Tier Disaster Recovery support was initiated with Avamar 7.5. You can recover backups from the cloud in case of theloss of a Data Domain and also recover an Avamar server from the cloud.
The Avamar and Data Domain System Integration Guide provides more information about Data Domain systems in an Avamarenvironment, including detailed steps to add a Data Domain system to the Avamar configuration.
Data deduplicationData deduplication is a key feature of the Avamar system. Data deduplication ensures that each unique sub-file, variable length object isstored only once across sites and servers.
During backups, Avamar client software examines the client file system and applies a data deduplication algorithm that identifies redundantdata sequences and breaks the client file system into sub-file, variable length data segments. Each data segment is assigned a unique ID.
The client software then determines whether this unique ID has already been stored on the Avamar server. If this object resides on theAvamar server, a link to the stored object is referenced in the backup.
Once an object has been stored on the server, it is not sent over the network again, no matter how many times it is encountered on anynumber of clients. This feature significantly reduces network traffic and provides for greatly enhanced storage efficiency on the server.
Figure 4. Data deduplication
1. Break data into atoms (variable length segments of file data).2. Send and store each atom only once.3. Up to 500 times daily data reduction in the Avamar backup repository.
Security and networkingThe following sections provide an overview of key Avamar security and networking features. The Avamar Product Security Guide providesfull details on product security and network configuration.
EncryptionTo provide enhanced security, Avamar can encrypt all data that is sent between clients and the server “in flight.”
You can set the encryption level on a client-by-client basis in client properties, or for an entire group of clients in group properties. You canalso disable “in-flight” encryption entirely.
Each Avamar server can also be configured to encrypt data that is stored on the server “at rest.” The decision to encrypt all data that isstored in an Avamar server is typically a one-time decision that is made when the server is initially deployed at a customer site.
28 Introduction

IPv4 and IPv6 supportInternet Protocol (IP) is a set of communication rules for routing traffic across networks to addressable devices like Avamar systemcomponents. The Avamar system supports both Internet Protocol Version 4 (IPv4) and IPv6 address notation.
IPv4 notationIPv4 notation is displayed as four octets, that are 1- to 3-digit base 10 numbers in a range of 0 to 255. Each octet is separated by periodsand represents 8 bits of data for a total address space of 32 bits.
A subnet mask identifies a range (a subnet) of IP addresses on the same network. For Avamar purposes, the subnet mask is /24,representative of a 255.255.255.0 netmask.
An example of IPv4 address and subnet mask is10.99.99.99/24.
IPv4 notation cannot be abbreviated. If an octet has zero (0) value, use a 0 in that octet.
IPv6 notationIPv6 notation is displayed as 16 octets, that are 2-digit hexadecimal (base 16) numbers in a range of 00 to FF. IPv6 notation combinesoctets by pairs into eight groups that are separated by colons, each group representing 16 bits of data for a total address space of 128bits.
For Avamar purposes, the subnet mask (called prefix in IPv6) is /64.
An example IPv6 address and prefix is 2001:0db8:85a3:0042:1000:8a2e:0370:7334/64.
As for a group with zero (0) value, IPv6 notation is different from IPv4 that can be abbreviated. For example, the following is a valid IPv6address and prefix: 2001:db8:abcd:0012::0/64.
Avamar IP configurationsIn the Avamar user interface, an IP address may be displayed in either IPv4 or IPv6 notation. The displayed value depends on how thatparticular component was configured when the hardware and software were installed.
IPv4 and IPv6 are not interoperable. They operate in separate stacks (that is, parallel, independent networks).
Avamar can be set up in a dual stack configuration. In that case, each Avamar component may have an IPv4 address, an IPv6 address, orboth (one primary and the other secondary). The Avamar user interface may display a component's primary address or both dual stackaddresses. For example, the following IP address for a particular device indicates that it is configured as dual stack:10.99.99.99/24,2001:db8:abcd:0012::0/64.
TSL 1.2 encryption protocol requiredEncrypted traffic using the TLS 1.0 and 1.1 protocols is no longer supported. Browsers, clients, and other components that require theseprotocols are not allowed to connect to the server. Only TLS 1.2 encryption is supported.
SSH MAC algorithmsThe SSH configuration has been modified to remove weak MAC algorithms that are used for SSH connections.
The following MAC algorithms are used for SSH connections:
• [email protected]• hmac-sha2-512• [email protected]• hmac-sha2-256• [email protected]• [email protected]• [email protected]• hmac-ripemd160
NOTE: Older versions of SSH clients, such as PuTTY or Plink, use weak MAC algorithms for an SSH connection and
must be upgraded. To view the latest release of PuTTY, see http://www.putty.org/
Introduction 29

Avamar Administrator
Topics:
• Overview of Avamar Administrator• Installing Avamar Administrator• Upgrading Avamar Administrator• Uninstalling Avamar Administrator• Editing Avamar Administrator client preferences• Setting a session time-out for Avamar Administrator• Starting Avamar Administrator• Avamar Administrator dashboard• Avamar Administrator user interface elements
Overview of Avamar AdministratorAvamar Administrator is a graphical management console software application that is used to administer an Avamar system from asupported Windows or Linux client computer.
Install Avamar Administrator on a supported computer and launch the software from the desktop icon or a command shell, or launch theJava Web Start version of the console software from a web browser or from Backup & Recovery Manager.
Avamar Administrator is the primary user interface for monitoring and configuring the Avamar system. Use it to monitor backup, restore,and system maintenance activities, as well as to configure backup policies, manage clients and user accounts, and configure other systemsettings.
You can administer one Avamar system at a time from Avamar Administrator.
The Avamar Administrator dashboard appears when you log in to Avamar Administrator. The dashboard provides an at-a-glance view ofAvamar system status, as well as access to all functionality through menus and launcher links.
Installing Avamar AdministratorYou can install Avamar Administrator on supported Microsoft Windows and 64-bit Linux platforms.
About this task
Details on support for specific operating system versions are available in the E-lab Navigator.NOTE: Before installing Avamar Administrator, ensure that the platform has already been manually upgraded to Java 7
or 8. Ensure that the DNS environment is configured so that all clients that run the Administrator can resolve the Hash
File System address (hfsaddr) value.
Installing Avamar Administrator on Microsoft Windows
Steps
1. Log in to the computer on which you are installing Avamar Administrator.2. Open a web browser and type the following URL:
https://Avamar_server/dtlt/home.htmlwhere Avamar_server is the DNS name or IP address of the Avamar server.
The Avamar Web Restore page appears.3. Click Downloads.4. Do one of the following, depending on the operating system:
2
30 Avamar Administrator

• If you are installing the software on 32-bit Windows, click + next to the Windows (32 bit) folder.
• If you are installing the software on 64-bit Windows, click + next to the Windows (64 bit) folder.5. Do one of the following, depending on the operating system:
• If you are installing the software on 32-bit Windows, click + next to the Microsoft Windows Vista, 7, 8, 8.1, 10, MicrosoftWindows Server 2008 (Console) folder.
• If you are installing the software on 64-bit Windows, click + next to the Microsoft Windows Vista, 7, 8, 8.1, 10, MicrosoftWindows Server 2008, 2008 R2, 2012, 2012 R2 (Console) folder.
6. Locate the Java Runtime Environment (JRE) install package, which is typically the last entry in the folder.7. If the JRE on the client computer is older than the JRE hosted on the Avamar server, download and install the newer JRE from the
Avamar server:
a. Click the jre-version.exe install package, where version is the JRE version.
b. Open the installation file, or download the file and then open it from the saved location.c. Follow the onscreen instructions to complete the JRE installation.
8. Click the AvamarConsoleMultiple-windows-version.exe install package, where version is the Avamar Administratorsoftware version.
9. Open the installation file, or download the file and then open it from the saved location.10. Follow the onscreen instructions to complete the Avamar Administrator software installation.
Installing Avamar Administrator on Linux
Steps
1. Log in to the computer on which you are installing Avamar Administrator.2. Open a web browser and type the following URL:
https://Avamar_server/dtlt/home.htmlwhere Avamar_server is the DNS name or IP address of the Avamar server.
The Avamar Web Restore page appears.3. Click Downloads.4. Click + next to the Linux for x86 (64 bit) folder.5. Click + next to the Red Hat Enterprise Linux 5 (Console) folder.
NOTE: Use the Red Hat Enterprise Linux 5 install packages for all supported Linux versions.
6. Locate the JRE RPM install package, which is typically the last entry in the folder.7. If the JRE on the client computer is older than the JRE hosted on the Avamar server, then download the install package to a
temporary folder such as /tmp.
The install package filename is jre-version-platform.rpm, where version is the JRE version and platform is the computingplatform.
8. Download the AvamarConsole-linux-rhel5-x86_64-version.rpm install package to a temporary install folder such as /tmp.
9. Open a command shell and log in as root on the computer where the software is installed.10. Change directory to the temporary folder to which you downloaded the install packages by typing a command such as cd /tmp.
11. If you downloaded a JRE, install it by typing rpm -ivh jre-version-platform.rpm.
12. Follow the onscreen instructions to complete the JRE installation.13. Install Avamar Administrator by typing rpm -ih AvamarConsole-linux-rhel5-x86_64-version.rpm
The install process prompts you to run avsetup_mcc to configure Avamar Administrator.
14. Configure Avamar Administrator by typing /usr/local/avamar/version/bin/avsetup_mcc.The configuration process prompts you to specify the location of the JRE installation.
15. Press Enter to accept the default install location.The configuration process prompts you to specify the root directory of the Avamar software.
16. Press Enter to accept the default install location.A confirmation message appears.
Avamar Administrator 31

Upgrading Avamar AdministratorYou can upgrade Avamar Administrator on either Microsoft Windows or Linux computers.
Steps
• You can install multiple versions of Avamar Administrator on the same Microsoft Windows computer. If you install AvamarAdministrator on a computer where it is already installed, select a destination folder carefully during the installation procedure:
○ To keep an older version, select a different installation folder.○ To directly upgrade the Avamar Administrator installation, select the same installation folder. The full version numbers identify their
two versions.NOTE: Before installing/upgrading Avamar Administrator, ensure that the platform has already been manually
upgraded to Java 7 or 8.
• To upgrade the Avamar Administrator software on the Linux platform, uninstall the previous version and install the new software. Useof the Linux software upgrade command (rpm -Uh) is not supported.
NOTE: Before installing the new version of Avamar Administrator, ensure that the platform has already been
manually upgraded to Java 7 or 8.
Uninstalling Avamar AdministratorYou can uninstall Avamar Administrator from either a Microsoft Windows or a Linux computer.
Prerequisites
Close any open Avamar Administrator sessions. Otherwise, the uninstall process may not complete successfully, which can complicatefuture installation of Avamar Administrator.
Steps
• On a Microsoft Windows computer, open the Windows Start menu and select Programs > Avamar > Administrator > version >Uninstall, and then click OK on the confirmation message.
• On a Linux computer:
1. Open a command shell and log in as root.2. Determine the package name by typing rpm -qa | grep Av.
3. Type rpm -e AvamarConsole-version, where AvamarConsole-version is the Avamar Administrator install package.
Editing Avamar Administrator client preferencesYou can edit some Avamar Administrator client preferences directly in Avamar Administrator. However, a number of preferences are onlyavailable for editing in the mcclient.xml client preferences file.
Steps
1. Close Avamar Administrator.2. Open install_dir/var/mc/gui_data/prefs/mcclient.xml in a text editor, where install_dir is the Avamar Administrator
installation directory.3. Edit the preference elements.4. Save and close the file.
The changes take effect the next time when you start Avamar Administrator.
32 Avamar Administrator

Setting a session time-out for AvamarAdministratorAn Avamar Administrator session remains active until a user closes the application by choosing Exit from the menu. To protect the assetsavailable through Avamar Administrator, set a session time-out value. The value applies to all Avamar Administrator sessions connected tothe Avamar server.
About this task
After you set a session time-out value, Avamar Administrator monitors the UI for activity. When Avamar Administrator detects no mouseor keyboard activity within the UI for the number of minutes set in the time-out value, it shuts down all processes, closes all windows, anddisplays the Inactive dialog box.
Steps
1. Open a command shell and log in by using one of the following methods:
• For a single-node server, log in to the server as admin.• For a multi-node server:
a. Log in to the utility node as admin.b. Load the admin OpenSSH key by typing the following command:
ssh-agent bashssh-add ~admin/.ssh/admin_key
2. Stop the Management Console Server (mcs) service by typing dpnctl stop mcs.
3. Change the working directory to /usr/local/avamar/var/mc/server_data/prefs by typing cd /usr/local/avamar/var/mc/server_data/prefs.
4. Open mcserver.xml in a plain text editor.
5. Find the <node name="mon"> entry.
6. Edit the value of the <entry key="consoleInactiveMinutesToReport" value="n" /> entry within the <nodename="mon"> entry, where n is the session time-out value in minutes.
7. Save the change and close the text editor.8. Start the MCS and the scheduler by typing the following command:
dpnctl start mcsdpnctl start sched
9. Close the command shell.Avamar Administrator uses the new session time-out value the next time that you open Avamar Administrator and connect with theAvamar server.
Starting Avamar AdministratorStart Avamar Administrator by using the console software that is installed on a local computer or start Avamar Administrator by using theJava Web Start version of the console software.
Prerequisites
Ensure that a minimum of 512 MB of system RAM is available on the local computer. Otherwise, Java heap errors may occur when youstart Avamar Administrator.
Steps
1. Launch Avamar Administrator by using one of the following methods.
Console software version Method
Microsoft Windows Double-click the Avamar Administrator icon on the Windows desktop.
Linux Open a command shell, and type mcgui.
Avamar Administrator 33

Console software version Method
Java Web Start Type https://Avamar_server/mc-portal/mcgui in the web address field of a webbrowser, where Avamar_server is the IP address or resolvable hostname of an Avamar server.
Java Web Start version fromBackup & Recovery Manager
In Backup & Recovery Manager, on the Systems window, select an Avamar system and clickLaunch Management Console.
The Login window appears.2. In Server, type the IP address or DNS name of the Avamar server to log in to.
NOTE: Automatically supply the Server and Domain Name boxes with an Avamar server name and an Avamar domain
by clicking Options and typing the server name in Default Administrator Server and the domain name in Default
Domain.
3. In User Name, type a username.
To access all Avamar Administrator functionality, the account that is associated with this username must be assigned the role ofAdministrator. Other roles provide reduced functionality.
To authenticate by using the internal authentication system, type only a username. To authenticate by using the enterpriseauthentication system (deprecated) or directory service authentication, type username@server, where username is the usernameand server is the fully qualified domain name of the authentication server.
If you use the format username@server for the username, then the system tries to authenticate the user by using enterpriseauthentication. If authentication with enterprise authentication fails, then the system tries to authenticate the user by using directoryservice authentication.
4. In Password, type the password for the user account.5. In Domain Name, type the Avamar domain to log in to:
• The root domain, in which the default should be used for entry of a single slash (/) character.• A specific domain or subdomain, in which the domain path should be typed by using the syntax /domain/subdomain1/
subdomain2.
6. Click Log In.
If this is the first time that you have connected to this Avamar server, the Accept Server Certificate dialog box opens. Verify theserver certificate details and click Yes.
The Avamar Administrator dashboard appears.
Avamar Administrator dashboardThe Avamar Administrator dashboard provides an at-a-glance view of Avamar system status, as well as access to all functionality throughmenus and launcher link.
The dashboard appears when you log in to Avamar Administrator.
34 Avamar Administrator

Figure 5. Avamar Administrator dashboard
launcher linkThe dashboard launcher link run persistent windows to perform tasks in Avamar Administrator.
Table 6. Dashboard launcher link
Button Window Available tasks in the window
Policy Policy Create and manage groups, datasets, schedules, andretention policies.
Backup & Restore Backup, Restore, and Manage Perform on-demand backups and restore, and managecompleted backups.
Data Movement Policy Data Movement Policy Configure policy-based replication and cloud tier.
Activity Activity Monitor backup, restore, backup validation, andreplication activity.
Administration Administration Create and manage domains, clients, users, systemevents, and services.
Server Server Monitor server activity and client sessions.
System Information panelThe System Information panel on the Avamar Administrator dashboard provides an overview of important system statistics.
System StateThe System State icon provides a status indicator for overall system status:
• A green check mark icon indicates that the system is fully operational.• A yellow caution icon indicates that there is an issue with the system that requires attention, but backups can continue.• A red x icon indicates that there is a problem with the system that requires immediate attention. Backups cannot occur until you
resolve the problem.
To view more detailed information on system state, click the arrow icon next to the System State field. The following table providesdetails about system state information in the dashboard.
Avamar Administrator 35
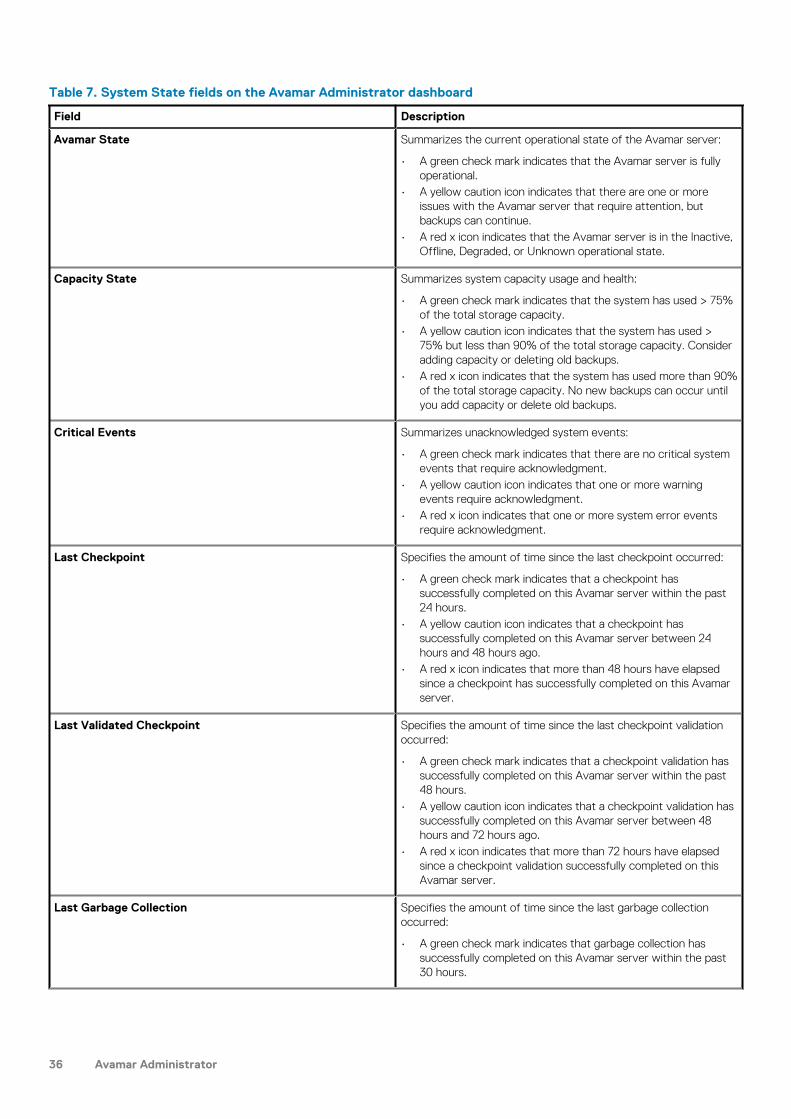
Table 7. System State fields on the Avamar Administrator dashboard
Field Description
Avamar State Summarizes the current operational state of the Avamar server:
• A green check mark indicates that the Avamar server is fullyoperational.
• A yellow caution icon indicates that there are one or moreissues with the Avamar server that require attention, butbackups can continue.
• A red x icon indicates that the Avamar server is in the Inactive,Offline, Degraded, or Unknown operational state.
Capacity State Summarizes system capacity usage and health:
• A green check mark indicates that the system has used > 75%of the total storage capacity.
• A yellow caution icon indicates that the system has used >75% but less than 90% of the total storage capacity. Consideradding capacity or deleting old backups.
• A red x icon indicates that the system has used more than 90%of the total storage capacity. No new backups can occur untilyou add capacity or delete old backups.
Critical Events Summarizes unacknowledged system events:
• A green check mark indicates that there are no critical systemevents that require acknowledgment.
• A yellow caution icon indicates that one or more warningevents require acknowledgment.
• A red x icon indicates that one or more system error eventsrequire acknowledgment.
Last Checkpoint Specifies the amount of time since the last checkpoint occurred:
• A green check mark indicates that a checkpoint hassuccessfully completed on this Avamar server within the past24 hours.
• A yellow caution icon indicates that a checkpoint hassuccessfully completed on this Avamar server between 24hours and 48 hours ago.
• A red x icon indicates that more than 48 hours have elapsedsince a checkpoint has successfully completed on this Avamarserver.
Last Validated Checkpoint Specifies the amount of time since the last checkpoint validationoccurred:
• A green check mark indicates that a checkpoint validation hassuccessfully completed on this Avamar server within the past48 hours.
• A yellow caution icon indicates that a checkpoint validation hassuccessfully completed on this Avamar server between 48hours and 72 hours ago.
• A red x icon indicates that more than 72 hours have elapsedsince a checkpoint validation successfully completed on thisAvamar server.
Last Garbage Collection Specifies the amount of time since the last garbage collectionoccurred:
• A green check mark indicates that garbage collection hassuccessfully completed on this Avamar server within the past30 hours.
36 Avamar Administrator

Table 7. System State fields on the Avamar Administrator dashboard (continued)
Field Description
• A yellow caution icon indicates that garbage collection has notsuccessfully completed on this Avamar server within the past30 hours.
• A red x icon indicates that garbage collection encountered anerror the last time it was run.
Data Domain System(s) State Summarizes the operational state of all Data Domain systems thathave been added to this Avamar server:
• A green check mark indicates that all Data Domain systems arefully operational.
• A yellow caution icon indicates that there is one or more issueswith Data Domain systems that require attention. However,backups can continue.
• A red x icon indicates that there is one or more problems withData Domain systems that require immediate attention.Backups cannot occur until all problems are resolved.
Scheduler StateThe Scheduler State field indicates whether scheduled activities are running or suspended. Scheduled activities include backups, emailnotifications, and replications. If scheduled activities are running, then the activities occur at the scheduled time. If scheduled activities aresuspended, then the activities do not occur until you resume the activities.
To suspend or resume scheduled activities, click Suspend or Resume.
Maintenance Activities StateThe Maintenance Activities State field indicates whether maintenance activities are running or suspended. Maintenance activitiesinclude checkpoints, checkpoint validation, and garbage collection. If maintenance activities are running, then the activities occur at thescheduled time. If maintenance activities are suspended, then the activities do not occur until you resume the activities from the Serverwindow.
License ExpirationThe License Expiration field lists the calendar date on which the license for the Avamar server expires.
Activities panelThe Activities panel in the Avamar Administrator dashboard provides status and detailed information for backup and replication jobs.
Backup JobsThe main status icon for backup jobs in the Activities panel indicates whether scheduled backups occur at the scheduled time or if thereis a problem that is preventing scheduled backups from occurring.
To display detailed status information, click the arrow button next to the Backup Jobs field. The following table provides details on thestatus information available for backup jobs.
Table 8. Backup job fields in the Avamar Administrator dashboard
Field Description
Scheduler State Specifies whether the scheduler for activities such as backups,email notifications, and replications is running or suspended.
Dispatcher State Specifies whether the dispatcher is running or suspended. If thedispatcher is suspended, then the Avamar server has reached thehealth check limit and no backups can occur. Capacity limits andthresholds on page 186 provides details.
Avamar Administrator 37

Table 8. Backup job fields in the Avamar Administrator dashboard (continued)
Field Description
Backup Groups Enabled Specifies the number of backup groups that are enabled. To openthe Policy window and manage groups, click the window icon tothe right of the field.
You can also view the total number of backup jobs that:
• Are pending.• Are currently running.• Failed within the specified period.• Succeeded with exceptions within the specified period.• Succeeded within the specified period.
To control the period for the results of completed backups, select a value from the Period list.
To view detailed information for a backup job in the Activity Monitor, click a numeric button.
Replication JobsThe main status icon for replication jobs in the Activities panel indicates whether replication jobs occur:
• A green check mark icon indicates that scheduled replication jobs occur at the scheduled time.• A yellow caution icon indicates that one or more replication groups are disabled.• A red x icon indicates that scheduled replication jobs are blocked. The block might be due to the scheduler being in a suspended state,
all replication groups being disabled, or some other issue with the system.
To configure replication groups in the Replication window, click the window icon to the right of the icon.
You can also view the total number of replication jobs that:
• Are pending.• Are currently running.• Failed within the specified period.• Succeeded with exceptions within the specified period.• Succeeded within the specified period.
To control the period for the results of completed replication jobs, select a value from the Period list.
To view detailed information for a replication job in the Replication Report, click a numeric button.
Capacity panelThe Capacity panel on the Avamar Administrator dashboard provides system capacity usage information for the Avamar server and anyData Domain systems that have been added.
Avamar server capacity informationThe capacity usage of the Avamar server is shown as a vertical bar with color indicators for usage levels that are based on the percentageof total capacity. A text field lists the percentage of used capacity.
If the Avamar system configuration includes a Data Domain system, then Avamar server capacity calculations include metadata usage forthe Data Domain system.
Click the link on the Avamar server name to view detailed system information in the Server Monitor, including Data Domain metadatautilization, if applicable.
Data Domain system capacity informationEach configured Data Domain system is listed separately in the Capacity panel.
The capacity usage of the Data Domain system is shown as a vertical bar with color indicators for usage levels that are based on thepercentage of total capacity.
Text fields list the total capacity of the Data Domain system in gibibytes (GiB), the amount of used capacity as a percentage and value inGiB, and the total amount of available capacity in GiB.
38 Avamar Administrator

To view the Data Domain Enterprise Manager web page for that system, click the link on the Data Domain system name.
Critical Events panelThe Critical Events panel in the Avamar Administrator dashboard shows the number of unacknowledged serious system errors andwarnings that have occurred, as well as certain defined system alerts.
To clear these serious system errors and warnings (that is, reset the count to zero), you must explicitly acknowledge them.Acknowledging system events on page 171 provides details.
The following table lists the system alerts that may appear in the Critical Events panel.
Table 9. System alerts in the Critical Events panel
Type of alert Description
HFS check failures If the last checkpoint validation failed, then a data integrity alert isgenerated. Investigate and address the issue as soon as possible.Creating a checkpoint on page 140 provides more information.
Capacity warnings These alerts warn that the system is approaching critical systemstorage capacity usage thresholds.
Capacity usage warnings These alerts warn that the system is approaching critical systemstorage capacity forecasting thresholds.
Avamar Administrator user interface elementsAll of the primary windows in the Avamar Administrator user interface share several elements and functionality in common, including thestatus bar, navigation tree features, and mouse shortcuts.
Status barThe status bar at the bottom of each Avamar Administrator persistent window conveys status information and provides a single-clickshortcut to specific features and functions.
Figure 6. Avamar Administrator status bar
Launcher shortcutsThe shortcut icons on the left side of the status bar provide shortcuts to the six main Avamar Administrator windows.
The following table lists the shortcut icons that are available on the status bar.
Table 10. Launcher shortcut icons on the status bar
Button Window Available tasks in the window
Policy Policy Create and manage groups, datasets, schedules, andretention policies.
Backup & Restore Backup, Restore, and Manage Perform on-demand backups and restore, and managecompleted backups.
Data Movement Policy Data Movement Policy Configure policy-based replication and cloud tier.
Activity Activity Monitor backup, restore, backup validation, andreplication activity.
Administration Administration Create and manage domains, clients, users, systemevents, and services.
Server Server Monitor server activity and client sessions.
Avamar Administrator 39

Status messagesThe right side of the status bar shows status messages for scheduler and backup dispatching, unacknowledged events, and the Avamarserver and Data Domain systems.
Scheduler and backup dispatching status
The scheduler controls whether scheduled backups occur. The backup dispatching status indicates whether backups can occur based onwhether the health check limit has been reached. The following table lists the available status messages.
Table 11. Scheduler and backup dispatching status messages
Status message Description
Sch/Disp: Running/Running Backups occur at the scheduled time. Scheduled backups areenabled, and the health check limit has not been reached.
Sch/Disp: Running/Suspended Although scheduled backups are enabled, backups do not occur atthe scheduled time because the health check limit has beenreached. Resolve the system capacity issues and acknowledge thesystem event to resume backups. Capacity Management on page186 and Acknowledging system events on page 171 providedetails.
Sch/Disp: Suspended/Running Although the health check limit has not been reached, backups donot occur at the scheduled time because scheduled backups aredisabled. Backups can resume when you resume scheduledoperations.
Sch/Disp: Suspended/Suspended Backups do not occur at the scheduled time because scheduledbackups are disabled and the health check limit has been reached.Suspending and resuming scheduled operations on page134Suspending and resuming scheduled operations on page 134provides details on reenabling the scheduler. CapacityManagement on page 186 and Acknowledging system events onpage 171 provide details on resolving the system capacity issuesand acknowledging system events to resume scheduled backups.
Unacknowledged events
Certain system events to require acknowledgement by an Avamar server administrator each time they occur. The following table lists theavailable status messages.
Table 12. Status messages for unacknowledged events
Status message Description
Have Unacknowledged Events There are entries in the unacknowledged events list that anAvamar server administrator must explicitly acknowledge. Click theUnacknowledged Events status icon or text label to show theAdministration window Unacknowledged Events pane (tab).Acknowledging system events on page 171 provides details.
No Unacknowledged Events There are no entries in the unacknowledged events list.
Avamar server and Data Domain system status
This icon lists the operational status of either the Avamar server or any configured Data Domain systems. The following table lists theavailable status messages.
Table 13. Operational status messages for Avamaror Data Domain
Status message Description
Server: Full Access Normal operational state for an Avamar server. All operations areallowed.
40 Avamar Administrator

Table 13. Operational status messages for Avamaror Data Domain (continued)
Status message Description
Server: Admin The Avamar server is in an administrative state in which theAvamar server and root user can read and write data. Other usersare only allowed to read data.
Server: Admin Only The Avamar server is in an administrative state in which theAvamar server or root user can read or write data. Other users arenot allowed access.
Server: Admin Read Only The Avamar server is in an administrative read-only state in whichthe Avamar server or root user can read data. Other users are notallowed access.
Server: Degraded The Avamar server has experienced a disk failure on one or morenodes. All operations are allowed, but immediate action should betaken to fix the problem.
Server: Inactive Avamar Administrator was unable to communicate with theAvamar server.
Server: Node Offline One or more Avamar server nodes are in an offline state.
Server: Read Only The Avamar server is in a read-only administrative state in which allusers can read data, but writing data is not allowed.
Server: Suspended Avamar Administrator can communicate with the Avamar server,but normal operations have been temporarily suspended.
Server: Synchronizing The Avamar server is in a transitional state. It is normal for theserver to be in this state during startup and for short periods oftime during maintenance operations.
Server: Unknown State Avamar Administrator could not determine the Avamar serverstate.
Data Domain System Unresponsive Avamar can connect to a Data Domain system, but there is aproblem with the connection.
DD System: Inactive Avamar cannot connect to a Data Domain system.
To suspend or resume Avamar server activities, click the Server status icon or text label to display the Avamar Server window SessionMonitor tab. From there, select Actions > Resume Backups/Restores or Actions > Suspend Backups/Restores to resume orsuspend server activities, respectively.
To view additional details about Data Domain system status, open the Server window by clicking Navigation > Server. Select theServer Management tab, and then select the Data Domain system in the tree. The Monitoring Status of the Data Domain systemappears in the right pane. The Avamar and Data Domain System Integration Guide provides details on the available detailed statusmessages.
Avamar Administrator 41

Navigation tree featuresThe navigation trees in the Administration, Backup, Restore and Manage, and Data Movement Policy windows provide severalcontrols to facilitate the location of one or more clients.
Figure 7. Navigation tree features
The upper pane shows the Avamar server domain structure. The lower pane shows contents of any domain that is selected in the upperpane. You can click the split pane icon to the left of the filter field between the two panes to split the two panes vertically instead ofhorizontally.
To show all clients in subfolders, click the double folder icon to the left of the filter field.
Type one or more characters in the filter field to filter the list to have only clients with names that contain those characters.
Mouse shortcutsThe Avamar Administrator user interface supports context-sensitive left-click, right-click, and double-click shortcuts.
Right-clickAll GUI elements that can enable features or functions when clicked, have right-click support added to them. However, when the GUIelement only acts as a navigation mechanism, there is no right-click support. For example, the Policy window client tree has a right-clickshortcut menu because specific features and functions become available based on which node of the tree is selected.
Double-clickFor all tables where properties or edit dialog boxes can be invoked, double-click any row of the table to display the properties or edit dialogbox. Additionally, when lists are used, double-click an element in the list to display the edit dialog box.
Column heading sortClick a table column heading to sort that column. For example, double-click the Activity Monitor State column to sort the ActivityMonitor by the state of each backup.
Press Shift and then click any table column heading to reverse sort the values in a table column.
42 Avamar Administrator

Avamar Web User Interface
Topics:
• Overview of the AUI• Access the AUI• AUI navigation pane• Basic management tasks• Navigation tree features• AUI dashboard• AUI Activity Monitor
Overview of the AUIThe Avamar Web User Interface is a web management application that is used to administer an Avamar server.
You can use the AUI to monitor and configure the Avamar server. Use the AUI to monitor backups, restore operations, and systemmaintenance activities, and to configure backup policies, manage clients and user accounts, and configure other system settings.
You can administer one Avamar server at a time from the AUI.
The AUI dashboard appears when you log in to Avamar. The dashboard provides an at-a-glance view of Avamar system status. Anavigation pane provides access to all functionality.
NOTE: The Avamar AUI is only supported in stand-alone environments.
Access the AUIAccess the Avamar Web User Interface through a web browser.
Steps
1. Open a web browser and type the following URL:
https://Avamar_server/auiWhere Avamar_server is the DNS name or IP address of the Avamar server.
NOTE: If the environment does not meet HTTPS certificate validation requirements, the certificate validation fails
and an error message is displayed asking if you want to continue to download packages. Ignoring certificate
validation might cause security issues.
2. In the Avamar Username field, type a username with root or administrator privileges.3. In the Avamar Password field, type the password for the root or administrator user.4. In the Avamar Domain field, type the Avamar domain to log in to:
• The root domain, in which the default should be used for entry of a single slash (/) character.• A specific domain or subdomain, in which the domain path should be typed by using the syntax /domain/subdomain1/
subdomain2.
5. Click Log In.The AUI dashboard is displayed.
6. To open the navigation pane from anywhere in the UI, click .The navigation pane opens and displays the available menu items.
3
Avamar Web User Interface 43

AUI navigation paneUse the left navigation pane to quickly browse to different panes in the UI. The navigation pane provides links that open other panes toperform tasks in the Avamar Web User Interface.
To open the navigation pane from anywhere in the UI, click . The navigation pane opens and displays the available menu items, as shownin the following illustration.
Figure 8. AUI navigation pane
To browse to another location in the UI, click a link in the navigation pane. This action opens the menu item in the main window.
The links provide access to the following features in the AUI:
Table 14. AUI navigation pane
Navigation link Icon Available features
Dashboard Provides an at-a-glance view of Avamar system status.
Asset Management Provides the ability to manage Avamar domains and client-related operations:
• Create, edit, delete, and refresh Avamar domains.• Add, edit, delete, and sync clients on the Avamar server.• Backup and restore clients.
Backup Policy Automates backups and enforces consistent rules and system behavior across anentire segment, or group of the user community. The dataset, schedule, andretention policy comprise the backup policy. The backup policy controls backupbehavior of all members of the backup policy.
Advanced Policy Manages Cloud DR-enabled backups and application consistent SQL virtualmachine backups, including automatic SQL discovery, automatic backup groupmanagement, and auto client SQL plugin installation and registration.
Replication Policy Copies client backups from the source Avamar system to an alternatedestination. Replicating backups to an alternate destination protects against dataloss if the source Avamar system fails.
Cloud Tier Policy Moves Avamar backups from Data Domain to the cloud and performs seamlessrecovery of these backups.
44 Avamar Web User Interface

Table 14. AUI navigation pane (continued)
Navigation link Icon Available features
Settings Assists administrators with adding accounts to the system, and creating andmanaging schedules, datasets, retention policies, and rules.
Proxy Management Assists administrators with deploying and managing Avamar proxies by offering arecommendation as to the number of proxies that should be deployed in eachvCenter, and a recommended ESX host location for each proxy.
System Assists administrators with configuring vCenter-to-Avamar authentication,registering the Avamar Plug-in for vSphere Web Client, and adding a DataDomain system to Avamar.
Activity Provides status and detailed information for backup and replication jobs.
Event Monitors operational status and server activity. Examples of Avamar eventsinclude client registration and activation, successful and failed backups, and harddisk status.
Basic management tasksLog out of the Avamar Web User Interface, access the online help, view product information, and suspend or run scheduled activities.
Steps
1. To log out of the AUI:
a. In the AUI header pane, click .
A confirmation message is displayed.
b. Click YES.You are logged out of the AUI.
2. To access the AUI online help:
a. In the AUI header pane, click .b. Click Help.
3. To view version and build details:
a. In the AUI header pane, click .b. Click About.
4. To suspend or run scheduled activities:
a. In the AUI header pane, click .b. Toggle the Scheduler State switch.
The Scheduler State indicates whether scheduled activities are running or suspended. Scheduled activities include backups, emailnotifications, and replications. If scheduled activities are running, then the activities occur at the scheduled time. If scheduledactivities are suspended, then the activities do not occur until you resume the activities.
Navigation tree featuresNavigation trees on the Asset Management, Backup Policy, Advanced Policy, and Setting windows provide controls to facilitate thelocation of one or more clients.
The Domain pane shows the Avamar server domain structure.
To display all clients in subfolders, in the navigation tree, expand the domain folder by clicking .
Avamar Web User Interface 45

AUI dashboardThe Avamar Web User Interface dashboard provides an at-a-glance view of Avamar system status.
The dashboard appears when you log in to the AUI and is divided into sections with each section displaying summary information.
The following figure illustrates the Dashboard view.
Figure 9. AUI dashboard
The following information is available in the AUI dashboard:
• Integrated and unprotected assets on the Avamar server.• System capacity usage for the Avamar server and Data Domain systems• Events• Client information• Backup activity status• Replication activity status
Monitoring assets in the dashboardThe Assets | Overview panel indicates the number of integrated and unprotected assets on the Avamar server.
• Integrated indicates the number of clients that are integrated into the Avamar server.• Unprotected indicates the number of clients that do not have any backups.
NOTE: When you run a backup job for a client, the Avamar server updates this value.
You can manage assets from the AUI by selecting Asset Management in the navigation pane.
View integrated clientsThe Assets | Overview panel on the AUI dashboard displays the number of clients that are integrated into the Avamar server.
Steps
1. To view information about integrated clients, click the icon next to Integrated.The Asset Management pane appears.
2. In the domain tree, select a domain or subdomain.The list of clients in the middle pane indicates client information including status.
46 Avamar Web User Interface

Results
The top part of the Asset Management pane displays information about the client domain, such as:
Icon Description
Clients
Indicates the number of clients within the domain.
Activities
Indicates the number of activities (backup and replication jobs) that have been initiated by clients within the domain.
Policies
Indicates the number of policies that apply to the clients within the domain.
View unprotected clientsThe Assets | Overview panel on the AUI dashboard displays the number of unprotected clients that do not have any backups.
Steps
1. To view information about unprotected clients, click the icon next to Unprotected.The Clients with no backups window appears and displays summary information for each client.
2. Review the client properties:
Property Description
Name Descriptive client name.
Domain The Avamar domain for the client.
Enabled Whether Avamar can perform backups for the client. Regardless of this setting, the client can restore files as long as aprevious backup exists in the system.
Activated Whether the client is activated with the Avamar server.
Client type The type of client (for example, regular, virtual machine, Image Proxy, or VMware vCenter).
Monitoring system capacity in the dashboardThe Capacity | Overview panel provides system capacity usage information for the Avamar server and any Data Domain systems thathave been added.
Avamar server capacity informationThe Capacity | Overview panel indicates the amount of available storage and used storage for the Avamar server in Gigabytes (GB).Additionally, a horizontal bar indicates the percentage of total storage used.
If the Avamar system configuration includes a Data Domain system, then Avamar server capacity calculations include metadata usage forthe Data Domain system.
Data Domain system capacity informationEach configured Data Domain system is listed separately in the Capacity | Overview panel.
The Capacity | Overview panel indicates the amount of available storage and used storage for the Data Domain system in GB.Additionally, a horizontal bar indicates the percentage of total storage used.
Avamar Web User Interface 47

Viewing events in the dashboardThe Events | All panel displays the unacknowledged serious system errors and warnings that have occurred, as well as certain definedsystem alerts.
The events appear in the list with the name, and the date and time that they occurred.
To filter events by severity, click one of the following options:
• Critical• Error• Warning
The Event Management pane appears and filters the results based on the chosen severity.
To display all events, click View More. The Event Management pane appears with a list of all events.
To clear these serious system errors and warnings (that is, reset the count to zero), you must explicitly acknowledge them. You canacknowledge an event from the Event Management pane.
The following table lists the system alerts that may appear in the Events | All panel.
Table 15. System alerts
Type of alert Description
HFS check failures If the last checkpoint validation failed, then a data integrity alert isgenerated. Investigate and address the issue as soon as possible.
Capacity warnings These alerts warn that the system is approaching critical systemstorage capacity usage thresholds.
Capacity usage warnings These alerts warn that the system is approaching critical systemstorage capacity forecasting thresholds.
Monitoring backup jobs in the dashboardA backup job is an on-demand backup or a backup that has been scheduled to run on an ongoing basis. A backup policy can be configuredfrom the Avamar Web User Interface by selecting Backup Policy in the navigation pane.
The Activities | Backup panel indicates whether scheduled backups occur at the scheduled time or if there is a problem that ispreventing backups from occurring:
• Blue indicates backup jobs that have completed successfully.• Green indicates scheduled backup jobs that are in progress.• Yellow indicates backup jobs that are scheduled but have not yet started.• Red indicates backup jobs that did not complete successfully or completed with errors.
NOTE: Only the backups within the past 24 hours appear in the Activities | Backup panel. If you restart the Avamar
Management Console Server (MCS), this value is reset.
Monitoring replication jobs in the dashboardA replication job copies a client backup from a source Avamar system to another target destination, for example, a Data Domain system.The purpose of replication is to protect against data loss if the source Avamar server fails. Replication jobs are configured from theAvamar Web User Interface by selecting Replication Policy in the navigation pane.
The Activities | Replication panel indicates the current backup status of groups that are configured with replication:
• Blue indicates replication jobs that have completed successfully.• Green indicates scheduled replication jobs that are in progress.• Yellow indicates replication jobs that are scheduled but have not yet started.• Red indicates replication jobs that did not complete successfully or completed with errors.
NOTE: Only the replication jobs within the past 24 hours appear in the Activities | Replication panel. If you restart the
Avamar Management Console Server (MCS), this value is reset.
48 Avamar Web User Interface
Viewing client informationThe Client | Information panel displays Avamar client details, such as the plug-in type, total client count, and total protected Gigabytes(GB).
• Plug-in type indicates the top 10 most frequent plug-ins that clients use• Total client count indicates the number of clients that use a specific plug-in• Total protected GB indicates the total amount of data in GB that the system protects for each client
The Avamar server updates this data once per day.
NOTE: To view Avamar client details, ensure that you run the scheduler service:
1. In the AUI header pane, click .
2. Toggle the Scheduler State switch to Running.
AUI Activity MonitorThe Activity Monitor in the Avamar Web User Interface enables you to monitor backup, restore, backup validation, and replicationactivity. To perform analysis or troubleshooting, you can view a detailed log of a client session.
To access the Activity Monitor, open the navigation pane, and then click Activity. The Activity Monitor appears with a list of allactivities.
NOTE: The AUI Activity Monitor window has been optimized for at least 1366 pixels-wide screens. Display issues might
occur for smaller screens. To properly display the AUI, ensure that your display is at least 1366 pixels wide.
The Activity Monitor provides you with options to filter the information that appears:
• Filter activities by duration—By default, the Activity Monitor displays the most recent 5,000 client activities. To select a differentduration, in the Filter activities by duration drop-down list, select Last 24 hours or Last 72 hours.
• Filter activities by domain—By default, the Activity Monitor displays all activities regardless of domain. To display only the activitiesfor a specific domain, in the Filter activities by domain drop-down list, select a domain or subdomain.
• Filter activities by status—By default, the Activity Monitor displays all activities regardless of status.
To display only activities with a specific status, at the top of the Activity Monitor, select one of the following options:
○ Canceled○ Completed○ Completed with Exceptions○ Failed○ Running○ Waiting
To filter activities by client, start time, plug-in, or type, click in their respective column.
The Activity Monitor displays the date and time that an activity began, and the total number of bytes examined during an activity.
To view activity details, expand the Details pane, by clicking .
Activity Monitor detailsThe following tables provide details on the information that is available in the Avamar Web User Interface Activity Monitor.
Table 16. Session details available in the Activity Monitor
Field Description
Status Status of the backup, restore, or validation activity.
Error Code If the activity did not successfully complete, a numeric error codeappears. To view a detailed explanation, double-click the errorcode.
Avamar Web User Interface 49

Table 16. Session details available in the Activity Monitor (continued)
Field Description
Start Time Date and time that this activity began, adjusted for the prevailingtime zone, which is shown in parentheses. Daylight Savings Time(DST) transitions are automatically compensated.
Elapsed Time Elapsed time for this activity.
End Time Date and time that this activity completed, adjusted for theprevailing time zone, which is shown in parentheses. DaylightSavings Time (DST) transitions are automatically compensated.
Type Type of activity. The Avamar Administrator online help providesdetails on each type.
Server Server on which the activity occurred, either the Avamar server ora Data Domain system.
Progress Bytes Total number of bytes examined during this activity.
New Bytes Percentage of new bytes backed up to either the Avamar server ora Data Domain system. Low numbers indicate high levels of datadeduplication.
Table 17. Client details available in the Activity Monitor
Field Description
ID The unique identifier for the Avamar client.
Client Avamar client name.
Domain Full location of the client in the Avamar server.
OS Client operating system.
Client Release Avamar client software version. If this activity is a VMware imagebackup or restore, then this value is the Avamar client softwareversion running on the image proxy client.
Proxy If this activity is a VMware image backup or restore, then this valueis the name of the proxy client performing the backup or restoreon behalf of the virtual machine. Blank for all other activities.
Table 18. Policy details available in the Activity Monitor
Field Description
Sched. Start Time Date and time that this activity was scheduled to begin.
Sched. End Time Date and time that this activity was scheduled to end.
Elapsed Wait Total amount of time that this activity spent in the activity queue.That is, the scheduled start time minus the actual start time.
Policy Group that started this activity. One of the following values:
• If the activity was a scheduled backup, the group that thisclient was a member of when this scheduled activity started.
• On-demand is shown for other backup, restore, and validationactivities.
• If the activity was a scheduled replication, then this value is thereplication group.
• Admin On-Demand Group is shown for-demand replicationactivities.
Plug-in Plug-in that is used for this activity.
50 Avamar Web User Interface

Table 18. Policy details available in the Activity Monitor (continued)
Field Description
Retention Retention types that are assigned to this backup. One or more ofthe following values:
• D—Daily• W—Weekly• M—Monthly• Y—Yearly• N—No specific retention type
Schedule If the activity was a scheduled backup, the schedule that beganthis activity. On-Demand or End User Request is shown for allother activities that are started from Avamar Administrator or theclient, respectively.
Dataset Name of the dataset that is used to create the backup. If theactivity is a replication job, this column lists the source systemname on the destination system, and the destination name on thesource system.
WID Work order ID. Unique identifier for this activity.
Monitor backupsYou can monitor backups to ensure a successful completion of restores and troubleshooting of issues. The Activity Monitor in theAvamar Web User Interface enables you to view status information for backups.
Steps
1. In the AUI navigation pane on the left, click , and then click Activity.The Activity Monitor appears with a list of all activities.
2. To filter the results to display only backup activity:
a. Click next to the Type column.b. Type On-Demand Backup.
c. Press Enter.
Cancel backupsYou can cancel a backup any time before it completes. The cancellation might take 5 minutes or longer. The backup might completebefore the cancellation finishes.
Steps
1. In the AUI navigation pane on the left, click , and then click Activity.The Activity Monitor appears with a list of activities.
2. Select the backup from the list.3. Click CANCEL.
A confirmation dialog box is displayed.4. Click YES.
Restart a backup jobYou can restart a completed or failed backup job in the Activity Monitor of the Avamar Web User Interface.
Steps
1. In the AUI navigation pane on the left, click , and then click Activity.The Activity Monitor appears with a list of all activities.
Avamar Web User Interface 51

2. Select a backup job in the list, and then click RESTART.A confirmation dialog box appears.
3. Click YES.
View a detailed client session logThe Activity Monitor in the Avamar Web User Interface enables you to view a detailed log of a client session to perform analysis ortroubleshooting.
Steps
1. In the AUI navigation pane on the left, click , and then click Activity.
The Activity Monitor appears and displays a list of all activities.
2. Select an activity from the list, and then click VIEW LOGS.
The Log details window appears. By default, the Activity Monitor displays a detailed log of all client backup activity for the past 72hours.
3. To filter the content based on a search string, in the search field, type the string.4. To download the log file, click Download.
Monitor restoresYou can monitor and view status information for backup and restore operations in the Activity Monitor.
About this task
To access the Activity Monitor, open the navigation pane, and then click Activity. The Activity Monitor appears with a list of allactivities.
NOTE: The AUI Activity Monitor window has been optimized for at least 1366 pixels-wide screens. Display issues might
occur for smaller screens. To properly display the AUI, ensure that your display is at least 1366 pixels wide.
The Activity Monitor provides you with options to filter the information that appears:
• Filter activities by duration—By default, the Activity Monitor displays the most recent 5,000 client activities. To select a differentduration, in the Filter activities by duration drop-down list, select Last 24 hours or Last 72 hours.
• Filter activities by domain—By default, the Activity Monitor displays all activities regardless of domain. To display only the activitiesfor a specific domain, in the Filter activities by domain drop-down list, select a domain or subdomain.
• Filter activities by status—By default, the Activity Monitor displays all activities regardless of status.
To display only activities with a specific status, at the top of the Activity Monitor, select one of the following options:
○ Canceled○ Completed○ Completed with Exceptions○ Failed○ Running○ Waiting
To filter activities by client, start time, plug-in, or type, click in their respective column.
The Activity Monitor displays the date and time that an activity began, and the total number of bytes examined during an activity.
To view activity details, expand the Details pane, by clicking .
52 Avamar Web User Interface

Cancel restoresYou can cancel a restore any time before it completes. The cancellation might take 5 minutes or longer. The restore might completebefore the cancellation finishes.
Steps
1. In the AUI navigation pane on the left, click , and then click Activity.The Activity Monitor appears with a list of activities.
2. Select the restore from the list.3. Click CANCEL.
A confirmation dialog box is displayed.
4. Click YES.
Monitor replication in the AUIThe Activity window in the AUI enables you to view status information for both on-demand and scheduled replication activity.
Steps
1. In the AUI navigation pane on the left, click , and then go to Monitor > Activity.The Activity Monitor appears and displays a list of all activities. Replication jobs indicate Replication Source in the Type column.Additionally, you can filter the view to display only replication jobs.
2. To filter the results to display only replication activity:
a. Click next to the Type column.b. Type Replication Source.
Cancel a replication taskYou can cancel a policy-based replication task in the Activity Monitor any time before it completes. The cancellation might take 5 minutesor longer. The replication may complete before the cancellation finishes.
Steps
1. In the AUI navigation pane on the left, click , and then click Activity.The Activity Monitor appears with a list of activities.
2. Select the replication task from the list.3. Click CANCEL.
A confirmation dialog box appears.4. Click YES.
Avamar Web User Interface 53

Client Management
Topics:
• Overview of Avamar clients• Client domains• Client registration• Activating a client• Client paging• Editing client information• Viewing client properties• Enabling and disabling a client• Moving a client to a new domain• Retiring a client• Deleting a client• View integrated clients• View unprotected clients
Overview of Avamar clientsAvamar clients are networked computers or workstations that access the Avamar server over a network connection.
You can organize and segregate clients by using Avamar domains. Domains provide enhanced security by enabling you to defineadministrative user accounts on a domain-by-domain basis.
Before Avamar can back up or restore data on a client, you must add, or register, the client with the Avamar server, and then activate theclient.
To provide maximum flexibility in deploying Avamar clients, registration and activation are separate events that occur asynchronously.Although they often occur at nearly the same time, they can also occur hours, days, or even weeks apart.
In Avamar Administrator, the client name must always be the client’s hostname. If the client name should be changed in AvamarAdministrator because the hostname changed, shut down the Avamar software on the client computer. Change the client name by editingthe client information, then restart the Avamar client software. This method is the only way to ensure that the client maintains itsregistration with the Management Console Server (MCS) database, which ensures that past backups continue to be associated with theclient.
Client domainsAvamar client domains are distinct zones to organize and segregate clients in the Avamar server. The server provides enhanced securityby enabling you to define administrative user accounts on a domain-by-domain basis.
Avamar client domains are completely internal to the Avamar server and have nothing to do with Internet domains.
Nested structureYou can nest domains to create a rich tree structure. Consider the following example domain.
4
54 Client Management

Figure 10. Avamar domain example
The root domain, avamar-1.example.com, contains three departmental domains: Accounting, Engineering, and Operations. TheOperations domain contains Maintenance and Shipping subdomains.
There is no functional difference between domains and subdomains. Subdomain is merely a term that refers to any domain nested withinanother higher level domain.
Hierarchical managementThe real power of domains is to add administrators to a specific level on the client tree. These domain-level administrators can thenmanage the clients and policies within that domain.
For example, if you add an administrative user to the root domain, then that user can administer clients and policies anywhere in thesystem. However, if you add an administrative user to a domain, then that user can only administer clients and policies in that domain andits subdomains.
The procedures in this guide assume that you are logged in to the root domain. If you log in to a lower-level domain, you may not haveaccess to specific clients, datasets, groups, and event management features outside that domain.
Special domainsYou cannot delete the MC_RETIRED and REPLICATE domains.
The MC_RETIRED domain contains clients that have been retired. Its primary purpose is to facilitate restores from retired client backups.
The REPLICATE domain contains replicated data from other servers.
Create a domain
Steps
1. In the AUI navigation pane on the left, click , and then click Asset Management.2. In the Asset Management pane, perform the following steps:
a. In the hierarchical Domain tree, select a location in the tree where you would like to create a domain.
b. Click .
The Create domain dialog box is displayed.
3. In the Name field, type the name of the domain.
Domain names must be 63 characters or fewer, and must not use any of the following characters: =~!@$^%(){}[]|,`;#\/:*?<>'"&.
Client Management 55

4. (Optional) Type the name, telephone number, email address, and location for a contact for the domain in the remaining fields.5. Click OK.
A confirmation message is displayed.
Edit domain informationYou can edit contact and location information for a domain.
Steps
1. In the AUI navigation pane on the left, click , and then click Asset Management.2. In the hierarchical Domain tree, select the domain3. To edit the domain information, perform either of the following steps:
• Click the overflow menu ( ), and then select Edit Domain.• In the DOMAIN ACTIONS pane, select Edit Domain.
The Edit Domain dialog box is displayed.4. Edit the domain contact information.5. Click OK.
Delete a domainWhen you delete a domain, the process also deletes any clients in the domain. To preserve the clients in the system, move the clients to anew domain before you delete the domain.
About this task
If you use directory service authentication, Avamar removes the LDAP maps that use that domain for access. The associated directoryservice groups are otherwise unaffected by the deletion.
Steps
1. In the AUI navigation pane on the left, click , and then click Asset Management.2. In the hierarchical Domain tree, select the domain that you would like to delete.3. To delete the domain, perform either of the following steps:
• Click the overflow menu ( ), and then select Delete Domain.• In the DOMAIN ACTIONS pane, select Delete Domain.
The Delete Domain dialog box is displayed.4. Click Yes.
Client registrationClient registration is the process of establishing an identity with the Avamar server. Once Avamar “knows” the client, it assigns a uniqueclient ID (CID), which it passes back to the client during activation.
There are three ways to register a client:
• Client-side registration• Interactive server-side registration by using Avamar Administrator• Batch client registration
NOTE: When registering a client to another server, unregister the client from the original server before registering it
with another server.
Client-side registrationThe client-side registration process depends on the operating system.
The Avamar Backup Clients User Guide describes client-side registration for each supported operating system.
56 Client Management

Client-side registration also activates the client at the same time. However, the client is automatically added to the Default Group andmust use the default dataset, schedule, and retention policy. As a result, this method may not provide enough control for some sites.
Register or add a clientYou can use the AUI to add a client to the system in a domain and policy. This action provides a high degree of control. For example, youcan assign a specific dataset, schedule, and retention policy. However, it can be time consuming to add many clients.
About this task
Client registration is the process of establishing an identity with the Avamar server. Once Avamar “knows” the client, it assigns a uniqueclient ID (CID), which it passes back to the client during activation.
Once the client is added and registered, you can add a client to the system in a domain and policy. This action provides a high degree ofcontrol. For example, you can assign a specific dataset, then schedule, and retention policy. However, it can be time consuming to addmany clients.
Steps
1. In the AUI navigation pane on the left, click , and then click Asset Management.2. In the domain tree, select a domain or a subdomain for the client.3. Click ADD CLIENT.
NOTE: The Avamar for VMware User Guide provides information about VMware vCenter, Image Proxy, and virtual
machine client types.
The New Client pane is displayed.4. In the New Client Name field, type the name of the account and then click NEXT.
The Optional Information pane is displayed.5. Optional, compete the optional contact information including the contact name, phone number, email, and location, and then click
NEXT.The Summary pane is displayed.
6. Review the client summary information, and then click ADD.The Finish pane is displayed.
7. Click OK.
Batch client registrationTo support large sites with many clients, the batch client registration feature enables you to define multiple clients in a single clientdefinition file. The file is then validated and imported into the Avamar server.
Batch client registration at large sites provides nearly as much control as interactively adding the client using the Avamar Administrator orthe AUI which is also much faster.
Clients definition filesAvamar supports Extensible Markup Language (XML) and comma-separated values (CSV) formats for the clients definition file for batchclient registration.
XML format
XML clients definition files must have an .xml extension and conform to the following structure and format:
<?xml version="1.0" encoding="UTF-8" ?> <registration_stream> <registrants> <entry host_name="MyClient.Example.com" mcs_domain="clients" mcs_group="MyGroup" dataset="MyDataset" retention_policy="MyRetentionPolicy" contact_address="192.168.31.5" contact_port="28002"
Client Management 57

access_list="user1@avamar:password, user2@LDAP" encryption="high" encryption_override="false" /> </registrants> </registration_stream>
NOTE: The clients definition file in this topic is for reference purposes only. Do not try to copy and paste this example
into a clients definitions file. Invisible formatting characters prevent you from successfully doing so.
Define each client by using a separate <entry> element. The following table describes the available attributes for each <entry>element.
Table 19. Attributes for each entry in a clients definition file
Attribute Description
host_name Network hostname or IP address for this client.
mcs_domain Optional Avamar domain for this client. Specifying a value for thisattribute overrides the default clients domain.
mcs_group Optional default group for this client. Specifying a value for thisattribute overrides assignment to the Default Group.
dataset Optional default dataset for this client to use during backups.Specifying a value for this attribute overrides the default datasetthat would normally be inherited from the group.
retention_policy Optional default backup retention policy for this client. Specifying avalue for this attribute overrides the default retention policy thatwould normally be inherited from the group.
contact_address Optional client IP address.
contact_port Set contact_port to 28002, the default Avamar data port.
access_list Optional list of users who can access the Avamar server from thisclient. The format is user@authentication:password.When you use the internal authentication system, the wordpassword must follow the colon. This step causes the system toprompt users for authentication when they access the system.When you use an external authentication system,omit :password. To define multiple users, separate each userentry with a comma (,) and enclose the entire list of users inquotation marks (" ").
encryption Encryption method for client/server data transfer:
• High• None
NOTE: The encryption technology and bit strength for aclient/server connection depends on several factors,including the client platform and Avamar server version.The Avamar Product Security Guide provides details.
encryption_override Optional encryptions override. If TRUE, then this client does notuse the group encryption method.
CSV format
CSV clients definition files use the same element and attribute names as the XML format. However, you must define each client on asingle line and separate each attribute value by a comma, as shown in the following example:
host_name,mcs_domain,mcs_group,dataset,retention_policy,contact_address,contact_port,access_list,encryption, encryption_override
58 Client Management

Validating and importing a clients definition file
Steps
1. In Avamar Administrator, click the Administration launcher link.The Administration window is displayed.
2. Click the Account Management tab.3. From the Actions menu, select Account Management > Import Clients from File.
The Validate dialog box appears.4. Browse to and select the saved clients definition file.5. Click Validate.
The Validation Results dialog box appears.6. If the clients definition file is error free, click Commit to import the client list. Or, of the clients definition file contains errors, correct
the errors, save the file again, and repeat the steps in this procedure.The Validation Results dialog box closes, and the new clients appear in the Account Management tree.
Activating a clientClient activation is the process of passing the client ID (CID) back to the client, where it is stored in a file on the client file system.
Prerequisites
• The client must be present on the network.• The Avamar client software must be installed and running on the client.• The Avamar server must be able to resolve the hostname that was used to register the client.
About this task
There are two ways to activate a client:
• Begin activation from the client. The Avamar Backup Clients User Guide describes this method.• Invite the client to activate with the server by using the AUI
NOTE: HP-UX, Linux, and Solaris clients can either be activated during installation or by using Avamar Administrator.
There is no client-side command to begin client activation on these computing platforms.
Steps
1. In the AUI navigation pane on the left, click , and then click Asset Management.2. In the domain tree, select the domain for the client.3. In the list of clients, select the client that you want to activate.
You can only view clients in the domain for the login account. To view all clients, log in to the root domain.
4. Click MORE ACTIONS > Invite Client.A status message indicates that the client was sent an invitation to activate with the server.
Reactivating a clientIn certain circumstance, such as client computer replacement, you may need to reactivate a client account with newly installed clientsoftware.
Steps
1. In the AUI navigation pane on the left, click , and then click Asset Management.2. In the domain tree, select the domain for the client.3. In the list of clients, select the client that you want to reactivate.
You can only view clients in the domain for the login account. To view all clients, log in to the root domain.
4. Click MORE ACTIONS > Edit Client.The Edit Client window is displayed.
5. Select the Activated check box.6. Click UPDATE.
Client Management 59

Next steps
After deactivating the client, follow instructions in the user guide for the specific plug-in to complete client registration. This proceduredeactivates the client so that it can be activated again.
Client pagingAvamar clients can be either pageable or non-pageable. If a client is pageable you can specify settings to control how the MCS determinesthe paging settings for the client. You may need to use workarounds for limitations that exist in environments with non-pageable clients.
Pageable clientsPageable clients have provided the Avamar server with a page address and port number, which enable performance of on-demandbackups and restores. Avamar Administrator can also browse the client file system during backups and restores in Avamar Administrator.
You can specify one of the following client paging settings to control how the MCS determines the paging settings for a client:
• Automatic — With the default setting of automatic paging, the MCS tries to automatically determine the paging settings for theclient. If the MCS receives updated paging information from the client, it automatically updates the settings.
• Manual — With manual paging, specify the IP address and data port number for client/MCS communications. You may want to usemanual paging when using Network Address Translation (NAT). With NAT, the MCS probably cannot automatically determine thecorrect client paging settings. In manual mode, the MCS never overwrites the IP address and port number settings for the client.
You can also disable automatic paging without specifying an IP address or data port number for client/MCS communications. Disablingautomatic paging might be useful to support clients that are off the network for extended periods of time, as can be the case with laptopcomputers. These clients must launch their own on-demand backups. For this reason, you should enable client paging whenever possible.
Non-pageable clientsA client is non-pageable when the Avamar Administrator server is not running on the Avamar server utility node or on a single-node servercannot establish a TCP/IP connection to port 28002 on the Avamar client.
When a client might be non-pageableA client might be non-pageable in the following situations:
• The environment (including the client) has firewall rules that prevent incoming connections on port 28002 to the client.• The client is behind a router that does not support port-forwarding for connections that were initiated from the Avamar server. (This
step is the common situation that managed service providers to enable encounter when they deploy Avamar without using VPN.)• The Avamar Administrator server cannot connect to the Avamar client on the paging address that is used by the Avamar
Administrator server. An example is when the client is multi-homed and the paging address that the Avamar Administrator server usesfor connecting the client does not have a route to the paging address.
• The environment requires authentication to establish a host-to-host connection to port 28002 on the client, and the AvamarAdministrator server process is not able to support the required authentication protocol.
• An IPSec environment. In a Windows environment, Microsoft best practices recommend enabling IPSec. Clients are not pageable in anIPSec environment.
MCS should automatically detect non-pageable clients and adjust settings. Usually no manual changes are needed in MCS. You candetermine whether a client is pageable or non-pageable by viewing the Client Summary in the AUI. If No appears in the Paging Enabledfield for the client, then MCS cannot connect to the avagent process on the client, which makes the client non-pageable.
Limitations in environments with non-pageable clientsYou can use Avamar Administrator to perform backups or restores, or define policies in environments with non-pageable clients. In somecases, you must type explicit path names.
The following limitations apply when the client is non-pageable:
• If the MCS cannot page the client on port 28002, then Avamar cannot invite the client to activate by using Avamar Administrator.• You cannot browse the client file system when defining datasets or when browsing to select a target for restore. To work around this
limitation, explicitly define the backup dataset without browsing a client. During a restore, explicitly type the restore target path.• You cannot view client logs. To work around this limitation, get the logs from the client computer.• You cannot page the client when there is a work order waiting for the client. In this case, the client connects to the MCS and polls for
the existence of a work order approximately once every minute.
60 Client Management

If you are backing up several hundred or more non-pageable clients, you may need to increase the polling interval. The default pollinginterval is 60 s. If MCS performance is slowing down, increase the polling interval until you achieve acceptable performance.
Adding or modifying client paging settingsThe MCS can automatically determine client paging settings, or you can manually specify paging settings for a client. You may need tomanually specify paging settings when you use NAT.
Steps
1. In the AUI navigation pane on the left, click , and then click Asset Management.2. In the domain tree, select the domain for the client.3. In the list of clients, select the client that you want to edit.
You can only view clients in the domain for the login account. To view all clients, log in to the root domain.
4. Click MORE ACTIONS > Edit Client.The Edit Client window is displayed.
5. Click the Paging tab.6. Select either the Automatic or Manual paging mode.7. If you selected Manual, specify the client information for client/MCS communications:
• If the MCS is unable to automatically determine a hostname for this client in automatic mode, type a valid (un-NAT’d) IP addressfor the client in the Address (IP or hostname) field.
• In the Port Number (secure) field, specify the data port number. The default data port is 30002.• In the Port Number (insecure) field, specify the data port number. The default data port is 28002.
8. Click UPDATE.
Editing client informationYou can edit the name, contact information, or location information for a client in Avamar Administrator.
About this task
In Avamar Administrator, the client name must always be the client hostname. Whenever you should change the client name in AvamarAdministrator because the client hostname changed, shut down the Avamar software on the client computer. Change the client name byway of this procedure, and then restart the Avamar client software. This action is the only way to ensure that the client maintains itsregistration with the Management Console Server (MCS) database, which ensures that past backups continue to be associated with theclient.
Steps
1. In the AUI navigation pane on the left, click , and then click Asset Management.2. In the domain tree, select the domain for the client.3. In the list of clients, select the client that you want to edit.
You can only view clients in the domain for the login account. To view all clients, log in to the root domain.
4. Click MORE ACTIONS > Edit Client.The Edit Client window is displayed.
5. Edit the name, contact information, or location information for the client.6. Click UPDATE.
A confirmation message is displayed.
Viewing client propertiesSteps
1. In the AUI navigation pane on the left, click , and then click Asset Management.2. In the domain tree, select the domain for the client.3. In the list of clients, select a client whose properties you want to view.
You can only view clients in the domain for the login account. To view all clients, log in to the root domain.
Client Management 61

The client details that are described in the following table appear in the right pane of the window.
Table 20. Client Summary Information
Column Description
Name Descriptive client name.
Enabled Whether Avamar can perform backups for the client. Regardless of this setting, the client can restore filesas long as a previous backup exists in the system.
Activated The client is activated with the Avamar server.
Activation Time The time that the client is activated with the Avamar server.
Domain The Avamar domain for the client.
Client OS The operating system on the client.
Client Version The version of Avamar client software on the client.
Client OS The operating system of the client.
Last Check-in The date and time that the Avamar client agent last checked in with the Avamar server.
Encryption The encryption method that is used for client/server data transfer.
CID The Client ID, a unique identifier for this client in the Avamar server. CIDs are assigned during clientactivation.
Client Paging Whether the client has provided the Avamar server with a page address and port number, by thatallowing it to perform on-demand backups and restores. In addition, Avamar Administrator can browse itsfile system during Avamar Administrator-initiated backups and restores.
Backup Statistics Status information for backup jobs for the client.
Enabling and disabling a clientYou can disable a client so that it cannot use the Avamar server to back up files. This action is typically done to place the system in a statethat supports maintenance activities. If a client has been disabled, you must reenable the client before backups for the client can resume.
Steps
1. In the AUI navigation pane on the left, click , and then click Asset Management.2. In the domain tree, select the domain for the client.3. In the list of clients, select the client that you want to edit.
You can only view clients in the domain for the login account. To view all clients, log in to the root domain.
4. Click MORE ACTIONS > Edit Client.The Edit Client window appears
5. To enable a client, in the Basic tab, select the Enabled checkbox.A confirmation message appears
6. To disable a client, in the Basic tab, unselect the Enabled checkbox.A confirmation message appears
7. Click UPDATE.
Moving a client to a new domainSteps
1. In the AUI navigation pane on the left, click , and then click Asset Management.2. In the hierarchical Domain tree, select the domain.3. In the list of clients, select the client that you want to move.
You can only view clients in the domain for the login account. To view all clients, log in to the root domain.
4. Click MORE ACTIONS > Move Client.
62 Client Management

The Move Client dialog box is displayed.5. Select the new domain for the client.6. Click OK.
Retiring a clientWhen you retire a client, Avamar stops running backups of the client. Avamar uses the specified retention setting for the existing backupsof a retired client to determine how long to retain the existing backups. Avamar also uses the specified retention setting for existingreplicas of a retired client's backups to determine how long to retain the existing replicas.
About this task
To restore data from existing backups or replicas of a retired client, use Avamar Administrator.
Steps
1. In the AUI navigation pane on the left, click , and then click Asset Management.2. In the domain tree, select the domain for the client.3. In the list of clients, select the client that you want to retire.
You can only view clients in the domain for the login account. To view all clients, log in to the root domain.
4. Click MORE ACTIONS > Retire Client.The Retire Client window appears.
5. In the Local Backups section, choose how long to keep backups for the client:
• To keep backups until their existing expiration dates, select Retain local backups with existing expiration date.• To keep backups indefinitely, regardless of the existing expiration dates, select Retain all local backups indefinitely.• To keep backups until a new expiration date, select Reset local backup expiration date and in New Expiration Date, select a
new date.6. For clients with replicas, in the Remote Backups section, choose how long to keep replicas for the client:
• To keep replicas until their existing expiration dates, select Retain remote backups with existing expiration date.• To keep replicas indefinitely, regardless of the existing expiration dates, select Retain all remote backups indefinitely.• To keep replicas until a new expiration date, select Reset remote backup expiration date and then select a new date.
7. To retire child VMware clients, in the Force Retire section, select Ignore running acitivity and force retire child vm client.8. Click SUBMIT.
A confirmation message appears.
Deleting a clientDelete a client and all backups of the client. Optionally, choose to delete all replicas that exist on replication destination systems.
About this task
When you delete a client, Avamar permanently deletes all backups that are stored for that client. Only delete a client when you are certainthat there is no reason to retain the backups. If there is any doubt, retire the client instead.
Steps
1. In the AUI navigation pane on the left, click , and then click Asset Management.2. In the hierarchical Domain tree, select the domain.3. In the list of clients, select the client that you want to delete.
You can only view clients in the domain for the login account. To view all clients, log in to the root domain.
4. Click MORE ACTIONS > Delete Client.The Delete Client dialog box appears and displays the number of existing backups for the client.
5. Select I understand this action is permanent and irreversible.
This field is a safety net to avoid unintentionally deleting a client and the client's backups.
6. Click YES.
Client Management 63

View integrated clientsThe Assets | Overview panel on the AUI dashboard displays the number of clients that are integrated into the Avamar server.
Steps
1. To view information about integrated clients, click the icon next to Integrated.The Asset Management pane appears.
2. In the domain tree, select a domain or subdomain.The list of clients in the middle pane indicates client information including status.
Results
The top part of the Asset Management pane displays information about the client domain, such as:
Icon Description
Clients
Indicates the number of clients within the domain.
Activities
Indicates the number of activities (backup and replication jobs) that have been initiated by clients within the domain.
Policies
Indicates the number of policies that apply to the clients within the domain.
View unprotected clientsThe Assets | Overview panel on the AUI dashboard displays the number of unprotected clients that do not have any backups.
Steps
1. To view information about unprotected clients, click the icon next to Unprotected.The Clients with no backups window appears and displays summary information for each client.
2. Review the client properties:
Property Description
Name Descriptive client name.
Domain The Avamar domain for the client.
Enabled Whether Avamar can perform backups for the client. Regardless of this setting, the client can restore files as long as aprevious backup exists in the system.
Activated Whether the client is activated with the Avamar server.
Client type The type of client (for example, regular, virtual machine, Image Proxy, or VMware vCenter).
64 Client Management

User Management and Authentication
Topics:
• Overview of Avamar user accounts• User authentication• Avamar internal authentication• Directory service authentication• Enabling backward compatibility with Enterprise Authentication• Roles• Adding a user to a domain• Editing user information• Deleting a user
Overview of Avamar user accountsA user account in Avamar can administer a domain or client. The user account defines the authentication system that is used to grantusers access to the Avamar server. It also defines the role for the user, which controls the operations that a user can perform.
You can add user accounts to domains or individual clients. When you add a user account to a domain, the account can administer thatdomain and any subdomains beneath it. When you add a user account to an individual client, the account can perform backups andrestores of that client, and access backups belonging to that client in the system.
In Avamar, users are entries in a domain or client access list. When you add a user account to the Avamar system, you are adding an entryto a domain or client user access list.
In the following example, the user “Gretchen” has been added to both the Accounting domain and a computer. However, theauthentication system and role are completely separate user accounts that happen to have the same username.
Figure 11. Users in Avamardomains
The following table describes the information that comprises an Avamar user account.
Table 21. Avamar user account information
Information Description
Username The username depends on the authentication system and must bein the format that the authentication system accepts. For example,the internal authentication system uses case-sensitive usernames,whereas Windows Active Directory usernames are case-insensitive. Usernames cannot be longer than 31 characters.
Authentication system An authentication system is a username/password system that isused to grant users access to the Avamar server.
Role Roles define the allowable operations for each user account.
5
User Management and Authentication 65

User authenticationAn authentication system is a username/password system that is used to grant users access to the Avamar server.
Avamar supports the following authentication systems:
• Avamar internal authentication, as described in Avamar internal authentication on page 66.• Directory service authentication, as described in Directory service authentication on page 66.
Avamar also supports the deprecated authentication method Enterprise Authentication. Enabling backward compatibility with EnterpriseAuthentication on page 80 describes how to enable continued support for Enterprise Authentication.
How Avamar authenticates users and assigns rolesTo provide backward compatibility with enterprise authentication and to account for the possibility of users in more than one LDAPmapped group, Avamar uses the following authentication and role assignment sequence for each login try:
1. When the username is in the format user, where user is a username without @server appended, then Avamar checks the internalAvamar authentication database.
If the username, password, and domain match, then the login is successful and Avamar assigns the user a role in the Avamar database.If they do not match, then the login fails.
2. When the username is in the format user@server, where user is a username and server is the fully qualified domain name of theauthentication server, then Avamar checks the login information by using enterprise authentication.
If the username, password, and domain match, then the login is successful and Avamar assigns the user a role in the Avamar database.If there is no match, then the evaluation continues.
3. When the username is in the format user@server and authentication by using enterprise authentication fails, then Avamar checks theLDAP mapping system.
The login try is checked against all mapped groups for a match of each of the following identifiers:
• Username, the portion of the User Name field entry before the @ symbol.• Password, as typed in the Password field.• Avamar domain, as typed in the Domain Name field.• Directory service domain, the portion of the User Name field entry after the @ symbol.
When all identifiers match, the login is successful and Avamar assigns the user a role from the mapped group.
A user can be the member of mapped groups in different directory service domains. The role of the mapped group that matches thedirectory service domain that is provided during login is assigned to the user for that session.
When the user is a member of more than one mapped group in the same directory service domain, the role with the greatest authorityis assigned.
4. When the login information does not meet the requirements of any of the previous steps, then the login fails and a failure messageappears.
Avamar internal authenticationWith Avamar internal authentication, you define the username and password for Avamar user accounts, and Avamar stores theinformation. Usernames are case-sensitive and cannot be longer than 31 characters.
No additional steps are required to use internal Avamar authentication to authenticate user accounts. You define the username andpassword for each account when you add the user in Avamar Administrator or the AUI.
Directory service authenticationUse directory service authentication to authenticate and assign roles to Avamar users by using information from an existing directoryservice. Directory service authentication works with specific LDAP directory services and provides additional functionality when used withan OpenLDAP directory service. Directory service authentication also works with a Network Information Service (NIS), on its own or withone of the supported LDAP directory services.
66 User Management and Authentication

Avamar products that use directory service authenticationThe following Avamar products can use directory service authentication to authenticate and authorize users:
• Avamar Administrator• Avamar Web Restore• Avamar client web UI (Avamar Desktop/Laptop)
Avamar product that uses directory service client recordsAvamar Client Manager does not use directory service authentication to authenticate and authorize user logins. However, Avamar ClientManager can use the directory service mechanism to obtain information about computers that are potential Avamar clients. Avamar ClientManager queries the directory service to obtain information about clients and, if available, directory service organizational units, such asdirectory domains, and directory groups.
Directory services typesDirectory service authentication supports the following types of directory services:
Table 22. Supported directory service types
Type Supported implementations
LDAP • Active Directory for Windows Server 2003• Active Directory Domain Services for Windows Server 2008• Active Directory Domain Services for Windows Server 2012• Active Directory Domain Services for Windows Server 2016• 389 Directory Server version 1.1.35
OpenLDAP SUSE OpenLDAP version 2.4
NIS Network Information Service
Avamar supports encrypted LDAP and OpenLDAP directory service authentication via SSL/TLS. By default, Avamar uses TLS 1.2 ifsupported by the LDAP or OpenLDAP server. Otherwise, Avamar falls back to a supported version of SSL/TLS. However, the Avamarserver does not provide an SSL/TLS certificate to the LDAP or OpenLDAP server for client authentication.
LDAP mapsDirectory service authentication uses LDAP maps to form a group of Avamar domain users by using information from a directory service.Link Avamar authorization levels to mapped directory service user accounts to create LDAP maps. The Adding an LDAP map sectionprovides more information.
NOTE: Deleting an Avamar domain removes the LDAP maps that rely on that Avamar domain for access. However,
removing LDAP maps does not affect the directory service groups or the directory service user records that are
associated with the removed maps.
LDAP directory service authenticationAvamar provides authentication and authorization of Avamar users through supported LDAP directory services.
Preparing to use LDAP directory service authentication on page 68 describes how to prepare to implement LDAP directory serviceauthentication.
Adding information for a supported LDAP directory service on page 69 describes how to provide the required information about theLDAP directory service to the Avamar system.
Editing the directory service configuration files on page 70 describes how to perform an optional manual edit of the ldap.propertiesand krb5.conf files.
User Management and Authentication 67

RequirementsAvamar directory service authentication supports the use of supported LDAP directory services that meet the following conditions:
• LDAP server permits username bind through both of the following formats:
○ username○ [email protected]
• LDAP server permits searching for group membership by using a username.• LDAP server permits searching for groups by using a search string.• LDAP server account that is provided when adding an LDAP map has permission to run a nested ldapsearch command.
Kerberos protocolAvamar's LDAP directory service authentication normally uses the Kerberos protocol for all communications with the Key DistributionCenter. Avamar automatically encrypts usernames and passwords before sending them to port 88 on the Key Distribution Center.
To use Avamar's LDAP directory service authentication without the Kerberos protocol, in a Simple Bind, manually edit theldap.properties file.
Preparing to use LDAP directory service authenticationTo prepare to use LDAP directory service authentication, give Avamar access to certain ports on the Key Distribution Center. Also, createthe directory service groups that are associated with Avamar LDAP maps.
Steps
1. Ensure that Avamar has access to the following recognized ports on the Key Distribution Center (KDC).
Table 23. Required Key Distribution Center ports
Port number Description
88 Kerberos authentication system
389 Lightweight Directory Access Protocol (LDAP)
464 Kerberos Change/Set password
636 LDAP over SSL/TLS
The ports are defined in krb5.conf and ldap.properties.
2. Create directory service groups in the directory service (not in Avamar).
Groups can range in size from one member to as many members as the directory service allows.
Ideally, create directory service groups specifically for use with an Avamar LDAP map. With dedicated directory service groups, groupcomposition is considered in the context of the level of Avamar access being granted. Also, the group name can include a commoncharacter pattern to simplify its discovery during mapping. For example, you could start each group name with the characters av, as inavAdministrators. This character pattern would enable you to search for all groups that are associated with Avamar by using thewildcard search string av*.
3. Open a command shell and log in by using one of the following methods:
• For a single-node server, log in to the server as admin.• For a multi-node server, log in to the utility node as admin.
4. Switch user to root by typing the following command:
su -5. Back up the keystore by typing the following command on one line:
cp -p /usr/local/avamar/lib/rmi_ssl_keystore /usr/local/avamar/lib/rmi_ssl_keystore.bak6. Import the LDAP server certificate into the keystore by typing the following command on one line:
keytool -importcert -file <certfile>.crt -keystore /usr/local/avamar/lib/rmi_ssl_keystore -storepass changemewhere <certfile> is the name of the LDAP server certificate, including path.
68 User Management and Authentication

7. Restart the MCS by typing the following command:
mcserver.sh --restart
Next steps
Configure Avamar to use the LDAP directory service.
Adding information for a supported LDAP directory serviceUse a wizard to add information for a supported LDAP directory service to use for authentication and authorization of Avamar users.
Prerequisites
Check that the directory service meets the following requirements:
• Provides authentication through a SASL (Simple Authentication and Security Layer) BIND that uses Kerberos.• Only uses LDAP v.3 base functionality.• Permits username bind through both of the following formats:
○ username○ [email protected]
• Permits searching for group membership by using a username.• Permits searching for groups by using a search string.• Has an available LDAP server account that has permission to run a nested ldapsearch command.
About this task
NOTE: Do not use the wizard to add a directory service that performs authentication using Simple Bind (plaintext).
Instead, manually edit the ldap.properties file as described in Editing the directory service configuration files on
page 70.
Steps
1. Log in to the root domain in Avamar Administrator as an administrator.
a. Launch Avamar Administrator.b. In Server, type the IP address or DNS name of the Avamar server to log in to.c. In User Name, type a username.
The username must be for an account that is assigned to the administrator role at the root domain level.
When Avamar is already configured to use a directory service, alternatively log in by using an LDAP account with administratorauthorization at the root domain level. Use the format: username@ldap-domain.
d. In Password, type the password for the user account.e. In Domain Name, use the default entry of a single slash (/) character to specify the root domain.f. Click Log In.
If this is the first time that you have connected to this Avamar server, the Accept Server Certificate dialog box opens. Verifythe server certificate details and click Yes.
The Avamar Administrator dashboard appears.2. In Avamar Administrator, click the Administration launcher link.
The Administration window is displayed.3. Click the LDAP Management tab.4. Click Directory Service Management.
The Directory Service Management dialog box appears.5. Add the directory service:
a. Click Add.The Adding a new Directory Service section appears.
b. Select LDAP.c. In Enter a fully qualified domain name, type the fully qualified domain name (FQDN) of a directory server.d. (Optional) If the directory server represents the organization’s default directory service domain, then select Make this the
default domain LDAP domain.
User Management and Authentication 69

To allow the Avamar client web UI to authenticate users from Macintosh computers, the LDAP server that is assigned toMacintosh users must be configured as the default server.
e. Click Add.A confirmation message appears.
f. Click Yes.A success message appears. If an error message appears instead, then resolve the issue and re-add the directory service. Errormessages during directory service configuration on page 78 provides details.
g. Click OK.The changes are applied to the Management Console Server (mcs) and EM Tomcat (emt) services.
6. (Optional) Repeat the previous step to add other authentication domains.7. Test the directory service entries:
a. In the Directory Service Management dialog box, select one of the entries from Configured Directory Services.The Testing section appears.
b. In Username, type the username for an account that is authorized to read the directory service database.c. In Password, type the password that is associated with the username.d. Click Run Test.
If an error message appears, then resolve the issue. Error messages during directory service configuration on page 78 providesdetails.
e. To close the Testing section, click Close.8. Click Close on the Directory Service Management dialog box.
Next steps
To associate the directory service group to Avamar user information, create an LDAP map. Adding an LDAP map on page 78 providesinstructions.
Editing the directory service configuration filesThe LDAP Management tool provides you with the ability to manually edit the ldap.properties and krb5.conf directory serviceconfiguration files. Manually edit these files to configure non-standard settings and to resolve problems that occur when configuringAvamar to use a directory service.
Prerequisites
Determine the correct format for keys and values in the configuration files.
Steps
1. Log in to the root domain in Avamar Administrator as an administrator.
a. Launch Avamar Administrator.b. In Server, type the IP address or DNS name of the Avamar server to log in to.c. In User Name, type a username.
The username must be for an account that is assigned to the administrator role at the root domain level.
When Avamar is already configured to use a directory service, alternatively log in by using an LDAP account with administratorauthorization at the root domain level. Use the format: username@ldap-domain.
d. In Password, type the password for the user account.e. In Domain Name, use the default entry of a single slash (/) character to specify the root domain.f. Click Log In.
If this is the first time that you have connected to this Avamar server, the Accept Server Certificate dialog box opens. Verifythe server certificate details and click Yes.
The Avamar Administrator dashboard appears.2. In Avamar Administrator, click the Administration launcher link.
The Administration window is displayed.3. Click the LDAP Management tab.4. To edit ldap.properties or Edit KRB5 file to edit krb5.conf, click Edit LDAP file.
5. Type additions and changes directly in the Edit file window.6. Click Save, and then click Close.
70 User Management and Authentication

Format requirements and settings for LDAP base functionalityThe LDAP Management tool in Avamar Administrator creates a correctly formatted ldap.properties file for supported LDAPdirectory services. When you manually edit the file by using the LDAP Management tool, the format must comply with specific parameterrequirements. You can manually add other settings to ldap.properties to meet an organization's authentication requirements.
LDAP base functionality parameter requirements
The following table lists the parameter requirements for LDAP base functionality.
Table 24. Parameter requirements for LDAP base functionality
Rule Description Format
One LDAP URL parameter for eachLDAP server
The LDAP URL parameter maps anLDAP server to a specific domaincontroller.
ldap.url.ds.example.abc.com=ldap://dchost.r1.example.abc.com:389
or
ldap.url.ds.example.abc.com=ldaps://dchost.r1.example.abc.com:636
where:
• ds.example.abc.com is the FQDN of the LDAPserver.
• dchost.example.abc.com is the FQDN of the domaincontroller for the LDAP server.
• 389 is the port that is used by the LDAP service.• 636 is the port that is used by the LDAP service
when encrypted with SSL/TLS.
Exactly one default server parameter The default server parameter is usedduring authentication of users onclients that are not mapped to aspecific domain. For example, localusers and users that log in from anAIX, FreeBSD, HP-UX, Linux, SCO,or Solaris computer.
ldap.qualified-name-default=dshost.example.abc.com wheredshost.example.abc.com is the FQDN of the defaultLDAP server.
Additional parameters
You can add other parameters to ldap.properties by using the LDAP Management tool in Avamar Administrator. The following tablelists the available settings.
Table 25. Additional parameter for LDAP base functionality
Parameter Description and values
ldap.auth.domain.login-domain-suffix Specifies a login domain name suffix that is included as part of theusername value when authenticating through LDAP, where login-domain-suffix is the login domain name suffix and the value is anauthentication domain. For example, users can log in using either:username@boston or [email protected], where thisparameter is set as follows:
ldap.auth.domain.boston=boston.edu
Use this parameter along with the next parameter,ldap.query.domain, to map multiple authentication domainsto a single login domain name suffix.
ldap.query.domain.log-in-domain-suffix Maps additional authentication domains to a single login domainsuffix, where the ldap.auth.domain parameter defines login-domain-suffix, and the ldap.query.domain values are additionalauthentication domains within the organization's intranet. Forexample, users from either authentication domain log in using the
User Management and Authentication 71

Table 25. Additional parameter for LDAP base functionality (continued)
Parameter Description and values
format username@boston, where the two parameters are set asfollows:
ldap.auth.domain.boston=boston.eduldap.query.domain.boston=science.boston.edu,art.boston.edu
ldap.entry.lookup.type.ldap-domain Defines the method that is used by the LDAP server when lookingup a username, where ldap-domain is the authentication domain.Possible values are:
• UN for username, the method that is commonly used by LDAPdirectory services. (Default)
• DN for distinguished name, the method that is commonly usedby OpenLDAP directory services.
user-login-module Controls the authentication mechanism. The following values areavailable:
• kerberos — LDAP authentication with Kerberos encryption.This value is the default.
• ldap — Plaintext LDAP authentication. This parameter alsorequires the ldap.auth.force.username.input=trueparameter to force user login even on a Windows domaincomputer.
• avamar — Avamar authentication.
• mix — Both kerberos and avamar.
ldap.auth.force.username.input Controls whether Avamar requires user log in though a login screenon web applications that permit Kerberos pass throughauthentication. Possible values are:
• False — Log in is not required. This value is the default.
• True — Log in is required. Required for the followingparameter: user-login-module=ldap.
avamar-authentication-domains Required by the following parameter: user-login-module=mix. The value is a comma-separated list of domains.Avamar authentication is applied to users from each listed domain.LDAP authentication is applied to all other users.
support-nis-authentication Enables (true) or disables (false) NIS authentication support.The default value is false.
nis.qualified-name-default Specifies the FQDN of the NIS domain server.
nis.url.nisdomainname Specifies the IP address of the NIS domain server, wherenisdomainname is the value of nis.qualified-name-default.
OpenLDAP directory service authenticationAvamar supports authentication and authorization of Avamar users through an OpenLDAP directory service.
Adding information about an OpenLDAP directory service to Avamar is described in Adding an OpenLDAP directory service on page 73.
Configuring Avamar to use an OpenLDAP directory service for authentication includes the ability to use optional parameters that exist forOpenLDAP. OpenLDAP directory service parameters on page 75 describes the required and optional parameters for OpenLDAP.
72 User Management and Authentication

Adding an OpenLDAP directory serviceTo configure an Avamar system to use an OpenLDAP directory service for authentication, edit the ldap.properties file.
About this task
Add an OpenLDAP directory service by manually editing the ldap.properties file of the Avamar server and adding the requiredparameters. Optional parameters can also be added to control how the Avamar system interacts with the OpenLDAP directory service.OpenLDAP directory service parameters on page 75 provides more information about the required and optional parameters.
Steps
1. Log in to the root domain in Avamar Administrator as an administrator.
a. Launch Avamar Administrator.b. In Server, type the IP address or DNS name of the Avamar server to log in to.c. In User Name, type a username.
The username must be for an account that is assigned to the administrator role at the root domain level.
When Avamar is already configured to use a directory service, alternatively log in by using an LDAP account with administratorauthorization at the root domain level. Use the format: username@ldap-domain.
d. In Password, type the password for the user account.e. In Domain Name, use the default entry of a single slash (/) character to specify the root domain.f. Click Log In.
If this is the first time that you have connected to this Avamar server, the Accept Server Certificate dialog box opens. Verifythe server certificate details and click Yes.
The Avamar Administrator dashboard appears.2. In Avamar Administrator, click the Administration launcher link.
The Administration window is displayed.3. Click the LDAP Management tab.4. To edit ldap.properties, click Edit LDAP file.
The Edit ldap.properties file dialog box appears.5. In the text entry area, type the following, on a new line:
ldap.entry.lookup.type.ldap-domain=DNwhere ldap-domain is the domain name of the OpenLDAP server.
This parameter is required.
6. In the text entry area, type the following, on a new line:
ldap.userdn.ldap-domain=rdn-valueswhere:
• ldap-domain is the domain name of the OpenLDAP server• rdn-values is a semi-colon separated list of the relative distinguished name bases for users, from the root distinguished name of
the LDAP tree.
Each entry in the list is a comma-separated, reverse-hierarchical, representation of a user group's relative distinguished name base.
This parameter is required, unless either the users are directly under the root distinguished name or the LDAP server permitsanonymous searches.
For example, if the users for the domain example.com can be found in Users, inside Employees, inside People, at the tree root,and in Admins at the tree root, then type:
ldap.userdn.example.com=ou=Users,ou=Employees,ou=People;ou=Admins7. In the text entry area, type the following, on a new line:
ldap.rootdn.ldap-domain=rootdn-formatwhere:
• ldap-domain is the domain name of the OpenLDAP server• rootdn-format is the root distinguished name format that is used by the LDAP server
User Management and Authentication 73

This parameter is required, unless the LDAP server uses the following root distinguished name format: dc=domain-segment,dc=domain-segment
For example, an LDAP server that stores the root distinguished name as dc=example, dc=com, does not require this parameter inldap.properties.
However, an LDAP server that stores the root distinguished name as u=example, o=com requires the following parameter inldap.properties: ldap.rootdn.exaple.com=u=example,o=com
8. In the text entry area, add optional OpenLDAP parameters.
Type each parameter on a new line.
9. Click Save.10. Test the directory service entries:
a. In the Directory Service Management dialog box, select one of the entries from Configured Directory Services.The Testing section appears.
b. In Username, type the username for an account that is authorized to read the directory service database.c. In Password, type the password that is associated with the username.d. Click Run Test.
If an error message appears, then resolve the issue. Error messages during directory service configuration on page 78 providesdetails.
e. To close the Testing section, click Close.11. Click Close on the Directory Service Management dialog box.
Results
The Avamar system enables authentication through the OpenLDAP directory service.
Next steps
To associate the directory service group to Avamar user information, create an LDAP map. Adding an LDAP map on page 78 providesinstructions.
Enabling OpenLDAP and Avamar authenticationTo configure an Avamar system to use Avamar authentication and OpenLDAP authentication, edit the ldap.properties file.
Prerequisites
Add an OpenLDAP directory service to the Avamar system.
About this task
After adding an OpenLDAP directory service for authentication, configure the Avamar system to use Avamar authentication for some ofthe Avamar domains.
Steps
1. Log in to the root domain in Avamar Administrator as an administrator.
a. Launch Avamar Administrator.b. In Server, type the IP address or DNS name of the Avamar server to log in to.c. In User Name, type a username.
The username must be for an account that is assigned to the administrator role at the root domain level.
When Avamar is already configured to use a directory service, alternatively log in by using an LDAP account with administratorauthorization at the root domain level. Use the format: username@ldap-domain.
d. In Password, type the password for the user account.e. In Domain Name, use the default entry of a single slash (/) character to specify the root domain.f. Click Log In.
If this is the first time that you have connected to this Avamar server, the Accept Server Certificate dialog box opens. Verifythe server certificate details and click Yes.
The Avamar Administrator dashboard appears.
74 User Management and Authentication

2. In Avamar Administrator, click the Administration launcher link.The Administration window is displayed.
3. Click the LDAP Management tab.4. To edit ldap.properties, click Edit LDAP file.
The Edit ldap.properties file dialog box appears.5. In the text entry area, type the following, on a new line:
user-login-module=mixThis parameter is required when enabling Avamar authentication with OpenLDAP authentication.
6. In the text entry area, type the following on a new line:
user-login-module-mix-ldap=ldapThis parameter is required when enabling Avamar authentication with OpenLDAP authentication.
7. In the text entry area, type the following on a new line:
avamar-authentication-domains=av-domain-listwhere av-domain-list is a comma-separated list of Avamar domains.
The Avamar system uses Avamar authentication for login authentication of users from each listed domain. The Avamar system usesOpenLDAP authentication for all other users.
8. Click Save.9. Click Close on the Directory Service Management dialog box.
Results
The Avamar system enables the specified mix of Avamar authentication and OpenLDAP authentication.
OpenLDAP directory service parametersThe following table describes the ldap.properties file parameters for use with an OpenLDAP directory service, in addition to thebase parameters specified in Table 24. Parameter requirements for LDAP base functionality on page 71.
Table 26. OpenLDAP directory service parameters
Parameter and example Description
ldap.entry.lookup.type.ldap-domain=DNFor an LDAP domain "xyz.com" that uses OpenLDAP:
ldap.entry.lookup.type.xyz.com=DN
Specifies OpenLDAP. Replace ldap-domain with the domain nameof the LDAP server. Use this parameter for OpenLDAP serversthat accept user logins only in distinguished name format. Forexample: uid=jsmith,dc=example,dc=com. This parameterenables the other OpenLDAP parameters in this table.
ldap.userdn.ldap-domain=rdn-valuesFor an LDAP domain "xyz.com" that organizes users in thefollowing organizational units:
• Managers which is under the tree root
• Accountants, under people, which is under the tree root
• HRs, under Employees, under Users, which is under thetree root
• Users, which is under the tree root
ldap.userdn.xyz.com=ou=Managers;ou=Accountants,ou=people;ou=HRs,ou=Employees,ou=Users;ou=Users
Specifies the relative distinguished name bases that are assignedto the organizational units that contain users. Replace ldap-domainwith the domain name of the LDAP server and replace rdn-valueswith a semi-colon separated list of relative distinguished namebases for users, from the root distinguished name of the LDAPtree. Each entry in the list is a comma-separated reverse-hierarchical representation of a user group's relative distinguishedname base.
ldap.rootdn.ldap-domain=rootdn-formatFor an LDAP domain "xyz.com" that stores the root distinguishedname as u=xyz, o=com:
Specifies the root distinguished name format of the LDAP server.This parameter is required unless the root distinguished nameformat is dc=domain-segment,dc=domain-segment.Replace ldap-domain with the domain name of the LDAP serverand replace rootdn-format with the root distinguished nameformat that is used by the LDAP server.
User Management and Authentication 75

Table 26. OpenLDAP directory service parameters (continued)
Parameter and example Description
ldap.rootdn.xyz.com=u=xyz,o=com
ldap.user.search.classes.ldap-domain=search-object
For an LDAP domain "xyz.com" that uses the object class type"person" in user searches:
ldap.user.search.classes.xyz.com=person
Specifies the object class type that is used by the user searchfilter. This parameter is optional. Replace ldap-domain with thedomain name of the LDAP server and replace search-object withthe value that specifies the object class type that is used by theuser search filter. Comma separated values can be used. Thedefault value is *.
ldap.user.search.attrs.ldap-domain=search-attribute
For an LDAP domain "xyz.com" that uses the object class attribute"cn" in user searches:
ldap.user.search.attrs.xyz.com=cn
Specifies the object class attribute that is used by the user searchfilter. This parameter is optional. Replace ldap-domain with thedomain name of the LDAP server and replace search-attributewith a single attribute that is used by the user search filter. Thedefault value is uid.
ldap.group.search.byUpn.classes.ldap-domain=search-upnFor an LDAP domain "xyz.com" that uses the User Principal Nameobject class types: sambaGroupMapping and posixGroup in groupsearches:
ldap.group.search.byUpn.classes.xyz.com=sambaGroupMapping,posixGroup
Specifies the object class type that is used by the group searchUser Principal Name filter. This parameter is optional. Replaceldap-domain with the domain name of the LDAP server andreplace search-upn with the value that specifies the object classtype that is used by the group search User Principal Name filter.Comma separated values can be used. The default value is *.
ldap.group.search.byUpn.attrs.ldap-domain=upn-attributes
For an LDAP domain "xyz.com" that uses the User Principal Nameobject class attributes: memberUid and uniqueMember in groupsearches:
ldap.group.search.byUpn.attrs.xyz.com=memberUid,uniqueMember
Specifies the object class attributes used by the group search UserPrincipal Name filter. This parameter is optional. Replace ldap-domain with the domain name of the LDAP server and replaceupn-attributes with the value that specifies the object classattributes used by the group search User Principal Name filter.Comma separated values can be used. The default value ismemberUid, uniqueMember.
ldap.unique.group.search.classes.ldap-domain=unique-typeFor an LDAP domain "xyz.com" that uses the object class type"posixGroup" in Unique Groups group searches:
ldap.unique.group.search.classes.xyz.com=posixGroup
Specifies the object class type that is used by the Unique Groupsgroup search filter. This parameter is optional. Replace ldap-domain with the domain name of the LDAP server and replaceunique-type with the value that specifies the object class type thatis used by the Unique Groups group search filter. Commaseparated values can be used. The default value issambaGroupMapping,posixGroup,groupOfUniqueNames.
ldap.unique.group.search.attrs.ldap-domain=unique-attributesFor an LDAP domain "xyz.com" that uses the object classattributes "cn" and "uid" in Unique Groups group searches:
ldap.unique.group.search.attrs.xyz.com=cn,uid
Specifies the object class attributes used by the Unique Groupsgroup search filter. This parameter is optional. Replace ldap-domain with the domain name of the LDAP server and replaceunique-attributes with the value that specifies the object classattributes used by the Unique Groups group search filter. Commaseparated values can be used. The default value is cn.
user-login-module=mix Enables authentication using the mix mode of Avamarauthentication with OpenLDAP authentication. Configuration mustalso include: user-login-module-mix-ldap=ldap andavamar-authentication-domains=av-domain-list.
76 User Management and Authentication

Table 26. OpenLDAP directory service parameters (continued)
Parameter and example Description
user-login-module-mix-ldap=ldap Specifies that the Avamar system uses Avamar authentication withOpenLDAP authentication. Configuration must also include: user-login-module=mix and avamar-authentication-domains=av-domain-list.
avamar-authentication-domains=av-domain-listFor an Avamar system that uses OpenLDAP and uses Avamarauthentication for the domains: /, /swclients, and /adminclients:
avamar-authentication-domains=/,/swclients,/adminclients
Specifies the internal Avamar domains that the Avamar systemchecks during Avamar authentication. Replace av-domain-list witha comma-separated list of Avamar domains. Configuration mustalso include: user-login-module=mix and user-login-module-mix-ldap=ldap.
Adding an NIS directory serviceProvide authentication and authorization of Avamar users through an NIS directory service.
Steps
1. Log in to the root domain in Avamar Administrator as an administrator.
a. Launch Avamar Administrator.b. In Server, type the IP address or DNS name of the Avamar server to log in to.c. In User Name, type a username.
The username must be for an account that is assigned the administrator role at the root domain level.
If you already configured a directory service, then you can log in with an account for an LDAP user with the administrator role atthe root domain level.
d. In Password, type the password for the user account.e. In Domain Name, use the default entry of a single slash (/) character to specify the root domain.f. Click Log In.
If this is the first time that you have connected to this Avamar server, the Accept Server Certificate dialog box opens. Verifythe server certificate details and click Yes.
The Avamar Administrator dashboard appears.2. In Avamar Administrator, click the Administration launcher link.
The Administration window is displayed.3. Click the LDAP Management tab.4. Click Directory Service Management.
The Directory Service Management dialog box appears.5. In the Directory Service Management dialog box, click Add.
The Adding a new Directory Service section appears.6. Select NIS.7. In Enter a fully qualified domain name, type the NIS domain name.8. In NIS Domain IP address, type the IP address of the NIS server.9. Click Add.
A confirmation message appears.10. Click Yes.
If an error message appears, then resolve the issue and retry this task. Error messages during directory service configuration on page78 provides details.
A success message appears.11. Click OK.
Results
The changes are applied to the Management Console Server (mcs) and EM Tomcat (emt) services.
User Management and Authentication 77

Next steps
To associate the directory service group to Avamar user information, create an LDAP map. Adding an LDAP map on page 78 providesinstructions.
Error messages during directory service configurationError messages appear when issues occur during adding or testing of a directory service configuration.
The following table lists some of the potential messages and provides a description of the cause.
Table 27. Error messages during directory service configuration'
Error message Description
Cannot discover KDC A key distribution center (KDC) could not be found by using thespecified domain information.
No URL is present The specified domain is not present in the ldap.propertiesfile.
Parameters are not correct The directory service domain information in theldap.properties file is invalid.
Client not found in Kerberos database The specified username is invalid.
Pre-authentication information was invalid The specified password is incorrect.
Query fails The specified user account does not have sufficient privileges toread the directory service database.
Clock skew too great The differential between the clock on the Avamar server host andthe clock on the directory service host is too large.
Cannot open LDAP configuration file The ldap.properties file does not exist or the file permissionsprevent access.
Cannot open Kerberos configuration file The krb5.conf file does not exist or the file permissions preventaccess.
GSS initiate failed Authentication of credentials failed. Usually authentication failure isbecause reverse DNS is improperly configured. Add the KDC hostto /etc/hosts on the Avamar server.
Cannot get kdc for realm The KDC is improperly configured in the krb5.conf file.
Domain <domain> exists in ldap.properties file The specified domain is in the ldap.properties file already.
Adding an LDAP mapTo associate the directory service group to Avamar user information, create an LDAP map. An LDAP map is a database construct that tiesa group of users to an authentication system, domain or subdomain access list, and role.
Prerequisites
Add directory service domains to the Avamar configuration.
Steps
1. In Avamar Administrator, click the Administration launcher link.The Administration window is displayed.
2. Click the Account Management tab.3. Click the LDAP Maps tab.4. In the left-pane hierarchical tree, select a domain or a subdomain to specify the access level of the directory service group.5. Select Actions > Account Management > New LDAP Map.
The New LDAP Group Map dialog box appears.6. From the LDAP Domains list, select a directory service domain to map.
78 User Management and Authentication

7. In the Group Search box, type a search string specific to the group being mapped.
You can use an asterisk (*) as a wildcard that represents one or more alphanumeric characters.
8. Click Search.The Directory Service Authentication dialog box appears.
9. Specify the authentication information that is required for querying the directory service.
Authentication can be through a domain different from the one being mapped, as long as there is a trust relationship between the twodomains.
a. From the Auth Domain list, select a domain to use for authentication.b. In the User Name box, type a username for an account that has Read privileges for the domain.c. In the Password box, type the password for the username.d. Click OK.
The Directory Service Authentication dialog box closes and the search starts. The Search button on the New LDAP Group Mapdialog box changes to Stop.
To terminate a search, click Stop. Searching a directory service can take a long time.
The search is complete when groups appear in the LDAP Groups list.10. From the LDAP Groups list, select the group to map.11. From the Role list, select a role for the group.12. Click OK.
The group is mapped and the New LDAP Group Map dialog box closes. To see the mapping on the LDAP Maps tab, select theadministrative node.
Editing the role for an LDAP map
Steps
1. In Avamar Administrator, click the Administration launcher link.The Administration window is displayed.
2. Click the Account Management tab.3. Click the LDAP Maps tab.4. In the left-pane hierarchical tree, select a domain or a subdomain.
The maps for the domain or subdomain appear in the LDAP Maps area.5. Select the map to edit.6. Select Actions > Account Management > Edit LDAP Map.
The Edit LDAP Map dialog box appears.7. In Role, select a new role to assign to the map.8. Click OK.
The map is assigned the new role. Group members are assigned the new role in all subsequent sessions.
Deleting an LDAP map
Steps
1. In Avamar Administrator, click the Administration launcher link.The Administration window is displayed.
2. Click the Account Management tab.3. Click the LDAP Maps tab.4. In the left-pane hierarchical tree, select a domain or a subdomain.
The maps for the domain or subdomain appear in the LDAP Maps area.5. Select the map to delete.6. Select Actions > Account Management > Delete LDAP Map.
The Delete LDAP Map dialog box appears.7. Click Yes.
User Management and Authentication 79

Editing the time-out value for directory service processesDirectory service processes wait as long as 5 minutes for a response from the directory service. After this period, the try is discarded anda time-out message appears. You can edit the time-out value.
About this task
The time-out value is used by the following directory service authentication processes:
• Authentication requests through the directory service• Addition of a directory service to the Avamar configuration• Testing of a directory service in the Avamar configuration
Steps
1. Open a command shell and log in by using one of the following methods:
• For a single-node server, log in to the server as admin.• For a multi-node server:
a. Log in to the utility node as admin.b. Load the admin OpenSSH key by typing the following command:
ssh-agent bashssh-add ~admin/.ssh/admin_key
2. Stop the Management Console Server (mcs) service by typing dpnctl stop mcs.
3. Change the working directory by typing the following command:
cd /usr/local/avamar/var/mc/server_data/prefs4. Open mcserver.xml in a text editor.
5. Find the <node name="ldap"> node.
6. Change the value of <entry key="ldap_services_timeout_seconds" value="n" /> to a new time-out value inseconds, where n is the new value.
The default value is 300 s (5 minutes).
7. Save the change and close the file.8. Start the MCS and the scheduler by typing the following command:
dpnctl start mcsdpnctl start sched
9. Close the command shell.
Enabling backward compatibility with EnterpriseAuthenticationTo continue to authenticate users through the deprecated Enterprise Authentication mechanism enable the capability.
About this task
With Enterprise Authentication, Avamar uses the Pluggable Authentication Module (PAM) library of the host Linux operating system toprovide access to external authentication databases. Enterprise Authentication, which is described in the Avamar Product Security Guide,is deprecated and will be removed in future releases. By default, you cannot select an Enterprise Authentication domain when you add auser to a domain or client. To continue to use Enterprise Authentication as an authentication mechanism, configure the system to enableselection of Enterprise Authentication when adding a user by changing the Enterprise Authentication selection setting in mcserver.xml.
Steps
1. Open a command shell and log in by using one of the following methods:
• For a single-node server, log in to the server as admin.• For a multi-node server:
a. Log in to the utility node as admin.b. Load the admin OpenSSH key by typing the following command:
80 User Management and Authentication

ssh-agent bashssh-add ~admin/.ssh/admin_key
2. Stop the Management Console Server (mcs) service by typing dpnctl stop mcs.
3. Change the working directory by typing the following command:
cd /usr/local/avamar/var/mc/server_data/prefs4. Open mcserver.xml in a text editor.
5. Find the <node name="ldap"> node.
6. Change the value of <entry key="enable_new_user_authentication_selection" value="false" /> from falseto true.
7. Save the change and close the file.8. Start the MCS and the scheduler by typing the following command:
dpnctl start mcsdpnctl start sched
9. Close the command shell.
RolesRoles define the allowable operations for each user account.
There are three types of roles:
• Administrator roles• Operator roles• User roles
Administrator rolesAdministrators are responsible for maintaining the server.
You can only assign the role of administrator to user accounts at a domain level. Domain level includes the top-level (root) domain and anyother domain or subdomain. You cannot assign the administrator role to user accounts at a client level.
You can assign the administrator role to users at the top-level (root) domain or to a specific domain or subdomain.
Avamar 18.2 introduces the concept of the vCenter administrator. This role is specific to the AUI and has no counterpart in AvamarAdministrator.
Table 28. Administrator roles
Administrator type Description
Root administrators Administrators at the top-level (root) domain have full control of the system. They are sometimes referredto as “root administrators.”
Domain administrators Administrators at domains other than root generally have access to most of the features that are describedin this guide. Administrators typically can only view or operate on objects in the domain. Any activity thatwould allow a domain administrator to view data outside the domain is disallowed. Access to server featuresof a global nature (for example, suspending or resuming scheduled operations or changing runtimes formaintenance activities) is disallowed. Domain administrators:
• Cannot add or edit other subdomain administrators.• Cannot change their assigned role.• Can change their password.
Domain administrators do not have access to the AUI dashboard.
vCenter administrator vCenter administrators have access to the same features as domain administrators, but additionally haveaccess to the AUI dashboard and to event management area within the vCenter domain.
User Management and Authentication 81

Operator rolesOperator roles are generally implemented to allow certain users limited access to certain areas of the server to perform backups andrestores, or obtain status and run reports. These roles allow greater freedom in assigning backup, restore, and reporting tasks to personsother than administrators.
You can only assign operator roles to user accounts at the domain level. You cannot assign these roles to user accounts at the client level.To add the user account to subdomains, you must have administrator privileges on the parent domain or above.
Users with an operator role do not have access to all administrative features. Instead, after login, they are presented with an interface thatprovides access to the features that they are allowed to use.
The following table describes the four operator roles.
Table 29. Operator roles
Operator type Description
Restore only operator Restore only operators are generally only allowed to perform restores and to monitor those activities todetermine when they complete and if they completed without errors. Restore only operators at the top-level(root) domain can perform restores for any client in the server. Restore only operators at a domain otherthan root can only perform restores for clients in that domain. Restore only operators can restore backupdata and monitor activities in the assigned domain.
• By default, restore only operators cannot perform restores to a different location or restores to multiplelocations. To enable this option, you must set the restore_admin_can_direct_restoresattribute to true in the mcserver.xml file.
• By default, restore only operators cannot browse backups from the command line or the Avamar WebRestore interface. To enable these activities for a restore only operator, add the noticketrequiredprivilege by using the avmgr chgv command:avmgr chgv --acnt=location --u=name --ud=auth \ --pv="enabled,read,mclogin,noticketrequired" where location is thesubdomain of the operator, name is the Avamar username of the user, and auth is the externalauthentication system that is used to authenticate the user.
Backup only operator Backup only operators are generally only allowed to perform backups and to monitor those activities todetermine when they complete and if they completed without errors. Backup only operators at the top-level(root) domain can perform backups for any client or group in the server. Backup only operators at domainsother than root can only perform backups for clients or groups in that domain. Backup only operators canperform on-demand backups of a client or a group, as well as monitor activities in the assigned domain.
• By default, backup only operators cannot perform restores to a different location or restores to multiplelocations. To enable this option, you must set the restore_admin_can_direct_restoresattribute to true in the mcserver.xml file.
• By default, backup only operators cannot perform backups from the command line. To enable commandline backups for a backup only operator, add the noticketrequired privilege by using the avmgrchgv avmgr chgv --acnt=location --u=name --ud=auth \ --pv="enabled,read,mclogin,backup,noticketrequired"command: where location is thesubdomain of the operator, name is the Avamar username of the user, and auth is the externalauthentication system that is used to authenticate the user.
Backup/restore operator Backup/restore operators are generally only allowed to perform backups or restores and to monitor thoseactivities to determine when they complete and if they completed without errors. As with roles that areassigned to other domain user accounts, backup/restore operators at the top-level (root) domain canperform backups and restores for any client or group in the server. Backup/restore operators at domainsother than root can only perform backups and restores for clients or groups in that domain. Backup/restoreoperators can perform the following tasks in the assigned domain:
• Perform on-demand backups for a client or group.• Perform restores.• Monitor activities.
By default, backup/restore operators cannot browse backups from the command line or by using theAvamar Web Restore interface, and cannot perform backups from the command line. To enable theseactivities, add the noticketrequired privilege by using the avmgr chgv command: avmgr chgv --acnt=location --u=name --ud=auth \ --pv="enabled,read,mclogin,backup,noticketrequired" where location is the subdomain of
82 User Management and Authentication

Table 29. Operator roles (continued)
Operator type Description
the operator, name is the Avamar username of the user, and auth is the external authentication system thatis used to authenticate the user.
Activity operator Activity operators are generally only allowed to monitor backup and restore activities and to create certainreports. Activity operators at the top-level (root) domain can view or create reports for backup and restoreactivities in all domains and subdomains. Activity operators at domains other than root can only view orcreate reports for backup and restore activities in that domain. Activity operators can perform the followingtasks in the assigned domain:
• Monitor activities.• View the group status summary.• View the Activity Report.• View the Replication Report.
User rolesUser roles limit the operations that are allowed for a user account to a specific client.
Users who are assigned to one of the user roles cannot log in to the Avamar Administrator, the AUI, Avamar Client Manager, or theAvamar client web UI.
NOTE: Avamar Administrator provides the ability to add a user account to a client. However, you cannot add a user
account to a client from the Avamar Web User Interface (AUI).
The following table describes the four user roles.
Table 30. User roles
User type Description
Back Up Only User Users assigned this role can start backups directly from the client by using the avtar command line.
Restore (Read) OnlyUser
Users assigned this role can start restores directly from the client by using the avtar command line orManagement Console Server (MCS) web services.
Back Up/Restore User Users assigned this role can start backups and restores directly from the client by using the avtarcommand line or MCS web services.
Restore (Read) Only/Ignore File Permissions
Similar to the Restore (Read) Only User role except that operating system file permissions are ignored duringrestores. This user is allowed to restore any file that is stored for an Avamar client. This role is only availablewhen users are authenticated by using Avamar internal authentication. To ensure trouble-free restores,Windows client user accounts should be assigned this role only when both of the following are true:
• Users are authenticated using Avamar internal authentication.• Users do not require access to the Avamar client web UI.
Role-based access control and the AUIThe AUI provides role-based security for users who access the web-based interface.
Each time that a user logs in to the AUI, the security subsystem maps the user to any assigned roles and domains. Avamar uses thatinformation to construct a table of the administrative areas and URLs that correspond to a user's access level.
After logging in, the AUI directs the user to a default page for their role, and hides any controls and areas that do not correspond to theuser's access level. For example, a backup only operator sees the Asset Management and Activity areas in the navigation pane, but notthe server management areas.
Each time that a user goes to an area within the AUI, regardless of the method, the security subsystem checks the incoming requestagainst the access table and grants or denies the request accordingly. The AUI reroutes any attempts to access unauthorized areas.
The following tables indicate the user roles that can access each of the specified feature panes within the AUI.
User Management and Authentication 83
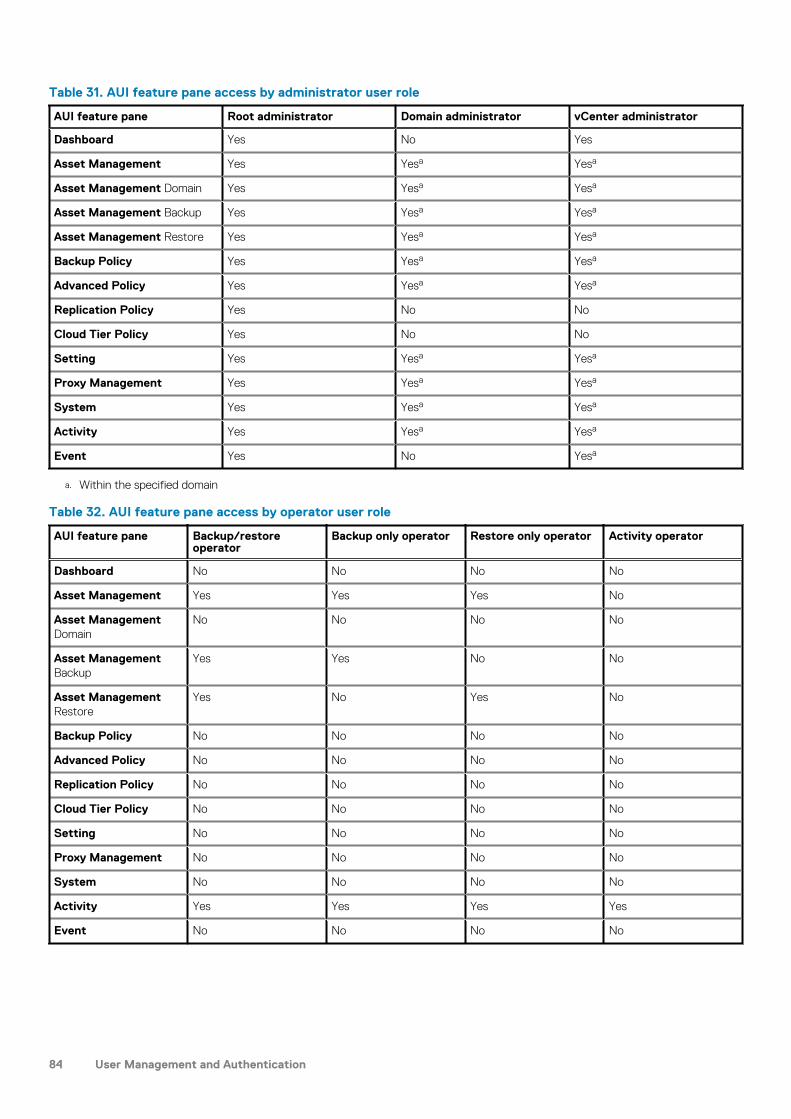
Table 31. AUI feature pane access by administrator user role
AUI feature pane Root administrator Domain administrator vCenter administrator
Dashboard Yes No Yes
Asset Management Yes Yesa Yesa
Asset Management Domain Yes Yesa Yesa
Asset Management Backup Yes Yesa Yesa
Asset Management Restore Yes Yesa Yesa
Backup Policy Yes Yesa Yesa
Advanced Policy Yes Yesa Yesa
Replication Policy Yes No No
Cloud Tier Policy Yes No No
Setting Yes Yesa Yesa
Proxy Management Yes Yesa Yesa
System Yes Yesa Yesa
Activity Yes Yesa Yesa
Event Yes No Yesa
a. Within the specified domain
Table 32. AUI feature pane access by operator user role
AUI feature pane Backup/restoreoperator
Backup only operator Restore only operator Activity operator
Dashboard No No No No
Asset Management Yes Yes Yes No
Asset ManagementDomain
No No No No
Asset ManagementBackup
Yes Yes No No
Asset ManagementRestore
Yes No Yes No
Backup Policy No No No No
Advanced Policy No No No No
Replication Policy No No No No
Cloud Tier Policy No No No No
Setting No No No No
Proxy Management No No No No
System No No No No
Activity Yes Yes Yes Yes
Event No No No No
84 User Management and Authentication

Adding a user to a domainYou can add a user account to a domain when the user account is authenticated by using Avamar internal authentication or thedeprecated enterprise authentication system.
About this task
Preparing to use LDAP directory service authentication on page 68 provides details on adding a user that uses an existing directory servicefor authentication.
Steps
1. To ensure that you assign the correct role to this user, review Roles on page 81.
2. In the AUI navigation pane, click , and then click Setting.The Setting pane appears.
3. Click the User tab.4. In the hierarchical Domain tree, select the domain for the new user.
NOTE: You cannot add user accounts to the MC_RETIRED domain.
5. Click Add.The User Management window appears.
6. (Optional) From the Authentication System list, select an authentication system.
The Authentication System list normally appears in a dimmed state, with Axion Authentication System (the internal system) thatis selected. This step indicates that the ability to select an enterprise authentication system is not currently enabled.
The enterprise authentication system, which is described in the Avamar Product Security Guide, is deprecated and will be removed infuture releases. However it can be used with this release. To enable the ability to select an enterprise authentication system, completethe procedure that is described in Enabling backward compatibility with Enterprise Authentication on page 80.
For a more robust alternative to enterprise authentication, use the method that is described in Preparing to use LDAP directory serviceauthentication on page 68.
7. In the User Name box, type the new username.
The username must meet the following requirements:
• If you use enterprise authentication, this option must be the username that the system assigns to.• The username cannot contain more than 31 characters.• The username cannot contain any of the following characters: ~!@$^%(){}[]|,`;#\/:*?<>'"&.
8. From the Role list, select a role for the user.9. In the Password box, type a password for the user.
Passwords are case-sensitive and must meet the following requirements:
• The password must be between 6 and 31 characters in length.• The password must contain only alphanumeric, hyphen, period, or underscore characters.• The password must contain at least one alphabetic character.
This field is not used with enterprise authentication.
10. In the Confirm Password box, retype the password.
This field is not used with enterprise authentication.
11. Click OK.A confirmation message appears.
Editing user informationSteps
1. In the AUI navigation pane, click , and then click Setting.The Setting pane appears.
2. Click the User tab.
User Management and Authentication 85

3. In the hierarchical Domain tree, select the domain with the user.4. Select the user.5. (Optional) Change the role for the user:
a. Click Edit.The User Management window appears.
b. From the Role list, select a role for the user.c. Click OK.
A confirmation message appears.6. (Optional) Change the password for the user:
a. Click the overflow menu ( ) for Edit.b. Click Edit Password.
The User Management window appears.c. Type a new password into both the Password and Confirm Password boxes.d. Click OK.
A confirmation message appears.
Deleting a userSteps
1. In the AUI navigation pane, click , and then click Setting.The Setting pane appears.
2. Click the User tab.3. In the hierarchical Domain tree, select the domain with the user.4. Select the user.5. Click Delete.
A confirmation message appears.6. Click Yes.
A second confirmation message appears.
86 User Management and Authentication

Backup
Topics:
• About on-demand backups• Perform an on-demand backup• Scheduling backups using the Policy wizard• Monitoring backups• Cancel backups• Managing completed backups
About on-demand backupsYou can perform an on-demand backup on an individual client, or a backup policy.
About this task
An on-demand backup is a one-time backup of data on an Avamar client computer. You may want to perform an on-demand backup forthe first backup of the client immediately after you install the Avamar client software. Perform an on-demand backup before systemmaintenance, software installations, or software upgrades.
When the Avamar server is using Data Domain for back-end storage, on-demand backups are written to the Data Domain by default.
Perform an on-demand backupYou can perform a client backup that is independent of existing schedules and backup policies.
About this task
You can perform an on-demand backup by using the AUI for the following plug-in types:
• VMware image• DB2• Linux File System• Microsoft SQL• Microsoft Hyper-V• Microsoft Exchange• Microsoft Windows File System• NDMP• Oracle
For all other plug-in types that are not in this list, use Avamar Administrator.
Steps
1. In the AUI navigation pane on the left, click , and then click Asset Management.The Asset Management window is displayed.
2. In the domain tree, select the domain for the client.3. In the list of clients, select the client computer to back up.
You can only view clients in the domain for the login account. To view all clients, log in to the root domain.
4. Click BACKUP.The Backup wizard is displayed. In the Plugin pane, a list of plug-ins on the client is displayed.
5. In the Plugins pane, select the plug-in and then browse to and select the check box next to the data that you want to back up.6. Click NEXT.
6
Backup 87

The Basic Configuration window is displayed.7. Select the backup retention policy settings:
• To automatically delete this backup from the Avamar server after a specific amount of time, select Retention period. Specify thenumber of days, weeks, months, or years for the retention period.
• To automatically delete this backup from the Avamar server on a specific calendar date, select End date and browse to that dateon the calendar.
• To keep this backup for as long as this client remains active in the Avamar server, select No end date.
8. From the Avamar encryption method list, select the encryption method to use for data transfer between the client and the Avamarserver during the backup.
The encryption technology and bit strength for a client/server connection depends on several factors, including the client operatingsystem and Avamar server version. The Avamar Product Security Guide provides additional information.
9. From the Optionally select a proxy to perform backup list, select the proxy.
The default setting is Automatic, which enables the Avamar server to choose the best proxy for this operation.
10. Click NEXT.
The More Options window is displayed.
11. Set the plug-in options. The user guide for each plug-in provides details on each of the options.12. (Optional) Toggle the Show Advanced Options switch to view advanced configuration options.
The user guide for each plug-in provides details on each of the options.
13. Click FINISH.
Scheduling backups using the Policy wizardScheduled backups run automatically to ensure that backups occur on an ongoing basis. You can schedule backups to run daily, weekly, ormonthly.
About this task
You can schedule backups by using the Policy wizard to create a backup policy.
Perform the following steps within the Policy wizard.
Steps
1. Assign members to the new backup policy.2. Assign a dataset to the new backup policy.
To create a dataset, use the Policy wizard or select Settings > Dataset > Add.
3. Assign a schedule to the new backup policy.
To create a schedule, use the Policy wizard or select Settings > Schedule > Add.
4. Assign a retention policy to the new backup policy.
To create a retention policy, use the Policy wizard or select Settings > Retention > Add.
5. Enable scheduling for the backup policy.
Dataset catalogThe Avamar system includes a set of preconfigured datasets by default. You can use these datasets for scheduled backups of clients, oryou can create a custom dataset.
NOTE: You cannot edit or delete the settings for the Avamar server preconfigured installed datasets. Modification of a
user-defined dataset impacts the existing backup policies that use the selected dataset. If you edit the settings of a
user-defined dataset, the changes are enforced on all members of the backup policy, unless you override the backup
policy settings and assign another dataset at the client level.
Base DatasetThe Base Dataset defines a set of minimum, or baseline, backup requirements. The initial settings in the Base Dataset are:
• No source data plug-ins
88 Backup

• No explicit exclusion or inclusion list entries
It is essentially an empty dataset.
Default DatasetThe Default Dataset defines persistent backup selections for the Default Group. The initial settings in the Default Dataset are:
• All available source data plug-ins• No explicit exclusion or inclusion list entries
It ensures that all members of the Default Group can back up their client computers regardless of platform type.
The directories that are listed in the following table are also inherently excluded from all backups, although they do not explicitly appear inthe exclusion list.
Table 33. Directories excluded from Default Dataset backups
Exclusion Description
.snapshot/ NetApp mounts
VARDIR/f_cache.dat Local avtar file cache
VARDIR/p_cache.dat Local avtar “is present” cache
UNIX DatasetThe UNIX Dataset is optimized for use with AIX, FreeBSD, HP-UX, Linux, and Solaris clients. The initial settings in the UNIX Dataset are:
• Only the AIX, FreeBSD, HP-UX, Linux, Macintosh OS X, and Solaris file system source data plug-ins• Explicit exclusion of various temp directories (/tmp, /var/tmp, /usr/tmp), core dump files (core), and local cache files
(*cache.dat, *scan.dat)
• No explicit inclusion list entries
The directories that are listed in the following table are also inherently excluded from all UNIX Dataset backups, although they do notexplicitly appear in the exclusion list.
Table 34. Directories excluded from UNIX Dataset backups
Exclusion Description
.snapshot/ NetApp mounts
VARDIR/f_cache.dat Local avtar cache files
VARDIR/p_cache.dat Local avtar cache files
/proc Pseudo file system that cannot be restored
/dev Excluded only if not running as root
/devices Excluded only for Solaris
Windows DatasetThe Windows Dataset is optimized for use with Microsoft Windows clients. The initial settings in the Windows Dataset are:
• Only Windows file system source data plug-in• No explicit exclusion or inclusion list entries
The directories that are listed in the following table are also inherently excluded from all Windows Dataset backups, although they do notexplicitly appear in the exclusion list.
Table 35. Directories excluded from Windows Dataset backups
Exclusion Description
.snapshot/ NetApp mounts
VARDIR/f_cache.dat Local avtar cache files
Backup 89

Table 35. Directories excluded from Windows Dataset backups (continued)
Exclusion Description
VARDIR/p_cache.dat Local avtar cache files
All files that the following registry keys are referencing to:
• HKEY_LOCAL_MACHINE\SYSTEM\CurrentControlSet\Control\BackupRestore\FilesNotToBackup
• HKEY_CURRENT_USER\SYSTEM\CurrentControlSet\Control\BackupRestore\FilesNotToBackup
Files that are explicitly designated by Microsoft to exclude frombackups
Temporary Internet files Internet Explorer temporary files
outlook.ost Outlook local cache files
outlook\*.ost Outlook local cache files
VMware Image DatasetThe VMware Image Dataset is the default dataset for protecting VMware entities with image backup. In many respects, the VMwareImage Dataset is simpler than most other datasets:
• The only available source data plug-ins are Linux and Windows virtual disks, and both are selected by default.• The Select Files and/or Folders option, as well as the Exclusions and Inclusions tabs, are disabled.• Change block tracking is enabled by default using an embedded utilize_changed_block_list=true plug-in option statement.
The Avamar for VMware User Guide provides details on using the VMware Image Dataset to back up VMware entities.
Add a datasetA dataset specifies the data to include in a scheduled backup and the options to use for the backup. Create at least one dataset forscheduled backups on a client or group of clients. Create multiple datasets to segregate client data.
About this task
NOTE: When the Avamar server is using Data Domain for back-end storage, the Data Domain system is the default
backup storage location. The system can be changed in the Options tab.
Steps
1. In the AUI navigation pane on the left, click , and then click Settings.The Setting pane is displayed.
2. Click the Dataset tab.3. Click ADD.
The Create Dataset window is displayed.
4. In the Dataset Name field, type a name for the dataset.
The name can include alphanumeric characters (A-Z, a-z, 0–9) and the following special characters: period (.), hyphen (-), andunderscore (_). Do not use Unicode characters or the following special characters: ` ~ ! @ # $ % ^ & * ( ) = + [ ] { } | \ / ; : ' " < > , ?
5. In the Plugins list, select the plug-in to use for the backups.6. Click the Options tab, and then set plug-in options either by using the graphical controls or by typing option names and values as text
entries.
(Optional) Toggle the Show Advanced Options switch to view advanced configuration options.
Plug-in options enable you to further customize the behavior of a dataset. The user guide for each plug-in provides details on theoptions available for the plug-in.
7. Click the Source Data tab, and then define the source data plug-ins that contribute data to this dataset.
• To include data from all plug-ins on the client, select Select All Data for All Local File Systems.• To include data only from a specific plug-in and limit the dataset to specific data:
a. From the Plugins list, select the plug-in to use for the backups.
Additional options might be displayed below the Select Plug-In Type list.
90 Backup

b. To back up all available data with the plug-in:
○ Select the option.○ Select Select Files and/or Folders and then type the path to the data.
c. To type the path to the data to back up, type the path in the File/Folder Path field and then click Add.
You can limit scheduled backups to a set of data by specifying the path to the data in the dataset. The following rules applywhen you type the path:
○ If you are using a file system plug-in, the first occurrence of an asterisk (*) in a path is treated as a folder wildcard. Forexample, to specify the My Documents folder for all users on a Windows computer, type C:\Documents andSettings\*\My Documents.
○ To specify the Documents folder for all users on a Macintosh, type /Users/*/Documents.
○ When you specify a data path, only the first occurrence of an asterisk is treated as a folder wildcard. Subsequentoccurrences are interpreted literally.
○ The path can include alphanumeric characters (A-Z, a-z, 0–9) and an asterisk (*) as a wildcard. Do not use any of thefollowing characters in the data path: ~!@$^%(){}[]|,`;#:*?<>'"&.
8. Click SUBMIT.
Dataset changes take effect on the next scheduled backup. Backups that have already begun or have been completed are notaffected.
Edit a datasetTo edit a dataset, complete the following steps.
About this task
NOTE: You cannot edit or delete the settings for the Avamar server preconfigured installed datasets. Modification of a
user-defined dataset impacts the existing backup policies that use the selected dataset. If you edit the settings of a
user-defined dataset, the changes are enforced on all members of the backup policy, unless you override the backup
policy settings and assign another dataset at the client level.
Steps
1. In the AUI navigation pane on the left, click , and then click Settings.2. Click the Dataset tab.
The list of configured datasets be displayed.
3. Select a dataset from the list that you want to edit, and then click EDIT.The Edit DataSet window is displayed.
4. In the Edit DataSet window, complete the following tasks:
a. From the Plugins list, select the plug-in to use for the backups.b. On the Option tab, edit the plug-in options either by using the graphical controls or by typing option names and values as text
entries.
(Optional) Toggle the Show Advanced Options switch to view advanced configuration options.
Plug-in options enable you to further customize the behavior of a dataset. The user guide for each plug-in provides details on theoptions available for the plug-in.
c. Click the Source Data tab, and then define the source data plug-ins that contribute data to this dataset.
• To include data from all plug-ins on the client, select Select All Data for All Local File Systems.• To include data only from a specific plug-in and limit the dataset to specific data:
i. From the Plugins list, select the plug-in to use for the backups.
Additional options might be displayed below the Select Plug-In Type list.ii. To back up all available data with the plug-in:
○ Select the option.○ Select Select Files and/or Folders and then type the path to the data.
iii. To type the path to the data to back up, type the path in the File/Folder Path field and then click Add.
You can limit scheduled backups to a set of data by specifying the path to the data in the dataset. The following rules applywhen you type the path:
Backup 91

○ If you are using a file system plug-in, the first occurrence of an asterisk (*) in a path is treated as a folder wildcard. Forexample, to specify the My Documents folder for all users on a Windows computer, type C:\Documents andSettings\*\My Documents.
○ To specify the Documents folder for all users on a Macintosh, type /Users/*/Documents.
○ When you specify a data path, only the first occurrence of an asterisk is treated as a folder wildcard. Subsequentoccurrences are interpreted literally.
○ The path can include alphanumeric characters (A-Z, a-z, 0–9) and an asterisk (*) as a wildcard. Do not use any of thefollowing characters in the data path: ~!@$^%(){}[]|,`;#:*?<>'"&.
• To include data from all plug-ins on the client, select Select All Data for All Local File Systems.• To include data only from a specific plug-in and limit the dataset to specific data:
i. From the Plugins list, select the plug-in to use for the backups.
Additional options might appear below the Select Plug-In Type list.ii. To back up all available data with the plug-in:
○ Select the option.○ Select Select Files and/or Folders and then browse to the data to include in the backups.
iii. To type the path to the data to back up, type the path in the File/Folder Path field and then click Add.
You can limit scheduled backups to a set of data by specifying the path to the data in the dataset. You can browse to ortype the path to the data. Several rules apply when you type the path.
If you are using a file system plug-in, then the first occurrence of an asterisk (*) in a path is treated as a folder wildcard.For example, to specify the My Documents folder for all users on a Windows computer, type C:\Documents andSettings\*\My Documents. To specify the Documents folder for all users on a Macintosh, type /Users/*/Documents.
NOTE: When you specify a data path, only the first occurrence of an asterisk is treated as a folder
wildcard. Subsequent occurrences are interpreted literally.
The path can include alphanumeric characters (A-Z, a-z, 0–9) and an asterisk (*) as a wildcard. Do not use any of thefollowing characters in the data path: ~!@$^%(){}[]|,`;#:*?<>'"&.
5. Click SUBMIT.Dataset changes take effect on the next scheduled backup. Backups that have already begun or have been completed are notaffected.
Delete a datasetTo delete a dataset, complete the following steps.
Prerequisites
Ensure that the dataset is not currently assigned to a client or group. You cannot delete a dataset if it is assigned to a client or group.
About this task
NOTE: You cannot edit or delete the settings for the Avamar server preconfigured installed datasets. Modification of a
user-defined dataset impacts the existing backup policies that use the selected dataset. If you edit the settings of a
user-defined dataset, the changes are enforced on all members of the backup policy, unless you override the backup
policy settings and assign another dataset at the client level.
Steps
1. In the AUI navigation pane on the left, click , and then click Settings.2. Click the Dataset tab.
The list of configured datasets is displayed.
3. Select a dataset from the list that you want to delete, and then click DELETE.A confirmation message is displayed.
4. Click YES.
92 Backup

Managing schedulesThis section describes how to manage schedules.
Scheduling backups using the AUI Policy wizardScheduled backups run automatically to ensure that backups occur on an ongoing basis. You can schedule backups to run daily, weekly, ormonthly.
About this task
You can schedule backups by using the Policy wizard to create a backup policy.
Perform the following steps within the Policy wizard. The Avamar Administration Guide provides more information about policies,datasets, schedules, and retention settings.
Steps
1. Assign members to the new backup policy.2. Assign a dataset to the new backup policy.
To create a dataset, use the Policy wizard or select Settings > Dataset > Add.
3. Assign a schedule to the new backup policy.
To create a schedule, use the Policy wizard or select Settings > Schedule > Add.
4. Assign a retention policy to the new backup policy.
To create a retention policy, use the Policy wizard or select Settings > Retention > Add.
5. Enable scheduling for the backup policy.
SchedulesSchedules are reusable objects that control when backups, custom event profile email notifications, and policy-based replication occur.
Schedule types
You can configure an Avamar schedule to repeat a system activity at one of the intervals that are listed in the following table.
Table 36. Schedule types
Scheduletype
Description
Daily Repeats a system activity every day at one or more times of the day. With daily schedules, you must also limit theduration of the activity to prevent job overlap.
Weekly Repeats a system activity every week on one or more days of the week. With weekly schedules, you must also definethe earliest start time for the activity, as well as the time at which the activity is stopped, even if it is still in progress.
Monthly Repeats a system activity on a specific calendar date or on a designated day of the week each month, such as the firstSunday of every month. With monthly schedules, you must also define the earliest start time for the activity, as well asthe time at which the activity is stopped, even if it is still in progress.
Schedule start time, end time, and duration
When you create a schedule, you also define when the schedule should take effect, and when it should be discontinued. For example,assume that you know that the client computers that are used for a specific development project will be obsolete at a specific future date.You can create a schedule for backups that would automatically cease backups on a certain date. Similarly, if you are administering a largesite, you can create schedules ahead of time, assign them to backup policies, and then activate them on a certain date. These backuppolicy backups would not occur until the schedule took effect.
Because scheduled activities often straddle two calendar days, it is important to understand that Avamar allocates the full window of timeto any activity started by a schedule. For example, consider a schedule with an earliest start time of 10 p.m., a latest end time of 6 a.m.(the following morning), and an end after date of December 31 of the current calendar year. On the evening of December 31, the activitystarts as expected and runs until completed, typically sometime during the morning of January 1 the following year. However, beginningJanuary 1, the schedule does not start any new scheduled activities.
The following figure illustrates how the start time, end time, and duration of a schedule interact with one another, using the initial settingsof the Default schedule.
Backup 93

Figure 12. Schedule start time, end time, and duration
This system activity begins at 10 p.m. (22:00), and can run until 6 a.m. (06:00) the next day, creating an effective 8 hour duration.
In practice, scheduled activities rarely start or end precisely on time. Server load affects actual start times, and complexity of the activityaffects actual end times. The complexity of the activity includes the amount of new client data that must be backed up, the number ofbackup policy backups that are started, and the number of email messages that must be sent.
Specifying a schedule start time sets that time as the earliest point that the system activity can begin. Also, specifying a duration or endtime establishes the latest possible end time for the system activity.
Schedule time zones
When you create or edit schedules, all times are shown relative to the local time zone for the Avamar Administrator client. For example,assume that you create a schedule in the Pacific Standard time zone with a next runtime of 10 p.m..The next runtime for the scheduleappears as 1 a.m. the following day (3 hours later) for an administrative user in the Eastern Standard time zone.
Schedule catalogThe Avamar system includes a set of preconfigured schedules by default. You can use these schedules or create a custom schedule.
NOTE: You cannot edit or delete the settings for the Avamar server preconfigured installed schedules. Modification of a
user-defined schedule impacts the existing backup policies that use the selected schedule. If you edit the settings in
user-defined schedule, the changes are enforced on all members of the backup policy, unless you override the backup
policy settings and assign another schedule at the client level.
The following schedules are available by default.
Table 37. Schedule catalog
Schedule name Description
Default Schedule Controls backup scheduling for the Default Group. It is initially configured to run once per day at 10p.m. If you edit these settings, the changes are enforced on all members of the Default Group.
Default Replication Schedule Controls replication for replication groups.
Default Tiering Schedule Controls backup scheduling for cloud tiering that moves Avamar backups from Data Domain to thecloud and performs seamless recovery of these backups.
Daily Schedule Avamar supplies a predefined Daily Schedule.
Evaluation Schedule Controls when the Evaluation Profile email notification is sent. It is initially configured to run everyMonday at 6 a.m.
Notification Schedule Controls when custom event profile email notification messages are sent.
Override Daily Schedule Defines the available start times for clients that have the Override group schedules settingenabled. This schedule is editable. Copies of this schedule are not used with the Override groupschedules setting.
Statistics Schedule Controls how often various Avamar server statistics (for example, the Avamar server detail Bytesprotected value) are retrieved or calculated. The default setting for this schedule is hourly.
Usage Intelligence Schedule Controls how often the Avamar server collects and transfers reporting information to AvamarSupport via the ESRS gateway.
94 Backup

Add a schedule
Steps
1. In the AUI navigation pane on the left, click , and then click Settings.2. Click the Schedule tab.3. Click ADD.
The Create Schedule dialog box is displayed.4. In the Schedule Name field, type a name for the schedule.
Do not use any of the following characters in the name: ~!@$^%(){}[]|,`;#\/:*?<>'"&.
5. In the Backup Window field, type a number of hours.6. In the Recurrence Type section, choose the schedule type:
Table 38. Settings for each type of schedule
Scheduletype
Settings
Daily To select the recurrence pattern by interval, perform the following steps:
a. Select By interval.b. In the From field, select the time when the schedule should take effect. To make a schedule effective
immediately, select the current time.c. In the To field, select the time when the schedule should end.d. Select the interval.e. Click ADD.
The selected times appear in the list.f. Click NEXT.
To select the recurrence pattern by a point in time, perform the following steps:
a. Select By time point.b. Specify the time. To make a schedule effective immediately, select the current time.c. Click ADD.
The selected times appear in the list.d. Click NEXT.
NOTE: To prevent job overlap, limit the duration of scheduled system activities.
Weekly Select the check box next to the days of the week on which the schedule should run.
Monthly Choose whether to repeat the activity on a specific calendar date or on a designated day of the week each month:
• To repeat the activity on a specific calendar date, select Day of every month, and then select the day from thelist.
• To repeat the activity on a designated day of the week each month, select The ... of every month and thenselect the day from the lists.
7. Click NEXT.The Recurrence Pattern pane is displayed.
8. Select how often the schedule runs:
a. Select the recurrence pattern. You can choose between by interval or by time point.b. Select how long the interval runs and then click ADD.
The selected times appear in the list.c. Click NEXT.
The Activites Constraint page is displayed.9. On the Activities Constraint page, complete the following tasks:
a. In the Select schedule start time field, define the activity operating hours by using the At and From fields. You can modify thedate.
You can type the times, or select the time and use the arrow buttons to change the times.
Backup 95

The server workload affects the start time for an activity. Also, the first time that a backup is performed for any client, the backupis allowed to continue past the specified end time. This behavior is permitted because initial backups can take longer thansubsequent backups of the same client.
b. In the Select schedule stop time field, select an end date option for the schedule.
Choose when to discontinue the schedule:
• To enable a schedule to run indefinitely, select No End Date.• To discontinue a schedule on a specific date, select End after and then select a date from the list.
10. Click FINISH.
Edit a schedule
About this task
NOTE: You cannot edit or delete the settings for the Avamar server preconfigured installed schedules. Modification of a
user-defined schedule impacts the existing backup policies that use the selected schedule. If you edit the settings in
user-defined schedule, the changes are enforced on all members of the backup policy, unless you override the backup
policy settings and assign another schedule at the client level.
Steps
1. In the AUI navigation pane on the left, click , and then click Settings.2. Click the Schedule tab.3. Select a schedule and then click EDIT.
The Edit Schedule dialog box appears.4. Edit the schedule settings.5. Click OK.
Delete a scheduleEnsure that the schedule is not currently assigned to a group. If a schedule is assigned to a group, you cannot delete the schedule.
About this task
NOTE: You cannot edit or delete the settings for the Avamar server preconfigured installed schedules. Modification of a
user-defined schedule impacts the existing backup policies that use the selected schedule. If you edit the settings in
user-defined schedule, the changes are enforced on all members of the backup policy, unless you override the backup
policy settings and assign another schedule at the client level.
Steps
1. In the AUI navigation pane on the left, click , and then click Settings.2. Click the Schedule tab.3. Select the schedule, and then click DELETE.4. In the confirmation message dialog box, click YES .
Manage rulesRules are used by the Avamar Server for domain map and automatic backup policy assignment for auto-discovered VMs.
You can create a new rule, edit an existing rule, or delete a rule.
Create a ruleRules are used by the Avamar server for domain map and automatic backup policy assignment for autodiscovered VMs.
About this task
When creating rules, ensure that rules are mutually exclusive, to avoid the situation where a VM might qualify under multiple rules.
96 Backup

Steps
1. In the AUI navigation pane on the left, click , and then click Settings.2. Click the Rule tab.3. In the domain tree, select a vCenter domain or subdomain for the client.4. On the Setting page, complete the following tasks:
a. Click ADD.
The New Rule window is displayed.
5. In the Rule Name field, type a name for the rule.6. In the Match Type field, select whether the rule should match Any of the listed filter mechanisms, or All of them.
This selection allows you to configure multiple different filters to select VMs, and to determine how these filters interact with oneanother to select the correct virtual machines. For example, you might create a filter that uses a virtual machine folder path to selectvirtual machines, and another filter that uses a virtual machine naming convention.
Use this option to determine which virtual machines are included under this rule:
• To include only virtual machines that are in the defined folder path and also follow the naming convention, select All.
This step excludes virtual machines that are in the folder path but that do not follow the naming convention. It also excludes virtualmachines that follow the naming convention but are not in the folder path
• To include any virtual machines that are either in the virtual machine folder path or that follow the naming convention, select Any.
7. To add a filter:
a. Click .
This step adds a row to the list of filters.
b. In the Filter column, select a filter type.
For example, to create a filter that uses a virtual machine naming convention, select VM Name, or to create filter that uses avCenter VM Tag, select VM Tag.
c. In the Operator column, select the operand.
For example, if VM Name is selected for the filter type and begins with is selected for the operand, then all virtual machines whosenames begin with the filter text is selected.
d. In the Value column, type the filter text.
For example, to create a filter that selects all virtual machines whose names begin with the text string HR_, select VM Name forthe filter type, begins with for the operand, and type HR_ for the filter text.
8. To create additional filters, click .This step adds a row to the list of filters.
9. To delete an existing filter, click Delete.10. Click SUBMIT.
Changes made to tags may experience a delay of up to 12 hours before being enforced. For this reason, edit tags with caution, orperform a synchronized vCenter operation, which automatically synchronizes the vCenter with the Avamar server.
Edit a ruleWhen editing a rule, ensure that rules are mutually exclusive, to avoid the situation where a virtual machine might qualify under multiplerules.
Steps
1. In the AUI navigation pane on the left, click , and then click Settings.2. Click the Rule tab.3. In the domain tree, select a vCenter domain or subdomain for the client.4. In the Settings page, complete the following tasks:
a. Select a folder that contains a VMware entity.b. Select a rule from the list that you want to edit, and then click EDIT.
The Edit Rule window is displayed.
5. In the Rule Name field, type a name for the rule.6. In the Match Type field, select whether the rule should match Any of the listed filter mechanisms, or All of them.
Backup 97

This selection allows you to configure multiple different filters to select VMs, and to determine how these filters interact with oneanother to select the correct virtual machines. For example, you might create a filter that uses a virtual machine folder path to selectvirtual machines, and another filter that uses a virtual machine naming convention.
Use this option to determine which virtual machines are included under this rule:
• To include only virtual machines that are in the defined folder path and also follow the naming convention, select All.
This step excludes virtual machines that are in the folder path but that do not follow the naming convention. It also excludes virtualmachines that follow the naming convention but are not in the folder path.
• To include any virtual machines that are either in the virtual machine folder path or that follow the naming convention, select Any.
7. To add a filter:
a. Click .
This step adds a row to the list of filters.
b. In the Filter column, select a filter type.
For example, to create a filter that uses a virtual machine naming convention, select VM Name, or to create filter that uses avCenter VM Tag, select VM Tag.
c. In the Operator column, select the operand.
For example, if VM Name is selected for the filter type and begins with is selected for the operand, then all virtual machines whosenames begin with the filter text is selected.
d. In the Value column, type the filter text.
For example, to create a filter that selects all virtual machines whose names begin with the text string HR_, select VM Name forthe filter type, begins with for the operand, and type HR_ for the filter text.
8. To create additional filters, click .This step adds a row to the list of filters.
9. To delete an existing filter:
a. Select the filter.b. In the Actions column, click Delete.
10. Click SUBMIT.Changes made to tags may experience a delay of up to 12 hours before being enforced. For this reason, edit tags with caution, orperform a synchronized vCenter operation, which automatically synchronizes the vCenter with the Avamar server.
Delete a rule
Steps
1. In the AUI navigation pane on the left, click , and then click Settings.2. Click the Rule tab.3. In the domain tree, select a vCenter domain or subdomain for the client.4. In the Setting page, complete the following tasks:
a. Select a rule from the list.b. Click DELETE.
Retention policiesBackup retention policies enable you to specify how long to keep a backup in the system.
A retention policy is assigned to each backup when the backup occurs. Specify a custom retention policy when you perform an on-demand backup, or create a retention policy that is assigned automatically to a group of clients during a scheduled backup.
When the retention for a backup expires, then the backup is automatically marked for deletion. The deletion occurs in batches during timesof low system activity.
If required, you can manually change the retention setting for an individual backup that has already occurred. If you change a configuredretention policy, however, the change applies only to backups that occur after the change. The retention setting remains the same forbackups that have already been performed. Therefore, it is important to consider and implement the best retention policy for a site beforetoo many backups occur.
There are two types of retention settings:
• Basic retention settings specify a fixed expiration date.
98 Backup

• Advanced retention settings specify the number of daily, weekly, monthly, and yearly backups to keep.
Basic retention settingsBasic retention settings are used to assign a fixed expiration date to a backup using one the settings in the following table.
Table 39. Basic retention settings
Retention setting Description
Retention period Enables you to define a fixed retention period in days, weeks, months, or years after the backup is performed.For example, you could specify that backups expire after 6 months.
End date Enables you to assign a calendar date as the expiration date. For example, you could specify that backupsexpire on December 31, 2013.
No end date Enables you to keep backups indefinitely. This setting is useful for ensuring that all backups that are assignedthis retention policy are retained for the life of the system.
NOTE: For backups of 32-bit Windows or 32-bit Linux client computers, do not assign a retention period for a date after
February 7, 2106. If you assign an extended retention period to a 32-bit Windows client, the backup completes with
exceptions. For 32-bit Linux clients, the backups complete but do not appear in Avamar Administrator.
Advanced retention settingsWith advanced retention settings, you can assign the expiration of backups dynamically by using the number of daily backups, weeklybackups, monthly backups, and yearly backups to retain in the system.
For scheduled daily backups, some backups are automatically assigned an advanced retention type:
• The first successful scheduled backup each day is designated as the daily backup.• The first successful scheduled backup each week is designated as the weekly backup.• The first successful scheduled backup each month is designated as the monthly backup.• The first successful scheduled backup each year is designated as the yearly backup.
For assigning advanced retention types, each day begins at 00:00:01 GMT, each week begins on Sunday, each month begins on the firstcalendar day of that month, and each year begins on January 1.
NOTE: You cannot apply advanced retention settings to on-demand backups. On-demand backups can occur at any
time, which are inherently asynchronous— the system cannot tag them as daily, weekly, monthly, or yearly.
Always use daily scheduled backups with retention policies with advanced retention settings. The Always keep: n weeks of dailybackups setting has no effect unless there are daily backups in the system. Depending on the schedule you use, daily backups may not bein the system. For example, if you assign a schedule to a group that only performs weekly backups, then there are no daily backups in thesystem.
Retention policy catalogThe Avamar system includes a set of preconfigured retention policies by default. You can use these retention policies for scheduledbackups of clients, or you can create a custom retention policy.
NOTE: You cannot edit or delete the settings for the Avamar server preconfigured installed retention policies.
Modification of a user-defined retention policy impacts the existing backup policies that use the selected retention
policy. If you edit the settings in a user-defined retention policy, the changes are enforced on all members of the backup
policy, unless you override the backup policy settings and assign another retention policy at the client level.
The retention policies in the following table are available by default.
Table 40. Retention policy catalog
Retention policy name Description
Minimal Retention Enables you to enforce a minimum basic retention setting across an entire site. For example, you cankeep all backups for at least 90 days regardless of what other retention policies specify. This feature isintended to address the need of some enterprises to enforce site-wide minimum retention standardsregardless of what individual organizations might decide to implement with other retention policies.
Backup 99

Table 40. Retention policy catalog (continued)
Retention policy name Description
The Minimal Retention policy is a global system object that controls only the minimal retention setting.Therefore, you cannot assign the Minimal Retention policy to a backup policy.
Default Retention Defines backup retention settings for the Default Group. By default, the Default Retention policyassigns a retention period of 60 days and retains 60 days of daily backups.
End User On DemandRetention
Controls the retention settings for on-demand backups that the client begins with, such as using theBack Up Now command on the Avamar Windows client. Advanced retention settings are disabled onthis retention policy because advanced retention settings never apply to on-demand backups. The EndUser On Demand Retention policy is a global system object that only controls retention for on-demandbackups that the client begins with. Therefore, you cannot assign the End User On Demand Retentionpolicy to a backup policy.
Monthly Retention Sets the expiration date to 1 month after the backup is performed.
Weekly Retention Sets the expiration date to 1 week after the backup is performed.
Add a retention policyIn the Administration window, you can add, remove, or delete a retention policy.
About this task
NOTE: Best practice is to specify a retention that is greater than or equal to 14 days. When you create a retention policy
for less than 14 days, an alert is displayed.
Steps
1. In the AUI navigation pane on the left, click , and then click Settings.2. Click the Retention tab.3. Click ADD.
The Add Retention Policy dialog box is displayed.4. In the Retention Name field, type a name for the retention policy.
Do not use any of the following characters in the retention policy name: ~!@$^%(){}[]|,`;#\/:*?<>'"&.
5. To delete backups automatically after a specific number of days, weeks, months, or years:
a. Select Retention period.b. Specify the number of days, weeks, months, or years.
6. To delete backups automatically on a specific calendar date:
a. Select End date period.b. Browse to that date on the calendar.
7. To keep backups for the period that a client is active, select No end date.8. To override the retention policy for scheduled backups:
a. Select Override basic retention policy for scheduled backups.b. Specify the maximum number of daily, weekly, monthly, and yearly backups to retain.
9. Click SAVE.
Edit a retention policy
About this task
NOTE: You cannot edit or delete the settings for the Avamar server preconfigured installed retention policies.
Modification of a user-defined retention policy impacts the existing backup policies that use the selected retention
policy. If you edit the settings in a user-defined retention policy, the changes are enforced on all members of the backup
policy, unless you override the backup policy settings and assign another retention policy at the client level.
100 Backup

Steps
1. In the AUI navigation pane on the left, click , and then click Settings.2. Click the Retention tab.3. Select a retention policy and then click EDIT.
The Edit Retention Policy dialog box appears.4. Edit the retention policy settings.5. Click SAVE.
Delete a retention policyEnsure that the retention policy is not currently assigned to a client or a backup policy. You cannot delete a retention policy when it isassigned to a client or backup policy.
About this task
NOTE: You cannot edit or delete the settings for the Avamar server preconfigured installed retention policies.
Modification of a user-defined retention policy impacts the existing backup policies that use the selected retention
policy. If you edit the settings in a user-defined retention policy, the changes are enforced on all members of the backup
policy, unless you override the backup policy settings and assign another retention policy at the client level.
Steps
1. In the AUI navigation pane on the left, click , and then click Settings.2. Click the Retention tab.3. Select the retention policy, and then click DELETE.4. On the confirmation message dialog box, click YES.
Enforcing a minimum retention settingMinimal retention enables you to enforce a minimum basic retention setting across an entire site. For example, you can keep all backupsfor at least 90 days regardless of what other retention policies specify.
About this task
This feature is intended to address the need of some enterprises to enforce site-wide minimum retention standards regardless of whatindividual organizations might decide to implement with other retention policies.
To enforce minimal retention, enable and configure the Minimal Retention policy, which is a default retention policy in the system. TheMinimal Retention policy is a global system object that controls only the minimal retention setting. Therefore, you cannot assign theMinimal Retention policy to a group.
Steps
1. In Avamar Administrator, select Tools > Manage Retention Policies.The Manage All Retention Policies window is displayed.
2. Select the Minimal Retention policy and click Edit.The Edit Retention Policy dialog box appears.
3. Select Retention period.4. Specify the number of days, weeks, months, or years to ensure that backups are retained.5. Click OK.
Automatically retaining the last backupTo retain the last backup of all clients, even after the backup exceeds its retention period, enable last backup retention. Last backupretention changes the default retention behavior for client backups that occur after it is enabled. With last backup retention, the lastbackup of a client is not marked for deletion when its retention period expires. Instead, the latest backup is the “last backup” and theprevious “last backup” expires or is retained according to its retention policy.
About this task
Last backup retention is designed for clients that do not back up frequently. For those clients, the default behavior can lead to the lastbackup expiring before a new backup occurs and clients that do not have an available backup.
Backup 101

Clients that are not permanently connected to a domain, such as remote desktops and laptops, may encounter this situation morefrequently than clients that have uninterrupted server access.
NOTE: When you enable last backup retention, Avamar retains a single backup for each client, even if you perform
multiple types of backups of a client. For example, if you perform both file system and application backups of a client,
and the file system backup is the last backup, then all application backups can expire.
Steps
1. Open a command shell and log in by using one of the following methods:
• For a single-node server, log in to the server as admin.• For a multi-node server:
a. Log in to the utility node as admin.b. Load the admin OpenSSH key by typing the following command:
ssh-agent bashssh-add ~admin/.ssh/admin_key
2. Change directories by typing:
cd /usr/local/avamar/var/mc/server_data/prefs3. Open mcserver.xml in a text editor.
4. Find the dpn node.
5. In the dpn node, change the value of the keep_last_backup entry key from false to true.
6. Save the change and close the text editor.7. Stop and restart the MCS, and start the scheduler by typing the following commands:
dpnctl stop mcsdpnctl start mcsdpnctl start sched
8. Close the command shell.
About backup policiesAvamar uses backup policies to automate backups and enforce consistent rules and system behavior across an entire segment, or groupof the user community.
MembersMembers are client machines that have been added to a particular backup policy for performing scheduled backups. Because the normalrules for domain administrators apply, these clients must be located within the same domain or within a subdomain of where the backuppolicy exists.
Backup PolicyWhen you create a backup policy, specify the dataset, schedule, and retention policy for the group. These three objects comprise thebackup policy. The backup policy controls backup behavior for all members of the backup policy.
You can override backup policy dataset and retention settings for a client by making explicit dataset or retention assignments for theclient. However, schedules apply only to backup policies, not individual clients.
Default GroupThe Avamar system includes a Default Group. In the default Avamar server configuration, the Default Group always uses the systemdefault dataset, schedule, and retention policy. You cannot change these system default assignments. However, you can edit the settingswithin the system default dataset, schedule, and retention policy.
If you do not create a backup policy, new clients are automatically added to the Default Group.
VMware groupsThe following table describes the special groups that apply to VMware environments.
102 Backup

Table 41. VMware groups
Group Description
Default Group The Avamar system includes a Default Group. In the default Avamar server configuration, theDefault Group always uses the system default dataset, schedule, and retention policy. Youcannot change these system default assignments. However, you can edit the settings within thesystem default dataset, schedule, and retention policy.
If you do not create any other groups, then new clients are automatically added to the DefaultGroup.
Default Proxy Group The Default Proxy Group is the default group for VMware Image Proxy clients. You cannot deletethe Default Proxy Group. Enabling the Default Proxy Group does not conflict with scheduledbackups that other plug-ins perform that are configured on the proxy client.
Default Virtual Machine Group New virtual machine clients are automatically added to the Default Virtual Machine Group whenthey are registered. You cannot manually delete the Default Virtual Machine Group, but it isautomatically deleted when you delete the vCenter domain.
Managing backup policiesThe Policies page provides access to backup policy tasks and information.
The Policies page includes a summary of each backup policy on the selected Avamar server.
Backup policy objects contain the following child objects:
• Schedule—when a scheduled backup is performed• Retention—how long the backup is stored in the backup appliance• Dataset—optional backup parameters• Members—add and remove clients from a backup policy
Create a backup policyWhen you create a backup policy, you define the dataset, schedule, and retention settings that are applied to a client or a group of clients.A backup policy must contain at least one Avamar client. If the backup policy contains two or more clients, the clients must belong to thesame Avamar domain. You can override backup policy settings at the client level.
Steps
1. In the AUI navigation pane on the left, click , and then click Backup Policy.2. In the domain tree, select a domain or subdomain for the backup policy.
To select a subdomain for the backup policy, toggle the Include Sub-domain switch to on.
3. To add a backup policy, click ADD.The Policy wizard is displayed and opens to the Properties page.
Configure backup policy propertiesYou can configure backup policy properties, including creating a name for the backup policy, enabling the backup policy, setting anoverride schedule, and enabling auto proxy mapping.
About this task
Complete the following tasks from the Properties page of the Policy wizard.
To access the Properties page of the Policy wizard, in the AUI navigation pane on the left, click , click Backup Policy > ADD.
Steps
1. In the Name field, type a name for the backup policy.2. To use this backup policy for scheduled client backups, select the Enabled check box.
Clearing the check box disables backups for the backup policy.
3. To override the assigned schedule for this backup policy, select Override Schedule:
• To skip the next scheduled backup, select Skip Next Backup.
Backup 103

• To perform the next scheduled backup one time only, select Run Next Backup Once.
4. To enable Auto proxy mapping, select the check box.5. Select a proxy from the list.6. To apply the backup policy to selected clients or remove a backup policy from selected clients and complete the wizard, click NEXT.
The Members page is displayed.
Add or remove members to a backup policyYou can configure backup policy attributes, including applying the backup policy to selected clients or removing a backup policy fromselected clients. You can add clients when you create or add or remove clients when you edit a back policy.
About this task
To access the Members page of the Policy wizard, in the AUI navigation pane on the left, click , click Backup Policy.
Complete the following steps from the Members pane of the Policy wizard.
Steps
1. In the domain tree, select the domain for the backup policy.
You can only view clients in the domain for the login account. To view all clients, log in to the root domain.
2. To add a client to a backup policy:
a. In the list of clients, select the client that you want to add.b. Click NEXT.
When you complete this task, the Avamar server applies the backup policy to the selected clients.
3. To remove a client from a backup policy:
a. In the list of clients, clear the client that you want to remove.b. Click NEXT.
This step removes the association between selected clients and the backup policy. When you complete the task, the backup policy nolonger applies to the selected clients.
4. To add a dataset to a backup policy and complete the wizard, click NEXT.The Dataset pane appears.
Add a dataset to a backup policyYou can configure backup policy attributes, including adding a dataset.
About this task
Complete the following tasks from the Dataset page of the Policy wizard.
To access the Properties page of the Policy wizard, in the AUI navigation pane on the left, click , click Backup Policy > ADD.
NOTE: When the Avamar server is using Data Domain for back-end storage, the Data Domain system is the default
backup storage location. The system can be changed in the Options tab.
Steps
1. In the Dataset field, select a dataset from the drop-down list.2. In the Dataset Name field, type a name for the dataset.
The name can include alphanumeric characters (A-Z, a-z, 0–9) and the following special characters: period (.), hyphen (-), andunderscore (_). Do not use Unicode characters or the following special characters: ` ~ ! @ # $ % ^ & * ( ) = + [ ] { } | \ / ; : ' " < > , ?
3. To include data from all plug-ins on the client, select Select All Data for All Local File Systems.4. From the Plugins list, select the plug-in to use for the backups.5. Click the Option tab, and then set plug-in options either by using the graphical controls or by typing option names and values as text
entries.
(Optional) Toggle the Show Advanced Options switch to view advanced configuration options.
Plug-in options enable you to further customize the behavior of a dataset. The user guide for each plug-in provides details on theoptions available for the plug-in.
104 Backup

6. Click the Source Data tab, and then define the source data plug-ins that contribute data to this dataset.
• To include data from all plug-ins on the client, select Select All Data for All Local File Systems.• To include data only from a specific plug-in and limit the dataset to specific data:
a. From the Plugins list, select the plug-in to use for the backups.
Additional options might be displayed below the Select Plug-In Type list.b. To back up all available data with the plug-in:
○ Select the option.○ Select Select Files and/or Folders and then type the path to the data.
c. To type the path to the data to back up, type the path in the File/Folder Path field and then click Add.
You can limit scheduled backups to a set of data by specifying the path to the data in the dataset. The following rules applywhen you type the path:
○ If you are using a file system plug-in, the first occurrence of an asterisk (*) in a path is treated as a folder wildcard. Forexample, to specify the My Documents folder for all users on a Windows computer, type C:\Documents andSettings\*\My Documents.
○ To specify the Documents folder for all users on a Macintosh, type /Users/*/Documents.
○ When you specify a data path, only the first occurrence of an asterisk is treated as a folder wildcard. Subsequentoccurrences are interpreted literally.
○ The path can include alphanumeric characters (A-Z, a-z, 0–9) and an asterisk (*) as a wildcard. Do not use any of thefollowing characters in the data path: ~!@$^%(){}[]|,`;#:*?<>'"&.
7. To add a schedule to a backup policy and complete the wizard, click NEXT.The Schedule page is displayed.
Add a schedule to a backup policyYou can configure backup policy attributes, including adding a schedule.
About this task
Complete the following tasks from the Schedule page of the Policy wizard.
To access the Schedule page of the Policy wizard, in the AUI navigation pane on the left, click , click Backup Policy > ADD.
Steps
1. To select an existing schedule, select a schedule type from the Schedule drop-down list, and then click NEXT.The Retention window is displayed.
2. To edit a schedule:
a. In the Schedule field, select a schedule that you would like to edit from the drop-down list.b. Toggle the Edit Schedule switch to ON.c. Edit the schedule settings, and then click NEXT.
The Retention window is displayed3. To add a schedule:
a. In the Schedule field, select New from the drop-down list.b. In the Schedule Name field, type a name for the schedule.
Do not use any of the following characters in the name: ~!@$^%(){}[]|,`;#\/:*?<>'"&.
c. In the Backup Window field, type a number of hours.d. In the Recurrence Type section, choose the schedule type:
Table 42. Settings for each type of schedule
Scheduletype
Settings
Daily To select the recurrence pattern by interval, perform the following steps:
i. Select By interval.ii. In the From field, select the time when the schedule should take effect. To make a schedule effective
immediately, select the current time.
Backup 105

Table 42. Settings for each type of schedule (continued)
Scheduletype
Settings
iii. In the To field, select the time when the schedule should end.iv. Select the interval.v. Click ADD.
The selected times appear in the list.vi. Click NEXT.
To select the recurrence pattern by a point in time, perform the following steps:
i. Select By time point.ii. Specify the time. To make a schedule effective immediately, select the current time.iii. Click ADD.
The selected times appear in the list.iv. Click NEXT. The Retention window is displayed
NOTE: To prevent job overlap, limit the duration of scheduled system activities.
Weekly i. Select the check box next to the days of the week on which the schedule should run.ii. In the Select schedule start time field, define the activity operating hours by using the At and From fields.
You can modify the date.
You can type the times, or select the time and use the arrow buttons to change the times.
The server workload affects the start time for an activity. Also, the first time that a backup is performed forany client, the backup is allowed to continue past the specified end time. This behavior is permitted becauseinitial backups can take longer than subsequent backups of the same client.
iii. In the Select schedule stop time field, select an end date option for the schedule.
Choose when to discontinue the schedule:
• To enable a schedule to run indefinitely, select No End Date.• To discontinue a schedule on a specific date, select End after and then select a date from the list.
iv. Click NEXT. The Retention window is displayed
Monthly i. Choose whether to repeat the activity on a specific calendar date or on a designated day of the week eachmonth:
• To repeat the activity on a specific calendar date, select Day of every month, and then select the dayfrom the list.
• To repeat the activity on a designated day of the week each month, select The ... of every month andthen select the day from the lists.
ii. In the Select schedule start time field, define the activity operating hours by using the At and From fields.You can modify the date.
You can type the times, or select the time and use the arrow buttons to change the times.
The server workload affects the start time for an activity. Also, the first time that a backup is performed forany client, the backup is allowed to continue past the specified end time. This behavior is permitted becauseinitial backups can take longer than subsequent backups of the same client.
iii. In the Select schedule stop time field, select an end date option for the schedule.
Choose when to discontinue the schedule:
• To enable a schedule to run indefinitely, select No End Date.• To discontinue a schedule on a specific date, select End after and then select a date from the list.
iv. Click NEXT. The Retention window is displayed
106 Backup

Apply retention to a backup policyYou can configure backup policy attributes, including adding retention.
About this task
Complete the following tasks from the Retention page of the Policy wizard.
To access the Schedule page of the Policy wizard, in the AUI navigation pane on the left, click , click Backup Policy > ADD.
NOTE: Best practice is to specify a retention that is greater than or equal to 14 days. When you create a retention policy
for less than 14 days, an alert is displayed.
Steps
1. To select an existing schedule, select a schedule type from the Retention drop-down list, and then click NEXT.The Summary window is displayed
2. To edit retention policy:
a. In the Retention field, select a retention policy that you would like to edit from the drop-down list.b. Toggle the Edit Retention switch to ON.c. Edit the retention settings, and then click NEXT.
The Retention window is displayed3. To add a retention:
a. In the Retention field, select New from the drop-down list.b. In the Retention Name field, type a name for the schedule.
Do not use any of the following characters in the name: ~!@$^%(){}[]|,`;#\/:*?<>'"&.
c. In the Backup Window field, type a number of hours.d. In the Recurrence Type section, choose the schedule type:
4. To delete backups automatically after a specific number of days, weeks, months, or years:
a. Select Retention period.b. Specify the number of days, weeks, months, or years.
5. To delete backups automatically on a specific calendar date:
a. Select End date period.b. Browse to that date on the calendar.
6. To keep backups for the period that a client is active, select No end date.7. To override the retention policy for scheduled backups:
a. Select Override basic retention policy for scheduled backups.b. Specify the maximum number of daily, weekly, monthly, and yearly backups to retain.
8. To review a summary of the backup policy and complete the wizard, click NEXT.The Summary page is displayed.
Edit a backup policyYou can edit a backup policy, including setting properties and adding or modifying members, datasets, schedules, and retention.
Steps
1. In the AUI navigation pane on the left, click , and then click Backup Policy.The Policy page appears.
2. In the domain tree, select a domain or subdomain for the backup policy.
To select a subdomain for the backup policy, toggle the Include Sub-domain switch to on.
3. Select a backup policy from the list, and then click Edit.
The Policy wizard is displayed where you can modify the required backup policy settings.
Backup 107

Copying a backup policyYou can copy backup policies within the same domain. You cannot copy a backup policy to another domain.
Steps
1. In the AUI navigation pane on the left, click , and then click Backup Policy.The Policy page is displayed.
2. Select the backup policy that you want to copy.3. Select MORE ACTIONS > Copy Policy.
The Copy Policy dialog box is displayed.4. Type a name for the new backup policy.5. To copy the entire client list to this new backup policy, select the Include Client Members check box.6. Click OK.
Enabling and disabling a backup policyYou can disable a backup policy to prevent scheduled backups from occurring for a group of clients. This step is typically done to place thesystem in a state that supports various maintenance activities.
About this task
If you disable a backup policy, you must re-enable the backup policy to resume scheduled backups.
Steps
1. In the AUI navigation pane on the left, click , and then click Backup Policy.The Policy page is displayed.
2. In the domain tree, select a domain or subdomain for the backup policy.
To select a subdomain for the backup policy, toggle the Include Sub-domain switch to on.
3. Select a backup policy from the list.4. To enable a backup policy, click MORE ACTIONS > Enable Policy.5. To disable a backup policy, click MORE ACTIONS > Disable Policy.
Delete a backup policy
Prerequisites
When deleting a backup policy, assign the clients in the backup policy that you would like to delete to a different backup policy so thatscheduled backups for the clients can continue uninterrupted.
Steps
1. In the AUI navigation pane on the left, click , and then click Backup Policy.2. In the domain tree, select a domain or subdomain for the backup policy.
To select a subdomain for the backup policy, toggle the Include Sub-domain switch to on.
3. Select the backup policy that you want to remove, and then click DELETE.
A confirmation message is displayed.
4. Click YES.
Start an on-demand backup of a backup policyProtecting an instance assigns the instance to a particular backup policy. You can assign more than one backup policy to an instance.
Steps
1. In the AUI navigation pane on the left, click , and then click Backup Policy.The Policy page appears.
2. In the domain tree, select a domain or subdomain for the backup policy.
108 Backup

To select a subdomain for the backup policy, toggle the Include Sub-domain switch to on.
3. Select a backup policy from the list, and then click START BACKUP.The instance receives protection that is based on the schedule and retention period that are specified in the backup policy.
Enabling a scheduled backup for a backup policyScheduled backups occur only for enabled backup policies. Backup policies are disabled by default unless you select the Enabled checkbox on the first page of the New Policy wizard. If you did not enable the backup policy when you created it, use the menu options in thePolicy window to enable backups.
Steps
1. In the AUI navigation pane on the left, click , and then click Backup Policy.The Policy page is displayed.
2. In the domain tree, select a domain or subdomain for the backup policy.
To select a subdomain for the backup policy, toggle the Include Sub-domain switch to on.
3. Select a backup policy from the list.4. To enable a backup policy, click MORE ACTIONS > Enable Policy.5. To disable a backup policy, click MORE ACTIONS > Disable Policy.
Monitoring backupsYou can monitor and view status information for backup and restore operations by using the Activity Monitor.
About this task
To access the Activity Monitor, open the navigation pane, and then click Activity. The Activity Monitor appears with a list of allactivities.
NOTE: The AUI Activity Monitor window has been optimized for at least 1366 pixels-wide screens. Display issues might
occur for smaller screens. To properly display the AUI, ensure that your display is at least 1366 pixels wide.
The Activity Monitor provides you with options to filter the information that appears:
• Filter activities by duration—By default, the Activity Monitor displays the most recent 5,000 client activities. To select a differentduration, in the Filter activities by duration drop-down list, select Last 24 hours or Last 72 hours.
• Filter activities by domain—By default, the Activity Monitor displays all activities regardless of domain. To display only the activitiesfor a specific domain, in the Filter activities by domain drop-down list, select a domain or subdomain.
• Filter activities by status—By default, the Activity Monitor displays all activities regardless of status.
To display only activities with a specific status, at the top of the Activity Monitor, select one of the following options:
○ Canceled○ Completed○ Completed with Exceptions○ Failed○ Running○ Waiting
To filter activities by client, start time, plug-in, or type, click in their respective column.
The Activity Monitor displays the date and time that an activity began, and the total number of bytes examined during an activity.
To view activity details, expand the Details pane, by clicking .
Backup 109

Cancel backupsYou can cancel a backup any time before it completes. The cancellation might take 5 minutes or longer. The backup might completebefore the cancellation finishes.
Steps
1. In the AUI navigation pane on the left, click , and then click Activity.The Activity Monitor appears with a list of activities.
2. Select the backup from the list.3. Click CANCEL.
A confirmation dialog box is displayed.4. Click YES.
Managing completed backupsAfter you perform an on-demand or scheduled backup, you can validate the backup, change settings for the backup, or delete the backup.
Finding a completed backup to manageYou can find a completed backup by searching for a backup that occurred on a specific calendar date or during a specific date range, or bysearching for a backup with a specific retention type.
About this task
NOTE: Avamar generally supports the use of specific supported international characters in directory, folder, and
filenames. However, proper display of international language characters is contingent on the client computer’s Java
locale and installed system fonts being compatible with the original language. If you browse backups that were created
with international characters and a compatible font is not installed, then any characters that the system cannot resolve
appear as rectangles. This action is a normal limitation of that particular situation and does not affect the ability to
restore these directories, folders, or files. The Avamar Release Notes provide additional international language support
information.
Steps
1. In the AUI navigation pane on the left, click , and then click Asset Management.The Asset Management window appears.
2. In the domain tree, select the domain for the client.3. From the list of clients, select the client with the backups to manage.4. In the Client Summary pane on the right, click VIEW MORE.5. Click the Backups tab.
A list of completed backups for this client appears. Any backup in this list can be used to restore the client.
6. To locate backups by date:
a. Click .b. Specify the date range in the From and To fields.c. Click RETRIEVE.
The list of backups for the date range appears.
110 Backup

Changing the expiration date for a backupYou can change the date that a backup expires. When the backup expires, Avamar users cannot recover data from the expired backup. Agarbage collection process runs on a nightly basis to clean up and reclaim space from orphaned data (data that is unique to the expiredbackups).
About this task
The expiration date can be a specific date that you select or a retention period of a certain number of days, weeks, months, or years. Youcan configure a backup to remain in backup storage for as long as the client remains active on the Avamar server.
Steps
1. In the AUI navigation pane on the left, click , and then click Asset Management.The Asset Management window is displayed.
2. In the domain tree, select the domain for the client.3. From the list of clients, select the client with the backups to manage.4. In the Client Summary pane on the right, click VIEW MORE.5. Click the Backup tab.
A list of completed backups for this client is displayed. Any backup in this list can be used to restore the client.
6. Select the backup that you would like to change the expiration date.7. Select MORE ACTIONS > Change expiration date.
The Change expiration date dialog box is displayed.8. Select the new expiration date:
• To automatically delete this backup from the Avamar server after a specific amount of time, select Retention period and thenspecify the number of days, weeks, months, or years for the retention period.
• To automatically delete this backup from the Avamar server on a specific calendar date, select End date and browse to that dateon the calendar.
• To keep this backup for as long as this client remains active in the Avamar server, select No end date.9. Click OK.
A confirmation message is displayed.
Changing the retention type for a backupTo support certain advanced features, Avamar Administrator automatically assigns one or more retention types to every backup. Forexample, the first backup that is created on an Avamar system is tagged as a daily, weekly, monthly, or yearly. You can manually changethe retention types assigned to a backup.
About this task
When you manually change the retention types assigned to a backup, especially one that has multiple retention types, ensure that you arenot inadvertently removing a weekly, monthly, or yearly backup that you should retain. For example, consider a backup that is assigneddaily, weekly, monthly, and yearly retention types. If you remove the yearly retention type designation, you might not have another yearlybackup in the system for quite a long time.
Steps
1. In the AUI navigation pane on the left, click , and then click Asset Management.The Asset Management window is displayed.
2. In the domain tree, select the domain for the client.3. From the list of clients, select the client with the backups to manage.4. In the Client Summary pane on the right, click VIEW MORE.5. Click the Backup tab.
A list of completed backups for this client is displayed. Any backup in this list can be used to restore the client.
6. Select the backup that you would like to change the expiration date.7. Select MORE ACTIONS > Change retention type.
The Change retention type dialog box is displayed.8. Select one of the following retention types for the backups:
Backup 111

• To explicitly assign a daily, weekly, monthly, or yearly retention type to this backup, select Tags and then select the check box nextto the retention type.
• If you do not want to explicitly assign a daily, weekly, monthly, or yearly retention type to the backup, select Not tagged. Thebackup is designated as untagged.
9. Click OK.A confirmation message is displayed.
Validating a backup by using Avamar AdministratorYou can verify that files can be restored from a backup. This validation starts a “virtual” restore of all files in the backup, but does notactually restore any files to the client file system.
Steps
1. In Avamar Administrator, click the Backup & Restore launcher link.The Backup, Restore and Manage window appears.
2. Find the backup. Finding a completed backup to manage on page 110 provides instructions.3. In the Backup History list, select the backup to validate.4. Select Actions > Validate Backup.
The Select Client to Perform Validation dialog box appears.5. Select the client on which to validate the backup:
• To validate the backup on the same client from which the backup was originally performed, select Validate using the backupclient.
• To validate the backup on a different client, select Validate using a different client, and then click Browse to browse to theclient.
6. From the Validation Plug-in Type list, select the plug-in on which to validate the backup. Only the plug-ins that are installed on theselected client appear in the list.
7. From the Avamar encryption method list, select the encryption method to use for client/server data transfer during the validation.
NOTE: The default encryption setting for backup validations is high, regardless of the encryption setting that is used
for the original backup.
8. Click OK.A confirmation message appears.
9. Click OK.
Next steps
Backup validations appear as activities in the Activity window. You can monitor and cancel the backup validation activity the same waythat you monitor or cancel a backup. Monitoring backups on page 109 and Cancel backups on page 51 provide instructions.
Viewing backup statisticsYou can view detailed statistics for completed backups from the Dashboard.
About this task
To access the dashboard, in the AUI navigation pane on the left, click , and then click Dashboard.
The Jobs | Backups pane of the Dashboard window provides statistics for any stored backup.
Table 43. Jobs | Backups pane
Status Description
Running Indicates the running backup activities.
Scheduled Indicates the schedules backup activities that are queued to start.
Complete Indicates the number of hosts that backed up successfully during the last job, which is updated after each backupjob. The job must run again to reflect changes to a job between backups. For example, if a job reports that 10 hostswere successfully backed up, the system edits the job so only one host remains. This number continues to be 10 untilthe job runs again. If successful, the number changes to one.
112 Backup

Table 43. Jobs | Backups pane (continued)
Status Description
Failed Indicates the number of hosts that did not back up successfully the last time the backup job ran, updated after eachbackup job. The job must run again to reflect changes to a job between backups. For example, if a job reports that 10hosts failed to back up, the system edits the job so only one host remains. This number continues to be 10 until thejob runs again. If the job fails, the number changes to one.
Information in the backup statistics dialog boxThe following information is available on the tabs of the Backup Statistics dialog box.
Table 44. Backup statistics dialog box information
Tab Information
Details Detailed information from the v_activities_2 database view.The Avamar Reports Guide provides more information about thev_activities_2 database view.
Files A list of files that are included in the backup.
File Aggregation A representative sampling of resource-intensive file types that areincluded in the backup, and aggregates deduplication statistics byfile type.
Options Any special options for the backup.
Errors Any errors that occurred during the backup.
Deleting a backupWhen deleting a backup, Avamar immediately and permanently deletes all data in that backup from the server.
Steps
1. In the AUI navigation pane on the left, click , and then click Asset Management.The Asset Management window is displayed.
2. In the domain tree, select the domain for the client.3. From the list of clients, select the client with the backups to manage.4. In the Client Summary pane on the right, click VIEW MORE.5. Click the Backup tab.
A list of completed backups for this client is displayed. Any backup in this list can be used to restore the client.
6. Select the backup that you would like to delete, and then click DELETE.A confirmation message is displayed.
7. Click YES.
Backup 113

Restore and Recovery
Topics:
• Restoring data from a backup• Monitor restores• Cancel restores• Windows client system recovery• Red Hat and CentOS Linux system recovery• SUSE Linux system recovery• Oracle Solaris system recovery
Restoring data from a backupYou can find a backup to restore either by date or by the contents of the backup. When you perform the restore, you can restore to eitherthe original location, a different location, or multiple locations.
About this task
NOTE: The options for the restore destination depend on the plug-in type. For example, the SQL Server plug-in enables
you to restore to a file instead of to SQL Server, and you cannot restore to multiple locations with the Oracle plug-in.
The user guide for each plug-in provides details on the available options and how to perform each available type of
restore.
Finding a backupThe first step to restore data is to find the backup with the data that you want to restore. You can find Avamar client backups bysearching either for a specific date or for specific content.
About this task
Locate backups by date when one or more of the following situations apply:
• You have saved all data for the client in a single backup set.• The exact pathname or name of the data to restore is unknown.• The backup that you want to restore is before a specific date or event. For example, you know the approximate date when data was
lost or corrupted. in which you can search for a backup before that date.• The specific types of backups are known. For example, scheduled disaster recovery backups are running every Wednesday and
Saturday night and full volume backups daily. When rebuilding a server, select the disaster recovery backup with the date closest tothe event that caused the loss of data.
Locate backups by the content of the backup when one or more of the following situations apply:
• You have backed up data on the client in separate backup sets.• You want to view multiple versions of the same file so that you can decide the version to restore.• The date of the backup or the content of a backup is unknown, but you know the name of the data to restore.
NOTE: Avamar generally supports the use of specific supported international characters in directory, folder, and
filenames. However, proper display of international language characters is contingent on the client computer’s Java
locale and installed system fonts being compatible with the original language. If you browse backups that were created
with international characters and a compatible font is not installed, then any characters that the system cannot resolve
appear as rectangles. This action is a normal limitation of that particular situation and does not affect the ability to
restore these directories, folders, or files. The Avamar Release Notes provide additional international language support
information.
7
114 Restore and Recovery

Finding a backup by date
Steps
1. In the AUI navigation pane on the left, click , and then click Asset Management.The Asset Management window is displayed.
2. In the domain tree, select the domain for the client.3. From the list of clients, select the client with the backups to manage.4. In the Client Summary pane on the right, click VIEW MORE.5. Click the Backup tab.
A list of completed backups for this client is displayed. Any backup in this list can be used to restore the client.
6. To locate backups by date:
a. Click SEARCH.b. Specify the date range in the From and To fields.c. Click RETRIEVE.
The list of backups for the date range is displayed.
Restoring to the original client
Steps
1. In the AUI navigation pane on the left, click , and then click Asset Management.The Asset Management window is displayed.
2. In the domain tree, select the domain for the client.
You cannot view clients outside the domain for the login account. To view all clients, log in to the root domain.
A list of Avamar clients is displayed in the pane below the domains list.3. From the list of clients, select the client computer to recover.4. (Optional) To locate backups by date:
a. In the right pane, click VIEW MORE.b. Click SEARCH.c. In the From and To fields, specify the date range.d. Click RETRIEVE.e. In the list of backups, select a backup.
The list of backups for the date range is displayed.5. Click the Restore tab.
The Restore wizard is displayed and the Destination Client pane is displayed on the right.
6. In the Destination Client pane, perform the following steps:
a. Select Restore to original client.b. Click NEXT.
The Backup Content pane is displayed.
7. In the Backup Content pane, perform the following steps:
a. In the left pane, select the folder from the tree.
The Backup Content pane displays a list of databases within the backup.
b. In the right pane, select the databases that you want to restore.c. Click NEXT.
The Destination Location pane is displayed.8. In the Destination Location pane, perform the following steps:
a. Select Restore everything to its original location.b. Click Next.
The More Options pane is displayed.
9. (Optional) In the More Option pane, toggle the Show Advanced Options switch to view advanced configuration options.
The user guide for each plug-in provides details on each of the options.
10. Click NEXT.
Restore and Recovery 115

The Summary page is displayed.11. Review the provided information, and then click FINISH.
Restoring to a different client
Steps
1. In the AUI navigation pane on the left, click , and then click Asset Management.The Asset Management window is displayed.
2. In the domain tree, select the domain for the client.
You cannot view clients outside the domain for the login account. To view all clients, log in to the root domain.
A list of Avamar clients is displayed in the pane below the domains list.3. From the list of clients, select the client computer to recover.4. (Optional) To locate backups by date:
a. In the right pane, click VIEW MORE.b. Click SEARCH.c. In the From and To fields, specify the date range.d. Click RETRIEVE.e. In the list of backups, select a backup.
The list of backups for the date range is displayed.5. Click the Restore tab.
The Restore wizard is displayed and the Destination Client pane is displayed on the right.
6. In the Destination Client pane, perform the following steps:
a. Select Restore everything to a different client.b. In the domain tree, select the domain for the client.c. In the list of clients, select the destination client.
The client is displayed in the Destination Client field.d. Click NEXT.
The Backup Content pane is displayed.
7. In the Backup Content pane, perform the following steps:
a. In the left pane, select the folder from the tree.
The Backup Content pane displays a list of databases within the backup.
b. In the right pane, select the databases that you want to restore.c. Click NEXT.
The Destination Location pane is displayed.8. In the Destination Location pane, perform the following steps:
a. Select Restore everything to a different location.b. In the Restore Location field, type the file path of the target location where you want to restore the data.
For example: E:/dbrestore_dir/
c. Click NEXT.
The More Options pane is displayed.
9. (Optional) In the More Option pane, toggle the Show Advanced Options switch to view advanced configuration options.
The user guide for each plug-in provides details on each of the options.
10. Click NEXT.
The Summary page is displayed.11. Review the provided information, and then click FINISH.
116 Restore and Recovery

Monitor restoresYou can monitor and view status information for backup and restore operations in the Activity Monitor.
About this task
To access the Activity Monitor, open the navigation pane, and then click Activity. The Activity Monitor appears with a list of allactivities.
NOTE: The AUI Activity Monitor window has been optimized for at least 1366 pixels-wide screens. Display issues might
occur for smaller screens. To properly display the AUI, ensure that your display is at least 1366 pixels wide.
The Activity Monitor provides you with options to filter the information that appears:
• Filter activities by duration—By default, the Activity Monitor displays the most recent 5,000 client activities. To select a differentduration, in the Filter activities by duration drop-down list, select Last 24 hours or Last 72 hours.
• Filter activities by domain—By default, the Activity Monitor displays all activities regardless of domain. To display only the activitiesfor a specific domain, in the Filter activities by domain drop-down list, select a domain or subdomain.
• Filter activities by status—By default, the Activity Monitor displays all activities regardless of status.
To display only activities with a specific status, at the top of the Activity Monitor, select one of the following options:
○ Canceled○ Completed○ Completed with Exceptions○ Failed○ Running○ Waiting
To filter activities by client, start time, plug-in, or type, click in their respective column.
The Activity Monitor displays the date and time that an activity began, and the total number of bytes examined during an activity.
To view activity details, expand the Details pane, by clicking .
Cancel restoresYou can cancel a restore any time before it completes. The cancellation might take 5 minutes or longer. The restore might completebefore the cancellation finishes.
Steps
1. In the AUI navigation pane on the left, click , and then click Activity.The Activity Monitor appears with a list of activities.
2. Select the restore from the list.3. Click CANCEL.
A confirmation dialog box is displayed.
4. Click YES.
Windows client system recoveryComprehensive details about the necessary backups for Windows client system recovery and the procedures to perform the recovery areavailable in the Avamar for Windows Server User Guide.
Restore and Recovery 117

Red Hat and CentOS Linux system recoveryThe following topics describe how to restore a Red Hat or CentOS Linux client system to its original system state.
Reconstructing the partition tableBefore you perform system recovery of a Linux client, you must reconstruct the partition table that is used in the original Avamar backup.This action is performed by running an avtar --showlog mounts command on a temporary client computer. This action thenexamines the output to determine the number and size of partitions to create when you install the operating system on the targetrecovery client.
Steps
1. Locate the backup:
The information that is acquired in this step is used to perform a system state recovery.
a. In the AUI navigation pane on the left, click , and then click Asset Management.
The Asset Management window appears.
b. In the domain tree, select the domain for the client.c. From the list of clients, select the original Linux client to recover.d. In the Client Summary pane on the left, click VIEW MORE.e. Click the Backups tab.f. To use to recover the system state, find the full system backup.g. Note the backup label number.h. Leave the AUI open for the remainder of the system state recovery procedure.
2. On a temporary client computer with network connectivity to the Avamar server, open a command shell and log in as root.3. Type the following command:
/usr/local/avamar/bin/avtar --avamaronly --showlog mounts --server=Avamar_server --id=username --ap=password --path=/domain/client --labelnumber=nwhere:
• Avamar_server is the IP address or fully qualified hostname as defined in DNS for the Avamar server.• username and password are the login credentials for a user account with a sufficient role and privileges to perform a restore.• /domain/client is the full location of the original Linux client on the Avamar server.• n is the label number of the backup to use for the system state recovery.
4. To locate entries beginning with mount_decision, examine the command output.
For example:
mount_decision: reason="starting_point" fstype="ext3" path="/"mount_decision: reason="default_backup" fstype="ext3" path="/boot"mount_decision: reason="default_backup" fstype="ext3" path="/home"These entries are for the mount points on the original system. Earlier in the output, there are entries for each of these mount points.For example:
mount: status="user_directed_backup" path="/" hdev="/dev/root" kind="ext3" blksize=4096freeblks=1189334 maxblks=2405872 freefiles=2259654 maxfiles=2432000 dev=2050mount: status="default_backup" path="/boot" hdev="/dev/sda1" kind="ext3" blksize=1024freeblks=183371 maxblks=194442 freefiles=50167 maxfiles=50200 dev=2049mount: status="default_backup" path="/home" hdev="/dev/sdb1" kind="ext3" blksize=4096freeblks=1027161 maxblks=5158925 freefiles=2530548 maxfiles=2621440 dev=2065These entries contain mount point size and path information.
5. Calculate the original file system size or each mount point in bytes by multiplying the blksize value by the maxblks value.
NOTE: Multiplying the blksize value by the maxblks value calculates the free space that is used on the original
device. However, you should create the root partition with an additional 2 GB to 3 GB of free space to ensure
sufficient space for the minimal install that is used for the restore process.
118 Restore and Recovery

6. Note which paths are mounted from separate file systems. This information is required later in the restore process.
Preparing the target recovery client
Steps
1. Ensure that the recovery destination disk is connected to the target recovery client.2. Perform a minimal installation of a compatible operating system. For the purposes of this procedure:
• Minimal installation means that desktop environment entries such as Desktop - Gnome should not be selected for installation.• In the Customize Now dialog box Base System category, select the Base option. Leave all other options disabled.• Compatible operating system means the same version. For example, if the original client backup on the Avamar server was
performed on an RHEL3 client, then install RHEL3 on the target recovery client.• Use the information that you gathered during Reconstructing the partition table on page 118 to create as many partitions as
necessary to replicate the original configuration.
3. (Optional) Save a copy of the /etc/fstab file so that you can compare it to the restored /etc/fstab file.
4. Install the Avamar Client for Linux. The Avamar Backup Clients User Guide provides instructions.
Performing system recovery of a Red Hat or CentOS Linuxclient
Prerequisites
Perform the steps in Reconstructing the partition table on page 118 and Preparing the target recovery client on page 119.
Steps
1. Start the recovery target client from the install media (first CD/DVD):
• On Red Hat or CentOS 4 or 5, type linux rescue at the command prompt.
• On Red Hat or CentOS 6.0, select Rescue installed system.• On Red Hat or CentOS 7.0 or later:
a. Select Troubleshooting.
i. Select Rescue a Red Hat Enterprise Linux system.2. Follow the onscreen instructions.
Be sure to enable networking by providing IP address, network mask, default gateway, and DNS server values when prompted. Youcan use a temporary hostname and IP, or the original information from the computer that you are restoring.
3. On Red Hat or CentOS 7.0 or later, set up networking by performing the following steps:
a. Log in as root.b. chroot /mnt/sysimagec. Modify the /etc/hosts, /etc/resolv.conf, and /etc/sysconfig/network as appropriate for the network
configuration.d. Restart the network service so that the changes take effect:
service network restarte. Type exit to go back single-user mode.
4. Allow the installer to search for installations and mount the /mnt/sysimage file system as read/write.
The /mnt/sysimage file system is the target of the restore, and is also referred to as the recovery destination disk.
NOTE: You cannot restore the root file system directly to /mnt/sysimage because there is no method to restrict
the restore operation to only the local partition without traversing network mount points. Therefore, a restore
directly to /mnt/sysimage might copy files from all the partitions, and /mnt/sysimage could fill up before all
required files were restored.
5. Ensure that the following directories are all present in the LD_LIBRARY_PATH system variable:
• /lib
Restore and Recovery 119

• /lib64• /usr/lib• /usr/lib64• /mnt/sysimage/lib• /mnt/sysimage/lib64• /mnt/sysimage/usr/local/avamar/libIf any directories are missing from LD_LIBRARY_PATH, add them.
6. Create a temporary /tmp/avtar.cmd flag file with a UNIX text editor. For example:
cd /tmpvi avtar.cmd--bindir=/mnt/sysimage/usr/local/avamar/bin--vardir=/mnt/sysimage/usr/local/avamar/var--sysdir=/mnt/sysimage/usr/local/avamar/etc--server=Avamar_server--account=/domain/client--id=username--ap=password--target=.where:
• Avamar_server is the Avamar server IP address or fully qualified hostname as defined in DNS.• /domain/client is the full location of the original Linux client on the Avamar server.• username and password are the login credentials for a user account with sufficient role and privileges to perform the restore.
7. Restore most of the directories that originally existed under root (/):
NOTE: Do not restore files that are on file systems other than the root file system at this time. These directories and
files are restored later in this procedure.
a. Create a temporary restore directory under the client /mnt/sysimage directory and change directory to it by typing commandssimilar to the following examples:
mkdir /mnt/sysimage/restorecd /mnt/sysimage/restore
b. Restore the contents of the root file system from the backup by typing the following command on a single command line:
/mnt/sysimage/usr/local/avamar/bin/avtar.bin -x --flagfile=/tmp/avtar.cmd --labelnumber=n[--exclude=./boot --exclude=./home] /where n is the label number of the backup to use for the system state recovery.
Use --exclude=path options to exclude paths that were identified as separate mount points. These directories and files areseparately restored later in this procedure.
The first two --exclude options in the previous command are included as an example. Replace the values with optionsappropriate to the system that you are restoring. Specify exclude options relative to the root of the original backup. For example,--exclude=./boot instead of --exclude=/boot.
c. For each directory that was restored, delete the original directory from /mnt/sysimage, and move the restored directory fromthe /mnt/sysimage/restore directory to /mnt/sysimage by typing commands similar to the following examples:
rm -rf /mnt/sysimage/etcmv /mnt/sysimage/restore/etc /mnt/sysimage/etc
d. Repeat the previous step for each directory that successfully restored to /mnt/sysimage/restore.
8. Restore individual files in the root (/) directory:
a. Change directory to /mnt/sysimage/restore by typing the following command:
cd /mnt/sysimage/restoreb. Restore the individual files in the root (/) directory by typing the following commands:
mv ./* /mnt/sysimagemv ./.* /mnt/sysimage
120 Restore and Recovery
9. Restore other mount points:
a. Check that file systems are mounted as expected by typing df -h at the command prompt.
b. Compare the output to the expected set of mounted file systems. If there are discrepancies, mount the devices onto the correctmount points.
c. Change directory to each mount point by typing a command similar to the following example:
cd /mnt/sysimage/homed. Create a temporary restore directory, then change directory to it by typing commands similar to the following examples:
mkdir ./restorecd ./restore
e. Restore the contents of the mount point by typing the following command:
/mnt/sysimage/usr/local/avamar/bin/avtar.bin -x --flagfile=/tmp/avtar.cmd --labelnumber=n /home
where n is the label number of the backup to use for the restore, and /home is an example mount point.
f. Return to the mount point directory, and delete all files except for the restore directory by typing commands similar to thefollowing examples:
alias ls=/usr/bin/lscd /mnt/sysimage/home; rm -rf `ls --hide restore`rm -rf ./.*
g. Change directory to the restore directory, then move the contents into the correct place in the mount point by typing thefollowing command:
cd ./restore;mv `ls -A ./` ..h. Remove the restore directory by typing the following commands:
cd ..rmdir restore
i. Repeat steps d through i for each remaining mount point.10. Perform final system checks:
a. Inspect /mnt/sysimage/etc/fstab, and verify that there are valid statements for each file system to be mounted on thenew system.
There are three ways that devices might be listed in the fstab file: device path, volume label, and Universally Unique Identifier(UUID).
You can determine this information about the file systems by typing /mnt/sysimage/lib/udev/vol_id device_path,where device_path is the /dev path to the device.
If that program is not present on the system, type /mnt/sysimage/sbin/blkid device_path.
If you created partitions manually during the minimal system install, the device UUIDs might have changed. Update the deviceUUIDs in /mnt/sysimage/etc/fstab. If some volumes are missing expected labels, set the label by typing /mnt/sysimage/sbin/e2label device_path label.
b. Re-examine the fstab carefully.
The restored system cannot start correctly when the fstab entries do not exactly match the storage device configuration. Therescue system on the install media has difficulty discovering which file systems to mount to /mnt/sysimage.
NOTE: If you saved a reference copy of the fstab file when you were preparing the target client for recovery,
then you can find the disk information in that file. For systems with few manual changes to the restored fstabfile, it might be possible to use the reference fstab file instead of the restored copy of the file.
c. Verify that no more files are present in /mnt/sysimage/restore by typing the following command:
ls -al /mnt/sysimage/restored. If the directory is empty, remove it by typing the following command:
rmdir /mnt/sysimage/restoree. If the command fails because the directory is not empty, then there might be directories that you failed to move in when you
restored most of the directories in root (/). Move the directories to the proper restore locations.11. Exit the command shell and restart the system by typing exit.
Restore and Recovery 121

If you are rebooting a Red Hat or CentOS 6 system, a menu appears.12. Select reboot, then OK and press Enter.
The system restarts.13. Eject the install media and start normally.14. Confirm correct client operation.
Troubleshooting system recovery of a Red Hat or CentOSLinux clientThe following topics provide details on troubleshooting issues that may occur after you perform system recovery of a Red Hat or CentOSLinux client.
Troubleshooting a start failure after system recoveryIf the restored system does not start at the end of the restore procedure, then the version of GRUB installed by the minimal OS might bedissimilar to the previous version on the server. Start into the restore environment and reinstall GRUB.
Steps
1. Start into the restore environment by starting the client from the install media with the rescue option.2. If the startup process cannot find the restored operating system, then its fstab is probably configured incorrectly. Mount the
partitions manually, and correct the contents of the file.3. Reinstall GRUB by typing the following commands:
chroot /mnt/sysimagegrub-install devicewhere device is the start device (for example, /dev/sda).
4. Exit the chroot environment by typing exit.
5. Exit the command shell and restart the system by typing exit.If you are rebooting a Red Hat or CentOS 6 system, a menu appears.
6. Select reboot, then OK and press Enter.The system restarts.
7. Eject the install media and start normally.
Restoring network settings after system recovery of a Linux clientIf the operating system detects that you have restored the system to new hardware, it might revert the network settings to defaults (forexample, DHCP name resolution instead of static IP). You can recover the previous network settings by manually reconfiguring thesettings.
To examine the previous settings, open the .bak files in /etc/sysconfig/network-scripts in a text editor. These files containuseful information, but should not be used in the current configuration in an unmodified form, since they include MAC address informationfrom the previous hardware.
SUSE Linux system recoveryThe following topics describe how to restore a SUSE Linux client system to its original system state.
Reconstructing the partition tableBefore you perform system recovery of a Linux client, you must reconstruct the partition table that is used in the original Avamar backup.This action is performed by running an avtar --showlog mounts command on a temporary client computer. This action thenexamines the output to determine the number and size of partitions to create when you install the operating system on the targetrecovery client.
Steps
1. Locate the backup:
122 Restore and Recovery

The information that is acquired in this step is used to perform a system state recovery.
a. In the AUI navigation pane on the left, click , and then click Asset Management.
The Asset Management window appears.
b. In the domain tree, select the domain for the client.c. From the list of clients, select the original Linux client to recover.d. In the Client Summary pane on the left, click VIEW MORE.e. Click the Backups tab.f. To use to recover the system state, find the full system backup.g. Note the backup label number.h. Leave the AUI open for the remainder of the system state recovery procedure.
2. On a temporary client computer with network connectivity to the Avamar server, open a command shell and log in as root.3. Type the following command:
/usr/local/avamar/bin/avtar --avamaronly --showlog mounts --server=Avamar_server --id=username --ap=password --path=/domain/client --labelnumber=nwhere:
• Avamar_server is the IP address or fully qualified hostname as defined in DNS for the Avamar server.• username and password are the login credentials for a user account with a sufficient role and privileges to perform a restore.• /domain/client is the full location of the original Linux client on the Avamar server.• n is the label number of the backup to use for the system state recovery.
4. To locate entries beginning with mount_decision, examine the command output.
For example:
mount_decision: reason="starting_point" fstype="ext3" path="/"mount_decision: reason="default_backup" fstype="ext3" path="/boot"mount_decision: reason="default_backup" fstype="ext3" path="/home"These entries are for the mount points on the original system. Earlier in the output, there are entries for each of these mount points.For example:
mount: status="user_directed_backup" path="/" hdev="/dev/root" kind="ext3" blksize=4096freeblks=1189334 maxblks=2405872 freefiles=2259654 maxfiles=2432000 dev=2050mount: status="default_backup" path="/boot" hdev="/dev/sda1" kind="ext3" blksize=1024freeblks=183371 maxblks=194442 freefiles=50167 maxfiles=50200 dev=2049mount: status="default_backup" path="/home" hdev="/dev/sdb1" kind="ext3" blksize=4096freeblks=1027161 maxblks=5158925 freefiles=2530548 maxfiles=2621440 dev=2065These entries contain mount point size and path information.
5. Calculate the original file system size or each mount point in bytes by multiplying the blksize value by the maxblks value.
NOTE: Multiplying the blksize value by the maxblks value calculates the free space that is used on the original
device. However, you should create the root partition with an additional 2 GB to 3 GB of free space to ensure
sufficient space for the minimal install that is used for the restore process.
6. Note which paths are mounted from separate file systems. This information is required later in the restore process.
Preparing the target recovery client
Steps
1. Ensure that the recovery destination disk is connected to the target recovery client.2. Perform a minimal installation of a compatible operating system. For the purposes of this procedure:
• Minimal installation means that only Base System and Minimal System (Appliances) packages are installed from the Softwareselection page. Clear the selection of all other packages so that they are not installed.
• Compatible operating system means the same version. For example, if the original client backup on the Avamar server wasperformed on an SLES10 client, then install SLES10 on the target recovery client.
Restore and Recovery 123

• Use the information that you gathered during Reconstructing the partition table on page 118 to create as many partitions asnecessary to replicate the original configuration.
3. (Optional) Save a copy of the /etc/fstab file so that you can compare it to the restored /etc/fstab file.
4. Install the Avamar Client for Linux. The Avamar Backup Clients User Guide provides instructions.
Performing system recovery of a SUSE Linux client
Prerequisites
Perform the steps in Reconstructing the partition table on page 118 and Preparing the target recovery client on page 123.
Steps
1. Start the recovery target client from the install media (first CD/DVD) and select Rescue System.2. Open a command shell on the recovery target client and log in as root.3. Mount the root partition that is created in the minimal install to /mnt by typing the following command:
mount /dev/sda# /mntwhere /dev/sda# is the device that contains the root file system. If the drive was configured to use Linux Logical VolumeManagement, then the root device might be in the form of /dev/VolGroup##/LogVol##.
4. Rebind the pseudo-file systems into the /mnt tree by typing the following commands:
mount --rbind /proc /mnt/procmount --rbind /sys /mnt/sysmount --rbind /dev /mnt/dev
5. Change the current file system root by typing the following command:
chroot /mnt6. Start the network as configured in the prerequisites by typing the following command:
rcnetwork start7. Mount the auto-mount file systems and verify that the correct file systems were mounted by typing the following command:
mount -a;df -h8. If any file systems are missing (for example, if /boot is not set to auto-mount), then manually mount them to the correct locations by
using additional mount commands.
9. Exit the chroot environment by typing exit.
10. Copy the network name resolution file from the chroot environment into the working restore environment by typing the followingcommand:cp /mnt/etc/resolv.conf /etc/resolv.conf
11. Ensure that the following directories are all present in the LD_LIBRARY_PATH system variable:
• /lib• /lib64• /usr/lib• /usr/lib64• /mnt/lib• /mnt/lib64• /mnt/usr/local/avamar/libIf any directories are missing from LD_LIBRARY_PATH, add them.
12. Create a temporary /tmp/avtar.cmd flag file with a UNIX text editor. For example:
cd /tmpvi avtar.cmd--bindir=/mnt/usr/local/avamar/bin--vardir=/mnt/usr/local/avamar/var--sysdir=/mnt/usr/local/avamar/etc--server=Avamar_server--account=/domain/client--id=username
124 Restore and Recovery

--ap=password--target=.where:
• Avamar_server is the Avamar server IP address or fully qualified hostname as defined in DNS.• /domain/client is the full location of the original Linux client on the Avamar server.• username and password are the login credentials for a user account with sufficient role and privileges to perform the restore.
13. Restore most of the directories that originally existed under root (/):
NOTE: Do not restore files that are on file systems other than the root file system at this time. These directories and
files are restored later in this procedure.
a. Create a temporary restore directory under the client /mnt directory and change directory to it by typing commands similar to thefollowing examples:
mkdir /mnt/restorecd /mnt/restore
b. Restore the contents of the root file system from the backup by typing the following command on a single command line:
/mnt/usr/local/avamar/bin/avtar.bin -x --flagfile=/tmp/avtar.cmd --labelnumber=n [--exclude=./boot --exclude=./home] /where n is the label number of the backup to use for the system state recovery.
Use --exclude=path options to exclude paths that were identified as separate mount points. These directories and files areseparately restored later in this procedure.
The first two --exclude options in the previous command are included as an example. Replace the values with optionsappropriate to the system that you are restoring. Specify exclude options relative to the root of the original backup. For example,--exclude=./boot instead of --exclude=/boot.
c. For each directory that was restored, delete the original directory from /mnt, and move the restored directory from the /mnt/restore directory to /mnt by typing commands similar to the following examples:
rm -rf /mnt/etcmv /mnt/restore/etc /mnt/etc
d. Repeat the previous step for each directory that successfully restored to /mnt/restore.
14. Restore individual files in the root (/) directory:
a. Change directory to /mnt/restore by typing cd /mnt/restore.
b. Restore the individual files in the root (/) directory by typing the following commands:
mv ./* /mntmv ./.* /mnt
15. Restore other mount points:
a. Check that file systems are mounted as expected by typing df -h at the command prompt.
b. Compare the output to the expected set of mounted file systems. If there are discrepancies, mount the devices onto the correctmount points.
c. Change directory to each mount point by typing a command similar to the following example:
cd /mnt/homed. Create a temporary restore directory, then change directory to it by typing commands similar to the following examples:
mkdir ./restorecd ./restore
e. Restore the contents of the mount point by typing the following command:
/mnt/usr/local/avamar/bin/avtar.bin -x --flagfile=/tmp/avtar.cmd --labelnumber=n /homewhere n is the label number of the backup to use for the restore, and /home is an example mount point.
f. Return to the mount point directory, and delete all files except for the restore directory by typing commands similar to thefollowing examples:
Restore and Recovery 125

alias ls=/usr/bin/lscd /mnt/home; rm -rf `ls --hide restore`rm -rf ./.*
g. Change directory to the restore directory, then move the contents into the correct place in the mount point by typing thefollowing command:
cd ./restore;mv `ls -A ./` ..h. Remove the restore directory by typing the following commands:
cd ..rmdir restore
i. Repeat steps d through i for each remaining mount point.16. Perform final system checks:
a. Inspect /mnt/etc/fstab, and verify that there are valid statements for each file system to be mounted on the new system.
There are three ways that devices might be listed in the fstab file: device path, volume label, and Universally Unique Identifier(UUID).
You can determine this information about the file systems by typing /mnt/lib/udev/vol_id device_path, wheredevice_path is the /dev path to the device.
If you created partitions manually during the minimal system install, the device UUIDs might have changed. Update the deviceUUIDs in /mnt/etc/fstab. If some volumes are missing expected labels, set the label by typing /mnt/sbin/e2labeldevice_path label.
b. Re-examine the fstab carefully.
The restored system cannot start correctly when the fstab entries do not exactly match the storage device configuration. Therescue system on the install media has difficulty discovering which file systems to mount to /mnt.
NOTE: If you saved a reference copy of the fstab file when you were preparing the target client for recovery,
then you can find the disk information in that file. For systems with few manual changes to the restored fstabfile, it might be possible to use the reference fstab file instead of the restored copy of the file.
c. Verify that no more files are present in /mnt/sysimage/restore by typing the following command:
ls -al /mnt/restored. If the directory is empty, remove it by typing the following command:
rmdir /mnt/restoree. If the command fails because the directory is not empty, then there might be directories that you failed to move in when you
restored most of the directories in root (/). Move the directories to the proper restore locations.17. Restart the system by typing reboot.
18. Eject the install media and start normally.19. Confirm correct client operation.
Troubleshooting system recovery of a SUSE Linux clientThe following topics provide details on troubleshooting issues that may occur after you perform system recovery of a SUSE Linux client.
Troubleshooting a boot failure after system recoveryIf the restored system does not start at the end of the restore procedure, then the version of GRUB installed by the minimal OS might bedissimilar to the previous version on the server. Boot into the restore environment and reinstall GRUB.
Steps
1. Boot into the restore environment:
a. Boot the recovery target client from the install media (first CD/DVD) and select Rescue System.b. Open a command shell on the recovery target client and log in as root.c. Mount the root partition that is created in the minimal install to /mnt by typing the following command:
mount /dev/sda# /mnt
126 Restore and Recovery

where /dev/sda# is the device that contains the root file system. If the drive was configured to use Linux Logical VolumeManagement, then the root device might be in the form of /dev/VolGroup##/LogVol##.
d. Rebind the pseudo-file systems into the /mnt tree by typing the following commands:
mount --rbind /proc /mnt/procmount --rbind /sys /mnt/sysmount --rbind /dev /mnt/dev
e. Change the current file system root by typing the following command:
chroot /mntf. Start the network as configured in the prerequisites by typing the following command:
rcnetwork startg. Mount the auto-mount file systems and verify that the correct file systems were mounted by typing the following command:
mount -a;df -hh. If any file systems are missing (for example, if /boot is not set to auto-mount), then manually mount them to the correct
locations by using additional mount commands.
2. Reinstall GRUB by typing the following commands:
chroot /mntgrub-install devicewhere device is the start device (for example, /dev/sda).
3. Exit the chroot environment by typing exit.
4. Reboot the system by typing reboot.
5. Eject the install media and start normally.
Restoring network settings after system recovery of a Linux clientIf the operating system detects that you have restored the system to new hardware, it might revert the network settings to defaults (forexample, DHCP name resolution instead of static IP). You can recover the previous network settings by manually reconfiguring thesettings.
To examine the previous settings, open the .bak files in /etc/sysconfig/network-scripts in a text editor. These files containuseful information, but should not be used in the current configuration in an unmodified form, since they include MAC address informationfrom the previous hardware.
Oracle Solaris system recoveryThe following topics describe how to restore an Oracle Solaris client system to its original system state.
Preparing for Oracle Solaris system recoveryEnsure that the environment meets the following prerequisites before you perform system recovery for an Oracle Solaris system.
Available backup with critical system filesTo successfully restore an Oracle Solaris client system to its original system state, you must have an Avamar backup of the entire local filesystem and the following critical system files and virtual file systems. This action is performed by forcing traversal of the targets that arelisted in the following table during a backup.
Table 45. Target locations for system recovery backups of an Oracle Solaris client
Target Description
mntfs /etc/svc/volatiletmpfs /etc/mnttabcachefs Solaris Cache File System
fdfs Solaris File Descriptor File System
Restore and Recovery 127

Table 45. Target locations for system recovery backups of an Oracle Solaris client (continued)
Target Description
fifofs Solaris FIFO File System
namefs Solaris Name File System
specfs Solaris Device Special File System
swapfs Solaris Swap File System
tfs Solaris Translucent File System
To ensure that these targets are included in a backup, use one of the following backup methods:
• In Avamar Administrator, explicitly add these targets in an on-demand backup or dataset by specifyingmntfs,tmpfs,cachefs,fdfs,fifofs,namefs,specfs,swapfs,tfs in the Force traversal of the specified file systemtype(s) box in the plug-in options.
• Specify --forcefs=”mntfs,tmpfs,cachefs,fdfs,fifofs,namefs,specfs,swapfs,tfs” on the avtar commandline.
Available /var and /opt file systemsThe original file system tables must have partitions for /opt and /var. The partitions for /opt and /var are mounted when you startSolaris in read-only mode.
If the partitions do not mount, then you must create new, temporary file systems for /opt and /var when you install a minimal version ofSolaris on the client.
Other file systemsIf you are using zfs or any other add-on file system, ensure that these file systems are correctly re-created and mounted beforebeginning system recovery.
Installation of a minimal version of SolarisCreate a file system layout that matches the original system as closely as possible. Ensure that there are separate file systems for /optand /var.
Performing system recovery of an Oracle Solaris client
Prerequisites
Perform the steps in Preparing for Oracle Solaris system recovery on page 127.
Steps
1. Start from CD by typing reboot -- cdrom or by changing the boot order in the BIOS menu, depending on the platform.
2. (Solaris 11 and 10 only) At the boot options menu, select one of the following options:
• 3. Solaris Interactive Text (Desktop session)• 4. Solaris Interactive Text (Console session)
3. Continue through the prompts, providing the client hostname, IP address, default gateway, and corporate DNS server name whenprompted to do so.
4. Exit the command prompt and return to a shell prompt:
• On Solaris 8, press ! when you are prompted to install software for Solaris with Solaris Web Start.• On Solaris 10 or 11, press F5 to exit when you are prompted to select an installation type, and then press F2 to confirm the exit.
5. Mount the /partition under /a as the target of the restore by typing the following command:
mount /dev/dsk/c1t0d0s0 /aUse the correct site-specific disk partition and mount parameters for the root volume.
6. Mount the /opt partition under /opt by typing the following command:
128 Restore and Recovery

mount /dev/dsk/c1t0d0s5 /optUse the correct site-specific disk partition and mount parameters for the /opt volume.
7. Mount the /var partition under /var by typing the following command:
mount /dev/dsk/c1t0d0s4 /varUse the correct site-specific disk partition and mount parameters for the /var volume.
8. Mount any additional file systems in their respective mount points under /a.
Create the mount point if does not exist. For example, to mount file system /data01 on c1t0d0s7, type the following command:
mount /dev/dsk/c1t0d0s7 on /a/data01
9. Install the proper version of the Avamar Client for Solaris software by using the instructions in the Avamar Backup Clients User Guide.
NOTE: The installation program displays a warning about root (/) having 0 free bytes, as well as errors related to
read-only file systems when trying to create /etc/init.d/avagent and various links in /usr/bin and /etc/rc.d/rcX.d. However, despite these warnings, all the binaries are correctly installed in /opt/AVMRclnt/bin.
10. Restore /etc to /a/etc by typing the following commands:
cd /a/etc/opt/AVMRclnt/bin/avtar -x --server=Avamar_server --id=username --password=password --account=/domain/client --target=. /etc --labelnumber=n --overwrite=alwayswhere:
• Avamar_server is the hostname or IP address of the Avamar server.• username and password are the Avamar login credentials for a user with a role that allows access to the backups for this client.• /domain/client is the Avamar domain and Solaris client to restore.• n is the label number of the backup to restore. If you do not specify a label number, then the most recent backup is used for the
restore.
NOTE: You cannot restore the root file system directly to /a, because there is no way to restrict the restore
operation to only the local partition without traversing network mount points. A restore directly to /a might copy
files from all partitions, causing /a to fill up before all required files are restored.
11. Inspect /a/etc/vfstab to verify the original mount points for the local file system.
12. In Avamar Administrator, click the Backup & Restore launcher link.The Backup, Restore and Manage window is displayed.
13. Click the Restore tab.14. In the clients tree, select the original Solaris client.15. Find and select the backup for the restore.16. Examine the directories and files that originally existed under root (/).17. For each directory that originally existed under root (/), perform the following steps:
a. If the directory does not exist, then manually create an empty directory with the same name under /a.
b. Change directory to that directory.c. From the command line, restore the contents of the directory from the backup.
For example, consider the following commands to restore /usr:
mkdir /a/usr; cd /a/usr/opt/AVMRclnt/bin/avtar -x --server=Avamar_server --id=username --password=password --account=/domain/client --labelnumber=n --overwrite=always --target=. /usrIf /opt and /var were originally on the root partition, then you can restore to /a/opt and /a/var. If /opt and /var wereseparate file systems, then restore to new, temporary locations, such as /a/newopt and /a/newvar. After completing all restores,move the contents of /a/newopt to /opt and /a/newvar to /var.
18. To restore the individual files that originally existed under root, run the restore command with the --norecursionoption to restorefiles without descending into subdirectories:
/opt/AVMRclnt/bin/avtar -x --server=Avamar_server --id=username --password=password --account=/domain/client --labelnumber=n --norecursion --overwrite=always --target=. /
19. Restart the client normally and confirm correct operation.
Restore and Recovery 129

Server Administration
Topics:
• Server shutdown and restart• Suspending and resuming server activities• Managing client sessions• Managing client agents and plug-ins• Backup and maintenance windows• Checkpoints• Activating the Avamar software and installing a server license• Managing services• Changing server passwords and OpenSSH keys• MCS configuration settings• Using network address translation (NAT)• Editing network settings for a single-node server• Adding a custom security notification for web browser logins• Viewing and editing server contact information• Migrating backups
Server shutdown and restartThe components that make up an Avamar server are shut down in stages:
• A shutdown of the Avamar software or individual subsystems as part of maintenance and other indicated activities.• A shutdown of the Avamar software, operating system, and hardware as part of a full power-down.
The following topics describe both processes in greater detail.
Administering the Avamar subsystemsThe dpnctl program enables you to gracefully shut down and restart the Avamar software or selected subsystems via the command-lineinterface. This process is independent of restarting the operating system.
Shutting down or restarting the Avamar software stops or restarts all of the Avamar subsystems as a group.
Shutting down the Avamar software
Prerequisites
Ensure that there is a recent and validated checkpoint before you perform a full shutdown.
Steps
1. Open a command shell and log in by using one of the following methods:
• For a single-node server, log in to the server as admin.• For a multi-node server:
a. Log in to the utility node as admin.b. Load the admin OpenSSH key by typing the following command:
ssh-agent bashssh-add ~admin/.ssh/admin_key
2. Type dpnctl stop.
8
130 Server Administration
A confirmation message prompts whether to shut down the local instance of EM Tomcat.3. Type y to shut down the local EM Tomcat instance, and then press Enter.
The output displays the status of the shutdown process until the shut down is complete.
Restarting the Avamar software
Steps
1. Open a command shell and log in by using one of the following methods:
• For a single-node server, log in to the server as admin.• For a multi-node server:
a. Log in to the utility node as admin.b. Load the admin OpenSSH key by typing the following command:
ssh-agent bashssh-add ~admin/.ssh/admin_key
2. Type dpnctl start.The output displays a confirmation message.
3. Type y to begin with restarting the software, and then press Enter.The output displays the status of the restart process until the restart is complete.
Stopping the MCS
Steps
1. Open a command shell and log in by using one of the following methods:
• For a single-node server, log in to the server as admin.• For a multi-node server:
a. Log in to the utility node as admin.b. Load the admin OpenSSH key by typing the following command:
ssh-agent bashssh-add ~admin/.ssh/admin_key
2. Type dpnctl stop mcs.
Starting the MCS
Steps
1. Open a command shell and log in by using one of the following methods:
• For a single-node server, log in to the server as admin.• For a multi-node server:
a. Log in to the utility node as admin.b. Load the admin OpenSSH key by typing the following command:
ssh-agent bashssh-add ~admin/.ssh/admin_key
2. Type dpnctl start mcs.
3. Resume scheduled operations by typing dpnctl start sched.
Getting MCS status
Steps
1. Open a command shell and log in by using one of the following methods:
• For a single-node server, log in to the server as admin.• For a multi-node server:
Server Administration 131

a. Log in to the utility node as admin.b. Load the admin OpenSSH key by typing the following command:
ssh-agent bashssh-add ~admin/.ssh/admin_key
2. Type dpnctl status mcs.
Stopping the EM Tomcat server
Steps
1. Open a command shell and log in by using one of the following methods:
• For a single-node server, log in to the server as admin.• For a multi-node server, log in to the utility node as admin.
2. Type dpnctl stop emt.
Starting the EM Tomcat server
Prerequisites
Ensure that EM Tomcat server has been correctly shut down.
Steps
1. Open a command shell and log in by using one of the following methods:
• For a single-node server, log in to the server as admin.• For a multi-node server, log in to the utility node as admin.
2. Type dpnctl start emt.
Getting EM Tomcat server status
Steps
1. Open a command shell and log in by using one of the following methods:
• For a single-node server, log in to the server as admin.• For a multi-node server:
a. Log in to the utility node as admin.b. Load the admin OpenSSH key by typing the following command:
ssh-agent bashssh-add ~admin/.ssh/admin_key
2. Type dpnctl status emt.
Powering off or restarting the serverAvamar Administrator allows you to gracefully power off or restart the entire Avamar server, including the Avamar software, operatingsystem, and hardware (where applicable).
NOTE: For the Avamar Data Store, this process powers off or restarts all nodes.
PrerequisitesBefore powering off or restarting the Avamar server, complete the following prerequisites:
• Stop all backup, restore, and data movement operations.
The shutdown process terminates any active operations before proceeding.• Complete all active Avamar Installation Manager package operations.• Ensure that a validated checkpoint was taken during the last 36 hours.• Ensure that the MCS was flushed during the last 12 hours.
132 Server Administration

• Complete or stop any garbage collection and HFS check operations.
The shutdown process terminates any active operations before proceeding.• Verify that sufficient free space exists.
Server utilization must be less than 85% of total capacity and 62% of available Avamar subsystem storage capacity.
Powering off the serverPower off the server to enable maintenance such as site power outages or physical equipment moves.
Steps
1. In Avamar Administrator, click the Server launcher link.The Server window is displayed.
2. Click the Server Management tab.3. Select the server that you want to power off.4. Select Actions > Shut Down Avamar System.
A confirmation dialog box appears.5. Click Yes.
The server issues a notification about the impending shutdown.6. Click OK.
The server begins the power off process.
Results
The following logs provide more information and progress updates:
• /usr/local/avamar/var/log/avosshutdown.log• /usr/local/avamar/var/log/dpnctl.log
Next steps
After completing maintenance, power on the server by one of the following methods:
• The power button on the front control panel (Gen4S).• The power/reset button on the rear I/O panel (Gen4T).• The RMM4 or RMC power control window.• The virtual environment control console or control interface.
For multi-node servers, power on each storage node in turn and then the utility node.
NOTE: Powering up the utility node before the storage nodes may cause delays in the start-up process.
Rebooting the server
Steps
1. In Avamar Administrator, click the Server launcher link.The Server window is displayed.
2. Click the Server Management tab.3. Select the server that you want to reboot.4. Select Actions > Reboot Avamar System.
A confirmation dialog box appears.5. Click Yes.
The server issues a notification about the impending reboot.6. Click OK.
The server begins the reboot process.
Results
The following logs provide more information and progress updates:
• /usr/local/avamar/var/log/avosshutdown.log• /usr/local/avamar/var/log/dpnctl.log
Server Administration 133

Suspending and resuming server activitiesYou can suspend and resume backups and restores, scheduled operations, and maintenance activities.
Suspending and resuming backups and restores
Steps
1. In Avamar Administrator, click the Server launcher link.The Server window is displayed.
2. Click the Server Management tab.3. In the left pane, select the Avamar server node.4. Open the Actions menu and select Suspend Backups/Restores or Resume Backups/Restores.
A confirmation message appears.5. Click Yes.
Suspending and resuming scheduled operations
Steps
1. In Avamar Administrator, select Tools > Manage Schedules.The Manage All Schedules window is displayed.
2. Click Suspend All or Resume All.
Suspending and resuming maintenance activities
Steps
1. In Avamar Administrator, click the Server launcher link.The Server window is displayed.
2. Open the Actions menu and select Suspend Maintenance Activities or Resume Maintenance Activities.A confirmation message appears.
3. Click OK.
Managing client sessionsYou can view a detailed log of a client session to perform troubleshooting or analysis of a backup or restore. If necessary, you can cancel aclient session or reset a client when unexpected system behavior occurs.
Monitoring client sessionsThe Session Monitor displays a list of active client backup and restore sessions.
Steps
1. In Avamar Administrator, click the Server launcher link.The Server window is displayed.
2. Click the Session Monitor tab.
The information in the following table appears for each session in the Session Monitor.
Table 46. Session Monitor tab properties
Property Description
User
User Avamar user ID (account name).
134 Server Administration

Table 46. Session Monitor tab properties (continued)
Property Description
Path Specifies a hierarchical location in the Avamar server. This optionis relative to the user's home location unless slash (/) is prefixedto the path designation, in which case an absolute path isassumed.
Domain Avamar domain where this user resides.
Client ID Unique identifier for this Avamar client.
Session
Type This activity is either avtarbackup or avtarrestore.
Root Top level of the file system being backed up, restored, orvalidated.
Start time Date and time that this client session started.
Plug-in Plug-in that is used for this activity.
Session ID Unique identifier for this client session.
Work order ID Unique identifier for this activity.
Elapsed Length of time that this client session has been running.
Progress bytes Total number of bytes examined during this activity.
New bytes Percentage of new bytes backed up to either the Avamar serveror a Data Domain system. Low numbers indicate high levels ofdata deduplication.
System
Name Client hostname.
OS name Operating system that is used by this client.
App version Avamar client software version.
Viewing a detailed client session logYou can view a detailed log of a client session to perform analysis or troubleshooting.
Steps
1. In Avamar Administrator, click the Activity launcher link.The Activity window is displayed.
2. Click the Activity Monitor tab.
By default, the Activity Monitor shows a detailed log of all client backup activity for the past 72 hours.
3. Specify the session log options:
a. Select Action > Session Log Options.The Session Log Options dialog box appears.
b. Select Show HTML logs to view the session log summary in HTML format, or Show raw logs to view the session log summaryas unformatted text.
c. (Optional) If you select the HTML log format, select the Show debug information checkbox to include troubleshoot informationin the session log summary.
d. Click OK.4. Select an activity in the list.5. Select Actions > View Session Log.
The Activity Session Drill-down dialog box appears.6. Perform any of the following tasks in the session log summary:
Server Administration 135

• (HTML format only) In the Log Files section, click a hyperlink to go to the log file.• Search for a specific text string in the session log summary by typing a text string in the Find field and then clicking Next or
Previous.• Return to the top of the session log summary by clicking Back to Top.• Export the session log summary to a file by clicking Export, specifying a location for the file, and clicking Save.• Update the contents in the session log summary by clicking Refresh.
7. Click Close.
Creating a Zip file for Avamar SupportThe Activity window enables you to create a Zip file of session log information for Avamar Support and upload the Zip file to the Avamarserver.
Steps
1. In Avamar Administrator, click the Activity launcher link.The Activity window is displayed.
2. Select an activity in the list.3. Select Actions > Download Support Bundle.
The Download Support Bundle dialog box appears.4. Browse to a directory for the Zip file.5. Click Save.
A progress dialog box displays the status of the operation.6. When the operation completes, click Close on the progress dialog box.7. To create a Zip file and copy it to the Avamar server, select Actions > Upload Support Bundle to Server.
The upload process creates a Zip file for session log summary information and copies the Zip file to the /tmp folder on the Avamarserver. A progress dialog box displays the status of the operation.
Canceling a client sessionOccasionally, a client might experience unexpected system behavior while it is performing a backup or restore. In these cases, it might benecessary to force an end to these client sessions from Avamar Administrator.
Steps
1. In Avamar Administrator, click the Server launcher link.The Server window is displayed.
2. Click the Session Monitor tab.A list of active client sessions appears.
3. Select the client session to cancel.4. Select Actions > Cancel Session.
A dialog box shows the progress of the cancellation.5. When the cancellation is complete, click Close.
Next steps
If you cannot cancel the client session, reset the client. This step immediately and forcibly terminates active avtar sessions on the client.
Resetting a client
About this task
Resetting a client immediately and forcibly terminates active client avtar session on that client. In most cases, you should try to cancelthe client session before resetting it.
Steps
1. In Avamar Administrator, click the Policy launcher link.The Policy window is displayed.
136 Server Administration

2. Click the Policy Management tab.3. Click the Clients tab.4. Select the client to reset.5. From the Actions menu, select Client > Reset Client.
Managing client agents and plug-insWhenever a client communicates with an Avamar server, it identifies itself by sending the following:
About this task
• The client ID
• The specific agent version
• The build running on that client
• A list of plug-ins (version and build) currently installed on that client
Occasionally, because of known incompatibilities, you may want to deny Avamar server access to all clients running a specific version (allbuilds) or a specific build of a client agent or plug-in.
You can also selectively allow or disallow the following plug-in operations for all clients running a specific plug-in version (all builds) or build:
• Client activations that are initiated from the client• On-demand backups that are initiated from the client• Scheduled backups• Restores• Backup validation• Ability to browse stored backups on the server
Any specific version (all builds) or build that is designated as obsolete is denied access to the Avamar server. A build is designated asobsolete only in cases of known incompatibility between the client agent or plug-in and the specific version of server software that wasinstalled. To prevent potential problems, this obsolete designation cannot be overridden using the feature to edit properties for thatversion or build.
Adding a build recordYou can add an MCS database record for a specific client agent or plug-in build. You can only add records at the build level. New versionrecords are automatically added after Avamar server software upgrades.
Steps
1. In Avamar Administrator, select Tools > Manage Agents & Plug-ins.The Manage All Agents & Plug-ins window is displayed.
2. In the left pane, select the agent or plug-in version for the build.3. Click New.
The New Build dialog box appears.4. In the Build box, type a valid agent or plug-in build number.5. To deny Avamar server access to clients with this agent or plug-in build, select the Disable checkbox.6. (Optional) Type a descriptive comment in the Comment box.7. Click OK.
Editing version or build records
Steps
1. In Avamar Administrator, select Tools > Manage Agents & Plug-ins.The Manage All Agents & Plug-ins window is displayed.
2. In the left pane, select the agent or plug-in.3. In the right pane, select the version or build to edit.4. Click Edit.
Server Administration 137

The Edit Build dialog box appears.5. To deny Avamar server access to clients with this agent or plug-in build, select the Disable checkbox.6. (Optional) Type a descriptive comment in the Comment box.7. Click OK.
Deleting a build recordYou can delete an MCS database record for a specific client agent or plug-in build. You cannot delete a record for an entire version.
Steps
1. In Avamar Administrator, select Tools > Manage Agents & Plug-ins.The Manage All Agents & Plug-ins window is displayed.
2. In the left pane, select the agent or plug-in.3. In the right pane, select the build to delete.
Click Delete.
Disabling all client initiated activationsYou may want to temporarily prevent clients from activating with the Avamar server to place the system in a state that supportsmaintenance activities. Client Invite does not work when clients are prevented from activating.
Steps
1. In Avamar Administrator, select Tools > Manage Agents & Plug-ins.The Manage All Agents & Plug-ins window is displayed.
2. Click Disable All Client Initiated Activations.3. To re-enable client initiated activations, click Enable All Client Initiated Activations.
Disabling all client initiated backupsYou can temporarily prevent Avamar clients from initiating on-demand backups to place the system in a state that supports variousmaintenance activities.
Steps
1. In Avamar Administrator, select Tools > Manage Agents & Plug-ins.The Manage All Agents & Plug-ins window is displayed.
2. Click Disable All Client Initiated Backups.3. To re-enable client that is initiated on-demand backups, click Enable All Client Initiated Backups.
Backup and maintenance windowsEach 24-hour day is divided into two operational windows, the backup window and the maintenance window.
The following figure shows the default backup and maintenance windows.
138 Server Administration

Figure 13. Default backup and maintenance windows
Backup windowThe backup window is that portion of each day that is reserved to perform normal scheduled backups. No maintenance activities areperformed during the backup window.
The default backup window begins at 8 p.m. local server time and continues uninterrupted for 12 hours until 8 a.m. the following morning.You can customize the backup window start time and duration.
Maintenance windowThe maintenance window is that portion of each day that is reserved to perform the routine server maintenance activities in the followingtable.
Table 47. Avamar server maintenance activities
Activity Description
Checkpoint A snapshot of the Avamar server that is taken for the expresspurpose of server rollbacks.
Checkpoint validation An internal operation that validates the integrity of a specificcheckpoint. Checkpoint validation is also known as a Hash FileSystem (HFS) check. After a checkpoint passes an HFS check, itcan be considered reliable enough to be used for a server roll back.
Garbage collection An internal operation that recovers storage space from deleted orexpired backups.
Although you can perform backups and restores during the maintenance window, doing so impacts the backup, restore, and maintenanceactivities. For this reason, minimize any backup, restore, or administrative activities during the maintenance window. There might be briefperiods of time when backup or administrative activities are not allowed.
The default maintenance window begins at 8 a.m. local server time and continues uninterrupted for 12 hours until 8 p.m. Although youcannot directly customize the maintenance window, its start time and duration are derived from backup window settings.
Server Administration 139

Editing the backup and maintenance windowsYou can edit the backup and maintenance windows by setting the backup window start time and duration, as well as the time zone for thebackup and maintenance windows.
About this task
Any changes to the backup window duration also affect the maintenance window duration. For example, changing the backup windowduration from 12 hours to 14 hours reduces the maintenance window duration by 2 hours.
The following best practices apply when you schedule system activities:
• Limit on-demand backups during the maintenance window.
You might want to advise users to avoid initiating any on-demand backups from their client computers during the first hour and a halfof the maintenance window (8 a.m. to 8 p.m. local time for most systems).
• Avoid initiating on-demand maintenance activities
Manually initiating maintenance activities such as checkpoints, checkpoint validation, or garbage collection temporarily disables allscheduled maintenance activities until the manually initiated operation completes. Unless there is an obligation to begin an on-demandmaintenance activity, it is best to rely on scheduled maintenance activities to ensure that sufficient time is allocated for each activitydaily.
Steps
1. In Avamar Administrator, select Tools > Manage Schedules.The Manage All Schedules window is displayed.
2. Click the Maintenance Window tab.3. Change the backup window start time, duration, or time zone by selecting a new value from the corresponding list.4. Click OK.
CheckpointsCheckpoints are system-wide backups that are taken for assisting with disaster recovery.
A checkpoint occurs automatically during the maintenance window. You can also manually start checkpoints at any time.
You can delete checkpoints to reclaim server storage capacity.
The Checkpoint Management tab on the Server window in Avamar Administrator displays the status of individual checkpoints. Thefollowing table provides the possible states for a checkpoint.
Table 48. Checkpoint states
State Description
The checkpoint failed validation or was canceled before it couldcomplete.
The checkpoint has not yet been validated.
Validation is being performed on this checkpoint.
The checkpoint passed validation.
Creating a checkpointA checkpoint occurs automatically during the maintenance window. You can also manually begin checkpoints at any time.
Steps
1. In Avamar Administrator, click the Server launcher link.The Server window is displayed.
2. Click the Checkpoint Management tab.3. Select Actions > Create Checkpoint.
140 Server Administration

A progress dialog box displays the status of the operation.4. When the checkpoint completes, click Close.
Deleting a checkpointYou can delete checkpoints to reclaim additional server storage capacity. Generally, it is best to delete unvalidated checkpoints before youdelete validated checkpoints.
Steps
1. In Avamar Administrator, click the Server launcher link.The Server window is displayed.
2. Click the Checkpoint Management tab.3. Select the checkpoint and select Actions > Delete Checkpoint.
A confirmation message appears.4. Click OK.
Rolling back to a checkpointRollback is the process of restoring the Avamar server to a known good state using data stored in a validated checkpoint. You cannot rollback an Avamar release 7.x server to a version 4.x or earlier checkpoint.
Prerequisites
If you added nodes to the Avamar server after the checkpoint occurred, remove the entries for the nodes from the probe.out file.
Use a validated checkpoint for roll back. Checkpoint validation occurs during each maintenance window.
NOTE: If you need a validated checkpoint before the next maintenance window completes, contact Avamar Support for
assistance.
Steps
1. Open a command shell and log in by using one of the following methods:
• For a single-node server, log in to the server as admin.• For a multi-node server:
a. Log in to the utility node as admin.b. Load the admin OpenSSH key by typing the following command:
ssh-agent bashssh-add ~admin/.ssh/admin_key
2. Shut down the server by typing dpnctl stop.
3. Display a list of checkpoints by typing cplist.
The checkpoint list appears similar to the following example:
cp.20140106170113 Fri Jan 6 17:01:13 2014 valid hfs del nodes 4 stripes 396cp.20140107170042 Sat Jan 7 17:00:42 2014 valid hfs del nodes 4 stripes 396cp.20140108170040 Sun Jan 8 17:00:40 2014 valid hfs ... nodes 4 stripes 396cp.20140109170043 Mon Jan 9 17:00:43 2014 valid hfs ... nodes 4 stripes 396where:
• cp.yyyymmddhhmmss is the checkpoint ID.• valid hfs indicates a validated checkpoint.
• valid par indicates a partially validated checkpoint.
4. Note the checkpoint ID of the checkpoint that you plan to use for the checkpoint.
Generally, roll the system back to the most recent fully validated checkpoint unless you have a good reason to roll back to an earliercheckpoint.
5. Start the roll back by typing the following command:
rollback.dpn --cptag=checkpoint_id >& file
Server Administration 141

where checkpoint_id is the checkpoint ID and file is a temporary file.
6. Wait for the roll back to complete. The roll back might take an hour, depending on the amount of data present in the Avamar server.When the roll back is complete, the command prompt returns.
7. Open the user-defined temporary file that was created during the roll back, and verify that the roll back successfully completedwithout errors.The server automatically restarts after a successful roll back.
Clearing a data integrity alertTo ensure data integrity, the Avamar server issues an alert any time a checkpoint validation fails. The only way to clear this alert is tocontact Avamar Support to obtain a reset code, and then input that code in the Clear Data Integrity Alert dialog box.
Prerequisites
Obtain a reset code from Avamar Support.
Steps
1. In Avamar Administrator, click the Administration launcher link.The Administration window is displayed.
2. Click the Event Management tab.3. Click the Unacknowledged Events tab near the bottom of the window.4. Select Actions > Event Management > Clear Data Integrity Alert.
The Clear Data Integrity Alert dialog box appears.5. Type the reset code in the Enter reset code field and click OK.
Activating the Avamar software and installing aserver licenseThe Avamar server requires a license key for permanent operation. Avamar software is licensed using the Dell EMC Common LicensingPlatform.
After installation, the Avamar software enters a 90-day evaluation period with full functionality. After the evaluation period expires, theAvamar server enters an unlicensed state. Without a valid license key, the Avamar server stops performing or limits several functions.
Activating the Avamar softwareUse this procedure to activate the Avamar software with the Common Licensing Platform.
Prerequisites
This procedure requires a License Authorization Code (LAC), provided in the License Authorization (LAC) email sent to you. If you cannotfind the email, send an email to [email protected] to request that the License Authorization email be resent. Include the Avamar productSO number in the email. The Avamar product SO number is required.
Steps
1. Log in to Support Zone (https://support.emc.com) by using the login credentials that are provided in the License Authorization (LAC)email.
2. In the Service Center drop-down list, click Manage Licenses.3. Select Avamar from the list of products.4. Click Activate my software.
The Activation wizard opens.5. Search for an available product to license by entering the License Authorization Code (LAC) and click Search.6. To complete licensing information, follow the prompts in the wizard.7. After the license key has been generated, download the key to be used when licensing the software.
142 Server Administration

Installing and activating a licenseAfter you receive the Avamar license key file, install and activate the license on the Avamar server.
Prerequisites
Obtain the Avamar license key by following the procedure in Activating the Avamar software on page 142.
Steps
1. Use WinSCP or an equivalent program to copy the license key file to the /tmp directory on a single-node server, or to the /tmpdirectory on the utility node in a multi-node server.
2. Open a command shell and log in by using one of the following methods:
• For a single-node server, log in to the server as admin.• For a multi-node server:
a. Log in to the utility node as admin.b. Load the admin OpenSSH key by typing the following command:
ssh-agent bashssh-add ~admin/.ssh/admin_key
3. Ensure that the Avamar server subsystem (also known as GSAN) is running by typing dpnctl status gsan.If GSAN is running, the output displays a status of up.
4. Use the correct command sequence to change file permissions on the Avamar license key file and activate the license.
Server status Command sequence
Running a. chmod 644 /tmp/license_key_fileb. avmaint license /tmp/license_key_file --avamaronlywhere license_key_file is the license key file.
Not running a. cd /usr/local/avamar/etcb. mv license.lic license.lic.oldc. cp /tmp/license_key_file license.licd. chmod 644 license.licwhere license_key_file is the license key file.
5. If the Avamar server is not running, start it by typing dpnctl start.
6. After the Avamar server restarts, verify that the server license is correctly installed by typing the following command:
avmaint license --avamaronlyLicense information appears in the command shell.
Managing servicesThe Services Administration tab on the Administration window in Avamar Administrator enables you to start, stop, suspend, orresume individual services on the Avamar server.
Steps
1. In Avamar Administrator, click the Administration launcher link.The Administration window is displayed.
2. Click the Services Administration tab.3. Manage the services:
• To start a service, right-click the service and select Start.• To stop a service, right-click the service and select Stop.• To suspend a service temporarily until you explicitly resume it, right-click the service and select Suspend.• To resume a service that you previously suspended, right-click the service and select Resume.
Server Administration 143

Information on the Services Administration tabThe following information appears on the Services Administration tab.
Table 49. Services Administration tab information
Name Description
Hostname DNS name of the Avamar server.
IP Address IP address of the Avamar server.
Load Average Average number of CPU threads over the past minute.
Last Administrator Datastore Flush Date and time of the last MCS flush.
PostgreSQL database Status of the MCS database.
Web Services Status of MCS web services.
Web Restore Disk Space Available Number of hard drive bytes that MCS web services can use tocreate the restore Zip file.
Login Manager Status of the Avamar Login Manager service.
snmp sub-agent Status of the Avamar SNMP sub-agent service
ConnectEMC Status of the ConnectEMC service.
VMware vCenter Connection Monitor Status of the VMware vCenter connections. This service is onlylisted when at least one vCenter client is added to the system.
snmp daemon Status of the Avamar SNMP master agent service.
ssh daemon Status of the Avamar Secure Shell (SSH) service.
syslog daemon Status of the Avamar syslog service.
Data Domain SNMP Manager Status of the SNMP service for monitoring configured DataDomain systems.
Remote Backup Manager Service Status of the external backup manager service that is used by theReplicas at Source feature.
RabbitMQ Status of the RabbitMQ message broker service.
Replication job Status of the replication job on the Avamar server.
NOTE: The list of services on the Services Administration tab varies according to the configuration of the Avamar
system.
Changing server passwords and OpenSSH keysUse the change-passwords utility to change the passwords for operating system user accounts and Avamar server user accounts.Also use change-passwords to create and modify SSH keys for those accounts.
About this task
The change-passwords utility guides you through the following operations:
• Changing passwords for the operating system accounts: admin and root• Changing passwords for the internal Avamar server accounts: root, MCUser, repluser, and viewuser• Creating and changing SSH keys
Steps
1. Suspend all scheduled operations:
a. In Avamar Administrator, select Tools > Manage Schedules.
144 Server Administration

b. On the Manage All Schedules window, click Suspend All.2. Open a command shell:
a. Log in to the server as admin.b. Switch user to root by typing the following command:
su -c. For a multi-node server, load the rootid OpenSSH key by typing the following command:
ssh-agent bashssh-add /root/.ssh/rootid
3. Start the utility by typing change-passwords.On a multi-node server, the output prompts you to specify whether to change passwords on all nodes or selected nodes.
4. Type y to change passwords on all nodes or n to change passwords on selected nodes, and then press Enter.The output prompts you to indicate whether you plan to specify SSH private keys that are authorized for root operations.
5. Type n and press Enter.The output prompts you to specify whether to change admin or root operating system user account passwords.
6. Type y to change the passwords or n to skip the process of changing the passwords, and then press Enter.
7. If you typed y in the previous step, then follow the system prompts to change the passwords for one or more of the admin or rootoperating system user accounts.The output prompts you to specify whether to change SSH keys.
8. Type y to change or create an SSH key, or type n, and then press Enter.
9. If you typed y in the previous step, then follow the system prompts to change or create the keys.The output prompts you to specify whether to change Avamar server passwords.
10. When prompted, type y to change the MCUser, Avamar root, repluser, and viewuser passwords, or if you do not want to change thepasswords, type n, and then press Enter.
11. If you typed y in the previous step, then follow the system prompts to change the passwords.The output prompts you to accept or reject the changes that are made to passwords or SSH keys during this utility session.
12. Type y to accept the changes or type n to exit this utility session without changes, and then press Enter.The output provides the status of the operation.
13. When the operation completes, resume scheduled operations:
a. In Avamar Administrator, select Tools > Manage Schedules.b. On the Manage All Schedules window, click Resume All.
MCS configuration settingsAvamar Administrator consists of both client and server software applications. You can independently configure each application by editingeither the server or client preferences file.
Changes to the server preferences file, mcserver.xml, affect all Avamar Administrator sessions. Changes to a client preferences file,mcclient.xml, only affect Avamar Administrator sessions on that client. Both files conform to the preferences.dtd XMLDocument Type Description (DTD) referenced by the JSDK 1.4 API.
Default and live copiesTwo copies of each of these files are present on the system:
• An initial default copy is used to initialize each application after installation.• A live copy contains the current settings that are used by the application.
The default copies are located in the /lib directory for each application. The live copies are located in a “live file” directory. The followingtable lists the default live file directory for each application.
Table 50. Default live file directory for MCS configuration files
Application Default live file directory
Server /usr/local/avamar/var/mc/server_data/prefs
Client install_directory/var/mc/gui_data/prefs, whereinstall_directory is typically C:\Program Files\avs
Server Administration 145
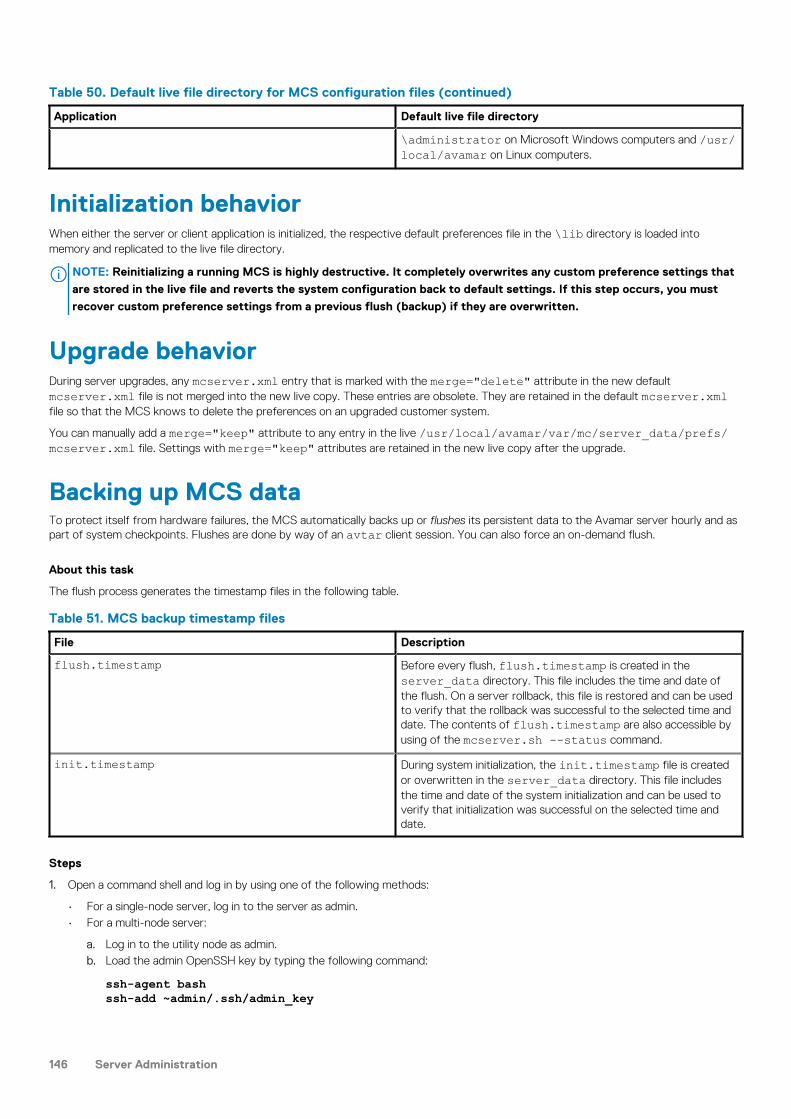
Table 50. Default live file directory for MCS configuration files (continued)
Application Default live file directory
\administrator on Microsoft Windows computers and /usr/local/avamar on Linux computers.
Initialization behaviorWhen either the server or client application is initialized, the respective default preferences file in the \lib directory is loaded intomemory and replicated to the live file directory.
NOTE: Reinitializing a running MCS is highly destructive. It completely overwrites any custom preference settings that
are stored in the live file and reverts the system configuration back to default settings. If this step occurs, you must
recover custom preference settings from a previous flush (backup) if they are overwritten.
Upgrade behaviorDuring server upgrades, any mcserver.xml entry that is marked with the merge="delete" attribute in the new defaultmcserver.xml file is not merged into the new live copy. These entries are obsolete. They are retained in the default mcserver.xmlfile so that the MCS knows to delete the preferences on an upgraded customer system.
You can manually add a merge="keep" attribute to any entry in the live /usr/local/avamar/var/mc/server_data/prefs/mcserver.xml file. Settings with merge="keep" attributes are retained in the new live copy after the upgrade.
Backing up MCS dataTo protect itself from hardware failures, the MCS automatically backs up or flushes its persistent data to the Avamar server hourly and aspart of system checkpoints. Flushes are done by way of an avtar client session. You can also force an on-demand flush.
About this task
The flush process generates the timestamp files in the following table.
Table 51. MCS backup timestamp files
File Description
flush.timestamp Before every flush, flush.timestamp is created in theserver_data directory. This file includes the time and date ofthe flush. On a server rollback, this file is restored and can be usedto verify that the rollback was successful to the selected time anddate. The contents of flush.timestamp are also accessible byusing of the mcserver.sh --status command.
init.timestamp During system initialization, the init.timestamp file is createdor overwritten in the server_data directory. This file includesthe time and date of the system initialization and can be used toverify that initialization was successful on the selected time anddate.
Steps
1. Open a command shell and log in by using one of the following methods:
• For a single-node server, log in to the server as admin.• For a multi-node server:
a. Log in to the utility node as admin.b. Load the admin OpenSSH key by typing the following command:
ssh-agent bashssh-add ~admin/.ssh/admin_key
146 Server Administration
2. To begin an on-demand MCS flush, type the following command:
mcserver.sh --flush
Restoring MCS data
Prerequisites
If you are planning to restore MCS data to a specific backup, find the label number for the backup either by browsing for the backup inAvamar Administrator or by using the avtar command:
• In Avamar Administrator, open the Backup, Restore and Manage window, and browse for backups in the /MC_BACKUPS account.
• Type the following command on a single command line:
avtar --backups --id=root --ap=password --path=/MC_BACKUPS --hfsaddr=Avamar_server --count=nwhere password is the Avamar root user account password (not the operating system root password), Avamar_server is the IPaddress or DNS name of the Avamar server, and n is the number of backups to list. A total number of 26 MCS flushes typically occurseach day for an Avamar server — one per hour and one each during the morning and evening system checkpoints. Therefore, to list allMCS backups for a specific past number of days, specify --count=n in increments of 26.
Steps
1. Open a command shell and log in by using one of the following methods:
• For a single-node server, log in to the server as admin.• For a multi-node server:
a. Log in to the utility node as admin.b. Load the admin OpenSSH key by typing the following command:
ssh-agent bashssh-add ~admin/.ssh/admin_key
2. Stop the MCS by typing dpnctl stop mcs.
3. Restore the MCS by typing one of the following commands:
• To restore to the most recent backup, type mcserver.sh --restore.
• To restore to a specific backup, type mcserver.sh --restore --labelnum=n, where n is the label number of the backup.
4. Open /usr/local/avamar/var/mc/server_log/restore.log to verify the success of the restore.
5. Start the MCS and the scheduler by typing the following command:
dpnctl start mcsdpnctl start sched
Reverting to the default MCS configuration settings
Steps
1. Open a command shell and log in by using one of the following methods:
• For a single-node server, log in to the server as admin.• For a multi-node server:
a. Log in to the utility node as admin.b. Load the admin OpenSSH key by typing the following command:
ssh-agent bashssh-add ~admin/.ssh/admin_key
2. Stop the MCS by typing dpnctl stop mcs.
3. Change the working directory by typing the following command:
cd /usr/local/avamar/var/mc/server_data/prefs4. Rename mcserver.xml to old.mcserver.xml by typing the following command:
mv mcserver.xml old.mcserver.xml
Server Administration 147
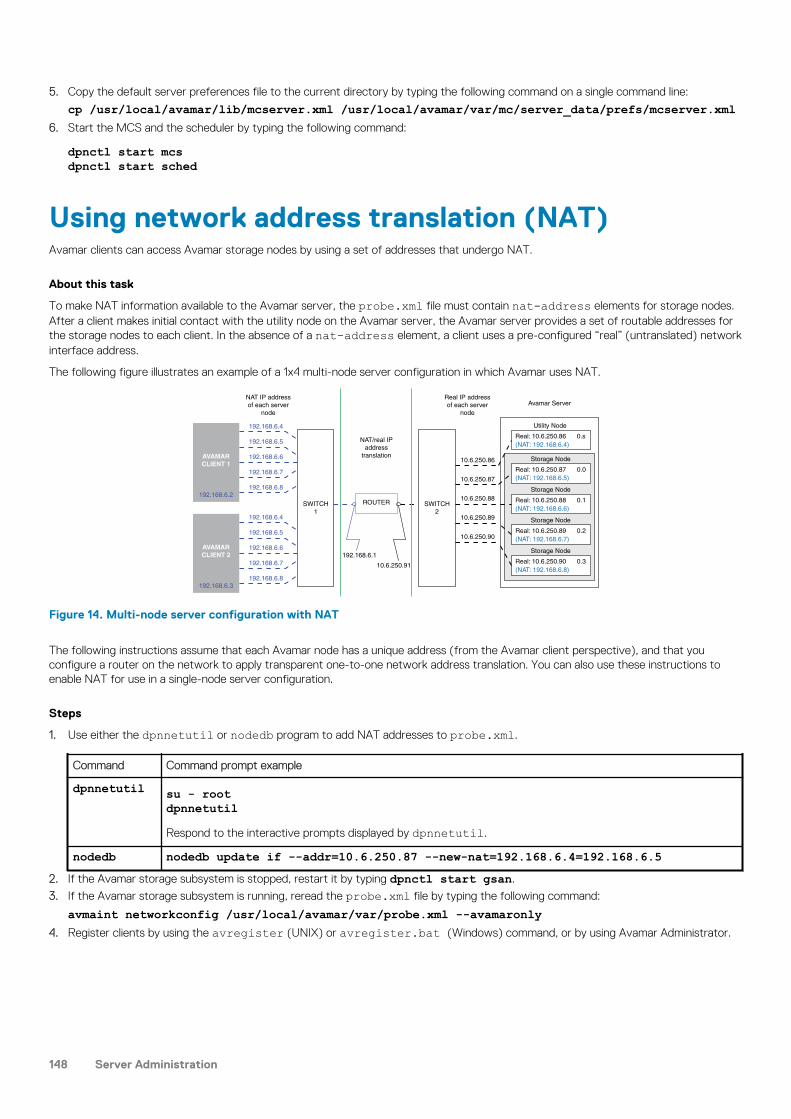
5. Copy the default server preferences file to the current directory by typing the following command on a single command line:
cp /usr/local/avamar/lib/mcserver.xml /usr/local/avamar/var/mc/server_data/prefs/mcserver.xml6. Start the MCS and the scheduler by typing the following command:
dpnctl start mcsdpnctl start sched
Using network address translation (NAT)Avamar clients can access Avamar storage nodes by using a set of addresses that undergo NAT.
About this task
To make NAT information available to the Avamar server, the probe.xml file must contain nat-address elements for storage nodes.After a client makes initial contact with the utility node on the Avamar server, the Avamar server provides a set of routable addresses forthe storage nodes to each client. In the absence of a nat-address element, a client uses a pre-configured “real” (untranslated) networkinterface address.
The following figure illustrates an example of a 1x4 multi-node server configuration in which Avamar uses NAT.
Real: 10.6.250.90 0.3
Storage Node
Storage Node
Storage Node
Storage Node
Utility Node
Avamar ServerReal IP address
of each server
node
NAT IP address
of each server
node
NAT/real IP
address
translation
ROUTER
AVAMAR
CLIENT 1
192.168.6.2
AVAMAR
CLIENT 2
192.168.6.3
SWITCH
2
(NAT: 192.168.6.8)
Real: 10.6.250.89 0.2
(NAT: 192.168.6.7)
Real: 10.6.250.88 0.1
(NAT: 192.168.6.6)
Real: 10.6.250.87 0.0
(NAT: 192.168.6.5)
Real: 10.6.250.86 0.s
10.6.250.88
(NAT: 192.168.6.4)
SWITCH
1
192.168.6.6
192.168.6.7
192.168.6.8
192.168.6.5
192.168.6.4
192.168.6.6
192.168.6.7
192.168.6.8
192.168.6.5
192.168.6.4
10.6.250.87
10.6.250.89
10.6.250.90
10.6.250.91
192.168.6.1
10.6.250.86
Figure 14. Multi-node server configuration with NAT
The following instructions assume that each Avamar node has a unique address (from the Avamar client perspective), and that youconfigure a router on the network to apply transparent one-to-one network address translation. You can also use these instructions toenable NAT for use in a single-node server configuration.
Steps
1. Use either the dpnnetutil or nodedb program to add NAT addresses to probe.xml.
Command Command prompt example
dpnnetutil su - rootdpnnetutilRespond to the interactive prompts displayed by dpnnetutil.
nodedb nodedb update if --addr=10.6.250.87 --new-nat=192.168.6.4=192.168.6.52. If the Avamar storage subsystem is stopped, restart it by typing dpnctl start gsan.
3. If the Avamar storage subsystem is running, reread the probe.xml file by typing the following command:
avmaint networkconfig /usr/local/avamar/var/probe.xml --avamaronly4. Register clients by using the avregister (UNIX) or avregister.bat (Windows) command, or by using Avamar Administrator.
148 Server Administration

Solutions for common NAT problemsTo determine whether NAT is in use, the client and Avamar server must have a network connection. The following table provides solutionsfor common NAT connection and configuration problems.
Table 52. Solutions for common NAT problems
Problem Solution
The Avamar server terminates with a FATAL ERROR message. Ensure that the probe.xml file:
• Exists in the /usr/local/avamar/var/ directory.
• Is a valid XML file and adheres to the node resource databaseformat.
• Lists NAT IP addresses correctly.
Use the nodedb print --say command to view the contentsof probe.xml. The --say option displays the path and name ofthe current node resource database.
The server/client connection fails. Use network diagnostic tools such as ping, traceroute,tracert, or iperf to verify network connectivity.
Editing network settings for a single-node serverAbout this task
The Changing the Name and IP Addressing of Avamar Systems Technical Note, which is available on Avamar Support at https://support.EMC.com, provides instructions on how to edit the network settings for a single-node server.
Adding a custom security notification for webbrowser loginsYou can include a custom security notification on the login page of Avamar Web Restore. This notification typically explains that onlyauthorized users are permitted access. It can also list the penalties for unauthorized access.
Steps
1. In a text editor, create a file that is named disclaimer_Web_Restore.txt.
2. Add the notification content to the file.
You can use some basic HTML tags and CSS inline styles in the notification content.
3. Copy the file to the following location on a single-node server, or on the utility node of a multi-node server:
/usr/local/avamar/var/em/server_data/
Viewing and editing server contact informationThe Avamar server sends contact information for the Avamar server to Avamar with every event it reports, including capacity reports thathelp prevent the system from exceeding critical thresholds. Keep this information current.
About this task
A server roll back applies the contact information that existed at the time of the checkpoint. When the roll back completes, you can viewor edit the contact information to ensure that the information is current.
Steps
1. In Avamar Administrator, select Help > View/Edit Contact Information.
The View/Edit Contact Information dialog box appears. The fields in the following table are read-only on the dialog box.
Server Administration 149

Table 53. Read-only fields on the View/Edit Contact Information dialog box
Field Description
System ID Unique Avamar server identifier, which is created during initialserver installation. This field is read-only.
AVE Yes (Y) if this server is an Avamar Virtual Edition (AVE) server orno (N) if it is not. This field is read-only.
2. Edit the contact information.
Table 54. Editable fields on the View/Edit Contact Information dialog box
Field Description
Avamar site ID Unique customer site identifier, which is specified during initialserver installation.
Data Domain S/N Serial number of Data Domain systems that have been added tothis server. If no Data Domain systems have been added, type(N/A).
Server location Physical location of the Avamar server at the customer site.
Company Information Name and address of the company that owns this Avamarserver.
Contact Information Name, telephone number, and email address of the primarycontact for this Avamar server.
3. Click OK.
Migrating backupsAvamar can now perform an automatic migration of GSAN, Data Domain, and hybrid backup data from the source server to thedestination server.
The Avamar server only supports automatic migration for the following backup types:
• Linux file system• Windows file system• NDMP
To automatically move backup data, trigger the migration job from the destination server. After the migration job has started, themigration tool moves the backup data from the source server to the destination server.
NOTE: Backups with a large number of small files might cause low migration performance.
For manual steps on how to perform system migrations of existing mixed Avamar and Data Domain systems to Avamar and Data Domainsystems, see the Avamar Mixed-source (GSAN and Data Domain) Backups Migration Technical Note.
150 Server Administration

Server Monitoring
Topics:
• Recommended daily server monitoring• Monitoring activities• Monitoring server status and statistics• Event monitoring• Server monitoring with syslog• Server monitoring with SNMP• Viewing Avamar server log files• Audit logging• Automatic notifications to Avamar Support• Verifying system integrity
Recommended daily server monitoringTo ensure that the Avamar server is working correctly, we recommend that you perform the system monitoring tasks that are listed in thefollowing table on a daily basis.
Table 55. System monitoring tools and tasks
Monitoring tool Monitoring task
Activity Monitor Investigate any abnormal client activity, such as backups thatcomplete with exceptions.
Server Monitor Confirm that the last checkpoint and validated checkpoint arerecent. Ideally, they should have occurred within the past 24 hours.
Event Monitor Investigate any system errors or warnings.
Unacknowledged Events list Investigate and clear (acknowledge) any unacknowledged events.
NOTE: Enable the Email Home feature and the ConnectEMC feature, which automatically email Avamar Support with
the status of the daily data integrity check and other important server messages.
Monitoring activitiesSteps
1. In Avamar Administrator, click the Activity launcher link.The Activity window is displayed.
2. Click the Activity Monitor tab.
Activity Monitor details on page 152 provides details on the information available in the Activity Monitor.
3. (Optional) Filter the information in the Activity Monitor to display only activities with a specific state, type, group, client, or plug-in:
a. Select Actions > Filter.The Filter Activity dialog box appears.
b. Define the filtering criteria and click OK.
9
Server Monitoring 151

Activity Monitor detailsBy default, the Activity Monitor tab displays the most recent 5,000 client activities during the past 72 hours. You can increase or reducethe amount of information in the Activity Monitor by editing the com.avamar.mc.wo completed_job_retention_hourspreference in the /usr/local/avamar/var/mc/server_data/prefs/mcserver.xml file, and then restarting the MCS.
The following tables provide details on the information that is available in the Activity Monitor.
Table 56. Session details available in the Activity Monitor
Column Description
Status Status of the backup, restore, or validation activity. The AvamarAdministrator online help provides details on each status.
Error Code If the activity did not successfully complete, a numeric error codeappears. To view a detailed explanation, double-click the errorcode .
Start Time Date and time that this activity began, adjusted for the prevailingtime zone, which is shown in parentheses. Daylight Savings Time(DST) transitions are automatically compensated.
Elapsed Time Elapsed time for this activity.
End Time Date and time that this activity completed, adjusted for theprevailing time zone, which is shown in parentheses. DaylightSavings Time (DST) transitions are automatically compensated.
Type Type of activity. The Avamar Administrator online help providesdetails on each type.
Server Server on which the activity occurred, either the Avamar server ora Data Domain system.
Progress Bytes Total number of bytes examined during this activity.
New Bytes Percentage of new bytes backed up to either the Avamar server ora Data Domain system. Low numbers indicate high levels of datadeduplication.
Table 57. Client details available in the Activity Monitor
Column Description
Client Avamar client name.
Domain Full location of the client in the Avamar server.
OS Client operating system.
Client Release Avamar client software version. If this activity is a VMware imagebackup or restore, then this value is the Avamar client softwareversion running on the image proxy client.
Proxy If this activity is a VMware image backup or restore, then this valueis the name of the proxy client performing the backup or restoreon behalf of the virtual machine. Blank for all other activities.
Table 58. Policy details available in the Activity Monitor
Column Description
Sched. Start Time Date and time that this activity was scheduled to begin.
Sched. End Time Date and time that this activity was scheduled to end.
Elapsed Wait Total amount of time that this activity spent in the activity queue.That is, the scheduled start time minus the actual start time.
Group Group that started this activity. One of the following values:
152 Server Monitoring

Table 58. Policy details available in the Activity Monitor (continued)
Column Description
• If the activity was a scheduled backup, the group that thisclient was a member of when this scheduled activity started.
• On-demand is shown for other backup, restore, and validationactivities.
• If the activity was a scheduled replication, then this value is thereplication group.
• Admin On-Demand Group is shown for-demand replicationactivities.
Plug-in Plug-in that is used for this activity.
Retention Retention types that are assigned to this backup. One or more ofthe following values:
• D—Daily• W—Weekly• M—Monthly• Y—Yearly• N—No specific retention type
Schedule If the activity was a scheduled backup, the schedule that beganthis activity. On-Demand or End User Request is shown for allother activities that are started from Avamar Administrator or theclient, respectively.
Dataset Name of the dataset that is used to create the backup. If theactivity is a replication job, this column lists the source systemname on the destination system, and the destination name on thesource system.
WID Work order ID. Unique identifier for this activity.
Monitoring server status and statisticsThe Server window in Avamar Administrator enables you to monitor status and statistics for the Avamar server as a whole, for individualnodes on the Avamar server, and for any configured Data Domain systems.
About this task
The following tabs appear on the Server window:
• The Server Monitor tab presents a summarized view of CPU, network, and hard drive performance statistics for the Avamar server.A separate subtab provides the same information for any configured Data Domain systems.
• The Server Management tab shows a detailed view of the server hardware resources for the Avamar server and any configuredData Domain systems.
• The Session Monitor tab shows a list of active client backup and restore sessions.• The Checkpoint Management tab shows detailed information for all system checkpoints that are performed for this Avamar server.• The Data Domain NFS Datastores tab lists the temporary NFS share for VMware instant access on any configured Data Domain
systems. The Avamar for VMware User Guide provides more information on instant access.
Server Monitoring 153

Server Monitor tabThe Server Monitor tab on the Server window in Avamar Administrator includes separate tabs for the Avamar server and anyconfigured Data Domain systems.
Avamar tabThe Avamar tab in the Server Monitor presents a summarized view of CPU, network, and hard drive performance statistics for theAvamar server.
The following tables describe the information available on the Avamar tab.
Table 59. Node details on the Avamar tab of the Server Monitor
Property Description
Status indicators Status of the node. One of the following values:
• Online (green)—The node is functioning correctly.• Read-Only (blue)—This status occurs normally as background
operations are performed and when backups have beensuspended.
• Time-Out (gray)—MCS could not communicate with thisnode.
• Unknown (yellow)—Node status cannot be determined.• Offline (red)—The node has experienced a problem. If
ConnectEMC has been enabled, a Service Request (SR) islogged. Go to Avamar Support to view existing SRs. Search theknowledgebase for KB000457963, Troubleshooting NodeOffline\GSAN Degraded Issues on an Avamar System.
ID Each node in the Avamar server has a unique logical identifier. Thisnode ID is expressed in the format module.node.
NOTE: Module and node numbering begins with zero.Therefore, the ID for the third node in the first module is0.2.
Table 60. CPU details on the Avamar tab of the Server Monitor
Property Description
Load Average number of CPU threads over the past minute.
User Percentage of CPU capacity that is consumed by running serverinstructions (anything other than operating system overhead).
Sys Percentage of CPU capacity that is consumed by operatingsystem overhead.
Table 61. Network details on the Avamar tab of the Server Monitor
Property Description
Ping Time in seconds that this node took to respond to a ping request.
In Received packet throughput reported in KB per second.
Out Sent packet throughput reported in KB per second.
Table 62. Disk details on the Avamar tab of the Server Monitor
Property Description
Reads Average number of hard drive reads per second as reported by theoperating system.
154 Server Monitoring

Table 62. Disk details on the Avamar tab of the Server Monitor (continued)
Property Description
Writes Average number of hard drive writes per second as reported bythe operating system.
Utilization Percentage of total available server storage capacity currentlyused.
Data Domain tabThe Data Domain tab in the Server Monitor provides CPU, disk activity, and network activity for each node on the Data Domain system.
The following tables describe the information available on the Data Domain tab.
Table 63. Node details on the Data Domain tab of the Server Monitor
Property Description
Status indicators Status of the node. One of the following values:
• OK (green)—The Data Domain system is functioning correctly.• Warning (yellow)—There is a problem with the Data Domain
system, but backups and restores can continue.• Error (red)—There is a problem with the Data Domain system,
and backups and restores are stopped until the problem isresolved.
If the status is yellow or red, you can view additional statusinformation to determine and resolve the problem. The Avamarand Data Domain System Integration Guide provides details.
Name Hostname of the Data Domain system as defined in corporateDNS.
Table 64. CPU details on the Data Domain tab of the Server Monitor
Property Description
Busy Avg. Average CPU usage as a percentage of total possible CPU usage.
Max Maximum CPU usage that has occurred as a percentage of totalpossible CPU usage.
Table 65. Disk (KB/S) details on the Data Domain tab of the Server Monitor
Property Description
Read Disk read throughput in kilobytes per second.
Write Disk write throughput in kilobytes per second.
Busy Disk I/O usage as a percentage of total possible disk I/O usage.
Table 66. Network (KB/S) details on the Data Domain tab of the Server Monitor
Property a Description
Eth#1 Desc—Description of the network interface.In/Out—Network bandwidth usage in kilobytes per second onnetwork interface 1.
Eth#2 Desc—Description of the network interface.In/Out—Network bandwidth usage in kilobytes per second onnetwork interface 2.
Eth#3 Desc—Description of the network interface.
Server Monitoring 155

Table 66. Network (KB/S) details on the Data Domain tab of the Server Monitor (continued)
Property a Description
In/Out—Network bandwidth usage in kilobytes per second onnetwork interface 3.
Eth#4 Desc—Description of the network interface.In/Out—Network bandwidth usage in kilobytes per second onnetwork interface 4.
a. The number of Eth# columns depends on the maximum number of network interfaces that the configured Data Domain systemssupport.
Server Management tabThe Server Management tab on the Server window in Avamar Administrator shows a detailed view of the server hardware resources,including both the Avamar server and any configured Data Domain systems.
Avamar server information is listed under the Avamar folder in the tree, and configured Data Domain systems are listed under the DataDomain folder in the tree.
The information in the right pane of the window changes when you select different items in the tree.
Table 67. Data display based on selections on the Server Management tab
Selected item Information in the right pane of the Server Management tab
Servers node Summary of bytes protected
Avamar or Data Domain nodes Blank
Avamar server name Detailed information for the Avamar server
Module Detailed information for that module
Node Detailed information for that node
Partition Detailed information for that logical hard drive partition
Data Domain system Detailed information for that Data Domain system
NOTE: Avamar is licensed in decimal units. Therefore, Total capacity and Capacity used are displayed in decimal units on
the Server Management tab. All other parts of the product that output capacity is displayed in binary units.
Bytes Protected SummaryThe following table provides details on the Bytes Protected Summary properties on the Server Management tab.
The amount is the pre-compress size on the client side.
Table 68. Bytes Protected Summary properties on the Server Management tab
Property Description
Properties Name of the Avamar server and configured Data Domain systems.
Values Number of bytes of protected data on the server or Data Domainsystem. The amount is the pre-compress size on the client side.
Server informationThe following tables describe the Server Information that is provided when an Avamar server is selected on the Server Managementtab.
156 Server Monitoring

Table 69. Server Details on the Server Management tab
Property Description
Active sessions Current number of active client sessions. Click the SessionMonitor tab for more information.
Total bytes free in partitions Disk free size from the OS level.
Server bytes reserved The maximum size that the current stripe files occupy.
Total capacity Total amount of server storage capacity.
Server utilization Percentage of total available server storage capacity currentlyused. This value is derived from the largest Disk Utilization valueon the Avamar tab in the Server Monitor, and thereforerepresents the absolute maximum Avamar server storageutilization. Actual utilization across all modules, nodes, and drivesmight be slightly lower.
Bytes protected (client pre-comp size) Total amount of client data in bytes that has been backed up(protected) on this server. The amount is the pre-compress sizeon the client side.
Bytes protected quota (client pre-comp size) Maximum amount of client data in bytes that is licensed forprotection on this server. The amount is the pre-compress size onthe client side.
License expiration Calendar date on which this server's licensing expires. When thelicensing is perpetual, the value is never.
Time since Server initialization Number of hours, days, and minutes that have elapsed since thisAvamar server was initialized.
Last checkpoint Date and time that the last server checkpoint was performed.Checkpoints are typically performed twice daily.
Last validated checkpoint Date and time that the server checkpoint was last validated.Checkpoint validation normally occurs once per day. Therefore, theLast validated checkpoint time and Last checkpoint timemight be different depending on the time of day that you view thisinformation.
NOTE: If the Last validated checkpoint and Lastcheckpoint times are more than 36 hours apart,checkpoint validation is not occurring, which is aproblem.
System Name User-assigned name of this Avamar server.
System ID Unique identifier for this Avamar server.
HFSAddr Hash File System (HFS) address (Addr). The hostname or IPaddress that backup clients use to connect to this Avamar server.
HFSPort HFS data port. The data port that backup clients use to connect tothis Avamar server. The default is port 27000.
IP Address IP address of this Avamar server. If the HFSAddr is an IP address,this value is the same as the HFSAddr.
Table 70. Maintenance Activities Details on the Server Management tab
Property Description
Suspended One of the following values:
• No — Server maintenance activities are not currentlysuspended (that is, server maintenance activities will runnormally during the next maintenance window).
Server Monitoring 157

Table 70. Maintenance Activities Details on the Server Management tab
Property Description
• Yes — Server maintenance activities are currently suspended.
Table 71. Garbage Collection Details on the Server Management tab
Property Description
Status One of the following values:
• Idle — Garbage collection is not currently taking place.• Processing — Garbage collection is taking place.
Result One of the following values:
• OK — Last garbage collection activity successfully completed.• Error code — Last garbage collection activity did not
successfully complete.
Start time Date and time that the last garbage collection activity began.
End time Date and time that the last garbage collection activity ended.
Passes Total number of passes during the last garbage collection activity.
Bytes recovered Total amount of storage space in bytes that was recovered duringthe last garbage collection activity.
Chunks deleted Total number of data chunks that were deleted during the lastgarbage collection activity.
Index stripes Total number of index stripes.
Index stripes processed Total number of index stripes that were processed during the lastgarbage collection activity.
Module informationThe following table provides details on the Module properties on the Server Management tab.
Table 72. Module properties on the Server Management tab
Property Description
Total bytes free in partitions Disk free size from the OS level.
Server bytes reserved The maximum size that the current stripe files occupy.
Total capacity Total amount of server storage capacity.
Server utilization Percentage of total available server storage capacity currentlyused. This value is derived from the largest Disk Utilization valuethat is shown on the Avamar tab in the Server Monitor, andtherefore represents the absolute maximum Avamar serverstorage utilization. Actual utilization across all modules, nodes, anddrives might be slightly lower.
Number of nodes Total number of nodes in this module.
IP address Base IP address of this module.
Node informationThe following tables provide details on the Node properties on the Server Management tab.
158 Server Monitoring

Table 73. Status indicators on the Node Information part of Server Management
Property Description
Status indicators One of the following values:
• Online (green) — Node is functioning correctly.• Read-Only (blue) — This option occurs normally as
background operations and when backups have beensuspended.
• Time-Out (gray) — MCS could not communicate with thisnode.
• Unknown (yellow) — Node status cannot be determined.• Offline (red) — Node has experienced a problem. If
ConnectEMC has been enabled, a Service Request (SR)should have been logged. Go to Avamar Support to viewexisting SRs. Search the knowledgebase for KB000457963,Troubleshooting Node Offline\GSAN Degraded Issues on anAvamar System.
Table 74. Server details on the Node Information part of Server Management
Property Description
State Current operational state of the server. One of the followingvalues:
• ONLINE — Node is functioning correctly.• DEGRADED — One or more disk errors have been detected.• OFFLINE — Node has experienced a problem. If ConnectEMC
has been enabled, a Service Request (SR) should have beenlogged. Go to Avamar Support to view existing SRs. Search theknowledgebase for KB000457963, Troubleshooting NodeOffline\GSAN Degraded Issues on an Avamar System.
• READONLY — Occurs normally as background operations areperformed and when backups have been suspended.
Runlevel Current operational state of the server. One of the followingvalues:
• fullaccess — This Avamar server is fully operational.• admin — Avamar server is fully operational but only the
administrator root account can access the server.• adminonly — Avamar server is fully operational but only the
administrator root account can access the server.• adminreadonly — Avamar server is in a read-only condition and
only the administrator root account can access the server.• readonly — Avamar server is in a read-only condition. Restores
are allowed but no new backups can be taken.• suspended — Scheduled backups are disabled until you
reenable the scheduler.• synchronizing — Avamar server is priming or synchronizing
stripes. A temporary condition. Some operations might bedelayed.
Accessmode Current access level of the server. The full server access mode istypically represented as 3 4-bit fields. For example: mhpu+mhpu+0000 The most significant bits show server privileges, the middlebits show root user privileges, and the least significant bits showprivileges for all other users. Individual bits in these fields conveythe following information:
• m — Migrate allowed.• h — Hash File System (HFS) is writable.• p — Persistent store is writable.
Server Monitoring 159
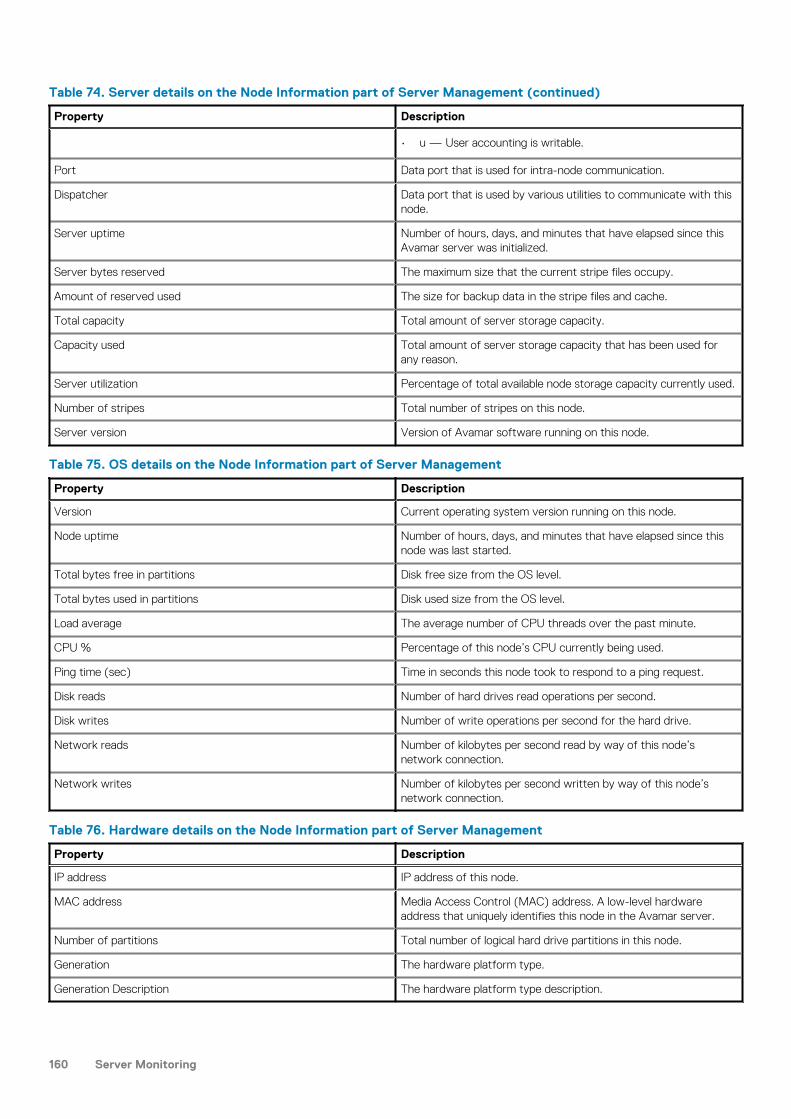
Table 74. Server details on the Node Information part of Server Management (continued)
Property Description
• u — User accounting is writable.
Port Data port that is used for intra-node communication.
Dispatcher Data port that is used by various utilities to communicate with thisnode.
Server uptime Number of hours, days, and minutes that have elapsed since thisAvamar server was initialized.
Server bytes reserved The maximum size that the current stripe files occupy.
Amount of reserved used The size for backup data in the stripe files and cache.
Total capacity Total amount of server storage capacity.
Capacity used Total amount of server storage capacity that has been used forany reason.
Server utilization Percentage of total available node storage capacity currently used.
Number of stripes Total number of stripes on this node.
Server version Version of Avamar software running on this node.
Table 75. OS details on the Node Information part of Server Management
Property Description
Version Current operating system version running on this node.
Node uptime Number of hours, days, and minutes that have elapsed since thisnode was last started.
Total bytes free in partitions Disk free size from the OS level.
Total bytes used in partitions Disk used size from the OS level.
Load average The average number of CPU threads over the past minute.
CPU % Percentage of this node’s CPU currently being used.
Ping time (sec) Time in seconds this node took to respond to a ping request.
Disk reads Number of hard drives read operations per second.
Disk writes Number of write operations per second for the hard drive.
Network reads Number of kilobytes per second read by way of this node’snetwork connection.
Network writes Number of kilobytes per second written by way of this node’snetwork connection.
Table 76. Hardware details on the Node Information part of Server Management
Property Description
IP address IP address of this node.
MAC address Media Access Control (MAC) address. A low-level hardwareaddress that uniquely identifies this node in the Avamar server.
Number of partitions Total number of logical hard drive partitions in this node.
Generation The hardware platform type.
Generation Description The hardware platform type description.
160 Server Monitoring

Partition informationThe following tables provide details on the Partition Information that is available when a partition is selected on the ServerManagement tab.
Table 77. Status indicators on the Partition Information part of Server Management
Property Description
Status indicators One of the following values:
• Online (green) — The partition is functioning correctly.• Offline (yellow) — The partition has one or more offline
stripes. If ConnectEMC has been enabled, a Service Request(SR) should have been logged. Go to the Avamar Supportwebsite to view existing SRs.
• Read-Only (blue) — The partition is read-only.• Nonfunctional (red) — The partition is not functioning. Search
the knowledgebase on the Avamar Support website forKB000465715, Suspended Partitions\Stripes and HfscheckFailures on Avamar (Symptom Code 22632).
Server bytes reserved The maximum size that the current stripe files occupy.
Amount of reserved used The size for backup data in the stripe files and cache.
Table 78. Server Details on the Node Information part of Server Management
Property Description
Total capacity Total amount of server storage capacity.
Capacity used Total amount of server storage capacity that has been used.
Server utilization Percentage of total available partition storage capacity that isused.
State Current operational state of this partition. One of the followingvalues:
• ONLINE — The partition is functioning correctly.• MIGRATING — Transitional state that might or might not be
due to normal operation.• OFFLINE — Transitional state that might or might not be due
to normal operation.• READY — Transitional state that might or might not be due to
normal operation.• RESTARTING — Transitional state that might or might not be
due to normal operation.
Number of offline stripes Total number of stripes on this partition that are offline due tomedia errors.
Number of transitioning stripes Total number of stripes on this partition that are in a transitionalstate that might or might not be due to normal operation.
Properties Various operating system properties (if known).
Values Settings for operating system properties (if known).
Total bytes free in partitions Disk free size from the OS level.
Total bytes used in partitions Disk used size from the OS level.
Data Domain system informationThe following table provides details on the Data Domain system properties on the Server Management tab.
Server Monitoring 161

Table 79. Data Domain system properties on the Server Management tab
Property Description
Status indicators One of the following values:
• Online (green)—The Data Domain system is functioningcorrectly.
• Offline (yellow)—The Data Domain system is offline. The DataDomain Offline Diagnostics Suite User Guide, which is availableon Avamar Support, provides more information.
• Read-Only (blue)—The Data Domain system is read-only.• Nonfunctional (red)—The Data Domain system is not
functioning. The Data Domain Offline Diagnostics Suite UserGuide provides more information.
IPv4 Hostname IPv4 hostname of the Data Domain system as defined in corporateDNS.
IPv6 Hostname IPv6 hostname of the Data Domain system as defined in corporateDNS.
Total Capacity (post-comp size) The total capacity for compressed data on the Data Domainsystem.
Server Utilization (post-comp use%) The percentage of capacity that is used on the Data Domainsystem for any reason after compression of the data.
Bytes Protected (client pre-comp size) The total number of bytes of data that are protected, or backedup, on the Data Domain system. This value is the number of bytesbefore the data is compressed.
File System Available (post-comp avail) The total amount of disk space available for compressed data inthe DDFS.
File System Used (post-comp used) The total amount of disk space that is used in the DDFS forcompressed data.
Username The username of the Data Domain OpenStorage (OST) accountthat Avamar should use to access the Data Domain system forbackups, restores, and replication, if applicable. This username isspecified when you add the Data Domain system to the Avamarconfiguration.
Default Replication Storage System Whether the Data Domain system is configured as defaultreplication storage. This option is selected or cleared when you addthe Data Domain system to the Avamar configuration.
Target For Avamar Checkpoint Backups Indicate whether to store Avamar Checkpoint Backups on the DataDomain system or not.
Maximum Streams For Avamar Checkpoint Backups The maximum number of reserved streams for Avamar CheckPointBackup on Data Domain system.
Maximum Streams The maximum number of Data Domain system streams thatAvamar can use at any one time to perform backups and restores.This number is configured for the Data Domain system when youadd the system to the Avamar configuration.
Maximum Streams Limit The maximum number of Data Domain systems backup writestreams.
Instant Access Limit The amount limit of VMs that generated from Instant AccessRestore.
DDOS Version Version number of the Data Domain Operating System (DD OS) onthe Data Domain system.
Serial Number The manufacturer’s serial number for the disk in the Data Domainsystem.
162 Server Monitoring

Table 79. Data Domain system properties on the Server Management tab (continued)
Property Description
Model number Model number of the Data Domain system.
Encryption Strength The default global encryption strength of DDBoost clients on DataDomain system. The values are none, medium, and high.
Authentication Mode The default global authentication mode of DDBoost clients on DataDomain system. The values are none, one-way, two-way, andanonymous.
Monitoring Status Monitoring status of the Data Domain system. The Avamar andData Domain System Integration Guide provides details on theavailable values.
Monitoring status details When the monitoring status is a value other than OK, thenadditional information appears in a list below the MonitoringStatus row. The following entries describe the available values.
NOTE: The Avamar and Data Domain System IntegrationGuide provides details on how to troubleshoot errorconditions that result from each of these values.
DD Boost licensing status, either:
• DDBoost Licensed• DDBoost not Licensed
DD Boost status, either:
• DDBoost Enabled• DDBoost Disabled
Whether the DD Boost user is enabled or disabled, either:
• DDBoost User Enabled• DDBoost User Disabled
DD Boost user status, either:
• DDBoost User Valid• DDBoost User Changed
DD Boost option status, either:
• DDBoost Option Enabled• DDBoost Option Disabled• DDBoost Option not Available
Status of the non-OST user, if configured, either:
• Non-ost user state is Unknown• Non-ost user Invalid• Non-ost user disabled• Non-ost user is not an admin user
NOTE: The non-OST user row does not appear when anon-OST user has not been configured.
SNMP status, either:
• SNMP Enabled• SNMP Disabled
Status of the Data Domain file system, either:
• File System Running• File System Enabled• File System Disabled• File System Unknown
Server Monitoring 163

Table 79. Data Domain system properties on the Server Management tab (continued)
Property Description
• File system status unknown since SNMP is disabled
Whether synchronization of maintenance operations, such ascheckpoints, HFS checks, and Garbage Collection, between theAvamar server and the Data Domain system can occur, either:
• Synchronization of maintenance operations is off.• Synchronization of maintenance operations is on.
Cloud Tier The status of Cloud Tier. If enabled, display the Cloud Unit name,or display as disabled.
Event monitoringAll Avamar system activity and operational status is reported as events to the MCS. Examples of Avamar events include client registrationand activation, successful and failed backups, and hard disk status.
Each event contains the information in the following table.
Table 80. Event information
Information Description
Event code Unique identifier
Date and time Date and time the event was reported
Category Category of event:
• SYSTEM• APPLICATION• USER• SECURITY
Type Type of event:
• INTERNAL• ERROR• WARNING• INFORMATION• DEBUG
Summary A one-line summary description of the event
Hardware source System node that reported the event
Software source System or application module that reported the event
Event notificationsThe following features generate notifications when specific events occur.
Pop-up alertsYou can configure individual events to generate a graphical pop-up alert each time the event occurs. Avamar Administrator must berunning for the pop-up alerts to appear.
Acknowledgment required listYou can specify that when a certain event type occurs, the Avamar system administrator must acknowledge the event.
164 Server Monitoring

Email messagesYou can specify that when a certain event type occurs, an email message is sent to a designated list of recipients. Email notifications canbe sent immediately or in batches at scheduled times.
A typical batch email notification message looks like the following example.
Table 81. Example of a batch email notification message
MCS: avamar-1.example.com
MCS Version: 7.1.0-nnnAvamar Server: avamar-1.example.comAvamar Server Version: 7.1.0-nnn
Event profile: My Custom ProfileCount of events: 3
Summary of events:Type-----------INFORMATIONINFORMATIONINFORMATION
Type-----------INFORMATIONINFORMATIONINFORMATION
Code------222072220822209
Count------111
Summary-------New group createdGroup modifiedGroup deleted
Event Code = 22207Event Date/Time = 5/10/14 09:58:20 PDTEvent Type = INFORMATIONEvent Severity = OKEvent Summary = New group createdSoftware Source = MCS:CR
Event Code = 22209Event Date/Time = 5/10/14 09:58:25 PDTEvent Type = INFORMATIONEvent Severity = OKEvent Summary = Group deletedSoftware Source = MCS:CR
Event Code = 22208Event Date/Time = 5/10/14 10:55:28 PDTEvent Type = INFORMATIONEvent Severity = OKEvent Summary = Group modifiedSoftware Source = MCS:CR
Syslog supportYou can specify that when an event type occurs, Avamar logs information to local or remote syslog files that are based on filtering rulesthat are configured for the syslog daemon that receives the events. Third-party monitoring tools and utilities capable of examining logentries can access the syslog files and process them to integrate Avamar event information into larger site activity and status reports.
SNMP supportThe Avamar SNMP implementation provides two ways to access Avamar server events and activity completion status:
• SNMP requests provide a mechanism for SNMP management applications to “pull” information from a remote SNMP-enabled client(in this case, the Avamar server).
Server Monitoring 165

• SNMP traps provide a mechanism for the Avamar server to “push” information to SNMP management applications wheneverdesignated Avamar events occur. You can configure an event type to output SNMP traps.
Usage intelligenceEnables the Avamar server to automatically collect and transfer reporting information to Avamar Support via the ESRS gateway.
Event profilesProfiles are a notification management feature that is used to logically group certain event codes together and specify which notificationsto generate when the events occur.
There are two basic types of event profiles:
• System profile — There is only one system event profile. It contains all possible system event codes.• Custom profiles — Custom profiles are used to send various notifications when certain system events occur. You can create as
many custom profiles as you should. This step is done to organize system events and generate notifications when any of those eventsoccur.
Profile catalogThe Avamar system includes a set of preconfigured event profiles by default.
System profile
There is only one system event profile. It contains all possible system event codes.
Evaluation profile
The evaluation profile is primarily intended to be used to support system evaluations. If enabled, this profile generates an email notificationand attaches 2 weeks’ worth of Activities - DPN Summary report information to the email message. The Avamar Reports Guide providesmore information about the Activities - DPN Summary report.
High Priority Events profile
The High Priority Events profile is enabled by default. This special event profile automatically email messages the following information toAvamar Support ([email protected]) twice daily:
• Status of the daily data integrity check• Selected Avamar server warnings and information messages• Any Avamar server errors
The only change that you can make to the High Priority Events profile is to add email addresses to the Recipient Email List. If you requirecustom High Priority Events profile settings, copy the profile and then edit the copy.
Local SNMP Trap profile
The Local SNMP Trap profile is read-only and is intended to be used for test purposes only. The profile enables you to verify successfullygenerated traps and that the local snmptrapd process receives the traps, which then writes the trap information to a syslog file.
Local Syslog profile
If enabled, the Local Syslog profile reports status by way of the local syslogd process on the Avamar server.
Usage Intelligence profile
Enables the Avamar server to automatically collect and transfer reporting information to Avamar Support via the ESRS gateway.
Editing the system event profileThe system event profile contains all possible system event codes. You can edit the system event profile to control whether an eventgenerates a pop-up alert in Avamar Administrator, an entry in the common unacknowledged events list, or neither.
Steps
1. In Avamar Administrator, select Tools > Manage Profiles.
166 Server Monitoring

The Manage All Profiles window is displayed.2. Select System Profile in the left pane and click Edit.
The Edit Profile dialog box appears with a list of event codes.3. To show a graphical pop-up alert in Avamar Administrator each time an event occurs, select the GUI Alert checkbox next to the
event.4. To add an entry to the common unacknowledged events list each time that an event occurs, select the Acknowledgement
Required checkbox.5. Click OK.
Creating a custom event profileCustom event profiles enable you to send notifications when specific system events occur.
About this task
You cannot view system events and profiles outside the domain that you are logged in to. This step affects the profiles that you can editand the events that you can add to a profile.
Steps
1. In Avamar Administrator, select Tools > Manage Profiles.The Manage All Profiles window is displayed.
2. In the left pane, select the domain for the custom event profile, and click New.The New Profile wizard appears.
3. In the Profile Name box, type a name for the event profile.4. For Profile Type, leave the default setting of Email, Syslog, and SNMP Trap Notification.
NOTE: Because the Usage Intelligence feature uses the preconfigured Usage Intelligence profile, do not create a
profile that is based on the Usage Intelligence profile type. This step results in redundant data being sent to Avamar
Support.
5. Choose whether to enable or disable the profile by selecting or clearing the Profile Enabled checkbox.6. Choose whether to enable email notifications for the profile by selecting or clearing the Email Enabled checkbox.7. If you enabled email notifications, then specify whether to send email notifications as soon as events occur or on a scheduled basis:
• To send email notifications as soon as events occur, select Send data as events occur.• To send email notifications on a scheduled basis, select Send data on a schedule, and then select the schedule from the list.
8. Choose whether to enable or disable syslog notification for the profile by selecting or clearing the Syslog Notification – Enabledcheckbox.
9. Choose whether to enable or disable SNMP notification for the profile by selecting or clearing the SNMP Trap Notification –Enabled checkbox.
10. Click Next.The Event Codes page appears.
11. Click the All Codes tab, and then select the Notify checkbox next to the errors that should trigger notifications.
NOTE: An asterisk (*) next to an event indicates an event of such severity that a notification is sent when that event
occurs, even if other event notifications are sent on a schedule.
12. Click the Audit Codes tab, and then select the Notify checkbox next to the audit events that should trigger notifications.
NOTE: An asterisk (*) next to an event code indicates an event of such severity that a notification is sent when that
event occurs, even if other event notifications are sent on a schedule.
13. If you are adding this custom event profile at the top-level (that is, not to a domain or subdomain), specify the parameters to controlcapacity forecast alerts:
a. Click the Parameters tab.b. Select the checkbox next to the parameter, and then type a new value for the parameter.c. Repeat the previous step as necessary for each parameter.
14. Click Next.The Attachments page appears.
15. (Optional) If the profile includes email notification messages, select the Attach Server status in email (XML) checkbox to include areport of overall Avamar server status in XML format in the messages.
Server Monitoring 167

16. (Optional) To include Avamar server logs in email notification messages, select the Attach Server logs in email checkbox and thentype the full path to the location of Avamar server logs in the Directory box. The default location is /usr/local/avamar/var/cron/.
17. Specify the reports to include in email notification messages:
a. Select the Attach checkbox next to the report to include.b. Select the checkbox next to the report for the file formats in which to send the report. You can select XML, CSV, or TXT.c. Specify the number of historical reports of this type to send with each notification message using the Since Count and Since
Unit fields. For example, send the past 2 months of these reports.
The following values are available from the Since Count list:
• day(s) ago• week(s) ago• month(s) ago• since last modified
18. Click Next.The Email Notification page appears.
19. If the profile includes email notification messages, then specify the recipients and options for the email notification messages:
a. In the Email Subject Header box, type an email subject line for the notification message.b. Add an email recipient to the list by typing a valid email address in the Enter Recipient box and then clicking +.c. (Optional) To remove a recipient from the Recipient Email List, select the recipient and click -.d. To insert all attachments into the body of the email notification message, select the Inline attachments checkbox.
NOTE: When you insert the attachments, the email message may be very long.
e. To immediately send a test email message, click Send Email.If the test email message is sent successfully, an Email accepted by transport layer confirmation message appears.
20. Click Next.The Syslog Notification page appears.
21. If the profile includes syslog notification messages, then specify the syslog notification parameters:
a. In the Address (IP or hostname) box, type the IP address or hostname of the Avamar server node running the syslogdprocess.
b. In the Port Number box, type the port number that is used for syslog communication.c. Choose whether to include extended event code information in the syslog message by selecting or clearing the Include extended
event data checkbox.
The extended information is delimited by using the following tags:
<Code><Type><Severity><Category><HwSource><Summary><active><lastEmailSendDate><domain><scheduleID><num_prefs><name><isSystem>
d. From the Facility list, select one of the following: user, local0, local1, local2, local3, local4, local5, local6, or local7.e. To test the syslog notification parameters, click Send Test Syslog Entry.
22. Click Next.The SNMP Trap Notification page appears.
23. If the profile includes SNMP notification messages, then specify SNMP notification parameters:
a. In the SNMP Trap address (IP or hostname) box, type the IP address or hostname of the computer running an application thatcan receive and process an SNMP trap.
b. In the Port Number box, type the port number on the host server that is listening for SNMP traps. The default data port is 162.c. In the SNMP Community box, type the name of the SNMP community that the SNMP trap listener is configured to use.
168 Server Monitoring

The SNMP community is a text string that the local Net-SNMP agent uses to authenticate itself with the SNMP managementapplication.
d. To test the SNMP notification parameters, click Send Test SNMP Trap.24. Click Finish.
Editing a custom event profileAfter you create a custom event profile for notifications of specific system events, you can edit any of the properties of the profile.
About this task
You cannot view system events and profiles outside the domain that you are logged in to. This step affects the profiles that you can editand the events that you can add to a profile.
Steps
1. In Avamar Administrator, select Tools > Manage Profiles.The Manage All Profiles window is displayed.
2. In the left pane, select the custom event profile and click Edit.The Edit Profile dialog box appears.
3. Edit the custom event profile. The properties are the same as when you create the profile.4. Click OK.
Copying a custom event profileYou can create a custom event profile with the same properties as a profile that you already created by copying the profile. You can copythe profile to the same domain or to a different domain.
Steps
1. In Avamar Administrator, select Tools > Manage Profiles.The Manage All Profiles window is displayed.
2. In the left pane, select the profile and click Copy.
The Save As dialog box appears.
3. Type a name for the new custom event profile in the Save As box.4. (Optional) To copy the new custom event profile to a different domain, click the ... button, browse to the new domain, and then click
OK.5. Click OK.
Testing custom event profile notificationsYou can test custom event profile notification mechanisms by sending a short email message or writing a short message to the syslog file.
Steps
1. In Avamar Administrator, select Tools > Manage Profiles.The Manage All Profiles window is displayed.
2. In the left pane, select the custom event profile and click Edit.The Edit Profile dialog box appears.
3. Test the custom event profile:
• To send a test email message, select the Email Notification tab and click Send Email.• To write a test message to the syslog file, select the Syslog Notification tab and click Send Test Syslog Entry.• To send a test SNMP trap message, select the SNMP Trap Notification tab and click Send Test SNMP Trap.
If the test message is successfully sent, a confirmation message appears.4. Click OK.5. To close the Edit Profile dialog box, click OK.
Server Monitoring 169

Enabling and disabling a custom event profileWhen you disable an event profile, no email notifications are sent until you reenable the profile. You can disable any profile except thesystem events profile.
Steps
1. In Avamar Administrator, select Tools > Manage Profiles.The Manage All Profiles window is displayed.
2. In the left pane, select the event profile.3. To disable the event profile, click Disable, or to enable the event profile, clickEnable.
Deleting a custom event profileYou can permanently delete any custom event profile except the system events profile.
Steps
1. In Avamar Administrator, select Tools > Manage Profiles.The Manage All Profiles window is displayed.
2. Select the event profile and click Delete.A confirmation message appears.
3. Click Yes.
Viewing events in the Event Monitor
Steps
1. In Avamar Administrator, click the Administration launcher link.The Administration window is displayed.
2. Click the Event Management tab.3. Click the Event Monitor tab near the bottom of the window.
The Avamar Administrator online help provides details on each of the columns in the Event Monitor.
4. Select the display mode for the Event Monitor:
• To display the most recent 5,000 system events for a defined range of dates, select Query.• To display the most recent 5,000 system events during the past 24 hours, select Monitor.
5. (Optional) Filter the events that appear in the Event Monitor:
a. Open the Actions menu and select Event Management > Filter.The Filter dialog box appears.
b. If you selected the Query display mode for the Event Monitor, select the range of dates for the events to display by using theFrom Date and To Date fields.
c. From the Category list, select the category of events to display.d. From the Type list, select the type of events to display.e. From the Severity list, select the severity of the events to display.f. To view events for all domains, select All Domains. Or, to view events for a specific domain, select Domain and then browse to or
type the domain name.g. To display only events that contain certain case-sensitive keywords in the event code data XML element, type the keyword in the
Data box.
This criterion promotes easy filtering on important keywords across event attributes. For example, filtering the Event Monitor onerror returns all events that contain the word error in any XML attribute (for example, category, type, or severity).
h. Choose whether to display events from all sources, from only the Avamar server, from all Data Domain systems, or from a singleData Domain system:
• To view events from all sources, leave the default selection of All Sources in the Source list.• To view events from only the Avamar server, select Avamar from the Source list.• To view events from all Data Domain systems, select Data Domain Systems from the Source list and leave the default
selection of All Systems.• To view events from a single Data Domain system, select Data Domain Systems from the Source list, select the System
option, and then either type or browse to the Data Domain system.
170 Server Monitoring

i. Click More to view additional filtering criteria.j. To limit the Event Monitor to events with a certain event code, select Only include codes and then add and remove codes from
the list. Or, to exclude events with a certain event code from the Event Monitor, select Exclude codes and then add and removecodes from the list.
k. Click OK.
Viewing the event catalogA sequential listing of all event codes and summary information is available in /usr/local/avamar/doc/event_catalog.txt onthe Avamar server. You can also view event_catalog.txt by using a web browser.
Steps
1. Open a web browser and type the following URL:
https://Avamar_serverwhere Avamar_server is the DNS name or IP address of the Avamar server.
The Avamar Web Restore page appears.2. Click Documentation.
The Avamar Documentation page appears.3. Click the plus icon next to Avamar Event Codes.4. Click event_catalog.txt.
The file opens in the web browser.
Acknowledging system eventsSystem events that are configured to require acknowledgment each time they occur, remain in the unacknowledged events list until theyare explicitly cleared, or acknowledged, by an Avamar server administrator.
Steps
1. In Avamar Administrator, click the Administration launcher link.The Administration window is displayed.
2. Click the Event Management tab.3. Click the Unacknowledged Events tab near the bottom of the window.4. Acknowledge the events:
• To acknowledge one or more events, select the event entries and select Actions > Event Management > AcknowledgeUnacknowledged Events.
• To acknowledge all events in the list, select Actions > Event Management > Clear All Alerts.
Customizing error eventsBy default, Avamar software continually monitors /var/log/messages for any occurrence of the case-insensitive search stringerror. Any occurrences of error create an event code of the type ERROR. You can customize this default behavior.
Steps
1. Define additional case-insensitive search strings that also create Avamar ERROR events.2. Add the search strings to /usr/local/avamar/var/mc/server_data/adminlogpattern.xml.
Server monitoring with syslogThe syslog system logging feature on UNIX and Linux systems collects system log messages and writes them to a designated log file. Youcan configure the Avamar server to send event information in syslog format.
The Avamar server supports both syslog and syslog-ng implementations.
Server Monitoring 171

NOTE: Persons configuring syslog monitoring of an Avamar server should be familiar with basic syslog concepts. A
complete discussion of basic syslog concepts and implementation is beyond the scope of this guide. The
www.syslog.org website provides additional information.
At the operating system level, system monitoring and logging rely on the syslogd process to collect system log messages and writethem to a designated log file. The syslogd process runs locally on every Avamar server node.
However, without additional configuration, each node’s syslogd only collects system information for that node, and writes it to a locallog file on that node. From a syslog perspective, each Avamar server node is unaware that any other server nodes exist. Also, the utilitynode syslog process is not aware that the Avamar Management Console Server (MCS) is collecting and logging Avamar eventinformation.
You can configure an Avamar event profile to format Avamar server event messages in syslog format and send this data to the syslogdprocess running on the Avamar server utility node.
The following table describes how an event profile maps Avamar server event data to syslog fields.
Table 82. Mappings of syslog fields to Avamar event data
Field in syslog Avamar event data
Facility Either User or Local#, where # is a number from 0 to 7.
Priority One of the following values, which are based on the Avamar eventtype:
• debug, if the Avamar event type is DEBUG
• err, if the Avamar event type is ERROR
• info, if the Avamar event type is INFO
• none, if the Avamar event type is INTERNAL
• warning, if the Avamar event type is WARNING
Date Avamar event date.
Time Avamar event time.
Hardware source Avamar event hardware source.
Software source Avamar event software source.
Message The following fields from the Avamar event code:
• event code• category• summary• event data
Configuring local syslogThe most basic way to implement Avamar server syslog monitoring is to configure the MCS to output Avamar event information to thelocal syslogd process running on the utility node. The local syslogd service merges the Avamar event information with the operatingsystem messages in a single local log file.
Steps
1. Enable the Local Syslog event profile on the Avamar server:
a. In Avamar Administrator, select Tools > Manage Profiles.b. Select the Local Syslog event profile in the left pane and click Enable.
2. On single-node servers and utility nodes with SLES 11 or later, configure the local utility node syslogd process to listen for MCS eventmessages on UDP data port 514:
a. Open a command shell and log in as admin on the single-node server or the utility node of a multi-node server.b. Switch user to root by typing su -.
c. Open /etc/syslog-ng/syslog-ng.conf in a text editor.
d. Locate the following entry:
172 Server Monitoring

## uncomment to process log messages from network:## udp(ip("0.0.0.0") port(514));
e. Add the following entry, including the comment:
## uncomment to process log messages from MCS:#udp(ip("0.0.0.0") port(514));
f. Save and close the file.g. Restart the syslog process by typing the following command:
service syslog restarth. Verify that syslog is listening on port 514 by typing the following command:
netstat -nap | grep 514The following output appears in the command shell:
udp 0 0 127.0.0.1:514 127.0.0.1:* 8043/syslog-ng
Configuring remote syslogRemote syslog monitoring includes the following:
About this task
• Configuring each server node to send syslog data to a remote logging host.• Creating a custom syslog event profile that sends Avamar server event messages in syslog format to the remote logging host.
Sites that implement remote syslog monitoring of an Avamar server in most cases already have a remote logging host that is configuredand deployed.
Many different syslog monitoring tools are available. Any syslog monitoring tool generally works with Avamar as long as it is configured tolisten for remote syslog messages over a LAN connection on UDP data port 514.
NOTE: For maximum security, implement remote syslog monitoring.
Steps
1. Create a custom syslog event profile that sends Avamar server event messages in syslog format to the remote logging host.2. Configure all server nodes to send syslog messages to the remote logging host.3. Configure the remote logging host to listen for syslog messages over a LAN connection on UDP data port 514.4. If a firewall is enabled on the remote logging host, configure the firewall to allow UDP traffic on port 514 for a defined IP range.
Creating a custom syslog event profile
Steps
1. In Avamar Administrator, select Tools > Manage Profiles.The Manage All Profiles window is displayed.
2. Select the Local Syslog event profile in the left pane and click Copy.The Save As dialog box appears.
3. Type a name for the new custom event profile in the Save As field.4. Leave the domain set to root (/). Custom syslog profiles must reside in the root domain.5. Click OK.6. In the Manage All Profiles dialog box, select the custom syslog event profile that you created and click Edit.
The Edit Profile dialog box appears.7. Select the Syslog Notification tab and specify syslog notification parameters:
a. In the Address (IP or hostname) field, type the IP address or hostname of the remote logging host.b. In the Port Number field, leave the port number set to 514.c. Select the Include extended event data option to include extended event code information in the syslog message.
Server Monitoring 173

The extended information is delimited by using the following tags:
<Code><Type><Severity><Category><HwSource><Summary><active><lastEmailSendDate><domain><scheduleID><num_prefs><name><isSystem>
d. From the Facility list, select one of the following values: user, local0, local1, local2, local3, local4, local5, local6, or local7.8. (Optional) To test the syslog notification parameters, click Send Test Syslog Entry.9. Click OK.
Configuring server nodes to send syslog messages to the remotelogging serverAs part of the process to configure remote syslog, you must configure all Avamar server nodes to send syslog messages to a remotelogging server over a LAN connection on UDP data port 514.
Steps
1. Open a command shell:
a. Log in to the server as admin.b. Switch user to root by typing the following command:
su -c. For a multi-node server, load the rootid OpenSSH key by typing the following command:
ssh-agent bashssh-add /root/.ssh/rootid
2. Open /etc/syslog-ng/syslog-ng.conf in a text editor.
3. Add the following entry:
destination logserver {udp("ip_address" port(514)); };log { source(src); destination(logserver); };where ip_address is the IP address of the remote logging host.
4. Save and close the file.5. Restart the syslog process by typing the following command:
service syslog restart6. On multi-node servers, repeat the previous steps for each node.
Configuring RHEL remote logging hosts running syslog
Steps
1. Open a command shell and log in to the remote logging host as root.2. Open /etc/sysconfig/syslog in a text editor.
3. Locate the following entry:
SYSLOGD_OPTIONS="-m 0"4. Add the -r parameter to the entry:
SYSLOGD_OPTIONS="-r -m 0"5. Save and close the file.6. Restart the syslogd process by typing the following command:
174 Server Monitoring

service syslog restart
Configuring SLES remote logging hosts running syslog-ng
Steps
1. Open a command shell and log in to the remote logging host as root.2. Open /etc/syslog-ng/syslog-ng.conf in a text editor.
3. Locate the following entry:
## uncomment to process log messages from network:## udp(ip("0.0.0.0") port(514));
4. Uncomment the entry:
## uncomment to process log messages from network:#udp(ip("0.0.0.0") port(514));
5. Save and close the file.6. Restart the syslog process by typing the following command:
service syslog restart7. Verify that syslog is listening on port 514 by typing the following command:
netstat -nap | grep 514The following output appears in the command shell:
udp 0 0 0.0.0.0:514 0.0.0.0:* 8043/syslog-ng
Configuring the firewall on the remote logging hostIf a firewall is enabled on the remote logging host, configure the firewall to allow UDP traffic on port 514 for a defined IP range.
Steps
1. Restrict the source IP addresses of the remote log messages in iptables or another firewall to avoid Denial Of Service (DOS) attackson the remote logging host.
The following example rule for iptables would allow client system logs for an IP address range of Avamar server nodes:
# Rules to allow remote logging for syslog(-ng) on the log HOST systemiptables -A INPUT -p udp -s 192.168.1.0/24 --dport 514 -j ACCEPTwhere 192.168.1.0/24 is in the IP address range of the Avamar server nodes.
The following example rule for iptables specifies the IP address for each Avamar server node on a single line and includes the Macaddress of the Network Interface Card (NIC) for the node:
iptables -A INPUT -p udp -s 192.168.1.12 -m mac --mac-source 00:50:8D:FD:E6:32 --dport 514 -jACCEPTiptables -A INPUT -p udp -s 192.168.1.13 -m mac --mac-source 00:50:8D:FD:E6:33 --dport 514 -jACCEPTiptables -A INPUT -p udp -s 192.168.1.14 -m mac --mac-source 00:50:8D:FD:E6:34 --dport 514 -jACCEPTiptables -A INPUT -p udp -s 192.168.1.15 -m mac --mac-source 00:50:8D:FD:E6:35 --dport 514 -jACCEPT...No rules are necessary for the outgoing syslog traffic on the client side.
2. Restart the firewall service on the remote logging host for the changes to take effect.3. Restart the syslog-ng service on all server nodes and the remote logging host for the changes to take effect:
Server Monitoring 175

service syslog restart
Server monitoring with SNMPSimple Network Management Protocol (SNMP) is a protocol for communicating and monitoring event notification information between anapplication, hardware device, or software application and any number of monitoring applications or devices.
NOTE: Persons configuring an Avamar server to send event information over SNMP should be familiar with basic SNMP
concepts. A complete discussion of basic SNMP concepts and implementation is beyond the scope of this guide. The
www.net-snmp.org website provides additional information.
The Avamar SNMP implementation provides SNMP requests and SNMP traps to access Avamar server events and activity status. TheAvamar server supports SNMP versions v1 and v2c.
SNMP requestsSNMP requests provide a mechanism for SNMP management applications to “pull” information from a remote SNMP-enabled applicationor device (in this case, the Avamar server). The SNMP management application sends a request to an SNMP master agent running on theAvamar server. The SNMP master agent then communicates with the Avamar SNMP sub-agent, which passes the request to the MCS.The MCS retrieves the data and sends it back to the Avamar SNMP sub-agent, which passes it back to the management application byway of the SNMP master agent. Data port 161 is the default data port for SNMP requests.
Avamar servers that are purchased directly from Avamar use the Net-SNMP master agent. Avamar servers that are built with otherindustry standard hardware likely use an SNMP master agent that is provided by the hardware manufacturer.
SNMP trapsSNMP traps provide a mechanism for the Avamar server to “push” information to SNMP management applications when designatedAvamar events occur. Data port 162 is the default data port for SNMP traps. Typically, the SNMP management application listens for theSNMP traps that designated remote hosts generate.
Configuring server monitoring with SNMP
Steps
1. To enable an SNMP management application to monitor an Avamar server, load the Avamar Management Information Base (MIB)definition file (AVAMAR-MCS-MIB.txt) into the master MIB used by the SNMP management application.
The MIB contains definitions of the information that can be monitored or which traps are sent for each SNMP application or device.
The following table provides the locations for the Avamar MIB definition file.
Table 83. Locations for the Avamar MIB definition file
Computer type MIB location
Single-node server /usr/local/avamar/doc
Multi-node server /usr/local/avamar/doc on the utility node
Computer with Avamar Administrator install_dir/doc, where install_dir is typically:
• C:\Program Files\avs\administrator onMicrosoft Windows computers
• /usr/local/avamar on Linux computers
• /opt/AVMRconsl on Solaris computers
A copy of the Avamar MIB definition file also resides in the /usr/share/snmp/mibs directory on single-node servers and utilitynodes. This copy is used by the Avamar SNMP sub-agent and should not be moved or distributed.
2. Configure the Net-SNMP agent. Configuring the Net-SNMP agent on page 177 provides instructions.3. Configure a custom event profile to output designated Avamar server events to an SNMP trap. Creating a custom event profile for an
SNMP trap on page 177 provides instructions.
176 Server Monitoring

Configuring the Net-SNMP agentThe avsetup_snmp command line utility configures the Net-SNMP agent to communicate with the Avamar server by using the AvamarSNMP sub-agent.
Steps
1. Open a command shell:
a. Log in to the server as admin.b. Switch user to root by typing the following command:
su -c. For a multi-node server, load the rootid OpenSSH key by typing the following command:
ssh-agent bashssh-add /root/.ssh/rootid
2. Type the following commands to launch the utility:
cd /rootavsetup_snmp
The output prompts you to specify the port on which to listen for SNMP requests.3. Specify the SNMP request data port:
• To use port 161, the default SNMP request data port, press Enter.• To use a different SNMP request data port, type the data port number and press Enter.
If avsetup_snmp was not able to detect any SNMP communities, the output prompts you to specify whether to allow SNMPv3read-write user based access.
4. Type n and press Enter.The output prompts you to specify whether to allow SNMPv3 read-only user based access.
5. Type n and press Enter.The output prompts you to specify whether to allow SNMPv1/v2c read-write community access.
6. Type n and press Enter.The output prompts you to specify whether to allow SNMPv1/v2c read-only community access.
7. To accept the default value of y, press Enter.The output prompts you to specify the community name to which to add read-only access. The SNMP community is a text string thatthe local Net-SNMP agent uses to authenticate itself with the SNMP management application.
8. Type the SNMP community name and press Enter.The output prompts you to specify the hostname or network address from which to accept this community name.
9. To accept the community name from all hostnames or network addresses, press Enter.The output prompts you to specify the OID to which this community should be restricted.
10. To specify no restriction, press Enter.The output prompts you to specify whether to configure another community.
11. Type n and press Enter.The output indicates that /etc/snmp/snmpd.conf was created and run to configure the system_setup group. Then the outputprompts you to specify the location of the system.
12. Type the physical location of the Avamar server and press Enter.The output prompts you to specify contact information.
13. Type contact information (for example, email address, telephone extension) and press Enter.The output prompts you to specify whether to correctly set the value of the sysServices.0 OID.
14. Type n and press Enter.The output indicates that /etc/snmp/snmpd.conf was installed and that snmpd was enabled.
Creating a custom event profile for an SNMP trapAs part of the process of configuring server monitoring with SNMP, create a custom event profile to output designated Avamar serverevents to an SNMP trap.
About this task
The default Avamar configuration includes a Local SNMP Trap profile that outputs Avamar server event messages to the local Net-SNMP trap listener (snmptrapd process). However, you cannot edit the Local SNMP Trap profile. The profile is intended to be used for
Server Monitoring 177

test purposes only, to verify that the local snmptrapd process can successfully generate and receive the traps. The process then writesthe trap information to a syslog file. Usually, the next step is to configure another custom profile to send Avamar SNMP traps to a remoteNet-SNMP trap listener.
NOTE: Only snmpv1 trap is supported.
Steps
1. Create a custom event profile by using the steps in Creating a custom event profile on page 167.
On the first page of the New Profile wizard, select the option to enable SNMP trap notification.
2. Continue through the wizard until the SNMP Trap Notification page appears.3. In the SNMP Trap Address (IP or hostname) box, type the IP address or hostname of a computer with an application capable of
receiving and processing an SNMP trap.4. In the Port Number box, type the port number on the host computer that listens for SNMP traps.5. In the SNMP Community box, type the name of the SNMP community that the SNMP trap listener is configured to use.6. (Optional) To test the SNMP notification parameters, click Send Test SNMP Trap.7. Click Finish.
Viewing Avamar server log filesBy default, the Avamar storage process log file (gsan.log) is limited to 25 MB in size and always contains the most recent information.Additional historic log files (for example, gsan.log.1, gsan.log.2, and so forth) might also exist. You can collect and view these logfiles by using command line operations.
Steps
1. Open a command shell and log in by using one of the following methods:
• For a single-node server, log in to the server as admin.• For a multi-node server:
a. Log in to the utility node as admin.b. Load the admin OpenSSH key by typing the following command:
ssh-agent bashssh-add ~admin/.ssh/admin_key
2. Create a new user-defined temporary directory and change directory to it by typing the following commands:
mkdir directorycd directorywhere directory is the directory name.
3. Retrieve copies of the storage node log files by typing the following command:
getlogsThe getlogs command gathers the important log files from a particular node, compresses them into a single tar file,nodelogs.tgz, then copies these files to numbered subdirectories in the current working directory.
4. Examine the nodelogs.tgz files for any entry that contains the string ERROR. To accomplish this, run the following shellcommands, which write any nodelogs.tgz entries that contain the string ERROR to a user-defined temporary file:
for p in [01].[!sm]*/nodelogs.tgz; dotar xzf $pgrep ERROR: cur/gsan.log*rm -rf cur/*done
5. Remove the user-defined temporary directory by typing the following commands:
cd ../rm -rf directory
178 Server Monitoring

Audit loggingThe audit log keeps a permanent log of system actions that users begin with. The data in this log enables enterprises that deploy Avamarto enforce security policies, detect security breaches or deviation from policies, and hold users accountable for those actions.
Only actions that users begin with are logged. Actions that the system begins with without a user account, such as scheduled backups,maintenance activities, are not logged.
System events with a category of SECURITY and type of AUDIT are used to implement the Avamar audit logging feature. Because theunderlying data for audit log entries are system events, this information is available in two places:
• Event Monitor, which also contains all other system events• Audit Log, which only contains events that are also audit log entries
By default, audit log information is retained for 1 year.
You can increase or reduce the audit log retention period by editing the value of clean_db_audits_days in /usr/local/avamar/var/mc/server_data/prefs/mcserver.xml, and restarting the MCS.
Viewing the Audit Log
Steps
1. In Avamar Administrator, click the Administration launcher link.The Administration window is displayed.
2. Click the Event Management tab.3. Click the Audit Log tab near the bottom of the window.
The Avamar Administrator online help provides details on each of the columns in the Audit Log.
4. Select the display mode for the Audit Log:
• To display the most recent 5,000 audit log entries for a defined range of dates, select Query.• To display the most recent 5,000 audit log entries during the past 24 hours, select Monitor.
5. (Optional) Filter the entries that appear in the Audit Log:
a. Open the Actions menu and select Event Management > Filter.The Filter dialog box appears.
b. If you selected the Query display mode for the Audit Log, select the range of dates for the entries to display by using the FromDate and To Date fields.
c. From the Severity list, select the severity of the log entries to display.d. To view log entries for all domains, select All Domains. Or, to view entries for a specific domain, select Domain and then browse
to or type the domain name.e. To display only log entries that contain certain case-sensitive keywords in the audit log entry data XML element, type the keyword
in the Data box.
This criterion promotes easy filtering on important keywords across log entry attributes. For example, filtering the log in errorreturns all log entries that contain the word error in any XML attribute (for example, category, type, or severity).
f. To view additional filtering criteria, click More.g. To limit the Audit Log to events with a certain event code, select Only include codes and then add and remove codes from the
list. Or, to exclude events with a certain event code from the Audit Log, select Exclude codes and then add and remove codesfrom the list.
h. Click OK.
Automatic notifications to Avamar SupportThe Email Home and ConnectEMC features automatically send notifications to Avamar Customer Support. These notifications includealerts for high priority events and daily reports to facilitate monitoring the Avamar server.
For environments where the Avamar server is part of a solution, such as the Integrated Data Protection Appliance, the automaticnotifications include the type of solution and other relevant details. This information ensures correct routing for alerts for improvedserviceability and no customer action is required.
Server Monitoring 179

Usage IntelligenceUsage Intelligence is a feature that enables the Avamar server to automatically collect and transfer reporting information to AvamarSupport. The types of reports that are sent to Avamar Support vary depending on how the Avamar server is licensed.
The use of this feature requires that:
• ESRS gateway is installed and deployed in the local environment.• You have the credentials to authorize registration with ESRS.
Installing and activating the ESRS licenseTo use Avamar with ESRS, you must have an Avamar license key file that includes ESRS licensing.
Installing and activating a license on page 143 contains information about how to install and activate an Avamar license key file.
Importing the ESRS Gateway certificate to the Avamar server'skeystoreBefore registering the Avamar server with the ESRS Gateway, you must import the ESRS Gateway certificate to the Avamar server'skeystore.
Steps
1. Export the ESRS Gateway certificate:
a. Point a browser at https://esrs_gateway:9443
where esrs_gateway is the hostname or IP address of the local ESRS gateway.
b. Use the browser's functionality to export the certificate.
For example, in Internet Explorer 11:
i. Click the lock icon in the URL field and select View Certificates.ii. Click the Details tab.iii. Click Copy to File and complete the steps in the Certificate Export Wizard.
2. Copy the exported certificate to a temporary location on the Avamar server.3. Open a command shell and log in by using one of the following methods:
• For a single-node server, log in to the server as admin.• For a multi-node server, log in to the utility node as admin.
4. Switch user to root by typing the following command:
su -5. Back up the keystore by typing the following command on one line:
cp -p /usr/local/avamar/lib/rmi_ssl_keystore /usr/local/avamar/lib/rmi_ssl_keystore.bak6. Import the ESRS server certificate into the keystore by typing the following command on one line:
keytool -importcert -keystore /usr/local/avamar/lib/rmi_ssl_keystore -storepass changeme -file <certfile>.crtwhere <certfile> is the name of the ESRS server certificate, including path.
7. Restart the MCS by typing the following command:
mcserver.sh --restart
Registering Avamar with ESRSTo enable the Usage Intelligence feature, you must register the Avamar server with ESRS.
Steps
1. In Avamar Administrator, select Tools > Manage ESRS.The Edit ESRS Gateaway Information window appears.
2. Type the IP address of the ESRS gateway in the ESRS Gateway field.3. Type the port number of the ESRS gateway in the Port field.4. Type the username and password for your Dell EMC Support credentials.
180 Server Monitoring

5. Click Register.6. A message window indicates that the registration was successful. Click OK to clear.
Results
Once the Avamar server has been registered with the ESRS gateway, no further configuration of the Usage Intelligence feature isrequired.
Email HomeThe Avamar Email Home feature automatically sends configuration, capacity, and general system information to Avamar Support oncedaily, and provides critical alerts in near-real time as needed.
By default, notification schedule email messages are sent at 6 a.m. and 3 p.m. each day. The Notification Schedule controls the timing ofthese messages.
Editing Email Home mail settingsEmail Home is configured and enabled during Avamar server installation. You can edit the mail settings for Email Home after theinstallation.
Steps
1. Open a command shell and log in by using one of the following methods:
• For a single-node server, log in to the server as admin.• For a multi-node server:
a. Log in to the utility node as admin.b. Load the admin OpenSSH key by typing the following command:
ssh-agent bashssh-add ~admin/.ssh/admin_key
2. Change directories by typing the following command:
cd /usr/local/avamar/var/mc/server_data/prefs3. Open mcserver.xml in a UNIX text editor.
4. Find the com.avamar.asn.module.mail node.
The com.avamar.asn.module.mail node contains the smtpHost and admin_mail_sender_address entries.
5. Verify that the value for the smtpHost entry is the DNS name of the outgoing SMTP mail server that is used to send Email Homemessages, such as smtp.example.com.
If the value for the entry is incorrect, edit the value.
NOTE: The Avamar server installation or upgrade automatically completes the value for the smtpHost entry. In most
cases, some arrangement must be made to enable email messages originating from the Avamar server to be
forwarded through the outgoing SMTP mail server to Avamar Support over the Internet.
6. Specify a valid email address with access to a corporate outgoing SMTP mail server as the value for theadmin_mail_sender_address entry.
NOTE: If you do not configure the Email Home feature to send messages from a valid email address, the incoming
email server rejects messages that are generated by the Email Home feature. Avamar Support is completely unaware
that these programmatically generated messages were rejected. In addition, because a valid sending email account is
not known, programmatically generated warnings to the sender that these messages could not be sent are never
viewed by anyone who can correct the problem.
7. Save the changes and close the file.8. Restart the MCS by typing the following commands:
dpnctl stop mcsdpnctl start
9. Close the command shell.
Server Monitoring 181

ConnectEMCConnectEMC is a program that runs on the Avamar server and sends information to Avamar Support. ConnectEMC is typically configuredto send alerts for high priority events as they occur, as well as reports once daily.
ConnectEMC is integrated with EMC Secure Remote Support (ESRS), provided that it is installed, operational, and network accessible bythe Avamar server. Contact the Avamar Sales Representative for more information about implementing ESRS.
Although ConnectEMC is initially configured during Avamar server software installation, Avamar Administrator enables you to manageConnectEMC settings, in the form of three user-configurable transports, after the server is operational:
• Primary transport• Failover transport• Notification transport
The primary and failover transports send alerts for high priority events as they occur. The primary transport is used unless it fails, at whichtime the failover transport is used.
The notification transport sends email notifications messages to one or more customer email addresses under certain conditions.
You also can control whether the MCS generates and sends ConnectEMC messages by enabling, disabling, stopping, and startingConnectEMC.
Enabling and disabling ConnectEMCDisabling ConnectEMC causes the MCS to stop generating ConnectEMC messages until ConnectEMC is reenabled. To allow the MCS tocontinue generating ConnectEMC messages but to queue the messages, stop ConnectEMC.
Steps
1. In Avamar Administrator, select Tools > Manage ConnectEMC.The Manage ConnectEMC window is displayed.
2. Specify whether the MCS generates and sends ConnectEMC messages:
• To stop the MCS from generating messages, click Disable.• To restart the generation of messages, click Enable.• To continue generating messages but queue the messages, click Stop.• To start sending the messages, click Start.
If you disable ConnectEMC, you are prompted to type a password.3. Type a valid password and click OK.
Editing the primary and failover transports
Steps
1. In Avamar Administrator, select Tools > Manage ConnectEMC.The Manage ConnectEMC window is displayed.
2. Select either Primary Transport or Failover Transport in the left pane, and click Edit.The Edit Primary/Secondary Transport dialog box appears.
3. Select the transport type from the Transport Type list:
• Email• FTP• HTTPS
NOTE: An operational Secure Remote Support gateway is required to use the FTP or HTTPS transport types.
4. (Email only) After selecting Email, complete the following steps.
a. In the SMTP Host (Email Server) field, specify the mail server hostname or IPv4 address.b. In the Email Address field, specify one or more recipients of these email messages. Separate multiple email addresses with
commas.c. In the Email Sender Address field, specify the email address from which to send the message.d. (Optional) To configure advanced settings, click Advanced, and then specify the following settings in the Edit Advanced Email
Settings dialog box:
182 Server Monitoring
• Retries – The number of retries to perform before reporting a failure. The default setting is five retries.• Timeout – The number of seconds to wait before reporting that the operation timed out. The default setting is 5 minutes
(300 s).• Description – A description of this transport that appears in the Manage ConnectEMC window. The default description is
Email Transport.
• Email Subject – The subject line in the email. The default subject line is Avamar ConnectEMC Notification Email.
Do not change the email subject unless instructed to do so by Avamar Support. Avamar spam filters can reject email messageswith other subject lines.
e. Click OK.5. (FTP only) After selecting FTP, complete the following steps.
a. In the IP Address field, specify an IPv4 address.b. In the Username field, specify an FTP username. The setting depends on the FTP server software.c. In the Password field, specify the password for the username.d. (Optional) To configure advanced settings, click Advanced, and then specify the following settings in the Edit Advanced FTP
Settings dialog box:
• Retries – The number of retries to perform before reporting a failure. The default setting is five retries.• Timeout – The number of seconds to wait before reporting that the operation timed out. The default setting is 5 minutes
(300 s).• Description – A description of this transport that appears in the Manage ConnectEMC window. The default description is
FTP Transport.
• FEP Folder – A unique customer UNIX path in the ConnectEMC Front End Processor (FEP). Use the folder location that issupplied by Avamar Support.
• FTP Port – An IP port. The default setting is port 21.• Mode – Either Active or Passive. The default setting is Active.
Do not change the email subject unless instructed to do so by Avamar Support. Avamar spam filters can reject email messageswith other subject lines.
e. Click OK.6. (HTTPS only) After selecting HTTPS, complete the following steps.
a. Type a valid URL for the Secure Remote Support home page in the URL field.
Valid URLs use the following format:
https://home_name[:port]/target_directorywhere home_name, port, and target_directory are the home name, data port, and target directory, respectively.
Use the URL provided by Avamar Support.
b. (Optional) To configure advanced settings, click Advanced, and then specify the following settings in the Edit Advanced HTTPSSettings dialog box:
• Retries – The number of retries to perform before reporting a failure. The default setting is five retries.• Timeout – The number of seconds to wait before reporting that the operation timed out. The default setting is 5 minutes
(300 s).• Private Key Pass Phrase – The passphrase that is associated with the private key file.• Private Key File – The file name of the private key file.• Client Certificate – The client certificate to use. The default setting is “Default,” which uses the certificate that the MCS
uses. Otherwise, type the file name of the client certificate.• Server CA Bundle – File containing a list of root certificates.• Verify Server Name – Whether to verify the server name. Either Yes or No. The default setting is No.
c. Click OK.
Sample key files are provided in /opt/connectemc/certs/ and https-privatekey.pem. Sample client certificates areprovided in /opt/connectemc/certs/ and https-cert.pem. Sample root certificate bundles are provided in /opt/connectemc/certs/ and https-ca-cert.pem.
7. Click OK on the Edit Primary/Secondary Transport dialog box.
Server Monitoring 183

Editing the notification transport
About this task
Steps
1. In Avamar Administrator, select Tools > Manage ConnectEMC.The Manage ConnectEMC window is displayed.
2. Select Notification Transport and click Edit.The Edit Notification Transport dialog box appears.
3. From the Notification Type list, select one of the following types:
• On Success — Notify recipients when an event file is successfully transferred to EMC.• On Failure — Notify recipients when an event file is not successfully transferred to EMC.• On Success or Failure — Notify recipients when an attempt is made to transfer an event file to EMC, regardless of the
outcome.• On All Failure — Notify recipients when all attempts to transfer an event file to EMC have failed.
4. In the SMTP Host (Email Server) box, type the mail server hostname or IPv4 address.5. In the Email Address box, type one or more recipients of these email messages. Separate multiple email addresses with commas.6. In the Email Sender Address box, type the email address from which the notification is sent.7. (Optional) To specify advanced settings, click Advanced and then specify the settings in the Edit Advanced Email Settings dialog
box:
a. In the Retries box, specify the number of retries to attempt before reporting a failure. The default setting is five retries.b. In the Timeout box, specify the number of seconds to wait before reporting that the operation timed out. The default setting is
300 s (5 minutes).c. In the Description box, specify the description of this transport that appears in the Manage ConnectEMC window. The default
description is Email Transport.
d. In the Email Subject box, specify the subject line for the email. The default subject line is Avamar ConnectEMCNotification Email.
NOTE: Do not change the email subject unless instructed to do so by Avamar Support. EMC spam filters may
reject email messages with other subject lines.
e. From the Email Format list, select the format of the email, either ASCII or HTML. The default setting is ASCII.f. Choose whether to include attachments that are sent to ConnectEMC in the notification email message by selecting or clearing
the Include CallHome Data checkbox.g. Click OK.
8. On the Edit Notification Transport dialog box, click OK.
Editing the site name
Steps
1. Open a command shell:
a. Log in to the server as admin.b. Switch user to root by typing:
su -2. Type the following commands to launch the utility and change the site name:
cd /rootavsetup_ connectemc.pl --site_name=site_nameWhere site_name is the name of the customer site.
3. Disable and then enable ConnectEMC.
Enabling and disabling ConnectEMC provides detailed information.
4. Restart MCS.Starting the MCS provides detailed information.
184 Server Monitoring

Testing transports
Steps
1. In Avamar Administrator, select Tools > Manage ConnectEMC.The Manage ConnectEMC window is displayed.
2. Click Test.
Editing the site name
Steps
1. Open a command shell:
a. Log in to the server as admin.b. Switch user to root by typing:
su -2. Type the following commands to launch the utility and change the site name:
cd /rootavsetup_ connectemc.pl --site_name=site_nameWhere site_name is the name of the customer site.
3. Disable and then enable ConnectEMC.
Enabling and disabling ConnectEMC provides detailed information.
4. Restart MCS.Starting the MCS provides detailed information.
Verifying system integrityTo verify Avamar server integrity, you must first ensure that a validated server checkpoint exists.
About this task
You might also want to collect and examine the server log files to ensure that no errors have occurred since that checkpoint wasperformed. Viewing Avamar server log files on page 178 provides instructions.
Steps
1. In Avamar Administrator, click the Server launcher link.The Server window is displayed.
2. Click the Server Management tab.3. Select the Avamar server name in the left pane.4. Verify that the Last validated checkpoint field shows a recent calendar date.
Server Monitoring 185

Capacity Management
Topics:
• Capacity utilization information• Capacity limits and thresholds• Capacity forecasting• Customizing capacity limits and behavior
Capacity utilization informationView real-time capacity utilization information for a single server in Avamar Administrator or for multiple servers in Backup & RecoveryManager.
In Avamar Administrator, view capacity utilization information for a single Avamar server on the Capacity panel of the AvamarAdministrator dashboard and on the Server Management tab in the Server window.
Capacity utilization information for multiple servers is available through Backup & Recovery Manager. For information about this capability,refer to the Backup & Recovery Manager product documentation.
Capacity limits and thresholdsThis following table describes how an Avamar server behaves as it crosses various consumed storage thresholds.
Table 84. Capacity limits and thresholds
Storage utilization Status Description
Less than 75% The system is considered to have adequatecapacity to store future backups.
75% Study server storage utilization todetermine whether the server has adequatecapacity to store future backups.
80% A pop-up notification warns you that theserver has consumed 80% of its availablestorage capacity. Study server storageutilization to determine whether the serverhas adequate capacity to store futurebackups.
90% Study server storage utilization todetermine whether the server has adequatecapacity to store future backups.
95% The server has reached the default healthcheck limit, which is the amount of storagecapacity that can be used and still have a“healthy” server. Avamar completes all in-progress backups, but the dispatcher stopsnew backup activity. When you log in toAvamar Administrator, a notificationappears. To resume future backup activity,acknowledge the system event. You cancustomize the health check limit, butsetting the limit higher than 95% is notrecommended. Customizing capacity limits
10
186 Capacity Management
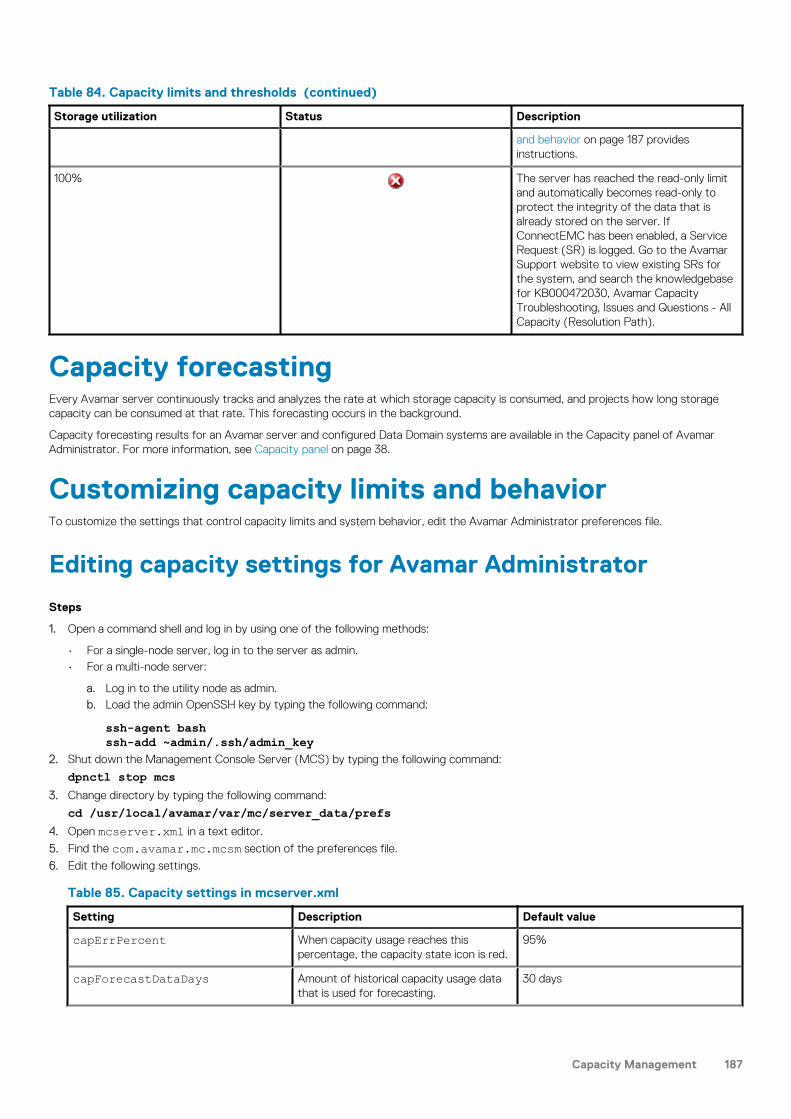
Table 84. Capacity limits and thresholds (continued)
Storage utilization Status Description
and behavior on page 187 providesinstructions.
100% The server has reached the read-only limitand automatically becomes read-only toprotect the integrity of the data that isalready stored on the server. IfConnectEMC has been enabled, a ServiceRequest (SR) is logged. Go to the AvamarSupport website to view existing SRs forthe system, and search the knowledgebasefor KB000472030, Avamar CapacityTroubleshooting, Issues and Questions - AllCapacity (Resolution Path).
Capacity forecastingEvery Avamar server continuously tracks and analyzes the rate at which storage capacity is consumed, and projects how long storagecapacity can be consumed at that rate. This forecasting occurs in the background.
Capacity forecasting results for an Avamar server and configured Data Domain systems are available in the Capacity panel of AvamarAdministrator. For more information, see Capacity panel on page 38.
Customizing capacity limits and behaviorTo customize the settings that control capacity limits and system behavior, edit the Avamar Administrator preferences file.
Editing capacity settings for Avamar Administrator
Steps
1. Open a command shell and log in by using one of the following methods:
• For a single-node server, log in to the server as admin.• For a multi-node server:
a. Log in to the utility node as admin.b. Load the admin OpenSSH key by typing the following command:
ssh-agent bashssh-add ~admin/.ssh/admin_key
2. Shut down the Management Console Server (MCS) by typing the following command:
dpnctl stop mcs3. Change directory by typing the following command:
cd /usr/local/avamar/var/mc/server_data/prefs4. Open mcserver.xml in a text editor.
5. Find the com.avamar.mc.mcsm section of the preferences file.
6. Edit the following settings.
Table 85. Capacity settings in mcserver.xml
Setting Description Default value
capErrPercent When capacity usage reaches thispercentage, the capacity state icon is red.
95%
capForecastDataDays Amount of historical capacity usage datathat is used for forecasting.
30 days
Capacity Management 187

Table 85. Capacity settings in mcserver.xml (continued)
Setting Description Default value
capForecastDataMinDays Minimum amount of historical capacityusage data that is required for forecasting.
14 days
capForecastReachedDays When forecasted capacity falls below thisnumber of days, Avamar Administratorbegins generating events that requireacknowledgment and displaying pop-upalerts at login.
30 days
capMonitorIntervalMin This setting controls how often AvamarAdministrator checks forecasted capacity.
1 day (daily)
capReachedPercentage When total capacity utilization reaches thispercentage threshold, the AvamarAdministrator process generates an eventnotification that the system is full.
95%
capWarnPercent When capacity usage reaches thispercentage, the capacity state icon isyellow.
80%
hcMonitorIntervalMin This setting controls how often AvamarAdministrator performs a health check(that is, verifies whether consumedcapacity has reached the health checklimit).
1 day (daily)
hcOffsetROPercentage Percentage that, when subtracted fromthe server read-only limit (100%),produces the health check limit.
5%
hcReminderIntervalMin This setting controls how often AvamarAdministrator issues events and pop-upalerts once the health check limit has beenreached.
60 minutes (hourly)
7. Save the changes and close the file.8. Start the MCS and the scheduler by typing the following command:
dpnctl start mcsdpnctl start sched
188 Capacity Management

Replication
Topics:
• Overview of Avamar replication• Enable Replicas at Source• Configuring policy-based replication• Performing on-demand replication in the AUI• Performing command line replication• Monitoring replication• Cancel a replication task in the AUI• Restore a backup from a replica on a destination system• MCS configuration parameters to support Replicas at Source
Overview of Avamar replicationAn Avamar replication job copies client backups from the source Avamar system to an alternate destination.
Replicating backups to an alternate destination protects against data loss if the source Avamar system fails.
Types of replicationAvamar provides the option to perform policy-based replication and command line replication.
Policy-based replication in the AUIPolicy-based replication provides greater control of the replication process. With policy-based replication, you can create replicationgroups in the AUI that define the following replication settings:
• Replication group members, either domains or clients• Priority order for replication tasks• Backups to replicate, based on the retention setting or the backup date• Maximum number of backups to replicate for each client• Destination system for the replicas• Replication schedule• Retention of replicas
Command line replication in the CLIPerform on-demand replication from the command line by logging in to the utility node and using the avrepl command line interface(CLI). Command line replication provides greater control of the replication process. Options for the avrepl command define thefollowing replication settings:
• Domains or clients to replicate• Backups to replicate, based on:
○ Plug-in that is used for the backup○ Retention setting for the backup○ Backup date
• Maximum number of backups to replicate for each client• Destination system for the replicas• Retention of replicas
11
Replication 189

Replication schedulingThe method for scheduling replication tasks depends on the type of replication that is used. For policy-based replication, define schedulessimilar to how backup schedules are defined. For command line replication, no schedule is defined because a replication task is manuallystarted by running the avrepl command on the utility node.
Defining a schedule for policy-based replication in the AUITo configure schedules for policy-based replication in the AUI:
1. In the left navigation pane, click .2. Click Administration > Settings, and then select the domain.3. Click the Schedule tab and then click + ADD.
From this window, you can define a schedule to start replication tasks automatically on a daily, weekly, or monthly interval. You can alsouse an ad hoc (on-demand) schedule that does not run automatically.
The schedule includes a start time and end time to specify the replication window.
Time zone considerationsWhen using the AUI to schedule replication tasks, note that the start time appears in the time zone of the system that is running the AUIweb browser. The start time does not appear in the time zone of the source system or in the time zone of the destination system.
For example, consider using the AUI web browser in the PT zone with a source system in the ET zone. The source system compensatesfor the three-hour difference between the two time zones. An 8 p.m. PT start time that is specified in the AUI means that the sourcesystem starts the replication task at 11 p.m ET.
Best practices for replication schedulingSchedule replication tasks during periods of low backup activity to ensure that the greatest number of client backups successfullyreplicate during each replication session. This scheduling consideration accommodates the fact that only completed client backups arereplicated.
For policy-based replication, consider the size of each replication group so that all backups replicate successfully during each scheduledreplication task. When a group grows so large that backups are not all replicating successfully, edit the schedule to enable more time, orsplit the group into smaller groups that run separately.
Replication authenticationPolicy-based replication requires that you specify valid credentials for an account only on the destination system when you configure thereplication policy. CLI-based replication, however, requires that you specify valid credentials for the source Avamar system and thedestination system in the command prompt.
For policy-based replication in the AUI, specify the credentials when you add the destination system using the Add New ReplicationDestination wizard:
1. In the left navigation pane, click .2. Navigate to Administration > System .3. Click the Replication Destination tab, and then click + Add.
For CLI-based replication, specify the user account and password for the destination system by using the --[replscript]dstid and--dstpassword options in the command prompt. To specify the user account and password for the source system, use the --[avtar]id and --password options.
On the source Avamar system, the repluser account is the default account for replication. When you use the repluser account forcommand line replication, omit the --[avtar]id option from the command and specify the password for the repluser account withthe --password option. The Avamar Product Security Guide provides a complete list of default accounts and passwords on the Avamarsystem.
190 Replication

Location of replicas on a destination Avamar systemOn a destination Avamar system, replicas are available in the REPLICATE domain. This domain contains a duplicate representation of theclient hierarchy that exists on the source Avamar system.
In the following figure, the avamar-1.example.com destination Avamar system contains both local clients and replicas from theavamar-2.example.com source server.
Figure 15. Replication domain structure example
All data in the REPLICATE domain is read-only. You can perform only the following operations on replicas in the REPLICATE domain:
• Change the expiration date of the replica• View backup statistics• Delete a replica
Replicas at Source on page 191 describes the Replicas at Source feature that provides management of replicas through the replicationsource Avamar server instead of the REPLICATE domain on the destination system.
Replicas at SourceWith Replicas at Source, view and manage replicas by using an Avamar Administrator session on the Avamar server that is the replicationsource.
FeaturesThe Replicas at Source feature is in Avamar server version 7.2 and newer. Enable Replicas at Source on page 194 describes how to enablethe feature.
The following table describes the features that Replicas at Source provides on the source Avamar server.
Table 86. Replicas at Source features available through the source Avamar server
Feature Description
View replicas on Restore tab Replicas appear along with backups on the Restore tab of theBackup, Restore and Manage window in Avamar Administrator.
Manage replica settings Use Avamar Administrator or the CLI to perform the followingactions with a replica:
• Change expiration date• Change retention• Delete• Validate• View statistics
Restore from replica Using the same methods that are available for backups, select areplica and restore it.
Periodic synchronization Periodically, the source Avamar system synchronizes with eachactive destination system. The default interval between
Replication 191

Table 86. Replicas at Source features available through the source Avamar server (continued)
Feature Description
synchronizations is 12 hours. Recent changes may not be reflectedfor some time. This synchronization includes the following actions:
• Apply expiration setting changes• Apply retention setting changes• Delete local listing if replica does not exist on remote
destination• Add local listing when unlisted replica is found on remote
destination
NOTE: Replicas at Source does not support replicas of virtual machine backups.
IntegrationSeveral Avamar tasks integrate Replicas at Source. The sections that document these tasks include information about the integration ofReplicas at Source features. The following table provides an overview of the Replicas at Source integration.
Table 87. Descriptions of the integration of Replicas at Source into Avamar tasks
Task Description
Remote destination management Prevents deletion of a remote destination listing from the sourceAvamar server when replicas from the source Avamar server existon the destination system. Includes an override option to force thedeletion of the remote destination listing and delete all the sourceserver's replicas from the destination system.
Restore Lists replicas with backups on the Restore tab of the Backup,Restore and Manage window in Avamar Administrator. When abackup exists on the source Avamar system and replicas exist onremote destination systems, the Avamar system uses the backupto restore.
Retire client When retiring a client, Replicas at Source provides additionalchoices that are related to the retention and expiration of replicas.
Delete client When deleting a client, Replicas at Source provides an option toalso delete the client's replicas.
Services administration Adds the External Backup Manager Service to the ServicesAdministration tab of the Administration window in AvamarAdministrator. The service includes standard service actions: Start,Stop, Restart, and View Properties. When the External BackupManager Service is stopped, Avamar Administrator preventsReplicas at Source management of replicas.
MCS Replicas at Source adds customizable settings tomcserver.xml.
MCCLI Replicas at Source adds hostname and location information to theoutput of mccli backup show. Replicas at Source alsoprovides the --location option for identifying replicas whenrunning any of the following commands:
• mccli backup validate• mccli backup delete• mccli backup edit• mccli backup restore
192 Replication

Retention of replicasWhen you replicate backups, the retention settings for the backup on the source Avamar system automatically apply to the replica on thedestination system. However, you can change the retention settings for the replica.
Set retention before replication occursFor policy-based replication in the AUI, specify a different retention setting for replicas on the Retention page of the Replication Policywizard when you configure the policy for the replication group.
For command line replication, use the --[avtar]expires option to specify a different retention setting for replicas.
Set retention after replication occursYou can enable Replicas at Source to use an Avamar Administrator session on the source Avamar server to set the retention of replicason the destination system, or log in to a destination Avamar system using AUI and manually change the expiration date of the replica afterreplication occurs. Changing the expiration date for a backup on page 111 provides instructions for changing the retention of backups.These instructions also apply to replicas on an Avamar system.
Replication with Data Domain systemsWhen an Avamar system stores backups on a Data Domain system, Avamar replication uses DD Boost to copy backups from the originalData Domain system and to create replicas on another Data Domain system.
Supported replication configurationsThe following table lists the supported replication configurations for Avamar replication using DD Boost.
Table 88. Replication configurations for Avamar replication using DD Boost
Backup storage Replication storage
Single Data Domain system Single Data Domain system
Single Data Domain system Multiple Data Domain systems
Multiple Data Domain systems Single Data Domain system
Multiple Data Domain systems Multiple Data Domain systems
In a configuration where the replication storage consists of multiple Data Domain systems, control the system which receives the replicasby mapping a domain on the source Avamar server to a destination Data Domain system. Specify the Data Domain system with the defaultdestination. Avamar replicates to the default destination when a destination Data Domain system is not identified.
The Avamar and Data Domain System Integration Guide provides instructions on storage mapping and specifying the default destinationData Domain system.
Replication detailsThe following details apply to Avamar replication with Data Domain systems:
• Data transfer during replication is between the Data Domain systems, without intermediate staging• Replication uses DD Boost to copy backups and to write replicas• Requires a Data Domain replication license• Does not use Data Domain replication• Replication is configured and monitored on the Avamar server• Replication task scheduling uses Avamar replication schedules only• Data Domain administration tools are not used
Replication 193

Enable Replicas at SourceThe Replicas at Source feature is available in Avamar server versions 7.2 and later. To enable the feature, modify mcserver.xml andthen start the Remote Backup Manager Service.
Prerequisites
Install or upgrade the Avamar server software to version 7.2 or later.
Steps
1. Open a command shell and log in by using one of the following methods:
• For a single-node server, log in to the server as admin.• For a multi-node server:
a. Log in to the utility node as admin.b. Load the admin OpenSSH key by typing the following command:
ssh-agent bashssh-add ~admin/.ssh/admin_key
2. Stop the MCS by typing the following command:
dpnctl stop mcs3. Change the working directory by typing the following command:
cd /usr/local/avamar/var/mc/server_data/prefs4. Open mcserver.xml in a text editor.
5. In the repl container element, set the value of the allow_dest_replica_management parameter to true.
The default value is false.
6. In the repl container element, set the value of the show_external_backups parameter to true.
The default value is true.
7. In the repl container element, set the value of the allow_manage_remote_backups_at_source parameter to true.
The default value is true.
8. Save the change and close the file.9. Start the MCS and the scheduler by typing the following command:
dpnctl start mcsdpnctl start sched
10. Log in to Avamar Administrator on the Avamar server that is associated with the client backups (source server).11. In Avamar Administrator, click the Administration launcher link.
The Administration window is displayed.12. Click the Services Administration tab.13. Right-click the Remote Backup Manager Service, and select Start.
Results
The Avamar server enables the Replicas at Source feature.
Configuring policy-based replicationPreparing to use policy-based replication in the AUI requires the completion of the following tasks.
Prerequisites
Log in to AUI on the Avamar server that is associated with the client backups (source server).
About this task
The following steps provide an overview of the order of the tasks for configuring policy-based replication in the AUI. Each step is explainedin more detail in a separate task section.
194 Replication

Steps
1. Add a replication destination for each system that stores replicas from the source server (destination system).
The section Add an Avamar system as a replication destination provides information about adding a replication destination system.
2. Create daily, weekly, or monthly schedules to use for replication scheduling.3. Create one or more replication groups to define the settings for policy-based replication.
Replication destinationsTo begin configuring policy-based replication on an Avamar server, add replication destinations.
Provide connection details for a supported data storage system to add it as a replication destination.
Avamar supports replication to other Avamar systems and to Data Domain systems through DD Boost. An Avamar system can replicate toanother Avamar system that is running a different version of the Avamar server software, but best results occur with the same serversoftware version.
Add an Avamar system as a replication destinationProvide connection information for an Avamar system to add it as a replication destination.
Steps
1. In the AUI, navigate to Administration > System .2. Click the Replication Destination tab, and then click + ADD.
The Add New Replication Destination wizard appears.3. In the Name field, type a reference name for the destination Avamar system.4. From the Encryption drop-down, select an encryption level.
The selected encryption level applies to replication data transfers with the destination Avamar system. The default setting is High, andshould not be changed unless the source is configured to use authentication and the destination does not use authentication, in whichcase it should be set to none.
5. In the Target Server Address field, type the DNS name or the IP address of the destination Avamar system.6. In the Target server connection port field, type the number of the outbound port on the source Avamar system to use when
communicating with the destination Avamar system.
The default port value is 27000.
Selecting High level Encryption results in an offset being applied to port to allow connections through firewalls. The default offset is+2000. Edit the offset by manually editing the secured_port_offset preference in mcserver.xml, and then restarting theMCS.
7. In the Target MCS connection port field, type the number of the inbound port on the destination Avamar server to use for dataconnections with MCS on the destination system.
The default port value is 28001.
8. In the User ID on target server field, type a username for an account on the destination Avamar system that has the backupprivilege and the admin privilege.
Normally, type repluser or root.NOTE: For a user with access that is limited to a domain beneath the root domain (tenant access), both the source
Avamar server and the destination system must be running Avamar server version 7.2 or later.
9. In the Password on target server field, type the password that is associated with the username.10. Click VALIDATE.
The source Avamar system authenticates with the destination Avamar system by using the specified settings.
When the validation completes successfully, the OK button is enabled.11. Click OK to add the replication destination and exit the wizard.
Results
AUI adds the replication destination to the list on the Replication Destinations tab.
Replication 195

Edit a replication destinationChange the connection information for a replication destination.
Steps
1. In the AUI, navigate to Administration > System .2. Click the Replication Destination tab, and then highlight the replication destination you want to edit.3. Click EDIT.
The Edit replication destination wizard appears.4. Edit the settings for the replication destination, and then click VALIDATE.5. Upon successful validation, click OK.
Results
AUI modifies the settings of the selected replication destination.
Setting the default Data Domain destinationIn a replication environment with more than one destination Data Domain system, you can specify which Data Domain system is thedefault destination. The default destination is the Data Domain system to which Avamar replicates data when a destination Data Domainsystem is not identified on the Storage Mapping tab of the AUI.
Steps
1. In the AUI, go to Administration > System .The System window appears
2. Click the Data Domain tab to display a list of configured Data Domain systems.3. If you need to add the default Data Domain destination, click + ADD. If the Data Domain system is already listed, select the system and
click Edit.The Add Data Domain or Edit Data Domain wizard appears.
4. Scroll down the wizard page to the Misc section, and select the Use system as default replication storage checkbox.5. Click VALIDATE.
Results
AUI modifies the settings of the selected replication destination.
Mapping a domain to a Data Domain systemIf there are multiple destination Data Domain systems, you can control which system receives the data that replicates from the sourceData Domain system. To specify the destination Data Domain system, map a domain on the source Avamar server to a destination DataDomain system. If you do not provide a mapping, then Avamar replicates the data from the source Data Domain system to the defaultdestination.
About this task
NOTE: You cannot map the domains on the source Avamar server to a destination Data Domain system until after the
first replication. During the first replication, the data replicates to the default destination.
Steps
1. In the AUI, go to Administration > System .The System window appears
2. Click the Storage Mapping tab, and then click + ADD.
The Add Storage Mapping dialog appears.
3. From the list, select the Data Domain system to use as the replication target.4. Click SUBMIT.
196 Replication

Delete a replication destination recordDelete the record for a replication destination from a source Avamar system.
About this task
If using Replicas at Source in Avamar Administrator to delete a replication destination record, when Replicas at Source is enabled, theAvamar system checks for replicas on the replication destination system. If replicas associated with the source Avamar system exist,Avamar Administrator prevents the deletion of the replication destination record. To delete the replication destination record even whenreplicas exist, override this setting.
When Replicas at Source is disabled, the Avamar system does not check for replicas on the replication destination system beforedeleting the replication destination record. Any existing replicas remain on the replication destination system until they expire or until theyare deleted by using the destination system interface.
Table 89. Replicas at Source
Replicas at Source Result
Enabled The Avamar system checks for replicas on the replication destination system and if no replicas exist, deletes thereplication destination record. To prevent the Avamar system from checking for replicas, and delete thereplication destination record even if replicas exist on the replication destination system, unselect Check forremote backups before deletion, and then click Yes.
Disabled The Avamar system deletes the replication destination record.
Steps
1. In the AUI, navigate to Administration > System .2. Click the Replication Destination tab, and then select the replication destination record that you want to delete.3. Click the Delete icon.
A confirmation dialog appears.4. To confirm the deletion, click YES.
Replication groupsReplication groups enable you to define the settings for policy-based replication.
The replication groups option includes the following:
• The domain and client members of the replication group• The backup types to replicate• The number of backups to replicate• The destination server• The replication schedule• How long replicated backups are retained on the destination server
You can specify the priority for which backup data replicates first. When you define the members of the replication group, the order inwhich members are listed in the Member(s) list controls the order in which backup data is replicated.
Backup data for a client replicates only once even if a client is listed individually and is also a member of a domain in the Member(s) list.
If an individual client is a higher priority in the Member(s) list than the domain, then the backup data for the individual client replicatesbefore the backup data for any other clients in the domain.
Create a replication policy/group in the AUI
Prerequisites
• Add a destination Avamar server to the configuration on the source Avamar server.• (Optional) Create a schedule to specify when replication for the group occurs.
Steps
1. In the AUI left navigation pane, click .
Replication 197

2. Navigate to Policy > Replication Policy.The Replication Policy window appears.
3. In the Replication Policy window, click + ADD.The Policy wizard appears.
4. On the Properties page, type a name for the replication group, and then select Enabled to enable replication for the replicationgroup.
5. If pool-based replication is used to enable multiple parallel replication backups from a Data Domain source to a Data Domain target,select Replicate client backups in parallel. Otherwise, select Default Mode.
a. To instruct the replication plug-in to use VSR optimization for plug-ins that support optimization, select Optimize VirtualSynthetic Replication (VSR).
NOTE: VSR optimization requires that the Replication order of client backups must be Oldest to Newest. This
option is selected by default. To require that all ordering options for pool-based replication are followed,
regardless of the plug-in, clear the selection from this option.
b. For the Replication order of client backups, select one of the following:
• Oldest to Newest begins replication with the oldest backup first.• Newest to Oldest begins replication with the newest backup first.
6. Click NEXT.The Members page appears.
7. On the Members page, complete the steps that are required for the members in the replication group.
Members in thereplication group
Steps
All clients Select Replicate all clients and click NEXT.
Specific domains orclients
a. Select Choose Membership.b. To add to the replication group, click > to expand the list of domains/clients, and then select or
unselect the checkbox next to a domain/client.
Selected members are added to the table.c. To remove a member from the replication group, click - next to the entry in the table.d. Click NEXT.
8. On the Backup Filters page, complete the steps that are required for the type of backups to replicate.
Type of backups toreplicate
Steps
All backups from allmembers of thereplication group
Select Replicate all backups.
Specific backups a. Select Include/Exclude backups by date, type, and more.b. Click Select Backup Filter.
The Backup Filter dialog box appears.c. Select the type of backups to replicate: Daily, Weekly, Monthly, Yearly, or No tag. Ensure that you
select at least one backup type.d. To replicate for each client that is a member of the replication group, specify the maximum number of
backups.
To replicate all backups (no maximum), select No limit for number of backups per client.
To replicate a certain number of the most recent backups for each member client, select Limit to andthen specify the maximum number to limit the backups to.
e. Specify date restrictions for the backups to replicate for each client that is a member of the replicationgroup.
To replicate all backups regardless of when the backups occurred, select No Date Restrictions.
To replicate only backups that occurred within a recent period, select Last and then specify an amountof past Day(s), Weeks(s), Month(s), or Year(s) to include.
198 Replication

Type of backups toreplicate
Steps
To replicate only backups that occurred during a range of dates, select Range and specify the startdate/time in the From fields, the end date/time in the To fields, or both.
f. Click OK.
9. Click NEXT.The Schedule page appears.
10. On the Schedule page, use the Select Existing Schedule drop-down to choose the default replication schedule or another schedulethat you have created.
11. Click NEXT.The Retention page appears.
12. On the Retenion page, specify when the replicated backups should expire on the destination server:
• To expire the replicated backups at the current expiration setting, select Keep current backup expiration.• To expire the replicated backups at a different time than the current expiration setting, select Set expiration by backup type
and then specify the number of days, weeks, months, or years to retain each backup type.
If a backup is of multiple types, then the expiration for the replicated backup is set to the specified value for the longest durationbackup type. For example, if a backup is both a daily and a monthly backup, then the expiration for the replicated backup is set tothe value that you specify for monthly backups.
13. Click NEXT.The Destination page appears.
14. On the Destination page, select an existing destination server from the table that you would like to replicate backups to, or add adestination server by clicking + ADD DESTINATION to open the Add replication destination dialog.
15. Click NEXT.The Summary page appears.
16. On the Summary page, review the replication policy configuration details. This page also provides you with the option to specifyadvanced configuration details.
• If you do not want to perform advanced configuration, click FINISH.• If you want to specify more configuration details, scroll to the bottom of the page and click Advanced Parameters.
When you click Advanced Parameters, a dialog displays.17. (Optional) Specify the following advanced parameters for the replication group. Additionally, you can move the Show Advanced
Options slider to the right to reveal additional fields. Advanced options will appear in bold.
a. To replicate only backups from specific plug-ins, specify the numeric plug-in descriptor in the Include plug-in specific backupsfield.
Separate multiple entries with a comma, or leave the box empty to replicate all backups. Numeric plug-in descriptors on page 208provides a list of numeric plug-in descriptors.
b. To exclude backups from specific plug-ins from replication, specify the numeric plug-in descriptor in the Exclude plug-in specificbackups field.
Separate multiple entries with a comma, or leave the box empty to replicate all backups.
c. For Excludes clients containing PATTERN from replication, separate multiple entries with a comma, or leave the box emptyto replicate all backups.
d. To replicate only a specific backup, specify the backup sequence number in the Backup sequence number field or the backuplabel in the Backup label field. Specify the complete backup sequence number or label.
e. To replicate backups that have a label that matches a specific pattern, specify the pattern in the Backup label pattern field.f. From the Informational message level drop-down, select the verbosity for informational messages in the replication log files:
• To suppress all informational messages but include errors and warnings in the log files, select No informationals.• To provide some information messages in the log files with errors and warnings, select Some informationals.• To provide additional status information in the log files with errors and warnings, select Many informationals.• To provide maximum information in the log files, including all informational messages, errors, and warnings, select All
informationals.
g. Specify whether to include advanced timing and deduplication statistics in the replication log files by selecting or unselecting theReport advanced statistics checkbox.
h. From the List contents being replicated drop-down, specify how much information about the replicated backups to include inthe replication log files:
• No file listing• List file names
Replication 199

• List files and dates
Use caution when including file information in the replication log files. Replication performance decreases, and the size of the logfiles can be very large.
i. To write the maximum amount of information to log files for troubleshooting, select the Enable debugging messages checkbox.
The replication process generates very large log files.
j. From the Maximum concurrent processes drop-down, select the maximum number of clients to replicate simultaneously.k. To reduce network usage to a specified rate in megabits per second, specify the number of megabits in the Network usage
throttle field.
Specify 0 (zero) for unrestricted network usage. To use 50 percent of a T1, specify 0.772.
l. If pool-based replication is being configured for Data Domain systems, select the order for client replication in the Client listordering drop-down.
m. If pool-based replication is being configured for Data Domain systems, for the Maximum number of Data Domain ReplicationStreams, type or use arrows in the field to specify the maximum number of avtar processes that can be started in parallel.
n. When you complete the advanced parameters, click OK to save the configuration details and exit the dialog, and then FINISH.
Enable or disable a replication policy/groupYou can disable a replication policy/group to prevent scheduled replications from occurring for that group. This step is typically done toplace the system in a state that supports maintenance activities. If you disable a replication group, you must re-enable the group toresume scheduled replications.
Steps
1. In the AUI left navigation pane, click .2. Navigate to Policy > Replication Policy.
The Replication Policy window appears.3. Select the desired replication policy and click the Edit icon.
The Policy wizard appears.4. Select the Enabled checkbox to enable the group, or unselect the checkbox to disable the group.5. Click NEXT to navigate through the remaining wizard steps, and then click FINISH to save any changes.
If the group is enabled, then the Enabled column in the Replication Policy window indicates True. If the group is disabled, then theEnabled column in the Replication Policy window indicates False.
Edit a replication policy/group
Steps
1. In the AUI left navigation pane, click .2. Navigate to Policy > Replication Policy.
The Replication Policy window appears.3. Select the desired replication group and click the Edit icon.
The Replication Policy wizard appears.4. Edit the settings for the replication group.
The settings are the same settings that you specified when you created the group.
5. Click FINISH.
Delete a replication policy/groupWhen you delete a replication group from the configuration on the source Avamar server, any data that you already replicated to thedestination server for the group remains on the destination server until the replicated backups expire or you delete the backups.
Steps
1. In the AUI left navigation pane, click .2. Navigate to Policy > Replication Policy.
The Replication Policy window appears.3. Select the replication group you want to remove and click the Delete icon.
A confirmation message appears.4. Click YES.
200 Replication

Performing on-demand replication in the AUIYou can perform on-demand replication of a replication group when you use policy-based replication in the AUI. An on-demand replicationis a one-time replication of data for the replication group. You may want to perform an on-demand replication for the first replication ofthe replication group after you configure policy-based replication. Perform on-demand replication before system maintenance, softwareinstallations, or software upgrades.
About this task
You can perform on-demand replication in the AUI by navigating to Policy > Replication Policy and selecting a policy from theReplication Policy window.
Perform on-demand replication from the Policy window
Steps
1. In the AUI left navigation pane, click .2. Navigate to Policy > Replication Policy.
The Replication Policy window appears.3. Select the desired replication group's policy from the table.4. Click RUN.
A confirmation message appears indicating that the replication activity has started. You can click the Activity link in the message orgo to the Activity window to view the progress.
Results
When the replication activity completes, the replicated backup appears in the Asset Management window.
1. Go to the Asset Management window and select a domain from the Domain pane.2. Select a client from the Asset Management pane, and then click VIEW MORE in the Client Summary pane.
NOTE: The source Avamar system currently lists only local backups. For remote backups, log in to the destination
system.
Performing command line replicationThe avrepl command line interface (CLI) enables you to replicate data from a source Avamar server to a destination Avamar server.
About this task
The avrepl binary is located in the \usr\local\avamar\bin directory on the server utility node. Log in as admin or root and run thecommand from that location.
Command referenceThe following topics provide a reference for the operations and options that the avrepl command supports.
Synopsisavrepl --operation=replicate [options] [target]
Replication 201

OperationsThe only supported operation for avrepl is --operation=replicate, which replicates data from the source Avamar server to adestination Avamar server.
OptionsUse the avrepl command options to control replication behavior.
Account optionsAccount options for the avrepl command enable you to specify credentials to connect to the destination Avamar server for replication.
The following account options are available for the avrepl command.
Table 90. Account options for the avrepl command
Option Description
--account=location
--acnt=location
--path=location
Specifies a hierarchical location on the destination Avamar server.This option is relative to the current home location, unless you usea slash (/) as a prefix to the path designation, in which case anabsolute path is assumed. The default account is REPLICATE.
--[replscript]dstaddr=destination_server Specifies the DNS name or IP address of the destination Avamarserver. Replication between servers of different versions issupported. However, for best results, ensure that the Avamarserver software on the destination server is the same version or anewer version than the source Avamar server.
--[replscript]dstid=repluser Specifies the Avamar user ID and domain to use for authenticationon the destination Avamar server.
NOTE: The repluser account is the only user accountthat is known to work reliably on all destination servers.
--dstpassword=password
--dstap=password
--dstpswd=password
Specifies the password for repluser account on the destinationAvamar server.
--[replscript]dstpath=domain Specifies a location (domain) on the destination Avamar server tostore replicated source data. The default value is the top-leveldirectory (/), which stores the replicated data in a new domainthat is named for the source Avamar server. Use this option withthe --[replscript]srcpath option. You cannot use thisoption with the --[replscript]dpnname option.
--[replscript]dstport=port Specifies the data port to use when connecting to the destinationAvamar server. The default value is 27000.
--hfsaddr=Avamar_server
--server=Avamar_server
Specifies the DNS name or IP address of the source Avamarserver.
--[avtar]id=user@auth Specifies the Avamar user ID and authentication system to use forauthentication on the source Avamar server. The default value isrepluser, which is the default replication user account on theAvamar server. To authenticate with the Avamar authenticationsystem, specify avamar for auth. For example: --[avtar]id=jdoe@avamar.
--password=password
--ap=password
--pswd=password
Specifies the password for the Avamar user ID to use forauthentication on the source Avamar server.
202 Replication

Logging optionsLogging options for the avrepl command enable you to specify the path and file name for the avrepl log file, and to control how muchinformation the plug-in writes to the log file.
The following logging options are available for the avrepl command.
Table 91. Logging options for the avrepl command
Option Description
--[avtar]informationals=n Sets the information level for status messages, where n is a single-digit integer value.
--[avtar]noinformationals={true | false} Specify true to disable all status messages.
--[avtar]statistics={true | false} Specify true to include advanced timing and deduplicationstatistics in the replication log files.
--log=file--logfile=file
Specifies the full path and file name of the avrepl plug-in log file.
--nostdout={true | false} Specify true to disable output to STDOUT. However, if you usethe --log or --logfile option, output still goes to the log file.
--nowarnings={true | false} Specify true to disable warning messages.
--quiet={true | false} Specify true to suppress all messages. This option is equivalent tousing both --[avtar]noinformationals=true and --nowarnings=true.
--verbose--v
Specify either --verbose or --v to enable all messages,including status and warning messages. o control the level ofverbosity, specify --verbose=n . The default value is --verbose=6.
Replication optionsReplication options for the avrepl command enable you to control replication functionality, such as which backups should replicate andhow long to retain replicated backups on the destination server.
The following replication options are available for the avrepl command.
Table 92. Replication options for the avrepl command
Option Description
--[avtar]after=timestamp Specifies that only backups matching timestamp and later shouldbe replicated. For timestamp, use 24 hour local time zone valuesthat conform to the syntax yyyy-mm-dd hh:mm:ss. You can usepartial timestamp values. The resolution is truncated to the lastsupplied value. For example, 2014-02 is equivalent to2014-02-01 00:00:00. You can also use this option with --[avtar]before=timestamp to define a range of effectivedates. Only backups that occurred within the date range arereplicated.
--[avtar]allsnapups={true | false} The default value is true, which replicates all backups. If false,then only the most recent backup for each client is replicated. Ifyou specify the --[avtar]count option, then the --[avtar]count option overrides the --[avtar]allsnapupsoption. Only the specified number of most recent backupsreplicates for each client.
--[avtar]before=timestamp Specifies that only backups that occurred before timestamp shouldbe replicated. For timestamp, use 24 hour local time zone valuesthat conform to the syntax yyyy-mm-dd hh:mm:ss. You can usepartial timestamp values. The resolution is truncated to the last
Replication 203

Table 92. Replication options for the avrepl command (continued)
Option Description
supplied value. For example, 2014-02 is equivalent to2012-02-01 00:00:00. You can also use this option with --[avtar]after=timestamp to define a range of effective dates.Only backups that occurred within the date range are replicated.
--[avtar]count=n Limits replicated backups to this maximum number (n) of mostrecent backups for each client.
--[avtar]exclude-pluginid-list=list Excludes backups that are performed with the specified plug-in,where list is a comma-separated list of plug-in IDs.
--[avtar]expires={n | period | timestamp} Specifies how long to retain replicated backups on the destinationserver:
• A number of days (n).• An expiration period as a specific number of days, weeks,
months, or years. To specify a period, use one of the followingvalues:
days=n
weeks=n
months=n
years=n
where n is a positive integer. For example, supply --[avtar]expires=years=2 to retain replicated backups fortwo years on the destination server. Also, --[avtar]expires=30 and --[avtar]expires=days=30 are equivalent.
• A timestamp for the date and time at which the replicatedbackup expires. Use 24 hour local time zone values thatconform to the syntax yyyy-mm-dd hh:mm:ss. You can usepartial timestamp values. The resolution is truncated to the lastsupplied value. For example, 2014-02 is equivalent to2014-02-01 00:00:00.
--[avtar]pluginid-list=list Replicates only backups that are performed with the specifiedplug-ins, where list is a comma-separated list of plug-in IDs.
--[avtar]retention-type={daily | weekly |monthly | yearly | none}
Replicates only backups with one of the following retention types:
• daily• weekly• monthly• yearly• noneIf you supply none, then only backups without a specific retentiontype are replicated.
--[replscript]dpnname=source_server--dpn=source_server
Specifies a name to use to represent the source Avamar server(source_server) as part of the path for the replicated files in theREPLICATE domain on the destination server. Specify the fullyqualified domain name of the source server. You cannot use thisoption with the --[replscript]dstpath or --[replscript]srcpath options.
--[replscript]dstencrypt={ssl | tls} Enables the specified encryption method for avtar, avmaint,and avmgr on the destination server. Valid encryption methodsare ssl and tls.
--[replscript]srcpath=domain Specifies a location (domain) on the source Avamar server fromwhich to begin replication. Only data within this location is
204 Replication

Table 92. Replication options for the avrepl command (continued)
Option Description
replicated. The default setting is the top-level domain (/), whichreplicates the entire server. Use this option with the --[replscript]dstpath option. You cannot use this option withthe --[replscript]dpnname option.
--backup-type=type Replicates only the specified type of backup, where type is one ofthe following values:
• differential• differential_full• incremental• incremental_full• level0_full• synthetic_full
-- max-ddr-streams= n Sets maximum number of avtar processes that can be started inparallel which target the back-end Data Domain system.
--optimize-vsr={true | false} Used with --vsr-plug-in-ids when --use-pool-based isset to true, this option identifies whether Virtual SyntheticReplication (VSR) optimization should be used with plug-ins thatsupport optimization. VSR optimization requires that the order ofreplication must be oldest-to-newest, regardless of other settings.The default setting for this option is true. To require that allordering options for pool-based replication are followed, regardlessof plug-in, set this option to false.
--ordering-criterion= order If --use-pool-based is set to true, this option determines theorder in which backups are replicated. Available values are:
• oldest-to-newest Begins replication with the oldestbackup first. If this option is not specified, it is the defaultsetting.
• newest-to-oldest Begins replication with the most recentbackup first.
• largest-to-smallest Begins replication with the largestbackup first.
• smallest-to-largest Begins replication with the smallestbackup first.
--use-pool-based={true | false} If true, enables pool-based replication mode, which replicates allclient backups in parallel when replicating from one Data Domainstorage system to another.
--vsr-plug-in-ids= plug-in-ids If --optimize-vsr is set to true, this option lists plug-in IDs forplug-ins that should use Virtual Synthetic Replication (VSR)optimization. By default, the NDMP and VMware plug-ins use VSRoptimization. No other plug-ins are supported.
--within={days | weeks | months | years}=n Replicates backups that occurred within these most recent days,weeks, months, or years, where n is a positive integer. Forexample, supply --within=months=3 to replicate threemonths' worth of backups for each client.
Avamar-only optionsAvamar-only options access advanced functionality that is normally reserved for use by Avamar personnel only. Misuse of these advancedoptions can cause loss of data. If you are unsure about any aspect of these options, contact Avamar Support for more information beforeusing them.
The following Avamar-only options are available for the avrepl command.
Replication 205

Table 93. Avamar-only advanced options for the avrepl command
Option Description
--bindir=path Specifies the directory that contains Avamar binary files. Thedefault value is /usr/local/avamar/bin.
--[avtar]exp-delta={days | weeks | months |years}=n
Changes replicated backup expiration dates on the destinationserver by the specified number (n) of days, weeks, months, oryears. The value can be either a positive or negative integer. Forexample, supply --[avtar]exp-delta=days=-2 to decreasethe backup expiration dates on the destination server by two days.Do not use --[avtar]exp-delta with --[avtar]expires.
--[avtar]expiration-policy=type=period Replicates backups of a specific retention type within the specifiedperiod, where type is one of the following values:
• dailies• weeklies• monthlies• yearliesand period is one of the following values:
• days=n
• weeks=n
• months=n
• years=n
and n is a positive integer. For example, supply --[avtar]expiration-policy=dailies=years=2 toreplicate two years' worth of daily backups for each client. The --[avtar]expiration-policy option takes precedence over--[avtar]expires.
--[avtar]label=name
--f=name
Specifies the labels of the backups to replicate. Separate multiplevalues with a comma.
--[avtar]label-pattern=pattern Replicates backups with a label that matches the specified pattern.Common glob operators (wildcards) such as asterisk (*) andquestion mark (?) are allowed. Separate multiple patterns bycommas, such as ----[avtar]label-pattern=temp, tmp.You can also specify the ----[avtar]label-pattern optionmultiple times in a single command.
--[avtar]sequencenumber=n
--[avtar]labelnumber=n
Specifies the sequence number of the backup to replicate.Separate multiple entries with a comma.
--[avtar]throttle=n Controls the rate at which the underlying avtar process sendsdata to the server. If you specify this option, avtar pauses aftersending each packet to ensure that network usage does notexceed the specified maximum bandwidth in megabits per second(Mbps). For example, --[avtar]throttle=5 uses half of a 10Mbps connection, and --[avtar]throttle=0.772 restrictsusage to half of a T1 link.
--[replscript]exclude=pattern Excludes domains or clients that contain pattern from replication,where pattern is a matching pattern in the domain or client name.Common glob operators (wildcards) such as asterisk (*) andquestion mark (?) are allowed. For example, specify --[replscript]exclude=spot to exclude any domain or clientwith a name that contains the pattern spot. Specify --[replscript]exclude=/clients/ to exclude all clients inthe /clients domain. Separate multiple patterns by commas,such as --[replscript]exclude=spot, /clients/. You
206 Replication

Table 93. Avamar-only advanced options for the avrepl command (continued)
Option Description
can also specify the --[replscript]exclude option multipletimes in a single command to specify more than one pattern.
--[replscript]forcecreate={true | false} Specify true to force the creation of all source server accountson the destination server, even if no data for an account is in thereplication. The default value is false, which creates accounts onthe destination server only for clients that replicate data.
--[replscript]force-move={1 | 0} Specify 1 (true) to force a move to the target server backupaccount. Specify 0 (false) if you do not want to force a move.
--[replscript]fullcopy={true | false} Specify true to assert full root-to-root replication mode, whichcreates a complete logical copy of an entire source server on thedestination server. The replicated data is not copied to theREPLICATE domain but is added directly to the root domain as ifthe source clients had registered with the destination server.Source server data that is replicated in this manner is fullymodifiable on the destination server.
--[replscript]globalcid={true | false} Specify true to use global client IDs (CIDs) during replication.Global CIDs are primarily used to enable fast failovers from oneserver to another after a root-to-root replication. true is thedefault setting.
--[replscript]reportonly={true | false} Specify true to assert report-only operational mode. Report-onlyoperational mode is used to predetermine the amount of storage areplication activity might consume on a destination server byrunning the replication job without actually saving any data to thedestination server.
--[replscript]restore={true | false} Specify true to assert restore operational mode. If you previouslyreplicated a source Avamar server to a destination Avamar server,you can run avrepl from the destination server and supply thiscommand with the --[replscript]dpnname=original_source_server option torestore that data to an Avamar server.
--[replscript]small-client-mb=n Threshold in MB before which the new data for a client isconsidered “small.” The default setting is 128 MB of new data.Specify 0 to disable this optimization.
--rechunk={disable | enable | default} Controls whether replicated data should be rechunked to maximizedata deduplication on the destination server. Use one of thefollowing values:
• disable — Do not rechunk data before storing on thedestination server.
• enable — Rechunk data before storing on the destinationserver to maximize data deduplication.
• default — Automatically rechunk data when source anddestination server chunking parameters are different.
Help option
The --help option displays a list of available options for the avrepl command:
avrepl --help
Version option
The --version option displays the software version of the avrepl command:
avrepl --version
Replication 207

Target listTo replicate specific clients or Avamar domains, include a list of the clients and domains at the end of the avrepl command. Separatemultiple entries with a space.
If you do not supply a list, then the replication includes all client backups on the source Avamar server.
Numeric plug-in descriptorsSome command options require one or more numeric plug-in descriptors as values. Valid numeric plug-in descriptors are listed in thefollowing table.
Table 94. Numeric plug-in descriptors
Descriptor Plug-in name
1000 Linux avagent
1001 Linux avtar
1002 Linux Oracle RMAN
1003 Linux NDMP
1009 Linux DB2
1014 Linux Lotus
1016 Linux VMware image
1019 Linux VMware File Level Restore (FLR)
1024 Linux extended retention
1025 Linux extended retention restore
1029 Linux Sybase
1030 Linux SAP
1034 Linux extended retention import
1035 Linux VDR Migration
1038 Linux VMware image restore
1039 Linux vApp image
2000 Oracle Solaris avagent
2001 Oracle Solaris avtar
2002 Oracle Solaris RMAN
2009 Oracle Solaris DB2
2014 Oracle Solaris Lotus
2029 Oracle Solaris Sybase
2030 Oracle Solaris SAP
3000 Windows avagent
3001 Windows avtar
3002 Windows Oracle RMAN
3004 Windows Exchange message
3005 Windows Exchange database
3006 Windows SQL
208 Replication

Table 94. Numeric plug-in descriptors (continued)
Descriptor Plug-in name
3009 Windows DB2
3011 Windows Exchange 2007 database
3012 Windows Exchange 2007 web
3014 Windows Lotus
3015 Windows VSS
3016 Windows VMware image
3017 Windows MOSS
3018 Windows Exchange VSS
3019 Windows VMware File Level Restore (FLR)
3026 Windows MOSS VSS
3027 Windows Exchange Granular Level Restore (GLR)
3028 Windows MOSS Granular Level Restore (GLR)
3029 Windows Sybase
3030 Windows SAP
3032 Windows Hyper-V VSS
3033 Windows Hyper-V Granular Level Restore (GLR)
3036 Windows cluster file system
3041 Windows VMware Granular Level Restore (GLR)
4000 HP-UX avagent
4001 HP-UX avtar
4002 HP-UX Oracle RMAN
4009 HP-UX DB2
4029 HP-UX Sybase
4030 HP-UX SAP
5000 IBM AIX avagent
5001 IBM AIX avtar
5002 IBM AIX Oracle RMAN
5009 IBM AIX DB2
5014 IBM AIX Lotus
5029 IBM AIX Sybase
5030 IBM AIX SAP
6000 Mac OSX avagent
6001 Mac OSX avtar
7003 NetApp NDMP
8003 EMC Celerra NDMP
10000 Novell NetWare avagent
Replication 209

Table 94. Numeric plug-in descriptors (continued)
Descriptor Plug-in name
10001 Novell NetWare avtar
10003 Novell NetWare NDMP
11000 FreeBSD avagent
11001 FreeBSD avtar
12000 SCO OpenServer avagent
12001 SCO OpenServer avtar
13000 SCO UnixWare avagent
13001 SCO UnixWare avtar
14003 EMC Isilon NDMP
CLI examplesReview the avrepl command examples for details on how to use options to control replication behavior.
Specify the following options with the avrepl command:
Table 95. Required options for the avrepl command
Option Description
--operation=replicate Command operation for avrepl.
--[replscript]dpnname=source_server Fully qualified domain name of the source Avamar server.
--[avtar]id=user@auth User account for the source Avamar server. The default value isrepluser. To use the repluser account, you can omit --[avtar]id and specify only the password for the repluseraccount with the --password option.
--password=password Password for the user account on the source Avamar server.
--[replscript]dstaddr=destination_server Destination Avamar server.
--[replscript]dstid=repluser Specifies the Avamar user ID and domain to use for authenticationon the destination Avamar server.
NOTE: The repluser account is the only user accountthat is known to work reliably on all destination servers.
--dstpassword=password
--dstap=password
--dstpswd=password
Specifies the password for repluser account on the destinationAvamar server.
If the firewall is installed and enabled on the destination server, then specify the --[replscript]dstencrypt option with the correctencryption method, which is either ssl or tls.
Replicating all client backupsThe following command replicates all client backups from the avamar-1.example.com source server to the replication-server-1.example.com destination server. The user account on the source server is jdoe@avamar (the jdoe user account withthe Avamar internal authentication system), and the password is password. The user account on the destination server is repluser,and the password is password.
avrepl --operation=replicate --[replscript]dpnname=avamar-1.example.com --[avtar]id=jdoe@avamar--password=password --[replscript]dstaddr=replication-server-1.example.com --[replscript]dstid=repluser --dstpassword=password --[replscript]dstencrypt=ssl
210 Replication

Replicating backups for specific clients or domainsThe following command replicates all backups for the client1 and client2 clients, as well as for all clients in the domain3 domain.
avrepl --operation=replicate --[replscript]dpnname=avamar-1.example.com --[avtar]id=jdoe@avamar--password=password --[replscript]dstaddr=replication-server-1.example.com --[replscript]dstid=repluser --dstpassword=password --[replscript]dstencrypt=ssl client1 client2domain3
Replicating specific types of backupsThe following command replicates all full (level 0) backups that occurred after February 1, 2014 for the client1 and client2 clients.
avrepl --operation=replicate --[replscript]dpnname=avamar-1.example.com --[avtar]id=jdoe@avamar--ap=password --[replscript]dstaddr=replication-server-1.example.com --[replscript]dstid=repluser --dstpassword=password --[replscript]dstencrypt=ssl --[avtar]after=2014-02-01 --backup-type=level0_full client1 client2
Monitoring replicationTo ensure that it is completing successfully and to troubleshoot issues, monitor replication.
About this task
The Monitor > Activity window in the AUI enables you to view status information for both on-demand and scheduled replication activity.
Monitor replication in the AUIThe Activity window in the AUI enables you to view status information for both on-demand and scheduled replication activity.
Steps
1. In the AUI navigation pane on the left, click , and then go to Monitor > Activity.The Activity Monitor appears and displays a list of all activities. Replication jobs indicate Replication Source in the Type column.Additionally, you can filter the view to display only replication jobs.
2. To filter the results to display only replication activity:
a. Click next to the Type column.b. Type Replication Source.
Cancel a replication task in the AUIYou can cancel a policy-based replication task in the Activity window of the AUI at any time before the task completes. Note that thecancellation might take 5 minutes or longer, and if the replication task completes before the cancellation occurs, the task does not getcancelled.
Steps
1. In the AUI, navigate to Monitor > Activity.A list of all activities appears.
2. In the Activity window, select the replication task you want to cancel, and click CANCEL.A confirmation message appears.
3. Click YES.
Replication 211

Restore a backup from a replica on a destinationsystemRestore replicated data from a client in the REPLICATE domain of a destination server. The restore target can be any client that is amember of a domain on the destination server, including the client that is the source of the original backup.
About this task
Use this method to restore data from a replica when the source Avamar server is unavailable and when Replicas at Source is not enabledon the source Avamar system.
NOTE: Restore is supported in only Avamar Administrator.
Steps
1. Register and activate the client that is the restore target with the destination Avamar server that manages the replicated data:
a. On a Windows client, right-click the Avamar system tray icon and select Manage > Activate Client.The Activate Client Setup dialog box appears.
b. Type the hostname of the destination Avamar server in the Administrator Server Address box.c. Type 28001 in the Administrator Server Port box.
d. Type the Avamar domain for the client in the Client Domain box.e. Click Activate.
2. In Avamar Administrator, click the Backup & Restore launcher link.The Backup, Restore and Manage window is displayed.
3. Click the Restore tab.The upper left pane contains a list of domains.
4. Select the REPLICATE domain, and then select the hostname of the source Avamar server.
5. Select the domain that contains the client that is the source of the original backup.6. Select the client from the list.7. Click the By Date tab or the By File/Folder tab and select the data to restore.
NOTE: Restoring data from a backup on page 114 provides alternate methods to find a backup and perform a restore.
8. Select Actions > Restore Now.The Restore Options dialog box appears.
9. Click Browse next to the Restore Destination Client box, and then browse to and select the client that is the restore target.
Do not select a client in the REPLICATE domain as the restore target. Select a client that is listed in the clients domain, or inanother domain on the Avamar server.
10. To use for the restore from the Restore Plug-in list, select the plug-in.11. From the Avamar encryption method list, select an encryption method for client/server data transfer during the restore.
NOTE: The encryption technology and bit strength for a client/server connection depend on several factors,
including the client operating system and Avamar server version. The Avamar Product Security Guide provides
details.
12. Select either Restore everything to a different location or Restore everything to multiple locations.13. Click Set Destination below the Items Marked for Restore list, and then select the destination paths for the data to restore.14. To include plug-in options with this restore, click More Options, and then configure the settings.15. Click OK on the Restore Options dialog box.
The Restore Request dialog box indicates that the restore was started.16. Click Close.17. (Optional) Change the registration of the restore target client back to the source Avamar server.
Perform this step when the source Avamar server is available.
212 Replication

MCS configuration parameters to support Replicasat SourceConfigure MCS management of Replicas at Source through configuration parameters in mcserver.xml.
Changing the configuration of Replicas at Source on page 214 describes how to change mcserver.xml. The following table describesthe Replicas at Source parameters in mcserver.xml.
Table 96. MCS configuration parameters to support Replicas at Source
Container Parameter Default value Description
repl external_sync_interval_minute
120 Sets the number of minutesbetween tries to synchronizethe replica metadata from thedestination system to the MCSdatabase on the source Avamarsystem. Settingget_backups_from_external_server to true overridesthis parameter.
repl allow_dest_replica_management
false Set to true to permitsynchronization of replicametadata between the remotedestination system and thesource Avamar server. Set tofalse to disablesynchronization and effectivelydisable the Replicas at Sourcefeature.
repl get_backups_from_external_server
false Set this value to true tooverride the default behaviorand force MCS to obtain replicametadata directly from thedestination system. By default,MCS obtains replica metadatafrom the destination system byperiodic synchronization. Thissynchronization writes themetadata to the local MCSdatabase on the source Avamarsystem.Avamar Administratoraccesses the local database toprovide replica information.
repl show_external_backups true Set to true to enable thelisting of replicas on the Restoretab. Set to false to disable thelisting of replicas on the Restoretab.
ebms ebms_home lib/mcebms.war Sets the location of the webarchive file for the externalbackup manager service.
ebms ebms_descriptor /WEB-INF/web.xml Sets the location of the XMLdescriptor file for the externalbackup manager service.
ebms ebms_port 9090 Sets the inbound (listening) portfor the external backup managerservice.
Replication 213

Table 96. MCS configuration parameters to support Replicas at Source (continued)
Container Parameter Default value Description
ebms ebms_use_https true Set to true to force theexternal backup managerservice to use SSL/TLSencryption for communicationwith destination systems.
mon ebmsIntervalMinutes 720 Sets the number of minutesbetween checks of the state ofthe Remote Backup ManagerService.
mon ebmsFailEventIntervalMinutes
120 Sets the number of minutesbetween published updates ofRemote Backup ManagerService stop events and failevents.
mon ebmsMonitorTimeout 300 Sets the number of minutes totry to check the state of theRemote Backup ManagerService.
repl allow_manage_remote_backups_at_source
true Set to true to permitmanagement of replicas on thesource Avamar server.Management includes: Delete,Change Expiration, and ChangeRetention. Set to false todisable management of replicason the source Avamar server.
Changing the configuration of Replicas at SourceTo change the configuration of the Replicas at Source feature change the parameter values in mcserver.xml.
About this task
This topic describes how to change the Replicas at Source configuration parameters in mcserver.xml. Refer to MCS configurationparameters to support Replicas at Source on page 213 for descriptions of the configuration parameters.
Steps
1. Open a command shell and log in by using one of the following methods:
• For a single-node server, log in to the server as admin.• For a multi-node server:
a. Log in to the utility node as admin.b. Load the admin OpenSSH key by typing the following command:
ssh-agent bashssh-add ~admin/.ssh/admin_key
2. Stop the MCS by typing the following command:
dpnctl stop mcs3. Change the working directory by typing the following command:
cd /usr/local/avamar/var/mc/server_data/prefs4. Open mcserver.xml in a text editor.
5. Find the container element of the parameter, and within that element, find the parameter.6. Change the value of the parameter.7. Save the change and close the file.
214 Replication

8. Start the MCS and the scheduler by typing the following command:
dpnctl start mcsdpnctl start sched
Restore Replicas at SourceWhen the Replicas at Source feature is enabled on the Avamar server, Avamar Administrator lists replicas on the Restore tab in the sametable that lists backups.
View and restore data from replicas through the Restore tab of Avamar Administrator. Replicas appear with the following information:
• Remote in the Type column
• Name/IP address and system type of the remote destination system in the Server column
NOTE: When Avamar Administrator lists data from a backup as both Local and Remote, the Avamar system always uses
the local backup to restore the data. However, when backup data that is listed as Remote is selected for validation, the
Avamar system stages and validates the referenced replica.
Replicas at Source on page 191 provides additional information about the Replicas at Source feature.
Replication 215

Server Updates and Hotfixes
Topics:
• Overview of the Avamar server software update process• Installing and configuring the Avamar Downloader Service• Downloading new packages from the EMC repository• Downloading and installing packages on the Avamar server• Viewing a list of installation packages on the Avamar server• Deleting packages from the Avamar server• Viewing the history of installations• Using the legacy Avamar Downloader Service• Troubleshooting Avamar Downloader Service issues
Overview of the Avamar server software updateprocessAvamar periodically provides updates and hotfixes for the Avamar server software. Avamar stores update packages and hotfix packages inthe EMC repository. Use the Avamar Downloader Service to download the installation packages to an Avamar server, or to a localWindows server and push the packages to an Avamar server. Then use Avamar Installation Manager to install the packages on the Avamarserver.
When required, you can remove old installation packages from the local repository on the Avamar server and then download them via theAvamar Downloader Service again.
If Internet access is unavailable, manually copy packages to the /data01/avamar/repo/packages directory on the utility node orsingle-node server instead of using the Avamar Downloader Service. Then use Avamar Installation Manager to install the packages on theAvamar server.
Avamar Downloader ServiceBefore Avamar release 7.3, the Avamar Downloader Service was installed on a separate standalone Microsoft Windows computer.Beginning with Avamar release 7.3, the downloader service is also available on the Avamar server, integrated with the Avamar InstallationManager. You can use either the legacy downloader service on a standalone Microsoft Windows computer or use the new downloaderservice that is integrated with the Avamar Installation Manager.
Customer Support typically installs the Avamar Downloader Service software during the installation or upgrade of an Avamar server. Youcan also download the Avamar Downloader Service from the Avamar server and install the software yourself.
If the Avamar Downloader Service computer is on a private network with restrictions on access to the EMC repository server, then youcan set up a proxy server for communication between the Avamar Downloader Service computer and the EMC repository server.
SecurityThe Avamar Downloader Service encrypts outgoing communication to the EMC repository by using SSL (Secure Socket Layers) over anHTTP connection. The Avamar Downloader Service validates each package that it downloads to ensure that the package has beencorrectly signed and transmitted.
Legacy Avamar Downloader ServiceThe legacy Avamar Downloader Service computer is a standalone Microsoft Windows computer with network access to Avamar sites onthe Internet and to all internal Avamar servers.
The legacy Avamar Downloader Service runs as a Windows service to monitor the EMC repository. A desktop shortcut, task tray icon, andWindows Start menu items provide access to the legacy Avamar Downloader Service user interface, which enables you to configure the
12
216 Server Updates and Hotfixes

downloader service and check the EMC repository for installation packages. The Avamar Downloader Service monitor contains statusmessages for the service.
The legacy Avamar Downloader Service accepts incoming requests for installation packages only from Avamar systems that are on aknown systems list.
Local repository
The C:\Program Files\EMC\Avamar Downloader Service\repository directory on the Avamar Downloader Servicecomputer serves as the local repository for downloaded installation packages.
NOTE: Do not rename client installation packages. The Avamar push upgrade mechanisms are incompatible with
renamed packages.
The manifest.xml file in the local repository contains a list of all server, client, and workflow packages that are currently available fordownload from the EMC repository.
AvInstaller and Avamar Installation ManagerThe AvInstaller process controls the download and installation process for installation packages on the Avamar server. Use AvamarInstallation Manager to manage the AvInstaller process.
InstallationCustomer Support installs AvInstaller during the installation or upgrade of an Avamar server. AvInstaller is installed on the utility node in amulti-node environment or the server in a single-node environment.
Local repositoryAvInstaller uses the /data01/avamar/repo/packages directory on the Avamar utility node or single-node server serves as the localrepository for downloaded installation packages. AvInstaller also manages a temporary directory that is used to extract the packagesduring installation.
To determine if new packages are available, the Avamar Downloader Service automatically downloads the manifest file from the EMCrepository once a day. If the legacy Avamar Downloader Service is being used, it sends the updated manifest file to the local repository foreach known Avamar system. AvInstaller uses the manifest file to obtain current information about all software packages that are availablefor download from the EMC repository.
User interfaceUse the Avamar Installation Manager user interface to manage AvInstaller. Avamar Installation Manager is installed automatically withAvInstaller. Avamar Installation Manager provides the following features:
• Download software packages via the Avamar Downloader Service.• Install the packages on the Avamar server.• View a list of the software packages in the repository of the Avamar server.• To reclaim storage, delete old installation packages from the Avamar server.• View the software installation history for the Avamar server.
Checking the status of the AvInstaller processTo check the status of the AvInstaller process:
Steps
1. Open a command shell and log in by using one of the following methods:
• For a single-node server, log in to the server as admin.• For a multi-node server:
a. Log in to the utility node as admin.b. Load the admin OpenSSH key by typing the following command:
ssh-agent bashssh-add ~admin/.ssh/admin_key
Server Updates and Hotfixes 217

2. Type dpnctl status avi.Output from the dpnctl status avi command should look similar to the following:
dpnctl: INFO: avinstaller status: up.
Stopping the AvInstaller processTo stop the AvInstaller process:
Steps
1. Open a command shell and log in by using one of the following methods:
• For a single-node server, log in to the server as admin, then switch user to root by typing su -.
• For a multi-node server, log in to the utility node as admin, then switch user to root by typing su -.
2. Type avinstaller.pl --stop.
3. Verify that the AvInstaller process has stopped by typing avinstaller.pl --test.Output from the avinstaller.pl --test command should look similar to the following:
Avistart process:INFO: AVI is not running.
Restarting the AvInstaller processTo restart the AvInstaller process:
Steps
1. Open a command shell and log in by using one of the following methods:
• For a single-node server, log in to the server as admin, then switch user to root by typing su -.
• For a multi-node server, log in to the utility node as admin, then switch user to root by typing su -.
2. Type avinstaller.pl --start.
3. Verify that the AvInstaller process is running by typing avinstaller.pl --test.Output from the avinstaller.pl --test command should look similar to the following:
Avistart process pid:INFO: AVI is running.
Installing and configuring the Avamar DownloaderServiceThe Avamar Downloader Service is installed as part of the Avamar software installation process.
Using the legacy Avamar Downloader Service on page 223 contains information about installing and configuring the legacy AvamarDownloader Service software on a standalone Microsoft Windows machine.
Configuring the Avamar Downloader ServiceConfigure Avamar Downloader Service before using it to download packages from the EMC repository server. Configuration tasks includeproviding login information for Avamar Support, specifying proxy server settings.
Steps
1. Open a web browser and log in to Avamar Installation Manager:
a. Type the following URL:
https://Avamar-server/aviwhere Avamar-server is the IP address or resolvable hostname of the Avamar server.
218 Server Updates and Hotfixes

The Avamar Installation Manager login page appears.b. Type the username of the Avamar administrator user account in the User Name field and the password in the Password field.c. Click Login.
2. Click Configuration.The Configuration window opens.
3. Specify the Avamar Support Username and Password that you received with the Avamar license at the time of product purchase.4. (Optional) Select Enable Proxy to enable a proxy server when the downloader service requires a proxy server to pass through the
firewall when communicating with Avamar Support. Specify the hostname or IP address and the port number for the proxy server.
a. Specify the hostname or IP address and the port number for the proxy server.b. If the proxy server requires authentication, type the Username and Password for the proxy server.
5. Click Save.
Downloading new packages from the EMCrepositoryYou can check the EMC repository for new server, client, and workflow packages, and then download the packages to install them.
Steps
1. Open a web browser and log in to Avamar Installation Manager:
a. Type the following URL:
https://Avamar-server/aviwhere Avamar-server is the IP address or resolvable hostname of the Avamar server.
The Avamar Installation Manager login page appears.b. Type the username of the Avamar administrator user account in the User Name field and the password in the Password field.c. Click Login.
2. Click Configuration.The Configuration window opens.
3. Click Check for New Packages.
The Check for New Packages dialog box appears and provides status messages. The Avamar server downloads the manifest filefrom the EMC repository server to the local repository. The Avamar server then processes the manifest file to determine whichpackages apply to the current server configuration.
When packages become available to download, they appear on the SW Releases, SW Upgrades, SW Updates, and Maintenancetabs, as defined by each package.
4. Click Close on the Check for New Packages dialog box.5. For any package on the SW Releases, SW Upgrades, SW Updates, and Maintenance tab, click Download to retrieve the package
from the EMC repository.
Downloading and installing packages on theAvamar serverUse Avamar Installation Manager to download and install software packages, patches, and hotfixes.
Prerequisites
Use a computer with at least 2 GB of RAM.
Steps
1. Open a web browser and log in to Avamar Installation Manager:
a. Type the following URL:
https://Avamar-server/aviwhere Avamar-server is the IP address or the resolvable hostname of the Avamar server.
Server Updates and Hotfixes 219

The Avamar Installation Manager login page appears.b. Type the username of the Avamar administrator user account in the User Name field and the password in the Password field.c. Click Login.
2. If a Download button appears for the package, click the button to download the package to the local repository.After the download completes, the Download button is replaced with an Install button and a Delete button.
3. To start the installation, click Install.The background color for the package changes to yellow and the initialization begins. When the initialization process completes, theInstallation Setup page appears.
4. Provide installation setup information.
Some packages do not require setup information.
5. To provide advanced settings, select Show advanced settings.6. Click Continue.
The Installation Progress page displays the status of the installation.
NOTE: If you close the browser during the installation of a package, the installation does not stop. To resume
monitoring the installation, open a browser window and log in to Avamar Installation Manager.
7. Respond to all installation prompts.
After the installation completes, the Install button becomes a Run button for workflow packages. The Run button enables you to runthe workflow package again.
Viewing a list of installation packages on theAvamar serverView a list of installation packages in the repository on an Avamar server on the Repository tab of Avamar Installation Manager.
Steps
1. Open a web browser and log in to Avamar Installation Manager:
a. Type the following URL:
https://Avamar-server/aviwhere Avamar-server IP address or resolvable hostname of the Avamar server.
The Avamar Installation Manager login page appears.b. Type the username of the Avamar administrator user account in the User Name field and the password in the Password field.c. Click Login.
2. Click Repository.The Repository tab appears.
3. (Optional) Toggle the sort order of the packages in the list by clicking a column heading.
Uploading installation packages to the Avamar serverUpload packages to the Avamar server from the local hard drive or other attached medium such as a flash drive using the PackageUpload feature on the Repository tab
Steps
1. Open a web browser and log in to Avamar Installation Manager:
a. Type the following URL:
https://Avamar-server/aviwhere Avamar-server is the IP address or resolvable hostname of the Avamar server.
The Avamar Installation Manager login page appears.b. Type the username of the Avamar administrator user account in the User Name field and the password in the Password field.c. Click Login.
2. Click Repository.The Repository tab appears.
220 Server Updates and Hotfixes

3. Click Browse to select a package for upload.
NOTE: Versions 9 through 11 of the Internet Explorer browser support a maximum upload size of 4 GB. Versions 6
through 8 support a maximum upload size of 2 GB.
Once the package upload completes, it automatically appears in the Repository table.
Repository tab headingsThe packages in the repository on an Avamar server appear on the Repository tab of Avamar Installation Manager. The most recentlyinstalled package appears at the bottom of the list.
The following table describes the information that appears for each package.
Table 97. Information on the Repository tab
Heading Description
FileName The name of the package.
Status The status of the package:
• Waiting — The AvInstaller service is copying the package tothe EMC repository.
• Checksum — The AvInstaller service is calculating the packagechecksum.
• Unsigning — The AvInstaller service is verifying the packagesignature.
• Extracting — The AvInstaller service is extracting the packagefrom the tarball.
• Accepted — The package is fully downloaded to the EMCrepository and is ready to be installed.
• Rejected — Either the package was rejected due to a problemin transit or it was downloaded successfully but was notapplicable to the system in its current state.
Note A brief description of the status.
Last Updated The date and time of the last status update.
Deleting packages from the Avamar serverAfter you successfully install a software package, the AvInstaller service automatically deletes the package from the repository on theAvamar system. Manually delete packages that are not installed.
About this task
Only Customer Support can delete restricted packages.
Steps
1. Open a web browser and log in to Avamar Installation Manager:
a. Type the following URL:
https://Avamar-server/aviwhere Avamar-server IP address or resolvable hostname of the Avamar server.
The Avamar Installation Manager login page appears.b. Type the username of the Avamar administrator user account in the User Name field and the password in the Password field.c. Click Login.
2. In the Package List, select a package.3. Click the Delete button next to the package.
A confirmation message appears.4. Click Yes.
Server Updates and Hotfixes 221

Viewing the history of installationsYou can view a history of the software installations, updates, and hotfixes for an Avamar server on the History tab of Avamar InstallationManager.
Steps
1. Open a web browser and log in to Avamar Installation Manager:
a. Type the following URL:
https://Avamar-server/aviwhere Avamar-server IP address or resolvable hostname of the Avamar server.
The Avamar Installation Manager login page appears.b. Type the username of the Avamar administrator user account in the User Name field and the password in the Password field.c. Click Login.
2. Click History.The History tab appears.
3. (Optional) Toggle the sort order of the packages in the list by clicking the heading of any column.4. (Optional) Filter the list of packages by selecting a filter value from the Show list.5. (Optional) View details about a package in the list by selecting the row for the package.6. (Optional) View the log file for a packages that has a processing status by clicking Logs in the Details table.7. (Optional) Export the log information to a Microsoft Excel or PDF file by clicking Export.
Installation history information
History columnsThe following table describes the information that appears on the Avamar Installation Manager History tab for each package.
Table 98. Information on the History tab
Heading Description
Title The name of the package.
Version The version of Avamar server software.
Description A brief description of the package.
Status The status of the package:
• Available — The package is in the manifest and is available todownload.
• Completed — The package installation completed.• Processing — A package installation is in progress.• Ready — The package is ready to install.• Removed — The package has been deleted from the Avamar
grid.
Last Updated The date and time of the last status update for the package.
Details columnsThe following table describes the information that appears in the Details table in the lower right pane of the History tab.
Table 99. Details on the History tab
Details table column heading Description
Status Status details for a package:
222 Server Updates and Hotfixes
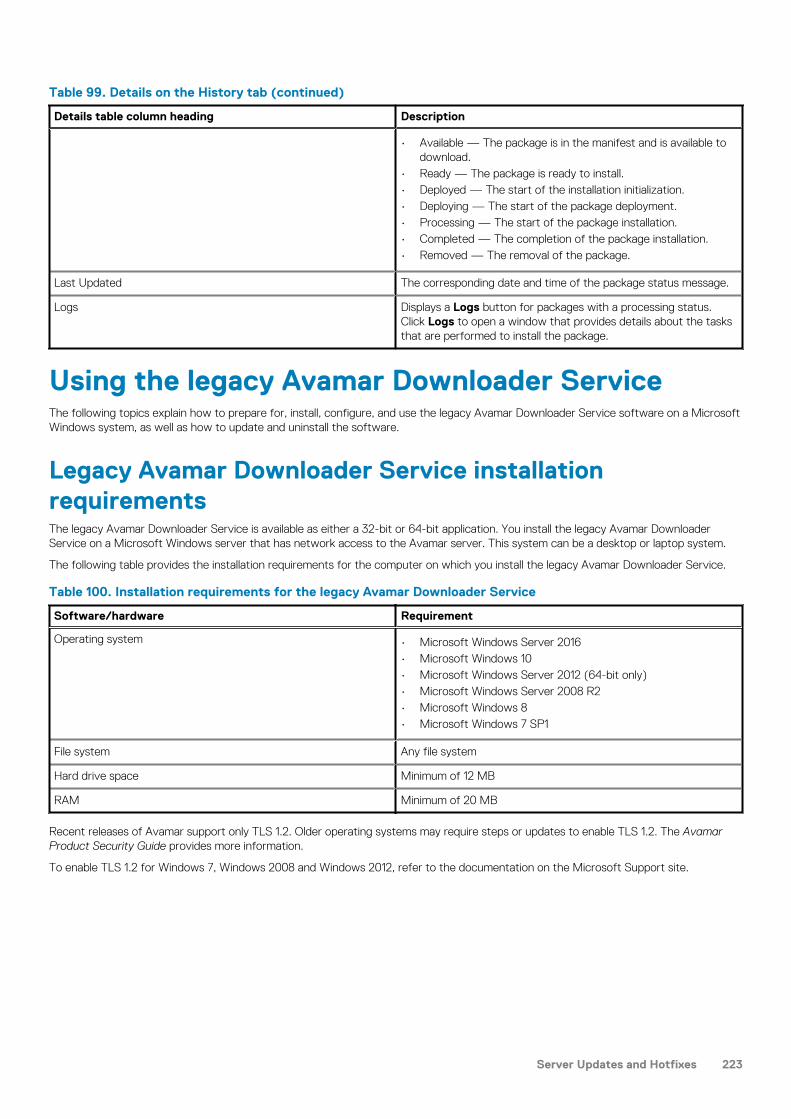
Table 99. Details on the History tab (continued)
Details table column heading Description
• Available — The package is in the manifest and is available todownload.
• Ready — The package is ready to install.• Deployed — The start of the installation initialization.• Deploying — The start of the package deployment.• Processing — The start of the package installation.• Completed — The completion of the package installation.• Removed — The removal of the package.
Last Updated The corresponding date and time of the package status message.
Logs Displays a Logs button for packages with a processing status.Click Logs to open a window that provides details about the tasksthat are performed to install the package.
Using the legacy Avamar Downloader ServiceThe following topics explain how to prepare for, install, configure, and use the legacy Avamar Downloader Service software on a MicrosoftWindows system, as well as how to update and uninstall the software.
Legacy Avamar Downloader Service installationrequirementsThe legacy Avamar Downloader Service is available as either a 32-bit or 64-bit application. You install the legacy Avamar DownloaderService on a Microsoft Windows server that has network access to the Avamar server. This system can be a desktop or laptop system.
The following table provides the installation requirements for the computer on which you install the legacy Avamar Downloader Service.
Table 100. Installation requirements for the legacy Avamar Downloader Service
Software/hardware Requirement
Operating system • Microsoft Windows Server 2016• Microsoft Windows 10• Microsoft Windows Server 2012 (64-bit only)• Microsoft Windows Server 2008 R2• Microsoft Windows 8• Microsoft Windows 7 SP1
File system Any file system
Hard drive space Minimum of 12 MB
RAM Minimum of 20 MB
Recent releases of Avamar support only TLS 1.2. Older operating systems may require steps or updates to enable TLS 1.2. The AvamarProduct Security Guide provides more information.
To enable TLS 1.2 for Windows 7, Windows 2008 and Windows 2012, refer to the documentation on the Microsoft Support site.
Server Updates and Hotfixes 223

Downloading the legacy Avamar Downloader ServicesoftwareDownload the legacy Avamar Downloader Service software from the Avamar Web Restore page on the Avamar server.
Steps
1. Log in to the Windows host system as an administrator.2. Type the URL of the Avamar server into the web browser:
https://Avamar_serverwhere Avamar_server is the Avamar system network hostname (as defined in DNS) or IP address.
The Avamar Web Restore page appears.3. Click Downloads.
The Downloads. list appears.4. Click + next to the platform heading for the Windows computer.5. Click + next to the operating system heading for the Windows computer.6. Click the link for AvamarDownloaderService-windows-platform-version.exe.
where:
• platform is the type of Windows platform (32-bit or 64-bit).• version is the version of the Avamar server software.
A dialog box prompts you to either run the file or save it.7. Save the installation file to a temporary directory.
Installing the legacy Avamar Downloader Service software
Steps
1. Log in to the Windows host computer as an administrator.2. Browse to the directory that contains AvamarDownloaderService-windows-platform-version.exe, and then double-
click the file to start the installation.The Microsoft Visual C++ 2010 Redistributable Maintenance setup application opens.
3. Accept the license and then click Install.Wait for the Visual C++ runtimes to install.
4. Click Finish.The setup wizard opens, starting with the welcome page.
5. Click Next.The Destination Folder page appears.
6. Specify the folder for the Avamar Downloader Service installation:
• To accept the default folder, C:\Program Files\EMC\Avamar Downloader Service, click Next.
• To specify a different folder, click Change and then browse to the folder. Then click Next.
The Ready to install Avamar Downloader Service page appears.7. Click Install.
The Installing Avamar Downloader Service page appears and displays the progress of the installation. After the installationcompletes, the Completed the Avamar Downloader Service Setup Wizard page appears.
8. Click Finish.The installation adds an Avamar Downloader Service icon to the Control Panel and the system tray. The installation also adds theAvamarDownloaderService to Windows Services.
224 Server Updates and Hotfixes

Enabling HTTPSHTTPS functionality must be enabled on the Microsoft Windows computer hosting the legacy Avamar Downloader Service. In somecircumstances, HTTPS might already be enabled on the computer. If not, perform the following steps on the computer.
About this task
Steps
1. Select Control Panel > Windows Firewall > Advanced settings.
The Windows Firewall with Advanced Security console appears.
2. In the navigation pane, click Outbound Rules.3. In the Actions pane, click New Rule.
The New Outbound Rule Wizard appears.4. Select Port, and then click Next.5. Select Specific remote ports, type 443 in the text box, and click Next.6. Click Allow the connection and clickNext.7. Accept the default settings and click Next.8. Provide a name for the outbound rule (for instance, “Avamar Downloader Service”) and click Finish.
The New Outbound Rule Wizard appears.9. In the Outbound Rules pane, right-click the outbound rule that you created before (should be at the top of list) and select Properties.
The Properties window appears.
10. Select the Programs and Services tab.11. Click Settings.12. Select Apply to this service.13. From the list of services, select Avamar Downloader Service and click OK.14. Click Apply and thenOK.15. Close the Windows Firewall with Advanced Security console.
Configuring the legacy Avamar Downloader ServiceConfigure Avamar Downloader Service before using it to download packages from the EMC repository server. Configuration tasks includeverifying the connection, building a known systems list, and specifying proxy server settings.
Prerequisites
Install the Avamar Downloader Service software.
Steps
1. On the Avamar Downloader Service computer, right-click the Avamar Downloader Service task tray icon and select ConfigureService.The Avamar Downloader Service configuration wizard opens, starting with the welcome page.
2. (Optional) To use the local version of the manifest.xml file, select Disable Internet access. Use only local files.
Use this option when the Avamar Downloader Service computer cannot connect over the Internet with the EMC repository.
3. On the welcome page of the configuration wizard, click Next.The Avamar Credentials page appears.
4. On this page, specify the Avamar Support Username and Password (plus confirmation) that you received with the Avamar license atthe time of product purchase, and then click Next.The Proxy Configuration page appears.
NOTE: To edit Avamar credentials later, open the Show Advanced Settings window by right-clicking the task tray
icon and selecting Show Advanced Settings.
5. (Optional) Specify the hostname or IP address and the port number for the proxy server as well as Avamar credentials: Username,Password, and Confirm Password.
Supply proxy server information to use a proxy server as an intermediary for requests from the Avamar Downloader Service computerto the EMC repository server. The page also allows you to select Use Authentication.
For example, use a proxy server when the Avamar Downloader Service computer is on a private network and access to the EMCrepository server is restricted.
Server Updates and Hotfixes 225
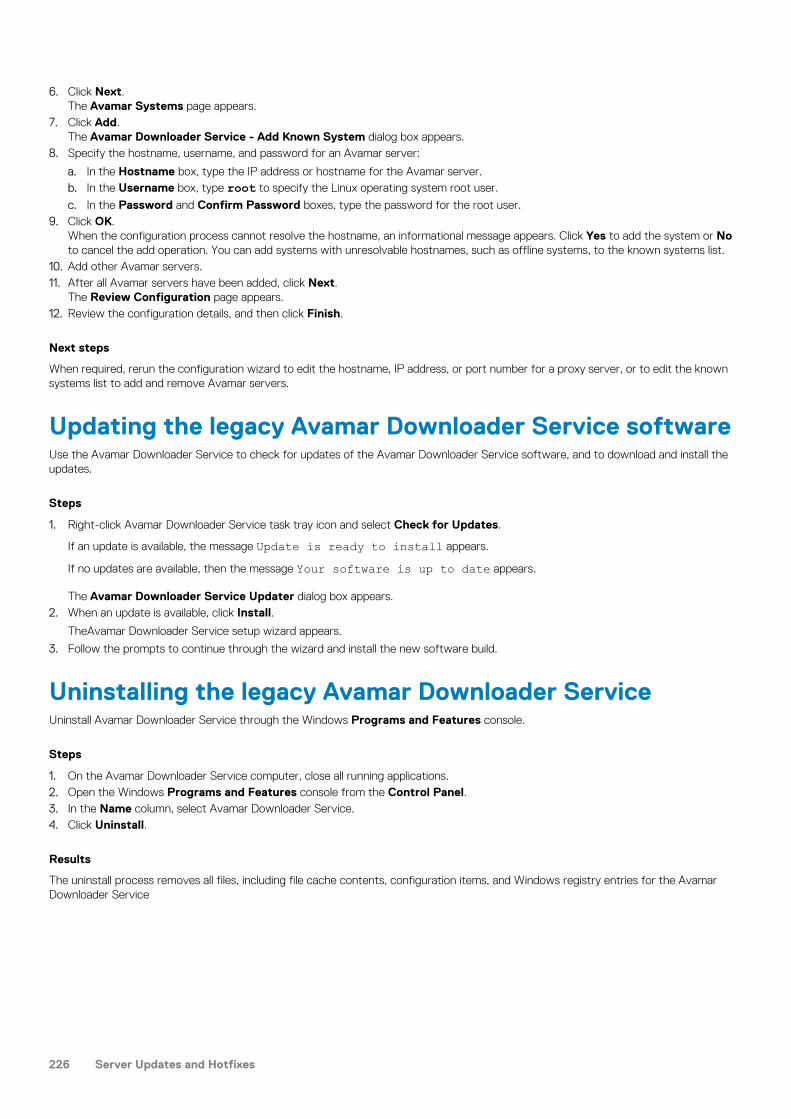
6. Click Next.The Avamar Systems page appears.
7. Click Add.The Avamar Downloader Service - Add Known System dialog box appears.
8. Specify the hostname, username, and password for an Avamar server:
a. In the Hostname box, type the IP address or hostname for the Avamar server.b. In the Username box, type root to specify the Linux operating system root user.
c. In the Password and Confirm Password boxes, type the password for the root user.9. Click OK.
When the configuration process cannot resolve the hostname, an informational message appears. Click Yes to add the system or Noto cancel the add operation. You can add systems with unresolvable hostnames, such as offline systems, to the known systems list.
10. Add other Avamar servers.11. After all Avamar servers have been added, click Next.
The Review Configuration page appears.12. Review the configuration details, and then click Finish.
Next steps
When required, rerun the configuration wizard to edit the hostname, IP address, or port number for a proxy server, or to edit the knownsystems list to add and remove Avamar servers.
Updating the legacy Avamar Downloader Service softwareUse the Avamar Downloader Service to check for updates of the Avamar Downloader Service software, and to download and install theupdates.
Steps
1. Right-click Avamar Downloader Service task tray icon and select Check for Updates.
If an update is available, the message Update is ready to install appears.
If no updates are available, then the message Your software is up to date appears.
The Avamar Downloader Service Updater dialog box appears.2. When an update is available, click Install.
TheAvamar Downloader Service setup wizard appears.
3. Follow the prompts to continue through the wizard and install the new software build.
Uninstalling the legacy Avamar Downloader ServiceUninstall Avamar Downloader Service through the Windows Programs and Features console.
Steps
1. On the Avamar Downloader Service computer, close all running applications.2. Open the Windows Programs and Features console from the Control Panel.3. In the Name column, select Avamar Downloader Service.4. Click Uninstall.
Results
The uninstall process removes all files, including file cache contents, configuration items, and Windows registry entries for the AvamarDownloader Service
226 Server Updates and Hotfixes

Downloading new packages from the EMC repositoryYou can check the EMC repository for new server, client, and workflow packages, and then download the packages to install them.
Prerequisites
Ensure that the status of the Avamar Downloader Service is either OK or Waiting for configuration. Otherwise, you cannotcheck for new packages.
Steps
1. Right-click the Avamar Downloader Service task tray icon and select Check for New Packages.
The Check for New Packages dialog box appears and provides status messages. The Avamar Downloader Service downloads themanifest file from the EMC repository server to the local repository on the Windows server and to Avamar servers on the knownsystems list.
A check mark next to a status message indicates that the process was successful. An X next to a status message indicates that theprocess failed.
2. To view details about failed processes, double-click the X next to the status message.3. Click Close on the Check for New Packages dialog box.
Viewing a list of packages available for downloadThe manifest.xml file in the repository folder on the Avamar Downloader Service computer contains a list of software packages thatare currently available for download from the EMC repository.
Steps
1. Right-click the Avamar Downloader Service task tray icon and select Open Repository.Windows Explorer opens and displays the C:\Program Files\EMC\Avamar Downloader Service\repository folder,which contains the manifest.xml file.
2. To view the package information, open the manifest.xml.
Package names use the .avp file name extension and appear within <filename> tags.
Verifying connectivity with the EMC repositoryAfter editing repository connection settings, or after package download failures, verify that the Avamar Downloader Service computer canconnect to the EMC repository server.
Steps
1. Right-click the Avamar Downloader Service task tray icon and select Run Diagnosis.
The status of the process appears in the Run Diagnosis dialog box. An X next to a status message indicates a problem with thenetwork connection, Click the X next to failures to view more information about the error in the Error Information dialog box.
The Run Diagnosis dialog box appears, and the process to check that network connectivity starts automatically.2. (Optional) To stop the verification process before it completes, click Stop System Check.3. When the verification completes, click Close.
Monitoring Avamar Downloader Service statusThe Avamar Downloader Service monitor automatically starts when you log in to the Avamar Downloader Service computer. Use themonitor to view the status of the Avamar Downloader Service.
Steps
• To view the status from the monitor, hover the mouse over the Avamar Downloader Service task tray icon.
A popup window with a status message appears.
The following table describes Avamar Downloader Service monitor status messages.
Server Updates and Hotfixes 227

Table 101. Avamar Downloader Service monitor status messages
Status message Description
Avamar Downloader Service Default status message.
Authentication Failure with the EMC Repository. HTTP basic authentication failure.
Authentication Failure with one or more “Known Systems.” HTTP basic authentication failure including:
○ Failed communication with the EMC repository.○ SSL (Secure Socket Layers) handshake failed.○ HTTP dropped connection.○ HTTP NAK (negatively acknowledged message).
Failed communication with one or more “Known Systems.” Possible causes:
○ SSL handshake failed.○ HTTP dropped connection.○ HTTP NAK.
Failed file download from the EMC repository. File transfer was aborted.
Failed file transfer to one or more known systems. File transfer was aborted.
Network Error HTTPS browser settings prevent the Avamar Downloader Servicefrom requesting files from the Avamar Online Support site.
Out of space. The Avamar Downloader Service file cache is full. To free up diskspace, remove files from the local repository.
Running. The service is running and communicating with all known systemsas well as the EMC repository.
Socket failure on host computer. Possible causes:
○ The host computer is out of socket resources.○ A binding problem with the NIC.○ Deadlock condition within Winsock.
Waiting for configuration. The Avamar Downloader Service was installed, but notconfigured.
Stopping and starting the Avamar Downloader ServicemonitorThe Avamar Downloader Service monitor starts automatically when you log in to the Avamar Downloader Service computer.
Steps
• To stop the monitor, right-click the Avamar Downloader Service task tray icon and select Exit.• To start the monitor, open the Windows Start menu and select All Programs > Avamar Downloader Service version > Avamar
Downloader Service Monitor.
228 Server Updates and Hotfixes

Troubleshooting Avamar Downloader ServiceissuesResolve common issues with the Avamar Downloader Service.
Package download failsSYMPTOM: The utility node or the single-node server cannot access the Windows host computer, and a message similar to the followingmessage appears when downloading a package.
The selected package cannot be downloaded.RESOLUTION: Add a line to the /etc/hosts file on the utility node with the IP address, fully qualified domain name, and short name ofthe Avamar Downloader Service computer.
SAMPLE ENTRY: 10.6.172.50 avamar-1.example.com avamar-1
Temporary IPv6 addresses cause package download to failSYMPTOM: The Avamar Downloader Service fails to download a package and displays connection refused errors.
POSSIBLE CAUSE: Temporary IPv6 addresses are in use on all operating systems. The connection refused errors are due to the useof temporary IPv6 addresses. Windows Vista, Windows 2008 Server, or later versions of Windows use temporary IPv6 addresses bydefault.
RESOLUTION: To work around this issue, block temporary IPv6 addresses on the Avamar Downloader Service computer. Type each ofthe following netsh commands at the command prompt on the Avamar Downloader Service computer. Type each netsh command on aseparate line.
netsh interface ipv6 set privacy state=disabled store=activenetsh interface ipv6 set privacy state=disabled store=persistentnetsh interface ipv6 set global randomizeidentifiers=disabled store=activenetsh interface ipv6 set global randomizeidentifiers=disabled store=persistent
Server Updates and Hotfixes 229

Avamar Client Manager
Topics:
• Overview of Avamar Client Manager• Starting Avamar Client Manager• Global tools• Overview• Clients• Policies• Queues• Logs
Overview of Avamar Client ManagerAvamar Client Manager is a web-based management application that provides centralized Avamar client administration capabilities forlarger businesses and enterprises. Avamar Client Manager facilitates the management of large numbers of Avamar clients.
Avamar Client Manager works with Avamar clients on a supported native operating system and Avamar clients on a supported operatingsystem running in a VMware virtual machine. Avamar Client Manager cannot work with Avamar clients through virtual center, virtualmachine, or virtual proxy configurations. The Avamar Client Manager UI displays supported Avamar clients and hides all unsupportedclients.
Connection securityTo secure data transmissions between a computer and the Avamar server, a secure connection is created using HTTPS.
This form of the HTTP protocol encrypts messages before they are sent and decrypts them when they are received. HTTPS is used for alllogin transmissions and for all transmission of data during registration and activation operations.
All trials to access the Avamar server through the UI over standard HTTP protocol are redirected to HTTPS to prevent plain texttransmissions.
Apache web server authenticationThe Avamar Client Manager UI uses only secure web pages, and an authentication warning appears in web browsers that access thosepages unless you install a trusted public key certificate on the Apache web server. This option is provided with Avamar.
The Avamar Product Security Guide describes how to obtain and install a trusted public key certificate for the Apache web server.
Editing the session time-out periodWhen a session has been running for 72 hours or more without any interaction between the web browser and the Avamar ClientManager server, Avamar Client Manager ends the session. The automatic session time-out protects the security of the assets accessiblethrough Avamar Client Manager. You can increase or decrease the time-out period.
About this task
When Avamar Client Manager ends a session, close the web browser window or tab in which the session was running, and restart AvamarClient Manager. Avamar Client Manager does not end a session while a commit task is in progress.
Steps
1. Open a command shell:
a. Log in to the server as admin.
13
230 Avamar Client Manager

b. Switch user to root by typing the following command:
su -c. For a multi-node server, load the rootid OpenSSH key by typing the following command:
ssh-agent bashssh-add /root/.ssh/rootid
2. Stop the EM Tomcat server by typing the following command:
dpnctl stop emt3. Open the following file in a text editor:
/usr/local/avamar-tomcat/webapps/aam/WEB-INF/web.xml4. Change the value of the session-timeout tag to a new value in minutes.
The following example illustrates the session-timeout tag with the default value of 4320 minutes (72 hours):
<session-config> <session-timeout>4320</session-timeout></session-config>
5. Save and close the file.6. Start the EM Tomcat server by typing the following command:
dpnctl start emt
Increasing the JavaScript time-out periodThe Avamar Client Manager UI uses JavaScript to perform many of its tasks. Sometimes an Avamar Client Manager UI script requiresmore time to finish than what a web browser’s default script time-out value permits.
About this task
When this step happens, a message appears and the script is stopped. You can click continue to allow the script to finish its work.
To avoid seeing this message, increase the script time-out period. The steps depend on the web browser.
Increasing the JavaScript time-out period in Internet Explorer onWindows
Steps
1. Open a registry editor, such as Regedt32.exe.
2. Open the following registry key:
HKEY_CURRENT_USER\Software\Microsoft\InternetExplorer\StylesIf the key does not exist, create it.
3. Create a DWORD value called MaxScriptStatements under the key.
4. Set the value of the DWORD to 20,000,000.
This number represents the number of script statements.
5. Restart the web browser.
Increasing the JavaScript time-out period in Firefox
Steps
1. In the browser address bar, type about:config.A warning message appears.
2. Click I’ll be careful, I promise!.The preferences window opens.
3. In Filter, type dom.max_script_run_time.The script runtime preference appears.
Avamar Client Manager 231

4. Double-click the preference.The Enter integer value dialog box appears.
5. Type 30 and click OK.
6. Restart the browser.
Avamar Client Manager configuration propertiesAvamar Client Manager normally does not require any changes to its default configuration. However, some properties can be adjusted tosuit a particular deployment requirement.
Avamar Client Manager properties are in the /usr/local/avamar/etc/acm.properties file.
The following table provides information about the properties.
Table 102. Avamar Client Manager configuration properties
Property Description Default value
activation.retry.attempts The number tries to activate a client activationbefore activation fails.
24
activation.retry.frequency.minutes The number of minutes between client activationtries.
120
move.getactivities.retry.attempts The number of checks to determine whether a clientis inactive (so that it can be moved).
7
move.getactivities.frequency.seconds The number of seconds between checks todetermine whether a client is inactive (so that it canbe moved).
5
move.queue.error.codes Sets a comma-separated list of error codes thatdetermine whether a move task failure is added tothe queue. A move is only added to the queue if itsfailure generates one of these error codes. Use thevalue none to prevent all failed move tasks frombeing added to the queue. Use the value empty toadd all failed move tasks to the queue.
22271, 22280, 22282,22295, 30006, 30012,30016, 30017, 30019
move.retry.attempts Sets the number of times a failed move task isretried.
24
move.retry.frequency.minutes Sets the span of time in minutes between retry tries. 120
orgu.name.append.domain Determines whether clients displayed in the ClientInformation area of the UI are listed using the clienthostname or FQDN. The default value displays theFQDN for each client.
true
toolbar.displaytime.client Determines whether time displayed within AvamarClient Manager uses the time zone of the webbrowser’s host computer or time zone of the Avamarserver. The default value uses the time zone of theweb browser’s host computer.
true
upgrade.freeform.flags Provides a way to pass key/value flags to upgradework orders. The value is a comma separated list ofKV pairs. For example:upgrade.freeform.flags=key1=val1,key2=val2,key3=val3
No default value
Changing an Avamar Client Manager configuration property
Steps
1. Open a command shell:
232 Avamar Client Manager
a. Log in to the server as admin.b. Switch user to root by typing the following command:
su -c. For a multi-node server, load the rootid OpenSSH key by typing the following command:
ssh-agent bashssh-add /root/.ssh/rootid
2. Change the current working directory by typing the following command:
cd /usr/local/avamar/etc3. Open the Avamar Client Manager properties file, acm.properties, in a text editor.
4. Edit the value of the property.5. Save and close the file.6. Restart the EM Tomcat server by typing the following command:
dpnctl stop emtdpnctl start emt
Starting Avamar Client ManagerStart Avamar Client Manager by typing the Avamar Client Manager URL in a web browser. Avamar Client Manager can also be startedwithin Backup & Recovery Manager.
Steps
1. Open a web browser and type the following URL:
https://Avamar_server/aamwhere Avamar_server is the resolvable hostname or IP address of the Avamar server that is running the Avamar Client Managerprocess.
2. In User Name, type the username of an administrator account on the Avamar server.3. In Password, type the password for the account.
Results
Avamar Client Manager opens to Server Summary section of the Overview page.
Login pageThe login page limits access to the Avamar Client Manager UI by requiring a username and a password.
The login page authenticates the username and the password through comparison with administrator accounts that are registered on theAvamar server. Avamar Client Manager only allows access for accounts with administrator privileges on the Avamar server that is runningthe Avamar Client Manager process.
After a successful login, the Avamar Client Manager UI opens to the Server Summary section of the Overview page.
Global toolsAvamar Client Manager provides several tools that you can use with more than one page.
Use these tools to help with the following tasks:
• Adding an Avamar server• Removing an Avamar server• Changing the settings for an Avamar server• Selecting an Avamar server to work with• Filtering a page's summary view• Viewing context relevant details• Exporting information from a page
Avamar Client Manager 233

• Enabling tool tips
Adding an Avamar serverTo enable management of the Avamar clients of an Avamar server, add the Avamar server to Avamar Client Manager.
Prerequisites
Determine the following information:
• The resolvable hostname or IP address of the Avamar server.• The inbound RMI port on the Avamar server.• The password for the MCUser account on the Avamar server.
Steps
1. Browse to the Server Summary section of the Overview page.2. Click Add Server.
The Add Server window appears.3. In System name (or) IP, type the resolvable hostname, or IP address, of the Avamar server.4. In Port, type the inbound RMI port for the Avamar server.
The field appears with the default value of 9443. Leave the default value unchanged unless a non-default port is used on the Avamarserver.
5. In MCUser Password, type the password for the MCUser account on the Avamar server.6. Click Save.
Results
Avamar Client Manager checks the values and adds the Avamar server.
Removing an Avamar serverTo stop management of the Avamar clients of an Avamar server, remove the Avamar server from Avamar Client Manager.
Steps
1. Browse to the Server Summary section of the Overview page.2. Select the Avamar servers to remove.
The Avamar server that hosts the Avamar Client Manager process cannot be removed.
3. Click Remove Server.A warning dialog box appears.
4. Click Yes.
Results
Avamar Client Manager removes the selected Avamar servers from the group of managed servers.
Changing the settings for an Avamar serverChanges on an Avamar server to the inbound RMI port or to the password for the MCUser account prevent management of the Avamarserver by Avamar Client Manager. Edit the stored settings for the Avamar server to reenable management by Avamar Client Manager.
Prerequisites
Determine the following information:
• The new inbound RMI port on the Avamar server.• The new password for the MCUser account on the Avamar server.
234 Avamar Client Manager
Steps
1. Suspend all activity on the Avamar server.
Suspending and resuming server activities on page 134describes how to suspend Avamar server activity.
2. Browse to the Server Summary section of the Overview page.3. Select an Avamar server.4. Click Edit Server.
The Edit Server window appears.5. In Port, type the inbound RMI port on the selected Avamar server.6. In MCUser Password, type the password for the MCUser account on the selected Avamar server.7. Click Save.
Results
Avamar Client Manager checks the values and reestablishes management of the Avamar server.
Selecting a serverUse the server selection field to display, and work with, information for a specific server.
Prerequisites
Expand the Navigation panel on the left side of the UI so that the server selection field is visible at the top of the panel. Browse to a pagethat displays the server selection field in an active, selectable, state.
Steps
1. On the server selection field, click the arrow icon.
When the server selection field is not visible, expand the Navigation panel on the left side of the UI. When the server selection field isnot relevant to the current page view it appears in a dimmed state, that is, it is not active and selectable.
2. From the list of servers, select a server.The page view refreshes. Information about the server and its tasks appears.
FiltersAvamar Client Manager offers you a wide range of filters.
Use a filter to determine which objects appear in the list on the current page. Filters work with a variety of objects. The type of object andthe available filters depend on the page's context. In Avamar Client Manager you can filter the following types of objects:
• Servers• Clients• Policies• Groups• Tasks• Log entries
Filters that apply to the current context appear on the Filters bar at the top of the page.
Searching by nameTo find objects by comparing a search string to object names, use the search field.
Prerequisites
Browse to a view that has one of the following search-enabled fields on the Filters bar:
• User name• Client name• Group name• Domain name
Avamar Client Manager 235

About this task
Use search to limit the list to objects with the same and similar names.
Steps
1. Click the arrow next to the search-enabled field.A text entry box appears.
2. In the text entry box, type a search string.
Avamar Client Manager compares the search string that you type to the names of objects and includes matching objects on the list.Objects match when a portion of the name contains the search string.
3. Click the magnifying glass icon.
Results
Avamar Client Manager refreshes the list and only objects with names that match the search string appear.
Searching by username
To include all clients that have a user with the characters "eng" in their username, type *eng* in the text entry field.
Next steps
(Optional) To remove the search string and to display all objects, click X next to the text entry field.
Search string rules
A search string is one or more characters that you type into a name search field. Avamar Client Manager compares the search string withall object names. When the search string matches all or part of an object's name, Avamar Client Manager adds the object's name to theresults.
The following rules apply to a search string:
• No more than 24 characters• Can use an asterisk (*) character to represent zero or more characters• Cannot start with a period character• Cannot include any of the characters that are listed in the Character column of the following table:
Table 103. Characters not allowed in search strings
Character Name Unicode
/ a Solidus 002F
: Colon 003A
; Semicolon 003B
? Question Mark 003F
" Quotation Mark 0022
< Less-than Sign 003C
> Greater-than Sign 003E
\ Reverse Solidus 005C
, Comma 002c
~ Tilde 007E
! Exclamation Mark 0021
@ Commercial At 0040
# Number Sign 0023
$ Dollar Sign 0024
% Percent Sign 0025
236 Avamar Client Manager

Table 103. Characters not allowed in search strings (continued)
Character Name Unicode
^ Circumflex Accent 005E
| Vertical Line 007C
& Ampersand 0026
' Apostrophe 0027
` Grave Accent 0060
( Opening parenthesis 0028
) Closing parenthesis 0029
{ Left Curly Bracket 007B
} Right Curly Bracket 007D
[ Left Square Bracket 005B
] Right Square Bracket 005D
a. An exception to this exclusion permits the solidus character in the Domain Name filter on the Policies page.
Using the activity type filterUse the activity type filter to limit a list to one type of activity.
Prerequisites
Browse to a view that includes Activity Type on the Filters bar.
Steps
1. On the Filters bar, click the arrow next to Activity Type.A selection list appears, with the values: Backup and Restore.
2. Select a value.
Select Backup to include only backup tasks in the list. Select Restore to include only restore tasks in the list.
For example, in the Idle Clients section of the Clients page, select Backup on the Activity Type filter. Avamar Client Manager limitsthe list to clients without any backup activity during the defined period.
Results
Avamar Client Manager filters the results using the activity type that you selected.
Using the client status filterUse the client status filter to add clients with the specified client status to the list.
Prerequisites
Browse to a view that includes Client Status on the Filters bar.
Steps
1. On the Filters bar, click the arrow next to Client Status.A selection list of the client statuses for all clients in that context appears.
2. Select a status.For example, in the Add Clients section of the Clients page, select Activation Failure on the Client Status filter. Avamar ClientManager limits the list to registered computers with at least one unsuccessful activation try.Avamar Client Manager refreshes the list. Only entries with the selected client status appear on the list.
3. Optional: Repeat the steps to select additional statuses.
Avamar Client Manager 237

Results
Avamar Client Manager refreshes the list. Only entries with the selected client statuses appear on the list.
Using the failure criteria filterUse the failure criteria filter to define which clients Avamar Client Manager includes in a list of failed clients.
Prerequisites
Browse to a view that includes Failure Criteria on the Filters bar.
Steps
1. On the Filters bar, click the arrow next to Failure Criteria.A selection list appears, with the values: At least one activity failed, All activities failed, and Last activity failed.
2. Select a value.
The value that you select determines which clients Avamar Client Manager includes in the list of failed clients. Avamar Client Managerincludes only clients that match the selected activity status.
For example, select Last activity failed. Avamar Client Manager refreshes the list and includes clients only when their most recentactivity failed. The failed activity can be either a backup or a restore.
Results
Avamar Client Manager refreshes the list. Only clients with an activity status that matches the selected value appear on the list.
Using the OS filterUse the OS filter to limit a list to clients with specific operating systems.
Prerequisites
Browse to a view that includes OS on the Filters bar.
Steps
1. On the Filters bar, click the arrow next to OS.A list of the OS versions of all clients in that context appears.
2. Select an OS version.Avamar Client Manager refreshes the list. Only clients with the selected OS version appear on the list.
3. Optional: To select additional OS versions, repeat the steps.
Results
Avamar Client Manager refreshes the list. Only clients with the selected OS versions appear on the list.
Using the period filterUse the period filter to define the calendar date boundaries of the displayed results.
Prerequisites
Browse to a view that includes Period on the Filters bar.
Steps
1. On the Filters bar, click the arrow next to Period.A selection list appears, with the values: Before, After, and On.
2. Select a value.3. Click the arrow next to the selected value.
A date entry field and a small calendar icon appear.4. Click the calendar icon, browse to a specific date, and then click the date.
Alternatively, in the date entry field, type a date using the format m/d/yy, and click the magnifying glass icon.
Avamar Client Manager refreshes the list. Only entries within the specified period appear on the list.
238 Avamar Client Manager

5. Optional: Further refine the results by repeating these steps using the other values.
Results
Avamar Client Manager refreshes the list. Only entries within the specified period appear on the list.
Using the status filterUse the status filter to limit a list to entries with specific statuses.
Prerequisites
Browse to a view that includes Status on the Filters bar.
Steps
1. On the Filters bar, click the arrow next to Status.A selection list of all statuses for all entries in that context appears.
2. Select a status.Avamar Client Manager refreshes the list. Only entries with the selected status appear on the list.
3. Optional: To select additional statuses, repeat the steps.
Results
Avamar Client Manager refreshes the list. Only entries with the selected statuses appear on the list.
Using the status code filterUse the status code filter to limit a list to entries with specific status codes.
Prerequisites
Browse to a view that includes Status Code on the Filters bar.
Steps
1. On the Filters bar, click the arrow next to Status Code.A selection list of the status codes for all entries in that context appears.
2. Select a status code.Avamar Client Manager refreshes the list. Only entries with the selected status code appear on the list.
3. Optional: To select additional status codes, repeat the steps.
Results
Avamar Client Manager refreshes the list. Only entries with the selected status codes appear on the list.
Using the success criteria filterUse the success criteria filter to define which clients Avamar Client Manager includes in a list of successful clients.
Prerequisites
Browse to a view that includes Success Criteria on the Filters bar.
Steps
1. On the Filters bar, click the arrow next to Success Criteria.A selection list appears, with the values: At least one activity successful, All activities successful, and Last activity successful.
2. Select a value.
The value that you select determines which clients Avamar Client Manager includes in the list of successful clients. Avamar ClientManager only includes clients that match the selected activity status.
For example, select Last activity successful. Avamar Client Manager refreshes the list and only includes the clients with a successfulbackup or restore.
Avamar Client Manager 239
Results
Avamar Client Manager refreshes the list. Only clients with an activity status that matches the selected value appear on the list.
Using the version filterUse the version filter to limit a list to clients with specific versions of the Avamar client software.
Prerequisites
Browse to a view that includes Version on the Filters bar.
Steps
1. On the Filters bar, click the arrow next to Version.A selection list of the Avamar client software versions for all clients in that context appears.
2. Select a version.Avamar Client Manager refreshes the list. Only clients with the selected software version appear on the list.
3. Optional: To select additional software versions, repeat the steps.
Results
Avamar Client Manager refreshes the list. Only clients with the selected software versions appear on the list.
Viewing detailsUse the Details panel to view context relevant details.
Prerequisites
Browse to a view that includes the Details panel or Details bar on the right-side.
Steps
1. On the right-side of the page, click the Details bar.The Details panel expands.
2. In Summary, select an object.
The page context determines the object type. An object can be a client or a group. You can select more than one object.
Detailed information for the selected object appears in the Details panel.3. (Optional) When you select more than one object, use the paging controls at the bottom of the Details panel to view information for
each selected object.
Exporting dataUse export to download the selected summary as an Excel spreadsheet.
Prerequisites
Browse to a page view that includes Export on the page bar.
Steps
1. On the page bar, click Export.
Avamar Client Manager includes all information from the summary in the exported data.
The web server pushes an Excel file containing the summary information to the browser.2. Save the file locally.3. Use an application that can read the Excel-formatted spreadsheets to open the file.
240 Avamar Client Manager

Setting the entries per page limitIncrease the limit on the number of entries displayed in summary lists.
About this task
By default, Avamar Client Manager limits its summary lists to 25 entries per page. When there are more entries than the current entriesper page limit, the entries appear on 2 or more pages. You can increase the entries per page limit to make it easier to work with manyentries.
Steps
1. On the status bar at the bottom of Avamar Client Manager, click Entries Per Page.The list of choices appears.
2. Click a number on the list.
Results
Avamar Client Manager sets the selected number as the new limit and refreshes the page.
Viewing tool tipsEnable and display tool tips to view concise help messages for various elements of the UI.
Steps
1. On the status bar at the bottom of Avamar Client Manager, select Show Tooltips.2. Hover the pointer over a user interface element that has a tool tip.
The following elements may have tool tips:
• Dashboard chart sections• Controls• Column headings
OverviewThe Overview page provides access to high-level information about the management of Avamar clients. It also provides tools for theadministration of Avamar servers.
From the left-side menu of the Overview page, select:
• Server Summary
Select Server Summary to view information about the selected Avamar server, to add an Avamar server, to remove an Avamarserver, or to edit the settings for an Avamar server.
• Dashboard
Select Dashboard to view information about the client backups for the selected Avamar server.
Server SummaryThe Server Summary section of the Overview page provides columns of information about the Avamar servers that Avamar ClientManager manages.
Filter this information by using the filters available on the Filters bar. Change the sorting method that is used for the list by clicking acolumn heading.
In each of the following columns, click a nonzero value to see a more detailed report about that column's information:
• Active Clients• Idle Clients• Successful Clients• Failed Clients
Avamar Client Manager 241

Server Summary columnsThe following table describes the columns that are used in the Server Summary section of the Overview page.
Table 104. Columns used in the Server Summary section
Column Description
Server Hostname or IP address of the Avamar server.
Version Version of Avamar server software that is installed on the Avamarserver.
Total Clients Total number of clients that are registered with the Avamar server.Does not include retired clients.
Active Clients Total number of clients with activity (backup or restore) during thespecified period.
Idle Clients Total number of clients with no backup activity during the specifiedperiod.
Successful Clients Total number of clients with a backup status that matches thevalue set in the Successful Backups filter. Also includes theaverage amount of time for those backups.
Failed clients Total number of clients with failed backups during the specifiedperiod.
Clients with Restore Total number of clients with restore activity (successful orunsuccessful) during the specified period.
DashboardThe Dashboard section of the Overview page provides a graphical snapshot view of a selected server.
The dashboard provides information in panels that you can expand, collapse, or delete to create the view you need.
Usage tips:
• Collapse or expand a panel by clicking the arrow icon in the panel's title bar.• Return the dashboard to its default view by reloading the page in the web browser.
Setting a panel's periodSet a panel's period to define the number of days of data in the display.
Prerequisites
Browse to the Dashboard section of the Overview page, with any of the following panels displayed: Analyze, Backup Report, andBackup Trend.
Steps
1. On a panel, in the period field, click the arrow icon.
The period field is available on the following panels:
• Analyze• Backup Report• Backup Trend
The period list appears.2. Select a period.
The available choices are:
• Last 24 hours• Last 7 days
242 Avamar Client Manager

• Last 30 days
Avamar Client Manager refreshes the panel with data for the selected period.
Client panelThe Client panel uses a pie chart to represent the total number of potential clients for the selected server. Colors represent thepercentage of the total for:
• Activated
Green represents the percentage of clients that the selected server has activated.• Not activated
Red represents the percentage of clients that the selected server has registered, but not activated.• Free
Gray represents the percentage of unused client connections available on the selected server.
Server panelThe Server panel provides a grid view of information about the selected server.
Table 105. Server information on the Server panel
Column Description
Node Type Specifies the server's node type: Single or Multi.
Active Backup Number of running backups.
Backup in Queue Number of backups in the server's queue waiting to run.
Replication Current state of the replication job:
• Running• Not running
Status Current state of the server's Management Console Server (MCS)system:
• Active• Down
Backup Trend panelThe Backup Trend panel is a line chart that shows the size of data that is backed up at specific points in time over a defined period. Thex-axis represents points in time over the selected period. The y-axis represents the size of data in the backup at each point in time.
The line that is drawn between the plotted points represents the backup trend, which is the change in backed up data over time.
Client Type panelThe Client Type panel uses a bar chart to represent for the selected server the number of activated clients that are in each of thefollowing categories:
• Regular
All activated clients that do not fit into one of the other three categories.• vMachine
Guest clients. The virtual computers that are backed up through Avamar client software running on the host computer.• Proxy
Proxy virtual machine clients. Clients that use Avamar for VMware image backup and restore.• vCenter
Avamar clients that protect vCenter management infrastructure by backing up vCenter hosts.
Avamar Client Manager 243
Analyze panelThe Analyze panel uses a bar chart to represent the number of clients that are in each of the following states during the selected period:
• Successful
Clients with at least one successful backup.• Failed
Clients with backup activity but no successful backups.• Idle
Clients with no backup activity.
Backup Report panelFor backups started during the selected period, the Backup Report panel uses a bar chart to represent the number of each of thefollowing results:
• Successful
Successfully completed backups, with or without errors.• Failed
Backups that failed to complete.• Canceled
Backups that are canceled before completion.
Client Queues panelThe Client Queues panel uses a bar chart to display the number of clients in each of the following queues:
• Upgrade• Move to server• Activation
Storage Capacity panelThe Storage Capacity panel uses a pie chart to represent the total storage capacity of the selected server. Colored slices represent thefollowing:
• Used
Red represents the portion of storage that contains data.• Free Capacity
Green represents the portion of storage that is unused and available.
Backup Health panelThe Backup Health panel uses a bar chart to represent the number of clients that have retained backup data for specific periods of time.The panel uses the periods: 1 day, 30 days, 60 days, and 90 days.
On the bar chart, the x-axis represents the period that Avamar has retained the data and the y-axis represents the number of clients.
ClientsThe Clients page provides information and tools for working with Avamar clients.
From this page, you can:
• Select the computers in the enterprise's domain and add them as Avamar clients• View detailed information about individual clients• Move, retire, and delete clients• Change a client's group associations• Upgrade the Avamar software on the client
To browse between the sections of the Clients page, select from the choices in the left-side menu.
244 Avamar Client Manager
Client and server toolsAvamar Client Manager provides several tools to help manage Avamar clients and Avamar servers.
A tool only appears when it is relevant to the context. Changes that are made by the tool apply to the selected client and the selectedserver. Launch a tool by clicking its command button.
Creating an Avamar domainTo add a branch to an Avamar server's administrative hierarchy, create an Avamar domain.
Prerequisites
Browse to a view that includes Create Domain: either the Add New Clients dialog box or the Client Move dialog box.
Steps
1. In the Domain Selection pane, select the location for the new domain.
To locate the new domain directly beneath the root domain, select the server icon. To locate the new domain beneath another domain,select that domain.
2. Click Create Domain.The New domain dialog box appears.
3. In New Domain Name, type a name for the domain.
Avamar does not allow the following characters in a domain name: =~!@$^%(){}[]|,`;#\/:*?<>'"&+4. Optional: Type information in the Contact, Phone, Email, and Location fields.5. Click OK.
Results
Avamar Client Manager adds the new domain to the selected server and the new domain appears on the Domain Selection pane.
Viewing the group associations of a clientTo determine the policies that apply to a client, view the groups that include the client.
Prerequisites
Browse to a view that includes Group Associations on the Actions bar.
About this task
The group associations of a client determine the client's backup dataset, the client's backup schedule, and the client's backup retentionperiod.
Steps
1. Select a client.2. Click Group Associations.
Results
The Groups for Client dialog box appears and lists the client's groups.
Adding group associations to a clientTo apply the policies of a group to a client, add the group association to the client.
Prerequisites
Browse to a view that includes Group Associations on the Actions bar.
About this task
This task results in an association between a client and a group. The Avamar server applies the group's policies to the client.
Avamar Client Manager 245

Steps
1. Select a client.2. Click Group Associations.3. On the Groups for Client dialog box, click Add Groups.
The Add Groups for Client dialog box appears.4. Select a group.
You can select more than one group.
5. Click Add.
Results
Avamar Client Manager adds the group associations to the client.
Creating a groupTo make a new set of policies available for assignment to clients, create a group with the policies. The Create Group command is availablewhen adding a client to a group, and when moving a client to a new domain or to a new server.
Prerequisites
Browse to a view that includes Create Group: either the Add Groups dialog box or the Client Move dialog box.
Steps
1. Click Create Group.
On the Client Move dialog box, selecting a domain enables the button.
The Create Group in Domain dialog box appears.2. In Group Name, type a name for the new group.
Avamar does not allow any of the following characters in a group's name: =~!@$^%(){}[]|,`;#\/:*?<>'"&+3. (Optional) Select Enable to enable scheduled backups of clients that you assign to the group.
To disable scheduled backups of clients that you assign to the group, clear this checkbox .
4. In Dataset, select a dataset for the group.5. In Schedule, select a schedule for the group.6. In Retention Policy, select a retention policy for the group.7. Click OK.
Results
Avamar Client Manager creates the group in the selected domain.
Removing group associations from a clientTo stop applying a group's policies to a client, remove the group association from the client.
Prerequisites
Browse to a view that includes Group Associations on the Actions bar.
About this task
This task removes the association between a client and a group. When you complete the task the group's policies no longer apply to theclient.
Steps
1. Select a client.2. Click Group Associations.3. On the Groups for Client dialog box, select a group.
You can select more than one group.
4. Click Remove.
246 Avamar Client Manager

Results
Avamar Client Manager removes the association between the client and the selected groups.
Overriding group policy settings for a clientTo modify policies that are applied to a client, override the policies of its group.
Prerequisites
Browse to a view where View/Edit Details appears on the Actions bar and the client appears in the clients list.
Steps
1. Select a client.2. On the Actions bar, click View/Edit Details.
The Client Details dialog box appears.3. Select the Advanced tab.
The policy override settings appear with the client's current state shown.4. Modify the client's current state by selecting or clearing settings.5. Click OK.
Results
Avamar Client Manager changes the group policy settings for the client.
Group policy override settingsTo modify a policy that is applied to a client, use one of the policy override settings.
The following table describes the policy override settings on the Advanced tab of the Client Details dialog box.
Table 106. Settings on the Advanced tab of Client Details
Setting Description
Override group retention Permits you to assign to a client a retention setting that is differentfrom the group setting. After selecting this option, assign aretention setting by selecting it from the Select an existingretention policy list.
Select an existing retention policy List of available retention settings that you can assign to a client.To use this list, first select Override group retention.
Disable all backups Disables all backups of the client. Users can still restore data.
Activated Places a registered client in an activated state. When you clear thissetting, users cannot perform backups or restores.
Allow client-initiated backups Permits users to begin backups from the client.
Allow file selection for client-initiated backups Permits users to select files to include in backups that are startedfrom the client. The Exclude list for the group's dataset does notapply.
Allow client to add to dataset Permits users to add folders to the datasets of the client's groups.The following rules apply to this setting:
• The Avamar server filters the added data with the group'sExclude list and Include list.
• The added data is in every scheduled and on-demand backupfor each group that is assigned to the client.
• User must have access to the Avamar client web UI to addfolders or remove folders.
Allow client to override daily group schedules Permits users to select a start time for scheduled backups that isdifferent from the group start time. Prerequisites:
Avamar Client Manager 247

Table 106. Settings on the Advanced tab of Client Details (continued)
Setting Description
• Add time entries to the Avamar server's Override schedule.• Assign a daily schedule to the client's group.• To allow them to select a new schedule, provide users access
to the Avamar client web UI.
Allow client to override retention policy on client-initiated backups Assigns the retention policy that is specified in Select an existingretention policy to client-initiated backups. Prerequisites:
• Enable Override group retention.• Enable Allow client-initiated backups.
Viewing summary information about a clientUse Client Details to see information about a client and its users.
Prerequisites
Browse to a view where View/Edit Details appears on the Actions bar and the client appears in the clients list.
Steps
1. Select a client.2. On the Actions bar, click View/Edit Details.
The Client Details dialog box appears.3. Select the Summary tab.
Results
Information about the client appears. Also, a list of users who are associated with the client appears.
Changing a client's name on the serverWhen you change a computer's hostname, also change the name that is used by the Avamar server to identify the computer as anAvamar client.
Prerequisites
Change the hostname on the computer, and in DNS, before performing this task. Browse to a view where View/Edit Details appears onthe Actions bar and the computer appears in the clients list.
Steps
1. Select a client.2. On the Actions bar, click View/Edit Details.
The Client Details dialog box appears.3. Select the Summary tab.4. In Client name, type the new hostname for the computer.5. Click OK.
Results
Avamar Client Manager replaces the old hostname with the new hostname for the Avamar client on the Avamar server.
Viewing a client's backup historyTo determine whether an Avamar server has backed up a client as expected, view the client's backup history.
Prerequisites
Browse to a view where View/Edit Details appears on the Actions bar and the client appears in the clients list.
248 Avamar Client Manager

Steps
1. Select a client.2. On the Actions bar, click View/Edit Details.
The Client Details dialog box appears.3. Select the Backups tab.4. In From, select the earliest date of the period to view.5. In To, select the latest date of the period to view.6. (Optional) Select On-demand backups.
Select this choice to include user-initiated backups in the results. Clear this choice to exclude those backups.
7. (Optional) Select Scheduled backups.
Select this choice to include backups that a group schedule begins with in the results. Clear this choice to exclude those backups.
Results
A list of the client's backups that match the filter settings appears.
Viewing a client's installed plug-insView the Avamar plug-ins that are installed on an Avamar client to help determine the types of data in its backups.
Prerequisites
Browse to a view where View/Edit Details appears on the Actions bar and the client appears in the clients list.
Steps
1. Select a client.2. On the Actions bar, click View/Edit Details.
The Client Details dialog box appears.3. Select the Plug-ins tab.
Results
The plug-ins that are installed on the client appear.
Deleting a client from a serverTo remove a client's records and backups from an Avamar server, delete the client from the server.
Prerequisites
Browse to a view where the client appears in the client list and Delete appears on the Actions bar.
About this task
When Avamar Client Manager deletes a client from an Avamar server it stops all activity with that client, deletes the client's backups, andremoves all record of the client from the server's database.
Steps
1. Select a client.2. On the Actions bar, click Delete.3. On the Confirm dialog box, type the password.
Use the password of the account that is logged in to Avamar Client Manager.
4. Click OK.The Alert dialog box appears.
5. Click OK.
Results
Avamar Client Manager runs a background process that removes all the client's information and data from the server.
Avamar Client Manager 249

Add ClientsThe Add Clients section provides information and tools to register and activate enterprise computers as Avamar clients.
Use the Add Clients section to import information about the computers in the enterprise. Import the information from a supported LDAPnaming system or from a CSV file.
After import, filter the information by client status and client name to help in the selection of prospective Avamar clients.
Use Avamar Client Manager to register and activate the selected computers to an Avamar server. Completion of the activation processrequires installation of the Avamar client software on the computers and access to Avamar client processes from the server. The normalworkflow is to install the client software on a computer before selecting it for activation.
Directory service informationYou can use an enterprise's directory service to provide Avamar Client Manager with information about the computers that are potentialAvamar clients.
Use a supported directory service that has information about the potential Avamar client computers. Avamar Client Manager queries thedirectory service to obtain information about clients and, if available, directory service organizational units, such as directory domains, anddirectory groups.
Before using the directory service method to obtain information about computers in a domain, configure Avamar Client Manager to usethe directory service.
The directory service method requires the following:
• TCP/IP access to the directory service from the server that is running Avamar Client Manager.• Account information for a user account with read access to the directory service.• The name of the directory service domain for the computers that you want to import.
Importing information from a directory serviceTo prepare to add computers as Avamar clients, import information about the computers from the directory service.
Prerequisites
Do the following:
• Configure Avamar Client Manager to use the directory service.• Obtain a username, and its associated domain and password for an account with read access to the directory service.• Have available the name of the directory service domain of the computers that are being imported.
Steps
1. In the left-side menu, click Clients > Add Clients.2. On the Actions bar, click New Clients.
The Client Information Source dialog box appears.3. Select Active Directory.4. In User Domain, select the domain of the account you are using to access the directory service.
To add directory service domains to this list, refer to the administration guide.
5. In User Name, type the name of the account.6. In Password, type the password of the account.7. In Directory Domain, select the name of the directory service domain for the computer information you are importing.8. Click OK.
Results
Avamar Client Manager imports the information from the directory service.
Next steps
Using the imported computer information, select and activate computers as clients of an Avamar server.
250 Avamar Client Manager

CSV file informationYou can use a comma-separated values (CSV) file to provide Avamar Client Manager with information about the computers that arepotential Avamar clients.
Create the CSV file manually or create it by using the output of a Systems management tool such as the Microsoft System CenterConfiguration Manager or the Microsoft Systems Management Server.
You can use the output that a Systems management tool generates during installation of the Avamar client software a group of computersto create the CSV file. However, only those clients with the Avamar client software successfully installed appear in Avamar ClientManager.
During the upload of a CSV file, Avamar Client Manager checks the file for correct formatting, and cancels the upload when it finds aproblem.
CSV file format
A correctly formatted CSV file complies with the following rules:
• At least two rows.• The values are separated only by a comma.• The first row of the file must consist of the literal names for each type of value.
The name for the first value is Hostname. The name for the second value is Group.
• The second row, and all subsequent rows, must have at least one value and no more than two values.• The formatting rules require a first value that is a valid hostname for a computer and a trailing comma.• The second value is optional, but when you include it, it must be the directory service logical group name for the computer.
When you do not provide the second value for a computer, Avamar Client Manager lists the computer at the root level in thehierarchical display.
• In the second value, use a forward slash (/) to separate the hierarchical levels of the directory service logical group name.
If you use spreadsheet software to create or edit the client list, do not add a comma with the value to try to create comma separatedvalues. Adding a comma to the value within the spreadsheet software can result in an incorrectly formatted file. When you save the clientlist in the editor as a CSV file type, the editor adds the comma separators as part of the file conversion process. To check the formatting,open the client list in a plain text editor.
Example of a correctly formatted client list file
In a plain text editor, a correctly formatted client list file looks like the following example.
Hostname,GroupUser1-desktop.Acme.corp.com,acme.corp/USA/MAUser1-laptop.Acme.corp.com,acme.corp/USA/CA/SFOUser2-desktop.Acme.corp.com,acme.corp/EngineeringUser3-desktop.Acme.corp.com,User4-desktop.Acme.corp.com,
The first line lists the literal names of each type of value.
The second line contains the hostname User1-desktop.Acme.corp.com, the separating comma, and the groupacme.corp/USA/MA.
The third line contains the hostname User1-laptop.Acme.corp.com, the separating comma, and the group acme.corp/USA/CA/SFO.
The fourth line contains the hostname User2-desktop.Acme.corp.com, the separating comma, and the group acme.corp/Engineering.
The fifth and sixth lines contain only the hostnames User3-desktop.Acme.corp.com and User4-desktop.Acme.corp.com,each followed by a comma. The formatting rules require a comma, even without a group. The lines do not list groups, so both hostnamesappear at the root level of the hierarchical display.
Avamar Client Manager 251

Figure 16. View after uploading the example CSV file
Uploading information in a CSV fileTo prepare to add computers as Avamar clients, upload information about the computers in a comma-separated values (CSV) file.
Prerequisites
Generate or create a correctly formatted CSV file and have a copy available on the web browsing computer.
Steps
1. In the left-side menu, click Clients > Add Clients.2. On the Actions bar, click New Clients.
The Client Information Source dialog box appears.3. Select CSV File.4. Click Browse.
The Choose File to Upload dialog box appears.5. Browse to the CSV file, select it, and click Open.6. On the Client Information Source dialog box, click OK.
Results
Avamar Client Manager uploads the information from the CSV file.
Next steps
Using the uploaded computer information, select and activate computers as clients of an Avamar server.
ActivationActivation consists of changing the relationship between a computer and an Avamar server to enable the server to manage backups ofthe computer.
The relationship moves through the three states that are shown in the following table.
Table 107. Relationship states during client activation
State Description
No relationship The computer is unknown to the server. Computers in this state appear in Add Clients, when youfirst add the computer information to Avamar Client Manager.
Registered Avamar Client Manager added the information about the computer to the Avamar server's database.Computers in this state appear in Registered Clients after Avamar Client Manager starts theactivation process and completes registration with the Avamar server. The changed state of thesecomputers also appears in Add Clients.
Activated The computer has Avamar client software that is installed and running. The client software and theserver are in communication and have exchanged an encrypted key to verify their identities.
252 Avamar Client Manager

Table 107. Relationship states during client activation (continued)
State Description
Computers in this state appear in Activated Clients after activation is complete. The changed stateof these computers also appears in Add Clients and Registered Clients.
A computer that is in the activation process appears on the Queues page, in Activation. Avamar Client Manager tries to activate acomputer every 2 hours until it succeeds or until it reaches the limit of 24 tries. When the process completes, Avamar Client Managerremoves the computer from this view and adds an entry on the Logs page, in Activation.
Activating computers to enable backup managementTo enable backup management of a client, activate it with an Avamar server.
Prerequisites
Install Avamar client software on the computers being activated and import information about the computers from either a directoryservice or a CSV file.
Steps
1. On the left-side menu, click Clients > Add Clients.A hierarchical view of the computers in the enterprise appears. Avamar Client Manager generates this view from the information thatyou imported.
2. To find the computers to activate, browse or search the hierarchy.3. Select each computer to activate.
To select all computers in a folder, expand the folder to show the computers, then select the folder.
4. Click Activate.The Server - Domain Selection dialog box appears.
5. Expand the listing for a server, and select an Avamar domain.
Avamar Client Manager assigns the computers to the selected server and domain during activation.
6. Click Next.The Server - Group Selection dialog box appears.
7. Select a group or multiple groups.
Avamar Client Manager assigns the computers to the selected group or groups during activation.
8. Click Finish.
Results
Avamar Client Manager sends the activation task to the queue.
Next steps
To determine the status of the activation process, Check the Activation section of the Queues page. After the process completes,check the Activation section of the Logs page to determine its final status.
Registered ClientsClients that an Avamar server has registered but not activated appear in the Registered Clients section.
Use the Registered Clients section to select clients and perform the following client-related tasks:
• Activate• Delete• Associate with groups• View and edit details• Add and remove group override settings
Avamar Client Manager 253

Activating a registered clientTo enable backup management of a registered client that failed to activate when it was registered, activate it from the RegisteredClients section.
Prerequisites
Install the Avamar client software on the computers you want to activate.
About this task
When activation of a computer as a client of an Avamar server fails, Avamar Client Manager still registers the computer with the server.Correct any problems that prevent the activation. Then retry the activation of the registered client.
Steps
1. On the left-side menu, click Clients > Registered Clients.2. Select each client to activate.3. Click Activate.
Results
Avamar Client Manager sends the activation task to the queue.
Next steps
To determine the status of the activation process, check the Activation section of the Queues page. After the process completes, checkthe Activation section of the Logs page to determine its final status.
Activated ClientsClients that are activated with the selected Avamar server appear in the Activated Clients section.
Use the Activated Clients section to perform the following tasks:
• Move client to a different server• Move client to a different Avamar domain• Retire a client• Delete a client• Manage a client's group associations• View and edit a client's details• Add and remove group override settings
Moving a client to a new serverTo manage an Avamar client through a new Avamar server, move the Avamar client's registration, activation, and backups to the newserver.
Prerequisites
Do the following:
• Add the target server to Avamar Client Manager as described in Adding an Avamar server on page 234.• Select a client that is activated to a server with Avamar server software version 5.0.1.31 or newer.• For a client activated with an Avamar server older than version 6.x, fully initialize the MCS process on that server.
Steps
1. On the left-side menu, click Clients > Activated Clients.2. Select a client.
Do not select an NDMP client. Do not select a client that has backups on a Data Domain server.
3. On the Actions bar, click Move.The Domain Selection pane of the Client Move dialog box appears.
4. At the top of the Domain Selection pane, from the server selection list, select the Avamar server that is the target of the move.
254 Avamar Client Manager

The target server's domains appear in the Domain Selection pane.5. In the Domain Selection pane, select the target domain.6. Click Next.
The Group Selection pane of the Client Move dialog box appears.7. Select a target group.
You can optionally select more than one target group. Avamar Client Manager adds the client to all selected groups.
8. In Replicate Existing Backups at the bottom of the Group Selection pane, select a value.
Option Description
All Replicate all the client's backups to the target server.
Last Replicate only the last backup.
None Replicate none of the backups.
Replication makes the backups available from the target server.
9. Optional: In Delete From Source:
• Select to remove all the client's backups from the source server.• Clear to move the source server's registration of the client to the source server's MC_RETIRED domain and retain copies of the
client's backups on the source server.10. Click Finish.
The Confirm Replication Authentication dialog box appears.11. In Source Server, type the password for the repluser account on the source server.12. In Target Server, type the password for the repluser account on the target server.13. Click OK.
Results
In a background process, Avamar Client Manager moves the client to the selected target.
Moving a client to a different Avamar domainTo change the administrative relationship between an Avamar client and an Avamar server you can move the client to a different Avamardomain.
Prerequisites
Select a client that is activated to a server with Avamar server software version 6.x or newer.
Steps
1. On the left-side menu, click Clients > Activated Clients.2. Select a client.3. On the Actions bar, click Move.
The Client Move dialog box appears.4. In the Domain Selection pane of the Client Move dialog box, select the target domain.5. Click Next.
The Group Selection pane appears on the Client Move dialog box.6. Select a target group.
You can optionally select more than one target group. Avamar Client Manager adds the client to all the selected groups.
7. Click Finish.An alert box appears.
8. Click OK.
Results
In a background process, Avamar Client Manager moves the client to the selected target.
Avamar Client Manager 255

Retiring a clientTo stop backups of an Avamar client, retire the Avamar client. Avamar Client Manager retains backups that exist at the time of retirementso that you can restore data when necessary.
Steps
1. On the left-side menu, click Clients > Activated Clients.2. Select a client.
You can select more than one client. The retention policy setting you select applies to all selected clients.
3. On the Actions bar, click Retire.The Retire Client dialog box appears.
4. In Select Retention Policy, select one of the options.
Option Description
Retire client and retain backups with existingexpiration date
The Avamar server retains the backups for the existing retention period
Retire client and retain all backups indefinitely The Avamar server retains the backups until you manually delete them
Retire client and reset backup expiration date The Avamar server retains the backups until the date set in New ExpirationDate
5. If you select Retire client and reset backup expiration date in the previous step then, in New Expiration Date, select a date.The Confirm dialog box appears.
6. Click Yes.
The Alert dialog box appears.
7. Click OK.
Results
In a background process, Avamar Client Manager retires the selected client.
Failed ClientsClients that have unsuccessful backup or restore activity appear in the Failed Clients section.
Use the Failed Clients section to perform the following tasks:
• Delete a client• Manage a client's group associations• View and edit a client's details• Add and remove group override settings
When working with failed clients, use the filters that are described in the following table.
Table 108. Failed client filters
Filter Description
Period Specifies the period that Avamar Client Manager examines.
Activity Type Specifies the type of activity that Avamar Client Managerexamines.
Failure Criteria Defines the failure threshold that is used by Avamar ClientManager.
Idle ClientsActivated Avamar clients that do not have any activity during a specified period appear in the Idle Clients section.
When working with idle clients, use the Period filter to specify the period that Avamar Client Manager examines for activity, and theActivity Type filter to specify the type of activity.
256 Avamar Client Manager

Use the Idle Clients section to perform the following tasks:
• Delete a client• Manage a client's group associations• View and edit a client's details• Add and remove group override settings
Upgrade ClientsThe Upgrade Clients section provides information and tools you can use to apply upgrades and hot fixes to Avamar clients.
Use the Upgrade Clients section to perform the following tasks:
• Download an upgrade package to a server• Select an upgrade package• Apply the package to selected clients• Remove an upgrade package from a server
Upgrade Clients section requirementsBefore using the Avamar Client Manager Upgrade Clients section, do the following:
• For each client or plug-in, install the minimum client version that is listed in the Avamar Push Client upgrade compatibility table of theE-lab Navigator.
NOTE: Use of the Upgrade Clients feature to upgrade Avamar client software on Windows cluster nodes is not
supported. The Avamar for Windows Server User Guide describes how to upgrade Avamar client software on
Windows cluster nodes.
• Install, configure, and run the Avamar Downloader Service. The Avamar Downloader Service obtains the client packages and plug-inpackages that the upgrade feature requires. This service pulls the packages and pushes them onto the Avamar data server subsystem(GSAN). After the packages are updated in GSAN, the packages appear in the Avamar Client Manager Select Package window, andupgrades can be performed.
Multiple system deploymentsFor Avamar deployments that include more than one Avamar system, Avamar Client Manager running on one of the Avamar systems(managing system) can be used to manage clients that are associated with other Avamar systems (managed systems).
The managed systems must meet the following requirements:
• Managed system is added to Avamar Client Manager on the managing system.
Adding managed systems to Avamar Client Manager on the managing system provides the managing system with the information thatit requires to support client upgrades on the managed systems.
• Managed system is running a "near version" of Avamar software that is no more than two versions earlier than the managing system.
The near version requirement ensures that all packages required by clients on the managed systems are available for deployment throughthe managing system.
To provide full client upgrade support for clients that are associated with Avamar systems that do not meet the near version requirement,run Avamar Client Manager on those systems.
Downloading upgrade and hotfix packagesUse Avamar Client Manager to download upgrade and hotfix packages to an Avamar server.
Prerequisites
Do the following:
• Install and configure the Avamar Downloader Service and the AvInstaller service. Refer to the administration guide for informationabout these tasks.
• Select an Avamar server.
About this task
Before applying an upgrade or hotfix package to an Avamar client, download the package to the Avamar server associated with theAvamar client.
Avamar Client Manager 257

Steps
1. On the left-side menu, click Clients > Upgrade Clients.2. On the Actions bar, click Select Package.
The Upgrade Client dialog box appears.3. In the Status column for the package, click Download.
The status of the package must be Available.
Results
Avamar Client Manager begins the download. A progress bar appears. After the download finishes, Avamar Client Manager updates thepackage status, in sequence, to each of the following values: Waiting, Processing, and Ready.
Selecting an upgrade packageTo apply to Avamar clients, select an upgrade package or hotfix package.
Prerequisites
Do the following:
• Install and configure the Avamar Downloader Service and the AvInstaller service. Refer to the administration guide for informationabout these tasks.
• Select an Avamar server.• Download the upgrade or hotfix package to the selected Avamar server.
Steps
1. On the left-side menu, click Clients > Upgrade Clients.2. On the Actions bar, click Select Package.
The Upgrade Client dialog box appears.3. Select a package.
Before you can select a package, the package must have a Ready status.
4. Click Select.The Upgrade Client dialog box closes.
Results
The Avamar clients that are eligible for the upgrade or the hotfix appear.
Next steps
Select clients and apply the upgrade or hotfix package to them.
Applying the upgrade packageSelect Avamar clients and apply the upgrade package or the hotfix package.
Prerequisites
Select an upgrade package or a hotfix package. View the list of Avamar clients that are eligible for the selected package.
About this task
NOTE: Applying an upgrade to an Avamar NDMP Accelerator node (accelerator node) causes the accelerator node to
drop running backups. After the upgrade, the accelerator node starts and completes NDMP backups normally.
Steps
1. From the list of Avamar clients that are eligible for the upgrade or the hotfix, select a client.
You can select more than one client.
2. On the Actions bar, click Upgrade.
258 Avamar Client Manager

Results
Avamar Client Manager starts upgrading the selected clients. The upgrade runs in the background.
Next steps
Track the progress of the upgrade in the Upgrade section of the Queues page. View the final status of the upgrade in the Upgradesection of the Logs page.
Deleting upgrade and hotfix packagesUse Avamar Client Manager to delete upgrade and hotfix packages from an Avamar server.
Prerequisites
Select an Avamar server that has an unneeded upgrade or hotfix package.
Steps
1. On the left-side menu, click Clients > Upgrade Clients.2. On the Actions bar, click Select Package.
The Upgrade Client dialog box appears.3. Select a package.
You can only delete packages that have a Ready status.
4. Click Delete.
Results
Avamar Client Manager removes the selected package from the Avamar server.
PoliciesThe Policies page provides access to group policy tasks and information.
The Policies page includes a summary of each group policy on the selected Avamar server.
Use the Policies page to perform the following tasks:
• Add clients to a group• Remove clients from a group• View the details of a group's dataset policy, retention policy, and schedule policy
Adding clients to a groupTo apply the policies of a group to selected clients, add the clients to the group.
About this task
Completion of this task results in association between the selected clients and a group. The Avamar server then applies the group'spolicies to the selected clients.
Steps
1. Click Policies > Groups.2. Select a group.3. Click Edit Group Members.
The Edit Group Members dialog box appears.4. Click Add.
The Add Clients to Group dialog box appears.5. Select a client.
You can select more than one client.
6. Click Add.
Avamar Client Manager 259

Results
Avamar Client Manager adds the clients to the group.
Removing clients from a groupTo remove the policies of a group from selected clients, remove the clients from the group.
About this task
This task removes the association between selected clients and a group. When you complete the task, the group's policies no longer applyto the selected clients.
Steps
1. Click Policies > Groups.2. Select a group.3. Click Edit Group Members.
The Edit Group Members dialog box appears.4. Select a client.
You can select more than one client.
5. Click Remove.
Results
Avamar Client Manager removes the clients from the group.
Viewing the dataset policy of a groupUse the entry for a group on the Policies page to view details of the dataset policy of the group.
Steps
1. Select an Avamar server.2. Click Policies > Groups.
A summary view of the groups on the selected server appears.3. On the entry for a group, in the Dataset column, click the name of the dataset policy.
Results
The dataset policy details for the selected group appear in a dialog box.
Viewing the retention policy of a groupUse the entry for a group on the Policies page to view details of the retention policy of the group.
Steps
1. Select an Avamar server.2. Click Policies > Groups.
A summary view of the groups on the selected server appears.3. On the entry for a group, in the Retention column, click the name of the retention policy.
Results
The retention policy details for the selected group appear in a dialog box.
260 Avamar Client Manager

Viewing the schedule policy of a groupUse the entry for a group on the Policies page to view details of the schedule policy of the group.
Steps
1. Select an Avamar server.2. Click Policies > Groups.
A summary view of the groups on the selected server appears.3. On the entry for a group, in the Schedule column, click the name of the schedule policy.
Results
The schedule policy details for the selected group appear in a dialog box.
QueuesThe Queues page provides access to the Avamar Client Manager activity queues.
The Queues page provides a summary view of active and pending Avamar Client Manager tasks for the selected Avamar server. Tasksappear in separate sections that are based on the type of task.
Table 109. Task types on the Queues page
Type of task Browse path Description
Activation Queues > Activation View active and pending tasks that are related to client activation.
Delete Queues > Delete View active and pending tasks that are related to the removal ofclients from Avamar servers.
Move Queues > Move View active and pending tasks that are related to moving clientsfrom one Avamar server to another
Retire Queues > Retire View active and pending tasks that are related to retiring Avamarclients.
Upgrade Queues > Upgrade View active and pending tasks that are related to upgrading thesoftware on Avamar clients.
Use the Queues page to perform the following tasks:
• View the details of active and pending tasks• Cancel tasks
Canceling a taskTo prevent it from running, cancel a pending task.
About this task
You can stop a task from running by canceling it while it is in the pending state.
Steps
1. On the left-side menu, click Queues > task_queue, where task_queue is the Queues page section for the type of task you arecanceling.For example to cancel a client activation, click Queues > Activation.
2. Select a task.3. Click Cancel.
A confirmation dialog box appears.4. Click OK.
Avamar Client Manager 261

Results
Avamar Client Manager removes the task from the queue, cancels the task, and adds an entry to the log.
LogsThe Logs page provides access to the Avamar Client Manager logs.
The Logs page provides a summary view of Avamar Client Manager logs. Log entries appear in separate sections that are based on thetype of task that generated the entry.
Table 110. Task types on the Logs page
Task type Browse path Description
Activation Logs > Activation View log entries that are related to client activation.
Delete Logs > Delete View log entries that are related to the removal of clients fromAvamar servers.
Move Logs > Move View log entries that are related to moving clients from oneAvamar server to another.
Retire Logs > Retire View log entries that are related to retiring Avamar clients.
Upgrade Logs > Upgrade View log entries that are related to upgrading the software onAvamar clients.
• Activation
Click Logs > Activation to view log entries that are related to client activation.• Delete
Click Logs > Delete to view log entries that are related to the removal of clients from Avamar servers.• Move
Click Logs > Move to view log entries that are related to moving clients from one Avamar server to another.• Retire
Click Logs > Retire to view log entries that are related to retiring Avamar clients.• Upgrade
Click Logs > Upgrade to view log entries that are related to upgrading the software on Avamar clients.
Use the Logs page to perform the following tasks:
• View log entries• View the client log for upgrades• Clear all log entries in a section
Viewing the client log after upgrading an Avamar clientView the Avamar client's local log after a completed upgrade try.
Prerequisites
Use Avamar Client Manager to apply an upgrade package or hotfix to an Avamar client.
About this task
Viewing the Avamar client's local log can provide details about the reasons for an unsuccessful client upgrade.
Steps
1. On the left-side menu, click Logs > Upgrade.2. On the right-side of the page, click the Details bar.
The Details panel expands.3. In Summary, select a client upgrade log entry.
262 Avamar Client Manager

Detailed information for the selected log entry appears in the Details panel.4. On the Details panel, in Log, click View Log.
Results
The Upgrade Log window opens and the client's local log appears in the window.
Next steps
(Optional) Select and copy information from the client's local log. Paste the copied information into a text editor.
Clearing all log entries in a sectionAvamar Client Manager provides a method for you to remove all log entries from a task section of Logs.
Prerequisites
Complete at least one task that results in a log entry in one of the task sections of the Logs page.
Steps
1. On the left-side menu, click Logs > task_log, where task_log is a Logs page section.For example, to clear all upgrade entries, click Logs > Upgrade.
2. Click Clear All.The Alert dialog box appears.
3. Click Yes.
Results
Avamar Client Manager removes all log entries for the selected section.
Avamar Client Manager 263
Avamar Desktop/Laptop
Topics:
• Overview of Avamar Desktop/Laptop• Requirements for Avamar Desktop/Laptop• Avamar client software installation• Avamar Desktop/Laptop user authentication• Avamar Desktop/Laptop user interfaces• Backup with Avamar Desktop/Laptop• Restore with Avamar Desktop/Laptop• Client backup and restore activity history• Editing Avamar Desktop/Laptop parameters• Client log locations
Overview of Avamar Desktop/LaptopAvamar Desktop/Laptop is a version of the Avamar client software for Windows and Macintosh that adds enhanced features forenterprise desktop and laptop computers. Many Avamar Desktop/Laptop features are also available on supported Linux computers.
Client installation and managementIn a corporate environment, you can install Avamar Desktop/Laptop on Windows and Macintosh desktop and laptop computers by usingsystems management tools such as Microsoft Systems Management Server 2003 (SMS).
You can also install the Avamar Desktop/Laptop software locally by launching an installation wizard.
After client installation, you can activate, upgrade, analyze, and manage clients by using the Avamar Client Manager web browser UI.
User authenticationAvamar Client Manager users authenticate through the enterprise Active Directory or OpenLDAP-compliant directory service, with orwithout Kerberos encryption. Users can also authenticate by using built-in Avamar authentication, or a combination of Avamarauthentication and LDAP authentication.
Pass-through authentication enables users to access the web UI without using the login screen. A secure message mechanismauthenticates users that are based on information from the client computer. Pass-through authentication also enables administrators toallow non-domain users to restore files to their local account on the computer.
User interfacesAvamar Desktop/Laptop functionality is available through two user interfaces:
• The client local user interface (client UI) is installed on the client computer when you install either the Avamar Client for Windows orthe Avamar Client for Mac OS X. With the client UI, an Avamar icon appears in the notification area ("system tray") on Windowscomputers or on the menu bar on Mac computers. Right-click the icon on Windows or click the icon on Mac to open the client menu,which provides access to backup, restore, program settings, and logs.
• Use the web browser user interface (web UI) to start an on-demand backup or restore, view backup and restore activity for a clientcomputer, or configure other backup settings for a client computer.
14
264 Avamar Desktop/Laptop

BackupUsers can start an on-demand backup with a single click on the client menu, or open the web UI for an interactive on-demand backup.Options to customize on-demand backup behavior include:
• Allowing users to create on-demand backup sets.• Limiting the total number of backups that can occur each day for each client computer.• Changing the retention policy for on-demand backups.• Disabling on-demand backups.
Perform scheduled backups of all Avamar Desktop/Laptop clients. For daily scheduled backups, you can allow users to select a differentstart time for their backups from a list of available times that you create. The system runs the backup as soon as possible after theselected time.
You can also allow users to add folders to the source data defined by the groups to which a client belongs. The folders are included in bothon-demand and scheduled backups for the client.
RestoreUsers can search for or browse to folders, files, and file versions to either the original location or to a new location on the same computer.Users can restore data with the same name or a new name.
When users restore data to the original location with the same name, the restore process overwrites any current local file versions withthe restored files. This type of restore is useful in situations where the current local versions contain errors or have data corruption issues.
To avoid overwriting the current local file versions, users can restore to a new location, restore with a new name, or both.
Domain users can restore files from any Windows or Mac computer on which they have a user profile to the Windows or Mac computer towhich they are logged in.
If large restore tasks are impacting network performance, you can specify a limit for the amount of data that users are allowed to restore.
Users are allowed to begin with only one restore task at a time. Additional requests are blocked and a message appears to the user. Youcan change this behavior to allow users to start multiple restore tasks.
Activity historyThe History page in the web UI provides a 14-day history of the status of restore and backup tasks for a client computer, as well aslistings of the folders and files backed up during that period. If you are a domain user with a user profile on the source computer, then youcan view the activity history for the source computer from a different computer.
Requirements for Avamar Desktop/LaptopWork with an Avamar field sales representative when deciding on the characteristics of the Avamar system deployment that work best tosupport desktop and laptop clients for an enterprise. The environment must meet the requirements in the following topics.
A description of the requirements for an Avamar system to support desktops and laptops at any one enterprise is beyond the scope of thisguide. The guide exists due to many differences in desktop and laptop topology for each enterprise.
Client computer requirementsAvamar client computers with Avamar Desktop/Laptop must meet the minimum requirements in the following sections.
Operating system requirementsAvamar Desktop/Laptop client computers require a Windows, Mac, or Linux operating system that is supported for use with the Avamarclient. The E-lab Navigator provides a complete and updated list.
Windows Server, MacOS X Server, and Linux computers that meet the requirements that are specified in the Avamar Backup ClientsUser Guide are supported as server-class clients. Generally, the Avamar Desktop/Laptop enhancements function the same for server-class computers as for desktop and laptops. Differences include:
• On a server-class computer, clicking Back Up Now on the Client menu or on the Backup reminder launches a backup of the datasetthat is assigned individually to the computer.
Avamar Desktop/Laptop 265

To view or edit the dataset that is assigned to a computer, use AUI to edit the policy settings for the client. Edit a dataset providesinstructions.
• The Avamar Desktop/Laptop feature for disabling backups for computers running on battery power is not available for server-classcomputers.
Backups are always enabled on server-class computers.• After disabling locally started restores on Windows server-class computers and Macintosh server-class computers, a restore can only
be performed by using AUI.
However, users with local administrative rights on the server-class computer can restore backups to a different computer.
Hardware requirementsThe following table lists hardware requirements for Avamar Desktop/Laptop client computers.
Table 111. Avamar Desktop/Laptop hardware requirements
Category Requirement
CPU 1 GHz
RAM 1 GB
Hard drive space 250 MB permanent hard drive space minimum for softwareinstallation. Snapshot technology and system state backup mayrequire additional space.
Network interface Either of the following:
• 10BaseT or higher, configured with the latest drivers for theplatform
• IEEE 802.11a/b/g, configured with the latest drivers for theplatform
Supported Avamar plug-insAvamar Desktop/Laptop supports backup and restore with the following Avamar File System plug-ins:
• Windows• Mac• Linux
Avamar Desktop/Laptop does not support application plug-ins or file system plug-ins for other operating systems.
Port requirementsThe TCP data port must enable bi-directional communication with the Avamar server.
Web browser requirementsThe web browser that you use for the Avamar Desktop/Laptop user interface must be JavaScript-enabled and meet other requirements.
The following table lists supported web browsers.
Table 112. Supported web browsers forAvamar Desktop/Laptop
Operating system Supported web browsers
Windows • Windows Internet Explorer• Mozilla Firefox
Macintosh Apple Safari
Linux Mozilla Firefox
NOTE: Browsers used with the Avamar software must support TLS 1.2 encryption.
266 Avamar Desktop/Laptop

Use one of the environment variables in the following table to launch the web browser.
Table 113. Environment variables for launching a web browser in Avamar Desktop/Laptop
Browser Environment variable
KDE kfmclient
GNOME gnome-open
Others BROWSER
Network requirementsThe network in an Avamar Desktop/Laptop environment must meet the requirements in the following table.
Table 114. Avamar Desktop/Laptop network requirements
Category Requirement
Protocol TCP/IP.
Routers Must permit TCP packet routing between the Avamar server andeach client computer.
Firewalls Must allow bi-directional communication between the Avamarserver and each client computer using TCP data port 28002.
Naming system Must facilitate connections between each client and the Avamarserver, including situations where DHCP and VPN access causechanges in IP address.
Avamar client software installationThe recommended method to install the Avamar client software on large numbers of Windows or Mac computers is to use a systemsmanagement tool. A systems management tool can remotely push install the software on large numbers of computers in a short amountof time.
A systems management tool can often generate a list of the computers where the software is successfully installed. You can use this list inAvamar Client Manager to register and activate computers.
You can install the Avamar Client for Windows by using several silent install options.
NOTE: Do not rename client installation packages. The Avamar push upgrade mechanisms are incompatible with
renamed packages.
Supported systems management toolsRemote installation has been tested and approved using the following systems management tools:
• Microsoft Systems Management Server 2003 (SMS) on Windows computers• SMS with Quest Software’s Quest Management Xtensions for SMS on Macintosh computers
You may also use other systems management tools, such as the tools in the following list, to remotely push install the Avamar clientsoftware:
• Microsoft System Center Configuration Manager 2007• IBM Tivoli Management Framework• HP OpenView ServiceCenter• Symantec Altiris• Apple Remote Desktop
Systems management tools vary. The steps that are required to push software to a set of computers depend on the tool. Consult thedocumentation for the tool to determine the steps that are required to perform these tasks.
Avamar Desktop/Laptop 267

Push installation on Windows computers
Steps
1. Copy the installer package for the Avamar Client for Windows to a location that is accessible to the systems management tool.2. Configure the systems management tool to copy the correct installer package to each computer.3. Designate the computers on which to install the software.4. Provide an installation launch command that uses the following format:
msiexec /qn /I "path_to_MSI_pkg" SERVER=server DOMAIN=domain GROUP=”groups” UICOMPONENT={0|1}PROGRESSBAR={true|false} BALLOONMESSAGE={true|false} BACKUPREMINDER=daysThe following table provides details on the arguments for the installation launch command.
Table 115. Push install launch command arguments
Argument Description
"path_to_MSI_pkg" Specifies the full path to the location of the installer packagerelative to the root of the computer file system.
SERVER=server Specifies the IP address or FQDN of the Avamar server that isassigned to the client. When this argument is omitted orincorrect, the client is successfully installed but is not activated.
DOMAIN=domain Specifies the Avamar domain for the client. The path must startwith a slash path character (Unicode 002F: /). The defaultvalue is /clients.
GROUP=groups Specifies a comma-separated list of Avamar backup groups forthe client. Start the path for each group with a slash pathcharacter (Unicode 002F: /), and enclose the group path inquotation marks. For example: GROUP=”/clients/text,/clients/admin”. The default value is “/Default Group”.
UICOMPONENT={0|1} Specifies whether to enable the Avamar client with the standardGUI (1) or as an agent process with no user interface (0). Whenyou specify 0, all remaining options are ignored.
PROGRESSBAR={true|false} Specifies whether to show (true) or hide (false) the progresswindow on the client during tasks.
BALLOONMESSAGE={true|false} Specifies whether to show (true) or hide (false) balloonmessages on the client during tasks.
BACKUPREMINDER=days Specifies the number of days after the last backup before abackup reminder appears. The possible values for days arenumbers 1 through 7 and Never. The default value is 3.
Users can change the values set by the UICOMPONENT, PROGRESSBAR, BALLOONMESSAGE, and BACKUPREMINDER by usingoptions on the client menu in the client UI. You can also change the values during an upgrade.
5. Launch the systems management tool installation process.
Push installation on Macintosh computers
Steps
1. Copy the installer package for the Avamar Client for Mac OS X to a location that is accessible to the systems management tool.2. Configure the systems management tool to copy the correct installer package to each computer.3. Designate the computers on which to install the software.4. Provide the installation launch command:
/usr/sbin/installer -pkg "path_to_install_pkg" -target install_location
268 Avamar Desktop/Laptop

where path_to_install_pkg is the full path to the location of the installer package relative to the root of the computer file system, andinstall_location is the location in which to install the software. Normally, install_location is the root (/), but any local volume is allowed.
5. Launch the systems management tool installation process.
Next steps
After installation of the Avamar Client for Mac OS X, a restart of some clients may be required. A change to the process data size settingthat is made on those computers causes the restart of those clients. During installation, the installer determines if the process data size isless than 96 MB. A minimum process data size of 96 MB is required for optimal performance of the Avamar Client for Mac OS X.
If the process data size is less than 96 MB, then the installer changes it to 96 MB and displays a restart reminder. If you leave the messageopen for more than 30 s without clicking a button to restart immediately or at a later time, then the reminder is hidden and appears againin 2 hours.
If you choose to restart the computer but the restart process is interrupted, then the reminder does not appear again. To complete theprocess data size change, remember to restart the computer.
Local client installationYou can install the Avamar Desktop/Laptop software locally by launching a graphical installation interface. After the installation, thecomputer is ready to register and activate with an Avamar server.
To perform a local installation, you can download the client installer by using the downloads link. If the downloads link is disabled, you musttransfer the client installer to the computer by some other file transfer method.
The disadvantages of using local installation are:
• It is very time consuming when performed individually on thousands of computers.• It does not provide a list that you can use to register and activate groups of computers in Avamar Client Manager.
The Avamar Backup Clients User Guide provides more information on local installation, upgrade, and uninstall of Avamar Desktop/Laptop.
Avamar client software uninstallWhen you uninstall Avamar client software from a client computer, scheduled backups no longer occur for the client. You cannot restorebackups to the client after you uninstall the software.
When you uninstall the Avamar client software, you can keep or delete the backups for the client:
• To keep the backups for the client so that you can restore the backups to a different client, retire the client by using AvamarAdministrator.
• To delete the backups for the client, delete the client by using Avamar Administrator.
Retire or delete the client either before or after you uninstall the Avamar client software.
Uninstall on Windows
Steps
1. Open the Windows Add or Remove Programs or Programs and Features applet.2. In the list of currently installed programs, select Avamar for Windows.3. Click Remove.
A confirmation message appears.4. Click Yes.
Uninstall on Macintosh
Steps
1. Open a Terminal (shell) session.2. Log in as an administrator.
The uninstall command requires root (super-user) permissions. The sudo command is used to run the command with rootpermissions. An administrator account or another account that is listed in sudoers is what sudo requires.
3. Run the uninstall script by typing the following command:
Avamar Desktop/Laptop 269

sudo /usr/local/avamar/bin/avuninstall.sh
Avamar Desktop/Laptop user authenticationAvamar Desktop/Laptop protects backup data by authenticating users and enforcing access rights. Avamar Desktop/Laptop uses aseparate server process running on the Avamar system to facilitate authentication through both internal and external methods. EveryAvamar system installation includes the Avamar Desktop/Laptop server process.
Pass-through authenticationPass-through authentication uses encrypted channels to access user credentials from a client computer and associate the credentials withfile ownership properties. The client computer operating system obtains the user credentials during login to the computer or throughcommon access card (CAC) technology.
Avamar Desktop/Laptop performs pass-through authentication transparently. Users can back up and restore files without viewing theAvamar Desktop/Laptop login screen.
Avamar Desktop/Laptop enables pass-through authentication by default. It is limited to users on Windows computers and Maccomputers. Also, Windows users with local administrator privileges can restore files that anyone owns on the computer without additionallogin.
Pass-through authentication is supported with LDAP authentication.
Enabling local user access for pass-through authenticationYou can configure Avamar Desktop/Laptop to allow local user access through pass-through authentication. A local user is a user that isauthenticated through a local computer account instead of a domain account.
About this task
With local user access enabled, local users can access the Avamar client web UI to restore data they own on the authenticating computer.
Local user access requires pass-through authentication on a Windows computer or a Mac computer. By default local user access isdisabled.
NOTE: Enabling local user access applies to all clients and backups that are associated with the server. Before you
enable local user access, carefully consider its security implications within the context of the organization. Local user
authentication is inherently less secure than domain authentication.
To enable local user access for pass-through authentication, uncomment the allowLocalUsers property in the dtlt.propertiesfile on the Avamar server, and then set its value to true by changing #allowLocalUsers=false to allowLocalUsers=true.
Disabling pass-through authenticationYou can disable pass-through authentication and require that all users log in through the Avamar Desktop/Laptop login screen. Whenpass-through authentication is disabled, configure one of other methods of authentication for Windows users and Mac users.
About this task
To disable pass-through authentication, set the value of the userLoginRequired property in the dtlt.properties file on theAvamar server to true.
LDAP authenticationConfigure Avamar Desktop/Laptop to use a supported LDAP directory service to authenticate users by using the directory service usernames and passwords.
The authentication process uses Kerberos in a Simple Authentication and Security Layer (SASL) Bind by default. Alternatively, configurethe authentication process to use plaintext in a Simple Bind. Only SASL Bind is supported with pass-through authentication. PlaintextSimple Bind is not compatible with pass-through authentication.
With LDAP authentication, users log in to the client computer with a domain account authenticated through a domain directory service. Touse a local account, enable local user access.
270 Avamar Desktop/Laptop

To increase the security of user data, Avamar Desktop/Laptop obtains the domain username of a Windows user or Mac user from theclient computer and displays it in a read-only field on the Avamar Desktop/Laptop login screen.
NOTE: Do not use the root account on a Mac to restore files from backups.
Configuring LDAP authentication for Avamar Desktop/LaptopTo configure Avamar Desktop/Laptop to authenticate users through a supported LDAP directory service, with either Kerberos in an SASLBind or plaintext in a Simple Bind, edit the LDAP configuration file.
Prerequisites
• Configure Avamar with information about the directory service. Adding information for a supported LDAP directory service on page 69provides instructions.
• Ensure that the configuration of the Avamar Desktop/Laptop server correctly describes any domain components that are used tosegregate authentication.
• To use Kerberos in an SASL Bind, ensure that the Kerberos realm for LDAP user authentication from Macintosh computers is thedefault Kerberos realm.
Steps
1. In Avamar Administrator, click the Administration launcher link.The Administration window is displayed.
2. Click the LDAP Management tab.3. Click Edit LDAP file.4. In the text area, edit or create the user-login-module key:
• To specify Kerberos in an SASL Bind, set user-login-module=kerberos.
• To specify plaintext in a Simple Bind, set user-login-module=ldap.
Kerberos is the default value. Avamar Desktop/Laptop assumes this value when the key is missing.
5. Click Save.6. Click Close.
Changing the Kerberos encryption typeIf you use LDAP authentication with Kerberos, you may need to change the Kerberos encryption type.
About this task
Avamar Desktop/Laptop uses the MIT Kerberos encryption type “DES cbc mode with CRC-32” to communicate with LDAP servers bydefault. This encryption type may conflict with a key distribution center (KDC) in the Active Directory environment. If that occurs, themessage KDC has no support for encryption type appears. To resolve this issue, remove the specified encryption type fromthe krb5.conf configuration file, which enables the KDC to select the encryption type.
Steps
1. In Avamar Administrator, click the Administration launcher link.The Administration window is displayed.
2. Click the LDAP Management tab.3. Click Edit KRB5 file.4. In the text area, find the following entries:
[libdefaults]default_tgs_enctypes = des3-cbc-sha1-kd des-cbc-crc des-cbc-md5default_tkt_enctypes = des3-cbc-sha1-kd des-cbc-crc des-cbc-md5
5. Comment out the entries:
[libdefaults]#default_tgs_enctypes = des3-cbc-sha1-kd des-cbc-crc des-cbc-md5#default_tkt_enctypes = des3-cbc-sha1-kd des-cbc-crc des-cbc-md5
6. Click Save.
Avamar Desktop/Laptop 271

7. Click Close.
Avamar authenticationYou can configure Avamar Desktop/Laptop to authenticate users by using Avamar authentication, which uses internal Avamar domaininformation.
Avamar authentication works with users who authenticate at the Avamar root level, Avamar domain levels, or Avamar subdomain levels.The mechanism first checks at the subdomain level. If the username is found at that level, then authentication proceeds. If the username isnot found, then the next level is checked. This step continues until the username is found, or the Avamar root is reached without findingthe username.
For example, if the login computer 123abc.example.com is activated with the /clients/mountain Avamar subdomain, then themechanism checks the Avamar system in the following order until the username is found:
1. /clients/mountain (activation subdomain)
2. /clients (next level up)
3. / (root)
With Avamar authentication, client computers must have a static, resolvable, fully qualified domain name. In addition, users must have alocal or domain login account for the client computer and an account on the Avamar domain that is associated with the client computer.
Avamar Desktop/Laptop applies the role that is assigned to the Avamar user account when it grants access to the account throughAvamar authentication. Users can perform only those operations that their role allows to. The one exception is that users with theRestore only operator role can launch a backup from Avamar Desktop/Laptop.
Configuring Avamar authenticationConfigure an Avamar system to use Avamar authentication through the LDAP Management tab of Avamar Administrator.
Prerequisites
Add Avamar user records to domain-level lists. Adding a user to a domain on page 85 provides instructions.
Steps
1. In Avamar Administrator, click the Administration launcher link.The Administration window is displayed.
2. Click the LDAP Management tab.3. Click Edit LDAP file.4. Edit or create the user-login-module key:
• To use Avamar authentication and all other configured and enabled authentication methods, set user-login-module=mix.
• To use Avamar authentication and all other configured and enabled authentication methods except LDAP, set user-login-module=avamar.
5. In the text area, type the following key/value pair:
avamar-authentication-domains=/domain1,/domain2,/domain3,/...where domain1, domain2, and domain3 are Avamar domain names that are combined in a comma-separated list. Each domain namemust begin with the root path designator: /.
For example, to use Avamar authentication for the following domains:
//clients/accounting/clients/shipping
Type the following key/value pair:
avamar-authentication-domains=/,/clients/accounting,/clients/shipping6. Click Save.7. Click Close.
272 Avamar Desktop/Laptop

Mixed authenticationYou can use multiple authentication methods in the same environment.
The authentication process occurs in the following order when you enable multiple authentication methods:
1. Users on a client in an Avamar domain are authenticated by using Avamar authentication.2. Users who are not logged in to a client in an Avamar domain are authenticated by using pass-through authentication.3. When mixed authentication is enabled and LDAP is configured, authenticates users, who are not logged in to a client assigned to a
specified Avamar domain, through LDAP.
Avamar Desktop/Laptop user interfacesAvamar Desktop/Laptop functionality is available through the client UI and the web UI.
Client UIThe client local user interface (client UI) is installed on the client computer when you install either the Avamar Client for Windows or theAvamar Client for Mac OS X. With the client UI, an Avamar icon appears in the notification area ("system tray") on Windows computers oron the menu bar on Mac computers. Right-click the icon on Windows or click the icon on Mac to open the client menu, which providesaccess to backup, restore, program settings, and logs.
The following table lists the functionality that is available in the client UI.
Table 116. Avamar Desktop/Laptop client UI functionality
Client menu item Description
Back Up Now Launches a single-click on-demand backup.
Back Up... Launches an interactive on-demand backup.
Restore... Launches an interactive restore.
Settings > Show Backup Reminder (days) Controls when a backup reminder appears to remind you that thecomputer has not been backed up for a period of time betweenone and seven days. You can also disable the reminder by selectingNever.
Settings > Show Progress Bar Controls whether the Progress window appears during a backup.You can cancel, pause, or view logs for a backup from theProgress window.
Settings > Show Balloon Messages Controls whether system status balloon messages appear near theAvamar icon on supported Windows computers.
Settings > Back Up On Battery Power Controls whether scheduled or on-demand backups can occur forthe computer when the computer is running on battery power.
Settings > Back Up On Wireless Controls whether scheduled or on-demand backups can occur forthe computer when the computer is joined to the network solely bya wireless connection.
Languages Enables you to select the language for the client UI.
Manage > Activate Client Activates the client, which provides a unique ID for the client andlinks the client to a specific Avamar server.
Manage > View Console Opens the client console, which provides access to local statusrecords for tasks, the Agent Log, the Console Log, and the WorkOrder Log.
Manage > Create ZIP File of Logs Creates a ZIP file of logs required by administrators to diagnosebackup and restore problems.
(Mac only) Client Agent Tasks Stops or restarts the backup agent process.
Avamar Desktop/Laptop 273

Table 116. Avamar Desktop/Laptop client UI functionality (continued)
Client menu item Description
(Mac only) Logs Provides access to the Agent Log, Console Log, and functionalityfor creating a ZIP file of logs required by administrators to diagnosebackup and restore problems.
About Provides version, server, and copyright information for AvamarDesktop/Laptop.
Help Launches online help for Avamar Desktop/Laptop when the clientis activated to an Avamar server.
Exit Shuts down the Avamar client.
Web UIUse the web browser user interface (web UI) to start an on-demand backup or restore, view backup and restore activity for a clientcomputer, or configure other backup settings for a client computer.
The following table describes the main elements of the web UI.
Table 117. Avamar Desktop/Laptop web UI functionality
Element Description
Avamar Desktop/Laptop logo You can replace the Avamar logo and the Desktop/Laptop logo inthe upper left corner of the web UI to rebrand the web UI.
Settings menu The settings menu in the upper right corner of the web UI enablesyou control web UI configuration settings, including:
• Whether to show tooltips• The language for the web UI• How many entries to show on the Search, Browse, or
History pages• The default page that appears when you perform a restore• Whether the full web UI or the browse-only mode, which
displays only the Search and History pages, is used
Refresh icon Refreshes the web UI page.
Help menu Provides access to the Avamar Desktop/Laptop online help and tosoftware version information.
Search page Enables you to search for files and folders on the client computerto restore.
Browse page Enables you to browse to files and folders on the client computerto restore.
Backup page Provides information about the backup groups to which the clientis assigned, as well as the next scheduled backup. Also enables youto perform an on-demand backup of the client by using the grouppolicies for the groups to which the client is assigned. When theAdd Data button is enabled on the Backup page, users can addfolders to the group datasets for scheduled and on-demandbackups.
History page Provides a 14-day record of backup and restore activity on thecomputer, including:
• Status of backup activity, and for each backup, a listing of thefile data that was transferred
• Status of restore activity
274 Avamar Desktop/Laptop

Table 117. Avamar Desktop/Laptop web UI functionality (continued)
Element Description
Status bar Displays the date and time of the last and next scheduled backup,as well as the outcome of the last backup. The status bar displaysinformation for the most recent 14 days. When the last backup wasmore than 14 days in the past, the status bar displays the messageNo backups found. However, if the retention policy assignedto the group for the client is more than 14 days, you may still seefiles on the Browse and Search pages.
Limited user interfaceThe Avamar server presents a limited version of the web UI to a client when the number of files and directories in a client backup exceedsabout 4 million or when there is insufficient allocated memory for Avamar Desktop/Laptop.
Large number of files and directories in a client backup
The exact number of files and directories that causes these changes is based on the available memory on the Avamar server.
There is no upper limit to the number of files and directories that can be in a backup.
Insufficient allocated memory
The limited version of the web UI also appears for all clients accessing the Avamar server when the memory it requires to satisfy itscurrent Avamar Desktop/Laptop requests exceeds the memory that it has allocated for Avamar Desktop/Laptop.
Encouraging users to log out of the web UI at the end of their session helps prevent this issue.
Description of the limited web UI
The limited version of the web UI has the following changes:
• The Search and History pages do not appear the web UI.• File versions are not available on the Browse page.• Restore is only allowed for users with local administrator rights on the computer. Non-administrator users cannot restore any files,
including those that they own locally on a server-class computer.• Restore data size limits are not enforced.
Apache web server authenticationTo protect user security, web browsers display an authentication warning when accessing a secure web page unless the web serverprovides a trusted public key certificate with the page. The Avamar Desktop/Laptop web UI uses only secure web pages, and this warningis seen in browsers that access those pages. To avoid the warning, install a trusted public key certificate on the Apache web server that isprovided with Avamar.
The Avamar Product Security Guide describes how to obtain and install a trusted public key certificate for the Apache web server.
Avamar Desktop/Laptop 275

Rebranding the web UIYou can rebrand the Avamar client web UI by replacing the two logo graphics in the upper left corner of the UI.
About this task
Figure 17. Replaceable graphics on the Avamar client web UI
Steps
1. Create two replacement graphics that are named ProductNameAvamar.png and ProductNameDTLT.png.
The replacement graphics must meet the following requirements:
• The file format must be Portable Network Graphic (.png).
• The background must be transparent so that the background gradient is visible behind the graphic text and images.• ProductNameAvamar.png Must be 97 pixels wide and 18 pixels tall.
• ProductNameDTLT.png Must be 128 pixels wide and 18 pixels tall.
2. Open a command shell:
a. Log in to the server as admin.b. Switch user to root by typing the following command:
su -c. For a multi-node server, load the rootid OpenSSH key by typing the following command:
ssh-agent bashssh-add /root/.ssh/rootid
3. Change the working directory by typing the following command:
cd /usr/local/avamar-tomcat-7.0.59/webapps/dtlt/images/banner4. Make backup copies of the original graphics by typing the following commands:
cp ProductNameAvamar.png ProductNameAvamar.png_origcp ProductNameDTLT.png ProductNameDTLT.png_orig
5. Move the new logos to the current working directory as ProductNameAvamar.png and ProductNameDTLT.png.
6. If the new graphics do not appear, delete the cached copies of previously viewed files in the web browser, and then refresh the page.
Changing the web UI portAccess to the web UI requires HTTPS communication between the Avamar server and the client web browser. When a user requests abackup or restore by using the Avamar client menu, the default web browser on the client is instructed to contact the Avamar server onport 443, the standard HTTPS port. On the Avamar server, this initial request to port 443 is redirected to port 8443, the HTTPS port forthe web UI. You can change the initial contact port by editing the avscc.cfg configuration file on the client and the Apache SSLconfiguration file on the server.
Steps
1. To use the new port number, edit the avscc.cfg file on the client computer:
a. Open avscc.cfg in a text editor.
On Windows clients, the file is in the %SystemDrive%\Program Files\avs\var directory. On all other clients, the file is inthe /usr/local/avamar/var directory.
276 Avamar Desktop/Laptop

If avscc.cfg does not exist at this location, then create the file.
b. Add the following line to the file:
--dtlt-port=n
where n is the initial contact port number.
c. Save and close avscc.cfg.
d. Restart the client.2. Edit the Apache SSL configuration file on the Avamar server:
a. Open a command shell and log in as admin on a single-node server or on the utility node of a multi-node server.b. Open the Apache SSL configuration file in a text editor.
On Red Hat Enterprise Linux, the file is /etc/httpd/conf.d/ssl.conf. On SuSE Linux Enterprise Server, the file is /etc/apache2/vhosts.d/vhost-ssl.conf.
c. Find the HTTPS port listening directive and change Listen 443 to Listen n, where n is the initial contact port number.
d. Save and close the file.e. Restart the Apache server process by typing apachectl restart.
Changing the secure token time-out valueAvamar Desktop/Laptop includes a temporary secure token as part of the URL it uses to begin a backup or restore session in a client webbrowser. The client web browser must establish an HTTPS connection with the Avamar server before the token expires or the session isrejected and the backup or restore cannot proceed. You can edit the default time-out value of 20 s.
Steps
1. Open a command shell and log in by using one of the following methods:
• For a single-node server, log in to the server as admin.• For a multi-node server:
a. Log in to the utility node as admin.b. Load the admin OpenSSH key by typing the following command:
ssh-agent bashssh-add ~admin/.ssh/admin_key
2. Stop the MCS by typing the following command:
dpnctl stop mcs3. Change the working directory by typing the following command:
cd /usr/local/avamar/var/mc/server_data/prefs4. Open mcserver.xml in a text editor.
5. In the <node name="dtlt"> section, edit the value of <entry key="expire_data_after_secs" value="20" />from 20 to the new time-out value in seconds.
6. Save the change and close the file.7. Start the MCS and the scheduler by typing the following command:
dpnctl start mcsdpnctl start sched
Forcing clients to use the alternate file browsing methodThe Avamar client web UI uses the OS-specific file browsing services on the client computer to provide a file manager interface for usersto select local files and folders to back up or restore. However, if these services are not available because the client uses NAT or becausea firewall rule blocks port 28002 on the client, then an alternate file browsing method is offered. You can require clients to use thealternate file browsing method.
About this task
One reason to change is to support the removable media. The default file browsing method does not support removable media, but thealternate method does.
The alternate method uses a Java applet to provide file browsing services. When the default services are unavailable, and the user electsto permit the alternate method, the Java applet is loaded. During loading of the applet, the user may see authentication warnings about
Avamar Desktop/Laptop 277

the website certificate of the Avamar server and the digital signature of the Java applet. Acknowledge these warnings or the applet doesnot load.
After the applet loads, the web page is automatically refreshed to allow the Avamar client web UI to use the applet. The user must restartthe task after the page is refreshed.
To force clients to use the alternate file browsing method, add the useAppletToBrowseLocalFile property to thedtlt.properties file on the Avamar server, and set the value to true.
Backup with Avamar Desktop/LaptopAvamar Desktop/Laptop provides several methods for starting a client backup.
The following table describes the methods for starting a client backup, and the options that are available for the method.
Table 118. Descriptions of methods for starting an Avamar Desktop/Laptop client backup
Method Description Options Dataset
Scheduled Avamar server automatically backs upthe client according to the schedulespecified for the client's group.
• User selected backuptime
• Add data
The dataset that is specified for thescheduled group, or the dataset that isassigned to the computer. When AddData is enabled, the dataset alsoincludes folders that the user hasadded.
Single-click Avamar server queues a backup of theclient when a user clicks Back UpNow on the client.
• Add data The dataset for each group that isassociated with the computer, or thedataset that is assigned to thecomputer. When Add Data is enabled,the dataset also includes folders thatthe user has added.
Interactive User clicks Back Up and the web UIappears. User selects from availablestart and data options and clicks BackUp Now on the Backup page. Avamarserver adds the backup to the backupqueue on the Avamar server.
• Add data• On-demand backup
set
The dataset of the group that the userselects from the groups that areassigned to the client. When Add Datais enabled, the dataset also includesfolders that the user has added. WhenSelect Now (on-demand backup setoption) is enabled and clicked, thedataset only includes the files andfolders that the user selects.
Scheduled backupsPerform scheduled backups of Avamar Desktop/Laptop client computers the same way that you back up other Avamar client computersin the environment. Create datasets, schedules, retention policies, and groups for the backups by using Avamar Administrator.
Users see the groups that are associated with an Avamar Desktop/Laptop client on the Backup page in the web UI.
The next scheduled backup time for each group that is associated with an Avamar Desktop/Laptop client also appears on the Backuppage. The group's policy normally determines the schedule start time for that group's backups. For individual Avamar Desktop/Laptopclients, you can permit users to select a different start time for their client's scheduled backups.
Allowing users to select the start time for scheduled backupsPermit users of an Avamar Desktop/Laptop client to select a start time for the client's scheduled backups that is different from the starttime that is assigned through group policy.
About this task
When you enable this feature for an Avamar Desktop/Laptop client, users can select from a list of administrator-defined times that appearon the Backup page in the web UI. The selected start time applies to all subsequent scheduled backups for the client.
To prevent gaps in protection, Avamar Desktop/Laptop clients continue to use the user-selected backup start time even when youremove that time from the Override Daily Schedule. When the user next logs in to the web UI Avamar Desktop/Laptop prompts theuser to select a new start time from the Backup page.
278 Avamar Desktop/Laptop

The Avamar server associates a user-selected start time with the client's group. Removing the client from a group also removes the user-selected start time for that client.
Steps
1. Ensure that the client belongs to a group that uses a daily schedule.2. Using AUI, add time entries to the Override Daily Schedule.
NOTE: The Override Daily Schedule displays time values using the time zone of the Avamar server. Avamar Desktop/
Laptop uses the time zone of the client when displaying the times that appear on the Backup page.
3. Using Avamar Administrator, enable Allow override of group's daily schedule for the client.
Add data optionFor scheduled backups and for on-demand backups, allow users to specify folders to include in the group policy-based backups of anAvamar Desktop/Laptop client computer.
When the Add data option is enabled, Avamar Desktop/Laptop creates backup datasets for the client computer by adding the folders thatthe user selects to the dataset of each group that the Avamar Desktop/Laptop client computer belongs to. Avamar Desktop/Laptopapplies the exclusions and inclusions in the dataset policy of each group to the folders that the user specifies.
Use Avamar Administrator to enable this option.
After you enable the Add data option, users add folders by clicking Add Data on the Backup page of the web UI, and selecting thefolders.
Single-click backupsUsers can start an on-demand backup on an Avamar Desktop/Laptop client computer by a single click on the Back Up Now button onthe client menu or on the backup reminder dialog box.
The data that is included in a single-click backup depends on the operating system of the client computer. The following table describesthe data that is included for specific operating systems. When the Add data option is enabled, Avamar Desktop/Laptop also adds userselected folders to the data included in the backup.
Table 119. Datasets for single-click on-demand backups
Operating system Data included in the backup
• Windows• Mac
Dataset for each group that the client belongs to
• Linux• Windows Server• Mac OS X Server
Dataset that is assigned to the computer
Interactive backupsInteractive backups allow users to select a backup group that is associated with the client and back up the client by using the group'ssettings. When on-demand backup sets are enabled, interactive backups also allow users to choose instead to back up only selected filesand folders.
Group selectionTo perform an interactive backup of a single group:
1. Select Back Up... on the Client menu.2. Select the backup group on the Backup page in the Web UI.3. Click Back Up Now.
When a user runs an interactive backup of a group, all policies that are associated with the selected group apply to the backup.
An interactive backup of a group differs from a single-click backup because in an interactive backup of a group only the selected group isbacked up.
Avamar Desktop/Laptop 279

File and folder selectionTo allow users to back up selected files on an Avamar Desktop/Laptop client without regard for the group policies that are assigned to theclient, enable on-demand backup sets. After enabling on-demand backup sets, users on Windows, Mac, and Linux computers that areAvamar Desktop/Laptop clients can create sets of folders and files to back up through on-demand backups. Users can create multiplesets, save the sets for reuse, and send a backup that is based on a set to the backup queue of the Avamar server.
On-demand backup sets do not change the data that is backed up according to the group policies that are assigned to the AvamarDesktop/Laptop client.
The Avamar server can be configured to limit the number of on-demand backup set backups that can be started from an AvamarDesktop/Laptop client.
To store backup data to the Data Domain, consider the following information:
• If a Data Domain system has been configured for the Avamar server, on-demand backups go to the GSAN.• If a single Data Domain system has been configured for the Avamar server, on-demand backups go to the Data Domain.• If there are multiple Data Domain systems configured for the Avamar server, on-demand backups are sent to the Data Domain, which
has more available space.
Allowing users to create on-demand backup setsEnable users on Windows, Mac, and Linux clients that use Avamar Desktop/Laptop to create on-demand backup sets.
Steps
1. Enable the Allow file selection on client initiated backups setting in Avamar Administrator by overidding the group policy settingfor the client.
2. Change the value of the allowUserInititedBackupsFileSelection key in the dtlt.properties file on the Avamarserver to true.
3. Users create the on-demand backup sets:
a. On the Avamar Desktop/Laptop client computer, right-click the Avamar icon and select Back Up....The web UI opens to the Backup page.
b. In Select folders and files to backup, click Select Now.The On-Demand Backup Sets dialog box appears.
c. To back up, and click OK, select the folders and files.d. To save the backup set for reuse, type a name for the backup set in Save backup set as, and click Save.e. (Optional) To instruct the Avamar server to add a backup of the on-demand backup set to the backup queue, click Start Backup,
and click OK.4. Users instruct the Avamar server to add a backup of a saved on-demand backup set to the backup queue:
a. On the Avamar Desktop/Laptop client computer, right-click the Avamar icon and select Back Up....The web UI opens to the Backup page.
b. In Select folders and files to backup, click Select Now.The On-Demand Backup Sets dialog box appears.
c. In Load Backup Set, select the backup set.d. Click Start Backup, and click OK.
Setting an on-demand backup limitSet a limit on the number of on-demand backup set backups that a user can add to the Avamar server's task queue.
About this task
By default, Avamar server uses the following rules for on-demand backup set backups:
• Only one on-demand backup set backup from a client is allowed in the task queue at a time.• An on-demand backup set backup cannot start while a backup for the client is running.• No limit on the number of on-demand backup set backups of a client that a user can add to the task queue.
To set a limit on the number of on-demand backup set backups that can occur each day for Avamar Desktop/Laptop client computers,set the restrictBackupsPerDay property in the dtlt.properties file on the Avamar server.
The following table describes the available values.
280 Avamar Desktop/Laptop

Table 120. Supported values for the restrictBackupsPerDay property
Value Description
false There is no limit on the number of on-demand backup set backupsthat can successfully run in a day. No limit is the default setting.
0 Users cannot run on-demand backup set backups.
n No more than n on-demand backup set backups can occur foreach client in a day. As used here, n is any positive integer less thanor equal to 100, and a day is defined as midnight to midnight in thetime zone for the Avamar server.
The specified value applies to all clients activated on the Avamar server. All successfully completed backups for all users on an AvamarDesktop/Laptop client computer count toward the total number of backups allowed each day.
NOTE: This limit applies only to backups that are based on a user-created on-demand backup set.
Disabling on-demand backupsPrevent users from performing on-demand backups from Avamar Desktop/Laptop client computers. This setting applies to both single-click on-demand backups and interactive on-demand backups.
Steps
1. In Avamar Administrator, click the Policy launcher link.The Policy window is displayed.
2. Click the Clients tab.3. Disable on-demand backups for either a single client or multiple clients.
Number of clients Steps to disable on-demand backups
One a. Select the client and click Edit.b. In the Edit Client dialog box, clear Allow client initiated backups.c. Click OK.
Two or more a. Select the clients and click Edit.b. In the Edit Multiple Clients dialog box, change Allow client initiated backups to No.c. Click Apply Change.d. Click OK.
Changing the retention policy for on-demand backupsThe End User On Demand Retention policy controls the retention of data for on-demand backups. You can change the End User OnDemand Retention policy on an Avamar server by using Avamar Administrator. The change applies to all on-demand backups initiated by aclient that is activated with that server. However, the change only applies to on-demand backups that occur after the change.
Steps
1. In Avamar Administrator, select Tools > Manage Retention Policies.The Manage All Retention Policies window is displayed.
2. Select End User On Demand Retention from the list and click Edit.The Edit Retention dialog box appears.
3. In Retention period, type a number and select a unit of time (days, weeks, months, or years).4. Click OK.
Avamar Desktop/Laptop 281

Restore with Avamar Desktop/LaptopThe following topics provide information on performing a restore and controlling restore-related settings in Avamar Desktop/Laptop.
Finding data to restoreAvamar Desktop/Laptop users can use the web UI to either browse to or search for folders, files, and file versions to restore.
Browsing for data to restoreFrom the left-side menu, select Browse to view the backups for a client computer in a tree view that you can browse to find folders andfiles to restore.
To browse a specific backup instead of all backups for the client, use Backup Date and Time to select the date and time of the backup.
Searching for data to restoreFrom the left-side menu in the web UI, select Search to search for specific folders and files to restore. To start a search, type a searchstring in the search field, and click Search. Results appear as they are gathered, and a progress indicator provides information about thelength of the search.
The search string that you specify in the search field must be 255 characters or fewer and is not case sensitive. Supported wildcards inthe search string include an asterisk (*) to represent zero or more characters and a question mark (?) to represent one character.
The string is compared to the names of all folders and files in the backups for the client computer. If all or part of a folder or file namematches the string, then the folder or file name appears in the search results.
Selecting a file versionThe backups for a client computer contain more than one version of many of the files that are backed up. When a file is backed up andthen subsequently edited, the next backup contains a new version of the file. Each version is kept for the retention period set by theAvamar administrator.
The number of versions of a file in the client backups depends on many factors, including:
• The length of time that backed up data is retained• The frequency of backups• How often the file is edited
When there are multiple versions of a file in the backups for a client, a version icon appears next to the file name when you browse orsearch for data to restore. To select a version of the file other than the most recent version, click the version icon and then select theversion. Then choose whether to overwrite the existing file on the client computer or to restore the file version with a new name.
Restore typesAvamar Desktop/Laptop users can restore data to the original location or to a new location on the same computer. Users can restore datawith the same name or a new name.
When users restore data to the original location with the same name, the restore process overwrites any current local file versions withthe restored files. This type of restore is useful in situations where the current local versions contain errors or have data corruption issues.
To avoid overwriting the current local file versions, users can restore to a new location, restore with a new name, or both.
Domain users can restore files from any Windows or Mac computer on which they have a user profile to the Windows or Mac computer towhich they are logged in. You can disable restore from a different computer by setting the value of thedisableRestoreFromAlternateComputer property in the dtlt.properties file on the Avamar server to true. This is a globalproperty that affects all clients.
Linux and Mac limitation on restoreLinux and Mac users who do not have write permission for the root folder cannot use Avamar Desktop/Laptop to restore their completedirectory structure to the original location. The operating system views this type of restore as an unauthorized try to write to the rootfolder and prevents it.
Trying to restore a complete directory structure fails when all the following are true:
282 Avamar Desktop/Laptop

• User logs in to a Mac or Linux computer with a user account that does not have write permission for the root folder.• User logs in to the Avamar Desktop/Laptop web UI using the Avamar Authentication method.• On the Avamar Desktop/Laptop Browse page, the user selects the complete directory structure.• User does not select a new location for the restore.
Workarounds
To work around this limitation, use either of the following methods for the restore:
• Restore the complete directory structure to a new location.• Restore less than all the files in the directory structure.
For example, clear one file from the folder that is furthest down the hierarchy of the restore set. Restoring less than all the files worksbecause the operating system views the subsequent restore as a series of write operations to folders beneath the root folder.
Restore requirementsTo restore from a different computer before you perform a restore, review the permissions requirements and the requirements.
Restore permissionsThe data that users can browse to, search for, and restore depends on user login account permissions.
When users search or browse for data to restore, the results that appear are filtered based on the current login credentials and the datathat has been backed up from the client computer. The following table provides details on the filtering.
Table 121. Avamar Desktop/Laptop data restore filtering
Data type Filtering on Windows Filtering on Mac
Folders Displays all folders for which the logged inuser is owner or is a member of a groupwith ownership rights, and any folder thatcontains folders or files for which the userhas rights.
Displays all folders for which the logged inuser has Read permission either as owner orbased on the folder's group or otherpermissions.
Files Displays all files that the logged in userowns.
Displays all files that the logged in userowns.
When users browse for data to restore, the following actions happen:
• A folder that a user does not have ownership rights for appears on the file system path for a folder or file for which the user hasownership rights. This option helps to provide a more accurate representation of the file system on the computer.
• A dimmed checkbox appears next to the folders. The folders are not restored when you restore a folder or file that includes them in itspath.
Users can restore data only if their login credentials grant operating system Write permission for the restore location. To restore data thathas the same path and name as data on the client computer, the login credentials must authenticate the user as the owner of the existingdata before the restore proceeds.
To restore files on Windows, the login account must have the Restore files and directories user right in Local Security. Thisuser right is assigned by default to accounts that are members of either the Administrators or Backup Operators groups. Assign the rightto an account that is not a member of either of these groups, or of another group that includes this user right, before a user can use theaccount to restore data.
Requirements to restore from a different computerTo restore from a different computer, meet the requirements in the following table.
Table 122. Requirements to restore from a different computer with Avamar Desktop/Laptop
Category Requirement
Operating system • Windows operating system• Mac operating system
Avamar Desktop/Laptop 283

Table 122. Requirements to restore from a different computer with Avamar Desktop/Laptop (continued)
Category Requirement
NOTE: Restores between Windows and Mac computersare supported.
Account type Domain
Profile Both source and target computers have a local profile for theuser’s domain account.
NOTE: A local profile for a domain account is createdautomatically at a user’s first login on the computer.
Avamar client Version 7.0 or later is installed on both source and target.
Avamar server Both source and target are activated with the same Avamar serverand the server is running Avamar 7.0 or later.
Backup There is at least one qualifying backup. A qualifying backup iscompleted successfully after:
• Avamar Desktop/Laptop 7.0 or later is installed on the sourcecomputer.
• A local profile for the user’s domain account is created on thesource computer.
By default, users with local administrator rights on a Windows source computer at the time of a backup can restore any file from thatsource computer to a target computer, regardless of file ownership. You can change this behavior to restrict their access to only files thatthey own. To restrict file access for Windows administrators, change the value of the checkAlternateComputerOwnershipproperty in the dtlt.properties file on the Avamar server to true.
Restore limitsYou can limit the amount of data in a single restore task and the number of concurrent restore tasks for a client computer.
Restore data size limitAvamar client users do not normally have a limit on the amount of data that is restored in a single task. This default setting enables a userto restore an entire backup in a single task. Large restore tasks can cause undesirable load on the network. Set a restore data size limit tocontrol the network load that these large restore tasks cause.
When you set a limit, individual users cannot restore more than the limit in any one restore task. Users must restore files that exceed thelimit in multiple tasks that do not exceed the limit, or an administrator must perform the restore.
NOTE: By design, the restore data size limit does not apply to server-class clients (those clients with a very large
backup data set).
To specify a restore data size limit, uncomment the limitRestoreSize key in the dtlt.properties file on the Avamar server, andset the value to the data size limit in MB.
Restore queue limitThe Avamar client web UI minimizes network and server load by blocking restore requests for clients that already have a restore task inthe queue. Users who start a new restore while one task is pending receive a message that the request is blocked. After the pending taskis complete, users can begin with a new restore task. You can change this behavior to allow users to start multiple restore tasks. Thechange applies to all clients of the Avamar server.
To remove the restore queue limit, change the value of the disallowMultipleRestores property in the dtlt.properties file onthe Avamar server to false.
284 Avamar Desktop/Laptop

Restore of replicated backupsYou can move an Avamar client to a new Avamar server by using Avamar Client Manager replication commands. When you move a client,the backups for the client are replicated on the new server. Avamar Desktop/Laptop must index replicated backups before they areavailable to browse or search in the web UI.
When a user logs in from the web UI on the client after the client has been moved, the Replicated Backups Available dialog boxappears. The user can either start indexing of the replicated backups or close the dialog box without starting indexing. When the usercloses the dialog box without indexing, an alert icon appears on the web UI banner bar. The user can also start indexing from the alert icon.
Indexing is a one-time task for a computer that has been moved to a new server. It runs in the same session in which it is started. When itcompletes, Avamar Desktop/Laptop sends the web browser a refresh command. The data from the replicated backups appears in theweb UI.
Client backup and restore activity historyThe History page in the Avamar Desktop/Laptop web UI provides a 14-day record of backup and restore activity on the client computer.
The Activity History section of the History page provides information about each backup and restore initiated during the past 14 days.The section also provides links to more detailed information about the backups. Information includes the results of the activity, the startdate and time, the duration of the activity, the amount of data, and the workorder ID. Click the activity label for a backup to view a list offiles in the dataset for the backup.
To view the backup history for a different computer, select the computer from the list. Meet the requirements in Requirements to restorefrom a different computer on page 283 before viewing the backup history for a different computer.
Editing Avamar Desktop/Laptop parametersThe Avamar Desktop/Laptop properties file, dtlt.properties, enables you to change parameters that affect functionality for allAvamar Desktop/Laptop clients that connect to the Avamar server. The file is on the Avamar server at: /usr/local/avamar/etc/dtlt.properties.
Steps
1. Open a command shell:
a. Log in to the server as admin.b. Switch user to root by typing the following command:
su -c. For a multi-node server, load the rootid OpenSSH key by typing the following command:
ssh-agent bashssh-add /root/.ssh/rootid
2. Change directory to /usr/local/avamar/etc by typing the following command:
cd /usr/local/avamar/etc3. Open dtlt.properties in a text editor.
4. Create or edit parameters.5. Save and close the file.
Avamar Desktop/Laptop parametersThe following table lists the parameters that are available in the dtlt.properties file.
Table 123. Avamar Desktop/Laptop parameters
Parameter Description
allowLocalUsers Enables and disables local user access for pass-throughauthentication. Uncomment the parameter by removing the # infront of the parameter, and then set the value to true to enablelocal user access for pass-through authentication. Use the default
Avamar Desktop/Laptop 285

Table 123. Avamar Desktop/Laptop parameters (continued)
Parameter Description
value of false to disable local user access for pass-throughauthentication.
allowServerRestores Enables or disables locally started restores on server classcomputers. Use the default value of true to allow restores onserver class computers, or false to disable restores on serverclass computers.
allowUserInititedBackupsFileSelection Enables or disables the ability for users to create sets of foldersand files to back up in on-demand backups. To enable selectablebackup sets, enable the Allow file selection on client initiatedbackups setting for the client in Avamar Administrator, and thenset the value of theallowUserInititedBackupsFileSelection parameter totrue. Use the default value of false to disable selectable backupsets.
checkAlternateComputerOwnership Controls whether users with local administrator rights can restoreany file from the source computer or only files that they own.Specify true to restrict local administrators to restore only filesthat they own, or the default value of false to allow localadministrators restore any file from the source computer.
disableRestoreFromAlternateComputer Enables or disables restore from a different computer. Specifytrue to disable restore from a different computer, or the defaultvalue of false to enable restore from a different computer.
disallowMultipleRestores Controls whether users can start multiple restore tasks for a clientcomputer simultaneously. Specify false to allow multiplesimultaneous restores, or use the default value of true to preventmultiple simultaneous restores.
limitRestoreSize Controls whether to limit the amount of data that is restored in asingle task. To specify a limit, uncomment thelimitRestoreSize parameter and specify the data size limit inMB. The default limit is 500 MB.
maxDirectoryDepth Specifies the number of nested subfolders in each hierarchicalbranch of a backup that the Avamar Desktop/Laptop servertraverses during indexing. The default value is 3000.
restrictBackupsPerDay Controls whether there is a limit to the number of on-demandbackups that can be performed from the client computer in asingle day, and if so, the maximum number. Use the default valueof false if you do not want to limit the number of on-demandbackups that can successfully run in a day. Specify 0 to disable on-demand backups on the client computer. To limit the number ofon-demand backups that can successfully run in a day, specify thelimit as a positive integer that is less than or equal to 100.
useAppletToBrowseLocalFile Controls whether users use the OS-specific file browsing serviceson the client computer or the alternate file browsing method.Specify true to allow users to use the OS-specific file browsingservices, or false to force users to use the alternate filebrowsing method. The default value is false.
userLoginRequired Enables and disables pass-through authentication. Use the defaultvalue of false to enable pass-through authentication, or true todisable pass-through authentication.
286 Avamar Desktop/Laptop

Client log locationsLocal logs on client computers provide information about backup and restore operations and UI functionality.
Available logsThe following table lists the available logs on client computers.
Table 124. Available client logs
Log type Log file name Description
Workorder workorder_name.log, whereworkorder_name is the full name of a task
Provide detailed information about aspecific task.
Agent avagent.log Provides information about the status of allbackup and restore activity on thecomputer.
Console avscc.log Provides information about theperformance of the UI. A console log iscreated for each user on a computer.
These logs are accessible through the client UI, and also can be accessed directly.
Log locations on Windows computersOn Windows computers the logs are available through the paths in the following table.
Table 125. Paths to logs on Windows computers
Log Path
Workorder %SystemDrive%\Program Files\avs\var\clientlogs\
Agent %SystemDrive%\Program Files\avs\var\
Console %APPDATA%\Avamar\
Log locations on Linux and Mac computersOn Linux and Mac computers the logs are available through the paths in the following table.
Table 126. Paths to logs on Linux and Mac computers
Log Path
Workorder /usr/local/avamar/clientlogs
Agent /var/avamar/
Console On Linux: $HOME/On Mac:$HOME/.avamardata/
Avamar Desktop/Laptop 287

Data Domain System Integration
Topics:
• Overview of Data Domain system integration• Preparing to add a Data Domain system• Adding a Data Domain system
Overview of Data Domain system integrationYou can store Avamar backups on one or more Data Domain systems, and then seamlessly restore data from the backups.
You can back up both file system and application data to a Data Domain system. Storage of Avamar backups on a Data Domain system isrecommended in environments with large databases that have a high change rate. Store the following types of backups on the Avamarserver instead:
• File system backups• Virtual machine backups• Remote office backups• Backups of databases with low change rates
When you store VMware image backups on a Data Domain system, you can boot a lost or corrupted virtual machine almost instantly fromthe backup by using the instant access feature.
You also can store Avamar checkpoints for a single-node server or Avamar Virtual Edition (AVE) on a Data Domain system.
Integration of Avamar with Data DomainDD OS software handles the deduplication of data on a Data Domain system. The Data Domain Boost (DD Boost) library provides aninterface for an Avamar system to send data that is deduplicated at the source to a Data Domain system.
Avamar uses the DD Boost library through API-based integration to access and work with directories, files, and other items on the DataDomain File System. The DD Boost API gives an Avamar system an interface into some of the properties and capabilities of the DataDomain system. This interface enables an Avamar system to control backup images that are stored on Data Domain systems. It alsoenables Avamar to manage maintenance activities and to control replication to remote Data Domain systems.
DD Boost is installed on the backup clients and on the Avamar utility node or an Avamar single node system. DD Boost is installedautomatically when you install the Avamar client or server software.
You can specify whether specific backup datasets are stored on an Avamar server or a Data Domain system.
When you select an Avamar server as the backup target, the Avamar client on each host performs deduplication segment processing. TheAvamar client sends the backup data and the associated metadata to the Avamar server.
When you select a Data Domain system as the backup target, the backup data is transferred to the Data Domain system. Simultaneously,the Avamar client sends the associated metadata to the Avamar server for storage. The metadata enables the Avamar managementsystem to perform restore operations directly from the Data Domain system without first staging the restored data on the Avamarsystem.
The process of data recovery is transparent to the backup administrator. The backup administrator uses the same Avamar recoveryprocesses that are native to current Avamar implementations.
File system backups on a Data Domain systemAvamar supports Data Domain system storage of file system backups for the following operating systems:
• Windows and Windows Server• IBM AIX• HP-UX (IA-64 only, requires ONCPlus Library revision 11.31.06 or later)
15
288 Data Domain System Integration

• Solaris (for Solaris 10 on SPARC, client side deduplication is disabled and deduplication is performed on the Data Domain system)• Red Hat Enterprise Linux (RHEL)• SUSE Linux Enterprise Server (SLES)• Mac 10.8, 10.9, and 10.10
NOTE: Only 64-bit operating systems are supported.
The E-lab Navigator provides detailed compatibility information.
Application backups on a Data Domain systemYou can store application data backups from the following Avamar plug-ins on a Data Domain system:
• Avamar Plug-in for DB2• Avamar Plug-in for Exchange VSS• Avamar Plug-in for Hyper-V VSS• Avamar Plug-in for Lotus Domino• Avamar Plug-in for Oracle• Avamar Plug-in for SAP with Oracle• Avamar Plug-in for SharePoint VSS• Avamar Plug-in for Sybase ASE• Avamar Plug-in for SQL Server
You can also store VMware image backups and backups with the Avamar NDMP Accelerator on a Data Domain system.
Data Domain Cloud Disaster RecoveryThe Data Domain Cloud Disaster Recovery (Cloud DR) solution facilitates the disaster recovery of on-premises virtual machines byproviding the capability to recover virtual machines in the cloud.
Cloud DR works with on-premises Avamar software and on-premises Data Domain storage to replicate backups of virtual machine data tothe public cloud. It can work with AWS S3 or Azure blob object storage.
Cloud DR can perform disaster recovery of production environments by recovering a complete virtual machine as an Amazon WebServices Elastic Compute Cloud (EC2) instance or as an Azure virtual machine. It can also recover directly to an on-premises VMwarevCenter server or to a VMware Cloud on AWS.
The Avamar and Data Domain System Integration Guide and the Cloud Disaster Recovery Installation and Administration Guide providemore information about using Avamar with Data Domain Cloud Disaster Recovery.
VMware instant accessWhen you store VMware image backups on a Data Domain system, you can boot some lost or corrupted virtual machines from the backupby using the instant access feature.
With instant access, the virtual machine image backup is staged to a temporary NFS share on the Data Domain system. You can then usethe vSphere Client to power on the virtual machine and initiate a vMotion of the virtual machine to a datastore within the vCenter. Whenthe vMotion is complete, the restored virtual machine files no longer exist on the Data Domain system. Then yo use Avamar Administratorto delete the NFS share on the Data Domain system.
NOTE: When you use instant access, do not leave the virtual machine running on the Data Domain system for extended
periods. When the virtual machine runs on the Data Domain system, performance might degrade because of the
workflow.
You can also restore a virtual machine to the production environment instead of using instant access. The Avamar software leveragesChanged Block Tracking (CBT) to dramatically speed the recovery process.
The Avamar for VMware User Guide provides details on instant access and restore of image backups.
Data Domain System Integration 289
Cloud tierWhen you store Avamar backup data on a Data Domain system, you can also configure the backups to be tiered to the cloud.
Data Domain Cloud Tier support was initiated with Avamar 7.4. DD Cloud Tier moves data from Data Domain to the cloud. From theAvamar Administrator, you can configure cloud tier to move Avamar backups from Data Domain to the cloud, and can perform seamlessrecovery of these backups.
Data Domain Cloud Tier disaster recovery support was initiated with Avamar 7.5. You can recover backups from the cloud in case of theloss of a Data Domain and you can also recover an Avamar server from the cloud.
The Avamar and Data Domain System Integration Guide provides more information about cloud tier with Data Domain.
Checkpoints on a Data Domain systemYou can store Avamar checkpoints for a single-node server or Avamar Virtual Edition (AVE) on a Data Domain system that uses DD OS5.3 or later. Checkpoints are system-wide backups of the Avamar server for disaster recovery purposes.
Storage of checkpoints on a Data Domain system is recommended in environments that do not include the following options:
• Replication to a secondary Avamar server.• Environments where most client backups are stored on a Data Domain system.
To configure storage of checkpoints on a Data Domain system, select the Use as target for Avamar Checkpoint Backups checkboxwhen adding or editing the Data Domain system in Avamar Administrator.
Contact Avamar Professional Service representatives for assistance with rolling back the Avamar server to a checkpoint on a Data Domainsystem.
Data Domain system streamsEach Data Domain system has a soft limit to the maximum number of connection and data streams that can be sustained simultaneouslywhile maintaining performance. The number of streams varies depending on the Data Domain system model.
Configure the maximum number of streams Avamar can use when adding a Data Domain system to the Avamar server. The Avamarserver uses the backup stream value to limit the number of concurrent backups or restore jobs.
If the Data Domain system is fully dedicated to the Avamar server, the stream value that is entered in Avamar Administrator could be themaximum number of streams that the Data Domain system model supports. In cases where the Data Domain system is shared with otherthird-party applications or another Avamar server, a subset of the number of streams should be allocated.
Each Avamar backup client that supports multi-stream backups can be configured to use the correct number of streams (typically basedon the number of databases). This step is done through multi-streaming configuration when the Avamar backup job is configured. Thestreams are released when the backup or restore operation completes. The number of streams that are allocated should depend on thenumber and type of Avamar clients that backs up data about the same time.
Replication with Data Domain systemsWhen an Avamar system stores backups on a Data Domain system, Avamar replication uses DD Boost to copy backups from the originalData Domain system and to create replicas on another Data Domain system.
Supported replication configurationsThe following table lists the supported replication configurations for Avamar replication using DD Boost.
Table 127. Replication configurations for Avamar replication using DD Boost
Backup storage Replication storage
Single Data Domain system Single Data Domain system
Single Data Domain system Multiple Data Domain systems
Multiple Data Domain systems Single Data Domain system
Multiple Data Domain systems Multiple Data Domain systems
290 Data Domain System Integration

In a configuration where the replication storage consists of multiple Data Domain systems, control the system which receives the replicasby mapping a domain on the source Avamar server to a destination Data Domain system. Specify the Data Domain system with the defaultdestination. Avamar replicates to the default destination when a destination Data Domain system is not identified.
The Avamar and Data Domain System Integration Guide provides instructions on storage mapping and specifying the default destinationData Domain system.
Replication detailsThe following details apply to Avamar replication with Data Domain systems:
• Data transfer during replication is between the Data Domain systems, without intermediate staging• Replication uses DD Boost to copy backups and to write replicas• Requires a Data Domain replication license• Does not use Data Domain replication• Replication is configured and monitored on the Avamar server• Replication task scheduling uses Avamar replication schedules only• Data Domain administration tools are not used
Monitoring and reporting Data Domain system statusAvamar can collect and display data for health monitoring, system alerts, and capacity reporting on a Data Domain system by using SimpleNetwork Management Protocol (SNMP).
SNMP enables monitoring Data Domain activities, events, capacity, and system status in the same way as monitoring activities, events,capacity, and system status for the Avamar server. Configure SNMP settings when adding a Data Domain system to the Avamarconfiguration.
The Avamar Reports Guide provides more information about creating reports. To analyze the system, run the reports.
The Avamar and Data Domain System Integration Guide provides more information on monitoring system status for a Data Domainsystem.
Security with Data Domain system integrationThe following sections provide details on security in an Avamar environment with Data Domain for encryption and user access.
EncryptionThe DD Boost library supports data encryption between the Avamar client and the Data Domain system for DDOS 5.5 or newer. The DDBoost library does not support data encryption between the Avamar client and the Data Domain system for DDOS 5.4.
Backups from the Avamar client to the Avamar server are always compressed and encrypted.
User accessUse caution when granting users access to the Data Domain system. Never provide authorization for a user to access the Data Domainsystem and manually delete the data.
Data migration to an attached Data Domain systemYou cannot migrate backup data directly from the Avamar server to an attached Data Domain system.
To start using the Data Domain system as the backup target for an Avamar client instead of the Avamar server, edit the dataset to usethe Data Domain system. Start performing backups to the Data Domain system. When changing the backup target to the Data Domainsystem, perform a full backup.
After you successfully perform a backup to the Data Domain system, you can delete the earlier backups from the Avamar server.
Data Domain System Integration 291

Enforcement of backups to Data DomainIn addition to selecting Data Domain as the storage target for a backup, administrators can configure an Avamar server to reject backupsthat are not destined for the configured Data Domain. This enforcement covers backups that you configure through the AvamarAdministrator and the AUI, as well as from command-line interfaces and other tools.
Without backup enforcement, if a backup does not specify Data Domain as the storage target, the Avamar server stores both the backupdata and metadata. This scenario can lead to unexpected capacity utilization issues. With backup enforcement, backups that do notspecify Data Domain as the storage target fail with a warning. Backups that specify a Data Domain storage target continue normally.
Backup enforcement is disabled by default. In this state, the server behavior is unchanged from previous Avamar releases.
NOTE: Backup enforcement does not affect the normal practices for storing and replicating maintenance backups of the
Avamar server, such as data from the MCS.
Configuring backup enforcement affects the replication behavior for environments that store any backups on the source Avamar server.The choice of enforcement mode may also impose software requirements on the source Avamar server.
The Avamar and Data Domain System Integration Guide provides more information.
Preparing to add a Data Domain systemBefore you add a Data Domain system to the Avamar configuration, install and configure both the Avamar server and the Data Domainsystem. Ensure that the environment meets the system requirements, and create a DD Boost user account on the Data Domain system.
System requirements for Data Domain system integrationEnsure that the environment meets the necessary system requirements before adding a Data Domain system to the Avamarconfiguration.
The following table lists the requirements for the Data Domain system.
Table 128. Data Domain system requirements
Feature or specification Requirement for use with Avamar
Data Domain Operating System (DD OS) DD OS 5.3 or newer
DD Boost DD Boost 2.6 or newerNOTE: DD Boost software enables backup servers tocommunicate with storage systems without the need forData Domain systems to emulate tape. There are twocomponents to DD Boost: one component that runs onthe backup server and another that runs on the DataDomain system. In the context of Avamar, thecomponent that runs on the backup server (DD Boostlibraries) is integrated into the Avamar client. DD Boostsoftware is an optional product that requires a license tooperate on the Data Domain system.
Data Domain device type Avamar supports any Data Domain system that supports theexecution of the required DD OS version.
Data Domain File System Enable Data Domain File System by using either the Data DomainSystem Manager or CLI. After you enable file system operations, itmay take up to 10 minutes before Avamar Administrator correctlyreflects the status of the Data Domain system. The time delay isincreased slightly when the Data Domain system is using the DDExtended Retention option. Do not perform backups, restores, orsystem maintenance operations until the status appears correctlyin Avamar Administrator. Otherwise, backups, restores, or systemmaintenance operations may fail.
DD Boost Enable DD Boost on the Data Domain system. When you enableDD Boost, DD Boost becomes the preferred method of
292 Data Domain System Integration

Table 128. Data Domain system requirements (continued)
Feature or specification Requirement for use with Avamar
connectivity for any clients that are enabled for DD Boost. Whilethis method is acceptable for clients that can take advantage ofDD Boost features, it can result in performance degradation forother clients. Proper due diligence and effective data gathering arekeys to avoiding such interactions, especially during upgrades.
DD Boost user account The DD Boost library uses a unique login account name that iscreated on the Data Domain system. This account name is knownas the DD Boost account. Only one DD Boost account exists perData Domain system. If the account is renamed and/or thepassword is changed, these changes must be immediately updatedon the Avamar system by editing the Data Domain configurationoptions. Failure to update the DD Boost account information couldyield integrity check errors or backup and restore problems. TheDD Boost account must have administrator privileges.
Capacity requirementsCarefully assess backup storage needs when evaluating how much data to store on the Data Domain system and the Avamar server. Addestimates from data that is sent to the Data Domain system from any other servers.
When the Data Domain system reaches its maximum storage capacity, no further backups to the Data Domain system occur untiladditional capacity is added or old backups are deleted.
Requirements when using other backup productsData Domain systems can use other third-party backup and archiving software. The Avamar server does not assume having soleownership of the Data Domain system. If the system is shared with other software products, ensure that proper sizing is evaluated.
The Avamar server does not use the native Data Domain system snapshot and replication features. Replication occurs through the DDBoost SDK library by using copying and cloning. However, other third party products might use the native Data Domain system snapshotand replication features. In this case, a snapshot of an entire Data Domain system or a replication of an entire Data Domain systemincludes the Avamar data.
Network requirementsThe Avamar server and all Data Domain systems must be on the same local network. Do not connect the Avamar server and Data Domainsystems over a Wide Area Network (WAN). Configurations that use a WAN are not supported.
You can use Avamar replication over a WAN to replicate data from source Avamar servers and Data Domain systems to target Avamarservers and Data Domain systems.
Before integrating a Data Domain system with an Avamar server, ensure that enough network bandwidth is available. Verify that thenetwork infrastructure provides more bandwidth than the bandwidth required by the maximum throughput of the Data Domain system.This step is to obtain the maximum throughput available on a Data Domain system (for restores, level zero backups, and subsequentincremental backups after a level-zero backup).
The network configuration must also meet the following requirements:
• Assign a Fully Qualified Domain Name (FQDN) to each Data Domain system.• Do not use IP addresses in place of hostnames when registering a Data Domain system. This action can limit the ability to route
optimized duplication traffic exclusively through a registered interface.• Ensure that DNS on the Data Domain system is correctly configured.• Ensure that forward and reverse DNS lookups work between the Avamar server, the Data Domain system, and all backup and restore
clients.• Use Hosts files to resolve hostnames to non-routable IP addresses.• Do not create secondary hostnames to associate with alternate or local IP interfaces.
Data Domain System Integration 293

NTP requirementsThe Avamar server, the Data Domain system, and all Avamar clients must use the same Network Time Protocol(NTP) server.
Port usage and firewall requirementsTo enable communication between Avamar and the Data Domain systems, review and implement the port usage and firewall requirementsin the following documents, which are available on Avamar Support:
• Avamar Product Security Guide• Port Requirements for Allowing Access to Data Domain System Through a Firewall Technical Note
Additional configuration settings when adding a Data Domain to the8TB or 16 TB AVEBefore adding a Data Domain system to the 8 TB or 16 TB Avamar Virtual Edition (AVE), it is recommended to modify the followingAvamar GSAN settings in order to improve system performance.
• avmaint config maxcompdatastripe=20971520 --avamaronly• avmaint config checkdiratomicrefs=true --avamaronly
Creating a DD Boost user accountBefore you can add a Data Domain system to the Avamar configuration, prepare the Data Domain system by enabling DD Boost andcreating a DD Boost user account for the Avamar server. This action is performed to access the Data Domain system for backups andrestores (and replication, if applicable).
About this task
If you change the DD Boost account name or password after you create the account, remember to edit the Data Domain systemconfiguration in Avamar Administrator. Otherwise all backups, restores, and maintenance activities fail.
Steps
1. Disable DD Boost on the Data Domain system by logging in to the Data Domain CLI as an administrative user and typing the followingcommand:
ddboost disable2. Create the DD Boost user account with administrator privileges by typing the following command:
user add username role adminwhere username is the username for the new account.
3. Set the new account as the DD Boost user by typing the following command:
ddboost set user-name usernamewhere username is the username for the account.
4. Enable DD Boost to allow the changes to take effect by typing the following command:ddboost enable
Adding a Data Domain systemYou can add a Data Domain system to Avamar by authenticating the Data Domain system with credentials, or by key-based SSH. If thelogin method by providing credentials (username/password) for a Data Domain system is disabled, you must import the SSH public key(/usr/local/avamar/lib/ddr_key.pub) from the Avamar server and add the key to the Data Domain system manually before connectingthem. Ensure that you have additional access to log in to the Data Domain system when login method by providing credentials for a DataDomain system is disabled.
Prerequisites
Perform the following steps if you want to authenticate the Data Domain system by key-based SSH:
1. Log in to the Data Domain system either as a sysadmin or with avamar_ostuser privileges where avamar_ostuser is the name of theDD Boost user for Avamar on the Data Domain system.
294 Data Domain System Integration

2. Add the SSH public key (/usr/local/avamar/lib/ddr_key.pub) from the Avamar server to the SSH authorized keys file on the DataDomain system by typing the command: adminaccess add ssh-key user Avamar_ostuser.
3. Ensure that the public key is successfully added to the Data Domain system by typing the command: adminaccess show ssh-key user Avamar_ostuser.
Steps
1. In Avamar Administrator, click the Server launcher link.The Server window is displayed.
2. Click the Server Management tab.3. Select Actions > Add Data Domain System.
The Add Data Domain System dialog box appears.4. On the System tab, specify Data Domain system information:
a. In the Data Domain System Name box, type the fully qualified domain name of the Data Domain system.
NOTE: Do not use an IP address or a secondary hostname that associates with alternative or local IP interfaces. It
may limit the ability of Avamar to route optimized deduplication traffic.
b. In the DDBoost User Name box, type the username of the DD Boost account for Avamar to access the Data Domain system forbackups, restores, and replication.
c. In the Password box, type the password for the account that Avamar uses to access the Data Domain system for backups,restores, and replication.
d. In the Verify Password box, type the password again for verification.e. If you have more than one Data Domain system that is associated with Avamar, you can specify one Data Domain system to be the
default replication storage. Select Use system as default replication storage if this system is the default replication storage.f. To store checkpoints for a single-node Avamar server or Avamar Virtual Edition (AVE) server on the Data Domain system instead
of the Avamar server, select the Use as target for Avamar Checkpoint Backups checkbox.g. Select the Use certificate authentication for REST communication checkbox to enable Avamar to use certificate-based
authentication while performing an operation with Data Domain system using REST-based communication.
NOTE: The Use certificate authentication for REST communication checkbox is displayed only on the Avamar
AUI.
h. To view the maximum number of streams that the Data Domain system supports, click Verify.i. Specify the maximum number of streams that Avamar can use at any one time to perform backups and restores:
• To specify a defined number of streams, type the number in the Max used by Avamar box.• To specify a maximum number of streams which are based on the percentage of the total number of supported streams:
i. Type the percentage in the Max used by Avamar box.ii. Select the As percentage of the max limit checkbox.
Consider both the maximum number of streams that the Data Domain system supports, as well as whether other applications areusing streams to send data to and receive data from the Data Domain system.
If the writing to and reading from the Data Domain system use all available streams, then Avamar queues backup or restorerequests until one or more streams become available.
5. To configure SNMP, click the SNMP tab.
SNMP configuration enables Avamar to collect and display data for system health monitoring, system alerts, and capacity reporting.
6. Verify the SNMP configuration:
• The Getter/Setter Port Number box lists the port on the Data Domain system from which to receive and on which to setSNMP objects. The default value is 161.
• The SNMP Community String box lists the community string Avamar uses for read-only access to the Data Domain system.• The Trap Port Number box lists the trap port on the Avamar server. The default value is 163.
7. To configure the cloud tier feature, click the Tiering tab.
Avamar software uses Cloud tier to move Avamar backup data from a Data Domain system to the cloud.
8. Click OK.A progress message appears.
9. When the operation completes, click Close.
Data Domain System Integration 295

Results
When you add a Data Domain system to the Avamar configuration, Avamar creates an MTree on the Data Domain system for the Avamarserver. The MTree refers to the directory created within the DD Boost path. Data Domain systems support a maximum of 100 MTrees. Ifyou reach the limit, you cannot add the Data Domain system to the Avamar configuration.
296 Data Domain System Integration

Command Shell Server Logins
Topics:
• User accounts• Starting command shell sessions• Switching user IDs• Using sudo
User accountsThe following user accounts are commonly used for system administration and maintenance tasks:
• root• admin
The admin account requires authentication by Secure Shell (SSH).
Starting command shell sessionsLog in to an Avamar server or utility node through SSH as the admin user. This action is performed for maintenance tasks andconfiguration for the Avamar system.
Prerequisites
NOTE: Cryptographic changes in Avamar 7.5.1 require the use of PuTTY 0.7 or later, and WinSCP 5.11.1 (build 7725) or
later.
Steps
• To start a command shell session on a single-node server, open a command shell and log in to the server as admin.• To start a command shell session on a multi-node server:
1. Open a command shell and log in to the utility node as admin.2. Load the admin OpenSSH key by typing the following commands:
ssh-agent bashssh-add ~admin/.ssh/admin_key
3. When prompted, type the admin_key passphrase and press Enter.
Switching user IDsYou can switch the user of a command shell session to root by typing su, and switch back to the previous login ID by typing exit. Whenyou switch the user of a command shell session to admin, you must also load the admin OpenSSH key.
Steps
1. Switch user to the admin user account and login shell by typing su - admin.
2. When prompted for a password, type the admin password and press Enter.3. Load the admin OpenSSH key by typing:
ssh-agent bashssh-add ~admin/.ssh/admin_key
A
Command Shell Server Logins 297

NOTE: To determine the active user account (login ID) of a shell session, type whoami.
Using sudoOn Gen4 and later Avamar Data Stores, the admin user accounts are automatically added to the sudoers file. This option enables adminusers to run a limited set of commands that would otherwise require operating system root permission.
Prefixing commands with sudoInstead of switching user to root with the su command, the admin user can directly issue commands that require root permissions byprefixing each command with sudo.
About this task
For example, the following command installs MyPackage.rpm:
sudo rpm -ivh MyPackage.rpmIf prompted for a password, type the password and press Enter.
You might be periodically prompted to retype the admin password when prefixing other commands with sudo.
298 Command Shell Server Logins

Plug-in Options
Topics:
• How to set plug-in options• Backup options• Restore options
How to set plug-in optionsPlug-in options enable you to control specific actions for on-demand backups, restores, and scheduled backups. The available plug-inoptions depend on the operation type and plug-in type.
Specify plug-in options in the AUI for on-demand backup or restore wizards, or when a dataset for a scheduled backup is created. Setplug-in options with the graphical user interface (GUI) controls (text boxes, check boxes, radio buttons, and so forth). Type an option andits value in the Key and Value fields.
NOTE: The Avamar software does not check or validate the information that is typed in the Show Free Form section of
the More Options pane. The values in the Key and Value fields override settings that are specified with the GUI controls
for the options.
Backup optionsThe backup options that appear depend on the type of plug-in.
This section describes the backup options for the following plug-ins:
• AIX file system• FreeBSD file system• HP-UX file system• Linux file system• Macintosh file system• NetWare file system• SCO OpenServer file system
Backup options for the Avamar Plug-in for Microsoft Windows are available in the Avamar for Windows Server User Guide. Backupoptions for application plug-ins, such as SQL Server and SharePoint VSS, are available in the user guide for the plug-in.
The following tables describe the options that are available when performing an on-demand backup or when configuring a dataset forscheduled backups for the listed file system plug-ins.
Table 129. Backup plug-in options
Option Description
Store backup on Data Domain system Stores the backup on a configured Data Domain system instead of on the Avamar server.To store the backup on a Data Domain system, select the checkbox and then select theData Domain system from the list.
Encryption method to Data Domain system Specifies the encryption method for data transfer between the client and the DataDomain system.
Backup label Assigns this descriptive label to the backup.
B
Plug-in Options 299

Table 130. Backup plug-in options for (NetWare only) SMS Authentication
Option Description
Server login ID Specifies the SMS login username. For example, CN=admin.O=HOSTNAME_CTX.
Server password Specifies the password for the SMS login username.
Snapshot stored-on pool Specifies the snapshot stored-on pool name.
Table 131. Backup plug-in options for logging
Option Description
List backup contents Specifies how much information about the backup contents to include in the log files. Theinformation includes:
• No file listing• List file names• List files and dates
Informational message level Specifies how many informational messages to include in the log files. This option includes:
• No informationals—Suppresses all informational messages, but includes errors andwarnings in the log files.
• Some informationals—Includes some informational messages in the log files.• Many informationals—Includes additional status information in the log files.• All informationals—Provides maximum information. Includes all informational
messages, errors, and warnings in the log files.
Report advanced statistics Specifies whether to write advanced timing and deduplication statistics to the log files.
Enable debugging messages Specifies whether to write maximum information to log files, which creates large log files.
Table 132. Backup plug-in options for file system traversal
Option Description
Do not traverse any mounts Specifies whether to traverse mount points during the backup.
Traverse fixed-disk mounts Specifies whether to traverse only hard disk file system mount during the backup.
Traverse fixed-disk and remote networkmounts
Specifies whether to traverse both hard disk and NFS network mount points during thebackup.
Force traversal of specified file systemtype(s)
Accepts a comma-separated list of one or more file system types (for example, nfs, ext2,jfs, xfs) that should not be traversed during this backup.
Table 133. Backup plug-in options for pre-script
Option Description
Run user-defined script at beginning ofbackup
Runs a user-defined script at the beginning of the backup session. The script must belocated in /usr/local/avamar/etc/scripts.
Abort backup if script fails Specifies whether to stop the backup when the script returns a non-zero status code.
Table 134. Backup plug-in options for post-script
Option Description
Run user-defined script at end of backup Runs a user-defined script at the end of the backup session. The script must be locatedin /usr/local/avamar/etc/scripts.
Exit process with script failure exitcode Specifies whether avtar should exit with the exit code of the script instead of a standardavtar exit code.
300 Plug-in Options
Table 135. Backup plug-in client cache options
Option Description
Check client-side caches and reportinconsistencies
If selected, a backup does not occur. Instead, Avamar performs a validation check of theclient-side cache with the Avamar server.
Check and repair client-side caches If selected, a backup does not occur. Instead, Avamar performs a validation check of theclient-side cache with the Avamar server, and repairs inconsistencies.
Maximum client file cache size (MBs) Specifies the maximum client file cache size in MB. A negative value indicates a fraction ofRAM. For example, -8 specifies that no more than 1/8th of physical RAM should beallocated to the client file cache.
Maximum client hash cache size (MBs) Specifies the maximum client hash cache size in MB. A negative value indicates a fractionof RAM. For example, -8 specifies that no more than 1/8th of physical RAM should beallocated to the client hash cache.
Table 136. Backup plug-in advanced options
Option Description
Client-side flag file Specifies the path to a flag file on the client that contains additional option settings.
Network usage throttle (Mbps) Specifies a setting that reduces network usage to a specified rate, expressed as megabits/second. For example, 0 = unrestricted, 50% of a T1 = 0.72.
Directly connect to all server nodes Specifies whether to establish multiple connections to the server. Multiple connections canimprove backup performance.
Table 137. Quota limit per backup
Option Description
Soft limit size (MBs) Specify the soft limit size of a backup. If the size of the backup source exceeds the softlimit, the backup succeeds with a warning. If you specify both the soft and hard limit size,ensure that the soft limit size is smaller than the hard limit size.
Hard limit size (MBs) Specify the hard limit size of a backup. If the size of the backup source exceeds the hardlimit, the backup fails.
Restore optionsThe restore options that are available depend on the type of plug-in.
This section describes the backup options for the following plug-ins:
• AIX file system• FreeBSD file system• HP-UX file system• Linux file system• Macintosh file system• NetWare file system• SCO OpenServer file system
Restore options for the Avamar Plug-in for Microsoft Windows are available in the Avamar for Windows Server User Guide. Restoreoptions for application plug-ins, such as SQL Server and SharePoint VSS, are available in the user guide for the plug-in.
File system plug-in restore optionsThe following table describes the options that are available when you perform a restore using the listed file system plug-ins.
Plug-in Options 301
Table 138. File system plug-in restore options
Option Description
Overwrite existing files Controls behavior when the file to be restored exists. One of thefollowing:
• Never• Always• Generate New Name• If Modified• If Newer
Encryption method from Data Domain system If the backup was stored on a Data Domain system, select theencryption method to use for data transfer from the Data Domainsystem to the client.
NetWare only SMS Authentication restore optionsThe following table describes the options that are available when you perform a restore using NetWare only SMS Authentication.
Table 139. NetWare only) SMS Authentication restore plug-in options
Option Description
Server login ID (NetWare only) Specifies the SMS login username. For example,CN=admin.O=HOSTNAME_CTX.
Server password (NetWare only) Specifies the password for the SMS loginusername.
Logging restore plug-in optionsThe following table describes the logging options that are available when you perform a restore.
Table 140. Logging restore plug-in options
Option Description
List backup contents Specifies how much information about the backup contents toinclude in the log files. The information includes:
• No file listing• List file names• List files and dates
Informational message level Specifies how many informational messages to include in the logfiles. This option includes:
• No informational—Suppresses all informational messages, butincludes errors and warnings in the log files.
• Some informationals—Includes some informational messagesin the log files.
• Many informationals—Includes additional status information inthe log files.
• All informationals—Provides maximum information. Includes allinformational messages, errors, and warnings in the log files.
Report advanced statistics Specifies whether to write advanced timing and deduplicationstatistics to the log files.
Enable debugging messages Specifies whether to write maximum information to log files, whichcreates very large log files.
302 Plug-in Options

Pre-script restore plug-in optionsThe following table describes the pre-script options that are available when you perform a restore.
Table 141. Pre-script restore plug-in options
Option Description
Run user-defined script at beginning of restore Runs a user-defined script at the beginning of the restore session.The script must be located in /usr/local/avamar/etc/scripts.
Abort restore when script fails When the script returns a non-zero status code, specify whetherto stop the restore.
Post-script restore plug-in optionsThe following table describes the post-script options that are available when you perform a restore.
Table 142. Post-script restore plug-in options
Option Description
Run user-defined script at end of restore Runs a user-defined script at the end of the restore session. Thescript must be located in /usr/local/avamar/etc/scripts.
Exit process with script failure exitcode Specifies whether avtar should exit with the exit code of thescript instead of a standard avtar exit code.
Client cache restore plug-in optionsThe following table describes the client cache options that are available when you perform a restore.
Table 143. Client cache restore plug-in options
Option Description
Check client-side caches and report inconsistencies If selected, a restore does not occur. Instead, Avamar performs avalidation check of the client-side cache with the Avamar server.
Check and repair client-side caches If selected, a restore does not occur. Instead, Avamar performs avalidation check of the client-side cache with the Avamar server,and repairs inconsistencies.
Rebuild client-side caches from most recent backup Does not restore data. If selected, Avamar uses the contents ofthe last backup to re-create the client-side file cache.
Advanced restore plug-in optionsThe following table describes the Advanced plug-in options that are available when you perform a restore.
Table 144. Advanced restore plug-in options
Option Description
Do not descend into subdirectories Specifies whether to restore only the specified top-level directoryand not any subdirectories.
Recreate original path beneath target directory Specifies whether to re-create the original path to files anddirectories beneath the specified target directory. For example, ifyou restore /usr/MyDir/MyFile to /tmp and you select thisoption, then the full path to the restored file is /tmp/usr/MyDir/MyFile.
Plug-in Options 303

Table 144. Advanced restore plug-in options (continued)
Option Description
Directly connect to all server nodes Specifies whether to establish multiple connections to the server.Multiple connections can improve restore performance undercertain circumstances.
304 Plug-in Options

Adding Files to the Avamar Web Restore Page
Topics:
• Adding files to the Avamar Web Restore Downloads page• Adding files to the Avamar Web Restore Documentation page
Adding files to the Avamar Web RestoreDownloads pageYou can add software files that are specific to your environment to the Downloads page, which you access from the Avamar WebRestore page for Avamar Desktop/Laptop.
About this task
At installation, the Downloads page is populated with default software files. If required, include additional software on the Downloadspage.
Steps
1. Open a shell command and log in to the server as admin.2. Change directory to /data01/avamar/src/downloads/ by typing the following command:
cd /data01/avamar/src/downloads/3. Create a folder by typing the following command:
mkdir folder_namewhere folder_name is the location in which you want to place files, for example, the Golden_Tenant folder.
4. Change directory to /data01/avamar/src/downloads/folder_name.
For example:
cd /data01/avamar/src/downloads/Golden_Tenant
5. Copy files that you want to be downloadable to the user into the folder.6. Change directory to /usr/local/avamar/httpds/downloads/ by typing the following command:
cd /usr/local/avamar/httpds/downloads/7. Create an XML file to define the folder.
For example, for the Golden Tenant folder, the XML file is similar to the following example:
<?xml version="1.0" encoding="UTF-8"?><download heading="Golden Tenant" displayName="Plug-Ins" path="/DPNInstalls/downloads/Golden_Tenant/" />
where:
• heading—Defines the root folder name.
• displayName—Defines the sub-folder name.
• path—Defines the location of the software file on disk, in which /DPNInstalls/downloads points to /data01/avamar/src/downloads on the Avamar server.
8. Refresh the Downloads page to verify that you can see the newly uploaded files.
C
Adding Files to the Avamar Web Restore Page 305

Adding files to the Avamar Web RestoreDocumentation pageYou can add documents that are specific to your environment to the Documentation page, which you access from the Avamar WebRestore page for Avamar Desktop/Laptop.
About this task
At installation, you can access the latest Avamar documentation by clicking the Online Support link on the Documentation page. Ifrequired, include additional guides and manuals on the Documentation page.
Steps
1. Open a shell command and log in to the server as admin.2. Change directory to /space/avamar/doc/downloads/ by typing the following command:
cd /space/avamar/doc/downloads/3. Copy files that you want to be downloadable to the user into the folder.4. Change directory to /usr/local/avamar/httpds/docs/ by typing the following command:
cd /usr/local/avamar/httpds/docs/5. Create an XML file to define a document.
For example, for the Golden Tenant User Guide, the XML file is similar to the following example:
<?xml version="1.0" encoding="UTF-8"?><download heading="40" displayName="Golden Tenant User Guide" path="/axiondocs/cur/GoldTenantUG.pdf/" />
Where:
• heading—Is set to the default value of 40.
• displayName—Defines the name of the document as it is displayed in the Documentation page.
• path—Defines the location of the document file on disk, in which /axiondocs/cur points to /space/avamar/doc/downloads on the Avamar server.
6. to verify that you can see the newly uploaded files, refresh the Documentation page.
306 Adding Files to the Avamar Web Restore Page

replicaReplicated copy of a backup.authentication systemA username and password system that is used to grant user access to the Avamar server. Avamar supports its own internal authenticationsystem (avs), as well as several external authentication systems (OpenLDAP, Windows Active Directory, NIS, and SMB).Avamar Downloader ServiceA Windows-based file distribution system that delivers software installation packages to target Avamar systems.Avamar Installation ManagerA web interface that manages installation packages.Avamar Web AccessA browser-based user interface that provides access to the Avamar server for the express purpose of restoring files to a client.Avamar File System (AvFS)A browsable virtual file system view of the normally inaccessible Avamar HFS. The Avamar File System provides read-only accessibility toall backups stored on an Avamar server down to the individual file level. This allows an Avamar server to be used as an online long-termhistorical strategic enterprise information store in addition to a backup and restore repository.AvInstallerA backend service that executes and reports package installations.backup policyIn the AUI, a backup policy specifies a dataset, schedule, and retention settings that are applied to a client or a group of clients. A backuppolicy must contain at least one Avamar client. If the backup policy contains two or more clients, the clients must belong to the sameAvamar domain. You can override backup policy settings at the client level.ConnectEMCA program that runs on the Avamar server and that sends information to Avamar Support. ConnectEMC is typically configured to sendalerts for high priority events as they occur, as well as reports once daily.Email HomeAn optional feature that uses the High Priority Events profile and Notification schedule to regularly send server error and status messagesto Avamar Support.EMC repository
A repository that contains server installation packages, client installation packages, and manifest files. The repository is located on theEMC network. Each EMC customer has a download center that contains files available to them. Outgoing communication from theAvamar Downloader Service to the EMC repository is encrypted with SSL over an HTTP connection.
EM Tomcat server (EMT)The Avamar EM Tomcat server (EMT) provides essential services required to display Avamar system information, and provides amechanism for managing Avamar systems using a standard web browser. The EMT also communicates directly with MCS.ESRSEMC Secure Remote Support.full replicationA full “root-to-root” replication creates a complete logical copy of an entire source system on the destination system. The replicated datais not copied to the REPLICATE domain. Instead, it is added to the root domain just as if source clients had registered with the destinationsystem. Also, source server data replicated in this manner is fully modifiable on the destination system. This replication method is typicallyused for system migration (from a smaller Avamar configuration to a larger, possibly multi-node configuration) or system replacement (forinstance, in a case of disaster recovery).HFSHash File System. The content addressed storage area inside the Avamar server used to store client backups.HFS checkAn Avamar Hash File System check (HFS check) is an internal operation that validates the integrity of a specific checkpoint. Once acheckpoint has passed an HFS check, it can be considered reliable enough to be used for a server rollback.JREJava Runtime Environment.local repositoryThe /data01/avamar/repo/packages directory on the utility node or single-node server. This directory contains the most currentmanifest file from the EMC repository. The Avamar Downloader Service pushes packages from the EMC repository to the local repository.If a customer site does not allow Internet access, you can manually copy packages into the local repository.LOFSLoopback File SystemMAC addressMedia Access Control Address. A unique hardware address, typically embedded at the lowest level in a hardware assembly, that uniquelyidentifies each device on a network.
Glossary

manifest fileAn XML file listing all the server, client, and workflow packages currently available for download from the EMC repository.moduleAvamar 1.2.0 and earlier multi-node Avamar servers utilized a dual-module synchronous RAIN architecture in which nodes were equallydistributed in two separate equipment cabinets on separate VLANs. The term “module” is a logical construct used to describe and supportthis architecture (older multi-node Avamar servers comprised a primary module and a secondary module). These legacy systems continueto be supported. However, newer multi-node Avamar servers use a single module architecture, and even though Avamar Administratorprovides “module detail” information, a module is therefore logically equivalent to the entire server.NATNetwork Address Translation.NDMPNetwork data management protocol. An open protocol that is used to move data from a NAS system to a backup server.acceleratorThe Avamar NDMP Accelerator (accelerator) is a specialized Avamar server node that, when used as part of an Avamar system, enablesbackup and restore of network addressed storage (NAS) systems by way of the network data management protocol (NDMP).NFSNetwork file system.NISNetwork Information Service. An external authentication system that can be used to log in to an Avamar server.nodeA networked storage subsystem that consists of both processing power and hard drive storage, and runs Avamar software.NTPNetwork Time Protocol. Controls the time synchronization of a client or server computer to another reference time source.ODBCOpen DataBase Connectivity. A standard database access method that makes it possible to access any data from any application,regardless of which database management system (DBMS) is handling the data.OpenLDAPOpen Lightweight Directory Access Protocol. An external authentication system that can be used to log in to an Avamar server.packages
Avamar software installation files, hotfix patches, and OS patches available from the EMC repository. Packages comprise three types:
• Client—A release of Avamar file system or application backup software.• Server—A new release of Avamar server software, a service pack, or a patch for the operating system, MC, or GSAN.• Workflow—A package that runs operations such as adding a node or replacing a node.
Package files use the .avp file extension.
PAMPluggable Authentication Module. A Linux library that enables a local system administrator to define how individual applicationsauthenticate users.RAINRedundant Array of Independent Nodes. A flexible, fault-tolerant architecture that enables an Avamar server to maintain availability andpreserve data storage if single nodes fail in an Avamar module.RDMSRelational Database Management System.replicationReplication is an optional feature that enables an Avamar system to store read-only copies of its data on a remote system. The replicateddata can be replicas of client backups and copies of Avamar system data. Replication supports disaster recovery of the Avamar system.rolesA setting in Avamar Administrator that controls which operations each user can perform in the Avamar server. Roles are assigned on auser-by-user basis.SSHSecure Shell. A remote login utility that authenticates by way of encrypted security keys instead of prompting for passwords. Thisprevents passwords from traveling across networks in an unprotected manner.storage nodeA node in the Avamar server that provides storage of data.system migrationA planned operation that uses full “root-to-root” replication to copy all data residing on a source Avamar server to a new destinationserver. If global client IDs (global CIDs) are used, clients that formerly backed up to the source server can continue to operatetransparently without reregistering with the new destination server.TFTPTrivial File Transfer Protocol. A version of the TCP/IP FTP protocol that has no directory or password capabilities.utility node

In scalable multi-node Avamar servers, a single utility node provides essential internal services for the server. These services include MCS,Domain Name Server (DNS), External authentication, Network Time Protocol (NTP), and Web access. Because utility nodes are dedicatedto running these essential services, they cannot be used to store backups.VLANVirtual Local Area Network.activationThe process of passing the client ID (CID) back to the client, where it is stored in an encrypted file on the client file system.Avamar AdministratorA graphical management console software application that is used to remotely administer an Avamar system from a supported Windowsor Linux client computer.Avamar clientA computer or workstation that runs Avamar software and accesses the Avamar server over a network connection. Avamar clientsoftware comprises a client agent and one or more plug-ins.Avamar serverThe server component of the Avamar client/server system. Avamar server is a fault-tolerant, high-availability system that efficientlystores the backups from all protected clients. It also provides essential processes and services required for data restores, client access,and remote system administration. Avamar server runs as a distributed application across multiple networked storage nodes.backupA point-in-time copy of client data that can be restored as individual files, selected data, or as an entire backup.client activationThe process of passing the client ID (CID) back to the client, where it is stored in an encrypted file on the client file system.client agentA platform-specific software process that runs on the client and communicates with the Management Console Server (MCS) and withany plug-ins installed on that client.client registrationThe process of establishing an identity with the Avamar server. When Avamar recognizes the client, it assigns a unique client ID (CID),which it passes back to the client during client activation.datasetA policy that defines a set of files, directories, and file systems for each supported platform that are included or excluded in backupsacross a group of clients. A dataset is a persistent and reusable Avamar policy that can be named and attached to multiple groups.DNSDomain Name Server. A dynamic and distributed directory service for assigning domain names to specific IP addresses.domainA feature in Avamar Administrator that is used to organize large numbers of clients into named areas of control and management.groupA level of organization in Avamar Administrator for one or more Avamar clients. All clients in an Avamar group use the same group policies,which include the dataset, schedule, and retention policy.group policyIn Avamar Administration, a group policy is defined as a dataset, schedule, and retention policy for all clients in an Avamar group.LANLocal Area Network.MCSManagement console server. The server subsystem that provides centralized administration (scheduling, monitoring, and management)for the Avamar server. The MCS also runs the server-side processes used by Avamar Administrator.plug-inAvamar client software that recognizes a particular kind of data resident on that client.plug-in optionsOptions that you specify during backup or restore to control backup or restore functionality.policyA set of rules for client backups that can be named and applied to multiple groups. Groups have dataset, schedule, and retention policies.registrationThe process of establishing an identity with the Avamar server. When Avamar recognizes the client, it assigns a unique client ID (CID),which it passes back to the client during client activation.restoreAn operation that retrieves one or more file systems, directories, files, or data objects from a backup and writes the data to a designatedlocation.retentionThe time setting to automatically delete backups on an Avamar server. Retention can be set to permanent for backups that should not bedeleted from an Avamar server. Retention is a persistent and reusable Avamar policy that can be named and attached to multiple groups.scheduleThe ability to control the frequency and the start and end time each day for backups of clients in a group. A schedule is a persistent andreusable Avamar policy that can be named and attached to multiple groups.