DB2 User Guide Main Contents: - SuperMap
30
1 / 30 Add: 6/F, Building 107, No. A10, Jiuxianqiao North Road, Chaoyang District, Beijing, 100015, CHINA, 100015 E-mail: [email protected] Website: www.supermap.com DB2 User Guide DB2 is a relation database manage system developed by IBM company. DB2 is mainly used in large application systems and it supports the user environment from mainframe to single. It provides high-level data usability, integrity, security, recoverability, and the application executive capacity from small to large scale. It has the basic functions and SQL commands that has nothing with platform. DB2 uses the data classification technology and enables mainframe data easily be downloaded to the LAN database server. And make the database localization and remote connections transparency. Its external connections change the query performance and support the parallel query for multiple tasks. The DB2 database can be assessed by any applications through using the Microsoft open database to connect the ODBC interface, Java interface or CORBA interface agency. Based on the DB2 features above, more and more users start to use the DB2 to manage the vast amount spatial data in GIS applications. In order to support the DB2 database, SuperMap providers a series of supports for DB2 datasource. This guide introduces how to install DB2, catalog DB2 and import and export DB2. Main Contents: Install DB2 This section introduces the installation of DB2 program. Please refer to the help for the supported platform. This help mainly introduce the installation on Window. It is suggested that install DB2 9.7 version based on the optimal performance of DB2 database 1. Double click setup.exe program and pop up the DB2 Setup Launchpad, as shown below.
-
Upload
khangminh22 -
Category
Documents
-
view
7 -
download
0
Transcript of DB2 User Guide Main Contents: - SuperMap

1 / 30
Add: 6/F, Building 107, No. A10, Jiuxianqiao North Road, Chaoyang District, Beijing, 100015, CHINA, 100015 E-mail: [email protected] Website: www.supermap.com
DB2 User Guide
DB2 is a relation database manage system developed by IBM company.
DB2 is mainly used in large application systems and it supports the user
environment from mainframe to single. It provides high-level data usability,
integrity, security, recoverability, and the application executive capacity from
small to large scale. It has the basic functions and SQL commands that has
nothing with platform. DB2 uses the data classification technology and enables
mainframe data easily be downloaded to the LAN database server. And make the
database localization and remote connections transparency. Its external
connections change the query performance and support the parallel query for
multiple tasks. The DB2 database can be assessed by any applications through
using the Microsoft open database to connect the ODBC interface, Java interface
or CORBA interface agency.
Based on the DB2 features above, more and more users start to use the DB2 to
manage the vast amount spatial data in GIS applications. In order to support the
DB2 database, SuperMap providers a series of supports for DB2 datasource. This
guide introduces how to install DB2, catalog DB2 and import and export DB2.
Main Contents:
Install DB2
This section introduces the installation of DB2 program. Please refer to the help
for the supported platform. This help mainly introduce the installation on Window.
It is suggested that install DB2 9.7 version based on the optimal performance of
DB2 database
1. Double click setup.exe program and pop up the DB2 Setup Launchpad, as
shown below.

2 / 30
Add: 6/F, Building 107, No. A10, Jiuxianqiao North Road, Chaoyang District, Beijing, 100015, CHINA, 100015 E-mail: [email protected] Website: www.supermap.com
2. Click the Install a Product link on the window left to enter the page of
Install a Product. This page lists all the DB2 products that are available.
Select DB2 Advanced Enterprise Server Edition Version 9.7 Fix Pack 4 and
click the Install New button.

3 / 30
Add: 6/F, Building 107, No. A10, Jiuxianqiao North Road, Chaoyang District, Beijing, 100015, CHINA, 100015 E-mail: [email protected] Website: www.supermap.com
3. Pop up the following Welcome dialog box and click Next button.
4. Pop up the Software License Agreement dialog box. Please read the
following license agreement carefully. If you accept this license, please
select I accept the terms in the license agreement and click the Next
button; If you don't accept this license, please select the I do not accept
the terms in the license agreement and click the Cancel button to exit the
installation.

4 / 30
Add: 6/F, Building 107, No. A10, Jiuxianqiao North Road, Chaoyang District, Beijing, 100015, CHINA, 100015 E-mail: [email protected] Website: www.supermap.com
5. Continue installing and pop up the Select the installation type dialog box.

5 / 30
Add: 6/F, Building 107, No. A10, Jiuxianqiao North Road, Chaoyang District, Beijing, 100015, CHINA, 100015 E-mail: [email protected] Website: www.supermap.com
Select the installation as the Typical Installation. You can view all the
functional units by clicking the View Features... button.
6. Continue installing and pop up the Select the installation, response file
creation, or both dialog box. Click the Next button.

6 / 30
Add: 6/F, Building 107, No. A10, Jiuxianqiao North Road, Chaoyang District, Beijing, 100015, CHINA, 100015 E-mail: [email protected] Website: www.supermap.com
The response file is a text file containing the settings and configuration. The
DB2 installation can read this file and execute the installation according to the
specified value. The installation with response file is also called Silent
Installation. It provides the access for the parameters of DB2 Installation
Wizard Settings.
7. Continue installing and pop up the Select the installation folder dialog
box. If the system install it by default, click the Next button directly;
If click the Changes... button to specify the installation path, click the
Next button.
If users select the Custom mode, pop up the Select the features to install
dialog box. Users can select the features according to their needs. You
also need to specify the installation folder, as shown below.

7 / 30
Add: 6/F, Building 107, No. A10, Jiuxianqiao North Road, Chaoyang District, Beijing, 100015, CHINA, 100015 E-mail: [email protected] Website: www.supermap.com
8. Continue installing, and pop up the Set user information for the DB2
Administration Server dialog box. Here you need to set the password for the
DB2 administration server and click the Next button.

8 / 30
Add: 6/F, Building 107, No. A10, Jiuxianqiao North Road, Chaoyang District, Beijing, 100015, CHINA, 100015 E-mail: [email protected] Website: www.supermap.com
"DB2 Administration Server" (DAS) is a kind of special DB2 administration
service, which is used to support GUI tools and help manage the tasks on
the local and remote DB2 server. DAS has a specified user account. When
start the DAS server, it uses this user account to make the DAS service log
in the computer.
DAS user has the SYSTEM permissions for every DB2 system in your
environment, so that it can start ans stop other instances when you need to.
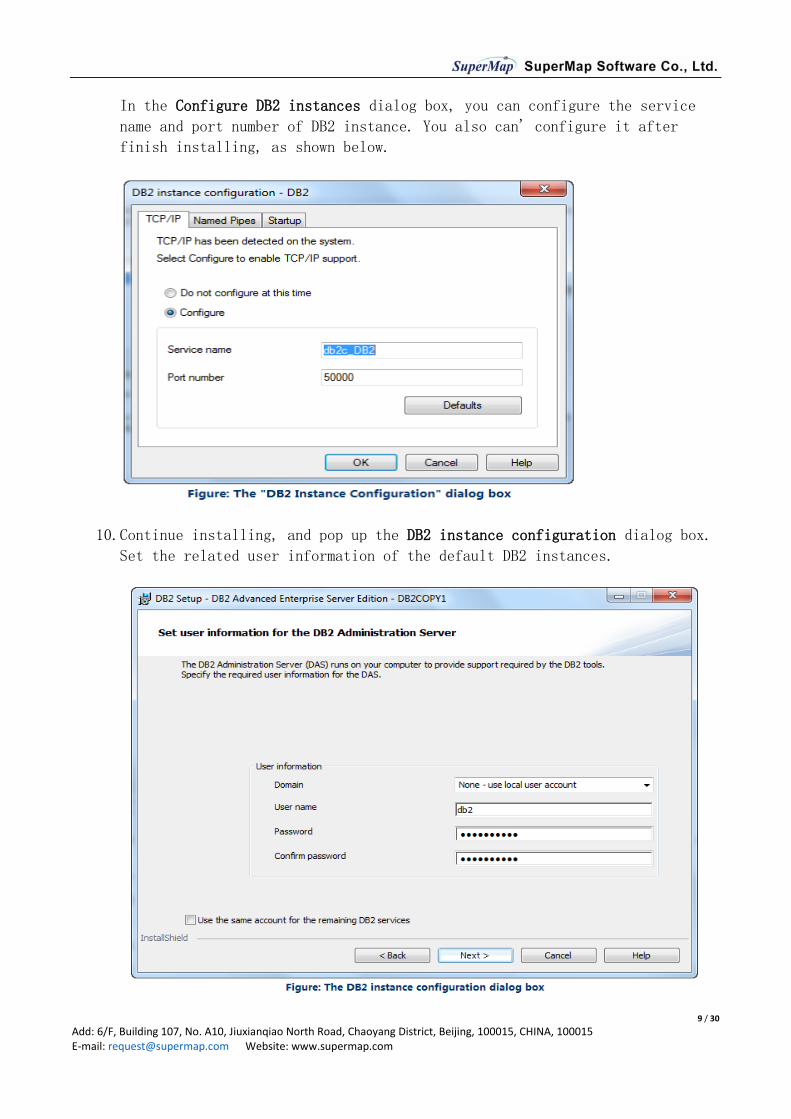
9. Continue installing, and pop up the Configure DB2 instances dialog box. If
you user the default configuration, click the Next button directly; If you
change the configuration of DB2 instance, click the Configure... button.
Instance is also called database administration program. It is the DB2 code
to admin the data.It can control the implementations for the data and
manage them to their child systems. Each instance has the following
features:
o Every instance is a complete environment, including all the database
partitions defined by the given parallel database system.
o Every instance has its own database (Other instances can't assess),
and all its database partitions share the same mother system.
o It has the independent safety and other instances in the same system
don't influence it.
9 / 30
Add: 6/F, Building 107, No. A10, Jiuxianqiao North Road, Chaoyang District, Beijing, 100015, CHINA, 100015 E-mail: [email protected] Website: www.supermap.com
In the Configure DB2 instances dialog box, you can configure the service
name and port number of DB2 instance. You also can' configure it after
finish installing, as shown below.
10.Continue installing, and pop up the DB2 instance configuration dialog box.
Set the related user information of the default DB2 instances.

10 / 30
Add: 6/F, Building 107, No. A10, Jiuxianqiao North Road, Chaoyang District, Beijing, 100015, CHINA, 100015 E-mail: [email protected] Website: www.supermap.com
11.Continue installing and pop up the Prepare the DB2 tools catalog dialog
box. Click the Next button.
Only create the DB2 tools catalog, can you use the task center and
dispatcher. The database created by DB2 tools catalog is stored in the DB2
database.
12.Continue installing, and pop up the Set up notifications dialog box, which
is used to configure SMTP server for the DB2 server. You can send the
running status alarm to the SMTP server. If you cancel the check box before
Set up your DB2 server to send notifications, the running status of DB2
will be recored in the administration log, as shown below. Click the Next
button.

11 / 30
Add: 6/F, Building 107, No. A10, Jiuxianqiao North Road, Chaoyang District, Beijing, 100015, CHINA, 100015 E-mail: [email protected] Website: www.supermap.com
13.Continue installing and pop up the Enable operating system security for
DB2 objects dialog box. Click the Next button.

12 / 30
Add: 6/F, Building 107, No. A10, Jiuxianqiao North Road, Chaoyang District, Beijing, 100015, CHINA, 100015 E-mail: [email protected] Website: www.supermap.com
14.Continue installing and pop up the Start copying files dialog box. Click
the Finish button.

13 / 30
Add: 6/F, Building 107, No. A10, Jiuxianqiao North Road, Chaoyang District, Beijing, 100015, CHINA, 100015 E-mail: [email protected] Website: www.supermap.com
15.After finish installing, pop up the Setup is complete dialog box and click
the Next button to install other products.

14 / 30
Add: 6/F, Building 107, No. A10, Jiuxianqiao North Road, Chaoyang District, Beijing, 100015, CHINA, 100015 E-mail: [email protected] Website: www.supermap.com
16.Pop up the Install additional products dialog box. If you don't want to
install the additional products, click the Finish button. If you want to
install the additional products, click the Install button to install the
additional products.
The Catalog of DB2
Catalog is a database connecting process form the client to the server on local
or remote. The purpose is to get the catalog information, namely generate the
catalog used to assess the database. The system database catalog contains a list
and a pointer. You can find the known database through the catalog no matter on
local or remote. If there is no catalog info, the application can not connect to
the database, so it should catalog before use the DB2.
Catalog includes the following two processes:
Map the server to the client, namely the catalog node.
Map the database under the server instances to the client, namely the catalog database.
You can execute the DB2 catalog operation through both the command method and the
Control Center interface. There are three edit command modes:

15 / 30
Add: 6/F, Building 107, No. A10, Jiuxianqiao North Road, Chaoyang District, Beijing, 100015, CHINA, 100015 E-mail: [email protected] Website: www.supermap.com
The Command Window with non-interactive mode.
The Command Line Processor with interactive mode.
The Command Editor with visualization and interactive mode.
The following introduces the detail operation for the two processes.
Node Cataloging
Through the catalog node, the client machine can recognize the server machine, building the mapping from server to the client, which includes how to catalog and anti-catalog the nodes.
In order to make the client distinguish the server, it needs to catalog the node.
This will map the system on server and the instances in system to the client; If
you want to cancel the mapping from server to client, it needs to anti-catalog
node.
Node Cataloging
Node cataloging can map the server systems and instances on system to the client.
You can catalog the node through command line or interface operation.
Basic Steps
Method One: Command Method
Mode One: The Command Window with non-interactive mode
Input db2cmd on Run to enter the command window of DB2; You can also enter
the command window through Program -> IBM DB2 -> DB2COPY1-> Command Line
Tools.
Input the node catalog command in the command window:
db2 catalog tcpip node node_name remote server_ip server server_port
o node_name: Input the node name to catalog, namely the instance name of server. The instance name must be unique in one machine. You can input the letter only or the combination of letters and figures. The letter is case insensitive. Note: The instance name can't be DB2 and it doesn't support the special character.
o server_ip: Input the IP address of server to catalog. o server_port: Input the port number of server to catalog and the default is 50000.

16 / 30
Add: 6/F, Building 107, No. A10, Jiuxianqiao North Road, Chaoyang District, Beijing, 100015, CHINA, 100015 E-mail: [email protected] Website: www.supermap.com
If catalog the node successfully, the following contents are shown in
command window.
Mode Two: The Command Line Processor with interactive mode
The same with mode one, enter the command line processor through Program ->
IBM DB2 -> DB2COPY1 -> Command Line Tools. Input the node catalog command
in this processor:
catalog tcpip node node_name remote server_ip server server_port
o node_name: Input the node name to catalog, namely the instance name
of server. The instance name must be unique in one machine. You can
input the letter only or the combination of letters and figures. The
letter is case insensitive. Note: The instance name can't be DB2 and
it doesn't support the special character.
o server_ip: Input the IP address of server to catalog.
o server_port: Input the port number of server to catalog and the
default is 50000.
Compared to the Command Window, the commands in "Command Line Processor"
only lack db2 key word.
If catalog the node successfully, the following contents are shown in
command line processor.

17 / 30
Add: 6/F, Building 107, No. A10, Jiuxianqiao North Road, Chaoyang District, Beijing, 100015, CHINA, 100015 E-mail: [email protected] Website: www.supermap.com
Mode Three: The Command Editor with visualization and interactive mode
The same with mode one, enter the command line processor through Program -
>IBM DB2 -> DB2COPY1 -> Command Line Tools. Input the database catalog
command in this processor; You can also open this window through Control
Center and Open with : Program -> IBM DB2 -> DB2COPY1 -> General
Administration Tools -> Control Center.
Input the node catalog command in the command editor window and the command
format is the same as mode two. Then click the button to execute the
command; Or you can select the selected item -> execute. The command
result is shown in the window below. If something goes wrong, it will give
the error info. If the result catalog successfully, the following contents
are shown in the command editor.

18 / 30
Add: 6/F, Building 107, No. A10, Jiuxianqiao North Road, Chaoyang District, Beijing, 100015, CHINA, 100015 E-mail: [email protected] Website: www.supermap.com
Method Two: Interface Execution Method
We can also catalog the DB2 node in Control Center through human computer
interaction of interface method. It has two processes: the server node cataloging
and the instances of server cataloging. The Control Center open with: Program ->
IBM DB2 -> DB2COPY1 -> General Administration Tools -> Control Center.
1. Server node catalog.
Right click All System node in the left directory tree of the control
center, and select Add. Pop up the Add System dialog box and set the system
type, system name, host name, node name, operating system, connection
protocol and notes of the server, as shown below. Click OK to finish.

19 / 30
Add: 6/F, Building 107, No. A10, Jiuxianqiao North Road, Chaoyang District, Beijing, 100015, CHINA, 100015 E-mail: [email protected] Website: www.supermap.com
Besides, when set the system name and host name for the server, you can search
the system by clicking the Discover button on the right of system name. Select
the server system to connect, as shown below. At this time, other contents will
be generated automatically.
2.The catalog of instances in server.
Right click the Instance node under the server and select the Add. Pop up
the Add Instance dialog box and set the instance name, instance node name,
operating system, connection protocol, host name and port number that the
target database belongs to, as shown below. Click "OK" to finish.

20 / 30
Add: 6/F, Building 107, No. A10, Jiuxianqiao North Road, Chaoyang District, Beijing, 100015, CHINA, 100015 E-mail: [email protected] Website: www.supermap.com
When set the instance, you can search the system by clicking the Discover button,
and select the instance name to connect, as shown below.
After finish the node catalog between database and the client through the method
above, you can view the catalog result in the Control Center. Right click the
Control Center node of the directory tree, and select the Refresh item. The

21 / 30
Add: 6/F, Building 107, No. A10, Jiuxianqiao North Road, Chaoyang District, Beijing, 100015, CHINA, 100015 E-mail: [email protected] Website: www.supermap.com
result is shown as below. You can see that the server has already connected with
the client.
Node Anti-cataloging
If cancel the mapping the server to the client, it needs to node anti-cataloging.
You can finish the node anti-cataloging through the methods of command line or
interface operation.
Basic Steps
Command Method
Mode one: The Command Window of non-interactive mode
In the Command Window, the command of node anti-cataloging is as below:
db2 uncatalog node node_name
o node_name: The server name that needs to node anti-cataloging.
Mode Two: The Command Line Processor with interactive mode

22 / 30
Add: 6/F, Building 107, No. A10, Jiuxianqiao North Road, Chaoyang District, Beijing, 100015, CHINA, 100015 E-mail: [email protected] Website: www.supermap.com
The commands in Command Line Processor and Command Editor are shown as
below:
uncatalog node node_name
Interface Execution Method
In the directory tree of Control Center, right click the database that needs to
database anti-cataloging and select the Remove.
Database Cataloging
After finish cataloging node, it needs to catalog the database, which is used to map the database under the server instance to the client in the form of alias. Include two parts: database cataloging and database anti-cataloging.
In order to access the database on server, after finish node cataloging, you
should catalog the database. Cataloging database is to map the database under the
server instance to the client in the form of alias; Canceling the mapping needs
to anti-catalog the database.
Database Cataloging
After finish the node cataloging, you can catalog the database. Map the database
underground the server instances to the client in the way of alias.

23 / 30
Add: 6/F, Building 107, No. A10, Jiuxianqiao North Road, Chaoyang District, Beijing, 100015, CHINA, 100015 E-mail: [email protected] Website: www.supermap.com
Basic Steps
Method One: Command Method
The same with the method of node catalog, you can catalog the database through
following three command mode.
Mode One: The Command Window with non-interactive mode
Input db2cmd on Run to enter the command window of DB2; You can also enter
the command window through Program -> IBM DB2 -> DB2COPY1-> Command Line
Tools.
Input the database catalog command in the command window:
db2 catalog db db_name as db_alias at node node_name
o db_name: Input the database name to catalog. You can input the letters only or the combination of letters and figures. The letters are case-insensitive and doesn't support the special character.
o db_alias: Input the database catalog to the alias used by the client. o node_name: Input the node name that the sever to catalog belongs to.
If catalog the node successfully, the following contents are shown in
command window.
Mode Two: The Command Line Processor with interactive mode
The same with mode one, enter the command line processor through Program ->
IBM DB2 -> DB2COPY1 -> Command Line Tools. Input the database catalog
command in this processor:
catalog db db_name as db_alias at node node_name
o db_name: Input the database name to catalog. You can input the letters only or the combination of letters and figures. The letters are case-insensitive and doesn't support the special character.

24 / 30
Add: 6/F, Building 107, No. A10, Jiuxianqiao North Road, Chaoyang District, Beijing, 100015, CHINA, 100015 E-mail: [email protected] Website: www.supermap.com
o db_alias: Input the database catalog to the alias used by the client. o node_name: Input the node name that the sever to catalog belongs to.
Compared to the Command Window, the commands in "Command Line Processor"
only lack db2 key word.
If catalog the database successfully, the following contents are shown in
command line processor.
Mode Three: The Command Editor with visualization and interactive mode
The same with mode one, enter the command line processor through Program ->
IBM DB2 -> DB2COPY1 -> Command Line Tools. Input the database catalog
command in this processor; You can also open this window through Control
Center and Open with: Program -> IBM DB2 -> DB2COPY1 -> General
Administration Tools -> Control Center.
Input the node catalog command in the command editor window and the command
format is the same as mode two. Then click the button to execute the
command; Or you can select the selected item -> execute. The command
result is shown in the window below. If something goes wrong, it will give
the error info. If the result catalog successfully, the following contents
are shown in the command editor.

25 / 30
Add: 6/F, Building 107, No. A10, Jiuxianqiao North Road, Chaoyang District, Beijing, 100015, CHINA, 100015 E-mail: [email protected] Website: www.supermap.com
Interface Execution Method
Right click the database under the server instances, and select the Add. Set the
database name, alias etc. in the pop-up Add Database dialog box. The database
name can be searched through the Discover button, as shown below. Click OK to
finish the mapping from database to the client.

26 / 30
Add: 6/F, Building 107, No. A10, Jiuxianqiao North Road, Chaoyang District, Beijing, 100015, CHINA, 100015 E-mail: [email protected] Website: www.supermap.com
After establish the database catalog between database under the server instances
and the client through the method above, you can view the catalog result in the
Control Center. Right click the Control Center node of the directory tree, and
select the Refresh item. The result is shown as below. You can see that the
server has already connected with the client.

27 / 30
Add: 6/F, Building 107, No. A10, Jiuxianqiao North Road, Chaoyang District, Beijing, 100015, CHINA, 100015 E-mail: [email protected] Website: www.supermap.com
Database Anti-cataloging
If cancel the mapping from database to the client, it needs to database anti-
cataloging. You can execute the commands of database anti-cataloging through
command line or interface operation to finish anti-cataloging the database.
Basic Steps
Command Method
Mode One: The Command Window with non-interactive mode
In the "Command Window", the commands of database anti-cataloging are shown
below:
db2 uncatalog db db_alias
o db_alias: The database alias that needs to be node anti-cataloging.
Mode Two: The "Command Line Processor" with interactive mode
The commands in Command Line Processor and Command Editor are shown as
below:

28 / 30
Add: 6/F, Building 107, No. A10, Jiuxianqiao North Road, Chaoyang District, Beijing, 100015, CHINA, 100015 E-mail: [email protected] Website: www.supermap.com
uncatalog db db_alias
Interface Execution Method
In the directory tree of Control Center, right click the database that needs to
database anti-cataloging and select the Remove.
Connect Database
After finish the node cataloging and database cataloging, connect the databases on server and the client.
Command Method
The commands in command window are shown as follows:
db2 connect to db_alias user user_name using user_password
o db_alias: Input the database catalog to the alias used by the client. o user_name: Input the user name of server to catalog. o user_password: Input the password of server to catalog.
The commands in Command Line Processor and Command Editor are shown as below:
connect to db_alias user user_name using user_password
If connected the database successfully, the following contents are shown in
command window.
Interface Execution Method
Right click the database to be connected in the directory tree in Control Center.
Select Connect and pop up the Connect dialog box. Input the server name and
password, and click OK to finish.

29 / 30
Add: 6/F, Building 107, No. A10, Jiuxianqiao North Road, Chaoyang District, Beijing, 100015, CHINA, 100015 E-mail: [email protected] Website: www.supermap.com
You can view the connecting status of mapping server in the Control Center, as
shown below:
Import and Export DB2 Data
In the DB2 database, we can import and export the data through the commands. The
following introduces the two process in detail.
Export data from the database
1. Sign in the operating system as the DB2 database user. 2. Create a new empty folder, which is used to store the data exported from the server database. 3. Execute the db2cmd command in the Run to enter the command window. And use the cd command to enter the folder
which is stores the data (namely the new folder). 4. Execute the following command and export the statement:
db2look -d dbname -e -c -o *.sql -i username -w password
o dbname: The name of server database. o *.wql: The sql file of exported statements for building table. o username: The user name of server database. o password: The password of server database.
5. Execute the following command and export the data of data table:

30 / 30
Add: 6/F, Building 107, No. A10, Jiuxianqiao North Road, Chaoyang District, Beijing, 100015, CHINA, 100015 E-mail: [email protected] Website: www.supermap.com
db2move dbname export>*.log -u username -p password
6. After execute these commands, the data will be imported to the new folder.
Import the data into the database
1. Sign in the operating system as the DB2 database user. 2. Create a new empty folder, which is used to store the data imported to the server database. 3. Execute the db2cmd command in the Run to enter the command window. And use the cd command to enter the folder
which is stores the data (namely the new folder). 4. Execute the following command and import to the datasheet:
db2 -tvf *.sql
5. Execute the following command and import to the data of data table:
db2move dbname import -u username -p password
6. After execute the command, the data will be imported into the database of server.
Note
About authorization. When export the DB2 database, it needs to give the
corresponding permissions to the users. Here it gives the administrator
permission of db2admin.