DataFlux Data Management Studio - SAS Support
422
DataFlux Data Management Studio
-
Upload
khangminh22 -
Category
Documents
-
view
1 -
download
0
Transcript of DataFlux Data Management Studio - SAS Support
DataFlux Data Management Studio

This page is intentionally blank

Dat
Use
Versio
taFlu
er’s Gu
on 2.1.1
ux Da
uide
ata M
Managgement S
A
Stud
August 31, 2
io
2010

This page is intentionally blank
DataFlux Data Management Studio i
Contact DataFlux
Corporate Headquarters
DataFlux Corporation DataFlux United Kingdom
940 NW Cary Parkway, Suite 201 Enterprise House
Cary, NC 27513-2792 1-2 Hatfields
Toll Free Phone: 877-846-FLUX (3589) London
Toll Free Fax: 877-769-FLUX (3589) SE1 9PG
Local Phone: 1-919-447-3000 Phone: +44 (0) 20 3176 0025
Local Fax: 919-447-3100
Web: http://www.dataflux.com
DataFlux Germany DataFlux France
In der Neckarhelle 162 Immeuble Danica B
69118 Heidelberg 21, avenue Georges Pompidou
Germany Lyon Cedex 03
Phone: +49 (0) 6221 4150 69486 Lyon
France
Phone: +33 (0) 4 72 91 31 42
Technical Support
Phone: 1-919-531-9000 Email: [email protected] Web: http://www.dataflux.com/MyDataFlux-Portal
Documentation Support
Email: [email protected]
Legal Information Copyright © 1997 - 2010 DataFlux Corporation LLC, Cary, NC, USA. All Rights Reserved.
DataFlux and all other DataFlux Corporation LLC product or service names are registered trademarks or trademarks of, or licensed to, DataFlux Corporation LLC in the USA and other countries. ® indicates USA registration.
DataFlux Legal Statements
DataFlux Solutions and Accelerators Legal Statements
ii DataFlux Data Management Studio
DataFlux Legal Statements
Apache Portable Runtime License Disclosure
Copyright © 2008 DataFlux Corporation LLC, Cary, NC USA.
Licensed under the Apache License, Version 2.0 (the "License"); you may not use this file except in compliance with the License. You may obtain a copy of the License at http://www.apache.org/licenses/LICENSE-2.0
Unless required by applicable law or agreed to in writing, software distributed under the License is distributed on an "AS IS" BASIS, WITHOUT WARRANTIES OR CONDITIONS OF ANY KIND, either express or implied. See the License for the specific language governing permissions and limitations under the License.
Apache/Xerces Copyright Disclosure
The Apache Software License, Version 1.1
Copyright © 1999-2003 The Apache Software Foundation. All rights reserved.
Redistribution and use in source and binary forms, with or without modification, are permitted provided that the following conditions are met:
1. Redistributions of source code must retain the above copyright notice, this list of conditions and the following disclaimer.
2. Redistributions in binary form must reproduce the above copyright notice, this list of conditions and the following disclaimer in the documentation and/or other materials provided with the distribution.
3. The end-user documentation included with the redistribution, if any, must include the following acknowledgment: "This product includes software developed by the Apache Software Foundation (http://www.apache.org)." Alternately, this acknowledgment may appear in the software itself, if and wherever such third-party acknowledgments normally appear.
4. The names "Xerces" and "Apache Software Foundation" must not be used to endorse or promote products derived from this software without prior written permission. For written permission, please contact [email protected].
5. Products derived from this software may not be called "Apache", nor may "Apache" appear in their name, without prior written permission of the Apache Software Foundation.
THIS SOFTWARE IS PROVIDED "AS IS'' AND ANY EXPRESSED OR IMPLIED WARRANTIES, INCLUDING, BUT NOT LIMITED TO, THE IMPLIED WARRANTIES OF MERCHANTABILITY AND FITNESS FOR A PARTICULAR PURPOSE ARE DISCLAIMED. IN NO EVENT SHALL THE APACHE SOFTWARE FOUNDATION OR ITS CONTRIBUTORS BE LIABLE FOR ANY DIRECT, INDIRECT, INCIDENTAL, SPECIAL, EXEMPLARY, OR CONSEQUENTIAL DAMAGES (INCLUDING, BUT NOT LIMITED TO, PROCUREMENT OF SUBSTITUTE GOODS OR SERVICES; LOSS OF USE, DATA, OR PROFITS; OR BUSINESS INTERRUPTION) HOWEVER CAUSED AND ON ANY THEORY OF LIABILITY, WHETHER IN CONTRACT, STRICT LIABILITY, OR TORT (INCLUDING NEGLIGENCE OR OTHERWISE) ARISING IN ANY WAY OUT OF THE USE OF THIS SOFTWARE, EVEN IF ADVISED OF THE POSSIBILITY OF SUCH DAMAGE.
This software consists of voluntary contributions made by many individuals on behalf of the Apache Software Foundation and was originally based on software copyright (c) 1999, International Business Machines, Inc., http://www.ibm.com. For more information on the Apache Software Foundation, please see http://www.apache.org.
DataDirect Copyright Disclosure
Portions of this software are copyrighted by DataDirect Technologies Corp., 1991 - 2008.
DataFlux Data Management Studio iii
Expat Copyright Disclosure
Part of the software embedded in this product is Expat software.
Copyright © 1998, 1999, 2000 Thai Open Source Software Center Ltd.
Permission is hereby granted, free of charge, to any person obtaining a copy of this software and associated documentation files (the "Software"), to deal in the Software without restriction, including without limitation the rights to use, copy, modify, merge, publish, distribute, sublicense, and/or sell copies of the Software, and to permit persons to whom the Software is furnished to do so, subject to the following conditions:
The above copyright notice and this permission notice shall be included in all copies or substantial portions of the Software.
THE SOFTWARE IS PROVIDED "AS IS", WITHOUT WARRANTY OF ANY KIND, EXPRESS OR IMPLIED, INCLUDING BUT NOT LIMITED TO THE WARRANTIES OF MERCHANTABILITY, FITNESS FOR A PARTICULAR PURPOSE AND NONINFRINGEMENT. IN NO EVENT SHALL THE AUTHORS OR COPYRIGHT HOLDERS BE LIABLE FOR ANY CLAIM, DAMAGES OR OTHER LIABILITY, WHETHER IN AN ACTION OF CONTRACT, TORT OR OTHERWISE, ARISING FROM, OUT OF OR IN CONNECTION WITH THE SOFTWARE OR THE USE OR OTHER DEALINGS IN THE SOFTWARE.
gSOAP Copyright Disclosure
Part of the software embedded in this product is gSOAP software.
Portions created by gSOAP are Copyright © 2001-2004 Robert A. van Engelen, Genivia inc. All Rights Reserved.
THE SOFTWARE IN THIS PRODUCT WAS IN PART PROVIDED BY GENIVIA INC AND ANY EXPRESS OR IMPLIED WARRANTIES, INCLUDING, BUT NOT LIMITED TO, THE IMPLIED WARRANTIES OF MERCHANTABILITY AND FITNESS FOR A PARTICULAR PURPOSE ARE DISCLAIMED. IN NO EVENT SHALL THE AUTHOR BE LIABLE FOR ANY DIRECT, INDIRECT, INCIDENTAL, SPECIAL, EXEMPLARY, OR CONSEQUENTIAL DAMAGES (INCLUDING, BUT NOT LIMITED TO, PROCUREMENT OF SUBSTITUTE GOODS OR SERVICES; LOSS OF USE, DATA, OR PROFITS; OR BUSINESS INTERRUPTION) HOWEVER CAUSED AND ON ANY THEORY OF LIABILITY, WHETHER IN CONTRACT, STRICT LIABILITY, OR TORT (INCLUDING NEGLIGENCE OR OTHERWISE) ARISING IN ANY WAY OUT OF THE USE OF THIS SOFTWARE, EVEN IF ADVISED OF THE POSSIBILITY OF SUCH DAMAGE.
IBM Copyright Disclosure
ICU License - ICU 1.8.1 and later [used in DataFlux Data Management Platform]
COPYRIGHT AND PERMISSION NOTICE
Copyright © 1995-2005 International Business Machines Corporation and others. All Rights Reserved.
Permission is hereby granted, free of charge, to any person obtaining a copy of this software and associated documentation files (the "Software"), to deal in the Software without restriction, including without limitation the rights to use, copy, modify, merge, publish, distribute, and/or sell copies of the Software, and to permit persons to whom the Software is furnished to do so, provided that the above copyright notice(s) and this permission notice appear in all copies of the Software and that both the above copyright notice(s) and this permission notice appear in supporting documentation.
THE SOFTWARE IS PROVIDED "AS IS", WITHOUT WARRANTY OF ANY KIND, EXPRESS OR IMPLIED, INCLUDING BUT NOT LIMITED TO THE WARRANTIES OF MERCHANTABILITY, FITNESS FOR A PARTICULAR PURPOSE AND NONINFRINGEMENT OF THIRD PARTY RIGHTS. IN NO EVENT SHALL THE COPYRIGHT HOLDER OR HOLDERS INCLUDED IN THIS NOTICE BE LIABLE FOR ANY CLAIM, OR ANY SPECIAL INDIRECT OR CONSEQUENTIAL DAMAGES, OR ANY DAMAGES WHATSOEVER RESULTING FROM LOSS OF USE, DATA OR PROFITS, WHETHER IN AN ACTION OF CONTRACT, NEGLIGENCE OR OTHER TORTIOUS ACTION, ARISING OUT OF OR IN CONNECTION WITH THE USE OR PERFORMANCE OF THIS SOFTWARE.
Except as contained in this notice, the name of a copyright holder shall not be used in advertising or otherwise to promote the sale, use or other dealings in this Software without prior written authorization of the copyright holder.
iv DataFlux Data Management Studio
Microsoft Copyright Disclosure
Microsoft®, Windows, NT, SQL Server, and Access, are either registered trademarks or trademarks of Microsoft Corporation in the United States and/or other countries.
Oracle Copyright Disclosure
Oracle, JD Edwards, PeopleSoft, and Siebel are registered trademarks of Oracle Corporation and/or its affiliates.
PCRE Copyright Disclosure
A modified version of the open source software PCRE library package, written by Philip Hazel and copyrighted by the University of Cambridge, England, has been used by DataFlux for regular expression support. More information on this library can be found at: ftp://ftp.csx.cam.ac.uk/pub/software/programming/pcre/.
Copyright © 1997-2005 University of Cambridge. All rights reserved.
Redistribution and use in source and binary forms, with or without modification, are permitted provided that the following conditions are met:
Redistributions of source code must retain the above copyright notice, this list of conditions and the following disclaimer.
Redistributions in binary form must reproduce the above copyright notice, this list of conditions and the following disclaimer in the documentation and/or other materials provided with the distribution.
Neither the name of the University of Cambridge nor the name of Google Inc. nor the names of their contributors may be used to endorse or promote products derived from this software without specific prior written permission.
THIS SOFTWARE IS PROVIDED BY THE COPYRIGHT HOLDERS AND CONTRIBUTORS "AS IS" AND ANY EXPRESS OR IMPLIED WARRANTIES, INCLUDING, BUT NOT LIMITED TO, THE IMPLIED WARRANTIES OF MERCHANTABILITY AND FITNESS FOR A PARTICULAR PURPOSE ARE DISCLAIMED. IN NO EVENT SHALL THE COPYRIGHT OWNER OR CONTRIBUTORS BE LIABLE FOR ANY DIRECT, INDIRECT, INCIDENTAL, SPECIAL, EXEMPLARY, OR CONSEQUENTIAL DAMAGES (INCLUDING, BUT NOT LIMITED TO, PROCUREMENT OF SUBSTITUTE GOODS OR SERVICES; LOSS OF USE, DATA, OR PROFITS; OR BUSINESS INTERRUPTION) HOWEVER CAUSED AND ON ANY THEORY OF LIABILITY, WHETHER IN CONTRACT, STRICT LIABILITY, OR TORT (INCLUDING NEGLIGENCE OR OTHERWISE) ARISING IN ANY WAY OUT OF THE USE OF THIS SOFTWARE, EVEN IF ADVISED OF THE POSSIBILITY OF SUCH DAMAGE.
Red Hat Copyright Disclosure
Red Hat® Enterprise Linux®, and Red Hat Fedora™ are registered trademarks of Red Hat, Inc. in the United States and other countries.
SAS Copyright Disclosure
Portions of this software and documentation are copyrighted by SAS® Institute Inc., Cary, NC, USA, 2009. All Rights Reserved.
SQLite Copyright Disclosure
The original author of SQLite has dedicated the code to the public domain. Anyone is free to copy, modify, publish, use, compile, sell, or distribute the original SQLite code, either in source code form or as a compiled binary, for any purpose, commercial or non-commercial, and by any means.
Sun Microsystems Copyright Disclosure
Java™ is a trademark of Sun Microsystems, Inc. in the U.S. or other countries.
DataFlux Data Management Studio v
Tele Atlas North American Copyright Disclosure
Portions copyright © 2006 Tele Atlas North American, Inc. All rights reserved. This material is proprietary and the subject of copyright protection and other intellectual property rights owned by or licensed to Tele Atlas North America, Inc. The use of this material is subject to the terms of a license agreement. You will be held liable for any unauthorized copying or disclosure of this material.
USPS Copyright Disclosure
National ZIP®, ZIP+4®, Delivery Point Barcode Information, DPV, RDI. © United States Postal Service 2005. ZIP Code® and ZIP+4® are registered trademarks of the U.S. Postal Service.
DataFlux holds a non-exclusive license from the United States Postal Service to publish and sell USPS CASS, DPV, and RDI information. This information is confidential and proprietary to the United States Postal Service. The price of these products is neither established, controlled, or approved by the United States Postal Service.
VMware
DataFlux Corporation LLC technical support service levels should not vary for products running in a VMware® virtual environment provided those products faithfully replicate the native hardware and provided the native hardware is one supported in the applicable DataFlux product documentation. All DataFlux technical support is provided under the terms of a written license agreement signed by the DataFlux customer.
The VMware virtual environment may affect certain functions in DataFlux products (for example, sizing and recommendations), and it may not be possible to fix all problems.
If DataFlux believes the virtualization layer is the root cause of an incident; the customer will be directed to contact the appropriate VMware support provider to resolve the VMware issue and DataFlux shall have no further obligation for the issue.
Solutions and Accelerators Legal Statements
Components of DataFlux Solutions and Accelerators may be licensed from other organizations or open source foundations.
Apache
This product may contain software technology licensed from Apache.
Licensed under the Apache License, Version 2.0 (the "License"); you may not use this file except in compliance with the License. You may obtain a copy of the License at: http://www.apache.org/licenses/LICENSE-2.0.
Unless required by applicable law or agreed to in writing, software distributed under the License is distributed on an "AS IS" BASIS, WITHOUT WARRANTIES OR CONDITIONS OF ANY KIND, either express or implied.
See the License for the specific language governing permissions and limitations under the License.
Creative Commons Attribution
This product may include icons created by Mark James http://www.famfamfam.com/lab/icons/silk/ and licensed under a Creative Commons Attribution 2.5 License: http://creativecommons.org/licenses/by/2.5/.
Degrafa
This product may include software technology from Degrafa (Declarative Graphics Framework) licensed under the MIT License a copy of which can be found here: http://www.opensource.org/licenses/mit-license.php.
Copyright © 2008-2010 Degrafa. All rights reserved.
Permission is hereby granted, free of charge, to any person obtaining a copy of this software and associated documentation files (the "Software"), to deal in the Software without restriction, including

vi DataFlux Data Management Studio
without limitation the rights to use, copy, modify, merge, publish, distribute, sublicense, and/or sell copies of the Software, and to permit persons to whom the Software is furnished to do so, subject to the following conditions:
The above copyright notice and this permission notice shall be included in all copies or substantial portions of the Software.
THE SOFTWARE IS PROVIDED "AS IS", WITHOUT WARRANTY OF ANY KIND, EXPRESS OR IMPLIED, INCLUDING BUT NOT LIMITED TO THE WARRANTIES OF MERCHANTABILITY, FITNESS FOR A PARTICULAR PURPOSE AND NONINFRINGEMENT. IN NO EVENT SHALL THE AUTHORS OR COPYRIGHT HOLDERS BE LIABLE FOR ANY CLAIM, DAMAGES OR OTHER LIABILITY, WHETHER IN AN ACTION OF CONTRACT, TORT OR OTHERWISE, ARISING FROM, OUT OF OR IN CONNECTION WITH THE SOFTWARE OR THE USE OR OTHER DEALINGS IN THE SOFTWARE.
Google Web Toolkit
This product may include Google Web Toolkit software developed by Google and licensed under the Apache License 2.0.
JDOM Project
This product may include software developed by the JDOM Project (http://www.jdom.org/).
OpenSymphony
This product may include software technology from OpenSymphony. A copy of this license can be found here: http://www.opensymphony.com/osworkflow/license.action. It is derived from and fully compatible with the Apache license that can be found here: http://www.apache.org/licenses/.
Sun Microsystems
This product may include software copyrighted by Sun Microsystems, jaxrpc.jar and saaj.jar, whose use and distribution is subject to the Sun Binary code license.
This product may include Java Software technologies developed by Sun Microsystems, Inc. and licensed to Doug Lea.
The Java Software technologies are copyright © 1994-2000 Sun Microsystems, Inc. All rights reserved.
This software is provided "AS IS," without a warranty of any kind. ALL EXPRESS OR IMPLIED CONDITIONS, REPRESENTATIONS AND WARRANTIES, INCLUDING ANY IMPLIED WARRANTY OF MERCHANTABILITY, FITNESS FOR A PARTICULAR PURPOSE OR NON-INFRINGEMENT, ARE HEREBY EXCLUDED. DATAFLUX CORPORATION LLC, SUN MICROSYSTEMS, INC. AND THEIR RESPECTIVE LICENSORS SHALL NOT BE LIABLE FOR ANY DAMAGES SUFFERED BY LICENSEE AS A RESULT OF USING, MODIFYING OR DISTRIBUTING THE SOFTWARE OR ITS DERIVATIVES. IN NO EVENT WILL SUN MICROSYSTEMS, INC. OR ITS LICENSORS BE LIABLE FOR ANY LOST REVENUE, PROFIT OR DATA, OR FOR DIRECT, INDIRECT, SPECIAL, CONSEQUENTIAL, INCIDENTAL OR PUNITIVE DAMAGES, HOWEVER CAUSED AND REGARDLESS OF THE THEORY OF LIABILITY, ARISING OUT OF THE USE OF OR INABILITY TO USE SOFTWARE, EVEN IF SUN MICROSYSTEMS, INC. HAS BEEN ADVISED OF THE POSSIBILITY OF SUCH DAMAGES.
Java Toolkit
This product includes the Web Services Description Language for Java Toolkit 1.5.1 (WSDL4J). The WSDL4J binary code is located in the file wsdl4j.jar.
Use of WSDL4J is governed by the terms and conditions of the Common Public License Version 1.0 (CPL). A copy of the CPL can be found here at http://www.opensource.org/licenses/cpl1.0.php.
DataFlux Data Management Studio vii
Table of Contents Introduction to the Documentation ................................................................. 1
Conventions Used in this Document .................................................................. 1
Reference Publications .................................................................................... 1
Overview of Data Management Studio ............................................................ 3
Overview of the Data Management Platform ....................................................... 3
Overview of Data Management Studio ............................................................... 4
DataFlux Methodology: Plan, Act, and Monitor .................................................... 5
Overview of the Interface ............................................................................... 6
Information Riser Bar ..................................................................................... 6
Overview Pane ............................................................................................... 7
Monitor Tab ................................................................................................... 9
Data Connections Riser Bar ........................................................................... 13
Collections Riser Bar ..................................................................................... 15
Folders Riser Bar .......................................................................................... 17
Data Management Servers Riser Bar ............................................................... 21
Administration Riser Bar ................................................................................ 23
Dialog for Data Jobs ..................................................................................... 24
Data Job Tab or Data Flow Tab ....................................................................... 25
Properties Tab ............................................................................................. 27
Variables Tab ............................................................................................... 28
Log Tab ...................................................................................................... 28
Dialog for Process Jobs ................................................................................. 29
Process Flow Tab .......................................................................................... 30
Inputs Tab .................................................................................................. 32
Repositories .................................................................................................. 33
viii DataFlux Data Management Studio
Overview of Repositories ............................................................................... 33
Connecting to Repositories ............................................................................ 34
Adding New Repositories ............................................................................... 34
Global Options ............................................................................................... 39
Setting Global Options .................................................................................. 39
Using Configuration Files ............................................................................... 39
Setting Logging Options ................................................................................ 40
Server Connections ....................................................................................... 42
Overview of Server Connections ..................................................................... 42
Data Connections .......................................................................................... 44
Overview of Data Connections ........................................................................ 44
Adding ODBC Connections ............................................................................. 45
Adding Federated Server Connections ............................................................. 49
Adding Localized DSN Connections .................................................................. 49
Adding Custom Connections ........................................................................... 50
Adding SAS Data Set Connections .................................................................. 51
Maintaining Data Connections ........................................................................ 51
Data Collections ............................................................................................ 55
Overview of Collections ................................................................................. 55
Creating Collections ...................................................................................... 55
Managing Collections .................................................................................... 55
Setting Collection Properties .......................................................................... 56
Working with Collection Fields ........................................................................ 56
Data Explorations .......................................................................................... 58
Overview of Data Explorations ....................................................................... 58
Creating a Data Exploration ........................................................................... 59
Setting Data Exploration Properties ................................................................. 59
DataFlux Data Management Studio ix
Working with Data Exploration Reports ............................................................ 60
Interpreting a Field Relationship Map .............................................................. 63
Business Rules and Tasks .............................................................................. 64
Introduction to Business Rules ....................................................................... 64
Creating a Rule that Compares Two Fields ....................................................... 70
Creating a Custom Metric That Performs a Calculation ....................................... 79
Creating a Data Monitoring Job ...................................................................... 82
Data Profiles ................................................................................................. 85
Overview of Data Profiles .............................................................................. 85
Creating a Profile ......................................................................................... 86
Preparing a Profile Report .............................................................................. 87
Reviewing a Profile Report ............................................................................. 94
Performing Primary Key and Foreign Key Analysis ............................................. 98
Performing Redundant Data Analysis ............................................................. 100
Performing Pattern Frequency Distribution Analysis ......................................... 104
Excluding Records from a Table Included in a Profile ....................................... 107
Data Jobs .................................................................................................... 109
Overview of Data Jobs ................................................................................ 109
Data Job Nodes .......................................................................................... 111
Creating a Data Job in the Folders Tree ......................................................... 118
Adding a Data Job Node to a Process Job ....................................................... 125
Running and Reviewing a Data Job ............................................................... 127
Resolving Field Name Conflicts ..................................................................... 129
Deploying a Data Job as a Real-Time Service ................................................. 133
Running Jobs from the Command Line ........................................................... 137
Using Text Files in a Data Job ...................................................................... 139
Process Jobs ............................................................................................... 149
x DataFlux Data Management Studio
Overview of Process Jobs ............................................................................ 149
Process Job Nodes ...................................................................................... 151
Creating a Process Job ................................................................................ 153
Running and Reviewing a Process Job ........................................................... 162
Deploying a Process Job as a Real-Time Service ............................................. 165
Macro Variables ........................................................................................... 170
Introduction to Macro Variables .................................................................... 170
Using Macro Variables To Specify File Names .................................................. 171
Using Macro Variables In an Expression ......................................................... 175
Usage Notes for Macro Variables .................................................................. 178
Entity Resolution ......................................................................................... 181
Overview of Entity Resolution ....................................................................... 181
Generating an Entity Resolution File .............................................................. 182
Working with an Entity Resolution File ........................................................... 186
Viewing Your Data....................................................................................... 190
Viewing a Summary for a Table .................................................................... 190
Viewing the Fields in a Table ........................................................................ 191
Viewing the Data Model for a Table ............................................................... 192
Viewing the Data in a Table ......................................................................... 192
Graphing the Data in a Table ....................................................................... 196
Copying and Exporting Metadata ................................................................. 197
Copying and Moving Metadata Objects .......................................................... 197
Exporting and Importing Metadata Packages .................................................. 198
Data Management Studio - Customize Dialog .............................................. 199
Data Management Studio Customize ............................................................. 199
Customize - Main Screen ............................................................................. 201
Dockable Sections ...................................................................................... 203
DataFlux Data Management Studio xi
Customize - Open a QKB ............................................................................. 209
Customize - Import from a File and Export from a QKB .................................... 210
Customize - Options .................................................................................... 212
Customize - Encodings, Languages, and Locales ............................................. 213
Customize - Data Types .............................................................................. 214
Customize - Definitions ............................................................................... 217
Customize - Case Definitions ....................................................................... 220
Nodes ....................................................................................................... 220
Customize - Extraction Definitions .............................................................. 222
Customize - Gender Definitions ................................................................... 224
Customize - Identification Definitions ......................................................... 226
Customize - Language Guess Definitions ..................................................... 228
Customize - Locale Guess Definitions .......................................................... 230
Customize - Match Definitions ..................................................................... 232
Customize - Parse Definitions ..................................................................... 234
Customize - Pattern Analysis Definitions ..................................................... 236
Customize - Standardization Definitions ..................................................... 237
Customize - Nodes ..................................................................................... 238
Token Mappings Node ................................................................................. 271
Customize - Parse Definition Quick Editor ...................................................... 297
Parse Definition Quick Editor - Categorization and Rule Building ........................ 300
Parse Definition Quick Editor - Element Analysis ............................................. 301
Parse Definition Quick Editor - Chopper Tab ................................................... 302
Parse Definition Quick Editor - Normalization Regexlib ..................................... 304
Parse Definition Quick Editor - Grammar Tab .................................................. 305
Parse Definition Quick Editor - Vocabulary ..................................................... 306
Customize Parse Definition Quick Editor - New Parse Definition ......................... 307
xii DataFlux Data Management Studio
Customize Parse Definition Quick Editor - Open Parse Definition ........................ 309
Customize Parse Definition Quick Editor - Save/Save As ............................ 310
Unicode Block .............................................................................................. 313
Customize Parse Definition Quick Editor - Troubleshooting ......................... 317
Error Messages .......................................................................................... 317
Customize Parse Definition Quick Editor - FAQ ............................................ 318
Customize - Vocabulary Editor ..................................................................... 325
Customize - Vocabulary Editor - Building Vocabularies ............................... 326
Customize - Vocabulary Editor - Modifying Vocabulary Words..................... 328
Add a word to a Vocabulary ......................................................................... 328
Modify a word in a Vocabulary ...................................................................... 328
Delete a word from a Vocabulary .................................................................. 328
Customize - Grammar Editor ........................................................................ 329
Customize - Grammar Editor - Building Grammars ...................................... 330
Customize - Grammar Editor - Modifying Grammars ................................... 331
Add a category to an existing Grammar ......................................................... 331
Add a rule to a Grammar's existing derived category ....................................... 331
Modify a category's abbreviation .................................................................. 331
Modify a category's name ............................................................................ 332
Modify the priority or category assigned to a rule ............................................ 332
Delete a category ....................................................................................... 332
Customize - Regex Editor ............................................................................ 333
Customize - Regex Library Editor - Building Regex Libraries ....................... 334
Customize - Regex Library Editor - Modifying Regex Library Files ............... 335
Customize - Regex Library Editor - Using Regular Expressions ................... 336
Meta-Characters ........................................................................................ 336
Subpatterns .............................................................................................. 347
DataFlux Data Management Studio xiii
Back References ........................................................................................ 351
Assertions ................................................................................................. 352
Subpatterns as Subroutines ......................................................................... 358
Customize - Phonetics Editor ........................................................................ 360
Customize - Phonetics Editor - Creating Phonetics Files .............................. 361
Customize - Phonetics Editor - Components of a Rule ................................. 362
Rule Text .................................................................................................. 362
Replacement Text ...................................................................................... 363
Customize - Phonetics Editor - Changing Rule Order ................................... 365
Customize - Chop Table .............................................................................. 365
Customize - Creating Chop Table Files ........................................................ 369
Customize - Chop Table Editor - Character Level Options ............................ 370
Character Classifications ............................................................................. 370
Operations ................................................................................................ 370
Implicit Separators ..................................................................................... 370
Scheme Builder .......................................................................................... 371
Scheme Builder - Menus .............................................................................. 372
File .......................................................................................................... 372
Edit .......................................................................................................... 372
View ......................................................................................................... 373
Report ...................................................................................................... 373
Tools ........................................................................................................ 374
Scheme Builder - Find ................................................................................. 375
Scheme Builder - Import From Text File ...................................................... 376
Scheme Builder - Options ............................................................................ 377
QKB Difference Viewer ................................................................................ 377
QKB Difference Viewer - Build Differences Dialog ............................................ 380
xiv DataFlux Data Management Studio
QKB Difference Command Line Interface .................................................... 383
QKB Merge Tool ......................................................................................... 383
QKB Merge Tool - FAQ ................................................................................. 385
QKB Merge Command Line Interface ........................................................... 387
Technical Support ....................................................................................... 388
Frequently Asked Questions (FAQ) ................................................................ 388
Appendixes ................................................................................................. 392
Quality Knowledge Base .............................................................................. 392
Encodings .................................................................................................... 394
Glossary ...................................................................................................... 396
DataFlux Data Management Studio 1
Introduction to the Documentation
Conventions Used in this Document
Reference Publications
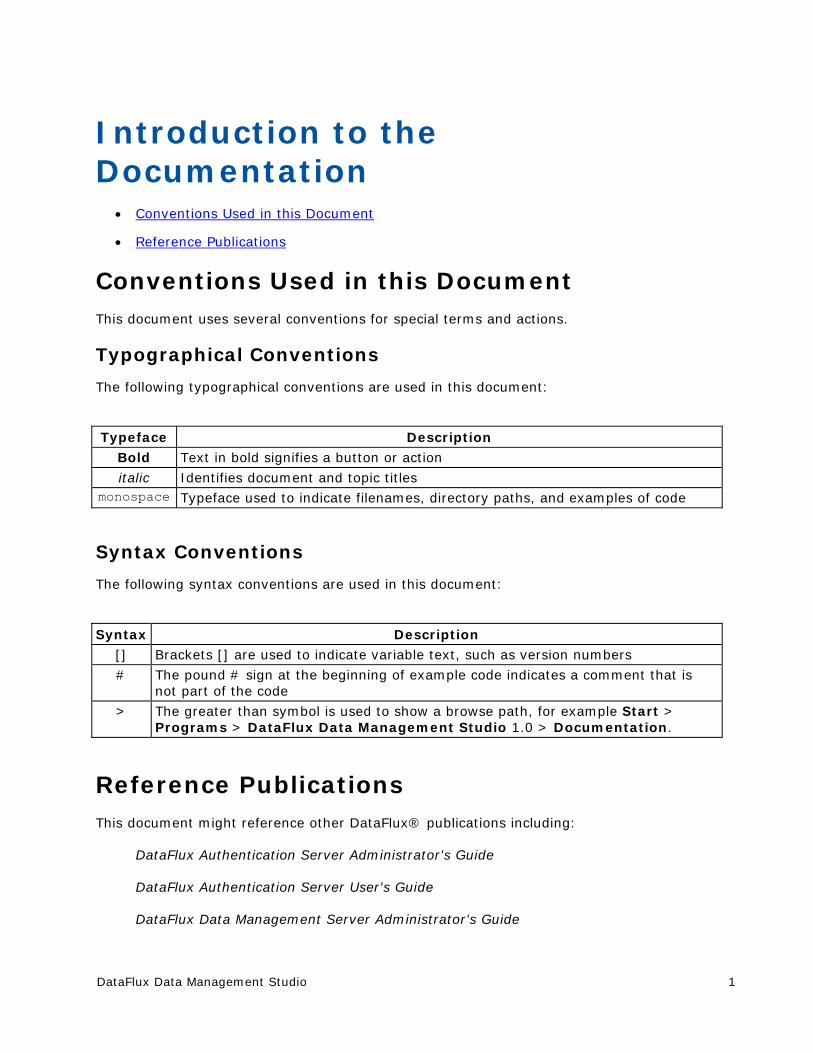
Conventions Used in this Document This document uses several conventions for special terms and actions.
Typographical Conventions
The following typographical conventions are used in this document:
Typeface Description
Bold Text in bold signifies a button or action
italic Identifies document and topic titles monospace Typeface used to indicate filenames, directory paths, and examples of code
Syntax Conventions
The following syntax conventions are used in this document:
Syntax Description [] Brackets [] are used to indicate variable text, such as version numbers
# The pound # sign at the beginning of example code indicates a comment that is not part of the code
> The greater than symbol is used to show a browse path, for example Start > Programs > DataFlux Data Management Studio 1.0 > Documentation.
Reference Publications This document might reference other DataFlux® publications including:
DataFlux Authentication Server Administrator's Guide
DataFlux Authentication Server User's Guide
DataFlux Data Management Server Administrator's Guide
2 DataFlux Data Management Studio
DataFlux Data Management Server User's Guide
DataFlux Data Management Studio Installation and Configuration Guide
DataFlux Expression Language Reference Guide
DataFlux Federation Server Administrator's Guide
DataFlux Federation Server User's Guide
DataFlux Migration Guide
DataFlux Quality Knowledge Base Online Help
DataFlux Data Management Studio 3
Overview of Data Management Studio
Overview of the DataFlux Data Management Platform
Overview of DataFlux Data Management Studio
DataFlux Methodology: Plan, Act, and Monitor
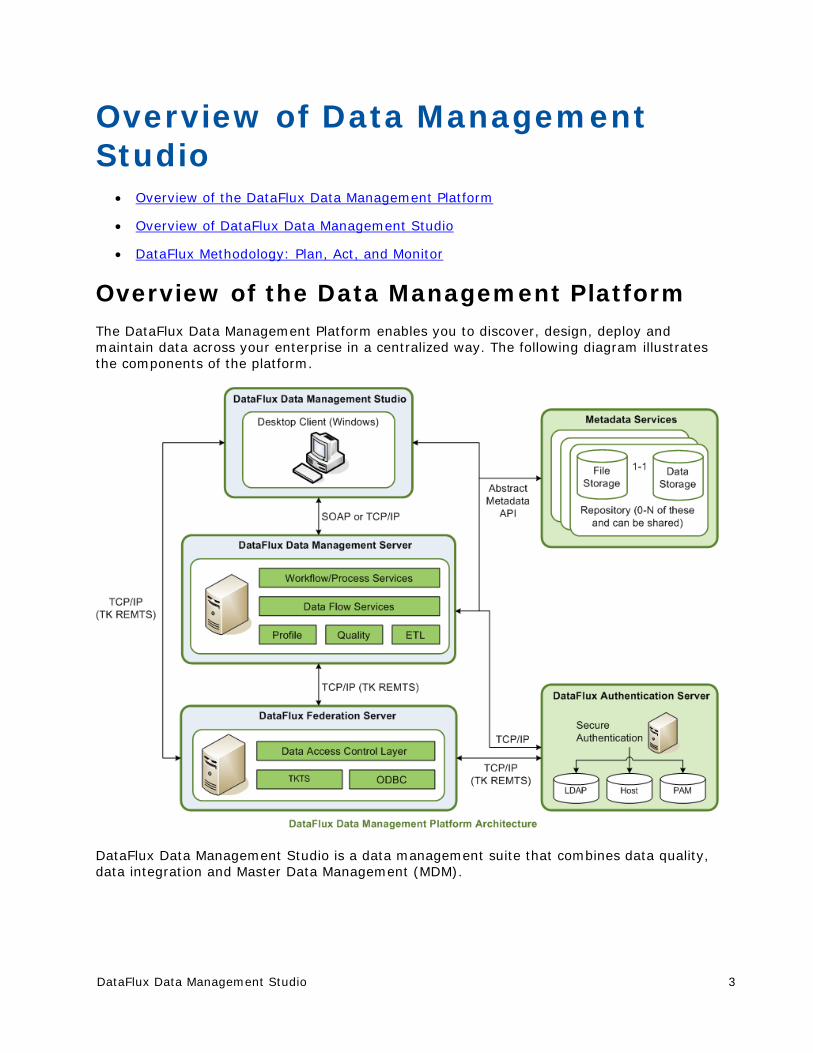
Overview of the Data Management Platform The DataFlux Data Management Platform enables you to discover, design, deploy and maintain data across your enterprise in a centralized way. The following diagram illustrates the components of the platform.
DataFlux Data Management Studio is a data management suite that combines data quality, data integration and Master Data Management (MDM).
4 DataFlux Data Management Studio
When you create profiles, business rules, jobs, and other objects in Data Management Studio, these objects are stored in repositories. Profiles, rules, tasks and some other objects in a repository are stored in database format. You can specify a separate storage location for objects that are stored as files, such as data jobs, process jobs, and queries. You can create a private repository for your own use, or you can create a shared repository that a number of people can use.
Data Management Studio can be used by itself or in combination with one or more of the following DataFlux servers:
The DataFlux Data Management Server provides a scalable server environment for large Data Management Studio jobs. Jobs can be uploaded from Data Management Studio to a Data Management Server, where the jobs are executed.
The DataFlux Federation Server manages TKTS data connections (Threaded Kernel Table Services) and the access privileges for these connections.
The DataFlux Authentication Server centralizes the management of users, groups, and database credentials.
You can connect to these servers in Data Management Studio, as described in Overview of Server Connections.
Overview of Data Management Studio DataFlux Data Management Studio is a data management suite that combines data quality, data integration and Master Data Management (MDM). It provides a process and technology framework to deliver a single, accurate and consistent view your enterprise data.
Data Management Studio gives you the ability to:
Merge customer, product, or other enterprise data
Unify disparate data through a variety of data integration methods (batch, real time, virtual)
Verify and complete address information
Integrate disparate data sets and ensure data quality
Transform and standardize product codes
Monitor data for compliance in batch or real time
Manage metadata hierarchy and visibility
Data Management Studio enables you to establish an effective an effective data governance platform. It provides a powerful interface for:
Metadata analysis - Understand what data resources you have and extract and organize metadata from any source anywhere throughout the enterprise
Data profiling - Execute a complete assessment of your organization's data, examining the structure, completeness, suitability and relationships of your information assets
DataFlux Data Management Studio 5
Data quality - Correct data problems, standardize data across sources and create an integrated view of corporate information
Data integration - Consolidate and migrate data from any data structure using extract-transform-load (ETL) methods, extract-load-transform (ELT) methods, as well as virtual or real-time data integration.
Data monitoring - Build business rules for quality, providing a foundation for an ongoing, highly-customized data governance program
Address standardization - Standardize and verify address information for more than 240 countries around the world
Data enrichment- Add new data elements to customer and product data to meet the needs of your organization
Data Management Studio is the core interface of the DataFlux Data Management Platform. This platform enables you to discover, design, deploy and maintain data across your enterprise in a centralized way.
DataFlux Methodology: Plan, Act, and Monitor The main activities in the DataFlux methodology are as follows:
Plan - Identify patterns and problems in your data.
Act - Create processes to improve data quality and data integration.
Monitor - Monitor your processes for data quality and data integration.
For more information about each of these activities, click the Information riser on the main Data Management Studio window, and then click the appropriate activity in the Data Life Cycle pane.

6 DataFlux Data Management Studio
Overview of the Interface The main window of Data Management Studio contains the following risers:
Information Riser Bar
Data Connections Riser Bar
Collections Riser Bar
Folders Riser Bar
Data Management Servers Riser Bar
Administration Riser Bar
The two main job editors in Data Management Studio are as follows:
Dialog for Data Jobs
Dialog for Process Jobs
Information Riser Bar You can use the Information Riser Bar to review information that summarizes your DataFlux Data Management Studio implementation or helps you monitor the status of selected assets in the implementation. The Information Riser Bar contains the following elements:
Overview Pane
Monitor Pane
DataFlux Data Management Studio 7
Overview Pane You can use the Overview pane to review summarized information about your DataFlux Data Management Studio implementation. The Overview pane contains the following sections:
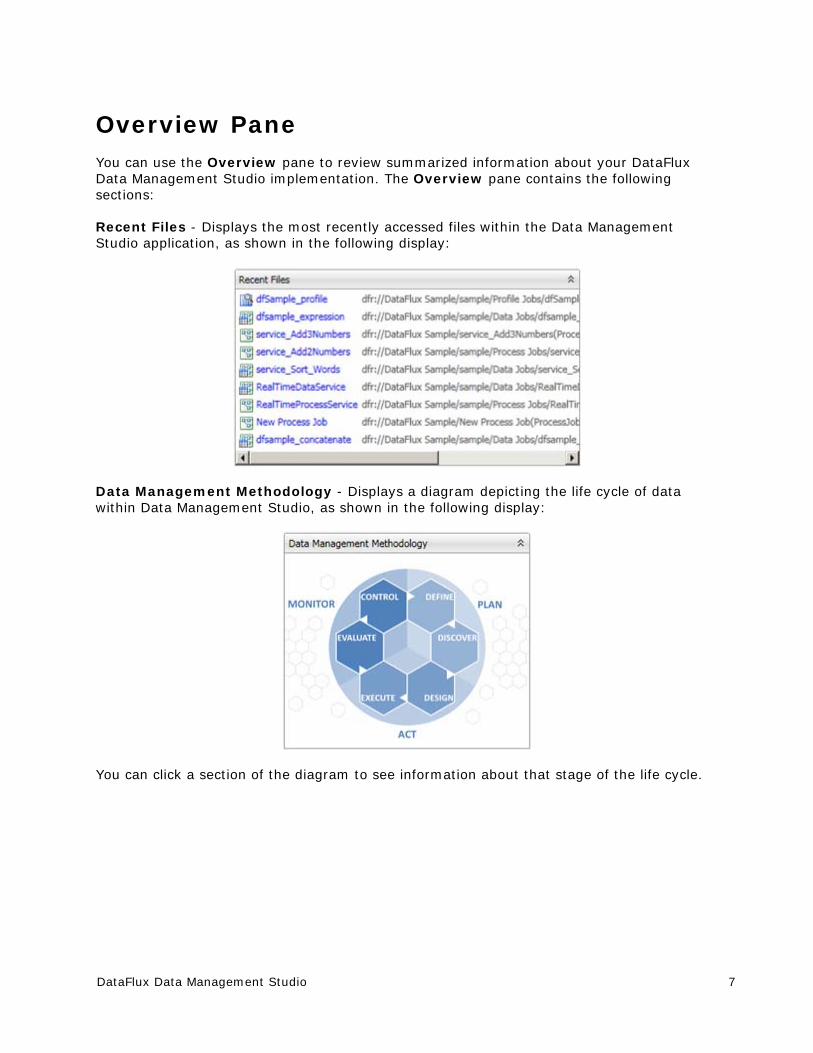
Recent Files - Displays the most recently accessed files within the Data Management Studio application, as shown in the following display:
Data Management Methodology - Displays a diagram depicting the life cycle of data within Data Management Studio, as shown in the following display:
You can click a section of the diagram to see information about that stage of the life cycle.
8 DataFlux Data Management Studio
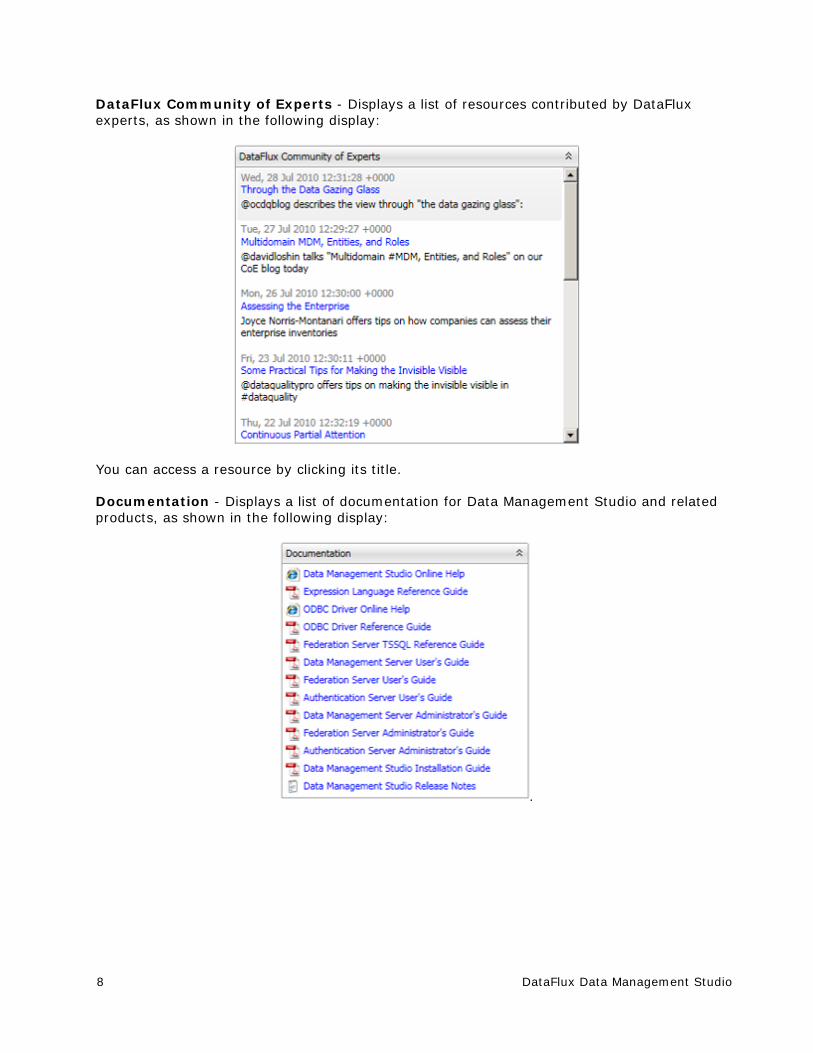
DataFlux Community of Experts - Displays a list of resources contributed by DataFlux experts, as shown in the following display:
You can access a resource by clicking its title.
Documentation - Displays a list of documentation for Data Management Studio and related products, as shown in the following display:
.
DataFlux Data Management Studio 9
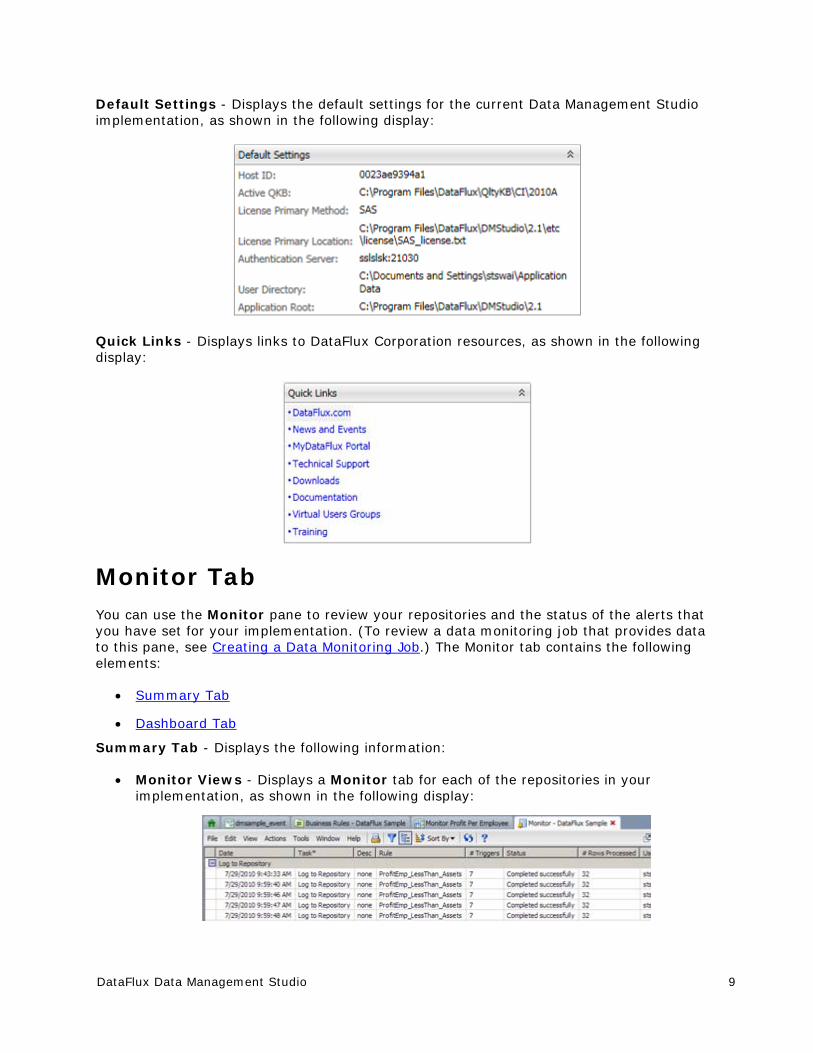
Default Settings - Displays the default settings for the current Data Management Studio implementation, as shown in the following display:
Quick Links - Displays links to DataFlux Corporation resources, as shown in the following display:
Monitor Tab You can use the Monitor pane to review your repositories and the status of the alerts that you have set for your implementation. (To review a data monitoring job that provides data to this pane, see Creating a Data Monitoring Job.) The Monitor tab contains the following elements:
Summary Tab
Dashboard Tab
Summary Tab - Displays the following information:
Monitor Views - Displays a Monitor tab for each of the repositories in your implementation, as shown in the following display:
10 DataFlux Data Management Studio
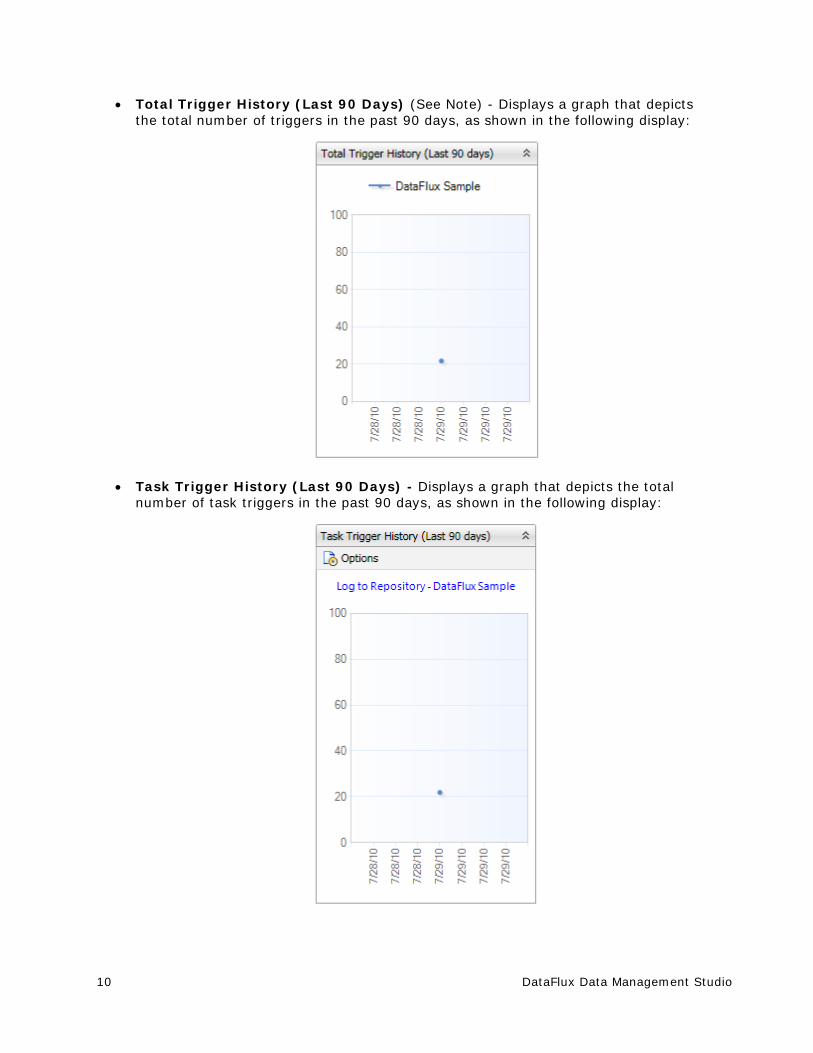
Total Trigger History (Last 90 Days) (See Note) - Displays a graph that depicts the total number of triggers in the past 90 days, as shown in the following display:
Task Trigger History (Last 90 Days) - Displays a graph that depicts the total number of task triggers in the past 90 days, as shown in the following display:
DataFlux Data Management Studio 11
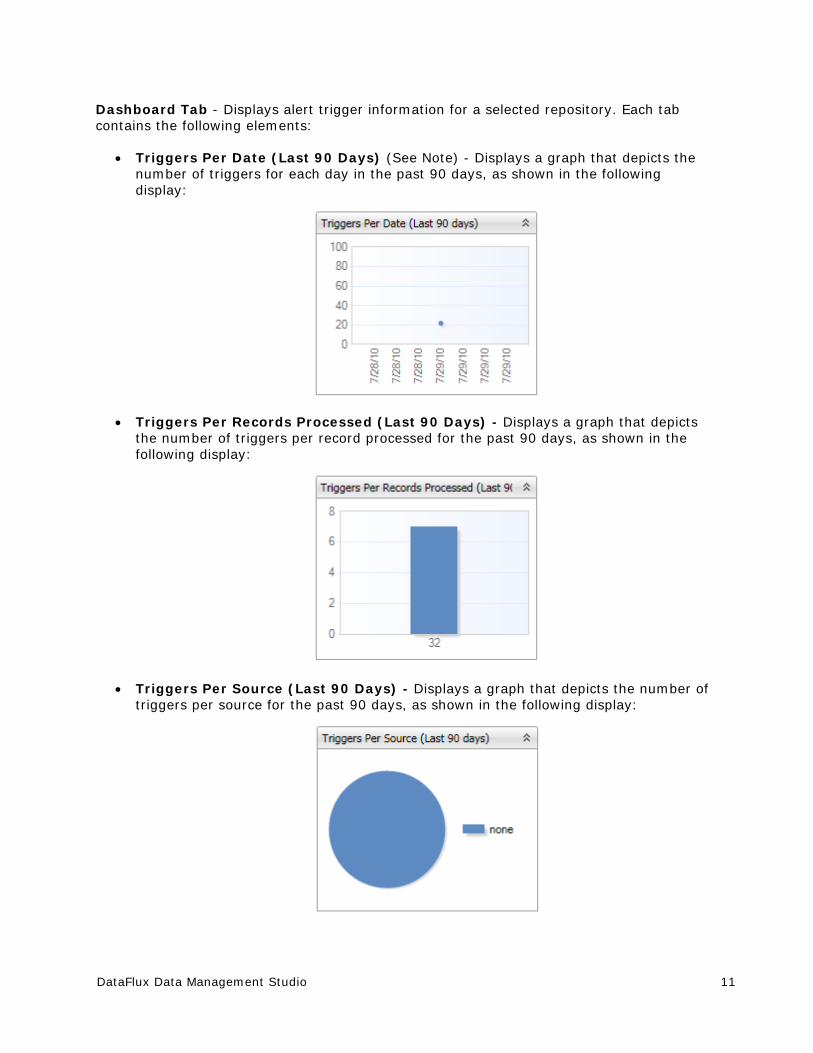
Dashboard Tab - Displays alert trigger information for a selected repository. Each tab contains the following elements:
Triggers Per Date (Last 90 Days) (See Note) - Displays a graph that depicts the number of triggers for each day in the past 90 days, as shown in the following display:
Triggers Per Records Processed (Last 90 Days) - Displays a graph that depicts the number of triggers per record processed for the past 90 days, as shown in the following display:
Triggers Per Source (Last 90 Days) - Displays a graph that depicts the number of triggers per source for the past 90 days, as shown in the following display:
12 DataFlux Data Management Studio
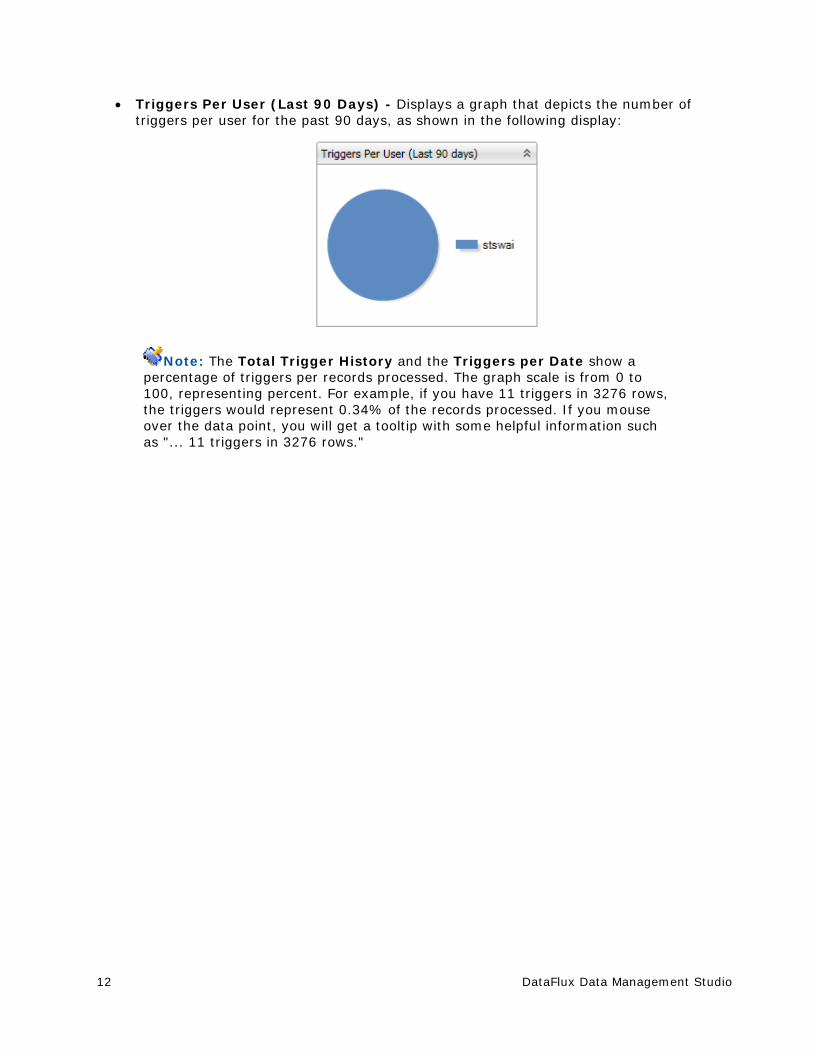
Triggers Per User (Last 90 Days) - Displays a graph that depicts the number of triggers per user for the past 90 days, as shown in the following display:
Note: The Total Trigger History and the Triggers per Date show a percentage of triggers per records processed. The graph scale is from 0 to 100, representing percent. For example, if you have 11 triggers in 3276 rows, the triggers would represent 0.34% of the records processed. If you mouse over the data point, you will get a tooltip with some helpful information such as "... 11 triggers in 3276 rows."
DataFlux Data Management Studio 13
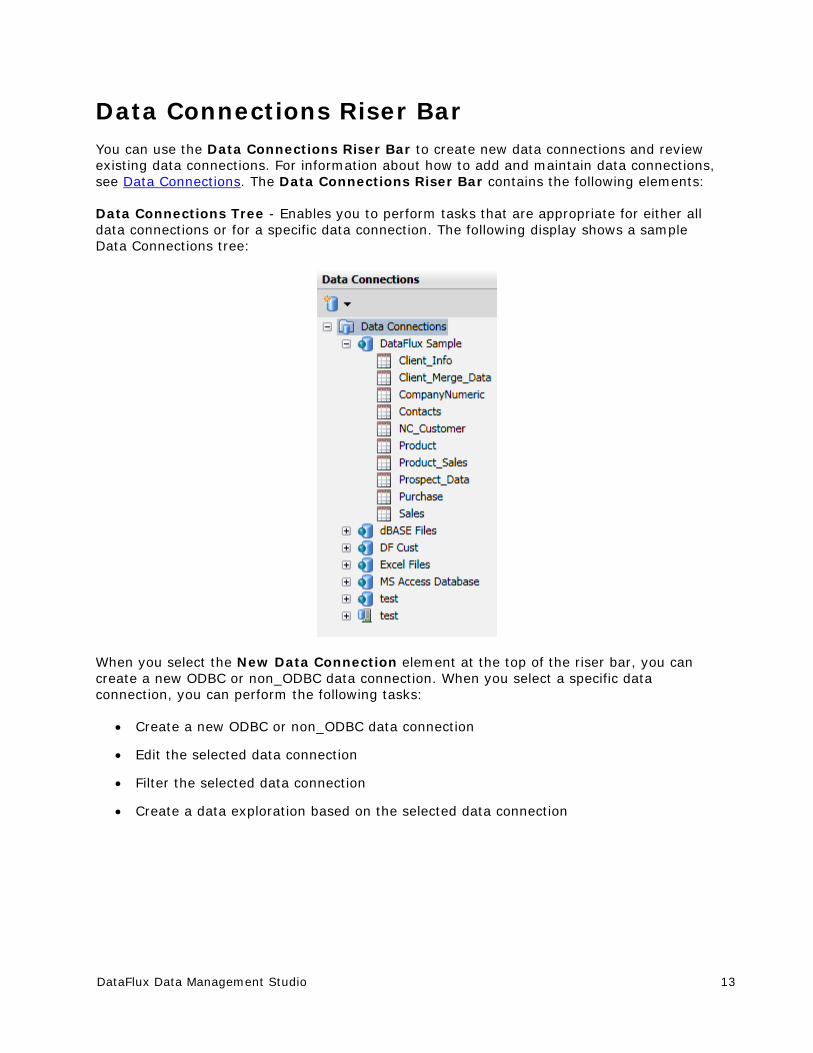
Data Connections Riser Bar You can use the Data Connections Riser Bar to create new data connections and review existing data connections. For information about how to add and maintain data connections, see Data Connections. The Data Connections Riser Bar contains the following elements:
Data Connections Tree - Enables you to perform tasks that are appropriate for either all data connections or for a specific data connection. The following display shows a sample Data Connections tree:
When you select the New Data Connection element at the top of the riser bar, you can create a new ODBC or non_ODBC data connection. When you select a specific data connection, you can perform the following tasks:
Create a new ODBC or non_ODBC data connection
Edit the selected data connection
Filter the selected data connection
Create a data exploration based on the selected data connection
14 DataFlux Data Management Studio
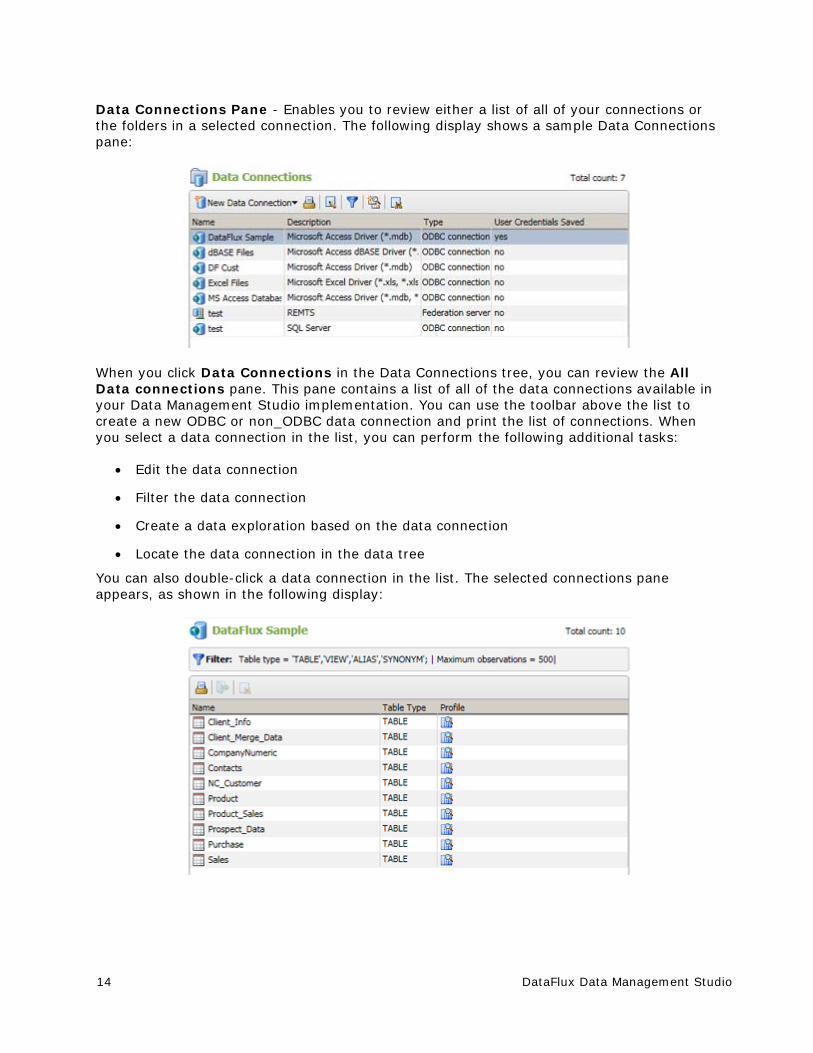
Data Connections Pane - Enables you to review either a list of all of your connections or the folders in a selected connection. The following display shows a sample Data Connections pane:
When you click Data Connections in the Data Connections tree, you can review the All Data connections pane. This pane contains a list of all of the data connections available in your Data Management Studio implementation. You can use the toolbar above the list to create a new ODBC or non_ODBC data connection and print the list of connections. When you select a data connection in the list, you can perform the following additional tasks:
Edit the data connection
Filter the data connection
Create a data exploration based on the data connection
Locate the data connection in the data tree
You can also double-click a data connection in the list. The selected connections pane appears, as shown in the following display:
DataFlux Data Management Studio 15
which contains the following elements:
Filter - Specifies the filter settings that have been applied to the selected connection
Tables and Files - Displays the tables and files that are available with the current filter settings
Toolbar - Enables you to print the list of tables in the data connection. If you select a table in the list, you can perform the following additional tasks:
Open the table for viewing in the Table View pane
Create a query based on the selected table
Create a data exploration based on the selected table
Create a new profile
Open a profile report (available for tables included in a profile)
Locate the table in the data tree
Finally, you can right-click a data connection in the data tree to access a pop-up menu. The available items vary by connection type, but they include the following functions:
Create a new data connection
Edit the selected data connection
Delete the selected data connection
Filter the selected data connection
Save or clear user credentials for the selected data connection
Create a data exploration based on the selected data connection
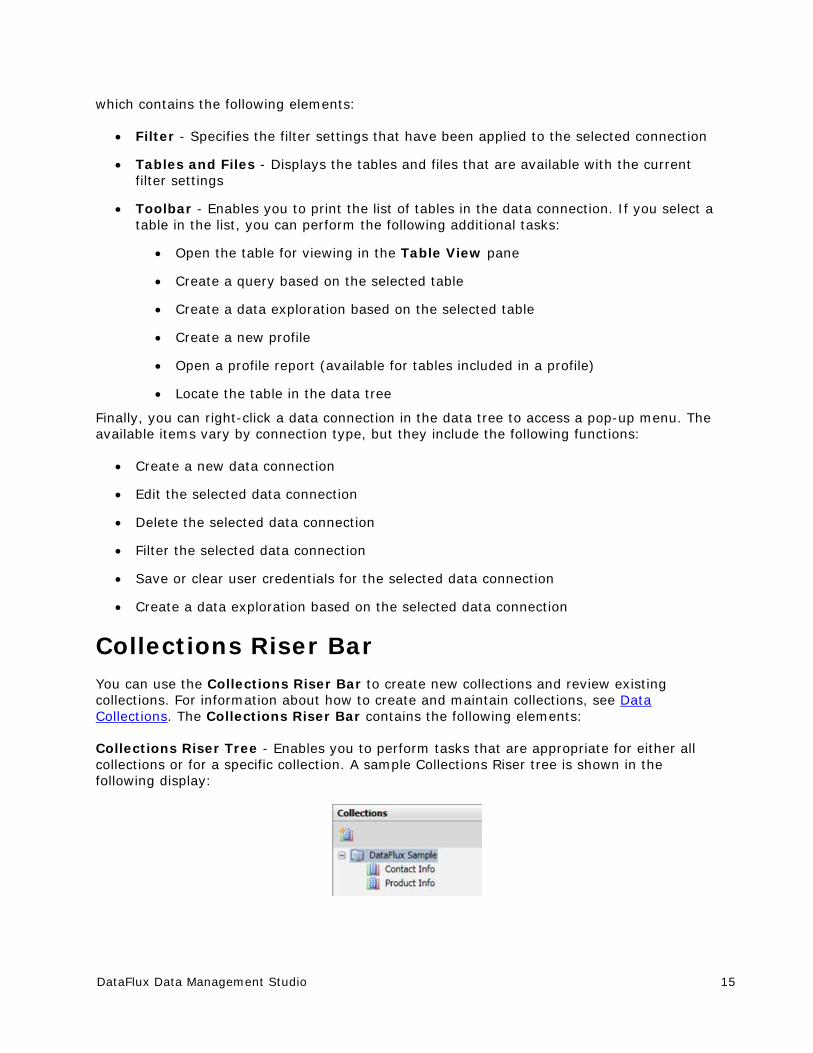
Collections Riser Bar You can use the Collections Riser Bar to create new collections and review existing collections. For information about how to create and maintain collections, see Data Collections. The Collections Riser Bar contains the following elements:
Collections Riser Tree - Enables you to perform tasks that are appropriate for either all collections or for a specific collection. A sample Collections Riser tree is shown in the following display:
16 DataFlux Data Management Studio
When you select the New Collection element in the toolbar at the top of the pane, you can create a new collection. When you select an existing collection in the collections list, you can perform the following tasks with the toolbar:
Create a new collection
Open and edit the selected collection
Delete the selected collection
Rename the collection
Create a data exploration based on the selected collection
Create a profile based on the selected collection
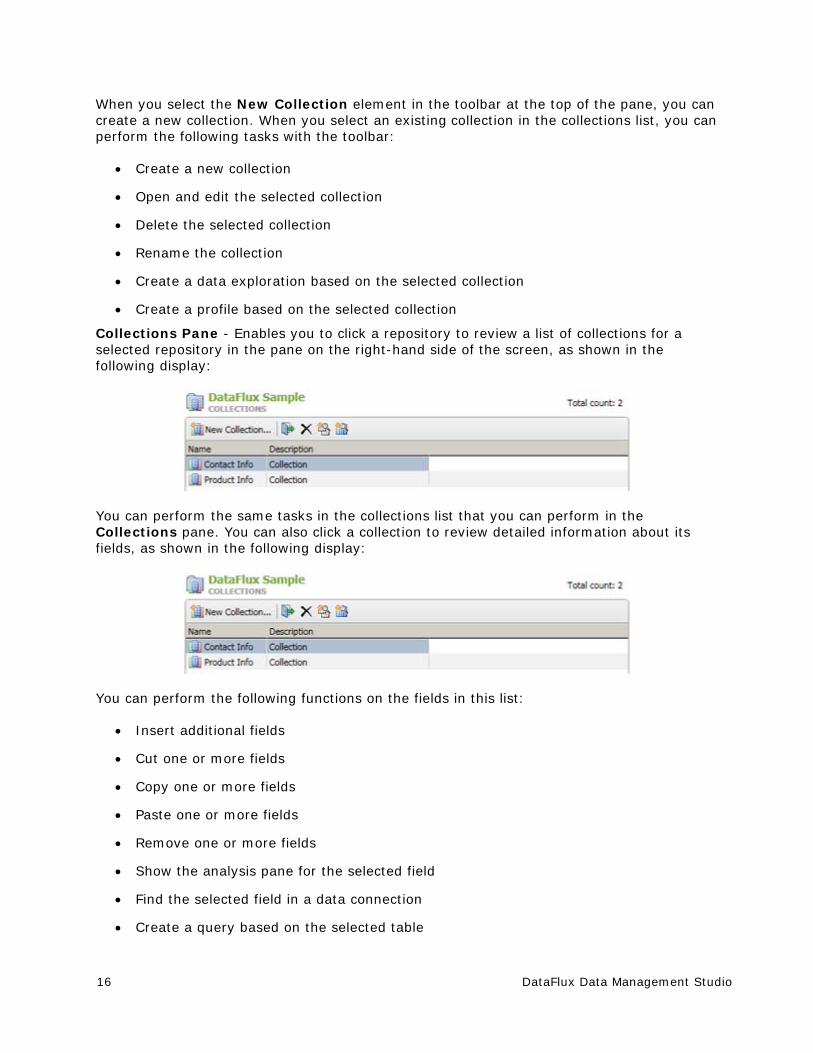
Collections Pane - Enables you to click a repository to review a list of collections for a selected repository in the pane on the right-hand side of the screen, as shown in the following display:
You can perform the same tasks in the collections list that you can perform in the Collections pane. You can also click a collection to review detailed information about its fields, as shown in the following display:
You can perform the following functions on the fields in this list:
Insert additional fields
Cut one or more fields
Copy one or more fields
Paste one or more fields
Remove one or more fields
Show the analysis pane for the selected field
Find the selected field in a data connection
Create a query based on the selected table
DataFlux Data Management Studio 17
Create a data exploration based on the selected table
Create a profile based on the selected field
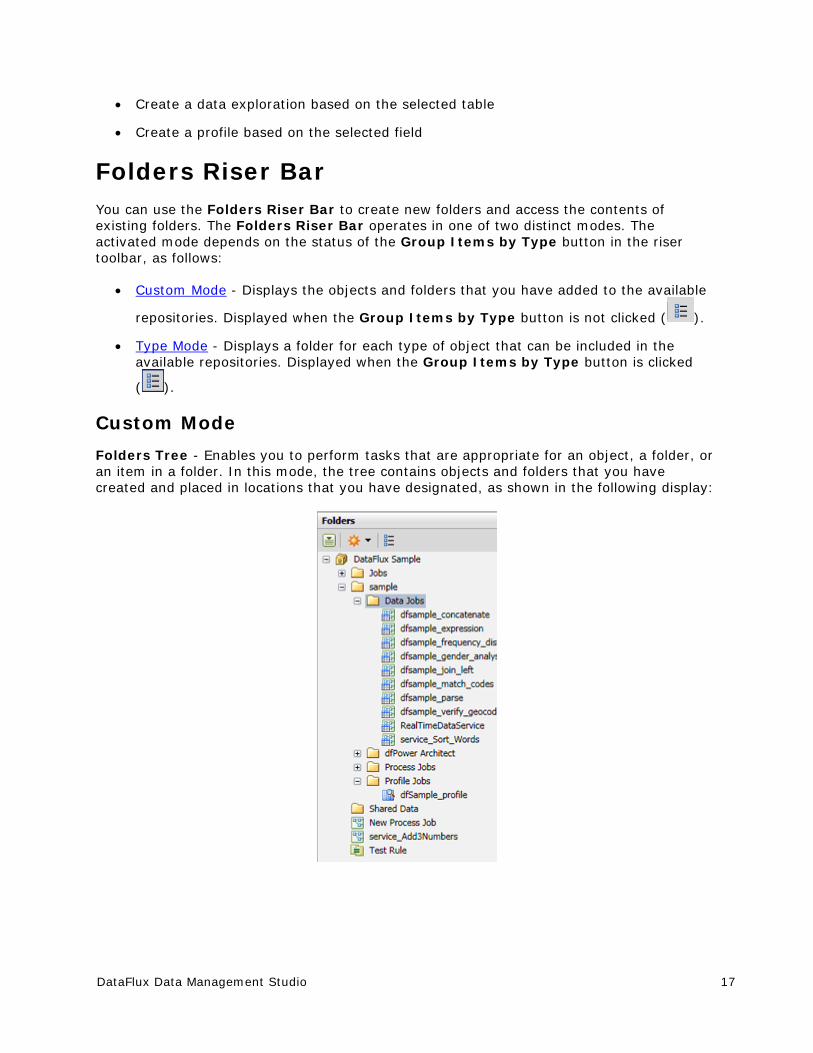
Folders Riser Bar You can use the Folders Riser Bar to create new folders and access the contents of existing folders. The Folders Riser Bar operates in one of two distinct modes. The activated mode depends on the status of the Group Items by Type button in the riser toolbar, as follows:
Custom Mode - Displays the objects and folders that you have added to the available
repositories. Displayed when the Group Items by Type button is not clicked ( ).
Type Mode - Displays a folder for each type of object that can be included in the available repositories. Displayed when the Group Items by Type button is clicked
( ).
Custom Mode
Folders Tree - Enables you to perform tasks that are appropriate for an object, a folder, or an item in a folder. In this mode, the tree contains objects and folders that you have created and placed in locations that you have designated, as shown in the following display:
18 DataFlux Data Management Studio
You can use the toolbar at the top of pane to perform the following functions:
Perform an action on a selected item. Note that the available actions vary depending on the item. These actions include import, export, copy, delete, rename, move to folder, copy to folder, lock, upgrade as data job, and upgrade as process job.
Create new objects in the selected folder. The available objects are folders, business rules, data explorations, data jobs, process jobs, profiles, queries, table templates, SAS files, and tasks.
Switch to the Type Mode (by clicking Group Items by Type).
Note that you can add a new user-defined folder to the Folders tree. Simply right-click a repository or parent folder and click New in the pop-up menu. You can also copy or move selected objects to a user-defined folder in the Folders tree. To perform these tasks, right-click an object in the Folders tree on the left or the information pane on the right. Then click Copy to Folder or Move to Folder.
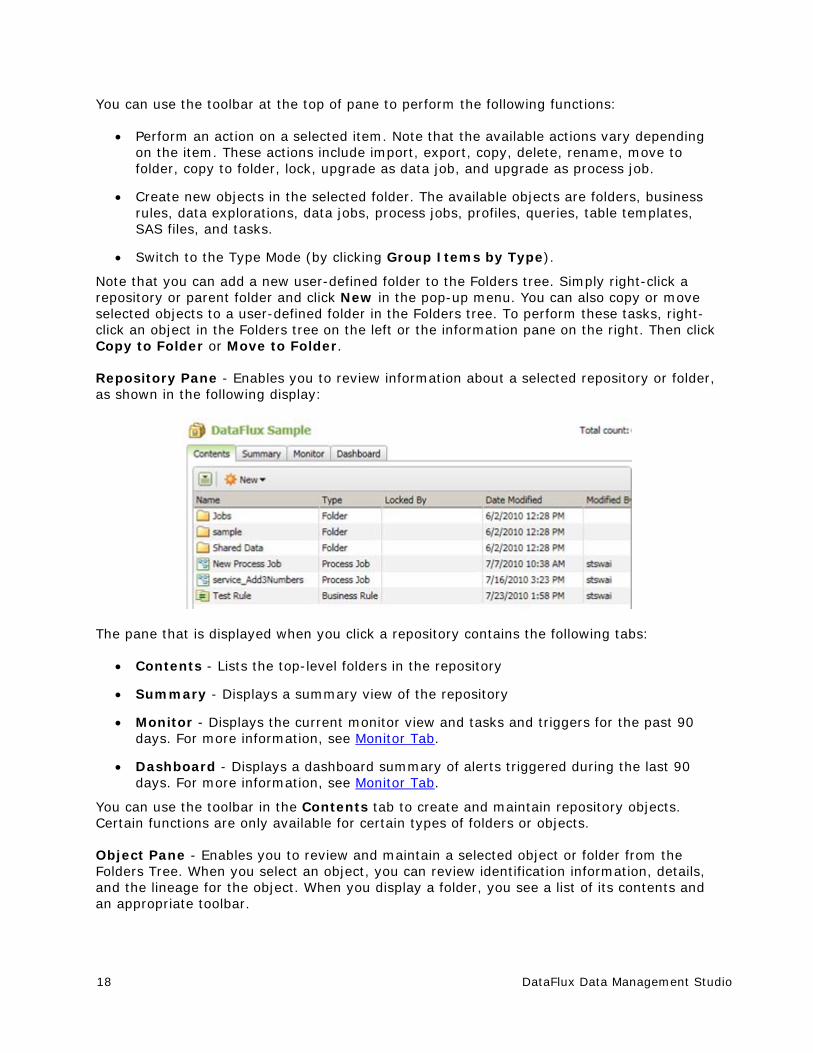
Repository Pane - Enables you to review information about a selected repository or folder, as shown in the following display:
The pane that is displayed when you click a repository contains the following tabs:
Contents - Lists the top-level folders in the repository
Summary - Displays a summary view of the repository
Monitor - Displays the current monitor view and tasks and triggers for the past 90 days. For more information, see Monitor Tab.
Dashboard - Displays a dashboard summary of alerts triggered during the last 90 days. For more information, see Monitor Tab.
You can use the toolbar in the Contents tab to create and maintain repository objects. Certain functions are only available for certain types of folders or objects.
Object Pane - Enables you to review and maintain a selected object or folder from the Folders Tree. When you select an object, you can review identification information, details, and the lineage for the object. When you display a folder, you see a list of its contents and an appropriate toolbar.
DataFlux Data Management Studio 19
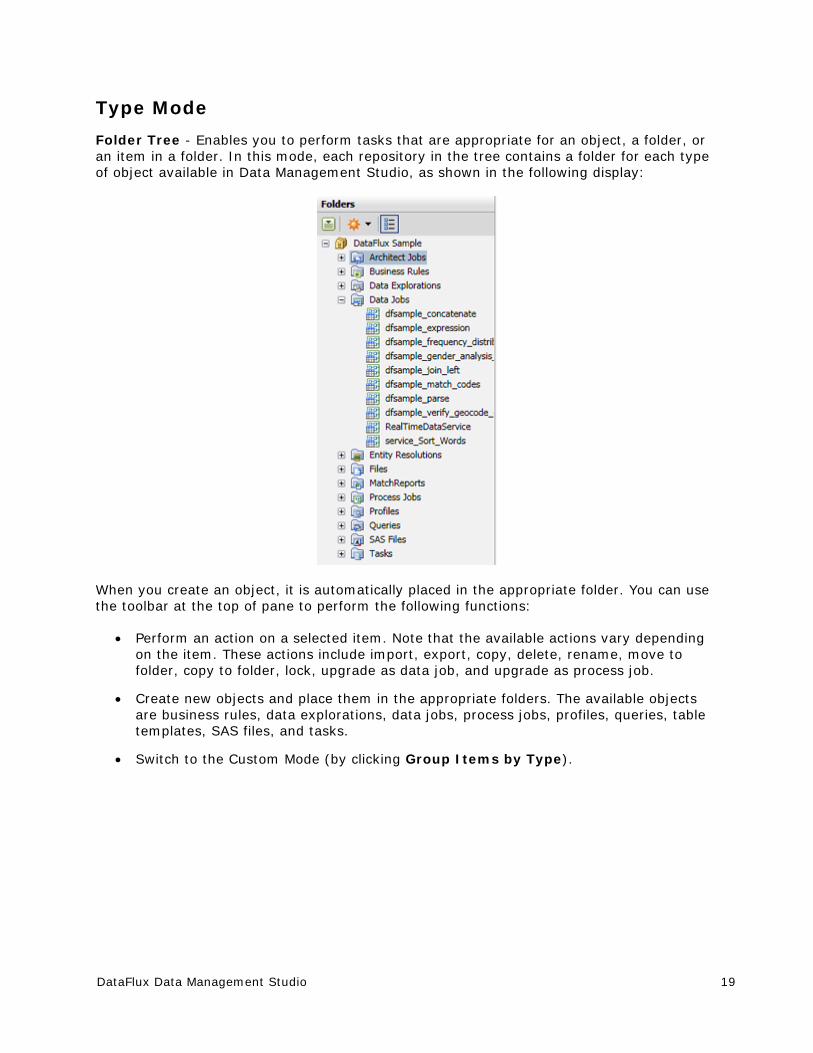
Type Mode
Folder Tree - Enables you to perform tasks that are appropriate for an object, a folder, or an item in a folder. In this mode, each repository in the tree contains a folder for each type of object available in Data Management Studio, as shown in the following display:
When you create an object, it is automatically placed in the appropriate folder. You can use the toolbar at the top of pane to perform the following functions:
Perform an action on a selected item. Note that the available actions vary depending on the item. These actions include import, export, copy, delete, rename, move to folder, copy to folder, lock, upgrade as data job, and upgrade as process job.
Create new objects and place them in the appropriate folders. The available objects are business rules, data explorations, data jobs, process jobs, profiles, queries, table templates, SAS files, and tasks.
Switch to the Custom Mode (by clicking Group Items by Type).
20 DataFlux Data Management Studio
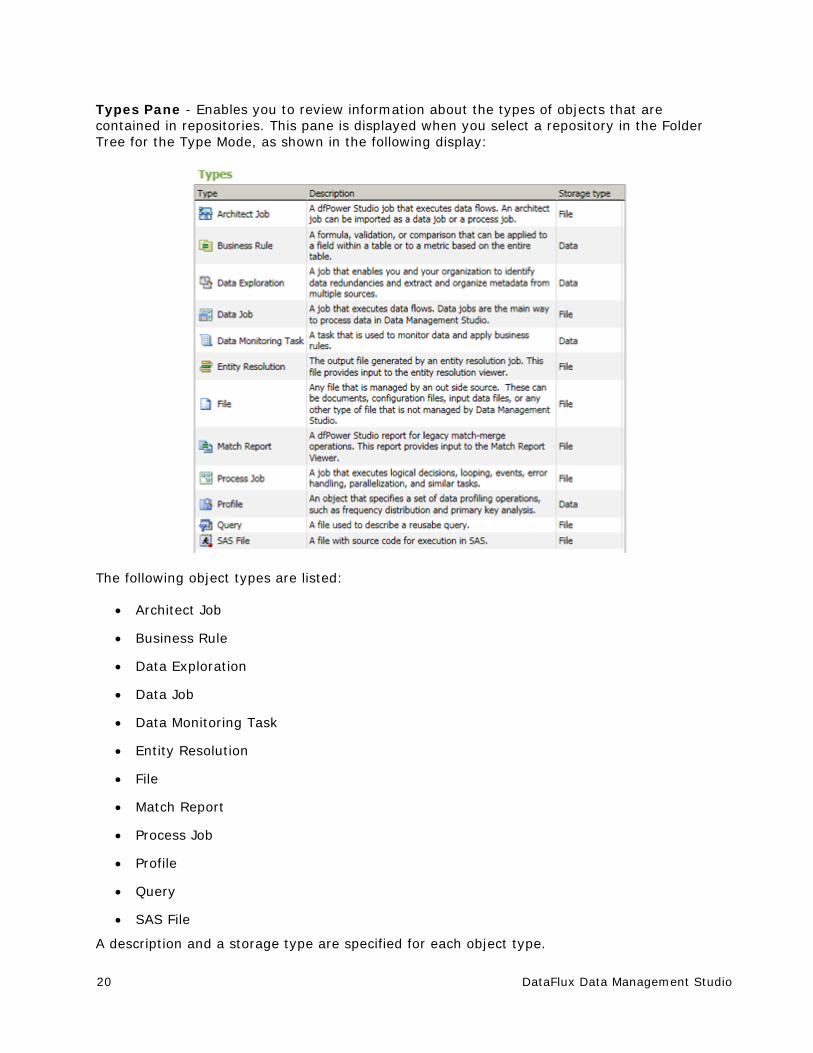
Types Pane - Enables you to review information about the types of objects that are contained in repositories. This pane is displayed when you select a repository in the Folder Tree for the Type Mode, as shown in the following display:
The following object types are listed:
Architect Job
Business Rule
Data Exploration
Data Job
Data Monitoring Task
Entity Resolution
File
Match Report
Process Job
Profile
Query
SAS File
A description and a storage type are specified for each object type.
DataFlux Data Management Studio 21
Object Pane - Enables you to review and maintain a selected object or folder from the Folders Tree. When you select an object, you can review identification information, details, and the lineage for the object. When you display a folder, you see a list of its contents and an appropriate toolbar.
Note: You can also right-click folders and object in both modes to display a pop-up menu. The menu enables you to perform object management functions (such as copy, rename, lock, unlock, and delete) and import and export functions.
Data Management Servers Riser Bar You can use the Data Management Servers Riser Bar to specify DataFlux Data Management Servers, which are used to remotely execute Data Management Studio jobs. For more information about connecting to a Data Management server, see DataFlux Data Management Server.
The Data Management Servers Riser Bar contains the following elements:
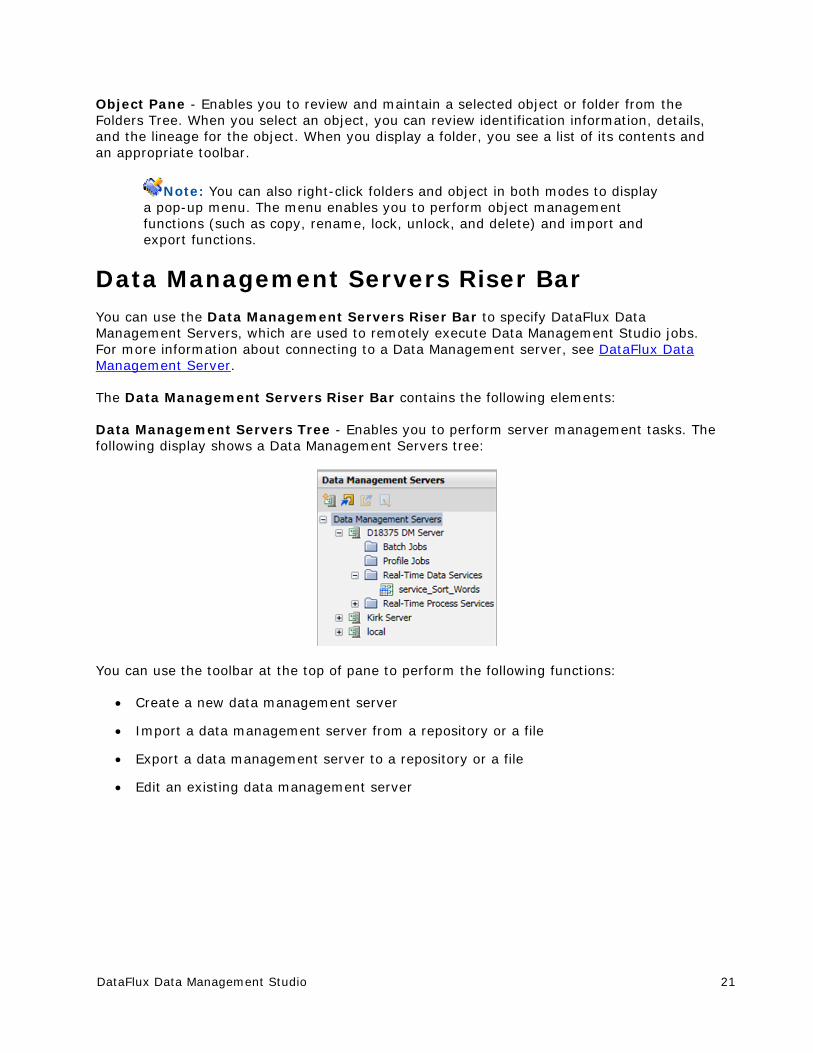
Data Management Servers Tree - Enables you to perform server management tasks. The following display shows a Data Management Servers tree:
You can use the toolbar at the top of pane to perform the following functions:
Create a new data management server
Import a data management server from a repository or a file
Export a data management server to a repository or a file
Edit an existing data management server
22 DataFlux Data Management Studio
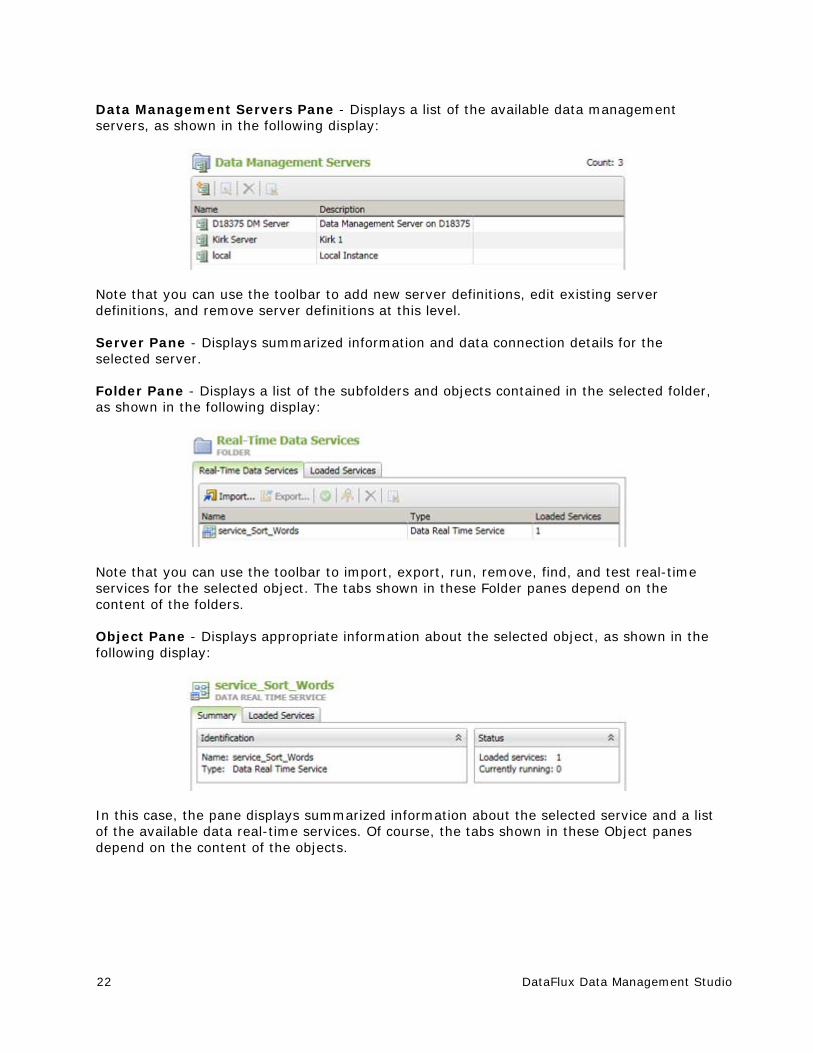
Data Management Servers Pane - Displays a list of the available data management servers, as shown in the following display:
Note that you can use the toolbar to add new server definitions, edit existing server definitions, and remove server definitions at this level.
Server Pane - Displays summarized information and data connection details for the selected server.
Folder Pane - Displays a list of the subfolders and objects contained in the selected folder, as shown in the following display:
Note that you can use the toolbar to import, export, run, remove, find, and test real-time services for the selected object. The tabs shown in these Folder panes depend on the content of the folders.
Object Pane - Displays appropriate information about the selected object, as shown in the following display:
In this case, the pane displays summarized information about the selected service and a list of the available data real-time services. Of course, the tabs shown in these Object panes depend on the content of the objects.
DataFlux Data Management Studio 23
Administration Riser Bar Administrators can use the Administration Riser Bar to specify DataFlux Federation Servers, DataFlux Authentication Servers, macros; Quality Knowledge Bases, Reference Sources, and repositories. Users other than administrators will not have a reason to use this riser. The Administration Riser Bar contains the following elements:
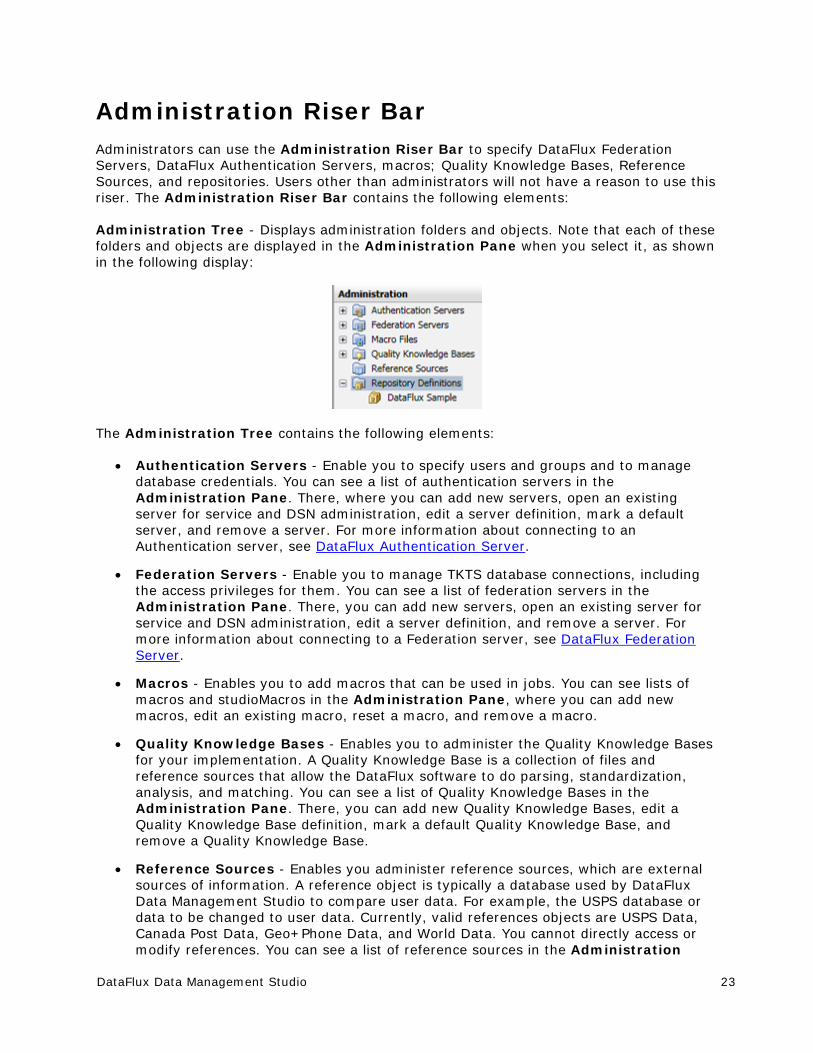
Administration Tree - Displays administration folders and objects. Note that each of these folders and objects are displayed in the Administration Pane when you select it, as shown in the following display:
The Administration Tree contains the following elements:
Authentication Servers - Enable you to specify users and groups and to manage database credentials. You can see a list of authentication servers in the Administration Pane. There, where you can add new servers, open an existing server for service and DSN administration, edit a server definition, mark a default server, and remove a server. For more information about connecting to an Authentication server, see DataFlux Authentication Server.
Federation Servers - Enable you to manage TKTS database connections, including the access privileges for them. You can see a list of federation servers in the Administration Pane. There, you can add new servers, open an existing server for service and DSN administration, edit a server definition, and remove a server. For more information about connecting to a Federation server, see DataFlux Federation Server.
Macros - Enables you to add macros that can be used in jobs. You can see lists of macros and studioMacros in the Administration Pane, where you can add new macros, edit an existing macro, reset a macro, and remove a macro.
Quality Knowledge Bases - Enables you to administer the Quality Knowledge Bases for your implementation. A Quality Knowledge Base is a collection of files and reference sources that allow the DataFlux software to do parsing, standardization, analysis, and matching. You can see a list of Quality Knowledge Bases in the Administration Pane. There, you can add new Quality Knowledge Bases, edit a Quality Knowledge Base definition, mark a default Quality Knowledge Base, and remove a Quality Knowledge Base.
Reference Sources - Enables you administer reference sources, which are external sources of information. A reference object is typically a database used by DataFlux Data Management Studio to compare user data. For example, the USPS database or data to be changed to user data. Currently, valid references objects are USPS Data, Canada Post Data, Geo+Phone Data, and World Data. You cannot directly access or modify references. You can see a list of reference sources in the Administration
24 DataFlux Data Management Studio
Pane. There, you can add new reference sources, open an existing reference source for administration, and edit an existing reference source. You can also mark a default reference source, remove a reference source, and verify individual US or Canadian addresses.
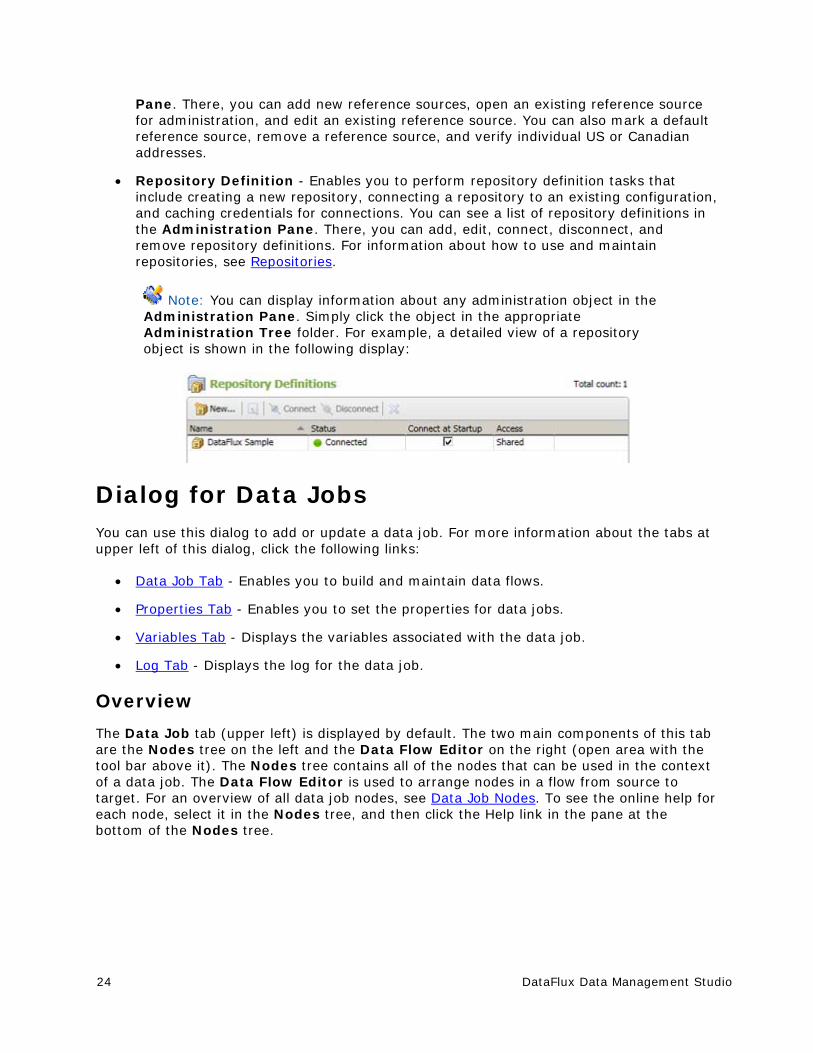
Repository Definition - Enables you to perform repository definition tasks that include creating a new repository, connecting a repository to an existing configuration, and caching credentials for connections. You can see a list of repository definitions in the Administration Pane. There, you can add, edit, connect, disconnect, and remove repository definitions. For information about how to use and maintain repositories, see Repositories.
Note: You can display information about any administration object in the Administration Pane. Simply click the object in the appropriate Administration Tree folder. For example, a detailed view of a repository object is shown in the following display:
Dialog for Data Jobs You can use this dialog to add or update a data job. For more information about the tabs at upper left of this dialog, click the following links:
Data Job Tab - Enables you to build and maintain data flows.
Properties Tab - Enables you to set the properties for data jobs.
Variables Tab - Displays the variables associated with the data job.
Log Tab - Displays the log for the data job.
Overview
The Data Job tab (upper left) is displayed by default. The two main components of this tab are the Nodes tree on the left and the Data Flow Editor on the right (open area with the tool bar above it). The Nodes tree contains all of the nodes that can be used in the context of a data job. The Data Flow Editor is used to arrange nodes in a flow from source to target. For an overview of all data job nodes, see Data Job Nodes. To see the online help for each node, select it in the Nodes tree, and then click the Help link in the pane at the bottom of the Nodes tree.
DataFlux Data Management Studio 25
If enabled, the Details pane appears above the Job Status line of the dialog. To enable the Details pane, select View > Show Details Pane from the main menu. The Details pane enables you to quickly view or update the attributes of a selected node in the context of the flow, without having to open the properties window for the node. The Details pane for a data job includes the following tabs:
Basic Properties - Displays the Name, Description and Notes for the selected node.
Node Connections - Displays the connections between the nodes included in the flow. You can add a connection, delete a selected connection, delete all of the connections, and change the order of the connections.
Preview - Displays the contents of the selected node.
Log - Displays a log for the selected node. If no nodes are selected, displays a log for the job that contains the node. For more information, see Log Tab.
The Job Status line at the bottom of the dialog displays the run-time status of the current job. It displays messages such as "Running" or "Completed Successfully."
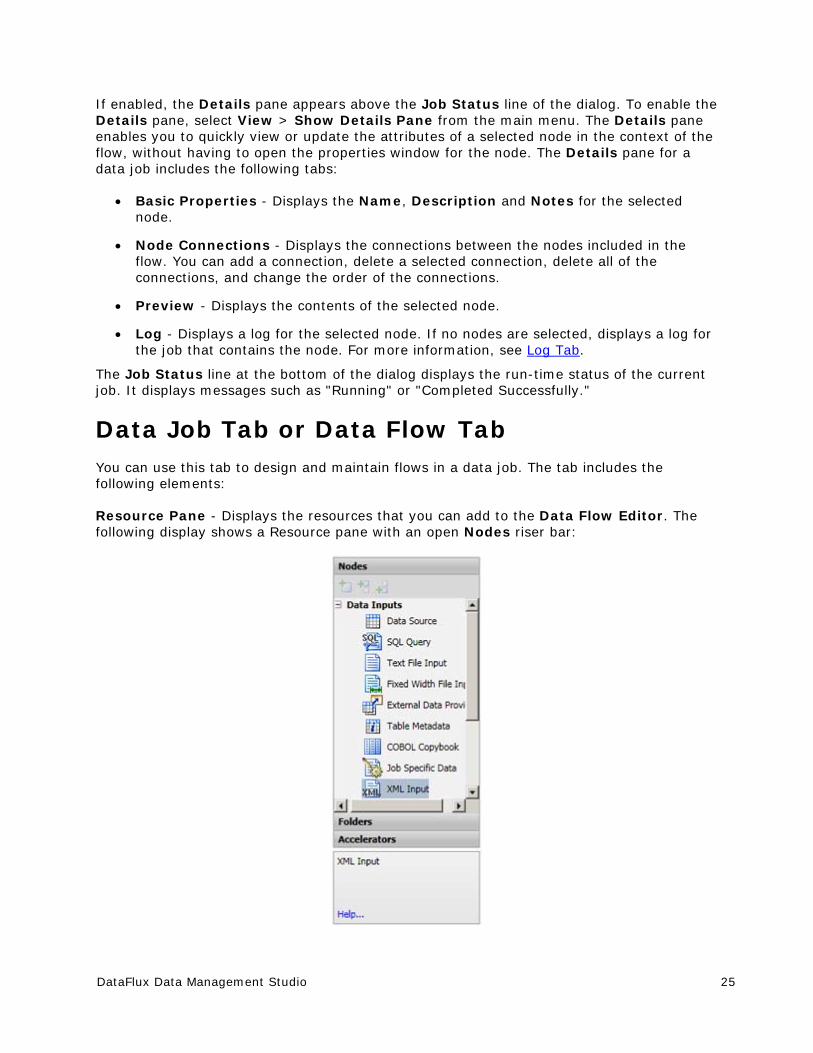
Data Job Tab or Data Flow Tab You can use this tab to design and maintain flows in a data job. The tab includes the following elements:
Resource Pane - Displays the resources that you can add to the Data Flow Editor. The following display shows a Resource pane with an open Nodes riser bar:
26 DataFlux Data Management Studio
The Resource Pane includes the following elements:
Nodes Riser Bar - Displays the nodes that you can add to the Data Flow Editor. The toolbar above the riser bar enables you to insert a selected node and insert selected nodes before or after nodes that you select in the Data Flow Editor. For an overview of all data job nodes, see Data Job Nodes.
Folders Riser Bar - Displays repositories. You can add items from the repositories to the Data Flow Editor. The toolbar above the Folder Riser Bar enables you to group items by type, find items, find in folders, and insert a selected item.
Accelerators Riser Bar - Displays any DataFlux accelerators that have been installed.
Selected Node Pane - Displays the name of the node that is selected in the Data Flow Editor
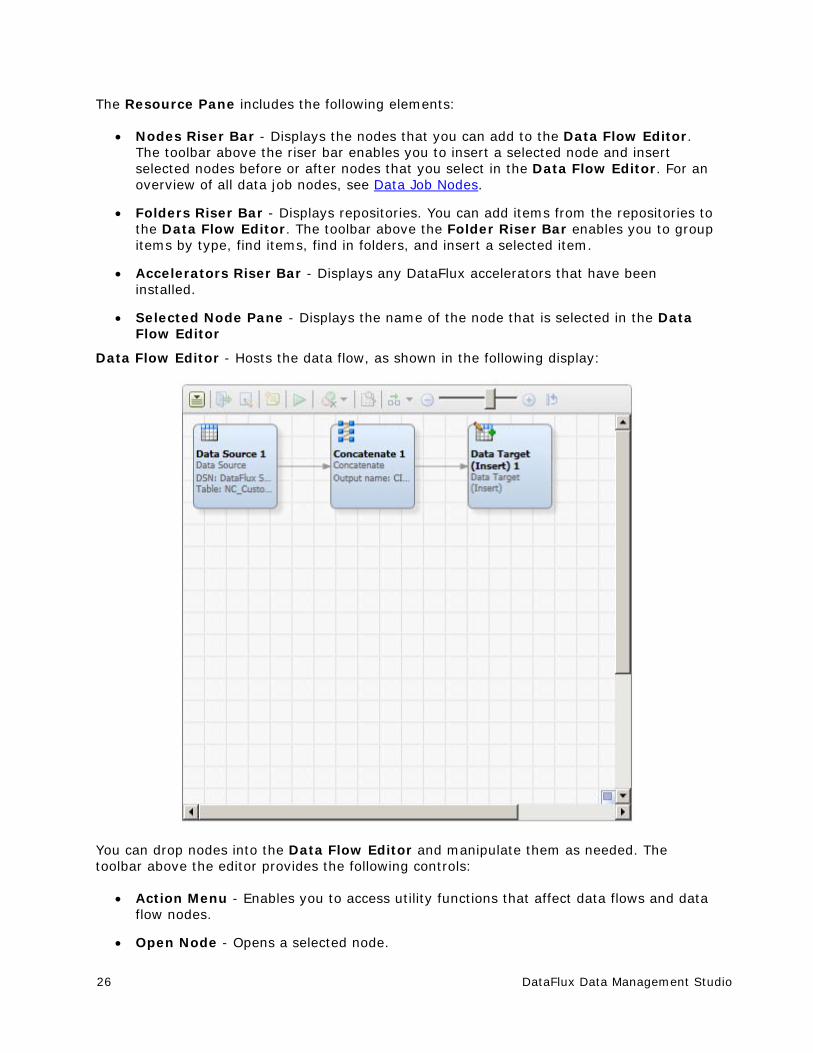
Data Flow Editor - Hosts the data flow, as shown in the following display:
You can drop nodes into the Data Flow Editor and manipulate them as needed. The toolbar above the editor provides the following controls:
Action Menu - Enables you to access utility functions that affect data flows and data flow nodes.
Open Node - Opens a selected node.
DataFlux Data Management Studio 27
Edit - Opens a selected node for editing.
Insert New Note - Adds a note to the Data Flow Editor.
Run Process Job - Runs the process job that contains the Data Job node and its Data Job tab; displayed only for Data Job nodes contained in process jobs
Run Data Job - Submits the job contained in the Data Flow Editor for processing.
Clear Node Status Indicators - Clears the node status indicator from one or more selected nodes.
Clear All Run Results - Clears all results from a process job run.
Preview - Initiates a preview run of a selected node.
Layout - Toggles between Left To Right and Top To Bottom layouts
Zoom - Zooms into and out of the Data Flow Editor.
Reset Zoom - Resets the Data Flow Editor to the default level.
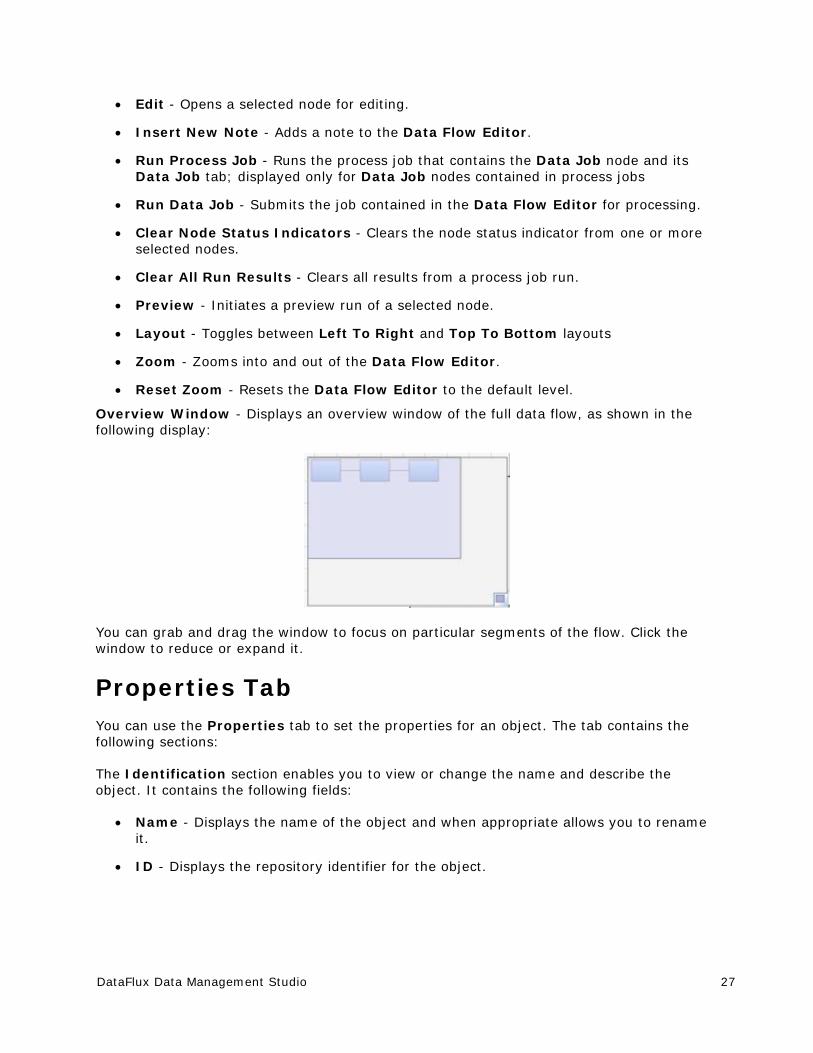
Overview Window - Displays an overview window of the full data flow, as shown in the following display:
You can grab and drag the window to focus on particular segments of the flow. Click the window to reduce or expand it.
Properties Tab You can use the Properties tab to set the properties for an object. The tab contains the following sections:
The Identification section enables you to view or change the name and describe the object. It contains the following fields:
Name - Displays the name of the object and when appropriate allows you to rename it.
ID - Displays the repository identifier for the object.
28 DataFlux Data Management Studio
Location - When available, use to specify the physical path to the object. Here is a sample path to a job in a DataFlux repository: dfr://Repository 2/Data Jobs/Data Job 1(DataJob). Here is a sample path to a SAS code on the file system: C:\Public\sas_Code.sas.
Description - Displays and existing description of the object or provides a field to enter a description.
The Database Connection section, when available, specifies the database connection for a table.
The SAS Workspace Server section, when available, specifies a connection to a SAS Workspace Server.
The Run section, when available, manages the display of the SAS Log and SAS Output. Both the log and the output can be displayed both before and after a run.
The Options section, when available, enables you to set options such as those to exclude a node from runs, to process node errors and binding failures. This section includes the following fields:
Node errors - Determines whether to abort or continue running the job when it encounters a node error.
Source binding failures - Determines how to handle a failure.
Process - When available in a process node, it determines whether to run the node in its default process or run it in a separate process.
The Notes section enables you to enter a note.
Variables Tab You can use the Variables tab to display the variables associated with a node. Use the toolbar to create new variables and delete selected variables.
Log Tab You can use the Log tab to display a log for a selected node or a job. Use the toolbar to perform the following functions:
Show Grid - Displays information about the node or job in a table format.
Show Statistics - Displays the statistical information about the node or job.
Save as Document - Saves the log as document.
Print - Prints the log.
Clear log - Clears the visible log content. It does not clear the model behind the log run.
Find Node in Flow - Finds the selected node in a flow.
DataFlux Data Management Studio 29
Dialog for Process Jobs You can use this dialog to add or update a process job. A process job enables you to create flows that support logical decisions, looping, events, error handling, parallelization, and similar tasks. For more information about the tabs at upper left of this dialog, click the following links:
Process Flow Tab - Enables you to build and maintain process flows.
Properties Tab - Enables you to set the properties for process jobs.
Variables Tab - Displays the variables associated with the process job.
Log Tab - Displays the log for the process job.
Overview
The Process Flow tab (upper left) is displayed by default. The two main components of this tab are the Nodes tree on the left and the Process Flow Editor on the right (open area with the toolbar above it). The Nodes tree contains all of the nodes that can be used in the context of a process job. The Process Flow Editor is used to arrange nodes in a flow from source to target. For an overview of all process job nodes, see Process Job Nodes. To see the online help for each node, select it in the Nodes tree, and then click the Help link in the pane at the bottom of the Nodes tree.
If enabled, the Details pane appears above the Job Status line of the dialog. To enable the Details pane, select View > Show Details Pane from the main menu. The Details pane enables you to quickly view or update the attributes of a selected node in the context of the flow, without having to open the properties window for the node. The Details pane for a process job includes the following tabs:
Basic Properties - Displays the Name, Description and Notes for the selected node. Includes an Exclude Node from Run check box.
Node Connections - Displays the connections between the nodes included in the flow. You can add a connection, delete a selected connection, delete all of the connections, and change the order of the connections.
Inputs - Adds data inputs to a process flow node in a process job. For more information, see Inputs Tab.
Outputs - Adds data outputs to a process flow node. You can show the run-time value for a selected output and refresh the list of outputs.
Log - Displays a log for the selected node. If no nodes are selected, displays a log for the job that contains the node. For more information, see Log Tab.
The Job Status line at the bottom of the dialog displays the run-time status of the current job. It displays messages such as "Running" or "Completed Successfully."
30 DataFlux Data Management Studio
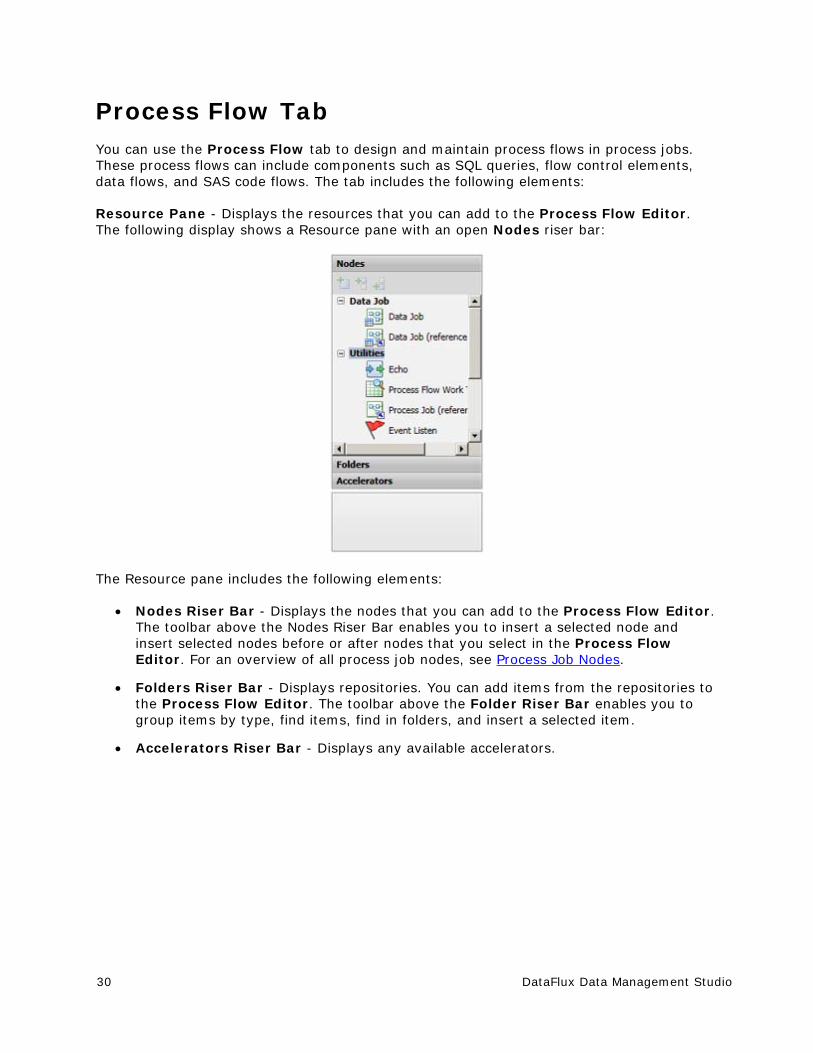
Process Flow Tab You can use the Process Flow tab to design and maintain process flows in process jobs. These process flows can include components such as SQL queries, flow control elements, data flows, and SAS code flows. The tab includes the following elements:
Resource Pane - Displays the resources that you can add to the Process Flow Editor. The following display shows a Resource pane with an open Nodes riser bar:
The Resource pane includes the following elements:
Nodes Riser Bar - Displays the nodes that you can add to the Process Flow Editor. The toolbar above the Nodes Riser Bar enables you to insert a selected node and insert selected nodes before or after nodes that you select in the Process Flow Editor. For an overview of all process job nodes, see Process Job Nodes.
Folders Riser Bar - Displays repositories. You can add items from the repositories to the Process Flow Editor. The toolbar above the Folder Riser Bar enables you to group items by type, find items, find in folders, and insert a selected item.
Accelerators Riser Bar - Displays any available accelerators.
DataFlux Data Management Studio 31
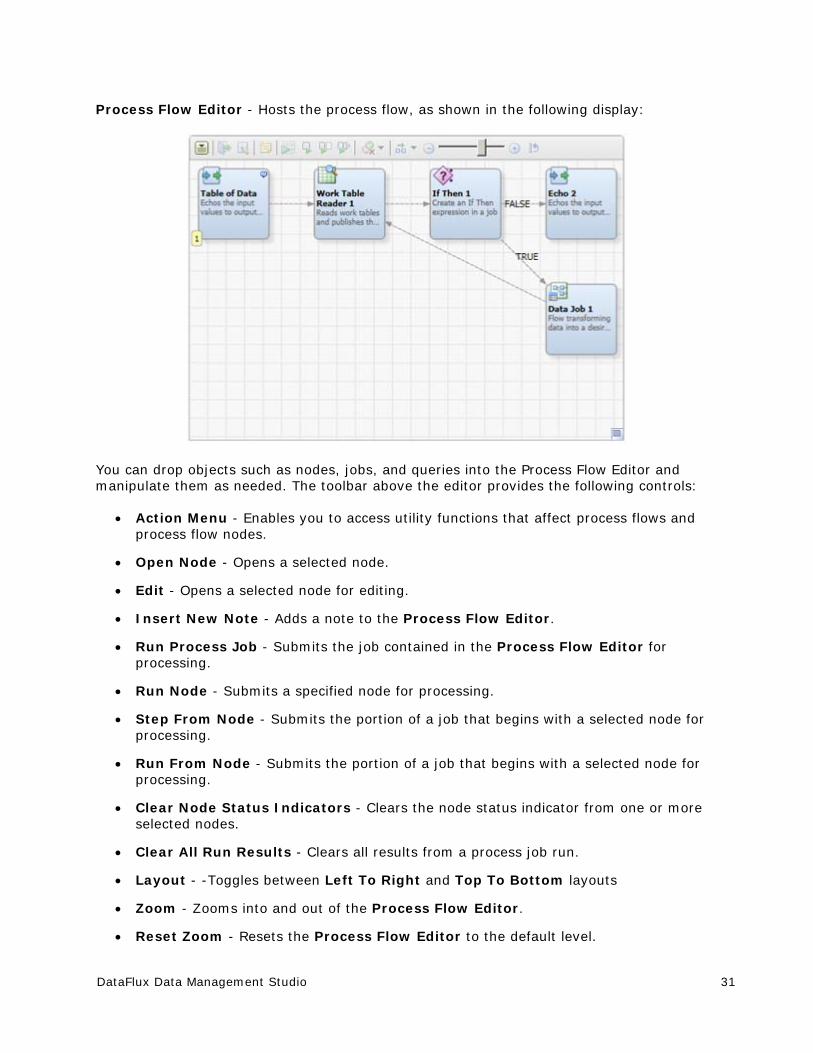
Process Flow Editor - Hosts the process flow, as shown in the following display:
You can drop objects such as nodes, jobs, and queries into the Process Flow Editor and manipulate them as needed. The toolbar above the editor provides the following controls:
Action Menu - Enables you to access utility functions that affect process flows and process flow nodes.
Open Node - Opens a selected node.
Edit - Opens a selected node for editing.
Insert New Note - Adds a note to the Process Flow Editor.
Run Process Job - Submits the job contained in the Process Flow Editor for processing.
Run Node - Submits a specified node for processing.
Step From Node - Submits the portion of a job that begins with a selected node for processing.
Run From Node - Submits the portion of a job that begins with a selected node for processing.
Clear Node Status Indicators - Clears the node status indicator from one or more selected nodes.
Clear All Run Results - Clears all results from a process job run.
Layout - -Toggles between Left To Right and Top To Bottom layouts
Zoom - Zooms into and out of the Process Flow Editor.
Reset Zoom - Resets the Process Flow Editor to the default level.

32 DataFlux Data Management Studio
Overview Window - Displays an overview window of the full process flow, as shown in the following display:
You can grab and drag the window to focus on particular segments of the flow.
Inputs Tab You can use the Inputs tab to add data inputs to a process flow node in a process job. The tab includes a list of inputs to the process flow and a toolbar. The toolbar includes the following elements:
New - Create inputs or input tables.
Edit Default Value - Edit the default value for a selected input. The inputs with the ABC icon are SQL options. Put your cursor over such options to see a description of some valid values for that option.
Note: You can only submit one SQL statement in each SQL node with the SQL_STMT value. However, you can use the Pre_SQL and Post_SQL values to submit additional SQL statements. You can also add multiple SQL nodes to a process job.
Specify Source Binding - Specifies the source binding for a selected input.
Show Run Time Values - Displays the run time value for a selected input.
Clear/Delete - Enables you to clear a default value or source binding for a selected input. Also enables you to delete a selected input.
Refresh - Refreshes the list of inputs.
Note: The SQL_Parameters input value is not included on the Input tabs for the Create Table(select) and the Create Table(query reference) nodes. Some databases that are supported in Data Management Studio do not provide support for these SQL parameters.
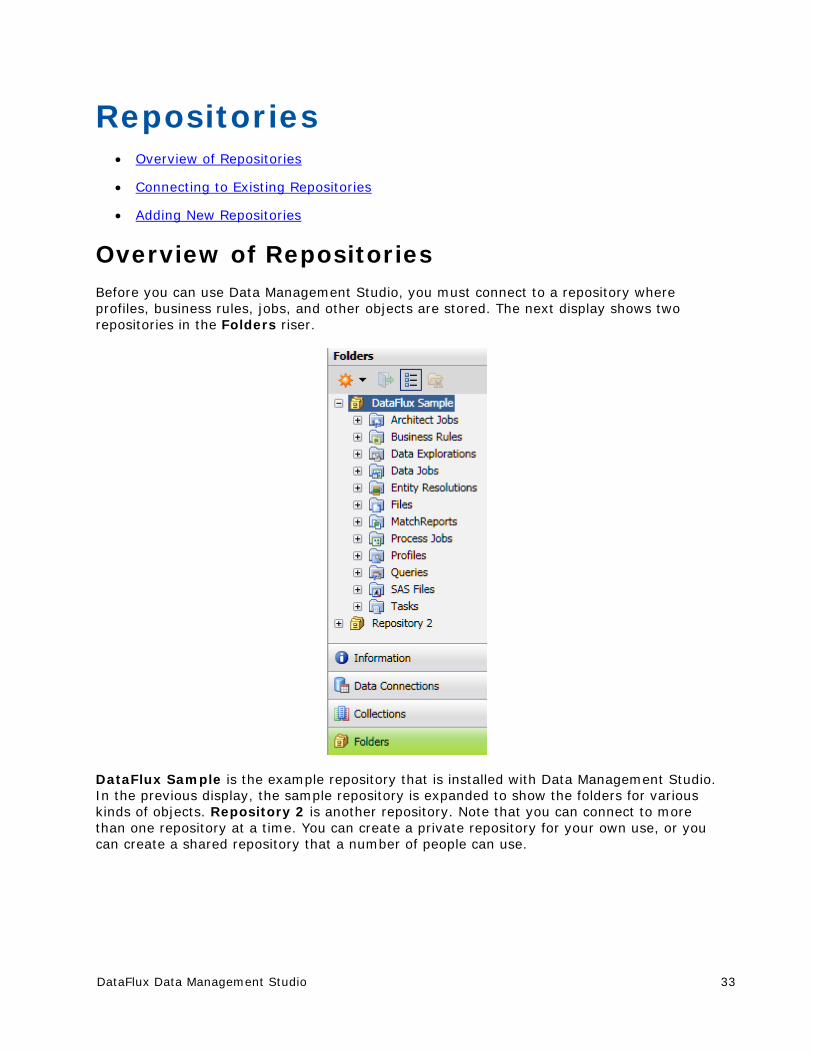
DataFlux Data Management Studio 33
Repositories Overview of Repositories
Connecting to Existing Repositories
Adding New Repositories
Overview of Repositories Before you can use Data Management Studio, you must connect to a repository where profiles, business rules, jobs, and other objects are stored. The next display shows two repositories in the Folders riser.
DataFlux Sample is the example repository that is installed with Data Management Studio. In the previous display, the sample repository is expanded to show the folders for various kinds of objects. Repository 2 is another repository. Note that you can connect to more than one repository at a time. You can create a private repository for your own use, or you can create a shared repository that a number of people can use.

34 DataFlux Data Management Studio
Data explorations, profiles, and all objects in the Business Rule Manager (rules, tasks, custom metrics, sources, and fields) are stored in database format. You can specify a separate storage location for objects that are stored as files, such as data jobs, process jobs, queries, *.sas files (SAS code files), and Entity Resolution Output files (*.sri files). Any file-based content can be stored in the file storage area of a repository, including your own content such as text files and graphics. You could store documentation files in a project folder, for example.
See also the usage notes for repositories.
Connecting to Repositories
Overview
You must connect to a repository where profiles, business rules, jobs, and other objects are stored before you can use Data Management Studio.
Perform the following steps to connect to an existing repository:
1. Click on the Administration riser bar.
2. Click on the Repository Definition folder in the left pane. You should see one or more repositories in the Repository Definition pane on the right. Note the status of the repositories: Connected or Disconnected.
3. Select a disconnected repository from the list, and then click on the Connect button above the repositories.
If you are successful, the status of the repository should change to Connected. You can now work with objects in this repository.
To display the properties of a repository in the Repository Definition folder, such as the physical paths to its storage areas, select a repository in the list. Information about that repository will display on the right.
Adding New Repositories
Overview
You can add a new Data Management Studio repository to store profiles, business rules, jobs, and other objects. You can perform the following tasks:
Plan a New Repository
Add a New Repository
Convert a dfPower Studio Repository
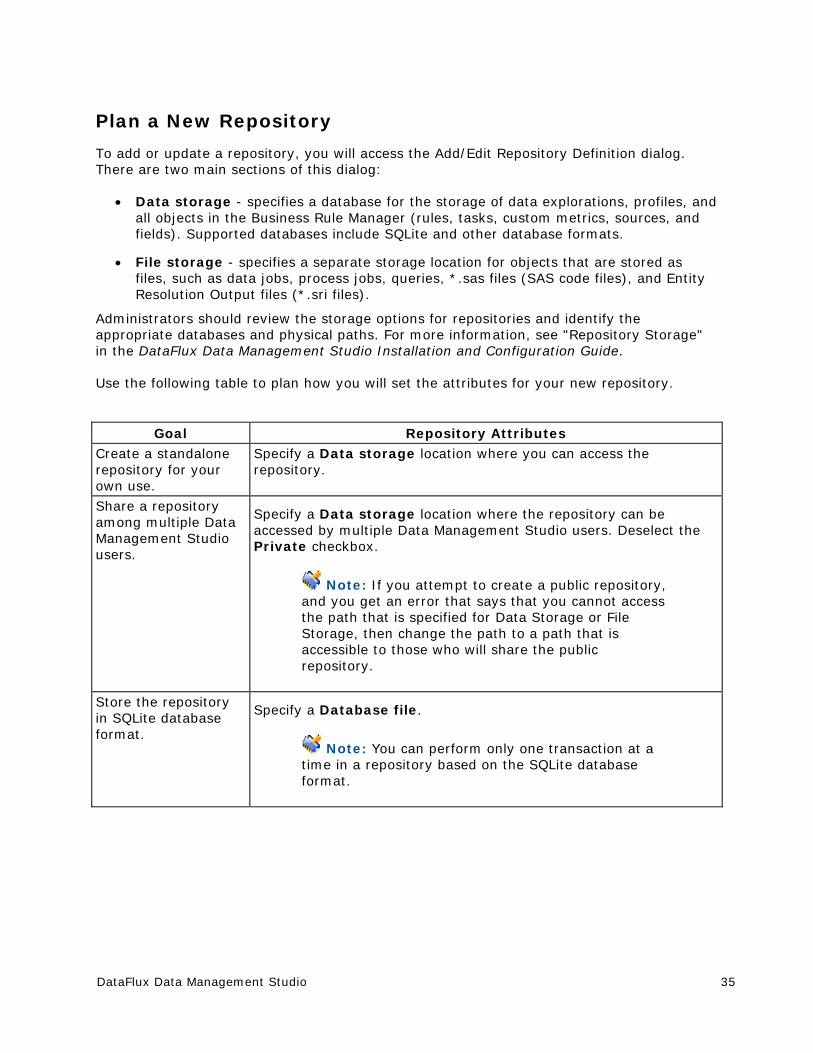
DataFlux Data Management Studio 35
Plan a New Repository
To add or update a repository, you will access the Add/Edit Repository Definition dialog. There are two main sections of this dialog:
Data storage - specifies a database for the storage of data explorations, profiles, and all objects in the Business Rule Manager (rules, tasks, custom metrics, sources, and fields). Supported databases include SQLite and other database formats.
File storage - specifies a separate storage location for objects that are stored as files, such as data jobs, process jobs, queries, *.sas files (SAS code files), and Entity Resolution Output files (*.sri files).
Administrators should review the storage options for repositories and identify the appropriate databases and physical paths. For more information, see "Repository Storage" in the DataFlux Data Management Studio Installation and Configuration Guide.
Use the following table to plan how you will set the attributes for your new repository.
Goal Repository Attributes Create a standalone repository for your own use.
Specify a Data storage location where you can access the repository.
Share a repository among multiple Data Management Studio users.
Specify a Data storage location where the repository can be accessed by multiple Data Management Studio users. Deselect the Private checkbox.
Note: If you attempt to create a public repository, and you get an error that says that you cannot access the path that is specified for Data Storage or File Storage, then change the path to a path that is accessible to those who will share the public repository.
Store the repository in SQLite database format.
Specify a Database file.
Note: You can perform only one transaction at a time in a repository based on the SQLite database format.
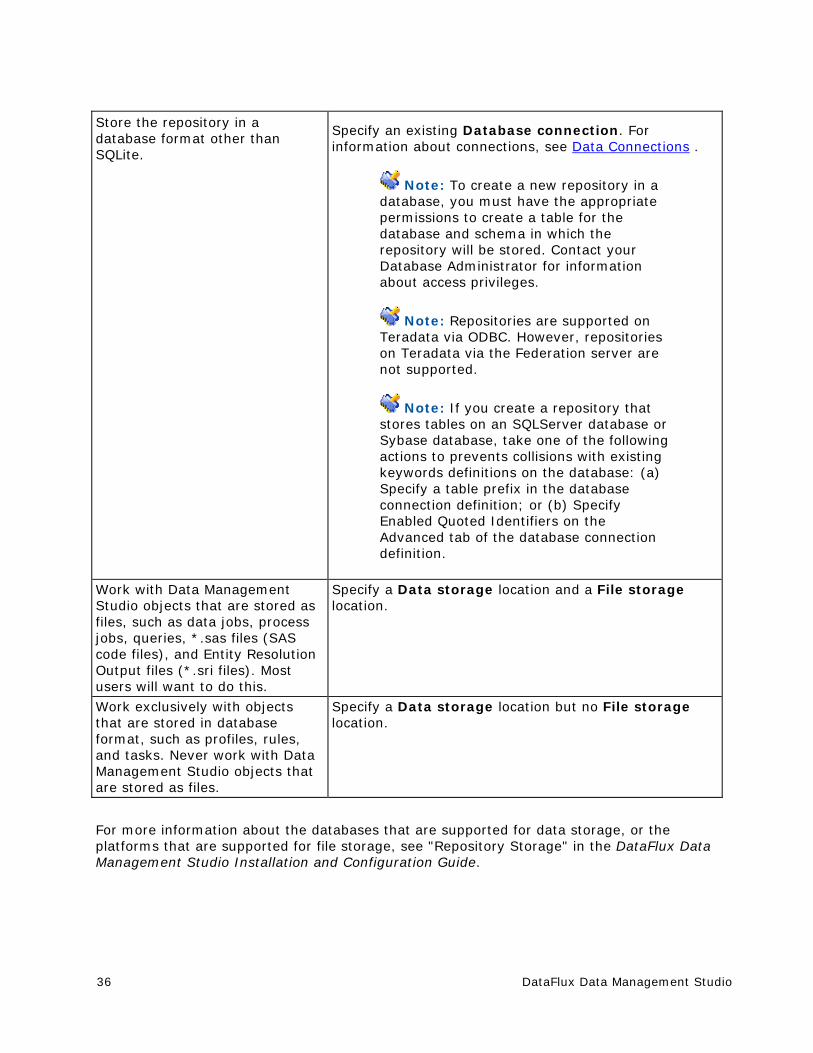
36 DataFlux Data Management Studio
Store the repository in a database format other than SQLite.
Specify an existing Database connection. For information about connections, see Data Connections .
Note: To create a new repository in a database, you must have the appropriate permissions to create a table for the database and schema in which the repository will be stored. Contact your Database Administrator for information about access privileges.
Note: Repositories are supported on Teradata via ODBC. However, repositories on Teradata via the Federation server are not supported.
Note: If you create a repository that stores tables on an SQLServer database or Sybase database, take one of the following actions to prevents collisions with existing keywords definitions on the database: (a) Specify a table prefix in the database connection definition; or (b) Specify Enabled Quoted Identifiers on the Advanced tab of the database connection definition.
Work with Data Management Studio objects that are stored as files, such as data jobs, process jobs, queries, *.sas files (SAS code files), and Entity Resolution Output files (*.sri files). Most users will want to do this.
Specify a Data storage location and a File storage location.
Work exclusively with objects that are stored in database format, such as profiles, rules, and tasks. Never work with Data Management Studio objects that are stored as files.
Specify a Data storage location but no File storage location.
For more information about the databases that are supported for data storage, or the platforms that are supported for file storage, see "Repository Storage" in the DataFlux Data Management Studio Installation and Configuration Guide.
DataFlux Data Management Studio 37
Add a New Repository
After you have planned your repository as described above, perform the following steps to add a new repository.
1. Click on the Administration riser bar.
2. In the Repository Definition pane, click on the New button to create the new repository.
3. The Add Repository Definition dialog appears. Enter the name of your repository in the Name field.
4. In the Data storage section of the dialog, specify a Database file or a Database connection for your new repository. The Database connection must have been created earlier. Example Database file: C:\Documents and Settings\USER_NAME\Application Data\DataFlux\Repository\Sample\DataStorage\DataManagement.rps Example Database connection: DB2_SERVER1_ODBC_REPOS
5. If you want to work with Data Management Studio objects that are stored as files, specify a File storage location. This physical path must be accessible to everyone who needs to access the data jobs, process jobs, queries, *.sas files (SAS code files), or Entity Resolution Output files (*.sri files) that will be stored there.
6. Select or deselect the Connect to repository at startup checkbox or the Private checkbox as appropriate.
7. Click on the OK button. A new repository will be created and you will be connected to that repository.
8. To verify that you are connected to the repository, select the repository in the Administration riser bar. The Status pane should indicate that you are connected to the repository.
Note: Do not create a repository database file (.rps) in the file storage location. This practice prevents manipulating the file through Data Management Studio, and it triggers unneeded update events in the file storage area every time that the database file is updated.
38 DataFlux Data Management Studio
Convert a dfPower Studio Repository
If you specify the location of a dfPower Studio repository in the Add Repository dialog, the repository will be converted to Data Management Studio format. Some objects in the repository will be converted and will be ready to use, and others will require additional processing. For more information, see the DataFlux Migration Guide.
Note: Data Management Studio does an in-place upgrade of a dfPower Studio repository. dfPower Studio cannot access a repository that has been converted to Data Management Studio format.
Accordingly, make a copy of the dfPower Studio repository to be upgraded, and then upgrade the copy rather than the original. Upgrading a copy of your repository enables you to preserve your original dfPower Studio content.
DataFlux Data Management Studio 39
Global Options Setting Global Options
Using Configuration Files
Setting Logging Options
Setting Global Options You can set some global options through the Data Management Studio Options dialog. Perform the following steps to set the options:
1. Click Tools and select Options to display the Data Management Studio Options dialog.
2. Select one of the tabs in the left pane to display the options in that category.
3. Enter data or select checkboxes for the appropriate fields.
From the Data Management Studio Options dialog, you can specify options such as the following:
general interface options
filter and search options
job options, such as sorting and clustering
SQL options, such as inner join defaults and editor type defaults
For details about the options available, see the help for the Data Management Studio Options dialog. Note that some options must be set in configuration files. For more information, see Using Configuration Files.
Using Configuration Files As described in Setting Global Options, you can set some default options for through the Data Management Studio Options dialog. Other settings are controlled in configuration files.
The main Data Management Studio configuration files are as follows:
app.cfg. Can exist in the installation folder and in a Windows profile for a user.
ui.cfg. Can exist in the installation folder and in a Windows profile for a user.
dfwfproc.cfg. Contains settings used by the dmpexec utility, which is used to execute jobs from the command line. For more information about dmpexec, see Running Jobs from the Command Line.
For a description of the options that can be set in these configuration files, see the "Configuration" section of the Data Management Studio Installation and Configuration Guide.
40 DataFlux Data Management Studio
Macro variables can be used to change system configuration values for Data Management Studio. This is done by specifying the appropriate directive, such as BASE/MACROS_PATH, in a macro variable definition. The name of the macro would be the same as the directive, and the value would be the new setting for that directive. For a description of the configuration directives, see "Configuration Options" in the DataFlux Data Management Studio Installation and Configuration Guide.
Setting Logging Options The following log files are provided for Data Management Studio:
Studio log
Platform log
DAC log
TKTS log
The Studio log, the Platform log, and the DAC log are enabled by default. The Studio log is based on log4net. The Platform and DAC logs use the SAS 9.2 Logging Facility. The SAS 9.2 Logging Facility logging facility is a flexible and configurable framework that you can use to collect, categorize, and filter events. Then you can write them to a variety of output devices. The logging facility supports problem diagnosis and resolution, performance and capacity management, and auditing and regulatory compliance.
The logging facility framework categorizes and filters log messages in SAS server and SAS programming environments, and writes log messages to various output devices. In the server environment, the logging facility logs messages based on predefined message categories, such as Admin for administrative messages, App for application messages, and Perf for performance messages. Messages for a category can be written to files, consoles, and other system destinations simultaneously. The logging facility also enables messages to be filtered based on the following thresholds: TRACE, DEBUG, INFO, WARN, ERROR, and FATAL.
You can also configure the application to provide the TKTS log, which does not use the SAS 9.2 Logging Facility.
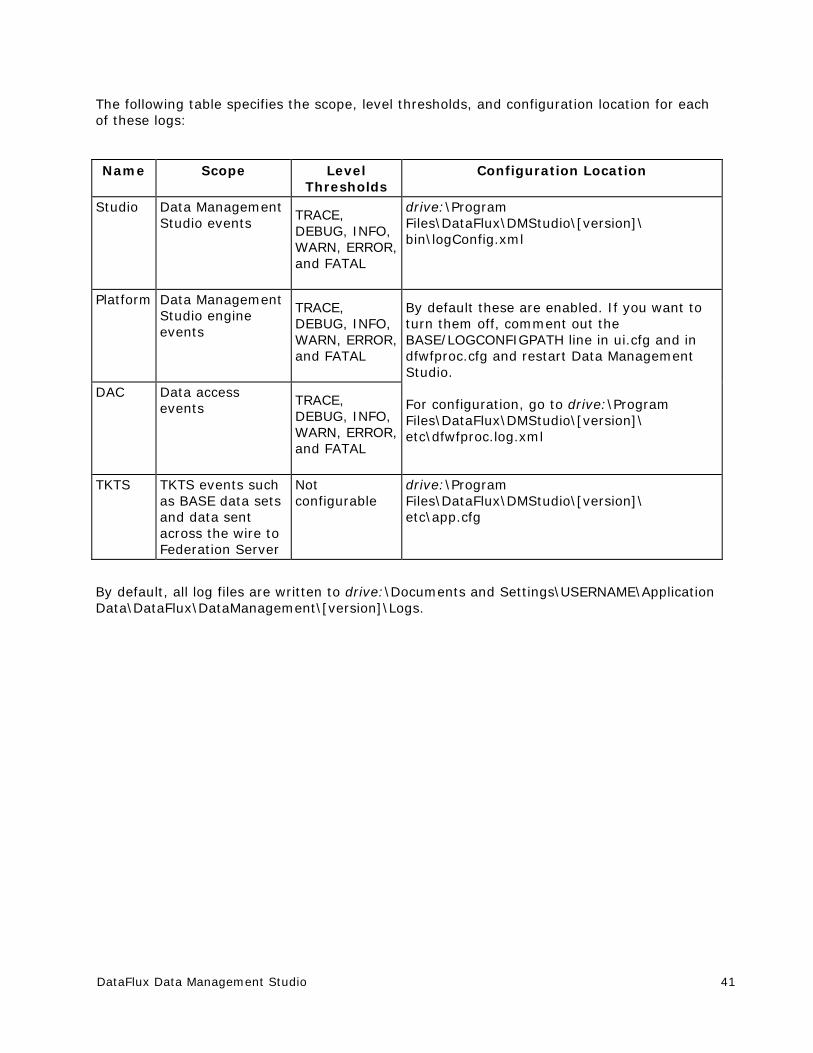
DataFlux Data Management Studio 41
The following table specifies the scope, level thresholds, and configuration location for each of these logs:
Name Scope Level Thresholds
Configuration Location
Studio Data Management Studio events
TRACE, DEBUG, INFO, WARN, ERROR, and FATAL
drive:\Program Files\DataFlux\DMStudio\[version]\ bin\logConfig.xml
Platform Data Management Studio engine events
TRACE, DEBUG, INFO, WARN, ERROR, and FATAL
By default these are enabled. If you want to turn them off, comment out the BASE/LOGCONFIGPATH line in ui.cfg and in dfwfproc.cfg and restart Data Management Studio.
For configuration, go to drive:\Program Files\DataFlux\DMStudio\[version]\ etc\dfwfproc.log.xml
DAC Data access events
TRACE, DEBUG, INFO, WARN, ERROR, and FATAL
TKTS TKTS events such as BASE data sets and data sent across the wire to Federation Server
Not configurable
drive:\Program Files\DataFlux\DMStudio\[version]\ etc\app.cfg
By default, all log files are written to drive:\Documents and Settings\USERNAME\Application Data\DataFlux\DataManagement\[version]\Logs.
42 DataFlux Data Management Studio
Server Connections Overview of Server Connections
Overview of Server Connections As illustrated in Overview of the Data Management Platform, Data Management Studio can be used by itself or in combination with one or more of the following DataFlux servers.
DataFlux Data Management Server
The Data Management Server provides a scalable server environment for large Data Management Studio jobs. Jobs can be uploaded from Data Management Studio to a Data Management Server, where the jobs are executed. For examples of how the Data Management Server can be used, see Deploying a Data Job as a Real-Time Service and Deploying a Process Job as a Real-Time Service.
It is assumed that a Data Management Server has been installed and that you know the domain name or IP address of the server. Perform the following steps to connect to the server in Data Management Studio:
1. Click the Data Management Server riser. The Data Management Server panel displays.
2. In the server information pane on the right, click the New Data Management Server icon in the tool bar. The Data Management Server dialog displays.
3. Enter a server name, description, and a domain name or IP address of the server.
4. Click Test Connection to verify your connection.
5. Click OK to save your changes.
For more information about this server, see the DataFlux Data Management Server User's Guide and the DataFlux Data Management Server Administrator's Guide.
DataFlux Federation Server
The Federation Server manages TKTS data connections (Threaded Kernel Table Services) and the access privileges for these connections. The Federation Server enables you to create Federated Server connections, Localized DSN connections, and Custom connections as described in Data Connections.
It is assumed that a Federation Server has been installed and that you know the domain name or IP address of the server. Perform the following steps to connect to the server in Data Management Studio:
1. Click the Administration riser.
2. Select the Federation Servers folder.
DataFlux Data Management Studio 43
3. In the server information pane on the right, click the New Federation Server Connection icon in the tool bar. The Add Federation Server Definition dialog displays.
4. Enter a server name, description, and a domain name or IP address of the server.
5. Click Test Connection to verify your connection.
6. Click OK to save your changes.
For more information about this server, see the DataFlux Federation Server User's Guide and the DataFlux Federation Server Administrator's Guide.
DataFlux Authentication Server
The Authentication Server centralizes the management of users, groups, and database credentials. It is assumed that an Authentication Server has been installed and that you know the domain name or IP address of the server. Perform the following steps to connect to the server in Data Management Studio:
1. Click the Administration riser.
2. Select the Authentication Servers folder.
3. In the server information pane on the right, click the New Authentication Server Connection icon in the tool bar. The Add Authentication Server Definition dialog displays.
4. Enter a server name, description, and a domain name or IP address of the server.
5. If you want this Authentication Server to be the one that authenticates you when you first start Data Management Studio, select the Set as default checkbox.
6. Click Test Connection to verify your connection.
7. Click OK to save your changes.
For more information about this server, see the DataFlux Authentication Server User's Guide and the DataFlux Authentication Server Administrator's Guide.
44 DataFlux Data Management Studio
Data Connections Overview of Data Connections
Adding ODBC Connections
Adding Federated Server Connections
Adding Localized DSN Connections
Adding Custom Connections
Adding SAS Data Set Connections
Maintaining Data Connections
Overview of Data Connections Data connections enable you to access your data in Data Management Studio from many types of data sources. You can click the Data Connections Riser Bar to create connections to the data connection types that DataFlux Data Management Studio supports. Select the following connection type dialogs from the drop-down menu in the New Data Connection object in the Data Connections toolbar:
ODBC Connection - Displays the Microsoft Windows ODBC Data Source Administrator dialog, which you can use to create ODBC connections.
Federated Server Connection - Enables you to create a federated connection that establishes a threaded connection between the DataFlux Federation Server and a database.
Localized DSN Connection - Enables you to create a localized DSN connection definition for a DataFlux Federation Server and a specific data source. This connection definition is used when you access federated tables. These localized connections are Federated Server connections to a DBMS that are named and created as an extra connection to the same source in metadata.
Custom Connection - Enables you to create a custom connection string for non-ODBC connection types. These custom strings enable you to establish native connections from a DataFlux Federation Server to third-party databases or to draw data from more than one type of data input.
SAS Data Set Connection - Enables you to create SAS data set connections.
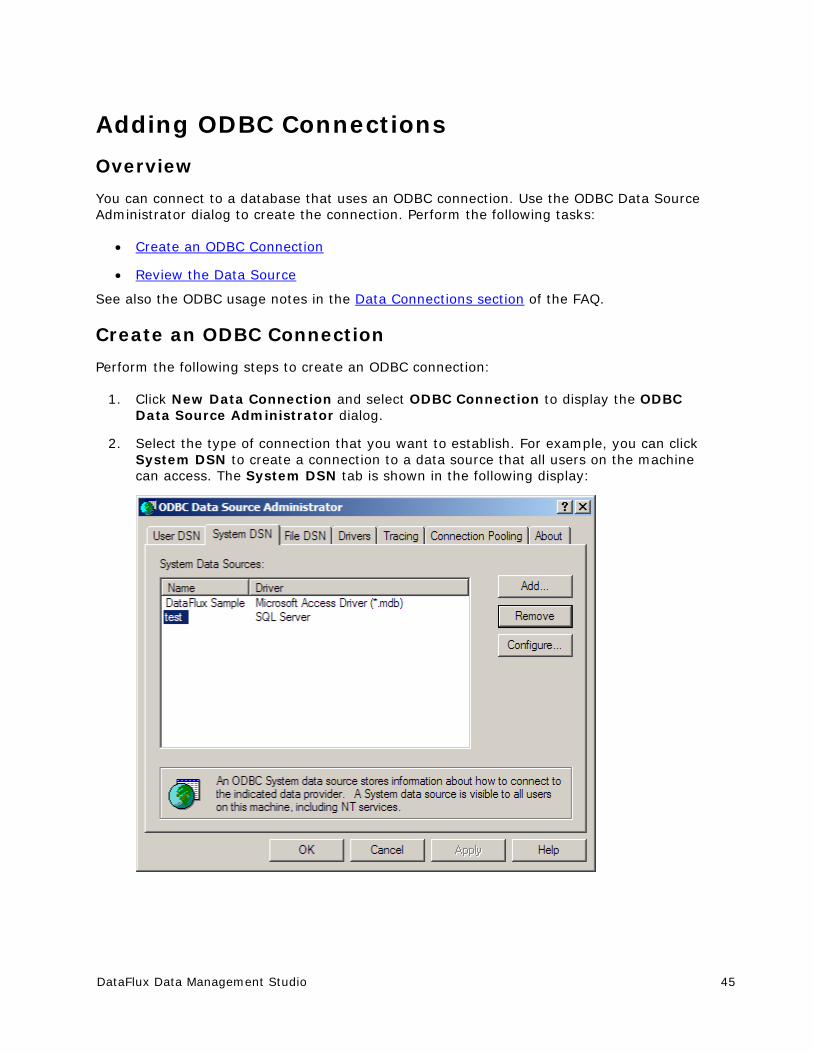
DataFlux Data Management Studio 45
Adding ODBC Connections
Overview
You can connect to a database that uses an ODBC connection. Use the ODBC Data Source Administrator dialog to create the connection. Perform the following tasks:
Create an ODBC Connection
Review the Data Source
See also the ODBC usage notes in the Data Connections section of the FAQ.
Create an ODBC Connection
Perform the following steps to create an ODBC connection:
1. Click New Data Connection and select ODBC Connection to display the ODBC Data Source Administrator dialog.
2. Select the type of connection that you want to establish. For example, you can click System DSN to create a connection to a data source that all users on the machine can access. The System DSN tab is shown in the following display:
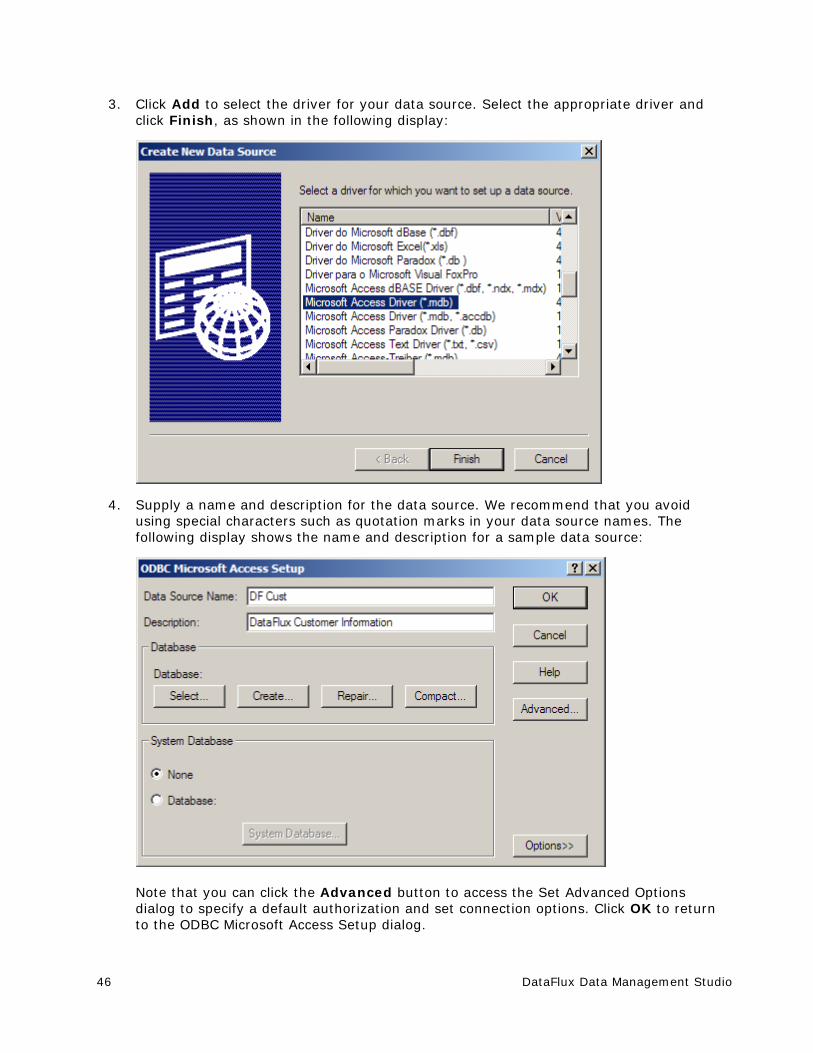
46 DataFlux Data Management Studio
3. Click Add to select the driver for your data source. Select the appropriate driver and click Finish, as shown in the following display:
4. Supply a name and description for the data source. We recommend that you avoid using special characters such as quotation marks in your data source names. The following display shows the name and description for a sample data source:
Note that you can click the Advanced button to access the Set Advanced Options dialog to specify a default authorization and set connection options. Click OK to return to the ODBC Microsoft Access Setup dialog.
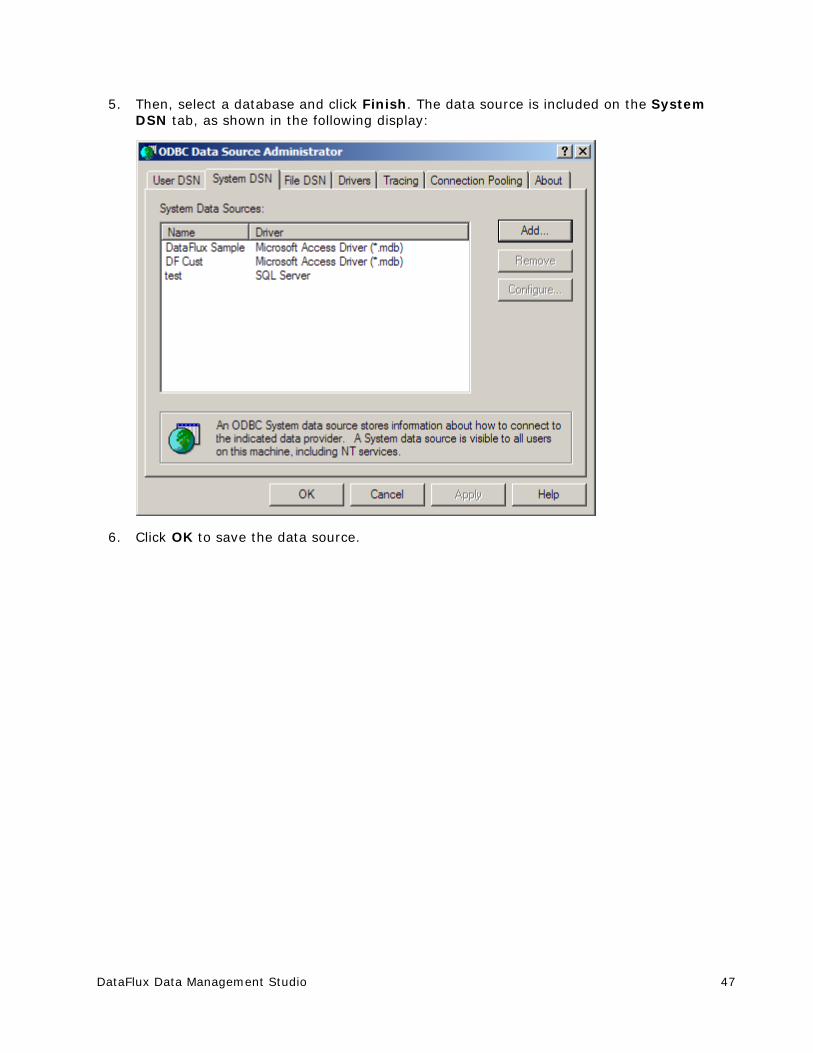
DataFlux Data Management Studio 47
5. Then, select a database and click Finish. The data source is included on the System DSN tab, as shown in the following display:
6. Click OK to save the data source.
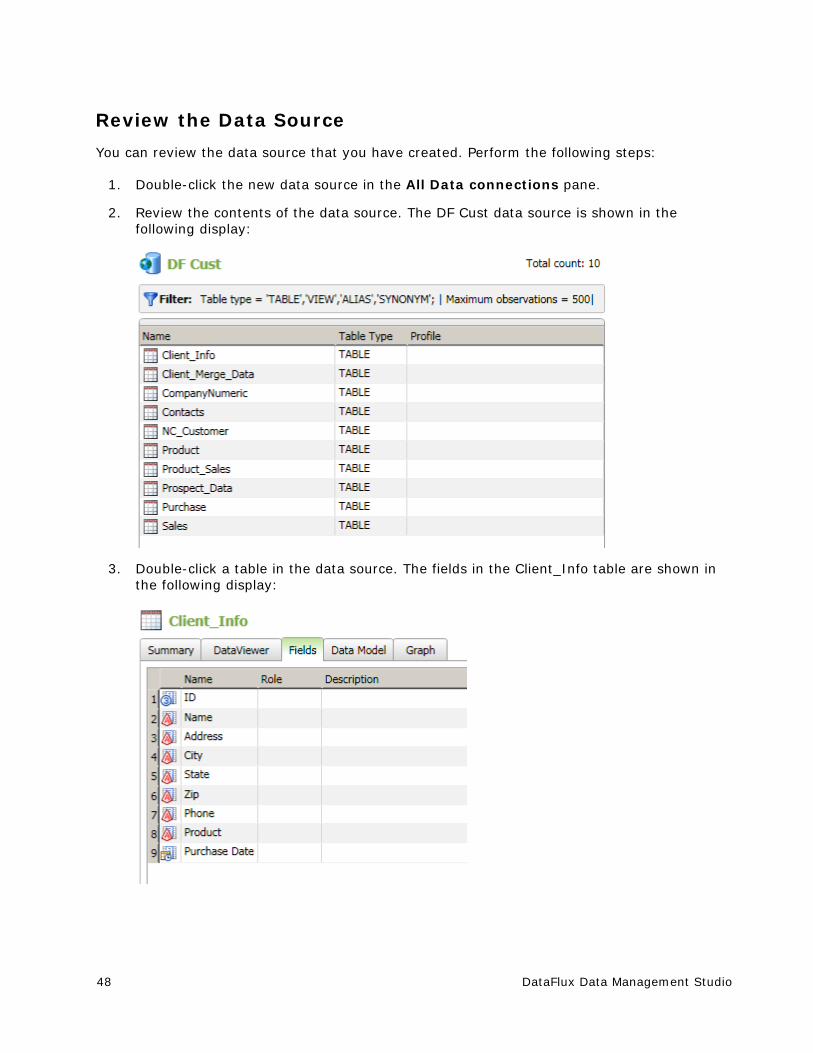
48 DataFlux Data Management Studio
Review the Data Source
You can review the data source that you have created. Perform the following steps:
1. Double-click the new data source in the All Data connections pane.
2. Review the contents of the data source. The DF Cust data source is shown in the following display:
3. Double-click a table in the data source. The fields in the Client_Info table are shown in the following display:
DataFlux Data Management Studio 49
Adding Federated Server Connections
Overview
You can establish a threaded connection from a DataFlux Federation Server to a database. Perform the following steps to create a federated server data connection:
1. Click New Data Connection and select Federated Server Connection to display the Federated Server Connection dialog.
2. Enter a name and description for the new connection into the appropriate fields. We recommend that you avoid using special characters in your connection names.
3. Enter the host name for the Server (DataFlux Federation Server).
4. Enter the Port number.
5. Specify a credentials setting in the Credentials section of the dialog.
Note that the connection string created with the new connection is displayed in the Connection String field. You can test the connection by clicking Test Connection.
Administrators can specify where federated server data connections are stored. For more information, see the TKTS DSN Directory setting in the "Data Access Component Directives" topic in the DataFlux Data Management Studio Installation and Configuration Guide.
Adding Localized DSN Connections
Overview
You can create a localized DSN connection definition for a DataFlux Federation Server and a specific data source. This connection definition is used when you access federated tables. These localized connections are federated server connections to a DBMS that are named and created as an extra connection to the same source in metadata.
You can use the Localized DSN Connection dialog to create localized DSN connection definitions. Localized DSN connections are typically used by jobs so that you do not have to specify detailed connection string information when they move content around between servers. As long as the connection is named the same in the target, it will be used by the target system in the same way as it was in the source system. Perform the following steps to create a localized DSN connection:
1. Click New Data Connection and select Localized DSN Connection to display the Localized DSN Connection dialog.
2. Enter a name and description for the new connection into the appropriate fields.
3. Enter the Federated DSN.
4. Enter the host name for the Server (DataFlux Federation Server).
50 DataFlux Data Management Studio
5. Enter the Port number.
6. Specify a credentials setting in the Credentials section of the dialog.
Note that the connection string created with the new connection is displayed in the Connection String field. You can test the connection by clicking Test Connection.
Administrators can specify where localized DSN connections are stored. For more information, see the User saved connection setting in the "Data Access Component Directives" topic in the DataFlux Data Management Studio Installation and Configuration Guide.
Adding Custom Connections
Overview
You can create a custom connection string for non-ODBC connection types. A custom connection string enables you to establish native connections from a DataFlux Federation Server to third-party databases or to draw data from more than one type of data input.
Use the Custom Connection dialog to create custom connections by performing the following steps:
1. Click New Data Connection and select Custom Connection to display the Custom Connection dialog.
2. Enter the connection string into the Custom connection field.
For example, a custom connection string could read as follows:
DRIVER=REMTS; SERVER=copper.us.dataflux.com; PORT=21032; PROTOCOL=BRIDGE;CONOPTS=(DSN=TERADATA_FS_NOTSSQL_TEST; ); DFXTYPE=DFTK; DRIVER=REMTS;SERVER='myserver.us.dataflux.com';PROTOCOL=BRIDGE;PORT= 21032;UID='DATAFLUX\myuser';PWD='mypassword';CONOPTS=(DRIVER=TSSQL;CONOPTS=((DSN=BASE_DSN);(DSN=ORACLE_DSN)));DFXTYPE=TKTS;
This connection string connects to two different data sources, Base and Oracle. The DSN called BASE_DSN is used to connect to a Base data service, and the DSN called ORACLE_DSN is used to connect to an Oracle data service.
The server option specifies the machine that the Federation Server is running on. Similarly, the port option specifies the port that the Federation Server is running on. Finally, the uid and password options are supplied for the user connecting to the Federation Server. Note that you must add DFXTYPE to all of your custom connection strings.
Note that you can test the connection by clicking Test Connection.
Administrators can specify where custom connections are stored. For more information, see the User saved connection setting in the "Data Access Component Directives" topic in the DataFlux Data Management Studio Installation and Configuration Guide.
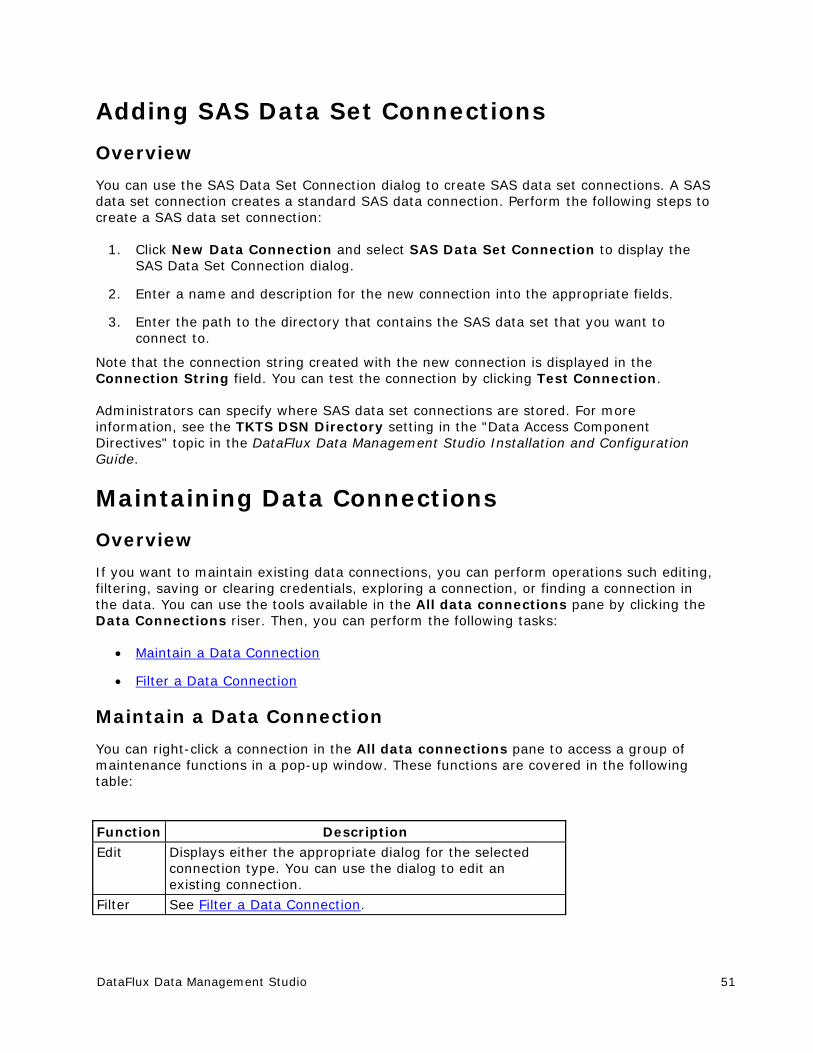
DataFlux Data Management Studio 51
Adding SAS Data Set Connections
Overview
You can use the SAS Data Set Connection dialog to create SAS data set connections. A SAS data set connection creates a standard SAS data connection. Perform the following steps to create a SAS data set connection:
1. Click New Data Connection and select SAS Data Set Connection to display the SAS Data Set Connection dialog.
2. Enter a name and description for the new connection into the appropriate fields.
3. Enter the path to the directory that contains the SAS data set that you want to connect to.
Note that the connection string created with the new connection is displayed in the Connection String field. You can test the connection by clicking Test Connection.
Administrators can specify where SAS data set connections are stored. For more information, see the TKTS DSN Directory setting in the "Data Access Component Directives" topic in the DataFlux Data Management Studio Installation and Configuration Guide.
Maintaining Data Connections
Overview
If you want to maintain existing data connections, you can perform operations such editing, filtering, saving or clearing credentials, exploring a connection, or finding a connection in the data. You can use the tools available in the All data connections pane by clicking the Data Connections riser. Then, you can perform the following tasks:
Maintain a Data Connection
Filter a Data Connection
Maintain a Data Connection
You can right-click a connection in the All data connections pane to access a group of maintenance functions in a pop-up window. These functions are covered in the following table:
Function Description
Edit Displays either the appropriate dialog for the selected connection type. You can use the dialog to edit an existing connection.
Filter See Filter a Data Connection.
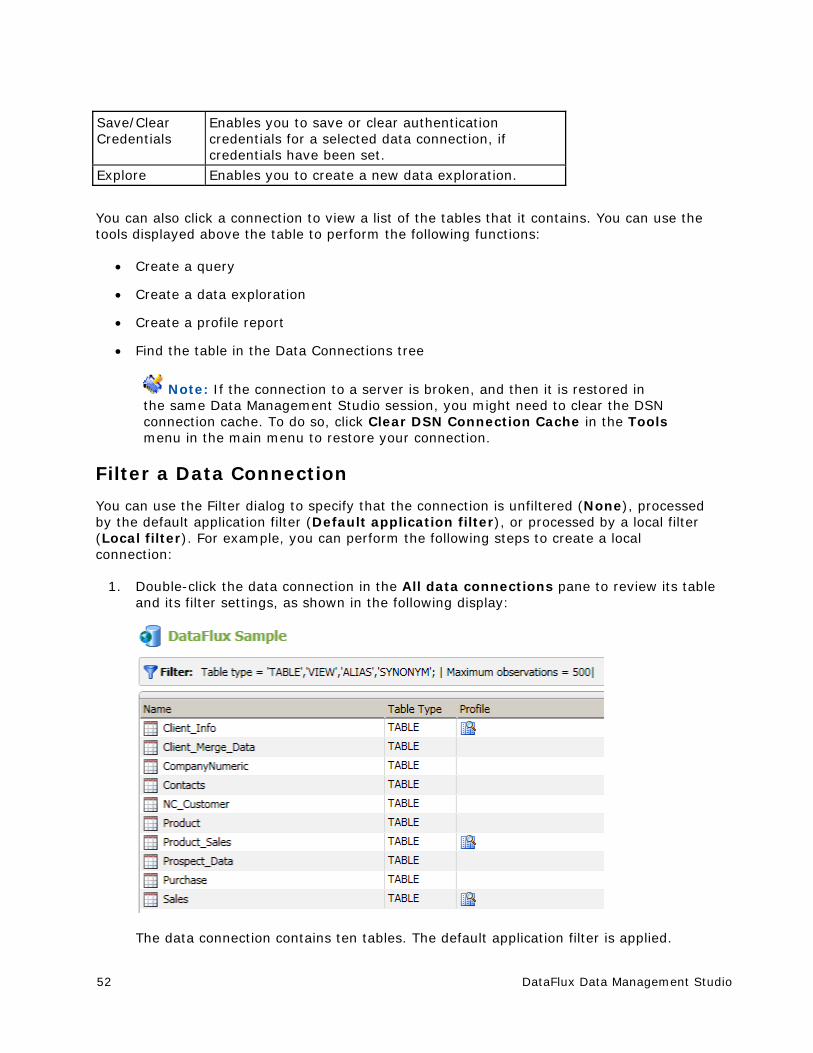
52 DataFlux Data Management Studio
Save/Clear Credentials
Enables you to save or clear authentication credentials for a selected data connection, if credentials have been set.
Explore Enables you to create a new data exploration.
You can also click a connection to view a list of the tables that it contains. You can use the tools displayed above the table to perform the following functions:
Create a query
Create a data exploration
Create a profile report
Find the table in the Data Connections tree
Note: If the connection to a server is broken, and then it is restored in the same Data Management Studio session, you might need to clear the DSN connection cache. To do so, click Clear DSN Connection Cache in the Tools menu in the main menu to restore your connection.
Filter a Data Connection
You can use the Filter dialog to specify that the connection is unfiltered (None), processed by the default application filter (Default application filter), or processed by a local filter (Local filter). For example, you can perform the following steps to create a local connection:
1. Double-click the data connection in the All data connections pane to review its table and its filter settings, as shown in the following display:
The data connection contains ten tables. The default application filter is applied.
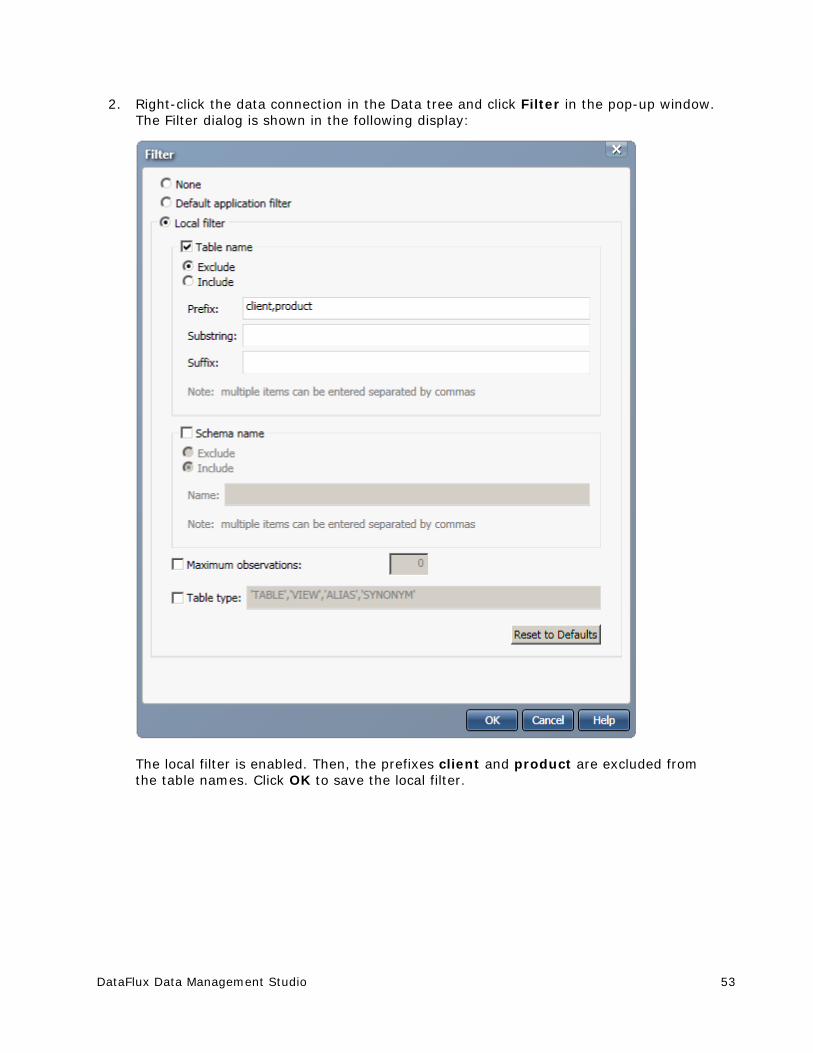
DataFlux Data Management Studio 53
2. Right-click the data connection in the Data tree and click Filter in the pop-up window. The Filter dialog is shown in the following display:
The local filter is enabled. Then, the prefixes client and product are excluded from the table names. Click OK to save the local filter.
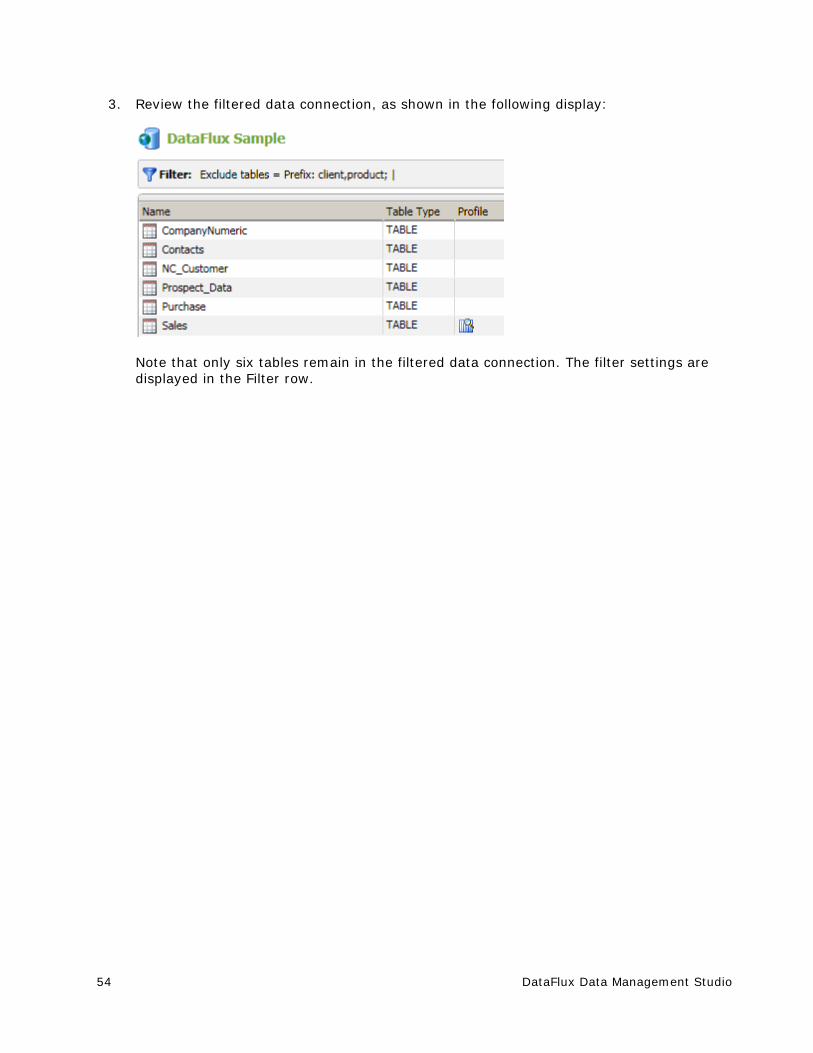
54 DataFlux Data Management Studio
3. Review the filtered data connection, as shown in the following display:
Note that only six tables remain in the filtered data connection. The filter settings are displayed in the Filter row.
DataFlux Data Management Studio 55
Data Collections Overview of Collections
Creating Collections
Managing Collections
Setting Collection Properties
Working With Collection Fields
Overview of Collections You can click the Collections Riser Bar to select data fields in different tables of different data connections. A collection provides a convenient way for you to build up a data set using those fields. A collection can be used as an input source for other components in DataFlux Data Management Studio, such as the Data Viewer, profiles, queries, and data explorations.
Creating Collections You can create a collection of fields drawn from a variety of tables and data connections. Perform the following steps to create a collection:
1. Click the Collections Riser Bar.
2. Click New Collection.
3. Enter an appropriate name and description in the New Collection dialog and click OK.
The new collection is displayed under its repository in the Collections riser.
Managing Collections
Overview
You can review and manage the list of collections in your repositories.
Click the Collections Riser Bar to display the Collections riser. You can manage the collections by right-clicking a collection and selecting one of the following functions:
Create a new collection
Open, delete, or rename an existing collection
Create a new data exploration
Create a new profile
Note that you can also access most of these functions in the toolbars above the Collections riser and the repository collection lists.
56 DataFlux Data Management Studio
Setting Collection Properties You can use the Properties tab for a collection to specify a name for the collection and provide a description.
Working with Collection Fields
Overview
You can manage and analyze the fields that are contained in your collections. You can open a collection in the Collections riser to access the Fields tab of the selected collection. Then you can perform the following tasks in the Fields tab:
Insert and Remove Fields
Cut, Paste, and Copy Fields
Perform Field Analysis
Manage Fields
Insert and Remove Fields
Perform the following steps to insert fields into a collection:
1. Click Insert Fields in the toolbar.
2. Select the connection that contains the fields. Note that you can filter the connection so that it only displays the tables that you need.
3. Select the fields that you need. Note that you can either open a table and pick individual fields with check boxes or select the check box next to the table to pick all of its fields.
4. Click Add to insert the selected fields.
To remove one or more fields from a selection, select the fields and click Remove.
Cut, Paste, and Copy Fields
You can use the cut, paste, and copy functions to move fields and groups of fields between collections. For example, you could copy a group of fields from a collection and paste them into several different collections. You could also cut or copy all of the fields in a collection and paste them in a new collection.
Perform Field Analysis
You can click Show Field Analysis Pane to display an analysis pane for a selected field. The pane contains the following riser bars:
Count Riser Bar - Displays counts for a selected field
Length Riser Bar - Displays length data for the rows that contain a selected field

DataFlux Data Management Studio 57
Report Riser Bar - Displays a report interface that you can use to sort or summarize the data for a selected field
Data Sample Riser Bar - Displays sample data for a selected field
The analysis pane interacts with the field list: if you select a different field in the field list, the appropriate information is displayed in the analysis pane. The following display shows part of the Count riser for a field:
Manage Fields
You can use the following toolbar functions to manage the fields in a collection:
Find in Data Connections - Displays the table view for the table that contains the selected field.
Query Field - Enables you to create a query based on one or more selected fields.
Explore Table - Enables you to create a data exploration based on one or more selected fields.
Profile Fields - Enables you to create a profile based on one or more selected fields.
58 DataFlux Data Management Studio
Data Explorations Overview of Data Explorations
Creating a Data Exploration
Setting Data Exploration Properties
Working with Data Exploration Reports
Interpreting a Field Relationship Map
Overview of Data Explorations Data explorations enable you and your organization to identify data redundancies and extract and organize metadata from multiple sources. Relationships between metadata can be identified and cataloged into types of data by specified business data types and processes.
A data exploration reads data from databases and categorizes the fields in the selected tables into categories. These categories have been predefined in the Quality Knowledge Base (QKB). Data explorations perform this categorization by matching column names. You also have the option of sampling the data in the table to determine whether the data is one of the specific types of categories in the QKB.
For example, your customer metadata might be grouped into one catalog and your address metadata might be grouped in another catalog. Once you have organized your metadata into manageable chunks, you can identify relationships between the metadata by table-level profiling. Creating a data exploration enables you to analyze tables within databases to locate potential matches and plan for the profiles that you need to run.
Once you have identified possible matches, you can plan the best way to handle your data and create a profile job for any database, table, or field. Thus, you can use a data exploration of your metadata to decide on the most efficient and profitable way to profile your physical data.
For more information about setting QKB options, see How can I specify Quality Knowledge Base options for profiles and data explorations?

DataFlux Data Management Studio 59
Creating a Data Exploration
Overview
You can create a new data exploration to identify data redundancies and extract and organize metadata from multiple sources.
Perform the following steps to create a data exploration:
1. Click New in the Main Menu. Then, click Data Exploration.
2. Enter a name for the data exploration in the Name field.
3. Specify a location for the data exploration in the Save in field.
4. Click OK to save the new data exploration.
Note that you can also create data explorations elsewhere in DataFlux Data Management Studio.
Setting Data Exploration Properties
Overview
You can set the properties used to generate a data exploration report to specify the sources and analysis methods for the report.
Click the Properties tab and set the properties for the report that you want to generate.
Specify Data Sources
You can use the Data sources field to review the sources that are available for inclusion in your data exploration. Then, you can click Add Table to specify the sources that you need. Note that you can either open a table and pick individual fields with check boxes or select the check box next to the table to pick all of its fields.
For example, you could select all of the fields in the Client_Info, Client_Merge_Data, and Contacts tables by selecting the check boxes next to those tables. Then, you could add only the Address field in the NC_Customer table by opening the table and selecting the check box next to that field.
Specify Analysis Methods
You can specify the analysis methods that you want to use in constructing your data exploration report. You can choose from the following analysis methods:
Field name matching - Uses match definitions and a locale to analyze the name of each field to discover which names match each other. Match definitions use a context-specific algorithm that combines parsing, normalization, standardization, and phonetics to identify potential duplicate records in a database table. For this example, you could select the Address match definition and set a locale of ENUSA and a sensitivity level of 85.
60 DataFlux Data Management Studio
Field name analysis - Uses identification analysis definitions and a locale to analyze the name of each field to determine which identity to assign to the field. Identification analysis definitions use an algorithm designed to guess at the identity of a data element based on the specified value. The definition takes advantage of a vocabulary to look up words that are known to be associated with certain identities. You could use the Contact Info identification definition for a sample data exploration.
Sample data analysis - Uses identification analysis definitions and a locale to determine which identity to assign to the field. Identification analysis definitions contain the logic and reference data used make this determination, so keep the Contact Info identification definition. Unlike the field name matching and field name analysis methods, which examine metadata, the sample data analysis method examines a small sample of physical data. Use the Sample size(records) to specify the number of records included in the data sample.
Note: You can save your data exploration under a different name if you click Save Exploration As in the File menu. However, the properties for the data exploration are set only when the original data exploration report has been generated. To generate the report, click the Report tab. Then, you can click Save Exploration As and save a copy of the data exploration with its properties intact.
Working with Data Exploration Reports
Overview
You can review the metadata collected in a data exploration run that was configured on the data exploration Properties tab. The data exploration Report tab is designed to display the results of field matches, definition matches, and table matches. You can see sample data for all of these matches and review any notes, collections, or profiles associated with them. You can also access the Log tab to review the log for the current report.
Click the data exploration Report tab to generate the report for the exploration, and then review the report results by performing the following tasks:
Review Field Matches
Review Identification Analysis Matches
Review Table Matches
Note: You can save your data exploration under a different name if you click Save Exploration As in the File menu. Because you have generated a report from the data exploration, a copy of the data exploration with its properties intact is saved.
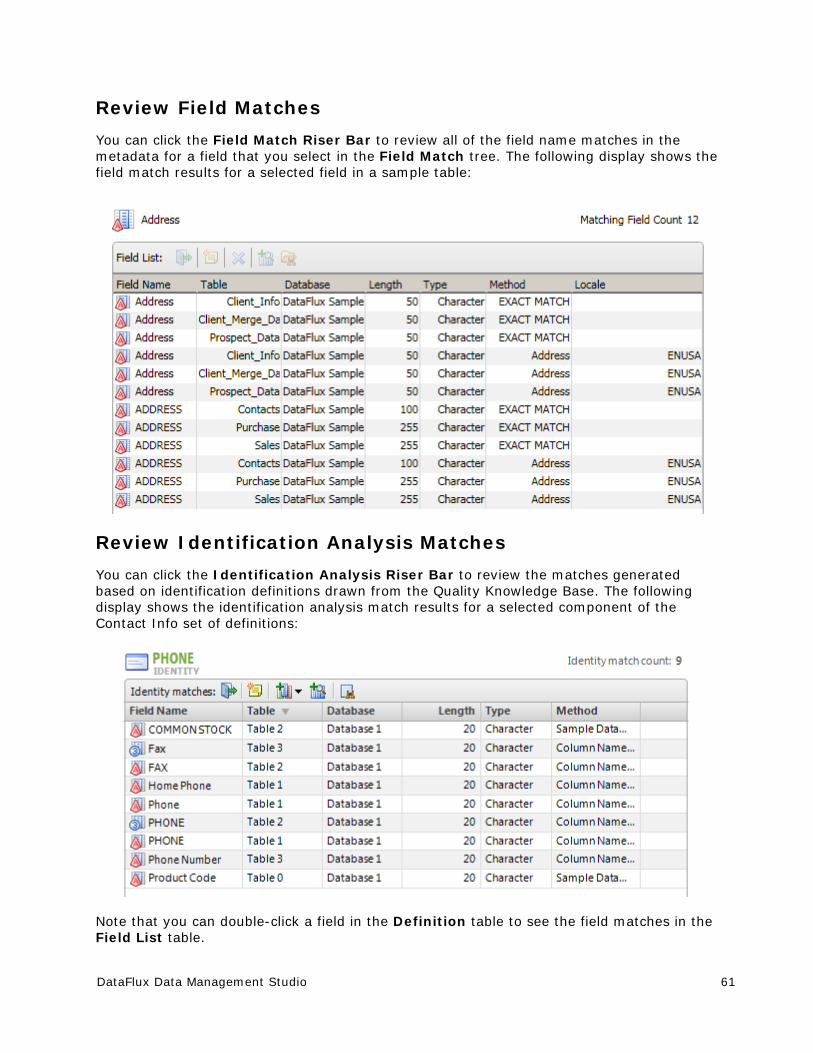
DataFlux Data Management Studio 61
Review Field Matches
You can click the Field Match Riser Bar to review all of the field name matches in the metadata for a field that you select in the Field Match tree. The following display shows the field match results for a selected field in a sample table:
Review Identification Analysis Matches
You can click the Identification Analysis Riser Bar to review the matches generated based on identification definitions drawn from the Quality Knowledge Base. The following display shows the identification analysis match results for a selected component of the Contact Info set of definitions:
Note that you can double-click a field in the Definition table to see the field matches in the Field List table.
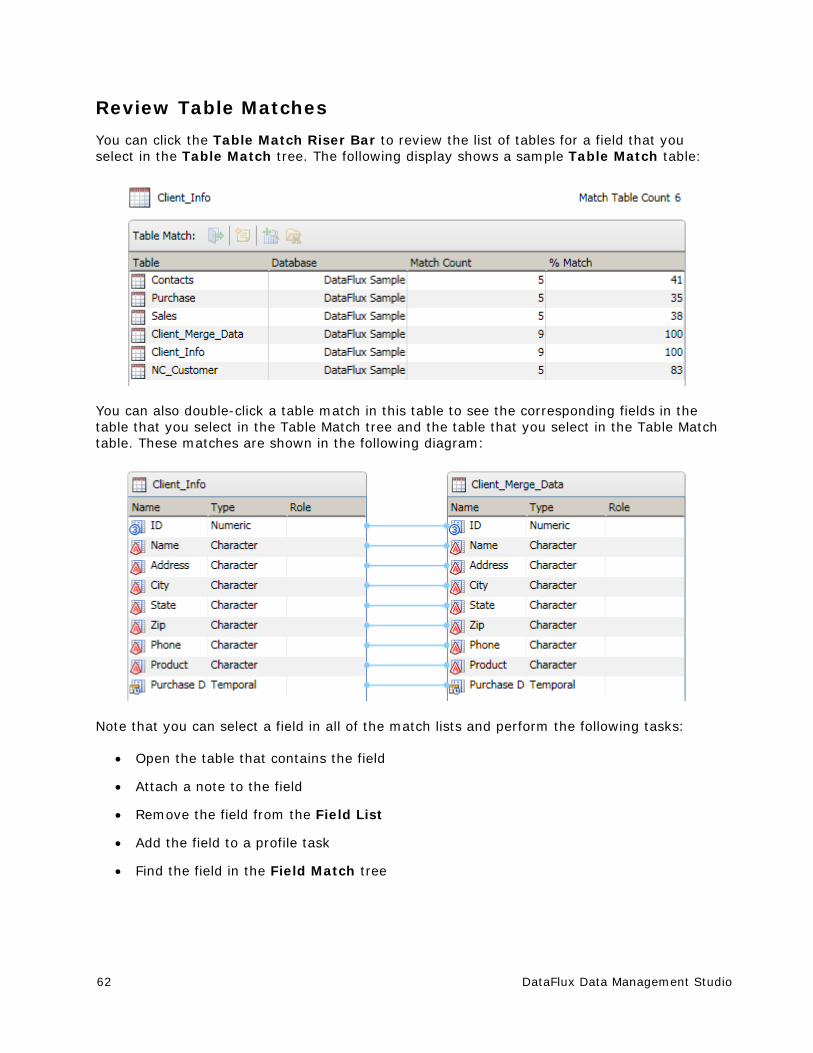
62 DataFlux Data Management Studio
Review Table Matches
You can click the Table Match Riser Bar to review the list of tables for a field that you select in the Table Match tree. The following display shows a sample Table Match table:
You can also double-click a table match in this table to see the corresponding fields in the table that you select in the Table Match tree and the table that you select in the Table Match table. These matches are shown in the following diagram:
Note that you can select a field in all of the match lists and perform the following tasks:
Open the table that contains the field
Attach a note to the field
Remove the field from the Field List
Add the field to a profile task
Find the field in the Field Match tree
DataFlux Data Management Studio 63
Interpreting a Field Relationship Map
Overview
You want to review and interpret a field relationship map that was created as a part of a data exploration report run. The field relationship map provides a visual presentation for the field relationships that are covered in the Report tab.
Click Map to view the field relationship map on the Map tab. Each field is displayed as a point contained in the circle created by the outer database and the inner table rings. Move the mouse over the point for a field to see the name of the field and the names of the table and database that contain it. You can also find the selected field in a report.
Note: Some points are connected to other points with red lines. The red lines represent key relationships between the fields. You can also right-click a point to see a pop-up menu that enables you to display the selected field and related fields in the Report tab. Finally, you can click many of the points and see sample data for the selected field on the Data Sample tab on the right side of the Map tab.
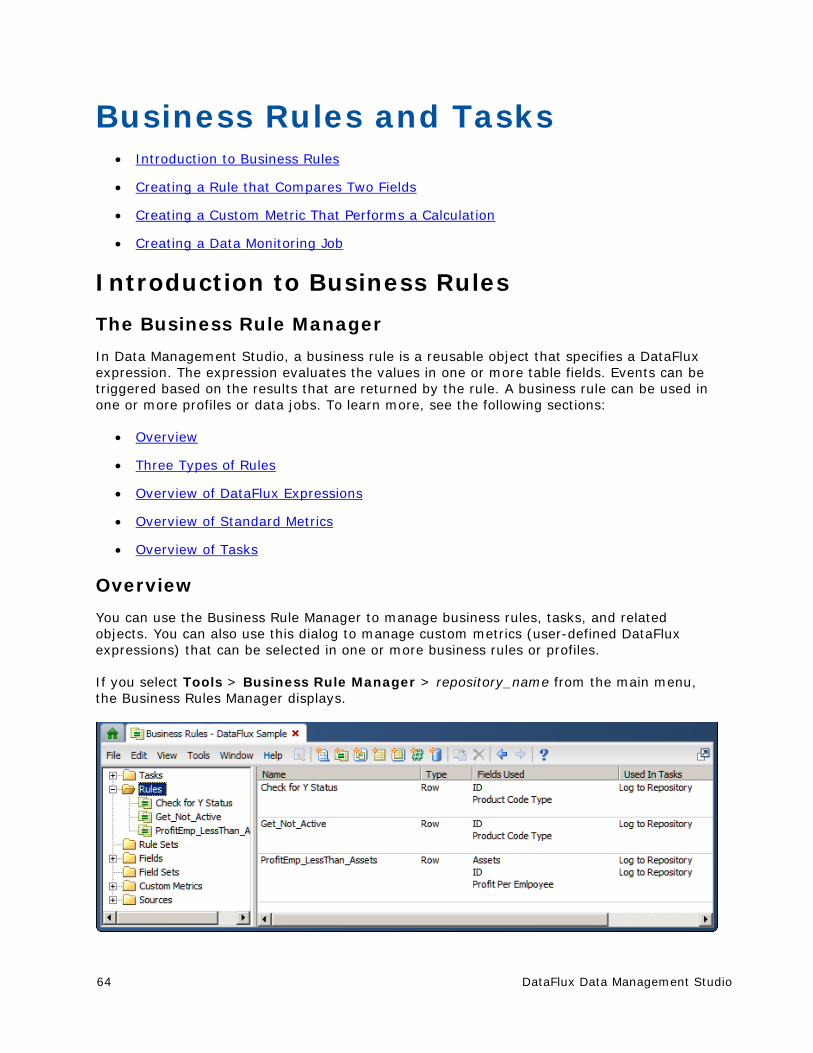
64 DataFlux Data Management Studio
Business Rules and Tasks Introduction to Business Rules
Creating a Rule that Compares Two Fields
Creating a Custom Metric That Performs a Calculation
Creating a Data Monitoring Job
Introduction to Business Rules
The Business Rule Manager
In Data Management Studio, a business rule is a reusable object that specifies a DataFlux expression. The expression evaluates the values in one or more table fields. Events can be triggered based on the results that are returned by the rule. A business rule can be used in one or more profiles or data jobs. To learn more, see the following sections:
Overview
Three Types of Rules
Overview of DataFlux Expressions
Overview of Standard Metrics
Overview of Tasks
Overview
You can use the Business Rule Manager to manage business rules, tasks, and related objects. You can also use this dialog to manage custom metrics (user-defined DataFlux expressions) that can be selected in one or more business rules or profiles.
If you select Tools > Business Rule Manager > repository_name from the main menu, the Business Rules Manager displays.
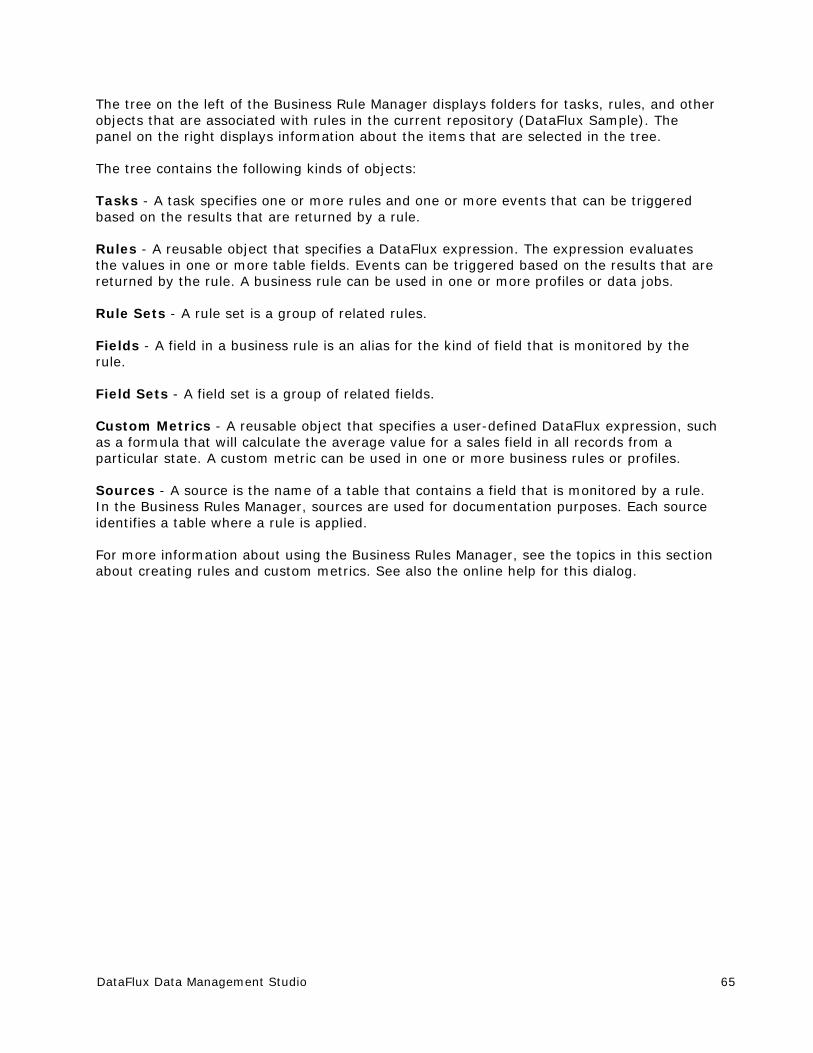
DataFlux Data Management Studio 65
The tree on the left of the Business Rule Manager displays folders for tasks, rules, and other objects that are associated with rules in the current repository (DataFlux Sample). The panel on the right displays information about the items that are selected in the tree.
The tree contains the following kinds of objects:
Tasks - A task specifies one or more rules and one or more events that can be triggered based on the results that are returned by a rule.
Rules - A reusable object that specifies a DataFlux expression. The expression evaluates the values in one or more table fields. Events can be triggered based on the results that are returned by the rule. A business rule can be used in one or more profiles or data jobs.
Rule Sets - A rule set is a group of related rules.
Fields - A field in a business rule is an alias for the kind of field that is monitored by the rule.
Field Sets - A field set is a group of related fields.
Custom Metrics - A reusable object that specifies a user-defined DataFlux expression, such as a formula that will calculate the average value for a sales field in all records from a particular state. A custom metric can be used in one or more business rules or profiles.
Sources - A source is the name of a table that contains a field that is monitored by a rule. In the Business Rules Manager, sources are used for documentation purposes. Each source identifies a table where a rule is applied.
For more information about using the Business Rules Manager, see the topics in this section about creating rules and custom metrics. See also the online help for this dialog.
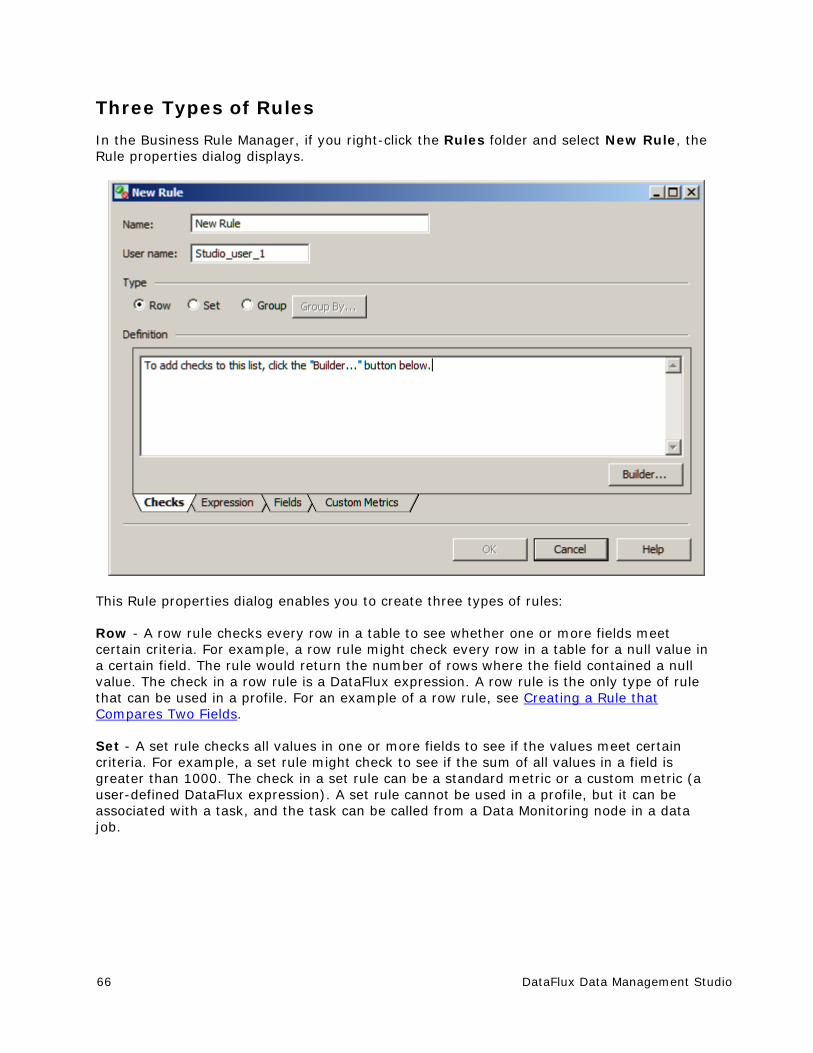
66 DataFlux Data Management Studio
Three Types of Rules
In the Business Rule Manager, if you right-click the Rules folder and select New Rule, the Rule properties dialog displays.
This Rule properties dialog enables you to create three types of rules:
Row - A row rule checks every row in a table to see whether one or more fields meet certain criteria. For example, a row rule might check every row in a table for a null value in a certain field. The rule would return the number of rows where the field contained a null value. The check in a row rule is a DataFlux expression. A row rule is the only type of rule that can be used in a profile. For an example of a row rule, see Creating a Rule that Compares Two Fields.
Set - A set rule checks all values in one or more fields to see if the values meet certain criteria. For example, a set rule might check to see if the sum of all values in a field is greater than 1000. The check in a set rule can be a standard metric or a custom metric (a user-defined DataFlux expression). A set rule cannot be used in a profile, but it can be associated with a task, and the task can be called from a Data Monitoring node in a data job.
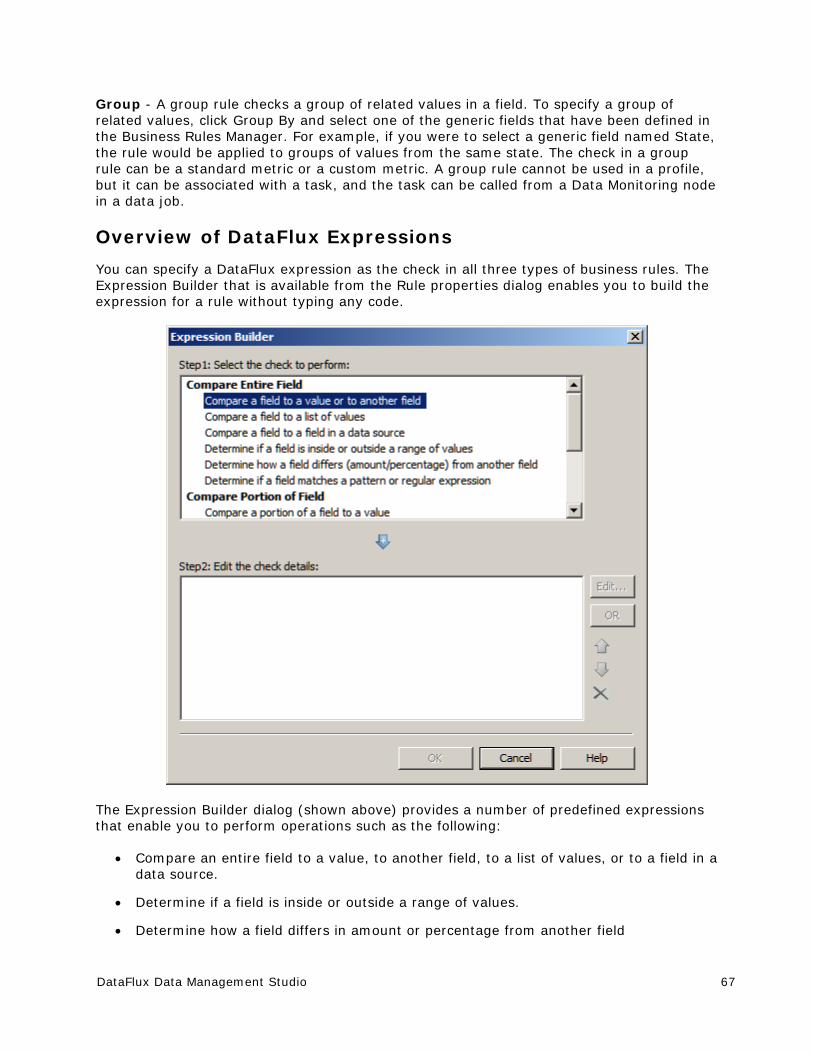
DataFlux Data Management Studio 67
Group - A group rule checks a group of related values in a field. To specify a group of related values, click Group By and select one of the generic fields that have been defined in the Business Rules Manager. For example, if you were to select a generic field named State, the rule would be applied to groups of values from the same state. The check in a group rule can be a standard metric or a custom metric. A group rule cannot be used in a profile, but it can be associated with a task, and the task can be called from a Data Monitoring node in a data job.
Overview of DataFlux Expressions
You can specify a DataFlux expression as the check in all three types of business rules. The Expression Builder that is available from the Rule properties dialog enables you to build the expression for a rule without typing any code.
The Expression Builder dialog (shown above) provides a number of predefined expressions that enable you to perform operations such as the following:
Compare an entire field to a value, to another field, to a list of values, or to a field in a data source.
Determine if a field is inside or outside a range of values.
Determine how a field differs in amount or percentage from another field
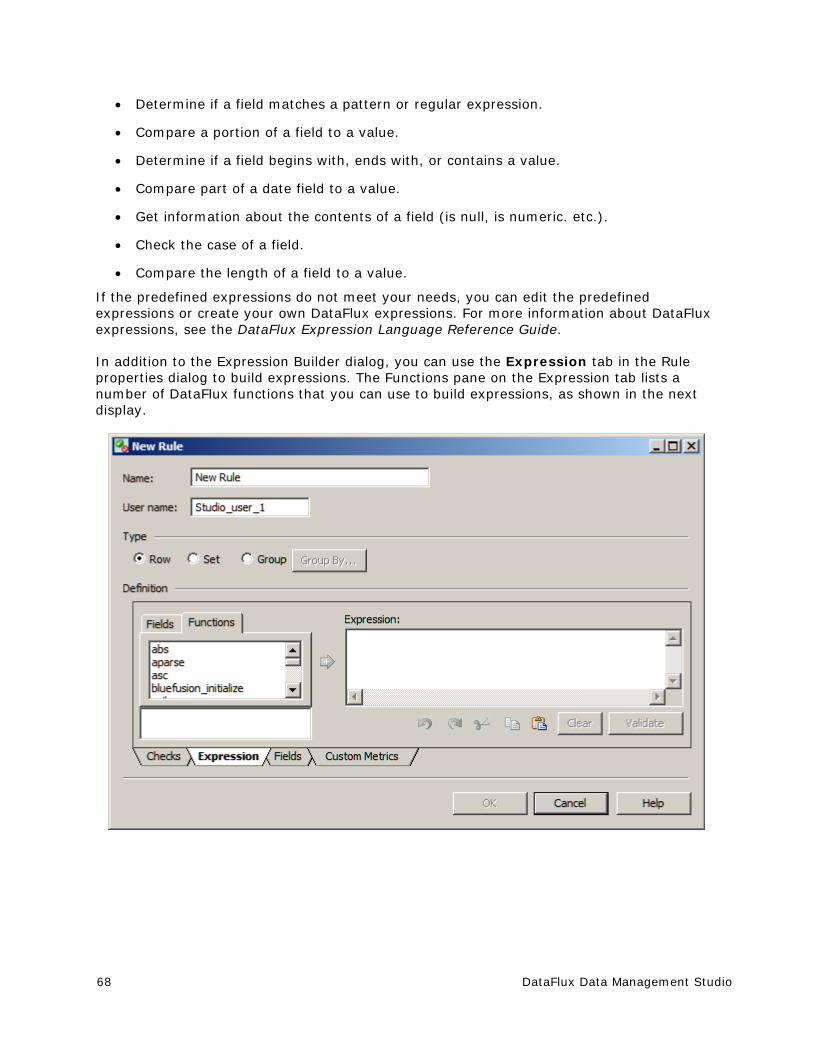
68 DataFlux Data Management Studio
Determine if a field matches a pattern or regular expression.
Compare a portion of a field to a value.
Determine if a field begins with, ends with, or contains a value.
Compare part of a date field to a value.
Get information about the contents of a field (is null, is numeric. etc.).
Check the case of a field.
Compare the length of a field to a value.
If the predefined expressions do not meet your needs, you can edit the predefined expressions or create your own DataFlux expressions. For more information about DataFlux expressions, see the DataFlux Expression Language Reference Guide.
In addition to the Expression Builder dialog, you can use the Expression tab in the Rule properties dialog to build expressions. The Functions pane on the Expression tab lists a number of DataFlux functions that you can use to build expressions, as shown in the next display.
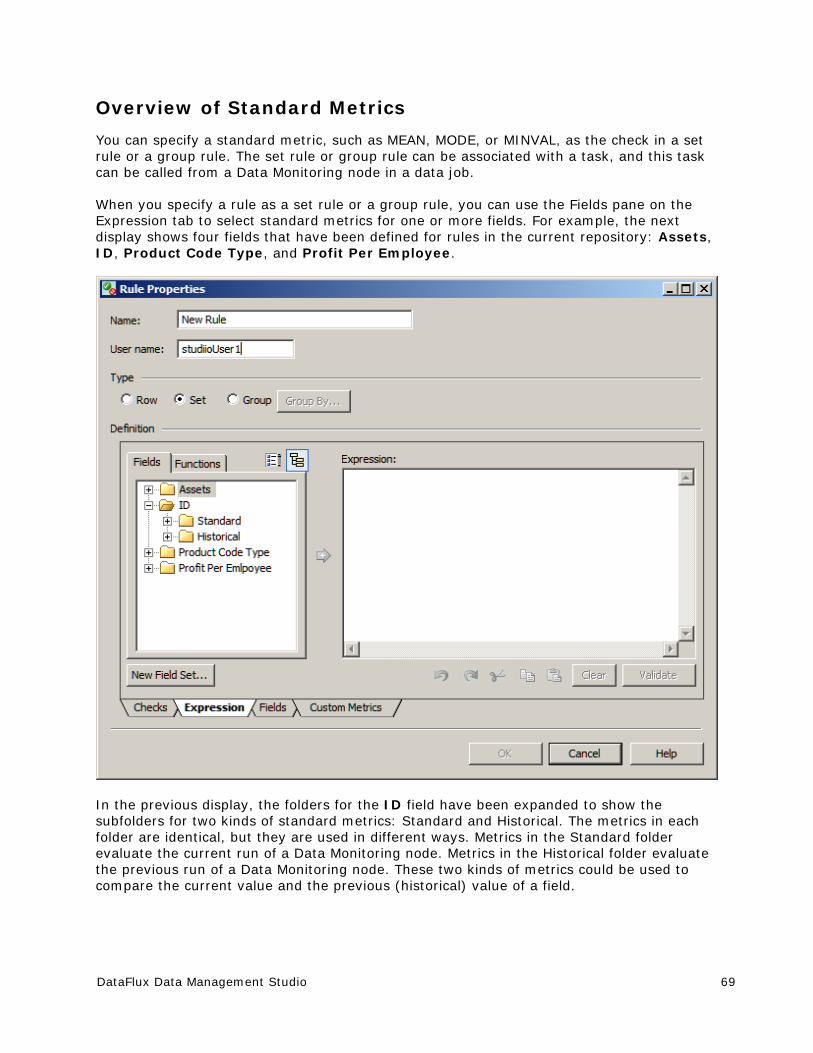
DataFlux Data Management Studio 69
Overview of Standard Metrics
You can specify a standard metric, such as MEAN, MODE, or MINVAL, as the check in a set rule or a group rule. The set rule or group rule can be associated with a task, and this task can be called from a Data Monitoring node in a data job.
When you specify a rule as a set rule or a group rule, you can use the Fields pane on the Expression tab to select standard metrics for one or more fields. For example, the next display shows four fields that have been defined for rules in the current repository: Assets, ID, Product Code Type, and Profit Per Employee.
In the previous display, the folders for the ID field have been expanded to show the subfolders for two kinds of standard metrics: Standard and Historical. The metrics in each folder are identical, but they are used in different ways. Metrics in the Standard folder evaluate the current run of a Data Monitoring node. Metrics in the Historical folder evaluate the previous run of a Data Monitoring node. These two kinds of metrics could be used to compare the current value and the previous (historical) value of a field.
70 DataFlux Data Management Studio
Overview of Tasks
A task specifies one or more rules and one or more events that can be triggered based on the results that are returned by a rule. For example, you can create a business rule that tracks the profit per employee against assets over time. Then, you link the business rule to a task. When you add the task to a monitoring job and run the job, you trigger input to the Monitor tab in the Information riser bar. For details about this scenario, see Creating a Data Monitoring Job.
Creating a Rule that Compares Two Fields
Overview
You can create a business rule that compares the values of two numeric fields in a profile or data job. For example, you could create a rule that compared the value in the Profits per Employee field to the value in the Assets field for each row in a table. You could associate a task with the rule so that rows in which the value of Profits per Employee is less than Assets would be logged to a DataFlux repository.
To create a rule, perform the following steps:
Plan the New Rule
Add Aliases for Fields That Will Be Specified in the Rule
Create a Rule That Compares Two Fields
Create a New Task and Associate it With the Rule
Apply the Rule
Plan the New Rule
Before you create a new rule, consider the following questions:
Q: What do you want the rule to do? A: Identify all records in a table where the profits per employee are less than the assets. Log these records to a DataFlux repository.
Q: What fields will you specify in this rule? A: The Assets field and Profit Per Employee field are required by the rule. An ID field (key field) could be used to identify the rows that are logged to the repository.
Q: What expression is needed for his rule? A: Something like: Profit Per Employee is less than Assets.
Q: Should the rule act on each row in a table; on all values in the field, or on a group of related values in a field? A: Each row in a table.
DataFlux Data Management Studio 71
Add Aliases for Fields That Will Be Specified in the Rule
A business rule specifies one or more fields. Rather than specify a particular field in a physical table, the Business Rule Manager enables you to specify an alias for the kind of fields that are specified in the rule. Later, when you apply the rule to a particular table in a profile or data job, you will map the field aliases to fields in a physical table.
In the current example, you would create an alias for a Profit Per Employee field and an Assets field. If you have not done so already, you would also specify an alias for a key field, such as ID. Key field aliases are useful if you specify output for a rule.
1. From the Folders tree in the main Data Management Studio window, select Tools > Business Rule Manager > repository_name from the main menu. The Business Rules Manager will display.
2. Expand the Fields folder on the left and check to see that the fields you need for the current rule have not already been added. For this example, assume that none of the fields that you need have been created.
3. Right-click the Fields folder and select New Field. The New Field dialog displays.
4. Enter a name for the field, such as Profit Per Employee. Then enter a description for the field, such as "Similar to profit/emp field in CompanyNumeric table." Click OK. The new field alias is added to the Fields folder.
5. Repeat for other fields that will be specified by the new rule, such as Assets and ID.
You now have aliases for all fields will be specified by this rule. You are ready to create the rule.
Create a Rule That Compares Two Fields
1. Display the Business Rule Manager if it is not already displayed. From the Folders tree, select Tools > Business Rule Manager > repository_name from the main menu.
2. Right-click the Rules folder and select New Rule. The New Rule dialog displays. For the current example, you would specify the following values in this dialog: Name for the rule: ProfitEmp_LessThan_Assets Type of rule: Row
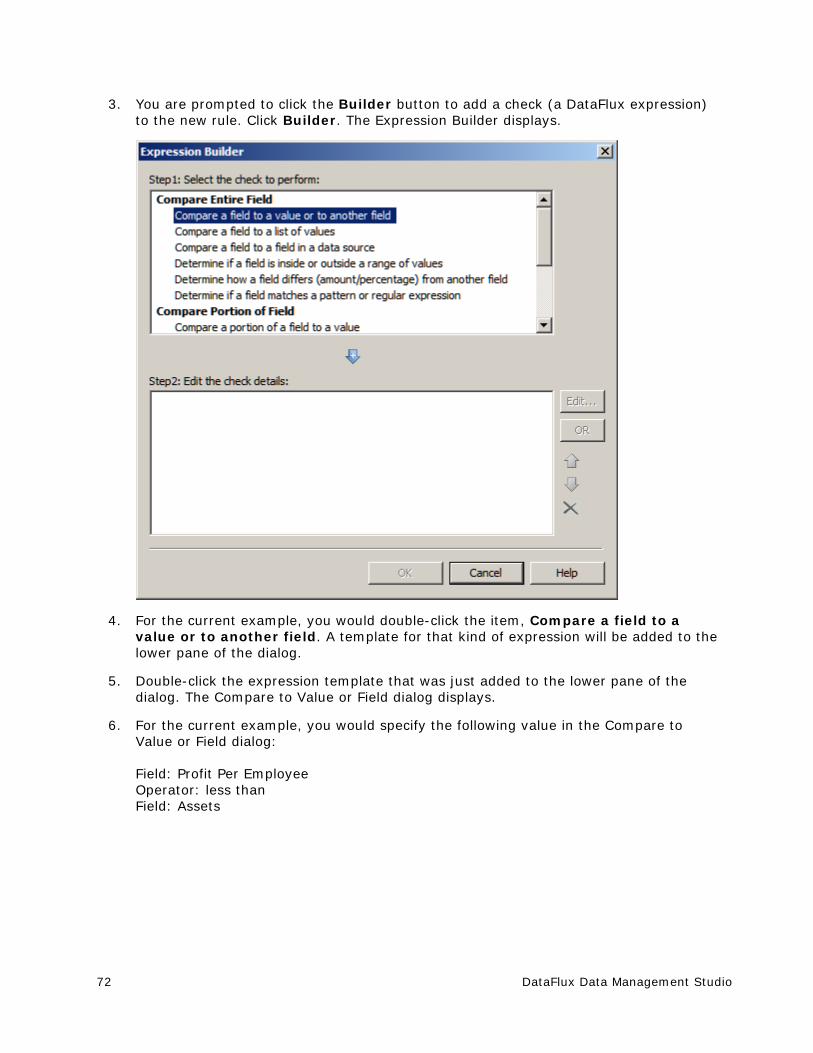
72 DataFlux Data Management Studio
3. You are prompted to click the Builder button to add a check (a DataFlux expression) to the new rule. Click Builder. The Expression Builder displays.
4. For the current example, you would double-click the item, Compare a field to a value or to another field. A template for that kind of expression will be added to the lower pane of the dialog.
5. Double-click the expression template that was just added to the lower pane of the dialog. The Compare to Value or Field dialog displays.
6. For the current example, you would specify the following value in the Compare to Value or Field dialog: Field: Profit Per Employee Operator: less than Field: Assets

DataFlux Data Management Studio 73
7. After entering the values above, the Compare to Value or Field dialog would look similar to the following display.
When you are satisfied with the Compare to Value or Field dialog, click OK. The Expression Builder displays. Click OK again. The New Rule dialog displays. You have created the check for the rule. The next step is to verify that you have specified aliases for all fields that are used in the expression and for any additional fields (such as ID) that will be used to write output from the rule.
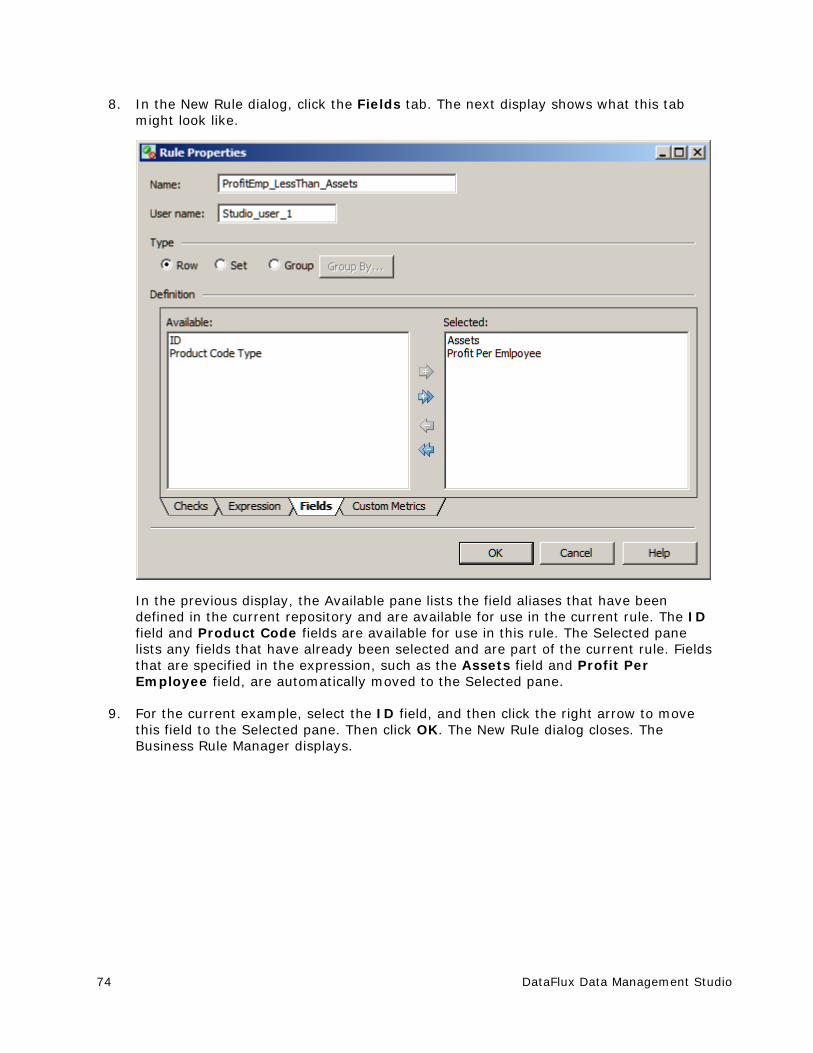
74 DataFlux Data Management Studio
8. In the New Rule dialog, click the Fields tab. The next display shows what this tab might look like.
In the previous display, the Available pane lists the field aliases that have been defined in the current repository and are available for use in the current rule. The ID field and Product Code fields are available for use in this rule. The Selected pane lists any fields that have already been selected and are part of the current rule. Fields that are specified in the expression, such as the Assets field and Profit Per Employee field, are automatically moved to the Selected pane.
9. For the current example, select the ID field, and then click the right arrow to move this field to the Selected pane. Then click OK. The New Rule dialog closes. The Business Rule Manager displays.
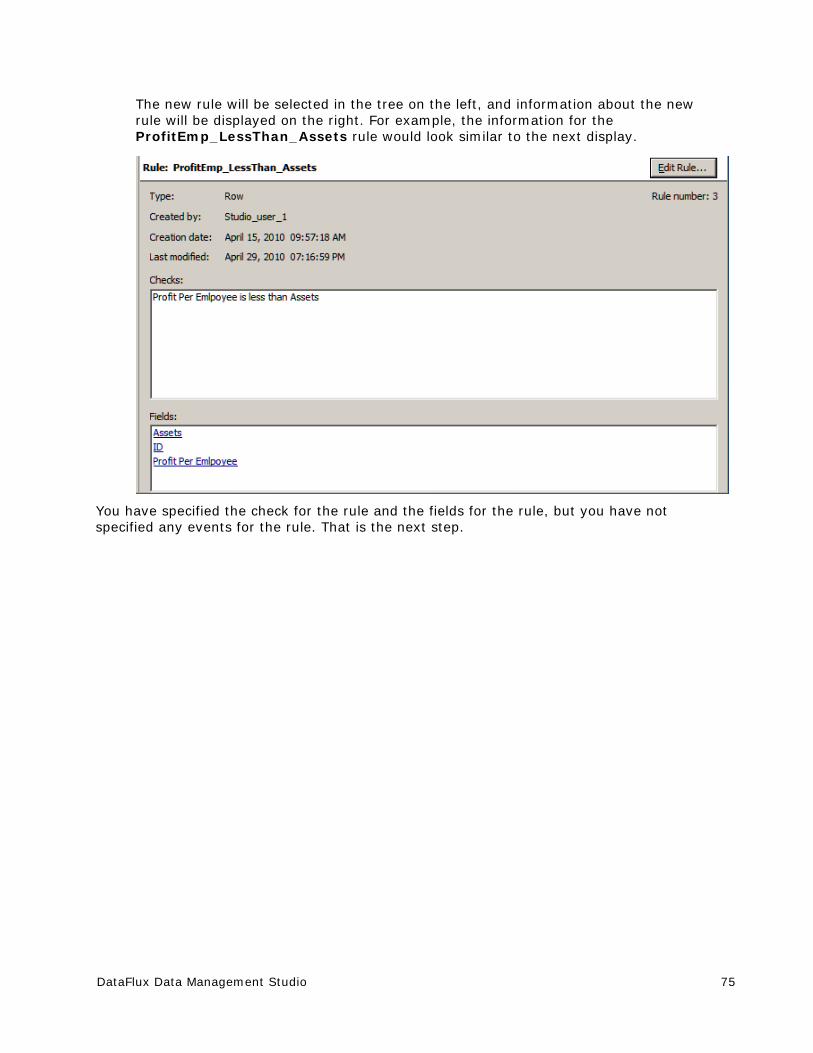
DataFlux Data Management Studio 75
The new rule will be selected in the tree on the left, and information about the new rule will be displayed on the right. For example, the information for the ProfitEmp_LessThan_Assets rule would look similar to the next display.
You have specified the check for the rule and the fields for the rule, but you have not specified any events for the rule. That is the next step.
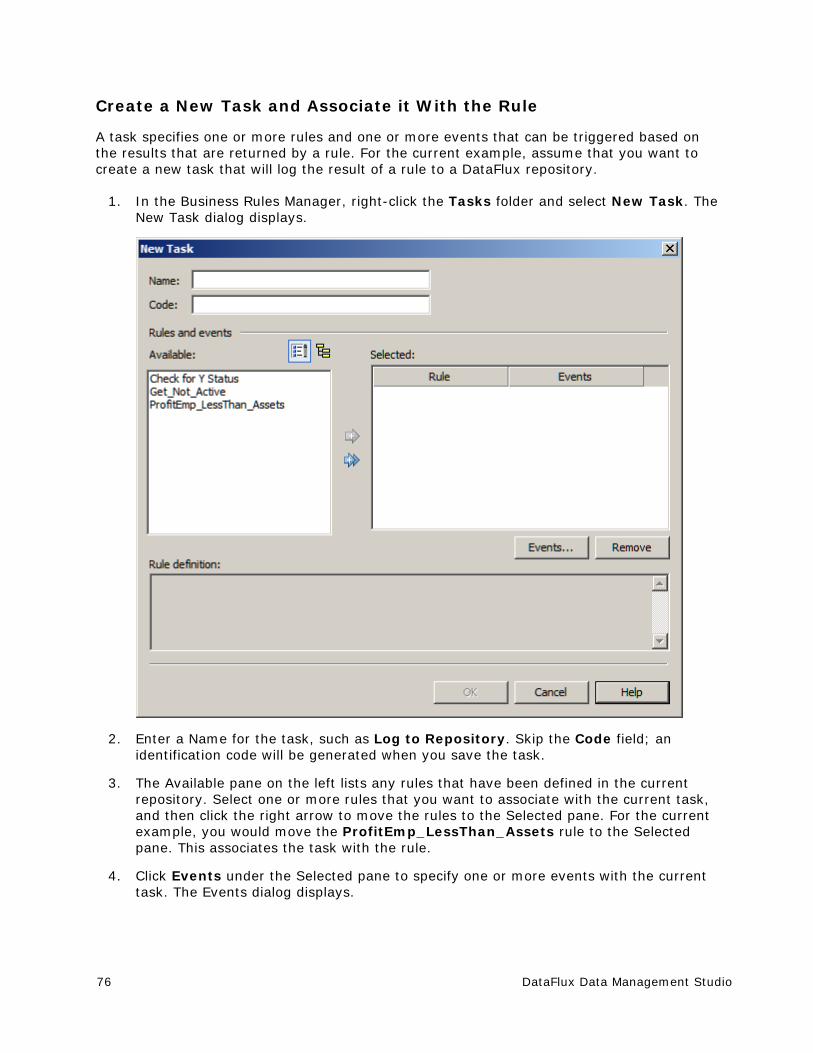
76 DataFlux Data Management Studio
Create a New Task and Associate it With the Rule
A task specifies one or more rules and one or more events that can be triggered based on the results that are returned by a rule. For the current example, assume that you want to create a new task that will log the result of a rule to a DataFlux repository.
1. In the Business Rules Manager, right-click the Tasks folder and select New Task. The New Task dialog displays.
2. Enter a Name for the task, such as Log to Repository. Skip the Code field; an identification code will be generated when you save the task.
3. The Available pane on the left lists any rules that have been defined in the current repository. Select one or more rules that you want to associate with the current task, and then click the right arrow to move the rules to the Selected pane. For the current example, you would move the ProfitEmp_LessThan_Assets rule to the Selected pane. This associates the task with the rule.
4. Click Events under the Selected pane to specify one or more events with the current task. The Events dialog displays.
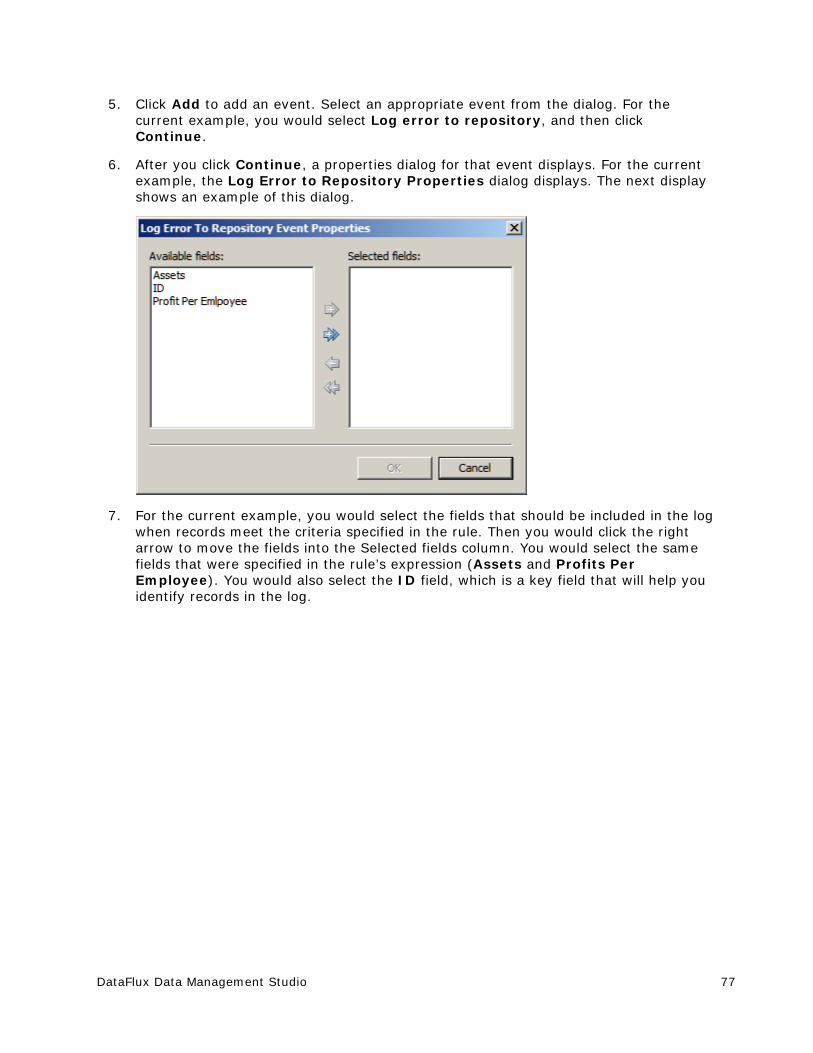
DataFlux Data Management Studio 77
5. Click Add to add an event. Select an appropriate event from the dialog. For the current example, you would select Log error to repository, and then click Continue.
6. After you click Continue, a properties dialog for that event displays. For the current example, the Log Error to Repository Properties dialog displays. The next display shows an example of this dialog.
7. For the current example, you would select the fields that should be included in the log when records meet the criteria specified in the rule. Then you would click the right arrow to move the fields into the Selected fields column. You would select the same fields that were specified in the rule’s expression (Assets and Profits Per Employee). You would also select the ID field, which is a key field that will help you identify records in the log.
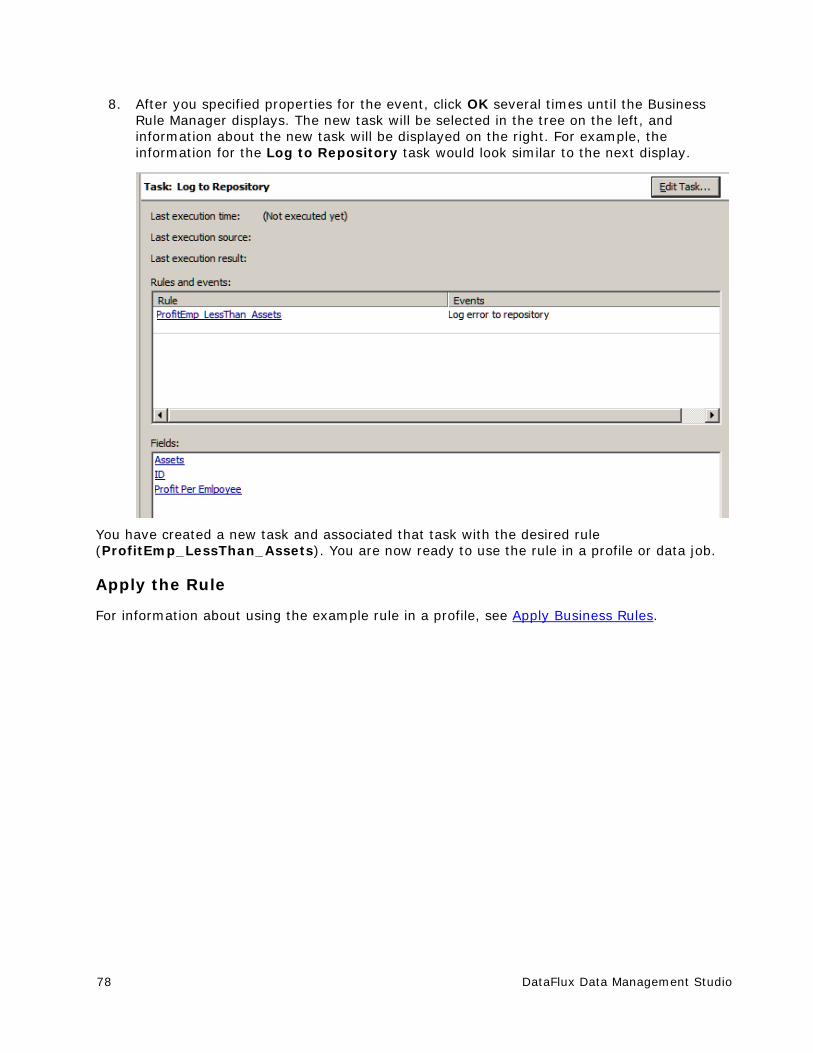
78 DataFlux Data Management Studio
8. After you specified properties for the event, click OK several times until the Business Rule Manager displays. The new task will be selected in the tree on the left, and information about the new task will be displayed on the right. For example, the information for the Log to Repository task would look similar to the next display.
You have created a new task and associated that task with the desired rule (ProfitEmp_LessThan_Assets). You are now ready to use the rule in a profile or data job.
Apply the Rule
For information about using the example rule in a profile, see Apply Business Rules.
DataFlux Data Management Studio 79
Creating a Custom Metric That Performs a Calculation
Overview
You can use a custom metric to perform a calculation for one or more fields when there is no predefined DataFlux expression for that operation. For example, you could create a metric that calculates the average value for a sales field in all records from a particular state. Perform the following steps:
Plan the New Custom Metric
Create a Custom Metric That Performs a Calculation
Apply the Custom Metric
Plan the New Custom Metric
A custom metric is a reusable object that specifies a user-defined DataFlux expression. You must have a detailed understanding of DataFlux Expression Language in order to create a custom metric. For more information, see the DataFlux Expression Language Reference Guide.
You can specify three blocks of code for a custom metric: a pre-expression, an expression, and a post-expression. The following DataFlux expression code will calculate the average value for a sales field in all records from a particular state, North Carolina (NC).
Pre-expression
public hidden integer total_sales public hidden integer row_count public integer `AVERAGE_SALES`
total_sales = 0 row_count = 0 `AVERAGE_SALES` = 0
Expression
if `STATE` == 'NC' then begin total_sales = total_sales + `SALES` row_count = row_count + 1 end
Post-expression
`AVERAGE_SALES` = total_sales / row_count
Note the input fields and output fields that are specified in your expression. You will need this information later. In the previous code, the input fields are SALES and STATE, and the output field is AVERAGE_SALES.
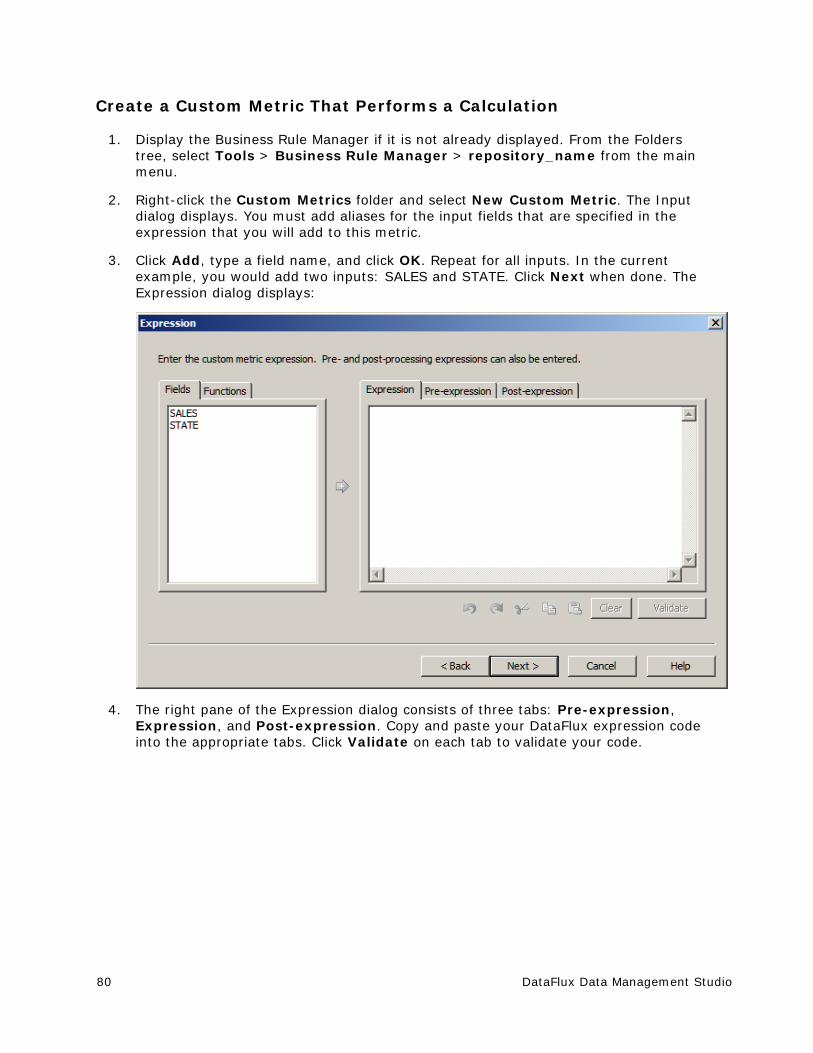
80 DataFlux Data Management Studio
Create a Custom Metric That Performs a Calculation
1. Display the Business Rule Manager if it is not already displayed. From the Folders tree, select Tools > Business Rule Manager > repository_name from the main menu.
2. Right-click the Custom Metrics folder and select New Custom Metric. The Input dialog displays. You must add aliases for the input fields that are specified in the expression that you will add to this metric.
3. Click Add, type a field name, and click OK. Repeat for all inputs. In the current example, you would add two inputs: SALES and STATE. Click Next when done. The Expression dialog displays:
4. The right pane of the Expression dialog consists of three tabs: Pre-expression, Expression, and Post-expression. Copy and paste your DataFlux expression code into the appropriate tabs. Click Validate on each tab to validate your code.

DataFlux Data Management Studio 81
5. When finished, click Next. The Description and Outputs dialog displays.
6. Enter a Description (name) for the custom metric, such as Average NC Sales Value.
7. The Available pane lists all fields that are specified in the expression. Select only the output fields from your expression. Then click the right arrow to move any outputs to the Selected pane. In the current example, the output for the metric is AVERAGE_SALES.
8. Click Finish. The new metric is saved, and the Business Rule Manager displays. The new metric will be selected in the tree on the left, and information about the new metric will be displayed on the right. For example, the information for the Average NC Sales Value metric would look similar to the next display.
82 DataFlux Data Management Studio
You have created a new custom metric. You are now ready to use the metric in a profile or data job.
Apply the Custom Metric
For information about using the example custom metric in a profile, see Apply Custom Metrics.
Creating a Data Monitoring Job
Overview
You can create jobs that enable you to monitor data quality. For example, you can create a business rule that tracks the profit per employee against assets over time. Then, you link the business rule to a task. When you add the task to a monitoring job and run the job, you trigger input to the Monitor tab in the Information riser bar.
Perform the following tasks to create and review a data monitoring job:
Identify an Appropriate Business Rule and Task
Create and Configure the Job
Run the Job
Review Data Monitoring Results
Identify an Appropriate Business Rule and Task
Identify a business rule and task that will report the conditions that you want to monitor. The current example uses the business rule and task that are described in Creating a Rule that Compares Two Fields.
Create and Configure the Job
Perform the following steps to create and configure the job:
1. Create a data job and give it an appropriate name, such as Monitor Profit Per Employee.
2. Open the job.
3. Add a Data Source node from the Data Inputs folder in the Nodes tree to the data flow.
4. Double-click the Data Source node to display its properties dialog.
5. Specify an appropriate input in the Input table field. For this example, the input is the Company Numeric table.
6. Rename the Data Source node to reflect the name of the input table (Company Numeric Table, for example).
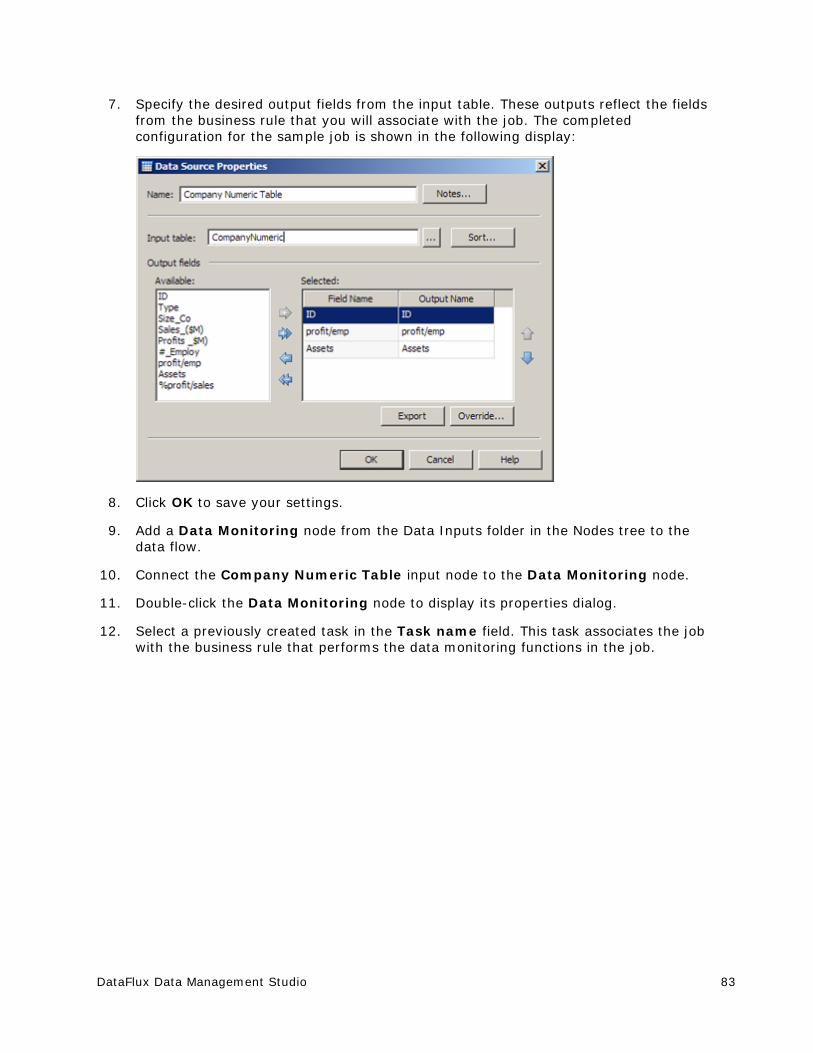
DataFlux Data Management Studio 83
7. Specify the desired output fields from the input table. These outputs reflect the fields from the business rule that you will associate with the job. The completed configuration for the sample job is shown in the following display:
8. Click OK to save your settings.
9. Add a Data Monitoring node from the Data Inputs folder in the Nodes tree to the data flow.
10. Connect the Company Numeric Table input node to the Data Monitoring node.
11. Double-click the Data Monitoring node to display its properties dialog.
12. Select a previously created task in the Task name field. This task associates the job with the business rule that performs the data monitoring functions in the job.
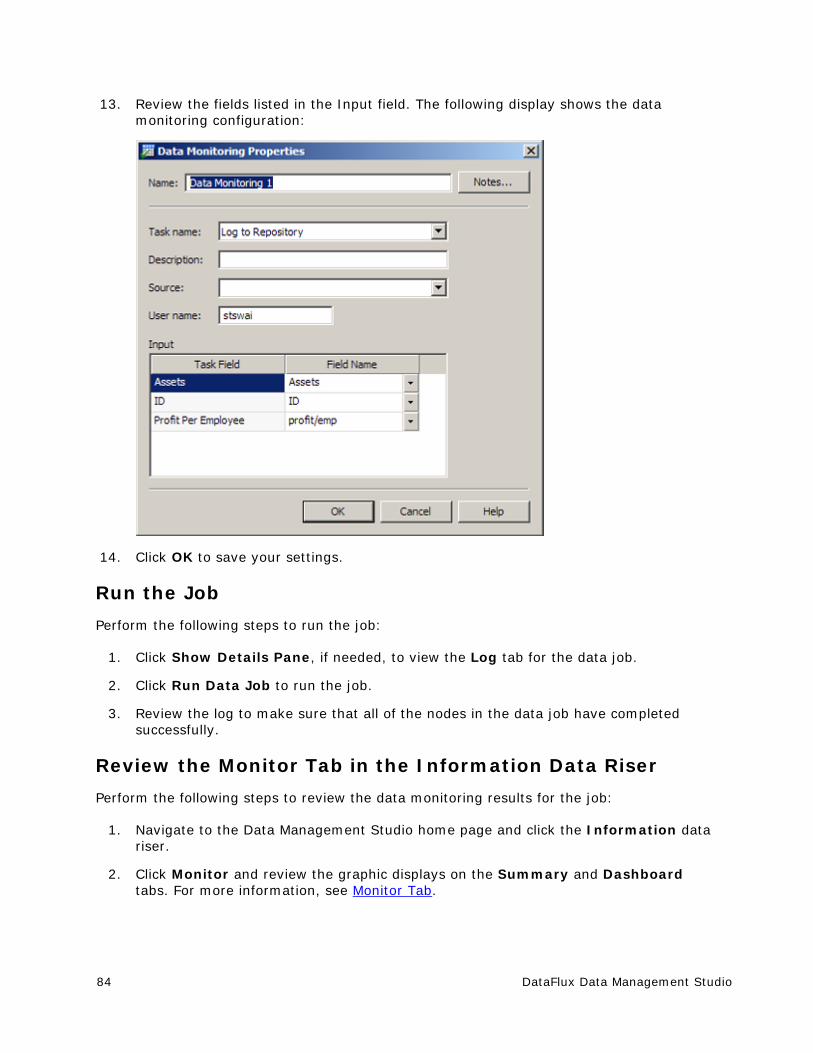
84 DataFlux Data Management Studio
13. Review the fields listed in the Input field. The following display shows the data monitoring configuration:
14. Click OK to save your settings.
Run the Job
Perform the following steps to run the job:
1. Click Show Details Pane, if needed, to view the Log tab for the data job.
2. Click Run Data Job to run the job.
3. Review the log to make sure that all of the nodes in the data job have completed successfully.
Review the Monitor Tab in the Information Data Riser
Perform the following steps to review the data monitoring results for the job:
1. Navigate to the Data Management Studio home page and click the Information data riser.
2. Click Monitor and review the graphic displays on the Summary and Dashboard tabs. For more information, see Monitor Tab.
DataFlux Data Management Studio 85
Data Profiles Overview of Data Profiles
Creating a Profile
Preparing a Profile Report
Reviewing a Profile Report
Performing Primary Key and Foreign Key Analysis
Performing Redundant Data Analysis
Performing Pattern Frequency Distribution Analysis
Excluding Records from a Table Included in a Profile
Overview of Data Profiles Creating and analyzing a data profile can be useful step in planning and monitoring your data management processes. When you profile your data, you can perform the following tasks more efficiently:
Identifying issues early in the data management process, when they are easier and less expensive to manage
Obtaining more accurate project scopes and resource estimates
Better understanding existing databases and evaluating how well they might support potential marketing activities
Determining which steps you should take to address data problems
Making better business decisions about your data
Running periodic profiles to monitor your data and ensure that your data management processes are working well
Data profiling encompasses discovery and audit activities that help you assess the composition, organization, and quality of databases. Thus, a typical data profiling process helps you to recognize patterns, identify scarcity in the data, and calculate frequency and basic statistics. Data profiling can also aid in identifying redundant data across tables and cross-column dependencies. All of these tasks are critical to optimal planning and monitoring.
For example, a profiling analysis might indicate the following:
80% of prospects and customers are males
40% of the records are missing street addresses
Your databases contain no income data
86 DataFlux Data Management Studio
Suppose that you are marketing a line of high-end women's shoes and accessories. After data profiling, you would know that your data set is not an appropriate tool to drive sales for these products.
You can also use the profiling data job nodes in a data job. These nodes enable you to perform basic statistical analysis, data validation, or similar tasks by embedding them in a data job. Then, you can repeat the profiling tasks every time you run the job that contains the nodes. For an example of a data job that includes profiling nodes, see Data Jobs.
Profiles can be executed from the command line, as described in Running Jobs from the Command Line.
Profiles use Quality Knowledge Bases. For information about setting QKB options, see How can I specify Quality Knowledge Base options for profiles and data explorations? They also support database catalogs.
Automatic data-type conversions will take place when a profile reads SAS data sets. For more information, see How are SAS Data Types Converted When DataFlux Software Reads or Writes SAS Data?
You can read an XML file in a profile. For information, see How Can I Read an XML File In a Profile?
Note: You must have a license that enables you to create to create a profile. However, you can read a profile without this license.
Creating a Profile
Overview
You can create a new profile to select one or more data sources and profile the data in those sources. You can run your profiles from within Data Management Studio or from the command line. For information about running jobs from the command line, see Running Jobs from the Command Line.
Perform the following steps to create a profile:
1. Click New in the Main Menu. Then, click Profile.
2. Enter a name for the profile in the Name field.
3. Specify a location for the profile in the Save in field.
4. Click OK to save the new profile.
Note that you can also create profiles elsewhere in DataFlux Data Management Studio.
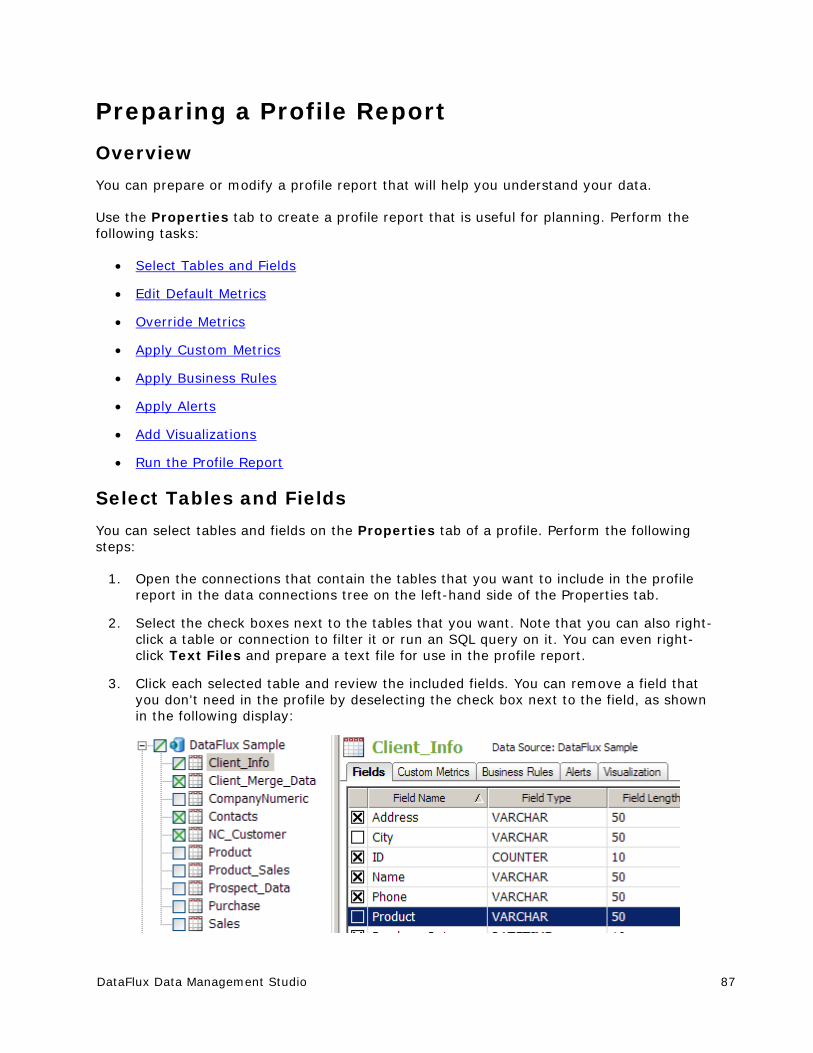
DataFlux Data Management Studio 87
Preparing a Profile Report
Overview
You can prepare or modify a profile report that will help you understand your data.
Use the Properties tab to create a profile report that is useful for planning. Perform the following tasks:
Select Tables and Fields
Edit Default Metrics
Override Metrics
Apply Custom Metrics
Apply Business Rules
Apply Alerts
Add Visualizations
Run the Profile Report
Select Tables and Fields
You can select tables and fields on the Properties tab of a profile. Perform the following steps:
1. Open the connections that contain the tables that you want to include in the profile report in the data connections tree on the left-hand side of the Properties tab.
2. Select the check boxes next to the tables that you want. Note that you can also right-click a table or connection to filter it or run an SQL query on it. You can even right-click Text Files and prepare a text file for use in the profile report.
3. Click each selected table and review the included fields. You can remove a field that you don't need in the profile by deselecting the check box next to the field, as shown in the following display:
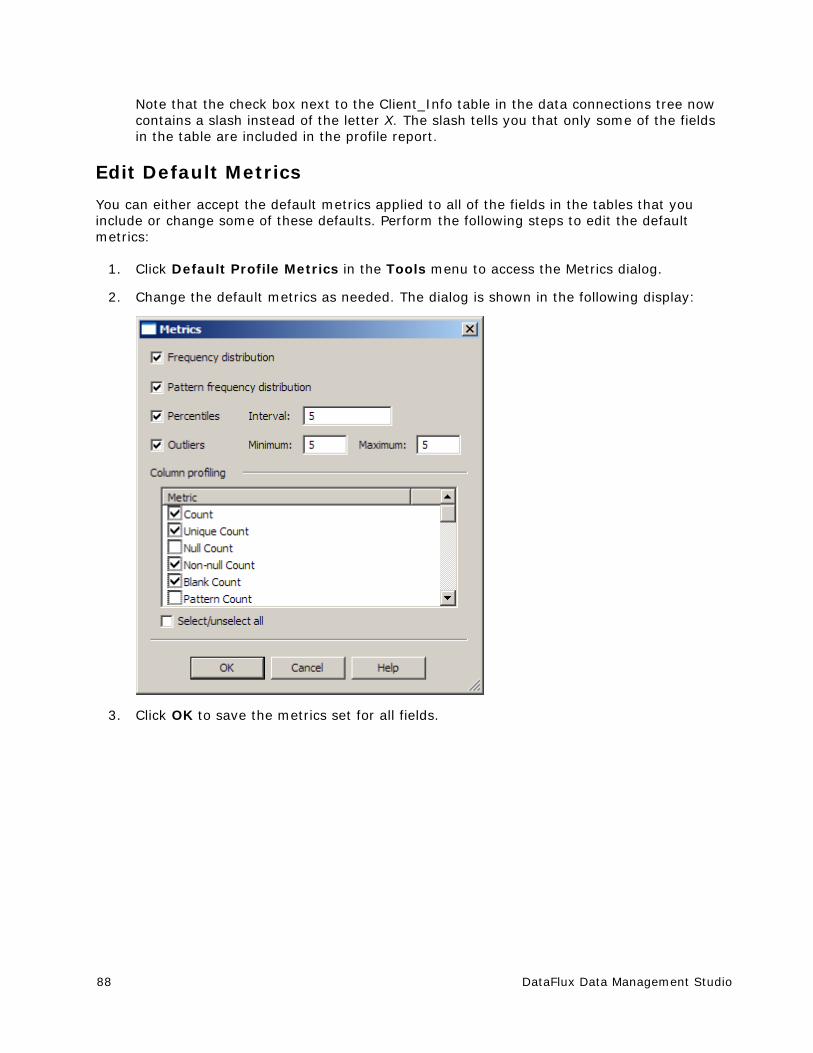
88 DataFlux Data Management Studio
Note that the check box next to the Client_Info table in the data connections tree now contains a slash instead of the letter X. The slash tells you that only some of the fields in the table are included in the profile report.
Edit Default Metrics
You can either accept the default metrics applied to all of the fields in the tables that you include or change some of these defaults. Perform the following steps to edit the default metrics:
1. Click Default Profile Metrics in the Tools menu to access the Metrics dialog.
2. Change the default metrics as needed. The dialog is shown in the following display:
3. Click OK to save the metrics set for all fields.
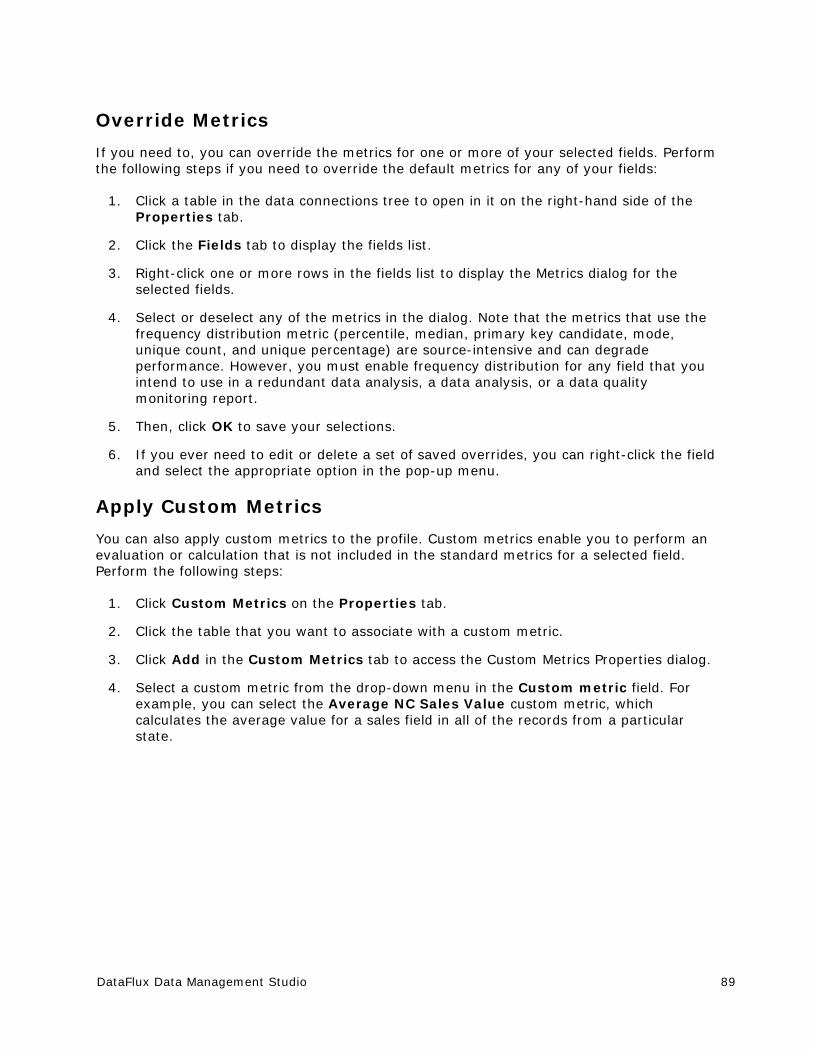
DataFlux Data Management Studio 89
Override Metrics
If you need to, you can override the metrics for one or more of your selected fields. Perform the following steps if you need to override the default metrics for any of your fields:
1. Click a table in the data connections tree to open in it on the right-hand side of the Properties tab.
2. Click the Fields tab to display the fields list.
3. Right-click one or more rows in the fields list to display the Metrics dialog for the selected fields.
4. Select or deselect any of the metrics in the dialog. Note that the metrics that use the frequency distribution metric (percentile, median, primary key candidate, mode, unique count, and unique percentage) are source-intensive and can degrade performance. However, you must enable frequency distribution for any field that you intend to use in a redundant data analysis, a data analysis, or a data quality monitoring report.
5. Then, click OK to save your selections.
6. If you ever need to edit or delete a set of saved overrides, you can right-click the field and select the appropriate option in the pop-up menu.
Apply Custom Metrics
You can also apply custom metrics to the profile. Custom metrics enable you to perform an evaluation or calculation that is not included in the standard metrics for a selected field. Perform the following steps:
1. Click Custom Metrics on the Properties tab.
2. Click the table that you want to associate with a custom metric.
3. Click Add in the Custom Metrics tab to access the Custom Metrics Properties dialog.
4. Select a custom metric from the drop-down menu in the Custom metric field. For example, you can select the Average NC Sales Value custom metric, which calculates the average value for a sales field in all of the records from a particular state.

90 DataFlux Data Management Studio
5. Review the inputs for the metric. Note that you can also add and delete outputs. The following display shows the properties for this custom metric:
6. Click OK to apply the custom metric.
These steps describe how to apply a custom metric that has already been created. For more information about the sample metric, see Creating a Custom Metric That Performs a Calculation.
Apply Business Rules
You can apply business rules. These rules can help you monitor your data (sometimes in combination with custom metrics and alerts). For example, they can enable you to identify a set of related records in a table. This can be useful when the records are either not identified by the standard analysis provided in a profile or not conveniently presented. You can also use a business rule to select a particular set of records that will be useful in more than one profile. Perform the following steps:
1. Click Business Rules on the Properties tab.
2. Click the table that you want to associate with a business rule. For example, you could select the CompanyNumeric table in the DataFlux Sample repository.
3. Click Add in the Business Rules tab to access the Business Rules Properties dialog.
4. Select a business rule from the drop-down menu in the Business Rules tab. For example, you could select a rule called ProfitEmp_LessThan_Assets. This rule would log any table row where the amount in the Profit Per Employee field is less than the amount in the Assets field.
DataFlux Data Management Studio 91
5. Review the inputs for the business rule. Map the field aliases in the rule to fields in the selected table. For example, you could map the field alias Profit Per Employee to the profit/emp field in the CompanyNumeric table, as shown in the next display.
6. Review the controls that enable you to log any data that violates the rule and specify the maximum number of rows to log. Set these controls as appropriate.
7. Click OK to apply the rule. Note that you can edit and delete existing business rules.
These steps describe how to apply a rule that has already been created. For more information about the example rule, see Creating a Rule that Compares Two Fields.
Apply Alerts
You can apply alerts that can help you monitor your data. These alerts are triggered by standard metrics, custom metrics, and business rules. Perform the following steps:
1. Click Alerts.
2. Click one of the tables that you have included in your profile.
3. Click Add in the Alerts tab to access the Add Alert dialog.
4. Specify the alert type. For this example, specify Business Rule.
5. Click Continue.
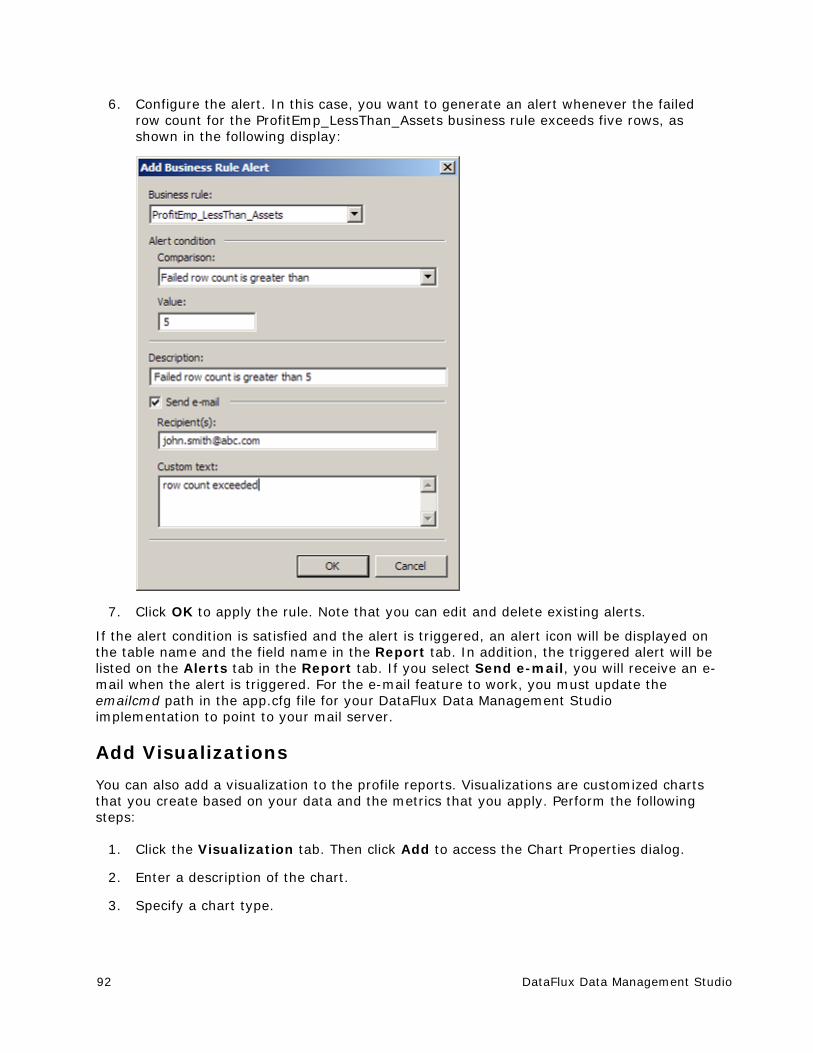
92 DataFlux Data Management Studio
6. Configure the alert. In this case, you want to generate an alert whenever the failed row count for the ProfitEmp_LessThan_Assets business rule exceeds five rows, as shown in the following display:
7. Click OK to apply the rule. Note that you can edit and delete existing alerts.
If the alert condition is satisfied and the alert is triggered, an alert icon will be displayed on the table name and the field name in the Report tab. In addition, the triggered alert will be listed on the Alerts tab in the Report tab. If you select Send e-mail, you will receive an e-mail when the alert is triggered. For the e-mail feature to work, you must update the emailcmd path in the app.cfg file for your DataFlux Data Management Studio implementation to point to your mail server.
Add Visualizations
You can also add a visualization to the profile reports. Visualizations are customized charts that you create based on your data and the metrics that you apply. Perform the following steps:
1. Click the Visualization tab. Then click Add to access the Chart Properties dialog.
2. Enter a description of the chart.
3. Specify a chart type.

DataFlux Data Management Studio 93
4. Specify the fields and metrics that you want to chart, as shown in the following display:
5. Click OK.
You will be able see this chart on the Report tab after you run the profile report. Note that you can also create visualizations on the Report tab.
Run the Profile Report
You must run the profile report whenever you change any of its properties. Perform the following steps:
1. Click Run in the toolbar to access the Run Profile dialog.
2. Enter a description of the run in the Description field.
3. Determine whether you want to append the report to the list of existing reports that drops down from the toolbar. If you select the Append to existing report check box, the report is added to the list. If you deselect the check box, the existing reports in the list are overwritten by the new report.
4. Determine whether you want to enter macros and macro values by clicking Macro Variables.
Profiles can also be executed from the command line, as described in Running Jobs from the Command Line.
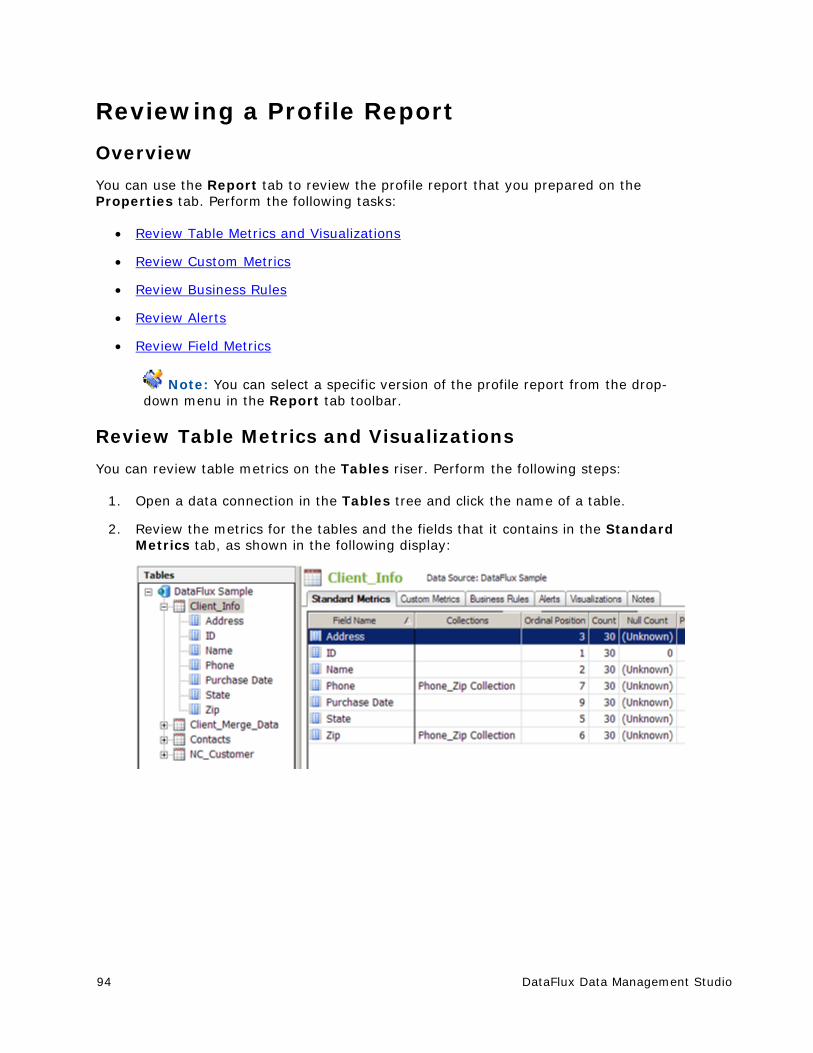
94 DataFlux Data Management Studio
Reviewing a Profile Report
Overview
You can use the Report tab to review the profile report that you prepared on the Properties tab. Perform the following tasks:
Review Table Metrics and Visualizations
Review Custom Metrics
Review Business Rules
Review Alerts
Review Field Metrics
Note: You can select a specific version of the profile report from the drop-down menu in the Report tab toolbar.
Review Table Metrics and Visualizations
You can review table metrics on the Tables riser. Perform the following steps:
1. Open a data connection in the Tables tree and click the name of a table.
2. Review the metrics for the tables and the fields that it contains in the Standard Metrics tab, as shown in the following display:
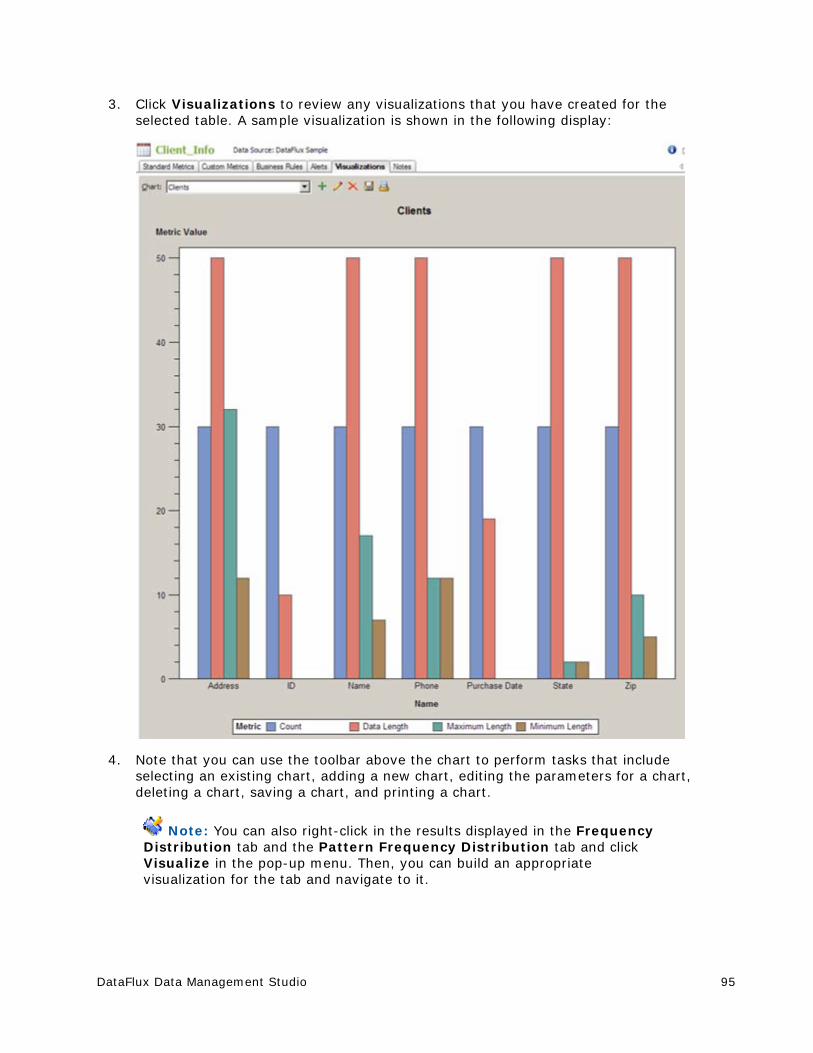
DataFlux Data Management Studio 95
3. Click Visualizations to review any visualizations that you have created for the selected table. A sample visualization is shown in the following display:
4. Note that you can use the toolbar above the chart to perform tasks that include selecting an existing chart, adding a new chart, editing the parameters for a chart, deleting a chart, saving a chart, and printing a chart.
Note: You can also right-click in the results displayed in the Frequency Distribution tab and the Pattern Frequency Distribution tab and click Visualize in the pop-up menu. Then, you can build an appropriate visualization for the tab and navigate to it.
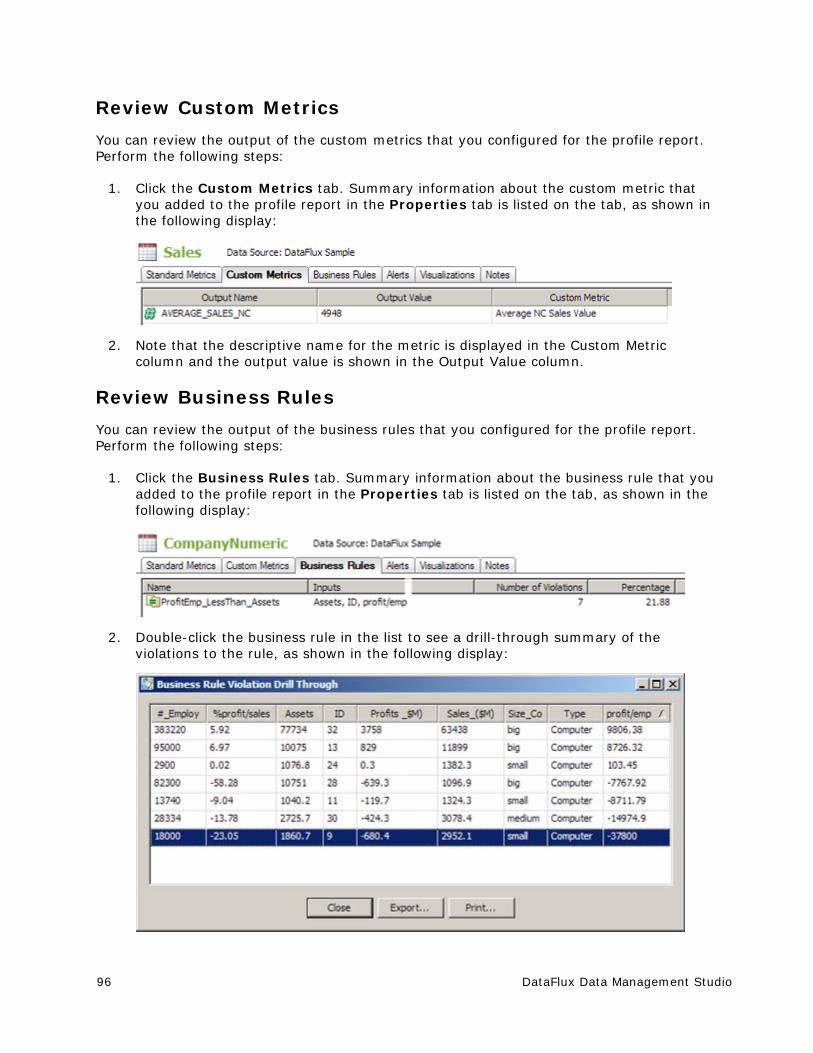
96 DataFlux Data Management Studio
Review Custom Metrics
You can review the output of the custom metrics that you configured for the profile report. Perform the following steps:
1. Click the Custom Metrics tab. Summary information about the custom metric that you added to the profile report in the Properties tab is listed on the tab, as shown in the following display:
2. Note that the descriptive name for the metric is displayed in the Custom Metric column and the output value is shown in the Output Value column.
Review Business Rules
You can review the output of the business rules that you configured for the profile report. Perform the following steps:
1. Click the Business Rules tab. Summary information about the business rule that you added to the profile report in the Properties tab is listed on the tab, as shown in the following display:
2. Double-click the business rule in the list to see a drill-through summary of the violations to the rule, as shown in the following display:
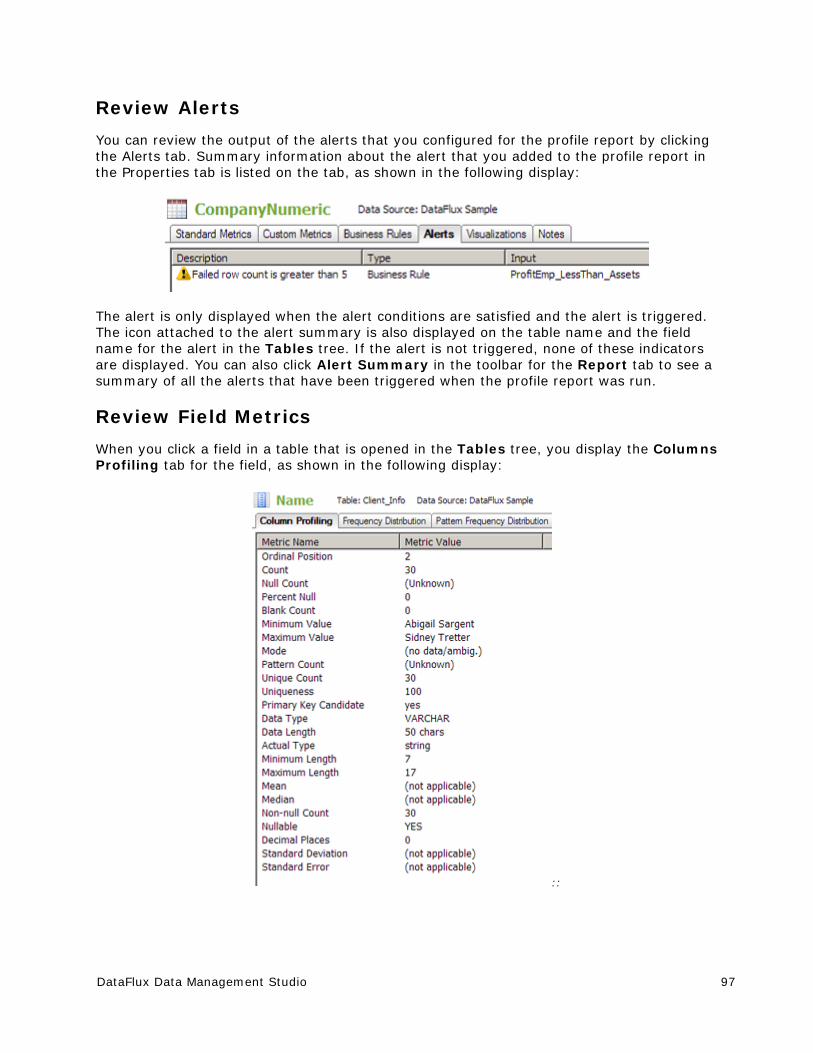
DataFlux Data Management Studio 97
Review Alerts
You can review the output of the alerts that you configured for the profile report by clicking the Alerts tab. Summary information about the alert that you added to the profile report in the Properties tab is listed on the tab, as shown in the following display:
The alert is only displayed when the alert conditions are satisfied and the alert is triggered. The icon attached to the alert summary is also displayed on the table name and the field name for the alert in the Tables tree. If the alert is not triggered, none of these indicators are displayed. You can also click Alert Summary in the toolbar for the Report tab to see a summary of all the alerts that have been triggered when the profile report was run.
Review Field Metrics
When you click a field in a table that is opened in the Tables tree, you display the Columns Profiling tab for the field, as shown in the following display:
::
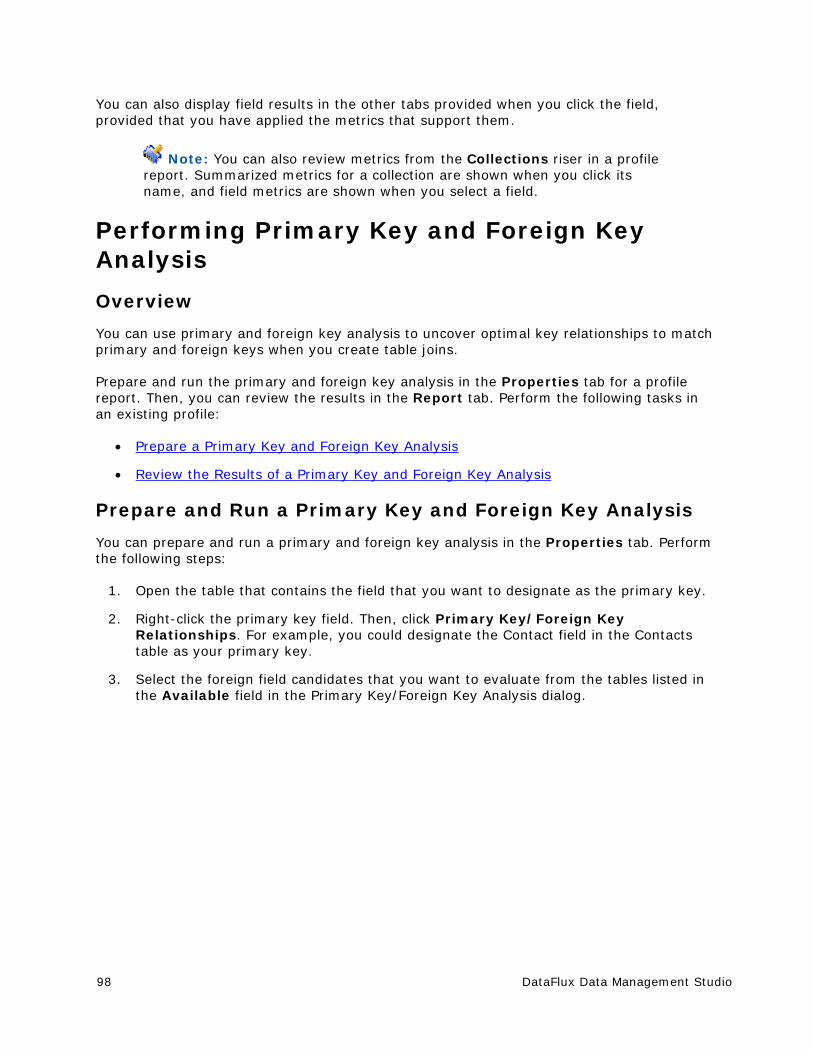
98 DataFlux Data Management Studio
You can also display field results in the other tabs provided when you click the field, provided that you have applied the metrics that support them.
Note: You can also review metrics from the Collections riser in a profile report. Summarized metrics for a collection are shown when you click its name, and field metrics are shown when you select a field.
Performing Primary Key and Foreign Key Analysis
Overview
You can use primary and foreign key analysis to uncover optimal key relationships to match primary and foreign keys when you create table joins.
Prepare and run the primary and foreign key analysis in the Properties tab for a profile report. Then, you can review the results in the Report tab. Perform the following tasks in an existing profile:
Prepare a Primary Key and Foreign Key Analysis
Review the Results of a Primary Key and Foreign Key Analysis
Prepare and Run a Primary Key and Foreign Key Analysis
You can prepare and run a primary and foreign key analysis in the Properties tab. Perform the following steps:
1. Open the table that contains the field that you want to designate as the primary key.
2. Right-click the primary key field. Then, click Primary Key/Foreign Key Relationships. For example, you could designate the Contact field in the Contacts table as your primary key.
3. Select the foreign field candidates that you want to evaluate from the tables listed in the Available field in the Primary Key/Foreign Key Analysis dialog.

DataFlux Data Management Studio 99
4. Click Add for each field that you want to evaluate. The following display shows a completed dialog:
5. Click OK to save your settings.
6. Click Run to run the profile.
Note: You can also prepare and run a primary key/foreign key analysis in the Report tab, provided that the field that you select has the frequency distribution metric enabled. Right-click the field in the Standard Metrics tab and follow the procedure described in this section. Then, run the profile.
Review the Results of a Primary Key and Foreign Key Analysis
You can review the results of a primary and foreign key analysis in the Report tab of a profile report. Perform the following steps:
1. Open the table that contains your primary key field in the Tables tree.
2. Click the primary key field.
3. Click the Primary Key/Foreign Key Analysis tab.
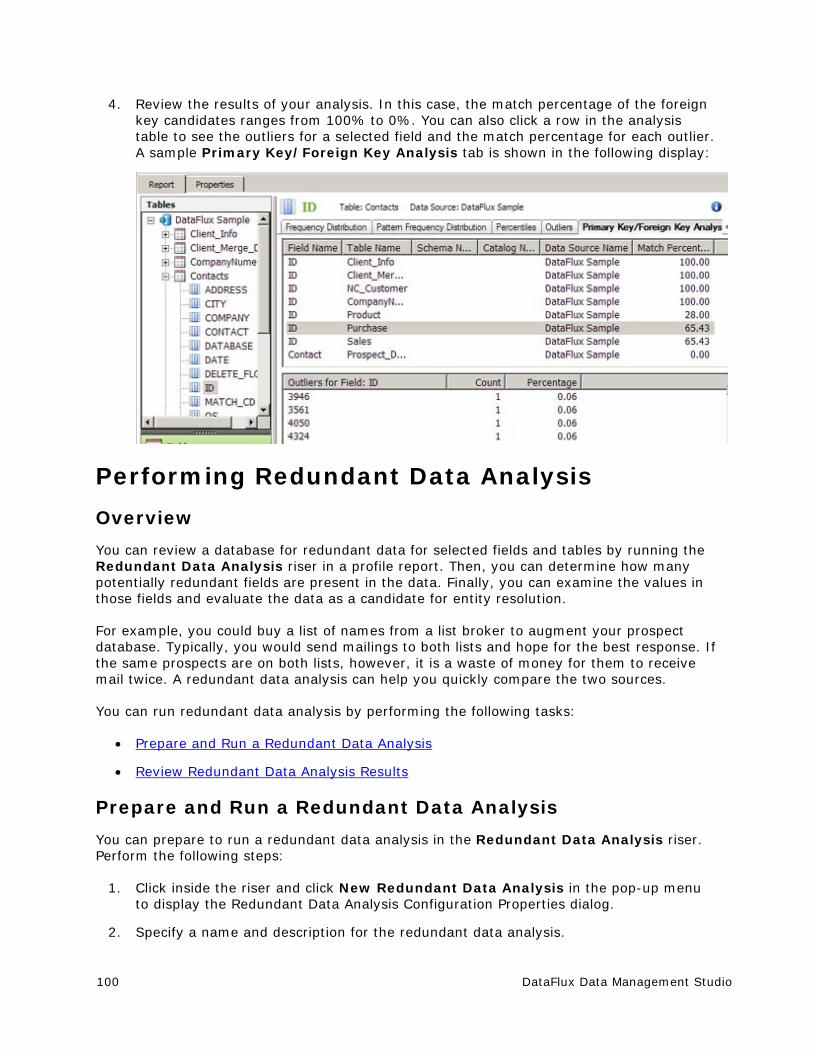
100 DataFlux Data Management Studio
4. Review the results of your analysis. In this case, the match percentage of the foreign key candidates ranges from 100% to 0%. You can also click a row in the analysis table to see the outliers for a selected field and the match percentage for each outlier. A sample Primary Key/Foreign Key Analysis tab is shown in the following display:
Performing Redundant Data Analysis
Overview
You can review a database for redundant data for selected fields and tables by running the Redundant Data Analysis riser in a profile report. Then, you can determine how many potentially redundant fields are present in the data. Finally, you can examine the values in those fields and evaluate the data as a candidate for entity resolution.
For example, you could buy a list of names from a list broker to augment your prospect database. Typically, you would send mailings to both lists and hope for the best response. If the same prospects are on both lists, however, it is a waste of money for them to receive mail twice. A redundant data analysis can help you quickly compare the two sources.
You can run redundant data analysis by performing the following tasks:
Prepare and Run a Redundant Data Analysis
Review Redundant Data Analysis Results
Prepare and Run a Redundant Data Analysis
You can prepare to run a redundant data analysis in the Redundant Data Analysis riser. Perform the following steps:
1. Click inside the riser and click New Redundant Data Analysis in the pop-up menu to display the Redundant Data Analysis Configuration Properties dialog.
2. Specify a name and description for the redundant data analysis.
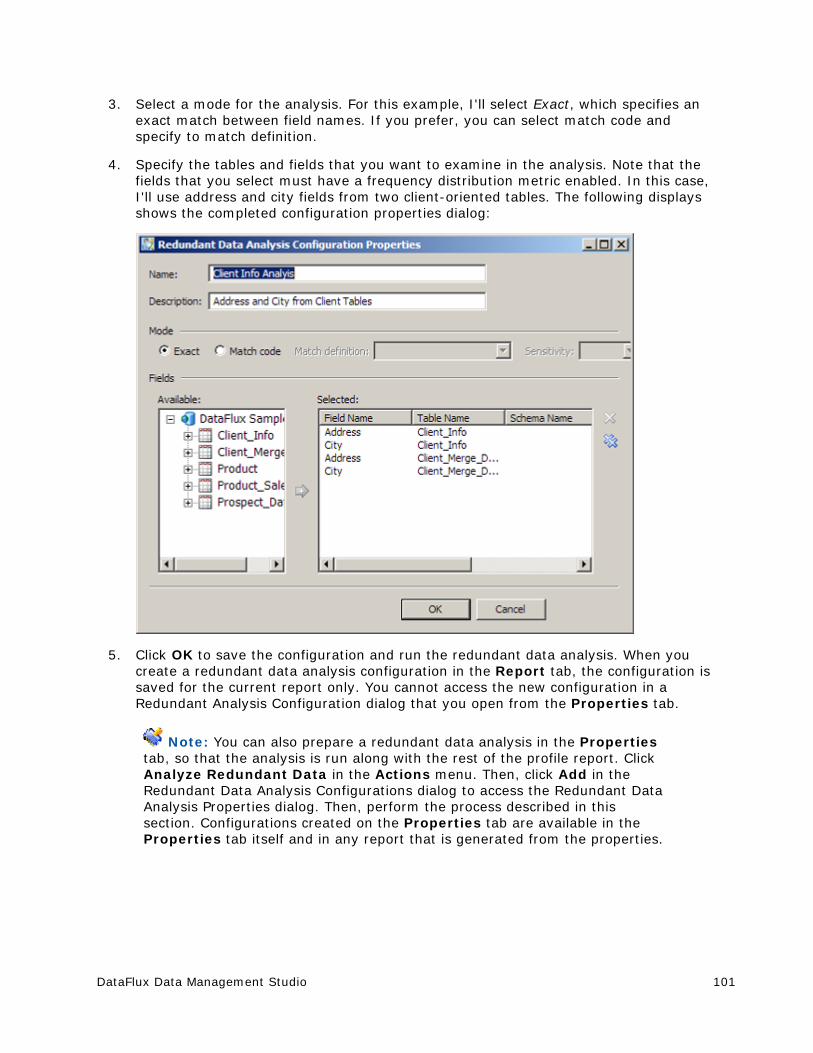
DataFlux Data Management Studio 101
3. Select a mode for the analysis. For this example, I'll select Exact, which specifies an exact match between field names. If you prefer, you can select match code and specify to match definition.
4. Specify the tables and fields that you want to examine in the analysis. Note that the fields that you select must have a frequency distribution metric enabled. In this case, I'll use address and city fields from two client-oriented tables. The following displays shows the completed configuration properties dialog:
5. Click OK to save the configuration and run the redundant data analysis. When you create a redundant data analysis configuration in the Report tab, the configuration is saved for the current report only. You cannot access the new configuration in a Redundant Analysis Configuration dialog that you open from the Properties tab.
Note: You can also prepare a redundant data analysis in the Properties tab, so that the analysis is run along with the rest of the profile report. Click Analyze Redundant Data in the Actions menu. Then, click Add in the Redundant Data Analysis Configurations dialog to access the Redundant Data Analysis Properties dialog. Then, perform the process described in this section. Configurations created on the Properties tab are available in the Properties tab itself and in any report that is generated from the properties.
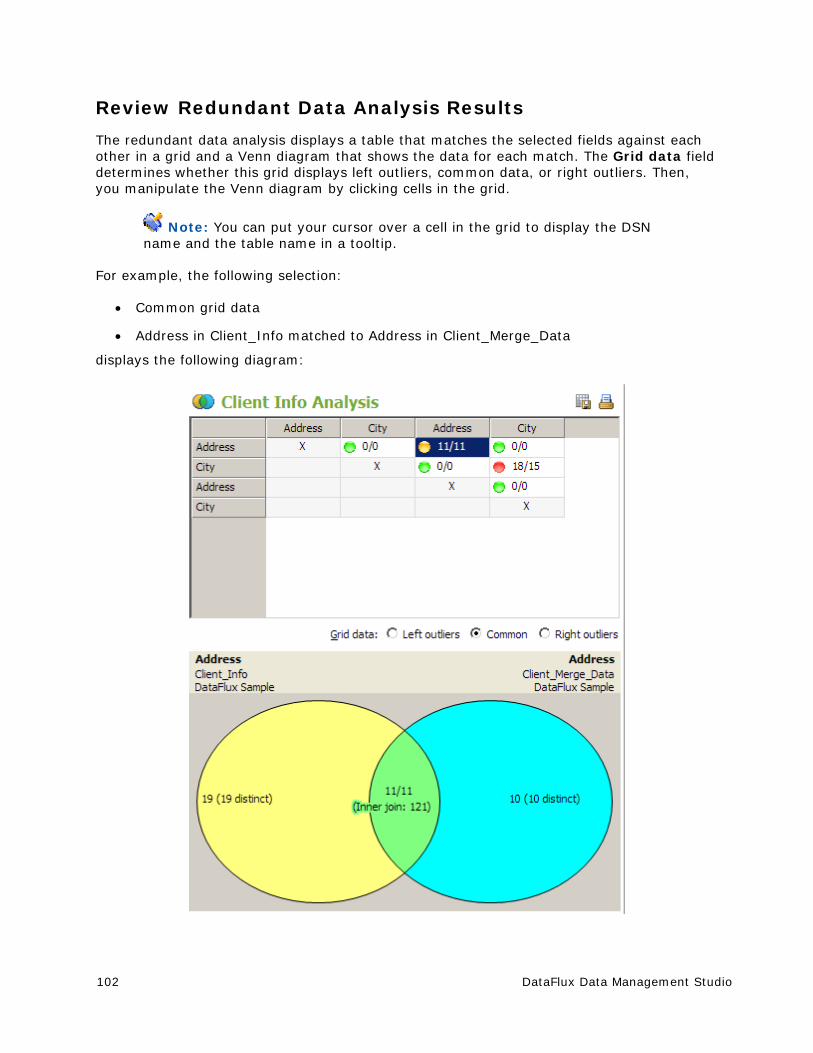
102 DataFlux Data Management Studio
Review Redundant Data Analysis Results
The redundant data analysis displays a table that matches the selected fields against each other in a grid and a Venn diagram that shows the data for each match. The Grid data field determines whether this grid displays left outliers, common data, or right outliers. Then, you manipulate the Venn diagram by clicking cells in the grid.
Note: You can put your cursor over a cell in the grid to display the DSN name and the table name in a tooltip.
For example, the following selection:
Common grid data
Address in Client_Info matched to Address in Client_Merge_Data
displays the following diagram:
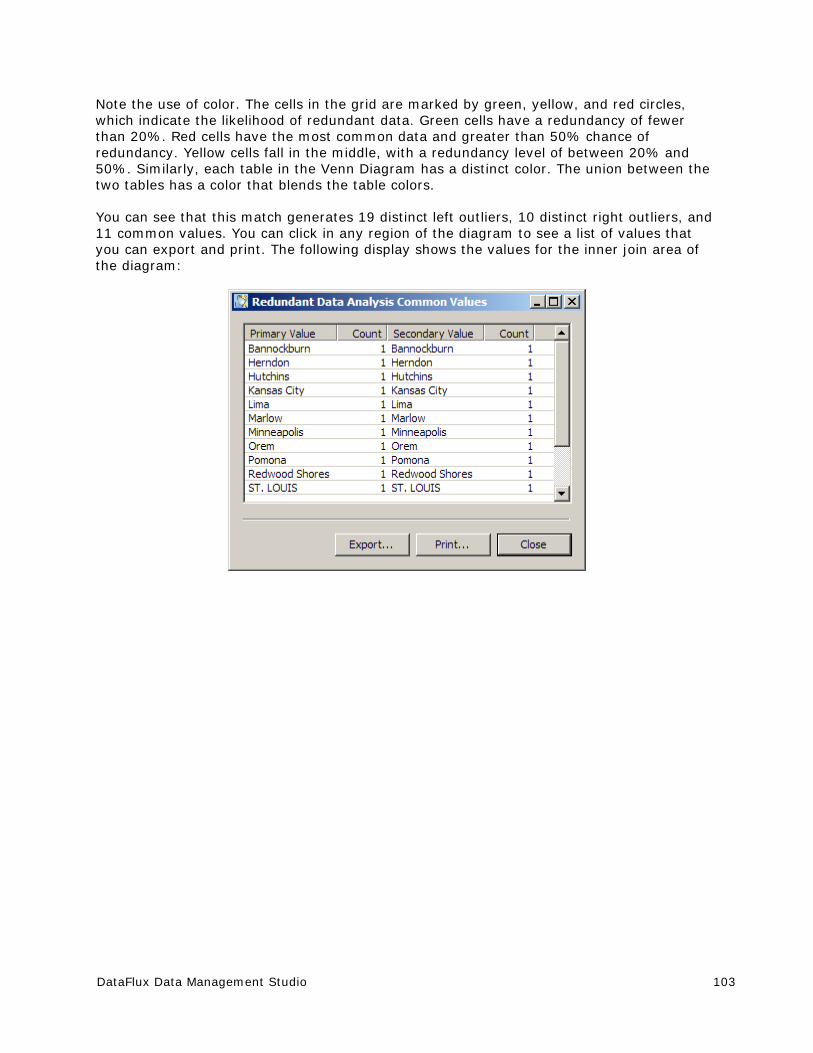
DataFlux Data Management Studio 103
Note the use of color. The cells in the grid are marked by green, yellow, and red circles, which indicate the likelihood of redundant data. Green cells have a redundancy of fewer than 20%. Red cells have the most common data and greater than 50% chance of redundancy. Yellow cells fall in the middle, with a redundancy level of between 20% and 50%. Similarly, each table in the Venn Diagram has a distinct color. The union between the two tables has a color that blends the table colors.
You can see that this match generates 19 distinct left outliers, 10 distinct right outliers, and 11 common values. You can click in any region of the diagram to see a list of values that you can export and print. The following display shows the values for the inner join area of the diagram:
104 DataFlux Data Management Studio
Performing Pattern Frequency Distribution Analysis
Overview
You can review the pattern frequency distribution of the values that are contained in a field. You can use this information to identify the variety of data patterns used for similar data. Then, you can decide which patterns to use.
Prepare and run a pattern frequency distribution analysis in the Properties tab for a profile report. Then, you can review the results in the Report tab. Perform the following tasks in an existing profile:
Prepare and Run a Pattern Frequency Distribution Analysis
Review the Results of a Pattern Frequency Distribution Analysis
Prepare and Run a Pattern Frequency Distribution Analysis
You can prepare and run a pattern frequency distribution analysis in the Properties tab. Perform the following steps:
1. Verify that the default metrics for the current profile include pattern frequency distribution analysis. Note that you can also set options for pattern frequency analysis in the Options dialog that you can access from the Tools menu in the Properties tab. The options on the General tab of the dialog control how many rows are sampled for pattern distribution and whether leading or trailing spaces are trimmed. The options on the Quality Knowledge Base tab enable you to select a locale and a Blue Fusion pattern analysis.
2. Click OK to save your settings.
3. Click Run to run the profile.
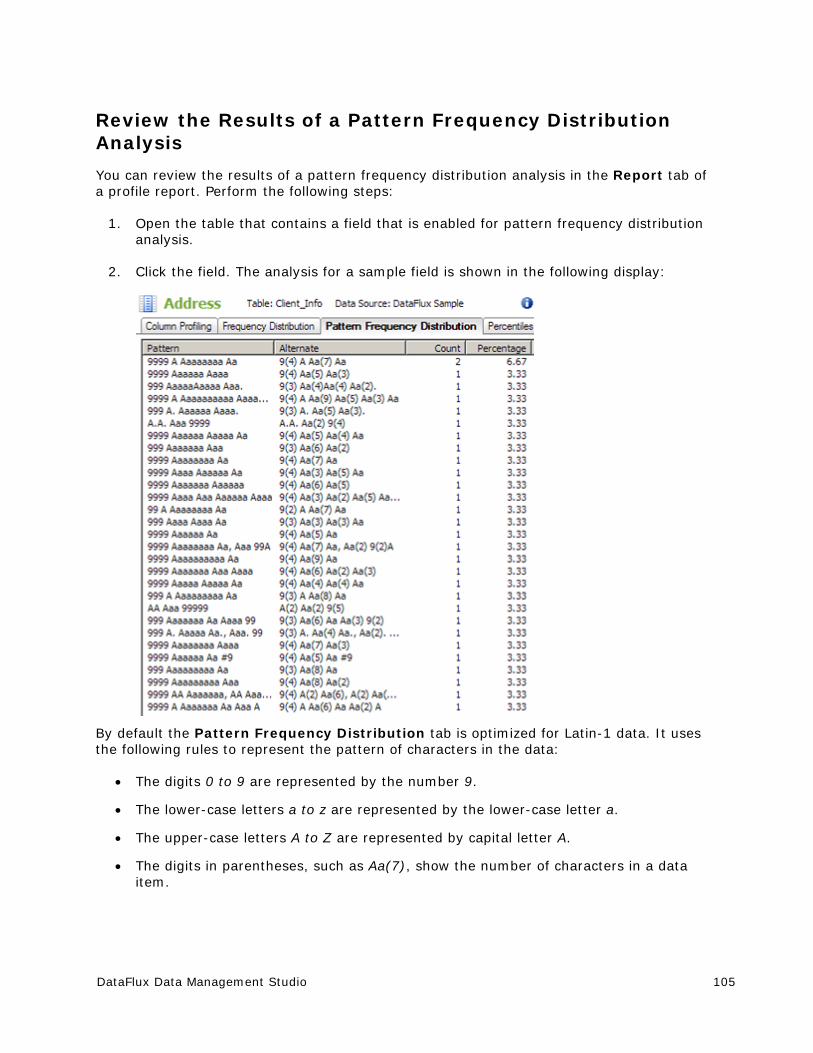
DataFlux Data Management Studio 105
Review the Results of a Pattern Frequency Distribution Analysis
You can review the results of a pattern frequency distribution analysis in the Report tab of a profile report. Perform the following steps:
1. Open the table that contains a field that is enabled for pattern frequency distribution analysis.
2. Click the field. The analysis for a sample field is shown in the following display:
By default the Pattern Frequency Distribution tab is optimized for Latin-1 data. It uses the following rules to represent the pattern of characters in the data:
The digits 0 to 9 are represented by the number 9.
The lower-case letters a to z are represented by the lower-case letter a.
The upper-case letters A to Z are represented by capital letter A.
The digits in parentheses, such as Aa(7), show the number of characters in a data item.
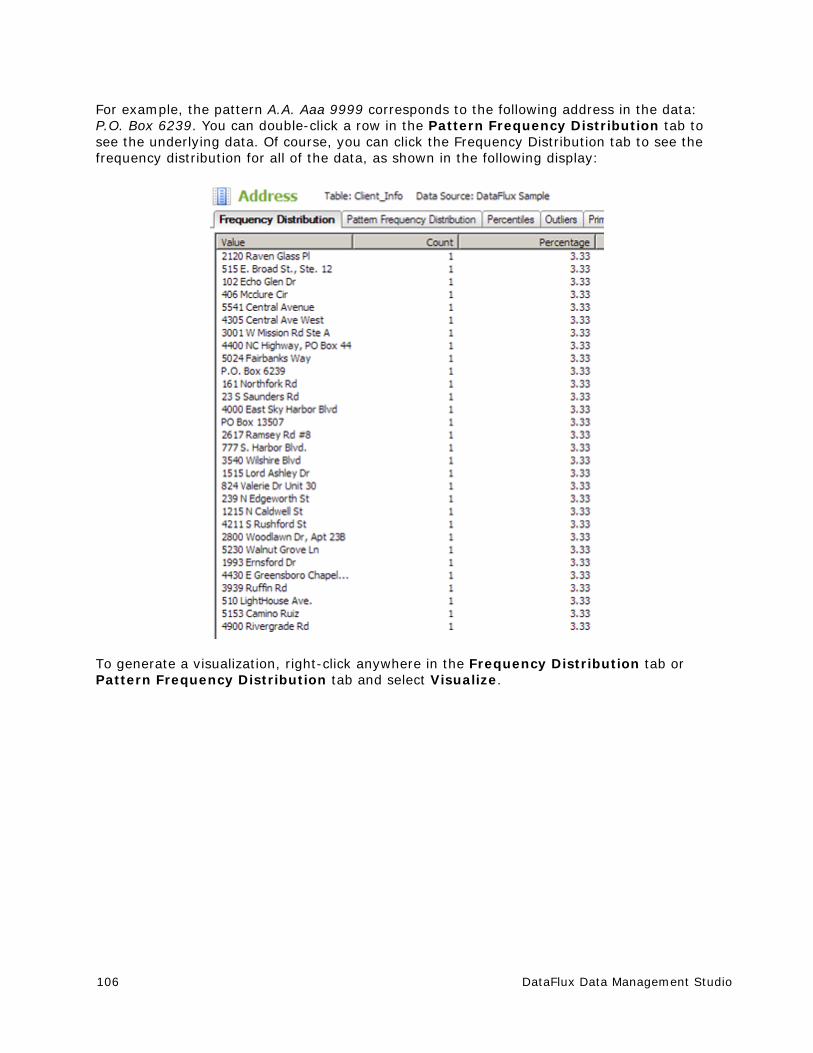
106 DataFlux Data Management Studio
For example, the pattern A.A. Aaa 9999 corresponds to the following address in the data: P.O. Box 6239. You can double-click a row in the Pattern Frequency Distribution tab to see the underlying data. Of course, you can click the Frequency Distribution tab to see the frequency distribution for all of the data, as shown in the following display:
To generate a visualization, right-click anywhere in the Frequency Distribution tab or Pattern Frequency Distribution tab and select Visualize.
DataFlux Data Management Studio 107
Excluding Records from a Table Included in a Profile
Overview
You can create a filtered table that would filter all records in a table that have a particular value in a field. For example, the DataFlux Sample connection includes a table called NC_Customer. You could create a filtered table that selects all records in the NC_Customer table where the City field contains a value of "Raleigh." Perform the following tasks:
Create a Filtered Table
Edit the Expression in a Filtered Table
Create a Filtered Table
You can create a filtered table based on a rule or on an SQL query. Perform the following steps to create a filtered table that is based on a rule:
1. Open a profile and click the Properties tab.
2. Expand the connection in the connection tree that contains the table that you want to filter. For example, you could expand the DataFlux Sample connection.
3. Right-click the table that you want to filter, such as NC_Customer. Click New Filtered Table.
4. Enter a name for the filter, such as Raleigh_Customer_Filter. Skip the SQL Query field.
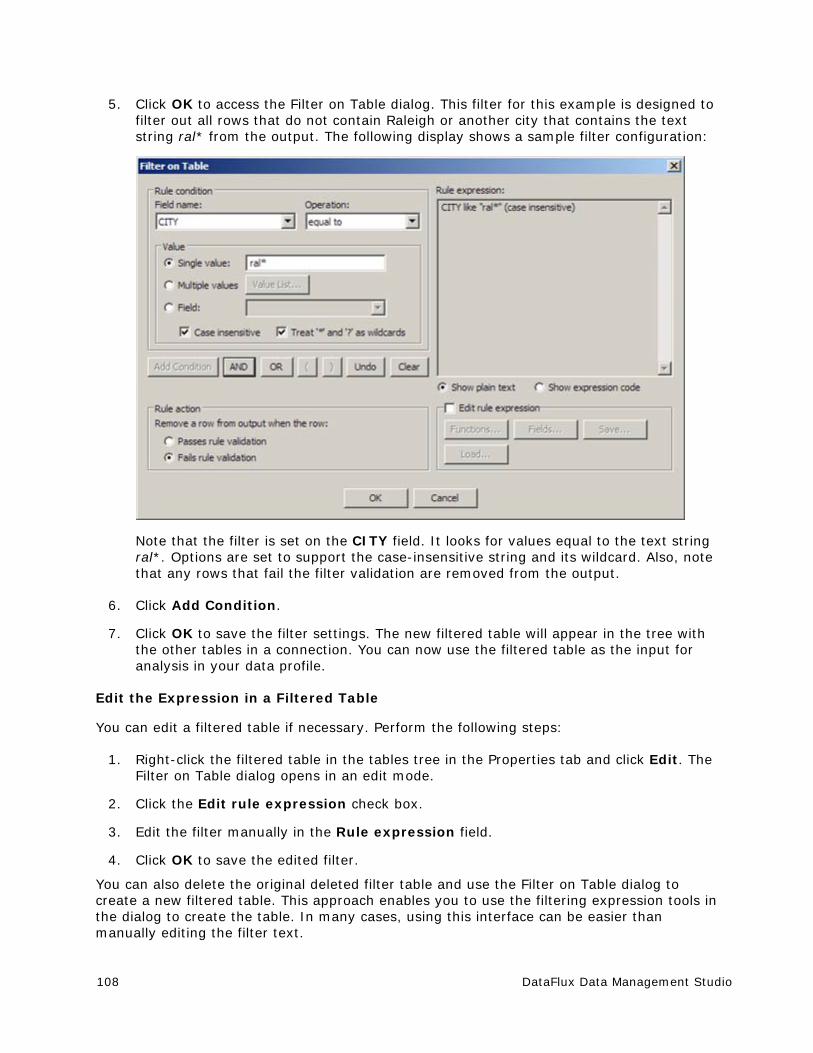
108 DataFlux Data Management Studio
5. Click OK to access the Filter on Table dialog. This filter for this example is designed to filter out all rows that do not contain Raleigh or another city that contains the text string ral* from the output. The following display shows a sample filter configuration:
Note that the filter is set on the CITY field. It looks for values equal to the text string ral*. Options are set to support the case-insensitive string and its wildcard. Also, note that any rows that fail the filter validation are removed from the output.
6. Click Add Condition.
7. Click OK to save the filter settings. The new filtered table will appear in the tree with the other tables in a connection. You can now use the filtered table as the input for analysis in your data profile.
Edit the Expression in a Filtered Table
You can edit a filtered table if necessary. Perform the following steps:
1. Right-click the filtered table in the tables tree in the Properties tab and click Edit. The Filter on Table dialog opens in an edit mode.
2. Click the Edit rule expression check box.
3. Edit the filter manually in the Rule expression field.
4. Click OK to save the edited filter.
You can also delete the original deleted filter table and use the Filter on Table dialog to create a new filtered table. This approach enables you to use the filtering expression tools in the dialog to create the table. In many cases, using this interface can be easier than manually editing the filter text.
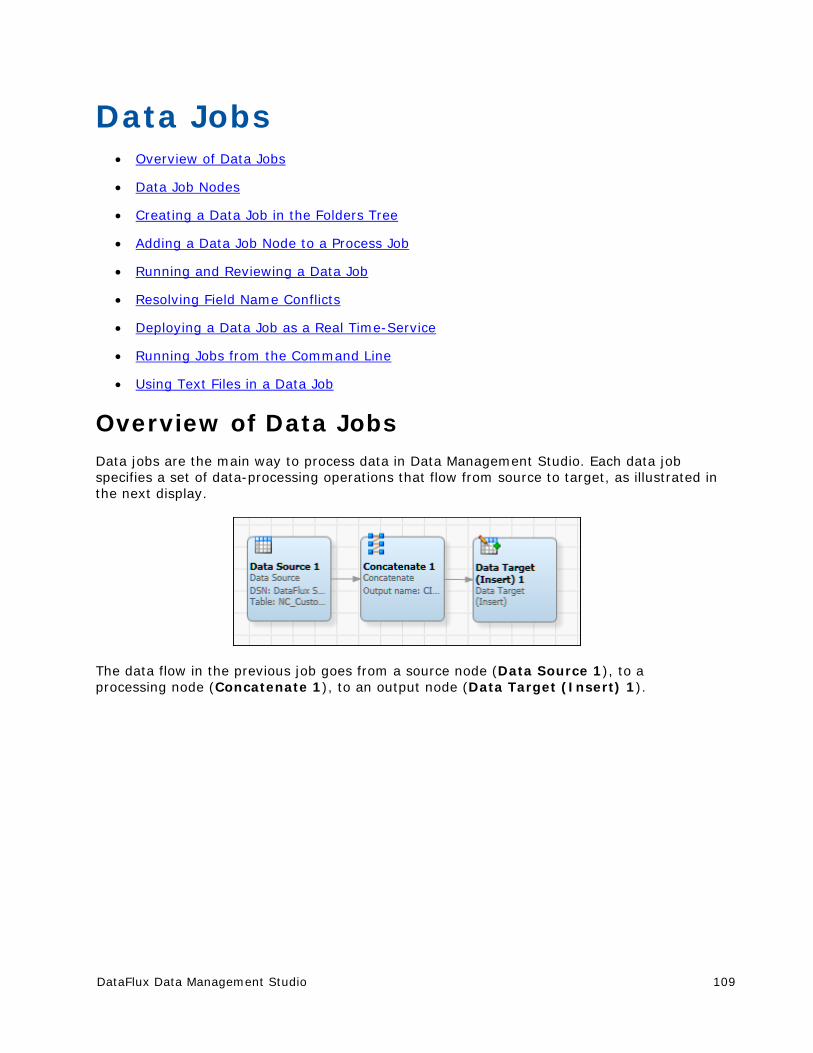
DataFlux Data Management Studio 109
Data Jobs Overview of Data Jobs
Data Job Nodes
Creating a Data Job in the Folders Tree
Adding a Data Job Node to a Process Job
Running and Reviewing a Data Job
Resolving Field Name Conflicts
Deploying a Data Job as a Real Time-Service
Running Jobs from the Command Line
Using Text Files in a Data Job
Overview of Data Jobs Data jobs are the main way to process data in Data Management Studio. Each data job specifies a set of data-processing operations that flow from source to target, as illustrated in the next display.
The data flow in the previous job goes from a source node (Data Source 1), to a processing node (Concatenate 1), to an output node (Data Target (Insert) 1).
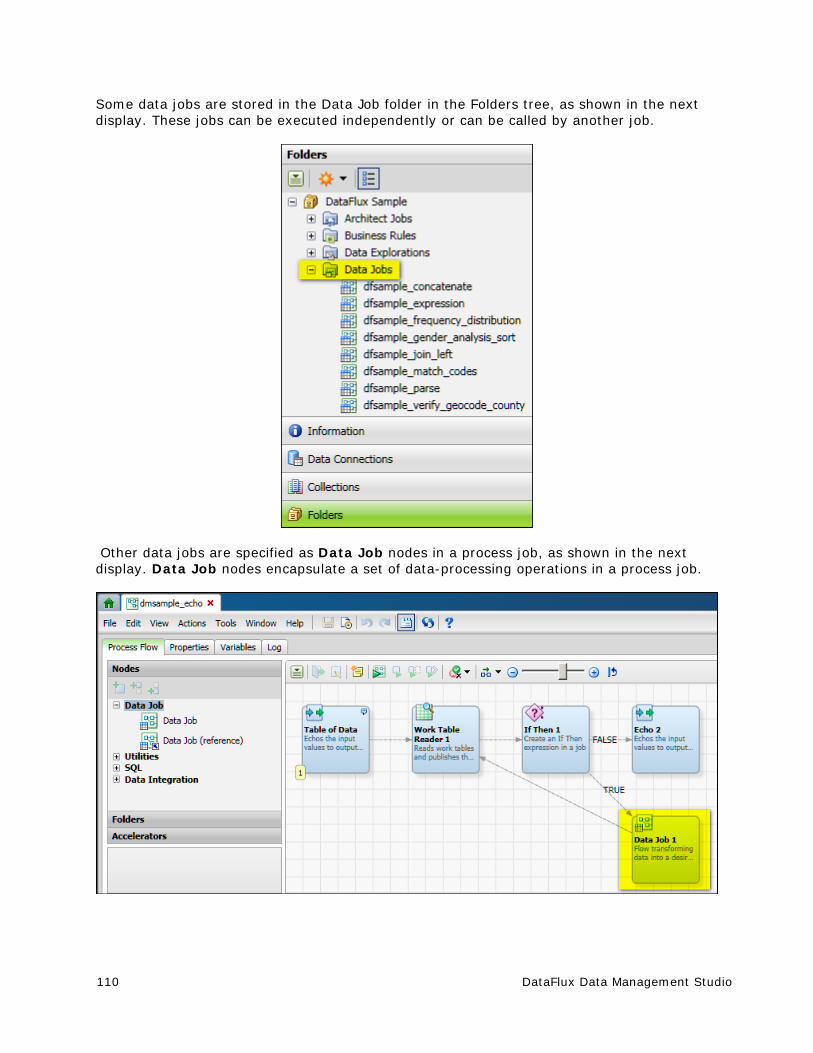
110 DataFlux Data Management Studio
Some data jobs are stored in the Data Job folder in the Folders tree, as shown in the next display. These jobs can be executed independently or can be called by another job.
Other data jobs are specified as Data Job nodes in a process job, as shown in the next display. Data Job nodes encapsulate a set of data-processing operations in a process job.

DataFlux Data Management Studio 111
The interfaces for these two kinds of data jobs are somewhat different, but they both specify a set of data-processing operations that flow from source to target. If you want to create a data job that can be executed independently or can be called by another job, create a data job in the Folders tree, as described in Creating a Data Job in the Folders Tree. If you want to add a set of data-processing operations to a process job, add a Data Job node to the job, as summarized in Adding a Data Job Node to a Process Job.
See also the Jobs, Profiles, Data Explorations section of the FAQ.
Data Job Nodes Data jobs are the main way to process data in Data Management Studio. You can add the following nodes to data jobs:
Data Inputs
Data Outputs
Data Integration
Quality
Enrichment
Entity Resolution
Monitor
Profile
Utilities
The tables below give brief descriptions of each node. To display the online help for all data job nodes, open a data job in the data job editor, select a node in the Nodes tree, and then click the Help link in the pane at the bottom of the Nodes tree.
Data Inputs
You can use these nodes to specify different kinds of input to a data job.
Name Description
Data Source Specifies a table as an input in a data job.
SQL Query Specifies an SQL query that selects data from one or more tables. The results table is used an input in a data job.
Text File Input Specifies a delimited text file as an input in a data job.
Fixed Width File Input
Specifies a fixed-width text file as an input in a data job.
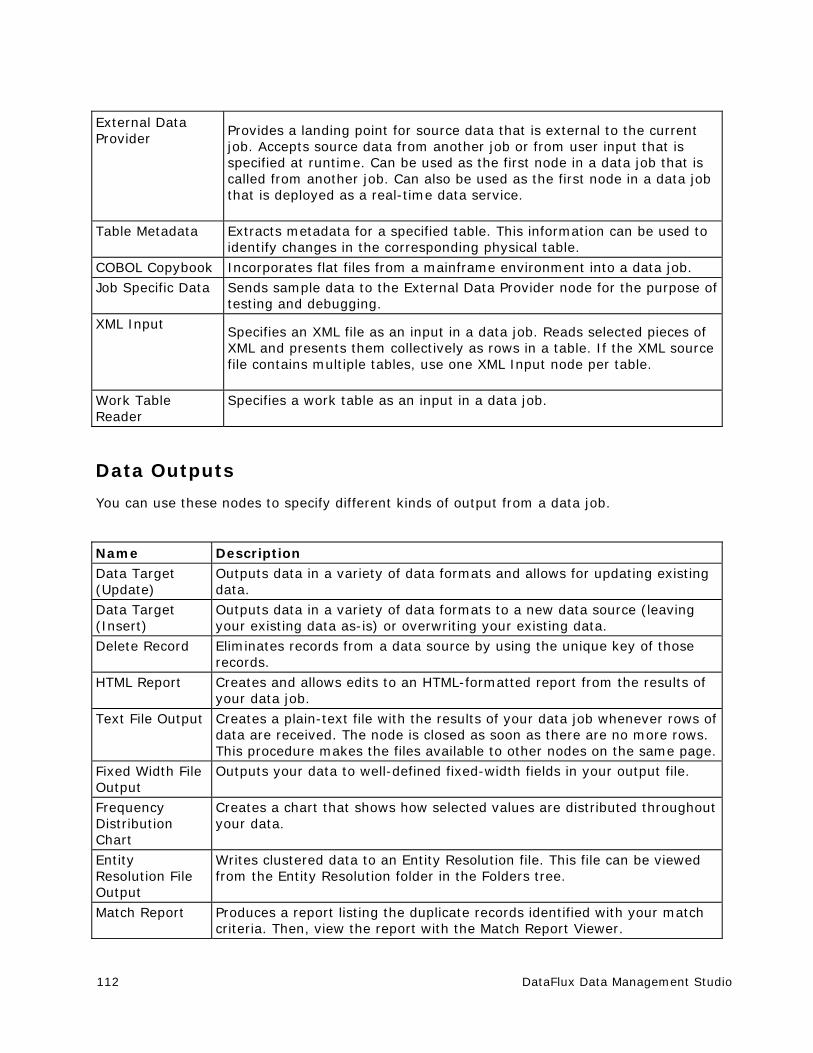
112 DataFlux Data Management Studio
External Data Provider
Provides a landing point for source data that is external to the current job. Accepts source data from another job or from user input that is specified at runtime. Can be used as the first node in a data job that is called from another job. Can also be used as the first node in a data job that is deployed as a real-time data service.
Table Metadata Extracts metadata for a specified table. This information can be used to identify changes in the corresponding physical table.
COBOL Copybook Incorporates flat files from a mainframe environment into a data job.
Job Specific Data Sends sample data to the External Data Provider node for the purpose of testing and debugging.
XML Input Specifies an XML file as an input in a data job. Reads selected pieces of XML and presents them collectively as rows in a table. If the XML source file contains multiple tables, use one XML Input node per table.
Work Table Reader
Specifies a work table as an input in a data job.
Data Outputs
You can use these nodes to specify different kinds of output from a data job.
Name Description Data Target (Update)
Outputs data in a variety of data formats and allows for updating existing data.
Data Target (Insert)
Outputs data in a variety of data formats to a new data source (leaving your existing data as-is) or overwriting your existing data.
Delete Record Eliminates records from a data source by using the unique key of those records.
HTML Report Creates and allows edits to an HTML-formatted report from the results of your data job.
Text File Output Creates a plain-text file with the results of your data job whenever rows of data are received. The node is closed as soon as there are no more rows. This procedure makes the files available to other nodes on the same page.
Fixed Width File Output
Outputs your data to well-defined fixed-width fields in your output file.
Frequency Distribution Chart
Creates a chart that shows how selected values are distributed throughout your data.
Entity Resolution File Output
Writes clustered data to an Entity Resolution file. This file can be viewed from the Entity Resolution folder in the Folders tree.
Match Report Produces a report listing the duplicate records identified with your match criteria. Then, view the report with the Match Report Viewer.
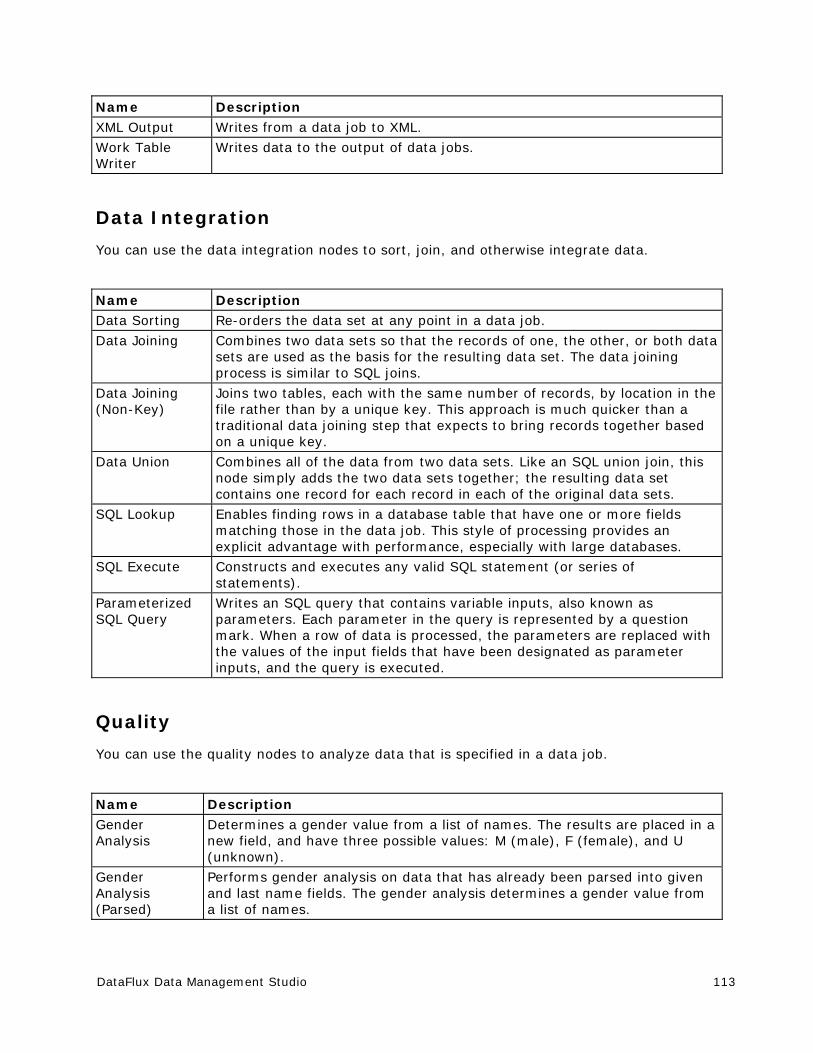
DataFlux Data Management Studio 113
Name Description XML Output Writes from a data job to XML.
Work Table Writer
Writes data to the output of data jobs.
Data Integration
You can use the data integration nodes to sort, join, and otherwise integrate data.
Name Description Data Sorting Re-orders the data set at any point in a data job.
Data Joining Combines two data sets so that the records of one, the other, or both data sets are used as the basis for the resulting data set. The data joining process is similar to SQL joins.
Data Joining (Non-Key)
Joins two tables, each with the same number of records, by location in the file rather than by a unique key. This approach is much quicker than a traditional data joining step that expects to bring records together based on a unique key.
Data Union Combines all of the data from two data sets. Like an SQL union join, this node simply adds the two data sets together; the resulting data set contains one record for each record in each of the original data sets.
SQL Lookup Enables finding rows in a database table that have one or more fields matching those in the data job. This style of processing provides an explicit advantage with performance, especially with large databases.
SQL Execute Constructs and executes any valid SQL statement (or series of statements).
Parameterized SQL Query
Writes an SQL query that contains variable inputs, also known as parameters. Each parameter in the query is represented by a question mark. When a row of data is processed, the parameters are replaced with the values of the input fields that have been designated as parameter inputs, and the query is executed.
Quality
You can use the quality nodes to analyze data that is specified in a data job.
Name Description
Gender Analysis
Determines a gender value from a list of names. The results are placed in a new field, and have three possible values: M (male), F (female), and U (unknown).
Gender Analysis (Parsed)
Performs gender analysis on data that has already been parsed into given and last name fields. The gender analysis determines a gender value from a list of names.
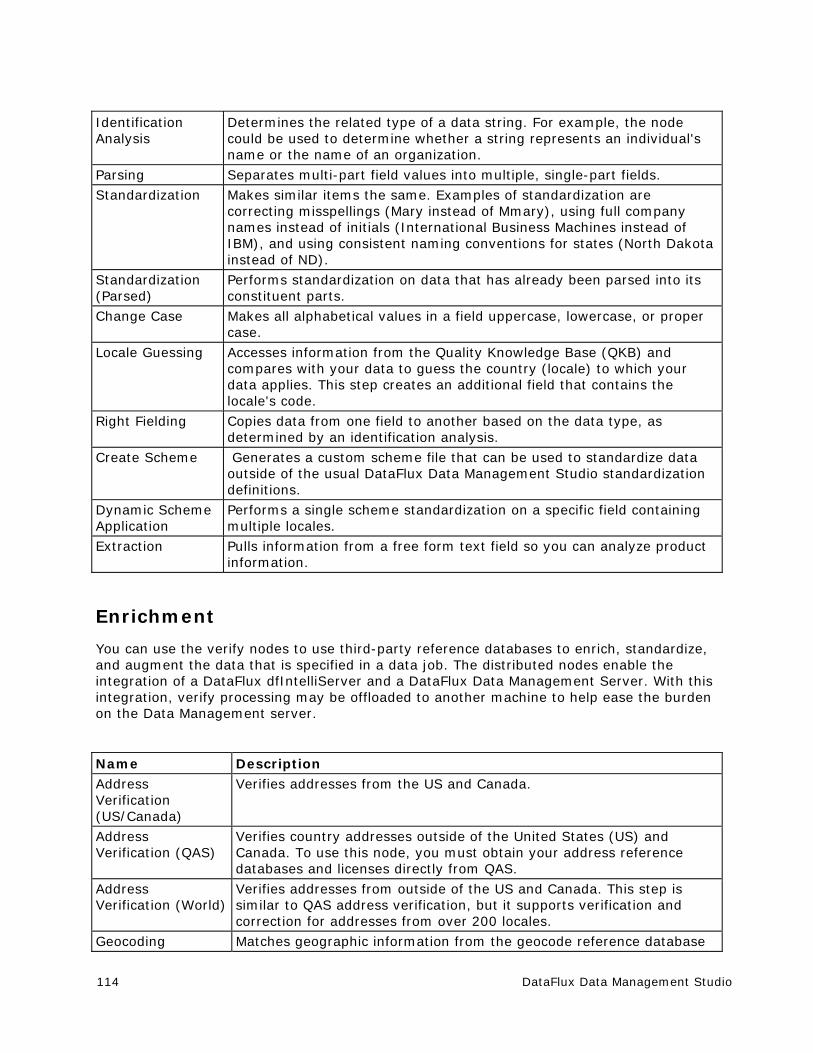
114 DataFlux Data Management Studio
Identification Analysis
Determines the related type of a data string. For example, the node could be used to determine whether a string represents an individual's name or the name of an organization.
Parsing Separates multi-part field values into multiple, single-part fields.
Standardization Makes similar items the same. Examples of standardization are correcting misspellings (Mary instead of Mmary), using full company names instead of initials (International Business Machines instead of IBM), and using consistent naming conventions for states (North Dakota instead of ND).
Standardization (Parsed)
Performs standardization on data that has already been parsed into its constituent parts.
Change Case Makes all alphabetical values in a field uppercase, lowercase, or proper case.
Locale Guessing Accesses information from the Quality Knowledge Base (QKB) and compares with your data to guess the country (locale) to which your data applies. This step creates an additional field that contains the locale's code.
Right Fielding Copies data from one field to another based on the data type, as determined by an identification analysis.
Create Scheme Generates a custom scheme file that can be used to standardize data outside of the usual DataFlux Data Management Studio standardization definitions.
Dynamic Scheme Application
Performs a single scheme standardization on a specific field containing multiple locales.
Extraction Pulls information from a free form text field so you can analyze product information.
Enrichment
You can use the verify nodes to use third-party reference databases to enrich, standardize, and augment the data that is specified in a data job. The distributed nodes enable the integration of a DataFlux dfIntelliServer and a DataFlux Data Management Server. With this integration, verify processing may be offloaded to another machine to help ease the burden on the Data Management server.
Name Description Address Verification (US/Canada)
Verifies addresses from the US and Canada.
Address Verification (QAS)
Verifies country addresses outside of the United States (US) and Canada. To use this node, you must obtain your address reference databases and licenses directly from QAS.
Address Verification (World)
Verifies addresses from outside of the US and Canada. This step is similar to QAS address verification, but it supports verification and correction for addresses from over 200 locales.
Geocoding Matches geographic information from the geocode reference database
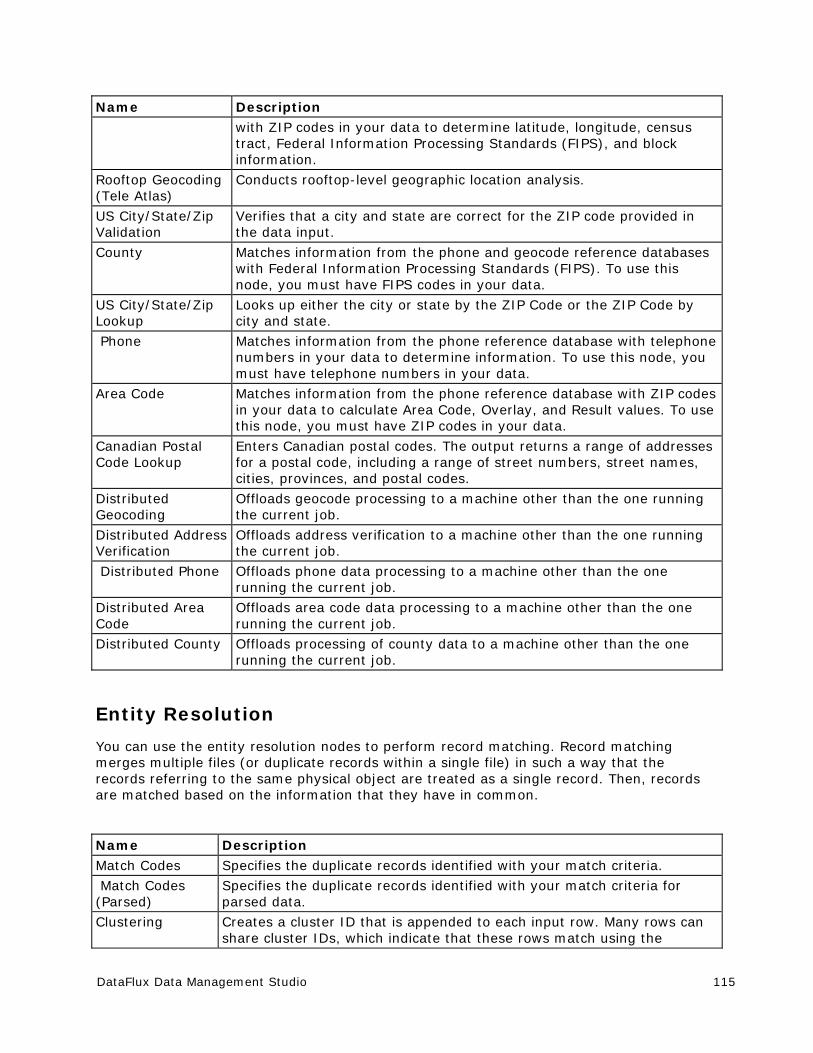
DataFlux Data Management Studio 115
Name Description with ZIP codes in your data to determine latitude, longitude, census tract, Federal Information Processing Standards (FIPS), and block information.
Rooftop Geocoding (Tele Atlas)
Conducts rooftop-level geographic location analysis.
US City/State/Zip Validation
Verifies that a city and state are correct for the ZIP code provided in the data input.
County Matches information from the phone and geocode reference databases with Federal Information Processing Standards (FIPS). To use this node, you must have FIPS codes in your data.
US City/State/Zip Lookup
Looks up either the city or state by the ZIP Code or the ZIP Code by city and state.
Phone Matches information from the phone reference database with telephone numbers in your data to determine information. To use this node, you must have telephone numbers in your data.
Area Code Matches information from the phone reference database with ZIP codes in your data to calculate Area Code, Overlay, and Result values. To use this node, you must have ZIP codes in your data.
Canadian Postal Code Lookup
Enters Canadian postal codes. The output returns a range of addresses for a postal code, including a range of street numbers, street names, cities, provinces, and postal codes.
Distributed Geocoding
Offloads geocode processing to a machine other than the one running the current job.
Distributed Address Verification
Offloads address verification to a machine other than the one running the current job.
Distributed Phone Offloads phone data processing to a machine other than the one running the current job.
Distributed Area Code
Offloads area code data processing to a machine other than the one running the current job.
Distributed County Offloads processing of county data to a machine other than the one running the current job.
Entity Resolution
You can use the entity resolution nodes to perform record matching. Record matching merges multiple files (or duplicate records within a single file) in such a way that the records referring to the same physical object are treated as a single record. Then, records are matched based on the information that they have in common.
Name Description
Match Codes Specifies the duplicate records identified with your match criteria.
Match Codes (Parsed)
Specifies the duplicate records identified with your match criteria for parsed data.
Clustering Creates a cluster ID that is appended to each input row. Many rows can share cluster IDs, which indicate that these rows match using the
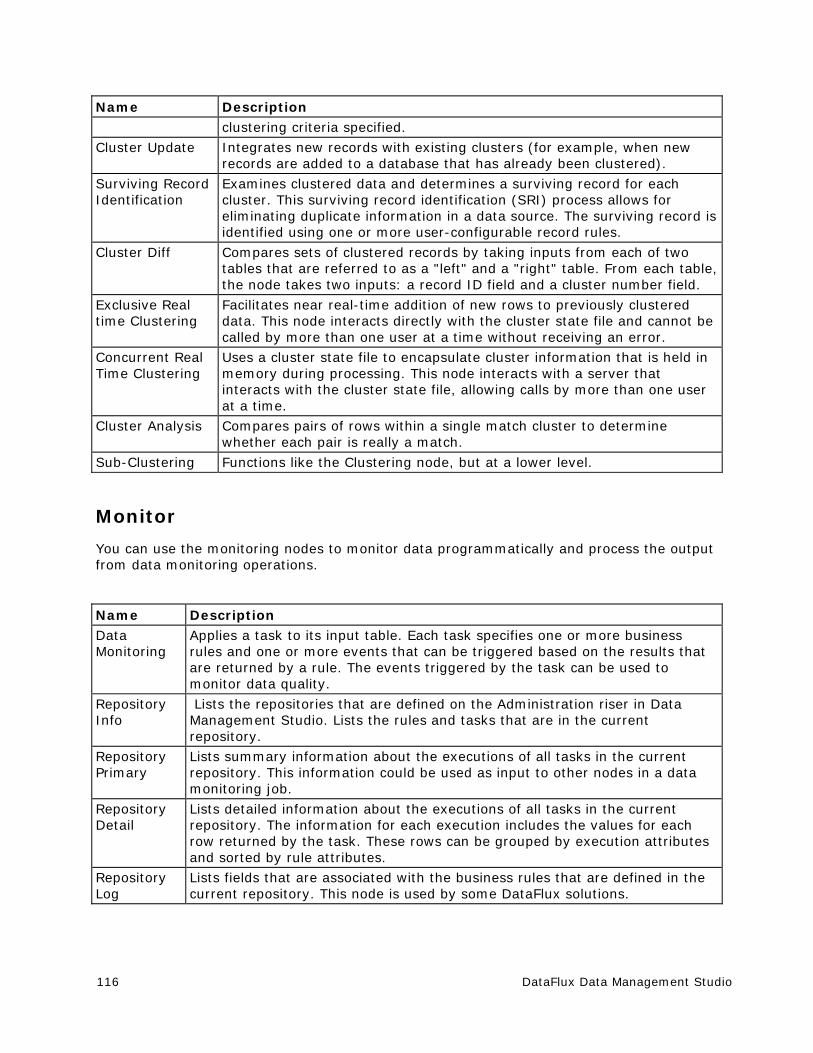
116 DataFlux Data Management Studio
Name Description clustering criteria specified.
Cluster Update Integrates new records with existing clusters (for example, when new records are added to a database that has already been clustered).
Surviving Record Identification
Examines clustered data and determines a surviving record for each cluster. This surviving record identification (SRI) process allows for eliminating duplicate information in a data source. The surviving record is identified using one or more user-configurable record rules.
Cluster Diff Compares sets of clustered records by taking inputs from each of two tables that are referred to as a "left" and a "right" table. From each table, the node takes two inputs: a record ID field and a cluster number field.
Exclusive Real time Clustering
Facilitates near real-time addition of new rows to previously clustered data. This node interacts directly with the cluster state file and cannot be called by more than one user at a time without receiving an error.
Concurrent Real Time Clustering
Uses a cluster state file to encapsulate cluster information that is held in memory during processing. This node interacts with a server that interacts with the cluster state file, allowing calls by more than one user at a time.
Cluster Analysis Compares pairs of rows within a single match cluster to determine whether each pair is really a match.
Sub-Clustering Functions like the Clustering node, but at a lower level.
Monitor
You can use the monitoring nodes to monitor data programmatically and process the output from data monitoring operations.
Name Description Data Monitoring
Applies a task to its input table. Each task specifies one or more business rules and one or more events that can be triggered based on the results that are returned by a rule. The events triggered by the task can be used to monitor data quality.
Repository Info
Lists the repositories that are defined on the Administration riser in Data Management Studio. Lists the rules and tasks that are in the current repository.
Repository Primary
Lists summary information about the executions of all tasks in the current repository. This information could be used as input to other nodes in a data monitoring job.
Repository Detail
Lists detailed information about the executions of all tasks in the current repository. The information for each execution includes the values for each row returned by the task. These rows can be grouped by execution attributes and sorted by rule attributes.
Repository Log
Lists fields that are associated with the business rules that are defined in the current repository. This node is used by some DataFlux solutions.
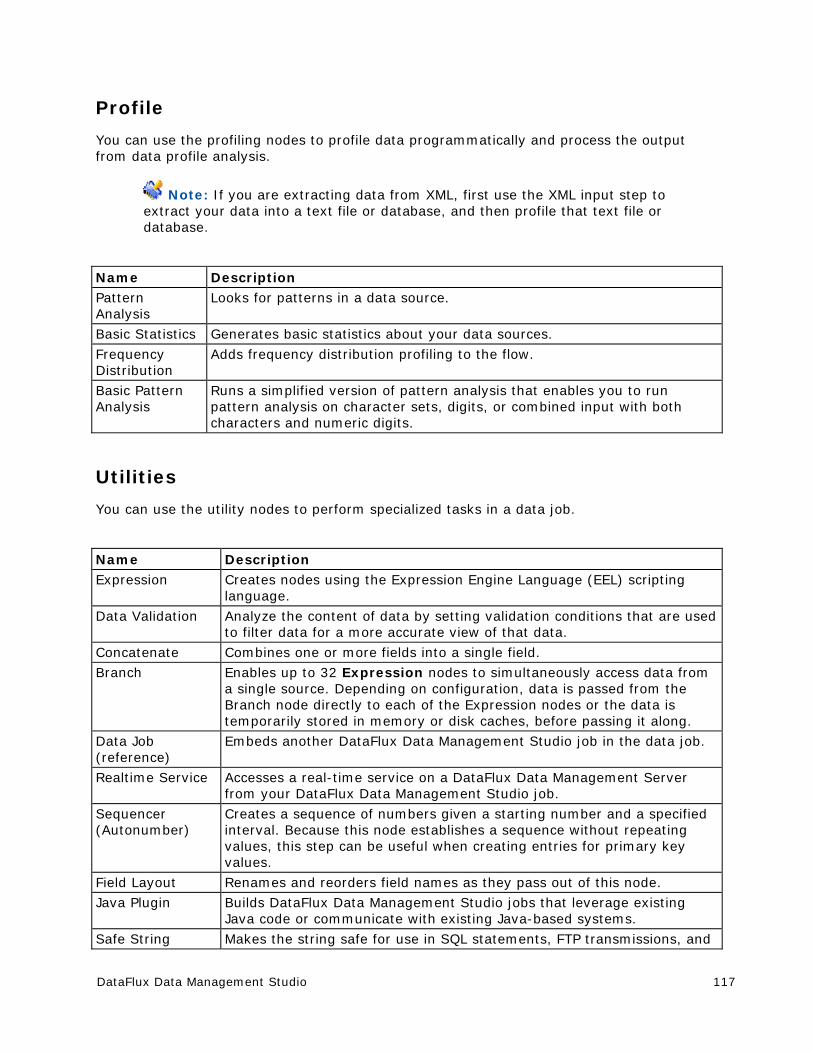
DataFlux Data Management Studio 117
Profile
You can use the profiling nodes to profile data programmatically and process the output from data profile analysis.
Note: If you are extracting data from XML, first use the XML input step to extract your data into a text file or database, and then profile that text file or database.
Name Description Pattern Analysis
Looks for patterns in a data source.
Basic Statistics Generates basic statistics about your data sources.
Frequency Distribution
Adds frequency distribution profiling to the flow.
Basic Pattern Analysis
Runs a simplified version of pattern analysis that enables you to run pattern analysis on character sets, digits, or combined input with both characters and numeric digits.
Utilities
You can use the utility nodes to perform specialized tasks in a data job.
Name Description Expression Creates nodes using the Expression Engine Language (EEL) scripting
language.
Data Validation Analyze the content of data by setting validation conditions that are used to filter data for a more accurate view of that data.
Concatenate Combines one or more fields into a single field.
Branch Enables up to 32 Expression nodes to simultaneously access data from a single source. Depending on configuration, data is passed from the Branch node directly to each of the Expression nodes or the data is temporarily stored in memory or disk caches, before passing it along.
Data Job (reference)
Embeds another DataFlux Data Management Studio job in the data job.
Realtime Service Accesses a real-time service on a DataFlux Data Management Server from your DataFlux Data Management Studio job.
Sequencer (Autonumber)
Creates a sequence of numbers given a starting number and a specified interval. Because this node establishes a sequence without repeating values, this step can be useful when creating entries for primary key values.
Field Layout Renames and reorders field names as they pass out of this node.
Java Plugin Builds DataFlux Data Management Studio jobs that leverage existing Java code or communicate with existing Java-based systems.
Safe String Makes the string safe for use in SQL statements, FTP transmissions, and
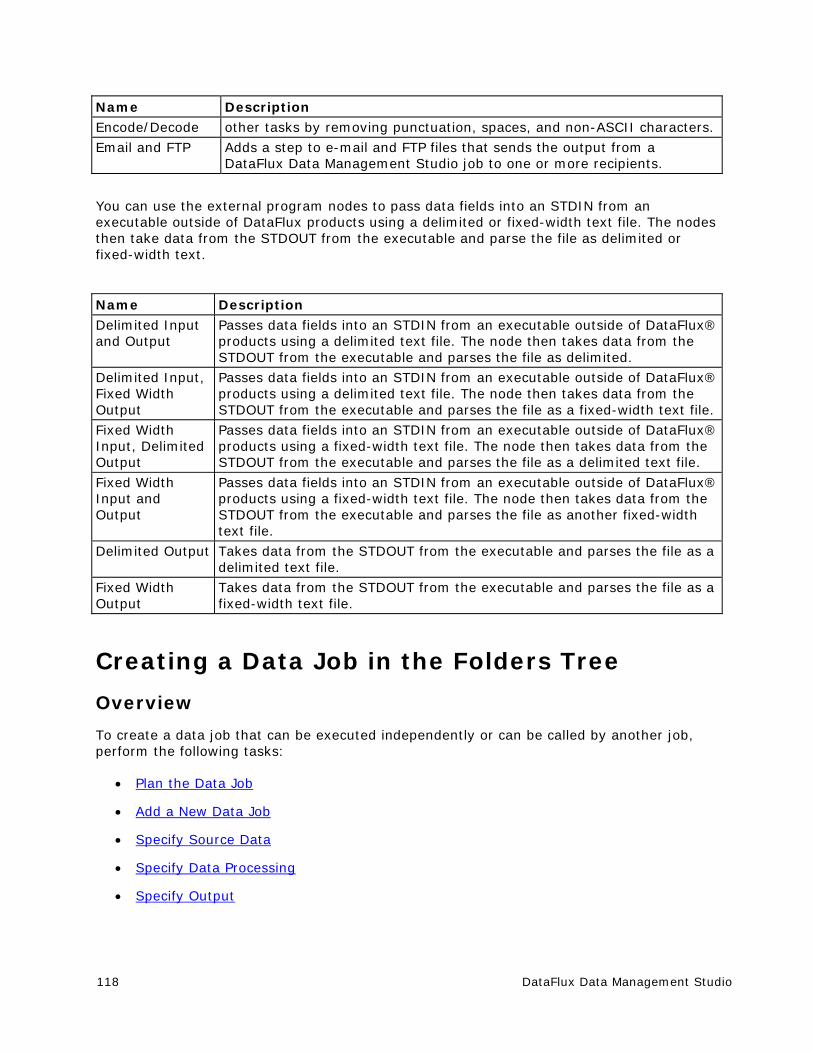
118 DataFlux Data Management Studio
Name Description Encode/Decode other tasks by removing punctuation, spaces, and non-ASCII characters.
Email and FTP Adds a step to e-mail and FTP files that sends the output from a DataFlux Data Management Studio job to one or more recipients.
You can use the external program nodes to pass data fields into an STDIN from an executable outside of DataFlux products using a delimited or fixed-width text file. The nodes then take data from the STDOUT from the executable and parse the file as delimited or fixed-width text.
Name Description
Delimited Input and Output
Passes data fields into an STDIN from an executable outside of DataFlux® products using a delimited text file. The node then takes data from the STDOUT from the executable and parses the file as delimited.
Delimited Input, Fixed Width Output
Passes data fields into an STDIN from an executable outside of DataFlux® products using a delimited text file. The node then takes data from the STDOUT from the executable and parses the file as a fixed-width text file.
Fixed Width Input, Delimited Output
Passes data fields into an STDIN from an executable outside of DataFlux® products using a fixed-width text file. The node then takes data from the STDOUT from the executable and parses the file as a delimited text file.
Fixed Width Input and Output
Passes data fields into an STDIN from an executable outside of DataFlux® products using a fixed-width text file. The node then takes data from the STDOUT from the executable and parses the file as another fixed-width text file.
Delimited Output Takes data from the STDOUT from the executable and parses the file as a delimited text file.
Fixed Width Output
Takes data from the STDOUT from the executable and parses the file as a fixed-width text file.
Creating a Data Job in the Folders Tree
Overview
To create a data job that can be executed independently or can be called by another job, perform the following tasks:
Plan the Data Job
Add a New Data Job
Specify Source Data
Specify Data Processing
Specify Output
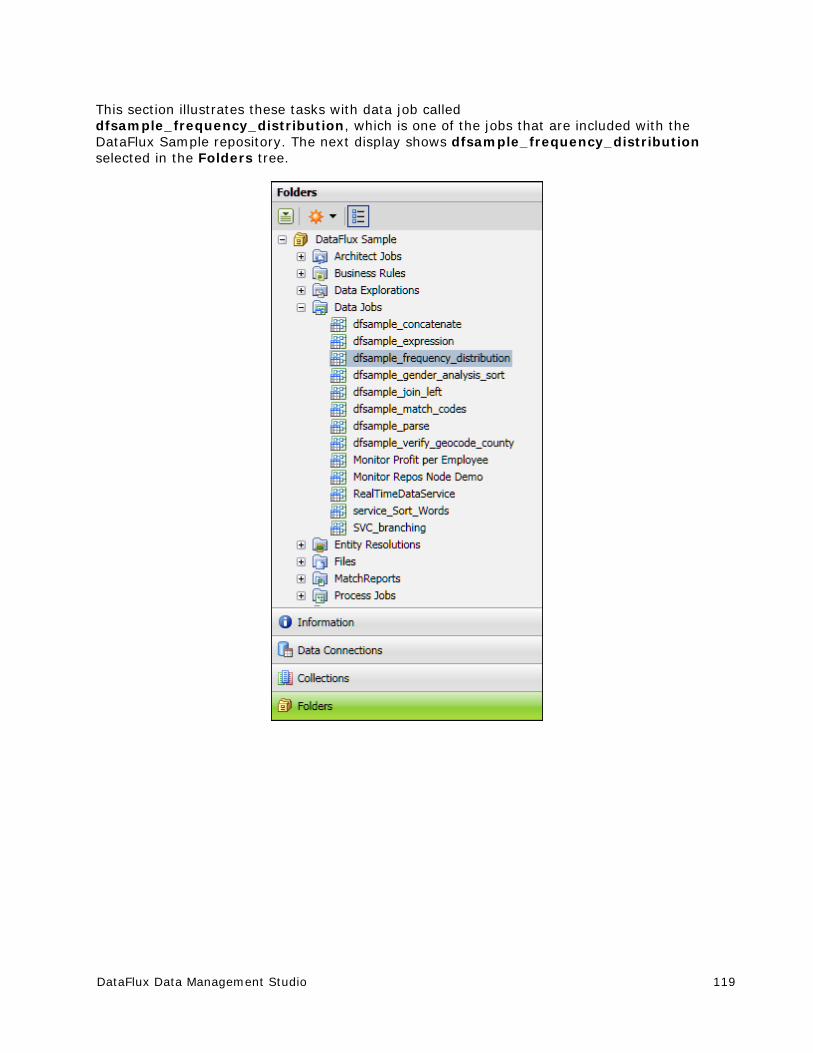
DataFlux Data Management Studio 119
This section illustrates these tasks with data job called dfsample_frequency_distribution, which is one of the jobs that are included with the DataFlux Sample repository. The next display shows dfsample_frequency_distribution selected in the Folders tree.
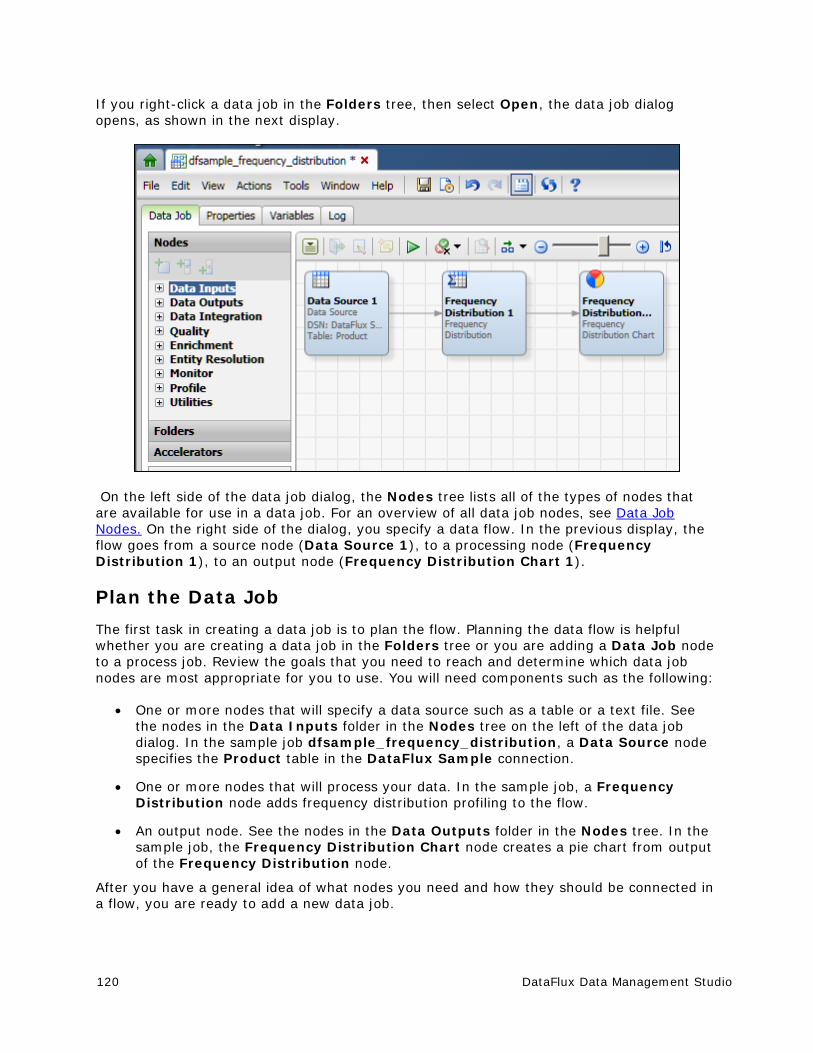
120 DataFlux Data Management Studio
If you right-click a data job in the Folders tree, then select Open, the data job dialog opens, as shown in the next display.
On the left side of the data job dialog, the Nodes tree lists all of the types of nodes that are available for use in a data job. For an overview of all data job nodes, see Data Job Nodes. On the right side of the dialog, you specify a data flow. In the previous display, the flow goes from a source node (Data Source 1), to a processing node (Frequency Distribution 1), to an output node (Frequency Distribution Chart 1).
Plan the Data Job
The first task in creating a data job is to plan the flow. Planning the data flow is helpful whether you are creating a data job in the Folders tree or you are adding a Data Job node to a process job. Review the goals that you need to reach and determine which data job nodes are most appropriate for you to use. You will need components such as the following:
One or more nodes that will specify a data source such as a table or a text file. See the nodes in the Data Inputs folder in the Nodes tree on the left of the data job dialog. In the sample job dfsample_frequency_distribution, a Data Source node specifies the Product table in the DataFlux Sample connection.
One or more nodes that will process your data. In the sample job, a Frequency Distribution node adds frequency distribution profiling to the flow.
An output node. See the nodes in the Data Outputs folder in the Nodes tree. In the sample job, the Frequency Distribution Chart node creates a pie chart from output of the Frequency Distribution node.
After you have a general idea of what nodes you need and how they should be connected in a flow, you are ready to add a new data job.
DataFlux Data Management Studio 121
Add a New Data Job
To add a new, empty data job in the Data Job folder in the Folders tree, perform the following tasks:
1. Click the Folders riser. Then, select New > Data Job from the Main Menu.
2. Enter a name for the data job in the Name field.
3. Specify a location for the data job in the Save in field.
4. Click OK to save the new data job. An empty job opens in the data job dialog.
The next task is to specify a data source for the job.
Specify Source Data
After you have created a new empty job, you can specify a data source for the job. The steps in this section are illustrated with the sample job dfsample_frequency_distribution.
1. Add a Data Source node to the flow. For the sample job, you would expand the Data Inputs folder in the Nodes tree on the left of the data job dialog and drag the Data Source node into the flow editor on the right.
2. Double-click the Data Source node to display its properties. For the sample, the properties dialog for the Data Source node would be displayed.
3. Use the properties dialog to select a data source. The fields that are available in that data source would be displayed. For the sample, you would click the selector in the Input table field and navigate to the DataFlux Sample connection. Then you would select the Products table. The fields that are available in the Products table would be displayed.
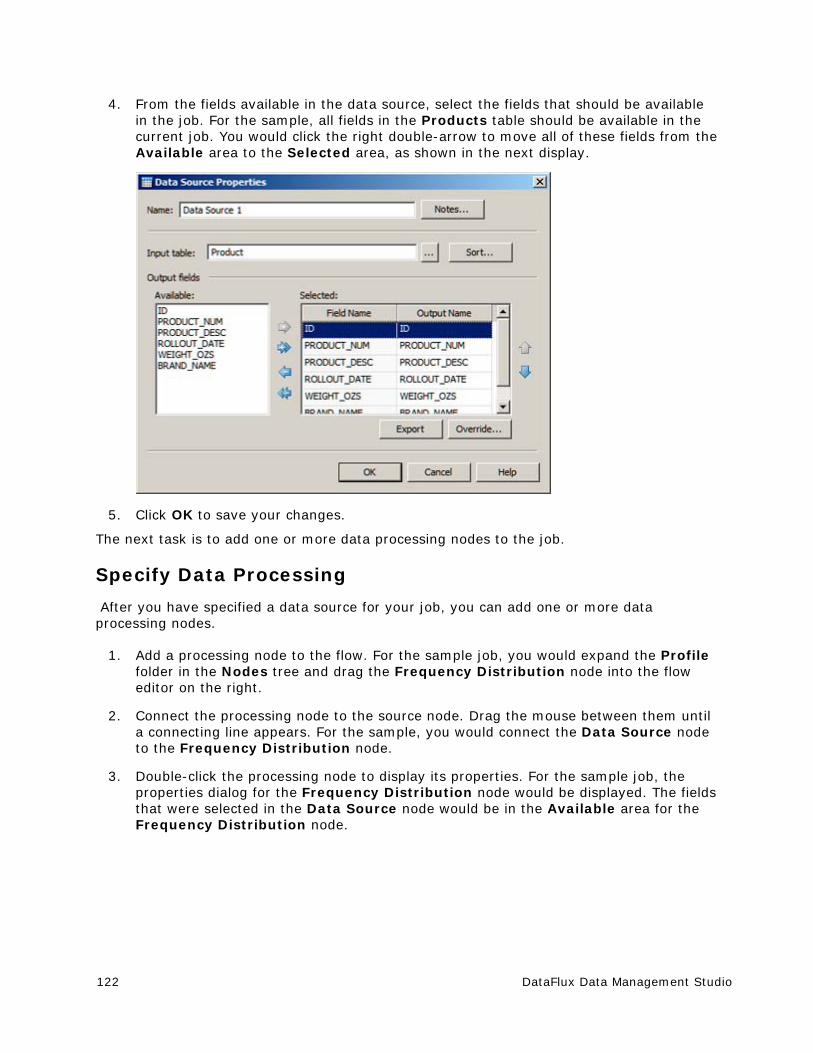
122 DataFlux Data Management Studio
4. From the fields available in the data source, select the fields that should be available in the job. For the sample, all fields in the Products table should be available in the current job. You would click the right double-arrow to move all of these fields from the Available area to the Selected area, as shown in the next display.
5. Click OK to save your changes.
The next task is to add one or more data processing nodes to the job.
Specify Data Processing
After you have specified a data source for your job, you can add one or more data processing nodes.
1. Add a processing node to the flow. For the sample job, you would expand the Profile folder in the Nodes tree and drag the Frequency Distribution node into the flow editor on the right.
2. Connect the processing node to the source node. Drag the mouse between them until a connecting line appears. For the sample, you would connect the Data Source node to the Frequency Distribution node.
3. Double-click the processing node to display its properties. For the sample job, the properties dialog for the Frequency Distribution node would be displayed. The fields that were selected in the Data Source node would be in the Available area for the Frequency Distribution node.
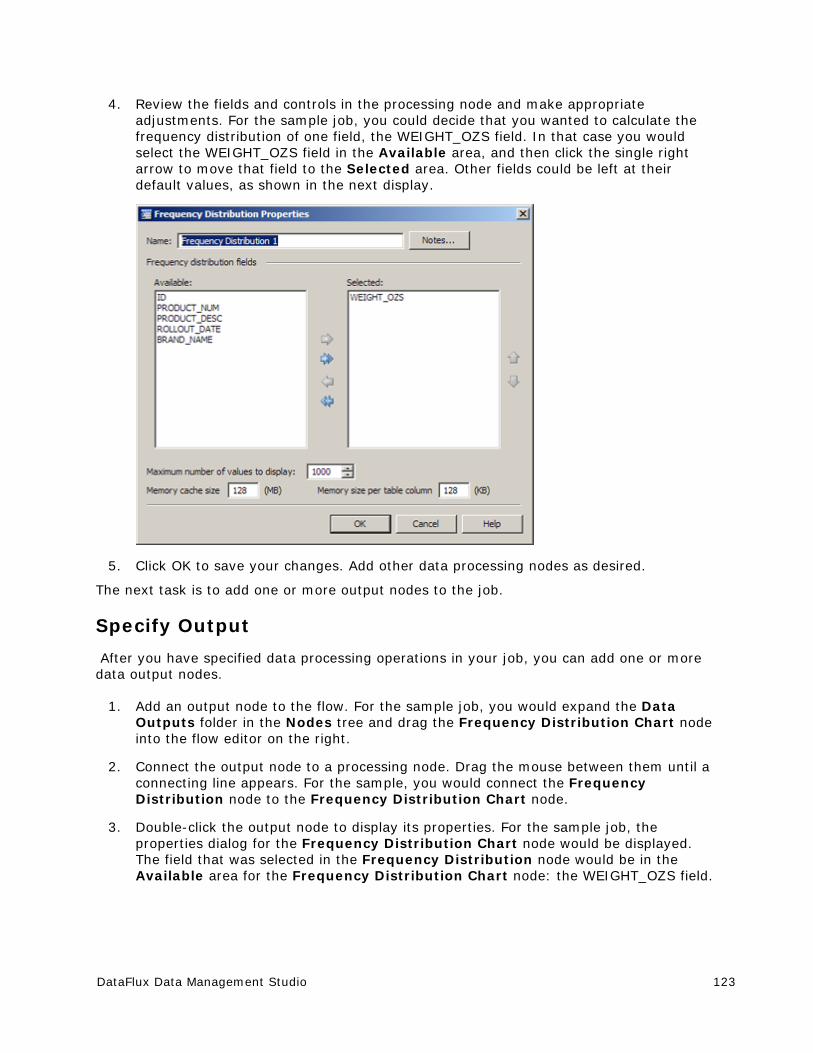
DataFlux Data Management Studio 123
4. Review the fields and controls in the processing node and make appropriate adjustments. For the sample job, you could decide that you wanted to calculate the frequency distribution of one field, the WEIGHT_OZS field. In that case you would select the WEIGHT_OZS field in the Available area, and then click the single right arrow to move that field to the Selected area. Other fields could be left at their default values, as shown in the next display.
5. Click OK to save your changes. Add other data processing nodes as desired.
The next task is to add one or more output nodes to the job.
Specify Output
After you have specified data processing operations in your job, you can add one or more data output nodes.
1. Add an output node to the flow. For the sample job, you would expand the Data Outputs folder in the Nodes tree and drag the Frequency Distribution Chart node into the flow editor on the right.
2. Connect the output node to a processing node. Drag the mouse between them until a connecting line appears. For the sample, you would connect the Frequency Distribution node to the Frequency Distribution Chart node.
3. Double-click the output node to display its properties. For the sample job, the properties dialog for the Frequency Distribution Chart node would be displayed. The field that was selected in the Frequency Distribution node would be in the Available area for the Frequency Distribution Chart node: the WEIGHT_OZS field.
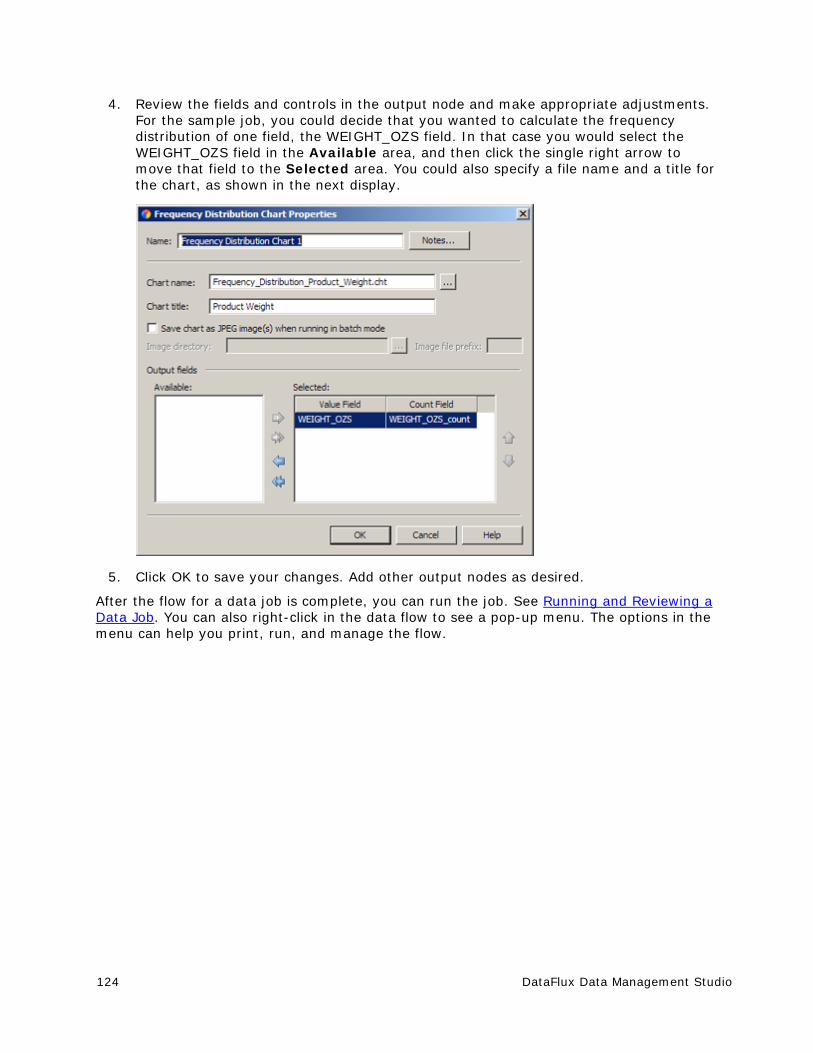
124 DataFlux Data Management Studio
4. Review the fields and controls in the output node and make appropriate adjustments. For the sample job, you could decide that you wanted to calculate the frequency distribution of one field, the WEIGHT_OZS field. In that case you would select the WEIGHT_OZS field in the Available area, and then click the single right arrow to move that field to the Selected area. You could also specify a file name and a title for the chart, as shown in the next display.
5. Click OK to save your changes. Add other output nodes as desired.
After the flow for a data job is complete, you can run the job. See Running and Reviewing a Data Job. You can also right-click in the data flow to see a pop-up menu. The options in the menu can help you print, run, and manage the flow.
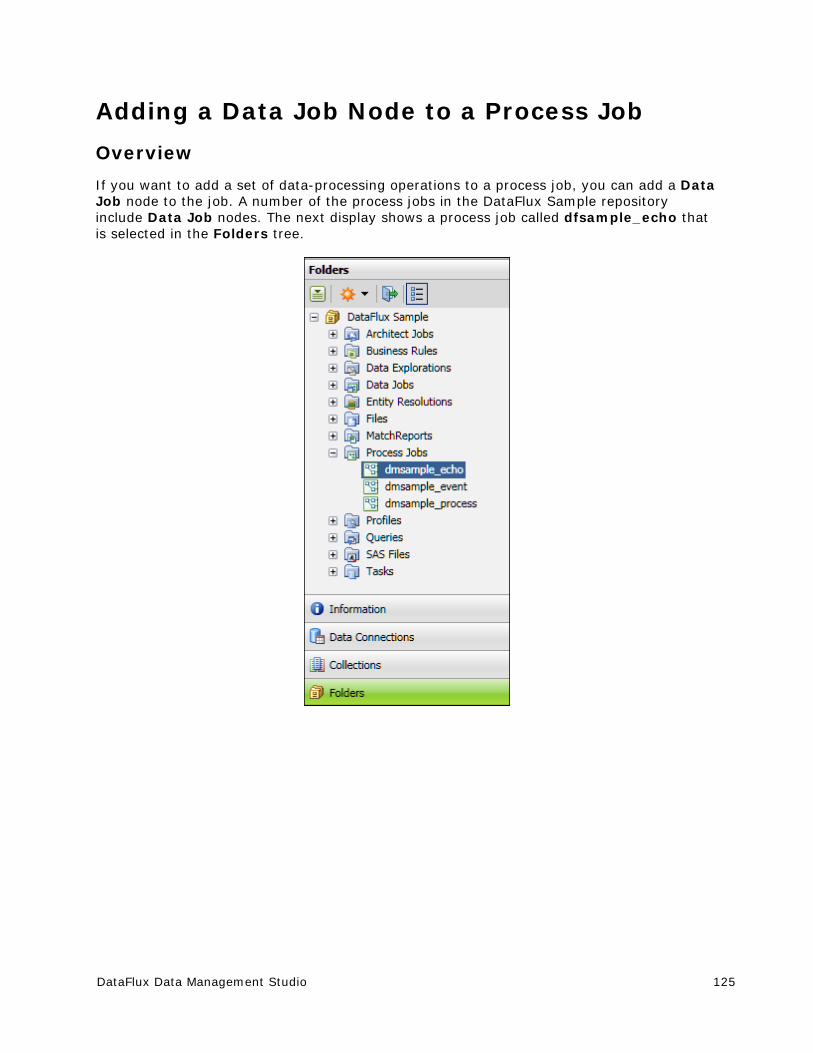
DataFlux Data Management Studio 125
Adding a Data Job Node to a Process Job
Overview
If you want to add a set of data-processing operations to a process job, you can add a Data Job node to the job. A number of the process jobs in the DataFlux Sample repository include Data Job nodes. The next display shows a process job called dfsample_echo that is selected in the Folders tree.
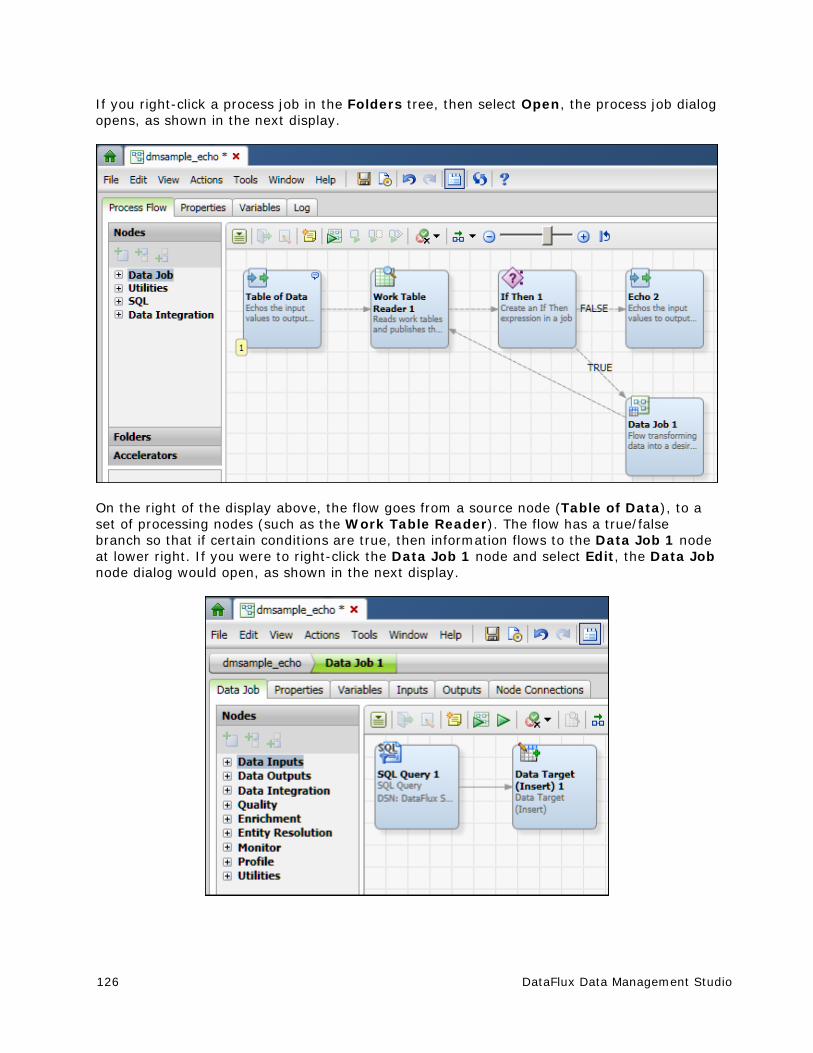
126 DataFlux Data Management Studio
If you right-click a process job in the Folders tree, then select Open, the process job dialog opens, as shown in the next display.
On the right of the display above, the flow goes from a source node (Table of Data), to a set of processing nodes (such as the Work Table Reader). The flow has a true/false branch so that if certain conditions are true, then information flows to the Data Job 1 node at lower right. If you were to right-click the Data Job 1 node and select Edit, the Data Job node dialog would open, as shown in the next display.

DataFlux Data Management Studio 127
The Data Job node dialog is very similar to the dialog for data jobs in the Folders tree. On the right of the display above, the flow goes from a processing node (SQL Query 1) to a target Data Target (Insert) 1). Data Job 1 gets data from the parent process job (dmsample_echo) and creates output tables based on that data. The interface for a Data Job node has three additional tabs which are needed in the context of a process job: Inputs, Outputs, and Node Connections.
The steps for adding a Data Job node to a process job depends on the flow of the parent job. For more information about how to create a process job with a Data Job node, see Creating a Process Job.
Running and Reviewing a Data Job
Run the Data Job
After the flow for a data job is complete, you can run and review the output. Perform the following steps:
1. Open the data job, if necessary.
2. Click Show Details Pane, if needed, to view the Log tab for the data job.
3. Click Run Data Job to run the job.
4. Review the log to make sure that all of the nodes in the data job have completed successfully. The following display shows the log for the sample job described in Creating a Data Job in the Folders Tree.
Note that all of the nodes have completed successfully. Also note that the 525 rows that were output from the Frequency Distribution node were inserted into the chart in the Frequency Distribution Chart node. If you click a node in the data flow when the log tab is open, the log will scroll to the section that covers the selected node.
Note: You can also run a Data Job node in a process job. Select the Data Job node and click Run Node. You can review the log entries for the node and its components in the Log tab. You can also review the node's output as described above.
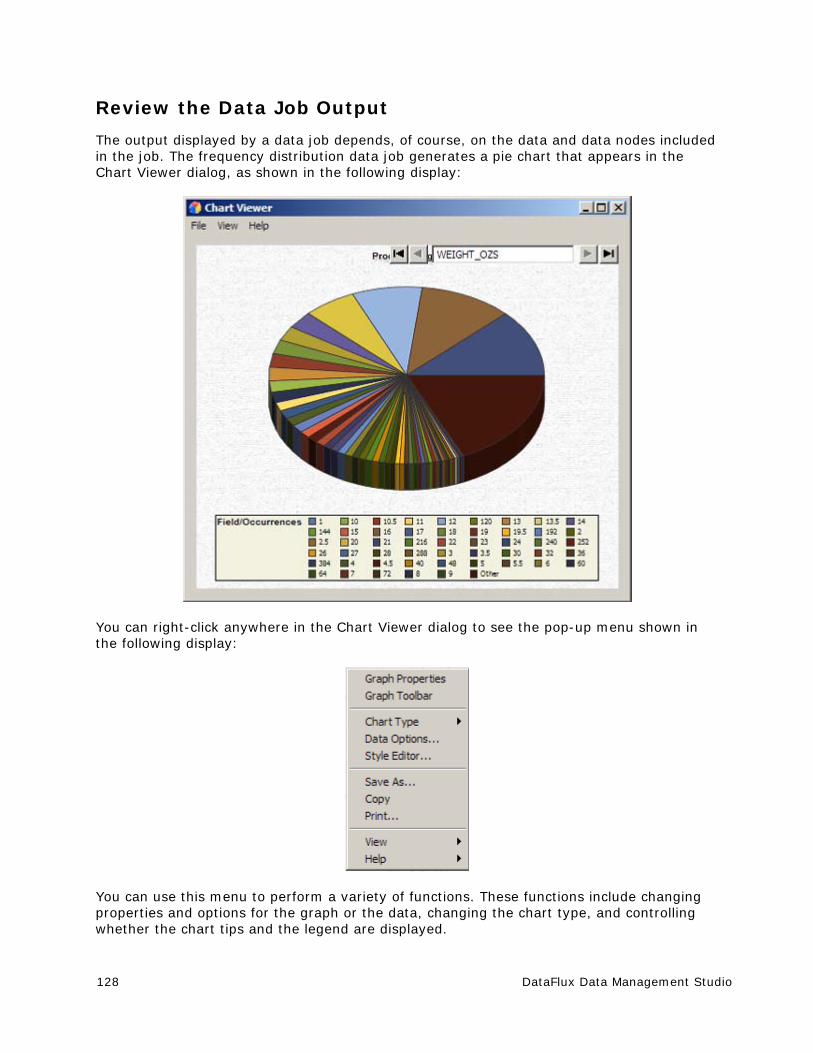
128 DataFlux Data Management Studio
Review the Data Job Output
The output displayed by a data job depends, of course, on the data and data nodes included in the job. The frequency distribution data job generates a pie chart that appears in the Chart Viewer dialog, as shown in the following display:
You can right-click anywhere in the Chart Viewer dialog to see the pop-up menu shown in the following display:
You can use this menu to perform a variety of functions. These functions include changing properties and options for the graph or the data, changing the chart type, and controlling whether the chart tips and the legend are displayed.
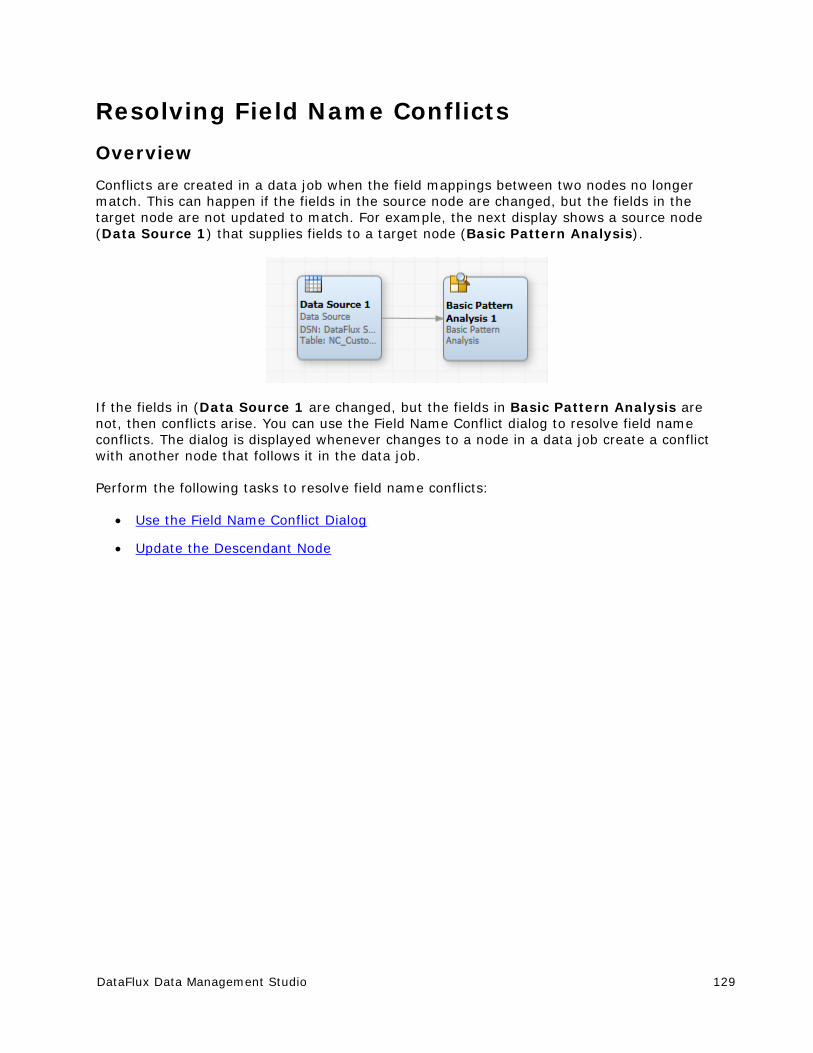
DataFlux Data Management Studio 129
Resolving Field Name Conflicts
Overview
Conflicts are created in a data job when the field mappings between two nodes no longer match. This can happen if the fields in the source node are changed, but the fields in the target node are not updated to match. For example, the next display shows a source node (Data Source 1) that supplies fields to a target node (Basic Pattern Analysis).
If the fields in (Data Source 1 are changed, but the fields in Basic Pattern Analysis are not, then conflicts arise. You can use the Field Name Conflict dialog to resolve field name conflicts. The dialog is displayed whenever changes to a node in a data job create a conflict with another node that follows it in the data job.
Perform the following tasks to resolve field name conflicts:
Use the Field Name Conflict Dialog
Update the Descendant Node
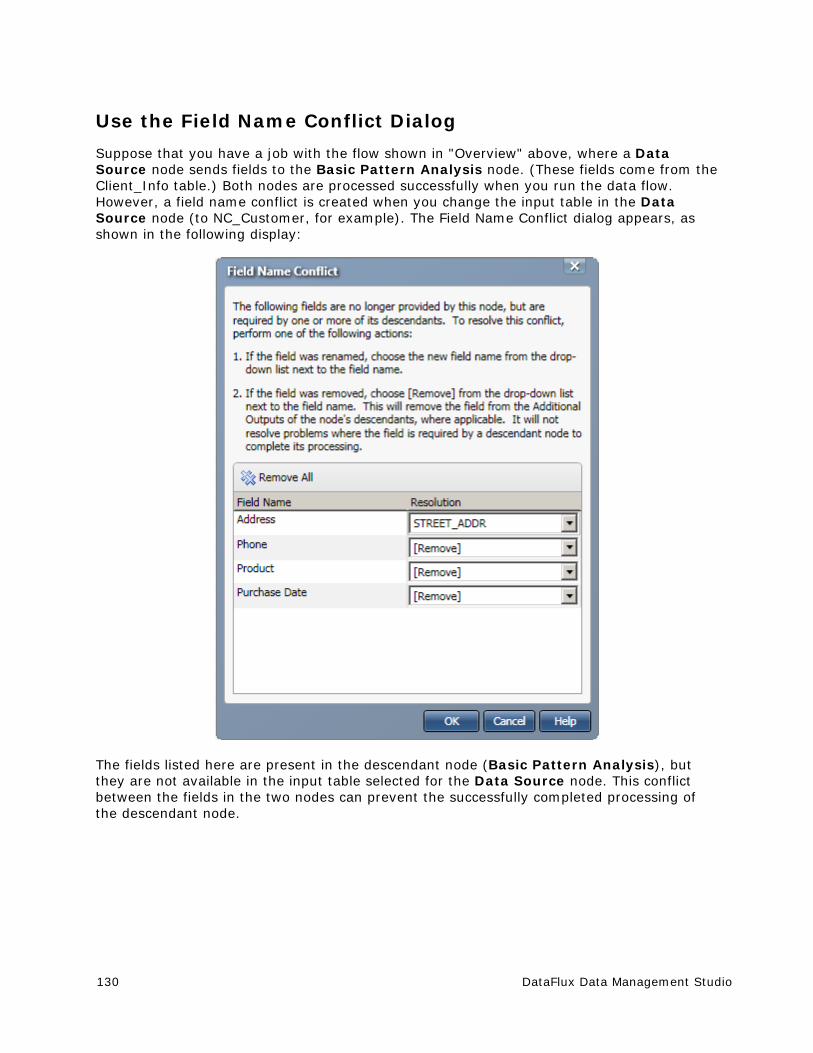
130 DataFlux Data Management Studio
Use the Field Name Conflict Dialog
Suppose that you have a job with the flow shown in "Overview" above, where a Data Source node sends fields to the Basic Pattern Analysis node. (These fields come from the Client_Info table.) Both nodes are processed successfully when you run the data flow. However, a field name conflict is created when you change the input table in the Data Source node (to NC_Customer, for example). The Field Name Conflict dialog appears, as shown in the following display:
The fields listed here are present in the descendant node (Basic Pattern Analysis), but they are not available in the input table selected for the Data Source node. This conflict between the fields in the two nodes can prevent the successfully completed processing of the descendant node.
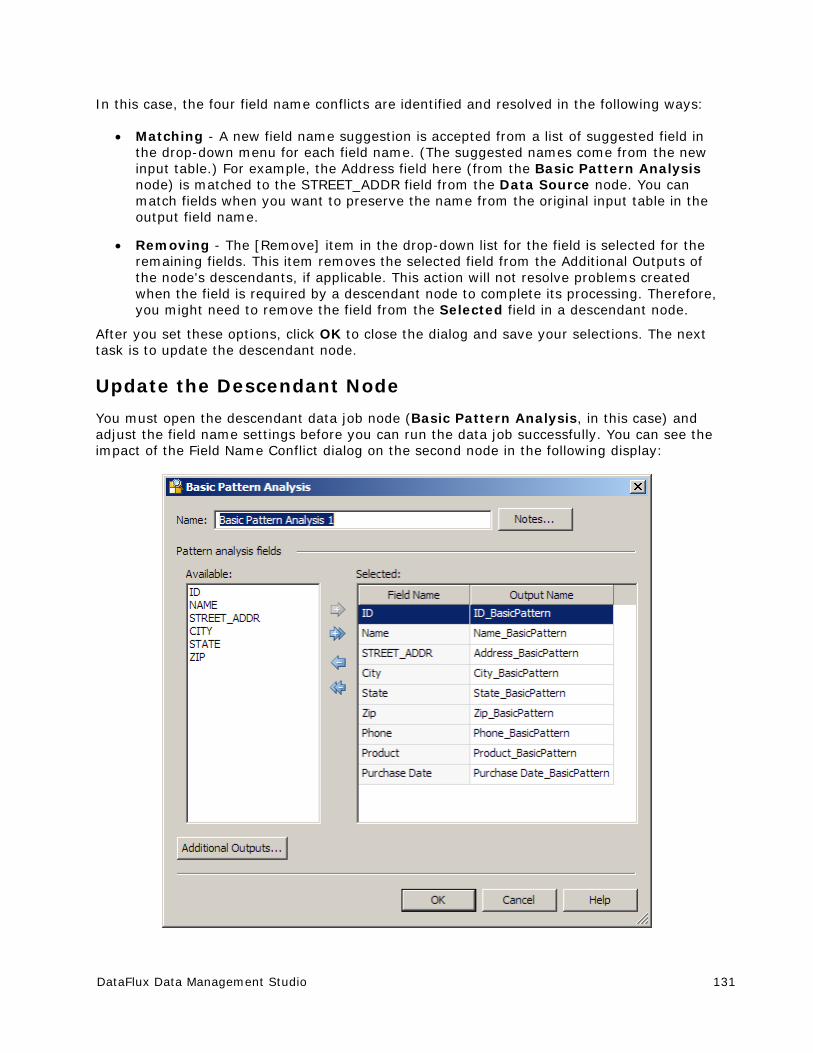
DataFlux Data Management Studio 131
In this case, the four field name conflicts are identified and resolved in the following ways:
Matching - A new field name suggestion is accepted from a list of suggested field in the drop-down menu for each field name. (The suggested names come from the new input table.) For example, the Address field here (from the Basic Pattern Analysis node) is matched to the STREET_ADDR field from the Data Source node. You can match fields when you want to preserve the name from the original input table in the output field name.
Removing - The [Remove] item in the drop-down list for the field is selected for the remaining fields. This item removes the selected field from the Additional Outputs of the node's descendants, if applicable. This action will not resolve problems created when the field is required by a descendant node to complete its processing. Therefore, you might need to remove the field from the Selected field in a descendant node.
After you set these options, click OK to close the dialog and save your selections. The next task is to update the descendant node.
Update the Descendant Node
You must open the descendant data job node (Basic Pattern Analysis, in this case) and adjust the field name settings before you can run the data job successfully. You can see the impact of the Field Name Conflict dialog on the second node in the following display:
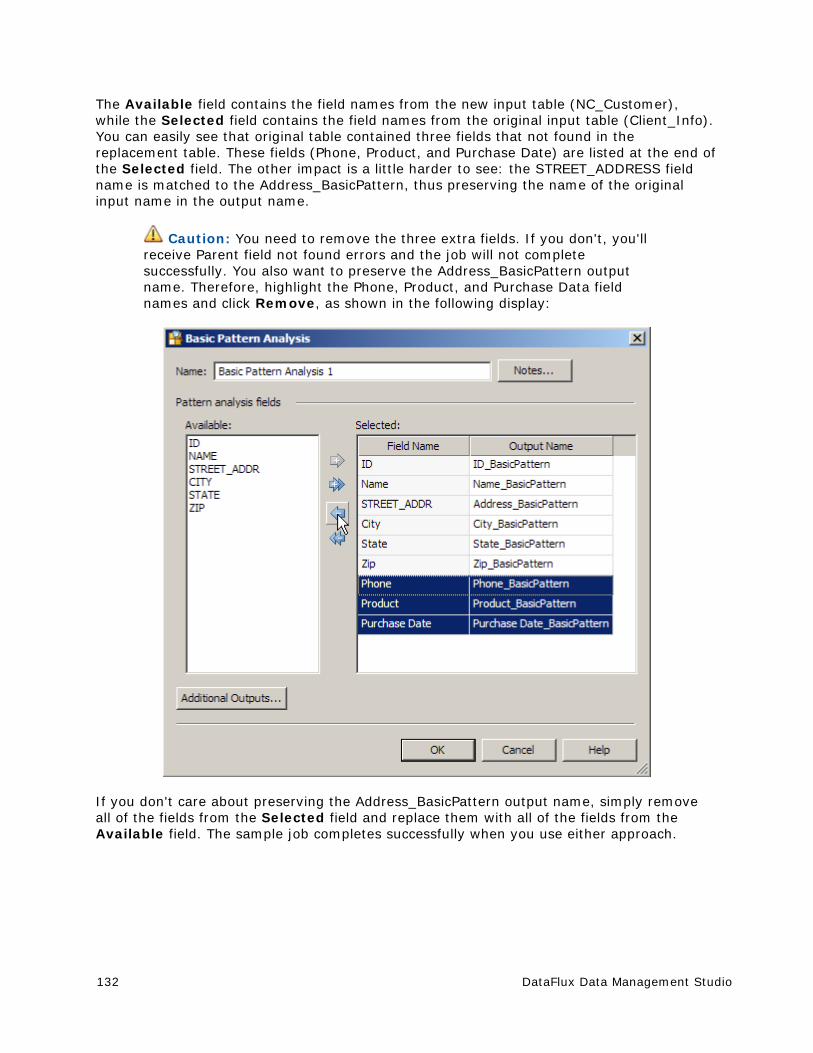
132 DataFlux Data Management Studio
The Available field contains the field names from the new input table (NC_Customer), while the Selected field contains the field names from the original input table (Client_Info). You can easily see that original table contained three fields that not found in the replacement table. These fields (Phone, Product, and Purchase Date) are listed at the end of the Selected field. The other impact is a little harder to see: the STREET_ADDRESS field name is matched to the Address_BasicPattern, thus preserving the name of the original input name in the output name.
Caution: You need to remove the three extra fields. If you don't, you'll receive Parent field not found errors and the job will not complete successfully. You also want to preserve the Address_BasicPattern output name. Therefore, highlight the Phone, Product, and Purchase Data field names and click Remove, as shown in the following display:
If you don't care about preserving the Address_BasicPattern output name, simply remove all of the fields from the Selected field and replace them with all of the fields from the Available field. The sample job completes successfully when you use either approach.
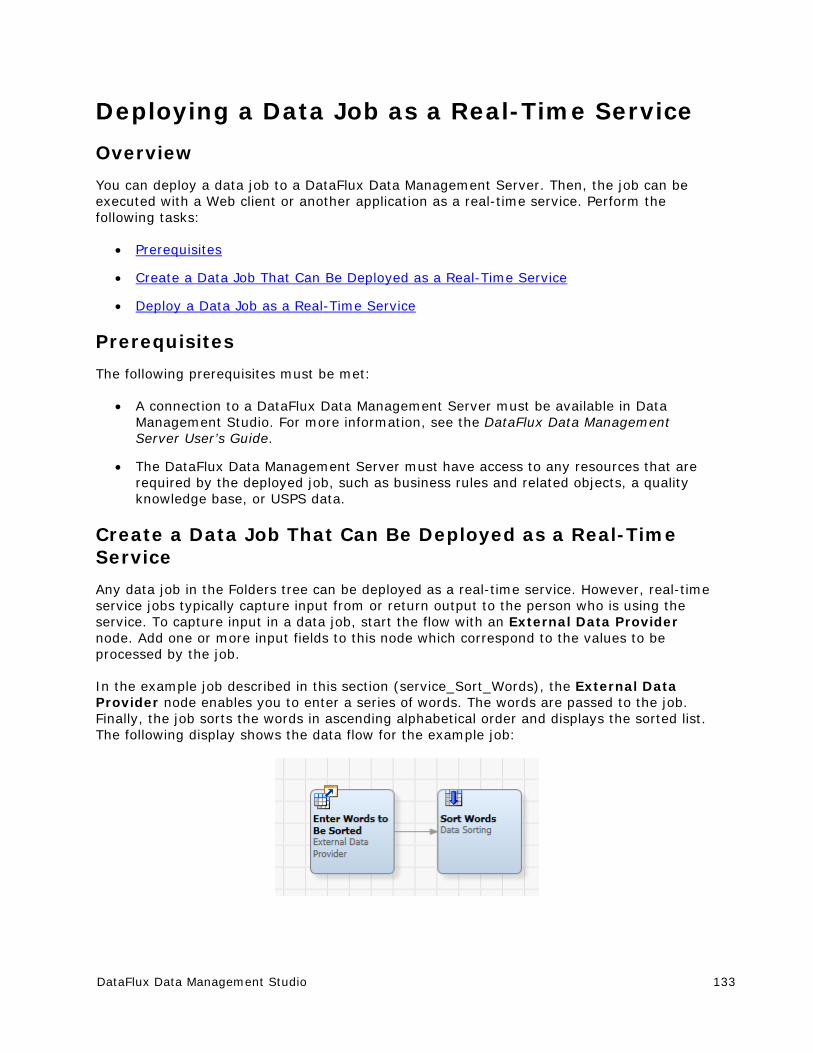
DataFlux Data Management Studio 133
Deploying a Data Job as a Real-Time Service
Overview
You can deploy a data job to a DataFlux Data Management Server. Then, the job can be executed with a Web client or another application as a real-time service. Perform the following tasks:
Prerequisites
Create a Data Job That Can Be Deployed as a Real-Time Service
Deploy a Data Job as a Real-Time Service
Prerequisites
The following prerequisites must be met:
A connection to a DataFlux Data Management Server must be available in Data Management Studio. For more information, see the DataFlux Data Management Server User’s Guide.
The DataFlux Data Management Server must have access to any resources that are required by the deployed job, such as business rules and related objects, a quality knowledge base, or USPS data.
Create a Data Job That Can Be Deployed as a Real-Time Service
Any data job in the Folders tree can be deployed as a real-time service. However, real-time service jobs typically capture input from or return output to the person who is using the service. To capture input in a data job, start the flow with an External Data Provider node. Add one or more input fields to this node which correspond to the values to be processed by the job.
In the example job described in this section (service_Sort_Words), the External Data Provider node enables you to enter a series of words. The words are passed to the job. Finally, the job sorts the words in ascending alphabetical order and displays the sorted list. The following display shows the data flow for the example job:
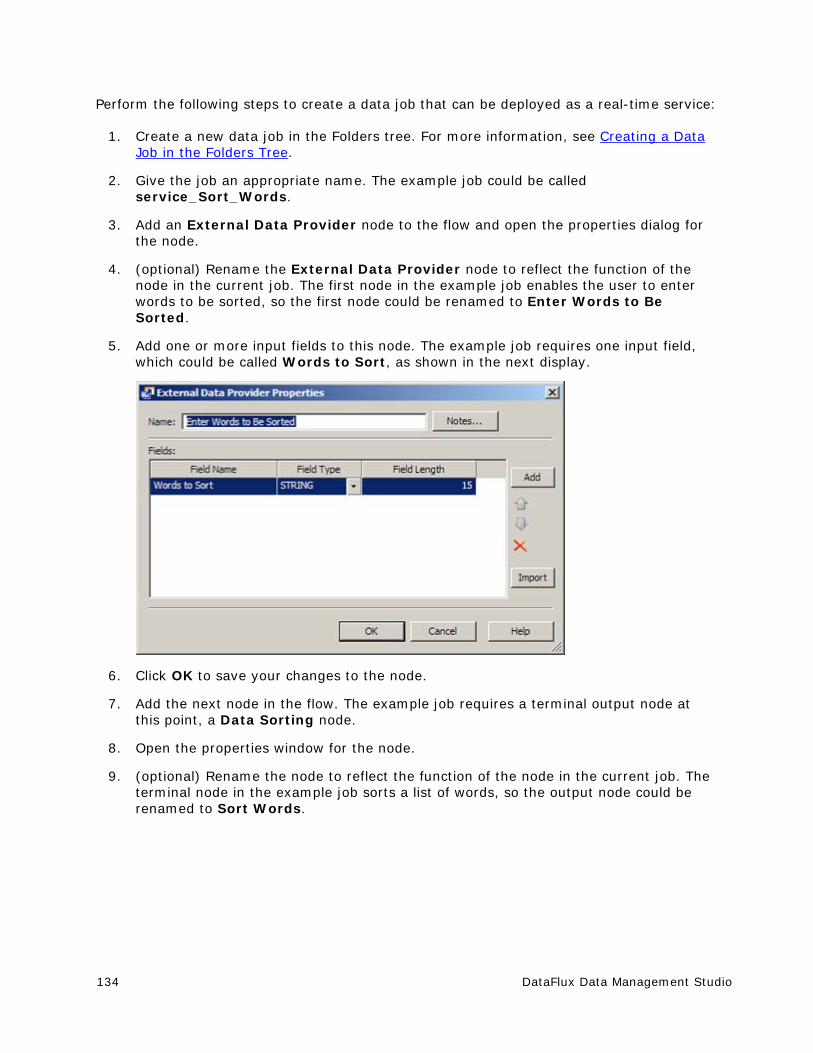
134 DataFlux Data Management Studio
Perform the following steps to create a data job that can be deployed as a real-time service:
1. Create a new data job in the Folders tree. For more information, see Creating a Data Job in the Folders Tree.
2. Give the job an appropriate name. The example job could be called service_Sort_Words.
3. Add an External Data Provider node to the flow and open the properties dialog for the node.
4. (optional) Rename the External Data Provider node to reflect the function of the node in the current job. The first node in the example job enables the user to enter words to be sorted, so the first node could be renamed to Enter Words to Be Sorted.
5. Add one or more input fields to this node. The example job requires one input field, which could be called Words to Sort, as shown in the next display.
6. Click OK to save your changes to the node.
7. Add the next node in the flow. The example job requires a terminal output node at this point, a Data Sorting node.
8. Open the properties window for the node.
9. (optional) Rename the node to reflect the function of the node in the current job. The terminal node in the example job sorts a list of words, so the output node could be renamed to Sort Words.
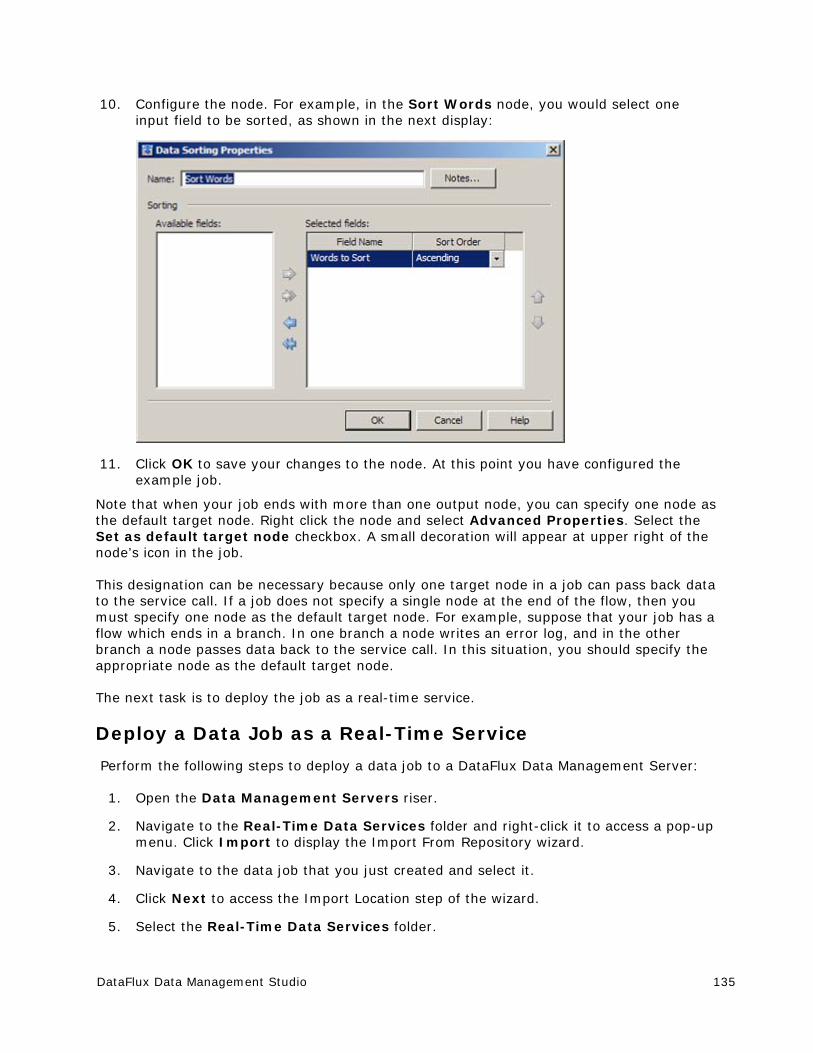
DataFlux Data Management Studio 135
10. Configure the node. For example, in the Sort Words node, you would select one input field to be sorted, as shown in the next display:
11. Click OK to save your changes to the node. At this point you have configured the example job.
Note that when your job ends with more than one output node, you can specify one node as the default target node. Right click the node and select Advanced Properties. Select the Set as default target node checkbox. A small decoration will appear at upper right of the node’s icon in the job.
This designation can be necessary because only one target node in a job can pass back data to the service call. If a job does not specify a single node at the end of the flow, then you must specify one node as the default target node. For example, suppose that your job has a flow which ends in a branch. In one branch a node writes an error log, and in the other branch a node passes data back to the service call. In this situation, you should specify the appropriate node as the default target node.
The next task is to deploy the job as a real-time service.
Deploy a Data Job as a Real-Time Service
Perform the following steps to deploy a data job to a DataFlux Data Management Server:
1. Open the Data Management Servers riser.
2. Navigate to the Real-Time Data Services folder and right-click it to access a pop-up menu. Click Import to display the Import From Repository wizard.
3. Navigate to the data job that you just created and select it.
4. Click Next to access the Import Location step of the wizard.
5. Select the Real-Time Data Services folder.

136 DataFlux Data Management Studio
6. Click Import.
7. Click Close to close the wizard. The job has been deployed to the server. The next task is to verify that the deployed job will execute properly as a real-time-service.
8. Right-click the deployed job, and then click Test in the pop-up menu.
9. Enter appropriate input. For the example job, you would enter a list of words in the Words to Sort field.
10. Click Test to test the inputs that you entered. The results of a test for the example job are shown in the following display:
The data job has now been deployed as a service and tested. It can be accessed and run with a Web client or another application.

DataFlux Data Management Studio 137
Running Jobs from the Command Line
Overview
You can use the dmpexec command to execute profiles, data jobs, or process jobs from the command line.
Collect Information Needed to Run the Command
Review the options that you can specify in a dmpexec command. The most commonly used options are listed in the following table.
Option Purpose Example
-j <file> Executes the job in the specified file
-j "C:\<JobLocation\JobName.JobExtension>"
-l <file> Writes the log to the specified file
-l "C:\<LogLocation>\Log.txt"
-c <file> Reads configuration from -c "C:\<ConfigLocation\FileName.cfg>"
-i <key>=<value>
Specifies job input variables
-i "PATH_OUT=C:\TEMP\" -i "FILE_OUT=out.txt"
-b <key>=<value>
Specifies job options for the job being run
-b "REPOSITORY=TestingRepos"
-o <key>=<value>
Overrides settings in config file
-o "MACRO=X"
You can use the -i, -b, and -o options multiple times to set multiple values.
Then, identify the paths to the jobs that you want to run. If you will be submitting jobs through the command line on a regular basis, you might want to document the physical paths to data jobs and process jobs that you work with. The interface displays the paths to these objects, but only in an abbreviated form. You can perform the following steps to identify the paths to data jobs and process jobs:
1. Go to the Administration riser and select the repository that contains the job that you want to run from the command line.
2. Note the path that is displayed in the File storage field for the repository.
3. Open Windows Explorer and navigate to the final directory in the path. Then navigate further until you find the folder that contains the job that you need. For example, the fully qualified path to the dfsample_concatenate data job might be similar to the following:
C:\Documents and Settings\All Users\Application Data\DataFlux\DataManagement\2.1\Repository\Sample\FileStorage\sample\Data Jobs\dfsample_concatenate.ddf.
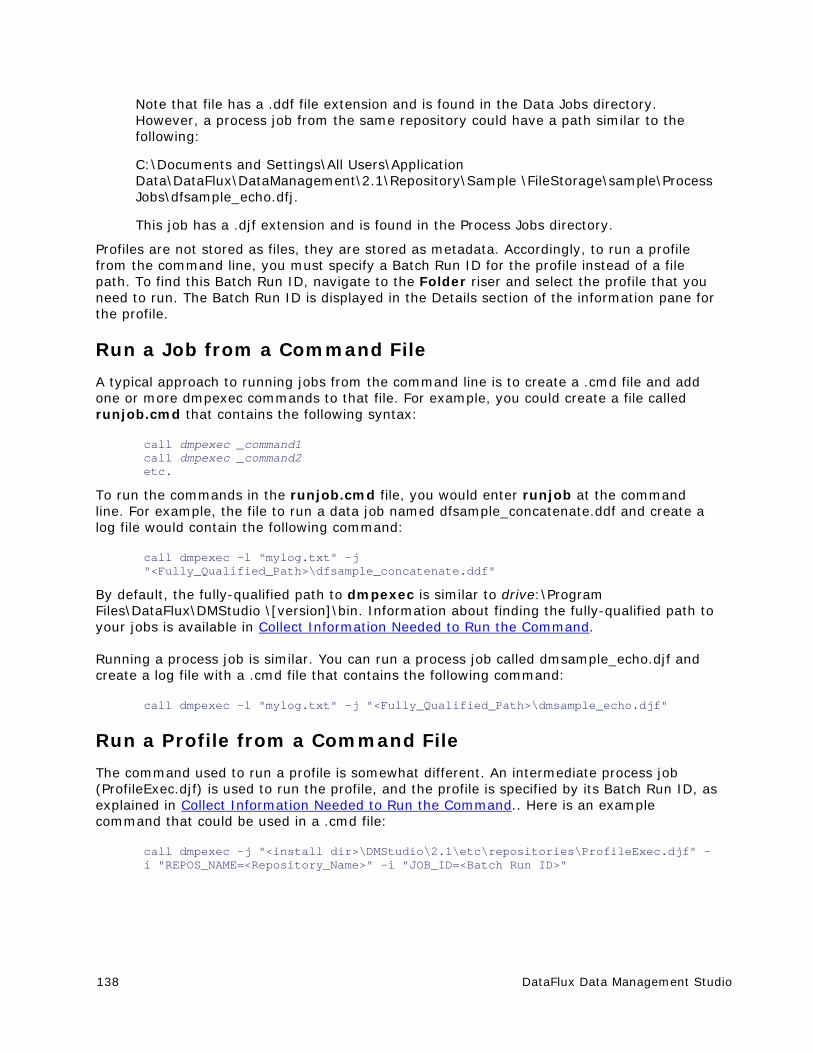
138 DataFlux Data Management Studio
Note that file has a .ddf file extension and is found in the Data Jobs directory. However, a process job from the same repository could have a path similar to the following:
C:\Documents and Settings\All Users\Application Data\DataFlux\DataManagement\2.1\Repository\Sample \FileStorage\sample\Process Jobs\dfsample_echo.dfj.
This job has a .djf extension and is found in the Process Jobs directory.
Profiles are not stored as files, they are stored as metadata. Accordingly, to run a profile from the command line, you must specify a Batch Run ID for the profile instead of a file path. To find this Batch Run ID, navigate to the Folder riser and select the profile that you need to run. The Batch Run ID is displayed in the Details section of the information pane for the profile.
Run a Job from a Command File
A typical approach to running jobs from the command line is to create a .cmd file and add one or more dmpexec commands to that file. For example, you could create a file called runjob.cmd that contains the following syntax:
call dmpexec _command1 call dmpexec _command2 etc.
To run the commands in the runjob.cmd file, you would enter runjob at the command line. For example, the file to run a data job named dfsample_concatenate.ddf and create a log file would contain the following command:
call dmpexec -l "mylog.txt" -j "<Fully_Qualified_Path>\dfsample_concatenate.ddf"
By default, the fully-qualified path to dmpexec is similar to drive:\Program Files\DataFlux\DMStudio \[version]\bin. Information about finding the fully-qualified path to your jobs is available in Collect Information Needed to Run the Command.
Running a process job is similar. You can run a process job called dmsample_echo.djf and create a log file with a .cmd file that contains the following command:
call dmpexec -l "mylog.txt" -j "<Fully_Qualified_Path>\dmsample_echo.djf"
Run a Profile from a Command File
The command used to run a profile is somewhat different. An intermediate process job (ProfileExec.djf) is used to run the profile, and the profile is specified by its Batch Run ID, as explained in Collect Information Needed to Run the Command.. Here is an example command that could be used in a .cmd file:
call dmpexec -j "<install dir>\DMStudio\2.1\etc\repositories\ProfileExec.djf" -i "REPOS_NAME=<Repository_Name>" -i "JOB_ID=<Batch Run ID>"

DataFlux Data Management Studio 139
Set the Maximum Pooled Process Option
When processes are reused too often, performance is sometimes reduced. Fortunately, you can specify the POOLING\MAXIMUM_USE option in the app.cfg file for Data Management Studio that will control the maximum number of times a pooled process may be reused. After the pooled process has been used the specified number of times, it is terminated. For information about the app.cfg file, see "Configuration Files" in the DataFlux Data Management Studio Installation and Configuration Guide.
Examine Return Codes from Command Line Jobs
You can review the return code from a job that you run from the command line. This code can be useful when you need to troubleshoot a failed job. The return codes are listed in the following table.
Return Code Description 0 Success
1 Job initialization failure
2 Job was cancelled
3 Job failed during execution
Using Text Files in a Data Job
Overview
You can include delimited text files or fixed-width text files as inputs or outputs in data jobs. Add an appropriate node to a data job. Then, you can use it to process your text file data.
Specifying Delimited Text File Inputs
You can add a Text File Input node to a data job to use a delimited text file as an input to a data job. Perform the following tasks:
Review the Text File
Configure Text File Parameters
Define Text File Fields
Preview the Text File Input
Review the Text File
You should examine the structure and content of the text file in a text editor. Be sure to note features such as whether the first line contains headings, whether the file contains text qualifiers, and what delimiters are used.
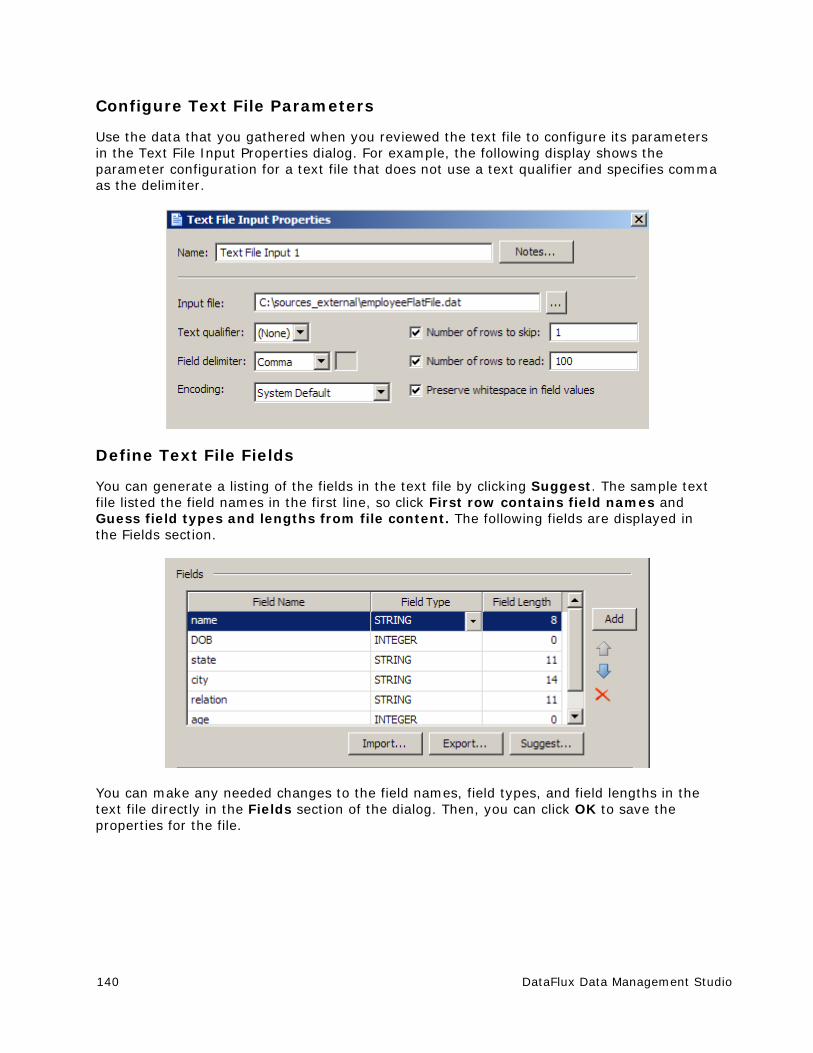
140 DataFlux Data Management Studio
Configure Text File Parameters
Use the data that you gathered when you reviewed the text file to configure its parameters in the Text File Input Properties dialog. For example, the following display shows the parameter configuration for a text file that does not use a text qualifier and specifies comma as the delimiter.
Define Text File Fields
You can generate a listing of the fields in the text file by clicking Suggest. The sample text file listed the field names in the first line, so click First row contains field names and Guess field types and lengths from file content. The following fields are displayed in the Fields section.
You can make any needed changes to the field names, field types, and field lengths in the text file directly in the Fields section of the dialog. Then, you can click OK to save the properties for the file.
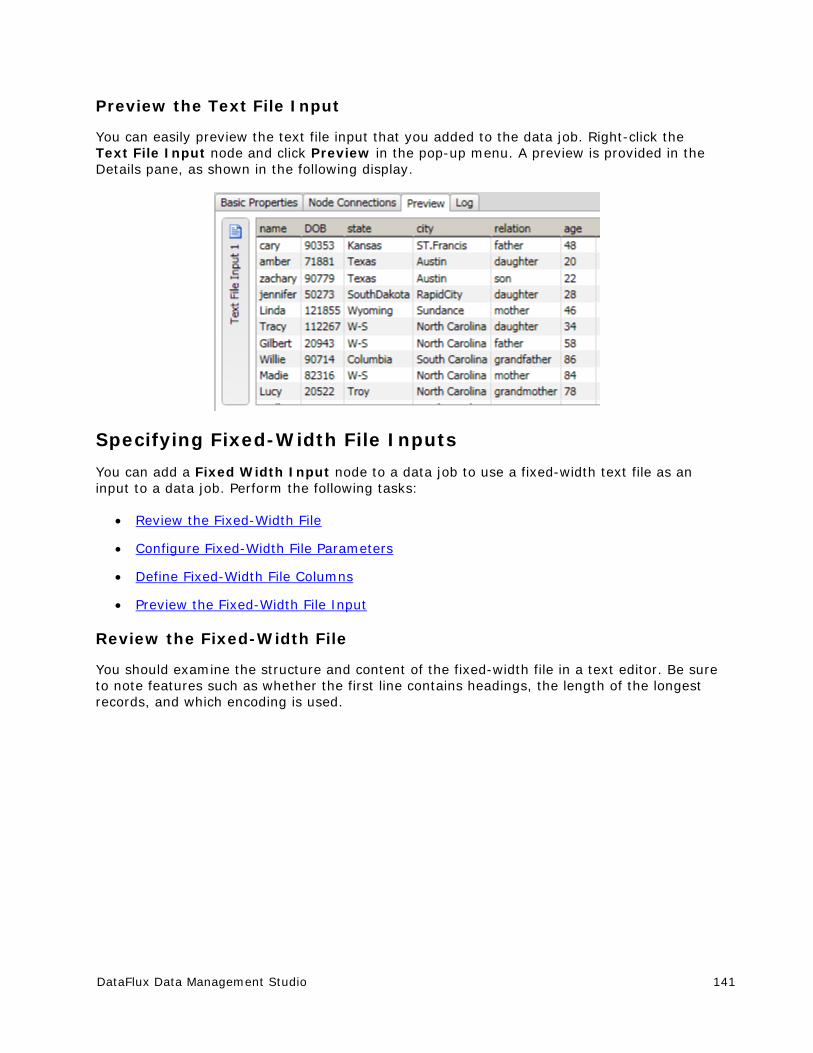
DataFlux Data Management Studio 141
Preview the Text File Input
You can easily preview the text file input that you added to the data job. Right-click the Text File Input node and click Preview in the pop-up menu. A preview is provided in the Details pane, as shown in the following display.
Specifying Fixed-Width File Inputs
You can add a Fixed Width Input node to a data job to use a fixed-width text file as an input to a data job. Perform the following tasks:
Review the Fixed-Width File
Configure Fixed-Width File Parameters
Define Fixed-Width File Columns
Preview the Fixed-Width File Input
Review the Fixed-Width File
You should examine the structure and content of the fixed-width file in a text editor. Be sure to note features such as whether the first line contains headings, the length of the longest records, and which encoding is used.
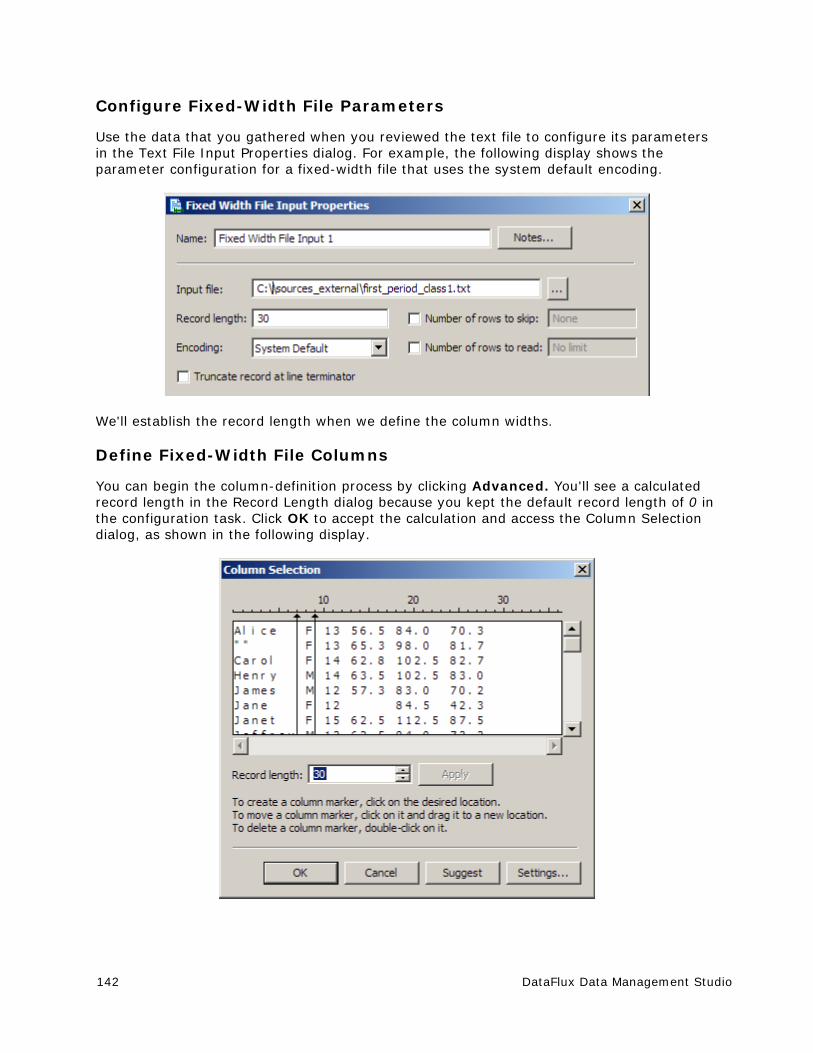
142 DataFlux Data Management Studio
Configure Fixed-Width File Parameters
Use the data that you gathered when you reviewed the text file to configure its parameters in the Text File Input Properties dialog. For example, the following display shows the parameter configuration for a fixed-width file that uses the system default encoding.
We'll establish the record length when we define the column widths.
Define Fixed-Width File Columns
You can begin the column-definition process by clicking Advanced. You'll see a calculated record length in the Record Length dialog because you kept the default record length of 0 in the configuration task. Click OK to accept the calculation and access the Column Selection dialog, as shown in the following display.
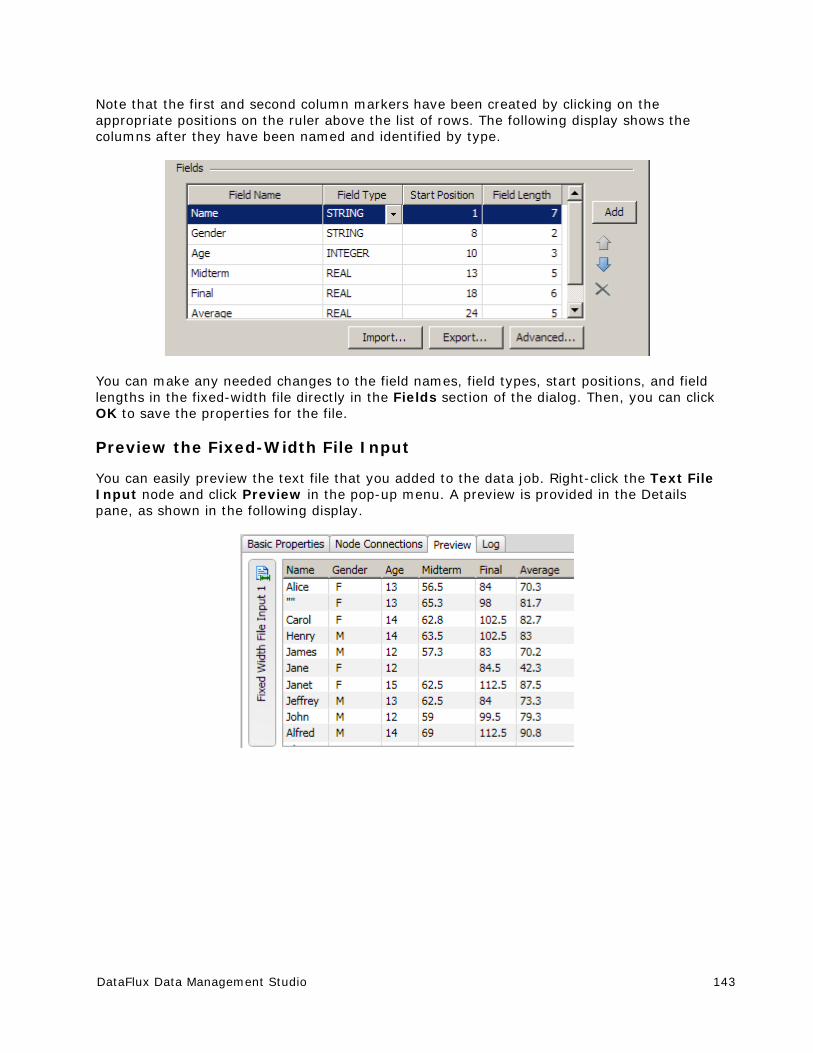
DataFlux Data Management Studio 143
Note that the first and second column markers have been created by clicking on the appropriate positions on the ruler above the list of rows. The following display shows the columns after they have been named and identified by type.
You can make any needed changes to the field names, field types, start positions, and field lengths in the fixed-width file directly in the Fields section of the dialog. Then, you can click OK to save the properties for the file.
Preview the Fixed-Width File Input
You can easily preview the text file that you added to the data job. Right-click the Text File Input node and click Preview in the pop-up menu. A preview is provided in the Details pane, as shown in the following display.
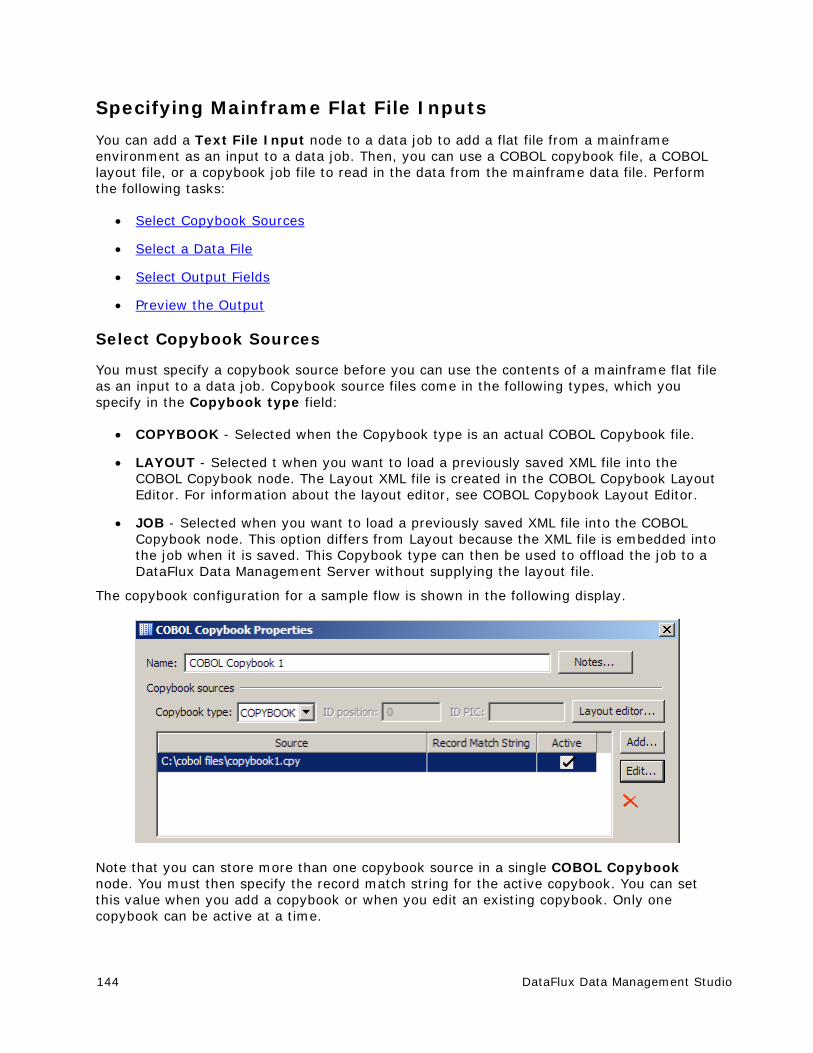
144 DataFlux Data Management Studio
Specifying Mainframe Flat File Inputs
You can add a Text File Input node to a data job to add a flat file from a mainframe environment as an input to a data job. Then, you can use a COBOL copybook file, a COBOL layout file, or a copybook job file to read in the data from the mainframe data file. Perform the following tasks:
Select Copybook Sources
Select a Data File
Select Output Fields
Preview the Output
Select Copybook Sources
You must specify a copybook source before you can use the contents of a mainframe flat file as an input to a data job. Copybook source files come in the following types, which you specify in the Copybook type field:
COPYBOOK - Selected when the Copybook type is an actual COBOL Copybook file.
LAYOUT - Selected t when you want to load a previously saved XML file into the COBOL Copybook node. The Layout XML file is created in the COBOL Copybook Layout Editor. For information about the layout editor, see COBOL Copybook Layout Editor.
JOB - Selected when you want to load a previously saved XML file into the COBOL Copybook node. This option differs from Layout because the XML file is embedded into the job when it is saved. This Copybook type can then be used to offload the job to a DataFlux Data Management Server without supplying the layout file.
The copybook configuration for a sample flow is shown in the following display.
Note that you can store more than one copybook source in a single COBOL Copybook node. You must then specify the record match string for the active copybook. You can set this value when you add a copybook or when you edit an existing copybook. Only one copybook can be active at a time.
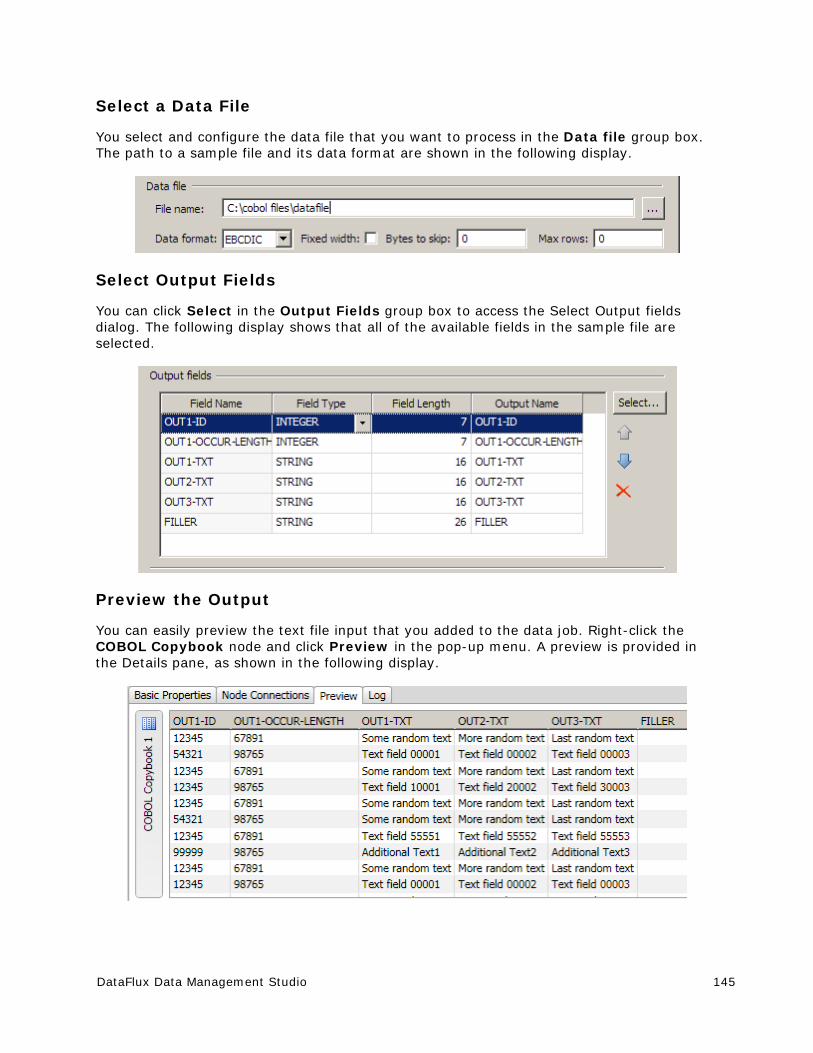
DataFlux Data Management Studio 145
Select a Data File
You select and configure the data file that you want to process in the Data file group box. The path to a sample file and its data format are shown in the following display.
Select Output Fields
You can click Select in the Output Fields group box to access the Select Output fields dialog. The following display shows that all of the available fields in the sample file are selected.
Preview the Output
You can easily preview the text file input that you added to the data job. Right-click the COBOL Copybook node and click Preview in the pop-up menu. A preview is provided in the Details pane, as shown in the following display.
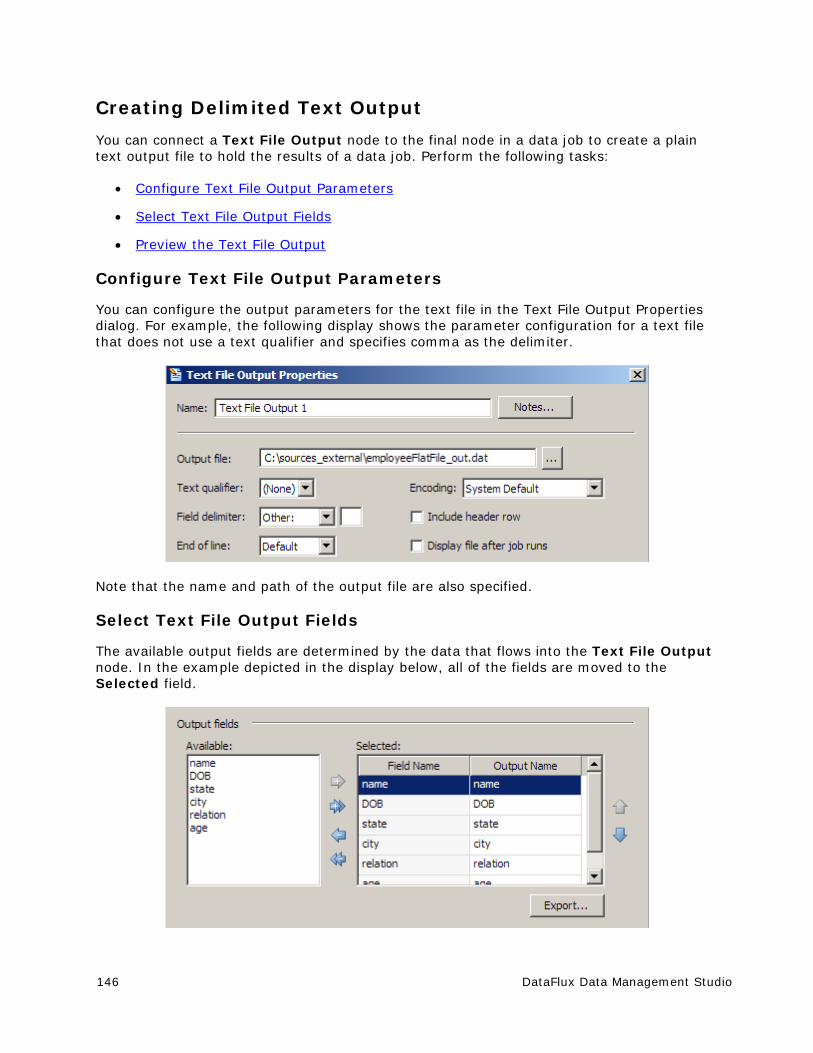
146 DataFlux Data Management Studio
Creating Delimited Text Output
You can connect a Text File Output node to the final node in a data job to create a plain text output file to hold the results of a data job. Perform the following tasks:
Configure Text File Output Parameters
Select Text File Output Fields
Preview the Text File Output
Configure Text File Output Parameters
You can configure the output parameters for the text file in the Text File Output Properties dialog. For example, the following display shows the parameter configuration for a text file that does not use a text qualifier and specifies comma as the delimiter.
Note that the name and path of the output file are also specified.
Select Text File Output Fields
The available output fields are determined by the data that flows into the Text File Output node. In the example depicted in the display below, all of the fields are moved to the Selected field.
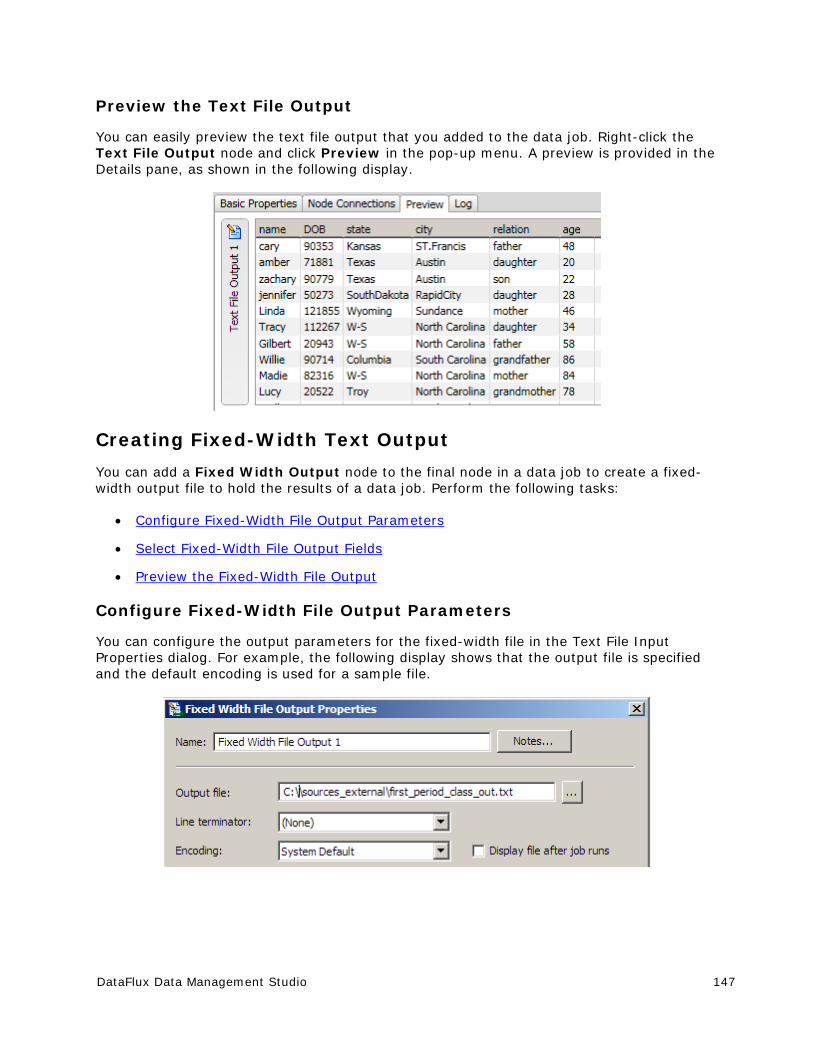
DataFlux Data Management Studio 147
Preview the Text File Output
You can easily preview the text file output that you added to the data job. Right-click the Text File Output node and click Preview in the pop-up menu. A preview is provided in the Details pane, as shown in the following display.
Creating Fixed-Width Text Output
You can add a Fixed Width Output node to the final node in a data job to create a fixed-width output file to hold the results of a data job. Perform the following tasks:
Configure Fixed-Width File Output Parameters
Select Fixed-Width File Output Fields
Preview the Fixed-Width File Output
Configure Fixed-Width File Output Parameters
You can configure the output parameters for the fixed-width file in the Text File Input Properties dialog. For example, the following display shows that the output file is specified and the default encoding is used for a sample file.
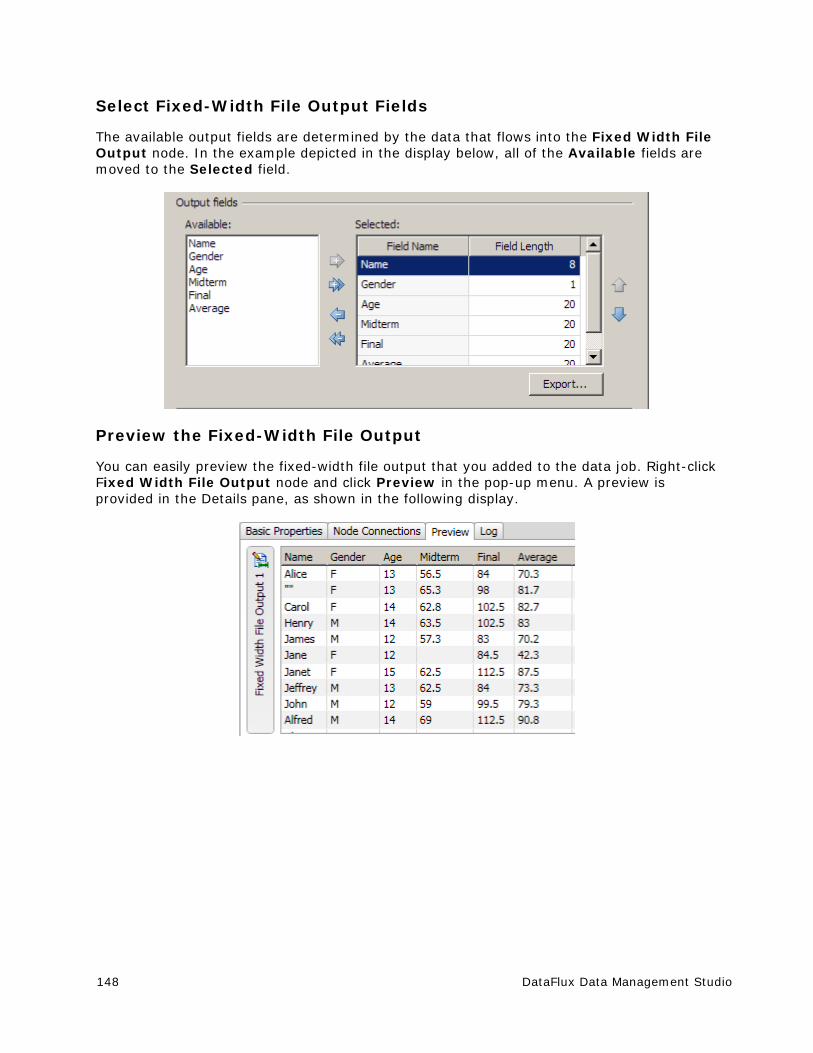
148 DataFlux Data Management Studio
Select Fixed-Width File Output Fields
The available output fields are determined by the data that flows into the Fixed Width File Output node. In the example depicted in the display below, all of the Available fields are moved to the Selected field.
Preview the Fixed-Width File Output
You can easily preview the fixed-width file output that you added to the data job. Right-click Fixed Width File Output node and click Preview in the pop-up menu. A preview is provided in the Details pane, as shown in the following display.
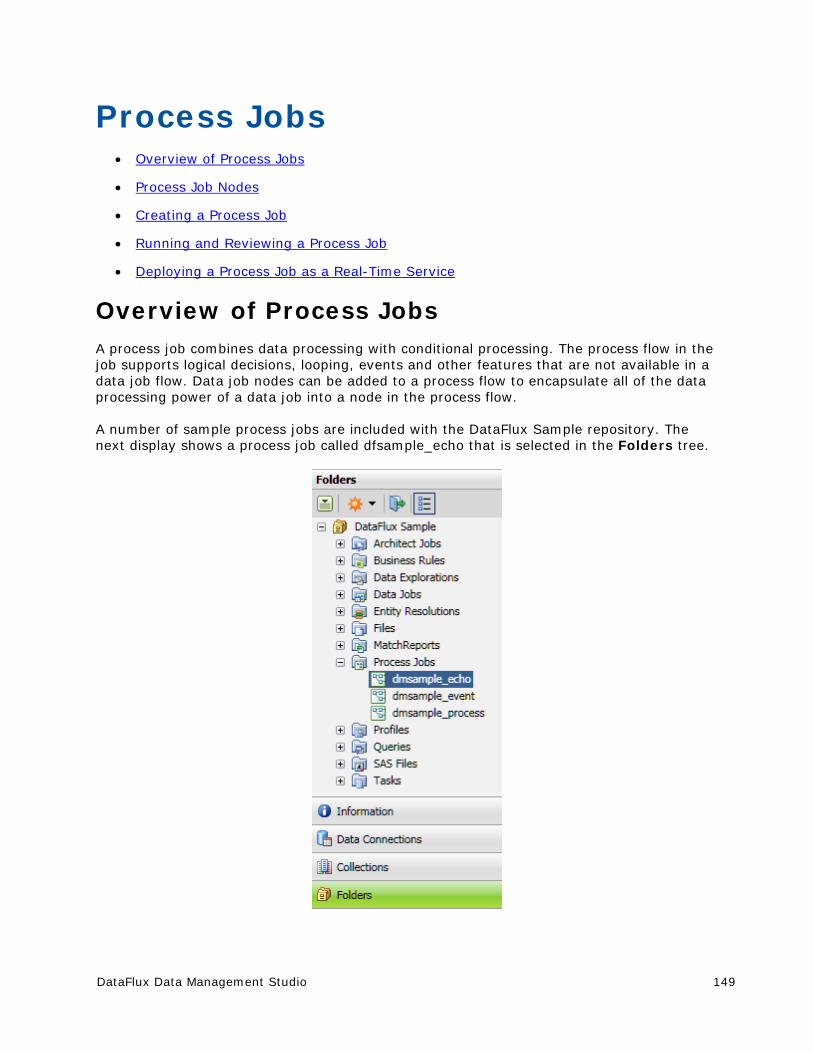
DataFlux Data Management Studio 149
Process Jobs Overview of Process Jobs
Process Job Nodes
Creating a Process Job
Running and Reviewing a Process Job
Deploying a Process Job as a Real-Time Service
Overview of Process Jobs A process job combines data processing with conditional processing. The process flow in the job supports logical decisions, looping, events and other features that are not available in a data job flow. Data job nodes can be added to a process flow to encapsulate all of the data processing power of a data job into a node in the process flow.
A number of sample process jobs are included with the DataFlux Sample repository. The next display shows a process job called dfsample_echo that is selected in the Folders tree.
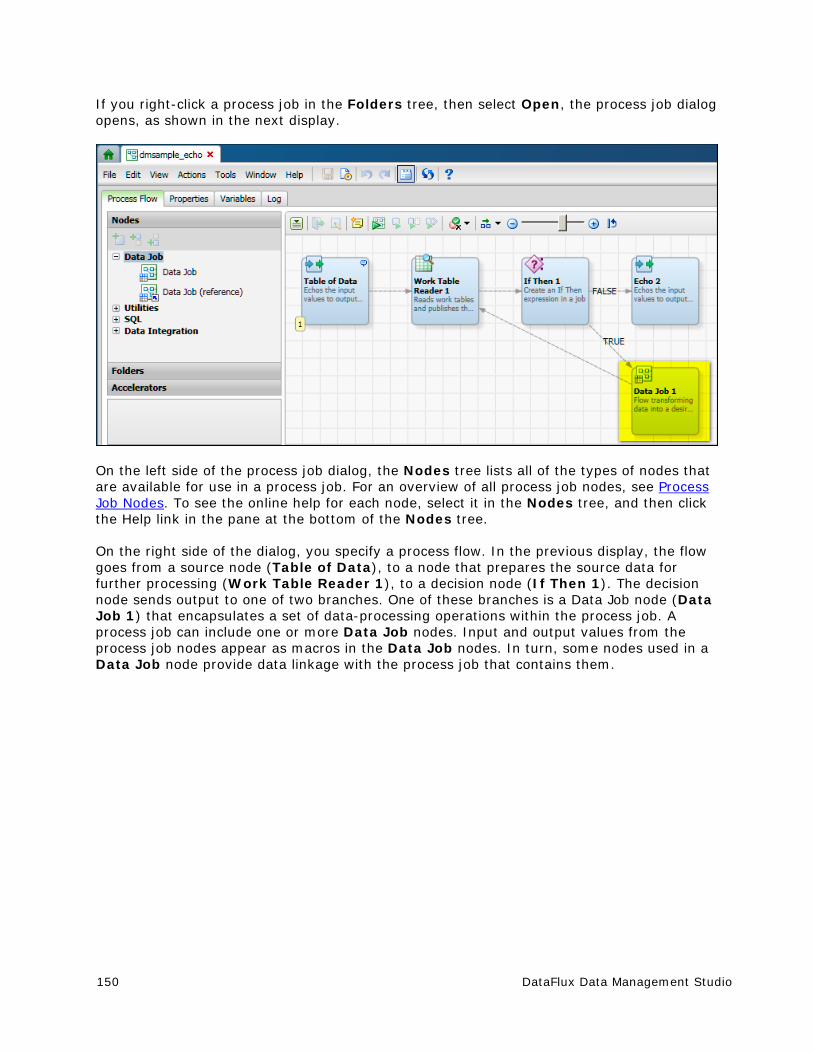
150 DataFlux Data Management Studio
If you right-click a process job in the Folders tree, then select Open, the process job dialog opens, as shown in the next display.
On the left side of the process job dialog, the Nodes tree lists all of the types of nodes that are available for use in a process job. For an overview of all process job nodes, see Process Job Nodes. To see the online help for each node, select it in the Nodes tree, and then click the Help link in the pane at the bottom of the Nodes tree.
On the right side of the dialog, you specify a process flow. In the previous display, the flow goes from a source node (Table of Data), to a node that prepares the source data for further processing (Work Table Reader 1), to a decision node (If Then 1). The decision node sends output to one of two branches. One of these branches is a Data Job node (Data Job 1) that encapsulates a set of data-processing operations within the process job. A process job can include one or more Data Job nodes. Input and output values from the process job nodes appear as macros in the Data Job nodes. In turn, some nodes used in a Data Job node provide data linkage with the process job that contains them.
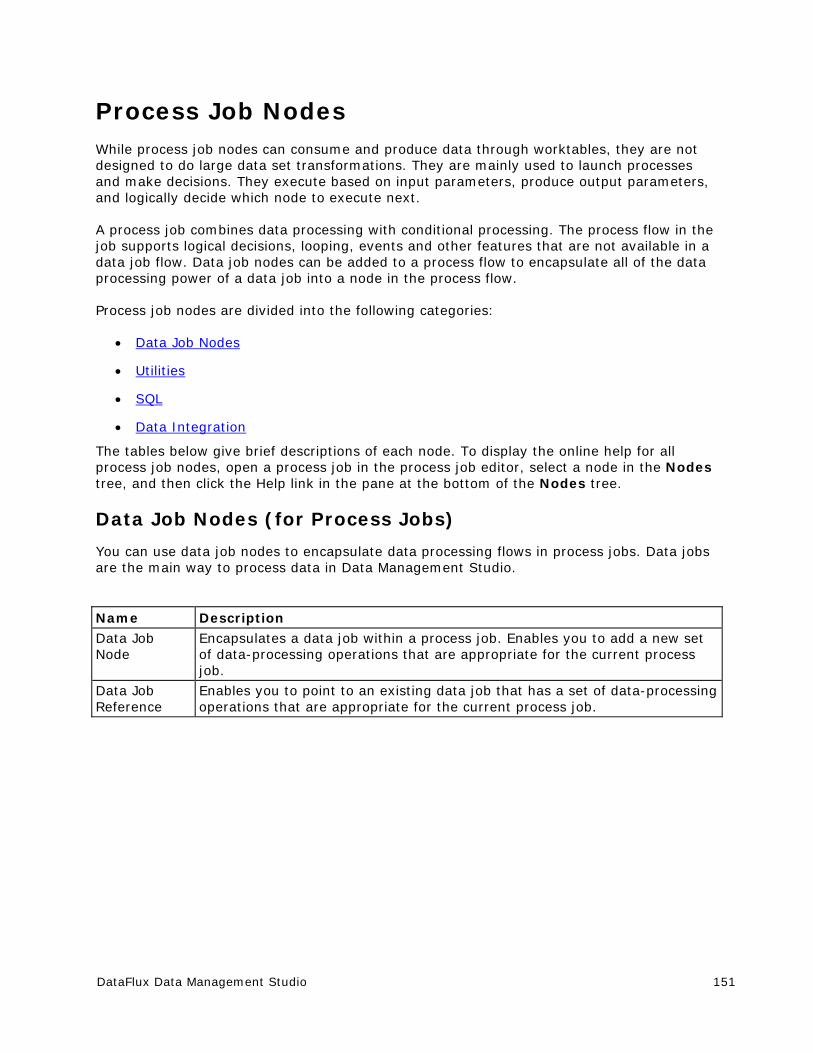
DataFlux Data Management Studio 151
Process Job Nodes While process job nodes can consume and produce data through worktables, they are not designed to do large data set transformations. They are mainly used to launch processes and make decisions. They execute based on input parameters, produce output parameters, and logically decide which node to execute next.
A process job combines data processing with conditional processing. The process flow in the job supports logical decisions, looping, events and other features that are not available in a data job flow. Data job nodes can be added to a process flow to encapsulate all of the data processing power of a data job into a node in the process flow.
Process job nodes are divided into the following categories:
Data Job Nodes
Utilities
SQL
Data Integration
The tables below give brief descriptions of each node. To display the online help for all process job nodes, open a process job in the process job editor, select a node in the Nodes tree, and then click the Help link in the pane at the bottom of the Nodes tree.
Data Job Nodes (for Process Jobs)
You can use data job nodes to encapsulate data processing flows in process jobs. Data jobs are the main way to process data in Data Management Studio.
Name Description
Data Job Node
Encapsulates a data job within a process job. Enables you to add a new set of data-processing operations that are appropriate for the current process job.
Data Job Reference
Enables you to point to an existing data job that has a set of data-processing operations that are appropriate for the current process job.

152 DataFlux Data Management Studio
Utilities
You can use the utilities nodes to help you manage your processes. For example, the event node can listen for events, and the worktable reader can read work tables generated by other flows. These nodes all work on process-related data or can handle or react to process information.
Name Description
Echo Echoes the input to the output so that the node can collect one or more outputs from other nodes into their inputs. Then, you can use their outputs as a single binding point.
Process Flow Work Table Reader
Reads worktables and publishes the data to the output.
Process Job Reference
Adds a reference to a process job to another process job. The data in the referenced process job is available to other nodes in the current process job.
Event Listen Enables you to listen for and respond to a specified event.
Expression Provides an Expression properties tab that you can use to create an expression.
Global Get/Set Reads a global job variable and enables you to set the variable to another value. In a process job, the Global Get/Set node is the only way to get string variables for nested jobs and set string variables for nested jobs. Variables on a nested job make the nested job reusable.
If Then Creates an IF THEN expression in a job.
Terminate Job Controls how a job is terminated.
SQL
You can use the SQL nodes to run SQL in parallel, manage custom SQL scripts, write your own SQL, and create or insert content into tables and so on. SQL nodes process data in that SQL processes data, but can also be used to run any SQL (such as DDL), and multiple SQL statements can be submitted from a single node.
You would use the SQL nodes in a process job to perform the following functions:
Get real ELT-type (extract, load, transform) performance improvements
Do parallel processing
Perform similar processing that cannot be done by SQL nodes in a data job.
Name Description Create Table (query reference)
Provides an SQL query that you can use as a template for creating a new table from the results of a reusable query. Then, you can add all of the query results to the new table.
Create Table Provides an SQL query that you can use as a template for creating tables
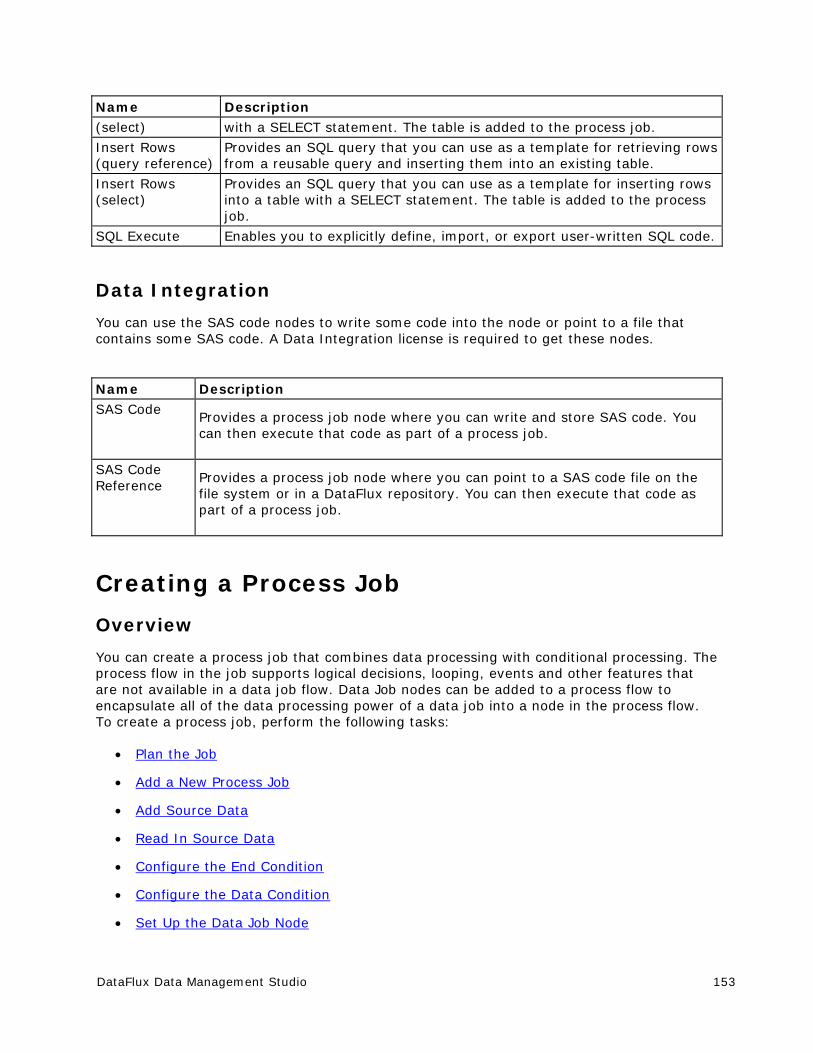
DataFlux Data Management Studio 153
Name Description (select) with a SELECT statement. The table is added to the process job.
Insert Rows (query reference)
Provides an SQL query that you can use as a template for retrieving rows from a reusable query and inserting them into an existing table.
Insert Rows (select)
Provides an SQL query that you can use as a template for inserting rows into a table with a SELECT statement. The table is added to the process job.
SQL Execute Enables you to explicitly define, import, or export user-written SQL code.
Data Integration
You can use the SAS code nodes to write some code into the node or point to a file that contains some SAS code. A Data Integration license is required to get these nodes.
Name Description SAS Code Provides a process job node where you can write and store SAS code. You
can then execute that code as part of a process job.
SAS Code Reference
Provides a process job node where you can point to a SAS code file on the file system or in a DataFlux repository. You can then execute that code as part of a process job.
Creating a Process Job
Overview
You can create a process job that combines data processing with conditional processing. The process flow in the job supports logical decisions, looping, events and other features that are not available in a data job flow. Data Job nodes can be added to a process flow to encapsulate all of the data processing power of a data job into a node in the process flow. To create a process job, perform the following tasks:
Plan the Job
Add a New Process Job
Add Source Data
Read In Source Data
Configure the End Condition
Configure the Data Condition
Set Up the Data Job Node
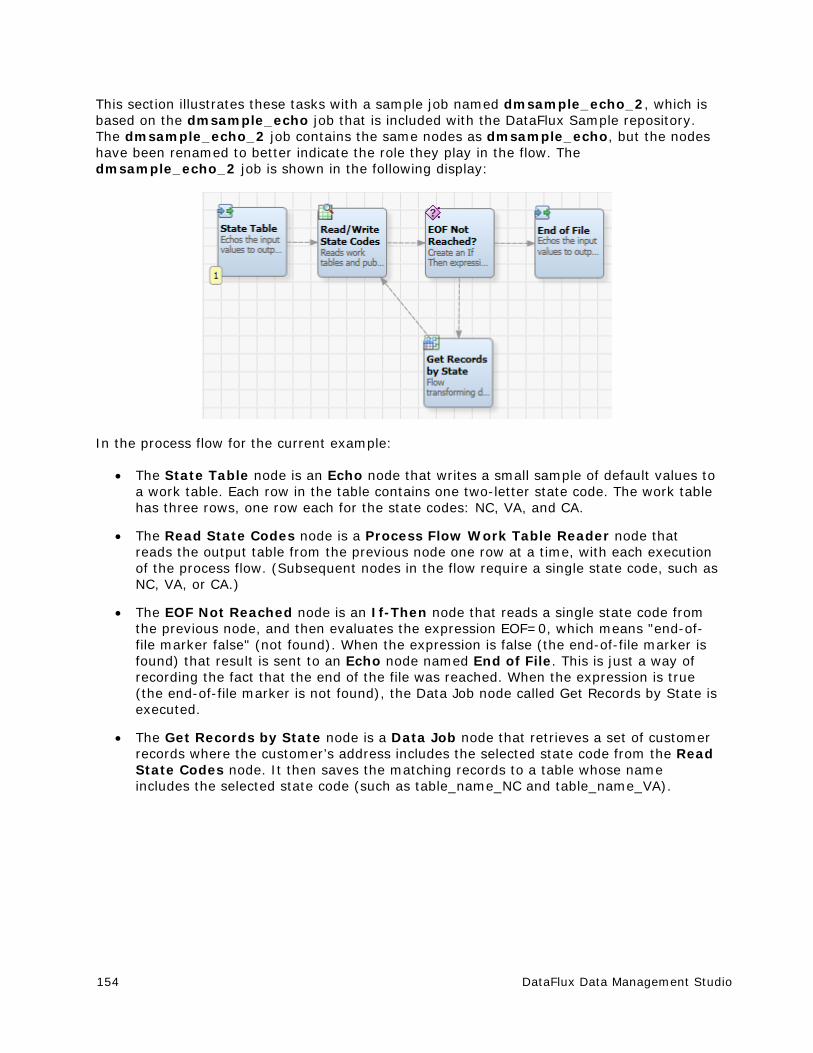
154 DataFlux Data Management Studio
This section illustrates these tasks with a sample job named dmsample_echo_2, which is based on the dmsample_echo job that is included with the DataFlux Sample repository. The dmsample_echo_2 job contains the same nodes as dmsample_echo, but the nodes have been renamed to better indicate the role they play in the flow. The dmsample_echo_2 job is shown in the following display:
In the process flow for the current example:
The State Table node is an Echo node that writes a small sample of default values to a work table. Each row in the table contains one two-letter state code. The work table has three rows, one row each for the state codes: NC, VA, and CA.
The Read State Codes node is a Process Flow Work Table Reader node that reads the output table from the previous node one row at a time, with each execution of the process flow. (Subsequent nodes in the flow require a single state code, such as NC, VA, or CA.)
The EOF Not Reached node is an If-Then node that reads a single state code from the previous node, and then evaluates the expression EOF=0, which means "end-of-file marker false" (not found). When the expression is false (the end-of-file marker is found) that result is sent to an Echo node named End of File. This is just a way of recording the fact that the end of the file was reached. When the expression is true (the end-of-file marker is not found), the Data Job node called Get Records by State is executed.
The Get Records by State node is a Data Job node that retrieves a set of customer records where the customer’s address includes the selected state code from the Read State Codes node. It then saves the matching records to a table whose name includes the selected state code (such as table_name_NC and table_name_VA).
DataFlux Data Management Studio 155
Plan the Job
The first task in creating a process job is to plan the flow. One way to start is to write a high-level description of the flow. For the current example job, the high-level description could read as follows:
Read a single state code from a table that contains a number of two-letter state codes. Retrieve a set of customer records where the customer’s address includes the selected state code. Save the matching records to a table whose name includes the selected state code. Repeat these tasks for each state in the state code table until the end-of-file marker is found.
Next, review the goals that you need to reach and determine which process job nodes are most appropriate for you to use. For an overview of all process job nodes, see Process Job Nodes. You will need nodes such as the following:
One or more nodes that will specify a data source such as a table or a text file. In a process job, a Data Job node is often used to provide source data in a form that is usable by the other nodes in the job. The sample process jobs dmsample_event and dmsample_process take this approach. In the current example, two process nodes are used: an Echo node and a Process Flow Work Table Reader node.
One or more nodes that provide conditional processing. These are the nodes that support logical decisions, looping, events and similar features. In the current example, an If-Then node (EOF Not Reached?) conditionally executes the Data Job node (Get Records by State).
One or more nodes that provide data processing. Typically you will add one or more Data Job nodes to perform data processing tasks. In the current example, the Data Job node Get Records by State retrieves a set of customer records where the customer’s address includes the selected state code from the Read State Codes node. It then saves the matching records to a table whose name includes the selected state code.
After you have a general idea of what nodes you need and how they should be connected in a flow, you are ready to add a new process job.
Add a New Process Job
You can create a new process job to create flows that support logical decisions, looping, events, error handling, parallelization, and similar tasks.
Perform the following steps to create a process job:
1. Click New in the Main Menu. Then, click Process Job.
2. Enter a name for the process job in the Name field (dmsample_echo_2, in this case).
3. Specify a location for the process job in the Save in field.
4. Click OK to save the new process job.
Note that you can also create process jobs elsewhere in DataFlux Data Management Studio.

156 DataFlux Data Management Studio
Add Source Data
A Data Job node is often used to provide source data in a form that is usable by the other nodes in a process job. The sample process jobs dmsample_event and dmsample_process take this approach. The dmsample_echo_2 job, however, uses an Echo node (which is renamed to State Table) that writes a small sample of data to a temporary work table. The temporary work table then provides the source data to the rest of the job.
Perform the following tasks to add an Echo node, rename it, and specify a set of default values:
1. Open the dmsample_echo_2 job.
2. Expand the Utilities folder in the Nodes tree and select an Echo node.
3. Drop the Echo node in the flow editor.
4. Open the Echo node and click Properties.
5. Enter a descriptive name, such as State Table, in the Name field.
6. Click Inputs.
7. Click New and select New Input Table.
8. Enter the name of your input table, such as States_Table. Click OK.
9. Click Edit Default Value.
10. Click New Row as needed to add default values for your input table. In this case, add NC, VA, and CA and click OK. The fully defined input is shown in the following display:
11. Click Outputs to verify that States_Table has been automatically created in the job's outputs.
12. Return to the sample job.
At this point, the sample job has a State Table node that creates a temporary work table named States_Table that contains three default state codes. These three state codes will be the input to the process job. However, the kind of processing that will be done in the sample job requires that one row of data be processed at a time. Accordingly, the next step is to add a node that will read one row of data in one pass of the input table.
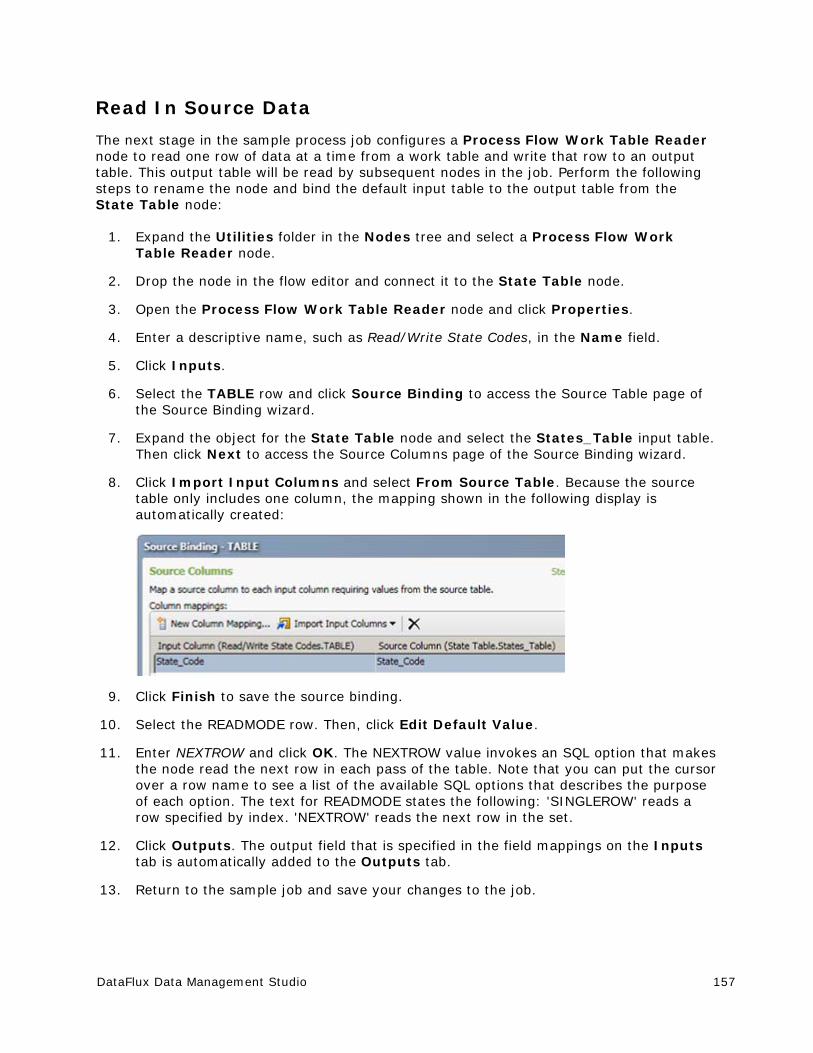
DataFlux Data Management Studio 157
Read In Source Data
The next stage in the sample process job configures a Process Flow Work Table Reader node to read one row of data at a time from a work table and write that row to an output table. This output table will be read by subsequent nodes in the job. Perform the following steps to rename the node and bind the default input table to the output table from the State Table node:
1. Expand the Utilities folder in the Nodes tree and select a Process Flow Work Table Reader node.
2. Drop the node in the flow editor and connect it to the State Table node.
3. Open the Process Flow Work Table Reader node and click Properties.
4. Enter a descriptive name, such as Read/Write State Codes, in the Name field.
5. Click Inputs.
6. Select the TABLE row and click Source Binding to access the Source Table page of the Source Binding wizard.
7. Expand the object for the State Table node and select the States_Table input table. Then click Next to access the Source Columns page of the Source Binding wizard.
8. Click Import Input Columns and select From Source Table. Because the source table only includes one column, the mapping shown in the following display is automatically created:
9. Click Finish to save the source binding.
10. Select the READMODE row. Then, click Edit Default Value.
11. Enter NEXTROW and click OK. The NEXTROW value invokes an SQL option that makes the node read the next row in each pass of the table. Note that you can put the cursor over a row name to see a list of the available SQL options that describes the purpose of each option. The text for READMODE states the following: 'SINGLEROW' reads a row specified by index. 'NEXTROW' reads the next row in the set.
12. Click Outputs. The output field that is specified in the field mappings on the Inputs tab is automatically added to the Outputs tab.
13. Return to the sample job and save your changes to the job.
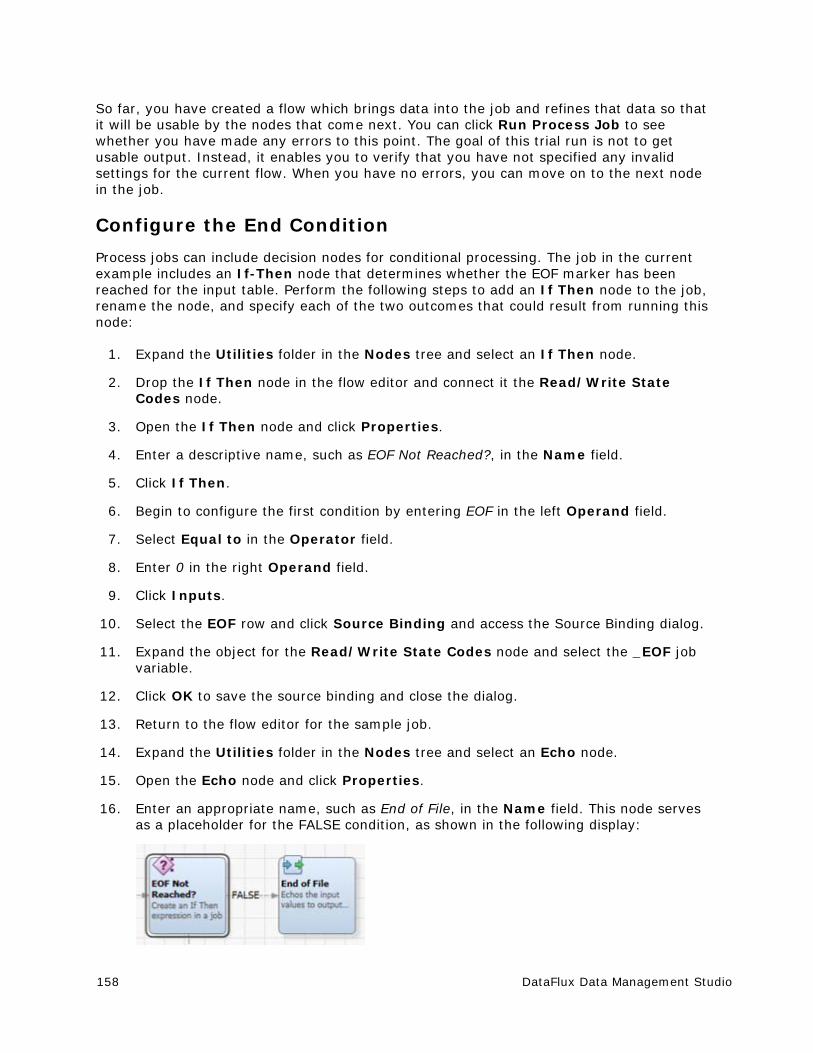
158 DataFlux Data Management Studio
So far, you have created a flow which brings data into the job and refines that data so that it will be usable by the nodes that come next. You can click Run Process Job to see whether you have made any errors to this point. The goal of this trial run is not to get usable output. Instead, it enables you to verify that you have not specified any invalid settings for the current flow. When you have no errors, you can move on to the next node in the job.
Configure the End Condition
Process jobs can include decision nodes for conditional processing. The job in the current example includes an If-Then node that determines whether the EOF marker has been reached for the input table. Perform the following steps to add an If Then node to the job, rename the node, and specify each of the two outcomes that could result from running this node:
1. Expand the Utilities folder in the Nodes tree and select an If Then node.
2. Drop the If Then node in the flow editor and connect it the Read/Write State Codes node.
3. Open the If Then node and click Properties.
4. Enter a descriptive name, such as EOF Not Reached?, in the Name field.
5. Click If Then.
6. Begin to configure the first condition by entering EOF in the left Operand field.
7. Select Equal to in the Operator field.
8. Enter 0 in the right Operand field.
9. Click Inputs.
10. Select the EOF row and click Source Binding and access the Source Binding dialog.
11. Expand the object for the Read/Write State Codes node and select the _EOF job variable.
12. Click OK to save the source binding and close the dialog.
13. Return to the flow editor for the sample job.
14. Expand the Utilities folder in the Nodes tree and select an Echo node.
15. Open the Echo node and click Properties.
16. Enter an appropriate name, such as End of File, in the Name field. This node serves as a placeholder for the FALSE condition, as shown in the following display:
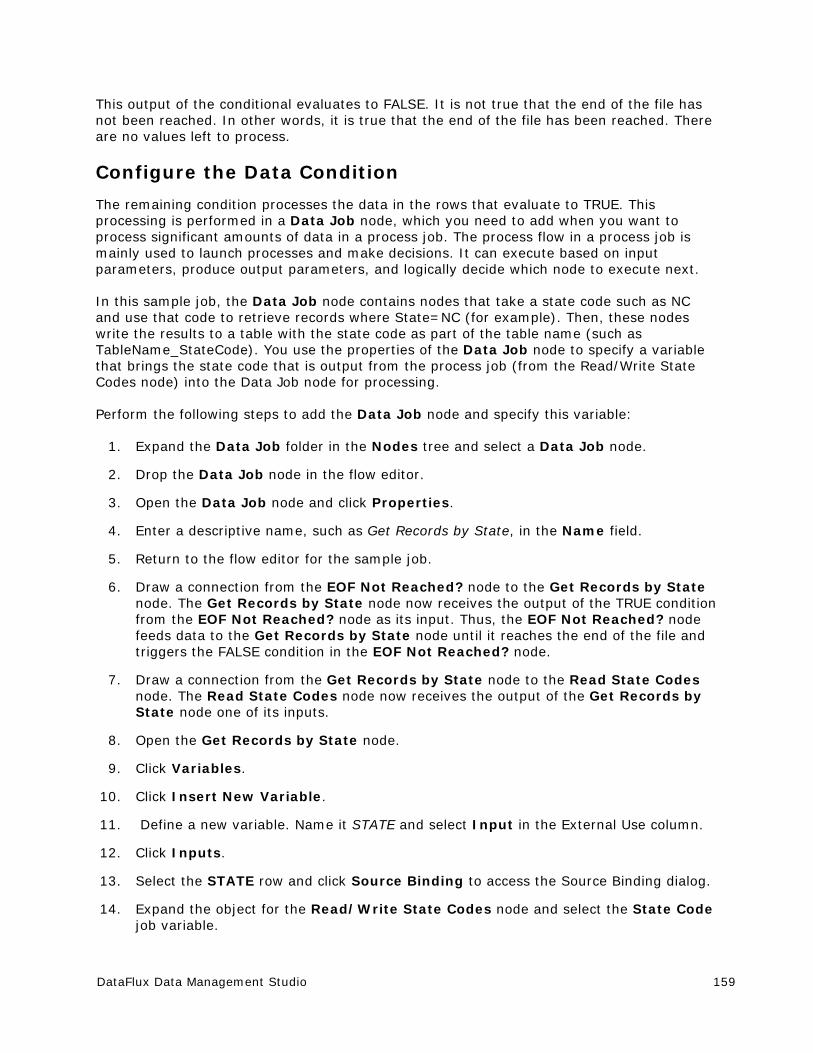
DataFlux Data Management Studio 159
This output of the conditional evaluates to FALSE. It is not true that the end of the file has not been reached. In other words, it is true that the end of the file has been reached. There are no values left to process.
Configure the Data Condition
The remaining condition processes the data in the rows that evaluate to TRUE. This processing is performed in a Data Job node, which you need to add when you want to process significant amounts of data in a process job. The process flow in a process job is mainly used to launch processes and make decisions. It can execute based on input parameters, produce output parameters, and logically decide which node to execute next.
In this sample job, the Data Job node contains nodes that take a state code such as NC and use that code to retrieve records where State=NC (for example). Then, these nodes write the results to a table with the state code as part of the table name (such as TableName_StateCode). You use the properties of the Data Job node to specify a variable that brings the state code that is output from the process job (from the Read/Write State Codes node) into the Data Job node for processing.
Perform the following steps to add the Data Job node and specify this variable:
1. Expand the Data Job folder in the Nodes tree and select a Data Job node.
2. Drop the Data Job node in the flow editor.
3. Open the Data Job node and click Properties.
4. Enter a descriptive name, such as Get Records by State, in the Name field.
5. Return to the flow editor for the sample job.
6. Draw a connection from the EOF Not Reached? node to the Get Records by State node. The Get Records by State node now receives the output of the TRUE condition from the EOF Not Reached? node as its input. Thus, the EOF Not Reached? node feeds data to the Get Records by State node until it reaches the end of the file and triggers the FALSE condition in the EOF Not Reached? node.
7. Draw a connection from the Get Records by State node to the Read State Codes node. The Read State Codes node now receives the output of the Get Records by State node one of its inputs.
8. Open the Get Records by State node.
9. Click Variables.
10. Click Insert New Variable.
11. Define a new variable. Name it STATE and select Input in the External Use column.
12. Click Inputs.
13. Select the STATE row and click Source Binding to access the Source Binding dialog.
14. Expand the object for the Read/Write State Codes node and select the State Code job variable.
160 DataFlux Data Management Studio
15. Click OK to save the source binding and close the dialog.
16. Click Node Connections to review the connections that you have established, as shown in the following display:
Set Up the Data Job Node
The data flow contained in the Get Records by State node processes the data that satisfies the TRUE condition of the if/then processing in the conditional. It uses the following nodes:
Select from CONTACTS is an SQL Query node that retrieves a set of customer records where the customer’s address includes the state code that is contained in the STATE variable. The value in the STATE variable is passed in from the process job. In the current example, the Contacts table is contained in the DataFlux Sample connection.
CONTACTS in STATE is a Data Target (Insert) node that writes the selected customer records to a table that has a STATE suffix on the table name. The current example uses the DataFlux Sample connection to write the new tables.
For the current example, we want to select all records from the Contacts table in the DataFlux Sample connection where the state field equals the value of the STATE input variable that is passed in from the process job. The following query selects those records:
select * from Contacts where state = '%%STATE%%'
Begin by adding an SQL Query node to the flow in the Get Records by State node. Then specify an appropriate SELECT statement. Perform the following steps:
1. Open the Get Records by State node.
2. Expand the Data Inputs folder in the Nodes tree and select an SQL Query node.
3. Drop the SQL Query node in the flow editor.
4. Double-click the SQL Query node to open its properties dialog. Select Open standard dialog in the dialog box that displays.
5. Enter a descriptive name, such as Select from CONTACTS, in the Name field.
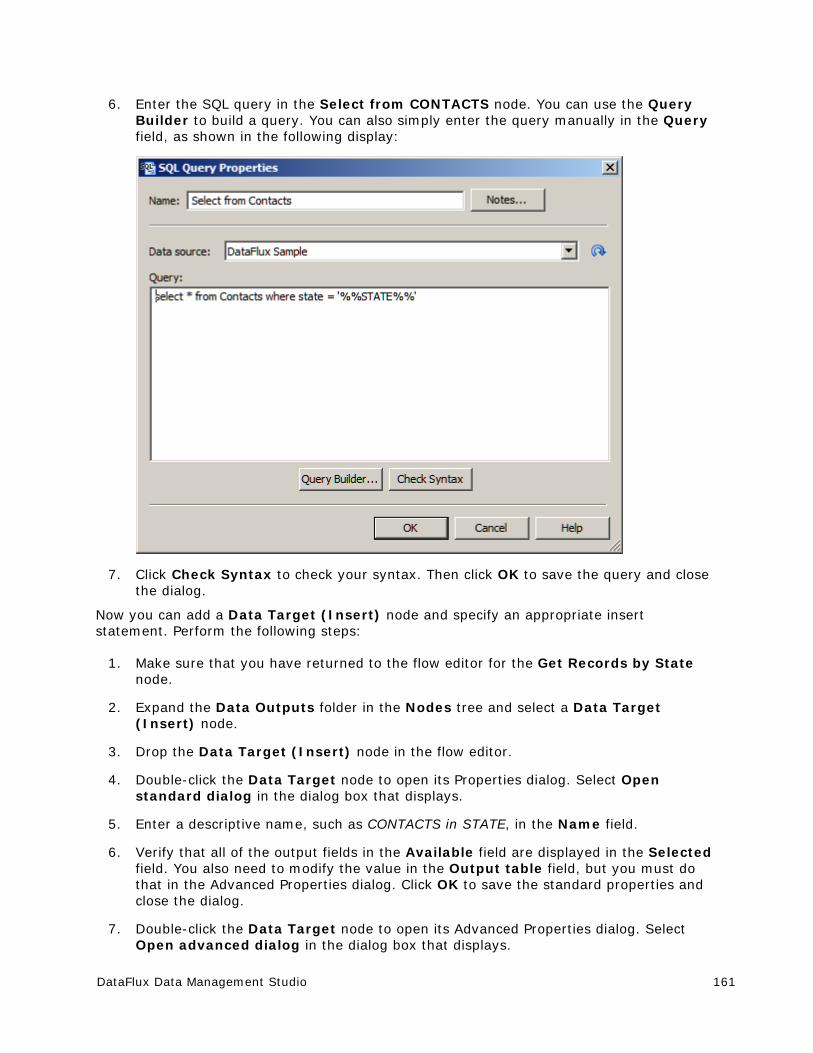
DataFlux Data Management Studio 161
6. Enter the SQL query in the Select from CONTACTS node. You can use the Query Builder to build a query. You can also simply enter the query manually in the Query field, as shown in the following display:
7. Click Check Syntax to check your syntax. Then click OK to save the query and close the dialog.
Now you can add a Data Target (Insert) node and specify an appropriate insert statement. Perform the following steps:
1. Make sure that you have returned to the flow editor for the Get Records by State node.
2. Expand the Data Outputs folder in the Nodes tree and select a Data Target (Insert) node.
3. Drop the Data Target (Insert) node in the flow editor.
4. Double-click the Data Target node to open its Properties dialog. Select Open standard dialog in the dialog box that displays.
5. Enter a descriptive name, such as CONTACTS in STATE, in the Name field.
6. Verify that all of the output fields in the Available field are displayed in the Selected field. You also need to modify the value in the Output table field, but you must do that in the Advanced Properties dialog. Click OK to save the standard properties and close the dialog.
7. Double-click the Data Target node to open its Advanced Properties dialog. Select Open advanced dialog in the dialog box that displays.

162 DataFlux Data Management Studio
8. Select the row for the DSN job variable.
9. Double-click the Default Value column and enter the DSN, which is DSN=DataFlux Sample;DFXTYPE=ODBC for this example.
10. Select the row for the TABLE_NAME job variable.
11. Double-click the Default Value column and enter the file name that includes the macro, which is dmsample_echo_%%STATE%% for this example.
12. Click OK to save the value and close the Advanced Properties dialog. The data job in the Get Records by State node should now be complete.
13. Return to the process job. Click Run Process Job to run the job.
14. Review the Log tab to ensure that the job completes successfully.
15. Check the DataFlux Sample folder in the Data Connections riser. Verify that the output tables are created (such as dmsample_echo_CA).
Running and Reviewing a Process Job
Overview
Once you have created and configured a process job, you can submit it for processing and review the output. Perform the following steps:
Run the Process Job
Review the Process Job Outputs
Run the Process Job
Perform the following steps to run the process job:
1. Open the process job, if necessary.
2. Click Show Details Pane, if needed, to view the Log tab for the process job.
3. Click Run Process Job to run the job.

DataFlux Data Management Studio 163
4. Review the log to make sure that all of the nodes in the process job have completed successfully. The following display shows the log for the sample job:
Note that you can review the SQL query code in the fifth row, which covers the SQL Query node. You can also trace the data target insert code in the next row. Note that all of the nodes completed successfully until the job is terminated in row seven, which covers the Terminate Job node. If you click a node in the process flow when the log tab is open, the log will scroll to the section that covers the selected node.
Note: You can also execute a process job from the command line. For more information, see Running Jobs from the Command Line.
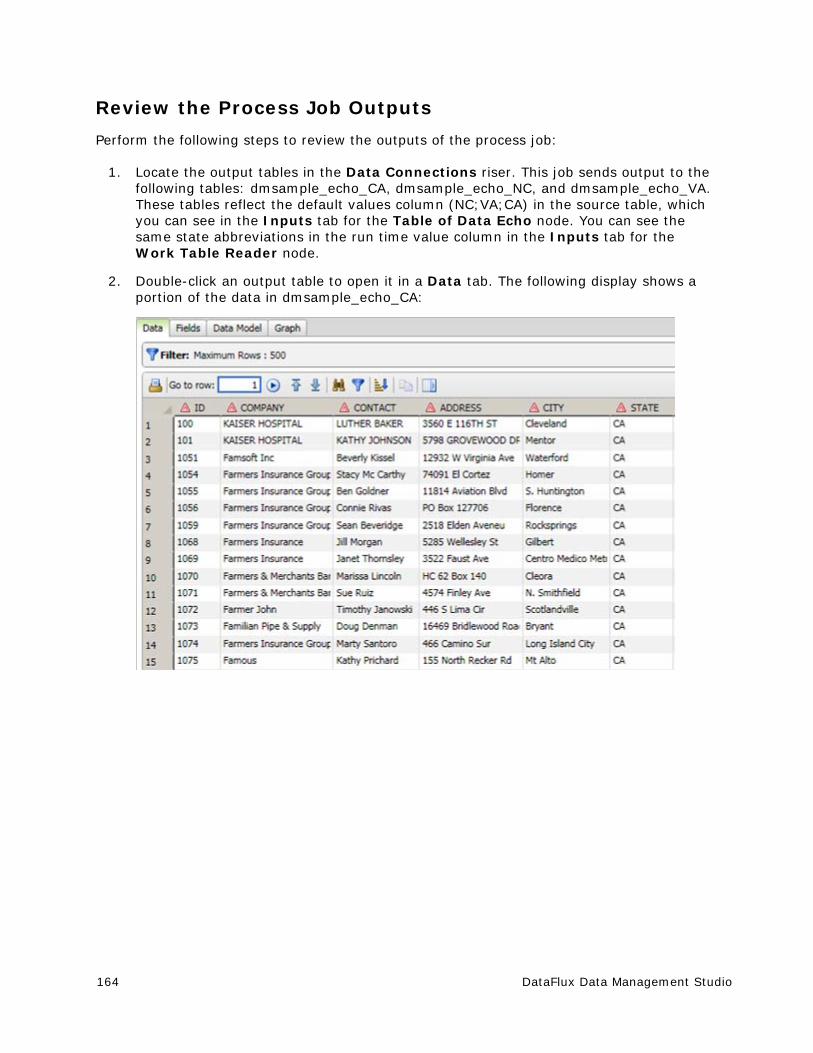
164 DataFlux Data Management Studio
Review the Process Job Outputs
Perform the following steps to review the outputs of the process job:
1. Locate the output tables in the Data Connections riser. This job sends output to the following tables: dmsample_echo_CA, dmsample_echo_NC, and dmsample_echo_VA. These tables reflect the default values column (NC;VA;CA) in the source table, which you can see in the Inputs tab for the Table of Data Echo node. You can see the same state abbreviations in the run time value column in the Inputs tab for the Work Table Reader node.
2. Double-click an output table to open it in a Data tab. The following display shows a portion of the data in dmsample_echo_CA:
DataFlux Data Management Studio 165
Deploying a Process Job as a Real-Time Service
Overview
You can deploy a process job outside of Data Management Studio so other users can run it with a Web client or another application. You can deploy the process job to a DataFlux Data Management Server. Then, the job can be executed with a Web client or another application as a real-time service.
Prerequisites
Create a Process Job That Can Be Deployed as a Real-Time Service
Deploy a Process Job as a Real-Time Service
Prerequisites
The following prerequisites must be met:
A connection to a DataFlux Data Management Server must be available in Data Management Studio. For more information, see the DataFlux Data Management Server User’s Guide.
The DataFlux Data Management Server must have access to any resources that are required by the deployed job, such as business rules and related objects, a quality knowledge base, or USPS data.
Perform the following tasks to deploy a process job as a real-time service:
Create a Process Job That Can Be Deployed as a Real-Time Service
Deploy a Process Job as a Real-Time Service
Create a Process Job That Can Be Deployed as a Real-Time Service
Any process job can be deployed as a real-time service. However, real-time service jobs typically capture input from or return output to the person who is using the service. To capture input in a process job, add input and output variables to the Variables tab for the job. Then have the nodes in the job refer to these variables.
In the example job described in this section (service_Add2Numbers), you can enter two numbers. These numbers are passed to the job, which adds them and displays the result. Three variables are specified in the Variables tab for the process job: two input variables and one output variable. The nodes in the job refer to these variables.
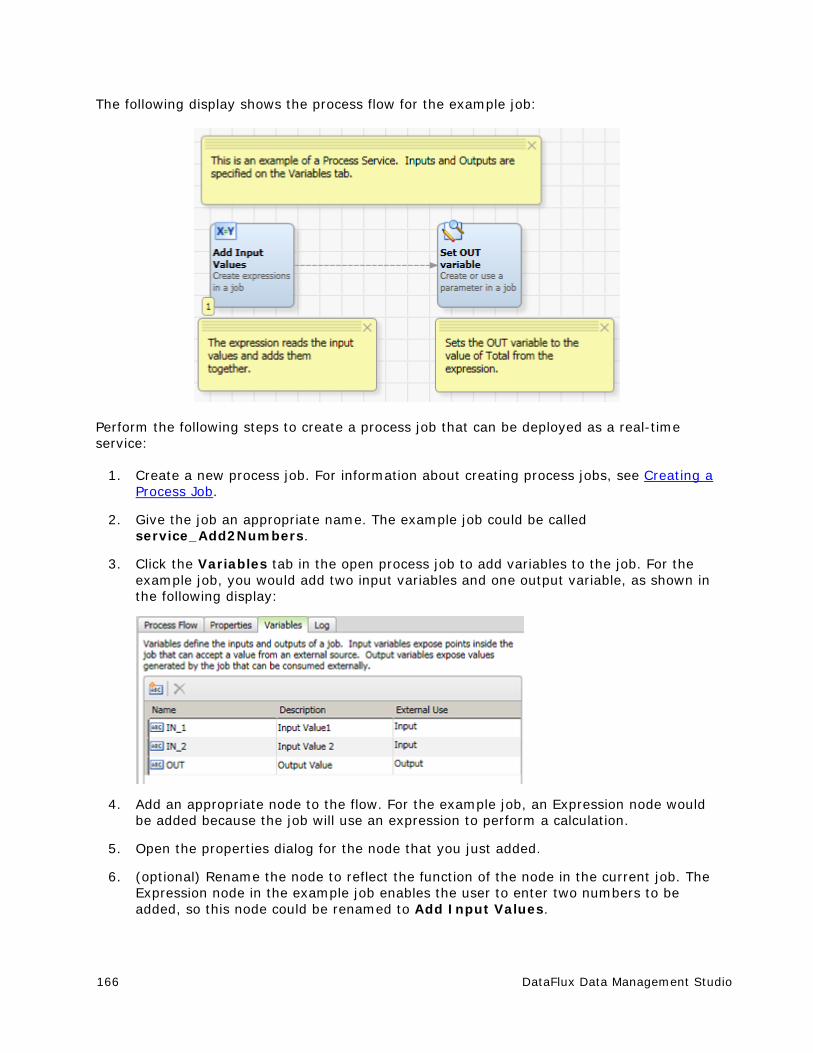
166 DataFlux Data Management Studio
The following display shows the process flow for the example job:
Perform the following steps to create a process job that can be deployed as a real-time service:
1. Create a new process job. For information about creating process jobs, see Creating a Process Job.
2. Give the job an appropriate name. The example job could be called service_Add2Numbers.
3. Click the Variables tab in the open process job to add variables to the job. For the example job, you would add two input variables and one output variable, as shown in the following display:
4. Add an appropriate node to the flow. For the example job, an Expression node would be added because the job will use an expression to perform a calculation.
5. Open the properties dialog for the node that you just added.
6. (optional) Rename the node to reflect the function of the node in the current job. The Expression node in the example job enables the user to enter two numbers to be added, so this node could be renamed to Add Input Values.
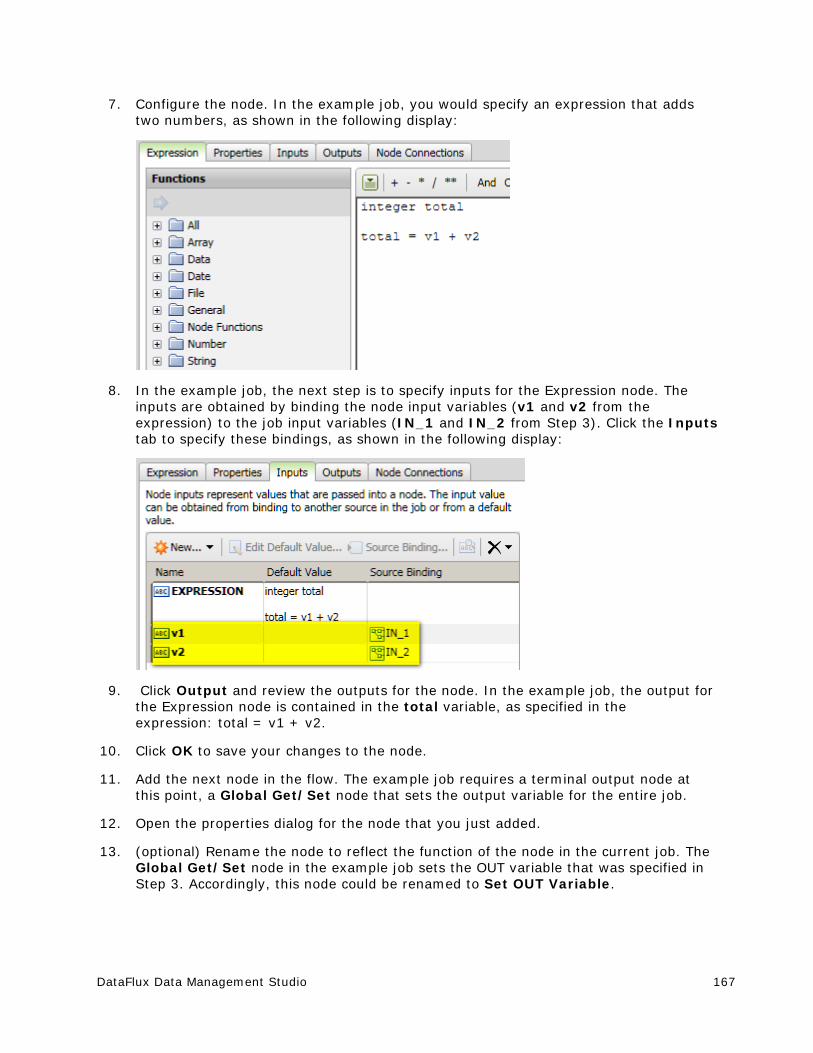
DataFlux Data Management Studio 167
7. Configure the node. In the example job, you would specify an expression that adds two numbers, as shown in the following display:
8. In the example job, the next step is to specify inputs for the Expression node. The inputs are obtained by binding the node input variables (v1 and v2 from the expression) to the job input variables (IN_1 and IN_2 from Step 3). Click the Inputs tab to specify these bindings, as shown in the following display:
9. Click Output and review the outputs for the node. In the example job, the output for the Expression node is contained in the total variable, as specified in the expression: total = v1 + v2.
10. Click OK to save your changes to the node.
11. Add the next node in the flow. The example job requires a terminal output node at this point, a Global Get/Set node that sets the output variable for the entire job.
12. Open the properties dialog for the node that you just added.
13. (optional) Rename the node to reflect the function of the node in the current job. The Global Get/Set node in the example job sets the OUT variable that was specified in Step 3. Accordingly, this node could be renamed to Set OUT Variable.
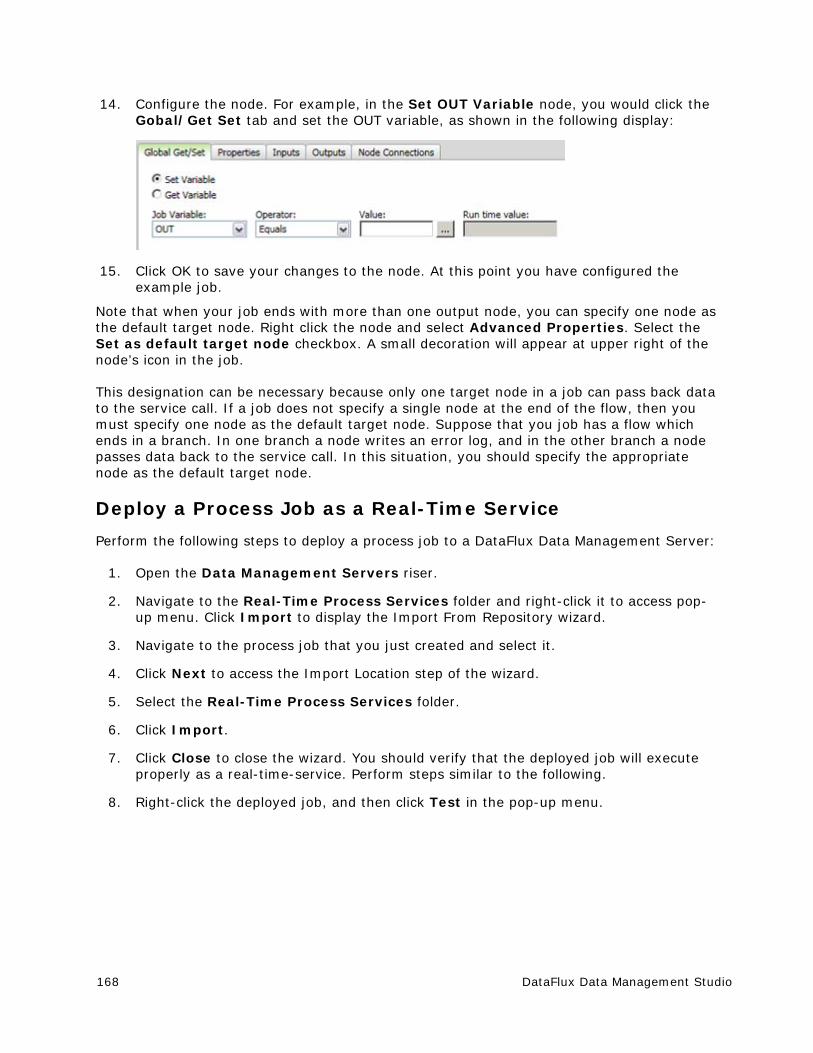
168 DataFlux Data Management Studio
14. Configure the node. For example, in the Set OUT Variable node, you would click the Gobal/Get Set tab and set the OUT variable, as shown in the following display:
15. Click OK to save your changes to the node. At this point you have configured the example job.
Note that when your job ends with more than one output node, you can specify one node as the default target node. Right click the node and select Advanced Properties. Select the Set as default target node checkbox. A small decoration will appear at upper right of the node’s icon in the job.
This designation can be necessary because only one target node in a job can pass back data to the service call. If a job does not specify a single node at the end of the flow, then you must specify one node as the default target node. Suppose that you job has a flow which ends in a branch. In one branch a node writes an error log, and in the other branch a node passes data back to the service call. In this situation, you should specify the appropriate node as the default target node.
Deploy a Process Job as a Real-Time Service
Perform the following steps to deploy a process job to a DataFlux Data Management Server:
1. Open the Data Management Servers riser.
2. Navigate to the Real-Time Process Services folder and right-click it to access pop-up menu. Click Import to display the Import From Repository wizard.
3. Navigate to the process job that you just created and select it.
4. Click Next to access the Import Location step of the wizard.
5. Select the Real-Time Process Services folder.
6. Click Import.
7. Click Close to close the wizard. You should verify that the deployed job will execute properly as a real-time-service. Perform steps similar to the following.
8. Right-click the deployed job, and then click Test in the pop-up menu.
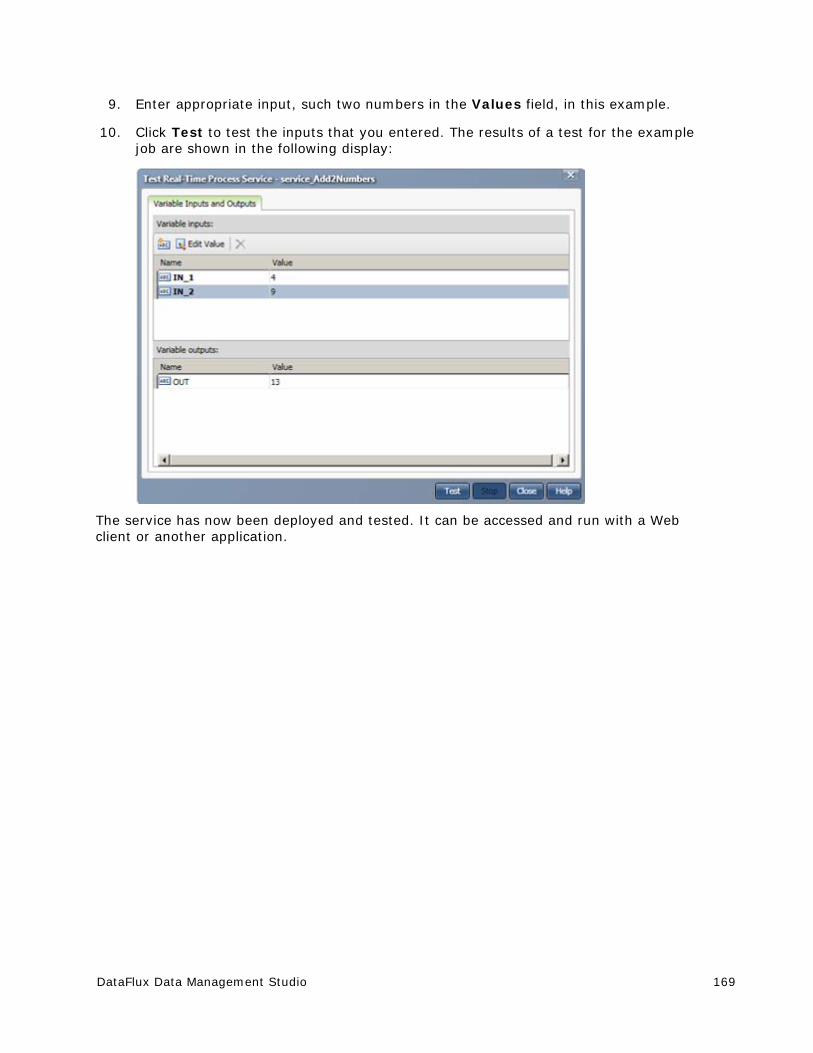
DataFlux Data Management Studio 169
9. Enter appropriate input, such two numbers in the Values field, in this example.
10. Click Test to test the inputs that you entered. The results of a test for the example job are shown in the following display:
The service has now been deployed and tested. It can be accessed and run with a Web client or another application.
170 DataFlux Data Management Studio
Macro Variables Introduction to Macro Variables
Using Macro Variables to Specify File Names
Using Macro Variables in an Expression
Usage Notes for Macro Variables
Introduction to Macro Variables
Overview
Macro variables enable you to dynamically substitute text strings in data jobs, process jobs, profiles, and business rules through symbolic substitution. You can assign large or small amounts of text to macro variables. The macro variable is replaced at run-time with the value that is defined in the macro definition.
A macro variable definition is a name-value pair that defines the text that will be substituted for the name at run-time. For example, a macro variable named INPUT_DIR_PATH could have the following definition:
INPUT_DIR_PATH=c:\MyFolder
All characters after the equal sign (=) and before the new line character become part of the definition. This means, for example, that you should not use spaces, quotation marks, or other characters after the equal sign unless you want them to be part of the text that is retrieved when the macro variable is called. The equal sign (=) and the new line character are reserved characters, but otherwise there are no restrictions on which characters can be used in a macro variable definition. There are no practical limits on the length of a macro variable name.
If you establish naming conventions for user-defined macro variables at your site, it will be easier to understand and manage these variables. For example, naming conventions can help you avoid accidental collisions with Data Management Studio configuration directives, some of which have common names, such as checkpoint. If you were to define a macro variable called checkpoint, it could override the default for this directive, and that might not be what you want. For a description of the configuration directives, see "Configuration Options" in the DataFlux Data Management Studio Installation and Configuration Guide.
The name in the definition (such as INPUT_DIR_PATH) is the string that you reference in a macro call. The syntax for a macro call is the macro name enclosed in two percentage marks, such as the following:
%%INPUT_DIR_PATH%%
See also Usage Notes for Macro Variables.
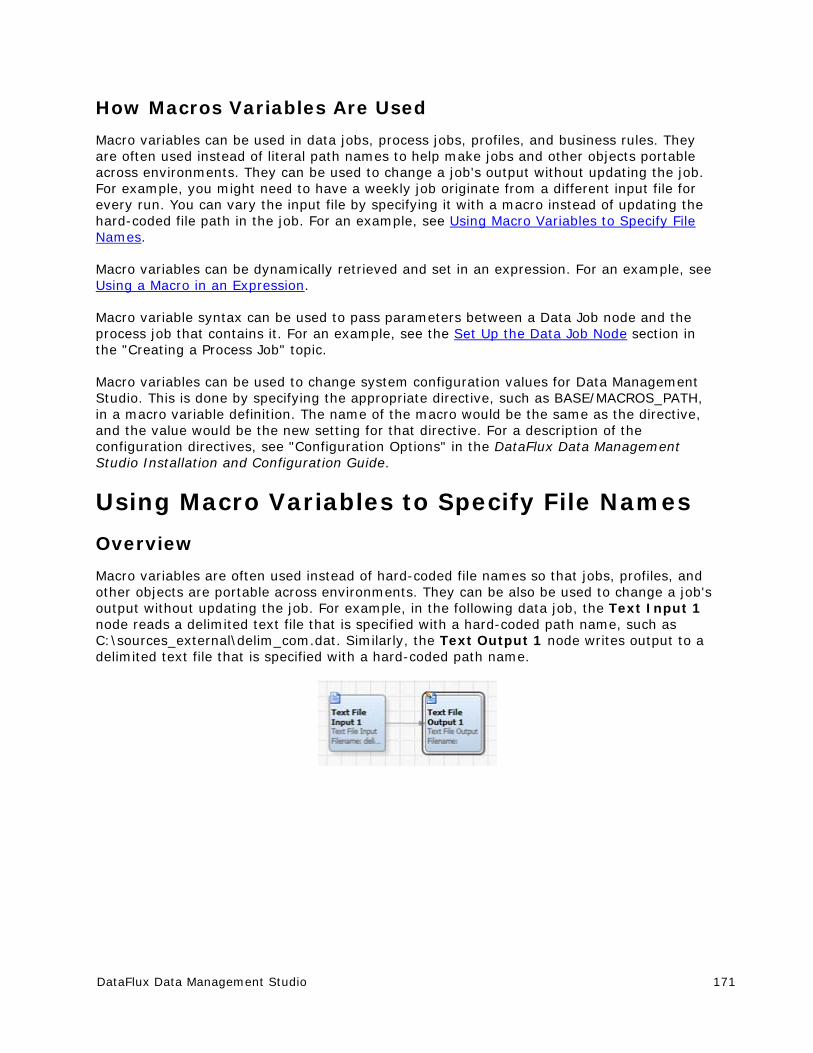
DataFlux Data Management Studio 171
How Macros Variables Are Used
Macro variables can be used in data jobs, process jobs, profiles, and business rules. They are often used instead of literal path names to help make jobs and other objects portable across environments. They can be used to change a job's output without updating the job. For example, you might need to have a weekly job originate from a different input file for every run. You can vary the input file by specifying it with a macro instead of updating the hard-coded file path in the job. For an example, see Using Macro Variables to Specify File Names.
Macro variables can be dynamically retrieved and set in an expression. For an example, see Using a Macro in an Expression.
Macro variable syntax can be used to pass parameters between a Data Job node and the process job that contains it. For an example, see the Set Up the Data Job Node section in the "Creating a Process Job" topic.
Macro variables can be used to change system configuration values for Data Management Studio. This is done by specifying the appropriate directive, such as BASE/MACROS_PATH, in a macro variable definition. The name of the macro would be the same as the directive, and the value would be the new setting for that directive. For a description of the configuration directives, see "Configuration Options" in the DataFlux Data Management Studio Installation and Configuration Guide.
Using Macro Variables to Specify File Names
Overview
Macro variables are often used instead of hard-coded file names so that jobs, profiles, and other objects are portable across environments. They can be also be used to change a job's output without updating the job. For example, in the following data job, the Text Input 1 node reads a delimited text file that is specified with a hard-coded path name, such as C:\sources_external\delim_com.dat. Similarly, the Text Output 1 node writes output to a delimited text file that is specified with a hard-coded path name.
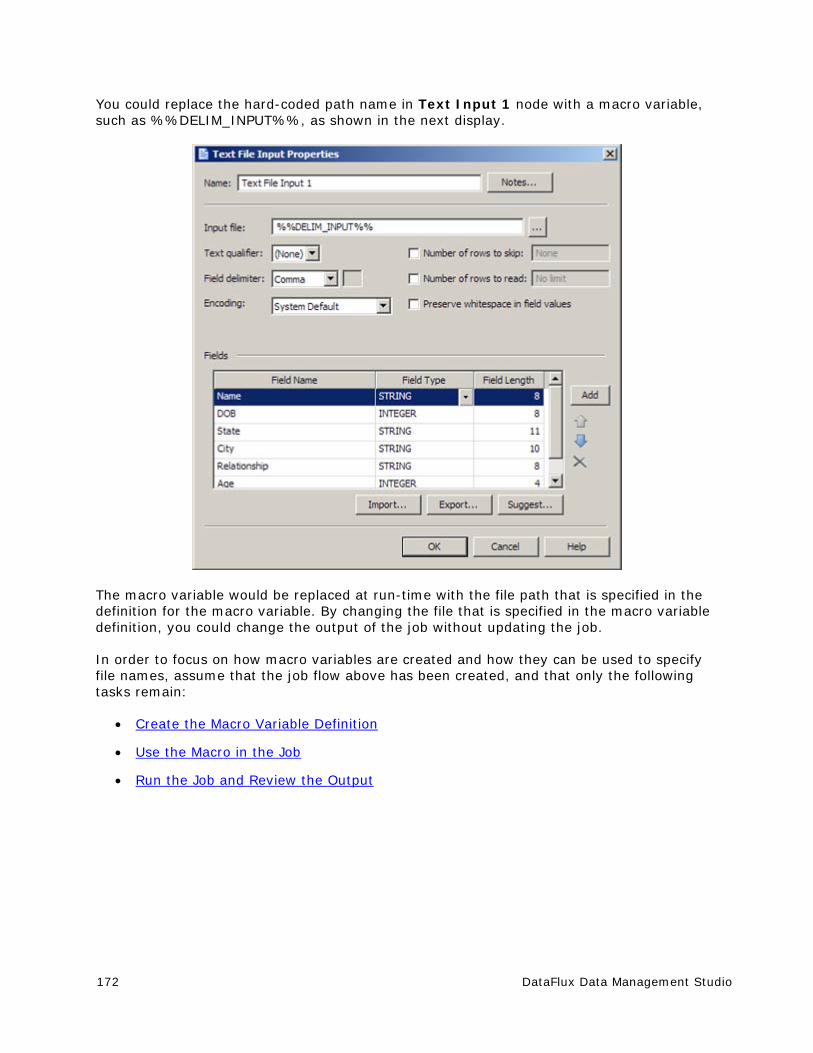
172 DataFlux Data Management Studio
You could replace the hard-coded path name in Text Input 1 node with a macro variable, such as %%DELIM_INPUT%%, as shown in the next display.
The macro variable would be replaced at run-time with the file path that is specified in the definition for the macro variable. By changing the file that is specified in the macro variable definition, you could change the output of the job without updating the job.
In order to focus on how macro variables are created and how they can be used to specify file names, assume that the job flow above has been created, and that only the following tasks remain:
Create the Macro Variable Definition
Use the Macro in the Job
Run the Job and Review the Output
DataFlux Data Management Studio 173
Create the Macro Variable Definition
The easiest way to add a macro variable definition is to use the Macro Files folder in the Administration riser. Macro variable definitions added here are stored in the macros.cfg file in your user profile directory by default. Perform the following steps:
1. On the Administration riser, open the Macro Files folder and right-click the macros item. Then, click New Macro in the information pane at right to display the New Macro dialog.
2. Enter a name (such as DELIM_INPUT) and a value (such as C:\sources_external\delim_com.dat) for the macro variable. This is equivalent to the following macro variable definition: DELIM_INPUT=C:\sources_external\delim_com.dat
3. Click OK to save the macro variable definition. The new macro variable is added to the list in the information pane.
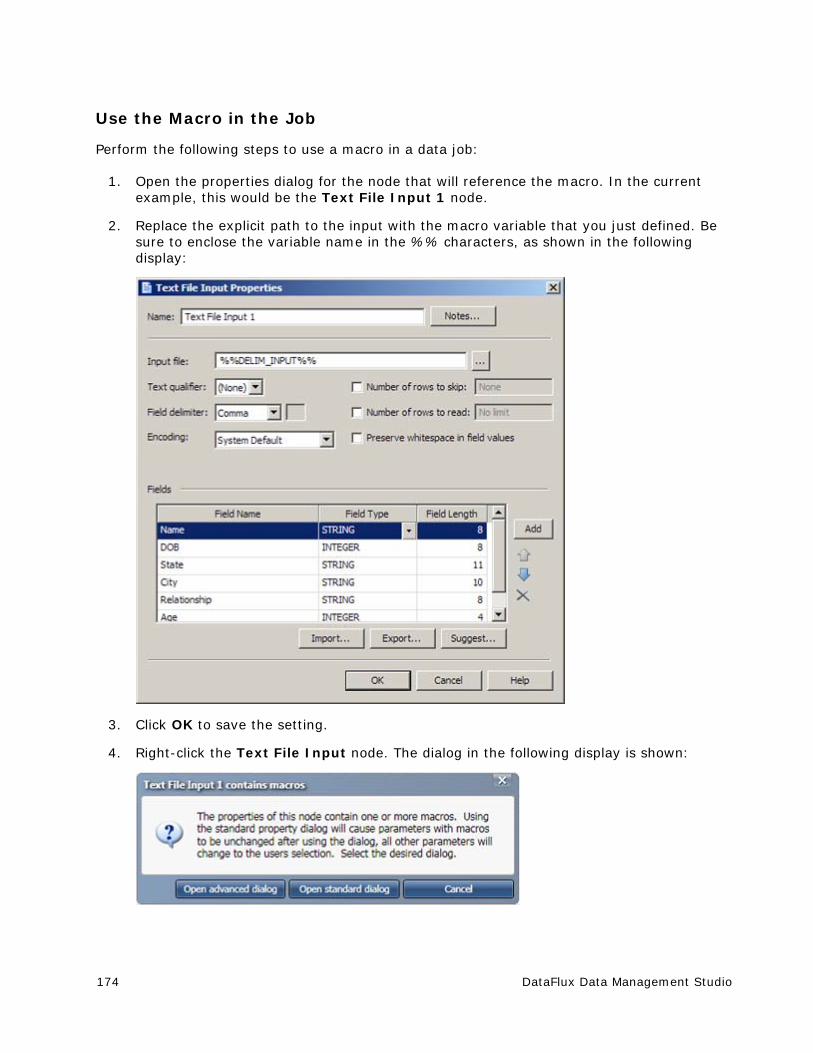
174 DataFlux Data Management Studio
Use the Macro in the Job
Perform the following steps to use a macro in a data job:
1. Open the properties dialog for the node that will reference the macro. In the current example, this would be the Text File Input 1 node.
2. Replace the explicit path to the input with the macro variable that you just defined. Be sure to enclose the variable name in the %% characters, as shown in the following display:
3. Click OK to save the setting.
4. Right-click the Text File Input node. The dialog in the following display is shown:
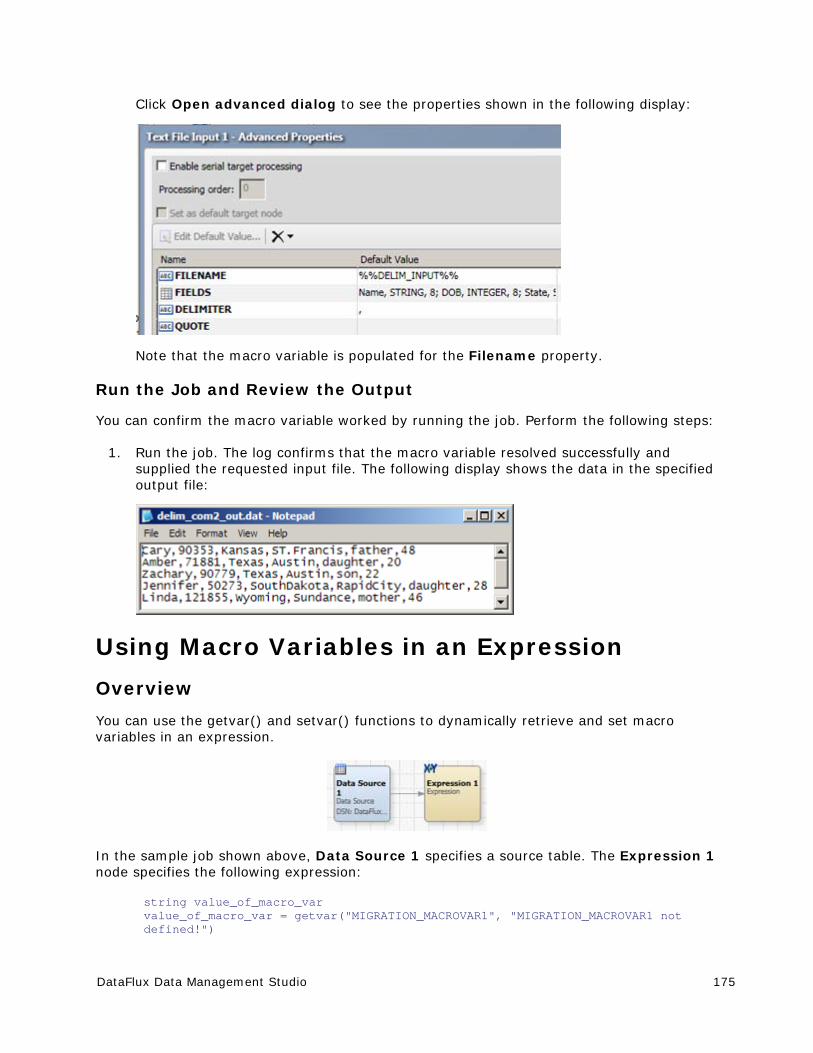
DataFlux Data Management Studio 175
Click Open advanced dialog to see the properties shown in the following display:
Note that the macro variable is populated for the Filename property.
Run the Job and Review the Output
You can confirm the macro variable worked by running the job. Perform the following steps:
1. Run the job. The log confirms that the macro variable resolved successfully and supplied the requested input file. The following display shows the data in the specified output file:
Using Macro Variables in an Expression
Overview
You can use the getvar() and setvar() functions to dynamically retrieve and set macro variables in an expression.
In the sample job shown above, Data Source 1 specifies a source table. The Expression 1 node specifies the following expression:
string value_of_macro_var value_of_macro_var = getvar("MIGRATION_MACROVAR1", "MIGRATION_MACROVAR1 not defined!")
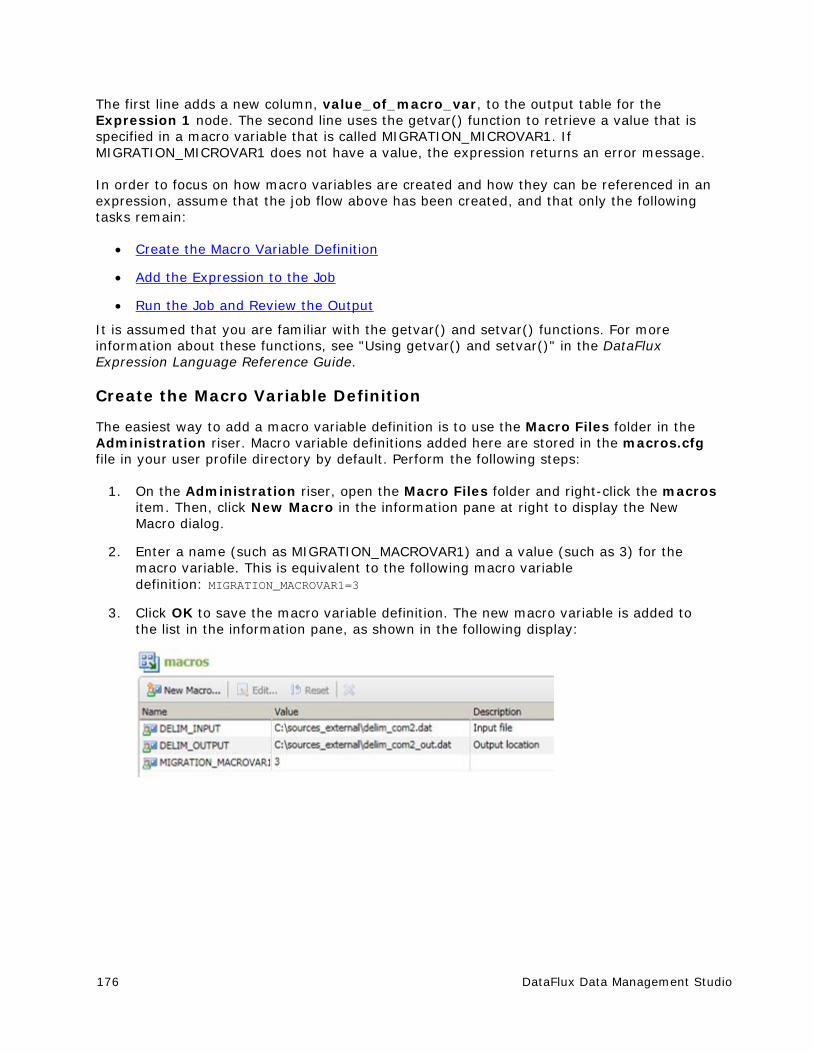
176 DataFlux Data Management Studio
The first line adds a new column, value_of_macro_var, to the output table for the Expression 1 node. The second line uses the getvar() function to retrieve a value that is specified in a macro variable that is called MIGRATION_MICROVAR1. If MIGRATION_MICROVAR1 does not have a value, the expression returns an error message.
In order to focus on how macro variables are created and how they can be referenced in an expression, assume that the job flow above has been created, and that only the following tasks remain:
Create the Macro Variable Definition
Add the Expression to the Job
Run the Job and Review the Output
It is assumed that you are familiar with the getvar() and setvar() functions. For more information about these functions, see "Using getvar() and setvar()" in the DataFlux Expression Language Reference Guide.
Create the Macro Variable Definition
The easiest way to add a macro variable definition is to use the Macro Files folder in the Administration riser. Macro variable definitions added here are stored in the macros.cfg file in your user profile directory by default. Perform the following steps:
1. On the Administration riser, open the Macro Files folder and right-click the macros item. Then, click New Macro in the information pane at right to display the New Macro dialog.
2. Enter a name (such as MIGRATION_MACROVAR1) and a value (such as 3) for the macro variable. This is equivalent to the following macro variable definition: MIGRATION_MACROVAR1=3
3. Click OK to save the macro variable definition. The new macro variable is added to the list in the information pane, as shown in the following display:
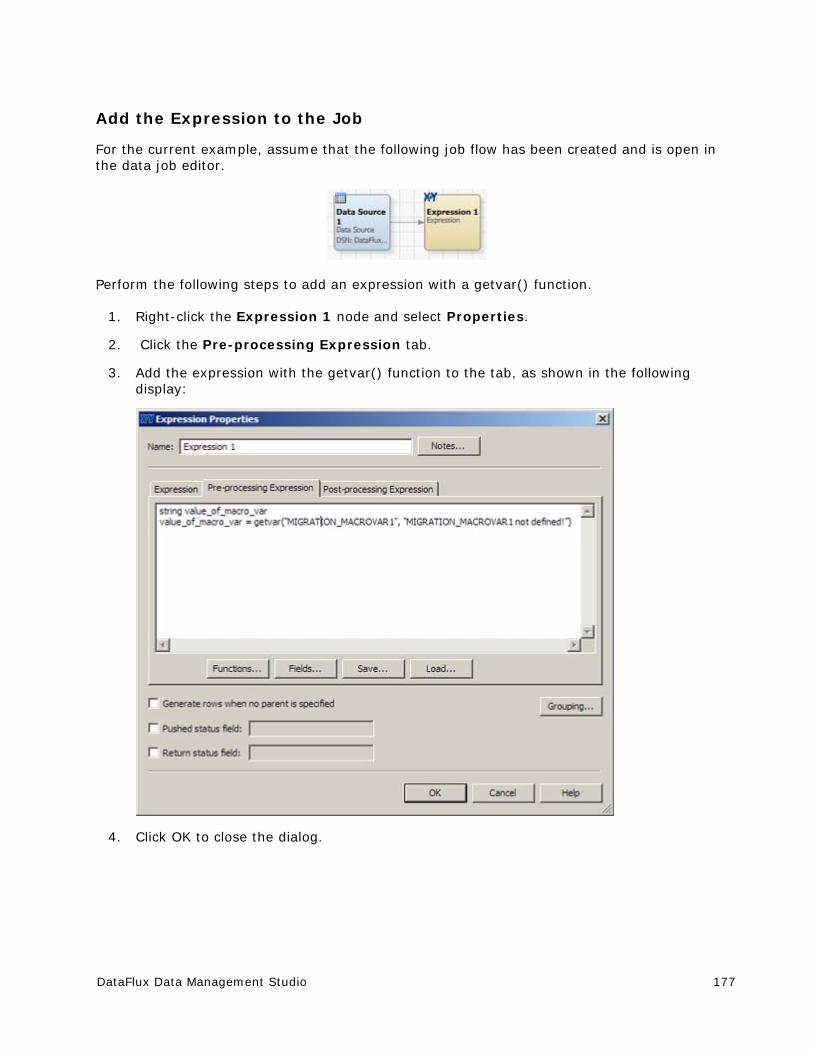
DataFlux Data Management Studio 177
Add the Expression to the Job
For the current example, assume that the following job flow has been created and is open in the data job editor.
Perform the following steps to add an expression with a getvar() function.
1. Right-click the Expression 1 node and select Properties.
2. Click the Pre-processing Expression tab.
3. Add the expression with the getvar() function to the tab, as shown in the following display:
4. Click OK to close the dialog.
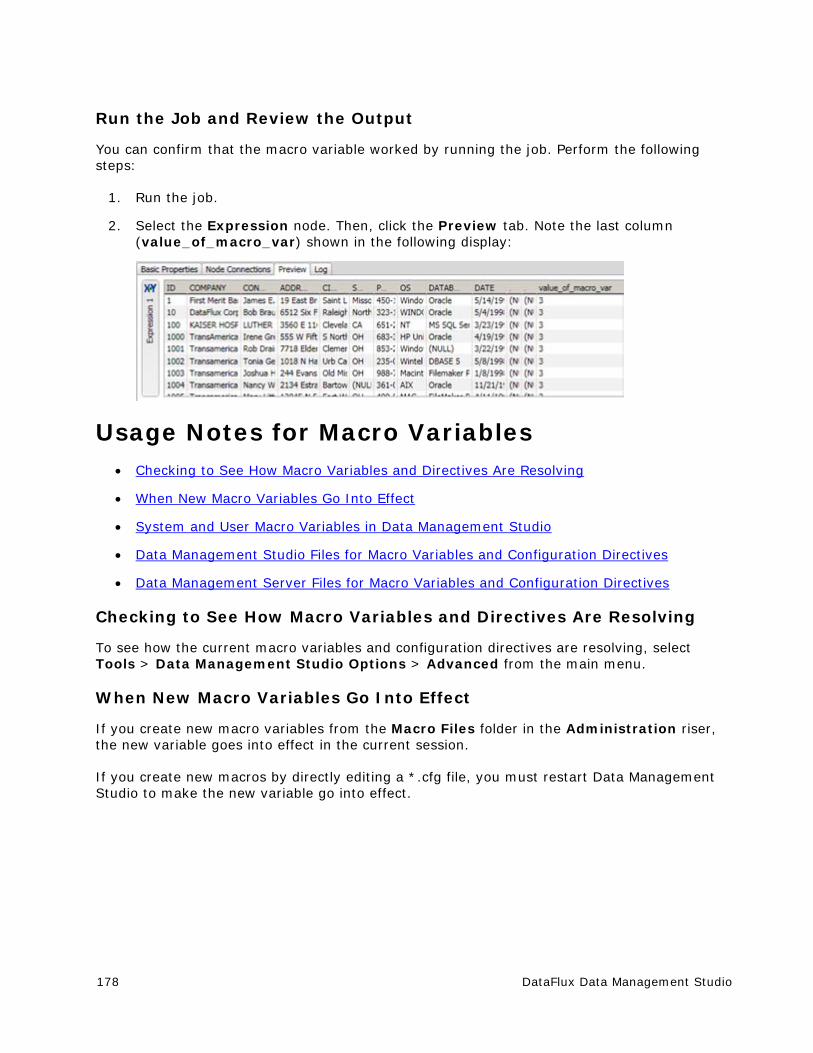
178 DataFlux Data Management Studio
Run the Job and Review the Output
You can confirm that the macro variable worked by running the job. Perform the following steps:
1. Run the job.
2. Select the Expression node. Then, click the Preview tab. Note the last column (value_of_macro_var) shown in the following display:
Usage Notes for Macro Variables Checking to See How Macro Variables and Directives Are Resolving
When New Macro Variables Go Into Effect
System and User Macro Variables in Data Management Studio
Data Management Studio Files for Macro Variables and Configuration Directives
Data Management Server Files for Macro Variables and Configuration Directives
Checking to See How Macro Variables and Directives Are Resolving
To see how the current macro variables and configuration directives are resolving, select Tools > Data Management Studio Options > Advanced from the main menu.
When New Macro Variables Go Into Effect
If you create new macro variables from the Macro Files folder in the Administration riser, the new variable goes into effect in the current session.
If you create new macros by directly editing a *.cfg file, you must restart Data Management Studio to make the new variable go into effect.
DataFlux Data Management Studio 179
System and User Macro Variables in Data Management Studio
Unlike Data Management Server, Data Management Studio supports both system macro variables and user macro variables.
System macro variables are available to all users that have access to Data Management Studio. The definitions for system macro variables are stored in *.cfg files in a subfolder in the installation directory for Data Management Studio. Here is an example path to a file that contains system macro definitions:
[drive:]\Program Files\DataFlux\DMStudio\2.1\etc\macros.cfg
User macro variables are available only to a specific user. The definitions for user macro variables are stored in *.cfg files in a subfolder of the user profile that is specified by the operating system. Here is an example path to a file that contains user macro definitions:
[drive:]\Documents and Settings\[username]\Application Data\DataFlux\DataManagement\2.1\macros.cfg
Note: In general, Data Management Studio users should update macro variables and configuration directives in the user area, not the system area. The *.cfg files in the Data Management Studio system area should be reserved for DataFlux Technical Support.
Data Management Studio Files for Macro Variables and Configuration Directives
Data Management Studio reads the following files in order to get configuration directives and resolve macro calls:
1. app.cfg in the etc folder of the installation directory. Contains system configuration directives that are provided by DataFlux. Example path: [drive:]\Program Files\DataFlux\DMStudio\2.1\etc\app.cfg
2. app.cfg in a user profile directory. Contains configuration directives that are specified by users. Example path: [drive:]\Documents and Settings\[username]\Application Data\DataFlux\DataManagement\2.1\app.cfg
3. ui.cfg in the etc folder of the installation directory. Contains system configuration directives that are provided by DataFlux.
4. dfwproc.cfg in the etc folder of the installation directory. Contains system configuration directives that are provided by DataFlux.
5. ui.cfg in a user profile directory. Contains configuration directives that are specified by users.
6. dfwproc.cfg in a user profile directory. Contains configuration directives that are specified by users.
7. *.cfg files in the etc\Macros folder of the installation directory. Contains system macro variable definitions in *.cfg files that are provided by DataFlux. The load order is alphabetical. The default location of the Macros folder can be changed by using the BASE/MACROS_PATH directive in the *.cfg files above.
180 DataFlux Data Management Studio
8. *.cfg files in the Macros folder in a user profile directory. Contains macro variable definitions in *.cfg files that are added by users. The load order is alphabetical. Only files with a *.cfg extension are read.
9. macros.cfg in the etc folder of the installation directory. Contains system macro variable definitions that are provided by DataFlux. This file is reserved for Technical Support. Do not add macro variable definitions to this file.
10. macros.cfg in a user profile directory. Contains macro variable definitions that are added by users. When you add a macro variable definition from the Macro Files folder in the Administration riser, it is added to this file by default. For more information about adding macros from the Macro Files folder, see Create the Macro Variable Definition.
11. Environment settings, such as operating system environment variables.
12. Command line options, if applicable. Data jobs, process jobs, and profiles can be executed from the command line as described in Running Jobs from the Command Line. At this stage, any -o options that have been specified for the job or profile are read.
Data Management Server Files for Macro Variables and Configuration Directives
As a shared resource, Data Management Server supports only system macro variables and directives. Data Management Server reads the following files in order to get configuration directives and resolve macro calls:
1. app.cfg in the etc folder of the installation directory. Contains system configuration directives that are provided by DataFlux.
2. dis.cfg in the etc folder of the installation directory. Contains system configuration directives that are provided by DataFlux.
3. dfwproc.cfgin the etc folder of the installation directory. Contains system configuration directives that are provided by DataFlux.
4. *.cfg files in the etc\Macros folder of the installation directory. Contain system macro variable definitions in *.cfg files that are provided by DataFlux. The load order is alphabetical. The default location of the Macros folder can be changed by using the BASE/MACROS_PATH directive in the *.cfg files above. .
5. macros.cfg in the etc folder of the installation directory. Contains system macro variable definitions that are provided by DataFlux. This file is reserved for Technical Support. Do not add macro variable definitions to this file.
6. Environment settings, such as operating system environment variables.
7. Command line options, if applicable. Data jobs, process jobs, and profiles can be executed from the command line as described in Running Jobs from the Command Line. At this stage, any -o options that have been specified for the job or profile are read.
DataFlux Data Management Studio 181
Entity Resolution Overview of Entity Resolution
Generating an Entity Resolution File
Working with an Entity Resolution File
Overview of Entity Resolution Entity resolution merges multiple files (or duplicate records within a single file) in such a way that records referring to the same physical object are treated as a single record. Records are matched based on the information that they have in common. The records that you merge appear to be different but can actually refer to the same person or thing. For example, a record for "John Q. Smith at 220 Academy Street" might be the same person as "J. Q. Smith" at the same address.
The first stage in an entity resolution project requires you to create and run a data job that contains one or more Entity Resolution nodes, which perform the following tasks:
Generating match codes
Creating clusters
Identifying surviving records
Generating an Entity Resolution Output File (the *.SRI file).
The second stage in an entity resolution project requires you to work with the Entity Resolution File. This stage includes the following tasks:
Examining clusters
Reviewing the Cluster Analysis section
Reviewing related clusters
Processing cluster records
182 DataFlux Data Management Studio
Generating an Entity Resolution File
Overview
You can merge records from multiple files or duplicate records within a single file so that records referring to the same physical object such as an individual, company, or product are treated as a single record. These records are matched based on the information that they have in common. Of course, the more information held in common among the records, the higher the confidence in the match.
You can create a data job to prepare an entity resolution file by performing the following tasks:
Create an Entity Resolution Data Job
Generate Match Codes
Set Clustering Properties
Identify Surviving Records
Prepare the Entity Resolution File and Run the Job
Create an Entity Resolution Data Job
You can create a data job. Then, you can populate it with the nodes that you need to merge your data and generate an entity resolution file. Perform the following steps:
1. Open a data job.
2. Open the Data Inputs folder in the Nodes tree. Select the Data Source node and drop it on the data flow.
3. Open the Entity Resolution folder in the Nodes tree. Select the Match Codes node and drop it on the data flow. Then, connect the Data Source node to the node.
4. Select the Clustering node and drop it on the data flow. Then, connect the Match Codes node to the Clustering node.
5. Select the Surviving Record Identification node and drop it on the data flow. Then, connect the Clustering node to the Surviving Record Identification node.
6. Open the Data Outputs folder in the Nodes tree. Select the Entity Resolution File Output node and drop it on the data flow. Then, connect the Surviving Record Identification node to the Entity Resolution File Output node.
7. Double-click the Data Source node to display its properties window. Specify an input table that contains the data that you need to merge and process for entity resolution. For example, you could select a Contacts table that combines data from the other tables in the data connection. You could also move all of its fields to the Selected field in the Output fields section.
8. Click OK to save the properties and close the window.
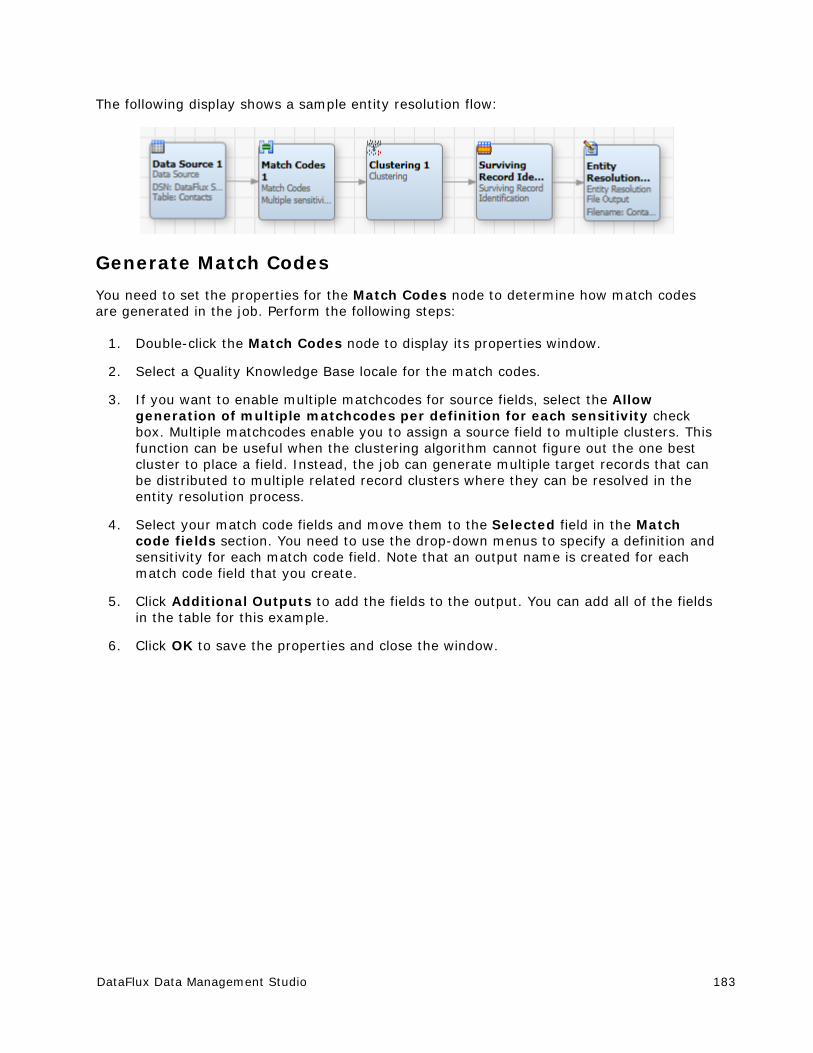
DataFlux Data Management Studio 183
The following display shows a sample entity resolution flow:
Generate Match Codes
You need to set the properties for the Match Codes node to determine how match codes are generated in the job. Perform the following steps:
1. Double-click the Match Codes node to display its properties window.
2. Select a Quality Knowledge Base locale for the match codes.
3. If you want to enable multiple matchcodes for source fields, select the Allow generation of multiple matchcodes per definition for each sensitivity check box. Multiple matchcodes enable you to assign a source field to multiple clusters. This function can be useful when the clustering algorithm cannot figure out the one best cluster to place a field. Instead, the job can generate multiple target records that can be distributed to multiple related record clusters where they can be resolved in the entity resolution process.
4. Select your match code fields and move them to the Selected field in the Match code fields section. You need to use the drop-down menus to specify a definition and sensitivity for each match code field. Note that an output name is created for each match code field that you create.
5. Click Additional Outputs to add the fields to the output. You can add all of the fields in the table for this example.
6. Click OK to save the properties and close the window.
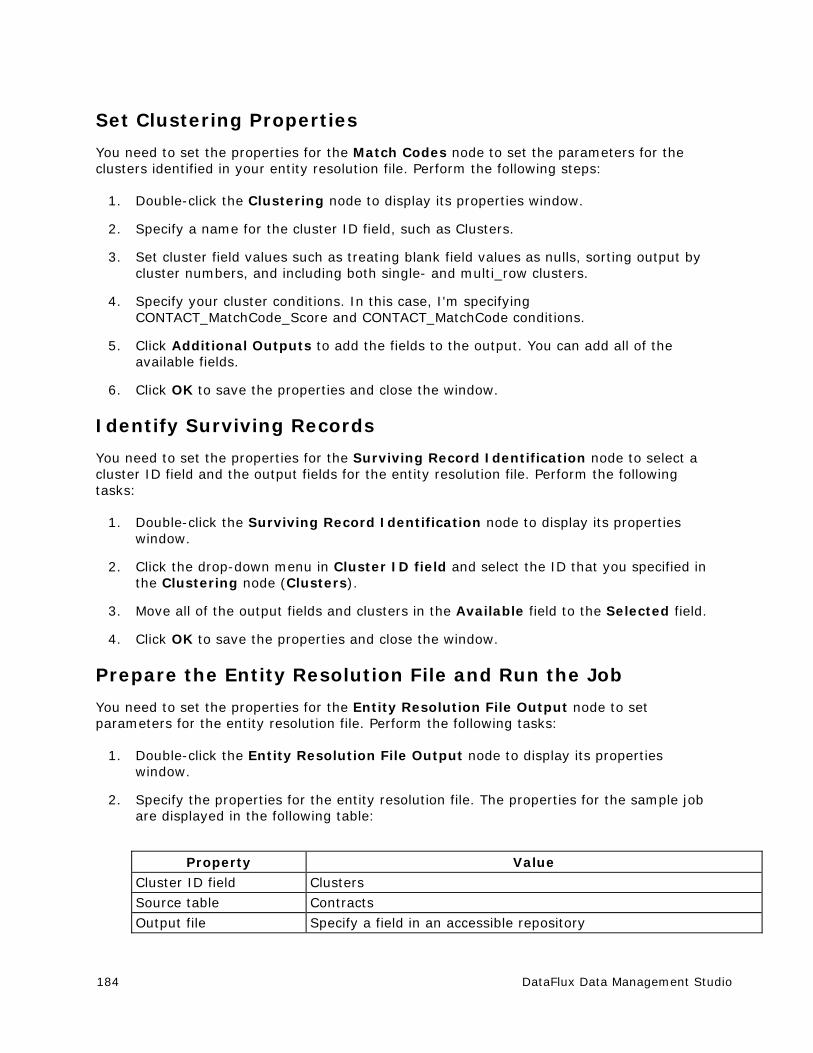
184 DataFlux Data Management Studio
Set Clustering Properties
You need to set the properties for the Match Codes node to set the parameters for the clusters identified in your entity resolution file. Perform the following steps:
1. Double-click the Clustering node to display its properties window.
2. Specify a name for the cluster ID field, such as Clusters.
3. Set cluster field values such as treating blank field values as nulls, sorting output by cluster numbers, and including both single- and multi_row clusters.
4. Specify your cluster conditions. In this case, I'm specifying CONTACT_MatchCode_Score and CONTACT_MatchCode conditions.
5. Click Additional Outputs to add the fields to the output. You can add all of the available fields.
6. Click OK to save the properties and close the window.
Identify Surviving Records
You need to set the properties for the Surviving Record Identification node to select a cluster ID field and the output fields for the entity resolution file. Perform the following tasks:
1. Double-click the Surviving Record Identification node to display its properties window.
2. Click the drop-down menu in Cluster ID field and select the ID that you specified in the Clustering node (Clusters).
3. Move all of the output fields and clusters in the Available field to the Selected field.
4. Click OK to save the properties and close the window.
Prepare the Entity Resolution File and Run the Job
You need to set the properties for the Entity Resolution File Output node to set parameters for the entity resolution file. Perform the following tasks:
1. Double-click the Entity Resolution File Output node to display its properties window.
2. Specify the properties for the entity resolution file. The properties for the sample job are displayed in the following table:
Property Value
Cluster ID field Clusters
Source table Contracts
Output file Specify a field in an accessible repository
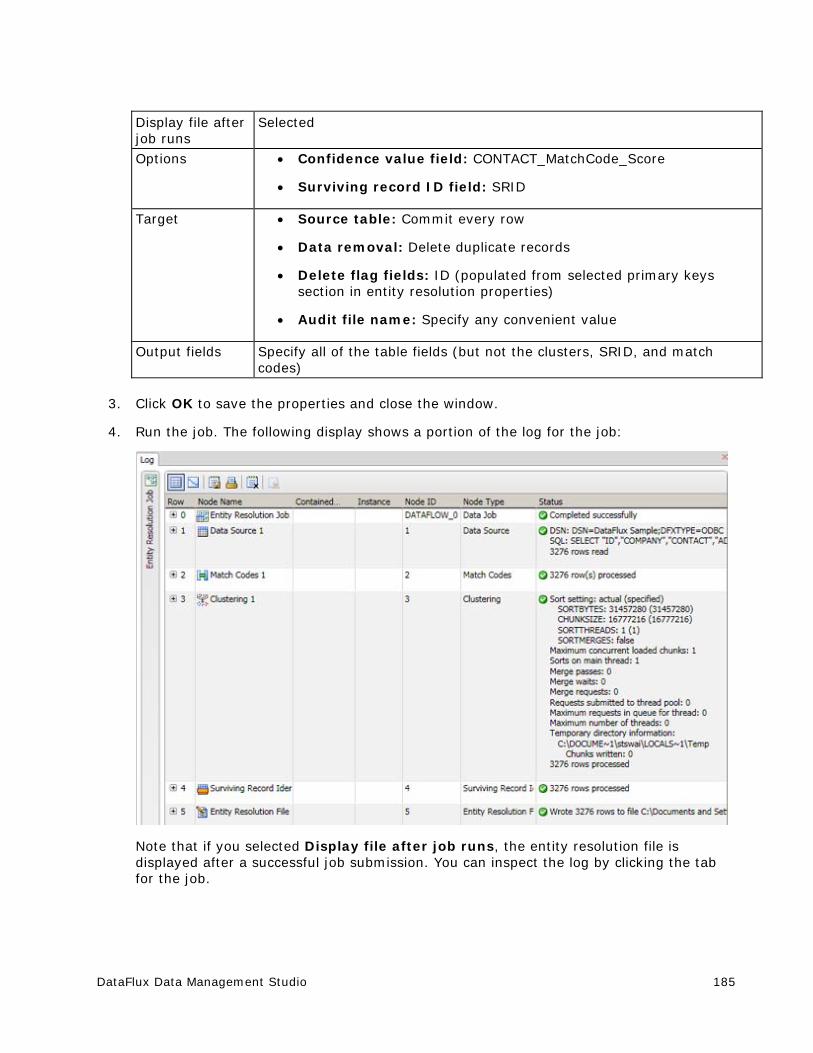
DataFlux Data Management Studio 185
Display file after job runs
Selected
Options Confidence value field: CONTACT_MatchCode_Score
Surviving record ID field: SRID
Target Source table: Commit every row
Data removal: Delete duplicate records
Delete flag fields: ID (populated from selected primary keys section in entity resolution properties)
Audit file name: Specify any convenient value
Output fields Specify all of the table fields (but not the clusters, SRID, and match codes)
3. Click OK to save the properties and close the window.
4. Run the job. The following display shows a portion of the log for the job:
Note that if you selected Display file after job runs, the entity resolution file is displayed after a successful job submission. You can inspect the log by clicking the tab for the job.

186 DataFlux Data Management Studio
Working with an Entity Resolution File
Overview
You can examine the entity resolution file generated in an entity resolution job. These files reflect the match code, clustering, survivor identification, and entity resolution output file settings made in the job.
You can review the entity resolution file that is displayed at the end of an entity resolution job or you can also select a file from the Entity Resolution folder in the Folders tree. To examine the file, perform the following tasks:
Examine Clusters
Review and Resolve Related Clusters
Process Cluster Records
Examine Clusters
You can use the Cluster tab and the Cluster Analysis tab to examine the clusters. Perform the following steps:
1. Review the list of clusters. Note that you can go to a specific cluster. You can also filter the clusters list.
2. Look for resolved clusters, which are marked by a check mark in the Action column, as shown in the following display:
You can double-click a resolved cluster to examine it in the Cluster Records tab.
3. Review the records for the cluster in the Records tab in the Details pane. (If you don't see the Details pane, click Show Details in the toolbar.) Then, review the Related Clusters and Notes tabs as needed.
DataFlux Data Management Studio 187
4. Examine the charts in the Cluster Analysis pane. You can examine the Record Count Distribution chart, which shows how many clusters in the entity resolution file have a specific record count. For example, when you put your cursor over a bar you learn that 208 clusters have a record count of four.
5. Examine the Record Count/Confidence/Related Clusters chart. The triangles in the chart represent clusters that have related clusters, while the points mark clusters that lack related clusters. You can put your cursor over a triangle or a point to see the cluster number and information about the record count, the confidence level, and the number of related clusters. The chart is as shown in the following display:
Review and Resolve Related Clusters
Some of the clusters in the clusters list might have related clusters. You must resolve these related records before you resolve the cluster in the list because you cannot apply changes to a cluster while it has active related records. Therefore, you must remove the related record from either the current cluster or from its related clusters before you can apply changes for the current cluster. Then, you must repeat this process for all of the related records in the current cluster.
Related clusters are created when you enable the generation of multiple match codes when you set the properties for the Match Codes node in the entity resolution job. Multiple matchcodes enable you to assign a source field to multiple clusters.
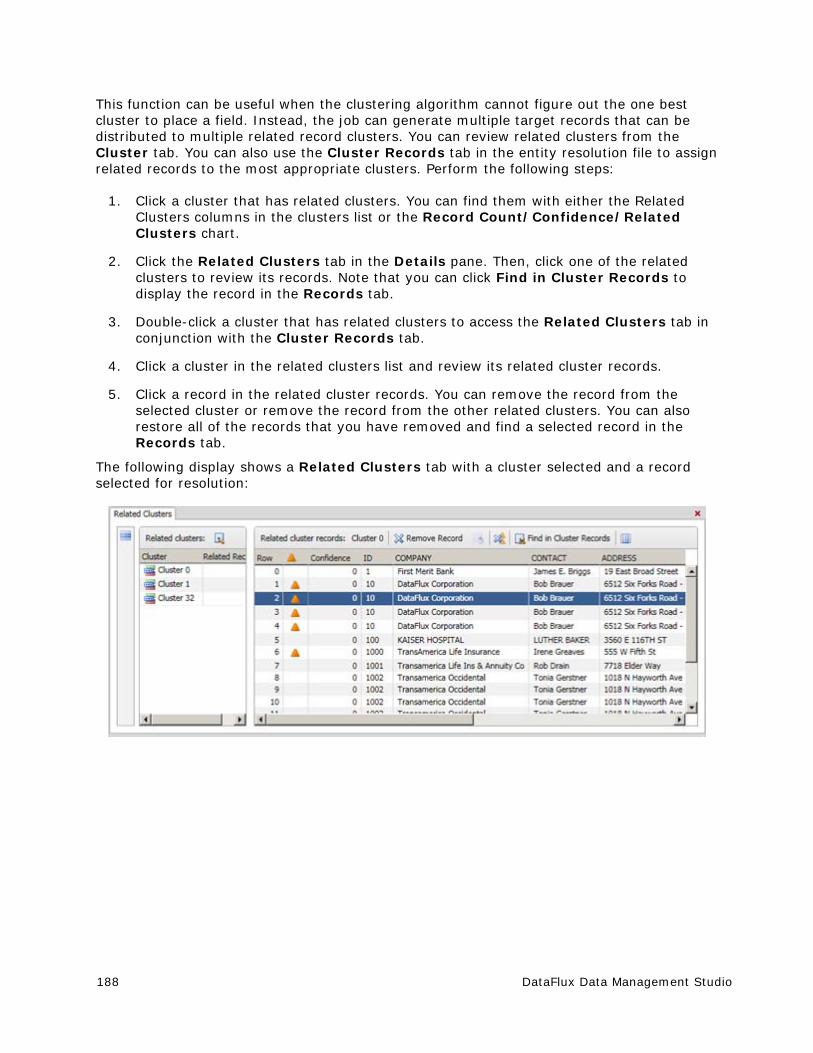
188 DataFlux Data Management Studio
This function can be useful when the clustering algorithm cannot figure out the one best cluster to place a field. Instead, the job can generate multiple target records that can be distributed to multiple related record clusters. You can review related clusters from the Cluster tab. You can also use the Cluster Records tab in the entity resolution file to assign related records to the most appropriate clusters. Perform the following steps:
1. Click a cluster that has related clusters. You can find them with either the Related Clusters columns in the clusters list or the Record Count/Confidence/Related Clusters chart.
2. Click the Related Clusters tab in the Details pane. Then, click one of the related clusters to review its records. Note that you can click Find in Cluster Records to display the record in the Records tab.
3. Double-click a cluster that has related clusters to access the Related Clusters tab in conjunction with the Cluster Records tab.
4. Click a cluster in the related clusters list and review its related cluster records.
5. Click a record in the related cluster records. You can remove the record from the selected cluster or remove the record from the other related clusters. You can also restore all of the records that you have removed and find a selected record in the Records tab.
The following display shows a Related Clusters tab with a cluster selected and a record selected for resolution:
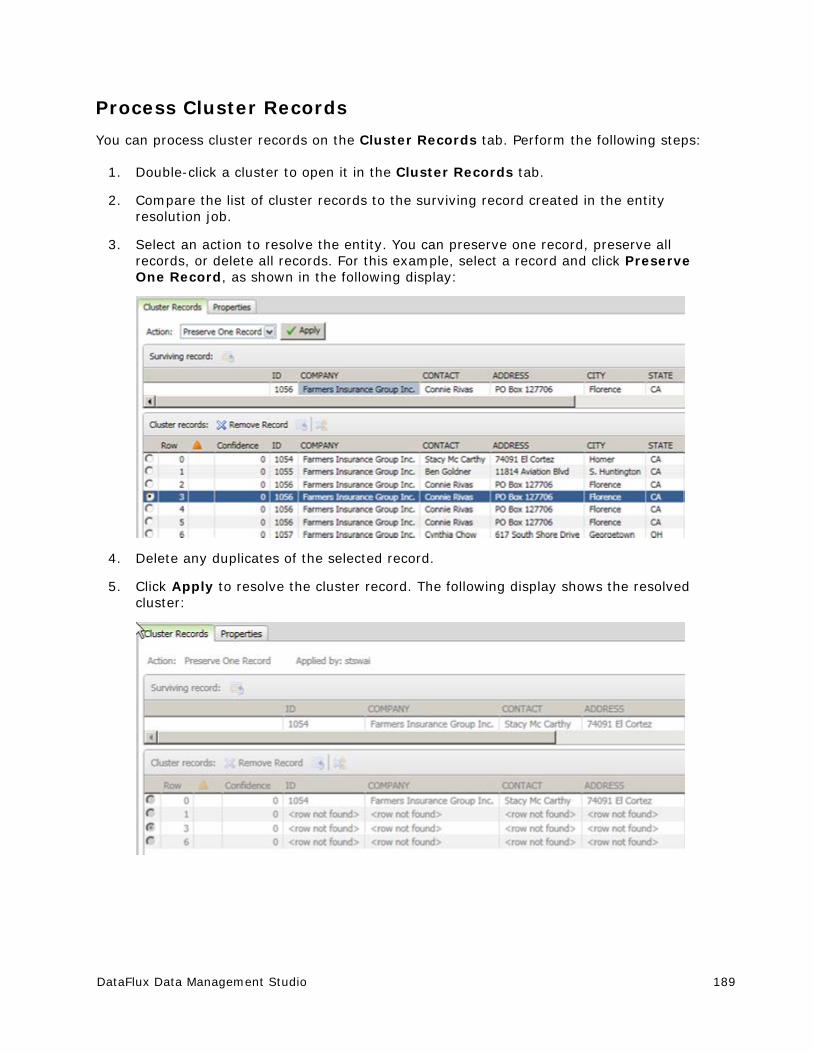
DataFlux Data Management Studio 189
Process Cluster Records
You can process cluster records on the Cluster Records tab. Perform the following steps:
1. Double-click a cluster to open it in the Cluster Records tab.
2. Compare the list of cluster records to the surviving record created in the entity resolution job.
3. Select an action to resolve the entity. You can preserve one record, preserve all records, or delete all records. For this example, select a record and click Preserve One Record, as shown in the following display:
4. Delete any duplicates of the selected record.
5. Click Apply to resolve the cluster record. The following display shows the resolved cluster:
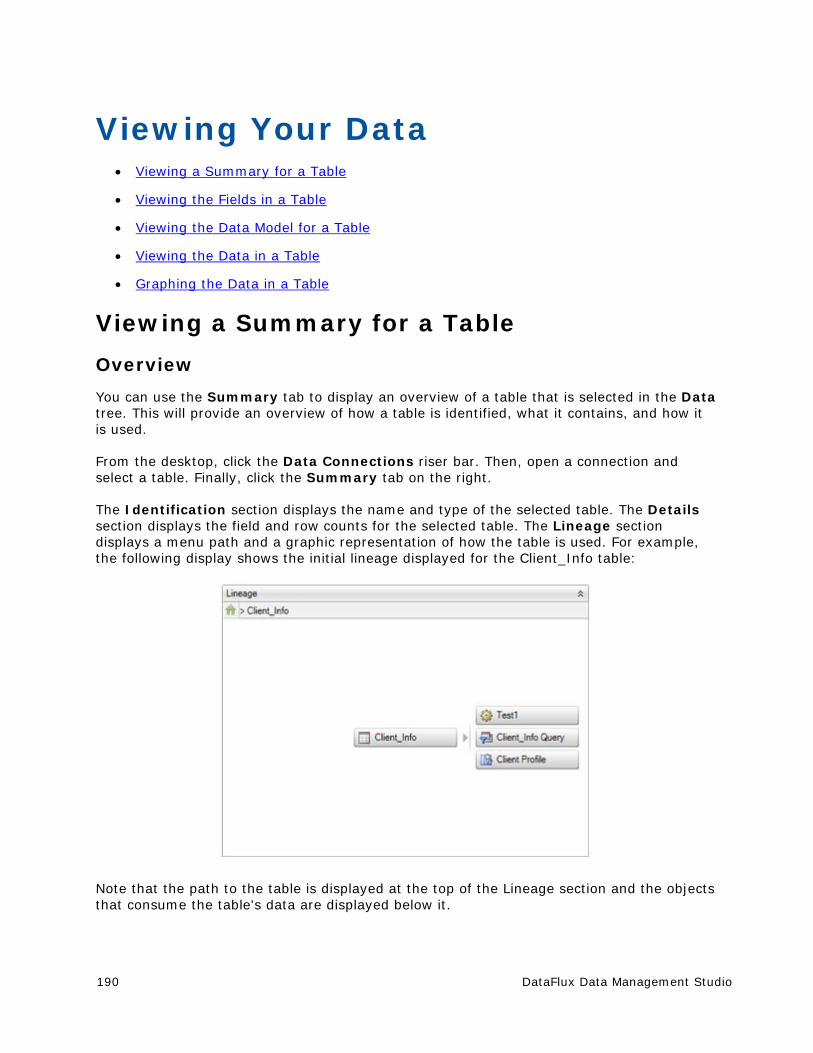
190 DataFlux Data Management Studio
Viewing Your Data Viewing a Summary for a Table
Viewing the Fields in a Table
Viewing the Data Model for a Table
Viewing the Data in a Table
Graphing the Data in a Table
Viewing a Summary for a Table
Overview
You can use the Summary tab to display an overview of a table that is selected in the Data tree. This will provide an overview of how a table is identified, what it contains, and how it is used.
From the desktop, click the Data Connections riser bar. Then, open a connection and select a table. Finally, click the Summary tab on the right.
The Identification section displays the name and type of the selected table. The Details section displays the field and row counts for the selected table. The Lineage section displays a menu path and a graphic representation of how the table is used. For example, the following display shows the initial lineage displayed for the Client_Info table:
Note that the path to the table is displayed at the top of the Lineage section and the objects that consume the table's data are displayed below it.
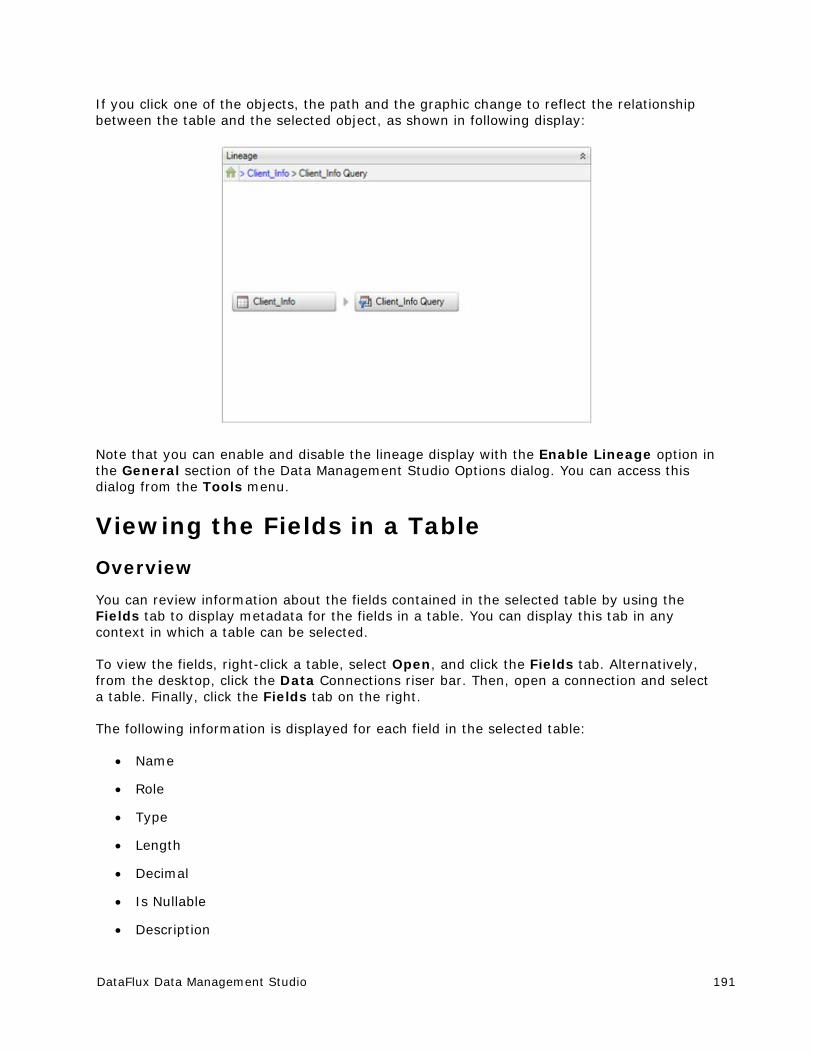
DataFlux Data Management Studio 191
If you click one of the objects, the path and the graphic change to reflect the relationship between the table and the selected object, as shown in following display:
Note that you can enable and disable the lineage display with the Enable Lineage option in the General section of the Data Management Studio Options dialog. You can access this dialog from the Tools menu.
Viewing the Fields in a Table
Overview
You can review information about the fields contained in the selected table by using the Fields tab to display metadata for the fields in a table. You can display this tab in any context in which a table can be selected.
To view the fields, right-click a table, select Open, and click the Fields tab. Alternatively, from the desktop, click the Data Connections riser bar. Then, open a connection and select a table. Finally, click the Fields tab on the right.
The following information is displayed for each field in the selected table:
Name
Role
Type
Length
Decimal
Is Nullable
Description
192 DataFlux Data Management Studio
Viewing the Data Model for a Table
Overview
You can identify key fields, data types and other elements of a table's data model by using the Data Model tab to display the data model. You can display this tab in any context in which a table can be selected.
To view the data model, right-click a table, select Open, and click the Data Model tab. Alternatively, from the desktop, click the Data Connections riser bar. Then, open a connection and select a table. Finally, click the Data Model tab on the right.
The tab displays a list of the fields contained in the table. Each field has an icon that indicates the data type for each field, whether it is a calculated field, a key field, and so on.
Viewing the Data in a Table
Overview
You can quickly review the data in a selected table by using the Data Viewer tab to display the data. You can also use this tab to search, filter, or sort the data; save it as a query or profile; or generate a simple reporting graphic based on the data.
You can display this tab in any context in which a table can be selected such as the Data Connections Riser or a query flow. The Data Viewer tab enables you to perform the following tasks:
Navigate the Data
Search the Data
Filter the Data
Sort the Data
Save as an SQL Query
Profile the Table
Open the Report Pane
Note that you can also preview the results of a node in a data job by selecting the node and clicking the Preview tab in the Details pane. When a node cannot be displayed, an icon is shown on the node. Put your cursor over the icon to see why the preview failed.
DataFlux Data Management Studio 193
Navigate the Data
You can easily navigate in the table data. You can use the navigation tools to perform the following tasks:
Enter a row number in the Go to row field. Then, click Go to row to specify the number of the first row that is displayed in the table.
Click Go to the first row to navigate to the first row of data in the data viewer.
Click Go to the last row to navigate to the last row of data in the data viewer.
Search the Data
You can click Find to display the search fields for the data viewer. You can use these fields to perform the following tasks:
Enter a search term in the Find field. Note that you can use the drop-down list to select a term from a previous search.
Set a find option by clicking Set find options. These options control how the search term is parsed and whether the whole word and the case are matched.
Specify the fields that are searched in the In fields field. You can click Select fields to find match to specify the data type for the fields or to select fields by name.
Click Find Next to go to the next match.
Click Find Previous to go to the previous match.
Note: Use the following syntax to search for empty strings, nulls, and null strings: 1) Leave the Find field empty to search for empty strings; 2) Enter (NULL) to search for nulls; and 3) Enter "(NULL)" to search for null strings. Note that some databases do not support null strings and will not return a result for them.
194 DataFlux Data Management Studio
Filter the Data
You can click Filter to filter the rows and fields that are displayed in the data viewer. You can use the Filters dialog to perform the following tasks:
Click Sample to configure the sample data that is displayed in the data viewer. By default, the Maximum rows field is enabled with a value of 500 rows. The value that you set here determines the sample size for the currently selected table.
Note: You can change this setting globally in the Default max rows field in the DataFlux Data Management Studio Options dialog at Tools > Options > DataViewer. The value that you set in the Options dialog determines the sample size for all tables when they are displayed in the Data Viewer tab.
Click Row Filter to configure how rows in the selected table are filtered. You can exclude or include values from any row in the table.
Click Field Filter to configure how fields in the selected table are filtered. You can select the fields that are displayed in the data viewer.
Note that the SELECT statement generated by each filter is displayed at the bottom of each filter tab.
Sort the Data
You can click Sort to access the Sort Dialog. Then, you can use the dialog to set the sort fields, order, and direction in the data viewer.
Save as an SQL Query
You can click Save as SQL Query to access the Save Query dialog. Then, you can use the dialog to name the query and select a save location for it.
Profile the Table
You can click Open Profile Report to view an existing profile that includes the selected table. You can also click New Profile Report to access the New Profile dialog. Then, you can use the dialog to name the profile and select a save location for it. You can also see a list of existing profiles.
DataFlux Data Management Studio 195
Open the Report Pane
You can click Open report pane to display the report pane for a selected field. Then, you can perform the following tasks:
Click Count to display counts of the field values. You can set options such as granularity, box plots, sorts, and discrete values. The options vary according to data type.
Click Length to display the lengths of the field values. You can set options such as granularity and box plots. The options vary according to data type.
Click Report to display sorted and summarized reports for a field. You can also group numeric values and display them discretely.
Note: You can set options for the data viewer in the DataViewer section of the Data Management Studio Options dialog. You can access this dialog from the Tools menu.
196 DataFlux Data Management Studio
Graphing the Data in a Table
Overview
You can create a graph that is based on the data in the selected table by using the Graph tab to configure the type, content, and format of a graph that is based on the data in the selected table. You can display this tab in any context in which a table can be selected.
To create a graph, right-click a table, select Open, and click the Graph tab. Alternatively, from the desktop, click the Data Connections riser bar. Then, open a connection and select a table. Finally, click the Graph tab on the right.
Perform the following steps to create a graph from the data in the selected table:
1. Select a chart type in the drop-down list in the Chart Type field. The following types are available:
Column
Stacked Column
Bar
Stacked Bar
Pie
Line
Spline
Area
Bubble
Radar
2. Select a field for the X Axis field.
3. Select a field for the Y Axis field.
4. Select a field for the Z Axis field (if applicable for the chart type).
5. Set the Row count range.
6. Select 3D if you need to generate the graph in three dimensions.
DataFlux Data Management Studio 197
Copying and Exporting Metadata Copying and Moving Metadata Objects
Exporting and Importing Metadata Packages
Copying and Moving Metadata Objects
Overview
You can copy or move jobs, profiles, business rules, or other objects to a user-defined folder in the Folders tree. Use Copy to Folder or Move to Folder to send the objects to the desired folder. The folder can be in any repository to which you are connected.
Perform the following steps:
1. Identify all of the objects that you want to copy or move. If you will be sending a metadata object to another repository, identify any dependencies that you need to manage. For example, if you want to copy a profile that depends on certain business rules, you will need to copy the rules as well unless the target repository has the same rules.
2. In the Folders riser, select the folder that contains objects to be copied or moved. A list of the objects in the folder appears on the right.
3. Perform one of the following:
To copy or move the entire folder, right-click the folder and select Copy to Folder or Move to Folder. A selection dialog displays.
To copy or move selected objects in the folder, select them in the right pane, and then click the Action Menu in the toolbar and select Copy to Folder or Move to Folder. A selection dialog displays.
4. Use the selection dialog to navigate to the target folder. The target folder can be in the current repository or another repository to which you are connected. Click Open to move or copy the objects.
198 DataFlux Data Management Studio
Exporting and Importing Metadata Packages
Overview
You can use the Export wizard to export one or more jobs, profiles, or other objects to another repository to which you are not connected. You can also use it to import a package of metadata objects that was exported from Data Management Studio.
Export a Package of Metadata Objects
1. Identify all of the objects that you want to export. Identify any dependencies that you need to manage. For example, if you want to export a profile that depends on certain business rules, you will need to export the rules as well unless the target repository has the same rules.
2. (Optional) Move or copy all objects to be exported into a single user-defined folder in the Folders tree. This will make it easier to select and export a collection of different kinds of objects. For more information, see Copying and Moving Metadata Objects.
3. In the Folders tree, select the folder that contains objects to export. A list of the objects in the folder appears on the right.
4. To export the entire folder, right-click the folder and select Export. To export selected objects in the folder, select them in the right pane, and then click the Export icon in the toolbar.
5. Follow the prompts for the Export wizard.
Import a Package of Metadata Objects
1. Identify the physical path to the metadata package that was exported from Data Management Studio.
2. Display user-defined folders by clicking the Group Items by Type icon at the top of the Folders tree.
3. Right click a target folder, and then select Import.
4. Navigate to the location where you can access the metadata package and select it.
5. Follow the prompts for the Import wizard.
DataFlux Data Management Studio 199
Data Management Studio - Customize Dialog
Customize
Customize - Parse Definition Quick Editor
Customize - Vocabulary Editor
Customize - Grammar Editor
Customize - Regex Editor
Customize - Phonetics Editor
Customize - Chop Table
Scheme Builder
QKB Merge Tool
QKB Difference Viewer
Data Management Studio Customize Customize is part of the DataFlux Data Management Studio package. Customize is primarily used to edit your Quality Knowledge Base (QKB). A QKB is a collection of files accompanying metadata. These files include:
.loc files
Regular Expression (Regex) Libraries
Vocabularies
Schemes
Grammars
Phonetics Libraries
The .loc files are specific to individual Encodings, Languages, and Locales. These files typically include data types that describe data and definitions describing data processing operations. Definitions use the Regex Libraries, Vocabularies, Schemes, Grammars, and Phonetics Libraries.
For more information about QKBs, see Appendix C: Quality Knowledge Base or click Help > QKB Help.
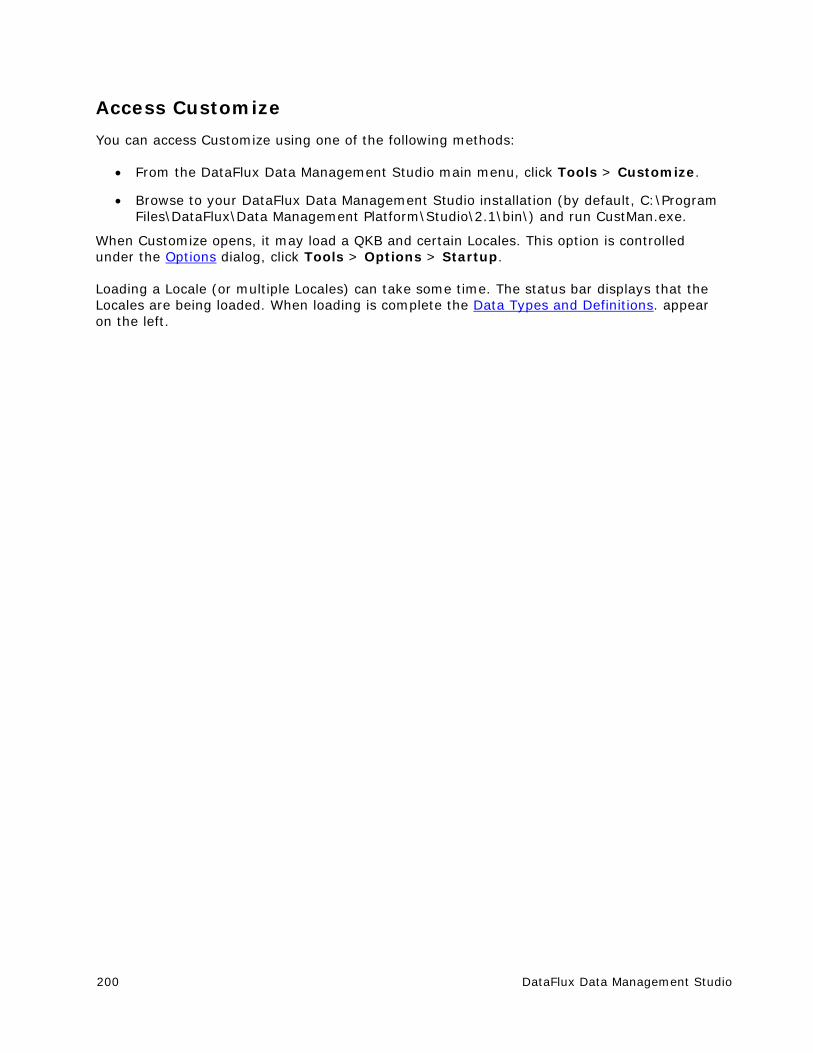
200 DataFlux Data Management Studio
Access Customize
You can access Customize using one of the following methods:
From the DataFlux Data Management Studio main menu, click Tools > Customize.
Browse to your DataFlux Data Management Studio installation (by default, C:\Program Files\DataFlux\Data Management Platform\Studio\2.1\bin\) and run CustMan.exe.
When Customize opens, it may load a QKB and certain Locales. This option is controlled under the Options dialog, click Tools > Options > Startup.
Loading a Locale (or multiple Locales) can take some time. The status bar displays that the Locales are being loaded. When loading is complete the Data Types and Definitions. appear on the left.
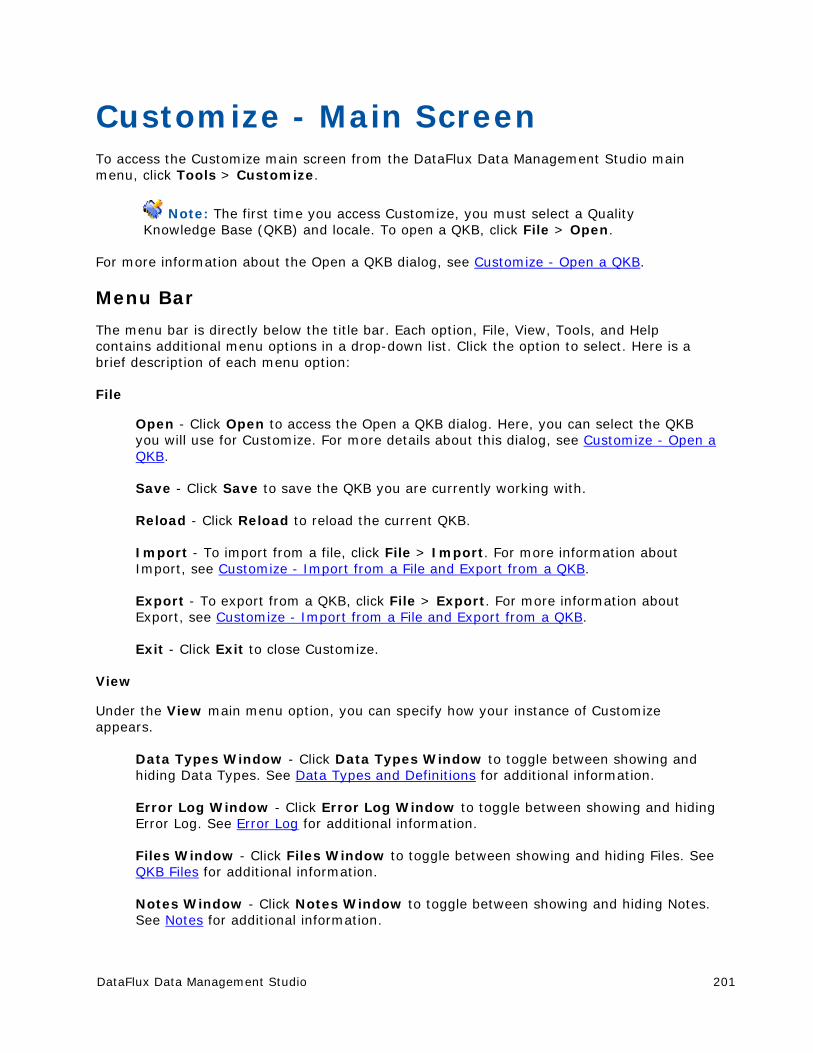
DataFlux Data Management Studio 201
Customize - Main Screen To access the Customize main screen from the DataFlux Data Management Studio main menu, click Tools > Customize.
Note: The first time you access Customize, you must select a Quality Knowledge Base (QKB) and locale. To open a QKB, click File > Open.
For more information about the Open a QKB dialog, see Customize - Open a QKB.
Menu Bar
The menu bar is directly below the title bar. Each option, File, View, Tools, and Help contains additional menu options in a drop-down list. Click the option to select. Here is a brief description of each menu option:
File
Open - Click Open to access the Open a QKB dialog. Here, you can select the QKB you will use for Customize. For more details about this dialog, see Customize - Open a QKB.
Save - Click Save to save the QKB you are currently working with.
Reload - Click Reload to reload the current QKB.
Import - To import from a file, click File > Import. For more information about Import, see Customize - Import from a File and Export from a QKB.
Export - To export from a QKB, click File > Export. For more information about Export, see Customize - Import from a File and Export from a QKB.
Exit - Click Exit to close Customize.
View
Under the View main menu option, you can specify how your instance of Customize appears.
Data Types Window - Click Data Types Window to toggle between showing and hiding Data Types. See Data Types and Definitions for additional information.
Error Log Window - Click Error Log Window to toggle between showing and hiding Error Log. See Error Log for additional information.
Files Window - Click Files Window to toggle between showing and hiding Files. See QKB Files for additional information.
Notes Window - Click Notes Window to toggle between showing and hiding Notes. See Notes for additional information.
202 DataFlux Data Management Studio
Properties Window - Click Properties Window to toggle between showing and hiding Properties. This displays information related to the selected QKB definition. See Properties for additional information.
Test Window - Click Test Window to toggle between showing and hiding the Testing section. See Testing for additional information.
Return to Default Docking - You can move the different tabs around to create a customized view. Click Return to Default Docking to move all Customize options back to the default locations.
Grid Options... - You can add grid lines to the right navigation. Click View > Grid Options. No grid appears, by default.
Display Grid - Select the Display Grid option to show lines in the right navigation.
Spacing - Click the drop-down list and select the amount of spacing between grid lines.
Style - Click the drop-down list and select the type of line you want to use in the grid.
Snap to grid - When the Snap to grid option is selected, any node you drag on the Customize diagram will be aligned with the nearest grid point where the mouse is released. If this option is not selected, you can move the node anywhere on the diagram and it will stay where the mouse is released.
Tools
Editors - Click Tools > Editors to select the different editors available in Customize.
Parse Definition Quick Editor - Opens the Parse Definition Quick Editor.
Grammar Editor - Opens the Grammar Editor.
Vocabulary Editor - Opens the Vocabulary Editor.
Regex Library Editor - Opens the Regex Library Editor.
Phonetics Editor - Opens the Phonetics Editor.
Chop Table Editor - Opens the Chop Table Editor.
Scheme Builder - Opens the Scheme Builder.
QKB Difference Viewer - Opens the QKB Difference Viewer.
QKB Merge Tool - Opens the QKB Merge Tool.
Options - The Customize Options dialog is available to specify startup and display settings for Customize.
For more information about the Options dialog, see Customize - Options.
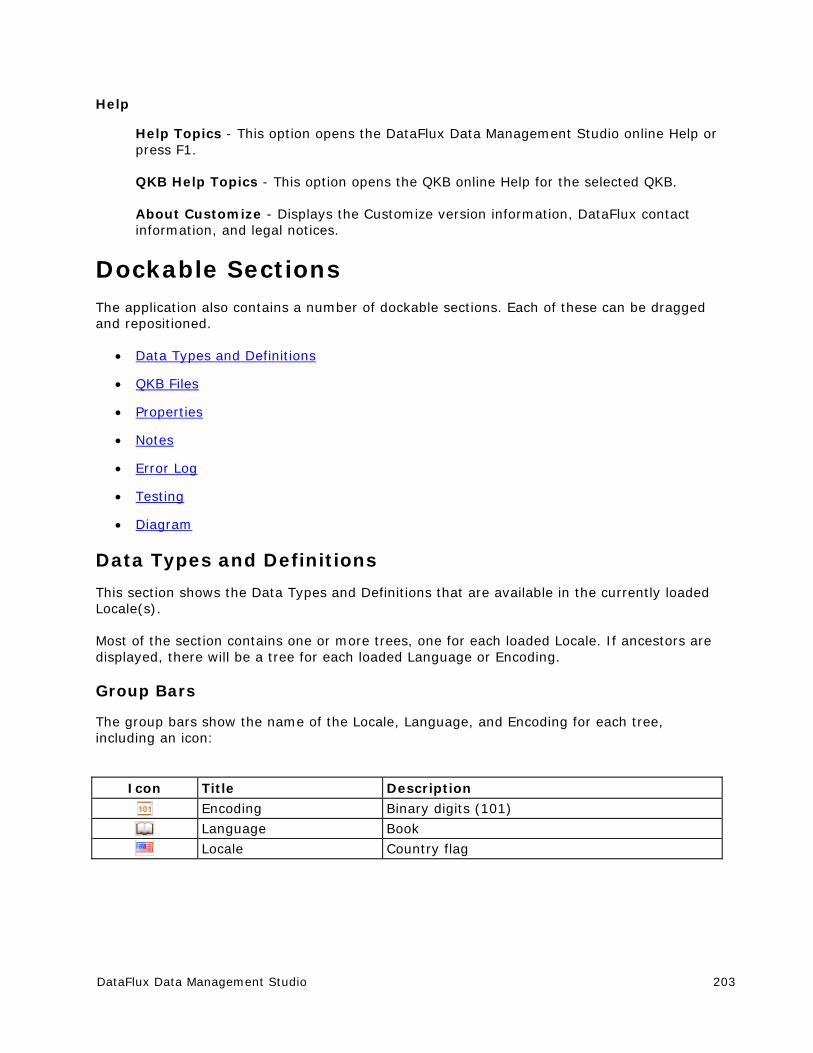
DataFlux Data Management Studio 203
Help
Help Topics - This option opens the DataFlux Data Management Studio online Help or press F1.
QKB Help Topics - This option opens the QKB online Help for the selected QKB.
About Customize - Displays the Customize version information, DataFlux contact information, and legal notices.
Dockable Sections The application also contains a number of dockable sections. Each of these can be dragged and repositioned.
Data Types and Definitions
QKB Files
Properties
Notes
Error Log
Testing
Diagram
Data Types and Definitions
This section shows the Data Types and Definitions that are available in the currently loaded Locale(s).
Most of the section contains one or more trees, one for each loaded Locale. If ancestors are displayed, there will be a tree for each loaded Language or Encoding.
Group Bars
The group bars show the name of the Locale, Language, and Encoding for each tree, including an icon:
Icon Title Description
Encoding Binary digits (101)
Language Book
Locale Country flag
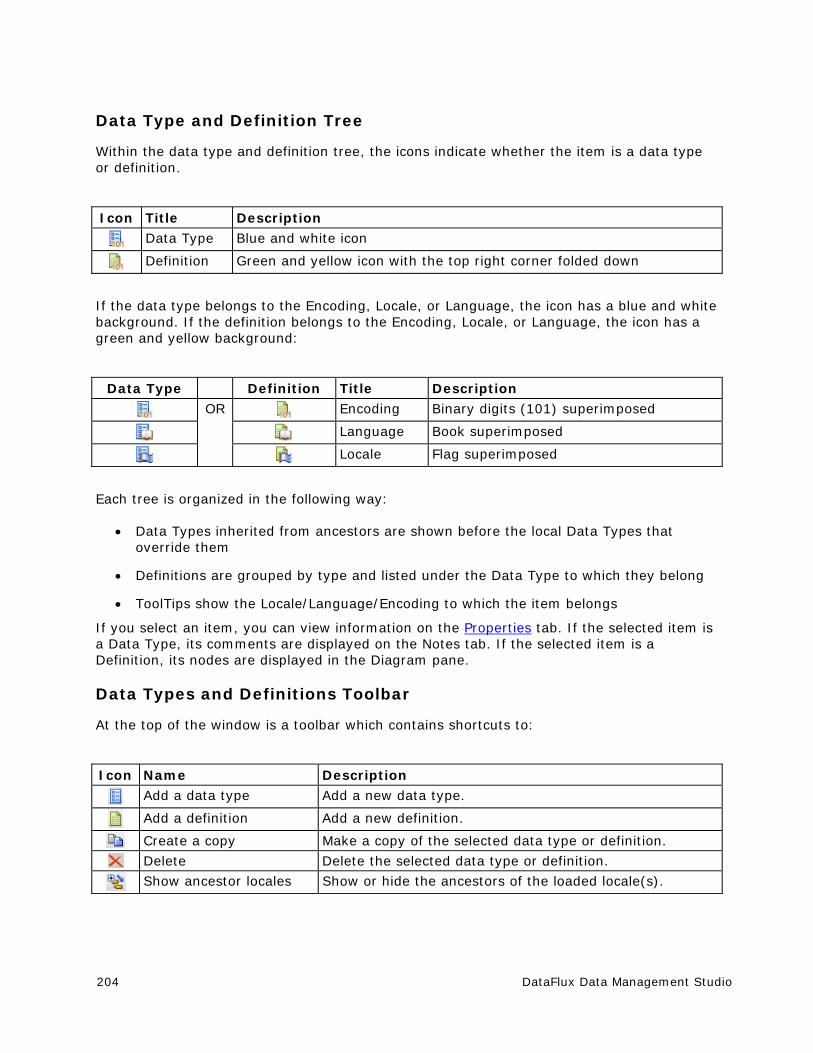
204 DataFlux Data Management Studio
Data Type and Definition Tree
Within the data type and definition tree, the icons indicate whether the item is a data type or definition.
Icon Title Description
Data Type Blue and white icon
Definition Green and yellow icon with the top right corner folded down
If the data type belongs to the Encoding, Locale, or Language, the icon has a blue and white background. If the definition belongs to the Encoding, Locale, or Language, the icon has a green and yellow background:
Data Type Definition Title Description
OR Encoding Binary digits (101) superimposed
Language Book superimposed
Locale Flag superimposed
Each tree is organized in the following way:
Data Types inherited from ancestors are shown before the local Data Types that override them
Definitions are grouped by type and listed under the Data Type to which they belong
ToolTips show the Locale/Language/Encoding to which the item belongs
If you select an item, you can view information on the Properties tab. If the selected item is a Data Type, its comments are displayed on the Notes tab. If the selected item is a Definition, its nodes are displayed in the Diagram pane.
Data Types and Definitions Toolbar
At the top of the window is a toolbar which contains shortcuts to:
Icon Name Description
Add a data type Add a new data type.
Add a definition Add a new definition.
Create a copy Make a copy of the selected data type or definition.
Delete Delete the selected data type or definition.
Show ancestor locales Show or hide the ancestors of the loaded locale(s).
DataFlux Data Management Studio 205
QKB Files
This tab shows the contents of the QKB, organized by type of file. Below the title bar, at the top of the section, the name and version of the QKB are displayed. When you select a file, metadata about the file appears at the bottom of the section. This metadata includes the following items:
Filename - This is the full path for the selected file
Locale - This is the locale name the selected file belongs to
Creation Date - The date and time the file was created
Modification Date - The date and time the file was last modified
The context menu for each file has the following options:
Edit with ... - This opens the appropriate editor application for the file type
Find usage in definitions - This opens the File Usage dialog. Delete - This removes the file
File Usage Dialog
The Find file usage in definitions dialog opens when you run Find usage in definitions from the context menu. It is divided into two tables for actively loaded definitions and other definitions.
Actively loaded definitions
The top table shows where the file is used within currently loaded Locales. The table includes five columns: Locale, Definition, Type, Node Type, and Comment.
Select a row in the table and click Open this definition and select the node icon to go directly to the node in Customize.
Other definitions (not actively loaded)
The bottom table shows where the file is used within locals that have not been loaded. The Node type column does not appear and you cannot go directly to the definition.
You do not have to close the File Usage dialog while you work on the QKB. You can even have multiple instances of this window, each for a different file. If you make some changes to the QKB, click Refresh icon.
Note: In most cases, the file is used directly in the node and the name is visible in the Properties tab. However, when Vocabulary files are also used by the Chop Table file, the Vocabulary itself will not be apparent from looking at the nodes. This is because the Vocabulary is embedded in the Chop file which is used by a Chop node. In this case, the Comment column shows that the Vocabulary is used by the Chop file.
For more information about the QKB, refer to Appendix C: Quality Knowledge Base or refer to the QKB online Help. From the Customize main menu, click Help > QKB Help.
206 DataFlux Data Management Studio
Properties
Each Data Type, Definition, and Node has its own properties. You must click Apply for your changes to take effect. The fields include the following:
Locale - This shows the encoding information for the locale you are viewing. See Encodings for additional information.
Data Type
Name - You can change the name of the Data Type, subject to certain rules. All definitions that belong to this Data Type are updated to use the new Data Type name.
Tokens - You can add or delete tokens, subject to certain rules. Tokens may also be renamed. Any definitions that use the tokens are updated as needed.
See also Editing a Data Type.
Definition Type
Name - The name of the definition can be changed, subject to certain rules. All definitions that embed this definition are updated to use the new name.
See also Editing a Definition.
Node
The contents of the Properties tab vary according to the type of node. See individual node pages for more information.
Notes
Each Data Type and node of a Definition may have some comments associated with it. To edit a comment, click the node or data type to select, and enter the comments in the Notes section. Click Apply.
If the comment is for a node, the Note icon appears on the node indicating a note is attached.
The maximum number of characters allowed is approximately 32,000.
Error Log
The Error Log tab shows details about errors encountered while loading locale, if any.

DataFlux Data Management Studio 207
Testing
The Testing section is divided into an input section (left) and an output section (right).
Input section
The bulk of this section is taken up by a table where test values can be entered. Most of the time, there is only one table shown (the Single Field table). However, when a definition that allows parsed input is being edited, two tabs are shown. The two tabs are labeled, Single Field and Parsed. The Single Field table accepts only single strings, while the Parsed table accepts several columns of input. The columns correspond to the tokens of the Parse Definition embedded in the definition currently being edited.
Click a row to select a test value you want to test. The results appear in the Output section.
The toolbar in the Testing section allows the following actions:
Icon Name Description
Add a new test value
Either click to add a new test value or type the value in the blank line at the bottom of the table.
Update the selected test value
Click this toolbar option to refresh the selected test value.
Delete the selected test value
Select the test value you want to delete and click Delete the selected test value.
Delete all test values
Click to delete all test values in the Test Values section.
Import test values Click to import existing information to use in testing. See Importing test values.
Sensitivity selector
The sensitivity selector is enabled when a sensitivity setting is necessary for testing. For example, when a Match Definition is being edited.
Importing test values
When you click Import test values, the Import Test Data dialog opens. Select the data input type. Click Next. Possible input types include the following:
Data Source
SQL Query
Text File Input
Fixed Width File Input

208 DataFlux Data Management Studio
SAS Data Set
SAS SQL Query
Locate the information you want to import. Select the table then click Next.
Select the maximum number of rows you want to use as your test data and select the Field name you want to use.
Click Finish. The data you imported appears in the Test Values section.
Output section
This section shows the result of the processing in response to the selected input. If a definition is selected, the output shown is the output of the last node. If a node within a definition is selected, that node's output is shown. The exact output displayed differs according to the type of node. Refer to the individual node pages for details.
Diagram
The Diagram section shows the layout of a Definition's nodes.
The selected node within the Diagram section is the output you see in the Testing section. That node's properties and notes are shown in the Properties and Notes tabs.
For more information on the actions available for Nodes and Groups, see Customize - Nodes.
The toolbar at the top of the Diagram section includes the following toolbar options:
Icon Name Description
Add a note A note can be placed anywhere in the diagram. This is distinct from the comments attached to each Node through the Notes tab.
Toggle grid display This turns the background grid on or off. Grid settings are available from Tools > Options > Display.
Change zoom level
This may be useful to focus in to a particular part of the definition.
Hold the diagram If activated, nodes that are resized or repositioned will bounce back to their original place. This prevents you from accidentally rearranging the diagram.
Return the diagram to a default layout
Click move all of the nodes to a default layout. Any invalid nodes that are not mandatory are also deleted, returning the definition to a valid state, if possible.
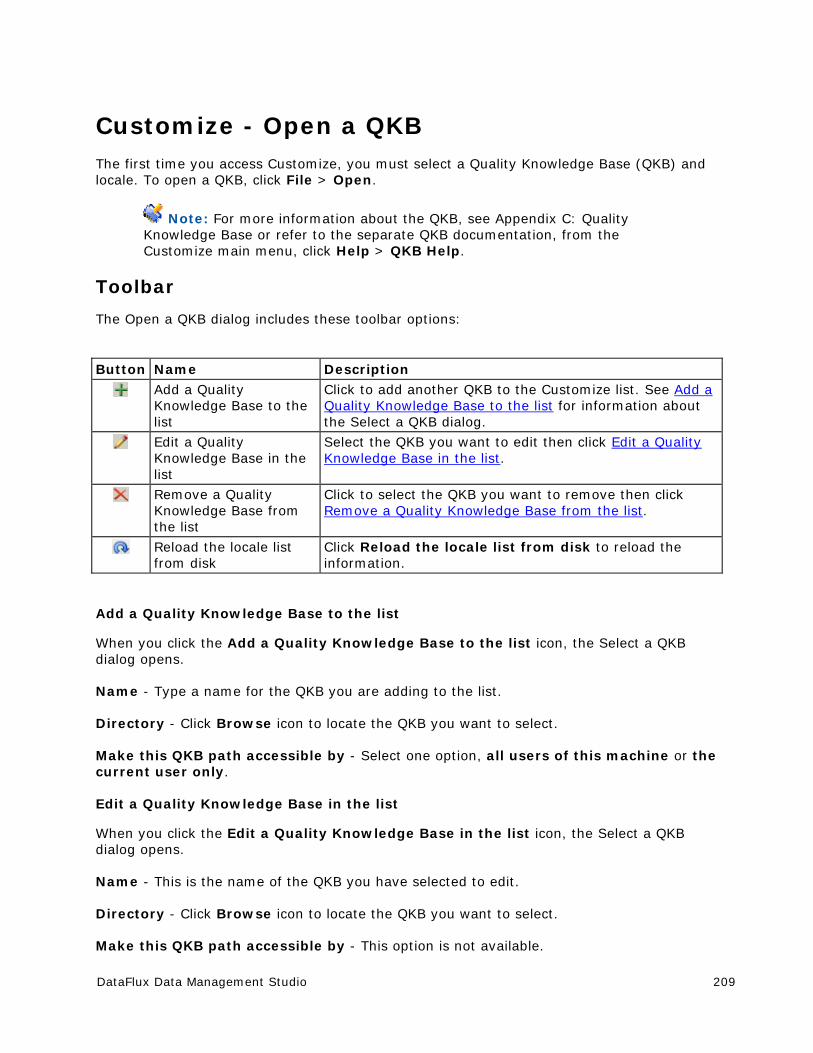
DataFlux Data Management Studio 209
Customize - Open a QKB The first time you access Customize, you must select a Quality Knowledge Base (QKB) and locale. To open a QKB, click File > Open.
Note: For more information about the QKB, see Appendix C: Quality Knowledge Base or refer to the separate QKB documentation, from the Customize main menu, click Help > QKB Help.
Toolbar
The Open a QKB dialog includes these toolbar options:
Button Name Description
Add a Quality Knowledge Base to the list
Click to add another QKB to the Customize list. See Add a Quality Knowledge Base to the list for information about the Select a QKB dialog.
Edit a Quality Knowledge Base in the list
Select the QKB you want to edit then click Edit a Quality Knowledge Base in the list.
Remove a Quality Knowledge Base from the list
Click to select the QKB you want to remove then click Remove a Quality Knowledge Base from the list.
Reload the locale list from disk
Click Reload the locale list from disk to reload the information.
Add a Quality Knowledge Base to the list
When you click the Add a Quality Knowledge Base to the list icon, the Select a QKB dialog opens.
Name - Type a name for the QKB you are adding to the list.
Directory - Click Browse icon to locate the QKB you want to select.
Make this QKB path accessible by - Select one option, all users of this machine or the current user only.
Edit a Quality Knowledge Base in the list
When you click the Edit a Quality Knowledge Base in the list icon, the Select a QKB dialog opens.
Name - This is the name of the QKB you have selected to edit.
Directory - Click Browse icon to locate the QKB you want to select.
Make this QKB path accessible by - This option is not available.

210 DataFlux Data Management Studio
Remove a Quality Knowledge Base from the list
Select the QKB you want to remove from the list and click Remove icon. This option only removes the QKB from the list and does not delete it from your installation.
Reload the locale list from disk
Click to refresh the locale list.
Customize - Import from a File and Export from a QKB
Import from a file
The Import option allows you to import Data Types and Definitions from a package previously created by Export.
To import from a file, click Import. The Import from a file dialog opens.
Filename - This is the path to the file you want to import.
Click Browse to locate the file you want to import. The Import file selection dialog opens. Select the file name then click Open.
File contents
Description - This is the description for the file.
Created - This is the date and time the file was created.
The Data Type appears in the field below.
Click Next. The Import from a file - Import results dialog opens.
The contents of the package will be imported. Any problems encountered during the import (for example, the Locale not licensed) are listed when the Import process is complete.
Data Types and Definitions will be imported into their Locales of origin, regardless of what Locales are loaded in Customize at the time of Import. For example, if a Definition was from ENUSA but you only have FRFRA loaded, then ENUSA is loaded and that Definition is imported into ENUSA. (This process assumes you are licensed to use the Locale in question.)
If the import contains an item that would cause a name collision (for example, a Data Type of the same name or a Definition of the same name and type already exists in the target Locale), the imported item will be renamed with an auto-incrementing number suffix. For example, if an "Address" Data Type already exists, the imported Data Type will be called "Copy of Address 2". A subsequent Import will result in "Copy of Address 3", and so on. You can rename the item to something more meaningful after the Import.
Definitions that are automatically imported as dependencies are treated in the same way as explicitly-exported Definitions. These also are imported into their Locales of origin.
DataFlux Data Management Studio 211
Files that are imported along with Definitions, such as Regex Libraries or Grammars, are also renamed in the same way to avoid overwriting existing files.
Note: The newly-imported Data Types and Definitions are NOT saved until you save the QKB.
Click Finish.
Export from a QKB
To export from a QKB, click File > Export. The Export from a QKB - Select items dialog opens.
The Export dialog displays a tree similar to Data Types and Definitions. When a check box is selected, that item will be exported. When a Definition check box is selected, the Data Type is automatically selected as well. Dependencies (definitions that are used by other definitions) will be determined automatically and do not need to be explicitly selected.
To export from a QKB, complete the following steps:
1. Select the QKB you want to export from.
2. Click Next.
3. Enter a name for the export file. The file will have a .qkx extension.
4. Add text describing the export and specify the location where the export package will be saved.
5. Click Save. The Export from a QKB - Select target dialog opens.
6. Click Next. Information about the Export appears in the Export from a QKB - Results dialog.
7. View what will be exported. In the right pane, the Data Types and Definitions selected for export appear. Dependencies of the explicitly-selected Definitions (for example, a Parse Definition that is needed by a selected Match Definition) will be automatically included. In the left pane, all the files that are used by the exported Definitions are shown (for example, Regex Libraries, Grammars, and so on). These will be exported in the same package.
8. Click Finish. The QKB you exported is saved.
212 DataFlux Data Management Studio
Customize - Options The Customize Options dialog is available to specify startup and display settings for Customize. To access the Options dialog, click Tools > Options.
Startup Tab
When you open the Options dialog, the Startup tab appears.
Select the Quality Knowledge Base (QKB) startup mode you want to use when Customize opens. Select one of these options:
None - If you select this option, no QKB will be selected when you start Customize.
Last opened QKB - If this option is selected, then the last QKB used with Customize will be available when you start Customize. This option is selected by default.
DataFlux Data Management Studio active QKB - If this option is selected, the QKB you have listed as your default will be the QKB available when you start Customize.
For more information about the QKB, see Appendix C: Quality Knowledge Base or refer to the separate QKB documentation, from the Customize main menu, click Help > QKB Help.
Display
Click the Display tab for additional option settings.
Show full descriptions in Category and Gender selection drop-down lists
Select this option to see complete descriptions in the Category and Gender drop-down lists. For example, if this check box is selected, you will see Male instead of M. The ToolTips always show the description.
Library file selection drop-down lists
These options relate to the library file selection. These options determine which files can be selected for a definition (for example, RegEx Library, Grammar, and so on).
Show files for the definition's locale only - Only files that belong to the same locale as a definition are visible.
Show files for the definition's locale and parents - Files that belong to the locale of the definition and the locale's ancestors are visible. This option is selected by default.
Show files for all locales (not recommended) - Files from any locale, language, and encoding are visible. This option is not recommended because arbitrary files (for example, from a different language) are not likely to be useful.
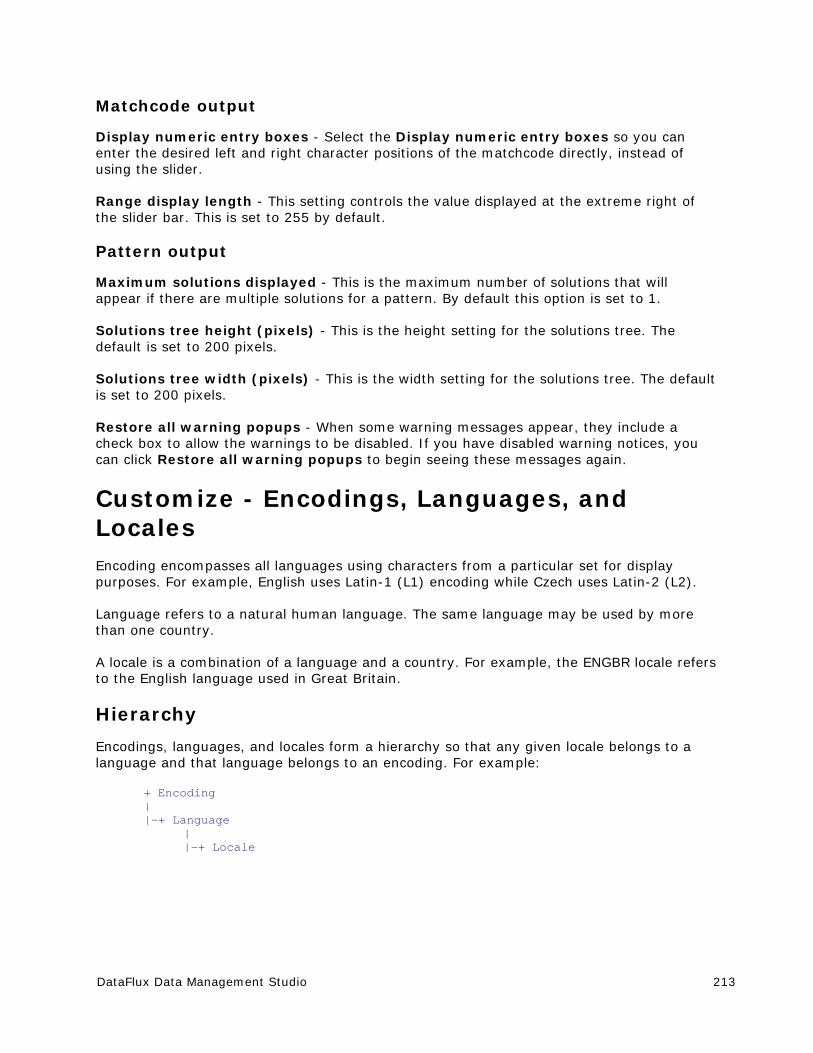
DataFlux Data Management Studio 213
Matchcode output
Display numeric entry boxes - Select the Display numeric entry boxes so you can enter the desired left and right character positions of the matchcode directly, instead of using the slider.
Range display length - This setting controls the value displayed at the extreme right of the slider bar. This is set to 255 by default.
Pattern output
Maximum solutions displayed - This is the maximum number of solutions that will appear if there are multiple solutions for a pattern. By default this option is set to 1.
Solutions tree height (pixels) - This is the height setting for the solutions tree. The default is set to 200 pixels.
Solutions tree width (pixels) - This is the width setting for the solutions tree. The default is set to 200 pixels.
Restore all warning popups - When some warning messages appear, they include a check box to allow the warnings to be disabled. If you have disabled warning notices, you can click Restore all warning popups to begin seeing these messages again.
Customize - Encodings, Languages, and Locales Encoding encompasses all languages using characters from a particular set for display purposes. For example, English uses Latin-1 (L1) encoding while Czech uses Latin-2 (L2).
Language refers to a natural human language. The same language may be used by more than one country.
A locale is a combination of a language and a country. For example, the ENGBR locale refers to the English language used in Great Britain.
Hierarchy
Encodings, languages, and locales form a hierarchy so that any given locale belongs to a language and that language belongs to an encoding. For example:
+ Encoding | |-+ Language
| |-+ Locale
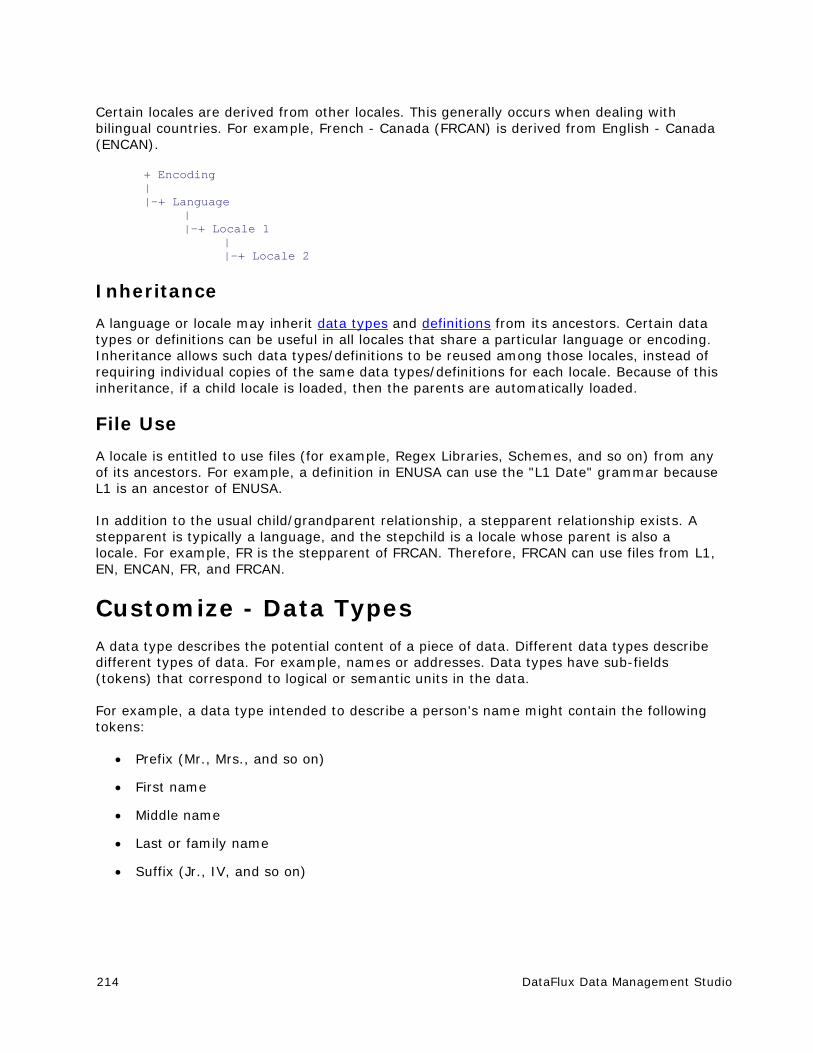
214 DataFlux Data Management Studio
Certain locales are derived from other locales. This generally occurs when dealing with bilingual countries. For example, French - Canada (FRCAN) is derived from English - Canada (ENCAN).
+ Encoding | |-+ Language
| |-+ Locale 1
| |-+ Locale 2
Inheritance
A language or locale may inherit data types and definitions from its ancestors. Certain data types or definitions can be useful in all locales that share a particular language or encoding. Inheritance allows such data types/definitions to be reused among those locales, instead of requiring individual copies of the same data types/definitions for each locale. Because of this inheritance, if a child locale is loaded, then the parents are automatically loaded.
File Use
A locale is entitled to use files (for example, Regex Libraries, Schemes, and so on) from any of its ancestors. For example, a definition in ENUSA can use the "L1 Date" grammar because L1 is an ancestor of ENUSA.
In addition to the usual child/grandparent relationship, a stepparent relationship exists. A stepparent is typically a language, and the stepchild is a locale whose parent is also a locale. For example, FR is the stepparent of FRCAN. Therefore, FRCAN can use files from L1, EN, ENCAN, FR, and FRCAN.
Customize - Data Types A data type describes the potential content of a piece of data. Different data types describe different types of data. For example, names or addresses. Data types have sub-fields (tokens) that correspond to logical or semantic units in the data.
For example, a data type intended to describe a person's name might contain the following tokens:
Prefix (Mr., Mrs., and so on)
First name
Middle name
Last or family name
Suffix (Jr., IV, and so on)
DataFlux Data Management Studio 215
Data types can be inherited down the locale hierarchy. This allows a data type to be reused among different locales that have a common encoding or language. For example, EN (English) is a parent language of ENUSA (English, USA) and ENGBR (English, Great Britain), so data types in EN can be accessible from both ENUSA and ENGBR. The exception to this rule occurs when the child locale has a data type of the same name as the parent. In this case, the child's data type overrides the parent's data type so the parent's data type is no longer accessible to the child.
Create a Data Type
You can create data types from the Customize Data Types and Definitions pane, or from the context menu within the tree. Your new data type will be assigned to the selected locale. If you use the context menu, this is the locale in which the context menu is activated.
In the Data Types and Definitions pane, specify a name for the new data type. There are some rules when naming data types and tokens.
Data Type Names Rules:
Names are case-insensitive for the purpose of comparison.
A name may not contain non-alphanumeric characters, including commas.
Within the locale, no two data types may have the same name.
A locale may have a data type of the same name as one in an ancestor locale; in this case, the ancestor's data type will be overridden. For example, the ancestor's data type will no longer be available for use within the child locale.
Note: You must also specify at least one token.
Token Name Rules:
Names are case-insensitive for the purpose of comparison.
A name may not contain non-alphanumeric characters, including commas.
Within the data type, no two tokens may have the same name.
Tokens in different data types, even data types with the same name in different locales, have no relation to each other.
Tokens can be added, edited, deleted, or rearranged. The order of tokens usually corresponds to the typical order of occurrence in real data, but it is not required.
Note: If you delete a token, extraction schemes or sought categories that reference that token are removed as well. As a result, you could potentially make a definition invalid by removing a token. Customize marks these items with a red "X".
You can also add comments in the Notes section (optional).
216 DataFlux Data Management Studio
Copy a Data Type
You can copy a data type from the Data Types and Definitions pane or from the context menu within the tree. When you copy a data type, all of the definitions are copied. Each individual copy belongs to the Locale where its original belongs.
For example, if you select a data type that comes from L1, that has two definitions under it (A and B) then definition A belongs to EN and definition B belongs to ENUSA. The copied data type is placed in L1. The copy of definition A is placed in EN and the copy of definition B in ENUSA.
If there is already a data type with the same name within the target locale, the copy will be named similarly to the original, with a numeric suffix added (for example, Copy of Address 2). You can rename the copy. The same principle applies to the definitions copied along with the data type.
You also have the option to copy the Data Type without any definitions.
Delete a Data Type
Select the data type you want to delete and click the Delete icon from the Data Types and Definitions toolbar. You can also delete a data type from the context menu within the tree.
Important: Only items that are not in use by any definitions may be deleted.
Edit a Data Type
To edit a data type, click the data type you want to edit. Click the Properties or Notes tab to make changes.
You can rename a data type from the Properties tab, using the data type name rules. Any existing definitions that use the renamed item, either in the current locale or its children, are notified of the new name.
Tokens can be added, renamed, or deleted, using the token name rules. If a token is deleted from the data type, any definition that uses that token is updated so the token is no longer used. However, if there is a definition that only uses one token from the data type, that token may not be deleted from the data type, regardless of how many other tokens are left in the data type.
For example:
Data Type A has tokens First, Middle, and Last
Definition B uses First and Last from Data Type A
Definition C uses First from Data Type A
No other Definitions use Datatype A
DataFlux Data Management Studio 217
Deletion of First from Data Type A is not allowed, because Definition C uses it as its only token, and deleting the token would make Definition C both useless and invalid. Middle can be deleted from the data type, and this has no effect since no definition uses it. Last can also be deleted, and Definition B will be updated to no longer use it.
Customize - Definitions A definition is a set of steps for processing a piece of data. There are several different kinds of definitions, described later. Generally, a definition is tied to a particular data type. Certain definitions use a data type's tokens; some may use only a subset of their data type's tokens. Some types of definitions make use of other definitions as well.
Definitions can be inherited down the locale hierarchy. This allows a definition be reused among different locales that have a common encoding or language. For example, EN (English) is the parent language of ENUSA (English - USA) and ENGBR (English - Great Britain), so definitions in EN could be accessible from both ENUSA and ENGBR. The exception to this rule occurs when the child locale has a definition of the same name and type as the parent. In this case, the child's definition overrides the parent's so the parent's definition is no longer accessible from the child.
Create a Definition
Definitions can be created from the toolbar in the Data Types and Definitions pane, or the context menu within the tree. When you click the Add a Definition icon, the New Definition dialog opens.
Your new definition will be assigned to the currently selected locale. If you used the context menu, this is the locale in which the context menu was activated.
You must specify the Data Type, Definition Type, and Name. If the context menu was used, some of these fields may already be populated.
Definition Name Rules:
Names are case-insensitive for the purpose of comparison.
A name may not contain non-alphanumeric characters, including commas.
Within a locale, no two definitions of the same type may have the same name.
A locale may have a definition of the same name and type as one in an ancestor locale; in this case, the ancestor's definition will be "overridden", for example, the ancestor's definition will no longer be available for use in the child locale.
Once the definition is created, a diagram appears in the Diagram pane. The behavior of the definition is configured using the Nodes in the diagram, which each represent one step in the process. The specifics of the Nodes for each definition type are described in the Nodes section.

218 DataFlux Data Management Studio
Copy a Definition
To copy a definition, click the Create a Copy icon in the Data Types and Definitions toolbar, or from the context menu within the tree. Each copy belongs to the Locale where its original belongs.
For example, if you select a Definition that belongs to EN, the copy is placed in EN.
If there is already a definition with the same name and type in the target locale, the copy will be named similarly to the original, with a numeric suffix (for example, "Copy of Address 2"). You can rename the copy as desired.
Delete a Definition
Select the item you want to delete and then click the Delete icon from the Data Types and Definitions toolbar, or from the context menu within the tree. Only items that are not in use by any other definitions may be deleted.
Edit a Definition
Select the definition to make changes to that definition. The Properties and Notes tabs are available just as when the definition was newly created.
To rename a definition, go to the Properties tab and type the new name. Make sure you refer to the rules for definition names. Any existing definitions that make use of the renamed item, either in the current locale or its children, will be made aware of the new name.
Validity
A definition may be invalid if:
it contains a Node that is invalid
one or more special constraints is violated
The text in the Output section of the Testing window displays why the definition is invalid and an invalid icon appears to the definition name in the Data Types and Definitions pane. Invalid definitions prevent a QKB from being saved.
DataFlux Data Management Studio 219
Definition Types
Definition types include:
Case Definitions
Extraction Definitions
Gender Definitions
Identification Definitions
Language Guess Definitions
Locale Guess Definitions
Match Definitions
Parse Definitions
Pattern Analysis Definitions
Standardization Definitions
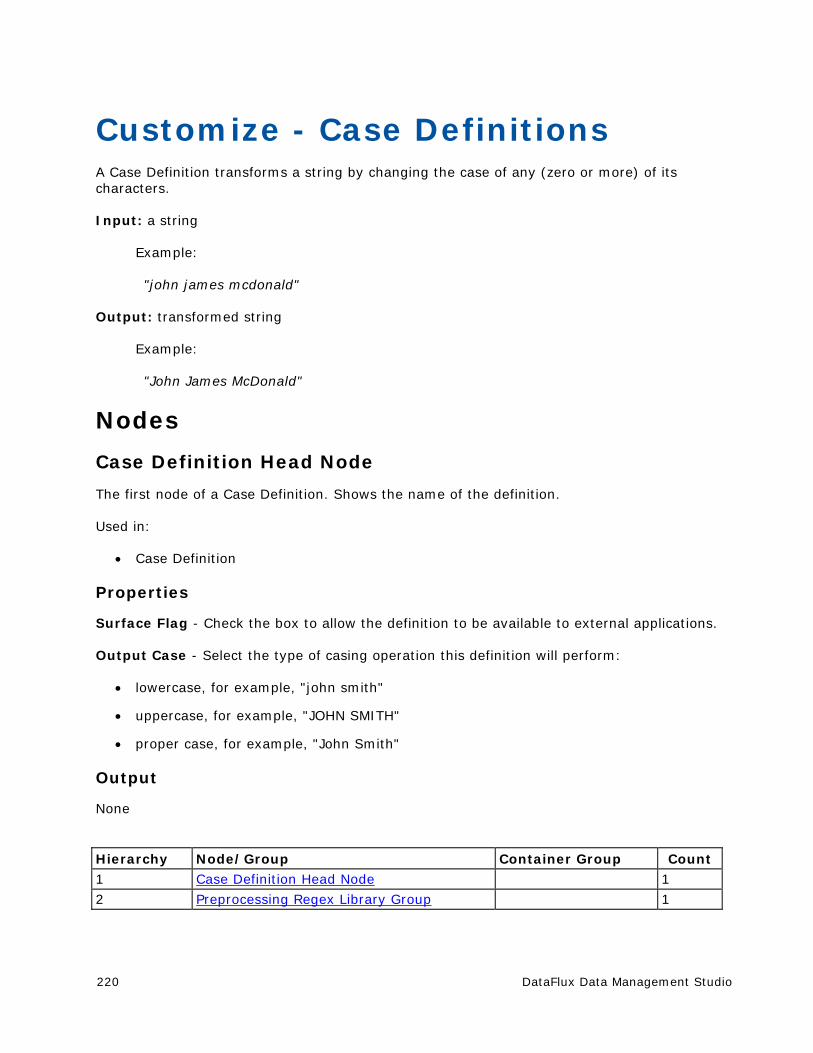
220 DataFlux Data Management Studio
Customize - Case Definitions A Case Definition transforms a string by changing the case of any (zero or more) of its characters.
Input: a string
Example:
"john james mcdonald"
Output: transformed string
Example:
"John James McDonald"
Nodes
Case Definition Head Node
The first node of a Case Definition. Shows the name of the definition.
Used in:
Case Definition
Properties
Surface Flag - Check the box to allow the definition to be available to external applications.
Output Case - Select the type of casing operation this definition will perform:
lowercase, for example, "john smith"
uppercase, for example, "JOHN SMITH"
proper case, for example, "John Smith"
Output
None
Hierarchy Node/Group Container Group Count 1 Case Definition Head Node 1
2 Preprocessing Regex Library Group 1
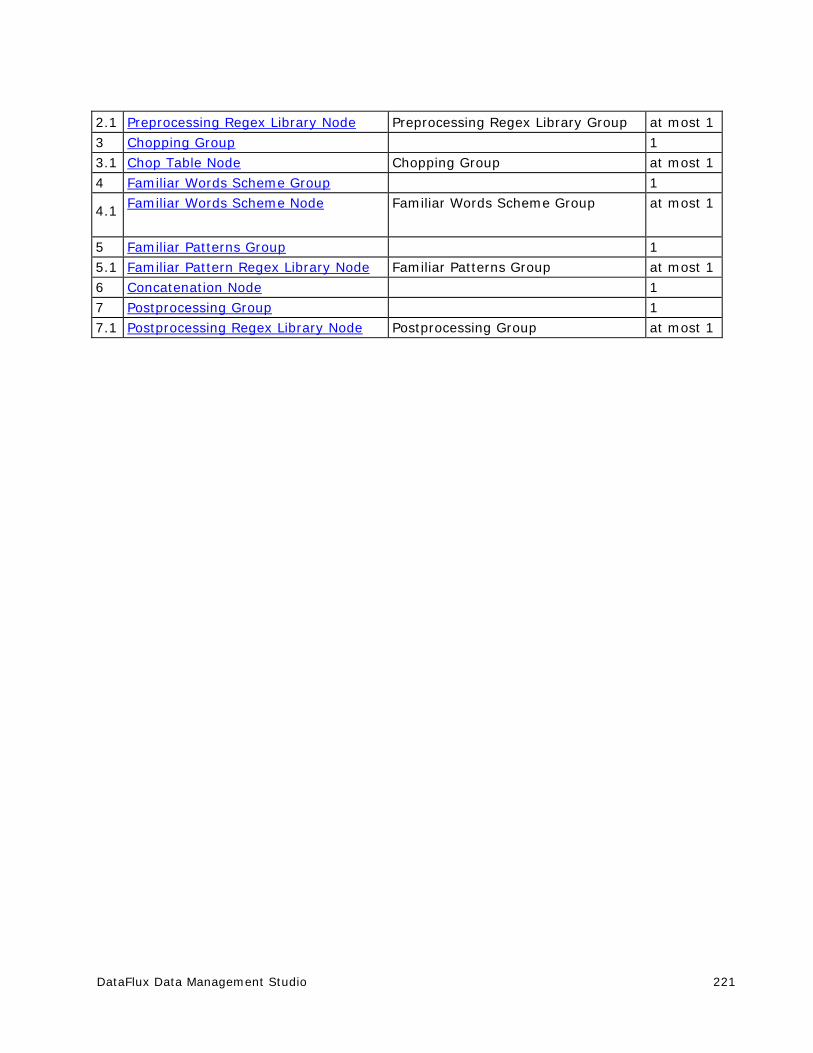
DataFlux Data Management Studio 221
2.1 Preprocessing Regex Library Node Preprocessing Regex Library Group at most 1
3 Chopping Group 1
3.1 Chop Table Node Chopping Group at most 1
4 Familiar Words Scheme Group 1
4.1 Familiar Words Scheme Node Familiar Words Scheme Group at most 1
5 Familiar Patterns Group 1
5.1 Familiar Pattern Regex Library Node Familiar Patterns Group at most 1
6 Concatenation Node 1
7 Postprocessing Group 1
7.1 Postprocessing Regex Library Node Postprocessing Group at most 1
222 DataFlux Data Management Studio
Customize - Extraction Definitions An Extraction Definition extracts parts of the input string and assigns them to corresponding tokens of the associated data type.
Input: a string
Example:
"100 Slightly used green Acme XJF-100 raygun $100 c/w lots of shiny buttons"
Output: mapping between tokens and substrings
Example:
Quantity => 100
Brand => "Acme"
Model => "XJF-100"
Color => "green"
Price => "$100"
Description => "Slightly used raygun c/w lots of shiny buttons"
Extraction Definition Head Node
The first node of an Extraction Definition. Shows the name of the definition.
Used in:
Extraction Definition
Properties
None
Output
None
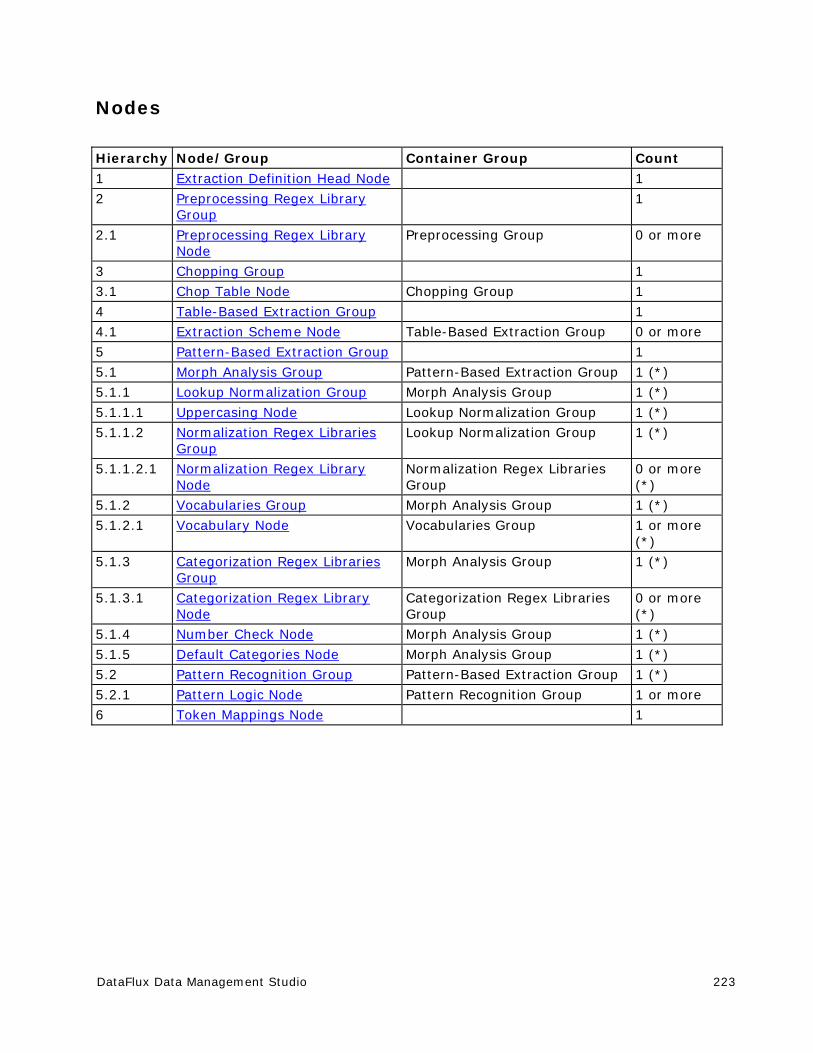
DataFlux Data Management Studio 223
Nodes
Hierarchy Node/Group Container Group Count
1 Extraction Definition Head Node 1
2 Preprocessing Regex Library Group
1
2.1 Preprocessing Regex Library Node
Preprocessing Group 0 or more
3 Chopping Group 1
3.1 Chop Table Node Chopping Group 1
4 Table-Based Extraction Group 1
4.1 Extraction Scheme Node Table-Based Extraction Group 0 or more
5 Pattern-Based Extraction Group 1
5.1 Morph Analysis Group Pattern-Based Extraction Group 1 (*)
5.1.1 Lookup Normalization Group Morph Analysis Group 1 (*)
5.1.1.1 Uppercasing Node Lookup Normalization Group 1 (*)
5.1.1.2 Normalization Regex Libraries Group
Lookup Normalization Group 1 (*)
5.1.1.2.1 Normalization Regex Library Node
Normalization Regex Libraries Group
0 or more (*)
5.1.2 Vocabularies Group Morph Analysis Group 1 (*)
5.1.2.1 Vocabulary Node Vocabularies Group 1 or more (*)
5.1.3 Categorization Regex Libraries Group
Morph Analysis Group 1 (*)
5.1.3.1 Categorization Regex Library Node
Categorization Regex Libraries Group
0 or more (*)
5.1.4 Number Check Node Morph Analysis Group 1 (*)
5.1.5 Default Categories Node Morph Analysis Group 1 (*)
5.2 Pattern Recognition Group Pattern-Based Extraction Group 1 (*)
5.2.1 Pattern Logic Node Pattern Recognition Group 1 or more
6 Token Mappings Node 1
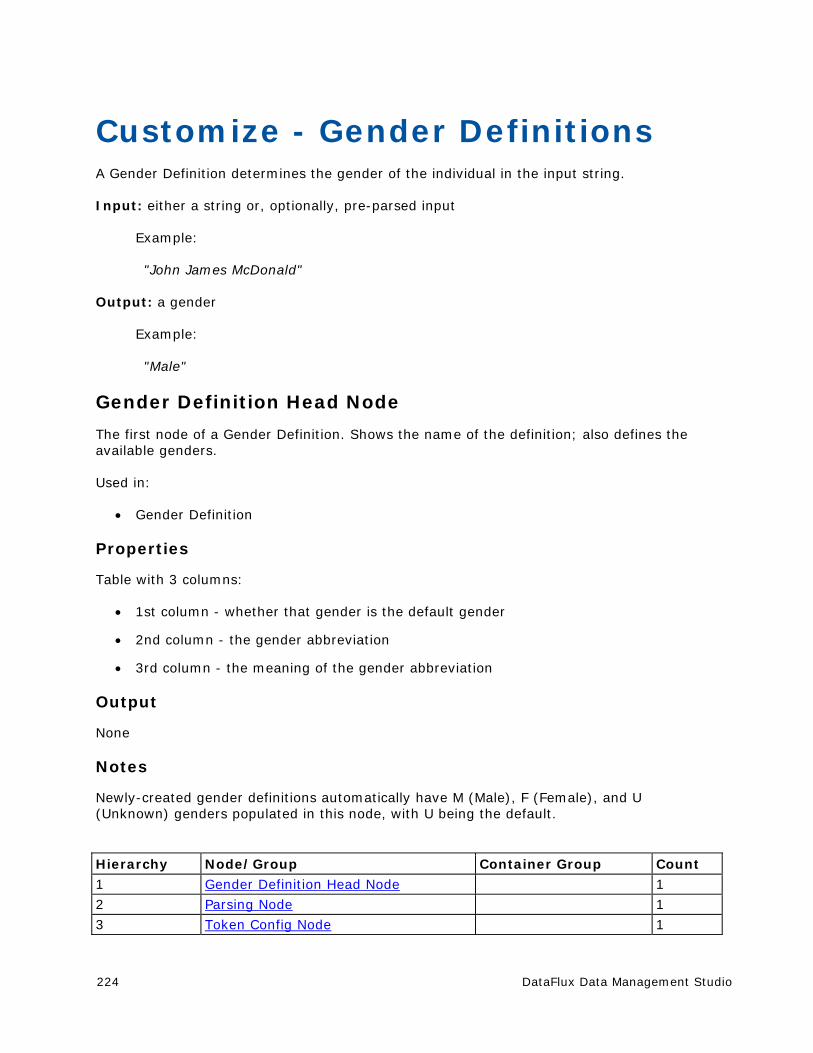
224 DataFlux Data Management Studio
Customize - Gender Definitions A Gender Definition determines the gender of the individual in the input string.
Input: either a string or, optionally, pre-parsed input
Example:
"John James McDonald"
Output: a gender
Example:
"Male"
Gender Definition Head Node
The first node of a Gender Definition. Shows the name of the definition; also defines the available genders.
Used in:
Gender Definition
Properties
Table with 3 columns:
1st column - whether that gender is the default gender
2nd column - the gender abbreviation
3rd column - the meaning of the gender abbreviation
Output
None
Notes
Newly-created gender definitions automatically have M (Male), F (Female), and U (Unknown) genders populated in this node, with U being the default.
Hierarchy Node/Group Container Group Count
1 Gender Definition Head Node 1
2 Parsing Node 1
3 Token Config Node 1
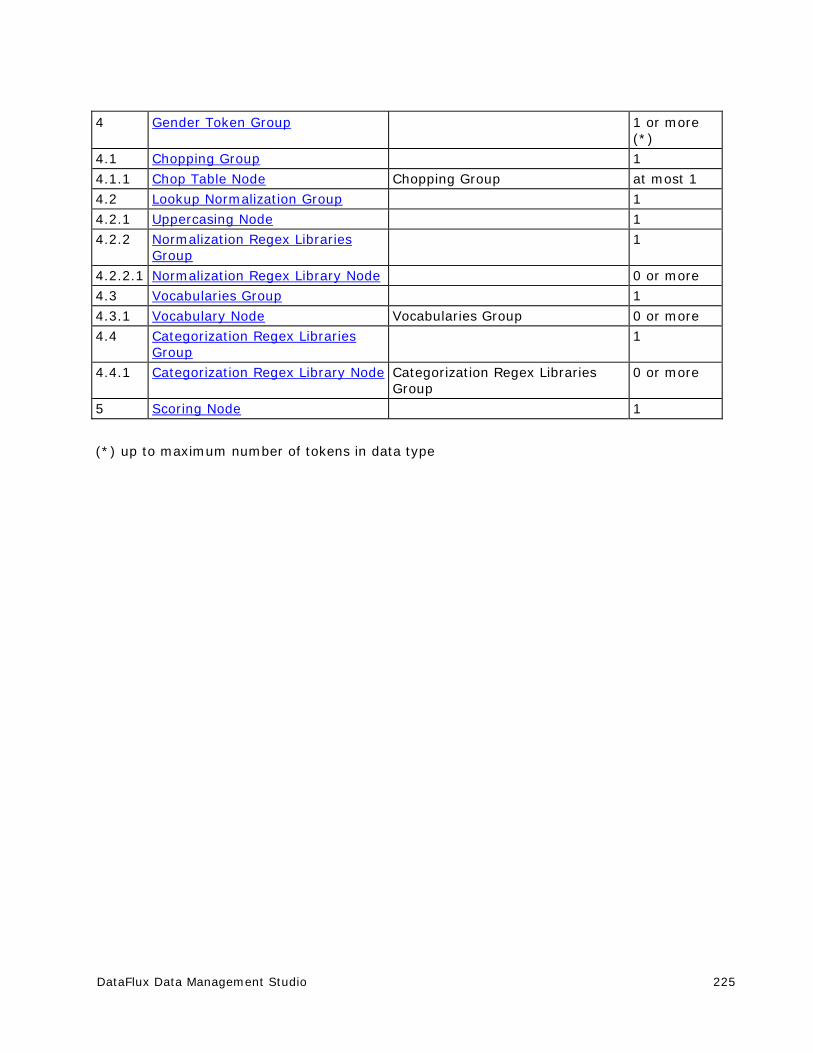
DataFlux Data Management Studio 225
4 Gender Token Group 1 or more (*)
4.1 Chopping Group 1
4.1.1 Chop Table Node Chopping Group at most 1
4.2 Lookup Normalization Group 1
4.2.1 Uppercasing Node 1
4.2.2 Normalization Regex Libraries Group
1
4.2.2.1 Normalization Regex Library Node 0 or more
4.3 Vocabularies Group 1
4.3.1 Vocabulary Node Vocabularies Group 0 or more
4.4 Categorization Regex Libraries Group
1
4.4.1 Categorization Regex Library Node Categorization Regex Libraries Group
0 or more
5 Scoring Node 1
(*) up to maximum number of tokens in data type
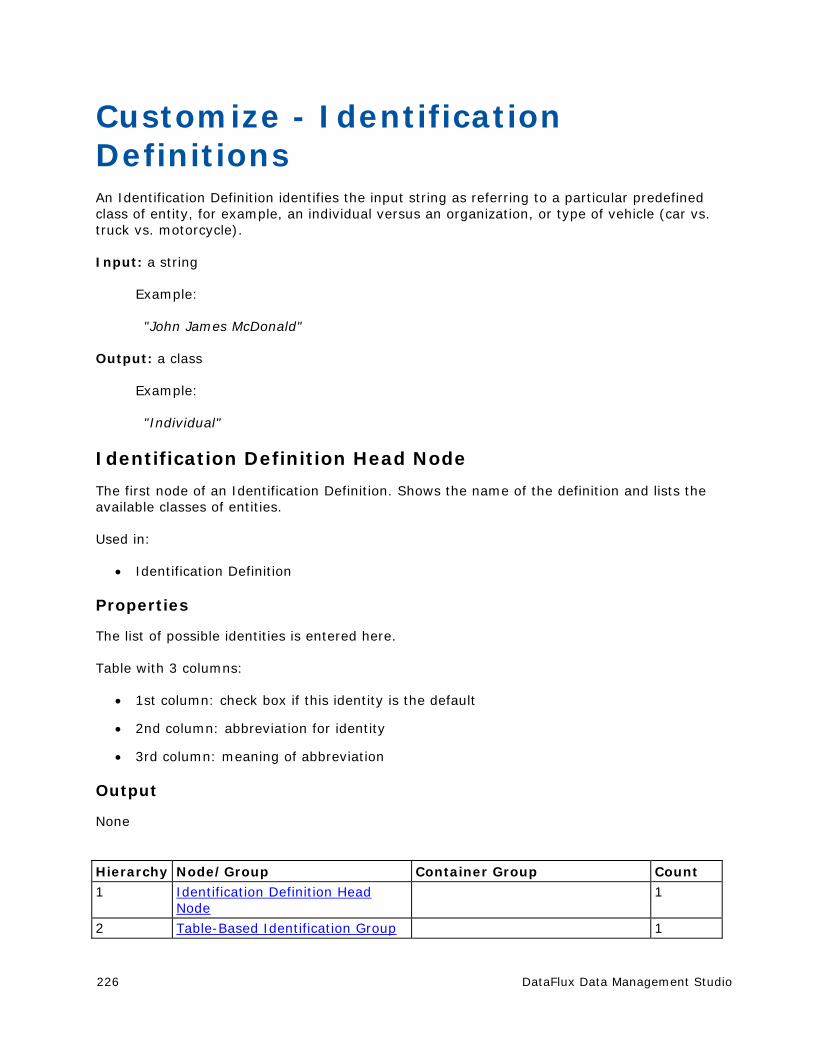
226 DataFlux Data Management Studio
Customize - Identification Definitions An Identification Definition identifies the input string as referring to a particular predefined class of entity, for example, an individual versus an organization, or type of vehicle (car vs. truck vs. motorcycle).
Input: a string
Example:
"John James McDonald"
Output: a class
Example:
"Individual"
Identification Definition Head Node
The first node of an Identification Definition. Shows the name of the definition and lists the available classes of entities.
Used in:
Identification Definition
Properties
The list of possible identities is entered here.
Table with 3 columns:
1st column: check box if this identity is the default
2nd column: abbreviation for identity
3rd column: meaning of abbreviation
Output
None
Hierarchy Node/Group Container Group Count 1 Identification Definition Head
Node 1
2 Table-Based Identification Group 1
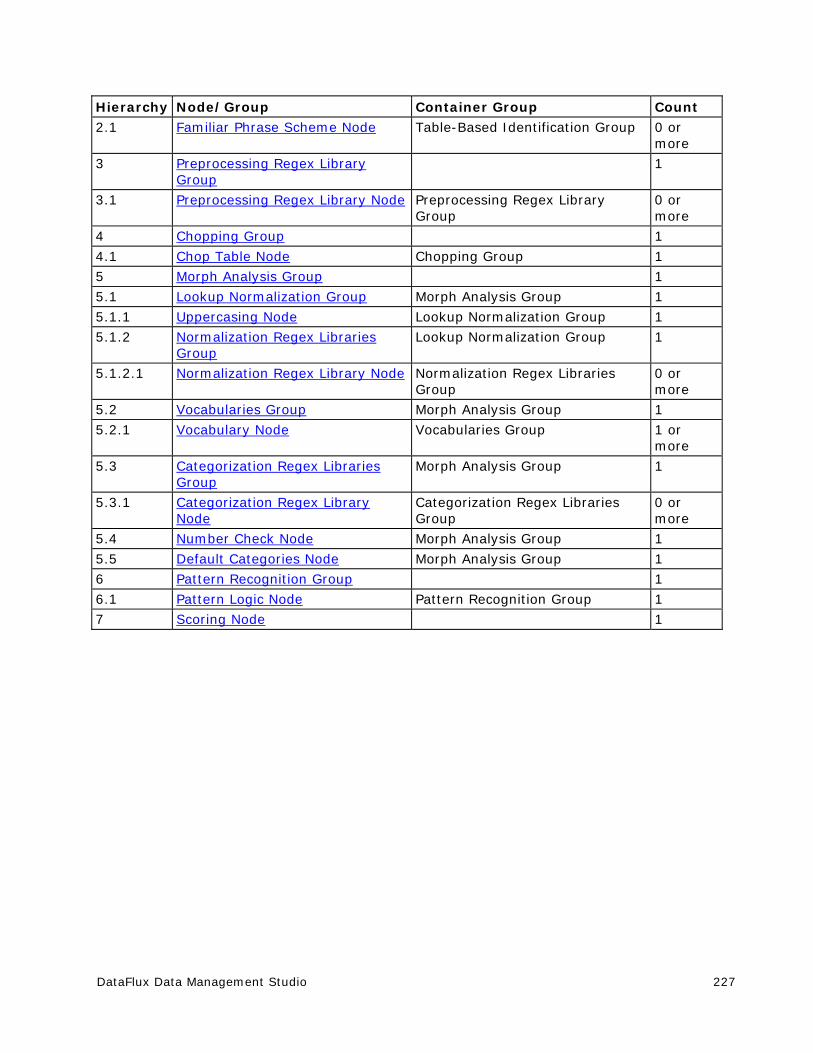
DataFlux Data Management Studio 227
Hierarchy Node/Group Container Group Count 2.1 Familiar Phrase Scheme Node Table-Based Identification Group 0 or
more
3 Preprocessing Regex Library Group
1
3.1 Preprocessing Regex Library Node Preprocessing Regex Library Group
0 or more
4 Chopping Group 1
4.1 Chop Table Node Chopping Group 1
5 Morph Analysis Group 1
5.1 Lookup Normalization Group Morph Analysis Group 1
5.1.1 Uppercasing Node Lookup Normalization Group 1
5.1.2 Normalization Regex Libraries Group
Lookup Normalization Group 1
5.1.2.1 Normalization Regex Library Node Normalization Regex Libraries Group
0 or more
5.2 Vocabularies Group Morph Analysis Group 1
5.2.1 Vocabulary Node Vocabularies Group 1 or more
5.3 Categorization Regex Libraries Group
Morph Analysis Group 1
5.3.1 Categorization Regex Library Node
Categorization Regex Libraries Group
0 or more
5.4 Number Check Node Morph Analysis Group 1
5.5 Default Categories Node Morph Analysis Group 1
6 Pattern Recognition Group 1
6.1 Pattern Logic Node Pattern Recognition Group 1
7 Scoring Node 1
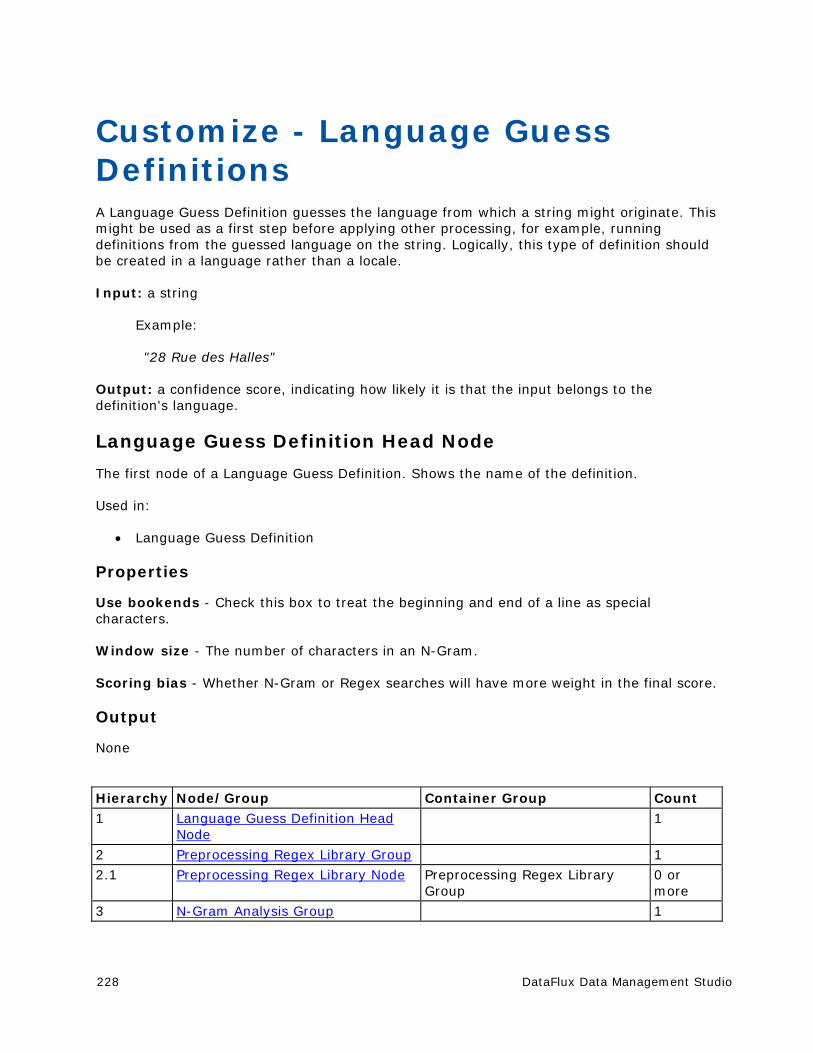
228 DataFlux Data Management Studio
Customize - Language Guess Definitions A Language Guess Definition guesses the language from which a string might originate. This might be used as a first step before applying other processing, for example, running definitions from the guessed language on the string. Logically, this type of definition should be created in a language rather than a locale.
Input: a string
Example:
"28 Rue des Halles"
Output: a confidence score, indicating how likely it is that the input belongs to the definition's language.
Language Guess Definition Head Node
The first node of a Language Guess Definition. Shows the name of the definition.
Used in:
Language Guess Definition
Properties
Use bookends - Check this box to treat the beginning and end of a line as special characters.
Window size - The number of characters in an N-Gram.
Scoring bias - Whether N-Gram or Regex searches will have more weight in the final score.
Output
None
Hierarchy Node/Group Container Group Count 1 Language Guess Definition Head
Node 1
2 Preprocessing Regex Library Group 1
2.1 Preprocessing Regex Library Node Preprocessing Regex Library Group
0 or more
3 N-Gram Analysis Group 1
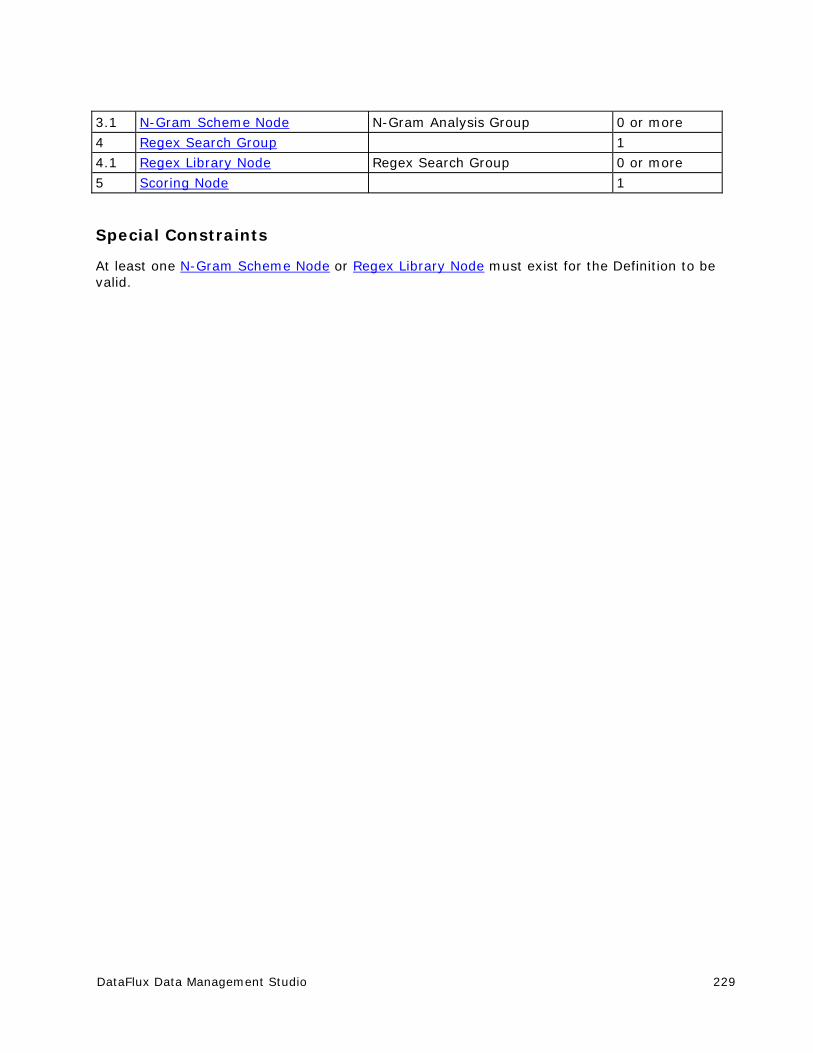
DataFlux Data Management Studio 229
3.1 N-Gram Scheme Node N-Gram Analysis Group 0 or more
4 Regex Search Group 1
4.1 Regex Library Node Regex Search Group 0 or more
5 Scoring Node 1
Special Constraints
At least one N-Gram Scheme Node or Regex Library Node must exist for the Definition to be valid.
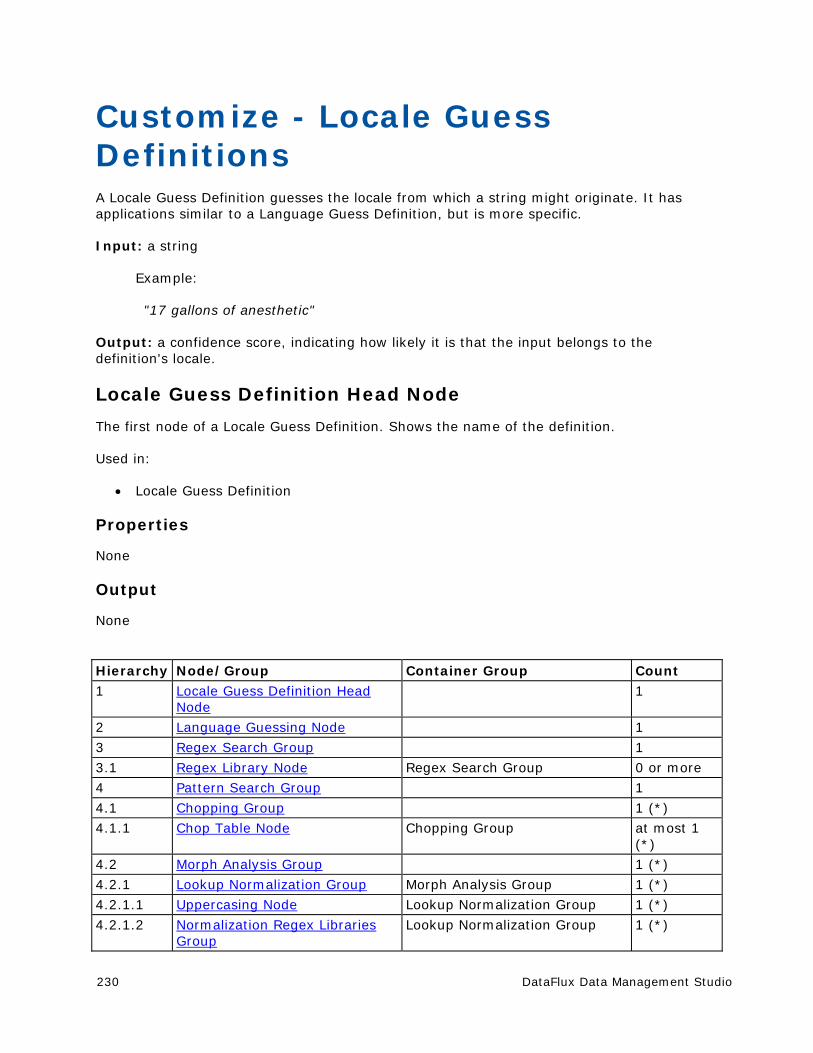
230 DataFlux Data Management Studio
Customize - Locale Guess Definitions A Locale Guess Definition guesses the locale from which a string might originate. It has applications similar to a Language Guess Definition, but is more specific.
Input: a string
Example:
"17 gallons of anesthetic"
Output: a confidence score, indicating how likely it is that the input belongs to the definition's locale.
Locale Guess Definition Head Node
The first node of a Locale Guess Definition. Shows the name of the definition.
Used in:
Locale Guess Definition
Properties
None
Output
None
Hierarchy Node/Group Container Group Count 1 Locale Guess Definition Head
Node 1
2 Language Guessing Node 1
3 Regex Search Group 1
3.1 Regex Library Node Regex Search Group 0 or more
4 Pattern Search Group 1
4.1 Chopping Group 1 (*)
4.1.1 Chop Table Node Chopping Group at most 1 (*)
4.2 Morph Analysis Group 1 (*)
4.2.1 Lookup Normalization Group Morph Analysis Group 1 (*)
4.2.1.1 Uppercasing Node Lookup Normalization Group 1 (*)
4.2.1.2 Normalization Regex Libraries Group
Lookup Normalization Group 1 (*)
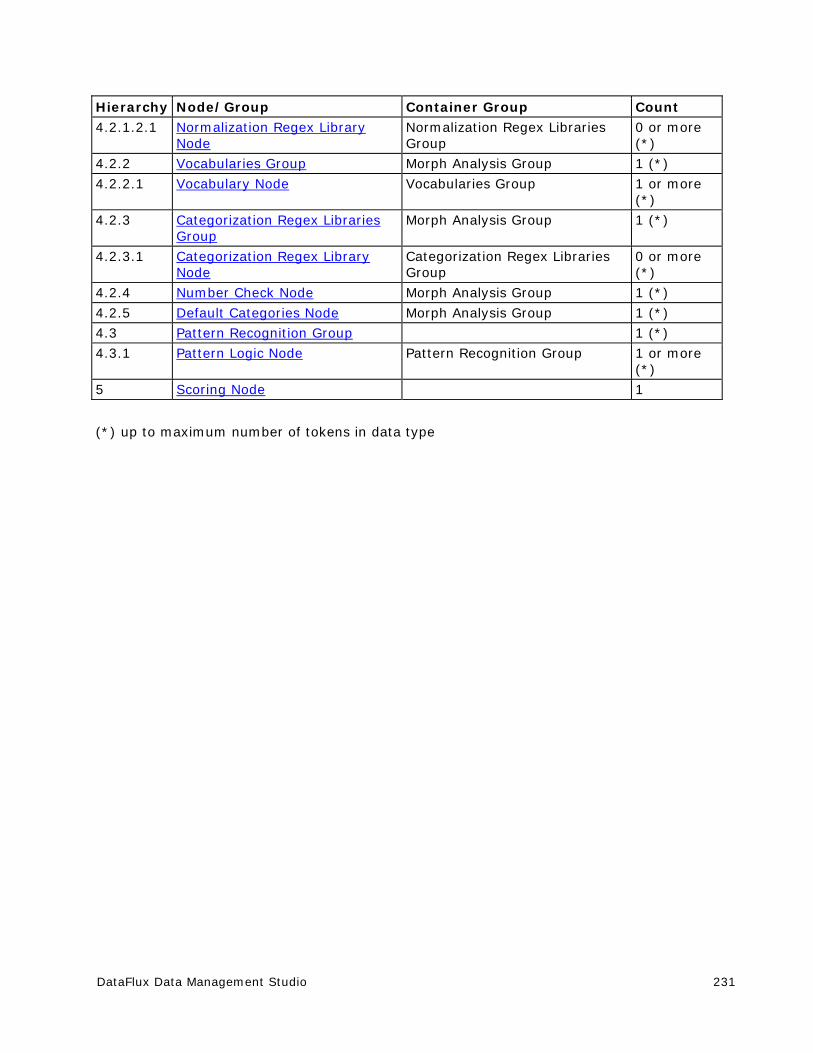
DataFlux Data Management Studio 231
Hierarchy Node/Group Container Group Count 4.2.1.2.1 Normalization Regex Library
Node Normalization Regex Libraries Group
0 or more (*)
4.2.2 Vocabularies Group Morph Analysis Group 1 (*)
4.2.2.1 Vocabulary Node Vocabularies Group 1 or more (*)
4.2.3 Categorization Regex Libraries Group
Morph Analysis Group 1 (*)
4.2.3.1 Categorization Regex Library Node
Categorization Regex Libraries Group
0 or more (*)
4.2.4 Number Check Node Morph Analysis Group 1 (*)
4.2.5 Default Categories Node Morph Analysis Group 1 (*)
4.3 Pattern Recognition Group 1 (*)
4.3.1 Pattern Logic Node Pattern Recognition Group 1 or more (*)
5 Scoring Node 1
(*) up to maximum number of tokens in data type
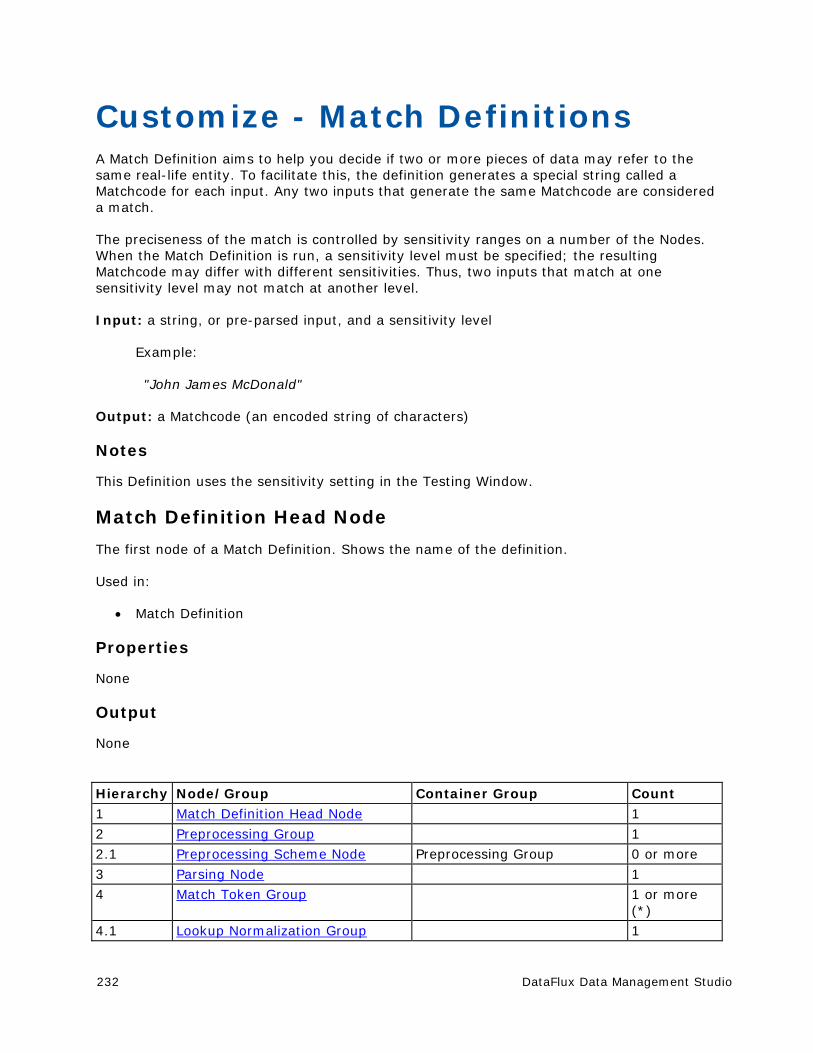
232 DataFlux Data Management Studio
Customize - Match Definitions A Match Definition aims to help you decide if two or more pieces of data may refer to the same real-life entity. To facilitate this, the definition generates a special string called a Matchcode for each input. Any two inputs that generate the same Matchcode are considered a match.
The preciseness of the match is controlled by sensitivity ranges on a number of the Nodes. When the Match Definition is run, a sensitivity level must be specified; the resulting Matchcode may differ with different sensitivities. Thus, two inputs that match at one sensitivity level may not match at another level.
Input: a string, or pre-parsed input, and a sensitivity level
Example:
"John James McDonald"
Output: a Matchcode (an encoded string of characters)
Notes
This Definition uses the sensitivity setting in the Testing Window.
Match Definition Head Node
The first node of a Match Definition. Shows the name of the definition.
Used in:
Match Definition
Properties
None
Output
None
Hierarchy Node/Group Container Group Count 1 Match Definition Head Node 1
2 Preprocessing Group 1
2.1 Preprocessing Scheme Node Preprocessing Group 0 or more
3 Parsing Node 1
4 Match Token Group 1 or more (*)
4.1 Lookup Normalization Group 1
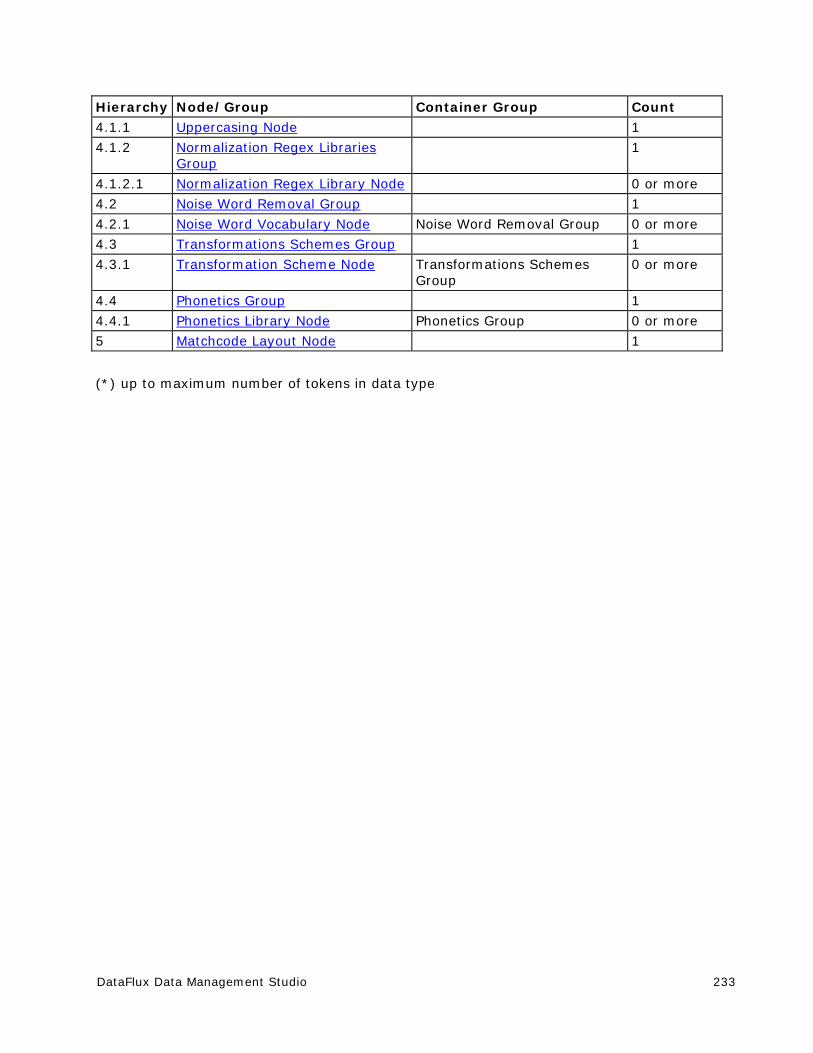
DataFlux Data Management Studio 233
Hierarchy Node/Group Container Group Count 4.1.1 Uppercasing Node 1
4.1.2 Normalization Regex Libraries Group
1
4.1.2.1 Normalization Regex Library Node 0 or more
4.2 Noise Word Removal Group 1
4.2.1 Noise Word Vocabulary Node Noise Word Removal Group 0 or more
4.3 Transformations Schemes Group 1
4.3.1 Transformation Scheme Node Transformations Schemes Group
0 or more
4.4 Phonetics Group 1
4.4.1 Phonetics Library Node Phonetics Group 0 or more
5 Matchcode Layout Node 1
(*) up to maximum number of tokens in data type
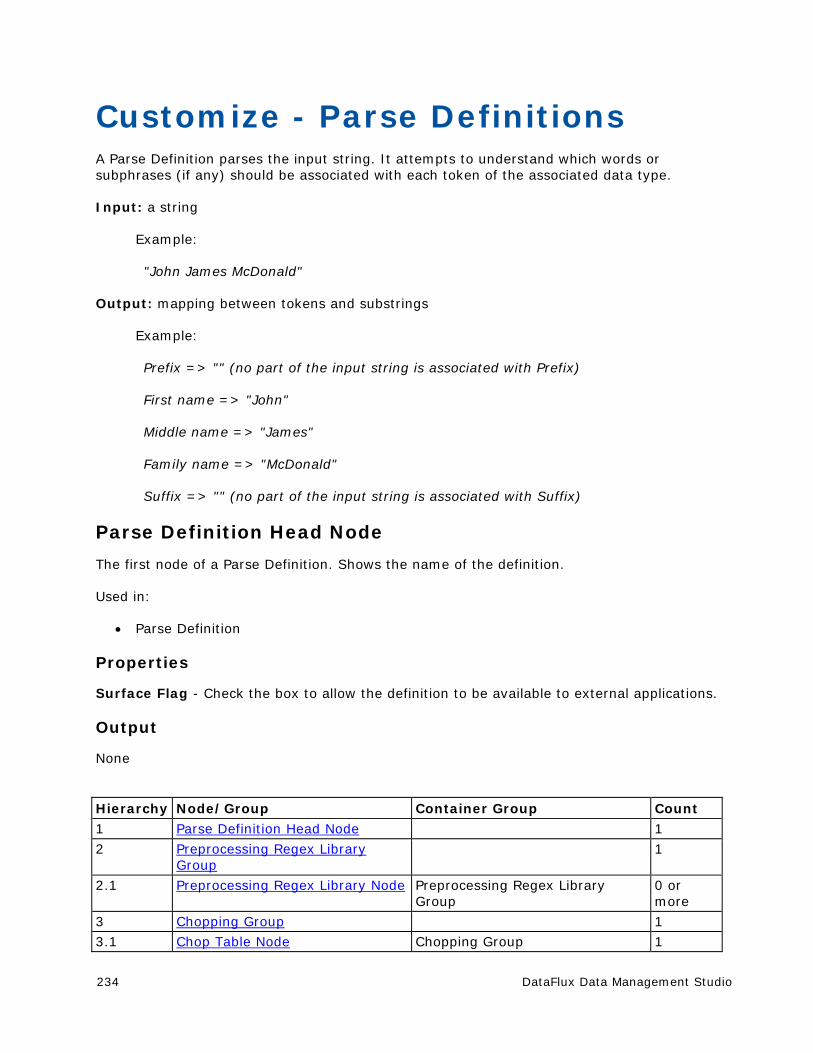
234 DataFlux Data Management Studio
Customize - Parse Definitions A Parse Definition parses the input string. It attempts to understand which words or subphrases (if any) should be associated with each token of the associated data type.
Input: a string
Example:
"John James McDonald"
Output: mapping between tokens and substrings
Example:
Prefix => "" (no part of the input string is associated with Prefix)
First name => "John"
Middle name => "James"
Family name => "McDonald"
Suffix => "" (no part of the input string is associated with Suffix)
Parse Definition Head Node
The first node of a Parse Definition. Shows the name of the definition.
Used in:
Parse Definition
Properties
Surface Flag - Check the box to allow the definition to be available to external applications.
Output
None
Hierarchy Node/Group Container Group Count
1 Parse Definition Head Node 1
2 Preprocessing Regex Library Group
1
2.1 Preprocessing Regex Library Node Preprocessing Regex Library Group
0 or more
3 Chopping Group 1
3.1 Chop Table Node Chopping Group 1
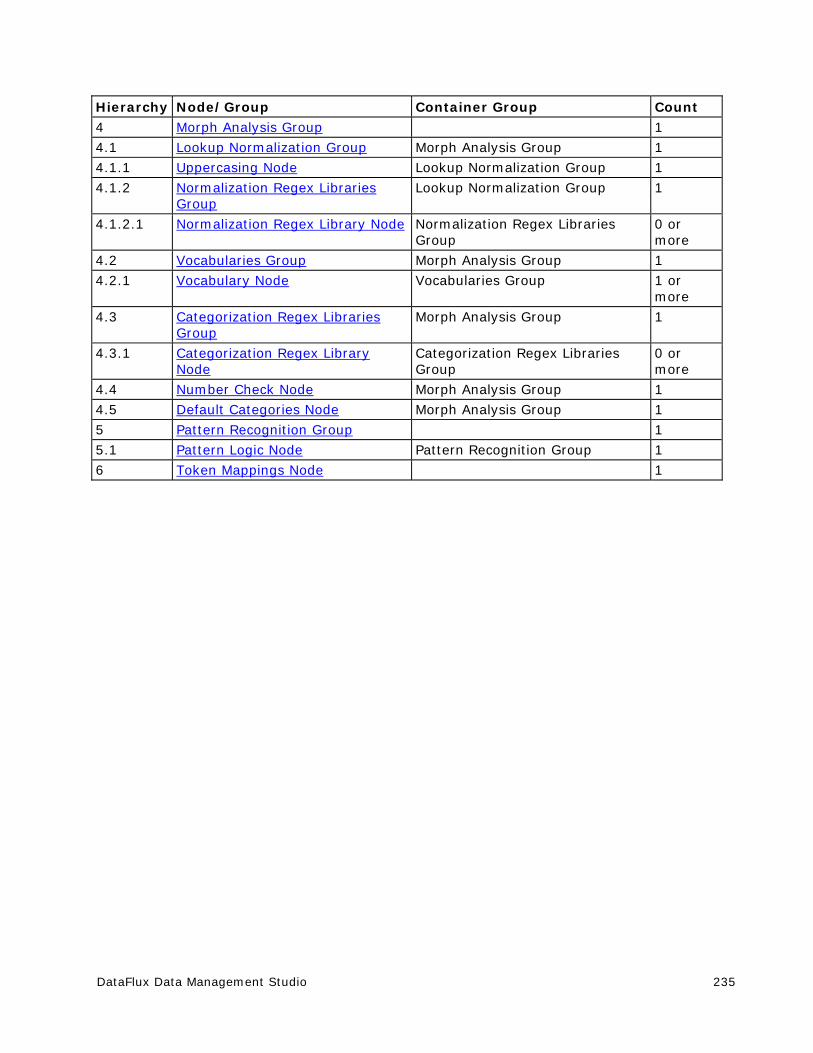
DataFlux Data Management Studio 235
Hierarchy Node/Group Container Group Count 4 Morph Analysis Group 1
4.1 Lookup Normalization Group Morph Analysis Group 1
4.1.1 Uppercasing Node Lookup Normalization Group 1
4.1.2 Normalization Regex Libraries Group
Lookup Normalization Group 1
4.1.2.1 Normalization Regex Library Node Normalization Regex Libraries Group
0 or more
4.2 Vocabularies Group Morph Analysis Group 1
4.2.1 Vocabulary Node Vocabularies Group 1 or more
4.3 Categorization Regex Libraries Group
Morph Analysis Group 1
4.3.1 Categorization Regex Library Node
Categorization Regex Libraries Group
0 or more
4.4 Number Check Node Morph Analysis Group 1
4.5 Default Categories Node Morph Analysis Group 1
5 Pattern Recognition Group 1
5.1 Pattern Logic Node Pattern Recognition Group 1
6 Token Mappings Node 1
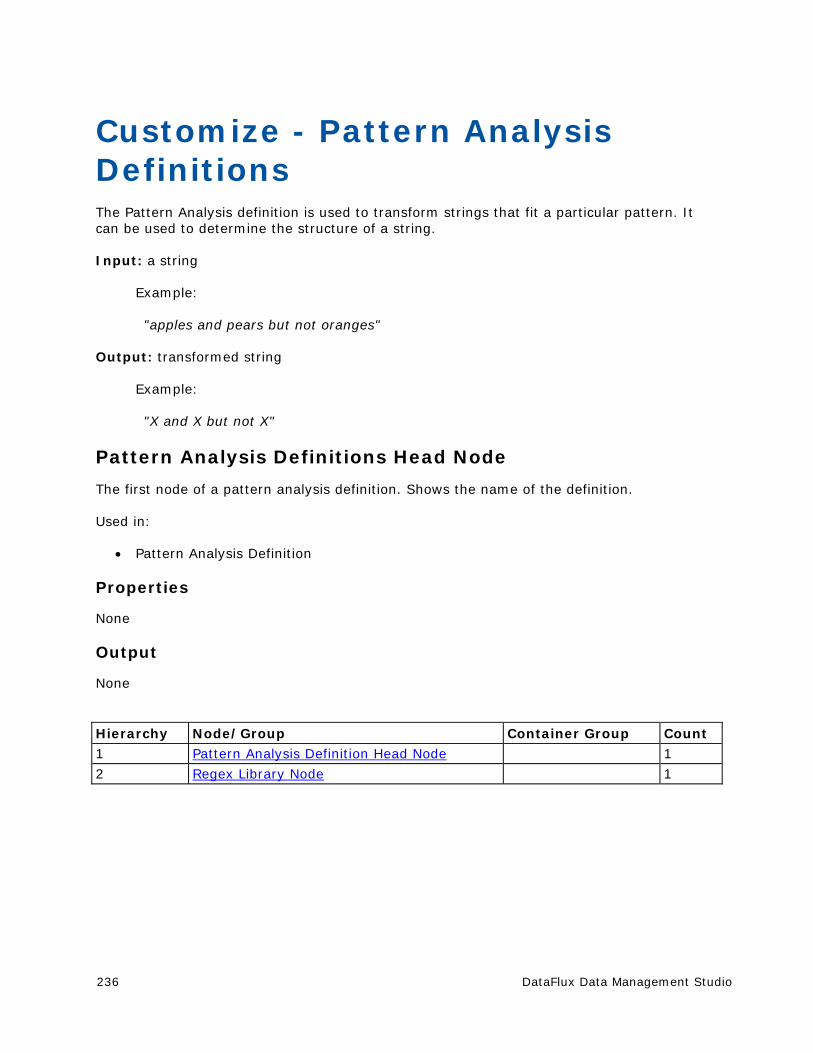
236 DataFlux Data Management Studio
Customize - Pattern Analysis Definitions The Pattern Analysis definition is used to transform strings that fit a particular pattern. It can be used to determine the structure of a string.
Input: a string
Example:
"apples and pears but not oranges"
Output: transformed string
Example:
"X and X but not X"
Pattern Analysis Definitions Head Node
The first node of a pattern analysis definition. Shows the name of the definition.
Used in:
Pattern Analysis Definition
Properties
None
Output
None
Hierarchy Node/Group Container Group Count 1 Pattern Analysis Definition Head Node 1
2 Regex Library Node 1
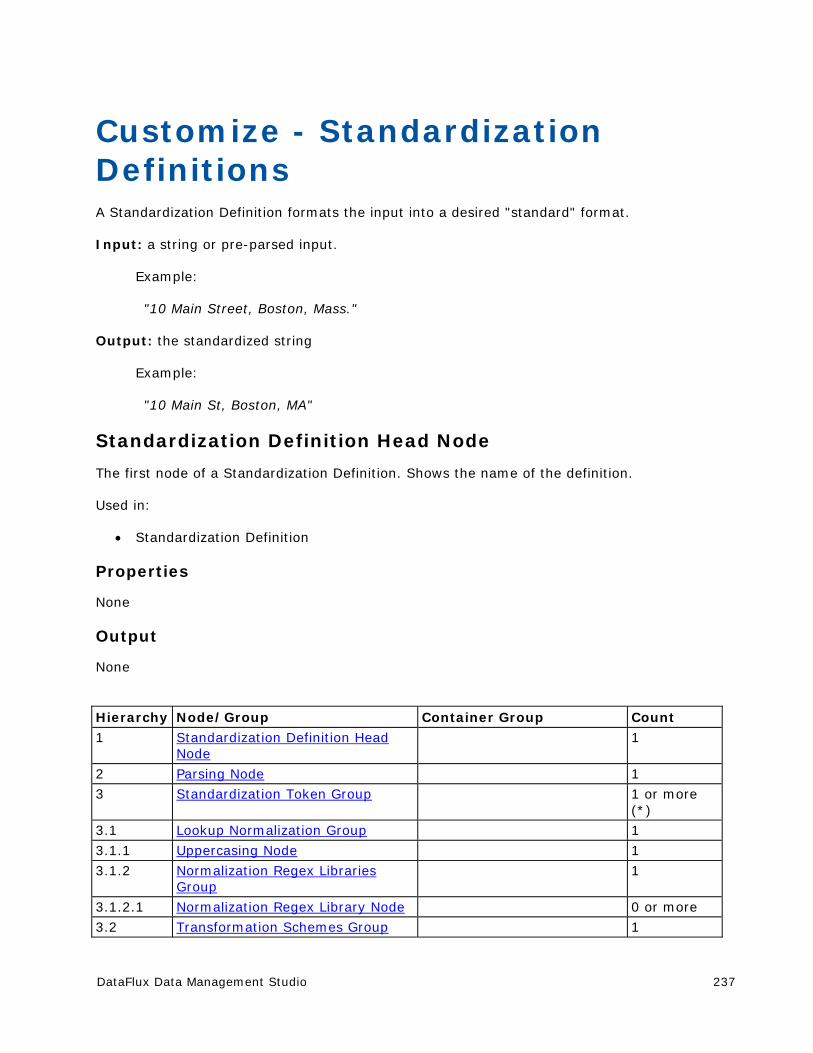
DataFlux Data Management Studio 237
Customize - Standardization Definitions A Standardization Definition formats the input into a desired "standard" format.
Input: a string or pre-parsed input.
Example:
"10 Main Street, Boston, Mass."
Output: the standardized string
Example:
"10 Main St, Boston, MA"
Standardization Definition Head Node
The first node of a Standardization Definition. Shows the name of the definition.
Used in:
Standardization Definition
Properties
None
Output
None
Hierarchy Node/Group Container Group Count
1 Standardization Definition Head Node
1
2 Parsing Node 1
3 Standardization Token Group 1 or more (*)
3.1 Lookup Normalization Group 1
3.1.1 Uppercasing Node 1
3.1.2 Normalization Regex Libraries Group
1
3.1.2.1 Normalization Regex Library Node 0 or more
3.2 Transformation Schemes Group 1
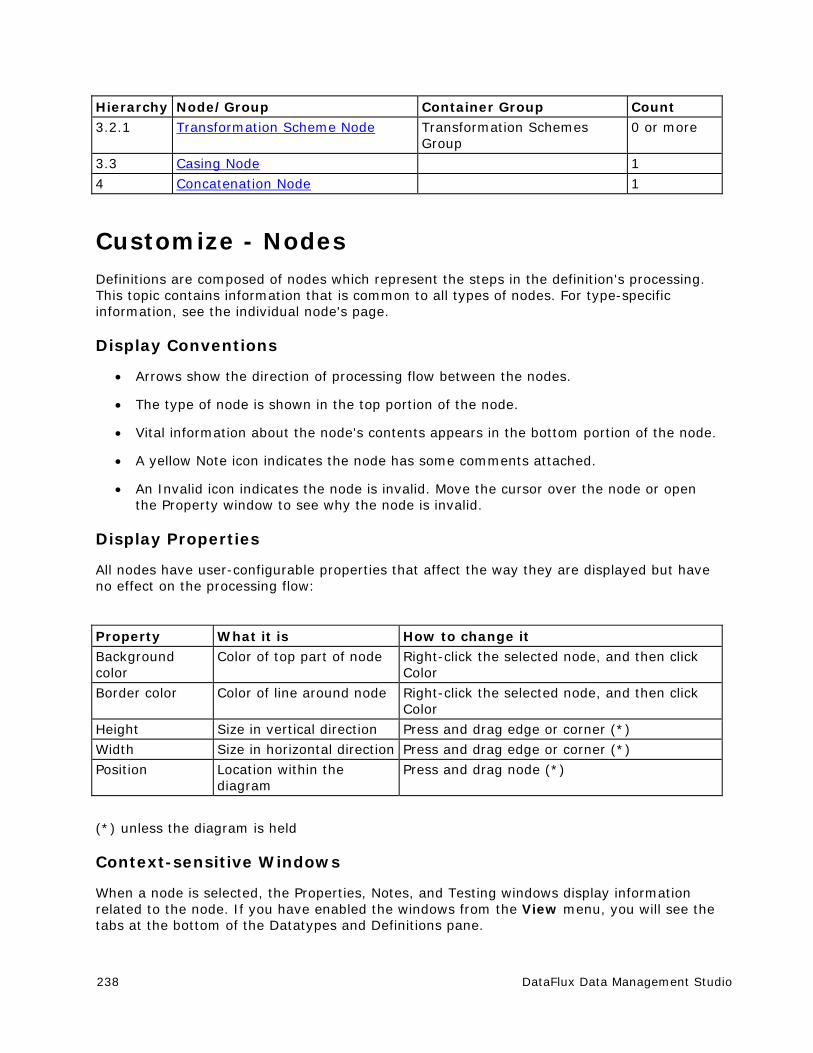
238 DataFlux Data Management Studio
Hierarchy Node/Group Container Group Count 3.2.1 Transformation Scheme Node Transformation Schemes
Group 0 or more
3.3 Casing Node 1
4 Concatenation Node 1
Customize - Nodes Definitions are composed of nodes which represent the steps in the definition's processing. This topic contains information that is common to all types of nodes. For type-specific information, see the individual node's page.
Display Conventions
Arrows show the direction of processing flow between the nodes.
The type of node is shown in the top portion of the node.
Vital information about the node's contents appears in the bottom portion of the node.
A yellow Note icon indicates the node has some comments attached.
An Invalid icon indicates the node is invalid. Move the cursor over the node or open the Property window to see why the node is invalid.
Display Properties
All nodes have user-configurable properties that affect the way they are displayed but have no effect on the processing flow:
Property What it is How to change it Background color
Color of top part of node Right-click the selected node, and then click Color
Border color Color of line around node Right-click the selected node, and then click Color
Height Size in vertical direction Press and drag edge or corner (*)
Width Size in horizontal direction Press and drag edge or corner (*)
Position Location within the diagram
Press and drag node (*)
(*) unless the diagram is held
Context-sensitive Windows
When a node is selected, the Properties, Notes, and Testing windows display information related to the node. If you have enabled the windows from the View menu, you will see the tabs at the bottom of the Datatypes and Definitions pane.
DataFlux Data Management Studio 239
Properties - You can configure certain parameters specific to the node's operation on the Properties pane. Click Apply to save your changes.
Notes - You can enter comments for the node in the Notes pane. You must click Apply to save your changes. This is optional.
Testing - The Testing pane displays the test data (if any) and the output of the node in response to the input.
Validity
Validity (or rather, invalidity) is indicated by this Invalid icon. This icon appears on any invalid nodes (as well as in the Datatypes and Definitions tab next to the name of a definition that contains invalid nodes). A node may be invalid for one or more of these reasons:
The Properties tab for the node is missing one or more mandatory properties. This may be because the fields have not been populated, or because a change made elsewhere in the definition caused a previous setting to become invalid.
One of the files used by the node is invalid (for example, it was deleted).
A special constraint on the definition has not been satisfied.
The reason for invalidity is shown in a tool tip for that node.
Notes
Each node may have comments attached to it. If a node includes comments, a Note icon appears on the node. Click the Notes tab to view.
Groups
Some nodes can contain other nodes. These are called groups. Groups have the same general functionality as nodes and may contain additional functionality.
Additional conventions for groups:
A group that contains invalid nodes is invalid.
To minimize a group, click the Collapse icon in the top right corner of the group. This has no effect on the processing flow.
Optional Groups
Certain groups may be enabled or disabled. When a group is disabled, none of the nodes it contains effects the definition processing. To enable or disable a group, access the group's Property tab and click the enable/disable check box.
Variable-count Groups
These groups may contain variable numbers of a certain node type. They may not be enabled or disabled, but you may perform these additional actions:
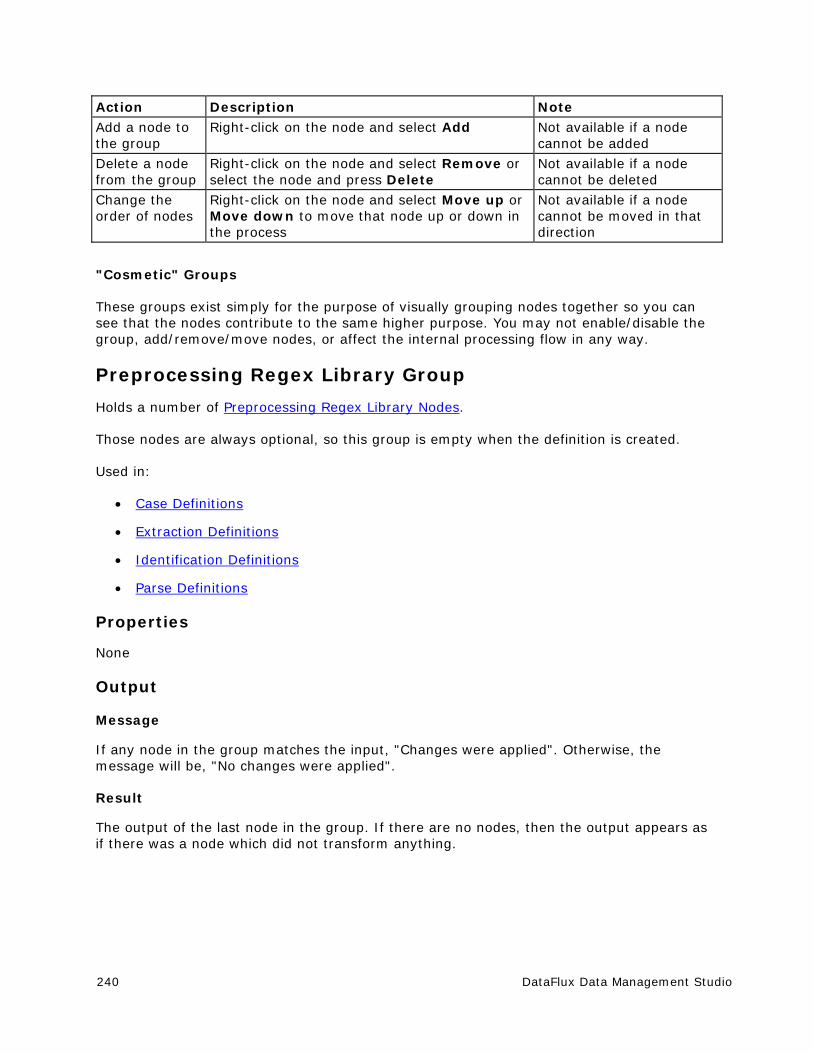
240 DataFlux Data Management Studio
Action Description Note Add a node to the group
Right-click on the node and select Add Not available if a node cannot be added
Delete a node from the group
Right-click on the node and select Remove or select the node and press Delete
Not available if a node cannot be deleted
Change the order of nodes
Right-click on the node and select Move up or Move down to move that node up or down in the process
Not available if a node cannot be moved in that direction
"Cosmetic" Groups
These groups exist simply for the purpose of visually grouping nodes together so you can see that the nodes contribute to the same higher purpose. You may not enable/disable the group, add/remove/move nodes, or affect the internal processing flow in any way.
Preprocessing Regex Library Group
Holds a number of Preprocessing Regex Library Nodes.
Those nodes are always optional, so this group is empty when the definition is created.
Used in:
Case Definitions
Extraction Definitions
Identification Definitions
Parse Definitions
Properties
None
Output
Message
If any node in the group matches the input, "Changes were applied". Otherwise, the message will be, "No changes were applied".
Result
The output of the last node in the group. If there are no nodes, then the output appears as if there was a node which did not transform anything.

DataFlux Data Management Studio 241
Preprocessing Regex Library Node
This node preprocesses the input string, removing or changing certain parts of the string using a set of regular expressions contained in a Regex Library. This is generally done to remove irrelevant information or format the input to facilitate downstream processing.
Used in:
Case Definitions
Extraction Definitions
Identification Definitions
Language Guess Definitions
Parse Definitions
Properties
Regex Library
Select a Regex Library to use. By default, only files from the locale and its ancestors appear in the drop-down. If you do not see the desired library, click Tools > Options. Click Display and select Show files for all locales under the Library file selection drop-down lists to view QKB files from all locales.
Click Edit to edit the selected file or create a new file, the appropriate editor opens.
Output
Message
If any regular expression in the Regex Library matches the input, "Changes were applied". Otherwise, the message will be, "No changes were applied".
Result
The input string after processing.
Note: It is possible for the input and output to be identical even if "Changes were applied", if the Regex Library returns output identical to the input.
242 DataFlux Data Management Studio
Chopping Group
Holds a number of Chop Table Nodes.
These nodes are optional in some definitions and mandatory in others. If mandatory, this group will contain a single (initially invalid) node when the definition is created.
Used in:
Case Definitions
Parse Definitions
Identification Definitions
Extraction Definitions
Gender Definitions
Locale Guess Definitions
Properties
None
Output
Results
The output of the last node in the group. If the group is empty (that is, Chop Nodes are not mandatory), the output shows the default chopping algorithm.
Notes
The default chopping algorithm chops based on white space only.

DataFlux Data Management Studio 243
Chop Table Node
Divide the input string into substrings, most commonly individual words. The boundaries are determined by the rules in the Chop Table, which determine whether a given character indicates the start and/or end of a substring.
Used in:
Case Definitions
Extraction Definitions
Gender Definitions
Identification Definitions
Language Guess Definitions
Locale Guess Definitions
Parse Definitions
Properties
Chop Table
Select a Chop Table to use. By default, only files from the locale and its ancestors appear in the drop-down. If you do not see the desired library, click Tools > Options. Click Display and select Show files for all locales under the Library file selection drop-down lists to view QKB files from all locales.
Click Edit to edit the selected file or create a new file, the appropriate editor opens.
Output
Results
A list of chopped substrings.
244 DataFlux Data Management Studio
Familiar Words Scheme Group
Holds a number of Familiar Word Scheme Nodes.
These nodes are always optional, so this Group is empty when the Definition is created.
Used in:
Case Definitions
Properties
None
Output
Message
If any node in the group matches the input, "Changes were applied". Otherwise, the message will be, "No changes were applied".
Familiar words
The output of the last node in the group. (If there are no nodes, then the output appears as if there was a node which did not transform anything.)
DataFlux Data Management Studio 245
Familiar Words Scheme Node
For certain known "words" (chopped substrings) within the input string, apply a transformation to those words. The scheme contains the list of "familiar words" and the desired transformations.
Used in:
Case Definitions
Properties
Scheme
Select a scheme to use. By default, only files from the locale and its ancestors appear in the drop-down. If you do not see the desired library, click Tools > Options. Click Display and select Show files for all locales under the Library file selection drop-down lists to view QKB files from all locales.
Click Edit to edit the selected file or create a new file, the appropriate editor opens.
Case Sensitive Scheme Lookup
Select this check box if the case of the input word must match the case of the word in the scheme in order to be transformed.
Output
Message
If any word was found in the scheme, "Changes were applied". Otherwise, the message will be, "No changes were applied".
Results
1st column: true if the input word was found in the scheme
2nd column: input word
3rd column: transformed word (if the input was found in the scheme), or input word (if it was not)
Note: It is possible for the input and output word to be identical even if the word was found in the scheme, if the scheme returns output identical to the input.
246 DataFlux Data Management Studio
Familiar Patterns Group
Holds a number of Familiar Pattern Regex Library Nodes.
These nodes are always optional, so this group is empty when the definition is created.
Used in:
Case Definition
Properties
None
Output
Message
If any node in the group matches the input, "Changes were applied". Otherwise, the message will be, "No changes were applied".
Result
The output of the last node in the group. If there are no nodes, then the input of the group is the output.
DataFlux Data Management Studio 247
Familiar Pattern Regex Library Node
Transform the input substrings with a set of regular expressions from in the Regex Library.
Used in:
Case Definition
Properties
Regex Library
Select a Regex Library to use. By default, only files from the locale and its ancestors appear in the drop-down. If you do not see the desired library, click Tools > Options. Click Display and select Show files for all locales under the Library file selection drop-down lists to view QKB files from all locales.
Click Edit to edit the selected file or create a new file, the appropriate editor opens.
Do not apply if the value is transformed by a scheme
Select this check box to skip the Regex processing in this node, if the scheme in the previous group caused a transformation. If there is no scheme, this check box has no effect.
Output
Message
If any regular expression in the Regex Library matches the input, "Changes were applied". Otherwise, the message will be, "No changes were applied".
Results
1st column: input word
2nd column: output word after transformation
248 DataFlux Data Management Studio
Concatenation Node
Concatenate substrings together into a single string.
In the Case Definitions, the chopped and processed substrings are reassembled in the same order and with the same inter-word (between words) whitespace as before chopping.
In the Standardization Definitions, the outputs of each token group are concatenated. The separating whitespace for each token is specified in the node.
Used in:
Case Definitions
Standardization Definitions
Properties
Case Definitions
None
Standard Definitions
A table with three columns:
1st column: whether or not to use the separator string specified in the third column
2nd column: the name of the token
3rd column: the separator string for that token, which appears before the token's output string if the first column selected
You can also change the order of the tokens in the concatenated string using the up and down arrows.
Output
Message
The message, "Changes were applied" always appears, since concatenation always happens.
Result
The string after concatenation.
DataFlux Data Management Studio 249
Postprocessing Group
Holds a number of Postprocessing Regex Library Nodes.
These nodes are always optional, so this group is empty when the definition is created.
Used in:
Case Definitions
Properties
None
Output
Message
If any node in the group matches the input, "Changes were applied". Otherwise, the message will be, "No changes were applied".
Result
The output of the last node in the group. If there are no nodes, then the input of the group is the output.
250 DataFlux Data Management Studio
Postprocessing Regex Library Node
Apply a transformation to the string, removing or changing certain parts of the string using a set of regexes contained in a Regex Library. Basically identical in function to a Preprocessing Regex Library Node.
Used in:
Case Definitions
Pattern Analysis Definitions
Note: Here it is referred to as a Regex Library Node.
Properties
Regex Library
Select a Regex Library to use.
Click Edit to edit the selected file or create a new file, the appropriate editor opens.
Output
Message
If any regular expressions in the Regex Library match the input, the message will be "Changes were applied". Otherwise, the message will be, "No changes were applied".
Result
The input string after processing.
Note: It is possible for the input and output to be identical even if "Changes were applied", if the Regex Library happens to return output identical to the input.

DataFlux Data Management Studio 251
Table-Based Extraction Group
Holds a number of Extraction Scheme Nodes.
These nodes are always optional, so this group is empty when the definition is created.
Used in:
Extraction Definitions
Properties
None
Output
Message
If any node in the group matches the input, "Changes were applied". Otherwise, the message will be, "No changes were applied".
Result
The output of the last node in the group. If there are no nodes, then the input of the group is the output.
252 DataFlux Data Management Studio
Extraction Scheme Node
Extract substrings from the input and assign them to tokens using scheme (table) lookup.
Used in:
Extraction Definitions
Properties
Scheme
Select a scheme to use.
Click Edit to edit the selected file or create a new file, the appropriate editor opens.
Token
Any word that is found in the scheme will be assigned to this token.
Case Sensitive Scheme Lookup
If this check box is selected, the case of the input must match the case of the word in the scheme.
Output
Message
If any part of the input was found in the scheme, "Changes were applied". Otherwise, the message will be, "No changes were applied".
Result
1st column: the word
2nd column: the token it was assigned to (blank if not assigned to any token)
DataFlux Data Management Studio 253
Pattern-Based Extraction Group
The Pattern-Based Extraction Group is an optional group. You may choose not to use this group and its contents, and rely purely on Table-Based Extraction (the default behavior).
Contains the following nodes:
Morph Analysis Group
Pattern Recognition Group
Used in:
Extraction Definitions
Properties
Use within definition
Click to select this check box to enable the group and its contained nodes.
Output
Message
If any node in the group matches the input, "Changes were applied". Otherwise, the message will be, "No changes were applied".
Result
The output of the last node in the group. If the group is not used, the output here is blank.

254 DataFlux Data Management Studio
Morph Analysis Group
The Morph Analysis Group is purely cosmetic. This node corresponds to the set of processing steps performed in the Blue Fusion morphological analysis. This group contains the following nodes:
Lookup Normalization Group
Vocabularies Group
Categorization Regex Libraries Group
Number Check Node
Default Categories Node
Used in:
Extraction Definitions
Identification Definitions
Locale Guess Definitions
Parse Definitions
Properties
None
Output
Message
If any node in the group matches the input, "Changes were applied". Otherwise, the message will be, "No changes were applied".
Result
The output of the last node in the group.
DataFlux Data Management Studio 255
Lookup Normalization Group
The Lookup Normalization Group is purely cosmetic. This group includes the steps that are performed to normalize the input for vocabulary lookup. This group contains the following nodes:
Uppercasing Node
Normalization Regex Libraries Group
Used in:
Extraction Definitions
Identification Definitions
Locale Guess Definitions
Match Definitions
Parse Definitions
Properties
None
Output
Message
If any node in the group matches the input, "Changes were applied". Otherwise, the message will be, "No changes were applied".
Result
The output of the last node in the group.
256 DataFlux Data Management Studio
Uppercasing Node
The Uppercasing node represents the uppercasing step within lookup normalization. By default, the input string(s) are automatically uppercased before proceeding with the rest of the normalization process.
Used in:
Extraction Definitions
Gender Definitions
Identification Definitions
Locale Guess Definitions
Match Definitions
Parse Definitions
Standardization Definitions
Properties
Automatic uppercasing
This check box is selected default. Click the check box to turn off automatic uppercasing.
Output
Message
If automatic uppercasing is on, "Changes were applied" because the uppercasing is applied. Otherwise, the message will be, "No changes were applied".
Result
Input(s) after uppercasing. It is possible for the input and output to be identical even if "Changes were applied", if the input was uppercased to begin with.
DataFlux Data Management Studio 257
Normalization Regex Libraries Group
The Normalization Regex Libraries Group contains a number of Normalization Regex Library Nodes. These nodes are always optional, so this group is empty when the definition is created.
Used in:
Extraction Definitions
Gender Definitions
Identification Definitions
Locale Guess Definitions
Match Definitions
Parse Definitions
Standardization Definitions
Properties
None
Output
Message
If any node in the group matches the input, "Changes were applied". Otherwise, the message will be, "No changes were applied".
Result
The output of the last node in the group. If there are no nodes, then the input of the group is the output.
258 DataFlux Data Management Studio
Normalization Regex Library Node
The Normalization Regex Library Node normalizes the input string using a set of regular expressions contained in a Regex Library. This is generally done to format the input prior to vocabulary lookup.
In most definitions the input to this node is a list of substrings or words. The normalization is applied to each substring independently.
Used in:
Extraction Definitions
Gender Definitions
Identification Definitions
Locale Guess Definitions
Match Definitions
Standardization Definitions
Parse Definitions
Properties
Regex Library
Select a Regex Library to use.
Click Edit to edit the selected file or create a new file, the appropriate editor opens.
Match Definition only
Sensitivity
The range of sensitivities for which this node should have an effect.
Output
Message
If any regular expressions in the Regex Library match the input, the message will be "Changes were applied". Otherwise, the message will be, "No changes were applied".
Result
The input(s) and the normalized form. It is possible for an input and output to be identical even if "Changes were applied", if the Regex Library returns output identical to the input.
DataFlux Data Management Studio 259
Vocabularies Group
The Vocabularies Group contains a number of Vocabulary Nodes. All Definitions that use this group require at least one Vocabulary Node, so this group contains a single (initially invalid) node when the definition is created.
Used in:
Extraction Definitions
Identification Definitions
Locale Guess Definitions
Parse Definitions
Properties
These properties are applied to all nodes in the group.
Perform fuzzy lookups
Check this box to use fuzzy lookups. By default, a word must match an entry in a vocabulary exactly in order to be called a match. If fuzzy lookups are activated, words that are somewhat similar to those in the vocabulary are considered a match. This option allows some variant forms, unorthodox spelling, or words with typographical errors. Turning on this option may slow the performance of the definition.
Fuzzy lookup threshold
The higher the threshold, the stricter the lookup. In other words, more similarity must exist for the word to match. Set at maximum strictness, the word must match exactly.
Note: This is basically the same as not allowing fuzzy lookups.
Output
Message
If any node in the group matches the input, "Changes were applied". Otherwise, the message will be, "No changes were applied".
Result
The output of the last node in the group. Since the outputs of successively-applied vocabulary nodes are cumulative, this is the combined output of all vocabularies applied.
260 DataFlux Data Management Studio
Vocabulary Node
The Vocabulary Node performs a lookup in the vocabulary file to retrieve the categories and likelihoods for each input word.
Used in:
Extraction Definitions
Gender Definitions
Identification Definitions
Locale Guess Definitions
Parse Definitions
Properties
Vocabulary
Select a Vocabulary to use.
Click Edit to edit the selected file or create a new file, the appropriate editor opens.
Stop searching if found in this vocabulary
If this check box is selected and the input word is found in the vocabulary of the current node, subsequent Vocabulary Nodes will not process that word. This allows you to decide whether two (or more) vocabularies which contain the same word should contribute all the categories, or if only the first vocabulary categories should be considered.
Output
Message
If any word in the Vocabulary matches the input, "Changes were applied". Otherwise, the message will be, "No changes were applied".
Result
A table with four columns:
1st column - the word
2nd column - the assigned category
3rd column - the likelihood associated with that category assignment
4th column - the word actually found, which might differ from the input word due to fuzzy lookup
Vocabulary outputs are cumulative, so a single node's output includes the outputs from previous vocabularies (if applicable).
DataFlux Data Management Studio 261
Notes
A vocabulary is a table containing a list of words. For each word, one or more categories are assigned, and a likelihood is attached to each assignment.
Categories
A category indicates the function of the word in the context for which the vocabulary is intended.
For example:
In the context of people's names, some possible categories might be:
Prefix Word (PW), for example, "Mr"
Given Name Word (GNW) , for example, "John"
Family Name Word (FNW), for example, "Smith"
Likelihoods
A likelihood indicates the presumptive probability of that word belonging to that category.
For example:
In the context of people's names, assuming the English language, you could say that, given no other information than our general knowledge of English, "Judy" has:
a very high likelihood of being a GNW
a very low likelihood of being a FNW
no possibility of being a PW
Relationship to Grammars
In many definitions, vocabularies (using Vocabulary Nodes) are used in conjunction with Grammars (through various Pattern Nodes). For this reason, the categories of a vocabulary that is intended for use in morphological analysis generally correspond to the categories defined in a related grammar.
FAQ - Multiple vocabularies with the same word
If you have two vocabularies and the same word is in each vocabulary with different categories, does it assign both categories?
Yes, assuming the "stop if found" flag is not set on the first vocabulary.
What if the word appears in two vocabularies with the same category but different likelihoods?
That category will appear one time and the last likelihood encountered will be used (that is, the duplicate overwrites the original).
262 DataFlux Data Management Studio
Note: This situation tends to cause confusion; it should be avoided, if possible.
Categorization Regex Libraries Group
The Categorization Regex Libraries Group includes a number of Categorization Regex Library Nodes. These nodes are always optional therefore, the group is empty when the definition is created.
Used in:
Extraction Definitions
Gender Definitions
Identification Definitions
Locale Guess Definitions
Parse Definitions
Properties
None
Output
Message
If any node in the group matches the input, "Changes were applied". Otherwise, the message will be, "No changes were applied".
Result
The output of the last node in the group. If there are no nodes, then the input of the group is the output.
DataFlux Data Management Studio 263
Categorization Regex Library Node
The Categorization Regex Library Node uses a Regex Library to assign a category and likelihood. For more information on this topic, see Vocabulary Node.
Used in:
Extraction Definitions
Gender Definitions
Identification Definitions
Locale Guess Definitions
Parse Definitions
Properties
Regex Library
Select a Regex Library to use.
Click Edit to edit the selected file or create a new file, the appropriate editor opens.
Category
The category that will be assigned to the word if a match is found in the Regex Library.
Likelihood
This is the likelihood of the category assignment.
Output
Message
If any regular expression in the Regex Library matches the input, "Changes were applied". Otherwise, the message will be, "No changes were applied".
Result
See Vocabulary Node. Output is cumulative and includes categories assigned by vocabularies, if applicable.

264 DataFlux Data Management Studio
Number Check Node
The Number Check Node represents the processing step that checks for numbers in the input. Numbers are assigned the special category NUM.
Used in:
Extraction Definitions
Identification Definitions
Locale Guess Definitions
Parse Definitions
Properties
None
Output
Message
If a number was found, "Changes were applied". Otherwise, the message will be, "No changes were applied".
Result
This node assigns only the NUM category, and will only have an effect if a number exists in the input. Output is cumulative with the outputs of Vocabulary Nodes and Categorization Regex Library Nodes (if applicable).
DataFlux Data Management Studio 265
Default Categories Node
The Default Categories Node categorizes any word in the input that has not been categorized by other means.
Used in:
Extraction Definitions
Identification Definitions
Locale Guess Definitions
Parse Definitions
Properties
A table accepting a list of categories and likelihoods to be assigned as a last resort.
Output
Message
If any word was assigned a default category, "Changes were applied". Otherwise, the message will be, "No changes were applied".
Result
Output is cumulative with the outputs of the Vocabulary Node, Categorization Regex Library Node, and Number Check Node.
266 DataFlux Data Management Studio
Pattern Recognition Group
The Pattern Recognition Group holds a number of Pattern Logic Nodes. The specifics of the nodes depend on the definition.
If the definition requires at least one Pattern Node, this group contains a single (initially invalid) node when the definition is first created.
Used in:
Extraction Definitions
Identification Definitions
Locale Guess Definitions
Parse Definitions
Properties
None
Output
Message
If any node in the group matches the input, "Changes were applied". Otherwise, the message will be, "No changes were applied".
Result
The output of the last node in the group.
DataFlux Data Management Studio 267
Pattern Logic Node
The Pattern Logic Node uses the categories previously assigned to input words by morphological analysis to generate possible parse solutions for the entire string. At the end of the morph analysis step, each word (or substring) in the input has been categorized. However, it is likely that:
a single word may have more than one possible category, and
categories by themselves, even if unambiguous, do not give the final answer expected
Pattern Logic Nodes solve both of these problems by considering each word and its categories in the context provided by the full string, and with the aid of a grammar that supplies information about the allowed structure of inputs.
Used in:
Parse Definitions
Identification Definitions
Extraction Definitions
Locale Guess Definitions
Properties
All Definition Types
The following properties are common to all definition types of Pattern Logic Nodes.
Grammar
Select a grammar to use. By default, only files from the locale and its ancestors appear in the drop-down. If you do not see the desired library, click Tools > Options. Click Display and select Show files for all locales under the Library file selection drop-down lists to view QKB files from all locales.
Click Edit to edit the selected file or create a new file, the appropriate editor opens.
A grammar describes all the categories that words may have (within a particular context, such as names or addresses) and the relationships between them. Some categories are derived from a combination of others, and there may be many different ways to derive a particular category.
For example:
In the United States, a phrase that represents a person's family name (the derived category) can commonly be seen in the following constructions:
single family-name word (for example, "John SMITH")
two family-name words (for example, "Helena BONHAM CARTER")
two family-name words with a hyphen (for example, "Mary JONES-SMITH")
268 DataFlux Data Management Studio
Multiple family-name words, with hyphens or without
Single initial (for example, "John S.", last name abbreviated to protect a person's identity), and the list expands greatly as different languages, countries, cultures, and customs are taken into account
In the simplest case, the structure of a grammar looks like a single tree. Some grammars may be made of multiple, unconnected trees.
Root Category
This is the category at the root of the desired sub-tree of the category hierarchy, as defined by the grammar. This may be anything from the true root of a single-tree grammar, the root of a tree in a multiple-tree grammar, or simply any category, depending on the intent.
Optimization Parameters
Override default settings - Select this check box to override the default optimization parameters.
Parse resource limit - The maximum amount of computational resources that the parser should use.
Solution tree depth - The maximum depth within a solution tree down to which parser will recurse.
Input length - Optimizes the processing for different lengths of input string.
Identification and Locale Guess Definitions only
Sought category
This is the category of interest within that sub-tree whose root is the root category.
Search for pattern
Choose one of the radio buttons:
In substrings - The pattern is matched against all substrings of the input
Using the full phrase - the pattern is matched only against the whole input
Identification and Locale Guess Definitions only
Stop searching if this pattern is found
If this check box is selected, processing of patterns stops after this node if the node matches.
Identification Definition
Identity
The identity to be assigned if the pattern matches.
DataFlux Data Management Studio 269
Weight
This number weights the pattern in the final calculation of the score.
Extraction Definition
Score
The score that this pattern will contribute to the final score.
Sought categories
Multiple sought categories can be selected, each with its own token to be assigned if the pattern matches.
Max matches
The maximum number of matches that will be processed for this pattern.
Locale Guess Definition
Likelihood
The likelihood of the input being in the definition's locale, if the pattern matches. Setting to "Never" implies that an input that matches this pattern could never belong to the definition's locale.
Output
Message
One of the following:
Changes were applied - if the pattern was found and generated some solutions
No solutions found - if no solutions were found
Parse abandoned - if computational resources were insufficient to complete the parsing operation (Parse Definition only)
Solution trees
If any solutions were found, a number of solution trees appear. Depending on the definition, they will be organized and displayed in different ways.
each pattern up to and including the pattern of the currently selected node can generate its own set of solutions
solution display is cumulative (for example, solutions found by previous patterns will be displayed along with solutions for the current node, if any)
for each pattern, the solutions are sorted from left to right in decreasing score order
the number of solutions shown can be configured under Tools > Options > Display
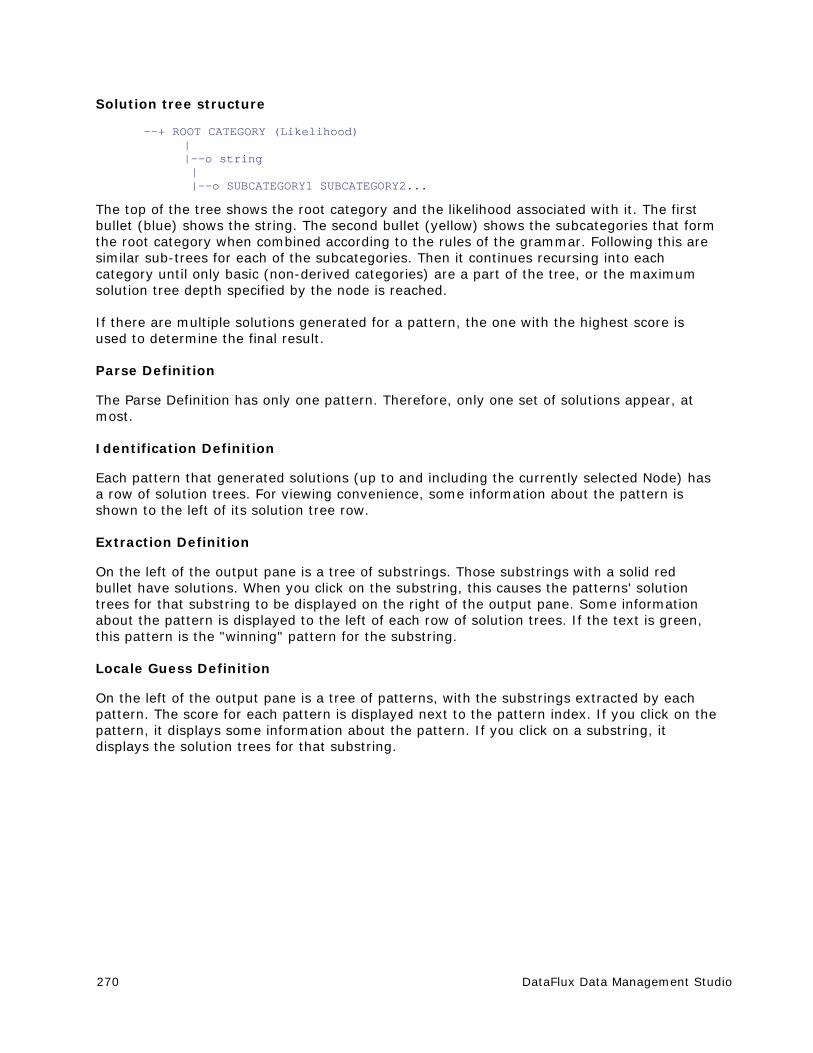
270 DataFlux Data Management Studio
Solution tree structure
--+ ROOT CATEGORY (Likelihood) | |--o string | |--o SUBCATEGORY1 SUBCATEGORY2...
The top of the tree shows the root category and the likelihood associated with it. The first bullet (blue) shows the string. The second bullet (yellow) shows the subcategories that form the root category when combined according to the rules of the grammar. Following this are similar sub-trees for each of the subcategories. Then it continues recursing into each category until only basic (non-derived categories) are a part of the tree, or the maximum solution tree depth specified by the node is reached.
If there are multiple solutions generated for a pattern, the one with the highest score is used to determine the final result.
Parse Definition
The Parse Definition has only one pattern. Therefore, only one set of solutions appear, at most.
Identification Definition
Each pattern that generated solutions (up to and including the currently selected Node) has a row of solution trees. For viewing convenience, some information about the pattern is shown to the left of its solution tree row.
Extraction Definition
On the left of the output pane is a tree of substrings. Those substrings with a solid red bullet have solutions. When you click on the substring, this causes the patterns' solution trees for that substring to be displayed on the right of the output pane. Some information about the pattern is displayed to the left of each row of solution trees. If the text is green, this pattern is the "winning" pattern for the substring.
Locale Guess Definition
On the left of the output pane is a tree of patterns, with the substrings extracted by each pattern. The score for each pattern is displayed next to the pattern index. If you click on the pattern, it displays some information about the pattern. If you click on a substring, it displays the solution trees for that substring.
DataFlux Data Management Studio 271
Token Mappings Node The Token Mappings Node maps categories to tokens, so tokens can be assigned to words.
Used in:
Parse Definitions
Extraction Definitions
Properties
Parse Definition
There are two tabs for the Token Mappings Mode properties. The Solution-based tab should be used in all Parse Definitions. The Default tab contains more advanced functionality, and is not always required.
Solution-Based tab
On the Solution-Based tab, you can map tokens to categories that are found in solutions generated by the Pattern Logic Node.
in the Token pane, highlight a token
in the Category pane, assign categories for the highlighted token
For example:
In the context of name-parsing, a category called Middle Name Word (MNW) could be mapped to a token called Middle Name. A category called Middle Name Initial (MNI) could also be mapped to the Middle Name token. All words that have been classified as MNW or MNI will be assigned to that token.
Default tab
The Default tab enables you to map tokens to categories when no solutions are found by the Pattern Logic Node.
in the Token pane, highlight a token
in the Category pane, assign categories for the highlighted token, together with the maximum number of words that can be contained in the token for that category
in the Default Token field, select a default token to allow words that have not been parsed to fall into a default token grouping. A dropdown box contains a list of all available tokens, plus a default entry of (None). A selection causes all words in the input string that were not matched using the table or a pattern to fall into the token specified, or just be discarded if (None) were selected. The default token can be changed to any another available token in the Default Token list.
For example:
272 DataFlux Data Management Studio
The word "contractor" is a common Name Appendage Word (NAW) and appears in such strings as "John Smith, contractor". However, suppose the input string is "John, contractor Smith". This is a rare, malformed input that would not normally generate any solutions in the Pattern Logic Node because the order of the word categories within the string does not fit the normal pattern.
This situation could be addressed by using the following default mappings:
Family Name to FNW
Given Name to GNW
Name Appendage to NAW
Now, each word is assigned to a token on the basis of their categories. This method of mapping tokens is intended for rare, unforeseen circumstances which would otherwise produce no output. It should not be used as a substitute for good design in the Pattern Logic Node.
Excluded categories
The Excluded Categories tab lists those categories of items that will be prevented from appearing in the final output. These are usually punctuation marks that do not form a part of any token, but are used by convention.
For example:
The comma is not a part of any token in the input string "John Smith, Jr." However, the name suffix "Jr" is usually written with a prefixed comma so we can expect it to be present in the input string.
Extraction Definition
Use token separator
If the Use token separator check box is selected, a token separator will be used between substrings that are assigned to the same token. You should input a string to be used as a separator in the text box to the right.
Default Token
In the Default Token field, select a token that allows words that have not been extracted to fall into a default token grouping. This dropdown box contains a list of all available tokens, plus a default entry of (None). A selection causes all words in the input string that were not matched using the table or a pattern to fall into the token specified, or just be discarded if (None) were selected. The default token can be changed to any another available token in the Default Token list.
Output
Results
Table with two columns:

DataFlux Data Management Studio 273
1st column - token name
2nd column - substring assigned to that token (in the Extraction Definition, could be several substrings concatenated together)
Parsing Node
The Parsing Node represents the processing carried out by a Parse Definition. This is necessary for definitions that treat individual tokens differently, to determine which substrings in an input string correspond to the tokens.
Used in:
Gender Definitions
Match Definitions
Standardization Definitions
Properties
Parse Definition
This is the name of the Parse Definition. All available Parse Definitions that belong to the same data type are shown here.
Allow "Parsed" input
If the Allow "Parsed" input check box is selected, you can choose to allow previously-parsed input as well as a single string. This parsed input can come from external sources (for example, columns of a database table) or from a previous run of the Parse Definition. No matter where the data comes from, the input fields must correspond to the tokens on the selected Parse Definition.
For more information about entering parsed input, see Testing Window.
Output
The output of the Parse Definition, if a single string was input. If parsed input was used, the parsing step is skipped, so there is no output.
274 DataFlux Data Management Studio
Token Config Node
The Token Config Node configures the sequential order of processing for tokens.
Used in:
Gender Definitions
Properties
Table with two columns:
1st column - name of the token
2nd column - whether to skip any tokens that have not yet been processed, if this token has assigned a gender
The order of token processing can be changed using the up and down arrows.
Output
None
Notes
Unlike other definitions, the Gender Definition processes the tokens sequentially, in the order set by you. It also enables you to permit certain tokens' outputs to be considered more definitive than others.
For example:
Input: "Mrs John Smith", referring to the wife of John Smith. In this case, "Mrs" is the definitive word.
If all the tokens are processed in the natural order, the outputs for the tokens are:
Name Prefix - "Mrs" (Female)
Given Name - "John" (Male)
Family Name - "Smith" (not used in the definition, since Family Name does not tell us anything about gender)
Since there is one female and one male assignment, the overall final gender assignment is unknown. However, processing stopped after the first token (Name Prefix) that has assigned a gender, the correct result is (Female). If Given Name was processed before Name Prefix, this does not work.
DataFlux Data Management Studio 275
Gender Token Group
The Gender Token Group represents the processing for a single token and contains the following Nodes:
Chopping Group
Lookup Normalization Group
Vocabularies Group
Categorization Regex Libraries Group
Used in:
Gender Definitions
Properties
Used within definition
If the Used within definition check box is not selected, the token corresponding to this group is not processed. The Token Group appears as a dimmed, minimized node and none of the contents are accessible.
Output
Message
If any node in the group matches the input, "Changes were applied". Otherwise, the message will be, "No changes were applied".
Result
The output of the last node in the group.
276 DataFlux Data Management Studio
Scoring Node
The Scoring Node represents the processing step that determines the final outcome.
Used in:
Gender Definitions
Identification Definitions
Language Guess Definitions
Locale Guess Definitions
Properties
None
Output
Gender Definition
Result
The final gender determination.
Scores
The scores for each possible gender.
Assignments
The possible gender assigned to each word.
Identification Definition
Result
The final gender determination.
Scores
The scores for each possible gender.
Language Guess Definition and Locale Guess Definition
Confidence score
A number ranging from 0 to 1000. The higher the score, the more likely it is the input string comes from the language or locale.
DataFlux Data Management Studio 277
Table-Based Identification Group
The Table-Based Identification Group holds a number of Familiar Phrase Scheme Nodes. These nodes are always optional, so this group is empty when the definition is created.
Used in:
Identification Definitions
Properties
None
Output
Message
If any node in the group matches the input, "Changes were applied". Otherwise, the message will be, "No changes were applied".
Result
The output of the last node in the group. If there are no nodes, then the output is as if there was a single node that had no effect.
278 DataFlux Data Management Studio
Familiar Phrase Scheme Node
The Familiar Phrase Scheme Node assigns an identity to the input string using a scheme.
Used in:
Identification Definitions
Properties
Scheme
Select a Scheme to use. By default, only files from the locale and its ancestors appear in the drop-down. If you do not see the desired library, click Tools > Options. Click Display and select Show files for all locales under the Library file selection drop-down lists to view QKB files from all locales.
Click Edit to edit the selected file or create a new file, the appropriate editor opens.
Identity
The identity that will be assigned if the scheme matches. This assignment is not final, but will contribute to the final score.
Case sensitive scheme lookup
If the Case sensitive scheme lookup check box is selected, the input case must match the case of the entry in the scheme in order to match.
Output
Message
If any entry in the scheme matches the input, "Changes were applied". Otherwise, the message will be, "No changes were applied".
Result
The assigned identity, if any.
DataFlux Data Management Studio 279
N-Gram Analysis Group
The N-Gram Analysis Group holds a number of N-Gram Scheme Nodes. These nodes are optional, so this group is empty when the definition is created. See the Language Guess Definitions special constraints.
Used in:
Language Guess Definitions
Properties
None
Output
Unlike other groups, the N-Gram Analysis Group's output is not the output of the last node in the group. This is because the nodes in the group do not have individual outputs. Instead, all of the schemes are combined to produce a single output.
Results
Table with four columns:
1st column - each of the N-Grams in the input
2nd column - number of occurrences in the input
3rd column - index of first occurrence in the input
4th column - number of occurrences in the training data
Raw score
The score obtained from N-Gram analysis (between 0 and 1000).
Bias setting
The bias setting previously chosen.
Bias factor
The numerical weight that the bias setting translates to.
Bias score
The N-Gram score after applying the bias.

280 DataFlux Data Management Studio
N-Gram Scheme Node
The N-Gram Scheme Node holds training data known to be in the language of interest. The data is stored in the form of N-Grams, short segments of the input text produced by sliding a window of size N, moving one character at a time, over the text. N refers to the number of characters in the segment (for example, 2, 3, or 4).
For example:
The N-Grams of size 3 in the string "Hello Bob" are:
Hel
ell
llo
lo[space]
o[space]B
[space]Bo
Bob
If bookends are used, there are two additional 3-Grams:
[bookend]He
ob[bookend]
The bookends represent the beginnings and ends of lines.
Used in:
Language Guess Definitions
Properties
Scheme
Select a Scheme to use. By default, only files from the locale and its ancestors appear in the drop-down. If you do not see the desired library, click Tools > Options. Click Display and select Show files for all locales under the Library file selection drop-down lists to view QKB files from all locales.
Click Edit to edit the selected file or create a new file, the appropriate editor opens.
Output
Individual N-Gram Scheme Nodes have no output, because all the schemes are combined to produce the output.
DataFlux Data Management Studio 281
Regex Search Group
The Regex Search Group holds a number of Regex Library Nodes. These nodes are optional, so this group is empty when the definition is created. See Language Guess Definition for special constraints.
Used in:
Language Guess Definitions
Locale Guess Definitions
Properties
None
Output
Regex score
The total score for all Regex Libraries.
Language Guess Definitions only
Bias setting
The bias setting previously chosen.
Bias factor
The numerical factor that the bias setting translates to.
Bias score
The regex score after weighting by the bias.

282 DataFlux Data Management Studio
Regex Library Node (for Guessing)
The Regex Library Node checks the input string matches for certain patterns that may indicate its language or locale of origin.
Used in:
Language Guess Definitions
Locale Guess Definitions
Properties
Regex Library
Select a Regex Library to use.
Click Edit to edit the selected file or create a new file, the appropriate editor opens.
Likelihood
This is the likelihood of the input belonging to the definition's language (or locale) if this Regex Library matches. "Never" means that, if the Regex Library matches, it is impossible for the input to have come from the language (or locale).
Output
Likelihood
The likelihood set previously.
Count
The number of matches for this node.
Score
The score for this node.
DataFlux Data Management Studio 283
Language Guessing Node
The Language Guessing Node represents the processing carried out by a Language Guess Definition.
Used in:
Locale Guess Definitions
Properties
Language definition
This is the Language Guess Definition to use, if one is desired. Any Language Guess Definition in the Locale (and ancestor Locales) may be selected, regardless of the data type.
Output
Confidence score
The usual output of the Language Guess Definition. This score will be factored into the final Locale Guess score.
284 DataFlux Data Management Studio
Pattern Search Group
The Pattern Search Group is an optional group. You can choose not to use this group and its contents, and rely on Regex Search (the default behavior). This group contains the following nodes:
Chopping Group
Morph Analysis Group
Pattern Recognition Group
Used in:
Locale Guess Definitions
Properties
Use within definition
Click to select this check box to enable the group and its contained nodes.
Output
Message
If any node in the group matches the input, "Changes were applied". Otherwise, the message will be, "No changes were applied".
Result
The output of the last node in the group.
DataFlux Data Management Studio 285
Preprocessing Group
The Preprocessing Group holds a number of Preprocessing Scheme Nodes. These nodes are always optional, so this group is empty when the definition is created.
Used in:
Match Definitions
Properties
None
Output
Message
If any node in the group matches the input, "Changes were applied". Otherwise, the message will be, "No changes were applied".
Result
The output of the last node in the group. If there are no nodes, then the input of the group is the output.
If parsed input is used, this group is skipped so there is no output.
286 DataFlux Data Management Studio
Preprocessing Scheme Node
The Preprocessing Scheme Node performs preprocessing on the input string prior to parsing.
Used in:
Match Definitions
Properties
Scheme
Select a Scheme to use. By default, only files from the locale and its ancestors appear in the drop-down. If you do not see the desired library, click Tools > Options. Click Display and select Show files for all locales under the Library file selection drop-down lists to view QKB files from all locales.
Click Edit to edit the selected file or create a new file, the appropriate editor opens.
Apply scheme
Click Apply scheme to apply the scheme to all substrings of the input or to the input as a whole.
Case sensitive scheme lookup
If this check box is selected, the input case must match the case of the entry in the scheme in order to be transformed.
Output
Message
If the scheme matches the input, "Changes were applied". Otherwise, the message will be, "No changes were applied".
Result
The transformed string.
DataFlux Data Management Studio 287
Match Token Group
The Match Token Group represents the processing for a single token and contains the following nodes:
Lookup Normalization Group
Noise Removal Group
Transformation Scheme Group
Phonetics Group
Used in:
Match Definition
Properties
Used within definition
If this check box is not selected, the token corresponding to this group is not processed.
Output
Message
If any node in the group matches the input, "Changes were applied". Otherwise, the message will be, "No changes were applied".
Result
The output of the last node in the group.

288 DataFlux Data Management Studio
Noise Word Removal Group
The Noise Word Removal Group contains a number of Noise Word Vocabulary Nodes. These nodes are always optional, so this group is empty when the definition is created.
Used in:
Match Definitions
Properties
None
Output
Message
If any node in the group matches the input, "Changes were applied". Otherwise, the message will be, "No changes were applied".
Result
The output of the last node in the group. If there are no nodes, the output displays as if there was a single node which had no effect.
DataFlux Data Management Studio 289
Noise Word Vocabulary Node
The Noise Word Vocabulary Node removes words that are considered "noise" from the input. These are usually words that form a legitimate part of the input but are not important for matching purposes. For example, if matching addresses, the word denoting the type of street (road, lane, drive, trail, and so on) is usually considered unimportant.
Used in:
Match Definitions
Properties
Vocabulary
Select a vocabulary to use. By default, only files from the locale and its ancestors appear in the drop-down. If you do not see the desired library, click Tools > Options. Click Display and select Show files for all locales under the Library file selection drop-down lists to view QKB files from all locales.
Click Edit to edit the selected file or create a new file, the appropriate editor opens.
Sensitivity
Select the sensitivity range for which this node will have an effect.
Output
Message
If any word in the Vocabulary matches the input, "Changes were applied". Otherwise, the message will be, "No changes were applied".
Result
The string after noise words were removed, if any.
"All noise" message
Will be set as true if every word in the input string was found to be a noise word. If this occurs, no filtering occurs and the string is left intact.
Filtered words
A list of the noise words that were removed.
290 DataFlux Data Management Studio
Transformations Schemes Group
The Transformations Schemes Group contains a number of Transformation Scheme Nodes. These nodes are always optional, so this group is empty when the definition is created.
Used in:
Match Definitions
Standardization Definitions
Properties
None
Output
Message
If any node in the group matches the input, "Changes were applied". Otherwise, the message will be, "No changes were applied".
Result
The output of the last node in the group. If there are no nodes, the output displays as if there was a single node that had no effect.
DataFlux Data Management Studio 291
Transformation Scheme Node
The Transformation Scheme Node transforms the input by table lookup. For example, to standardize variant spellings to a common form.
Used in:
Match Definitions
Standardization Definitions
Properties
Scheme
Select a scheme to use.
Click Edit to edit the selected file or create a new file, the appropriate editor opens.
Apply scheme
Select one of the option buttons to apply the scheme to all substrings of the input, or to the input as a whole.
Case sensitive scheme lookup
Select this check box if the input case must match the case of the entry in the scheme in order to be transformed.
Output
Message
If the scheme matches the input, "Changes were applied". Otherwise, the message will be, "No changes were applied".
Result
The input after transformation.
Note: The result may be the same as the input even though "Changes were applied" appears in the message, if the scheme transforms the input to itself.
292 DataFlux Data Management Studio
Phonetics Group
The Phonetics Group contains a number of Phonetics Library Nodes. These nodes are always optional, so this group is empty when the definition is created.
Used in:
Match Definitions
Properties
None
Output
Message
If any node in the group matches the input, "Changes were applied". Otherwise, the message will be, "No changes were applied".
Result
The output of the last node in the group. If there are no nodes, the output displays as if there was a single node that had no effect.
DataFlux Data Management Studio 293
Phonetics Library Node
The Phonetics Library Node transforms an input using a Phonetics Library.
A Phonetics Library is a list of character combinations and their transformations, based on phonetic equivalents. For example, a doubled consonant ("LL") might be replaced by a single consonant ("L"). This is useful when dealing with words which are subject to spelling errors or variant forms, usually proper names. The underlying principle is that names that are written to sound alike, even though they might not be written the same way, are likely to refer to the same entity.
Used in:
Match Definitions
Properties
Phonetics Library
Select a Phonetics Library to use.
Click Edit to edit the selected file or create a new file, the appropriate editor opens.
Sensitivity
Select a sensitivity range for which this node will have an effect.
Output
Message
If any entry in the Phonetics Library matches the input, "Changes were applied". Otherwise, the message will be, "No changes were applied".
Result
The string after phonetic transformation.
294 DataFlux Data Management Studio
Matchcode Layout Node
The Matchcode Layout Node enables you to design the matchcode.
Used in:
Match Definitions
Properties
Each sensitivity range (from 50 to 100 in intervals of 5) has its own tab. On each tab, the tokens used in the definition are listed.
Token checkbox
Select the check box if the token should contribute to the matchcode.
Sliders
The sliders indicate which character positions the token output will occupy within the matchcode. Index 1 refers to the first character. The maximum character position is 255. To change the display range of the slider bar, click Tools > Options > Display.
If the total number of character positions assigned to a token is less than the number of characters in that token's substring, the substring will be truncated. Conversely, empty character positions will be filled with "placeholder" characters.
The total length of the matchcode will be set to the maximum character position used by tokens. For example, if two tokens are used, with sliders set to (1, 8) and (9, 14) respectively, the length of the matchcode will be 14.
Output
Message
If any regular expression in the Regex Library matches the input, "Changes were applied". Otherwise, the message will be, "No changes were applied".
Result
The encoded matchcode.
DataFlux Data Management Studio 295
Standardization Token Group
The Standardization Token Group represents the processing for a single token. This group contains the following nodes:
Lookup Normalization Group
Transformation Schemes Group
Casing Node
Used in:
Standardization Definitions
Properties
Used within definition
If this check box is not selected, the token corresponding to this group is not processed.
Output
Message
If any node in the group matches the input, "Changes were applied". Otherwise, the message will be, "No changes were applied".
Result
The output of the last node in the group.
296 DataFlux Data Management Studio
Casing Node
The Casing Node represents the processing of a Case Definition.
Used in:
Standardization Definitions
Properties
Output case
Select uppercase, lowercase, or proper case.
Case definition
The name of the Case Definition to use (if desired). All the Case Definitions that belong to the same data type and have the selected output case will be displayed.
Output
Message
If the scheme matches the input, "Changes were applied". Otherwise, the message will be, "No changes were applied".
Result
The string after casing.
Note: The result may be identical to the input even though "Changes were applied", if the string was in the right case to begin with.
DataFlux Data Management Studio 297
Customize - Parse Definition Quick Editor The Customize Parse Definition Quick Editor uses your data to automatically build chop tables, vocabularies, and grammars.
About the Customize Parse Definition Quick Editor
The Customize Parse Definition Quick Editor framework includes the main menu, toolbar, and tabs.
Main Menu
File
New - Creates a new Parse Definition Quick Editor job. See Customize- New Parse Definition for additional information.
Open - Accesses an existing Parse Definition Quick Editor job. See Customize- Open Parse Definition for additional information.
Save - Saves your Parse Definition Quick Editor job. For more information about the Save and Save As options, see Customize- Save/Save As.
Save As - Saves your Parse Definition Quick Editor job to specify a location and file name. For more information about the Save and Save As options, see Customize- Save/Save As.
Exit - Closes the Parse Definition Quick Editor.
Edit
Filter List - Creates filters for the data in the Parse Definition Quick Editor.
Column - Click the Column drop-down list for the following options: Data Value, Word Count, Categorized Words, Categorization Status, and Root Category Rule.
Comparison - The Comparison drop-down list includes the following options: equal to, not equal to, begins with, ends with, contains, and like.
Value - Type the value you want to filter in the Value field.
Match Case - Select Match Case if you want the condition to only include the case used in the Value field.
Add Condition - Click Add Condition once you have selected options from the Column and Comparison fields and entered a Value. Your new condition will appear in the Conditions section.
Cancel Filter - Click Cancel Filter when you want to remove a filter from the process.
298 DataFlux Data Management Studio
Search
Find - To locate items in your data, click Search > Find. The Find dialog opens.
Find Next - Once you have the text string you want to search for in the Find dialog, you can click Find Next to locate the next instance of that text.
Go To - Allows you to jump to a specific item in the data.
Options
Refresh Parse Results - Click to refresh the parse results on the Categorization and Rule Building dialog as you build your parse definition. This option updates the Categorization and Rule Building dialog with the parse results so you can see how the parse definition appears as you build the parse definition.
Note: If you make changes directly to the grammar or vocabulary, some of the derived category and rule information may be cleared from the Categorization and Rule Building dialog.
Set QKB - Opens the Select QKB dialog. Click to select the QKB you want to use for this particular Parse Definition and click OK.
Note: You can only have one instance of the Parse Definition Quick Editor or Customize open at a time since both access the Quality Knowledge Base (QKB).
Help
Help Topics - Opens the DataFlux Data Management Studio online Help.
About - Displays contact information and the copyright statement.
Toolbar
The Parse Definition Quick Editor toolbar provides shortcuts to some of the commonly used options for the Parse Definition Quick Editor.
Parse Definition Quick Editor Tabs
Select the Categorization and Rule Building tab to view the results after your new parse definition is applied to your data. The table provides:
Word Count - the number of words in the sentence
Categorized Words - the words matched with words in the vocabulary
Categorization Status - the percentage of words from the total number of words found to have a category in the vocabulary
Root Category Rule - whether a particular sentence matched a specified pattern rule or not
See Parse Definition Quick Editor - Categorization and Rule Building for more information.
DataFlux Data Management Studio 299
Element Analysis
Element Analysis shows how often each word is listed along with the category, based on the parse definition vocabulary.
See Parse Definition Quick Editor - Element Analysis for more information.
Chopper
The Chopper tab in Parse Definition Quick Editor provides a similar function as the separate Chop Table Editor. You can edit and create chop tables within the parse definition.
See Parse Definition Quick Editor - Chopper Tab for more information.
Normalization Regexlib
The Normalization Regexlib in the Parse Definition Quick Editor provides similar functionality as the separate Regex Editor. You can edit and create new regex libraries within the parse definition.
See Parse Definition Quick Editor - Normalization Regexlib for more information.
Grammar
The Grammar tab in the Parse Definition Quick Editor provides the same functionality as the separate Grammar Editor. You can edit and create new grammars within the parse definition.
See Parse Definition Quick Editor - Grammar for more information.
Vocabulary
The Vocabulary tab in the Parse Definition Quick Editor provides similar functionality as the separate Vocabulary Editor. You can edit and create new vocabularies for the parse definition.
See Parse Definition Quick Editor - Vocabulary for more information.
300 DataFlux Data Management Studio
Parse Definition Quick Editor - Categorization and Rule Building The Categorization and Rule Building tab shows the results after the new parse definition is applied to your data.
The columns include:
Word Count - the number of words in the sentence
Categorized Words - the words matched with words in the vocabulary
Categorization Status - the percentage of words from the total number of words found to have a category in the vocabulary
Root Category Rule - whether a particular sentence matched a specified pattern rule or not
Word/Category
The Word/Category table displays the parsed entry. If there is a grammar rule related to the word, it displays in the table. Each step displays how the final definition arrived at the results from the previous definitions and processed components.
You can click an entry to see the Word/Category at the bottom of the screen.
Word
Right-click on the Word.
Adjust Chopping - Use this option to make changes to the way the Parse Definition Quick Editor separates the item.
Category
Right-click on the Category:
Assign Basic Category - A basic category is a category representing a single word. Basic categories are the basic building blocks of Grammar rules.
Create Category - Select Create Category to add a basic category. The Add Category dialog opens.
Click OK and you will see the new Category assigned. In this example, ABBOTT is assigned the category of LASTNAME.
NUM (Number) - Use this category when you have a number as a part of the data (for example, in an address).
Unassign Basic Category - When you have a basic category you want to remove, right-click the word and select Unassign Basic Category to return to the default category.
DataFlux Data Management Studio 301
Add Rule to Derived Category - Once a category is created, you can select the category and right-click Add Rule to Derived Category to create an additional category.
Note: A rule must be associated with the Derived Category prior to saving the parse definition.
Remove Rule from Derived Category - To delete a derived category, right-click on the category to select Remove Rule from Derived Category.
Derive Root Category from Rule - Select this option to assign your derived rule to the root rule used for parsing.
Remove Rule from Root Category - Select the rule you want to remove from the root category, right-click and select Remove Rule from Root Category.
Parse Definition Quick Editor - Element Analysis Element Analysis shows how often each word is listed along with the category, based on the parse definition vocabulary.
The columns on the Element Analysis tab include:
Word - the parsed word
Frequency - the number of times the word appears in the data source
Categories - the category assigned to each word
Note: The Categories column includes categories from all the vocabularies.
Right-click on the entry to make changes to the category:
Assign Basic Category - Click Assign Basic Category for the following drop-down list options:
Create Category - Select Create Category to add a basic category. The Add Category dialog opens.
NUM (Number) - Use this category when you have a number as a part of the data (for example, Address).
Unassign Basic Category - When you have a basic category you want to remove, right-click the word and select Unassign Basic Category to return to the default category.
302 DataFlux Data Management Studio
Parse Definition Quick Editor - Chopper Tab The Chopper tab in Parse Definition Quick Editor provides a similar function as the separate Chop Table Editor. You can edit and create chop tables within the parse definition.
The following unique menu items are available in the Edit menu of this tab:
Disable Table - This option allows you to edit and create chop tables within the parse definition.
Disable Rules - This option allows you to update the Chop Rules. See Customize - Chop Table - Rules.
Implicit Separation - Implicit separators are an optional feature of string chopping. For each parse definition, you can enable or disable implicit separators. If implicit separators are enabled, a separator mark is placed wherever the classification of a character differs from the classification of the previous character in a string. See Customize - Chop Table Editor - Character Level Options.
The Chopper tab includes the following elements:
Chopper used in definition - Specifies the name of a single chopper that is used by the parse definition. When a new definition is created, a chopper with a placeholder name New Chopper is listed here. You can change the chopper library file or edit the chopper using the buttons next to the field. When you choose a different chopper, you are prompted to either save or discard the existing definition. Then, you can either select an existing chopper with a drop-down menu or create a new chopper in the Chopper tab.
The Table sub-tab includes the following elements:
Unicode block - the Unicode block drop-down list provides a list of character subsets, see Unicode Block for the complete list.
Character Name - the Character Name is the actual name of the character, for example semicolon
Character - the Character represents the actual appearance of the character, for example the Character Name is semicolon and Character is ;
Classification - the Classification drop-down list includes:
LETTER/SYMBOL - a letter or non-separating symbol
NUMBER - a numeric digit (0-9)
LEAD SEPARATOR - a delimiter attached to the beginning of a word (for example, the left parenthesis)
TRAIL SEPARATOR - a delimiter attached at the end of a word (for example, a period)
FULL SEPARATOR - a delimiting character (for example, space, dash, and comma)

DataFlux Data Management Studio 303
Operation - the Operation drop-down list includes:
USE - use the character as-is in the word list and output tokens
TRIM - omit from word list; trim leading/trailing characters in output tokens
SUPPRESS - omit from the word list and output tokens
Value - each character is assigned a value
Hex Value - this field represents the character code for the character on that line
The Rules sub-tab uses a rules-based chopping algorithm that works by matching portions of an input string from left to right using search criteria and states. These are specified by rules which can be defined from the Rules tab. These rules are processed from top to bottom and the search criteria includes:
A vocabulary of words
A single regular expression
The system uses the search criteria to first match the input string at the current position. If it fails, it proceeds to the next rule and attempts to match using the criteria for that rule, and so on. If no rules match, the input string position is advanced by one character and the algorithm run again. This process is repeated until the process reaches the end of the input string.
If the system is able to successfully match a substring, it then attempts to validate the state. At any point in time, the system maintains a state of zero or more flags, which are just variables that either exist or not. Each rule has the ability to check for the existence of flags in the current state using a simple Boolean syntax. This is called the Prerequisite State Condition. If this validation fails, the rule fails to match and the next rule is checked, and so on. If it succeeds, then the following occurs:
The input string is advanced to the end of the successful match in the Search criterion.
A new state (Output State) consisting of zero or more flags is set. The new state replaces the old state.
The string is chopped before the current match, after the current match, at both points, or not at all.
This part of the Rules tab sets up an initial state before any rule processing is performed. This is useful for identifying a pre-existing state in order to force certain rules first.
The Initial Flags list has two controls. Click the Add icon to open the Add New Flag dialog. Here, you will enter the name of the new initial flag. As you create new flags, it is added alphabetically to the list. To delete an existing flag, select the flag and click the Delete icon.
The Rules sub-tab includes the following elements:
Initial Flags - Displays the initial flags associated with the chopper definition. You can use the neighboring buttons to delete and rearrange the flags.
304 DataFlux Data Management Studio
Method - The Method is either Vocab or Regex, depending on the type of criterion for the rule. This determines the format for the Search Criterion column.
Regular Expression - This field allows you to type the regex directly into the accompanying field.
Vocabulary - The Vocabulary drop-down list allows you to select one of the available vocabularies.
Category The Category drop-down list displays all of the possible categories for the selected vocabulary.
Prerequisite State Condition - This is a Boolean text expression.
Output Flags - The Output Flags list can be populated with flag names just like Initial Flags.
Chop Mode - The Chop Mode drop-down list allows you to select one of the possible modes.
Notes - The Notes field allows you to add 128 characters of text. This is used for documentation purposes.
Parse Definition Quick Editor - Normalization Regexlib The Normalization Regexlib in the Parse Definition Quick Editor provides similar functionality as the separate Regex Editor. You can edit and create new regex libraries within the parse definition.
Note: Normalization Regexlib in the Parse Definition Quick Editor does not provide the ability to test your regex libraries like the Regex Editor.
The tab includes the following elements:
Normalization regexlibs used in definition - Displays the normalization regexlibs used in the parse definition (0 or more). When an existing definition is loaded, all that definition's normalization regexlibs appear in the list view field in logical order, starting at the top. When a new definition is created, no normalization regexlibs exist yet, so the field is empty. Zero or one rows of the field may be selected at a time.
Add Expression - To add a new expression to the Parse Definition Quick Editor, right-click on one of the expressions and select Add Expression. The Add Expression dialog opens.
Regular Expression - A regular expression is a pattern matched against a subject string from left to right. Most characters stand for themselves in a pattern and match the corresponding characters in the subject. For more information about Regular Expressions and Substitution, refer to Customize - Regex Library Editor - Using Regular Expressions.

DataFlux Data Management Studio 305
Note: For more information about regular expressions, see the DataFlux Expression Language Reference Guide (click Start > Programs > DataFlux > Data Management Studio 2.1 > Documentation >Expression Language Reference Guide.
Substitution - A substitution is a string that is inserted into the output of a regular expression call in place of the pattern matched by the regular expression. For more information about Regular Expressions and Substitution, refer to Customize - Regex Library Editor - Using Regular Expressions.
Notes - Use the Notes section to create a note related to the selected expression.
Edit Expression - You can edit an existing expression, right-click on the expression you want to edit and select Edit Expression. Make your changes and click OK.
Delete Expression - To delete an existing expression, select the expression, right-click and click Delete Expression.
Move Expression - Move a selected expression up or down in the list.
Save Expression - Saves the expression.
For more information about regular expressions, see the DataFlux Expression Language Reference Guide (click Start > Programs > DataFlux Data Management Studio1.0 > Help > Expression Language Reference Guide.
Parse Definition Quick Editor - Grammar Tab The Grammar tab in the Parse Definition Quick Editor provides the same functionality as the separate dfPower© Customize Grammar Editor. You can edit and create new grammars within the parse definition.
Grammar used in definition - Specifies the grammars used for the definition. You can add grammars and change, edit, delete, and reorder the existing grammars by using the buttons next to the field. When you choose a different grammar, you are prompted to either save or discard the existing definition. Then, you can either select an existing grammar with a drop-down menu or create a new grammar in the Grammar tab.
The left navigation section displays the Basic Categories and Derived Categories set in earlier steps of the Parse Definition Quick Editor. Right-click on any of the items in this section and the following options are available:
Add Category - Click Add Category to add a Basic or Derived Category to the selected item. The Add Category dialog opens.
Change Category Abbreviation - Click Change Category Abbreviation for the item selected. The Change Category Abbreviation dialog opens.
306 DataFlux Data Management Studio
Add Rule - Select the item where you want to add a rule, right-click and select Add Rule. The Rule Properties section on the right is where you will create your rule.
Delete Selected Item - To delete an item, select the item from the list, right-click and select Delete Selected Item.
Category Properties
Abbreviation - The abbreviation for the selected category.
Name - The name of the selected category.
Type - Select Basic or Derived.
Rule Properties
Parent category - The Parent category is the basic or derived category the rule is related to.
Priority - Click the Priority drop-down list for the priority options available. The options include: Very Low, Low, Medium, High, or Very High.
Category - The Category field shows you a list of categories related to the rule. You can add, edit, and remove categories in this section.
Add - Click Add to add another category to your rule.
Edit - Select the item you want to edit and click Edit. The Edit Rule Category dialog opens.
Remove - Select the rule category you want to remove from the rule.
Parse Definition Quick Editor - Vocabulary The Vocabulary tab in the Parse Definition Quick Editor provides similar functionality as the separate Vocabulary Editor. You can edit and create new vocabularies for the parse definition.
Note: The Vocabulary option in the Parse Definition Quick Editor does not provide the option to import vocabularies like the Vocabulary Editor.
Vocabularies used in definition - Specifies the one or vocabularies that are used in the parse definition. When an existing definition is loaded, all of that definition's vocabularies appear in the list in logical order, starting at the top. When a new definition is created, it contains one vocabulary with the placeholder name "New Vocabulary." Note that there must always be at least one vocabulary present (unlike regexlibs). Note that you can add vocabularies and change, edit, delete, and reorder the existing vocabularies by using the buttons next to the field.
DataFlux Data Management Studio 307
Editing the selected vocabulary - Displays the words contained in whichever vocabulary is currently selected in the Vocabularies used in definition field. If there are no items in the Vocabularies used in definition field or none are selected, the Word ListView is empty. The words are arranged alphabetically.
Word - The word you have selected in the Editing the selected vocabulary field appears in the Word field.
Word Properties
Categories
Category - This is the category name for the word selected from your data source.
Likelihood - This column represents the likelihood that a word belongs in a particular category. The options include: Very Low, Low, Medium, High, and Very High.
Add - Click Add to add a category for the selected word. The Add Word Category dialog opens.
Edit - If you have multiple categories for a particular word, select the category you want to edit, and then click Edit. The Edit Word Category dialog opens.
Delete - Select the category you want to delete and click Delete.
Note: Because you can add any existing vocabularies to the definition, it is possible that an existing vocabulary may contain categories that are not contained in the definition's grammar. These categories are retained when the vocabulary is saved, but they are ignored by the definition's processing unless they are added to the grammar. You cannot add or edit categories that are not defined in the grammar.
Customize Parse Definition Quick Editor - New Parse Definition To begin a new parse definition in the Parse Definition Quick Editor, click File > New to open the New Parse Definition dialog.
Root category
A Root Category is where all basic and derived rules begin. Here, you begin creating the root category for your parse definition.
Abbreviation - Type a grammar abbreviation for the Root Category for your new parse definition.
Name - Enter the name of the Root Category for your new parse definition.
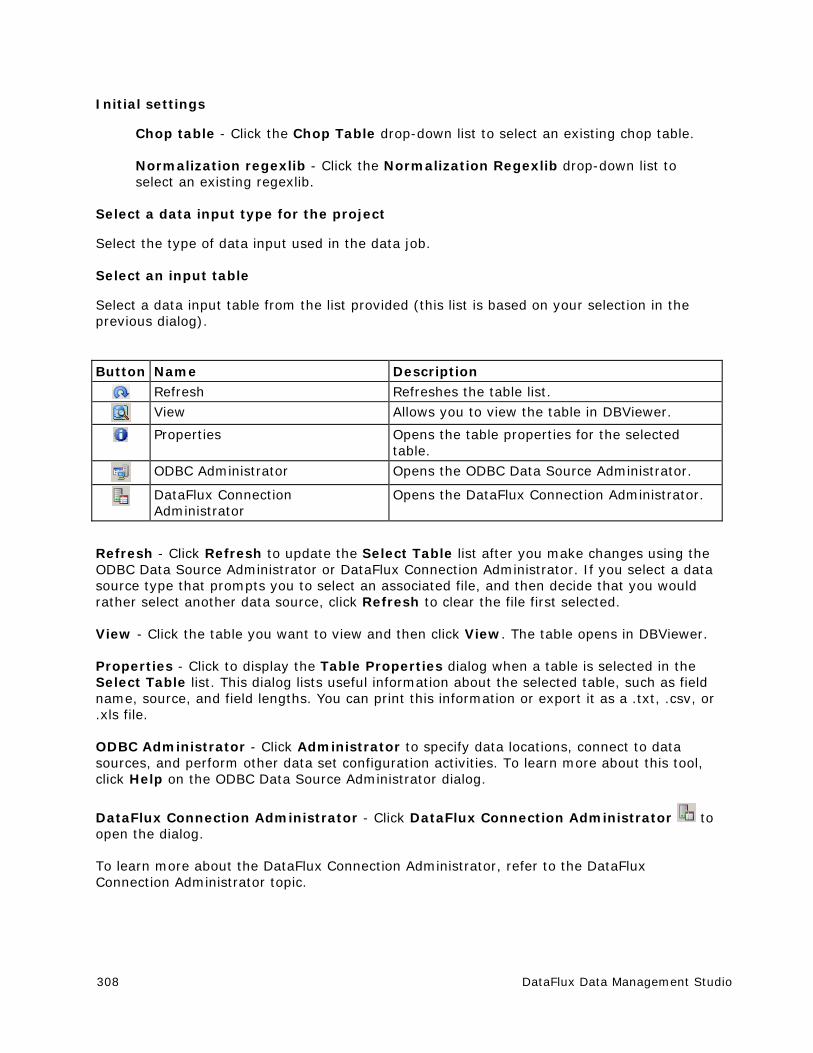
308 DataFlux Data Management Studio
Initial settings
Chop table - Click the Chop Table drop-down list to select an existing chop table.
Normalization regexlib - Click the Normalization Regexlib drop-down list to select an existing regexlib.
Select a data input type for the project
Select the type of data input used in the data job.
Select an input table
Select a data input table from the list provided (this list is based on your selection in the previous dialog).
Button Name Description
Refresh Refreshes the table list.
View Allows you to view the table in DBViewer.
Properties Opens the table properties for the selected table.
ODBC Administrator Opens the ODBC Data Source Administrator.
DataFlux Connection Administrator
Opens the DataFlux Connection Administrator.
Refresh - Click Refresh to update the Select Table list after you make changes using the ODBC Data Source Administrator or DataFlux Connection Administrator. If you select a data source type that prompts you to select an associated file, and then decide that you would rather select another data source, click Refresh to clear the file first selected.
View - Click the table you want to view and then click View. The table opens in DBViewer.
Properties - Click to display the Table Properties dialog when a table is selected in the Select Table list. This dialog lists useful information about the selected table, such as field name, source, and field lengths. You can print this information or export it as a .txt, .csv, or .xls file.
ODBC Administrator - Click Administrator to specify data locations, connect to data sources, and perform other data set configuration activities. To learn more about this tool, click Help on the ODBC Data Source Administrator dialog.
DataFlux Connection Administrator - Click DataFlux Connection Administrator to open the dialog.
To learn more about the DataFlux Connection Administrator, refer to the DataFlux Connection Administrator topic.
DataFlux Data Management Studio 309
Select an input field
Select an input field from the Fieldname drop-down list. This list is based on the fields available from your data source.
Your results appear in the Parse Definition Quick Editor:
Click the tabs available under the toolbar to view your data.
Customize Parse Definition Quick Editor - Open Parse Definition To open an existing parse definition in the Parse Definition Quick Editor, perform the following steps:
1. Click File > Open (or from the Parse Definition Quick Editor toolbar, click the Open icon to open the Open Parse Definition dialog.
2. Select the Parse Definition you want to access and click Next.
3. Select the data input type for this Parse Definition. Click Next.
4. Select the input table you want to access for this Parse Definition. Click Next.
5. Select the field you want to access in the Parse Definition. Click Finish.
Your Parse Definition opens in the Parse Definition Quick Editor. You are ready to edit the Parse Definition.
310 DataFlux Data Management Studio
Customize Parse Definition Quick Editor - Save/Save As To save your new Parse Definition in the Parse Definition Quick Editor, click File > Save or File > Save As.
Important: Make sure you complete all steps in the Parse Definition Quick Editor prior to saving your parse definition.
Parse Definition
Name - Type a Name for your new Parse Definition.
Data type - Click the Data Type drop-down list to select the data type for this Parse Definition. The options include:
City - State/Province - Postal Code
Name/Organization
Organization
Phone
State
ZIP
Organization (Two Organization)
Address
Date
Name
Name (Two Name)
Name (Multiple Name)
Account Number
Date/Time
Business Title
Country
Address (Global)
City
City - State/Province - Postal Code (Global)
DataFlux Data Management Studio 311
Name (Global)
Phone (Global)
Text
Website New - To create a new data type, click New. The New Data Type dialog opens.
Name - Enter a name for the New Data Type.
Example - In the Example field, create a meaningful example of the new data type.
Tokens
Add - Click the Add icon to add a token to the list.
Delete - Click the Delete icon to delete a token from the list.
Up - Click the Move Up icon to move a token up in the list.
Down - Click the Move Down icon to move a token down in the list.
Note: If you delete a token, extraction schemes or sought categories that reference that token are removed as well. As a result, you could potentially make a definition invalid by removing a token. Customize marks these items with a red "X".
Default Categories
Category - This is the category name from your data source.
Likelihood - This column represents the likelihood that a word belongs in a particular category. The options include: Very Low, Low, Medium, High, and Very High.
Add - Click Add to add a category for the selected word. The Add Default Category dialog opens.
Edit - If you have multiple categories for a particular word, select the category you want to edit, and then click Edit. The Edit Default Category dialog opens.
Delete - Select the category you want to delete and click Delete.
Files
Chop Table - Click the Browse icon to select the Chop Table where you want this Parse Definition saved.
Note: The Chop Table selected when creating the new Parse Definition automatically appears in this field.
Normalization Regexlib - Click the Browse icon to select the Normalization Regexlib where you want this Parse Definition saved.
312 DataFlux Data Management Studio
Note: The Normalization Regexlib selected when creating the new Parse Definition automatically appears in this field.
Grammar - Click the Browse icon to select the Grammar where this new Parse Definition will be saved.
Vocabulary - Click the Browse icon to select the Vocabulary where this new Parse Definition will be saved.
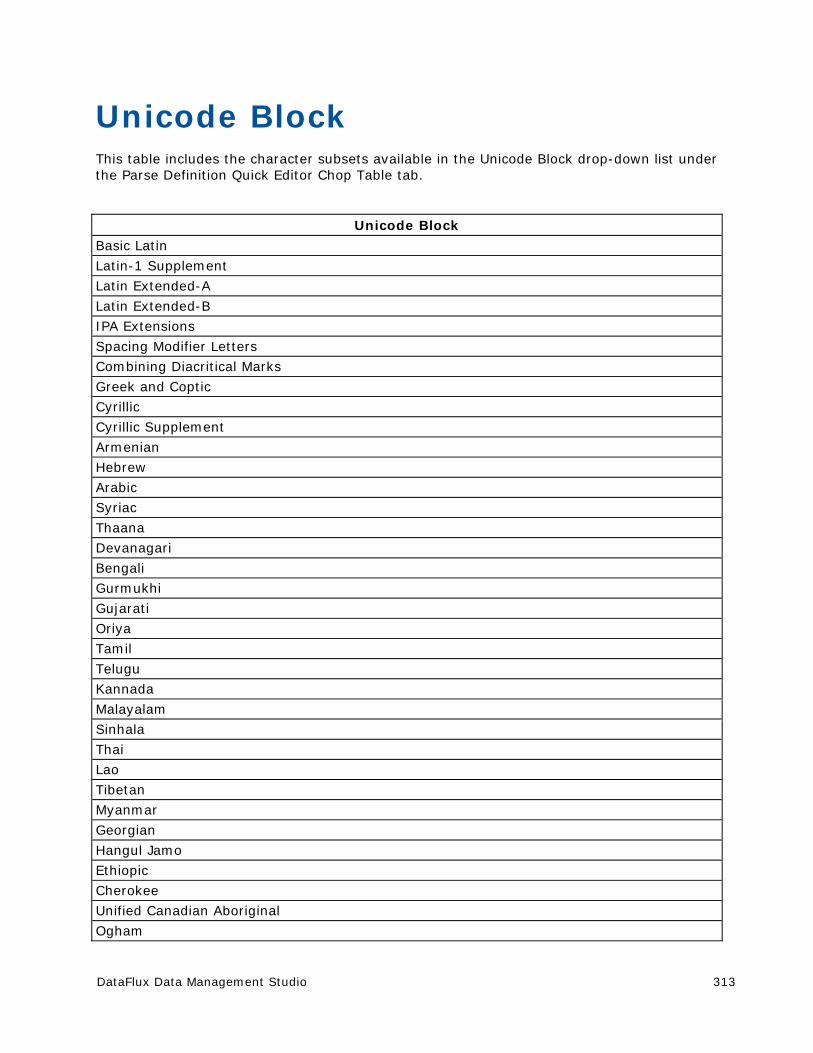
DataFlux Data Management Studio 313
Unicode Block This table includes the character subsets available in the Unicode Block drop-down list under the Parse Definition Quick Editor Chop Table tab.
Unicode Block
Basic Latin
Latin-1 Supplement
Latin Extended-A
Latin Extended-B
IPA Extensions
Spacing Modifier Letters
Combining Diacritical Marks
Greek and Coptic
Cyrillic
Cyrillic Supplement
Armenian
Hebrew
Arabic
Syriac
Thaana
Devanagari
Bengali
Gurmukhi
Gujarati
Oriya
Tamil
Telugu
Kannada
Malayalam
Sinhala
Thai
Lao
Tibetan
Myanmar
Georgian
Hangul Jamo
Ethiopic
Cherokee
Unified Canadian Aboriginal
Ogham
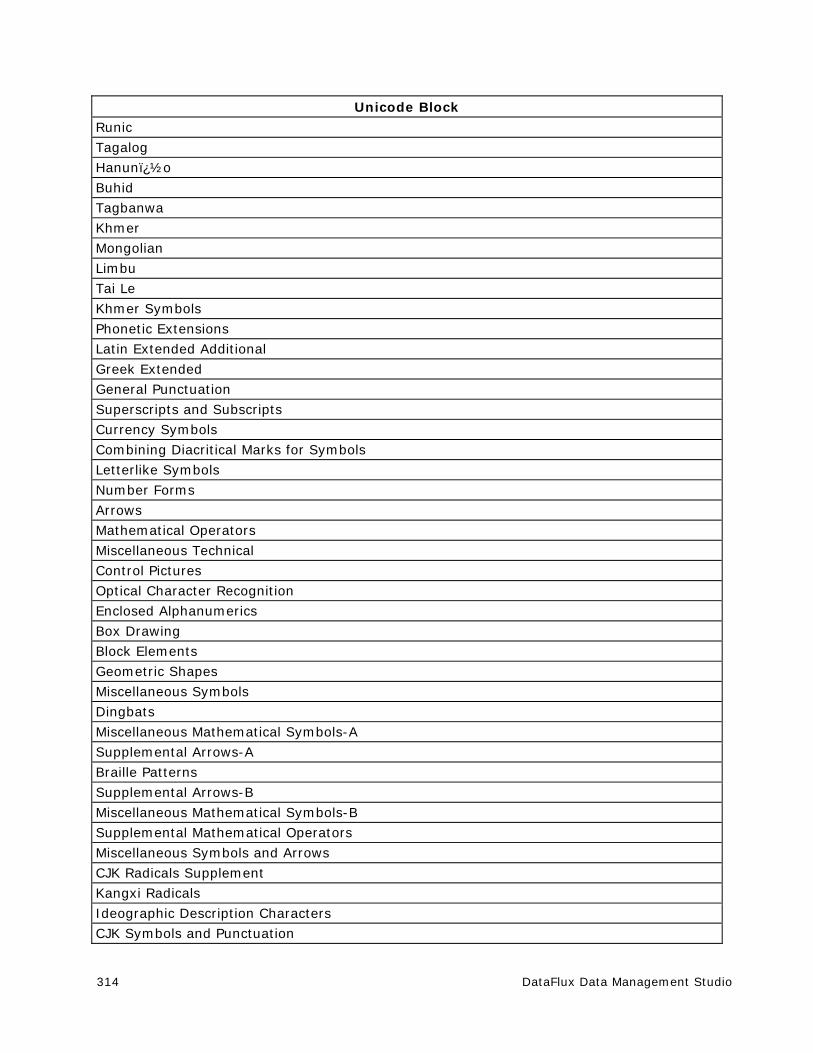
314 DataFlux Data Management Studio
Unicode Block Runic
Tagalog
Hanun�o
Buhid
Tagbanwa
Khmer
Mongolian
Limbu
Tai Le
Khmer Symbols
Phonetic Extensions
Latin Extended Additional
Greek Extended
General Punctuation
Superscripts and Subscripts
Currency Symbols
Combining Diacritical Marks for Symbols
Letterlike Symbols
Number Forms
Arrows
Mathematical Operators
Miscellaneous Technical
Control Pictures
Optical Character Recognition
Enclosed Alphanumerics
Box Drawing
Block Elements
Geometric Shapes
Miscellaneous Symbols
Dingbats
Miscellaneous Mathematical Symbols-A
Supplemental Arrows-A
Braille Patterns
Supplemental Arrows-B
Miscellaneous Mathematical Symbols-B
Supplemental Mathematical Operators
Miscellaneous Symbols and Arrows
CJK Radicals Supplement
Kangxi Radicals
Ideographic Description Characters
CJK Symbols and Punctuation
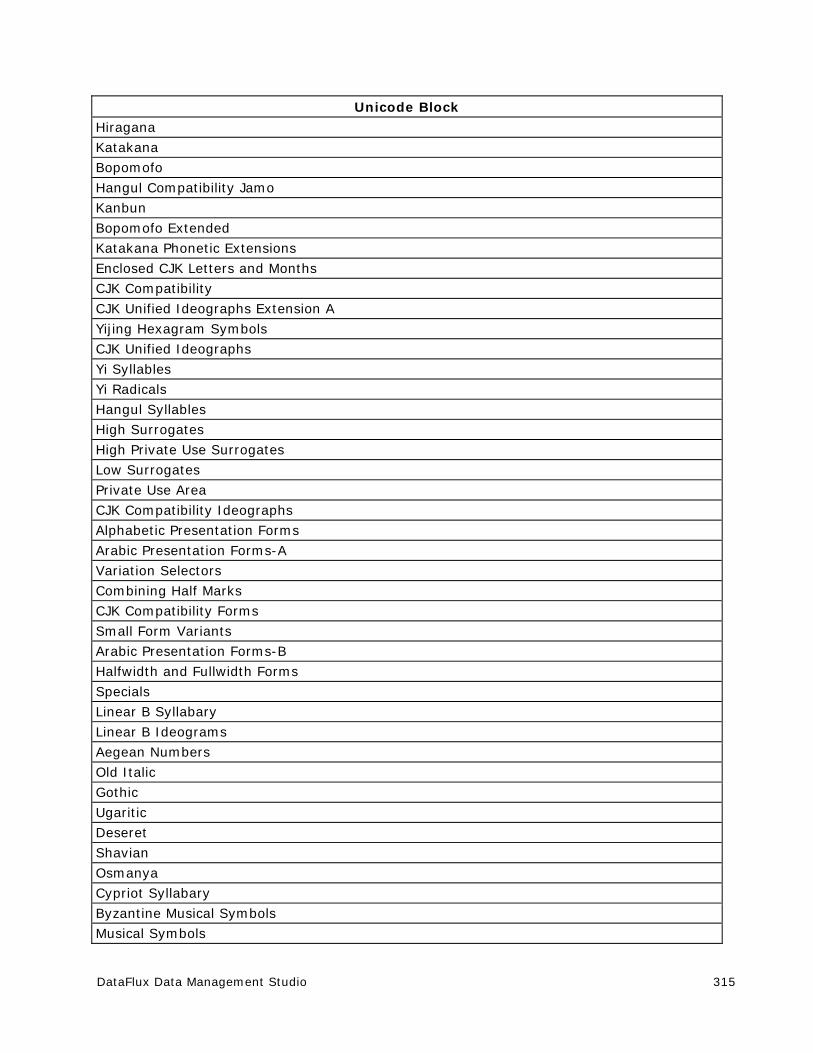
DataFlux Data Management Studio 315
Unicode Block Hiragana
Katakana
Bopomofo
Hangul Compatibility Jamo
Kanbun
Bopomofo Extended
Katakana Phonetic Extensions
Enclosed CJK Letters and Months
CJK Compatibility
CJK Unified Ideographs Extension A
Yijing Hexagram Symbols
CJK Unified Ideographs
Yi Syllables
Yi Radicals
Hangul Syllables
High Surrogates
High Private Use Surrogates
Low Surrogates
Private Use Area
CJK Compatibility Ideographs
Alphabetic Presentation Forms
Arabic Presentation Forms-A
Variation Selectors
Combining Half Marks
CJK Compatibility Forms
Small Form Variants
Arabic Presentation Forms-B
Halfwidth and Fullwidth Forms
Specials
Linear B Syllabary
Linear B Ideograms
Aegean Numbers
Old Italic
Gothic
Ugaritic
Deseret
Shavian
Osmanya
Cypriot Syllabary
Byzantine Musical Symbols
Musical Symbols
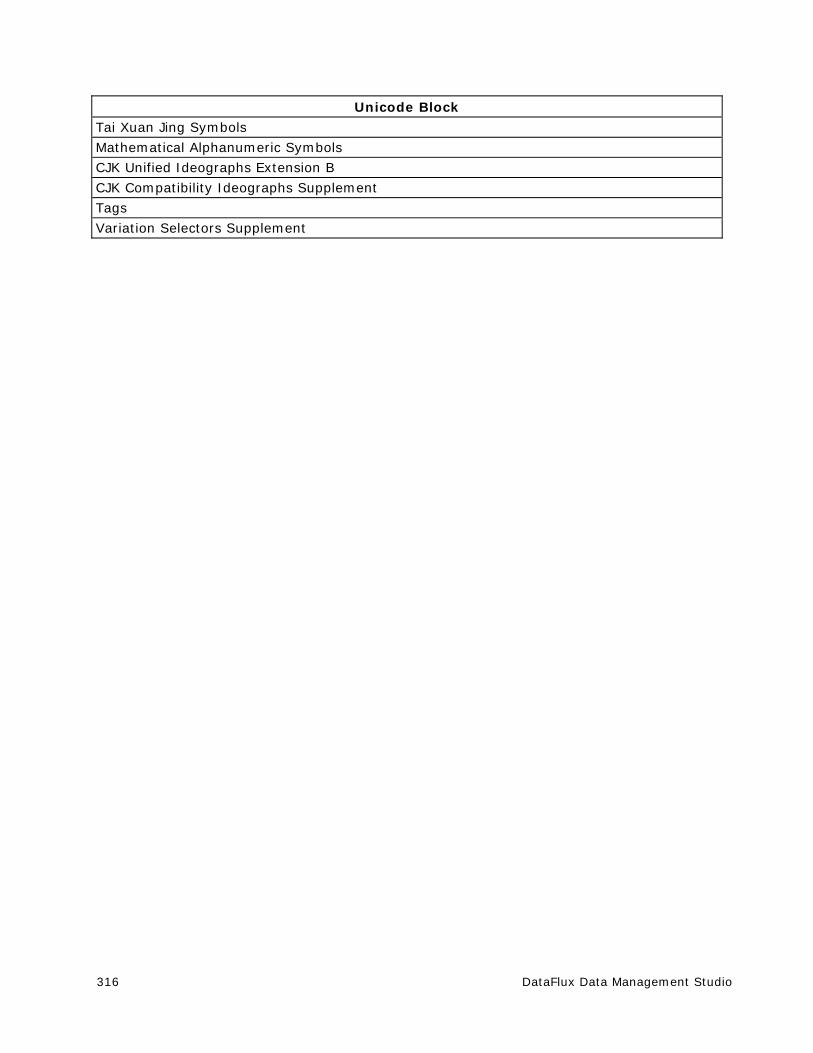
316 DataFlux Data Management Studio
Unicode Block Tai Xuan Jing Symbols
Mathematical Alphanumeric Symbols
CJK Unified Ideographs Extension B
CJK Compatibility Ideographs Supplement
Tags
Variation Selectors Supplement
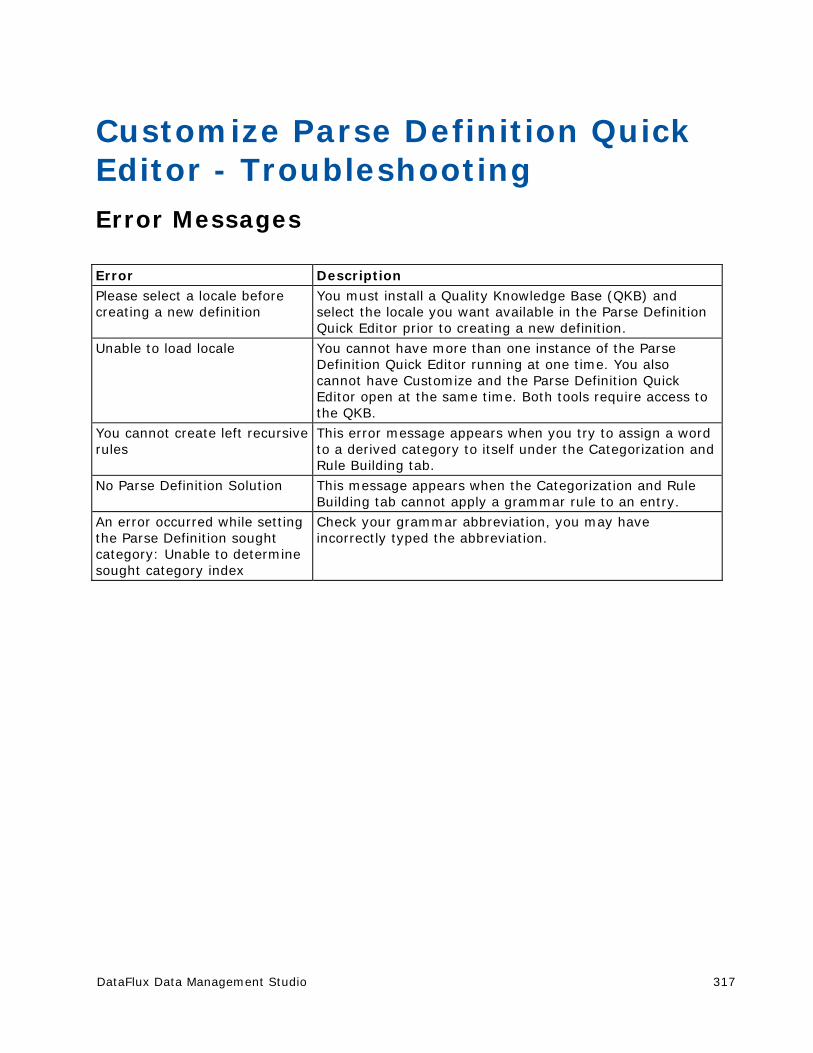
DataFlux Data Management Studio 317
Customize Parse Definition Quick Editor - Troubleshooting Error Messages
Error Description
Please select a locale before creating a new definition
You must install a Quality Knowledge Base (QKB) and select the locale you want available in the Parse Definition Quick Editor prior to creating a new definition.
Unable to load locale You cannot have more than one instance of the Parse Definition Quick Editor running at one time. You also cannot have Customize and the Parse Definition Quick Editor open at the same time. Both tools require access to the QKB.
You cannot create left recursive rules
This error message appears when you try to assign a word to a derived category to itself under the Categorization and Rule Building tab.
No Parse Definition Solution This message appears when the Categorization and Rule Building tab cannot apply a grammar rule to an entry.
An error occurred while setting the Parse Definition sought category: Unable to determine sought category index
Check your grammar abbreviation, you may have incorrectly typed the abbreviation.
318 DataFlux Data Management Studio
Customize Parse Definition Quick Editor - FAQ Here are some questions and answers you may have regarding the Parse Definition Quick Editor:
Why do I receive the error message, "Unable to load locale" when I try to run the Parse Definition Quick Editor and Customize?
Both the Parse Definition Quick Editor and Customize require access the Quality Knowledge Base (QKB) therefore, you cannot have both tools open at the same time.
Why would I use the Parse Definition Quick Editor?
The Parse Definition Quick Editor allows you to create a new parse definition using a step-by-step process. When you view the results of the new parse definition you can determine the changes you need to make. You can also use the Parse Definition Quick Editor to apply existing parse definitions to your data and edit using the chop table, regex, grammar, or vocabulary components.
Once I have created my parse definition using the Parse Definition Quick Editor, what else should I configure to complete the parse definition process?
You will need to open Customize and set your Preprocessing and Token Mapping to have your new parse definition available.
Note: Both Customize and the Parse Definition Quick Editor need to access the QKB.
What data sources are available in the Parse Definition Quick Editor for my incoming data?
You can access an ODBC data source, SQL Query, Delimited Text File, Fixed Width Text File, SAS Data Sets, and Profile Reports.
How are my data sources configured?
You will configure your data sources the same way as you configure them for the Data Management Studio data job input nodes.
What are Basic and Derived Categories?
A basic category is a category that represents a single word. Basic categories are the basic building blocks of Grammar rules. Every basic category in a Grammar corresponds to a category in an ordered word list. A derived category is a category composed of one or more other categories. The makeup of a derived category is described using rules.
DataFlux Data Management Studio 319
Are word entries automatically re-parsed and updated with the changes in my parse definition?
To include all parse changes, click Options > Refresh Parse Results (from the main menu). This allows you to re-parse the data content with all the changes. You are prompted to save the parse definition as well.
When I have the Parse Definition Quick Editor open, can I have other vocabularies, chop tables, or regex libraries open within the parse definition?
The Parse Definition Quick Editor does not allow you to make changes directly to the vocabularies, chop tables, or regex libraries within a parse definition. To do this, use Customize.
What is a root category?
The root category is where all other rules (basic and derived) begin.
Categorization and Rule Building
What is Categorization and Rule Building?
Click the Categorization and Rule Building tab to view the result after your new parse definition is applied to your data. This table provides:
Word Count - the number of words in the sentence
Categorized Words - the words matched with words in the vocabulary
Categorization Status - the percentage of words from the total number of words found to have a category in the vocabulary
Root Category Rule - whether a particular sentence matched a specified pattern rule or not
What root category rule is assigned when there is no rule matched?
When there is no rule matched, you will see the message, "No Parse Solution" next to the entry.
What does "No Parse Definition Solution" mean?
This message appears when the Categorization and Rule Building tab cannot apply a grammar rule to an entry.
What does the Word/Category fields listed at the bottom of the Parse Definition Quick Editor mean when I select an entry in the Categorization and Rule building tab?
This illustrates how the Parse Definition Quick Editor parsed entry finds the correct grammar rule for the selected entry. Each step displays how the final definition arrived at the results from the previous definitions and processed components.
320 DataFlux Data Management Studio
How can I narrow down the number of entries under Categorization and Rule Building?
Create a filter, click Edit > Filter List.
Sometimes there is no category listed for words that are defined in my vocabulary, why?
When an entry does not fall under a particular rule category, it is difficult to select the correct category. When this happens there is no category associated with the entry.
Does Parse Definition Quick Editor have support for categorization regexlibs?
The Parse Definition Quick Editor does not support categorizing regexlibs.
When I remove a rule from the Root Category the derived rule also becomes unlisted. Is this expected behavior?
Yes, this is expected. When you remove a rule from Root Category, only the basic types remain in the list.
The Parse Definition Quick Editor Categorization and Rule tab does not display derived rules. Is this expected behavior?
Parse Definition Quick Editor does not display the derived rules unless the derived rule falls into a root category.
Element Analysis
What is Element Analysis?
Element Analysis shows how often each word is listed along with the category, based on the parse definition vocabulary.
Can I assign a basic category to a word?
Yes, right-click on an entry and select Assign Basic Category > Create Category.
How do I unassign an existing basic category?
To unassign a basic category, right-click on an entry and select Unassign Basic Category.
Why is there no category next to an entry, but the entry falls within a grammar?
Some word entries are not included in the vocabulary associated with a grammar. However for these entries the grammar assigns a default guess category. Based on that default category the grammar rule is still applied. The entries that are not listed in the vocabulary are not assigned a category in Element Analysis.
DataFlux Data Management Studio 321
Why are some numbers listed under the NUM category in Element Analysis while others do not include numbers?
The category list on the Element Analysis tab is built from the vocabulary. If the number does not appear in the vocabulary with the NUM category assigned, then the NUM category does not appear on the Element Analysis tab. Some numbers appear correctly categorized as NUM on the Categorization and Rule Building tab, even though they are not in the vocabulary. This happens because some parse definitions have a categorization regexlib that can match numbers with the NUM category.
Can I unassign basic categories from multiple entries at one time, especially when the entries have the same type?
No, you must unassign basic categories one at a time.
Filters
What are filters?
Filters allow you to narrow down entries shown in the Categorization and Rule Building, Element Analysis, and Vocabulary tabs.
How much can I apply filters?
With filters you can build "AND" logic with conditions on any of the available columns within each tab. The filter operations change depending on the data type of the content, string, numeric, or date type.
Can I use regular expressions in my filtering?
Yes, to use a regular expression when creating filters use the "LIKE" operation which allows you to apply a regular expression.
Can I use "OR" logic in filters?
This functionality is not available at this time.
Which Parse Definition Quick Editor tabs use filtering?
You can filter your content on the Categorization and Rule Building, Element Analysis, and Vocabulary tabs.
Is filtering case sensitive?
By default, filtering is case insensitive unless you select Match Case.
Chop Table
What is Chop Table?
The Chop Table in Parse Definition Quick Editor provides a similar function as the separate Chop Table Editor. You can edit and create chop tables within the parse definition.
322 DataFlux Data Management Studio
Does the Chop Table option in the Parse Definition Quick Editor provide the same functionality available in Chop Table Editor?
Chop Table in the Parse Definition Quick Editor does not provide the ability to test your chop table like the Chop Table Editor.
Do my changes to the Chop Table appear immediately on the Categorization and Rule Building tab?
Yes, the changes immediately appear on the Categorization and Rule Building tab. You can also click Options > Refresh Parse Results.
I can only select one item at a time in Chop Table Editor. Is this by design?
Yes, you can only make changes to one item at a time.
How do I make the font larger or smaller?
Use the toolbar options, Increase Font Size and Decrease Font Size to adjust the font in the Parse Definition Quick Editor.
Can I locate a character based on the decimal or hexadecimal value?
Yes, to locate a character using the decimal or hexadecimal value, click Search > Go To.
What is implicit separation?
Implicit separators are an optional feature of string chopping. For each parse definition, you can enable or disable implicit separators. If implicit separators are enabled, a separator mark is placed wherever the classification of a character differs from the classification of the previous character in a string. See Customize - Chop Table Editor - Character Level Options for additional information.
Normalization Regexlib
What is Normalization Regexlib?
The Normalization Regexlib in the Parse Definition Quick Editor provides similar functionality as the separate Regex Editor. You can edit and create new regex libraries within the parse definition.
Does the Normalization Regexlib option in the Parse Definition Quick Editor provide the same functionality available in the Regex Editor?
Normalization Regexlib in the Parse Definition Quick Editor does not provide the ability to test your regex libraries like the Regex Editor.
Do my changes to the Normalization Regexlib appear immediately on the Categorization and Rule Building tab?
Yes, the changes immediately appear on the Categorization and Rule Building tab. You can also click Options > Refresh Parse Results.
DataFlux Data Management Studio 323
Where can I find more information about using regular expressions in DataFlux© products?
For additional information about creating regular expressions, refer to the DataFlux Expression Language Reference Guide (click Start > Programs > DataFlux Data Management Studio1.0 > Help > Expression Language Reference Guide).
Grammar
What is Grammar?
The Grammar tab in the Parse Definition Quick Editor provides the same functionality as the separate Grammar Editor. You can edit and create new grammars within the parse definition.
Does the Grammar option in the Parse Definition Quick Editor provide the same functionality as the separate Grammar Editor?
Yes, both Grammar options provide the same functionality.
Vocabulary
What is Vocabulary?
The Vocabulary tab in the Parse Definition Quick Editor provides similar functionality as the separate Vocabulary Editor. You can edit and create new vocabularies for the parse definition.
Does the Vocabulary tab in the Parse Definition Quick Editor provide the same functionality as the Vocabulary Editor?
Vocabulary does not provide the option to import vocabularies like the Vocabulary Editor.
How can I see all the different categories that I have for my Vocabularies?
Refer to your Grammar basic categories which includes your vocabulary categories.
Creating a New Grammar and Rule
What components can I reuse or start with when building a new rule?
You have an option to begin building a new rule with an existing parse definition and regex library.
Can I start creating a new parse definition without using any regex libraries or chop definitions?
You can create a parse definition without a regex library but you must have at least a chop table definition.
324 DataFlux Data Management Studio
How do I start creating grammars?
From the Categorization and Rule Building tab, click an entry to select. At the bottom of the screen, you should see a Word/Category listing for the entry. Select a word, right-click and select Assign Basic Category. You can follow these steps to create a derived category and assign that derived category to a root category.
How do I add a basic category to a word?
To assign a word to a basic category from Categorization And Rule Building tab and Element Analysis tab, select the word, right-click and select Assign Basic Category.
How do I create derived categories from Categorization and Rule Building?
You can create derived categories after you have assigned basic categories to your words. Select a basic category or multiple basic categories, right-click and select Add Rule To Derived Category.
Can I create recursive rules to avoid repetition?
You can create right recursive rules such as:
Address Street Address
But not left recursive rules such as:
Address Address Street
Left recursive rules yield an infinite loop.
What does the message "You cannot create left recursive rules" mean?
This error message appears when you try to assign a word to a derived category to itself under the Categorization and Rule Building tab.
Can I change the chopping of a word from the Categorization and Rule Building tab?
Yes, under Word/Category, select the word then right-click and select Adjust Chopping. Click the operation drop-down list and select USE, SUPPRESS, or TRIM for this word.
DataFlux Data Management Studio 325
Customize - Vocabulary Editor Before using the Customize Vocabulary Editor, you should define all of your basic categories and implement them in a Grammar, create your parse definitions, and create a text file for each basic category.
The Vocabulary Editor allows you to build a vocabulary-- a collection of words obtained by importing data from other data sets (text files or DataFlux© scheme files). Each word in the Vocabulary is defined as belonging to one or more categories, which are defined in an associated Grammar. When the parsing system needs to categorize a word, it can then easily search a single Vocabulary rather than multiple text files. We recommend you build one Vocabulary per parse definition.
Within the Vocabulary Editor, you must specify which input text sources you want to combine to develop a Vocabulary, and indicate which category's data each library represents.
Note that a Vocabulary is stored in a proprietary format. To help ensure Vocabulary integrity, you should not attempt to create or edit a Vocabulary directly, but rather through the Vocabulary Editor.
326 DataFlux Data Management Studio
Customize - Vocabulary Editor - Building Vocabularies You can use the Customize Vocabulary Editor to build Vocabularies. We recommend you build one Vocabulary per parse definition, so repeat the following steps for each parse definition.
1. Open the Vocabulary Editor Screen. On the Customize main screen, choose Tools > Vocabulary Editor. The Vocabulary Editor screen appears.
2. Set Your Locale. Choose Options > Set Locale. The Select Locale screen appears. Click on the appropriate locale, and then click OK. The locale setting is saved from session to session, so you do not need to specify it again unless you need to build a Vocabulary for a different locale.
3. Create a New Vocabulary. On the Vocabulary Editor screen, choose File > New.
4. Import Basic Categories From a Grammar. Associate the Vocabulary with a Grammar, which contains the categories with which you will use to build Vocabulary word entries. Each word in the Vocabulary must be associated with at least one category from the Grammar but it could be associated with many categories.
To import basic categories from a grammar, first choose Options > Categories. The Categories dialog appears. Click Import. The Select Grammar dialog opens. Select the Grammar that you want to associate with your new Vocabulary, and then click OK. On the Categories screen, the Grammar's standard category abbreviations and descriptions appear. (Derived categories are not imported.) Use the Delete button to delete any unwanted categories, and then click Close.
Note: To add or modify a category, you must use the Grammar Editor.
5. Import Words Into the Vocabulary. Now that you have imported the basic categories from your Grammar, you can associate the import data for this parse definition with the categories that they represent. To begin, choose File > Import. The Import Words dialog appears. One by one, specify data files that contain words for your Vocabulary and associate default categories for each word. For example, for a name parse definition, you will most likely have a category in the associated Grammar that represents a given name. Call this category GN. To start to build your Vocabulary, you will import a list of first names and associate all of those new words with the GN category. You will also need to set a likelihood for each new word brought into this Vocabulary. The value that you supply for Default Likelihood will be assigned as the likelihood for all words coming from that category's data library. Once you actually build the Vocabulary, you can adjust the likelihood for individual words.
DataFlux Data Management Studio 327
The Overwrite option dictates the desired behavior if a word is imported that already exists in the Vocabulary, but with a different likelihood. If the Overwrite option is selected, the default likelihood associated with the incoming word will overwrite the likelihood for that word in the Vocabulary. If Overwrite is not selected, the likelihood specified in the existing Vocabulary will not be overwritten. This situation could occur when either you are updating an existing Vocabulary or the build settings specify more than one data library for a single category.
6. Build the Vocabulary. Once you have defined the process to at least import one data set, you are ready to build the Vocabulary. Click Import. You can repeat these steps as many times as necessary to bring in all the data you need for the Vocabulary. You can also add words individually by choosing Edit > Add Word. When the import is complete, click Close to return to the Vocabulary Editor dialog from the main Vocabulary dialog. Listed there are all the words you imported. Entries are displayed in alphabetical order based on the ANSI C sort order. If the same word appears in more than one input file, an additional category will be assigned to that word rather than adding the word to the Vocabulary multiple times. This makes it easy to see when a word was found in multiple categories.
7. Modify the Likelihood of Words in the Vocabulary. Now that you are looking at the actual words in your newly built Vocabulary, you can make specific modifications to the likelihood of individual words. For example, you see the name "Scott" listed in the Vocabulary as being both a Family Name Word and a Given Name Word. You might determine that "Scott" is more likely a Given Name Word than a Family Name Word, so you would increase the Given Name Word likelihood for that one name, "Scott." Now say you see the name "Aaron" listed as being in the same two categories, but you determine that it is more likely a Family Name Word, so you could increase Family Name Word likelihood that name. To make a category modification, select the word you want to change. The categories associated with the selected word appear on the right side of the screen. Use the Edit and Delete buttons to modify the category list as appropriate. Keep in mind that unless you de-select the Overwrite option on the associated Build Settings file, if you use those settings to re-build the Vocabulary, your changes will be overwritten. Although there may be some adjustments that you want to make to the likelihoods at this point, later testing with the Parse Test Tool will probably reveal other necessary adjustments to give the desired result.
8. Save the Vocabulary. Now that your Vocabulary is built, you need to save it. Select File > Save. If this is a newly built Vocabulary, the Vocabulary Editor will prompt you for a name.
328 DataFlux Data Management Studio
Customize - Vocabulary Editor - Modifying Vocabulary Words Other than altering the likelihood for specific words in a Vocabulary, we recommend you not make many other modifications. However, certain situations may warrant it, so the Vocabulary Editor does allow these operations. This may provide a good way to temporarily make changes for testing purposes.
Add a word to a Vocabulary 1. On the Vocabulary Editor dialog, select File > Open. The Open dialog opens.
2. Select the Vocabulary to which you want to add a word, and then click Open. The Vocabulary's details appear on the Vocabulary Editor dialog.
3. Select Edit > Add Word. The Add Word dialog appears.
4. Enter your new word, and then click OK. The word now appears selected under Word on the Vocabulary Editor dialog.
5. On the right side of the screen, add at least one category with a likelihood value.
Note: The Vocabulary Editor will alert you if you try to add a word that already exists in the Vocabulary.
Modify a word in a Vocabulary 1. On the Vocabulary Editor dialog, select File > Open. The Open dialog appears.
2. Select the Vocabulary that contains the word you want to modify, and then click Open. The Vocabulary's details appear on the Vocabulary Editor dialog.
3. Under Word, select the word you want to modify. The word's details appear on the right side of the screen.
4. Click the Edit button to change category settings and likelihood values.
Delete a word from a Vocabulary 1. On the Vocabulary Editor dialog, select File > Open. The Open dialog appears.
2. Select the Vocabulary that contains the word you want to delete, and then click Open. The Vocabulary's details appear on the Vocabulary Editor dialog.
3. Under Word, select the word you want to delete.
4. Select Edit > Delete Word.

DataFlux Data Management Studio 329
Customize - Grammar Editor A Grammar is a set of rules that represent expected patterns of words in a given context. Once the parsing system identifies the basic categories for each word (through the Vocabulary), the patterns for that phrase are then compared against the Grammar. The ideal is for every possible pattern of categories to be found in the Grammar with no duplicates. However, this is not very realistic. What you should strive for is to fully identify all of the common and some of the less common patterns, and resolve any ambiguities through well-thought-out adjustments of the rule priorities.
Note that a Grammar file is stored in a proprietary format. To help ensure Grammar integrity, you should not attempt to create or edit a Grammar file directly, but always through the Grammar Editor.
330 DataFlux Data Management Studio
Customize - Grammar Editor - Building Grammars You can use the Customize Grammar Editor to build Grammars. We recommend you build one Grammar per parse definition, so repeat the following steps for each parse definition.
1. Open the Grammar Editor Screen. On the Customize main screen, choose Tools > Grammar Editor. The Grammar Editor dialog appears.
2. Set Your Locale. Select Options > Set Locale. The Select Locale dialog appears. Click on the appropriate locale, and then click OK. The locale setting is saved from session to session, so you do not need to specify it again unless you need to build a Grammar for a different locale.
3. Create a New Grammar. On the Grammar Editor dialog, choose File > New. Two top-level containers appear on the Grammar dialog, one for basic categories and one for derived categories. Also, one basic category is always created by default for every Grammar: the NUM category that represents any numeric component in a pattern rule.
4. Create Basic Categories in a Grammar. Select Edit > Add Category. The Add Category dialog appears. Enter an abbreviation and a descriptive name for your new category, select Basic, and then click OK. You have now created one new basic category, which appears in the Grammar Editor dialog. Repeat this as necessary to establish the basic category types you want to create. For a name parse definition, these might be things like a first name word category, a middle name word category and a last name word category, among others.
5. Create Derived Categories in a Grammar. After creating several basic categories, you can create derived categories (which are essentially pattern variations) that are built upon those basic categories or on other derived categories. Select Edit > Add Category. The Add Category dialog appears. Enter an abbreviation and a descriptive name for your new category, select Derived, and then click OK. You have now created a new derived category, which appears on the Grammar Editor dialog. Repeat this step as necessary to create new derived categories.
6. Populate Derived Categories with Rules Built on Other Categories. Select a newly created derived category, and then choose Edit > Add Rule. New fields appear on the right side of the Grammar Editor dialog, displaying the rules for the selected derived category. Click Add to build a new rule from the available categories. A rule must contain at least one category, but can contain many. After creating the new pattern rule from the given category list, assign a Priority. Medium is the default priority for newly created rules. A derived category must have at least one rule, but it can have many as well. Repeat this step as necessary to create new rules for the derived categories.
7. Save the Grammar. Now that your Grammar is beginning to take shape, save it. Select File > Save. If this is a newly built Grammar, Customize will prompt you for a name.
DataFlux Data Management Studio 331
Customize - Grammar Editor - Modifying Grammars There are several ways you can modify Grammars.
Add a category to an existing Grammar 1. On the Grammar Editor dialog, choose File > Open. The Open dialog opens.
2. Select the Grammar to which you are adding a category, and then click Open. The Grammar's details appear on the Grammar Editor dialog.
3. Select Edit > Add Category. The Add Category dialog appears.
4. Enter an abbreviation and a descriptive name for your new category, select Basic, and then click OK.
Add a rule to a Grammar's existing derived category
1. On the Grammar Editor dialog, choose File > Open. The Open dialog opens.
2. Select the Grammar that contains the derived category to which you are adding a rule, and then click Open. The Grammar's details appear on the Grammar Editor dialog.
3. In the tree view, select the derived category to which you want to add a rule.
4. Select Edit > Add Rule. New fields appear on the right side of the Grammar Editor dialog, displaying the rules for the selected derived category. Click Add to build a new rule from the available categories, and then assign a Priority.
Modify a category's abbreviation 1. On the Grammar Editor dialog, choose File > Open. The Open dialog opens.
2. Select the Grammar that contains the category whose abbreviation you want to change, and then click Open. The Grammar's details appear on the Grammar Editor dialog.
3. In the tree view, select the category whose abbreviation you want to change.
4. Select Edit > Change Category Abbreviation. The Change Category Abbreviation dialog appears.
5. Edit the abbreviation, and then click OK.
332 DataFlux Data Management Studio
Modify a category's name 1. On the Grammar Editor dialog, choose File > Open. The Open dialog opens.
2. Select the Grammar that contains the category whose name you want to change, and then click Open. The Grammar's details appear on the Grammar Editor dialog.
3. In the tree view, select the category whose name you want to change.
4. On the right of the screen, change the text in the Name field.
Modify the priority or category assigned to a rule
1. On the Grammar Editor dialog, choose File > Open. The Open dialog opens.
2. Select the Grammar that contains the rule whose priorities or categories you want to change, and then click Open. The Grammar's details appear on the Grammar Editor dialog.
3. In the tree view, select the category that contains the rule you want to change.
4. On the right of the screen, under Category, select the rule you want to change.
5. To change the rule's priority, select a new priority from the Priority drop-down.
6. To change the rule's category, click Edit, use the Edit Rule Category dialog to select a new category, and then click OK.
Delete a category 1. On the Grammar Editor dialog, choose File > Open. The Open dialog opens.
2. Select the Grammar that contains the category you want to delete, and then click Open. The Grammar's details appear on the Grammar Editor dialog.
3. In the tree view, select the category you want to delete.
4. Select Edit > Delete Category. The category is deleted immediately and without confirmation.
Note: If the category you are attempting to delete is used in a rule for another category, you will not be able to delete the category. Instead, an error message will appear and the deletion will abort.
Caution: When you attempt to delete categories that are used inside other categories, a warning message will tell you the category might become invalid if you delete it here. Avoid deleting categories that are used by other category rules. You may corrupt the entire Grammar. To ensure this is not a problem, if you want to delete a category from your Grammar, delete or modify all the rules that reference the category you want to delete.

DataFlux Data Management Studio 333
Customize - Regex Editor Regular expressions are powerful tools you can use to transform data. In the DataFlux Data Management Studio implementation, regular expressions are organized into libraries that you can use for parsing, standardization, and matching. To build and test these libraries, use the Customize Regex Library Editor. ("Regex" is short for "regular expression.")
In the context of parse definitions, standardization definitions, and match definitions, regular expressions are primarily intended for character-level cleansing and transformations. For word- and phrase-level transformations, you should instead use standardization data libraries.
Regular expressions you create in the Regex Library Editor must adhere to the syntax defined for Perl regular expressions. For information on writing Perl regular expressions, see Mastering Regular Expressions by Jeffrey E.F. Friedl or other readily available reference material on the subject.
334 DataFlux Data Management Studio
Customize - Regex Library Editor - Building Regex Libraries
1. Open the Regex Library Editor. On the Customize main screen, select Tools > Other QKB Editors > Regex Library Editor. The Regex Library Editor dialog appears.
2. Set a QKB. Select Options > Set QKB. The Regex Library Editor window appears. Select the appropriate QKB and locale and click Open. The QKB and locale setting is saved from session to session, so you do not need to specify it again unless you need to build a Regex Library file for a different locale.
3. Create a New Regex Library File. Select File > New.
4. Add Your Regular Expressions. By default, when you create a new Regex Library file, the Regex Library Editor will ask you to supply the first Regular Expression/Substitution pair. Type the Regular Expression and the Substitution in the appropriate fields and click OK. Before you add more regular expressions, be aware that regular expressions will be applied sequentially in the order they appear in the Regex Library. So, it is possible that a value could be modified by one regular expression, and then the result of that modification could be modified again by a regular expression that appears further down. This could occur several times as DataFlux Data Management Studio applies each regular expression from top to bottom. Therefore, you should be careful not to subvert the effects of one regular expression with another. With that in mind, all new regular expression rules are added to the end of the list. Click on the newly created row and drag the rule to the desired position in the list. Repeat this process until you have defined all your regular expressions.
5. Save Your Regex Library. Select File > Save. Because this is a new Regex Library, the Regex Library Editor will prompt you for a file name.
6. Test Your Regex Library. After creating a Regex Library, you can use the Regex Library Editor to test your expressions. At the bottom of the Regex Library is the Test Area, which allows you to type sample input strings to verify that you have written your regular expressions correctly. Type an input string and observe the result. If the result is not what you intended, you can modify your regular expressions or their order and re-test. When you are satisfied with the results, be certain to save your changes.
DataFlux Data Management Studio 335
Customize - Regex Library Editor - Modifying Regex Library Files After using the Regex Library Editor Test Area to test your regular expressions, you might find some unintended effects because of the order of your expressions.
To alter the expression order in a Regex Library:
1. In the Regex Library Editor, select the row you want to move.
2. Drag the row to the desired location, and then release the mouse button. The row appears in its new position.
Tips:
If your substitution string is empty, the matched pattern is removed because it is replaced with nothing.
During parse normalization and matching, strings are capitalized before regular expressions are applied. So, you should make regular expressions case-insensitive in libraries that will be used for these purposes. Or, you can use only capital letters when representing literal text in the expressions. During parse pre-processing, strings are not capitalized before regular expressions are applied. Therefore, you can use case-sensitive regular expressions in libraries used for pre-processing if there is some benefit to doing this.
336 DataFlux Data Management Studio
Customize - Regex Library Editor - Using Regular Expressions DataFlux Data Management Studio supports Perl-compatible syntax for regular expressions. A regular expression is a pattern that is matched against a subject string from left to right. Most characters stand for themselves in a pattern, and match the corresponding characters in the subject. For example, the pattern:
The quick brown fox
matches a portion of a subject string identical to itself. The power of regular expressions lies in their ability to include alternatives and repetitions in the pattern. These are encoded in the pattern by the use of meta-characters, which do not stand for themselves but instead are interpreted in some special way.
A substitution is a string inserted into the output of a regular expression call in place of the pattern matched by the regular expression. To further the example, suppose the following regular expression and substitution are applied to the input string:
Regular Expression Substitution
brown blue
Result: The quick blue fox
In a substitution string, all characters stand for themselves, except the backslash-escape digit is interpreted as a back reference to a captured subpattern. See information on capturing subpatterns with regular expressions. Also, casing operators \U, \u, \L, \l, and \E may be used in substitution strings just like Perl substitutions. For additional information on Perl operators, refer to the Perl documentation.
Meta-Characters There are two different sets of meta-characters: those recognized anywhere in the pattern except within square brackets ([ ]), and those recognized in square brackets. Outside square brackets, the meta-characters are:
Character Description
\ General escape character with several uses
^ Assert start of subject (or line, in multi-line mode)
$ Assert end of subject (or line, in multi-line mode)
. Match any character except new line (by default)
[ Start character class definition
| Start of alternative branch
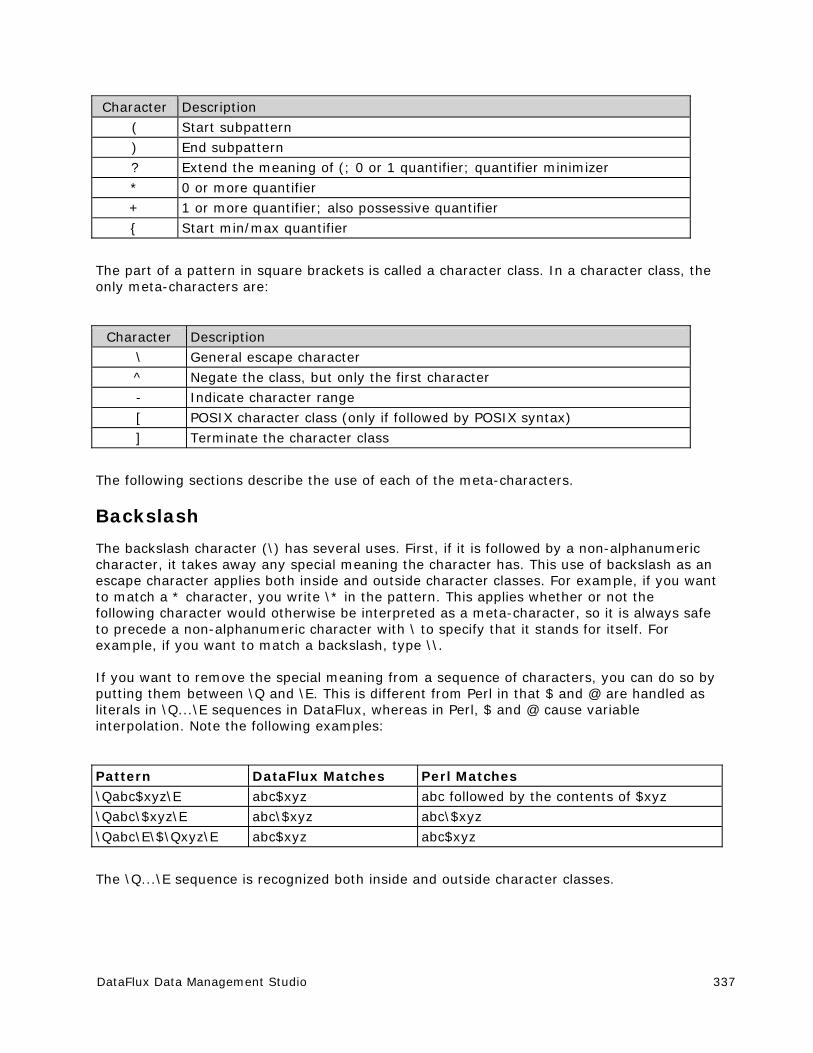
DataFlux Data Management Studio 337
Character Description
( Start subpattern
) End subpattern
? Extend the meaning of (; 0 or 1 quantifier; quantifier minimizer
* 0 or more quantifier
+ 1 or more quantifier; also possessive quantifier
{ Start min/max quantifier
The part of a pattern in square brackets is called a character class. In a character class, the only meta-characters are:
Character Description
\ General escape character
^ Negate the class, but only the first character
- Indicate character range
[ POSIX character class (only if followed by POSIX syntax)
] Terminate the character class
The following sections describe the use of each of the meta-characters.
Backslash
The backslash character (\) has several uses. First, if it is followed by a non-alphanumeric character, it takes away any special meaning the character has. This use of backslash as an escape character applies both inside and outside character classes. For example, if you want to match a * character, you write \* in the pattern. This applies whether or not the following character would otherwise be interpreted as a meta-character, so it is always safe to precede a non-alphanumeric character with \ to specify that it stands for itself. For example, if you want to match a backslash, type \\.
If you want to remove the special meaning from a sequence of characters, you can do so by putting them between \Q and \E. This is different from Perl in that $ and @ are handled as literals in \Q...\E sequences in DataFlux, whereas in Perl, $ and @ cause variable interpolation. Note the following examples:
Pattern DataFlux Matches Perl Matches
\Qabc$xyz\E abc$xyz abc followed by the contents of $xyz
\Qabc\$xyz\E abc\$xyz abc\$xyz
\Qabc\E\$\Qxyz\E abc$xyz abc$xyz
The \Q...\E sequence is recognized both inside and outside character classes.
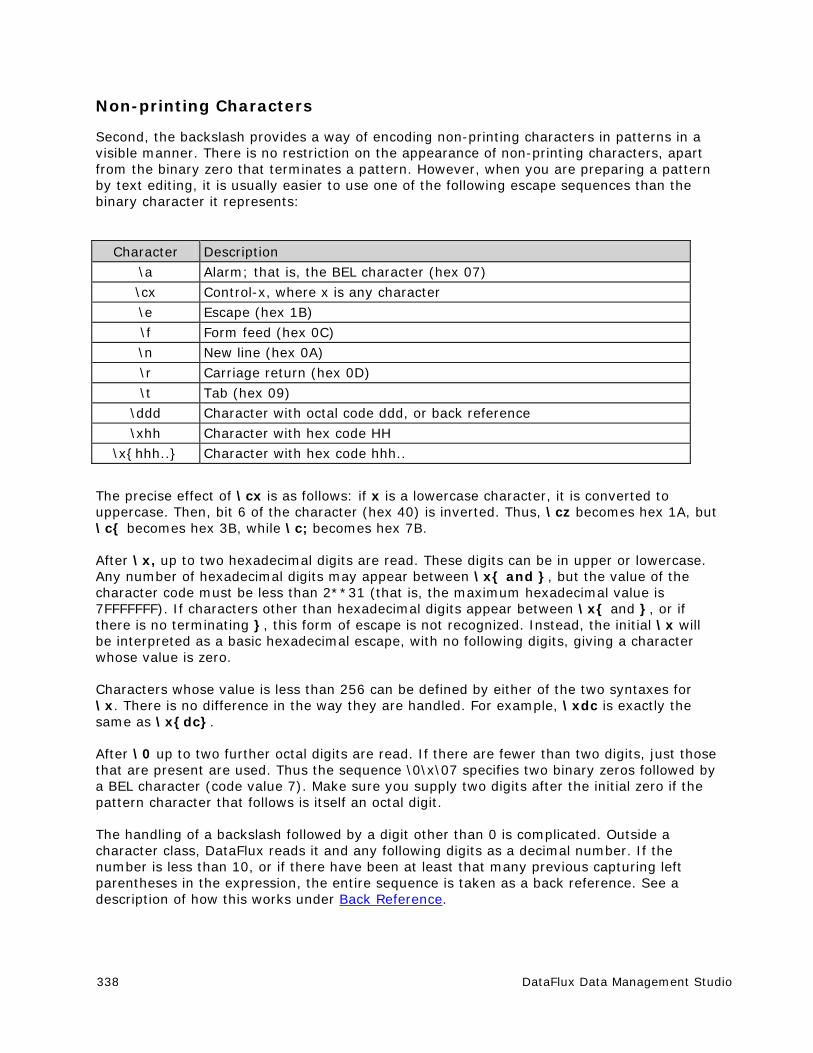
338 DataFlux Data Management Studio
Non-printing Characters
Second, the backslash provides a way of encoding non-printing characters in patterns in a visible manner. There is no restriction on the appearance of non-printing characters, apart from the binary zero that terminates a pattern. However, when you are preparing a pattern by text editing, it is usually easier to use one of the following escape sequences than the binary character it represents:
Character Description
\a Alarm; that is, the BEL character (hex 07)
\cx Control-x, where x is any character
\e Escape (hex 1B)
\f Form feed (hex 0C)
\n New line (hex 0A)
\r Carriage return (hex 0D)
\t Tab (hex 09)
\ddd Character with octal code ddd, or back reference
\xhh Character with hex code HH
\x{hhh..} Character with hex code hhh..
The precise effect of \cx is as follows: if x is a lowercase character, it is converted to uppercase. Then, bit 6 of the character (hex 40) is inverted. Thus, \cz becomes hex 1A, but \c{ becomes hex 3B, while \c; becomes hex 7B.
After \x, up to two hexadecimal digits are read. These digits can be in upper or lowercase. Any number of hexadecimal digits may appear between \x{ and }, but the value of the character code must be less than 2**31 (that is, the maximum hexadecimal value is 7FFFFFFF). If characters other than hexadecimal digits appear between \x{ and }, or if there is no terminating }, this form of escape is not recognized. Instead, the initial \x will be interpreted as a basic hexadecimal escape, with no following digits, giving a character whose value is zero.
Characters whose value is less than 256 can be defined by either of the two syntaxes for \x. There is no difference in the way they are handled. For example, \xdc is exactly the same as \x{dc}.
After \0 up to two further octal digits are read. If there are fewer than two digits, just those that are present are used. Thus the sequence \0\x\07 specifies two binary zeros followed by a BEL character (code value 7). Make sure you supply two digits after the initial zero if the pattern character that follows is itself an octal digit.
The handling of a backslash followed by a digit other than 0 is complicated. Outside a character class, DataFlux reads it and any following digits as a decimal number. If the number is less than 10, or if there have been at least that many previous capturing left parentheses in the expression, the entire sequence is taken as a back reference. See a description of how this works under Back Reference.
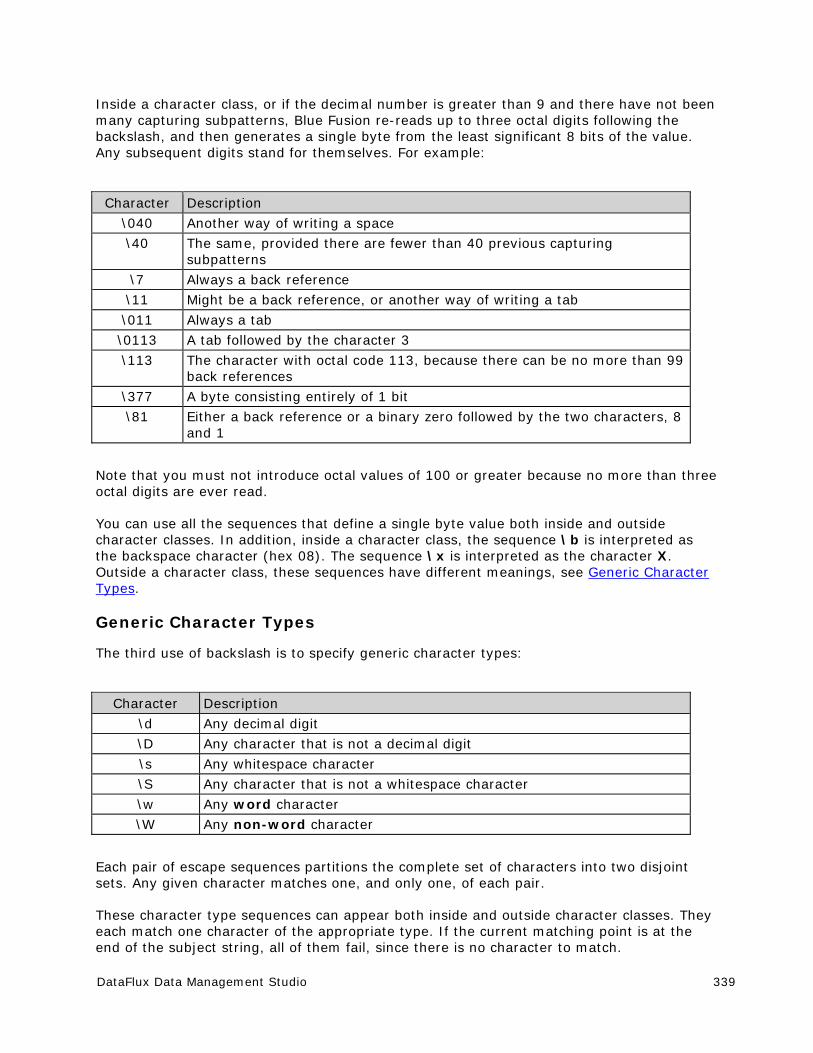
DataFlux Data Management Studio 339
Inside a character class, or if the decimal number is greater than 9 and there have not been many capturing subpatterns, Blue Fusion re-reads up to three octal digits following the backslash, and then generates a single byte from the least significant 8 bits of the value. Any subsequent digits stand for themselves. For example:
Character Description
\040 Another way of writing a space
\40 The same, provided there are fewer than 40 previous capturing subpatterns
\7 Always a back reference
\11 Might be a back reference, or another way of writing a tab
\011 Always a tab
\0113 A tab followed by the character 3
\113 The character with octal code 113, because there can be no more than 99 back references
\377 A byte consisting entirely of 1 bit
\81 Either a back reference or a binary zero followed by the two characters, 8 and 1
Note that you must not introduce octal values of 100 or greater because no more than three octal digits are ever read.
You can use all the sequences that define a single byte value both inside and outside character classes. In addition, inside a character class, the sequence \b is interpreted as the backspace character (hex 08). The sequence \x is interpreted as the character X. Outside a character class, these sequences have different meanings, see Generic Character Types.
Generic Character Types
The third use of backslash is to specify generic character types:
Character Description
\d Any decimal digit
\D Any character that is not a decimal digit
\s Any whitespace character
\S Any character that is not a whitespace character
\w Any word character
\W Any non-word character
Each pair of escape sequences partitions the complete set of characters into two disjoint sets. Any given character matches one, and only one, of each pair.
These character type sequences can appear both inside and outside character classes. They each match one character of the appropriate type. If the current matching point is at the end of the subject string, all of them fail, since there is no character to match.
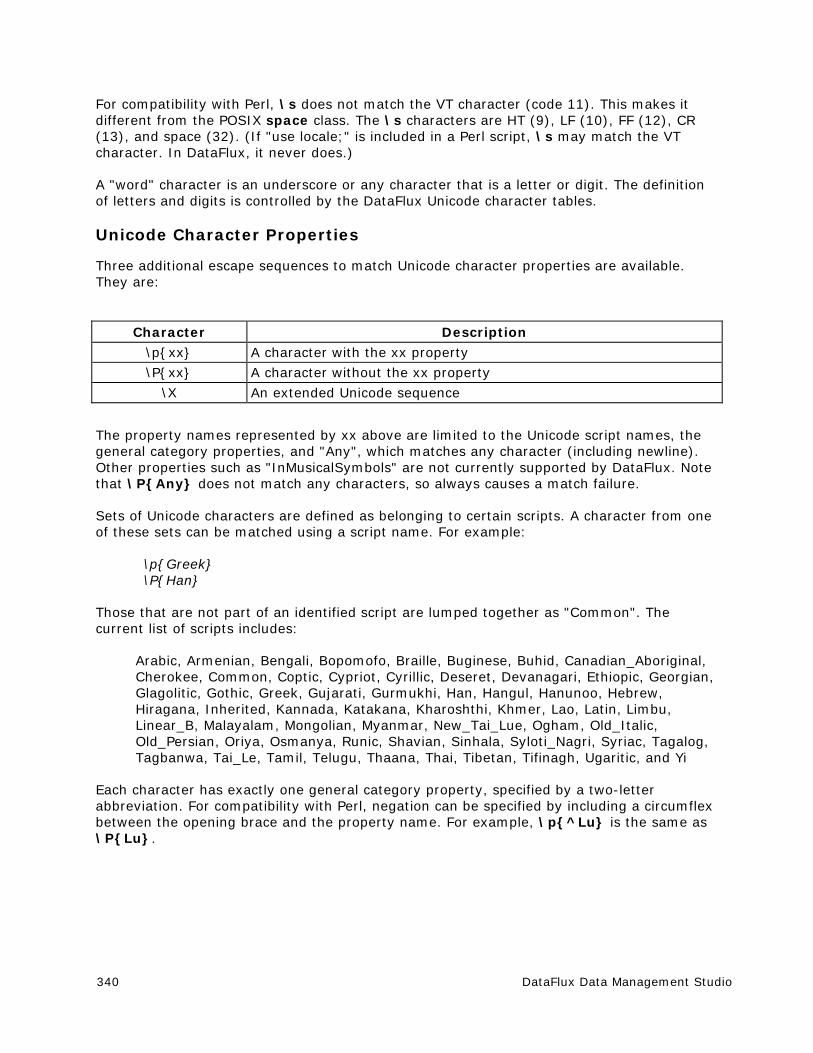
340 DataFlux Data Management Studio
For compatibility with Perl, \s does not match the VT character (code 11). This makes it different from the POSIX space class. The \s characters are HT (9), LF (10), FF (12), CR (13), and space (32). (If "use locale;" is included in a Perl script, \s may match the VT character. In DataFlux, it never does.)
A "word" character is an underscore or any character that is a letter or digit. The definition of letters and digits is controlled by the DataFlux Unicode character tables.
Unicode Character Properties
Three additional escape sequences to match Unicode character properties are available. They are:
Character Description
\p{xx} A character with the xx property
\P{xx} A character without the xx property
\X An extended Unicode sequence
The property names represented by xx above are limited to the Unicode script names, the general category properties, and "Any", which matches any character (including newline). Other properties such as "InMusicalSymbols" are not currently supported by DataFlux. Note that \P{Any} does not match any characters, so always causes a match failure.
Sets of Unicode characters are defined as belonging to certain scripts. A character from one of these sets can be matched using a script name. For example:
\p{Greek} \P{Han}
Those that are not part of an identified script are lumped together as "Common". The current list of scripts includes:
Arabic, Armenian, Bengali, Bopomofo, Braille, Buginese, Buhid, Canadian_Aboriginal, Cherokee, Common, Coptic, Cypriot, Cyrillic, Deseret, Devanagari, Ethiopic, Georgian, Glagolitic, Gothic, Greek, Gujarati, Gurmukhi, Han, Hangul, Hanunoo, Hebrew, Hiragana, Inherited, Kannada, Katakana, Kharoshthi, Khmer, Lao, Latin, Limbu, Linear_B, Malayalam, Mongolian, Myanmar, New_Tai_Lue, Ogham, Old_Italic, Old_Persian, Oriya, Osmanya, Runic, Shavian, Sinhala, Syloti_Nagri, Syriac, Tagalog, Tagbanwa, Tai_Le, Tamil, Telugu, Thaana, Thai, Tibetan, Tifinagh, Ugaritic, and Yi
Each character has exactly one general category property, specified by a two-letter abbreviation. For compatibility with Perl, negation can be specified by including a circumflex between the opening brace and the property name. For example, \p{^Lu} is the same as \P{Lu}.
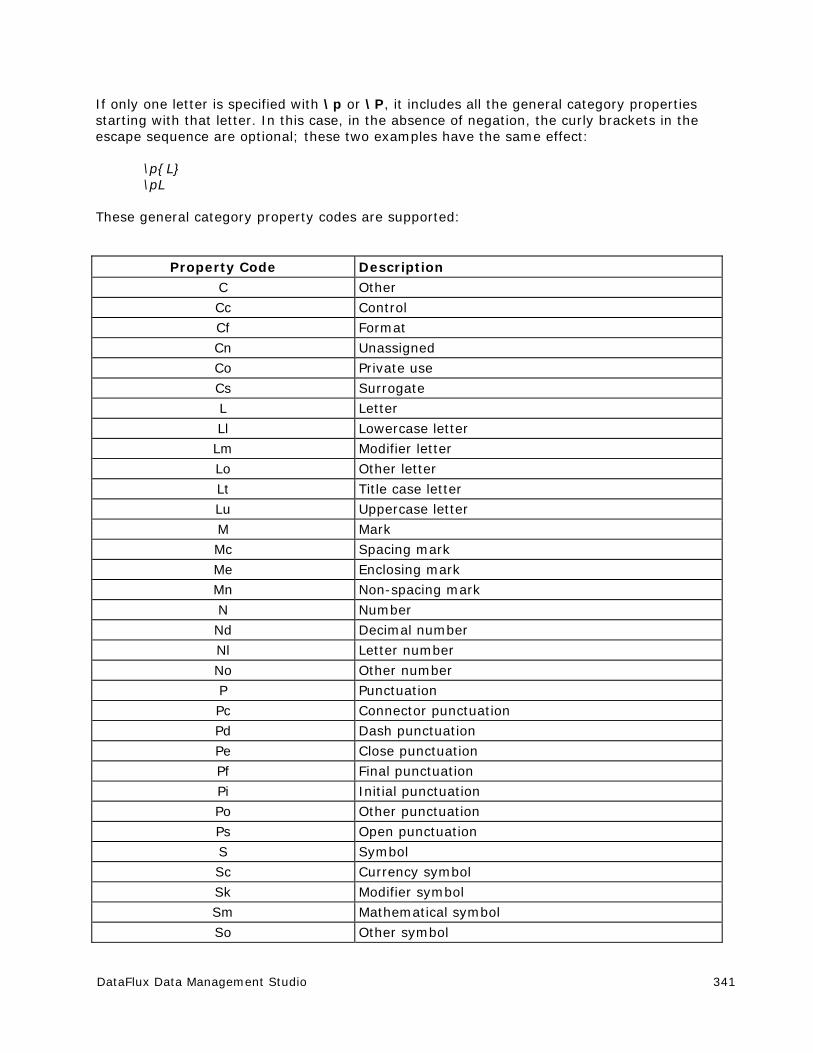
DataFlux Data Management Studio 341
If only one letter is specified with \p or \P, it includes all the general category properties starting with that letter. In this case, in the absence of negation, the curly brackets in the escape sequence are optional; these two examples have the same effect:
\p{L} \pL
These general category property codes are supported:
Property Code Description
C Other
Cc Control
Cf Format
Cn Unassigned
Co Private use
Cs Surrogate
L Letter
Ll Lowercase letter
Lm Modifier letter
Lo Other letter
Lt Title case letter
Lu Uppercase letter
M Mark
Mc Spacing mark
Me Enclosing mark
Mn Non-spacing mark
N Number
Nd Decimal number
Nl Letter number
No Other number
P Punctuation
Pc Connector punctuation
Pd Dash punctuation
Pe Close punctuation
Pf Final punctuation
Pi Initial punctuation
Po Other punctuation
Ps Open punctuation
S Symbol
Sc Currency symbol
Sk Modifier symbol
Sm Mathematical symbol
So Other symbol
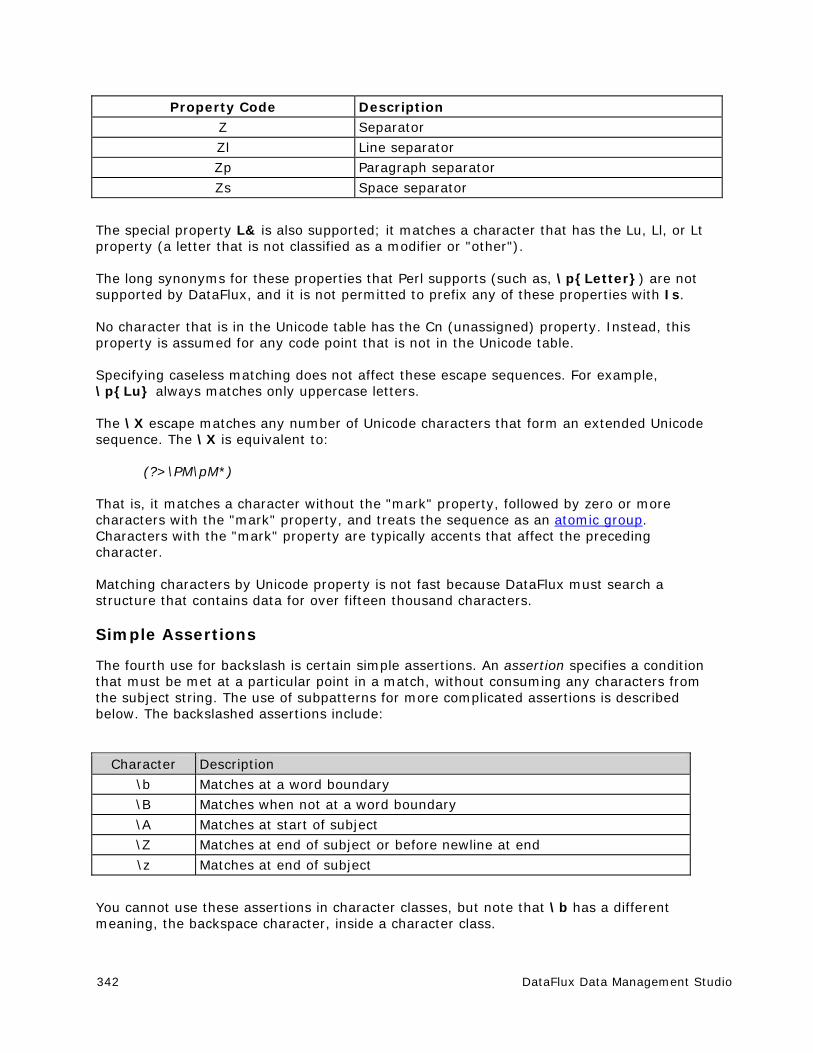
342 DataFlux Data Management Studio
Property Code Description Z Separator
Zl Line separator
Zp Paragraph separator
Zs Space separator
The special property L& is also supported; it matches a character that has the Lu, Ll, or Lt property (a letter that is not classified as a modifier or "other").
The long synonyms for these properties that Perl supports (such as, \p{Letter}) are not supported by DataFlux, and it is not permitted to prefix any of these properties with Is.
No character that is in the Unicode table has the Cn (unassigned) property. Instead, this property is assumed for any code point that is not in the Unicode table.
Specifying caseless matching does not affect these escape sequences. For example, \p{Lu} always matches only uppercase letters.
The \X escape matches any number of Unicode characters that form an extended Unicode sequence. The \X is equivalent to:
(?>\PM\pM*)
That is, it matches a character without the "mark" property, followed by zero or more characters with the "mark" property, and treats the sequence as an atomic group. Characters with the "mark" property are typically accents that affect the preceding character.
Matching characters by Unicode property is not fast because DataFlux must search a structure that contains data for over fifteen thousand characters.
Simple Assertions
The fourth use for backslash is certain simple assertions. An assertion specifies a condition that must be met at a particular point in a match, without consuming any characters from the subject string. The use of subpatterns for more complicated assertions is described below. The backslashed assertions include:
Character Description
\b Matches at a word boundary
\B Matches when not at a word boundary
\A Matches at start of subject
\Z Matches at end of subject or before newline at end
\z Matches at end of subject
You cannot use these assertions in character classes, but note that \b has a different meaning, the backspace character, inside a character class.
DataFlux Data Management Studio 343
A word boundary is a position in the subject string where the current character and the previous character do not both match \w or \W (one matches \w and the other matches \W) or the start or end of the string if the first or last character matches \w, respectively.
The \A, \Z, and \z assertions differ from the traditional circumflex and dollar in that they only match at the beginning and end of the subject string. The difference between \Z and \z is that \Z matches before a newline at the end of the string as well as at the very end, whereas \z matches only at the end.
Circumflex and Dollar
Outside a character class, in the default matching mode, the circumflex character (^) is an assertion that is true only if the current matching point is at the beginning of the subject string. Inside a character class, circumflex has an entirely different meaning.
Circumflex need not be the first character of the pattern if a number of alternatives are involved, but it should be the first character in each alternative in which it appears if the pattern is ever to match that branch. If all possible alternatives start with a circumflex that is, if the pattern is constrained to match only at the start of the subject is said to be an "anchored" pattern. (There are also other constructs that can cause a pattern to be anchored.)
A dollar character ($) is an assertion that is true only if the current matching point is at the end of the subject string, or immediately before a newline character that is the last character in the string (by default). Dollar need not be the last character of the pattern if a number of alternatives are involved, but it should be the last item in any branch in which it appears. Dollar has no special meaning in a character class.
Full Stop (Period, Dot)
Outside a character class, a dot (.) in the pattern matches any one character in the subject string except (by default) a character that signifies the end of a line. The matched character may be more than one byte long. When a line ending is defined as a single character (CR or LF), dot never matches that character; when the two-character sequence CRLF is used, dot does not match CR if it is immediately followed by LF, but otherwise it matches all characters (including isolated CRs and LFs).
The handling of dot is entirely independent of the handling of circumflex and dollar. The only relationship is that they all involve newline characters. Dot has no special meaning in a character class.
Matching a Single Byte
Outside a character class, the escape sequence \C matches any one byte. Unlike a dot, it always matches CR and LF. The feature is provided in Perl in order to match individual bytes in UTF-8 mode. Since it breaks up UTF-8 characters into individual bytes, what remains in the string may be a malformed UTF-8 string. For this reason, the \C escape sequence is best avoided.
DataFlux does not allow \C to appear in look behind assertions, because this would make it impossible to calculate the length of the look behind for UTF-8 characters.

344 DataFlux Data Management Studio
Square Brackets and Character Classes
An opening square bracket ([) introduces a character class, terminated by a closing square bracket (]). A closing square bracket on its own is not special. If a closing square bracket is required as a member of the class, it should be the first data character in the class (after an initial circumflex, if present) or escaped with a backslash.
A character class matches a single character in the subject. The character may occupy more than one byte. A matched character must be in the set of characters defined by the class, unless the first character in the class definition is a circumflex, in which case the subject character must not be in the set defined by the class. If a circumflex is actually required as a member of the class, ensure it is not the first character, or escape it with a backslash.
For example, the character class [aeiou] matches any lower case vowel, while [^aeiou] matches any character that is not a lowercase vowel. Note that a circumflex is just a convenient notation for specifying the characters that are in the class by enumerating those that are not. It is not an assertion; it still consumes a character from the subject string, and fails if the current pointer is at the end of the string.
Characters with values greater than 255 can be included in a class as a literal string of bytes, or by using the \x{ escaping mechanism.
When caseless matching is set, any letters in a class represent both their upper and lowercase versions. So, for example, a caseless [aeiou] matches A as well as a, and a caseless [^aeiou] does not match A, whereas a caseful version would.
Characters that might indicate line breaks (CR and LF) are never treated in any special way when matching character classes.
You can use the minus/hyphen (-) character to specify a range of characters in a character class. For example, [d-m] matches any letter between d and m, inclusive. If a minus character is required in a class, it must be escaped with a backslash or appear in a position where it cannot be interpreted as indicating a range, typically as the first or last character in the class.
It is not possible to have the literal character ] as the end character of a range. A pattern such as [W-]46] is interpreted as a class of two characters (W and -) followed by a literal string 46], so it would match W46] or -46]. However, if the ] is escaped with a backslash, it is interpreted as the end of range, so [W-\]46] is interpreted as a single class containing a range followed by two separate characters. You can also use the octal or hexadecimal representation of ] to end a range.
Ranges operate in the collating sequence of character values. They can also be used for characters specified numerically, for example [\000-\037]. Ranges can include characters whose values are greater than 255, for example [\x{100}-\x{2ff}]. If a range that includes letters is used when caseless matching is set, it matches the letters in either case. For example, [W-c] is equivalent to [][\\^_`wxyzabc], matched caselessly.
The character types \d, \D, \p, \P, \s, \S, \w, and \W may also appear in a character class, and add the characters that they match to the class. For example, [\dABCDEF] matches any hexadecimal digit. A circumflex can conveniently be used with the uppercase character types to specify a more restricted set of characters than the matching lowercase type. For example, the class [^\W_] matches any letter or digit, but not underscore.
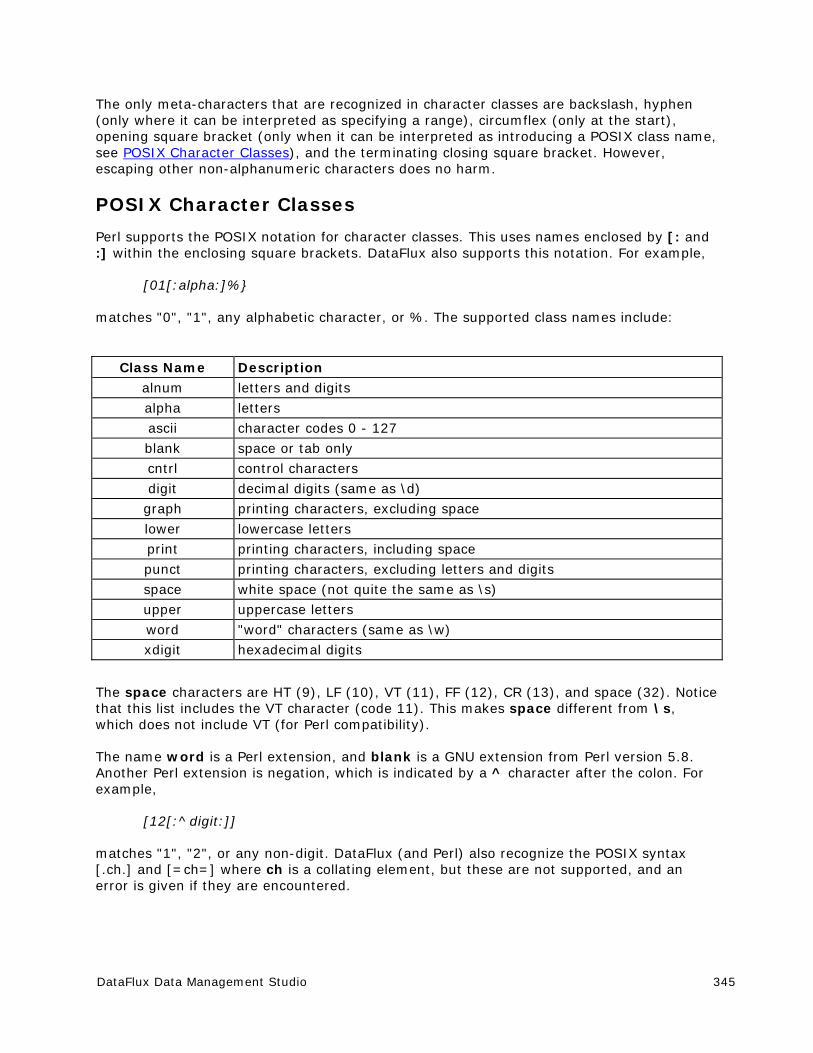
DataFlux Data Management Studio 345
The only meta-characters that are recognized in character classes are backslash, hyphen (only where it can be interpreted as specifying a range), circumflex (only at the start), opening square bracket (only when it can be interpreted as introducing a POSIX class name, see POSIX Character Classes), and the terminating closing square bracket. However, escaping other non-alphanumeric characters does no harm.
POSIX Character Classes
Perl supports the POSIX notation for character classes. This uses names enclosed by [: and :] within the enclosing square brackets. DataFlux also supports this notation. For example,
[01[:alpha:]%}
matches "0", "1", any alphabetic character, or %. The supported class names include:
Class Name Description
alnum letters and digits
alpha letters
ascii character codes 0 - 127
blank space or tab only
cntrl control characters
digit decimal digits (same as \d)
graph printing characters, excluding space
lower lowercase letters
print printing characters, including space
punct printing characters, excluding letters and digits
space white space (not quite the same as \s)
upper uppercase letters
word "word" characters (same as \w)
xdigit hexadecimal digits
The space characters are HT (9), LF (10), VT (11), FF (12), CR (13), and space (32). Notice that this list includes the VT character (code 11). This makes space different from \s, which does not include VT (for Perl compatibility).
The name word is a Perl extension, and blank is a GNU extension from Perl version 5.8. Another Perl extension is negation, which is indicated by a ^ character after the colon. For example,
[12[:^digit:]]
matches "1", "2", or any non-digit. DataFlux (and Perl) also recognize the POSIX syntax [.ch.] and [=ch=] where ch is a collating element, but these are not supported, and an error is given if they are encountered.
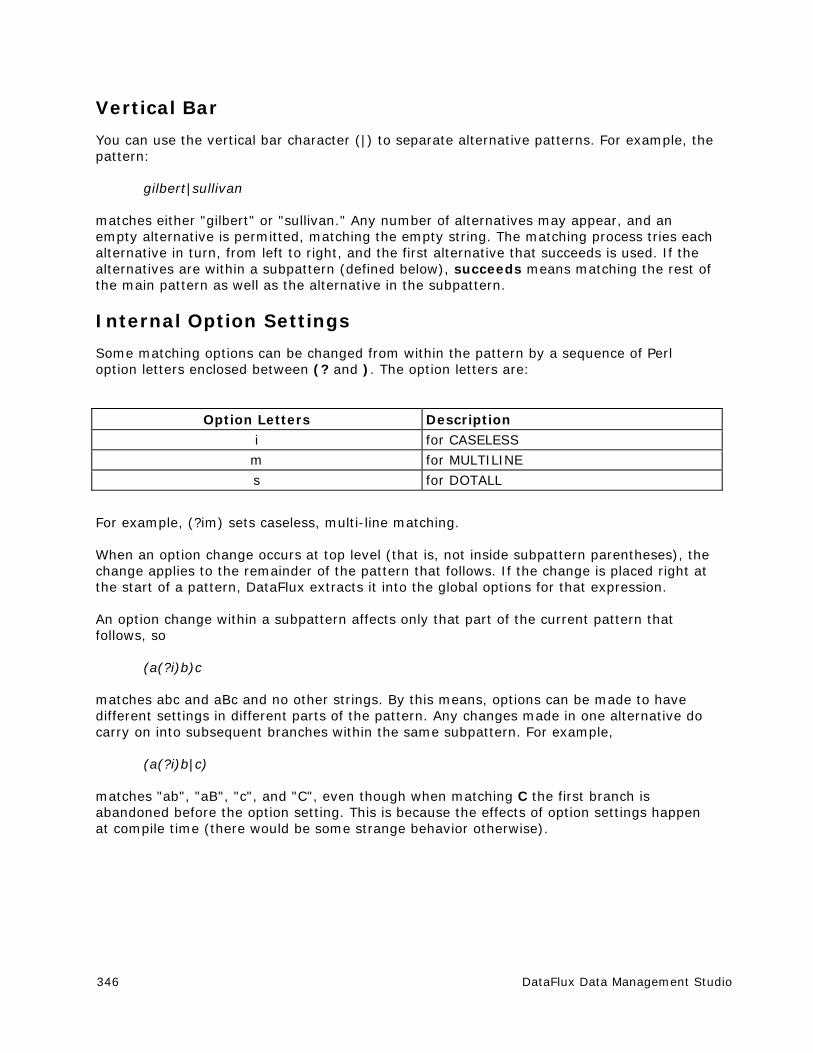
346 DataFlux Data Management Studio
Vertical Bar
You can use the vertical bar character (|) to separate alternative patterns. For example, the pattern:
gilbert|sullivan
matches either "gilbert" or "sullivan." Any number of alternatives may appear, and an empty alternative is permitted, matching the empty string. The matching process tries each alternative in turn, from left to right, and the first alternative that succeeds is used. If the alternatives are within a subpattern (defined below), succeeds means matching the rest of the main pattern as well as the alternative in the subpattern.
Internal Option Settings
Some matching options can be changed from within the pattern by a sequence of Perl option letters enclosed between (? and ). The option letters are:
Option Letters Description
i for CASELESS
m for MULTILINE
s for DOTALL
For example, (?im) sets caseless, multi-line matching.
When an option change occurs at top level (that is, not inside subpattern parentheses), the change applies to the remainder of the pattern that follows. If the change is placed right at the start of a pattern, DataFlux extracts it into the global options for that expression.
An option change within a subpattern affects only that part of the current pattern that follows, so
(a(?i)b)c
matches abc and aBc and no other strings. By this means, options can be made to have different settings in different parts of the pattern. Any changes made in one alternative do carry on into subsequent branches within the same subpattern. For example,
(a(?i)b|c)
matches "ab", "aB", "c", and "C", even though when matching C the first branch is abandoned before the option setting. This is because the effects of option settings happen at compile time (there would be some strange behavior otherwise).

DataFlux Data Management Studio 347
Subpatterns Subpatterns are delimited by parentheses ( and ), which you can nest. Marking part of a pattern as a subpattern does two things:
It localizes a set of alternatives. For example, the pattern:
cat(aract|erpillar|)
matches one of the words "cat," "cataract," or "caterpillar." Without the parentheses, it would match "cataract," "erpillar," or the empty string.
It also sets up the subpattern as a capturing subpattern. When the whole pattern matches, that portion of the subject string that matched the subpattern is passed back to the caller through the ovector argument pcre_exec(). Opening parentheses are counted from left to right (starting from 1) to obtain numbers for the capturing subpatterns.
For example, if the string "the red king" is matched against the pattern:
the ((red|white) (king|queen))
the captured substrings are "red king," "red," and "king," and are numbered 1, 2, and 3, respectively.
The fact that parentheses fulfill two functions is not always helpful. There are often times when a grouping subpattern is required without a capturing requirement. If an opening parenthesis is followed by a question mark and a colon (?:, the subpattern does not do any capturing, and is not counted when computing the number of any subsequent capturing subpatterns. For example, if the string "the white queen" is matched against the pattern:
the ((?:red|white) (king|queen))
the captured substrings are "white queen" and "queen", and are numbered 1 and 2. The maximum number of capturing subpatterns is 65535, and the maximum depth of nesting of all subpatterns, both capturing and non-capturing, is 200.
As a convenient shorthand, if any option settings are required at the start of a non-capturing subpattern, the option letters may appear between the "?" and the ":." Thus the two patterns:
(?i:saturday|sunday) (?:(?i)saturday|sunday)
match exactly the same set of strings. Because alternative branches are tried from left to right, and options are not reset until the end of the subpattern is reached, an option setting in one branch does affect subsequent branches, so the above patterns match "SUNDAY" as well as "Saturday."
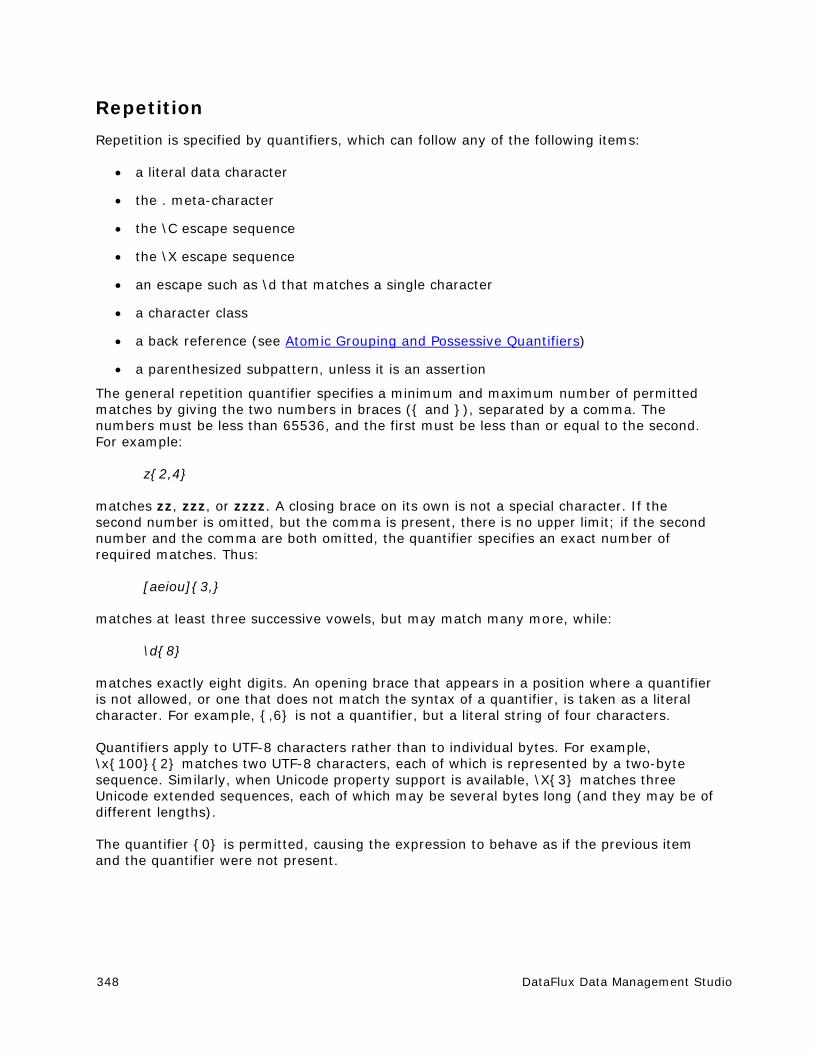
348 DataFlux Data Management Studio
Repetition
Repetition is specified by quantifiers, which can follow any of the following items:
a literal data character
the . meta-character
the \C escape sequence
the \X escape sequence
an escape such as \d that matches a single character
a character class
a back reference (see Atomic Grouping and Possessive Quantifiers)
a parenthesized subpattern, unless it is an assertion
The general repetition quantifier specifies a minimum and maximum number of permitted matches by giving the two numbers in braces ({ and }), separated by a comma. The numbers must be less than 65536, and the first must be less than or equal to the second. For example:
z{2,4}
matches zz, zzz, or zzzz. A closing brace on its own is not a special character. If the second number is omitted, but the comma is present, there is no upper limit; if the second number and the comma are both omitted, the quantifier specifies an exact number of required matches. Thus:
[aeiou]{3,}
matches at least three successive vowels, but may match many more, while:
\d{8}
matches exactly eight digits. An opening brace that appears in a position where a quantifier is not allowed, or one that does not match the syntax of a quantifier, is taken as a literal character. For example, {,6} is not a quantifier, but a literal string of four characters.
Quantifiers apply to UTF-8 characters rather than to individual bytes. For example, \x{100}{2} matches two UTF-8 characters, each of which is represented by a two-byte sequence. Similarly, when Unicode property support is available, \X{3} matches three Unicode extended sequences, each of which may be several bytes long (and they may be of different lengths).
The quantifier {0} is permitted, causing the expression to behave as if the previous item and the quantifier were not present.
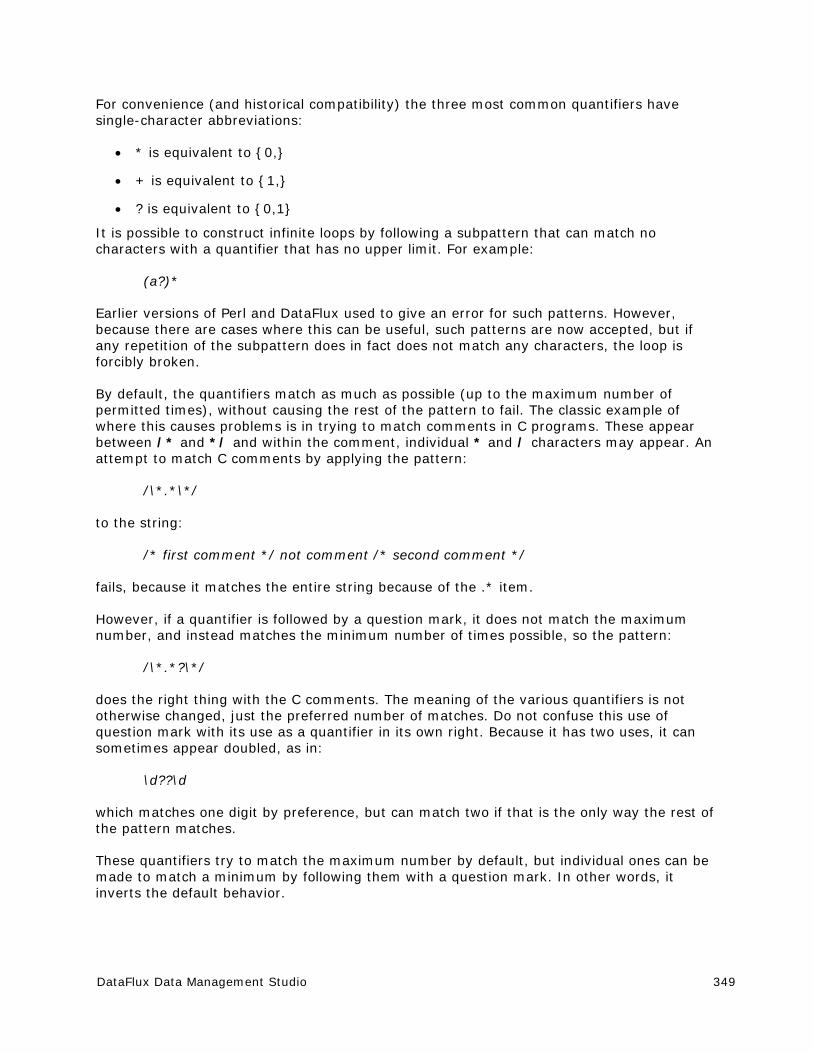
DataFlux Data Management Studio 349
For convenience (and historical compatibility) the three most common quantifiers have single-character abbreviations:
* is equivalent to {0,}
+ is equivalent to {1,}
? is equivalent to {0,1}
It is possible to construct infinite loops by following a subpattern that can match no characters with a quantifier that has no upper limit. For example:
(a?)*
Earlier versions of Perl and DataFlux used to give an error for such patterns. However, because there are cases where this can be useful, such patterns are now accepted, but if any repetition of the subpattern does in fact does not match any characters, the loop is forcibly broken.
By default, the quantifiers match as much as possible (up to the maximum number of permitted times), without causing the rest of the pattern to fail. The classic example of where this causes problems is in trying to match comments in C programs. These appear between /* and */ and within the comment, individual * and / characters may appear. An attempt to match C comments by applying the pattern:
/\*.*\*/
to the string:
/* first comment */ not comment /* second comment */
fails, because it matches the entire string because of the .* item.
However, if a quantifier is followed by a question mark, it does not match the maximum number, and instead matches the minimum number of times possible, so the pattern:
/\*.*?\*/
does the right thing with the C comments. The meaning of the various quantifiers is not otherwise changed, just the preferred number of matches. Do not confuse this use of question mark with its use as a quantifier in its own right. Because it has two uses, it can sometimes appear doubled, as in:
\d??\d
which matches one digit by preference, but can match two if that is the only way the rest of the pattern matches.
These quantifiers try to match the maximum number by default, but individual ones can be made to match a minimum by following them with a question mark. In other words, it inverts the default behavior.

350 DataFlux Data Management Studio
When a capturing subpattern is repeated, the value captured is the substring that matched the final iteration. For example, after:
(tweedle[dume]{3}\s*)+
has matched "tweedledum tweedledee" the value of the captured substring is "tweedledee". However, if there are nested capturing subpatterns, the corresponding captured values may have been set in previous iterations. For example, after:
/(a|(b))+/
matches "aba" the value of the second captured substring is "b".
Atomic Grouping and Possessive Quantifiers
With both maximizing and minimizing repetition, failure of what follows normally causes the repeated item to be re-evaluated to see if a different number of repeats allows the rest of the pattern to match. Sometimes it is useful to prevent this, either to change the nature of the match, or to cause it to fail earlier, when the author of the pattern knows there is no point in carrying on.
For example, the pattern \d+one when applied to the subject line:
123456two
After matching all 6 digits and then failing to match "one", the normal action of the match is to try again with only 5 digits matching the \d+ item, and then 4, and so on, before failing. "Atomic grouping" (a term used in Mastering Regular Expressions by Jeffrey Friedl) provides the means for specifying that once a subpattern has matched, it is not to be re-evaluated in this way.
If we use atomic grouping for the previous example, the matcher gives up immediately on failing to match "one" the first time. The notation is a kind of special parenthesis, starting with (?> as in this example:
(?>\d+)one
This kind of parenthesis "locks up" the part of the pattern it contains once it has matched, and a failure further into the pattern is prevented from backtracking into it. Backtracking past it to previous items, however, works as normal.
An alternative description is that a subpattern of this type matches the string of characters that an identical standalone pattern matches, if anchored at the current point in the subject string.
Atomic grouping subpatterns are not capturing subpatterns. Simple cases such as the above example can be thought of as a maximizing repeat that must swallow everything it can. So, while both \d+ and \d+? are prepared to adjust the number of digits they match in order to make the rest of the pattern match, (?>\d+) can only match an entire sequence of digits.
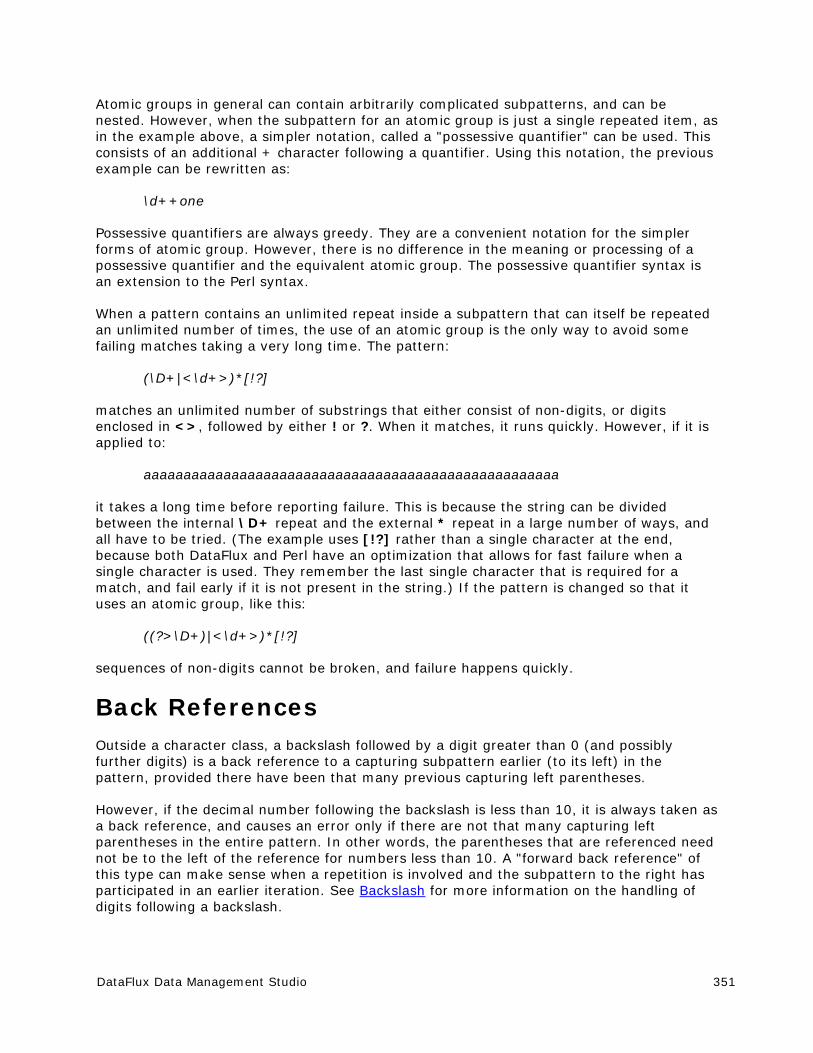
DataFlux Data Management Studio 351
Atomic groups in general can contain arbitrarily complicated subpatterns, and can be nested. However, when the subpattern for an atomic group is just a single repeated item, as in the example above, a simpler notation, called a "possessive quantifier" can be used. This consists of an additional + character following a quantifier. Using this notation, the previous example can be rewritten as:
\d++one
Possessive quantifiers are always greedy. They are a convenient notation for the simpler forms of atomic group. However, there is no difference in the meaning or processing of a possessive quantifier and the equivalent atomic group. The possessive quantifier syntax is an extension to the Perl syntax.
When a pattern contains an unlimited repeat inside a subpattern that can itself be repeated an unlimited number of times, the use of an atomic group is the only way to avoid some failing matches taking a very long time. The pattern:
(\D+|<\d+>)*[!?]
matches an unlimited number of substrings that either consist of non-digits, or digits enclosed in <>, followed by either ! or ?. When it matches, it runs quickly. However, if it is applied to:
aaaaaaaaaaaaaaaaaaaaaaaaaaaaaaaaaaaaaaaaaaaaaaaaaaaa
it takes a long time before reporting failure. This is because the string can be divided between the internal \D+ repeat and the external * repeat in a large number of ways, and all have to be tried. (The example uses [!?] rather than a single character at the end, because both DataFlux and Perl have an optimization that allows for fast failure when a single character is used. They remember the last single character that is required for a match, and fail early if it is not present in the string.) If the pattern is changed so that it uses an atomic group, like this:
((?>\D+)|<\d+>)*[!?]
sequences of non-digits cannot be broken, and failure happens quickly.
Back References Outside a character class, a backslash followed by a digit greater than 0 (and possibly further digits) is a back reference to a capturing subpattern earlier (to its left) in the pattern, provided there have been that many previous capturing left parentheses.
However, if the decimal number following the backslash is less than 10, it is always taken as a back reference, and causes an error only if there are not that many capturing left parentheses in the entire pattern. In other words, the parentheses that are referenced need not be to the left of the reference for numbers less than 10. A "forward back reference" of this type can make sense when a repetition is involved and the subpattern to the right has participated in an earlier iteration. See Backslash for more information on the handling of digits following a backslash.
352 DataFlux Data Management Studio
A back reference matches whatever actually matched the capturing subpattern in the current subject string, rather than anything matching the subpattern itself (see Subpatterns as Subroutines). So the pattern:
(sens|respons)e and \1ibility
matches "sense and sensibility" and "response and responsibility," but not "sense and responsibility." If caseful matching is in force at the time of the back reference, the case of letters is relevant. For example:
((?i)rah)\s+\1
matches "rah rah" and "RAH RAH," but not "RAH rah," even though the original capturing subpattern is matched caselessly.
There may be more than one back reference to the same subpattern. If a subpattern has not actually been used in a particular match, any back references to it always fail. For example, the pattern:
(a|(bc))\2
always fails if it starts to match a rather than bc. Because there may be many capturing parentheses in a pattern, all digits following the backslash are taken as part of a potential back reference number. If the pattern continues with a digit character, some delimiter must be used to terminate the back reference. Here an empty comment (see Comments) can be used.
A back reference that occurs inside the parentheses to which it refers fails when the subpattern is first used. So, for example, (a\1) never matches. However, such references can be useful inside repeated subpatterns. For example, the pattern:
(a|b\1)+
matches any number of a's and also aba, ababbaa, and so on. At each iteration of the subpattern, the back reference matches the character string corresponding to the previous iteration. For this to work, the pattern must be such that the first iteration does not need to match the back reference. This can be done using alternation, as in the example above, or by a quantifier with a minimum of 0.
Assertions An assertion is a test on the characters following or preceding the current matching point that does not actually consume any characters. The simple assertions coded as \b, \B, \A, \Z, \z, ^, and $ are described above. More complicated assertions are coded as subpatterns. There are two kinds: those that look ahead of the current position in the subject string, and those that look behind it.
An assertion subpattern is matched in the normal way, except it does not cause the current matching position to be changed. An assertion subpattern is matched in the normal way, except that it does not cause the current matching position to be changed.
DataFlux Data Management Studio 353
Assertion subpatterns are not capturing subpatterns, and may not be repeated, because it makes no sense to assert the same thing several times. If any kind of assertion contains capturing subpatterns within it, these are counted for the purposes of numbering the capturing subpatterns in the whole pattern. However, substring capturing is carried out only for positive assertions, because it does not make sense for negative assertions.
Look Ahead Assertions
Look ahead assertions start with (?= for positive assertions and (?! for negative assertions. For example,
\w+(?=;)
matches a word followed by a semicolon, but does not include the semicolon in the match, and:
one(?!two)
matches any occurrence of "one" that is not followed by "two." Note that the apparently similar pattern:
(?!one)two
does not find an occurrence of "two" that is preceded by something other than "one"; it finds any occurrence of "two", because the assertion (?!one) is always true when the next three characters are "two." A look behind assertion is needed to achieve this effect.
If you want to force a matching failure at some point in a pattern, the most convenient way to do it is with (?!) because an empty string always matches, so an assertion that requires there not to be an empty string must always fail.
Look Behind Assertions
Look behind assertions start with (?<= for positive assertions and (?<! negative assertions. For example:
(?<!one)two
does find an occurrence of "two" that is not preceded by "one." The contents of a look behind assertion are restricted so all the strings it matches must have a fixed length. However, if there are several alternatives, they do not all have to have the same fixed length. For example:
(?<=leopard|donkey)
is permitted, but:
(?<!dogs?|cats?)
causes an error at compile time. Branches that match different length strings are permitted only at the top level of a look behind assertion. This is an extension compared with Perl (for version 5.8), which requires all branches to match the same length of string. An assertion such as:
354 DataFlux Data Management Studio
(?<=ab(c|de))
is not permitted because its single top-level branch can match two different lengths, but it is acceptable if rewritten to use two top-level branches:
(?<=abc|abde)
The implementation of look behind assertions is, for each alternative, to temporarily move the current position back by the fixed width and then try to match. If there are insufficient characters before the current position, the match is deemed to fail.
DataFlux does not allow the \C escape to appear in look behind assertions, because it makes it impossible to calculate the length of the look behind for UTF-8 characters. The \X escape, which can match different numbers of bytes, is also not permitted.
Atomic groups can be used in conjunction with look behind assertions to specify efficient matching at the end of the subject string. Consider a simple pattern such as:
abcd$
when applied to a long string that does not match. Because matching proceeds from left to right, DataFlux looks for each a in the subject and then sees what follows matches the rest of the pattern. If the pattern is specified as:
^.*abcd$
the initial .* matches the entire string at first, but when this fails (because there is no following a), it backtracks to match all but the last character, and then all but the last two characters, and so on. Once again the search for a covers the entire string, from right to left, so we are no better off. However, if the pattern is written as:
^(?>.*)(?<=abcd)
or, equivalently, using the possessive quantifier syntax,
^.*+(?<=abcd)
there can be no backtracking for the .* item; it can match only the entire string. The subsequent look behind assertion does a single test on the last four characters. If it fails, the match fails immediately. For long strings, this approach makes a significant difference to the processing time.
DataFlux Data Management Studio 355
Using Multiple Assertions
Several assertions (of any sort) may occur in succession. For example:
(?<=\d{3})(?<!999)one
matches "one" preceded by three digits that are not 999. Notice that each of the assertions is applied independently at the same point in the subject string. First, there is a check that the previous three characters are all digits, and then there is a check that the same three characters are not 999. This pattern does not match "one" preceded by six characters, the first of which are digits and the last three of which are not 999. For example, it does not match 123abcone. A pattern to do that is:
(?<=\d{3}...)(?<!999)one
This time, the first assertion looks at the preceding six characters, checking that the first three are digits, and then the second assertion checks the preceding three characters are not 999.
Assertions can be nested in any combination. For example:
(?<=(?<!one)two)cat
matches an occurrence of "cat" that is preceded by "two," which in turn is not preceded by "one," while:
(?<=\d{3}(?!999)...)one
is another pattern which matches "one" preceded by three digits and any three characters that are not 999.
Conditional Subpatterns
It is possible to cause the matching process to obey a subpattern conditionally or to choose between two alternative subpatterns, depending on the result of an assertion, or whether a previous capturing subpattern matched or not. The two possible forms of conditional subpattern are:
(?(condition)yes-pattern) (?(condition)yes-pattern|no-pattern)
If the condition is satisfied, the yes-pattern is used; otherwise the no-pattern (if present) is used. If there are more than two alternatives in the subpattern, a compile-time error occurs.
There are three kinds of conditions. If the text between the parentheses consists of a sequence of digits, or a sequence of alphanumeric characters and underscores, the condition is satisfied, if the capturing subpattern of that number or name previously matched. There is a possible ambiguity here, because subpattern names may consist entirely of digits. DataFlux first looks for a named subpattern; if it cannot find one and the text consists entirely of digits, it looks for a subpattern of that number, which must be greater than zero. Using subpattern names that consist entirely of digits is not recommended.
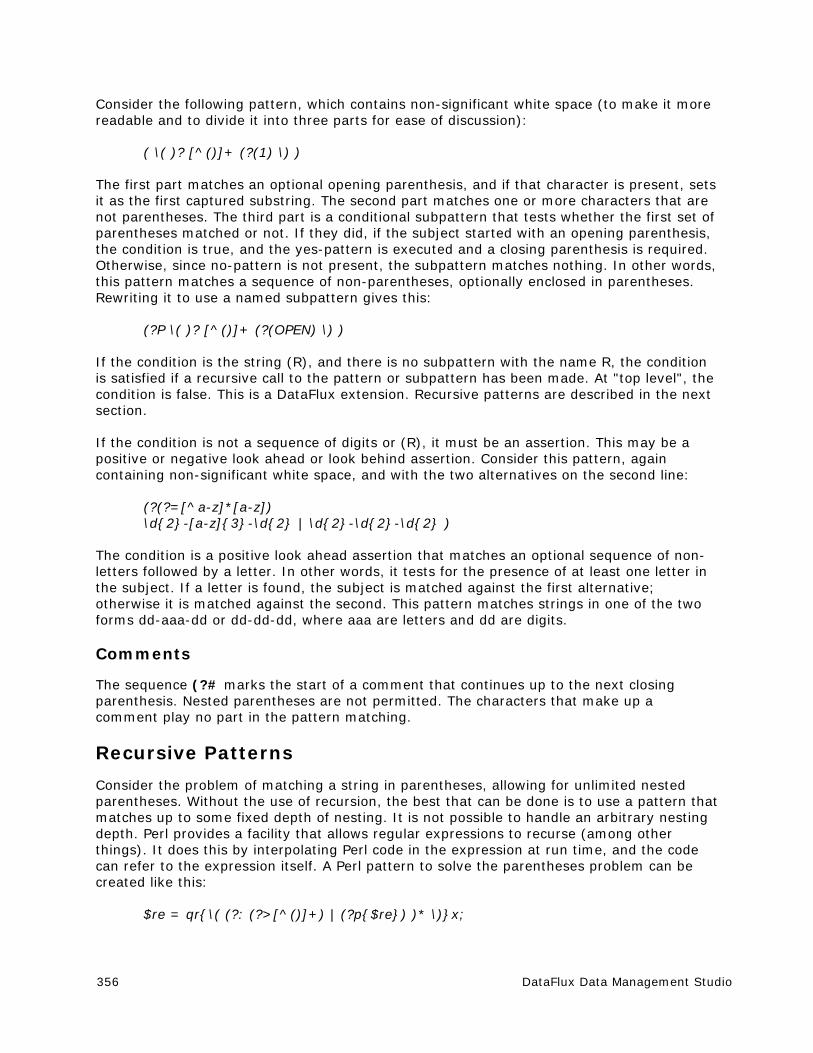
356 DataFlux Data Management Studio
Consider the following pattern, which contains non-significant white space (to make it more readable and to divide it into three parts for ease of discussion):
( \( )? [^()]+ (?(1) \) )
The first part matches an optional opening parenthesis, and if that character is present, sets it as the first captured substring. The second part matches one or more characters that are not parentheses. The third part is a conditional subpattern that tests whether the first set of parentheses matched or not. If they did, if the subject started with an opening parenthesis, the condition is true, and the yes-pattern is executed and a closing parenthesis is required. Otherwise, since no-pattern is not present, the subpattern matches nothing. In other words, this pattern matches a sequence of non-parentheses, optionally enclosed in parentheses. Rewriting it to use a named subpattern gives this:
(?P \( )? [^()]+ (?(OPEN) \) )
If the condition is the string (R), and there is no subpattern with the name R, the condition is satisfied if a recursive call to the pattern or subpattern has been made. At "top level", the condition is false. This is a DataFlux extension. Recursive patterns are described in the next section.
If the condition is not a sequence of digits or (R), it must be an assertion. This may be a positive or negative look ahead or look behind assertion. Consider this pattern, again containing non-significant white space, and with the two alternatives on the second line:
(?(?=[^a-z]*[a-z]) \d{2}-[a-z]{3}-\d{2} | \d{2}-\d{2}-\d{2} )
The condition is a positive look ahead assertion that matches an optional sequence of non-letters followed by a letter. In other words, it tests for the presence of at least one letter in the subject. If a letter is found, the subject is matched against the first alternative; otherwise it is matched against the second. This pattern matches strings in one of the two forms dd-aaa-dd or dd-dd-dd, where aaa are letters and dd are digits.
Comments
The sequence (?# marks the start of a comment that continues up to the next closing parenthesis. Nested parentheses are not permitted. The characters that make up a comment play no part in the pattern matching.
Recursive Patterns
Consider the problem of matching a string in parentheses, allowing for unlimited nested parentheses. Without the use of recursion, the best that can be done is to use a pattern that matches up to some fixed depth of nesting. It is not possible to handle an arbitrary nesting depth. Perl provides a facility that allows regular expressions to recurse (among other things). It does this by interpolating Perl code in the expression at run time, and the code can refer to the expression itself. A Perl pattern to solve the parentheses problem can be created like this:
$re = qr{\( (?: (?>[^()]+) | (?p{$re}) )* \)}x;
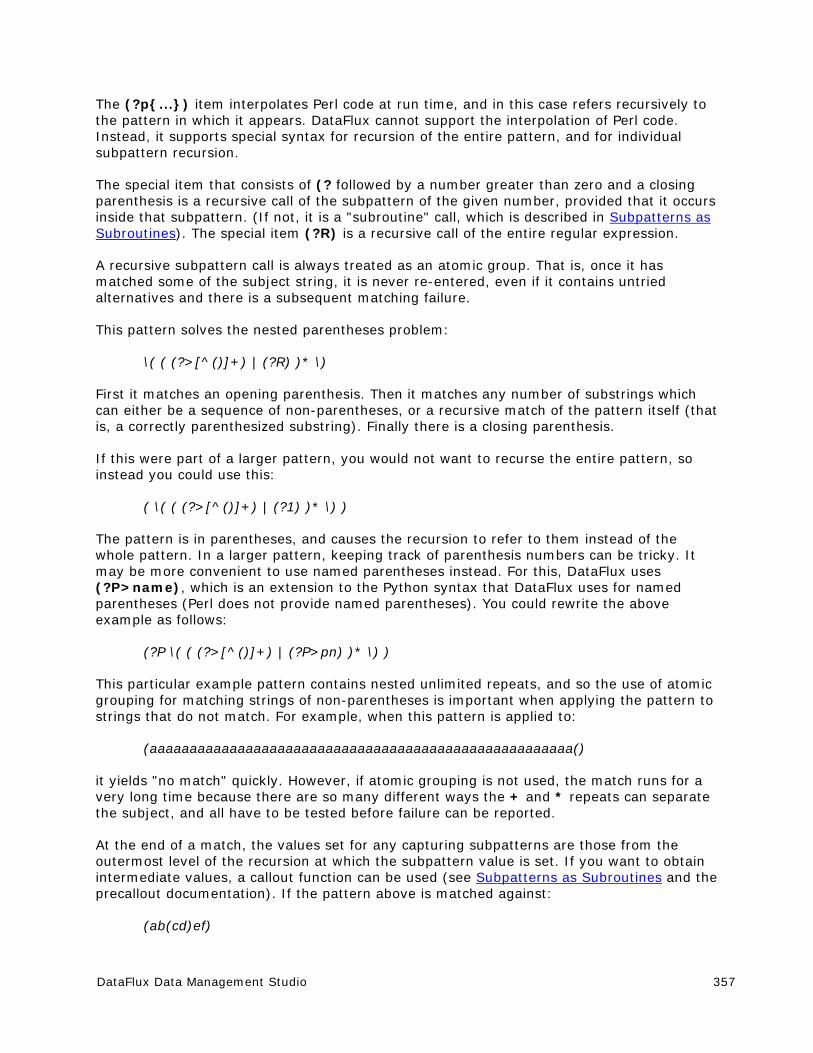
DataFlux Data Management Studio 357
The (?p{...}) item interpolates Perl code at run time, and in this case refers recursively to the pattern in which it appears. DataFlux cannot support the interpolation of Perl code. Instead, it supports special syntax for recursion of the entire pattern, and for individual subpattern recursion.
The special item that consists of (? followed by a number greater than zero and a closing parenthesis is a recursive call of the subpattern of the given number, provided that it occurs inside that subpattern. (If not, it is a "subroutine" call, which is described in Subpatterns as Subroutines). The special item (?R) is a recursive call of the entire regular expression.
A recursive subpattern call is always treated as an atomic group. That is, once it has matched some of the subject string, it is never re-entered, even if it contains untried alternatives and there is a subsequent matching failure.
This pattern solves the nested parentheses problem:
\( ( (?>[^()]+) | (?R) )* \)
First it matches an opening parenthesis. Then it matches any number of substrings which can either be a sequence of non-parentheses, or a recursive match of the pattern itself (that is, a correctly parenthesized substring). Finally there is a closing parenthesis.
If this were part of a larger pattern, you would not want to recurse the entire pattern, so instead you could use this:
( \( ( (?>[^()]+) | (?1) )* \) )
The pattern is in parentheses, and causes the recursion to refer to them instead of the whole pattern. In a larger pattern, keeping track of parenthesis numbers can be tricky. It may be more convenient to use named parentheses instead. For this, DataFlux uses (?P>name), which is an extension to the Python syntax that DataFlux uses for named parentheses (Perl does not provide named parentheses). You could rewrite the above example as follows:
(?P \( ( (?>[^()]+) | (?P>pn) )* \) )
This particular example pattern contains nested unlimited repeats, and so the use of atomic grouping for matching strings of non-parentheses is important when applying the pattern to strings that do not match. For example, when this pattern is applied to:
(aaaaaaaaaaaaaaaaaaaaaaaaaaaaaaaaaaaaaaaaaaaaaaaaaaaaa()
it yields "no match" quickly. However, if atomic grouping is not used, the match runs for a very long time because there are so many different ways the + and * repeats can separate the subject, and all have to be tested before failure can be reported.
At the end of a match, the values set for any capturing subpatterns are those from the outermost level of the recursion at which the subpattern value is set. If you want to obtain intermediate values, a callout function can be used (see Subpatterns as Subroutines and the precallout documentation). If the pattern above is matched against:
(ab(cd)ef)
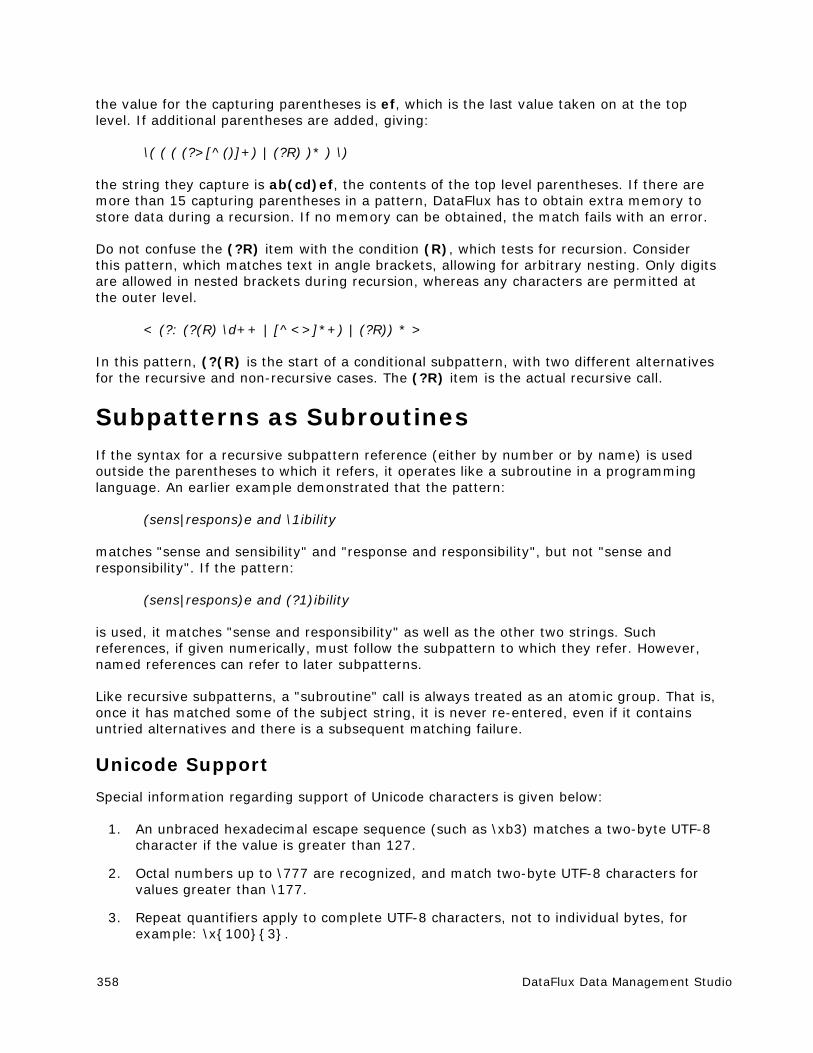
358 DataFlux Data Management Studio
the value for the capturing parentheses is ef, which is the last value taken on at the top level. If additional parentheses are added, giving:
\( ( ( (?>[^()]+) | (?R) )* ) \)
the string they capture is ab(cd)ef, the contents of the top level parentheses. If there are more than 15 capturing parentheses in a pattern, DataFlux has to obtain extra memory to store data during a recursion. If no memory can be obtained, the match fails with an error.
Do not confuse the (?R) item with the condition (R), which tests for recursion. Consider this pattern, which matches text in angle brackets, allowing for arbitrary nesting. Only digits are allowed in nested brackets during recursion, whereas any characters are permitted at the outer level.
< (?: (?(R) \d++ | [^<>]*+) | (?R)) * >
In this pattern, (?(R) is the start of a conditional subpattern, with two different alternatives for the recursive and non-recursive cases. The (?R) item is the actual recursive call.
Subpatterns as Subroutines If the syntax for a recursive subpattern reference (either by number or by name) is used outside the parentheses to which it refers, it operates like a subroutine in a programming language. An earlier example demonstrated that the pattern:
(sens|respons)e and \1ibility
matches "sense and sensibility" and "response and responsibility", but not "sense and responsibility". If the pattern:
(sens|respons)e and (?1)ibility
is used, it matches "sense and responsibility" as well as the other two strings. Such references, if given numerically, must follow the subpattern to which they refer. However, named references can refer to later subpatterns.
Like recursive subpatterns, a "subroutine" call is always treated as an atomic group. That is, once it has matched some of the subject string, it is never re-entered, even if it contains untried alternatives and there is a subsequent matching failure.
Unicode Support
Special information regarding support of Unicode characters is given below:
1. An unbraced hexadecimal escape sequence (such as \xb3) matches a two-byte UTF-8 character if the value is greater than 127.
2. Octal numbers up to \777 are recognized, and match two-byte UTF-8 characters for values greater than \177.
3. Repeat quantifiers apply to complete UTF-8 characters, not to individual bytes, for example: \x{100}{3}.
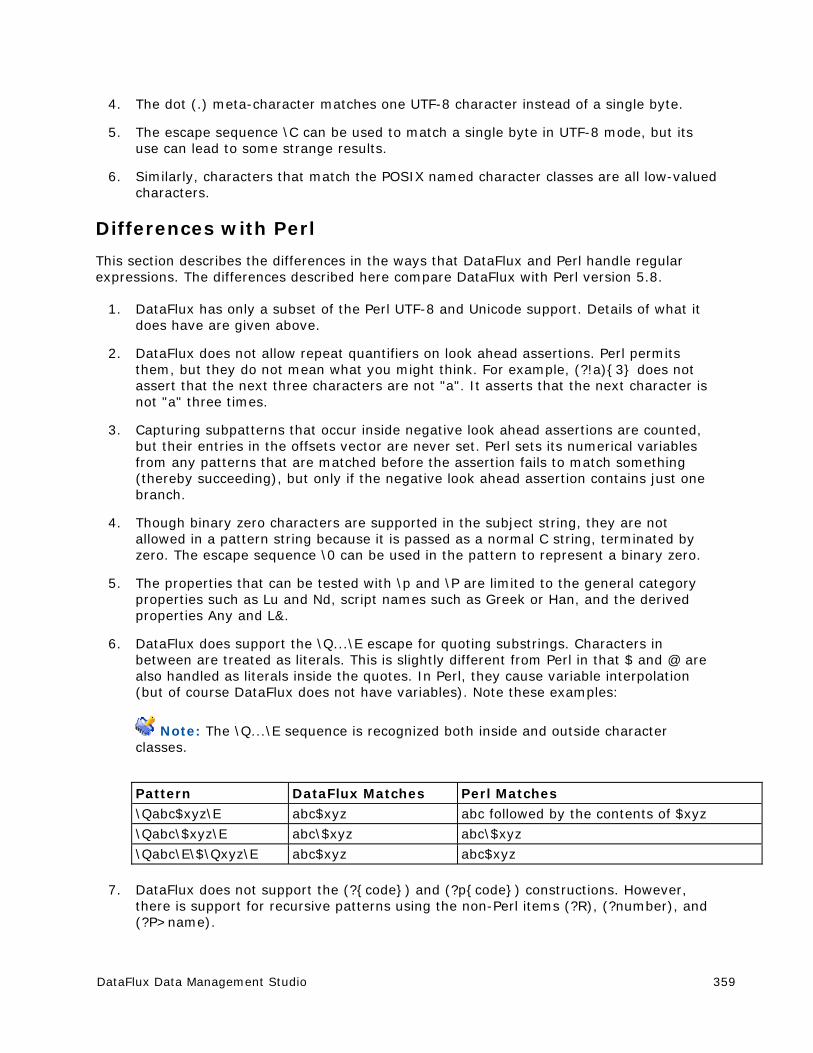
DataFlux Data Management Studio 359
4. The dot (.) meta-character matches one UTF-8 character instead of a single byte.
5. The escape sequence \C can be used to match a single byte in UTF-8 mode, but its use can lead to some strange results.
6. Similarly, characters that match the POSIX named character classes are all low-valued characters.
Differences with Perl
This section describes the differences in the ways that DataFlux and Perl handle regular expressions. The differences described here compare DataFlux with Perl version 5.8.
1. DataFlux has only a subset of the Perl UTF-8 and Unicode support. Details of what it does have are given above.
2. DataFlux does not allow repeat quantifiers on look ahead assertions. Perl permits them, but they do not mean what you might think. For example, (?!a){3} does not assert that the next three characters are not "a". It asserts that the next character is not "a" three times.
3. Capturing subpatterns that occur inside negative look ahead assertions are counted, but their entries in the offsets vector are never set. Perl sets its numerical variables from any patterns that are matched before the assertion fails to match something (thereby succeeding), but only if the negative look ahead assertion contains just one branch.
4. Though binary zero characters are supported in the subject string, they are not allowed in a pattern string because it is passed as a normal C string, terminated by zero. The escape sequence \0 can be used in the pattern to represent a binary zero.
5. The properties that can be tested with \p and \P are limited to the general category properties such as Lu and Nd, script names such as Greek or Han, and the derived properties Any and L&.
6. DataFlux does support the \Q...\E escape for quoting substrings. Characters in between are treated as literals. This is slightly different from Perl in that $ and @ are also handled as literals inside the quotes. In Perl, they cause variable interpolation (but of course DataFlux does not have variables). Note these examples:
Note: The \Q...\E sequence is recognized both inside and outside character classes.
Pattern DataFlux Matches Perl Matches
\Qabc$xyz\E abc$xyz abc followed by the contents of $xyz
\Qabc\$xyz\E abc\$xyz abc\$xyz
\Qabc\E\$\Qxyz\E abc$xyz abc$xyz
7. DataFlux does not support the (?{code}) and (?p{code}) constructions. However, there is support for recursive patterns using the non-Perl items (?R), (?number), and (?P>name).
360 DataFlux Data Management Studio
8. There are some differences that are concerned with the settings of captured strings when part of a pattern is repeated. For example, matching "aba" against the pattern /^(a(b)?)+$/ in Perl leaves $2 unset, but in DataFlux it is set to "b".
9. DataFlux provides some extensions to the Perl regular expression facilities:
a. Although look behind assertions must match fixed length strings, each alternative branch of a look behind assertion can match a different length of string. Perl requires them all to have the same length.
b. Where a backslash is followed by a letter with no special meaning, the backslash is always ignored (Perl can be made to issue a warning).
c. The greediness of the repetition quantifiers is inverted; that is, by default they are not greedy, but if followed by a question mark they are.
d. The (?R), (?number), and (?P>name) constructs allows for recursive pattern matching (Perl can do this using the (?p{code}) construct, which PCRE cannot support.)
e. DataFlux supports the possessive quantifier "++" syntax, taken from the Sun© Java© package.
Customize - Phonetics Editor DataFlux Data Management Studio software uses phonetic analysis (Phonetics) during the process of generating match codes. Phonetics processing involves applying a set of Phonetics rules to an input string. The goal is to create Phonetics rules that produce the same output string for input strings that have similar pronunciations and/or spellings. For example, the following two strings are phonetically equivalent in English:
"SCHMIDT"
"SHMITT"
Phonetics rules would reduce both of these to the string "SHMIT." To create Phonetics rules, use the Customize Phonetics Editor.
DataFlux Data Management Studio 361
Customize - Phonetics Editor - Creating Phonetics Files
1. Open the Phonetics Editor. On the Customize main screen, select Tools > Phonetics Editor. The Phonetics Editor dialog opens.
2. Set Your Locale. Select Options > Set Locale. The Select Locale dialog opens. Select the appropriate locale and click OK. The locale setting is saved from session to session, so you do not need to specify it again unless you need to build a Phonetics file for a different locale.
3. Create a New Phonetics File. Select File > New.
4. Create Phonetics Rules. Select Edit > Add Rule. The Add Rule dialog opens. Specify Rule Text and Replacement Text, and then click OK. Set Priority and any flags. (For more information on Phonetics rules, see Components of a Rule). To add another rule/row, select Edit > Add Rule again. Be aware that the new row will be added after the current row. This allows you to place the new rule in the desired location sequentially within the library. Repeat this process until you have defined all desired rules.
5. Save Your Phonetics File. Select File > Save. Because this is a new Phonetics file, the Phonetics Editor will prompt you for a file name.
6. Test Your Phonetics File. At the bottom of the Phonetics Editor is a Test Area. This area allows you to supply sample input strings to test your Phonetics rules. Type an input string and observe the result. If the result is not what you intended, you can modify your rules and re-test. The Test Area also displays the previous string and result so you can make comparisons.
362 DataFlux Data Management Studio
Customize - Phonetics Editor - Components of a Rule A phonetics rule specifies a pattern you want to locate, the replacement text (if any), and the action you want taken after the replacement is made.
Rule Text Rule text identifies the pattern you want to locate. Rule text can consist of literal characters and a small set of meta-characters:
The dot meta-character (".")
A single period/dot in the rule text matches any single character in the input string. For example, the rule of "CA." would match any phrase that has a "C" followed by an "A" followed by any other character.
Character class ("[" and "]")
Enclose a set of literal characters in square brackets to match any one of the specified characters. For example, the rule text "CA[TB]" would match "CAT" and "CAB," but would not match "CAP."
If the first character within a character class is a circumflex ("^"), it will match only characters that are not listed in the character class. For example, the rule text "CA[^TB]" would not match "CAT" and "CAB," but it would match "CAP," "CAN," or any other phrase that has a "CA" followed by any character except a "T" or "B."
Beginning of word ("^")
Use a circumflex to indicate that the following pattern must be found at the beginning of a word. For example, the rule text "^SAND" would match "SANDWICH," but not "STREISAND."
End of word ("$")
Use a dollar sign to indicate that the preceding pattern must be found at the end of a word. For example, the rule text "SAND$" would match "STREISAND" as well as the word "SAND" (because it is at the end of the word) but not "SANDWICH."
Replace the first n characters ("/")
Use an embedded forward slash to search on an entire pattern but then replace only the characters prior to the slash. For example, the rule text "SCH/OOL" with the replacement text "SK" will match the word "SCHOOL" and produce an output string of "SKOOL."
This is different than the rule "SCH," which will match the pattern "SCH" anywhere within a string. It is also different from "^SCH," which will match the pattern "SCH" if it is at the beginning of any word, regardless of what follows it.

DataFlux Data Management Studio 363
Literal characters
Specify all literal characters in uppercase. If you want to use a literal that is also used as a meta-character (the dollar sign, dot/period, circumflex, forward slash, backslash, or square bracket), escape that character by preceding it with a backslash. For example, to look for a dollar sign, use the rule text "\$." To match a backslash, use "\\."
To match against a space
You cannot match against a space unless the space is the only thing in the rule. For example, to replace a space with an underscore, use the rule text "\ " with the replacement text "_." Other than this one purpose, you should not use white space in Phonetics rules.
Replacement Text Replacement text replaces the entire pattern found by the rule text, except in the case of a forward slash. If you use the forward slash in your rule text, the replacement text replaces the pattern up to the slash.
Replacement text can contain only literal text, no meta-characters.
Priority
There are two factors that determine the order in which Phonetics rules are processed: priority and order.
Phonetics rules are processed in decreasing priority. In the case of multiple rules with the same priority, rules are processed in the order in which they appear (top to bottom). Priority must be a numeric value greater than 0 and less than 100.
For more information, see Changing Rule Order.
Reset flag
When you select the Reset flag, the character following the replacement is considered the beginning of a word, potentially allowing it to match rules using the "^" meta-character.
For example, with an input string of "MCKNIGHT", if the rule text is "MC" and the Reset flag is selected, after any replacement has been made, the "K" would be considered the beginning of a word meaning that "KN" would be replaced by "N" due to the "KN" rule.
Rewind flag
Phonetics maintains a search pointer that references a position in the input string. When processing begins, the search pointer points to the beginning of the string. When a Phonetics rule is applied to the string, the search pointer moves forward through the string to point to the position just after the text that was just replaced.
For example, suppose the input string is "ISAACS", and your Phonetics library has rule "C" with replacement text "K". After this rule is applied, the string would look like "ISAAKS," and the search pointer would point to the letter "S."

364 DataFlux Data Management Studio
But suppose you also have the rule "KS" and the replacement string "X". If the search pointer points to the letter "S" in "ISAAKS," there is no way to match the text "KS" and make the replacement. This is where the Rewind flag is helpful. If you use the rewind flag on the first rule, then after "C" is replaced with "K," the search pointer will be rewound to point to the letter "K" in "ISAAKS," Now your rule "KS" will be applied, and the string will be changed to "ISAAX."
Ignore Replace flag
If you select the Ignore Replace flag, when a rule is matched, DataFlux Data Management Studio will not make any replacements, even if replacement text is specified. DataFlux Data Management Studio will continue processing rules from the end of the matched pattern forward.
This is useful when you want to make certain that a specific pattern will never be replaced by other Phonetics rules. For example, suppose you have a rule "Y" with replacement text "I," but you don't want to change "Y" to "I" if the "Y" is followed by another vowel. You could use a rule such as "Y[AEIOU]" and set the Ignore Replace flag. As long as this rule has a higher priority than the first rule, the "Y" will be preserved when it is followed by another vowel. There is no need to write any replacement text for the "Y[AEIOU]" rule; the replacement text field is ignored when the Ignore Replace flag is set.
Note: It does not make sense to use the Ignore Replace flag and the Rewind flag in the same rule. These two flags are mutually exclusive.

DataFlux Data Management Studio 365
Customize - Phonetics Editor - Changing Rule Order After using the Phonetics Editor's Test Area to test your Phonetics rules, you might see some unintended effects because of the order in which the rules are processed. If this happens, you can alter the order in which the rules are processed to change the effects.
Two factors control the order in which Phonetics rules are processed. Highest precedence is given to Priority, so you can simply increase the priority to have the rule processed earlier, or decrease the priority to have the rule processed later.
Within a certain priority, rules are processed in the order in which they appear in the Phonetics Editor (top to bottom). To reorder:
1. In the Phonetics Editor, select the rule/row you want to move.
2. Drag the row to the desired location, and then release the mouse button. The row appears in its new position.
Customize - Chop Table Before using the Customize Chop Table Editor, you should define all of the chopping characteristics for each value in the default character table.
A chop table is a collection of character-level rules used to create an ordered word list from an input string. Each character in the default character table has both a classification and an operation specified. You should build one chop table per parse definition. The Chop Table Editor allows you to build a chop table.
Table
Unicode Block - The Unicode Block drop-down list provides a list of character subsets, see Unicode Block for the complete list.
Character Name - The Character Name is the actual name of the character, for example, semicolon.
Character - The Character represents the actual appearance of the character, for example the Character Name is semicolon and the Character is ;.
Classification - The Classification drop-down list includes:
LETTER/SYMBOL - a letter or non-separating symbol
NUMBER - a numeric digit (0-9)
LEAD SEPARATOR - a delimiter attached to the beginning of a word (for example, the left parenthesis)
366 DataFlux Data Management Studio
TRAIL SEPARATOR - a delimiter attached at the end of a word (for example, a period)
FULL SEPARATOR - a delimiting character (for example, space, dash, and comma)
Operation - The Operation drop-down list includes:
USE - use the character as-is in the word list and output tokens
TRIM - omit from word list; trim leading/trailing characters in output tokens
SUPPRESS - omit from the word list and output tokens
Value - This is the ordinal value of the Unicode code point.
Hex Value - The hexadecimal value of the Value (above).
Rules
The rules-based chopping algorithm works by matching portions of an input string from left to right using search criteria and states. These are specified by rules which can be defined from the Rules tab. These rules are processed from top to bottom and the search criteria includes:
A vocabulary of words
A single regular expression
The system uses the search criteria to first match the input string at the current position. If it fails, it proceeds to the next rule and attempts to match using the criteria for that rule, and so on. If no rules match, the input string position is advanced by one character and the algorithm run again. This process is repeated until the process reaches the end of the input string.
If the system is able to successfully match a substring, it then attempts to validate the state. At any point in time, the system maintains a state of zero or more flags, which are just variables that either exist or not. Each rule has the ability to check for the existence of flags in the current state using a simple Boolean syntax. This is called the Prerequisite State Condition. If this validation fails, the rule fails to match and the next rule is checked, and so on. If it succeeds, then the following occurs:
The input string is advanced to the end of the successful match in the Search criterion.
A new state (Output State) consisting of zero or more flags is set. The new state replaces the old state.
The string is chopped before the current match, after the current match, at both points, or not at all.
This part of the Rules tab sets up an initial state before any rule processing is performed. This is useful for identifying a pre-existing state in order to force certain rules first.
The Initial Flags list has two controls. Click the Add icon to open the Add New Flag dialog. Here, you will enter the name of the new initial flag. As you create new flags, it is added alphabetically to the list. To delete an existing flag, select the flag and click the Delete icon.
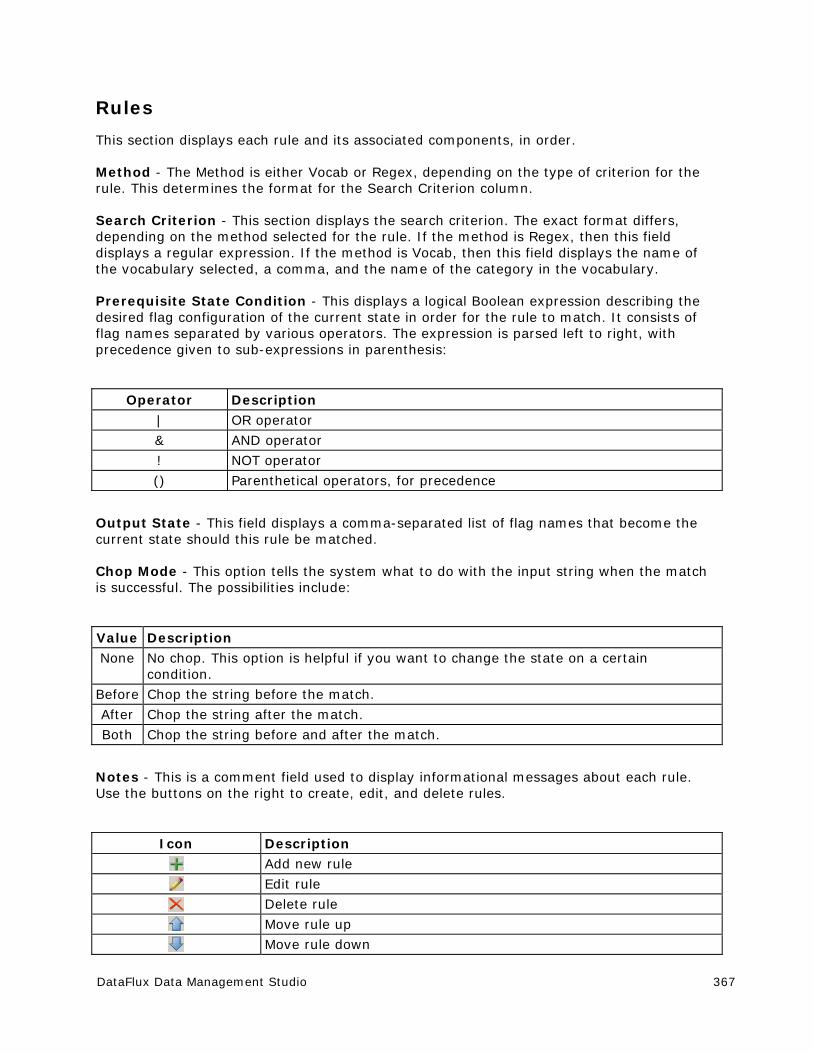
DataFlux Data Management Studio 367
Rules
This section displays each rule and its associated components, in order.
Method - The Method is either Vocab or Regex, depending on the type of criterion for the rule. This determines the format for the Search Criterion column.
Search Criterion - This section displays the search criterion. The exact format differs, depending on the method selected for the rule. If the method is Regex, then this field displays a regular expression. If the method is Vocab, then this field displays the name of the vocabulary selected, a comma, and the name of the category in the vocabulary.
Prerequisite State Condition - This displays a logical Boolean expression describing the desired flag configuration of the current state in order for the rule to match. It consists of flag names separated by various operators. The expression is parsed left to right, with precedence given to sub-expressions in parenthesis:
Operator Description | OR operator
& AND operator
! NOT operator
() Parenthetical operators, for precedence
Output State - This field displays a comma-separated list of flag names that become the current state should this rule be matched.
Chop Mode - This option tells the system what to do with the input string when the match is successful. The possibilities include:
Value Description None No chop. This option is helpful if you want to change the state on a certain
condition.
Before Chop the string before the match.
After Chop the string after the match.
Both Chop the string before and after the match.
Notes - This is a comment field used to display informational messages about each rule. Use the buttons on the right to create, edit, and delete rules.
Icon Description
Add new rule
Edit rule
Delete rule
Move rule up
Move rule down
368 DataFlux Data Management Studio
When you click Add a rule, the Add Rule dialog opens.
Matching Method - In the Matching Method section, select Regular Expression or Vocabulary. When you select Regular Expression you can type the regex directly into the accompanying field. If you select Vocabulary, you must select one of the available vocabularies from the drop-down list. When you select a vocabulary, the Category drop-down list becomes active. All of the possible categories for the selected vocabulary appear. The All category is always present in this list. This category allows all words in the vocabulary to be used as possible matches.
Prerequisite State Condition - This is a Boolean text expression.
Output State - The Output State list can be populated with flag names just like Initial Flags.
Chopping Mode - The Chopping Mode drop-down list allows you to select one of the possible modes.
Notes - The Notes field allows you to add 128 characters of text. This is used for documentation purposes.
Testing
The test area is used to test input strings against the chopping configuration.
Input string
The Input string field accepts any form of text input.
Go - Click Go to run the string through the Chop Table Editor for a result. The result is displayed in the Result section.
Clear - Click Clear to clear both the Input string and Result fields.
Result
The Result section includes two columns, Phrase and Source.
Phrase - The Phrase column shows the chopped substring.
Source - The Source column displays whether the corresponding chopped phrase originated from the table or the rules by displaying Table or Rules. The first rows in this table always show None in the Source column because this represents some beginning prefix of the input string that was not chopped. All subsequent rows have an explicit source specified.
Double-click any row in the Result table to see why the substring on that row was chopped.

DataFlux Data Management Studio 369
Customize - Creating Chop Table Files
1. To open the Chop Table Editor from the main menu, click Tools > Design > Chop Table Editor. You can also open the Chop Table Editor from the toolbar. The Chop Table Editor dialog opens with the Open a QKB dialog.
2. You must first select QKB and Locale. Click the QKB in the left pane then select the Locale on the right side. Click Open. The locale setting is saved from session to session, so you do not need to specify it again unless you need to build a chop table for a different locale.
3. To create a new chop table. Select File > New. The Select Locale(s) dialog opens. Select the locale and click OK. The New Chop Table dialog opens.
4. You can now make changes to the Chop Table. By default, when you create a chop table, the Chop Table Editor creates a character name value for every character in the set with Classification set to Letter and Operation set to Use. To obtain usable results, you must edit these default values. For example, for the Space character name, you will most likely want to change the Classification to Full Separator and Operation to Trim. This indicates to DataFlux Data Management Studio that when it encounters a space in a string, it should break the string at the space into separate tokens and remove ("trim") the space. For more information, see Character Level Options.
5. When you are finished making changes, save your Chop Table, click File > Save. You will be prompted to enter a name for the Chop Table Editor.

370 DataFlux Data Management Studio
Customize - Chop Table Editor - Character Level Options Character Classifications
Classification Description
LETTER A letter or non-separating symbol
NUMBER A numeric digit (0-9)
FULL SEPARATOR A delimiting character, for example, spaces, dashes, and commas
LEAD SEPARATOR A delimiter attached to the beginning of a word, for example, left parenthesis
TRAIL SEPARATOR A delimiter attached at the end of a word, for example, a period
Operations
Operation Description
USE Use the character as-is in the word list and output tokens
TRIM Omit from word list; trim leading/trailing characters in output tokens
SUPPRESS Omit from the word list and output tokens
Implicit Separators Implicit separators are an optional feature of string chopping. For each parse definition, you can enable or disable implicit separation. If you enable implicit separators, a separator mark is placed wherever the classification of a character differs from the classification of the previous character in a string. To use implicit separation, on the Chop Table Editor screen, choose Options > Implicit Separation.
For example, using implicit separation, the phrase:
APT124
will be separated into two phrases:
APT 124
DataFlux Data Management Studio 371
assuming that the letter "T" is assigned one classification such as "Letter" and the number "1" is assigned a different classification such as "Number." If both characters have the same classification, they will remain together. With implicit separation disabled, this phrase could only be broken apart by assigning separator functionality to the "T" or to the "1," but that change would affect every instance of those characters.
Scheme Builder You can use Scheme Builder to create custom standardization schemes, which determine how data will be standardized. There are two ways to display the Scheme Builder:
From the main menu, select Tools > Other QKB Editors > Scheme Builder.
Open an existing profile. Click the Report tab. Select a table in the navigation tree on the left. Click the Standard Metrics tab on the right. Right-click a field for which you want to define a custom scheme, and then select Scheme Builder.
372 DataFlux Data Management Studio
Scheme Builder - Menus Following are descriptions of the menus on the Profile - Viewer Scheme Builder screen. You can access this screen from the Profile - Viewer main screen by selecting a field for which you want to build a scheme, and then choosing Tools > Scheme Builder.
File New - Start a new scheme.
Open - Retrieve an existing scheme.
Close - Close the current scheme.
Save - Save the current scheme.
Save As - Save the current scheme with a new file name.
Note: Schemes will be saved with a .qkb extension. Any scheme created in earlier versions will be saved as .qkb file when it is open and saved. You will see a dialog when you try to save the new scheme. If you save this file in the new format, you will not be able to access the scheme in earlier versions of DataFlux Data Management Studio. Click Yes to save the scheme under the new format or No if you do not want to save in the new format.
Print - Print the current scheme.
Import From A Text File - Import a scheme using the Import From Text File screen.
Import N-Grams - Import N-Grams from a text file.
Export to Text File - Export the current scheme as a scheme text file.
Export to Excel Worksheet - Export the current scheme as a Microsoft Excel worksheet.
Exit - Close the Scheme Builder screen.
Edit Add - Add an entry to the current scheme.
Edit - Edit the selected scheme entry.
Delete - Delete the selected scheme entry.
Clear - Clear the selected scheme entry.
Paste - Paste into the Standard box at the bottom of the screen the latest string copied to the Windows Clipboard.
DataFlux Data Management Studio 373
Find In Data - Use the Scheme Builder - Find screen to find a string in your data.
Find In Standard - Use the Scheme Builder - Find screen to find a string in the current scheme.
Sort By Data - Sort the current scheme alphanumerically by the data.
Sort By Standard - Sort the current scheme alphanumerically by the standard.
Reset - Clear the current scheme.
Build Scheme - Use Smart Clustering Data Analysis results to attempt to build a scheme automatically. This can serve as a starting point and greatly reduce your manual scheme building effort.
Modify Standards Manually - Specify whether to manually modify a single instance or all instances.
View Toolbar - Show/hide the toolbar.
Status Bar - Show/hide the status bar.
Report Load Report - Retrieve a previously saved Scheme Builder report.
Save Report - Save the current Scheme Builder report.
Find In Report - Use the Scheme Builder Find screen to find a string in the current report.
Add Selection to Scheme - After performing a data analysis, you can select multiple data permutations in the results. This option adds all selected permutations to the current scheme, along with the value in the Standard box at the bottom of the screen.
Set Current as Standard - Set the selected permutation as the standard value of the corresponding data element(s) selected in the Scheme Builder report for the scheme entry.
Compare Report to Scheme - Use these options when you want to compare the data from the current report to a scheme. They are enabled only when a scheme has been loaded.
Hide Existing Permutations - Hides any data in the report that is already contained in the scheme. You will see only the data that has not already been added.
Highlight Unaccounted Permutations - When available, highlights all the data in the report that has not already been added to the scheme, in order to quickly identify what data has (or has not) been accounted for.
Print Report - Print the current Scheme Builder report.
374 DataFlux Data Management Studio
Export Report - Export the current Scheme Builder report as a text file.
Sort Mode
Alphabetically - Sorts data results alphabetically.
By Occurrence - Sorts data results by occurrence.
Permutation Drill Down - Display the records in the current database that contain the selected data-analysis permutation.
Tools Set QKB Locale - Set your Quality Knowledge Base (QKB1) to the appropriate locale.
Note: To select a locale, you must have that locale installed.
Merge Schemes - Merge two existing schemes into a third scheme.
Generate SQL - Create a file of SQL commands that can reproduce the effects of using the current scheme.
Options - Use the Scheme Builder - Options screen to set Scheme Builder options.
1The Quality Knowledge Base (QKB) is a collection of files and configuration settings that contain all DataFlux data
management algorithms. The QKB is directly editable using Data Management Studio.
DataFlux Data Management Studio 375
Scheme Builder - Find Find What - Type the string you want to find.
Match Whole Word Only - Specify that you want to find your string only when it occurs as a whole word. For example, with this option selected, the string "dat" would find "dat," but not "data" or "date."
Match Case - Specify that you want to find your string only when it has the same case. For example, with this option selected, the string "data" would find "data," but not "Data."
Direction - Set the direction of the search: Up or Down.
376 DataFlux Data Management Studio
Scheme Builder - Import From Text File Following are descriptions of the items on the Scheme Builder Import From Text File screen. You can access this screen from the Scheme Builder screen by choosing File > Import From Text File.
Import File Name - Specify the name and location of your scheme text file. You can type the file path and name manually (for example, c:\myfiles\myscheme.txt), or click the Browse icon to browse for the file.
Text Qualifier - Specify what character, if any, the Scheme Builder should expect at the beginning and end of each text field value in the scheme text file. The two available qualifiers are single quote (') and double quote (").
Note: If your scheme text file was created by another program, check that program's documentation to see what text qualifier, if any, it might have used. Or, look at the file directly in a text editor such as Microsoft© Notepad.
Number of Rows to Skip - If your scheme text file has introductory or header information, specify the number of introductory lines to skip before the Scheme Builder starts reading the scheme text file's content as data.
Encoding - Specify the type of encoding used in the scheme text file.
Field Delimiter - Specify the type of separator (delimiter) used in the scheme text file for separating data fields.
Note: If your scheme text file was created by another program, check that program's documentation to see what field delimiter it might have used. Or, look at the file directly in a text editor such as Notepad.

DataFlux Data Management Studio 377
Scheme Builder - Options Following are descriptions of the items on the Profile - Viewer Scheme Builder Options screen. You can access this screen from the Scheme Builder screen by choosing Tools > Options.
Add Every Report Permutation when Using Build Scheme - Include at least one data/standard rule for every value in the analysis report, even for values that are not part of matching clusters identified in the scheme build process.
Include Group Number when Printing and Exporting Reports - Entries that group together in the same cluster carry the same group number when printing and exporting to a text file.
Maximum Number of Rows to Display in the Drill Through - The number of rows to display in the permutation drill through.
QKB Difference Viewer The QKB Difference Viewer is a tool used to view the differences between Quality Knowledge Base (QKB) files when:
Determining the changes that have occurred to a QKB since installation
Determining the differences between two different QKB files
Determining differences between two separate QKB files
Viewing what changes have occurred before merging QKBs
You can access QKB Difference Viewer by selecting Tools > QKB Difference Viewer from the main menu or by selecting Tools > QKB Difference Viewer from the menu in the Customize dialog. You can also use a command-line interface to view the differences between QKB files. For more information, see QKB Difference Command Line Interface.
About the QKB Difference Viewer Screen
The following sections explain the QKB Difference Viewer screen including the main menu, toolbar, left navigation, and right navigation.
Main Menu
This section describes the QKB Difference Viewer main menu.
File
Open - Click File > Open to open a saved difference file. The difference file is saved with the .qkd extension.
Build Difference File - To build a difference file, click File > Build Difference File. The Build Differences dialog opens.
378 DataFlux Data Management Studio
For information about the Build Differences dialog, see QKB Differences Viewer - Build Differences Dialog.
Recent - Displays recently created difference files. Click the filename to open.
Exit - Click to close the QKB Difference Viewer.
View
Status Bar - By default the Status Bar appears as a part of the QKB Difference Viewer screen. Click Status Bar to toggle the status bar.
Back - Click Back to go to the previous screen viewed.
Forward - Click Forward to return to the next screen.
Filters
You can use filters to hide items that you do not want to see. To set a filter, select the item that you want to filter under Properties. Then, click Filters > Filter Name or Filters > Filter Name/Value Pair.
Note: You can also use the toolbar options, Filter on name or Filter on name and value.
Filter Name - This option is used to filter all items with the chosen name. This filters on name only.
Filter Name/Value Pair - Filters all items that have the selected name and value. This filters on name and value.
Clear Filters - Select Clear Filters to clear all filters.
Filter List - Click Filters > Filter list to view the filters. The filters appear in the Filters Dialog.
Note: You can remove filters only when the User Set column shows Yes. If Remove Filter is not available, the Remove Filter button is disabled.
To remove a filter, you can click on the item on the Filter dialog and click Remove Filter or if you want clear all filters, click Clear All. You can also clear all filters from the QKB Difference Viewer screen, click Clear filters .
To view filters, click Show filters and the Filters dialog opens.
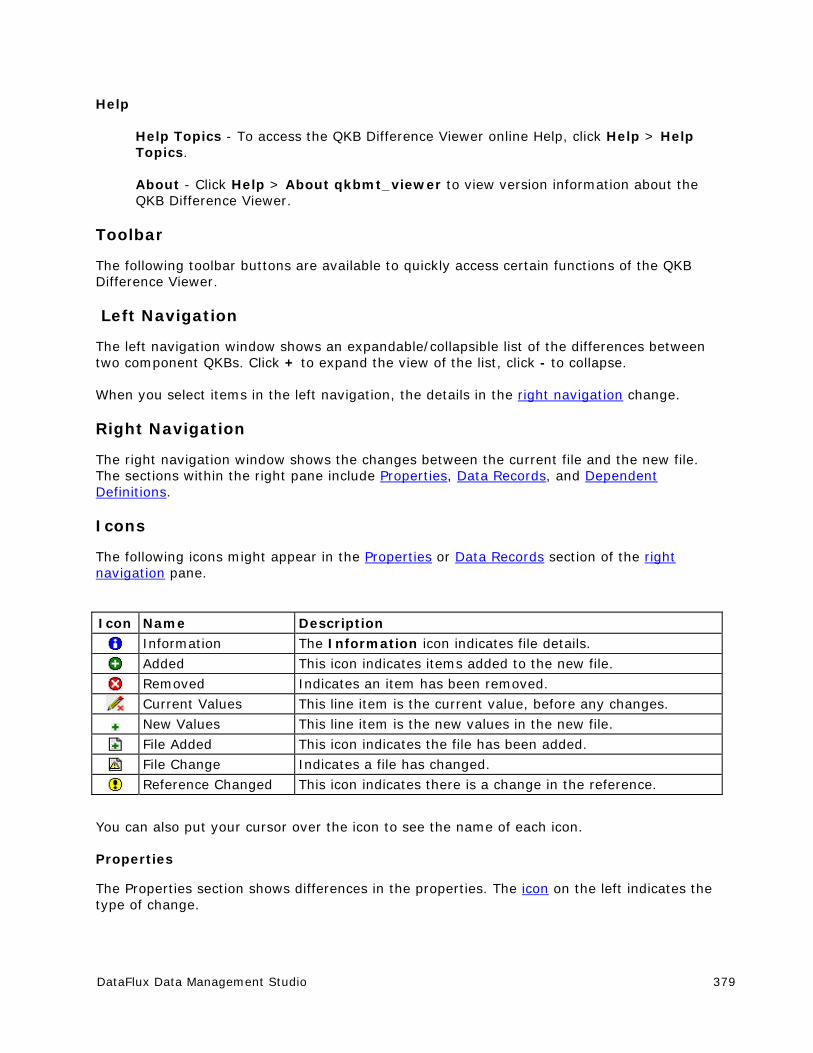
DataFlux Data Management Studio 379
Help
Help Topics - To access the QKB Difference Viewer online Help, click Help > Help Topics.
About - Click Help > About qkbmt_viewer to view version information about the QKB Difference Viewer.
Toolbar
The following toolbar buttons are available to quickly access certain functions of the QKB Difference Viewer.
Left Navigation
The left navigation window shows an expandable/collapsible list of the differences between two component QKBs. Click + to expand the view of the list, click - to collapse.
When you select items in the left navigation, the details in the right navigation change.
Right Navigation
The right navigation window shows the changes between the current file and the new file. The sections within the right pane include Properties, Data Records, and Dependent Definitions.
Icons
The following icons might appear in the Properties or Data Records section of the right navigation pane.
Icon Name Description
Information The Information icon indicates file details.
Added This icon indicates items added to the new file.
Removed Indicates an item has been removed.
Current Values This line item is the current value, before any changes.
New Values This line item is the new values in the new file.
File Added This icon indicates the file has been added.
File Change Indicates a file has changed.
Reference Changed This icon indicates there is a change in the reference.
You can also put your cursor over the icon to see the name of each icon.
Properties
The Properties section shows differences in the properties. The icon on the left indicates the type of change.
380 DataFlux Data Management Studio
Show Filtered - Click Show Filtered to view the filtered items in this section. If the Show Filtered button is disabled, there are no filters.
Data Records
The Data Records section displays the differences in the records. The icons on the left indicate the type of change.
Find Record - Click Find Record to locate a record within the Data Records list. The Find dialog opens.
Dependent Definitions
This section displays items dependent on the item currently being viewed. The dependent items are generally definitions but can also be files. Click the link under Definition Name to go directly to the folder and file associated with the Locale and Match Definition.
The right navigation view changes to show details for the item selected in the left navigation view.
QKB Difference Viewer - Build Differences Dialog From the QKB Difference Viewer, click File > Build Difference File. The Build Differences dialog opens.
The following sections explain the Build Difference dialog in more detail.
Comparison Mode
Separate QKBs- Select this option to compare two different QKBs. All of the files in the first QKB are compared with the files in the second QKB. During this process, if a file exists in one QKB but not the second, the file is flagged as added or deleted.
When this option is selected, two list boxes appear under Selection. Select two different QKBs to compare.
Installed QKB - If this option is selected, the current QKB is compared with the installer version. The "clean install" version of the QKB is saved as a .anc file, at the time of installation. Each file with the .qkb extension is compared with the corresponding .anc file to show the changes made since the QKB was installed. In the case of multiple installations, the difference shows only the changes since the most recent installation.
Note: If multiple QKB versions were installed into the same directory, a merge will have occurred among the QKB files. The .anc files are identical to the files contained in the most recently applied installer package, and do not contain any information about the previous installations.
When this option is selected, a list box appears under Selection. Select the QKB that you want to compare with the installer version.
DataFlux Data Management Studio 381
Single QKB Files - If you select this option, two files are compared during the difference process. These files can be from the same or different QKBs. These files do not have to have the same name or similar contents but they do have to be the same type. Examples include regexlib and scheme.
When this option is selected, a File Type drop-down list appears under Selection. Select one file from each list box.
Note: The same QKB file can be selected from each list box.
As you select a QKB in each list box, the File drop-down list appears. Here, you can select a specific file that you want to compare.
Selection
File Type
The File Type drop-down list appears when you select the Single QKB Files option under Comparison Mode. Click the drop-down list and select a file type.
Current QKB
Name - The Name column displays the names of all the QKBs available.
Directory - This is the directory path for each QKB displayed.
New QKB
Name - This column displays the names of all the QKBs available.
Directory - The Directory column displays the directory path for each QKB displayed in the list.
File
The File drop-down list appears when you select Single QKB Files and a File Type under Comparison Mode. Click the drop-down list and select a file.
Output
Difference File - In each of the Comparison Modes, you must specify a location for the difference file. The difference file is saved with a .qkd extension. If you do not specify this extension, it will be appended to the filename.
Log File - The log file is saved with a .log extension. If you do not specify the .log extension, it will be appended to the filename.
Include Vocab differences in main file - When this option is selected, the vocabulary will be included in the difference process. This check box is selected by default.
Note: If OK is disabled, all of the required fields for the selected Comparison Mode have not been populated.
382 DataFlux Data Management Studio
Once you are finished building your QKB Differences, click OK. The QKB Diff Tool dialog opens.
The process steps through the QKB Difference process in this dialog. Once the process is finished, the final line will show, Completed.
Note: This process can take a considerable amount of time. The amount of time is dependent on the size of the QKB and the number of locales installed.
Once the process is complete, close the QKB Difference Tool dialog and the difference results appear in the QKB Difference Viewer.
Refer to QKB Difference Viewer for additional information.
DataFlux Data Management Studio 383
QKB Difference Command Line Interface You can use qkbdiffbuilder.exe, a command-line interface, to view the differences between QKB files. Perform the following steps to display usage notes for the interface.
1. Display a command prompt and change to the bin folder for Data Management Studio. The default path is as follows: C:\Program Files\DataFlux\Data Management Studio\[version_number]\bin
2. Type qkbdiffbuilder.exe and then press Enter
QKB Merge Tool The QKB Merge Tool is used to merge one Quality Knowledge Base (QKB) with a new QKB. For example, if you customized your QKB Contact Information (CI) 2007B, you might want to merge that QKB with the new QKB CI 2008A.
Important: Use caution when using the QKB Merge Tool. Once you begin the merge process, you cannot go back. For this reason, it is recommended that you back up your old QKB before using the QKB Merge Tool.
You can access the QKB Merge Tool by selecting Tools > QKB Difference Viewer from the main menu or by selecting Tools > QKB Merge Tool from the menu in the Customize dialog. You can also use a command-line interface to merge two QKB files. For more information, see QKB Merge Command Line Interface.
Source QKB
Select the source QKB for the merge process. During the merge process, the source QKB will merge with the destination QKB. The source will not change during this action.
Destination QKB
This is the destination for the source QKB. This means the contents of the source QKB will be combined with the contents from the selected destination QKB. The destination QKB is overwritten with the result.
Note: Once you click Merge, this QKB will be modified.
Log File
You can specify a log filename here. This is an optional field. If you do not specify a log file, no log is created.
Merge
Click Merge to run the merge process. The source QKB will combine with the destination QKB.
384 DataFlux Data Management Studio
Note: Once you begin the merge process, you cannot go back.
If Merge is disabled, you either need to select the source or destination or you have selected the same QKB in both lists.
Exit
When you are finished with the QKB Merge Tool, click Exit to close the tool.

DataFlux Data Management Studio 385
QKB Merge Tool - FAQ What is merged when you install a new QKB in the same directory as an existing QKB?
When you attempt to install a new QKB file over an existing QKB file, the installer invokes the QKB Merge Tool. During this process, everything that you have saved to your QKB is merged in some way. For example, assume you already have QKB 2007B installed, you made some changes, and now you are preparing to install 2008A over 2007B.
At the time of the merge there are three files that are affected for each item in the QKB (for example, schemes, regexlibs, grammars, and others):
The existing .qkb file (for example, en001.rgx.qkb), with your changes
The .anc file (for example, en001.rgx.qkb.anc)
Note: This is the 2007B file, as shipped with the 2007B installer.
The new file from 2008A (the 2008A installer copies this to en001.rgx.qkb.new)
Note: This .new file is renamed with the .anc extension after the QKB merge is complete, overwriting the previous .anc file.
This allows the 2008A installer to compare what was shipped in 2007B and what has changed.
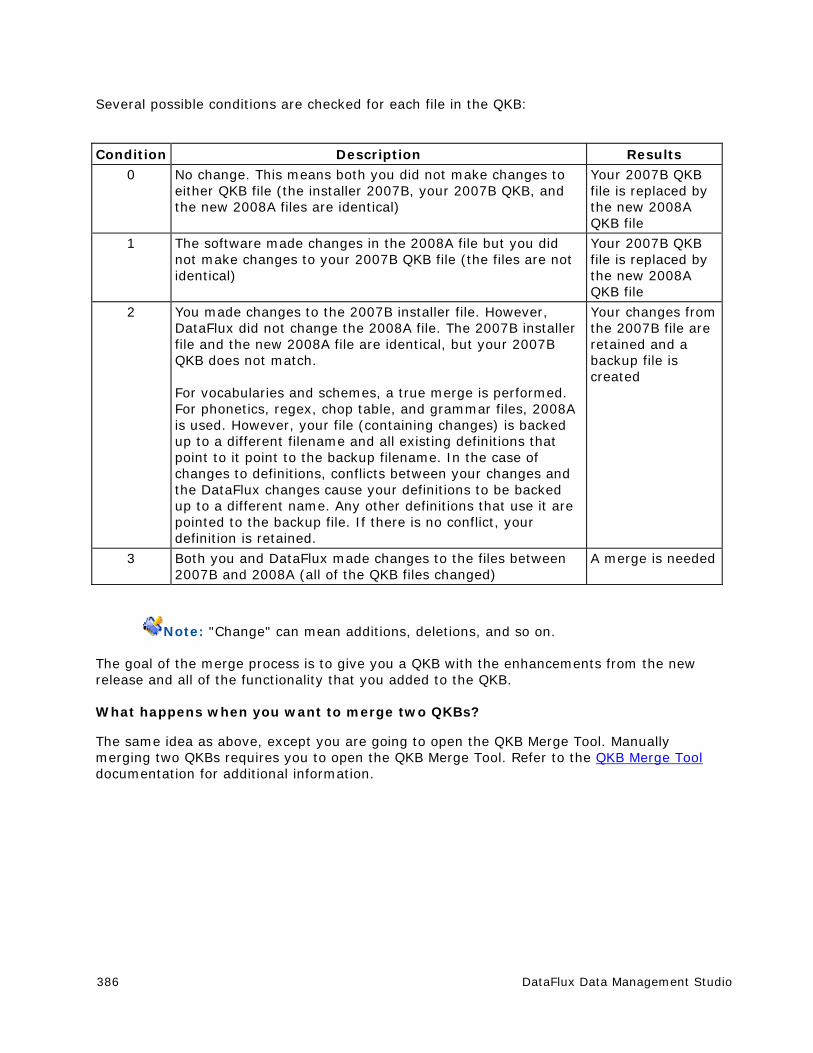
386 DataFlux Data Management Studio
Several possible conditions are checked for each file in the QKB:
Condition Description Results 0 No change. This means both you did not make changes to
either QKB file (the installer 2007B, your 2007B QKB, and the new 2008A files are identical)
Your 2007B QKB file is replaced by the new 2008A QKB file
1 The software made changes in the 2008A file but you did not make changes to your 2007B QKB file (the files are not identical)
Your 2007B QKB file is replaced by the new 2008A QKB file
2 You made changes to the 2007B installer file. However, DataFlux did not change the 2008A file. The 2007B installer file and the new 2008A file are identical, but your 2007B QKB does not match. For vocabularies and schemes, a true merge is performed. For phonetics, regex, chop table, and grammar files, 2008A is used. However, your file (containing changes) is backed up to a different filename and all existing definitions that point to it point to the backup filename. In the case of changes to definitions, conflicts between your changes and the DataFlux changes cause your definitions to be backed up to a different name. Any other definitions that use it are pointed to the backup file. If there is no conflict, your definition is retained.
Your changes from the 2007B file are retained and a backup file is created
3 Both you and DataFlux made changes to the files between 2007B and 2008A (all of the QKB files changed)
A merge is needed
Note: "Change" can mean additions, deletions, and so on.
The goal of the merge process is to give you a QKB with the enhancements from the new release and all of the functionality that you added to the QKB.
What happens when you want to merge two QKBs?
The same idea as above, except you are going to open the QKB Merge Tool. Manually merging two QKBs requires you to open the QKB Merge Tool. Refer to the QKB Merge Tool documentation for additional information.
DataFlux Data Management Studio 387
QKB Merge Command Line Interface You can use cmtgui.exe, a command-line interface, to merge two QKB files. Perform the following steps to display usage notes for this interface.
1. Display a command prompt and change to the bin folder for Data Management Studio. The default path is as follows: C:\Program Files\DataFlux\Data Management Studio\[version_number]\bin
2. Type cmtgui.exe, and then press Enter.
388 DataFlux Data Management Studio
Technical Support Frequently Asked Questions
If you do not find your answer, please contact DataFlux Technical Support.
Frequently Asked Questions (FAQ) The following questions and answers are designed to assist you when working with Data Management Studio. If you do not find your answer, please contact DataFlux Technical Support.
Data Connections
General
Jobs, Profiles, Data Explorations
Repositories
Data Connections
Are there any special considerations for ODBC drivers using the wire protocol?
DataDirect provides a number of wire protocol ODBC drivers that communicate directly with a database server, without having to communicate through a client library. If these drivers are available at your site, they are available from the Drivers tab of the ODBC Data Source Administrator dialog.
If you use a wire protocol driver to create an ODBC connection, the following special considerations apply:
Verify that the following value is set in the registry. It is needed in order for Unicode characters to display properly. For each wire driver, go into the registry under HKEY_LOCAL_MACHINE\SOFTWARE\ODBC\ODBC.INI\<DSN NAME>, create a string value called ColumnSizeAsCharacter, and set it to 1.
After you set up an ODBC connection with a wire protocol driver, verify that the appropriate options have been set on the Advanced tab of the connection properties dialog. The Advanced tab can be displayed as follows: from the ODBC Data Source Administrator dialog, click the System DSN tab. Select the ODBC connection with a wire protocol driver, and then click the Configure button. The properties dialog for the connection displays. Click the Advanced tab and review the options on this tab. To turn on an option, click the checkbox beside the option.
How Can I Read an XML File in a Data Job?
Due to the limitations of the ODBC 32-bit XML driver, we recommend that you use the XML Input node to read an XML file in a data job.
DataFlux Data Management Studio 389
How Can I Read an XML File In a Profile?
We recommend that you extract the data from the XML file to a text file or to a database table, and then profile the text file or table. To extract the data, create a data job in which the XML Input node is used to read the XML file, and then use other nodes to output a text file or a database table.
General
Why can't I save global options for DataFlux Data Management Studio under Microsoft Vista or Windows Server 2008?
DataFlux Data Management Studio saves global options to a user.config file that is hidden by default under Microsoft Vista and Windows Server 2008. You must un-hide this file in order to save global options. The physical path to the file is as follows:
C:\Documents and Settings\<UserID>\Local Settings\Application Data\DataFlux\ProDesigner.vshost.exe_Url_<some_hash_code>
Why doesn't my screen repaint when I'm prompted to log into a table with ODBC?
If you access a table with ODBC, you might be prompted to log in to the database. If your screen does not repaint properly, try setting the Show window contents while dragging option for Microsoft Windows. Consult the documentation for your version of Windows for details about setting this option.
Jobs, Profiles, Data Explorations
What is the maximum length for character variables (such as column names) in DataFlux Data Management Studio?
In data jobs, Data Input nodes and Data Output nodes support very long character fields for SAS data. They successfully work with 32K (32767 bytes) fields, which is the maximum length for character fields in SAS data sets. QKB-related nodes only process the first 256 characters and ignore the rest. Expression node string functions should work, including the mid() and len() functions. The 256 character limitation applies to regular expressions or QKB-related-functions.
In profiles, report metrics such as Data Type, Data Length, Unique Count, and Frequency Distribution are correct for strings up to 32K in length. Pattern Frequency Distribution only uses the first 254 characters instead of 256.
390 DataFlux Data Management Studio
How can I specify Quality Knowledge Base options for profiles and data explorations?
Configuration options for the QKB are set in the Quality Knowledge Base Engine section of the app.cfg file. For example, the QKB\PATH option enables you to specify the path to the QKB. The QKB/ON_DEMAND option determines whether the QKB is loaded on demand or all at once. By default, the option is set to YES. The QKB/ALLOW_INCOMPAT specifies how newer QKB definitions are handled. By default, this option is set to NO. You might want to change this option to YES if a profile or data exploration fails due to an incompatible (newer) QKB definition. The QKB\COMPATVER option enables you to specify the QKB version. Finally, the QKB\SURFACEALL determines whether all parse definitions are surfaced.
You can use Data Management Studio to change the QKB/ALLOW_INCOMPAT option. Click Tools in the main menu and select Options to display the Data Management Studio Options dialog. Click the General section of the dialog and update the checkbox for Allow use of incompatible Quality Knowledge Base definitions.
To change other QKB options, you must edit the app.cfg file. See the "Configuration" section of the Data Management Studio Installation and Configuration Guide.
How are SAS Data Types Converted When DataFlux Software Reads or Writes SAS Data?
DataFlux software and SAS data sets support different data types. Accordingly, automatic data-type conversions will take place when Data Management Studio software reads or writes SAS data sets. Also, nulls and missing values will be converted to other values. These changes can impact features that depend on particular data types. For example, when a profile reads a SAS data set, SAS fields with a format that applies to datetime values will be reported as datetime. SAS fields with a format that applies to time values will be reported as a time and SAS fields with a format that applies to date values will be reported as a date. As a result, the profile will not calculate some metrics such as Blank Count or Maximum Length for those fields.
The following data-type conversions are made automatically when DataFlux software, such as a data job or a profile, reads SAS data.
For jobs: SAS numeric columns with a format that applies to date, time or datetime values will be converted to a DataFlux field of type date.
For profiles: SAS fields with a format that applies to datetime values will be reported as datetime. SAS fields with a format that applies to time values will be reported as a time and SAS fields with a format that applies to date values will be reported as a date. Other SAS numeric columns will be converted to a DataFlux field of type real.
SAS character columns will be converted to a DataFlux field of type string with the same length as the SAS character column.
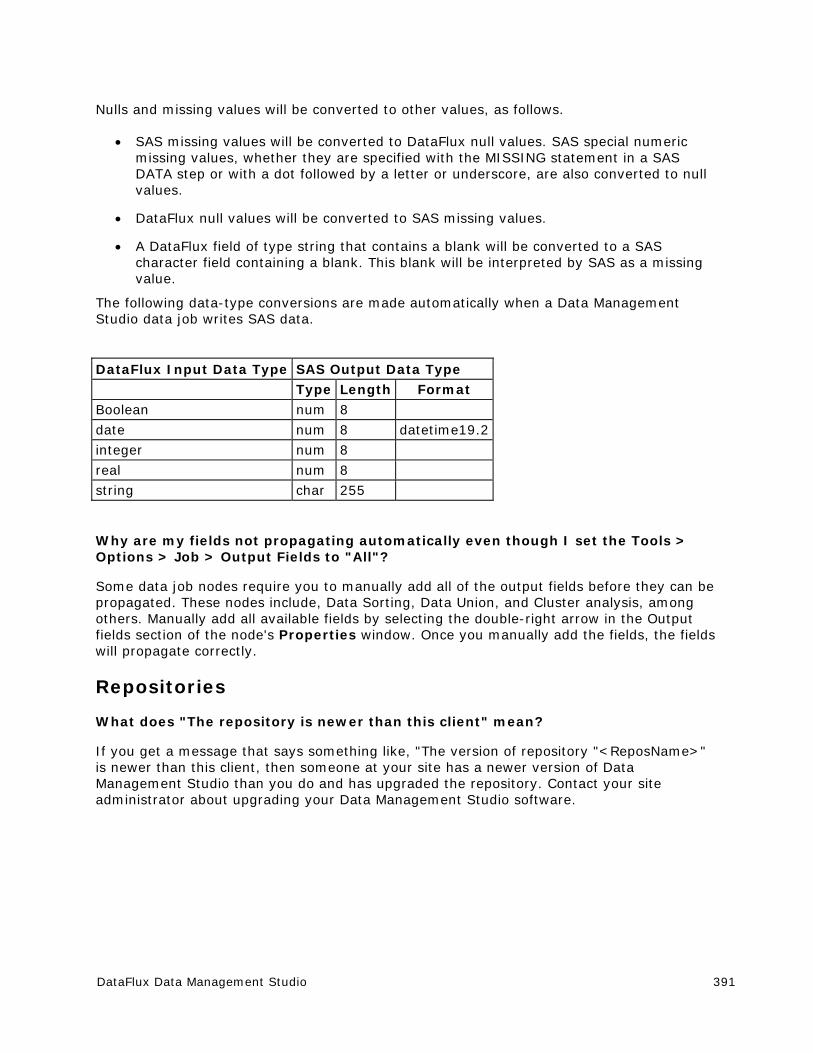
DataFlux Data Management Studio 391
Nulls and missing values will be converted to other values, as follows.
SAS missing values will be converted to DataFlux null values. SAS special numeric missing values, whether they are specified with the MISSING statement in a SAS DATA step or with a dot followed by a letter or underscore, are also converted to null values.
DataFlux null values will be converted to SAS missing values.
A DataFlux field of type string that contains a blank will be converted to a SAS character field containing a blank. This blank will be interpreted by SAS as a missing value.
The following data-type conversions are made automatically when a Data Management Studio data job writes SAS data.
DataFlux Input Data Type SAS Output Data Type Type Length Format
Boolean num 8
date num 8 datetime19.2
integer num 8
real num 8
string char 255
Why are my fields not propagating automatically even though I set the Tools > Options > Job > Output Fields to "All"?
Some data job nodes require you to manually add all of the output fields before they can be propagated. These nodes include, Data Sorting, Data Union, and Cluster analysis, among others. Manually add all available fields by selecting the double-right arrow in the Output fields section of the node's Properties window. Once you manually add the fields, the fields will propagate correctly.
Repositories
What does "The repository is newer than this client" mean?
If you get a message that says something like, "The version of repository "<ReposName>" is newer than this client, then someone at your site has a newer version of Data Management Studio than you do and has upgraded the repository. Contact your site administrator about upgrading your Data Management Studio software.
392 DataFlux Data Management Studio
Appendixes Quality Knowledge Base
Encodings
Quality Knowledge Base
Overview
The Quality Knowledge Base (QKB) is a collection of files that store data and logic that define data management operations. DataFlux software products and SAS Data Quality Server reference the QKB when performing data management operations.
Each QKB supports data management operations for a specific business area. The QKB for Contact Information supports management of commonly-used contact information for individuals and organizations, for example, names, addresses, company names, and phone numbers.
Data and logic in the QKB are organized into a set of definitions. Each definition defines a single context-sensitive data management operation. For example, a definition in the QKB might contain data and logic used to parse phone numbers. Another definition might contain data and logic used to determine the gender of an individual's name.
When you use a DataFlux product or SAS Data Quality Server to process your data, you specify which definitions the software should invoke. For example, if you are generating a report in entity resolution viewer, you can specify that the viewer should use the "Organization" definition when processing data in the "Company" field in your table.
The QKB from DataFlux contains a set of definitions developed at DataFlux for use with common types of data names, addresses, phone numbers, and so on. DataFlux provides periodic updates to the QKB with new definitions and enhancements to existing definitions. To download updates to the QKB, visit the DataFlux Web site QKB page at http://www.dataflux.com/MyDataFlux-Portal.
You can use definitions in the QKB as delivered by DataFlux, or you can customize the QKB by modifying definitions or creating new definitions for use with your own business data. Customizations to the QKB are made using Data Management Studio Customize. Since the QKB is used by all DataFlux products and SAS Data Quality Server, changes made to the QKB using Customize are automatically available to your entire enterprise.
For additional information, refer to the QKB online Help. Open Customize and from the main menu, click Help > QKB Help Topics.

DataFlux Data Management Studio 393
Troubleshooting - Quality Knowledge Base Issues
Downloading the Latest QKB
A QKB is not delivered in the same installation as Data Management Studio. You can use an existing QKB or you can install the most recent version of the QKB, available at http://www.dataflux.com/MyDataFlux-Portal. If you do choose to download the latest QKB version, install it after you install Data Management Studio.
Locating the QKB Documentation
To access the QKB online help, open Customize. From the main menu, click Help > QKB Help Topics.
Merge Options
It is a good idea to create backup copies of your QKB prior to installing a new QKB. By default, the QKB location is c:\Program Files\DataFlux\QltyKB\CI\[version number]. If you choose to install the latest QKB, you can install it into a new directory and change your QKB Directory setting in the Data Management Studio to point to the new location. You can also install it into a new directory and use the Customize and import features to selectively import portions of the updated QKB. The final option is to install the new QKB directly into an existing QKB location. The installation has merge functionality that will incorporate the updates from DataFlux into your existing QKB while keeping any changes you might have made.
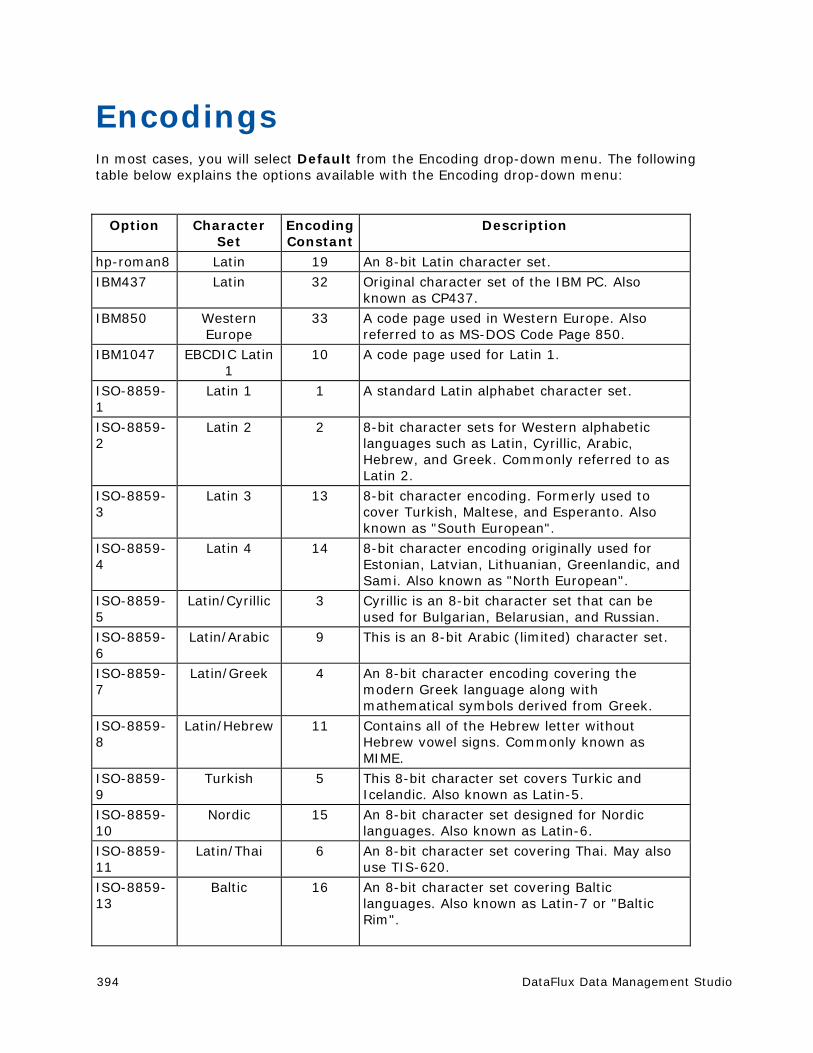
394 DataFlux Data Management Studio
Encodings In most cases, you will select Default from the Encoding drop-down menu. The following table below explains the options available with the Encoding drop-down menu:
Option Character Set
Encoding Constant
Description
hp-roman8 Latin 19 An 8-bit Latin character set.
IBM437 Latin 32 Original character set of the IBM PC. Also known as CP437.
IBM850 Western Europe
33 A code page used in Western Europe. Also referred to as MS-DOS Code Page 850.
IBM1047 EBCDIC Latin 1
10 A code page used for Latin 1.
ISO-8859-1
Latin 1 1 A standard Latin alphabet character set.
ISO-8859-2
Latin 2 2 8-bit character sets for Western alphabetic languages such as Latin, Cyrillic, Arabic, Hebrew, and Greek. Commonly referred to as Latin 2.
ISO-8859-3
Latin 3 13 8-bit character encoding. Formerly used to cover Turkish, Maltese, and Esperanto. Also known as "South European".
ISO-8859-4
Latin 4 14 8-bit character encoding originally used for Estonian, Latvian, Lithuanian, Greenlandic, and Sami. Also known as "North European".
ISO-8859-5
Latin/Cyrillic 3 Cyrillic is an 8-bit character set that can be used for Bulgarian, Belarusian, and Russian.
ISO-8859-6
Latin/Arabic 9 This is an 8-bit Arabic (limited) character set.
ISO-8859-7
Latin/Greek 4 An 8-bit character encoding covering the modern Greek language along with mathematical symbols derived from Greek.
ISO-8859-8
Latin/Hebrew 11 Contains all of the Hebrew letter without Hebrew vowel signs. Commonly known as MIME.
ISO-8859-9
Turkish 5 This 8-bit character set covers Turkic and Icelandic. Also known as Latin-5.
ISO-8859-10
Nordic 15 An 8-bit character set designed for Nordic languages. Also known as Latin-6.
ISO-8859-11
Latin/Thai 6 An 8-bit character set covering Thai. May also use TIS-620.
ISO-8859-13
Baltic 16 An 8-bit character set covering Baltic languages. Also known as Latin-7 or "Baltic Rim".
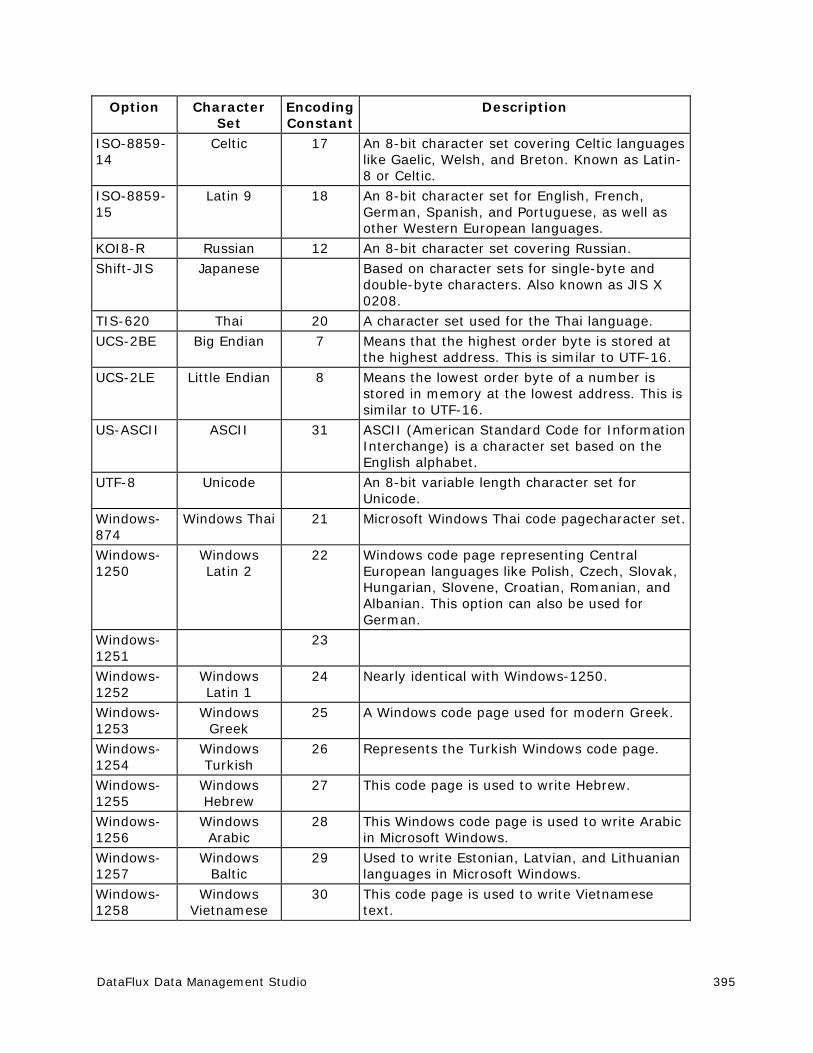
DataFlux Data Management Studio 395
Option Character Set
Encoding Constant
Description
ISO-8859-14
Celtic 17 An 8-bit character set covering Celtic languages like Gaelic, Welsh, and Breton. Known as Latin-8 or Celtic.
ISO-8859-15
Latin 9 18 An 8-bit character set for English, French, German, Spanish, and Portuguese, as well as other Western European languages.
KOI8-R Russian 12 An 8-bit character set covering Russian.
Shift-JIS Japanese Based on character sets for single-byte and double-byte characters. Also known as JIS X 0208.
TIS-620 Thai 20 A character set used for the Thai language.
UCS-2BE Big Endian 7 Means that the highest order byte is stored at the highest address. This is similar to UTF-16.
UCS-2LE Little Endian 8 Means the lowest order byte of a number is stored in memory at the lowest address. This is similar to UTF-16.
US-ASCII ASCII 31 ASCII (American Standard Code for Information Interchange) is a character set based on the English alphabet.
UTF-8 Unicode An 8-bit variable length character set for Unicode.
Windows-874
Windows Thai 21 Microsoft Windows Thai code pagecharacter set.
Windows-1250
Windows Latin 2
22 Windows code page representing Central European languages like Polish, Czech, Slovak, Hungarian, Slovene, Croatian, Romanian, and Albanian. This option can also be used for German.
Windows-1251
23
Windows-1252
Windows Latin 1
24 Nearly identical with Windows-1250.
Windows-1253
Windows Greek
25 A Windows code page used for modern Greek.
Windows-1254
Windows Turkish
26 Represents the Turkish Windows code page.
Windows-1255
Windows Hebrew
27 This code page is used to write Hebrew.
Windows-1256
Windows Arabic
28 This Windows code page is used to write Arabic in Microsoft Windows.
Windows-1257
Windows Baltic
29 Used to write Estonian, Latvian, and Lithuanian languages in Microsoft Windows.
Windows-1258
Windows Vietnamese
30 This code page is used to write Vietnamese text.
396 DataFlux Data Management Studio
Glossary
A
Access Control Entry
An Access Control Entry (ACE) is an entry of user information made to the Access Control Lists (ACLs) which is used to secure access to individual DataFlux Data Management Server objects.
Access Control Lists
Access Control Lists (ACLs) are used to secure access to individual DataFlux Data Management Server objects.
address verification
Address verification (validation) is the process of comparing a physical address to a reference database of known physical addresses so the original address can be standardized and corrected according to postal authority standards.
AIC
Analyze, Improve, Control (AIC) - DataFlux enables organizations to analyze, improve, and control their data from a single data quality integration platform. DataFlux tools and approaches can help you build a comprehensive set of business rules that can create a unified view of your enterprise data and enhance the effectiveness of CDI, CRM, ERP, legacy data migration, or compliance initiatives.
AMAS
Address Matching Approval System (AMAS) is the program the Australia Post administers to certify address verification software.
API
Application Programming Interface (API) is a set of software protocols, routines, and/or tools used when building software applications.
APO
Army/Air Force post office (APO) is an indication for the USPS.
ASCII
ASCII (American Standard Code for Information Interchange) is a character set based on the English alphabet
B
basic category
A basic category is a category that represents a single word. Basic categories are the basic building blocks of Grammar rules. Every basic category in a Grammar corresponds to a category in an ordered word list. For this reason, you should design Grammar rules in parallel with word-analysis logic.
batch processing
The application of data management routines to data source records in what are often very large groups, usually in processes that require no manual user intervention. Contrast with real-time processing.
business functions
These are expressions which are written in a generic manner so they can be reused from multiple rules or applications.
DataFlux Data Management Studio 397
business rule
A conditional statement that tells a system running a business process how to react to a particular situation.
C
case definition
A set of logic used to accurately change the case of an input value, accounting for unique values that need to be case sensitive, such as abbreviations and business names.
CASS
Coding Accuracy Support System (CASS) is the program the United States Postal Service (USPS) administers to certify address verification software.
CBSA
Census Bureau Statistical Areas (CBSA)
CEDA
Cross-Environment Data Access (CEDA)
census string
The census string is a US Census Bureau designation for the boundary area in which the centroid exists. The census string contains state, county, and other census-type information.
centroid
A centroid is the approximate mathematical center of the ZIP or ZIP+4 boundary.
checks
These are built-in checks (expressions) that provide a template to the user to build common standard expressions.
chop table
A proprietary file type used by DataFlux as a lex table to separate characters in a subject value into more usable segments.
CMRA
US Commercial Mail Receiving Agency (CMRA)
CMSA
Consolidated Metropolitan Statistical Areas (CMSA)
Comments
Comments are text within a code segment that are not executed. Comments can be either C-style (starts with /* and ends with */) or C++ style (starts with // and continues to the end of a line).
Core Fields
Default logic to handle data such as name and address, which inform the identity management process.
CPC
Canadian Post Certification (CPC) is the SERP program administered by the Canadian Post. This is similar to the CASS certification administered by the USPS.
CRM
Customer Relationship Management (CRM)
custom metrics
Custom metrics may be used when the standard metrics do not contain the rules you need to accomplish the desired results.
398 DataFlux Data Management Studio
D
dashboard
The dashboard is a Web-based view of the task grid and graphs in the Monitor Viewer.
data profiling
A discovery process that uncovers potential problem areas in large amounts of structured data.
data type
Not used in the sense of a database data type ("varchar" for instance) but used to describe sets of data values that follow certain rules and conventions. "Name" and "Address" are two examples of data types.
database
A collection of tables containing data that can be accessed easily by a computer system.
definition
An algorithm available to a DataFlux application.
derived category
A derived category is a category composed of one or more other categories. The makeup of a derived category is described using rules.
dfIntelliServer
dfIntelliServer provides a real-time or transactional mechanism for communicating with the MCRD through the Architect API. dfIntelliServer has several client libraries (including a Web services client) that can be called from a number of different applications in many different computing environments. dfIntelliServer allows one at a time queries and modifications to the MCRD. dfIntelliServer allows organizations to access Architect jobs through an API that can accept one group of data elements at a time rather than a complete table. This functionality takes advantage of the power of encapsulation of discreet chunks of work in Architect, so a programmer need only make one call to the client API to perform a related set of activities.
DPV
Delivery Point Validation (DPV) specifies if the given address is a confirmed delivery point as opposed to being within a valid range of house numbers on the street.
DSN
Data Source Name (DSN)
E
EEL
Expression Engine Language (EEL)
ERP
Enterprise Resource Planning (ERP)
ETL
Extraction, Transformation, and Loading
event
An event represents an action which should be taken when a rule fails. Actions can include sending email messages, storing the offending row in the repository, or executing an external process.
Expression
This is the DataFlux syntax used in the Business Rule Manager to build business rules.
DataFlux Data Management Studio 399
F
field
Also known as a "variable" or a "column," a single piece of data in a database table. Database tables can have many fields. The user defines the fields. Each field has a unique identifier in the repository. From a data monitoring standpoint, the fields are not tied to any specific database or table but are bound at the time of execution to the current data set or row.
field set
A field set is a collection of fields that belong together. These usually represent a table of data and are used to aid in building rules and viewing results.
FIPS
Federal Information Processing Standards (FIPS) - A 5-digit number assigned to each county in the U.S. by the Census Bureau. The first 2 digits are the state code, and the last 3 digits are the county number.
FPO
Fleet post office (FPO) indication for USPS used for military personnel.
G
gender analysis
An algorithm that can determine the gender of persons by their names.
gender definition
A set of logic used to determine the probable gender of a name or identity-type input string.
grammar
A proprietary file type used to store hierarchical patterns pertinent to a specific subject area.
group rule
A group rule evaluates and applies all rules to groups of data (for example, data grouped by state and the rules evaluated for each state).
H
historical metrics
A historical metric is available when a business rule is run a second time under the same report name. You can view and compare the last two reports.
I
identification analysis
An algorithm that can determine from a known set of options what type of data is represented by a particular subject value.
identification definition
A set of logic used to identify an input string as a member of a redefined or user-defined value group or category.
inputs
Input fields are the fields where you apply the checks specified in the Rule Manager. This list includes all the fields you have defined in the Business Rule Manager, including the Output fields from custom metrics and any grouped by field.
400 DataFlux Data Management Studio
J
job
The saved configuration settings for a particular task in a Data Management Studio application. You can run jobs interactively or combine them with other jobs and schedule the set of jobs to run on a particular date or time.
L
LACS
US Locatable Address Conversion Service (LACS) is a product/system in a different USPS product line that allows mailers to identify and convert a rural route address to a "city-style" address.
locale
The country of origin based on an address or country code.
locale guessing
A process that attempts to identify the country of origin of a particular piece of data based on an address, country code, or other field.
M
match
The process of identifying data strings that can be different representations of the same semantic information. For example, the strings Mr. Bob Brauer, Robert J., and Brauer can be considered to match each other.
match cluster
A set of records grouped together based on some commonality. Cluster IDs are numeric values used to refer to these clusters. You can append cluster IDs to records in a database to document matches.
match codes
The end result of passing data through a match definition. A normalized, encrypted string that represents portions of a data string that are considered to be significant with regard to the semantic identity of the data. Two data strings are said to "match" if the same match code is generated for each.
match definition
A set of logic used to generate a match code for a data string of a specific data type.
match value
A string representing the value of a single token after match processing.
MCD
Minor Civil Division (MCD)
MDM
Master Data Management (MDM) focuses on master data shared by several different systems and groups.
merge
The process of joining records and eliminating duplicate records from a table based on user-specified conditions and rules.
metadata
Information that describes the properties of data , for example when was last accessed or the size of the data value.
DataFlux Data Management Studio 401
micropolitan
This term is used in US Census data and refers to a population area including a city with 10,000 to 50,000 residents and surrounding areas.
MSA
Metropolitan Statistical Areas (MSA) - The MSA code assigned by the Office of Management and Budget. Use this code as an index key in the MSA file.
N
namespace
A namespace is a unique container created to hold a logical grouping of identifiers.
O
Object
An object is anything that can be stored in the Data Management Studio Navigator and accessed by the Data Management Studio applications.
objects
Objects are individual jobs and services.
ODBC
Open Database Connectivity (ODBC) - an open standard application programming interface (API) for accessing databases.
OFAC
Office of Foreign Assets Control (OFAC) - Federal regulations related to the Patriot Act.
OLAP
Online Analytical Processing (OLAP)
organization
A company, university, or other type of institution. For example: IBM Corporation, University of Connecticut, or St. Joseph�s Hospital
outputs
The output field is the field(s) used to apply the rule in the custom metric. Set your output field to serve as the field where the results from your custom metric are collected.
P
parse
The process of dividing a data string into a set of token values. For example: Mr. Bob Brauer, Mr. = Prefix, Bob = Given, Brauer = Family
parse definition
A name for a context-specific parsing algorithm. A parse definition determines the names and contents of the sub-strings that will hold the results of a parse operation.
pattern analysis definition
A regular expression library that forms the basis of a pattern recognition algorithm.
phonetics
An algorithm applied to a data string to reduce it to a value that will match other data strings with similar pronunciations.
402 DataFlux Data Management Studio
PMB
A private mailbox (PMB) is categorized as a mailbox located at a mail center other than the post office or home.
PMSA
Principal Metropolitan Statistical Areas (PMSA)
Primary Key
Primary key is a unique identifier assigned to a database field. Social Security Numbers or a ISBNs are examples of possible primary keys.
Q
QAS
QuickAddress Software (QAS)
QKB
The Quality Knowledge Base (QKB) is a collection of files and configuration settings that contain all DataFlux data management algorithms. The QKB is directly editable using Data Management Studio.
Quality Knowledge Base Locales
The Quality Knowledge Base (QKB) locales contain the files, file relationships, and metadata needed to correctly parse, match, standardize, and otherwise process data.
R
RDBMS
Relational Database Management System (RDBMS) allows you to access data in a database in unique ways, such as adding tables and records, and joining tables.
RDI
Residential Delivery Indicator (RDI)
real-time processing
Processing a record or data one piece at a time as it enters a computer system, for financial transactions, for example. Contrast with batch processing.
record
Also called a "row" or "observation," one complete set of fields in a database table.
regular expression
A mini-language composed of symbols and operators that enables you to express how a computer application should search for a specified pattern in text.�A pattern may then be replaced with another pattern, also described using the regular expression language.
repository
A Data Management Studio repository is a hierarchical data storage mechanism.
row rule
A row rule evaluates every row of data passed into the Monitoring node.
RP
Software Evaluation and Recognition Program is a program the Canada Post administers to certify address verification software.
rule
A single rule can be either a row level rule or a data set level rule. A row level rule is applied to each row which enters the system while a data set level rule is applied to an entire data set or a portion of a data set.
DataFlux Data Management Studio 403
rule set
A rule set is a set of one or more rules which are applied together as a group. Use a rule set when you find you are using a few rules together frequently.
S
SDK
Software Development Kit (SDK)
sensitivity
Regarding matching procedures, sensitivity refers to the relative tightness or looseness of the expected match results. A higher sensitivity indicates you want the values in your match results to be very similar to each other. A lower sensitivity setting indicates that you would like the match results to be "fuzzier" in nature.
SERP
The Software Evaluation and Recognition Program (SERP) is a program the Canadian Post administers to certify address verification software.
Service Oriented Architecture
Service Oriented Architecture (SOA) - All of the interaction with the master customer reference database is through a service-oriented architecture that enables any system to talk to the customer database and request or update information.
set rule
A set rule evaluates and applies rules to all of the input data completely (for example, it will evaluate all 1000 rows of data as a set).
SQL
Structured Query Language (SQL) is a language used to request information from database systems.
standard metrics
Standard metrics are pre-defined rules (expressions) set in Data Management Studio. Most of the time, this is enough to achieve the results for your job.
standardization definition
A set of logic used to standardize a string.
standardization scheme
A collection of transformation rules that typically apply to one subject area, like company name standardization or province code standardization.
standardize
The process of transforming a data string so each of the string's token values conforms to a preferred standard representation: IBM Corporation = IBM CORP; Mister Bob Brauer, Junior = MR BOB BRAUER JR.
Statement of Accuracy
Statement of Accuracy (SoA) is the form used for Canadian Post Certification (CPC) standards.
T
table
A table is a collection of records in a database.
tasks
Tasks contain the rules and the events that go with your individual rule. Tasks associate alert events with a rule that are triggered after a rule fails.
404 DataFlux Data Management Studio
token
Used by DataFlux to designate the output strings of a parse process. The output string of a parse process. A word or atomic group of words with semantic meaning in a data string. A set of expected tokens is defined for each data type.
U
Unicode
An industry standard used to allow text and symbols from languages around the world.
unified
This is the version of the repository you are using. The term "unified" means the repository contains data for Data Management Studio Profile reports, Business Rules, and Data Monitoring results.
URI
Uniform Resource Identifier (URI) is a string of characters identifying a resource or file path.
USPS
United States Postal Service (USPS) provides postal services in the United States. The USPS offers address verification and standardization tools.
V
vocabulary
A proprietary file type used for categorizing data look-ups pertinent to a specific subject area.