Livestream Studio
697
LIVESTREAM STUDIO
-
Upload
khangminh22 -
Category
Documents
-
view
1 -
download
0
Transcript of Livestream Studio
LIVESTREAM STUDIO

TTable oable of Contentsf Contents
Requirements & Recommendations.............................................................................................. 8
Recommended Hardware Specifications for Livestream Studio............................... 9
Supported Capture Devices for Livestream Studio™ .................................................15
What Cameras Work with Livestream Studio?.............................................................. 19
Power Requirements for Livestream Studio™ Hardware Products .........................21
Forcing Windows PC to Run Maximum Amount of Cores....................................... 22
Recommended Power Settings For Running Studio on a Laptop..........................28
Fix Font Sizing Issues in Windows 10.............................................................................. 32
Prevent Automatic Windows Updates............................................................................ 35
Prevent Windows Update Sharing ...................................................................................40
Known Issues with Studio for Mac Beta......................................................................... 43
Can I Run Anti-Virus Software on my Studio PC? .......................................................44
Getting Started with Livestream Studio ....................................................................................... 45
What is Livestream Studio?................................................................................................46
The Different Ways To Access Livestream Studio........................................................48
Try Livestream Studio Before Buying .............................................................................. 54
How to Install Livestream Studio ..................................................................................... 57
Using the Livestream Studio USB Dongle......................................................................62
What Happens If I Lose My Studio Dongle?..................................................................64
Log Into Livestream Studio via a Subscription..............................................................65
Arranging & Simplifying the Livestream Studio Interface........................................... 67
Livestream Studio: First Steps ........................................................................................... 76
Creating, Importing, and Exporting Projects................................................................. 78
Importing & Exporting Projects via Dropbox ................................................................ 87
2

Video Inputs........................................................................................................................................ 97
Connect Cameras to Livestream Studio........................................................................98
Setting Your Project Format .............................................................................................112
Using 4K Project Formats .................................................................................................115
Using Standard Definition-only Formats .......................................................................118
Adding Input Sources........................................................................................................ 122
Screen Capturing with Livestream Studio ................................................................... 127
Using the DeckLink Studio 2 and Similar Cards ......................................................... 128
Using the DeckLink Mini Recorder ................................................................................ 132
Configuring Input Settings............................................................................................... 133
Converting Input Sources of Different Formats......................................................... 140
Advanced Input Source Cropping ................................................................................. 142
Using the Color Source Generator ............................................................................... 149
Switching Controls.......................................................................................................................... 153
Using Livestream Studio's Simple Interface................................................................. 154
Introduction to Multi-View & Preview/Program Switching ..................................... 159
Using a Mouse to Switch Preview and Program........................................................ 162
Configuring a Keyboard to Use with Livestream Studio ...........................................173
Using External Multi-Screen with Livestream Studio .................................................177
Audio Workflow ............................................................................................................................... 184
Adding Audio Sources....................................................................................................... 185
Monitoring Audio in Livestream Studio ........................................................................ 189
Controlling the Audio Mixer ............................................................................................ 194
Fold Audio Channels Into Mono....................................................................................205
Using HD550 Direct Audio Inputs .................................................................................207
Using Line In Audio Sources with the HD550 ............................................................ 210
3

Outputting & Recording .................................................................................................................211
Setting Up a Video Output............................................................................................... 212
Configuring Auxiliary Outputs......................................................................................... 215
Set up High-Resolution & ISO Recordings in Livestream Studio...........................222
ISO Recording Best Practices ......................................................................................... 227
Recording Options in Livestream Studio .....................................................................230
Streaming ..........................................................................................................................................242
Choose a Streaming Quality in Livestream Studio....................................................243
Streaming to Livestream with Livestream Studio.......................................................249
Streaming to Vimeo via Livestream Studio..................................................................256
Streaming to Facebook Live via Livestream Studio...................................................263
Stream to a Scheduled Live Post on Facebook via Livestream Studio................. 273
Stream to Twitter & Periscope via Livestream Studio ............................................... 277
Streaming to YouTube via Livestream Studio ..............................................................282
Streaming via RTMP and Zixi from Livestream Studio..............................................287
Streaming to Ustream.......................................................................................................292
Streaming to Twitch via Livestream Studio..................................................................293
Stream to Multiple Providers Using Livestream Studio............................................ 300
Advanced Streaming Settings in Livestream Studio .................................................. 313
Can Livestream Studio Stream to Facebook Workplace? ....................................... 315
4

Graphic Overlays ............................................................................................................................. 316
Adding Graphics Overlay Tracks......................................................................................317
Mixing Graphics Overlays into Program.......................................................................335
Using the Tie Controls ..................................................................................................... 348
Importing Livestream Graphics Files .............................................................................355
Importing Excel Spreadsheets and .CSV Files.............................................................359
Using RSS Feeds ..................................................................................................................371
Integrating Google Spreadsheets .................................................................................. 377
Importing a Twitter Feed into Livestream Studio.......................................................387
Using a .CSV Over HTTP ..................................................................................................393
Livestream Studio Certified Data Sources ...................................................................399
Building a Picture-in-Picture Graphic........................................................................... 404
Building a Clock or Timer ................................................................................................ 414
Importing Animated Graphics......................................................................................... 431
Media Playback ................................................................................................................................436
Configuring Media Playback Settings ...........................................................................437
Media Playback Transcoder Supported Video Formats ........................................... 441
Importing Videos into the Media Playback Module ..................................................445
Use Dropbox to Import Video Files...............................................................................447
Controls & Options in Livestream Studio Media Bin.................................................457
Basic Video Replay While Recording ............................................................................465
Exporting Clips from Livestream Studio...................................................................... 468
5

Remote Cameras ............................................................................................................................ 471
Activating Bonjour Service for Remote Camera Sources........................................472
Using the Remote Desktop Client for Windows........................................................ 477
Using the Remote Desktop Client for macOS .......................................................... 483
Adding a Remote Live Interview.....................................................................................491
Using Mevo as a Remote Camera.................................................................................497
Best Practices for Mevo as a Remote Camera Source ............................................503
Bringing an iOS Camera Signal into Livestream Studio ...........................................507
Bringing a Broadcaster Signal into Livestream Studio .............................................. 510
Bringing an Android Camera Signal into Livestream Studio ................................... 519
Connecting a GoPro Camera to Livestream Studio .................................................525
Bringing Other Streams into Livestream Studio .........................................................530
Uninstall Mac OS X Remote Camera and Audio Redirector...................................534
Web Control .....................................................................................................................................538
What is Studio Web Control? ..........................................................................................539
Add a User to Studio Web Control ................................................................................546
Supported Browsers and Devices for Studio Web Control.....................................550
Using Graphics Overlays in Studio Web Control ....................................................... 551
Media Playback in Web Control (Beta) .........................................................................564
Studio Simulcasting via Web Control............................................................................569
6

Advanced Features..........................................................................................................................579
Using Chroma Key............................................................................................................ 580
Hardware Encoding and Decoding with Livestream Studio...................................594
How Do I Know if My Intel Processor Includes Quick Sync?................................ 600
How Do I Know if My GPU Supports NVENC and NVDEC?.................................. 603
Using a Bonded Network to Stream .............................................................................607
Configuring Mid-Roll Advertisements............................................................................611
Adding & Configuring Tally Lights.................................................................................. 615
NewTek NDI Integration in Livestream Studio............................................................619
Setting Up Studio as an RTMP Server ...........................................................................637
Create a Backup Stream to Livestream ........................................................................652
Enabling Closed Captioning Ingestion.........................................................................655
Import & Export Recorded Files Using Adobe Premiere Pro..................................659
Import & Export Recorded Files Using Final Cut Pro 7 ........................................... 660
Troubleshooting...............................................................................................................................661
Troubleshooting Steps: Not Seeing Input Source .....................................................662
Incorrect Order of Inputs ................................................................................................ 666
Livestream Studio Not Fitting Within Screen ..............................................................672
Can't Access Studio From Login Window ...................................................................674
My Studio PIN Is Invalid. What Do I Do? ......................................................................676
Studio Recording Does Not Play Back ......................................................................... 677
Remote Cameras and Direct Inputs out of Sync.......................................................678
Send Studio Logs to Livestream.....................................................................................681
How to Use the Studio USB Recovery Drive ............................................................. 684
Studio Software Crashes From Launch........................................................................691
Network Resource Unavailable When Installing Studio...........................................692
What is Livestream Studio's Warranty? ........................................................................ 694
Uninstalling Livestream Studio........................................................................................695
7

RRequirequirements &ements &RRececommendaommendationstions
8

RRececommended Harommended Hardwardware Specificae Specificationstionsffor Livestror Livestream Studioeam Studio
Below are the recommended hardware specifications for running Livestream
Studio, including example workflows that each system type can handle.
Please note that many of these scenarios involve using Livestream Studio's hardwareencoding feature. This is when the encoding is done either by a supported graphicscard or in a processor that has integrated graphics.
9

Desktop Computer with HarDesktop Computer with Hardwardware Ence Encoding Enabledoding Enabled
HarHardwardware Componente Component RRececommended Minimum Desktop (withommended Minimum Desktop (withHarHardwardware Ence Encoding)oding)
Processor with Integrated Graphics Quad Core Intel® i5 (6th Generation) ori7 (4th Generation) Processor or better
Graphics Quick Sync-enabled CPU or NVIDIANVENC-enabled GPU
Memory 8 GB or better
Storage 128GB SSD + 512GB HDD or better
Motherboard Intel compatible motherboard
Example of a supported workflow • Camera sources: Multiple HD inputs& outputs
• Streaming: Up to 1080p multi-bitratestreaming profiles
• Graphics: Intermediate graphicstemplates and layering with picture-in-picture, chroma key, and imageoverlays
10

Desktop Computer without HarDesktop Computer without Hardwardware Ence Encodingoding
HarHardwardware Componente Component RRececommended Specificaommended Specifications (notions (noharhardwardware ence encoding)oding)
Processor 6 (Hexa) Core Intel® i7 5th GenerationExtreme Edition or better
Graphics NVIDIA GeForce 600 Series or better
Memory 16GB or better
Storage 2TB SSD
Motherboard Intel compatible motherboard
Example of a supported workflow • Sources: Multiple HD Inputs/Outputs• Streaming: Up to 720p multi-bitrate
streaming oror single-bitrate 1080pstreaming
• Graphics: Intermediate graphicstemplates and layering with picture-in-picture, chroma key, and imageoverlays
11

AdvancAdvanced Desktop Computer with Hared Desktop Computer with Hardwardware Ence Encodingoding
HarHardwardware Componente Component RRececommended Desktop Specificaommended Desktop Specificationtion
Processor 6 (Hexa) Core Intel i7 6th GenerationExtreme Edition or better
Graphics NVENC enabled NVIDIA GPU (Such asNvidia Geforce GT 730)
Memory 32-64GB DDR4 Memory
Storage 2TB SSD
Motherboard Intel compatible motherboard
Example of a supported workflow • Sources: Multiple 4K / HD Inputs andOutputs
• Streaming: 4K / 1080p multi-bitratestreaming
• Graphics: Advanced graphicstemplates and layering with picture-in-picture, chroma key, and animatedgraphic overlays
12

Minimum Laptop with HarMinimum Laptop with Hardwardware Ence Encodingoding
HarHardwardware Componente Component Minimum Laptop SpecificaMinimum Laptop Specification (withtion (withHarHardwardware Ence Encoding)oding)
Processor with integrated graphics 4 (Quad) Core Intel i5 - 6th Generationor better
Memory 8GB or better
Graphics Quick Sync enabled CPU or NVIDIANVENC enabled GPU
Storage 500GB HDD (SSD preferred) or better
Example of a supported workflow • Sources: USB Webcams, USB 3.0Capture devices and RemoteCameras over LAN/WLAN
• Streaming: Up to 720p multi-bitratestreaming
• Graphics: Simple grahpics templateswith picture-in-picture and staticoverlays (no chroma key, noanimated graphics)
13
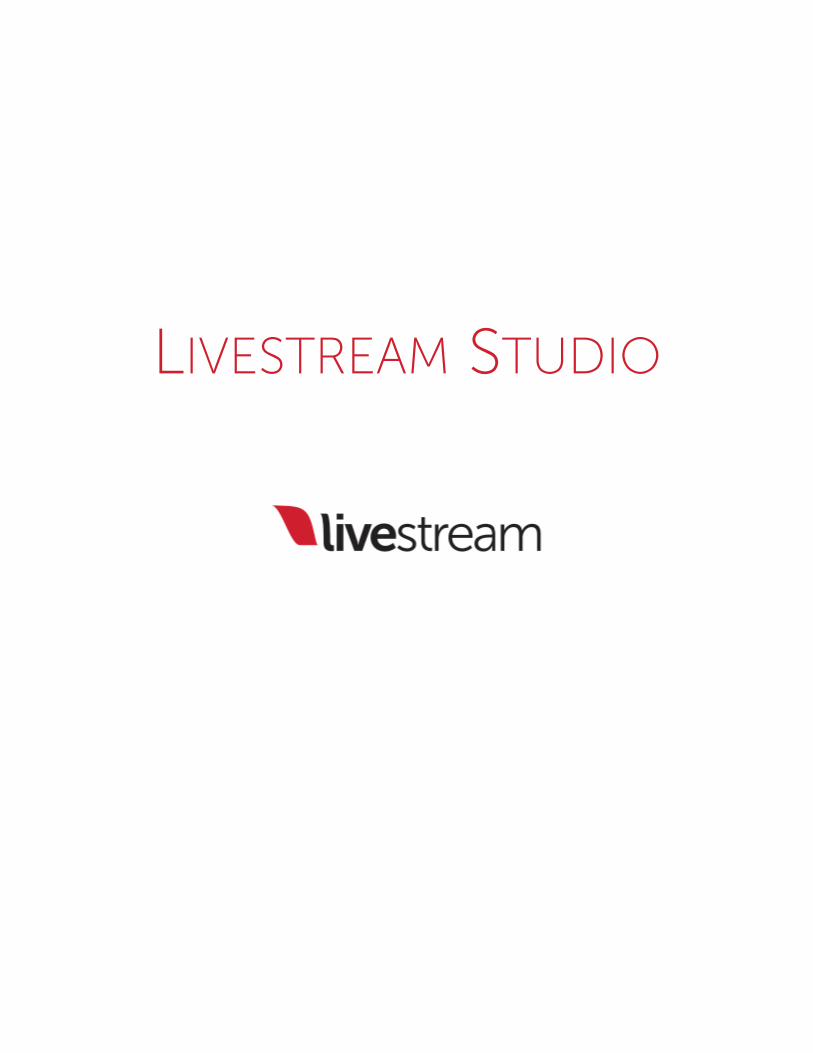
AdvancAdvanced Laptop with Hared Laptop with Hardwardware Ence Encodingoding
HarHardwardware Componente Component AdvancAdvanced Laptop specificaed Laptop specification (withtion (withharhardwardware ence encoding)oding)
Processor with integrated graphics 4 (Quad) Core Intel i7 - 6th Generationor better
Graphics Quick Sync enabled CPU or NVIDIANVENC enabled GPU
Memory 16 GB DDR4 Memory or better
Storage 500 GB SSD or better
Example of a supported workflow • Sources: USB Webcams and USB 3.0Capture devices
• Streaming: Up to 1080p Multi-bitratestreaming profiles..
• Graphics: Intermediate Graphicstemplates and layering w/ PiP,Chroma Key, and image overlays.
Additional NotesAdditional Notes
• Livestream Studio is not compatible with Windows 32-bit systems.• Studio for macOS is currently available in beta.• If you intend to use USB 3.0 capture devices for any video input or output, we
recommend your motherboard have an Intel X99 chipset, as X79 chipsets do notsupport these USB 3.0 devices. Please see Blackmagic's notice regarding USB 3.0device support.
14

Supported CapturSupported Capture Device Devices fes for Livestror LivestreameamStudio™Studio™
Here is a full list of supported capture devices:
PCIe
- **Blackmagic Decklink SDI
- Blackmagic DeckLink SDI 4K
- **Blackmagic DeckLink Duo
- Blackmagic DeckLink Duo 2
- **Blackmagic DeckLink Quad
- Blackmagic DeckLink Quad 2
- **Blackmagic DeckLink Optical Fiber
- **Blackmagic DeckLink Studio
- Blackmagic DeckLink Studio 4K
- **Blackmagic DeckLink HD Extreme 3D
- Blackmagic DeckLink 4K Extreme
- Blackmagic DeckLink 4K Extreme 12G - Quad SDI
- Blackmagic DeckLink 4K Pro
- Blackmagic DeckLink Mini Recorder (capture only)
- Blackmagic DeckLink Mini Monitor (playback only)
- Blackmagic Intensity Pro 4K
- Blackmagic DeckLink Mini Recorder 4K (capture only)
- Blackmagic DeckLink Mini Monitor 4K (playback only)
- Magewell Pro Capture AIO
- Magewell Pro Capture HDMI
15

- Magewell Pro Capture Quad HDMI
- Magewell Pro Capture SDI
- Magewell Pro Capture Quad SDI
- Magewell Pro Capture Mini HDMI
- Magewell Pro Capture Mini SDI
****Indicates this product has been discontinued. However, it is still compatible with oursoftware if you already own it.
Thunderbolt
- Blackmagic UltraStudio Mini Recorder (capture only)
- Blackmagic UltraStudio Mini Monitor (playback only)
- **Blackmagic UltraStudio 3D
- Blackmagic UltraStudio 4K
- Blackmagic UltraStudio 4K Extreme
- Blackmagic UltraStudio 4K Extreme 3
- **Blackmagic UltraStudio Express
- Blackmagic Intensity Shuttle for Thunderbolt
- **Blackmagic Intensity Extreme
****Indicates this product has been discontinued. However, it is still compatible with oursoftware if you already own it.
Blackmagic Design does not currently offer capture devices that connect via
Thunderbolt 3.
16
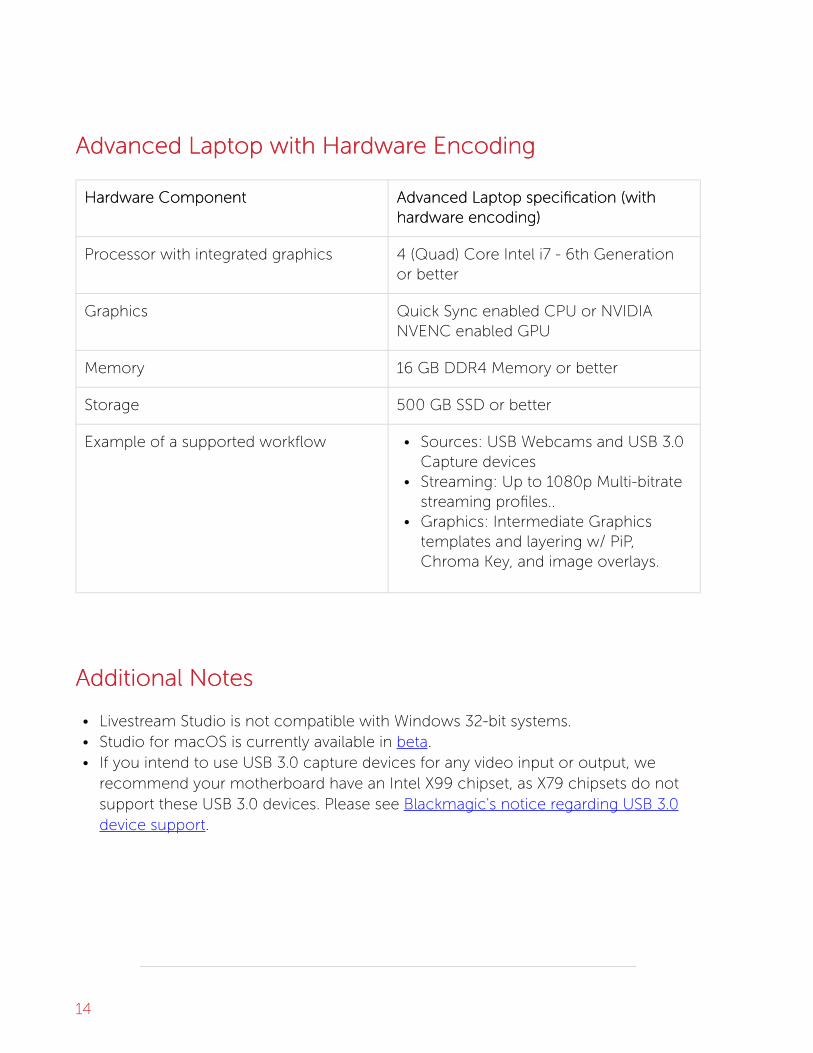
Please make sure you are plugging Thunderbolt capture devices into a ports
that have a Thunderbolt logo; oftentimes, these can be confused with display
ports.
USB 3.0
- Blackmagic UltraStudio Pro
- Blackmagic UltraStudio SDI
- Blackmagic Intensity Shuttle for USB 3.0
- **Blackmagic ATEM 1 M/E Production Switcher
- **Blackmagic ATEM 2 M/E Production Switcher
- Magewell USB Capture HDMI
- Magewell USB Capture SDI
****Indicates this product has been discontinued. However, it is still compatible with oursoftware if you already own it.
Blackmagic USB 3.0 encoding devices are not supported on all machines. In
particular, motherboards with an Intel X79 chipset do not support Blackmagic
USB 3.0 devices. Please see Blackmagic Design's notes about USB 3.0 system
requirements.
Studio does not utilize the individual inputs on the ATEM production
switchers. Studio can ingest the output from these production switchers via
USB 3.0.
17

Important:Important: Capture devices that connect via USB 2.0 are not cnot compaompatibletible with
Livestream Studio.
The following Blackmagic Design products do notdo not work with Livestream Studio:
- H.264 Pro Recorder
- ATEM Television Studio
- ATEM Production Studio 4K
- ATEM 1 M/E Production Studio 4K
- ATEM 2 M/E Production Studio 4K
- ATEM 2 M/E Broadcast Studio 4K
If you would like to connect one of the ATEM 4K switchers to Studio, it isrecommended to utilize one of their video outputs (HDMI, SDI, etc.) into a BlackmagicCapture device that Studio does support.
18

WhaWhat Cameras Wt Cameras Work with Livestrork with LivestreameamStudio?Studio?
Livestream Studio is compatible with USB webcams, consumer HDMI camcorders,
and higher end HD-SDI cameras. Older cameras can also connect via component,
composite, and S-Video provided you have the proper video capture cards to
connect them to your PC.
USB Webcams are ideal for very localized use, as most webcams' cables do not extendbeyond six feet.
HDMI cameras range in size and cost and work best for shorter distances. While longerHDMI cables are available, we recommending staying below 20 feet to retain optimalvideo quality.
HD-SDI cameras are much pricier but can be worth the cost if your productionrequires long cable runs. SDI cables can transmit audio & video over hundreds of feetwithout losing video quality.
Livestream Studio does support 4K camera inputs, provided that you install a 4Kcompatible capture card. Please be advised that not all providers support streaming in4K at this time.
A Note RA Note Regaregarding PTZ Camerasding PTZ Cameras
If you wish to use a PTZ camera with Livestream Studio, it must either include a videooutput interface (e.g. SDI) or be NDI compatible. If your PTZ camera does not includeeither of these specifications, then it will not work with Livestream Studio.
19

360 Cameras360 Cameras
Livestream Studio does not support 360 cameras and video formats at this time.
20

PPower Rower Requirequirements fements for Livestror LivestreameamStudio™ HarStudio™ Hardwardware Pre Productsoducts
The power required to run Livestream Studio will be dependent on the type of systemyou are running the software on.
The HD51, HD510, and HD550 have the following power requirements:
• 230 / 110 Volts• Approximately 500 watts running at full capacity
21

ForForcing Windows PC to Run Maximumcing Windows PC to Run MaximumAmount oAmount of Corf Coreses
To optimize your computer's performance when using Livestream Studio, we
recommend forcing your system to use its maximum amount of cores (usually
four or six; the below example has eight).
This does not apply to macOS systems.
Open the Windows start menu and type "RunRun," then open the Run desktop app.
Type mscmscononfigfig into the text field, then click OK.
22

This window will open up. Navigate to the BootBoot tab.
Click AdvancAdvanced options...ed options...
23

Check Number oNumber of prf prococessorsessors to enable the dropdown menu.
24

Select the highest number of processors your system has (in this case, 8). Then clickOK.
25

Apply the settings, then click OK.
26
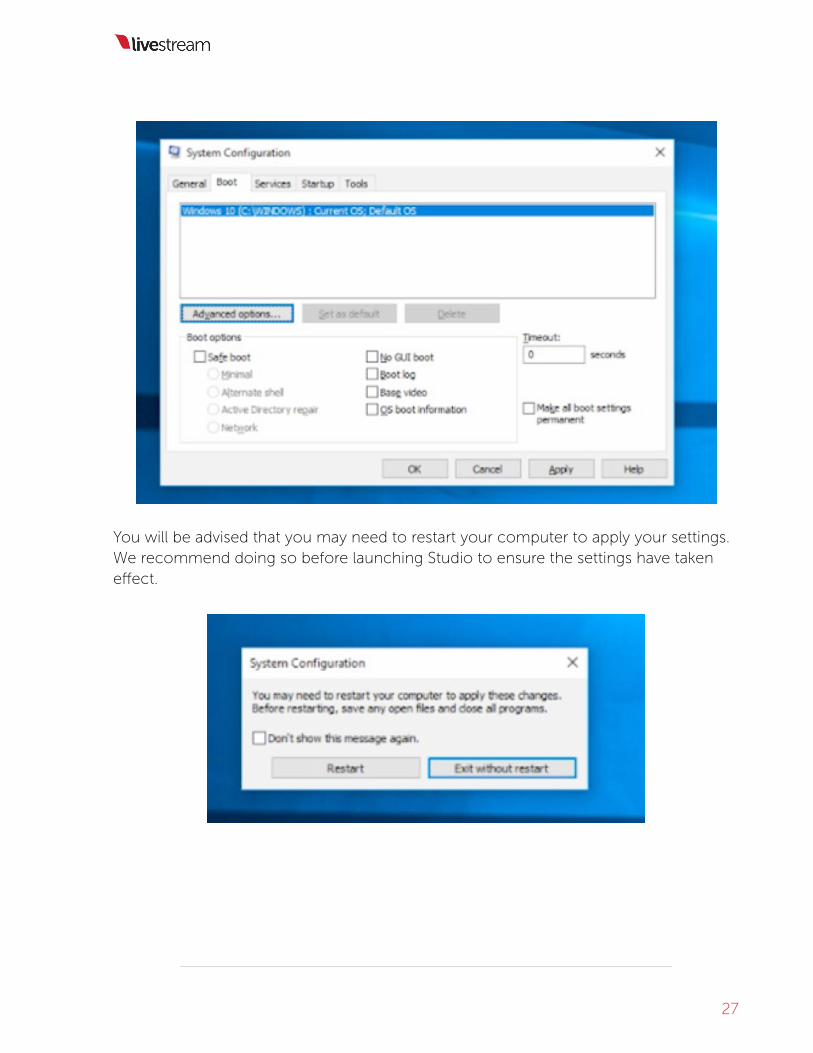
You will be advised that you may need to restart your computer to apply your settings.We recommend doing so before launching Studio to ensure the settings have takeneffect.
27

RRececommended Pommended Power Settings Forower Settings ForRunning Studio on a LaptopRunning Studio on a Laptop
Version 4.2 of Livestream Studio allows for a wider variety of PCs to run Studio with
the addition of the harhardwardware ence encodingoding feature. Below we have some additional
settings in Windows to help optimize its performance.
This does not apply to macOS systems.
Set PSet Power Setting to High Power Setting to High Perferformancormance Modee Mode
Go to the Start Menu and navigate to PPower Optionsower Options. (This can also be found withinthe Control Panel.)
28

Click the dropdown arrow next to Show additional plansShow additional plans.
High perfHigh performancormancee will appear as an option. Click the corresponding radio button toselect it. After doing so, click Change plan settingsChange plan settings.
29

Under TTurn ourn off the displayff the display, select NeverNever.
Under Put the cPut the computer to sleepomputer to sleep, select NeverNever.
30

Click Save changesSave changes.
31

Fix Font Sizing Issues in Windows 10Fix Font Sizing Issues in Windows 10
Scaling Windows font to 100% will make it easier to use Studio with Windows 10.
Navigate to WindowsWindows SettingsSettings.
Select SSystemystem.
32

Select DisplayDisplay, and drag the scale all the way to the left so it reads 100%. Then clickApplyApply to save the settings, which will then take effect immediately.
33

34

PrPrevent Automaevent Automatic Windows Updatic Windows Updatestes
The last thing you want right before or during an event is to be forced to update
Windows, which could postpone your setup or interrupt your stream. While there
is no way to turn off updates entirely, you can configure Windows settings to run
updates only at certain times.
Since macOS does not automatically restart or force updates, this article only
applies to Windows systems.
Open the StartStart menu and click the gearwheel to open SettingsSettings.
Select UpdaUpdate & securityte & security.
35

Under the Windows UpdaWindows Updatete tab, click Change active hoursChange active hours.
36

You can choose a 12-hour time range during which Windows will not automaticallyupdate. If an update becomes available during that time frame, a notification willappear letting you know that your computer will restart outside of active hours.
37

If you do see the notification and feel your event is going to run longer, you can selectRRestart Optionsestart Options and tell Windows when to restart your computer to install updates.
38

39

PrPrevent Windows Updaevent Windows Update Sharingte Sharing
Included with Windows 10 is the ability to send and receive software updates from
other nearby PC's automatically. While this may be convenient in other use-cases,
it can take up bandwidth and CPU resources that you would rather preserve for
Livestream Studio, so we recommend disabling this feature while using Studio.
This does not apply to macOS systems.
Open the Start menu and type in Windows UpdaWindows Update settingste settings. When this option appearsin the menu, select it.
Under the UpdaUpdate settingste settings section, select AdvancAdvanced optionsed options.
40

Scroll down to the bottom of the window to the Pause UpdaPause Updatestes section and selectChoose how updaChoose how updates artes are delivere delivereded.
41

Toggle the switch to OffOff.
42
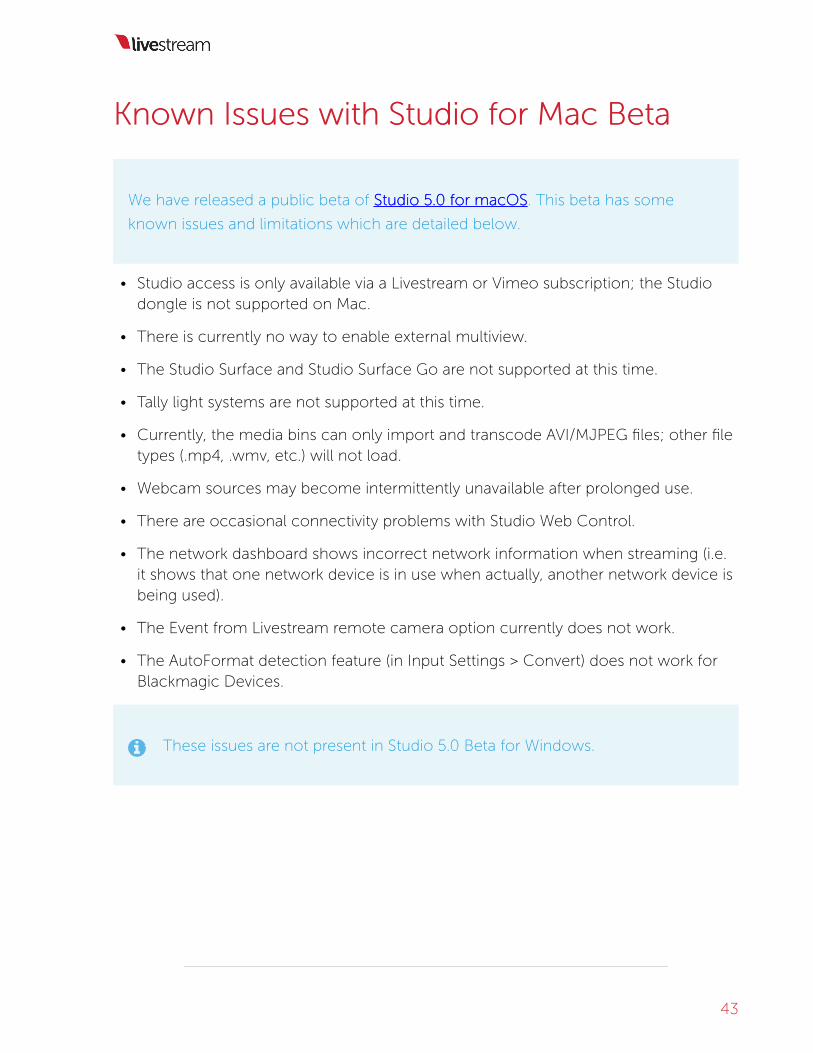
Known Issues with Studio fKnown Issues with Studio for Mac Betaor Mac Beta
We have released a public beta of Studio 5Studio 5..0 f0 for macOSor macOS. This beta has some
known issues and limitations which are detailed below.
• Studio access is only available via a Livestream or Vimeo subscription; the Studiodongle is not supported on Mac.
• There is currently no way to enable external multiview.
• The Studio Surface and Studio Surface Go are not supported at this time.
• Tally light systems are not supported at this time.
• Currently, the media bins can only import and transcode AVI/MJPEG files; other filetypes (.mp4, .wmv, etc.) will not load.
• Webcam sources may become intermittently unavailable after prolonged use.
• There are occasional connectivity problems with Studio Web Control.
• The network dashboard shows incorrect network information when streaming (i.e.it shows that one network device is in use when actually, another network device isbeing used).
• The Event from Livestream remote camera option currently does not work.
• The AutoFormat detection feature (in Input Settings > Convert) does not work forBlackmagic Devices.
These issues are not present in Studio 5.0 Beta for Windows.
43

Can I Run Anti-Virus SoCan I Run Anti-Virus Softwarftware on my Studioe on my StudioPC?PC?
Running anti-virus software that includes real-time protection while using LivestreamStudio can use up CPU resources and possibly even interrupt your stream'sconnection.
As a best practice, anti-virus software, Windows Firewall, and similar real-timeprotections should be disabled while you are running Livestream Studio, and ifpossible, your system should be dedicated to just using Studio. Do not download filesfrom sources you do not trust onto your Studio computer.
44

Getting Started withGetting Started withLivestrLivestream Studioeam Studio
45

WhaWhat is Livestrt is Livestream Studio?eam Studio?
Livestream Studio is a live production switcher that incorporates many elements of
a professional live multi-camera production into one desktop software. Think of it
as a live production truck or a TV station's master control room in your computer.
Its most basic features include:
• Connect up to 25 camera inputsConnect up to 25 camera inputs: Plug in your cameras directly into your PC to getas many angles as you need.
• Send up to 25 live video outputsSend up to 25 live video outputs: Output your video to projectors or monitors; idealfor auditoriums, conferences, and houses of worship.
• ThrThree graphic overlay tracksee graphic overlay tracks: Build graphic overlays to countdown to your eventstart, identify people, loop tweets using your event hashtag, or display a scoreboard.
• TTwo media playback moduleswo media playback modules: Bring in pre-recorded video clips to incorporate intoyour production, such as sponsored content or montages.
• Built-in audio mixBuilt-in audio mixerer: Embed audio from your cameras or connect a USB mixer ormicrophone and control all the audio for your event directly from Studio.
• CapturCapture up to fe up to four high-rour high-resolution isolaesolution isolated (ISO) rted (ISO) rececorordingsdings: Record your event orindividual camera angles in broadcast quality for post-production editing or replay.
• Basic rBasic replayeplay: Play back an ISO recording as your broadcast is happening, givingviewers a different angle of your event (e.g. a goal score).
• ChrChroma koma keyey: Eliminate a colored background to incorporate different backgroundimages into your event (e.g. a weather map, virtual studio)
• StrStream to Livestream to Livestream and other pream and other providersoviders: Go live to Livestream, Facebook,YouTube, Periscope, Twitch, and more. Choose one or stream to multiplesimultaneously.
Many more advanced features are also included.
What Equipment Do I Need In Order to Use LivestreamStudio?
First and foremost, you need cameras. Studio is compatible with most SDI, HDMI,component, composite, S-video, and USB web cameras that output broadcaststandard formats. If you do not own any cameras and need some suggestions, we
46

have some here. Keep in mind you will also need the proper cables to output thesecameras' video signals into Studio (HD-SDI camera = HD-SDI cable, etc.)
Next, you need to be able to connect these cameras to the computer that is runningStudio. This is done using a capturcapture device devicee. These can connect to your computer viaPCIe, USB 3.0, or Thunderbolt, and convert your camera's video into a signal your PCcan read. Read more about what a capture device is and which capture devicesLivestream Studio supports.
With few exceptions, you will need one capture device per camera. Webcams do notrequire a capture device.
Finally, you need a PC running Windows 64-bit version 7 or higher. Studio for Mac iscurrently in beta and works on Mac OSX Sierra or higher.
Studio requires a robust computer in order to run with all of its features successfully.We have a comprehensive guide of recommended hardware specifications dependingon your workflow needs.
If you are interested in or have already purchased a Livestream Studio
hardware product (e.g. HD31, HD51, HD550), capture devices are already built
into your machine. There is no need to purchase additional capture devices
or an additional PC.
How Do I Get Livestream Studio?
We offer Livestream Studio in various forms to accommodate as many needs andbudgets as possible. Get started with a 30-day free trial or learn about the differentways to purchase Studio.
47

The DiffThe Differerent Went Ways Tays To Aco Acccess Livestress LivestreameamStudioStudio
There are a variety of ways to gain full access to Livestream Studio:
Purchase a Livestream Subscription
Unlimited access to two (2) licenses of Livestream Studio is available with anyLivestream platform subscription. Download Livestream Studio and launch thesoftware. Select Get StartedGet Started on the right side to choose subscription access.
Your browser will open, allowing you to sign up immediately for a plan. Select the SignSignUp NowUp Now button that corresponds with the desired plan.
Learn more about what each plan offers.
Choose whether to purchase a yearly plan or pay month-to-month and complete theform by entering your payment information. Once you are done, you will see awindow indicating a plan has been purchased. Click NextNext to continue using your planand Studio.
48

Livestream Studio will indicate that your full access has been unlocked.
You must be connected to the internet and logged in to your subscribed
account on Livestream Studio in order to access the software.
One-Time Purchase: Software Dongle
Livestream Studio requires an internet connection in order to run when using it in trialmode or as part of a subscription (described above). If you intend to use it offline orwould prefer to not make recurring payments, you can purchase full access to thesoftware via USB dongle with a one-time payment of $799.
49

When you launch Studio, you will see a screen with various purchase options. SelectBuy StudioBuy Studio on the left side.
Your web browser will open and direct you to the Livestream Store. Livestream Studiowill be placed in your cart. Select Check OutCheck Out to proceed with the order.
This one-time purchase of Studio includes a physical USB dongle that must stayconnected to your computer in order to unlock access to Livestream Studio whileusing the software. This is why you will need to select a shipping method and entershipping information along with your billing information.
Once you have completed the order, Livestream will process and ship the LivestreamStudio dongle to your shipping address.
This dongle does not include access to stream to the Livestream Platform. If
50

you wish to use Livestream as your streaming destination, you will need to
purchase a Livestream subscription.
It's best to plug the dongle into a USB 2.0 port (black), not a USB 3.0 port
(blue). Learn more about using the USB dongle.
One-Time Purchase: Hardware
If your computer does not meet our recommended specifications or you do not feelcomfortable building a custom machine, we offer hardware options that include fullaccess to Livestream Studio and Blackmagic Design capture devices pre-installed. Thisoption, like the software dongle, also allows for offline use. Learn more our availablemodels:
• HD31• HD51• HD550
51

Studio hardware units do not include access to stream to the Livestream
Platform. If you wish to use Livestream as your streaming destination, you will
need to purchase a Livestream subscription.
All features available with Studio, such as streaming to other providers, SDI/HDMI/NDIoutputs, 10 remote cameras, etc. are available with all of these options.
The diffThe differerencences between these options ares between these options are:e:
• Ability to StrAbility to Stream to the Livestream to the Livestream Plaeam Platftformorm• While the dongle and hardware solutions give you the ability to stream to
various providers, a Livestream subscription is required in order to stream to theLivestream Platform.
• Number oNumber of Licf Licenses:enses:• Subscription access to Studio grants you access to two Studio licenses, allowing
you to run Studio on two different computers using the same login.• Both one-time purchase options offer one Studio license per unit.
• Offline AOffline Availability:vailability:• Purchasing Studio via a subscription requires having an internet connection at all
times.• Both one-time purchase options allow you to access Studio without an internet
connection (although streaming will still require an internet connection).
• Phone Support:Phone Support:• Customers that purchase a subscription that includes phone support will have a
PIN for the length of their subscription.• Please note that phone support is not available with all plans.
• Customers who make a one-time purchase get one (1) year of phone support.After one year, you can contact customer care via email or extend phonesupport access.
• PaymentPayment
52

• Subscriptions are available on a monthly or yearly basis. If you plan to use Studiofor a limited time, or you plan to use Studio with the Livestream platform, this isa more cost-effective option for you. Learn about our subscription options here.
• When you purchase the dongle or a hardware unit, you have Studio access forlife. If you intend to use Studio for the long-term with a provider other thanLivestream, this is the most cost-efficient option for you. Visit our store to see allone-time purchase options.
As an additional note, customers who already made a one-time Studio purchaseandand have a Livestream subscription have access to up to three separate Studio licensesand thus have the ability to run Studio on three different machines if desired.
53

TTry Livestrry Livestream Studio Befeam Studio Beforore Buyinge Buying
There is a trial option with Livestream Studio. The duration of the trial varies
depending on the provider you are using.
Download and install Livestream Studio. When the installation is complete, thesoftware will launch and you will see the following screen.
A demo of Studio is available by signing up for either Livestream or Vimeo. Selectwhichever provider you prefer at the bottom of the window. When you finished signingup, you can start testing out Studio.
LivestrLivestream Team Trialrial
If you selected Livestream, you will have a trial of Studio available to you for 30 days30 days.The limitations of this trial include:
• No more than 10 concurrent viewers per stream
54

• Maximum 20 minutes per stream.• Viewers must be logged in to a Livestream account in order to see your content.
All other features of Livestream Studio are available to you during this trial. You will seea countdown for how many days you have left in the trial in the StrStreameam module.
Your default draft event (created when you signed up for the trial) is already selected asyour streaming destination. You can stream to this event or select + New E+ New Eventvent to theright of the EEvent Namevent Name menu.
When your 30 days are up, you will be prompted to upgrade your Livestream accountto a paid plan.
Vimeo DemoVimeo Demo
55

Signing up for Vimeo gives you access to a 10-minute live demo. This means you havefull access to Livestream Studio and may broadcast for a total of 10 minutes before thedemo expires.
A countdown of your demo time remaining will appear when you navigate to theStrStreameam tab and hover the cursor over the Vimeo icon at the bottom of the interface.
All video recordings and outputs will include a watermark during this demo period.
Your demo will expire after you have streamed for a total of 10 minutes.
To continue using Livestream Studio when your free access expires, we have a fewoptions for purchasing.
56

How to Install LivestrHow to Install Livestream Studioeam Studio
Livestream Studio software can be downloaded onto a Windows or Mac (beta only)computer from livestream.com/studio by clicking on the DownloadDownload to Get Startedto Get Startedbutton.
If you are using Windows, you must be logged in as an Admin user in order to
install and run Livestream Studio. You will also need an Internet connection
for this entire process.
If you purchased a Livestream Studio hardware product (HD31, HD51, HD550,
etc.), Livestream Studio software is already pre-installed on your unit.
57

Select which operating system you are using: Windows or Mac. Keep in mind thatStudio for Mac is currently in beta.
Installing on WindowsInstalling on Windows
The download will begin automatically. Open the .exe file.
It will bring you to the installation wizard for the Livestream Studio Launcher.
Agree to the license terms and follow the on-screen steps to complete the installationprocess, then click FinishFinish in the wizard.
58

The Livestream Studio Launcher will open, download the Studio software, and promptyou to install the software via another installation wizard.
59

When the installation is finished, the most recent version of Livestream Studio willlaunch on your system.
Installing on MacInstalling on Mac
After the .pkg file downloads, click it to open it. The install wizard will open. Follow theon-screen steps to complete the installation. Upon completion, Livestream Studio willlaunch automatically.
60

61

Using the LivestrUsing the Livestream Studio USB Dongleeam Studio USB Dongle
If you made a one-time purchase of Livestream Studio for your own computer, you willreceive a USB dongle which will give you access to your full Studio license.
By plugging this dongle into a USB 2.USB 2.00 port, you'll be able to access all of the paidfeatures of Livestream Studio without the need for a Livestream account.
The dongle must be connected to your PC at all times while using Livestream Studio inorder to use the software. If you have multiple computers that require full access toLivestream Studio simultaneously, then you will need one dongle per system.per system.
Additional Notes about Using the DongleAdditional Notes about Using the Dongle
• The Studio Dongle does notnot include the ability to stream to the LivestreamPlatform; if you wish to use Livestream as your streaming destination, you will needto purchase a Livestream subscription.
• Livestream Studio hardware units (HD31, HD51, HD550, etc.) do not require anadditional software dongle. The license will already be unlocked when you launchLivestream Studio on those systems.
• We urge you to keep your Studio dongle in a safe place. If you are building acustom computer to run Studio, consider building it so that the dongle is on theinside of the unit.
62

• We do not support plugging the USB dongle into the USB 3USB 3..00 port due toinconsistent results. If you have done this and were able to load Studio successfully,please let us know by contacting us and providing your system's hardwarespecifications.
63

WhaWhat Happens If I Lt Happens If I Lose My Studio Dongle?ose My Studio Dongle?
Per Livestream Studio terms, if your Studio USB dongle is lost or stolen, you areresponsible for purchasing a new one. Livestream will not replace Studio dongles.
We urge you to keep your Studio dongle in a safe place. If you are building a customcomputer to run Studio, consider building it so that the dongle is on the inside of theunit.
64

LLog Into Livestrog Into Livestream Studio via aeam Studio via aSubscriptionSubscription
If you have already purchased a Livestream or Vimeo Live subscription, you also
have full, unlimited access to two (2) Livestream Studio licenses. This means you
can run Livestream Studio on two separate systems using your account login.
After you have installed the Livestream Studio software on a Windows or Maccomputer, a welcome window will pop up prompting you to log in via Livestream orVimeo. Select the provider you are using to log in.
If you select Livestream, enter your email and password in the next window, thenselect LLog In With Emailog In With Email.
65
If you selected Vimeo, a browser window will open prompting you to log in to Vimeoand authorize Livestream Studio access to your account. Once you grant Studioaccess, navigate back to the software.
Please be advised that subscription access to Livestream Studio will require an
internet connection at all times. If you feel you will need to use Livestream
Studio offline at any point, we recommend looking into our other one-time
purchase options.
66

Arranging & Simplifying the LivestrArranging & Simplifying the LivestreameamStudio InterfacStudio Interfacee
While Livestream Studio maintains a generally consistent layout, there are a few
ways you can customize the interface to best fit your needs.
Select YSelect Your Interfacour Interface Modee Mode
When you first log into Livestream Studio, you will be given the option to Choose aChoose aModeMode, as shown below.
SimpleSimple is ideal for beginners and producers with smaller workflows (1-2 cameras, fewgraphics, some video playback). This will display one Output window and a multiviewwhere you will click each source to select what is shown in the Output. By default, thismode displays a single column of producer tool tabs (e.g. Audio Mixer, Graphics,
67

Media, etc.). Selecting Simple will quickly remove a lot of clutter from the Studiointerface that smaller scale productions may not need.
AdvancAdvanceded is best for producers with larger scale workflows (multiple camera inputs,multiple graphics channels, picture-in-picture, etc.). This features the traditionalPreview/Program monitor setup and transition controls normally used in a multi-camera production, in addition to two columns of producer tool tabs by default so youcan see more on your screen.
Select one, then click CrCreaeate New Prte New Projectoject to start using Studio.
You can easily switch your project from one mode to the other by clicking theinterface icon in the upper right corner and choosing your interface mode.
Most demonstrations will feature the interface in Advanced mode. Instructions on howelements specific to Simple Mode work are available here.
RResizesize Thre Three Main Sectionsee Main Sections
Studio's interface consists of the Preview & Program or Output monitors on top, themulti-view in the middle, and production element modules on the bottom third of the
68

interface. This general layout cannot change, but you do have the ability to adjust thesizing of these three main sections by dragging and dropping the two section dividersup and down as you see fit.
In the example shown below, we raised the top divider to make the multiview sectionlarger.
Before:
After:
69

RRearrange Learrange Lower Modulesower Modules
When you first open Studio and add your inputs, the lower-third portion of theinterface includes all your additional production elements (audio mixer, remotecameras, graphics, media, stream configuration, etc.). These have a defaultarrangement, separated into two columns.
Left column:
70

Right column:
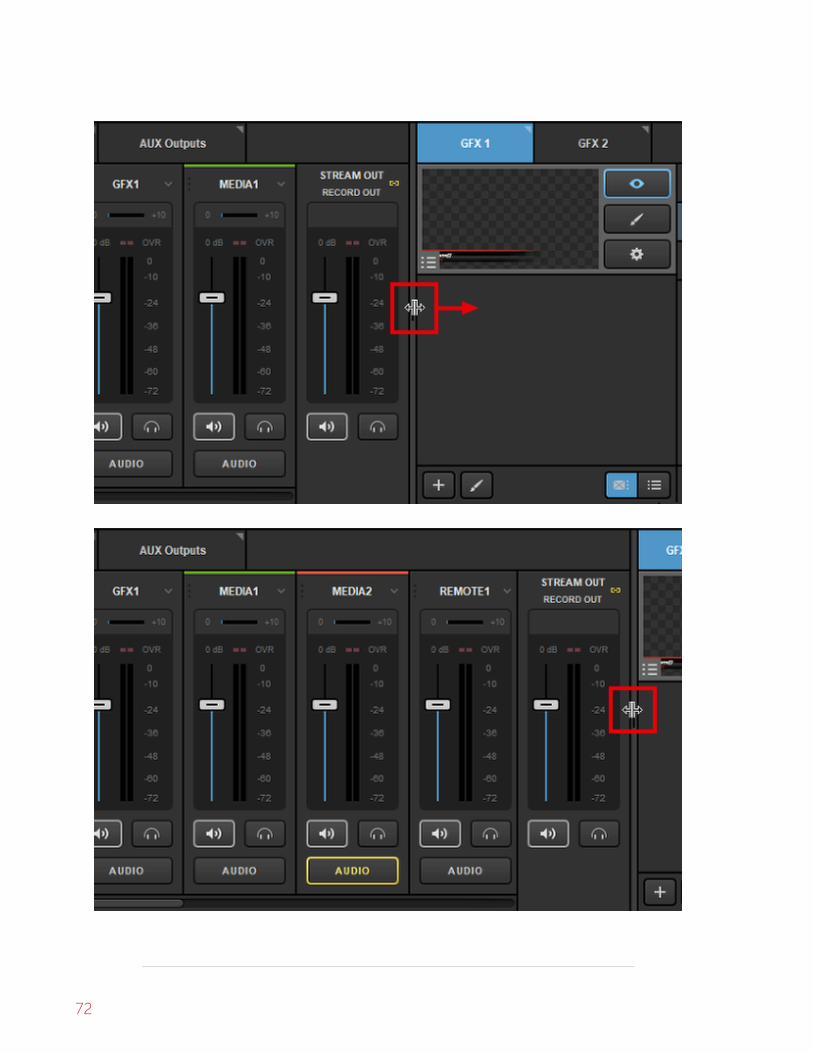
When using advanced mode, each column splits the screen evenly by default. If youprefer one to be larger than the other, drag and drop the middle divider the desiredlocation.
71
72

You can also collapse the entire right column by clicking the collapse button
on the far right side. Click it again to expand the column.
73

In addition to adjusting the width of each column, you can also rearrange the modulesby dragging and dropping each tab between the two columns.
For example, if you need to monitor audio and remote cameras at the same time, dragthe remote camera tab to the right column so you can see both the audio mixer andthe remote camera module simultaneously.
If you are using a limited number of additional elements or simply wish to not have twoseparate columns, go to Settings: PrSettings: Project Formaoject Formatt. Under the TTabs Conabs Configurafigurationtionsetting, select 1 Column1 Column.
74

75

LivestrLivestream Studio: First Stepseam Studio: First Steps
There are a variety of directions you can take when getting started with the software.Below are a few starting points to help guide you:
Connect Cameras to Livestream Studio
Seeing Camera Inputs in Studio
Creating & Saving Projects
Introduction to the Multi-View
Use a Mouse to Switch Sources
Use a Keyboard to Switch Sources
Control the Audio Mixer
Monitoring Audio
Adding Graphic Overlay Modules
Mixing Graphic Overlays into Program
Importing Videos into the Media Playback Module
76

Set up a High-Resolution Recording
Go Live to Livestream
These only scratch the surface of Livestream Studio's capabilities. Look for moreadvanced walkthroughs in the help center and the Livestream Studio User Manual.
77

CrCreaeating, Importing, and Exporting Prting, Importing, and Exporting Projectsojects
Livestream Studio has the ability to save, load, import, and export Livestream
Project files, allowing you to keep configurations saved on your system so you can
use them whenever you need to, without starting from scratch.
When you open Livestream Studio, by default you will be working on your previousproject (or UntitledUntitled PrProjectoject if it is your first time launching Studio). Click on the title inthe upper right corner to see more options.
To rename your project, simply type the name into the text box. When you click out ofthe window, the project will automatically be renamed.
78

Now your project is renamed. As you configure it (e.g. add graphics templates, importmedia clips, arrange inputs, etc.), it will save automatically. This occurs regardless of theproject being renamed, but now you can identify it.
You can create a new project at any time by clicking on your project title and selectingNewNew.
79

A new untitled project will open with default configurations. As mentioned above, youcan rename the new project by clicking on the title.
To go back to working on a previously saved project, click on the project title and clickOpenOpen. A dropdown list of your projects will appear. Click the project that you want towork on.
80

The selected project will then open as it last appeared in Livestream Studio.
You may want to keep a Studio project configuration saved on your hard drive if youintend to use it often or move it to another Studio system. For this case, we created theImport/Export feature. When your Studio project is configured the way you like it, clickthe project title, then ExportExport.
81
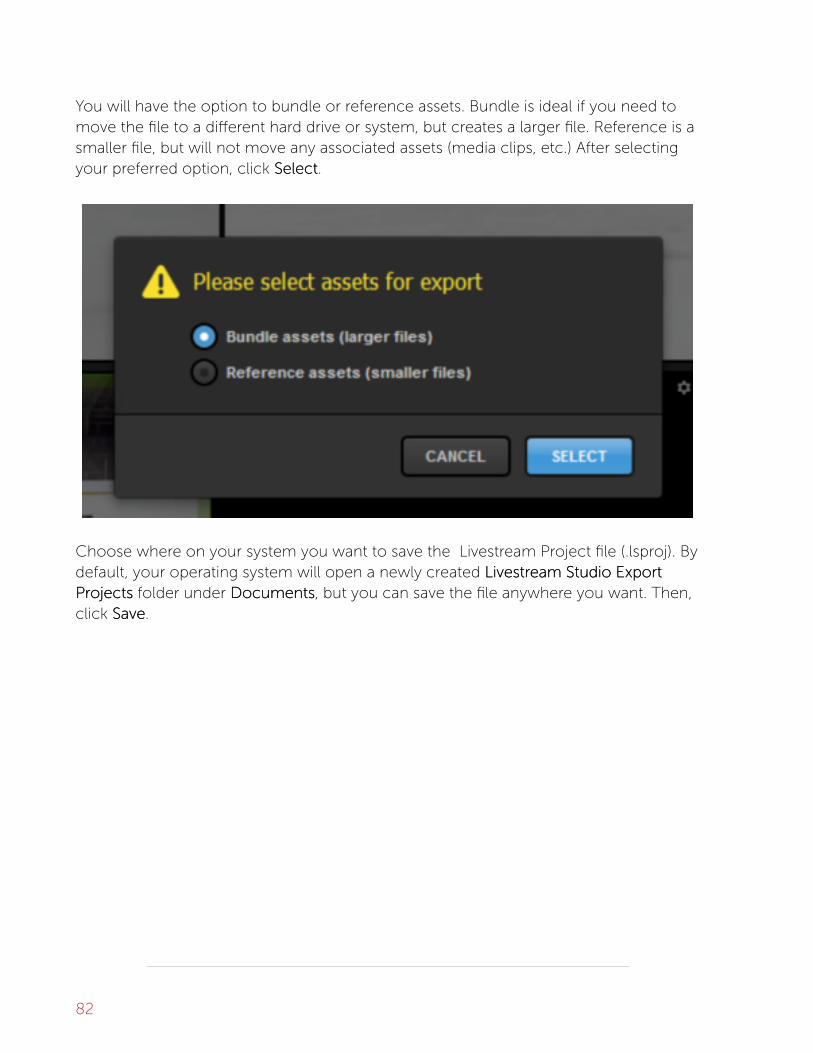
You will have the option to bundle or reference assets. Bundle is ideal if you need tomove the file to a different hard drive or system, but creates a larger file. Reference is asmaller file, but will not move any associated assets (media clips, etc.) After selectingyour preferred option, click SelectSelect.
Choose where on your system you want to save the Livestream Project file (.lsproj). Bydefault, your operating system will open a newly created LivestrLivestreameam StudioStudio ExportExportPrProjectsojects folder under DocumentsDocuments, but you can save the file anywhere you want. Then,click SaveSave.
82

Your system will warn if you already have a .lsproj of the same name and give you theoption of replacing it. If you click NoNo, you will have the option to rename it in your savelocation.
If you imported media files into your media bin, you will be asked whether to save theoriginal video files or their transcoded versions (i.e., the files created after they werebrought into Studio).
83

When you are ready to use that particular project file, you can click on the project titleand then on ImportImport.
Find your .lsproj file in Windows, select it, and click OpenOpen.
84

This will create a new project in Livestream Studio with the proper configurations set.You can rename this by clicking the project title if desired.
If you no longer intend to use the project you are working on, you can click the projecttitle and then DeleteDelete. This will not delete an exported file, but you will no longer beable to select it from the OpenOpen menu.
85

86

Importing & Exporting PrImporting & Exporting Projects via Drojects via Dropboopboxx
You have the option to save your Livestream Studio project files to a Dropbox
folder rather than a local folder if you wish. You can also import .lsproj files from
Dropbox into any Livestream Studio system using the same integration.
For the best experience, we recommend simplifying your Dropbox folder
structure to no more than 1 or 2 subfolders. Multiple subfolders can cause
extended sync times with Dropbox.
Connect Dropbox to Livestream Studio
To configure Dropbox, navigate to settings by clicking the gearwheel icon in the upperright corner of Studio.
Navigate to the DrDropboopboxx tab.
87

Click Connect DrConnect Dropboopboxx.
A browser window will open. Log in to your Dropbox account to connect it withLivestream Studio.
88

The browser will indicate that authorization was successful. Return to LivestreamStudio.
89

The Settings: DrSettings: Dropboopboxx window will indicate that your account is connected. ClickSelect FoldersSelect Folders to choose which folder to use with Livestream Studio.
90

Choose a local folder, which will include copies of anything you save to Dropbox onthe local hard drive as well. By default, this will be set to Documents > Dropbox, butyou can click BROBROWSEWSE to choose a different location.
Next, choose the Dropbox folder you want to work out of. This can either be a generic"Dropbox" folder (as selected above) or you can expand into any folders within yourDropbox account (e.g. "Projects," seen below).
When you are done selecting your folders, click Save.Save.
91

Your Dropbox account will sync with Livestream Studio. Make sure Use Files frUse Files fromomDrDropboopboxx is checked. Then save your settings.
92

Save Project to Dropbox
When you want to save your project to Dropbox, click the project name from theupper right corner, then click Export...Export...
93

Select whether to bundlebundle your assets into the project (e.g. graphics, media clips, etc.)or if the project should simply rrefefererencencee their file paths.
Give your project a name and make sure your folder is selected. Then click Export.Export.
94

The .lsproj file will now be saved in your Dropbox folder as well as the local folder youselected in settings.
Import Project from Dropbox
To import your project into Livestream Studio, click the project name in the upper rightcorner, then click Import...Import...
95

Click on your .lsproj file from the Dropbox folder, then click SelectSelect. Your project willopen up in Studio.
96

Video InputsVideo Inputs
97

Connect Cameras to LivestrConnect Cameras to Livestream Studioeam Studio
To connect your cameras to Livestream Studio, you must have a supported
capture device (unless you are using a webcam), a video cable that is compatible
with your camera (HD-SDI cable, HDMI cable, etc.), and any necessary cables to
connect your capture device to your computer.
WWebcamsebcams
Livestream Studio should recognize any USB webcam once its drivers are installed.Typically webcam drivers will download and install automatically once you connect thecamera to a USB port on the computer.
Built-in webcams will also be recognized automatically.
98

99

CamcCamcororders & Video Camerasders & Video Cameras
For other cameras, you will need a Blackmagic Design capture device in order forLivestream Studio to recognize the input. Magewell devices are also compatible.
Studio hardware products (HD31, HD51, HD550, etc.) all have Blackmagic
DeckLink Mini Recorders and a DeckLink Mini Monitor and drivers pre-
installed. These driver installation steps should be executed by customers who
are running Studio on their own computer.
100
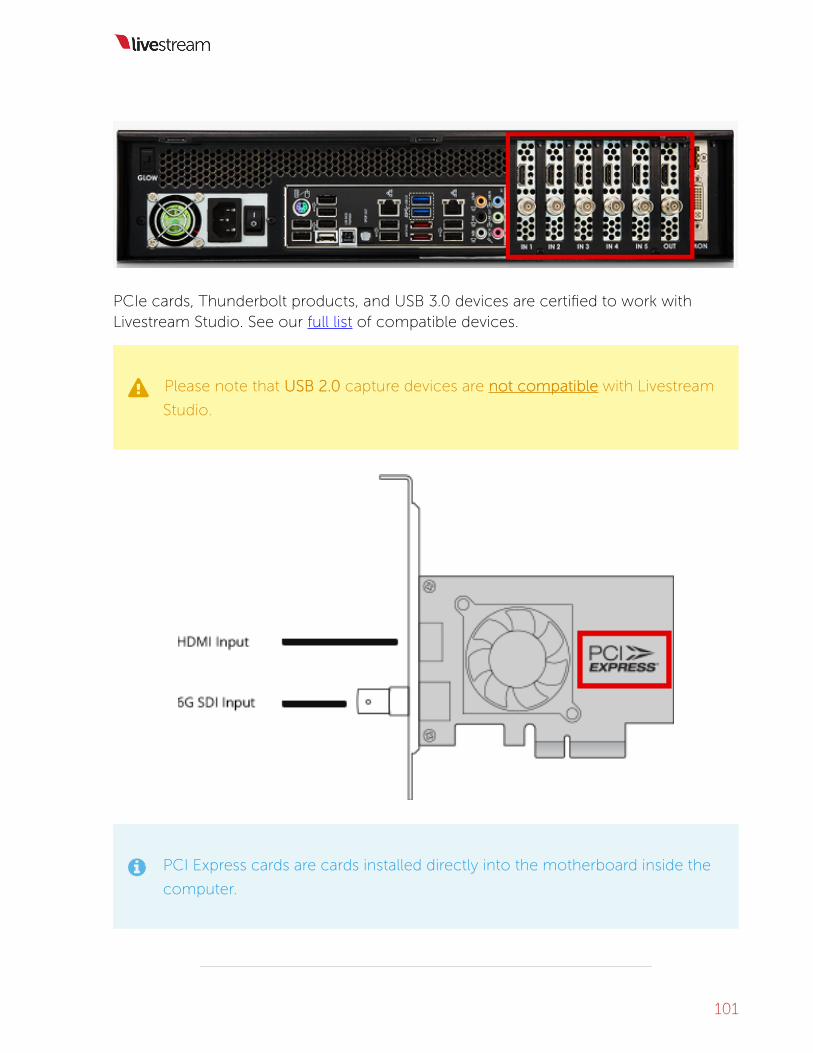
PCIe cards, Thunderbolt products, and USB 3.0 devices are certified to work withLivestream Studio. See our full list of compatible devices.
Please note that USB 2.USB 2.00 capture devices are not cnot compaompatibletible with Livestream
Studio.
PCI Express cards are cards installed directly into the motherboard inside the
computer.
101

Connect the capture device to your computer if the device is not already installed. Thisexample shows a USB 3.0 device (Blackmagic Design UltraStudio SDI).
102

Go to Blackmagic Design's website. To install the devices drivers, click CapturCapturee andandPlaybackPlayback on the right side.
103

Below the product menu on the left side is the Latest Downloads menu. DesktopVideo is the device driver that you will need. Find the recommended version, then clickthe button that corresponds to your operating system (Mac OSX or Windows) to startthe download.
At this time, we recommend downloading Desktop Video version 1010..99.10.10.
104

You will be prompted to register your device, which is not required. If you wish to skipregistration, click DownloadDownload OnlyOnly in the bottom left corner.
105

When the download completes, open the file and follow the simple on-screen steps toinstall. Once the installation is complete, restart your computer.
Now that the drivers are installed, turn on your cameras and connect them to yourBlackmagic devices.
106

To check that your system is receiving a video in through the device, open BlackmagicMedia Express befbefororee launching Livestream Studio. This program was installed with theDesktop Video driver.
107

Click on the LLogog andand CapturCapturee tab underneath the player.
Select the device you want to check on the Devices menu.
108

Next, go to EditEdit and select the PrPrefefererencenceses menu.
109

Under PrProjectoject VideoVideo FormaFormatt, select the format your camera is outputting, then click OKat the bottom of the window.
If you noticed your video signal come in before selecting Edit > PrEdit > Prefefererencenceses,
simply take note of the currently configured project video format. You will
need to know this in order to see your cameras in Livestream Studio.
Your video signal should now appear in the Media Express player, confirming that youhave a video signal coming into your system. Be sure to close Media Express beforelaunching Studio.
110

111

Setting YSetting Your Prour Project Formaoject Formatt
To configure your Studio Project Format, click on the gear wheel in the upper rightcorner of Livestream Studio.
The first tab is PrProject Formaoject Formatt. This menu is where you set your project video qualityand format as well as adjust some interface configurations. The video formats that areavailable to choose from are based on which Definition you select.
• StrStreaming Optimizeaming Optimizeded (previously referred to as LLow CPU Pow CPU Perferformancormancee) includes720p project formats, which are ideal for streaming particularly on laptops andlower end CPUs.
• Ultra HDUltra HD includes 4K formats, which should only be used if you have 4K-compatiblecameras and capture cards.
• HDHD has the most options for video formats, including 1080i, 1080p, 720p, NTSC,and PAL formats.
• LLow Definitionow Definition has 480p, 432p, 360p, NTSC, and PAL formats and will auto-downscale any HD inputs to the selected format.
112

Either a 1080p or 720p format will produce the best quality stream, as they
eliminate the need to de-interlace. All formats will be true broadcast quality
when recording and outputting the video.
After choosing your Definition, choose your specific PrProject Video Formaoject Video Formatt.
Check each camera’s settings to ensure that they all match each other as well
as your project format. This will keep your CPU consumption low.
113

Be sure to save your settings. Next, connect your cameras if you haven't done soalready, then configure your inputs.
114

Using 4K PrUsing 4K Project Formaoject Formatsts
You can use 4K video capture cards to bring 4K video signals into Livestream
Studio.
ImportantImportant: While you can record and output in 4K, you can only stream in 4K
if you are able to enable hardware encoding.
In settings, under the PrProjectoject FormaFormatt menu, there is a DefinitionDefinition section.
Selecting UltraUltra HDHD will allow you to choose a 4K format as your Project Format. Thismeans that you can use 4K cameras with supported 4K capture cards to bring in 4Kvideo signals.
115

Any camera sources that are not in 4K can be converted under the InputInput SettingsSettings tab.Please note that using the converter may increase your CPU consumption.
116

117

Using StandarUsing Standard Definition-only Formad Definition-only Formatsts
Producers who use Livestream Studio on low-performance computers can now
help preserve their CPU by using Low Definition and Streaming Optimized project
formats.
In settings, under the PrProjectoject FormaFormatt menu, there are various options for Quality andFormat. Alongside High Definition mode, Studio offers Streaming Optimized (previouslyknown as Low CPU Performance) Ultra HD, and Low Definition modes.
StrStreaming Optimizeaming Optimizeded includes 720p formats only; LLow Definition modeow Definition mode includes 480pformats and lower. These should be selected when using low-performance computersand laptops.
118

119

Studio supports hardware encoding and decoding via NVIDIA NVENC/NVDEC
or Intel Quick Sync, which also greatly reduces CPU usage on low-
performance computers.
Any HD input sources will convert to the selected project format automatically.
When using Low Definition mode, you will only be able to stream in a resolution equalto your selected Project Format regardless of which streaming provider you use. This isto preserve the CPU.
120

121

Adding Input SourAdding Input Sourcceses
Navigate to Settings (gearwheel in the upper right corner of Studio), and then theInputsInputs tab. This is where you can choose every input source to use in your production,including graphics overlays, media, remote cameras, etc.
Livestream Studio allows for up to 25 direct camera inputs via Blackmagic Design orMagewell devices, webcams, and local screen captures.
Notice that on the bottom left corner of the window, there are ++ and -- buttons. Theseallow you to add or remove inputs.
122

Start on the VideoVideo SourSourccee column. Click on the dropdown menu to select your source.
123
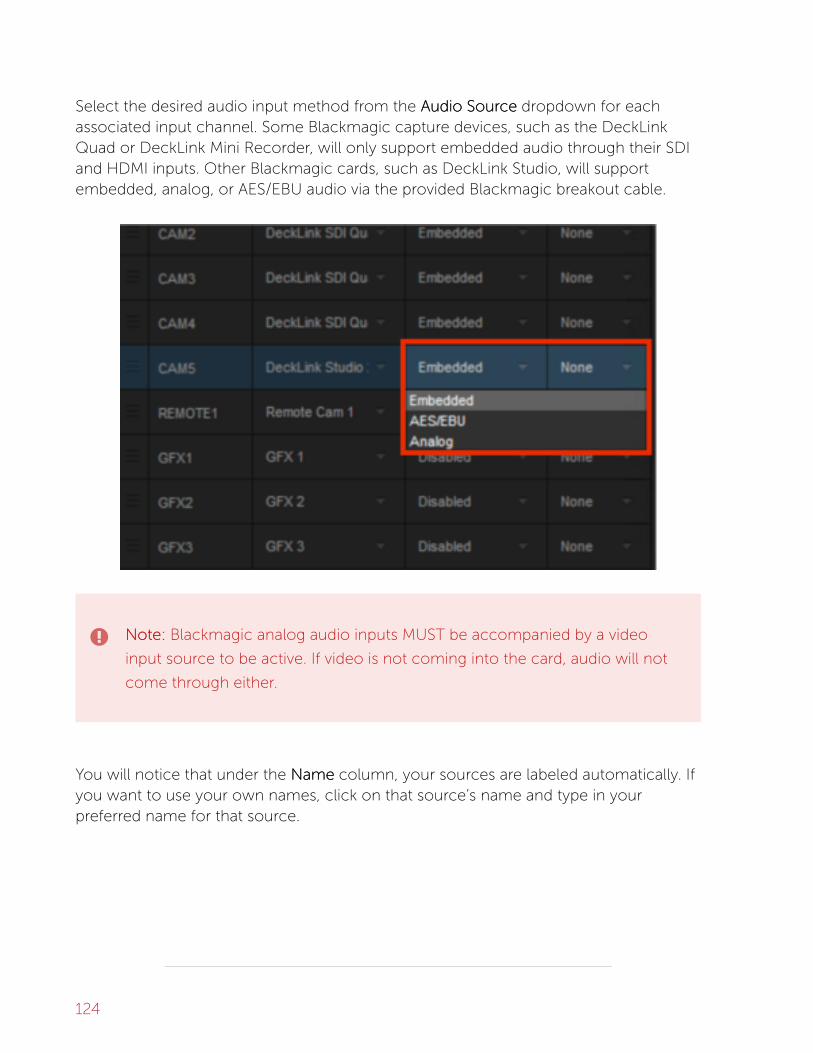
Select the desired audio input method from the AudioAudio SourSourccee dropdown for eachassociated input channel. Some Blackmagic capture devices, such as the DeckLinkQuad or DeckLink Mini Recorder, will only support embedded audio through their SDIand HDMI inputs. Other Blackmagic cards, such as DeckLink Studio, will supportembedded, analog, or AES/EBU audio via the provided Blackmagic breakout cable.
Note:Note: Blackmagic analog audio inputs MUST be accompanied by a video
input source to be active. If video is not coming into the card, audio will not
come through either.
You will notice that under the NameName column, your sources are labeled automatically. Ifyou want to use your own names, click on that source’s name and type in yourpreferred name for that source.
124

If you have a Studio Surface or Surface Go connected to your system, you can assignthe tracks under the SurfacSurfacee column. If you do not have Studio Surface, your onlyoption will be NoneNone.
You can reorder your inputs by dragging and dropping them from the left side.
125

When you are finished configuring your inputs, click SaveSave in the upper right corner.Your sources will appear in your multi-view in the order in which you set them.
126

ScrScreen Capturing with Livestreen Capturing with Livestream Studioeam Studio
When adding your inputs in Livestream Studio, one source you will notice is yourcomputer's screen. Select this to add a local screen capture as an input.
This feature is ideal for systems with multiple monitors connected (e.g.
Livestream Studio on one monitor, and a slideshow on another monitor).
Please note that local screen capturing will increase CPU.
Save your settings to see the screen in your multi-view. You can transition it intoProgram the same as with any other input.
127

Using the DeckLink Studio 2 and SimilarUsing the DeckLink Studio 2 and SimilarCarCardsds
Most Blackmagic Design capture devices can be used as either an input oror output
device. One example of this is the DeckLink Studio 2 card, which came preinstalled
on Livestream's first generation of Studio hardware products (HD50, HD500).
Add this card as an input by going to SettingsSettings > InputsInputs, then click the ++ button to add itwith whichever connection type you are using.
If you add this as an input, but then try to add it as an output by going to the OutputsOutputstab, Studio will notify you that it is already being used in InputsInputs.
128

If you want to use any device as an output, be sure to remove it from Inputs byselecting it, and then clicking the -- button. Then you can go back to the Outputs taband select it.
129

When you select it as an output, you will notice that if you try to add it as an inputagain, Livestream Studio will notify you that it is being used in Outputs.
130

131

Using the DeckLink Mini RUsing the DeckLink Mini Rececororderder
The Livestream Studio HD51 and HD550 are each equipped with five Blackmagic
DeckLink Mini Recorders; the HD31 has three cards installed.
Each card has one SDI input and one HDMI input.
The 4K editions of the HD51 and HD550 have 4K versions of these cards
installed.
Each card can only handle one source at a time. You cannot use both the SDI andHDMI input on the same card. For example, if you use the HDMI input on MiniRecorder 1, you cannot also use the SDI input on Mini Recorder 1 and would thus haveto use an SDI input on one of the other four Mini Recorder cards.
132
ConConfiguring Input Settingsfiguring Input Settings
Every physical input, NDI input, RTMP input, and remote camera in Livestream
Studio has individual configurations you can set in under the InputInput SettingsSettings tab.
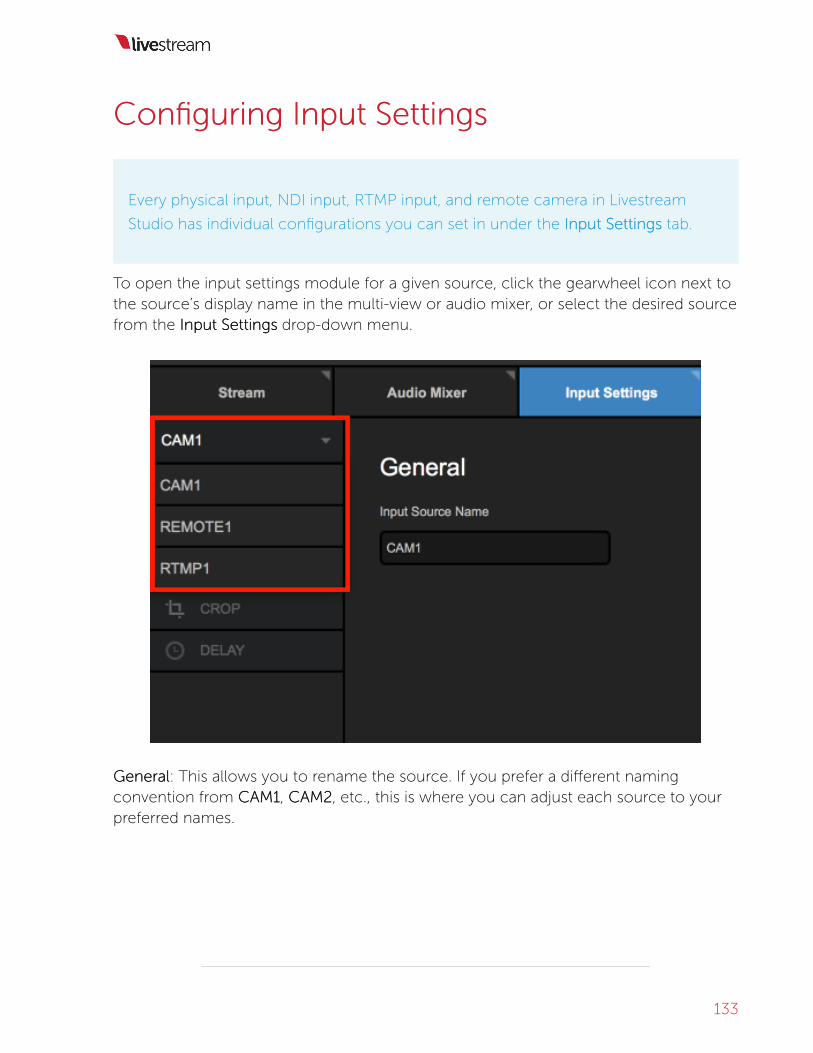
To open the input settings module for a given source, click the gearwheel icon next tothe source’s display name in the multi-view or audio mixer, or select the desired sourcefrom the InputInput SettingsSettings drop-down menu.
GeneralGeneral: This allows you to rename the source. If you prefer a different namingconvention from CAM1CAM1, CAM2CAM2, etc., this is where you can adjust each source to yourpreferred names.
133

AudioAudio: 16 audio channels per input source in stereo mode, or up to eight audiochannels per input in mono mode, with the respective source fader.
Stereo:
Mono:
134

Available audio channels are displayed for the selected source. In stereo mode, use the“LL” and “RR” buttons along the bottom of the module to assign left and right audiochannels to the input source fader.
In mono mode, click the corresponding speaker icon button to assign input channelsto the source fader. Each input channel has an individual level meter with gain control.
Converter:Converter: Allows for video inputs to be converted to your project video format in real-time. This allows producers to use different types of camera sources and formats. Thevideo converter also has an auto-detect function that will recognize different formatsinstantly.
135

If the converter does not automatically detect the source format of the camera, selectthe converter tab to pick the format from a full range of 1080, 720, NTSC, and PALoptions and convert it into the format that the current project is set to.
CrCropop: Allows you to crop your input's picture.
TTally:ally: Activate and control a Tally Light system through Livestream Studio. Afterconnecting a Metasetz tally system via USB, click the TTallyally icon shown here and selectand available tally port to assign to that camera. Repeat this step for each camerasource.
If you do not see this option, go to Settings: AdvancSettings: Advanceded and make sure TTallyally is checked.
136

Delay:Delay: If you notice a discrepancy in synchronization between direct camera inputsand remote cameras, you can delay an individual input's video and audio by up to twoseconds to help keep your sources in sync.
137

Closed CaptionsClosed Captions: Livestream Studio can receive a closed captioning signal from aclosed captioning encoder via SDI, and output to Livestream's live player. This is whereyou control which channel of closed captions come through.
If you do not see this option, go to Settings: AdvancSettings: Advanceded and make sure ClosedCaptioning is enabled.
This feature only works on the Livestream livelive player. It does not work for
third-party players, and it does not save on video on demand clips.
138

139

Converting Input SourConverting Input Sourcces oes of Difff DiffererententFormaFormatsts
Livestream Studio works best when all video input sources match the same video
format. However, with certain sources such as laptops and webcams, it may not
be possible to match them all together. This is where the built-in any-to-any
converter comes in.
Go to the InputInput SettingsSettings tab and select the input source you need to convert. Thenselect the ConvertConvert tab on the left side of the interface.
In many cases, Livestream Studio will be able to automatically convert your source.Otherwise, choose your input source's format from the dropdown menu.
140

Once the correct format is selected, the converter will turn on and you will see yourvideo source.
Using the converter will reduce the quality of your video signal and increase
your CPU usage, so only use it when necessary.
Bringing a Laptop into LivestrBringing a Laptop into Livestream Studioeam Studio
When bringing in a laptop, you will almost certainly use the converter. Many laptopscome with an HDMI output port that can directly connect to a Blackmagic capturedevice via an HDMI cable. For those that do not have an HDMI output, we recommendusing the Blackmagic DVI Extender.
Another option for bringing a laptop into Livestream Studio as a source is to install theRemote Camera Client for Windows and Mac over your local network. This will avoidthe need to use the converter.
141

AdvancAdvanced Input Soured Input Sourcce Cre Croppingopping
You can create multiple virtual camera shots per input source. This works best with
4K inputs.
Navigate to the InputInput SettingsSettings tab.
Select which camera you would like to adjust by clicking the dropdown in the upperleft corner of the module.
142

Click the CrCropop tab. Your input source will appear in the space to the right.
You can do a basic crop by clicking and dragging the corner of the image, anddragging and dropping the cropped frame.
143

Click AdvancAdvanceded ModeMode to reveal more cropping options.
To the right of your source are numbers 1-4 in different colors, each with acorresponding TTakakee and EditEdit button.
144

Producers using 4K and 1080p input sources should consider checking the
720 min cr720 min crop sizop sizee, which will prevent any cropping to go less than a 720p
resolution and thus reduce quality loss.
Clicking EditEdit on any shot will allow you to adjust that particular shot without affectingthe output. Click and drag the corners to crop the shot. Notice the border of your shotmatches the color of the corresponding number, and CAM1 in the multi-view is not yetshowing the crop.
145

If your mouse has a scroll wheel, you can also use that to crop your shot.
Before clicking the glowing TTakakee button, check the TTransitionransition DuraDurationtion and MotionMotionDampingDamping IntensityIntensity settings below.
Under TTransitionransition DuraDurationtion, you can choose how you fast you want to move betweenshots. CutCut will be an immediate switch. The following timer buttons indicate a virtualcamera movement (i.e., a virtual tilt or pan) in order of increasing time (fast, medium,slow).
MotionMotion DampingDamping IntensityIntensity will adjust the smoothness of each camera motion. Instantwill be a fast, real-time, and more jagged movement. Each option afterwards is slightlyslower and smoother. This option does not impact virtual transitions if CutCut is selected.
146

Once your Transition Duration and Motion Damping Intensity are set, click the glowingTTakakee button.
The TTakakee button will turn red and you will notice your input will transition to thecropped area in your multi-view.
You can build up to four different cropped areas per input using the corresponding EditEditbuttons.
147

In this example, if we take Shot 3, only that cropped area appears under Cam 1 in themultiview.
148

Using the Color SourUsing the Color Sourcce Generae Generatortor
In addition to cameras, graphics and media sources, you can include up to two
color sources in your Livestream Studio production.
To add a color source as an input source, navigate to the Inputs tab in settings. Clickthe ++ button and select Color/BarsColor/Bars from the dropdown menu.
After saving your settings, you will notice a Colors/BarsColors/Bars tab appear in the lower left partof the interface.
Selecting ColorColor BarsBars will produce standard bars as a source in your multi-view.
149

Selecting SolidSolid ColorColor will produce a single color in your multi-view. You can selectwhich color by clicking the '##' button.
150

151

Selecting TTestest TToneone will produce a standard audio tone that will come through thecolor source. Uncheck it if you do not want any audio coming through your colorsource.
152

SSwitching Contrwitching Controlsols
153

Using LivestrUsing Livestream Studio's Simple Interfaceam Studio's Simple Interfacee
The Simplified Interface in Livestream Studio is a good option for customers with
smaller production setups looking for minimal clutter.
When you first launch Studio or create a new project, you will be prompted to chooseyour interface mode: Simple or Advanced, allow you to arrange Studio in the Simpleinterface from the start.
If you have an existing project in Advanced mode, you can easily switch to Simplemode by clicking the interface icon in the upper right corner and selecting SimpleSimple.
The most noticeable change can be seen in the upper portion of the interface. ThePreview/Program monitors are replaced by a single OutputOutput monitor; whichever sourceis in this monitor is what your viewers are seeing. You will also notice the mixing panelthat includes transition, graphics overlay, advert, and fade-to-black controls is alsogone.
154

The Tabs containing your various production elements (graphics, media, etc.) willdefault to the 1 Column1 Column setting, meaning the lower portion of the Studio interface willbe grouped into one column rather than have a divider splitting them into twointerchangeable columns.
Your default production elements will also reduce to one GFX channel and
one Media bin in addition to your single camera. You can still add to your
setup by going to Settings: InputsSettings: Inputs.
155

To switch between your video sources in this mode, use your mouse and left-click onthe desired source in your multi-view. The source will transition into Output.
Using Graphics in Simple ModeUsing Graphics in Simple Mode
To overlay graphics in this mode, navigate to the GFX tab. Add a graphic by browsingthe Graphics Store or by clicking + Add Custom Layers+ Add Custom Layers to build your own.
You will see your graphics preview and settings on the left side with the ability to addand edit data fields on the right side.
The main difference with graphics overlays in simplified mode versus advanced modeis how you transition graphics overlays into the Output. Since the mixing panel is not
156

present in Simple Mode, you will see PUSHPUSH and PULLPULL options here, with the layer'sauto-loop settings underneath.
To adjust the design of the graphic, double-click the preview to open the GFXDesigner. A more in-depth explanation on building and using graphics overlays inStudio is covered in another section.
When you are ready to show your graphic, click the flashing PUSHPUSH button. The graphicwill transition into the Output; to remove it from Program, click the red PULLPULL button.
157

TTransitions in Simple Moderansitions in Simple Mode
By default, the GFX transitions will be a 45-frame long edge wipe, whereas transitionsbetween different video sources will be a cut.
You can change this by navigating to the TTransitionsransitions module. Be sure the to select thecorrect tab on the far left side when choosing your transitions; MainMain is your main videomix, followed by each graphics overlay track. You can then select among differenttransition types
158

IntrIntroduction to Multi-View & Production to Multi-View & Preview/eview/PrProgram Sogram Switchingwitching
The Advanced interface mode of Livestream Studio is designed for traditional
Preview/Program switching, with controls available via mouse, defined keyboard
shortcuts, and assigned controls on the Livestream Studio Surface or Surface Go.
The software includes a multi-view that allows you to see all of your video sources andgraphics overlays in one display.
If you are not seeing your full multi-view, go to the Multi-ScrMulti-Screeneen tab in settings, andcheck Enable Primary ScrEnable Primary Screen Multi-Vieween Multi-View, then click SaveSave.
159

At the top of this multi-view are two larger monitors, which are called Preview (left) andProgram (right).
PrPrevieweview is where you would typically review any video source or graphics overlay priorto transitioning it to your recording and/or stream.
PrProgramogram is the content that is currently showing in your recording and/or stream; it iswhat your viewers are currently watching.
Below Preview and Program is an arrangement of smaller monitors with every camera
160

input, graphics overlay channel, media bin, remote camera, and color source that youare using.
A standard multi-camera production typically involves putting a source into Preview,then using a transition control to switch it into Program.
161

Using a Mouse to SUsing a Mouse to Switch Prwitch Preview andeview andPrProgramogram
Advanced Mode includes Preview and Program monitors as well as a mixing panel
with transition controls, giving you more options for switching between your video
sources using your mouse.
If you are using the Simple Interface mode, see switching instructions herheree.
To put any of your sources into Preview, hover over the source in the multi-view withyour mouse, and simply click it.
That source will now be in the Preview monitor, and you should notice a green borderaround it in the multi-view.
162

If you want to put a source directly into Program without previewing it, hover yourmouse over it in the multi-view and right-click it.
That source will now be in Program and will have a red border surrounding it in themulti-view.
163

You can also double-click on the Preview monitor, which will automatically transitionthat source into Program.
To adjust how sources are put into Preview and Program using your mouse, navigateto the Mouse / TMouse / Touchouch tab in settings. Select the desired actions, then click SaveSave.
164

Livestream Studio’s transition controls can be found in the upper right corner of thesoftware interface. CutCut switches Preview and Program immediately with no overlapoccurring between them. Clicking the CutCut button activates this transition.
165
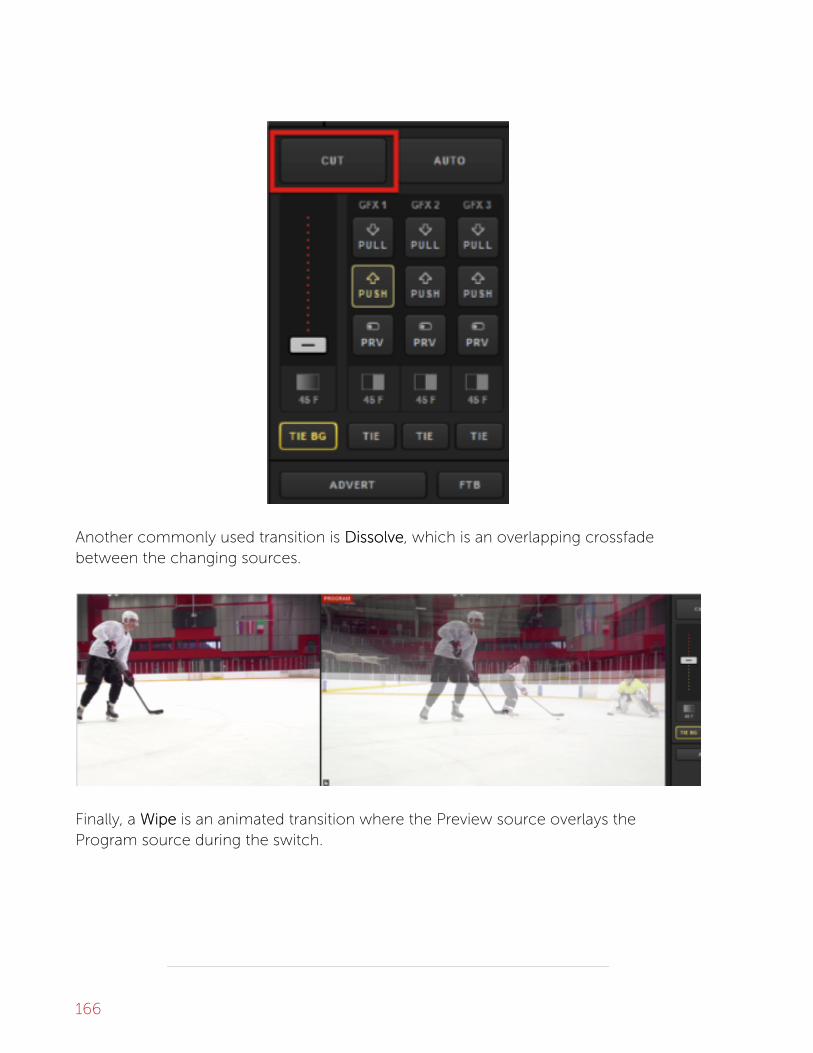
Another commonly used transition is DissolveDissolve, which is an overlapping crossfadebetween the changing sources.
Finally, a WipeWipe is an animated transition where the Preview source overlays theProgram source during the switch.
166

In Livestream Studio, you can configure fades and wipes under the TTransitionsransitions tab inthe lower right corner.
Notice on the left side that you can choose to set a transition for both your main mix(i.e., any source in Preview) and each individual graphics overlay channel.
167

Fade is the first option in the menu, which is the dissolve transition. When you select it,you can set the amount of time you want an automatic transition between sources tolast.
168

You can also double-click the duration time under the transition controls to change thespeed of any automatic transition quickly.
The remaining options in this menu are different kinds of wipes. Selecting one willshow additional settings on the right.
‘RReverseeverse DirDirectionection’ will push the wipe in the opposite direction that it moves by default.
169

‘Flip FlopFlip Flop’ will alternate the wipe between the default direction and the reversedirection.
Feathering allows you to determine how hard or soft the edge of the wipe animationwill be, in pixels. The more pixels you cover, the more faded the line will be.
170

Some wipes also have options for adjusting their positions and appearance on thescreen when they are used.
To activate an automatic transition, click ‘Auto’ in the upper right corner. The sourceswill then switch based on the duration you set for that transition.
171

You can always employ a manual transition by clicking and dragging the virtual T BarT Barbelow the transition buttons. This allows you to control the speed of that transition.
172

ConConfiguring a Kfiguring a Keyboareyboard to Use withd to Use withLivestrLivestream Studioeam Studio
You can create custom keyboard shortcuts in Livestream Studio by assigning
hotkeys.
Open the settings menu and click the HotkHotkeyseys tab.
This will reveal a list of controls. Each control has a default hotkey assigned to it.
The images below show the Livestream Studio Keyboard, which is simply a
standard keyboard that is designed to reflect the default hotkey settings.
However, you can use hotkeys in Livestream Studio with any keyboard.
173

Some common default keyboard commands include:
The 11 key will put your first input source into Preview
Pressing 22 puts the second input source into Preview, 33 puts the third source inPreview, and so on.
Similarly, to put your first input source directly into Program, press the F1F1 key on yourkeyboard.
174

F2F2 will put the second source into Program, F3F3 the third source, and so forth.
Mac (beta) UsersMac (beta) Users: In order to use the F1, F2, etc. hotkeys, you must either hold
down the fnfn key when pressing them, or go to SSystem Prystem Prefefererencenceses >
KKeyboareyboardd and make sure Use F1, F2, etc. kUse F1, F2, etc. keys as standareys as standard function kd function keyseys is
checked.
Pressing EnterEnter will cut between Preview and Program sources, while pressing thespacebar will activate an auto-transition between those sources.
175

You can customize these hotkeys to better fit your workflow if you wish.
The keyboard that Livestream provides with all Studio Hardware units (as well
as for separate purchase in our Store) is designed to fit the default hotkey
settings when you are producing a live event. It will operate like a normal
keyboard when typing into text fields and when using with other applications.
176

Using External Multi-ScrUsing External Multi-Screen with Livestreen with LivestreameamStudioStudio
If you have a second monitor connected to your system, you have the option of
displaying all or part of your multi-view by using your system’s graphics card. The
software can support up to a Quad GPU setup out of a graphics card which can
output to up to 4 displays.
For best results, we recommend connecting the secondary display to the
available HDMI port on the graphics card connected to your Livestream
Studio system (It will also work with DVI and VGA connections).
First, check your computer’s display settings in Control Panel. In ScrScreen Reen Resolutionesolution, goto the Multiple Displays menu and select Extend these displaysExtend these displays.
177

In Livestream Studio, go to settings and click on the Multi-ScrMulti-Screeneen tab. With the secondmonitor connected, you will notice it looks different from before.
You should see your display listed in the ConnectedConnected DisplayDisplay dropdown menu. Selectthe display and click IdentifyIdentify.
178

Select the resolution and frame rate at which you want Livestream Studio’s multi-viewto output.
Next, determine which layout you want to see in your external monitor.
179

Below the layout selection, use your mouse to drag and drop each video source youwant to see into the appropriate box below.
In addition to video sources, you can include a logo, time of day, viewer count, andstream status.
180

If you drag a logo into your external multi-view, click on it to be given the option toupload a logo image.
181

Underneath the multi-view preview, you will see options for showing or hiding specificoverlays on the multi-view and for whether you want to allow your mouse onto thatdisplay.
When you have set your multi- view to your desired preferences, click SaveSave. You willsee the multi- view appear on your external monitor.
182

183

Audio WAudio Workfloworkflow
184

Adding Audio SourAdding Audio Sourcceses
Livestream Studio’s built-in audio mixer can be found in the lower left corner of theinterface.
Each input source will have a corresponding audio source that you can monitor andadjust.
You may have a separate audio mixer or a microphone can connect to your systemdirectly via USB or line-in (the HD550 also has two 1/4-inch XLR combo inputs built in).
185
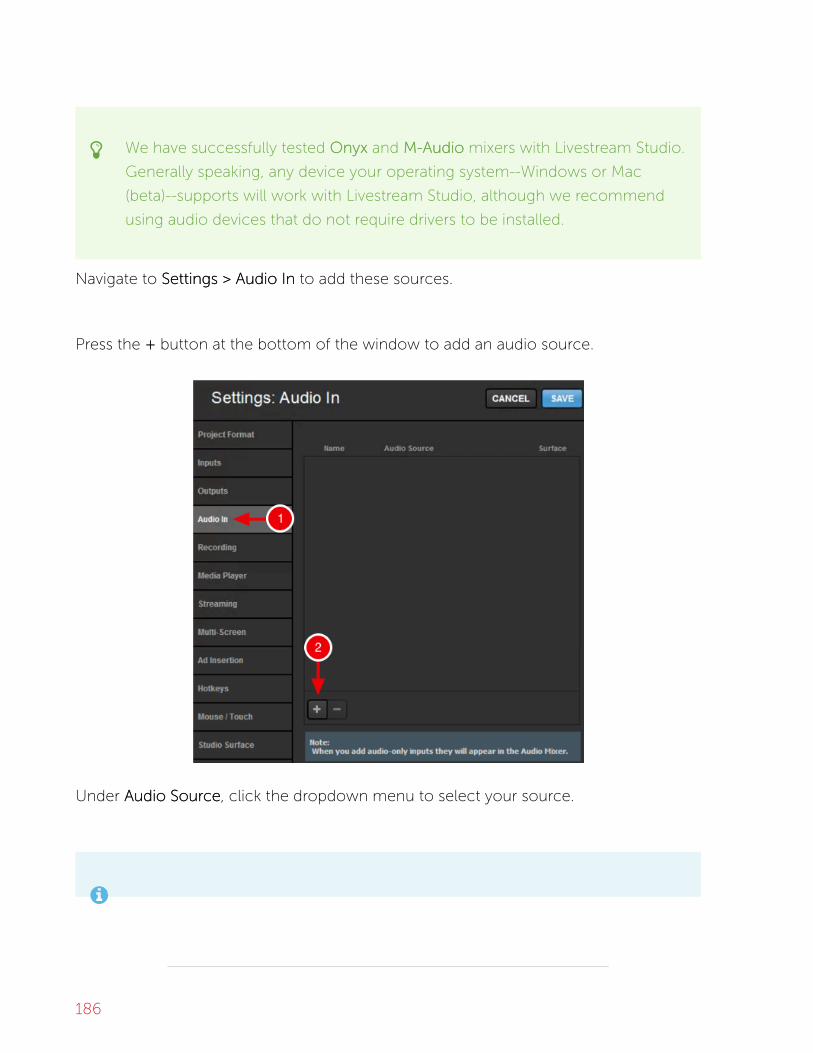
We have successfully tested OnyxOnyx and M-AudioM-Audio mixers with Livestream Studio.
Generally speaking, any device your operating system--Windows or Mac
(beta)--supports will work with Livestream Studio, although we recommend
using audio devices that do not require drivers to be installed.
Navigate to Settings >Settings > Audio InAudio In to add these sources.
Press the ++ button at the bottom of the window to add an audio source.
Under AudioAudio SourSourccee, click the dropdown menu to select your source.
186

If your device is not recognized, check to see if it needs to have drivers
installed.
Livestream Studio will automatically label the source (e.g., AAUDIO1UDIO1). Click on the nameif you wish to change it.
This source can also be assigned to a track on Studio Surface if you have oneconnected. Otherwise, ‘None’ will be the only option available.
187

Click SaveSave in settings. You should now see your audio source included with your othersources in the Audio Mixer.
188

Monitoring Audio in LivestrMonitoring Audio in Livestream Studioeam Studio
In order to mix your audio effectively, you need to be able to hear it. Start by pluggingheadphones or speakers into the headphone jack on your system.
You may not hear any audio right away, even if you see audio levels. If this is the case,there are settings on your system to check.
Windows
Go to your Windows Control Panel and navigate to your Sound settings. Under thePlayback tab settings, look for SpeakSpeakers - Rers - RealTealTek High Definition Audioek High Definition Audio. Select thatsource, click SetSet asas DefaultDefault, then click OKOK.
189

Mac (beta)
Go to SSystem Prystem Prefefererencenceses > SoundSound. In the OutputOutput screen, make sure HeadphonesHeadphones ishighlighted.
190

After confirming the above system settings, navigate to Livestream Studio. Check theheadphone volume meter in the upper right corner and adjust the level to the desiredvolume. You can also adjust your Windows volume as you would when using anyother program.
This does not affect audio levels of the inputs, Preview, or Program.
191

You will know which sources you are hearing in your headphones by checking theAudio Mixer. The bottom of each source has a headphone button.
Any headphone button with a white border is currently being heard in yourheadphones. You can monitor as many sources at any given time as you need. Clickon the headphone button to stop monitoring the corresponding source; you willnotice the white border will disappear from the button.
192

This only impacts your local headphone output and does not stop the audio
from outputting to your stream and/or recording.
This also applies to monitoring Program audio, which is typically represented byRRececorord Out / Strd Out / Stream Outeam Out.
193

ContrControlling the Audio Mixolling the Audio Mixerer
For each audio source in the Audio Mixer, you can see that source’s levels, as well as acorresponding fader, speaker button, and AudioAudio button.
When switching sources, you may notice the different AudioAudio buttons turning yellow asyou make the transitions.
194

This indicates that the audio source is heard in Program because its correspondingvideo input is in Program. It is not heard when the video input is not in Program.
If there is a particular audio source you want outputting to Program at all times, clickthe AudioAudio button; it will turn red.
195

This locks that input source’s audio into Program. Even if you continue switching videosources, you will still hear that audio source.
196

Click the AudioAudio button again to disable the locking. What you hear will revert to thedefault setting of following the video source into and out of Program.
If there is a particular source's audio that you do not want to hear at any point, click onthe corresponding speaker button.
197

The button should go from white to black, and the levels will fade from green/yellowto gray. This indicates that the source is muted. You can turn off muting for any sourceby clicking its speaker button again.
Muted sources can still be monitored through headphones as long as the
headphone button is activated.
198

You can also link audio sources to each other. For example, if you have all audiocoming in from CAM1CAM1, you may want to link other cameras to that source for seamlesstransitions.
Click on the name of the source at the top of the audio module. You will notice youhave the option to link to any other input source.
199

Linking an input will cause the linked source to override the audio that had beencoming in originally. The mixer will indicate which source’s audio is being heard.
In this example, CAM1CAM1 has been linked to CAM2CAM2, so viewers will hear CAM1CAM1's audiowhen either CAM1CAM1 or CAM2CAM2 are in Program. Notice in the image below how the levelsare identical and both AudioAudio buttons are yellow (the red bar above the CAM2 labelindicates that CAM2 is in Program).
200

You can link multiple inputs to one audio source for smooth transitions.
201

Most producers link RRececorordd OutOut and StrStreameam OutOut together for consistent Programaudio across all output sources. Those two outputs may be unlinked if desired, but theycannot be linked to any other source.
To adjust the levels of any audio source, click and drag the corresponding fader for thatsource.
202

If audio levels are too high, the mixer's OVR meter for any over-modulating source willblink red.
203

You can also adjust the gain of each source by clicking and dragging the small gainmeter above that source’s level meter.
204

Fold Audio Channels Into MonoFold Audio Channels Into Mono
In Livestream Studio, your audio setup can be set to either mono or stereo.
To fold all of your audio channels into mono. Go to Settings:Settings: AdvancAdvanceded. In the AudioFormat dropdown menu, select MonoMono.
Now all of your audio inputs will be in mono, which you can see reflected under InputInputSettingsSettings > AudioAudio.
205

206

Using HD550 DirUsing HD550 Direct Audio Inputsect Audio Inputs
HD550 users have the ability to plug in an XLR or ¼” audio input directly into their
unit without the need for a USB adapter.
Please note that these inputs support mic level audio signals only. If your
audio equipment is line level, see here for a workaround.
When you plug in your audio source, be sure to add it as an audio input by going to‘SettingsSettings’ > ‘Audio InAudio In,’ and click the ‘++’ button.
207

When you click SaveSave, you will see the source in the audio mixer. You may notice a verylow level of sound coming in.
208

This low level of audio may appear regardless if your source is connected or
not.
This “white noise” should not exceed -48dB on either input and is characteristic of allUSB-based PC audio devices and is virtually inaudible.
209

Using Line In Audio SourUsing Line In Audio Sourcces with thees with theHD550HD550
If you own an HD550 and wish to use a line in audio input rather than a mic in
audio input, you will need to add an additional accessory to your setup.
The HD550 XLR inputs support mic levelmic level inputs only, which ranges from -60dBV to-40dBV. Line levelLine level audio on consumer products starts much higher at -10dBV.
If you add a Whirlwind IMPWhirlwind IMPAD In-Line XLR BarrAD In-Line XLR Barrel Tel Transfransformerormer to your workflow, this willallow you to bring in a line level source into the XLR inputs on the HD550. Theseaccessories reduce the decibel (dB) level coming from your audio source so thatStudio can support it.
These barrel transformers vary based on the amount of dB they remove from thesource. For example, the Whirlwind IMPAD40 removes 40dB from your source's audio.Also available are:
• Whirlwind IMPAD30 - removes 30dB• Whirlwind IMPAD20 - removes 20dB• Whirlwind IMPAD10- removes 10dB
Simply connect your audio source to the female end of the transformer, then connectthe male end of the transformer to your HD550. Then configure your audio as younormally would.
We cannot guarantee that other similar products will work with the HD550 as
we have not tested them. If you have success bringing in a line-in source
using a different workflow, please let us know!
210

Outputting & ROutputting & Rececorordingding
211

Setting Up a Video OutputSetting Up a Video Output
Livestream Studio allows you to send up to 25 video signal separate to different
sources such as monitors, projectors, etc. This requires multiple Blackmagic
Design video cards that can output a video signal.
Trying to set up an NDI output? Learn more.
Navigate to the OutputsOutputs tab in Settings and click the ++ button to add an output source.
Select which device will be used for the output (Studio hardware products such as theHD550 have the DeckLink Mini Monitor pre-installed).
212

Next, select which source will be output through each device. You can output yourProgram feed or any other input source (e.g., CAM1).
When you have finished setting your output(s), click SaveSave. You will now see theselected source(s) being sent to your monitor, projection system, etc.
213

214

ConConfiguring Auxiliary Outputsfiguring Auxiliary Outputs
Livestream Studio gives you the ability to choose up to four auxiliary output mixes.
This can be helpful for changing picture-in-picture and output sources (monitors,
projectors, etc.).
Navigate to settings, and enter the OutputsOutputs menu. Under Number oNumber of Af AUUX MixX Mixeses, selecthow many auxiliary outputs you want to use.
You can set any output to use an auxiliary source, which is helpful if you intend tochange the sources shown to your onsite viewers.
215

When you set your auxiliary outputs, you should see an AAUUXX OutputsOutputs tab appear in thelower right section. Each auxiliary output includes all camera inputs, graphics tracks,media bins, remote cameras, RTMP inputs, and NDI inputs.
216

To utilize this with your picture-in-picture graphics, go to a Graphics tab (e.g., GFX 1)and create a new layer.
Click the Paintbrush icon.
217

The GFX Designer will open. Click on the VideoVideo button to bring a video source intoyour graphics layer.
Click on the dropdown menu to change any settings, including your video source.Note that AUX sources are now among your options.
When you have finished setting your video source in the graphics layer, close out ofthe GFX Designer and make sure that layer is visible.
218

Navigate to the AAUUXX OutputsOutputs tab of the AUX source you are using. Here you can selectwhich of your inputs you want to see in the AUX output. You can choose amongcamera inputs, media sources, remote cameras, and NDI sources.
Push the graphics channel to Program to allow you and your viewers to see it.
219

To change the source in your graphics overlay, go back to the AAUUXX OutputsOutputs tab andclick on the desired source. That source will turn green, indicating that it is beingpreviewed.
To switch sources, use either the CutCut or AutoAuto button to the left.
If you click on the transition type under AutoAuto, you can choose both the type
and speed of the transition used for each AUX source.
220

Click a transition control and the AAUUXX OutputsOutputs tab will indicate that the new source isbeing pushed through that auxiliary source by highlighting that source in red.
You will also see the change in your graphics overlay in Preview and Program.
221

Set up High-RSet up High-Resolution & ISO Resolution & ISO Rececorordingsdingsin Livestrin Livestream Studioeam Studio
In Livestream Studio, click the gearwheel icon in the upper right hand corner to accesssettings, then select the RRececorordingding tab.
Default RDefault Rececorord Ld Locaocation:tion: Selects the location where the Livestream Studio recordingswill be saved by default--typically the "Videos" folder in Windows and the "Movies"folder in Mac (beta). Click the BrBrowseowse button to select a different default recordlocation.
222

ISO RISO Rececorordingding: ISO is an abbreviation for "Isolated". When referring to cameras in videoproduction, this term indicates that the individual camera video signals are beingisolated and recorded independently of each other and the final Program mix. Thesefiles can be used later for further editing offline or live replay during or after an event.
Select how many hi-resolution recordings you want to produce (up to four), and whichsources you want to record. You can record Program (dirty), Program (clean), and anyother source in your multi-view. We have more recommendations regarding ISOrecordings.
Along with the single cameras, you can also record the Program output in 'Clean' or'Dirty' mode.
• CleanClean: Without graphic overlays• DirtyDirty: With graphic overlays
By default, the selected option is PrProgram (dirty)ogram (dirty).
Specify RSpecify Rececorord Ld Locaocation:tion: As a best practice, choose different locations for each ISOrecording. This can help resolve any hard drive performance related issues whenrecording multiple ISOs by spreading to multiple HDDs.
223

TimecTimecodeode: You can select how you want timecode to be presented. This is meant forusers who intend on editing the recordings together and have a preference on whichtype of timecode to use when matching up the sources.
RRececorording Bitrading Bitratete: Chooses the quality your recording will be in. Higher bitrates will behigher quality, but also produce much larger files.
224

RRececorord to Media Bin:d to Media Bin: When a recording begins, it will immediately be added to theselected media bin. Both bins can be selected or deselected simultaneously. This isnecessary in order to use the basic replay feature.
Click SaveSave and you will be able to start recording.
Available recording time is dictated by available internal disk space. Ifnecessary, external devices with transfer speeds of at least 50MB/sec may be used forrecording, though performance may vary. Make sure your external device is connectedand choose save to that location in the Recording settings. Studio also lets you knowhow much space is remaining on your hard drive.
When you are ready to start recording, click RRececorordd in the upper right corner.
225
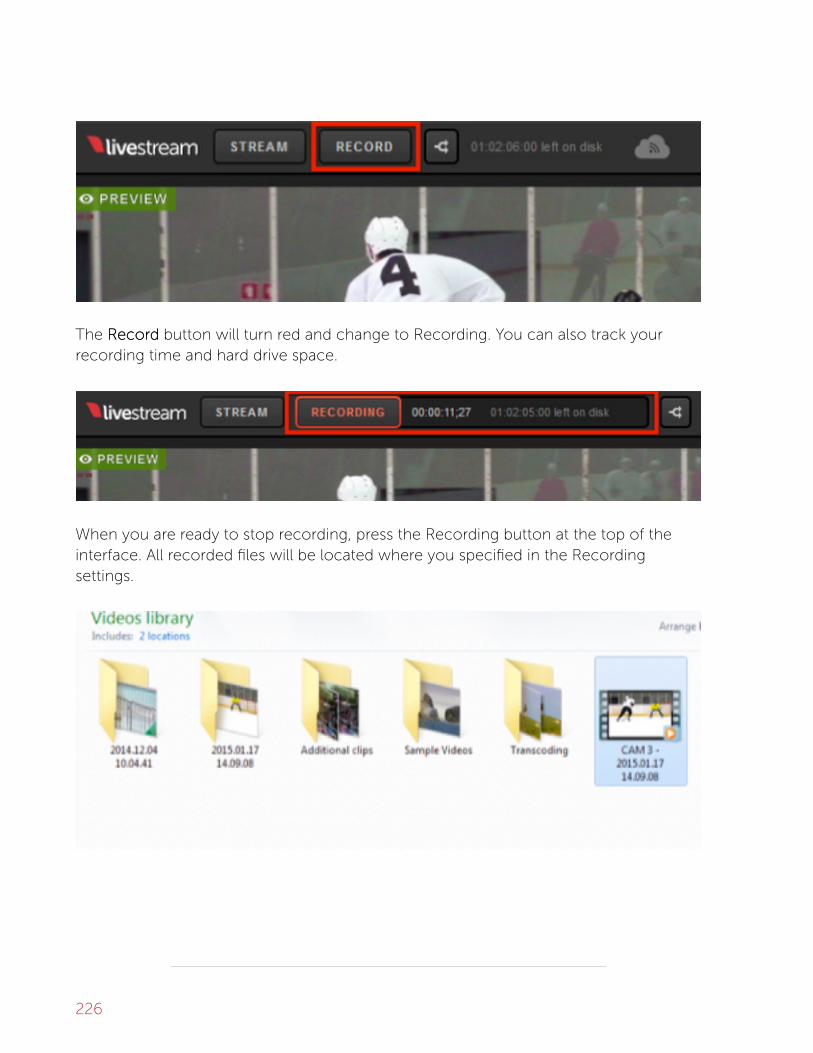
The RRececorordd button will turn red and change to Recording. You can also track yourrecording time and hard drive space.
When you are ready to stop recording, press the Recording button at the top of theinterface. All recorded files will be located where you specified in the Recordingsettings.
226

ISO RISO Rececorording Best Practicding Best Practiceses
Below is information regarding internal and external hard drive recommendations
for producers who want to do multiple, simultaneous ISO recordings.
For owners oFor owners of our series of our series of Studio HD harf Studio HD hardwardware units:e units:
The HDD or SSD currently installed on your system have the following specs:
• HD31HD31: 2TB WD BLACK SERIES WD2003FZEX 7200 RPM / SATA 2.5" Internal HDD• HD50*HD50*: 1 TB / 5400 RPM / SATA 3.5" Internal HDD• HD51HD51: 1 TB / Western Digital Red 7200 RPM / SATA 2.5" Internal HDD• HD51 4K EditionHD51 4K Edition: Samsung 850 EVO 2TB SSD• HD500*HD500*: 500 GB/ 5400 RPM / SATA 2.5" Internal HDD• HD510*HD510*: 1 TB / Western Digital Red 7200 RPM / SATA 2.5" Internal Hard Drive• HD550HD550: 1 TB/ Western Digital Red 7200 RPM/ SATA 2.5" Internal Hard Drive• HD550 4K EditionHD550 4K Edition: Samsung 850 EVO 2TB SSD• HD900*HD900*: 2 TB / 5400 RPM & 500 GB / 5400 RPM SATA 2.5" Internal HDDs• HD1700*HD1700*: 2 TB / 5400 RPM & 500 GB / 5400 RPM SATA 2.5" Internal HDDs• HD1710*HD1710*: Dual quick-time front removable (2) x WD Red 1TB / 7200 RM ISO
recording drives, mid-plane, access door, receiver mounting kits. 1 internal fixmounted WD Red 1TB / 7200 RM ISO hard drive & 1 internal fix mounted 120GBSSD OS / application drive.
**indicates a discontinued product
Check out the full product technical specifications.
To avoid performance issues, we recommend using an external HDD via USB 3.0 asmentioned below and/or spreading the recording across multiple drives by selectingthe Specify RSpecify Rececorord Ld Locaocationtion option within the RRececorordingding section of the LivestreamStudio settings.
227

WhaWhat type ot type of harf hard drived drive is ris rececommended when rommended when rececorordingdingISOs?ISOs?
We recommend recording to a separate HDD, either installed on the desktop systemor an external HDD connected via USB 3.0, that adheres to the following specification:
7200 RPM64 MB CacheFormatted NTFS (Full format)2TB or larger (for longer broadcasts)
The Western Digital Red series hard drives have been tested and approved forrecording 4 isolated cameras. You can pair this with a USB 3.0 HDD enclosure such asthis one from Macally.
228

I don't have a WI don't have a Western Digital Restern Digital Red series drive but my HDD meets the red series drive but my HDD meets the rececommendedommendedspecificaspecification:tion:
If a Western Digital Red series drive is not available, using more than one HDD andspecifying different record locations may help resolve any performance issues.
Testing done using other brand hard drives with the recommended
specification have resulted in poor performance when recording 3-4 ISO
cameras. Recording 2 ISO cameras performed well in these cases.
229

RRececorording Options in Livestrding Options in Livestream Studioeam Studio
Livestream Studio includes various ways to record your Program and ISO
recordings. Recordings are saved in a user selected destination folder; by default,
you can find the files in the Videos folder on Windows and the Movies folder on
Mac (available in beta only).
Simple EncSimple Encodeode
If you are just looking to record an .mp4 of your event, you can still do this via theStrStreameam tab. Select StrStream to Fileeam to File as your destination.
Choose the quality you wish to encode at and choose where you want to save therecording (by default it will save to the Videos folder on Windows or the Movies folderon macOS).
230

When you are ready to start encoding, click Go LiveGo Live.
The Studio Log will indicate the encoding has started. When you are ready to stoprecording, click the red StrStreamingeaming button in the bottom right corner of the Streammodule.
Your recording will be saved in the location you specified.
231

Hi-RHi-Resolution Presolution Program and ISO Rogram and ISO Rececorordingding
If you are looking for a broadcast quality high resolution Motion JPEG recording ofeither your Program output or any of your isolated (ISO) video sources, navigate toStudio settings by click the gearwheel button in the upper right corner of the interface.
Navigate to the RRececorordingding tab on the left side of the menu. The default recordinglocation is where your recordings will be saved (by default, "Videos" for Windowscomputers and "Movies" for macOS). Click Browse if you want all of your recordings tosave somewhere else, such as an external hard drive.
232

The Default file fDefault file formaormatt of your recording will be MJPEG by default. H.264 is covered ina section below.
Farther down in the menu are your ISO Recording options. With MJPEG selected asthe default file format, you can run up to four recordings simultaneously. This is helpfulif you wish to edit your sources together in post-production or you intend to use thebasic replay feature.
233

Each checkbox will activate a recording. Select which sources you wish to record.
PrProgram (clean)ogram (clean) is your Program recording without any graphics overlays.
Choose this if, for example, you need to repurpose your recording for
different brands.
Below each source selection is the option to Specify RSpecify Rececorord Ld Locaocationtion. This allows youto save any of your recordings in a location separate from the Default Record Locationconfigured above.
Below your ISO recordings specifications are additional settings for your recordings,include how timecode is recorded, your recording bitrate, and the ability to also saveyour recordings in either Media bin. RRececorord to Media Bind to Media Bin is essential if you intend touse the basic replay feature.
234

Once your recordings are configured, save your settings. To start recording, clickRRececorordd in the upper left corner of the Studio interface; click it again to stop recording.You can find your .MJPEG in the specified recording location(s).
ComprCompressed Pressed Program or ISO Rogram or ISO Rececorordingding
If you are operating on a system that supports hardware encoding, you can also recordan .mp4 file of either your Program or a single video source. Click the gearwheelbutton in the upper right corner of the Studio interface to enter the Settings menu.
235

Select the RRececorordingding tab on the left side of the menu. You can change the Default fileDefault filefformaormatt to H.264 to create a compressed recording that consumes less hard drivespace than the MPJEG recording.
If you do not see this option, navigate to Settings: Streaming and make sure HarHardwardwareeencencodingoding is enabled. If you do not see an option for Hardware encoding, then yoursystem does not have the proper hardware installed to support it.
236

This setting only allows you to create oneone ISO recording, as opposed to four hi-resolution recordings. Choose which source you would like to record.
237

You can specify a record location that is different from the default setting by checkingSpecify RSpecify Rececorording Lding Locaocationtion. In addition, you can configure which timecode yourprefer, recording bitrate, and whether to also record your source into the Media Bin(essential if you plan to use the Basic Replay function).
238

Save your settings. When you are ready to start recording, click RRececorordd in the upper leftcorner of the Studio interface. You can find the .mp4 file in your specified recordlocation.
Backup RBackup Rececorordingding
When you stream to any provider, Studio will by default save a backup .mp4 recordingof your Program to your hard drive. You can change these settings by clicking on thegearwheel button in the upper right corner of the Studio interface.
239

Navigate to the StrStreamingeaming tab. Towards the bottom you will see settings for LLocal MP4ocal MP4RRececorordingding and MP4 RMP4 Rececorording Lding Locaocationtion.
We recommend leaving Highest Quality OnlyHighest Quality Only selected, as this will recorded only thefile of the highest selected bitrate when you configure your stream. If you choose AllAllQualitiesQualities and select a multi-bitrate streaming quality, you system will record separatefiles of each quality, which can tax your CPU.
240

Unless you are also recording separately using the methods described above, we donot recommend disabling the local recording.
By default, the MP4 RMP4 Rececorording Lding Locaocationtion will be either the Videos folders on Windowsor the Movies folder on macOS. You can click BrBrowseowse to choose a different location,such as an external hard drive.
Be sure to save your settings.
241

StrStreamingeaming
242

Choose a StrChoose a Streaming Quality in Livestreaming Quality in LivestreameamStudioStudio
Livestream Studio has more flexibility and streaming bitrate options than ever
before. These include the ability to stream in 1080p, 4k, and custom bitrates.
In order to see the highest quality options, you must have hardware encoding enabledon your Studio system by going to your SettingsSettings > StrStreamingeaming.
This means your computer must have either an Intel Processor or NVIDIA card installedthat supports this feature. Computers that do notnot have these will not see the hardwareencoding option and have a more limited selection of streaming bitrates available tothem.
After saving your settings, navigate to the StrStreameam tab in the lower portion of Studio.
243
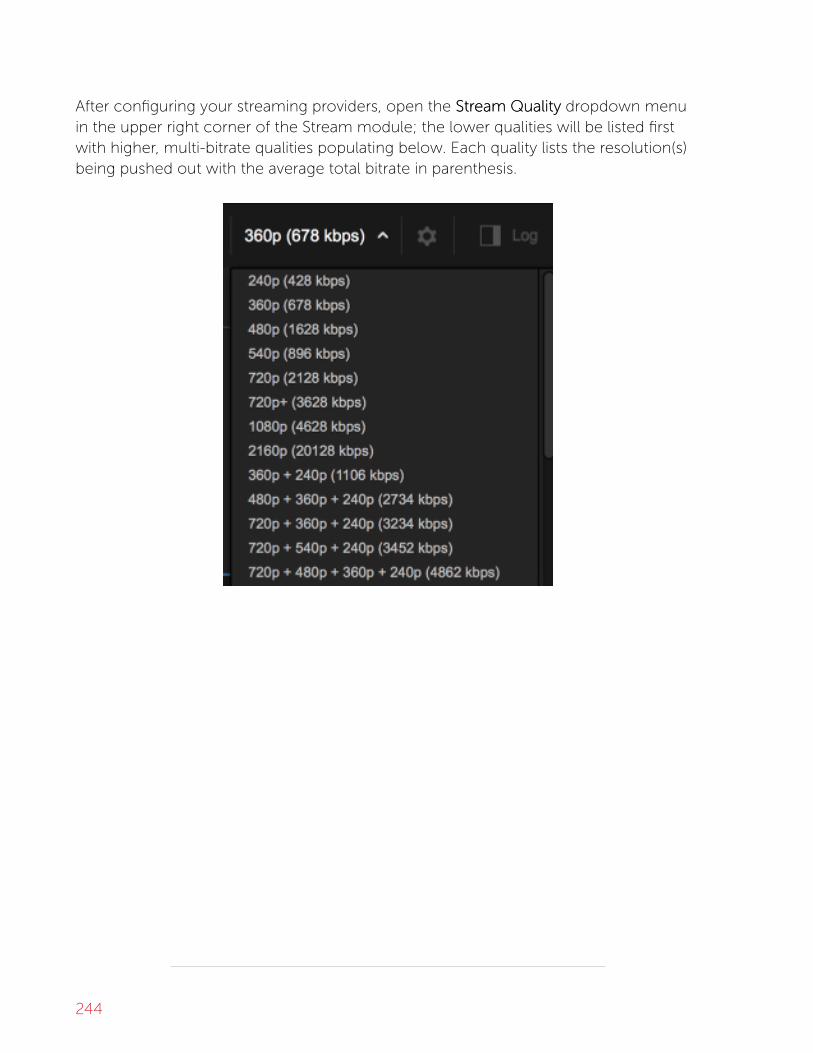
After configuring your streaming providers, open the StrStreameam QualityQuality dropdown menuin the upper right corner of the Stream module; the lower qualities will be listed firstwith higher, multi-bitrate qualities populating below. Each quality lists the resolution(s)being pushed out with the average total bitrate in parenthesis.
244

Selecting CustomCustom allows you to configure your own bitrate in case none of the presetssuit your needs. Click the corresponding gearwheel to open up the bitrate settings.
Choose a name for this particular quality (e.g. High), set the width, height, video bitrate,audio bitrate, audio sample rate, and encoding profile. Once you have configured thesettings, click DoneDone.
245

246

You can add up to four custom bitrates by clicking Add QualityAdd Quality. Each quality can beedited individually by clicking the corresponding gearwheels.
You can remove a quality by going into its Edit QualityEdit Quality menu and selecting DeleteDeleteQualityQuality.
WhaWhat's the Best Quality ft's the Best Quality for Me?or Me?
There are two factors to consider when choosing a streaming quality: Network UploadSpeed and CPU.
247

Upload speed is easier to determine, especially if you are connected to a dedicatednetwork via Ethernet. Go to www.speedtest.net and start a speedtest. Pay attention toyour upload speed results.
If you perform a speed test on a shared network, the results will display the upload anddownload speeds available for the total network, not just your device, so the numberswill be less accurate. It's best to remove other computers and devices from yournetwork.
Our rule of thumb is to choose a quality whose total bitrate is halfhalf of your uploadspeed. This allows room for network fluctuation. For example, if your upload speed isabout 10Mbps, which equals about 10,000Kbps, then you can safely assume yournetwork can push out 720p + 480p + 360 + 2720p + 480p + 360 + 240p (4862Kbps)40p (4862Kbps) and lower.
When choosing your hardware, be sure to review our recommended hardwarespecifications, which includes expected performance benchmarks for different types ofprocessors.
248

StrStreaming to Livestreaming to Livestream with Livestream with LivestreameamStudioStudio
Select the StrStreameam tab in Livestream Studio. Here you will see a few providers to choosefrom. Select LivestrLivestreameam.
Log in to your Livestream account.
249

At the top of the module is a text field labeled Enter a title fEnter a title for your stror your stream...eam... Type astream title in here.
Choose an event from the EEvent Namevent Name drop-down menu (or click + New E+ New Eventvent tocreate a new event).
By default, your Livestream followers will receive a notification when you go live. If youdo not want to send out a notification, uncheck Notify FollowersNotify Followers.
250

Click AdvancAdvanced Settingsed Settings if you want to send the stream over a bonded connection,send it as a backup stream, or specify which network(s) to use for your stream.
251

When you are ready to start your stream, click Go LiveGo Live in the bottom right corner.
When streaming is active, the stream module and streaming log on the right sideprovide live updates on streaming status.
252

StrStreaming Ineaming Inffo Windowo Window: Displays live streaming status info.
DuraDurationtion: Displays the current streaming duration.
FPSFPS: Displays the current outgoing FPS.
KbpsKbps: Displays the current outgoing bitrate.
ViewersViewers: Displays the number of concurrent viewers watching the stream.
StrStream Staeam Statustus: Displays the current status of the stream.
StrStreaming Leaming Logog: Displays live streaming updates.
• PPerferfect Strect Streamingeaming: The stream is going out with no issues.• Internet TInternet Too Slow foo Slow for Qualityor Quality: Upload bandwidth does not support selected quality.
This is generally an on-site IT issue and should be escalated to the IT department.Changing quality requires the stream to be stopped and restarted.
• LLost Internet Connectionost Internet Connection: Internet connection has been lost. Again, check withonsite IT if this happens.
• CPU WCPU Warningarning: CPU percentage is getting very high.• PrProblem publishing to primary serveroblem publishing to primary server: Studio is unable to stream to the primary
publishing point due to local Internet connection issues or an issue with thepublishing point.
253

• Antilag FeaAntilag Featurture Te Triggerriggereded: Antilag has been triggered based on the selected queuelimit (see “Streaming Preferences” above).Audio Peak Warning: Audio levels are peaking above normal levels.
Press the StrStreamingeaming button again to end the stream. When a stream is terminated, theuser will be prompted to post the video on-demand to the event, save the clip as adraft on the event page, or delete the cloud recording.
254

To change the Livestream account you stream to, click on your account name insidethe Stream module. From here, you can either open a browser to your LivestreamAccount Settings or Log Out of your account in Studio.
255
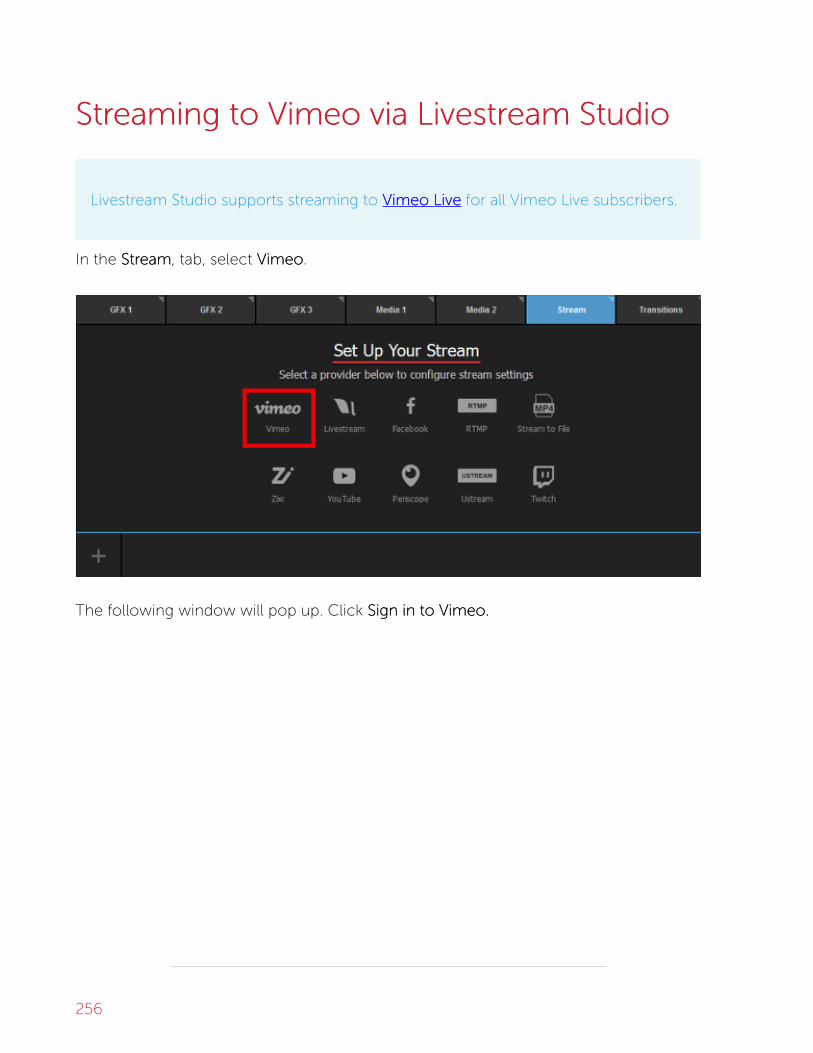
StrStreaming to Vimeo via Livestreaming to Vimeo via Livestream Studioeam Studio
Livestream Studio supports streaming to Vimeo LiveVimeo Live for all Vimeo Live subscribers.
In the StrStreameam, tab, select VimeoVimeo.
The following window will pop up. Click Sign in to Vimeo.Sign in to Vimeo.
256

A browser window will open; you may need to minimize Studio in order to see it. Login to your Vimeo account and authorize Studio to access information from youraccount to proceed.
257

Now that you are logged in, you can configure your stream. At the top of the module,give your stream a title and select your streaming quality on the right side.
Since Vimeo Live includes cloud transcoding, we recommend selecting a
single bitrate quality.
In the top right corner is a gearwheel icon. Selecting this wil allow you to set youraspect ratio and choose your default network to use for streaming. The defaultnetwork will be used when streaming to any provider you add to Studio unless youspecify a different device for a specific provider (shown in a later step).
Next choose which Vimeo event you want to stream to or select CrCreaeate Newte New tostream to a new event. Then choose your desired privacy settings under the SharShareeWithWith menu.
258

You currently cannot stream to a live event more than once on Vimeo. You
will need to create a new one each time you go live to Vimeo.
Clicking AdvancAdvanced Settingsed Settings will give you the option to use a specific network device tostream to Vimeo; Use default networkUse default network will use the network device you selected earlier,but you may override that setting here if you wish to use a different connection forVimeo. This can be handy if you want to keep simultaneous streams on separatenetworks as a failsafe.
Click Hide AdvancHide Advanced Settingsed Settings to collapse this menu.
259

When you are ready to start your stream, click Go LiveGo Live in the bottom right corner.
Your Program output will appear in your chosen video destination on Vimeo.
260

For easy access to your stream, hover your cursor over the Vimeo icon; the
URL to your stream will appear there.
261

When your event is over, end the stream by clicking the red StrStreamingeaming button in thelower right corner.
To log out of Vimeo, click your profile name below the stream title and click LLog Outog Out.
262

StrStreaming to Feaming to Facacebook Live via Livestrebook Live via LivestreameamStudioStudio
You have the option to stream directly to your Facebook Profiles and Facebook
Events, as well as Pages and Groups of which you are an adminadmin.
This are details going live to Facebook via Livestream Studio. If you arIf you are tryinge trying
to strto stream to Feam to Facacebook via the Livestrebook via the Livestream Plaeam Platftform Simulcast form Simulcast feaeaturture, seee, see herheree..
LLog in to Fog in to Facacebook.ebook.
Navigate to the StrStreameam tab in the lower right corner of Studio, then select FFacacebookebook.
Click Sign in to FSign in to Facacebookebook. A browser window will open.
263

Enter your Facebook credentials, and select whether you wish to stay persistentlylogged into Livestream Studio. Then click LLog Inog In.
264

Livestream Studio will request several permissions, including your friend lists, events,ability to post, and access to pages you manage. Be sure to allow these and continue.
We recommend setting your default audience settings to PublicPublic, especially if
you ever intend to stream to an audience beyond your friends list. You can
restrict your audience for each broadcast within Livestream Studio before you
go live.
265

Click OKOK to finish permission settings.
When authorization is complete, you can close your browser window if it does notclose automatically.
266

ConConfigurfigure Fe Facacebook Settingsebook Settings
Across the top of the Stream module are a handful of add-ons for your stream,including the abilities to tag your (1) location and (2) friends. You can also log out ofyour Facebook account, click the URL to open the page where your stream will behosted, or remove Facebook as a streaming destination.
You can also access these options by hovering your cursor over the Facebook
icon at the bottom of the module.
Below these options are basic stream configuration settings.
267

1. In the PPostost AsAs dropdown, you can choose between your personal profile, any pagesyou admin, or any groups you admin.
2. SharShare withe with lets you choose which audience you would like to share your streamwith.
3. Check Continuous LiveContinuous Live if you wish to keep streaming beyond Facebook's four-hourstreaming limit (note that this will notnot send out additional notifications or save anyVOD from your stream onto Facebook).
Below these basic configurations, click AdvancAdvanced Settingsed Settings to set a variety of options forcustomizing your live video post on Facebook, such as adding tags for other pages onFacebook, and audience targeting tools.
You can also provide other metadata for your stream, such as targeted countries andwhat language the broadcast will be in.
268

At the bottom of this section, you can select which network to stream over, if you havemultiple available.
Go Live to FGo Live to Facacebookebook
At the top of the module, give your stream a name and select a streaming quality. Foroptimum performance on Facebook, select a single bitrate (e.g. 720p+) rather than amulti-bitrate quality (e.g. 720p + 540p + 240p).
Clicking the gearwheel allows you to select your preferred aspect ratio. Choosing 1:1or 9:16 will display a yellow SaSaffe Are Area Displayea Display in Program and Preview demonstratingwhat your stream's output will look like so you can set your shots accordingly. You alsohave the option to see the display is all multiview sources, or to turn it off entirely.
269

Here, you can also choose your default streaming network. Unless you specified adifferent network in the AdvancAdvanced Settingsed Settings section, your stream will broadcast over thisnetwork.
Click GoGo LiveLive to start your stream.
Once you are live, you can view your stream by hovering the mouse over theFacebook logo and clicking the URL in the menu that pops up.
270
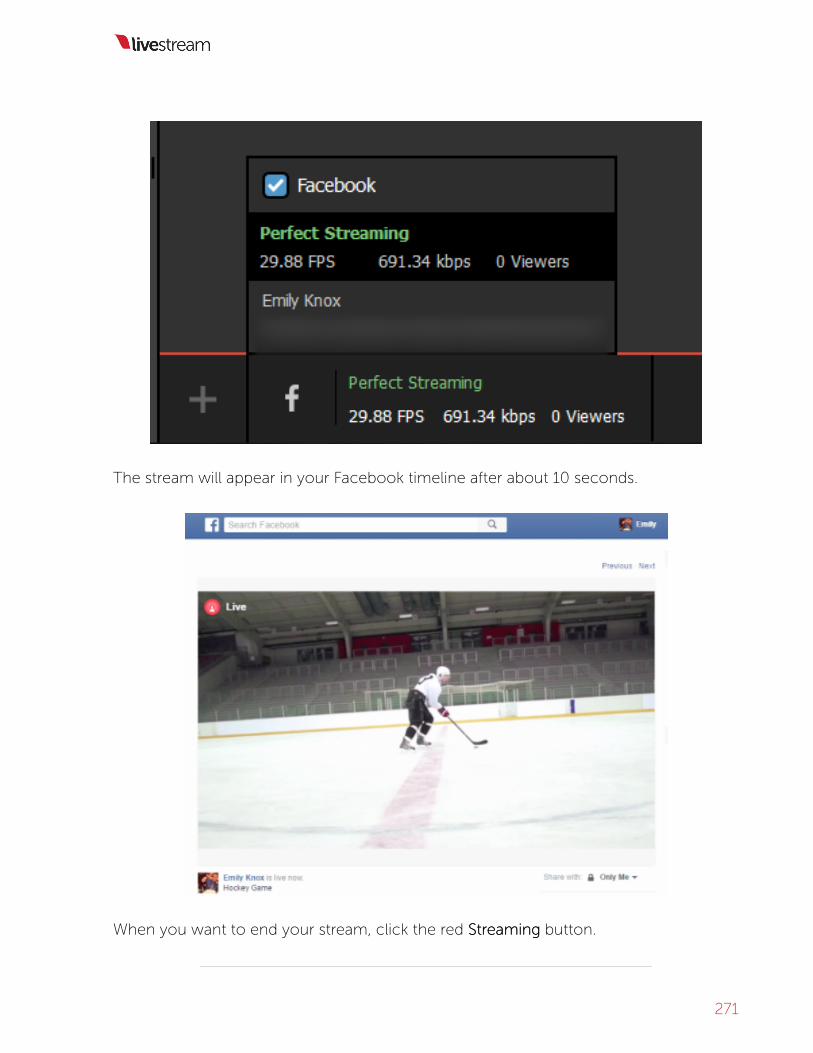
The stream will appear in your Facebook timeline after about 10 seconds.
When you want to end your stream, click the red StrStreamingeaming button.
271

The broadcast will end promptly and the stream will save on your Facebook timelinefor on-demand playback.
272

StrStream to a Scheduled Live Peam to a Scheduled Live Post onost onFFacacebook via Livestrebook via Livestream Studioeam Studio
While you can go live to your Facebook pages and groups at any time, many
publishers on Facebook prefer to use Facebook's Scheduling feature so that their
followers have prior notice and are more likely to watch their live event.
Schedule a Live Video on FSchedule a Live Video on Facacebookebook
In order to stream from Studio to a scheduled live video on Facebook, you will firstneed to create the scheduled post on Facebook.
Facebook provides a comprehensive tutorial and best practices to scheduling a livevideo on Facebook. A broader live overview for Publishers on Facebook is alsoavailable.
Once your live video is scheduled, you can configure Studio to stream to it.
Go Live to YGo Live to Your Scheduled Live Pour Scheduled Live Postost
In Livestream Studio, navigate to the StrStreameam tab, select Facebook and log in to thesame account. Select your Page under PPost Asost As, and then open the StrStream Team Too drop-down menu. Your scheduled live video post will appear there.
273

Select that scheduled post. Configure the rest of your stream is the same as all streamsto Facebook.
When you are ready to start broadcasting, click Go LiveGo Live in the bottom right corner.
When you edit your scheduled post on Facebook, you can see your stream come inand monitor it. However it will not appear live on your timeline until the time youscheduled your post to go live.
274

If you want to go live sooner, click the Manual StartManual Start button at the bottom of the posteditor in Facebook.
Once you confirm you want to proceed and Facebook fetches your stream preview,click Go LiveGo Live. Your stream will be live on your Facebook timeline.
275
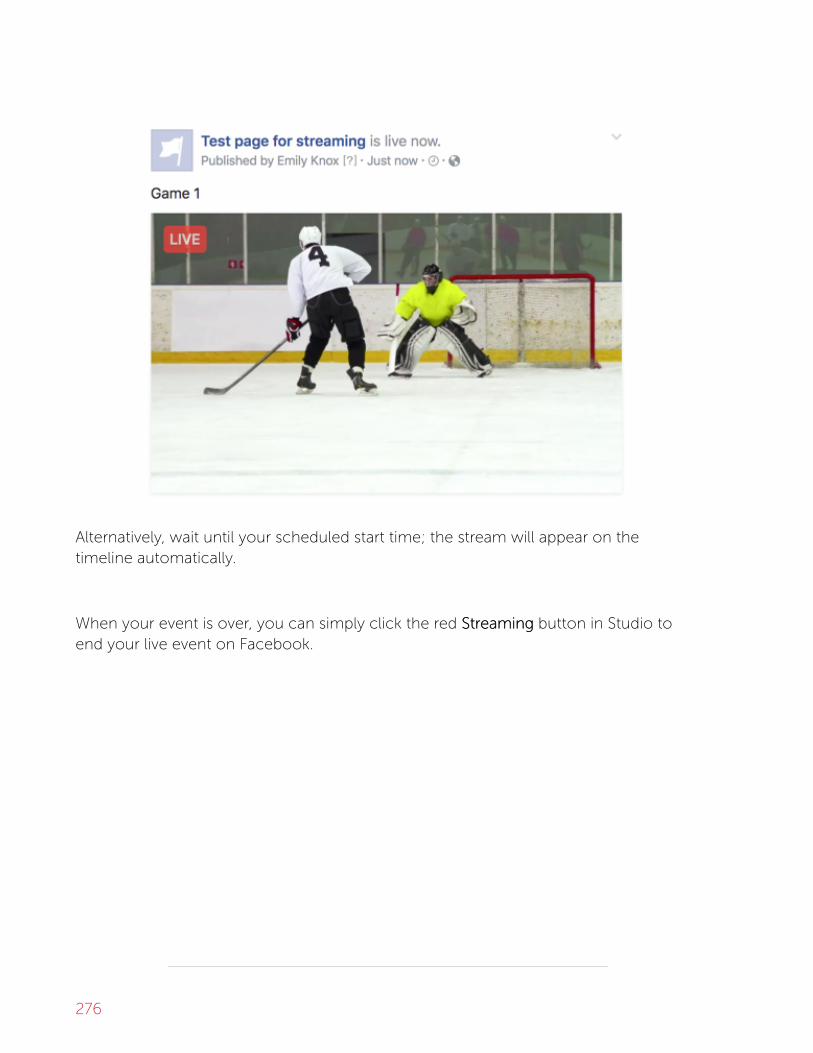
Alternatively, wait until your scheduled start time; the stream will appear on thetimeline automatically.
When your event is over, you can simply click the red StrStreamingeaming button in Studio toend your live event on Facebook.
276

StrStream to Team to Twitter & Pwitter & Perisceriscope viaope viaLivestrLivestream Studioeam Studio
Livestream Studio integrates with and streams directly to Periscope.
Navigate to the StrStreameam tab and select Periscope as your streaming provider.
Click Sign in to PSign in to Perisceriscopeope.
277

This will open your web browser to Periscope's login page. If your browser does notautomatically come to the front of your screen, you may need to manually switch overto it. Do not exit StudioDo not exit Studio.
This will not work if Microsoft Edge is your default browser. Set Google
Chrome or Mozilla Firefox as your Windows default browser in order to log in.
Log in to Periscope and authorize Studio to access your Periscope account. This isnecessary in order for the two applications to communicate to each other.
Once authorized, you can close your browser and go back to Studio.
In the Stream module, give your stream a title and be sure to select 540p540p as yourquality.
278

Periscope does not support any other streaming quality. 540p is the streaming
quality profile that is recommended by Periscope.
Click the gearwheel on the upper right side to set your aspect ratio and your defaultnetwork to stream with.
When you have configured these settings, click the gearwheel again to collapse thismenu.
Below the stream name is a small Twitter bird icon. By default, it is blue, indicating thatthe stream to Periscope will also be tweeted to the Twitter account connected to yourPeriscope account. If you do not want your stream on Twitter, click the bird icon todisable it.
279

Clicking the gearwheel in the popup menu will allow you to choose which of youravailable network connections you will send your stream though (this example onlyhas one).
Below this, you can specify a network to use if you wish to stream using a networkdifferent from your default set network. This is handy if you intend to add otherproviders and wish to use different connection types for each stream.
When you are ready to start streaming, click Go LiveGo Live in the bottom right corner.
280

When your event is over, click the red StrStreamingeaming button to end the stream.
When you stream ends, you can see information about your viewers and for how longyou streamed. Choose to either save your video on demand or delete it.
281

StrStreaming to Yeaming to YououTTube via Livestrube via Livestream Studioeam Studio
You can stream to your YouTube channel directly from Livestream Studio. There
are two ways YouTube supports streaming: either their "Stream Now" option or the
Live Events Dashboard.
To get started, go to the StrStreameam tab and select YouTube as a provider.
You will need to log in using your YouTube/Google credentials and allow LivestreamStudio to access your account. This will open a new browser window; if your browserdoes not come to the front of your screen, navigate away from Studio to see it and login. Do not close Studio.Do not close Studio.
If you are using Google apps (i.e. an Google account that is not a standard
@gmail.com address), you may need to authorize access to third-party
applications in your Google account or via an admin.
282

Once you are logged in and authorize Studio access to your Google account, you canclose the browser and navigate back to Studio.
Give your stream a title and choose a streaming quality. Since YouTube provides cloudtranscoding, we recommend selecting a single-bitrate quality.
Clicking on the gearwheel will allow you set your aspect ratio and choose your defaultnetwork. This is the network that will be used to stream with by default for any providerin Studio.
Once you have configured these settings, you can click the gearwheel icon again tocollapse the menu.
283

You can select which YouTube event you want to stream to in the EEvent Namevent Name drop-down menu. Selecting StrStream Noweam Now will simply start a new stream to your channelrather than broadcasting to a previously created event. The URL to your stream will beavailable below the menu.
Clicking AdvancAdvanced Settingsed Settings will allow you to choose a different network rather thanyour default network to stream with. This is handy if you intend to add other providersto Studio and wish to keep them on different network devices. When you specifyYouTube's network, you can click Hide AdvancHide Advanced Settingsed Settings to collapse the menu.
284

When you are ready to start streaming, click Go LiveGo Live in the lower right corner.
When your event is over, click the red StrStreamingeaming button to end the stream. If you needto log out of YouTube, click your name below the stream title, then click LLog Outog Out.
285

286

StrStreaming via RTeaming via RTMP and Zixi frMP and Zixi fromomLivestrLivestream Studioeam Studio
You can stream directly from the Livestream Studio software to other services
using any RTMP server (e.g. Wowza, Akamai, etc.) as well as Zixi. Both use-cases
have very similar interfaces.
Under the StrStreameam tab, click the streaming protocol you plan to use (RTMP or Zixi).
At the top of the module, configure a stream title and streaming quality.
Click the gearwheel to adjust your aspect ratio or choose a default network for sendingyour stream.
287
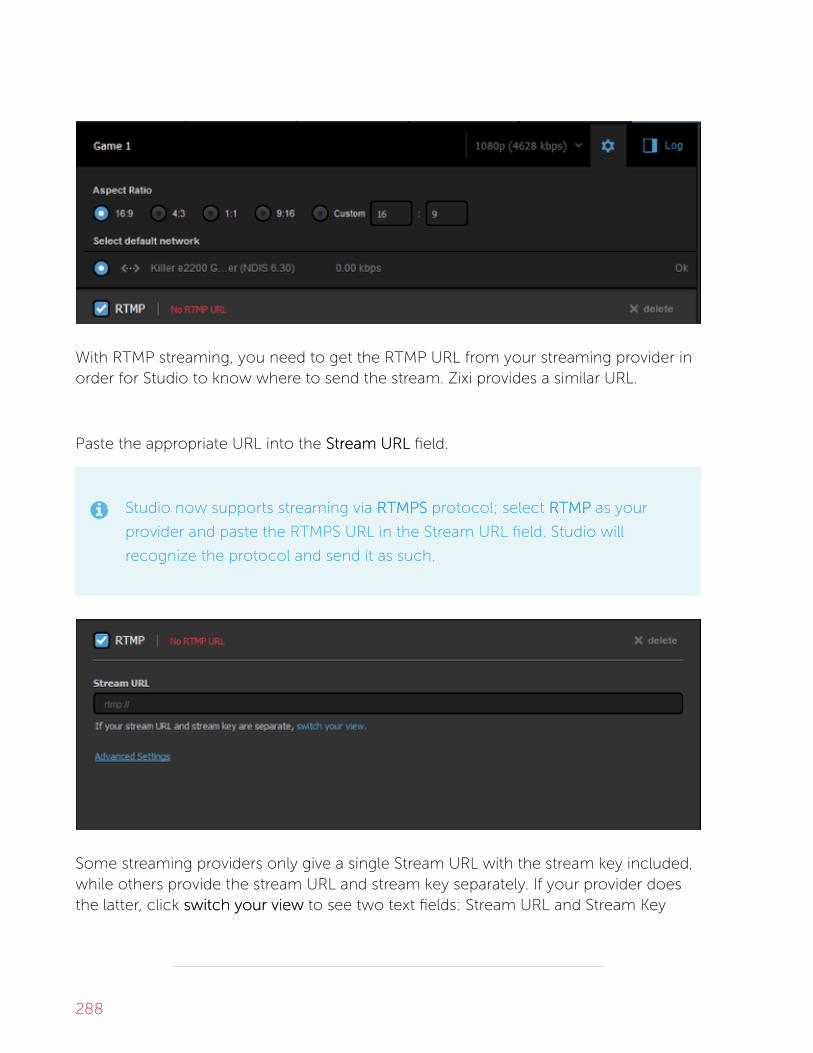
With RTMP streaming, you need to get the RTMP URL from your streaming provider inorder for Studio to know where to send the stream. Zixi provides a similar URL.
Paste the appropriate URL into the StrStreameam URLURL field.
Studio now supports streaming via RTRTMPSMPS protocol; select RTRTMPMP as your
provider and paste the RTMPS URL in the Stream URL field. Studio will
recognize the protocol and send it as such.
Some streaming providers only give a single Stream URL with the stream key included,while others provide the stream URL and stream key separately. If your provider doesthe latter, click switch your viewswitch your view to see two text fields: Stream URL and Stream Key
288

Clicking AdvancAdvanced Settingsed Settings will show additional options, such as importing theconfiguration XML file (Import FImport Frrom Fom FMLEMLE), enabling authorization, and choosingwhich network to stream over if you do not wish to use your
Zixi users will see the option to enter a Zixi password, as well as the option to use abonded connection or specify a network under their AdvancAdvanceded SettingsSettings. Checking UseUseBondingBonding will automatically use all available networks to which your Studio PC isconnected.
289

When your RTMP or Zixi settings are configured, click Go LiveGo Live to start streaming toyour destination.
Studio will start streaming your content to your destination and display informationsuch as outgoing frame rate and bitrate. Any potential issues will display in the log onthe right side.
290

When your event is over, click the red StrStreamingeaming button to end your stream.
291

StrStreaming to Ustreaming to Ustreameam
In order to stream to Ustream via Livestream Studio, producers must use the RTMPsection of the StrStreameam module.
Ustream provides instructions on how to obtain the RTMP URL for your channel here.
292

StrStreaming to Teaming to Twitch via Livestrwitch via Livestream Studioeam Studio
Livestream Studio offers direct integration with Twitch for producers who wish to
stream their content there.
In the StrStreameam module, click the Twitch logo to start configuring your stream settings.
The pop-up window seen below will appear. Click Sign in to TSign in to Twitchwitch and navigate toyour web browser if it does not switch over automatically.
293

Log in to your Twitch account within the browser.
Authorize Livestream Studio to access information from your Twitch account byclicking AuthorizAuthorizee. After doing so, navigate back to Studio if the browser does not closeby default.
294

Enter a title for your stream and set your streaming quality.
Click the gearwheel icon to set your desired output aspect ratio and the defaultnetwork to use with your stream. If you choose a 1:1 or 9:16 ratio, a Safe Area Displaywill appear in your output by default. You can change this to show in all sources inyour multiview or to not display at all.
295

Set your game name, stream title on Twitch, ingestion location, and whether to saveyour VOD on Twitch.
Clicking AdvancAdvanceded SettingsSettings will allow you to specify a network to stream out at if youdo not wish to use your default network selected earlier.
296

Click GoGo LiveLive when you are ready to start broadcasting. Livestream Studio will indicatethat the stream has started and display your streaming status.
When you are ready to finish streaming, click the red StrStreamingeaming button.
297

Hover your mouse over the Twitch icon at the bottom of the module. You will find alink to your Twitch channel.
298

299

StrStream to Multiple Pream to Multiple Providers Usingoviders UsingLivestrLivestream Studioeam Studio
You have the option to stream to multiple providers at the same time using
Livestream Studio.
Your video is only encoded once, so CPU demands for this feature are similar to thosefor streaming to just one provider. However, bandwidth requirements will be higher.Multiple streams will use as much bandwidth as the qualities selected for eachprovider.
ExampleExample: If 720p + 480p + 360p + 240p (4862Kbps) Stream Quality is selected forLivestream and ‘Highest Quality’ is selected for Facebook (in this case, 720p), then thetotal outgoing bitrate will average 4862 + 2128 = 6990Kbps6990Kbps. We always recommendhaving twice the upload speed on your network as the selected bitrate, which is about114Mbps upload speed4Mbps upload speed in this case.
Start by clicking one provider’s logo to add it to Studio (this example will useLivestream).
300

Log in to the selected provider to configure your stream settings.
Configure your stream destination as you normally would (e.g. select your Livestreamevent).
301

Now add a second provider by clicking the ++ button in the lower left corner of theStream module.
Select a second provider (this example will show Facebook).
302
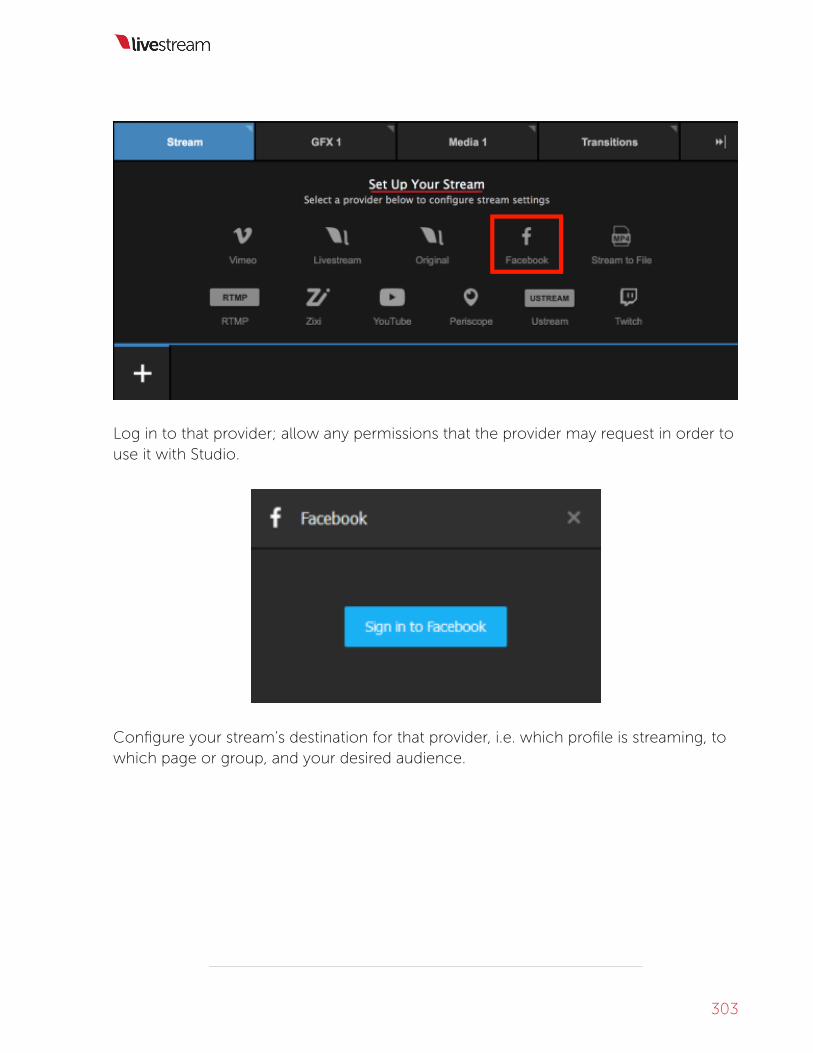
Log in to that provider; allow any permissions that the provider may request in order touse it with Studio.
Configure your stream’s destination for that provider, i.e. which profile is streaming, towhich page or group, and your desired audience.
303

You can click AdvancAdvanceded SettingsSettings to configure further settings for that provider if youwish.
304

At the top of the overall StrStreameam panel, your stream title, bitrate, and aspect ratio.
If you need to change a setting for a particular provider, click the provider's icon at thebottom of the panel. The selected provider will be a ligher shade of gray.
305

Click ‘GoGo LiveLive’ in the bottom right corner to start your stream.
306

The Stream module in Studio will show the streaming status for each provider alongthe bottom of the interface, as well as the overall outgoing bitrate in the middle of thepanel.
Open a web browser and go to your selected stream destinations. You will see theexact same live content in each player.
307

308

You can deactivate a provider by hovering your mouse over its icon and uncheckingthe checkbox in the upper left corner of the popup box. If this is done while you arestreaming, that will stop the stream on that provider only.
You can reactivate that provider at any time (live or not live) by checking the checkbox.
When your event is over, click StrStreamingeaming in the lower left corner to end the stream.
309

Studio will let you know that the stream has ended and display the maximum viewersyour event had and the stream duration.
Certain providers may have actions for you to take after the broadcast. For example,Livestream will ask if you want to post the video on demand, save it as a draft, or deleteit (‘Save draft’ is selected by default.) Choose your desired option, then click DoneDone.
310
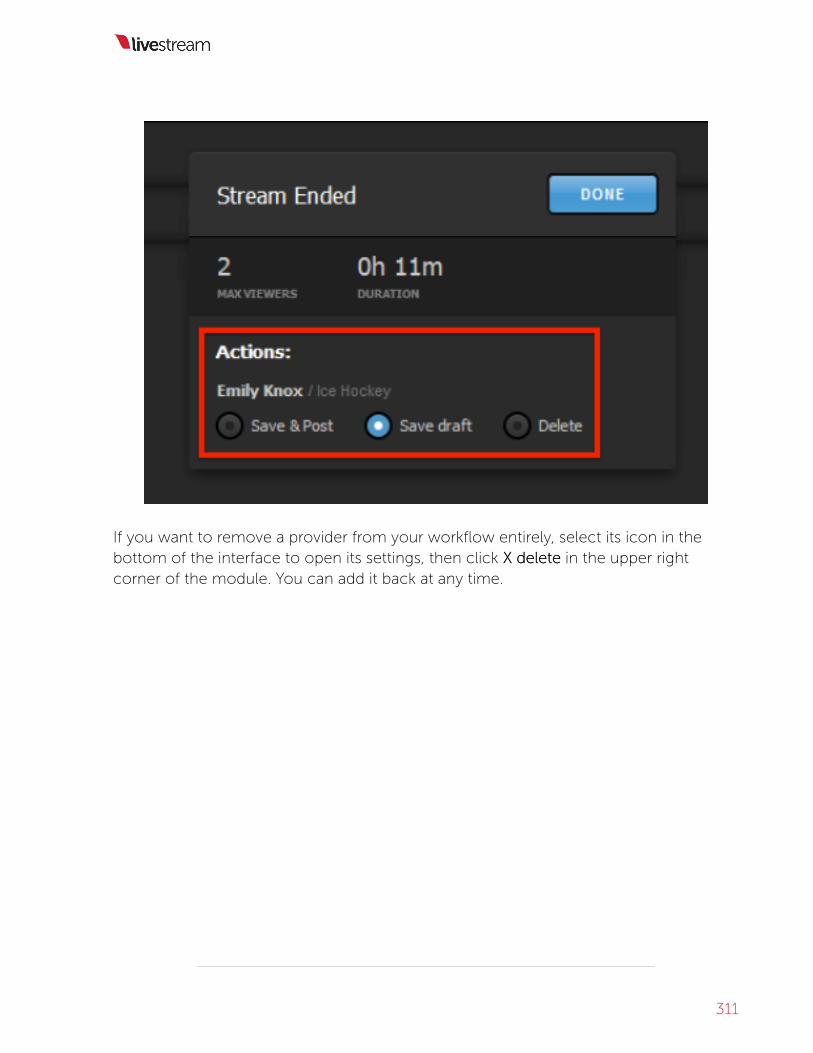
If you want to remove a provider from your workflow entirely, select its icon in thebottom of the interface to open its settings, then click X deleteX delete in the upper rightcorner of the module. You can add it back at any time.
311

It’s important to note that Facebook will not stream alongside any other streamingprovider besides Livestream. Facebook will have to be disabled in Studio prior tostreaming to YouTube, etc.
If you wish to stream to Livestream and Facebook but have limited bandwidth, youmay want to look into Facebook Live for Livestream on the Livestream Platform.
312

AdvancAdvanced Stred Streaming Settings in Livestreaming Settings in LivestreameamStudioStudio
Livestream Studio allows you to configure additional settings regarding your
stream's output and response to certain situations.
These settings can be found by clicking the gearwheel in the upper right corner of theStudio interface and navigating to the Settings: StrSettings: Streamingeaming menu.
HarHardwardware ence encodingoding: This option only appears on PC's that have integrated graphicscards that support video encoding. Learn more.
AntilagAntilag: Selecting ‘On’ for Antilag works to reduce latency on the viewing end. If a delayon the encoding side builds up past the chosen AntilagAntilag DuraDurationtion (below), the framebuffer will be cleared. Turning Antilag off will continue to build a cache of frames
313

without clearing the data, thus building latency to your viewers. If low latency is acritical component of your stream, disabling Antilag is not recommended.
KKey Fey Frame Interval:rame Interval: Places key frames into the stream to track changes in movement.Two seconds is a standard setting, but you may want to consider a higher interval ifyour event has a lot of motion.
EncEncoder Queueoder Queue: The number of frames that Livestream Studio will allow to build upprior to a stream terminating due to bandwidth or CPU issues.
BitraBitratete: A ‘Variable’ bitrate will change the outgoing bitrate based on the movement inthe video. Static images will send at a lower bitrate; high movement will increase thebitrate. ‘Constant’ bitrate will maintain the outgoing bitrate regardless of the amount ofmovement in the video.
LLocal MP4 Rocal MP4 Rececorordingding: Automatically records an .mp4 of your stream as a backup. It itstrongly recommended to leave this feature enabled. Selecting Highest Quality OnlyHighest Quality Onlywill record in only the highest bitrate and resolution that you are outputting (e.g. if yourstream quality is 720p + 540p + 240p, your backup recording will record in 720p,whereas selecting All QualtiesAll Qualties will produce three separate recordings simultaneously,one for each quality).
MP4 RMP4 Rececorording Lding Locaocationtion: Choose where the backup recording described above issaved. By default, your recordings will save to the Videos folder on your system's Cdrive, but you may choose to save it elsewhere, such as an external hard drive.
StrStreaming Modeeaming Mode: Allows you to choose the outgoing frame rate. The higher the rateyou choose, the more CPU usage will increase.
Closed CaptioningClosed Captioning: If you need to ingest closed captions over SDI, here is where youenable it. Learn more about Studio's closed captioning support.
314

Can LivestrCan Livestream Studio Stream Studio Stream to Feam to FacacebookebookWWorkplacorkplace?e?
Facebook Workplace is not directly integrated with Livestream Studio. However, youcan stream to your Workplace community via RTMP.
315

Graphic OverlaysGraphic Overlays
316

Adding Graphics Overlay TAdding Graphics Overlay Tracksracks
Livestream Studio gives you the option to use three graphics overlay channels, all
of which can include multiple layers of static or data-driven graphics.
To ensure you have the desired number of graphics overlay channels available, go toyour settings and navigate to the AdvancAdvanceded tab.
Look for the GraphicGraphic OverlayOverlay TTracksracks menu. This is where you select the number of GFXtabs you want available to you in the Livestream Studio interface (up to three).
Next, in the InputsInputs tab, add your GFX channels as video sources if you wish to seethem in your multi-view. This is especially helpful if you are using picture-in-picture orother full-screen graphics.
317

After saving your settings, you will see the desired number of GFX channels and anyGFX channels added to your multi-view.
The first step in adding graphics overlays to the GFX channel is adding a layer. You caneasily add a Livestream pre-built graphic template such as a lower third by navigatingthe Studio Graphics Store seen inside the graphics module.
318
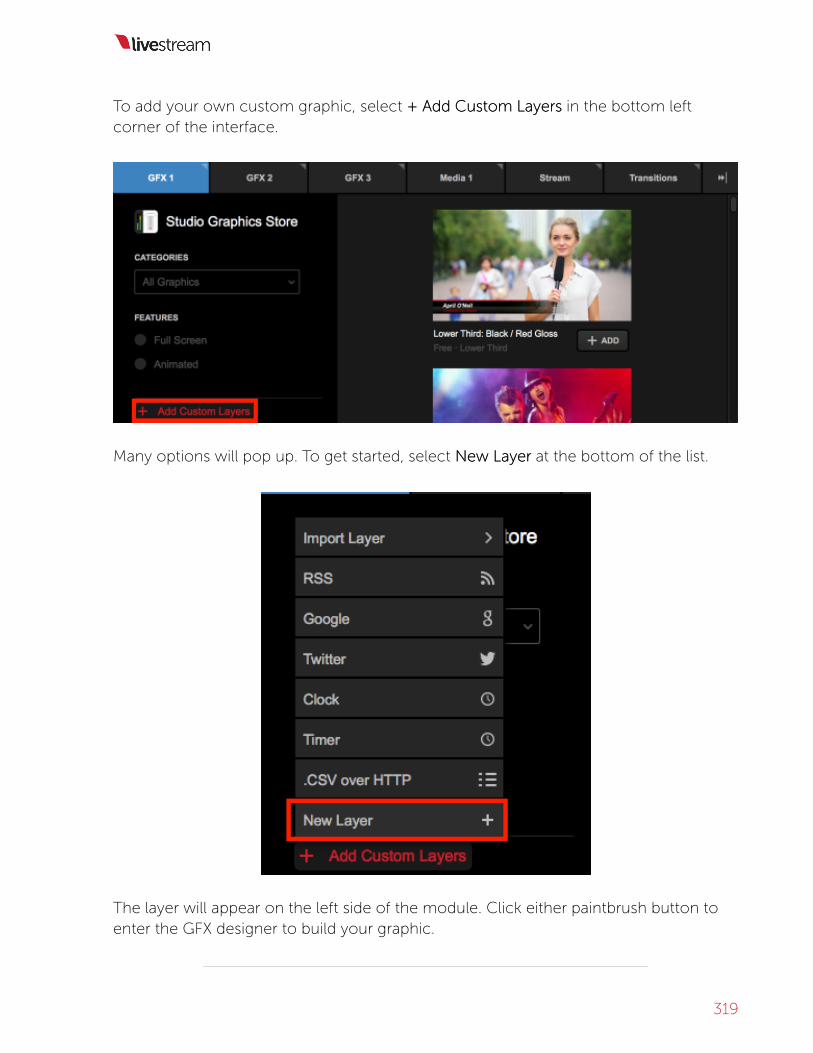
To add your own custom graphic, select + Add Custom Layers+ Add Custom Layers in the bottom leftcorner of the interface.
Many options will pop up. To get started, select NewNew LayerLayer at the bottom of the list.
The layer will appear on the left side of the module. Click either paintbrush button toenter the GFX designer to build your graphic.
319

Simple Mode:Simple Mode: To open the GFX Designer in Simple mode, double-click the
graphics layer.
Clicking the +T+T button will add static text to your graphics layer.
320

Click the attached gearwheel button for editing options (font, size, color, etc.)
321

The next button allows you to add either a static or dynamic image to your graphicslayer.
A static image is any image file you can import, which will always be visible when thatgraphics layer is also visible. The image will not change.
Supported image formats are .png, .jpg, .jpeg, .bmp, .xpm, .tif, .tiff
322

A dynamic image will change if the hosted file is also changed. In the designer, youchoose the file where it is located and its dimensions.
323

The next option you can add is a video source. Clicking this will allow you to choosewhich video source you want to include in your graphics channel, place it, size it, etc.Each layer can support up to five video sources.
The following button allows you to add text or image data fields. Here is where you setwhere assets will be, their sizes, font colors, etc. The content of those fields is added ina later step.
324

Farther to the right, the two arrow buttons are for UndoUndo and RRedoedo.
The next button will provide you with a box identifying the title safe (inner box) andaction safe (outer box) areas. This lets you know that your graphics will not be cut offthe screen.
325

The next three buttons allow you to change how the GFX Designer displaystransparency. This has no impact on the appearance of your graphics overlays.
326

Right clicking on your content in the designer allows you to undo and redo actions,move content between layers, copy, paste, etc.
Close out of the GFX Designer when you have finished building your graphics layer. Ifyou hover your mouse over your GFX layer, you will notice a name appear at the top-left of the image. Double-click the text to rename this GFX layer.
327

You can adjust other settings for that graphics layer by clicking the gear wheel button.The settings shown will change based on the type of graphics overlay being used.
Most GFX layer settings will be related to your data fields. If you added a text or imagefield, a column for each should have been created to the right, which you can rename.
328

You can also add a column by clicking + C+ COLOLUMNUMN underneath where the datapopulates and add that asset in the GFX Designer.
329

In the one row that appears, you can add content to those fields by clicking in the cell.You can then type any desired content into a text field.
330

Double-clicking an image field will allow you to browse your computer for an image toput in that image field.
Click the adjacent radio button to highlight it blue. This will make that row of datavisible when that layer is shown in Preview or Program.
To use the same graphics overlay template for different information or data, click ++ROROWW on the bottom.
331

Fill in the data cells with the information you want to use for those text or image fields.
Click the corresponding radio button to make that row of data visible in your graphicslayer.
332
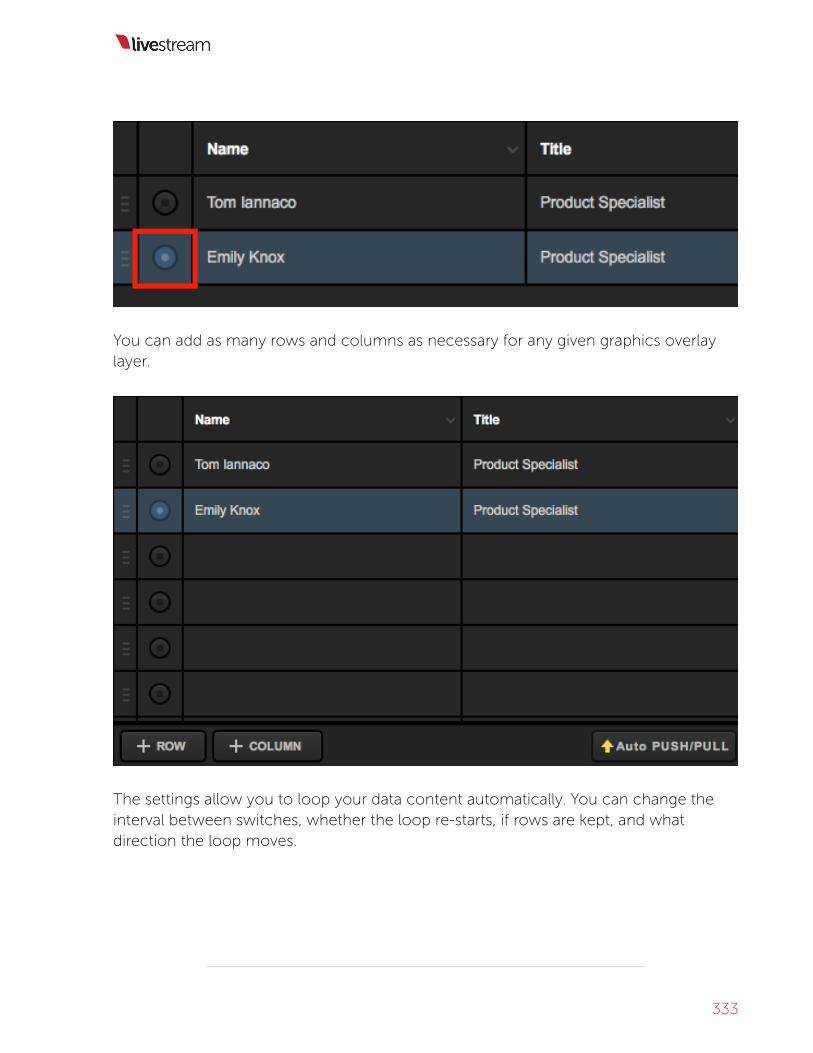
You can add as many rows and columns as necessary for any given graphics overlaylayer.
The settings allow you to loop your data content automatically. You can change theinterval between switches, whether the loop re-starts, if rows are kept, and whatdirection the loop moves.
333

334

Mixing Graphics Overlays into PrMixing Graphics Overlays into Programogram
The mixing panel shown in this section is only visible when Studio is in
AdvancAdvanced Interfaced Interface Modee Mode. Mixing graphics in Simple Mode is covered herheree.
Once your graphic is designed and configured, you can start adding it to yourproduction. First, make sure your layer is visible by clicking the eyeball icon. It shouldbe highlighted blue.
If you have multiple layers in your graphics overlay channel, highlight the eye icon ofany layer that you want to be visible; more than one layer can be visible at a time.
335

Please note that if you have multiple layers in one module, you can click the displaybuttons on the bottom to show your layers in list mode to manage them more easily.
336

You can still access settings, the GFX Designer, and change visibility for each layerwhen using this view.
337
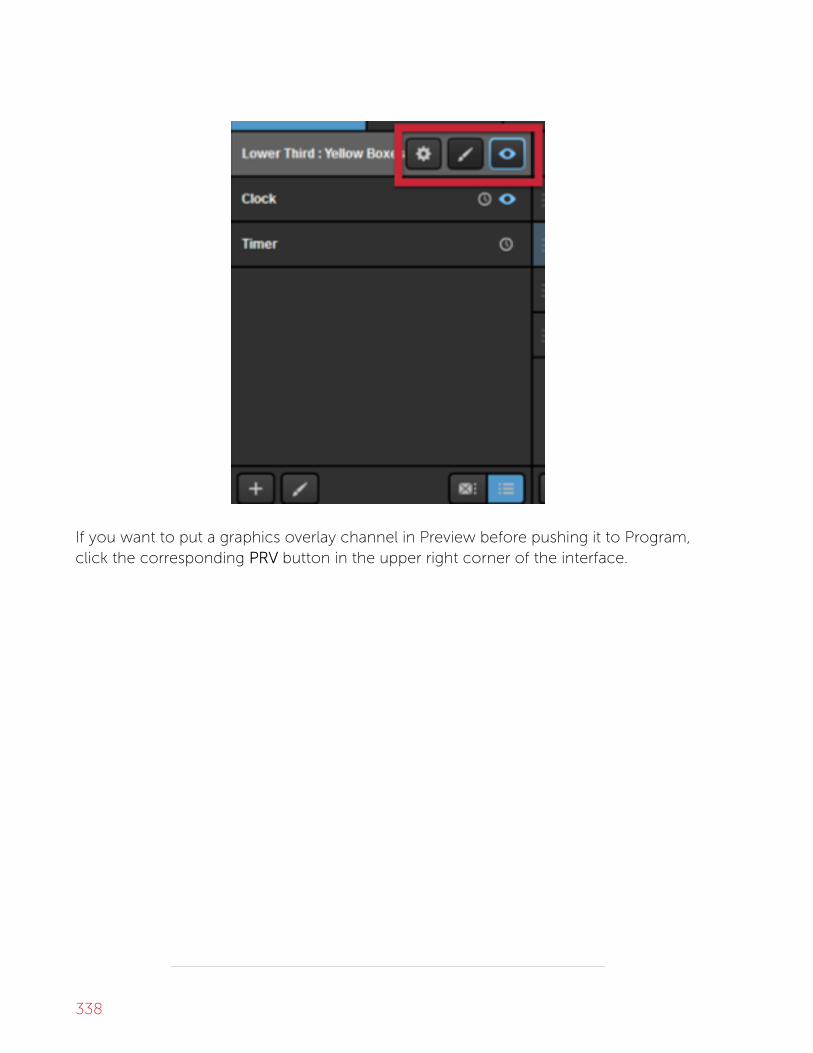
If you want to put a graphics overlay channel in Preview before pushing it to Program,click the corresponding PRVPRV button in the upper right corner of the interface.
338

You should now see the visible layers of your graphics overlay channel in Preview.
339

You should also notice the yellow PUSHPUSH button flashing. Click it to bring your graphicsoverlays into Program.
Your visible layers are now seen in both Preview and Program.
This is also indicated by PUSHPUSH no longer flashing and the PULLPULL button turning red.
340
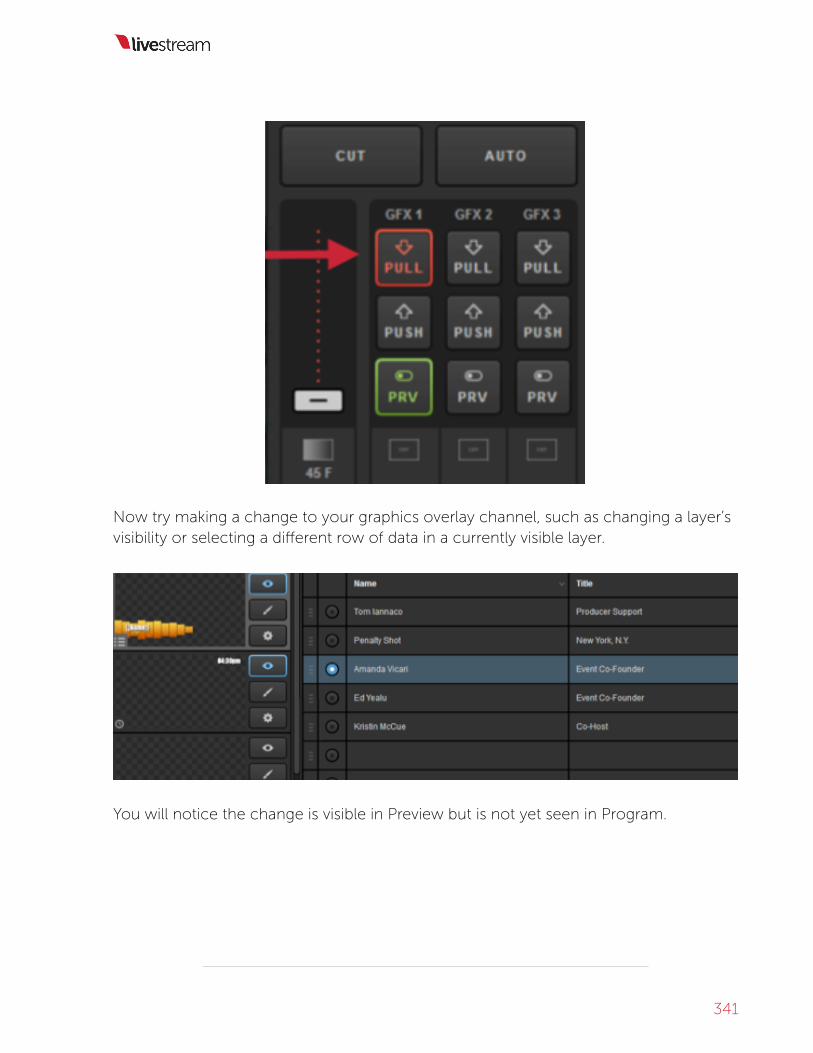
Now try making a change to your graphics overlay channel, such as changing a layer’svisibility or selecting a different row of data in a currently visible layer.
You will notice the change is visible in Preview but is not yet seen in Program.
341

The PUSHPUSH button has also started flashing again. This means that Livestream Studio hasdetected a change in that GFX channel and is ready to change it in Program. Click itwhen you are ready to show the change to viewers.
You should now see the change reflected in both Preview and Program.
342

For each layer, you have the option to have every change automatically pushed toProgram immediately by selecting the AAUTUTO PUSH/PULLO PUSH/PULL button on the bottom right.
Please note that if the graphics overlay is not yet in Program, you will need to push itmanually by clicking PUSHPUSH in the upper right corner.
343

To remove a visible graphics overlay quickly while AAUTUTO PUSH/PULLO PUSH/PULL is enabled, simplyclick on the highlighted radio button of the visible row.
Now the graphic has been removed from Program and the radio button has faded inthe graphics module to indicate this.
344

Click the red PULLPULL button that corresponds to that channel to remove everything fromthat graphics overlay channel from Program.
Doing so will remove that graphics overlay from Program, but you will still see it inPreview if the PRVPRV button is still selected.
345

To remove a graphics overlay from Preview, click the corresponding green PRVPRV button.
You should no longer see your graphics overlay in either Preview or Program.
346

347

Using the Tie ContrUsing the Tie Controlsols
You may need to switch a video source and a graphics overlay simultaneously. This
is where the TIE BGTIE BG and TIETIE buttons in Livestream Studio (Advanced Interface only)
come in.
At least one of these TIETIE buttons must be selected at all times. This tells the transitioncontrols what to reference when switching.
If only TIE BGTIE BG is highlighted yellow, then only the video source in Preview will switch toProgram when transitioning.
348

After using a transition control, notice how the video source switched, but GFX 1remained in Preview because only TIETIE BGBG was selected.
To switch the video source and bring in a graphics overlay at the same time, select TIETIEBGBG and the corresponding TIETIE button for your graphic. Be sure to select the PRVPRVbutton for the graphics overlay channel that is tied to your video source.
349

Your Preview and Program monitors should look similar to this, with a GFX channel inPreview. Use a transition control to switch the sources.
Now your video sources have switched and your graphics overlay has been pushed toProgram.
350

If only the GFX 1 and GFX 2 TIETIE buttons are lit and both sources are in Preview, thenboth overlays will switch into Program when transitioning. The video will not change.
In this example, GFX 1 has a lower-third graphic, and GFX 2 is a clock. Use a transitioncontrol to bring both into Program.
After the transition, both graphics overlays are now in Program, but the video source isthe same since TIETIE BGBG was not selected.
351

To pull a graphics overlay out of Program simultaneously with a video source, tie thebackground and the graphics overlay together.
Next, you will need to remove the graphics overlay from Preview. This will tell thetransition controls that the graphic should not be shown in Program on the nextswitch.
352

Your monitors should look similar to this now, with Preview showing a different videosource and no graphic. Use a transition control to switch the sources.
Now your video sources have changed, and your graphics overlay is no longer inProgram.
353

354

Importing LivestrImporting Livestream Graphics Fileseam Graphics Files
Livestream’s Graphics StorGraphics Storee has numerous free templates that can be downloaded
and imported into Livestream Studio. You can also export any template you build in
Studio and import it into another Studio project later using this feature.
Studio has the Livestream Graphics Store built into its interface. Navigate to any GFXmodule. Open the Categories menu or select Features you would like your graphic tohave on the left side and browse through template options on the right side. If you finda design you like you can simply click +Add+Add below the corresponding template.
Alternatively, if you downloaded a template from the Store website or exported an.lsgfx file previously, you can import that file from your local hard drive by selecting+Add Custom Layers+Add Custom Layers > Import LayerImport Layer > LivestrLivestream Graphicseam Graphics.
355

Browse your computer for the .lsgfx file you just downloaded (this is typically found inthe DownloadsDownloads folder). When you find the file, click OpenOpen.
356
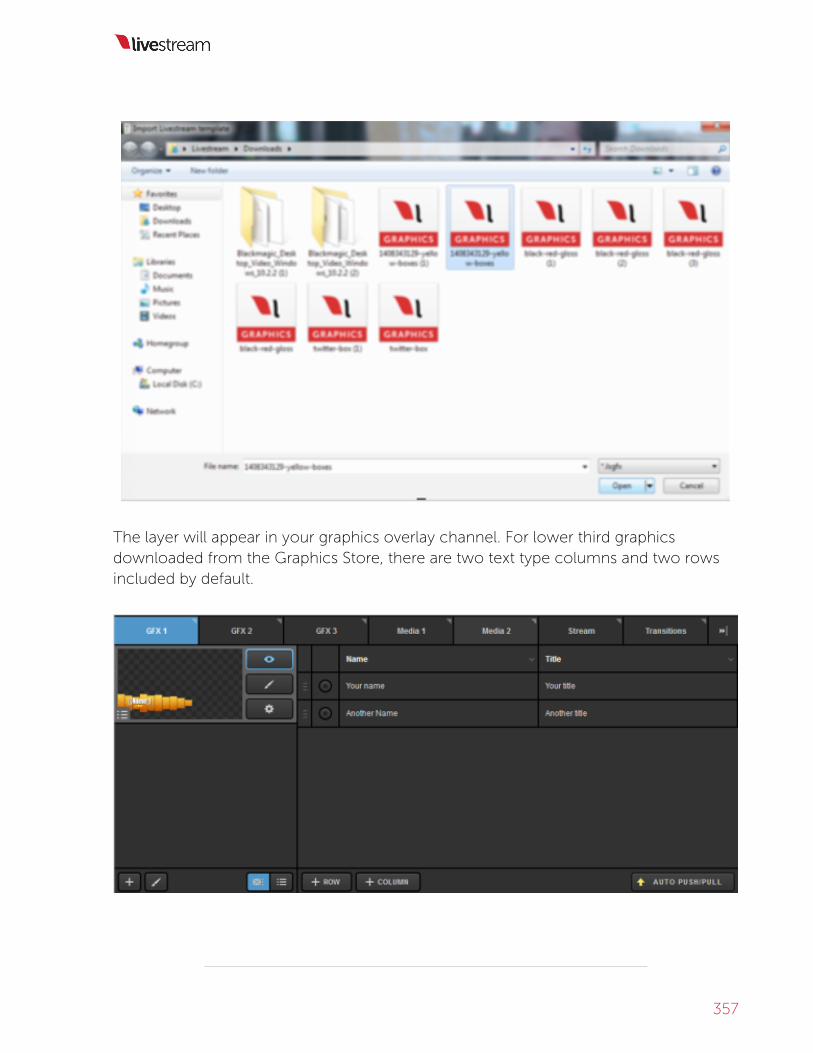
The layer will appear in your graphics overlay channel. For lower third graphicsdownloaded from the Graphics Store, there are two text type columns and two rowsincluded by default.
357

If you open the GFX Designer by clicking the paintbrush icon, you will see clearlywhich text fields the two columns correspond to and can adjust them as necessary.
Just as with any manually built graphic, you can add as many columns for data fields orrows of content as necessary.
358

Importing ExImporting Exccel Sprel Spreadsheets and .eadsheets and .CSVCSVFilesFiles
Rather than manually inputting your data in Livestream Studio, you can import all yourdata from an Excel (.xlsx) spreadsheet or .CSV file.
For the best experience, we recommend that your document have no more
than 250 rows. You can use other Excel or .CSV files in as many graphics
layers as needed if you need to show more data.
If you want to include images, make a column with the URLs where the images arehosted.
359

To get started, click +Add Custom Layers+Add Custom Layers, then select Import LayerImport Layer. Choose eitherExExccel Sprel Spreadsheeteadsheet or ..CSV FileCSV File.
The browse window will appear, allowing you to select your file and import it.
360

The data from your file will appear on the right side of the module. Click the gearwheel to enter its settings.
Checking WWaatch file ftch file for updaor updatete will prompt Livestream Studio to make any changes tothe data that are made in the original .xlsx file on your hard drive.
361

Checking Use first rUse first row as cow as column titlesolumn titles will change row A in your spreadsheet to betitles of the corresponding columns in the GFX layer.
Click on the name of any column to change the data type that is in the column (text orimage).
362

If you want to be able to edit the information within Livestream Studio, uncheck RReadeadOnlyOnly. Otherwise, changes can only be made in the original file.
Any edits made to in Livestream Studio will not change content in the original
document.
363

..CSV File OnlyCSV File Only - Further down in the settings, you can adjust the separators in thedocument as well as the character encoding (which is typically detectedautomatically).
Scroll down to find your Auto-Loop settings, including interval between rows, direction,and starting point.
364

Next, click on the paintbrush icon at the bottom of the graphics module to enter theGFX Designer.
365

Select ExExccelel or ..CSVCSV in the dropdown menu and click the list icon to insert your textand image fields into the designer.
From here, you can drag and drop each field to wherever you want it to be displayed.
366

Click the gearwheel icon on each field to choose font, size, color, opacity, etc.
367

Feel free to add any additional elements to your graphics overlay using the other iconsat the bottom of the designer.
Close out of the GFX Designer when you have finished. To use the graphic, click BackBackto view the layer module.
368
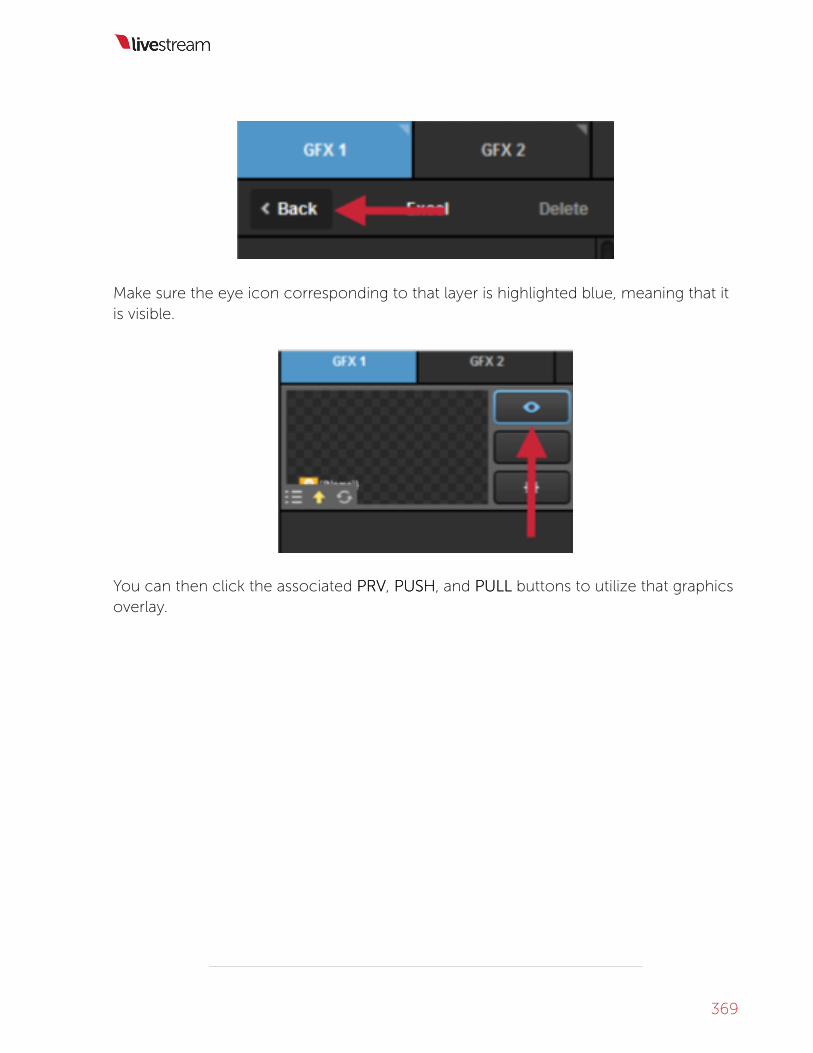
Make sure the eye icon corresponding to that layer is highlighted blue, meaning that itis visible.
You can then click the associated PRVPRV, PUSHPUSH, and PULLPULL buttons to utilize that graphicsoverlay.
369

370

Using RSS FeedsUsing RSS Feeds
If you want to include an RSS feed in your Livestream Studio production, go to a GFXmodule, open the +Add Custom Layers+Add Custom Layers menu and select RSSRSS from the graphics menu.
The RSS layer will appear in the graphics overlay channel. Click the gear wheel to enterits settings.
If access to your RSS feed requires authentication, check BasicBasic AuthenticaAuthenticationtion andenter your credentials.
371

When you enter the RSS URL, the data should populate on the right and give youaccess to further settings.
Set the time interval in seconds that you want Livestream Studio to look for newinformation from your RSS feed under Auto advancAuto advance dae data intervalta interval.
372

To control the number of posts from your RSS feed, you can choose to only includeposts within a recent time frame.
You can also limit Livestream Studio to pull only a certain number of most recent posts.
373
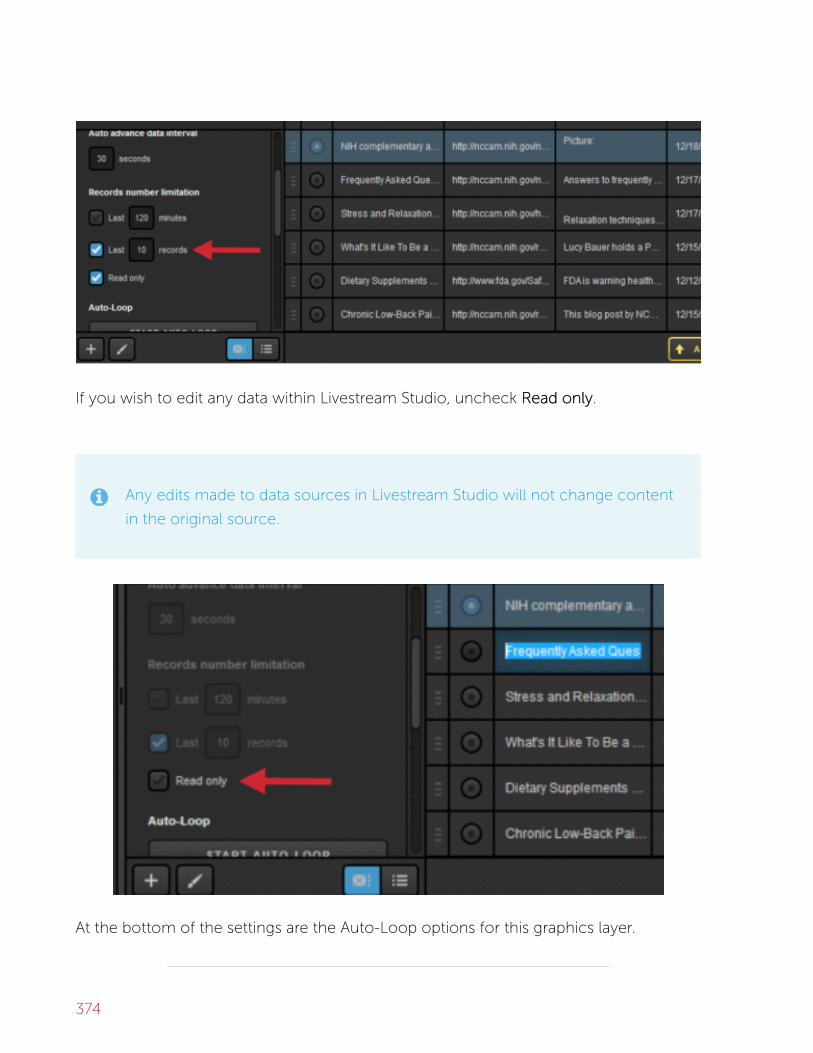
If you wish to edit any data within Livestream Studio, uncheck RReadead onlyonly.
Any edits made to data sources in Livestream Studio will not change content
in the original source.
At the bottom of the settings are the Auto-Loop options for this graphics layer.
374

Next, enter the GFX Designer, and select RSSRSS from the dropdown. Click the list icon toselect your data fields.
375

Close out of the GFX Designer and return to the layers module to make the layervisible. You can now include content from the RSS feed into your production via thegraphics overlay controls.
376

IntegraIntegrating Google Sprting Google Spreadsheetseadsheets
An easy way to integrate and manage data in a graphics overlay from an external
source is to use Google Sheets. Livestream Studio can integrate up to 1515 Google
Sheets graphics layers; this is an authorization limitation determined by Google.
Navigate to a graphics overlay track, open the + Add Custom Layers+ Add Custom Layers menu and selectGoogleGoogle.
You do not need to log in if you select Enter a public Google sprEnter a public Google spreadsheeteadsheet. Selectingthis will allow you to enter the document’s URL.
377

If you want to use your own private Google document, you will need to sign in to aGoogle account to allow access to your Google Drive. When you click Sign in withSign in withGoogleGoogle, a new browser window will open allowing you to sign in and allow thispermission.
378

Once you see the Authorization Successful message, navigate back to Studio andselect the document with the information you want to include in your graphic. Theselected document’s data will populate on the right.
379

For the best experience, we recommend that your document not have more
than 250 rows. You can use Google in multiple graphics layers if you need to
show more data.
You can always use a different spreadsheet in your Google Drive by clicking theChangeChange button. Spreadsheets will be ordered by most recently modified.
380

Scroll down to adjust additional settings for this layer. To turn your first row intocolumn titles, check Use first rUse first row as cow as column titlesolumn titles.
381

Click on any column title to change the type of data included in that field (text orimage).
Uncheck RReadead onlyonly if you want to be able to edit the information within LivestreamStudio. Otherwise, changes can only be made in Google Docs.
Scroll down in the settings to configure your Auto-Loop preferences, including howoften Studio switches to the next row, the direction the loop should go, and where theloop should start from.
382

The next step is to start designing your graphic. Click on the paintbrush button to enterthe GFX Designer.
In the Google Spreadsheet layer, click on the list icon to see your columns. Click onone to insert it into the GFX Designer.
Click on the gearwheel button to access more options for your font, colors, etc.
383

Close out of the GFX Designer when you have finished. In the graphics overlaychannel, click BackBack in the upper right corner to return to the layer module.
384

Make sure the Google spreadsheet layer is visible by selecting the eye icon. This willallow you to this graphics overlay to be visible in Livestream Studio.
385

386

Importing a TImporting a Twitter Feed into Livestrwitter Feed into LivestreameamStudioStudio
You can include a graphics layer of a Twitter feed from a username or hashtag as a
graphics overlay in Livestream Studio.
To get started, you may want to consider adding a Twitter graphic template from ourGraphics Store. In the GFX module, select TTwitterwitter from the Categories menu, then click+ADD+ADD under one of the design options.
When the graphic is imported, you will see the design preview on the left side and aprompt to sign in on the right. Click Sign in with TSign in with Twitterwitter to open a browser window andsign in to Twitter. This is required in order to allow Studio and Twitter to communicatewith each other, however you are not restricted to displaying tweets from your ownTwitter account.
387
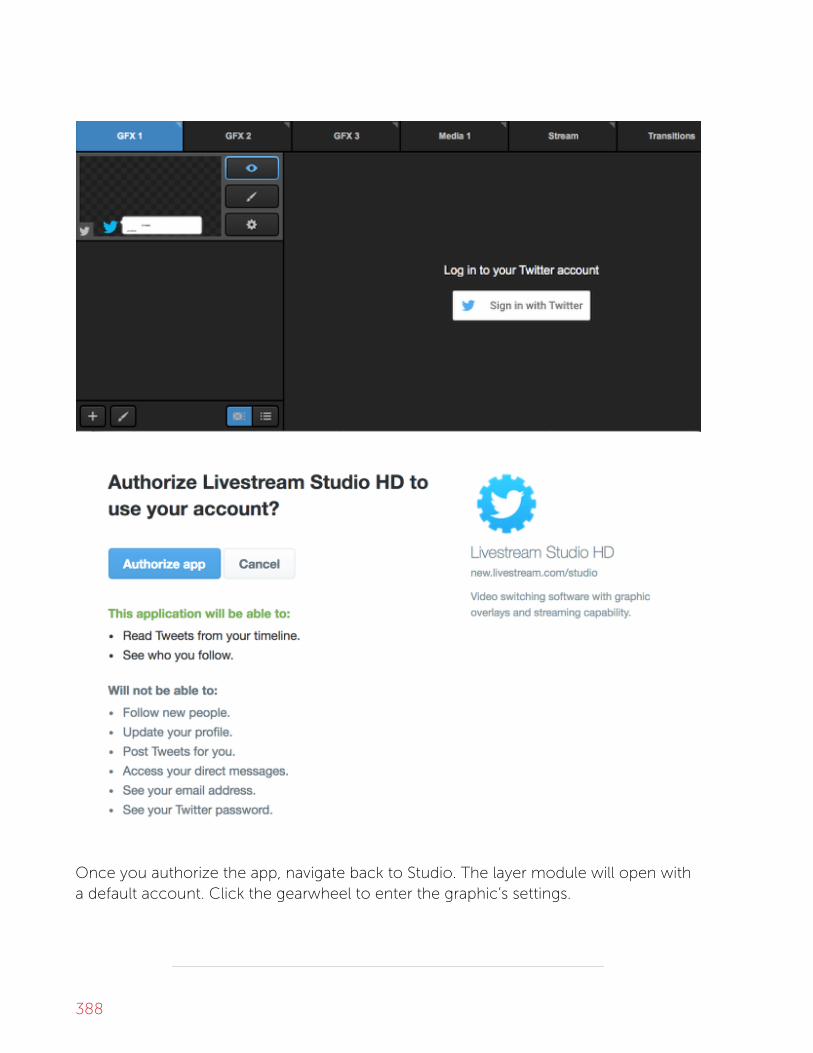
Once you authorize the app, navigate back to Studio. The layer module will open witha default account. Click the gearwheel to enter the graphic’s settings.
388

Select a username or hashtag to poll. Keep in mind that you must include '##' in thefront of hashtags and '@@' in front of usernames. When you have typed in the desiredasset, press the Enter or Return key.
On the right, tweets from that username or hashtag will load on the right side,including each tweet's avatar, name, username, and time stamp.
389

Scroll down on the left side of the module to find more settings. You can select howoften Livestream Studio should look for new tweets. Newer tweets appear at the top ofthe module. You can also tell Livestream Studio how many tweets to look for within acertain time frame. Select RReadead OnlyOnly if you do not want to be able to edit the tweets.
Scroll down in the settings to configure any desired Auto-Loop options.
390

If you wish to adjust the appearance of the graphic or change what information isshown, click the paintbrush icon to open the GFX Designer. You can adjust theplacement, size, font, and color of any of the text fields by selecting it and clicking thegearwheel icon.
If you do not wish to use a Livestream Graphics template, you can also create yourown by opening the + Add Custom Layers+ Add Custom Layers menu and selecting TTwitterwitter.
391

Follow the login steps as described above, then open the GFX Designer. Click on thelist button in the Twitter layer, and you can add any data field from Twitter such as thetweet, username, avatar, etc. as well as any other design element.
392

Using a .Using a .CSV Over HTTPCSV Over HTTP
If you are hosting a .CSV file on a web server, you can use graphics overlays in
Livestream Studio to display data from it.
In a GFX module, open the +Add Custom Layers+Add Custom Layers menu and select ..CSV over HTTPCSV over HTTP.
If your file requires authentication in order access it, check BasicBasic AuthenticaAuthenticationtion andenter your credentials.
393

In the settings, input the URL where the .CSV file is located, then the press EnterEnter orRReturneturn key on your keyboard. Your data will populate on the right with further settingsbecoming available on the left.
Make sure there are no spaces between either field; only commas should
separate each value.
CORRECT: Data 1,Name,http://cdn.livestream.com/resources/branding/
livestream-logo.png
INCORRECT: Data 1, Name, http://cdn.livestream.com/resources/branding/
livestream-logo.png
394

Scroll down on the left side of the module to configure additional settings. Set theamount of time in seconds that Livestream Studio should refresh and look for new datain your .CSV under Auto advancAuto advance dae data intervalta interval.
If the first row actually contains the titles of each field, you can check Use first rUse first row asow asccolumn titlesolumn titles to move them up to the title field.
395

If you want to make changes to your .CSV content via Livestream Studio, uncheckRReadead onlyonly. Otherwise, leave it checked.
Scroll down to tell Livestream Studio what your column separators are and the types ofcharacters being used (typically auto-detected).
At the bottom are your Auto-Loop settings if you want Livestream Studio to rotatethrough your .CSV data; these settings include how often the displayed row changes,what direction it loops in, and its starting point.
396

To design the graphic, click the paint brush icon to enter the GFX Designer.
397

Select the CSVCSV layer from the dropdown in the lower left corner and design yourgraphic as desired.
You can now control the graphics overlay by using PRVPRV, PUSHPUSH, and PULLPULL as desired.
398

LivestrLivestream Studio Certified Daeam Studio Certified Data Sourta Sourcceses
A LivestrLivestream Studio Certified Daeam Studio Certified Data Sourta Sourcce (LSCDS)e (LSCDS) is a spreadsheet document
formatted according to the Livestream Studio specification. An Excel (.xlsx), CSV or
Google Spreadsheet document can be used to define LSCDS. Below, you'll find
information on the benefits and instructions on how to create/utilize a LSCDS
formatted file.
Why do I need LivestrWhy do I need Livestream Studio™ Certified Daeam Studio™ Certified DatataSourSourcces?es?
The main advantage of LSCDS in Livestream Studio™ graphics layer compared to anystandard custom excel, Google spreadsheet or CSV file is the ability to remotelycontrol data selection “eyeball” in Livestream Studio™. This feature is primarily designedfor distributed production workflows, meaning when a dedicated person operatesgraphics data during a live video production.
This feature can also be used for automation, for example, in combination with customweb services that generate CSV files on the fly to control graphics data in production,such as sports scoring.
In the examples below, you’ll find small scripts for data ON/OFF program validation, aswell as illustrations on how to bring dynamic image objects into Livestream Studiousing external files.
How to define LivestrHow to define Livestream Studio™ Certified Daeam Studio™ Certified DatataSourSourcceses
399

You can copy one of the examples below and add columns, rows and data to theexample as needed (make sure the PROGRAMPROGRAM column remains in the A1A1position).Youmay also use an existing file as a Livestream Certified spreadsheet, just add anadditional first column and name the first cell (Cell A1Cell A1) - PROGRAMPROGRAM. Once you haveload the file to Livestream Studioas a graphics data layer, you will see a smallLivestream logo over the layer thumbnail.
Once the file is identified as a certified data source, Livestream Studio will look for "ONON"and "OFFOFF" values within the first column (A2:Ax). "ONON" value will activate that row in theLivestream Studio™ GFX layer, while "OFFOFF" deactivates that row. The "ON" or "OFF"status will be represented by the "eyeball" logo within Livestream Studio.
If there are multiple ON values in the column, Livestream Studio will use the first fromthe top. You can add validation scripts to your spreadsheet by following instructionsbelow to maintain single row selection. More information on using validation scriptsbelow.
NoteNote: All the values that are not equal to ON and OFF will be ignored.
Livestream certified CSV files can be used in Studio via file path on local disk/networkor over HTTP protocol.
Sample LSCDS FilesSample LSCDS Files
• Excel• Google Spreadsheet Template - You can add this template to your own Google
Drive by clicking the "Use This Template" button.• CSV
400

Installing VInstalling Validaalidation Scriptstion Scripts
Google SprGoogle Spreadsheet:eadsheet:
The Google Spreadsheet templates linked above already include validation scripts.Below is a link to the source code of the validation script we used for the sample. Youcan use the text to install the script on your own custom Google Spreadsheets. Toinstall the script, do the following:
- Click 'TToolsools' > 'Script EditorScript Editor……' (or 'Script ManagerScript Manager……'):
- Copy the Google Spreadsheet Validation Script found here and paste it into the editor
- Click the Save icon and name it.
ExExccel:el:
The sample file provided above has the validation script built in. If you already have afile you would like to use, you can use the validation script linked here.
401

Dynamic images and LSCDSDynamic images and LSCDS
External data files may contain columns with HTTP URLs or local/network addressesreferencing images you would like to use in your GFX template. To define a column asan Image type column, add [img][img] at the beginning of the column name. LivestreamStudio™ will recognize the path as an image and display it in your graphics template.
NoteNote: When an image can not be found at the provided URL or path,
Studio will display an empty (transparent) image field.
SprSpreadsheet Formaeadsheet Formatting Best Practictting Best Practiceses
Google SprGoogle Spreadsheet:eadsheet:
- Freeze row 1 and column 1 (View - Freeze Row / Freeze Column)
402

- Add data validation using the shown parameters:
- Add conditional formatting to the A2:A (all the values in A row except A1)
ExExccel file fel file formaormattingtting:
We recommend using the template available HERE when using Excel files for LSCDS.
403

Building a PicturBuilding a Picture-in-Picture-in-Picture Graphice Graphic
When doing a multi-camera production, many producers sometimes like to show
two or more camera shots at the same time. Livestream Studio gives you the ability
to show up to five cameras within one picture-in-picture graphics layer.
Navigate to a graphics tab, open the +Add Custom Layers+Add Custom Layers menu and select NewNewLayerLayer.
Click the corresponding paint brush button to enter the GFX Designer.
404

Click the camera icon at the bottom of the window. A video source will appear in thedesigner.
405

Click the attached gearwheel icon to change which source appears in there. You canchoose any camera input, media source, remote camera, graphics track, or colorsource.
406

Add another source.
407

You can drag and drop either of these anywhere within the designer. Clicking thegearwheel will also allow you to resize and crop your sources.
408

A sample double-box (or two-box) might look something like this:
409

If you want to give a background to your picture-in-picture, add a third source to theGFX designer. In this example, we're using a looping video background in Media 1.
410

Right-click the third source and click TTo Bottom Layero Bottom Layer. This will force it to be behindyour other two sources.
Scale it so it fills the designer. Now your picture-in-picture looks like this.
411

Close out of the designer and make sure your layer is visible (the eye icon is blue).Then click the corresponding flashing PushPush button to bring it into Program.
412

Now both sources are seen in Program at the same time with your background. ClickPullPull whenever you are ready to show your previous Program source.
413

Building a Clock or TimerBuilding a Clock or Timer
Adding a time-of-day clock or a countdown timer are very similar processes.
ClockClock
You may want to overlay a time-of-day clock into your production. This can be doneby opening the +Add Custom Layers+Add Custom Layers menu selecting the ClockClock option in the graphicsoverlay channel.
This will add a clock layer to the graphics channel. Click on the paintbrush icon toopen the GFX Designer for that layer.
414
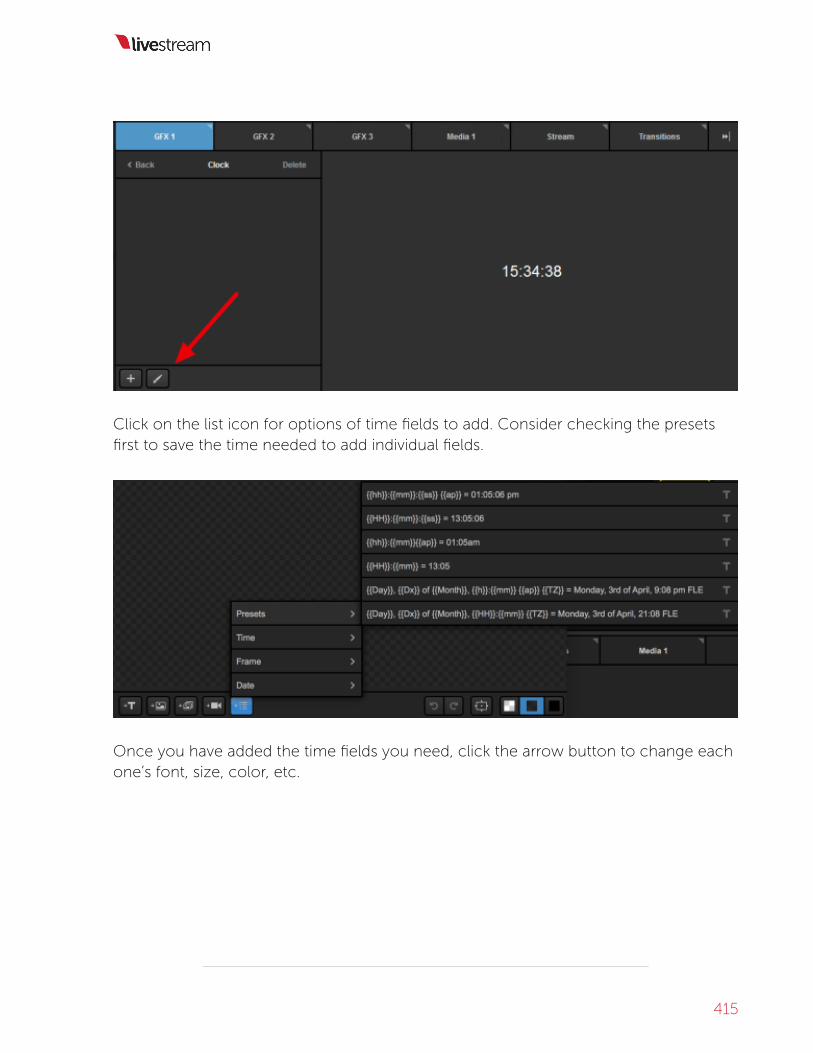
Click on the list icon for options of time fields to add. Consider checking the presetsfirst to save the time needed to add individual fields.
Once you have added the time fields you need, click the arrow button to change eachone’s font, size, color, etc.
415
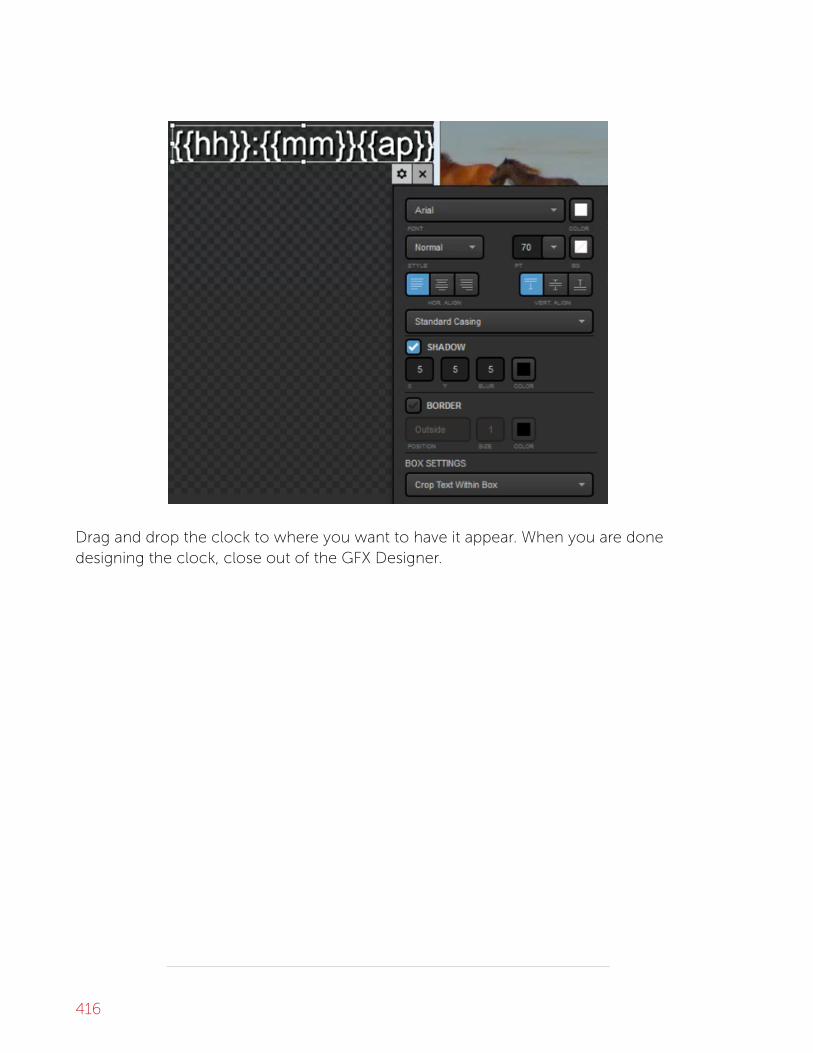
Drag and drop the clock to where you want to have it appear. When you are donedesigning the clock, close out of the GFX Designer.
416

There are no additional settings for the clock layer other than deleting it. Click BackBack toreturn to the layer module. Then click the eye icon to ensure the clock layer is visiblewhen you want to include it in your production.
417

TimerTimer
To integrate a countdown or timer overlay into your production, open the +Add+AddCustom LayersCustom Layers menu and select TimerTimer in the graphics overlay channel.
Click the gear wheel icon to enter that layer’s settings.
418

The settings for that layer will appear on the left side, with the reflected timer displayingon the right.
419

CountdownCountdown toto allows you to set a specific time and date for when the countdownshould end. The countdown will update on the right side.
For a quick configuration, you can check Use start time oUse start time of strf streaming eventeaming event to
automatically set the countdown to end at the start time of an event you have
selected in the Stream tab.
Below the time/date setting are options for what the graphics overlay should do whenthe countdown completes.
Hide Layer + PushHide Layer + Push will keep GFX 1 in Program, but remove the timer GFX layer frombeing visible. Other layers in GFX 1 will remain in Program.
420

Pull frPull from PGMom PGM will pull all layers under that GFX channel from Program when thecountdown ends.
TTransitionransition can be used when the GFX channel is cued as a video source from themultiview instead of an overlay. It will take the Preview source once the countdownends.
421

The transition type can be selected in the settings for that GFX layer.
Leaving all options unchecked will keep the completed countdown graphic inProgram.
422

The next setting is CountdownCountdown frfromom, where you set the time that the countdown willstart. The format of this countdown can either be hours:minutes:seconds, orminutes:seconds.
Type in the time you want to count down from. Clicking StartStart will begin thecountdown manually.
When the countdown has started, a PausePause button will replace it. Click PausePause if youwant the countdown to stop but stay at the current time, allowing you to resume fromthat point.
423

Clicking StopStop will both stop the countdown and reset it to the beginning.
Below the Start and Stop options, there are options for what the clock should do whenpushed, pulled, or finished.
424

Scroll down further in the layer settings to find the hotkey option. Click the checkboxto enable it.
Click on the box that reads NoneNone. This will highlight it blue.
Once it is blue, use the buttons on your keyboard to create a hotkey (e.g., Shift+P).
It cannot be a hotkey command that already has an action in Livestream
Studio assigned to it.
425

Now you can push your countdown graphic to Program like normal. Instead ofpressing the buttons in the GFX module, you can use your keyboard to quickly andeasily pause and continue your clock.
The last option for this layer is TimerTimer, which gives you a clock that counts up fromzero. As with the CountdownCountdown frfromom option, you can set the format and start and stopthe timer.
Below these controls are the actions the graphic will take when first pushed to andpulled from Program.
426
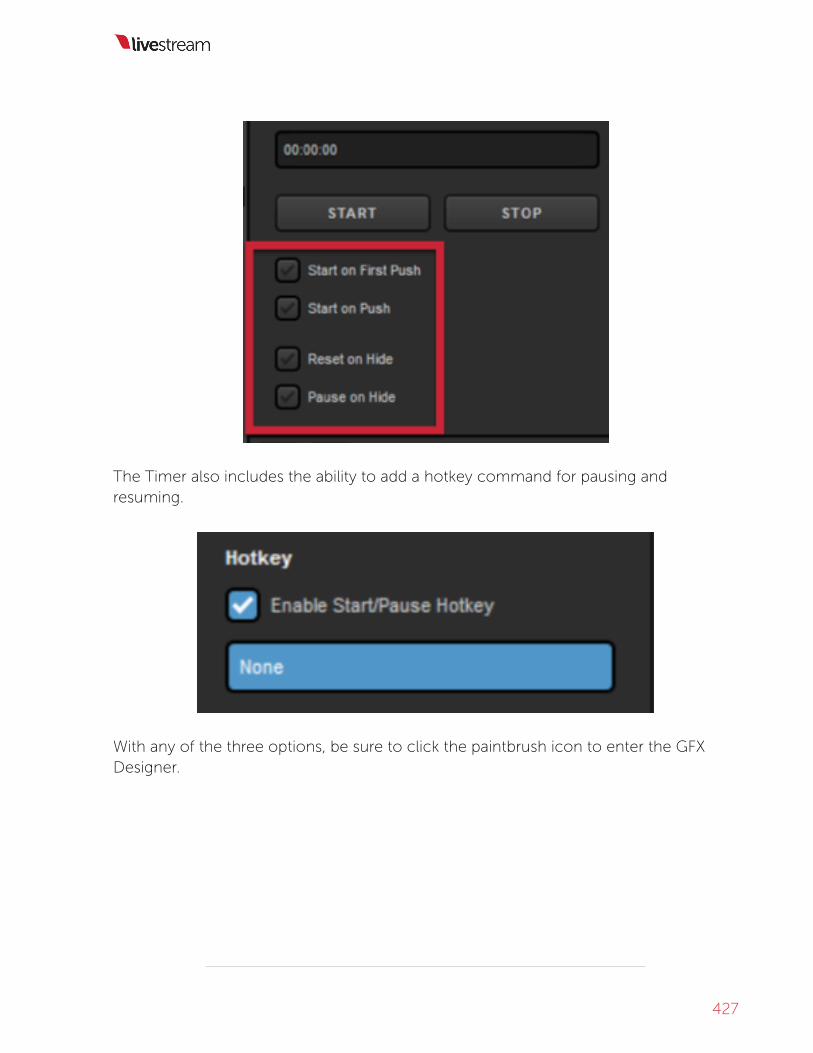
The Timer also includes the ability to add a hotkey command for pausing andresuming.
With any of the three options, be sure to click the paintbrush icon to enter the GFXDesigner.
427

In the Timer layer, click on the list icon to add time fields. Check the presets first, as thismay save time in designing the graphic.
Use the dropdown menu to customize how the clock looks.
428

When finished, close out of the GFX Designer, then click BackBack in the graphics layersettings. Your timer graphic can now be made visible and pushed to Program whendesired.
429

430

Importing AnimaImporting Animated Graphicsted Graphics
Livestream Studio can accept a folder of images that it will loop through to create
an animated graphics overlay.
This feature is best for lower-third graphics and corner bugs. Larger animated graphics,such as backdrops, should be exported at videos and come in through a media bin. Tokeep your images’ backgrounds transparent, .PNG files are recommended.
Your .PNG files must be less than 1.less than 1.5 million pix5 million pixelsels. To determine a .PNG file's pixels,view that file's properties and multiply the height by the width. For this graphic, whichhas subtle animations, 1614 x 390 = 629,460 pixels.
To add an animated graphic, go to a graphics overlay channel. There are a number oftemplates available for free in the Livestream Graphics Store. To quickly access one,select the AnimaAnimatedted option under Features. Scroll through the template options on theright side and click +ADD+ADD below the corresponding design.
431

Livestream Studio will prompt you to select where you want to save the file on yourcomputer’s hard drive. Choose your destination and then click SelectSelect.
The graphic file will load in Livestream Studio and you can edit it in the same fashion aswith any any other graphic.
432

You can also add your own .png sequence by selecting +Add Custom Layers+Add Custom Layers > NewNewLayerLayer.
If you are adding a custom layer, open the designer by clicking the paintbrush icon,then click the sequence icon. Open the folder that has your .PNG file sequence
433

and select the first file in that folder. The graphic will take a moment to render and thenappear in the GFX Designer.
From there, designing the graphic follows the same procedure as designing stillgraphics (adding data fields, etc.).
434

All other functions of the graphics overlay, including adding data, changing settings,and pushing and pulling the layer are the same as other graphics.
435

Media PlaybackMedia Playback
436
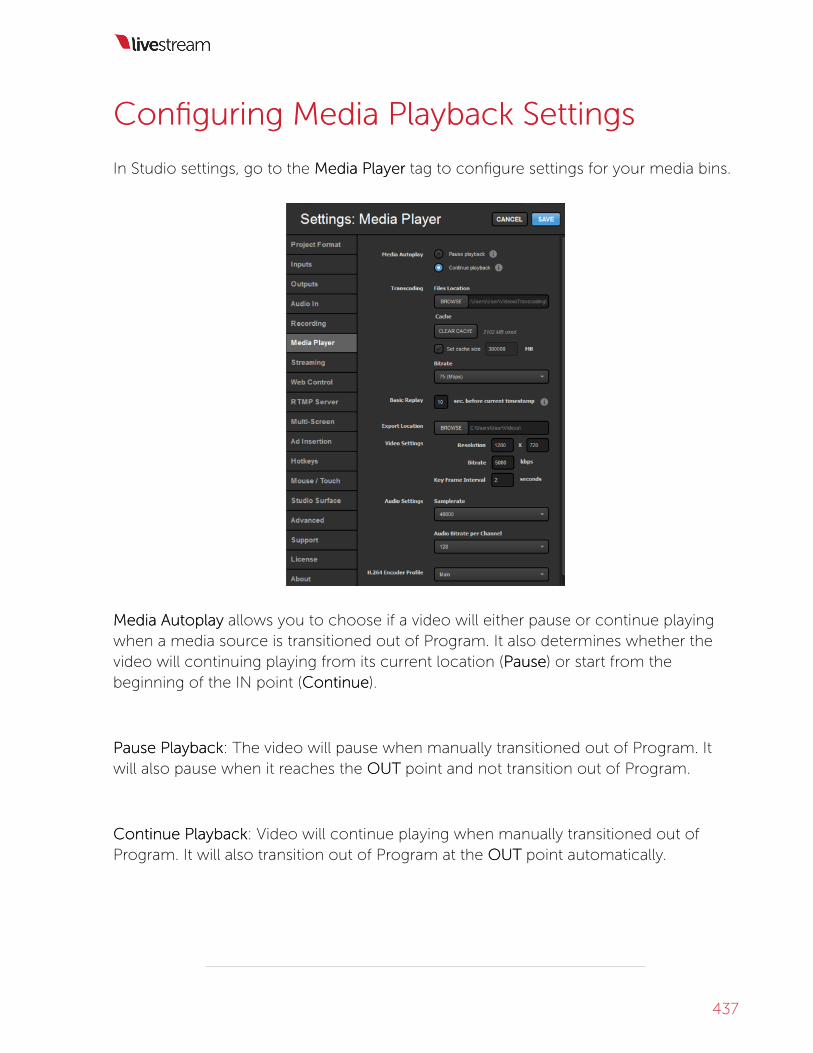
ConConfiguring Media Playback Settingsfiguring Media Playback Settings
In Studio settings, go to the Media PlayerMedia Player tag to configure settings for your media bins.
MediaMedia AutoplayAutoplay allows you to choose if a video will either pause or continue playingwhen a media source is transitioned out of Program. It also determines whether thevideo will continuing playing from its current location (PausePause) or start from thebeginning of the IN point (ContinueContinue).
Pause PlaybackPause Playback: The video will pause when manually transitioned out of Program. Itwill also pause when it reaches the OUTOUT point and not transition out of Program.
Continue PlaybackContinue Playback: Video will continue playing when manually transitioned out ofProgram. It will also transition out of Program at the OUTOUT point automatically.
437

TTranscranscodingoding FilesFiles LLocaocationtion is where any transcoded videos (i.e., videos you bring intoyour media bin) will be saved. You can bring those videos into a media bin againwithout transcoding.
TTranscranscodingoding CacheCache lets you control the amount of data stored in the transcodingfolder before files are deleted. You can also manually clear the cache here.
438

TTranscranscodingoding BitraBitratete determines the bitrate to which the videos are transcoded. Higherbitrates will have higher resolution but also create larger files.
BasicBasic RReplayeplay lets you tell Livestream Studio how far back from the current timestampto set an In point. The Out point will be set to the current timestamp.
439

You can export videos or portions of videos from your media bin. You can choose theirexport location and video settings here.
When your media bin settings are configured to your liking, click SaveSave.
440

Media Playback TMedia Playback Transcranscoder Supportedoder SupportedVideo FormaVideo Formatsts
Livestream Studio can accept most common video format files.
The codecs listed below are from “Supported media formats in Media Foundation(Windows).” Supported media formats in Media Foundation (Windows). Microsoft, 28Nov. 2012. Web. 7 Feb. 2013: http://msdn.microsoft.com/en-us/library/windows/desktop/dd757927%28v=vs.85%29.aspx.
Please note that Studio does notnot support Apple-only based formats (e.g. ProRes).
File Containers:File Containers:
441

FormaFormatt FileFileExtensionsExtensions
MediaMediaSourSourccee
MediaMediaSinkSink
RRequirequireses
3GP .3g2, .3gp,.3gp2,.3gpp
MPEG-4FileSource
3GP FileSink
Windows 7
Advanced Streaming Format(ASF)
.asf, .wma,
.wmvASFMediaSource
ASFMediaSink
WindowsVista
Audio Data Transport Stream(ADTS).
.aac, .adts ADTSFileSource
None Windows 7
AVI .avi AVI FileSource
None Windows 7
MP3 .mp3 MP3FileSource
MP3File Sink
File source:Windows VistaFile sink:Windows 7
MPEG-4 .m4a,.m4v,.mov,.mp4
MPEG-4FileSource
MPEG-4FileSink
Windows 7
Synchronized Accessible MediaInterchange (SAMI)
.sami, .smi SAMIMediaSource
None WindowsVista
WAVE .wav AVI FileSource
None Windows 7
Audio CodecsAudio Codecs
442

FormaFormatt DecDecoderoder EncEncoderoder RRequirequireses
μ-lawCoding
Audio Compression Manager(ACM) μ-law Codec
None WindowsVista
AdvancedAudioCoding(AAC)
AAC Decoder AAC Encoder Windows7
MP3 Windows MediaMP3 Decoder
None WindowsVista
GSM 6.10 ACM GSM 6.10Codec
None WindowsVista
WindowsMediaAudio(WMA)
Windows Media AudioDecoder Windows MediaAudio Voice Decoder
Windows Media AudioDecoder Windows MediaAudio Voice Decoder
WindowsVista
Media Foundation provides wrappers for several ACM codecs listed in the
previous table. However, Media Foundation does not support arbitrary ACM
codecs.
Video CodecsVideo Codecs
443

FormaFormatt DecDecoderoder EncEncoderoder RRequirequireses
DVVideo
DV Video Decoder None Windows7
H.264 H.264 VideoDecoder
H.264 VideoEncoder
Windows7
MJPEG MJPEG Decoder None Windows7
MPEG-4Part 2
MPEG-4 Part 2Video Decoder
None Windows7
MPEG-4v1/v2/v3
Windows MediaMPEG-4 V3Decoder WindowsMedia MPEG4 V1/V2Decoder
None WindowsVista
WindowsMediaVideo(WMV)
Windows Media Video9 Decoder WindowsMedia Video 9 ScreenDecoder
Windows Media Video 9 EncoderWindows Media Video 9 ScreenEncoder Windows Media Video 7/8En- coder
WindowsVista
444

Importing Videos into the Media PlaybackImporting Videos into the Media PlaybackModuleModule
Livestream Studio has a video transcoder built into its two Media bins.
In your media bin, press the ++ button in the bottom left corner.
Browse your computer for your video, then click open.
Livestream Studio will begin transcoding your video immediately.
445

Transcoding time depends on the clip length.
If you are having trouble transcoding your video, check that it can successfullyplayback in Windows Media Player. Videos that cannot be played in Window MediaPlayer will likely not be able to be transcoded in Livestream Studio's media bins.
446

Use DrUse Dropboopbox to Import Video Filesx to Import Video Files
Videos saved in a Dropbox account can now be imported into the Media bins in
Livestream Studio through a simple integration.
For the best experience, we recommend simplifying your Dropbox folder
structure to no more than 1 or 2 subfolders. Multiple subfolders can cause
extended sync times with Dropbox
Connect Dropbox to Livestream Studio
Start by clicking the gear wheel in the upper right corner to enter Settings.
Navigate to the Dropbox tab.
447
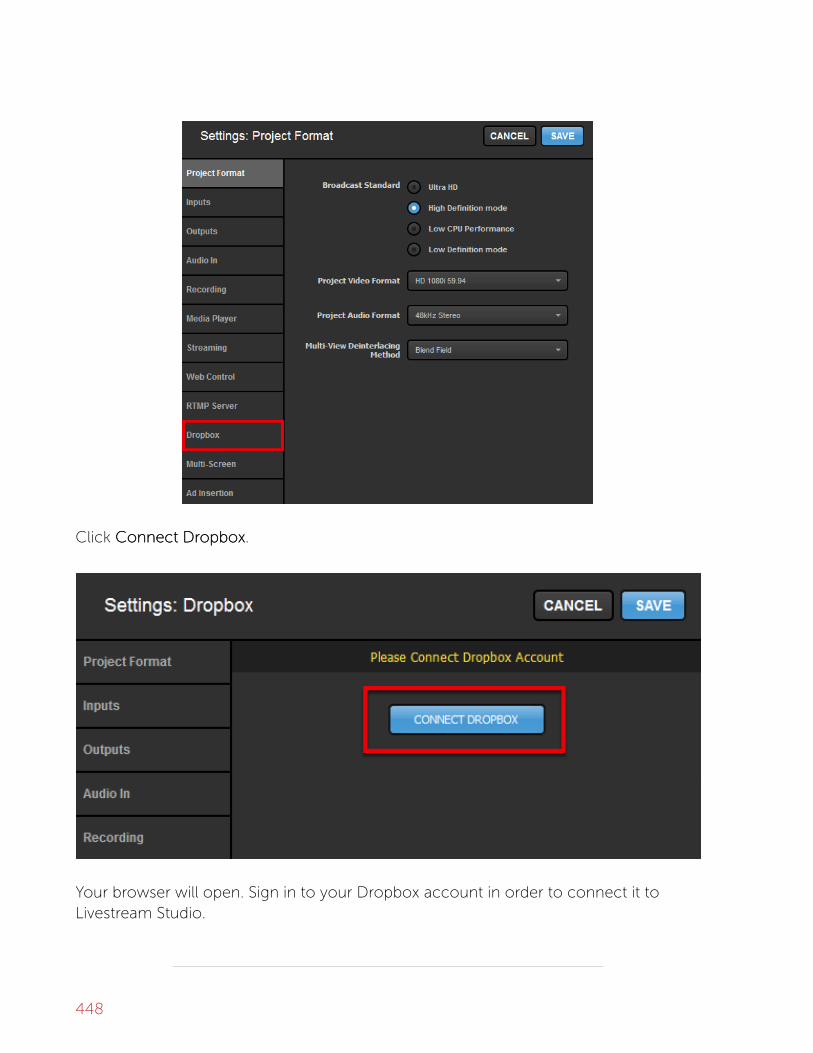
Click Connect DrConnect Dropboopboxx.
Your browser will open. Sign in to your Dropbox account in order to connect it toLivestream Studio.
448

When authorization is successful, return to Livestream Studio.
449

The settings will indicate that you are logged in. Click Select FoldersSelect Folders.
450

Choose a Local Folder from your computer's hard drive. This will allow any files yousave to your Dropbox, such as transcoded videos, to also be saved locally.
Then choose the folder within your Dropbox where the videos you want to use arestored. This can be either your general Dropbox, or a folder within your Dropbox (inthis example, "Videos"). Click SaveSave when you are done.
451

Your Dropbox account will sync to Livestream Studio.
Make sure that Use Files frUse Files from Drom Dropboopboxx is checked. Then click SaveSave.
452

Import Videos from Dropbox
Navigate to one of your Media bins. Click the ++ button in the lower left corner of themodule.
453

Your dropbox folder will open. Click on the video you wish to import, then click SelectSelect.
454

455

The video will start transcoding in the media bin. When it is finished, you will be able toplay it back like normal.
456

ContrControls & Options in Livestrols & Options in Livestream Studioeam StudioMedia BinMedia Bin
Each Media Bin comes with a variety of controls and options for playing back your
clips.
To queue a clip in your media bin, simply click on it with your mouse to highlight it. Itwill appear in the player to the right.
The bottom left corner of the module includes general playback options. If you wantto your video to start playing as soon as you transition it into Program, make sureAutoplayAutoplay is checked. Otherwise your video will start on a freeze frame.
457

To the right of Autoplay is Play as ListPlay as List, which will play all video files in your binchronologically with no break or black frames in between. When the last clip plays,Studio will automatically transition from the Media Bin to the source in Preview.
458

Next is the LLoop Playbackoop Playback button, which will play the selected video on repeat ratherthan play the next clip or transition to the Preview source.
459

Selecting both Play as ListPlay as List and LLoop Playbackoop Playback will play all of your clips back to backand restart from the top when the last clip ends.
460

At the bottom of the player are player controls and a blue timebar. Use your mouse todrag the red scrubber to any point within the clip.
With your mouse, you can drag and drop both ends and set In and Out points if youwant to playback only a portion of your clip. You can also set In and Out points bydragging the scrubber to the desired point and pressing the corresponding In or Outbracket button above the timeline.
461

The main playback controls primarily control where the scrubber moves to. They are:
1. Jump to beginning of entire clip2. Jump in In point3. Frame back4. Play from In point to Out point5. Play from scrubber's current location to the end of the clip6. Frame forward7. Jump to Out point8. Jump to end of entire clip
There are default hotkeys set for various media playback options, which you can findand custom configure by navigating to Settings: HotkSettings: Hotkeyseys.
462

When LLoop Playbackoop Playback is turned off, Studio will countdown your video from 20
seconds (yellow) and then 10 seconds (red), allowing you to prepare your
next source in Preview. When the clips reaches zero, Studio will seamlessly
transition from the Media Bin to the source in Preview.
463

464

Basic Video RBasic Video Replay While Replay While Rececorordingding
Livestream Studio allows you to play back media while you are recording it for
easy, basic replay options during a live event.
To start, make sure that one of your Media Bins is selected in the RRececorordingding section ofthe Livestream Studio settings.
Your media will automatically populate within the selected Bin once the recording hasstarted.
465

The red dot to the left of the clip duration indicates that this clip is currently
being recorded.
When recording, the clip in your Media Bin will behave much like any other media. Youcan set an IN and an OUT point for playback and scrub along the timeline as well. Themain difference is that the timeline is growing as long as the recording process is activewhich does not occur when using pre-recorded media.
By default, pressing RR on your keyboard will set IN and OUT points on your clip for themost recent 10 seconds. Taking that media bin into Program will automaticallyplayback that section of your recording. You can adjust this setting under the MediaMediaPlayerPlayer tab in settings.
466

467

Exporting Clips frExporting Clips from Livestrom Livestream Studioeam Studio
The media bins have an export tool that allows you to save your recordings or clips
of recordings in them as .mp4 files on your hard drive.
First, select a video you want to export.
Set In and Out points for your clip. If you want to export the full video, make sure thebrackets enclose the entire timeline.
468

When you are ready to export your clip, click on the arrow icon next to the video’sname.
The double arrow button at the top of the interface turn blue and show a smallprogression bar as your clip is exporting.
Click on the button to view your transcoding queue. This will tell you how much timeis left in your clip and the status of any other transcoded or exported video.
469

470

RRemote Camerasemote Cameras
471

ActivaActivating Bonjour Servicting Bonjour Service fe for Ror RemoteemoteCamera SourCamera Sourcceses
In order to use remote cameras in Livestream Studio, you must make sure you
have Bonjour service installed and activated on your Windows computer. Remote
cameras will not work without Bonjour running.
Bonjour is pre-installed on Studio hardware units (e.g. HD31, HD51, HD550, etc.)
and is always running on Mac systems. Customers who only purchased the
software should have gotten a prompt to install it.
To install Bonjour manually, click here and click DownloadDownload.
Once the software has finished downloading, open the installation wizard.
Follow the on-screen prompts to complete the installation.
472

To ensure Bonjour is running, first make sure Studio is closed. Then open the startmenu and type ServicServiceses. Click the Services icon that appears at the top of the menu.
473

Look for Bonjour ServicBonjour Servicee in the menu and select it.
474

Right-click it and click RRestartestart.
475

Close out the menu and relaunch Studio. Remote cameras on your network shouldnow be detected by Studio.
476

Using the RUsing the Remote Desktop Client femote Desktop Client fororWindowsWindows
In Livestream Studio, you have the option of using a Windows desktop system as a
remote camera source by connecting it to Studio over your local network
connection. This is great for adding a slideshow presentation into your production.
Before configuring any remote camera settings, be sure to add the necessary amountof remote camera modules to your project by going to Settings: InputsSettings: Inputs and addingremote cameras. You can have up to 10 remote cameras in your multi-view
Installing & ConInstalling & Configuring the Rfiguring the Remoteemote ClientClient
First, be sure to connect your remote Windows computer to the same network towhich the computer running Livestream Studio is connected.
477

Download the Remote Desktop Client onto your Windows computer here.
Open the downloaded file and follow the on-screen steps to run the installationwizard, then click FinishFinish.
Remote Camera will launch in the background of your PC. Right-click on the icon inthe bottom toolbar and click SettingsSettings.
478

Here you can adjust your remote camera’s name as well as set which video and audiosignals are visibile from that PC. In this example, only the Desktop screen is visible, butother video sources that are later added to this computer can also be detected (e.g.webcams).
479

Computer NameComputer Name: The name that will appear in the remote camera module for yourremote camera source.
Checked sources will be available to use from this system as a remote camera source.Uncheck any sources you do not want to use.
EncEncoder Qualityoder Quality: The resolution you want the video to stream at over your network toLivestream Studio. Slower CPU's should use a lower resolution.
EncEncoder Foder Framerarameratete: The frame rate you want the video to stream at over your networkto Livestream Studio. Slower CPU's should use 'half-speed FPS (30p).'
Back in Livestream Studio, under the Remote Cam tab, you should see your PC listedas a source as long as it is connected to your Portal router either via Ethernet or Wi-Fi.
Select it from the list to activate the source; it will appear on the right side of themodule.
480

Click the corresponding gearwheel to see more options.
Video SourVideo Sourccee: The remote client has the ability to use either the system's desktop, anattached webcam, or an installed Blackmagic capture device as a video source. Usethe dropdown menu to select which one you want to use.
481
MonitorMonitor: If you select 'Desktop' as the video source and the remote system hasmultiple displays, you can configure which display you would like to use as a source byselecting it from the drop-down menu.
CapturCapture Device Devicee: If you select a Blackmagic Capture Device as your video source andhave more than one installed on your system, choose which one you want to use.
Audio SourAudio Sourccee: You also have the option of selecting from any of your available audiodevices. The default is the standard system audio output.
CapturCapture Mouse Cursor:e Mouse Cursor: Unselect this option if you would not like to see the mousecurser on the remote system.
TTrroubleshootingoubleshooting
If you are not seeing any options on the list within the Remote Cam tabs, please checkthe following:
• Make sure the remote system is on the same network, connected to the sameRouter or Access Point as your Studio system.• If the system is on the same network but using a different access point, the
Remote Camera will not properly connect.
• Check that the following ports are open if you use a firewall:• UDP: 5353, 60936 - 61036
TCP: 60936 - 61036
• Check that Bonjour Service is started.
482

Using the RUsing the Remote Desktop Client femote Desktop Client forormacOSmacOS
In Livestream Studio, you have the option of using an Apple Mac OS X/
macOS desktop system as a remote camera source.
Installing the RInstalling the Remoteemote ClientClient
If you haven't already done so, install the Livestream Studio Remote Camera client onthe computer you're planning to use as the remote system.
Download the small prDownload the small program herogram here.e.
Double-click the Livestream Studio Remote Camera.dmg file in your Finder to start theinstaller.
483

Drag the Livestream Studio Remote Camera into the Applications folder.
484

Go to the applications folder and double click on Livestream Studio Remote Camera toopen the application.
You will see this window pop up indicting that the remote camera icon will appear inyour menu bar at the top of your screen. You can choose to prevent the message fromappearing again.
Make sure the remote system is on the same network as your Livestream Studio™system. It will run in the background until you close it. You can close it by clicking onthe icon in the menu bar and clicking 'CloseClose.'
485

When the Remote Client is running, you can click the icon and click 'SettingsSettings' to makefurther adjustments to your remote camera source.
Computer NameComputer Name: The name that will appear in the remote camera module for yourremote camera source.
Checked sources will be available to use from this system as a remote camera source.
486

Uncheck any sources you do not want to use.
EncEncoder Qualityoder Quality: The resolution you want the video to stream at over your network toLivestream Studio. Slower CPU's should use a lower resolution.
EncEncoder Foder Framerarameratete: The frame rate you want the video to stream at over your networkto Livestream Studio. Slower CPU's should use 'half-speed FPS (30p).'
Adding and ConAdding and Configuring a Rfiguring a Remote Souremote Sourcce in Livestre in LivestreameamStudio:Studio:
Once the client is installed on the remote system and is running, you can use it as asource in Livestream Studio.
Make sure to add a RRemoteemote CameraCamera as an input within the InputsInputs section of theLivestream Studio settings and click save at the top.
On the bottom left of the Studio interface, you should now see a tab labeled RemoteCam 1. Click on that to reveal a list of available options.
487

If Studio can find the remote system over your local network connection, you shouldsee it come up as an option on the left side.
Select your Mac computer to activate it in Studio. It will appear on the right side of themodule.
488

Additional Options:Additional Options:
Click the gear wheel next to the remote camera source in the list to access furthersettings.
Video SourVideo Sourccee: The remote client has the ability to use either the system's desktop, anattached webcam, or an installed Blackmagic capture device as a video source. Usethe dropdown menu to select which one you want to use.
MonitorMonitor: If you select 'Desktop' as the video source and the remote system hasmultiple displays, you can configure which display you would like to use as a source byselecting it from the drop-down menu.
CapturCapture Mouse Cursor:e Mouse Cursor: Unselect this option if you would not like to see the mousecurser on the remote system.
CapturCapture Device Devicee: If you select a Blackmagic Capture Device or a webcam as your videosource and have more than one installed on your system, choose which one you want
489

to use.
Audio SourAudio Sourccee: You also have the option of selecting from any of your available audiodevices. The default is the standard system audio output.
TTrroubleshootingoubleshooting
If you are not seeing any options on the list within the Remote Cam tabs, please checkthe following:
• Make sure the remote system is on the same network, connected to the sameRouter or Access Point as your Studio system.
• If the system is on the same network but using a different access point, the RemoteCamera will not properly connect.
• Check that the following ports are open if you use a Firewall:• UDP: 5353, 60936 - 61036• TCP: 60936 - 61036
• Check that Bonjour Service service is enabled on the Studio system.
490

Adding a RAdding a Remote Live Interviewemote Live Interview
Livestream Studio customers can add a live webcam source from another location
into their Studio production. This is called Live InterviewLive Interview.
Interview guest(s) will need an Internet connection, Google Chrome, a webcam, and amicrophone connected to their computer.
It is strongly recommended that audio is provided to any local hosts or
interviewer directly via the headphone out jack on your Studio unit using
headphones, IFB's, etc. Otherwise, there will be a distinct echo in your stream
during the interaction.
Live Interview currently only works on desktop Chrome; there is currently no
support for Live Interview via mobile devices.
Navigate to a Remote Camera tab and click AddAdd StrStreameam. Then click LiveLive InterviewInterview.
491

Only one Interview can occur in Livestream Studio at this time.
You will be provided two URLs: a Live Interview Link and a Moderator Link. Press theCopyCopy button to copy the corresponding URL to your clipboard and provide the URL toyour guest(s) via email or other means).
New URLs generate each time a Live Interview is added. If you wish to
provide a URL in advance, do not click RRemove fremove from listom list.
When someone opens on the provided Interview URL in Google Chrome, he/she willbe prompted to type in a name and allow the camera and microphone to be accessed.When finished, he/she can click JoinJoin InterviewInterview..
492

The moderator URL can be given to someone who can choose between differentinterview guest sources. The moderator’s camera will not be shown, but will be able tohear audio from all connected interviewees.
The moderator is also connected to the chat to help communicate with all interviewguests and the producer.
When a guest has joined the Interview, they will see his/her camera feed, but will alsosee that he/she is connected and have access to the internal chat.
493

In Livestream Studio you will see this chat as well, allowing you to communicate withthe guest.
494

You can bring in the guest's camera by clicking the dropdown in the upper right cornerof the module and clicking his/her name. You can have as many guests as you wish inthe list, but you can only select one guest at a time.
After clicking a name, the guest's camera will be available as a remote camera source,which you can switch to whenever you are ready.
The guest's view will change to seeing their camera in the lower left corner and overlaya larger view of what is currently in Program. He/she will also hear Program audio anda PrPrevieweview notification in the upper right-hand corner of the screen.
495

When the guest's camera is switched into Program, they will see a red OnOn AirAirnotification in the upper right-hand corner.
By default, the guest will hear Program audio but not hear their own audio, even whenthey are in Program.
496

Using Mevo as a RUsing Mevo as a Remote Cameraemote Camera
Livestream Studio can accept Mevo as a remote camera source when connected
to the same network.
Make sure that your Mevo is turned on and connected to the same local network asyour Livestream Studio machine.
Launch the Mevo app and navigate to the main menu. Choose AdvancAdvanceded SettingsSettings.
You will see a section for LivestrLivestream Studio Modeeam Studio Mode. Choose your desired resolution andbitrate for your camera's output into Studio, then toggle on the Mevo RMevo Remote Cameraemote Cameraswitch.
You cannot change your resolution while remote camera mode is enabled.
497

Selecting 1080p / 151080p / 15..0Mbps0Mbps will disable all Camera Assistant features (Face
Detection, Live Follow, Auto Pilot, Static Shots)
This notification will pop up, which is simply to notify you that you are changing yourcamera's use and that it is only functional with Studio. You may toggle the switch backoff at any time.
498

Your Mevo will appear at an Remote Camera option in Studio. Select it to see yourcamera's output in Studio.
If you have re-named your Mevo in the app, be aware that it will still show up
in Studio with its original identification number.
The below message will prompt you to change some settings in Studio to improve theexperience with Mevo remote camera. Clicking Apply RApply Rececommendaommendationstions will set all
499

direct inputs to be delayed by one second, syncing them with Mevo and any otherremote camera sources.
In the Mevo app, you will notice the bottom left corner now shows a dark gray buttonindicating it is linked to Studio but is not currently in Preview or Program. If you tap thisbutton, the option to push it to the Preview (PRV) or Program (PGM) monitors in Studiowill appear.
Use your finger to slide the gray button to either PRV or PGM to put your Mevo intoeither Preview or Program in Studio, respectively
500

Once Mevo is in the Preview or Program monitor, tap the button again and slide it toswitch it between the monitors in Studio.
While Mevo is being used a Remote Camera in Studio, you may still live edit your Mevoshot in your Mevo app. Your Mevo will output this live editing to Studio, just as it wouldto a local recording or Mevo stream to Livestream or Facebook Live.
You cannot start a separate Mevo stream to Livestream or Facebook Live
while Studio Remote Camera Mode is enabled. You also cannot record to a
microSD card inside the camera while in Studio Remote Camera Mode.
501

Once your Mevo is connected, check here for best practices and
recommendations for using Mevo as a remote camera source.
TTrroubleshootingoubleshooting
If you are not seeing any options on the list within the Remote Cam tabs, please checkthe following:
• Make sure the remote system is on the same network, connected to the sameRouter or Access Point as your Studio system.• If the system is on the same network but using a different access point, the
Remote Camera will not properly connect.
• Check that the following ports are open if you use a firewall:• UDP: 5353, 60936 - 61036
TCP: 60936 - 61036
• Check that Bonjour Service is started.
502

Best PracticBest Practices fes for Mevo as a Ror Mevo as a RemoteemoteCamera SourCamera Sourccee
If you intend to use Mevo as a ruse Mevo as a remote camera souremote camera sourccee in Livestream Studio, our
team has some configuration recommendations for optimal performance.
PrProject Formaoject Formatt
First, under Settings: PrSettings: Project Formaoject Formatt, you should select StrStreamingeaming OptimizOptimizeded.
Choose a Project Format that matches your Mevo's Frame Rate. Doing this will matchthe Mevo's video resolution and frame rate, therefore increasing the quality while alsoreducing CPU usage that would otherwise be used to resize the Mevo's video feed.
503
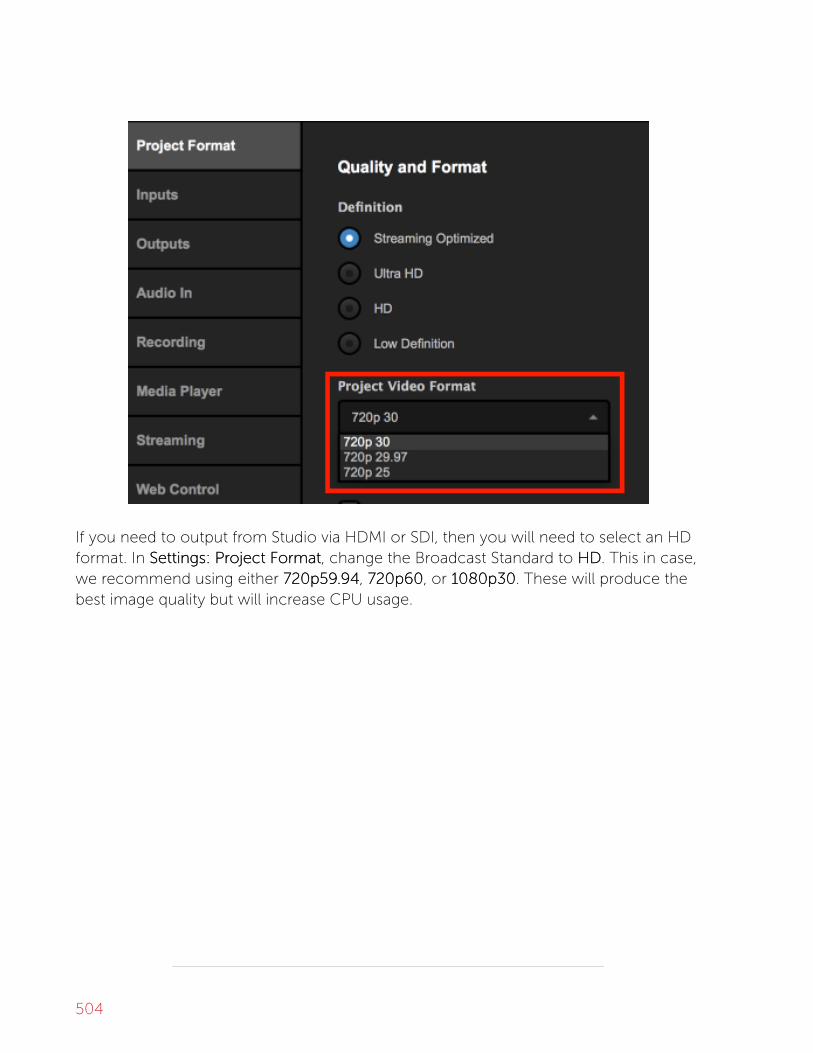
If you need to output from Studio via HDMI or SDI, then you will need to select an HDformat. In Settings: PrSettings: Project Formaoject Formatt, change the Broadcast Standard to HDHD. This in case,we recommend using either 720p59720p59..9494, 720p60720p60, or 1080p301080p30. These will produce thebest image quality but will increase CPU usage.
504

When you select your Project Format, click SaveSave.
Camera SCamera Synchrynchronizaonizationtion
To avoid sync issues, it's best that you set your direct input sources to be delayed byone second. Studio has an easy setting to do this.
Click the gearwheel in the upper right corner of Studio, then click the AdvancAdvanceded tab.
Navigate to the RRemote Inputs Semote Inputs Synchrynchronizaonizationtion setting and select Delay All Inputs by 1Delay All Inputs by 1SecSecond and Sond and Synchrynchronizonizee. This will allow your wired inputs to compensate for thelatency experienced by wireless sources (in this case, Mevo) and sync them together.
505

Be sure to save your settings.
506
Bringing an iOS Camera Signal intoBringing an iOS Camera Signal intoLivestrLivestream Studioeam Studio
Livestream Studio allows you to use your iOS device as a remote camera source.
You will need a Livestream account in order to use this feature.
Download the Livestream iOS application.
Connect your iOS device via Wi-Fi to the same network as your Livestream Studiosystem. Open the Livestream iOS application, tap the menu icon in the upper right,then tap the gear wheel. This will open the application settings.
Tap "Studio RStudio Remote Cameraemote Camera" and make sure Studio Remote Camera is enabled.
Then select the blue LivestrLivestream Studio Ream Studio Remote Cameraemote Camera bar.
507

If you have not added a remote camera as an input, go to Settings: InputsSettings: Inputs. Click the ++button to add a new input and select Remote Camera from the video input drop-downmenu.
Open the Remote Cam tab. You will find a list of all remote camera devices currentlyconnected to your network. Find your iOS device from the list of devices. Now you useyour iOS Device as a camera source in your Livestream Studio production.
If you click on the gear wheel next to your remote iOS source, you can
change settings such as which camera is being used and at what resolution.
508
TTrroubleshootingoubleshooting
If you are not seeing any options on the list within the Remote Cam tabs, please checkthe following:
• Make sure the remote system is on the same network, connected to the sameRouter or Access Point as your Studio system.• If the system is on the same network but using a different access point, the
Remote Camera will not properly connect.
• Check that the following ports are open if you use a firewall:• UDP: 5353, 60936 - 61036
TCP: 60936 - 61036
• Check that Bonjour Service is started.
509

Bringing a BrBringing a Broadcaster Signal intooadcaster Signal intoLivestrLivestream Studioeam Studio
Livestream Studio allows you to use your Livestream Broadcaster device as a
remote camera source.
Connect your Broadcaster to the same network as the Livestream Studio computer.
In Studio, make sure you have added a remote camera as an input.
If you have not yet done this, open your Studio settings and select the InputsInputs tab. Clickthe ++ button to add a new input and select RRemoteemote CameraCamera from the drop-downmenu.
Livestream Broadcaster Pro
Power on the device and use the bottom Menu joystick to connect it to the samenetwork that your Livestream Studio system is connected to.
After connecting it, push in the joystick to enter the menu and select StrStream Modeeam Mode.
510
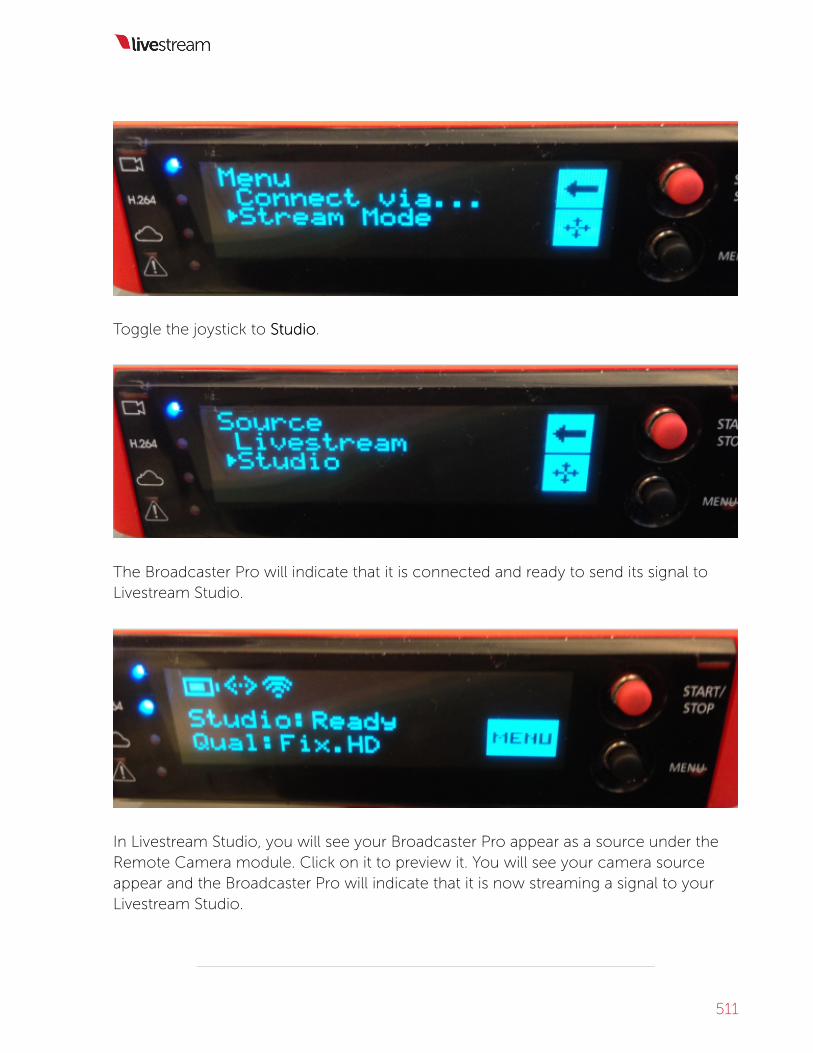
Toggle the joystick to StudioStudio.
The Broadcaster Pro will indicate that it is connected and ready to send its signal toLivestream Studio.
In Livestream Studio, you will see your Broadcaster Pro appear as a source under theRemote Camera module. Click on it to preview it. You will see your camera sourceappear and the Broadcaster Pro will indicate that it is now streaming a signal to yourLivestream Studio.
511

Livestream Broadcaster mini
You can also connect a Broadcaster mini to Livestream Studio as a remote camera.When you finish pairing it through the Livestream app, using the same network yourLivestream Studio system is connected to, select it from the Broadcaster list.
512

It will open the camera view finder. Click on the gearwheel in the top right corner toaccess settings.
513

Scroll down and you will see Studio Mode. Toggle the switch on (green) to enableStudio Mode. Then click SaveSave in the upper right corner.
514

The mobile app will indicate that your Broadcaster mini is in Studio mode.
515

In Livestream Studio, your Broadcaster mini will appear in the list of remote cameras.Click on it to preview your camera source and switch it into Studio's Program monitoras desired.
516
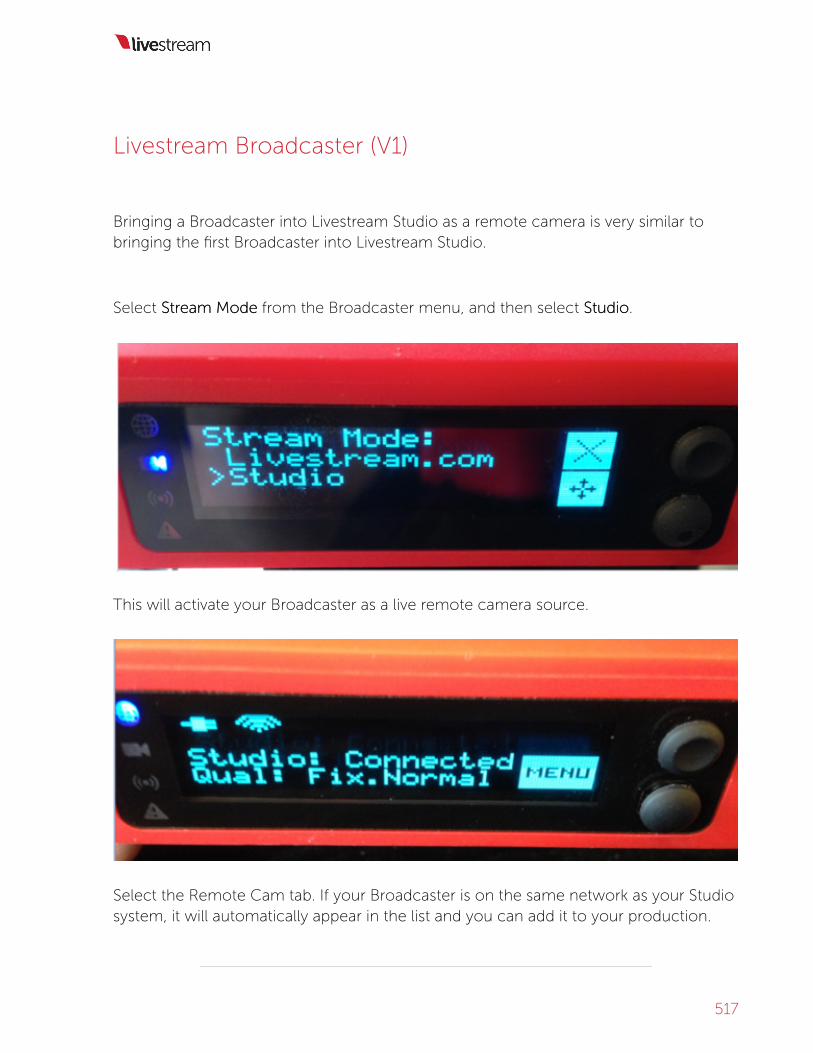
Livestream Broadcaster (V1)
Bringing a Broadcaster into Livestream Studio as a remote camera is very similar tobringing the first Broadcaster into Livestream Studio.
Select StrStreameam ModeMode from the Broadcaster menu, and then select StudioStudio.
This will activate your Broadcaster as a live remote camera source.
Select the Remote Cam tab. If your Broadcaster is on the same network as your Studiosystem, it will automatically appear in the list and you can add it to your production.
517
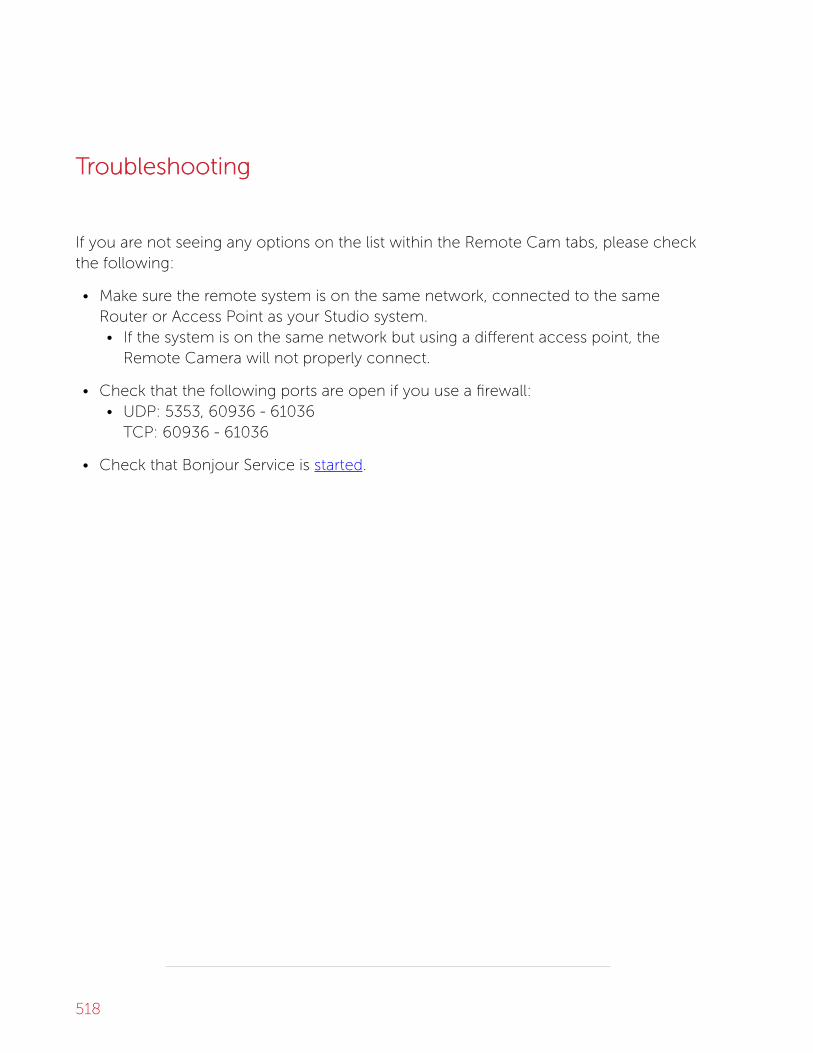
TTrroubleshootingoubleshooting
If you are not seeing any options on the list within the Remote Cam tabs, please checkthe following:
• Make sure the remote system is on the same network, connected to the sameRouter or Access Point as your Studio system.• If the system is on the same network but using a different access point, the
Remote Camera will not properly connect.
• Check that the following ports are open if you use a firewall:• UDP: 5353, 60936 - 61036
TCP: 60936 - 61036
• Check that Bonjour Service is started.
518
Bringing an AndrBringing an Android Camera Signal intooid Camera Signal intoLivestrLivestream Studioeam Studio
Livestream Studio allows you to use your Android device as a remote camera
source. You will need a Livestream account in order to use this feature.
Download the Livestream Android application.
You must be running Android version 4.0 or higher in order to install the
Livestream app on Android devices.
Connect your Android device via Wi-Fi to the same network that your LivestreamStudio system is connected to.
Open the Livestream Android application and tap the menu icon in the upperleft corner, then the gearwheel.
519

520

This will open your settings menu. Tap Studio RStudio Remote Cameraemote Camera.
Tap UseUse asas RRemoteemote CameraCamera.
521

This will activate your Android device as a live Remote Camera source. The notificationwill read "Waiting for Studio to connect..."
You can hold your camera at portrait or landscape mode; the picture will still
hold a 16:9 aspect ratio.
522

In Studio, ensure you have added a Remote Camera as an input.
• If you have not added a Remote Camera as an input, open your Studio settings andselect the InputsInputs tab.
• Click the ++ button to add a new input and select RRemoteemote CameraCamera from the drop-down menu.
• Save your changes.
In Studio, select the RRemoteemote CamCam tab.
You will find a list of all remote camera devices currently connected to your network.You can click each remote camera device to reveal a preview.
Find your Android device from the list of devices.
523

Now you may use your Android Device as a Remote Camera source in your LivestreamStudio production.
TTrroubleshootingoubleshooting
If you are not seeing any options on the list within the Remote Cam tabs, please checkthe following:
• Make sure the remote system is on the same network, connected to the sameRouter or Access Point as your Studio system.• If the system is on the same network but using a different access point, the
Remote Camera will not properly connect.
• Check that the following ports are open if you use a firewall:• UDP: 5353, 60936 - 61036
TCP: 60936 - 61036
• Check that Bonjour Service is started.
524
Connecting a GoPrConnecting a GoPro Camera to Livestro Camera to LivestreameamStudioStudio
Livestream Studio includes the ability to bring a GoPro Hero 4 as a remote camera
source via the GoPro camera's built-in WiFi hotspot.
At this time, the GoPro Hero 4 SessionSession and GoPro Hero 55 cannot be used as
remote cameras in Livestream Studio. There is currently a known issue GoPro
Hero 3 as a remote camera as well.
To connect a GoPro Hero 4 as a remote camera, first enable the WiFi on the cameraby pressing the WiFi button the side of the camera (or by activating it within itssettings).
GoPro Hero 4 Black will have lower latency (less than 1 second) than GoPro
Hero 3 (1-2 seconds).
525

If your Livestream Studio system does not have a built-in Wi-Fi receiver*, you canpurchase a USB receiver, such as TP-LINK TL-WN727N 150Mbps, and plug it in to aUSB port or a USB hub.
*Livestream Studio hardware products (HD31/HD51/HD510/HD1710, etc.) do
not include built-in Wi-Fi receivers. Newer HD550's do have a Wi-Fi receiver
built-in, but you will need an additional receiver if you intend to
broadcast over Wi-Fi.
526

Check your system’s network settings to ensure the Wi-Fi is enabled and connected toyour GoPro camera.
If you have secured your GoPro's Wi-Fi hotspot, you will need to enter the
password in order for Livestream Studio to recognize it.
527

Once your system recognizes the GoPro’s WiFi, the GoPro will appear as a source inyour remote camera modules.
528

Select the GoPro to activate it. You can then switch it into Program as desired.
Please note that the GoPro's wireless output to Studio does not exceed 240p.
For the best quality, connect the GoPro to Studio directly via HDMI.
529

Bringing Other StrBringing Other Streams into Livestreams into LivestreameamStudioStudio
If you have a camera streaming to another destination, you can pull that stream intoyour Livestream Studio as a remote camera source by clicking ‘AddAdd StrStreameam.’
Clicking this will give you a few options.
The first option listed is EEventvent frfromom LivestrLivestreameam. This allows you to pull in a stream froman event on Livestream.com as a remote camera source.
You must have the login credentials for the account hosting the event you
wish to bring in.
530

The next options are to pull in an RTMP or Zixi stream. Click AddAdd StrStreameam and selectwhich one you are using.
531

Enter the appropriate playback URL for accessing the stream into the text box in themodule, then press the Enter key.
532

The stream will appear in the remote camera module. Expected latency will varydepending on connectivity strength, but will likely hover around ten seconds.
533

Uninstall Mac OS X RUninstall Mac OS X Remote Camera andemote Camera andAudio RAudio Rediredirectorector
To uninstall the Remote Camera Desktop Audio Redirector, navigate to yourApplications folder and locate the LSAudioRLSAudioRediredirectorUninstallerectorUninstaller application. Double-click it.
This message will pop up asking you to confirm that you want to uninstall the AudioRedirector. Click UninstallUninstall.
When the script finishes running, this message will pop up, confirming the AudioRedirector has been uninstalled successfully.
534

To uninstall the Remote Camera Desktop Client on a Mac system, first close theapplication by clicking the icon in the top menu bar.
Locate the Remote Camera application in your Applications folder.
535

Drag the application to Trash.
Empty the trash.
536

537

WWeb Contreb Controlol
538

WhaWhat is Studio Wt is Studio Web Contreb Control?ol?
Now available with Studio 4.1, Studio Web Control allows you to give yourself or
others access to a Livestream Studio system directly from a supported browser.
On your Studio system, go to settings, then click the WWebeb ContrControlol tab. Click thecheckbox next to EnableEnable WWebeb ContrControlol to see more options.
First, you will see a Studio ID and a Web Control Link. These are used to add users toyour Studio system.
539

You can use the default ID that populates, or create your own by clicking the pencilicon to edit it. Click save when you are done, or cancel to keep the previous name.
Below is your list of allowed users that you have invited to your Studio Web Control.You can also adjust how much access each user has to your Studio.
540

Finally you can choose how your Studio Web Control is laid out in the module below.Choose a layout and drag and drop sources you wish to see into the position you wantthem in.
541

When you log in to Studio Web Control using your Livestream or Vimeo accountcredentials, any Studio system you have been added to will be listed below as offline oronline. Select your online Studio.
542

A window such as the one below will open for users granted Full Access:
543

Here is where those users will be able to the see and control the multiview, control theaudio mixer, operate the transition controls as well as insert mid-roll advertisementsand fade to black. They can also click the menu icon in the upper right corner tochange their view and log out.
Read only users will see a similar window to those given Full Access, with theexception of a ‘Read Only’ ribbon in the upper right control. These users can see everypart of the interface that Full Access users can, but they cannot control it or make anychanges.
Users granted access to the multiview will see something similar to below, dependedon your layout settings.
They can click on the sources to put into Preview and Program. They can also clickStrStreameam and RRececorordd at the top of the module to go live and start recording, respectively.
544

Users granted access to controls only will see the audio mixer, stream module, GFXmodules, all the options seen under the transition controls. However they do not havethe ability to see or control the multiview.
All users can log out of web control by click the menu icon in the upper right cornerand clicking LLogog OutOut.
545

Add a User to Studio WAdd a User to Studio Web Contreb Controlol
You can add additional users to control your Studio via Google Chrome and other
supported browsers.
In your Livestream Studio system, go to SettingsSettings > WWeb Contreb Controlol.
Enable Web Control by clicking the check box, then navigate to the UsersUsers box.
546

To add a user, click the ++ button. The following window will appear.
547

Enter the person’s email address and how much access you wish to grant them. Theoptions are:
• AdministraAdministratortor - full access plus ability to change access for themselves and otherusers
• FFull acull acccessess - full use of all Studio Web Control features (multi-view and controls);cannot change other users access.
• RRead onlyead only - can only view web control with no ability to control Studio• MultiviewMultiview - can see the multi-view as configured from Studio and use mouse
controls to put sources in Preview and Program• ContrControls onlyols only - can control audio mixer, GFX, stream tab, RTMP inputs, and other
transition controls in web control but cannot see the multi-view.
Click SaveSave and then save your Studio settings. The user you have invited to access yourStudio via Web Control will not be able to join it until you save your settings.
You can always adjust what kind of access each user has when you go back
into the settings. Doing so will kick them out of any current session and they
will have to re-enter the Studio Web Control interface again.
548

The email address you sent the invite to will receive the following email:
The user should click the blue Open WOpen Web Contreb Controlol button. They will be prompted to loginto a Livestream or Vimeo account if they are not already, and then directed to theStudio Web Control interface that they have been given access to.
The user must have an account on Livestream or Vimeo in order to log into
Studio Web Control. If they do not have an account, they can click Join
LivestrLivestreameam or VimeoVimeo. The user must use the email address that was invited to
Studio Web Control.
549

Supported BrSupported Browsers and Devicowsers and Devices fes for Studioor StudioWWeb Contreb Controlol
In order to use Web Control with Livestream Studio, customers must use the mostrecent versions of Google Chrome or Mozilla Firefox on the following operatingsystems only:
• macOS• Windows• Chromebook• Android
Web Control is notnot supported on Microsoft Edge, Safari, and all iOS devices.
550

Using Graphics Overlays in Studio WUsing Graphics Overlays in Studio WebebContrControlol
WWeb Contreb Controlol, the Livestream Studio feature allowing the ability to control certain
aspects of Livestream Studio via a web browser that supports WebRTC (e.g.,
Google Chrome, Mozilla Firefox), includes the ability to add .lsgfx files via Dropbox,
insert data, and have full control over your graphic overlays’ settings.
A Dropbox account is required in order to use this feature. Log in to Dropbox andlocate your folders (or create a new one).
Save the .lsgfx files you wish to use in Livestream Studio in this folder. Only .lsgfx filesare supported in Studio Web Control.
551

Sample .lsgfx files can be found in the Studio Graphics Store, or can be created whenyou export a graphics overlay layer that you manually created in Livestream Studio.
The first step is within the Livestream Studio software. Navigate to Settings, then selectthe DrDropboopboxx tab.
552

Click Connect DrConnect Dropboopboxx.
Log in to your Dropbox account by entering your account credentials and clicking SignSigninin.
553

Studio will request permission to access your files in Dropbox. Click AllowAllow.
554

You will need to select a folder on your local drive to save your imported file to and afolder in your Dropbox from which to select .lsgfx files. Once you made you choices,click SaveSave.
555

Studio will indicate that your Dropbox account is synchronized with Studio.
556

Next, log in to Web Control and open your Studio (assuming you have already addedyourself as a user).
You should notice the three graphics overlay tabs in the bottom portion of the screen;select one of them to continue.
557

You can either browse the free Graphics Store within the Web Control graphics overlaymodule, or scroll down and click AddAdd CustomCustom LayersLayers.
Any .lsgfx files saved in your selected Dropbox folder will be listed here. Click the nameof the file you wish to use.
558

The graphics file will load with its design and settings on the left and its data on theright.
It is not possible to open the GFX Designer in Web Control. The appearance
of the graphic can only be edited within the Studio software.
On the right side, you have the ability to add data rows and columns and enable theAuto Push/Pull feature when selecting different rows.
559

Clicking the gearwheel on the left side will open the settings available with thatgraphic, such as auto-loop timing, direction, and starting point.
560

Overlaying graphics in Web Control is the same as in Studio software. Click thecorresponding PRVPRV button to show your graphics overlay in Preview.
Click PUSHPUSH to transition the graphic overlay into Program.
561

Now, you will see the graphic overlay in your Program monitor.
To remove it from Program, click the corresponding PULLPULL button.
562

563

Media Playback in WMedia Playback in Web Contreb Control (Beta)ol (Beta)
You can import videos from Dropbox into your Media bins via a Web Control
supported brsupported browserowser.
Please note this is a beta feature. We are aware that previewing video in the
player is not functioning at this time. If you experience other issues, please
contact us so we can investigate.
Open Web Control for your Studio system. If you have not already integrated aDropbox account with Studio, you can do so by opening the SettingsSettings menu in theupper right corner, then navigating to the DrDropboopboxx tab. The steps to integrate Dropboxwith Studio are the same with Web Control.
Once Dropbox is connected to Studio, select one of the Media tabs in Web Controland click the ++ button in the bottom left corner.
564

Any video file that is stored in your selected Dropbox folder will appear in the pop-upmenu. Select the file you wish to import into Studio.
565

The file will begin transcoding. When transcoding completes, you will see a thumbnailof the clip on the right side of the panel.
566

567

All player controls and options function exactly the same way in Web Control as theydo in the Studio software.
568

Studio Simulcasting via WStudio Simulcasting via Web Contreb Controlol
Simulcasting via Livestream Studio can now be set up via Studio Web Control. It
works similarly to setting up simulcasting within the Livestream Studio software.
Log in to Web Control and navigate to the lower left corner. Select the StrStreameam tab.Choose one provider to start with; this example will use Livestream.
Log in to your account.
569

Configure your provider's settings. For example, choose your Livestream event andwhether or not to notify your Livestream followers when you go live.
570

Click AdvancAdvanced Settingsed Settings to reveal further options below; in Livestream's case, usingbonding or using this Studio as a backup stream. All providers will allow you to specifya network to stream through.
571

When you have finished configuring your settings for your first provider, select the ++icon in the lower left corner to add another provider.
572

Choose another provider (this example uses Facebook).
573

Sign in to your account. This may open a new browser window. Once you are signedin, navigate back to Web Control.
The provider's icon will appear as a new bottom tab within the module. Clicking it willallow you to configure settings for that streaming destinations (e.g. where on Facebookyou are streaming, audience, tag location, etc.)
574

Now you can give your stream a title and choose a streaming quality. Keep in mindthat not all quality options are supported by all providers (e.g. Facebook does notcurrently support 1080p or higher).
575

To start streaming, click Go LiveGo Live in the lower right corner of the Stream module.
576

Your stream will begin immediately and the Stream module will turn into a dashboardexplaining your outgoing bitrates, frame rates, viewer counts, and any error messagesor warnings regarding your stream.
When you are down streaming, click the red StrStreamingeaming button in the lower rightcorner.
You stream will end immediately and a dialogue box will open with informationregarding your stream and any action items required (e.g. post the video on demand toyour event page).
577

578

AdvancAdvanced Feaed Featurtureses
579

Using ChrUsing Chroma Koma Keyey
Livestream Studio includes chroma key, giving users the ability to remove a color
from the video source, typically a background color to replace with an image such
as a virtual set.
Chroma key is done through the graphics module. Start by adding a new layer to anygraphics overlay channel.
Click the paintbrush icon to enter the GFX Designer.
580

Next, click on the camera icon to add an input source to your graphics layer.
Click the gearwheel to select which input source you want to use for chroma key.
581

You can adjust how your input source looks inside the GFX Designer as necessary,such as scaling it to fit the whole screen.
582
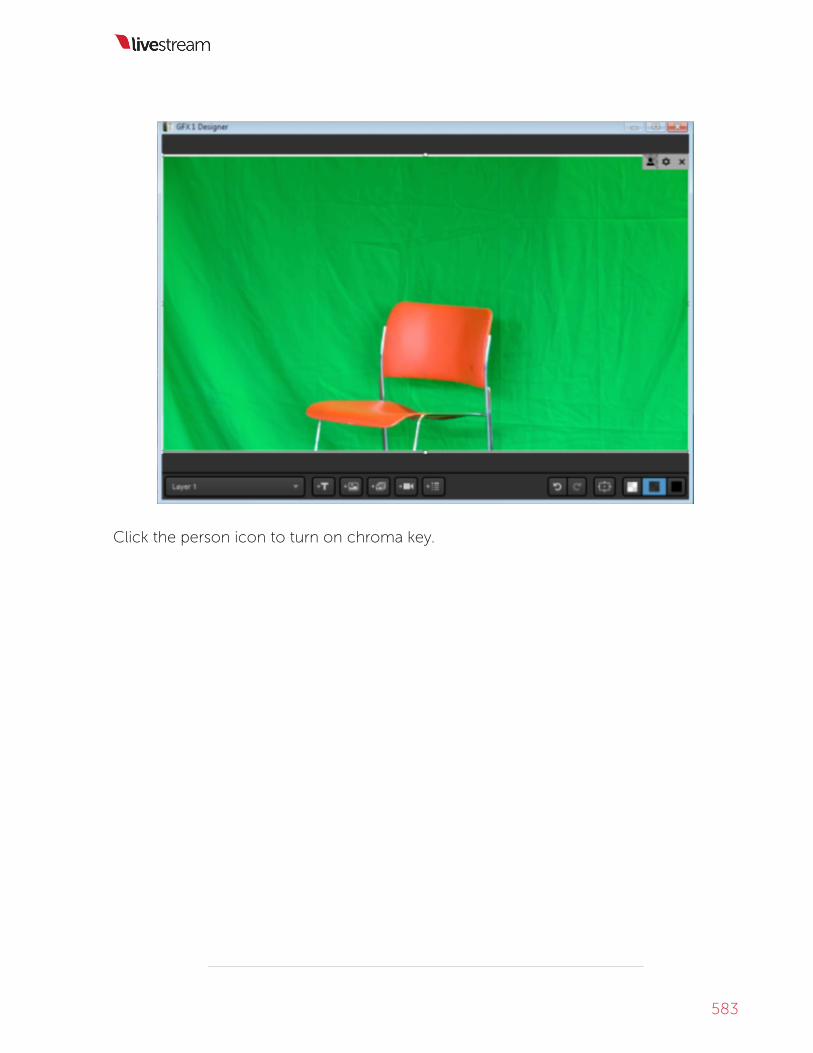
Click the person icon to turn on chroma key.
583

Livestream Studio will automatically detect the most prominent color (green in thisexample) and key it out once chroma key is turned on.
584

Next, close out of the GFX Designer and put either a camera, media source, orgraphics source into Program from your multi-view. The example above has a whitebackground video from Media 2.
Now push your graphics overlay layer into Program by clicking the corresponding‘PUSHPUSH’ button.
585

You should now see your chroma keyed input source overlaying your Program source.
To make further adjustments to your chroma key graphic, go back to the GFXDesigner.
586

When you select your input source in the graphics overlay while chroma key is turnedon, you will see other options in the upper right corner.
To erase all chroma keying on your input source, click the ‘XX’ icon. Note that the greenbackground has returned to the picture.
587
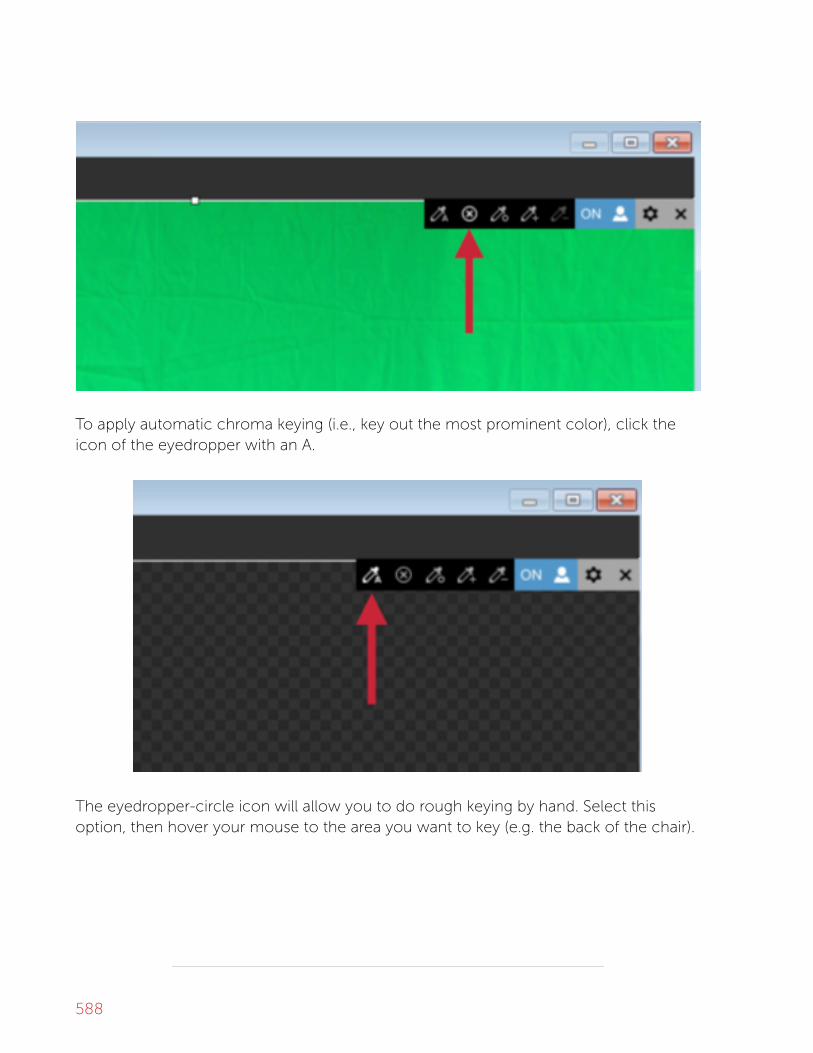
To apply automatic chroma keying (i.e., key out the most prominent color), click theicon of the eyedropper with an A.
The eyedropper-circle icon will allow you to do rough keying by hand. Select thisoption, then hover your mouse to the area you want to key (e.g. the back of the chair).
588

Click and drag your mouse to start real-time keying. You can increase or decrease thekeying color range, which will be indicated by a circle around the area.
The end result should be similar to the image above, where the colors within the rangethat was selected are now on the chroma key palette and thus not visible.
589

The eyedropper with a plus sign either initializes the chroma key or adds color hues tothe chroma key palette. This is helpful if there are shadows in your background that didnot key out fully.
The eyedropper with a minus sign will exclude colors from your chroma key palette.This is helpful if a color on your set is similar to the color you keyed out and is faded. In
590

this example, the orange chair is keyed out and the red sweater is also largely keyedout.
After using the eyedropper minus tool on the red sweater, you can now see thesweater; orange is still on the chroma key palette.
591

Please note that other graphics or images in the same graphics layer will be visible. Usecaution with this type of workflow, as it is likely to increase your CPU usage.
592

593

HarHardwardware Ence Encoding and Decoding and Decoding withoding withLivestrLivestream Studioeam Studio
Studio includes harhardwardware ence encodingoding and harhardwardware dece decodingoding which moves the
video processing to a dedicated GPU, greatly reducing your CPU usage while
running Studio.
These features are only available on computers with Intel processors that includeQuick Sync Video (which are listed here) or have an NVIDIA GeForce card that includesNVENC and NVDEC. We have instructions on how to determine if your computer hasan Intel Quick Sync processor or has an NVIDIA card that supports NVENC andNVDEC.
The HD31, HD51 4K, and HD550 4K are the only Livestream-built units that have therequired hardware that includes these features. Many laptops include them as well.
Computers that do not have the proper hardware installed will not display thesefeatures in Studio.
To enable hardware encoding in Livestream Studio, click the SettingsSettings icon in the upperright corner of the interface.
594

Navigate to the StrStreamingeaming menu.
595

At the top of the menu, check HarHardwardware Ence Encodingoding. Then click SaveSave.
As an example, here is the processor being used on a Windows 10 computer.
596

The CPU usage when hardware encoding is turned off—streaming a single bitrateaveraging 2128kbps, with 2 media bins, and 1 animated graphics overlay—is nearly100%. The stream timed out after about 1 minute due to lack of resources.
In comparison, the CPU usage with the same workflow while hardware encoding isturned on was cut in half, down to 48%.
597

To enable hardware decoding, navigate to the AdvancAdvanceded menu in settings. Make sureEnable harEnable hardwardware dece decodingoding is checked. This will reduce the CPU resources needed tobring in your camera sources.
598

599

How Do I Know if My Intel PrHow Do I Know if My Intel PrococessoressorIncludes Quick SIncludes Quick Sync?ync?
In order to be able to use the harhardwardware ence encodingoding feature in Livestream Studio, you
must have the proper hardware installed on your computer. One of these options
is having a processor that include Intel Quick SIntel Quick Syncync. (The other is NVENC via
NVIDIA GeForce GPUs.)
Intel Quick Sync is Intel's version of dedicated video encoding and decoding
hardware core. Rather than using a general GPU, this core is located on the
processor die and is dedicated just for video processing.
Studio will automatically detect if you have the proper hardware or not. You
can quickly check this by going to the Settings: StrSettings: Streamingeaming menu. If HarHardwardwaree
EncEncodingoding does not appear at the top of the menu, then you do not have the
GPU hardware.
To determine if your processor includes Quick Sync, first you need to determine yourCPU model.
• Windows 7Windows 7: Open the Start menu, right-click ComputerComputer, then click PrPropertiesoperties.• Windows 8 & 10Windows 8 & 10: Right-click the Start menu, then click SSystemystem.
600

If you are running Studio (beta) on a Mac, to find the exact CPU model you will need toopen the Terminal application. Enter the following command, then press the Returnkey:
sysctl -nmachdep.cpu.brand_string
Your CPU model will be displayed underneath.
In a web browser, navigate to this listthis list and find your CPU model (Tip: Use the CTRL+F/CMD+F search function in your browser and type in the model ID).
601

If your CPU does not appear in the list, then you do not have Intel Quick Sync availablewith your computer's processor.
602

How Do I Know if My GPU SupportsHow Do I Know if My GPU SupportsNVENC and NVDENVENC and NVDEC?C?
In order to be able to use the harhardwardware ence encoding and haroding and hardwardware dece decodingoding features
in Livestream Studio, you must have the proper hardware installed on your
computer. One of these options is via NVENC (encoding) and NVDEC (decoding),
which process the video via a supported NVIDIA GeForce graphics card.
The first sign of knowing whether your PC supports these features is to go into Studioand check Settings: StrSettings: Streamingeaming for HarHardwardware Ence Encodingoding, then check Settings:Settings:AdvancAdvanceded for HarHardwardware Dece Decodingoding. If these options do not appear in these menus,then, unfortunately, you do not have the supported hardware.
603

We have successfully tested the following NVIDIA GeForce models:
• GTX1050
• GTX950
• GT730 (GK208-400-A1 - other versions of this model have been reported to
not work)
• GTX650
To find out if a specific model supports these features, first visit this list and search forthe card's model name. The quickest way to do this is to hold CTRL+F (Windows) orCMD+F (Mac) and type the model name into the page search. The browser will jumpto the first matching result.
Find your model in one of the tables and take note of the Code nameCode name (in this case,GTX 1050 is GP107-300GP107-300).
604

Now visit the NVIDIA GPU Support Matrix. The first table on this page represents cardsthat support hardware encoding (NVENC), the second table is for cards that supporthardware decoding (NVDEC). Search for the first two letters and three numbers of thecode name (in this example, GP107).
If your code name is on the first table, then your GPU supports hardware encoding inLivestream Studio. If it appears in the second table, then it supports hardwaredecoding.
605
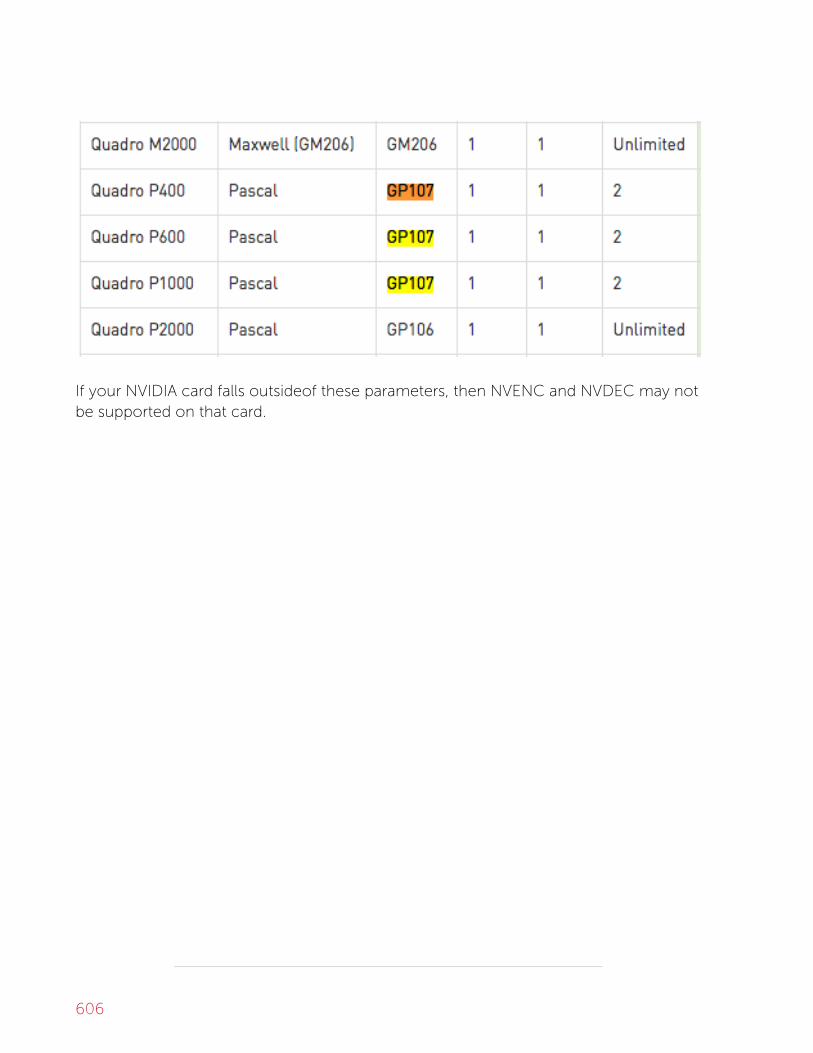
If your NVIDIA card falls outsideof these parameters, then NVENC and NVDEC may notbe supported on that card.
606

Using a Bonded Network to StrUsing a Bonded Network to Streameam
Livestream Studio has the ability to stream via a bonded connection, allowing you
to stream over multiple Ethernet, Wi-Fi or 4G/LTE network connections, increasing
your bandwidth while also allowing you to create network redundancy.
ImportantImportant: Bonding is only available when streaming to Livestream. If
choosing multiple providers, be aware that other providers will use only the
network you selected when configuring each provider's stream settings.
While Windows should recognize and automatically install any necessary drivers forUSB modems, the drivers can also be manually downloaded from the modem vendor'ssite. Ensure that all networks can access the Internet.
In order to successfully stream with a bonded connection, ports UDP 2088UDP 2088 and TTCP/IPCP/IP8080 need to be open in addition to standard Firewall ports.
As a best practice, it's recommended that USB devices are spread across your PC'svarious USB ports and hubs. This avoids taxing each USB hub and ensures that eachmodem's connection is used.
In Livestream Studio, navigate to the StrStreameam tab and login to your Livestream account.
607

Select your event, then click AdvancAdvanceded SettingsSettings.
Check Use BondingUse Bonding, then click DoneDone.
608

At the top-right corner of the Stream module is a gearwheel. Select this to configuredefault settings for your stream, including your default network. Here you will see aBondingBonding column with each corresponding network and a small dropdown menu withthe following options:
• UseUse: Networks with this option selected will combine together and distribute thestream.
• Standby - use only when neededStandby - use only when needed: This network will not be used unless all otheractive networks lose connection. For example, if you have a 4G USB modemplugged in with data caps, you may want to consider saving that as your backupconnection to avoid data overage charges.
• OffOff: Will not be used at any point during your broadcast regardless of the status ofother network connections.
609

When you go live, your network dashboard will show information for each network,such as the bitrates each active one is distributing and if one disconnects.
Your standbystandby networks will not stream unless a problem occurs with all of yourselected primary networks (i.e. those with UseUse selected).
610

ConConfiguring Mid-Rfiguring Mid-Roll Advertisementsoll Advertisements
Owners of the Livestream Studio™ software who also have an Enterprise planEnterprise plan on
Livestream can now insert a mid-roll advertisement during a live broadcast with the
press of a button. In order for this feature to work, make sure you have set-up and
ccononfigurfigured a Google DFP aced a Google DFP acccountount.
Once the Google DFP account is properly configured with Livestream, launchLivestream Studio.
Open the settings menu and navigate to the AdAd InsertionInsertion menu.
Within this menu tab, you'll find the following options:
Segment DuraSegment Durationtion: adjust the length of the mid-roll advertisement segment. This is
611
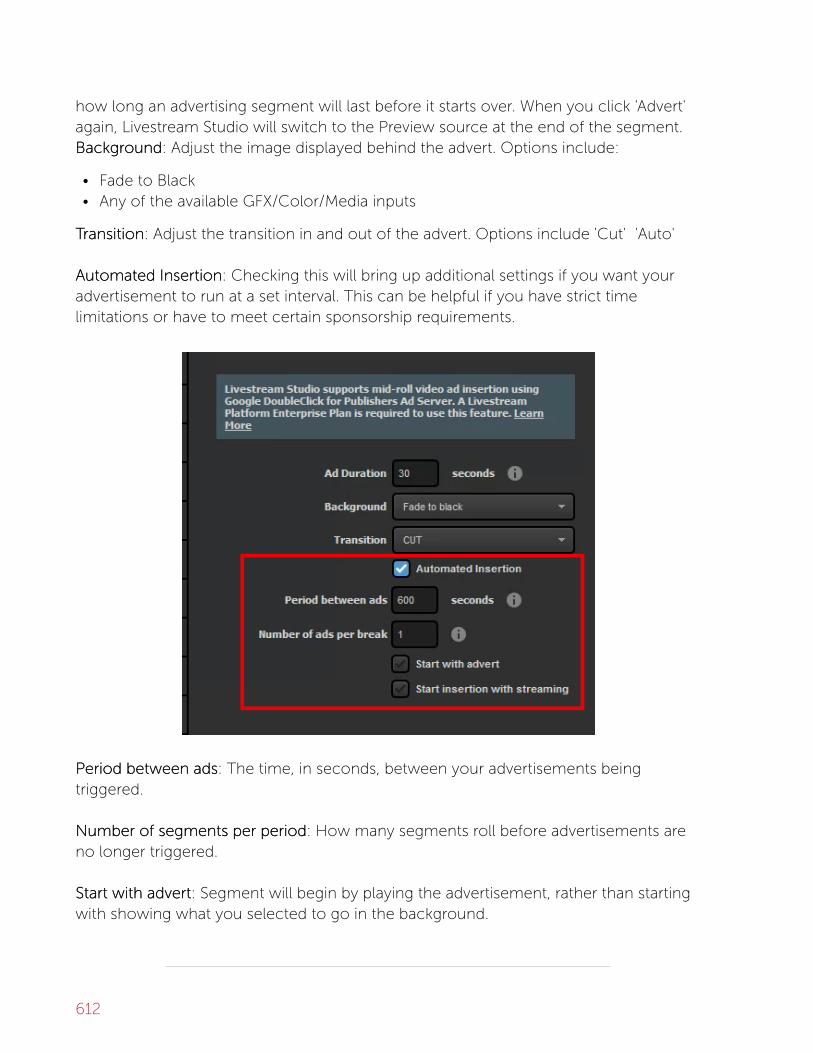
how long an advertising segment will last before it starts over. When you click 'Advert'again, Livestream Studio will switch to the Preview source at the end of the segment.BackBackgrgroundound: Adjust the image displayed behind the advert. Options include:
• Fade to Black• Any of the available GFX/Color/Media inputs
TTransitionransition: Adjust the transition in and out of the advert. Options include 'Cut' 'Auto'
AutomaAutomated Insertionted Insertion: Checking this will bring up additional settings if you want youradvertisement to run at a set interval. This can be helpful if you have strict timelimitations or have to meet certain sponsorship requirements.
PPeriod between adseriod between ads: The time, in seconds, between your advertisements beingtriggered.
Number oNumber of segments per periodf segments per period: How many segments roll before advertisements areno longer triggered.
Start with advertStart with advert: Segment will begin by playing the advertisement, rather than startingwith showing what you selected to go in the background.
612

Start insertion with strStart insertion with streamingeaming: When you go live, the first content your viewers will seeis your advertising.
After configuring the Ad Insertion Preferences, click Save. To activate a mid-rollmanually, click the 'AdvertAdvert' button below the transition controls.
When inserting an advertisement via the Livestream Studio™ Software, the followingshould occur:
• Depending on your choice of background, the Program window will change toreflect the selected option.
• The AdvertAdvert button will become red and include a Countdown timer.• On the top Left of the Program window, it will read "OUTPUT Advertisement:
[Transition] is locked until End". In the below example the option selected is "Fade toBlack".
After clicking AdvertAdvert again, it will switch to a countdown to when your stream willreturn to content.
613

614

Adding & ConAdding & Configuring Tfiguring Tally Lightsally Lights
A tally light is a small signal-lamp on a professional video camera or monitor. It is
usually located above the lens or on the electronic viewfinder and communicates
that the camera is 'live' - i.e. its signal is being used for the 'main program' at that
moment.
Tally light systems by MetaSETZ (http://www.metasetz.com) are currently theonly systems supported by Livestream Studio.
Once you have acquired your Tally Light system, connect it to your computer via anavailable USB port. The system should recognize it and automatically install the drivers.
Open the Livestream Studio software and open Settings:Settings: AdvancAdvanceded.
Under OtherOther, check the TTallyally LightsLights option. Save your settings.
615

Go to the InputInput SettingsSettings tab and select the camera to which you want to assign a tallyport.
616

Select TTallyally and assign one of the available tally ports to your camera as seen below.Do this for each of your cameras.
When the camera is set to Program, the selected Tally Light will turn on.
617
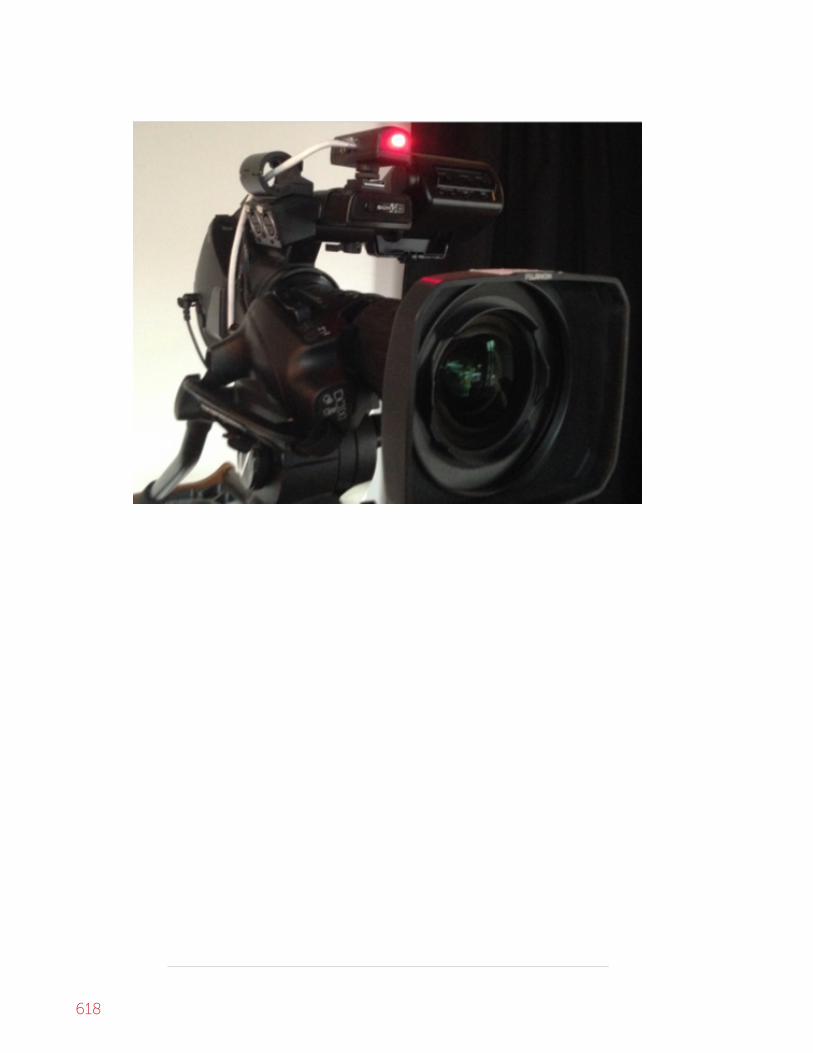
618

NewNewTTek NDI Integraek NDI Integration in Livestrtion in LivestreameamStudioStudio
Livestream Studio includes NewTek NDI Integration, allowing Livestream Studio
producers to input or output video sources over their local network with other NDI
enabled software and devices.
WhaWhat is Newt is NewTTek NDI?ek NDI?
NDI, which stands for Network DevicNetwork Device Interface Interfacee, is an open protocol developed byNewTek that allows for high-quality video & audio signals to be transferred betweendevices over a local area network (LAN). In other words, different video softwareproducts with the NDI tools and applications installed--such as Livestream Studio,TriCaster, Adobe Premiere Pro, and more--can now communicate their video signals toeach other over your local network with very low latency.
IS NDI|HX Supported?
Yes, provided that you are using Studio 5.0 or higher and you have the NDI|HX driverinstalled on your Studio machine. You can find the driver download here.
How Do I Set Up NDI Integration with Livestream Studio?
619

All you need to to do is make sure you are running version 4.5 (or later) of LivestreamStudio and make sure it is connected to the same local IP (i.e. same network) as anyother NDI enabled devices you wish to use with Livestream Studio. The integration isbuilt into the software.
How Do I Bring In Another Source via NDI?
First, you need to have another NDI enabled source connected to the same networkas your Livestream Studio system. This example will show a looping graphic sequencein Adobe Premiere Pro running on an iMac. Learn more about Newtek's NDI tools anddownloads.
In Livestream Studio, click the gearwheel in the upper right corner to access settings.
620

Navigate to the InputsInputs menu.
Add an Input and click the Video SourVideo Sourccee dropdown menu. NDI enabled sources onyour network will be available as input options. The third option here is the iMacrunning Adobe Premiere Pro.
621

Select your desired NDI source(s), then click SaveSave. Studio can handle up to 25 NDIsources.
622

Your NDI source will appear in your multi-view in Livestream Studio alone with all otherinputs. You can switch it into Preview and Program as you would any other source.
A key feature with NDI is alpha channel supportalpha channel support. This means a source like the oneshown above, which is a looping graphic with no background, can also be broughtinto Livestream Studio with a transparent background.
623

To enable this in Studio, navigate to one of the GFXGFX menus, select ++ and click NewNewLayerLayer.
Click the paintbrush icon to open the GFX Designer.
624

To bring in your NDI source as a graphic, click the camera icon.
625

Your first input source will appear. Click the corresponding gearwheel to select yourNDI source. Notice that the graphic has a transparent background, rather than a blackone.
626

Make any appearance adjustments as necessary (in this example, we cropped theempty space and dragged the graphic to the bottom to make it a true lower-thirdgraphic).
627

When you are satisfied with your NDI source's appearance, close the GFX Designer.
628

Now you can use your graphics overlay controls in the upper right corner ofLivestream Studio to bring in your NDI source as a graphics overlay with alpha channelsupport.
629

How Do I Output via NDI?
Setting up an NDI output is similar to setting up a normal live video output. Thedifference is that instead of using a video card and video cables to output yourProgram or other Studio source, you are outputting over your local network.
Click the gearwheel in the upper right corner to access settings.
630

Navigate to the OutputsOutputs menu.
The lower half of the menu is the NDI OutputsNDI Outputs section. Click the ++ button to add anNDI output.
Studio supports a maximum of five (5)five (5) NDI outputs.
631
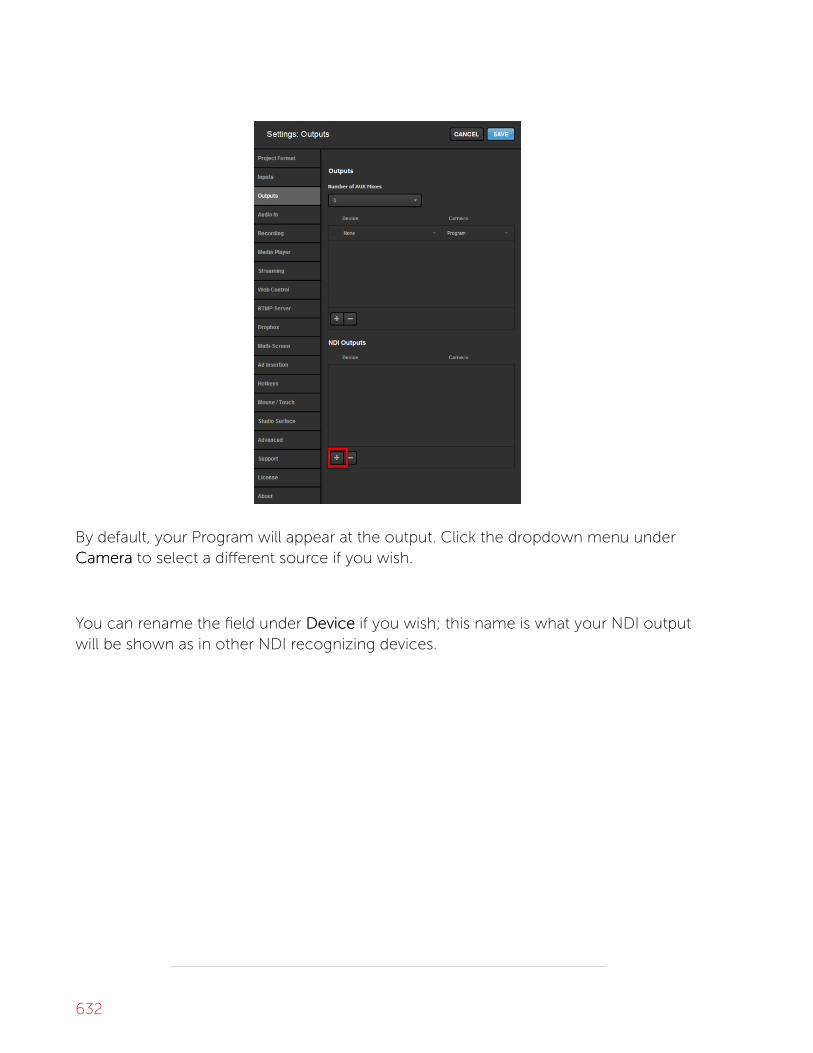
By default, your Program will appear at the output. Click the dropdown menu underCameraCamera to select a different source if you wish.
You can rename the field under DevicDevicee if you wish; this name is what your NDI outputwill be shown as in other NDI recognizing devices.
632

After selecting your output(s), be sure to save your settings.
633

Now other NDI enabled devices and software on your network will be able to bring inyour selected output(s) as a source or input (e.g. other Studio systems, vMix, TriCasters,etc.)
My NDI Sources are Buffering, How do I Prevent This?
If you notice buffering or lag in your NDI sources, you can reduce the bandwidthrequired to bring them in via Input SettingsInput Settings, in the lower left corner of LivestreamStudio.
Select your NDI source from the input dropdown menu on the left side.
634

Navigate to the ConvertConvert menu.
By default, LLow bandwidth modeow bandwidth mode is turned off. Check it to enable it.
635

Your NDI input is now converted to a lower resolution, which will soften its appearancebut deliver the video signal more steadily.
636

Setting Up Studio as an RTSetting Up Studio as an RTMP ServerMP Server
With Livestream Studio, you can send a stream from a third-party encoder via
RTMP directly to Studio and bring that stream in as a source.
ImportantImportant: In order for this feature to work successfully, your network must
have Port 1935 open to allall communication, as it is a UDP connection. This
port also needs to be forwarded to the internal IP address of the machine
using the server.
If your encoder is streaming to Studio from an external location (i.e. not from
the same network), you must ensure that both systems are on a public-facing
IP address in order for your encoder and Studio to communicate with each
other.
Speak with your IT administrator if your network requires these changes to be
made.
RTRTMP Input BasicsMP Input Basics
Go to Settings:Settings: InputsInputs. You can add up to 10 RTMP input sources. Make sure to saveyour settings.
637

Your RTMP tab(s) will appear in the lower left corner of the interface; select one tocontinue.
Your RTMP URL and Stream Name are displayed on the right side as well as the left-hand side menu.
638

By default, authentication is turned off. If you would prefer to have a username andpassword affiliated with your RTMP Server, click ChangeChange SettingsSettings.
This will open the RTRTMPMP ServerServer tab in Studio's settings. Check AuthenticaAuthenticationtion and enterthe desired username and password; then click SaveSave.
639

To save time copying and pasting, Studio gives you the option to Download
FMLE Settings, which you can then import into your encoder.
640

In your third-party encoder (e.g., Wirecast, OBS, etc.), open your RTMP settings andenter the RTMP URL and Stream Name from Studio into the corresponding fields.
If you enabled authorization, enter your RTMP Input's username and password intoyour third-party encoder.
641

Start streaming from your third-party encoder to your RTMP Input.
In the Livestream Studio multi-view, the video output from your third-party encoder willappear in your RTMP Input.
642

You can transition your RTMP Input into Program, just as you would with any othersource. When you end the stream from your third-party encoder, the source will nolonger be visible in Livestream Studio.
Advanced Settings
On the left side of the module, scroll down to find more options.
643
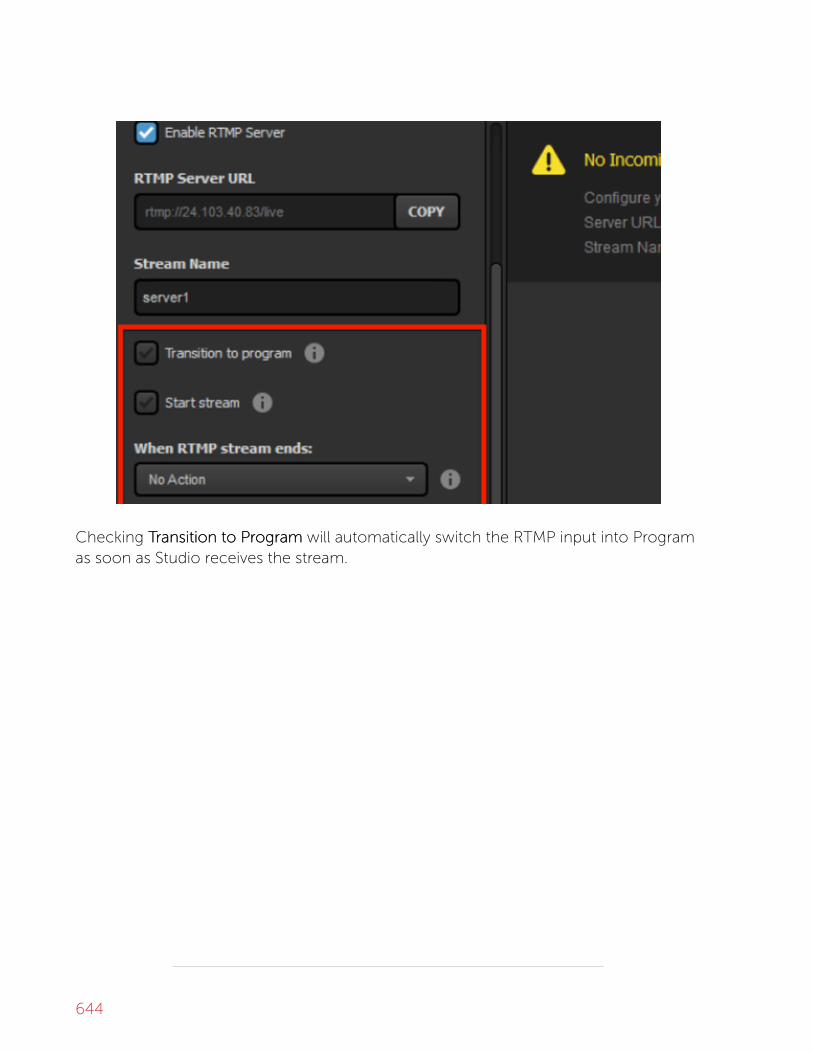
Checking TTransition to Prransition to Programogram will automatically switch the RTMP input into Programas soon as Studio receives the stream.
644
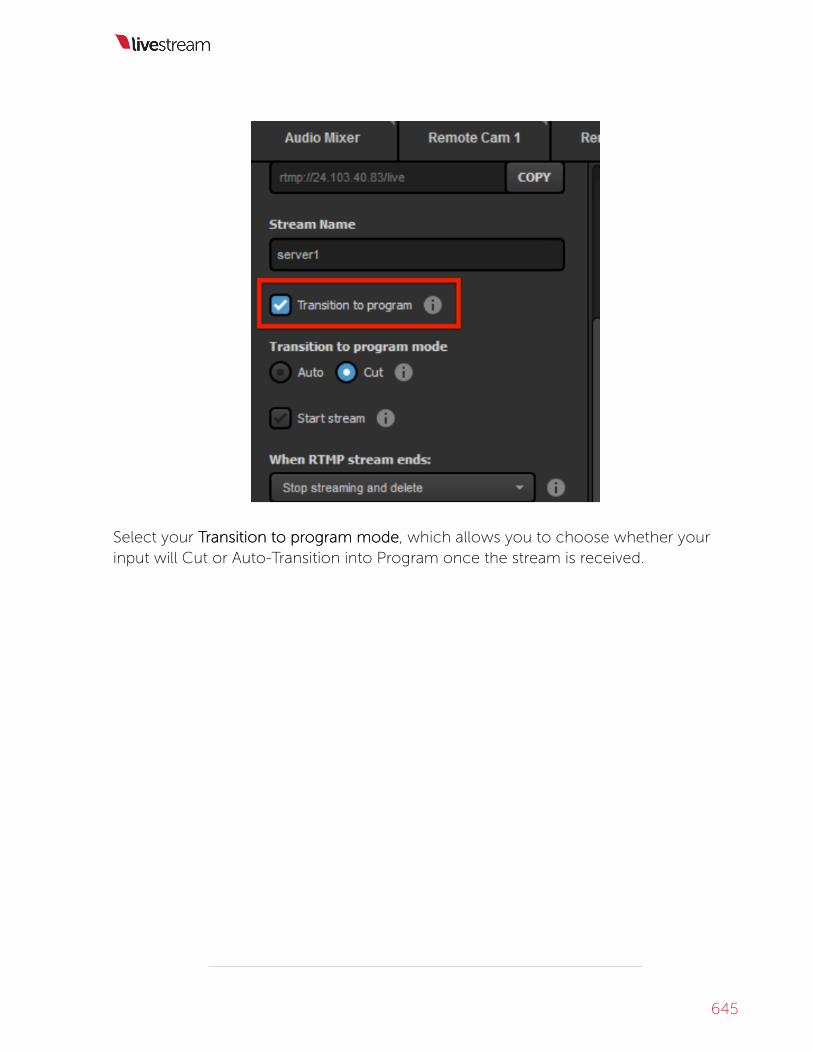
Select your TTransition to prransition to program modeogram mode, which allows you to choose whether yourinput will Cut or Auto-Transition into Program once the stream is received.
645

Next is StartStart StrStreameam, which can prompt Studio to automatically start streaming to yourselected provider(s) in Livestream Studio (e.g. Livestream) as soon as it receives theRTMP input.
646

When RTWhen RTMP strMP stream endseam ends allows you to select what Livestream Studio should do whenyou stop streaming from your third-party encoder. The options are:
• No ActionNo Action: Studio will not react to the RTMP stream stopping• Stop StrStop Streaming and Peaming and Postost: Studio will end its stream and post the video on demand.• Stop StrStop Streaming Draeaming Draftft: Studio will end its stream and save the video as a draft post
(Livestream only).• Stop StrStop Streaming and Deleteeaming and Delete: Studio will end its stream and delete the video on
demand (Livestream only).• SSwitch to Prwitch to Preview and Keview and Keep Streep Streamingeaming: Studio will continue streaming, but
transition the Preview source into Program.
647

With these settings enabled, your RTMP source will now automatically appear inProgram and Livestream Studio will start streaming to your chosen provider withoutany additional action needed.
You can also configure RTMP input settings via Livestream Studio Web
Control.
Troubleshooting
If you attempt to stream from your encoder and are unable to reach the RTMP server,it could be that Studio is not displaying your machine's internal IP address. Follow thesteps below to get the correct IP address
Go to your Windows network settings and find your connection status; click LLocal Arocal AreaeaConnectionConnection.
648
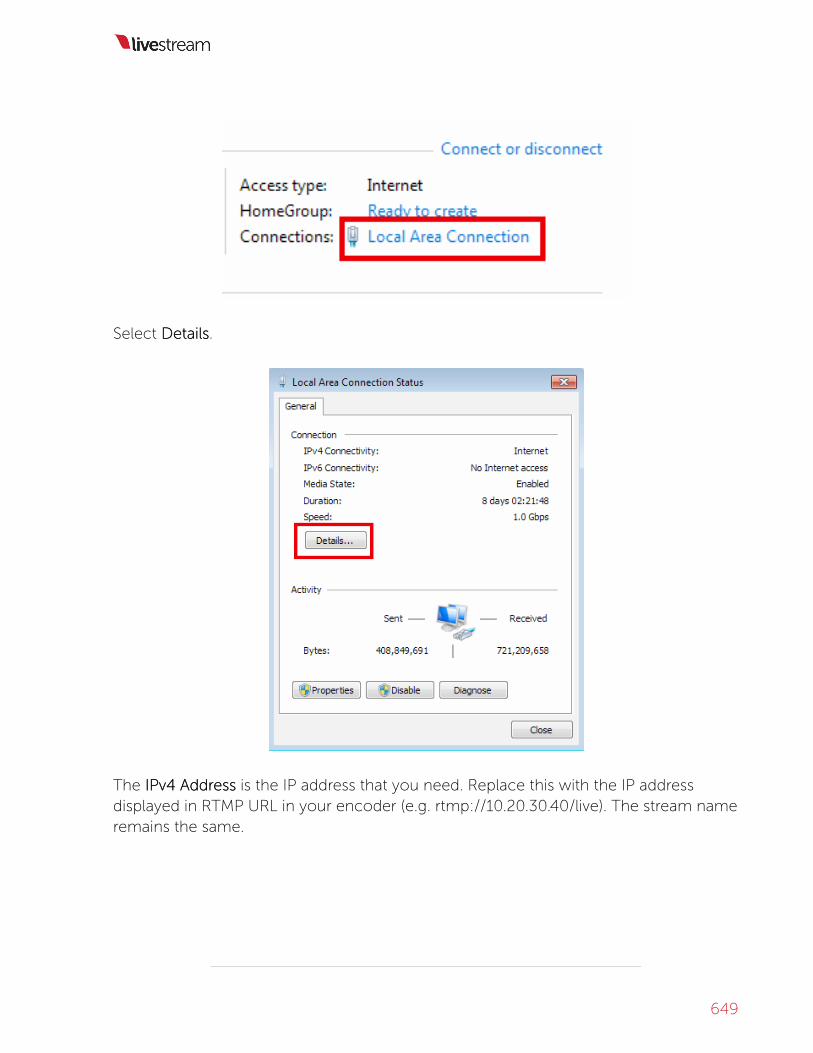
Select DetailsDetails.
The IPv4 AddrIPv4 Addressess is the IP address that you need. Replace this with the IP addressdisplayed in RTMP URL in your encoder (e.g. rtmp://10.20.30.40/live). The stream nameremains the same.
649
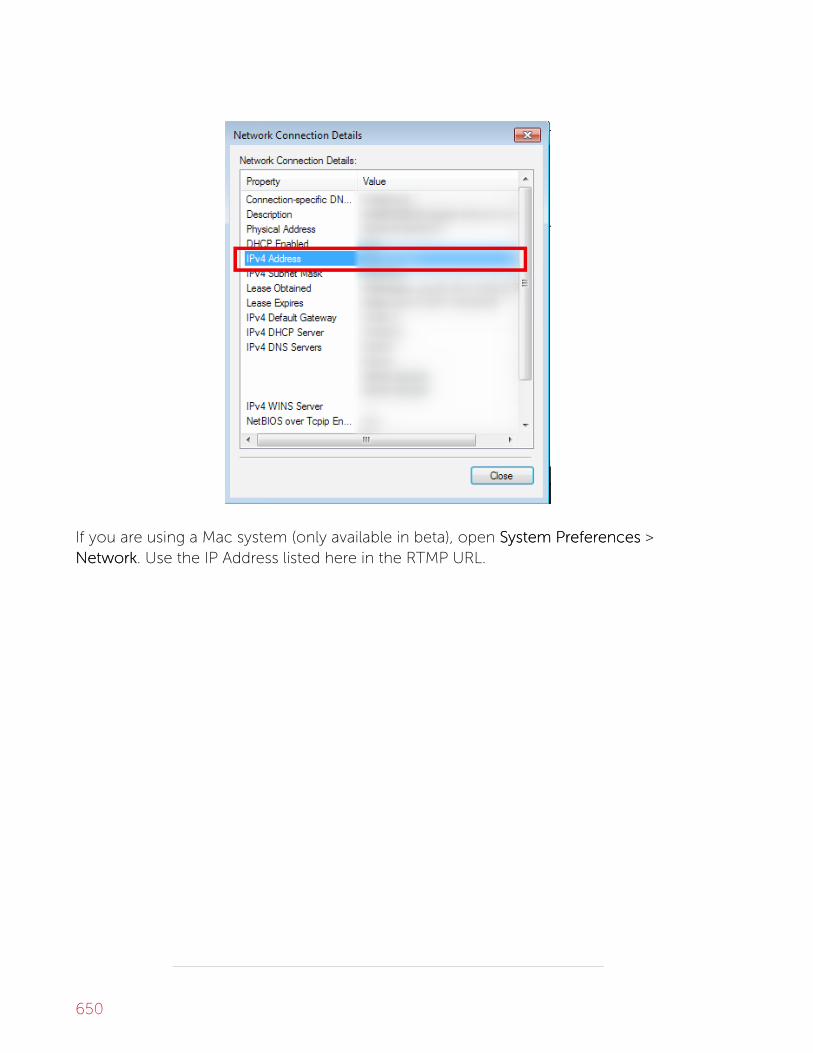
If you are using a Mac system (only available in beta), open SSystem Prystem Prefefererencenceses >NetworkNetwork. Use the IP Address listed here in the RTMP URL.
650

You should now be able to go live to your Studio RTMP server.
651

CrCreaeate a Backup Strte a Backup Stream to Livestream to Livestreameam
Unfortunately, this feature is currently not functioning properly. Our
development team is aware and working on a fix. We will update this article
when a fix has been released. Please contact us if you are trying to create a
backup stream via Livestream Studio.
You can create a backup stream to Livestream using Livestream Studio. This is
helpful if you are looking to add redundancy to your workflow in the event of a
bandwidth drop or power failure. You will need two systems running Livestream
Studio. Determine which will be your primary encoder and secondary encoder.
This fThis feaeaturture only works when stre only works when streaming to Livestreaming to Livestream.ceam.com.om. Livestream Studio cannotcreate a backup stream for other providers.
Start your stream to Livestream on your primary encoder as you normally would.
Open Livestream Studio on your secondary encoder. Navigate to the StrStreameam module,log in to Livestream. Make sure the following streaming settings match the settings onyour primary encoder:
• Event• Streaming Quality
Next, select AdvancAdvanced Settingsed Settings.
652

Check Backup StrBackup Streameam.
When your settings are configured, select Go LiveGo Live to start streaming your backup.
653

If the stream from the primary encoder fails due to bandwidth drop or power failure,the stream from secondary encoder will continue without interrupting the viewingexperience on Livestream.
ImportantImportant: Backup Stream is not available when using Bonding as your
delivery method.
654

Enabling Closed Captioning IngestionEnabling Closed Captioning Ingestion
Livestream Studio can ingest FCC compliant closed captioning data with their
input sources and stream it out to Livestream.
Livestream Studio supports CEA 608 and CEA 708 closed captioning signals. Mostclosed captioning encoders support these type of signals, as they are FCC compliant.
Important:Important: The captions must be embedded into an SDISDI input in order to be
recognized.
To enable closed captions forwarding to Livestream, go to settings and enter theStrStreamingeaming menu. At the bottom you will see ClosedClosed CaptionsCaptions. Check ClosedClosed CaptionsCaptionsEnabledEnabled to allow for closed captioning data to be received.
Next, select whether the closed captions are available only with the source they arecoming from (FollowFollow onon switchingswitching), if the captions should show regardless of what
655

source is in Program (FFrromom singlesingle cameracamera) or only when the source is in AUX program(FFrromom AAUUXX).
Save your settings, then return to the InputInput SettingsSettings tab. Select the camera source(s)that has the closed captioning data embedded, then click on ClosedClosed CaptionsCaptions.
656

Check EnabledEnabled, and then select which channel your closed captions are comingthrough. This will require that the selected input source be a 10-bit input signal, ratherthan 8-bit.
When you go live, your captions will be available as an option in the Livestream playeras well as your Livestream VOD. Please note you will not see any captions inLivestream Studio or when you download the video file from your event page.
657

658

Import & Export RImport & Export Rececororded Files Usingded Files UsingAdobe PrAdobe Premieremiere Pre Proo
First, make sure you have Blackmagic Design Desktop Video installed on your system.Go to https://www.blackmagicdesign.com/support, select 'Capture and Playback,' anddownload Desktop Video.
• Open Adobe Premiere Pro and choose a new project• Select the capture format• Select the sequence settings
Important: These should maImportant: These should match the video ftch the video formaormat settings ot settings of the Livestrf the Livestream Studioeam StudioPrProjectoject
Import the video clip.
• Go to: File > Import• Select the video file and select open.
The imported file should appear in the clip bin.
• Drag the clip into the timeline.
The user will be prompted to change or keep sequence settings. Choose “Keepsequence settings.”
Exporting video clipsExporting video clips:
• Go to File > Export > Media• Select “Match Sequence Settings”• Enter an output name.• Click “Export”
659

Import & Export RImport & Export Rececororded Files Using Finalded Files Using FinalCut PrCut Pro 7o 7
Follow the steps below in Final Cut Pro 7 to bring a clip into the editing software.
NoteNote: If you are simply looking to export a recording as a compressed .mp4 file, youmay want to consider trying the export feature in Livestream Studio's media bin.
1. Open Final Cut Pro and choose a new project.2. Drag the video clip into the file bin.3. Drag the clip into the timeline.
a. A prompt to “Change the Sequence Settings” will display.b. Choose “Yes”
4. Go to Files > Export > Quicktime Movie5. Choose “Sequence Settings”
Note: Settings must be exactly the same as the settings on the LivestrNote: Settings must be exactly the same as the settings on the Livestream Studio™eam Studio™prproject.oject.
6. Save the clip.
660

TTrroubleshootingoubleshooting
661

TTrroubleshooting Steps: Not Seeing Inputoubleshooting Steps: Not Seeing InputSourSourccee
If you are unable to receive a video signal in your Studio software please make sureyou confirm the following:
Are you using a Blackmagic or Magewell capture device?
Livestream Studio will best work with video signals from certified Blackmagic Designcapture devices. Magewell cards are also supported. If you are using a non-Blackmagicdevice there is a chance your signal will not appear in the software.
Check here for our list of supported devices.
Do you have the recommended version of theBlackmagic Design drivers?
CurrCurrently rently rececommended version: 10ommended version: 10..99.10.10
**If you are running Windows 10 PrWindows 10 Pro version 1709o version 1709, we recommend using DesktopVideo version 1010..99..55..
Drivers found on the Blackmagic Design package discs are often out of date asBlackmagic frequently releases updates. Please be sure you are using the properversion of the Blackmagic drivers, which you can download at blackmagicdesign.com/support.
• Select CapturCapture & Playbacke & Playback and download the above-recommended version ofDesktop Video.
662

Are you getting a video signal in Blackmagic MediaExpress?
Click the Start button and search for Media Express, then click Blackmagic MediaExpress to open the program. Select the LLog and Capturog and Capturee tab to display the videoinput. Click Edit on the menu bar at the top of the program and select PrPrefefererencenceses,then confirm that your Project Video Format matches the format of your video source.
If you receive a video signal in Media Express, you should check Studio's video formatsettings. If you do not receive a video signal in Media Express, confirm you areconnected to the correct input and your camera is configured properly (e.g. SDI orHDMI correctly selected).
663

Does Livestream Studio's video format match your inputsource?
Open Studio's Preferences by clicking the gearwheel icon at the top right-hand side ofthe program window. In the PrProjectoject FormaFormatt tab at the left-hand side of the Preferenceswindow, and choose the video format that matches your input source's format. Pleasenote that all your input sources should match Studio's video format setting.
664

Are you connected to the correct input of yourBlackmagic device?
Generally, Blackmagic Design doesn't specifically mark the input/outputs of the deviceon the actual hardware. Please check your capture device's documentation to confirmthe proper input.
Is your camera configured properly?
Many cameras with multiple output formats allow you to define your specific outputmethod. Check your camera's settings to confirm your are properly configured for HD-SDI, HDMI or analog, depending on your input to the Blackmagic Design device.
Does your camera output to an external display?
Connect the camera's output to an external display such as a monitor to verify thevideo signal. If you do not receive a signal, try a new wire of the same type or double-check your camera's settings.
If all of the above fail please contact Livestream Support by going to Livestream Studiosettings and navigating to the SupportSupport tab. You will find contact information and yourSupport PIN there.
665

IncIncorrorrect Orect Order oder of Inputsf Inputs
Some producers using some Livestream Studio hardware products onlyonly (HD51/
HD510/HD550) have noticed their inputs not appearing in the multiview in the
proper order. Livestream Studio includes an input calibrator for these specific units
that can resolve this issue.
In Livestream Studio, click on the gearwheel to open settings, then click InputsInputs. A linkto the Livestream Inputs Calibrator will be at the bottom of the window.
Customers using the HD31HD31 will need to open the tool manually by going to
their Windows Start menu > Search > type in %localappdata% > select
666

LivestrLivestream Studioeam Studio > select LSDevicLSDeviceOreOrderCalibraderCalibrationtion. This tool is not
compatible with other computers running Livestream Studio software.
A window will pop up prompting that Livestream Studio will close. Click OKOK.
When Livestream Studio closes, a new window will pop up that will prompt you tounplug all of your cameras from all of your Blackmagic Design devices. After you dothis, click StartStart CalibraCalibratingting.
667

Select your preferred input type, either HDMI or SDI. You will only need one camera forthis process, so if you are alternating input types, choose which ever one you are usingmore of. The calibration will still work. Then click NextNext.
If you haven't disconnected all of your cables yet, do so now. Then click DoneDone.
Connect a camera to In 1In 1 on your system. The calibrator will indicate when it hasdetected it and completed calibrating it.
668

The calibrator will automatically prompt you to move to the next input. Unplug yourcamera from In 1In 1 and plug it into In 2In 2. Repeat this for the all five Blackmagic Designcards.
669

670

After you've gone through all inputs, the calibrator will inform you that calibration iscomplete. Click Save and Livestream Studio will reopen with your inputs in the properorder.
Please note that calibration is project-based. If you create a new project, you may needto calibrate your input sources again.
671
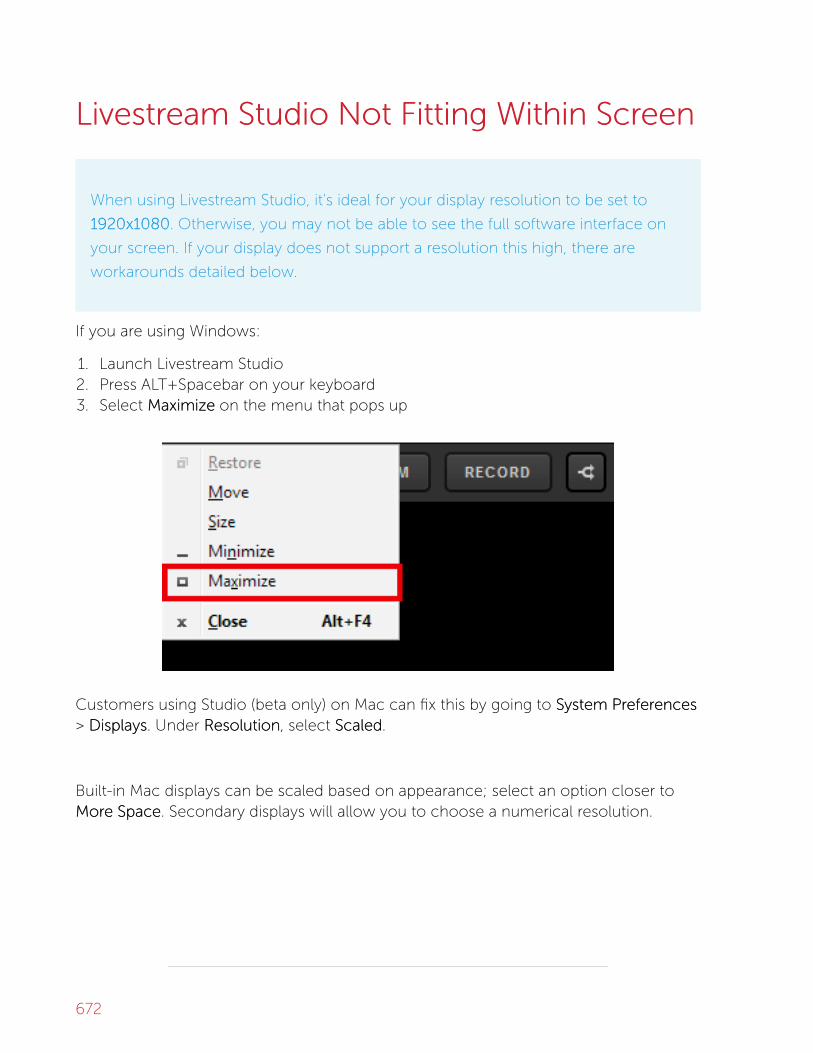
LivestrLivestream Studio Not Fitting Within Scream Studio Not Fitting Within Screeneen
When using Livestream Studio, it's ideal for your display resolution to be set to
1920x10801920x1080. Otherwise, you may not be able to see the full software interface on
your screen. If your display does not support a resolution this high, there are
workarounds detailed below.
If you are using Windows:
1. Launch Livestream Studio2. Press ALT+Spacebar on your keyboard3. Select MaximizMaximizee on the menu that pops up
Customers using Studio (beta only) on Mac can fix this by going to SSystem Prystem Prefefererencenceses> DisplaysDisplays. Under RResolutionesolution, select ScaledScaled.
Built-in Mac displays can be scaled based on appearance; select an option closer toMorMore Space Spacee. Secondary displays will allow you to choose a numerical resolution.
672

Alternatively, you could also click the green fullscreen button in the upper left corner ofthe Studio window.
Livestream Studio should now fill out your display without any parts of the interfacebeing cut off.
673

Can't AcCan't Acccess Studio Fess Studio Frrom Lom Login Windowogin Window
Some customers who access Livestream Studio via a subscription (rather than a USBdongle or hardware unit) have encountered a constant spinning wheel and cannot getpast the first login window to access the software interface.
If you experience this, there are a few steps to take that can resolve this:
• Check thaCheck that Windows is fully up to dat Windows is fully up to datete. Some customers have resolved this issue bysimply running Windows updates.
• Clear your Internet ExplorClear your Internet Explorer SSL staer SSL statete. We have specifically seen clearing browsercache in Internet Explorer help resolve this issue.1. To access the Delete Browsing History dialog:
• If you are using Internet Explorer 8, on the TToolsools menu, click InternetInternetOptionsOptions.
• If you are using Internet Explorer 9 or 10, click the gearwheelgearwheel iciconon, and thenclick Internet OptionsInternet Options.
2. Click the ContentContent tab.3. Click Clear SSL staClear SSL statete, and then click OKOK.
674

• Clearing your cache in Internet Explorer as instructed on this webpage has helpedwith this issue in the past as well.
We have only encountered this behavior on Windows machines. If you
experience this issue while testing Studio for Mac beta, please contact us to
investigate.
675

My Studio PIN Is Invalid. WhaMy Studio PIN Is Invalid. What Do I Do?t Do I Do?
Your Studio PIN allows you to speak with our Customer Care team via phone sevendays a week, 9:30 AM-8:30 PM EST. Studio PINs are valid for one (1) year from the dateof purchase of the Studio software or hardware unit.
If you believe thaIf you believe that your Studio support PIN has expirt your Studio support PIN has expired less than a year aed less than a year after purfter purchasechase,contact us with your product's serial number and attach a receipt or invoice from yourpurchase for our team to investigate.
If you have owned Studio for more than a year and you would like to renew yourStudio PIN, please contact us with your product's serial number. PIN renewals areavailable for $499 per year.
Please note that renewing your Studio PIN does notdoes not extend Studio's one (1) yearwarranty. Learn more about Studio's warranty here.
676

Studio RStudio Rececorording Does Not Play Backding Does Not Play Back
If you used Livestream Studio to record and the AVI file does not play back in other
software, Studio may be able to recover the file via the built-in transcoder in the
Media bin.
To repair your AVI file, navigate to either Media tab in Livestream Studio and importyour AVI file. If the file transcodes and plays back in the Media bin, then Studio was ableto recover it. After doing so, export the file to your hard drive.
We have seen this method work in cases where Studio crashed during the recordingand the AVI file left over was corrupt and unplayable.
677

RRemote Cameras and Diremote Cameras and Direct Inputs out oect Inputs out offSSyncync
It's common for hard-wired cameras and remote cameras to not be exactly
synced up. This is due to the nature of their individual workflows; wireless signals
generally travel slower than directly connected signals.
To resolve this, Studio has a simple setting to sync all your camera sources together.
Click the gearwheel in the upper right corner of Studio, then click the AdvancAdvanceded tab.
678

Navigate to the RRemoteemote InputsInputs SSynchrynchronizaonizationtion setting and select Delay All Inputs by 1Delay All Inputs by 1SecSecond and Sond and Synchrynchronizonizee. This will allow your wired inputs to compensate for thelatency experienced by wireless sources (in this case, Mevo) and sync them together.
679

If you are only using remote camera sources, then select Delay RDelay Remote Camera Inputsemote Camera Inputsby 1 Secby 1 Second and Sond and Synchrynchronizonizee.
Be sure to save your settings.
680
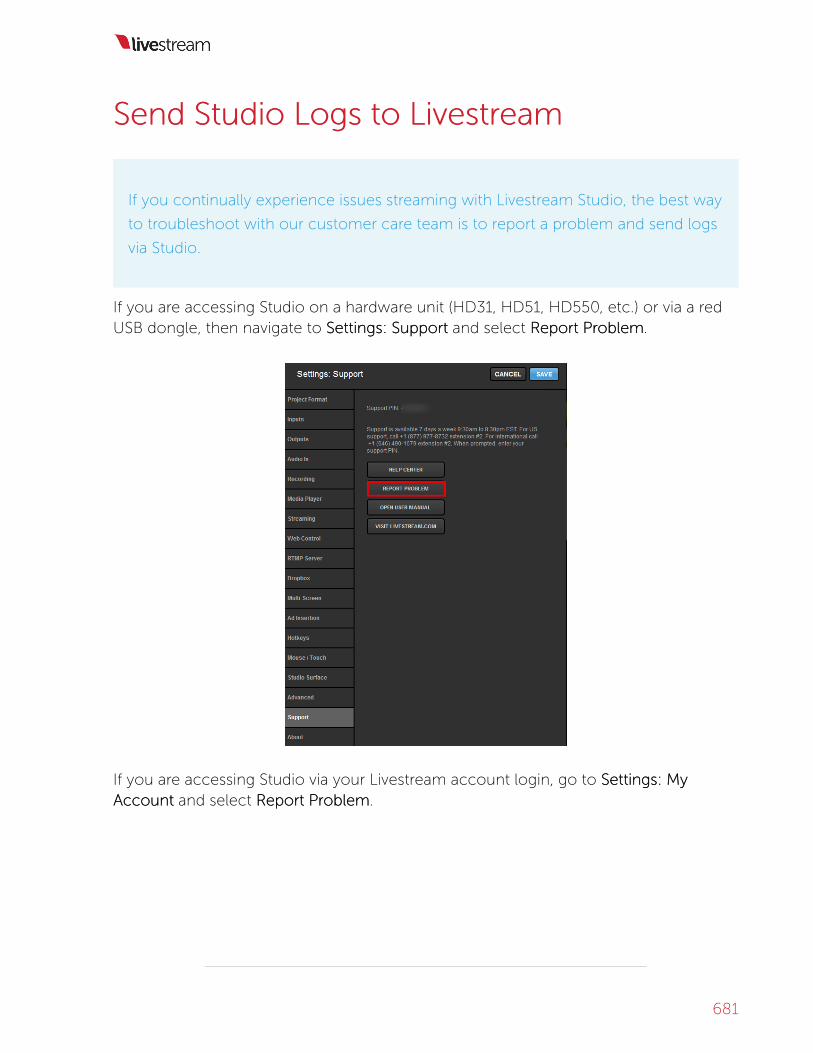
Send Studio LSend Studio Logs to Livestrogs to Livestreameam
If you continually experience issues streaming with Livestream Studio, the best way
to troubleshoot with our customer care team is to report a problem and send logs
via Studio.
If you are accessing Studio on a hardware unit (HD31, HD51, HD550, etc.) or via a redUSB dongle, then navigate to Settings: SupportSettings: Support and select RReport Preport Problemoblem.
If you are accessing Studio via your Livestream account login, go to Settings: MySettings: MyAcAcccountount and select RReport Preport Problemoblem.
681

Fill in the required information and make sure Include logs and debug inInclude logs and debug infformaormationtion ischecked. Then click SendSend. Our team will respond as soon as possible.
682

683

How to Use the Studio USB RHow to Use the Studio USB Rececovery Driveovery Drive
Included with the 4K editions of Livestream Studio hardware units (HD51 4K,
HD550 4K) are USB recovery drives, which you can use whenever there is a
Windows system failure or any situation in which you would like to restore your
system to Windows default settings. The full process takes about 20 minutes.
IMPORTIMPORTANTANT:: Please read and fully understand all of the instructions before
starting the process. If you have any questions or concerns, please contact
customer care.
684

Before beginning this process, make sure you have your Windows License numberavailable to you. It is included in the 'Studio Bits and Bops' box that is shipped with yourStudio hardware unit.
1. Back up any files you wish to prBack up any files you wish to preserveeserve. This process is destructive and will return thesystem to factory settings and result in the loss of all user files.
2. Insert your USB Restore Drive into any of your Studio unit's USB ports.
3. Power the system on using the power button.
4. Once the Livestream logo appears for the first time, tap the “F8” key repeatedly toenter the Boot Menu.
5. In the Boot Menu, select 'KingstonDataTraveler 3.0PMAP,' then hit the Enter key.
685

6. You will be presented with the main menu following a few seconds of load time.Your Studio unit's Livestream restoration option will be selected. Hit the Enter key.
7. At the 'Choose language' screen, press the 'Enter' key to select the default option ofEnglishEnglish.
686

8. At the 'Configuring console-data' screen, press the 'Enter' key to select the defaultoption of Don’t touch kDon’t touch keymapeymap.
9. Wait for the system to complete its image verification. This process will take about10 minutes. ETA andProgress bar will be visible on the screen to indicate the process.
687

10. Once completed, you will be presented with the following screen. Type 'yy,' thenpress the 'Enter' key.
NONOTETE: If you have not backed up any files you wish to keep, press “CTRL+C”
to exit and secure your files. PrProgrogressing past step 10 will ressing past step 10 will result in daesult in data lossta loss.
688

11. Confirm your selection by typing 'y' key again and pressing the “Enter” key (NONOTETE:Data loss will occur immediaimmediatelytely once the 'Enter' key is pressed).
689
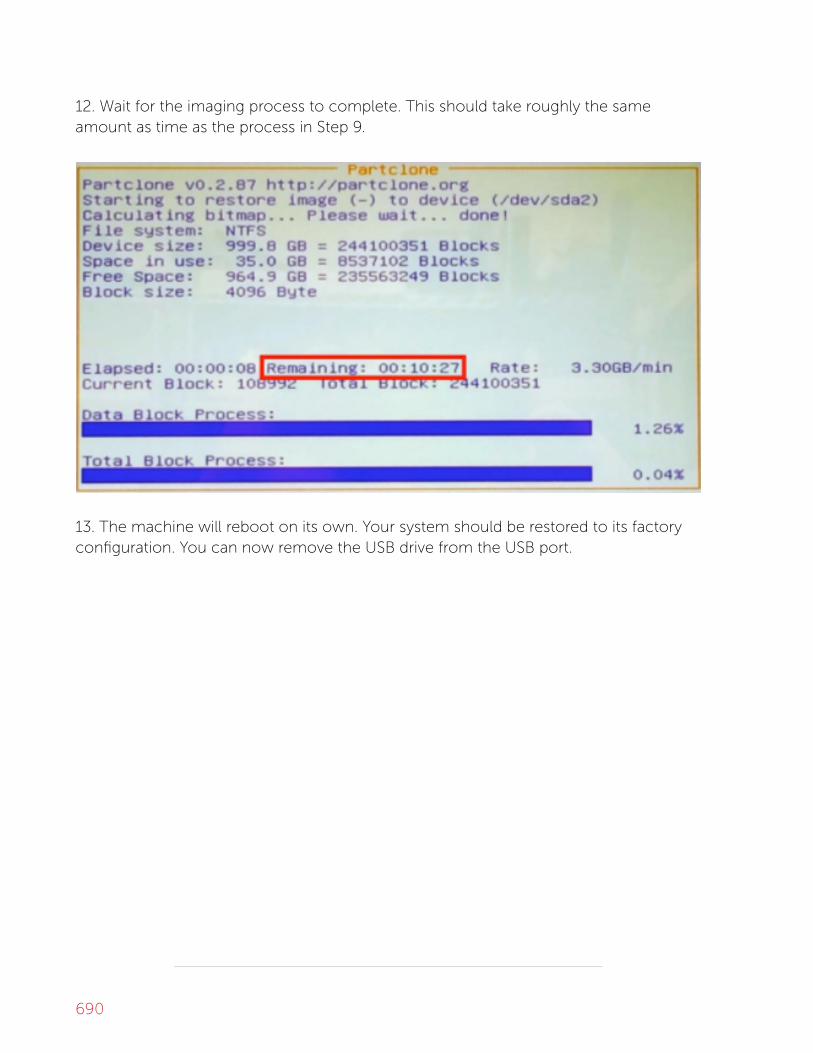
12. Wait for the imaging process to complete. This should take roughly the sameamount as time as the process in Step 9.
13. The machine will reboot on its own. Your system should be restored to its factoryconfiguration. You can now remove the USB drive from the USB port.
690

Studio SoStudio Softwarftware Crashes Fe Crashes Frrom Launchom Launch
If you attempt to launch Livestream Studio and it crashes before the opening
splash screen finishes loading, you may be missing important Windows
components.
Please check the following:
- Ensure that Windows is fully-updated.
- Check that Livestream Studio has been installed under the Administrator account onyour computer.
- Make sure you have installed Visual C++ 2013 Redistributable Package x64 on yourcomputer.
Windows 10 UsersWindows 10 Users
If you experience this behavior, it may be due to having Windows 10 N or Windows 10KN editions installed. These versions do not come with the Windows Media FeaturePack, which is required in order for Livestream Studio to run. You can download thepack from Microsoft's website here.
We have only encountered this behavior on Windows machines. If you
experience this while testing Studio for Mac beta, please contact us to
investigate.
691

Network RNetwork Resouresourcce Unavailable Whene Unavailable WhenInstalling StudioInstalling Studio
There is a known issue when attempting to install Livestream Studio on your
Windows PC after rolling back your Windows version. Below outlines what the
issue looks like and how to resolve it.
We have specifically seen this behavior when customers have rolled back fromWindows 10 version 1709 to Windows 10 version 1703, but it possible with otherWindows rollbacks as well.
After rolling back Windows, if you attempt to install Livestream Studio on your PCagain, you may see a message indicating that a network resource is unavailable.
692

What happened is that Windows damaged some of Studio's data in the registry duringthe rollback.
To fix this, run the installer of the version of Studio you were running priorprior to theWindows rollback; if you are seeing this error, it was likely not the most recent version.You can find downloads to all of our previous installers in the Version History article.
Since technically this version of Studio already exists on your PC, the installation wizardwill prompt you with options to Remove or Repair it; select RRemoveemove. This will fix theregistry damage and thus allow you to install any version of Livestream Studio.
693
WhaWhat is Livestrt is Livestream Studio's Weam Studio's Warranty?arranty?
Our full Livestream Studio warranty is available here. We recommend you review theterms in full.
Some major points include:
• Livestream Studio hardware products have a one (1) year warranty.• If the Studio dongle is lost or stolen, it is the responsibility of the customer to
purchase a new one.• You have thirty (30) days to return an item from the date of purchase if you
purchased directly from the Livestream Store.• Livestream products purchased through other retailers must be returned in
accordance with their respective returns and refunds policy.
694

Uninstalling LivestrUninstalling Livestream Studioeam Studio
To uninstall Livestream Studio, first make sure that Studio is not running, regardless ofwhich operating system you are using.
Uninstall Studio from Windows
Then go to the Control Panel in Windows and select UninstallUninstall aa PrProgramogram.
Find LivestrLivestreameam StudioStudio, then right-click and click UninstallUninstall.
695

Follow the on-screen prompts to run the uninstaller. This will only remove thesoftware, not the launcher.
You can re-install the software if you double click the launcher on the desktop.
Uninstall from MacOS (beta only)
To uninstall Studio beta from a Mac system, simply find Livestream Studio in yourApplications folder and click and drag it to the Trash. Alternatively, right-click LivestreamStudio in your Applications folder and select Move to TMove to Trashrash.
696

Once Livestream Studio is in the Trash, right-click the Trash icon and click Empty TEmpty Trashrash.
Livestream Studio is now uninstalled.
697