STUDIO EXPERT
160
RANOREX STUDIO EXPERT
-
Upload
khangminh22 -
Category
Documents
-
view
2 -
download
0
Transcript of STUDIO EXPERT

RANOREX STUDIO EXPERT

TABLE OF CONTENTS
RANOREX STUDIO EXPERT ..................................................................................................... 4
IDENTIFY DYNAMIC UI ELEMENTS ......................................................................................................... 5
Attribute weights .................................................................................................................... 8
Weight rules and dynamic IDs .............................................................................................. 11
Share weight rules ................................................................................................................. 20
REGULAR EXPRESSIONS IN RANOREX STUDIO ....................................................................................... 26
Basic regex syntax ................................................................................................................. 28
Regex applied in Ranorex Studio ........................................................................................... 31
USER CODE LIBRARY ........................................................................................................................ 36
Create a collection and methods .......................................................................................... 36
Access methods in the user code library ............................................................................... 41
CODE MODULES ............................................................................................................................ 44
Access the repository and repository items .......................................................................... 47
Module variables and data-driven testing ............................................................................ 54
Access screenshots ................................................................................................................ 63
RANOREX STUDIO IDE .................................................................................................................... 65
Create .................................................................................................................................... 65
Build ...................................................................................................................................... 66
Run ........................................................................................................................................ 70
Adding new items.................................................................................................................. 71
Solution explorer ................................................................................................................... 73
Debugging ............................................................................................................................. 75
Code completion ................................................................................................................... 79
Code conversion .................................................................................................................... 79
Code navigation .................................................................................................................... 80
Code generation .................................................................................................................... 80
Refactoring ............................................................................................................................ 80
RANOREX AUTOMATION HELPERS ..................................................................................................... 81
Installation and updating ...................................................................................................... 82
CollectRetryErrorMessages ................................................................................................... 84
ReportToPDF ......................................................................................................................... 84
EmailModule ......................................................................................................................... 88
PopupWatcherLibrary ........................................................................................................... 91
SystemLibrary ........................................................................................................................ 94
StringLibrary .......................................................................................................................... 95
ValidationLibrary ................................................................................................................... 95
FileLibrary .............................................................................................................................. 96
EmailLibrary ........................................................................................................................ 103
DragNDropLibrary ............................................................................................................... 104

WebLibrary .......................................................................................................................... 106
RUNTIME AND REMOTE EXECUTION .................................................................................................. 109
Create an executable build ................................................................................................. 110
Click RUN to start a test run. ............................................................................................... 110
Command line execution ..................................................................................................... 117
Manual remote execution ................................................................................................... 136
Ranorex Agents ................................................................................................................... 138
Agent-based remote execution ........................................................................................... 144
Troubleshooting and FAQ ................................................................................................... 154

Ranorex Studio expert
This section is intended for users with programming expertise and who face advanced,
complex test challenges. It describes the Ranorex Studio programming interface in detail, as
well as other advanced topics such as dynamic UI element mapping, the user code library,
and code modules.
Mapping dynamic UI elements
Regular Expressions
User Code Library
Code Modules
Ranorex Automation Helpers
Ranorex Studio IDE
Runtime and Remote Execution

Identify dynamic UI elements
Many applications contain so-called dynamic UI elements. These changes whenever a
particular event happens, e.g. when you reload a web page. It’s often harder for automated testing tools to identify these UI elements reliably. This is because identifiers that are robust
for static UI elements (like the element ID) change all the time for dynamic UI elements. This is why you need to fall back on other identifiers for dynamic UI elements.
For web elements, Ranorex Studio uses an intelligent algorithm that recognizes when a UI
element is dynamic. It ignores dynamic IDs and uses robust, static attributes instead. This means you should normally not need to find and replace dynamic IDs in your web repository
items.
However, for desktop applications and mobile apps, you will need to deal with dynamic IDs manually. You can either replace them by hand in the RanoreXPaths of your repository items,
or you can use RanoreXPath weight rules to optimize object recognition. We recommend the latter.
In this chapter, you’ll find out how attribute weights work and how you can change them with weight rules so that Ranorex Studio can reliably identify dynamic UI elements.
On this page, we summarize some of the key concepts necessary to understand the content on the other pages of this chapter.
The object recognition process
When tracking and identifying UI elements, Ranorex Studio categorizes them according to
their purpose and to define their states. When a UI element is dynamic, this is reflected in this categorization, i.e. one of its attributes has a dynamic value.
The following image illustrates the categorization process.

Assignment of technology-independent role
Assignment of role-specific characteristics…
…and attributes derived from these characteristics
Assignment of one or more technology-specific capabilities…
…and attributes derived from these capabilities
Reference
This is explained in detail in Ranorex Studio advanced > UI elements > ⇢ Roles,
capabilities, and more
UI element identification with RanoreXPath
Ranorex Studio uses RanoreXPath expressions to identify UI elements. These expressions are
based on a set of hierarchical nodes and predicates. They reflect the categories assigned in
the object recognition process. Therefore, a RanoreXPath expression may contain a dynamic attribute value to identify a UI element.

The following image shows the structure of the RanoreXPath expression for the Exit button in
the Ranorex Studio Demo Application. The expression uses a stable attribute value to identify the button.
Basic structure: The RanoreXPath for an isolated UI element consists of three
elements: an axis specifier, a node, and zero or more predicate(s)
For the isolated Exit button, the axis specifier is /, the node is the role button, and
the predicate consists of an attribute-value pair that uniquely identifies the button
Reference
This is explained in detail in Ranorex Studio advanced > RanoreXPath > ⇢ RanoreXPath
basics
Which attributes does the RanoreXPath use?
Ranorex Studio first categorizes UI elements and then generates a RanoreXPath expression for them based on these categories. However, while a UI element usually only has one role it
can be assigned, there are many different attributes that derive from the element’s various
categories and capabilities. Which of these attributes Ranorex Studio uses in the RanoreXPath expression to identify a UI element is not random. It is determined by so-called attribute weights.
Let’s take a look at the Exit button in the Demo App again.

Ranorex Studio assigns the technology-independent role button to the UI element
Ranorex Studio recognizes that the UI element is a WinForms element and assigns the technology-specific capability WinForms to it
The capability WinForms contains four Control attributes, from which Ranorex
Studio chooses ControlName to use in the RanoreXPath expression to identify the UI
element
As mentioned above, Ranorex Studio doesn’t make this choice randomly. It uses the
ControlName attribute because this attribute has the highest weight from all of the available ones.
Attribute weights are important because they allow you to tell Ranorex Studio to use a stable
attribute to identify a UI element. This is the solution to identifying dynamic UI elements reliably. The following pages of this chapter explain how to do this in detail.
Attribute weights
Attribute weights are integer values assigned to UI element attributes. They control which attributes Ranorex Studio uses in RanoreXPath expressions to identify UI elements.
On this page, we explain attribute weights and how you can access their configuration dialog.
What are attribute weights?
To reliably identify UI elements, Ranorex Studio can choose from more than 600 attributes that are derived from two categories: role-specific characteristics and technology-specific capabilities.

Aside from an attribute name (e.g. ControlName) and an element-specific attribute value (e.g.
‘RxButtonExit’), each attribute also has a weight value. This weight value is an integer between 0 and 200.
When generating a RanoreXPath for a UI element, Ranorex Studio uses the attribute with the highest weight to identify the UI element. Attributes with weights below 100 (i.e. starting from
99) are ignored for RanoreXPath generation. (They may instead be used for automatic name generation for repository items).
Therefore, from the attributes in the image above, Ranorex Studio would use ControlName
to identify the Exit button in the Ranorex Studio Demo Application because it has the highest attribute weight at 150.
Ranorex Studio contains default attribute weights for all attributes. These are based on
testing and experience and work well in most cases. However, in some cases, you may need to fine-tune them. Reliably identifying UI elements with dynamic attributes is one such case.
Below, we explain where you can find the dialog to edit attribute weights. On the next page of
this chapter, we then use an example to explain how to apply new attribute weights in practice.
Configuration dialog for attribute weights
To open the dialog for configuring attribute weights, do one of the following:
In Ranorex Studio or Ranorex Spy, click Settings > Advanced > Edit attribute
weights….
In Ranorex Spy under Browser & Results, select an element in the element tree and
under Overview, click Edit path weights…

The configuration dialog opens:
Overview of all currently existing attribute weight rules and buttons to add, delete,
and disable them.
Note
Attribute weights are organized according to weight rules. Weight rules are
where you can change the weights of individual attributes. You can also apply
rule conditions to control which UI elements a weight rule (and therefore, the weight adjustment) affects. We explain this on the next page.

Button to restore the default attribute weight values
Fields to name the rule and to control which attribute’s weight you want to change
and whether conditions should apply
Link to display the attribute weight values for this rule (see image below)
Fields to create and edit rule conditions
Overview of all attributes and their weights for a rule.
Weight rules and dynamic IDs
On the previous pages of this chapter, we explained how attribute weights influence the generation of RanoreXPath expressions and showed you where in Ranorex Studio you can
change attribute weights. On this page, we’ll now use this information to solve a more complex issue in test automation: robustly identifying dynamic UI elements.
For this purpose, we will adjust attribute weights in a weight rule and then apply this rule
using a rule condition. The Ranorex Studio Demo Application will serve as the AUT for this example.
Start Ranorex Studio Demo App and Spy
If you don’t already have the Demo App on your computer, you can download it and unpack it to a folder of your choice.

Start the Demo App and click the tab Dynamic IDs.
Click Show image with dynamic ID.
Note
The image displayed receives a new random ID each time you click the checkmark to display it, i.e. a dynamic ID. You can see the current ID to the right
of the image.
Issues when using dynamic IDs for identification
Let’s look at what issues come up when using a dynamic ID to identify a UI element. To
illustrate this, we track the image two times:
If the image isn’t already visible, click Show image with dynamic ID.
In Ranorex Spy, click Track and track the image in the Demo App. Note the
generated RanoreXPath expression.
In the Demo App, hide the image again.
Show the image once more.

Track the image again and note the generated RanoreXPath expression.
Hiding and displaying the image generates a new ID for it each time. When tracking the same
image before and after redisplaying it, two different RanoreXPath expressions are therefore generated. They use different values for the attribute ControlName.
RanoreXPath expression when displaying the image the first time.
RanoreXPath expression when displaying the image the second time.
Note
Dynamic IDs/values aren’t always immediately recognizable, but often, they
consist of a fixed prefix or suffix (e.g. img_) and an alphanumeric string that
doesn’t follow any particular pattern.

Prefix img_
Randomly and dynamically generated alphanumerical string
Aside from being harder to read, RanoreXPath expressions containing such dynamic IDs also
prevent robust identification and therefore automated testing of the referenced UI elements.
To solve this issue without having to manually edit RanoreXPath expressions for dynamic UI
elements every time, we need to change attribute weights and implement them with a weight rule.
Create a new weight rule
To get a robust RanoreXPath expression without a dynamic ID in it, we need to create a new weight rule with adjusted attribute weights. This way, Ranorex Studio will avoid the dynamic attribute and use a different, more robust one to identify the UI element.
In our case, the automatically chosen attribute ControlName belongs to the Control group of
the technology-specific capability WinForms.

ControlName’s value is the dynamic ID. The attribute also has the highest weight at
150. Therefore, Ranorex Studio uses it in generating the RanoreXPath expression.
The attribute ControlTypeName has the stable value PictureBox and could
therefore be used instead of ControlName. However, its weight is lower, so that’s
where we need to make an adjustment.
We will now use a weight rule to tell Ranorex Studio to use the attribute ControlTypeName
instead of ControlName when generating the RanoreXPath expression. To define this new rule, open the configuration dialog for attribute weights (see ⇢ Attribute weights) and:
In the configuration dialog, click Add.
Enter a name.
Select the capability that contains the attribute whose weight you want to change.
In our case, this is Control.
Select the attribute whose weight you want to change. In our case, this is ControlName.
Set the new weight value. We reduce ControlName’s weight to 99. This will cause
Ranorex Studio to ignore it for RanoreXPath generation and use whichever other
attribute has the highest weight. In our case, this will be ControlTypeName.
Click OK or Apply.
Hint
Instead of reducing one attribute’s weight, you can also increase another’s,
e.g. you could ControlTypeName’s weight to above 150 in our case. This is a
matter of preference.

Test the new weight rule
Let’s now check whether the weight rule works as intended. To test the new weight rule:
Start the Demo App.
Click the tab Dynamic IDs.
Click Show image with dynamic ID.
In Ranorex Spy, click Track and track the image.
The generated RanoreXPath shows that Ranorex Studio used the attribute
ControlTypeName instead of ControlName.
The overview shows that the dynamic ID is still the value for the attribute
ControlName. However, this attribute now has a weight of 99 and is therefore ignored by Ranorex Studio for RanoreXPath generation.

The RanoreXPath expression is now robust against changes in the dynamic ID. However, our
weight rule applies to all WinForm UI elements, so the attribute ControlName won’t be used
in any of them for identification. This could be a disadvantage when trying to identify a UI
element where ControlName would be a robust attribute. To solve this, we need to apply a weight rule condition.
Create a rule condition
To prevent our rule from being applied to all WinForms UI elements, we need to define a rule condition that restricts the rule’s use to the cases where we want it applied.
Note
To create a sensible rule condition, you need to recognize a pattern in the
dynamic ID. In our example, the pattern is that the dynamic ID always consists
of the prefix img_ and then an alphanumeric string.
To create a rule condition:
Open the configuration dialog for attribute weights.
Select the rule we created above.
Click Add condition.

This is where you set the source the condition refers to, i.e. the UI element that must
have the defined attribute and the defined regex in its RanoreXPath expression. The options correspond to nodes in the UI element tree displayed in Ranorex Spy
• self: Ranorex Studio checks the UI element it is identifying (i.e. generating the
RanoreXPath for) itself, i.e. the image of the cat in our case. Usually the best
choice. • parent: Ranorex Studio checks the UI element that is the parent of the UI
element it is identifying (i.e. generating the RanoreXPath for), i.e. the container
containing the image in our case. • toplevel: Ranorex Studio checks the UI element that is the top-level ancestor of
the UI element it is identifying (i.e. generating the RanoreXPath for), i.e. the application ( = Demo App) containing the image, in our case.
The attribute that must be present in the UI element’s generated RanoreXPath and
contain the defined regex. In other words, the attribute with the dynamic value. All
attributes of the capability selected in the rule definition above are available. In our case, ControlName is the correct attribute to choose, since this is the one with the
dynamic ID.
The ⇢ regex that the attribute’s value will be checked against. If it matches, the
condition is fulfilled. In our case, we only want the weight rule to apply if the RanoreXPath expression generated for a UI element contains the attribute
ControlName with a value that consists only of the prefix img_ and an
alphanumerical string.
Test the rule condition
Now let’s test whether the rule condition works as intended. To do so, we’ll first track a UI
element with a dynamic ID, i.e. the image in the Demo App. This will show whether the weight
rule is applied correctly so that the generated RanoreXPath does not use the attribute ControlName.
Then we’ll track a UI element that doesn’t have a dynamic ID. This will show whether the weight rule is NOT applied so that the generated RanoreXPath does use the attribute ControlName.
Track the dynamic UI element
Start the Demo App.
Click the tab Dynamic IDs.
Click Show image with dynamic ID.
In Ranorex Spy, click Track and track the image.

The generated RanoreXPath shows that Ranorex Studio used the attribute
ControlTypeName instead of ControlName.
Overview of all the attributes for this UI element.
The weight rule works and is applied correctly.
Track the non-dynamic UI element
Start the Demo App.
Click the tab Image-based automation.
Click Show image.
In Ranorex Spy, click Track and track the image.

The generated RanoreXPath shows that Ranorex Studio used the attribute
ControlName with the value TheCat.
Overview of all the attributes for this UI element.
As intended, the weight rule is not applied.
Share weight rules
If you’re working with a team, it can be very useful to share your weight rules, so that your colleagues can also avoid dynamic IDs and generate robust RanoreXPath expressions.
This page explains how it works and also contains the default weight rules in XML format.
Copy and paste weight rules
Ranorex Studio stores weight rules as XML files. Sharing weight rules works by copying and pasting the content of a weight rule in the configuration dialog for attribute weights.
In the configuration dialog for attribute weights, select the weight rule you want to share.
Right-click the weight rule and click Copy.
Paste the content into a text editor of your choice, save the file, and transfer it to
the target machine.

On the target machine, copy the content of the file, and in the configuration dialog
for attribute weights, paste it into the list of rules.
Default weight rules
RxWinForms ControlNet11 Classnames
XML
<rule
name="RxWinForms ControlNet11 Classnames"
enabled="True"
capability="nativewindow"
attribute="class"
setweight="0"
conditionsoperator="and">
<condition
source="self"
attribute="class"
match="^WindowsForms10.Window"
negate="False"></condition>
</rule>
RxWeb YUI (Yahoo User Interface Library)
XML
<rule
name="RxWeb YUI (Yahoo User Interface Library)"
enabled="True"
capability="webelement"
attribute="id"
setweight="0"
conditionsoperator="or">
<condition
source="self"

attribute="id"
match="^yui(_d+)"
negate="False"></condition>
<condition
source="self"
attribute="id"
match="^yui-gen.*"
negate="False"></condition>
</rule>
RxWeb JS Frameworks (ExtJS, Sencha, Ozone Widget ,…)
XML
<rule
name="RxWeb JS Frameworks (ExtJS, Sencha, Ozone Widget ,...)"
enabled="True"
capability="webelement"
attribute="id"
setweight="0"
conditionsoperator="or">
<condition
source="self"
attribute="id"
match="^ext-.*d+.*"
negate="False"></condition>
<condition
source="self"
attribute="id"
match="^[a-z]+-d{4}(-[a-z]*(-d*)?)?"
negate="False"></condition>

</rule>
RxWeb jQuery
XML
<rule
name="RxWeb jQuery"
enabled="True"
capability="webelement"
attribute="id"
setweight="0"
conditionsoperator="or">
<condition
source="self"
attribute="id"
match="^ui-id-d+"
negate="False"></condition>
</rule>
RxWeb ASP.net
XML
<rule
name="RxWeb ASP.net"
enabled="False"
capability="webelement"
attribute="id"
setweight="0"
conditionsoperator="or">
<condition
source="self"

attribute="id"
match="^ctl00($|_)(.*($|_))"
negate="False"></condition>
</rule>
RxWeb GWT
XML
<rule
name="RxWeb GWT"
enabled="True"
capability="webelement"
attribute="id"
setweight="0"
conditionsoperator="or">
<condition
source="self"
attribute="id"
match="^gwt-uid-d+.*"
negate="False"></condition>
<condition
source="self"
attribute="id"
match="^isc_.+"
negate="False"></condition>
</rule>
RxWeb MS Dynamics CRM
XML
<rule
name="RxWeb MS Dynamics CRM"
enabled="True"

capability="webelement"
attribute="id"
setweight="0"
conditionsoperator="or">
<condition
source="self"
attribute="id"
match="[a-zA-Z_]+_{([0-9 A-F]+(-)?)+}_d+"
negate="False"></condition>
</rule>
RxWin32 Random Control IDs
XML
<rule
name="RxWin32 Random ControlIds"
enabled="False"
capability="nativewindow"
attribute="controlid"
setweight="0"
conditionsoperator="or"></rule>

Regular Expressions in Ranorex Studio
A regular expression, or regex, is a sequence of characters that forms a search pattern. This pattern can find other strings.
Regexes have their origins in theoretical computer science and are based on mathematical
principles. In favor of a more practical approach, we don’t go into the theoretical details of regexes in this chapter. If you would like to learn more about them, there are many resources
on the web that offer detailed explanations. The Wikipedia article for regular expressions is a good place to start.
In this chapter, you will lean why regexes are used, get an overview of their syntax, and see how you can apply them in Ranorex Studio.
On this page, we illustrate how regexes work and discuss regex style, i.e. how to phrase them.
How regexes work
As mentioned in the introduction paragraph, regexes are basically a search pattern. They act the same way in Ranorex Studio, as a filter mechanism.
In Ranorex Studio, regexes are used in the following areas:
• In RanoreXPath expressions as part of identifying UI elements
• In Validation actions to validate strings • In Get actions to extract strings
• In weight rule conditions to define the string that needs to be present in a RanoreXPath expression for the condition to be fulfilled
Let’s take a validation as an example to illustrate this. In the validation, we want to check the
value of a UI element attribute. The value, i.e. the string to be checked, consists of letters and a number. For the validation, only the number is relevant. Additionally, the number may
change as a result of interacting with the AUT. Therefore, the validation must be able to find any number in the string to be robust. A regex accomplishes this:

In the AUT, the number of database entries is contained in an alphanumerical string.
A filter, i.e. the regex, has to find and return only the number from the
alphanumerical string.
The result of this filtering process is that only the number is passed on to the
validation; the rest of the string is ignored.
Regex style
Before we go on to the syntax and examples on the next two pages, let’s take a moment to talk about style in regexes.
As with most formulas or filters, there are often several different regexes you can use to arrive at the same result. Which regex to choose then depends on two factors.
Specific vs. general phrasing
In most cases, we recommend you phrase regexes so they are more general, i.e. apply to more cases. Use specific phrasing if you have a very specific task you want to solve.
Example:
Dynamic Ids often consist of a prefix or suffix and a random string. A regex to catch such
dynamic IDs should be as general as possible, so it won’t just identify a particular pattern, e.g. only dynamic IDs with a prefix, but not with a suffix.

Detailed vs. minimalistic phrasing
Since regexes are based on mathematical principles, it’s possible to phrase them very
minimalistically, i.e. with very few characters. This may be economical, but it often makes them harder to read for other people. Keep this in mind when working in a team.
Basic regex syntax
On this page, we list the basic regex metacharacters and illustrate the basic syntax of regexes by way of example strings.
Ranorex Studio uses the .NET regex engine. It is quite powerful and complex, and explaining
all of it would be beyond the scope of this user guide. If you would like in-depth information on it, please refer to Microsoft’s official .NET guide article.
Metacharacters
There is a set of characters that are used in regexes as operators. These characters are called metacharacters.
If you don’t want the regex engine to interpret them as metacharacter, e.g. because you want
to find one in a string, you need to “escape” them. This means preceding the metacharacter
with a backslash \, i.e. \$.
. The period is a placeholder for any single character
^ Matches the start of a string
$ Matches the end of a string
| Functions as an either-or operator
? Matches the preceding element zero or one time
+ Matches the preceding element one or more times
* Matches the preceding element zero or more times
{ } Matches the preceding element the specified number of times
( ) Defines a subexpression
[ ] Defines a bracket expression that may contain a set of characters that other metacharacters can be applied to
Examples
Single-element expressions
[1234567]

• Matches a single character that is contained in the bracket expression, i.e. a number
between 1 and 7 here. • Alternative expression: [1-7]
[Max]
• Matches any single letter contained in the bracket expression, i.e. “M”, “a”, or “x”. • Important: Does not match the word “Max”.
[1-35-8]
• Matches the numbers 1, 2, 3, 5, 6, 7, 8.
• Does not match the number 35.
Multi-element expressions
[1-9][ab]
• Matches any combination of the bracket expressions, i.e. “1a”, “1b”, “2a”, “2b”, …., “9a”, “9b”.
Quantifiers
The quantifier metacharacters ?, +, *, and {} are placed after the characters they should apply
to.
[1-9]?
• Matches a string that contains any of the numbers between 1 and 9 either zero or one time.
• (Colou?r) would therefore match both “Colour” and “Color”.
[1-9]+
• Matches any number that consists of one or more numbers between 1 and 9. • In other words, matches any number greater than 0.
[0-9]{5}
• Matches any five-digit number.
[0-9]{3,}
• Matches any number with at least three digits.

[0-9]{3,5}
• Matches any number with at least three and at most five digits.
Match beginning of string
^Image_
• Matches all strings that start with “Image_”
(^Image_)[0-9]{3}
• Matches all strings that start with “Image_” followed by a three-digit number.
• Examples for matched strings: “Image_001”, “Image_999”, “Image_127”, …
(^Image_)[0-9]{3}(\.jpg)
• Matches all strings that start with “Image_” followed by a three-digit number and
“.jpg”. • Note that the period character . is escaped with a backslash \.
Match end of string
Sample$
• Matches all strings that end in “Sample”.
(Sample[0-9]{3}$)
• Matches all strings that end in “Sample” followed by a three-digit number.
Placeholders
Image.*
• Matches all strings that consist of “Image” followed by any number of other
characters. • . is the placeholder for any character.
• Examples for matched strings: “Image3459834059346237832jkhdsdb”, “Image”, “ImageTheCat”

Match alternatives
((G|g)r(a|e)y)
• Matches the strings “Gray”, “gray”, “Grey”, and “grey”.
Exclude characters
With [^ you can exclude characters.
[^0-9]
• Excludes all numbers. Therefore, matches any string that doesn’t contain any numbers.
RanoreXPath examples
You can also use regexes in RanoreXPath expressions. Here are some examples:  
Example Description
button[@text~’sample[0-
9]’]
Matches the following button elements: “sample0”,
“sample1”, … “sample9”, “My sample26”.
listitem[@text~’^sample’] Matches all elements whose text attribute value starts
with “sample”.
listitem[@text~’sample$’] Matches all elements whose text attribute value ends in
“sample”.
listitem[@text~’gr(a|e)y’] Matches all elements whose text attribute value is either
“gray” or “grey”.
listitem[@text~’^sample\ 123$’]
Matches all elements whose text attribute value is “sample 123” (use a backslash to escape special
characters like space)
Regex applied in Ranorex Studio
On this page, you’ll find two examples that show how to apply regexes in Ranorex Studio. The
first example is a validation, while the second example extracts a value with a Get value action.
Sample solution
The completed sample solution containing the examples on this page is available for
download. You are invited to experiment with it. Alternatively, you can follow the instructions below to build your own test solution.
Instruction
Unzip the project directory to any folder on your computer
Start Ranorex Studio and open the solution file RegEx.rxsln
Download the Ranorex Studio Demo Application
If you don’t already have the Demo App on your computer, you can download it here and
unpack it to a folder of your choice.
Validation example
Regexes are often helpful when validating values that change through interaction with the AUT. In this example, we want to validate a dynamically generated image ID that is displayed next to the image.
The ID changes whenever the image is hidden and shown again.

Solution
A simple text-based validation would fail here because the ID changes dynamically. A regex, by contrast, can easily deal with it.
Let’s take a look at the validation in Ranorex Studio:
The validation operator is AttributeRegex, as we’re validating with a regex
The Match name depends on the repository item linked to the action. In our case,
we validate the Text attribute of the repository item
The regex matches a string that starts with “img_” followed by a 16-digit string
consisting of any letters or numbers – this is what the dynamic ID consists of
Result
The validation succeeds whenever the Text attribute of the linked repository item has a value that the defined regex matches.
Extract information with a Get value action and a regex
The Get value action allows you to extract attribute values. Often, you may only want to extract a certain part of a value, e.g. a number. This can be done with a regex.
Start the Demo App and click the tab Test database.
Enter the data for a person and add it to the database.

Suppose we now want to extract a person’s age from the resulting string in the database and
assign it to a variable.
The database entry is displayed as a string in the Demo App The person’s age is part
of this string.
In Ranorex Studio, this string is represented by the repository item TextLine. The
RanoreXPath expression for this repository item uses the attribute accessiblerole with the value ListItem.
Solution
We need to use a regex to extract the age from the string. Then we can pass it on to a variable, so it can be used in a validation, for example.
Let’s take a look at the completed Get value action in Ranorex Studio.
The entire action in Ranorex Studio
Action type Get value to extract a value
The linked repository item’s attribute that contains the value
The variable that the value will be assigned to

The regex to extract only the age. In this case, it matches any number with at least
one and at most 2 digits, i.e. all numbers from 0-99
Repository item linked to the action
Result
If the Text attribute of the linked repository item contains a number from 0-99, this number is
extracted and assigned to the variable $myAge.
In the report, this would look as follows:

User code library
With user code methods, you can extend the functionality of basic or smart actions and even
create custom new actions. User code methods are explained in ⇢ User code actions, where you’ll also find examples.
The user code library lets you organize these user code methods and makes them accessible to others from a central point. In this way, the user code library is also an interface for collaboration between team members without and with coding skills.
This chapter is split into two parts.
In the ⇢ first part, which is more relevant to team members with coding skills, you’ll find out how to create a user code library and fill it with your user code methods.
In the ⇢ second part, geared more towards team members without coding skills, you’ll find out how to access the user code library to use the user code methods stored in it.
Watch our on-demand webinar
Mastering User Code in Ranorex Studio: Extend your
automated tests with user code actions, user code modules, and
user code libraries.
Create a collection and methods
In this chapter, we’ll show you how to create a user code collection, fill it with methods, and
make it accessible to other users. This way, team members without coding skills can profit
from user code methods.
A user code collection is defined as a collection of user code methods that belong together logically. All user code collections together make up the user code library.
Create a new collection
To create a new collection:
View now
https://www.ranorex.com/help/latest/ranorex-studio-expert/user-code-library/collections-and-methods/
https://www.ranorex.com/help/latest/ranorex-studio-expert/user-code-library/collections-and-methods/
https://www.ranorex.com/help/latest/ranorex-studio-expert/user-code-library/using-user-code-library/

Click File > New > File…
Click User code collection and enter a name.
Click Create.
Alternatively, you can also create a collection in the following ways:
Click the Add user code collection symbol in the Ranorex Studio toolbar, confirm the save location, and enter a name.
Right-click in the projects view and click Add > New item…

Structure of a user code collection
A new user code collection will have the following code structure:
Inclusion of the required program libraries
Definition of the namespace
Class definition of the user code collection. This is where you define the user code
methods.
User code collection file
The user code collection also appears in the projects view as a file. You can add multiple user code collections per solution and organize their files in folders.

Opened user code collection file in Ranorex Studio
The user code collection file in the projects view
Add user code methods
User code collections only become useful once you add user code methods to them. Others can then access these methods in the project the user code collection is part of.
To add a user code method:
In the class definition of the user code collection, right-click where you want to add
the new method.
Click Insert new user code method…
Name the method and click OK.
The code construct for the method is inserted.
Note
The code construct of the method will be inserted wherever you right-clicked. Always make sure the method has been inserted at the correct position, i.e. in
the class definition.

Program a user code method
Ranorex Studio only inserts a code snippet. You then have to add your custom code along with a good description of what the method does.
Here’s an example of a finished user code method:
Instantiation of the repository in the class (optional)

Reference
Addressing repository items in code modules is explained in Ranorex Studio expert >
Code modules > ⇢ Access the repository.
Method description
This short description is displayed when selecting the user code method in the library. It makes it easier for users to find out what the method does. This is why you
should always make sure to add a short, but meaningful description.
Custom code In this example, the first name “John” is entered into a text field that is represented
by the repository item FirstName.
Note
Instead of instantiating a repository in the class of a user code collection, you can also pass a repository to a method as a parameter. Available argument
types are listed in Ranorex Studio fundamentals > Actions > ⇢ User code
actions.
Access methods in the user code library
In this chapter, you’ll find out how to access the user code library and add user code methods
to a recording module.
Add a user code method
To add a user code method to a recording module:
In the recording module view, click Add new action > User code > Select from library.

Creates a new user code method.
List of recently used user code methods for quick access.
The user code library will open. You can now select a user code method from the available
user code collections.
Select your desired user code method in the library.
Click Confirm selection.

Search for user code methods
Sort user code methods by different criteria
User code collections
User code methods, grouped in user code collections
Description of the user code method, as entered by the creator in the code
Click to add the selected method to the recording module

Code Modules
In most cases, you can automate tests with Ranorex Studio and never touch a single line of
code. But if you prefer to write your own code to automate a test, you can do so in Ranorex Studio with code modules.
In the following chapters, you’ll learn how to create code modules and how to tackle typical testing tasks with them, like accessing repository items, working with variables, and data-driven testing.
You can either follow along with the instructions in these chapters and build your code
modules step by step based on the sample solution below, or you can download our
completed sample solution in the chapter ⇢ Module variables and data-driven testing and experiment with the completed code modules.
Watch our on-demand webinar
Mastering User Code in Ranorex Studio: Extend your automated tests with user code actions, user code modules, and
user code libraries.
Download the sample solution
The examples in this chapter are based on the sample solution for the chapter Data-driven testing. Download the sample solution here to follow along with the instructions in the following chapters.
Install the sample solution:
Unzip to any folder on your computer.
Start Ranorex Studio and open the solution file RxDatabase.rxsln
View now

Hint
The sample solution is available for Ranorex versions 8.0 or higher. You must
agree to the automatic solution upgrade for versions 8.2 and higher.
Preparation
To keep everything organized, we’ll put all of our code modules in their own folder, called
Code modules. It’s already there in the sample solution. If you’re using your own solution, simply create a code module as described below.
Create a code module
To create a new code module:
In the test suite view, click the test container where you want to add the code
module.
Click either:
The Add code module symbol in the Ranorex Studio toolbar.
Add > New code module in the test suite menu or the context menu of the
test container.

Select the Code modules folder that comes with the sample solution, or if working in your own solution, select the folder that you created in the preparation step
above. Click OK.
Name the new code module and click Create.
Ranorex Studio creates the code module in the programming language that’s been configured for the solution/the project. The standard language is C#, and the following
explanations are based on C#.
Code modules are organized into several sections:

Integration of the required classes and definition of the namespace
Class definition, including the necessary empty constructor.
The Run() method, where you can implement your code. This is also where default
values for various timeouts are predefined.
Access the repository and repository items
This chapter describes how to access the repository and individual repository items from a code module, in order to link them to actions programmed in code.
Test scenario
Our AUT will be the Ranorex Studio Demo Application, which is contained in the sample
solution linked in ⇢ Introduction. We want to enter personal data (first name, last name) into
a database with a code module.
Let’s first take a look at how this is done with a recording module:

Mouse click into the text field represented by the repository item FirstName and text entry “John”.
Mouse click into the text field represented by the repository item LastName and text
entry “Public”.
We’ll now create a code module with the same functionality.
Create the code module
Create a code module as described in ⇢ Introduction and name it InsertName.cs.
Instantiate the repository
To perform an action on a UI element with a code module, you first need to instantiate the repository where this UI element is represented. The repository is instantiated with its file name, as shown in the projects view.
Instantiate the repository in the Run() method of the code module as follows:

Repository in the projects view
Instantiation of the repository in the Run() method of the code module InsertName.cs
Note
The class name and file name of the repository are always the same.
Alternatively, you can also instantiate the repository with the method Instance:
Use UI elements
With the repository instantiated, you can now use the contained repository items, and therefore the UI elements represented by them, for your test.
In the repository structure, each repository item is its own class with a set of methods. For
example, to enter the first name into the respective text field of the database form, you need to call the following method:

The class hierarchy for calling methods follows the structure of the repository. You can display the available variables and methods using the dynamic help.
Coding the action for entering the last name works in the same way:
Run the code module
Now that we’ve programmed the required actions, we can run the code module and see if it
performs in the same way as the recording module.
To run the code module:
Change to the test suite view.
Drag and drop the code module to the correct spot in the test case.
Deactivate or delete the recording module of the same name.

Click RUN.
Note
Code modules and recording modules are used in exactly the same way in the
test suite. If a recording module and a code module share the same name, you can differentiate them by their symbol and the appended folder name in
parentheses.
Define code-internal variables for repository items
As your code module grows, it can quickly become very complex if you always address
repository items and their methods using their full path. This is especially true if you use the
same repository items multiple times.
In this case, it can make sense to address a repository item using a local or global variable. We’ll show you how to do so with the Add entry button of the database form.

Note
These variables have nothing to do with those that you define for data-driven
testing. These are called module variables in code and are explained in the chapter ⇢ Module variables and data-driven testing.
Create a new code module, name it AddEntry.cs, and enter the following code in
the Run() method:
Instantiation of the repository
Definition of the variable ButtonAdd, which references the repository item
BtnAddEntry
A click action on the referenced button

Note
You can also define variables for repository items by dragging the repository
item from the repository in the recording module view and dropping it in the code module at the desired position.
If the respective repository hasn’t been instantiated yet in this code module, this will be done automatically. Otherwise, the existing instantiation will be
used.
Validate with code modules
You can also create validations in code modules. The class Validate contains everything required for validations. For full documentation of the available methods and variables, please refer to Ranorex Namespace/Validate in the API documentation.
Take a look at the following example, which shows how to implement the validation of the number of database entries from the sample solution in a code module:
Validation action in the recording module
This action compares the text value of the repository item CounterEntries against
the value 1.

Reference
Validations are explained in Ranorex Studio fundamentals > ⇢ Test validation
Implementation in the code module The method Validate.Equals compares the text value of the repository item CounterEntries against the value 1.
By itself, the method Validate.Equals does not create a report entry. This is why we
added a simple if-then-else condition to generate a report entry depending on the
result of the comparison.
Reference
Configuring reporting in user code is explained in Ranorex Studio fundamentals
> Reporting > ⇢ Complex customizations
Reference
More advanced examples for the Validate class are available in Hands-on application
topics > ⇢ Code examples
Module variables and data-driven testing
To perform data-driven testing, you need to define variables. Outside of code modules, you can do so easily through the Ranorex Studio UI. Within code modules, however, you must use module variables. Only module variables can reference external data.

Note
Don’t confuse module variables with local/global code variables, which are
only for referencing code-internal values.
Test scenario
We want the test to pull personal data from an external data source (CSV file) and enter it into
the database of the Ranorex Studio Demo Application. All of this needs to be accomplished with a code module.
External data source, e.g. a CSV file.
Ranorex Studio Demo Application with all of the data entered into the database.

Reference
To learn how to accomplish this with a recording module, please refer to Ranorex
Studio advanced > ⇢ Data-driven testing
The role of module variables
As mentioned above, local or global code variables cannot access external data. This is where
module variables come in. Module variables act as a bridge between an external data source
and the code module.
External data source, added to the test suite by way of a CSV connector.
Module variable in the test suite view, bound to the external data.
Module variable in code.
Create a module variable
Now we’ll create a code module that pulls the first name from an external data source and
enters it in the respective database field. This process is the same for all fields that use ⇢ action variables.

For gender and department, which are radio buttons and list elements, we’ll need to connect
module variables to ⇢ repository variables. This is explained further below.
Create a new code module and name it InsertPerson.cs.
Right-click below the empty constructor and click Insert new module variable…
Name the module variable varFirstName, enter John as the default value, and click
OK.
Ranorex Studio will create a module variable definition with the following content:
Private string constant _varFirstName with the default value of the variable.
Internal reference.
Public module variable varFirstName with Get and Set methods.
The variable also appears in the UI of Ranorex Studio:

Variable in the module browser as part of the code module.
Unbound variable in the test suite view next to the code module.
This shows that the module variable has been defined correctly and is recognized outside of
the code module. It’s ready to be fed with external data.
Connect the module variable to the repository item
We’ve defined the module variable, but it now needs to be connected to the correct repository item. Otherwise, the value it will receive from the external data source will end up
nowhere.
Connect the module variable to the repository item representing the text field for the first name:
At the beginning of the class InsertPerson, add a private, static repository.
Instantiate the repository in the previously empty constructor.

Implement the data transfer from the module variable to the repository item in the
Run() method.
Bind the module variable to the data
Finally, to complete the data chain from the external data source to the repository item, we
need to bind the module variable to the data. This is done through the Ranorex Studio UI and not in code.
Reference
Managing and assigning data sources is explained in Ranorex Studio advanced > Data-
driven testing > ⇢ Manage and assign data sources.
Data binding is explained in Ranorex Studio advanced > Data-driven testing > ⇢ Data binding.
To bind the module variable(s) to the data:

Add a CSV data source using a CSV data connector and name it myData. You can find
the CSV file RxTestDatabase.csv in the sample solution. Alternatively, create your own CSV file.
Assign the CSV data source to the test case that contains the code module.
Under Data binding…, bind the column FirstName to the module variable
varFirstName and repeat for the other columns.
The data chain is now complete. The module variable will pull the data from the external data
source and then pass it to the repository item.
Address variable repository items with module variables
Just like the value of a text entry action, repository items can also be made variable. This is
particularly useful for UI elements like menu entries, list elements, radio buttons etc. The
variables used for these purposes are called repository variables. In our example, this applies
to the gender and department entries, as they are radio buttons and list elements, respectively.
In this section, we’ll show you how to use module variables to address existing repository variables in code. This requires that you first define them in the Ranorex Studio UI, which is explained ⇢ here. First, we’ll take a look at the radio buttons, then list elements.

Test scenario
We want the test to select the radio button based on values (“Male” or “Female”) it pulls from a data source. In a recording module, the solution would look like this:
Gender radio buttons in the database of the Ranorex Studio Demo Application.
Variable repository item that represents the radio buttons. Note the repository
variable $varGender in the RanoreXPath.
Mouse-click action linked to the variable repository item.
Reference
For a more details on how this is accomplished with a recording module, please refer to
Ranorex Studio advanced > Data-driven testing > ⇢ Define variables or take a look at the sample solution for this chapter.
Address radio buttons
In a code module named SelectGender.cs, carry out the following steps:
In the class SelectGender, declare the private, static repository myRepo.

Instantiate the repository in the constructor of the SelectGender class.
Below the constructor, insert the module variable ModVarGender. This module variable will take on the value of the repository variable $varGender. Complete the
code as follows to implement the selection functionality:
Get method that returns the current value of the variable $varGender.
Set method
Sets the value of the variable $varGender to the current value pulled from the data source
through data binding.
Then calls the Select() method to select the radio button defined by the value of the variable.

Download the sample solution
This sample solution contains all the finished examples of this and the previous chapters.
Install the sample solution:
Unzip to any folder on your computer.
Start Ranorex Studio and open the solution file RxDatabase.rxsln
Hint
The sample solution is available for Ranorex versions 8.0 or higher. You must agree to the automatic solution upgrade for versions 8.2 and higher.
Access screenshots
You can also access screenshots of UI elements with code modules. This is useful for image-based automation, where UI items are identified by image comparison.
Note
Don’t confuse module variables with local/global code variables, which are
only for referencing code-internal values.
The following screenshot shows the necessary code to address a screenshot of a repository
item:

Calls the repository according to the repository’s hierarchy, beginning with
DemoApplication in this case.
Calls the Info object of the repository item (this is necessary because only this class works with the following method).
Calls the Get method to retrieve the screenshot.
Hint
The sample solution is available for Ranorex versions 8.0 or higher. You must
agree to the automatic solution upgrade for versions 8.2 and higher.
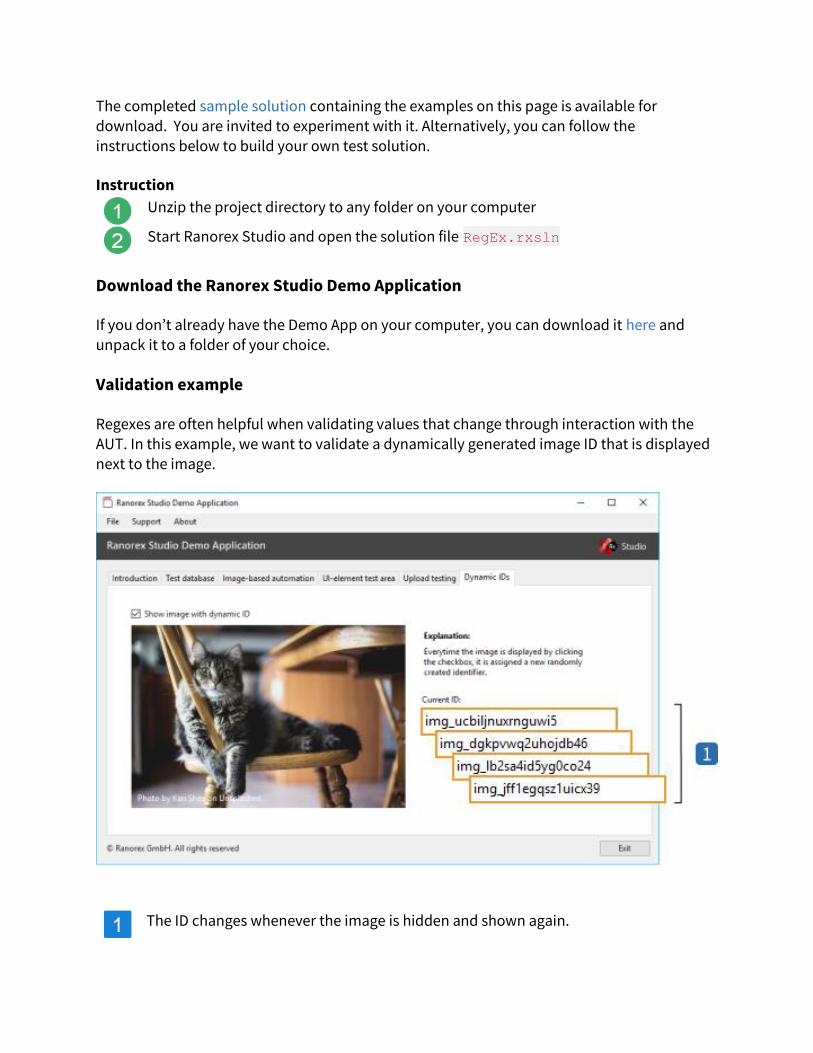
Ranorex Studio IDE
Ranorex Studio is an Integrated Development Environment for .Net framework applications written in C# and VB.Net.
Ranorex Studio is based on SharpDevelop, an open source tool.
Select a chapter from the menu for more details about the respective topic.
Create
Within a Ranorex Solution different kind of projects can be created.
Ranorex test suite A project holding a Ranorex Test Suite which may contain recordings
and code modules. This might be your first choice when starting with Ranorex Studio

Ranorex test suite
module library
A project holding recordings and code modules which can be shared
and reused
Ranorex class
library
A project for creating classes which are used in other applications
Ranorex console application
A project that creates a command line application
Ranorex Windows application
A project that creates an application with a windows interface
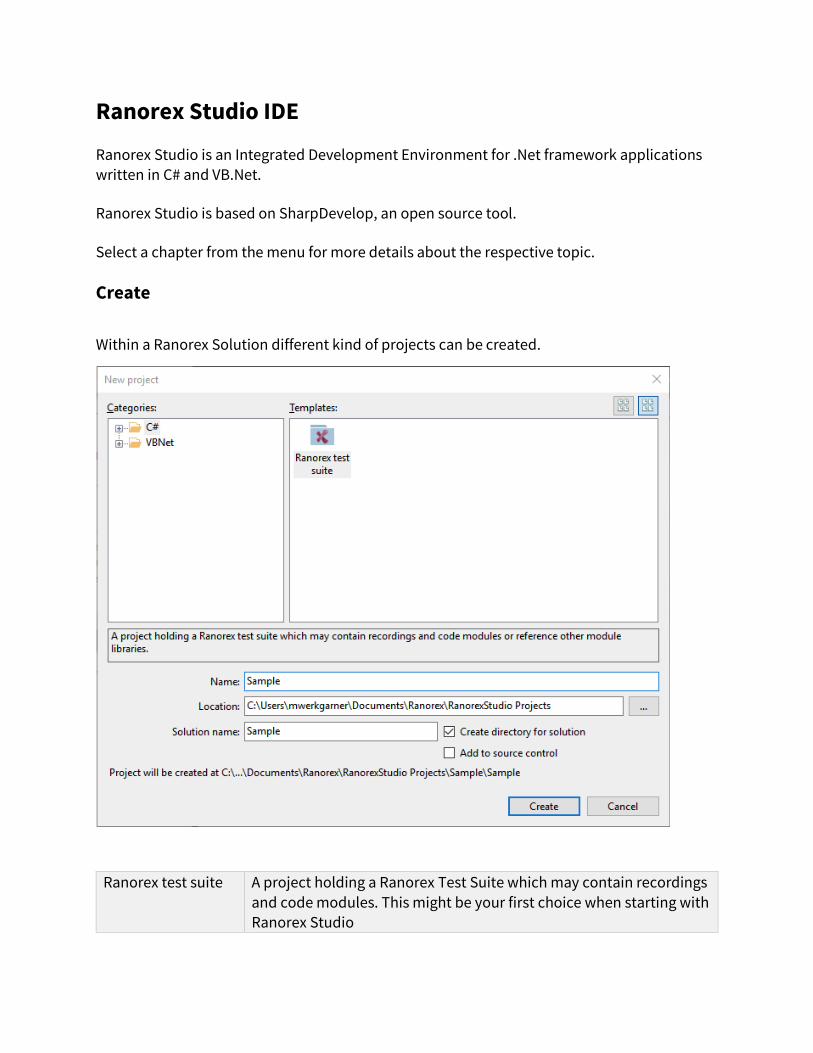
Build
After creating your application, it can be built using the ‘Build’ menu.

Within this menu, either the whole solution, or a specific project in the solution can be built, rebuilt or cleaned.
Build messages will be shown in the ‘Output’ window.
Build Errors and Warnings will be displayed in the ‘Errors’ window.
Project specific settings can be defined in the ‘Project Options’ dialog, which can be accessed from the ‘Project’ menu.

To name some of these settings, you can set the name or the type of the generated assembly in the ‘Application’ tab, for example.
You can also set the target CPU and framework or the output path in the ‘Compiling’ tab.

Run
After building the project successfully, it can be executed from the ‘Debug’ menu either with
or without debugger.

Adding new items
Ranorex Studio provides several different templates which can be added to a project either
via the ‘Project’ menu, or within the ‘Project Explorer’ context menu.
Add new item through ‘Project’ menu

Adding new item through ‘Project Explorer’ context menu
Additional to Ranorex specific files as
• Code Module, • Module Groups,
• Recording Module and • Repository
programming language specific files like
• Class, • Interface,
• Struct and • Form
can also be added just the same as
• empty resource and • text files.

After adding a Form it’s possible to use a forms designer which allows to visually design the UI
as described explicitly in the article ‘Visually Designing Forms‘ posted at SharpDevelop Community Blog.
Solution explorer
Besides adding new items to the project, the ‘Solution Explorer’ allows to perform some other assistant options to edit your solution.
For example, adding folders to organize projects by separating recording modules from user code modules.
Additionally, you are able to delete unused files. This feature is useful specially to delete outdated log files. Alternatively, unused files can be excluded from the project without deleting them from the solution.

It’s also possible to redefine the ‘Start Up Project’ of a solution.

Debugging
Ranorex provides the possibility to debug code directly in the development environment.
To enable the debugger press the ‘Enable Debugging’ button in the toolbar.
To make the Debugger stop at a specific position in your code, you can set breakpoints. Breakpoints can either be set
• by clicking on the left margin at the line you want to set it, or
• by putting the cursor to the line, you want to add a breakpoint, open the ‘Debug’ menu an choose ‘Toggle Breakpoint’.

By setting a breakpoint, a red circle will be added at the margin and the line of code will be
highlighted red. The breakpoint can be removed in the same way as it has been added.
After setting a breakpoint the debugger can be started by executing your application as described in the chapter Run.
The application will start and Ranorex Studio will switch to the ‘Debug Layout’ which causes the following menu items to be available from ‘Debugger’ menu and toolbar:
Continue
debugging
Continues execution
Stop process Forces the process to stop
Step over Executes the statement on the current line but it will not step into
Step into Executes the statement on the current line and stops at the first line of
code inside the method
Step out Finishes executing the current method and returns to its parent
method

To skip several lines of code and continue debugging on a specific line, the context menu
item ‘Set Current Statement’ can be chosen by right-clicking on the line and choosing ‘Set Current Statement’ from the context menu.
In paused mode, the actual state of the individual objects can be diagnosed.
The following windows can be activated in the sub-menu ‘Debug’ which is part of the ‘View’ menu.
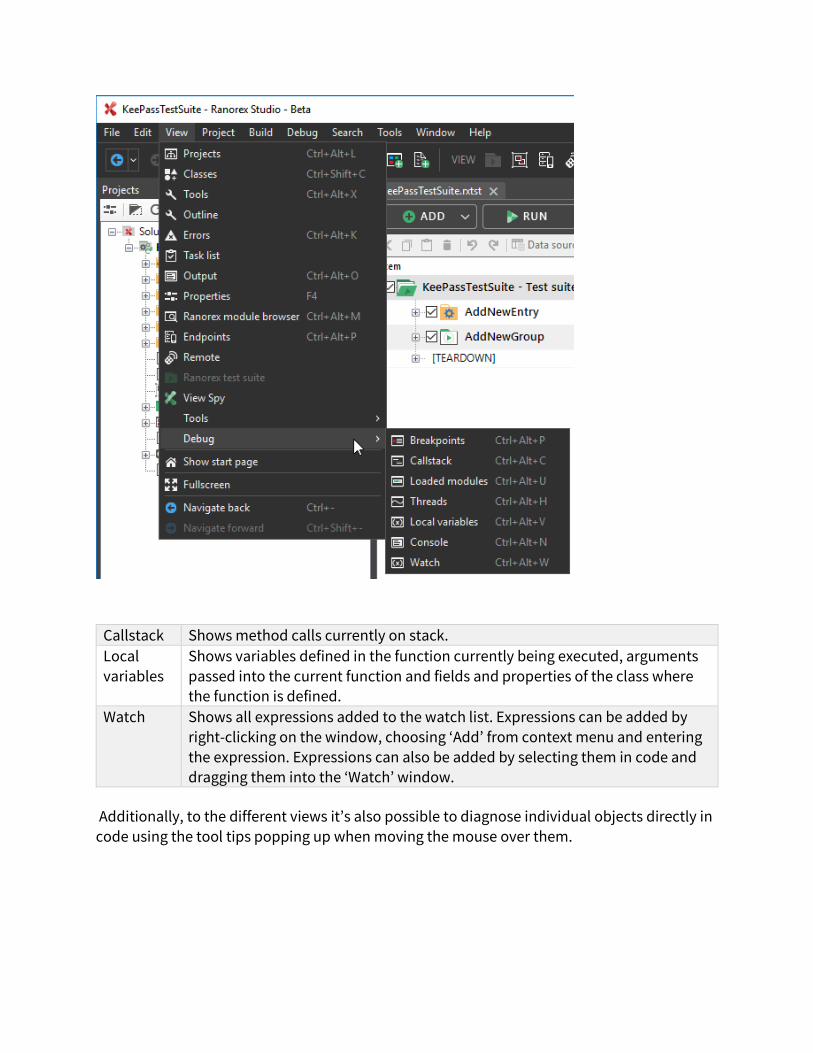
Callstack Shows method calls currently on stack.
Local
variables
Shows variables defined in the function currently being executed, arguments
passed into the current function and fields and properties of the class where the function is defined.
Watch Shows all expressions added to the watch list. Expressions can be added by
right-clicking on the window, choosing ‘Add’ from context menu and entering
the expression. Expressions can also be added by selecting them in code and
dragging them into the ‘Watch’ window.
Additionally, to the different views it’s also possible to diagnose individual objects directly in
code using the tool tips popping up when moving the mouse over them.

Note
If Visual Studio 2010 is installed on the machine running Ranorex Studio,
debugging might be slow. To overcome this issue, it is recommended to search the key ‘LowLevelHooksTimeout’ in the registry and delete all occurrences.
Code completion
Ranorex supports code completion as you type.
Further details about how this works can be found in the article Code Completion posted at SharpDevelop Community Blog.
Code conversion
With Ranorex Studio it is possible to convert a single code file as well as whole projects from
C# to VB.NET and vice versa.
This can be performed by right-clicking on the specific element in the Project Explorer and choosing ‘Convert’ from the context menu.

Code navigation
With Ranorex Studio several features for an intuitive and quick navigation in code are
supported. Further details can be found in the article Code Navigation posted at SharpDevelop Community Blog.
Code generation
Ranorex Studio can help you saving time with providing you auto generated code and code
templates as described in the article Code Generation posted at SharpDevelop Community Blog.
Refactoring
Ranorex Studio supports several mechanisms to refactor code. Further details can be found
in the article Refactoring posted at SharpDevelop Community Blog.

Ranorex Automation Helpers
The Ranorex Automation Helpers are a collection of useful code modules and user code
methods that can be used in any Ranorex Studio solution. They allow you to use functionality in your tests that you would normally need coding skills for. Examples include:
• Automated distribution of test reports via email • Automated handling of pop-up windows
• Automated conversion of reports to PDF
• Automated creation of custom log files • Advanced string operations
• Measuring intervals during test execution • Automated file downloads for web tests
With the Automation Helpers, you can do all of the above and more without coding.
In this chapter, we’ll explain how to install and update the Automation Helpers and we’ll give instructions how to use each code module and user code method.
Contribute to the Automation Helpers
The Automation Helpers are released under an open-source license and can be used, edited, and extended by anyone. You’re welcome to contribute!

The Automation Helpers source code is stored in a GitHub project at
https://github.com/ranorex/Packages/tree/master/AutomationHelpers/src/. You can
send your changes and extensions to us by making a pull request on GitHub.
The folder Modules contains the code modules included in the Automation Helpers.
The folder UserCodeCollections contains the user-code methods included in the Automation Helpers.
Installation and updating
On this page, we’ll explain how to install and update the Automation Helpers.
Installing the Automation Helpers
You can add the Automation Helpers to any Ranorex Studio solution in two ways. To do so:
In the projects view:
Click the Add Ranorex Automation Helpers button.
Right-click the solution and click Ranorex Automation Helpers > Add
Automation Helpers.
In the dialog window that appears, click Add Automation Helpers.
Click Close.

After adding the Automation Helpers, you will find a new Library module project named Ranorex Automation Helpers in the projects view and in the module browser of your test solution.
Ranorex Automation Helpers module library project in the projects view
Ranorex Automation Helpers module collection in the module browser.
Updating the Automation Helpers

We’re always adding new content to the Automation Helpers, so we’ve made it easy to keep
them up-to-date.
To update the Automation Helpers:
Right-click the solution and click Ranorex Automation Helpers > Update
Automation Helpers. The package manager opens, displaying the Updates tab.
Select the Automation Helpers from the list. If your solution only contains one
project, simply click Add to update. If there are more projects, click Manage and select the projects to update.
CollectRetryErrorMessages
Auto-retry is a useful feature available for all test containers. Test cases or smart folders with
an auto-retry count will be rerun until they are either successful or all retries have been used up.
By default, failures and the related error messages are only logged to the report if all retries
fail. If you want to log any failures even if the test container succeeded, you can use the module described here.
Simply add it to the desired test container.
ReportToPDF
It can often be useful to convert Ranorex Studio reports to other file types, such as PDF. One
way of doing so is ⇢ manually with a tool provided by Ranorex. If you want to automate this process, however, the ReportToPDFModule in the Automation Helpers is a great help.
It will automatically convert your report to PDF. You can use it with the default settings or customized.

Default usage
Drag the module to the desired test container. Everything up to this point will be
included in the PDF report. Everything after it won’t be included.
Hint
The final teardown section of your test is usually the best place to put it. This
way, when the test is done, all information has been logged to the HTML report
and the PDF report will also contain all of this information.
Note
You’ll notice the module will display five unbound variables in the Data
binding/iterations column of the test suite. You can ignore these for default
usage. These variables are for customizing the way the PDF is created.

Once you’ve finished a test run with the module, the default HTML report will display the
results as usual and also include an After Test Suite section.
A warning is shown for the five unbound variables. You can ignore it.
The section After Test Suite displays that the report was successfully converted to PDF and can be opened by clicking Open PDF.
For default usage, the PDF file itself is in the Reports folder of the output folder of your test
solution.
Custom usage
As hinted at above, the module comes with five predefined variables that are used to customize the way the module creates the PDF version of the report.
To use these variables for customization, you need to either create a data source that
contains possible customization values or create parameters with these values. You then bind each value to the respective variable.

Reference
Data sources, parameters, and data binding are explained in
Ranorex Studio fundamentals > ⇢ Data-driven testing
Here are the variables and which values they accept:
PdfName
File name for the PDF report.
If left empty, the default report name consisting of test solution name, date, and time is used.
Does not accept the report name placeholders normally available (e.g. %T, %D. %M, %Y, etc.).
PdfDirectoryPath
Path to an existing folder you want to save the PDF report to. If left empty, the report folder in the output folder is used.
Xml
Path to an XML stylesheet (*.xsl) for the PDF. If left empty, automatically searches for an XSL
file in the output folder.
Details
Possible values: none, failed, all (default). Determines what information the PDF report contains.
DeleteRanorexReport
Possible values: true, false (default). Determines whether the default HTML report is deleted
automatically after the test. If set to true, the default HTML report will still be displayed after
the test run has finished, but only from the machine’s RAM. It will not be saved to the harddisk.

EmailModule
With the EmailModule, you can have your test send out an email at a desired point in the test
run automatically and even attach the report to it. This is useful for getting notifications when
a long test has reached a certain point or to automatically send out test results to several people.
Add the module
Simply drag the module from the module browser to the desired test container.
Once the test run arrives at this point, it will send out the email as configured (see
further below for mandatory configuration).
Hint
If you’ve configured the module to attach the report to the email, we
recommend placing the module in the final teardown section of your test, so
everything is done and all information is included in the report.
In the above image, we added the module to the teardown section of the test case
Test_introduction_functions, after the module that closes the AUT. We configured it to send out an email informing us that the AUT has been closed.

Configure the module
The module contains 14 predefined variables. They are used to configure the module. Some of them are mandatory, others optional.
To use these variables for configuration, you need to either create a data source that contains possible configuration values or create parameters with these values. You then bind each value to the respective variable.
Reference
Data sources, parameters, and data binding are explained in Ranorex Studio
fundamentals > ⇢ Data-driven testing
Here are all the variables and which values they accept:
Subject
The subject line of the email.
Body
The main text of the email.
To
The email address of the recipient.
From
The email address of the account you want to send the email from.
ServerHostname
SMTP name of the email server used to send the email. These usually follow the pattern
“smtp.myserver.com”. Please consult your company’s tech support if you are unsure which email server to use.

Note
Remember that the machine you run the test on must have access to this email
server, e.g. be in your company’s network domain and have the correct rights.
ServerPort
The port the email server will use to send the email. This is usually port 25. Please consult
your company’s tech support if you are unsure which port to use.
UseSSL
Whether to use SSL encryption. Possible values: true, false.
Username
Username for the email account used to send the email from. Normally not needed if the
machine you run the test on is in the email server’s network domain and already logged into the email account, e.g. in Microsoft Outlook.
Password
Password for the email account used to send the email from. See Username for more information.
SendEmailOnFailure
Only sends the email if a failure has occurred at a point prior to the module. Possible values: true, false.
SendEmailOnSuccess
Only sends the email if no failures have occurred prior to the module. Possible values: true,
false.
SendZippedReportOnComplete
Attaches the test report as a ZIP file. Possible values: true, false.
SendPdfReportOnComplete
Attaches the test report as a PDF file. Possible values: true, false.

PdfReportCustomStylesheet
Path to an XSL stylesheet you want to use to customize the PDF test report.
Result
After running a test with the module, the report contains a log entry that will also indicate whether a report was attached to the email.
PopupWatcherLibrary
Unexpected popup windows are a common reason for failed or disrupted test runs. Handling
them properly without code is hard. The PopupWatcherLibrary contains a range of useful methods that automatically deal with popup windows.
To use them, simply ⇢ add the individual methods to the desired recording modules and configure them as described on this page.

Prerequisites
Two prerequisites must be met for the methods to work:
The popup window itself must be stored as a repository item.
The popup window must contain a UI element that closes it. This UI element must also be stored as a repository item.
Note
In our example, we use the OK button. We could also have used the Cancel
button or the Close button in the top-right of the popup. The best button to
choose depends on the popup window itself.
PopupWatcher methods
There are four different methods, each with a different purpose.
StartPopupWatcher
The main method. Waits for a popup window to appear and clicks a UI element to close the window.
You can use this method multiple times to have multiple watchers running at the same time
or one after another, each watching for a different popup, for example. However, running
popup watchers uses resources, so make sure to stop them when they are no longer needed. This is done with the two Stop* methods (see below).

Available arguments:
RepoItemInfo findElement / clickElement: The repository item representing the popup window itself and the repository item representing the button that should be clicked.
Returns:
Here is an example for a finished method:
StopPopupWatcher
Stops an active popup watcher that has the same values for the arguments findElement and clickElement (see StartPopupWatcher).
StopAllPopupWatchers
Stops all active popup watchers.
PauseWhileExists
Waits for a popup window to appear and pauses the test execution until it disappears. In
principle the same as StartPopupWatcher, but only waits for the popup to disappear by itself
and does not click anything to make it disappear.
Result
With the prerequesites met and a popup watcher active, Ranorex Studio will automatically pause test execution when encountering a popup and handle it.
In our example, Ranorex Studio clicks the OK button. Afterwards, test execution resumes.

The report also shows that a popup watcher handled a popup.
SystemLibrary
This collection contains user code methods that provide useful system functionality, like killing processes or starting timers.
To use them, simply ⇢ add the individual methods to the desired recording modules.
KillProcess
Kills a process. String processname is the name of the process to kill as displayed in the Windows Task Manager.
GetDateTimeAsString
Returns the current date and time as a string. String expectedFormat defines the format of
the returned string. It uses the placeholders d = day, M = month, y = year, h = hour, m = minute, s = second.
If left empty, uses the format currently set in Windows.
StartTimer / StopTimer
These methods allow you to measure the time between two actions. StartTimer starts the timer, StopTimer stops it and logs the elapsed time to the report.
String timerName is a custom name for the timer. This way, you can have several timers running at once.

StringLibrary
This collection contains user code methods that provide useful string manipulation functionality.
To use them, simply ⇢ add the individual methods to the desired recording modules.
ConcatStrings
Concatenates two strings into one and returns the resulting string. String string1 / string 2 are the strings to concatenate.
GetRandomString
Produces a random string of the specified length and returns it. String length is the number of characters of the string. If left empty, uses 35 characters as length.
ValidationLibrary
This collection contains user code methods that provide useful validation functionality.
To use them, simply ⇢ add the individual methods to the desired recording modules and configure them as described on this page.
CompareValues
Compares whether two strings are the same. String string1 / string2 are the strings to
compare. It behaves like a Validation action, i.e. if the strings are not the same, will log an
error to the report and cause the containing module to fail.
Examples for success and failure in the report:
https://www.ranorex.com/help/latest/ranorex-studio-expert/user-code-library/using-user-code-library/
https://www.ranorex.com/help/latest/ranorex-studio-expert/user-code-library/using-user-code-library/

FileLibrary
During a test run, it’s often useful or necessary to run checks on files or write data to them. The FileLibrary collection contains all the user code methods that make this possible.
Here, we explain how each of them works. To use them, simply ⇢ add the individual methods to the desired recording modules and configure them as described on this page.
AppendStringToExistingFile
This method opens a file and appends a string to the end of the file. If the file doesn’t exist, it will be created automatically.
The following arguments are available:
String text
• The string you want to append to the file. • Can be a variable.
String path
• The path to the file you want to append the string to. Can be absolute or relative and
must include file name and extension. The base path is the output folder of the
solution.
• If you only specify the file name and extension, i.e. don’t provide a path, the method will look for the file in the output folder of the solution.

• If the specified file doesn’t exist, the method automatically creates the file and then
appends the string to it.
Boolean addNewLine
• true = appends the string in a new line at the end of the file. • false = appends the string to the end of the last line in the file.
The method is also logged to the report:
CheckFilesExist
This method checks whether one or more files exist. It behaves like a Validation action, i.e. results in success or failure of the containing module.
The following arguments are available:
String path
• The path to the folder that contains the file(s) whose existence you want to check. Can
be absolute or relative. The base path is the output folder of the solution. • The relative path “./” will search for the files in the output folder.
String pattern
• You can either enter a specific file name and extension to find a specific file or you can
specify a search pattern, which will then find all files that match it. E.g.: “DemoApp.*” will check for any files named DemoApp, regardless of file ending.
Int32 expectedCount
• How many files that match the string pattern are expected to exist in the target folder.
This is the validation part of the method.
• The method compares this number against the number of files it actually finds using
the search pattern.

• If the numbers match, it returns a success, if they don’t, it returns a failure.
Results are logged to the report:
DeleteFiles
This method deletes one or more files.
The following arguments are available:
String path
• The path to the folder that contains the file(s) you want to delete. Can be absolute or relative. The base path is the output folder of the solution. The relative path “./” will search for the files in the output folder.

String pattern
• You can either enter a specific file name and extension to find a specific file to delete
or you can specify a search pattern, which will then delete all files that match it. E.g.: “DemoApp.*” will check for any files named DemoApp, regardless of file ending.
If the method can’t find the file(s) to delete, it will not result in a failure of the module. Only a warning will be logged to the report.
myLogFile.text deleted successfully in the output folder
Warning that myLo.txt could not be found in the output folder and therefore wasn’t
deleted
ValidateFileContainsText
This method checks whether a file contains a specific string. It is available with and without
an argument to specify the file encoding. It behaves like a Validation action, i.e. results in success or failure of the containing module.
The following arguments are available:
String filePath
• The path to the file you want to check. Can be absolute or relative and must include
file name and extension. The base path is the output folder of the solution.
• If you only specify the file name and extension, i.e. don’t provide a path, the method
will look for the file in the output folder of the solution. • If the path is wrong or the file can’t be found, the containing module won’t fail, but an
error will be logged to the report.

String text
• The string to look for in the specified file. • Can be a variable.
String fileEncoding
• The encoding of the specified file. • If left empty, uses UTF-8 encoding.
ValidateFilesBinaryEqual
This method compares whether the content of two binary files is the same. It behaves like a Validation action, i.e. results in success or failure of the containing module.
String filePath1 and filePath2
• The paths to the two files you want to compare. Can be absolute or relative and must
include file names and extensions. The base path is the output folder of the solution.
• If you only specify the file names and extensions, i.e. don’t provide paths, the method
will look for the files in the output folder of the solution. • If the path is wrong or the file(s) can’t be found, the containing module won’t fail, but
an error will be logged to the report.
The results are logged to the report:
Successful comparison, i.e. both files match
Failure, i.e. the files don’t match

ValidateFilesTextEqual
This method compares whether the content of two text files is the same. It is available with and without an argument to normalize the line endings in the files for better comparison. It behaves like a Validation action, i.e. results in success or failure of the containing module.
String filePath1 and filePath2
• The paths to the two files you want to compare. Can be absolute or relative and must
include file names and extensions. The base path is the output folder of the solution.
• If you only specify the file names and extensions, i.e. don’t provide paths, the method
will look for the files in the output folder of the solution.
• If the path is wrong or the file(s) can’t be found, the containing module won’t fail, but an error will be logged to the report.
Boolean normalizeLineEndings
• true = Normalizes line endings to make comparison of files with different encodings possible. Does not make changes to the original files.
The results are also logged to the report:
Successful comparison, i.e. both files match
Failure, i.e. the files don’t match

WaitForFile
This method pauses the test run for a specific time and, while paused, checks whether one or more files exist, i.e. the method waits for one or more files to exist. Depending on whether the file exists within the waiting period or not, the containing module succeeds or fails.
String path
• The path to the folder that contains the file(s) whose existence you want to check. Can
be absolute or relative. The base path is the output folder of the solution. • The relative path “./” will search for the files in the output folder.
String pattern
• You can either enter a specific file name and extension to find a specific file or you can
specify a search pattern, which will then find all files that match it. E.g.: “DemoApp.*” will check for any files named DemoApp, regardless of file ending.
Int32 duration
• Waiting time in milliseconds.
• This is how long the test run will pause to wait for the file(s) to exist.
The results are also logged to the report:
Success
Failure, i.e. the files did not exist within the waiting period
WriteToFile

This method creates a file and writes a string to it. It’s different from
AppendStringToExistingFile, which can only append a string to an already existing file.
String text
• The string to write to the new file. • Can be a variable.
String filenamePrefix
• The path where you want to write the file. Can be absolute or relative and must
include the file name and extension. The base path is the output folder of the solution.
• Prefix for the file name of the new file.
• If left empty, the file name will only consist of the obligatory timestamp (<filename>_YYYYMMDD_HHmmSS).
String fileExtension
• File extension for the new file. • If left empty, the file will not be of any file type.
Note
If the method is called more than once per second, the last call will overwrite all
preceding ones. The method only creates separate new files if at least one
second has passed between calls.
EmailLibrary
The method in this library replicates most of the functionality of the ⇢ Email module. The
only difference is that instead of the three variables for attaching the test report, the Email
method has a single argument for attaching a file. The rest of the arguments correspond to the variables of the module. Please refer to them for more details.
To use the method, simply ⇢ add it to the desired recording modules.
String attachment
The path to the file you want to attach to the email.

Upon execution, the method returns a boolean value, i.e. true or false, that corresponds to
whether the email was sent successfully or not. Like other return values, you can pass it on to other actions or modules.
DragNDropLibrary
Moving UI elements with drag and drop during a test is not possible without coding. This collection contains the method that implements this functionality.
To use it, simply ⇢ add the method to the desired recording modules.
Arguments
The following arguments are available:
Adapter source
• The repository item representing the UI element you want to move.
Adapter target
• The repository item representing the UI element where the adapter source will be
dropped.
Example
You have a text file called “text1.txt” that you want to move from a local folder to a cloud folder (e.g. Dropbox). You want to do so by drag and drop.

First, you need to have both the text file and the drop area in the cloud folder as repository
items in your solution.
Repository item for the text file you want to move
Repository item for the drop area in the cloud folder
Result
The method drags the text file to the drop area and drops it, resulting in the file being uploaded to Dropbox.

WebLibrary
Ranorex Studio provides a wide range of web testing capabilities that require no coding skills.
However, some functionality is impossible or a lot of work to implement without coding. The WebLibrary contains several useful methods that solve this issue.
To use them, simply ⇢ add the individual methods to the desired recording modules and configure them as described on this page.
DownloadFile
It may often be necessary to download a file during a web test. This is possible without any coding, but the DownloadFile method simplifies the process.
The available arguments for the method are:
String uri
• URI of the file to download.
• If the address is wrong or the file can’t be found, returns an error. • In this case, the test module containing the method will fail and the report will log a
failure.
String localPath
• The path to the folder where you want to save the file. Can be absolute or relative. • If left empty, saves the file in the output folder of the test solution.
Boolean overwriteExisting
• true = if the file already exists in the target location, overwrites it. • false = does not overwrite the file, but returns a warning and aborts the download.
The results are also logged to the report:

Report showing successful download of the file
Report showing aborted download, as the file already existed and overwriteExisting
was set to false
Report showing a failed module because the file could not be downloaded
GetHttpStatusCode
Checks a website at the specified URL and returns its HTTP status code. The following arguments are available:
String returnValue
• The HTTP status code returned by the method. • Can be passed on to a variable.
String url
• The URL of the website whose status you want to check.
The results are also logged to the report:

ReportFullPageScreenshot
Creates a full screenshot of a webpage, including elements that are currently not displayed on screen. The webpage must be saved as a repository item and passed to the method as an argument.
The screenshot is saved in the output folder and also logged to the report.
RepoItemInfo repoItemInfo
• The repository item that represents the webpage you want to screenshot.
• If it isn’t a webpage, an error will be logged to the report. The containing module will
not fail, however.

Runtime and remote execution
In this chapter, you’ll learn about executing tests in runtime environments, with a focus on
remote execution. A runtime environment is a machine without a Ranorex Studio installation that is only used for executing and not building tests. Executing tests on remote machines
opens up many possibilities: You can distribute tests on several different physical or virtual machines to run them in parallel, asynchronously, or based on a schedule.
The basics
The first step in remote test execution is to create an executable build of your test. You then
deploy this build to a runtime environment, typically a remote machine, and execute it there. In ⇢ Create an executable build, you’ll find out how to create an executable build and
include the Ranorex Studio runtime library, license information, and external files in the build.
In ⇢ command line execution, you’ll find out how to run an executable build through a
command line interface and learn the available command line arguments.

Manual remote testing
In manual remote testing, you pack the executable build and deploy it to the remote machine(s) yourself. You then trigger test execution directly on the remote machine or
through a Remote Desktop Protocol (RDP) connection, using the command line. This is explained in ⇢ Manual remote testing.
Agent-based remote testing
Ranorex Agent is a standalone tool that simplifies and streamlines remote test execution with
Ranorex Studio. Agents are installed on remote machines and receive executable builds either through the remote pad in Ranorex Studio or through the command line. Agents
automatically execute a test queue and deliver the report to the original machine the test was deployed from.
Agents are explained in ⇢ Ranorex Agent. Using them for remote testing is explained in ⇢ Agent-based remote testing.
Create an executable build
On this page, you’ll find out how to create an executable build, and how to include the Ranorex Studio runtime library, license information, and external files in the build.
An executable build is simply a build of your test that you can execute like a program.
Create an executable build
Ranorex Studio automatically creates an executable build of your test whenever you do one of the following:
Click RUN to start a test run.

Click Build all projects in the solution.
Click Build the current project.
When Ranorex Studio builds a test, it automatically copies all the basic required files to the
folder \bin\Debug\ in the respective project’s folder, as shown below. This is called the output folder. You can change the output folder directory in the >Settings.
Default output folder directory for the executable build of a project.
Executable of the test, named after the project. In our case, this is Introduction.
Configuration files.
Module group and test suite files.
Required libraries and the settings of the project.
Optional external files that were manually included in the output folder.
In this case, the Ranorex Studio Demo Application is the AUT. Without it, the test
would not run correctly. It is small enough to be included with the project. Large AUTs should be preinstalled on the specific runtime environment and not included in
the executable build.

Note
The executable build shown in the above image allows you to run the test on
machines that have a full version of Ranorex Studio installed. However, we want to execute tests in runtime environments, i.e. machines without a
Ranorex Studio installation. This is why we need to include the Ranorex
Studio runtime library and licensing information.
Include Ranorex Studio runtime library
To execute a test in a runtime environment, you need to include the Ranorex Studio runtime
library with the executable build. You do so by activating the option Copy runtime to output in the settings. By default, it is deactivated.
In Ranorex Studio, open the settings.
Ensure the General tab is displayed.
Check Copy runtime to output and click OK.

Now when you create an executable build, Ranorex Studio automatically includes the
runtime library under \Runtime\ in the output folder.
Include license information
To execute a test in a runtime environment, you need to include license information in the executable build.
Note
Executing a test in a runtime environment requires at least a Ranorex
Runtime Floating License. You can still execute your test if you don’t include
license information, but only for 30 days as part of the Ranorex Studio trial. You can’t execute a test in a runtime environment with the license information of a
Node-locked License.
For more information about Ranorex licenses, contact our Sales Team.
By default, license information is not included in the executable build. To include it:
In Ranorex Studio, open the settings.
Ensure the General tab is displayed.
Click Include license information and click OK.

Now when you create an executable build, Ranorex Studio automatically includes the license
information file in the executable build.
Include external files
Sometimes you may want to include external files with your executable build. To do so, you need to first include them in your project and then configure them to be included in builds.

Note
Examples of external files you may want to include:
• The AUT or required libraries.
• Images or HTML/CSS/XSL files for custom reports. • Data sources for data-driven tests.
For our explanation, we want to include the Ranorex Studio Demo Application in the
executable build. To do so, we first include it in the project:
Copy the file to the project folder. In our case, this is the file RxDemoApp.exe.
In the projects view, click the Refresh and the Show all files buttons to display the added file.

Right-click the file.
Click Include in project.
Note
After including the file, its icon will switch from transparent to fully outlined and when right-clicking it, the option Exclude from project will be listed.

You’ve included the file in your project. Now you need to configure it to be included in the
output folder when creating an executable build.
In the projects view, click the file and press F4 to open the file’s properties.
Set Copy to output directory to Always or PreserveNewest.
Never: The file won’t be included.
Always: The file will be copied each time you create an executable build.
PreserveNewest: The file will only be copied if it changed since the last build.
Command line execution
On this page, you’ll find out how to run an executable build from a command line interface. This page also contains all arguments and parameters available for this purpose, with
examples of how to use them.
Execute your test through the command line
To run a test through a command line interface:
In the command line interface, switch to the output folder of the executable build,
enter the name of the executable and press Enter.

Note
If you don’t specify otherwise through arguments, this executes the test as it was configured (solution settings, run configuration, report settings, etc.) when
you created the executable build.
Result:
The test is executed as if you had pressed the RUN button in Ranorex Studio. The terminal window shows the debug information.

ErrorLevel return value
When you run a test, the ErrorLevel return value indicates the test result:
0 Successful test run.
-1 Test run aborted due to error.
-2 Specified Ranorex Agent could not be found.
42 No valid license found.
Note
This is only relevant when executing tests in a continuous integration environment.
The test automatically returns this value to the CI system.
Command syntax
We use the following syntax on this page to describe the available command line arguments.
/ Arguments are introduced with a forward slash, e.g. /help. Separate more than one
argument with a space. : A colon introduces a parameter of an argument, e.g. /reportlevel:Debug.

| The pipe denotes exclusive alternatives (one or the other, not both), e.g. /reportlevel:Debug|Info. Do not enter it in the command line interface.
|| The double pipe denotes inclusive alternatives (one or the other, or both), e.g.
/reportfile:<path name>\||<report name>. Do not enter it in the command
line interface. {
} Braces denote optional arguments, e.g. /testrail {trrunid=<id>}. Do not enter
braces in the command line interface. <
> Angle brackets denote a placeholder, e.g. /reportlevel:<any integer value>.
Do not enter angle brackets in the command line interface.
Sample syntax:
<test_project_name>.exe {/<argument1>
/<argument2>:<parameter1>|<parameter2>} …
Almost all arguments are available in a short and a long form. You can use either as you wish and even mix them.
Note
This illustrates that in principle, all arguments are optional. Running the test
executable without any arguments will run it as it was configured at the time
of the build. Arguments simply allow you to adjust this configuration in certain ways.
In the following list, when something is designated as optional, it means you can omit it and the respective argument will still work. Conversely, if something
isn’t optional, it will prevent the argument from working.
Display the help
/?|help
Lists all available command line arguments and their parameters in the command line interface.
Example:
RxDatabase.exe /?
Displays the available command line arguments for use with the test executable RxDatabase.exe.

Activate maintenance mode
/m|maintenancemode
Runs the test in maintenance mode.
Example:
RxDatabase.exe /m
Runs the test executable RxDatabase.exe in maintenance mode.
Reference
Maintenance mode is explained in Ranorex Studio advanced > ⇢ Maintenance mode
Reporting
Define report levels
/rl|reportlevel:None|Debug|Info|Warn|Error|Success|Failure|<any
integer value>
• Sets the threshold for messages to be included in the report.
• None deactivates reporting entirely. • The predefined report levels correspond to the following values: Debug=10, Info=20,
Warn=30, Error=40, Success=110, Failure=120 • You can use either the name or the value of a report level to set it.
Examples:
RxDatabase.exe /rl:Error
Sets the report level to the threshold Error (corresponding to the value 40). The report will only include messages with a report level ≥ Error.
RxDatabase.exe /rl:110
Sets the report level to the threshold 110 (corresponding to Success). The report will only include messages with a report level ≥ 110.

Custom report file name and path
/rf|reportfile:<path name>\||<file name>
• <report_name> sets a new report name. • <path_name> sets a new path where the report is saved. Requires a trailing backslash.
• You need to specify at least one of the parameters.
• If you only specify one of the parameters, the default value will be used for the other. • Setting a new path affects all report files, i.e. the .rxlog, .rxlog.data, .css, .xsl files and
RanorexReport.png.
• For <report name>, you can also use placeholders. These are explained below under Report name placeholders.
Examples:
RxDatabase.exe /rf:myReport_%Y
Saves the report files under the names “myReport_YYYY.rxlog” and “myReport_YYYY.rxlog.data”, e.g. “myReport_2019.rxlog”. The save path remains the default one.
RxDatabase.exe /rf:myReports\\myReport_%Y-%M-%D
Creates the folder \\myReports\\ in the output folder. The report files are stored there under the name “myReport_YYYY-MM-DD.rxlog” and “myReport_YYYY-MM-DD.rxlog.data” (e.g. “myReport_2019-11-23.rxlog”

Zipped report
/zr|zipreport {/zrf|zipreportfile:<path name>\||<file name>}
• The first argument creates a zipped copy of the report with the file ending .rxzlog. • The second argument is optional. It requires /zr and allows you to set a custom save
path and file name in the same way as for the normal report (see above under Custom report file name and path).
Examples:
RxDatabase.exe /zr
Creates a zipped report file (.rxzlog) with the default name in the default report folder in the output folder.
RxDatabase.exe /zr /zrf:myZipReports\myReport%Y
Creates the folder \myZipReports\ in the output folder and stores the zipped report there under the file name “myReportYYYY.rxzlog”, e.g. “myReport2019.rxzlog”.
JUnit-compatible report
/ju/junit
• Creates a JUnit-compatible copy of the report in the default report folder. • The file ending is .junit.xml
Examples:
RxDatabase.exe /ju
Creates a JUnit-compatible copy of the report with the ending .junit.xml in the default report folder in the output folder.

Report name placeholders
You can use the following placeholders in the <file name> parameters of the /rf and /zrf arguments.
%Y Current year (e.g. 2018)
%M Current month (e.g. 11)
%D Current day of the month (e.g. 28)
%T Current time (e.g. 105214 for 10:52:14 am)
%L Run label (see Set run label, run ID, and SUT version)
%R Current run configuration
%H Host name
%S Test suite name
%X Test suite result
Video reporting
/vr|videorecording:Off|KeepFailedTests|KeepAllTests
{/vrs|viderecordingsource:Auto|Screen1|Screen2|Screen3|Screen4}
• The first argument sets the recording mode. Off disables video reporting,
KeepFailedTests saves videos of failed test cases only, KeepAllTests saves videos for all test cases.
• The second argument is optional. It sets the source screen from which the videos will
be recorded. The screen numbers correspond to the display settings in Windows. Auto
uses the screen the mouse is on at the start of the test run. If you don’t specify it, the source that was set when the test was built will be used.
Examples:
RxDatabase.exe /vr:KeepFailedTests
Activates video reporting, records from Screen 2, and saves only videos of failed test cases.
Reference
Reporting is explained in Ranorex Studio fundamentals > ⇢ Reporting

Configure settings
List all configurable settings
/lcp|listconfigparams
• Lists all configurable settings, including their current values.
Configure settings
/cfg|config:<setting name>=<value>
• Assigns the specified value to the specified setting.
Examples:
RxDatabase.exe /cfg:adapter.defaultsearchtimeout=1500ms
Runs the test executable with the value 1500ms assigned to the setting adapter.defaultsearchtimeout.
RxDatabase.exe /cfg:adapter.defaultsearchtimeout=1500ms
/cfg:recorder.replay.generatereport=False
This example illustrates that you can configure several settings at once by separating the individual arguments with a space.
Reference
Settings are explained in Ranorex Studio system details > ⇢ Settings and configuration
TestRail integration
/testrail /truser=<user name> /trpass=<password>
{/trrunid=<id>|/trrunname=<name>}
• /testrail synchronizes the test results to a new test run (default name) on TestRail. It requires /truser and /trpass to log into the specified TestRail account.
• /trrunid=<id> is optional and synchronizes the test results to an existing test run on
TestRail. <id> is the test run’s ID on TestRail. Cannot be used with /trrunname.

• /trrunname=<name> is optional and synchronizes the test results to a new test run on
TestRail with a custom name, set by <name>. Cannot be used with /trrunid.
Examples:
RxDatabase.exe /testrail /truser=johndoe /trpass1234
/trrunname=Nightly
Runs the test and synchronizes the results to a new test run with the name Nightly on TestRail. Uses johndoe as username and 1234 as password to log in to TestRail.
Reference
The TestRail integration is explained in Interfaces and connectivity > ⇢ TestRail
integration.
Jira integration
/jit|jiratasks:on|off|createlink||autohandle
{/jiu|jirauser=<user name or email>} {/jip|jirapass=<password or API
token>}
• These arguments will only work if you’ve set up the Jira integration in Ranorex Studio
beforehand and if the Jira.jsd file is included in the executable build of your test
(which it is, by default).
• /jit|jiratasks enables manual and/or automatic issue handling for the test run and
overrides the respective settings in the Jira.jsd file.
on|off = Enables|Disables both manual and automatic handling.
createlinks = Enables manual handling. autohandle = Enables automatic handling.
• /jiu|jirauser and /jip|jirapass are optional if the machine the test is run on has Jira
credentials for the respective Jira instance saved in the Windows Credentials Manager. Otherwise they are required. If credentials exist and you use these arguments, the
existing credentials will be ignored.
<user name or email> is the Jira user name (server) or email (cloud).
<password or API token> is the password for the user name (server) or the API token (cloud).
Examples:

RxDatabase.exe /jit:createlink
Runs the test and enables manual issue handling if credentials exist on the machine.
RxDatabase.exe /jit:autohandle /jiu=johndoe /jip=1234
Runs the test and enables automatic issue handling. Uses johndoe as user name and 1234 as password to log in to Jira. If other credentials already exist on this machine, ignores them.
Reference
The Jira integration is explained in Interfaces and connectivity > ⇢ Jira integration
Endpoints
Run a test on an endpoint
/ep|endpoint{:<endpoint name>}
/ep:<WebDriver endpoint> {/epc|endpointconfig:<configuration name>}
/ep:<WebDriver endpoint> {/epcfp|endpointconfigfilepath:<file path>}
• /ep:<endpoint name> sets the endpoint with the specified name as the automation
root, meaning that the test will be executed on this endpoint. • If no name is specified, sets localhost as the automation root, i.e. the current machine.
• The second argument is optional and requires a WebDriver endpoint as automation
root. It sets an endpoint configuration by name. You need to have added the
configuration in the endpoints pad in Ranorex Studio. Cannot be used with /epcfp.
• The third argument is optional and requires a WebDriver endpoint as automation root.
It sets an endpoint configuration by filepath. The file must be in JSON format. Cannot be used with /epc.
Example:
RxDatabase.exe /ep:iPhone5
Runs the test on the endpoint with the name iPhone5.
RxDatabase.exe /ep:WebDriver2 /epc:Windows7Chrome
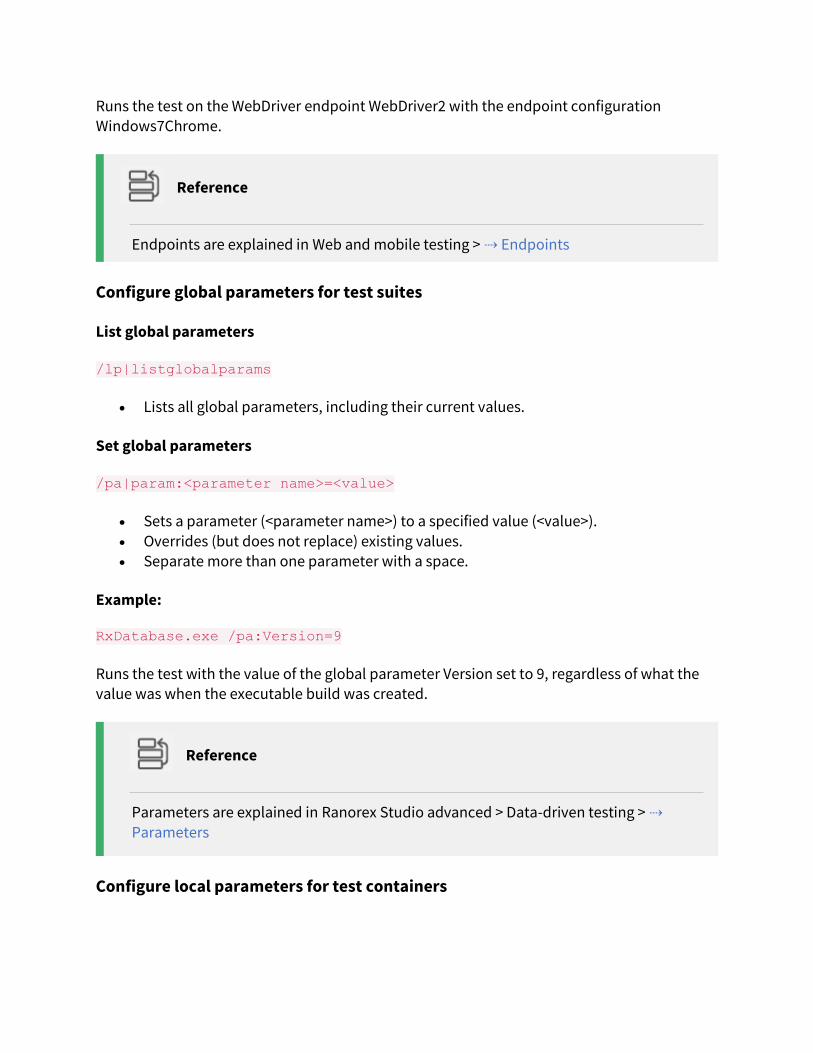
Runs the test on the WebDriver endpoint WebDriver2 with the endpoint configuration
Windows7Chrome.
Reference
Endpoints are explained in Web and mobile testing > ⇢ Endpoints
Configure global parameters for test suites
List global parameters
/lp|listglobalparams
• Lists all global parameters, including their current values.
Set global parameters
/pa|param:<parameter name>=<value>
• Sets a parameter (<parameter name>) to a specified value (<value>).
• Overrides (but does not replace) existing values.
• Separate more than one parameter with a space.
Example:
RxDatabase.exe /pa:Version=9
Runs the test with the value of the global parameter Version set to 9, regardless of what the
value was when the executable build was created.
Reference
Parameters are explained in Ranorex Studio advanced > Data-driven testing > ⇢
Parameters
Configure local parameters for test containers

List local parameters
/ltcpa|listtestcaseparams:<test container>
• Lists all parameters and their values of a test container, i.e. a test case or smart folder. • <test container> is the name or GUID of the test container.
Set local parameters
/tcpa|testcaseparam|testcontainerparam:<test container>:<parameter
name>=<value>
• Sets a parameter (<parameter name>) in a test container (<test container>) to a
specified value (<value>). <test container> is the name or GUID of a test container.
• Overrides (but does not replace) existing values. • Separate more than one parameter with a space.
Example:
RxDatabase.exe /tcpa:EnterName:Name=Jane
Runs the test with the value of the local parameter Name in the test container EnterName Version set to Jane.
Reference
Parameters are explained in Ranorex Studio advanced > Data-driven testing > ⇢
Parameters
Selective test run
Select test suite to run
/ts|testsuite:<test suite path>
• Selects a specific test suite to execute.
• If the test suite file is located in a subfolder of the output folder, then you need to
specify the path to it. Otherwise, the name of the file is sufficient.
• You can specify only one test suite to execute with this argument. If you specify more than one, only the last one will be executed.
Examples:

RxDatabase.exe /ts:Introduction.rxtst
Runs the test executable and executes only the test suite Introduction. The test suite file is located directly in the output folder (\bin\debug\), so the file name is sufficient.
RxDatabase.exe /ts:TestSuites\Introduction.rxtst
Runs the test executable and executes only the test suite Introduction. The test suite file is located in the subfolder \TestSuites\ in the output folder, so you need to specify this folder.
RxDatabase.exe /ts:RxDatabase.rxtst /ts:Introduction.rxtst
Runs the test executable and executes only the test suite Introduction. Ignores the specified
test suite RxDatabase because only the last test suite is executed when more than one is specified.
Select test container to run
/tc|testcase|testcontainer:<test container name or GUID>
• Selects only a specific test container to execute. Also executes descendant test
containers that were checked to be run when the executable build was created. The specified test container itself does not need to be checked.
• You can specify only one test container. If you specify more than one, only the last one
will be executed. • If a test container has a non-unique name, you must use its GUID to specify it. You can
find the GUID in the test container’s properties.
• If the test container is part of the test suite initially created as part of the
project/solution, then you can omit the /ts argument. Otherwise, you need to specify the test suite with the argument /ts:<test suite path>, as explained under Select test suite to run.
Note
This only executes the specified test container and checked descendant test
containers. It does not execute ancestor or sibling test containers, including
setup or teardown regions. This can easily result in test failure.
Examples:
RxDatabase.exe /tc:Introduction

Executes the test container Introduction and all checked descendant test containers in the
test suite initially created as part of the project/solution.
RxDatabase.exe /ts:ImageBased.rxtst /tc:Image_B
Executes the test container Image_B and all checked descendant test containers in the test
suite ImageBased. The test suite ImageBased.rxtst was not initially created as part of the project, but added later, so it needs to be specified.
RxDatabase.exe /ts:ImageBased.rxtst /tc:Image_B /tc:Image_A
As above, but ignores Image_B and executes only Image_A because only the last test
container is executed when more than one is specified.
Set a data range in a test container’s data source
/tcdr|testcasedatarange|testcontainerdatarange:<test container>=<rows>
• Executes a test container for only the specified rows from its data source.
• <test container> is the name or GUID of the test container, <rows> is the rows in the
data source. See below for examples on how to specify rows.
• This argument only works if the respective test container is run, i.e. it had to be checked when you created the executable build, or you have to ensure it’s run through
other arguments. You can do so with the /tc argument as explained under Select test
container to run, or with the argument /rc as explained under Select run configuration. • If the test container is part of the test suite initially created as part of the
project/solution, then you can omit the /ts argument. Otherwise, you need to specify
the test suite with the argument /ts:<test suite path>, as explained under Select test suite to run.
Examples:
RxDatabase.exe /ts:RxDatabase.rxtst /rc:Database /tcdr:Data-
driven_DB_Test=3-5
Executes the test suite RxDatabase in the run configuration Database. Uses only the rows 3 to 5 (from 8 in total) from the data source of the test case Data-driven_DB_Test. The specified run configuration ensures that the referenced test container is run.

How to specify data ranges:
Data-driven_DB_Test=3
Uses only row 3.
Data-driven_DB_Test=3-5
Uses rows 3 to 5, i.e. 3, 4, and 5.
Data-driven_DB_Test=3,5
Uses rows 3 and 5.
Data-driven_DB_Test=3,5-8
Uses rows 3, 5, 6, 7, and 8.
Select run configuration
/rc|runconfig:<run configuration>

• Executes a test suite in the specified run configuration.
• If you only have one test suite, you don’t need to specify the test suite. If you have
more than one test suite, you need to specify the test suite that contains the
respective run configuration with the argument /ts:<test suite> (see “Select a test suite to run”).
• You can specify only one run configuration. If you specify more than one, only the last one will be used.
Examples:
RxDatabase.exe /rc:All
If you only have one test suite, executes it in the run configuration All. If you have multiple test suites, results in an error.
RxDatabase.exe /ts:ImageBased.rxtst /rc:All
Executes the test suite ImageBased in the run configuration All.
Select module to execute
/mo|module:<module name>
• Executes a recording or code module in a test container.
• You need to specify the respective test container with the argument /tc as explained under Select a test container to run.
• If the module is part of the test suite initially created as part of the project/solution,
then you can omit the /ts argument. Otherwise, you need to specify the test suite with the argument /ts:<test suite path>, as explained above in “Select a test suite to run.”
• <module_name> takes the name or GUID of the module.
Examples:
RxDatabase.exe /ts:ImageBased.rxtst /tc:Image_B /mo:TestDynamicImage
Executes the recording module TestDynamicImage in the test container Image_B in the test suite ImageBased.

Reference
Running test suites and run configurations are explained in Ranorex Studio
fundamentals > Test suite > ⇢ Execute a test suite
Set run label, run ID, and SUT version
Run label
/rul|runlabel:<custom value>
• Sets a custom run label that will be displayed in the report.
• The run label will also replace the placeholder %L in the report name (see Reporting further above).
Run ID
/runid:<custom value>
• Sets a custom run ID. Not displayed in the default report.
SUT version
/sutversion:<custom value>
• Sets a custom SUT version that will be displayed in the report.

Ranorex Agent
/a|agent:"<agent name>"|["agent tag"]|? /a|agent:"<agent name>"|["agent tag"] /artifacts:<file pattern>
• Runs the test on the specified Ranorex Agent. Only one agent can be addressed.
• <agent name> takes the name of the Agent, or the name or IP of the machine it is installed on. Quote the value if it contains spaces.
• If the specified Agent can’t be found, automatically runs an Agent discovery and lists
all available Agents in the current network. • The parameter ? manually starts an Agent discovery.
• [“agent tag”] is any tag added to an agent. The test will be run on an Agent that has all
specified tags. If there are more Agents that match the tag(s), the one with the fewest jobs will be used. Separate tags with a trailing comma. Quote tag if it contains spaces.
• If the specified Agent is found, automatically zips the executable build, deploys it to
the Agent machine, and starts the test run.
• /artifacts combines with the arguments to address an agent by name or tag. It instructs the Agent to collect and download all files that match the specified file
pattern(s) after test execution. Separate more than one file pattern with semicolons.
Default value is: *.rxzlog;*.junit.xml. This is the Ranorex Studio report in different formats. Files with this ending are always downloaded.
Example:
RxDatabase.exe /a:"QA Agent"
Executes the test on the Agent named QA Agent.
RxDatabase.exe /a:["Smoke Tests", Android]
Executes the test on an Agent that has the tags Smoke Tests and Android.
Reference
Configuring Ranorex Agents is explained in Ranorex Studio fundamentals > Ranorex
Studio Overview > ⇢ Ranorex Agents
Running tests on Agents is explained in Ranorex Studio fundamentals > Ranorex Studio Overview > ⇢ Agent-based remote execution

Manual remote execution
On this page, you’ll learn how to manually run an executable build in a remote runtime
environment, i.e. on a machine without Ranorex Studio installed. This means that you’ll
transfer the executable build to the target machine, run it there, and retrieve the report yourself.
Running an executable build through a Ranorex Agent simplifies and automates a large part of this process. This is explained in ⇢ Ranorex Agents and ⇢ Agent-based remote execution
Pack the executable build
Before you can run your executable build on a remote machine, you need to copy it there
first. We recommend doing so as follows:
Ensure your test is configured the way you want and so it will run on the remote
machine. You won’t be able to change the deployed test on the remote machine unless you install Ranorex Studio there or use command line arguments, which only
offer limited ways of adjusting test execution.
Ensure all required files are ⇢ included in the project and configured to be copied to
the output folder.
⇢ Create a new build of your project.
Navigate to the output folder (\bin\debug\) and add it to a ZIP archive.
Copy this ZIP file to the target machine and unpack it. You can now run the test.

Run the test
You can run a test either directly on the remote machine or via a remote desktop connection (e.g. through the Windows RDP). The basic process is the same:
Deploy the executable build to the remote machine and unpack it, if you haven’t done so already.
Run the test in one of the following ways:
In the output folder, double-click the test executable (<test name>.exe, e.g.
Introduction.exe in our example).
⇢ Open a command line interface and run the test from there. This way you
can also pass arguments to customize your test run.
Attention
Executing a test in a runtime environment requires at least a Ranorex Runtime
Floating License. You need to ⇢ include the license’s information in the executable build.
Also make sure your remote machine is connected to the same network as your
server where the Ranorex License Manager is installed, so the remote machine
can lease the required license. Otherwise, the command line interface will display the following error message:

If you don’t have a license, you can install the free 30-day trial license of Ranorex Studio on
the remote machine to run the test.
Reporting
When running a test remotely, a report is created in the same way as when running it from Ranorex Studio. This report and its raw data file are stored in the Reports folder of the unpacked output folder of the executable build on the remote machine.
Report file and raw data file.
You can move the report files to your main system where Ranorex Studio is installed and view
and process them there.
Ranorex Agents
On this page, you’ll learn what Ranorex Agents are, how to install them, and how to configure them.
What are Ranorex Agents?
A Ranorex Agent is a standalone tool that simplifies and streamlines test execution on
remote machines. The Agent is installed on the remote machine and communicates with a

Ranorex Studio installation on the source machine, from which it receives tests and to which
it reports results. This way, you can start tests on a remote machine directly from within Ranorex Studio.
Quick facts:
• You can install an Agent on virtual or physical machines.
• You can install one Agent per machine. • Agents queue tests and execute them one after another.
Note
You need a Runtime Floating License to execute tests via an Agent. When idling,
Agents don’t require a license. They only lease it when executing tests. You
need to ⇢ include the license information with the executable build of the test
that you deploy to the Agent. The Agent must also have access to the network with the server where the Ranorex License Manager is installed, so it can lease
the license.
You can deploy and execute tests on Agents in two ways:
• through the remote pad from within Ranorex Studio, from where you can manage all
Agents and execute tests on them. • through a command line interface.
Both possibilities are explained in ⇢ Agent-based test execution.
Download and install Agents
The Ranorex Agent comes as a standalone tool with a separate installer. It isn’t included in
the Ranorex Studio installation. You need to download it and install it separately on each
remote machine you want to run tests on.
Download the Agent on a machine with Ranorex Studio:
On a machine with Ranorex Studio, from the Ranorex Studio menu bar click View >
Remote. The remote pad opens.
Click Add Ranorex Agent.
Click Download Ranorex Agent.

The download archive opens in your default browser.
Click your Ranorex Studio version and download the file under Ranorex Remote
Agent.
To install the Agent on a remote machine:
Transfer the downloaded installation file to the desired remote machine.
Run the installation file, accept the license agreement, and click Install.
Wait for the Agent to install. The Agent will start automatically once installation has
finished.
Note
The machine you’re installing the Agent on doesn’t need to have any sort of
Ranorex Studio license preinstalled. However, you need to include license
information in the executable build of the test you deploy to it. The Agent then leases the correct license automatically from the Ranorex License Manager in
your network.

Follow the instructions of the first-time setup.
Start Agents
By default, Agents start with Windows. You can also start Agents manually from the Start menu.
Agents normally run minimized to the system tray. You can open them from there.
Configure Agents
To configure Agents, click the button in the top-right corner of the Agent window:

Let’s you change the Agent’s name. The default name is MyAgent. The display name is shown in the title bar of the Agent
window and in the remote pad in Ranorex Studio. In the above image, we’ve named
it Ranorex Agent.
Attention
If you change the display name, you need to remove and re-add the Agent
in the remote pad in Ranorex Studio.
We recommend you give each Agent a unique name. Otherwise, it will
become more difficult to find the correct one in the remote pad and to
address them through a command line interface.
Opens the folder \Ranorex\Agent\Data\ in the installation directory of the Agent. This is where Agent logs and configuration files are stored.
Starts the Agent with Windows.
Keeps the Windows user session active even when a remote desktop connection is
ended or interrupted.

Note
• This can make your remote machine vulnerable as an essential security feature is disabled. We recommend you do not store any sensitive information on the remote
machine if you use this feature.
• If you end the RDP session while a test is running, the remote machine may change to a different screen resolution. This can cause a test failure.
• For more information on running a test via RDP, refer to ⇢ Tips and troubleshooting.
Keeps the Agent on top of all windows.
Quits the Agent.
Add tags to Agents
Tags allow you to categorize Agents, so you can trigger runs not on a specific Agent, but on an
Agent with one or more specific tags. This is particularly helpful when tests are triggered on
Agents in a CI pipeline because it allows you to balance the workload better and ensure a
particular test is run on a machine with certain properties.
For example:
1. You have 5 Agents. 3 of them you tag with “midnight-job”, the other two are untagged.
2. Now you want to run a midnight job. You run it from the command line with this tag.
3. Ranorex Studio now searches for all Agents that have this tag and runs the test on the one with the fewest jobs.
Note
To run tests on Agents via tags, you need to use command line arguments. The
relevant arguments are explained ⇢ here.
To add tags to an Agent:
In the Agent, click Tags.

Click Add tags to agent.
Enter the tag and press Enter.
The tag appears in the Agent.
Hint
• You can add any number of tags to an Agent.
• Tags are case-insensitive.
Agent-based remote execution
On this page, you’ll find out how to run executable builds on remote machines via a Ranorex
Agent. You can do so either from the remote pad in Ranorex Studio or manually through a
command line interface. We’ll first explain the remote pad, and then the command line interface.
The remote pad
The remote pad is the control center for managing Agents in your network, and for deploying and running executable builds on them.
You can open the remote pad in Ranorex Studio in two ways:

In the toolbar, click the remote pad symbol
In the menu bar, click View > Remote.
If you haven’t added any Agents yet, the remote pad will display its empty screen.
Add Agents to the remote pad
Before you can work with Agents from the remote pad, you need to add them to it.
To add an Agent:
In the remote pad, click Add Ranorex Agent.
If you haven’t done so yet, ⇢ download the Agent and install it on the remote
machine. The remote machine must be in the same network as the machine you’re
using the remote pad on.
Click Manage Agents….

The Agent list appears. Add your Agent in one of two ways:
Under Available Agents in your network, identify the Agent you want to add
and click Add Agent.
Under Search manually, enter the IP address or the host name of the remote machine the Agent is installed on and click Add Agent.
When you’re done, click Back to return to the control panel of the remote pad.
The added Agent appears in the Agent list. Remove deletes the Agent from the list. It
does not uninstall the Agent on the remote machine.
An added Agent indicated by the green label.
In the control panel of the remote pad, you’ll see the added Agent in its idle state, ready to be used for running tests.
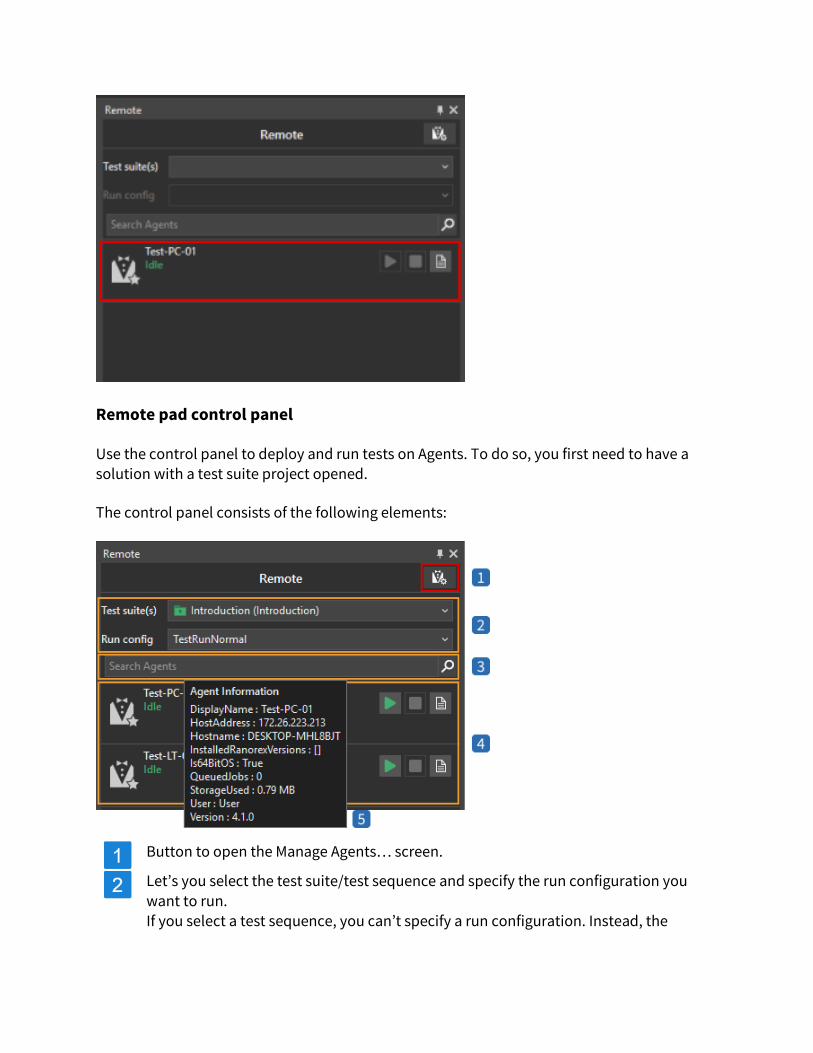
Remote pad control panel
Use the control panel to deploy and run tests on Agents. To do so, you first need to have a solution with a test suite project opened.
The control panel consists of the following elements:
Button to open the Manage Agents… screen.
Let’s you select the test suite/test sequence and specify the run configuration you
want to run. If you select a test sequence, you can’t specify a run configuration. Instead, the

individual test suites of the test sequence will execute in the run configuration that is
active when you click the Run button next to an Agent.
Let’s you search added Agents by their attributes (e.g. tags, name, host name, etc.),
i.e. what’s displayed when you hover over them (see item 5).
All Agents you’ve added to the remote pad.
Hovering over an Agent will display a tooltip showing the Agent’s attributes.
Run a test on an Agent through the remote pad
Deploying and executing a test on an Agent is easy with the remote pad.
To deploy and execute a test:
Select the desired test suite or test sequence.
Select a run configuration if possible (test sequences use the configurations active in
the contained test suites at the time of clicking the Run button in the remote pad).
Click the Run button to deploy and run the test on the Agent.
You can continue working on the machine you started the test from. The test will execute on the remote machine the respective Agent is installed on. Once the test has started, you can see how the test is progressing in the remote pad:

Ranorex Studio is creating an executable build of the test and deploying it to the Agent machine. The green status bar shows the progress.
Test execution has started on the Agent machine. The status message shows which
test container is currently being executed and the clock symbol on the Run button
indicates a test in progress. You can abort the test with the Stop button at any time.
Test execution has finished.
The Agent returns to the idle state. Click the button with the page and the numbered symbol to display the run history for this Agent.
The numbered symbol indicates how many test runs were completed since last viewing the run history. The symbol’s color indicates the success status of the test run:
Green = successful test run.
Red = test run with at least one error.

If more than one test run is queued on the Agent, a blue number over the Run button shows
which test in the queue is currently being executed:
Run history
The run history provides detailed information about the test runs executed on an Agent.
Top open it:
Click the button View run history.
Filter categories for test runs. You can filter by success/error, test run initiator, and time.
List of executed tests in chronological order.
Clicking a run above displays details about it in this area.
From left to right: Opens the report, downloads the report from the Agent machine to the local machine, deletes the selected history entry.

Note
The run history of an Agent shows all tests executed on this Agent: for example,
even those that were not started from the remote pad, but from a command line
interface.
Run a test on an Agent through the command line
Aside from starting tests from the remote pad as explained above, you can also use a
command line interface to deploy tests to Agents, where they will then be run. This is especially useful for incorporating Agent-based test execution into your continuous integration process.
Reference
All command line arguments are listed in Ranorex Studio Expert > Runtime and
remote execution > ⇢ Command line execution
To run a test on an Agent via command line:
In Ranorex Studio, ⇢ create an executable build of your test.
On your source machine, start a command line interface and navigate to the executable build’s output folder.
Run the .exe file in the output folder with the argument /agent:<agent-name>.

Note
If you spell the Agent name incorrectly or if the Agent can’t be reached over the network, you’ll see a list of Agents available in the network. You can also bring
this list up with the argument /agent:?.
If the Agent is found, the following will happen automatically:
• The output folder is added to a ZIP file.
• The ZIP file is deployed to the Agent. • The test is executed on the Agent. • Progress of the test run is displayed in the command line interface.
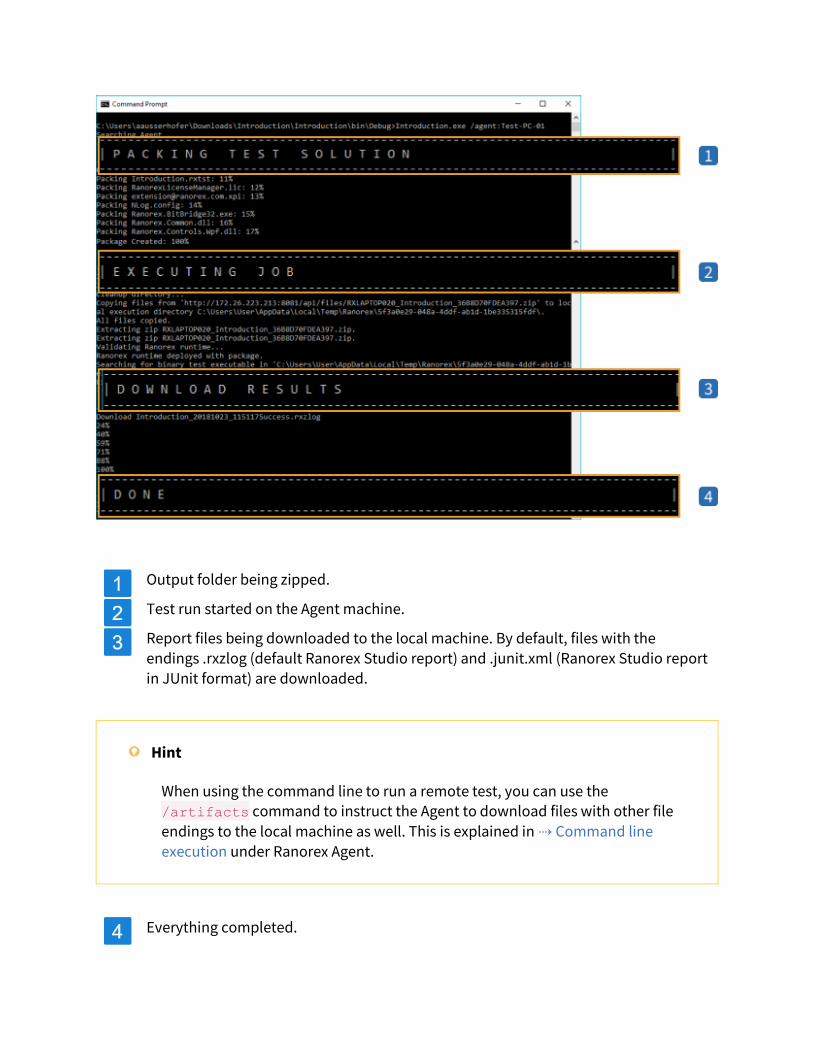
Output folder being zipped.
Test run started on the Agent machine.
Report files being downloaded to the local machine. By default, files with the
endings .rxzlog (default Ranorex Studio report) and .junit.xml (Ranorex Studio report
in JUnit format) are downloaded.
Hint
When using the command line to run a remote test, you can use the /artifacts command to instruct the Agent to download files with other file
endings to the local machine as well. This is explained in ⇢ Command line
execution under Ranorex Agent.
Everything completed.
Note
The test run will also appear in the run history of the Agent in the remote pad.
Troubleshooting and FAQ
This page collects helpful tips and troubleshooting advice for remote testing.
System requirements for remote testing
The machine you want to run a test on remotely must fulfill the ⇢ system requirements of the respective Ranorex Studio version you’re using.
However, in terms of software requirements, you only need to make sure your target system has the required .NET Framework installed.
Note
If you’re deploying a data-driven test with an Excel data connector and don’t
have or want to use an Excel license on the remote machine, refer to ⇢ Executing data-driven tests.
Ranorex Agent firewall settings
On a remote machine running a Ranorex Agent, the firewall must be configured to allow
access to TCP port 8081 and UDP ports 10000-10001.
Troubleshooting
Agent can’t be found/execution not working correctly
• Make sure the machine Ranorex Studio is running on is in the same network (subnet) as the remote machine the Agent is running on.
• Make sure the Agent is running in an active user session. Do not log off the user from the machine the Agent is running on.
• Ensure TCP port 8081 and UDP ports 10000-10001 are open on the remote machine.

• Check the Windows Event Log on the machine the Agent is running on for entries related to the Agent.
FAQ
Can I install a Ranorex Agent on a virtual machine?
Yes. The system requirements described above on this page apply.
You will likely also need to increase the global timeout values in the > ⇢ Recorder settings, as virtual machines are often slower. We can’t recommend an exact value, as the required increase depends mostly on your network.
Can I install more than one Ranorex Agent per Windows installation?
No. You can install only one Agent per Windows installation.
Which type of license do I need to run an executable build remotely?
You will need at least one Runtime Floating License. You have to ⇢ include the license
information in the executable build, so the Agent can lease the Runtime Floating License from the Ranorex License Manager when starting a test run.
If you don’t have a license, you can also install a free 30-day trial of Ranorex Studio on the
remote machine. However, you have to manually confirm the license each time you run a test.
Contact our Sales team for more information about licenses.
How many licenses do I need for remote test execution on a Ranorex Agent?
An Agent uses one Runtime Floating License while executing tests. When not executing tests (idling), no license is used.
How to overcome NAT issues
If the machine with the Ranorex Studio installation and the Agent machine aren’t in the same
network, the Agent may not automatically appear in your Agent list and you may not be able to manually add it using the IP address. This is because by default, machines do not have the routing information to connect to a machine outside their own network.
To overcome this issue, a network route has to be configured either on the gateways between the networks, or on each machine.

Below is an example solution.
In the image, our networks’ addresses start with 192.168.x.x. One has the gateway 192.168.2.1
(right), the other 192.168.3.1 (left). Both gateways share the subnet 192.168.1.x (middle). This subnet has the gateway 192.168.1.1 (top middle), which is connected to the internet.
The network of gateway 192.168.3.1 contains two computers. One of them has three virtual machines (VMs) running on it. All of the VMs have 192.168.3.x IP addresses.
The network of gateway 192.168.2.1 contains a router and two computers. They all have 192.168.2.x IP addresses.
Enable a route across gateways
If you ping ‘192.168.2.2’ (PC 2) from computer ‘192.168.3.6’ (VM C), then the request will time
out, unless you enable a proper route across the gateways. Assuming the 192.168.3.6 (VM C) is running Windows 7, type one of the following commands on 192.168.3.6 (VM C):
• route add 192.168.2.0 mask 255.255.255.0 192.168.1.2 metric 2 (add whole network to the route table) or
• route add 192.168.2.2 mask 255.255.255.0 192.168.1.2 metric 2 (add single computer to the route table)

Once the command has been entered, the ping/communication would successfully go from
192.168.3.6 (VM C) to 192.168.2.2 (PC 2), but 192.168.2.2 (PC 2) would still not be able to ping
192.168.3.6 (VM C). There are two workarounds to enable communication between these two networks:
• Set up a route on the gateways • Set up the route on the machines that need to communicate across networks
Consider gateway firewalls when setting up the routes, as they may block cross-traffic from
the machines. If this is the case, you will need a network admin to either set up the route on the gateway instead or to set up port forwarding to allow traffic through the firewall.
As most gateways behind corporate internet firewalls function as bridges, not much internal traffic is firewalled on the local network. To check if your connection is firewalled, try ‘tracert
192.168.2.2’. If stars ‘*’ appear in the ‘trace route’ instead of IP addresses, then either the connection went through the firewall, or it has been misdirected into the internet.
Note
For our example, we chose the standard subnet 255.255.255.0
You’ll need to confirm the subnet on either side of the gateways, and adjust your route setup commands as needed.
The route metric (last number in command) is assigned to a route and is used
to identify its priority – with 1 being of the highest priority. Usually network admins base the router metric on the amount of hops in a route, as the route
with the least hops is usually the best. As the route in our example contains two hops, our router metric is 2.
A route command is only persistent (will stay after reboot) if you add the ‘-p’
argument to it. Thus, you can easily try route commands at no risk beforehand, and simply reboot if you want to undo them. Once you’ve found the right route, you can make the commands persistent after reboot.
Guidelines for testing via remote desktop protocol (RDP)
You can test remotely via RDP connections. There are some limitations, however.

Running tests via RDP
You can run an executable build on a remote machine via RDP in the same way as without RDP. The procedure is the same as explained on the previous pages.
Recording tests via RDP
It is not possible to record tests via RDP with Ranorex Studio.
This is because the RDP window doesn’t allow Ranorex Studio, or other test automation tools, to identify UI elements as normal. Instead, only the RDP window is identified.
Mouse click action on the Submit button of the Ranorex Studio Demo Application in
an RDP window.
The resulting repository item doesn’t represent the button, but the entire image
displayed in the RDP window.
Standby
When the remote machine switches to standby mode, it disconnects from the network. This
also interrupts the RDP connection and therefore causes a currently running test to fail.
Disable standby mode on remote machines you want to run tests on via RDP, even if they’re connected to a power source.

Other people accessing the remote machine
When you connect to a remote machine via RDP, it’s locked to other users and they cannot
connect to it remotely without your agreeing to hand over the session first. However,
someone can still log in physically on the actual remote machine. This automatically interrupts the RDP connection and causes a currently running test to fail.
Keep user session alive after closing remote desktop connection
When you connect to a remote machine via RDP, deploy and start your test, and then
disconnect the remote session, your test will fail. This is because the current user session will be quit.
To keep the current user session active even if you’ve disconnected the RDP session:
On the remote machine, create a batch file and insert the following code:
for /f "skip=1 tokens=3 usebackq" %%s in (
`query user %username%`
) do (
%windir%\\\\System32\\\\tscon.exe %%s /dest:console
)
Save the batch file on the desktop of your remote machine and name it KeepSessionOpen.bat.

If you need to disconnect the RDP session, run the batch file with administrator
privileges and your remote machine will remain unlocked.
Note
• This can make your remote machine vulnerable as an essential security
feature is disabled. We recommend you do not store any sensitive
information on the remote machine if you use this feature.
• If you end the RDP session while a test is running, the remote machine may change to a different screen resolution. This can cause a test failure.