livestream studio manual
732
LIVESTREAM STUDIO MANUAL
-
Upload
khangminh22 -
Category
Documents
-
view
1 -
download
0
Transcript of livestream studio manual

LIVESTREAM STUDIO MANUAL

Table of Contents Table of Contents
Requirements & Recommendations ............................................................................................ 10
Recommended Hardware Specifications for Livestream Studio .............................. 11
Supported Capture Devices for Livestream Studio ......................................................17
Installing or Updating Blackmagic Design Desktop Video Drivers .......................... 23
What Cameras Work with Livestream Studio? .............................................................. 25
Power Requirements for Livestream Studio Hardware Products ............................ 26
Forcing Windows PC to Run Maximum Amount of Cores ....................................... 27
Recommended Power Settings For Running Studio on a Windows Laptop ....... 32
Fix Font Sizing Issues in Windows 10 .............................................................................. 36
Prevent Automatic Windows Updates ............................................................................ 39
Prevent Windows Update Sharing ...................................................................................44
MacOS Mojave Permission Requirements for Studio ................................................. 47
Can I Run Anti-Virus Software on my Studio Computer? .........................................49
Getting Started with Livestream Studio .......................................................................................50
What is Livestream Studio? .................................................................................................51
How To Access Livestream Studio .................................................................................. 53
Demo Livestream Studio Before Buying ........................................................................ 55
How to Install Livestream Studio ..................................................................................... 57
Using the Livestream Studio USB Dongle ......................................................................62
What Happens If I Lose My Studio Dongle? ..................................................................64
Log Into Livestream Studio via a Subscription ..............................................................65
Arranging & Simplifying the Livestream Studio Interface ...........................................66
Studio: First Steps ................................................................................................................. 74
Creating, Importing, and Exporting Projects ................................................................. 76
Importing & Exporting Projects via Dropbox ................................................................84
2

Video Inputs ........................................................................................................................................93
Connect Cameras to Your Studio PC or Mac ..............................................................94
Setting Your Project Format ............................................................................................ 107
Using 4K Project Formats ................................................................................................ 110
Using Standard Definition-only Formats .......................................................................112
Adding Input Sources .........................................................................................................115
Screen Capturing with Livestream Studio ................................................................... 122
Using the DeckLink Studio 2 and Similar Cards ......................................................... 125
Using the DeckLink Mini Recorder ................................................................................ 127
Configuring Input Settings ............................................................................................... 128
Using PTZ Cameras with Livestream Studio ............................................................... 134
Converting Input Sources of Different Formats ......................................................... 142
Advanced Input Source Cropping ................................................................................. 144
Color Correction in Livestream Studio ......................................................................... 150
Using the Color Source Generator ............................................................................... 164
Switching Controls .......................................................................................................................... 166
Using Livestream Studio's Simple Interface ................................................................. 167
Introduction to Multi-View & Preview/Program Switching ..................................... 174
Using a Mouse to Switch Preview and Program .........................................................177
Configuring a Keyboard to Use with Livestream Studio ..........................................190
Using External Multi-Screen with Livestream Studio ................................................ 194
3

Audio Workflow .............................................................................................................................. 200
Adding Audio Sources ....................................................................................................... 201
Monitoring Audio in Livestream Studio ....................................................................... 204
Controlling the Audio Mixer ........................................................................................... 209
Multi-Language Audio ....................................................................................................... 221
Fold Audio Channels Into Mono ....................................................................................229
Audio Filters ......................................................................................................................... 231
Using HD550 Direct Audio Inputs .................................................................................239
Using the Studio One Audio Inputs and Outputs ......................................................242
Using Line In Audio Sources with the HD550 ............................................................ 251
Outputting & Recording ................................................................................................................252
Setting Up a Video Output ...............................................................................................253
Configuring Auxiliary Outputs .........................................................................................256
Set up High-Resolution & ISO Recordings in Livestream Studio ...........................263
ISO Recording Best Practices ........................................................................................ 268
Recording Options in Livestream Studio .....................................................................270
4

Streaming .......................................................................................................................................... 281
Choose a Streaming Quality in Livestream Studio ....................................................282
Streaming to Vimeo via Livestream Studio ..................................................................287
Stream to a Scheduled Event on Vimeo via Studio ...................................................293
Streaming to Livestream with Livestream Studio .......................................................297
Streaming to Facebook Live via Livestream Studio ...................................................303
Stream to a Scheduled Live Post on Facebook via Livestream Studio ................. 313
Stream to a Facebook Group via Livestream Studio ..................................................317
Stream to Twitter & Periscope via Livestream Studio ............................................... 319
Streaming to YouTube via Livestream Studio ..............................................................324
Stream via RTMP, RTMPS, Zixi, and UDP from Livestream Studio .........................329
Streaming to IBM Video (Ustream) ................................................................................334
Streaming to Twitch via Livestream Studio ..................................................................335
Stream to Multiple Providers Using Livestream Studio ............................................. 341
Studio Log and Streaming Information ........................................................................352
Advanced Streaming Settings in Livestream Studio ..................................................354
Can Livestream Studio Stream to Facebook Workplace? .......................................356
5

Graphic Overlays ............................................................................................................................. 357
Adding Graphics Overlay Tracks .....................................................................................358
Mixing Graphics Overlays into Program .......................................................................374
Using the Tie Controls ..................................................................................................... 384
Importing Livestream Graphics Files ............................................................................ 390
Importing Excel Spreadsheets and .CSV Files .............................................................394
Using RSS Feeds ................................................................................................................ 403
Integrating Google Spreadsheets ................................................................................. 409
Importing a Twitter Feed into Livestream Studio ....................................................... 417
Display Facebook Comments via Livestream Studio ................................................423
Display YouTube Comments via Livestream Studio .................................................. 431
Using a .CSV Over HTTP ..................................................................................................437
Livestream Studio Certified Data Sources ...................................................................443
Display a Webpage in Livestream Studio .................................................................... 448
Building a Picture-in-Picture Graphic ............................................................................455
Building a Clock or Timer ................................................................................................465
Importing Animated Graphics ........................................................................................ 480
Media Playback ............................................................................................................................... 485
Configuring Media Playback Settings .......................................................................... 486
Media Playback Supported Video Formats ................................................................. 490
Importing Videos into the Media Playback Module ................................................. 494
Use Dropbox to Import Video Files .............................................................................. 496
Controls & Options in Livestream Studio Media Bin .................................................505
Basic Video Replay While Recording ............................................................................ 510
Exporting Clips from Livestream Studio ....................................................................... 513
6

Remote Cameras ............................................................................................................................ 515
Activating Bonjour Service for Remote Camera Sources ........................................ 516
Overview of Studio Remote Camera Options ............................................................520
Using the Remote Desktop Client for Windows ........................................................523
Using the Remote Desktop Client for macOS ...........................................................529
Adding a Remote Live Interview .....................................................................................536
NewTek NDI Integration in Livestream Studio ............................................................543
Using Mevo as a Remote Camera .................................................................................555
Connect Mevo to Studio via IP .......................................................................................562
Best Practices for Mevo as a Remote Camera Source ............................................565
Bringing a Broadcaster Signal into Livestream Studio ..............................................569
Bringing an iOS Camera Signal into Livestream Studio ...........................................576
Bringing an Android Camera Signal into Livestream Studio .................................. 580
Bringing Other Streams into Livestream Studio .........................................................587
Setting Up Studio as an RTMP Server ........................................................................... 591
Uninstall Mac OS X Remote Camera and Audio Redirector .................................. 604
Web Control .....................................................................................................................................607
What is Studio Web Control? ......................................................................................... 608
Add a User to Studio Web Control ................................................................................ 614
Supported Browsers and Devices for Studio Web Control .....................................618
Using Graphics Overlays in Studio Web Control .......................................................619
Media Playback in Web Control ..................................................................................... 631
Studio Simulcasting via Web Control ............................................................................634
7

Advanced Features ..........................................................................................................................643
Using Chroma Key ............................................................................................................ 644
Hardware Encoding and Decoding with Livestream Studio ...................................654
How Do I Know if My Intel Processor Includes Quick Sync? .................................659
How Do I Know if My GPU Supports NVENC and NVDEC? ...................................662
Using a Bonded Network to Stream ............................................................................ 666
Configuring Mid-Roll Advertisements ...........................................................................670
Adding & Configuring Tally Lights ..................................................................................673
Create a Backup Stream to Livestream ........................................................................676
Enabling Closed Captioning Ingestion .........................................................................679
Changing Language in Livestream Studio to Chinese ............................................ 682
Import & Export Recorded Files Using Adobe Premiere Pro ................................. 684
Import & Export Recorded Files Using Final Cut Pro 7 ........................................... 685
8

Troubleshooting .............................................................................................................................. 686
Troubleshooting Steps: Not Seeing Input Source .....................................................687
Incorrect Order of Inputs .................................................................................................691
Livestream Studio Not Fitting Within Screen ..............................................................697
Can't Access Studio From Login Window .................................................................. 699
My Studio PIN Is Invalid. What Do I Do? ..................................................................... 700
Studio Takes Longer than One Minute to Launch ..................................................... 701
Studio Recording Does Not Play Back .........................................................................702
"Recorder Error" in Livestream Studio ...........................................................................703
Remote Cameras and Direct Inputs out of Sync .......................................................704
Unable to Log In to Google Sheets ...............................................................................707
Send Studio Logs to Livestream .....................................................................................709
How to Use the Studio USB Recovery Drive .............................................................. 712
Studio Software Crashes From Launch ........................................................................ 718
Network Resource Unavailable When Installing Studio ........................................... 719
What is Livestream Studio's Warranty? ......................................................................... 721
Uninstall Blackmagic Design Desktop Video Drivers ................................................ 722
Uninstalling Livestream Studio ........................................................................................ 725
Uninstalling Livestream Studio Beta ..............................................................................729
9

Requirements & Requirements & Recommendations Recommendations
10

Recommended Hardware Specifications Recommended Hardware Specifications for Livestream Studio for Livestream Studio
Below are the recommended hardware specifications for running Livestream Studio, including
example workflows that each system type can handle.
Please note that many of these scenarios involve using Livestream Studio's hardware encoding feature.
This is when the encoding is done either by a supported graphics card or in a processor that has
integrated graphics.
11

Desktop Computer with Hardware Encoding Enabled Desktop Computer with Hardware Encoding Enabled
Hardware Component Hardware Component Recommended Minimum Desktop (with Recommended Minimum Desktop (with
Hardware Encoding) Hardware Encoding)
Processor with Integrated Graphics Quad Core Intel® i5 (6th Generation) or i7 (4th
Generation) Processor or better
Graphics Quick Sync-enabled CPU or NVIDIA NVENC-
enabled GPU
Memory 8 GB or better
Storage 128GB SSD + 512GB HDD or better
Motherboard Intel compatible motherboard
Example of a supported workflow • Camera sources: Multiple HD inputs &
outputs
• Streaming: Up to 1080p multi-bitrate
streaming profiles
• Graphics: Intermediate graphics templates
and layering with picture-in-picture, chroma
key, and image overlays
12

Desktop Computer without Hardware Encoding Desktop Computer without Hardware Encoding
Hardware Component Hardware Component Recommended Specifications (no hardware Recommended Specifications (no hardware
encoding) encoding)
Processor 6 (Hexa) Core Intel® i7 5th Generation Extreme
Edition or better
Graphics NVIDIA GeForce 600 Series or better
Memory 16GB or better
Storage 2TB SSD
Motherboard Intel compatible motherboard
Example of a supported workflow • Sources: Multiple HD Inputs/Outputs
• Streaming: Up to 720p multi-bitrate streaming
oror single-bitrate 1080p streaming
• Graphics: Intermediate graphics templates
and layering with picture-in-picture, chroma
key, and image overlays
13

Advanced Desktop Computer with Hardware Encoding Advanced Desktop Computer with Hardware Encoding
Hardware Component Hardware Component Recommended Desktop Specification Recommended Desktop Specification
Processor 6 (Hexa) Core Intel i7 6th Generation Extreme
Edition or better
Graphics NVENC enabled NVIDIA GPU (Such as Nvidia
Geforce GT 730)
Memory 32-64GB DDR4 Memory
Storage 2TB SSD
Motherboard Intel compatible motherboard
Example of a supported workflow • Sources: Multiple 4K / HD Inputs and Outputs
• Streaming: 4K / 1080p multi-bitrate streaming
• Graphics: Advanced graphics templates and
layering with picture-in-picture, chroma key,
and animated graphic overlays
14

Minimum Laptop with Hardware Encoding Minimum Laptop with Hardware Encoding
Hardware Component Hardware Component Minimum Laptop Specification (with Hardware Minimum Laptop Specification (with Hardware
Encoding) Encoding)
Processor with integrated graphics 4 (Quad) Core Intel i5 - 6th Generation or better
Memory 8GB or better
Graphics Quick Sync enabled CPU or NVIDIA NVENC
enabled GPU
Storage 500GB HDD (SSD preferred) or better
Example of a supported workflow • Sources: USB Webcams, USB 3.0 Capture
devices and Remote Cameras over LAN/
WLAN
• Streaming: Up to 720p multi-bitrate streaming
• Graphics: Simple grahpics templates with
picture-in-picture and static overlays (no
chroma key, no animated graphics)
15

Advanced Laptop with Hardware Encoding Advanced Laptop with Hardware Encoding
Hardware Component Hardware Component Advanced Laptop specification (with hardware Advanced Laptop specification (with hardware
encoding) encoding)
Processor with integrated graphics 4 (Quad) Core Intel i7 - 6th Generation or better
Graphics Quick Sync enabled CPU or NVIDIA NVENC
enabled GPU
Memory 16 GB DDR4 Memory or better
Storage 500 GB SSD or better
Example of a supported workflow • Sources: USB Webcams and USB 3.0 Capture
devices
• Streaming: Up to 1080p Multi-bitrate
streaming profiles..
• Graphics: Intermediate Graphics templates
and layering w/ PiP, Chroma Key, and image
overlays.
Additional Notes Additional Notes
• Livestream Studio is not compatible with Windows 32-bit systems.
• macOS must be on HighHigh Sierra or laterSierra or later in order to run Studio.
• If you intend to use USB 3.0 capture devices for any video input or output, we recommend your
motherboard have an Intel X99 chipset, as X79 chipsets do not support these USB 3.0 devices. Please
see Blackmagic's notice regarding USB 3.0 device support.
16

Supported Capture Devices for Livestream Supported Capture Devices for Livestream Studio Studio
Here is a full list of supported capture devices:
PCIe
- **Blackmagic Decklink SDI
- Blackmagic DeckLink SDI 4K
- **Blackmagic DeckLink Duo
- Blackmagic DeckLink Duo 2
- **Blackmagic DeckLink Quad
- Blackmagic DeckLink Quad 2
- **Blackmagic DeckLink Optical Fiber
- **Blackmagic DeckLink Studio
- Blackmagic DeckLink Studio 4K
- **Blackmagic DeckLink HD Extreme 3D
17

- Blackmagic DeckLink 4K Extreme
- Blackmagic DeckLink 4K Extreme 12G - Quad SDI
- Blackmagic DeckLink 4K Pro
- Blackmagic DeckLink Mini Recorder (capture only)
- Blackmagic DeckLink Mini Monitor (playback only)
- Blackmagic Intensity Pro 4K
- Blackmagic DeckLink Mini Recorder 4K (capture only)
- Blackmagic DeckLink Mini Monitor 4K (playback only)
- Blackmagic DeckLink SDI Micro
- Blackmagic DeckLink Micro Recorder (capture only)
- **Magewell Pro Capture AIO
- **Magewell Pro Capture HDMI
- **Magewell Pro Capture Quad HDMI
- **Magewell Pro Capture SDI
18

- **Magewell Pro Capture Quad SDI
- **Magewell Pro Capture Mini HDMI
- **Magewell Pro Capture
- **Magewell Eco Capture Dual HDMI M.2
- **Magewell Eco Capture Dual SDI M.2
- **Magewell Eco Capture 4K M.2
- **Magewell Eco Capture SDI M.2
**Drivers for Magewell Pro cards can be downloaded here; Magewell Eco drivers can be downloaded
here.
****Indicates this product has been discontinued. However, it is still compatible with our software if you
already own it.
Thunderbolt
- Blackmagic UltraStudio Mini Recorder (capture only)
- Blackmagic UltraStudio Mini Monitor (playback only)
- **Blackmagic UltraStudio 3D
19

- Blackmagic UltraStudio 4K
- Blackmagic UltraStudio 4K Extreme
- Blackmagic UltraStudio 4K Extreme 3
- **Blackmagic UltraStudio Express
- Blackmagic Intensity Shuttle for Thunderbolt
- **Blackmagic Intensity Extreme
****Indicates this product has been discontinued. However, it is still compatible with our software if you
already own it.
Please make sure you are plugging Thunderbolt capture devices into a ports that have a
Thunderbolt logo; oftentimes, these can be confused with display ports.
USB 3.0
- Blackmagic Intensity Shuttle for USB 3.0
- ****Blackmagic UltraStudio Pro
- ****Blackmagic ATEM 1 M/E Production Switcher
20
- ****Blackmagic ATEM 2 M/E Production Switcher
- Magewell USB Capture HDMI
- Magewell USB Capture SDI
****Indicates this product has been discontinued. However, it is still compatible with our software if you
already own it.
The Blackmagic UltraStudio SDI is not supported.
Blackmagic USB 3.0 encoding devices are not supported on all machines. In particular,
motherboards with an Intel X79 chipset do not support Blackmagic USB 3.0 devices. Please
see Blackmagic Design's notes about USB 3.0 system requirements.
Studio does not utilize the individual inputs on the ATEM production switchers. Studio can
ingest the output from these production switchers via USB 3.0.
USB Webcam Adapters
These devices will allow your computer to recognize your camera similarly to how it would recognize a
webcam. Studio generally recognizes most webcams. We have tested the following:
- Blackmagic Web Presenter
- Elgato Cam Link
21

• The following formats did notnot work: 720p 30, 720p 29.97, 720p 25 and 1080p/720p 23.98, all
interlaced formats
- Elgato Cam Link 4K
• The following formats did notnot work: 720p 30, 720p 29.97, 720p 25 and 4k/1080p/720p 23.98
If you are using an Elgato device, please check their website for supported cameras.
The following Blackmagic Design products The following Blackmagic Design products do notdo not work with Livestream Studio: work with Livestream Studio:
- H.264 Pro Recorder
- ATEM Television Studio
- ATEM Production Studio 4K
- ATEM 1 M/E Production Studio 4K
- ATEM 2 M/E Production Studio 4K
- ATEM 2 M/E Broadcast Studio 4K
If you would like to connect one of the ATEM 4K switchers to Studio, it is recommended to utilize one of
their video outputs (HDMI, SDI, etc.) into a Blackmagic Capture device that Studio does support.
Once you have a capture card(s) connected to your computer, be sure to install the Blackmagic drivers.
22

Installing or Updating Blackmagic Design Installing or Updating Blackmagic Design Desktop Video Drivers Desktop Video Drivers
Blackmagic Design Desktop Video is the driver that is required in order for Livestream Producer and
Livestream Studio software to recognize video inputs coming in through a Blackmagic Design Blackmagic Design
capture devicecapture device. If you are having an issue seeing your camera source, it could be an issue with the
current version of the drivers you have installed.
If you currently have another version, you should first uninstall that version and then install the
recommended Desktop Video version.
We generally recommend using the most recent version of Desktop Video. However, if you are on
Windows 10 Pro version 1709Windows 10 Pro version 1709, we recommend downloading Desktop Video 10.9.5. 10.9.5.
Go to http://www.blackmagicdesign.com/support. Under Select a Product Family,Select a Product Family, choose Capture and Capture and
PlaybackPlayback.
23

Below on the left side is a column called Latest DownloadsLatest Downloads. Find the desired version of Desktop VideoDesktop Video,
and select the operating system you are using (Mac or Windows).
You will be prompted to register. This step is optional. You may skip it by clicking 'DownloadDownload OnlyOnly' in the
bottom left corner.
When the download is complete, open the .zip folder and run the installer.
Follow the on-screen steps, then restart your computer to complete the installation.
24

What Cameras Work with Livestream What Cameras Work with Livestream Studio? Studio?
Livestream Studio is compatible with USB webcams, consumer HDMI camcorders, and higher end
HD-SDI cameras. Older cameras can also connect via component, composite, and S-Video
provided you have the proper video capture cards to connect them to your PC.
USB Webcams are ideal for very localized use, as most webcams' cables do not extend beyond six feet.
HDMI cameras range in size and cost and work best for shorter distances. While longer HDMI cables are
available, we recommending staying below 20 feet to retain optimal video quality.
HD-SDI cameras are much pricier but can be worth the cost if your production requires long cable runs.
SDI cables can transmit audio & video over hundreds of feet without losing video quality.
Livestream Studio does support 4K camera inputs, provided that you install a 4K compatible capture
card. Please be advised that not all providers support streaming in 4K at this time.
A Note Regarding PTZ Cameras A Note Regarding PTZ Cameras
If you wish to use a PTZ camera with Livestream Studio, it must either include a video output interface
(e.g. SDI) or be NDI compatible. If your PTZ camera does not include either of these specifications, then
it will not work with Livestream Studio.
360 Cameras 360 Cameras
Livestream Studio does not support 360 cameras and video formats at this time.
25

Power Requirements for Livestream Studio Power Requirements for Livestream Studio Hardware Products Hardware Products
The power required to run Livestream Studio will be dependent on the type of system you are running
the software on.
The HD51, HD510, and HD550 have the following power requirements:
• 230 / 110 Volts
• Approximately 500 watts running at full capacity
26

Forcing Windows PC to Run Maximum Forcing Windows PC to Run Maximum Amount of Cores Amount of Cores
To optimize your computer's performance when using Livestream Studio, we recommend forcing
your system to use its maximum amount of cores (usually four or six; the below example has eight).
This does not apply to macOS systems.
Open the Windows start menu and type "RunRun," then open the Run desktop app.
Type msconfigmsconfig into the text field, then click OK.
27

This window will open up. Navigate to the BootBoot tab.
Click Advanced options... Advanced options...
28

Check Number of processorsNumber of processors to enable the dropdown menu.
Select the highest number of processors your system has (in this case, 8). Then click OK.
29

Apply the settings, then click OK.
You will be advised that you may need to restart your computer to apply your settings. We recommend
doing so before launching Studio to ensure the settings have taken effect.
30

31

Recommended Power Settings For Recommended Power Settings For Running Studio on a Windows Laptop Running Studio on a Windows Laptop
There are some settings in Windows to help optimize Studio's performance when activating
hardware encodinghardware encoding. .
This does not apply to macOS systems.
Go to the Start Menu and navigate to Power OptionsPower Options. (This can also be found within the Control Panel.)
Click the dropdown arrow next to Show additional plansShow additional plans.
32

High performanceHigh performance will appear as an option. Click the corresponding radio button to select it. After doing
so, click Change plan settingsChange plan settings.
Under Turn off the displayTurn off the display, select NeverNever.
33

Under Put the computer to sleepPut the computer to sleep, select NeverNever.
Click Save changesSave changes.
34

35

Fix Font Sizing Issues in Windows 10 Fix Font Sizing Issues in Windows 10
Scaling Windows font to 100% will make it easier to use Studio with Windows 10.
Navigate to WindowsWindows SettingsSettings.
Select SystemSystem.
36

Select DisplayDisplay, and drag the scale all the way to the left so it reads 100%. Then click ApplyApply to save the
settings, which will then take effect immediately.
37

38

Prevent Automatic Windows Updates Prevent Automatic Windows Updates
The last thing you want right before or during an event is to be forced to update Windows, which
could postpone your setup or interrupt your stream. While there is no way to turn off updates
entirely, you can configure Windows settings to run updates only at certain times.
Since macOS does not automatically restart or force updates, this article only applies to
Windows systems.
Open the StartStart menu and click the gearwheel to open SettingsSettings.
Select Update & securityUpdate & security.
39

Under the Windows UpdateWindows Update tab, click Change active hoursChange active hours.
40

You can choose a 12-hour time range during which Windows will not automatically update. If an update
becomes available during that time frame, a notification will appear letting you know that your computer
will restart outside of active hours.
41

If you do see the notification and feel your event is going to run longer, you can select Restart Options Restart Options
and tell Windows when to restart your computer to install updates.
42

43

Prevent Windows Update Sharing Prevent Windows Update Sharing
Included with Windows 10 is the ability to send and receive software updates from other nearby
PC's automatically. While this may be convenient in other use-cases, it can take up bandwidth and
CPU resources that you would rather preserve for Livestream Studio, so we recommend disabling
this feature while using Studio.
This does not apply to macOS systems.
Open the Start menu and type in Windows Update settingsWindows Update settings. When this option appears in the menu,
select it.
Under the Update settingsUpdate settings section, select Advanced optionsAdvanced options.
44

Scroll down to the bottom of the window to the Pause UpdatesPause Updates section and select Choose how updates Choose how updates
are deliveredare delivered.
Toggle the switch to OffOff.
45

46

MacOS Mojave Permission Requirements MacOS Mojave Permission Requirements for Studio for Studio
If you are using Livestream Studio on macOS Mojave, we recommend checking your Security &
Privacy settings to ensure that Studio can run and all your video and audio sources are properly
recognized.
In System PreferencesSystem Preferences, navigate to Security & PrivacySecurity & Privacy. Select the PrivacyPrivacy tab in the window that opens.
There are three permissions you will need to ensure has Livestream Studio enabled: CameraCamera,
MicrophoneMicrophone, and AccessibilityAccessibility. Highlight each of these and make sure Livestream StudioLivestream Studio is checked.
These permission settings do not apply to earlier versions of macOS.
47

48

Can I Run Anti-Virus Software on my Studio Can I Run Anti-Virus Software on my Studio Computer? Computer?
Running anti-virus software that includes real-time protection while using Livestream Studio can use up
CPU resources and possibly even interrupt your stream's connection.
As a best practice, anti-virus software, Windows Firewall, and similar real-time protections should be
disabled while you are running Livestream Studio, and if possible, your system should be dedicated to
just using Studio. Do not download files from sources you do not trust onto your Studio computer.
49

Getting Started with Getting Started with Livestream Studio Livestream Studio
50

What is Livestream Studio? What is Livestream Studio?
Livestream Studio is a live production switcher that incorporates many elements of a professional
live multi-camera production into one desktop software. Think of it as a live production truck or a
TV station's master control room on your computer.
Its most basic features include:
• Connect multiple camera inputsConnect multiple camera inputs: Plug in your cameras directly into your PC to get as many angles as
you need.
• Live video outputsLive video outputs: Output your video to projectors or monitors; ideal for auditoriums, conferences,
and houses of worship.
• Three graphics overlay tracksThree graphics overlay tracks: Build graphics (GFX) overlays to countdown to your event start, identify
people, loop tweets using your event hashtag, or display a scoreboard.
• Media playback modulesMedia playback modules: Bring in pre-recorded video clips to incorporate into your production, such
as sponsored content or montages.
• Built-in audio mixer and audio filtersBuilt-in audio mixer and audio filters: Embed audio from your cameras or connect a USB mixer or
microphone and control all the audio for your event directly from Studio.
• Capture up to four high-resolution isolated (ISO) recordingsCapture up to four high-resolution isolated (ISO) recordings: Record your event or individual camera
angles in broadcast quality for post-production editing or replay.
• Basic replayBasic replay: Playback an ISO recording as your broadcast is happening, giving viewers a different
angle of your event (e.g. a goal score).
• Chroma keyChroma key: Eliminate a colored background to incorporate different background images into your
event (e.g. a weather map, virtual studio)
• Stream to Vimeo and other providersStream to Vimeo and other providers: Go live to Vimeo, Livestream, Facebook, YouTube, Periscope,
Twitch, and more. Choose one or stream to multiple simultaneously.
Studio supports up to three (3) GFX tracks, eight (8) audio-only sources, and one (1) interview. All other
sources (local inputs, remote cameras, media bins, RTMP inputs, etc.) are flexible, and all inputs may
total up to 50.
What Equipment Do I Need In Order to Use Livestream Studio?
51

First and foremost, you need cameras. Studio is compatible with most SDI, HDMI, component,
composite, S-video, and USB web cameras that output broadcast standard formats. If you do not own
any cameras and need some suggestions, we have some here. Keep in mind you will also need the
proper cables to output these cameras' video signals into Studio (HD-SDI camera = HD-SDI cable, etc.)
Next, you need to be able to connect these cameras to the computer that is running Studio. This is
done using a capture devicecapture device. These can connect to your computer via PCIe, USB 3.0, or Thunderbolt,
and convert your camera's video into a signal your PC can read. Read more about what a capture device
is and which capture devices Livestream Studio supports.
With few exceptions, you will need one capture device per camera. Webcams do not require a capture
device.
Finally, you need a PC running Windows 64-bit version 7 or later or macOS High Sierra or later.
Studio requires a robust computer in order to run with all of its features successfully. We have a
comprehensive guide of recommended hardware specifications depending on your workflow needs.
If you have already purchased a Livestream Studio hardware product (e.g. HD31, HD51,
HD550), capture devices are already built into your machine. There is no need to purchase
additional capture devices or an additional PC.
How Do I Get Livestream Studio?
Get started with a demo or learn how to access Studio.
52

How To Access Livestream Studio How To Access Livestream Studio
Full access to two (2) licenses of Livestream Studio is available with a Vimeo PremiumVimeo Premium membership
or a paid Livestream account.
Download Livestream Studio on your Windows or Mac computer. Follow the on-screen steps to install
the software, after which it will automatically launch.
Studio will prompt you to log into either a Livestream or Vimeo account. If you do not have an account,
you can sign up for either by clicking the desired provider at the bottom of the prompt.
Once your account is created and paid for, you may then log into Studio using your account credentials.
Studio will indicate that your full access has been unlocked.
A few things to note:
• Because Studio needs to authenticate your login, you will need an internet connection to access the
software. If you lose your internet connection, you can continue to use Studio offline for up to 24
hours before being required to reconnect.
• While Livestream Studio has the ability to stream to various providers, a paid Livestream account does
not allow you to stream to Vimeo, and a Vimeo Premium account does not include the ability to
stream to Livestream.
53

• If you purchased a Livestream Enterprise account, you will have a phone support PIN for the length
of your membership. Phone support is not available with Vimeo Premium.
54

Demo Livestream Studio Before Buying Demo Livestream Studio Before Buying
There is a short demo option with Livestream Studio that allows you to try the software prior to
purchasing.
Download and install Livestream Studio. When the installation is complete, the software will launch and
you will see the following screen.
A demo of Studio is available by signing up for Vimeo. Signing up for Vimeo gives you access to a
10-minute live demo. This means you have full access to Livestream Studio and may broadcast for a
total of 10 minutes before the demo expires.
A countdown of your demo time remaining will appear when you navigate to the StreamStream tab and hover
the cursor over the Vimeo icon at the bottom of the interface.
All video recordings and outputs will include a watermark during this demo period.
Your demo will expire after you have streamed for a total of 10 minutes.
55

To continue using Livestream Studio when your demo expires, you will need to purchase a subscription.
56

How to Install Livestream Studio How to Install Livestream Studio
Livestream Studio software can be downloaded onto a Windows or Mac computer from
livestream.com/studio by clicking on the DownloadDownload to Get Startedto Get Started and selecting the operating system
you are using: Windows or Mac.
If you are using Windows, you must be logged in as an Admin user in order to install and run
Livestream Studio. You will also need an Internet connection for this entire process.
If you purchased a Livestream Studio hardware product (HD31, HD51, HD550, etc.),
Livestream Studio software is already pre-installed on your unit.
Installing on Windows Installing on Windows
The download will begin automatically. Open the .exe file.
It will bring you to the installation wizard for the Livestream Studio Launcher.
57

Agree to the license terms and follow the on-screen steps to complete the installation process, then
click FinishFinish in the wizard.
58

The Livestream Studio Launcher will open, download the Studio software, and prompt you to install the
software via another installation wizard.
59

When the installation is finished, the most recent version of Livestream Studio will launch on your
system.
Installing on Mac Installing on Mac
After the .pkg file downloads, click it to open it. The install wizard will open. Follow the on-screen steps
to complete the installation. Upon completion, Livestream Studio will launch automatically.
60

61

Using the Livestream Studio USB Dongle Using the Livestream Studio USB Dongle
If you made a one-time purchase of Livestream Studio for your own Windows computer, you will
receive a USB dongle which will give you access to your full Studio license.
You should first download and install the Studio software onto your PC.
By plugging this dongle into a USB 2.0USB 2.0 port, you'll be able to access all of the paid features of Livestream
Studio without the need for a paid Livestream or Vimeo Premium account.
The dongle must be connected to your PC at all times while using Livestream Studio in order to use the
software. If you have multiple computers that require full access to Livestream Studio simultaneously,
then you will need one dongle per system.per system.
Additional Notes about Using the Dongle Additional Notes about Using the Dongle
• The Studio Dongle is The Studio Dongle is notnot compatible with MacOS systems; you must use it with a Windows compatible with MacOS systems; you must use it with a Windows
computer. computer.
• The Studio Dongle does notnot include the ability to stream to the Livestream Platform; if you wish to
use Livestream as your streaming destination, you will need to purchase a Livestream subscription.
• Livestream Studio hardware units (HD31, HD51, HD550, etc.) do not require an additional software
dongle. The license will already be unlocked when you launch Livestream Studio on those systems.
• We urge you to keep your Studio dongle in a safe place. If you are building a custom computer to
run Studio, consider building it so that the dongle is on the inside of the unit.
62

• We do not support plugging the USB dongle into the USB 3.0USB 3.0 port due to inconsistent results. If you
have done this and were able to load Studio successfully, please let us know by contacting us and
providing your system's hardware specifications.
63

What Happens If I Lose My Studio Dongle? What Happens If I Lose My Studio Dongle?
Per Livestream Studio terms, if your Studio USB dongle is lost or stolen, you are responsible for reporting
the loss and may be charged a replacement fee.
We urge you to keep your Studio dongle in a safe place. If you are building a custom computer to run
Studio, consider building it so that the dongle is on the inside of the unit.
64

Log Into Livestream Studio via a Log Into Livestream Studio via a Subscription Subscription
If you have already purchased a Livestream or Vimeo Live subscription, you also have full, unlimited
access to two (2) Livestream Studio licenses. This means you can run Livestream Studio on two
separate systems using your account login.
After you have installed and launched the Livestream Studio software, a welcome window will pop up
prompting you to log in via Livestream or Vimeo. Select the provider you are using to log in.
If you select Livestream, enter your email and password in the next window, then select Log In With Log In With
EmailEmail. If you select Vimeo, a browser window will open. If you are already logged into a Premium
account, you will then be logged into Studio. Otherwise, enter your account credentials to log in.
Please be advised that subscription access to Livestream Studio will require an internet
connection in order to log in. Offline access is available for up to 24 hours after you log in
before you are prompted to reauthenticate.
65

Arranging & Simplifying the Livestream Arranging & Simplifying the Livestream Studio Interface Studio Interface
While Livestream Studio maintains a generally consistent layout, there are a few ways you can
customize the interface to best fit your needs.
Select Your Interface Mode Select Your Interface Mode
When you first log into Livestream Studio, you will be given the option to Choose a ModeChoose a Mode, as shown
below.
SimpleSimple is ideal for beginners and producers with smaller workflows (1-2 cameras, few graphics, some
video playback). This will display one Output window and a multiview where you will click each source
to select what is shown in the Output. By default, this mode displays a single column of producer tool
66

tabs (e.g. Audio Mixer, Graphics, Media, etc.). Selecting Simple will quickly remove a lot of clutter from
the Studio interface that smaller scale productions may not need.
AdvancedAdvanced is best for producers with larger scale workflows (multiple camera inputs, multiple graphics
channels, picture-in-picture, etc.). This features the traditional Preview/Program monitor setup and
transition controls normally used in a multi-camera production, in addition to two columns of producer
tool tabs by default so you can see more on your screen.
Select one, then click Create New ProjectCreate New Project to start using Studio.
You can easily switch your project from one mode to the other by clicking the interface icon in the
upper right corner and choosing your interface mode.
Most demonstrations will feature the interface in Advanced mode. Instructions on how elements specific
to Simple Mode work are available here.
Resize Three Main Sections Resize Three Main Sections
Studio's interface consists of the Preview & Program or Output monitors on top, the multi-view in the
middle, and production element modules on the bottom third of the interface. This general layout
cannot change, but you do have the ability to adjust the sizing of these three main sections by dragging
and dropping the two section dividers up and down as you see fit.
In the example shown below, we raised the top divider to make the multiview section larger.
67

Before:
After:
Rearrange Lower Modules Rearrange Lower Modules
68

When you first open Studio and add your inputs, the lower-third portion of the interface includes all your
additional production elements (audio mixer, remote cameras, graphics, media, stream configuration,
etc.). These have a default arrangement, separated into two columns.
Example left column:
Example right column:
69

When using advanced mode, each column splits the screen evenly by default. If you prefer one to be
larger than the other, drag and drop the middle divider the desired location.
70

You can also collapse the entire right column by clicking the collapse button on the far right
side. Click it again to expand the column.
71

In addition to adjusting the width of each column, you can also rearrange the modules by dragging and
dropping each tab between the two columns.
For example, if you need to monitor audio and media playback at the same time, drag the media bin
tab(s) to the right column so you can see both the audio mixer and the media player simultaneously.
72

If you are using a limited number of additional elements or simply wish to not have two separate
columns, go to Settings: Project FormatSettings: Project Format. Under the Tabs ConfigurationTabs Configuration setting, select FlatFlat.
73

Studio: First Steps Studio: First Steps
There are a variety of directions you can take when getting started with the software. Below are a few
starting points to help guide you:
Arranging & Simplifying the Livestream Studio Interface
Connect Cameras to Livestream Studio computer
Adding Camera Inputs in Studio
Creating & Saving Projects
Introduction to the Multi-View
Use a Mouse to Switch Sources
Use a Keyboard to Switch Sources
Add Audio Sources
Control the Audio Mixer
Monitoring Audio
Adding Graphic Overlay Modules
Mixing Graphic Overlays into Program
74

Importing Videos into the Media Playback Module
Set up a High-Resolution Recording
Go Live to any provider such as Vimeo or Livestream
These only scratch the surface of Livestream Studio's capabilities. Look for more advanced walkthroughs
in the help center or download the Livestream Studio User Manual.
75

Creating, Importing, and Exporting Projects Creating, Importing, and Exporting Projects
Livestream Studio has the ability to save, load, import, and export Livestream Project files, allowing
you to keep configurations saved on your system so you can use them whenever you need to,
without starting from scratch.
When you open Livestream Studio, by default you will be working on your previous project (or Untitled Untitled
ProjectProject if it is your first time launching Studio). Click on the title in the upper right corner to see more
options.
To rename your project, simply type the name into the text box. When you click out of the window, the
project will automatically be renamed.
76

Now your project is renamed. As you configure it (e.g. add graphics templates, import media clips,
arrange inputs, etc.), it will save automatically. This occurs regardless of the project being renamed, but
now you can identify it.
You can create a new project at any time by clicking on your project title and selecting NewNew.
A new untitled project will open with default configurations. As mentioned above, you can rename the
new project by clicking on the title.
77

To go back to working on a previously saved project, click on the project title and click OpenOpen. A
dropdown list of your projects will appear. Click the project that you want to work on.
The selected project will then open as it last appeared in Livestream Studio.
You may want to keep a Studio project configuration saved on your hard drive if you intend to use it
often or move it to another Studio system. For this case, we created the Import/Export feature. When
your Studio project is configured the way you like it, click the project title, then ExportExport.
78

You will have the option to bundle or reference assets. Bundle is ideal if you need to move the file to a
different hard drive or system, but creates a larger file. Reference is a smaller file, but will not move any
associated assets (media clips, etc.) After selecting your preferred option, click SelectSelect.
Choose where on your system you want to save the Livestream Project file (.lsproj). By default, your
operating system will open a newly created LivestreamLivestream StudioStudio ExportExport ProjectsProjects folder under DocumentsDocuments,
but you can save the file anywhere you want. Then, click SaveSave.
79

Your system will warn if you already have a .lsproj of the same name and give you the option of
replacing it. If you click NoNo, you will have the option to rename it in your save location.
If you imported media files into your media bin, you will be asked whether to save the original video files
or their transcoded versions (i.e., the files created after they were brought into Studio).
80

When you are ready to use that particular project file, you can click on the project title and then on
ImportImport.
Find your .lsproj file in Windows, select it, and click OpenOpen.
81

This will create a new project in Livestream Studio with the proper configurations set. You can rename
this by clicking the project title if desired.
If you no longer intend to use the project you are working on, you can click the project title and then
DeleteDelete. This will not delete an exported file, but you will no longer be able to select it from the Open Open
menu.
82

83

Importing & Exporting Projects via Dropbox Importing & Exporting Projects via Dropbox
You have the option to save your Livestream Studio project files to a Dropbox folder rather than a
local folder if you wish. You can also import .lsproj files from Dropbox into any Livestream Studio
system using the same integration.
For the best experience, we recommend simplifying your Dropbox folder structure to no
more than 1 or 2 subfolders. Multiple subfolders can cause extended sync times with
Dropbox.
Connect Dropbox to Livestream Studio
To configure Dropbox, navigate to settings by clicking the gearwheel icon in the upper right corner of
Studio.
Navigate to the DropboxDropbox tab.
84

Click Connect DropboxConnect Dropbox.
A browser window will open. Log in to your Dropbox account to connect it with Livestream Studio.
85

The browser will indicate that authorization was successful. Return to Livestream Studio.
86

The Settings: DropboxSettings: Dropbox window will indicate that your account is connected. Click Select FoldersSelect Folders to
choose which folder to use with Livestream Studio.
Choose a local folder, which will include copies of anything you save to Dropbox on the local hard drive
as well. By default, this will be set to Documents > Dropbox, but you can click BROWSEBROWSE to choose a
different location.
87

Next, choose the Dropbox folder you want to work out of. This can either be a generic "Dropbox" folder
(as selected above) or you can expand into any folders within your Dropbox account (e.g. "Projects,"
seen below).
When you are done selecting your folders, click Save. Save.
88

Your Dropbox account will sync with Livestream Studio. Make sure Use Files from DropboxUse Files from Dropbox is checked.
Then save your settings.
89

Save Project to Dropbox
When you want to save your project to Dropbox, click the project name from the upper right corner,
then click Export... Export...
90

Select whether to bundlebundle your assets into the project (e.g. graphics, media clips, etc.) or if the project
should simply referencereference their file paths.
Give your project a name and make sure your folder is selected. Then click Export. Export.
The .lsproj file will now be saved in your Dropbox folder as well as the local folder you selected in
settings.
91

Import Project from Dropbox
To import your project into Livestream Studio, click the project name in the upper right corner, then click
Import... Import...
Click on your .lsproj file from the Dropbox folder, then click SelectSelect. Your project will open up in Studio.
92

Video Inputs Video Inputs
93

Connect Cameras to Your Studio PC or Connect Cameras to Your Studio PC or Mac Mac
To connect your cameras to Livestream Studio, you must have a supported capture device (unless
you are using a webcam), a video cable that is compatible with your camera (HD-SDI cable, HDMI
cable, etc.), and any necessary cables to connect your capture device to your computer.
Webcams Webcams
Livestream Studio should recognize any USB webcam once its drivers are installed. Typically webcam
drivers will download and install automatically once you connect the camera to a USB port on the
computer.
Built-in webcams will also be recognized automatically.
94

Camcorders & Video Cameras Camcorders & Video Cameras
For other cameras, you will need a Blackmagic Design in order for Livestream Studio to recognize the
input. Magewell devices are also compatible.
95

Studio hardware products (HD31, HD51, HD550, etc.) all have capture devices and drivers pre-
installed. These driver installation steps should be executed by customers who are running
Studio on their own computer with their own Blackmagic Design devices.
PCIe cards, Thunderbolt products, and USB 3.0 devices are certified to work with Livestream Studio. See
our full list of compatible devices.
Please note that USB 2.0USB 2.0 capture devices are not compatiblenot compatible with Livestream Studio.
96

PCI Express cards are cards installed directly into the motherboard inside the computer.
97

Connect the capture device to your computer if the device is not already installed. This example shows
a USB 3.0 device (Blackmagic Design UltraStudio SDI).
Go to Blackmagic Design's website. To install the devices drivers, click CaptureCapture andand PlaybackPlayback on the right
side.
98

Below the product menu on the left side is the Latest Downloads menu. Desktop Video is the device
driver that you will need. Find the latest, then click the button that corresponds to your operating system
(Mac OSX or Windows) to start the download.
If you are on Windows 10 Pro version 1709Windows 10 Pro version 1709, we recommend downloading Desktop Video
10.9.5. 10.9.5.
99

You will be prompted to register your device, which is not required. If you wish to skip registration, click
DownloadDownload OnlyOnly in the bottom left corner.
100

When the download completes, open the file and follow the simple on-screen steps to install. Once the
installation is complete, restart your computer.
Now that the drivers are installed, turn on your cameras and connect them to your Blackmagic devices.
101

To check that your system is receiving a video in through the device, open Blackmagic Media Express
beforebefore launching Livestream Studio. This program was installed with the Desktop Video driver.
102

Click on the LogLog andand CaptureCapture tab underneath the player.
Select the device you want to check on the Devices menu.
103

Next, go to EditEdit and select the PreferencesPreferences menu.
Under ProjectProject VideoVideo FormatFormat, select the format your camera is outputting, then click OK at the bottom of
the window.
104

If you noticed your video signal come in before selecting Edit > PreferencesEdit > Preferences, simply take note
of the currently configured project video format. You will need to know this in order to see
your cameras in Livestream Studio.
Your video signal should now appear in the Media Express player, confirming that you have a video
signal coming into your system. Be sure to close Media Express before launching Studio.
105

106

Setting Your Project Format Setting Your Project Format
To configure your Studio Project Format, click on the gear wheel in the upper right corner of Livestream
Studio.
The first tab is Project FormatProject Format. This menu is where you set your project video quality and format as well
as adjust some interface configurations. The video formats that are available to choose from are based
on which Definition you select.
• Streaming OptimizedStreaming Optimized (previously referred to as Low CPU PerformanceLow CPU Performance) includes 720p project
formats, which are ideal for streaming particularly on laptops and lower end CPUs.
• Ultra HDUltra HD includes 4K formats, which should only be used if you have 4K-compatible cameras and
capture cards.
• HDHD has the most options for video formats, including 1080i, 1080p, 720p, NTSC, and PAL formats.
• Low DefinitionLow Definition has 480p, 432p, 360p, NTSC, and PAL formats and will auto-downscale any HD inputs
to the selected format.
107

Either a 1080p or 720p format will produce the best quality stream, as they eliminate the
need to de-interlace. All formats will be true broadcast quality when recording and outputting
the video.
After choosing your Definition, choose your specific Project Video FormatProject Video Format.
Check each camera’s settings to ensure that they all match each other as well as your project
format. This will keep your CPU consumption low.
108

Be sure to save your settings. Next, connect your cameras if you haven't done so already, then configure
your inputs.
109

Using 4K Project Formats Using 4K Project Formats
You can use 4K video capture cards to bring 4K video signals into Livestream Studio.
ImportantImportant: While you can record and output in 4K, you can only stream in 4K if you are able
to enable hardware encoding.
In settings, under the ProjectProject FormatFormat menu, there is a DefinitionDefinition section.
Selecting UltraUltra HDHD will allow you to choose a 4K format as your Project Format. This means that you can
use 4K cameras with supported 4K capture cards to bring in 4K video signals.
110

Any camera sources that are not in 4K can be converted under the InputInput SettingsSettings tab. Please note that
using the converter may increase your CPU consumption.
111

Using Standard Definition-only Formats Using Standard Definition-only Formats
Producers who use Livestream Studio on low-performance computers can now help preserve their
CPU by using Low Definition and Streaming Optimized project formats.
In settings, under the ProjectProject FormatFormat menu, there are various options for Quality and Format. Alongside
High Definition mode, Studio offers Streaming Optimized (previously known as Low CPU Performance)
Ultra HD, and Low Definition modes.
Streaming OptimizedStreaming Optimized includes 720p formats only; Low Definition modeLow Definition mode includes 480p formats and
lower. These should be selected when using low-performance computers and laptops.
112

113

Studio supports hardware encoding and decoding via NVIDIA NVENC/NVDEC or Intel Quick
Sync, which also greatly reduces CPU usage on low-performance computers.
Any HD input sources will convert to the selected project format automatically.
When using Low Definition mode, you will only be able to stream in a resolution equal to your selected
Project Format regardless of which streaming provider you use. This is to preserve the CPU.
114

Adding Input Sources Adding Input Sources
To add inputs and other sources (e.g. remote cameras, media player, etc.), navigate to the InputsInputs tab in
the lower left quadrant of the Studio interface. Some inputs will have already been added automatically
such as graphics, two media players, and any detected cameras.
To add more inputs such as a remote camera, select Add InputAdd Input.
A menu will open up with a variety of options:
• Local CameraLocal Camera: Any cameras that are physically connected to your computer, including webcams and
screens for screen capturing.
115

• RemoteRemote: Sources that can communicate with Studio via the local network, such as Mevo,
Broadcasters, iOS and Android devices, Mac and Windows desktops, and NDI inputs. Any devices
already on the network and waiting for Studio will be listed here automatically.
• Live InterviewLive Interview: Invite guests from different locations to be a part of your production via their webcam
and browser. Studio only supports one interview.
• StreamStream: Bring in other streams, such as RTMP and RTSP playback, RTMP Ingest, or other events on
Livestream.
• MediaMedia: Add media bins to playback pre-recorded videos such as highlights or montages.
• GFXGFX: Up to 3 graphics overlay channels can be individual sources such as picture-in-picture graphics
or fullscreen scoreboards.
• Audio OnlyAudio Only: Bring in audio via USB or the direct inputs on the HD550 or Studio One hardware units.
You may add up to eight (8) Audio Only inputs.
Unless otherwise specified (i.e. Live Interview, GFX, and Audio Only), Studio allows for up to 50 total
sources to be added (e.g. 25 local cameras and 25 remote cameras, but no additional inputs).
Each source you add will appear in a list in the inputs menu. You can re-order your inputs dragging and
dropping them up and down via the drag handle on the left side; this will also change the order they
appear in the multi-view.
116

Each source will be given a default name, but you can edit this by hovering the cursor over it and
selecting the pencil icon that appears.
For local cameras, use the Device drop-down menu to choose which capture device and input (e.g. SDI
or HDMI) should be used for each source.
117

To configure settings for any source, select the corresponding gearwheel to enter its settings menu.
Along the left side of the menu are menu options such as your audio source for that input, along with
additional settings.
118

Under GeneralGeneral is where you can choose the audio source tied to the select video source. Many camera
sources and capture devices, such as the Blackmagic DeckLink Quad or DeckLink Mini Recorder, will
only support embedded audio through their SDI and HDMI inputs. Other Blackmagic cards, such as
DeckLink Studio, will support embedded, analog, or AES/EBU audio via the provided Blackmagic
breakout cable.
Blackmagic analog audio inputs MUST be accompanied by a video input source to be active.
If a video signal is not coming into the card, audio will not come through either.
119

Learn more about input settingsinput settings.
If this is a source you will need to quickly access often, you can pin it so that a tab to it becomes
available alongside your other production elements. Select the pin icon to do this.
To return to the general Inputs menu, click the back button in the upper left corner.
If you have a Studio Surface or Surface Go connected to your system, you can assign the tracks under
the Surface slotSurface slot column. If you do not have a Studio Surface product, this menu will not be present.
120

To remove an input, select the trash icon on the right side of the corresponding source.
121

Screen Capturing with Livestream Studio Screen Capturing with Livestream Studio
When adding your inputs in Livestream Studio, one source you can include is your computer's screen(s).
Navigate to Add Input > Local CameraAdd Input > Local Camera. You can select a local screen from the menu that opens up.
This feature is ideal for systems with multiple monitors connected (e.g. Livestream Studio on
one monitor, and a slideshow on another monitor). Please note that local screen capturing
will increase CPU.
Once you select a screen, it will be available in your multi-view. You can transition it into Program just as
you can with any other input.
If you want to change out a screen (i.e. you chose one by mistake), you can open the Device drop-
down menu in the Inputs module and choose a different one.
122

There are a few settings you can configure when capturing a local desktop. Select the corresponding
gearwheel in the Inputs menu to adjust these.
Under GeneralGeneral settings, you can check your audio source; if you want to hear audio coming from your
computer, make sure LivestreamDesktopAudioCaptureLivestreamDesktopAudioCapture is selected. You can also choose whether you
want your mouse cursor to be displayed; this is disabled by default.
123

If you need to bring in local audio from your desktop, make sure to go into your system's Sound settings
and ensure that LivestreamDesktopAudioCaptureLivestreamDesktopAudioCapture is the selected output or playback device, rather than
your system's speakers or headphones.
124

Using the DeckLink Studio 2 and Similar Using the DeckLink Studio 2 and Similar Cards Cards
Most Blackmagic Design capture devices can be used as either an input oror output device. One
example of this is the DeckLink Studio 2 card, which came preinstalled on Livestream's first
generation of Studio hardware products (HD50, HD500).
Add this card as an input by going to InputsInputs, then navigate to Add InputAdd Input > LocalLocal to add it with whichever
connection type you are using.
If you add this as an input, but then try to add it as an output by going to the OutputsOutputs tab, Studio will
notify you that it is already being used in InputsInputs.
If you want to use any device as an output, be sure to remove it from Inputs by selecting the
corresponding trash icon on the right side. Then you can go back to the Outputs tab and select it.
125

When you select it as an output, you will notice that if you try to add it as an input again, it will not be
available.
126

Using the DeckLink Mini Recorder Using the DeckLink Mini Recorder
The Livestream Studio HD51 and HD550 are each equipped with five Blackmagic DeckLink Mini
Recorders; the HD31 has three cards installed.
Each card has one SDI input and one HDMI input.
The 4K editions of the HD51 and HD550 have 4K versions of these cards installed.
Each card can only handle one source at a time. You cannot use both the SDI and HDMI input on the
same card. For example, if you use the HDMI input on Mini Recorder 1, you cannot also use the SDI
input on Mini Recorder 1 and would thus have to use an SDI input on one of the other four Mini
Recorder cards.
127

Configuring Input Settings Configuring Input Settings
Every input in Livestream Studio has individual settings you can configure directly from the Inputs
module, including audio settings, conversion, cropping, audio/video sync correction, tally lights,
captions, and color correction.
To open the input settings module for a given source, navigate to the InputsInputs tab in the lower left
quadrant. To the right of each input is a gearwheel; selecting this will open input settings for that source.
You can also access an input's settings menu by clicking the gearwheel icon next to the
source’s display name in the multi-view or in the audio mixer by clicking the source name and
selecting Input SettingsInput Settings.
GeneralGeneral: This is the first tab that will open and will include any settings specific to that input source. For
example, direct camera inputs (e.g. webcams, HDMI/SDI cameras) will have the option to choose the
audio source for that camera (e.g. "built-in microphone," "embedded," etc.)
Mevo will allow you to configure all the basic settings for your Mevo directly from Studio.
Remote desktops (Windows and Mac) will show the options to change your video source, audio source,
and whether you want to capture the cursor from that desktop.
128

You can learn more about the general settings available for:
• iOS and Android devices
• Local screens
• Broadcasters
• NDI inputs
• Live interviews
• RTMP Server and other streams
• Media bins
• Graphics overlays
• Audio-only inputs
AudioAudio: Incoming audio channels are displayed for the selected source. In stereo mode, use the “LL” and
“RR” buttons along the bottom of the module to assign left and right audio channels to the input source
fader.
In mono mode, click the corresponding speaker icon to assign input channels to the source fader. Each
input channel has an individual level meter with gain control.
Stereo:
129

Mono:
130

Converter:Converter: Allows for video inputs to be converted to your project video format in real-time. This allows
producers to use different types of camera sources and formats. The video converter also has an auto-
detect function that will recognize different formats instantly.
If the converter does not automatically detect the source format of the camera, select the converter tab
to pick the format from a full range of format options and convert it into the format that the current
project is set to.
CropCrop: Allows you to crop your input's picture.
PTZPTZ: If this input is a PTZ camera, you can connect and control it from here.
Delay:Delay: If you notice a discrepancy in synchronization between direct camera inputs and remote
cameras, you can delay an individual input's video and audio by up to two seconds to help keep your
sources in sync.
131

ColorColor: If the coloring or white balance of your input source seems off, open this menu to correct it.
Tally:Tally: Activate and control a Tally Light system through Livestream Studio. After connecting a Metasetz
tally system via USB, click the TallyTally icon shown here and select and available tally port to assign to that
camera. Repeat this step for each camera source.
If you do not see this option, go to Settings: AdvancedSettings: Advanced and make sure TallyTally is checked. Also please note
that these only work with local inputs and not remote sources.
132

Closed CaptionsClosed Captions: Livestream Studio can receive a closed captioning signal from a closed captioning
encoder via SDI, and output to Livestream's live player. This is where you control which channel of
closed captions come through.
If you do not see this option, go to Settings: AdvancedSettings: Advanced and make sure Closed Captioning is enabled.
This feature only works on players that support CEA-608 captions.
133

Using PTZ Cameras with Livestream Studio Using PTZ Cameras with Livestream Studio
You can connect and control a pan-tilt-zoom (PTZ) camera to Livestream Studio via VISCA or NDI
protocols.
Connect the PTZ Camera to Studio Connect the PTZ Camera to Studio
First, connect your PTZ camera to the same network to which your Studio system is connected.
You can then connect the camera to Studio via SDI, HDMI, NDI, RTSP, etc. Go to the InputsInputs tab and
select Add InputAdd Input. Depending on how you are connecting your camera, your PTZ will appear either under
Local CameraLocal Camera (e.g. SDI, HDMI), RemoteRemote (NDI), or StreamStream (RTSP, RTMP).
Please note that in order for Studio to receive an NDI camera's signal, you may need to install
the NDI|HX DriverNDI|HX Driver from NewTek.
At this point, will see your camera's output appear in the Studio multi-view but you will not have control
access yet.
To the right of the PTZ source in InputsInputs, select the gearwheel. This will bring you to the camera's general
settings. Select the PTZPTZ tab on the left side.
134

If you are connecting to your camera using VISCA, enter the camera's IP address.
Port 5678 is standard but you may change it if you've configured your camera to communicate over a
different port (1-65536). Adapter index is useful if you have more than one PTZ camera.
Once you've configured your settings, select ConnectConnect.
Alternatively, if your camera is communicating via NDI, navigate to the bottom of the menu where it says
Connect with NDIConnect with NDI. If an NDI signal is being received from this source, the ConnectConnect button will be
enabled. Click it to activate the PTZ controls.
135

Control the PTZ Camera Inside Studio Control the PTZ Camera Inside Studio
After clicking either Connect button, your source will appear in the menu along side a set of controls
along the left side of the pane.
136

To pan and tilt your camera, click and drag the virtual joystick in the direction you wish to move the
camera.
Below the virtual joystick is the zoom option; click and drag the zoom control right or left to zoom in or
zoom out.
Below the zoom control is the focus control. By default, the AFAF button is highlighted, which is Auto Auto
FocusFocus. To control the focus manually, disable the auto focus and click and drag the focus control left or
right to adjust it.
137

Under the focus control is the white balance control, which is set to Auto by default.
At the bottom, you can select DisconnectDisconnect to disconnect Studio from your camera's PTZ controls.
Configure Preset Shots Configure Preset Shots
You can configure up to five preset shots if you know you need the camera to move from one shot to
another frequently. First, use the manual controls described above to get the shot you need, then click
Save PresetSave Preset.
138

All the numbered buttons will turn green. Select the one you wish to use for this shot (in this example,
we clicked 3)3).
That number will turn yellow, indicating that you are currently on the number 3 preset shot. Now
whenever you need that shot, click the assigned number and the camera will move to that shot.
139

Open Controller in a New Window Open Controller in a New Window
In the bottom right corner of the PTZ controller module, click the new window button.
The PTZ menu will now be open in another window, which you can put next to Studio or in another
monitor to control your camera outside of the main Studio interface.
140

141

Converting Input Sources of Different Converting Input Sources of Different Formats Formats
Livestream Studio works best when all video input sources match the same video format. However,
with certain sources such as laptops and webcams, it may not be possible to match them all
together. This is where the built-in any-to-any converter comes in.
Go to the InputsInputs tab and select gearwheel corresponding to the source you need to convert. Then
select the ConvertConvert tab on the left side of the interface.
In most cases, Livestream Studio will automatically convert your source. Otherwise, choose your input
source's format from the drop-down menu.
142

Once the correct format is selected, the converter will turn on and you will see your video source.
Using the converter will reduce the quality of your video signal and increase your CPU usage,
so only use it when necessary.
Bringing a Laptop into Livestream Studio Bringing a Laptop into Livestream Studio
When bringing in a laptop, you will almost certainly use the converter. Many laptops come with an HDMI
output port that can directly connect to a Blackmagic capture device via an HDMI cable. For those that
do not have an HDMI output, we recommend using the Blackmagic DVI Extender.
Another option for bringing a laptop into Livestream Studio as a source is to install the Remote Camera
Client for Windows and Mac over your local network.
143

Advanced Input Source Cropping Advanced Input Source Cropping
You can create multiple virtual camera shots for each input source. This works best with 4K inputs
and Mevo.
Navigate to the InputsInputs tab. Find the desired input you wish to crop and click the gearwheel that
corresponds to it to enter its settings.
This feature does not work on media sources or GFX sources.
Select the CropCrop tab on the left side.
144

You can do a basic crop by clicking and dragging the corner of the image, and dragging and dropping
the cropped frame. You can also scroll on your mouse or trackpad to crop. The crop will be locked to
the aspect ratio of your project format (16:9 in most cases).
Click AdvancedAdvanced ModeMode to reveal more cropping options.
If you are using Mevo, you will only see Advanced mode for cropping. Learn moreLearn more about
controlling Mevo via Studio.
To the right of your source are numbers 1-4 in different colors, each with a corresponding TakeTake and Edit Edit
button.
145

Clicking EditEdit on any shot will allow you to adjust that particular shot without affecting the output. Click
and drag the corners to crop the shot. Notice the border of your shot matches the color of the
corresponding number, and the source in the multi-view is not yet reflecting the crop.
146
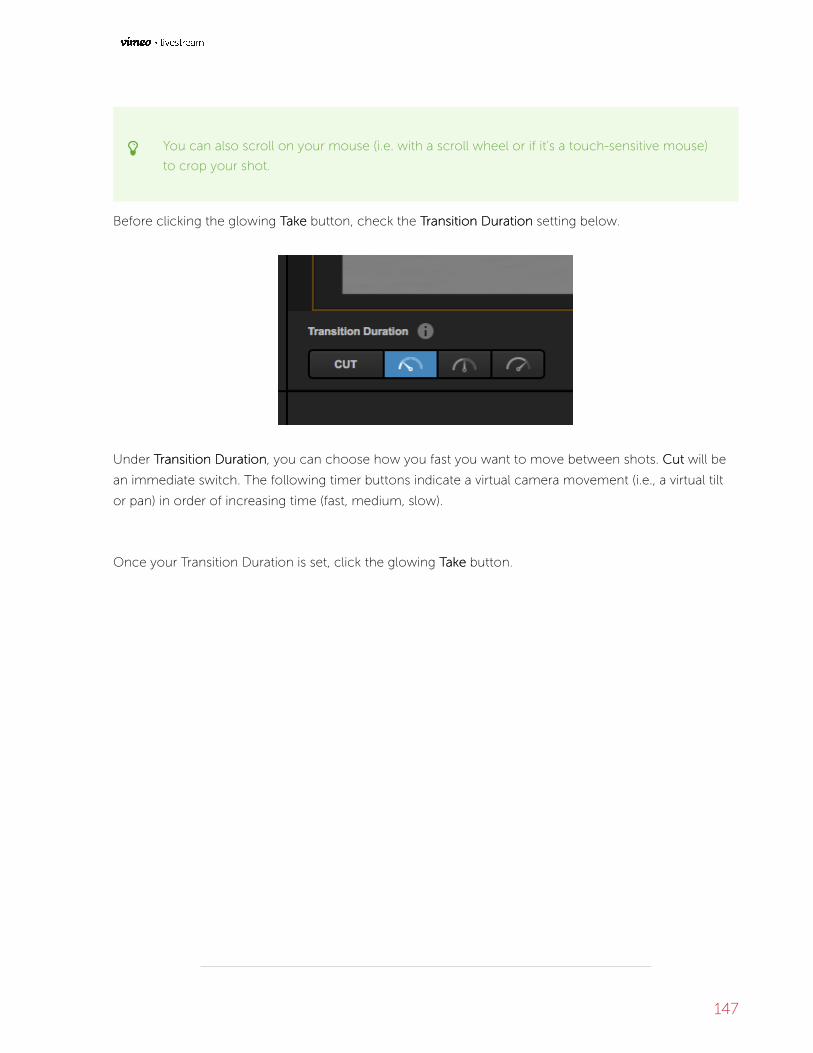
You can also scroll on your mouse (i.e. with a scroll wheel or if it's a touch-sensitive mouse)
to crop your shot.
Before clicking the glowing TakeTake button, check the TransitionTransition DurationDuration setting below.
Under TransitionTransition DurationDuration, you can choose how you fast you want to move between shots. CutCut will be
an immediate switch. The following timer buttons indicate a virtual camera movement (i.e., a virtual tilt
or pan) in order of increasing time (fast, medium, slow).
Once your Transition Duration is set, click the glowing TakeTake button.
147

The Take Take button will turn red and you will notice your input will transition to the cropped area in your
multi-view.
148

You can build up to four different cropped areas per input using the corresponding EditEdit buttons. Switch
between each using their corresponding TakeTake buttons.
149

Color Correction in Livestream Studio Color Correction in Livestream Studio
As of version 6, you can adjust the light levels and coloring in all of your camera sources whether
they are local (directly connected) or remote. You can adjust the shot's Hue, Saturation, Brightness,
Contrast, Lift, Gamma, and Gain with aid from three different color monitors.
Color correction settings are available for each camera input except Mevo, as Mevo includes its own
image adjustments setting built-in, which is also accessible in Studio once a Mevo is connected. Color
correction settings cannot be applied to GFX or Media sources.
Navigate to the InputsInputs tab in the lower left corner of the interface. Select the corresponding gearwheel
to the input you wish to adjust.
Along the left side of the panel is the ColorColor tab; selecting this opens the Color Correction menu.
150

Color Monitors Color Monitors
A helpful tool when color correcting is the Color MonitorsColor Monitors window. There are three monitors you can
use when making adjustments to your image.
By default, you will see the WaveformWaveform monitor. This monitor helps measure the blacks and whites in
your image from left to right. In this graph, you want to make sure all of the data (the green waves and
lines) are within this monitor (between 0 and 100 on the left side).
151

If something is too dark, it will "crush" to the bottom, resulting in image loss to black; if something is too
light, the waves will crush to the top and result in overexposure. When you work with the Brightness,
Contrast, Lift, Gamma, and Gain settings (discussed below), you will see the impact in this graph.
(Although this chart is green, it's measuring all the white, gray, and black in the entire shot, not just the
green channel.)
Open the dropdown in the upper left corner of the window to see two more options: RGB Waveform RGB Waveform
ParadeParade and VectorscopeVectorscope.
RGB Waveform ParadeRGB Waveform Parade will show waveforms for each of the three video channels (red, green, blue),
informing you of the overall color balance in your shot. The closer all three match, the more balanced
your video will look in terms of color and temperature. In the below example, red is higher than green,
and blue is the lowest; this is because the shot has more red tones in it as it was taken during sunset; if
we balance these waveforms, it will look more like midday.
Similar to the Waveform, you want to make sure your colors aren't crushing all the way to the top or
bottom (unless you're going for a specific look).
152

To adjust these, open the color channel settings that are available with each light adjustment setting
(Brightness, Contrast, Lift, Gamma, Gain).
By pushing up the blue and reducing the red, we now have a more color balanced shot.
VectorscopeVectorscope measures hue and saturation. In other words, it tells you what colors are most prominent
and by how much. If you lower your saturation, the pixels in the middle will reduce and your image will
153

look more black and white, whereas a saturated image will show the pixels more spread out towards the
edge of the scope.
Note that each color has a pair of squares, one closer to the center than the other; the more-center
square represents the pure color while the square farther to the edge is a super pure color (e.g. Yellow
and Super Yellow; these are both seen if you use HD SMPTE color bars).
Color Correction Settings and What They Mean Color Correction Settings and What They Mean
Best practice is to adjust your settings while the color monitors window is open. Each setting has a slider
that starts at a neutral position with a reset button next to it. Here is what each setting changes:
HueHue: The actual colors that you see. Hue is a 360-degree measurement that reflects where on the color
wheel the colors in your shot fall. You can adjust it down to -180 degrees or up to 180 degrees; you will
notice these two extremes will be nearly identical in color but opposite of the neutral position. If you
have the vectorscope open when you adjust this setting, you will notice the pixel pattern will spin like a
wheel as you adjust the slider.
Zero degrees:
154

180 degrees:
SaturationSaturation: The amount of color. If you reduce saturation to the lowest setting, your shot will be nearly
black and white. Slide it to the right to increase the color in your shot to be closer to pure color. Keep
your vectorscope open to ensure you don't over-saturate your image (i.e. pixels should not surpass the
squares).
155

Saturation increased, giving this shot more color, especially in the yellow/orange regions.
BrightnessBrightness: Adjusts all of the lightness and darkness in your image symmetrically. In other words, your
white and blacks will move up and down the same amount, causing an extreme white when adjusted all
the way up and an extreme black when completely reduced. Keep an eye on your waveform monitor
while adjusting this, and consider using Lift, Gamma, and Gain before adjusting Brightness.
156

When Brightness is increased, the entire waveform stays in the exact same shape but moves higher in
the graph. This is what we mean when we say it adjusts the light in the shot "symmetrically."
ContrastContrast: The difference in brightness between the darkest and lightest areas of your image. This is
another setting where your waveform graph will be helpful. Unlike Brightness, your blacks and whites
will move the same amount, but in opposite directions. An image with low contrast will show the
waveform more condensed to the middle and appear very gray and flat, whereas an image with high
contrast will be more spread out from top to bottom. This is another setting you should consider waiting
on changing until you adjust Lift, Gamma, and Gain first.
157

Increasing Contrast will show the waveform spreading apart evenly, with lights getting lighter just as the
darks get darker.
LiftLift: This controls the level of black in your shot without modifying the white. The waveform will show
the bottom half of the graph move the most when adjusting this setting. You will get all white when
raising the lift all the way up.
158

Lift has been lowered, darkening the black tones with minimal impact on the whites.
GammaGamma: This controls the range of gray tones (or mid-tones) without modifying true black or true white.
159

Gamma has been raised, with the most movement happening in the middle of the waveform.
GainGain: This controls the white levels in your shot without modifying the black. In other words, this is the
opposite of Lift. If you push this all the way down, your shot will be entirely black.
Gain has been increased, dramatically increasing the lighter tones in this image and the darker tones
barely adjusting.
160

While Lift, Gamma, and Gain all focus on different areas of light in your image, adjusting them
will still impact the appearance of the entire shot. Consider using those three settings to
adjust the lighting balance in your image first, and then use Brightness or Contrast to help
boost those adjustments as you see fit.
Comparing Two or More Inputs Comparing Two or More Inputs
If you have two (or more) cameras pointing at the same shot and you want to compare them, the
easiest way to to do this is to select the pin icon to add the input as its own tab for easy access.
Then go back to the InputsInputs tab and open the settings for another input. Pin as many cameras as you
need to compare.
You can then open the color monitors for each input, then compare and adjust accordingly. The name
of the input will be at the top of the window so you know which one you're adjusting. You can alway un-
pin and re-pin inputs as you need.
161

Reset Settings to Default Reset Settings to Default
If you've overdone it on a color correction setting, you can click the arrow button next to that setting to
reset it to the default position.
If you've adjusted multiple settings and want to start from scratch, click the ResetReset button at the bottom
of the Color Correction menu to reset all settings back to their defaults.
162

163

Using the Color Source Generator Using the Color Source Generator
In addition to cameras, graphics and media sources, you can include color sources in your
Livestream Studio production.
To add a color source as an input source, navigate to the InputsInputs tab in the main Studio interface, then
click Add InputAdd Input in the bottom left corner. Hover the cursor over Local CameraLocal Camera, which will open a menu
that includes Colors / BarsColors / Bars.
The color source will appear in your list of inputs. Click the gearwheel on the right side to access its
settings.
You can use either a solid color or traditional color bars. If you select Solid Color, you can either type in
the hex code or click on the ## button to select a color.
164

You can also choose whether or not to include a test tone as your audio source by checking the box
next to Test ToneTest Tone. You can also adjust the pitch of the tone below (default is 1000 Hz; a lower number
will be a lower pitch, a higher number creates a higher pitch). Uncheck the box if you do not want any
audio coming through your color source.
165

Switching Controls Switching Controls
166

Using Livestream Studio's Simple Interface Using Livestream Studio's Simple Interface
The Simplified Interface in Livestream Studio is a good option for customers with smaller
production setups looking for minimal clutter.
When you first launch Studio or create a new project, you will be prompted to choose your interface
mode: Simple or Advanced, allow you to arrange Studio in the Simple interface from the start.
If you have an existing project in Advanced mode, you can easily switch to Simple mode by clicking the
interface icon in the upper right corner and selecting SimpleSimple.
The most noticeable change can be seen in the upper portion of the interface. The Preview/Program
monitors are replaced by a single OutputOutput monitor; whichever source is in this monitor is what your
viewers are seeing. You will also notice the mixing panel that includes transition, graphics overlay, advert,
and fade-to-black controls is also gone.
167

The Tabs containing your various production elements (graphics, media, etc.) will default to the Flat Flat
setting, meaning the lower portion of the Studio interface will be grouped into one column rather than
have a divider splitting them into two interchangeable columns.
Your default production elements will also reduce to one GFX channel and one Media bin in
addition to any detected cameras. You can still add to your setup by going the InputsInputs tab and
selecting Add InputAdd Input.
To switch between your video sources in this mode, use your mouse and left-click on the desired source
in your multi-view. The source will transition into the Output monitor.
168

Using Graphics in Simple Mode Using Graphics in Simple Mode
To overlay graphics in this mode, navigate to the GFX tab. Add a graphic by browsing the Graphics Store
or by clicking + Create Custom Graphic+ Create Custom Graphic to build your own.
169

You will see your graphics preview and settings on the left side with the ability to add and edit data fields
on the right side.
170

The main difference with graphics overlays in simplified mode versus advanced mode is how you
transition graphics overlays into the Output. Since the mixing panel is not present in Simple Mode, you
will see PUSHPUSH and PULLPULL options here, with the layer's auto-loop settings underneath.
To adjust the design of the graphic, double-click the preview to open the GFX Designer. A more in-depth
explanation on building and using graphics overlays in Studio is covered in another section.
When you are ready to show your graphic, click the flashing PUSHPUSH button. The graphic will transition
into the Output; to remove it from Program, click the red PULLPULL button.
171

Transitions in Simple Mode Transitions in Simple Mode
By default, the GFX transitions will be a 45-frame long edge wipe, whereas transitions between different
video sources will be a cut.
You can change this by navigating to the TransitionsTransitions module. Be sure the to select the correct tab on the
far left side when choosing your transitions; MainMain is your main video mix, followed by each graphics
overlay track. You can then select among different transition types
172

173

Introduction to Multi-View & Preview/Introduction to Multi-View & Preview/Program Switching Program Switching
The Advanced interface mode of Livestream Studio is designed for traditional Preview/Program
switching, with controls available via mouse, defined keyboard shortcuts, and assigned controls on
the Livestream Studio Surface or Surface Go.
The software includes a multi-view that allows you to see all of your video sources and graphics overlays
in one display.
If you are not seeing your full multi-view, go to the Multi-ScreenMulti-Screen tab in settings, and check Enable Enable
Primary Screen Multi-ViewPrimary Screen Multi-View, then click SaveSave.
174

At the top of this multi-view are two larger monitors, which are called Preview (left) and Program (right).
PreviewPreview is where you would typically review any video source or graphics overlay prior to transitioning it
to your recording and/or stream.
ProgramProgram is the content that is currently showing in your recording and/or stream; it is what your viewers
are currently watching.
Below Preview and Program is an arrangement of smaller monitors with every camera input, graphics
overlay channel, media bin, remote camera, and color source that you are using.
175

A standard multi-camera production typically involves putting a source into Preview, then using a
transition control to switch it into Program.
176

Using a Mouse to Switch Preview and Using a Mouse to Switch Preview and Program Program
Advanced Mode includes Preview and Program monitors as well as a mixing panel with transition
controls, giving you more options for switching between your video sources using your mouse.
If you are using the Simple Interface mode, see switching instructions herehere.
To put any of your sources into Preview, hover over the source in the multi-view with your mouse, and
simply click it.
That source will now be in the Preview monitor, and you should notice a green border around it in the
multi-view.
177

If you want to put a source directly into Program without previewing it, hover your mouse over it in the
multi-view and right-click it.
That source will now be in Program and will have a red border surrounding it in the multi-view.
178

You can also double-click on the Preview monitor, which will automatically transition that source into
Program.
To adjust how sources are put into Preview and Program using your mouse, navigate to the Mouse / Mouse /
TouchTouch tab in settings. Select the desired actions, then click SaveSave.
179

Livestream Studio’s transition controls can be found in the upper right corner of the software
interface. CutCut switches Preview and Program immediately with no overlap occurring between them.
Clicking the CutCut button activates this transition.
180

Another commonly used transition is DissolveDissolve, which is an overlapping crossfade between the changing
sources.
Finally, a WipeWipe is an animated transition where the Preview source overlays the Program source during
the switch.
In Livestream Studio, you can configure fades and wipes under the TransitionsTransitions tab in the lower right
corner.
181

Notice on the left side that you can choose to set a transition for both your main mix (i.e., any source in
Preview) and each individual graphics overlay channel.
Fade is the first option in the menu, which is the dissolve transition. When you select it, you can set the
amount of time you want an automatic transition between sources to last.
182

You can also double-click the duration time under the transition controls to change the speed of any
automatic transition quickly.
The next transition option is Dip to colorDip to color, which is similar to a fade but instead of cross-fading the two
sources in Preview and Program, Program will fade, or "dip," into a selected color which then, in turn,
fades into the source coming in from Preview.
When selecting Dip to color, you can choose the duration of the transition in frames and the color the
transition uses to the right of the transition menu. If you don't like your settings, click Reset Transition Reset Transition
SettingsSettings to go back to the default settings.
183

A dip to color transition looks similar to this:
The next transition is referred to as a stingerstinger, which is a video or image sequence that animates in
Program while your sources cut in the background. This is common in live sports broadcasts switching
to and from replays or news broadcasts switching to different reporters.
184

You can use a short .mov file by clicking Add VideoAdd Video or a PNG image sequence by clicking Add Image Add Image
SequenceSequence. When selecting an image sequence, go to the folder your image sequence is saved in and
select the first file in the sequence; this will import all of them.
Stingers cannot exceed five (5) seconds. If you are using a video, we recommend you use an .mov file
that matches your project format in Studio to prevent upscaling or downscaling.
A PNG sequence should not exceed 1920x1080. If your project format is 30 FPS, your sequence should
not exceed 150 images; if the project is 60 FPS, the sequence can have a maximum of 300 images.
After importing your stinger into Studio, use the slider below to determine at what point during the
stinger the Preview and Program should switch. This should ideally be when the stinger overlays the
entire screen so that viewers don't see the cut behind it.
185

After setting the stinger, click AutoAuto to transition it in realtime.
The remaining options in this menu are different kinds of wipes. Selecting one will show additional
settings on the right.
186

ReverseReverse DirectionDirection will push the wipe in the opposite direction that it moves by default.
Flip FlopFlip Flop will alternate the wipe between the default direction and the reverse direction.
187

Feathering allows you to determine how hard or soft the edge of the wipe animation will be, in pixels.
The more pixels you cover, the more faded the line will be.
Some wipes also have options for adjusting their positions and appearance on the screen when they are
used.
To activate an automatic transition, click AutoAuto in the upper right corner. The sources will then switch
based on the duration you set for that transition.
188

You can always employ a manual transition by clicking and dragging the virtual T BarT Bar below the
transition buttons. This allows you to control the speed of that transition.
189

Configuring a Keyboard to Use with Configuring a Keyboard to Use with Livestream Studio Livestream Studio
You can create custom keyboard shortcuts in Livestream Studio by assigning hotkeys.
Open the settings menu and click the HotkeysHotkeys tab.
This will reveal a list of controls. Each control has a default hotkey assigned to it.
The images below show the Livestream Studio Keyboard, which is simply a standard keyboard
that is designed to reflect the default hotkey settings. However, you can use hotkeys in
Livestream Studio with any keyboard.
Some common default keyboard commands include:
190

The 11 key will put your first input source into Preview
Pressing 22 puts the second input source into Preview, 33 puts the third source in Preview, and so on.
Similarly, to put your first input source directly into Program, press the F1F1 key on your keyboard.
F2F2 will put the second source into Program, F3F3 the third source, and so forth.
191

Mac UsersMac Users: In order to use the F1, F2, etc. hotkeys, you must either hold down the fnfn key
when pressing them or go to System PreferencesSystem Preferences > KeyboardKeyboard and make sure Use F1, F2, etc. Use F1, F2, etc.
keys as standard function keyskeys as standard function keys is checked.
Pressing EnterEnter will cut between Preview and Program sources, while pressing the spacebar will
activate an auto-transition between those sources.
You can customize these hotkeys to better fit your workflow if you wish.
The keyboard that Livestream provides with all Studio Hardware units (as well as for separate
purchase in our Store) is designed to fit the default hotkey settings when you are producing a
live event. It will operate like a normal keyboard when typing into text fields and when using
with other applications.
192

193

Using External Multi-Screen with Livestream Using External Multi-Screen with Livestream Studio Studio
If you have a second monitor connected to your system, you have the option of displaying all or
part of your multi-view by using your system’s graphics card. The software can support up to a
Quad GPU setup out of a graphics card which can output to up to 4 displays.
For best results, we recommend connecting the secondary display to the available HDMI port
on the graphics card connected to your Livestream Studio system (It will also work with DVI
and VGA connections).
First, check your computer’s display settings in Control Panel. In Screen ResolutionScreen Resolution, go to the Multiple
Displays menu and select Extend these displaysExtend these displays.
In Livestream Studio, go to settings and click on the Multi-ScreenMulti-Screen tab. With the second monitor
connected, you will notice it looks different from before.
194

You should see your display listed in the ConnectedConnected DisplayDisplay drop-down menu. Select the display and
click IdentifyIdentify.
Select the resolution and frame rate at which you want Livestream Studio’s multi-view to output.
195

Next, determine which layout you want to see in your external monitor.
Below the layout selection, use your mouse to drag and drop each video source you want to see into
the appropriate box below.
196

In addition to video sources, you can include a logo, time of day, viewer count, and stream status.
If you drag a logo into your external multi-view, click on it to be given the option to upload a logo
image.
197

Underneath the multi-view preview, you will see options for showing or hiding specific overlays on the
multi-view and for whether you want to allow your mouse onto that display.
When you have set your multi-view to your desired preferences, click SaveSave. You will see the multi-view
appear on your external monitor.
198

199

Audio Workflow Audio Workflow
200

Adding Audio Sources Adding Audio Sources
Livestream Studio’s built-in audio mixer can be found in the lower left corner of the interface under the
AudioAudio tab.
Each input source will have a corresponding audio source that you can monitor and adjust.
You may have a separate audio mixer or a microphone can connect to your system directly via USB or
line-in (the HD550 also has two 1/4-inch XLR combo inputs built in).
We have successfully tested OnyxOnyx and M-AudioM-Audio mixers with Livestream Studio. Generally
speaking, any device your operating system--Windows or Mac--supports will work with
Livestream Studio, although we recommend using audio devices that do not require drivers
to be installed.
To add these sources, navigate to Inputs > Add Input > Audio OnlyInputs > Add Input > Audio Only. Choose your source from the menu
that pops open. You can add up to eight (8) Audio Only sources.
201

If your device is not recognized, check to see if it needs to have drivers installed.
Livestream Studio will automatically label the source (e.g., AUDIO1AUDIO1). Hover your cursor over the name
and then select the pencil icon that appears to edit it if you wish.
This source can also be assigned to a track on Studio Surface if you have one connected.
202

You should now see your audio source included with your other sources in the Audio Mixer.
203

Monitoring Audio in Livestream Studio Monitoring Audio in Livestream Studio
In order to mix your audio effectively, you need to be able to hear it. Start by plugging headphones or
speakers into the headphone jack on your system.
You may not hear any audio right away, even if you see audio levels. If this is the case, there are settings
on your system to check.
Windows
Go to your Windows Control Panel and navigate to your Sound settings. Under the Playback tab settings,
look for Speakers - RealTek High Definition AudioSpeakers - RealTek High Definition Audio. Select that source, click SetSet asas DefaultDefault, then click OKOK.
You may need to disable some other audio devices first for this to take effect.
204

Mac
Go to System PreferencesSystem Preferences > SoundSound. In the OutputOutput screen, make sure HeadphonesHeadphones is highlighted.
205

After confirming the above system settings, navigate to Livestream Studio. Check the headphone
volume meter in the upper right corner and adjust the level to the desired volume. You can also adjust
your Windows volume as you would when using any other program.
This does not affect audio levels of the inputs, Preview, or Program.
206

You will know which sources you are hearing in your headphones by checking the Audio Mixer. The
bottom of each source has a headphone button.
Any headphone button with a white border is currently being heard in your headphones. You can
monitor as many sources at any given time as you need. Click on the headphone button to stop
monitoring the corresponding source; you will notice the white border will disappear from the button.
This also applies when monitoring Program audio, which is typically represented by Stream Out / Record Stream Out / Record
OutOut.
This only impacts your local headphone output and does not stop the audio from outputting
to your stream and/or recording.
While monitoring your audio, keep an eye on your levels both in the audio mixer and in the multi-view.
Each sources audio is seen on the left side of each monitor. You can also further adjust any input's audio
by implementing audio filters.
Clicking the lock icon below the levels indicator will enable Peak Hold for that source, which will provide
a permanent visual as to where your audio is peaking so you may adjust accordingly. Keeping this icon
unlocked (default) will still show the indicator but it will follow your levels as they go down.
207

208

Controlling the Audio Mixer Controlling the Audio Mixer
For each audio source in the Audio Mixer, you can see that source’s levels, as well as a corresponding
fader, speaker button, and AudioAudio button.
While this mixer controls the basic levels and mix of all your audio sources, you can refine
each individual input's audio using audio filters.
When switching sources, you may notice the different AudioAudio buttons turning yellow as you make the
transitions. This indicates that the audio source is heard in Program because its corresponding video
input is in Program. It is not heard when the video input is not in Program.
You may also notice the sources in the switcher highlighted red or green. This is simply indicating what
is also shown in the multiview; the source highlighted in red is in Program, the source highlighted in
green is in Preview.
209

If there is a particular audio source you want outputting to Program at all times, click the AudioAudio button; it
will turn red.
210

This locks that input source’s audio into Program. Even if you continue switching video sources, you will
still hear that audio source in addition to any other active audio source.
211

Click the AudioAudio button again to disable the locking. What you hear will revert to the default setting of
following the video source into and out of Program.
If there is a particular source's audio that you do not want to hear at any point, click on the
corresponding speaker button. The button should go from white to black, and the levels will fade from
green/yellow to gray. This indicates that the source is muted. You can turn off muting for any source by
clicking its speaker button again.
212

Muted sources can still be monitored through headphones as long as the headphone button
is activated.
You can also link audio sources to each other. For example, if you have all audio coming in from CAM1CAM1,
you may want to link other cameras to that source for seamless transitions.
Click on the name of the source at the top of the audio module. You will notice you have the option to
link to any other input source.
213

Linking an input will cause the linked source to override the audio that had been coming in originally.
The mixer will indicate which source’s audio is being heard.
In this example, CAM1CAM1 has been linked to CAM2CAM2, so viewers will hear CAM1CAM1's audio when either CAM1CAM1 or
CAM2CAM2 are in Program. Notice in the image below how the levels are identical and both AudioAudio buttons
are yellow (the red bar above the CAM2 label indicates that CAM2 is in Program).
214

You can link multiple inputs to one audio source for smooth transitions.
215

By default, RecordRecord OutOut and StreamStream OutOut together for consistent Program audio across all output sources.
Those two outputs may be unlinked if desired, but they cannot be linked to any other source.
216

To adjust the levels of any audio source, click and drag the corresponding fader for that source. A good
rule of thumb is to ensure your audio peaks at around -4dB.
217

If audio levels are too high (i.e. they reach or exceed 0dB, the mixer's OVR meter for any over-
modulating source will blink red. Activating an input source's audio filters can help prevent this.
218

You can also adjust the gain of each source by clicking and dragging the small gain meter above that
source’s level meter.
219

220

Multi-Language Audio Multi-Language Audio
Livestream Studio can accept multiple audio tracks with different languages via SDI and/or a multi-
channel audio interface and send them out to either a single player (via UDP or Zixi only), or
simulcast multiple streams, each with a different language selected.
Requirements Requirements
To bring multiple languages into Studio, they must come in through a single input with multiple channels
of audio (e.g. English in channels 1 and 2, Spanish in channels 3 and 4, and so on. You could also
configure one language per channel with each one outputting to L and R). This can typically be achieved
using an external audio mixer going into a camera, which then outputs SDI into your Studio system.
We’ve also tested the Behringer UMC404HD interface successfully.
If you wish to have a single stream where viewers can choose which language they hear in the
destination player, your streaming provider will need to include a server that can accept MPEG-TS
output. Currently, neither Vimeo nor Livestream support this workflow, but you can learn more about
how to set it up with Wowza here.
The alternative is to simulcast from Studio to multiple destinations (e.g. three separate Vimeo events).
You can choose which language each event should output in the Stream tab; this is described in further
detail below.
If neither setup works for you, we'd love to hear your feedback.
Language configuration Language configuration
221

To setup multiple languages in Studio, navigate to Settings: Multi-language EventsSettings: Multi-language Events and check Enable Enable
Multi-language EventsMulti-language Events.
Select the input that the multiple audio channels with the different languages are coming in.
222

You can add up to 16 languages. Use the ++ / -- buttons to add and remove language tracks, then use the
drop-down menu on the right side to select the desired language. The abbreviations here are based on
international language standards; a reference of language codes is available here.
223

Be sure to add languages in the same order in which they are coming into Studio. For example, if English
is coming in via channel 1, add English first. This is so Studio can map them to the correct channel
properly (although you can adjust it manually if needed). Save your settings when you're done.
Navigate to the InputsInputs tab and select the gearwheel of the input with the languages coming in. Select
the AudioAudio tab. In addition to FiltersFilters, you should see a separate tab for each language you added. This is
where you can check and adjust the channels that each language is using in Studio.
If you adjust filters, they will be applied to all available languages. There is currently no way to
adjust filters for each language individually.
224

To monitor the languages coming in, navigate to the Audio Audio tab. A drop-down menu with the various
languages will appear under the input you selected in the Settings: Multi-language EventsSettings: Multi-language Events menu. You can
use this menu to select which language you monitor locally. This does not impact your stream, but
rather gives you a chance to confirm that the correct language is coming through the correct channels.
225

If you want to listen to audio channels while manually mapping them to languages, try having
the audio mixer and the input audio settings open in opposite columns so you can navigate
between them seamlessly.
Streaming via UDP or Zixi to a single player Streaming via UDP or Zixi to a single player
Navigate to the StreamStream tab and select either UDP or Zixi as your streaming destination. Enter your
destination URL into the URL field.
Below this, you can find the Video PID (packet identifier) and each language's audio PID. Studio
generates these automatically but you can edit them to be any value between 32-8190. You will need
these when creating .stream and SMIL files for Wowza.
Each language will be checked by default, but if for any reason you don't want a language included in a
stream, uncheck it and it won't output to Program.
226

Select Go LiveGo Live when you're ready to start your stream.
Streaming to multiple destinations with different audio Streaming to multiple destinations with different audio tracks tracks
227

For all other providers available in Studio, you can achieve a multi-language event by adding multiple
streaming destinations. For example, Vimeo Premium allows for up to three simultaneous live events,
which would let you broadcast three streams with identical video but different audio at the same time all
within one provider.
When you have multi-language events enabled and your languages configured (as described above), you
will see a SelectSelect LanguageLanguage drop-down menu, allowing you to choose which language will output to that
destination. Select a different language for each stream.
Consider including the language in the name of each event (i.e. Vimeo events, Livestream
events, Facebook schedule posts) so that your viewers know which one to watch and also so
you can easily choose which language to configure for each stream.
Make sure each destination is activated (i.e. is checked at the top of the panel or when you hover over its
bottom tab). Select Go LiveGo Live when you're ready to start streaming; each destination will go live
simultaneously.
228

Fold Audio Channels Into Mono Fold Audio Channels Into Mono
In Livestream Studio, your audio setup can be set to either mono or stereo.
To fold all of your audio channels into mono. Go to Settings:Settings: AdvancedAdvanced. In the Project Audio Format
drop-down menu, select 48kHz48kHz MonoMono.
Now all of your audio inputs will be in mono. You can see this by going to the InputsInputs tab, then select the
gearwheel that corresponds to the desired input, then select AudioAudio.
229

230

Audio Filters Audio Filters
As of version 6, Studio's input settings now includes audio filters, allowing you to adjust and define
the sound coming from each camera or audio source. Filters included are a Limiter, Compressor,
Equalizer, and Noise Gate.
To adjust an input's audio, navigate to the InputsInputs tab in the lower left corner. Select the gearwheel that
corresponds to the source you wish to adjust.
Select the AudioAudio tab on the left side. Be sure to check the General tab to adjust your overall input audio
levels first; a good rule of thumb is to set this so your audio peaks at around -4 decibels (dB), which you
can do either by adjusting the gain above the audio input.
You should also check the channels to which your audio source is outputting. For example, if you only
have audio coming in through Input 1 (channel 1), be sure both the L and R buttons are selected so your
viewers on headphones hear audio in both ears rather than one. This common with Studio One units.
231

To adjust your audio further, select the FiltersFilters tab.
232

One thing to note is that the default settings for each (i.e. if you enable all filters but don't adjust the
settings any further) are best suited for speech audio, such as interviews, panel discussions, public
meetings, etc. If you're in a noisier or more dynamic audio environment (e.g. concerts, recitals), you may
want to adjust these further to get the desired sound. While we can provide guidelines for what each
setting adjusts, best practice is always to test, listen, and adjust accordingly.
There are four areas in which you can adjust your input's audio. Generally, it's best to start from the
bottom, which deals with lower audio levels, and work your way up.
Noise Gate Noise Gate
The Noise GateNoise Gate at the bottom of the menu deals with the quieter end of your audio. It's disabled by
default so be sure to select the checkmark if you want to activate it.
233

This is useful if you're in an environment that may have a lot of undesired background noise, such as an
HVAC system. The default threshold is set to -40dB. When you go above this threshold, all sound will
come through. However, when your main incoming audio drops below this, your background noise will
be filtered out.
For example, if a band is playing a song, presumably their audio would be well above -40dB, and so the
Noise Gate would allow all sound to come through. When the band finishes their song, audio may drop
below this threshold, and thus any faint background noise would also cut out.
Equalizer Equalizer
Above the Noise Gate is the EqualizerEqualizer, which balances out different pitches and determines what pitches
(or frequencies) should be louder than others. If you want to apply the Equalizer to your audio input, be
sure to select the corresponding checkmark.
Before adjusting the PreampPreamp setting, take a look at the frequencies below it. Each slider represents a
different sound frequency, with the lowest pitches being on the left and the highest on the right. By
default, these are all balanced at 0 dB. If, for example, you notice that a deeper voice is coming in louder
than a higher pitched voice when they should be equal, this is where you can fix that.
234

If, after adjusting your frequencies, you notice that your overall sound is particularly loud or soft, this is
where the PreampPreamp comes into play. It defaults to 0 dB, but you can increase or decrease the average
audio level the source outputs using this setting, allowing you to keep your frequencies balanced as
desired, but ensuring this source still gets heard at the appropriate volume.
Here are a few guidelines for what each frequency represents:
• 32 - sub-bass (a subwoofer's low vibration during a deep space scene)
• 64 - bass (kick drum)
• 125 - bass (bass guitar)
• 250 - upper bass (lower vocals, lower notes of a piano)
• 500 - lower midrange (cello)
• 1k - midrange (adjusting this setting will likely have the most obvious impact on your sound)
• 2k - upper midrange (pop of a snare drum, trumpet; also very obvious to human ears)
• 4k - presence/sibilance (the traditional "treble" setting in home stereos)
• 8k - brilliance (cymbals, bells)
• 16k - open air (nearly the limit to which the human ear can hear)
235

Compressor Compressor
The next setting up is the CompressorCompressor, which is not activated by default. If you wish to compress your
louder audio, be sure to select the checkmark to enable it.
In short, the Compressor takes louder audio levels and reduces them to more normalized levels. This is
primarily determined by the ThresholdThreshold setting, which should be set to a lower decibel level than the
threshold from the Limiter (discussed below). The Compressor's threshold establishes a dynamic range
of audio, keeping most of your audio within a certain level.
Any audio that comes in below this threshold will not be impacted by the Compressor (in other words,
however it comes through the input is exactly how it will output). Sounds above this decibel level will be
"compressed," or reduced to output at a lower level compared to how it comes in.
The rest of the settings in this filter determine how the Compressor behaves.
236

RatioRatio: There is some math involved in this setting, but generally speaking this determines how
dramatically audio above the threshold will be compressed, with the default setting set to a 5:1 ratio. For
example, if an audio signal comes in 5dB above the threshold, then the Compressor will output that
audio at 1dB above the configured threshold. If you imagine a straight, diagonal line graph, the threshold
tells Studio at what point the line should bend, and the ratio will determine how far it bends down.
AttackAttack: How long (in milliseconds) the audio signal should be above the threshold before Studio applies
the compression. If you set a longer attack time, then shorter spikes in audio will not be compressed.
This is set to 4 ms by default.
ReleaseRelease: Essentially the opposite of attack; this setting determines how long Studio should wait before
uncompressing audio when it returns below the threshold. This is also set to 200ms by default, but note
that the maximum release time available is higher than the attack setting.
Knee radiusKnee radius: This measures how gradual the transition from uncompressed to compressed audio will be
once your audio level goes past the threshold. A lower setting will make the transition more abrupt,
whereas a higher setting will create a more smooth, gradual transition.
Makeup gainMakeup gain: This is also sometimes referred to as "output gain." Oftentimes when compressing audio, it
could end up compressing sound so much that it actually goes below the threshold and cause louder
sounds to be quieter than their quieter counterparts. The makeup gain will bring that louder audio back
up to where it should be in terms of volume.
DetectionDetection: This determines how the Compressor detects audio peaks. PeakPeak will recognize absolute
peaks and be more responsive to short spikes in audio that go above the threshold. RMSRMS (Root Mean
Square) determines the average peak audio rather than brief spikes and thus is less responsive to short
peaks.
Limiter Limiter
237

Finally at the top is the LimiterLimiter, which is enabled by default and is almost the opposite of the Noise Gate.
The lone setting in this filter is the ThresholdThreshold, which is typically set to a very high dB level, with the
default setting being -1 dB.
This helps prevent your audio from overmodulating should an extremely loud sound come through. Any
audio that surpasses the threshold configured here will be filtered out, including any audio that is
decreased through the Compressor but still reaches above this limit. If you are in a very quiet
environment, you may consider lowering this beyond the default setting.
If you adjust your audio so much that to the point where you want to start from scratch, each filter has a
ResetReset button that places everything within that filter back to default settings.
238

Using HD550 Direct Audio Inputs Using HD550 Direct Audio Inputs
HD550 users have the ability to plug in an XLR or ¼” audio input directly into their unit without the
need for a USB adapter.
Please note that these inputs support mic level audio signals only. If your audio equipment is
line level, see here for a workaround.
When you plug in your audio source, be sure to add it as an audio input by navigating to the Inputs Inputs tab.
Select Add Input > Audio OnlyAdd Input > Audio Only. These inputs are the USB PnP Sound DevicesUSB PnP Sound Devices.
239

You may notice a very low level of sound coming in. This low level of audio may appear regardless if
your source is connected or not.
240

This white noise should not exceed -48dB on either input. It is characteristic of all USB-based PC audio
devices and is virtually inaudible.
241

Using the Studio One Audio Inputs and Using the Studio One Audio Inputs and Outputs Outputs
All editions of the Studio One hardware includes two 1/4" audio inputs and two 1/4" audio outputs.
These can all be found labeled on the back of the unit.
242

To ensure your Studio One audio setup is configured correctly, go to Control Panel and open the Sound
settings. You will want to ensure the following:
• Under the Playback tab, set Speakers: Realtek High Definition AudioSpeakers: Realtek High Definition Audio as the Default DeviceDefault Device. This will
allow for the headphone jack in the front of the unit to work so that you can monitor audio from
Studio.
• Also under the Playback tab, set U24XL with SPDIF I/OU24XL with SPDIF I/O as the Default Communication DeviceDefault Communication Device to
allow the ¼” output jacks of the Studio One unit to playback the Program Output of the Studio
program at all times.
• Under the RecordingRecording tab, set Line: U24XL with SPDIF I/OLine: U24XL with SPDIF I/O as the default device to bring your ¼" audio
inputs into Studio.
243

244

The 1/4" Out plugs will output Program audio (i.e. audio coming through Stream Out/Record OutStream Out/Record Out in
Studio's audio mixer). Keep in mind these outputs are stereo by design, so you will hear Channel 1
through the L output and Channel 2 through the R output.
Plug in your audio source to the inputs (bottom ports). After you launch Studio, go to the InputsInputs tab in
the lower right corner. Select Add InputAdd Input > Audio OnlyAudio Only. Select the 1/4" Input(s).
245

Troubleshooting: Not Seeing 1/4" Input in Studio Settings?
First, make sure you are running Studio version 5.2 or later, as this version resolves an issue with
detecting the drivers for the card.
If Studio still does not detect your audio inputs after updating, you may need to rollback the audio
device's drivers to the Windows default driver.
To do this, navigate to Control Panel > Uninstall a program, and uninstall ESI U 24 XL USB Driver version ESI U 24 XL USB Driver version
v2.6.0.0v2.6.0.0. You will need to restart your system after doing this.
Open Control Panel > Device Manager, open the Sound, video and game controllersSound, video and game controllers option and find
U24XL with SPDIF I/OU24XL with SPDIF I/O. Right-click it and select PropertiesProperties.
246

Select the DriversDrivers tab. If the Driver Provider says "ESI" and the Driver Version says "2.6.0," then select Roll Roll
Back DriverBack Driver. This will remove the ESI driver in favor of the Microsoft driver version 10.0.17134.1.
247

Restart your system again. When you launch Studio, create a new project to start with a fresh audio
configuration.
If the issue persists, you can try going back to the Driver window (shown above) and this time select
Disable DeviceDisable Device and restart your system. When Windows relaunches, go back to Device Manager, find
U24XL with SPDIF I/OU24XL with SPDIF I/O, right click it and re-enable the device. You will need to restart again and we
recommend creating a new Studio project.
If disabling the device does not resolve the issue still, you may again go back to the Driver window and
select Uninstall DeviceUninstall Device. When you restart your machine, the device will reinstall. Relaunch Studio and
create a new project.
If the issue still persists, please contact us.
The source will automatically be labeled Audio 1Audio 1 and appear in both the Inputs list and the Audio Mixer.
248

You can adjust the channel input into Studio by navigating to the InputsInputs tab, selecting the gearwheel that
corresponds to Audio 1Audio 1, and then selecting AudioAudio on the left side.
You will see both audio channels; Input 1Input 1 is the Left (L) input, Input 2Input 2 is the Right (R) input. Each input can
be configured to send audio out to either one channel or both channels.
For example, if your audio source is only plugged into the R input on the Studio One unit, you may want
to configure Input 2Input 2 to send audio to both the L and R channels so that your viewers will hear audio
from both sides rather than only one channel.
Both channels will be reflected inside Studio's Audio Mixer.
249

If you are using both 1/4" inputs, you can keep each input separate by selecting LL under Input 1 and R R
under Input 2, creating a stereo audio output to your stream.
250

Using Line In Audio Sources with the Using Line In Audio Sources with the HD550 HD550
If you own an HD550 and wish to use a line in audio input rather than a mic in audio input, you will
need to add an additional accessory to your setup.
The HD550 XLR inputs support mic levelmic level inputs only, which ranges from -60dBV to -40dBV. Line level Line level
audio on consumer products starts much higher at -10dBV.
If you add a Whirlwind IMPAD In-Line XLR Barrel TransformerWhirlwind IMPAD In-Line XLR Barrel Transformer to your workflow, this will allow you to
bring in a line level source into the XLR inputs on the HD550. These accessories reduce the decibel (dB)
level coming from your audio source so that Studio can support it.
These barrel transformers vary based on the amount of dB they remove from the source. For example,
the Whirlwind IMPAD40 removes 40dB from your source's audio. Also available are:
• Whirlwind IMPAD30 - removes 30dB
• Whirlwind IMPAD20 - removes 20dB
• Whirlwind IMPAD10- removes 10dB
Simply connect your audio source to the female end of the transformer, then connect the male end of
the transformer to your HD550. Then configure your audio as you normally would.
We cannot guarantee that other similar products will work with the HD550 as we have not
tested them. If you have success bringing in a line-in source using a different workflow, please
let us know!
251

Outputting & Recording Outputting & Recording
252

Setting Up a Video Output Setting Up a Video Output
Livestream Studio allows you to send up to 25 video signal separate to different sources such as
monitors, projectors, etc. This requires multiple Blackmagic Design video cards that can output a
video signal.
Trying to set up an NDI output? Learn more.
Navigate to the OutputsOutputs tab in Settings and click the ++ button to add an output source.
Select which device will be used for the output (Studio hardware products such as the HD550 have the
DeckLink Mini Monitor pre-installed).
253

If you are using a Livestream HD hardware product (HD31, HD51, HD550), make sure your
Project Format is not in Streaming OptimizedStreaming Optimized mode. The DeckLink Mini Monitor cannot
output when using those project formats.
Next, select which source will be output through each device. You can output your Program feed or any
other input source (e.g., CAM1).
When you have finished setting your output(s), click SaveSave. You will now see the selected source(s) being
sent to your monitor, projection system, etc.
254

255

Configuring Auxiliary Outputs Configuring Auxiliary Outputs
Livestream Studio gives you the ability to choose up to four auxiliary output mixes. This can be
helpful for changing picture-in-picture and output sources (monitors, projectors, etc.).
Navigate to settings, and enter the OutputsOutputs menu. Under Number of AUX MixesNumber of AUX Mixes, select how many
auxiliary outputs you want to use.
You can set any output to use an auxiliary source, which is helpful if you intend to change the sources
shown to your onsite viewers.
256

When you set your auxiliary outputs, you should see an AUXAUX tab appear in the lower left section. Each
auxiliary output includes all camera inputs, media bins, remote cameras, RTMP inputs, and NDI inputs.
257

To utilize this with your picture-in-picture graphics, go to a Graphics tab (e.g., GFX 1) and create a new
layer (Create Custom Graphic Create Custom Graphic > New LayerNew Layer).
Click the Paintbrush button.
The GFX Designer will open. Click on the VideoVideo button to bring a video source into your graphics layer.
258

Click on the drop-down menu to change any settings, including your video source. Note that AUX
sources are now among your options.
When you have finished setting your video source in the graphics layer, close out of the GFX Designer
and make sure that layer is visible.
Navigate to the AUXAUX OutputsOutputs tab of the AUX source you are using. Here you can select which of your
inputs you want to see in the AUX output. You can choose from camera inputs, media sources, remote
cameras, and NDI sources.
259

Push the graphics channel to Program to allow you and your viewers to see it.
To change the source in your graphics overlay, go back to the AUXAUX OutputsOutputs tab and click on the desired
source. That source will turn green, indicating that it is ready to be transitioned into the AUX output.
To switch sources, use either the CutCut or AutoAuto button to the left.
260

If you click on the transition type under AutoAuto, you can choose both the type and speed of the
auto transition used for each AUX source.
Click a transition control; the AUXAUX tab will indicate that the new source is being pushed through that
auxiliary source by highlighting that source in red.
You will also see the change in your graphics overlay in Preview and Program.
261

262

Set up High-Resolution & ISO Recordings Set up High-Resolution & ISO Recordings in Livestream Studio in Livestream Studio
In Livestream Studio, click the gearwheel icon in the upper right-hand corner to access settings, then
select the RecordingRecording tab.
Are you looking to record a smaller-sized MP4 file of your program? Try the Stream to File
option instead.
Default Record Location:Default Record Location: Selects the location where the Livestream Studio recordings will be saved by
default--typically the "Videos" folder in Windows and the "Movies" folder in Mac. Click the BrowseBrowse button
to select a different default record location.
263

ISO RecordingISO Recording: ISO is an abbreviation for "Isolated". When referring to cameras in video production, this
term indicates that the individual camera video signals are being isolated and recorded independently of
each other and the final Program mix. These files can be used later for further editing offline or live
replay during or after an event.
ISO recordings are only available via this hi-resolution recording setting. Selecting Stream to Stream to
FileFile in the Stream tab will not record ISOs.
Select how many hi-resolution recordings you want to produce (up to four), and which sources you
want to record. You can record Program (dirty), Program (clean), and any other source in your multi-
view. We have more recommendations regarding ISO recordings.
Along with the single cameras, you can also record the Program output in 'Clean' or 'Dirty' mode.
• CleanClean: Without graphic overlays
• DirtyDirty: With graphic overlays
By default, the selected option is Program (dirty)Program (dirty).
Specify Record Location:Specify Record Location: As a best practice, choose different locations for each ISO recording. This can
help resolve any hard drive performance related issues when recording multiple ISOs by spreading to
multiple HDDs.
264

TimecodeTimecode: You can select how you want timecode to be presented. This is meant for users who intend
on editing the recordings together and have a preference on which type of timecode to use when
matching up the sources.
Recording BitrateRecording Bitrate: Chooses the quality your recording will be in. Higher bitrates will be higher quality, but
also produce much larger files.
265

Record to Media Bin:Record to Media Bin: When a recording begins, it will immediately be added to the selected media bin.
Both bins can be selected or deselected simultaneously. This is necessary in order to use the basic
replay feature.
Click SaveSave and you will be able to start recording.
Available recording time is dictated by available internal disk space. If necessary, external devices with
transfer speeds of at least 50MB/sec may be used for recording, though performance may vary. Make
sure your external device is connected and choose save to that location in the Recording settings.
Studio also lets you know how much space is remaining on your hard drive.
When you are ready to start recording, click RecordRecord in the upper right corner.
The RecordRecord button will turn red and change to Recording. You can also track your recording time and
hard drive space.
266

When you are ready to stop recording, press the Recording button at the top of the interface. All
recorded files will be located where you specified in the Recording settings.
267

ISO Recording Best Practices ISO Recording Best Practices
Below is information regarding internal and external hard drive recommendations for producers
who want to do multiple, simultaneous ISO recordings.
For owners of our series of Studio HD hardware units: For owners of our series of Studio HD hardware units:
The HDD or SSD currently installed on your system have the following specs:
• HD31*HD31*: 2TB WD BLACK SERIES WD2003FZEX 7200 RPM / SATA 2.5" Internal HDD
• Studio OneStudio One: 1 TB Western Digital Red 7200 RPM/ SATA 2.5" Internal HDD
• HD50*HD50*: 1 TB / 5400 RPM / SATA 3.5" Internal HDD
• HD51HD51: 1 TB / Western Digital Red 7200 RPM / SATA 2.5" Internal HDD
• HD51 4K EditionHD51 4K Edition: Samsung 850 EVO 2TB SSD
• HD500*HD500*: 500 GB/ 5400 RPM / SATA 2.5" Internal HDD
• HD510*HD510*: 1 TB / Western Digital Red 7200 RPM / SATA 2.5" Internal Hard Drive
• HD550HD550: 1 TB/ Western Digital Red 7200 RPM/ SATA 2.5" Internal Hard Drive
• HD550 4K EditionHD550 4K Edition: Samsung 850 EVO 2TB SSD
• HD900*HD900*: 2 TB / 5400 RPM & 500 GB / 5400 RPM SATA 2.5" Internal HDDs
• HD1700*HD1700*: 2 TB / 5400 RPM & 500 GB / 5400 RPM SATA 2.5" Internal HDDs
• HD1710*HD1710*: Dual quick-time front removable (2) x WD Red 1TB / 7200 RM ISO recording drives, mid-
plane, access door, receiver mounting kits. 1 internal fix mounted WD Red 1TB / 7200 RM ISO hard
drive & 1 internal fix mounted 120GB SSD OS / application drive.
**indicates a discontinued product
Check out the full product technical specifications.
To avoid performance issues, we recommend using an external HDD via USB 3.0 as mentioned below
and/or spreading the recording across multiple drives by selecting the Specify Record LocationSpecify Record Location option
within the RecordingRecording section of the Livestream Studio settings.
268

What type of hard driveWhat type of hard drive is recommended when recording is recommended when recording ISOs? ISOs?
We recommend recording to a separate HDD, either installed on the desktop system or an external
HDD connected via USB 3.0, that adheres to the following specification:
7200 RPM
64 MB Cache
Formatted NTFS (Full format)
2TB or larger (for longer broadcasts)
The Western Digital Red series hard drives have been tested and approved for recording 4 isolated
cameras. You can pair this with a USB 3.0 HDD enclosure such as this one from Macally.
Testing done using other brand hard drives with the recommended specification have
resulted in poor performance when recording 3-4 ISO cameras. Recording 2 ISO cameras
performed well in these cases.
If a Western Digital Red series drive is not available, using more than one HDD and specifying different
record locations may help resolve any performance issues.
269

Recording Options in Livestream Studio Recording Options in Livestream Studio
Livestream Studio includes various ways to record your Program and ISO recordings. Recordings
are saved in a user-selected destination folder; by default, you can find the files in the Videos folder
on Windows and the Movies folder on Mac.
Encode Program as an MP4 File
If you are just looking to record an .mp4 of your event, you can do this via the StreamStream tab. Select Stream Stream
to Fileto File as your destination.
Choose the quality you wish to encode at and choose where you want to save the recording (by default
it will save to the Videos folder on Windows or the Movies folder on macOS). You can also add a title,
which the file will save as alongside the date in your hard drive.
When you are ready to start encoding, click Go LiveGo Live.
270

The Studio Log will indicate the encoding has started. When you are ready to stop recording, click the
red StreamingStreaming button in the bottom right corner of the Stream module.
Your recording will be saved in the location you specified.
271

Hi-Resolution (MJPEG AVI) Program and ISO Recording
If you are looking for a broadcast quality high-resolution Motion JPEG recording of either your Program
output or any of your isolated (ISO) video sources, navigate to Studio settings by clicking the gearwheel
button in the upper right corner of the interface.
Navigate to the RecordingRecording tab on the left side of the menu. The default recording location is where your
recordings will be saved (by default, "Videos" for Windows computers and "Movies" for macOS). Click
Browse if you want all of your recordings to save somewhere else, such as an external hard drive.
The Default file formatDefault file format of your recording will be MJPEG by default. H.264 is covered in a section below.
272

Farther down in the menu are your ISO Recording options. With MJPEG selected as the default file
format, you can run up to four recordings simultaneously. This is helpful if you wish to edit your sources
together in post-production or you intend to use the basic replay feature.
Each checkbox will activate a recording. Select which sources you wish to record.
Program (clean)Program (clean) is your Program recording without any graphics overlays. Choose this if, for
example, you need to repurpose your recording for different brands.
Below each source selection is the option to Specify Record LocationSpecify Record Location. This allows you to save any of
your recordings in a location separate from the Default Record Location configured above.
273

Below your ISO recordings specifications are additional settings for your recordings, include how
timecode is recorded, your recording bitrate, and the ability to also save your recordings in either Media
bin. Record to Media BinRecord to Media Bin is essential if you intend to use the basic replay feature.
Once your recordings are configured, save your settings. To start recording, click RecordRecord in the upper
left corner of the Studio interface; click it again to stop recording. You can find your AVI in the specified
recording location(s).
274

Compressed (H.264 MP4) Program or ISO Recording
If you are operating on a system that supports hardware encoding, you can also record an .mp4 file of
either your Program or a single video source. Click the gearwheel button in the upper right corner of the
Studio interface to enter the Settings menu.
If your system only has NVIDIA NVENC for hardware encoding, this feature will not work if
your project is set to interlaced formats (e.g. 1080i59.94, 1080i60). Unless your PC or Mac
also uses Intel QuickSync, change your project format to a progressive format (e.g. 1080p30,
720p30) or to use this feature or switch the Recording settings to MJPEG file format.
Select the RecordingRecording tab on the left side of the menu. You can change the Default file formatDefault file format to H.264
to create a compressed recording that consumes less hard drive space than the MPJEG recording.
275

If you do not see this option, navigate to Settings: StreamingSettings: Streaming and make sure Hardware encodingHardware encoding is
enabled. If you do not see an option for Hardware encoding, then your system does not have the proper
hardware installed to support it.
This setting only allows you to create oneone ISO recording, as opposed to four hi-resolution recordings.
Choose which source you would like to record.
276

You can specify a record location that is different from the default setting by checking Specify Recording Specify Recording
LocationLocation. In addition, you can configure which timecode your prefer, recording bitrate, and whether to
also record your source into the Media Bin (essential if you plan to use the Basic Replay function).
277

Save your settings. When you are ready to start recording, click RecordRecord in the upper left corner of the
Studio interface. You can find the .mp4 file in your specified record location.
Backup Recording of a Live Broadcast
When you stream to any provider, Studio will by default save a backup .mp4 recording of your Program
to your hard drive. You can change these settings by clicking on the gearwheel button in the upper right
corner of the Studio interface.
278

Navigate to the StreamingStreaming tab. Towards the bottom, you will see settings for Local MP4 RecordingLocal MP4 Recording and
MP4 Recording LocationMP4 Recording Location.
We recommend leaving Highest Quality OnlyHighest Quality Only selected, as this will record only the file of the highest
selected bitrate when you configure your stream. If you choose All QualitiesAll Qualities and select a multi-bitrate
streaming quality, your system will record separate files of each quality, which can tax your CPU.
Unless you are also recording separately using the methods described above, we do not recommend
disabling the local recording.
279

By default, the MP4 Recording LocationMP4 Recording Location will be either the Videos folders on Windows or the Movies
folder on macOS. You can click BrowseBrowse to choose a different location, such as an external hard drive.
Be sure to save your settings.
280

Streaming Streaming
281

Choose a Streaming Quality in Livestream Choose a Streaming Quality in Livestream Studio Studio
Livestream Studio has more flexibility and streaming bitrate options than ever before. These include
the ability to stream in 1080p, 4k, and custom bitrates.
In order to see the highest quality options, you must have hardware encoding enabled on your Studio
system by going to your SettingsSettings > StreamingStreaming.
This means your computer must have either an Intel Processor or NVIDIA card installed that supports
this feature. Computers that do notnot have these will not see the hardware encoding option and have a
more limited selection of streaming bitrates available to them.
After saving your settings, navigate to the StreamStream tab in the lower portion of Studio.
After configuring your streaming providers, open the StreamStream QualityQuality dropdown menu in the upper right
corner of the Stream module; the lower qualities will be listed first with higher, multi-bitrate qualities
282

populating below. Each quality lists the resolution(s) being pushed out with the average total bitrate in
parenthesis.
Selecting CustomCustom allows you to configure your own bitrate in case none of the presets suit your needs.
Click the corresponding gearwheel to open up the bitrate settings.
*The ability to use custom bitrates is available regardless if you have hardware encoding or not.
283

Choose a name for this particular quality (e.g. High), set the width, height, video bitrate, audio bitrate,
audio sample rate, and encoding profile. Once you have configured the settings, click DoneDone.
284

You can add up to four custom bitrates by clicking Add QualityAdd Quality. Each quality can be edited individually by
clicking the corresponding gearwheels.
You can remove a quality by going into its Edit QualityEdit Quality menu and selecting Delete QualityDelete Quality.
285

What's the Best Quality for Me? What's the Best Quality for Me?
There are two factors to consider when choosing a streaming quality: Network Upload Speed and CPU.
Upload speed is easier to determine, especially if you are connected to a dedicated network via
Ethernet. Go to www.speedtest.net and start a speedtest. Pay attention to your upload speed results.
If you perform a speed test on a shared network, the results will display the upload and download
speeds available for the total network, not just your device, so the numbers will be less accurate. It's best
to remove other computers and devices from your network.
Our rule of thumb is to choose a quality whose total bitrate is halfhalf of your upload speed. This allows
room for network fluctuation. For example, if your upload speed is about 10Mbps, which equals about
10,000Kbps, then you can safely assume your network can push out 720p + 480p + 360 + 240p 720p + 480p + 360 + 240p
(4862Kbps)(4862Kbps) and lower.
When choosing your hardware, be sure to review our recommended hardware specifications, which
includes expected performance benchmarks for different types of processors.
286

Streaming to Vimeo via Livestream Studio Streaming to Vimeo via Livestream Studio
Livestream Studio supports streaming to Vimeo LiveVimeo Live for all Vimeo Premium members.
If you are not logged in already, go to the StreamStream tab and select VimeoVimeo.
The following window will pop up. Click Sign in to Vimeo. Sign in to Vimeo.
A browser window will open; you may need to minimize Studio in order to see it. Studio will
automatically log into the account that your default browser is logged into. If you are not logged into a
Vimeo account, you will be prompted to.
287

Once you are logged in, you can configure your stream. At the top of the module, give your stream a
title and select your streaming quality on the right side.
Since Vimeo Live includes cloud transcoding, we recommend selecting a single bitrate
quality.
In the top right corner is a gearwheel icon. Selecting this will allow you to set your aspect ratio and
choose your default network to use for streaming. The default network will be used when streaming to
any provider you add to Studio unless you specify a different device for a specific provider (shown in a
later step).
288

Next, choose your stream goes under the Select EventSelect Event menu. You can either create a new event by
selecting New EventNew Event or stream to a pre-created event. Learn more about streaming to a scheduled event
on Vimeo via Studio.
If you have enabled multi-language events, you can choose which incoming language (or audio track)
will output to this particular stream by using the Select LanguageSelect Language drop-down menu; if you are
simulcasting, this allows you to stream to the same provider but select a different language for each
stream instance. This menu does not appear if multi-language events are not enabled.
289

Clicking Advanced SettingsAdvanced Settings will give you the option to use a specific network device to stream to Vimeo;
Use default networkUse default network will use the network device you selected earlier, but you may override that setting
here if you wish to use a different connection for Vimeo. This can be handy if you want to keep
simultaneous streams on separate networks as a failsafe.
Click Hide Advanced SettingsHide Advanced Settings to collapse this menu.
290

When you are ready to start your stream, click Go LiveGo Live in the bottom right corner.
Your Program output will appear in your chosen event on Vimeo.
For easy access to your stream, hover your cursor over the Vimeo icon; the URL to your
stream will appear there.
291

When your event is over, end the stream by clicking the red StreamingStreaming button in the lower right corner.
To log out of Vimeo, click your profile name below the stream title and click Log OutLog Out.
292

Stream to a Scheduled Event on Vimeo via Stream to a Scheduled Event on Vimeo via Studio Studio
In order to stream to a scheduled event on Vimeo from Studio, you need to follow the steps below
in order for the event to appear as an option in Studio.
First, in a browser, go to your Vimeo account and create a live event. Vimeo allows you to create either a
one-time event (only go live once) or a recurring event (which you can go live to repeatedly).
You must have a Vimeo PremiumVimeo Premium membership in order to go live to Vimeo.
293

After setting the title, time, and audience, you will be brought to the event setup page and your event is
available to select from in Studio. There is no need to click the "Next" button on this pageThere is no need to click the "Next" button on this page, especially if
your event is more than 60 minutes away.
294

Launch Livestream Studio and navigate to the StreamStream tab. Select VimeoVimeo and log into your Vimeo
account.
295

Under the Stream tab, open the Select EventSelect Event menu. Your event should be listed here. The rest of
configuring your stream is the same as streaming to a new event.
When you are ready to start your stream, click Go LiveGo Live in the bottom right corner.
296

Streaming to Livestream with Livestream Streaming to Livestream with Livestream Studio Studio
Select the StreamStream tab in Livestream Studio. Here you will see a few providers to choose from. Select
LivestreamLivestream.
Log in to your Livestream account.
297

At the top of the module is a text field labeled Enter a title for your stream...Enter a title for your stream... Type a stream title in here.
Choose an event from the Event NameEvent Name drop-down menu (or click + New Event+ New Event to create a new event).
By default, your Livestream followers will receive a notification when you go live. If you do not want to
send out a notification, uncheck Notify FollowersNotify Followers.
298

If you have enabled multi-language events, you can choose which incoming language (or audio track)
will output to this particular stream by using the Select LanguageSelect Language drop-down menu; if you are
simulcasting, this allows you to stream to the same provider but select a different language for each
stream instance. This menu does not appear if multi-language events are not enabled.
Click Advanced SettingsAdvanced Settings if you want to send the stream over a bonded connection, send it as a backup
stream, or specify which network(s) to use for your stream.
299

When you are ready to start your stream, click Go LiveGo Live in the bottom right corner.
Press the red StreamingStreaming button to end the stream. When a stream is terminated, the user will be
prompted to post the video-on-demand (VOD) to the event, save the clip as a draft on the event page,
or delete the cloud recording.
300

To change the Livestream account you stream to, click on your account name inside the Stream
module. From here, you can either open a browser to your Livestream Account Settings or Log Out of
your account in Studio.
301

302

Streaming to Facebook Live via Livestream Streaming to Facebook Live via Livestream Studio Studio
You have the option to stream directly to your Facebook Profiles and Pages of which you are an
adminadmin.
This article covers going live to Facebook via Livestream Studio. If you are trying to stream to If you are trying to stream to
Facebook via the Livestream Platform Simulcast feature, see Facebook via the Livestream Platform Simulcast feature, see herehere. .
Log in to Facebook. Log in to Facebook.
Navigate to the StreamStream tab in the lower right corner of Studio, then select FacebookFacebook.
Click Sign in to FacebookSign in to Facebook. A browser window will open.
303

Enter your Facebook credentials, and select whether you wish to stay persistently logged into Livestream
Studio. Then click Log InLog In.
Livestream Studio will request several permissions, including your friend lists, events, ability to post, and
access to pages you manage. Be sure to allow these and continue.
304

We recommend setting your default audience settings to PublicPublic, especially if you ever intend
to stream to an audience beyond your friends list. You can restrict your audience for each
broadcast within Livestream Studio before you go live.
Click OKOK to finish permission settings.
305

When authorization is complete, you can close your browser window if it does not close automatically.
Configure Facebook Settings Configure Facebook Settings
Across the top of the Stream module are a handful of add-ons for your stream, including the abilities to
tag your (1) location and (2) friends. You can also log out of your Facebook account, click the URL to
open the page where your stream will be hosted, or remove Facebook as a streaming destination.
You can also access these options by hovering your cursor over the Facebook icon at the
bottom of the module.
Below these options are basic stream configuration settings.
306

1. In the PostPost AsAs dropdown, you can choose between your personal profile, any pages you admin, or
any groups you admin.
2. Share withShare with lets you choose which audience you would like to share your stream with.
3. Check Continuous LiveContinuous Live if you wish to keep streaming beyond Facebook's eight-hour streaming limit
(note that this will notnot send out additional notifications or save any VOD from your stream onto
Facebook).
If you have enabled multi-language events, you can choose which incoming language (or audio track)
will output to this particular stream by using the Select LanguageSelect Language drop-down menu; if you are
simulcasting, this allows you to stream to the same provider but select a different language for each
stream instance. This menu does not appear if multi-language events are not enabled.
307

Below these basic configurations, click Advanced SettingsAdvanced Settings to set a variety of options for customizing
your live video post on Facebook, such as adding tags for other pages on Facebook, and audience
targeting tools.
You can also provide other metadata for your stream, such as targeted countries and what language the
broadcast will be in.
At the bottom of this section, you can select which network to stream over, if you have multiple
available.
308

Go Live to Facebook Go Live to Facebook
At the top of the module, give your stream a name and select a streaming quality. For optimum
performance on Facebook, select a single bitrate (e.g. 720p+) rather than a multi-bitrate quality (e.g.
720p + 540p + 240p).
Clicking the gearwheel allows you to select your preferred aspect ratio. Choosing 1:1 or 9:16 will display
a yellow Safe Area DisplaySafe Area Display in Program and Preview demonstrating what your stream's output will look
like so you can set your shots accordingly. You also have the option to see the display is all multiview
sources, or to turn it off entirely.
Here, you can also choose your default streaming network. Unless you specified a different network in
the Advanced SettingsAdvanced Settings section, your stream will broadcast over this network.
309

Click GoGo LiveLive to start your stream.
Once you are live, you can view your stream by hovering the mouse over the Facebook logo and
clicking the URL in the menu that pops up.
310

The stream will appear in your Facebook timeline after about 10 seconds.
When you want to end your stream, click the red Streaming Streaming button.
311

The broadcast will end promptly and the stream will save on your Facebook timeline for on-demand
playback.
312

Stream to a Scheduled Live Post on Stream to a Scheduled Live Post on Facebook via Livestream Studio Facebook via Livestream Studio
While you can go live to your Facebook pages and groups at any time, many publishers on
Facebook prefer to use Facebook's Scheduling feature so that their followers have prior notice and
are more likely to watch their live event.
Schedule a Live Video on Facebook Schedule a Live Video on Facebook
In order to stream from Studio to a scheduled live video on Facebook, you will first need to create the
scheduled post on Facebook.
Facebook provides a comprehensive tutorial and best practices to scheduling a live video on Facebook.
A broader live overview for Publishers on Facebook is also available.
Once your live video is scheduled, you can configure Studio to stream to it.
Go Live to Your Scheduled Live Post Go Live to Your Scheduled Live Post
In Livestream Studio, navigate to the StreamStream tab, select Facebook and log in to the same account. Select
your Page under Post AsPost As, and then open the Stream ToStream To drop-down menu. Your scheduled live video
post will appear there.
313

Select that scheduled post. Configure the rest of your stream is the same as all streams to Facebook.
When you are ready to start broadcasting, click Go LiveGo Live in the bottom right corner.
When you edit your scheduled post on Facebook, you can see your stream come in and monitor it.
However it will not appear live on your timeline until the time you scheduled your post to go live.
If you want to go live sooner, click the Manual StartManual Start button at the bottom of the post editor in Facebook.
314

Once you confirm you want to proceed and Facebook fetches your stream preview, click Go LiveGo Live. Your
stream will be live on your Facebook timeline.
315

Alternatively, wait until your scheduled start time; the stream will appear on the timeline automatically.
When your event is over, you can simply click the red Streaming Streaming button in Studio to end your live event
on Facebook.
316

Stream to a Facebook Group via Livestream Stream to a Facebook Group via Livestream Studio Studio
In order to go live to a Facebook Group from Livestream Studio, you must first be an Admin and
install the Livestream Studio Facebook App to your Group. Once you have done so, you will be able
to choose your Group as a streaming destination within Studio.
First, make sure you are an AdminAdmin of your Group. Only Admins can adjust Group settings and go live to
Groups. Also, ensure that you are using Livestream Studio version 5.1.25 or later.
On your Group's Discussion page, open the MoreMore menu and select Edit Group SettingsEdit Group Settings.
Scroll down to the AppsApps section and select Add AppsAdd Apps.
317

Find the Livestream StudioLivestream Studio app in the list and select it. Once you've added the app to your Group, be
sure to scroll to the bottom of the settings screen and click SaveSave.
In the Livestream Studio software, navigate to the Stream tab and select FacebookFacebook. Configure your
stream as you normally would; your Facebook Group should appear as an option in the Post AsPost As menu.
318
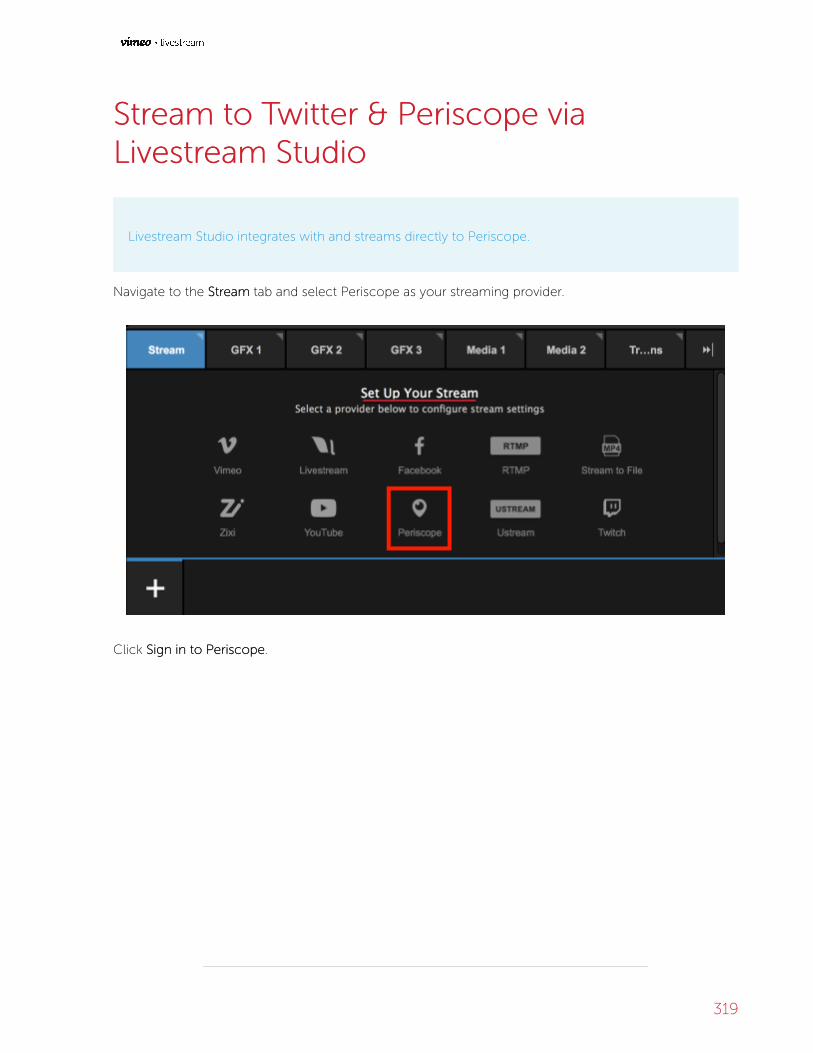
Stream to Twitter & Periscope via Stream to Twitter & Periscope via Livestream Studio Livestream Studio
Livestream Studio integrates with and streams directly to Periscope.
Navigate to the StreamStream tab and select Periscope as your streaming provider.
Click Sign in to PeriscopeSign in to Periscope.
319

This will open your web browser to Periscope's login page. If your browser does not automatically come
to the front of your screen, you may need to manually switch over to it. Do not exit StudioDo not exit Studio.
This will not work if Microsoft Edge is your default browser. Set Google Chrome or Mozilla
Firefox as your Windows default browser in order to log in.
Log in to Periscope and authorize Studio to access your Periscope account. This is necessary in order
for the two applications to communicate to each other.
Once authorized, you can close your browser and go back to Studio.
In the Stream module, give your stream a title and select your quality.
720p is the streaming quality profile that is recommended by Periscope. 1080p and above are
not supported.
320

Click the gearwheel on the upper right side to set your aspect ratio and your default network to stream
with.
When you have configured these settings, click the gearwheel again to collapse this menu.
Below the stream name is a small Twitter bird icon. By default, it is blue, indicating that the stream to
Periscope will also be tweeted to the Twitter account connected to your Periscope account. If you do
not want your stream on Twitter, click the bird icon to disable it.
Clicking the gearwheel in the popup menu will allow you to choose which of your available network
connections you will send your stream though (this example only has one).
321

If you have enabled multi-language events, you can choose which incoming language (or audio track)
will output to this particular stream by using the Select LanguageSelect Language drop-down menu; if you are
simulcasting, this allows you to stream to the same provider but select a different language for each
stream instance. This menu does not appear if multi-language events are not enabled.
Below this, you can specify a network to use if you wish to stream using a network different from your
default set network. This is handy if you intend to add other providers and wish to use different
connection types for each stream.
322

When you are ready to start streaming, click Go LiveGo Live in the bottom right corner.
When your event is over, click the red StreamingStreaming button to end the stream.
When you stream ends, you can see information about your viewers and for how long you streamed.
Choose to either save your video on demand or delete it.
323

Streaming to YouTube via Livestream Studio Streaming to YouTube via Livestream Studio
You can stream to your YouTube channel directly from Livestream Studio. There are two ways
YouTube supports streaming: either their "Stream Now" option or the Live Events Dashboard.
To get started, go to the StreamStream tab and select YouTube as a provider.
You will need to log in using your YouTube/Google credentials and allow Livestream Studio to access
your account. This will open a new browser window; if your browser does not come to the front of your
screen, navigate away from Studio to see it and log in. Do not close Studio. Do not close Studio.
If you are using Google apps (i.e. an Google account that is not a standard @gmail.com
address), you may need to authorize access to third-party applications in your Google
account or via an admin.
Once you are logged in and authorize Studio access to your Google account, you can close the
browser and navigate back to Studio.
324

Give your stream a title and choose a streaming quality. Since YouTube provides cloud transcoding, we
recommend selecting a single-bitrate quality.
Clicking on the gearwheel will allow you set your aspect ratio and choose your default network. This is
the network that will be used to stream with by default for any provider in Studio.
Once you have configured these settings, you can click the gearwheel icon again to collapse the menu.
You can select which YouTube event you want to stream to in the Event Name Event Name drop-down menu.
Selecting Stream NowStream Now will simply start a new stream to your channel rather than broadcasting to a
previously created event. The URL to your stream will be available below the menu.
325

If you have enabled multi-language events, you can choose which incoming language (or audio track)
will output to this particular stream by using the Select LanguageSelect Language drop-down menu; if you are
simulcasting, this allows you to stream to the same provider but select a different language for each
stream instance. This menu does not appear if multi-language events are not enabled.
Clicking Advanced SettingsAdvanced Settings will allow you to choose a different network rather than your default network
to stream with. This is handy if you intend to add other providers to Studio and wish to keep them on
different network devices. When you specify YouTube's network, you can click Hide Advanced Settings Hide Advanced Settings
to collapse the menu.
326

When you are ready to start streaming, click Go LiveGo Live in the lower right corner.
When your event is over, click the red StreamingStreaming button to end the stream. If you need to log out of
YouTube, click your name below the stream title, then click Log OutLog Out.
327

328

Stream via RTMP, RTMPS, Zixi, and UDP Stream via RTMP, RTMPS, Zixi, and UDP from Livestream Studio from Livestream Studio
You can stream directly from the Livestream Studio software to other services (e.g. Wowza,
Akamai, etc.) using other common protocols such as RTMP/RTMPS, Zixi, and UDP. All these options
have very similar interfaces.
Under the StreamStream tab, click the streaming protocol you plan to use (RTMP, Zixi, or UDP; select RTMP if
streaming via RTMPS).
At the top of the module, configure a stream title and streaming quality.
Click the gearwheel to adjust your aspect ratio or choose a default network for sending your stream.
329

The URL (and Stream Key, if using RTMP) comes from your streaming provider, which allows Studio to
know where to send the stream. Paste the appropriate URL into the URL field.
Some RTMP streaming providers only give a single Stream URL with the stream key included, while
others provide the stream URL and stream key separately. If your provider does the latter, click switch switch
your viewyour view to see two text fields: Stream URL and Stream Key
330

If you've enabled multi-language events, you will see a Select LanguageSelect Language dropdown menu in the RTMP
panel, allowing you to choose which language will output in this stream instance.
Clicking Advanced SettingsAdvanced Settings will show additional options. For RTMP you will see the option to import the
configuration XML file (Import From FMLEImport From FMLE), enable authorization, and choose which network to stream
over if you do not wish to use your default network.
Zixi users will see the option to enter a Zixi password, as well as the option to use a bonded connection
or specify a network under their AdvancedAdvanced SettingsSettings. Checking Use BondingUse Bonding will automatically use all
available networks to which your Studio PC is connected.
Both Zixi and UDP provide the Video packet identifier (PID) and Audio PID, which a .stream or SMIL file
would need to recognize your stream. This is particularly helpful when streaming to a player that can
recognize multiple audio tracks for the same video.
331

When your settings are configured, click Go LiveGo Live to start streaming to your destination.
Studio will start streaming your content to your destination and display information such as outgoing
frame rate and bitrate. Any potential issues will display in the log on the right side.
When your event is over, click the red Streaming Streaming button to end your stream.
332

333

Streaming to IBM Video (Ustream) Streaming to IBM Video (Ustream)
In order to stream to IBM Video (formerly known as Ustream) via Livestream Studio, producers must use
the RTMP section of the StreamStream module.
Instructions on how to obtain the RTMP URL for your channel can be found here.
334

Streaming to Twitch via Livestream Studio Streaming to Twitch via Livestream Studio
Livestream Studio offers direct integration with Twitch for producers who wish to stream their
content there.
In the Stream Stream module, click the Twitch logo to start configuring your stream settings.
The pop-up window seen below will appear. Click Sign in to TwitchSign in to Twitch and navigate to your web browser if
it does not switch over automatically.
Log in to your Twitch account within the browser.
335

Authorize Livestream Studio to access information from your Twitch account by clicking AuthorizeAuthorize. After
doing so, navigate back to Studio if the browser does not close by default.
336

Enter a title for your stream and set your streaming quality.
Click the gearwheel icon to set your desired output aspect ratio and the default network to use with
your stream. If you choose a 1:1 or 9:16 ratio, a Safe Area Display will appear in your output by default.
You can change this to show in all sources in your multiview or to not display at all.
Set your game name, stream title on Twitch, ingestion location, and whether to save your VOD on
Twitch.
337

If you have enabled multi-language events, you can choose which incoming language (or audio track)
will output to this particular stream by using the Select LanguageSelect Language drop-down menu; if you are
simulcasting, this allows you to stream to the same provider but select a different language for each
stream instance. This menu does not appear if multi-language events are not enabled.
Clicking AdvancedAdvanced SettingsSettings will allow you to specify a network to stream out at if you do not wish to use
your default network selected earlier.
338

Click GoGo LiveLive when you are ready to start broadcasting. Livestream Studio will indicate that the stream
has started and display your streaming status.
When you are ready to finish streaming, click the red StreamingStreaming button.
339

Hover your mouse over the Twitch icon at the bottom of the module. You will find a link to your Twitch
channel.
340

Stream to Multiple Providers Using Stream to Multiple Providers Using Livestream Studio Livestream Studio
You have the option to stream to multiple providers at the same time using Livestream Studio.
Your video is only encoded once, so CPU demands for this feature are similar to those for streaming to
just one provider. However, bandwidth requirements will be higher. Multiple streams will use as much
bandwidth as the qualities selected for each provider.
ExampleExample: If 720p + 480p + 360p + 240p (4862Kbps) Stream Quality is selected for Livestream and
‘Highest Quality’ is selected for Facebook (in this case, 720p), then the total outgoing bitrate will average
4862 + 2128 = 6990Kbps6990Kbps. We always recommend having twice the upload speed on your network as
the selected bitrate, which is about 14Mbps upload speed14Mbps upload speed in this case.
You can also utilize this feature to send multiple streams to the same provider with different
audio tracks (e.g. languages). Learn more.
Start by clicking one provider’s logo to add it to Studio (this example will use Livestream).
Log in to the selected provider to configure your stream settings.
341

Configure your stream destination as you normally would (e.g. select your Livestream event).
Now add a second provider by clicking the ++ button in the lower left corner of the Stream module.
342

Select a second provider (this example will show Facebook).
Log in to that provider; allow any permissions that the provider may request in order to use it with
Studio.
343

Configure your stream’s destination for that provider, i.e. which profile is streaming, to which page or
group, and your desired audience.
You can click AdvancedAdvanced SettingsSettings to configure further settings for that provider if you wish.
344

At the top of the overall StreamStream panel, your stream title, bitrate, and aspect ratio.
If you need to change a setting for a particular provider, click the provider's icon at the bottom of the
panel. The selected provider will be a ligher shade of gray.
345

Click GoGo LiveLive in the bottom right corner to start your stream.
The Stream module in Studio will show the streaming status for each provider along the bottom of the
interface, as well as the overall outgoing bitrate in the middle of the panel.
346

Open a web browser and go to your selected stream destinations. You will see the exact same live
content in each player.
347

You can deactivate a provider by hovering your mouse over its icon and unchecking the checkbox in the
upper left corner of the popup box. If this is done while you are streaming, that will stop the stream on
that provider only.
You can reactivate that provider at any time (live or not live) by checking the checkbox.
348

When your event is over, click Streaming Streaming in the lower left corner to end the stream.
Studio will let you know that the stream has ended and display the maximum viewers your event had
and the stream duration.
349

Certain providers may have actions for you to take after the broadcast. For example, Livestream will ask if
you want to post the video on demand, save it as a draft, or delete it (‘Save draft’ is selected by default.)
Choose your desired option, then click DoneDone.
If you want to remove a provider from your workflow entirely, select its icon in the bottom of the
interface to open its settings, then click X delete X delete in the upper right corner of the module. You can add it
back at any time.
350

It’s important to note that Facebook will not stream alongside any other streaming provider besides
Livestream. Facebook will have to be disabled in Studio prior to streaming to YouTube, etc.
If you wish to stream to Livestream and Facebook but have limited bandwidth, you may want to look
into simulcasting via the Livestream platform or Vimeo.
351

Studio Log and Streaming Information Studio Log and Streaming Information
Livestream Studio displays basic information about your stream as well as a log with various
warnings and notifications regarding your stream.
When streaming is active, the stream module and streaming log on the right side provide live updates on
streaming status.
• FPSFPS: Displays the current outgoing FPS.
• MbpsMbps: Displays the current outgoing bitrate.
• ViewersViewers: Displays the number of concurrent viewers watching the stream.
• Stream StatusStream Status: Displays the current status of the stream (e.g. "Perfect Streaming").
• Streaming LogStreaming Log: Displays live streaming updates.
Common messages you may see in the streaming log are:
• Perfect StreamingPerfect Streaming: The stream is going out with no issues.
• Internet Too Slow for QualityInternet Too Slow for Quality: Upload bandwidth does not support selected quality. This is generally
an on-site IT issue and should be escalated to the IT department. Changing quality requires the
stream to be stopped and restarted.
• Lost Internet ConnectionLost Internet Connection: Internet connection has been lost. Again, check with onsite IT if this
happens.
• CPU WarningCPU Warning: CPU percentage is getting very high.
352

• Problem publishing to primary serverProblem publishing to primary server: Studio is unable to stream to the primary publishing point due
to local Internet connection issues or an issue with the publishing point.
• Antilag Feature TriggeredAntilag Feature Triggered: Antilag has been triggered based on the selected queue limit (see
Streaming Preferences above).
• Audio Peak WarningAudio Peak Warning: Audio levels are peaking above normal levels.
353

Advanced Streaming Settings in Livestream Advanced Streaming Settings in Livestream Studio Studio
Livestream Studio allows you to configure additional settings regarding your stream's output and
response to certain situations.
These settings can be found by clicking the gearwheel in the upper right corner of the Studio interface
and navigating to the Settings: StreamingSettings: Streaming menu.
Hardware encodingHardware encoding: This option only appears on PC's that have integrated graphics cards that support
video encoding. Learn more.
AntilagAntilag: Selecting ‘On’ for Antilag works to reduce latency on the viewing end. If a delay on the encoding
side builds up past the chosen AntilagAntilag DurationDuration (below), the frame buffer will be cleared. Turning Antilag
off will continue to build a cache of frames without clearing the data, thus building latency to your
viewers. If low latency is a critical component of your stream, disabling Antilag is not recommended.
354

Key Frame Interval:Key Frame Interval: Places keyframes into the stream to track changes in movement. Two seconds is a
standard setting, but you may want to consider a more frequent interval if your event has a lot of
motion.
Encoder QueueEncoder Queue: The number of frames that Livestream Studio will allow to build up prior to a stream
terminating due to bandwidth or CPU issues.
BitrateBitrate: A ‘Variable’ bitrate will change the outgoing bitrate based on the movement in the video. Static
images will send at a lower bitrate; high movement will increase the bitrate. ‘Constant’ bitrate will
maintain the outgoing bitrate regardless of the amount of movement in the video.
Local MP4 RecordingLocal MP4 Recording: Automatically records an .mp4 of your stream as a backup. It is strongly
recommended to keep this feature enabled. Selecting Highest Quality OnlyHighest Quality Only will record in only the
highest bitrate and resolution that you are outputting (e.g. if your stream quality is 720p + 540p + 240p,
your backup file will record in 720p, whereas selecting All QualitiesAll Qualities will produce three separate
recordings simultaneously, one for each quality).
MP4 Recording LocationMP4 Recording Location: Choose where the backup recording described above is saved. By default,
your recordings will save to the Videos folder on your system's C drive, but you may choose to save it
elsewhere, such as an external hard drive.
Streaming ModeStreaming Mode: Allows you to choose the outgoing frame rate. The higher the rate you choose, the
more CPU usage will increase.
Closed CaptioningClosed Captioning: If you need to ingest closed captions over SDI, here is where you enable it. Learn
more about Studio's closed captioning support.
355

Can Livestream Studio Stream to Facebook Can Livestream Studio Stream to Facebook Workplace? Workplace?
Facebook Workplace is not directly integrated with Livestream Studio. However, you can stream to your
Workplace community via RTMP.
356

Graphic Overlays Graphic Overlays
357

Adding Graphics Overlay Tracks Adding Graphics Overlay Tracks
Livestream Studio gives you the option to use three graphics overlay channels, all of which can
include multiple layers of static or data-driven graphics.
By default, three graphics overlay tracks will be available and listed in the InputsInputs menu in the lower left
corner of the Studio interface. You will also see them in your multi-view.
If you do not intend to use all three graphics overlay tracks, you can remove any of them by going to the
InputsInputs menu and selecting the trash icon to the right of each. This will remove that GFX input from the
multi-view and make it unavailable as an overlay.
358

The first step in adding graphics overlays to the GFX channel is adding a layer. You can easily add a
Livestream pre-built graphics template such as a lower third by navigating the Studio Graphics Store seen
inside the graphics module.
To add your own custom graphic, select Create Custom GraphicCreate Custom Graphic in the bottom left corner of the
interface.
Many options will pop up. To get started, select NewNew LayerLayer at the bottom of the list.
359

The layer will appear on the left side of the module. Click either paintbrush button to enter the GFX
designer to build your graphic.
Simple Mode:Simple Mode: To open the GFX Designer in Simple mode, double-click the graphics layer.
Clicking the +T+T button will add static text to your graphics layer.
360

Click the attached gearwheel button for editing options (font, size, color, etc.)
361

The next button allows you to add either a static or dynamic image to your graphics layer.
A static image is any image file you can import, which will always be visible when that graphics layer is
also visible. The image will not change.
Supported image formats are .png, .jpg, .jpeg, .bmp, .xpm, .tif, .tiff
A dynamic image will change if the hosted file is also changed. In the designer, you choose the file
where it is located and its dimensions.
362

The next option you can add is a video source. Clicking this will allow you to choose which video source
you want to include in your graphics channel, place it, size it, etc. Each layer can support up to five video
sources.
363

Next, you can add a webpage as a source in your graphics layer. This includes the ability to navigate the
page and change its appearance within Studio. Please note there is currently no option to bring in audio
from your browser source.
The following button allows you to add text or image data fields. Here is where you set where assets will
be, their sizes, font colors, etc. The content of those fields is added in a later step.
364

Farther to the right, the two arrow buttons are for UndoUndo and RedoRedo.
The next button will provide you with a box identifying the title safe (inner box) and action safe (outer
box) areas. This lets you know that your graphics will not be cut off the screen.
365

The next three buttons allow you to change how the GFX Designer displays transparency. This has no
impact on the appearance of your graphics overlays.
366

Right clicking on your content in the designer allows you to undo and redo actions, move content
between layers, copy, paste, etc.
Close out of the GFX Designer when you have finished building your graphics layer. If you hover your
mouse over your GFX layer, you will notice a name appear at the top-left of the image. Double-click the
text to rename this GFX layer.
367

You can adjust other settings for that graphics layer by clicking the gear wheel button. The settings
shown will change based on the type of graphics overlay being used.
Most GFX layer settings will be related to your data fields. If you added a text or image field, a column for
each should have been created to the right, which you can rename.
368

You can also add a column by clicking + COLUMN+ COLUMN underneath where the data populates and add that
asset in the GFX Designer.
In the one row that appears, you can add content to those fields by clicking in the cell. You can then
type any desired content into a text field.
369

Double-clicking an image field will allow you to browse your computer for an image to put in that image
field.
Click the adjacent radio button to highlight it blue. This will make that row of data visible when that layer
is shown in Preview or Program.
370

To use the same graphics overlay template for different information or data, click + ROW+ ROW on the bottom.
Fill in the data cells with the information you want to use for those text or image fields.
371

Click the corresponding radio button to make that row of data visible in your graphics layer.
You can add as many rows and columns as necessary for any given graphics overlay layer.
The settings allow you to loop your data content automatically. You can change the interval between
switches, whether the loop re-starts, if rows are kept, and what direction the loop moves.
372

373

Mixing Graphics Overlays into Program Mixing Graphics Overlays into Program
The mixing panel shown in this section is only visible when Studio is in Advanced Interface Advanced Interface
ModeMode. Mixing graphics in Simple Mode is covered herehere.
Once your graphic is designed and configured, you can start adding it to your production. First, make
sure your layer is visible by clicking the eyeball icon. It should be highlighted blue.
If you have multiple layers in your graphics overlay channel, highlight the eye icon of any layer that you
want to be visible; more than one layer can be visible at a time.
374

Please note that if you have multiple layers in one module, you can click the display buttons on the
bottom to show your layers in list mode to manage them more easily.
You can still access settings, the GFX Designer, and change visibility for each layer when using this view.
If you want to put a graphics overlay channel in Preview before pushing it to Program, click the
corresponding PRVPRV button in the upper right corner of the interface.
375

You should now see the visible layers of your graphics overlay channel in Preview.
You should also notice the yellow PUSHPUSH button flashing. Click it to bring your graphics overlays into
Program.
376

Your visible layers are now seen in both Preview and Program.
This is also indicated by PUSHPUSH no longer flashing and the PULLPULL button turning red.
377

Now try making a change to your graphics overlay channel, such as changing a layer’s visibility or
selecting a different row of data in a currently visible layer.
You will notice the change is visible in Preview but is not yet seen in Program.
378

The PUSHPUSH button has also started flashing again. This means that Livestream Studio has detected a
change in that GFX channel and is ready to change it in Program. Click it when you are ready to show
the change to viewers.
You should now see the change reflected in both Preview and Program.
For each layer, you have the option to have every change automatically pushed to Program immediately
by selecting the AUTO PUSH/PULLAUTO PUSH/PULL button on the bottom right.
379

Please note that if the graphics overlay is not yet in Program, you will need to push it manually by
clicking PUSHPUSH in the upper right corner.
To remove a visible graphics overlay quickly while AUTO PUSH/PULLAUTO PUSH/PULL is enabled, simply click on the
highlighted radio button of the visible row.
Now the graphic has been removed from Program and the radio button has faded in the graphics
module to indicate this.
380

Click the red PULLPULL button that corresponds to that channel to remove everything from that graphics
overlay channel from Program.
381

Doing so will remove that graphics overlay from Program, but you will still see it in Preview if the PRV PRV
button is still selected.
To remove a graphics overlay from Preview, click the corresponding green PRVPRV button.
382

You should no longer see your graphics overlay in either Preview or Program.
383

Using the Tie Controls Using the Tie Controls
You may need to switch a video source and a graphics overlay simultaneously. This is where the TIE TIE
BGBG and TIETIE buttons in Livestream Studio (Advanced Interface only) come in.
At least one of these TIETIE buttons must be selected at all times. This tells the transition controls what to
reference when switching.
If only TIE BGTIE BG is highlighted yellow, then only the video source in Preview will switch to Program when
transitioning.
384

After using a transition control, notice how the video source switched, but GFX 1 remained in Preview
because only TIETIE BGBG was selected.
To switch the video source and bring in a graphics overlay at the same time, select TIETIE BGBG and the
corresponding TIETIE button for your graphic. Be sure to select the PRVPRV button for the graphics overlay
channel that is tied to your video source.
385

Your Preview and Program monitors should look similar to this, with a GFX channel in Preview. Use a
transition control to switch the sources.
Now your video sources have switched and your graphics overlay has been pushed to Program.
386

If only the GFX 1 and GFX 2 TIETIE buttons are lit and both sources are in Preview, then both overlays will
switch into Program when transitioning. The video will not change.
In this example, GFX 1 has a lower-third graphic, and GFX 2 is a clock. Use a transition control to bring
both into Program.
After the transition, both graphics overlays are now in Program, but the video source is the same since
TIETIE BGBG was not selected.
387

To pull a graphics overlay out of Program simultaneously with a video source, tie the background and
the graphics overlay together.
Next, you will need to remove the graphics overlay from Preview. This will tell the transition controls that
the graphic should not be shown in Program on the next switch.
388

Your monitors should look similar to this now, with Preview showing a different video source and no
graphic. Use a transition control to switch the sources.
Now your video sources have changed, and your graphics overlay is no longer in Program.
389

Importing Livestream Graphics Files Importing Livestream Graphics Files
Livestream’s Graphics StoreGraphics Store has numerous free templates that can be downloaded and imported
into Livestream Studio. You can also export any template you build in Studio and import it into
another Studio project later using this feature.
Studio has the Livestream Graphics Store built into its interface. Navigate to any GFX module. Open the
Categories menu or select Features you would like your graphic to have on the left side and browse
through template options on the right side. If you find a design you like you can simply click +Add +Add below
the corresponding template.
Alternatively, if you downloaded a template from the Store website or exported an .lsgfx file previously,
you can import that file from your local hard drive by selecting Create Custom GraphicCreate Custom Graphic > Import Layer Import Layer >
Livestream GraphicsLivestream Graphics.
390

Browse your computer for the .lsgfx file you just downloaded (this is typically found in the Downloads Downloads
folder). When you find the file, click OpenOpen.
391

The layer will appear in your graphics overlay channel. For lower third graphics downloaded from the
Graphics Store, there are two text type columns and two rows included by default.
If you open the GFX Designer by clicking the paintbrush icon, you will see clearly which text fields the
two columns correspond to and can adjust them as necessary.
Just as with any manually built graphic, you can add as many columns for data fields or rows of content
as necessary.
392

393

Importing Excel Spreadsheets and .CSV Importing Excel Spreadsheets and .CSV Files Files
Rather than manually inputting your data in Livestream Studio, you can import all your data from an
Excel (.xlsx) spreadsheet or .CSV file.
For the best experience, we recommend that your document have no more than 250 rows.
You can use other Excel or .CSV files in as many graphics layers as needed if you need to
show more data.
If you want to include images, make a column with the URLs where the images are hosted.
394

To get started, click Create Custom GraphicCreate Custom Graphic, then hover the cursor over Import LayerImport Layer. Choose either
Excel Spreadsheet Excel Spreadsheet or .CSV File.CSV File.
The browse window will appear, allowing you to select your file and import it.
The data from your file will appear on the right side of the module. Click the gear wheel to enter its
settings.
395

Checking Watch file for updateWatch file for update will prompt Livestream Studio to make any changes to the data that are
made in the original .xlsx file on your hard drive.
Checking Use first row as column titlesUse first row as column titles will change row A in your spreadsheet to be titles of the
corresponding columns in the GFX layer.
Click on the name of any column to change the data type that is in the column (text or image).
396

If you want to be able to edit the information within Livestream Studio, uncheck ReadRead OnlyOnly. Otherwise,
changes can only be made in the original file.
Any edits made to in Livestream Studio will not change content in the original document.
.CSV File Only.CSV File Only - Further down in the settings, you can adjust the separators in the document as well as
the character encoding (which is typically detected automatically).
397

Scroll down to find your Auto-Loop settings, including interval between rows, direction, and starting
point.
Next, click on the paintbrush icon at the bottom of the graphics module to enter the GFX Designer.
398

Select ExcelExcel or .CSV.CSV in the dropdown menu and click the list icon to insert your text and image fields
into the designer.
From here, you can drag and drop each field to wherever you want it to be displayed.
399

Click the gearwheel icon on each field to choose font, size, color, opacity, etc.
400

Feel free to add any additional elements to your graphics overlay using the other icons at the bottom of
the designer.
Close out of the GFX Designer when you have finished. To use the graphic, click BackBack to view the layer
module.
Make sure the eye icon corresponding to that layer is highlighted blue, meaning that it is visible.
You can then click the associated PRVPRV, PUSHPUSH, and PULLPULL buttons to utilize that graphics overlay.
401

402

Using RSS Feeds Using RSS Feeds
If you want to include an RSS feed in your Livestream Studio production, go to a GFX module, open the
Create Custom Graphic Create Custom Graphic menu and select RSSRSS from the graphics menu.
The RSS layer will appear in the graphics overlay channel. Click the gear wheel to enter its settings.
If access to your RSS feed requires authentication, check BasicBasic AuthenticationAuthentication and enter your
credentials.
403

When you enter the RSS URL, the data should populate on the right and give you access to further
settings.
Set the time interval in seconds that you want Livestream Studio to look for new information from your
RSS feed under Auto advance data intervalAuto advance data interval.
404

To control the number of posts from your RSS feed, you can choose to only include posts within a
recent time frame.
You can also limit Livestream Studio to pull only a certain number of most recent posts.
405

If you wish to edit any data within Livestream Studio, uncheck ReadRead onlyonly.
Any edits made to data sources in Livestream Studio will not change content in the original
source.
At the bottom of the settings are the Auto-Loop options for this graphics layer.
406

Next, enter the GFX Designer, and select RSSRSS from the dropdown. Click the list icon to select your data
fields.
Close out of the GFX Designer and return to the layers module to make the layer visible. You can now
include content from the RSS feed into your production via the graphics overlay controls.
407

408

Integrating Google Spreadsheets Integrating Google Spreadsheets
An easy way to integrate and manage data in a graphics overlay from an external source is to use
Google Sheets. Livestream Studio can integrate up to 15 15 Google Sheets graphics layers; this is an
authorization limitation determined by Google.
Navigate to a graphics overlay track, open the Create Custom GraphicCreate Custom Graphic menu and select GoogleGoogle.
You do not need to log in if you select Enter a public Google spreadsheetEnter a public Google spreadsheet. Selecting this will allow you to
enter the document’s URL.
409

If you want to use your own private Google document, you will need to sign in to a Google account to
allow access to your Google Drive. When you click Sign in with GoogleSign in with Google, a new browser window will
open allowing you to sign in and allow this permission.
410

Once you see the Authorization Successful message, navigate back to Studio and select the document
with the information you want to include in your graphic. The selected document’s data will populate on
the right.
For the best experience, we recommend that your document not have more than 250 rows.
You can use Google in multiple graphics layers if you need to show more data.
411

You can always use a different spreadsheet in your Google Drive by clicking the ChangeChange button.
Spreadsheets will be ordered by most recently modified.
Scroll down to adjust additional settings for this layer. To turn your first row into column titles, check Use Use
first row as column titlesfirst row as column titles.
412

Click on any column title to change the type of data included in that field (text or image).
Uncheck ReadRead onlyonly if you want to be able to edit the information within Livestream Studio. Otherwise,
changes can only be made in Google Docs.
413

Scroll down in the settings to configure your Auto-Loop preferences, including how often Studio
switches to the next row, the direction the loop should go, and where the loop should start from.
The next step is to start designing your graphic. Click on the paintbrush button to enter the GFX
Designer.
414

In the Google Spreadsheet layer, click on the list icon to see your columns. Click on one to insert it into
the GFX Designer.
Click on the gearwheel button to access more options for your font, colors, etc.
Close out of the GFX Designer when you have finished. In the graphics overlay channel, click BackBack in the
upper right corner to return to the layer module.
415

Make sure the Google spreadsheet layer is visible by selecting the eye icon. This will allow you to this
graphics overlay to be visible in Livestream Studio.
416

Importing a Twitter Feed into Livestream Importing a Twitter Feed into Livestream Studio Studio
You can include a graphics layer of a Twitter feed from a username or hashtag as a graphics overlay
in Livestream Studio.
To get started, you may want to consider adding a Twitter graphic template from our Graphics Store. In
the GFX module, select TwitterTwitter from the Categories menu, then click +ADD+ADD under one of the design
options.
When the graphic is imported, you will see the design preview on the left side and a prompt to sign in on
the right. Click Sign in with TwitterSign in with Twitter to open a browser window and sign in to Twitter. This is required in
order to allow Studio and Twitter to communicate with each other, however you are not restricted to
displaying tweets from your own Twitter account.
417

Once you authorize the app, navigate back to Studio. The layer module will open with a default account.
Click the gearwheel to enter the graphic’s settings.
418

Select a username or hashtag to poll. Keep in mind that you must include '##' in the front of hashtags and
'@@' in front of usernames. When you have typed in the desired asset, press the Enter or Return key.
On the right, tweets from that username or hashtag will load on the right side, including each tweet's
avatar, name, username, and time stamp.
419

Scroll down on the left side of the module to find more settings. You can select how often Livestream
Studio should look for new tweets. Newer tweets appear at the top of the module. You can also tell
Livestream Studio how many tweets to look for within a certain time frame. Select ReadRead OnlyOnly if you do
not want to be able to edit the tweets.
Scroll down in the settings to configure any desired Auto-Loop options.
420

If you wish to adjust the appearance of the graphic or change what information is shown, click the
paintbrush icon to open the GFX Designer. You can adjust the placement, size, font, and color of any of
the text fields by selecting it and clicking the gearwheel icon.
If you do not wish to use a Livestream Graphics template, you can also create your own by opening the
Create Custom GraphicCreate Custom Graphic menu, hovering your mouse over SocialSocial, and selecting Twitter postTwitter post.
421

Follow the login steps as described above, then open the GFX Designer. Click on the list button in the
Twitter layer, and you can add any data field from Twitter such as the tweet, username, avatar, etc. as
well as any other design element.
422

Display Facebook Comments via Display Facebook Comments via Livestream Studio Livestream Studio
Studio lets you include comments from your Facebook broadcast or your other videos on
Facebook and show them in a graphics overlay.
Please note that Facebook does not include the names or photos of commenters from a
PagePage or GroupGroup post, regardless of the audience setting. Only the comments will be viewable.
In a GFX module, select Create Custom Graphic Create Custom Graphic in the bottom left corner.
Hover your mouse over SocialSocial, then select Facebook CommentFacebook Comment.
423

Once you add the Facebook Comment layer, be sure to open the GFX Designer to design your graphic
and add the desired fields from Facebook (profile picture, name, comment, number of likes on that
comment).
424

There are two ways this feature can be used.
See Comments on Current Live Broadcast
By default, this option is set to get comments from Facebook stream providerFacebook stream provider. This means when you set
up Studio to broadcast to Facebook, the comments that populate will be from the stream that appears
on Facebook once you go live from Studio.
425

You can also filter the comments that come in by a keyword or hashtag. This will pre-populate a default
comment you can display in your graphic that will prompt your viewers to use the desired phrase. If you
want to see all the comments that come in, uncheck Filter commentsFilter comments.
Next, you can configure how often Studio polls for new comments and how many of the most recent
comments will it show. By default, it will poll new comments every 60 seconds and display the most
recent 100.
Below this setting are the auto-loop settings, where you can set Studio to loop through each comment
at a defined interval.
426

427

Once you go live and some viewers have commented, Studio will poll Facebook for comments as
configured, and you can display them one at a time in a graphics overlay.
See Comments from Another Facebook Post
If you wish to display comments from another Facebook video, you must have login credentials to the
account that owns the video, whether it's from your profile or a Page of which you are an admin.
Click Log InLog In to open a browser window and log into Facebook.
Once you are logged in, paste the URL of your Facebook video into the field.
You can filter the comments that come in by a keyword or hashtag. This will pre-populate a default
comment you can display in your graphic that will prompt your viewers to use the desired phrase. If you
want to see all the comments that come in, uncheck Filter commentsFilter comments.
428

Next, you can configure how often Studio polls for new comments and how many of the most recent
comments will it show. By default, it will poll new comments every 60 seconds and display the most
recent 100.
Below this setting are the auto-loop settings, where you can set Studio to loop through each comment
at a defined interval.
429

430

Display YouTube Comments via Livestream Display YouTube Comments via Livestream Studio Studio
Studio lets you include comments from your YouTube broadcast or other videos on YouTube and
show them in a graphics overlay.
In a GFX module, select Create Custom GraphicCreate Custom Graphic in the bottom left corner. Hover your mouse over
SocialSocial, then select YouTubeYouTube CommentComment.
Once you add the YouTube Comment layer, be sure to open the GFX Designer to design your graphic
and add the desired fields from YouTube (profile picture, name, comment; "likes" will appear but will
appear as "N/A" in the data field).
431

There are two ways this feature can be used.
See Comments on Current Live Broadcast See Comments on Current Live Broadcast
By default, this option is set to get comments from YouTube stream providerYouTube stream provider. This means when you set
up Studio to broadcast to YouTube, the comments that populate will be from the stream that appears on
YouTube once you go live from Studio.
432

You can also filter the comments that come in by a keyword or hashtag. This will pre-populate a default
comment you can display in your graphic that will prompt your viewers to use the desired phrase. If you
want to see all the comments that come in, uncheck Filter commentsFilter comments.
Next, you can configure how often Studio polls for new comments and how many of the most recent
comments will it show. By default, it will poll new comments every 60 seconds and display the most
recent 100.
Below this setting are the auto-loop settings, where you can set Studio to loop through each comment
at a defined interval.
433

434

See Comments from Another YouTube Video See Comments from Another YouTube Video
If you wish to display comments from another YouTube video, select Use separate loginUse separate login. Paste the URL
of the video whose comments you wish to display in the graphics overlay, then press the Enter key on
your keyboard.
You can filter comments based on a keyword or hashtag. This will pre-populate a default comment you
can display in your graphic that will prompt your viewers to use the desired phrase. If you want to see all
the comments that come in, uncheckFilter commentsFilter comments.
Next, you can configure how often Studio polls for new comments and how many of the most recent
comments will it show. By default, it will poll new comments every 60 seconds and display the most
recent 100.
Below this setting are the auto-loop settings, where you can set Studio to loop through each comment
at a defined interval.
435

436

Using a .CSV Over HTTP Using a .CSV Over HTTP
If you are hosting a .CSV file on a web server, you can use graphics overlays in Livestream Studio to
display data from it.
In a GFX module, open the Create Custom Graphic Create Custom Graphic menu and select .CSV over HTTP.CSV over HTTP.
If your file requires authentication in order access it, check BasicBasic AuthenticationAuthentication and enter your
credentials.
437

In the settings, input the URL where the .CSV file is located, then the press EnterEnter or Return Return key on your
keyboard. Your data will populate on the right with further settings becoming available on the left.
Make sure there are no spaces between either field; only commas should separate each
value.
CORRECT: Data 1,Name,http://cdn.livestream.com/resources/branding/livestream-logo.png
INCORRECT: Data 1, Name, http://cdn.livestream.com/resources/branding/livestream-
logo.png
438

Scroll down on the left side of the module to configure additional settings. Set the amount of time in
seconds that Livestream Studio should refresh and look for new data in your .CSV under Auto advance Auto advance
data intervaldata interval.
If the first row actually contains the titles of each field, you can check Use first row as column titles Use first row as column titles to
move them up to the title field.
If you want to make changes to your .CSV content via Livestream Studio, uncheck ReadRead onlyonly. Otherwise,
leave it checked.
439

Scroll down to tell Livestream Studio what your column separators are and the types of characters being
used (typically auto-detected).
At the bottom are your Auto-Loop settings if you want Livestream Studio to rotate through your .CSV
data; these settings include how often the displayed row changes, what direction it loops in, and its
starting point.
440

To design the graphic, click the paint brush icon to enter the GFX Designer.
441

Select the CSVCSV layer from the dropdown in the lower left corner and design your graphic as desired.
You can now control the graphics overlay by using PRVPRV, PUSHPUSH, and PULLPULL as desired.
442

Livestream Studio Certified Data Sources Livestream Studio Certified Data Sources
A Livestream Studio Certified Data Source (LSCDS)Livestream Studio Certified Data Source (LSCDS) is a spreadsheet document formatted according
to the Livestream Studio specification. An Excel (.xlsx), CSV or Google Spreadsheet document can
be used to define LSCDS. Below, you'll find information on the benefits and instructions on how to
create/utilize a LSCDS formatted file.
Why do I need Livestream Studio™ Certified Data Why do I need Livestream Studio™ Certified Data Sources?Sources?
The main advantage of LSCDS in Livestream Studio™ graphics layer compared to any standard custom
excel, Google spreadsheet or CSV file is the ability to remotely control data selection “eyeball” in
Livestream Studio™. This feature is primarily designed for distributed production workflows, meaning
when a dedicated person operates graphics data during a live video production.
This feature can also be used for automation, for example, in combination with custom web services
that generate CSV files on the fly to control graphics data in production, such as sports scoring.
In the examples below, you’ll find small scripts for data ON/OFF program validation, as well as
illustrations on how to bring dynamic image objects into Livestream Studio using external files.
How to define Livestream Studio™ Certified Data How to define Livestream Studio™ Certified Data SourcesSources
You can copy one of the examples below and add columns, rows and data to the example as needed
(make sure the PROGRAMPROGRAM column remains in the A1A1position).You may also use an existing file as a
Livestream Certified spreadsheet, just add an additional first column and name the first cell (Cell A1Cell A1) -
PROGRAMPROGRAM. Once you have load the file to Livestream Studioas a graphics data layer, you will see a small
Livestream logo over the layer thumbnail.
443

Once the file is identified as a certified data source, Livestream Studio will look for "ONON" and "OFFOFF" values
within the first column (A2:Ax). "ONON" value will activate that row in the Livestream Studio™ GFX layer,
while "OFFOFF" deactivates that row. The "ON" or "OFF" status will be represented by the "eyeball" logo within
Livestream Studio.
If there are multiple ON values in the column, Livestream Studio will use the first from the top. You can
add validation scripts to your spreadsheet by following instructions below to maintain single row
selection. More information on using validation scripts below.
NoteNote: All the values that are not equal to ON and OFF will be ignored.
Livestream certified CSV files can be used in Studio via file path on local disk/network or over HTTP
protocol.
Sample LSCDS Files Sample LSCDS Files
• Excel
• Google Spreadsheet Template - You can add this template to your own Google Drive by clicking the
"Use This Template" button.
• CSV
Installing Validation ScriptsInstalling Validation Scripts
Google Spreadsheet: Google Spreadsheet:
The Google Spreadsheet templates linked above already include validation scripts. Below is a link to the
source code of the validation script we used for the sample. You can use the text to install the script on
your own custom Google Spreadsheets. To install the script, do the following:
- Click 'ToolsTools' > 'Script Editor…Script Editor…' (or 'Script Manager…Script Manager…'):
444

- Copy the Google Spreadsheet Validation Script found here and paste it into the editor
- Click the Save icon and name it.
Excel: Excel:
The sample file provided above has the validation script built in. If you already have a file you would like
to use, you can use the validation script linked here.
Dynamic images and LSCDS Dynamic images and LSCDS
External data files may contain columns with HTTP URLs or local/network addresses referencing images
you would like to use in your GFX template. To define a column as an Image type column, add [img][img] at
the beginning of the column name. Livestream Studio™ will recognize the path as an image and display
it in your graphics template.
445

NoteNote: When an image can not be found at the provided URL or path, Studio will display an
empty (transparent) image field.
Spreadsheet Formatting Best Practices Spreadsheet Formatting Best Practices
Google Spreadsheet: Google Spreadsheet:
- Freeze row 1 and column 1 (View - Freeze Row / Freeze Column)
- Add data validation using the shown parameters:
446

- Add conditional formatting to the A2:A (all the values in A row except A1)
Excel file formattingExcel file formatting:
We recommend using the template available HERE when using Excel files for LSCDS.
447

Display a Webpage in Livestream Studio Display a Webpage in Livestream Studio
Beginning with version 5.2, Livestream Studio allows you to display and interact with a webpage
within the graphics overlay module.
In a GFX tab, select Create Custom GraphicCreate Custom Graphic, then select New LayerNew Layer.
Open the GFX Designer for the blank layer you just created.
448

At the bottom of the window, select the webpage icon.
449

A webpage graphic will appear and fill the entirety of the GFX canvas. By default, it will show vimeo.com.
At this time, any audio from the webpage will not be heard in Studio.
450

With the webpage selected, click the gearwheel icon in the corner to change the URL. You can also
adjust the size of the webpage graphic.
451

Selecting the InteractInteract option will open a new window in Studio and allow you to navigate the site just as
you would in a normal browser, including scrolling, clicking on links to other pages, and typing into text
fields.
452

Note the upper right corner of this window includes a </></> button. Selecting this button will open a CSS
editor that will allow you to change the appearance of the webpage in Studio. Be sure to click Save Save
when you're done.
453

You can now mix your webpage into your production as you would with any other graphic.
454

Building a Picture-in-Picture Graphic Building a Picture-in-Picture Graphic
When doing a multi-camera production, many producers sometimes like to show two or more
camera shots at the same time. Livestream Studio gives you the ability to show up to five cameras
within one picture-in-picture graphics layer.
Navigate to a graphics tab, open the +Add Custom Layers+Add Custom Layers menu and select New LayerNew Layer.
Click the corresponding paint brush button to enter the GFX Designer.
455

Click the camera icon at the bottom of the window. A video source will appear in the designer.
456

Click the attached gearwheel icon to change which source appears in there. You can choose any
camera input, media source, remote camera, graphics track, or color source.
457

Add another source.
458

You can drag and drop either of these anywhere within the designer. Clicking the gearwheel will also
allow you to resize and crop your sources.
459

A sample double-box (or two-box) might look something like this:
460

If you want to give a background to your picture-in-picture, add a third source to the GFX designer. In
this example, we're using a looping video background in Media 1.
Right-click the third source and click To Bottom LayerTo Bottom Layer. This will force it to be behind your other two
sources.
461

Scale it so it fills the designer. Now your picture-in-picture looks like this.
462

Close out of the designer and make sure your layer is visible (the eye icon is blue). Then click the
corresponding flashing PushPush button to bring it into Program.
463

Now both sources are seen in Program at the same time with your background. Click PullPull whenever you
are ready to show your previous Program source.
464

Building a Clock or Timer Building a Clock or Timer
Adding a time-of-day clock or a countdown timer are very similar processes.
Clock
You may want to overlay a time-of-day clock into your production. This can be done by opening the
Create Custom Graphic Create Custom Graphic and menu selecting the ClockClock option in the graphics overlay channel.
This will add a clock layer to the graphics channel. Click on the paintbrush icon to open the GFX
Designer for that layer.
465

Click on the list icon for options of time fields to add. Consider checking the presets first to save the
time needed to add individual fields.
Once you have added the time fields you need, click the arrow button to change each one’s font, size,
color, etc.
466

Drag and drop the clock to where you want to have it appear. When you are done designing the clock,
close out of the GFX Designer.
467

There are no additional settings for the clock layer other than deleting it. Click BackBack to return to the layer
module. Then click the eye icon to ensure the clock layer is visible when you want to include it in your
production.
Timer
To integrate a countdown or timer overlay into your production, open the Create Custom GraphicCreate Custom Graphic menu
and select TimerTimer in the graphics overlay channel.
468

Click the gear wheel icon to enter that layer’s settings.
The settings for that layer will appear on the left side, with the reflected timer displaying on the right.
469

CountdownCountdown toto allows you to set a specific time and date for when the countdown should end. The
countdown will update on the right side.
For a quick configuration, you can check Use start time of streaming eventUse start time of streaming event to automatically
set the countdown to end at the start time of an event you have selected in the Stream tab.
Below the time/date setting are options for what the graphics overlay should do when the countdown
completes.
470

Hide Layer + PushHide Layer + Push will keep GFX 1 in Program, but remove the timer GFX layer from being visible. Other
layers in GFX 1 will remain in Program.
Pull from PGMPull from PGM will pull all layers under that GFX channel from Program when the countdown ends.
471

TransitionTransition can be used when the GFX channel is cued as a video source from the multiview instead of an
overlay. It will take the Preview source once the countdown ends.
The transition type can be selected in the settings for that GFX layer.
472

Leaving all options unchecked will keep the completed countdown graphic in Program.
The next setting is CountdownCountdown fromfrom, where you set the time that the countdown will start. The format
of this countdown can either be hours:minutes:seconds, or minutes:seconds.
473

Type in the time you want to count down from. Clicking StartStart will begin the countdown manually.
When the countdown has started, a PausePause button will replace it. Click PausePause if you want the countdown
to stop but stay at the current time, allowing you to resume from that point.
Clicking Stop Stop will both stop the countdown and reset it to the beginning.
474

Below the Start and Stop options, there are options for what the clock should do when pushed, pulled,
or finished.
Scroll down further in the layer settings to find the hotkey option. Click the checkbox to enable it.
Click on the box that reads NoneNone. This will highlight it blue.
475

Once it is blue, use the buttons on your keyboard to create a hotkey (e.g., Shift+P).
It cannot be a hotkey command that already has an action in Livestream Studio assigned to it.
Now you can push your countdown graphic to Program like normal. Instead of pressing the buttons in
the GFX module, you can use your keyboard to quickly and easily pause and continue your clock.
The last option for this layer is TimerTimer, which gives you a clock that counts up from zero. As with the
CountdownCountdown from from option, you can set the format and start and stop the timer.
476

Below these controls are the actions the graphic will take when first pushed to and pulled from Program.
The Timer also includes the ability to add a hotkey command for pausing and resuming.
With any of the three options, be sure to click the paintbrush icon to enter the GFX Designer.
477

In the Timer layer, click on the list icon to add time fields. Check the presets first, as this may save time in
designing the graphic.
Use the dropdown menu to customize how the clock looks.
478

When finished, close out of the GFX Designer, then click BackBack in the graphics layer settings. Your timer
graphic can now be made visible and pushed to Program when desired.
479

Importing Animated Graphics Importing Animated Graphics
Livestream Studio can accept either an .mov file or a folder of images that it will loop through to
create an animated graphics overlay.
This feature is best for lower-third graphics and corner bugs. Larger animated graphics, such as
backdrops, should be exported as videos and come in through a media bin. To keep your images’
backgrounds transparent, .PNG files are recommended if you are using an image sequence.
Your .PNG files must be less than 8.3 million pixelsless than 8.3 million pixels. To determine a .PNG file's pixels, view that file's
properties and multiply the height by the width. For this graphic, which has subtle animations, 1614 x
390 = 629,460 pixels.
If you use an .mov file instead, be sure your video matches the same project format as your Studio
project to ensure no upscaling or downscaling occurs.
To add an animated graphic, go to a graphics overlay channel. There are a number of templates
available for free in the Livestream Graphics Store. To quickly access one, select the AnimatedAnimated option
under Features. Scroll through the template options on the right side and click +ADD+ADD below the
corresponding design.
480

Livestream Studio will prompt you to select where you want to save the file on your computer’s hard
drive. Choose your destination and then click SelectSelect.
The graphics file will load in Livestream Studio and you can edit it in the same fashion as with any other
graphic.
481

You can also add your own .png sequence or .mov file by selecting Create Custom GraphicCreate Custom Graphic > New New
LayerLayer.
If you are adding a custom layer, open the designer by clicking the paintbrush icon, then click the
sequence icon. Select your .mov file, or open the folder that has your .PNG file sequence and select the
first file in that folder. The graphic will take a moment to render and then appear in the GFX Designer.
482

From there, designing the overlay follows the same procedure as designing still graphics (adding data
fields, etc.).
483

All other functions of the graphics overlay, including adding data, changing settings, and pushing and
pulling the layer are the same as other graphics.
484

Media Playback Media Playback
485

Configuring Media Playback Settings Configuring Media Playback Settings
In Studio settings, go to the Media PlayerMedia Player tag to configure settings for your media bins.
MediaMedia AutoplayAutoplay allows you to choose if a video will either pause or continue playing when a media
source is transitioned out of Program. It also determines whether the video will continuing playing from
its current location (PausePause) or start from the beginning of the IN point (ContinueContinue).
Pause PlaybackPause Playback: The video will pause when manually transitioned out of Program. It will also pause
when it reaches the OUTOUT point and not transition out of Program.
Continue PlaybackContinue Playback: Video will continue playing when manually transitioned out of Program. It will also
transition out of Program at the OUTOUT point automatically.
486

TranscodingTranscoding FilesFiles LocationLocation is where any transcoded videos (i.e., videos you bring into your media bin)
will be saved. You can bring those videos into a media bin again without transcoding.
TranscodingTranscoding CacheCache lets you control the amount of data stored in the transcoding folder before files are
deleted. You can also manually clear the cache here.
487

TranscodingTranscoding BitrateBitrate determines the bitrate to which the videos are transcoded. Higher bitrates will have
higher resolution but also create larger files.
BasicBasic ReplayReplay lets you tell Livestream Studio how far back from the current timestamp to set an In point.
The Out point will be set to the current timestamp.
You can export videos or portions of videos from your media bin. You can choose their export location
and video settings here.
488

When your media bin settings are configured to your liking, click SaveSave.
489
Media Playback Supported Video Formats Media Playback Supported Video Formats
Livestream Studio can accept most common video format files.
The codecs listed below are from “Supported media formats in Media Foundation (Windows).”
Supported media formats in Media Foundation (Windows). Microsoft, 28 Nov. 2012. Web. 7 Feb.
2013: http://msdn.microsoft.com/en-us/library/windows/desktop/dd757927%28v=vs.85%29.aspx.
Please note that Studio does notnot support Apple-only based formats (e.g. ProRes).
File Containers: File Containers:
490

FormaFormat t File File
Extensions Extensions
Media Media
Source Source
Media Media
Sink Sink
RRequires equires
3GP .3g2, .3gp,
.3gp2,
.3gpp
MPEG-4
File
Source
3GP File
Sink
Windows 7
Advanced Streaming Format (ASF) .asf, .wma,
.wmv
ASF
Media
Source
ASF
Media
Sink
Windows
Vista
Audio Data Transport Stream (ADTS). .aac, .adts ADTS
File
Source
None Windows 7
AVI .avi AVI File
Source
None Windows 7
MP3 .mp3 MP3 File
Source
MP3 File
Sink
File source:
Windows Vista
File sink: Windows 7
MPEG-4 .m4a,
.m4v,
.mov,
.mp4
MPEG-4
File
Source
MPEG-4
File
Sink
Windows 7
Synchronized Accessible Media
Interchange (SAMI)
.sami, .smi SAMI
Media
Source
None Windows
Vista
WAVE .wav AVI File
Source
None Windows 7
Audio Codecs Audio Codecs
491

FormaFormat t Decoder Decoder Encoder Encoder RRequires equires
μ-law
Coding
Audio Compression Manager (ACM)
μ-law Codec
None Windows
Vista
Advanced
Audio
Coding
(AAC)
AAC Decoder AAC Encoder Windows
7
MP3 Windows Media
MP3 Decoder
None Windows
Vista
GSM 6.10 ACM GSM 6.10
Codec
None Windows
Vista
Windows
Media
Audio
(WMA)
Windows Media Audio Decoder
Windows Media Audio Voice
Decoder
Windows Media Audio Decoder
Windows Media Audio Voice
Decoder
Windows
Vista
Media Foundation provides wrappers for several ACM codecs listed in the previous table.
However, Media Foundation does not support arbitrary ACM codecs.
Video Codecs Video Codecs
492

FormaFormat t Decoder Decoder Encoder Encoder RRequires equires
DV
Video
DV Video Decoder None Windows
7
H.264 H.264 Video
Decoder
H.264 Video
Encoder
Windows
7
MJPEG MJPEG Decoder
None Windows
7
MPEG-4
Part 2
MPEG-4 Part 2
Video Decoder
None Windows
7
MPEG-4
v1/v2/v3
Windows Media
MPEG-4 V3
Decoder Windows Media
MPEG4 V1/V2
Decoder
None Windows
Vista
Windows
Media
Video
(WMV)
Windows Media Video 9
Decoder Windows Media
Video 9 Screen Decoder
Windows Media Video 9 Encoder Windows
Media Video 9 Screen Encoder Windows
Media Video 7/8 En- coder
Windows
Vista
493

Importing Videos into the Media Playback Importing Videos into the Media Playback Module Module
Livestream Studio has a video transcoder built into its Media bins.
In your media bin, press the ++ button in the bottom left corner.
Browse your computer for your video, then select it from the file explorer. Livestream Studio will begin
transcoding your video immediately.
If your video file is a Motion JPEG AVI andand matches your project format, the media bin will
not need to transcode the file. Systems that have hardware encoding can also directly import
H.264 MP4 files of the same project format.
494

Transcoding time depends on the clip length.
If you are having trouble transcoding your video, check that it can successfully playback in Windows
Media Player. Videos that cannot be played in Window Media Player will likely not be able to be
transcoded in Livestream Studio's media bins.
495

Use Dropbox to Import Video Files Use Dropbox to Import Video Files
Videos saved in a Dropbox account can be imported into the Media bins in Livestream Studio
through a simple integration.
For the best experience, we recommend simplifying your Dropbox folder structure to no
more than 1 or 2 subfolders. Multiple subfolders can cause extended sync times with
Dropbox
Connect Dropbox to Livestream Studio
Start by clicking the gear wheel in the upper right corner to enter Settings.
Navigate to the Dropbox tab.
496

Click Connect DropboxConnect Dropbox.
Your browser will open. Sign in to your Dropbox account in order to connect it to Livestream Studio.
497

When authorization is successful, return to Livestream Studio.
498

The settings will indicate that you are logged in. Click Select FoldersSelect Folders.
Choose a Local Folder from your computer's hard drive. This will allow any files you save to your
Dropbox, such as transcoded videos, to also be saved locally.
499

Then choose the folder within your Dropbox where the videos you want to use are stored. This can be
either your general Dropbox or a folder within your Dropbox (in this example, "Videos"). Click SaveSave when
you are done.
Your Dropbox account will sync to Livestream Studio.
Make sure that Use Files from DropboxUse Files from Dropbox is checked. Then click SaveSave.
500

Import Videos from Dropbox
Navigate to one of your Media bins. Click the ++ button in the lower left corner of the module.
501

Your Dropbox folder will open. Click on the video you wish to import, then click SelectSelect.
502

The video will start transcoding in the media bin. When it is finished, you will be able to play it back as
normal.
503

504

Controls & Options in Livestream Studio Controls & Options in Livestream Studio Media Bin Media Bin
Each Media Bin comes with a variety of controls and options for playing back your clips.
Select the desired clip you want to play to highlight it. It will appear in the player to the right.
The bottom left of the module includes general playback options. If you want to your video to start
playing as soon as you transition it into Program, make sure AutoplayAutoplay is checked. Otherwise, your video
will start on a freeze frame.
To the right of Autoplay is PlaylistPlaylist, which will play all video files in your bin chronologically with no break
or black frames in between. When the last clip plays, Studio will automatically transition from the Media
Bin to the source in Preview.
Next is the Loop PlaybackLoop Playback button, which will play the selected video on repeat rather than play the next
clip or transition to the Preview source.
505

Selecting both Play as ListPlay as List and Loop PlaybackLoop Playback will play all of your clips in order, then restart from the top
when the last clip ends.
At the bottom of the player are player controls and a blue time bar. Use your mouse to drag the red
scrubber to any point within the clip.
With your mouse, you can drag and drop both ends and set In and Out points if you want to playback
only a portion of your clip. You can also set In and Out points by dragging the scrubber to the desired
point and pressing the corresponding In or Out bracket button above the timeline.
506

The main playback controls primarily control where the scrubber moves to. They are:
1. Jump to beginning of the entire clip
2. Jump in In point
3. Frame back
4. Play from In point to Out point
5. Play from scrubber's current location to the end of the clip
6. Frame forward
7. Jump to Out point
8. Jump to end of the entire clip
There are default hotkeys set for various media playback options, which you can find and custom
configure by navigating to Settings: HotkeysSettings: Hotkeys.
507

When Loop PlaybackLoop Playback is turned off, Studio will countdown your video from 20 seconds
(yellow) and then 10 seconds (red), allowing you to prepare your next source in Preview.
When the clip reaches zero, Studio will seamlessly transition from the Media Bin to the source
in Preview.
508

509

Basic Video Replay While Recording Basic Video Replay While Recording
Livestream Studio allows you to play back media while you are recording it for easy, basic replay
options during a live event.
To start, make sure that one of your Media Bins is selected in the RecordingRecording section of the Livestream
Studio settings.
Your media will automatically populate within the selected Bin once the recording has started.
510

The red dot to the left of the clip duration indicates that this clip is currently being recorded.
When recording, the clip in your Media Bin will behave much like any other media. You can set an IN
and an OUT point for playback and scrub along the timeline as well. The main difference is that the
timeline is growing as long as the recording process is active which does not occur when using pre-
recorded media.
By default, pressing RR on your keyboard will set IN and OUT points on your clip for the most recent 10
seconds. Transitioning that media bin into Program will automatically playback that section of your
recording. You can adjust this setting under the MediaMedia PlayerPlayer tab in settings.
Make sure Continue playbackContinue playback (in Settings: Media PlayerSettings: Media Player) is turned on and Loop playbackLoop playback and
Play as listPlay as list (buttons in the Media Bin) are turned off. This will cause your clip to playback and
then switch back to the source in Preview automatically. The Media Bin will display a
countdown until the clip ends, and then switch with Preview with no black frames or freeze
frames.
511

512

Exporting Clips from Livestream Studio Exporting Clips from Livestream Studio
The media bins have an export tool that allows you to save your recordings or clips of recordings in
them as .mp4 files on your hard drive.
First, select a video you want to export.
Set In and Out points for your clip. If you want to export the full video, make sure the brackets enclose
the entire timeline.
When you are ready to export your clip, click on the arrow icon next to the video’s name.
513

The double arrow button at the top of the interface turn blue and show a small progression bar as your
clip is exporting.
Click on the button to view your transcoding queue. This will tell you how much time is left in your clip
and the status of any other transcoded or exported video.
514

Remote Cameras Remote Cameras
515

Activating Bonjour Service for Remote Activating Bonjour Service for Remote Camera Sources Camera Sources
In order to use remote cameras in Livestream Studio, you must make sure you have Bonjour
service installed and activated on your Windows computer. Remote cameras will not work without
Bonjour running.
Bonjour is pre-installed on Studio hardware units (e.g. HD31, HD51, HD550, etc.) and is always
running on Mac systems. Customers who only purchased the software should have gotten a
prompt to install it.
To install Bonjour manually, click here and click DownloadDownload.
Once the software has finished downloading, open the installation wizard.
Follow the on-screen prompts to complete the installation.
516

To ensure Bonjour is running, first make sure Studio is closed. Then open the start menu and type
ServicesServices. Click the Services icon that appears at the top of the menu.
517

Look for Bonjour ServiceBonjour Service in the menu and select it.
518

Right-click it and click RestartRestart.
Close out the menu and relaunch Studio. Remote cameras on your network should now be detected by
Studio.
519

Overview of Studio Remote Camera Overview of Studio Remote Camera Options Options
Livestream Studio includes a variety of ways to bring in a source over your local network or by
other remote means. Below is an overview of what remote sources Studio supports.
Remote Desktop Client (Windows & macOS) Remote Desktop Client (Windows & macOS)
With the Livestream Remote Desktop Client for Windows and Mac, you can bring another computer's
desktop screen or camera source(s) and audio into Studio over your local network. Install and run the
small application onto the system you want to use as a source and make sure that it's connected to the
same network as the computer running Studio. Then you can add it as a remote input.
Livestream Mobile App (iOS & Android) Livestream Mobile App (iOS & Android)
If you want to bring in your mobile device's camera, you can do so via the Livestream mobile app for
iOS and Android. This will require you to log into a Livestream account; if you don't have one you can
join via the app for free. Also, be sure your mobile device is connected over Wi-Fi to the same network
to which your Studio system is connected.
Mevo Cameras Mevo Cameras
Through our partnership with Mevo Inc., any Mevo camera can be a remote camera input in Studio over
your local network. Connect Mevo to your network and it will be available as a remote camera option in
Studio (provided it is not already streaming or recording on its own). You can then control a handful of
Mevo's options and settings directly in Studio.
520

NewTek NDI Inputs NewTek NDI Inputs
Studio can accept any input outputting a signal via NewTek's NDI protocol, such as PTZ cameras, Adobe
Premiere Pro, and much more. Provided both products are on the same network, Studio can
communicate with the NDI source and bring it in as an input at very low latency.
Livestream Broadcaster Devices Livestream Broadcaster Devices
If you own any Livestream Broadcaster product, you can set it to Studio mode and use it to bring in any
HDMI source over your local network.
In addition to local network remote cameras, there are a few other ways to bring in sources outside of
your network.
Live Interview Live Interview
Send a URL to anyone regardless of their location to bring in their webcam and microphone via their
desktop browser.
RTMP Input RTMP Input
Send a stream from another encoder to Studio directly via an RTMP URL and Stream key provided by
Studio.
521

Stream Playback Stream Playback
Playback streams from Livestream or other providers (latency varies).
522

Using the Remote Desktop Client for Using the Remote Desktop Client for Windows Windows
In Livestream Studio, you have the option of using a Windows desktop system as a remote camera
source by connecting it to Studio over your local network connection. This is great for adding a
slideshow presentation into your production.
Installing & Configuring the RemoteInstalling & Configuring the Remote Client Client
First, be sure to connect your remote Windows computer to the same network access point to which
the computer running Livestream Studio is connected.
Download the Remote Desktop Client onto your Windows computer hereDownload the Remote Desktop Client onto your Windows computer here.
Open the downloaded file and follow the on-screen steps to run the installation wizard, then click FinishFinish.
523

Remote Camera will launch in the background of your PC. Right-click on the icon in the bottom toolbar
and select SettingsSettings.
Here you can adjust your remote camera’s name as well as set which video and audio signals are visible
from that PC. In this example, only the Desktop screen is visible, but other video sources that are later
added to this computer can also be detected (e.g. webcams).
524

Computer NameComputer Name: The name that will appear in the remote camera module for your remote camera
source.
Checked sources will be available to use from this system as a remote camera source. This includes any
connected cameras and screens. Uncheck any sources you do not want to Studio to access.
Encoder QualityEncoder Quality: The resolution you want the video to stream over your network to Livestream Studio.
Slower CPU's should use a lower resolution.
Encoder FramerateEncoder Framerate: The frame rate you want the video to stream over your network to Livestream
Studio. Slower CPU's should use 'half-speed FPS (30p).'
Add the Remote Desktop to Studio Add the Remote Desktop to Studio
Back in Livestream Studio, go to the InputsInputs tab. You can add your remote PC to Studio by selecting Add Add
InputInput > RemoteRemote, then select the name of your PC.
525

The Remote source will be added to your list of inputs. You can rename it if you wish or change it to a
different remote source from the drop-down menu that appears. You will also see a status (e.g. "Perfect
streaming") indicating its connection strength.
To configure settings for the remote input in Studio, select the gearwheel to the right of the input.
Under the General tab, you'll see additional options:
Video SourceVideo Source: The remote client has the ability to use either the system's desktop, an attached webcam,
or an installed Blackmagic capture device as a video source. Use the drop-down menu to select which
one you want to use.
526

MonitorMonitor: If you select 'Desktop' as the video source and the remote system has multiple displays, you
can configure which display you would like to use as a source by selecting it from the drop-down menu.
Capture DeviceCapture Device: If you select a Blackmagic Capture Device as your video source and have more than
one installed on your system, choose which one you want to use.
Audio SourceAudio Source: You also have the option of selecting from any of your available audio devices. The
default is the standard system audio output.
Capture Mouse Cursor:Capture Mouse Cursor: Unselect this option if you would not like to see the mouse cursor on the
remote system.
Learn more about configuring additional input settings.
Troubleshooting Troubleshooting
If you are not seeing any options on the list within the Remote Cam tabs, please check the following:
527

• Make sure the remote system is on the same network, connected to the same Router or Access
Point as your Studio system.
• If the system is on the same network but using a different access point, the Remote Camera will
not properly connect.
• Check that the following ports are open if you use a firewall:
• UDP: 5353, 60936 - 61036
TCP: 60936 - 61036
• Check that Bonjour Service has started.
528

Using the Remote Desktop Client for Using the Remote Desktop Client for macOS macOS
In Livestream Studio, you have the option of using a macOS desktop system as a remote camera
source by connecting it to Studio over your local network connection. This is great for adding a
slideshow presentation into your production.
Installing the RemoteInstalling the Remote Client Client
First, be sure to connect your remote macOS computer to the same network access point to which the
computer running Livestream Studio is connected. You will then need to install the Studio Remote
Desktop client.
Download the small program here. Download the small program here.
Double-click the Livestream Studio Remote Camera.dmg file in your Finder to start the installer.
529

Drag the Livestream Studio Remote Camera into the Applications folder.
Go to the applications folder and double click on Livestream Studio Remote Camera to open the
application.
You will see this window pop up indicating that the remote camera icon will appear in your menu bar at
the top of your screen. You can choose to prevent the message from appearing again.
530

Make sure the remote system is on the same network as your Livestream Studio system. It will run in the
background until you close it. You can close it by clicking on the icon in the menu bar and clicking
CloseClose.
When the Remote Client is running, you can click the icon and click SettingsSettings to make further
adjustments to your remote camera source.
531

Computer NameComputer Name: The name that will appear in the remote camera module for your remote camera
source.
Checked sources will be available to use from this system as a remote camera source. This will include
any connected cameras and screens. Uncheck any sources you do not want to use.
Encoder QualityEncoder Quality: The resolution you want the video to stream over your network to Livestream Studio.
Slower CPU's should use a lower resolution.
Encoder FramerateEncoder Framerate: The frame rate you want the video to stream over your network to Livestream
Studio. Slower CPU's should use 'half-speed FPS (30p).'
Adding and Configuring a Remote Source in Livestream Adding and Configuring a Remote Source in Livestream Studio: Studio:
532

Once the client is installed on the remote system and is running, you can use it as a source in Livestream
Studio.
In Studio, navigate to the InputsInputs tab then select Add InputAdd Input > RemoteRemote. If Studio can find the remote
system over your local network connection, you should see it come up as an option.
Select your Mac computer to activate it in Studio. It will appear in the bottom of the Inputs list.
You can hover your cursor over the name (e.g. "Remote 1") and click the pencil icon that appears to
rename it. If you need a different remote source, click the drop-down menu to select one. Next to this
will be an indicator informing you of the connection status (e.g. "Perfect Streaming").
Click the gear wheel next to the far right of the remote camera source in the list to access further
settings.
533

Video SourceVideo Source: The remote client has the ability to use either the system's desktop, an attached webcam,
or an installed Blackmagic capture device as a video source. Use the drop-down menu to select which
one you want to use.
MonitorMonitor: If you select 'Desktop' as the video source and the remote system has multiple displays, you
can configure which display you would like to use as a source by selecting it from the drop-down menu.
Capture DeviceCapture Device: If you select a webcam or other connected camera as your video source and have
more than one installed on your system, choose which one you want to use.
Audio SourceAudio Source: You also have the option of selecting from any of your available audio devices. The
default is the standard system audio output.
Capture Mouse Cursor:Capture Mouse Cursor: Unselect this option if you would not like to see the mouse cursor on the
remote system.
Learn about additional input settings.
534

Troubleshooting Troubleshooting
If you are not seeing any options on the list within the Remote Cam tabs, please check the following:
• Make sure the remote system is on the same network, connected to the same Router or Access
Point as your Studio system.
• If the system is on the same network but using a different access point, the Remote Camera will not
properly connect.
• Check that the following ports are open if you use a Firewall:
• UDP: 5353, 60936 - 61036
• TCP: 60936 - 61036
• Check that Bonjour Service service is enabled on the Studio system.
535

Adding a Remote Live Interview Adding a Remote Live Interview
Livestream Studio customers can add a live webcam source from another location into their Studio
production. This is called Live InterviewLive Interview.
Interview guest(s) will need an Internet connection, Google Chrome, a webcam, and a microphone
connected to their computer.
It is strongly recommended that audio is provided to any local hosts or interviewer directly via
the headphone out jack on your Studio unit using headphones, IFB's, etc. Otherwise, there
will be a distinct echo in your stream during the interaction.
Live Interview currently only works on desktop Chrome; there is currently no support for Live
Interview via mobile devices.
Navigate to the InputsInputs tab. Select Add InputAdd Input > Live InterviewLive Interview > Live InterviewLive Interview.
536

While you can send an invite to as many people as you like, only one Interview can occur in
Livestream Studio at a time.
The Live Interview will appear at the bottom of the inputs list. Select the corresponding gearwheel on
the right side to configure it.
In the General settings, there are two tabs: InviteInvite and ChatChat. The Invite menu is open by default.
You will be provided two unique URLs: Guest inviteGuest invite and Moderator inviteModerator invite. Press the CopyCopy button to copy
the corresponding URL to your clipboard and provide the URL to your guest(s) via email or other means).
537

New URLs generate each time a Live Interview is added. If you wish to provide a URL in
advance, do not remove your Live Interview from the Inputs list.
When someone opens on the provided Guest Interview URL in Google Chrome, they will be prompted
to allow the camera and microphone to be accessed (This is required in order for the interview to work).
They can then type in their name, then click JoinJoin Interview. Interview.
538

The optional Moderator Invite URL can be given to a third person who can select between each guest
camera to show in Studio via their Chrome browser. The moderator’s camera and microphone will not
be used but they will be able to see and hear all connected guests. The moderator is also connected to
the chat to help communicate with all interview guests and the producer.
When a guest has joined the Interview, they will see their camera feed, a ConnectedConnected notification, and
have access to the internal chat with you (the Producer), the Moderator, and all connected guests.
539

In Livestream Studio you can see this chat as well by selecting the ChatChat tab.
You can bring in the guest's camera by clicking the Select guestSelect guest drop-down and clicking their name. You
can have as many guests as you wish in that list, but you can only select one guest at a time.
540

After clicking a name, the guest's camera will appear in the input source, which you can switch to
whenever you are ready.
The guest's view will change to seeing their camera in the lower left corner and overlay a larger view of
what is currently in Program. They will also hear Program audio and a PreviewPreview notification in the upper
right-hand corner of the screen.
541

When the guest's camera is switched into Program, they will see a red OnOn AirAir notification in the upper
right-hand corner.
By default, the guest will hear Program audio but not hear their own audio, even when they are in
Program.
Some other controls the Guest will have include:
• Leave Interview:Leave Interview: They can exit the interview.
• HoldHold: Will pause the stream from sending to Studio. They can then click ResumeResume to start sending
their feed to Studio again.
• MuteMute: Will Mute their microphone
• Stop VideoStop Video: Will stop sending their video (but will still send audio)
• SettingsSettings: Allows users to select a different webcam, audio source, and show or hide the Program
feed from Studio.
Learn about additional input settings.
542

NewTek NDI Integration in Livestream NewTek NDI Integration in Livestream Studio Studio
Livestream Studio includes NewTek NDI Integration, allowing you to input or output video sources
over your local network with other NDI enabled software and devices.
What is NewTek NDI? What is NewTek NDI?
NDI, which stands for Network Device InterfaceNetwork Device Interface, is an open protocol developed by NewTek that allows
for high-quality video & audio signals to be transferred between devices over a local area network (LAN).
In other words, different video software products with the NDI tools and applications installed--such as
Livestream Studio, TriCaster, Adobe Premiere Pro, and more--can now communicate their video signals
to each other over your local network with very low latency.
IS NDI|HX Supported?
Yes, provided that you are using Studio 5.0 or higher and you have the NDI|HX driver installed on the
computer running Studio. You can find the driver download here.
How Do I Set Up NDI Integration with Livestream Studio?
All you need to to do is make sure you are running version 4.5 (or later) of Livestream Studio and make
sure it is connected to the same local IP (i.e. same network) as any other NDI enabled devices you wish
to use with Livestream Studio. The integration is built into the software.
543

How Do I Bring In Another Source via NDI?
First, you need to have another NDI enabled source connected to the same network as your Livestream
Studio system. This example will show a looping graphics sequence in Adobe Premiere Pro running on
an iMac. Learn more about Newtek's NDI tools and downloads.
In Livestream Studio, navigate to the InputsInputs tab in the lower left corner. Select Add Input > RemoteAdd Input > Remote. Any
available NDI source will appear in the menu for you to select.
544

Your NDI source will appear in the bottom of your Inputs list and in your multi-view along with all other
inputs. You can switch it into Preview and Program as you would any other source.
A key feature with NDI is alpha channel supportalpha channel support. This means a source like the one shown above, which
is a looping graphic with no background, can also be brought into Livestream Studio with a transparent
background.
To enable this in Studio, navigate to one of the GFXGFX menus, select Create Custom GraphicCreate Custom Graphic and click
New LayerNew Layer.
545

Click the paintbrush icon to open the GFX Designer.
To bring in your NDI source as a graphic, click the camera icon.
546

Your first input source will appear. Click the corresponding gearwheel to select your NDI source. Notice
that the graphic has a transparent background, rather than a black one.
547

Make any appearance adjustments as necessary (in this example, we cropped the empty space and
dragged the graphic to the bottom to make it a true lower-third graphic).
548

When you are satisfied with your NDI source's appearance, close the GFX Designer.
549

Now you can use your graphics overlay controls in the upper right corner of Livestream Studio to bring
in your NDI source as a graphics overlay with alpha channel support.
550

How Do I Output via NDI?
Setting up an NDI output is similar to setting up a normal live video output. The difference is that instead
of using a video card and video cables to output your Program or another Studio source, you are
outputting over your local network.
Click the gearwheel in the upper right corner to access settings.
Navigate to the OutputsOutputs menu.
The lower half of the menu is the NDI OutputsNDI Outputs section. Click the ++ button to add an NDI output.
551

Studio supports a maximum of five (5)five (5) NDI outputs.
By default, your Program will appear as the output. Click the drop-down menu under CameraCamera to select a
different source.
You can rename the field under DeviceDevice if you wish; this name is what your NDI output will be shown as
in other NDI recognizing devices.
552

After selecting your output(s), be sure to save your settings.
Now other NDI enabled devices and software on your network will be able to bring in your selected
output(s) as a source or input (e.g. other Studio systems, vMix, TriCasters, etc.)
My NDI Sources are Buffering, How do I Prevent This?
If you notice buffering or lag in your NDI sources, you can reduce the bandwidth required to bring them
in
553

Find your NDI source from the Inputs list and select the corresponding gearwheel to enter its settings.
Navigate to the ConvertConvert tab on the left side.
By default, the converter is receiving the signal in HighResHighRes mode. Open the drop-down menu to switch
to LowResLowRes. This will convert the NDI to a lower resolution, which will soften its appearance but deliver
the video signal more steadily.
554

Using Mevo as a Remote Camera Using Mevo as a Remote Camera
Livestream Studio can accept Mevo as a remote camera source when connected to the same
network.
Make sure that your Mevo is turned on and connected to the same local network as your Livestream connected to the same local network as your Livestream
Studio machineStudio machine. If it is not connected to the same network (i.e. to the same access point), Studio cannot
recognize Mevo.
When Mevo is on your network, Studio will automatically detect it. There is no need to open the Mevo
app to enable it as a remote camera.
You must be on Studio version 6 and Mevo version 1.13 with the latest firmware. These are
not compatible with older versions and do not support this workflow. When you launch the
Mevo app and are connected to your camera's hotspot, you will see a prompt to Update Update
FirmwareFirmware if your camera is not updated.
555

You cannot start a separate stream or recording from Mevo while Studio Remote Camera
Mode is enabled.
Your Mevo will appear on the bottom of your Inputs list. You can rename it by hovering your cursor over
its name and selecting the pencil icon that appears. You can select a different remote source by opening
the drop-down menu. When your Mevo is connected, a status message will appear here as well (e.g.
"Perfect streaming").
To further configure and control your Mevo, select the corresponding gearwheel icon to the right.
Many of Mevo's basic settings in the Mevo app are configurable directly in Studio in the General tab. This
includes the camera's name, resolution, frame rate, password protection, the Mevo button's setting, auto
turn off, auto-wide on app disconnect, and speaker and LED ring settings.
556

Any of these settings that you change in Studio will also be reflected inside the Mevo app. Keep in mind
each setting will need a few seconds in order to take effect.
If you adjust the Mevo's resolution within Studio's input settings menu, this will cause the
Mevo to restart. Do not change this setting inside Studio's inputs' menu if you are live or
about to go live.
In addition to these general settings, the AdjustmentsAdjustments tab will allow you to customize the Mevo's image,
including exposure, shutter speed, ISO, white balance, brightness, contrast, saturation, sharpness, view
angle, exposure metering, image flip, electronic image stabilization (EIS), and anti flicker settings.
These are the same settings found in the Mevo app's Adjustments menu and any changes made to these
in Studio will be reflected in the Mevo app.
557

Use the Crop functionality in Studio to adjust your Mevo's shot. This allows you to configure up to four
preset shots with motion and transition control.
Studio does not include some Mevo features such as face detection, live follow, and auto-pilot; these
features are only controllable via the Mevo app. If you do use these features in the Mevo app, you will
not be able to control your Mevo shot inside Studio until you switch to a generic shot or wide shot in
the Mevo app.
Control Mevo Remote Camera in the Mevo App Control Mevo Remote Camera in the Mevo App
You can still use the Mevo app to control your camera instead of Studio if you prefer.
After adding Mevo as an input in Studio as described above, connect your Mevo app to your camera via
Wi-Fi. You will notice the bottom left corner now shows a dark gray button indicating it is linked to
Studio but is not currently in Preview or Program. If you tap this button, the option to push it to the
Preview (PRV) or Program (PGM) monitors in Studio will appear.
558

Use your finger to slide the gray button to either PRV or PGM to put your Mevo into either Preview or
Program in Studio, respectively.
Once Mevo is in the Preview or Program monitor, tap the button again and slide it to switch it between
the monitors in Studio.
559

While Mevo is being used as a Remote Camera in Studio, you may still live edit your Mevo shot in your
Mevo app. This would include features such as face detection and live follow, but please note that while
these features are in use, you will not be able to change Mevo's shot via Studio until you cut to a generic
crop or a wide shot.
Your Mevo will output all crops and edits to Studio. Additionally, whichever crop preset in Studio is
activated will adjust to reflect the edit made in the Mevo App. Notice below, the cursor is not touching
the Take / Edit buttons, but the orange box (Preset 1) crops anyway; this was an edit made inside the
Mevo app.
Selecting 1080p / 15.0Mbps1080p / 15.0Mbps will disable all Camera Assistant features (Face Detection, Live
Follow, Auto Pilot, Static Shots). Panning and zooming via the Mevo app are also disabled, but
you can cut/crop your shot or use the crop features inside Studio.
Once your Mevo is connected, check here for best practices and recommendations for using
Mevo as a remote camera source.
560

Troubleshooting Troubleshooting
If you are not seeing any options on the list within the Remote Cam tabs, please check the following:
• Make sure the remote system is on the same network, connected to the same Router or Access
Point as your Studio system.
• If the system is on the same network but using a different access point, the Remote Camera will
not properly connect.
• Check that the following ports are open if you use a firewall:
• UDP: 5353, 60936 - 61036
TCP: 60936 - 61036
• Check that Bonjour Service is started.
• If you've checked all the above steps andand you are connecting over Ethernet, there could be a rare IP
configuration issue.
• If Mevo is still not appearing, try connecting via IP address.
561

Connect Mevo to Studio via IP Connect Mevo to Studio via IP
If your local network has firewall or anti-virus restrictions in place and causes your Mevo to not
appear automatically as a standard Remote Input, you can connect a Mevo to Studio by finding its
IP address and entering it into Studio.
To find your Mevo camera's IP address, launch the Mevo app on your mobile device, tap Configure Configure
Mevo Mevo and connect Mevo to the the same network to which your Studio system is connected.
Once Mevo is connected, tap the Info (i) Info (i) icon to the right of the network name.
562

Select the Manual IPv4Manual IPv4 tab; below this is the IP address, which will be four numbers separated by
periods.
You can also get Mevo's IP address from other network admins tools such as your Wi-Fi
router or DHCP server.
In Studio, open the InputsInputs tab, navigate to Add Input > RemoteAdd Input > Remote, then select Add Mevo by IPAdd Mevo by IP.
563

The below window will open prompting you to enter Mevo's IP address. Enter the IP address from Mevo,
then click SubmitSubmit.
After a moment, Mevo will connect to Studio, after which you can configure its settings and switch into
your production as you would if you connected through the standard remote camera process.
564

Best Practices for Mevo as a Remote Best Practices for Mevo as a Remote Camera Source Camera Source
If you intend to use Mevo as a remote camera sourceuse Mevo as a remote camera source in Livestream Studio, our team has some
configuration recommendations for optimal performance.
Project Format Project Format
First, under Settings: Project FormatSettings: Project Format, you should select StreamingStreaming OptimizedOptimized.
Choose a Project Format that matches your Mevo's Frame Rate. Doing this will increase the quality while
also reducing CPU usage that would otherwise be used to resize the Mevo's video feed.
565

If you need to output from Studio via HDMI or SDI, then you will need to select an HD format. In
Settings: Project FormatSettings: Project Format, change the Definition to HDHD. This in case, we recommend using either
720p59.94720p59.94, 720p60720p60, or 1080p301080p30. These will produce the best image quality but will increase CPU usage.
566

When you select your Project Format, click SaveSave.
Camera Synchronization Camera Synchronization
To avoid sync issues, it's best that you set your direct input sources to be delayed by one second. Studio
has an easy setting to do this.
Click the gearwheel in the upper right corner of Studio, then click the AdvancedAdvanced tab.
Navigate to the Remote Inputs SynchronizationRemote Inputs Synchronization setting and select Delay All Inputs by 1 Second and Delay All Inputs by 1 Second and
SynchronizeSynchronize. This will allow your wired inputs to compensate for the latency experienced by wireless
sources (in this case, Mevo) and sync them together.
567

Be sure to save your settings.
568

Bringing a Broadcaster Signal into Bringing a Broadcaster Signal into Livestream Studio Livestream Studio
Livestream Studio allows you to use your Livestream Broadcaster device as a remote camera
source.
Connect your Broadcaster to the same network as the Livestream Studio computer.
Livestream Broadcaster Pro
Power on the device and use the bottom Menu joystick to connect it to the same network that your
Livestream Studio system is connected to.
After connecting it, push in the joystick to enter the menu and select Stream ModeStream Mode.
569

Toggle the joystick to StudioStudio.
The Broadcaster Pro will indicate that it is connected and ready to send its signal to Livestream Studio.
In Livestream Studio, navigate to the InputsInputs tab in the lower left section. Select Add Input > RemoteAdd Input > Remote. You
can select your Broadcaster Pro from here, which will add it the bottom of your inputs list and your
multi-view.
570

Livestream Broadcaster mini
You can also connect a Broadcaster mini to Livestream Studio as a remote camera. When you
finish pairing it through the Livestream app, using the same network your Livestream Studio system is
connected to, select it from the Broadcaster list.
It will open the camera viewfinder. Click on the gearwheel in the top right corner to access settings.
571

Scroll down and you will see Studio Mode. Toggle the switch on (green) to enable Studio Mode. Then
click SaveSave in the upper right corner.
572

The mobile app will indicate that your Broadcaster mini is in Studio mode.
573

In Livestream Studio, navigate to the InputsInputs tab in the lower left section. Select Add Input > RemoteAdd Input > Remote. You
can select your Broadcaster mini from here, which will add it the bottom of your inputs list and your
multi-view.
Livestream Broadcaster (V1)
Bringing a Broadcaster into Livestream Studio as a remote camera is very similar to bringing the
Broadcaster Pro into Livestream Studio.
Select StreamStream ModeMode from the Broadcaster menu, and then select StudioStudio.
This will activate your Broadcaster as a live remote camera source.
574

In Livestream Studio, navigate to the InputsInputs tab in the lower left section. Select Add Input > RemoteAdd Input > Remote. You
can select your Broadcaster from here, which will add it the bottom of your inputs list and your multi-
view.
Troubleshooting Troubleshooting
If you are not seeing any options on the list within the Remote Cam tabs, please check the following:
• Make sure the remote system is on the same network, connected to the same Router or Access
Point as your Studio system.
• If the system is on the same network but using a different access point, the Remote Camera will
not properly connect.
• Check that the following ports are open if you use a firewall:
• UDP: 5353, 60936 - 61036
TCP: 60936 - 61036
• Check that Bonjour Service is started.
575

Bringing an iOS Camera Signal into Bringing an iOS Camera Signal into Livestream Studio Livestream Studio
Livestream Studio allows you to use your iOS device as a remote camera source. You will need a
Livestream account in order to use this feature.
Download the Livestream iOS application. Connect your iOS device via Wi-Fi to the same network as
your Livestream Studio system.
Open the Livestream iOS application and log into your Livestream account.
Don't have a Livestream account? Tap Continue with EmailContinue with Email, then Sign up.Sign up. This will create a
free account on Livestream and grant you access to the mobile app's features, including
Studio Remote Camera. Keep in mind a free Livestream account does not allow you to go
live to the Livestream platform unless you pay for a Livestream plan.
Tap the menu icon in the upper right, then tap the gear wheel. This will open the application settings.
Tap Studio Remote CameraStudio Remote Camera and make sure Studio Remote Camera is enabled.
Then select the blue Livestream Studio Remote CameraLivestream Studio Remote Camera bar.
576

In Livestream Studio, go to the InputsInputs tab in the lower left corner. Select Add InputAdd Input > RemoteRemote. If your
device is connected to the same access point as Studio, it will appear as an option for you to select.
577

If you click on the gear wheel next to your remote iOS source, you can change settings such
as which camera is being used and at what resolution.
Troubleshooting Troubleshooting
If you are not seeing any options on the list within the Remote Cam tabs, please check the following:
• Make sure the remote system is on the same network, connected to the same Router or Access
Point as your Studio system.
• If the system is on the same network but using a different access point, the Remote Camera will
not properly connect.
578

• Check that the following ports are open if you use a firewall:
• UDP: 5353, 60936 - 61036
TCP: 60936 - 61036
• Check that Bonjour Service is started.
579

Bringing an Android Camera Signal into Bringing an Android Camera Signal into Livestream Studio Livestream Studio
Livestream Studio allows you to use your Android device as a remote camera source. You will need
a Livestream account in order to use this feature.
Download the Livestream Android application.
Connect your Android device's Wi-Fi to the same network that your Livestream Studio system is
connected to.
Open the Livestream Android application. You will need a Livestream account to proceed with using the
app.
Don't have a Livestream account? Tap Continue with EmailContinue with Email, then Sign up.Sign up. This will create a
free account on Livestream and grant you access to the app's features, including remote
camera. Keep in mind this will not allow you to go live to Livestream unless you pay for a
plan.
Tap the menu icon in the upper left corner, then the gearwheel.
580

581

This will open your settings menu. Tap Studio Remote CameraStudio Remote Camera.
Tap UseUse asas RemoteRemote CameraCamera.
582

This will activate your Android device as a live Remote Camera source. The notification will read "Waiting
for Studio to connect..."
You can hold your camera at portrait or landscape mode; the picture will still hold a 16:9
aspect ratio.
583

In Livestream Studio, navigate to the InputsInputs tab in the lower left corner. Select Add InputAdd Input > RemoteRemote. If
your Android device is connected to the same access point as Studio, it will appear in the list of remote
devices for you to select from.
584

The Android remote camera will be added to the bottom of your Inputs list, where you can choose a
different remote camera and see the connection status (e.g. "Perfect streaming"). Click the
corresponding gearwheel on the right to access additional settings.
You can adjust which camera your device is using (front or back) by opening the MonitorMonitor drop-down
menu.
585

Troubleshooting Troubleshooting
If you are not seeing any options on the list within the Remote Cam tabs, please check the following:
• Make sure the remote system is on the same network, connected to the same Router or Access
Point as your Studio system.
• If the system is on the same network but using a different access point, the Remote Camera will
not properly connect.
• Check that the following ports are open if you use a firewall:
• UDP: 5353, 60936 - 61036
TCP: 60936 - 61036
• Check that Bonjour Service is started.
586

Bringing Other Streams into Livestream Bringing Other Streams into Livestream Studio Studio
If you have a video source streaming to another destination, you can pull that stream into your
Livestream Studio as a remote camera source.
Navigate to the InputsInputs tab in the lower left corner. Select Add Input Add Input > StreamStream. There will be a few options
here.
RTMP ServerRTMP Server is a different way to bring a stream into Livestream Studio and is covered herehere.
Livestream EventLivestream Event allows you to pull in a stream from an event on Livestream.com as a remote camera
source. You must have the login credentials for the account hosting the event you wish to bring in. You must have the login credentials for the account hosting the event you wish to bring in.
587

After adding a Livestream Event as an input, it will appear in the bottom of your inputs list and in your
multi-view. You can hover your cursor over the name (e.g. "Livestream evnet 1") and click the pencil icon
that appears to edit it.
Select the corresponding gearwheel to the right to configure the input.
Log into the Livestream account that's hosting the stream you wish to bring in.
By default, Studio can detect which of your events are live and bring it in automatically. Alternatively, you
can choose an event manually.
588

You can also bring in streams via RTMP, RTSP, and Zixi playback URLs, which can be provided by the
stream's hosting platform. Select the protocol your stream is using from InputsInputs > Add InputAdd Input > StreamStream.
Enter the appropriate playback URL for accessing the stream into the Stream URL text box, then press
the Enter key.
589

The stream will appear in the module. Expected latency will vary depending on connectivity strength,
but will likely hover around ten seconds.
Learn more about additional input settings.
590

Setting Up Studio as an RTMP Server Setting Up Studio as an RTMP Server
With Livestream Studio, you can send a stream from a third-party encoder via RTMP directly to
Studio and bring that stream in as a source.
ImportantImportant: In order for this feature to work successfully, your network must have Port 1935
open to allall communication, as it is a UDP connection. This port also needs to be forwarded
to the internal IP address of the machine using the server.
If your encoder is streaming to Studio from an external location (i.e. not from the same
network), you must ensure that both systems are on a public-facing IP address in order for
your encoder and Studio to communicate with each other.
Speak with your IT administrator if your network requires these changes to be made.
RTMP Input Basics RTMP Input Basics
Go to InputsInputs and navigate to Add Input Add Input > Stream Stream > RTMP Server. RTMP Server.
591

To configure the RTMP server, select the gearwheel icon to the right of the RTMP server input.
By default, authentication is turned off. If you would prefer to have a username and password affiliated
with your RTMP Server, click ChangeChange SettingsSettings.
592

This will open the RTMPRTMP ServerServer tab in Studio's settings. Check AuthenticationAuthentication and enter the desired
username and password; then click SaveSave.
Scroll down in the GeneralGeneral tab; your RTMPRTMP URLURL and StreamStream NameName are displayed in this menu.
593

To save time copying and pasting, Studio gives you the option to Download FMLE Settings,
which you can then import into your encoder.
594

In your third-party encoder (e.g., Wirecast, OBS, etc.), open your RTMP settings and enter the RTMP URL
and Stream Name from Studio into the corresponding fields.
If you enabled authorization, enter your RTMP Input's username and password into your third-party
encoder.
595

Start streaming from your third-party encoder to your RTMP Input.
In the Livestream Studio multi-view, the video output from your third-party encoder will appear in your
RTMP Input.
596

You can transition your RTMP Input into Program, just as you would with any other source. When you
end the stream from your third-party encoder, the source will no longer be visible in Livestream Studio.
Advanced Settings
In the RTMP input's General settings, scroll down to find additional settings.
597

Checking Transition to ProgramTransition to Program will automatically switch the RTMP input into Program as soon as Studio
receives the stream. Select your Transition to program modeTransition to program mode, which allows you to choose whether your
input will Cut or Auto-Transition into Program once the stream is received.
598

Next is StartStart StreamStream, which can prompt Studio to automatically start streaming to your selected
provider(s) in Livestream Studio (e.g. Livestream) as soon as it receives the RTMP input.
When RTMP stream endsWhen RTMP stream ends allows you to select what Livestream Studio should do when you stop
streaming from your third-party encoder. The options are:
• No ActionNo Action: Studio will not react to the RTMP stream stopping
• Stop StreamingStop Streaming: Studio will end its stream. Check the StreamStream tab to a prompt on what to do with
your stream's archive on the selected streaming destination (e.g. save as draft, post, delete).
• Switch to Preview and Keep StreamingSwitch to Preview and Keep Streaming: Studio will continue streaming, but transition the Preview
source into Program.
599

With these settings enabled, your RTMP source will now automatically appear in Program and
Livestream Studio will start streaming to your chosen provider without any additional action needed.
You can also configure RTMP input settings via Livestream Studio Web Control.
Troubleshooting
If you attempt to stream from your encoder and are unable to reach the RTMP server, it could be that
Studio is not displaying your machine's internal IP address. Follow the steps below to get the correct IP
address
Go to your Windows network settings and find your connection status; click Local Area ConnectionLocal Area Connection.
Select DetailsDetails.
600

The IPv4 AddressIPv4 Address is the IP address that you need. Replace this with the IP address displayed in RTMP URL
in your encoder (e.g. rtmp://10.20.30.40/live). The stream name remains the same.
601

If you are using a Mac system, open System PreferencesSystem Preferences > NetworkNetwork. Use the IP Address listed here in the
RTMP URL.
602

You should now be able to go live to your Studio RTMP server.
603

Uninstall Mac OS X Remote Camera and Uninstall Mac OS X Remote Camera and Audio Redirector Audio Redirector
To uninstall the Remote Camera Desktop Audio Redirector, navigate to your Applications folder and
locate the LSAudioRedirectorUninstallerLSAudioRedirectorUninstaller application. Double-click it.
This message will pop up asking you to confirm that you want to uninstall the Audio Redirector. Click
UninstallUninstall.
When the script finishes running, this message will pop up, confirming the Audio Redirector has been
uninstalled successfully.
To uninstall the Remote Camera Desktop Client on a Mac system, first close the application by clicking
the icon in the top menu bar.
604

Locate the Remote Camera application in your Applications folder.
Drag the application to Trash.
605

Empty the trash.
606

Web Control Web Control
607

What is Studio Web Control? What is Studio Web Control?
Studio Web Control allows you to give yourself or others access to a Livestream Studio system
directly from a supported browsersupported browser.
On your Studio system, go to settings, then click the WebWeb ControlControl tab. Click the checkbox next to
EnableEnable WebWeb ControlControl to see more options.
First, you will see a Studio ID and a Web Control Link. These are used to add users to your Studio system.
608

You can use the default ID that populates, or create your own by clicking the pencil icon to edit it. Click
save when you are done, or cancel to keep the previous name.
Below is your list of allowed users that you have invited to your Studio Web Control. You can also adjust
how much access each user has to your Studio.
Finally you can choose how your Studio Web Control is laid out in the module below. Choose a layout
and drag and drop sources you wish to see into the position you want them in.
609

When you log into Studio Web Control using your Livestream or Vimeo account credentials, any Studio
system you have been added to will be listed below as offline or online. Select your online Studio.
610

A window such as the one below will open for users granted Full Access:
611

Here is where those users will be able to the see and control the multiview, control the audio mixer,
operate the transition controls as well as insert mid-roll advertisements and fade to black. They can also
click the menu icon in the upper right corner to change their view and log out.
Read only users will see a similar window to those given Full Access, with the exception of a ‘Read Only’
ribbon in the upper right control. These users can see every part of the interface that Full Access users
can, but they cannot control it or make any changes.
Users granted access to the multiview will see something similar to below, depended on your layout
settings.
They can click on the sources to put into Preview and Program. They can also click StreamStream and Record Record
at the top of the module to go live and start recording, respectively.
Users granted access to controls only will see the audio mixer, stream module, GFX modules, all the
options seen under the transition controls. However, they do not have the ability to see or control the
multiview.
612

All users can log out of web control by click the menu icon in the upper right corner and clicking Log Log
OutOut.
If you're using Web Control on the same network (LAN) as Studio, the information between
the two will be exchanged peer-to-peer (P2P) over the LAN rather than over the internet.
613

Add a User to Studio Web Control Add a User to Studio Web Control
You can add additional users to control your Studio via Google Chrome and other supported
browsers.
In your Livestream Studio system, go to SettingsSettings > Web ControlWeb Control.
Enable Web Control by clicking the check box, then navigate to the UsersUsers box.
614

To add a user, click the ++ button. The following window will appear.
Enter the person’s email address and how much access you wish to grant them. The options are:
• AdministratorAdministrator - full access plus ability to change access for themselves and other users
615

• Full accessFull access - full use of all Studio Web Control features (multi-view and controls); cannot change
other users access.
• Read onlyRead only - can only view web control with no ability to control Studio
• MultiviewMultiview - can see the multi-view as configured from Studio and use mouse controls to put sources
in Preview and Program
• Controls onlyControls only - can control audio mixer, GFX, stream tab, RTMP inputs, and other transition controls
in web control but cannot see the multi-view.
Click SaveSave and then save your Studio settings. The user you have invited to access your Studio via Web
Control will not be able to join it until you save your settings.
You can always adjust what kind of access each user has when you go back into the settings.
Doing so will kick them out of any current session and they will have to re-enter the Studio
Web Control interface again.
The email address you sent the invite to will receive the following email:
The user should click the blue Open Web ControlOpen Web Control button or the studio-webcontrol.livestream.com URL.
They will be prompted to log into a Livestream or Vimeo account if they are not already, and then
directed to the Studio Web Control interface that they have been given access to.
616

The user must have an account on Livestream or Vimeo in order to log into Studio Web
Control. If they do not have an account, they can click Join Livestream Livestream or VimeoVimeo. The user
must use the email address that was invited to Studio Web Control.
617

Supported Browsers and Devices for Studio Supported Browsers and Devices for Studio Web Control Web Control
In order to use Web Control with Livestream Studio, customers must use the most recent versions of
Google Chrome, Mozilla Firefox, or Safari on the following operating systems only:
• macOS
• Windows
• Chromebook
• Android
Web Control is notnot supported on Microsoft Edge and all iOS devices.
618

Using Graphics Overlays in Studio Web Using Graphics Overlays in Studio Web Control Control
Web ControlWeb Control, the Livestream Studio feature allowing the ability to control certain aspects of
Livestream Studio via a web browser that supports WebRTC (e.g., Google Chrome, Mozilla Firefox),
includes the ability to add .lsgfx files via Dropbox, insert data, and have full control over your
graphics overlays’ settings.
A Dropbox account is required in order to use this feature. Log in to Dropbox and locate your folders (or
create a new one).
Save the .lsgfx files you wish to use in Livestream Studio in this folder. Only .lsgfx files are supported in
Studio Web Control.
619

Sample .lsgfx files can be found in the Studio Graphics Store or can be created when you export a
graphics overlay layer that you manually created in Livestream Studio.
The first step is within the Livestream Studio software. Navigate to Settings, then select the DropboxDropbox tab.
Click Connect DropboxConnect Dropbox.
620

Log in to your Dropbox account by entering your account credentials and clicking Sign inSign in.
Studio will request permission to access your files in Dropbox. Click AllowAllow.
621

You will need to select a folder on your local drive to save your imported file to and a folder in your
Dropbox from which to select .lsgfx files. Once you made your choices, click SaveSave.
622

Studio will indicate that your Dropbox account is synchronized with Studio.
623

Next, log in to Web Control and open your Studio (assuming you have already added yourself as a user).
You should notice the three graphics overlay tabs in the bottom portion of the screen; select one of
them to continue.
624

You can either browse the free Graphics Store within the Web Control graphics overlay module or scroll
down and click AddAdd CustomCustom LayersLayers.
Any .lsgfx files saved in your selected Dropbox folder will be listed here. Click the name of the file you
wish to use.
625

The graphics file will load with its design and settings on the left and its data on the right.
It is not possible to open the GFX Designer in Web Control. The appearance of the graphic
can only be edited within the Studio software.
On the right side, you have the ability to add data rows and columns and enable the Auto Push/Pull
feature when selecting different rows.
626

Clicking the gearwheel on the left side will open the settings available with that graphic, such as auto-
loop timing, direction, and starting point.
627

Overlaying graphics in Web Control is the same as in Studio software. Click the corresponding PRV PRV
button to show your graphics overlay in Preview.
Click PUSHPUSH to transition the graphic overlay into Program.
628

Now, you will see the graphics overlay in your Program monitor.
To remove it from Program, click the corresponding PULLPULL button.
629

630

Media Playback in Web Control Media Playback in Web Control
You can import videos from Dropbox into your Media bins via a Web Control supported browsersupported browser.
Open Web Control for your Studio system. If you have not already integrated a Dropbox account with
Studio, you can do so by opening the SettingsSettings menu in the upper right corner, then navigating to the
DropboxDropbox tab. The steps to integrate Dropbox with Studio are the same with Web Control.
Once Dropbox is connected to Studio, select one of the Media tabs in Web Control and click the + +
button in the bottom left corner.
631

Any video file that is stored in your selected Dropbox folder will appear in the pop-up menu. Select the
file you wish to import into Studio.
The file will begin transcoding. When transcoding completes, you will see a thumbnail of the clip on the
right side of the panel.
632

All player controls and options function exactly the same way in Web Control as they do in the Studio
software.
633

Studio Simulcasting via Web Control Studio Simulcasting via Web Control
Simulcasting via Livestream Studio can now be set up via Studio Web Control. It works similarly to
setting up simulcasting within the Livestream Studio software.
Log in to Web Control and navigate to the lower left corner. Select the StreamStream tab. Choose one provider
to start with; this example will use Livestream.
Log in to your account.
634

Configure your provider's settings. For example, choose your Livestream event and whether or not to
notify your Livestream followers when you go live.
635

Click Advanced SettingsAdvanced Settings to reveal further options below; in Livestream's case, using bonding or using this
Studio as a backup stream. All providers will allow you to specify a network to stream through.
636

When you have finished configuring your settings for your first provider, select the ++ icon in the lower
left corner to add another provider.
637

Choose another provider (this example uses Facebook).
638

Sign in to your account. This may open a new browser window. Once you are signed in, navigate back
to Web Control.
The provider's icon will appear as a new bottom tab within the module. Clicking it will allow you to
configure settings for that streaming destinations (e.g. where on Facebook you are streaming, audience,
tag location, etc.)
639

Now you can give your stream a title and choose a streaming quality. Keep in mind that not all quality
options are supported by all providers (e.g. Facebook does not currently support 1080p or higher).
640

To start streaming, click Go LiveGo Live in the lower right corner of the Stream module.
Your stream will begin immediately and the Stream module will turn into a dashboard explaining your
outgoing bitrates, frame rates, viewer counts, and any error messages or warnings regarding your
stream.
When you are down streaming, click the red StreamingStreaming button in the lower right corner.
641

You stream will end immediately and a dialogue box will open with information regarding your stream
and any action items required (e.g. post the video on demand to your event page).
642

Advanced Features Advanced Features
643

Using Chroma Key Using Chroma Key
Livestream Studio includes chroma key, giving users the ability to remove a color from the video
source, typically a background color to replace with an image such as a virtual set.
Chroma key is done through the graphics module. Start by adding a new layer to any graphics overlay
channel.
Click the paintbrush icon to enter the GFX Designer.
644

Next, click on the camera icon to add an input source to your graphics layer.
Click the gearwheel to select which input source you want to use for chroma key.
You can adjust how your input source looks inside the GFX Designer as necessary, such as scaling it to fit
the whole screen.
645

Click the person icon to turn on chroma key.
Livestream Studio will automatically detect the most prominent color (green in this example) and key it
out once chroma key is turned on.
646

Next, close out of the GFX Designer and put either a camera, media source, or graphics source into
Program from your multi-view. The example above has a white background video from Media 2.
Now push your graphics overlay layer into Program by clicking the corresponding PUSHPUSH button.
647

You should now see your chroma keyed input source overlaying your Program source.
To make further adjustments to your chroma key graphic, go back to the GFX Designer.
648

When you select your input source in the graphics overlay while chroma key is turned on, you will see
other options in the upper right corner.
To erase all chroma keying on your input source, click the XX icon. Note that the green background has
returned to the picture.
649

To apply automatic chroma keying (i.e., key out the most prominent color), click the icon of the
eyedropper with an A.
The eyedropper-circle icon will allow you to do rough keying by hand. Select this option, then hover
your mouse to the area you want to key (e.g. the back of the chair).
Click and drag your mouse to start real-time keying. You can increase or decrease the keying color
range, which will be indicated by a circle around the area.
650

The end result should be similar to the image above, where the colors within the range that was
selected are now on the chroma key palette and thus not visible.
651

The eyedropper with a plus sign either initializes the chroma key or adds color hues to the chroma key
palette. This is helpful if there are shadows in your background that did not key out fully.
The eyedropper with a minus sign will exclude colors from your chroma key palette. This is helpful if a
color on your set is similar to the color you keyed out and is faded. In this example, the orange chair is
keyed out and the red sweater is also largely keyed out.
After using the eyedropper minus tool on the red sweater, you can now see the sweater; orange is still
on the chroma key palette.
652

Please note that other graphics or images in the same graphics layer will be visible. Use caution with this
type of workflow, as it is likely to increase your CPU usage.
653

Hardware Encoding and Decoding with Hardware Encoding and Decoding with Livestream Studio Livestream Studio
Studio includes hardware encodinghardware encoding and hardware decodinghardware decoding which moves the video processing to a
dedicated GPU, greatly reducing your CPU usage while running Studio.
These features are only available on computers with Intel processors that include Quick Sync Video
(which are listed here) or have an NVIDIA GeForce card that includes NVENC and NVDEC. We have
instructions on how to determine if your computer has an Intel Quick Sync processor or has an NVIDIA
card that supports NVENC and NVDEC.
The HD31, HD51 4K, and HD550 4K are the only Livestream-built units that have the required hardware
that includes these features. Many laptops include them as well.
Computers that do not have the proper hardware installed will not display these features in Studio.
To enable hardware encoding in Livestream Studio, click the SettingsSettings icon in the upper right corner of
the interface.
654

Navigate to the StreamingStreaming menu.
655

At the top of the menu, check Hardware EncodingHardware Encoding. Then click SaveSave.
As an example, here is the processor being used on a Windows 10 computer.
656

The CPU usage when hardware encoding is turned off—streaming a single bitrate averaging 2128kbps,
with 2 media bins, and 1 animated graphics overlay—is nearly 100%. The stream timed out after about 1
minute due to lack of resources.
In comparison, the CPU usage with the same workflow while hardware encoding is turned on was cut in
half, down to 48%.
657

To enable hardware decoding, navigate to the AdvancedAdvanced menu in settings. Make sure Enable hardware Enable hardware
decodingdecoding is checked. This will reduce the CPU resources needed to bring in your camera sources.
658

How Do I Know if My Intel Processor How Do I Know if My Intel Processor Includes Quick Sync? Includes Quick Sync?
In order to be able to use the hardware encodinghardware encoding feature in Livestream Studio, you must have the
proper hardware installed on your computer. One of these options is having a processor that
include Intel Quick SyncIntel Quick Sync. (The other is NVENC via NVIDIA GeForce GPUs.)
Intel Quick Sync is Intel's version of dedicated video encoding and decoding hardware core. Rather
than using a general GPU, this core is located on the processor die and is dedicated just for video
processing.
Studio will automatically detect if you have the proper hardware or not. You can quickly
check this by going to the Settings: StreamingSettings: Streaming menu. If Hardware EncodingHardware Encoding does not appear
at the top of the menu, then you do not have the GPU hardware.
To determine if your processor includes Quick Sync, first you need to determine your CPU model.
• Windows 7Windows 7: Open the Start menu, right-click ComputerComputer, then click PropertiesProperties.
• Windows 8 & 10Windows 8 & 10: Right-click the Start menu, then click SystemSystem.
659

If you are running Studio on a Mac, to find the exact CPU model you will need to open the Terminal
application. Enter the following command, then press the Return key:
<p>sysctl -nmachdep.cpu.brand_string</p>
Your CPU model will be displayed underneath.
In a web browser, navigate to this listthis list and find your CPU model (Tip: Use the CTRL+F/CMD+F search
function in your browser and type in the model ID).
660

If your CPU does not appear in the list, then you do not have Intel Quick Sync available with your
computer's processor.
661

How Do I Know if My GPU Supports How Do I Know if My GPU Supports NVENC and NVDEC? NVENC and NVDEC?
In order to be able to use the hardware encoding and hardware decodinghardware encoding and hardware decoding features in Livestream
Studio, you must have the proper hardware installed on your computer. One of these options is via
NVENC (encoding) and NVDEC (decoding), which process the video via a supported NVIDIA
GeForce graphics card.
The first sign of knowing whether your PC supports these features is to go into Studio and check
Settings: StreamingSettings: Streaming for Hardware EncodingHardware Encoding, then check Settings: AdvancedSettings: Advanced for Hardware DecodingHardware Decoding. If
these options do not appear in these menus, then, unfortunately, you do not have the supported
hardware.
662

We have successfully tested the following NVIDIA GeForce models:
• GTX1050
• GTX950
• GT730 (GK208-400-A1 - other versions of this model have been reported to not work)
• GTX650
To find out if a specific model supports these features, visit the NVIDIA GPU Support Matrix. The first
table on this page represents cards that support hardware encoding (NVENC); the second table (below)
is for cards that support hardware decoding (NVDEC). Below each of these tables are three green
buttons which are different NVIDIA product lines; clicking all of these will expand and complete each
respective list.
663

Search for the the model name of the GPU on your system (e.g. GTX 1050). The quickest way to do this
is to hold CTRL+F (Windows) or CMD+F (Mac) and type the model name into the page search. The
browser will jump to the first matching result.
If your model name is on the first set of tables and lists "YES" under the H.264 (AVCHD) YUV 4:2:0H.264 (AVCHD) YUV 4:2:0
column, then your GPU supports hardware encoding in Livestream Studio.
If it appears in the second set of tables and lists "YES" under the H.264 (AVCHD)H.264 (AVCHD) column, then it supports
hardware decoding.
664

If your NVIDIA card falls outside of these parameters, then NVENC and/or NVDEC may not be supported
on that card
665

Using a Bonded Network to Stream Using a Bonded Network to Stream
Livestream Studio has the ability to stream via a bonded connection, allowing you to stream over
multiple Ethernet, Wi-Fi or 4G/LTE network connections, increasing your bandwidth while also
allowing you to create network redundancy.
ImportantImportant: Bonding is only available when streaming to Livestream. If choosing multiple
providers, be aware that other providers will use only the network you selected when
configuring each provider's stream settings.
While Windows should recognize and automatically install any necessary drivers for USB modems, the
drivers can also be manually downloaded from the modem vendor's site. Ensure that all networks can
access the Internet.
In order to successfully stream with a bonded connection, ports UDP 2088UDP 2088 and TCP/IP 80TCP/IP 80 need to be
open in addition to standard Firewall ports.
As a best practice, it's recommended that USB devices are spread across your PC's various USB ports
and hubs. This avoids taxing each USB hub and ensures that each modem's connection is used.
In Livestream Studio, navigate to the StreamStream tab and login to your Livestream account.
666

Select your event, then click AdvancedAdvanced SettingsSettings.
Check Use BondingUse Bonding, then click DoneDone.
667

At the top-right corner of the Stream module is a gearwheel. Select this to configure default settings for
your stream, including your default network. Here you will see a Bonding Bonding column with each
corresponding network and a small dropdown menu with the following options:
• UseUse: Networks with this option selected will combine together and distribute the stream.
• Standby - use only when neededStandby - use only when needed: This network will not be used unless all other active networks lose
connection. For example, if you have a 4G USB modem plugged in with data caps, you may want to
consider saving that as your backup connection to avoid data overage charges.
• OffOff: Will not be used at any point during your broadcast regardless of the status of other network
connections.
When you go live, your network dashboard will show information for each network, such as the bitrates
each active one is distributing and if one disconnects.
668

Your standbystandby networks will not stream unless a problem occurs with all of your selected primary
networks (i.e. those with UseUse selected).
669

Configuring Mid-Roll Advertisements Configuring Mid-Roll Advertisements
Owners of the Livestream Studio software who also have an Enterprise planEnterprise plan on Livestream can now
insert a mid-roll advertisement during a live broadcast with the press of a button. In order for this
feature to work, make sure you have set-up and configured a Google Ad Managerconfigured a Google Ad Manager (formerly known
as Google DFP).
Once the Google DFP account is properly configured with Livestream, launch Livestream Studio.
Open the settings menu and navigate to the AdAd InsertionInsertion menu.
Within this menu tab, you'll find the following options:
Segment DurationSegment Duration: adjust the length of the mid-roll advertisement segment. This is how long an
advertising segment will last before it starts over. When you click AdvertAdvert again, Livestream Studio will
670

switch to the Preview source at the end of the segment.
BackgroundBackground: Adjust the image displayed behind the advert. Options include:
• Fade to Black
• Any of the available GFX/Color/Media inputs
TransitionTransition: Adjust the transition in and out of the advert. Options include CutCut and Auto. Auto.
Automated InsertionAutomated Insertion: Checking this will bring up additional settings if you want your advertisement to
run at a set interval. This can be helpful if you have strict time limitations or have to meet certain
sponsorship requirements.
Period between adsPeriod between ads: The time, in seconds, between your advertisements being triggered.
Number of segments per periodNumber of segments per period: How many segments roll before advertisements are no longer
triggered.
Start with advertStart with advert: Segment will begin by playing the advertisement, rather than starting with showing
what you selected to go in the background.
Start insertion with streamingStart insertion with streaming: When you go live, the first content your viewers will see is your
advertising.
671

After configuring the Ad Insertion Preferences, click Save. To activate a mid-roll manually, click the Advert Advert
button below the transition controls.
When inserting an advertisement via the Livestream Studio Software, the following should occur:
• Depending on your choice of background, the Program window will change to reflect the selected
option.
• The AdvertAdvert button will become red and include a Countdown timer.
• On the top Left of the Program window, it will read "OUTPUT Advertisement: [Transition] is locked
until End". In the below example the option selected is "Fade to Black".
After clicking AdvertAdvert again, it will switch to a countdown to when your stream will return to content.
672

Adding & Configuring Tally Lights Adding & Configuring Tally Lights
A tally light is a small signal-lamp typically seen on top of a camera. It is usually located above the
lens or on the electronic viewfinder and communicates that the camera is 'live' - i.e. its signal is
being seen in Program at that moment.
Tally light systems by MetaSETZ (http://www.metasetz.com) are currently the only systems supported by
Livestream Studio.
Once you have acquired your Tally Light system, connect it to your computer via an available USB port.
The system should recognize it and automatically install the drivers.
Open the Livestream Studio software and open Settings:Settings: AdvancedAdvanced.
Under OtherOther, check the TallyTally LightsLights option. Save your settings.
673

Go to the InputsInputs tab and select the local input to which you want to assign a tally port, then click the
corresponding gearwheel to the right to enter that input's settings.
Select TallyTally and assign one of the available tally ports to your camera as seen below. Do this for each of
your cameras.
When the camera is set to Program, the selected Tally Light will turn on.
674

675

Create a Backup Stream to Livestream Create a Backup Stream to Livestream
Unfortunately, this feature is currently not functioning properly. Our development team is Unfortunately, this feature is currently not functioning properly. Our development team is
aware and working on a fix. We will update this article when a fix has been released. aware and working on a fix. We will update this article when a fix has been released.
You can create a backup stream to Livestream using Livestream Studio. This is helpful if you are
looking to add redundancy to your workflow in the event of a bandwidth drop or power failure. You
will need two systems running Livestream Studio. Determine which will be your primary encoder
and secondary encoder.
This feature only works when streaming to Livestream.com.This feature only works when streaming to Livestream.com. Livestream Studio cannot create a backup
stream for other providers.
Start your stream to Livestream on your primary encoder as you normally would.
Open Livestream Studio on your secondary encoder. Navigate to the Stream Stream module, log in to
Livestream. Make sure the following streaming settings match the settings on your primary encoder:
• Event
• Streaming Quality
Next, select Advanced SettingsAdvanced Settings.
676

Check Backup StreamBackup Stream.
When your settings are configured, select Go LiveGo Live to start streaming your backup.
677

If the stream from the primary encoder fails due to bandwidth drop or power failure, the stream from
secondary encoder will continue without interrupting the viewing experience on Livestream.
ImportantImportant: Backup Stream is not available when using Bonding as your delivery method.
678

Enabling Closed Captioning Ingestion Enabling Closed Captioning Ingestion
Livestream Studio can ingest FCC compliant closed captioning data with their input sources and
stream it out to Livestream.
Livestream Studio supports ingesting CEA 708 closed captions via Blackmagic DeckLink devices. Most
closed captioning encoders support this type of captions, as they are FCC compliant. Studio can then
deliver CEA 608 captions to your streaming destination, provided the player also supports those closed
captioning standards.
Important:Important: The captions must be embedded into a Blackmagic DesignBlackmagic Design SDISDI input in order to
be recognized. Closed captioning currently does not work when using Magewell capture
cards, including the cards installed on the Studio One.
To enable closed captions forwarding to Livestream, go to settings and enter the StreamingStreaming menu. At the
bottom, you will see ClosedClosed CaptionsCaptions. Check ClosedClosed CaptionsCaptions EnabledEnabled to allow for closed captioning
data to be received.
Next, select whether the closed captions are available only with the source they are coming from
(FollowFollow onon switchingswitching), if the captions should show regardless of what source is in Program (FromFrom single single
cameracamera), or only when the source is in AUX program (FromFrom AUXAUX).
679

Save your settings, then go to the InputsInputs tab. Select the camera source(s) that has the closed captioning
data embedded, then click the corresponding gearwheel to the right to configure its settings.
On the left side, select ClosedClosed CaptionsCaptions.
Check EnabledEnabled, and then select which channel your closed captions are coming through. This will
require that the selected input source be a 10-bit input signal, rather than 8-bit.
When you go live, your captions will be available as an option in the destination's player as well as your
Livestream VOD. Please note you will not see any captions in Livestream Studio or when you download
the video file from your event page.
680

We cannot guarantee that captions will be available on Android due to the diverse nature of
its versioning and devices.
681

Changing Language in Livestream Studio to Changing Language in Livestream Studio to Chinese Chinese
Livestream Studio includes the ability to change the language of the Studio interface between
English and Chinese.
Click the gearwheel button in the upper right corner of the Studio interface. Navigate to the Settings: Settings:
AdvancedAdvanced menu. Towards the bottom will be the Language dropdown menu where you can select your
preferred language.
You will be notified that your language setting has changed. It will be applied when you relaunch Studio.
682

If you ever do this accidentally, click the gearwheel in the Studio interface. The third tab down is the
Advanced menu. The third setting from the bottom of the menu is the language dropdown menu; select
English, press the blue Save button, and relaunch Studio. The interface will return to English.
683

Import & Export Recorded Files Using Import & Export Recorded Files Using Adobe Premiere Pro Adobe Premiere Pro
Unfortunately, Adobe Premiere 2018 for Mac no longer supports MJPEG AVI files. This issue
does not appear on Windows machines.
First, make sure you have Blackmagic Design Desktop Video installed on your system. Go
to https://www.blackmagicdesign.com/support, select 'Capture and Playback,' and download Desktop
Video.
• Open Adobe Premiere Pro and choose a new project
• Select the capture format
• Select the sequence settings
Important: These should match the video format settings of the Livestream Studio Project Important: These should match the video format settings of the Livestream Studio Project
Import the video clip.
• Go to: File > Import
• Select the video file and select open.
The imported file should appear in the clip bin.
• Drag the clip into the timeline.
The user will be prompted to change or keep sequence settings. Choose “Keep sequence settings.”
Exporting video clipsExporting video clips:
• Go to File > Export > Media
• Select “Match Sequence Settings”
• Enter an output name.
• Click “Export”
684

Import & Export Recorded Files Using Final Import & Export Recorded Files Using Final Cut Pro 7 Cut Pro 7
Follow the steps below in Final Cut Pro 7 to bring a clip into the editing software.
NoteNote: If you are simply looking to export a recording as a compressed .mp4 file, you may want to
consider trying the export feature in Livestream Studio's media bin.
1. Open Final Cut Pro and choose a new project.
2. Drag the video clip into the file bin.
3. Drag the clip into the timeline.
a. A prompt to “Change the Sequence Settings” will display.
b. Choose “Yes”
4. Go to Files > Export > Quicktime Movie
5. Choose “Sequence Settings”
Note: Settings must be exactly the same as the settings on the Livestream Studio™ project. Note: Settings must be exactly the same as the settings on the Livestream Studio™ project.
6. Save the clip.
685

Troubleshooting Troubleshooting
686

Troubleshooting Steps: Not Seeing Input Troubleshooting Steps: Not Seeing Input Source Source
If you are unable to receive a video signal in your Studio software please make sure you confirm the
following:
Are you using a Blackmagic or Magewell capture device?
Livestream Studio will best work with video signals from certified Blackmagic Design capture devices.
Magewell cards are also supported. If you are using a non-Blackmagic device there is a chance your
signal will not appear in the software.
Check here for our list of supported devices.
Do you have the recommended version of the Blackmagic Design drivers?
We generally recommend using the most recent version of Desktop Video. However, if you are on
Windows 10 Pro version 1709Windows 10 Pro version 1709, we recommend downloading Desktop Video 10.9.5. 10.9.5.
Drivers found on the Blackmagic Design package discs are often out of date as Blackmagic frequently
releases updates. Please be sure you are using the proper version of the Blackmagic drivers, which you
can download at blackmagicdesign.com/support.
• Select Capture & PlaybackCapture & Playback and download Desktop Video for your operating system.
687

Are you getting a video signal in Blackmagic Media Express?
Click the Start button and search for Media Express, then click Blackmagic Media Express to open the
program. Select the Log and CaptureLog and Capture tab to display the video input. Click Edit on the menu bar at the top
of the program and select PreferencesPreferences, then confirm that your Project Video Format matches the format
of your video source.
If you receive a video signal in Media Express, you should check Studio's video format settings. If you do
not receive a video signal in Media Express, confirm you are connected to the correct input and your
camera is configured properly (e.g. SDI or HDMI correctly selected).
688

Does Livestream Studio's video format match your input source?
Open Studio's Preferences by clicking the gearwheel icon at the top right-hand side of the program
window. In the ProjectProject FormatFormat tab at the left-hand side of the Preferences window, and choose the
video format that matches your input source's format. Please note that all your input sources should
match Studio's video format setting.
Are you connected to the correct input of your Blackmagic device?
Generally, Blackmagic Design doesn't specifically mark the input/outputs of the device on the actual
hardware. Please check your capture device's documentation to confirm the proper input.
689

Is your camera configured properly?
Many cameras with multiple output formats allow you to define your specific output method. Check
your camera's settings to confirm your are properly configured for HD-SDI, HDMI or analog, depending
on your input to the Blackmagic Design device.
Does your camera output to an external display?
Connect the camera's output to an external display such as a monitor to verify the video signal. If you do
not receive a signal, try a new wire of the same type or double-check your camera's settings.
If all of the above fail please contact Livestream Support by going to Livestream Studio settings and
navigating to the SupportSupport tab. You will find contact information and your Support PIN there.
690

Incorrect Order of Inputs Incorrect Order of Inputs
Some producers using some Livestream Studio hardware products onlyonly (HD51/HD510/HD550)
have noticed their inputs not appearing in the multiview in the proper order. Livestream Studio
includes an input calibrator for these specific units that can resolve this issue.
In Livestream Studio, click on the gearwheel to open settings, then click InputsInputs. A link to the Livestream
Inputs Calibrator will be at the bottom of the window.
Customers using the HD31HD31 will need to open the tool manually by opening the File Explorer
and navigating to Program Files (x86) -- > Livestream Studio Launcher --->
LSDeviceOrderCalibration. This tool is not compatible with other computers running
Livestream Studio software.
A window will pop up prompting that Livestream Studio will close. Click OKOK.
691

When Livestream Studio closes, a new window will pop up that will prompt you to unplug all of your
cameras from all of your Blackmagic Design devices. After you do this, click StartStart CalibratingCalibrating.
Select your preferred input type, either HDMI or SDI. You will only need one camera for this process, so
if you are alternating input types, choose whichever one you are using more of. The calibration will still
work. Then click NextNext.
If you haven't disconnected all of your cables yet, do so now. Then click DoneDone.
692

Connect a camera to In 1In 1 on your system. The calibrator will indicate when it has detected it and
completed calibrating it.
693

The calibrator will automatically prompt you to move to the next input. Unplug your camera from In 1 In 1
and plug it into In 2In 2. Repeat this for all five Blackmagic Design cards.
694

After you've gone through all inputs, the calibrator will inform you that calibration is complete. Click Save
and Livestream Studio will reopen with your inputs in the proper order.
695

Please note that calibration is project-based. If you create a new project, you may need to calibrate your
input sources again.
696

Livestream Studio Not Fitting Within Screen Livestream Studio Not Fitting Within Screen
When using Livestream Studio, it's ideal for your display resolution to be set to 1920x10801920x1080.
Otherwise, you may not be able to see the full software interface on your screen. If your display
does not support a resolution this high, there are workarounds detailed below.
If you are using Windows:
1. Launch Livestream Studio
2. Press ALT+Spacebar on your keyboard
3. Select MaximizeMaximize on the menu that pops up
Customers using Studio on Mac can fix this by going to System PreferencesSystem Preferences > DisplaysDisplays. Under
ResolutionResolution, select ScaledScaled.
Built-in Mac displays can be scaled based on appearance; select an option closer to More SpaceMore Space.
Secondary displays will allow you to choose a numerical resolution.
697

Alternatively, you could also click the green fullscreen button in the upper left corner of the Studio
window.
Livestream Studio should now fill out your display without any parts of the interface being cut off.
698

Can't Access Studio From Login Window Can't Access Studio From Login Window
Some customers who access Livestream Studio via a subscription (rather than a USB dongle or hardware
unit) have encountered a constant spinning wheel and cannot get past the first login window to access
the software interface.
If you experience this, there are a few steps to take that can resolve this:
• Check that Windows is fully up to dateCheck that Windows is fully up to date. Some customers have resolved this issue by simply running
Windows updates.
• Clear your Internet Explorer SSL stateClear your Internet Explorer SSL state. We have specifically seen clearing browser cache in Internet
Explorer help resolve this issue.
1. To access the Delete Browsing History dialog:
• If you are using Internet Explorer 8, on the ToolsTools menu, click Internet OptionsInternet Options.
• If you are using Internet Explorer 9 or 10, click the gearwheelgearwheel iconicon, and then click Internet Internet
OptionsOptions.
2. Click the ContentContent tab.
3. Click Clear SSL stateClear SSL state, and then click OKOK.
• Clearing your cache in Internet Explorer as instructed on this webpage has helped with this issue in
the past as well.
We have only encountered this behavior on Windows machines. If you experience this issue
while using Studio on macOS, please contact us to investigate.
699

My Studio PIN Is Invalid. What Do I Do? My Studio PIN Is Invalid. What Do I Do?
Your Studio PIN allows you to speak with our Customer Care team via phone seven days a week, 9:30
AM-8:30 PM EST. Studio PINs are valid for one (1) year from the date of purchase of the Studio software
or hardware unit.
If you believe that your Studio support PIN has expired less than a year after your hardware or dongle If you believe that your Studio support PIN has expired less than a year after your hardware or dongle
purchasepurchase, contact us with your product's serial number and attach a receipt or invoice from your
purchase for our team to investigate.
700
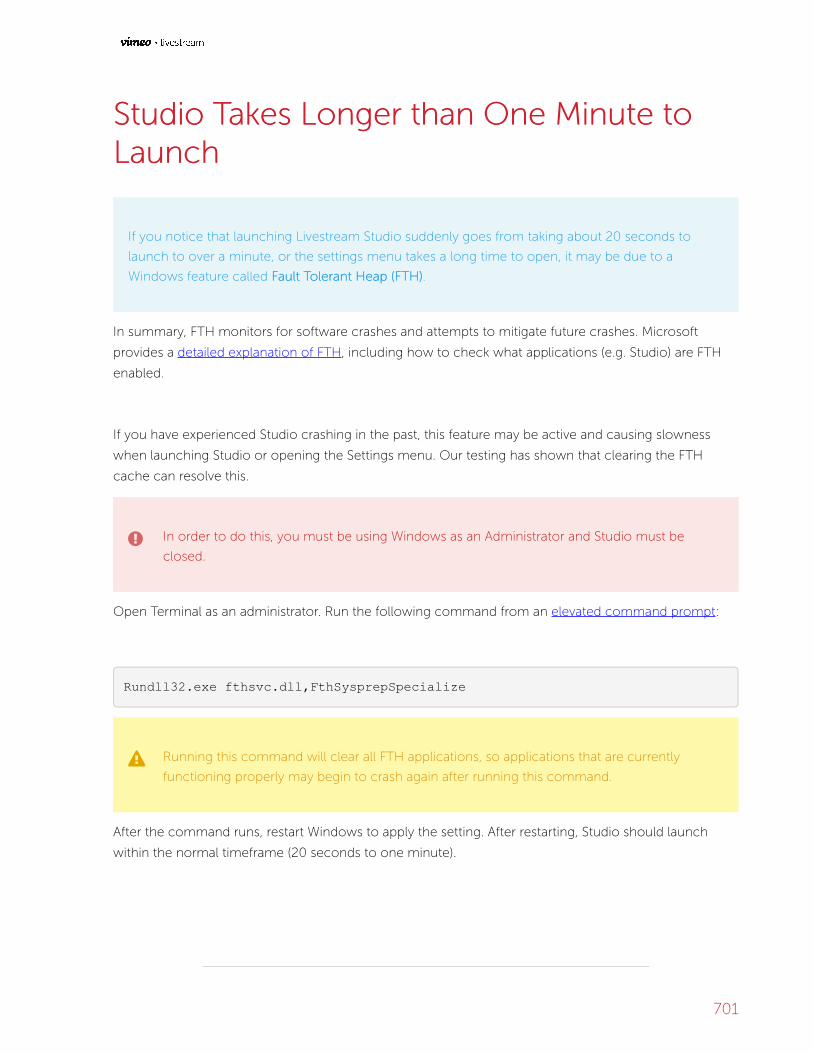
Studio Takes Longer than One Minute to Studio Takes Longer than One Minute to Launch Launch
If you notice that launching Livestream Studio suddenly goes from taking about 20 seconds to
launch to over a minute, or the settings menu takes a long time to open, it may be due to a
Windows feature called Fault Tolerant Heap (FTH)Fault Tolerant Heap (FTH).
In summary, FTH monitors for software crashes and attempts to mitigate future crashes. Microsoft
provides a detailed explanation of FTH, including how to check what applications (e.g. Studio) are FTH
enabled.
If you have experienced Studio crashing in the past, this feature may be active and causing slowness
when launching Studio or opening the Settings menu. Our testing has shown that clearing the FTH
cache can resolve this.
In order to do this, you must be using Windows as an Administrator and Studio must be
closed.
Open Terminal as an administrator. Run the following command from an elevated command prompt:
Rundll32.exe fthsvc.dll,FthSysprepSpecialize
Running this command will clear all FTH applications, so applications that are currently
functioning properly may begin to crash again after running this command.
After the command runs, restart Windows to apply the setting. After restarting, Studio should launch
within the normal timeframe (20 seconds to one minute).
701

Studio Recording Does Not Play Back Studio Recording Does Not Play Back
If you used Livestream Studio to record and the AVI file does not play back in other software, Studio
may be able to recover the file via the built-in transcoder in the Media bin.
To repair your AVI file, navigate to either Media tab in Livestream Studio and import your AVI file. If the file
transcodes and plays back in the Media bin, then Studio was able to recover it. After doing so, export the
file to your hard drive.
We have seen this method work in cases where Studio crashed during the recording and the AVI file left
over was corrupt and unplayable.
702

"Recorder Error" in Livestream Studio "Recorder Error" in Livestream Studio
If you attempt to start an H.264 ISO recording a see a "Recorder Error" message (shown below), it's
typically related to Studio's project format and how your system's hardware encodes video.
Studio has the ability to create an H.264 ISO recording if your PC or Mac includes hardware encoding.
However, if your system includes hardware encoding onlyonly via NVIDIA NVENC, then you will not be able
to record if you are using an interlaced format (e.g. formats that include "i" such as 1080ii59.94, 1080ii60,
etc.) as this is a limitation of NVIDIA's encoding capabilities. Only systems that include hardware
encoding via Intel Quick Sync would support these formats.
As a workaround, go to Settings: Project FormatSettings: Project Format and select a progressive project format (e.g. formats
that include "p" such as 1080pp30, 720pp30). Another alternative is to go to Settings: RecordingSettings: Recording and switch
the Default File Format to MJPEG, but this would create a larger, uncompressed file.
703

Remote Cameras and Direct Inputs out of Remote Cameras and Direct Inputs out of Sync Sync
It's common for hard-wired cameras and remote cameras to not be exactly synced up. This is due
to the nature of their individual workflows; wireless signals generally travel slower than directly
connected signals.
To resolve this, Studio has a simple setting to sync all your camera sources together.
Click the gearwheel in the upper right corner of Studio, then click the AdvancedAdvanced tab.
704

Navigate to the RemoteRemote InputsInputs Synchronization Synchronization setting and select Delay All Inputs by 1 Second and Delay All Inputs by 1 Second and
SynchronizeSynchronize. This will allow your wired inputs to compensate for the latency experienced by wireless
sources (in this case, Mevo) and sync them together.
If you are only using remote camera sources, then select Delay Remote Camera Inputs by 1 Second and Delay Remote Camera Inputs by 1 Second and
SynchronizeSynchronize.
705

Be sure to save your settings.
706

Unable to Log In to Google Sheets Unable to Log In to Google Sheets
If you are unable to log in to Google via the GFX module and need to use a Google Spreadsheet
with your graphics overlays, we have a workaround option detailed below.
In your Google Spreadsheet, navigate to File > Publish to the webFile > Publish to the web.
Copy the URL of your sheet. In Studio, add a Google Spreadsheet and select Enter a public Google Enter a public Google
spreadsheetspreadsheet. Paste your sheet's URL in the field below. Your data will then populate on the right side.
707

708

Send Studio Logs to Livestream Send Studio Logs to Livestream
If you continually experience issues streaming with Livestream Studio, the best way to troubleshoot
with our customer care team is to report a problem and send logs via Studio.
If you are accessing Studio on a hardware unit (HD31, HD51, HD550, etc.) or via a red USB dongle, then
navigate to Settings: SupportSettings: Support and select Report ProblemReport Problem.
If you are accessing Studio via your Livestream account login, go to Settings: My AccountSettings: My Account and select
Report ProblemReport Problem.
709

Fill in the required information and make sure Include logs and debug informationInclude logs and debug information is checked. Then click
SendSend. Our team will respond as soon as possible.
710

711

How to Use the Studio USB Recovery Drive How to Use the Studio USB Recovery Drive
Included with all Livestream Studio hardware units are USB recovery drives, which you can use
whenever there is a Windows system failure or any situation in which you would like to restore your
system to Windows default settings. The full process takes about 20 minutes.
Please read and fully understand all of the instructions beforebefore starting the process. If you have
any questions or concerns, please contact customer care.
Before beginning this process, make sure you have your Windows License number available to you. It is
included in the 'Studio Bits and Bops' box that is shipped with your Studio hardware unit.
1. Back up any files you wish to preserveBack up any files you wish to preserve. This process is destructive and will return the system to factory
settings and result in the loss of all user files.
712

2. Insert your USB Restore Drive into any of your Studio unit's USB ports.
3. Power the system on using the power button.
4. Once the Livestream logo appears for the first time, tap the “F8” key repeatedly to enter the Boot
Menu.
5. In the Boot Menu, select 'KingstonDataTraveler 3.0PMAP,' then hit the Enter key.
713

6. You will be presented with the main menu following a few seconds of load time. Your Studio unit's
Livestream restoration option will be selected. Hit the Enter key.
7. In the 'Choose language' screen, press the 'Enter' key to select the default option of EnglishEnglish.
8. At the 'Configuring console-data' screen, press the 'Enter' key to select the default option of Don’t Don’t
touch keymaptouch keymap.
714

9. Wait for the system to complete its image verification. This process will take about 10 minutes. ETA
and the progress bar will be visible on the screen to indicate the process.
10. Once completed, you will be presented with the following screen. Type 'yy,' then press the 'Enter' key.
NOTENOTE: If you have not backed up any files you wish to keep, press “CTRL+C” to exit and
secure your files. Progressing past step 10 will result in data lossProgressing past step 10 will result in data loss.
715

11. Confirm your selection by typing 'yy' key again and pressing the “Enter” key (NOTENOTE: Data loss will occur
immediatelyimmediately once the 'Enter' key is pressed).
12. Wait for the imaging process to complete. This should take roughly the same amount as time as the
process in Step 9.
716

13. The machine will reboot on its own. Your system should be restored to its factory configuration. You
can now remove the USB drive from the USB port.
717

Studio Software Crashes From Launch Studio Software Crashes From Launch
If you attempt to launch Livestream Studio and it crashes before the opening splash screen finishes
loading, you may be missing important Windows components.
Please check the following:
- Ensure that Windows is fully-updated.
- Check that Livestream Studio has been installed under the Administrator account on your computer.
- Make sure you have installed Visual C++ 2013 Redistributable Package x64 on your computer.
Windows 10 Users Windows 10 Users
If you experience this behavior, it may be due to having Windows 10 N or Windows 10 KN editions
installed. These versions do not come with the Windows Media Feature Pack, which is required in order
for Livestream Studio to run. You can download the pack from Microsoft's website here.
We have only encountered this behavior on Windows machines. If you experience this while
using Studio on macOS, please contact us to investigate.
718

Network Resource Unavailable When Network Resource Unavailable When Installing Studio Installing Studio
There is a known issue when attempting to install Livestream Studio on your Windows PC after
rolling back your Windows version. Below outlines what the issue looks like and how to resolve it.
We have specifically seen this behavior when customers have rolled back from Windows 10 version 1709
to Windows 10 version 1703, but it possible with other Windows rollbacks as well.
After rolling back Windows, if you attempt to install Livestream Studio on your PC again, you may see a
message indicating that a network resource is unavailable.
What happened is that Windows damaged some of Studio's data in the registry during the rollback.
719

To fix this, run the installer of the version of Studio you were running priorprior to the Windows rollback; if
you are seeing this error, it was likely not the most recent version. You can find downloads to all of our
previous installers in the Version History article.
Since technically this version of Studio already exists on your PC, the installation wizard will prompt you
with options to Remove or Repair it; select RemoveRemove. This will fix the registry damage and thus allow you
to install any version of Livestream Studio.
720

What is Livestream Studio's Warranty? What is Livestream Studio's Warranty?
Our full Livestream Studio warranty is available here.here. We recommend you review the terms in full.
Some major points include:
• Livestream Studio hardware products have a one (1) year warranty.
• If the Studio dongle is lost or stolen, it is the responsibility of the customer to report the loss to
Livestream; Livestream may charge a replacement fee.
• You have thirty (30) days to return an item from the date of purchase if you purchased directly from
the Livestream Store.
• Livestream products purchased through other retailers must be returned in accordance with their
respective returns and refunds policy.
721

Uninstall Blackmagic Design Desktop Video Uninstall Blackmagic Design Desktop Video Drivers Drivers
If you need to update your Blackmagic Design Desktop Video drivers, you must first uninstall the
version that is currently installed on your computer before installing the current recommended installing the current recommended
versionversion.
Uninstalling drivers on Windows computers differs slightly from doing so on Mac computers.
Instructions for both are outlined below.
Uninstall Blackmagic Design Drivers -Uninstall Blackmagic Design Drivers - Windows Windows
Go to your system's Control Panel, then enter the Uninstall a programUninstall a program menu.
722

Find Blackmagic Design Desktop Video in the menu. Right-click it, then click UninstallUninstall.
Follow the on-screen prompts, which will notify you that you must restart your computer for the
uninstall to take effect.
After you restart your computer, the uninstallation will be complete.
Uninstall Blackmagic Drivers - Mac Uninstall Blackmagic Drivers - Mac
Find the DesktopVideo_.dmgDesktopVideo_.dmg file in your Finder. These are typically saved in your Downloads folder.
Open the .dmg file and double-click Uninstall Desktop VideoUninstall Desktop Video.
723

You will need to confirm that you want to uninstall Blackmagic Design drivers. Click YesYes.
Uninstallation is now complete.
724

Uninstalling Livestream Studio Uninstalling Livestream Studio
To uninstall Livestream Studio, first make sure that Studio is not running, regardless of which operating
system you are using.
Uninstall Studio from Windows
Go to SettingsSettings (Start menu > gearwheel) and select the AppsApps menu.
If you are running an older version of Windows (i.e. Windows 7), go to Control Panel and
select UninstallUninstall aa ProgramProgram.
725

Find and select LivestreamLivestream StudioStudio, then select UninstallUninstall.
726

Follow the on-screen prompts to run the uninstaller. Once Studio is uninstalled, you can download the
desired version from this page.
Uninstall from MacOS
To uninstall Studio from a Mac system, simply find Livestream Studio in your Applications folder and click
and drag it to the Trash. Alternatively, right-click Livestream Studio in your Applications folder and select
Move to TrashMove to Trash.
727

Once Livestream Studio is in the Trash, right-click the Trash icon and click Empty TrashEmpty Trash.
Livestream Studio is now uninstalled.
728

Uninstalling Livestream Studio Beta Uninstalling Livestream Studio Beta
To uninstall a Beta version of Livestream Studio, first make sure that Studio Beta is not running, regardless
of which operating system you are using.
Uninstall Studio from Windows
Go to the Settings menu in Windows (Start > gearwheel), and select the Apps Apps menu.
If you are using an older version of Windows (i.e. Windows 7), go to Control Panel > Uninstall
a Program.
729

Find and select LivestreamLivestream Studio BetaStudio Beta, then select UninstallUninstall. Make sure you selected the Beta and not Make sure you selected the Beta and not
the main "Livestream Studio" program. the main "Livestream Studio" program.
730

Follow the on-screen prompts to run the uninstaller. Once Studio Beta is uninstalled, you can download
the desired version from this page.
Uninstall from MacOS
To uninstall Studio Beta from a Mac system, open the Finder and locate Livestream Studio Beta in your
Applications folder and click and drag it to the Trash. Alternatively, right-click Livestream Studio BetaLivestream Studio Beta in
your Applications folder and select Move to TrashMove to Trash. Make sure you selected the Beta and not the main Make sure you selected the Beta and not the main
"Livestream Studio" application. "Livestream Studio" application.
731

Once Livestream Studio Beta is in the Trash, right-click the Trash icon and click Empty TrashEmpty Trash.
Livestream Studio Beta is now uninstalled. You can download the desired version from this page.
732