Data Protection Guide for VMs, Datastores, and VMDKs using ...
91
NetApp Data Broker 1.0.1 Data Protection Guide for VMs, Datastores, and VMDKs using the SnapCenter Plug-in for VMware vSphere December 2019 | 215-14603_B0 [email protected]
-
Upload
khangminh22 -
Category
Documents
-
view
1 -
download
0
Transcript of Data Protection Guide for VMs, Datastores, and VMDKs using ...

NetApp Data Broker 1.0.1Data Protection Guidefor VMs, Datastores, and VMDKs using the SnapCenter Plug-in for VMware vSphere
December 2019 | 215-14603_B0 [email protected]
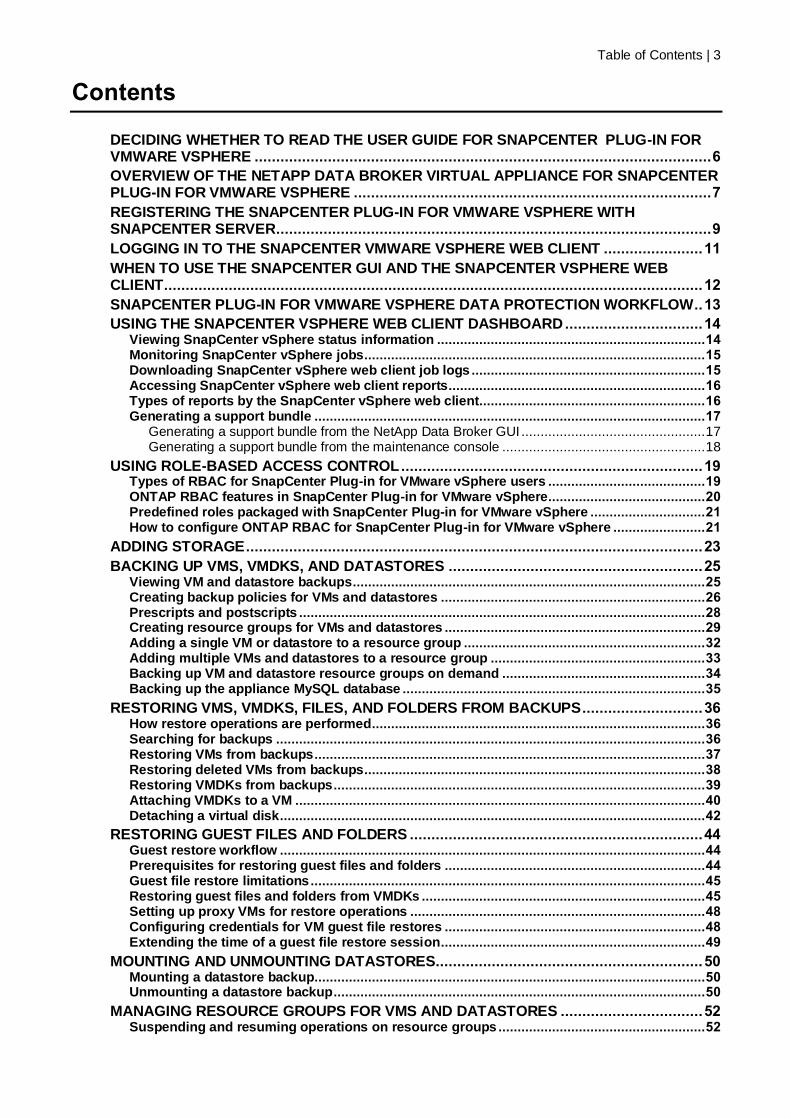
Table of Contents | 3
Contents
DECIDING WHETHER TO READ THE USER GUIDE FOR SNAPCENTER PLUG-IN FOR VMWARE VSPHERE .......................................................................................................... 6
OVERVIEW OF THE NETAPP DATA BROKER VIRTUAL APPLIANCE FOR SNAPCENTER PLUG-IN FOR VMWARE VSPHERE ................................................................................... 7
REGISTERING THE SNAPCENTER PLUG-IN FOR VMWARE VSPHERE WITH SNAPCENTER SERVER ..................................................................................................... 9
LOGGING IN TO THE SNAPCENTER VMWARE VSPHERE WEB CLIENT ....................... 11
WHEN TO USE THE SNAPCENTER GUI AND THE SNAPCENTER VSPHERE WEB CLIENT ............................................................................................................................. 12
SNAPCENTER PLUG-IN FOR VMWARE VSPHERE DATA PROTECTION WORKFLOW .. 13
USING THE SNAPCENTER VSPHERE WEB CLIENT DASHBOARD ................................ 14 Viewing SnapCenter vSphere status information ...................................................................... 14 Monitoring SnapCenter vSphere jobs ......................................................................................... 15 Downloading SnapCenter vSphere web client job logs ............................................................. 15 Accessing SnapCenter vSphere web client reports ................................................................... 16 Types of reports by the SnapCenter vSphere web client........................................................... 16 Generating a support bundle ...................................................................................................... 17
Generating a support bundle from the NetApp Data Broker GUI ................................................ 17 Generating a support bundle from the maintenance console ..................................................... 18
USING ROLE-BASED ACCESS CONTROL ...................................................................... 19 Types of RBAC for SnapCenter Plug-in for VMware vSphere users ......................................... 19 ONTAP RBAC features in SnapCenter Plug-in for VMware vSphere ......................................... 20 Predefined roles packaged with SnapCenter Plug-in for VMware vSphere .............................. 21 How to configure ONTAP RBAC for SnapCenter Plug-in for VMware vSphere ........................ 21
ADDING STORAGE .......................................................................................................... 23
BACKING UP VMS, VMDKS, AND DATASTORES ........................................................... 25 Viewing VM and datastore backups ............................................................................................ 25 Creating backup policies for VMs and datastores ..................................................................... 26 Prescripts and postscripts .......................................................................................................... 28 Creating resource groups for VMs and datastores .................................................................... 29 Adding a single VM or datastore to a resource group ............................................................... 32 Adding multiple VMs and datastores to a resource group ........................................................ 33 Backing up VM and datastore resource groups on demand ..................................................... 34 Backing up the appliance MySQL database ............................................................................... 35
RESTORING VMS, VMDKS, FILES, AND FOLDERS FROM BACKUPS ............................ 36 How restore operations are performed ....................................................................................... 36 Searching for backups ................................................................................................................ 36 Restoring VMs from backups ...................................................................................................... 37 Restoring deleted VMs from backups ......................................................................................... 38 Restoring VMDKs from backups ................................................................................................. 39 Attaching VMDKs to a VM ........................................................................................................... 40 Detaching a virtual disk ............................................................................................................... 42
RESTORING GUEST FILES AND FOLDERS .................................................................... 44 Guest restore workflow ............................................................................................................... 44 Prerequisites for restoring guest files and folders .................................................................... 44 Guest file restore limitations ....................................................................................................... 45 Restoring guest files and folders from VMDKs .......................................................................... 45 Setting up proxy VMs for restore operations ............................................................................. 48 Configuring credentials for VM guest file restores .................................................................... 48 Extending the time of a guest file restore session ..................................................................... 49
MOUNTING AND UNMOUNTING DATASTORES.............................................................. 50 Mounting a datastore backup...................................................................................................... 50 Unmounting a datastore backup ................................................................................................. 50
MANAGING RESOURCE GROUPS FOR VMS AND DATASTORES ................................. 52 Suspending and resuming operations on resource groups ...................................................... 52

Modifying resource groups ......................................................................................................... 52 Deleting resource groups ............................................................................................................ 53
MANAGING POLICIES FOR VMS AND DATASTORES .................................................... 54 Detaching policies ....................................................................................................................... 54 Modifying policies........................................................................................................................ 54 Deleting policies .......................................................................................................................... 55
MANAGING BACKUPS OF VMS AND DATASTORES ...................................................... 56 Renaming backups ...................................................................................................................... 56 Deleting backups ......................................................................................................................... 56
MANAGING STORAGE SYSTEMS ................................................................................... 57 Modifying storage VMs ................................................................................................................ 57 Removing storage VMs using the SnapCenter VMware vSphere web client ............................ 57
MANAGING THE NETAPP DATA BROKER VIRTUAL APPLIANCE ................................. 58 Modifying the time zone for backups .......................................................................................... 58 Modifying the NetApp Data Broker logon credentials................................................................ 58 Modifying the vCenter settings in the NetApp Data Broker ....................................................... 59 Modifying the network settings ................................................................................................... 59
USING REST APIS FOR VMWARE VSPHERE .................................................................. 61 Accessing REST APIs using the Swagger API web page .......................................................... 61 REST API workflows for adding and modifying storage VMs .................................................... 62 REST API workflows for creating and modifying resource groups ........................................... 62 REST API workflow for backing up on demand ......................................................................... 63 REST API workflow for restoring VMs ........................................................................................ 63 REST API workflow for restoring deleted VMs ........................................................................... 64 REST API workflow for restoring VMDKs ................................................................................... 65 REST API workflows for attaching and detaching VMDKs ........................................................ 65 REST API workflows for mounting and unmounting datastores ............................................... 66 REST APIs for downloading jobs and generating reports ......................................................... 67
USING ADVANCED SETTINGS ........................................................................................ 69 Properties you can override to customize your configuration .................................................. 69
TROUBLESHOOTING ...................................................................................................... 73 VMware vSphere web client GUI not working correctly ............................................................. 73 Restarting the vSphere web client service in Linux ................................................................... 73 Restarting the vSphere web client service in Windows ............................................................. 74 Bad gateway error........................................................................................................................ 74 Backup not deleted for on-demand deletion request ................................................................. 75 Cannot add storage ..................................................................................................................... 75 Cannot download job logs .......................................................................................................... 75 Cannot unmount a backup .......................................................................................................... 76 Compatibility check fails ............................................................................................................. 76 Dashboard content does not load ............................................................................................... 76 Dashboard does not display jobs ............................................................................................... 77 You may have reached the maximum number of NFS volumes configured in the vCenter ..... 78 New VM names are not listed after renaming ............................................................................. 78 Unable to discover datastores on a storage VM without a management LIF ............................ 78 Unable to discover datastores on SCV: Unable to get storage details… .................................. 79 Backup fails with SC-SCVHOST error ......................................................................................... 79 VMware vSphere does not remove snapshot delta disks during restore ................................. 79 VMware Snapshot copies are not deleted .................................................................................. 80 Backup fails for version-flexible mirror for VM on NFS datastore ............................................. 80 Backups are not detached after guest file restore session is discontinued ............................. 80 Backup operation fails if Snapshot copies on secondary storage reaches maximum ............ 80 Jobs remain in running state after virtual appliance reboot ...................................................... 81 Plug-in is still listed in vCenter after being removed ................................................................. 81 Too many Snapshot copies after attach or mount operations .................................................. 81 Guest file restore session is blank ............................................................................................. 81 Guest file restore attach disk operation fails ............................................................................. 82 Guest file restore email shows ?????? for file name in email .................................................. 82 Guest file restore session creation fails during validation ........................................................ 83 “Bad Gateway” error during migration ....................................................................................... 83 SnapCenter vSphere web client hangs on GUI after changing the OVA IP............................... 83

Table of Contents | 5
MIGRATING TO THE VIRTUAL APPLIANCE FOR SNAPCENTER PLUG-IN FOR VMWARE VSPHERE ......................................................................................................................... 84
Migrating from SnapCenter to the virtual appliance for SnapCenter Plug-in for VMware vSphere ........................................................................................................................................ 84
DISABLING THE SNAPCENTER PLUG-IN FOR VMWARE VSPHERE” ............................ 87
MINIMUM ONTAP PRIVILEGES REQUIRED ..................................................................... 88 Additional information for SnapCenter Plug-in for VMware vSphere ........................................ 89
COPYRIGHT INFORMATION ............................................................................................ 90
TRADEMARK INFORMATION .......................................................................................... 91
HOW TO SEND YOUR COMMENTS ABOUT DOCUMENTATION AND RECEIVE UPDATE NOTIFICATIONS............................................................................................................... 92

6 | SnapCenter Plug-in for VMware vSphere
Deciding whether to read the User Guide for SnapCenter Plug-in for VMware vSphere
This information describes how to use the Linux-based NetApp Data Broker virtual appliance (Open Virtual Appliance format) which enables the SnapCenter Plug-in for VMware vSphere. It describes how to use the SnapCenter vSphere web client in vCenter to perform crash-consistent and VM-consistent backup and restore operations for VMs, datastores, and VMDKs, and how to register the plug-in with SnapCenter Server to support application-consistent backup and restore operations.
Overview of the NetApp Data Broker virtual appliance for SnapCenter Plug-in for VMware vSphere | 7
Overview of the NetApp Data Broker virtual appliance for SnapCenter Plug-in for VMware vSphere
For SnapCenter 4.2 and later, the SnapCenter Plug-in for VMware vSphere is deployed in the NetApp Data Broker Linux-based virtual appliance.
When the SnapCenter Plug-in for VMware vSphere feature is enabled in NetApp Data Broker, the virtual appliance adds the following functionality to your environment:
• Support for VM-consistent and crash-consistent data protection operations for VMware
virtual machines (VMs) and datastores without a dependency on the SnapCenter Server.
• Support for SnapCenter application-consistent (application over VMDK/RDM) data
protection operations for virtualized databases and virtualized file systems on primary
and secondary storage.
The SnapCenter Plug-in for VMware vSphere features provided by the virtual appliance include the following:
• Support for VMs, VMDKs, and datastores
The plug-in provides a VMware vSphere web client in vCenter. You use the web client
GUI to perform VM-consistent backups of VMs, VMDKs, and datastores. You can also
restore VMs and VMDKs, and restore files and folders that reside on a guest OS.
Note: When backing up VMs, VMDKs, and datastores, the plug-in does not support RDMs.
Backup jobs for VMs ignore RDMs. If you need to back up RDMs, you must use a SnapCenter application-based plug-in.
The plug-in also provides a MySQL database on the virtual appliance VM that contains
SnapCenter Plug-in for VMware vSphere metadata.
• Support for virtualized databases
The plug-in supports backup, recovery, and cloning of virtualized applications and file
systems (for example, virtualized SQL, Oracle, and Exchange databases) when you
have the appropriate application based SnapCenter plug-ins installed and you are using
SnapCenter to perform data protection operations. Data protection operations are
managed using the SnapCenter GUI. SnapCenter natively leverages the SnapCenter
Plug-in for VMware vSphere for all data protection operations on VMDKs, raw device
mappings (RDMs), and NFS datastores. After the virtual appliance is deployed, the plug-
in handles all interactions with vCenter. The plug-in supports all SnapCenter application-
based plug-ins.
Note: SnapCenter does not support single Snapshot copies of databases and VMs together.
Backups for VMs and databases must be scheduled and run independently, which creates separate Snapshot copies, even if the databases and VMs are hosted in the same volume. Database application backups must be scheduled by using the SnapCenter GUI; VM and datastore backups must be scheduled by using the SnapCenter vSphere web client GUI.
• VMware Tools is required for VM consistent Snapshot copies
If VMware Tools is not installed and running, the file system is not quiesced and a crash-
consistent Snapshot is created.
• VMware Storage vMotion is required for restore operations in SAN (VMFS)
environments
The restore workflow for VMware file system (VMFS) utilizes the VMware Storage
vMotion feature. Storage vMotion is a part of the vSphere Standard License but is not
available with the vSphere Essentials or Essentials Plus licenses.
8 | SnapCenter Plug-in for VMware vSphere
Most restore operations in NFS environments use native ONTAP functionality (for
example, Single File SnapRestore) and do not require VMware Storage vMotion.
• The virtual appliance is deployed as a Linux VM
Although the virtual appliance must be installed as a Linux VM, the SnapCenter Plug-in
for VMware vSphere supports both Windows-based and Linux-based vCenters.
SnapCenter natively uses this plug-in without user intervention to communicate with your
vCenter to support SnapCenter application-based plug-ins that perform data protection
operations on Windows and Linux virtualized applications.
• Backup jobs for VMs and datastores must be migrated to the SnapCenter Plug-in for
VMware vSphere
o Backup jobs performed by SnapCenter Plug-in for VMware vSphere 4.0, 4.1, and
4.1.1 must be migrated to SnapCenter Plug-in for VMware vSphere 4.2. You migrate
these backups by using Windows PowerShell cmdlets in SnapCenter 4.2.
Migrating to the virtual appliance for SnapCenter Plug-in for VMware vSphere
o Backup jobs performed by VSC with SnapManager for Virtual Infrastructure (SMVI)
can be migrated to SnapCenter Plug-in for VMware vSphere 4.2. You migrate these
backups by using the NetApp Import Utility for SnapCenter and Virtual Storage
Console, which is in the NetApp Support Toolchest.
NetApp Import Utility for SnapCenter and Virtual Storage Console
In addition to these major features, the SnapCenter Plug-in for VMware vSphere also
provides support for iSCSI, Fibre Channel, FCoE, VMDK over NFS 3.0 and 4.1, and VMDK
over VMFS 5.0 and 6.0.
For the latest information about supported versions, see the NetApp Interoperability Matrix
Tool (IMT).
For information about NFS protocols and ESXi, see the VMware "vSphere Storage"
documentation.
For information about SnapCenter data protection, see the Data Protection Guide for your
SnapCenter plug-in in the SnapCenter Documentation Center.
For information about deploying the virtual appliance for SnapCenter Plug-in for VMware
vSphere, see the NetApp Data Broker Deployment Guide for SnapCenter Plug-in for
VMware vSphere.

Registering the SnapCenter Plug-in for VMware vSphere with SnapCenter Server | 9
Registering the SnapCenter Plug-in for VMware vSphere with SnapCenter Server
If you want to perform application-over-VMDK workflows in SnapCenter (application-based protection workflows for virtualized databases and file systems), you must register the SnapCenter Plug-in for VMware vSphere virtual appliance with the SnapCenter Server.
Note: If you are a SnapCenter user and you upgraded to SnapCenter 4.2 and migrated your application over VMDK backups to the SnapCenter Plug-in for VMware, the migration command automatically registers the plug-in.
Before you begin
• You must be running SnapCenter Server 4.2.
• You must have deployed the NetApp Data Broker virtual appliance and enabled the
SnapCenter Plug-in for VMware vSphere.
• For vCenters in Linked Mode, you must register the SnapCenter Plug-in for VMware
vSphere virtual appliance for each vCenter.
About this task
• You register the SnapCenter Plug-in for VMware vSphere with SnapCenter Server by
using the SnapCenter GUI to add a “vsphere” type host.
Port 8144 is predefined for communication within the NetApp Data Broker virtual appliance.
Attention: You can register multiple instances of the SnapCenter Plug-in for VMware
vSphere on the same SnapCenter Server 4.2 to support application-based data protection operations on VMs. You cannot register the same SnapCenter Plug-in for VMware vSphere on multiple SnapCenter Servers.
• For vCenters in Linked Mode, you must register the SnapCenter Plug-in for VMware
vSphere virtual appliance for each vCenter.
Steps
1. In the SnapCenter GUI left navigation pane, click Hosts.
2. Verify that the Managed Hosts tab is selected at the top.
3. Click Add to start the wizard.
4. On the Add Hosts dialog box, specify the host you want to add to the SnapCenter Server:
For this field… Do this…
Host Type Select “vSphere” as the type of host.
Host name Enter the IP address of the NetApp Data Broker virtual appliance.
Credential Enter the username and password for the NetApp Data Broker virtual appliance that was provided during the appliance deployment.
5. Click Submit.
When the VM host is successfully added, it is displayed on the Managed Hosts tab.
6. In the left navigation pane, click Settings, then click the Credential tab, and then
click Add to add credentials for the virtual appliance.

10 | SnapCenter Plug-in for VMware vSphere
7. Provide the credential information that was specified during the deployment of the NetApp Data Broker virtual appliance.
Note: You must select Linux for the Authentication field.
After you finish
If the NetApp Data Broker virtual appliance credentials are modified, you must also update the registration in SnapCenter Server using the SnapCenter Managed Hosts page.

Logging in to the SnapCenter VMware vSphere web client | 11
Logging in to the SnapCenter VMware vSphere web client
When the NetApp Data Broker virtual appliance is deployed, it installs a SnapCenter vSphere web client, which is displayed on the vCenter screen with other vSphere web clients.
Before you begin
Transport Layer Security (TLS) must be enabled in vCenter. Refer to the VMware documentation.
Steps
1. In your browser, navigate to VMware vSphere vCenter.
2. On the VMware screen, click vSphere Web Client (Flex) or vSphere Client (HTML5).
3. Log in to the VMware vCenter Single Sign-On page.
Attention: Click the Login button. Due to a known VMware issue, do not use the ENTER key to log in. For details, see the VMware documentation on ESXi Embedded Host Client issues.
4. On the VMware vSphere Web Client page, click (home) in the toolbar, and then select SnapCenter Plug-in for VMware vSphere.

12 | SnapCenter Plug-in for VMware vSphere
When to use the SnapCenter GUI and the SnapCenter vSphere web client
The SnapCenter Plug-in for VMware vSphere is different from other SnapCenter plug-ins. You use the VMware vSphere web client GUI for all backup and restore operations for VMs, VMDKs, and datastores. For all other SnapCenter plug-ins (application-based plug-ins), you use the SnapCenter GUI for backup and restore operations. You can also use the vSphere web client GUI Dashboard to monitor the list of protected and unprotected VMs.
Note: The plug-in supports the vSphere web client. It does not support vCenter thick clients.
To protect VMs and datastores, you use the SnapCenter vSphere web client interface. The web client GUI integrates with NetApp Snapshot copy technology on the storage system. This enables you to back up VMs and datastores in seconds and restore VMs without taking an ESXi host offline.
Use this GUI… To perform these operations... And to access these backups...
SnapCenter vSphere web client GUI
VM and datastore backup
VMDK attach and detach
Datastore mount and unmount
VM restore
VMDK restore
Guest file and folder restore
Backups of VMs and datastores that were performed by using the SnapCenter vSphere web client GUI.
SnapCenter GUI Backup and restore of databases and applications on VMs, including
protecting Microsoft SQL Server databases, Microsoft Exchange databases, SAP HANA databases, and Oracle databases.
Database clone
Backups performed by using
the SnapCenter GUI.
Note: For VM consistent backup and restore operations, you must use the vSphere web client. Although it is possible to perform some operations using VMware tools, for example, mounting or renaming a datastore, those operations will not be registered in the SnapCenter repository and, therefore, will not be recognized.
Note: SnapCenter does not support single Snapshot copies of databases and VMs together. Backups for VMs and databases must be scheduled and run independently, which creates separate Snapshot copies, even if the databases and VMs are hosted in the same volume. Application backups must be scheduled by using the SnapCenter GUI; VM and datastore backups must be scheduled by using the SnapCenter vSphere web client GUI.

SnapCenter Plug-in for VMware vSphere data protection workflow | 13
SnapCenter Plug-in for VMware vSphere data protection workflow
The data protection workflow lists the tasks that you perform for data protection.

14 | SnapCenter Plug-in for VMware vSphere
Using the SnapCenter vSphere web client Dashboard
The SnapCenter vSphere web client Dashboard gives you a first glance into the status of your data protection jobs and your VM protection status, and access to jobs and log information for troubleshooting. The Dashboard is updated once an hour.
Viewing SnapCenter vSphere status information
This page displays summary status information. The information is updated once an hour.
Steps
1. In the left Navigator pane of the vSphere web client, click Dashboard, select a vCenter Server, and then click the Status tab.
2. View specific information or click a link for more details.
This Dashboard tile… Displays the following information…
Recent job activities The three to five most recent backup, restore, and mount jobs.
• Click on a job ID to see more details about that job.
• Click See all to go to the Job Monitor tab for more details on all jobs.
Jobs A count of each job type (backup, restore, and mount) performed within
the selected time window.
• Hover the cursor over a section of the chart to see more details.
• Hover the cursor over an entry in the legend below the chart to see more details.
Latest Protection Summary Summaries of the data protection status of primary and secondary VMs
or datastores within the selected time window; the default is 7 days.
• Click the drop-down menu to select VMs or Datastores.
• For secondary storage, select SnapMirror or SnapVault.
• Hover the cursor over a section of a chart to see more details.
• Hover the cursor over an entry in the legend below the chart to see more details.
• You can change the time window by editing the configuration file.
• Internal counters are updated after each backup, primary or secondary.
Note: If you use a mirror-vault protection policy, then the counters for the protection summary are displayed in the SnapVault summary chart, not in the SnapMirror chart.
Configuration The total number of each type of object managed by the SnapCenter Plug-in for VMware vSphere.
• Click the SVMs link to go to the Storage page for more details.
• Click the Resource Groups link to go to the Resource Group page for more details.
• Click the Backup Policies link to go to the Policies page for more
details.
Also displays the total count of VMs and datastores available in the vCenter instance.
Storage The total number of Snapshot copies, SnapMirror, and SnapVault copies generated and the amount of storage used for primary and secondary Snapshot copies over a 90-day period. The graph shows consumption trends and calculates storage savings. Storage information is updated once every 24 hours at 12:00 A.M.
• Hover the cursor over a line on the chart to see more details.
• Hover the cursor over a section in the Storage Savings chart to see more details.
Storage Savings The ratio of logical capacity (Snapshot copy savings plus storage consumed) to the physical capacity of primary storage. The bar chart illustrates the storage savings.

Using the SnapCenter vSphere web client Dashboard | 15
The line graph separately plots primary and secondary storage consumption on a day-by-day basis over a rolling 90-day period.
• Hover over the charts to see detailed day-by-day results.
Monitoring SnapCenter vSphere jobs
After performing any data protection operation using the SnapCenter vSphere web client, you can monitor the job status from the Job Monitor tab in the Dashboard and view job details.
Steps
1. In the left Navigator pane of the vSphere web client, click Dashboard, select a vCenter Server, and then click the Job Monitor tab.
The Job Monitor tab lists each job and its status, start time, and end time. If the job names are long, you might need to scroll to the right to view the start and end times. The display is refreshed every 30 seconds.
• Click (refresh icon) to refresh the display on-demand.
• Click (filter icon) to select the time range, type, and status of jobs you want
displayed.
2. To view the details of a job, double-click the job.
Click (refresh icon) in the Job Details window to refresh the display while the job is running.
Downloading SnapCenter vSphere web client job logs
You can download the job logs from the Job Monitor tab on the Dashboard of the SnapCenter vSphere web client.
Note: Jobs and job messages are retained for 90 days. Job logs that are older than the configured retention are purged at 16:30:00 every Sunday. You cannot modify this schedule.
Steps
1. In the left Navigator pane of the vSphere web client, click Dashboard, select a vCenter Server, and then click the Job Monitor tab.
2. Click (download icon) in the Job Monitor title bar.
You might need to scroll to the right to see the icon.
You can also double-click a job to access the Job Details window and then click Download Job Logs.
Result
Job logs are located on the Linux VM host where the virtual appliance for the SnapCenter Plug-in for VMware vSphere is deployed. The default job log location is /var/log/netapp.

16 | SnapCenter Plug-in for VMware vSphere
Accessing SnapCenter vSphere web client reports
You can request reports for one or more jobs from the dashboard.
Note: The Reports tab contains information on the jobs that are selected on the Jobs page in the Dashboard. If no jobs are selected, the Reports tab is blank.
Steps
• In the left Navigator pane of the vSphere web client, click Dashboard, select a vCenter Server, and then click the Reports tab.
• For Backup Reports, you can do the following:
• Modify the report
Click (filter icon) to modify the time range, job status type, resource groups, and policies to be included in the report.
• Generate a detailed report
Double-click any job to generate a detailed report for that job.
• Optional: On the Reports tab, click Download and select the format (HTML or CSV).
You can also click (download icon) to download plug-in logs.
Types of reports by the SnapCenter vSphere web client
The SnapCenter vSphere web client provides customizable report options that provide you with details about your data protection jobs and plug-in resource status.
Note: Backup schedules are executed in the time zone in which the virtual appliance is deployed. vCenter reports data in the time zone in which the vCenter is located. Therefore, if the virtual appliance and the vCenter are in different time zones, data in the SnapCenter Plug-in for VMware vSphere Dashboard might not be the same as the data in the reports.
Note: Information on migrated backups is not displayed in the Dashboard until backups are performed after the migration.
Report type Description
Backup Report Displays overview data about backup jobs. Click a section/status on the
graphic to see a list of jobs with that status on the Reports tab.
For each job, the report lists the job ID, corresponding resource group,
backup policy, start time and duration, status, and job details which
includes the job name (Snapshot copy name) if the job completed, and
any warning or error messages.
Using the SnapCenter vSphere web client Dashboard | 17
You can download the Report table in HTML or CSV format. You can
also download the Job Monitor job logs for all the jobs (not just the jobs
in the report).
Deleted backups are not included in the report.
Mount Report Displays overview data about mount jobs. Click a section/status on the
graphic to see a list of jobs with that status on the Reports tab.
For each job, the report lists the job ID, job status, job name, and job
start and end times. The job name includes the Snapshot copy name. For
example: Mount Backup <snapshot-copy-name>.
You can download the Report table in HTML or CSV format. You can
also download the Job Monitor job logs for all the jobs (not just the jobs
in the report).
Restore Report Displays overview status information about restore jobs. Click a
section/
status on the graphic to see a list of jobs with that status on the Reports
tab.
For each job, the report lists the job ID, job status, job name, and job
start and end times. The job name includes the Snapshot copy name. For
example: Restore Backup <snapshot-copy-name>.
You can download the Report table in HTML or CSV format. You can
also download the Job Monitor job logs for all the jobs (not just the jobs
in the report).
Last Protection Status of
VMs or Datastores Report
Displays overview information about the protection status, during the
configured number of days, for VMs and datastores managed by the Plug-in for VMware vSphere. The default is 7 days; you can modify the value in the properties file. Click a section/status on the on the primary protection chart to see a list of VMs or datastores with that status on the Reports tab.
The VM or Datastores Protection Status Report for protected VMs and datastores displays the names of VMs or datastores that have been backed up during the configured number of days, the latest Snapshot copy name, and the start and end times for the latest backup run.
The VM or Datastores Protection Status Report for unprotected VMs or datastores displays the names of VMs or datastores that do not have any successful backups during the configured number of days.
You can download the Report table in HTML or CSV format. You can
also download the Job Monitor job logs for all the jobs (not just the jobs
in the report).
Note: This report is refreshed every hour when the plug-in cache is refreshed. Therefore, the report might not display VMs or datastores that were recently backed up.
Generating a support bundle
There are two ways you can generate all the information needed by the NetApp Support Team for diagnosing any issue: from the NetApp Data Broker GUI or from the maintenance console menu.
Generating a support bundle from the NetApp Data Broker GUI
Before you begin
To logon to the NetApp Data Broker GUI, you must know the IP address and the log in credentials.
• The IP address was displayed when the NetApp Data Broker was deployed.

18 | SnapCenter Plug-in for VMware vSphere
• Use the log in credentials provided during the deployment of the virtual appliance or as later modified.
Steps
1. Log in to the NetApp Data Broker.
Use the format https://<OVA-IP-address>:8080 to access the NetApp Data
Broker.
2. Click the Settings icon in the top toolbar.
3. On the Settings page, in the Support section, click Generate Support Bundle.
4. After the support bundle is generated, click the link that is provided to download the bundle to NetApp.
Generating a support bundle from the maintenance console
Steps
1. Open a maintenance console window.
2. From the Main Menu, select menu option 4) Support and Diagnostics.
3. From the Support and Diagnostics Menu, select menu option 1) Generate support bundle.

Using Role-based access control | 19
Using Role-based access control
SnapCenter Plug-in for VMware vSphere provides an additional level of RBAC for managing virtualized resources. The plug-in supports both vCenter Server RBAC and Data ONTAP RBAC.
Note: SnapCenter and ONTAP RBAC applies only to SnapCenter Server application-consistent (application over VMDK) jobs. If you use the plug-in to support SnapCenter application-consistent jobs, you must assign the SnapCenterAdmin role; you cannot change the permissions of the
SnapCenterAdmin role.
The plug-in ships with predefined vCenter roles. You must use the vCenter GUI to add these roles to vCenter Active Directory users to perform SnapCenter operations.
You can create and modify roles and add resource access to users at any time. However, when you are setting up the plug-in for the first time, you should at least add Active Directory users or groups to roles, and then add resource access to those users or groups.
Types of RBAC for SnapCenter Plug-in for VMware vSphere users
If you are using the SnapCenter Plug-in for VMware vSphere, the vCenter Server provides an additional level of RBAC. The plug-in supports both vCenter Server RBAC and ONTAP RBAC.
• vCenter Server RBAC
This security mechanism applies to all jobs performed by the SnapCenter Plug-in for VMware vSphere, which includes VM-consistent, VM crash-consistent, and SnapCenter Server application-consistent (application over VMDK) jobs. This level of RBAC restricts the ability of vSphere users to perform SnapCenter Plug-in for VMware vSphere tasks on vSphere objects, such as virtual machines (VMs) and datastores.
The plug-in deployment creates the following roles for SnapCenter operations on vCenter:
SCV Administrator
SCV Backup
SCV Guest File Restore
SCV Restore
SCV View
The vSphere administrator sets up vCenter Server RBAC by doing the following:
o Setting the vCenter Server permissions on the root object (also known as the root
folder). You can then refine the security by restricting child entities that do not need
those permissions.
o Assigning the SCV roles to Active Directory users.
Note: At a minimum, all users must be able to view vCenter objects. Without this privilege, users cannot access the SnapCenter vSphere web client GUI.
• ONTAP RBAC
This security mechanism applies only to SnapCenter Server application-consistent (application over VMDK) jobs. This level restricts the ability of SnapCenter to perform specific storage operations, such as backing up storage for datastores, on a specific storage system.
Use the following workflow to set up ONTAP and SnapCenter RBAC:

20 | SnapCenter Plug-in for VMware vSphere
1. The storage administrator creates a role on the storage VM with the necessary privileges.
2. Then the storage administrator assigns the role to a storage user.
3. The SnapCenter administrator adds the storage VM to the SnapCenter Server, using that storage username.
4. Then the SnapCenter administrator assigns roles to SnapCenter users.
The following diagram provides an overview of the validation workflow for RBAC privileges (both vCenter and ONTAP):
ONTAP RBAC features in SnapCenter Plug-in for VMware vSphere
Note: ONTAP RBAC applies only to SnapCenter Server application-consistent (application over VMDK) jobs.
ONTAP role-based access control (RBAC) enables you to control access to specific storage systems and the actions a user can perform on those storage systems. The SnapCenter Plug-in for VMware vSphere works with vCenter Server RBAC, SnapCenter RBAC (when needed to support application-based operations), and ONTAP RBAC to determine which SnapCenter tasks a specific user can perform on objects on a specific storage system.
SnapCenter uses the credentials that you set up (username and password) to authenticate each storage system and determine which operations can be performed on that storage system. The plug-in uses one set of credentials for each storage system. These credentials determine all tasks that can be performed on that storage system; in other words, the credentials are for SnapCenter, not an individual SnapCenter user.
ONTAP RBAC applies only to accessing storage systems and performing SnapCenter tasks related to storage, such as backing up VMs. If you do not have the appropriate ONTAP RBAC privileges for a specific storage system, you cannot perform any tasks on a vSphere object hosted on that storage system.
Each storage system has one set of ONTAP privileges associated with it.
Using both ONTAP RBAC and vCenter Server RBAC provides the following benefits:

Using Role-based access control | 21
• Security
The administrator can control which users can perform which tasks on both a fine-grained vCenter Server object level and a storage system level.
• Audit information
In many cases, SnapCenter provides an audit trail on the storage system that lets you track events back to the vCenter user who performed the storage modifications.
• Usability
You can maintain controller credentials in one place.
Predefined roles packaged with SnapCenter Plug-in for VMware vSphere
To simplify working with vCenter Server RBAC, SnapCenter Plug-in for VMware vSphere provides a set of predefined roles that enable users to perform SnapCenter tasks. There is also a read-only role that allows users to view SnapCenter information, but not perform any tasks.
The predefined roles have both the required SnapCenter-specific privileges and the native vCenter Server privileges to ensure that tasks complete correctly. In addition, the roles are set up to have the necessary privileges across all supported versions of vCenter Server.
As an administrator, you can assign these roles to the appropriate users.
Note: The plug-in returns these roles to their default values (initial set of privileges) each time you
restart the vCenter web client service or modify your installation. If you upgrade the NetApp Data Broker virtual appliance, the predefined roles are automatically upgraded to work with that version of the plug-in.
You can see the predefined roles in the vCenter GUI by clicking > Administration > Roles.
Role Description
SCV Administrator Provides all native vCenter Server and SnapCenter-specific privileges necessary to perform all SnapCenter Plug-in for VMware vSphere tasks.
SCV View Provides read-only access to all the SnapCenter Plug-in for VMware vSphere backups, resource groups, and policies.
SCV Backup Provides all native vCenter Server and SnapCenter-specific privileges necessary
to back up vSphere objects (virtual machines and datastores).
The user also has access to the configure privilege.
The user cannot restore from backups.
SCV Restore Provides all native vCenter Server and SnapCenter-specific privileges necessary to restore vSphere objects that have been backed up using the SnapCenter Plug-in for VMware vSphere and to restore guest files and folders.
The user also has access to the configure privilege.
The user cannot back up vSphere objects.
SCV Guest File Restore Provides all native vCenter Server and SnapCenter-specific privileges necessary to restore guest files and folders. The user cannot restore VMs or VMDKs.
How to configure ONTAP RBAC for SnapCenter Plug-in for VMware vSphere
Note: ONTAP RBAC applies only to SnapCenter Server application-consistent (application over VMDK) jobs.
You must configure ONTAP RBAC on the storage system if you want to use it with the SnapCenter Plug-in for VMware vSphere. From within ONTAP, you must perform the following tasks:
• Create a single role.
ONTAP 9 Administrator Authentication and RBAC Power Guide

22 | SnapCenter Plug-in for VMware vSphere
• Create a username and password (storage system credentials) in ONTAP for the role.
This storage system credential is needed to allow you to configure the storage systems for the SnapCenter Plug-in for VMware vSphere. You do this by entering the credentials in the plug-in. Each time you log in to a storage system using these credentials, you are presented with the set of SnapCenter functions that you set up in ONTAP when you created the credentials.
You can use the administrator or root login to access all the SnapCenter tasks; however, it is a good practice to use the RBAC feature provided by ONTAP to create one or more custom accounts with limited access privileges.
Minimum ONTAP privileges required

Adding storage | 23
Adding storage
Before you can backup or restore VMs, you must add storage clusters or storage VMs by using the SnapCenter vSphere web client. Adding storage enables the SnapCenter Plug-in for VMware vSphere to recognize and manage backup and restore operations in vCenter.
About this task
The SnapCenter Plug-in for VMware vSphere performs backup and restore operations on directly connected storage VMs and on storage VMs in a storage cluster.
Note: If you are using the SnapCenter Plug-in for VMware vSphere to support application-based backups on VMDKs, then you must use the SnapCenter GUI to enter storage credentials and register storage systems.
• For vCenters in linked mode, you must separately add storage systems to each vCenter.
• Names for storage VMs must resolve to management LIFs.
If you added etc host entries for storage VM names in SnapCenter, you must verify that
they are also resolvable from the virtual appliance.
• Storage credentials are not shared between multiple SnapCenter Plug-ins for VMware
vSphere or between Windows SnapCenter Server and the SnapCenter plug-in on
vCenter.
Steps
1. In the left Navigator pane of the vSphere web client, click Storage Systems.
2. On the Storage Systems page, click Add.
3. In the Add Storage System dialog box, enter the basic storage VM or cluster information:
For this field… Do this…
vCenter Server Select the vCenter Server
Storage system Enter the FQDN or IP address of a storage cluster or storage VM.
The SnapCenter plug-in does not support multiple storage systems with the same name on different clusters. Each storage system that is supported by SnapCenter must have a unique data LIF IP address.
Platform Select the platform.
Username Enter the ONTAP username that is used to log on to the storage VM.
Password Enter the storage VM logon password.
Protocol Select HTTP or HTTPS.
Port Select port 443 (the default) or port 80 to communicate with vCenter.
Timeout Enter the number of seconds vCenter waits before timing out the operation. The default is 60 seconds.
Preferred IP If the storage VM has more than one IP address, check this box and enter the IP address that you want SnapCenter to use.
Log SnapCenter Server events
to syslog
Check the box to log events to the log for plug-in.
This option logs only the events for the SnapCenter Plug-in for VMware vSphere.
Send AutoSupport Notification for
failed operations to storage system
Check the box if you want Autosupport notification for failed data protection jobs.
You must also enable Autosupport on the storage VM and configure the Autosupport email settings.

24 | SnapCenter Plug-in for VMware vSphere
4. Click Add.
If you added a storage cluster, all storage VMs in that cluster are automatically added. Automatically added storage VMs (sometimes called “implicit” storage VMs) are displayed on the cluster summary page with a hyphen (-) instead of a username. Usernames are displayed only for explicit storage entities.

Backing up VMs, VMDKs, and datastores | 25
Backing up VMs, VMDKs, and datastores
The SnapCenter vSphere web client performs data protection operations for VMs, VMDKs, and datastores. All backup operations are performed on resource groups, which can contain any combination of one or more VMs and datastores. You can back up on demand or according to a defined protection schedule.
When you back up a datastore, you are backing up all the VMs in that datastore.
Backup and restore operations cannot be performed simultaneously on the same resource group.
You should review the deployment planning section for information on what the SnapCenter Plug-in for VMware vSphere does and does not support.
The following workflow shows the sequence in which you must perform the backup operations:
Viewing VM and datastore backups
When you are preparing to back up or restore a VM or datastore, you might want to see all the backups that are available for that resource and view details of those backups.
About this task
Note: Browsing large file folders, for example 10k file folders, might take one or more minutes the first time. Subsequent browsing sessions take less time.
Steps
1. In the VMware vSphere web client page, click (home) in the toolbar, and then select VMs and Templates from the drop-down list.
2. Navigate to the VM for which you want to view backups, then select the More Objects tab, and then select the Backups tab.

26 | SnapCenter Plug-in for VMware vSphere
3. Double-click the backup that you want to view.
Creating backup policies for VMs and datastores
You must create backup policies before you use the SnapCenter Plug-in for VMware vSphere to back up VMs and datastores.
Before you begin
• You must have read the prerequisites.
• You must have secondary storage relationships configured.
If you are replicating Snapshot copies to a mirror or vault secondary storage, the relationships must be configured and the SnapCenter administrator must have assigned the storage VMs to you for both the source and destination volumes.
For information about how administrators assign resources to users, see the SnapCenter Administration Guide.
• If you want VM consistent backups, you must have VMware Tools installed and running.
VMware Tools is needed to quiesce VMs.
About this task
Most of the fields on these wizard pages are self-explanatory. The following information describes some of the fields for which you might require guidance.
Steps
1. In the left Navigator pane of the SnapCenter vSphere web client, click Policies.
2. In the Policies page, click New Policy in the toolbar.
3. In the New Backup Policy page, enter the policy name, a description, and select the vCenter Server that will use the policy.
• Linked mode

Backing up VMs, VMDKs, and datastores | 27
In linked mode, each vCenter has a separate virtual appliance. Therefore, you can use duplicate names across vCenters. However, you must create the policy in the same vCenter as the resource group.
• Supported characters
Do not use the following special characters in VM, datastore, cluster, policy, backup, or resource group names: % & * $ # @ ! \ / : * ? " < > - | ; ' , .
An underscore character (_) is allowed.
4. Specify the retention settings.
Important: You should set the retention count to 2 backups or higher if you plan to enable SnapVault replication. If you set the replication count to 1 backup to keep, the retention operation can fail. This is because the first Snapshot copy is the reference Snapshot copy for the SnapVault relationship until the newer Snapshot copy is replicated to the target.
Note: The maximum retention value is 1018 backups for resources on ONTAP 9.4 or later, and 254 backups for resources on ONTAP 9.3 or earlier. Backups will fail if retention is set to a value higher than what the underlying ONTAP version supports. This is also true for spanning datastores. If a spanning datastore includes resources on both ONTAP 9.3 and earlier and on ONTAP 9.4 and later, make sure you set the retention value below 254.
5. Specify the frequency settings.
The policy specifies the backup frequency only. The specific protection schedule for backing up is defined in the resource group. Therefore, two or more resource groups can share the same policy and backup frequency but have different backup schedules.
6. In the Replication fields, specify replication to secondary storage:
For this field… Do this…
Update SnapMirror after backup
Select this option to create mirror copies of backup sets on another volume that has a SnapMirror relationship to the primary backup volume.
If a volume is configured with a mirror-vault relationship, you must select only the Update SnapVault after backup option if you want backups copied to the mirror-vault destinations.
Update SnapVault after backup
Select this option to perform disk-to-disk backup replication on another volume that has a SnapVault relationship to the primary backup volume.
If a volume is configured with a mirror-vault relationship, you must select only this option if you want backups copied to the mirror-vault destinations.
Snapshot label Enter an optional, custom label to be added to SnapVault Snapshot copies created with this policy.
The Snapshot label helps to distinguish Snapshots created with this policy from other Snapshots on the secondary storage system.
Note: A maximum of 31 characters is allowed for SnapVault labels. Custom Snapshot copy labels are supported only for SnapVault labels; not for SnapMirror or backup copies.
7. Optional: In the Advanced fields, select the fields that are needed.
For this field… Do this…
VM consistency Check this box to quiesce the VMs and create a VMware snapshot
each time the backup job runs.
Attention: You must have VMware Tools running on the VM to perform VM consistent backups. If VMware Tools is not running, a crash-consistent backup is performed instead.
Note: When you check the VM consistency box, backup
operations might take longer and require more storage space. In this scenario, the VMs are first quiesced, then VMware performs a
28 | SnapCenter Plug-in for VMware vSphere
VM consistent snapshot, then SnapCenter performs its backup operation, and then VM operations are resumed.
Include datastores with
independent disks
Check this box to include in the backup any datastores with
independent disks that contain temporary data.
Scripts Enter the fully qualified path of the prescript or postscript that you
want the Plug-in for VMware vSphere to run before or after backup
operations. For example, you can run a script to update SNMP traps, automate alerts, and send logs.
Note: Prescripts and postscripts must be located on the virtual appliance VM.
To enter multiple scripts, press Enter after each script path to list
each script on a separate line. The character ";" is not allowed.
Note: The script path is validated at the time the script is executed.
8. Click Add.
You can verify that the policy is created and review the policy configuration by selecting the policy in the Policies page.
Prescripts and postscripts
You can use custom prescripts and postscripts as part of your data protection operations. These scripts enable automation either before your data protection job or after. For example, you might include a script that automatically notifies you of data protection job failures or warnings. Before you set up your prescripts and postscripts, you should understand some of the requirements for creating these scripts.
Supported script types
Only Perl scripts are supported.
Script path location
Prescripts and postscripts are run by the SnapCenter Plug-in for VMware vSphere. Therefore, the scripts must be located on the NetApp Data Broker virtual appliance VM.
Note: The script path is validated at the time the script is executed.
Where to specify scripts
Scripts are specified in backup policies. When a backup job is started, the policy automatically associates the script with the resources being backed up.
When you create a backup policy, the wizards in some plug-ins provide separate fields to specify prescripts and postscripts. Other wizards only provide a single field for both.
To specify multiple scripts, press Enter after each script path to list each script on a separate line. Semicolons (;) are not allowed. You can specify multiple prescripts and multiple postscripts. A single script can be coded as both a prescript and a postscript and can call other scripts.
When scripts are executed
Scripts are executed according to the value set for BACKUP_PHASE.
• BACKUP_PHASE=PRE_BACKUP
Prescripts are executed in the PRE_BACKUP phase of the operation.
Note: If a prescript fails, the backup also fails.
• BACKUP_PHASE=POST_BACKUP or BACKUP_PHASE=FAILED_BACKUP

Backing up VMs, VMDKs, and datastores | 29
Postscripts are executed in the POST_BACKUP phase of the operation after the backup
completes successfully or in the FAILED_BACKUP phase if the backup does not complete successfully.
Note: If a postscript fails, the backup completes successfully, and a warning message is sent.
Environment variables passed to scripts
You can use the following environment variables in scripts.
Environment variable Description
BACKUP_NAME Name of the backup.
Variable passed in postscripts only.
BACKUP_DATE Date of the backup, in the format yyyymmdd
Variable passed in postscripts only.
BACKUP_TIME Time of the backup, in the format hhmmss
Variable passed in postscripts only.
BACKUP_PHASE The phase of the backup in which you want the script to run.
Valid values are: PRE_BACKUP, POST_BACKUP, and FAILED_BACKUP.
Variable passed in prescripts and postscripts.
STORAGE_SNAPSHOTS The number of storage snapshots in the backup.
Variable passed in postscripts only.
STORAGE_SNAPSHOT.# One of the defined storage snapshots, in the following format:
<filer>:/vol/<volume>:<ONTAP-snapshot-name>
Variable passed in postscripts only.
VIRTUAL_MACHINES The number of VMs in the backup.
Variable passed in prescripts and postscripts.
VIRTUAL_MACHINE.# One of the defined virtual machines, in the following format:
<VM name>|<VM UUID>|<power-state>|<VM snapshot>|<ip-
addresses>
<power-state> has the values POWERED_ON, POWERED_OFF, or
SUSPENDED
<VM snapshot> has the values true or false
Variable passed in prescripts and postscripts.
Script timeouts
The timeout for backup scripts is 15 minutes and cannot be modified.
Creating resource groups for VMs and datastores
A resource group is the container to which you add one or more VMs or datastores that you want to protect. For example, you can back up a single VM, or you can back up all the VMs in a datastore. Resource groups can contain any combination of VMs and datastores.
About this task
You can add or remove VMs and datastores from a resource group at any time.
• Backing up a single resource
To back up a single resource (for example, a single VM), you must create a resource
group that contains that single resource.
• Backing up multiple resources
To back up multiple resources, you must create a resource group that contains multiple
resources.
• Optimizing Snapshot copies
30 | SnapCenter Plug-in for VMware vSphere
To optimize Snapshot copies, you should group into one resource group the VMs and
datastores that are associated with the same volume.
• Backup policies
Although it is possible to create a resource group without a backup policy, you can only
perform scheduled data protection operations when at least one policy is attached to the
resource group. You can use an existing policy, or you can create a new policy while
creating a resource group.
Note: A resource group can contain VMs, and SAN and NAS datastores; it cannot contain VSAN or VVOL datastores.
Attention: Do not add VMs that are in an inaccessible state. Although you can create a resource group that contains inaccessible VMs, backups for that resource group will fail.
Steps
1. In the left Navigator pane of the SnapCenter vSphere web client, click Resource Groups
and then click (Create Resource Group).
This is the easiest way to create a resource group. However, you can also create a resource group with one resource by performing one of the following:
o To create a resource group for one VM, click (home) > VMs and Templates then
right-click a VM, select All NetApp SnapCenter Actions from the drop-down list, and
then select Create Resource Group from the secondary drop-down list.
o To create a resource group for one datastore, click (home) > Storage then right-
click a datastore, select All NetApp SnapCenter Actions from the drop-down list,
and then select Create Resource Group from the secondary drop-down list.
The Create Resource Group wizard begins.
2. In the General Info & Notification page in the wizard, do the following:
For this field… Do this…
vCenter Server
Name Enter a name for the resource group.
Do not use the following special characters in VM, datastore, policy,
backup, or resource group names:
% & * $ # @ ! \ / : * ? " < > - | ; ' , . An underscore character (_) is allowed. VM or datastore names with special characters are truncated, which makes it difficult to search for a specific backup.
In linked mode, each vCenter has a separate SnapCenter Plug-in for VMware vSphere repository. Therefore, you can use duplicate names across vCenters.
Description Enter a description of the resource group.
Notification From the drop-down list, select when you want to receive notifications about operations on this resource group:
Error or warnings: Send notification for errors and warnings only
Errors: Send notification for errors only
Always: Send notification for all message types
Never: Do not send notification
Email send from Enter the email address you want the notification sent from.
Email send to Enter the email address of the person you want to receive the notification. For multiple recipients, use a comma to separate the email addresses.
Email subject Enter the subject you want for the notification emails.
Backing up VMs, VMDKs, and datastores | 31
For this field… Do this…
Custom Snapshot format If you want to use custom Snapshot copy names, select this checkbox and then enter a name format.
• By default, this feature is disabled.
• The default Snapshot copy names use the format
<ResourceGroup>_<HostName>_<TimeStamp>
However, you can specify a custom format using the variables $ResourceGroup, $Policy, $HostName, $ScheduleType, and $CustomText. Use the drop-down list in the custom name format box to select which variables you want to use, and the order in which they are used. If you select $CustomText, enter the custom text in the additional box that is provided. A timestamp is automatically added to the end of the custom name format you specify.
• Special characters
For special characters in names, follow the same guidelines given for the Name field.
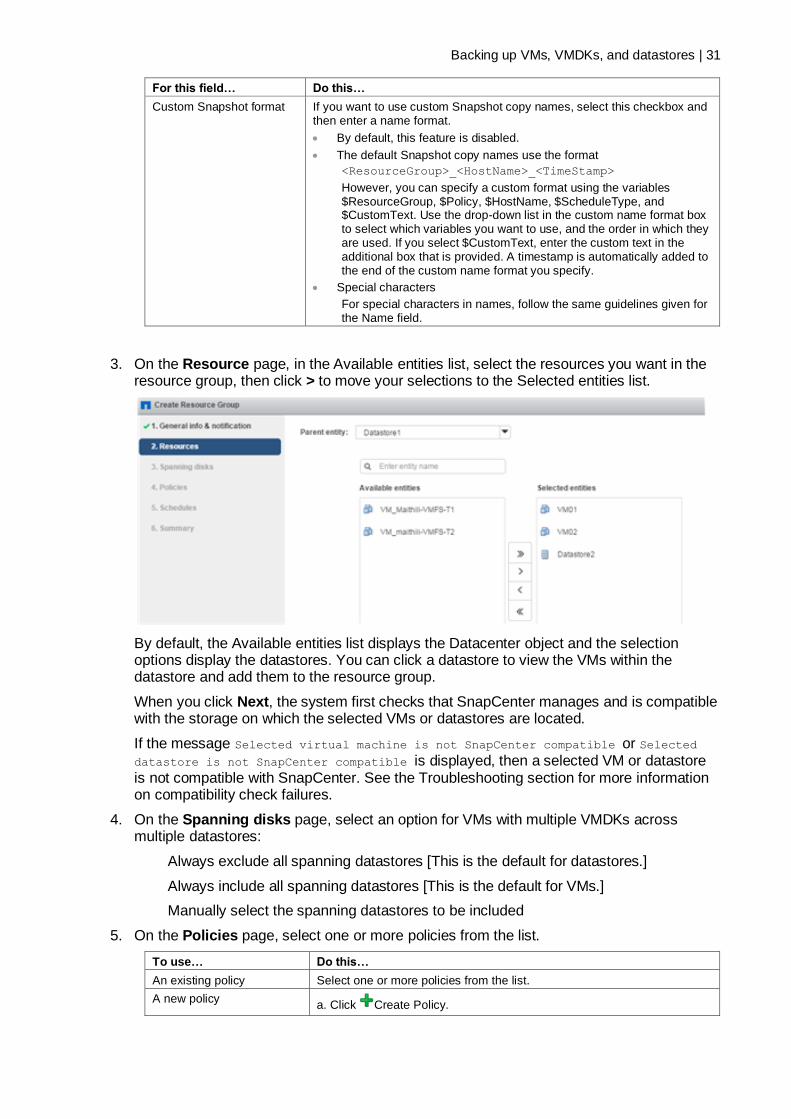
3. On the Resource page, in the Available entities list, select the resources you want in the resource group, then click > to move your selections to the Selected entities list.
By default, the Available entities list displays the Datacenter object and the selection options display the datastores. You can click a datastore to view the VMs within the datastore and add them to the resource group.
When you click Next, the system first checks that SnapCenter manages and is compatible with the storage on which the selected VMs or datastores are located.
If the message Selected virtual machine is not SnapCenter compatible or Selected datastore is not SnapCenter compatible is displayed, then a selected VM or datastore is not compatible with SnapCenter. See the Troubleshooting section for more information on compatibility check failures.
4. On the Spanning disks page, select an option for VMs with multiple VMDKs across multiple datastores:
Always exclude all spanning datastores [This is the default for datastores.]
Always include all spanning datastores [This is the default for VMs.]
Manually select the spanning datastores to be included
5. On the Policies page, select one or more policies from the list.
To use… Do this…
An existing policy Select one or more policies from the list.
A new policy a. Click Create Policy.
32 | SnapCenter Plug-in for VMware vSphere
b. Complete the New Backup Policy wizard to return to the Create Resource Group wizard.
Note: In Linked Mode, the list includes policies in all the linked vCenters. You must select a policy that is on the same vCenter as the resource group.
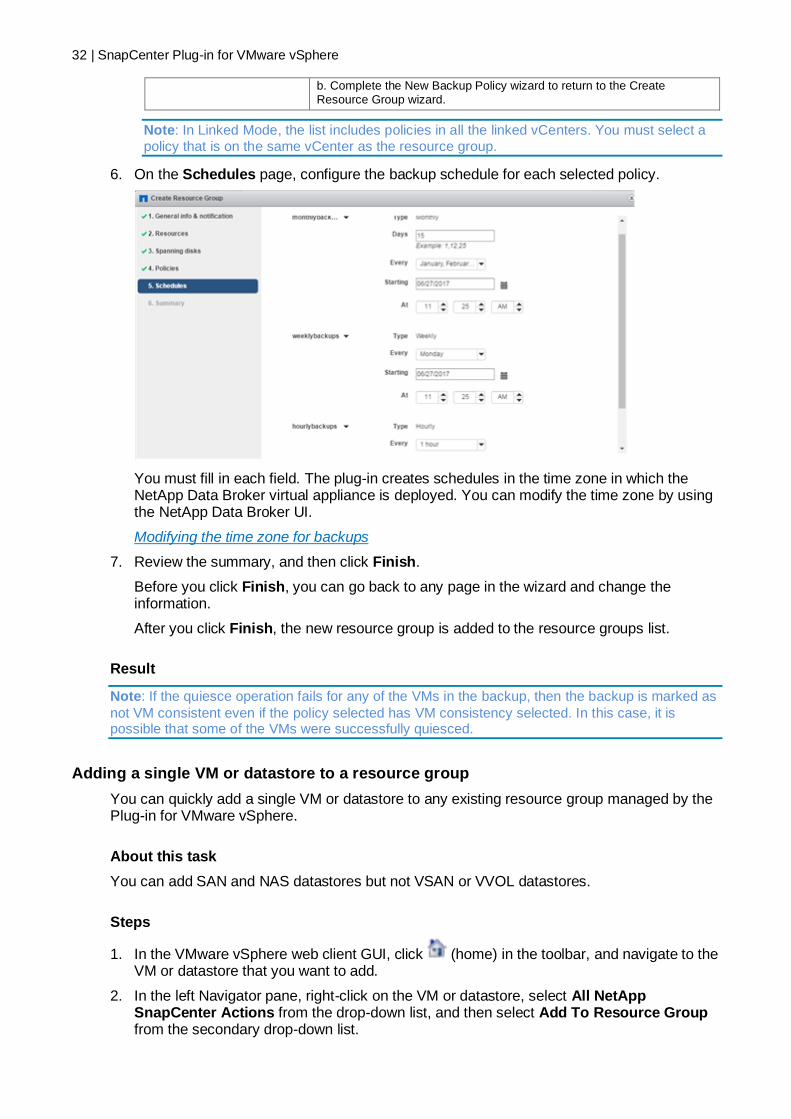
6. On the Schedules page, configure the backup schedule for each selected policy.
You must fill in each field. The plug-in creates schedules in the time zone in which the NetApp Data Broker virtual appliance is deployed. You can modify the time zone by using the NetApp Data Broker UI.
Modifying the time zone for backups
7. Review the summary, and then click Finish.
Before you click Finish, you can go back to any page in the wizard and change the information.
After you click Finish, the new resource group is added to the resource groups list.
Result
Note: If the quiesce operation fails for any of the VMs in the backup, then the backup is marked as
not VM consistent even if the policy selected has VM consistency selected. In this case, it is possible that some of the VMs were successfully quiesced.
Adding a single VM or datastore to a resource group
You can quickly add a single VM or datastore to any existing resource group managed by the Plug-in for VMware vSphere.
About this task
You can add SAN and NAS datastores but not VSAN or VVOL datastores.
Steps
1. In the VMware vSphere web client GUI, click (home) in the toolbar, and navigate to the VM or datastore that you want to add.
2. In the left Navigator pane, right-click on the VM or datastore, select All NetApp SnapCenter Actions from the drop-down list, and then select Add To Resource Group from the secondary drop-down list.

Backing up VMs, VMDKs, and datastores | 33
The system first checks that SnapCenter manages and is compatible with the storage system on which the selected VM is located and then displays the Add to Resource Group page. If the message SnapCenter Compatibility Error is displayed, then the selected VM is not compatible with SnapCenter. If the selected VM is not compatible, then you must first add the appropriate storage VM to SnapCenter.
3. In the Add to Resource Group page, select a resource group, and then click OK.
When you click OK, the system first checks that SnapCenter manages and is compatible with the storage on which the selected VMs or datastores are located.
If the message Selected virtual machine is not SnapCenter compatible or Selected datastore is not SnapCenter compatible is displayed, then a selected VM or datastore is not compatible with SnapCenter. See the Troubleshooting section for more information on compatibility check failures.
Adding multiple VMs and datastores to a resource group
You can add multiple VMs and datastores to any existing resource group by using the Plug-in for VMware vSphere Edit Resource Group wizard.
About this task
Note: You can add SAN and NAS datastores but not VSAN or VVOL datastores.
Steps
1. In the left Navigator pane of the SnapCenter vSphere web client, click Resource Groups,
then select a resource group, and then click (Edit) to start the wizard.
2. On the Resource page, in the Available entities list, select a VM or datastore you want to add to the resource group, then click > to move your selection to the Selected entities list. You can move all the available entities by clicking >>.
By default, the Available entities list displays the Datacenter object. You can click a datastore to view the VMs within the datastore and add them to the resource group.
When you click Next, the system first checks that SnapCenter manages and is compatible with the storage on which the selected VMs or datastores are located. If the message Some entities are not SnapCenter compatible. is displayed, then a selected VM or datastore is not compatible with SnapCenter. See the Troubleshooting section for more information on compatibility check failures.
3. Repeat Step 2 for each VM or datastore that you want to add.

34 | SnapCenter Plug-in for VMware vSphere
4. Click Next until you reach the Summary page, and then review the summary and click Finish.
Backing up VM and datastore resource groups on demand
A backup operation on a resource group is performed on all the resources defined in the resource group. You can back up a resource group on demand from the VMware vSphere web client GUI in vCenter. If a resource group has a policy attached and a schedule configured, then backups occur automatically according to the schedule.
Before you begin
You must have created a resource group with a policy attached.
About this task
Note: In earlier releases of Virtual Storage Console (VSC), you could perform an on-demand backup without having a backup job configured for a VM or datastore. However, in SnapCenter Plug-in for VMware vSphere, VMs and datastores must be in a resource group before you can perform backups.
Steps
1. In the left Navigator pane of the SnapCenter vSphere web client, click Resource Groups.
2. In the Objects tab of the Resource Groups page, select the resource group you want to
back up, and then click (Run Now) in the toolbar.
3. If the resource group has multiple policies configured, then in the Backup Now dialog box, select from the drop-down list the policy you want to use for this backup operation, and then click Yes.
4. Click OK to start the backup.
5. Optional: Monitor the operation progress by clicking Recent Tasks at the bottom of the window or on the dashboard Job Monitor for more detail.
Result
Note: If the quiesce operation fails for any of the VMs in the backup, then the backup is marked as
not VM consistent even if the policy selected has VM consistency selected. In this case, it is possible that some of the VMs were successfully quiesced.
Backing up VMs, VMDKs, and datastores | 35
Backing up the appliance MySQL database
The virtual appliance for SnapCenter Plug-in for VMware vSphere includes a MySQL database (also called an NSM database) that contains the metadata for all jobs performed by the plug-in. You should back up this repository regularly.
You should also back up the repository before performing migrations or upgrades.
Steps
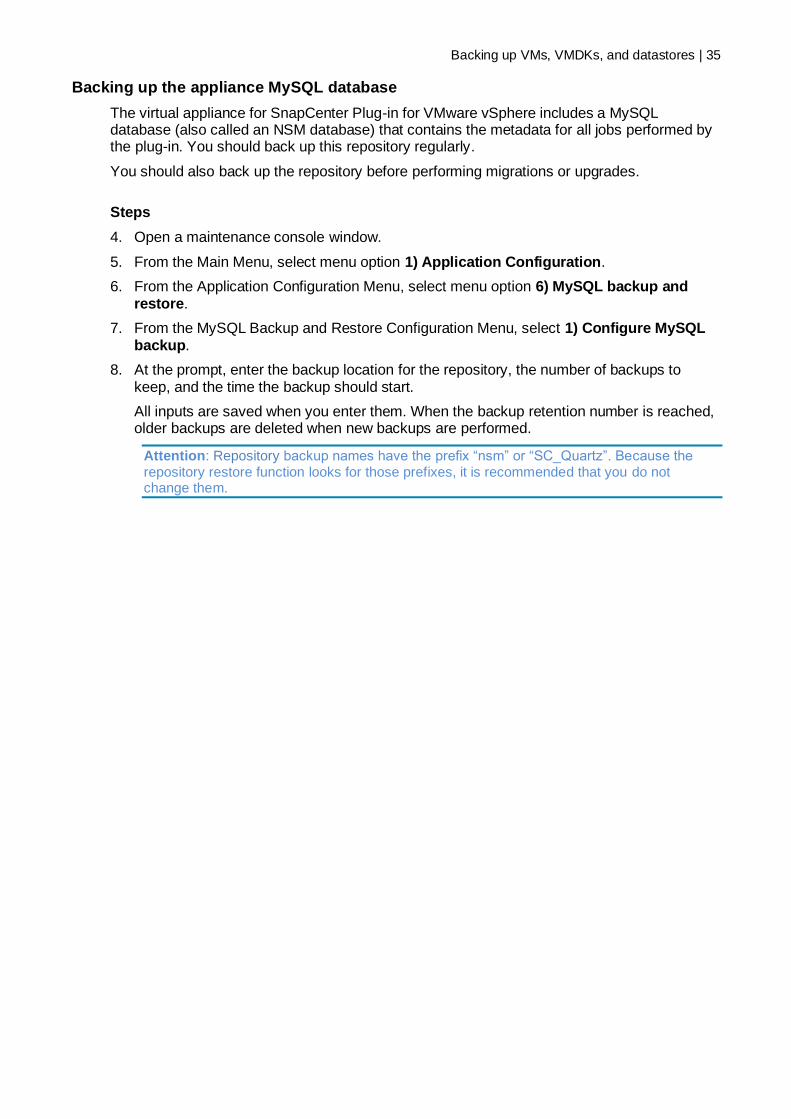
4. Open a maintenance console window.
5. From the Main Menu, select menu option 1) Application Configuration.
6. From the Application Configuration Menu, select menu option 6) MySQL backup and restore.
7. From the MySQL Backup and Restore Configuration Menu, select 1) Configure MySQL backup.
8. At the prompt, enter the backup location for the repository, the number of backups to keep, and the time the backup should start.
All inputs are saved when you enter them. When the backup retention number is reached, older backups are deleted when new backups are performed.
Attention: Repository backup names have the prefix “nsm” or “SC_Quartz”. Because the repository restore function looks for those prefixes, it is recommended that you do not change them.

36 | SnapCenter Plug-in for VMware vSphere
Restoring VMs, VMDKs, files, and folders from backups
You can restore VMs and VMDKs from primary or secondary backups. VMs are always restored to the original host and datastore; VMDKs can be restored to either the original or an alternate datastore. You cannot use the SnapCenter Plug-in for VMware vSphere to restore a datastore, only the individual VMs in the datastore. You can also restore individual files and folders in a guest file restore session, which attaches a backup copy of a virtual disk and then restores the selected files or folders.
You cannot restore backups of storage VMs that have been removed. For example, if you add a storage VM using the management LIF and then create a backup, and then you remove that storage VM and add a cluster that contains that same storage VM, the restore operation for the backup will fail.
You cannot restore storage VMs using the cluster management LIF if the storage VM was backed up using the SVM management LIF.
How restore operations are performed
For VMFS environments, the SnapCenter Plug-in for VMware vSphere uses clone and mount operations with Storage VMotion to perform restore operations. For NFS environments, the plug-in uses native ONTAP Single File SnapRestore (SFSR) to provide greater efficiency for most restore operations.
Restore operations NFS environments VMFS environments
Performed using
ONTAP SFSR
Performed using clone and mount with Storage VMotion
Performed using clone and mount with Storage VMotion
Restoring VMs and VMDKs
from primary backups
Restoring VMs and VMDKs from secondary backups
Restoring deleted VMs and
VMDKs from primary
backups
Restoring deleted VMs and
VMDKs from secondary
backups
Restoring VMs and VMDKs
from VM-consistent primary
backups
Restoring VMs and VMDKs
from VM-consistent
secondary backups
Guest file restore operations are performed using clone and mount operations (not Storage VMotion) in both NFS and VMFS environments.
Searching for backups
You can search for and find a specific backup of a VM or datastore using the Restore wizard. After you locate a backup, you can then restore it.
Steps
1. In the VMware vSphere web client GUI, click (home) in the toolbar, and then do one of the following:
To view backups for… Do the following…

Restoring VMs, VMDKs, files, and folders from backups | 37
VMs Select VMs and Templates from the drop-down list.
Datastores Select Storage from the drop-down list.
2. In the left Navigator pane, expand the datacenter that contains the VM or datastore.
3. Optional: Right-click a VM or datastore, then select All NetApp SnapCenter Actions in the drop-down list, and then select Restore in the secondary drop-down list.
4. In the Restore wizard enter a search name and click Search.
You can filter the backup list by clicking (filter icon) and selecting a date and time range, selecting whether you want backups that contain VMware Snapshots, whether you want mounted backups, and the location. Click OK.
Restoring VMs from backups
When you restore a VM, you overwrite the existing content with the backup copy that you select. You can restore VMs from either a primary or secondary backup to the same ESXi server.
Note: Restore operations cannot complete successfully if there are Snapshot copies of the VM that were performed by software other than the SnapCenter Plug-in for VMware vSphere.
Note: The following restore workflow is not supported: Add a storage VM, then perform a backup of that VM, then delete the storage VM and add a cluster that includes that same storage VM, and then attempt to restore the original backup.
Before you begin
• A backup must exist.
You must have created a backup of the VM using the SnapCenter Plug-in for VMware
vSphere before you can restore the VM.
• The VM must not be in transit.
The VM that you want to restore must not be in a state of vMotion or Storage vMotion.
About this task
• VM is unregistered and registered again
The restore operation for VMs unregisters the original VM, restores the VM from a
backup Snapshot copy, and registers the restored VM with the same name and
configuration on the same ESXi server. You must manually add the VMs to resource
groups after the restore.
• Restoring datastores
You cannot restore a datastore, but you can restore any VM in the datastore.
• VMware consistency snapshot failures for a VM
Even if a VMware consistency snapshot for a VM fails, the VM is nevertheless backed
up. You can view the entities contained in the backup copy in the Restore wizard and
use it for restore operations.
• A restore operation might fail if the storage tier of the FabricPool where the VM is located
is unavailable.
Steps
1. In the VMware vSphere web client GUI, click (home) in the toolbar, and then select VMs and Templates from the drop-down list.

38 | SnapCenter Plug-in for VMware vSphere
Note: If you are restoring a deleted VM, the storage VM credentials that were added to the SnapCenter Plug-in for VMware vSphere must be vsadmin or a user account that has all the
same privileges as vsadmin. The host must be on a storage system that is running ONTAP
8.2.2 or later.
2. In the left Navigator pane, right-click a VM, then select All NetApp SnapCenter Actions in the drop-down list, and then select Restore in the secondary drop-down list.
3. In the Restore wizard, on the Select Backup page, select the backup copy that you want to restore from.
You can search for a specific backup name or a partial backup name, or you can filter the
backup list by clicking (filter icon) and selecting a date and time range, selecting whether you want backups that contain VMware Snapshots, whether you want mounted backups, and the location. Click OK to return to the wizard.
4. On the Select Scope page, click Entire virtual machine in the Restore scope field and then select the ESXi host where the backup should be mounted.
The restore destination is the same ESXi host where the VM was originally registered.
5. On the Select Location page, select the location of the datastore that you want to restore from.
6. Review the Summary page and then click Finish.
7. Optional: Monitor the operation progress by clicking Recent Tasks at the bottom of the screen.
Refresh the screen to display updated information.
After you finish
Although the VMs are restored, they are not automatically added to their former resource groups. Therefore, you must manually add the VMs to the appropriate resource groups.
Restoring deleted VMs from backups
You can restore a deleted VM from a datastore primary or secondary backup to an ESXi host that you select.
Before you begin
• The user account for the storage system, on the Storage Systems page in the
SnapCenter vSphere web client, must have the minimum ONTAP privileges required for
ONTAP operations, as listed in the SnapCenter Concepts Guide and the SnapCenter
Installation and Setup Guide.
• A backup must exist.
You must have created a backup of the VM using the SnapCenter Plug-in for VMware
vSphere before you can restore the VMDKs on that VM.
About this task
You cannot restore a datastore, but you can restore any VM in the datastore.
Note: A restore operation might fail if the storage tier of the FabricPool where the VM is located is unavailable.
Steps

Restoring VMs, VMDKs, files, and folders from backups | 39
1. In the VMware vSphere web client GUI, click (home) in the toolbar, and then select Storage from the drop-down list.
2. Select the datastore on which the deleted VM was located, then select the More Objects tab, and then select the Backups tab.
3. Double-click on a backup to see a list of all VMs that are included in the backup.
4. Select the deleted VM from the backup list and click Restore.
5. In the Restore wizard, on the Select Backup page, select the backup copy that you want to restore from.
You can search for a specific backup name or a partial backup name, or you can filter the
backup list by clicking (filter icon) and selecting a date and time range, selecting whether you want backups that contain VMware Snapshots, whether you want mounted back ups, and the location. Click OK to return to the wizard.
6. On the Select Scope page, click Entire virtual machine in the Restore scope field and then select the Destination ESXi host name.
The restore destination can be any ESXi host that has been added to SnapCenter. This option restores the contents of the last datastore in which the VM resided from a Snapshot copy with the specified time and date. The Restart VM check box is checked if you select this option.
If you are restoring a VM in an NFS datastore onto an alternate ESXi host that is in an ESXi cluster, then after the VM is restored, it is registered on the alternate host.
7. On the Select Location page, select the location of the datastore that you want to restore from.
8. Review the Summary page and then click Finish.
Restoring VMDKs from backups
You can restore one or more virtual machine disks (VMDKs) on a VM to the same datastore. You can restore existing VMDKs, or deleted or detached VMDKs from either a primary a secondary backup.
Before you begin
• A backup must exist.
You must have created a backup of the VM using the SnapCenter Plug-in for VMware
vSphere.
• The VM must not be in transit.
The VM that you want to restore must not be in a state of vMotion or Storage vMotion.
About this task
• If the VMDK is deleted or detached from the VM, then the restore operation attaches the
VMDK to the VM.
• A restore operation might fail if the storage tier of the FabricPool where the VM is located
is unavailable.
• Attach and restore operations connect VMDKs using the default SCSi controller. VMDKs
that are attached to a VM with a NVME controller are backed up, but for attach and
restore operations they are connected back using a SCSi controller.
Steps

40 | SnapCenter Plug-in for VMware vSphere
1. In the VMware vSphere web client GUI, click (home) in the toolbar, and then select VMs and Templates from the drop-down list.
2. In the left Navigator pane, right-click a VM, then select All NetApp SnapCenter Actions in the drop-down list, and then select Restore in the secondary drop-down list.
3. In the Restore wizard, on the Select Backup page, select the backup copy that you want to restore from.
You can search for a specific backup name or a partial backup name, or you can filter the
backup list by clicking (filter icon) and selecting a date and time range, selecting whether you want backups that contain VMware Snapshots, whether you want mounted backups, and primary or secondary location. Click OK to return to the wizard.
4. On the Select Scope page, select the restore destination by clicking Particular virtual disk in the Restore scope field.
To… Specify the restore destination…
Restore to the original datastore
Use the default, parent, datastore that is displayed.
Restore to an alternate datastore on the same ESXi host
Click on the destination datastore and select a different datastore from the list.
You can unselect any datastores that contain VMDKs that you do not want to restore.
5. On the Select Location page, select the Snapshot copy that you want to restore (primary or secondary).
6. Review the Summary page and then click Finish.
7. Optional: Monitor the operation progress by clicking Recent Tasks at the bottom of the screen.
Refresh the screen to display updated information.
Attaching VMDKs to a VM
You can attach one or more VMDKs from a backup to the parent VM or to an alternate VM on the same ESXi host. This makes it easier to restore one or more individual files from a drive instead of restoring the entire drive. You can detach the VMDK after you have restored or accessed the files you need.
About this task
You have the following attach options:
• You can attach virtual disks from a primary or a secondary backup.
• You can attach virtual disks to the parent VM (the same VM that the virtual disk was
originally associated with) or to an alternate VM on the same ESXi host.
The following limitations apply to attaching virtual disks:
• Attach and detach operations are not supported for Virtual Machine Templates.
• When more than 15 VMDKs are attached to an iSCSI controller, the virtual machine for
SnapCenter Plug-in for VMware vSphere cannot locate VMDK unit numbers higher than
15 because of VMware restrictions.
In this case, add the SCSi controllers manually and try the attach operation again.
• You cannot manually attach a virtual disk that was attached or mounted as part of a
guest file restore operation.

Restoring VMs, VMDKs, files, and folders from backups | 41
• Attach and restore operations connect VMDKs using the default SCSi controller. VMDKs
that are attached to a VM with a NVME controller are backed up, but for attach and
restore operations they are connected back using a SCSi controller.
Steps
1. In the VMware vSphere web client GUI, click (home) in the toolbar, and then select VMs and Templates from the drop-down list.
2. Optional: In the left Navigator pane, select a VM.
3. Optional: Click the More Objects tab and then select the Backups tab to view the list of backups for the selected VM.
Scroll right to see all the columns on the screen.
4. In the left navigation pane, right-click the VM, then select All NetApp SnapCenter Actions in the drop-down list, and then select Attach virtual disk in the secondary drop-down list.
5. On the Attach Virtual Disk pane, in the Backup section, select a backup.
You can filter the backup list by clicking (filter icon) and selecting a date and time range, selecting whether you want backups that contain VMware snapshots, whether you want mounted backups, and the location. Click OK.
6. On the Attach Virtual Disk pane, in the Select Disks section, select one or more disks you want to attach and the location you want to attach from (primary or secondary).
You can change the filter to display primary and secondary locations.
7. By default, the selected virtual disks are attached to the parent VM. To attach the selected virtual disks to an alternate VM in the same ESXi host, click Click here to attach to alternate VM and specify the alternate VM.
8. Click Attach.
9. Optional: Monitor the operation progress in the Recent Tasks section.
Refresh the screen to display updated information.
10. Verify that the virtual disk is attached by performing the following:
a. Click (home) in the toolbar, and then select VMs and Templates from the drop-down list.
b. In the left Navigator pane, right-click a VM, then select Edit settings in the drop-down list.
c. In the Edit Settings box, click Manage other disks and then expand the list for each hard disk to see the list of disk files.
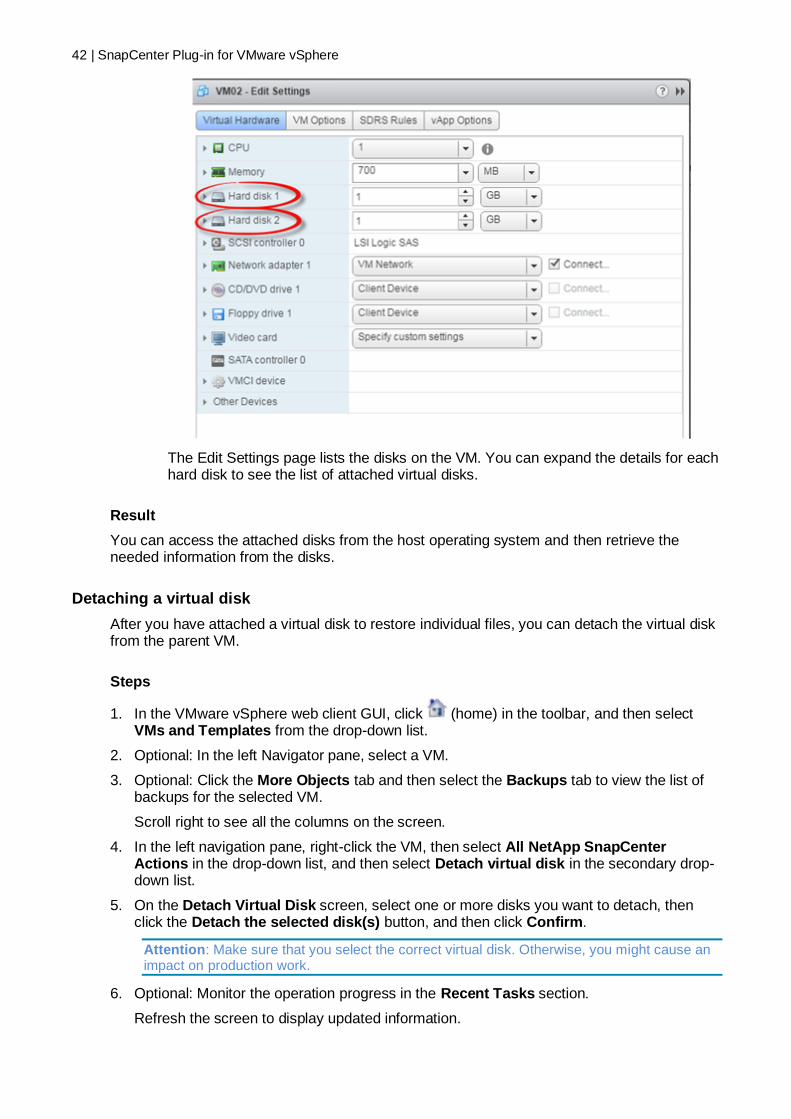
42 | SnapCenter Plug-in for VMware vSphere
The Edit Settings page lists the disks on the VM. You can expand the details for each hard disk to see the list of attached virtual disks.
Result
You can access the attached disks from the host operating system and then retrieve the needed information from the disks.
Detaching a virtual disk
After you have attached a virtual disk to restore individual files, you can detach the virtual disk from the parent VM.
Steps
1. In the VMware vSphere web client GUI, click (home) in the toolbar, and then select VMs and Templates from the drop-down list.
2. Optional: In the left Navigator pane, select a VM.
3. Optional: Click the More Objects tab and then select the Backups tab to view the list of backups for the selected VM.
Scroll right to see all the columns on the screen.
4. In the left navigation pane, right-click the VM, then select All NetApp SnapCenter Actions in the drop-down list, and then select Detach virtual disk in the secondary drop-down list.
5. On the Detach Virtual Disk screen, select one or more disks you want to detach, then click the Detach the selected disk(s) button, and then click Confirm.
Attention: Make sure that you select the correct virtual disk. Otherwise, you might cause an impact on production work.
6. Optional: Monitor the operation progress in the Recent Tasks section.
Refresh the screen to display updated information.
Restoring VMs, VMDKs, files, and folders from backups | 43
7. Verify that the virtual disk is detached by performing the following:
a. Click in the toolbar, and then select VMs and Templates from the drop-down list.
b. In the left Navigator pane, right-click a VM, then select Edit settings in the drop-down list.
c. In the Edit Settings box, click Manage other disks and then expand the list for each hard disk to see the list of disk files.
The Edit Settings page lists the disks on the VM. You can expand the details for each hard disk to see the list of attached virtual disks.

44 | SnapCenter Plug-in for VMware vSphere
Restoring guest files and folders
You can restore files or folders from a virtual machine disk (VMDK) on a Windows guest OS.
Guest restore workflow
Guest OS restore operations require multiple steps.
Guest OS restore operations include the following steps:
1. Attach
Attach a virtual disk to a guest VM or proxy VM and start a guest file restore session. 2. Wait
Wait for the attach operation to complete before you can browse and restore. When the attach operation finishes, a guest file restore session is automatically created and an email notification is sent.
3. Select files or folders
Browse the VMDK in the Guest File Restore session and select one or more files or folders to restore.
4. Restore
Restore the selected files or folders to a specified location.
Prerequisites for restoring guest files and folders
Before you restore one or more files or folders from a VMDK on a Windows guest OS, you must be aware of all the requirements.
• VMware Tools must be installed and running.
SnapCenter uses information from VMware Tools to establish a connection to the VMware Guest OS.
• The Windows Guest OS must be running Windows Server 2008 R2 or later.
For the latest information about supported versions, see the NetApp Interoperability Matrix Tool (IMT).
• The credentials for the target VM must specify the built-in domain administrator account
or the built-in local administrator account. The username must be "Administrator." Before
starting the restore operation, the credentials must be configured for the VM to which you
want to attach the virtual disk. The credentials are required for both the attach operation
and the subsequent restore operation. Workgroup users can use the built-in local
administrator account.
Attention: If you must use an account that is not the built-in administrator account, but has administrative privileges within the VM, you must disable UAC on the guest VM.
• You must know the backup Snapshot copy and VMDK to restore from.
SnapCenter Plug-in for VMware vSphere does not support searching of files or folders to restore. Therefore, before you begin you must know the location of the files or folders with respect to the Snapshot copy and the corresponding VMDK.
• Virtual disk to be attached must be in a SnapCenter backup.
The virtual disk that contains the file or folder you want to restore must be in a VM backup that was performed using the virtual appliance for SnapCenter Plug-in for VMware vSphere.
• To use a proxy VM, the proxy VM must be configured.
If you want to attach a virtual disk to a proxy VM, the proxy VM must be configured before the attach and restore operation begins.

Restoring guest files and folders | 45
• For files with non-English-alphabet names, you must restore them in a directory, not as a
single file.
You can restore files with non-alphabetic names, such as Japanese Kanji, by restoring the directory in which the files are located.
• Restoring from a Linux guest OS is not supported
You cannot restore files and folders from a VM that is running Linux guest OS. However, you can attach a VMDK and then manually restore the files and folders. For the latest information on supported guest OS, see the NetApp Interoperability Matrix Tool (IMT).
Guest file restore limitations
Before you restore a file or folder from a guest OS, you should be aware of what the feature does not support.
• You cannot restore dynamic disk types inside a guest OS.
• If you restore an encrypted file or folder, the encryption attribute is not retained. You
cannot restore files or folders to an encrypted folder.
• The Guest File Browse page displays the hidden files and folder, which you cannot filter.
• You cannot restore from a Linux guest OS.
You cannot restore files and folders from a VM that is running Linux guest OS. However,
you can attach a VMDK and then manually restore the files and folders. For the latest
information on supported guest OS, see the NetApp Interoperability Matrix Tool.
• You cannot restore from a NTFS file system to a FAT file system.
When you try to restore from NTFS-format to FAT-format, the NTFS security descriptor is not copied because the FAT file system does not support Windows security attributes.
• You cannot restore guest files from a cloned VMDK.
• You cannot restore from secondary backups if the backup was performed on a system
running ONTAP 9.2 or later and if the VMware consistency option was on.
• You cannot restore the directory structure for a file.
If a file in a nested directory is selected to be restored, the file is not restored with the same directory structure. The directory tree is not restored, only the file. If you want to restore a directory tree, you can copy the directory itself at the top of the structure.
Restoring guest files and folders from VMDKs
You can restore one or more files or folders from a VMDK on a Windows guest OS.
About this task
By default, the attached virtual disk is available for 24 hours and then it is automatically detached. You can choose in the wizard to have the session automatically deleted when the restore operation completes, or you can manually delete the Guest File Restore session at any time, or you can extend the time in the Guest Configuration page.
Guest file or folder restore performance depends upon two factors: the size of the files or folders being restored; and the number of files or folders being restored. Restoring a large number of small-sized files might take a longer time than anticipated compared to restoring a small number of large-sized files, if the data set to be restored is of same size.
Attention: Only one attach or restore operation can run at the same time on a VM. You cannot run
parallel attach or restore operations on the same VM.
Attention: The guest restore feature allows you to view and restore system and hidden files and to view encrypted files. Do not attempt to overwrite an existing system file or to restore encrypted files to an encrypted folder. During the restore operation, the hidden, system, and encrypted
46 | SnapCenter Plug-in for VMware vSphere
attributes of guest files are not retained in the restored file. Viewing or browsing reserved partitions might cause an error.
Steps
1. In the VMware vSphere web client in vCenter, click (home) > VMs and Templates then right-click a VM, select All NetApp SnapCenter Actions from the drop-down list, and then select Guest File Restore from the secondary drop-down list.
Select the VM where you want to attach the virtual disk. If you do not want to attach directly to that VM, you can select a proxy VM in the wizard.
Before you start the wizard, make sure the target VM for the guest file restore operation has valid credentials.
The Guest File Restore wizard begins.
2. In the Restore Scope page, specify the backup that contains the virtual disk you want to attach by doing the following:
a. In the Backup Name table, select the backup that contains the virtual disk that you want attach.
b. In the VMDK table, select the virtual disk that contains the files or folders you want to restore.
c. In the Locations table, select the location, primary or secondary, of the virtual disk that you want to attach.
3. In the Guest Details page, do the following:
a. Choose where to attach the virtual disk by doing the following:
Select this option… If…
A single job You want to attach the virtual disk to the VM that you right-clicked
before you started the wizard, and then select the credential for the VM.
Note: Credentials must already be created for the VM.
All jobs for the plug-in
You want to attach the virtual disk to a proxy VM and then select the proxy
VM.
Note: The proxy VM must be configured before the attach and restore
operation begins.
b. Select the Send email notification option.
This option is required if you want to be notified when the attach operation finishes and the virtual disk is available. The notification email includes the virtual disk name, the VM name, and the newly assigned drive letter for the VMDK.
Best Practice: Enable this option because a guest file restore is an asynchronous operation and there might be a time latency to establish a guest session for you.
This option uses the email settings that are configured when you set up the VMware vSphere web client in vCenter.
4. Review the summary, and then click Finish.
Before you click Finish, you can go back to any page in the wizard and change the information.
5. Wait until the attach operation completes.
You can view the progress of the attach operation in the Guest File Restore page, or in the Dashboard job monitor, or you can wait for the email notification.
Restoring guest files and folders | 47
6. To find the files that you want to restore from the attached virtual disk, click > SnapCenter Plug-in for VMware vSphere, then in the left Navigator pane click Guest File Restore and select the Guest Configuration tab.
In the Guest Session Monitor table, you can display additional information about a session by clicking ... in the right column.
7. Select the guest file restore session for the virtual disk that was listed in the notification email.
All partitions are assigned a drive letter, including system reserved partitions. If a VMDK has multiple partitions, you can select a specific drive by selecting the drive in the drop-down list in the drive field at the top of the Guest File Browse page.
8. Click the Browse Files icon to view a list of files and folders on the virtual disk.
When you double click a folder to browse and select individual files, there might be a time latency while fetching the list of files because the fetch operation is performed at run time.
For easier browsing, you can use filters in your search string. The filters are case-sensitive, Perl expressions without spaces. The default search string is .*. The following table shows some example Perl search expressions.
This expression… Searches for…
. Any character except a newline character.
.* Any string. This is the default.
a The character a.
ab The string ab.
a|b The character a or b.
a* Zero or more instances of the character a.
a+ One or more instances of the character a.
a? Zero or one instance of the character a.
a{x} Exactly x number of instances of the character a.
a{x,} At least x number of instances of the character a.
a{x,y} At least x number of instances of the character a and at most y
number.
\ Escapes a special character.
Note: The Guest File Browse page displays all hidden files and folders. in addition to all other files and folders.
9. Select one or more files or folders that you want to restore, and then click Select Restore Location.
The files and folders to be restored are listed in the Selected File(s) table.
10. In the Select Restore Location page, specify the following:
Option Description
Restore to path Enter the UNC share path to the guest where the selected files will be restored.
For example: \\10.60.136.65\c$
If original file(s)
exist
Select the action to be taken if the file or folder to be restored already exists on the restore destination: Always overwrite or Always skip.
Note: If the folder already exists, then the contents of the folder are merged with the existing folder.
Disconnect Guest
Session after
successful restore
Select this option if you want the guest file restore session to be deleted when
the restore operation completes.
11. Click Restore.
You can view the progress of the restore operation in the Guest File Restore page, or in

48 | SnapCenter Plug-in for VMware vSphere
the Dashboard job monitor, or you can wait for the email notification. The time it takes for the email notification to be sent depends upon the length of time of the restore operation.
The notification email contains an attachment with the output from the restore operation. If the restore operation fails, open the attachment for additional information.
Setting up proxy VMs for restore operations
If you want to use a proxy VM for attaching a virtual disk for guest file restore operations, you must set up the proxy VM before you begin the restore operation. Although you can set up a proxy VM at any time, it might be more convenient to set it up immediately after the plug-in deployment completes.
Steps
1. In the SnapCenter vSphere web client, click (home) in the toolbar, and then select SnapCenter Plug-in for VMware vSphere from the drop-down list.
2. In the left Navigator pane, click Guest File Restore.
3. In the Run As Credentials section, do one of the following:
To do this… Do this…
Use existing credentials Select any of the configured credentials.
Add new credentials 1. Click (Add).
2. In the Run As Credentials dialog box, enter the credentials.
3. Click Select VM, then select a VM in the Proxy VM dialog box. Click Save to return to the Run As Credentials dialog box.
4. Enter the credentials.
For Username, you must enter “Administrator”.
The SnapCenter Plug-in for VMware vSphere uses the selected credentials to log into the selected proxy VM.
Note: The Run As credentials must be the default domain administrator that is provided by Windows or the built-in local administrator. Workgroup users can use the built-in local administrator account.
4. In the Proxy Credentials section, click (Add) to add a VM to use as a proxy.
5. In the Proxy VM dialog box, complete the information, and then click Save.
Configuring credentials for VM guest file restores
When you attach a virtual disk for guest file or folder restore operations, the target VM for the attach must have credentials configured before you restore.
About this task
User Access Control Enabled User Access Control Disabled
Domain user A domain user with “administrator” as
the username works fine. For example,
“NetApp\administrator”.
However, a domain user with “xyz” as
the username that belongs to a local
administrator group will not work. For
example, you cannot use “ NetApp\xyz”.
Either a domain user with “administrator”
as the username or a domain user with “xyz” as the username that belongs to a local administrator group, works fine. For example, “NetApp\administrator” or
“ NetApp\xyz”.
Workgroup user A local user with “administrator” as the
username works fine.
However, a local user with “xyz” as the
username that belongs to a local
Either a local user with “administrator” as the username or a local user with “xyz” as the username that belongs to a local administrator group, works fine.

Restoring guest files and folders | 49
administrator group will not work. However, a local user with “xyz” as the
username that does not belong to local
administrator group will not work.
In the above examples, “ NetApp” is the dummy domain name and “xyz” is dummy local username.
Steps
1. In the VMware vSphere web client in vCenter, click (home) in the toolbar, and then select SnapCenter Plug-in for VMware vSphere from the drop-down list.
2. In the left Navigator pane, click Guest File Restore.
6. In the Run As Credentials section, do one of the following:
To do this… Do this…
Use existing credentials Select any of the configured credentials.
Add new credentials 5. Click (Add).
6. In the Run As Credentials dialog box, enter the credentials.
7. Enter the credentials.
For Username, you must enter “Administrator”.
8. Click Select VM, then select a VM in the Proxy VM dialog box. Click Save to return to the Run As Credentials dialog box.
Select the VM that should be used to authenticate the credentials.
The SnapCenter Plug-in for VMware vSphere uses the selected credentials to log into the selected VM.
3. Click Save.
Extending the time of a guest file restore session
By default, an attached Guest File Restore VMDK is available for 24 hours and then it is automatically detached. You can extend the time in the Guest Configuration page.
About this task
You might want to extend a guest file restore session if you want to restore additional files or folders from the attached VMDK at a later time. However, because guest file restore sessions use a lot of resources, extending session time should be performed only occasionally.
Steps
1. In the VMware vSphere web client in vCenter, click (home) in the toolbar, and then select SnapCenter Plug-in for VMware from the drop-down list.
2. In the left Navigator pane, click Guest File Restore.
3. Select a guest file restore session and then click (Extend Selected Guest Session) in the Guest Session Monitor title bar.
The session is extended for another 24 hours.

50 | SnapCenter Plug-in for VMware vSphere
Mounting and unmounting datastores
You can mount a datastore from a backup if you want to access files in the backup. You can either mount the backup to the same ESXi host where the backup was created or to an alternate ESXi host that has the same type of VM and host configurations. You can mount a datastore multiple times on a host.
Mounting a datastore backup
You can manually mount a datastore backup if you want to access the files in the backup.
Before you begin
• If you want to mount to an alternate ESXi host, you must ensure that the alternate ESXi
host can connect to the storage and has the following:
o Same UID and GID as that of the original host
o Same virtual appliance for SnapCenter Plug-in for VMware vSphere version as that
of original host
• Because the ESXi can only discover one unique LUN per datastore, the operation will fail
if it finds more than one. This can occur if you start a mount operation before a previous
mount operation has finished, or if you manually clone LUNs, or if clones are not deleted
from storage during an unmount operation. To avoid discovery of multiple clones, you
should clean up all stale LUNs on the storage.
About this task
Note: A mount operation might fail if the storage tier of the FabricPool where the datastore Is located is unavailable.
Steps
1. In the VMware vSphere web client in vCenter, click (home) in the toolbar, and then select Storage from the drop-down list.
2. Right-click a datastore and select NetApp SnapCenter in the drop-down list, and then select Mount Backup in the secondary drop-down list.
3. On the Mount Datastore page, select a backup and a backup location, and then click Finish.
4. Optional: To verify that the datastore is mounted, perform the following:
a. Click in the toolbar, and then select Storage from the drop-down list.
b. The left Navigator pane displays the datastore you mounted at the top of the list.
Unmounting a datastore backup
You can unmount a datastore backup when you no longer need to access the files in the datastore.
Steps
1. In the VMware vSphere web client in vCenter, click (home) in the toolbar, and then select Storage from the drop-down list.

Mounting and unmounting datastores | 51
2. In the left Navigator pane, right-click a datastore, then select NetApp SnapCenter in the drop-down list, and then select Unmount in the secondary drop-down list.
Note: Make sure that you select the correct datastore to unmount. Otherwise, you might cause an impact on production work.
3. In the Unmount Cloned Datastore dialog box, click the Unmount the cloned datastore option, and then click Confirm.
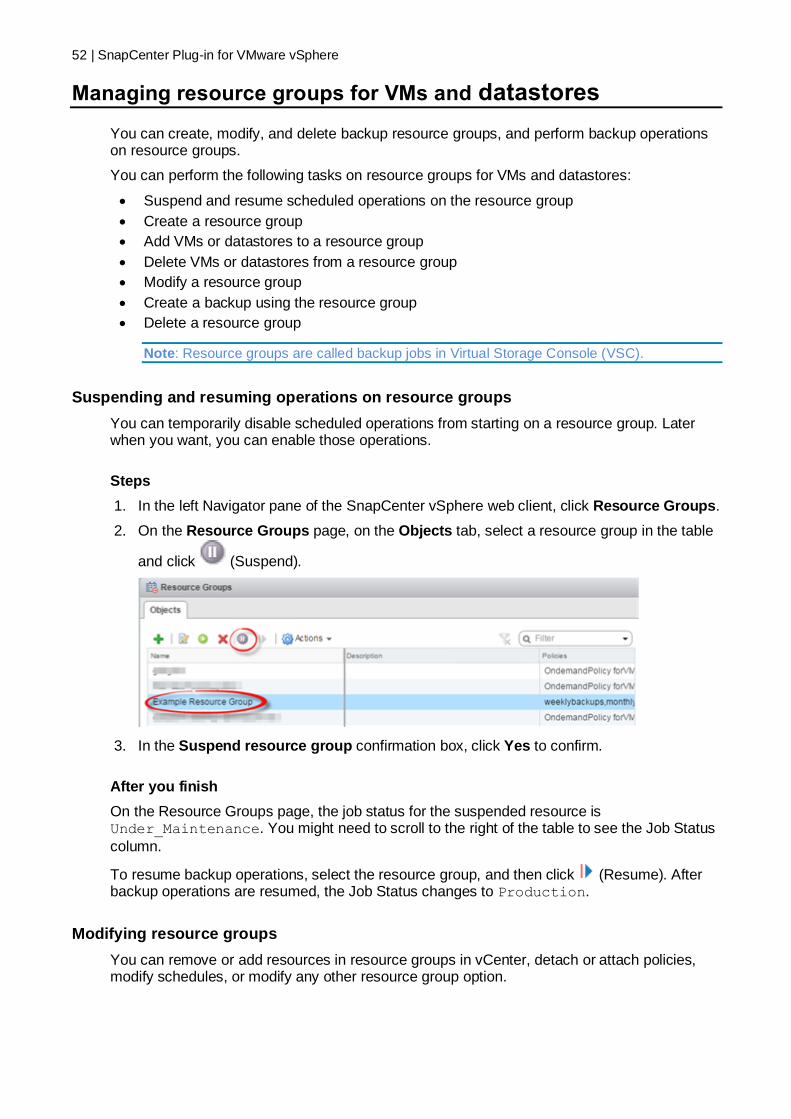
52 | SnapCenter Plug-in for VMware vSphere
Managing resource groups for VMs and datastores
You can create, modify, and delete backup resource groups, and perform backup operations on resource groups.
You can perform the following tasks on resource groups for VMs and datastores:
• Suspend and resume scheduled operations on the resource group
• Create a resource group
• Add VMs or datastores to a resource group
• Delete VMs or datastores from a resource group
• Modify a resource group
• Create a backup using the resource group
• Delete a resource group
Note: Resource groups are called backup jobs in Virtual Storage Console (VSC).
Suspending and resuming operations on resource groups
You can temporarily disable scheduled operations from starting on a resource group. Later when you want, you can enable those operations.
Steps
1. In the left Navigator pane of the SnapCenter vSphere web client, click Resource Groups.
2. On the Resource Groups page, on the Objects tab, select a resource group in the table
and click (Suspend).
3. In the Suspend resource group confirmation box, click Yes to confirm.
After you finish
On the Resource Groups page, the job status for the suspended resource is Under_Maintenance. You might need to scroll to the right of the table to see the Job Status
column.
To resume backup operations, select the resource group, and then click (Resume). After backup operations are resumed, the Job Status changes to Production.
Modifying resource groups
You can remove or add resources in resource groups in vCenter, detach or attach policies, modify schedules, or modify any other resource group option.

Managing resource groups for VMs and datastores | 53
About this task
If you want to modify the name of a resource group, do not use the following special characters in VM, datastore, policy, backup, or resource group names:
% & * $ # @ ! \ / : * ? " < > - | ; ' , . An underscore character (_) is
allowed.
Steps
1. In the left Navigator pane of the SnapCenter vSphere web client, click Resource Groups.
2. On the Resource Groups page, on the Objects tab, select a resource group in the table
and then click (Edit).
3. On the left list in the Edit Resource Group wizard, click the category that you want to modify and enter your changes.
You can make changes in multiple categories.
4. Click Next until you see the Summary page, and then click Finish.
Deleting resource groups
You can delete a resource group in vCenter if you no longer need to protect the resources in the resource group. You must ensure that all resource groups are deleted before you remove the virtual appliance for SnapCenter Plug-in for VMware vSphere from vCenter.
About this task
All resource group delete operations are performed as force deletes. The delete operation detaches all policies from the vCenter resource group, removes the resource group from the virtual appliance for SnapCenter Plug-in for VMware vSphere, and deletes all backups and Snapshot copies of the resource group.
Note: In a SnapVault relationship, the last Snapshot copy cannot be deleted; therefore, the resource group cannot be deleted. Before deleting a resource group that is part of a SnapVault relationship, you must use either OnCommand System Manager or use the ONTAP CLI to remove the SnapVault relationship, and then you must delete the last Snapshot copy.
Steps
1. In the left Navigator pane of the SnapCenter vSphere web client, click Resource Groups.
2. On the Resource Groups page, on the Objects tab, select a resource group in the table
and then click (Delete).
3. In the Delete resource group confirmation box, click Yes to confirm.

54 | SnapCenter Plug-in for VMware vSphere
Managing policies for VMs and datastores
You can create, modify, view, detach, and delete backup policies for the SnapCenter Plug-in for VMware vSphere. Policies are required to perform data protection operations.
Detaching policies
You can detach policies from a SnapCenter Plug-in for VMware vSphere resource group when you no longer want those policies to govern data protection for the resources. You must detach a policy before you can remove it or before you modify the schedule frequency.
About this task
Attention: The guidelines for detaching policies from the virtual appliance for SnapCenter Plug-in for VMware vSphere resource groups in the VMware vSphere web client differ from the guidelines for SnapCenter resource groups. For a VMware vSphere web client resource group, it is possible to detach all policies, which leaves the resource group with no policy. However, to perform any data protection operations on that resource group, you must attach at least one policy.
Steps
1. In the left Navigator pane of the SnapCenter vSphere web client, click Resource Groups.
2. On the Resource Groups page, select a resource group in the table and then click (Edit).
3. On the Policies page of the Edit Resource Group wizard, clear the check mark next to the policies you want to detach.
You can also add a policy to the resource group by checking the policy.
4. Make any additional modifications to the resource group in the rest of the wizard, and then click Finish.
Modifying policies
You can modify policies for a SnapCenter Plug-in for VMware vSphere resource group. You can modify the frequency, replication options, Snapshot copy retention settings, or scripts information while a policy is attached to a resource group.
About this task
Modifying SnapCenter Plug-in for VMware vSphere backup policies differs from modifying backup policies for SnapCenter application-based plug-ins. You do not need to detach policies from resource groups when you modify the plug-in policies.
Before you modify the replication or retention settings, you should consider the possible consequences.
• Increasing replication or retention settings
Backups continue to accumulate until they reach the new setting.
• Decreasing replication or retention settings
Backups in excess of the new setting are deleted when the next backup is performed.
Note: To modify a plug-in policy schedule, you must modify the schedule in the plug-in resource group.

Managing policies for VMs and datastores | 55
Steps
1. In the left Navigator pane of the SnapCenter vSphere web client, click Policies.
2. On the Policies page, select a policy, and then click then click (Edit Policy) in the toolbar.
3. Modify the policy fields.
4. When you are finished, click Update.
Result
The changes take effect when the next scheduled backup is performed.
Deleting policies
If you no longer require a configured backup policy for the virtual appliance for SnapCenter Plug-in for VMware vSphere, you might want to delete it.
Before you begin
You must have detached the policy from all resource groups in the virtual appliance for SnapCenter before you can delete it.
Steps
1. In the left Navigator pane of the SnapCenter vSphere web client, click Policies.
2. On the Policies page, select a policy, and then click then click (Remove) in the toolbar.
3. In the confirmation dialog box click Yes.

56 | SnapCenter Plug-in for VMware vSphere
Managing backups of VMs and datastores
You can rename and delete backups performed by the SnapCenter Plug-in for VMware vSphere. You can also delete multiple backups simultaneously.
Renaming backups
You can rename SnapCenter Plug-in for VMware vSphere backups if you want to provide a better name to improve searchability.
Steps
1. In the VMware vSphere web client GUI, click (home) in the toolbar, and then select VMs and Templates from the drop-down list.
2. In the left Navigator pane, select a VM for which you want to rename a backup, then select the More Objects tab, and then select the Backups tab.
3. Select the backup that you want to rename and click Rename.
4. On the Rename Backup dialog box, enter the new name, and click OK.
Do not use the following special characters in VM, datastore, policy, backup, or resource group names: & * $ # @ ! \ / : * ? " < > - | ; ' , . An underscore character (_) is allowed.
Deleting backups
You can delete SnapCenter Plug-in for VMware vSphere backups if you no longer require the backup for other data protection operations. You can delete one backup or delete multiple backups simultaneously.
Before you begin
You cannot delete backups that are mounted. You must unmount a backup before you can delete it.
Steps
1. In the VMware vSphere web client GUI, click (home) in the toolbar, and then select VMs and Templates from the drop-down list.
2. In the left Navigator pane, select a VM, then select the More Objects tab, and then select the Backups tab.
3. Do one of the following:
To delete this many backups…
Do the following…
One Select the backup and click Delete.
2 to 40 Select the backups, then click Actions, and then click Delete in the
drop-down list.
Note: You can select a maximum of 40 backups to delete.
4. Click Yes to confirm the delete operation.
5. Refresh the backup list by clicking the (refresh button) on the left vSphere menu bar.

Managing storage systems | 57
Managing storage systems
Before you can backup or restore VMs or datastores using the SnapCenter vSphere web client, you must add the storage.
Modifying storage VMs
You can use the SnapCenter vSphere web client to modify the configurations of clusters and storage VMs that are registered in the SnapCenter Plug-in for VMware vSphere and used for VM data protection operations.
Note: If you modify a storage VM that was automatically added as part of a cluster (sometimes called an implicit storage VM), then that storage VM changes to an explicit storage VM and can be separately deleted without changing the rest of the storage VMs in that cluster. On the Storage Systems page, the username is blank for implicit storage VMs; usernames are displayed for explicit storage VMs in the cluster list and have the ExplicitSVM flag set to true.
Note: If you added storage VMs for application-based data protection operations using the SnapCenter GUI, you must use the same GUI to modify those storage VMs.
Steps
1. In the left Navigator pane of the SnapCenter vSphere web client, click Storage Systems.
2. On the Storage Systems page, select the storage VM to be modified and then click Edit Storage System.
3. On the Edit Storage System dialog box, enter the new values, and then click Add to apply the changes.
Removing storage VMs using the SnapCenter VMware vSphere web client
You can use the SnapCenter vSphere web client to remove storage VMs from the inventory in vCenter.
Note: If you added storage VMs for application-based data protection operations using the SnapCenter GUI, you must use the same GUI to modify those storage VMs.
Before you begin
You must unmount all datastores in the storage VM before you can remove the storage VM.
About this task
Note: If a resource group has backups that reside on a storage VM that you remove, then subsequent backups for that resource group fail.
Steps
1. In the left Navigator pane of the SnapCenter vSphere web client, click Storage Systems.
2. On the Storage Systems page, select the storage VM to be removed and then
click Remove.
3. In the Remove Storage System confirmation box, click Yes to confirm.
4. If the removed storage VM was managed by an ESXi 6.7 Server, then you must restart the web client service.

58 | SnapCenter Plug-in for VMware vSphere
Managing the NetApp Data Broker virtual appliance
You need to use the NetApp Data Broker virtual appliance GUI to update the virtual appliance configuration, which includes vCenter credentials, NetApp Data Broker credentials, or time zones for backups.
Modifying the time zone for backups
When you configure a backup schedule for a SnapCenter Plug-in for VMware vSphere resource group, the schedule is automatically set for the time zone in which the NetApp Data Broker virtual appliance is deployed. You can modify that time zone by using the NetApp Data Broker UI.
Before you begin
You must know the IP address and the log in credentials for the NetApp Data Broker.
• The IP address was displayed when the NetApp Data Broker was deployed.
• Use the log in credentials provided during the deployment of the virtual appliance or as later modified.
Steps
5. Log in to the NetApp Data Broker.
Use the format https://<OVA-IP-address>:8080 to access the NetApp Data
Broker.
6. Click the Settings icon in the top toolbar.
7. On the Settings page, in the Date and Time section, click Edit.
8. Select the new time zone and click Save.
The new time zone will be used for all backups performed by the SnapCenter Plug-in for VMware vSphere.
Modifying the NetApp Data Broker logon credentials
You can modify the logon credentials for the NetApp Data Broker. This affects only logging in to the NetApp Data Broker appliance GUI.
Before you begin
Managing the NetApp Data Broker virtual appliance | 59
You must know the IP address and the log in credentials for the NetApp Data Broker.
• The IP address was displayed when the NetApp Data Broker was deployed.
• Use the log in credentials provided during the deployment of the virtual appliance or as later modified.
Steps
1. Log in to the NetApp Data Broker.
Use the format https://<OVA-IP-address>:8080 to access the NetApp Data
Broker.
2. Click the Settings icon in the top toolbar.
3. On the Settings page, in the User section, click Edit.
4. Enter the new username or password and click Save.
Modifying the vCenter settings in the NetApp Data Broker
You can modify the vCenter logon credentials and the vCenter port number that are configured in the NetApp Data Broker. These settings are used by the virtual appliance to access vCenter.
Before you begin
You must know the IP address and the log in credentials for the NetApp Data Broker.
• The IP address was displayed when the NetApp Data Broker was deployed.
• Use the log in credentials provided during the deployment of the virtual appliance or as later modified.
Steps
1. Log in to the NetApp Data Broker.
Use the format https://<OVA-IP-address>:8080 to access the NetApp Data
Broker.
2. In the left navigation pane, click Configuration.
3. On the Configuration page, in the vCenter section, click Edit.
4. Enter the new username or password or vCenter port number and then click Save.
Modifying the network settings
You can modify the network settings that are configured in the NetApp Data Broker. These settings are used by the virtual appliance to access vCenter.
Before you begin
You must know the IP address and the log in credentials for the NetApp Data Broker.
• The IP address was displayed when the NetApp Data Broker was deployed.
• Use the log in credentials provided during the deployment of the virtual appliance or as later modified.
Steps

60 | SnapCenter Plug-in for VMware vSphere
1. Log in to the NetApp Data Broker.
Use the format https://<OVA-IP-address>:8080 to access the NetApp Data
Broker.
2. Click the Settings icon in the top toolbar.
3. On the Settings page, in the Network Settings section, click IPv4 or IPv6, and then click
Edit.
Enter the new information and click Save.
If you are removing a network setting, do the following:
o IPv4: In the IP Address field, enter 0.0.0.0 and then click Save.
o IPv6: In the IP Address field: enter ::0 and then click Save.
Note: If you are using both IPv4 and IPv6, you cannot remove both network settings. The remaining network must specify the DNS Servers and Search Domains fields.

Using REST APIs for VMware vSphere | 61
Using REST APIs for VMware vSphere
You can use the SnapCenter Plug-in for VMware vSphere REST APIs to perform common data protection operations. The plug-in has different Swagger web pages from the Windows SnapCenter Swagger web pages.
• REST API workflows are documented for the following operations on VMs and
datastores using the REST APIs for VMware vSphere:
o Add and modify storage VMs and clusters
o Create and modify resource groups
o Backup VMs, scheduled and on-demand
o Restore VMs and deleted VMs
o Restore VMDKs
o Mount and unmount datastores
• Operations that are not supported by the REST APIs for VMware vSphere
o Guest file restore
o Installation and configuration of the Plug-in for VMware vSphere
o Assign RBAC roles or access to users
• uri parameter
The uri parameter always returns a "null" value.
• Login timeout
The default timeout is 120 minutes (2 hours). You can configure a different timeout value in the vCenter settings.
• Token management
For security, REST APIs use a mandatory token that is passed with each request and is used in all API calls for client validation. The REST APIs for VMware vSphere use the VMware authentication API to obtain the token. VMware provides the token management.
To obtain the token, use /4.1/auth/login REST API and provide the vCenter
credentials.
• API version designations
Each REST API name includes the SnapCenter version number in which the REST API was first released. For example, the REST API /4.1/datastores/{moref}/backups was first released in SnapCenter 4.1.
REST APIs in future releases will usually be backward compatible and will be modified to accommodate new features as needed.
Accessing REST APIs using the Swagger API web page
REST APIs are exposed through the Swagger web page. You can access the Swagger web page to display the SnapCenter Server or SnapCenter Plug-in for VMware vSphere REST APIs, as well as to manually issue an API call. You can use SnapCenter Plug-in for VMware vSphere REST APIs to perform protection operations on VMs and datastores.
The plug-in has different Swagger web pages from the Windows SnapCenter Swagger web pages.

62 | SnapCenter Plug-in for VMware vSphere
Before you begin
For SnapCenter Plug-in for VMware vSphere REST APIs, you must know either the IP address or the host name of the Linux-based NetApp Data Broker virtual appliance that enables the plug-in.
Note: The plug-in only supports REST APIs for the purpose of integrating with third party applications and does not support PowerShell cmdlets or a CLI.
Steps
1. From a browser, enter the URL to access the plug-in Swagger web page:
https://<OVA_IP_address_or_host_name>:8144/api/swagger-ui.html#
Note: Ensure that the REST API URL does not have the following characters: +, ., %, and &.
Example
Access SnapCenter Plug-in for VMware vSphere REST APIs:
https://192.0.2.82:8144/api/swagger-ui.html#
https://OVAhost:8144/api/swagger-ui.html#
Log ins use the vCenter authentication mechanism to generate the token.
2. Click an API resource type to display the APIs in that resource type.
REST API workflows for adding and modifying storage VMs
To perform add and modify storage VM operations using REST APIs for VMware vSphere, you must follow the prescribed sequence of REST API calls.
For each REST API, add https://<server>:<port> at the front of the REST API to form a
complete endpoint.
Workflow for adding storage VM operations
Step REST API Comments
1 /4.1/storage-system Add Storage System adds the specified storage
VM to the virtual appliance for SnapCenter Plug-in for VMware vSphere.
Workflow for modifying storage VM operations
Step REST API Comments
1 /4.1/storage-system getSvmAll gets the list of all available storage VMs.
Note the name of the storage VM that you want to modify.
2 /4.1/storage-system
Modify Storage System modifies the specified
storage VM.
Pass the name from Step 1 in addition to all the other required attributes.
REST API workflows for creating and modifying resource groups
To perform create and modify resource group operations using REST APIs for VMware vSphere, you must follow the prescribed sequence of REST API calls.
For each REST API, add https://<server>:<port> at the front of the REST API to form a
complete endpoint.

Using REST APIs for VMware vSphere | 63
Workflow for creating resource groups
Step REST API Comments
1 /4.1/policies Get Policies gets the list of VMware vSphere
web client policies.
Note the policyId that you want to use when creating the resource group and the policy frequency.
If no policies are listed, then use the Create
Policy REST API to create a new policy.
2 /4.1/resource-groups Create a Resource Group creates a resource
group with the specified policy.
Pass the policyId from Step 1 and enter the policy frequency details in addition to all other required attributes.
Workflow for modifying resource groups
Step REST API Comments
1 /4.1/resource-groups Get List of Resource Groups gets the list of
VMware vSphere web client resource groups.
Note the resourceGroupId that you want to modify.
2 /4.1/policies If you want to modify the assigned policies, Get
Policies gets the list of VMware vSphere web
client policies.
Note the policyId that you want to use when modifying the resource group and the policy frequency.
3 /4.1/resource-groups/
{resouceGroupId}
Update a Resource Group modifies the specified
resource group.
Pass the resourceGroupId from Step 1.
Optionally, pass the policyId from Step 2 and enter the frequency details in addition to all other required attributes.
REST API workflow for backing up on demand
To perform backup operations on demand using REST APIs for VMware vSphere, you must follow the prescribed sequence of REST API calls.
For each REST API, add https://<server>:<port> at the front of the REST API to form a complete endpoint.
Step REST API Comments
1 /4.1/resource-groups Get List of Resource Groups gets the list of
VMware vSphere web client resource groups.
Note the resourceGroupId and the policyId for the resource group you want to back up.
2 /4.1/resource-
groups/backupnow
Run a backup on a Resource Group backs up
the resource group on demand.
Pass the resourceGroupId and the policyId from Step 1.
REST API workflow for restoring VMs
To perform restore operations for VM backups using REST APIs for VMware vSphere, you must follow the prescribed sequence of REST API calls.
For each REST API, add https://<server>:<port> at the front of the REST API to form a
complete endpoint.

64 | SnapCenter Plug-in for VMware vSphere
Step REST API Comments
1 Go to http://<vCenter-IP>/mob
Find the VM moref from the VMware Managed Objects URL.
Note the moref for the VM that you want to restore.
2 /4.1/vm/{moref}/backups Get VM Backups gets a list of backups for the
specified VM.
Pass the moref from Step 1.
Note the backupId of the backup you want to restore.
3 /4.1/vm/backups/{backupId}/
snapshotlocations
Get snapshot locations gets the location of the
Snapshot copy for the specified backup.
Pass the backupId from Step 2.
Note the snapshotLocationsList information.
4 /4.1/vm/{moref}/backups/
availableesxhosts
Get available ESX Hosts gets the information
for the host on which the backup is stored.
Note the availableEsxHostsList information.
5 /4.1/vm/{moref}/backups/
{backupId}/restore
Restore a VM from a backup restores the
specified backup.
Pass the information from Steps 3 and 4 in the restoreLocations attribute.
Note: If the VM backup is a partial backup, set the restartVM parameter to "false".
You cannot restore a VM that is a template.
REST API workflow for restoring deleted VMs
To perform restore operations for VM backups using REST APIs for VMware vSphere, you must follow the prescribed sequence of REST API calls.
For each REST API, add https://<server>:<port> at the front of the REST API to form a complete endpoint.
Step REST API Comments
1 Go to http://<vCenter-IP>/mob
Find the VM uuid from the VMware Managed Objects
URL.
Note the uuid for the VM that you want to restore.
2 /4.1/vm/{uuid}/backups Get VM Backups gets a list of backups for the
specified VM.
Pass the uuid from Step 1.
Note the backupId of the backup you want to restore.
3 /4.1/vm/backups/{backupId}/
snapshotlocations
Get snapshot locations gets the location of the
Snapshot copy for the specified backup.
Pass the backupId from Step 2.
Note the snapshotLocationsList information.
4 /4.1/vm/{moref}/backups/
availableesxhosts
Get available ESX Hosts gets the information
for the host on which the backup is stored.
Note the availableEsxHostsList information.
5 /4.1/vm/{uuid}/backups/
{backupId}/restore
Restore VM from a backup using uuid or
restore a deleted VM restores the specified
backup.
Pass the uuid from Step 1.
Pass the backupId from Step 2.
Pass the information from Steps 3 and 4 in the restoreLocations attribute.
Note: If the VM backup is a partial backup, set the restartVM parameter to "false".

Using REST APIs for VMware vSphere | 65
You cannot restore a VM that is a template.
REST API workflow for restoring VMDKs
To perform restore operations for VMDKs using REST APIs for VMware vSphere, you must follow the prescribed sequence of REST API calls.
For each REST API, add https://<server>:<port> at the front of the REST API to form a
complete endpoint.
Step REST API Comments
1 Go to http://<vCenter-IP>/mob
Find the VM moref from the VMware Managed
Objects URL.
Note the moref for the VM in which the VMDK is located.
2 /4.1/vm/{moref}/backups Get VM Backups gets a list of backups for the
specified VM.
Pass the moref from Step 1.
Note the backupId of the backup you want to restore.
3 /4.1/vm/backups/{backupId}/
snapshotlocations
Get snapshot locations gets the location of the
Snapshot copy for the specified backup.
Pass the backupId from Step 2.
Note the snapshotLocationsList information.
4 /4.1/vm/{moref}/backups/
vmdklocations
Get Vmdk Locations gets a list of VMDKs
for the specified VM.
Note the vmdkLocationsList information.
5 /4.1/vm/{ moref}/backups/
{backupId}/
availabledatastores
Get Available Datastores gets a list of
datastores that are available for the restore operation.
Pass the moref from Step 1.
Pass the backupId from Step 2.
Note the DatastoreNameList information.
6 /4.1/vm/{moref}/backups/
availableesxhosts
Get available ESX Hosts gets the information
for the host on which the backup is stored.
Pass the moref from Step 1.
Note the availableEsxHostsList information.
7 /4.1/vm/{moref}/backups/
{backupId}/restorevmdks Restore a VMDK from a backup restores the
specified VMDK from the specified backup.
In the esxHost attribute, pass the information
from availableEsxHostsList in Step 6.
Pass the information from Steps 3 through 5 to the vmdkRestoreLocations attribute:
• In the restoreFromLocation attribute, pass the information from snapshotLocationsList in Step 3.
• In the vmdkToRestore attribute, pass the
information from vmdkLocationsList in Step 4.
• In the restoreToDatastore attribute, pass the information from DatastoreNameList in Step 5.
REST API workflows for attaching and detaching VMDKs
To perform attach and detach operations for VMDKs using REST APIs for VMware vSphere, you must follow the prescribed sequence of REST API calls.
For each REST API, add https://<server>:<port> at the front of the REST API to form a complete endpoint.

66 | SnapCenter Plug-in for VMware vSphere
Workflow for attaching VMDKs
Step REST API Comments
1 Go to http://<vCenter-IP>/mob
Find the VM moref from the VMware Managed Objects URL.
Note the moref for the VM to which you want to attach a VMDK.
2 /4.1/vm/{moref}/backups Get VM Backups gets a list of backups for the
specified VM.
Pass the moref from Step 1.
Note the backupId of the backup you want to restore.
3 /4.1/vm/{moref}/backups/
{backupId}/vmdklocations
Get VMDK Locations gets a list of VMDKs for the
specified VM.
Pass the backupId from Step 2 and the moref from Step 1.
Note the vmdkLocationsList information.
4 /4.1/vm/{moref}/attachvmdks Attach VMDKs attaches the specified VMDK to the
original VM.
Pass the backupId from Step 2 and the moref from Step 1.
Pass the vmdkLocationsList from Step 3 to the vmdkLocations attribute.
Note: To attach a VMDK to a different VM, pass the moref of the target VM in the alternateVmMoref attribute.
Workflow for detaching VMDKs
Step REST API Comments
1 Go to http://<vCenter-IP>/mob
Find the VM moref from the VMware Managed Objects URL.
Note the moref for the VM on which you want to detach a VMDK.
2 /4.1/vm/{moref}/backups Get VM Backups gets a list of backups for the
specified VM.
Pass the moref from Step 1.
Note the backupId of the backup you want to restore.
3 /4.1/vm/{moref}/backups/
{backupId}/vmdklocations
Get VMDK Locations gets a list of VMDKs for the
specified VM.
Pass the backupId from Step 2 and the moref from Step 1.
Note the vmdkLocationsList information.
4 /4.1/vm/{moref}/detachvmdks Detach VMDKs detaches the specified VMDK.
Pass the moref from Step 1.
Pass the VMDK vmdkLocationsList details from Step 3 to the vmdksToDetach attribute.
REST API workflows for mounting and unmounting datastores
To perform mount and unmount operations for datastore backups using REST APIs for VMware vSphere, you must follow the prescribed sequence of REST API calls.
For each REST API, add https://<server>:<port> at the front of the REST API to form a complete endpoint.

Using REST APIs for VMware vSphere | 67
Workflow for mounting datastores
Step REST API Comments
1 Go to http://<vCenter-IP>/mob
Find the datastore moref from the VMware Managed Objects URL.
Note the moref for the datastore that you want to mount.
2 /4.1/datastores/{moref}/
backups
Get the list of backups for a datastore
gets a list of backups for the specified datastore.
Pass the moref from Step 1.
Note the backupId that you want to mount.
3 /4.1/datastores/backups/
{backupId}/snapshotlocators
Get the list of Snapshot Locations gets
details about the location of the specified backup.
Pass the backupId from Step 2.
Note the datastore and the location from the snapshotLocationsList list.
4 /4.1/datastores/{moref}/
availableEsxHosts
Get the list of Available Esxi Hosts gets
the list of ESXi hosts that are available for mount operations.
Pass the moref from Step 1.
Note the availableEsxHostsList information.
5 /4.1/datastores/backups/
{backupId}/mount
Mount datastores for a backup mounts the
specified datastore backup.
Pass the backupId from Step 2.
In the datastore and location attributes, pass the information from snapshotLocationsList in Step 3.
In the esxHostName attribute, pass the information from availableEsxHostsList in Step 4.
Workflow for unmounting datastores
Step REST API Comments
1 /4.1/datastores/backups/
{backupId}/mounted
Get the list of mounted datastores.
Note the datastore moref(s) that you want to unmount.
2 /4.1/datastores/unmount
UnMount datastores for a backup unmounts
the specified datastore backup.
Pass the datastore moref(s) from Step 1.
REST APIs for downloading jobs and generating reports
To generate reports and download logs for VMware vSphere web client jobs using REST APIs, you must use the REST API calls for VMware vSphere.
For each REST API, add https://<server>:<port> at the front of the REST API to form a
complete endpoint.
Getting job details
Use the following REST APIs in the Jobs section to get detailed information on jobs:
REST API Comments
/4.1/jobs Get all jobs gets the job details for multiple jobs. You can
narrow the scope of the request by specifying a job type, such as backup, mountBackup, or restore.
/4.1/jobs/{id} Get job details gets detailed information for the specified
job.

68 | SnapCenter Plug-in for VMware vSphere
Downloading logs
Use the following REST API in the Jobs section to download job logs:
REST API Comments
/4.1/jobs/{id}/logs getJobLogsById downloads the logs for the specified job.
Generating reports
Use the following REST APIs in the Reports section to generate reports:
REST API Comments
4.1/reports/protectedVM Get Protected VM List gets a list of the protected VMs
during the last seven days.
/4.1/reports/
unProtectedVM
Get Unprotected VM List gets a list of the unprotected
VMs during the last seven days.

Using advanced settings | 69
Using advanced settings
To improve operational efficiency, you can modify the scbr.override configuration file to change default values. These values control settings such as the number of VMware snapshots that are created or deleted during a backup or the amount of time before a backup script stops running.
The scbr.override configuration file is used by the SnapCenter Plug-in for VMware vSphere environments that support SnapCenter application-based data protection operations. If this file does not exist, then you must create it from the template file.
Creating the scbr.override configuration file
1. Go to \opt\netapp\scvservice\standalone_aegis\etc\scbr\
scbr.override-template.
2. Copy the scbr.override-template file to a new file called scbr.override in the
\opt\netapp\scvservice\standalone_aegis\etc\scbr directory.
Using the scbr.override configuration file
• By default, the template uses "#" to comment the configuration properties. To use a
property to modify a configuration value, you must remove the "#" characters.
• You must restart the service on the NetApp Data Broker virtual appliance host for the
changes to take effect.
Properties you can override to customize your configuration
You can use the properties that are listed in the scbr.override configuration file to change
default values.
dashboard.protected.vm.count.interval=7
Specifies the number of days for which the dashboard displays VM protection status.
The default value is "7".
guestFileRestore.guest.operation.interval=5
Specifies the time interval, in seconds, that SnapCenter Plug-in for VMware vSphere monitors for completion of guest operations on the guest (Online Disk and Restore Files). The total wait time is set by guestFileRestore.online.disk.timeout and
guestFileRestore.restore.files.timeout.
The default value is "5".
guestFileRestore.monitorInterval=30
Specifies the time interval, in minutes, that SnapCenter Plug-in for VMware vSphere monitors for expired guest file restore sessions. Any session that is running beyond the configured session time is disconnected.
The default value is "30".
guestFileRestore.online.disk.timeout=100
Specifies the time, in seconds, that SnapCenter Plug-in for VMware vSphere waits for an online disk operation on a guest VM to complete. Note that there is an additional 30-second wait time before the plug-in polls for completion of the online disk operation.
The default value is "100".
guestFileRestore.restore.files.timeout=3600

70 | SnapCenter Plug-in for VMware vSphere
Specifies the time, in seconds, that SnapCenter Plug-in for VMware vSphere waits for a restore files operation on a guest VM to complete. If time is exceeded, the process is ended and the job is marked as failed.
The default value is "3600" (1 hour).
guestFileRestore.robocopy.directory.flags=/R:0 /W:0 /ZB /CopyAll /
EFSRAW /A-:SH /e /NJH /NDL /NP
Specifies the extra robocopy flags to use when copying directories during guest file restore operations.
Do not remove /NJH or add /NJS because this will break the parsing of the restore output.
Do not allow unlimited retries (by removing the /R flag) because this might cause endless retries for failed copies.
The default values are "/R:0 /W:0 /ZB /CopyAll /EFSRAW /A-:SH /e /NJH /NDL /NP" .
guestFileRestore.robocopy.file.flags=/R:0 /W:0 /ZB /CopyAll /EFSRAW /
A-:SH /NJH /NDL /NP
Specifies the extra robocopy flags to use when copying individual files during guest file restore operations.
Do not remove /NJH or add /NJS because this will break the parsing of the restore output.
Do not allow unlimited retries (by removing the /R flag) because this might cause endless retries for failed copies.
The default values are "/R:0 /W:0 /ZB /CopyAll /EFSRAW /A-:SH /NJH /NDL /NP" .
guestFileRestore.sessionTime=1440
Specifies the time, in minutes, that SnapCenter Plug-in for VMware vSphere keeps a guest file restore session active.
The default value is "1440" (24 hours).
guestFileRestore.use.custom.online.disk.script=true
Specifies whether to use a custom script for onlining disks and retrieving drive letters when creating guest file restore sessions. The script must be located at [Install
Path] \etc\guestFileRestore_onlineDisk.ps1. A default script is provided
with the installation. The values [Disk_Serial_Number], [Online_Disk_Output],
and [Drive_Output] are replaced in the script during the attach process.
The default value is "false".
include.esx.initiator.id.from.cluster=true
Specifies that SnapCenter Plug-in for VMware vSphere should include iSCSI and FCP intiator IDs from all the ESXi hosts in the cluster in the application over VMDK workflows.
The default value is "false".
max.concurrent.ds.storage.query.count=15
Specifies the maximum number of concurrent calls that SnapCenter Plug-in for VMware vSphere can make to the SnapCenter Server to discover the storage footprint for the datastores. The plug-in makes these calls when you restart the Linux service on the Plug-in for VMware vSphere VM host.
nfs.datastore.mount.retry.count=3
Specifies the maximum number of times SnapCenter Plug-in for VMware vSphere tries to mount a volume as a NFS Datastore in vCenter.
The default value is "3".
nfs.datastore.mount.retry.delay=60000

Using advanced settings | 71
Specifies the time, in milliseconds, that SnapCenter Plug-in for VMware vSphere waits between attempts to mount a volume as a NFS Datastore in vCenter.
The default value is "60000" (60 seconds).
script.virtual.machine.count.variable.name= VIRTUAL_MACHINES
Specifies the environmental variable name that contains the virtual machine count. You must define the variable before you execute any user-defined scripts during a backup job.
For example, VIRTUAL_MACHINES=2 means that two virtual machines are being backed up.
script.virtual.machine.info.variable.name=VIRTUAL_MACHINE.%s
Provides the name of the environmental variable that contains information about the nth virtual machine in the backup. You must set this variable before executing any user defined scripts during a backup.
For example, the environmental variable VIRTUAL_MACHINE.2 provides information about the second virtual machine in the backup.
script.virtual.machine.info.format= %s|%s|%s|%s|%s
Provides information about the virtual machine. The format for this information, which is set in the environment variable, is the following: VM name|VM UUID| VM power state (on|off)|VM snapshot taken (true|false)|IP address(es)
The following is an example of the information you might provide: VIRTUAL_MACHINE.2=VM 1|564d6769-f07d-6e3b-
68b1f3c29ba03a9a|POWERED_ON||true|10.0.4.2
storage.connection.timeout=600000
Specifies the amount of time, in milliseconds, that the SnapCenter Server waits for a response from the storage system.
The default value is "600000" (10 minutes).
vmware.esx.ip.kernel.ip.map
There is no default value. You use this value to map the ESXi IP address to the VMkernel IP address. By default, the SnapCenter Plug-in for VMware vSphere uses the management VMkernel adapter IP address of the ESXi host. If you want Plug-in for VMware vSphere to use a different VMkernel adapter IP address, you must provide an override value.
In the following example, the management VMkernel adapter IP address is 10.225.10.56; however, the SnapCenter Plug-in for VMware vSphere uses the specified address of 10.225.11.57 and 10.225.11.58. And if the management VMkernel adapter IP address is 10.225.10.60, the plug-in uses the address 10.225.11.61.
vmware.esx.ip.kernel.ip.map=10.225.10.56:10.225.11.57,10.225.1
1.58; 10.225.10.60:10.225.11.61
vmware.max.concurrent.snapshots=30
Specifies the maximum number of concurrent VMware snapshots that the SnapCenter Plug-in for VMware vSphere performs on the server.
This number is checked on a per datastore basis and is checked only if the policy has "VM consistent" selected. If you are performing crash-consistent backups, this setting does not apply.
The default value is "30".

72 | SnapCenter Plug-in for VMware vSphere
vmware.max.concurrent.snapshots.delete=30
Specifies the maximum number of concurrent VMware snapshot delete operations, per datastore, that the SnapCenter Plug-in for VMware vSphere performs on the server.
This number is checked on a per datastore basis.
The default value is "30".
vmware.query.unresolved.retry.count=10
Specifies the maximum number of times the SnapCenter Plug-in for VMware vSphere retries sending a query about unresolved volumes because of "...time limit for holding off I/O..." errors.
The default value is "10".
vmware.quiesce.retry.count=0
Specifies the maximum number of times the SnapCenter Plug-in for VMware vSphere retries sending a query about VMware snapshots because of "...time limit for holding off I/O..." errors during a backup.
The default value is "0".
vmware.quiesce.retry.interval=5
Specifies the amount of time, in seconds, that the SnapCenter Plug-in for VMware vSphere waits between sending the queries regarding VMware snapshot "...time limit for holding off I/O..." errors during a backup.
The default value is "5".
vmware.query.unresolved.retry.delay= 60000
Specifies the amount of time, in milliseconds, that the SnapCenter Plug-in for VMware vSphere waits between sending the queries regarding unresolved volumes because of "...time limit for holding off I/O..." errors. This error occurs when cloning a VMFS datastore.
The default value is "60000" (60 seconds).
vmware.reconfig.vm.retry.count=10
Specifies the maximum number of times the SnapCenter Plug-in for VMware vSphere retries sending a query about reconfiguring a VM because of "...time limit for holding off I/O..." errors.
The default value is "10".
vmware.reconfig.vm.retry.delay=30000
Specifies the maximum number of time in milliseconds that the SnapCenter Plug-in for VMware vSphere waits between sending queries regarding reconfiguring a VM because of "...time limit for holding off I/O..." errors.
The default value is "30000" (30 seconds).
vmware.rescan.hba.retry.count=3
Specifies the amount of time, in milliseconds, that the SnapCenter Plug-in for VMware vSphere waits between sending the queries regarding rescanning the host bus adapter because of "...time limit for holding off I/O..." errors.
The default value is "3".
vmware.rescan.hba.retry.delay=30000
Specifies the maximum number of times the SnapCenter Plug-in for VMware vSphere retries requests to rescan the host bus adapter.
The default value is "30000".

Troubleshooting | 73
Troubleshooting
If you encounter unexpected behavior while performing data protection operations using the VMware vSphere web client for the SnapCenter Plug-in for VMware vSphere, you can use the log files to identify the cause and resolve the problem.
For detailed information on SnapCenter Plug-in for VMware vSphere operations, you can use the plug-in Dashboard to download the VMware vSphere web client log files.
VMware vSphere web client GUI not working correctly
Description
After a deployment, or after an upgrade on a VM where Virtual Storage Console for VMware vSphere (VSC) was previously installed, the following might occur:
• Right-click menus that are documented for mount, unmount, attach, and detach
operations do not appear.
• The SnapCenter VMware vSphere web client GUI does not match the documentation.
• The Dashboard is not displayed correctly.
During normal use, a page display (for example, the Resource Groups page) might stall or get stuck loading.
Corrective action
1. Clear the browser cache and then check if the GUI is operating properly.
2. If the problem persists, then restart the VMware vSphere web client service.
Restarting the vSphere web client service in Linux
If your vCenter is on a Linux appliance, then you must use Linux commands to restart the VMware web client service.
Steps
1. Use SSH to log in to the vCenter Server Appliance as root.
2. Access the Appliance Shell or BASH Shell by using the following command:
shell
3. Stop the web client service by using the following command:
Client Command
Flex service-control --stop vsphere-client
HTML5 service-control --stop vsphere-ui
4. Delete all stale scvm packages on vCenter by using the following command:
Client Command
Flex etc/vmware/vsphere-client/vc-packages/vsphere-client-serenity/
rm -rf com.netapp.scvm.webclient-<version_number>
HTML5 etc/vmware/vsphere-ui/vc-packages/vsphere-client-serenity/
rm -rf com.netapp.scvm.webclient-<version_number>
Attention: Do not remove the VASA or VSC7.x and later packages.

74 | SnapCenter Plug-in for VMware vSphere
5. Start the web client service by using the following command:
Client Command
Flex service-control --start vsphere-client
HTML5 service-control --start vsphere-ui
Restarting the vSphere web client service in Windows
If your vCenter is on a Windows host, then you must use Windows commands to restart the VMware web client service.
Steps
1. If you are running vCenter 6.5 or later, perform the following:
a) Stop the web client service by using the following command:
Client Command
Flex service-control --stop vsphere-client
HTML5 service-control --stop vsphere-ui
Wait for the message Completed Stop service request.
b) Delete all stale scvm packages on vCenter by performing the following:
i. Navigate to the vCenter vsphere-client-serenity/ folder.
Client Location of folder
Flex C:\ProgramData\VMware\vCenterServer\cfg\vsphere-client\
vc-packages\vsphere-client-serenity\
HTML5 C:\ProgramData\VMware\vCenterServer\cfg\vsphere-ui\
vc-packages\vsphere-client-serenity\
ii. Delete all plug-in folders with the following name: com.netapp.scvm.webclient-<version_number>.
c) Restart the web client service by using the following command:
Client Command
Flex service-control --start vsphere-client
HTML5 service-control --start vsphere-ui
Wait for the message Completed Start service request.
2. If you are running vCenter 6.0 update 3 or later, perform the following:
a) Open Server Manager on the Windows system on which vCenter Server is running.
b) Click Configuration > Services.
c) Select VMware vSphere Web Client and click Stop.
d) Delete all stale packages on vCenter by performing the following:
i. Navigate to the vCenter vsphere-client-serenity/ folder.
Bad gateway error
Description
One reason this error occurs is if you manually added files or other content to the NetApp Data Broker appliance and then tried to migrate. In this scenario, there is not enough space in the appliance for the migration process.

Troubleshooting | 75
Error message
The remote server returned an error: (502) Bad Gateway.
Corrective action
Remove any manually-added files.
Backup not deleted for on-demand deletion request
Description
You have a resource with a mirror-vault protection policy, and you tried to delete a backup on demand but the backup was not deleted and no error message was returned. This can occur when the backup that you tried to delete is a common base Snapshot copy for the relationship. ONTAP does not return error an error message in this case.
Workaround
There is no workaround.
Cannot add storage
Description
You tried to add storage but the operation failed with a Java certificate error. This can occur when the time settings for your vCenters are not synchronized.
Error message
Failed to add/update storage system(s) information.
java.security.cert.CertificateNotYetValidException
Corrective action
Reconfigure the time for each vCenter so that they are synchronized. The ESXi server, the virtual appliance, and each vCenter must be synchronized to the same time.
Cannot download job logs
Description
You tried to download job logs, but the log file named in the error message has been deleted.
Error message
HTTP ERROR 500 Problem accessing /export-scv-logs.
Corrective action
Check the file access status and permissions for the file named in the error message and correct the access problem.
76 | SnapCenter Plug-in for VMware vSphere
Cannot unmount a backup
Description
Although the backup is listed as mounted in the SnapCenter VMware vSphere web client GUI, it is not listed in the unmount backup screen.
Workaround
Use the REST API "/backup/{backup-Id}/cleanup" to clean up the out-of-bound datastores.
Compatibility check fails
Description
A SnapCenter compatibility check failed when you attempted to create a resource group. Reasons for incompatibility might be:
• VMDKs are on unsupported storage; for example, on an ONTAP system running in
7-Mode or on a non-ONTAP device.
• A datastore is on NetApp storage running Clustered Data ONTAP 8.2.1 or earlier.
SnapCenter versions 4.x support ONTAP 8.3.1 and later.
The SnapCenter Plug-in for VMware vSphere does not perform compatibility checks for
all ONTAP versions; only for ONTAP versions 8.2.1 and earlier. Therefore, always see
the NetApp Interoperability Matrix Tool (IMT) for the latest information about SnapCenter
support.
• A shared PCI device is attached to a VM.
• A preferred IP is not configured in SnapCenter.
• You have not added the storage VM (SVM) management IP to SnapCenter.
• The storage VM is down.
Error message
Some entities are not SnapCenter compatible
Corrective actions
• Make sure the storage VM is running.
• Make sure that the storage system on which the VMs are located have been added to
the SnapCenter Plug-in for VMware vSphere inventory.
• Make sure the storage VM is added to SnapCenter. Use the Add storage system option
on the VMware vSphere web client GUI.
• If there are spanning VMs that have VMDKs on both NetApp and non-NetApp
datastores, then move the VMDKs to NetApp datastores.
Dashboard content does not load
Description
You clicked Dashboard > Backup Jobs but you have two IP addresses for the SnapCenter Plug-in for VMware vSphere host, which is not supported for IPv4. As a result, the job request is sent to an IP address that is not recognized by the SnapCenter Server.
Another possible cause is that you have two NICs.

Troubleshooting | 77
Error message
Failed to load dashboard content.
Corrective action
To prevent this problem, add the IP address that you want to use.
1. Navigate to the location where the NetApp Data Broker virtual appliance is deployed: /opt/netapp/scvservice/standalone_aegis/etc
2. Open the file network-interface.properties.
3. In the network.interface=10.10.10.10 field, add the IP address that you want to
use.
Dashboard does not display jobs
Description
You clicked Dashboard > Jobs or Recent Jobs but the Dashboard does not display the correct information. This might be due to a vCenter caching problem.
Corrective action
1. Log in to the NetApp Data Broker, then click Configuration in the left navigation pane, and then click the service option for SnapCenter Plug-in for VMware vSphere to disable the plug-in.
Use the format https://<OVA-IP-address>:8080 to access the NetApp Data
Broker.
2. In vCenter, clear the browser cache by deleting the com.netapp.scvm.webclient-
4.2.0 folder from the vsphere-client-serenity/ folder.
Client Location of folder
Flex vCenter Server Appliance:
etc/vmware/vsphere-client/vc-packages/vsphere-client-serenity/
vCenter Server for Windows:
C:\ProgramData\VMware\vCenterServer\cfg\vsphere-client\
vc-packages\vsphere-client-serenity\
Mac OS:
/var/lib/vmware/vsphere-client/vsphere-client/vc-packages/
vsphere-client-serenity/
HTML5 vCenter Server Appliance:
etc/vmware/vsphere-ui/vc-packages/vsphere-client-serenity/
vCenter Server for Windows:
C:\ProgramData\VMware\vCenterServer\cfg\vsphere-ui\ vc-packages\vsphere-client-serenity\
Mac OS:
/var/lib/vmware/vsphere-ui/vsphere-client/vc-packages/
vsphere-client-serenity/
3. Stop and then restart the vSphere web client service.
Client Commands
Flex service-control --stop vsphere-client
service-control --start vsphere-client
HTML5 service-control --stop vsphere-ui
service-control --start vsphere-ui

78 | SnapCenter Plug-in for VMware vSphere
4. Log in to the NetApp Data Broker, then click Configuration in the left navigation pane, and then click the service option for SnapCenter Plug-in for VMware vSphere to enable and register the plug-in.
Use the format https://<OVA-IP-address>:8080 to access the NetApp Data
Broker.
You may have reached the maximum number of NFS volumes configured in the vCenter
Description
You attempted to mount a backup copy of an NFS datastore on a storage virtual machine (storage VM) with the root volume in a load-sharing mirror relationship.
Error message
You may have reached the maximum number of NFS volumes configured in
the vCenter. Check the vSphere Client for any error messages.
Corrective action
To prevent this problem, change the maximum volumes setting by navigating to ESX > Manage > Settings > Advance System Settings and changing the NFS.MaxVolumes value. Maximum value is 256.
New VM names are not listed after renaming
Description
After a VM was added to a resource group, the VM was renamed. However, the new name is not displayed on the Resources page.
The SnapCenter Plug-in for VMware vSphere acts on the VM uuid, not the name. Therefore, VM names are a convenience to users.
Corrective action
To make sure new VM names are displayed on the Resources page, edit the resource group and remove the VM. Then rename the VM and re-add the VM to the resource group.
Unable to discover datastores on a storage VM without a management LIF
Description
A scheduled backup job failed when a storage VM without a management LIF was added to SnapCenter. The plug-in cannot resolve this storage VM and was unable to discover any datastores or volumes on the storage VM, and therefore, was not able to perform backup or restore operations.
Corrective action
Either add the storage VM to SnapCenter and specify the management LIF, or add a cluster that contains the storage VM and specify the cluster management LIF.

Troubleshooting | 79
Unable to discover datastores on SCV: Unable to get storage details…
Description
Although backups have run successfully in the past, they are now failing because the time that the plug-in must wait for the storage system exceeds the configured timeout period.
Error message
Unable to discover resources on SCV: Unable to get storage details
for datastore <xxx>…
Corrective action
Increase the configured timeout.
1. In the left Navigator pane of the vSphere web client, click Storage Systems.
2. On the Storage Systems page, select the storage system to be modified and click (Edit).
3. In the Timeout field, increase the number of seconds; 180 seconds is recommended for large environments.
Backup fails with SC-SCVHOST error
Description
A scheduled backup failed because the vCenter did not respond.
Error message
SC-SCVHOST: Activity 'Discovering Resources' failed with error:
Storage discovery failed
Corrective action
Fix the vCenter problem and then either run a backup on demand or wait until the next scheduled backup.
VMware vSphere does not remove snapshot delta disks during restore
Description
When you restore a backup of a VM on a Windows 2008 or Windows 2008 R2 system, the virtual appliance for SnapCenter Plug-in for VMware vSphere does not always remove all snapshot delta disks.
During a backup, the plug-in creates the quiesced VMware snapshot, which results in the creation of snapshot delta disks. However, if you restore the VM, then revert to the VMware snapshot taken during the backup process, and then delete it, not all the delta disk files are deleted.
Corrective action
There is no workaround for this issue. You might want to contact VMware support for assistance.
80 | SnapCenter Plug-in for VMware vSphere
VMware Snapshot copies are not deleted
Description
VMware Snapshot copies might not be deleted if you are backing up a resource group that is using a policy in which the VM consistency option is selected and a VMware Snapshot copy fails for one of the VMs in the resource group. This option quiesces the VMs in the resource group before the backup is performed. When a VM Snapshot copy fails, the VMquiesce flag is set to false, which prevents the VMware Snapshot copies from getting deleted. This situation can cause out-of-diskspace conditions.
Corrective action
There is no workaround for this issue.
Backup fails for version-flexible mirror for VM on NFS datastore
Description
A SnapMirror update failed for a Version-FlexibleMirror relationship for a VM on an NFS datastore.
Corrective action
To successfully transfer Snapshot copies to secondary storage for Version-FlexibleMirror relationships, make sure that the SnapMirror policy type is Asynchronous Mirror and that the "all_source_snapshots" option is checked.
Backups are not detached after guest file restore session is discontinued
Description
A guest file restore operation was performed from a VM-consistent backup. While the guest file restore session was active, another VM-consistent backup was performed for the same VM. When the guest file restore session is disconnected, either manually or automatically after 24 hours, the backups for the session are not detached.
Corrective action
Manually detach the VMDKs that were attached from the active guest file restore session.
Backup operation fails if Snapshot copies on secondary storage reaches maximum
Description
When the number of Snapshot copies on the secondary storage (mirror-vault) reaches the maximum limit, the activity to register backup and apply retention in the backup operation fails.
Error message
This Snapshot copy is currently used as a reference Snapshot copy by
one or more SnapMirror relationships. Deleting the Snapshot copy can
cause future SnapMirror operations to fail.
Troubleshooting | 81
Corrective action
You should configure SnapMirror retention policy for the secondary storage to avoid reaching the maximum limit of Snapshot copies on the secondary storage.
Jobs remain in running state after virtual appliance reboot
Description
You restarted the NetApp Data Broker virtual appliance or you restarted the SnapCenter vSphere web client service when data protection operations were running. When the virtual appliance or the web client service is restarted, those jobs remain in a running state.
Corrective action
Use the REST API failJobs to clean up stale entries.
Plug-in is still listed in vCenter after being removed
Description
After removing the virtual appliance for SnapCenter Plug-in for VMware vSphere host VM, the plug-in remains listed in vCenter until the local vCenter cache is refreshed. However, because the plug-in was removed, no SnapCenter VMware vSphere operations can be performed on that host.
Workaround
• Make sure the plug-in is in a Disabled state on the NetApp Data Broker configuration
page.
• You can wait until the vCenter Server is refreshed or you can restart the vCenter Server.
Too many Snapshot copies after attach or mount operations
Description
If you perform an attach or mount operation on a SnapVault destination volume that is protected by SnapVault schedules and is running ONTAP 8.2.4, you may see an extra Snapshot copy listed in the attach or mount dialog screen. This occurs because the attach or mount operation clones the SnapVault destination volume and ONTAP updates the volume by creating a new Snapshot copy.
Corrective action
Turn off the ONTAP schedule for the SnapVault volume to prevent new Snapshot copies from being created when you clone the volume. Previously existing Snapshot copies are not deleted.
Guest file restore session is blank
Description
You created a guest file restore session and while that session was active, the guest operating system was rebooted. When this occurs, VMDKs in the guest OS might remain offline. Therefore, when you try to browse the guest file restore session, the list is blank.

82 | SnapCenter Plug-in for VMware vSphere
Corrective action
Manually put the VMDKs back online in the guest OS. When the VMDKs are online, the guest file restore session will display the correct contents.
Guest file restore attach disk operation fails
Description
You started a guest file restore operation but the attach disk operation failed even though VMware Tools was running and the Guest OS credentials were correct.
Error
Error while validating guest credentials, failed to access guest
system using specified credentials: Verify VMWare tools is running
properly on system and account used is Administrator account, Error
is SystemError vix error codes = (3016, 0).
Corrective action
Restart the VMware Tools Windows service on the Guest OS, and then retry the guest file restore operation.
Guest file restore email shows ?????? for file name in email
Description
You used the guest file restore feature to restore files or folders with non-English characters in the names and the email notification displays "??????" for the restored file names.
Corrective action
The email attachment correctly lists the names of the restored files and folders.

Troubleshooting | 83
Guest file restore session creation fails during validation
Description
You attempted to start a guest file restore session but the request timed out because a VM clone operation was in progress.
Error message
Could not access HTTP invoker remote service at [null]; nested
exception is java.net.SocketTimeoutException: Read timed out
Workaround
There is no workaround. You must wait until the clone operation ends.
“Bad Gateway” error during migration
Description
During migration from SnapCenter to the SnapCenter Plug-in for VMware vSphere virtual appliance, the NetApp Data Broker connection was stopped, or the service was stopped.
Workaround
There is no workaround. The NetApp Data Broker connection status must be “connected” during the migration process.
SnapCenter vSphere web client hangs on GUI after changing the OVA IP
Description
The NetApp Data Broker virtual appliance IP address was changed but the new address was not registered with vCenter.
Corrective action
1. Restart the SnapCenter vSphere web client service.
2. In vCenter, check that the SnapCenter vSphere web client is displayed in the home menu.
3. Check the configuration of the SnapCenter plug-in in vCenter and update the IP address for the virtual appliance, if necessary.
4. Check the registered IP address for the local host in vCenter. If the IP address that is registered in vCenter is different from the ID of the current local host, then reregister the vCenter extension with the new IP address.
5. Restart the vSphere web client service.

84 | SnapCenter Plug-in for VMware vSphere
Migrating to the virtual appliance for SnapCenter Plug-in for VMware vSphere
You use Windows PowerShell cmdlets to migrate SnapCenter metadata from the Windows-based SnapCenter Server to the SnapCenter Plug-in for VMware vSphere enabled by the virtual appliance.
There are two migration options:
• Migrating from SnapCenter to the NetApp Data Broker virtual appliance for SnapCenter
Plug-in for VMware vSphere
You must migrate metadata for the following from Windows-based SnapCenter:
o VM-consistent data protection performed by the SnapCenter Plug-in for VMware
vSphere
o Application-consistent data protection metadata of virtualized databases or file
systems performed by a SnapCenter application-based plug-in with support from the
SnapCenter Plug-in for VMware vSphere
To migrate, you use the Windows SnapCenter PowerShell cmdlet
invoke-SCVOVAMigration.
You can only migrate metadata from SnapCenter 4.0 or later.
• Migrating from VSC to the NetApp Data Broker virtual appliance for SnapCenter Plug-in
for VMware vSphere
You can migrate VSC 6.2.x (SMVI) metadata for backup jobs that are not integrated with
SnapCenter.
To migrate, you use the NetApp Import Utility for SnapCenter and Virtual Storage
Console that is in the NetApp Support ToolChest. Make sure to select the VSC to
SnapCenter migration option.
NetApp ToolChest: NetApp Import Utility for SnapCenter and Virtual Storage Console
Migrating from SnapCenter to the virtual appliance for SnapCenter Plug-in for VMware vSphere
You use the SnapCenter Windows PowerShell cmdlets to migrate SnapCenter VM-consistent backup metadata and SnapCenter application-consistent for virtualized data backup metadata to the NetApp Data Broker virtual appliance for SnapCenter Plug-in for VMware vSphere.
Before you begin
• You must be running SnapCenter Server 4.2 or later.
• The NetApp Data Broker virtual appliance must be deployed with SnapCenter Plug-in for
VMware vSphere enabled and registered on vCenter.
• On the NetApp Data Broker dashboard, the status for SnapCenter Plug-in for VMware
vSphere must be “connected.”
• You must have created a Linux type Run As credential using the account that was
specified during the deployment of the NetApp Data Broker virtual appliance.
• SnapCenter hosts must be configured with IP addresses, not fully qualified domain
names (FQDN).
Note: In a Linked Mode environment, you must migrate all linked nodes together.
• Names for storage VMs must resolve to management LIFs.
If you added etc host entries for storage VM names in SnapCenter, you must verify that
they are also resolvable from the virtual appliance.

Migrating to the virtual appliance for SnapCenter Plug-in for VMware vSphere | 85
About this task
• The migration command migrates metadata from SnapCenter 4.0, 4.1, and 4.1.1 only. If
you are using an earlier version of SnapCenter then you must first upgrade before you
can migrate.
o What is migrated:
SnapCenter metadata, which includes storage systems, customized throttles
and email settings in the SnapCenter configuration file, policies, resource
groups, backup metadata, and mounts.
(the migration fails when it encounters prescripts or postscripts)
o What is not migrated:
▪ Pre- and post-scripts that are configured for resource groups
▪ Active guest file restore sessions, guest file restore credentials, and proxy
VMs
▪ scbr.override configuration file
• To ensure migration success, the migration command suspends all hosts that are
registered with SnapCenter. After the migration process finishes successfully,
SnapCenter hosts are resumed.
• You must use the Windows Powershell cmdlet invoke-SCVOVAMigration for each
SnapCenter Plug-in for VMware vSphere that is registered with SnapCenter. The cmdlet
does the following:
o Suspends all schedules to prevent job failures during the migration. After a
successful migration, schedules are automatically re-enabled.
o Migrates storage connections and metadata.
o Creates backup schedules for post-migration backups.
o Uninstalls the existing SnapCenter Plug-in for VMware vSphere from the Windows
host.
Note: If the plug-in is installed on the SnapCenter Server host and protection is configured for the SnapCenter repository, then the migration process also uninstalls the
plug-in package that contains the SnapCenter Plug-in for VMware vSphere and the SnapCenter Plug-in for Windows, and then reinstalls the latest version of SnapCenter Plug-in for Windows to support the repository protection. The host type in the SnapCenter GUI changes from “vsphere” to “Windows”.
o Removes the vSphere host and resource groups from the Windows SnapCenter
Server.
o Activates the backups jobs on the virtual appliance for SnapCenter Plug-in for
VMware vSphere.
o Registers the vSphere host for the virtual appliance with SnapCenter to support
application-based backups of virtualized databases and file systems (application over
VMDK backups).
• Metadata for application based VMDK backups is stored in the SnapCenter Server
repository. Metadata for VM and datastore backups is stored in the NetApp Data Broker
virtual appliance repository.
Steps
1. Log on to the SnapCenter vSphere web client and verify that no jobs are running.
2. Log on to the SnapCenter GUI using the SnapCenter Admin username.
If you use any other username to log in, even if that username has all permissions, might cause a migration error.

86 | SnapCenter Plug-in for VMware vSphere
3. In the Windows SnapCenter GUI left navigation pane, click Settings, then click the
Credential tab, and then click Add to add credentials for the virtual appliance.
4. Create the name of the Run As credential to be used in the invoke-SCVOVAMigration
cmdlet.
Note: You must select Linux for the Authentication field.
This step adds the credentials that SnapCenter Server uses to access the virtual appliance during the migration.
5. Open a Windows PowerShell window and run the following cmdlets:
Open-SmConnection
invoke-SCVOVAMigration -SourceSCVHost old-SCV-host-IP
-DestinationSCVOVAHost new-OVA-IP -OVACredential OVA-credentials
-ByPassValidationCheck -Overwrite -ContinueMigrationOnStorageError
-ScheduleOffsetTime time-offset
The migration command suspends job schedules before migrating metadata and registers the virtual appliance with SnapCenter Server.
After you finish
• Job details on the Dashboard
Information on the migrated backups is listed in the recent jobs but detailed information
is not displayed in the Dashboard until backups are performed after the migration.
• Backup names
Backup names before migration have the format RGName_HostName_Timestamp.
For example, -NAS_DS_RG_perf1server_07-05-2019_02.11.59.9338.
Backup names after migration have the format RGName_Timestamp.
For example, -NAS_VM_RG_07-07-2019_21.20.00.0609.
• Pre- and post-scripts
Scripts that are configured for resource groups are not migrated. In addition, scripts
written for Windows systems will not run on the Linux-based virtual appliance. Therefore,
you must recreate the scripts and add those scripts after migration.
• Guest file restore credentials
Guest file restore credentials are not migrated. Therefore, you must create new guest file
credentials after the migration.
• scbr.override configuration file
If you have customized settings in the scbr.override configuration file, then you must
move that file to the virtual appliance and restart the web client service.
• Upgrade SnapCenter application-based plug-ins
• If you use the virtual appliance for SnapCenter Plug-in for VMware vSphere to support
other SnapCenter plug-ins, then you must update those plug-ins to 4.2 or later.
• Uninstall SnapCenter Server
If you use SnapCenter only for VM-consistent or crash-consistent data protection, then
after all VM backups are migrated to the virtual appliance, you can uninstall SnapCenter
Server on the Windows host.

Disabling the SnapCenter Plug-in for VMware vSphere” | 87
Disabling the SnapCenter Plug-in for VMware vSphere”
If you no longer need the SnapCenter data protection features and want to uninstall the plug-in, you must disable the plug-in in the NetApp Data Broker virtual appliance configuration. For example, if you deployed the NetApp Data Broker virtual appliance in a test environment, you might need to disable the SnapCenter plug-in in that environment and enable them in a production environment.
Before you begin
You must have administrator privileges.
About this task
When you disable the SnapCenter Plug-in for VMware vSphere, all resource groups are suspended and the plug-in is unregistered as an extension in vCenter.
When you enable the SnapCenter Plug-in for VMware vSphere, the plug-in is registered as an extension in vCenter, all resource groups are in production mode, and all schedules are enabled.
Steps
1. Optional: Back up the SnapCenter MySQL repository in case you want to restore it to a new virtual appliance. Backing up the virtual appliance repository
2. Log in to NetApp Data Broker web client.
The IP of the NetApp Data Broker is displayed when you deploy the virtual appliance.
3. Click Configuration in the left navigation pane, and then click the service option for SnapCenter Plug-in for VMware vSphere to disable the plug-in.
4. Confirm your choice.
5. Delete the .ova file, as follows:
a. Log in to VMware vSphere.
b. In the left navigator screen, right-click the instance of the OVA (the name of the OVA that was used when the OVA was deployed) and select Delete from Disk.
c. Log in to SnapCenter and remove the vSphere host.

88 | SnapCenter Plug-in for VMware vSphere
Minimum ONTAP privileges required
The minimum ONTAP privileges that are required vary according to the SnapCenter plug-ins you are using for data protection.
All SnapCenter plug-ins require the following minimum privileges, except where noted in the information following these tables.
All-access commands: Minimum privileges required for ONTAP 8.2.x and later
event generate-autosupport-log
job history show
job stop
lun
lun create
lun delete
lun igroup add
lun igroup create
lun igroup delete
lun igroup rename
lun igroup show
lun mapping add-reporting-nodes
lun mapping create
lun mapping delete
lun mapping remove-reporting-nodes
lun mapping show
lun modify
lun move-in-volume
lun offline
lun online
lun persistent-reservation clear
lun resize
lun serial
lun show
snapmirror list-destinations
snapmirror policy add-rule
snapmirror policy modify-rule
snapmirror policy remove-rule
snapmirror policy show
snapmirror restore
snapmirror show
snapmirror show-history
snapmirror update
snapmirror update-ls-set
version
All-access commands: Minimum privileges required for ONTAP 8.2.x and later
volume clone create
volume clone show
volume clone split start
volume clone split stop
volume create
volume destroy
volume file clone create
volume file show-disk-usage
volume offline
volume online
volume modify
Minimum ONTAP privileges required | 89
volume qtree create
volume qtree delete
volume qtree modify
volume qtree show
volume restrict
volume show
volume snapshot create
volume snapshot delete
volume snapshot modify
volume snapshot rename
volume snapshot restore
volume snapshot restore-file
volume snapshot show
volume unmount
vserver cifs
vserver cifs share create
vserver cifs share delete
vserver cifs shadowcopy show
vserver cifs share show
vserver cifs show
vserver export-policy
vserver export-policy create
vserver export-policy delete
vserver export-policy rule create
vserver export-policy rule show
vserver export-policy show
vserver iscsi
vserver iscsi connection show
vserver show
Read-only commands: Minimum privileges required for ONTAP 8.2.x and later
network interface
network interface failover-groups
network interface show
vserver
Additional information for SnapCenter Plug-in for VMware vSphere
• If you are running ONTAP 8.2.x
You must login as vsadmin on the storage VM to have the appropriate privileges for
SnapCenter Plug-in for VMware vSphere operations.
• If you are running ONTAP 8.3 and later
You must login as vsadmin or with a role that has the minimum privileges listed in the
tables above.

90 | SnapCenter Plug-in for VMware vSphere
Copyright information
Copyright © 2019 NetApp, Inc. All rights reserved. Printed in the U.S.
No part of this document covered by copyright may be reproduced in any form or by any means—graphic, electronic, or mechanical, including photocopying, recording, taping, or storage in an electronic retrieval system—without prior written permission of the copyright owner.
Software derived from copyrighted NetApp material is subject to the following license and disclaimer:
THIS SOFTWARE IS PROVIDED BY NETAPP "AS IS" AND WITHOUT ANY EXPRESS OR IMPLIED WARRANTIES, INCLUDING, BUT NOT LIMITED TO, THE IMPLIED WARRANTIES OF MERCHANTABILITY AND FITNESS FOR A PARTICULAR PURPOSE, WHICH ARE HEREBY DISCLAIMED. IN NO EVENT SHALL NETAPP BE LIABLE FOR ANY DIRECT, INDIRECT, INCIDENTAL, SPECIAL, EXEMPLARY, OR CONSEQUENTIAL DAMAGES (INCLUDING, BUT NOT LIMITED TO, PROCUREMENT OF SUBSTITUTE GOODS OR SERVICES; LOSS OF USE, DATA, OR PROFITS; OR BUSINESS INTERRUPTION) HOWEVER CAUSED AND ON ANY THEORY OF LIABILITY, WHETHER IN CONTRACT, STRICT LIABILITY, OR TORT (INCLUDING NEGLIGENCE OR OTHERWISE) ARISING IN ANY WAY OUT OF THE USE OF THIS SOFTWARE, EVEN IF ADVISED OF THE POSSIBILITY OF SUCH DAMAGE.
NetApp reserves the right to change any products described herein at any time, and without notice. NetApp assumes no responsibility or liability arising from the use of products described herein, except as expressly agreed to in writing by NetApp. The use or purchase of this product does not convey a license under any patent rights, trademark rights, or any other intellectual property rights of NetApp.
The product described in this manual may be protected by one or more U.S. patents, foreign patents, or pending applications.
Data contained herein pertains to a commercial item (as defined in FAR 2.101) and is proprietary to NetApp, Inc. The U.S. Government has a non-exclusive, non-transferrable, non-sublicensable, worldwide, limited irrevocable license to use the Data only in connection with and in support of the U.S. Government contract under which the Data was delivered. Except as provided herein, the Data may not be used, disclosed, reproduced, modified, performed, or displayed without the prior written approval of NetApp, Inc. United States Government license rights for the Department of Defense are limited to those rights identified in DFARS clause 252.227-7015(b).

Trademark information
NETAPP, the NETAPP logo, and the marks listed on the NetApp Trademarks page are trademarks of NetApp, Inc. Other company and product names may be trademarks of their respective owners.
http://www.netapp.com/us/legal/netapptmlist.aspx
How to send your comments about documentation and receive update notifications
You can help us to improve the quality of our documentation by sending us your feedback. You can receive automatic notification when production-level (GA/FCS) documentation is initially released or important changes are made to existing production-level documents.
If you have suggestions for improving this document, send us your comments by email.
To help us direct your comments to the correct division, include in the subject line the product name, version, and operating system.
If you want to be notified automatically when production-level documentation is released or important changes are made to existing production-level documents, follow Twitter account @NetAppDoc.
You can also contact us in the following ways:
• NetApp, Inc., 495 East Java Drive, Sunnyvale, CA 94089 U.S.
• Telephone: +1 (408) 822-6000
• Fax: +1 (408) 822-4501
• Support telephone: +1 (888) 463-8277