
curriculum and standards greenhouse manual - Oklahoma.gov
76
An Introductory Guide for Educators GREENHOUSE MANUAL UNITED STATES BOTANIC GARDEN cityblossoms
-
Upload
khangminh22 -
Category
Documents
-
view
1 -
download
0
Transcript of curriculum and standards greenhouse manual - Oklahoma.gov

An Introductory Guide for Educators
GREENHOUSEMANUAL
UNITED STATES BOTANIC GARDEN
cityblossoms


A N I N T R O D U C T O R Y G U I D E F O R E D U C A T O R S | 3
GREENHOUSE MANUAL An Introductory Guide for Educators
A publication of the National Center for Appropriate Technology in collaboration with the United States Botanic Garden and City Blossoms
United States Botanic Garden (USBG) 100 Maryland Avenue, SW, Washington, DC 20001
202.225.8333 | www.usbg.gov
Mailing Address:245 First Street, SW
Washington, DC 20515
The U.S. Botanic Garden (USBG) is dedicated to demonstrating the aesthetic, cultural, economic, therapeutic, and ecological importance of plants to the well-being of humankind. The USBG fosters the exchange of ideas and
information relevant to national and international partnerships.
National Center for Appropriate Technology (NCAT)3040 Continental Drive, Butte, MT 59702
800.275.6228 | www.ncat.org
The National Center for Appropriate Technology’s (NCAT) mission is to help people by championing small-scale, local, and sustainable solutions to reduce poverty, promote healthy communities, and protect natural resources. NCAT’s ATTRA Program is committed to providing high-value information and technical assistance to farmers, ranchers, Extension agents,
educators, and others involved in sustainable agriculture in the United States.
For more information on ATTRA and to access its publications, including this Greenhouse Manual: An Introductory Guide for Educators, visit www.attra.ncat.org or call the ATTRA toll-free hotline at 800.346.9140.
City Blossoms is a nonprofit dedicated to fostering healthy communities by developing creative, kid-driven green spaces. Applying their unique brand of gardens, science, art, healthy living, and community building, they “blossom” in neighborhoods
where kids, their families, and neighbors may not otherwise have access to green spaces. For more information on City Blossoms, their programming, resources and trainings, visit www.cityblossoms.org or call 202.431.8991.
UNITED STATES BOTANIC GARDEN
cityblossoms

4 | G R E E N H O U S E M A N U A L
ACKNOWLEDGMENTS
This manual was written and prepared by Andy Pressman and Thea Rittenhouse, NCAT Agriculture Specialists as well as Rebecca Lemos-Otero, Amy Smith and Willa Pohlman of City Blossoms.
Additional contributors include:Co-Authors: Guy Ames, Sharon Burke, Rex Dufour, Tammy Howard, Chris Lent, Ruth Mischler, Lee Coykendall, Emily Hestness, Ray Mims, and Susan PellEditors: Cathy Svejkovsky and Tracy Mumma
Thank you to the following people at the United States Botanic Garden for their partnership and support in producing this manual and for their dedication to sustainable gardening and education: Lee Coykendall, Senior Education Specialist Emily Hestness, Ph.D, Urban Agriculture Education Specialist Ray Mims, Partnership, Conservation and Sustainability Horticulturist Susan Pell, Ph.D., Deputy Executive Director
We would like to take the opportunity to thank these advisors from across the school greenhouse spectrum who provided guidance on this manual’s content, content review, and assistance with outreach and promotion.
Jacqueline Scotland, DCPS Wilson High School Cassandra Bell DCPS Eastern High SchoolKelly Custer, River Terrace Education Campus Gloria Gibson, DCPS Wilson High School Sandra Farber, Extension Agent, University of the District of Columbia (UDC) Beth Gingold, DCPS, Schools Conservation Division Sally Parker, DCPS Energy and Sustainability Josh Singer, DC Parks and RecreationSam Ullery, Office of the State Superintendent of Education, School Garden Coordinator Alex Wilson, DCPS, Wilson High SchoolMark Chambers, DCPS, Schools Conservation Division

A N I N T R O D U C T O R Y G U I D E F O R E D U C A T O R S | 5
TABLE OF CONTENTS
Foreward . . . . . . . . . . . . . . . . . . . . . . . . . . . . . . . . . . . . . . . . . . . . . . . . . . . . . . . . . . . . . . . . . . . . . . . . . . . . . . . . . . . . . 6
How This Manual Works—An Introduction . . . . . . . . . . . . . . . . . . . . . . . . . . . . . . . . . . . . . . . . . . . . . . . . . . . . . . . . . . . . . . . . . . 7
Part 1: A Strong Foundation—Getting Started . . . . . . . . . . . . . . . . . . . . . . . . . . . . . . . . . . . . . . . . . . . . . . . . . . . . . . . . . . . . . 8 Factors to Consider about a Greenhouse . . . . . . . . . . . . . . . . . . . . . . . . . . . . . . . . . . . . . . . . . . . . . . . . . . . . . . . . . . . . . . 8
Designing for Your Climate . . . . . . . . . . . . . . . . . . . . . . . . . . . . . . . . . . . . . . . . . . . . . . . . . . . . . . . . . . . . . . . . . . . . . . . . . 9
Connections to Standards and Evidence of Benefits . . . . . . . . . . . . . . . . . . . . . . . . . . . . . . . . . . . . . . . . . . . . . . . . . . . . . . 9
Spotlight: Grown By Kids, For Kids in Livingston, Montana . . . . . . . . . . . . . . . . . . . . . . . . . . . . . . . . . . . . . . . . . . . . . . . . 11
Part 2: The Best Greenhouse For You—Design & Budget . . . . . . . . . . . . . . . . . . . . . . . . . . . . . . . . . . . . . . . . . . . . . 12
Questions to Ask in Preparation: What, Why, Where, When & How . . . . . . . . . . . . . . . . . . . . . . . . . . . . . . . . . . . . . . . . . . 12
Greenhouse Types . . . . . . . . . . . . . . . . . . . . . . . . . . . . . . . . . . . . . . . . . . . . . . . . . . . . . . . . . . . . . . . . . . . . . . . . . . . . . . 13
Infrastructure Elements: Temperature, Orientation, Ventilation & Light . . . . . . . . . . . . . . . . . . . . . . . . . . . . . . . . . . . . . . . . . 16
Creating an Interior Layout . . . . . . . . . . . . . . . . . . . . . . . . . . . . . . . . . . . . . . . . . . . . . . . . . . . . . . . . . . . . . . . . . . . . . . . . . 20
Hydroponics . . . . . . . . . . . . . . . . . . . . . . . . . . . . . . . . . . . . . . . . . . . . . . . . . . . . . . . . . . . . . . . . . . . . . . . . . . . . . . . . . . . . 22
Budgeting for a School Greenhouse . . . . . . . . . . . . . . . . . . . . . . . . . . . . . . . . . . . . . . . . . . . . . . . . . . . . . . . . . . . . . . . . . . 23
Part 3: Plants, Plants, Plants—Growing in Greenhouse . . . . . . . . . . . . . . . . . . . . . . . . . . . . . . . . . . . . . . . . . . . . . . . . . . . . 26
Planning with the School Year & Growing Season . . . . . . . . . . . . . . . . . . . . . . . . . . . . . . . . . . . . . . . . . . . . . . . . . . . . . . . 26
Creating a Planting Schedule . . . . . . . . . . . . . . . . . . . . . . . . . . . . . . . . . . . . . . . . . . . . . . . . . . . . . . . . . . . . . . . . . . . . . . . 27
Greenhouse Planting with Students . . . . . . . . . . . . . . . . . . . . . . . . . . . . . . . . . . . . . . . . . . . . . . . . . . . . . . . . . . . . . . . . . . 29
From Seed to Seedling: Soil, Water & Nutrients . . . . . . . . . . . . . . . . . . . . . . . . . . . . . . . . . . . . . . . . . . . . . . . . . . . . . . . . . 33
Soil Mix Ingredients . . . . . . . . . . . . . . . . . . . . . . . . . . . . . . . . . . . . . . . . . . . . . . . . . . . . . . . . . . . . . . . . . . . . . . . . . . . . . . 35
Steps for Starting Seeds . . . . . . . . . . . . . . . . . . . . . . . . . . . . . . . . . . . . . . . . . . . . . . . . . . . . . . . . . . . . . . . . . . . . . . . . . . 36
Caring for Seedlings . . . . . . . . . . . . . . . . . . . . . . . . . . . . . . . . . . . . . . . . . . . . . . . . . . . . . . . . . . . . . . . . . . . . . . . . . . . . . . 37
Seedling Nutrition . . . . . . . . . . . . . . . . . . . . . . . . . . . . . . . . . . . . . . . . . . . . . . . . . . . . . . . . . . . . . . . . . . . . . . . . . . . . . . . 38
Environmental & Space Factors . . . . . . . . . . . . . . . . . . . . . . . . . . . . . . . . . . . . . . . . . . . . . . . . . . . . . . . . . . . . . . . . . . . . . 40
Problem Solving: Pest & Disease Management . . . . . . . . . . . . . . . . . . . . . . . . . . . . . . . . . . . . . . . . . . . . . . . . . . . . . . . . . 42
Beneficial Insects . . . . . . . . . . . . . . . . . . . . . . . . . . . . . . . . . . . . . . . . . . . . . . . . . . . . . . . . . . . . . . . . . . . . . . . . . . . . . . . . 44
Pests . . . . . . . . . . . . . . . . . . . . . . . . . . . . . . . . . . . . . . . . . . . . . . . . . . . . . . . . . . . . . . . . . . . . . . . . . . . . . . . . . . . . . . . . . 45
Tools for Managing Greenhouse Plant Diseases . . . . . . . . . . . . . . . . . . . . . . . . . . . . . . . . . . . . . . . . . . . . . . . . . . . . . . . . . 48
Spotlight: Helping Hands in Washington, D.C. . . . . . . . . . . . . . . . . . . . . . . . . . . . . . . . . . . . . . . . . . . . . . . . . . . . . . . . . . . 50
Part 4: Let’s Learn Together—Education & Engagement . . . . . . . . . . . . . . . . . . . . . . . . . . . . . . . . . . . . . . . . . . . . . . . . . . . 51
Not Just Science! Creating a Larger Vision . . . . . . . . . . . . . . . . . . . . . . . . . . . . . . . . . . . . . . . . . . . . . . . . . . . . . . . . . . . . . 51
Project-Based Learning . . . . . . . . . . . . . . . . . . . . . . . . . . . . . . . . . . . . . . . . . . . . . . . . . . . . . . . . . . . . . . . . . . . . . . . . . . . 53
Time to Harvest: Connecting a School Greenhouse with a Farm-to-School Program . . . . . . . . . . . . . . . . . . . . . . . . . . . . . 55
Spotlight: Growing Greens in Washington DC . . . . . . . . . . . . . . . . . . . . . . . . . . . . . . . . . . . . . . . . . . . . . . . . . . . . . . . . . . 59
Appendix 1: Budget Template . . . . . . . . . . . . . . . . . . . . . . . . . . . . . . . . . . . . . . . . . . . . . . . . . . . . . . . . . . . . . . . . . . . . . . . . . . . . . . . 60
Appendix 2: Greenhouse Seedling Planting Schedule . . . . . . . . . . . . . . . . . . . . . . . . . . . . . . . . . . . . . . . . . . . . . . . . . . . . . . . . . . . . . 62
Appendix 3: Succession Planting . . . . . . . . . . . . . . . . . . . . . . . . . . . . . . . . . . . . . . . . . . . . . . . . . . . . . . . . . . . . . . . . . . . . . . . . . . . . 63
Appendix 4: Further Resources . . . . . . . . . . . . . . . . . . . . . . . . . . . . . . . . . . . . . . . . . . . . . . . . . . . . . . . . . . . . . . . . . . . . . . . . . . . . . 64
References . . . . . . . . . . . . . . . . . . . . . . . . . . . . . . . . . . . . . . . . . . . . . . . . . . . . . . . . . . . . . . . . . . . . . . . . . . . . . . . . . . . . . . . . . . . . . 72

6 | G R E E N H O U S E M A N U A L
FOREWORD
Across the United States, a growing number of schools are planting gardens, engaging in Farm to School activities, and integrating plant science into the curriculum. To support and expand these hands-on learning activities, schools are exploring ways to build new infrastructure or reinvest in existing facilities such as school greenhouses. Unfortunately, many school greenhouses are underutilized or only a single knowledgeable and dedicated teacher is enabling their use.
The United States Botanic Garden (USBG), the National Center for Appropriate Technology (NCAT), and City Blossoms recognized the emerging need for user-friendly guidance on operating school greenhouses and maximizing their educational potential. To that end, we have developed this introductory manual for educators wanting to better use their school greenhouses for educational purposes. The manual clearly and concisely lays out a basic understanding of greenhouses, how to integrate them into lessons, and how to effectively use them in classroom curricula and after-school activities.
The USBG would like to thank NCAT, City Blossoms, and our team of advisors for the time, energy, and thoughtfulness they devoted to the development of this manual. We hope that it will serve as a useful resource to facilitate transformative learning experiences in schools nationwide, while cultivating students’ appreciation of the importance of plants to the well-being of humankind.
Sarharah Moon Chaption, Ph.DExecutive DirectorUnited States Botanic Garden
A N I N T R O D U C T O R Y G U I D E F O R E D U C A T O R S | 7
Educators today are increasingly challenged to align their instruction with state and national standards, resulting in having less time to incorporate creative approaches to engage students. While these standards provide a prescriptive framework and benchmarks for understanding, teachers and school districts remain at the helm of determining how to teach. This opens many opportunities to incorporate best practices in experiential learning into an educator’s toolbox.
This manual provides information and tactics for K–12 teachers, regardless of experience level, including:• Classroom Connections • Project-Based Learning: A Template for Developing
Interdisciplinary Performance Tasks• Using Greenhouses to Grow Plants and Vegetables
The Appendix provides resource listing that include:• Greenhouse and Garden-based Curricula, Lesson Plans,
and E-guides• Educator Professional Development Resources, and • Funding Opportunities
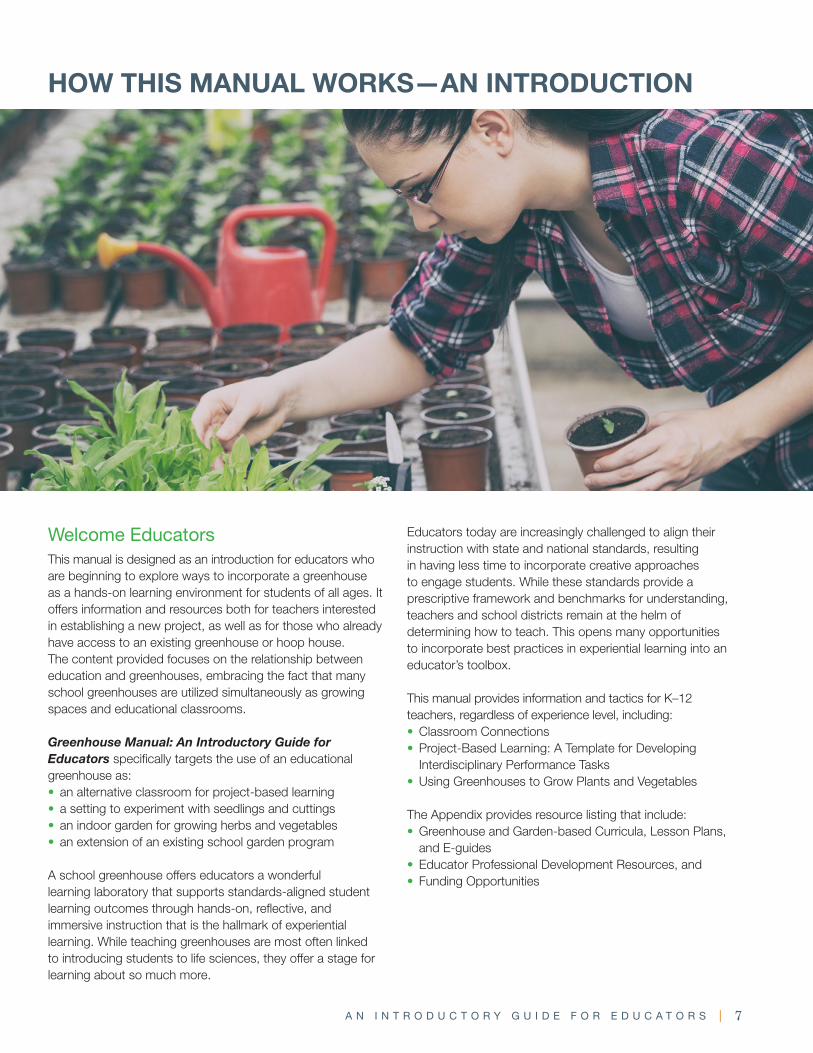
Welcome EducatorsThis manual is designed as an introduction for educators who are beginning to explore ways to incorporate a greenhouse as a hands-on learning environment for students of all ages. It offers information and resources both for teachers interested in establishing a new project, as well as for those who already have access to an existing greenhouse or hoop house. The content provided focuses on the relationship between education and greenhouses, embracing the fact that many school greenhouses are utilized simultaneously as growing spaces and educational classrooms.
Greenhouse Manual: An Introductory Guide for Educators specifically targets the use of an educational greenhouse as:• an alternative classroom for project-based learning • a setting to experiment with seedlings and cuttings• an indoor garden for growing herbs and vegetables• an extension of an existing school garden program
A school greenhouse offers educators a wonderful learning laboratory that supports standards-aligned student learning outcomes through hands-on, reflective, and immersive instruction that is the hallmark of experiential learning. While teaching greenhouses are most often linked to introducing students to life sciences, they offer a stage for learning about so much more.
HOW THIS MANUAL WORKS—AN INTRODUCTION
8 | G R E E N H O U S E M A N U A L
• What structure is right? If you are planning on building a new greenhouse structure, there are a number of questions to ask. The intended use, available space, available budget and your climate will all influence what structure is best for your school. See Part 2 The Best Greenhouse for You: Design & Budget for more on greenhouse structures.
Building a Greenhouse ProgramDeveloping a successful greenhouse program will not happen overnight and often takes a few school years to refine. However, building strong infrastructure as you create your program will help to establish a more sustainable project. Developing a group of teachers, staff, parents, community members and students who are committed to shaping and maintaining the program will help give this project longevity. Ideally, the team of educators involved should span across grade levels and academic disciplines. With a strong multi-grade and interdisciplinary structure, the project will have the support and knowledge base to keep programming and maintenance running smoothly.
Involving students from the beginning is key to building a project that they will be invested in and take ownership over. Whether your intended use is focused on particular classes or after school programming, clearly outlining students’ roles in the greenhouse will help encourage student participation and enthusiasm.
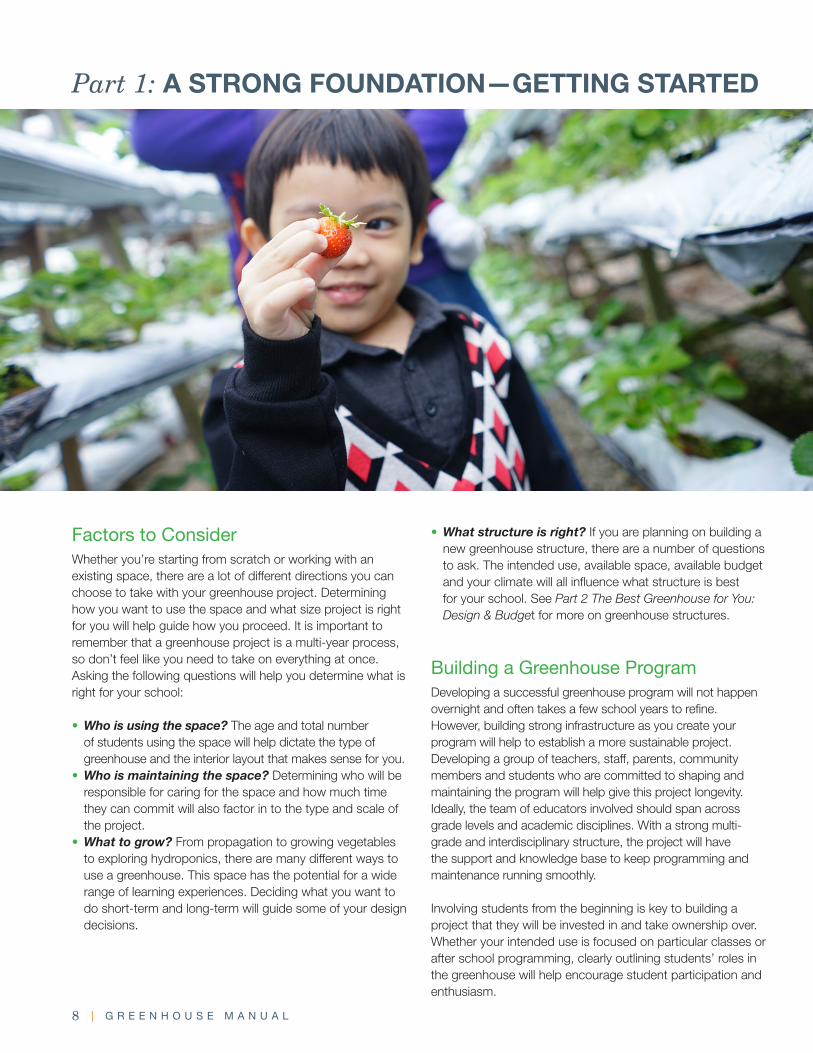
Factors to ConsiderWhether you’re starting from scratch or working with an existing space, there are a lot of different directions you can choose to take with your greenhouse project. Determining how you want to use the space and what size project is right for you will help guide how you proceed. It is important to remember that a greenhouse project is a multi-year process, so don’t feel like you need to take on everything at once. Asking the following questions will help you determine what is right for your school:
• Who is using the space? The age and total number of students using the space will help dictate the type of greenhouse and the interior layout that makes sense for you.
• Who is maintaining the space? Determining who will be responsible for caring for the space and how much time they can commit will also factor in to the type and scale of the project.
• What to grow? From propagation to growing vegetables to exploring hydroponics, there are many different ways to use a greenhouse. This space has the potential for a wide range of learning experiences. Deciding what you want to do short-term and long-term will guide some of your design decisions.
Part 1: A STRONG FOUNDATION—GETTING STARTED
A N I N T R O D U C T O R Y G U I D E F O R E D U C A T O R S | 9
Connections to Standards & Evidence of BenefitsWhile researching what kind of structure to choose, it is helpful to have outlined possible greenhouse curriculum and aligning it to national and state teaching standards. This can help strengthen the case for the value of a greenhouse project. There are a diversity of resources that help demonstrate the importance of a project like this—both for creating cross-curricular connections and for supporting multiple approaches to engaging with curricular content. Cornell University’s College of Agriculture & Life Sciences offers a summary of research findings across several key benefit areas, and is a useful place to find resources supporting the advantages of this type of programming: http://gardening.cals.cornell.edu/.
Documenting Your Project & EvaluationBeing able to tell the story of your greenhouse project will help create a narrative that describes how your project progresses and how it impacts your school community. Taking pictures of the space from the beginning can visually recount how the space is transformed. In addition to tracking the physical progress of the space, measuring the impact of the project on the students who use it is also a strong way of tracking its success. Collecting data before the greenhouse project takes shape will make for an even stronger measure of the effects of your program on your school environment. For ideas on how to evaluate your program, visit Cornell University’s Evaluation Toolkit: http://gardening.cals.cornell.edu/program-tools/evaluation-toolkit/.
Thinking of your project in phases will help make the project feel manageable and give the school community clear expectations. As a starting point, consider beginning with something small, like cold frames or conducting small greenhouse experiments to get a sense of what your school has the capacity to maintain. For educators rejuvenating an existing greenhouse, it may be helpful to do an inventory of what equipment exists, what is working, and what needs to be fixed or replaced. Having an honest conversation with maintenance staff and administration around what concrete steps need to be taken to make the space functional will start everyone off with a clear understanding of what the project entails.
Whether you are building from the ground up or working to reenergize an existing greenhouse, creating a detailed and realistic budget that aligns with your team’s vision is key to building a lasting program. Creating a budget that takes into consideration not only the initial cost of a greenhouse, but the funding needed for multiple years of maintenance and programming will help organize funding efforts and continue to lay down a sustainable foundation.
Designing for Your ClimateThere are many different greenhouse designs for various uses, climates, and levels of investment. Greenhouse designs offer varying levels of control over the inside environment. The aim for a greenhouse is to help the gardener overcome the challenges of their climate and allow for a better growing environment. In hot climates, a greenhouse might be focused on protecting crops from excessive heat, while in cold climates a greenhouse will be built to protect plants from low temperatures.
For example in a desert climate where temperatures can be very high and soil can be very sandy or clay-heavy and potentially low in nitrogen, a greenhouse can provide the opportunity to create a controlled environment with a soil mix and regulated temperature that is more amenable to growing a wider variety of edible plants.
In cold temperate climates, winters can be long and bring sustained freezing temperatures. Greenhouses in these environments are essential for extending the growing season to align a little more closely with the school year, enabling students to participate more in experiencing the full cycle of growing annual vegetables.
Before deciding on a greenhouse-type structure, it is important to research your local climate and weather patterns. Try reaching out to others nearby who have maintained greenhouses or hoop houses to get their perspectives and insight on their challenges and successes.
10 | G R E E N H O U S E M A N U A L
CLASSROOM CONNECTIONS: Exploring the History of Greenhouses
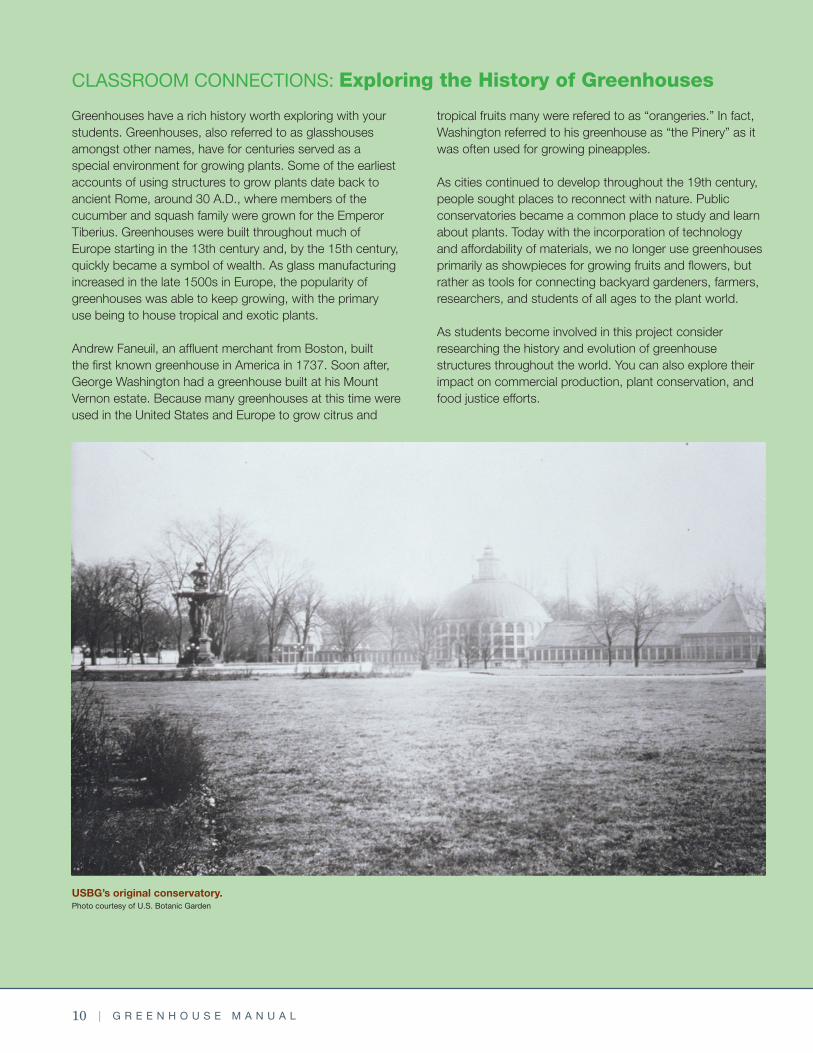
Greenhouses have a rich history worth exploring with your students. Greenhouses, also referred to as glasshouses amongst other names, have for centuries served as a special environment for growing plants. Some of the earliest accounts of using structures to grow plants date back to ancient Rome, around 30 A.D., where members of the cucumber and squash family were grown for the Emperor Tiberius. Greenhouses were built throughout much of Europe starting in the 13th century and, by the 15th century, quickly became a symbol of wealth. As glass manufacturing increased in the late 1500s in Europe, the popularity of greenhouses was able to keep growing, with the primary use being to house tropical and exotic plants.
Andrew Faneuil, an affluent merchant from Boston, built the first known greenhouse in America in 1737. Soon after, George Washington had a greenhouse built at his Mount Vernon estate. Because many greenhouses at this time were used in the United States and Europe to grow citrus and
tropical fruits many were refered to as “orangeries.” In fact, Washington referred to his greenhouse as “the Pinery” as it was often used for growing pineapples.
As cities continued to develop throughout the 19th century, people sought places to reconnect with nature. Public conservatories became a common place to study and learn about plants. Today with the incorporation of technology and affordability of materials, we no longer use greenhouses primarily as showpieces for growing fruits and flowers, but rather as tools for connecting backyard gardeners, farmers, researchers, and students of all ages to the plant world.
As students become involved in this project consider researching the history and evolution of greenhouse structures throughout the world. You can also explore their impact on commercial production, plant conservation, and food justice efforts.
USBG’s original conservatory. Photo courtesy of U.S. Botanic Garden
A N I N T R O D U C T O R Y G U I D E F O R E D U C A T O R S | 11
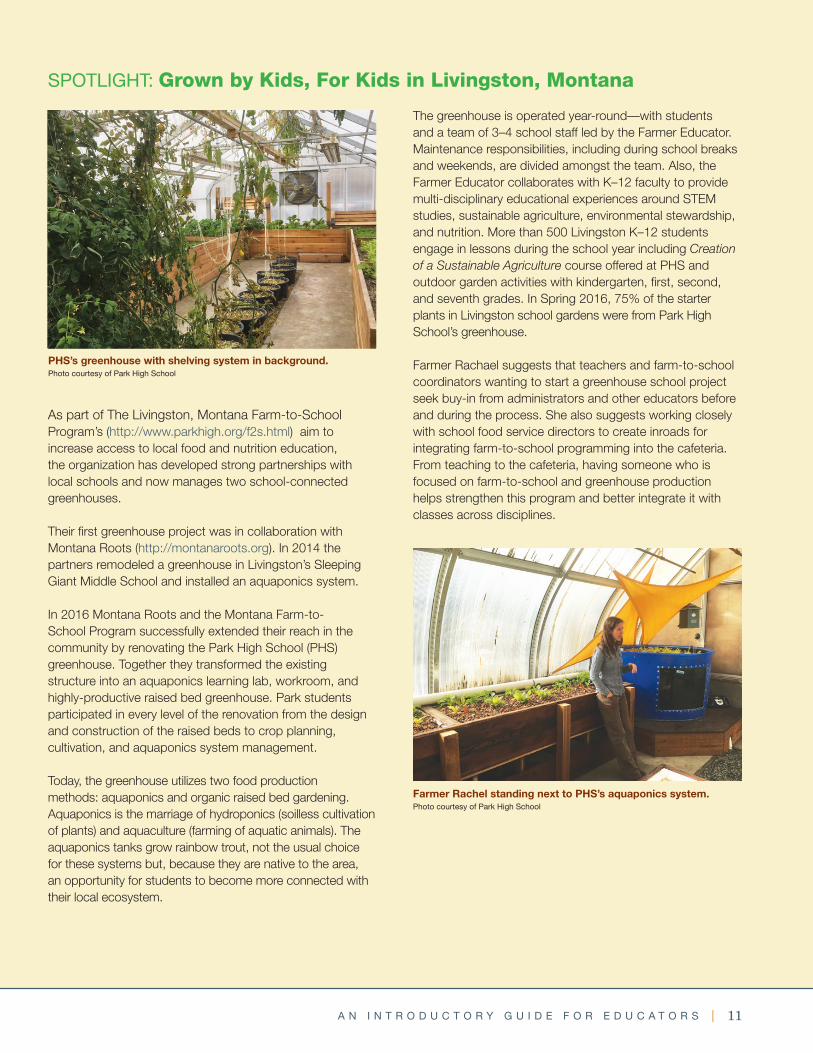
SPOTLIGHT: Grown by Kids, For Kids in Livingston, Montana
As part of The Livingston, Montana Farm-to-School Program’s (http://www.parkhigh.org/f2s.html) aim to increase access to local food and nutrition education, the organization has developed strong partnerships with local schools and now manages two school-connected greenhouses.
Their first greenhouse project was in collaboration with Montana Roots (http://montanaroots.org). In 2014 the partners remodeled a greenhouse in Livingston’s Sleeping Giant Middle School and installed an aquaponics system.
In 2016 Montana Roots and the Montana Farm-to-School Program successfully extended their reach in the community by renovating the Park High School (PHS) greenhouse. Together they transformed the existing structure into an aquaponics learning lab, workroom, and highly-productive raised bed greenhouse. Park students participated in every level of the renovation from the design and construction of the raised beds to crop planning, cultivation, and aquaponics system management.
Today, the greenhouse utilizes two food production methods: aquaponics and organic raised bed gardening. Aquaponics is the marriage of hydroponics (soilless cultivation of plants) and aquaculture (farming of aquatic animals). The aquaponics tanks grow rainbow trout, not the usual choice for these systems but, because they are native to the area, an opportunity for students to become more connected with their local ecosystem.
The greenhouse is operated year-round—with students and a team of 3–4 school staff led by the Farmer Educator. Maintenance responsibilities, including during school breaks and weekends, are divided amongst the team. Also, the Farmer Educator collaborates with K–12 faculty to provide multi-disciplinary educational experiences around STEM studies, sustainable agriculture, environmental stewardship, and nutrition. More than 500 Livingston K–12 students engage in lessons during the school year including Creation of a Sustainable Agriculture course offered at PHS and outdoor garden activities with kindergarten, first, second, and seventh grades. In Spring 2016, 75% of the starter plants in Livingston school gardens were from Park High School’s greenhouse.
Farmer Rachael suggests that teachers and farm-to-school coordinators wanting to start a greenhouse school project seek buy-in from administrators and other educators before and during the process. She also suggests working closely with school food service directors to create inroads for integrating farm-to-school programming into the cafeteria. From teaching to the cafeteria, having someone who is focused on farm-to-school and greenhouse production helps strengthen this program and better integrate it with classes across disciplines.
Farmer Rachel standing next to PHS’s aquaponics system. Photo courtesy of Park High School
PHS’s greenhouse with shelving system in background. Photo courtesy of Park High School

12 | G R E E N H O U S E M A N U A L
determining the size and type of greenhouse to install, it is helpful for your team and/or group of students to first answer some questions. These answers will help you choose a structure or figure out if the structure you currently have is equipped to accomplish your goals. Answering the questions will also help you strengthen presentations and proposals you may need for your school’s administration, staff, community, or potential supporters.
Intended Use: What activities do you plan to do in this space? How many people would you like to accommodate at a time? Who is using the greenhouse and what access do they need to have to use the greenhouse safely (age-appropriate design, ADA accessibility)? What times of year will the greenhouse be used? Will it include a growing space, classroom area, and storage?
Available Space: What locations on your campus are available and easy to use (fields, existing greenhouses, rooftop, playgrounds, gardens)? What is the proximity of the space to
Questions to Ask in Preparation: What, Why, Where, When & HowA greenhouse is basically an enclosed space that is heated and lit by the sun. Short-wave solar radiation passes through a layer of glass or other transparent or semi-transparent material, and heats up surfaces like the ground and plants inside the greenhouse. Because of their nature, greenhouses also make it possible to control variables such as temperature, humidity, and light. The ways a greenhouse does these tasks is up to you and your team. The shape, size, and location of the greenhouse is your choice and should be selected based on availability of space, budget, maintenance hours, and other support.
If you are working on a new project, this section will help guide you through some concepts and elements to keep in mind when deciding on a structure. For educators revitalizing an existing greenhouse, this information may help you better understand all the moving parts and improve how the greenhouse is organized, maintained, and used. When
Part 2: THE BEST GREENHOUSE FOR YOU—DESIGN & BUDGET

A N I N T R O D U C T O R Y G U I D E F O R E D U C A T O R S | 13
the amenities needed (water, electricity, etc.)? How long is this space available? Is there outside area around the greenhouse for additional seating, storage, or a garden? What permit and zoning restrictions may need to be taken under consideration? If there is an existing greenhouse, is it currently set up for the intended use, if not what can be changed?
Ballpark Budget: Is this part of a larger school construction project or renovation? Does funding need to be secured by your school or by your greenhouse team? Are in-kind donations possible? How much funding is available for construction? For annual maintenance? (See the last section of this chapter for more information on budgeting.)
Now that clear intentions and limitations for this project have been defined, it is time to research what kind of greenhouse to secure.
Greenhouse TypesBecause every school has its own space and budget limitations to work with, this chapter will take a broader definition of greenhouse so that there is an option for almost every school. When doing research to figure out the best fit, consider location, access to land, permanence of project, access to resources and utilities, and of course the overall purpose of the greenhouse. Below, are a few kinds of structures to consider:
Freestanding Conventional Greenhouse This is the model most people picture when they think of a greenhouse. It is the most common design with the support structure made of wood or metal posts and glass or translucent polycarbonate glazing panels as the covering material. Though these can be built by hand, they tend to be very labor intensive. Models can be purchased as kits of various sizes or professionally installed. Kits are available from small scale hobby use (around 8ft x12ft) to industrial sizes that can be more easily set up with heating and ventilation systems. These are appropriate if you are sure your greenhouse will be a permanent structure and there is a large enough budget to cover the building costs. This is especially true if a foundation needs to be built, and amenities like ventilation systems, lighting, water access, and electricity added. It will be difficult to add these systems after construction, so funding for the whole installation should be secured beforehand. Freestanding structures tend to provide more even light distribution and less shading issues but can be less energy efficient than attached greenhouses due to their large amount of perimeter space from which heat can escape. (Figs 1, 2, 3, 5)
FIG. 1 Greenhouse.Photo courtesy of Meeting House Farm
FIG. 2 Greenhouse built from a kit.
FIG. 3 Greenhouse built from recycled materials.

14 | G R E E N H O U S E M A N U A L
High Tunnel/ Hoop HouseFor groups looking for a less permanent, more affordable option, hoop houses are worth considering. The main structural difference is that these are made with plastic sheeting. They do not tend to be set up for heating or ventilation as often, and are much more cost-effective. They can also be more easily made to fit specific dimensions. Hoop houses can be purchased as kits, and can be installed by professionals, a guided group of volunteers, or even older students. Unlike a greenhouse where the growing environment can be controlled, high tunnels mostly rely on passive heating, cooling, and humidity control. Furthermore, plants are more likely to be grown in the ground in a high tunnel versus containers, which are more common with greenhouse growing. (Fig 4)
Lean-to or Attached GreenhouseFor schools with very limited space and/or no field area, an attached greenhouse may be a good option. They are designed to have at least one side connected to an existing building, preferably the south-facing side. However, depending on the greenhouse placement in relation to the structure it is connected to, attached greenhouses may experience shading from the adjacent structure. The size of attached greenhouses is dictated by the length and height of the wall they are attached to and so, they tend to be smaller than freestanding greenhouses. It can be hard to easily accommodate a whole class in these greenhouses due to their narrower design. A big positive is that utilities like electric and water can be utilized from the existing building to make this an even more cost-effective design. (Fig 5)
Cold Frames/Cold HouseThese are not really greenhouses but are a great first project alternative for teachers that would like to begin exploring concepts of greenhouses, but do not have the budget or capacity yet to start a larger project. Used to extend the gardening season, the cold frame is the simplest (and by far the cheapest) option. A cold frame is a glass or plastic structural cover over your garden that protects seeds, seedlings, and plants from excessively low temperatures, wind, snow, and rain. Cold frames can be purchased or built by volunteers, teachers, and older students. They can be semi-permanent and set in one location or transportable to be moved around a garden. (Fig 6)
FIG. 4 Hoop house with garden.
FIG. 5 Freestanding conventional greenhouse (R) and attached/lean-to (L) school greenhouses. Photo courtesy of Rimol Greenhouse Systems
FIG. 6 Plastic coldframe.
A N I N T R O D U C T O R Y G U I D E F O R E D U C A T O R S | 15
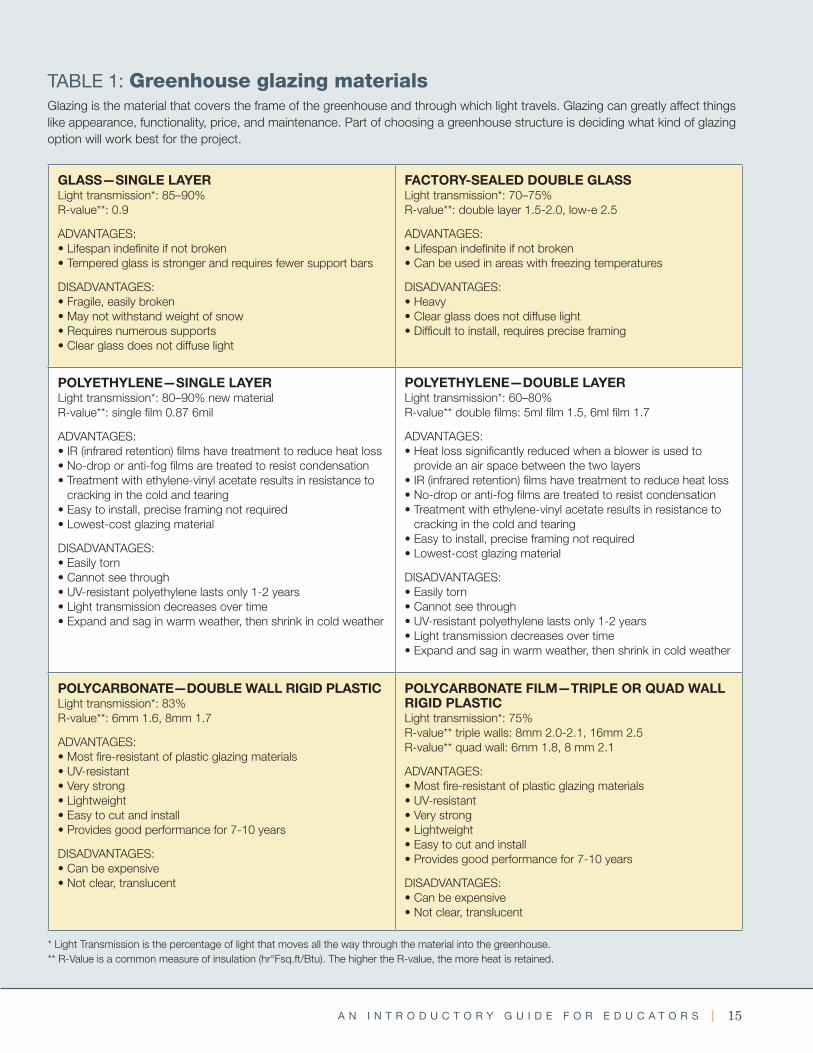
GLASS—SINGLE LAYERLight transmission*: 85–90%R-value**: 0.9
ADVANTAGES:• Lifespan indefinite if not broken• Tempered glass is stronger and requires fewer support bars
DISADVANTAGES:• Fragile, easily broken• May not withstand weight of snow• Requires numerous supports• Clear glass does not diffuse light
FACTORY-SEALED DOUBLE GLASSLight transmission*: 70–75%R-value**: double layer 1.5-2.0, low-e 2.5
ADVANTAGES:• Lifespan indefinite if not broken• Can be used in areas with freezing temperatures
DISADVANTAGES:• Heavy• Clear glass does not diffuse light• Difficult to install, requires precise framing
POLYETHYLENE—SINGLE LAYERLight transmission*: 80–90% new materialR-value**: single film 0.87 6mil
ADVANTAGES:• IR (infrared retention) films have treatment to reduce heat loss• No-drop or anti-fog films are treated to resist condensation• Treatment with ethylene-vinyl acetate results in resistance to
cracking in the cold and tearing• Easy to install, precise framing not required• Lowest-cost glazing material
DISADVANTAGES:• Easily torn• Cannot see through• UV-resistant polyethylene lasts only 1-2 years• Light transmission decreases over time• Expand and sag in warm weather, then shrink in cold weather
POLYETHYLENE—DOUBLE LAYERLight transmission*: 60–80%R-value** double films: 5ml film 1.5, 6ml film 1.7
ADVANTAGES:• Heat loss significantly reduced when a blower is used to
provide an air space between the two layers• IR (infrared retention) films have treatment to reduce heat loss• No-drop or anti-fog films are treated to resist condensation• Treatment with ethylene-vinyl acetate results in resistance to
cracking in the cold and tearing• Easy to install, precise framing not required• Lowest-cost glazing material
DISADVANTAGES:• Easily torn• Cannot see through• UV-resistant polyethylene lasts only 1-2 years• Light transmission decreases over time• Expand and sag in warm weather, then shrink in cold weather
POLYCARBONATE—DOUBLE WALL RIGID PLASTICLight transmission*: 83%R-value**: 6mm 1.6, 8mm 1.7
ADVANTAGES:• Most fire-resistant of plastic glazing materials• UV-resistant• Very strong• Lightweight• Easy to cut and install• Provides good performance for 7-10 years
DISADVANTAGES:• Can be expensive• Not clear, translucent
POLYCARBONATE FILM—TRIPLE OR QUAD WALL RIGID PLASTICLight transmission*: 75%R-value** triple walls: 8mm 2.0-2.1, 16mm 2.5R-value** quad wall: 6mm 1.8, 8 mm 2.1
ADVANTAGES:• Most fire-resistant of plastic glazing materials• UV-resistant• Very strong• Lightweight• Easy to cut and install• Provides good performance for 7-10 years
DISADVANTAGES:• Can be expensive• Not clear, translucent
* Light Transmission is the percentage of light that moves all the way through the material into the greenhouse.** R-Value is a common measure of insulation (hr°Fsq.ft/Btu). The higher the R-value, the more heat is retained.
TABLE 1: Greenhouse glazing materialsGlazing is the material that covers the frame of the greenhouse and through which light travels. Glazing can greatly affect things like appearance, functionality, price, and maintenance. Part of choosing a greenhouse structure is deciding what kind of glazing option will work best for the project.
16 | G R E E N H O U S E M A N U A L
Placing a Greenhouse The location of a greenhouse is one of the most important decisions to make. The function and efficiency of the structure in regard to heat gain, ventilation, maintenance, and energy use will be greatly impacted by its placement, or siting. The following simple rules can help with proper siting of a greenhouse.
1. Look for a flat topography. The flatter the area, the easier it is to construct and operate a greenhouse.
2. Include primary stakeholders like school and maintenance staff in selection of the site.
3. Plan for rainwater. Drainage provisions should be made during construction to ensure that rainwater coming off the structure does not accumulate and that it has a place to run other than into the greenhouse.
4. Place within easy access. Greenhouses should be conveniently located so that they are easy to visit with a group of students throughout the year. The location should also consider accessibility to all users.
5. Place close to utilities. Access to a good water source is critical. Is electricity or heating required?
6. Be aware of permitting and legal considerations. Before construction, study all permitting issues.
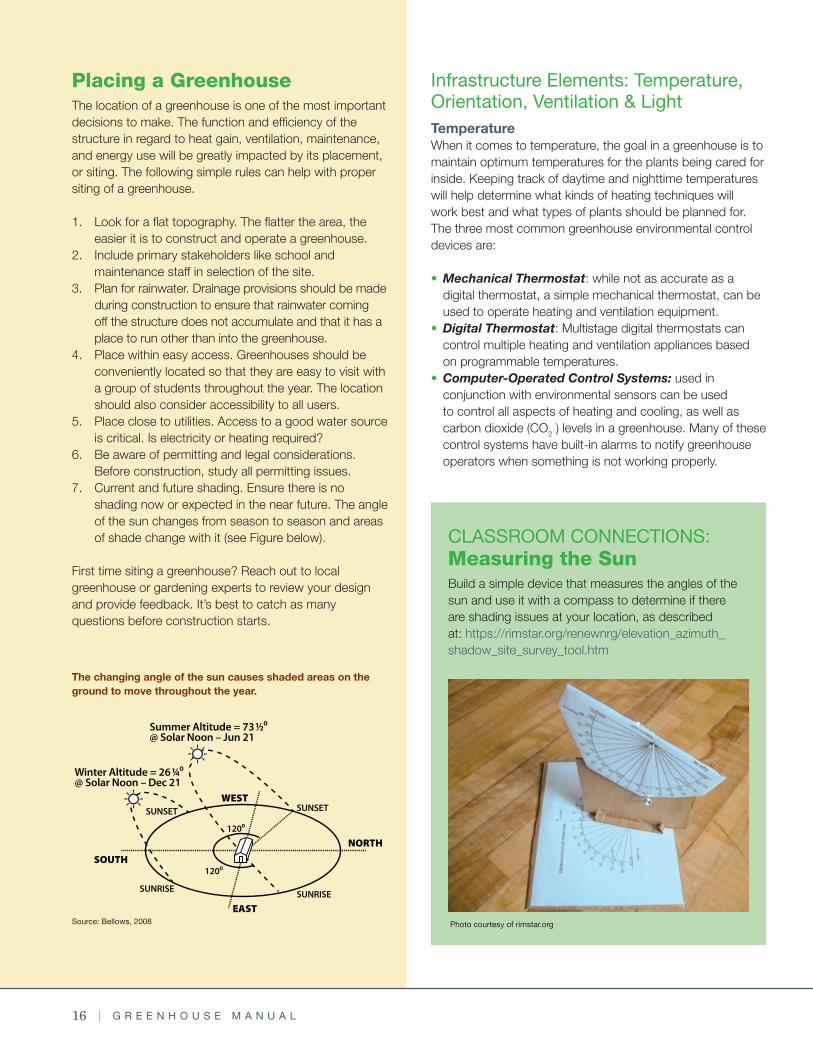
7. Current and future shading. Ensure there is no shading now or expected in the near future. The angle of the sun changes from season to season and areas of shade change with it (see Figure below).
First time siting a greenhouse? Reach out to local greenhouse or gardening experts to review your design and provide feedback. It’s best to catch as many questions before construction starts.
Infrastructure Elements: Temperature, Orientation, Ventilation & LightTemperatureWhen it comes to temperature, the goal in a greenhouse is to maintain optimum temperatures for the plants being cared for inside. Keeping track of daytime and nighttime temperatures will help determine what kinds of heating techniques will work best and what types of plants should be planned for. The three most common greenhouse environmental control devices are:
• Mechanical Thermostat: while not as accurate as a digital thermostat, a simple mechanical thermostat, can be used to operate heating and ventilation equipment.
• Digital Thermostat: Multistage digital thermostats can control multiple heating and ventilation appliances based on programmable temperatures.
• Computer-Operated Control Systems: used in conjunction with environmental sensors can be used to control all aspects of heating and cooling, as well as carbon dioxide (CO2 ) levels in a greenhouse. Many of these control systems have built-in alarms to notify greenhouse operators when something is not working properly.
Source: Bellows, 2008
The changing angle of the sun causes shaded areas on the ground to move throughout the year.
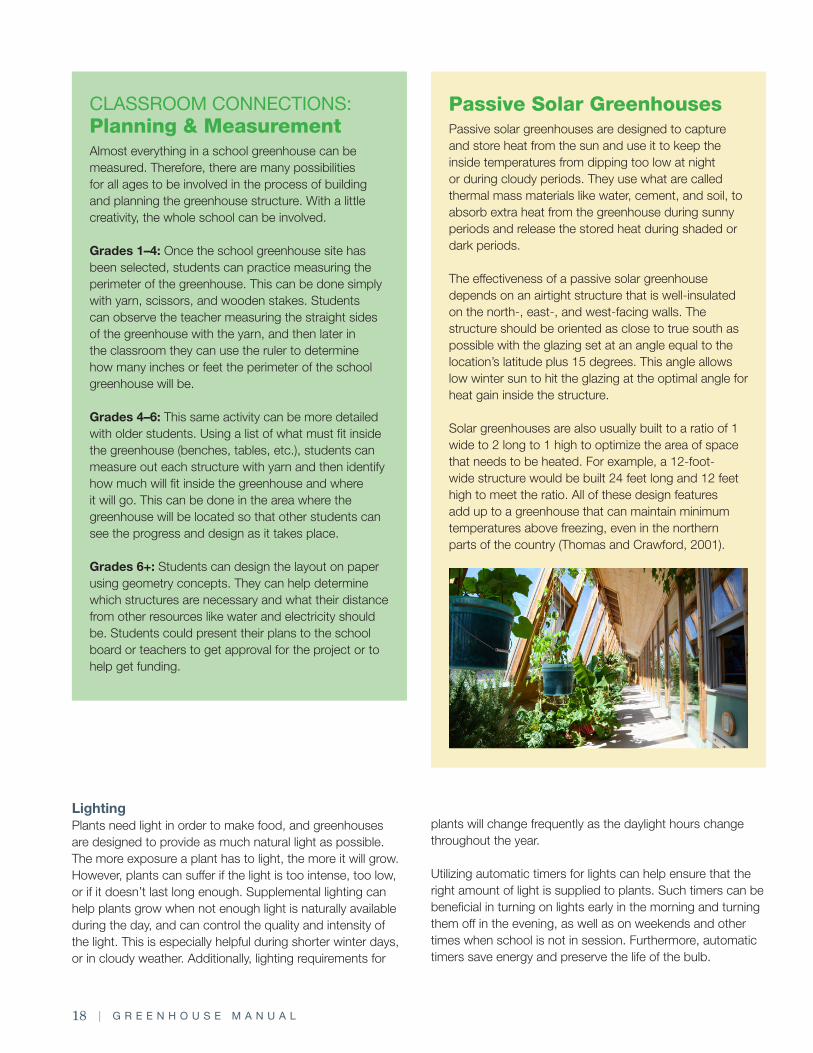
CLASSROOM CONNECTIONS:Measuring the SunBuild a simple device that measures the angles of the sun and use it with a compass to determine if there are shading issues at your location, as described at: https://rimstar.org/renewnrg/elevation_azimuth_shadow_site_survey_tool.htm
Photo courtesy of rimstar.org

A N I N T R O D U C T O R Y G U I D E F O R E D U C A T O R S | 17
Ventilation and CoolingSince greenhouses are designed to capture as much solar heat as possible, they can overheat in hotter weather. Overheating can stunt or kill plants. Sometimes just being able to open doors and vents is enough to get natural ventilation to cool a greenhouse and control humidity. However, it can also invite pests and diseases into the greenhouse, so vigilance is necessary. Electric fans are useful to increase airflow and to cool down a greenhouse. Horizontal Airflow Fans (HAF) are used to circulate air inside the greenhouse, distribute heat evenly, and reduce condensation on plant foliage that can lead to disease. End-wall fans are big enough to exchange the entire volume of air in the greenhouse with the outside air. A non-electrical option is shade cloth, a woven material that can be draped over inside sections of the greenhouse to provide cooling shade. Shade cloth is available in varying densities.
HeatingWhile glazing materials are an efficient means of converting sunlight into heat, they also allow a lot of heat to escape since they are not particularly good insulators. Depending on your location, this can lead to problems maintaining acceptable inside temperatures when the sun is not shining and it is cold outside. Adding heat to the greenhouse can provide the warmth plants need during periods of cold outdoor temperatures. Heat can be provided in greenhouses through electric hot-air heaters with fans (most common), hydronic (circulating water-based) systems placed in the floor or on the growing benches, or by adding compost to hoop houses and other structures without electricity.
Orientation for Solar Heat Gain & VentilationGreenhouse orientation refers to the direction the greenhouse is facing. In locations north of 40 degrees latitude (Columbus, OH or above), it is recommended that a greenhouse be faced so that the long axis runs east to west. This approach places one long side of the structure facing due south for optimum solar heat gain in the cooler months. For locations south of 40 degrees latitude, a north-to-south orientation takes advantage of prevailing winds to help with ventilation during the hottest months. A north-to-south orientation also reduces shading from the structure of the greenhouse (see Figure 7below). A greenhouse should have little to no shading from trees, buildings, or other structures. To determine if a location is shade-free year-round, an instrument called a solar pathfinder can be used. Most professional greenhouse and solar installers have this tool and they can be called on to do a solar site survey to determine the level of shading. (See above for note on surveying with students)
CLASSROOM CONNECTIONS: Site Selection as a Teachable Moment
Working with students on greenhouse design.Photo courtesy of NCAT
Involving students in the site selection offers a great learning opportunity. For example, students grades 1-12 can take light, wind, and temperature measurements; track the sun at different times of the day; explore scale and learn computer-aided drawing during design layout; and investigate microclimates. It is very important to also include the school community (parents, teachers, principals, maintenance staff) in this decision-making process. An event like an open house where people can look at draft plans and give suggestions is a great way to get buy-in from your community.
FIG. 7: A north-to-south orientation of the long axis tends to work best for warm-weather growing and areas south of 40 degrees latitude, while an east-to-west orientation allows more light to reach the plants during the winter months in areas above 40degrees latitude.
18 | G R E E N H O U S E M A N U A L
Passive Solar GreenhousesPassive solar greenhouses are designed to capture and store heat from the sun and use it to keep the inside temperatures from dipping too low at night or during cloudy periods. They use what are called thermal mass materials like water, cement, and soil, to absorb extra heat from the greenhouse during sunny periods and release the stored heat during shaded or dark periods.
The effectiveness of a passive solar greenhouse depends on an airtight structure that is well-insulated on the north-, east-, and west-facing walls. The structure should be oriented as close to true south as possible with the glazing set at an angle equal to the location’s latitude plus 15 degrees. This angle allows low winter sun to hit the glazing at the optimal angle for heat gain inside the structure.
Solar greenhouses are also usually built to a ratio of 1 wide to 2 long to 1 high to optimize the area of space that needs to be heated. For example, a 12-foot-wide structure would be built 24 feet long and 12 feet high to meet the ratio. All of these design features add up to a greenhouse that can maintain minimum temperatures above freezing, even in the northern parts of the country (Thomas and Crawford, 2001).
Lighting Plants need light in order to make food, and greenhouses are designed to provide as much natural light as possible. The more exposure a plant has to light, the more it will grow. However, plants can suffer if the light is too intense, too low, or if it doesn’t last long enough. Supplemental lighting can help plants grow when not enough light is naturally available during the day, and can control the quality and intensity of the light. This is especially helpful during shorter winter days, or in cloudy weather. Additionally, lighting requirements for
CLASSROOM CONNECTIONS:Planning & MeasurementAlmost everything in a school greenhouse can be measured. Therefore, there are many possibilities for all ages to be involved in the process of building and planning the greenhouse structure. With a little creativity, the whole school can be involved.
Grades 1–4: Once the school greenhouse site has been selected, students can practice measuring the perimeter of the greenhouse. This can be done simply with yarn, scissors, and wooden stakes. Students can observe the teacher measuring the straight sides of the greenhouse with the yarn, and then later in the classroom they can use the ruler to determine how many inches or feet the perimeter of the school greenhouse will be.
Grades 4–6: This same activity can be more detailed with older students. Using a list of what must fit inside the greenhouse (benches, tables, etc.), students can measure out each structure with yarn and then identify how much will fit inside the greenhouse and where it will go. This can be done in the area where the greenhouse will be located so that other students can see the progress and design as it takes place.
Grades 6+: Students can design the layout on paper using geometry concepts. They can help determine which structures are necessary and what their distance from other resources like water and electricity should be. Students could present their plans to the school board or teachers to get approval for the project or to help get funding.
plants will change frequently as the daylight hours change throughout the year.
Utilizing automatic timers for lights can help ensure that the right amount of light is supplied to plants. Such timers can be beneficial in turning on lights early in the morning and turning them off in the evening, as well as on weekends and other times when school is not in session. Furthermore, automatic timers save energy and preserve the life of the bulb.
A N I N T R O D U C T O R Y G U I D E F O R E D U C A T O R S | 19
• LED grow lights offer a balance between blue and red lights for plants. They are small in size and weigh much less than other types of grow lights. LEDs have a high light intensity and produce almost no heat. And while their initial cost is higher, especially in comparison to T-5 fluorescent lights, their lifespan can last on average between 50,000 and 100,000 hours.
Energy EfficiencyGreenhouses can be expensive to heat and ventilate, especially if they are operating during winter months in colder regions. To be more energy efficient and economical, consider including some of the following techniques in your greenhouse plan:
• Keep the greenhouse structure tight by limiting cracks where air infiltration can occur. Seal door frames with caulk or weatherstripping, and repair any holes in the foundation, doors, glazing material, and around vents. Also keep doors closed.
• Insulate. On new foundations, adding 1 to 2 inches of polyurethane or polystyrene insulation, 1.5 to 2 feet deep around the entire foundation, can reduce heat loss. On existing foundations that are not insulated, make sure that all cracks and holes are repaired. Walls, including foundation knee walls, can be insulated up to the plant or bench height. Reflective insulation boards work well; however, the reflective surface should not be positioned toward any perimeter heating pipes and a small airspace should be included between the insulation and sidewall to prevent freezing of the wall.
• Add a windbreak to the outside of the north wall of the greenhouse. Planting conifers or utilizing a temporary fence as a windbreak, if possible, can help divert wind up and over the greenhouse.
• Add a thermal blanket or night curtain to prevent heat loss at night.
• Perform annual maintenance on heating systems. • Utilize HAF fans to circulate air. Keep in mind that making
the greenhouse “tighter” will also increase the relative humidity. HAF fans improve the greenhouse temperature and humidity levels.
• Maximize the amount of greenhouse space being heated and group plants together based on temperature requirements.
• Use infrared (IR) and anti-condensation treated films to reduce infrared and thermal radiation losses in polyethylene covered greenhouses.
• Use computerized control systems to increase energy efficiency.
• Use alternative heating sources.
Types of Greenhouse LightingThe types of lights used in a greenhouse for supplemental plant growth are incandescent, fluorescent, High Intensity Discharge (HID), and LED. Each of these types offer varying levels of performance and efficiency, which are reflected in their price.
• Incandescent lights are often used as a spot light on a specific plant or with a small grouping of plants where the light is placed at a minimum of 24” from the plant(s). These lights get hot and their placement should be carefully considered for school greenhouses. Incandescent lights are inexpensive to purchase and have a life span of less than 1,000 hours.
• Fluorescent grow lights are ideal for starting plants because they are traditionally on the blue end of the light spectrum, which favors plant growth. And because they are cooler in temperature, they can be situated within a few inches of plant seedlings. But as the plants grow, the light will need to be raised. These fluorescent lights are quite efficient and can offer up to 20,000 hours of use.
T-8 and T-12 bulbs refers to a fluorescent light where the T represents the diameter of the bulb. Newer types of fluorescent bulbs are available in the red spectrum to encourage blooming and can be combined in a fixture with a blue bulb. Together they provide the full spectrum of light required by plants. Additionally, full-spectrum fluorescent lights have come on the market in recent years, as well as T-5 lights, which triple the amount of light output of T-8 or T-12 lights without increasing energy use.
• High Intensity Discharge (HID) lights are used to cover
a large growing area. HID lights provide a high output of light from a ballast, allowing them to be hung high above plants. They also produce heat, which can burn plant leaves if situated too close. The height of a HID light is determined by its wattage, and a reflective hood is most often used with HID lights in order to direct light down to the plants.
There are two types of HID lights: metal halide and high pressure sodium. Metal halide lighting produces a blue light spectrum that closely resembles natural light, thus serving well as primary lighting. High pressure sodium lights utilize the red light spectrum and can be used as supplemental light for plant growth, as they help prevent leggy plant growth. High pressure sodium bulbs last longer than metal halides, but should be changed according to manufacturers’ recommendations. Even though the bulb might still be functioning, using it for too long can result in reduced light output and increased energy cost.
20 | G R E E N H O U S E M A N U A L
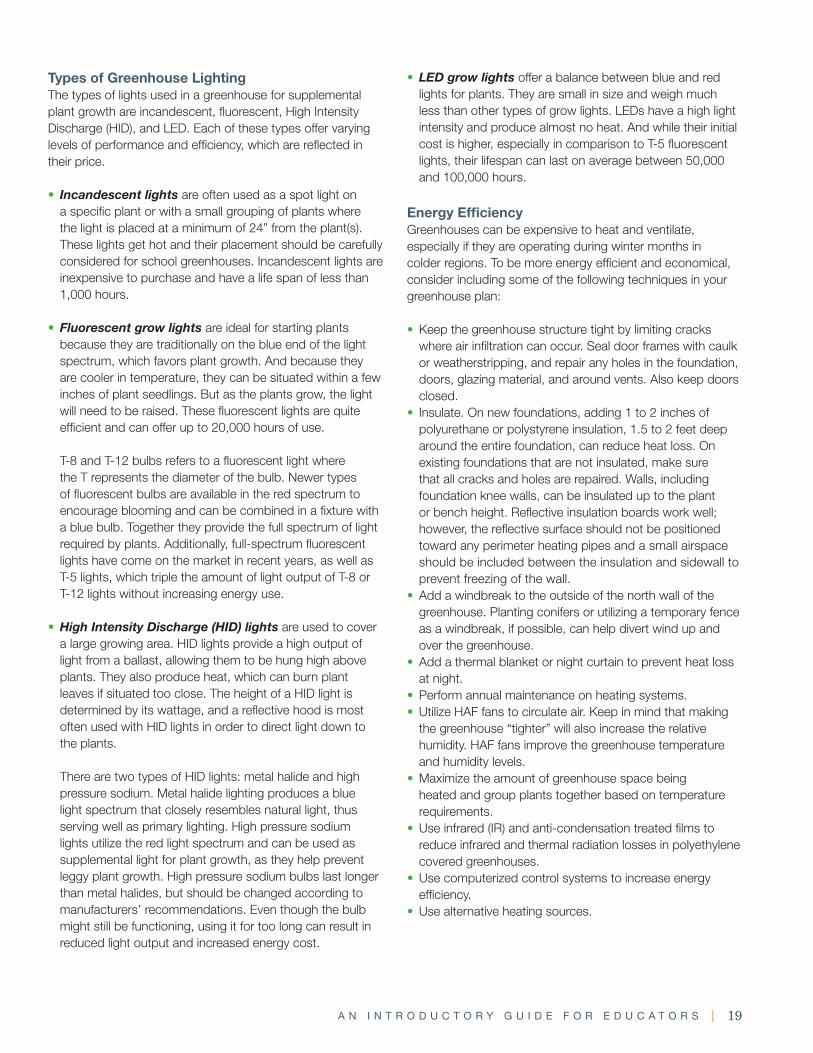
FIG. 8 Multipurpose greenhouse. Photo courtesy of City Blossoms
Creating an Interior Layout In a school-based greenhouse it is as important to plan the inside of the greenhouse as the structure itself. If this is an educational space, it should work both as a production area and a workspace designed for the target age-range of students. This includes thinking about the height of benches, tables, sizes of the gathering spaces, width of aisles, size of storage areas, and signs that clearly communicate proper etiquette and identify areas within the greenhouse. Similar to the design considerations for the greenhouse frame, the interior layout should evaluate any shading that may take place, include space to efficiently move equipment and groups of students around, and accommodate accessibility requirements and needs. Many school greenhouses and gardens require spaces to be compliant with the Americans with Disabilities Act (ADA). For information on ADA regulations, please visit: www.ada.gov.
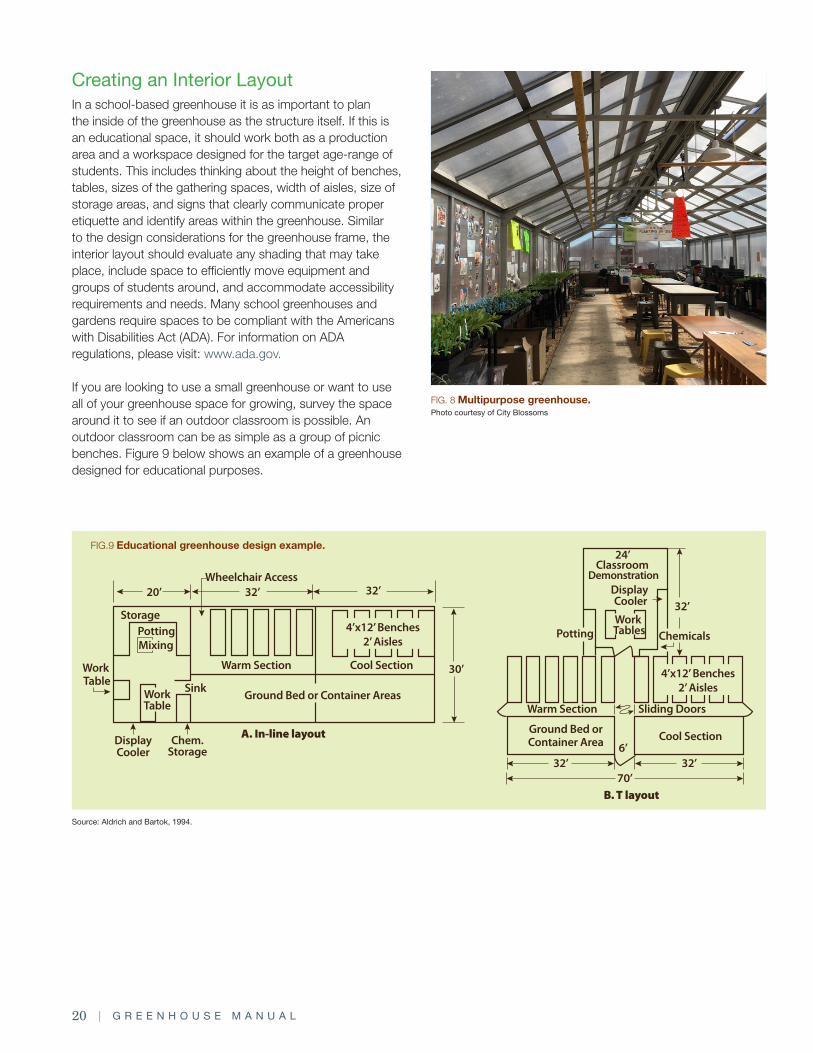
If you are looking to use a small greenhouse or want to use all of your greenhouse space for growing, survey the space around it to see if an outdoor classroom is possible. An outdoor classroom can be as simple as a group of picnic benches. Figure 9 below shows an example of a greenhouse designed for educational purposes.
Source: Aldrich and Bartok, 1994.
FIG.9 Educational greenhouse design example.
A N I N T R O D U C T O R Y G U I D E F O R E D U C A T O R S | 21
Possible Interior FeaturesOne or several of these features can be included in a greenhouse:
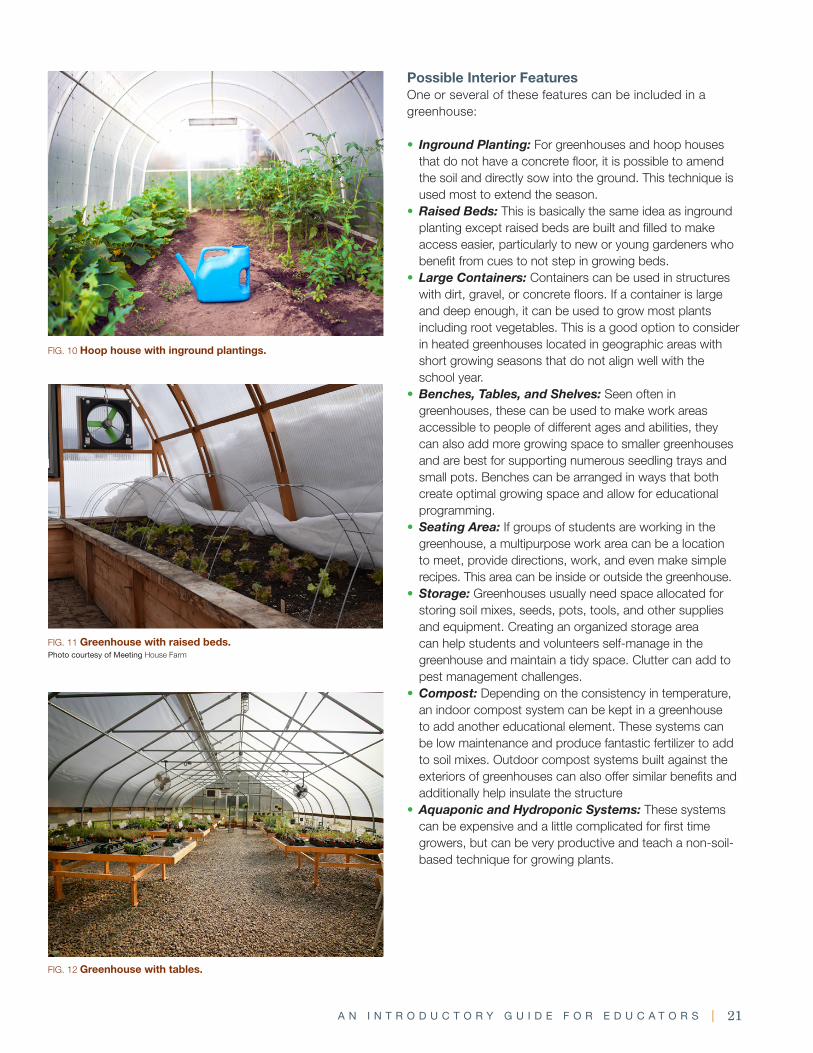
• Inground Planting: For greenhouses and hoop houses that do not have a concrete floor, it is possible to amend the soil and directly sow into the ground. This technique is used most to extend the season.
• Raised Beds: This is basically the same idea as inground planting except raised beds are built and filled to make access easier, particularly to new or young gardeners who benefit from cues to not step in growing beds.
• Large Containers: Containers can be used in structures with dirt, gravel, or concrete floors. If a container is large and deep enough, it can be used to grow most plants including root vegetables. This is a good option to consider in heated greenhouses located in geographic areas with short growing seasons that do not align well with the school year.
• Benches, Tables, and Shelves: Seen often in greenhouses, these can be used to make work areas accessible to people of different ages and abilities, they can also add more growing space to smaller greenhouses and are best for supporting numerous seedling trays and small pots. Benches can be arranged in ways that both create optimal growing space and allow for educational programming.
• Seating Area: If groups of students are working in the greenhouse, a multipurpose work area can be a location to meet, provide directions, work, and even make simple recipes. This area can be inside or outside the greenhouse.
• Storage: Greenhouses usually need space allocated for storing soil mixes, seeds, pots, tools, and other supplies and equipment. Creating an organized storage area can help students and volunteers self-manage in the greenhouse and maintain a tidy space. Clutter can add to pest management challenges.
• Compost: Depending on the consistency in temperature, an indoor compost system can be kept in a greenhouse to add another educational element. These systems can be low maintenance and produce fantastic fertilizer to add to soil mixes. Outdoor compost systems built against the exteriors of greenhouses can also offer similar benefits and additionally help insulate the structure
• Aquaponic and Hydroponic Systems: These systems can be expensive and a little complicated for first time growers, but can be very productive and teach a non-soil-based technique for growing plants.
FIG. 10 Hoop house with inground plantings.
FIG. 11 Greenhouse with raised beds. Photo courtesy of Meeting House Farm
FIG. 12 Greenhouse with tables.
22 | G R E E N H O U S E M A N U A L
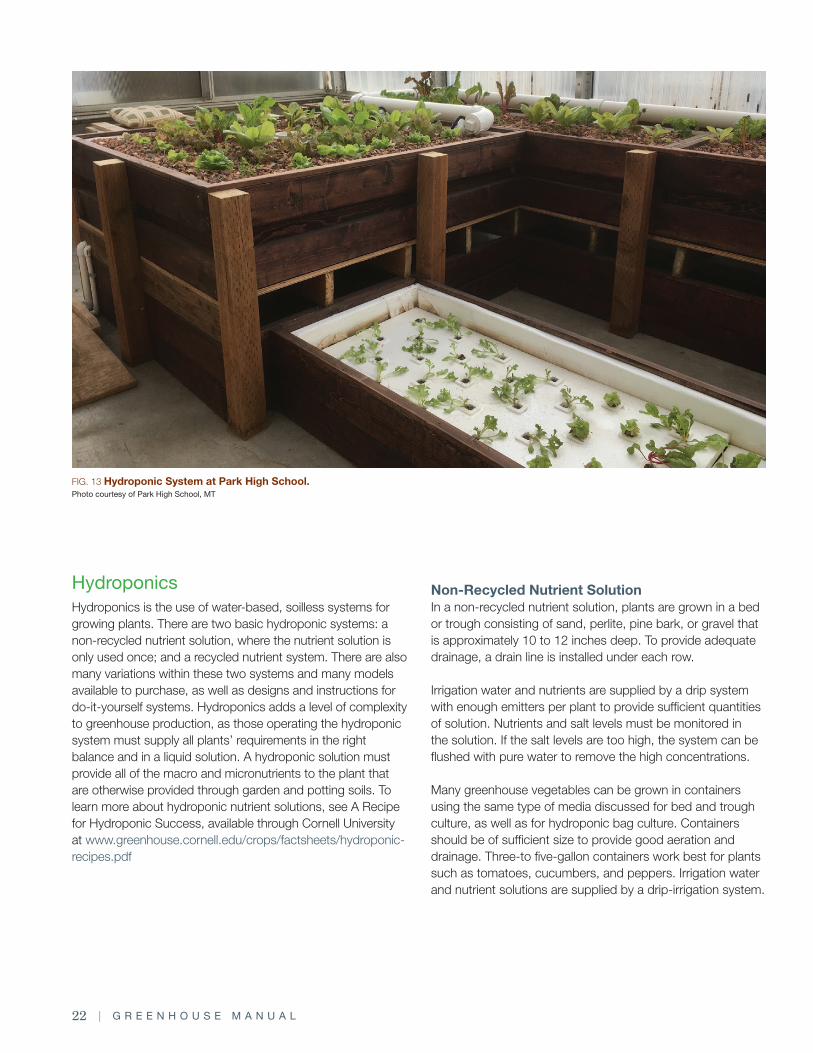
Non-Recycled Nutrient SolutionIn a non-recycled nutrient solution, plants are grown in a bed or trough consisting of sand, perlite, pine bark, or gravel that is approximately 10 to 12 inches deep. To provide adequate drainage, a drain line is installed under each row.
Irrigation water and nutrients are supplied by a drip system with enough emitters per plant to provide sufficient quantities of solution. Nutrients and salt levels must be monitored in the solution. If the salt levels are too high, the system can be flushed with pure water to remove the high concentrations.
Many greenhouse vegetables can be grown in containers using the same type of media discussed for bed and trough culture, as well as for hydroponic bag culture. Containers should be of sufficient size to provide good aeration and drainage. Three-to five-gallon containers work best for plants such as tomatoes, cucumbers, and peppers. Irrigation water and nutrient solutions are supplied by a drip-irrigation system.
Hydroponics Hydroponics is the use of water-based, soilless systems for growing plants. There are two basic hydroponic systems: a non-recycled nutrient solution, where the nutrient solution is only used once; and a recycled nutrient system. There are also many variations within these two systems and many models available to purchase, as well as designs and instructions for do-it-yourself systems. Hydroponics adds a level of complexity to greenhouse production, as those operating the hydroponic system must supply all plants’ requirements in the right balance and in a liquid solution. A hydroponic solution must provide all of the macro and micronutrients to the plant that are otherwise provided through garden and potting soils. To learn more about hydroponic nutrient solutions, see A Recipe for Hydroponic Success, available through Cornell University at www.greenhouse.cornell.edu/crops/factsheets/hydroponic-recipes.pdf
FIG. 13 Hydroponic System at Park High School. Photo courtesy of Park High School, MT

A N I N T R O D U C T O R Y G U I D E F O R E D U C A T O R S | 23
FIG. 14 Hydroponic System. Photo courtesy of University of the District Of Columbia (UDC)
FIG. 15 Budget meeting at Eastern HS Greenhouse.Photo courtesy of City Blossoms
Budgeting for a School GreenhouseOnce your team has designed a plan for your greenhouse project including the type of structure, location, methods for heating/cooling and ventilation, and interior design, it is time to create a budget that takes into consideration construction, maintenance, material, and possibly even programming costs. A budget is a strong tool in helping organize your vision so that it can be most clearly shared with the rest of your school and potential supporters. Budgets can be made either for one year or multiple years if you are trying to build up your project over time. If the total estimated cost initially exceeds your current resources, an itemized budget can help determine what costs can be lowered, what items can be secured through donations, and what kind of fundraising efforts are required.
See next page (page 24) for an example budget, Appendix 1 (page 60) for a blank budget template to use as a guide, and Appendix 4 (page 64) for a list of potential funding sources.
Recycled Nutrient SolutionIn a hydroponic system that utilizes recycled nutrient solution, the plants are grown in medium and the nutrient solution is pumped through the plants no less than every 30 minutes. In this system, a tank containing the bulk nutrient solution should be of sufficient capacity to supply three gallons of solution per plant. Beds are irrigated to about one inch below the surface and the tank is refilled with a premixed nutrient solution daily or at least once every third day. The nutrient solution should be monitored frequently for total solids and replaced when levels approach 3,500 ppm.
The Nutrient Film Technique was invented in Britain and is a variation of the recycled nutrient solution system. The Nutrient Film Technique is commonly used for smaller crops, such as herbs and lettuce. The plants are placed in shallow, plastic troughs and the nutrient solution is continually pumped over the roots without any medium to hold the plants. The troughs are on a slope, so the nutrient solution is constantly recirculating.
24 | G R E E N H O U S E M A N U A L
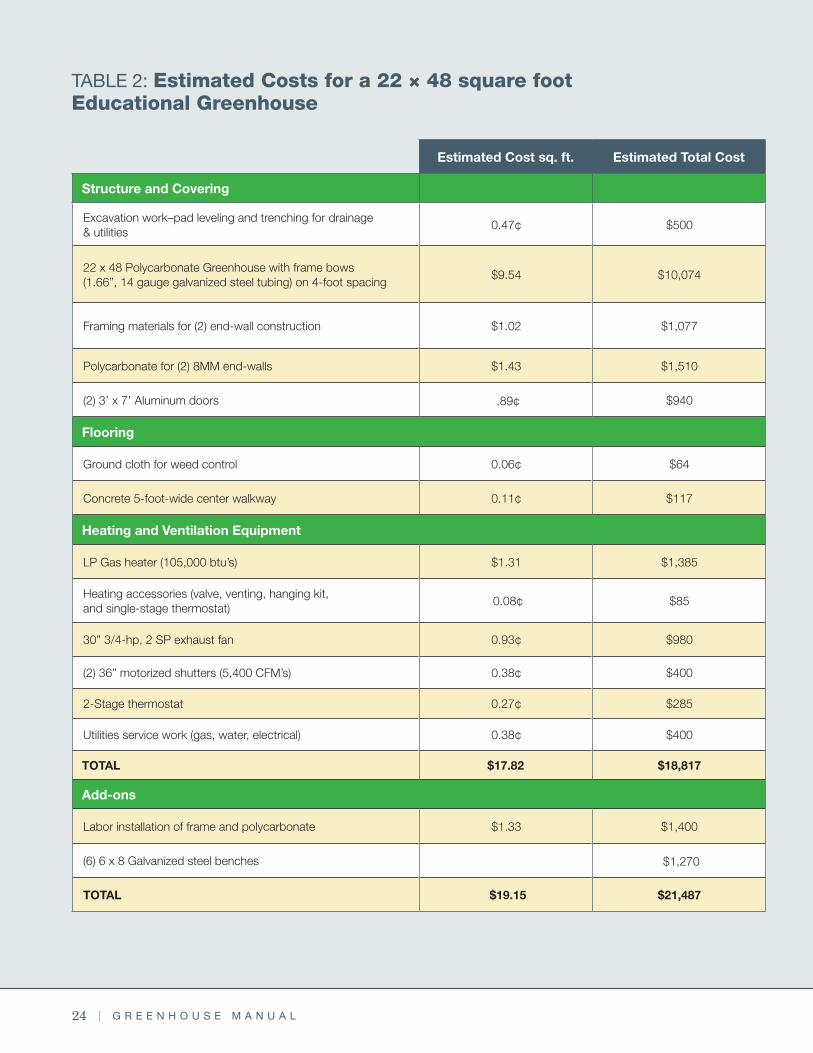
TABLE 2: Estimated Costs for a 22 × 48 square foot Educational Greenhouse
Estimated Cost sq. ft. Estimated Total Cost
Structure and Covering
Excavation work–pad leveling and trenching for drainage & utilities
0.47¢ $500
22 x 48 Polycarbonate Greenhouse with frame bows (1.66”, 14 gauge galvanized steel tubing) on 4-foot spacing
$9.54 $10,074
Framing materials for (2) end-wall construction $1.02 $1,077
Polycarbonate for (2) 8MM end-walls $1.43 $1,510
(2) 3’ x 7’ Aluminum doors .89¢ $940
Flooring
Ground cloth for weed control 0.06¢ $64
Concrete 5-foot-wide center walkway 0.11¢ $117
Heating and Ventilation Equipment
LP Gas heater (105,000 btu’s) $1.31 $1,385
Heating accessories (valve, venting, hanging kit, and single-stage thermostat)
0.08¢ $85
30” 3/4-hp, 2 SP exhaust fan 0.93¢ $980
(2) 36” motorized shutters (5,400 CFM’s) 0.38¢ $400
2-Stage thermostat 0.27¢ $285
Utilities service work (gas, water, electrical) 0.38¢ $400
TOTAL $17.82 $18,817
Add-ons
Labor installation of frame and polycarbonate $1.33 $1,400
(6) 6 x 8 Galvanized steel benches $1,270
TOTAL $19.15 $21,487
A N I N T R O D U C T O R Y G U I D E F O R E D U C A T O R S | 25
CLASSROOM CONNECTIONS: Using Greenhouses to Teach Sustainable Development
The greenhouse offers an innovative learning lab in which students can study the interconnected pillars of sustainability: environmental sustainability, economic sustainability, and socio-cultural sustainability. Investigating sustainability in a greenhouse can serve as a catalyst for solutions to local and global challenges. Following are a few ideas to integrate lessons into sustainable solutions curriculum.
Environmental Sustainability: Students can learn about methods to support environmental sustainability by using the greenhouse to investigate specific environmental challenges. Lessons can demonstrate how human actions and some agricultural practices can lead to environmental degradation. Opportunities for student projects include:• Growing food with less water• Heating the greenhouse with a renewable energy source• Using compost to improve soil health• Protecting water resources through responsible
management of pesticide and herbicide use• Lessening climate change by growing food locally and
reducing greenhouse gas emissions
Economic Sustainability: One way students can learn about economic sustainability is through a project in which they become young entrepreneurs, in theory or in practice. Students can create plans to grow, market, and distribute vegetables plants grown in a greenhouse. At the end of the assignment, students can be challenged to think of the environmental impacts of growing and distributing the crop.
From a cross-curricular teaching perspective, this assignment also integrates science, math, and technology and can be expanded to include language arts by having students create ad campaigns and marketing materials. An alternative or add-on to this assignment is to split the class in three—assigning one group to grow for the highest profit, one to grow for the highest nutritional value for the greatest number of people, and one to grow with the lowest environmental impact possible. The results offer rich comparisons that can be useful in further investigating the pillars of sustainability and systems-based thinking.
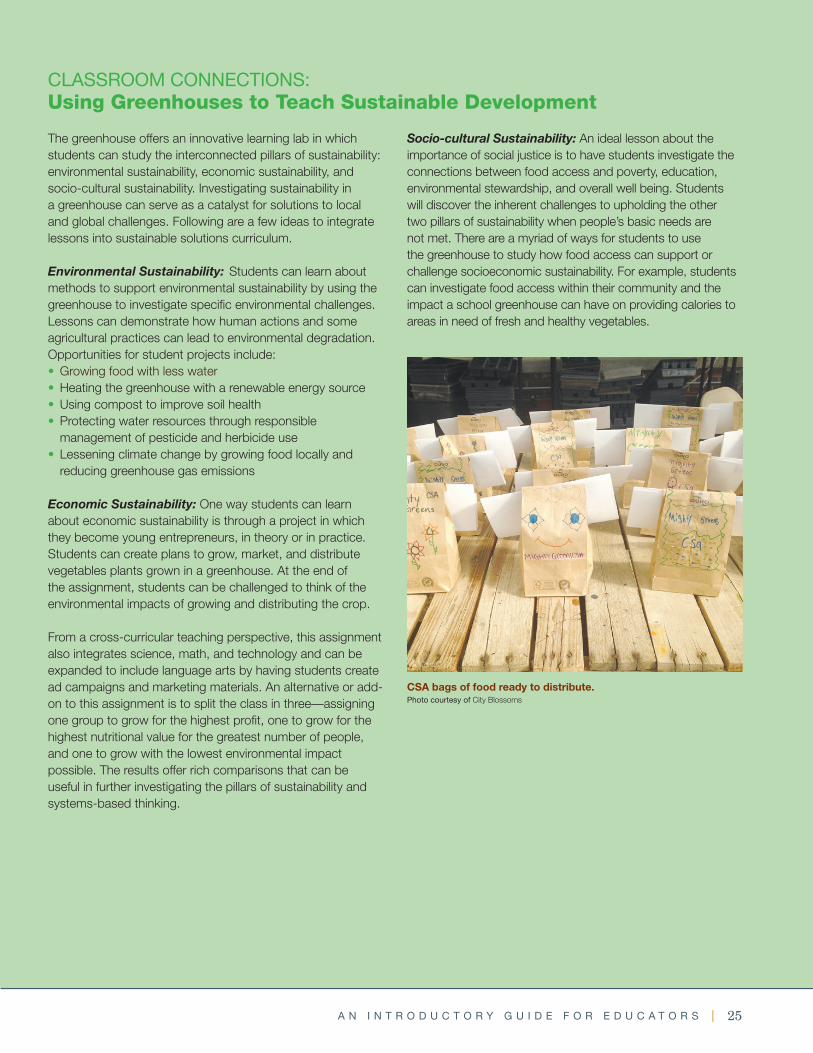
Socio-cultural Sustainability: An ideal lesson about the importance of social justice is to have students investigate the connections between food access and poverty, education, environmental stewardship, and overall well being. Students will discover the inherent challenges to upholding the other two pillars of sustainability when people’s basic needs are not met. There are a myriad of ways for students to use the greenhouse to study how food access can support or challenge socioeconomic sustainability. For example, students can investigate food access within their community and the impact a school greenhouse can have on providing calories to areas in need of fresh and healthy vegetables.
CSA bags of food ready to distribute. Photo courtesy of City Blossoms

26 | G R E E N H O U S E M A N U A L
for watering, temperature, and humidity control are all management practices to consider as you plan your planting schedule. Here are some important questions to answer during the planning process:
• What are the goals for growing plants in the greenhouse (experimentation, production, transplanting to a garden)?
• When should spring, summer, and fall seeds and propagation be started?
• How many seeds should be started or plants propagated?• Who will care for the plants, including watering and
controlling temperature and humidity levels?• Will all of the resulting plants be used by the school or
distributed to other schools and/or the public?
Annual plants are typically divided into two categories: cool season and warm season. There are several different variations within these categories but, in general, some vegetables thrive in cooler conditions and others do better in warmer conditions. Information such as a plant’s growing conditions and its days to maturity, or harvest, are usually noted on a seed packet or in a seed catalog. Days to harvest (also called days to maturity) is an approximation of how many days it will take for the plant to go from a young seedling to an edible treat (see detailed explanation in next
School greenhouses can be very versatile and used to explore numerous long-term projects connected to growing and nurturing plants. They can be indoor production gardens cultivating vegetables and herbs for harvesting, places for starting seedlings and propagating plants for transplanting into existing outdoor gardens or distributing through community events and fundraisers, or labs or job-training environments for budding horticulturalists, biologists, farmers, and gardeners. This section will focus on how to start seeds, care for plants in the greenhouse, and safely harvest produce.
Planning with the School Year & Growing SeasonBefore planting the first seed it is very helpful to create a plan for the season. If seeds are being germinated for the purpose of production, a plan can help you chart the best start dates for your geographic location as well as guide how the greenhouse will be used and organized. A very important item to take under consideration during the creation of this plan is your school’s seasonal breaks. Aligning the growing season with the school schedule, assigning students or volunteers to check on the greenhouse plants on weekends and when school is not in session, and setting up automated systems
Part 3: PLANTS, PLANTS, PLANTS—GROWING IN A GREENHOUSE

A N I N T R O D U C T O R Y G U I D E F O R E D U C A T O R S | 27
section). It is also helpful to use the USDA Plant Hardiness Zone Map (http://planthardiness.ars.usda.gov) to determine in which zone you are located. The zones are based on the average annual minimum winter temperature and help gardeners and growers determine which plants are most likely to thrive in their locations at what times.
Creating a Planting ScheduleOnce your school has settled on a type of greenhouse structure, its purpose (growing seedlings, food production, etc.), the interior design, best seasons for use, basic list of plants you are interested in growing, and the strategies for maintenance, it is time to create your planting schedule. Let’s begin by understanding when seeds should be started in a greenhouse. By working backward, starting from the harvest date, the seed starting date can be calculated based on the Days To Mature (DTM) of each plant. This amount of time is referred to as Days To Maturity (DTM) and is referenced in seed catalogs. However, DTMs refer to the amount of time a plant needs to grow after it has been transplanted; DTMs do not take into account the amount of time a seed takes to germinate and then grow out in the greenhouse. To illustrate how to create a planting schedule, look at an example using tomatoes on the next page. Also, see the planting schedule template in Appendix 2 (page 62) for more information.
CLASSROOM CONNECTIONS: Making a Planting Schedule with Students Garden planning offers opportunities for students of all ages to be involved with the process. Students who are part of the planning will be engaged from the beginning with what is growing, generating a sense of connection and responsibility toward the school greenhouse. School greenhouse educators can consider the following activities and processes to invite students to participate in the planning process.
Grades K–4: Make vision boards, planting schedules, and photo-based calendars using cut-out images from seed catalogs. It is often free to request catalogs from various seed companies. The final products can be hung in the greenhouse to help students and visitors see what is being seeded, transplanted, or harvested.
Grades 5–8: Survey students about which types of vegetables they would like to grow in the greenhouse. Then have them read the seed packet to determine expected dates to start the seeds, transplant, and harvest.
Grades 9–12: Using seed catalogs or seed company websites, ask students to research and propose specific plant varieties to grow in the greenhouse. Create a system either on a white board or garden log for students to keep track of planting dates and other relevant data.
Photo courtesy of City Blossoms
Cool-season plants• Plant in fall for winter
harvest*
• Plant in early spring for harvest before school ends*
Warm-season plants • Plant in late spring
before school ends for fall harvest*
Spinach 50-60 days Tomatoes 80 days
Broccoli 60-70 days Melons 80-90 days
Onions/scallions
60 daysSummer squash
70-80 days
Carrots 60-70 days Eggplant 80-90 days
Radishes 40-50 days Peppers 80-90 days
Lettuce 40-50 days Cucumber 75-80 days
Parsley 60-70 days Basil 60-80 days
* Remember to arrange for volunteers, students, or staff to care for plants over long breaks in winter, spring, and fall. Incentives such as sharing in the harvest might inspire more volunteers.
TABLE 3: Planning with the School Year
28 | G R E E N H O U S E M A N U A L
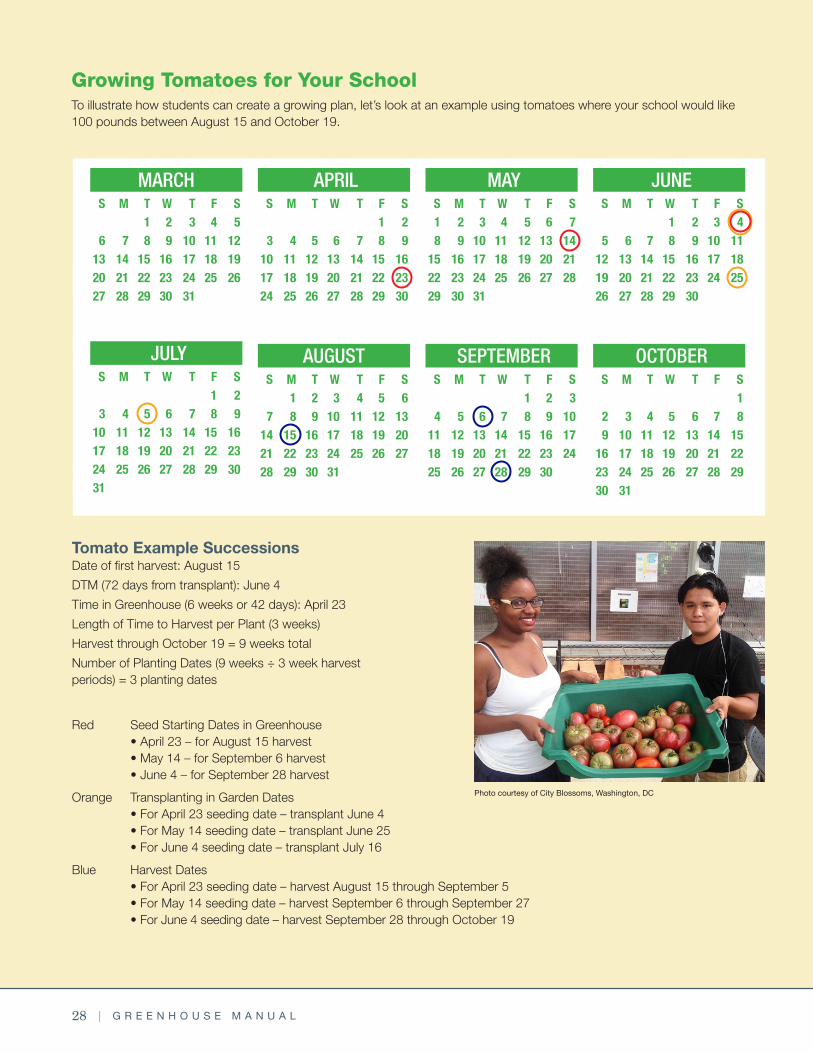
Growing Tomatoes for Your SchoolTo illustrate how students can create a growing plan, let’s look at an example using tomatoes where your school would like 100 pounds between August 15 and October 19.
Photo courtesy of City Blossoms, Washington, DC
Tomato Example SuccessionsDate of first harvest: August 15
DTM (72 days from transplant): June 4
Time in Greenhouse (6 weeks or 42 days): April 23
Length of Time to Harvest per Plant (3 weeks)
Harvest through October 19 = 9 weeks total
Number of Planting Dates (9 weeks ÷ 3 week harvest periods) = 3 planting dates
Red Seed Starting Dates in Greenhouse • April 23 – for August 15 harvest • May 14 – for September 6 harvest • June 4 – for September 28 harvest
Orange Transplanting in Garden Dates • For April 23 seeding date – transplant June 4 • For May 14 seeding date – transplant June 25 • For June 4 seeding date – transplant July 16
Blue Harvest Dates • For April 23 seeding date – harvest August 15 through September 5 • For May 14 seeding date – harvest September 6 through September 27 • For June 4 seeding date – harvest September 28 through October 19
OCTOBER S M T W T F S 1 2 3 4 5 6 7 8 9 10 11 12 13 14 15 16 17 18 19 20 21 22 23 24 25 26 27 28 29 30 31
AUGUST S M T W T F S 1 2 3 4 5 6 7 8 9 10 11 12 13 14 15 16 17 18 19 20 21 22 23 24 25 26 27 28 29 30 31
SEPTEMBER S M T W T F S 1 2 3 4 5 6 7 8 9 10 11 12 13 14 15 16 17 18 19 20 21 22 23 24 25 26 27 28 29 30
MARCH S M T W T F S 1 2 3 4 5 6 7 8 9 10 11 12 13 14 15 16 17 18 19 20 21 22 23 24 25 26 27 28 29 30 31
APRIL S M T W T F S 1 2 3 4 5 6 7 8 9 10 11 12 13 14 15 16 17 18 19 20 21 22 23 24 25 26 27 28 29 30
JUNE S M T W T F S 1 2 3 4 5 6 7 8 9 10 11 12 13 14 15 16 17 18 19 20 21 22 23 24 25 26 27 28 29 30
MAY S M T W T F S 1 2 3 4 5 6 7 8 9 10 11 12 13 14 15 16 17 18 19 20 21 22 23 24 25 26 27 28 29 30 31
JULY S M T W T F S 1 2 3 4 5 6 7 8 9 10 11 12 13 14 15 16 17 18 19 20 21 22 23 24 25 26 27 28 29 30 31

A N I N T R O D U C T O R Y G U I D E F O R E D U C A T O R S | 29
Understanding Plant PropagationPlants reproduce in one of two ways: sexual propagation or asexual propagation. Sexual propagation results in fertilization when both male (sperm in the pollen) and female (eggs in the ovul, inside the ovary of the pistil) sex cells come together. Seeds from sexual propagation result in a new plant with its own unique genetics. Annual vegetables are plants that reproduce sexually and complete their entire life cycle (germination, vegetative growth, flowering, and seed production) all within a single year.
Asexual propagation uses plant division, cuttings, tissue culture, and other means to reproduce without the gene exchange of sexual reproduction. Asexual propagation creates a new generation of plants that is genetically identical to its parent source and is common amongst perennial fruits, berries, nuts, and cultivars of many horticultural plants. This section will focus more on growing from seed, but both forms of propagation are worth exploring with all grade levels.
Open-Pollinated and Hybrid SeedsThere are two types of seeds to consider for starting plants: open-pollinated and hybrid seeds. Open-pollinated seeds are produced when fertilization occurs within the same flower (self-pollination) or when the pollen from one plant fertilizes the flowers of another plant cross-pollination of the same genetically stable variety. Open-pollinated seeds maintain the vigor and other traits through generations and are commonly referred to as standard varieties. Greenhouses can play a vital role in maintaining open-pollinated varieties by isolating them from pollen from other varieties. Among the plant varieties that are open-pollinated are heirloom seeds that have been maintained and handed down over generations.
Hybrid seed is developed through controlled cross-pollination from two genetically different parents. Hybrids are developed from inbred lines and deliberately target specific characteristics such as plant vigor, uniformity in size and shape, increase in yield, flavor, quality, storage capacity, and pest and disease resistance. The first generation of seeds are referred to as F1 Hybrids and, due to the complexity of the breeding process, seeds from the F1 generation are not saved, since the plants they would grow into (the F2 generation) can inherit both the desirable and undesirable characteristics that were present in the parent line.
Succession PlantingsSome annual vegetables grow and mature quickly and can be followed by another planting of vegetables. In order to have the same type of crop available for an extended period of time, succession plantings can be achieved in two ways.
The first way to achieve a succession planting is by spreading out the seed-starting dates to cover the entire harvest window. This method uses the same type of plant variety so that the DTM is consistent. However, you also need to know the length of time the plant will produce edible leaves or fruit. A ripening period of three weeks can be figured in to the tomato example, with the school wanting tomatoes between August 15 and October 19.
With this information, it can be determined that three succession plantings will be necessary to spread the tomato harvest over the total nine weeks. Considering the three-week seeding intervals and starting with the first seeding on April 23, subsequent seeding dates can be scheduled for May 14 and June 4. Furthermore, the total number of plants needed can be divided by the number of plantings to determine how many seeds to sow for each succession.
Another technique for creating succession plantings is to start varieties of the same plant with different days to maturity, all on the same day. This method takes a little more experience and practice to achieve a consistent supply over an extended period of time, as yield potentials and harvest lengths can vary. Nonetheless, if three different varieties of tomatoes were selected with 72, 102, and 132 days to maturity, then the school could have a consistent supply of tomatoes over the nine weeks. See Appendix 3 (page 63) for a useable template.
Greenhouse Planting with StudentsNow that you have set an estimated planting schedule, your team is ready to start propagating!
Getting Started with SeedsStarting seeds with students of all ages is a great activity for utilizing the school greenhouse. It is a straightforward activity with fast results, as most annual seeds germinate very quickly, allowing students the opportunity to see the result of the activity. The information in this section will provide educators with background knowledge to design and deliver lessons for students on the germination process and life cycle of plants, supplies needed for planting seeds, and steps for starting seeds in a school greenhouse.
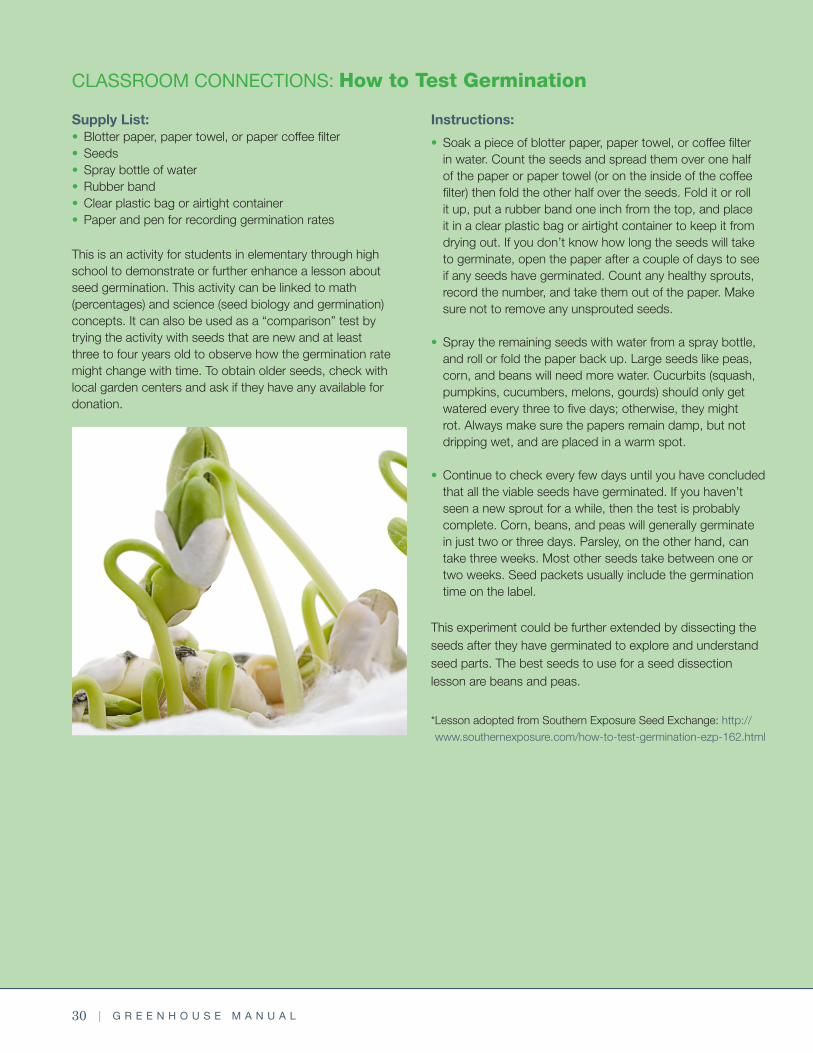
30 | G R E E N H O U S E M A N U A L
CLASSROOM CONNECTIONS: How to Test Germination
Supply List: • Blotter paper, paper towel, or paper coffee filter• Seeds• Spray bottle of water• Rubber band • Clear plastic bag or airtight container• Paper and pen for recording germination rates
This is an activity for students in elementary through high school to demonstrate or further enhance a lesson about seed germination. This activity can be linked to math (percentages) and science (seed biology and germination) concepts. It can also be used as a “comparison” test by trying the activity with seeds that are new and at least three to four years old to observe how the germination rate might change with time. To obtain older seeds, check with local garden centers and ask if they have any available for donation.
Instructions:
• Soak a piece of blotter paper, paper towel, or coffee filter in water. Count the seeds and spread them over one half of the paper or paper towel (or on the inside of the coffee filter) then fold the other half over the seeds. Fold it or roll it up, put a rubber band one inch from the top, and place it in a clear plastic bag or airtight container to keep it from drying out. If you don’t know how long the seeds will take to germinate, open the paper after a couple of days to see if any seeds have germinated. Count any healthy sprouts, record the number, and take them out of the paper. Make sure not to remove any unsprouted seeds.
• Spray the remaining seeds with water from a spray bottle, and roll or fold the paper back up. Large seeds like peas, corn, and beans will need more water. Cucurbits (squash, pumpkins, cucumbers, melons, gourds) should only get watered every three to five days; otherwise, they might rot. Always make sure the papers remain damp, but not dripping wet, and are placed in a warm spot.
• Continue to check every few days until you have concluded that all the viable seeds have germinated. If you haven’t seen a new sprout for a while, then the test is probably complete. Corn, beans, and peas will generally germinate in just two or three days. Parsley, on the other hand, can take three weeks. Most other seeds take between one or two weeks. Seed packets usually include the germination time on the label.
This experiment could be further extended by dissecting the seeds after they have germinated to explore and understand seed parts. The best seeds to use for a seed dissection lesson are beans and peas.
* Lesson adopted from Southern Exposure Seed Exchange: http://www.southernexposure.com/how-to-test-germination-ezp-162.html
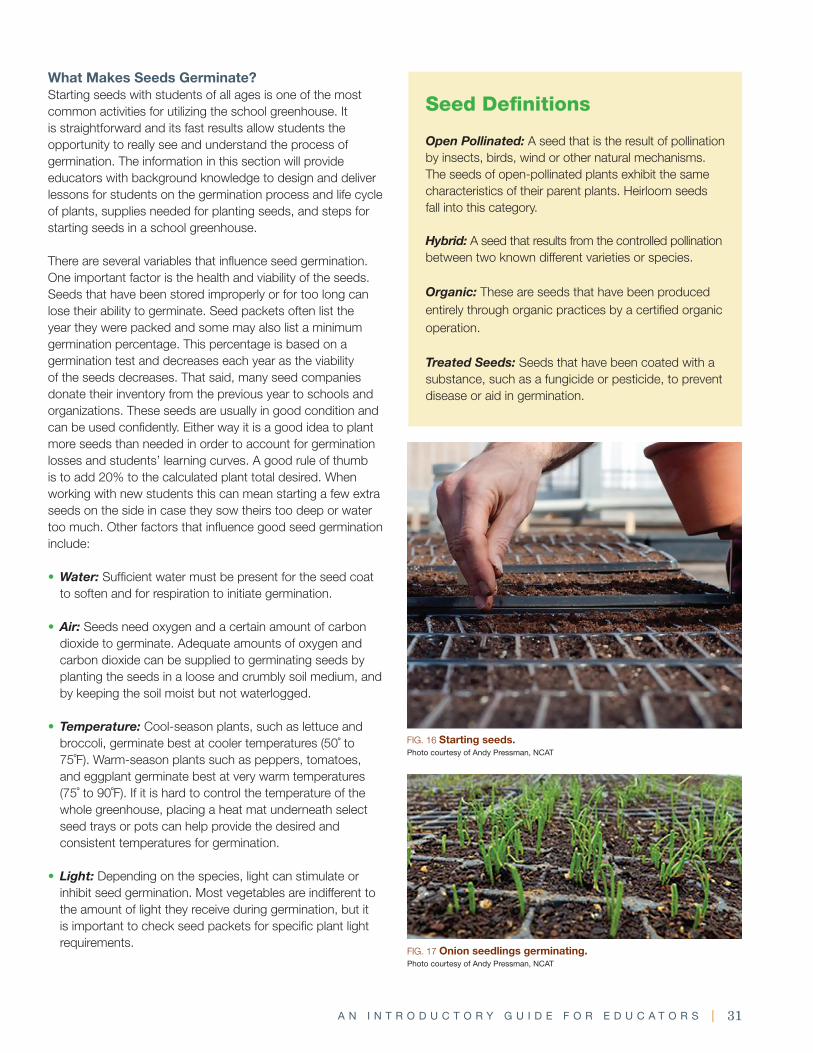
A N I N T R O D U C T O R Y G U I D E F O R E D U C A T O R S | 31
FIG. 16 Starting seeds. Photo courtesy of Andy Pressman, NCAT
Seed Definitions
Open Pollinated: A seed that is the result of pollination by insects, birds, wind or other natural mechanisms. The seeds of open-pollinated plants exhibit the same characteristics of their parent plants. Heirloom seeds fall into this category.
Hybrid: A seed that results from the controlled pollination between two known different varieties or species.
Organic: These are seeds that have been produced entirely through organic practices by a certified organic operation.
Treated Seeds: Seeds that have been coated with a substance, such as a fungicide or pesticide, to prevent disease or aid in germination.
What Makes Seeds Germinate?Starting seeds with students of all ages is one of the most common activities for utilizing the school greenhouse. It is straightforward and its fast results allow students the opportunity to really see and understand the process of germination. The information in this section will provide educators with background knowledge to design and deliver lessons for students on the germination process and life cycle of plants, supplies needed for planting seeds, and steps for starting seeds in a school greenhouse.
There are several variables that influence seed germination. One important factor is the health and viability of the seeds. Seeds that have been stored improperly or for too long can lose their ability to germinate. Seed packets often list the year they were packed and some may also list a minimum germination percentage. This percentage is based on a germination test and decreases each year as the viability of the seeds decreases. That said, many seed companies donate their inventory from the previous year to schools and organizations. These seeds are usually in good condition and can be used confidently. Either way it is a good idea to plant more seeds than needed in order to account for germination losses and students’ learning curves. A good rule of thumb is to add 20% to the calculated plant total desired. When working with new students this can mean starting a few extra seeds on the side in case they sow theirs too deep or water too much. Other factors that influence good seed germination include:
• Water: Sufficient water must be present for the seed coat to soften and for respiration to initiate germination.
• Air: Seeds need oxygen and a certain amount of carbon
dioxide to germinate. Adequate amounts of oxygen and carbon dioxide can be supplied to germinating seeds by planting the seeds in a loose and crumbly soil medium, and by keeping the soil moist but not waterlogged.
• Temperature: Cool-season plants, such as lettuce and broccoli, germinate best at cooler temperatures (50˚ to 75˚F). Warm-season plants such as peppers, tomatoes, and eggplant germinate best at very warm temperatures (75˚ to 90˚F). If it is hard to control the temperature of the whole greenhouse, placing a heat mat underneath select seed trays or pots can help provide the desired and consistent temperatures for germination.
• Light: Depending on the species, light can stimulate or inhibit seed germination. Most vegetables are indifferent to the amount of light they receive during germination, but it is important to check seed packets for specific plant light requirements.
FIG. 17 Onion seedlings germinating. Photo courtesy of Andy Pressman, NCAT
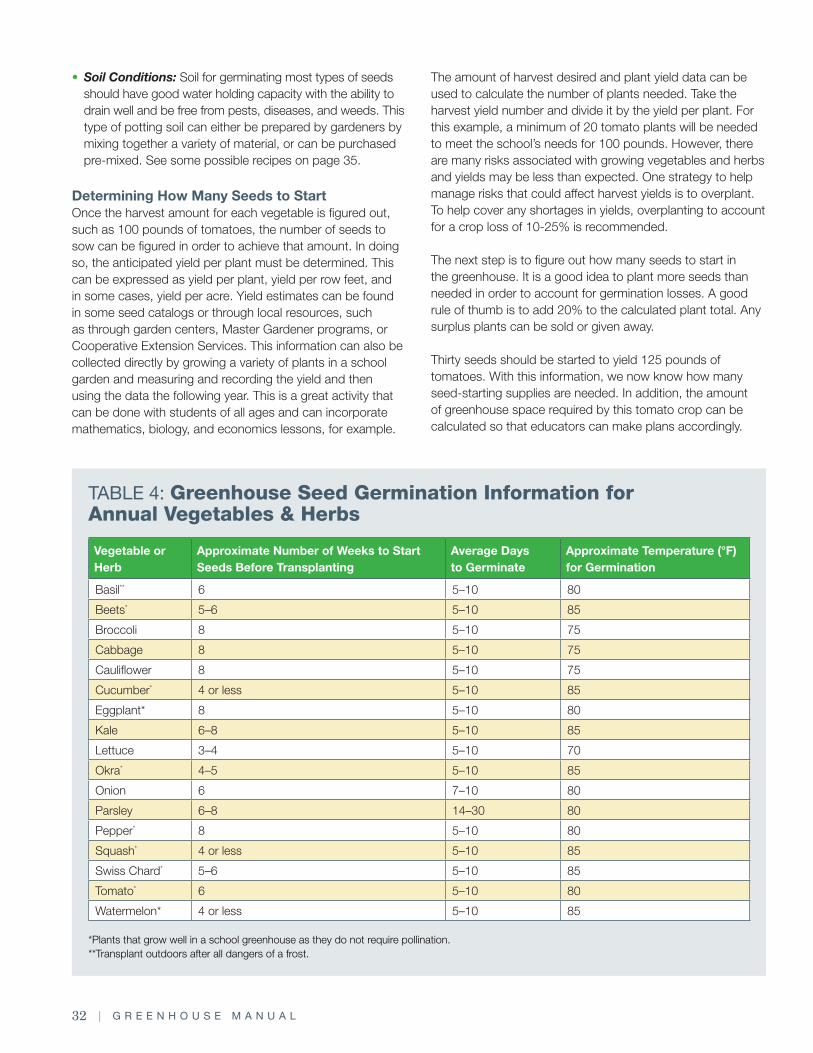
32 | G R E E N H O U S E M A N U A L
The amount of harvest desired and plant yield data can be used to calculate the number of plants needed. Take the harvest yield number and divide it by the yield per plant. For this example, a minimum of 20 tomato plants will be needed to meet the school’s needs for 100 pounds. However, there are many risks associated with growing vegetables and herbs and yields may be less than expected. One strategy to help manage risks that could affect harvest yields is to overplant. To help cover any shortages in yields, overplanting to account for a crop loss of 10-25% is recommended.
The next step is to figure out how many seeds to start in the greenhouse. It is a good idea to plant more seeds than needed in order to account for germination losses. A good rule of thumb is to add 20% to the calculated plant total. Any surplus plants can be sold or given away.
Thirty seeds should be started to yield 125 pounds of tomatoes. With this information, we now know how many seed-starting supplies are needed. In addition, the amount of greenhouse space required by this tomato crop can be calculated so that educators can make plans accordingly.
Vegetable or Herb
Approximate Number of Weeks to Start Seeds Before Transplanting
Average Days to Germinate
Approximate Temperature (°F) for Germination
Basil** 6 5–10 80
Beets* 5–6 5–10 85
Broccoli 8 5–10 75
Cabbage 8 5–10 75
Cauliflower 8 5–10 75
Cucumber* 4 or less 5–10 85
Eggplant* 8 5–10 80
Kale 6–8 5–10 85
Lettuce 3–4 5–10 70
Okra* 4–5 5–10 85
Onion 6 7–10 80
Parsley 6–8 14–30 80
Pepper* 8 5–10 80
Squash* 4 or less 5–10 85
Swiss Chard* 5–6 5–10 85
Tomato* 6 5–10 80
Watermelon* 4 or less 5–10 85
*Plants that grow well in a school greenhouse as they do not require pollination.**Transplant outdoors after all dangers of a frost.
• Soil Conditions: Soil for germinating most types of seeds should have good water holding capacity with the ability to drain well and be free from pests, diseases, and weeds. This type of potting soil can either be prepared by gardeners by mixing together a variety of material, or can be purchased pre-mixed. See some possible recipes on page 35.
Determining How Many Seeds to StartOnce the harvest amount for each vegetable is figured out, such as 100 pounds of tomatoes, the number of seeds to sow can be figured in order to achieve that amount. In doing so, the anticipated yield per plant must be determined. This can be expressed as yield per plant, yield per row feet, and in some cases, yield per acre. Yield estimates can be found in some seed catalogs or through local resources, such as through garden centers, Master Gardener programs, or Cooperative Extension Services. This information can also be collected directly by growing a variety of plants in a school garden and measuring and recording the yield and then using the data the following year. This is a great activity that can be done with students of all ages and can incorporate mathematics, biology, and economics lessons, for example.
TABLE 4: Greenhouse Seed Germination Information for Annual Vegetables & Herbs
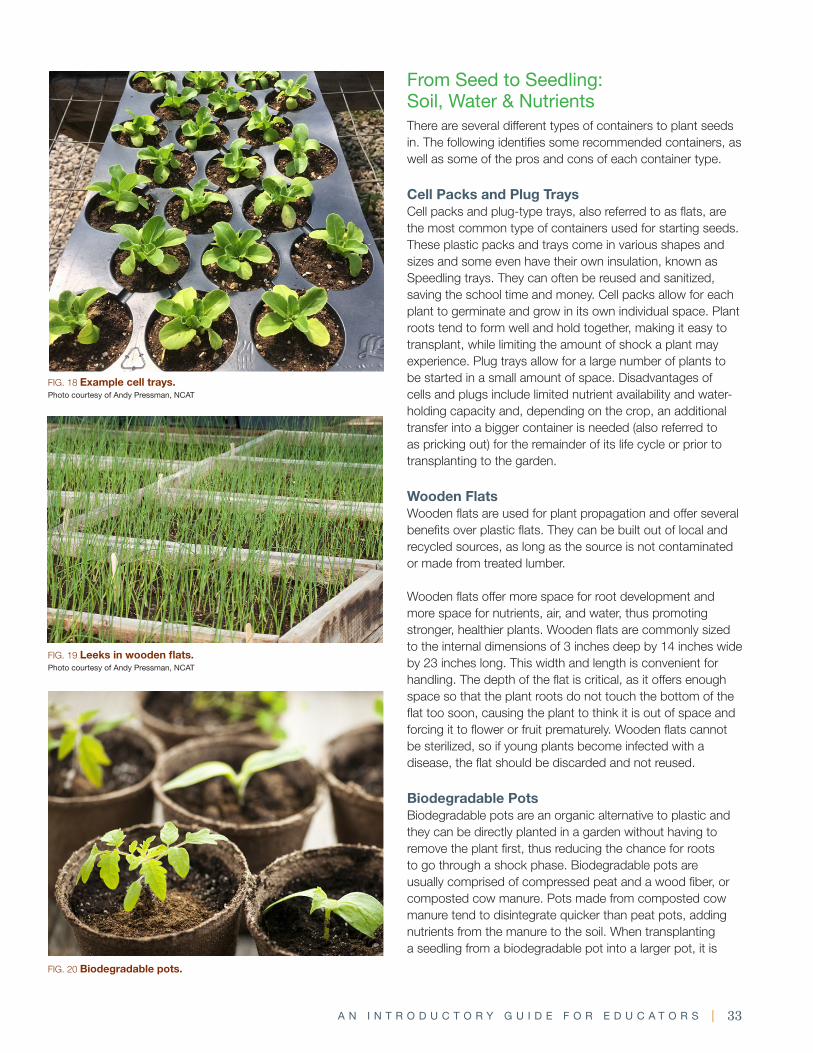
A N I N T R O D U C T O R Y G U I D E F O R E D U C A T O R S | 33
From Seed to Seedling: Soil, Water & Nutrients There are several different types of containers to plant seeds in. The following identifies some recommended containers, as well as some of the pros and cons of each container type.
Cell Packs and Plug TraysCell packs and plug-type trays, also referred to as flats, are the most common type of containers used for starting seeds. These plastic packs and trays come in various shapes and sizes and some even have their own insulation, known as Speedling trays. They can often be reused and sanitized, saving the school time and money. Cell packs allow for each plant to germinate and grow in its own individual space. Plant roots tend to form well and hold together, making it easy to transplant, while limiting the amount of shock a plant may experience. Plug trays allow for a large number of plants to be started in a small amount of space. Disadvantages of cells and plugs include limited nutrient availability and water-holding capacity and, depending on the crop, an additional transfer into a bigger container is needed (also referred to as pricking out) for the remainder of its life cycle or prior to transplanting to the garden.
Wooden FlatsWooden flats are used for plant propagation and offer several benefits over plastic flats. They can be built out of local and recycled sources, as long as the source is not contaminated or made from treated lumber.
Wooden flats offer more space for root development and more space for nutrients, air, and water, thus promoting stronger, healthier plants. Wooden flats are commonly sized to the internal dimensions of 3 inches deep by 14 inches wide by 23 inches long. This width and length is convenient for handling. The depth of the flat is critical, as it offers enough space so that the plant roots do not touch the bottom of the flat too soon, causing the plant to think it is out of space and forcing it to flower or fruit prematurely. Wooden flats cannot be sterilized, so if young plants become infected with a disease, the flat should be discarded and not reused.
Biodegradable PotsBiodegradable pots are an organic alternative to plastic and they can be directly planted in a garden without having to remove the plant first, thus reducing the chance for roots to go through a shock phase. Biodegradable pots are usually comprised of compressed peat and a wood fiber, or composted cow manure. Pots made from composted cow manure tend to disintegrate quicker than peat pots, adding nutrients from the manure to the soil. When transplanting a seedling from a biodegradable pot into a larger pot, it is
FIG. 19 Leeks in wooden flats. Photo courtesy of Andy Pressman, NCAT
FIG. 20 Biodegradable pots.
FIG. 18 Example cell trays.Photo courtesy of Andy Pressman, NCAT

34 | G R E E N H O U S E M A N U A L
best to remove the seedling from the smaller biodegradable pot to allow the plant roots to access the new space more efficiently. Cardboard egg cartons, newspaper, and paper cups (that are not lined with plastic) are also biodegradable options for starting seeds. Some of these materials, such as molded newspaper filled with soil mix, can break down rather quickly, so they may not be ideal containers for plants that need longer growing periods before transplanting.
Soil BlocksSoil blocks do not rely on any container, but rather on a good soil mix that holds together to serve as both the container and the growing medium for a transplant seedling. A soil-block maker is used to mold the soil into blocks, and the seeds are planted directly into the molds. The key with using soil blocks is to have a soil mix that can be formed into blocks and has good water-holding capacity, since there is no physical structure holding the soil together. These requirements are best met through a homemade soil blend, as most commercial mixes tend to not hold together well enough for soil blocks.
Soil MixesA good seedling soil mix will provide an ideal environment for plant development. Seedling soil mixes differ from garden soil in that they contain higher amounts of organic matter, as well as drainage and aeration materials so that the young seedlings flourish despite being restricted in a container. There are many different types of mixes and recipes appropriate for starting seeds. Soil mixes can be purchased from garden supply centers or made from a custom blend, which is a great hands-on activity for students. It is important for all soil mixes to:
• Contain readily available nutrients to support healthy plant growth
• Have adequate water and moisture retention • Provide proper drainage of excess water • Maintain pockets of air (pore space) • Be free of pathogens and weed seeds
This section includes a list of ingredients for mixing custom blends and sample recipes for soil mixes, including one for a soil block mix. Additional recipes are provided in the ATTRA publication Organic Potting Mixes, available at: https://attra.ncat.org/viewhtml/?id=609
FIG. 21 Soil block makers. Photo courtesy of Andy Pressman, NCAT
FIG. 22 Making soil mixes. Photo courtesy of City Blossoms
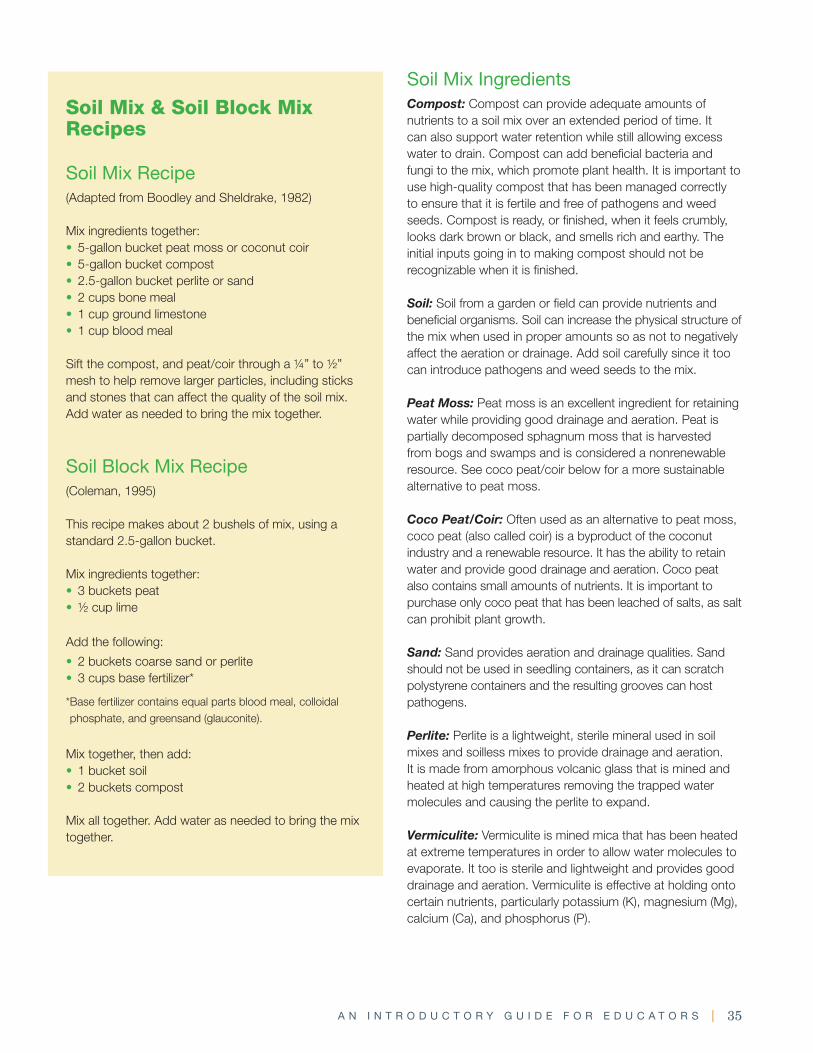
A N I N T R O D U C T O R Y G U I D E F O R E D U C A T O R S | 35
Soil Mix & Soil Block Mix Recipes
Soil Mix Recipe (Adapted from Boodley and Sheldrake, 1982)
Mix ingredients together: • 5-gallon bucket peat moss or coconut coir • 5-gallon bucket compost • 2.5-gallon bucket perlite or sand • 2 cups bone meal • 1 cup ground limestone • 1 cup blood meal
Sift the compost, and peat/coir through a ¼” to ½” mesh to help remove larger particles, including sticks and stones that can affect the quality of the soil mix. Add water as needed to bring the mix together.
Soil Block Mix Recipe(Coleman, 1995)
This recipe makes about 2 bushels of mix, using a standard 2.5-gallon bucket.
Mix ingredients together: • 3 buckets peat • ½ cup lime
Add the following:
• 2 buckets coarse sand or perlite • 3 cups base fertilizer*
* Base fertilizer contains equal parts blood meal, colloidal phosphate, and greensand (glauconite).
Mix together, then add: • 1 bucket soil • 2 buckets compost
Mix all together. Add water as needed to bring the mix together.
Soil Mix IngredientsCompost: Compost can provide adequate amounts of nutrients to a soil mix over an extended period of time. It can also support water retention while still allowing excess water to drain. Compost can add beneficial bacteria and fungi to the mix, which promote plant health. It is important to use high-quality compost that has been managed correctly to ensure that it is fertile and free of pathogens and weed seeds. Compost is ready, or finished, when it feels crumbly, looks dark brown or black, and smells rich and earthy. The initial inputs going in to making compost should not be recognizable when it is finished.
Soil: Soil from a garden or field can provide nutrients and beneficial organisms. Soil can increase the physical structure of the mix when used in proper amounts so as not to negatively affect the aeration or drainage. Add soil carefully since it too can introduce pathogens and weed seeds to the mix.
Peat Moss: Peat moss is an excellent ingredient for retaining water while providing good drainage and aeration. Peat is partially decomposed sphagnum moss that is harvested from bogs and swamps and is considered a nonrenewable resource. See coco peat/coir below for a more sustainable alternative to peat moss.
Coco Peat/Coir: Often used as an alternative to peat moss, coco peat (also called coir) is a byproduct of the coconut industry and a renewable resource. It has the ability to retain water and provide good drainage and aeration. Coco peat also contains small amounts of nutrients. It is important to purchase only coco peat that has been leached of salts, as salt can prohibit plant growth.
Sand: Sand provides aeration and drainage qualities. Sand should not be used in seedling containers, as it can scratch polystyrene containers and the resulting grooves can host pathogens.
Perlite: Perlite is a lightweight, sterile mineral used in soil mixes and soilless mixes to provide drainage and aeration. It is made from amorphous volcanic glass that is mined and heated at high temperatures removing the trapped water molecules and causing the perlite to expand.
Vermiculite: Vermiculite is mined mica that has been heated at extreme temperatures in order to allow water molecules to evaporate. It too is sterile and lightweight and provides good drainage and aeration. Vermiculite is effective at holding onto certain nutrients, particularly potassium (K), magnesium (Mg), calcium (Ca), and phosphorus (P).
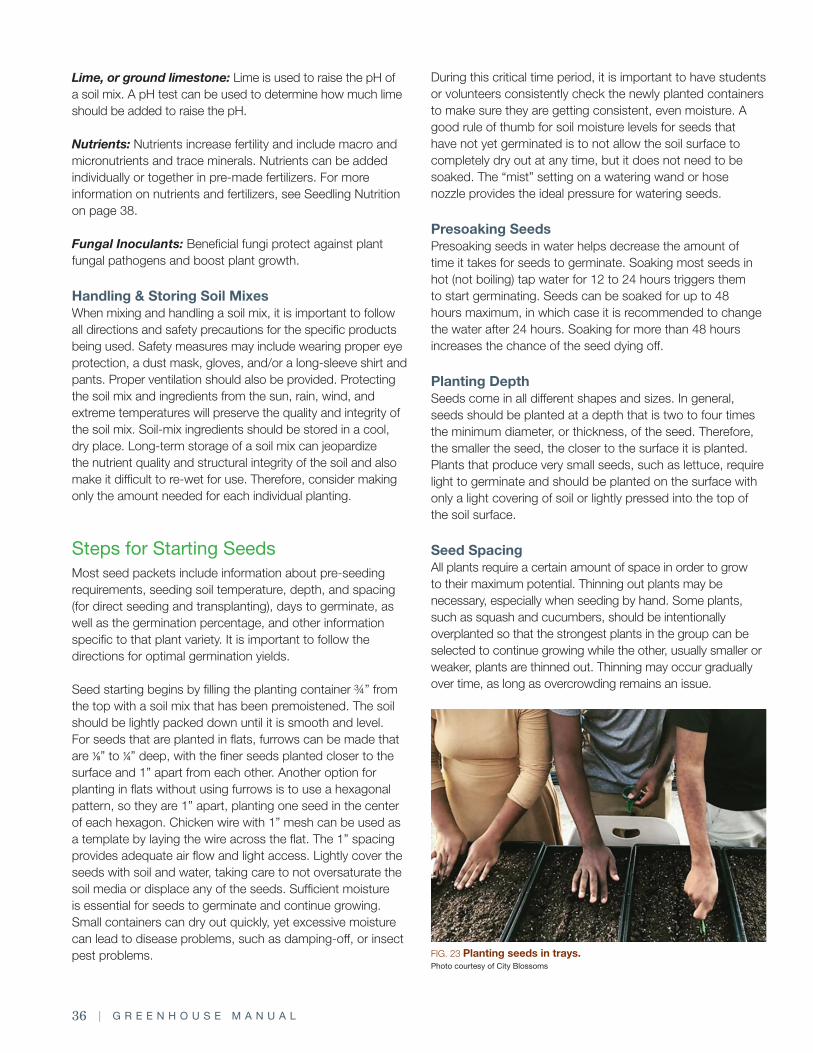
36 | G R E E N H O U S E M A N U A L
FIG. 23 Planting seeds in trays. Photo courtesy of City Blossoms
Lime, or ground limestone: Lime is used to raise the pH of a soil mix. A pH test can be used to determine how much lime should be added to raise the pH.
Nutrients: Nutrients increase fertility and include macro and micronutrients and trace minerals. Nutrients can be added individually or together in pre-made fertilizers. For more information on nutrients and fertilizers, see Seedling Nutrition on page 38.
Fungal Inoculants: Beneficial fungi protect against plant fungal pathogens and boost plant growth.
Handling & Storing Soil Mixes When mixing and handling a soil mix, it is important to follow all directions and safety precautions for the specific products being used. Safety measures may include wearing proper eye protection, a dust mask, gloves, and/or a long-sleeve shirt and pants. Proper ventilation should also be provided. Protecting the soil mix and ingredients from the sun, rain, wind, and extreme temperatures will preserve the quality and integrity of the soil mix. Soil-mix ingredients should be stored in a cool, dry place. Long-term storage of a soil mix can jeopardize the nutrient quality and structural integrity of the soil and also make it difficult to re-wet for use. Therefore, consider making only the amount needed for each individual planting.
Steps for Starting SeedsMost seed packets include information about pre-seeding requirements, seeding soil temperature, depth, and spacing (for direct seeding and transplanting), days to germinate, as well as the germination percentage, and other information specific to that plant variety. It is important to follow the directions for optimal germination yields.
Seed starting begins by filling the planting container ¾” from the top with a soil mix that has been premoistened. The soil should be lightly packed down until it is smooth and level. For seeds that are planted in flats, furrows can be made that are ⅛” to ¼” deep, with the finer seeds planted closer to the surface and 1” apart from each other. Another option for planting in flats without using furrows is to use a hexagonal pattern, so they are 1” apart, planting one seed in the center of each hexagon. Chicken wire with 1” mesh can be used as a template by laying the wire across the flat. The 1” spacing provides adequate air flow and light access. Lightly cover the seeds with soil and water, taking care to not oversaturate the soil media or displace any of the seeds. Sufficient moisture is essential for seeds to germinate and continue growing. Small containers can dry out quickly, yet excessive moisture can lead to disease problems, such as damping-off, or insect pest problems.
During this critical time period, it is important to have students or volunteers consistently check the newly planted containers to make sure they are getting consistent, even moisture. A good rule of thumb for soil moisture levels for seeds that have not yet germinated is to not allow the soil surface to completely dry out at any time, but it does not need to be soaked. The “mist” setting on a watering wand or hose nozzle provides the ideal pressure for watering seeds.
Presoaking SeedsPresoaking seeds in water helps decrease the amount of time it takes for seeds to germinate. Soaking most seeds in hot (not boiling) tap water for 12 to 24 hours triggers them to start germinating. Seeds can be soaked for up to 48 hours maximum, in which case it is recommended to change the water after 24 hours. Soaking for more than 48 hours increases the chance of the seed dying off.
Planting DepthSeeds come in all different shapes and sizes. In general, seeds should be planted at a depth that is two to four times the minimum diameter, or thickness, of the seed. Therefore, the smaller the seed, the closer to the surface it is planted. Plants that produce very small seeds, such as lettuce, require light to germinate and should be planted on the surface with only a light covering of soil or lightly pressed into the top of the soil surface.
Seed Spacing All plants require a certain amount of space in order to grow to their maximum potential. Thinning out plants may be necessary, especially when seeding by hand. Some plants, such as squash and cucumbers, should be intentionally overplanted so that the strongest plants in the group can be selected to continue growing while the other, usually smaller or weaker, plants are thinned out. Thinning may occur gradually over time, as long as overcrowding remains an issue.
A N I N T R O D U C T O R Y G U I D E F O R E D U C A T O R S | 37
Caring for SeedlingsOnce seeds germinate, the young, tender seedlings need consistent care in order for the plants to mature. Plants not only need sufficient nutrients and water, but also ideal surroundings within the greenhouse environment. Sufficient humidity, air circulation, temperature, and light levels are necessary for proper plant growth. Without adequate food, water, and suitable growing conditions, seedlings can quickly show signs of stress, such as yellowing leaves, stunted growth, or outbreaks of pests and diseases.
WateringWater is essential to every stage of plant growth, from vegetative growth and flowering to fruit set and ripening. Managing watering in the school greenhouse depends on how the plants are monitored, watered, what plants are being grown, and at what point they are in the life cycle. Seedlings should be checked every day to see if they have adequate moisture levels. Depending on environmental conditions in the greenhouse, plants may need to be watered daily, perhaps twice daily, or possibly only every three to five days.
Factors in determining how often plants need water include: • Water-holding capacity of potting soil • Type and size of container • Greenhouse environmental conditions (temperature, light,
humidity) • Depth of planted seed • Age of plants • Type of plant(s)
How Much Water to Apply to SeedlingsThe potting soil for seedlings should be constantly moist, but not soggy. Not having enough water can inhibit plant growth. Wilting leaves is one sign that a plant is not receiving enough water. Other signs include graying leaves, red or purple leaves, loss of leaf sheen, pest and disease damage, and root damage. Overwatering can also be harmful to plants, particularly young seedlings. Too much water limits the amount of oxygen in the soil, which can be damaging to root tissues. Overwatering can lead to wilting, spindly, leggy stems, and an increase in plant diseases. Overwatering also wastes water.
Factors Affecting Greenhouse WaterThere are a few concerns to be aware of when watering plants, particularly young seedlings. First, water temperature may affect some plants. While the water temperature may have less of an impact on plants that prefer cooler environments, such as plants in the brassica family (i.e., broccoli, cabbage, and kale), cold water can cause heat-loving plants to go into shock. Bringing cold water to room
temperature, around 70°F, is ideal for tomatoes, peppers, eggplants, melons, cucumbers, and other members of the Solanaceae and Cucurbitaceae plant families. Second, water containing high levels of chlorine can be harmful to plants and soil organisms, usually indicated by yellowing leaves along the leaf veins followed by curling of the leaves. Chlorine in water can be dissipated by exposing it to air and by allowing the water to settle overnight.
Finally, water that is treated with water softener may contain high levels of sodium that can be toxic to plants. Sodium obtained from salt is commonly used to remove high amounts of minerals found in hard water. The sodium can affect the amount of water a plant takes up by making it think it has more water than it actually does. This can cause a plant to die of thirst. Furthermore, the salt can build up in the potting soil, which can be detrimental to other seedlings if the potting mix is reused.
Watering Greenhouse Seedlings Most school greenhouses water seedlings manually and from the top of the plant down to the roots. Watering plants in the greenhouse manually is simple and easy for all ages, although initially it can be labor intensive and challenging to water plants uniformly. There are many different types of watering cans, hoses, and wands to choose from. The spray pattern for watering seedlings should be light enough so as not to deliver too much water that will harm the seedlings or disrupt the potting soil. It is normal for new seedlings to fall over when being watered from above, but they should be fine as long as they don’t snap, become dislodged, or uprooted from the potting soil.
Overhead watering forces nutrients down to the roots. However, it is also known to promote plant diseases in a greenhouse, such as damping-off. Damping off is a fungal infection that causes root rot or stem lesions that can quickly kill young seedlings. Over-watering, poor potting soil drainage, and poor air circulation can lead to damping off. For more information on damping off and other plant diseases, see the section on pest and disease management starting on page 42.
Watering from the bottom is an alternative to overhead watering as it supplies water quickly to the roots while limiting the potential risk of disease. Bottom watering can be achieved by submerging a flat or container into a trough filled with water up to the potting soil level. Another option is a water table or water bed which includes a resevoir from which plant roots can draw from without becoming waterlogged. These are usually available through greenhouse supply companies.

38 | G R E E N H O U S E M A N U A L
Irrigation and Automated Watering Systems Setting up an irrigation system in the school greenhouse or hoophouse can be beneficial. By using drip irrigation or soaker hoses, water can be evenly distributed to the plants. Micro sprinklers and misters also provide a consistent overhead supply of water efficiently. Irrigation systems can be designed in zones by using shut-off valves that will allow for the water to be applied to certain areas only when the valve to a zone is opened or turned on. Furthermore, irrigation systems can be set up on automated timing systems. Using automated timers can reduce the risk of plants drying out and provide a consistent source of moisture that is essential in a greenhouse environment. In addition, automated watering systems can ensure that the water needs of the seedlings are met as opposed to having to rely on someone being present to manually water or control an irrigation system.
Working with Facilities Management It is important to work with the facilities maintenance team and keep them informed about any issues with the irrigation system. Water pressure can sometimes be an issue in older school buildings, or there may be certain times of the day or week when it is not possible to use the irrigation system due to water pressure or other maintenance issues. Maintenance teams typically have tools that might be needed in the case of a leak or problem with the water source. However, it should not be expected that school maintenance staff can assist with any aspect of the greenhouse, as this is typically outside of their roles and responsibilities. Therefore, it is critical to provide those involved in watering the greenhouse with the information necessary to operate and maintain the irrigation system. This includes having all tools, maps, and manuals available at all times.
Seedling Nutrition Newly germinated seedlings first absorb nutrients that have been stored in the seed. As they use up all of the stored nutrients, the plants may require additional nutrient inputs in order to grow. This usually occurs once the plant’s first set of true leaves have developed. Once most seedlings germinate, or sprout, there are often two sets of leaves that emerge at the beginning, these are called first leaves. A third, single, leaf will form a few days later that does not look like the first set. This single leaf is the plant’s first true leaf and indicates the proper time for fertilizing, thinning, and pricking out (see Creating More Space for Seedlings on page 40). Plants can take up nutrients from fertilizer applications through their leaves and roots. Plants vary in their fertilizer requirements, which are determined based on the current stage of development. The nutrient needs of seedlings can vary between the vegetative (foliage growth) and reproductive (flowering and fruiting) stages. Young seedlings, however, are very tender, and too much fertilizer can be harmful to their health.
Seedling troubleshooting(Adapted from The New Seed Starters Handbook, 1988)
• No or low germination: Using old or improperly stored seed; soil temperature too low or too high; seeds planted too deeply; lack of moisture; insufficient light or darkness; damping-off disease.
• Poor root development: Poor drainage; low soil fertility; excessive salt concentrations; low temperatures; insufficient air space in soil mixture.
• Mold: Sign of insufficient air circulation, poor drainage, insufficient soil aeration, or over-fertilization. Provide adequate air circulation and lightly add powered charcoal to the soil.
• Spindly or leggy plants: Caused by insufficient light, excessively high temperatures, and crowding of plants. Provide more light, lower temperature, or thin plants. For leggy plants, transplant in to a deeper container.
• Discolored roots: Sign of excessive salt concentrations from over-fertilizing or from roots being waterlogged. Best option to resolve is to replant in fresh soil and also ensure good drainage.
• Yellowing of lower leaves: Sign of magnesium deficiency or over-fertilizing. Reduce the amount of fertilizer, in severe cases, replant seedlings in a fresh soil mix.
• Leaf curl: Often a sign of over-fertilizing. Reduce the amount of fertilizer, in severe cases, replant seedlings in a fresh soil mix.
• Stunted plants or leaves dropping: Caused by
gas that has leaked out from greenhouse heater or water heater. This is usually not an issue with natural gas/propane. Contact maintenance or fuel service provider to fix leak.
• Bud drop: May occur in excessively dry air, particularly with peppers. Increase humidity and mist plant blossoms.
A N I N T R O D U C T O R Y G U I D E F O R E D U C A T O R S | 39
Micronutrients • Iron (Fe): Involved in plant respiration, chlorophyll
development, and activating nitrogen fixation. Deficiencies may result in chlorosis between the leaf veins and eventually necrosis or death of the leaves.
• Boron (B): Functions include synthesizing proteins; transporting water, starches, and sugars; and regulating nitrogen, root growth, seed and fruit formation, and water uptake. Deficiencies may result in the absence of terminal growth, chlorosis, curled or wilted leaves, and reduced flowering.
• Manganese (Mn): Part of plant enzymes and used in the formation of vitamins. Deficiencies may result in conditions similar to those of iron deficiencies with chlorosis in young leaves.
• Copper (Cu): A catalyst for respiration and the proper functioning of enzymes and for carbohydrate and protein synthesis. Deficiencies may result in stunted growth, poor pigmentation, and wilting and eventual death of leaf tips.
• Zinc (Zn): Activates photosynthetic enzymes, helps
regulate carbohydrates and the plant hormone auxin, and contributes to seed production. Deficiencies may result in decrease in stem length, irregular growth (rosetting) of terminal leaves, chlorosis, and reduced fruit formation.
• Molybdenum (Mo): Necessary for nitrogen fixation and nitrogen uptake by plants. Deficiencies may result in similar characteristics as nitrogen deficiencies and leaf cupping.
• Chlorine (Cl): Required for photosynthesis. Deficiencies may result in stunted growth, wilting, and chlorosis.
Adding Fertility Organic fertilizers are available in liquid or dry form. The dry forms are most commonly used in greenhouses as an ingredient in potting mixes and are also applied when seedlings are transplanted in to the garden. This is generally because the nutrients are slow to release (there are some dry-soluble fertilizers designed to be dissolved in water). A liquid fertilizer rapidly makes plant nutrients available. They can be applied as a soil drench or as a foliar feed onto the plant leaves. The correct amount and frequency of fertilizer applications should follow the directions listed on a product label. Be certain to moisten potting soil before blending in a dry fertilizer so as not to damage plant roots.
Materials to consider for soil fertility: • Nitrogen (N) – Alfalfa Meal, Blood Meal, Cottonseed Meal • Phosphorus (P) – Phosphate Rock or Soft Phosphate
(Colloidal) • Potassium (K) – Greensand, Wood Ash, Kelp Meal
Essential Elements for Seedling Growth Plants use the process of photosynthesis to convert light energy into carbohydrates and, later, proteins. In addition, plants need mineral nutrients in order to grow. There are 16 essential or necessary elements needed by plants: carbon, hydrogen, oxygen, nitrogen, phosphorus, potassium, calcium, magnesium sulfur, iron, manganese, copper, boron, zinc, molybdenum, and chlorine. Other elements, such as silicon, can improve seedling development and plant health but are not essential. Carbon, hydrogen, and oxygen, found in the soil and air, are used in large quantities by plants to make carbohydrates through photosynthesis. These elements can be somewhat controlled in a greenhouse by regulating the amount of water plants receive and the amount of carbon dioxide in the air through proper ventilation. The remaining essential elements are minerals that can be divided into groups based on how much of the mineral is required by the plant. Macronutrients are the major elements needed by plants in large amounts. Micronutrients or trace elements are needed in small amounts.
Macronutrients • Nitrogen (N): Used in forming new plant cells and sugars.
Deficiencies may result in slow growth, stunted plants, chlorosis in plant leaves (turning yellow), and burning of leaf tips (tips turning brown).
• Phosphorus (P): Required in early stages of plant development, root growth, and seed formation. Deficiencies may result in stunted growth and leaves turning purple.
• Potassium (K): Needed for the development and mobility
of carbohydrates, regulating the rate of photosynthesis, opening and closing plant stomata, and transporting sugars. Deficiencies may result in slow growth, marginal necrosis or burning of leaf tips, weak stalks, and reduced pest and disease resistance.
• Calcium: (Ca): Influences the growth of cell walls and prevents leaching of mineral salts from plant cells. Deficiencies may result in partial or no terminal bud development, premature shredding of blossoms and buds, weakened stems, and short, thick bulbous roots.
• Magnesium (Mg): Needed for photosynthesis as it is
the only element in chlorophyll and activates enzymes necessary for plant growth. Deficiencies may result in chlorosis, upward curling of leaves along their margins, and stunted growth.
• Sulfur (S): Part of two amino acids (cysteine and methionine) found in proteins. Deficiencies may result in pale young leaves, spindly plants, and delayed growth.
40 | G R E E N H O U S E M A N U A L
Foliar Fertilization Liquid foliar fertilizers, such as a fish or seaweed-based emulsion or compost tea extract, provide a quick uptake of plant nutrients for a short period of time, helping provide nutrients that are not being made available through the roots. Foliar “feeding” as it is sometimes referred to, involves spraying a liquid fertilizer on the plants’ leaves and stems to the point of run-off. Foliar sprays of compost tea can also be helpful in preventing plant diseases. A good practice in applying a liquid foliar feed is to apply it on cloudy days in the morning or late afternoon. This will reduce the chances of sun damage to the wet leaves and allow adequate time for the plants to absorb the nutrients. During the heat of the day, plants may close their stomata, which would prevent the uptake of water and nutrients. Liquid fish and seaweed fertilizers contain macronutrients and trace minerals, including iron and zinc, and are sold as a concentrated liquid.
Be aware that liquid fish and seaweed emulsions smell fishy! Having proper ventilation in the greenhouse, wearing rubber gloves, carefully rinsing any buckets and watering cans used to apply the fish emulsion, and storing them away from the sun are protocols that can minimize the strong odor.
Environmental & Space Factors In addition to water and nutrients, seedlings also have certain environmental and space requirements in order to thrive. Plants are unable to digest water and nutrients without the necessary levels of humidity, temperature, air circulation, and light, plants are unable to digest water and nutrients. Seedlings may also need room to grow as conditions in a flat may become crowded. Light is one of the most critical necessities once seeds have germinated. Vegetable and herb seedlings need
at least eight to 10 hours of light each day in order to make and store food. If this minimum amount of light is not available, the seedlings may become spindly. Reducing the temperature triggers the plants to tolerate less light and thus become less spindly. Keep in mind that seedlings also need about eight hours of darkness each day in order to grow.
Seedlings prefer less warmth than what is required for germination. Generally, seedlings do well at daytime temperatures between 60°F and 70°F and down to 50°F to 60°F at night. Cool-loving plants such as lettuce and onions can even tolerate cooler daytime temperatures of around 50°F. There are some exceptions, but a greenhouse environment that is too warm can cause the seedlings to become weak and spindly.
Providing and maintaining humidity levels between 50% and 70% satisfies most plants’ needs for moisture—if the air is too dry, they can lose too much water through their leaves. Too much humidity can encourage fungal and disease issues. Providing good air circulation while holding off on watering for a few days can assist plants in overcoming fungal and disease problems.
Creating More Space for Seedlings As seedlings begin to grow, they usually become overcrowded in their containers. If more than one seed was planted per container, then the seedlings will need to be thinned down to one plant. The largest and healthiest looking seedling should be selected to keep while the other seedlings can be snipped with scissors or pinched with fingers at the soil level to thin without damaging the roots of the remaining plant that will continue to grow. Plants may also outgrow their space and they will need to be transferred to a larger container. This stage is often referred to as potting on or pricking out. The first transfer usually takes place no sooner than three to four weeks after germination, or once the first set of true leaves, have formed.
Steps for Pricking Out: 1. Fill the new container with moist potting soil.
2. Open a new space for the seedling in the new container with a pencil, Popsicle stick, plant label, or other tool at a slightly deeper depth than it was seeded in.
3. Making sure that the potting soil is moist, gently lift one seedling at a time out of the first cell or flat and carefully place the seedling into the hole in the new container. It is important to scoop the plants up rather than lift them by the leaves or the stem. A broken seedling stem will not re-grow. If the plants are clumped together, be careful not to injure the plant roots and leave as much soil as possible around the roots.
Making Compost Tea1. Fill a permeable bag, such as a clean pillowcase or
tight burlap bag, with high quality compost. Put the bag in a clean 5- to 7-gallon bucket.
2. Fill the bucket with water.
3. Let the compost “steep” in the bucket at least 24 hours.
4. Take the compost bag out of the bucket and squeeze out the water.
5. Pour the “tea” into a watering can or a fertilizer sprayer (if you use a sprayer, filter the tea so that the nozzle does not get clogged).
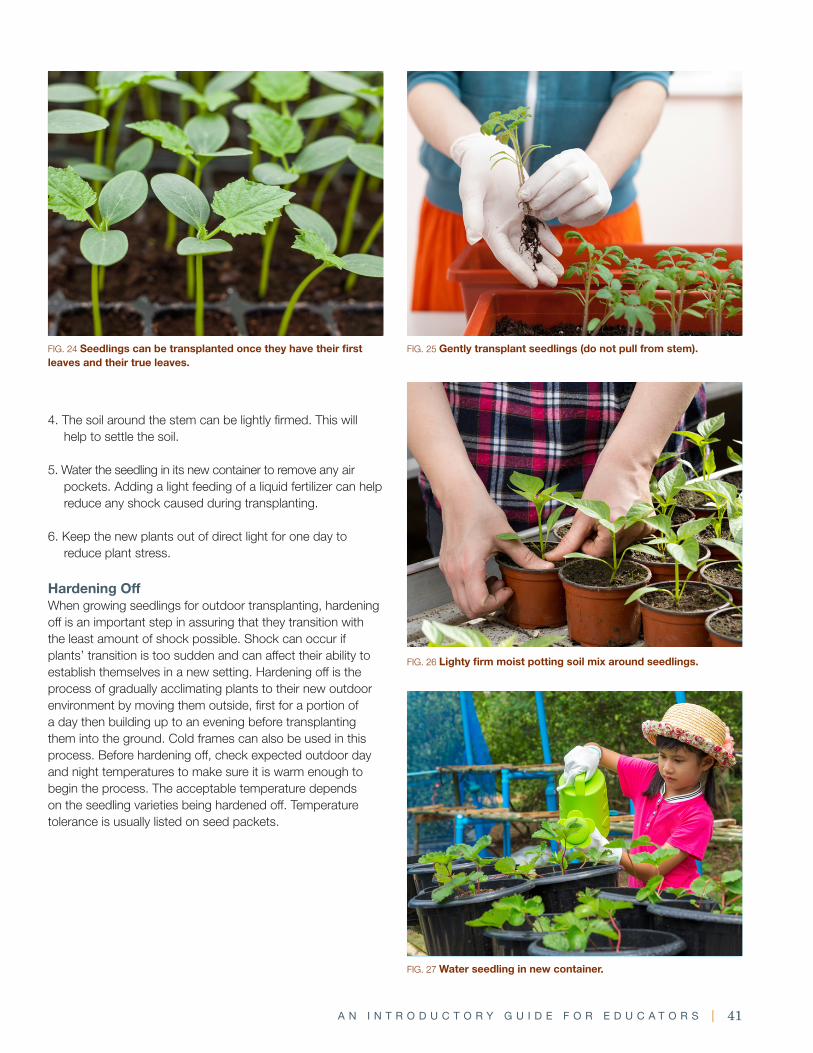
A N I N T R O D U C T O R Y G U I D E F O R E D U C A T O R S | 41
FIG. 25 Gently transplant seedlings (do not pull from stem).
FIG. 26 Lighty firm moist potting soil mix around seedlings.
FIG. 24 Seedlings can be transplanted once they have their first leaves and their true leaves.
FIG. 27 Water seedling in new container.
4. The soil around the stem can be lightly firmed. This will help to settle the soil.
5. Water the seedling in its new container to remove any air pockets. Adding a light feeding of a liquid fertilizer can help reduce any shock caused during transplanting.
6. Keep the new plants out of direct light for one day to reduce plant stress.
Hardening OffWhen growing seedlings for outdoor transplanting, hardening off is an important step in assuring that they transition with the least amount of shock possible. Shock can occur if plants’ transition is too sudden and can affect their ability to establish themselves in a new setting. Hardening off is the process of gradually acclimating plants to their new outdoor environment by moving them outside, first for a portion of a day then building up to an evening before transplanting them into the ground. Cold frames can also be used in this process. Before hardening off, check expected outdoor day and night temperatures to make sure it is warm enough to begin the process. The acceptable temperature depends on the seedling varieties being hardened off. Temperature tolerance is usually listed on seed packets.

42 | G R E E N H O U S E M A N U A L
Problem Solving: Pest & Disease ManagementGreenhouses exist because, ideally, humidity and temperature can be regulated and pests can be kept out—it’s a controlled environment. In a school setting with many kids and teachers going in and out of the greenhouse, keeping pests out can sometimes be challenging. Proper screens can assist in preventing access to the greenhouse by insects, but when pests do get into the greenhouse, it’s important to be able to properly identify them so that the right control measures can be used. In addition to damaging plants, some greenhouse pests can also transmit plant diseases. This section focuses on management strategies for greenhouse pests and diseases.
Tools for Managing Plant PestsThere are many tools available to manage pests in a greenhouse, but some strategies may not be suitable for a school setting. Integrated Pest Management (IPM) involves the integration of cultural, physical, biological, and chemical practices to grow plants with a minimal use of pesticides (Greer and Diver, 1999). This is the best strategy to start with in a school greenhouse and also the best way to include students. Monitoring, sampling, and recordkeeping are used to determine when control options are needed in order to keep pests below a damaging threshold.
Educational Equipment for Greenhouse Pests • Magnifying glass(es) or hand lenses (with at least 10× power) • Digital camera with macro function (most cell phones will
work) • Spray bottle • Insect collection jars or vials • Notebook
Steps for Implementing IPM Step 1: Establish a Scouting ProgramIPM begins with establishing a scouting program for frequent monitoring, as well as creating a recordkeeping system that is accessible and easily understood by all who are involved. Proper identification and an understanding of the life cycles of pests is essential to the monitoring process in order to apply the right control measure. Having a good pest and disease identification resource on hand aids in the effort. It’s also important to be able to identify the most common beneficial insects, so that they are not mistaken for pests. Visual inspection and the use of sticky trap cards can be used for monitoring, especially for detecting early infestations, though be aware that sticky traps may collect beneficial species as well.
FIG. 29 Checking out insects. Photo courtesy of City Blossoms
FIG. 28 Transplanting. Photo courtesy of City Blossoms
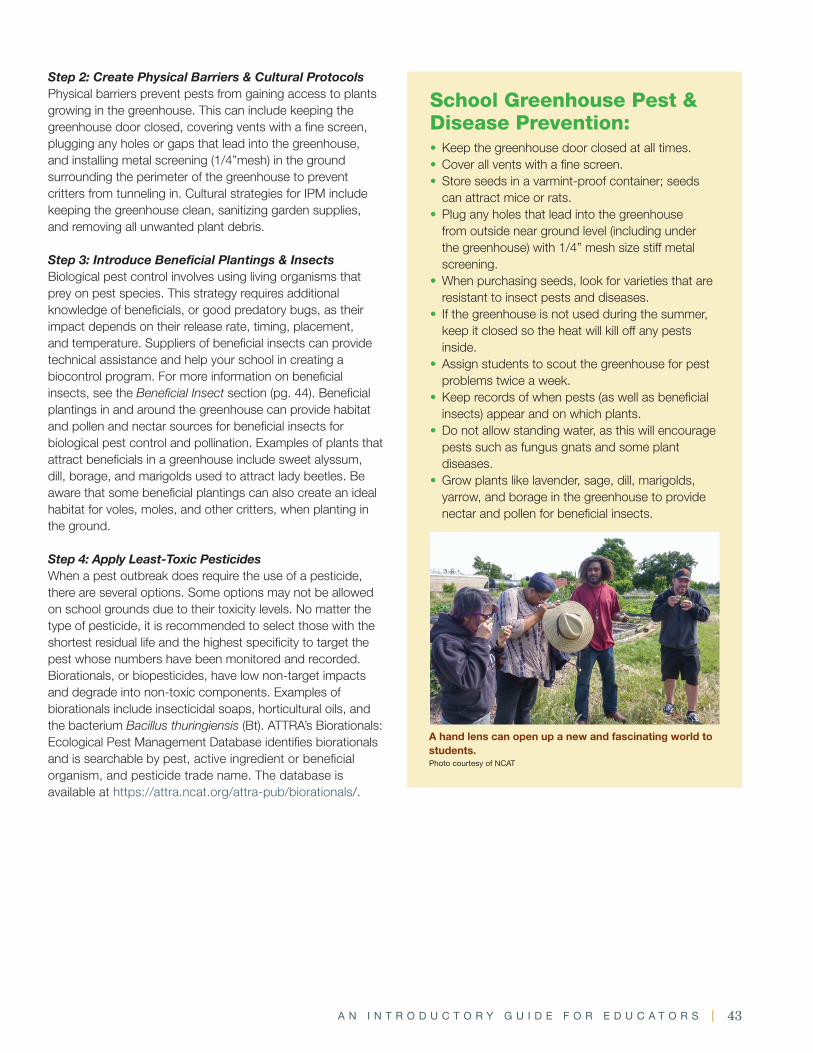
A N I N T R O D U C T O R Y G U I D E F O R E D U C A T O R S | 43
Step 2: Create Physical Barriers & Cultural Protocols Physical barriers prevent pests from gaining access to plants growing in the greenhouse. This can include keeping the greenhouse door closed, covering vents with a fine screen, plugging any holes or gaps that lead into the greenhouse, and installing metal screening (1/4”mesh) in the ground surrounding the perimeter of the greenhouse to prevent critters from tunneling in. Cultural strategies for IPM include keeping the greenhouse clean, sanitizing garden supplies, and removing all unwanted plant debris.
Step 3: Introduce Beneficial Plantings & InsectsBiological pest control involves using living organisms that prey on pest species. This strategy requires additional knowledge of beneficials, or good predatory bugs, as their impact depends on their release rate, timing, placement, and temperature. Suppliers of beneficial insects can provide technical assistance and help your school in creating a biocontrol program. For more information on beneficial insects, see the Beneficial Insect section (pg. 44). Beneficial plantings in and around the greenhouse can provide habitat and pollen and nectar sources for beneficial insects for biological pest control and pollination. Examples of plants that attract beneficials in a greenhouse include sweet alyssum, dill, borage, and marigolds used to attract lady beetles. Be aware that some beneficial plantings can also create an ideal habitat for voles, moles, and other critters, when planting in the ground.
Step 4: Apply Least-Toxic Pesticides When a pest outbreak does require the use of a pesticide, there are several options. Some options may not be allowed on school grounds due to their toxicity levels. No matter the type of pesticide, it is recommended to select those with the shortest residual life and the highest specificity to target the pest whose numbers have been monitored and recorded. Biorationals, or biopesticides, have low non-target impacts and degrade into non-toxic components. Examples of biorationals include insecticidal soaps, horticultural oils, and the bacterium Bacillus thuringiensis (Bt). ATTRA’s Biorationals: Ecological Pest Management Database identifies biorationals and is searchable by pest, active ingredient or beneficial organism, and pesticide trade name. The database is available at https://attra.ncat.org/attra-pub/biorationals/.
School Greenhouse Pest & Disease Prevention: • Keep the greenhouse door closed at all times. • Cover all vents with a fine screen.• Store seeds in a varmint-proof container; seeds
can attract mice or rats. • Plug any holes that lead into the greenhouse
from outside near ground level (including under the greenhouse) with 1/4” mesh size stiff metal screening.
• When purchasing seeds, look for varieties that are resistant to insect pests and diseases.
• If the greenhouse is not used during the summer, keep it closed so the heat will kill off any pests inside.
• Assign students to scout the greenhouse for pest problems twice a week.
• Keep records of when pests (as well as beneficial insects) appear and on which plants.
• Do not allow standing water, as this will encourage pests such as fungus gnats and some plant diseases.
• Grow plants like lavender, sage, dill, marigolds, yarrow, and borage in the greenhouse to provide nectar and pollen for beneficial insects.
A hand lens can open up a new and fascinating world tostudents.Photo courtesy of NCAT
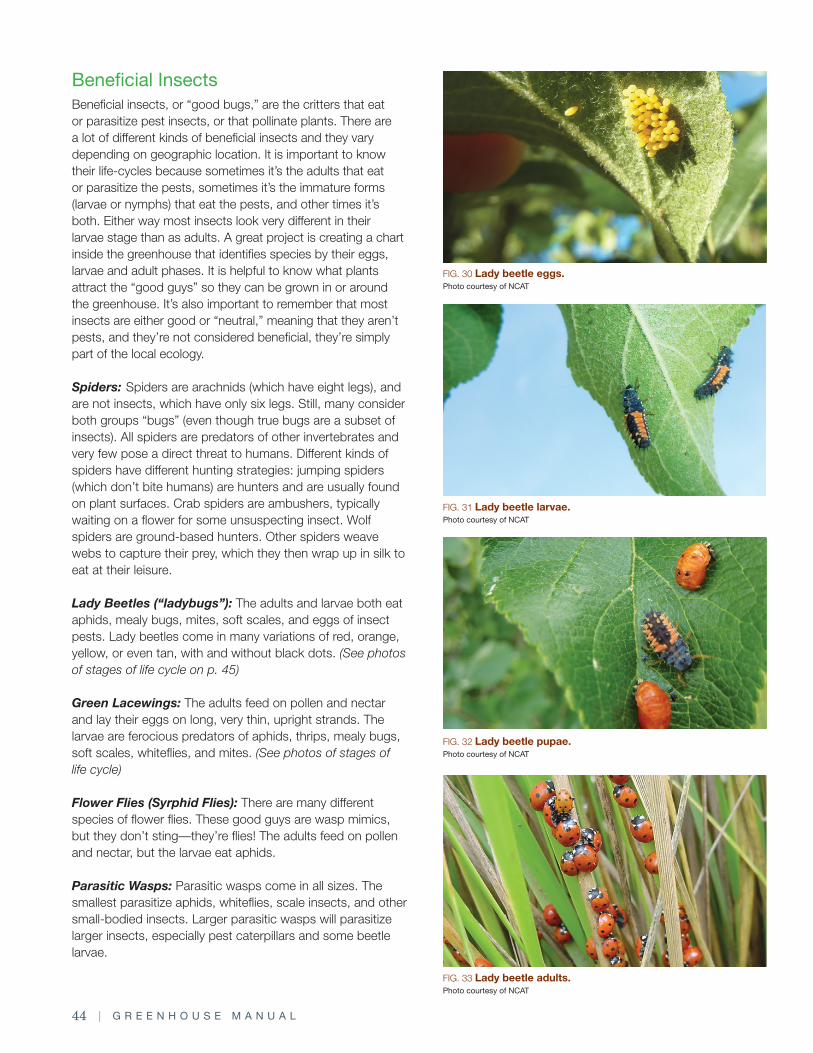
44 | G R E E N H O U S E M A N U A L
Beneficial Insects Beneficial insects, or “good bugs,” are the critters that eat or parasitize pest insects, or that pollinate plants. There are a lot of different kinds of beneficial insects and they vary depending on geographic location. It is important to know their life-cycles because sometimes it’s the adults that eat or parasitize the pests, sometimes it’s the immature forms (larvae or nymphs) that eat the pests, and other times it’s both. Either way most insects look very different in their larvae stage than as adults. A great project is creating a chart inside the greenhouse that identifies species by their eggs, larvae and adult phases. It is helpful to know what plants attract the “good guys” so they can be grown in or around the greenhouse. It’s also important to remember that most insects are either good or “neutral,” meaning that they aren’t pests, and they’re not considered beneficial, they’re simply part of the local ecology.
Spiders: Spiders are arachnids (which have eight legs), and are not insects, which have only six legs. Still, many consider both groups “bugs” (even though true bugs are a subset of insects). All spiders are predators of other invertebrates and very few pose a direct threat to humans. Different kinds of spiders have different hunting strategies: jumping spiders (which don’t bite humans) are hunters and are usually found on plant surfaces. Crab spiders are ambushers, typically waiting on a flower for some unsuspecting insect. Wolf spiders are ground-based hunters. Other spiders weave webs to capture their prey, which they then wrap up in silk to eat at their leisure.
Lady Beetles (“ladybugs”): The adults and larvae both eat aphids, mealy bugs, mites, soft scales, and eggs of insect pests. Lady beetles come in many variations of red, orange, yellow, or even tan, with and without black dots. (See photos of stages of life cycle on p. 45)
Green Lacewings: The adults feed on pollen and nectar and lay their eggs on long, very thin, upright strands. The larvae are ferocious predators of aphids, thrips, mealy bugs, soft scales, whiteflies, and mites. (See photos of stages of life cycle)
Flower Flies (Syrphid Flies): There are many different species of flower flies. These good guys are wasp mimics, but they don’t sting—they’re flies! The adults feed on pollen and nectar, but the larvae eat aphids.
Parasitic Wasps: Parasitic wasps come in all sizes. The smallest parasitize aphids, whiteflies, scale insects, and other small-bodied insects. Larger parasitic wasps will parasitize larger insects, especially pest caterpillars and some beetle larvae.
FIG. 31 Lady beetle larvae. Photo courtesy of NCAT
FIG. 32 Lady beetle pupae.Photo courtesy of NCAT
FIG. 33 Lady beetle adults. Photo courtesy of NCAT
FIG. 30 Lady beetle eggs. Photo courtesy of NCAT
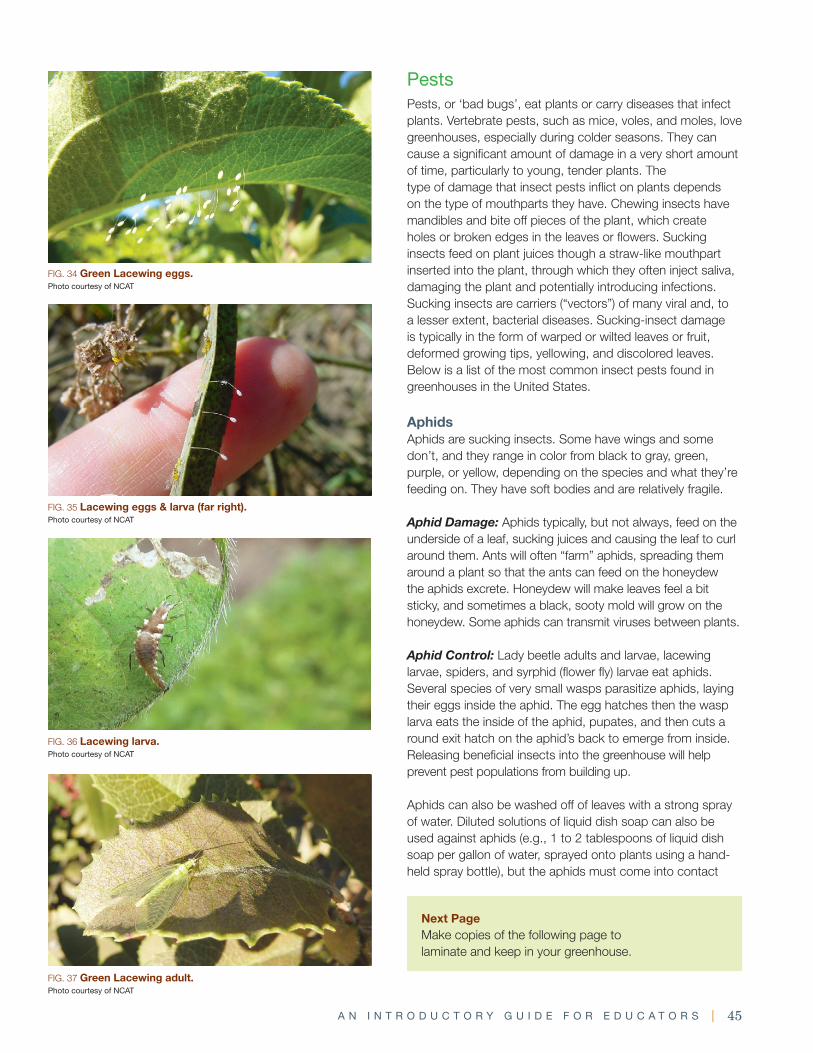
A N I N T R O D U C T O R Y G U I D E F O R E D U C A T O R S | 45
PestsPests, or ‘bad bugs’, eat plants or carry diseases that infect plants. Vertebrate pests, such as mice, voles, and moles, love greenhouses, especially during colder seasons. They can cause a significant amount of damage in a very short amount of time, particularly to young, tender plants. The type of damage that insect pests inflict on plants depends on the type of mouthparts they have. Chewing insects have mandibles and bite off pieces of the plant, which create holes or broken edges in the leaves or flowers. Sucking insects feed on plant juices though a straw-like mouthpart inserted into the plant, through which they often inject saliva, damaging the plant and potentially introducing infections. Sucking insects are carriers (“vectors”) of many viral and, to a lesser extent, bacterial diseases. Sucking-insect damage is typically in the form of warped or wilted leaves or fruit, deformed growing tips, yellowing, and discolored leaves. Below is a list of the most common insect pests found in greenhouses in the United States.
AphidsAphids are sucking insects. Some have wings and some don’t, and they range in color from black to gray, green, purple, or yellow, depending on the species and what they’re feeding on. They have soft bodies and are relatively fragile.
Aphid Damage: Aphids typically, but not always, feed on the underside of a leaf, sucking juices and causing the leaf to curl around them. Ants will often “farm” aphids, spreading them around a plant so that the ants can feed on the honeydew the aphids excrete. Honeydew will make leaves feel a bit sticky, and sometimes a black, sooty mold will grow on the honeydew. Some aphids can transmit viruses between plants.
Aphid Control: Lady beetle adults and larvae, lacewing larvae, spiders, and syrphid (flower fly) larvae eat aphids. Several species of very small wasps parasitize aphids, laying their eggs inside the aphid. The egg hatches then the wasp larva eats the inside of the aphid, pupates, and then cuts a round exit hatch on the aphid’s back to emerge from inside. Releasing beneficial insects into the greenhouse will help prevent pest populations from building up.
Aphids can also be washed off of leaves with a strong spray of water. Diluted solutions of liquid dish soap can also be used against aphids (e.g., 1 to 2 tablespoons of liquid dish soap per gallon of water, sprayed onto plants using a hand-held spray bottle), but the aphids must come into contact
Next Page Make copies of the following page to laminate and keep in your greenhouse.
FIG. 35 Lacewing eggs & larva (far right). Photo courtesy of NCAT
FIG. 36 Lacewing larva.Photo courtesy of NCAT
FIG. 37 Green Lacewing adult. Photo courtesy of NCAT
FIG. 34 Green Lacewing eggs. Photo courtesy of NCAT

46 | G R E E N H O U S E M A N U A L
Thrips Nymphs. Spotted Cucumber Beetles. Larvae & Caterpillars (many varieties).
Adult Thrips. Striped Cucumber Beetles. Slugs.
Whitefly Nymphs. Flea Beetles.
Young & Adult Aphids. Adult Whiteflies. Spider Mite Web.
Photos courtesy of Whitney Cranshaw, Rex Dufour, NCAT, John Goolsby, USDA-ARS, Merle Shepard
CLASSROOM CONNECTIONS:
InsectPests
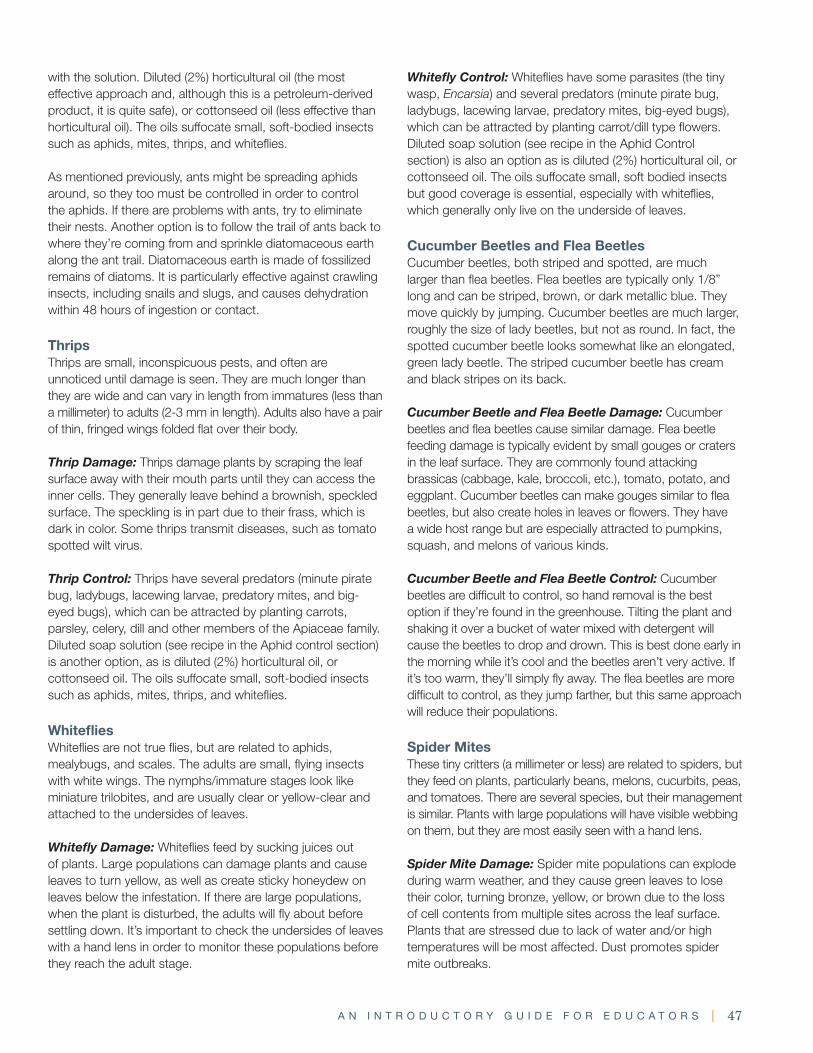
A N I N T R O D U C T O R Y G U I D E F O R E D U C A T O R S | 47
Whitefly Control: Whiteflies have some parasites (the tiny wasp, Encarsia) and several predators (minute pirate bug, ladybugs, lacewing larvae, predatory mites, big-eyed bugs), which can be attracted by planting carrot/dill type flowers. Diluted soap solution (see recipe in the Aphid Control section) is also an option as is diluted (2%) horticultural oil, or cottonseed oil. The oils suffocate small, soft bodied insects but good coverage is essential, especially with whiteflies, which generally only live on the underside of leaves.
Cucumber Beetles and Flea BeetlesCucumber beetles, both striped and spotted, are much larger than flea beetles. Flea beetles are typically only 1/8” long and can be striped, brown, or dark metallic blue. They move quickly by jumping. Cucumber beetles are much larger, roughly the size of lady beetles, but not as round. In fact, the spotted cucumber beetle looks somewhat like an elongated, green lady beetle. The striped cucumber beetle has cream and black stripes on its back.
Cucumber Beetle and Flea Beetle Damage: Cucumber beetles and flea beetles cause similar damage. Flea beetle feeding damage is typically evident by small gouges or craters in the leaf surface. They are commonly found attacking brassicas (cabbage, kale, broccoli, etc.), tomato, potato, and eggplant. Cucumber beetles can make gouges similar to flea beetles, but also create holes in leaves or flowers. They have a wide host range but are especially attracted to pumpkins, squash, and melons of various kinds.
Cucumber Beetle and Flea Beetle Control: Cucumber beetles are difficult to control, so hand removal is the best option if they’re found in the greenhouse. Tilting the plant and shaking it over a bucket of water mixed with detergent will cause the beetles to drop and drown. This is best done early in the morning while it’s cool and the beetles aren’t very active. If it’s too warm, they’ll simply fly away. The flea beetles are more difficult to control, as they jump farther, but this same approach will reduce their populations.
Spider MitesThese tiny critters (a millimeter or less) are related to spiders, but they feed on plants, particularly beans, melons, cucurbits, peas, and tomatoes. There are several species, but their management is similar. Plants with large populations will have visible webbing on them, but they are most easily seen with a hand lens.
Spider Mite Damage: Spider mite populations can explode during warm weather, and they cause green leaves to lose their color, turning bronze, yellow, or brown due to the loss of cell contents from multiple sites across the leaf surface. Plants that are stressed due to lack of water and/or high temperatures will be most affected. Dust promotes spider mite outbreaks.
with the solution. Diluted (2%) horticultural oil (the most effective approach and, although this is a petroleum-derived product, it is quite safe), or cottonseed oil (less effective than horticultural oil). The oils suffocate small, soft-bodied insects such as aphids, mites, thrips, and whiteflies.
As mentioned previously, ants might be spreading aphids around, so they too must be controlled in order to control the aphids. If there are problems with ants, try to eliminate their nests. Another option is to follow the trail of ants back to where they’re coming from and sprinkle diatomaceous earth along the ant trail. Diatomaceous earth is made of fossilized remains of diatoms. It is particularly effective against crawling insects, including snails and slugs, and causes dehydration within 48 hours of ingestion or contact.
ThripsThrips are small, inconspicuous pests, and often are unnoticed until damage is seen. They are much longer than they are wide and can vary in length from immatures (less than a millimeter) to adults (2-3 mm in length). Adults also have a pair of thin, fringed wings folded flat over their body.
Thrip Damage: Thrips damage plants by scraping the leaf surface away with their mouth parts until they can access the inner cells. They generally leave behind a brownish, speckled surface. The speckling is in part due to their frass, which is dark in color. Some thrips transmit diseases, such as tomato spotted wilt virus.
Thrip Control: Thrips have several predators (minute pirate bug, ladybugs, lacewing larvae, predatory mites, and big-eyed bugs), which can be attracted by planting carrots, parsley, celery, dill and other members of the Apiaceae family. Diluted soap solution (see recipe in the Aphid control section) is another option, as is diluted (2%) horticultural oil, or cottonseed oil. The oils suffocate small, soft-bodied insects such as aphids, mites, thrips, and whiteflies.
WhitefliesWhiteflies are not true flies, but are related to aphids, mealybugs, and scales. The adults are small, flying insects with white wings. The nymphs/immature stages look like miniature trilobites, and are usually clear or yellow-clear and attached to the undersides of leaves.
Whitefly Damage: Whiteflies feed by sucking juices out of plants. Large populations can damage plants and cause leaves to turn yellow, as well as create sticky honeydew on leaves below the infestation. If there are large populations, when the plant is disturbed, the adults will fly about before settling down. It’s important to check the undersides of leaves with a hand lens in order to monitor these populations before they reach the adult stage.
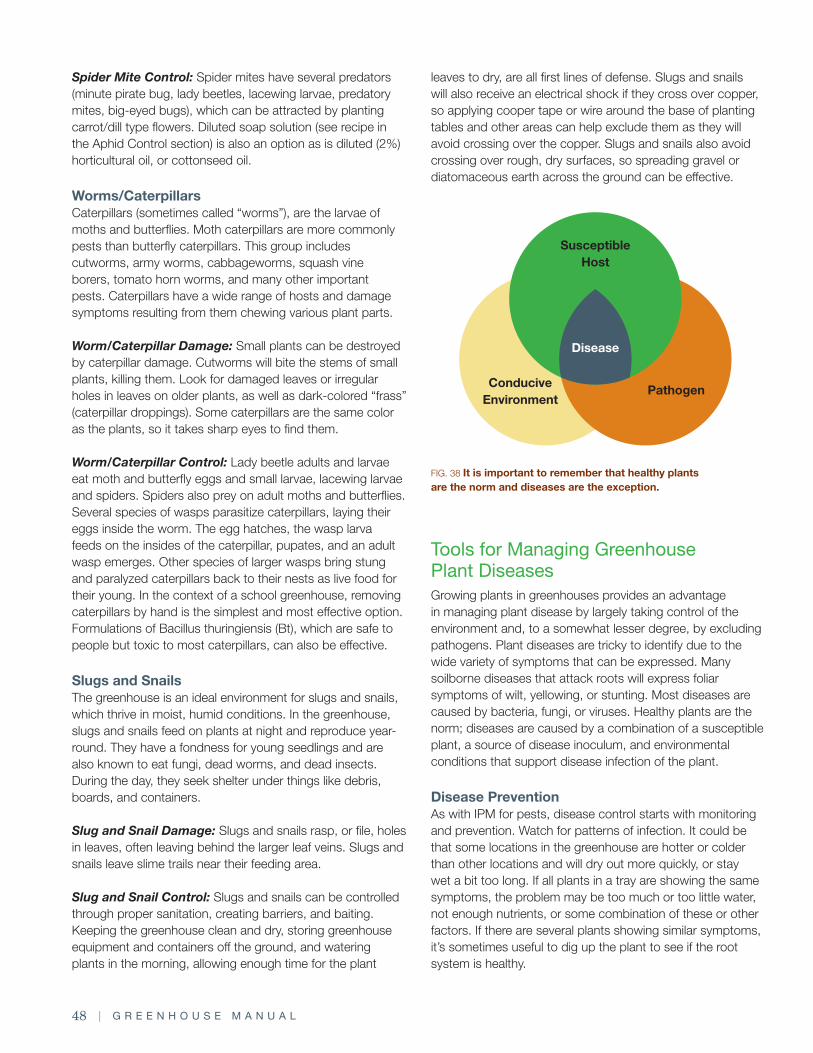
48 | G R E E N H O U S E M A N U A L
leaves to dry, are all first lines of defense. Slugs and snails will also receive an electrical shock if they cross over copper, so applying cooper tape or wire around the base of planting tables and other areas can help exclude them as they will avoid crossing over the copper. Slugs and snails also avoid crossing over rough, dry surfaces, so spreading gravel or diatomaceous earth across the ground can be effective.
Tools for Managing Greenhouse Plant Diseases Growing plants in greenhouses provides an advantage in managing plant disease by largely taking control of the environment and, to a somewhat lesser degree, by excluding pathogens. Plant diseases are tricky to identify due to the wide variety of symptoms that can be expressed. Many soilborne diseases that attack roots will express foliar symptoms of wilt, yellowing, or stunting. Most diseases are caused by bacteria, fungi, or viruses. Healthy plants are the norm; diseases are caused by a combination of a susceptible plant, a source of disease inoculum, and environmental conditions that support disease infection of the plant.
Disease Prevention As with IPM for pests, disease control starts with monitoring and prevention. Watch for patterns of infection. It could be that some locations in the greenhouse are hotter or colder than other locations and will dry out more quickly, or stay wet a bit too long. If all plants in a tray are showing the same symptoms, the problem may be too much or too little water, not enough nutrients, or some combination of these or other factors. If there are several plants showing similar symptoms, it’s sometimes useful to dig up the plant to see if the root system is healthy.
Spider Mite Control: Spider mites have several predators (minute pirate bug, lady beetles, lacewing larvae, predatory mites, big-eyed bugs), which can be attracted by planting carrot/dill type flowers. Diluted soap solution (see recipe in the Aphid Control section) is also an option as is diluted (2%) horticultural oil, or cottonseed oil.
Worms/CaterpillarsCaterpillars (sometimes called “worms”), are the larvae of moths and butterflies. Moth caterpillars are more commonly pests than butterfly caterpillars. This group includes cutworms, army worms, cabbageworms, squash vine borers, tomato horn worms, and many other important pests. Caterpillars have a wide range of hosts and damage symptoms resulting from them chewing various plant parts.
Worm/Caterpillar Damage: Small plants can be destroyed by caterpillar damage. Cutworms will bite the stems of small plants, killing them. Look for damaged leaves or irregular holes in leaves on older plants, as well as dark-colored “frass” (caterpillar droppings). Some caterpillars are the same color as the plants, so it takes sharp eyes to find them.
Worm/Caterpillar Control: Lady beetle adults and larvae eat moth and butterfly eggs and small larvae, lacewing larvae and spiders. Spiders also prey on adult moths and butterflies. Several species of wasps parasitize caterpillars, laying their eggs inside the worm. The egg hatches, the wasp larva feeds on the insides of the caterpillar, pupates, and an adult wasp emerges. Other species of larger wasps bring stung and paralyzed caterpillars back to their nests as live food for their young. In the context of a school greenhouse, removing caterpillars by hand is the simplest and most effective option. Formulations of Bacillus thuringiensis (Bt), which are safe to people but toxic to most caterpillars, can also be effective.
Slugs and SnailsThe greenhouse is an ideal environment for slugs and snails, which thrive in moist, humid conditions. In the greenhouse, slugs and snails feed on plants at night and reproduce year-round. They have a fondness for young seedlings and are also known to eat fungi, dead worms, and dead insects. During the day, they seek shelter under things like debris, boards, and containers.
Slug and Snail Damage: Slugs and snails rasp, or file, holes in leaves, often leaving behind the larger leaf veins. Slugs and snails leave slime trails near their feeding area.
Slug and Snail Control: Slugs and snails can be controlled through proper sanitation, creating barriers, and baiting. Keeping the greenhouse clean and dry, storing greenhouse equipment and containers off the ground, and watering plants in the morning, allowing enough time for the plant
FIG. 38 It is important to remember that healthy plants are the norm and diseases are the exception.
SusceptibleHost
ConduciveEnvironment
Pathogen
Disease
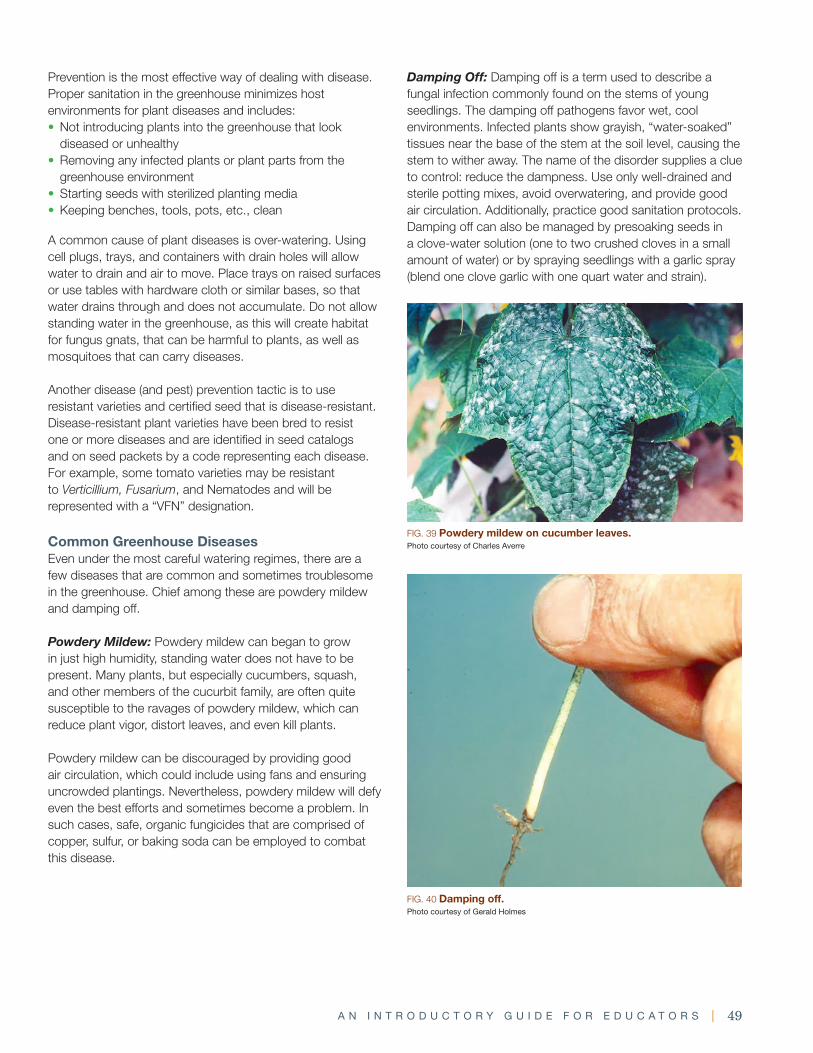
A N I N T R O D U C T O R Y G U I D E F O R E D U C A T O R S | 49
Prevention is the most effective way of dealing with disease. Proper sanitation in the greenhouse minimizes host environments for plant diseases and includes: • Not introducing plants into the greenhouse that look
diseased or unhealthy • Removing any infected plants or plant parts from the
greenhouse environment • Starting seeds with sterilized planting media • Keeping benches, tools, pots, etc., clean
A common cause of plant diseases is over-watering. Using cell plugs, trays, and containers with drain holes will allow water to drain and air to move. Place trays on raised surfaces or use tables with hardware cloth or similar bases, so that water drains through and does not accumulate. Do not allow standing water in the greenhouse, as this will create habitat for fungus gnats, that can be harmful to plants, as well as mosquitoes that can carry diseases.
Another disease (and pest) prevention tactic is to use resistant varieties and certified seed that is disease-resistant. Disease-resistant plant varieties have been bred to resist one or more diseases and are identified in seed catalogs and on seed packets by a code representing each disease. For example, some tomato varieties may be resistant to Verticillium, Fusarium, and Nematodes and will be represented with a “VFN” designation.
Common Greenhouse Diseases Even under the most careful watering regimes, there are a few diseases that are common and sometimes troublesome in the greenhouse. Chief among these are powdery mildew and damping off.
Powdery Mildew: Powdery mildew can began to grow in just high humidity, standing water does not have to be present. Many plants, but especially cucumbers, squash, and other members of the cucurbit family, are often quite susceptible to the ravages of powdery mildew, which can reduce plant vigor, distort leaves, and even kill plants.
Powdery mildew can be discouraged by providing good air circulation, which could include using fans and ensuring uncrowded plantings. Nevertheless, powdery mildew will defy even the best efforts and sometimes become a problem. In such cases, safe, organic fungicides that are comprised of copper, sulfur, or baking soda can be employed to combat this disease.
FIG. 39 Powdery mildew on cucumber leaves. Photo courtesy of Charles Averre
FIG. 40 Damping off. Photo courtesy of Gerald Holmes
Damping Off: Damping off is a term used to describe a fungal infection commonly found on the stems of young seedlings. The damping off pathogens favor wet, cool environments. Infected plants show grayish, “water-soaked” tissues near the base of the stem at the soil level, causing the stem to wither away. The name of the disorder supplies a clue to control: reduce the dampness. Use only well-drained and sterile potting mixes, avoid overwatering, and provide good air circulation. Additionally, practice good sanitation protocols. Damping off can also be managed by presoaking seeds in a clove-water solution (one to two crushed cloves in a small amount of water) or by spraying seedlings with a garlic spray (blend one clove garlic with one quart water and strain).

50 | G R E E N H O U S E M A N U A L
SPOTLIGHT: Helping Hands in Washington, D.C.
Woodrow Wilson High School is a large, diverse high school in Washington, D.C. As a green ribbon school, they have demonstrated their commitment to reducing their environmental impact, improving the health and wellness of the community, and providing environmental education in key STEM (Science, Technology, Engineering, and Math) career paths. The greenhouse at Wilson HS offers a hands-on learning space that fits into the school’s STEM umbrella program, primarily in the environmental sciences pathway. The school’s two environmental science teachers are instrumental in creating curriculum and using the greenhouse space to supplement their in-class instruction.
Part of the reason this greenhouse program has grown and thrived over the last few years is that it is maintained by a team of dedicated teachers and students, and just as importantly a number of committed community volunteers. Volunteers have been a vital part of the team, taking on responsibilities that would be hard for a teacher and students to work on, leaving participants more time for programming. For example, when some of the technical equipment that keeps the greenhouse operating optimally stopped working,
Wilson HS was able to depend on its relationships with its volunteers to figure out the issues and manage repairs, a responsibility that would have otherwise fallen on a teacher. In addition, school alumni who grow food for local restaurants volunteer their time and expertise to offer classes on operating greenhouses, acting as mentors to students.
This buy-in and support from volunteers has given The Greenhouse Club the time and opportunity to take on a lot more program-based projects. Roughly a dozen students grow seedlings, herbs, and plants to sell in their community. They also started a pilot program of growing sprouts to sell to the teachers at the school. The program has been so successful that it has expanded and the students are now growing sprouts for a local restaurant. The club experiments with new ideas and techniques, and they are currently developing an aquaponics system. In addition, the club participates in recycling and composting programs. This is a great example of a greenhouse project that has evolved over time with the support of community members, grants, and student-led efforts.
Wilson High School Greenhouse Club. Photo courtesy of Wilson High School
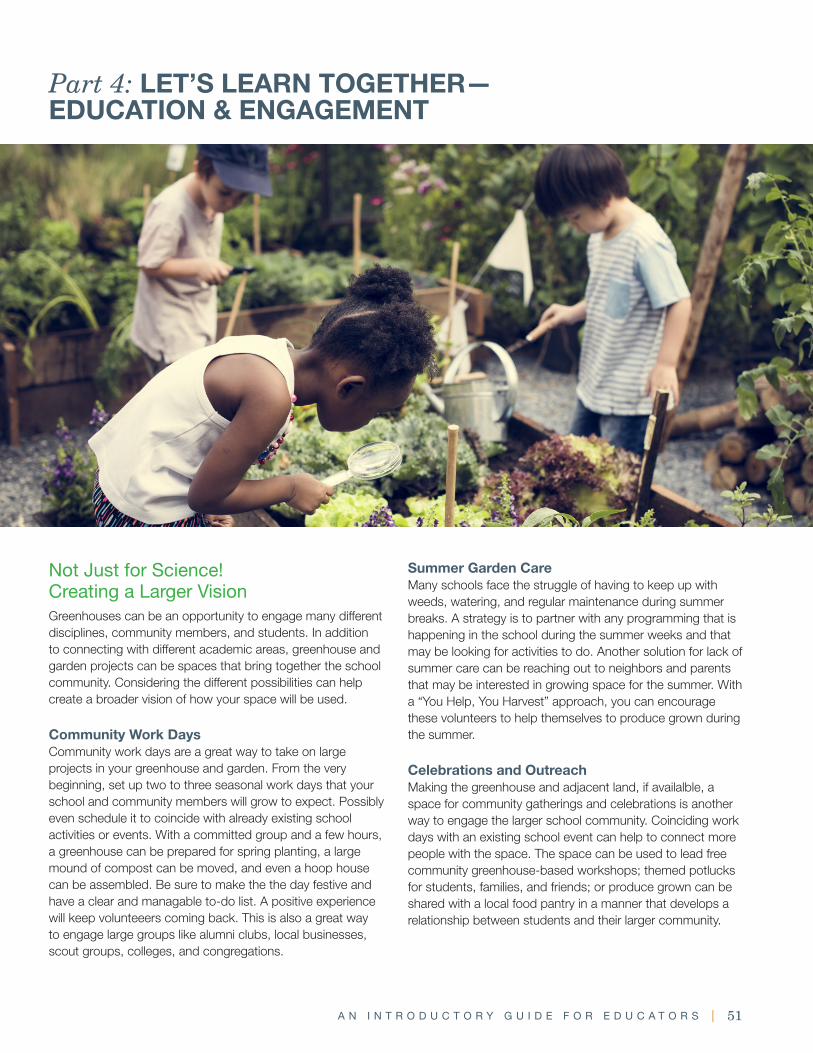
A N I N T R O D U C T O R Y G U I D E F O R E D U C A T O R S | 51
Summer Garden CareMany schools face the struggle of having to keep up with weeds, watering, and regular maintenance during summer breaks. A strategy is to partner with any programming that is happening in the school during the summer weeks and that may be looking for activities to do. Another solution for lack of summer care can be reaching out to neighbors and parents that may be interested in growing space for the summer. With a “You Help, You Harvest” approach, you can encourage these volunteers to help themselves to produce grown during the summer.
Celebrations and OutreachMaking the greenhouse and adjacent land, if availalble, a space for community gatherings and celebrations is another way to engage the larger school community. Coinciding work days with an existing school event can help to connect more people with the space. The space can be used to lead free community greenhouse-based workshops; themed potlucks for students, families, and friends; or produce grown can be shared with a local food pantry in a manner that develops a relationship between students and their larger community.
Not Just for Science! Creating a Larger VisionGreenhouses can be an opportunity to engage many different disciplines, community members, and students. In addition to connecting with different academic areas, greenhouse and garden projects can be spaces that bring together the school community. Considering the different possibilities can help create a broader vision of how your space will be used.
Community Work Days Community work days are a great way to take on large projects in your greenhouse and garden. From the very beginning, set up two to three seasonal work days that your school and community members will grow to expect. Possibly even schedule it to coincide with already existing school activities or events. With a committed group and a few hours, a greenhouse can be prepared for spring planting, a large mound of compost can be moved, and even a hoop house can be assembled. Be sure to make the the day festive and have a clear and managable to-do list. A positive experience will keep volunteeers coming back. This is also a great way to engage large groups like alumni clubs, local businesses, scout groups, colleges, and congregations.
Part 4: LET’S LEARN TOGETHER— EDUCATION & ENGAGEMENT
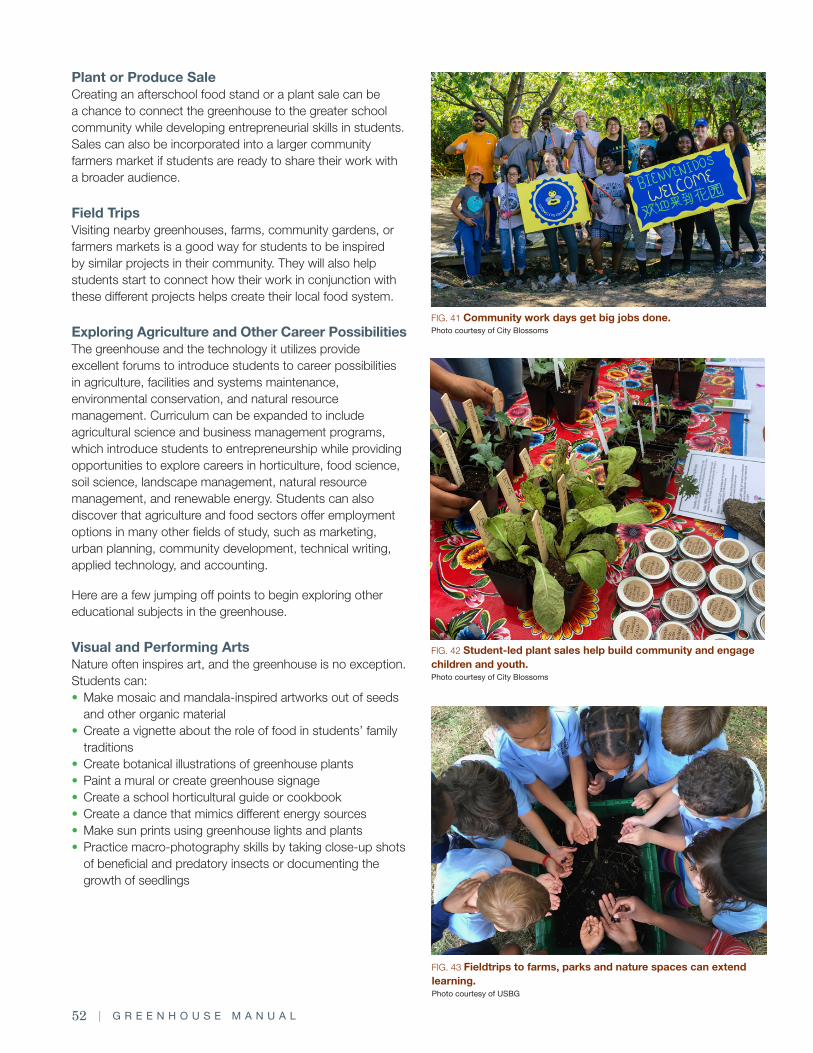
52 | G R E E N H O U S E M A N U A L
Plant or Produce SaleCreating an afterschool food stand or a plant sale can be a chance to connect the greenhouse to the greater school community while developing entrepreneurial skills in students. Sales can also be incorporated into a larger community farmers market if students are ready to share their work with a broader audience.
Field TripsVisiting nearby greenhouses, farms, community gardens, or farmers markets is a good way for students to be inspired by similar projects in their community. They will also help students start to connect how their work in conjunction with these different projects helps create their local food system.
Exploring Agriculture and Other Career PossibilitiesThe greenhouse and the technology it utilizes provide excellent forums to introduce students to career possibilities in agriculture, facilities and systems maintenance, environmental conservation, and natural resource management. Curriculum can be expanded to include agricultural science and business management programs, which introduce students to entrepreneurship while providing opportunities to explore careers in horticulture, food science, soil science, landscape management, natural resource management, and renewable energy. Students can also discover that agriculture and food sectors offer employment options in many other fields of study, such as marketing, urban planning, community development, technical writing, applied technology, and accounting.
Here are a few jumping off points to begin exploring other educational subjects in the greenhouse.
Visual and Performing ArtsNature often inspires art, and the greenhouse is no exception. Students can: • Make mosaic and mandala-inspired artworks out of seeds
and other organic material • Create a vignette about the role of food in students’ family
traditions• Create botanical illustrations of greenhouse plants• Paint a mural or create greenhouse signage• Create a school horticultural guide or cookbook• Create a dance that mimics different energy sources• Make sun prints using greenhouse lights and plants• Practice macro-photography skills by taking close-up shots
of beneficial and predatory insects or documenting the growth of seedlings
FIG. 41 Community work days get big jobs done. Photo courtesy of City Blossoms
FIG. 42 Student-led plant sales help build community and engage children and youth. Photo courtesy of City Blossoms
FIG. 43 Fieldtrips to farms, parks and nature spaces can extend learning.Photo courtesy of USBG
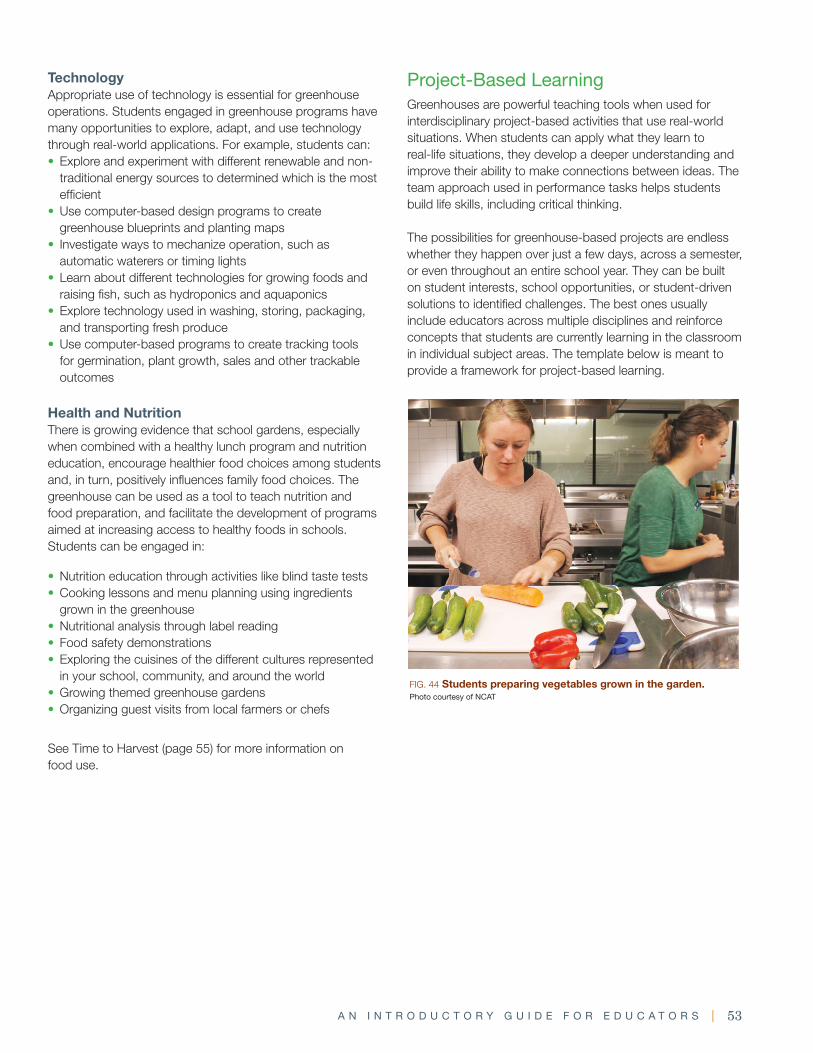
A N I N T R O D U C T O R Y G U I D E F O R E D U C A T O R S | 53
Project-Based LearningGreenhouses are powerful teaching tools when used for interdisciplinary project-based activities that use real-world situations. When students can apply what they learn to real-life situations, they develop a deeper understanding and improve their ability to make connections between ideas. The team approach used in performance tasks helps students build life skills, including critical thinking.
The possibilities for greenhouse-based projects are endless whether they happen over just a few days, across a semester, or even throughout an entire school year. They can be built on student interests, school opportunities, or student-driven solutions to identified challenges. The best ones usually include educators across multiple disciplines and reinforce concepts that students are currently learning in the classroom in individual subject areas. The template below is meant to provide a framework for project-based learning.
TechnologyAppropriate use of technology is essential for greenhouse operations. Students engaged in greenhouse programs have many opportunities to explore, adapt, and use technology through real-world applications. For example, students can: • Explore and experiment with different renewable and non-
traditional energy sources to determined which is the most efficient
• Use computer-based design programs to create greenhouse blueprints and planting maps
• Investigate ways to mechanize operation, such as automatic waterers or timing lights
• Learn about different technologies for growing foods and raising fish, such as hydroponics and aquaponics
• Explore technology used in washing, storing, packaging, and transporting fresh produce
• Use computer-based programs to create tracking tools for germination, plant growth, sales and other trackable outcomes
Health and NutritionThere is growing evidence that school gardens, especially when combined with a healthy lunch program and nutrition education, encourage healthier food choices among students and, in turn, positively influences family food choices. The greenhouse can be used as a tool to teach nutrition and food preparation, and facilitate the development of programs aimed at increasing access to healthy foods in schools. Students can be engaged in:
• Nutrition education through activities like blind taste tests• Cooking lessons and menu planning using ingredients
grown in the greenhouse• Nutritional analysis through label reading• Food safety demonstrations• Exploring the cuisines of the different cultures represented
in your school, community, and around the world• Growing themed greenhouse gardens• Organizing guest visits from local farmers or chefs
See Time to Harvest (page 55) for more information onfood use.
FIG. 44 Students preparing vegetables grown in the garden. Photo courtesy of NCAT
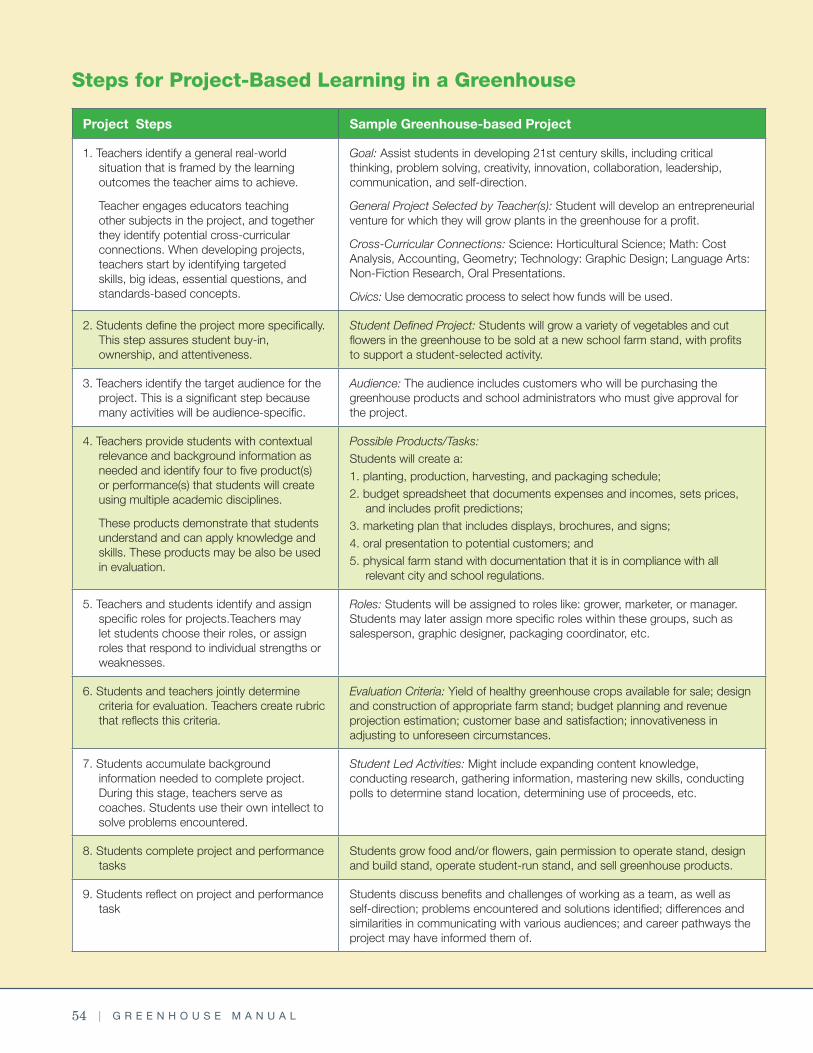
54 | G R E E N H O U S E M A N U A L
Project Steps Sample Greenhouse-based Project
1. Teachers identify a general real-world situation that is framed by the learning outcomes the teacher aims to achieve.
Teacher engages educators teaching other subjects in the project, and together they identify potential cross-curricular connections. When developing projects, teachers start by identifying targeted skills, big ideas, essential questions, and standards-based concepts.
Goal: Assist students in developing 21st century skills, including critical thinking, problem solving, creativity, innovation, collaboration, leadership, communication, and self-direction.
General Project Selected by Teacher(s): Student will develop an entrepreneurial venture for which they will grow plants in the greenhouse for a profit.
Cross-Curricular Connections: Science: Horticultural Science; Math: Cost Analysis, Accounting, Geometry; Technology: Graphic Design; Language Arts: Non-Fiction Research, Oral Presentations.
Civics: Use democratic process to select how funds will be used.
2. Students define the project more specifically.This step assures student buy-in, ownership, and attentiveness.
Student Defined Project: Students will grow a variety of vegetables and cut flowers in the greenhouse to be sold at a new school farm stand, with profits to support a student-selected activity.
3. Teachers identify the target audience for the project. This is a significant step because many activities will be audience-specific.
Audience: The audience includes customers who will be purchasing the greenhouse products and school administrators who must give approval for the project.
4. Teachers provide students with contextual relevance and background information as needed and identify four to five product(s) or performance(s) that students will create using multiple academic disciplines.
These products demonstrate that students understand and can apply knowledge and skills. These products may be also be used in evaluation.
Possible Products/Tasks: Students will create a: 1. planting, production, harvesting, and packaging schedule; 2. budget spreadsheet that documents expenses and incomes, sets prices,
and includes profit predictions; 3. marketing plan that includes displays, brochures, and signs; 4. oral presentation to potential customers; and 5. physical farm stand with documentation that it is in compliance with all
relevant city and school regulations.
5. Teachers and students identify and assign specific roles for projects.Teachers may let students choose their roles, or assign roles that respond to individual strengths or weaknesses.
Roles: Students will be assigned to roles like: grower, marketer, or manager. Students may later assign more specific roles within these groups, such as salesperson, graphic designer, packaging coordinator, etc.
6. Students and teachers jointly determine criteria for evaluation. Teachers create rubric that reflects this criteria.
Evaluation Criteria: Yield of healthy greenhouse crops available for sale; design and construction of appropriate farm stand; budget planning and revenue projection estimation; customer base and satisfaction; innovativeness in adjusting to unforeseen circumstances.
7. Students accumulate background information needed to complete project. During this stage, teachers serve as coaches. Students use their own intellect to solve problems encountered.
Student Led Activities: Might include expanding content knowledge, conducting research, gathering information, mastering new skills, conducting polls to determine stand location, determining use of proceeds, etc.
8. Students complete project and performance tasks
Students grow food and/or flowers, gain permission to operate stand, design and build stand, operate student-run stand, and sell greenhouse products.
9. Students reflect on project and performance task
Students discuss benefits and challenges of working as a team, as well as self-direction; problems encountered and solutions identified; differences and similarities in communicating with various audiences; and career pathways the project may have informed them of.
Steps for Project-Based Learning in a Greenhouse
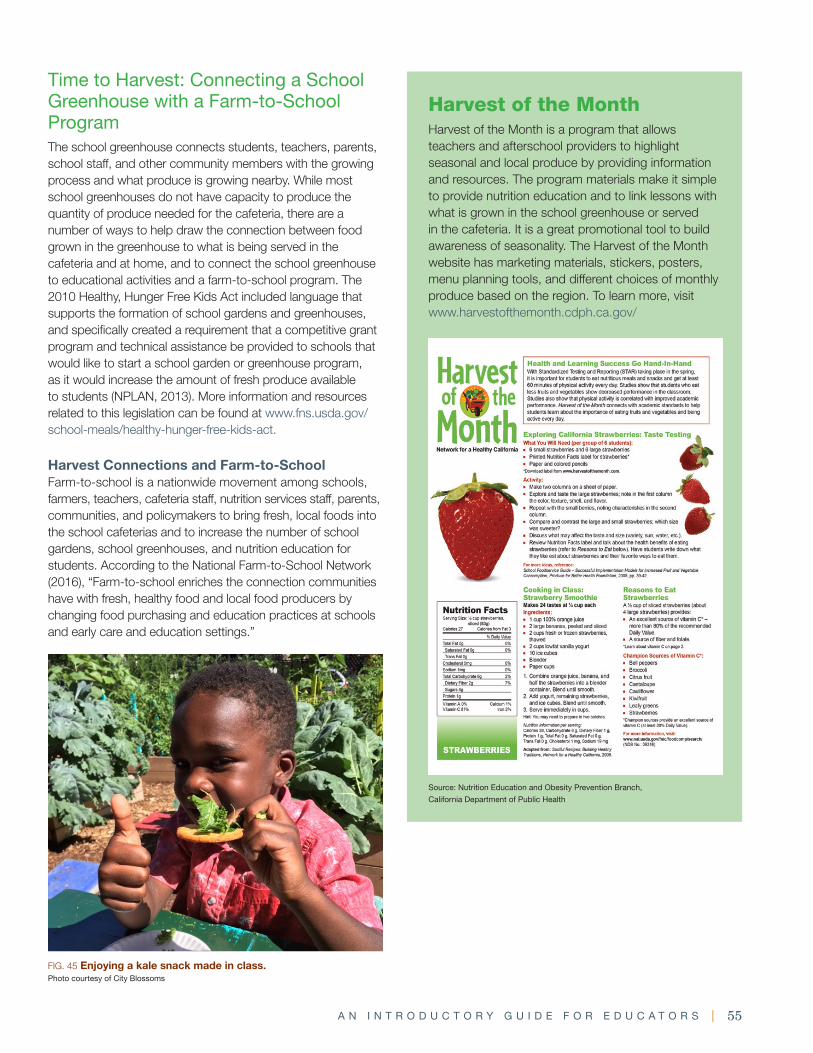
A N I N T R O D U C T O R Y G U I D E F O R E D U C A T O R S | 55
Time to Harvest: Connecting a School Greenhouse with a Farm-to-School ProgramThe school greenhouse connects students, teachers, parents, school staff, and other community members with the growing process and what produce is growing nearby. While most school greenhouses do not have capacity to produce the quantity of produce needed for the cafeteria, there are a number of ways to help draw the connection between food grown in the greenhouse to what is being served in the cafeteria and at home, and to connect the school greenhouse to educational activities and a farm-to-school program. The 2010 Healthy, Hunger Free Kids Act included language that supports the formation of school gardens and greenhouses, and specifically created a requirement that a competitive grant program and technical assistance be provided to schools that would like to start a school garden or greenhouse program, as it would increase the amount of fresh produce available to students (NPLAN, 2013). More information and resources related to this legislation can be found at www.fns.usda.gov/school-meals/healthy-hunger-free-kids-act.
Harvest Connections and Farm-to-SchoolFarm-to-school is a nationwide movement among schools, farmers, teachers, cafeteria staff, nutrition services staff, parents, communities, and policymakers to bring fresh, local foods into the school cafeterias and to increase the number of school gardens, school greenhouses, and nutrition education for students. According to the National Farm-to-School Network (2016), “Farm-to-school enriches the connection communities have with fresh, healthy food and local food producers by changing food purchasing and education practices at schools and early care and education settings.”
Harvest of the MonthHarvest of the Month is a program that allows teachers and afterschool providers to highlight seasonal and local produce by providing information and resources. The program materials make it simple to provide nutrition education and to link lessons with what is grown in the school greenhouse or served in the cafeteria. It is a great promotional tool to build awareness of seasonality. The Harvest of the Month website has marketing materials, stickers, posters, menu planning tools, and different choices of monthly produce based on the region. To learn more, visit www.harvestofthemonth.cdph.ca.gov/
FIG. 45 Enjoying a kale snack made in class. Photo courtesy of City Blossoms
Source: Nutrition Education and Obesity Prevention Branch,
California Department of Public Health
56 | G R E E N H O U S E M A N U A L
Classroom Salad Day/Salad BarsSalad bars are another way to link to the school greenhouse program. Salad bars improve the quality and freshness of the produce served in cafeterias and open up new avenues for teaching kids about where their food comes from and how to make healthy choices. Salad Bars to Schools focuses on funds to help schools purchase the materials for a salad bar so that students have daily access to fresh fruits and vegetables, whole grains, and healthy proteins (www.saladbars2schools.org). The Minnesota Department of Health has developed a Field Guide to Salad Bars in Schools, which provides step-by-step instructions for school and nutrition services staff on designing and implementing a school salad bar including how to feature local seasonal produce. Download the guide at: www.health.state.mn.us/divs/hpcd/chp/cdrr/nutrition/docsandpdf/guidetosbinschools.pdf
Taste Testing Produce from the school greenhouse can be brought into the classroom or cafeteria to serve as the basis of a sample taste test. Taste tests are a great way to help students make the connection between produce being grown in the garden and used in the cafeteria. Looking ahead to see what vegetables are being used in the cafeteria and doing a taste test with one of those vegetables can be a great way for students to experience a vegetable served in different ways. Connect with the child nutrition director and cafeteria staff to make sure this activity goes smoothly. For more information on creating a farm-to-school taste test, visit http://growing-minds.org/farm-to-school-taste-tests/
Calendar/Timeline of Suggested Activities to Link School Greenhouse with Farm-to-School Programs
August-September: • Plan how to incorporate greenhouse produce into other school activities/programs (afterschool programs, events).• Plan educational posters featuring healthy produce that can be used to enhance tastings or salad days. • Develop school-year calendar including harvest of the month, cafeteria tasting, greenhouse tours, and/or classes.• Conduct menu planning with cafeteria or parent groups; conduct outreach and promotion of Farm-to-School. For
more information, visit www.fns.usda.gov/farmtoschool/farm-school-resources#Menu%20Planning
October: • Plan a greenhouse harvest for cafeteria, classroom, or school event, inviting principal or district officials. • Participate in National Farm-to-School Month. Visit www.farmtoschool.org for schoolwide and statewide events. • Plan activities and promotion for National Farm-to-School Month. A good resource for ideas is National Farm-to-
School Month: Celebrating the Movement, www.farmtoschool.org/our-work/farm-to-school-month• Develop a communications and outreach strategy for Farm-to-School Month using the program toolkit at
www.farmtoschool.org/resources-main/national-farm-to-school-month-communications-toolkit-2016
November/December/January:• Visit a greenhouse• Conduct Meet-a-Farmer and Chef activity highlighting seasonal and locally available produce• Feature locally grown or school grown produce once a month in cafeteria or salad bar. Use Harvest of the Month for
guidance.
February/March/April:• Organize and hold field trip to a local farm, community garden, or farmers market.• Produce Farm-to-School newsletter.• Organize Farm-to-School group/meetings.• Organize end-of-school year fundraiser event.
May/June:• Hold end-of-school-year events featuring the school greenhouse, salad bar, and local produce on cafeteria menu • Consider events to utilize school greenhouse during summer• Offer school greenhouse produce for afterschool or other school programs
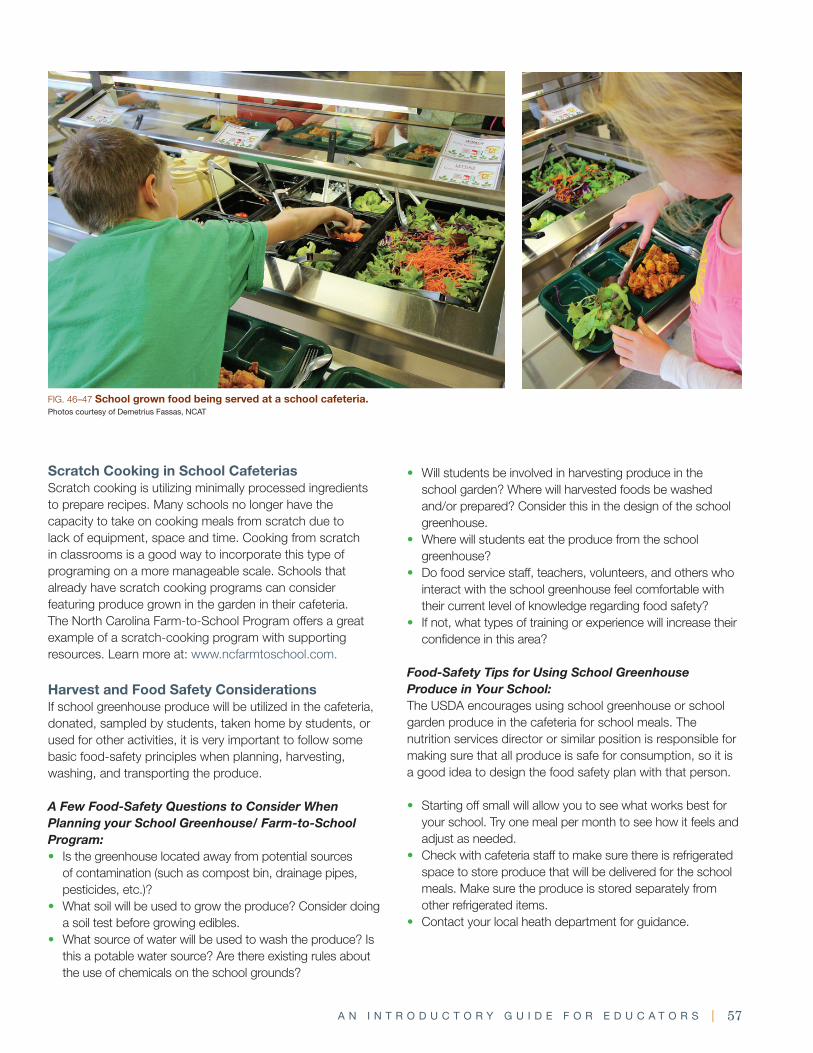
A N I N T R O D U C T O R Y G U I D E F O R E D U C A T O R S | 57
FIG. 46–47 School grown food being served at a school cafeteria. Photos courtesy of Demetrius Fassas, NCAT
• Will students be involved in harvesting produce in the school garden? Where will harvested foods be washed and/or prepared? Consider this in the design of the school greenhouse.
• Where will students eat the produce from the school greenhouse?
• Do food service staff, teachers, volunteers, and others who interact with the school greenhouse feel comfortable with their current level of knowledge regarding food safety?
• If not, what types of training or experience will increase their confidence in this area?
Food-Safety Tips for Using School Greenhouse Produce in Your School:The USDA encourages using school greenhouse or school garden produce in the cafeteria for school meals. The nutrition services director or similar position is responsible for making sure that all produce is safe for consumption, so it is a good idea to design the food safety plan with that person.
• Starting off small will allow you to see what works best for your school. Try one meal per month to see how it feels and adjust as needed.
• Check with cafeteria staff to make sure there is refrigerated space to store produce that will be delivered for the school meals. Make sure the produce is stored separately from other refrigerated items.
• Contact your local heath department for guidance.
Scratch Cooking in School CafeteriasScratch cooking is utilizing minimally processed ingredients to prepare recipes. Many schools no longer have the capacity to take on cooking meals from scratch due to lack of equipment, space and time. Cooking from scratch in classrooms is a good way to incorporate this type of programing on a more manageable scale. Schools that already have scratch cooking programs can consider featuring produce grown in the garden in their cafeteria. The North Carolina Farm-to-School Program offers a great example of a scratch-cooking program with supporting resources. Learn more at: www.ncfarmtoschool.com.
Harvest and Food Safety Considerations If school greenhouse produce will be utilized in the cafeteria, donated, sampled by students, taken home by students, or used for other activities, it is very important to follow some basic food-safety principles when planning, harvesting, washing, and transporting the produce.
A Few Food-Safety Questions to Consider When Planning your School Greenhouse/ Farm-to-School Program: • Is the greenhouse located away from potential sources
of contamination (such as compost bin, drainage pipes, pesticides, etc.)?
• What soil will be used to grow the produce? Consider doing a soil test before growing edibles.
• What source of water will be used to wash the produce? Is this a potable water source? Are there existing rules about the use of chemicals on the school grounds?

58 | G R E E N H O U S E M A N U A L
Food-Safety Tips for Growing and Harvesting Produce: • Provide basic food-safety training for all staff, students,
and volunteers who will work in the greenhouse. Important topics to cover include handwashing, cleaning and sanitizing equipment and containers for harvesting and storing produce, glove use, and how to properly handle produce during harvest, washing, and transportation.
• Make sure the school district has an insurance policy for volunteers in the event of an accident or injury.
• Consider making a permission slip at the beginning of the year that explains the school greenhouse, includes a description of activities, and instructs parents to notify the school if a student has allergies that would prevent him or her from being in the school greenhouse.
• If students, volunteers, or teachers are sick, have an alternative activity for them to do so they do not contaminate the produce but are still able to participate with the rest of the students.
• Set up a hand washing station in the greenhouse and make sure all students follow the proper handwashing procedure before any harvesting activity.
• The school greenhouse could have a box of disposable gloves for students to wear when handling fresh produce, especially when the produce will be served in the cafeteria.
• It is a good practice to limit the time between harvest and consumption- if the school greenhouse will be harvesting produce for the cafeteria. If possible harvest the produce that morning so it does not have to be stored for long periods of time unless it is being frozen.
• Routinely monitor the school greenhouse for signs of animals, rodents, or rotten produce, and make sure the greenhouse is regularly cleaned. This is a great job for students of all ages to do on a regular basis.
• Routinely clean all harvesting tools immediately before and after harvesting.
• Develop a cleaning schedule for all harvest containers. This is also a great job for students.
• One best practice that has been utilized by school districts is for the cafeteria staff to process the produce and freeze it for use the following school year. If the school cafeteria has the capacity to do this, it can be a good way to ensure food-safety practices are followed and to also preserve the summer harvest for use in the fall when students return.
• Keep accurate harvest and cleaning records and keep them readily available so that the nutrition services staff can review them.
• As a precaution, check with the school district about their insurance policy to cover in case of a foodborne illness.
FIG. 48 Preparing garden grown food.
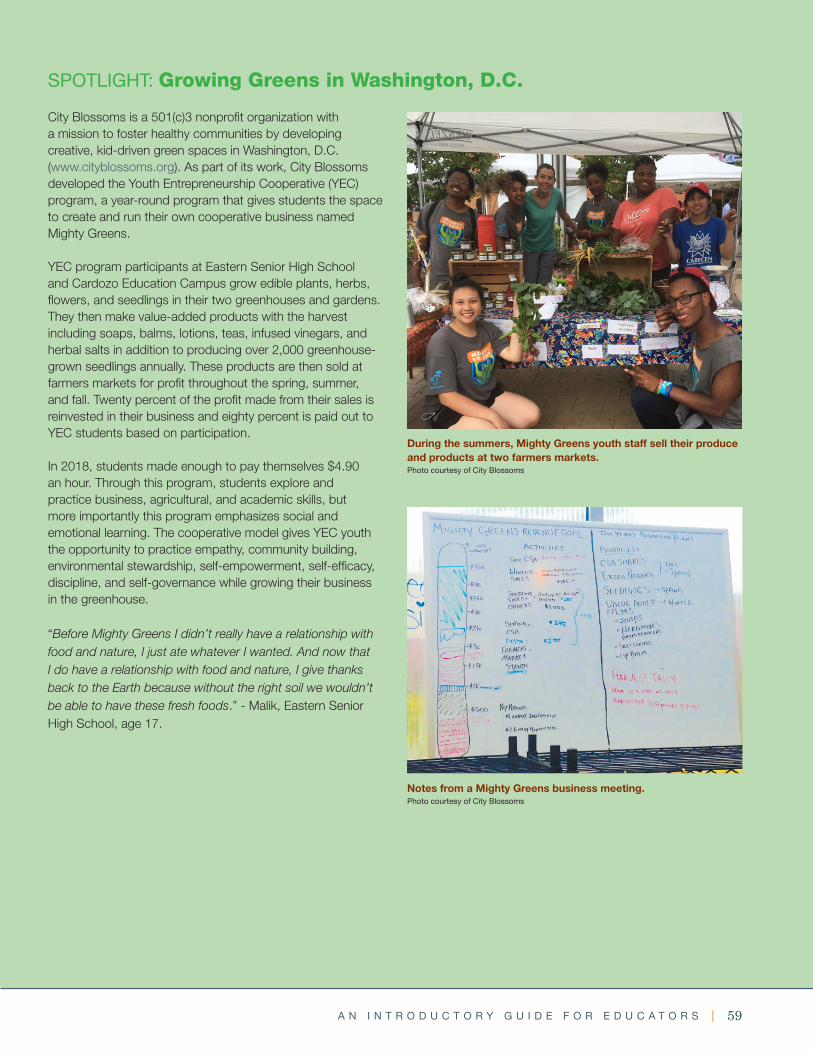
A N I N T R O D U C T O R Y G U I D E F O R E D U C A T O R S | 59
SPOTLIGHT: Growing Greens in Washington, D.C.
City Blossoms is a 501(c)3 nonprofit organization with a mission to foster healthy communities by developing creative, kid-driven green spaces in Washington, D.C. (www.cityblossoms.org). As part of its work, City Blossoms developed the Youth Entrepreneurship Cooperative (YEC) program, a year-round program that gives students the space to create and run their own cooperative business named Mighty Greens.
YEC program participants at Eastern Senior High School and Cardozo Education Campus grow edible plants, herbs, flowers, and seedlings in their two greenhouses and gardens. They then make value-added products with the harvest including soaps, balms, lotions, teas, infused vinegars, and herbal salts in addition to producing over 2,000 greenhouse-grown seedlings annually. These products are then sold at farmers markets for profit throughout the spring, summer, and fall. Twenty percent of the profit made from their sales is reinvested in their business and eighty percent is paid out to YEC students based on participation.
In 2018, students made enough to pay themselves $4.90 an hour. Through this program, students explore and practice business, agricultural, and academic skills, but more importantly this program emphasizes social and emotional learning. The cooperative model gives YEC youth the opportunity to practice empathy, community building, environmental stewardship, self-empowerment, self-efficacy, discipline, and self-governance while growing their business in the greenhouse. “Before Mighty Greens I didn’t really have a relationship with food and nature, I just ate whatever I wanted. And now that I do have a relationship with food and nature, I give thanks back to the Earth because without the right soil we wouldn’t be able to have these fresh foods.” - Malik, Eastern Senior High School, age 17.
During the summers, Mighty Greens youth staff sell their produce and products at two farmers markets. Photo courtesy of City Blossoms
Notes from a Mighty Greens business meeting.Photo courtesy of City Blossoms
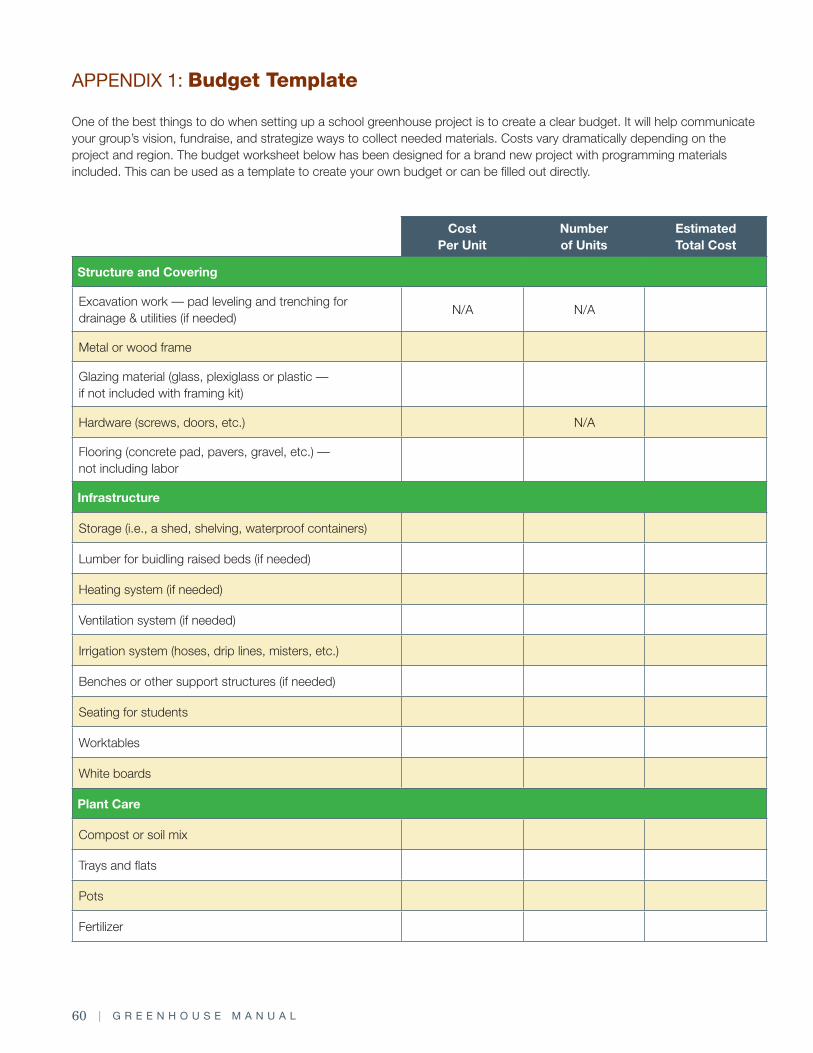
60 | G R E E N H O U S E M A N U A L
Cost Per Unit
Number of Units
Estimated Total Cost
Structure and Covering
Excavation work — pad leveling and trenching for drainage & utilities (if needed)
N/A N/A
Metal or wood frame
Glazing material (glass, plexiglass or plastic — if not included with framing kit)
Hardware (screws, doors, etc.) N/A
Flooring (concrete pad, pavers, gravel, etc.) — not including labor
Infrastructure
Storage (i.e., a shed, shelving, waterproof containers)
Lumber for buidling raised beds (if needed)
Heating system (if needed)
Ventilation system (if needed)
Irrigation system (hoses, drip lines, misters, etc.)
Benches or other support structures (if needed)
Seating for students
Worktables
White boards
Plant Care
Compost or soil mix
Trays and flats
Pots
Fertilizer
APPENDIX 1: Budget Template
One of the best things to do when setting up a school greenhouse project is to create a clear budget. It will help communicate your group’s vision, fundraise, and strategize ways to collect needed materials. Costs vary dramatically depending on the project and region. The budget worksheet below has been designed for a brand new project with programming materials included. This can be used as a template to create your own budget or can be filled out directly.
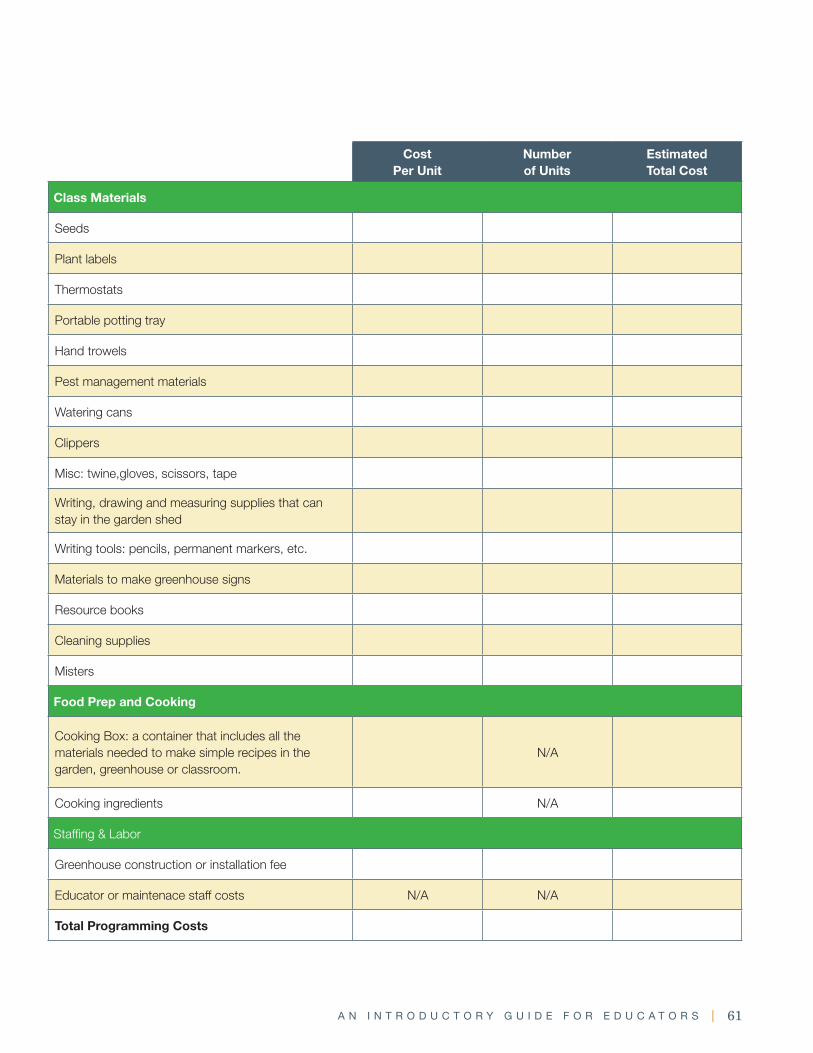
A N I N T R O D U C T O R Y G U I D E F O R E D U C A T O R S | 61
Cost Per Unit
Number of Units
Estimated Total Cost
Class Materials
Seeds
Plant labels
Thermostats
Portable potting tray
Hand trowels
Pest management materials
Watering cans
Clippers
Misc: twine,gloves, scissors, tape
Writing, drawing and measuring supplies that can stay in the garden shed
Writing tools: pencils, permanent markers, etc.
Materials to make greenhouse signs
Resource books
Cleaning supplies
Misters
Food Prep and Cooking
Cooking Box: a container that includes all the materials needed to make simple recipes in the garden, greenhouse or classroom.
N/A
Cooking ingredients N/A
Staffing & Labor
Greenhouse construction or installation fee
Educator or maintenace staff costs N/A N/A
Total Programming Costs
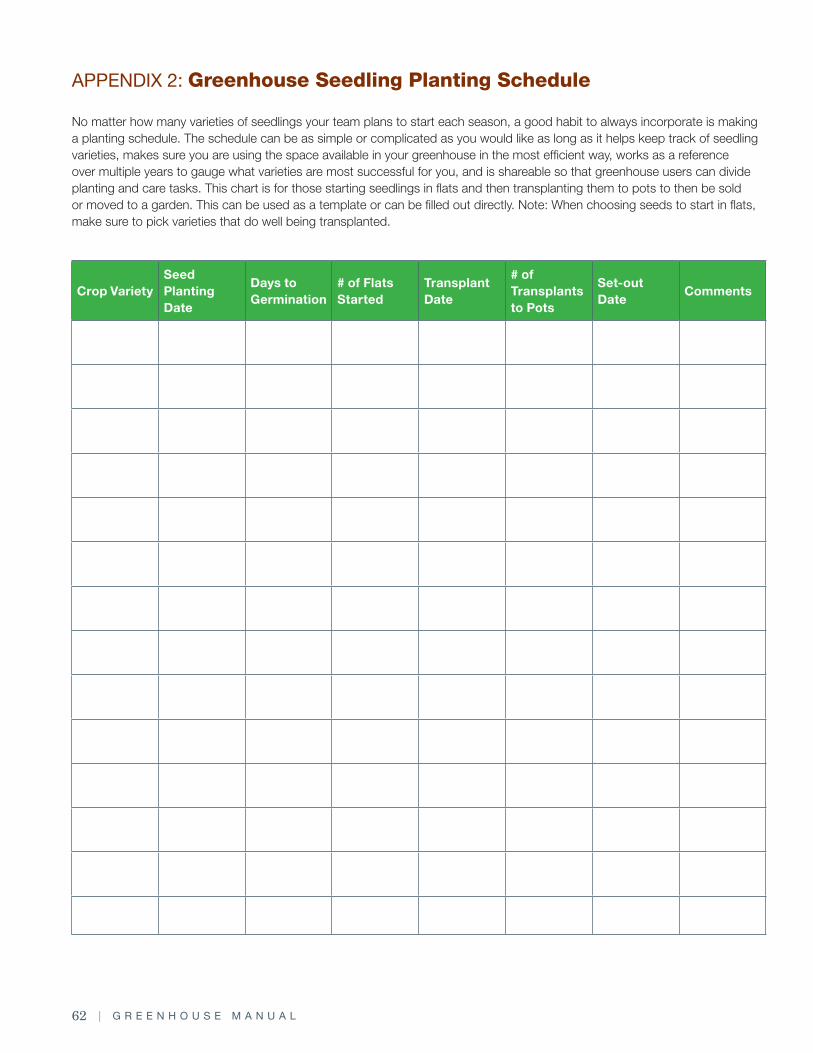
62 | G R E E N H O U S E M A N U A L
Crop VarietySeed Planting Date
Days to Germination
# of Flats Started
Transplant Date
# of Transplants to Pots
Set-out Date
Comments
APPENDIX 2: Greenhouse Seedling Planting Schedule
No matter how many varieties of seedlings your team plans to start each season, a good habit to always incorporate is making a planting schedule. The schedule can be as simple or complicated as you would like as long as it helps keep track of seedling varieties, makes sure you are using the space available in your greenhouse in the most efficient way, works as a reference over multiple years to gauge what varieties are most successful for you, and is shareable so that greenhouse users can divide planting and care tasks. This chart is for those starting seedlings in flats and then transplanting them to pots to then be sold or moved to a garden. This can be used as a template or can be filled out directly. Note: When choosing seeds to start in flats, make sure to pick varieties that do well being transplanted.
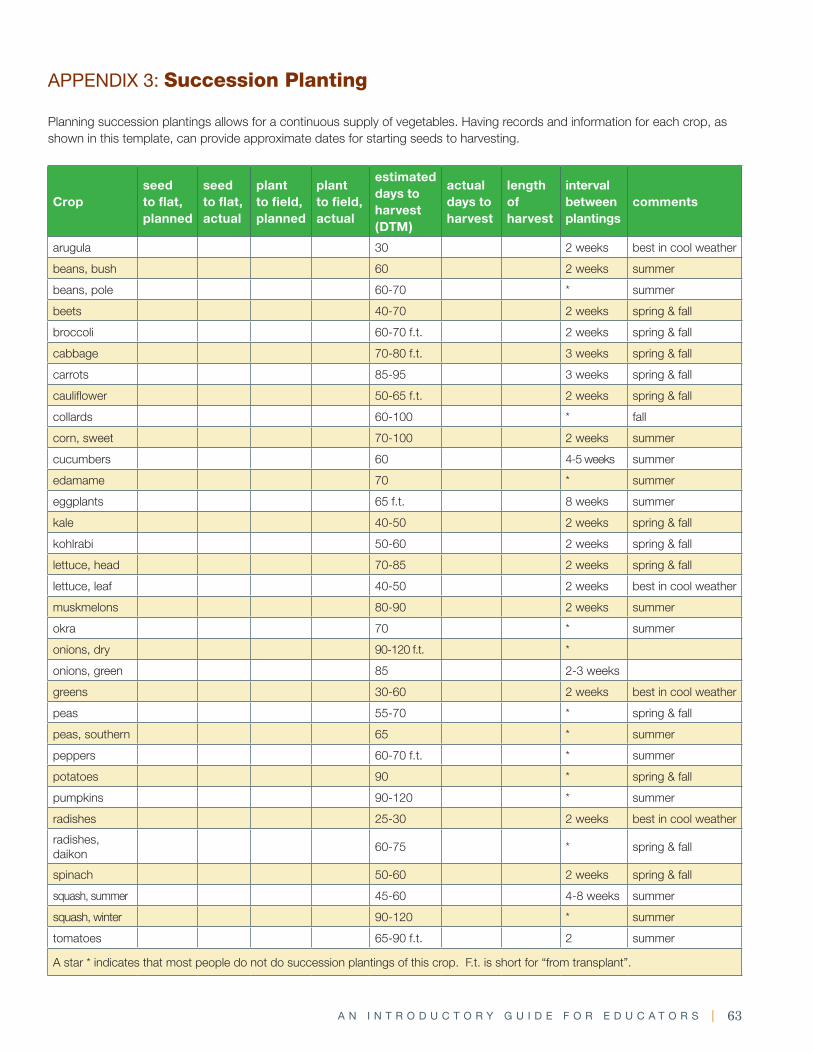
A N I N T R O D U C T O R Y G U I D E F O R E D U C A T O R S | 63
Cropseed to flat, planned
seed to flat, actual
plant to field, planned
plant to field, actual
estimated days to harvest (DTM)
actual days to harvest
length of harvest
interval between plantings
comments
arugula 30 2 weeks best in cool weather
beans, bush 60 2 weeks summer
beans, pole 60-70 * summer
beets 40-70 2 weeks spring & fall
broccoli 60-70 f.t. 2 weeks spring & fall
cabbage 70-80 f.t. 3 weeks spring & fall
carrots 85-95 3 weeks spring & fall
cauliflower 50-65 f.t. 2 weeks spring & fall
collards 60-100 * fall
corn, sweet 70-100 2 weeks summer
cucumbers 60 4-5 weeks summer
edamame 70 * summer
eggplants 65 f.t. 8 weeks summer
kale 40-50 2 weeks spring & fall
kohlrabi 50-60 2 weeks spring & fall
lettuce, head 70-85 2 weeks spring & fall
lettuce, leaf 40-50 2 weeks best in cool weather
muskmelons 80-90 2 weeks summer
okra 70 * summer
onions, dry 90-120 f.t. *
onions, green 85 2-3 weeks
greens 30-60 2 weeks best in cool weather
peas 55-70 * spring & fall
peas, southern 65 * summer
peppers 60-70 f.t. * summer
potatoes 90 * spring & fall
pumpkins 90-120 * summer
radishes 25-30 2 weeks best in cool weather
radishes, daikon
60-75 * spring & fall
spinach 50-60 2 weeks spring & fall
squash, summer 45-60 4-8 weeks summer
squash, winter 90-120 * summer
tomatoes 65-90 f.t. 2 summer
A star * indicates that most people do not do succession plantings of this crop. F.t. is short for “from transplant”.
APPENDIX 3: Succession Planting
Planning succession plantings allows for a continuous supply of vegetables. Having records and information for each crop, asshown in this template, can provide approximate dates for starting seeds to harvesting.

64 | G R E E N H O U S E M A N U A L
The Greenhouse ProjectBy New York Sun WorksProvides K–12 curriculum that uses cutting-edge technology and project-based learning to connect science and the environment through the lens of sustainable urban farming.http://nysunworks.org
Greenhouse Projects and Curriculum Manual By Lafayette College Technology ClinicThis manual offers projects and ideas for greenhouse programming to promote student involvement, including detailed instruction and supplies needed.https://techclinic.lafayette.edu/wp-content/uploads/sites/17/2014/12/BangorGreenhouse-Manual2.pdf
Hands On Plant Science (HOPS) HOPS, Hands on Plant Science, is an immersive environmental education program for urban youth. Outdoor gardens become a living laboratory for students to explore and wonder about the natural world. Through a series of hands on experiments, students are first invited into the outdoor environment with an exploration of water – they test water for temperature, PH, and dissolved oxygen, and learn about and build watersheds. They explore photosynthesis and learn how plants work, using microscopes to see pollen up close. They extract liquid from leaves and with the use of refractometers, see that sugar happens! Students settle in to the quiet of the gardens and use art as their lens. The program concludes with an invitation to apply what they have learned.www.USBG.gov/HOPS
Integrated Pest Management for Greenhouse Operations in Maryland’s Secondary SchoolsBy University of Maryland ExtensionA guide for the high school instruction of Integrated Pest Management (IPM) techniques for responsible production of viable greenhouse crops, with special attention paid to protecting waterways.http://extension.umd.edu/sites/default/files/_docs/programs/ipmnet/IPM-GHManual-Student-Ver-UMD-3.pdf
Integrated Pest Management for Teachers Curriculum By Penn State ExtensionInquiry-based IPM lessons that address standards in different subject areas, including lessons on insects, soil ecosystems, biological controls, pesticides, agriculture, home and school gardens.http://extension.psu.edu/pests/ipm/schools-childcare/schools/educators/curriculum
Web-Based Curriculum, Lesson Plans & Guides There are hundreds of organizations doing incredible work in the area of greenhouse and garden-based learning and Farm-to-School programs. Lesson plans, curricula, and publications are plentiful, and an online search will lead you to a great number of resources. This guide provides a portal to some of the many existing resources that can be used as presented, adapted for use in your own classroom, or simply serve as a launching pad to spawn ideas on how you can utilize the greenhouse to engage students and inspire learning.
Free Online Greenhouse Resources Building a GreenhouseBy Integrated Teaching and Learning Program, College of Engineering, University of Colorado BoulderProvides project-based learning exercises that introduce students in grades 9–11 to global issues such as greenhouse gas emissions and their relationship to global warming, and how greenhouse design takes advantage of heat transfer processes to create controlled environments.https://www.teachengineering.org/activities/view/cub_housing_lesson03_activity2
The Greenhouse EffectBy University Corporation of Atmospheric ResearchProvides standards-aligned lessons for students in grades 5–9 on greenhouse gases, how greenhouses retain heat, and what impacts a greenhouse.https://scied.ucar.edu/teaching-box/greenhouse-effect
Greenhouse Operation and Management By University of Missouri-ColumbiaThis curriculum is designed as a semester-long course for students in grades 11–12 who are interested in various aspects of greenhouse production. It comprises seven units that reflect relevant issues of concern to a greenhouse owner: 1) The Greenhouse Industry; 2) Growing Structures; 3) Plant Science Basics; 4) Plant Growth; 5) Plant Propagation; 6) Plant Health; and 7) Greenhouse Business Management.https://dese.mo.gov/sites/default/files/aged-Greenhouse%20Mngmnt%20Student%20Reference.pdf
APPENDIX 4: Further Resources

A N I N T R O D U C T O R Y G U I D E F O R E D U C A T O R S | 65
A Child’s Garden of StandardsBy California Department of Education, 2002This resource links school gardening to California Standards for grades 2–6. It provides many examples that are timeless and would be applicable nationally.http://ucanr.edu/sites/MarinMG/files/122929.pdf
The Concord ConsortiumThe website includes extensive K–12 standards-aligned lessons, with activities across all subjects; a STEM resource finder that features free, open-source educational activities; models and software tools; and an online tool to find your path through the Next Generation Science Standards. www.concord.org
Education OutsideOffers a curriculum framework that helps educators plan a comprehensive and sequenced outdoor education program. It is arranged by themes (Basics, Soil, Plants, Creatures, Ecology, Materials, and Food), which can then be organized into an academic schedule, building the key concepts of each theme over a K-5 educational experience. www.educationoutside.org
Facing the FutureBy Western Washington UniversityThis K–12 curriculum focuses on sustainability, addresses Big Ideas, and is designed to equip and motivate students to develop critical thinking skills, build global awareness, and engage in positive solutions for a sustainable future. www.facingthefuture.org
Farm to Institution New England The six-state network of non-profit, public, and private entities offers information, guides, reports and case studies on farm to institution, activities, and lessons that support farm-to-school learning. https://www.farmtoinstitution.org/guides
Grow PittsburghThis organization offers a variety of lesson plans and activities for grades 1–8 that integrate garden and cooking activities to promote healthy lifestyles, enhance academic achievement, and encourage environmental stewardship. It also offers cooking plans, gardening guidance, garden layouts, and a children’s book list.http://schools.growpittsburgh.org/teach/lesson-plans/
Science of Life Explorations and Fun with IPMBy Cornell University New Your State Pest Management A teacher guide and lesson plans for students in grades 4–5 that focus on entomology, green science, history, and social studies.https://nysipm.cornell.edu/community/teaching-ipm/science-life-explorations/
Virtual GreenhouseBy Concord ConsortiumStudents can virtually learn about the basic need of organisms and explore how light and temperature impact plants.http://concord.org/stem-resources/virtual-greenhouse
Free Online Garden-Based Resources Ag in the ClassroomBy the U.S. Department of AgricultureA rich resource for teachers including a National Resource Directory that provides an extensive Agriculture in the Classroom resource list, and K–8 educational materials including lesson plans and downloadable curriculum guides. www.agclassroom.org
Captain Planet FoundationSupports high-quality, hands-on environmental stewardship projects, operates several learning gardens, offers small grants, and has several activities that benefit students. The website includes a link to extensive teacher resources including garden curricula, outdoor class management techniques, three-dimensional science and engineering activities, and funding resources. It offers numerous garden-based lessons for elementary and middle school that are tied to common core curriculum standard and provide an environmental stewardship learning opportunity.www.captainplanetfoundation.org
The Center for EcoliteracyThe website offers tools and articles for redesigning school meal programs and helping students learn about food’s place in our lives. www.ecoliteracy.org
Center for Nutrition in SchoolsA project of the University of California Davis, the Center provides curriculum and fact sheets on standards-based nutrition education, including linkages to garden-based learning, and research citing academic benefits of garden-based learning.http://cns.ucdavis.edu/resources/infosheets.html

66 | G R E E N H O U S E M A N U A L
Learn About AgBy California Foundation for Agriculture in the ClassroomThis website provides fact sheets and educational materials, short activities, and numerous K–12 garden-based lesson plans that are categorized by grade level, standard, and subject. It also offers Gardens for Learning, a free 98-page resource book for educators on creating and sustaining a school garden. http://learnaboutag.org/resources/learn.cfm
Let’s Move!Let’s Move! was a comprehensive initiative, launched by the former First Lady, Michelle Obama, dedicated to solving the challenge of childhood obesity. The website is archived and offers a variety of information on starting schoolyard gardens and provides a helpful, easy-to-follow school garden checklist.https://letsmove.obamawhitehouse.archives.gov/ school-garden-checklist
Life LabBased in Santa Cruz, CA Life Lab is a leader in garden-based education and resources. The website hosts downloadable lessons and activity videos.http://lifelab.org/for-educators/schoolgardens/#lessons
National Farm-to-School NetworkThe website includes a searchable library of hundreds of resources from various organizations related to farm-to-school, local foods, food safety, network building, K–12 curriculum, and lessons, which can be easily searched using many parameters. www.farmtoschool.org
Nature Works Everywhereby The Nature ConservancyNature Works Everywhere gives teachers, students and families everything they need to start exploring and understanding nature around the globe alongside Nature Conservancy scientists. The website includes interactive lesson plans, videos, and online tools to align to standards and can be customized for each classroom.https://www.natureworkseverywhere.org/resources/
Growing MindsThe website includes a searchable database of garden-related literature and a large variety of K-12 farm-to-school lesson plans that incorporate state and national curriculum, many of which are submitted by teachers. Growing Minds also hosts a Southeast Farm-to-School Conference. http://growing-minds.org/lesson-plans-landing-page/
Grow Your LunchThis organization provides resources and assistance to schools and communities interested in edible school gardens and garden to cafeteria programs. www.growyourlunch.com
Harvest of the MonthThis website features tools and resources that can be used in diverse applications to support healthy eating and daily physical activity, and provides information helpful with the implementation of classroom cooking and cafeteria activities, including recipes and nutrition fact labels.www.harvestofthemonth.cdph.ca.gov/Pages/default.aspx
Humane Connection This organization offers 13 resources to teach kids about food waste.http://humaneeducation.org/blog/2013/09/23/12-resources-teaching-food-waste
KidsGardeningThe organization provides grants, numerous year-round garden-based classroom projects, teacher resources, school garden activities, how-to guides, and lesson/curriculum connections that can be searched by curricular connections, education standards, garden type (including hydroponics and greenhouses), learning themes, setting, and season.https://kidsgardening.org/lesson-plans/
Lawrence Hall of ScienceThis program of the University of California Berkeley provides digital educational technology that explores hands-on science and health topics. The DIY Science application provide 13 free, easy to use, hands-on activities, plus images, videos, and much more. The site also provides a link to make Sun Prints for a small fee. www.lawrencehallofscience.org
A N I N T R O D U C T O R Y G U I D E F O R E D U C A T O R S | 67
Garden-Based PublicationsA Handful of SeedsBy Tina Poles, Occidental Arts and Ecology CenterThis resource provides lessons and practical information on seed saving for school gardens, promotes seed saving as a way to increase student understandings of natural cycles and stewardship, and contains interesting history and lore. http://oaec.org/wp-content/uploads/2014/10/A-Handful-of-Seeds.pdf
Big Ideas—Linking Food, Culture, Health, and the Environment—A New Alignment with Academic StandardsBy the Center for Ecoliteracy in partnership with National Geographic, 2014 This 86-page publication identifies key “big ideas” that link food, culture, health, and the environment and offers learning opportunities that engage students simultaneously with relevant big ideas and current academic standards. https://www.ecoliteracy.org/sites/default/files/uploads/shared_files/CEL_Big_Ideas_Alignment_K-12.pdf
Botany on your PlateBy UC Berkeley Botanical GardenThis is an investigative science curriculum for grades K-4 that examines edible plants. An inquiry-based science curriculum, it includes activities that spark dialogue among students about edible plants and encourages students to engage and observe the world around them. The curriculum is divided into lessons on roots, shoots, stems, plants, leaves, fruits, and seeds. A main component of the lessons is sampling the different edible plant parts discussed in the lesson. The lessons were developed to align with the National Science Education Standards. Available for purchase.http://botanicalgarden.berkeley.edu/education/curriculum
Cooking with California FoodBy Georgeanne Brennan and Ann M. Evans, Center for EcoLiteracy, 2011This 123-page e-book introduces the concept of the dynamic 6-5-4 School Lunch Matrix, based on six dishes students know and love, five ethnic flavor profiles, and four seasons. It offers ideas for adding more fresh, local, healthy foods to school lunches; helps meal services devise an appealing variety of menus around dishes that children already prefer; honors California’s rich history and cultural heritage; and describes a tested plan for effective professional development for food services staff. It is available for download in English and Spanish.www.ecoliteracy.org/sites/default/files/uploads/cooking_with_california_food_K-12.pdf
Nutrition to Grow On By University of California, Department of Nutrition CurriculumIntended for grades 4–6, this curriculum links school gardens or greenhouses directly with nutrition education. Nine lessons are designed to teach children and their families about nutrition by relating each lesson to a garden activity. The curriculum uses the garden to integrate disciplines, including science, mathematics, language arts, history, environmental studies, nutrition, and health, while reinforcing some of the California academic content standards. www.cde.ca.gov/ls/nu/he/nrttogrow.asp
Project EAT—Educate, Act, ThriveThis California-based organization has developed a set of K–6 lesson plans that link school gardens, nutrition education, and physical education with academic standards. The lesson plans focus on science, math, nutrition, and physical fitness. Each lesson includes links to additional curriculum, specific standards addressed with each grade level, modifications for different grade levels, and follow-up activities. Afterschool programs are included. The website also features monthly school-wide activities. http://projecteat.acoe.org/in-the-classroom/educator-resources#lesson-plans
Teach EngineeringThis organization offers nearly 1,500 K–12 lesson plans that link engineering across multiple subjects, including several lesson plans that focus on photosynthesis, greenhouse gas, decomposition, plant science, and energy.www.teachengineering.org
What’s Cooking By the U.S. Department of Agriculture This website offers household and large-quantity recipes using farm products, food fact sheets, and a variety of tools such as a menu builder and shopping list.http://whatscooking.fns.usda.gov
University of Kentucky Entomology Program This website provides a number of resources for young students to explore insects and a teacher guide to six-legged science. www.uky.edu/Ag/Entomology/ythfacts/resourc/resourc.htm
68 | G R E E N H O U S E M A N U A L
Greenhouse Gardener’s Companion, Revised: Growing Food & Flowers in Your Greenhouse or SunspaceBy Shane Smith, Illustrated by Marjorie LeggittThe most comprehensive book on greenhouse gardening available today. In this fully revised edition of a best-selling classic, veteran gardener Shane Smith embraces this new “lifestyle” approach to greenhouse gardening. Through lively writing that balances wit with commonsense advice, Smith draws on his more than 20 years’ experience to cover everything you need to know to establish a charming and productive greenhouse. Available for purchace.
The Growing ClassroomThis garden-based science and nutrition curriculum for grades K–6 was developed by the LifeLab at UC Santa Cruz. The book is divided into lessons, which include materials, connections to standards, activities, and follow-up discussion. The lessons include both indoor and outdoor activities and cover topics such as: problem solving and communication; awareness and discovery of perceptions; soil; mysteries of growing; photosynthesis; cycles and changes, with a focus on decomposition and decay; interdependence in human and animal communities; ecology and anatomy of insects and flowers; ways energy consumption patterns can be changed; and ways for children to conserve and recycle. https://www.lifelab.org/tag/the-growing-classroom/
Growing School and Youth Gardens in New York City: A Guide to ResourcesBy GreenThumb, City of New York, 2009The 49-page guide includes chapters on garden planning and design, curriculum, indoor and outdoor gardening, beyond the classroom, and fundraising.https://www.nycgovparks.org/sub_about/partners/greenthumb/school_garden_resource_guide.pdf
The Lunch Line with Recycling in MindBy Snohomish County Public Works, Solid Waste, 2009This publication provides links to lesson plans, activity guides, curricula, videos, and more to teach students about waste reduction and recycling in the cafeteria and beyond.https://snohomishcountywa.gov/DocumentCenter/View/3768/Resource-Guide-For-Educators?bidId=
Do the Rot Thing: A Teacher’s Guide to Compost ActivitiesBy the Alameda County Waste Management Authority & Source Reduction and Recycling Board; republished for online access by the Central Vermont Solid Waste Management District, 2007This guide provides numerous activities to introduce students to concepts related to biodegradability, basic composting, and worm composting. It also features activities that students can direct to teach others about composting.http://www.cvswmd.org/uploads/6/1/2/6/6126179/do_the_rot_thing_cvswmd1.pdf
Gardens for LearningBy the California School Garden Network, 2006This 98-page e-book provides information on linking garden to curriculum, designing gardens, finding supplies, funding, sustaining the garden, and more.www.csgn.org/sites/csgn.org/files/CSGN_book_0.pdf
Garden Gastronomy/Gastronomía del Jardín: A Bilingual CookbookBy City Blossoms, 2017 A bilingual, garden-to-table collection of recipes designed to help children become enthusiastic and healthy chefs. Perfect for the educator interested in sharing the joy of cooking with kids, this artfully constructed book is full of colorful photographs and cheerful illustrations that make it an appealing treat for readers of all ages. This book contains: 32 inexpensive, fresh, and delicious recipes and techniques for cooking with kids. Available for purchace. http://cityblossoms.org/shop/garden-gastronomy-a-bilingual-cookbook
Got VeggiesBy Nutrition, Physical Activity & Obesity Program of the Wisconsin Department of Health Services, 2010This publication offers a comprehensive youth, garden-based, nutrition-education curriculum, lesson plans, garden-based activities, ideas for cooking and eating food grown in the garden, and some excellent resources.www.dhs.wisconsin.gov/publications/p0/p00228.pdf
A N I N T R O D U C T O R Y G U I D E F O R E D U C A T O R S | 69
Educator Professional DevelopmentMany botanical gardens, urban agriculture programs, and community farms offer training programs to assist educators with production techniques, creating new gardens, starting farm-to-school programs, integrating indoor and outdoor gardens into the classroom, and more. Below are a few organizations that offer professional development programs. Educators will find many more opportunities at the local level, especially through those who are actively involved in school greenhouse and garden programs.
Captain Planet FoundationThis foundation provides teachers with training on outdoor classroom management, standards-based curriculum, and lesson kits that allow students to learn math, science, history, language arts, and health in the context of project-based learning in the garden.www.captainplanetfoundation.org/about
Keystone College Environmental Education InstituteThe Institute offers a variety of week-long summer courses on garden-based learning with various credit options.www.keystone.edu/kceei
Kids GardeningKidsGardening is a leading resource for garden-based educators across the country.www.kidsgardening.org
Life LabThis organization offers workshops at its Garden Classroom in Santa Cruz, California, and at schools across the nation, as well as schoolyard garden consulting. It also offers curriculum and publications for purchase.http://www.lifelab.org
National Energy Education Development ProjectThis project offers professional development to educators on curriculum correlations to all state science content standards and national common core standards.www.need.org/Educators
New York Botanical GardenThe New York Botanical Garden provides a six-day professional development course, which covers topics from school gardening to earth science, and offer teachers the tools and training they need to integrate plants and science into the classroom. Customized workshops can also be arranged. www.nybg.org/edu/teacher/professional-development.php
Math in the GardenProduced by UC Berkeley Botanical GardenThis curriculum guide offers math lessons and activities for students in grades K–6, which can be conducted in a school garden or school greenhouse setting. The lessons cover a wider range of topics, from discovering patterns and symmetry to measuring planting beds and weighing harvests. The activities promote inquiry, language, nutrition, and teamwork. For purchase.http://botanicalgarden.berkeley.edu/education/curriculum
Online Energy Resources for EducatorsBy Pacific Gas and Electric Company, 2009A 22-page annotated guide to internet resources for teaching about energy and the environment.www.pge.com/includes/docs/pdfs/shared/edusafety/teacherskids/energenius/energenius_online_energy_resource_guidev14.pdf
Rethinking School Lunch GuideBy the Center for Ecoliteracy, 2010 Offers extensive curricula resources, including tips for integrating food and gardening themes into lessons.www.ecoliteracy.org/download/rethinking-school-lunch-guide
Teaching in Nature’s Classroom: Core Principles of Garden-Based Education By Nathan Larson, 2015 This illustrated e-book presents 15 guiding principles of garden-based education and connects these to research literature. www.teachinginnaturesclassroom.org
The USDA Farm-to-School Planning KitThis toolkit guides you though questions to consider and helpful resources to reference when starting or growing a farm-to-school program. It is designed for use by schools, school districts, and community partners. The toolkit is filled with tips and examples, insights from others, and lists of resources for further research.www.fns.usda.gov/sites/default/files/f2s/F2S-Planning-Kit.pdf
A Worm Guide: A Vermicomposting Guide for TeachersBy Tavia Pagan and Rachelle Steen, Office of Education and the Environment at the California Integrated Waste Management Board, 2006This 48-page guide provides teachers with information on how to start and maintain a successful classroom worm bin. Includes the basics of vermicomposting, worm bin construction plans, troubleshooting, fundraising tips, classroom activities, and useful case studies of other successful vermicomposting programs.https://www2.calrecycle.ca.gov/Publications/Details/912
70 | G R E E N H O U S E M A N U A L
Burpee Seed CompanyProvides seed donations to schools and organizations. www.burpee.com/gardenadvicecenter/about/public-relations-and-media-request-contact/public-relations-contact.html
Captain Planet FoundationProvides $500–$2,500 grants for youth projects that focus on environmental stewardship and community service.https://www.captainplanetfoundation.org/grants/
Environmental Protection Agency, Environmental Education Grants Provides grants that vary in amount to support projects that enhance the public’s awareness and environmental stewardship. www.epa.gov/education/environmental-education-ee-grants
Fruit Tree Planting Foundation Donates 12-20 fruit tree orchards to schoolyards, along with materials, orchard installation, design work, and onsite environmental curriculumwww.ftpf.org/fruittree101.htm
Green Thumb Challenge GrantThe $250 award recognizes continued sustainability of an exceptional youth garden program. www.greeneducationfoundation.org/greenthumbchallengesub/green-thumb-challenge-winners.html
The Herb Society of America—Donald Samull Classroom Herb Garden GrantProvides $200 grants to public and/or private 3rd through 6th grade teachers for start-up herb gardens. http://www.herbsociety.org/support/grants-scholarships/
Idaho National LaboratoryOffers mini-grants up to $500 for K–12 projects and classroom grants up to $5,000 that enhance STEM instruction and learning environments.www.inl.gov/inl-initiatives/education/k-12-stem-grants
Johnny’s Selected SeedsCollaborates in local and national efforts that contribute to agricultural education, provide produce to local communities, and support healthy eating habits and sustainable horticultural programs.www.johnnyseeds.com/t-charitable-giving.aspx
New York SunworksProvides hands-on teacher training that assists educators in integrating themes of sustainability into the classroom. http://nysunworks.org/education/teacher-training
Stone Barns Center for Food and Agriculture Teacher’s InstituteThe Teacher Institute is a ten-day intensive workshop at Stone Barns Center for Food and Agriculture in New York’s Hudson Valley. The program targets specific states each summer and prepares educators to pilot the Stone Barns food studies curriculum, explore ways to cook with students and learn how to use a local farm as a teaching tool. www.stonebarnscenter.org/our-work/education/index.html
Vermont Feed The organization offers a variety of professional development opportunities for educators including farm-to-school courses and culinary workshops for child nutrition professionals. http://vtfeed.org/what-vt-feed
Grant & Fundraising ResourcesThe following list includes funds that are typically offered on an annual basis.
American Heart Association Teaching Garden Offers support and oversight schools in the form of training and materials (garden beds, organic soil, plants, and activities). https://www.heart.org/en/professional/educator/teaching-gardens/teaching-gardens-recognition-program
American Honda Provides grants ranging from $20,000–$75,000 for projects that focus on youth education, specifically in science, technology, engineering, math, and the environment.https://www.honda.com/community/applying-for-a-grant
Annie’s GardenSupports schoolyard gardens and agricultural scholarships for undergraduate/graduate students in organic agriculture.www.annies.com/doing-more/grants-for-gardens
Bonnie PlantsProvides free plants to schools that have an American Heart Association Teaching Garden. https://bonnieplants.com/community/aha-teaching-gardens
https://www.heart.org/en/professional/educator/teaching-gardens/teaching-gardens-recognition-program
A N I N T R O D U C T O R Y G U I D E F O R E D U C A T O R S | 71
Wild Ones, Lorrie Otto Seeds for Education Grant ProgramAwards $500 grants for plants and seeds to schools, nature centers, and other non-profit places of learning across the USA.https://wildones.org/seeds-for-education/
Youth Garden Grant Awards grants of $500 to support school and youth educational garden projects.www.kidsgardening.org/2017-youth-garden-grant
Kids GardeningProvides various funding opportunities that support installation or enhancement of educational gardens at schools and community centers.https://kidsgardening.org/garden-grants/
Lowe’s Charitable and Educational Foundation Awards grants of $5,000–$25,000 for public education and community improvement projects.https://newsroom.lowes.com/apply-for-a-grant
National Environmental Education FoundationProvides grants to support environmental education. www.neefusa.org/grants
Nature Works Everywhere Garden GrantsProvides grants of $1,000–$2,000 to K–12 public or charter schools in the United States interested in leading or enhancing a garden or environmental-based project.www.natureworkseverywhere.org/grants
NEA Foundation Green Grants Provides individual grants up to $5,000 to public school educators for the development and implementation of ideas and approaches for teaching “green” concepts. www.neafoundation.org/pages/grants-to-educators
Project Learning Tree—Green Works GrantProvides grants up to $1,000 to schools and youth organizations for environmental service-learning projects that link classroom learning to the real world.https://www.plt.org/resources/greenworks-grants/
Project Orange ThumbProvides grants of $3,500 in cash and tools to community groups across North America involved in gardening. www2.fiskars.com/Community/Project-Orange-Thumb
Scotts Miracle Gro Foundation Grants Provides grant funding and pollinator education resources to help establish and enhance pollinator gardens. https://scottsmiraclegro.com/pollinatorpromise
Target Field Trip Grants Awards Field Trip Grants to K–12 schools, which are valued up to $700.https://corporate.target.com/corporate-responsibility/grants
72 | G R E E N H O U S E M A N U A L
REFERENCES
Greer, Lane and Steve Diver. 1999. Integrated Pest Management for Greenhouse Crops. ATTRA Publication IP144. Butte, MT: NCAT. https://attra.ncat.org/attra-pub/download.php?id=48
Mumma, Tracy. 2016. USDA Farm-to-School Census Results Released. ATTRA News. March 16. https://attra.ncat.org/newsletter/weekly_harvest_031616.html
National Farm-to-School Network. No date. Connecting and Strengthening the Farm-to-School Movement. Accessed August 2016. www.farmtoschool.org
National Policy & Legal Analysis Network to Prevent Childhood Obesity. 2013. Serving School Garden Produce in the Cafeteria. June. Oakland, CA: Changelab Solutions. www.changelabsolutions.org/sites/default/files/SchoolGardenLiability_Memo_FINAL_20130621.pdf
Southern Exposure Seed Exchange. No date. How to Test Germination. www.southernexposure.com/how-to-test-germination-ezp-162.html
Thomas, Andrew L. and Richard J. Crawford, Jr. 2001. Performance of an Energy-efficient, Solar-heated Greenhouse in Southwest Missouri. Southwest Missouri Agricultural Research and Education Center 2001 Research Report. Mount Vernon, MO: University of Missouri-Columbia.
Aldrich, Robert A. and John W. Bartok. 1994. Greenhouse Engineering. NRAES-33. Ithaca, NY: Natural Resource, Agriculture and Engineering Service. http://host31.spidergraphics.com/nra/doc/Fair%20Use%20Web%20PDFs/NRAES-33_Web.pdf
Bellows, Barbara. 2008. Solar Greenhouses. ATTRA Publication IP142. Butte, MT: NCAT. https://attra.ncat.org/attra-pub/summaries/summary.php?pub=59
Boodley, J.W. and R. Sheldrake, Jr. 1982. Cornell Peat-Lite Mixes for Commercial Plant Growing. Ithaca, NY: Cornell University.
Bubel, Nancy. 1988. The New Seed-Starters Handbook. Emmaus, PA: Rodale Press, Inc. p. 59–62.
Coleman, Eliot. 1995. The New Organic Grower: A Master’s Manual of Tools and Techniques for the Home and Market Gardener. White River junction, VT: Chelsea Green Publishing.
DeFacio, Patricia, Lynn Pickerel, and Susan M. Rhyne. 2002. Greenhouse Operation and Management. Instructional Materials Laboratory. Columbia MO: University of Missouri. https://dese.mo.gov/sites/default/files/aged-Greenhouse%20Mngmnt%20Instructor%20Guide.pdf

A N I N T R O D U C T O R Y G U I D E F O R E D U C A T O R S | 73

74 | G R E E N H O U S E M A N U A L

A N I N T R O D U C T O R Y G U I D E F O R E D U C A T O R S | 75

UNITED STATES BOTANIC GARDEN
cityblossoms