CS82-CH8 Taco Bell 1-9
16
This equipment has been engineered to provide you with dependable service when used according to the instructions in this manual and standard commercial kitchen practices. 1 ! ! FOR YOUR SAFETY Do not store or use gasoline or other flammable vapors and liquids in the vicinity of this or any other appliance. ! ! WARNING Improper installation, adjustment, alteration, service or maintenance can cause property damage, injury or death. Read the Installation, Operating and Maintenance Instructions thoroughly before installing or servicing this equipment. ! ! WARNING Initial heating of unit may generate smoke or fumes and must be done in a well-ventilated area. Overexposure to smoke or fumes may cause nausea or dizziness. Hot Holding Cabinet Model: CS82-CH8 & CS36-CH3 Innovative Foodservice Equipment Custom Designed for Performance, Service and Value. INSTALLATIONAND OPERATING INSTRUCTIONS INTENDED FOR OTHER THAN HOUSEHOLD USE RETAIN THIS MANUAL FOR FUTURE REFERENCE UNIT MUST BE KEPT CLEAR OF COMBUSTIBLES AT ALL TIMES ANSI/NSF4 Phone: +1 Fax: +1 (214) 565-0976 Toll Free: +1 (800) 527-2100 Website: www.apwwyott.com E-mail: [email protected] (214) 421-7366 BevLes Company, Inc. 729 Third Avenue Dallas, TX 75226
-
Upload
khangminh22 -
Category
Documents
-
view
0 -
download
0
Transcript of CS82-CH8 Taco Bell 1-9
This equipment has been engineered to provide you with dependable service when used according to theinstructions in this manual and standard commercial kitchen practices.
1
! !FOR YOUR SAFETY
Do not store or use gasoline or other flammable vapors and liquids in thevicinity of this or any other appliance.
! !
WARNINGImproper installation, adjustment, alteration, service or maintenance cancause property damage, injury or death. Read the Installation, Operating andMaintenance Instructions thoroughly before installing or servicing thisequipment.
! !WARNING
Initial heating of unit may generate smoke or fumes and must be done in awell-ventilated area. Overexposure to smoke or fumes may cause nausea ordizziness.
Hot Holding CabinetModel: CS82-CH8 & CS36-CH3
!"# $%&''&& (()'*
Innovative Foodservice EquipmentCustom Designed for Performance, Service and Value.
INSTALLATION AND OPERATINGINSTRUCTIONS
INTENDED FOR OTHER THAN HOUSEHOLD USERETAIN THIS MANUAL FOR FUTURE REFERENCE
UNIT MUST BE KEPT CLEAR OF COMBUSTIBLES AT ALL TIMES
ANSI/NSF4
Phone: +1Fax: +1 (214) 565-0976Toll Free: +1 (800) 527-2100Website: www.apwwyott.comE-mail: [email protected]
(214) 421-7366
BevLes Company, Inc.729 Third AvenueDallas, TX 75226
! !"#$#%& !"# #$%&'( )*+*)# ,' - .',*/,"-( !-0-)1 ') 2/#-+* .)-3,"3*4 5!"3! 3'2(1 )*#2(, "/
#*)"'2# "/62)$') 1*-,!7
!
!! '!#%("& !"# #$%&'(5-)/#'+ "%%"/*/,!-0-)15!"3!5"(( )*#2(, "/ #*)"'2# "/62)$') 1*-,!7
!!)!*+$,#& !"# #$%&'( )*+*)# ,' - .',*/,"-( !-0-)1') 2/#-+*.)-3,"3*45!"3!%-$ )*#2(, "/%"/') ')
%'1*)-,* "/62)$') .)'123,') .)'.*),$1-%-8*7
!!#,+$)(& !"# #$%&'( )*+*)# ,' "/+')%-,"'/ ,!-, /**1# #.*3"-( -,,*/,"'/')%2#, &* +2(($ 2/1*)#,''1
*9*/ ,!'28!/', 1-/8*)'2#7
GENERAL INFORMATION
THIS MANUAL SHOULD BE RETAINED FOR FUTURE REFERENCE
BevLes Company takes pride in the design and quality of our products. When used as intended and withproper care and maintenance, you will experience years of reliable operation from this equipment. Toensure best results, it is important that you read and follow the instructions in this manual carefully.
Installation and start-up should be performed by a qualified installer who thoroughly reads, understands
and follows these instructions.
If you have questions concerning the installation, operation, maintenance or service of this product, write
Technical Service Department BevLes Company, Inc., 729 ThirdAvenue, Dallas, TX 75226.
Before installing and operating this equipment be sure everyone involved in its operation is fully trained and
aware of all precautions. Accidents and problems can result by a failure to follow fundamental rules and
precautions.
The following words and symbols, found in this manual, alert you to hazards to the operator, service
personnel or the equipment. The words are defined as follows:
SAFETY PRECAUTIONS
!
)!*+$,#& !*#* %'1*(# -)* 1*#"8/*14 &2"(,4 -/1 #'(1 +') 3'%%*)3"-( 2#*7 :+ ,!*#* %'1*(# -)*
.'#","'/*1 #' ,!* 8*/*)-( .2&("3 3-/ 2#* ,!* *;2".%*/, %-<* #2)* ,!-, 3-2,"'/#4 5-)/"/8#4 -/1
'.*)-,"/8 "/#,)23,"'/# -)* 3(*-)($ .'#,*1 /*-) *-3! 2/", #' ,!-, -/$'/* 2#"/8 ,!* *;2".%*/, 5"((
2#* ", 3'))*3,($-/1/', "/62)* ,!*%#*(9*#') !-)% ,!**;2".%*/,7
!
! !"#$#%&=!*3< ,!* 1-,- .(-,* '/ ,!"# 2/", &*+')* "/#,-((-,"'/7='//*3, ,!* 2/", '/($ ,' ,!* 9'(,-8*
-/1 +)*;2*/3$ ("#,*1'/ ,!*1-,- .(-,*7='//*3,'/($ ,' > ') ? .!-#*-# ("#,*1'/ ,!*1-,- .(-,*7
!
!! !"#$#%& @(*3,)"3-( -/1 8)'2/1"/8 3'//*3,"'/#%2#, 3'%.($ 5",! ,!* -..("3-&(* .'),"'/# '+ ,!*
/-,"'/-(*(*3,)"3-( 3'1*-/1A')',!*) ('3-( *(*3,)"3-( 3'1*#7
2
IMMEDIATELY INSPECTFORSHIPPINGDAMAGE
All containers should be examined for damage before and during unloading. The freight carrier has
assumed responsibility for its safe transit and delivery. If equipment is received damaged, either apparent or
concealed, a claim must be made with the delivering carrier.
A) Apparent damage or loss must be noted on the freight bill at the time of delivery. It must then be signed by
the carrier representative (Driver). If this is not done, the carrier may refuse the claim. The carrier should
supply the necessary forms.
B) Concealed damage or loss if not apparent until after equipment is uncrated, a request for inspection
must be made to the carrier within 15 days. The carrier should arrange an inspection.
Installation and start-up should be performed by a qualified installer who thoroughly reads, understands and
follows these instructions.
BE CERTAIN TO HOLD ALL CONTENTS AND PACKAGING MATERIAL.

! ! !"#$#%& !"!# $%!&' &'( !%!$)#*$&% +'*) ,( *--!#.*'/ *) *' 0&)!#1 2+#' 344 ,!43#! $%!&'*'/
.+#4&$!1
! !'!()$*#& 53 '3) .!) )6! +'*) 0*)6 *). ,&$7 4%&) &/&*'.) )6! 0&%%1 8) 0*%% '3) 39!#&)! 9#39!#%(
+'%!.. )6!#! *. &) %!&.) :; < =; ,#!&)6*'/.9&$!,!6*'>+'*)1 ?@99%*!. )3 )6!ABCD<AECF'%(G
! ! !"#$#%& @' !&#)6*'/ $&,%! -+.) $3''!$) )6! &99%*&'$! )3 &%% 3)6!# +'*). *' )6! $3-9%!)!
*'.)&%%&)*3'&'> 4#3- )6!#! )3 &' *'>!9!'>!')!&#)6 $3''!$)*3'1
! !#*)$'+&26*.9#3>+$) *. *')!'>!> 43# $3--!#$*&%+.!3'%(1 3) 43# 63+.!63%>+.!1
! ! !"#$#%& ,SHOCK HAZARD 5!<!'!#/*H! &%% 930!# )3 !I+*9-!') ,!43#! $%!&'*'/ )6!
!I+*9-!')1
!!
#*)$'+&26! +'*) 06!' *'.)&%%!>J-+.) ,! !%!$)#*$&%%( /#3+'>!>&'> $3-9%(0*)6 %3$&% $3>!.J 3# *'
)6! &,.!'$! 34 %3$&% $3>!.J 0*)6 )6! '&)*3'&% !%!$)#*$&% $3>! @ B8K LM@NO< %&)!.) !>*)*3'1
A&'&>*&' *'.)&%%&)*3' -+.) $3-9%( 0*)6 AB@<B2@ 5@P5 A1::1: +-,!# O QRST: U!'!#&%
P!I+*#!-!').<A&'&>*&'V%!$)#*$&%A3>!M&#) 88J ROS<QRSTR<A3--!#$*&%A337*'/@99%*&'$!.1
!!
#*)$'+& W3$&% $3>!. #!/&#>*'/ *'.)&%%&)*3' "&#( /#!&)%( 4#3- 3'! &#!& )3 &'3)6!#1 26! &)*3'&%
L*#! M#3)!$)*3'@..3$*&)*3'J 8'$1 .)&)!. *' *). LM@SD %&)!.) !>*)*3' )6&) %3$&% $3>!. &#! X@+)63#*)(
E&"*'/ Y+#*.>*$)*3'; 06!' *) $3-!. )3 #!I+*#!-!') 43# *'.)&%%&)*3' 34 !I+*9-!')1 26!#!43#!J
*'.)&%%&)*3'.63+%>$3-9%(0*)6 &%% %3$&% $3>!.1
! ! !"#$#%& ,SHOCK HAZARD 53'3) 39!'&'(9&'!%. )6&) #!I+*#! )6!+.!34 )33%.1
3
! !'!()$*#& B+*)&,%! 43# *'.)&%%&)*3' 3' $3-,+.)*,%! 4%33# 06!' *'.)&%%!> 0*)6 %!/. 3# $&.)!#.
9#3"*>!>1
! ! !"#$#%&@4&$)3#(&+)63#*H!>&/!') .63+%>6&'>%!&%%-&*')!'&'$!&'> #!9&*#1 Z!43#!>3*'/&'(
-&*')!'&'$!3# #!9&*#J $3')&$) )6!Z!"W!.A3-9&'(1
!"#$#%& 8'.)&%% 9!# )6! .9&$*'/ #!I+*#!-!'). %*.)!> *' )6! *'.)&%%&)*3' .!$)*3' 34 )6*.-&'+&%1[!
.)#3'/%( #!$3--!'> 6&"*'/ & $3-9!)!') 9#34!..*3'&% *'.)&%% )6! !I+*9-!')1@ %*$!'.!> !%!$)#*$*&'
.63+%> -&7! )6! !%!$)#*$&% $3''!$)*3'. &'> $3''!$) 930!# )3 )6! +'*)1 W3$&% $3>!. .63+%> &%0&(.
,! +.!> 06!' $3''!$)*'/ )6!.! +'*). )3 !%!$)#*$&% 930!#1 8' )6! &,.!'$! 34 %3$&% $3>!.J +.! )6!
%&)!.) "!#.*3'34 )6! &)*3'&%V%!$)#*$&%A3>!1
!!
!!
!"#$#%& 26*. >!"*$! .63+%> ,! .&4!%( &'> &>!I+&)!%( /#3+'>!> *' &$$3#>&'$! 0*)6 %3$&%
$3>!.J 3# *' )6! &,.!'$! 34 %3$&% $3>!.J 0*)6 )6! &)*3'&% V%!$)#*$&% $3>!J @ B8K LM@ NOJ W&)!.)
V>*)*3' )3 9#3)!$) )6! +.!# 4#3- !%!$)#*$&% .63$71 8) #!I+*#!. & /#3+'>!> .(.)!- &'> & >!>*$&)!>
$*#$+*)J 9#3)!$)!> ,( & 4+.! 3# $*#$+*) ,#!&7!# 34 9#39!# .*H! &'> #&)*'/1 A&'&>*&' *'.)&%%&)*3' -+.)
$3-9%(0*)6 )6!A&'&>*&'V%!$)#*$&%A3>!JAB@A::1:J &. &99%*$&,%!1
!! !"#$#%& 5*.$3''!$) >!"*$! 4#3- !%!$)#*$&% 930!# .+99%( &'> 9%&$! & 2&/ F+)<W3$73+) 3' )6!
930!#9%+/J *'>*$&)*'/ )6&) (3+&#!03#7*'/3' )6! $*#$+*)1
4
TABLE OF CONTENTS
SECTION ITEM PAGE
Safety Precautions 2
General Information 2
1. Introduction 5
2. Operational Procedures 5
3. 6
4. 7
5. Troubleshooting Guide 8
6. Preventative Maintenance 9
7. Wiring Diagrams 10A. Taco Bell Top Module 10B. Taco Bell Control Panel 11C. Taco Bell Front Panel Enclosure 12
8. Parts List & Exploded Views 13A. Main Cabinet (Exploded View) 13B. Top ModuleC. Door AssemblyD. Parts List 15
9. Warranty 16
Cleaning
Specifications
(Exploded View) 14(Exploded View) 14
IMPORTANT FOR FUTURE REFERENCE
Please complete this information and retain this manual for the life of the equipment. ForWarranty Service and/or Parts, this information is required.
Model Number Serial Number Date Purchased
Notes:

1. INTRODUCTION
2. OPERATIONAL PROCEDURES
BevLes Hot Holding Cabinets are designed and engineered to hold prepared foods within a precisetemperature range. Built from the finest materials available, BevLes Hot Holding Cabinets are customdesigned for performance, service and value.
All models are U.L., C.U.L., and U.L. Sanitation listed.BevLes Hot Holding Cabinets are furnished with a 10-foot power cord with a 20 amp molded plug. ANEMA5-20R receptacle is required.Each cabinet is equipped with self-closing door hinges designed to open to a maximum of 180°.
Hot Holding Cabinets require a minimum of 4” between each Hot Holding Cabinet and otherequipment or surfaces for proper air circulation to and from fan motor air vents; full size models (over50” tall) also require 4” between the and other surfaces.
If your Hot Holding Cabinet is equipped with stationary legs, it is important to level your cabinet forproper operation. To level, simply turn the adjustable hex foot as needed on each leg.
Plug the cabinet into the power source. Use a separate electrical line (120V-20A), protected by acircuit breaker of the proper rating. (NEMA 5-20R receptacle is required).
All personnel responsible for the operation and maintenance of BevLes Hot Holding Cabinetsshouldbecome familiarwith thismanual prior to operating the equipment.
Notes
Do not flex doors beyond 180°. Excessive stress on the hinge may lead to metal fatigue andpossible breakage.
topof the cabinetDo not place any objects over motor air vents located on right side of cabinet top mountedheatingunit.
Step 1.WARNING:
Care should be exercised when adjusting to avoid loosening or removing the leg from thecabinet base. Hold the leg firmly and adjust the hex foot. NOTE: Model CS82-CH8 mustremain equipped with factory authorized legs, and can never be mounted on casters of anytype.
Step 2.
WARNING: Before plugging in cabinet, ensure compatibility with your electrical source byreferring to the serial number label located on the top side of the Hot Holding Cabinet. Foranynecessary assistance, please contact theBevLes factory.
5
Step3.
NOTE: Some models may beequippedwith other types of shelf supports; pleasecontact the BevLes factory with any questions onshelf support installation.
Make certain that the wire shelf supports have beenproperly installed. Improperly spaced shelves mayaffect air flow circulation within the cabinet interiorleading to “hot” or “cold” spots. As shown in Figure 1,supports attach to the airflow (side) panels beginningwith the bottom holes in each airflow panel (left and rightside of cabinet). Small indentations (dimples) on theairflow panels indicate the correct placement holes foreach wire shelf support.
Figure 1
Step4.
Step 5.
Push power switch to “ON” position. The digital display will light and show the current cabinettemperature.Ared LED light (located in the upper left corner of the display) will be displayed anytimethe cabinet temperature falls below the set temperature.
After five minutes, check the digital display and the air flow inside the cabinet to be sure that it isheating properly. As a point of reference, most “empty” full size cabinets will reach their settemperatures within approximately 30 minutes.

6
Your BevLes Hot Holding Cabinet features a 24-hour mechanical Timer to allow for automatic operation.The Timer and a Timer ON-OFF switch are located behind the 3¾” x 6” door at the right of the black powerswitch near the top of the cabinet. To open the door, turn the black knob counterclockwise until you can slidethe door up about½ inch and then lift the door out and upward.
TO SET TIMER (See Figure 2)
Step1.
Step 2.
Step 3.
ON
OFFStep4.
Access the timer behind the sliding door next to the main powerswitch near the top of theBevLes cabinet.Activate the automatic ON/OFF Timer by toggling the switch tothe “ON” position. (NOTE: the switch is not shown in diagram - itis located to the left of theTimer.)Determine when you want the BevLes cabinet to automaticallyturn on and turn off. Remove the RED TAB and replace it in theslot when you want the BevLes cabinet to be turned . Pressdown to attach the TAB to the Timer. Remove the BLACK TABand replace it in the slot when you want the BevLes cabinet to beturned . Press down to attach theTAB to theTimer.Turn the dial clockwise until the TIME ARROW (B) (the blackarrow located in the center of the Timer) is pointing at the correct
Figure 2
time of day.Be sure that themain heated cabinet power switch (black) remains in the “ON” position.Step5.
Note: For unscheduled ON/OFF operation of the cabinet the Manual Knob may be used tooverride the timer’sON/OFFmodesettings.
IN CASE OF POWER LOSS, RESET TIMER AS DESCRIBED IN STEP 4.
3. CLEANING
Step1.
Step 2. WARNING: Always unplug the cabinet beforedismantlingor cleaning.
Step 3. CAUTION: At least two people should do thelifting to avoidpossible injury.
Step 5.
Step 6.CAUTION: Use care when handling the airflow (side) panels. Any
damageor bendingmaymake re-installationdifficult.
Step 7.
WARNING: Avoid splashing water or any other liquid into the top mounted heating unit toprevent possible damage to electrical components.
Push power switch toOFFposition.
Unplug power cord from power source.
If needed, remove the top mounted heating unit.
Remove thewire shelf supports.
Remove the airflow (side) panels by carefully lifting each panel and tilting the bottom toward thecenter of the cabinet.
Clean all parts thoroughly with soapy water and soft cloths or sponges. Never use steel wool orcaustic cleaning compounds.
IF YOU HAVE ANY QUESTIONS REGARDING THE INSTALLATION OR OPERATION OF YOURBEVLES HOT HOLDING CABINET, REVIEW THIS MANUALAND THEN CALLTHE BEVLES FACTORYCUSTOMERSERVICESUPPORTHOTLINE:
Step4.
BEVLES800/441-1601
Opendoor(s) to 90° position.

7
4. SPECIFICATIONS
72.882
82.221
39.314
4.977
32.344
22.507

SYMPTOM MOST LIKELY CAUSE SOLUTION
Digital Controller displays 2 dots
at bottom of display (Open
Sensor Indicator Lights, See
Diagram).
Temperature Sensor has
failed or the connector is
loose or not plugged in.
Call the BevLes Technical Service
Department to verify symptoms and
for a possible solution involving
removing the Control Module (If
further repairs are required under
warranty obtain your Authorization
Number for repairs).
5. TROUBLESHOOTING GUIDE
Digital Controller Displays Temp.
Between 165-180 ºF.
VERIFY: 1)Actual cabinet temp. is
low, 2)There IS NO air movement
from left side air duct.
Main Blower (fan) has
failed.
Call the BevLes Technical Service
Department to verify symptoms and if
under warranty to obtain your
Authorization Number for repairs.
IS
The Relay has failed in
the Closed position (will
not turn the heater off).
Call the BevLes Technical Service
Department to verify symptoms and if
under warranty to obtain your
Authorization Number for repairs.
Digital Controller Displays a
Temp. Between 200-240 ºF.
VERIFY: 1)Actual cabinet temp. is
between 200-240 ºF, 2)Heater
Indictor Light is OFF, 3)There IS
air movement from left side air
duct.
Digital Controller Displays a
Temp. Less Than 100 ºF.
VERIFY: 1)Actual cabinet temp. is
between 70-100 ºF, 2)Heater
Indicator Light is ON, 3)There IS Air
movement from left side air duct.
The Relay has failed in
the Open position (will not
turn the heater on).
Call the BevLes Technical Service
Department to verify symptoms and if
under warranty to obtain your
Authorization Number for repairs.
Digital Controller is Blank
VERIFY: 1)Power switch is on,
2)Unit is plugged in appropriate
outlet, 3)There is air movement
from left side air duct.
The Transformer and/or
Temperature Controller
has failed.
Call the BevLes Technical Service
Department to verify symptoms and if
under warranty to obtain your
Authorization Number for repairs.
Digital Controller is Blank
VERIFY: 1)Power switch is on,
2)Unit is plugged in appropriate
outlet, 3)There IS NO air
movement from left side air duct.
1)Power Cord not
plugged in, 2)Circuit
Breaker may have
tripped, 3)Outlet may be
damaged, 4)Power cord
plug could be damaged,
5)Timer is being used
(Timer Bypass switch in
ON Position) but the time
or trippers are indicating
the wrong time, 6)Power
switch may have failed.
1)Verify Power Cord is plugged in
appropriate outlet, 2)Verify Circuit
Breaker is not tripped, 3)Verify Outlet
is functioning properly (unplug BevLes
unit, plug a known working appliance
into outlet with same voltage and turn
on, plug BevLes unit back into outlet),
4)Verify Plug is not damaged, 5)Set
the correct time and manually trip
timer to on position if necessary,
6)Call the BevLes Technical Service
Department to verify symptoms and if
under warranty to obtain your
Authorization Number for repairs.
DIGITALCONTROLLER
DISPLAY
Heat Indicator Light
Open Sensor Indicator Lights
8

6. Preventive Maintenance (
POWER CORD SHOULD ALWAYS BE DISCONNECTED FROM POWER SOURCE BEFOREPERFORMINGANYPREVENTIVEMAINTENANCEONTHETOPMOUNTEDHEATINGUNIT.
DONOT get any liquid in the area behind the Control Module (where the 12 connector terminalblock is mounted).
BevLes (800)
!" #$%! &'(( )!* )!(+,-. /$0,-'* 1!+'(23 /4567/)58 /49:7/)9;
Aminimum clearance of 4” should be maintained at the sides, back and top of all CS82-CH8 models. Thiswill allow for proper operation of all fan blowers and cooling fans. No objects should be placed on top of thecabinet. The cabinet should be level with all hex feet of the 6” legs firmly adjusted. TheCS36 model shouldhave aminimumof 2” to 4” clearance at the sides and back.
The following should be performedat least once every three to sixmonths:
All models have louver openings at the left front side corner of the Top Mounted Heating Unit.These openingsmust remain open so that ambient air can circulate past the control module (coolingthe electrical components inside the Front Panel). On the CS82 model there are additional louveropenings located on the top of the Top Mounted Heating Unit that must also remain open toprevent the main internal fan blower (motor) assembly from over heating. The CS36 model hasadditional louver openings located in the rear panel (back) of the Top Mounted Heating Unit thatmust also remain open to prevent it’smain internal fan blower (motor) assembly fromover heating.
Use a slotted screwdriver to remove the four screws from the corners of the front Panel of theControlModule. Carefully lift out the Control Module (you do not have to disconnect any wires at the rear ofthe Control Module) and place it on top of the cabinet. Inspect the axial cooling fan located in the leftfront corner of the Top Mounted Heating Unit, and make certain that it is clean and free of any dirtor grease build-up. Next, inspect the left end of theControl Module (where the cooling fan blows) forany dirt or grease build-up. You can use a damp cloth and mild cleanser to clean this surface
After cleaning, place the Control Module back into the Top Mounted HeatingUnit and secure with the four slotted screws. On CS36 model there a second axial cooling fanlocated inside the rear panel (back) of the Top Mounted Heating Unit. It is extremely important thatthis cooling fan also remain clean and free of any dirt or grease build-up.
Visually inspect the magnetic door gaskets for any damage (dirt or grease, tears, exposed magnet,etc.). Clean or replace if needed.
Visually inspect power cord and 20Ampmolded plug for any excessivewear or damage.
On CS82 model, check 6” legs to be certain that all hex feet are properly adjusted and making firmcontact with the floor. (Check to see that cabinet is level). On CS36 model check to see that thecasters are free of any dirt or debris, and the brakes are in locked positionwhen cabinet is in use.
Visually inspect the door latch and hinges to verify that they are securely attached to the door andcabinet. Check attachment screws for snugness. If any screws are loose or missing they must beplaced back to correct position. Use a permanent “high strength threadlocker” to re-install screws,or order replacement screws (with a threadlock patch) from .
Inspect to see that airflow side panels are properly mounted on the inner side walls of the cabinet.Check to see that the Top Mounted Heating Unit is properly seated on the cabinet. This can beeasily verified by removing the left and right “top” airflow side panels and visually inspecting the fit ofthe Top Mounted Heating Unit into the cabinet frame. Also, make certain that the wire shelfsupports (8 sets) are located in the proper positions for uniform airflow and temperature distribution.Small indentations (dimples) on the airflow side panels indicate the correct placement holes for eachwire shelf support. The first wire shelf support should be located in the bottomhole of the airflow sidepanel (next to the base of the cabinet). The second is located 7 ½” above the first, and this continuesup the side of the cabinet.
733-2203
9

���
�
7. WIRE DIAGRAMS (1 of 3)��
�
�
�
�
�
�
�
�
�
�
�
�
�
�
�
�
�
�
���
�
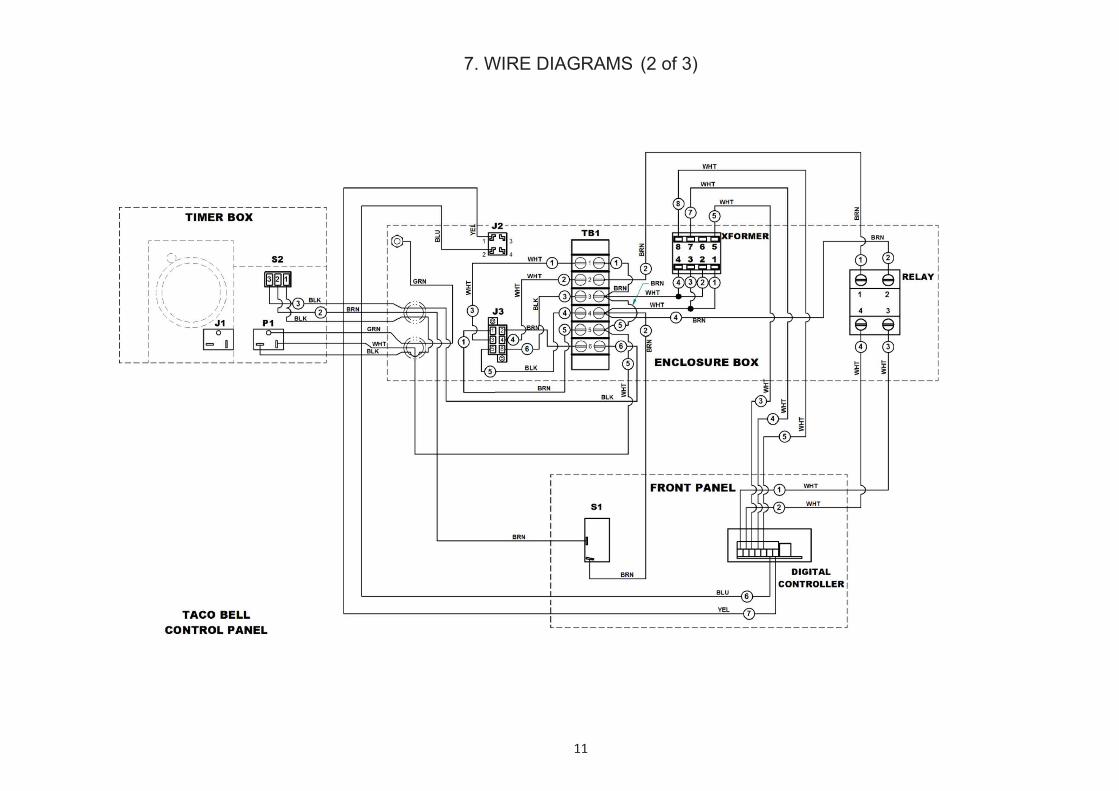
7. WIRE DIAGRAMS (2 of 3)�
�
�
�
�
�
�
�
�
�
�
�
�
�
�
�
�
�
�

���
�
7. WIRE DIAGRAMS (3 of 3)�
�
�
�
�
�
�
�

8. PARTS LIST & EXPLODED VIEW
MAIN CABINET
13
20
16
14
4
46
2
34
1
49
2
47
16
28
1
18
1
9
1
16
1
17
1
22
1
1
1
2
1
4
1
36
1
38
1
35
1
39
1
23
1
29
1
7
1
8
1
32
1
31
1
10
4
27
2
12
2
11
4
13
4
48
66
48
66
21
16
37
49
42
4
5
1
6
1
40
1
19
34
15
10045
4
43
441
16
25
4
33
29
26
8
30
20
24
4
44
4
3
2
131
2
35
37
4
8
10 11
20
9
21
29
49
6
17
12
25
27
26
34
36
32
38
31
33
18
40
19
42
43
44
45
39
41
30 16
46
48
48
13
2
15
7
47
24
23
22
28
5
1
3
14
131

103
1
117
1
59
2
67
1
72
1
121
1
74
1
78
1
98
1
101
1
60
2
63
1
61
1
113
1
86
1
80
1
65
1
99
1
70
1
66
4
115
1
88
1
62
179
9
81
9
84
2
68
2
90
1
104
1
75
1
114
1
111
1
106
1
92
2
119
1
125
1
109
1
110
1
123
1
118
1
83
1
77
4
112
1
64
1
71
1
19
34
15
100
96
2
85
8
107
11
95
2
116
4
76
10
105
2
33
29
120
5
85
8
126
1
127
1
140
1
133
1
132
1
107
3
120
5
136
1
152
1
81
9
139
1
PARTS LIST & EXPLODED VIEW (Continued)
Top Module
14
54
50
57DoorAssembly
53
2
129
4
55
51
37
53
87
69
104
100
97
94
91
90
8982
135 83
96106
105103
85
85
86
110
111112
113114152
81
81
9392
95
101
108 102
134
84
88 79
126
127
124139
98
99
109
5833
140147
122123
136
80
6162
67
73
107
107
6870
74
71 120
120
64
66
75
115
116
77
118
78117
132133
119
59
19
125
12176
6560
63
72
15
128129
130

15
Item P/N Description Quan Item P/N Description Quan Item P/N Description Quan
!
"#
!
!
!
"
!
"
$
"
%
%
!
#
!
!
!
!
!
!
&
'(()* +,-'./0 1 02 2(00(.3455,)
'670 +)89 !%:&; < == < :;$
9(9 )4>,0
-807?* .8@5,047
'(()* 2(00(.* (60,)
'(()* +,-'./0 1 02 0(93455,)
AB45* (60,) 0(9
7?855,-* A4',* 0(9
A4',* 455,)* 0(9
C)(50* 455,) 0(9
45A6-80()* ?,80,) 0,).458-
455,)* ),8) 0(9
6),0?85,* ;:"" < =! < !
',C-,70()* 84)
7(>,)* 45A6-804(5
7?855,-* C)(50
0,).458- 2-(7B
560* ?,< B,9A* DE1=!
7-8.9* 04.,) +4),
26A?45@* A589 3" F 2-87B 5G-(5
7?855,-* ),8)
26A?45@* A589 :; ?(-, 5G-(5
+,-'.,50* A-4',* +80,) 985
0?,).(A080
A7),+* 9?* E1=!H=3#* A3A
7,)8.47 45A6-80()
7(>,)* .(0()
560* 0455,).85 7-49
985,-* ),8)
0) ?' 9? A.A $ < 3! AA
.(65045@* 7((-45@ C85
C85* 8<48-
A7),+* )' ?' A- D#1=! < ! I5
D#1=! ?,< 560* B,9A* 54
7(50)(- 985,-
,57-(A6),* ,-,70)478-
,57-(A6),* 04.,)
2-87B 7(55,70()
9-6@* " 945
7-8.9* F7F
.(65045@ 8'890,) 7(551 ),'
+4), A,0* 027.
.3A 0) ?' 9? E1=!H F
-(7B +8A?,) ,<0 DE
560* ?,<* E1=! AA
26A?45@* &3# A589* ?,G7(
04.,)* 2)87B,0
7-8.9* 04.,) 7()'
.3A* 0) ?' 9?* $1=! < =3" A3A
2)87B,0* 2)87B,0
45A6-80()* 04.,)* A+407? 0,).458-A
&!$!&&
&#"&E#
#=;=$$$
&#"&
&"&E%=
&!$!&;
&" %#"
&" %"#
&"!$&E
&"!$#"
&E$"#"
&"!$#$
&#"#=!
&"! #$
&"!!E$
&" %;!
&#! ""
#"$$ $$
&"!!"#
&##$$;
&" %;E
#%E&!$$
&"!$$$
&#!!$#
# $;#$$
&#"&!"
&"!$$"
&&$=""
&"! E#
&&$;=E
&"!$ !
&#"E#$
&&$&$%
#"$#=$$
&"! E"
&"&E#"
&"&E#=
&#"&$$
&#! "%
&#! ;
&#";"#
&#"&$$
# $#1$$
#;$$&$$
#"$!%$$
#%&#"1$$
&"!$!"
&"!!""
# &$$
&"!$!#
&E$"##
;!J
;=
;"
;;
;EJ
;&
;#
;%
E$
E
E!
E=
E"
E;
EE
E&
E#
E%
&$
&
&!
&=
&"
&;
&E
&&
&#
&%
#$
#
#!
#=
#"
#;
#E
#&
##
#%
%$
%
%!
%=
%"
%;
%E
%&
%#
%%
$$
$
$!
!
"
"
!
"
"
$$
="
E
E
"
"
#
!
!$
!%
"%
E
"
"
"
"
!
E
EE
!
"
287B* (60,)
A4',* (60,)* )4@?0
@8AB,0* .8@5,047 =!1!3; < !#1 3#
A4',* (60,)* -,C0
'670 +)89* "# < &$ < :; 1 782
'670 +)89* ! < &$ < :; 1 782
?45@,* )4@?0 A699()0
?45@,* -,C0 A699()0 +,-'.,50
455,) A4',* -,C0
A?4.* A4',* 455,)
A0)49* 287B45@ :;$ < :#&; < E:!;
A0)49* 287B45@ :;$ < :#&; < =$:&;
A0)49* 287B45@ :;$ < :#&; < =$:$$
A699()0* 2600(5
)4>,0* 9(9 =3 E C-6A? 2),8B
455,) A4',* )4@?0
287B* 455,)
28A,* 455,)
)4>560* $1=! 0?45 ?,8'
2)87B,0* ?((B* 84) '670
A7),+* A?0 .,08-* D $ < 3!* I
?,8',) 28)* 7,50,)
7(>,)* ?,8',) 28)* 7,50,)
)4>560* 3"1!$ 0?45 ?,8'
+8A?,) :&; < :!#
A7),+* 3"1!$ < 3! 0) ?'
A?4.* 7,50,) 455,) A4',
?,8',) 28)* 0(9
7(>,)* ?,8',) 28)* 0(9
A7),+* .87? 3"1!$ < =3"
+,-'.,50* @8AB,0 ),0845,)
@8AB,0 ),0845,)* (60,)* 2(00(.
A7),+* $1=! < 3! 0) ?'*AA
@8AB,0 ),0845,)* (60,)* 7,50,)
@8AB,0 ),0845,)* (60,)* 0(9
@8AB,0 ),0845,)* )4@?0* (60,)
!1!" < 3! 0) ?' 9? +39807?
@8AB,0 ),0845,)* -,C0* (60,)
28A,* (60,)
'670 +)89* # < !% :; 1 28A,
+8A?,)* -(7B* 450* 3"* I
-,@* 8'K6A082-,
+8A?,)* C-80 3"F
+8A?,)* -(7B* 3"* 8A., 2 #:! :
560* ?,<* 3"1!$ AA
84) '670* 2(00(.
2)87B,0* 84) '670
)4>,0* A(C0* ;3 E* ;EE973-2
84) '670* 0(9
?45@, 1 78. )4A, 7?)(.,
'(()* (60,)* 0(9 L0G9, 2M
&"&EE#
&"&EE%
&#"#!$
&"&E&$
&#"&&!
&#"&&E
&"&E#;
&"&E#E
&"&EE=
&E$$=$
&E$; E
&E$; !
&E$; #
&"!$"$
#=;=E$$
&"&EE"
&"&EE;
&"&EE!
#=;= $$
&"$;E;
&&$ E%
&"&EEE
&"&E#
#=;=!$$
#; %E1$$
#!$;;$$
&E$$=
&"&EE
&"&E#!
#! $$
&"&E%;
&"&E#&
# &;%$$
&"! !#
&"&E&#
&"&E&E
&&$E!#
&"&E&&
&"&E#$
&#"&#$
#;$&%$$
&#"E%E
#;$&E$$
#;$#!1$$
#"!;!$$
&"! $"
&";&"&
&&$$#"
&"! &!
&#"E%!
&"&E%
!
=
"
;
E
&
#
%
$
!
=
"
;
E
&
#
%
!$
!
!!
!=
!"
!;
!E
!&
!#
!%
=$
=
=!
==
="
=;
=E
=&
=#
=%
"$
"
"!
"=
""
";
"E
"&
"#
"%
;$
;
!"# $%"&!
!

16
4/02
! "#$%#& '()*+,- %.)./#0 1+22+,/-
!" #$%&' ()*+,* - ./00/12 #3 4!!5
6$7+*8 9: ;!:<= <!:> ?55 @/A8 9: ;!:<= 454>B" 5
:C D*)0*1 E/&&/+F1 F7 F$* 7&%G%+/0 H,&I$/1*& F$/F 7+ F$* '/F* F$* *J,%HK*+F %1 1$%HH*' ;170'=2 %F E%00 L*
M&** 7M '*M*IF1 %+ K/F*&%/01 7& E7&NK/+1$%HC D*)0*1 E%002 /F %FO1 '%1I&*F%7+2 &*H/%& 7& &*H0/I*2 ',&%+G
F$* E/&&/+FP H*&%7' H&%+F*' L*07E2 /+P H/&F F$/F $/1 / '*M*IF %+ K/F*&%/0 7& E7&NK/+1$%H F$/F E/1
H&*1*+F E$*+ F$* H&7',IF 1$%HH*' M&7K D*)0*12 /+' E$%I$ K/+%M*1F1 %F1*0M ',&%+G F$* E/&&/+FP
H*&%7',+'*&+7K/0,1* /+' 1*&)%I*C
6/&F18#E7-P*/&1 M&7K'/F*7M 7&%G%+/0 1$%HK*+F M&7K F$*D*)0*1 M/IF7&PC
Q/L7&8R+*--P*/&
- (%& S%&I,0/F%7+D07E*&(11*KL0%*1 ;K7F7&1= /+' 67E*& TE%FI$*1 1$/00 L* 7+* P*/& M&7K'/F* 7M
7&%G%+/0 1$%HK*+FC
S/0&7'U(%&VW*/F%+GX0*K*+F1 1$/00 L* F$&**P*/&1 M&7K'/F*7M 7&%G%+/0 1$%HK*+FC
-- (00 *0*IF&%I/0 I7KH7+*+F1:!B'/P1
!C D*)0*1 K,1F L* I7+F/IF*'2 /+' H&*>/HH&7)/0 K,1F L* %11,*' LP F$* D*)0*1 M/IF7&P H&%7& F7 /+P FPH*
7M 1*&)%I* L*%+G H*&M7&K*'C D*)0*1 /11,K*1 +7 &*1H7+1%L%0%FP M7& /+P I$/&G*1 F$/F E*&* +7F *AH&*110P
/,F$7&%Y*'LP F$*D*)0*1 M/IF7&P2 7& M7& /+PI$/&G*1 F$/F *AI**'2 %+D*)0*1O170*Z,'G*K*+F2 +7&K/0 /+'
I,1F7K/&P/K7,+F1C
?C D*)0*1E%00 H/P[6T\&7,+' I$/&G*1 M7& /+P H/&F F$/F $/1 / '*M*IF %+K/F*&%/0 7&E7&NK/+1$%H F$/FE/1
H&*1*+F E$*+ F$* H&7',IF 1$%HH*' M&7KD*)0*12 /+' E$%I$K/+%M*1F1 %F1*0M ',&%+G F$* 7M F$*
E/&&/+FP H*&%7' ,+'*& +7&K/0 ,1* /+' 1*&)%I*C(00 E/&&/+FP &*H0/I*K*+F H/&F1 E%00 1$%H @CRCDC D*)0*1
M/IF7&P2S$%+72S(": :BC
<C #$%1 E/&&/+FP 1$/00 L* )7%' %+ %F1 *+F%&*FP %M /+P /L,1* 7M2 K%1,1* 7M2 /0F*&/F%7+]K7'%M%I/F%7+ 7M 7&
%KH&7H*& K/%+F*+/+I* 7M 7&%G%+/0 H&7',IF 7II,&1C ^M2 /F /+P F%K* / I0/%K %1 &*H7&F*' F7 D*)0*12 F$*
H,&I$/1*& %1 '*0%+J,*+F %+ H/PK*+F M7& F$*H&7',IF2E/&&/+FPE%00 +7F /HH0PC
4C D,P*&O1 _*K*'%*1>^M / D*)0*1 H&7',IF M/%01 ',* F7 / '*M*IF %+ K/F*&%/0 7& E7&NK/+1$%H %+ I7+M7&K%FP
E%F$ F$*E/&&/+F%*1 %+ H/&/G&/H$7+*2 L,P*& 1$/00 +7F%MPD*)0*17M 1,I$ M/%0,&*E%F$%+ / &*/17+/L0* F%K*2
L,F %+ +7 *)*+F L*P7+' M%MF**+ ;:4= '/P1 7M 1,I$ '%1I7)*&P 7M '*M*IF %+ K/F*&%/0 7& E7&NK/+1$%HC
D*)0*1 1$/00 H&7)%'*2 %+ %F1 170* '%1I&*F%7+2 *%F$*& F$* &*H/%& 7& &*H0/I*K*+F 7M /+P '*M*IF%)*7& /+P +7+>
I7+M7&K%+G H/&FC D*)0*1 1H*I%M%I/00P '%1/)7E1 /+P 7F$*& &*H&*1*+F/F%7+2 E/&&/+FP 7& 0%/L%0%FP &*0/F%+G
F7 F$* I7+F%+,*',1*7M F$*H&7',IFC
5 XAI0,1%7+ 7M I7+1*J,*+F%/0 /+' %+I%'*+F/0 '/K/G*1>^+ +7 *)*+F 1$/00 D*)0*1 L* 0%/L0* M7& /+P
%+I%'*+F/02 1H*I%/02 %+'%&*IF2 7& I7+1*J,*+F%/0 '/K/G*12 E$*F$*& &*1,0F%+G M&7K +7+>'*0%)*&P 7& M&7K
F$* ,1*2 K%1,1*2 7& %+/L%0%FP F7 ,1* F$* H&7',IF2 7& M&7K '*M*IF1 %+ F$* H&7',IF2 7& M&7K
D*)0*1O 7E+ +*G0%G*+I* 7& 7F$*& F7&FC #$%1 *AI0,1%7+ /HH0%*1 &*G/&'0*11 7M E$*F$*& 1,I$ '/K/G*1 /&*
17,G$F M7& L&*/I$7ME/&&/+FP2 L&*/I$7M I7+F&/IF2 +*G0%G*+I*27& 1F&%IF 0%/L%0%FP %+ F7&F 7& ,+'*& /+P7F$*&
0*G/0 F$*7&PC
C .%1I0/%K*& 7M E/&&/+F%*1>#$* E/&&/+F%*1 I7+F/%+*' %+ H/&/G&/H$ 7+* /L7)* /&* F$* *AI0,1%)*
E/&&/+F%*1 G%)*+ LP D*)0*1 /+' 1,H*&1*'* /+P H&%7&2 I7+F&/&P2 7& /''%F%7+/0 &*H&*1*+F/F%7+12
E$*F$*& 7&/0 7& E&%FF*+C D*)0*1 $*&*LP '%1I0/%K1 /+' *AI0,'*1 /00 7F$*& E/&&/+F%*1>E$*F$*&
*AH&*11*'2 %KH0%*'2 7& 1F/F,F7&P>%+I0,'%+G /+P E/&&/+FP 7M K*&I$/+F/L%0%FP2 /+P E/&&/+FP 7M
M%F+*11 M7& / H/&F%I,0/& H,&H71*2 /+' /+P %KH0%*' E/&&/+F%*1 7F$*&E%1* /&%1%+G M&7K I7,&1* 7M
'*/0%+G7& ,1/G*7M F&/'*C
M&7K'/F*7M 7&%G%+/0 1$%HK*+F M&7K F$*D*)0*1 M/IF7&PC
M&7K'/F*7M 7&%G%+/0 1$%HK*+FC
!"#$ %&'"