Creating Purchase Requistions & Receiving
96
Creating Purchase Requistions & Receiving VERSION: 07/28/2021
-
Upload
khangminh22 -
Category
Documents
-
view
5 -
download
0
Transcript of Creating Purchase Requistions & Receiving

Creating Purchase Requistions &
Receiving
VERSION: 07/28/2021


Table of Contents
About the Purchasing Process 3
Setting Up Requester Preferences 5
Creating a New Purchase Requisition 9
Reporting a Misuse 15
Indicating that the Order is Associated with a State Contract or UniversityTerm Contract (UTC) 16
Attaching Documents to a Requisition 17
Adding Asset Information 20
Naming a Requisition 21
Entering Line Comments in a Requisition 21
Changing the Default Information for a Requisition Line 22
Entering a Contract or Grant Chartfield String with a SpeedChart 26
Deleting Items from the Requisition 27
Entering Comments Applicable to the Entire Requisition 28
Approval Justification 29
Budget Error Notification 29
Time-saving Features 30
Entering a Contract or Grant Chartfield String with a SpeedChart 30
Requisition Settings 31
Splitting Funds for a Line of the Requisition 36
Modifying Line, Shipping, or Chartfield Information and Applying it to theEntire Requisition 38
Requesting a Multi-Year Contract 41
Budget Error Notification 44
Managing a Requisition 45
Copying a Requisition (not available for supplier catalog orders) 47
Printing a Requisition 48
1

Viewing the Reason a Requisition was Rejected 49
Budget Error Notification 50
Modifying a Requisition 50
Canceling a Requisition 52
Returning Items 52
Viewing a Requisition's Life Cycle 53
Creating Receipts and Submitting Invoices 54
Submitting a Change Order Request 64
Processing a Return 85
Infoporte Finance Transactions 88
Search fields for reconciling 93
2

About the Purchasing ProcessOverview
Departmental requesters create a non-supplier catalog purchase requisition if:
l The total amount of goods or services purchased is greater than $5,000. Thisexcludes services from an individual, such as an independent contractor.
l The total amount of goods or services purchased is less than $5,000, but thesupplier is not in the supplier catalog and requires a purchase order.
l There is a legal contract with terms and conditions for services. This excludesagreements over what types of food will be served at an event or when the eventwill be due to inclement weather.
l Note: When considering a purchase of more than $5,000, it is helpful to firstdiscuss your plans with a purchasing agent in order to receive guidance and helpmanage costs. You can use the Purchasing Engagement Tool to find the contactinformation for the appropriate agent.
Depending on the circumstances, the requisition is routed to the department, central office,or both for approval. If the requisition is denied, the departmental requester can makechanges to the document and resubmit it. Once approved, all requisitions route to apurchasing agent. Purchasing agents do one of the following:
l If the requisition can be purchased on a State/University Term Contract (UTC),the purchasing agent creates a purchase order, with reference to a State/UTCcontract.
l If a State/UTC contract does not apply and the requisition total does not exceed$5,000, the purchasing agent creates a purchase order with reference to therequisition and sends the purchase order to the supplier.
l If a State/UTC contract does not apply, the requisition total exceeds $5,000, and asole source is not provided, the purchasing agent creates a bid document tocompetively bid out the request. When the supplier responses come in, they areevaluated by the purchasing agent and the department, who jointly decide whichsupplier to purchase from.
l If the order exceeds $5,000 and a sole source is provided, the purchasing agentsends the bid to the supplier to complete. The bid is not a competitive bid. Whenthe response comes in, the bid is awarded and a purchase order is sent to thesupplier.
l If the requisition is over $5,000 and the department has already received thegoods, the purchasing agent reviews the misuse information and then processes aconfirming purchase order to pay the supplier.
3

The department or the Central Receiving Department denotes the receipt in the system . Ifthe goods required inspection, the purchasing agent will let the department know once theyhave passed inspection, so they can enter the receipt. The system then creates a receiptwith reference to the purchase order, and when the supplier submits an invoice, a POvoucher entry is created to pay the supplier.
For additional information about making purchases at the University, refer to the FinanceDivision's Basic Spending Guidelines by Fund Source guide.
4

Setting Up Requester PreferencesPurchase requesters can set defaults for their purchase requests. These default values areestablished on the Requester Setup page. Once the default values are set up, they are usedon all supplier catalog and non-supplier catalog requisitions, and can be changed fromrequisition to requisition.
Steps for Working With Your Requester Preferences
Follow these steps to set up or change existing requester preferences:
1. From the Admin WorkCenter home page, choose Finance WorkCenter >BuyCarolina/Purchase Order > Requester Setup
2. Enter either of the fields:
In this field: Do the following:
Requester Enter your UNC Onyen.
Description Enter your first and last name.
3. Click the Search button.
Result: The system displays the Requester Setup page.
4. Complete the required fields. You must enter a default for the following chartfields:
5

l Location Set ID (enter this field first)
l Ship To (same as Location Set ID)
l Location
l Phone
l GL Unit (Business Unit)
l Department
Note: Any field with a magnifying glass icon has a look up feature, which revealsanswer options when you click it. This can be helpful in finding the appropriate field.
5. Complete the fields for any other values you want to create for your requisitions.
Note: If you don't want to create a default value for any of the other fields, leave thosefields blank.
6. Click the Save button.
Result: The system saves the default values, which fill in automatically when youcreate a supplier catalog or non-supplier catalog requisition.
6

Requester Preferences Fields
In this field: Do the following:
Location SetID*
Before entering any default information, enter either UNCCH or UNCGA inthis field.
Ship To* Enter the ship to address or follow the steps below to search for theappropriate address:
a. Click the Lookup (magnifying glass) icon.
Result: The system displays the first 300 ship to addresses.
b. In the Description field, change “begins with” to “contains.” Type aword or two to describe your location and click Look Up.
c. Click the link for the ship to address you need.
Location* Enter your location or follow the steps below to search for your location:
a. Click the Lookup (magnifying glass) icon.
Result: The system displays the first 300 addresses.
b. In the Description field, change “begins with” to “contains.” Type aword or two to describe your location and click Look Up.
c. Click the link for the location you need.
Phone* Enter your phone number.
GL Unit* Look up, or enter, the business unit.
Fund Look up, or enter, the fund.
Source Look up, or enter, the source.
Account Leave this field blank. The account value defaults based on the category codechosen on the requisition, or from the supplier's website, though you canchange it.
Dept* Look up, or enter, the department.
Program Look up, or enter, the program.
Cost Code 1 Look up, or enter, cost code 1.
Cost Code 2 Look up, or enter, cost code 2.
Cost Code 3 Look up, or enter, cost code 3.
7

In this field: Do the following:
Affiliation Look up, or enter, the affiliation.
Fund Affiliation Look up, or enter, the fund affiliation.
* Required fields
8

Creating a New Purchase RequisitionOverview
Departmental requesters create purchase requisitions to request goods or services.
Purchase requisitions are required for any order over $5,000, whether or not the purchaseis made from a supplier in the supplier catalog.
For orders less than $5,000:
l If the supplier is listed in the supplier catalog do not create a purchaserequisition. Use BuyCarolina instead.
l If the supplier is not listed in the catalog purchase, requisitions are optionalunless the supplier requires a purchase order.
If you need to make several purchases, you need to create separate purchase requests foreach supplier you need to buy from. For example, you can purchase as many items asneeded from a single supplier, but if the items come from different supplier, you need tocreate separate purchase requests. If you don't know which supplier the purchase needs tobe made from (for example, if the purchase will go out for bid), still list a supplier on therequisition.
Save Money by Planning Ahead
When considering a purchase of more than $5,000, reach out to a purchasing agent as earlyas possible so they have time to find you the best price possible. To identify an agent tocontact:
1. Go to www.finance.edu > Procurement button > Purchasing Services
2. Click the blue Purchasing Engagement Tool button.
3. Narrow the results by selecting an option from either one of the two filters.
Related Reference
For information on canceling, copying, printing, editing, or finding an existing requisition,see Managing a Requisition, page 45.
Creating a New Purchase Requisition
Follow these steps to create a new purchase requisition:
1. From the Admin WorkCenter home page, choose Finance WorkCenter >BuyCarolina/Purchase Order> Requisition
9
Result: The system displays the Procurement Services page, showing the suppliersthat are listed in the catalog.
Note: If you haven't set up your required default values, the system displays theRequester Setup page. If you have already entered these default values, skip to step 2.
2. If prompted, you must enter some default values on this page before you can create apurchase requisition. Refer to steps 4 and 5 of the Setting Up Requester Preferences,page 5 instructions for more information.
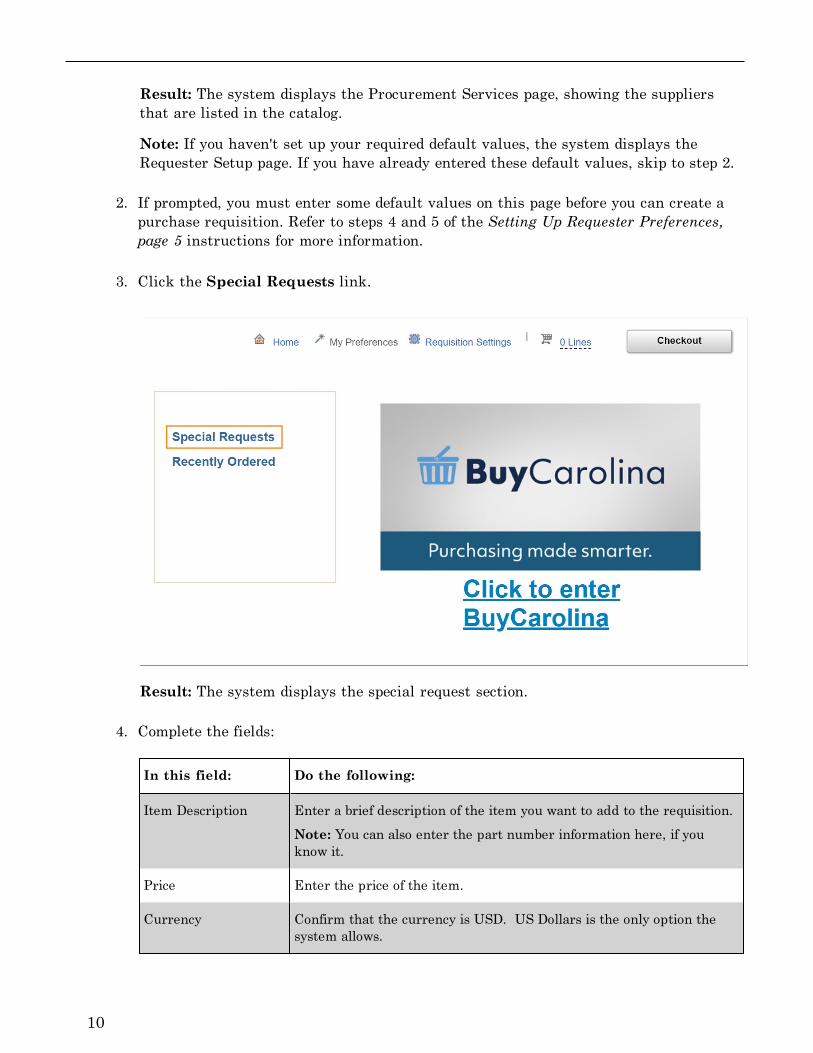
3. Click the Special Requests link.
Result: The system displays the special request section.
4. Complete the fields:
In this field: Do the following:
Item Description Enter a brief description of the item you want to add to the requisition.
Note: You can also enter the part number information here, if youknow it.
Price Enter the price of the item.
Currency Confirm that the currency is USD. US Dollars is the only option thesystem allows.
10

In this field: Do the following:
Quantity Enter the quantity you want to order.
Unit of Measure Search for and choose, or enter, the unit of measure that matches theprice you entered.
Category Enter the eight-digit category code, if you know it, or follow these stepsbelow to search for it..
a. Click the Lookup (magnifying glass) icon.
b. Choose Description, Containsfrom the Search By list box.
c. Enter one or more words that describe what you areordering.
d. Click the Find button.
Result: The system displays a list of category codes that meet thesearch criteria.
e. Select the appropriate category code number.
Result: The system displays the Add Items and Services tab.
Due Date If you want to specify the date you need the item by, enter that date.
11

In this field: Do the following:
Supplier Search for and choose, or enter, the supplier number. To search for thesupplier ID:
a. Click the Lookup (magnifying glass) icon.
b. Enter the supplier name.
c. Click the Find button.
Result: The system displays a list of suppliers that match the criteriayou specified.
d. Choose the Supplier ID line that has the appropriatelocation information.
e. If the supplier is not listed in the system, refer to theRequesting a New Campus Supplier, page 1 trainingdocumentation.
Caution: Do not select a supplier that has the letters EDX in theDefault Location column. These suppliers can only be used whenpurchasing from the supplier catalog.
Note: Only one supplier per requisition is allowed.
Note: If you want, you can leave the supplier blank on every line, enterthe supplier by clicking the Requisitions Settings link, and apply itto all lines. Refer to Creating a New Purchase Requisition , page 9 formore information.
Result: The system returns you to the Add Items and Services tabwith the supplier you chose filled in.
Mfg ID If you want to, enter the manufacturer identification number.
Mfg Item ID If you want to, enter the manufacturer's item identification number.
5. Click the Add to Cart button.
12

Result: The system updates the Shopping Cart on the top right corner of the page,showing the number of items on the purchase request and the total amount.
Notes:
13

l To add more items to this requisition, repeat steps 4 and 5.
l If you list a supplier, make sure to choose the same supplier for each requisitionline.
6. Click the Checkout button.
Result: The system displays the Checkout and Submit page.
Note: In limited cases, additional steps are required before you can save and submityour requisition. Once you have entered all of the requisition's line items, complete thesteps for any or all of the following, as applicable to your situation:
l Reporting a Misuse, page 15, if the requisition is being created after ordering andreceiving goods valued at more than $5,000 without first requesting a purchaseorder
l Indicating that the Order is Associated with a State Contract or University TermContract (UTC) , page 16
l Attaching Documents to a Requisition, page 17 if the requisition is valued at morethan $5,000 and not part of a State Contract or UTC
l Adding Asset Information, page 20, if you are buying equipment that costs at least$5,000.
7. Perform additional edits or add detail to your requisition prior to saving it bycompleting any or all of the following:
l Naming a Requisition, page 21
l Entering Line Comments in a Requisition, page 21
l Changing the Default Information for a Requisition Line, page 22
l Creating a New Purchase Requisition , page 9
l Creating a New Purchase Requisition , page 9
l Deleting Items from the Requisition, page 27
l Entering Comments Applicable to the Entire Requisition, page 28
When you have finished editing your requisition, or if you don't need to edit or addcomments to the requisition, click the Pre-Check Budget button. If you receive an errormessage you will need to select a new chartfield string or wait until funds have been addedto that string.
14

Result: The system checks to see if enough budget is available on the chartfield stringto cover the purchase amount. If there ienough budget, the system doesn't display anerror message. If the system displays an error message, work with your businessmanager to move budget to the chartfield string or to use different chartfield values.
8. Do one of the following:
l If you want to save the requisition to work on later, click the Save for Laterapprovals button. When you are ready to finish the requisition, refer to theManaging a Requisition, page 45 for information about finding and completing it.
l If you are ready to submit the requisition, click the Save & submit button.
Caution: You must Pre-Check the budget before you click the Save & submit button.
Results:
l The system kicks off the approvals process by routing the document to the firstapproval level.
l If the requisition includes account and category codes that indicate equipment isinvolved, the requisition also routes to the Asset Management team for approval.
l If there are problems with the requisition, the system displays an error messagewith a link to the policies for purchases greater than $5,000.
Reporting a Misuse
You must create a purchase requisition for all goods and services totaling $5,000 or more.If you already received $5,000 or more in goods or services, you must still create arequisition and report a misuse.
1. Create a requisition for the items and add a note in the Requisition Comments andAttachments section on the checkout screen to alert the buyer that it's for items thathave already been ordered and received.
15

2. Click the Attachments and Comments link to attach a letter documenting themisuse and why it occurred. Also attach the invoice, if you have received it from thesupplier.
Note: See Attaching Documents to a Requisition, page 17 for instructions aboutattaching documents.
Indicating that the Order is Associated with a State Contract orUniversity Term Contract (UTC)
If the requisition is related to a State Contract or UTC, it still goes through theDepartment and Central Office approval process. Once approved, it is transferred directlyinto a purchase order.
Attachments are not necessary for requisitions related to a State Contract or UTC, unlessthe supplier has sent you a quote.
1. To indicate to the buyer that your purchase is related to a State Contract or UTC, adda note in the Requisition Comments and Attachments section on the checkout screen.
16

2. If you have a quote from the supplier or any other documents to attach, click theAttachments and Comments link.
Note: See Attaching Documents to a Requisition, page 17 for instructions aboutattaching documents.
Attaching Documents to a Requisition
Attachments are required for any order greater than $5,000. Attachments are required fora State Contract or UTC Contract only if the supplier provided a quote. Examples ofattachments include:
l signed contracts
l quotes that you have already received from a supplier
l a sole source justification form and any backup documentation, if there is only onespecific supplier that you can use
1. To attach a document, click the Attachments and Commentslink on Checkout-Review and Submit.
Result: The system displays the Attachments page.
2. Click the Add Attachments button.
17

Result: The system displays the File Attachment box.
3. Click the Choose File button.
4. Choose the file you want to attach by finding the file on a local or network computerdrive, and double-clicking on the file name.
5. Click the Upload button.
Result: They system displays the attached file's name and attachment ID.
18

6. To view the attachment and verify that it was uploaded correctly, click the Viewbutton.
Result: The file opens in a new window.
7. Close the window displaying the image.
Note: If the file isn't correct and you need to delete it, click the Minus button to theright of the row, and then click OK to confirm that you want to delete the attachment.
19
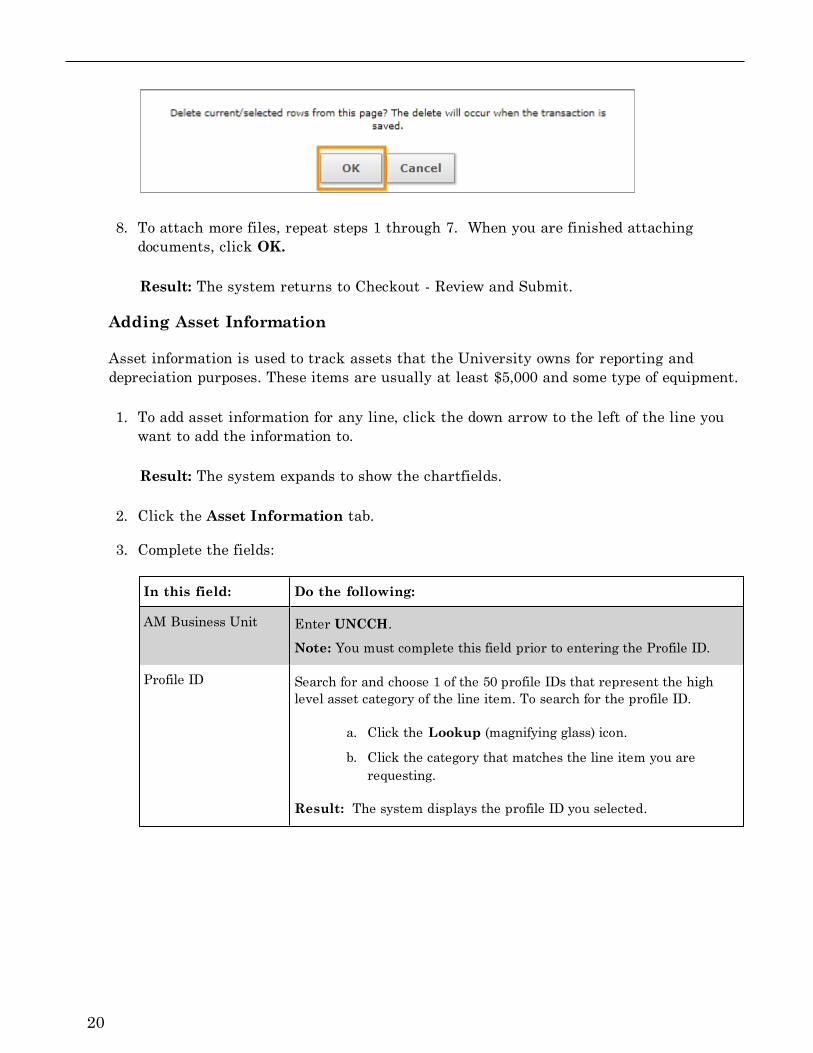
8. To attach more files, repeat steps 1 through 7. When you are finished attachingdocuments, click OK.
Result: The system returns to Checkout - Review and Submit.
Adding Asset Information
Asset information is used to track assets that the University owns for reporting anddepreciation purposes. These items are usually at least $5,000 and some type of equipment.
1. To add asset information for any line, click the down arrow to the left of the line youwant to add the information to.
Result: The system expands to show the chartfields.
2. Click the Asset Information tab.
3. Complete the fields:
In this field: Do the following:
AM Business Unit Enter UNCCH.
Note: You must complete this field prior to entering the Profile ID.
Profile ID Search for and choose 1 of the 50 profile IDs that represent the highlevel asset category of the line item. To search for the profile ID.
a. Click the Lookup (magnifying glass) icon.
b. Click the category that matches the line item you arerequesting.
Result: The system displays the profile ID you selected.
20

4. Click the Asset Information 2 tab.
5. Check the box under Capitalize.
Note: You must add asset information for the piece of equipment, as well as anyassociated costs, including freight, installation fees, discounts, and trade-in values.
Naming a Requisition
1. If you want to be able to search for and locate this requisition by name in the future,complete the field:
In this field: Do the following:
Requisition Name Enter a name to help you identify the requisition later.
Note: If you are creating this requisition as a change order, use thisfield along with the header comments to list the PO number and toindicate that it is a change order. Refer to the Managing a Requisition,page 45 page for more information about change order.
Entering Line Comments in a Requisition
You can add comments to any or every line on your requisition. These comments are visibleto departmental approvers, Purchasing Services, and anyone who opens the document fromthe Manage Requisitions page.
21

1. Click the Comment icon to the right of the line item you want to comment on.
Result: The system displays the Line Comments page.
2. Enter the line level comment and mark the checkboxes to indicate where you want thecomment to be visible. You can mark as many checkboxes as necessary.
In this field: Do the following:
Send to Supplier Mark this checkbox if you want the comment to appear on the purchaseorder that is dispatched to the supplier.
Show at Receipt Mark this checkbox if you want the comment to appear on the receiptdocumentation.
Show at Voucher Mark this checkbox if you want the comment to appear on the voucher.
3. Click the OK button.
Result: The system returns to the Review and Submit tab.
Changing the Default Information for a Requisition Line
The requisition line section displays information about each requisition line. Theinformation defaults from the selections you made on the Add New Items tab, but you may
22

need to make a change. For example, you may want one specific line shipped to a differentlocation than the other lines. Or you may have accidentally entered the wrong quantity fora certain line item.
1. On Checkout - Review and Submit, change the requisition information for any line,click the down arrow to the left of the line you want to change and complete any or allof the following fields:
In this field: Do the following:
Due Date Enter the date you want the item by.
Quantity Enter the quantity you want to order.
Ship To Enter the ship to location or follow the steps below to search for theappropriate ship to location:
a. Click the Lookup (magnifying glass) icon.
Result: The system displays the first 300 ship to addresses.
b. In the Description field, change “begins with” to “contains.”Type a word or two to describe your location and click LookUp.
c. Click the link for the ship to location you need.
Result: The system sends this line to the selected location.
Attention To Enter the name of the person to whose attention the shipment needs tobe sent.
Note: If you work in Auxiliary Services, enter the shop, job, and phasecode here, if applicable.
Note: If a line needs to be received by Amount instead of Quantity, complete steps 2through 4. Otherwise skip to step 5.
2. To mark a line as Amount Only, click the Line Details button.
23

Result: The system displays the Line Details page pop-up.
3. Complete this step:
In this field: Do the following:
Amount Only Check this checkbox.
4. Then click the OK button.
24

5. To modify chartfield information, click the gray triangle beside Accounting Lines.
6. Click the Chartfields2 tab.
Note: For information about chartfields, refer to the Chartfield Structure quickreference card.
25

Result: The system displays any default chartfields. You can change them and enterother chartfields as necessary.
Entering a Contract or Grant Chartfield String with a SpeedChart
You can always use the instructions above to manually enter a chartfield string for acontract or grant, but a quicker way is to just enter the Project ID into the SpeedChartfield. When you do, the system will fill in the rest of the chartfield string for youautomatically.
1. In the Accounting Lines section, click the Chartfields2 tab.
Result: The system displays your default chartfield string or one that you've manuallyentered.
2. Enter the Project ID for the contract or grant in the SpeedChart field.
Note: You may need to click into another field on the requisition to get the chartfieldsto update.
26

Result: The chartfield string is updated based on the Project ID you chose.
3. If necessary, update the Account field.
Note: The SpeedChart does not update the Account field and keeps the default value.You can change the Account manually if you need to.
Deleting Items from the Requisition
If you need to remove one or more lines from your requisition, you can delete them beforesaving and submitting the requisition.
1. Mark the checkbox in the row that you want to delete.
2. Click the Delete Selected link.
27

3. When prompted, click the Yes button to confirm that you want to delete the selectedlines.
Result: The system removes that line and, if all lines are deleted before therequisition has been saved, displays the Add Items and Services tab.
Note: If the requisition has already been saved, the system shows an error message ifyou try to delete every line. You must leave at least one line or start a new requisitionfrom scratch.
Entering Comments Applicable to the Entire Requisition
If you need to, you can enter comments that apply to the entire requisition, rather thanindividual lines on the requisition. If this is a change order for an existing purchase order,you must enter "Change Order for PO = 2XXXXXXXXX" in the header comments.
1. Enter general information about the requisition in the Comments field.
2. Under the Comments field, mark the checkboxes to indicate where you want thecomment to be visible. You can mark as many checkboxes as necessary.
In this field: Do the following:
Send to Supplier Mark this checkbox if you want the comment to appear on the purchaseorder that is dispatched to the supplier.
Use StandardComments
Click this link if you want to choose a pre-defined standard comment,such as Change Order, Check with Order, and so on.
Result: The system displays the Standard Comments page.
a. Search for and choose, or enter, the appropriate CommentType.
b. Click the OK button.
Result: The system returns you to the RFQ Header Comments page.
Show at Receipt Mark this checkbox if you want the comment to appear on the receiptdocumentation.
Shown at Voucher Mark this checkbox if you want the comment to appear on the voucher.
28

3. Click the OK button.
Result: the system returns your to Checkout- Review and Submit.
Approval Justification
Enter approval justification comments in the Approval Justification section.
Budget Error Notification
Procurement document creators will receive email alerts when the chartfield strings usedin existing purchase requisitions and purchase orders contain budget errors.
The email alert includes: document type, document number, a link to a training video ofhow to correct the budget error, and a link to the transaction detail.
A sample of the email alert is below:
29

Time-saving FeaturesEntering a Contract or Grant Chartfield String with a SpeedChart
You can always manually enter a chartfield string for a contract or grant, but a quickerway is to just enter the Project ID into the SpeedChart field. When you do, the system willfill in the rest of the chartfield string for you automatically.
1. In the Accounting Lines section, click the Chartfields2 tab.
Result: The system displays your default chartfield string or one that you've manuallyentered.
2. Enter the Project ID for the contract or grant in the SpeedChart field.
Note: You may need to click into another field on the requisition to get the chartfieldsto update.
30

Result: The chartfield string is updated based on the Project ID you chose.
3. If necessary, update the Account field.
Note: The SpeedChart does not update the Account field and keeps the default value.You can change the Account manually if you need to.
Requisition Settings
Overview
For purchase requisitions that will include multiple items, the Requisitions Settings allowsyou to save time by first entering information into certain fields that will not be clearedout each time that you click Add to Cart.
Using the Requisition Settings link is optional and is intended to save you time whenentering lengthy requisitions.
Using Requisition Settings Link
Follow these steps to use the Requisition Settings link:
31

1. From the Admin WorkCenter home page, choose Finance WorkCenter >BuyCarolina/Purchase Order> Requisition
Result: The Create Requisition Page will automatically display the Supplier Catalog.
2. Click the Requisition Settings link.
3. Select Override and then complete any of the remaining fields that you want toremain in the form after each time you add an item to the requisition.
Note: You can leave as many of the fields blank as you want but will want to completeeach of the fields that will be the same for all of the items that you will add to thepurchase requisition.
In this field: Do the following:
Supplier Click the Lookup (magnifying glass) icon to search for the supplier
Buyer Leave blank.
Supplier Location Leave blank.
Category Leave blank as most of the items on the purchase requisition will fallunder different categories.
32

In this field: Do the following:
Unit of Measure Select a Unit of Measure if one unit of measure can be applied to all ofthe items that will be included on the Purchase Requisition.
Note: "EA" (Each) will work for most items.
Ship To You do not need to change the default information that appears in thisfield unless you want all of the items to be shipped to an alternatelocation. Click the Lookup (magnifying glass) icon to change locations ifneeded.
Due Date If you want to specify a date that you need all of the items by, enter thatdate.
Attention If all items will need to be sent to the same person, enter that person'sname here.
Pct Leave blank.
Location If you want the Location for all of your items to be different from yourdefault location, enter it here.
GL Unit If you want the GL Unit for all of your items to be different from yourdefault, enter it here.
Fund If you want the Fund for all of your items to be different from yourdefault, enter it here.
Source If you want the Source for all of your items to be different from yourdefault, enter it here.
Account Leave blank. This field is automatically updated based on the Categoryyou select for each item.
Dept If you want the Dept for all of your items to be different from yourdefault, enter it here.
PC Business Unit If you want the PC Business Unit for all of your items to be differentfrom your default, enter it here.
Note: Only enter this field if you also enter a Project ID.
Project ID If you want the Project ID for all of your items to be different from yourdefault, enter it here.
Activity If you want the Activity for all of your items to be different from yourdefault, enter it here.
Note: Only enter this field if you also enter a Project ID.
Program If you want the Program for all of your items to be different from yourdefault, enter it here.
33

In this field: Do the following:
Cost Code 1 If you want the Cost Code 1 for all of your items to be different fromyour default, enter it here.
Cost Code 2 If you want the Cost Code 2 for all of your items to be different fromyour default, enter it here.
Cost Code 3 If you want the Cost Code 3 for all of your items to be different fromyour default, enter it here.
Affiliate If you want the Affiliate for all of your items to be different from yourdefault, enter it here.
Fund Affiliation If you want the Fund Affiliation for all of your items to be different fromyour default, enter it here.
4. After completing any of the fields that you want to remain in the form after each timeyou add an item to the requisition, click the OK button.
34

5. Click the OK button to start creating purchase requisition.
Result: The fields that were completed on the Requisition Settings are alreadyentered in the Special Special link and will remain in the form each time thatyou click Add to Cart to add another item.
6. Click the Special Request link.
35

Splitting Funds for a Line of the Requisition
1. To use multiple chartfield strings on any line, click the down arrow to theleft of the line you would like to split fund.
2. Click the + icon.
Result: The system displays a second line.
3. Complete the fields, if necessary:
36

In this field: Do the following:
Distribute By Choose the option you want:
l Quantity if you want to split the funding by quantity.
l Amt if you want to split the funding by amount. Alwayschoose this option for services, so you can create a receiptby amount.
Liquidate By Choose the option you want in the event that you end uprecapturing some or all of the money:
l Quantity if you want to liquidate by quantity.
l Amt if you want to liquidate by amount.
Note: If you chose to distribute by amount, you must liquidateby amount. If you chose to distribute by quantity, you canliquidate by amount or quantity.
Location Enter the location you are ordering from.
Quantity If you chose to distribute by Quantity, enter the quantity foreach line. If you chose to distribute by Amt, the systemdoesn't display this field.
Percent If you chose to distribute by Amt, enter the percentage toassign to each line. If you chose to distribute by Quantity,leave this field blank.
Note: For information about chartfields, refer to the Chartfield Structurequick reference card.
37

Modifying Line, Shipping, or Chartfield Information andApplying it to the Entire Requisition
If you want to make the same change to every line item, use the Mass Changelink to do so. Use this option to modify any of the following:
l supplier
l buyer
l category code
l shipping information
l accounting information
1. In the Requisition Lines section of the Checkout - Review and Submit page,complete the field:
In this field: Do the following:
Select All /DeselectAll
Mark the checkbox.
2. Click the Mass Change link.
Result: The system displays the Edit Lines/Shipping/Accounting forSelected Lines. All fields will come in blank, even if they have valuesassociated with them.
3. Enter new information in any field. Leaving a field blank does not affectthe original value of that field. Remember that the information you enteraffects every line item on this requisition.
38

Note: For information about chartfields, refer to the Chartfield Structurequick reference card.
4. Click the OK button.
Result: The system displays the Distribution Change Options page.
5. Choose the appropriate option:
In this field: Do the following:
All DistributionLines
Mark this checkbox to apply changes to all distribution lines.
MatchingDistribution Lines
Mark this checkbox to apply changes to each existingdistribution line by matching the distribution line numbers.
ReplaceDistribution Lines
Mark this checkbox to remove the existing distribution linesand replace them with changed distribution lines.
39

6. Click the OK button.
Result: The system changes to the requisition header information anddisplays the Review and Submit tab.
40

Requesting a Multi-Year ContractOverview
When entering a requisition for a multi-year contract, it's important that you structureyour requisition correctly. This will greatly aid the buyer who is tasked with creatingpurchase orders from your requisition and will help avoid potential errors. Here, wehighlight the key things you need to do to enter the requisition correctly. For generalinformation about creating a purchase requisition, see the Creating a Purchase Requisitionsection in this guide.
Requesting a Multi-Year Contract
Follow these steps the request a multi-year contract:
1. From the Admin WorkCenter home page, choose Finance WorkCenter >BuyCarolina/Purchase Order> Requisition
2. Click the Special Request link.
3. Complete the fields:
In this field: Do the following:
Item Description Enter a clear description for the contract.
Price Enter the total cost for all years of the contract, not the amount peryear.
Quantity Enter "1" in this field.
Unit of Measure Enter EA for each.
Category Choose the appropriate category for your service.
Due Date Enter the date you need your goods or services. This field is optional.
Supplier ID Choose the Supplier ID from the lookup icon.
Supplier Name This will fill in automatically after you've chosen the Supplier ID.
Additional Information Enter information that specifies the amount and length of the contract.Make sure to enter when the contract will begin, end, and when it maybe time to renew the contract.
41

4. Click the Add to Cart button.
5. Click the Checkout link.
6. If needed, make any necessary adjustments to the options on this screen, such as thechartfield string.
If You Want To Receive by Amount Instead of Quantity:
a. Click the Line Details icon.
b. Click the Amount Only box and then click the OK button.
42

7. Click the Attachments and Comments link and attach supporting documentation.
Note: It's very important to include adequate documentation and comments so thebuyer knows exactly how to structure the contract.
8. Click the Pre-Check Budget button.
Note: Pre-checking the budget only checks that there is enough budget on a chartfieldstring at the time you check it. The system does not pre-encumber, or hold the moneyout of the budget. Pre-encumbrances happen once the purchase requisition is approved,so it is possible that there won't be enough budget to cover the request once it'sapproved if another transaction uses the budgeted money on the chartfield string first.
43

9. Click the Save and submit button.
Once the buyer processes your requisition, a separate purchase order will be created foreach year of the contract. The amount on each purchase order will only be the portion thatwill be used for that particular year of the contract. In the example we used in the stepsabove, we asked for a three year contract for $30,000. The buyer will create three $10,000purchase orders, one for each year of the contract.
Note: Be aware that future year POs with non-project-related chartfield strings forfuture budget years will show budget a budget error of “Budget is Closed” or “Budgetis On Hold.” This is to be expected and will be rectified when the next budget year isopened. Project-related chartfield strings don’t necessarily follow the fiscal year andtherefore can have multiple budget years open. Any budget errors on project-relatedPOs will either be because the chartfield string is over budget or the budget period forthe project has ended.
Budget Error Notification
Procurement document creators will receive email alerts when the chartfield strings usedin existing purchase requisitions and purchase orders contain budget errors.
The email alert includes: document type, document number, a link to a training video ofhow to correct the budget error, and a link to the transaction detail.
A sample of the email alert is below:
44

Managing a RequisitionOverview
Use the Manage Requisitions page to search for a supplier catalog order or non-suppliercatalog requisition that has already been created. Once you have found the requisition youcan:
l Copying a Requisition (not available for supplier catalog orders), page 47
l Printing a Requisition, page 48
l Viewing the Reason a Requisition was Rejected, page 49
l Modifying a Requisition , page 50
l Canceling a Requisition , page 52
l Returning Items, page 52
l Viewing a Requisition's Life Cycle, page 53
Specific instructions for each of these actions is provided in the sections that follow.
Related Reference
For information on creating a new requisition, see Creating a New Purchase Requisition ,page 9
Managing a Requisition
Follow these steps to manage a requisition:
1. From the Admin WorkCenter home page, choose Finance WorkCenter >BuyCarolina/Purchase Order > Manage Requisition
Before you can perform any of the Manage Requisition functions, you must search for andselect the requisition you would like to cancel, copy, print, or edit.
2. On the Manage Requisitions page, complete one or more of the fields:
In this field: Do the following:
Business Unit Enter the business unit associated with the requisition you aresearching for.
45

In this field: Do the following:
Requisition Name If the requisition was given a name, enter the name of the requisitionyou are searching for.
Requisition ID Enter the requisition ID of the document you are searching for.
Request Status Choose the appropriate status from the list box of the requisition youare searching for.
Date From Use the Date From and Date To fields to search for requisitions createdwithin a specific date range.
Date To Use the Date From and Date To fields to search for requisitions createdwithin a specific date range.
Requester Enter the Requester ID of the person listed as the requester on therequisition you are searching for.
Note: The requester is the department contact for the requisition.
Entered By Enter the ID of the person who entered the requisition you aresearching for.
PO ID Enter the purchase order ID associated with the requisition you aresearching for.
3. Click the Search button.
Result: The system displays the first 50 results that meet the criteria you specified. Ifyou don't see the requisition you are searching for within those results, enter morecriteria in the search fields and try again.
46

4. Once you see the requisition you are looking for in your search results, refer to thesteps below to copy, print, edit or cancel that requisition.
Copying a Requisition (not available for supplier catalog orders)
Use the Copy Requisition feature to copy any existing non-supplier catalog requisitioninstead of creating a new one from scratch. This can be helpful if a new requisition will besimilar to one that was already created.
The requisition you are copying can be in any status. When you copy an existingrequisition, the system:
l copies the information from the previously created requisition
l assigns a new Req ID to the new requisition
l displays the Checkout - Review and Submit page of the Requisitions page
You can modify your new, copied requisition before submitting it for approval.
1. Once you find the requisition you want to copy, complete the field:
In this field: Do the following:
Select Action Choose Copy .
2. Click the Go button.
Result: The system copies the requisition and displays the Checkout - Review andSubmit page of the Create Requisitions page.
3. Make any changes to the requisition, including updating the chartfield information, ifnecessary.
Note: The attachments are not copied from the original requisition to the newrequisition. You will need to attach documentation if the requisition's business rulesrequire it.
4. Click the Save for Later button.
5. Click the Pre-Check Budget button.
47

6. Click the Save & submit button.
Printing a Requisition
Any printed requisition can display one of these levels of detail:
l Detailed chartfield information
l High-level summary information
1. Once you find the requisition you want to print, complete the field:
In this field: Do the following:
Select Action Choose View Print.
2. Click the Go button.
3. When the system asks if you want to print distribution details with the requisition,choose one of the following:
l Yes to print all of the chartfield information for every line
l No to print only a high-level summary of the requisition
Result: The system opens a new window with a printer-friendly report.
48

4. Use your browser's print functionality to print the requisition.
5. Close the new window your browser opened which displayed the printer-friendlyrequisition.
Viewing the Reason a Requisition was Rejected
Before modifying a requisition that has been rejected, it is helpful to view the commentsfrom the approver to find out why it was rejected.
1. Once you find the rejected requisition, complete the field:
In this field: Do the following:
Select Action Choose View Approvals.
2. Click the Go button.
49

Result: The system displays the Approval Status page.
3. Click the arrow to the left of Comments and view the comments.
Budget Error Notification
Procurement document creators will receive email alerts when the chartfield strings usedin existing purchase requisitions and purchase orders contain budget errors.
The email alert includes: document type, document number, a link to a training video ofhow to correct the budget error, and a link to the transaction detail.
A sample of the email alert is below:
Modifying a Requisition
After submitting a requisition, circumstances may require you to change the requisition.Using the Edit Requisition option, you can change the original requisition, such as toupdate the quantity ordered, price, scheduled delivery date, or ship to location.
If the approval process has been started for this requisition, regardless of how complete theprocess is, the system may require the approval process to be started again.
50

If any line of a non-supplier catalog requisition has been transferred to a purchase order,you need to create a new requisition from scratch instead of modifying the existingrequisition. Use the Requisition Name field and the Header Comments field to list thepurchase order number and to indicate that the requisition is being created as a changeorder. In the header comments you must enter "Change Order for PO = 2XXXXXXXXX."
The change order is subject to the same budget checking and workflow as the originalrequisition. If you need to liquidate part or all of the encumbrance, notify the buyer andsubmit a change order request to Purchasing Services (see Processing a Change OrderRequest).
1. Once you find the requisition you want to modify, complete the field:
In this field: Do the following:
Select Action Choose Edit
2. Click the Go button.
Result: The system displays the Edit Requisition- Review and Submit page.
3. If the requisition is pending approval you receive a message telling you that editing therequisition may reinitialize the approval process. Click the OK button. Otherwise, skipthis step.
4. Make the appropriate changes to your requisition.
5. Click the Save for Later button.
6. Click the Pre-Check Budget button.
7. Click the Save & submit button.
Result: The system restarts the approvals process by routing the document andsending a notification to the first approval level.
51

Canceling a Requisition
BuyCarolina is an electronic business-to-business system. This means that the orders aretransmitted electronically every hour. If a BuyCarolina order has not already beenprocessed by the supplier and you need to cancel, follow these steps.
1. Contact the supplier directly.
2. Once you have received confirmation of the cancellation, email the confirmation toProcurement at [email protected].
Result: Procurement manually relieves the encumbrance in ConnectCarolina.
Returning Items
If a BuyCarolina order is incorrect but has already been processed by the supplier, you willneed to contact the supplier to request a Return Merchandise Authorization (RMA).
Note: You will need to provide the supplier with purchase order number; suppliers donot know anything about purchase requisitions. The supplier will then process anelectronic Credit Memo for the returned items.
Exception: Staples does not use RMAs. Staples can process returns two ways:
l Log into Staples within ConnectCarolina. Click on My Orders and then On-LineReturn.
l Call Staples with the Purchase Order number.
To see your Purchase Order number:
1. From the Admin WorkCenter, choose Finance WorkCenter >BuyCarolina/Purchase Order > Manage Requisition
2. Enter the appropriate search criteria to find your order and click the Search button.
3. Click the Expand button by your order.
4. Click on the Purchase Orders icon to view the Purchase Order number.
52

Note: The Purchase Orders icon will only be lit up if a Purchase Order has beencreated.
Viewing a Requisition's Life Cycle
1. To see all the other documents associated with a particular requisition, click the arrowto the left of the requisition line.
Result: The system displays all documents associated with the requisition.
2. Click on any document that is in color to view it.
53

Creating Receipts and Submitting InvoicesOverview
When shipments from a purchase order arrive, the purchased products must be reviewedand inventoried to make sure they are the right item, in the right quantity, and in theright quality.
The invoice must also be submitted on the Vendor Invoice Submission page (VISP).
Receiving and the Vendor Invoice Submission page are only done against purchase orders.Do not create a receipt or submit an invoice for supplier catalog, voucher, or P-Cardtransactions.
The supplier listed on the purchase order does not receive payment until you create thereceipt in the system and submit the invoice using the Vendor Invoice Submission page.
The systems sends an email reminder to create receipts for orders which will allow thesystem to pay the invoice received from the supplier. The reminder process runs twiceweekly – on Monday and Thursday at 7 a.m. – and generates an email to users.
Sample email reminder:
If the goods are damaged or a return is necessary, contact the supplier directly and ask fora Return Merchandise Authorization (RMA) number, or some other identifier that provesthat your area authorized to return the products.
Creating Receipts
Use the following steps to create a receipt for a purchase order. When creating the receipt,be sure you know whether your PO is set up by quantity or by amount.
1. From the Admin WorkCenter, home page, choose Finance WorkCenter >BuyCarolina/Purchase Order > Add/Update Receipts by PO
2. On the Add a New Value tab, click the Add button.
54

3. To search by PO number, enter the PO number in the ID field.
Note: Although searching by PO number is preferred, you can also search by SupplierName. To do so, click the Lookup icon on the right side of the Supplier Name fieldand select the Vendor Name.
Be careful when searching by supplier. Be sure to select and receive the correct itemsfrom the correct PO.
While it is not required, it may sometimes be helpful to also include a range of datesusing the Start Date and End Date fields.
4. Click the Search button.
5. Select the items to receive and click the OK button.
55

5. Enter the date the goods or services were received in the Received Date field.
6. Do one of the following:
l Enter the quantity received in the Received Quantity field, if the line item wasset up or the PO to be received by quantity.
l If the line item was set up on the PO to be received by dollar amount, enterReceived Amount in dollars.
7. If you need to, you can click Header Comments/Attachments to add comments and/orattachments at the header level
8. If you need to , click Line Comments to add comments and/or attachments at the linelevel.
9. When you are finished entering the informatin, click the Save Receipt button.
Adjusting or Canceling a Receipt
You can change or cancel an existing receipt for goods or services that have not yet beeninvoiced. You cannot cancel a receipt that has already been matched to a voucher.
Always remember to click Save Receipt after making any changes. Once the system savesyour changes, you should receive a confirmation of the change.
56

Follow these steps to adjust or cancel a line of receipt:
1. From the Admin WorkCenter home page, choose Finance WorkCenter >BuyCarolina/Purchase Order > Add/Update Receipts by PO
2. Click Find an Existing Value tab.
3. Search for the receipt you want to change or cancel. The most common ways to searchare by Receipt Number or by PO number.
4. Click the Search button.
57

Result: The system displays the search results in a list or goes directly to the ReceiveItems page.
If the search results are displayed in a list, click the receipt you want to change. Then thesystem displays the Receive Items page.
Canceling a Line of Receipt
1. If you want to remove an item/line that was previously received in error, click the X inthe Cancel Line column of the row assigned to the item.
Result: A pop-up message window will appear.
2. Click the Yes button.
3. Click the Save Receipt button.
Changing the Quantity or Amount Received
1. If you want to adjust the received quantity or amount, select the previously receivedvalue and change it to the correct value.
2. Then, click the Save Receipt button.
58

Canceling a Receipt Completely
1. To cancel a receipt completely, click red X next to the Receipt field. This is the CancelReceipt button.
Result: The system displays a pop-up message asking if you're sure.
2. Click the Yes button.
3. Click the Save Receipt button.
59

Submitting an Invoice
After receiving your items, you must also submit the invoice using the Vendor InvoiceSubmission page so that payment can be released to the supplier.
Follow these steps to submit an invoice:
1. To access the Vendor Invoice Submission page do one of the following:
l Go to https://vendor.itsapps.unc.edu/visp/vendor.
l From the Admin WorkCenter home page, choose Admin WorkCenter Links >Vendor Invoice Submission Page.
2. Using the information provided on both the purchase order and the invoice provided bythe supplier, enter information into each field on the page and click Validate.
Note: When you click Validate, the system verifies that there is a valid PO associatedwith the Supplier ID/Vendor ID. It also checks that the invoice you are submittinghasn't already been processed. If you receive an error, double-check the informationyou entered and click Validate again.
60

3. After the system recognizes the PO ID that you entered, the Vendor Invoice FileUpload screen will appear. Click the Browse button to select the file name that youassigned to the invoice and click Open.
4. Click the Upload button.
61

5. If you need to attach more files, repeat steps 3, 4, and 5.
6. When you are done attaching files, click the Invoice Complete button to submit theinvoice.
Result: The Invoice Complete status changes to YES and the Invoice Complete Timeshows a timestamp with the date and time.
8. At this point, you can take a screenshot that shows the invoice is complete with thedate/time it was completed.
9. When you are finished working on the invoice, do one of the following.
l Click the Submit Another Invoice link.
62

Note: Your work on the current invoice will be discarded if you have not alreadyclicked Invoice Complete.
l Click the Quit link.
Result: The system displays the main vendor invoice submission page and you cancreate another invoice from here.
63

Submitting a Change Order RequestWhen you need to make changes to a purchase order (PO), you need to submit a changeorder request which is a new purchase requisition to communicate the changes to thebuyer. On the new purchase requisition, reference the PO you need changed and specifywhich lines need to be adjusted. The requisition for the change order doesn't become a newpurchase order, it is used simply to notify the buyer of what to change on your existing PO.It is important to reference each line from the PO that you want changed and to put in theamount of change for each line based on whether you are increasing or decreasing a line orfully liquidating the PO. The buyer will adjust the purchase quantities and amounts andwill run a budget check when updating the PO. You can make five different change orderrequests:
l Reducing the Amount or Quantity on a PO Line
l Increasing the Amount or Quantity on a PO Line
l Reducing a PO Line and Requesting Chartfield Changes for all Invoices GoingForward
l Increasing a PO Line and Requesting Chartfield Changes for all Invoices GoingForward
l Liquidating the Total PO Amount
Important: Before submitting the change order request we recommend that youcontact the buyer associated with the purchase order before submitting the changeorder request to ensure that the PO and any related documents are updated properly.
Be sure you have completed any steps required by the UNC Purchasing policy and procedures. This can include, but is not limited to, ensuring the order is canceled with the supplier and that no outstanding invoices exist.
Also, prior to putting in a request to reduce any PO lines or totally liquidating the PO, you must review all receipts and vouchers related to the PO and be sure there are no unbilled receipts or vouchers that are unmatched or have match exceptions. Any issues related to receipts or vouchers must be cleaned up prior to the submitting the change order request so the buyer can source the request based on the requisition.
A PO that is in completed status can not have a change order request added. If you need to make a change to a completed PO, put in a new purchase requisition to create new PO.
Note: You can see the PO status in the upper right hand corner of the Purchase Orderthru PO Inquiry or by clicking the PO icon on the original requisition through ManageRequisitions.
A. Reducing the Amount or Quantity on a PO Line
Follow these steps to reduce the amount of an item or the quantity on a PO line:
64

1. From the Admin WorkCenter home page, choose Finance WorkCenter >BuyCarolina/Purchase Order > Requisition
2. Click the Special Request link.
3. Complete the following fields:
In this field: Do the following:
Item Description Enter the description of the item that needs to be changed. Be sure touse the same description used on the original purchase requisition.
Price Enter $0.00.
Important: The system sets the Zero Price Indicator for you whichallows you to process the requisition with a price of zero. Make sure toenter zero for the price.
Quantity Enter a 1.
Note: You must enter a "1" if you enter a price of $0.00. This isn'trelated to the actual quantity you want changed on the PO. Informationabout the quantity should be described in the Item Description field.
Unit of Measure Enter the unit of measure, such as EA for each.
Category Choose the category that most accurately describes the item.
Suppleir ID Enter the supplier ID number.
Supplier Name Enter the supplier's name.
Additional Information To reduce the dollar amount enter the following: "Reduce PO# XXXXX,Line# XXXXX by $XXXX.XX. PO line is currently $XXXXX.XX andshould be $XXXX.XX after decrease."
To reduce quantity enter: "Reduce PO#XXXXX, Line#XXXXX) byquantity of XXX. PO Line is currently quantity XXX and will be quantityXXX after decrease."
For example: "Reduce PO# 548329, Line 1 by quantity of 5. PO line iscurrently quantity 15 and will be quantity 10 after decrease."
65

4. Click the Add to Cart button.
Result: The system displays a pop up message.
5. Click the Yes button.
Result: The system refreshes and clears out the information on the Create Requisitionpage for you to enter another line item, and the item you just finished entering isadded to the Shopping Cart box at the top right corner.
66

6. Click the Checkout button.
7. In the Requisition Name field, enter "Change Order for PO XXXXX."
8. In the Comments box, enter "Change Order for PO XXXXX."
9. Click the Pre-Check Budget button.
10. When the following message appears, click the OK button.
67

11. Click the Save & submit button.
Result: The system displays a Confirmation page.
B. Increasing the Amount or Quantity on a PO Line
Follow these steps to increase the amount or quantity on a PO line:
1. From the Admin WorkCenter home page, choose Finance WorkCenter >BuyCarolina/Purchase Order > Requisition
2. Click the Special Request link.
3. Complete the following fields:
In this field: Do the following:
Item Description Enter the description of the item that needs to be changed. Be sure touse the same description used on the original purchase requisition.
Price Enter the amount (or price per unit if increasing quantity) of increase.
Quantity Enter a "1" if receiving by amount. If receiving by quantity, enter thequantity that you are increasing by.
Unit of Measure Enter the unit of measure, such as EA for each.
Category Choose the category that most accurately describes the item.
Supplier ID Enter the supplier ID number.
Supplier Name Enter the supplier's name.
68

In this field: Do the following:
Additional Information To increase the dollar amount enter: "Increase PO#XXXXX,Line#XXXXXby $XXXX.XX. PO total amount is currently $XXXX.XX andshould be $XXXX.XX after increase."
OR
To increase the quantity enter: "Increase PO#XXXXX, Line#XXXXX byquantity of XXX. PO Line is currently quantity XXX and will be quantityXXX after increase."
For example: "Increase PO#847624468, Line#1 by quantity of 5. POline is currently quantity of 10 and will be quantity of 15 after increase."
4. Click the Add to Cart button.
Result: The system does one of the following:
69

l If you are increasing by amount, the system refreshes and clears out theinformation on the Create Requisition page for you to enter another lineitem, and the item you just finished entering will be added to the ShoppingCart box at the top right corner.
l If you are increasing by quantity, the system displays a popup message.
5. Click the "Yes" button.
6. Click the Checkout button.
7. Click the Expand Section arrow on the left side of the screen and click Chartfields 2to verify that the existing chartfield string is the one that you want to use for theincrease. (If you want to use a different chartfield string for the increase, follow thesteps in Section D.)
8. After reviewing the chartfield string, click the Collapse Section arrow to close theexpanded section.
70

9. In the Requisition Name field and the Comments box, enter "Change Order for POXXXXXXXXXX."
10. Click the Pre-Check Budget button.
Result: The system displays a pop up message.
11. Click the OK button.
12. Click the Save & submit button.
71

Result: The system displays a Confirmation page.
C. Reducing a PO Line and Requesting Chartfield Changes for allInvoices Going Forward
Follow these steps to reduce a PO line and request Chartfield changes for all invoices goingforward:
1. From the Admin WorkCenter home page, choose Finance WorkCenter >BuyCarolina/Purchase Order > Requisition
2. Click the Special Request link.
3. Follow these steps to reduce the amount of an item or the quantity on a POline:, page 64.
4. For the second line on the Change Order, complete the following fields:
In this field: Do the following:
Item Description Enter the description of the item that needs to be changed.
Note: You're not allowed to use the exact same linedescription that you used for Line #1 so you need to add"Chartfield Change" to the end.
For example, if you entered "microscopes" for Line #1 youcould enter "microscopes Chartfield Change" for Line #2.
Price If you're receiving by amount, enter the total amount to pre-encumber on the new chartfield string.
If receiving by quantity, enter price per unit.
Quantity Enter 1 if you're receiving by amount. If you're receiving byquantity, enter the quantity that you are increasing by.
Unit of Measure Enter the unit of measure, such as EA for each.
Category Choose the category that most accurately describes the item.
Supplier ID Enter the supplier ID number.
Supplier Name Enter the supplier's name.
72

In this field: Do the following:
Additional Information Include the following statement:
"This line represents amount left to bill from PO Line #1AFTER factoring in a reduction of X and the amount that hasalready been billed on the line X. The amount should be Xagainst new chartfield string."
For example: "This line represents amount left to bill fromPO Lines#1 AFTER factoring in a $20,000 reduction and theamount that has already been billed on the line ($5,000). Thisamount should be $25,000 against new chartfield string."
5. Click the Add to Cart button.
6. Click the Checkout button.
73

7. In the Requisition Name field and Comments box, enter "Change Order for POXXXXX."
8. To see the chartfield string to make sure that it is the same, click the ExpandSection arrow to the left of the first line.
9. Click the Chartfields2 tab to see the chartfield string for Line #1. The Chartfieldstring for Line #1 should be the same chartfield string that was used on the originalline. If it is not the same chartfield string, enter the original chartfield string.
10. Click the Expand Section arrow again to minimize the section
74

11. To edit the chartfield string for Line #2, click the Expand Section arrow to the left ofLine #2. The chartfield string for Line #2 should be the new chartfield string that willbe used for the remaining monies.
12. On the Chartfields2 tab, enter the new chartfield string that will be used for theremaining monies.
13. Click the Expand Section arrow again to minimize the section
14. Click the Pre-Check Budget button.
15. When the following message appears, click the OK button.
75

16. Click the Save & submit button.
Result: The system displays a confirmation page.
D. Increasing a PO Line and Requesting Chartfield Changes forall Invoices Going Forward
Follow these steps to increase a PO line and request chartfield changes for all invoicesgoing forward:
1. From the Admin WorkCenter home page, choose Finance WorkCenter >BuyCarolina/Purchase Order > Requisition
2. Click the Special Request link.
3. Follow these steps to increase the amount or quantity on a PO line:, page 68
Note: This particular type of Change Order requires at least two lines. If more thanone chartfield string change is requested, then the Change Order Request will requiremore than two lines.
4. For the second line on the Change Order Request, include the following fields:
In this field: Do the following:
Item Description Enter the description of the item that needs to be changed.
Note: You're not allowed to use the exact same linedescription that you used for Line #1 so you need to add"Chartfield Change" to the end.
For example, if you entered "microscopes" for Line #1 youcould enter "microscopes Chartfield Change" for Line #2.
Price If you're increasing by amount, enter the total amountremaining on the PO combined with the amount of increase.
If increasing by quantity, enter price per unit.
Quantity Enter 1 if you're receiving by amount.
If you're receiving by quantity, enter the quantity that you arecarrying over from the original PO combined with thequantity you're increasing by.
76

In this field: Do the following:
Unit of Measure Enter the unit of measure, such as EA for each.
Category Choose the category that most accurately describes the item.
Supplier ID Enter the supplier ID number.
Supplier Name Enter the supplier's name.
Additional Information Include the following statement: "This line represents theamount left to bill to new chartfield string from POLine#XXXXX of $XXXX.XX plus the amount of increase of$XXXX.XX. The amount on this line should be $XXXX.XX."
For example: "This line represents the amount left to bill tonew chartfield string from PO line#1 of $6,500 plus theamount of increase of $10,5000. the amount on this lineshould be $17,000."
5. Click the Add to Cart button.
6. Click the Checkout button.
77

7. In the Requisition Name field and Comments box, enter "Change Order for POXXXXX."
8. To view the chartfield string in order to make sure that it is the same, click theExpand Section arrow to the left of the first line.
9. Click the Chartfields2 tab to see the chartfield string for Line #1. The chartfieldstring for Line #1 should be the same chartfield string that was used on the originalline. If it is not the same chartfield string that was used on the original line, enter theoriginal chartfield string.
78

10. Once the original chartfield string has been entered, click the Expand Section arrowto minimize the section.
11. To edit the chartfield string for Line #2, click the Expand Section arrow to the left ofLine #2. The chartfield string for Line #2 should be the new chartfield string that willnow be used for the line.
12. On the Chartfields2 tab, enter the new chartfield string that will now be used for theline.
13. Click the Expand Section arrow to minimize the section.
79

14. Click the Pre-Check Budget button.
Result: The system displays a pop up message.
15. Click the OK button.
16. Click the Save & submit button.
Result: The system displays a Confirmation page.
E. Liquidating the Total PO Amount
Follow these steps the liquidate the total amount remaining on a PO:
1. From the Admin WorkCenter home page, choose Finance WorkCenter >BuyCarolina/Purchase Order > Requisition
2. Click the Special Item link.
3. Complete the fields:
80

In this field: Do the following:
Item Description Enter Entire PO.
Price Enter $0.00.
Important: The system sets the Zero Price Indicator for you whichallows you to process the requisition with a price of zero. Make sure toenter zero for the price.
Quantity Enter a 1.
Note: You must enter a "1" when entering a price of $0.00. This isn'trelated to the actual quantity you want changed on the PO. Informationabout the quantity should be described in the Item Description field.
Unit of Measure Enter the unit of measure, such as EA for each.
Category Choose the category that most accurately describes the item.
Supplier ID Enter the supplier ID number.
Supplier Name Enter the supplier's name.
Additional Information Enter the following: "PO#XXXXX has $XXXX.XX remaining and needscomplete liquidation."
For example: "PO#8798625541 has $20,000 remaining and needscomplete liquidation."
4. Click the Add to Cart button.
81

Result: The system displays a pop up message.
5. Click the Yes button.
6. Click the Checkout button.
82

7. In the Requisition Name field and Comments box, enter "Change Order for POXXXXX."
8. Click the Pre-Check Budget button.
9. When the following message appears, click the OK button.
10. Click the Save & submit button.
83

Result: The system displays a confirmation page.
84

Processing a ReturnOverview
Returns of materials or equipment acquired with a purchase order require authorizationfrom the supplier and documentation in the purchase order system to receive credit for thereturn.
Returns of materials or equipment acquired with a purchase order require a returnmaterial authorization (RMA) number from the suppleir. Once the RMA is received, a newrequisition must be created in ConnectCarolina. All data entry fields must be completedand the requisition must be specified as a change order. The RMA number and the originalpurchase order number must be referenced in the requisition header. The change orderrequisition notifies the appropriate purchasing agent to contact the department about thedetails of the return.
Important: It is highly recommended that you contact the buyer associated with thepurchase order to ensure that PO and any related documents are updated properly.
Processing a Return
Follow these steps to process a return:
1. From the Admin WorkCenter home page, choose Finance WorkCenter >BuyCarolina/Purchase Order> Requisition
2. Click the Requisition tab.
3. Click the Special Request link.
4. Complete the fields:
In this field: Do the following:
Item Description Enter the description of the item you are returning.
Price Enter $0.00.
Quantity Enter the number of items you are returning.
Unit of Measure Enter the unit of measure, often EA for each.
Category Choose the category that most accurately describes the item.
Supplier ID Enter the supplier number.
Supplier Name Enter the supplier's name.
Additional Information Enter the line number from the PO for the item you are returning.
85

5. Click the Add to Cart button.
Result: The system displays a pop up message.
6. Click the Yes button.
Caution: The system sets the Zero Price Indicator for you which allows you to processthe requisition with a price of zero. Make sure to enter zero for the price, otherwise therequisition will encumber funds for whatever amount is entered on the chartfieldstring entered for the item.
86

7. Click the Checkout button.
8. In the Requisition Comments & Attachmentsbox, enter the PO number and theRMA number for the return you are processing.
9. Click the Pre-Check Budget button.
10. Click the Save & submit button.
Note: It is recommended that you inform the buyer of the return and reference the POnumber as well as the requisition number for the return.
87

Infoporte Finance TransactionsOverview
InfoPorte is the principal reporting tool for finding balances, individual transactions, andvarious other information. The purpose of this document is to show you how to sign on toInfoPorte and find finance transactions.
This document is not intended to be the complete training on InfoPorte. To attain thenecessary understanding of InfoPorte, you need to attend the Financial Reporting withInfoPorte class.
Access to InfoPorte is controlled by your InfoPorte Administrator. Generally, you aregranted access to the pages and departments within the purview of your job. New usersneed to request access through their InfoPorte Administrator.
To access the request form and to see the list of InfoPorte Access Administrators, go to:https://infoporte.unc.edu/tools/data_dictionary_documents.php. In the first column, look forInfoporte Admin/Access Request Coordinator list. In the column to the far right, clickDownload to view the list in Excel.
Accessing InfoPorte and Finding Finance Transactions
Follow these steps to access InfoPorte and find finance transactions:
There are two ways to access InfoPorte. Choose either Step 1 or 2.
1. From the Admin WorkCenter home page, choose Finance WorkCenter, click InfoPortefrom the left menu.
88

2. Click the Login button.
Result: The buttons that you have access to appear in the top toolbar. A useful buttonis the Tools button. THis button contains the following tabs:
l Data Dictonary Data Dictionary > Account Mapping tab. This tab allows you tolook up the translation from an FRS account to the equivalent chartfield string inConnectCarolina.
l Data Dictionary > Chartfield Lookup tab. This tab allows you to search forConnectCarolina chartfields by an alpha or numeric search.
l Data Dictionary > General Info tab. This tab contains a list of forms and files,such as the Access Request Form for InfoPorte and a list of the InfoPorteAdministrators
3. Click the Finance button.
Result: The system displays the landing page for the Finance tab, which is the DeptAccounting tab.
4. Click the Transactions tab.
Result: The system displays the basic search fields. There is also an Advanced searchfield section beneath the Basic search section, which allows you to search at anadditional level of detail.
89

5. Click the Advanced link to open the Advanced search section.
6. The Fiscal Year, Budget Year, and Acct Period fields default to the current period.Change these fields if you are looking for a transaction in a different accountingperiod.
Note: For each accounting period you select, you will see transactions for just thoseaccounting periods, rather than transactions life-to-date up to the period selected.
7. Complete the search fields per the table below. Keep in mind the following:
l The list in the table below focuses on finding each transaction type, but it is notan exhaustive list of ways you can search. For example, you could search by aspecific cost code, but that is not listed in this table.
l Your complete set of search fields impacts your overall search results. Forexample, if you select STAT_EX_EX ledger in the Basic search section, and thenenter a journal ID in the Advanced section that does not have a State fund, youwill get no results.
l There is an optimal set of chartfield combinations for reconciling. Thosecombinations are listed in the table at the end of this document.
To find this transaction From the Basic searchsection, enter:
From the Advancedsection, enter:
purchase requisitions
vendor catalog orders
Note: These requirements will havean associated voucher if they havebeen invoiced to the vendor.
l one or combination ofpre-encumbranceledgers:
l F&A_PRE
l OSR_PRE
l STAT_EX_PR
l TRST_EX_PR
l your department
REQ_PREENC in the TransType field - to see all reqs foryour dept
Rquisition ID in the Trans IDfield - to see one specificrequisition
Acct Date From and AcctDate To - to see requisitionswithin a date range
90

vouchers
Note: This includes travelvouchers, and purchase requisitionsand vendor catalog orders that havebeen invoiced to the vendor.
l one or combination ofpre-encumbranceledgers:
l F&A_PRE
l OSR_PRE
l STAT_EX_PR
l TRST_EX_PR
l your department
AP_VOUCHER in the TransType field - to see allvouchers for your department
Voucher ID in the Trans IDfield - to see one specificvoucher
Campus journals l leave blank Journal ID in the Trans IDfield - to search for a singlejournals
expense from data collect batches,such as FEDEX, medical insurance,and core data fees
l one or combination ofpre-encumbranceledgers:
l F&A_PRE
l OSR_PRE
l STAT_EX_PR
l TRST_EX_PR
l your department
GL_JOURNAL in the TransType field
deposits l your department AR_MISCPAY in the Transtpe field - to see all deposits
Deposit ID in the Trans IDfield - to see a specific deposit
91

budget journals or transfers l one or combination ofpre-encumbranceledgers:
l F&A_PRE
l OSR_PRE
l STAT_EX_PR
l TRST_EX_PR
l your department
9. Click the Search button.
Result: The system displays the journals based on your search criteria. The tablebelow shows the information in key fields by transaction type.
92

Transactiontype
Description TransType
Trans ID Reference 1 Refrence2
Purcahserequisitions
vendorcatalogorders
VendorID_Vendorname
AP_VOUCHER
Voucher ID_ Invoice # Payment Ref #_Payment Date
RequisitionID
Campusvouchers
VendorID_Vendorname
AP_VOUCHER
Voucher ID_ Invoice # Payment Ref #_Payment Date
not used
Travelvouchers
VendorID_Vendorname
AP_VOUCHER
Travel ID_ Invoice # Payment Ref #_Payment Date
not used
Campusjournals
Journal linedescription,if used
GL_JOURNAL
Journal ID_ JournalDate
Journal linereference, ifused
not used
CABS Journal linedescription,if used
GL_JOURNAL
Journal ID_ JournalDate
Journal linereference, ifused
not used
PCard Merchantname
GL_JOURNAL
Journal ID_ PostedDate
Transactiondate
not used
other datacollect batchfiles, such asfedex or coredata fees
filedescription
GL_JOURNAL
Journal ID_ JournalDate
not used
depostis not used AR_MISCPAY
AR Business Unit_Depost ID
not used not used
budgetjournals
not used GL_BD_JRNL
Journal ID_ PostedDate
not used not used
Search fields for reconciling
When you reconcile, it is best to search for transactions by specific chartfield string. Beloware recommended chartfield combinations for reconciliation purposes.
Fund type Chartfield combination
State Fund- Source - Department ID
F&A Source - Department ID
OSR Source - Project ID
93

Trust Source only, with two exceptions:
l Endowments: Enter fund and source to see principaland income
l Trusts allocated across multiple departments: Entersource and department ID
94