Hardee's Funding LLC/Carl's Jr. Funding LLC (Series 2021-1 ...
Upload
khangminh22Category
view
9download
0
Creating Helpful User Interfaces
Tamar E. Granor
Tomorrow's Solutions, LLC
8201 Cedar Road
Elkins Park, PA 19027
Voice: 215-635-1958
Email: [email protected]
Web: www.tomorrowssolutionsllc.com
Overview One of the most popular packages in personal computer software history is Intuit's Quicken,
which lets people track their bill-paying and other financial information. Given that personal
finance is a stressful subject for most people, what is it about Quicken that makes its users love it
so?
The answer is that Quicken is designed to make entering data simple and straightforward. Its user
interface includes a number of abilities that cut down on typing and make it easier to get things
right. In short, Quicken's user interface is helpful.
You can create helpful user interfaces with Visual FoxPro. In this session, we'll look at four
techniques for helping the user, two of them drawn from the Quicken user interface.

The two Quicken features are QuickFill comboboxes and simplified date entry. QuickFill
combos are based on native VFP features—I first implemented them in VFP 6. For simplified
date entry, we'll start with the ActiveX DateTime Picker control, but you can do the same thing
using a VFP textbox. The third technique, AutoComplete textboxes, is actually provided natively
in VFP 9; you just have to set it up. VFP 7 introduced the tools for the fourth technique, adaptive
menus, but you have to write a fair amount of code to make them work.
AutoComplete—Prompting users with previous entries A number of applications keep track of what you've entered for a particular item and give you the
opportunity to choose a previous entry rather than retyping it. This capability, called
AutoComplete, is particularly common on web pages (for example, the Google’s Search
textbox).
With AutoComplete, when you start typing in a textbox, entries that match what you've typed so
far appear in a dropdown list. You can use the keyboard or mouse to choose one of those entries
rather than typing the rest yourself.
Before VFP 9, if you wanted this capability, you had to build it yourself. That meant intercepting
the KeyPress event, maintaining a table of entries, and generally a lot of code. VFP 9 supports
AutoComplete for textboxes natively; three new properties control its behavior.
When AutoComplete is turned on for a textbox, VFP remembers entries in that textbox. When
you return to the textbox and start typing, entries that match what you've typed so far appear in a
dropdown. Type a single space to see the entire list for this textbox. Choose an item from the
dropdown to have it entered into the textbox. To remove an item from the list, highlight the item
and press the Delete key. Figure 1 shows a textbox that uses AutoComplete for city names.
Figure 1. Using AutoComplete—This textbox for entering a city has AutoComplete set to show the list in most
recently used order.
Like so much else in VFP, the key to AutoComplete is a table. The table, by default called
AutoComp.DBF and stored in the user application data directory (HOME(7)), keeps track of
each item entered in an AutoComplete textbox. Table 1 shows the structure of this table.
Table 1 Storing AutoComplete data—The table that stores AutoComplete data has seven fields. It allows you
to organize AutoComplete several different ways.
Field Type Purpose
Source Character
(20)
Identifies the textboxes that include this item in their AutoComplete
lists.
Data Character The item to include in AutoComplete lists.

(254)
Count Integer The number of times this item has been chosen.
Weight Integer A user-specified (or developer-specified) weight for this item to
determine where it appears in the list.
Created DateTime The time when this item was added.
Updated DateTime The time when this item was last chosen.
User Memo Available for user-specified data.
The AutoComplete table supports several different ways of organizing the list of items. Those
options are echoed in the AutoComplete property that turns this feature on. Table 2 shows the
values for AutoComplete. When AutoComplete is set to 2, 3, or 4, the list is sorted in descending
order, based on the specified field. For AutoComplete values of 2 and 4, the Updated field is
used to break ties. The AutoComplete property can be changed at runtime, so you can offer users
the chance to control the order of these items.
Table 2 Enabling AutoComplete—The AutoComplete property controls AutoComplete behavior for an
individual textbox.
Value Meaning
0 No AutoComplete for this textbox.
1 Turn on AutoComplete with the list in alphabetical order.
2 Turn on AutoComplete with the list ordered by frequency of use (the Count field).
3 Turn on AutoComplete with the list ordered by time of use (the Updated field).
4 Turn on AutoComplete with a user-specified ordering of the list (the Weight field).
VFP maintains the Updated and Count fields automatically. The Weight field has to be set
manually, so you need to provide some kind of maintenance mechanism for custom orderings.
If every textbox in an application had its own list for AutoComplete, the AutoComplete table
would grow far too large and, more importantly, users would become frustrated, as an item they'd
entered on one form failed to show up for the same field on another form.
Fortunately, VFP's AutoComplete feature is designed to avoid this problem. The
AutoCompSource property of textboxes lets you specify a category for the textbox, such as
FirstName or City. All textboxes with the same value for AutoCompSource share a single list of
items, based on the value of the Source field in the AutoComplete table. (You've probably seen
this behavior with websites, where your name or email address appears in an AutoComplete list
for a site you've never used before.)
In practice, this means that for each application you build, you'll probably want to subclass your
textbox class for each category, setting AutoCompSource appropriately. Then, use your
subclasses to build forms with textboxes that share AutoComplete data. Alternatively, if you

already have a builder for textboxes, you could add AutoCompSource there. You could also use
the Toolbox's Properties functionality to ensure that AutoCompSource gets set for each textbox.
By default, there's a single AutoComplete table. (As noted above, it's stored in the directory
referenced by HOME(7).) However, you can choose to put the table wherever you want and even
to use multiple tables.
The AutoCompTable property of the _SCREEN object specifies the default location for the
AutoComp table. Set the property to specify something other than the directory indicated by
HOME(7).
In addition, textboxes have a new AutoCompTable property that lets you specify where to find
the table for that particular textbox. When the property is empty, the textbox uses the table
specified by _SCREEN.AutoCompTable. When both are empty, the default table is used.
Be aware that the AutoComplete table is opened behind the scenes each time you enter a textbox
that uses it. If it can’t be opened (because it doesn’t exist or because it’s open exclusively
elsewhere), there’s no error, but there’s also no AutoComplete functionality.
The session materials contain a form (EmployeeAdd.SCX) that has AutoComplete enabled for a
number of fields. There's no code behind the form for the AutoComplete capabilities; a number
of properties are set for the various textboxes. The form also includes a combobox that lets you
change the AutoComplete setting for the textboxes, so that the lists appear in a different order.
QuickFill—Helping users with combo box selections QuickFill is first cousin to AutoComplete. It provides similar (actually, slightly better)
functionality for combo boxes. As the user types in a combo box, the list moves to the first entry
matching the text typed so far, and the textbox portion of the combo shows that entry, with the
portion following the text typed so far highlighted. Figure 2 shows the textbox portion of a
QuickFill combo in Quicken 2001.
Figure 2 QuickFill combo—The textbox portion of a QuickFill combo shows the letters typed so far as regular
text and highlights the inferred letters from the first matching item. Here, "ru" was typed and the first match
is "Ruby Tuesday."
While VFP doesn't provide native support for QuickFill combos, you can build your own. The
secret is to use code in the KeyPress method to examine what the user has typed so far and set the
combo's DisplayValue to the first matching item. The class library HelpfulUI.VCX in the session
materials include an abstract class (cboQFill) and three concrete subclasses (cboAlsQFill,
cboArrQFill and cboListQFill) that implement QuickFill. The three concrete subclasses vary in
the RowSourceType used for the combo. The example form, EmployeeAdd.SCX, uses
cboAlsQFill to let the user select the employee's title from the list of existing titles.
The abstract class cboQFill has a number of custom properties, shown in Table 3, and two
custom methods, HandleKey and Search, both called from KeyPress. HandleKey evaluates the
keystroke and determines what action, if any, to take. Search is abstract in this class; the concrete
subclasses use this method to search their RowSource for whatever the user has typed so far.

Table 3 Implementing QuickFill—The abstract class that implements QuickFill uses a bunch of custom
properties.
Property Purpose
lHandled Indicates whether the keystroke was handled by the HandleKey method or
should be processed normally.
lSearch Indicates whether the Search method should be called.
lStartOver Specifies whether too much time has passed since the last keystroke and this
keystroke should be considered a new entry.
lTimeOutPossible Specifies whether the time between keystrokes is tracked.
nAnchor The position where the last selection began.
nLastKey The ASCII code for the most recently typed keystroke.
nModifier The modifier keys pressed with the most recent keystroke. Uses the same
bitwise code as the KeyPress method.
The KeyPress method (shown in Listing 1) contains the code that orchestrates the QuickFill
process. The method receives information about the key(s) pressed. It then figures out whether
this keystroke starts a new entry or continues a current entry, based on the lTimeOutPossible
parameter and the time between this keystroke and the last one. If timing out is possible, the time
period is specified by the same system variable that controls incremental search (_INCSEEK for
VFP 7 and later, _DBLCLICK for earlier versions). KeyPress saves information about the key(s)
pressed to the appropriate properties, then calls HandleKey. HandleKey sets the lHandled and
lSearch properties. When control returns, KeyPress uses those properties to determine what to do
next.
Listing 1. Processing a keystroke—The KeyPress method is the control center for QuickFill.
LPARAMETERS nKeyCode, nShiftAltCtrl
* Check whether to continue or start over
LOCAL nHitTime
nHitTime = SECONDS()
IF This.lTimeOutPossible AND ;
nHitTime - This.nLastKeyTime > IIF(VERSION(5) >= 700, _INCSEEK, _DBLCLICK)
This.lStartOver = .T.
ELSE
This.lStartOver = .F.
ENDIF
This.nLastKeyTime = nHitTime
* Grab the keycode to figure out what to do with it
THIS.nLastKey = nKeyCode
THIS.nLastModifier = nShiftAltCtrl
THIS.HandleKey()
IF THIS.lHandled
NODEFAULT
IF THIS.lSearch
THIS.Search()

ENDIF
ENDIF
The HandleKey method does most of the work. The CASE statement breaks the processing down
into various groups. The first branch covers regular characters (the alphabet, digits and
punctuation marks)—the new character is added to the end of the string and the portion used for
searching is increased to include the new character. The remaining branches cover a variety of
navigation keys, including Home, End, and the arrows.
Listing 2. Processing a keystroke—The HandleKey method evaluates the keystroke and adjusts a variety of
properties.
LOCAL cSoFar, nHoldLength
THIS.lHandled = .F.
IF This.lStartOver
cSoFar = ""
This.SelStart = 0
This.SelLength = 0
This.nAnchor = 0
ELSE
cSoFar = LEFT(THIS.DisplayValue,THIS.SelStart)
ENDIF
DO CASE
CASE BETWEEN(THIS.nLastKey,65,90) OR BETWEEN(THIS.nLastKey,97,122) OR ;
(BETWEEN(THIS.nLastKey,32,126) AND ;
THIS.nLastModifier = KEY_MODIFIER_NONE)
* Alphanumeric and punctuation
THIS.DisplayValue = PADR(cSoFar,THIS.SelStart) + CHR(THIS.nLastKey)
THIS.SelStart = LEN(TRIM(THIS.DisplayValue))
* handle embedded blanks
IF THIS.nLastKey = 32
THIS.SelStart = THIS.SelStart+1
ENDIF
THIS.lSearch =.T.
THIS.lHandled = .T.
THIS.nAnchor = THIS.SelStart
CASE THIS.nLastKey = KEY_BACKSPACE
* On backspace, remove one character from current position
* and search
IF THIS.SelStart<>0 AND ;
THIS.SelStart+THIS.SelLength = LEN(TRIM(THIS.DisplayValue))
THIS.DisplayValue = LEFT(cSoFar,LEN(cSoFar)-1)
THIS.SelStart = LEN(TRIM(THIS.DisplayValue))
THIS.lSearch = .T.
THIS.lHandled = .T.
THIS.nAnchor = THIS.SelStart
ELSE
IF This.SelStart = 0 AND This.lStartOver
* Back up from end of content
cSoFar = TRIM(This.DisplayValue)
This.DisplayValue = LEFT(cSoFar, LEN(cSoFar)-1)
This.SelStart = LEN(TRIM(This.DisplayValue))
This.lSearch = .T.
This.lHandled = .T.
This.nAnchor = This.SelStart

ENDIF
ENDIF
CASE (THIS.nLastKey = KEY_RTARROW OR THIS.nLastKey = KEY_LTARROW ;
OR THIS.nLastKey = KEY_END)
* Move to end. For right arrow and end, the key stroke will do the rest
* For left arrow, we need to move one to the right, so that the keystroke
* ends up one before the end.
IF THIS.SelStart+THIS.SelLength=LEN(TRIM(THIS.DisplayValue)) ;
AND THIS.SelLength<>0
THIS.SelStart = LEN(TRIM(THIS.DisplayValue))
IF THIS.nLastKey = KEY_LTARROW
THIS.SelStart = THIS.SelStart-1
ENDIF
THIS.SelLength = 0
THIS.lSearch =.F.
ELSE
* Nothing is highlighted, so treat as ordinary nav keys in the
* text box
DO CASE
CASE THIS.nLastKey = KEY_RTARROW
IF THIS.SelStart <> LEN(TRIM(THIS.DisplayValue))
THIS.SelStart = THIS.SelStart+1
ENDIF
CASE THIS.nLastKey = KEY_LTARROW
IF THIS.SelStart <> 0
THIs.SelStart = THIS.SelStart - 1
ENDIF
CASE THIS.nLastKey = KEY_END
THIS.SelStart = LEN(TRIM(THIS.DisplayValue))
ENDCASE
ENDIF
THIS.lHandled = .T.
THIS.nAnchor = THIS.SelStart
CASE THIS.nLastKey = KEY_HOME
* Move to beginning of text
THIS.SelStart = 0
THIS.nAnchor = 0
THIS.SelLength = 0
THIS.lSearch =.F.
THIS.lHandled = .T.
CASE THIS.nLastKey = KEY_SHIFT_RTARROW AND THIS.nLastModifier <>
KEY_MODIFIER_NONE
* Shift-rightarrow does nothing if the highlight goes to the end
* Otherwise, it increases the highlight to the right.
IF THIS.SelStart+THIS.SelLength <> LEN(TRIM(THIS.Text))
IF THIS.nAnchor = THIS.SelStart
THIS.SelLength = THIS.SelLength+1
ELSE
nHoldLength = THIS.SelLength
THIS.SelStart = THIS.SelStart+1
THIS.SelLength = nHoldLength-1
ENDIF
ENDIF
THIS.lHandled = .T.
THIS.lSearch = .F.

CASE THIS.nLastKey = KEY_SHIFT_LTARROW AND THIS.nLastModifier <>
KEY_MODIFIER_NONE
* Shift-leftarrow does nothing if the highlight starts at the beginning
* Otherwise, it increases the highlight to the left.
IF THIS.SelStart <> 0
IF THIS.nAnchor = THIS.SelStart + THIS.SelLength
nHoldLength = THIS.SelLength
THIS.SelStart = THIS.SelStart-1
THIS.SelLength = nHoldLength+1
ELSE
THIS.SelLength = THIS.SelLength-1
ENDIF
ENDIF
THIS.lHandled = .T.
THIS.lSearch = .F.
OTHERWISE
THIS.lSearch =.F.
ENDCASE
RETURN
The concrete subclasses contain code for the Search method. cboAlsQFill, for working with
RowSourceType 2-Alias and 6-Fields, includes an additional method, SetAlias, and a cAlias
property, used to keep track of the alias and order on which the combo is based. cboArrQFill, for
array-based combos, has an aContents property to hold the combo data and aUpperContents,
used for an uppercase copy of the data. (In VFP 7 and later, this is no longer necessary, as
ASCAN() is capable of case-insensitive searches, but the code has not been changed to take
advantage of this capability.)
Listing 3 shows the Search method from cboArrQFill. In VFP 7 and later, the code takes
advantage of ASCAN()'s ability to search a specified column. In earlier versions, a loop ensures
that the matched value is in column 1. If a match is found, the ListIndex property is set to point to
the first matching value and the highlight (SelLength) is set to highlight everything after the
portion typed by the user.
Listing 3. Searching in an array—The Search method of cboArrQFill uses ASCAN() to find the first matching
element.
LOCAL cSoFar, nPos, cOldExact, lInColumn
cOldExact=SET("EXACT")
SET EXACT OFF
cSoFar = PADR(THIS.DisplayValue,THIS.SelStart)
nCurPos = THIS.ListIndex
IF LEN(cSoFar) = 0
THIS.ListIndex = 0
ELSE
DO CASE
CASE VERSION(5)<700 && VFP 6 and earlier
lInColumn=.F.
nPos=-1 && initialize to impossible value
nLastPos = 0

DO WHILE NOT lInColumn AND nPos<>0
nPos = ASCAN(THIS.aUpperContents,UPPER(cSoFar),nLastPos+1)
IF nPos<>0 AND (ALEN(This.aUpperContents,2)=0 OR ;
ASUBSCRIPT(THIS.aUpperContents,nPos,2)=1)
lInColumn=.T.
ELSE
nLastPos=nPos
ENDIF
ENDDO
CASE VERSION(5)>=700 && VFP 7 or later
* Can use columnar scan to save time
nPos = ASCAN(This.aUpperContents, UPPER(cSoFar), -1, -1, 1)
ENDCASE
IF nPos<>0
THIS.ListIndex = ASUBSCRIPT(THIS.aUpperContents,nPos,1)
THIS.SelStart = LEN(cSoFar)
IF LEN(TRIM(THIS.DisplayValue)) >= LEN(cSoFar)
THIS.SelLength = LEN(TRIM(THIS.DisplayValue))-LEN(cSoFar)
ELSE
* This can happen if you add spaces to the end
* of an item already in the list.
This.SelLength = 0
ENDIF
ENDIF
ENDIF
SET EXACT &cOldExact
Using the QuickFill classes is easy. Just drop the one you want on the form and set the
RowSource property. In a couple of cases, you may also need to set RowSourceType.
The example form, EmployeeAdd.SCX, uses a QuickFill combo (based on cboAlsQFill) to
specify the new employee's job title. Figure 3 shows the combo in use—the letters "mar" were
typed to reach this point.
Figure 3. Using a QuickFill combo—This combo lets you select the a new employee's position with a minimum
of typing.
Easy Date Manipulation Entering dates is one of the areas where Quicken excels. The Quicken date textbox lets you
modify the date in a variety of ways and offers a calendar for selecting a date. The date textbox
uses the + and – keys to change by one day at a time, and accepts a number of shortcuts, such as
"T" for today's date, "M" for the first of the month and so on. Of course, you can simply type the
desired date, as well.
While it's possible to build a similar control with native VFP code, the ActiveX Date and Time
Picker control that comes with Visual FoxPro already includes a dropdown calendar. It doesn't
take much code to make it respond to the appropriate keystrokes.
The class oleQuickenDatePicker is included in the HelpfulUI class library in the session
materials. It's based on (but not subclassed from) the acxDTPicker class, published by Marcia

Akins in "MegaFox: 1002 Things You Wanted to Know about Extending Visual FoxPro." In
particular, the Date and Time Picker control has problems when bound to a field with an empty
value; Marcia's code (in the native Init, Change and Refresh methods and the custom SetValue
and UpdateControlSource methods) works around that limitation. Figure 4 shows the control
with the calendar expanded.
Figure 4. Date and time picker—This control makes it easy to either enter or choose a date.
Most of the code to emulate Quicken's behavior is in a custom method called HandleKey, called
from the control's KeyPress method. HandleKey checks for the various keystrokes that can
modify the date (shown in Table 4) and processes them. All the keys that change to the first or
last day of a particular period are sensitive to the current date value; if it's already the specified
item, they go back or forward one more of the specified period. For example, if the date in the
control is April 1, 2004, and the user presses M, the date changes to March 1, 2004.
Table 4 Quick date manipulation—The Quicken Date Picker handles these keystrokes.
Key Meaning
+ Increase date by one day.
- Decrease date by one day.
T Change to today's date
W Change to first day of week (based on SET FDOW value). If the date is already the first
day of the week, go back one week.
K Change to last day of week (based on SET FDOW value). If the date is already the last
day of the week, go forward one week.
M Change to first day of month. If the date is already the first day of the month, go back one
month.
H Change to last day of month. If the date is already the last day of the month, go forward
one month.
Y Change to first day of year. If the date is already the first day of the year, go back one
year.
R Change to last day of year. If the date is already the last day of the year, go forward one

year.
The KeyPress method is quite simple. It calls the HandleKey method and then checks whether
the current keystroke was handled. If so, the KeyAscii parameter is set to 0 to prevent the
control's default behavior. (For most of the keys being handled, the default behavior is simply to
beep.) For native VFP controls, you generally prevent default behavior by issuing NODEFAULT,
but ActiveX controls don't respond to NODEFAULT. The method for preventing default
behavior varies with the control—for the Date and Time Picker, changing the keyascii parameter
to 0 does the trick.
LPARAMETERS keyascii
LOCAL lHandled
This.HandleKey(KeyAscii)
IF This.lHandled
keyascii=0
* Need to call Change explicitly because it's suppressed
* by change to keyascii
This.Change()
ENDIF
* Prepare for next keystroke
This.lHandled = .F.
RETURN keyascii
Here's the code for the HandleKey method:
LPARAMETERS nKey
LOCAL dOriginalValue
dOriginalValue = TTOD(This.Object.Value)
DO CASE
CASE UPPER(CHR(nKey)) = "T"
* Today's date
This.Object.Value = DATE()
This.lHandled = .T.
CASE UPPER(CHR(nKey)) = "W"
* First of week. If already on first of week,
* go back a week.
IF DOW(dOriginalValue) = SET("FDOW")
This.Object.Value = dOriginalValue - 7
ELSE
This.Object.Value = dOriginalValue - ;
MOD(DOW(dOriginalValue) - SET("Fdow"), 7)
ENDIF
This.lHandled = .T.
CASE UPPER(CHR(nKey)) = "K"
* End of week. If already on end of week,
* go forward a week.
nLastDayOfWeek = EVL(SET("FDOW")-1,7)
IF DOW(dOriginalValue) = nLastDayOfWeek
This.Object.Value = dOriginalValue + 7

ELSE
This.Object.Value = dOriginalValue + ;
MOD(nLastDayOfWeek-DOW(dOriginalValue), 7)
ENDIF
This.lHandled = .T.
CASE UPPER(CHR(nKey)) = "M"
* First of month. If already on first of month,
* go back a month
IF DAY(dOriginalValue) = 1
This.Object.Value = GOMONTH(dOriginalValue, -1)
ELSE
This.Object.Value = dOriginalValue - DAY(dOriginalValue) + 1
ENDIF
This.lHandled = .T.
CASE UPPER(CHR(nKey)) = "H"
* Last of month. If already on last of month,
* go forward another month.
IF DAY(dOriginalValue + 1) = 1 && last of month
This.Object.Value = GOMONTH(dOriginalValue + 1, 1) -1
ELSE
This.Object.Value = GOMONTH(dOriginalValue - DAY(dOriginalValue) + 1, 1) ;
- 1
ENDIF
This.lHandled = .T.
CASE UPPER(CHR(nKey)) = "Y"
* First of year. If already on first of year,
* go back a year
IF MONTH(dOriginalValue) = 1 AND DAY(dOriginalValue) = 1
This.Object.Value = GOMONTH(dOriginalValue, -12)
ELSE
This.Object.Value = DATE(YEAR(dOriginalValue), 1, 1)
ENDIF
This.lHandled = .T.
CASE UPPER(CHR(nKey)) = "R"
* Last of year. If already on last of year,
* go forward a year.
IF MONTH(dOriginalValue) = 12 AND DAY(dOriginalValue) = 31
This.Object.Value = GOMONTH(dOriginalValue, 12)
ELSE
This.Object.Value = DATE(YEAR(dOriginalValue), 12, 31)
ENDIF
This.lHandled = .T.
CASE nKey = 43 AND NOT This.lHandled && "+"
This.Object.Value = dOriginalValue + 1
This.lHandled = .T.
CASE nKey = 45 AND NOT This.lHandled && "-"
This.Object.Value = dOriginalValue - 1
This.lHandled = .T.
OTHERWISE
ENDCASE

When the calendar is not open, one portion of the date (the month, the day or the year) is
highlighted. By default, pressing + or – increases or decreases that portion by 1. As noted in
Table 4, we want to change the entire date by one day rather than a single portion. If the user
presses the + or – on the alphabetic portion of the keyboard, the code in HandleKey is called.
However, the control handles the + or – on the numeric keypad earlier, in the KeyDown event.
So, we need code in KeyDown to prevent the default behavior. As in KeyPress, changing the
parameter to 0 suppresses the default behavior.
*** ActiveX Control Event ***
LPARAMETERS keycode, shift
LOCAL dCurrent
* Have to change built-in behaviors here. KeyPress is too late.
* This code suppresses the normal behavior of + and - on the
* numeric keypad. Then, KeyPress can handle them along with the
* + and - from the alpha keyboard.
DO CASE
CASE INLIST(KeyCode, 107, 109) && + or -
keycode = 0
ENDCASE
RETURN keycode
The only other code needed is to set _VFP.AutoYield to .T. in the Init method and restore it to its
original value in Destroy.
There's one behavior of the Quicken date control I haven't been able to duplicate with the Date
and Time Picker. In Quicken, the keystrokes in Table 4 work even in the dropped down calendar.
I haven't found an event that fires when a keystroke is pressed while the calendar is open.
The example form, EmployeeAdd.SCX, contains two of the customized DateTimePicker
controls, one for the employee's birth date and one for the date he or she was hired.
Adaptive menus—keeping focus on the usual As their name suggests, adaptive menus (sometimes called "MRU menus") change over time,
generally to reflect the way they have been used. The idea is to keep menu items users frequently
need easily accessible.
Recent versions of Microsoft Office and Windows include adaptive menus that show only
recently used items on each menu dropdown, but provide quick access to the hidden items. The
hidden items display automatically if the user pauses after opening a dropdown. The user can
explicitly show the items by selecting the chevron item at the bottom of each dropdown. When
the dropdown expands, the items that were hidden are shown with a lighter background, giving
the impression that they're physically set back from the others. Figure 5 shows Word 2000's Edit
menu as it first opens on my machine; Figure 6 shows the same menu after hovering the mouse
over the chevron.

Figure 5. Before expansion—When first opened, the Edit menu shows only recently used items.
Figure 6. Expanded menu—After pausing or clicking on the chevron, the menu expands to show all items.
Recently used items have a regular background, while other items have a lighter background, giving the
visual impression they're placed in the background.
When you choose one of the hidden items, it's added to the shorter version of the menu. Figure 7
shows the Edit menu as it initially appears after choosing the Paste item from the expanded
version in Figure 6.

Figure 7. Adapted menu—Choosing an item from the menu adds it to the shorter version that initially
appears.
Adaptive menus are somewhat controversial. Some users find them frustrating because they
make it difficult to establish "muscle memory," the ability to find an item based on its position.
Other users appreciate adaptive menus because they clear away clutter and leave only those items
one uses. (Note that this is actually a negative as well, as users may not discover useful options
because they're hidden.) In fact, both Office and Windows make adaptive menus optional; you
can turn them off if they bother you.
VFP 7 introduced the tools needed to build adaptive menus in our applications, the MRU and
INVERT clauses of the DEFINE BAR command. However, actually creating adaptive menus
requires code beyond those two clauses.
There are actually three issues. The first is the code to expand and contract the menu. The
Solution Samples that come with VFP include an example ("Add personalized menus") that
demonstrates the necessary code. The second issue, which is not included in the Solution
Samples code, is tracking menu usage and applying it when expanding the menu.
The final problem is that the Menu Designer doesn't support the MRU and INVERT clauses
natively, nor does it provide an easy way to supply the additional code needed for adaptive
menus. I've created a GenMenuX driver to generate the required code; it's discussed later in these
notes.
Creating adaptive menus
To create a menu that expands and contracts, you need an item with the MRU keyword. Any bar
with that keyword displays as a chevron and fires not only when clicked, but also when the
mouse hovers over it. (Unlike the Windows and Office adaptive menus, VFP's MRU bars are not
fired simply by expanding the dropdown and waiting.)
You can attach any code you want to an MRU bar; to create an adaptive menu, use code that
redraws the selected popup including the hidden items. Use the INVERT keyword to give an
item the lighter background that makes it appear set back. After issuing the necessary DEFINE
BAR commands, as well as the ON SELECTION BAR and/or ON BAR commands that assign
actions to the menu items, activate the same popup again. (The initial selection of the MRU item
deactivates the popup.) Following that ACTIVATE POPUP command, which introduces a wait
state, include code to redraw the selected popup in its contracted state.
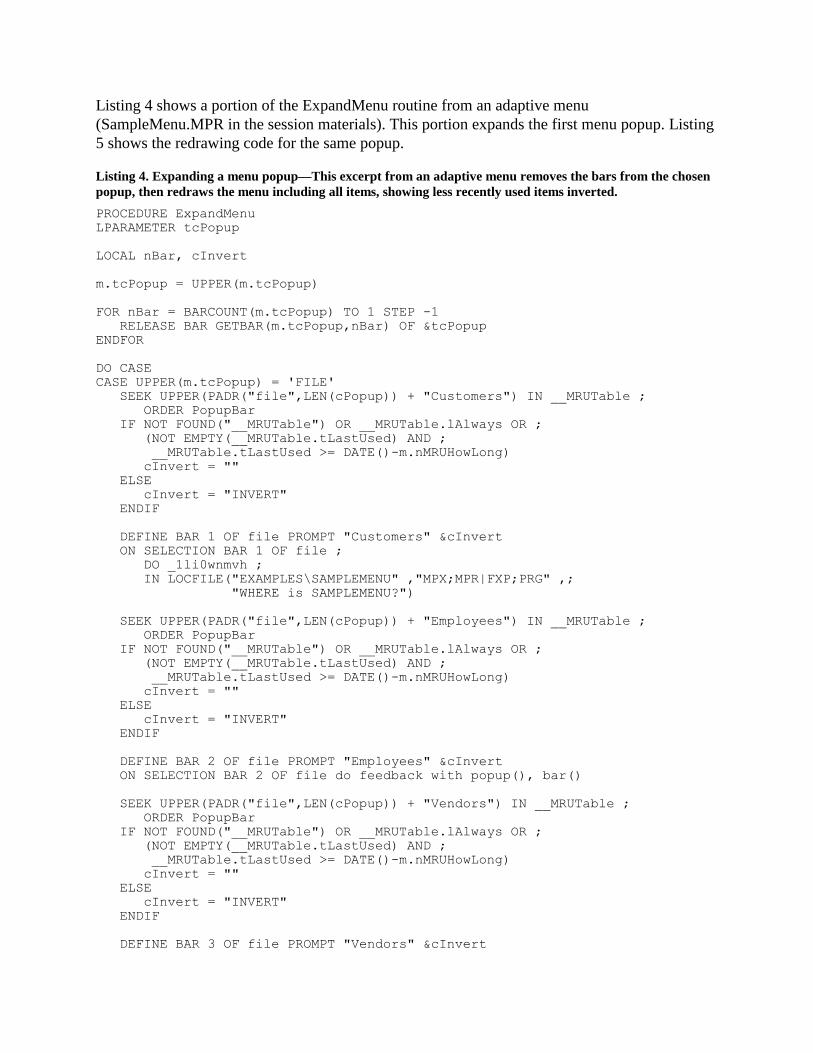
Listing 4 shows a portion of the ExpandMenu routine from an adaptive menu
(SampleMenu.MPR in the session materials). This portion expands the first menu popup. Listing
5 shows the redrawing code for the same popup.
Listing 4. Expanding a menu popup—This excerpt from an adaptive menu removes the bars from the chosen
popup, then redraws the menu including all items, showing less recently used items inverted.
PROCEDURE ExpandMenu
LPARAMETER tcPopup
LOCAL nBar, cInvert
m.tcPopup = UPPER(m.tcPopup)
FOR nBar = BARCOUNT(m.tcPopup) TO 1 STEP -1
RELEASE BAR GETBAR(m.tcPopup,nBar) OF &tcPopup
ENDFOR
DO CASE
CASE UPPER(m.tcPopup) = 'FILE'
SEEK UPPER(PADR("file",LEN(cPopup)) + "Customers") IN __MRUTable ;
ORDER PopupBar
IF NOT FOUND("__MRUTable") OR __MRUTable.lAlways OR ;
(NOT EMPTY(__MRUTable.tLastUsed) AND ;
__MRUTable.tLastUsed >= DATE()-m.nMRUHowLong)
cInvert = ""
ELSE
cInvert = "INVERT"
ENDIF
DEFINE BAR 1 OF file PROMPT "Customers" &cInvert
ON SELECTION BAR 1 OF file ;
DO _1li0wnmvh ;
IN LOCFILE("EXAMPLES\SAMPLEMENU" ,"MPX;MPR|FXP;PRG" ,;
"WHERE is SAMPLEMENU?")
SEEK UPPER(PADR("file",LEN(cPopup)) + "Employees") IN __MRUTable ;
ORDER PopupBar
IF NOT FOUND("__MRUTable") OR __MRUTable.lAlways OR ;
(NOT EMPTY(__MRUTable.tLastUsed) AND ;
__MRUTable.tLastUsed >= DATE()-m.nMRUHowLong)
cInvert = ""
ELSE
cInvert = "INVERT"
ENDIF
DEFINE BAR 2 OF file PROMPT "Employees" &cInvert
ON SELECTION BAR 2 OF file do feedback with popup(), bar()
SEEK UPPER(PADR("file",LEN(cPopup)) + "Vendors") IN __MRUTable ;
ORDER PopupBar
IF NOT FOUND("__MRUTable") OR __MRUTable.lAlways OR ;
(NOT EMPTY(__MRUTable.tLastUsed) AND ;
__MRUTable.tLastUsed >= DATE()-m.nMRUHowLong)
cInvert = ""
ELSE
cInvert = "INVERT"
ENDIF
DEFINE BAR 3 OF file PROMPT "Vendors" &cInvert

ON SELECTION BAR 3 OF file do feedback with popup(), bar()
SEEK UPPER(PADR("file",LEN(cPopup)) + "\-") IN __MRUTable ORDER PopupBar
IF NOT FOUND("__MRUTable") OR __MRUTable.lAlways OR ;
(NOT EMPTY(__MRUTable.tLastUsed) AND ;
__MRUTable.tLastUsed >= DATE()-m.nMRUHowLong)
cInvert = ""
ELSE
cInvert = "INVERT"
ENDIF
DEFINE BAR 4 OF file PROMPT "\-" &cInvert
SEEK UPPER(PADR("file",LEN(cPopup)) + "Quit") IN __MRUTable ORDER PopupBar
IF NOT FOUND("__MRUTable") OR __MRUTable.lAlways OR ;
(NOT EMPTY(__MRUTable.tLastUsed) AND ;
__MRUTable.tLastUsed >= DATE()-m.nMRUHowLong)
cInvert = ""
ELSE
cInvert = "INVERT"
ENDIF
DEFINE BAR 5 OF file PROMPT "Quit" &cInvert
ON SELECTION BAR 5 OF file ;
DO _1li0wnmvi ;
IN LOCFILE("EXAMPLES\SAMPLEMENU" ,"MPX;MPR|FXP;PRG" ,;
"WHERE is SAMPLEMENU?")
ACTIVATE POPUP file
IF NOT gMRUExiting
DO Redraw WITH m.tcPopup ;
IN ("D:\WRITING\CONFS\SWFOX\INTERFACES\EXAMPLES\SAMPLEMENU.MPR")
ENDIF
Listing 5. Drawing an adaptive menu—This excerpt from an adaptive menu shows code for redrawing a
single popup after the user makes a selection.
PROCEDURE Redraw
LPARAMETER tcPopup
LOCAL lAnySkipped
lAnySkipped = .F.
m.tcPopup = UPPER(m.tcPopup)
FOR nBar = BARCOUNT(m.tcPopup) TO 1 STEP -1
RELEASE BAR GETBAR(m.tcPopup,nBar) OF &tcPopup
ENDFOR
DO CASE
CASE UPPER(m.tcPopup) = 'FILE'
SEEK UPPER(PADR("file",LEN(cPopup)) + "Customers") IN __MRUTable ;
ORDER PopupBar
IF NOT FOUND("__MRUTable") OR ;
(__MRUTable.lAlways OR __MRUTable.tLastUsed >= DATE()-m.nMRUHowLong)
DEFINE BAR 1 OF file PROMPT "Customers"
ON SELECTION BAR 1 OF file ;
DO _1li0wnmvh ;

IN LOCFILE("EXAMPLES\SAMPLEMENU" ,"MPX;MPR|FXP;PRG" ,;
"WHERE is SAMPLEMENU?")
ELSE
lAnySkipped = .t.
ENDIF
SEEK UPPER(PADR("file",LEN(cPopup)) + "Employees") IN __MRUTable ;
ORDER PopupBar
IF NOT FOUND("__MRUTable") OR ;
(__MRUTable.lAlways OR __MRUTable.tLastUsed >= DATE()-m.nMRUHowLong)
DEFINE BAR 2 OF file PROMPT "Employees"
ON SELECTION BAR 2 OF file do feedback with popup(), bar()
ELSE
lAnySkipped = .t.
ENDIF
SEEK UPPER(PADR("file",LEN(cPopup)) + "Vendors") IN __MRUTable ;
ORDER PopupBar
IF NOT FOUND("__MRUTable") OR ;
(__MRUTable.lAlways OR __MRUTable.tLastUsed >= DATE()-m.nMRUHowLong)
DEFINE BAR 3 OF file PROMPT "Vendors"
ON SELECTION BAR 3 OF file do feedback with popup(), bar()
ELSE
lAnySkipped = .t.
ENDIF
SEEK UPPER(PADR("file",LEN(cPopup)) + "\-") IN __MRUTable ORDER PopupBar
IF NOT FOUND("__MRUTable") OR ;
(__MRUTable.lAlways OR __MRUTable.tLastUsed >= DATE()-m.nMRUHowLong)
DEFINE BAR 4 OF file PROMPT "\-"
ELSE
lAnySkipped = .t.
ENDIF
SEEK UPPER(PADR("file",LEN(cPopup)) + "Quit") IN __MRUTable ORDER PopupBar
IF NOT FOUND("__MRUTable") OR ;
(__MRUTable.lAlways OR __MRUTable.tLastUsed >= DATE()-m.nMRUHowLong)
DEFINE BAR 5 OF file PROMPT "Quit"
ON SELECTION BAR 5 OF file ;
DO _1li0wnmvi ;
IN LOCFILE("EXAMPLES\SAMPLEMENU" ,"MPX;MPR|FXP;PRG" ,;
"WHERE is SAMPLEMENU?")
ELSE
lAnySkipped = .t.
ENDIF
IF lAnySkipped
DEFINE BAR 6 OF file PROMPT "MRU item" ;
MRU
ON SELECTION BAR 6 OF file ;
DO ExpandMenu WITH "file" ;
in ("D:\WRITING\CONFS\SWFOX\INTERFACES\EXAMPLES\SAMPLEMENU.MPR")
ENDIF

Tracking menu usage is a little trickier. A table is the obvious choice for storing the usage data,
but there are several questions. What information do we need to track? How do we populate the
table with the appropriate list of items? How do we update the table when the user chooses a
menu item?
I've chosen to keep the tracking table fairly simple; Table 5 shows the structure. You might want
to track additional information such as frequency of use. The tracking table needs a single index
tag called PopupBar, with an index key of UPPER(cPopup + cBar).
Table 5. Menu usage table—The table that tracks usage of menu items can be fairly simple.
Field Type Purpose
iID I (AutoInc) Unique id for this record.
cPopup C(15) Name of the popup containing this item.
cBar C(50) Prompt of the menu item.
lAlways L Should this item always be displayed, rather than adapting based on
usage?
lExit L Indicates whether this menu item closes the menu.
tLastUsed T The time this item was last selected.
Populating the table calls for a way to find out what items are on the menu. One possibility is to
wait and add each menu item the first time it's actually used. However, if you're working with the
Menu Designer, you can use the information it contains to populate the table. (This is the
approach used by the GenMenuX driver described below.)
The code in Listing 6 comes from the Setup section of SampleMenu.MPR; it's an excerpt,
showing only the code for the File popup. Analogous code adds bars on the other popups.
Listing 6. Populating the menu tracking table—This code adds menu bars to the usage tracking table, if
they're not already there.
IF NOT USED("__MRUTable")
IF NOT FILE("D:\WRITING\CONFS\SWFOX\INTERFACES\EXAMPLES\MRUSAMPLE.DBF")
CREATE TABLE ;
("D:\WRITING\CONFS\SWFOX\INTERFACES\EXAMPLES\MRUSAMPLE.DBF") ;
(iID I AUTOINC, cPopup C(15), cBar C(50), lAlways L, ;
lExit L, tLastUsed T)
INDEX ON UPPER(cPopup + cBar) TAG PopupBar
USE
ENDIF
USE ("D:\WRITING\CONFS\SWFOX\INTERFACES\EXAMPLES\MRUSAMPLE.DBF") IN 0 ;
SHARED ALIAS __MRUTable
ENDIF
* Add menu bars to MRU table, if necessary
IF NOT SEEK(UPPER(PADR("File ", LEN(__MRUTable.cPopup)) + "Customers"), ;
"__MRUTable", "PopupBar")
INSERT INTO ("D:\WRITING\CONFS\SWFOX\INTERFACES\EXAMPLES\MRUSAMPLE.DBF") ;
(cPopup, cBar, lAlways, lExit) ;

VALUES ("File ", "Customers", .F., .F.)
ENDIF
IF NOT SEEK(UPPER(PADR("File ", LEN(__MRUTable.cPopup)) + "Employees"), ;
"__MRUTable", "PopupBar")
INSERT INTO ("D:\WRITING\CONFS\SWFOX\INTERFACES\EXAMPLES\MRUSAMPLE.DBF") ;
(cPopup, cBar, lAlways, lExit) ;
VALUES ("File ", "Employees", .T., .F.)
ENDIF
IF NOT SEEK(UPPER(PADR("File ", LEN(__MRUTable.cPopup)) + "Vendors"), ;
"__MRUTable", "PopupBar")
INSERT INTO ("D:\WRITING\CONFS\SWFOX\INTERFACES\EXAMPLES\MRUSAMPLE.DBF") ;
(cPopup, cBar, lAlways, lExit) ;
VALUES ("File ", "Vendors", .F., .F.)
ENDIF
IF NOT SEEK(UPPER(PADR("File ", LEN(__MRUTable.cPopup)) + "\-"), ;
"__MRUTable", "PopupBar")
INSERT INTO ("D:\WRITING\CONFS\SWFOX\INTERFACES\EXAMPLES\MRUSAMPLE.DBF") ;
(cPopup, cBar, lAlways, lExit) ;
VALUES ("File ", "\-", .T., .F.)
ENDIF
IF NOT SEEK(UPPER(PADR("File ", LEN(__MRUTable.cPopup)) + "Quit"), ;
"__MRUTable", "PopupBar")
INSERT INTO ("D:\WRITING\CONFS\SWFOX\INTERFACES\EXAMPLES\MRUSAMPLE.DBF") ;
(cPopup, cBar, lAlways, lExit) ;
VALUES ("File ", "Quit", .T., .T.)
ENDIF
Perhaps the hardest piece of the whole problem is updating the tracking table when a menu item
is used. If menus were objects, we could use BindEvents() to run code at the appropriate time,
but that's not an option. The solution is use a command that was ostensibly added to VFP
(actually to FoxPro 2.6) solely for dBase compatibility. The command is ON EXIT POPUP and it
lets you set up an event handler that fires whenever any item on a particular menu popup is
selected. The syntax is:
ON EXIT POPUP Name Command
To record menu usage, the same routine can be called by each popup:
ON EXIT POPUP MyPopup DO UpdateMenu WITH POPUP(), BAR()
The UpdateMenu routine then uses the parameter values, which identify the popup and bar
chosen, to update the tracking table. The code looks like this (though you need to substitute the
path to the actual tracking table in the UPDATE command):
PROCEDURE UpdateMenu
* Update menu usage table when item is chosen
LPARAMETERS cPopup, nBar
LOCAL cBarPrompt
cBarPrompt = STRTRAN(PRMBAR(ALLTRIM(m.cPopup), m.nBar),"<\","")
UPDATE MenuTracking ;
SET tLastUsed = DATETIME() ;
WHERE UPPER(cPopup) == UPPER(ALLTRIM(m.cPopup)) ;
AND UPPER(cBar) == UPPER(ALLTRIM(m.cBarPrompt))

RETURN
You can update any other information you're tracking, such as frequency of use, in the same
procedure.
Behaving appropriately when the menu shuts down is another tricky problem. There are two
issues. First, since the menu opened the tracking table, it should be closed when the menu shuts
down.
The second problem is subtle. When a user expands the popup for one menu pad and then moves
to another pad without making a selection, the redrawing of the original popup is delayed until
some menu selection is made or the user leaves the menu. This is appropriate, so that if the user
returns to the expanded popup, it’s still expanded. (It’s also out of programmatic control.)
However, if the user has expanded one or more popups and then chooses a menu item that shuts
down the menu, there’s no reason to redraw any expanded popups and doing so is likely to
generate errors, because the pads and popups may no longer exist.
To resolve both issues, we need a way to determine that the menu is being closed. A public
variable (gMRUExiting) declared in the Setup code is used. The code that closes the menu must
set this variable to True and close the MRU table. The ExpandMenu procedure checks the value
of gMRUExisting before redrawing popups.
Figure 8 shows the menu created by SampleMenu.MPR. The Process pad has been opened. In
Figure 9, the user has chosen the chevron item and the menu is expanded.
Figure 8. Adaptive menu—When the example menu first opens, only recently used items are shown.
Figure 9. Expanded menu—After clicking on or pausing over the chevron, the menu popup expands to show
the less recently used Invoices item.
A GenMenuX driver
While the total amount of code you need to create an adaptive menu isn't huge, writing it by hand
would be a pain. Ideally, you want to create adaptive menus using the Menu Designer.
The Menu Designer stores information about the menu in a table, using the extension MNX for
the table itself (the DBF), and MNT for the memo file (the FPT). When you choose Menu |
Generate from the VFP menu or build a project that includes menu files, a program called
GenMenu.PRG (located in the VFP home directory) translates the table into actual menu code.
GenMenuX is a wrapper for GenMenu; it allows you to add capabilities without modifying the
menu generator program. GenMenuX, which is in the public domain, was written by Andrew
Ross MacNeill. The most recent version is included in the materials for this session.
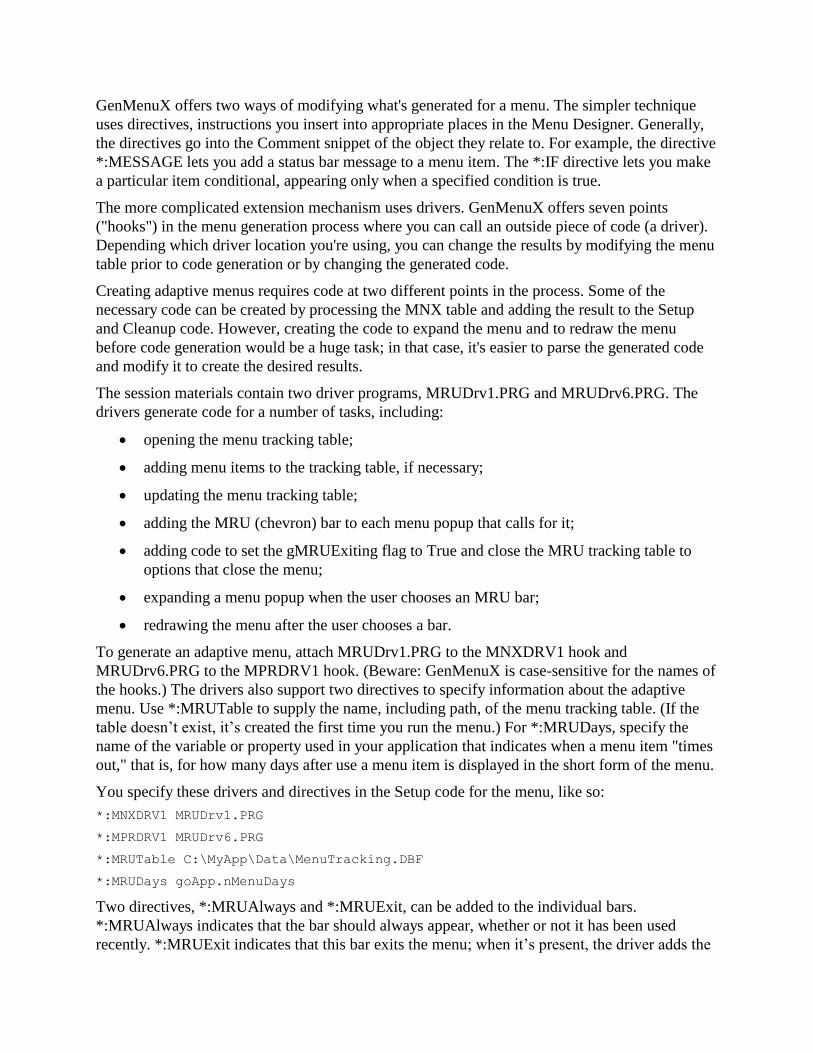
GenMenuX offers two ways of modifying what's generated for a menu. The simpler technique
uses directives, instructions you insert into appropriate places in the Menu Designer. Generally,
the directives go into the Comment snippet of the object they relate to. For example, the directive
*:MESSAGE lets you add a status bar message to a menu item. The *:IF directive lets you make
a particular item conditional, appearing only when a specified condition is true.
The more complicated extension mechanism uses drivers. GenMenuX offers seven points
("hooks") in the menu generation process where you can call an outside piece of code (a driver).
Depending which driver location you're using, you can change the results by modifying the menu
table prior to code generation or by changing the generated code.
Creating adaptive menus requires code at two different points in the process. Some of the
necessary code can be created by processing the MNX table and adding the result to the Setup
and Cleanup code. However, creating the code to expand the menu and to redraw the menu
before code generation would be a huge task; in that case, it's easier to parse the generated code
and modify it to create the desired results.
The session materials contain two driver programs, MRUDrv1.PRG and MRUDrv6.PRG. The
drivers generate code for a number of tasks, including:
opening the menu tracking table;
adding menu items to the tracking table, if necessary;
updating the menu tracking table;
adding the MRU (chevron) bar to each menu popup that calls for it;
adding code to set the gMRUExiting flag to True and close the MRU tracking table to
options that close the menu;
expanding a menu popup when the user chooses an MRU bar;
redrawing the menu after the user chooses a bar.
To generate an adaptive menu, attach MRUDrv1.PRG to the MNXDRV1 hook and
MRUDrv6.PRG to the MPRDRV1 hook. (Beware: GenMenuX is case-sensitive for the names of
the hooks.) The drivers also support two directives to specify information about the adaptive
menu. Use *:MRUTable to supply the name, including path, of the menu tracking table. (If the
table doesn’t exist, it’s created the first time you run the menu.) For *:MRUDays, specify the
name of the variable or property used in your application that indicates when a menu item "times
out," that is, for how many days after use a menu item is displayed in the short form of the menu.
You specify these drivers and directives in the Setup code for the menu, like so:
*:MNXDRV1 MRUDrv1.PRG
*:MPRDRV1 MRUDrv6.PRG
*:MRUTable C:\MyApp\Data\MenuTracking.DBF
*:MRUDays goApp.nMenuDays
Two directives, *:MRUAlways and *:MRUExit, can be added to the individual bars.
*:MRUAlways indicates that the bar should always appear, whether or not it has been used
recently. *:MRUExit indicates that this bar exits the menu; when it’s present, the driver adds the

necessary code to close the MRU table and set the exit flag. Put these directives in the Comment
snippet of the relevant bars.
To use GenMenuX, point the _GenMenu system variable to GenMenuX.PRG. The
documentation for GenMenuX has more details on setting it up.
Please note that the drivers provided with the session materials haven’t been extensively tested;
some of the kinks are still being ironed out. In particular, there are some problems when working
with the VFP system menu (as created by choosing Quick Menu in the Menu Designer). In
addition, the drivers haven't been tested with other GenMenuX drivers or directives. Please let
me know about any problems you run into.
The Bottom Line People make mistakes for all kinds of reasons. Anything you can do in your applications that
makes it easier for your users to enter the right data without making the overall process more
difficult is worth considering.
The techniques in this session offer a few ways to make users' tasks easier. However, it's possible
that some users will find them more troublesome than helpful, so consider offering users a way to
turn them off.
Copyright © 2022 FDOKUMEN