
Mitsubishi Lancer Evolution I - III - PlugIn Installation Manual
Upload
khangminh22Category
view
3download
0
Page 1
SD467609
Create Your First Autocad Plugin Ben Rand Job Industrial Services, Inc.
Description
Have you ever wanted to automate complicated or time-consuming design processes? But maybe you've been intimidated by learning how to program, or even where to start? In this class, you'll learn how to write your first plugin for Autocad, using the C# language. If you've already started on your programming journey, you'll benefit from learning some coding best practices. Join a two-time AU Top Speaker for this exciting introduction to programming in Autocad.
Speaker(s)
Ben Rand has been using AutoCAD software since Release 12. He learned to program using LISP in AutoCAD, worked his way up through VBA to VB.NET, and now spends most of his days programming in C# (occasionally still in AutoCAD!). He has worked in the Industrial Engineering field for more than 18 years as a CAD Manager, developer and IT Director. In 2013, he was the Top DAUG overall winner at AU, and he served as a mentor for the AutoCAD Mentor All-Star team. Ben has been presenting at AU since 2015, and was honored to appear on the Top Rated Speaker list in 2017 and 2018, and is a Pluralsight Author. Ben is the proud father of four children and enjoys reading and playing a variety of sports including pickleball, volleyball, and tennis. In 2018, Ben was a member of a USTA men's league team that placed 1st in the entire country.
Learning Objectives
• Create a plugin for Autocad using the C# language.
• Write focused, cohesive classes and methods.
• Use abstraction to make code more flexible.
• Interact with the Autocad Object Model to automate processes.

Page 2
Introduction
Today, you’re going to learn how to create a useful plugin for Autocad, using C#. I’ll try to explain things so that if you’re new to programming, you should be able to understand what’s going on. Learning how to program requires some effort, but that shouldn’t stop you from jumping in. I also include some advanced concepts, which I wish I’d known earlier in my programming career. Before we get started, there are a few pre-requisites you’ll need. Autocad LT will not work for this class as it doesn’t support plugins, so you’ll need a full version of Autocad. The other two pre-requisites are available for free.
• Full version of Autocad (Autocad LT will not work)
• Visual Studio 2019 Community edition or higher https://visualstudio.microsoft.com/downloads/
• Autocad ObjectARX SDK for the version of Autocad you have installed https://www.autodesk.com/developer-network/platform-technologies/autocad/objectarx-license-download
Scenario Let’s give ourselves some context. You work for a local city government, and regularly deal with individual properties, or parcels. You’d like to make common tasks like creating standard layers and quantifying parcels a little bit easier. Please note that due to the width constraints of this document, there are many code samples where the code “wraps” to the next line and/or there are some weird or missing indents, that I wouldn’t choose in my real code.
Create a plugin for Autocad using C#
In Visual Studio, we create solutions which contain one or more projects. Each project can be based on a different project template, which have different structures and content, depending on the purpose of the template. Each project can also use different languages, so it’s possible in Visual Studio to have a solution with some projects in VB, some in C#, and others in F# or even other languages. Although I now program primarily in C# these days, it was really helpful to me to create “mixed” language solutions when I was transitioning from VB to C#. When creating plugins for Autodesk software, including Autocad, our main project type will be Class Library. This type of project compiles to a DLL file, not an EXE (or executable) file. A class library can’t run on its own. It must be “hosted” by some other executable application. In our case, the “host” application will be Autocad.
Creating the Solution and Project The first thing you need to do is to create a new solution in Visual Studio (VS). When you start VS it asks, “What do you want to do?” 1. Click Create a new project.

Page 3
2. In the Search for templates box, enter class library. 3. Select Class Library (.NET Framework) then click Next. Note that you’ll want the C#
version to follow along with this class, although all of this is easily done in VB.NET as well. 4. Click Next.
FIGURE 1 USING A PROJECT TEMPLATE
5. Enter a project name of Parcels. 6. Click Create. 7. In Solution Explorer, delete Class1.cs.
Adding Autocad references We need to add some references to our project to a few Autocad libraries, so that we can interact with them.
1. Right-click References, then choose Add Reference. 2. Click Browse, then locate the folder where you extracted/installed the ObjectARX SDK,
then navigate to the inc folder, as shown below.

Page 4
FIGURE 2 SELECTING AUTOCAD LIBRARIES FROM OBJECTARX SDK
3. Hold the CTRL key and select AcCoreMgd.dll, AcDbMgd.dll and AcMgd.dll, then click
Add and OK. These are the most common libraries you need for interacting with Autocad and a drawing database. 4. In Solution Explorer, hold SHIFT and select each of the libraries you just added, then right-
click and choose Properties. 5. Change Copy Local to False.
FIGURE 3 COPY LOCAL SETTING FOR AUTOCAD LIBRARIES

Page 5
When your plugin is loaded into Autocad, these libraries will already be loaded by Autocad itself, so there’s no need to include them when you build your solution. We need them as references, though, so that we can program against them. This is required for any new Autocad plugin solution. After you’ve been through it a few times, it’ll take only a few seconds.
Hello World Every programming tutorial starts with a Hello World example. While this often seems like a “dumb” exercise, we can actually learn several important things, including how to access the Editor in Autocad. 1. Right-click the Parcels project node (not the solution at the top!) and choose Add Class. 2. Name the class Commands and click Add. A class is a template for creating objects, which hold information and can perform operations when our program is running. Classes define fields and properties, which hold information, and methods, which do stuff, like reading data from a text file, drawing a line in a drawing, or saving information to a database. It’s a good idea to keep classes rather small and focused on a single job. The fields, properties and methods within that class should all be focused on doing that job. The methods should also be as short as possible, again focused on one particular task. 3. Change the Commands class code to read as follows:
using Autodesk.AutoCAD.Runtime;
using System;
using System.Linq;
namespace Parcels
{
public class Commands
{
[CommandMethod("PS_Hello")]
public void Hello()
{
var document =
Autodesk.AutoCAD.ApplicationServices.Application.DocumentManager.MdiAc
tiveDocument;
var editor = document.Editor;
editor.WriteMessage("\nHello World!");
}
}
}
At the top of the file you see several using directives, such as

Page 6
using Autodesk.AutoCAD.Runtime;
Directives provide us with a shorthand way to get to classes contained within a particular namespace. A namespace is a mechanism for organizing code, similar to the way folders help us organize files. In the example above, we now have access to classes within the Autodesk.AutoCAD.Runtime namespace.
Next you see a namespace statement:
namespace Parcels
This indicates that the code in this file belongs to the Parcels namespace. By default, the
name of the project acts as the primary namespace. If you create subfolders within your project, the subfolder name is added to the end of the primary namespace. VS usually adds this automatically when you create new Class files. Curly brackets { } are used in C# at the beginning and end of each code block. Code blocks
include namespaces, classes, methods, and within certain control structures such as if,
foreach, while and switch.
Next we identify the class name: public class Commands
In addition to identifying the class name, I have added the accessibility modifier public to
indicate that this class is visible anywhere in our solution, including to other projects. We’ll keep things simple for now and make most classes and methods public.
Next we get to a method declaration (and yes, I’m skipping a line on purpose for just a moment): public void Hello()
This is a void method which indicates that it does something, but does not return any value. We’ll see other methods later which return a value, in which case we’ll replace void with the type of value the method returns. This method has no parameters, so we just include an empty set of parentheses at the end of the statement. Sitting on top of the method declaration you see: [CommandMethod(“PS_Hello”)]
This is known as an attribute, which adds metadata to the method. In this case, it’s telling Autocad that when the user types PS_HELLO at the command prompt, run the Hello()
method. Where does CommandMethod come from? It’s located in the
Autodesk.AutoCAD.Runtime namespace, which is why we needed the using declaration at
the very top of the file.

Page 7
Our first statement inside the Hello() method is a doozy:
var document =
Autodesk.AutoCAD.ApplicationServices.Application.DocumentManager.MdiAc
tiveDocument;
Note the really long chain of objects we have to navigate through to get to MdiActiveDocument. This is one of the more intimidating aspects of programming in
Autocad: figuring out where everything is. The Autodesk.Autocad namespace makes some
sense, since we’re programming in Autocad. We could surmise that there’s an Autodesk.Revit namespace floating out there in some other libraries in another SDK. From
there ApplicationServices.Application represents the application itself. Think of that
like the Autocad program window (maybe not entirely accurate, but good enough for a start). As you type in VS, intellisense kicks in and reveals available namespaces and classes, helping you (somewhat) through the discovery process. Below is a screenshot of this in action.
FIGURE 4 INTELLISENSE GUIDES YOUR CODING
Autocad can have multiple drawings open at a time, which are managed by DocumentManager, and from there we can get the MdiActiveDocument, which represents
the active drawing in Autocad when we run our command. Here we’re establishing a variable (a placeholder) named document. This is going to represent
a Document object within AutoCAD. In other words, a drawing. Technically I should have
identified the variable type as follows: Document document = Autodesk.AutoCAD…MdiActiveDocument (truncated for brevity)
Using the var keyword, instead of the specific type, tells C# to work out the type itself. I like it
because it’s less typing and gets the job done. Once we have a variable representing the active document, we assign its Editor property to a
variable named editor. This object enables us to interact with the drawing in many of the
same ways we do in the drawing window and command prompt. For example, we can select objects in the drawing, write messages and much more. Finally, we get to this statement: editor.WriteMessage(“\nHello World!”);

Page 8
The WriteMessage() method has a required string argument (the message we want to
output). Once again, intellisense guides us as we type.
FIGURE 5 INTELLISENSE DISPLAYING METHOD ARGUMENTS
The \n feeds a newline character, so that “Hello World!” appears on an empty line.
Setting up for debugging It’s time to run our program! Before we can do that, we need to setup one last thing. Class libraries (files with a .dll extension) are intended to be hosted within an executable program, in our case AutoCAD. So, we need to tell VS that when we debug our application, we want a host application to start first. We’ll then load our class library into the application, and run our new command. 1. Right-click the Parcels project in Solution Explorer, then choose Properties. 2. Select the Debug tab on the left. 3. Under Start Action, select Start External program, then click Browse and locate
acad.exe on your system. Mine is at C:\Program Files\Autodesk\AutoCAD 2020. 4. Under Start options enter /nologo. This helps Autocad start up quicker. Note that you can use any of your usual startup switches, such as /p followed by a profile name if you want Autocad to start in a specific profile. 5. Close the Properties tab, then click Save All on the toolbar.
Debugging in Autocad At long last, we’re ready to run (debug) our program. 1. Click Start or press F5 to begin a debugging session. VS builds your application, then launches AutoCAD. 2. Start a new drawing, then type NETLOAD at the command prompt and press Enter. 3. Browse to your solution folder to locate the Parcels.dll. Mine is located at
C:\Users\username\source\repos\Parcels\Parcels\bin\Debug.

Page 9
FIGURE 6 NAVIGATING TO THE BIN\DEBUG FOLDER
C:\Users\username\source\repos is the default folder for VS solutions. The first Parcels folder is the solution folder. The second Parcels folder is the project folder. The bin folder is where binary (compiled) files are stored. And finally, the Debug folder is where our particular build is going. When you are ready to “ship” a final product, you should switch your build to Release which will send the binary files to the Release folder instead. 4. Click Open to load the library. 5. At the Security prompt, choose Always Load.
FIGURE 7 SECURITY PROMPT
6. At the command prompt, type PS_HELLO and press Enter. You should see Hello World! at the command prompt.
FIGURE 8 SUCCESSFUL WRITE TO THE COMMAND PROMPT
7. Close Autocad to end your debugging session and return to VS. Congratulations, you’ve just created your first, not very useful (yet), plugin for Autocad.

Page 10
Write focused, cohesive classes and methods
Time for something more interesting. Let’s add a command to create and activate a layer in our drawing. 1. In the Commands class, insert the following code after the closing bracket of the Hello()
method, and before the last two brackets which close the class and namespace blocks. [CommandMethod("PS_CreateParcelLayer")]
public void CreateLayer()
{
var creator = new ParcelLayer();
creator.Create();
}
At this point, most tutorials would just jam all the code for creating a layer into this method, but that’s a really good way to start you on the path of writing spaghetti code, which means code that’s doing too much. Your Commands class would grow into an uncontrollable mess, there’d
be copied and pasted code left and right, dogs and cats living together, sheer chaos. At the risk of a bit of confusion in the short term, I’d rather get you off on the right foot. In my opinion, the Commands class should identify the commands we want accessible within
Autocad, instantiate an object or two responsible for doing whatever action we want done, and then get out of the way. Here, the CreateLayer() method is pretty straightforward. We instantiate a new object of type
ParcelLayer using the new ParcelLayer() statement, and assign this newly created
object to a variable named creator. “Newing up” or instantiating objects like this is very
common. var creator = new ParcelLayer();
We then call a method belonging to that class, named Create().
creator.Create();
At this point, no ParcelLayer class exists, hence the red squiggly line you see in VS. We
need to add this class. 2. Hover your cursor over ParcelLayer, then press CTRL+. (period on your keyboard). Or
use the little Quick Action icon that appears below the token. 3. Select Generate class ‘ParcelLayer’ in new file.

Page 11
FIGURE 9 USING A QUICK ACTION TO GENERATE A NEW CLASS
4. Notice that a new file, ParcelLayer.cs appears in Solution Explorer. 5. Hover your cursor over Create(), the use the Quick Action icon and choose Generate
method ‘ParcelLayer.Create’.
FIGURE 10 USING A QUICK ACTION TO GENERATE A METHOD
VS should open the ParcelLayer class file at this point, but if not, double-click it in the
Solution Explorer window. Here’s the code you should see. internal class ParcelLayer
{
public ParcelLayer()
{
}
public void Create()
{
throw new NotImplementedException();
}
}

Page 12
The internal access modifier means that this class is visible only within the Parcels project,
but not to other projects you may eventually add to the solution. For our purposes it doesn’t really matter, but in practice, I don’t use the internal modifier much.
Next we see an empty constructor.
public ParcelLayer()
{
}
A constructor is a special type of method, named the same as the class and with no return value (not even void). Constructors are used to start a new object in a specific state. Frequently we’ll use a constructor with parameters as a means of passing initial data or other objects into the object being created. If your constructor is truly empty, like it is here, you don’t need it at all as VS will just infer one. To keep my code clean, I would probably erase this, and only add a constructor back in when I need to do something more substantial, which we’ll see later. 6. Within the Create() method, replace the throw new
NotImplementedException(); line with the following code:
var layerName = "Parcels";
var document = Application.DocumentManager.MdiActiveDocument;
var database = document.Database;
using(var transaction =
database.TransactionManager.StartTransaction())
{
var layerTable =
(LayerTable)transaction.GetObject(database.LayerTableId,
OpenMode.ForRead);
LayerTableRecord layer;
if (layerTable.Has(layerName) == false)
{
layer = new LayerTableRecord
{
Name = layerName,
Color = Color.FromColorIndex(ColorMethod.ByAci, 161)
};
layerTable.UpgradeOpen();
layerTable.Add(layer);
transaction.AddNewlyCreatedDBObject(layer, true);
}
database.Clayer = layerTable[layerName];
transaction.Commit();
};

Page 13
After typing this code, you’re probably going to have lots of red squigglies. Place your cursor in any of those spots in the code, then press CTRL+. to add in the missing using declarations. In
some cases, the Quick Action may suggest more than one matching library. Be sure to choose the following: using Autodesk.AutoCAD.ApplicationServices;
using Autodesk.AutoCAD.Colors;
using Autodesk.AutoCAD.DatabaseServices;
Lots to unpack in this method. First, we assign the string “Parcels” to a variable named layerName. We’ll use that in several places throughout the code.
Next, we grab the active document, and its Database. An Autocad DWG file is actually a big
database which happens to display most of its data graphically. Any time we want to draw, or access layers, styles, etc., we’ll be working with the Database class.
Note that this is the second time we’ve needed to get to the MdiActiveDocument object,
which is going to get VERY tedious. We’ll make this easier a little later, but I wanted to point it out now as I really hate stuff that makes my life more difficult, and typing
Autodesk.AutoCAD.ApplicationServices.Application.DocumentManager.MdiAc
tiveDocument
more than once definitely qualifies. Next, we see our old friend, using, but this time it is used as a statement. Many objects in C#
use an interface called IDisposable which ensures that objects release important resources.
The using statement automatically disposes these resources when you’re finished using them.
For example, if you are writing to a file, you want to be sure that the file is properly closed following a write operation. Within the using statement arguments, we start a new Transaction.
using(var transaction =
database.TransactionManager.StartTransaction())
{
//do some stuff here
transaction.Commit();
};
A transaction is a critical mechanism Autocad uses to safeguard access to the database. It ensures that things get saved properly if everything goes well, in which case we can call transaction.Commit() at the very end of the using block. If something goes wrong, a
transaction.Abort() statement is issued, and nothing that happened within the using
block is persisted to the database.

Page 14
Because you are going to use the transaction construct A LOT when programming with Autocad, we’ll introduce a helper method later on to make working with transactions a lot easier. But for now, let’s continue with our explanation of the Create() method.
Typically, when you add a new layer in Autocad, you open the Layer Manager palette, which displays all the layers and their various settings (properties!). We can access the same information via the LayerTable object in the drawing’s Database. We access objects in the
database via Transaction’s GetObject() method.
var layerTable =
(LayerTable)transaction.GetObject(database.LayerTableId,
OpenMode.ForRead);
Each item in the database has an ObjectId which we supply to GetObject(). Some items in
the database are readily accessible via a special “named” property, like LayerTableId. Using
the ObjectId for the LayerTable object, GetObject() retrieves that object from the database.
We cast the returned object to its specific type by adding (LayerTable) in front of the
transaction keyword. We could also do this by placing as LayerTable just after the closing
parenthesis as shown below: var layerTable = transaction.GetObject(database.LayerTableId,
OpenMode.ForRead) as LayerTable;
And finally, we’re opening the LayerTable in read-only mode, which is recommended practice. We’ll change it to read-write mode later when we actually need to change something in the database. Each layer in the LayerTable is represented by a LayerTableRecord, so we setup a
variable for this. LayerTableRecord layer;
Because we aren’t assigning a value to this variable yet, we can’t use the var keyword, so the
compiler can’t infer what type the object will be. When we run our command, it is possible that the “Parcels” layer already exists, in which case we don’t need to create it again. So we’ll check to see if the layer exists first. if (layerTable.Has(layerName) == false)
{
layer = new LayerTableRecord
{
Name = layerName,
Color = Color.FromColorIndex(ColorMethod.ByAci, 161)
};
};

Page 15
if…else… structures are highly important in programming. They give our programs the ability to
make decisions, or branch. An if statement evaluates a conditional statement and if true,
branches to do something. Otherwise (the conditional is false), it does something else. Note that the else clause is optional, we don’t always have to do something else. Assuming the layer
already exists, we don’t need to do anything and can omit the else clause. Note the double equals == in the conditional. When we use a single = we’re saying, “Assign
whatever’s on the right side to the variable on the left side.” But when we use == we’re asking “Is the thing on the right equal to the thing on the left?” If the layer table does not have a layer matching layerName (i.e. “Parcels”), then we’ll create a
new layer and set its color. layer = new LayerTableRecord
{
Name = layerName,
Color = Color.FromColorIndex(ColorMethod.ByAci, 161)
};
Here we’re using object initialization syntax to initialize the newly created layer object’s name and its color. There are many options for assigning colors, but if you’re sticking with the standard 256 color palette, you’ll typically use the FromColorIndex() method of the Color object:
Color.FromColorIndex(ColorMethod.ByAci, 161)
Which sets the color to 161. Note that you could have written the code in the sample like this as well: layer = new LayerTableRecord();
layer.Name = layerName;
layer.Color = Color.FromColorIndex(ColorMethod.ByAci, 161);
Both do the same thing; I prefer using object initializer syntax because it’s (surprise!) less typing. This next part was very strange to me when starting to work with transactions. While we’ve created a new layer in memory, we haven’t actually added it to the LayerTable in the
document’s database. Before we can do this, we need to upgrade the object to read-write mode, which we do using the UpgradeOpen() method.
layerTable.UpgradeOpen();
We can then add the layer object to it:

Page 16
layerTable.Add(layer);
And finally, we have to add the new object to our transaction object. transaction.AddNewlyCreatedDBObject(layer, true);
After closing the if block, we’ll set the database’s CLayer property (the current layer) to the
ObjectId of the layer we created (or, possibly, already exists). We can get that ObjectId via
the layerTable variable, using square brackets [ ] with an index value—here, a string
containing the layer’s name. database.Clayer = layerTable[layerName];
And finally (critically!), we need to commit our transaction. Otherwise nothing is persisted. transaction.Commit();
Follow the steps in Debugging in Autocad earlier in this document, using the command PS_CREATEPARCELLAYER in step 6 to test your program. The “Parcels” layer should be added to your drawing and set current.
Refactoring to the Active Class I mentioned before that there are some really common things we need access to when programming in Autocad, such as the MdiActiveDocument, Editor, and transactions. We
can make our life a lot simpler by creating a “helper” class. I learned this from a very memorable AU 2015 class taught by Scott McFarlane back in 2015. I’ve included a link to his class in the presentation slides for this class. 1. Add a new class file to your project named Active.cs. 2. Replace the default code with the following. using Autodesk.AutoCAD.ApplicationServices;
using Autodesk.AutoCAD.DatabaseServices;
using Autodesk.AutoCAD.EditorInput;
using System;
namespace Parcels
{
public static class Active
{
public static Document Document =>
Application.DocumentManager.MdiActiveDocument;
public static Editor Editor => Document.Editor;
public static Database Database => Document.Database;
public static void UsingTransaction(Action<Transaction>
action)
{

Page 17
using (var transaction =
Active.Database.TransactionManager.StartTransaction())
{
action(transaction);
transaction.Commit();
}
}
}
}
Note: going forward, I’ll omit the namespace Parcels { } portion of code for new classes or
interfaces to save space. This class has a different access modifier we haven’t seen yet: static. Static classes are
special in that you cannot instantiate them (via the new keyword), and they can only contain
static methods and properties. Here, we identify three properties which give us direct, easy access to the current Document, its Editor, and its Database. So, wherever you need
access to MdiActiveDocument, you can just do this:
var doc = Active.Document;
The UsingTransaction() method requires more explanation. Recall when we first discussed
transactions that we’re always going to have the following “boilerplate” code (I’ve substituted our new static property Active.Database for the original database variable):
using(var transaction =
Active.Database.TransactionManager.StartTransaction())
{
//do some stuff here
transaction.Commit();
};
If we could somehow substitute in “random” code in place of the comment //do some stuff
here, it would make our lives quite a bit simpler. And we can do just that by passing in an
Action<Transaction> argument to the Active.UsingTransaction() method. This
method spins up a transaction, executes whatever code is passed in via the action argument, then commits and closes the transaction. We’ll see exactly how to call this in the next part of our lesson.
Interact with the Autocad Object Model to automate processes
One of the tasks we’re frequently asked to do in our imaginary parcel job scenario is summarizing how many parcels are in a specific area, and what the combined area is. We’ll define a “parcel” as being a closed polyline, on the “Parcels” layer, and ignore all other polylines that might wind up in our selection set. Let’s setup a new command in our Commands class.

Page 18
[CommandMethod("PS_CountParcels")]
public void CountParcels()
{
var cmd = new ParcelCounter();
var summary = cmd.Count();
Active.Editor.WriteMessage($"\nFound {summary} parcels.");
}
First we instantiate a ParcelCounter object and then call its Count() method. This method
will return some sort of summary object which we assign to the summary variable.
We then use the Editor (via our handy-dandy Active class!) to write out the number of
parcels found. 1. Create the ParcelCounter class as before by placing your cursor anywhere inside
ParcelCounter, then using CTRL+. and choosing Declare Class. 2. Add the following code: public int Count()
{
var count = 0;
var options = new PromptSelectionOptions();
options.MessageForAdding = "Add parcels";
options.MessageForRemoval = "Remove parcels";
var filter = new SelectionFilter(new TypedValue[]
{
new TypedValue((int)DxfCode.Start, "LWPOLYLINE"),
new TypedValue((int)DxfCode.LayerName, "Parcels")
});
var result = Active.Editor.GetSelection(options, filter);
if (result.Status == PromptStatus.OK)
{
Active.UsingTransaction(tr =>
{
foreach (var objectId in result.Value.GetObjectIds())
{
var polyline = (Polyline)tr.GetObject(objectId,
OpenMode.ForRead);
if (polyline.Closed)
{
count++;
}
}
});
}

Page 19
return count;
}
3. Use CTRL+. shortcut to add using statements for
Autodesk.AutoCAD.DatabaseServices and Autodesk.AutoCAD.EditorInput to
resolve a couple of red squigglies. This is a rather lengthy method that essentially does two things. First, it sets up some selection options and filters, and prompts the user to select objects in the drawing. Second, it uses a transaction to iterate through the selected objects to count them. While it is very common to write code this way (lots of responsibilities mashed into one method), your code will quickly grow to be an unruly mess with all kinds of responsibilities. Let’s refactor this by extracting the code responsible for selecting objects, and moving it to its own method. This refactoring is so common, it’s been given a name: Extract Method. We’re extracting code from one method and forming a new method which is then called from the original method. 4. Add the following code: private PromptSelectionResult SelectParcels()
{
var options = new PromptSelectionOptions();
options.MessageForAdding = "Add parcels";
options.MessageForRemoval = "Remove parcels";
var filter = new SelectionFilter(new TypedValue[]
{
new TypedValue((int)DxfCode.Start, "LWPOLYLINE"),
new TypedValue((int)DxfCode.LayerName, "Parcels")
});
return Active.Editor.GetSelection(options, filter);
}
5. Back in Count() add a line after var count = 0; as follows:
var result = SelectParcels();
Let’s discuss SelectParcels().
private PromptSelectionResult SelectParcels()
This method is marked with the private access modifier, which means that it cannot be seen
or accessed from outside this class. It returns a PromptSelectionResult which indicates
whether the selection operation was successful or not. When selecting objects in Autocad, the user might select some objects, or nothing, or she might hit ESC. A PromptSelectionResult captures all of that for us.
Page 20
The Editor class has several methods we can use to get a selection of objects, which all use a
similar pattern. They all take some sort of Options object (like PromptSelectionOptions),
and some also allow a SelectionFilter object. Here, the options variable sets up the
prompts the user sees. var options = new PromptSelectionOptions();
options.MessageForAdding = "Add parcels";
options.MessageForRemoval = "Remove parcels";
The filter variable sets up some TypedValue array filters so that only “valid” objects are
selected. var filter = new SelectionFilter(new TypedValue[]
{
new TypedValue((int)DxfCode.Start, "LWPOLYLINE"),
new TypedValue((int)DxfCode.LayerName, "Parcels")
});
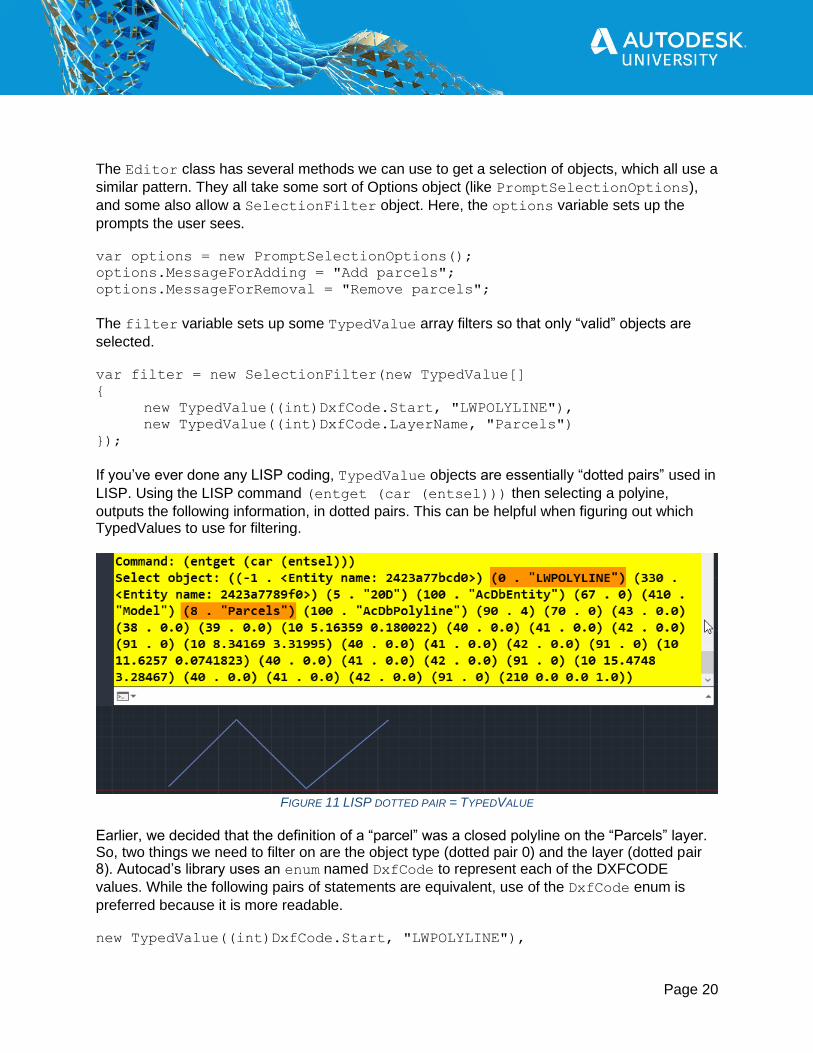
If you’ve ever done any LISP coding, TypedValue objects are essentially “dotted pairs” used in
LISP. Using the LISP command (entget (car (entsel))) then selecting a polyine,
outputs the following information, in dotted pairs. This can be helpful when figuring out which TypedValues to use for filtering.
FIGURE 11 LISP DOTTED PAIR = TYPEDVALUE
Earlier, we decided that the definition of a “parcel” was a closed polyline on the “Parcels” layer. So, two things we need to filter on are the object type (dotted pair 0) and the layer (dotted pair 8). Autocad’s library uses an enum named DxfCode to represent each of the DXFCODE
values. While the following pairs of statements are equivalent, use of the DxfCode enum is
preferred because it is more readable. new TypedValue((int)DxfCode.Start, "LWPOLYLINE"),

Page 21
new TypedValue((int)DxfCode.LayerName, "Parcels")
new TypedValue(0, "LWPOLYLINE"),
new TypedValue(8, "Parcels")
With our PromptSelectOptions and SelectionFilter objects ready to go, we can pass
them into Editor’s GetSelection() method, and return the results.
return Active.Editor.GetSelection(options, filter);
We can now return to a discussion of the Count() method.
var result = SelectParcels();
if (result.Status == PromptStatus.OK)
{
We assign the return value of SelectParcels to the result variable. We then check to see if its Status equals PromptStatus.OK. PromptStatus is yet another enum from the Autocad
library. It is important to do this check because the user might have cancelled out of the command, or made an invalid selection, in which case there’s no point in trying to do anything else. Active.UsingTransaction(tr =>
{
Next, we use our Active.UsingTransaction method. The Action parameter requires a placeholder for a transaction, which we’ll identify using tr. The => symbol is called a lambda
operator. I read somewhere that this was called the “goes to” operator, which kind of stuck for me. So “tr (a transaction) goes to (the following code).” The code that we want to happen inside the transaction is as follows: foreach (var objectId in result.Value.GetObjectIds())
{
var polyline = (Polyline)tr.GetObject(objectId,
OpenMode.ForRead);
if (polyline.Closed)
{
count++;
}
}
foreach is a new type of construct for us. It allows us to loop over (or iterate) a collection of
objects. In this case, a PromptSelectionResult object contains a Value property, which in
this case is a SelectionSet object, from which we can call GetObjectIds() which returns
the ObjectIds of any objects the user selected.

Page 22
We then use the transaction’s GetObject() method on each objectId, casting the returned
object to a Polyline and storing it in the polyline variable. Now we can check if the polyline is
Closed. If so, we’ll increase the count variable using the ++ operator. ++ increments an
integer variable by 1. You could also do this as follows: count = count + 1;
Calling the Count() method gives us a count of selected parcels. The caller of this method,
Commands.CountParcels(), receives an integer value back, and outputs a summary
message to the command prompt, via Active.Editor.WriteMessage().
A simple count of objects seems kind of boring. We could do that via the Properties panel in Autocad. But what about the sum of the areas of all the parcels? If you try that in the Properties panel, you just get “*Varies*” which is not helpful. You could try using the AREA command, but that’s kind of a pain. Let’s refactor our Count() method to provide more data about the parcels
selected.
Refactoring the Count() method It would be nice if our method could provide not only a count of selected parcels, but also the total area of the selected parcels. Let’s create a class to store this information. 1. Add a new class to the Parcels project named ParcelSummary.
2. Add the following code: public class ParcelSummary
{
public int Count { get; set; }
public double Area { get; set; }
}
This simple class contains two properties, Count and Area. Change the
ParcelCounter.Count() method to return a ParcelSummary object, replacing the count
(integer) variable with a summary (ParcelSummary) variable. Changes are highlighted below:
public ParcelSummary Count()
{
var summary = new ParcelSummary();
var result = SelectParcels();
if (result.Status == PromptStatus.OK)
{
Active.UsingTransaction(tr =>
{
foreach (var objectId in result.Value.GetObjectIds())
{
var polyline = (Polyline)tr.GetObject(objectId,
OpenMode.ForRead);
if (polyline.Closed)

Page 23
{
summary.Count++;
summary.Area += polyline.Area;
}
}
});
}
return summary;
}
Each time the program finds a closed polyline in the selected objects, the summary object’s
Count property will be incremented, and its Area property will have the polyline’s area added to
it. The += operator adds a value to an existing value.
Unfortunately, our message results are going to be a little weird at this point, because C# won’t know what to display for a ParcelSummary object. We could override a built-in method called
ToString() but I have bigger plans.
Use abstraction to make code more flexible
While writing to the command prompt is one way for us to report information, it’s pretty limited. We might want to eventually write to a text file, to Excel, or to a database. How can we do this in a way that is flexible? A good programming technique for classes that need to interact with one another is to program to abstractions, not to concrete implementations. Programming to Editor.WriteMessage()
is an example of programming to a concrete implementation. There’s only one place the output can go: Autocad’s command prompt. Interfaces are a type of abstraction used to define “contracts”—specifying method signatures and/or properties without providing an actual implementation. We can then write a class that implements an interface, meaning that it has to provide an implementation of the methods and properties identified by the interface. 1. Right-click the Parcels project, then choose Add > New Item. 2. Select Interface from the list of templates, then type the name IMessageWriter, then click
Add. 3. Copy the following code into the IMessageWriter.cs file. public interface IMessageWriter
{
void WriteMessage(string message);
}
Note that there is no executable code in an interface. The convention for naming interfaces in C# is to prefix the name with an I. This interface identifies a single void method, named
WriteMessage() which takes a string argument--the message we want “written” out.

Page 24
Another way that our program might change is in the specific content (the “message”) that we write out. For example, when writing to the command prompt within a drawing, we might have a fairly short summary message. But when we write to a text file, we might want to include additional information, such as the drawing path, and the date/time we ran the command. Let’s add another interface called IParcelSummarizer.
4. Use steps 1-3 above, but name the file IParcelSummarizer. 5. Add the following code: public interface IParcelSummarizer
{
string GenerateSummary(ParcelSummary summary);
}
This interface defines a single method, GenerateSummary, which requires a ParcelSummary
object, and returns a string. This will provide us with a mechanism for creating different
summarizations of the data collected in a ParcelSummary object.
Let’s update the ParcelSummary class to include a Write method that makes use of our new
abstractions. 6. In the ParcelSummary class, add the following method.
public void Write(IParcelSummarizer summarizer, IMessageWriter writer)
{
writer.WriteMessage(summarizer.GenerateSummary(this));
}
By programming to abstractions, the ParcelSummary class doesn’t know how its data will be
formatted (the IParcelSummarizer’s job) nor where the message will be written (the
IMessageWriter’s job). It just knows that writer has a WriteMessage() method, and that
summarizer has a GenerateSummary method it can call. The this keyword passed into
GenerateSummary refers to the instance of ParcelSummary whose Write method was
called. We now need implementations of each of our interfaces. Let’s start by implementing a simple IMessageWriter, which writes to the Autocad command prompt.
7. Add a new class named AutocadMessageWriter to the Parcels project. 8. Add the following code: public class AutocadMessageWriter : IMessageWriter
{
public void WriteMessage(string message)
{
Active.Editor.WriteMessage($”\n{message}”);

Page 25
}
}
Now let’s implement IParcelSummarizer.
9. Add a new class to the Parcels project named ParcelSummarizer. 10. Add the following code: public class ParcelSummarizer : IParcelSummarizer
{
public string GenerateSummary(ParcelSummary summary)
{
var message = $"Found {summary.Count} parcels.";
message += $"\nCombined area: {summary.Area:N2}";
return message;
}
}
To recap, implementations of IParcelSummarizer define what we’re going to write, based on
data contained in a ParcelSummary object. Implementations of IMessageWriter define
where we are going to write the message. Let’s go back to the Commands.CountParcels() method, and wire this together.
[CommandMethod("PS_CountParcels")]
public void CountParcels()
{
var cmd = new ParcelCounter();
var summary = cmd.Count();
var summarizer = new ParcelSummarizer();
summary.Write(summarizer,
new AutocadMessageWriter());
}
We instantiate a ParcelSummarizer object. Then we call summary.Write() method, and
pass the summarizer object, and a new AutocadMessageWriter object.
If this seems like a lot of work, and a confusing way to simply write to the Autocad command prompt, you’re right. But we’re about to get to the good part. What if our plugin requirements change (and they always do!), and we now need to write summaries out to a text file? Let’s create another IMessageWriter, which writes to a text file.
1. Add a new class file to your project called TextMessageWriter. 2. Add the following code:

Page 26
public class TextMessageWriter : IMessageWriter
{
private readonly string _filePath;
private readonly bool _shouldAppend = false;
public TextMessageWriter(string filePath, bool shouldAppend =
false)
{
_filePath = filePath;
_shouldAppend = shouldAppend;
}
public void WriteMessage(string message)
{
using (var streamWriter = new StreamWriter(_filePath,
_shouldAppend))
{
streamWriter.WriteLine(message);
}
}
}
This class implements IMessageWriter, as does AutocadMessageWriter. Note that to
instantiate this class, the caller needs to specify a file path where we want the file to be written. There is also an optional parameter to specify whether the file should be appended to, or overwritten each time. These settings are stored in readonly fields for later use. The
readonly modifier means that once the variable _filePath or _shouldAppend are
assigned a value, they cannot be changed later. WriteMessage uses a StreamWriter (part of the .NET framework) to write data to a text file.
Let’s suppose that one of the requirements of writing our ParcelSummary data to a text file is to output both the filename of the file containing the parcels, as well as a date/time stamp so we know when the data was written. However, we still want to include the same basic data that ParcelSummarizer provides.
It turns out that this is a good place to apply a programming design pattern called the Decorator Pattern. This is an easy way for us to take some existing functionality and “decorate” it with new functionality, without complicating the original functionality. 3. Add a new class named TextParcelSummarizer to your solution with the code below.
public class TextParcelSummarizer : IParcelSummarizer
{
private readonly IParcelSummarizer _decoratedSummarizer;
public TextParcelSummarizer(IParcelSummarizer
decoratedSummarizer)
{

Page 27
_decoratedSummarizer = decoratedSummarizer;
}
public string GenerateSummary(ParcelSummary summary)
{
var message = Active.Document.Name;
message += _decoratedSummarizer.GenerateSummary(summary);
message += DateTime.Now.ToString();
return message;
}
}
Due to space/time constraints, I’m not going to explain the decorator pattern in depth. Consider that a homework assignment. But note that this class implements IParcelSummarizer, and
also takes in an IParcelSummarizer as the decoratedSummarizer argument. In the
GenerateSummary method, it calls the decorated summarizer’s GenerateSummary method,
and wraps that message with some additional messaging of its own. It then returns the full, decorated message back to the caller. How do we use this? Pretty simple, actually. Back in Commands.CountParcels(), make the
following changes: [CommandMethod("PS_CountParcels")]
public void CountParcels()
{
//previous code omitted for brevity
var myDocuments =
Environment.GetFolderPath(Environment.SpecialFolder.MyDocuments);
summary.Write(new TextParcelSummarizer(summarizer),
new TextMessageWriter(Path.Combine(myDocuments,
"ParcelSummary.txt"), true));
}
NOTE: Environment.GetFolderPath(Environment.SpecialFolder.MyDocuments)
retrieves the path to the current user’s My Documents folder. Path.Combine combines
portions of a file path (i.e. the path to My Documents with the file name “Parcels.txt”). This time, when we call summary.Write(), we new up a TextParcelSummarizer and pass
in the same summarizer object we used before. We also pass in an instance of
TextMessageWriter, with the path and append option set to true.
At this point, you can debug and test your code. Use the PS_CREATEPARCELLAYER command to create a Parcels layer in an empty drawing. Draw a few open and closed polylines on that layer. For good measure, add a few open and closed polylines on another layer, then use the PS_COUNTPARCELS command to see the summary. Note that you should now get

Page 28
output to two different locations: the command prompt and to a text file in your My Documents folder! Opening the file, we see something like the following:
FIGURE 12 WRITING A PARCEL SUMMARY TO A TEXT FILE
Bonus Material (Time Permitting) What if we now wanted to include an option for writing out to an HTML file for viewing on the Web? Turns out that most of the plumbing is already in place. We’ll need a new IParcelSummarizer.
1. Add a new class and name it HtmlParcelSummarizer, with the following code. public class HtmlParcelSummarizer : IParcelSummarizer
{
public string GenerateSummary(ParcelSummary summary)
{
return
$@"<!DOCTYPE HTML>
<html>
<head>
<title>Parcel Summary</title>
</head>
<body>
<h1>Parcel Summary for {Active.Document.Name}</h1>
<ul>
<li>Found {summary.Count} parcels.</li>
<li>Combined area: {summary.Area:N2}</li>
</ul>
</body>
</html>";
}
}
All we’re doing here is creating a long string in HTML format, with some of the data from our ParcelSummary object sprinkled in. We need to write out to a text file, similar to our

Page 29
TextMessageWriter. But because our HTML is complete in this case, we should overwrite
the resulting file each time we run our command. Let’s go wire this up in our CountParcels method and run it!
2. In the Commands class, change CountParcels to the following:
[CommandMethod("PS_CountParcels")]
public void CountParcels()
{
//previous code omitted for brevity
summary.Write(new HtmlParcelSummarizer(),
new TextMessageWriter(Path.Combine(myDocuments,
"ParcelSummary.html"), false));
}
Note that we’re instantiating an HtmlParcelSummarizer, and a new TextMessageWriter,
since we need to write to a different file, and our append option is different in this case. Debug the code and run PS_CountParcels again. If you look in your My Documents folder, you should see the following:
FIGURE 13 HTML AND TXT SUMMARY FILES
Open up the ParcelSummary.html file and you’ll see a very basic web page that looks like this:
Using abstraction, and a useful design pattern, we now get two completely different text file outputs, one as a TXT file, the other as HTML!
Summary
In summary, we learned how to create a plugin for Autocad, using Visual Studio and the C# language. We saw how to add references to key Autocad DLLs so that we could program to the Autocad API. We learned about namespaces, classes, properties and methods. We learned some programming constructs like if/else and foreach to control the flow of our program.

Page 30
Within the Autocad API, we saw how to use the CommandMethod attribute to flag certain methods for Autocad so that we could use those commands at the command prompt, just like native Autocad commands. We learned how to use Transactions to query information from a drawing database, and how to add objects (like new layers) to the database. We created a special helper class, Active, to simplify access to the active Document, Database and Editor. We also created a boilerplate helper method, UsingTransaction, which takes in arbitrary code as an Action parameter, and does all the necessary Transaction setup and Commit code for us. This kind of method greatly simplifies very common code we would otherwise have to write over and over again. We learned the importance of splitting code up into separate, focused classes and methods to keep our code readable, and easy to maintain. We learned about coding to abstractions instead of concrete implementations. This leads to more flexible, adaptable code. I hope you’ve enjoyed this class and will start experimenting on your own! Please feel free to reach out if you have questions. You can reach me via email at [email protected].
Copyright © 2022 FDOKUMEN