Request for Information – How to Create Create an RFI
32
_____________________________________________________________________________________ Copyright 2014 Exostar LLC All Rights Reserved RFI – Create: 1 Request for Information – How to Create Create an RFI To create any RFx (RFI, RFQ, RFP, Auction or Buyer Survey), from the View and Manage RFx(s) page, click on the Create RFx button. Follow the steps below to create an RFI: 1. From the top toolbar, go to RFx(s) Create New RFx Or, from the View and Manage RFx(s) page, click the Create RFx button 2. In the pop-up window, click the Create New RFx button There are several ways to create a new RFI in this system: Create New RFx - Use this button to create an RFI from “scratch”. Create From Template – This allows you to build an RFI from a previously developed RFI. Create From Import – This uses a previous RFI that can be imported into your system.
-
Upload
khangminh22 -
Category
Documents
-
view
0 -
download
0
Transcript of Request for Information – How to Create Create an RFI
_____________________________________________________________________________________ Copyright 2014 Exostar LLC All Rights Reserved RFI – Create: 1
Request for Information – How to Create
Create an RFI
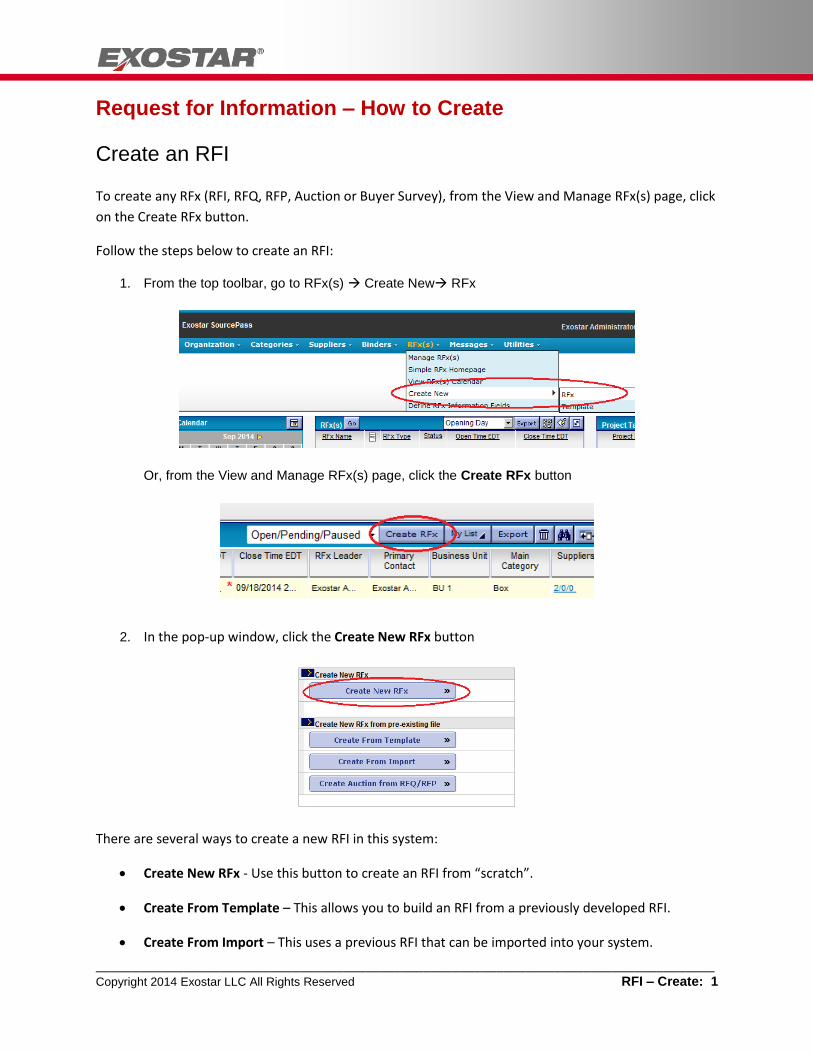
To create any RFx (RFI, RFQ, RFP, Auction or Buyer Survey), from the View and Manage RFx(s) page, click
on the Create RFx button.
Follow the steps below to create an RFI:
1. From the top toolbar, go to RFx(s) Create New RFx
Or, from the View and Manage RFx(s) page, click the Create RFx button
2. In the pop-up window, click the Create New RFx button
There are several ways to create a new RFI in this system:
Create New RFx - Use this button to create an RFI from “scratch”.
Create From Template – This allows you to build an RFI from a previously developed RFI.
Create From Import – This uses a previous RFI that can be imported into your system.
_____________________________________________________________________________________ Copyright 2014 Exostar LLC All Rights Reserved RFI – Create: 2
Basic Information
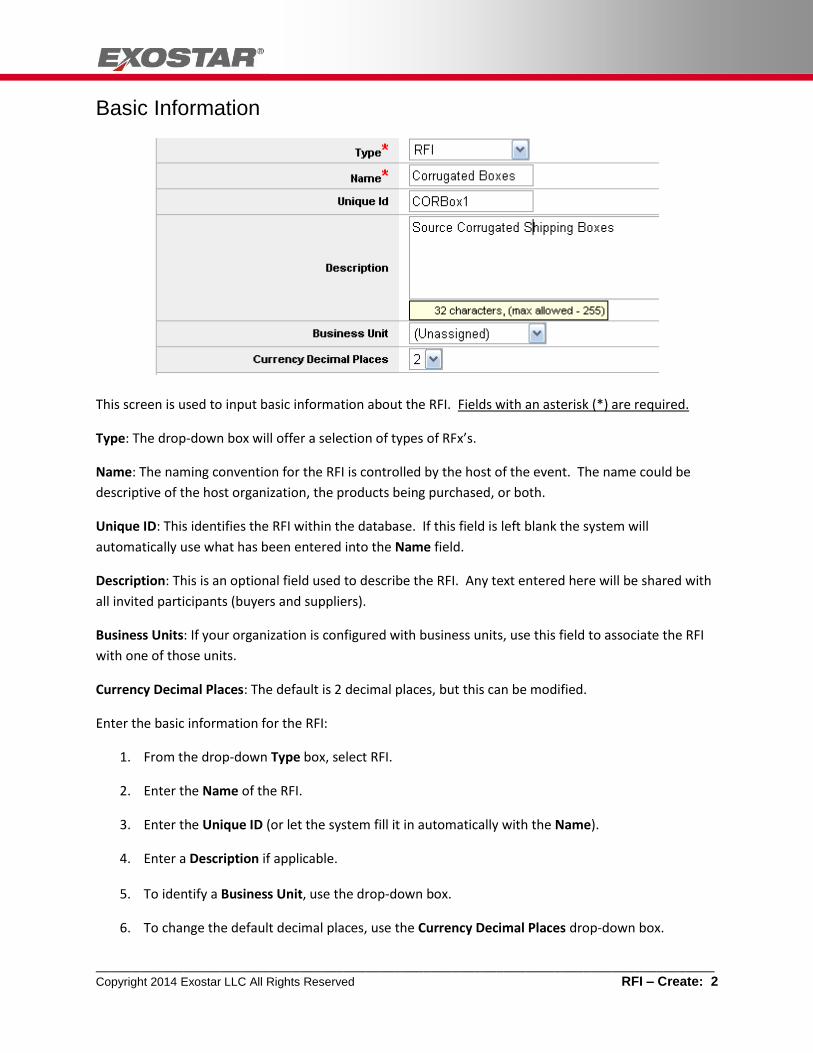
This screen is used to input basic information about the RFI. Fields with an asterisk (*) are required.
Type: The drop-down box will offer a selection of types of RFx’s.
Name: The naming convention for the RFI is controlled by the host of the event. The name could be
descriptive of the host organization, the products being purchased, or both.
Unique ID: This identifies the RFI within the database. If this field is left blank the system will
automatically use what has been entered into the Name field.
Description: This is an optional field used to describe the RFI. Any text entered here will be shared with
all invited participants (buyers and suppliers).
Business Units: If your organization is configured with business units, use this field to associate the RFI
with one of those units.
Currency Decimal Places: The default is 2 decimal places, but this can be modified.
Enter the basic information for the RFI:
1. From the drop-down Type box, select RFI.
2. Enter the Name of the RFI.
3. Enter the Unique ID (or let the system fill it in automatically with the Name).
4. Enter a Description if applicable.
5. To identify a Business Unit, use the drop-down box.
6. To change the default decimal places, use the Currency Decimal Places drop-down box.
_____________________________________________________________________________________ Copyright 2014 Exostar LLC All Rights Reserved RFI – Create: 3
Basic Information, continued
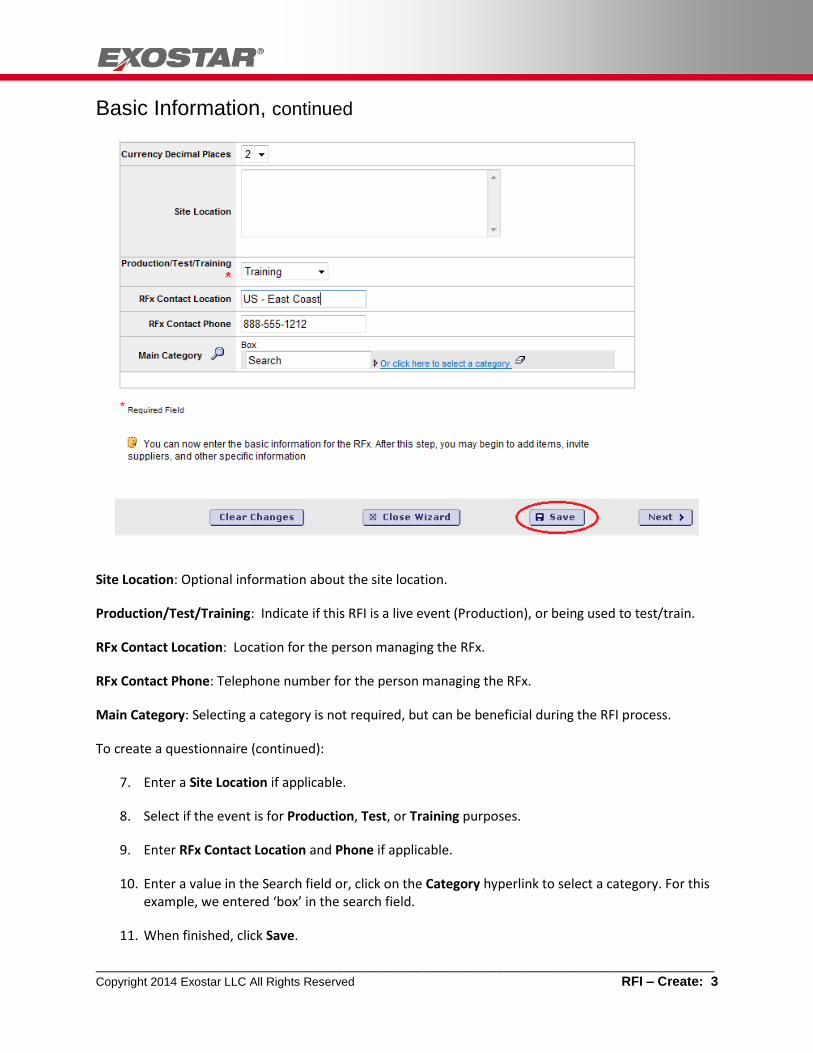
Site Location: Optional information about the site location.
Production/Test/Training: Indicate if this RFI is a live event (Production), or being used to test/train.
RFx Contact Location: Location for the person managing the RFx.
RFx Contact Phone: Telephone number for the person managing the RFx.
Main Category: Selecting a category is not required, but can be beneficial during the RFI process.
To create a questionnaire (continued):
7. Enter a Site Location if applicable.
8. Select if the event is for Production, Test, or Training purposes.
9. Enter RFx Contact Location and Phone if applicable.
10. Enter a value in the Search field or, click on the Category hyperlink to select a category. For this example, we entered ‘box’ in the search field.
11. When finished, click Save.

_____________________________________________________________________________________ Copyright 2014 Exostar LLC All Rights Reserved RFI – Create: 4
Basic Information, continued
Clicking the Save button after inputting basic information about the RFI will cause the navigation Wizard
menu to display on the left side of the screen. The Wizard will guide you as you create the RFI. You can
click on any step in the Wizard to move directly to it. You can skip steps and move through the Wizard
in any order.
To use the Wizard:
1. On the Basic Information step, click the Next button at the bottom of the screen.
2. Or, use the Wizard to select Define RFI Rules and then begin building the RFI.
_____________________________________________________________________________________ Copyright 2014 Exostar LLC All Rights Reserved RFI – Create: 5
Define RFI Rules
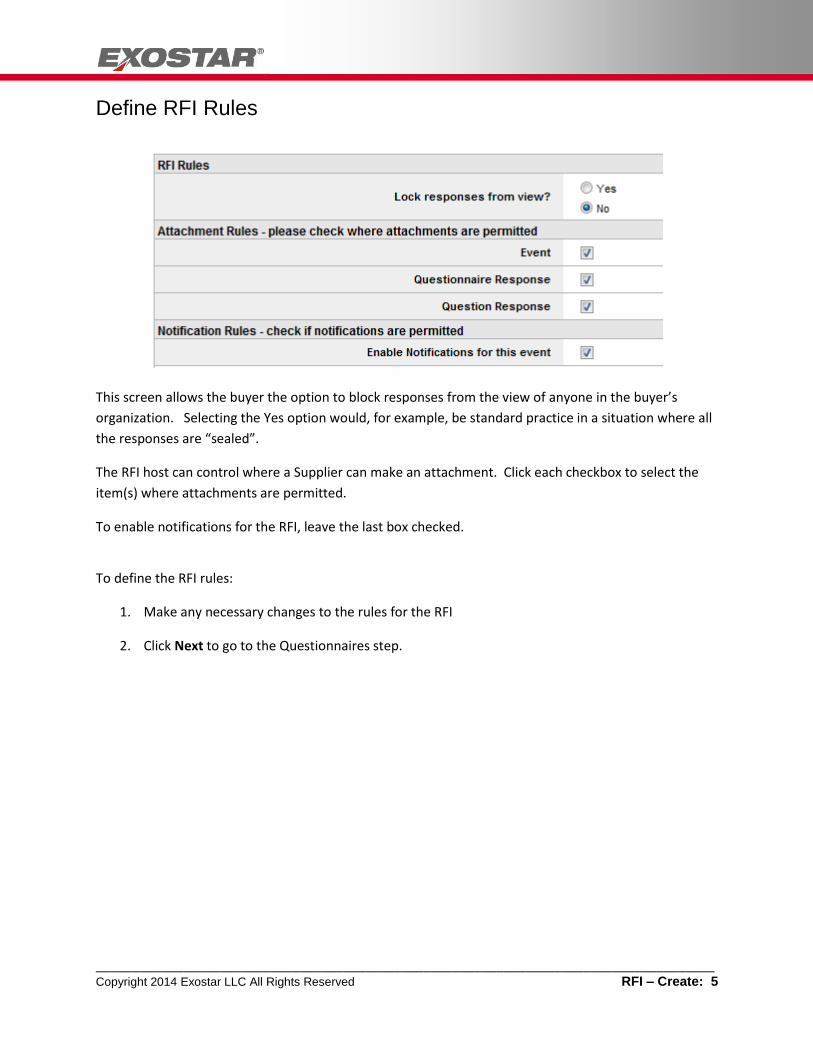
This screen allows the buyer the option to block responses from the view of anyone in the buyer’s
organization. Selecting the Yes option would, for example, be standard practice in a situation where all
the responses are “sealed”.
The RFI host can control where a Supplier can make an attachment. Click each checkbox to select the
item(s) where attachments are permitted.
To enable notifications for the RFI, leave the last box checked.
To define the RFI rules:
1. Make any necessary changes to the rules for the RFI
2. Click Next to go to the Questionnaires step.
_____________________________________________________________________________________ Copyright 2014 Exostar LLC All Rights Reserved RFI – Create: 6
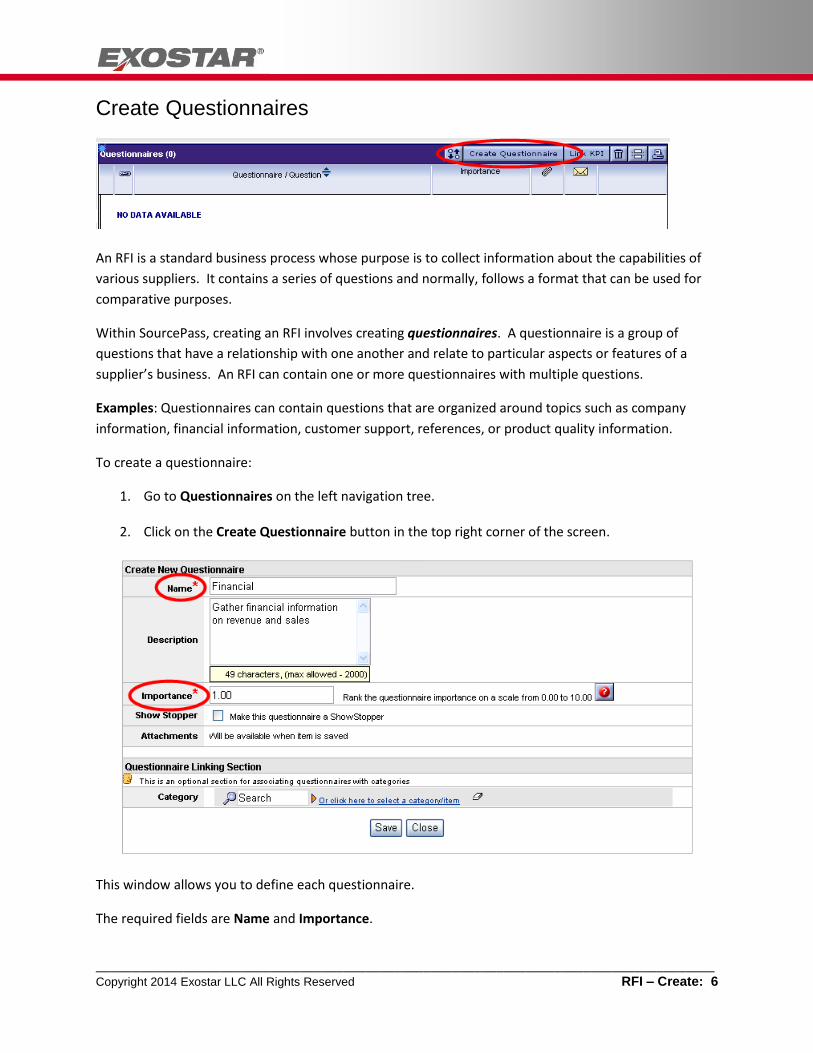
Create Questionnaires
An RFI is a standard business process whose purpose is to collect information about the capabilities of
various suppliers. It contains a series of questions and normally, follows a format that can be used for
comparative purposes.
Within SourcePass, creating an RFI involves creating questionnaires. A questionnaire is a group of
questions that have a relationship with one another and relate to particular aspects or features of a
supplier’s business. An RFI can contain one or more questionnaires with multiple questions.
Examples: Questionnaires can contain questions that are organized around topics such as company
information, financial information, customer support, references, or product quality information.
To create a questionnaire:
1. Go to Questionnaires on the left navigation tree.
2. Click on the Create Questionnaire button in the top right corner of the screen.
This window allows you to define each questionnaire.
The required fields are Name and Importance.
_____________________________________________________________________________________ Copyright 2014 Exostar LLC All Rights Reserved RFI – Create: 7
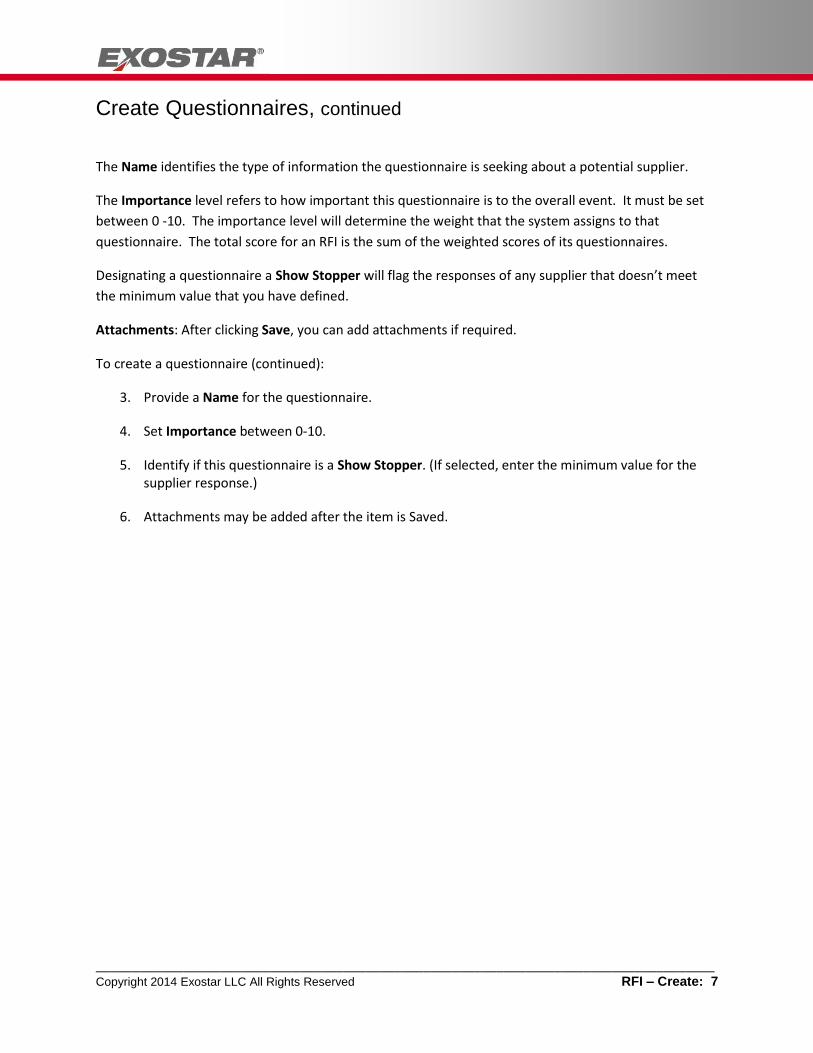
Create Questionnaires, continued
The Name identifies the type of information the questionnaire is seeking about a potential supplier.
The Importance level refers to how important this questionnaire is to the overall event. It must be set
between 0 -10. The importance level will determine the weight that the system assigns to that
questionnaire. The total score for an RFI is the sum of the weighted scores of its questionnaires.
Designating a questionnaire a Show Stopper will flag the responses of any supplier that doesn’t meet
the minimum value that you have defined.
Attachments: After clicking Save, you can add attachments if required.
To create a questionnaire (continued):
3. Provide a Name for the questionnaire.
4. Set Importance between 0-10.
5. Identify if this questionnaire is a Show Stopper. (If selected, enter the minimum value for the supplier response.)
6. Attachments may be added after the item is Saved.
_____________________________________________________________________________________ Copyright 2014 Exostar LLC All Rights Reserved RFI – Create: 8
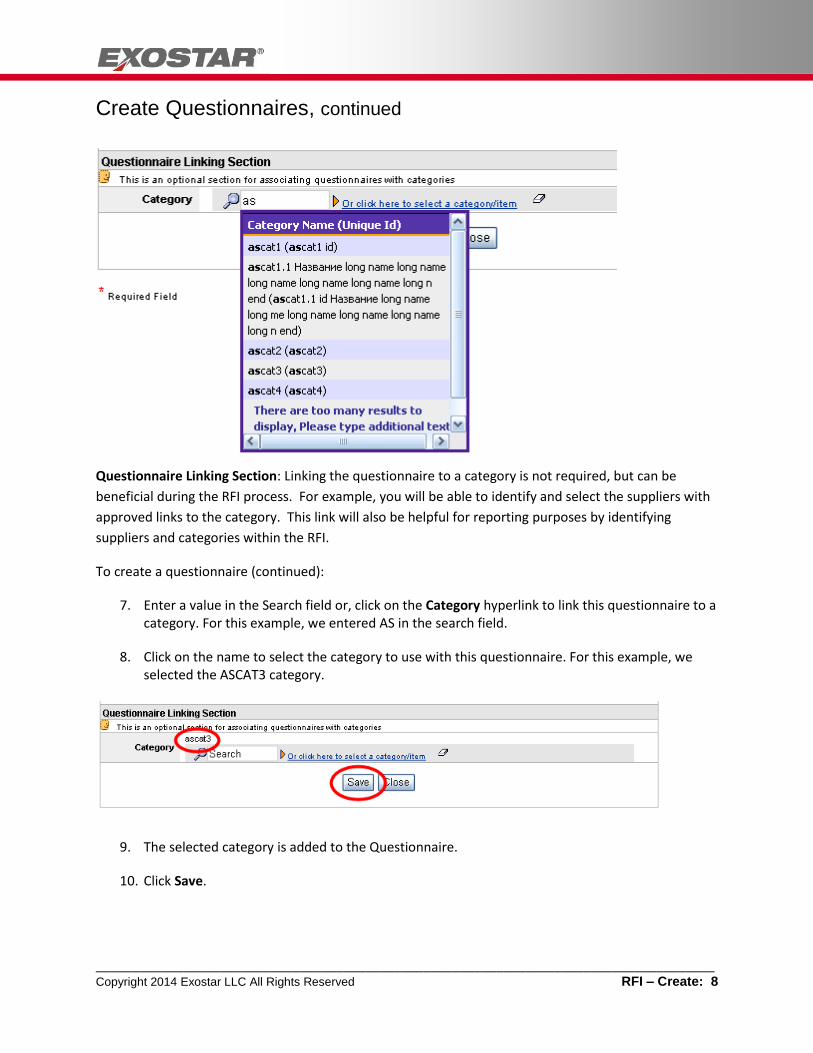
Create Questionnaires, continued
Questionnaire Linking Section: Linking the questionnaire to a category is not required, but can be
beneficial during the RFI process. For example, you will be able to identify and select the suppliers with
approved links to the category. This link will also be helpful for reporting purposes by identifying
suppliers and categories within the RFI.
To create a questionnaire (continued):
7. Enter a value in the Search field or, click on the Category hyperlink to link this questionnaire to a category. For this example, we entered AS in the search field.
8. Click on the name to select the category to use with this questionnaire. For this example, we selected the ASCAT3 category.
9. The selected category is added to the Questionnaire.
10. Click Save.

_____________________________________________________________________________________ Copyright 2014 Exostar LLC All Rights Reserved RFI – Create: 9
Create Questions
Once a questionnaire is created, you can begin adding the questions.
To create questions:
1. Click the Create button on the bottom frame to begin adding new questions.
Each question can contain up to 2000 characters. The answer types available are:
Text
Decimal
Date
Selection
Integer
Yes/No
Currency
Table
Spacer Row
Note: Use a numbering system to better track large numbers of questionnaires and questions.
If selecting an Integer, Decimal, or Currency answer type, you can specify a minimum and a maximum
value. This will restrict the value the suppliers can enter for their answers.
Text, Table and Date answers can only be scored manually.
To create questions (continued):
2. Type the question in the Question box.
3. Select Answer Type from the drop-down menu.
_____________________________________________________________________________________ Copyright 2014 Exostar LLC All Rights Reserved RFI – Create: 10
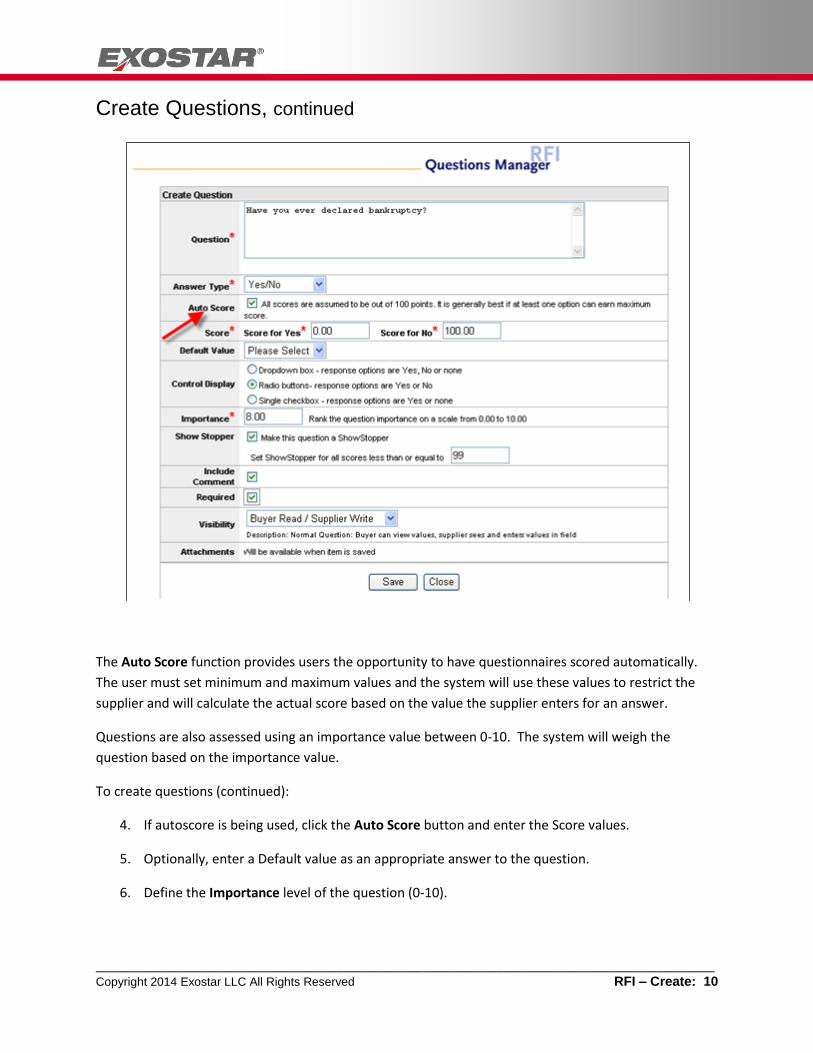
Create Questions, continued
The Auto Score function provides users the opportunity to have questionnaires scored automatically.
The user must set minimum and maximum values and the system will use these values to restrict the
supplier and will calculate the actual score based on the value the supplier enters for an answer.
Questions are also assessed using an importance value between 0-10. The system will weigh the
question based on the importance value.
To create questions (continued):
4. If autoscore is being used, click the Auto Score button and enter the Score values.
5. Optionally, enter a Default value as an appropriate answer to the question.
6. Define the Importance level of the question (0-10).
_____________________________________________________________________________________ Copyright 2014 Exostar LLC All Rights Reserved RFI – Create: 11
Create Questions, continued
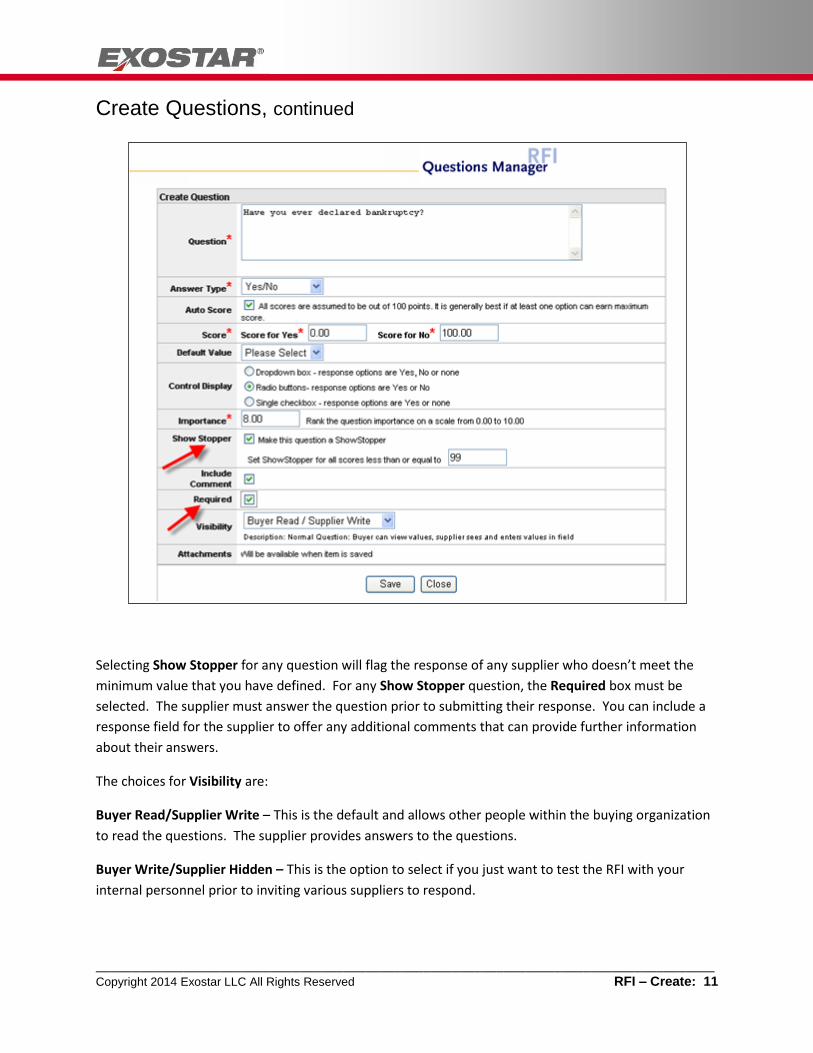
Selecting Show Stopper for any question will flag the response of any supplier who doesn’t meet the
minimum value that you have defined. For any Show Stopper question, the Required box must be
selected. The supplier must answer the question prior to submitting their response. You can include a
response field for the supplier to offer any additional comments that can provide further information
about their answers.
The choices for Visibility are:
Buyer Read/Supplier Write – This is the default and allows other people within the buying organization
to read the questions. The supplier provides answers to the questions.
Buyer Write/Supplier Hidden – This is the option to select if you just want to test the RFI with your
internal personnel prior to inviting various suppliers to respond.
_____________________________________________________________________________________ Copyright 2014 Exostar LLC All Rights Reserved RFI – Create: 12
Create Questions, continued
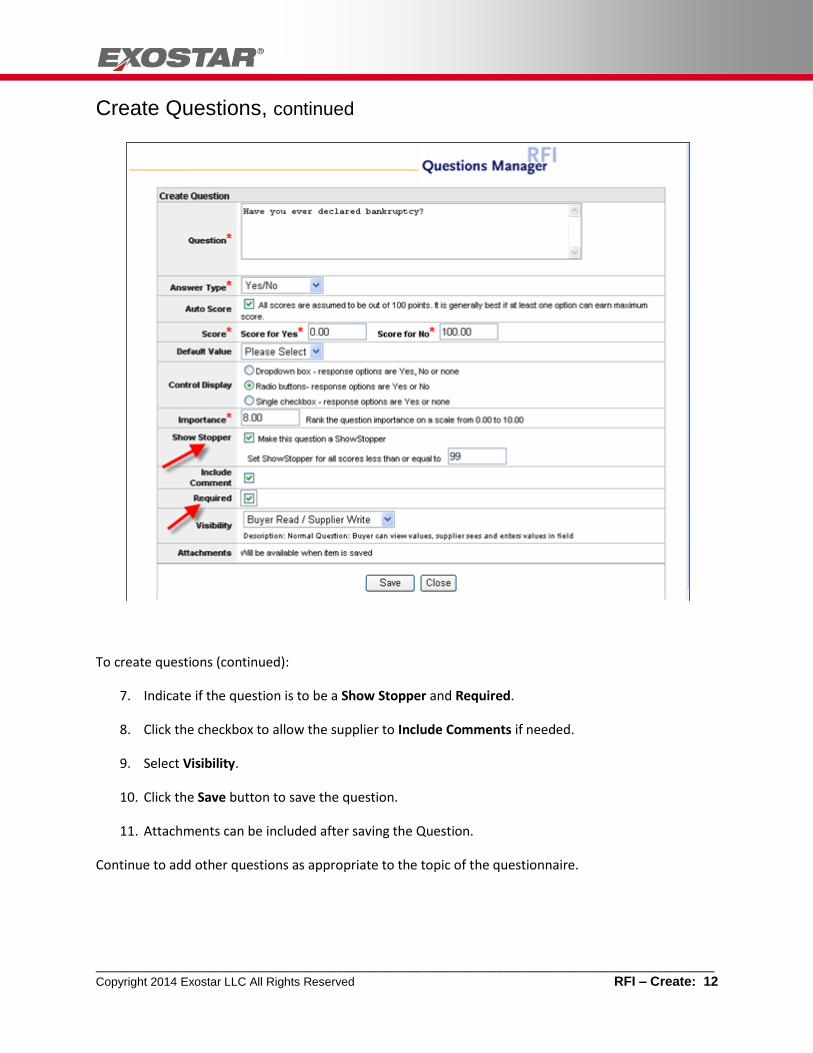
To create questions (continued):
7. Indicate if the question is to be a Show Stopper and Required.
8. Click the checkbox to allow the supplier to Include Comments if needed.
9. Select Visibility.
10. Click the Save button to save the question.
11. Attachments can be included after saving the Question.
Continue to add other questions as appropriate to the topic of the questionnaire.

_____________________________________________________________________________________ Copyright 2014 Exostar LLC All Rights Reserved RFI – Create: 13
Sequence Questions
You can reorder the sequence of questions with the sequence button in the top right corner.
Example: After constructing a list of questions, a buyer may want to put the more significant questions
at the top of the list.
To reorder the question sequence:
1. From the Edit Questionnaire window, click the sequence button.
2. Click on the question to select it.
_____________________________________________________________________________________ Copyright 2014 Exostar LLC All Rights Reserved RFI – Create: 14
Sequence Questions, continued
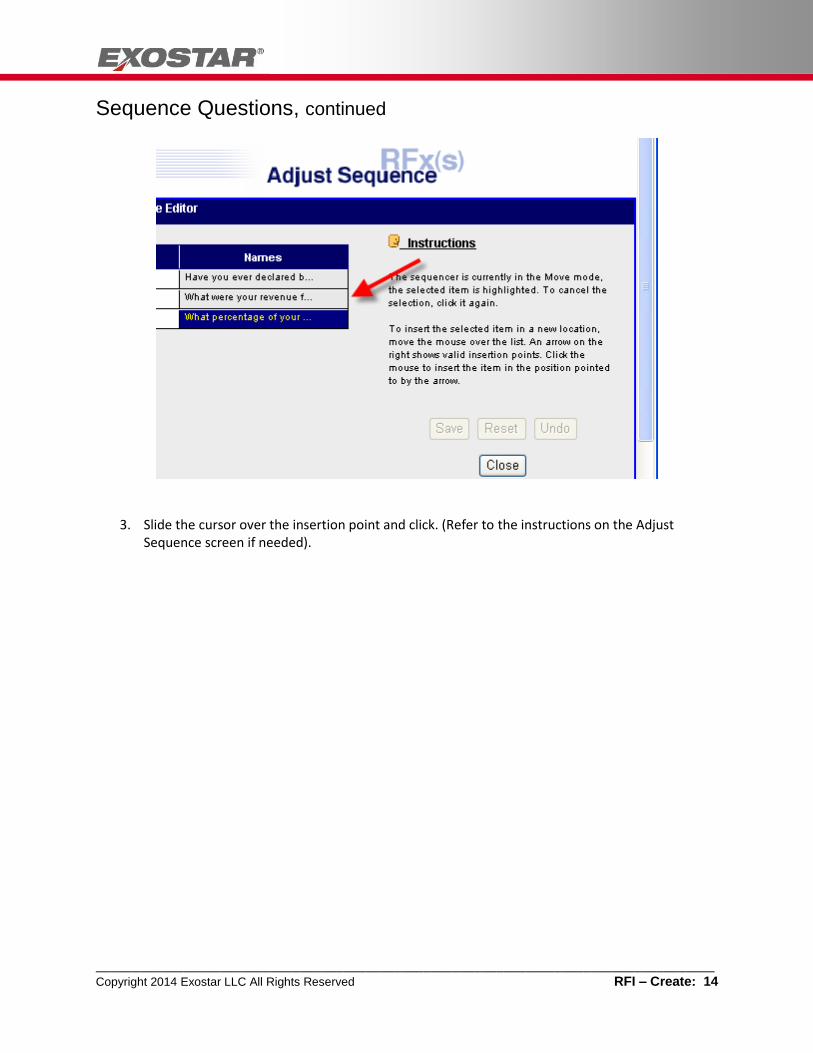
3. Slide the cursor over the insertion point and click. (Refer to the instructions on the Adjust
Sequence screen if needed).

_____________________________________________________________________________________ Copyright 2014 Exostar LLC All Rights Reserved RFI – Create: 15
Sequence Questions, continued
4. Once moved, the questions will be reset in the new sequence.
5. Click Save to save the new sequence.
The new sequence of questions will now appear on the Edit Questionnaire screen.
6. Click Close to return to the Edit tab screen. The questionnaires will be listed by title and the
Wizard will be available.

_____________________________________________________________________________________ Copyright 2014 Exostar LLC All Rights Reserved RFI – Create: 16
Edit Questionnaire Weights
Once you have created the questionnaires, it is time to assign weights to them. This is where the buyer
decides the weight, or significance, of each questionnaire in relation to all the others.
The popup from this page will explain how the questionnaires are weighted and scored within the RFI.
The ‘Importance’ values you assigned are shown in the middle column and can be edited. The
corresponding calculated weights are shown in the right column. (Note: You may need to minimize the
popup screen to see these values).
The weights must be normalized (the sum of all questionnaire weights must total 100).
To edit questionnaire weights:
1. Select Weight Questionnaires from the Wizard menu.
2. Review the explanation of how weights are used for scoring.
3. Click the Close button to close the weight calculation window.
4. Click in the text box for a questionnaire to edit the Importance Level.
5. Click Next.
_____________________________________________________________________________________ Copyright 2014 Exostar LLC All Rights Reserved RFI – Create: 17
Edit Question Weights
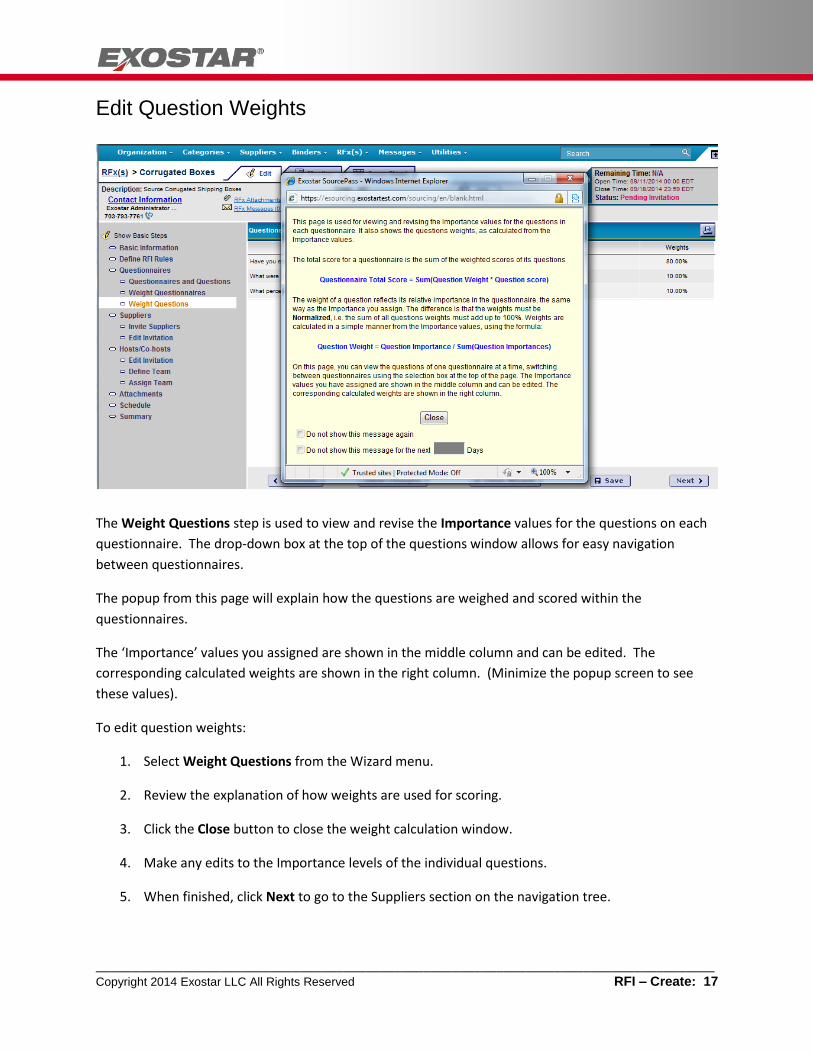
The Weight Questions step is used to view and revise the Importance values for the questions on each
questionnaire. The drop-down box at the top of the questions window allows for easy navigation
between questionnaires.
The popup from this page will explain how the questions are weighed and scored within the
questionnaires.
The ‘Importance’ values you assigned are shown in the middle column and can be edited. The
corresponding calculated weights are shown in the right column. (Minimize the popup screen to see
these values).
To edit question weights:
1. Select Weight Questions from the Wizard menu.
2. Review the explanation of how weights are used for scoring.
3. Click the Close button to close the weight calculation window.
4. Make any edits to the Importance levels of the individual questions.
5. When finished, click Next to go to the Suppliers section on the navigation tree.
_____________________________________________________________________________________ Copyright 2014 Exostar LLC All Rights Reserved RFI – Create: 18
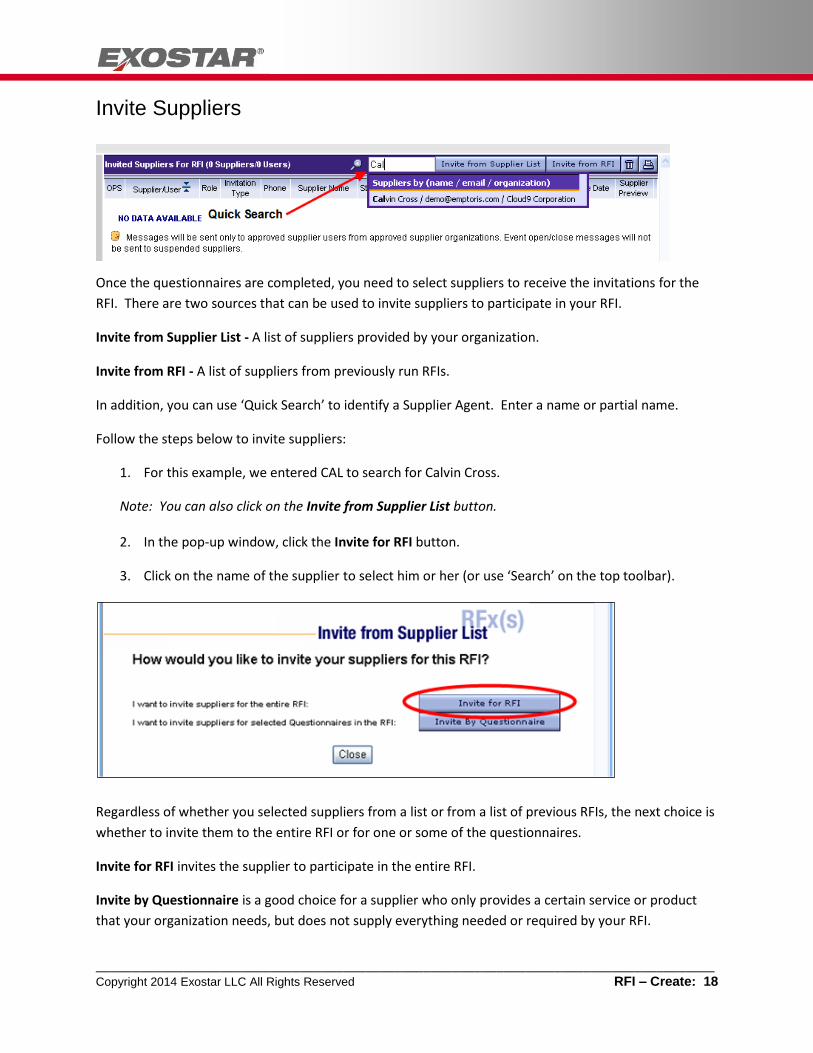
Invite Suppliers
Once the questionnaires are completed, you need to select suppliers to receive the invitations for the
RFI. There are two sources that can be used to invite suppliers to participate in your RFI.
Invite from Supplier List - A list of suppliers provided by your organization.
Invite from RFI - A list of suppliers from previously run RFIs.
In addition, you can use ‘Quick Search’ to identify a Supplier Agent. Enter a name or partial name.
Follow the steps below to invite suppliers:
1. For this example, we entered CAL to search for Calvin Cross.
Note: You can also click on the Invite from Supplier List button.
2. In the pop-up window, click the Invite for RFI button.
3. Click on the name of the supplier to select him or her (or use ‘Search’ on the top toolbar).
Regardless of whether you selected suppliers from a list or from a list of previous RFIs, the next choice is
whether to invite them to the entire RFI or for one or some of the questionnaires.
Invite for RFI invites the supplier to participate in the entire RFI.
Invite by Questionnaire is a good choice for a supplier who only provides a certain service or product
that your organization needs, but does not supply everything needed or required by your RFI.

_____________________________________________________________________________________ Copyright 2014 Exostar LLC All Rights Reserved RFI – Create: 19
Invite Suppliers, continued
From this screen, buyers will invite specific users within each supplier organization. Depending on the
number of potential suppliers, there may be several pages to this screen. The suppliers are listed
alphabetically. Note: Holding the cursor over the page numbers will reveal how the listings are divided.
Using the “Select All” feature will allow you to invite all of the suppliers that are displayed on the page.
You will only see suppliers listed that have not been previously invited to this event.
The filter drop-down box will default to the list of suppliers in the “My Supplier List” or if none are
selected to Approved—that is, a list of approved suppliers. Other options from this filter are:
My Org. Suppliers – Suppliers that have been linked to your organization.
My Supplier List – Suppliers you may have previously selected to add to your personal list.
With Suggested Links – Suppliers that have suggested links to a category but the link has not been approved by the content manager.
With Approved Links-All – Lists suppliers in your buyer organization that have approved links to a category.
With Approved Links-My Org. – Lists suppliers that have approved links and are linked to your specific organization list.
To invite suppliers:
1. Click in the checkbox on the right side of the screen next to those suppliers you wish to invite.
2. Click the Invite for RFI button.
3. The “Invite from Supplier List” pop-up screen will appear. Click Close.

_____________________________________________________________________________________ Copyright 2014 Exostar LLC All Rights Reserved RFI – Create: 20
Invite Suppliers, continued
The invited suppliers will then be displayed on the Invited Suppliers screen.
_____________________________________________________________________________________ Copyright 2014 Exostar LLC All Rights Reserved RFI – Create: 21
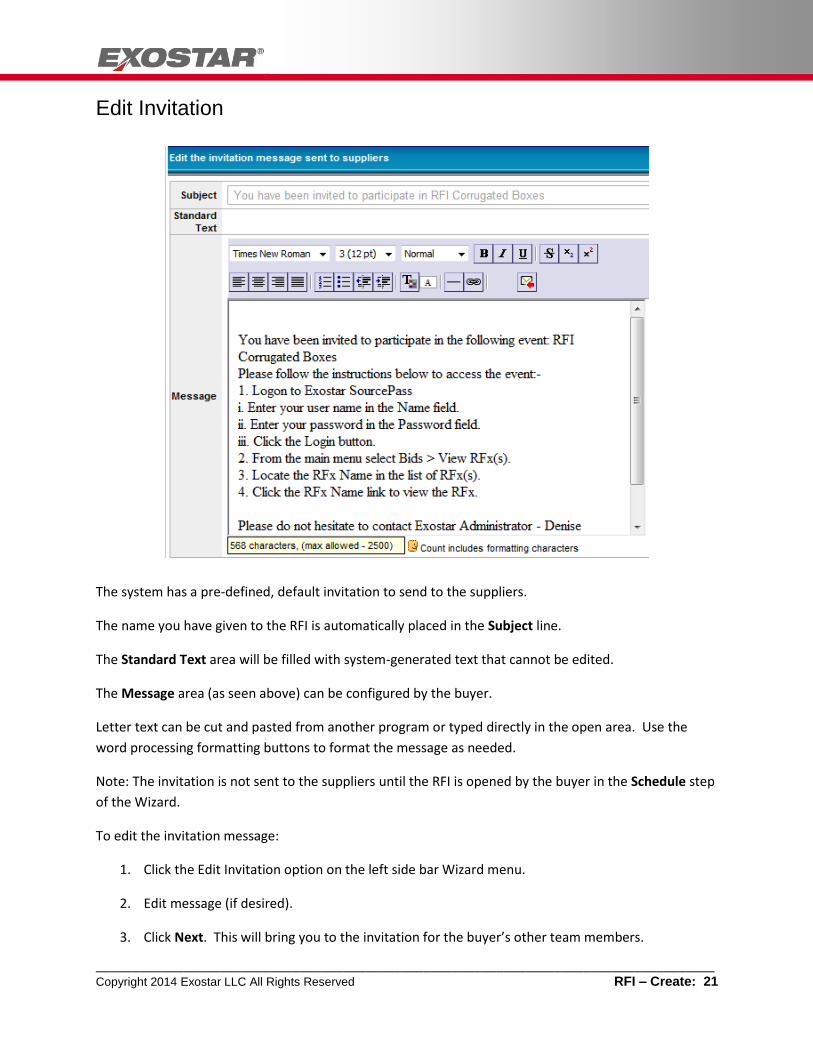
Edit Invitation
The system has a pre-defined, default invitation to send to the suppliers.
The name you have given to the RFI is automatically placed in the Subject line.
The Standard Text area will be filled with system-generated text that cannot be edited.
The Message area (as seen above) can be configured by the buyer.
Letter text can be cut and pasted from another program or typed directly in the open area. Use the
word processing formatting buttons to format the message as needed.
Note: The invitation is not sent to the suppliers until the RFI is opened by the buyer in the Schedule step
of the Wizard.
To edit the invitation message:
1. Click the Edit Invitation option on the left side bar Wizard menu.
2. Edit message (if desired).
3. Click Next. This will bring you to the invitation for the buyer’s other team members.

_____________________________________________________________________________________ Copyright 2014 Exostar LLC All Rights Reserved RFI – Create: 22
Hosts/Co-Hosts – Edit Invitation
The system has a default invitation defined to send to the team members. However, the standard
invitation letter sent to the buyer team can be edited to fit your needs.
Letter text can be cut and pasted from another program or typed directly in the open area. Use the
word processing formatting buttons to format the message as needed.
To invite hosts & co-hosts:
1. From Host/Co-Host, edit the Message text if desired.
2. Click Next to save the new text.

_____________________________________________________________________________________ Copyright 2014 Exostar LLC All Rights Reserved RFI – Create: 23
Define Team
In some organizations, selecting suppliers is a team effort. The leader of the event is responsible for
selecting the other team members. Defining team members allows for RFx collaborative involvement to
cascade to other users.
From this step of the Wizard menu you can choose which team members will assist you with the process
of hosting the RFI. The team members can also be used for a quality assurance/control process.
Potential team members within an organization are grouped under two tabs:
Linked to Category(s) – Buyers who are linked to a particular category or product line from a supplier or
suppliers.
All - Any buyers who are eligible to be team members within the organization.
To invite team members:
1. From Host/Co-Host>Define Team, click the Add Team Members button.
2. From the All tab, select the checkbox next to the members of the buyer organization that will take part in this RFx.
3. Click on the Add Team Members button.
4. Click OK.
5. Then click Next.

_____________________________________________________________________________________ Copyright 2014 Exostar LLC All Rights Reserved RFI – Create: 24
Assign Team Roles
Once selected, the team members are assigned roles by the leader of the event. By default, the creator
of the RFx is designated as the Lead Role and the Primary Contact. The Lead will have full permissions
within the event.
The options in the Roles drop-down box are:
Lead/Host (L) – The creator of the event with full permissions. This role can be shared with other members of the team.
Member/Co-Host (M) – Has the same permissions as the Lead, except that this role cannot schedule the event to open and close.
Observer (O) – Has the ability to monitor the RFI.
Scoring Observer (S) and Scoring Member (Q) – Have the ability to participate in collaborative scoring initiatives. Their scores from the score sheet section of the RFI will be used as part of the overall team average.
One member of the team should be designated as a Primary Contact when these roles are assigned.
To assign team roles:
1. From Host/Co-Host>Assign Team, select the role type from the drop-down menu.
2. Type the Role Letter in the selection box for the member(s) you want to change.
3. Click Next.

_____________________________________________________________________________________ Copyright 2014 Exostar LLC All Rights Reserved RFI – Create: 25
View Attachments
There may be documents that the buyer wants to include with this RFI that will help the potential
suppliers better understand the scope of the RFI and provide more appropriate and relevant responses.
These attachments can include such things as Terms and Conditions, Technical Specifications, Tables and
Charts, etc.
The buyer can add attachments and group them into specific folders. The attachments dialog box will
display who created this attachment and the date and time when it was attached.
To add attachments:
1. Click on the Add button. The Add Attachment dialog box is displayed.
Note: Use the Update button to replace an attachment with a modified version.
_____________________________________________________________________________________ Copyright 2014 Exostar LLC All Rights Reserved RFI – Create: 26
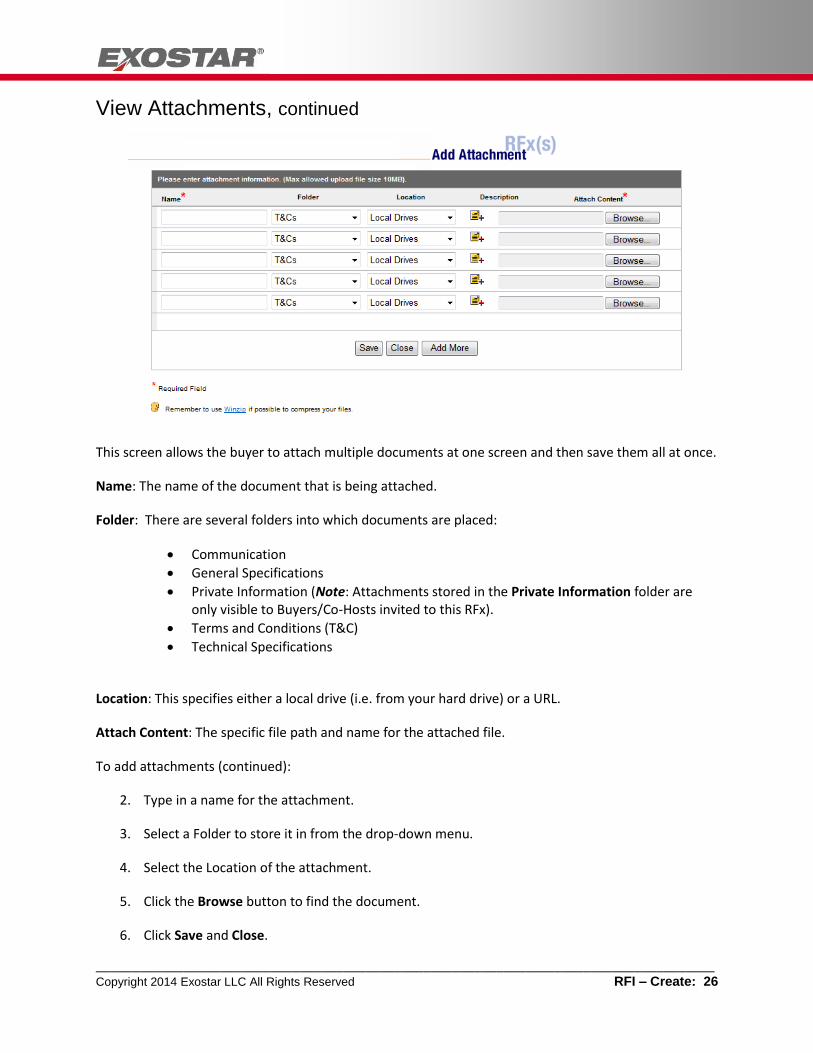
View Attachments, continued
This screen allows the buyer to attach multiple documents at one screen and then save them all at once.
Name: The name of the document that is being attached.
Folder: There are several folders into which documents are placed:
Communication
General Specifications
Private Information (Note: Attachments stored in the Private Information folder are only visible to Buyers/Co-Hosts invited to this RFx).
Terms and Conditions (T&C)
Technical Specifications
Location: This specifies either a local drive (i.e. from your hard drive) or a URL.
Attach Content: The specific file path and name for the attached file.
To add attachments (continued):
2. Type in a name for the attachment.
3. Select a Folder to store it in from the drop-down menu.
4. Select the Location of the attachment.
5. Click the Browse button to find the document.
6. Click Save and Close.
_____________________________________________________________________________________ Copyright 2014 Exostar LLC All Rights Reserved RFI – Create: 27
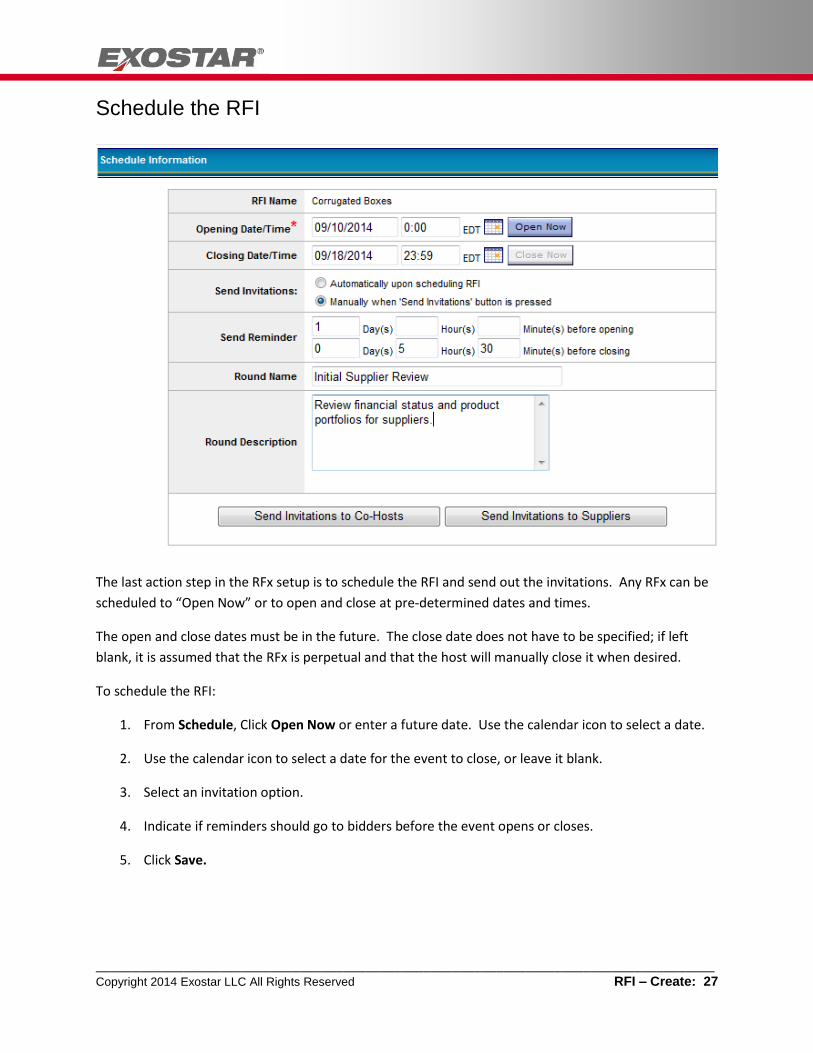
Schedule the RFI
The last action step in the RFx setup is to schedule the RFI and send out the invitations. Any RFx can be
scheduled to “Open Now” or to open and close at pre-determined dates and times.
The open and close dates must be in the future. The close date does not have to be specified; if left
blank, it is assumed that the RFx is perpetual and that the host will manually close it when desired.
To schedule the RFI:
1. From Schedule, Click Open Now or enter a future date. Use the calendar icon to select a date.
2. Use the calendar icon to select a date for the event to close, or leave it blank.
3. Select an invitation option.
4. Indicate if reminders should go to bidders before the event opens or closes.
5. Click Save.
_____________________________________________________________________________________ Copyright 2014 Exostar LLC All Rights Reserved RFI – Create: 28
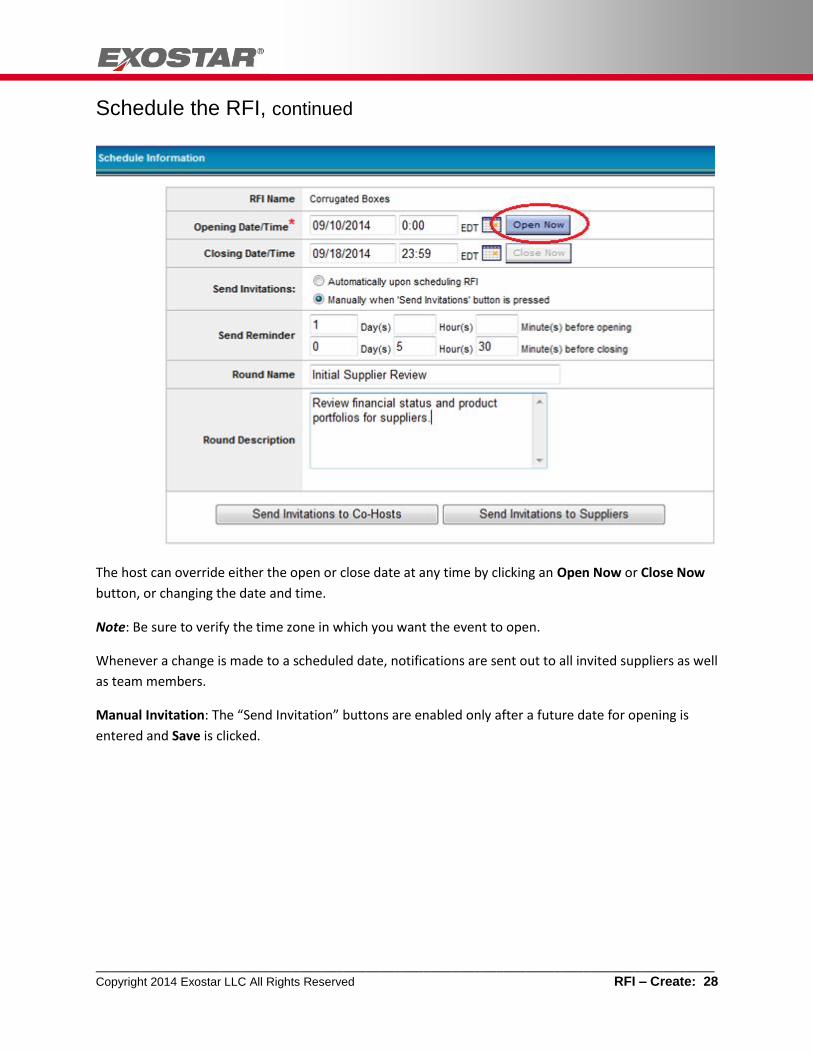
Schedule the RFI, continued
The host can override either the open or close date at any time by clicking an Open Now or Close Now
button, or changing the date and time.
Note: Be sure to verify the time zone in which you want the event to open.
Whenever a change is made to a scheduled date, notifications are sent out to all invited suppliers as well
as team members.
Manual Invitation: The “Send Invitation” buttons are enabled only after a future date for opening is
entered and Save is clicked.
_____________________________________________________________________________________ Copyright 2014 Exostar LLC All Rights Reserved RFI – Create: 29
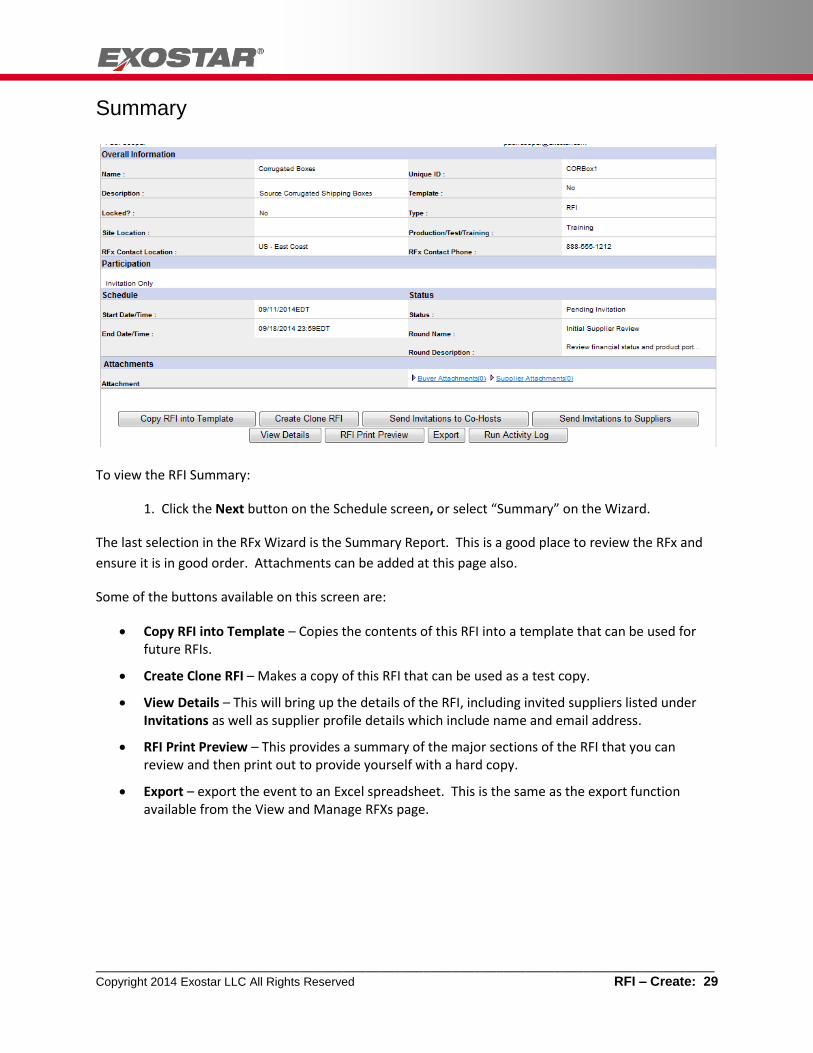
Summary
To view the RFI Summary:
1. Click the Next button on the Schedule screen, or select “Summary” on the Wizard.
The last selection in the RFx Wizard is the Summary Report. This is a good place to review the RFx and
ensure it is in good order. Attachments can be added at this page also.
Some of the buttons available on this screen are:
Copy RFI into Template – Copies the contents of this RFI into a template that can be used for future RFIs.
Create Clone RFI – Makes a copy of this RFI that can be used as a test copy.
View Details – This will bring up the details of the RFI, including invited suppliers listed under Invitations as well as supplier profile details which include name and email address.
RFI Print Preview – This provides a summary of the major sections of the RFI that you can review and then print out to provide yourself with a hard copy.
Export – export the event to an Excel spreadsheet. This is the same as the export function available from the View and Manage RFXs page.
_____________________________________________________________________________________ Copyright 2014 Exostar LLC All Rights Reserved RFI – Create: 30
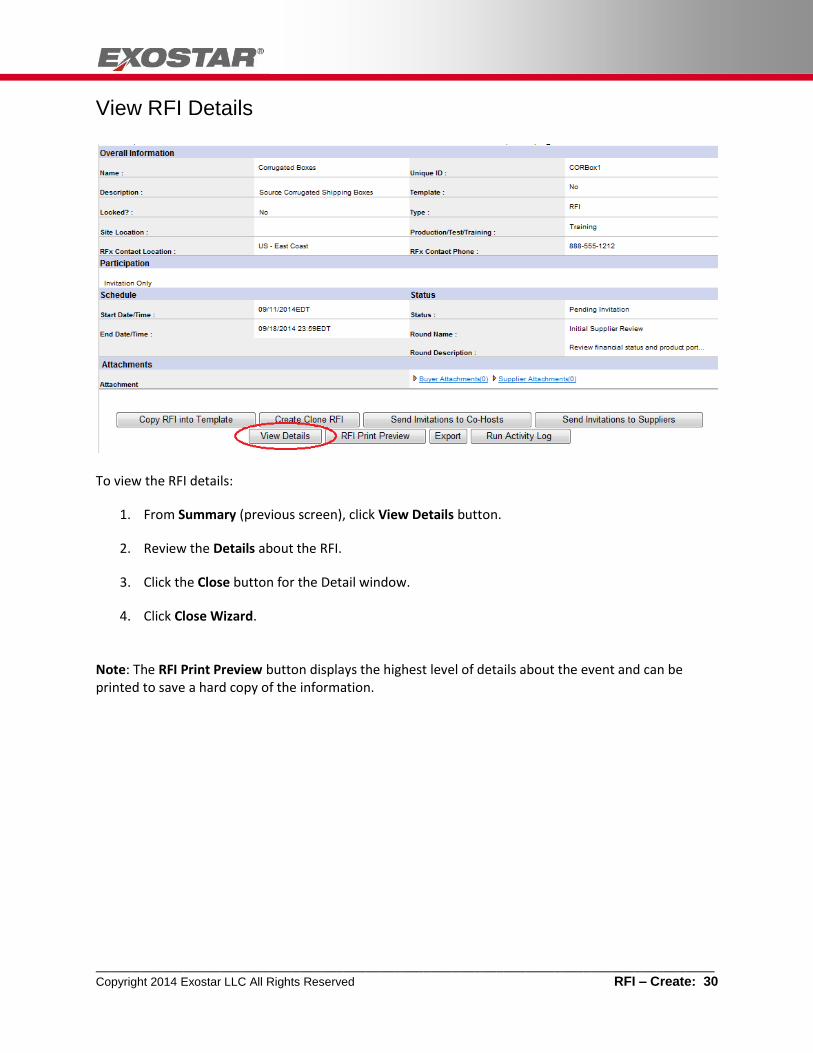
View RFI Details
To view the RFI details:
1. From Summary (previous screen), click View Details button.
2. Review the Details about the RFI.
3. Click the Close button for the Detail window.
4. Click Close Wizard. Note: The RFI Print Preview button displays the highest level of details about the event and can be printed to save a hard copy of the information.

_____________________________________________________________________________________ Copyright 2014 Exostar LLC All Rights Reserved RFI – Create: 31
Copy an RFI into a Template
From the Summary step of the Wizard, the user can create a template of their event.
The newly created template will appear on the Template page of the View and Manage RFx(s) screen so
that it can be reused.
Only the structure of the RFI, not the scheduling information, is entered into a template. It is used for
building future RFIs.
To copy an RFI into a template:
1. From the Summary Step, click on the Copy RFx into Template button.
2. Give the template a Name and Unique Id.
3. Click Next.
4. Click Save.
5. Then click Close Wizard.
_____________________________________________________________________________________ Copyright 2014 Exostar LLC All Rights Reserved RFI – Create: 32
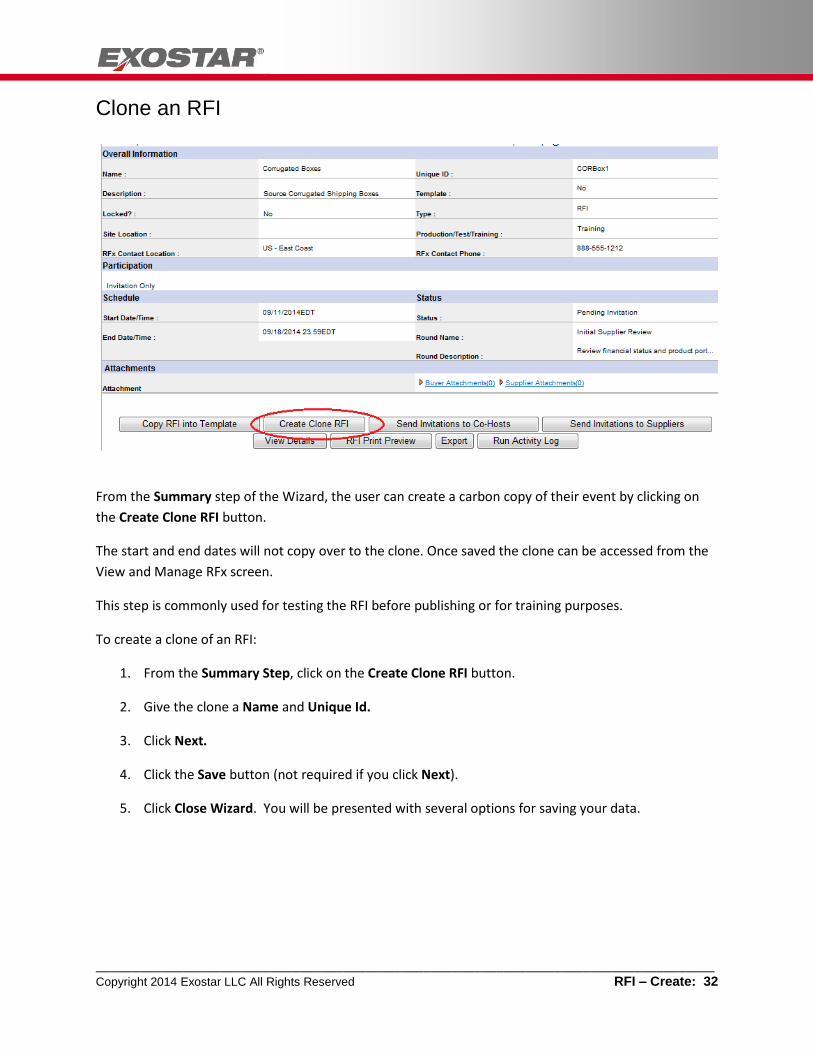
Clone an RFI
From the Summary step of the Wizard, the user can create a carbon copy of their event by clicking on
the Create Clone RFI button.
The start and end dates will not copy over to the clone. Once saved the clone can be accessed from the
View and Manage RFx screen.
This step is commonly used for testing the RFI before publishing or for training purposes.
To create a clone of an RFI:
1. From the Summary Step, click on the Create Clone RFI button.
2. Give the clone a Name and Unique Id.
3. Click Next.
4. Click the Save button (not required if you click Next).
5. Click Close Wizard. You will be presented with several options for saving your data.