Contents - GM Owner Centre
453
-
Upload
khangminh22 -
Category
Documents
-
view
0 -
download
0
Transcript of Contents - GM Owner Centre

84642602 B
C
M
Y
CM
MY
CY
CMY
K
19_CHEV_Silverado_4500HD_5500HD_6500HD_COV_en_US_84642602B_2018OCT08.ai 1 10/9/2018 9:51:05 AM19_CHEV_Silverado_4500HD_5500HD_6500HD_COV_en_US_84642602B_2018OCT08.ai 1 10/9/2018 9:51:05 AM

Chevrolet Silverado 4500HD/5500HD/6500HD Owner Manual (GMNA-Localizing-U.S.-12102101) - 2019 - crc - 10/2/18
Contents Introduction . . . . . . . . . . . . . . . . . . . . . . 2
In Brief . . . . . . . . . . . . . . . . . . . . . . . . . . . 5
Keys, Doors, and Windows . . . . . 29
Seats and Restraints . . . . . . . . . . . 45
Storage . . . . . . . . . . . . . . . . . . . . . . . . . 92
Instruments and Controls . . . . . . . 95
Lighting . . . . . . . . . . . . . . . . . . . . . . . 132
Infotainment System . . . . . . . . . . 141
Climate Controls . . . . . . . . . . . . . . 186
Driving and Operating . . . . . . . . . 192
Vehicle Care . . . . . . . . . . . . . . . . . . 289
Service and Maintenance . . . . . 359
Technical Data . . . . . . . . . . . . . . . . 407
Customer Information . . . . . . . . . 414
Reporting Safety Defects . . . . . . 425
OnStar . . . . . . . . . . . . . . . . . . . . . . . . 428
Connected Services . . . . . . . . . . . 436
Special Equipment Options . . . 440
Index . . . . . . . . . . . . . . . . . . . . 441

Chevrolet Silverado 4500HD/5500HD/6500HD Owner Manual (GMNA-Localizing-U.S.-12102101) - 2019 - crc - 10/2/18
2 Introduction
Introduction
The names, logos, emblems,slogans, vehicle model names, andvehicle body designs appearing inthis manual including, but not limitedto, GM, the GM logo, CHEVROLET,the CHEVROLET Emblem, andSILVERADO are trademarks and/orservice marks of General MotorsLLC, its subsidiaries, affiliates,or licensors.
For vehicles first sold in Canada,substitute the name “GeneralMotors of Canada Company” forChevrolet Motor Division wherever itappears in this manual.
This manual describes features thatmay or may not be on the vehiclebecause of optional equipment thatwas not purchased on the vehicle,model variants, countryspecifications, features/applicationsthat may not be available in yourregion, or changes subsequent tothe printing of this owner’s manual.
Refer to the purchasedocumentation relating to yourspecific vehicle to confirm thefeatures.
Keep this manual in the vehicle forquick reference.
Canadian Vehicle OwnersA French language manual can beobtained from your dealer, atwww.helminc.com, or from:
Propriétaires Canadiens
On peut obtenir un exemplaire dece guide en français auprès duconcessionnaire ou à l'adressesuivante:
Helm, IncorporatedAttention: Customer Service47911 Halyard DrivePlymouth, MI 48170USA
Using this ManualTo quickly locate information aboutthe vehicle, use the Index in theback of the manual. It is analphabetical list of what is in themanual and the page number whereit can be found.
Danger, Warning, andCautionWarning messages found on vehiclelabels and in this manual describehazards and what to do to avoid orreduce them.
Litho in U.S.A.Part No. 84642602 B Second Printing ©2018 General Motors LLC. All Rights Reserved.

Chevrolet Silverado 4500HD/5500HD/6500HD Owner Manual (GMNA-Localizing-U.S.-12102101) - 2019 - crc - 10/2/18
Introduction 3
{ Danger
Danger indicates a hazard with ahigh level of risk which will resultin serious injury or death.
{ Warning
Warning indicates a hazard thatcould result in injury or death.
Caution
Caution indicates a hazard thatcould result in property or vehicledamage.
A circle with a slash through it is asafety symbol which means “DoNot,” “Do not do this,” or “Do not letthis happen.”
SymbolsThe vehicle has components andlabels that use symbols instead oftext. Symbols are shown along withthe text describing the operation orinformation relating to a specificcomponent, control, message,gauge, or indicator.
M : Shown when the owner’smanual has additional instructionsor information.
* : Shown when the servicemanual has additional instructionsor information.
0 : Shown when there is moreinformation on another page —“see page.”
Vehicle Symbol Chart
Here are some additional symbolsthat may be found on the vehicleand what they mean. See thefeatures in this manual forinformation.
u : Air Conditioning System
G : Air Conditioning Refrigerant Oil
9 : Airbag Readiness Light
! : Antilock Brake System (ABS)
$ : Brake System Warning Light
9 : Dispose of Used ComponentsProperly
P : Do Not Apply High PressureWater
B : Engine Coolant Temperature
_ : Flame/Fire Prohibited
H : Flammable
[ : Forward Collision Alert
R : Fuse Block Cover LockLocation
+ : Fuses
j : ISOFIX/LATCH System ChildRestraints

Chevrolet Silverado 4500HD/5500HD/6500HD Owner Manual (GMNA-Localizing-U.S.-12102101) - 2019 - crc - 10/2/18
4 Introduction
Q : Keep Fuse Block CoversProperly Installed
| : Lane Change Alert
@ : Lane Departure Warning
A : Lane Keep Assist
* : Malfunction Indicator Lamp
: : Oil Pressure
X : Park Assist
~ : Pedestrian Ahead Indicator
O : Power
7 : Rear Cross Traffic Alert
I : Registered Technician
/ : Remote Vehicle Start
> : Seat Belt Reminders
I : Side Blind Zone Alert
h : Stop/Start
7 : Tire Pressure Monitor
d : Traction Control/StabiliTrak/Electronic Stability Control (ESC)
a : Under Pressure
V : Vehicle Ahead Indicator

Chevrolet Silverado 4500HD/5500HD/6500HD Owner Manual (GMNA-Localizing-U.S.-12102101) - 2019 - crc - 10/2/18
In Brief 5
In Brief
Instrument PanelInstrument Panel . . . . . . . . . . . . . . . . 6
Initial Drive InformationInitial Drive Information . . . . . . . . . . 8Remote Keyless Entry (RKE)System . . . . . . . . . . . . . . . . . . . . . . . . 8
Remote Vehicle Start . . . . . . . . . . . 9Door Locks . . . . . . . . . . . . . . . . . . . . . 9Windows . . . . . . . . . . . . . . . . . . . . . . . 10Seat Adjustment . . . . . . . . . . . . . . . 10Heated Seats . . . . . . . . . . . . . . . . . . 12Head Restraint Adjustment . . . . 13Seat Belts . . . . . . . . . . . . . . . . . . . . . 13Airbag On-Off Switch . . . . . . . . . . 13Mirror Adjustment . . . . . . . . . . . . . . 13Steering Wheel Adjustment . . . . 14Interior Lighting . . . . . . . . . . . . . . . . 15Exterior Lighting . . . . . . . . . . . . . . . 16Windshield Wiper/Washer . . . . . . 16Climate Controls . . . . . . . . . . . . . . . 17Transmission . . . . . . . . . . . . . . . . . . 18Four-Wheel Drive . . . . . . . . . . . . . . 18
Vehicle FeaturesInfotainment System . . . . . . . . . . . 20Radio(s) . . . . . . . . . . . . . . . . . . . . . . . 20
Satellite Radio . . . . . . . . . . . . . . . . . 21Portable Audio Devices . . . . . . . . 21Bluetooth . . . . . . . . . . . . . . . . . . . . . . 21Steering Wheel Controls . . . . . . . 21Cruise Control . . . . . . . . . . . . . . . . . 22Driver InformationCenter (DIC) . . . . . . . . . . . . . . . . . 22
Rear Vision Camera (RVC) . . . . 23Power Outlets . . . . . . . . . . . . . . . . . 23
Performance and MaintenanceFuel . . . . . . . . . . . . . . . . . . . . . . . . . . . 24Engine Oil Life System . . . . . . . . 24Driving for Better FuelEconomy . . . . . . . . . . . . . . . . . . . . . 24
Diesel Particulate Filter . . . . . . . . 25Diesel Exhaust Fluid . . . . . . . . . . . 28Roadside AssistanceProgram . . . . . . . . . . . . . . . . . . . . . . 28

Chevrolet Silverado 4500HD/5500HD/6500HD Owner Manual (GMNA-Localizing-U.S.-12102101) - 2019 - crc - 10/2/18
6 In Brief
Instrument Panel
Base Shown, Uplevel Similar

Chevrolet Silverado 4500HD/5500HD/6500HD Owner Manual (GMNA-Localizing-U.S.-12102101) - 2019 - crc - 10/2/18
In Brief 7
1. Instrument Panel IlluminationControl 0 137.
2. Integrated Trailer Brake Control(ITBC) System (If Equipped).See Towing Equipment 0 257.
3. Exterior Lamp Controls 0 132.
Fog Lamps 0 136 (IfEquipped).
4. Air Vents 0 190.
5. Turn Signal Lever. See Turnand Lane-Change Signals0 135.
Windshield Wiper/Washer 0 97.
6. Favorite Switches (Out ofView). See Steering WheelControls 0 96.
Volume Switches (Out of View).See Steering Wheel Controls0 96.
7. Instrument Cluster 0 105.
8. Hazard Warning Flashers0 135.
9. Shift Lever. See AutomaticTransmission 0 223.
Tow/Haul Selector Button (IfEquipped). See Tow/HaulMode 0 227.
Range Selection Mode (IfEquipped). See Manual Mode0 226.
10. Light Sensor. See AutomaticHeadlamp System 0 134.
11. Infotainment 0 141.
12. Passenger Airbag On-OffSwitch (If Equipped) (Out ofView). See Airbag On-OffSwitch 0 65.
13. Heated Front Seats 0 50 (IfEquipped).
14. Power Outlet 110/120-VoltAlternating Current (IfEquipped). See Power Outlets0 100.
15. Power Outlets 0 100 (IfEquipped).
16. { Exterior Cargo Lamps0 137.
q Exhaust Brake Switch (IfEquipped). See Exhaust Brake0 234.
g Power Take Off (PTO)Switch (If Equipped). SeePower Take-Off (PTO) 0 270.
g Traction Control System(TCS) 0 235.
Auxiliary Button (If Equipped).See Add-On ElectricalEquipment 0 266.
Air Suspension Switch (IfEquipped). See Air Suspension0 236.
17. Instrument Panel Storage 0 92(If Equipped).
18. Climate Control Systems (withHeater Only) 0 186 or ClimateControl Systems (with AirConditioning) 0 188 (IfEquipped).
19. Steering Wheel Controls 0 96(If Equipped).
Driver Information Center (DIC)Controls (If Equipped).See Driver Information Center(DIC) (Base Level) 0 119 orDriver Information Center (DIC)(Uplevel) 0 120.

Chevrolet Silverado 4500HD/5500HD/6500HD Owner Manual (GMNA-Localizing-U.S.-12102101) - 2019 - crc - 10/2/18
8 In Brief
20. Horn 0 97.
21. Steering Wheel Adjustment0 96 (Out of View).
22. Cruise Control 0 237.
23. Data Link Connector (DLC)(Out of View). See MalfunctionIndicator Lamp (Check EngineLight) 0 113.
24. Parking Brake 0 233.
25. Electronic Transfer Case Knob(If Equipped). See Four-WheelDrive 0 228.
Initial DriveInformationThis section provides a briefoverview about some of theimportant features that may or maynot be on your specific vehicle.
For more detailed information, referto each of the features which can befound later in this owner’s manual.
Remote Keyless Entry(RKE) SystemThe Remote Keyless Entry (RKE)key functions may work from up to60 m (197 ft) away from the vehicle.
K : Press to unlock the driver door.Press K again within three secondsto unlock all remaining doors.
Q : Press to lock all doors. Lockand unlock feedback can bepersonalized. See VehiclePersonalization 0 124.
7 : Press and release one time toinitiate vehicle locator. Press 7 andhold for at least three seconds tosound the panic alarm. Press 7again to cancel the panic alarm.

Chevrolet Silverado 4500HD/5500HD/6500HD Owner Manual (GMNA-Localizing-U.S.-12102101) - 2019 - crc - 10/2/18
In Brief 9
/ : If equipped, press and releaseQ and then immediately press andhold/ for at least four seconds tostart the engine. See RemoteVehicle Start 0 34.
See Keys 0 29 and Remote KeylessEntry (RKE) System Operation 0 32.
Remote Vehicle StartIf equipped, the engine can bestarted from outside of the vehicle.
Starting the Vehicle
1. Press and release Q on theRKE transmitter.
2. Immediately press and hold /for at least four seconds or untilthe turn signal lamps flash.
Start the vehicle normally afterentering.
When the vehicle starts, the parkinglamps will turn on.
Remote start can be extended.
Canceling a Remote Start
To cancel a remote start, do one ofthe following:
. Press and hold/ until theparking lamps turn off.
. Turn on the hazard warningflashers.
. Turn the vehicle on and then off.
See Remote Vehicle Start 0 34.
Door LocksThere are several ways to lock andunlock the vehicle.
From outside, use the RemoteKeyless Entry (RKE) transmitter orthe key in the driver door.
From inside, use the power doorlocks or push down or pull up on themanual door locks.
From inside, pull the door handleonce to unlock the door. Pull againto open the door.
Power Door Locks
Base
Crew Cab
Q : Press to lock the doors.

Chevrolet Silverado 4500HD/5500HD/6500HD Owner Manual (GMNA-Localizing-U.S.-12102101) - 2019 - crc - 10/2/18
10 In Brief
K : Press to unlock the doors.
See Door Locks 0 35 and PowerDoor Locks 0 36.
Windows
Power Windows
Base
Crew Cab
Power windows work when theignition is on, in ACC/ACCESSORY,or when Retained Accessory Power(RAP) is active. See RetainedAccessory Power (RAP) 0 214.
Using the window switch, press toopen or pull to close the window.
The windows may be temporarilydisabled if they are used repeatedlywithin a short time.
See Power Windows 0 42.
Seat Adjustment
Manual Seats
To adjust a manual seat:
1. Pull the handle at the front ofthe seat.
2. Slide the seat to the desiredposition and release thehandle.
3. Try to move the seat back andforth to be sure it is locked inplace.
See Seat Adjustment 0 47.

Chevrolet Silverado 4500HD/5500HD/6500HD Owner Manual (GMNA-Localizing-U.S.-12102101) - 2019 - crc - 10/2/18
In Brief 11
Power Seats
To adjust a power seat, if equipped:
. Move the seat forward orrearward by sliding the controlforward or rearward.
. If equipped, raise or lower thefront part of the seat cushion bymoving the front of the controlup or down.
. If equipped, raise or lower theseat by moving the rear of thecontrol up or down.
See Power Seat Adjustment 0 48.
Lumbar Adjustment
Manual Lumbar
If equipped, move the lever up ordown repeatedly to increase ordecrease lumbar support.
See Lumbar Adjustment 0 48.
Power Lumbar
To adjust the power lumbar support,if equipped:
. Press and hold the controlforward to increase or rearwardto decrease upper and lowerlumbar support at the same time.
. If equipped, press and hold thecontrol up to increase upperlumbar support and decreaselower lumbar support.
Press and hold the control downto increase lower lumbar supportand decrease upper lumbarsupport.

Chevrolet Silverado 4500HD/5500HD/6500HD Owner Manual (GMNA-Localizing-U.S.-12102101) - 2019 - crc - 10/2/18
12 In Brief
See Lumbar Adjustment 0 48.
Reclining Seatbacks
Manual Reclining Seatbacks
To adjust a manual seatback:
1. Lift the lever.
The seatback will automaticallyfold forward.
2. To recline, move the seatbackrearward to the desiredposition, then release the leverto lock the seatback in place.
3. Push and pull on the seatbackto make sure it is locked.
To return the seatback to the uprightposition:
1. Lift the lever fully withoutapplying pressure to theseatback, and the seatback willreturn to the upright position.
2. Push and pull on the seatbackto make sure it is locked.
See Reclining Seatbacks 0 49.
Power Reclining Seatbacks
To recline a power seatback,if equipped:
. Tilt the top of the controlrearward to recline.
. Tilt the top of the control forwardto raise.
See Reclining Seatbacks 0 49.
Heated Seats
If equipped, the buttons are on thecenter stack. To operate, the enginemust be running.
PressI or+ to heat the driver orpassenger seatback only.
Press J or z to heat the driver orpassenger seat cushion andseatback.
See Heated Front Seats 0 50.

Chevrolet Silverado 4500HD/5500HD/6500HD Owner Manual (GMNA-Localizing-U.S.-12102101) - 2019 - crc - 10/2/18
In Brief 13
Head RestraintAdjustmentDo not drive until the head restraintsfor all occupants are installed andadjusted properly.
To achieve a comfortable seatingposition, change the seatbackrecline angle as little as necessarywhile keeping the seat and the headrestraint height in the properposition.
See Head Restraints 0 46 and SeatAdjustment 0 47.
Seat Belts
Refer to the following sections forimportant information on how to useseat belts properly:
. Seat Belts 0 53
. How to Wear Seat Belts Properly0 54
. Lap-Shoulder Belt 0 56
. Lower Anchors and Tethers forChildren (LATCH System) 0 76
Airbag On-Off SwitchIf the instrument panel endcap hasthe switch pictured in the followingillustration, the vehicle has anairbag on-off switch that you canuse to manually turn on or off thefront outboard passenger airbag.
To operate the airbag on-off switch,use the vehicle key.
See Airbag On-Off Switch 0 65 forimportant information.
Mirror AdjustmentUsing hood-mounted air deflectorsand add-on convex mirrorattachments could decrease mirrorperformance.

Chevrolet Silverado 4500HD/5500HD/6500HD Owner Manual (GMNA-Localizing-U.S.-12102101) - 2019 - crc - 10/2/18
14 In Brief
Exterior Mirrors
Manual Mirrors
If equipped, adjust manual mirrorsby moving them up and down or leftto right to see a little of the side ofthe vehicle and to have a clear viewbehind the vehicle.
See Manual Mirrors 0 39.
Power Mirrors
Base
Crew Cab
If equipped with power mirrors:
1. Press (1) or (2) to select thedriver or passenger side mirror.
2. Press the arrows on the controlpad to move the mirror up,down, right, or left.
3. Adjust each outside mirror sothat a little of the vehicle andthe area behind it can be seen.
See Power Mirrors 0 40.
Interior Mirror
Adjustment
Adjust the mirror for a clear view ofthe area behind the vehicle.
Manual Dimming Rearview Mirror
If equipped, push the tab forward fordaytime use and pull it for nighttimeuse to avoid glare from theheadlamps from behind. SeeManual Rearview Mirror 0 41.
Steering WheelAdjustment

Chevrolet Silverado 4500HD/5500HD/6500HD Owner Manual (GMNA-Localizing-U.S.-12102101) - 2019 - crc - 10/2/18
In Brief 15
To adjust the steering wheel:
1. Hold the steering wheel andpull the lever.
2. Move the steering wheel upor down.
3. Release the lever to lock thewheel in place.
Do not adjust the steering wheelwhile driving.
Interior LightingDome Lamps
There are dome lamps in theoverhead console and the headliner,if equipped.
To change the dome lamp settings,press the following:
OFF : Turns the lamps off, evenwhen a door is open.
DOOR : The lamps come onautomatically when a door isopened.
ON : Turns all dome lamps on.
Reading Lamps
There are reading lamps in theoverhead console and the headliner,if equipped. To operate, the ignitionmust be on or in ACC/ACCESSORYor using Retained AccessoryPower (RAP).
Pressm orn next to each readinglamp to turn it on or off.
For more information about interiorlighting, see Instrument PanelIllumination Control 0 137.

Chevrolet Silverado 4500HD/5500HD/6500HD Owner Manual (GMNA-Localizing-U.S.-12102101) - 2019 - crc - 10/2/18
16 In Brief
Exterior Lighting
The exterior lamp control is on theinstrument panel to the left of thesteering wheel.
O : Turns off the automaticheadlamps and Daytime RunningLamps (DRL). Turn the headlampcontrol to O again to turn theautomatic headlamps or DRLback on.
For vehicles first sold in Canada, offwill only work when the vehicle is inP (Park).
AUTO : Automatically turns on theheadlamps, parking lamps,taillamps, instrument panel lights,
roof marker lamps (if equipped),front/rear sidemarker lamps, andlicense plate lamps.
; : Turns on the parking lampsincluding all lamps, except theheadlamps.
5 : Turns on the headlampstogether with the parking lamps andinstrument panel lights.
See:
. Exterior Lamp Controls 0 132.
. Daytime Running Lamps (DRL)0 134.
. Fog Lamps 0 136.
Windshield Wiper/Washer
The windshield wiper control is onthe turn signal lever.
The windshield wipers are controlledby turning the band withz on it.
1 : Fast wipes.
w : Slow wipes.
3 INT : Turn the band up for morefrequent wipes or down for lessfrequent wipes.
OFF : Turns the windshieldwipers off.
8 : For a single wipe, turn to8,then release. For several wipes,hold the band on8 longer.
Lm : Push the paddle at the top ofthe lever to spray washer fluid onthe windshield.
See Windshield Wiper/Washer 0 97.

Chevrolet Silverado 4500HD/5500HD/6500HD Owner Manual (GMNA-Localizing-U.S.-12102101) - 2019 - crc - 10/2/18
In Brief 17
Climate ControlsThese systems control the heating, cooling, and ventilation.
Climate Control System (with Heater Only)
1. Fan Control
2. Air Recirculation
3. Air Delivery Mode Controls
4. Defrost
5. TEMP (Temperature Control)

Chevrolet Silverado 4500HD/5500HD/6500HD Owner Manual (GMNA-Localizing-U.S.-12102101) - 2019 - crc - 10/2/18
18 In Brief
Climate Control System (with Air Conditioning)
1. Fan Control
2. A/C (Air Conditioning)
3. Air Delivery Mode Controls
4. Defrost
5. TEMP (Temperature Control)
6. K (Rear Window Defogger, IfEquipped)
f (Heated Outside Mirror, IfEquipped)
8 (Outside Air, If Equipped)
7. Air Recirculation
Transmission
Range Selection Mode
The Range Selection Mode switch,if equipped, is on the shift lever.
1. To enable the Range Selectionfeature, move the shift lever tothe L (Manual Mode) position.The current range will appearnext to the L. This is thehighest attainable range withall lower gears accessible. Asan example, when 5 (Fifth)gear is selected, 1 (First)through 5 (Fifth) gears areavailable.
2. Press the plus/minus buttonson the shift lever to select thedesired range of gears forcurrent driving conditions. SeeManual Mode 0 226.
While using Range Selection Mode,cruise control and the Tow/HaulMode can be used.
Grade Braking is not available whenRange Selection Mode is active.See Tow/Haul Mode 0 227.
Four-Wheel DriveIf equipped with four-wheel drive,the engine's driving power can besent to all four wheels for extratraction.

Chevrolet Silverado 4500HD/5500HD/6500HD Owner Manual (GMNA-Localizing-U.S.-12102101) - 2019 - crc - 10/2/18
In Brief 19
Manual Locking Hubs
{ Warning
It is dangerous to get out of thevehicle if the shift lever is not fullyin P (Park) with the parking brakefirmly set. The vehicle can roll.
Do not leave the vehicle when theengine is running. If you have leftthe engine running, the vehiclecan move suddenly. You or otherscould be injured. To be sure thevehicle will not move, even whenyou are on fairly level ground,always set the parking brake andmove the shift lever to P (Park).See Shifting Into Park 0 214.
The locking hubs are located oneach end of the front axle and mustbe manually turned to LOCK beforethe four-wheel drive modes canbe used.
The hubs may remain in the LOCKposition when road surface tractionconditions are variable or it isunsafe to unlock them. Turn thelocking hubs to FREE when it issafe to do so.
When four-wheel drive is no longerneeded turn the locking hubsto FREE.
Transfer Case Controls
Use these controls to shift into andout of the different four-wheel drivemodes.
Electronic Transfer Case
This transfer case knob is to the leftof the steering column.
The different drive options that maybe available are described following.
N (Neutral) : Use only when thevehicle needs to be towed.
2 m (Two-Wheel Drive High) : Thissetting is used for driving in moststreet and highway situations.

Chevrolet Silverado 4500HD/5500HD/6500HD Owner Manual (GMNA-Localizing-U.S.-12102101) - 2019 - crc - 10/2/18
20 In Brief
4 m (Four-Wheel Drive High) : Usethis setting when extra traction isneeded, such as on snowy or icyroads or in most off-road situations.
4 n (Four-Wheel Drive Low) : Thissetting sends maximum power to allfour wheels. Choose 4n whendriving in deep sand, mud, or snow,and while climbing or descendingsteep hills.
See Four-Wheel Drive 0 228.
Vehicle Features
Infotainment SystemThe base radio and base radio withtouchscreen information is includedin this manual. See the infotainmentmanual for information on theuplevel radios, audio players,phone, navigation system, RearSeat Entertainment (RSE), andvoice or speech recognition,if equipped.
Radio(s)
Base Radio
O : Press to turn the system on.Press and hold to turn it off. Whenon, press to mute; press again tounmute. Turn to increase ordecrease the volume.
RADIO : Press to choose betweenFM, AM, and SiriusXM, if equipped.
MEDIA : Press to change the audiosource between CD, USB, AUX,and Bluetooth Audio, if equipped.
{ : Press to go to the Home Page.
MENU : Press to select a menu.
g : Press to seek the previousstation or track.
l : Press to seek the next stationor track.
See the base radio information inOverview (Base Radio withTouchscreen) 0 146 or Overview(Base Radio) 0 142.
Base Radio with Touchscreen
O : Press to turn the system on.Press and hold to turn it off. Whenon, press to mute; press again tounmute. Turn to increase ordecrease the volume.
{ : Press to go to the Home Page.
7 : Press to seek the previousstation or track.
6 : Press to seek the next stationor track.
See the base radio withtouchscreen information in Overview(Base Radio with Touchscreen)0 146 or Overview (Base Radio)0 142.

Chevrolet Silverado 4500HD/5500HD/6500HD Owner Manual (GMNA-Localizing-U.S.-12102101) - 2019 - crc - 10/2/18
In Brief 21
Setting the Clock
See Clock 0 98.
Satellite RadioVehicles with a SiriusXM satelliteradio tuner and a valid SiriusXMsatellite radio subscription canreceive SiriusXM programming.
SiriusXM Satellite RadioService
SiriusXM is a satellite radio servicebased in the 48 contiguous UnitedStates and 10 Canadian provinces.SiriusXM satellite radio has a widevariety of programming andcommercial-free music, coast tocoast, and in digital-quality sound.A fee is required to receive theSiriusXM service.
For more information refer to:
. www.siriusxm.com or call1-888-601-6296 (U.S.).
. www.siriusxm.ca or call1-877-438-9677 (Canada).
See Satellite Radio (Base Radiowith Touchscreen) 0 154 or SatelliteRadio (Base Radio) 0 154.
Portable Audio DevicesThis vehicle may have a 3.5 mm(1/8 in) auxiliary input jack and USBports in the center console orarmrest. There may be a USB portin the upper glove box. Externaldevices such as iPods®, laptopcomputers, MP3 players, and USBstorage devices may be connected,depending on the audio system.
See USB Port 0 160 and AuxiliaryJack 0 165.
BluetoothThe Bluetooth system allows userswith a Bluetooth-enabled cell phoneto make and receive hands-freecalls using the vehicle audio systemand controls.
The Bluetooth-enabled cell phonemust be paired with the in-vehicleBluetooth system before it can beused in the vehicle. Not all phoneswill support all functions.
See Bluetooth (Overview) 0 174 orBluetooth (Infotainment Controls)0 175.
Steering Wheel Controls
If equipped, some audio controlscan be adjusted at the steeringwheel.
g : If equipped with OnStar or aBluetooth system, press to interactwith those systems. See OnStarOverview 0 428, Bluetooth(Overview) 0 174 or Bluetooth(Infotainment Controls) 0 175,or “Bluetooth (Overview)” in theinfotainment manual.

Chevrolet Silverado 4500HD/5500HD/6500HD Owner Manual (GMNA-Localizing-U.S.-12102101) - 2019 - crc - 10/2/18
22 In Brief
i : Press to reject an incomingcall or end a current call. Press tomute or unmute the infotainmentsystem when not on a call.
o or p : Press to go to theprevious or next menu option.
w orx : Press to go to the next orprevious selection.
V : Press to select a highlightedmenu option.
The favorite and volume switchesare on the back of the steeringwheel.
1. Favorite: When on a radiosource, press to select the nextor previous favorite. When on amedia source, press to selectthe next or previous track.
2. Volume: Press to increase ordecrease the volume.
See Steering Wheel Controls 0 96.
Cruise Control
5 : Press to turn the system on oroff. The indicator light is white whencruise control is on and turns offwhen cruise control is off.
+RES : If there is a set speed inmemory, press briefly to resume tothat speed or press and hold toaccelerate. If cruise control isalready active, use to increasevehicle speed.
SET− : Press briefly to set thespeed and activate cruise control.If cruise control is already active,use to decrease vehicle speed.
* : Press to disengage cruisecontrol without erasing the setspeed from memory.
See Cruise Control 0 237.
Driver InformationCenter (DIC)The DIC display is in the instrumentcluster. It shows the status of manyvehicle systems.
If the vehicle has the base levelinstrument cluster, the trip odometerreset stem is used to operatethe DIC.

Chevrolet Silverado 4500HD/5500HD/6500HD Owner Manual (GMNA-Localizing-U.S.-12102101) - 2019 - crc - 10/2/18
In Brief 23
If the vehicle has the uplevelinstrument cluster, the right steeringwheel controls are used to operatethe DIC.
w orx : Press to move up ordown in a list.
o or p : Press to move betweenthe interactive display zones in thecluster.
V : Press to open a menu or selecta menu item. Press and hold toreset values on certain screens.
See Driver Information Center (DIC)(Base Level) 0 119 or DriverInformation Center (DIC) (Uplevel)0 120.
Rear VisionCamera (RVC)If equipped, RVC shows a view ofthe area behind the vehicle on theinfotainment display when thevehicle is shifted into R (Reverse) toaid with parking and low-speedbacking maneuvers.
See Rear Vision Camera (RVC)0 240.
Power OutletsAccessory power outlets can beused to plug in electrical equipment,such as a cell phone, MP3player, etc.
The vehicle may have up to fouraccessory power outlets.
Vehicles with a Center Console
. One or two in front of thecupholders on the centerconsole
. One inside the center console
. One on the rear of the centerconsole
Vehicles with Bench Seats
. One on the center stack belowthe climate control system
. One or two in the storage areaon the bench seat
Lift the cover to access and replacewhen not in use.
See Power Outlets 0 100.

Chevrolet Silverado 4500HD/5500HD/6500HD Owner Manual (GMNA-Localizing-U.S.-12102101) - 2019 - crc - 10/2/18
24 In Brief
Performance andMaintenance
FuelUse of diesel fuel with ultra lowsulfur content (15 ppm, maximum) isrequired. See Fuel for DieselEngines 0 241.
Engine Oil Life SystemThe engine oil life system calculatesengine oil life based on vehicle useand, on most vehicles, displays aDIC message when it is necessaryto change the engine oil and filter.The oil life system should be resetto 100% only following an oilchange.
Resetting the Oil Life System
To reset the engine oil life system:
1. Display REMAINING OIL LIFEon the DIC.See Driver Information Center(DIC) (Base Level) 0 119 orDriver Information Center (DIC)(Uplevel) 0 120. If the vehicle
does not have DIC buttons, thevehicle must be in P (Park) toaccess this display.
2. Press and hold V on the DIC,or the trip odometer reset stemif the vehicle does not haveDIC buttons, for severalseconds. The oil life willchange to 100%.
The oil life system can also be resetas follows:
1. Display REMAINING OIL LIFEon the DIC.See Driver Information Center(DIC) (Base Level) 0 119 orDriver Information Center (DIC)(Uplevel) 0 120.
2. Fully press the acceleratorpedal slowly three times withinfive seconds.
3. If the display changes to 100%,the system is reset.
See Engine Oil Life System 0 298.
Driving for Better FuelEconomyDriving habits can affect fuelmileage. Here are some driving tipsto get the best fuel economypossible:
. Set the climate controls to thedesired temperature after theengine is started, or turn themoff when not required.
. Avoid fast starts and acceleratesmoothly.
. Brake gradually and avoidabrupt stops.
. Avoid idling the engine for longperiods of time.
. When road and weatherconditions are appropriate, usecruise control.
. Always follow posted speedlimits or drive more slowly whenconditions require.
. Keep vehicle tires properlyinflated.
. Combine several trips into asingle trip.

Chevrolet Silverado 4500HD/5500HD/6500HD Owner Manual (GMNA-Localizing-U.S.-12102101) - 2019 - crc - 10/2/18
In Brief 25. Replace the vehicle's tires with
the same TPC Spec numbermolded into the tire's sidewallnear the size.
. Follow recommended scheduledmaintenance.
Diesel Particulate FilterThe Duramax engine is equippedwith a Diesel Particulate Filter (DPF)that will filter or trap particulates.The DPF is under the vehicle in theexhaust system.
Depending on a number of factorsmonitored by the engine computer,the DPF will need to be cleaned ofaccumulated solids. When acleaning is needed, the enginecomputer will initiate a cleaningaction by warming the exhaust gastemperature. This feature has beendesigned to operate automatically,with limited operator involvement orawareness.
Noise may be heard at low speedswhen the emission controls areactive. This is normal.
Manual Regeneration of DieselParticulate Filter
If equipped, this feature allows formanual cleaning/regeneration of theDPF when it is unable to cleanitself. It may be necessary toperform a manual regeneration ifdriving conditions — such asextended slow speed, stop-and-gotraffic, extended idles, short drivecycles, or stationary PTOoperation — prevent DPFself-cleaning.
Manual regeneration can only beused when the DPF has become atleast 90% full. At 100% full, it willattempt to automatically self-clean ifproper driving conditions are met.The DPF will clean itself if thevehicle can be driven above50 km/h (30 mph) for about30 minutes.
A Driver Information Center (DIC)message displays when manualregeneration is possible.
Scroll through the DIC pages to findthe Exhaust Filter menu. Dependingon whether the vehicle has a baseor uplevel cluster, it may be underthe Options menu.
If the vehicle cannot be stoppedwhen the DIC message firstindicates cleaning is available,automatic self-cleaning may havebegun. If conditions cannot be metfor self-cleaning to complete, andmanual regeneration is selected, itmay take up to four minutes for thesystem to switch to manualregeneration. When the switchoccurs, a DIC message prompts tostart the cleaning process.
{ Warning
Do not leave the vehicle duringthe regeneration.
Make sure that there are noflammables near the muffler, DPFand exhaust pipe which mayresult in a fire.
(Continued)

Chevrolet Silverado 4500HD/5500HD/6500HD Owner Manual (GMNA-Localizing-U.S.-12102101) - 2019 - crc - 10/2/18
26 In Brief
Warning (Continued)
Remember that the temperatureof exhaust gases is high enoughto burn you. You and others couldbe seriously injured.
Before starting the manualregeneration, make sure all of thefollowing safety conditions are met:
. The vehicle is parked on levelground, away from anyflammable materials.
. The vehicle is parked outdoors,away from any walls orbuildings.
. The vehicle is at least 3 m (10 ft)from any obstructions ormaterials that may combustor melt.
. The shift lever is in P (Park).
. The fuel tank is at leastone-eighth full.
. All fluids are at the proper level.
. No diagnostic trouble codeshave been set, and themalfunction indicator lamp isnot on.
. The engine coolant temperatureis above 71 °C (160 °F).
After making sure all of the safetyconditions have been met, press thetrip odometer reset stem or@ onthe steering wheel control for atleast one second to select Start onthe DIC.
Follow the instructions in the DICmessages. Choose ACCEPT toacknowledge that all of these safetyconditions have been met and toactivate regeneration.
If the DIC returns to the previousscreen, then one or more of thenecessary operating conditions hasnot been met.
Continue to follow the instructions inthe DIC messages. Hold theExhaust Brake switch on theinstrument panel below the climatecontrols for more thanthree seconds, and then release it,to begin the regeneration process.
If the EXHAUST BRAKE ONmessage displays, then the switchwas released too soon. Press itagain to turn off the exhaust brake,then try again when the DICmessage prompts.
When manual regeneration begins,the engine speed increases, theengine cooling fan sound increases,and a DIC message indicates thatcleaning is in progress.
A DIC message will display whencleaning has completed. Themessage will remain as long ascleaning is not necessary. Cleaningcould take up to 30 minutes. Uponcompletion, the engine will return tonormal idle, but exhaustcomponents will remain hot forseveral minutes. Do not move thevehicle until the exhaust has hadtime to cool. Manual regenerationcan be canceled at any time bypressing the brake pedal or turningthe engine off. Unusual noises maybe heard if regeneration isinterrupted.

Chevrolet Silverado 4500HD/5500HD/6500HD Owner Manual (GMNA-Localizing-U.S.-12102101) - 2019 - crc - 10/2/18
In Brief 27
Cleaning the DPF (ExhaustFilter)
While the DPF cleaning isautomatically controlled by theengine computer, the DriverInformation Center (DIC) maydisplay a message. The vehicle willneed to operate continuously untilthe message is no longer displayed.Cleaning occurs above50 km/h (30 mph). If the vehicle isreturned to idle during the cleaningprocess, the driver may notice aslightly different sound or a slightlyelevated engine idle speed. This isnormal. No action is required on thepart of the driver during a regularDPF cleaning. See DieselParticulate Filter 0 217.
Special DPF Driver Messages
If the vehicle is used for numerousshort trips or extended slow-speedoperation, the engine computer maynot be able to adequately heat upthe exhaust system to clean theDPF effectively. The enginecomputer has been designed tocontinuously monitor the condition
of the DPF. When the enginecomputer detects that the DPF isnearly full of particulates and thatthe vehicle is not being operated ina manner that would allow effectiveautomatic DPF cleaning, the DICwill display a message.
If the vehicle continues to be drivenin a manner that prevents effectiveDPF cleaning, the DPF will becomeplugged with particulates. If thisoccurs, the engine computer willturn on the malfunction indicatorlamp (Check Engine Light) in theinstrument cluster, and the DIC willdisplay the message ENGINEPOWER IS REDUCED. See DieselParticulate Filter 0 217.
Fuel
Use Ultra Low Sulfur DieselFuel (ULSD)
Use ULSD only. The emissioncontrol hardware used on thevehicle may be damaged by usingfuel with high sulfur levels. Use onlyfuel that is dispensed from pumpsbearing the ULSD label.
Do Not Use Low Sulfur DieselFuel (LSD)
Do not use fuel that is dispensedfrom pumps bearing the LSD label.
Do Not Use Non-Highway Fuel
Fuel labeled as off road ornon-highway is typically very high insulfur content and will damage theemission control system.Non-highway fuel is not intended foruse in on-highway vehicles anddoes not have the fuel propertiesneeded by the DPF-equippedDuramax diesel.
In addition:
. Use the correct engine oil.
. Do not add gasoline todiesel fuel.
. Do not modify the induction orexhaust systems.
See Fuel for Diesel Engines 0 241and Engine Oil 0 295.

Chevrolet Silverado 4500HD/5500HD/6500HD Owner Manual (GMNA-Localizing-U.S.-12102101) - 2019 - crc - 10/2/18
28 In Brief
Diesel Exhaust FluidDiesel Exhaust Fluid (DEF) is usedwith diesel engines to reduce theamount of regulated emissionsproduced. The DEF system must bemaintained for the vehicle to runproperly.
DEF is not a fuel additive. Forrefilling instructions, see DieselExhaust Fluid 0 220. DEF shouldnot be mixed with or added to dieselfuel. DEF freezes when exposed totemperatures below −11 °C (12 ° F).
Locating Diesel Exhaust Fluid
DEF can be purchased at yourdealer. It can also be purchased atauthorized vehicle and truckdealerships. Additionally, somediesel truck fueling stations orretailers may have DEF forpurchase. For vehicles with anactive OnStar or connected serviceplan, OnStar can help to locate aDEF retailer. See RecommendedFluids and Lubricants 0 398.
As the DEF tank becomes low onfluid, the Driver Information Center(DIC) will begin to display warningsto indicate the approximateremaining range. These warningswill increase as the tank becomesempty. Once the tank is empty,vehicle speed will be limited. If thereis an issue with the quality of thefluid or the DEF system, the DIC willdisplay warnings. See DieselExhaust Fluid 0 220.
Roadside AssistanceProgramU.S.: 1-888-899-1327
TTY Users (U.S. Only):1-888-889-2438
Canada: 1-800-268-6800
New Chevrolet owners areautomatically enrolled in theRoadside Assistance Program.
See Roadside Assistance Program0 418.

Chevrolet Silverado 4500HD/5500HD/6500HD Owner Manual (GMNA-Localizing-U.S.-12102101) - 2019 - crc - 10/2/18
Keys, Doors, and Windows 29
Keys, Doors, andWindows
Keys and LocksKeys . . . . . . . . . . . . . . . . . . . . . . . . . . . 29Remote Keyless Entry (RKE)System . . . . . . . . . . . . . . . . . . . . . . . 32
Remote Keyless Entry (RKE)System Operation . . . . . . . . . . . . 32
Remote Vehicle Start . . . . . . . . . . 34Door Locks . . . . . . . . . . . . . . . . . . . . 35Power Door Locks . . . . . . . . . . . . . 36Lockout Protection . . . . . . . . . . . . . 36Safety Locks . . . . . . . . . . . . . . . . . . . 36
Vehicle SecurityVehicle Security . . . . . . . . . . . . . . . . 37Vehicle Alarm System . . . . . . . . . 37Immobilizer . . . . . . . . . . . . . . . . . . . . 38Immobilizer Operation . . . . . . . . . 38
Exterior MirrorsConvex Mirrors . . . . . . . . . . . . . . . . 39Manual Mirrors . . . . . . . . . . . . . . . . . 39Trailer-Tow Mirrors . . . . . . . . . . . . . 39Power Mirrors . . . . . . . . . . . . . . . . . . 40Folding Mirrors . . . . . . . . . . . . . . . . . 40Heated Mirrors . . . . . . . . . . . . . . . . . 41
Interior MirrorsInterior Rearview Mirrors . . . . . . . 41Manual Rearview Mirror . . . . . . . . 41Automatic Dimming RearviewMirror . . . . . . . . . . . . . . . . . . . . . . . . . 41
WindowsWindows . . . . . . . . . . . . . . . . . . . . . . . 41Manual Windows . . . . . . . . . . . . . . 42Power Windows . . . . . . . . . . . . . . . 42Sun Visors . . . . . . . . . . . . . . . . . . . . . 44
Keys and Locks
Keys
{ Warning
Leaving children in a vehicle withan ignition key or RemoteKeyless Entry (RKE) transmitter isdangerous and children or otherscould be seriously injured orkilled. They could operate thepower window or other controls ormake the vehicle move. Thewindows will function with the keyin the ignition or with the RKEtransmitter in the vehicle, andchildren or others could be caughtin the path of a closing window.Do not leave children in a vehiclewith the ignition key or an RKEtransmitter.

Chevrolet Silverado 4500HD/5500HD/6500HD Owner Manual (GMNA-Localizing-U.S.-12102101) - 2019 - crc - 10/2/18
30 Keys, Doors, and Windows
{ Warning
If the key is unintentionallyrotated while the vehicle isrunning, the ignition could bemoved out of the RUN position.This could be caused by heavyitems hanging from the key ring,or by large or long items attachedto the key ring that could becontacted by the driver orsteering wheel. If the ignitionmoves out of the RUN position,the engine will shut off, brakingand steering power assist may be
(Continued)
Warning (Continued)
impacted, and airbags may notdeploy. To reduce the risk ofunintentional rotation of theignition key, do not change theway the ignition key and RemoteKeyless Entry (RKE) transmitter,if equipped, are connected to theprovided key rings.
The ignition key and key rings, andRKE transmitter, if equipped, aredesigned to work together as asystem to reduce the risk of
unintentionally moving the key outof the RUN position. The ignitionkey has a small hole to allowattachment of the provided key ring.It is important that any replacementignition keys have a small hole. Seeyour dealer if a replacement key isrequired.
The combination and size of therings that came with your keys werespecifically selected for yourvehicle. The rings are connected tothe key like two links of a chain toreduce the risk of unintentionallymoving the key out of the RUNposition. Do not add any additionalitems to the ring attached to theignition key. Attach additional itemsonly to the second ring, and limitadded items to a few essential keysor small, light items no larger thanan RKE transmitter.

Chevrolet Silverado 4500HD/5500HD/6500HD Owner Manual (GMNA-Localizing-U.S.-12102101) - 2019 - crc - 10/2/18
Keys, Doors, and Windows 31
Interference from radio-frequencyidentification (RFID) tags mayprevent the key from starting thevehicle. Keep RFID tags away fromthe key when starting the vehicle.
The key is used for the ignition, alldoor locks, the glove box, and thefloor console storage bin,if equipped. The key has abar-coded key tag that the dealer orqualified locksmith can use to makenew keys. Store this information in asafe place, not in the vehicle.
See your dealer if a replacementkey or additional key is needed. If itbecomes difficult to turn a key,
inspect the key blade for debris.Periodically clean with a brushor pick.
Programming Keys
Follow these procedures to programup to eight keys to the vehicle.
Programming with TwoRecognized Keys
To program a new key:
1. Insert the original, alreadyprogrammed key in the ignitionand turn the ignition on.
2. Turn the ignition off, andremove the key.
3. Quickly, within five seconds,insert the second originalalready programmed key in theignition and turn the ignition on.
4. Turn the ignition off, andremove the key.
5. Insert the key to beprogrammed and turn theignition on within five seconds.
6. The security light will turn offonce the key has beenprogrammed.
7. Repeat Steps 1–5 if additionalkeys are to be programmed.
If a key is lost or damaged, see yourdealer to have a new key made.
Programming withoutRecognized Keys
Program a new key to the vehiclewhen a recognized key is notavailable.
If two currently recognized keys arenot available, follow this procedureto program the first key.
This procedure will takeapproximately 30 minutes tocomplete for the first key. Thevehicle must be off and all of thekeys you wish to program must bewith you.
1. Insert the new vehicle key intothe ignition.
2. Turn the ignition on. Thesecurity light will come on.

Chevrolet Silverado 4500HD/5500HD/6500HD Owner Manual (GMNA-Localizing-U.S.-12102101) - 2019 - crc - 10/2/18
32 Keys, Doors, and Windows
3. Wait 10 minutes until thesecurity light turns off.
4. Turn the ignition off.
5. Repeat Steps 2–4 two moretimes. After the third time, turnthe ignition on; the key islearned and all previouslyknown keys will no longer workwith the vehicle.
6. To learn a second key, turn theignition off, insert the secondkey to be learned, and turn theignition on.
After two keys are learned, theremaining keys can be learned byfollowing the procedure in“Programming with TwoRecognized Keys.”
If locked out of the vehicle, seeRoadside Assistance Program0 418.
With an active OnStar or connectedservice plan, an OnStar Advisormay remotely unlock the vehicle.See OnStar Overview 0 428.
Remote Keyless Entry(RKE) SystemSee Radio Frequency Statement0 424.
If there is a decrease in the RemoteKeyless Entry (RKE) operatingrange:
. Check the distance. Thetransmitter may be too far fromthe vehicle.
. Check the location. Othervehicles or objects may beblocking the signal.
. Check the transmitter's battery.See “Battery Replacement” laterin this section.
. If the transmitter is still notworking correctly, see yourdealer or a qualified technicianfor service.
Remote Keyless Entry(RKE) System OperationThe Remote Keyless Entry (RKE)transmitter functions may work up to60 m (197 ft) away from the vehicle.
Other conditions can affect theperformance of the RKE transmitter.See Remote Keyless Entry (RKE)System 0 32.
With Remote Start Shown, withoutRemote Start Similar
/ : If equipped, press and releaseQ and then immediately press andhold/ for at least four seconds tostart the engine. See RemoteVehicle Start 0 34.
Q : Press to lock all doors.
If enabled, the turn signal lampsflash once to indicate locking hasoccurred. If enabled, the horn chirps

Chevrolet Silverado 4500HD/5500HD/6500HD Owner Manual (GMNA-Localizing-U.S.-12102101) - 2019 - crc - 10/2/18
Keys, Doors, and Windows 33
when Q is pressed again withinthree seconds. See VehiclePersonalization 0 124.
Pressing Q arms the alarm system.See Vehicle Alarm System 0 37.
K : Press once to unlock only thedriver door. If K is pressed againwithin three seconds, all remainingdoors unlock. The interior lampsmay come on and stay on for20 seconds or until the ignition isturned on.
If enabled, the turn signal lampsflash twice to indicate unlocking hasoccurred. See VehiclePersonalization 0 124. If enabled,the exterior lamps may turn on. SeeVehicle Personalization 0 124.
Pressing K on the RKE transmitterdisarms the alarm system. SeeVehicle Alarm System 0 37.
7 : Press and release one time toinitiate vehicle locator. The turnsignal lamps flash and the hornsounds three times.
Press and hold 7 for at leastthree seconds to sound the panicalarm. The turn signal lamps flashand the horn sounds repeatedly for30 seconds. The alarm turns offwhen the ignition is turned on or 7is pressed again. The ignition mustbe off for the panic alarm to work.
Battery Replacement
Replace the battery in the RKEtransmitter soon if the DIC displaysREPLACE BATTERY INREMOTE KEY.
Caution
When replacing the battery, donot touch any of the circuitry onthe transmitter. Static from yourbody could damage thetransmitter.
To replace the battery:
1. Separate and remove the backcover of the RKE transmitterwith a flat, thin object, such asa coin.

Chevrolet Silverado 4500HD/5500HD/6500HD Owner Manual (GMNA-Localizing-U.S.-12102101) - 2019 - crc - 10/2/18
34 Keys, Doors, and Windows
2. Press and slide the batterydown toward the pocket of theRKE transmitter in the directionof the key ring. Do not use ametal object.
3. Remove the battery.
4. Insert the new battery, positiveside facing up. Replace with aCR2032 or equivalent battery.
5. Push together the RKEtransmitter back cover top sidefirst, and then the bottomtoward the key ring.
Remote Vehicle StartIf equipped with remote start, theclimate control system will come onwhen the vehicle is started remotely,depending on the outsidetemperature.
The rear defog and heated frontseats, if equipped, may also comeon.See Heated Front Seats 0 50 andVehicle Personalization 0 124.
Laws in some communities mayrestrict the use of remote starters.Check local regulations for anyrequirements on remote starting ofvehicles.
Do not use remote start if thevehicle is low on fuel.
The vehicle cannot be remotestarted if:
. The key is in the ignition.
. The hood is not closed.
. There is an emission controlsystem malfunction and themalfunction indicator lamp is on.
The engine will turn off during aremote vehicle start if:
. The coolant temperature getstoo high.
. The oil pressure gets low.
. The ignition is in any mode otherthan off.
. The hazard flashers are on.
. Two remote starts or a start withan extension have been used.
. The vehicle is not in P (Park).
The RKE transmitter range may bereduced while the vehicle is running.
Other conditions can affect theperformance of the transmitter.See Remote Keyless Entry (RKE)System 0 32 or VehiclePersonalization 0 124.
Starting the Engine Using RemoteStart
1. Press and release Q.
2. Immediately press and hold /until the turn signal lamps flashor for at least four seconds.

Chevrolet Silverado 4500HD/5500HD/6500HD Owner Manual (GMNA-Localizing-U.S.-12102101) - 2019 - crc - 10/2/18
Keys, Doors, and Windows 35
When the vehicle starts, theparking lamps will turn on. Thedoors will be locked and theclimate control system maycome on.
The engine will continue to runfor 15 minutes. After30 seconds, repeatSteps 1 and 2 for a 15-minutetime extension.
Turn the ignition on to operate thevehicle.
Extending Engine Run Time
The engine run time can beextended by 15 minutes, for a totalof 30 minutes, if during the first15 minutes Steps 1 and 2 arerepeated while the engine is stillrunning. An extension can berequested 30 seconds after starting.
A maximum of two remote starts,or a single start with an extension,is allowed between ignition cycles.
The ignition must be turned on andthen back off to use remote startagain.
Canceling a Remote Start
To cancel a remote start, do one ofthe following:
. Press and hold/ until theparking lamps turn off.
. Turn on the hazard warningflashers.
. Turn the ignition on and then off.
Door Locks
{ Warning
Unlocked doors can bedangerous.
. Passengers, especiallychildren, can easily openthe doors and fall out of amoving vehicle. The doorscan be unlocked andopened while the vehicle ismoving. The chance ofbeing thrown out of thevehicle in a crash isincreased if the doors arenot locked. So, all
(Continued)
Warning (Continued)
passengers should wearseat belts properly and thedoors should be lockedwhenever the vehicle isdriven.
. Young children who get intounlocked vehicles may beunable to get out. A childcan be overcome byextreme heat and can sufferpermanent injuries or evendeath from heat stroke.Always lock the vehiclewhenever leaving it.
. Outsiders can easily enterthrough an unlocked doorwhen you slow down or stopthe vehicle. Locking thedoors can help prevent thisfrom happening.
There are several ways to lock andunlock the vehicle.

Chevrolet Silverado 4500HD/5500HD/6500HD Owner Manual (GMNA-Localizing-U.S.-12102101) - 2019 - crc - 10/2/18
36 Keys, Doors, and Windows
From outside:
. Use the Remote Keyless Entry(RKE) transmitter.
. Use the key in the driver door orthe passenger door, if equipped.
From inside, use the power doorlocks or the manual door locks. Tolock the door with the manual doorlocks, push down on the manuallock knob.
From inside, pull the door handleonce to unlock the door. Pull thehandle again to open the door.
See Vehicle Alarm System 0 37.
Free-Turning Locks
The door key lock cylinder turnsfreely when either the wrong key isused, or the correct key is not fullyinserted. The free-turning door lockfeature prevents the lock from beingforced open. To reset the lock, turnit to the vertical position with thecorrect key fully inserted. Removethe key and insert it again. If thisdoes not reset the lock, turn the keyhalfway around in the cylinder andrepeat the reset procedure.
Power Door Locks
Base
Crew Cab
Q : Press to lock the doors.
K : Press to unlock the doors.
Lockout ProtectionIf the ignition is on or in ACC/ACCESSORY and the power doorlock switch is pressed with thedriver door open, all the doors willlock and only the driver door willunlock.
If the vehicle is off and locking isselected while a door is open, whenall doors are closed the vehicle willcheck for RKE transmitters inside.If an RKE transmitter is detected,and the number of RKE transmittershas not reduced, the driver door willunlock and the horn will chirp threetimes.
This can be manually overridden bypressing and holding Q on thepower door lock switch.
Safety LocksIf equipped, the rear door safetylocks prevent passengers fromopening the rear doors from insidethe vehicle.
Chevrolet Silverado 4500HD/5500HD/6500HD Owner Manual (GMNA-Localizing-U.S.-12102101) - 2019 - crc - 10/2/18
Keys, Doors, and Windows 37
Crew Cab
Press { to activate the safety lockson the rear doors. The indicator lightcomes on when activated. Press {again to deactivate. The vehiclemust be on, in ACC/ACCESSORY,or in Retained Accessory Power(RAP). See Retained AccessoryPower (RAP) 0 214.
If the indicator light flashes, thefeature may not be working properly.
Vehicle SecurityThis vehicle has theft-deterrentfeatures; however, they do not makethe vehicle impossible to steal.
Vehicle Alarm System
The indicator light, on theinstrument panel near thewindshield, indicates the status ofthe system.
Off : Alarm system is disarmed.
On Solid : Vehicle is securedduring the delay to arm the system.
Fast Flash : Vehicle is unsecured.A door, the tailgate, or the hoodis open.
Slow Flash : Alarm system isarmed.
Arming the Alarm System
1. Turn off the vehicle.
2. Lock the vehicle in one oftwo ways:
. Use the RKE transmitter.
. With a door open, press Qon the interior of the door.
3. After 30 seconds, the alarmsystem will arm and theindicator light will begin toslowly flash. Pressing Q on theRKE transmitter a second timewill bypass the 30-seconddelay and immediately arm thealarm system.
The vehicle alarm system will notarm if the doors are locked withthe key.

Chevrolet Silverado 4500HD/5500HD/6500HD Owner Manual (GMNA-Localizing-U.S.-12102101) - 2019 - crc - 10/2/18
38 Keys, Doors, and Windows
If the driver door is opened withoutfirst unlocking with the RKEtransmitter, the horn will chirp andthe lights will flash to indicatepre-alarm. If the vehicle is notstarted, or the door is not unlockedby pressing K on the RKEtransmitter during the 10-secondpre-alarm, the alarm will beactivated.
The alarm will also be activated if apassenger door, the tailgate, or thehood is opened without firstdisarming the system. When thealarm is activated, the turn signalsflash and the horn sounds for about30 seconds. The alarm system willthen re-arm to monitor for the nextunauthorized event.
Disarming the Alarm System
To disarm the alarm system or turnoff the alarm if it has been activated:
. Press K on the RKE transmitter.
. Start the vehicle.
To avoid setting off the alarm byaccident:
. Lock the vehicle after alloccupants have exited.
. Always unlock a door with theRKE transmitter.
Unlocking the driver door withthe key will not disarm thesystem or turn off the alarm.
How to Detect a TamperCondition
If K is pressed on the RKEtransmitter and the horn chirps threetimes, an alarm occurred previouslywhile the alarm system was armed.
If the alarm has been activated, amessage will appear on the DIC.
ImmobilizerSee Radio Frequency Statement0 424.
Immobilizer Operation
This vehicle has a passivetheft-deterrent system.
The system does not have to bemanually armed or disarmed.
The vehicle is automaticallyimmobilized when the vehicle isturned off.
The system is automaticallydisarmed when the ignition is turnedfrom off to on.
The security light, in the instrumentcluster, comes on if there is aproblem with arming or disarmingthe theft-deterrent system.
When trying to start the vehicle, thesecurity light comes on briefly whenthe ignition is turned on.

Chevrolet Silverado 4500HD/5500HD/6500HD Owner Manual (GMNA-Localizing-U.S.-12102101) - 2019 - crc - 10/2/18
Keys, Doors, and Windows 39
If the engine does not start and thesecurity light stays on, there is aproblem with the system. Turn theignition off and try again.
If the engine still does not start, andthe key appears to be undamaged,try another ignition key. It may benecessary to check the fuse. SeeFuses and Circuit Breakers 0 320.If the engine still does not start withthe other key, the vehicle needsservice. If the vehicle does start, thefirst key may be faulty. See yourdealer.
It is possible for the immobilizersystem to learn new or replacementkeys. Up to eight keys can beprogrammed for the vehicle. Toprogram additional keys, see Keys0 29.
Do not leave the transmitter ordevice that disarms or deactivatesthe vehicle theft system in thevehicle.
See your dealer to get a new keyblank cut exactly as the ignition keythat operates the system.
Exterior Mirrors
Convex Mirrors
{ Warning
A convex mirror can make things,like other vehicles, look fartheraway than they really are. If youcut too sharply into the right lane,you could hit a vehicle on theright. Check the inside mirror orglance over your shoulder beforechanging lanes.
The passenger side mirror is convexshaped. A convex mirror's surface iscurved so more can be seen fromthe driver seat.
Manual MirrorsIf equipped, adjust manual mirrorsby moving the mirror up and downor left to right to see a little of theside of the vehicle and to have aclear view behind the vehicle.
Using hood-mounted air deflectorsand add-on convex mirrorattachments could decrease mirrorperformance.
Trailer-Tow Mirrors
If equipped, adjust trailer-towmirrors for a clear view of the areabehind you. Manually pull out themirror head to extend it for bettervisibility when towing a trailer.
The lower portion of the mirror isconvex. A convex mirror's surface iscurved to see more from the driver

Chevrolet Silverado 4500HD/5500HD/6500HD Owner Manual (GMNA-Localizing-U.S.-12102101) - 2019 - crc - 10/2/18
40 Keys, Doors, and Windows
seat. The convex mirror can beadjusted manually to the driverpreferred position for better vision.
The mirror may have a turn signalarrow that flashes in the direction ofthe turn or lane change.
Power Mirrors
Base
Crew Cab
If equipped with power mirrors:
1. Press (1) or (2) to select thedriver or passenger side mirror.
2. Press the arrows on the controlpad to move the mirror in thedesired direction.
3. Adjust each outside mirror sothat a little of the vehicle andthe area behind it can be seen.
Folding Mirrors
Manual Folding
If equipped, push the mirror towardthe vehicle to fold. Push the mirroroutward to return to its originalposition.
Manually fold the mirrors inward toprevent damage when goingthrough an automatic car wash.
Turn Signal Indicator
If equipped, indicator lights on themirror flash in the direction of theturn or lane change.

Chevrolet Silverado 4500HD/5500HD/6500HD Owner Manual (GMNA-Localizing-U.S.-12102101) - 2019 - crc - 10/2/18
Keys, Doors, and Windows 41
Heated MirrorsK : If equipped, the rear windowdefogger also heats the outsidemirrors.
W : If equipped, press to turn theheated outside mirrors on or off.
If equipped with trailer-tow mirrors,only the upper glass of the mirror isheated. The lower convex part ofthe towing mirrors is not heated.
See “Rear Window Defogger” underClimate Control Systems (withHeater Only) 0 186 or ClimateControl Systems (with AirConditioning) 0 188.
Interior Mirrors
Interior Rearview MirrorsAdjust the rearview mirror for a clearview of the area behind yourvehicle.
Do not spray glass cleaner directlyon the mirror. Use a soft toweldampened with water.
Manual Rearview MirrorIf equipped, push the tab forward fordaytime use and pull it rearward fornighttime use to avoid glare fromthe headlamps from behind.
Automatic DimmingRearview MirrorIf equipped, the mirror willautomatically reduce the glare of theheadlamps from behind. Thedimming feature comes on eachtime the vehicle is started.
Windows
{ Warning
Never leave a child, a helplessadult, or a pet alone in a vehicle,especially with the windowsclosed in warm or hot weather.They can be overcome by theextreme heat and sufferpermanent injuries or even deathfrom heat stroke.

Chevrolet Silverado 4500HD/5500HD/6500HD Owner Manual (GMNA-Localizing-U.S.-12102101) - 2019 - crc - 10/2/18
42 Keys, Doors, and Windows
The vehicle aerodynamics aredesigned to improve fuel economyperformance. This may result in apulsing sound when either rearwindow is down and the frontwindows are up. To reduce thesound, open either a front windowor the sunroof, if equipped.
Manual WindowsIf equipped, turn the hand crank oneach door to manually raise or lowerthe manual windows.
Power Windows
{ Warning
Children could be seriouslyinjured or killed if caught in thepath of a closing window. Neverleave the Remote Keyless Entry(RKE) transmitter or keys in a
(Continued)
Warning (Continued)
vehicle with children. When thereare children in the rear seat, usethe window lockout button toprevent operation of the windows.See Keys 0 29.
Base
Crew Cab
The power windows work when theignition is on, in ACC/ACCESSORY,or when Retained Accessory Power(RAP) is active. See RetainedAccessory Power (RAP) 0 214.
Using the window switch, press toopen or pull to close the window.
The windows may be temporarilydisabled if they are used repeatedlywithin a short time.

Chevrolet Silverado 4500HD/5500HD/6500HD Owner Manual (GMNA-Localizing-U.S.-12102101) - 2019 - crc - 10/2/18
Keys, Doors, and Windows 43
Window Lockout
Crew Cab
If equipped, this feature stops therear door passenger windowswitches from working except fromthe driver position.
PressZ to engage the rearwindow lockout feature. Theindicator light is on when engaged.
PressZ again to disengage.
Window Express Movement
All windows can be opened withoutholding the window switch. Pressthe switch down fully and quicklyrelease to express open thewindow.
If equipped, pull the window switchup fully and quickly release toexpress close the window.
Briefly press or pull the windowswitch in the same direction to stopthat window’s express movement.
Window Automatic ReversalSystem
The express-close feature willreverse window movement if itcomes in contact with an object.Extreme cold or ice could cause thewindow to auto-reverse. Thewindow will operate normally afterthe object or condition is removed.
Automatic Reversal SystemOverride
{ Warning
If automatic reversal systemoverride is active, the window willnot reverse automatically. You orothers could be injured and thewindow could be damaged.Before using automatic reversalsystem override, make sure thatall people and obstructions areclear of the window path.
When the engine is on, override theautomatic reversal system by pullingand holding the window switch ifconditions prevent it from closing.

Chevrolet Silverado 4500HD/5500HD/6500HD Owner Manual (GMNA-Localizing-U.S.-12102101) - 2019 - crc - 10/2/18
44 Keys, Doors, and Windows
Programming the PowerWindows
Programming may be necessary ifthe vehicle battery has beendisconnected or discharged. If thewindow is unable to express-up,program each express-closewindow:
1. Close all doors.
2. Turn the ignition on or to ACC/ACCESSORY.
3. Partially open the window to beprogrammed. Then close it andcontinue to pull the switchbriefly after the window hasfully closed.
4. Open the window and continueto press the switch briefly afterthe window has fully opened.
Remote Window Operation
If equipped, this feature allows thewindows to be opened remotely.If enabled in vehicle personalization,press and hold K on the RKEtransmitter. See VehiclePersonalization 0 124.
Sun Visors
Pull the sun visor down to blockglare. Detach the sun visor from thecenter mount to pivot to the sidewindow and, if equipped, extendalong the rod.

Chevrolet Silverado 4500HD/5500HD/6500HD Owner Manual (GMNA-Localizing-U.S.-12102101) - 2019 - crc - 10/2/18
Seats and Restraints 45
Seats andRestraints
Head RestraintsHead Restraints . . . . . . . . . . . . . . . 46
Front SeatsSeat Adjustment . . . . . . . . . . . . . . . 47Center Seat . . . . . . . . . . . . . . . . . . . . 47Power Seat Adjustment . . . . . . . . 48Lumbar Adjustment . . . . . . . . . . . . 48Reclining Seatbacks . . . . . . . . . . . 49Heated Front Seats . . . . . . . . . . . . 50
Rear SeatsRear Seats . . . . . . . . . . . . . . . . . . . . 51
Seat BeltsSeat Belts . . . . . . . . . . . . . . . . . . . . . 53How to Wear Seat BeltsProperly . . . . . . . . . . . . . . . . . . . . . . 54
Lap-Shoulder Belt . . . . . . . . . . . . . 56Seat Belt Use DuringPregnancy . . . . . . . . . . . . . . . . . . . . 58
Lap Belt . . . . . . . . . . . . . . . . . . . . . . . 59Seat Belt Extender . . . . . . . . . . . . . 59Safety System Check . . . . . . . . . . 59Seat Belt Care . . . . . . . . . . . . . . . . . 60
Replacing Seat Belt SystemParts after a Crash . . . . . . . . . . . 60
Airbag SystemAirbag System . . . . . . . . . . . . . . . . . 61Where Are the Airbags? . . . . . . . 62When Should an AirbagInflate? . . . . . . . . . . . . . . . . . . . . . . . 63
What Makes an AirbagInflate? . . . . . . . . . . . . . . . . . . . . . . . 64
How Does an AirbagRestrain? . . . . . . . . . . . . . . . . . . . . . 64
What Will You See after anAirbag Inflates? . . . . . . . . . . . . . . 64
Airbag On-Off Switch . . . . . . . . . . 65Servicing the Airbag-EquippedVehicle . . . . . . . . . . . . . . . . . . . . . . . 67
Adding Equipment to theAirbag-Equipped Vehicle . . . . . 68
Airbag System Check . . . . . . . . . . 68Replacing Airbag System Partsafter a Crash . . . . . . . . . . . . . . . . . 69
Child RestraintsOlder Children . . . . . . . . . . . . . . . . . 69Infants and Young Children . . . . 71Child Restraint Systems . . . . . . . 73Where to Put the Restraint . . . . . 75Lower Anchors and Tethers forChildren (LATCH System) . . . . 76
Replacing LATCH System PartsAfter a Crash . . . . . . . . . . . . . . . . . 85
Securing Child Restraints (Withthe Seat Belt in theRear Seat) . . . . . . . . . . . . . . . . . . . 85
Securing Child Restraints (Withthe Seat Belt in the CenterFront Seat) . . . . . . . . . . . . . . . . . . . 87
Securing Child Restraints (Withthe Seat Belt in theFront Seat) . . . . . . . . . . . . . . . . . . . 88

Chevrolet Silverado 4500HD/5500HD/6500HD Owner Manual (GMNA-Localizing-U.S.-12102101) - 2019 - crc - 10/2/18
46 Seats and Restraints
Head RestraintsFront Seats
The vehicle’s front seats haveadjustable head restraints in theoutboard seating positions.
{ Warning
With head restraints that are notinstalled and adjusted properly,there is a greater chance thatoccupants will suffer a neck/spinal injury in a crash. Do notdrive until the head restraints forall occupants are installed andadjusted properly.
Adjust the head restraint so that thetop of the restraint is at the sameheight as the top of the occupant'shead. This position reduces thechance of a neck injury in a crash.
The height of the head restraint canbe adjusted. Pull the head restraintup to raise it. Try to move the headrestraint to make sure that it islocked in place.
To lower the head restraint, pressthe button, located on the top of theseatback, and push the restraintdown. Try to move the headrestraint after the button is releasedto make sure that it is locked inplace.
The front seat outboard headrestraints are not removable.

Chevrolet Silverado 4500HD/5500HD/6500HD Owner Manual (GMNA-Localizing-U.S.-12102101) - 2019 - crc - 10/2/18
Seats and Restraints 47
Rear Seats
The rear seat has adjustableheadrests in the outboard seatingpositions.
The height of the headrest can beadjusted. Pull the headrest up toraise it. To lower the headrest, pushthe headrest down.
If you are installing a child restraintin the rear seat, see “Securing aChild Restraint Designed for theLATCH System” under LowerAnchors and Tethers for Children(LATCH System) 0 76.
Front Seats
Seat Adjustment
{ Warning
You can lose control of thevehicle if you try to adjust a driverseat while the vehicle is moving.Adjust the driver seat only whenthe vehicle is not moving.
To adjust a manual seat:
1. Pull the handle at the front ofthe seat.
2. Slide the seat to the desiredposition and release thehandle.
3. Try to move the seat back andforth to be sure it is locked inplace.
To adjust the seatback, seeReclining Seatbacks 0 49.
To adjust the lumbar support,if equipped, see Lumbar Adjustment0 48.
Center SeatIf equipped, the center frontseatback doubles as an armrest andcupholder/storage area for the driverand passenger when the centerfront seat is not used. Do not use itas a seating position when theseatback is folded down.

Chevrolet Silverado 4500HD/5500HD/6500HD Owner Manual (GMNA-Localizing-U.S.-12102101) - 2019 - crc - 10/2/18
48 Seats and Restraints
Power Seat Adjustment
{ Warning
The power seats will work withthe ignition off. Children couldoperate the power seats and beinjured. Never leave childrenalone in the vehicle.
To adjust a power seat, if equipped:
. Move the seat forward orrearward by sliding the controlforward or rearward.
. If equipped, raise or lower thefront part of the seat cushion bymoving the front of the controlup or down.
. If equipped, raise or lower theseat by moving the rear of thecontrol up or down.
To adjust the seatback, seeReclining Seatbacks 0 49.
To adjust the lumbar support, seeLumbar Adjustment 0 48.
Lumbar Adjustment
Manual Lumbar
If equipped, move the lever up ordown repeatedly to increase ordecrease lumbar support.
Power Lumbar
To adjust the power lumbar support,if equipped:
. Press and hold the controlforward to increase or rearwardto decrease upper and lowerlumbar support at the same time.
. If equipped, press and hold thecontrol up to increase upperlumbar support and decreaselower lumbar support.

Chevrolet Silverado 4500HD/5500HD/6500HD Owner Manual (GMNA-Localizing-U.S.-12102101) - 2019 - crc - 10/2/18
Seats and Restraints 49
Press and hold the control downto increase lower lumbar supportand decrease upper lumbarsupport.
Reclining Seatbacks
{ Warning
Sitting in a reclined position whenthe vehicle is in motion can bedangerous. Even when buckledup, the seat belts cannot dotheir job.
The shoulder belt will not beagainst your body. Instead, it willbe in front of you. In a crash, youcould go into it, receiving neck orother injuries.
The lap belt could go up overyour abdomen. The belt forceswould be there, not at your pelvicbones. This could cause seriousinternal injuries.
(Continued)
Warning (Continued)
For proper protection when thevehicle is in motion, have theseatback upright. Then sit wellback in the seat and wear theseat belt properly.
Do not have a seatback reclined ifthe vehicle is moving.
Manual Reclining Seatbacks
{ Warning
If either seatback is not locked, itcould move forward in a suddenstop or crash. That could causeinjury to the person sitting there.Always push and pull on theseatbacks to be sure they arelocked.
To adjust a manual seatback:
1. Lift the lever.

Chevrolet Silverado 4500HD/5500HD/6500HD Owner Manual (GMNA-Localizing-U.S.-12102101) - 2019 - crc - 10/2/18
50 Seats and Restraints
The seatback will automaticallyfold forward.
2. To recline, move the seatbackrearward to the desiredposition, then release the leverto lock the seatback in place.
3. Push and pull on the seatbackto make sure it is locked.
To return the seatback to the uprightposition:
1. Lift the lever fully withoutapplying pressure to theseatback, and the seatback willreturn to the upright position.
2. Push and pull on the seatbackto make sure it is locked.
Power Reclining Seatbacks
To recline a power seatback,if equipped:
. Tilt the top of the controlrearward to recline.
. Tilt the top of the control forwardto raise.
Heated Front Seats
{ Warning
If temperature change or pain tothe skin cannot be felt, the seatheater may cause burns. Toreduce the risk of burns, use carewhen using the seat heater,especially for long periods oftime. Do not place anything onthe seat that insulates againstheat, such as a blanket, cushion,cover, or similar item. This maycause the seat heater tooverheat. An overheated seatheater may cause a burn or maydamage the seat.

Chevrolet Silverado 4500HD/5500HD/6500HD Owner Manual (GMNA-Localizing-U.S.-12102101) - 2019 - crc - 10/2/18
Seats and Restraints 51
If equipped, the buttons are on thecenter stack. To operate, the enginemust be running.
PressI or+ to heat the driver orpassenger seatback only.
Press J or z to heat the driver orpassenger seat cushion andseatback.
The indicator light on the buttoncomes on when this feature is on.
Press the button once for thehighest setting. With each press ofthe button, the seat will change tothe next lower setting, and then tothe off setting. The indicator lights
next to the buttons indicate three forthe highest setting and one for thelowest. If the heated seats are onhigh for an extended time, their levelmay automatically be lowered.
Remote Start Auto Heated Seats
During a remote start, the heatedseats can be turned onautomatically. When it is coldoutside, the heated seats turn on.The heated seats are canceledwhen the ignition is turned on. Pressthe heated seat buttons to use theheated seats after the vehicle isstarted.
The heated seat indicator lights donot turn on during a remote start.
The temperature performance of anunoccupied seat may be reduced.This is normal.
The heated seats will not turn onduring a remote start unless theyare enabled in the vehiclepersonalization menu.See Remote Vehicle Start 0 34 andVehicle Personalization 0 124.
Rear SeatsRear Seat Reminder
If equipped, the message REARSEAT REMINDER LOOK IN REARSEAT displays under certainconditions indicating there may bean item or passenger in the rearseat. Check before exiting thevehicle.
This feature will activate when asecond row door is opened whilethe vehicle is on or up to 10 minutesbefore the vehicle is turned on.There will be an alert when thevehicle is turned off. The alert doesnot directly detect objects in the rearseat; instead, under certainconditions, it detects when a reardoor is opened and closed,indicating that there may besomething in the rear seat.
The feature is active only once eachtime the vehicle is turned on and off,and will require reactivation byopening and closing the second rowdoors. There may be an alert evenwhen there is nothing in the rearseat; for example, if a child entered

Chevrolet Silverado 4500HD/5500HD/6500HD Owner Manual (GMNA-Localizing-U.S.-12102101) - 2019 - crc - 10/2/18
52 Seats and Restraints
the vehicle through the rear doorand left the vehicle without thevehicle being shut off.
The feature can be turned on or off.See Vehicle Personalization 0 124.
Folding the Rear Seat
Either side of the rear seat can befolded for added cargo space.
Caution
Folding a rear seat with the seatbelts still fastened may causedamage to the seat or the seatbelts. Always unbuckle the seatbelts and return them to theirnormal stowed position beforefolding a rear seat.
Make sure that nothing is on theseat cushion.
To fold the seat, slowly pull the seatcushion up.
To return the seat to the normalseating position, slowly pull the seatcushion down.
Make sure the seat belts are nottwisted or caught in the seatcushion.
{ Warning
A seat belt that is improperlyrouted, not properly attached,or twisted will not provide theprotection needed in a crash. Theperson wearing the belt could beseriously injured. After raising therear seatback, always check to besure that the seat belts areproperly routed and attached, andare not twisted.

Chevrolet Silverado 4500HD/5500HD/6500HD Owner Manual (GMNA-Localizing-U.S.-12102101) - 2019 - crc - 10/2/18
Seats and Restraints 53
Seat BeltsThis section describes how to useseat belts properly, and some thingsnot to do.
{ Warning
Do not let anyone ride where aseat belt cannot be worn properly.In a crash, if you or yourpassenger(s) are not wearingseat belts, injuries can be muchworse than if you are wearingseat belts. You can be seriouslyinjured or killed by hitting thingsinside the vehicle harder or bybeing ejected from the vehicle. Inaddition, anyone who is notbuckled up can strike otherpassengers in the vehicle.
It is extremely dangerous to ridein a cargo area, inside or outsideof a vehicle. In a collision,passengers riding in these areasare more likely to be seriouslyinjured or killed. Do not allow
(Continued)
Warning (Continued)
passengers to ride in any area ofthe vehicle that is not equippedwith seats and seat belts.
Always wear a seat belt, andcheck that all passenger(s) arerestrained properly too.
This vehicle has indicators as areminder to buckle the seat belts.See Seat Belt Reminders 0 111.
Why Seat Belts Work
When riding in a vehicle, you travelas fast as the vehicle does. If thevehicle stops suddenly, you keepgoing until something stops you.It could be the windshield, theinstrument panel, or the seat belts!
When you wear a seat belt, you andthe vehicle slow down together.There is more time to stop becauseyou stop over a longer distance and,when worn properly, your strongestbones take the forces from the seatbelts. That is why wearing seat beltsmakes such good sense.
Questions and Answers AboutSeat Belts
Q: Will I be trapped in the vehicleafter a crash if I am wearing aseat belt?
A: You could be— whether you arewearing a seat belt or not. Yourchance of being consciousduring and after a crash, so youcan unbuckle and get out, ismuch greater if you are belted.

Chevrolet Silverado 4500HD/5500HD/6500HD Owner Manual (GMNA-Localizing-U.S.-12102101) - 2019 - crc - 10/2/18
54 Seats and Restraints
Q: If my vehicle has airbags, whyshould I have to wear seatbelts?
A: Airbags are supplementalsystems only. They work withseat belts— not instead of them.Whether or not an airbag isprovided, all occupants still haveto buckle up to get the mostprotection.
Also, in nearly all states and inall Canadian provinces, the lawrequires wearing seat belts.
How to Wear Seat BeltsProperlyFollow these rules for everyone'sprotection.
There are additional things to knowabout seat belts and children,including smaller children andinfants. If a child will be riding in thevehicle, see Older Children 0 69 orInfants and Young Children 0 71.Review and follow the rules forchildren in addition to the followingrules.
It is very important for all occupantsto buckle up. Statistics show thatunbelted people are hurt more oftenin crashes than those who arewearing seat belts.
There are important things to knowabout wearing a seat belt properly.
. Sit up straight and always keepyour feet on the floor in front ofyou (if possible).
. Always use the correct bucklefor your seating position.
. Wear the lap part of the belt lowand snug on the hips, justtouching the thighs. In a crash,
this applies force to the strongpelvic bones and you would beless likely to slide under the lapbelt. If you slid under it, the beltwould apply force on yourabdomen. This could causeserious or even fatal injuries.
. Wear the shoulder belt over theshoulder and across the chest.These parts of the body are bestable to take belt restrainingforces. The shoulder belt locks ifthere is a sudden stop or crash.
{ Warning
You can be seriously injured,or even killed, by not wearingyour seat belt properly.

Chevrolet Silverado 4500HD/5500HD/6500HD Owner Manual (GMNA-Localizing-U.S.-12102101) - 2019 - crc - 10/2/18
Seats and Restraints 55
Never allow the lap or shoulder beltto become loose or twisted.
Never wear the shoulder belt underboth arms or behind your back.
Always use the correct buckle foryour seating position.
Never route the lap or shoulder beltover an armrest.

Chevrolet Silverado 4500HD/5500HD/6500HD Owner Manual (GMNA-Localizing-U.S.-12102101) - 2019 - crc - 10/2/18
56 Seats and Restraints
Lap-Shoulder BeltIf the vehicle is a regular cab, thenall seating positions in the vehiclehave a lap-shoulder belt. If thevehicle is a crew cab, then allseating positions in the vehicle havea lap-shoulder belt except for thecenter front passenger position(if equipped), which has a lap belt.See Lap Belt 0 59.
The following instructions explainhow to wear a lap-shoulder beltproperly.
1. Adjust the seat, if the seat isadjustable, so you can sit upstraight. To see how, see“Seats” in the Index.
2. Pick up the latch plate and pullthe belt across you. Do not letit get twisted.
The lap-shoulder belt may lockif you pull the belt across youvery quickly. If this happens, letthe belt go back slightly tounlock it. Then pull the beltacross you more slowly.
If the shoulder portion of apassenger belt is pulled out allthe way, the child restraintlocking feature may beengaged. If this happens, letthe belt go back all the wayand start again.
3. Push the latch plate into thebuckle until it clicks.
Pull up on the latch plate tomake sure it is secure. If thebelt is not long enough, seeSeat Belt Extender 0 59.
Position the release button onthe buckle so that the seat beltcould be quickly unbuckled ifnecessary.
4. If equipped with a shoulder beltheight adjuster, move it to theheight that is right for you. See“Shoulder Belt Height Adjuster”

Chevrolet Silverado 4500HD/5500HD/6500HD Owner Manual (GMNA-Localizing-U.S.-12102101) - 2019 - crc - 10/2/18
Seats and Restraints 57
later in this section forinstructions on use andimportant safety information.
5. To make the lap part tight, pullup on the shoulder belt.
To unlatch the belt, push the buttonon the buckle. The belt shouldreturn to its stowed position.
Always stow the seat belt slowly.If the seat belt webbing returnsquickly to the stowed position, theretractor may lock and cannot bepulled out. If this happens, pull theseat belt straight out firmly to unlockthe webbing, and then release it.If the webbing is still locked in theretractor, see your dealer.
Before a door is closed, be sure theseat belt is out of the way. If a dooris slammed against a seat belt,damage can occur to both the seatbelt and the vehicle.
Shoulder Belt Height Adjuster
The vehicle has a shoulder beltheight adjuster for the driver andfront outboard passenger seatingpositions.
Adjust the height so the shoulderportion of the belt is on the shoulderand not falling off of it. The beltshould be close to, but notcontacting, the neck. Impropershoulder belt height adjustmentcould reduce the effectiveness ofthe seat belt in a crash. See How toWear Seat Belts Properly 0 54.

Chevrolet Silverado 4500HD/5500HD/6500HD Owner Manual (GMNA-Localizing-U.S.-12102101) - 2019 - crc - 10/2/18
58 Seats and Restraints
Push down on the release button tomove the height adjuster to thedesired position.
Move the adjuster up by pushing upon the shoulder belt guide.
After the adjuster is set to thedesired position, try to move it downwithout pushing the release buttonto make sure it has locked intoposition.
Seat Belt Pretensioners
This vehicle has seat beltpretensioners for the driver and frontoutboard passenger, if equippedwith a front outboard passengerseat. Although the seat beltpretensioners cannot be seen, theyare part of the seat belt assembly.They can help tighten the seat beltsduring the early stages of amoderate to severe frontal, nearfrontal, or rear crash if the thresholdconditions for pretensioneractivation are met.
Pretensioners work only once. If thepretensioners activate in a crash,the pretensioners and probablyother parts of the vehicle's seat belt
system will need to be replaced.See Replacing Seat Belt SystemParts after a Crash 0 60.
Do not sit on the outboard seat beltwhile entering or exiting the vehicleor at any time while sitting in theseat. Sitting on the seat belt candamage the webbing and hardware.
Rear Seat Belt Comfort Guides
Rear seat belt comfort guides mayprovide added seat belt comfort forolder children who have outgrownbooster seats and for some adults.When installed on a shoulder belt,the comfort guide positions theshoulder belt away from the neckand head.
Comfort guides are availablethrough your dealer for the rearoutboard seating positions.Instructions are included with theguide.
Seat Belt Use DuringPregnancySeat belts work for everyone,including pregnant women. Like alloccupants, they are more likely tobe seriously injured if they do notwear seat belts.
A pregnant woman should wear alap-shoulder belt, and the lapportion should be worn as low aspossible, below the rounding,throughout the pregnancy.
The best way to protect the fetus isto protect the mother. When a seatbelt is worn properly, it is more likely

Chevrolet Silverado 4500HD/5500HD/6500HD Owner Manual (GMNA-Localizing-U.S.-12102101) - 2019 - crc - 10/2/18
Seats and Restraints 59
that the fetus will not be hurt in acrash. For pregnant women, as foranyone, the key to making seatbelts effective is wearing themproperly.
Lap BeltThis section is only for the lap belt.To learn how to wear a lap-shoulderbelt, see Lap-Shoulder Belt 0 56.
The vehicle may have a centerseating position with a lap seat belt.The lap seat belt does not have aretractor.
To make the belt longer, tilt the latchplate and pull it along the belt.
Buckle, position, and release it thesame way as the lap part of alap-shoulder belt.
To make the belt shorter, pull its freeend as shown until the belt is snug.
If the belt is not long enough, seeSeat Belt Extender 0 59.
Make sure the release button on thebuckle is positioned so you wouldbe able to unbuckle the seat beltquickly if necessary.
Seat Belt ExtenderIf the vehicle's seat belt will fastenaround you, you should use it.
But if a seat belt is not long enough,your dealer will order you anextender. When you go in to order it,take the heaviest coat you will wear,so the extender will be long enoughfor you. To help avoid personalinjury, do not let someone else useit, and use it only for the seat it ismade to fit. The extender has beendesigned for adults. Never use it forsecuring child restraints. For moreinformation on the proper use and fitof seat belt extenders see theinstruction sheet that comes withthe extender.
Safety System CheckPeriodically check the seat beltreminder, seat belts, buckles, latchplates, retractors, shoulder beltheight adjusters (if equipped), andseat belt anchorages to make surethey are all in working order. Lookfor any other loose or damaged seatbelt system parts that might keep a

Chevrolet Silverado 4500HD/5500HD/6500HD Owner Manual (GMNA-Localizing-U.S.-12102101) - 2019 - crc - 10/2/18
60 Seats and Restraints
seat belt system from performingproperly. See your dealer to have itrepaired. Torn, frayed, or twistedseat belts may not protect you in acrash. Torn or frayed seat belts canrip apart under impact forces. If abelt is torn or frayed, have itreplaced immediately. If a belt istwisted, it may be possible tountwist by reversing the latch plateon the webbing. If the twist cannotbe corrected, ask your dealer tofix it.
Make sure the seat belt reminderlight is working. See Seat BeltReminders 0 111.
Keep seat belts clean and dry. SeeSeat Belt Care 0 60.
Seat Belt CareKeep belts clean and dry.
Seat belts should be properly caredfor and maintained.
Seat belt hardware should be keptdry and free of dust or debris. Asnecessary, exterior hard surfacesand seat belt webbing may be lightlycleaned with mild soap and water.Ensure there is not excessive dustor debris in the mechanism. If dustor debris exists in the system pleasesee the dealer. Parts may need tobe replaced to ensure properfunctionality of the system.
{ Warning
Do not bleach or dye seat beltwebbing. It may severely weakenthe webbing. In a crash, theymight not be able to provideadequate protection. Clean andrinse seat belt webbing only withmild soap and lukewarm water.Allow the webbing to dry.
Replacing Seat BeltSystem Parts after aCrash
{ Warning
A crash can damage the seat beltsystem in the vehicle. A damagedseat belt system may not properlyprotect the person using it,resulting in serious injury or evendeath in a crash. To help makesure the seat belt systems areworking properly after a crash,have them inspected and anynecessary replacements made assoon as possible.
After a minor crash, replacement ofseat belts may not be necessary.But the seat belt assemblies thatwere used during any crash mayhave been stressed or damaged.See your dealer to have the seatbelt assemblies inspected orreplaced.

Chevrolet Silverado 4500HD/5500HD/6500HD Owner Manual (GMNA-Localizing-U.S.-12102101) - 2019 - crc - 10/2/18
Seats and Restraints 61
New parts and repairs may benecessary even if the seat beltsystem was not being used at thetime of the crash.
Have the seat belt pretensionerschecked if the vehicle has been in acrash, or if the airbag readiness lightstays on after you start the vehicleor while you are driving. See AirbagReadiness Light 0 111.
Airbag SystemThe vehicle has the followingairbag:
. A frontal airbag for the driver.
The vehicle may have the followingairbag:
. A frontal airbag for the frontoutboard passenger.
For frontal airbags, the wordAIRBAG is on the center of thesteering wheel for the driver and onthe instrument panel for the frontoutboard passenger.
Airbags are designed to supplementthe protection provided by seatbelts. Even though today’s airbagsare also designed to help reducethe risk of injury from the force of aninflating airbag, all airbags mustinflate very quickly to do their job.
Here are the most important thingsto know about the airbag system:
{ Warning
You can be severely injured orkilled in a crash if you are notwearing your seat belt, even withairbags. Airbags are designed towork with seat belts, not replacethem. Also, airbags are notdesigned to inflate in every crash.In some crashes seat belts arethe only restraint. See WhenShould an Airbag Inflate? 0 63.
Wearing your seat belt during acrash helps reduce your chanceof hitting things inside the vehicleor being ejected from it. Airbagsare “supplemental restraints” tothe seat belts. Everyone in thevehicle should wear a seat beltproperly, whether or not there isan airbag for that person.

Chevrolet Silverado 4500HD/5500HD/6500HD Owner Manual (GMNA-Localizing-U.S.-12102101) - 2019 - crc - 10/2/18
62 Seats and Restraints
{ Warning
Because airbags inflate with greatforce and faster than the blink ofan eye, anyone who is upagainst, or very close to anyairbag when it inflates can beseriously injured or killed. Do notsit unnecessarily close to anyairbag, as you would be if sittingon the edge of the seat or leaningforward. Seat belts help keep youin position before and during acrash. Always wear a seat belt,even with airbags. The drivershould sit as far back as possiblewhile still maintaining control ofthe vehicle. The seat belts andthe front outboard passengerairbag(s) are most effective whenyou are sitting well back andupright in the seat with both feeton the floor.
{ Warning
Children who are up against,or very close to, any airbag whenit inflates can be seriously injuredor killed. Always secure childrenproperly in the vehicle. To readhow, see Older Children 0 69 orInfants and Young Children 0 71.
There is an airbag readiness lighton the instrument panel, whichshows the airbag symbol.
The system checks the airbagelectrical system for malfunctions.The light tells you if there is anelectrical problem. See AirbagReadiness Light 0 111.
Where Are the Airbags?
The driver frontal airbag is in thecenter of the steering wheel.

Chevrolet Silverado 4500HD/5500HD/6500HD Owner Manual (GMNA-Localizing-U.S.-12102101) - 2019 - crc - 10/2/18
Seats and Restraints 63
If the vehicle has a front outboardpassenger frontal airbag, it is in thepassenger side instrument panel.
{ Warning
If something is between anoccupant and an airbag, theairbag might not inflate properlyor it might force the object intothat person causing severe injuryor even death. The path of aninflating airbag must be keptclear. Do not put anythingbetween an occupant and an
(Continued)
Warning (Continued)
airbag, and do not attach or putanything on the steering wheelhub or on or near any otherairbag covering.
When Should an AirbagInflate?This vehicle is equipped with one ormore airbags. See Airbag System0 61. Airbags are designed to inflateif the impact exceeds the specificairbag system's deploymentthreshold. Deployment thresholdsare used to predict how severe acrash is likely to be in time for theairbags to inflate and help restrainthe occupants. The vehicle haselectronic sensors which help theairbag system determine theseverity of the impact. Deploymentthresholds can vary with specificvehicle design.
Frontal airbags are designed toinflate in moderate to severe frontalor near-frontal crashes to help
reduce the potential for severeinjuries mainly to the driver’s or frontoutboard passenger’s head andchest.
Whether the frontal airbags will orshould inflate is not based primarilyon how fast the vehicle is traveling.It depends on what is hit, thedirection of the impact, and howquickly the vehicle slows down.
Frontal airbags may inflate atdifferent crash speeds depending onwhether the vehicle hits an objectstraight on or at an angle, andwhether the object is fixed ormoving, rigid or deformable, narrowor wide.
Frontal airbags are not intended toinflate during vehicle rollovers, rearimpacts, or in many side impacts.
In any particular crash, no one cansay whether an airbag should haveinflated simply because of thevehicle damage or repair costs.

Chevrolet Silverado 4500HD/5500HD/6500HD Owner Manual (GMNA-Localizing-U.S.-12102101) - 2019 - crc - 10/2/18
64 Seats and Restraints
What Makes an AirbagInflate?In a deployment event, the sensingsystem sends an electrical signaltriggering a release of gas from theinflator. Gas from the inflator fills theairbag causing the bag to break outof the cover. The inflator, the airbag,and related hardware are all part ofthe airbag module.
For airbag locations, see Where Arethe Airbags? 0 62.
How Does an AirbagRestrain?In moderate to severe frontal ornear frontal collisions, even beltedoccupants can contact the steeringwheel or the instrument panel. Inmoderate to severe side collisions,even belted occupants can contactthe inside of the vehicle.
Airbags supplement the protectionprovided by seat belts bydistributing the force of the impactmore evenly over theoccupant's body.
But airbags would not help in manytypes of collisions, primarilybecause the occupant's motion isnot toward those airbags. See WhenShould an Airbag Inflate? 0 63.
Airbags should never be regardedas anything more than a supplementto seat belts.
What Will You See afteran Airbag Inflates?After a frontal airbag inflates, itquickly deflates, so quickly thatsome people may not even realizethe airbag inflated. Somecomponents of the airbag modulemay be hot for several minutes. Forlocation of the airbags, see WhereAre the Airbags? 0 62.
The parts of the airbag that comeinto contact with you may be warm,but not too hot to touch. There maybe some smoke and dust comingfrom the vents in the deflatedairbags. Airbag inflation does notprevent the driver from seeing out of
the windshield or being able to steerthe vehicle, nor does it preventpeople from leaving the vehicle.
{ Warning
When an airbag inflates, theremay be dust in the air. This dustcould cause breathing problemsfor people with a history ofasthma or other breathing trouble.To avoid this, everyone in thevehicle should get out as soon asit is safe to do so. If you havebreathing problems but cannotget out of the vehicle after anairbag inflates, then get fresh airby opening a window or a door.If you experience breathingproblems following an airbagdeployment, you should seekmedical attention.
The vehicle has a feature that mayautomatically unlock the doors (ifequipped with power door locks),turn on the interior lamps andhazard warning flashers, and shutoff the fuel system after the airbags

Chevrolet Silverado 4500HD/5500HD/6500HD Owner Manual (GMNA-Localizing-U.S.-12102101) - 2019 - crc - 10/2/18
Seats and Restraints 65
inflate. The feature may alsoactivate, without airbag inflation,after an event that exceeds apredetermined threshold. Afterturning the ignition off and then onagain, the fuel system will return tonormal operation; the doors can belocked, the interior lamps can beturned off, and the hazard warningflashers can be turned off using thecontrols for those features. If any ofthese systems are damaged in thecrash they may not operate asnormal.
{ Warning
A crash severe enough to inflatethe airbags may have alsodamaged important functions inthe vehicle, such as the fuelsystem, brake and steeringsystems, etc. Even if the vehicleappears to be drivable after amoderate crash, there may beconcealed damage that couldmake it difficult to safely operatethe vehicle.
(Continued)
Warning (Continued)
Use caution if you should attemptto restart the engine after a crashhas occurred.
In many crashes severe enough toinflate the airbag, windshields arebroken by vehicle deformation.Additional windshield breakage mayalso occur from the front outboardpassenger airbag.
. Airbags are designed to inflateonly once. After an airbaginflates, you will need some newparts for the airbag system.If you do not get them, theairbag system will not be thereto help protect you in anothercrash. A new system will includeairbag modules and possiblyother parts. The service manualfor the vehicle covers the needto replace other parts.
. The vehicle has a crash sensingand diagnostic module whichrecords information after acrash.
See Vehicle Data Recording andPrivacy 0 426 and Event DataRecorders 0 426.
. Let only qualified technicianswork on the airbag systems.Improper service can mean thatan airbag system will not workproperly. See your dealer forservice.
Airbag On-Off SwitchIf the passenger side instrumentpanel endcap has the switchpictured in the following illustration,the vehicle has an airbag on-offswitch that you can use to manuallyturn on or off the front outboardpassenger airbag.

Chevrolet Silverado 4500HD/5500HD/6500HD Owner Manual (GMNA-Localizing-U.S.-12102101) - 2019 - crc - 10/2/18
66 Seats and Restraints
This switch should only be turned tothe OFF position if the person in thefront outboard passenger position isa member of a passenger risk groupidentified by the nationalgovernment as follows:
Infant. An infant (less than1 year old) must ride in the frontseat because:
. My vehicle has no rear seat;
. My vehicle has a rear seat toosmall to accommodate arear-facing infant seat; or
. The infant has a medicalcondition which, according to theinfant's physician, makes itnecessary for the infant to ride inthe front seat so that the drivercan constantly monitor thechild's condition.
Child age 1 to 12. A childage 1 to 12 must ride in the frontseat because:
. My vehicle has no rear seat;
. Although children ages 1 to 12ride in the rear seat(s) wheneverpossible, children ages 1 to 12
sometimes must ride in the frontbecause no space is available inthe rear seat(s) of my vehicle; or
. The child has a medicalcondition which, according to thechild's physician, makes itnecessary for the child to ride inthe front seat so that the drivercan constantly monitor thechild's condition.
Medical Condition. A passengerhas a medical condition which,according to his or her physician:
. Causes the passenger airbag topose a special risk for thepassenger; and
. Makes the potential harm fromthe passenger airbag in a crashgreater than the potential harmfrom turning off the airbag andallowing the passenger, even ifbelted, to hit the instrumentpanel or windshield in a crash.
{ Warning
If the front outboard passengerfrontal airbag is turned off for aperson who is not in a risk groupidentified by the nationalgovernment, that person will nothave the extra protection of anairbag. In a crash, the airbag willnot be able to inflate and helpprotect the person sitting there.Do not turn off the front outboardpassenger frontal airbag unlessthe person sitting there is in a riskgroup.

Chevrolet Silverado 4500HD/5500HD/6500HD Owner Manual (GMNA-Localizing-U.S.-12102101) - 2019 - crc - 10/2/18
Seats and Restraints 67
To turn off the front outboardpassenger frontal airbag, insert theignition key into the airbag on-offswitch, push in, and move theswitch to the OFF position.
The airbag OFF light will come onand stay on to let you know that thefront outboard passenger airbag isoff. See Airbag On-Off Light 0 111.The airbag OFF light will stay on toremind you that the airbag is off.The front outboard passengerairbag will remain off until you turn itback on again.
{ Warning
If the airbag readiness light evercomes on and stays on, it meansthat something may be wrongwith the airbag system. Forexample, the front outboardpassenger frontal airbag couldinflate even though the airbagon-off switch is turned off.
(Continued)
Warning (Continued)
To help avoid injury to yourself orothers, have the vehicle servicedright away. See Airbag ReadinessLight 0 111 for more information,including important safetyinformation.
To turn the front outboard passengerairbag on again, insert the ignitionkey into the airbag on-off switch,push in, and move the switch to theON position.
The front outboard passengerfrontal airbag is now enabled (mayinflate). See Airbag On-Off Light0 111.
Servicing theAirbag-Equipped VehicleAirbags affect how the vehicleshould be serviced. There are partsof the airbag system in severalplaces around the vehicle. Yourdealer and the service manual haveinformation about servicing thevehicle and the airbag system. Topurchase a service manual, seePublication Ordering Information0 423.
{ Warning
For up to 10 seconds after thevehicle is turned off and thebattery is disconnected, an airbagcan still inflate during improperservice. You can be injured if youare close to an airbag when itinflates. Avoid yellow connectors.They are probably part of theairbag system. Be sure to followproper service procedures, andmake sure the person performingwork for you is qualified to do so.

Chevrolet Silverado 4500HD/5500HD/6500HD Owner Manual (GMNA-Localizing-U.S.-12102101) - 2019 - crc - 10/2/18
68 Seats and Restraints
Adding Equipment to theAirbag-Equipped VehicleAdding accessories that change thevehicle's frame, bumper system,height, front end, or side sheetmetal, may keep the airbag systemfrom working properly.
The operation of the airbag systemcan also be affected by changing,including improperly repairing orreplacing, any parts of the following:
. Airbag system, including airbagmodules, front sensors, sensingand diagnostic module, or airbagwiring
. Front seats, including stitching,seams, or zippers
. Seat belts
. Steering wheel, instrumentpanel, overhead console, ceilingtrim, or pillar garnish trim
. Inner door seals, includingspeakers
Your dealer and the service manualhave information about the locationof the airbag modules and sensors,
sensing and diagnostic module, andairbag wiring along with the properreplacement procedures.
If a snow plow is added to thevehicle, the airbags should still workproperly. The airbag systems weredesigned to work properly under awide range of conditions, includingsnow plowing with vehicles thathave the optional snow plow preppackage, RPO VYU. Do not changeor defeat the snow plow's "trippingmechanism." If you do, it candamage the snow plow and thevehicle, and may cause an airbagdeployment.
If the vehicle must be modifiedbecause you have a disability andhave questions about whether themodifications will affect the vehicle’sairbag system, or if you havequestions about whether the airbagsystem will be affected if the vehicleis modified for any other reason, callCustomer Assistance. SeeCustomer Assistance Offices 0 416.
Airbag System CheckThe airbag system does not needregularly scheduled maintenance orreplacement. Make sure the airbagreadiness light is working. SeeAirbag Readiness Light 0 111.
Caution
If an airbag covering is damaged,opened, or broken, the airbagmay not work properly. Do notopen or break the airbagcoverings. If there are anyopened or broken airbagcoverings, have the airbagcovering and/or airbag modulereplaced. For the location of theairbags, see Where Are theAirbags? 0 62. See your dealerfor service.

Chevrolet Silverado 4500HD/5500HD/6500HD Owner Manual (GMNA-Localizing-U.S.-12102101) - 2019 - crc - 10/2/18
Seats and Restraints 69
Replacing Airbag SystemParts after a Crash
{ Warning
A crash can damage the airbagsystems in the vehicle.A damaged airbag system maynot properly protect you and yourpassenger(s) in a crash, resultingin serious injury or even death. Tohelp make sure the airbagsystems are working properlyafter a crash, have theminspected and any necessaryreplacements made as soon aspossible.
If an airbag inflates, you will need toreplace airbag system parts. Seeyour dealer for service.
If the airbag readiness light stays onafter the vehicle is started or comeson when you are driving, the airbagsystem may not work properly. Havethe vehicle serviced right away. SeeAirbag Readiness Light 0 111.
Child Restraints
Older Children
Older children who have outgrownbooster seats should wear thevehicle’s seat belts.
The manufacturer instructions thatcome with the booster seat state theweight and height limitations for thatbooster. Use a booster seat with alap-shoulder belt until the childpasses the fit test below:
. Sit all the way back on the seat.Do the knees bend at the seatedge? If yes, continue. If no,return to the booster seat.
. Buckle the lap-shoulder belt.Does the shoulder belt rest onthe shoulder? If yes, continue.If no, try using the rear seat beltcomfort guide, if available. See“Rear Seat Belt Comfort Guides”under Lap-Shoulder Belt 0 56.If a comfort guide is notavailable, or if the shoulder beltstill does not rest on theshoulder, then return to thebooster seat.
. Does the lap belt fit low andsnug on the hips, touching thethighs? If yes, continue. If no,return to the booster seat.

Chevrolet Silverado 4500HD/5500HD/6500HD Owner Manual (GMNA-Localizing-U.S.-12102101) - 2019 - crc - 10/2/18
70 Seats and Restraints. Can proper seat belt fit be
maintained for the length of thetrip? If yes, continue. If no,return to the booster seat.
If you have the choice, a childshould sit in a position with alap-shoulder belt and get theadditional restraint a shoulderbelt can provide.
Q: What is the proper way towear seat belts?
A: An older child should wear alap-shoulder belt and get theadditional restraint a shoulderbelt can provide. The shoulderbelt should not cross the face orneck. The lap belt should fitsnugly below the hips, justtouching the top of the thighs.This applies belt force to thechild's pelvic bones in a crash.It should never be worn over theabdomen, which could causesevere or even fatal internalinjuries in a crash.
Also see “Rear Seat Belt ComfortGuides” under Lap-Shoulder Belt0 56.
According to accident statistics,children are safer when properlyrestrained in a rear seating position.
In a crash, children who are notbuckled up can strike other peoplewho are buckled up, or can bethrown out of the vehicle. Olderchildren need to use seat beltsproperly.
{ Warning
Never allow more than one childto wear the same seat belt. Theseat belt cannot properly spreadthe impact forces. In a crash, theycan be crushed together andseriously injured. A seat belt mustbe used by only one person ata time.
{ Warning
Never allow a child to wear theseat belt with the shoulder beltbehind their back. A child can beseriously injured by not wearingthe lap-shoulder belt properly. In acrash, the child would not berestrained by the shoulder belt.The child could move too farforward increasing the chance ofhead and neck injury. The childmight also slide under the lapbelt. The belt force would then beapplied right on the abdomen.
(Continued)

Chevrolet Silverado 4500HD/5500HD/6500HD Owner Manual (GMNA-Localizing-U.S.-12102101) - 2019 - crc - 10/2/18
Seats and Restraints 71
Warning (Continued)
That could cause serious or fatalinjuries. The shoulder belt shouldgo over the shoulder and acrossthe chest.
Infants and YoungChildrenEveryone in a vehicle needsprotection! This includes infants andall other children. Neither thedistance traveled nor the age andsize of the traveler changes the
need, for everyone, to use safetyrestraints. In fact, the law in everystate in the United States and inevery Canadian province sayschildren up to some age must berestrained while in a vehicle.
{ Warning
Children can be seriously injuredor strangled if a shoulder belt iswrapped around their neck. Theshoulder belt can tighten butcannot be loosened if it is locked.The shoulder belt locks when it ispulled all the way out of theretractor. It unlocks when theshoulder belt is allowed to go allthe way back into the retractor,but it cannot do this if it iswrapped around a child’s neck.If the shoulder belt is locked andtightened around a child’s neck,the only way to loosen the belt isto cut it.
(Continued)
Warning (Continued)
Never leave children unattendedin a vehicle and never allowchildren to play with the seatbelts.
Every time infants and youngchildren ride in vehicles, they shouldhave the protection provided byappropriate child restraints. Neitherthe vehicle's seat belt system nor itsairbag system is designed for them.
Children who are not restrainedproperly can strike other people,or can be thrown out of the vehicle.
{ Warning
Never hold an infant or a childwhile riding in a vehicle. Due tocrash forces, an infant or a childwill become so heavy it is notpossible to hold it during a crash.For example, in a crash at only40 km/h (25 mph), a 5.5 kg (12 lb)
(Continued)

Chevrolet Silverado 4500HD/5500HD/6500HD Owner Manual (GMNA-Localizing-U.S.-12102101) - 2019 - crc - 10/2/18
72 Seats and Restraints
Warning (Continued)
infant will suddenly become a110 kg (240 lb) force on a person'sarms. An infant or child should besecured in an appropriaterestraint.
{ Warning
Children who are up against,or very close to, any airbag whenit inflates can be seriously injured
(Continued)
Warning (Continued)
or killed. Never put a rear-facingchild restraint in the frontoutboard seat. Secure arear-facing child restraint in a rearseat. It is also better to secure aforward-facing child restraint in arear seat. If you must secure aforward-facing child restraint inthe front outboard seat, alwaysmove the front passenger seat asfar back as it will go.
Child restraints are devices used torestrain, seat, or position children inthe vehicle and are sometimescalled child seats or car seats.
There are three basic types ofchild restraints:
. Forward-facing child restraints
. Rear-facing child restraints
. Belt-positioning booster seats
The proper child restraint for yourchild depends on their size, weight,and age, and also on whether thechild restraint is compatible with thevehicle in which it will be used.
For each type of child restraint,there are many different modelsavailable. When purchasing a childrestraint, be sure it is designed to beused in a motor vehicle. If it is, therestraint will have a label saying thatit meets federal motor vehicle safetystandards. The restraintmanufacturer's instructions thatcome with the restraint state theweight and height limitations for aparticular child restraint. In addition,

Chevrolet Silverado 4500HD/5500HD/6500HD Owner Manual (GMNA-Localizing-U.S.-12102101) - 2019 - crc - 10/2/18
Seats and Restraints 73
there are many kinds of restraintsavailable for children with specialneeds.
{ Warning
To reduce the risk of neck andhead injury in a crash, infants andtoddlers should be secured in arear-facing child restraint until agetwo, or until they reach themaximum height and weight limitsof their child restraint.
{ Warning
A young child's hip bones are stillso small that the vehicle's regularseat belt may not remain low onthe hip bones, as it should.Instead, it may settle up aroundthe child's abdomen. In a crash,the belt would apply force on abody area that is unprotected byany bony structure. This alonecould cause serious or fatal
(Continued)
Warning (Continued)
injuries. To reduce the risk ofserious or fatal injuries during acrash, young children shouldalways be secured in appropriatechild restraints.
Child Restraint Systems
Rear-Facing Infant Restraint
A rear-facing child restraint providesrestraint with the seating surfaceagainst the back of the infant.
The harness system holds the infantin place and, in a crash, acts tokeep the infant positioned in therestraint.
Forward-Facing Child Restraint
A forward-facing child restraintprovides restraint for the child'sbody with the harness.

Chevrolet Silverado 4500HD/5500HD/6500HD Owner Manual (GMNA-Localizing-U.S.-12102101) - 2019 - crc - 10/2/18
74 Seats and Restraints
Booster Seats
A belt-positioning booster seat isused for children who haveoutgrown their forward-facing childrestraint. Boosters are designed toimprove the fit of the vehicle's seatbelt system until the child is largeenough for the vehicle seat belts tofit properly without a booster seat.See the seat belt fit test in OlderChildren 0 69.
Securing an Add-On ChildRestraint in the Vehicle
{ Warning
A child can be seriously injured orkilled in a crash if the childrestraint is not properly secured inthe vehicle. Secure the childrestraint properly in the vehicleusing the vehicle’s seat belt orLATCH system, following theinstructions that came with thatchild restraint and the instructionsin this manual.
To help reduce the chance of injury,the child restraint must be securedin the vehicle. Child restraints mustbe secured in vehicle seats by lapbelts or the lap belt portion of alap-shoulder belt, or by the LATCHsystem. See Lower Anchors andTethers for Children (LATCHSystem) 0 76 for more information.Children can be endangered in acrash if the child restraint is notproperly secured in the vehicle.
When securing an add-on childrestraint, refer to the instructionsthat come with the restraint whichmay be on the restraint itself or in abooklet, or both, and to this manual.The child restraint instructions areimportant, so if they are notavailable, obtain a replacementcopy from the manufacturer.
Keep in mind that an unsecuredchild restraint can move around in acollision or sudden stop and injurepeople in the vehicle. Be sure toproperly secure any child restraint inthe vehicle— even when no child isin it.
In some areas of the United Statesand Canada, Certified ChildPassenger Safety Technicians(CPSTs) are available to inspectand demonstrate how to correctlyuse and install child restraints. Inthe U.S., refer to the NationalHighway Traffic SafetyAdministration (NHTSA) website tolocate the nearest child safety seatinspection station. For CPST

Chevrolet Silverado 4500HD/5500HD/6500HD Owner Manual (GMNA-Localizing-U.S.-12102101) - 2019 - crc - 10/2/18
Seats and Restraints 75
availability in Canada, check withTransport Canada or the ProvincialMinistry of Transportation office.
Securing the Child Within theChild Restraint
{ Warning
A child can be seriously injured orkilled in a crash if the child is notproperly secured in the childrestraint. Secure the childproperly following the instructionsthat came with that child restraint.
Where to Put theRestraintAccording to accident statistics,children and infants are safer whenproperly restrained in an appropriatechild restraint secured in a rearseating position.
Whenever possible, children aged12 and under should be secured ina rear seating position.
Never put a rear-facing childrestraint in the front. This is becausethe risk to the rear-facing child is sogreat if the airbag deploys.
If a child restraint is secured in thefront outboard passenger seat andthe vehicle has a switch on theinstrument panel endcap tomanually turn off the front outboardpassenger airbag, see AirbagOn-Off Switch 0 65 and SecuringChild Restraints (With the Seat Beltin the Center Front Seat) 0 87 orSecuring Child Restraints (With theSeat Belt in the Rear Seat) 0 85 orSecuring Child Restraints (With theSeat Belt in the Front Seat) 0 88 formore information, includingimportant safety information.
{ Warning
A child in a rear-facing childrestraint can be seriously injuredor killed if the front outboardpassenger airbag inflates. This isbecause the back of therear-facing child restraint would
(Continued)
Warning (Continued)
be very close to the inflatingairbag. A child in a forward-facingchild restraint can be seriouslyinjured or killed if the frontoutboard passenger airbaginflates and the passenger seat isin a forward position.
Even if the airbag switch hasturned off the front outboardpassenger frontal airbag, nosystem is fail-safe. No one canguarantee that an airbag will notdeploy under some unusualcircumstance, even though it isturned off.
Secure rear-facing child restraintsin a rear seat, even if the airbagis off. If you secure aforward-facing child restraint inthe front outboard passengerseat, always move the seat as farback as it will go. It is better tosecure the child restraint in arear seat.

Chevrolet Silverado 4500HD/5500HD/6500HD Owner Manual (GMNA-Localizing-U.S.-12102101) - 2019 - crc - 10/2/18
76 Seats and Restraints
{ Warning
A child in a child restraint in thecenter front seat can be badlyinjured or killed by the frontalairbags if they inflate. Neversecure a child restraint in thecenter front seat. It is alwaysbetter to secure a child restraint ina rear seat.
Do not use child restraints in thecenter front seat position.
If the vehicle does not have a rearseat that will accommodate arear-facing child restraint, arear-facing child restraint should notbe installed in the vehicle, even ifthe airbag is off.
When securing a child restraint withthe seat belts in a rear seat position,study the instructions that came withthe child restraint to make sure it iscompatible with this vehicle.
Child restraints and booster seatsvary considerably in size, and somemay fit in certain seating positionsbetter than others.
Depending on where you place thechild restraint and the size of thechild restraint, you may not be ableto access adjacent seat belts orLATCH anchors for additionalpassengers or child restraints.Adjacent seating positions shouldnot be used if the child restraintprevents access to or interferes withthe routing of the seat belt.
Wherever a child restraint isinstalled, be sure to follow theinstructions that came with the childrestraint and secure the childrestraint properly.
Keep in mind that an unsecuredchild restraint can move around in acollision or sudden stop and injurepeople in the vehicle. Be sure toproperly secure any child restraint inthe vehicle — even when no child isin it.
Lower Anchors andTethers for Children(LATCH System)The LATCH system secures a childrestraint during driving or in a crash.LATCH attachments on the childrestraint are used to attach the childrestraint to the anchors in thevehicle. This system is designed tomake installation of a child restrainteasier.
In order to use the LATCH system inyour vehicle, you need a childrestraint that has LATCHattachments. LATCH-compatiblerear-facing and forward-facing childseats can be properly installedusing either the LATCH anchors orthe vehicle’s seat belts. Do not useboth the seat belts and the LATCHanchorage system to secure arear-facing or forward-facingchild seat.
Booster seats use the vehicle’s seatbelts to secure the child in thebooster seat. If the manufacturerrecommends that the booster seatbe secured with the LATCH system,

Chevrolet Silverado 4500HD/5500HD/6500HD Owner Manual (GMNA-Localizing-U.S.-12102101) - 2019 - crc - 10/2/18
Seats and Restraints 77
this can be done as long as thebooster seat can be positionedproperly and there is no interferencewith the proper positioning of thelap-shoulder belt on the child.
Make sure to follow the instructionsthat came with the child restraint,and also the instructions in thismanual.
When installing a child restraint witha top tether, you must also useeither the lower anchors or the seatbelts to properly secure the childrestraint. A child restraint mustnever be attached using only the toptether.
The LATCH anchorage system canbe used until the combined weightof the child plus the child restraint is29.5 kg (65 lbs). Use the seat beltalone instead of the LATCHanchorage system once thecombined weight is more than29.5 kg (65 lbs).
See Securing Child Restraints (Withthe Seat Belt in the Center FrontSeat) 0 87 or Securing ChildRestraints (With the Seat Belt in theRear Seat) 0 85 or Securing ChildRestraints (With the Seat Belt in theFront Seat) 0 88.
Child restraints built after March2014 will be labeled with thespecific child weight up to which theLATCH system can be used toinstall the restraint.
The following explains how to attacha child restraint with theseattachments in the vehicle.
Not all vehicle seating positions orchild restraints have lower anchorsand attachments or top tetheranchors and attachments. In thiscase, the seat belt must be used(with top tether where available) tosecure the child restraint.See Securing Child Restraints (Withthe Seat Belt in the Center FrontSeat) 0 87 or Securing ChildRestraints (With the Seat Belt in theRear Seat) 0 85 or Securing ChildRestraints (With the Seat Belt in theFront Seat) 0 88.
Lower Anchors
Lower anchors (1) are metal barsbuilt into the vehicle. There are twolower anchors for each LATCHseating position that willaccommodate a child restraint withlower attachments (2).

Chevrolet Silverado 4500HD/5500HD/6500HD Owner Manual (GMNA-Localizing-U.S.-12102101) - 2019 - crc - 10/2/18
78 Seats and Restraints
Top Tether Anchor
A top tether (3, 4) is used to securethe top of the child restraint to thevehicle. A top tether anchor is builtinto the vehicle. The top tetherattachment hook (2) on the childrestraint connects to the top tetheranchor in the vehicle in order toreduce the forward movement androtation of the child restraint duringdriving or in a crash.
The child restraint may have asingle tether (3) or a dual tether (4).Either will have a single attachmenthook (2) to secure the top tether tothe anchor.
Some child restraints that have atop tether are designed for use withor without the top tether beingattached. Others require the toptether always to be attached. InCanada, the law requires thatforward-facing child restraints havea top tether, and that the tether beattached. Be sure to read and followthe instructions for your childrestraint.
Lower Anchor and Top TetherAnchor Locations
Regular Cab — Two-PassengerFront Seat
Regular Cab — Three-PassengerFront Seat
i : Seating positions withtop tether anchors.
Do not install a child restraint in thecenter front seating position.See Securing Child Restraints (Withthe Seat Belt in the Center FrontSeat) 0 87 or Securing ChildRestraints (With the Seat Belt in theRear Seat) 0 85 or Securing ChildRestraints (With the Seat Belt in theFront Seat) 0 88 for moreinformation.

Chevrolet Silverado 4500HD/5500HD/6500HD Owner Manual (GMNA-Localizing-U.S.-12102101) - 2019 - crc - 10/2/18
Seats and Restraints 79
Crew Cab Rear Seat
I : Seating positions with toptether anchors.
H : Seating positions with twolower anchors.
To assist in locating the loweranchors on crew cab models, eachseating position with lower anchors
has two labels near the creasebetween the seatback and the seatcushion.
For regular cab models, there is ananchor symbol on the cover toassist you in locating the top tetheranchors.
Do not install a child restraint in thecenter seating position.See Securing Child Restraints (Withthe Seat Belt in the Center FrontSeat) 0 87 or Securing ChildRestraints (With the Seat Belt in theRear Seat) 0 85 or Securing ChildRestraints (With the Seat Belt in theFront Seat) 0 88 for moreinformation.
Regular Cab
For regular cab models, the toptether anchors are under covers onthe back panel behind thepassenger seat. Remove the trimplug to access the anchor. Be sureto use an anchor on the same sideof the vehicle as the seatingposition where the child restraint willbe placed.

Chevrolet Silverado 4500HD/5500HD/6500HD Owner Manual (GMNA-Localizing-U.S.-12102101) - 2019 - crc - 10/2/18
80 Seats and Restraints
Crew Cab
For crew cab models, the top tetheranchors are the loops near the topof the seatback for each rearseating position. These loops will beused to route the top tether through,as well as to secure the top tether tothe vehicle. Be sure to use theanchor (loop) on the same side ofthe vehicle as the seating positionwhere the child restraint will beplaced.
Be sure to read the followinginstructions to properly install a childrestraint using these loops.
Do not secure a child restraint in aposition without a top tether anchorif a national or local law requiresthat the top tether be attached, or ifthe instructions that come with thechild restraint say that the top tethermust be attached.
According to accident statistics,children and infants are safer whenproperly restrained in a childrestraint system or infant restraintsystem secured in a rear seatingposition. See Where to Put theRestraint 0 75 for additionalinformation.
Securing a Child RestraintDesigned for the LATCHSystem
{ Warning
A child could be seriously injuredor killed in a crash if the childrestraint is not properly attachedto the vehicle using either theLATCH anchors or the vehicleseat belt. Follow the instructions
(Continued)
Warning (Continued)
that came with the child restraintand the instructions in thismanual.
{ Warning
Do not attach more than one childrestraint to a single anchor,except for the center top tetheranchor in the crew cab. Attachingmore than one child restraint to asingle anchor could cause theanchor or attachment to comeloose or even break during acrash. A child or others could beinjured. To reduce the risk ofserious or fatal injuries during acrash, attach only one childrestraint per anchor.

Chevrolet Silverado 4500HD/5500HD/6500HD Owner Manual (GMNA-Localizing-U.S.-12102101) - 2019 - crc - 10/2/18
Seats and Restraints 81
{ Warning
Children can be seriously injuredor strangled if a shoulder belt iswrapped around their neck. Theshoulder belt can tighten butcannot be loosened if it is locked.The shoulder belt locks when it ispulled all the way out of theretractor. It unlocks when theshoulder belt is allowed to go allthe way back into the retractor,but it cannot do this if it iswrapped around a child’s neck.If the shoulder belt is locked andtightened around a child’s neck,the only way to loosen the belt isto cut it.
Buckle any unused seat beltsbehind the child restraint sochildren cannot reach them. Pullthe shoulder belt all the way outof the retractor to set the lock,and tighten the belt behind thechild restraint after the childrestraint has been installed.
Caution
Do not let the LATCHattachments rub against thevehicle’s seat belts. This maydamage these parts. If necessary,move buckled seat belts to avoidrubbing the LATCH attachments.
Do not fold the rear seatbackwhen the seat is occupied. Do notfold the empty rear seat with aseat belt buckled. This coulddamage the seat belt or the seat.Unbuckle and return the seat beltto its stowed position, beforefolding the seat.
If you need to secure more than onechild restraint in the rear seat, seeWhere to Put the Restraint 0 75.
Regular Cab Models
1. For models without a rear seat,forward-facing child restraintsshould only be installed in theright front seating position withbelts and a top tether.
See Securing Child Restraints(With the Seat Belt in theCenter Front Seat) 0 87 orSecuring Child Restraints (Withthe Seat Belt in the Rear Seat)0 85 or Securing ChildRestraints (With the Seat Beltin the Front Seat) 0 88.
If the child restraintmanufacturer recommends thatthe top tether be attached,attach and tighten the toptether to the top tether anchor,if your vehicle has one. Referto the child restraintinstructions and the followingsteps:
1.1. Fold the passengerseatback forward toaccess the top tetheranchor. See RecliningSeatbacks 0 49.
1.2. Find the top tetheranchor.
1.3. Remove the cover toexpose the anchor.

Chevrolet Silverado 4500HD/5500HD/6500HD Owner Manual (GMNA-Localizing-U.S.-12102101) - 2019 - crc - 10/2/18
82 Seats and Restraints
1.4. Route, attach, and tightenthe top tether accordingto your child restraintinstructions and thefollowing instructions:
If the position you areusing has an adjustablehead restraint and youare using a dual tether,route the tether aroundthe head restraint.
If the position you areusing has an adjustablehead restraint and youare using a single tether,raise the head restraintand route the tetherunder the head restraintand in between the headrestraint posts.
2. Secure the child restraint in theright front seating position withthe vehicle belts.See Securing Child Restraints(With the Seat Belt in theCenter Front Seat) 0 87 orSecuring Child Restraints (Withthe Seat Belt in the Rear Seat)0 85 or Securing ChildRestraints (With the Seat Beltin the Front Seat) 0 88.
3. Before placing a child in thechild restraint, make sure it issecurely held in place. Tocheck, grasp the child restraintat the belt path and attempt tomove it side to side and backand forth. There should be nomore than 2.5 cm (1 in) ofmovement for properinstallation.
Crew Cab Models
1. Attach and tighten the lowerattachments to the loweranchors. If the child restraintdoes not have lowerattachments or the desiredseating position does not havelower anchors, secure the childrestraint with the top tether andthe belts. Refer to your childrestraint manufacturer’sinstructions and theinstructions in this manual.
1.1. Find the lower anchorsfor the desired seatingposition.
1.2. Put the child restraint onthe seat.

Chevrolet Silverado 4500HD/5500HD/6500HD Owner Manual (GMNA-Localizing-U.S.-12102101) - 2019 - crc - 10/2/18
Seats and Restraints 83
1.3. Attach and tighten thelower attachments on thechild restraint to the loweranchors.
2. For forward-facing childrestraints, attach and tightenthe top tether to the top tetheranchor (loop), if your vehiclehas one. Follow the childrestraint instructions, thevehicle LATCH anchor weightlimits described at thebeginning of this section, andthe following steps:
Example — Rear Driver SidePosition
Example — Rear Driver SidePosition
2.1. For a top tether in therear driver side position:
2.1.1. Raise theheadrest.
2.1.2. Route the toptether (4) betweenthe headrestposts, through theloop (3), behindthe inboardheadrest post, andunder the centershoulder belt (2).

Chevrolet Silverado 4500HD/5500HD/6500HD Owner Manual (GMNA-Localizing-U.S.-12102101) - 2019 - crc - 10/2/18
84 Seats and Restraints
2.1.3. Then attach thetop tether (4) tothe top tetheranchor (loop) (1) atthe center rearseating position.
2.2. For a top tether in therear center position:
2.2.1. Route the toptether (4) throughthe center loop (1),and behind thepassenger sideheadrest post.
2.2.2. Then attach thetop tether (4) tothe top tetheranchor (loop) atthe rear passengerside seatingposition.
2.3. For a top tether in therear passenger sideposition:
2.3.1. Raise theheadrest.
2.3.2. Route the toptether (4) betweenthe headrestposts, through theloop on thepassenger side,and behind theinboardheadrest post.
2.3.3. Then attach thetop tether (4) tothe top tetheranchor (loop) (1) atthe center rearseating position.
3. Tighten the top tether per thechild restraint manufacturer'sinstructions.
When the top tether is properlytightened, the anchor (loop)may bend. This is normal andwill not damage the vehicle.
If child restraints are installedin both outboard positions, bothtop tethers can be attached tothe center loop. Top tetherscan be attached for childrestraints in all three rear
seating positions at the sametime, following the routinginstructions above.
4. Before placing a child in thechild restraint, make sure it issecurely held in place. Tocheck, grasp the child restraintat the LATCH path and attemptto move it side to side andback and forth. There shouldbe no more than 2.5 cm (1 in)of movement for properinstallation.
Headrest Removal andReinstallation
Crew Cab Models
For outboard rear seating positions,if the child restraint cannot beinstalled properly with the headrestin place, the headrest may beremoved. See your dealer forassistance with removal.
Store the removed headrests in asecure place. Reinstall the headrestbefore the seating position is used.

Chevrolet Silverado 4500HD/5500HD/6500HD Owner Manual (GMNA-Localizing-U.S.-12102101) - 2019 - crc - 10/2/18
Seats and Restraints 85
To reinstall the headrest:
1. Insert the headrest posts intothe holes in the top of theseatback with the longerchrome plated post toward thedriver side of the vehicle.
2. Push the headrest all the waydown until it contacts the top ofthe seatback.
Replacing LATCH SystemParts After a Crash
{ Warning
A crash can damage the LATCHsystem in the vehicle. A damagedLATCH system may not properlysecure the child restraint,resulting in serious injury or evendeath in a crash. To help makesure the LATCH system isworking properly after a crash,see your dealer to have thesystem inspected and anynecessary replacements made assoon as possible.
If the vehicle has the LATCH systemand it was being used during acrash, new LATCH system partsmay be needed.
New parts and repairs may benecessary even if the LATCHsystem was not being used at thetime of the crash.
Securing Child Restraints(With the Seat Belt in theRear Seat)When securing a child restraint withthe seat belts in a rear seat position,study the instructions that came withthe child restraint to make sure it iscompatible with this vehicle.
If the child restraint has the LATCHsystem, see Lower Anchors andTethers for Children (LATCHSystem) 0 76 for how and where toinstall the child restraint usingLATCH. If a child restraint is securedin the vehicle using a seat belt andit uses a top tether, see LowerAnchors and Tethers for Children(LATCH System) 0 76 for top tetheranchor locations.
Do not secure a child seat in aposition without a top tether anchorif a national or local law requiresthat the top tether be anchored, or ifthe instructions that come with thechild restraint say that the top tethermust be anchored.

Chevrolet Silverado 4500HD/5500HD/6500HD Owner Manual (GMNA-Localizing-U.S.-12102101) - 2019 - crc - 10/2/18
86 Seats and Restraints
In Canada, the law requires thatforward-facing child restraints havea top tether, and that the tether beattached.
If the child restraint or vehicle seatposition does not have the LATCHsystem, you will be using the seatbelt to secure the child restraint. Besure to follow the instructions thatcame with the child restraint.
If more than one child restraintneeds to be installed in the rearseat, be sure to read Where to Putthe Restraint 0 75.
1. Put the child restraint onthe seat.
2. Pick up the latch plate, and runthe lap and shoulder portionsof the vehicle's seat beltthrough or around the restraint.The child restraint instructionswill show you how.
3. Push the latch plate into thebuckle until it clicks.
Position the release button onthe buckle, away from the childrestraint, so that the seat beltcould be quickly unbuckled ifnecessary.
4. Pull the shoulder belt all theway out of the retractor to setthe lock. When the retractorlock is set, the belt can betightened but not pulled out ofthe retractor.

Chevrolet Silverado 4500HD/5500HD/6500HD Owner Manual (GMNA-Localizing-U.S.-12102101) - 2019 - crc - 10/2/18
Seats and Restraints 87
5. To tighten the belt, push downon the child restraint, pull theshoulder portion of the belt totighten the lap portion of thebelt, and feed the shoulder beltback into the retractor. Wheninstalling a forward-facing childrestraint, it may be helpful touse your knee to push down onthe child restraint as youtighten the belt.
Try to pull the belt out of theretractor to make sure theretractor is locked. If theretractor is not locked, repeatSteps 4 and 5.
6. If the child restraint has a toptether, follow the child restraintmanufacturer's instructionsregarding the use of the toptether. See Lower Anchors andTethers for Children (LATCHSystem) 0 76 for moreinformation on using the toptether anchors.
7. Before placing a child in thechild restraint, make sure it issecurely held in place. Tocheck, grasp the child restraintat the seat belt path andattempt to move it side to sideand back and forth. When thechild restraint is properlyinstalled, there should be nomore than 2.5 cm (1 in) ofmovement.
To remove the child restraint,unbuckle the vehicle seat belt andlet it return to the stowed position.If the top tether is attached to a toptether anchor, disconnect it.
For outboard rear seating positions,if the child restraint cannot beinstalled properly with the headrestin place, the headrest may be
removed. See your dealer forassistance with removal, and storethe removed headrest in a secureplace. When the child restraint isremoved, reinstall the headrestbefore the seating position is used.For reinstallation instructions, see“Headrest Removal andReinstallation” under Lower Anchorsand Tethers for Children (LATCHSystem) 0 76.
Securing Child Restraints(With the Seat Belt in theCenter Front Seat)
{ Warning
A child in a child restraint in thecenter front seat can be badlyinjured or killed by the frontalairbags if they inflate. Neversecure a child restraint in thecenter front seat. It is alwaysbetter to secure a child restraint ina rear seat.

Chevrolet Silverado 4500HD/5500HD/6500HD Owner Manual (GMNA-Localizing-U.S.-12102101) - 2019 - crc - 10/2/18
88 Seats and Restraints
Do not use child restraints in thecenter front seat position.
Securing Child Restraints(With the Seat Belt in theFront Seat)This vehicle has airbags. A rearseat is a safer place to secure aforward-facing child restraint. SeeWhere to Put the Restraint 0 75.
There is a switch on the instrumentpanel endcap that you can use toturn off the front outboardpassenger frontal airbag. SeeAirbag On-Off Switch 0 65 for moreinformation, including importantsafety information.
Never put a rear-facing childrestraint in the front. This is becausethe risk to the rear-facing child is sogreat if the airbag deploys.
{ Warning
A child in a rear-facing childrestraint can be seriously injuredor killed if the front outboardpassenger airbag inflates. This isbecause the back of therear-facing child restraint wouldbe very close to the inflatingairbag. A child in a forward-facingchild restraint can be seriouslyinjured or killed if the frontoutboard passenger airbaginflates and the passenger seat isin a forward position.
Even if the airbag switch hasturned off the front outboardpassenger frontal airbag, nosystem is fail-safe. No one canguarantee that an airbag will notdeploy under some unusualcircumstance, even though it isturned off.
Secure rear-facing child restraintsin a rear seat, even if the airbagis off. If you secure a
(Continued)
Warning (Continued)
forward-facing child restraint inthe front outboard passengerseat, always move the seat as farback as it will go. It is better tosecure the child restraint in arear seat.
{ Warning
If the airbag readiness light evercomes on and stays on, it meansthat something may be wrongwith the airbag system. Forexample, the front outboardpassenger frontal airbag couldinflate even though the airbagon-off switch is turned off.
To help avoid injury to yourself orothers, have the vehicle servicedright away. See Airbag ReadinessLight 0 111 for more information,including important safetyinformation.

Chevrolet Silverado 4500HD/5500HD/6500HD Owner Manual (GMNA-Localizing-U.S.-12102101) - 2019 - crc - 10/2/18
Seats and Restraints 89
If the vehicle does not have a rearseat that will accommodate arear-facing child restraint, arear-facing child restraint should notbe installed in the vehicle, even ifthe airbag is off.
If a child restraint uses a top tether,see Lower Anchors and Tethers forChildren (LATCH System) 0 76 fortop tether anchor locations.
Do not secure a child restraint in aposition without a top tether anchorif a national or local law requiresthat the top tether be anchored, or ifthe instructions that come with thechild restraint say that the top tethermust be anchored.
In Canada, the law requires thatforward-facing child restraints havea top tether, and that the tether beattached.
When using the lap-shoulder belt tosecure the child restraint in thisposition, follow the instructions thatcame with the child restraint and thefollowing instructions:
1. Move the seat as far back as itwill go before securing theforward-facing child restraint.Move the seat upward or theseatback to an upright position,if needed, to get a tightinstallation of the childrestraint.
When the airbag on-off switchhas turned off the frontoutboard passenger frontalairbag, the OFF indicator in theairbag off light should light andstay lit when you start thevehicle. See Airbag On-OffLight 0 111.
2. Put the child restraint onthe seat.
3. Pick up the latch plate, and runthe lap and shoulder portionsof the vehicle's seat beltthrough or around the restraint.The child restraint instructionswill show you how.
Tilt the latch plate to adjust thebelt, if needed.
4. Push the latch plate into thebuckle until it clicks.

Chevrolet Silverado 4500HD/5500HD/6500HD Owner Manual (GMNA-Localizing-U.S.-12102101) - 2019 - crc - 10/2/18
90 Seats and Restraints
Position the release button onthe buckle, away from the childrestraint, so that the seat beltcould be quickly unbuckled ifnecessary.
5. Pull the shoulder belt all theway out of the retractor to setthe lock. When the retractorlock is set, the belt can betightened but not pulled out ofthe retractor.
6. To tighten the belt, push downon the child restraint, pull theshoulder portion of the belt totighten the lap portion of thebelt, and feed the shoulder beltback into the retractor. Wheninstalling a forward-facing childrestraint, it may be helpful touse your knee to push down onthe child restraint as youtighten the belt.
Try to pull the belt out of theretractor to make sure theretractor is locked. If theretractor is not locked, repeatSteps 5 and 6.
7. If the vehicle does not have arear seat and the child restraintmanufacturer recommendsusing a top tether anchor,attach the top tether to the toptether anchor. Refer to theinstructions that came with thechild restraint and to LowerAnchors and Tethers forChildren (LATCH System) 0 76.
8. Before placing a child in thechild restraint, make sure it issecurely held in place. Tocheck, grasp the child restraintat the seat belt path andattempt to move it side to sideand back and forth. When thechild restraint is properlyinstalled, there should be nomore than 2.5 cm (1 in) ofmovement.
To remove the child restraint,unbuckle the vehicle seat belt andlet it return to the stowed position.If the top tether is attached to a toptether anchor, disconnect it.
If you turned the airbag off with theswitch, turn on the front outboardpassenger airbag when you remove

Chevrolet Silverado 4500HD/5500HD/6500HD Owner Manual (GMNA-Localizing-U.S.-12102101) - 2019 - crc - 10/2/18
Seats and Restraints 91
the child restraint from the vehicleunless the person who will be sittingthere is a member of a passengerairbag risk group. See AirbagOn-Off Switch 0 65 for moreinformation, including importantsafety information.

Chevrolet Silverado 4500HD/5500HD/6500HD Owner Manual (GMNA-Localizing-U.S.-12102101) - 2019 - crc - 10/2/18
92 Storage
Storage
Storage CompartmentsStorage Compartments . . . . . . . . 92Instrument Panel Storage . . . . . . 92Glove Box . . . . . . . . . . . . . . . . . . . . . 92Cupholders . . . . . . . . . . . . . . . . . . . . 93Sunglasses Storage . . . . . . . . . . . 93Center Console Storage . . . . . . . 94Floor Console Storage . . . . . . . . . 94
StorageCompartments
{ Warning
Do not store heavy or sharpobjects in storage compartments.In a crash, these objects maycause the cover to open andcould result in injury.
Instrument Panel StorageIf equipped, there is storage underthe climate control system.
To access, pull down on the handle.
Glove Box
To access the upper glove box,unlock with the key and pull up onthe handle. There may be a USBport in the upper glove box. SeeUSB Port 0 160.
To access the lower glove box, pulldown on the handle.

Chevrolet Silverado 4500HD/5500HD/6500HD Owner Manual (GMNA-Localizing-U.S.-12102101) - 2019 - crc - 10/2/18
Storage 93
{ Warning
For safety, close the glove boxduring driving. There is a risk ofinjury from the open lid or itemsstored in the glove box.
You and others could be seriouslyinjured.
CupholdersFront
There may be cupholders on thecenter front seat console armrest.
Rear
If equipped, pull the rear seatarmrest down to access thecupholders.
Sunglasses Storage
If equipped, sunglasses storage ison the overhead console. Press thefixed button on the cover andrelease to access.

Chevrolet Silverado 4500HD/5500HD/6500HD Owner Manual (GMNA-Localizing-U.S.-12102101) - 2019 - crc - 10/2/18
94 Storage
Center Console Storage
Bench Seat
If equipped, pull the front centerseat armrest down to access thestorage area with cupholders.
Press the button and lift to open.There is a removable divider.
If equipped, there are dual USBports, an accessory power outlet,and an auxiliary jack inside.
Bucket Seat
If equipped, press the latch and liftto open. Depending on the optionsthere may be a tote compartment,accessory power outlet, auxiliaryjack, and USB port(s) inside. Thereare openings for power cords on theedge of the storage area.
See Power Outlets 0 100, USB Port0 160, and Auxiliary Jack 0 165.
Floor Console Storage
If equipped with front seat floorconsole storage, unlock with theignition key, press the button, andlift to open.

Chevrolet Silverado 4500HD/5500HD/6500HD Owner Manual (GMNA-Localizing-U.S.-12102101) - 2019 - crc - 10/2/18
Instruments and Controls 95
Instruments andControls
ControlsSteering Wheel Adjustment . . . . 96Steering Wheel Controls . . . . . . . 96Horn . . . . . . . . . . . . . . . . . . . . . . . . . . . 97Windshield Wiper/Washer . . . . . . 97Compass . . . . . . . . . . . . . . . . . . . . . . 98Clock . . . . . . . . . . . . . . . . . . . . . . . . . . 98Power Outlets . . . . . . . . . . . . . . . . 100Wireless Charging . . . . . . . . . . . . 102
Warning Lights, Gauges, andIndicatorsWarning Lights, Gauges, andIndicators . . . . . . . . . . . . . . . . . . . 104
Instrument Cluster . . . . . . . . . . . . 105Speedometer . . . . . . . . . . . . . . . . . 108Odometer . . . . . . . . . . . . . . . . . . . . . 108Trip Odometer . . . . . . . . . . . . . . . . 108Tachometer . . . . . . . . . . . . . . . . . . . 108Fuel Gauge . . . . . . . . . . . . . . . . . . . 108Engine Oil PressureGauge . . . . . . . . . . . . . . . . . . . . . . 109
Engine Coolant TemperatureGauge . . . . . . . . . . . . . . . . . . . . . . 110
Voltmeter Gauge . . . . . . . . . . . . . . 110
Seat Belt Reminders . . . . . . . . . . 111Airbag Readiness Light . . . . . . . 111Airbag On-Off Light . . . . . . . . . . . 111Charging System Light . . . . . . . 113Malfunction Indicator Lamp(Check Engine Light) . . . . . . . . 113
Brake System WarningLight . . . . . . . . . . . . . . . . . . . . . . . . 115
Antilock Brake System (ABS)Warning Light . . . . . . . . . . . . . . . 115
Tow/Haul Mode Light . . . . . . . . . 116Traction Off Light . . . . . . . . . . . . . 116Wait-to-Start Light . . . . . . . . . . . . 116Low Fuel Warning Light . . . . . . . 117Diesel Exhaust Fluid (DEF)Warning Light . . . . . . . . . . . . . . . 117
Security Light . . . . . . . . . . . . . . . . . 117High-Beam On Light . . . . . . . . . . 117Front Fog Lamp Light . . . . . . . . . 118Lamps On Reminder . . . . . . . . . . 118Cruise Control Light . . . . . . . . . . 118Power Take-Off Light . . . . . . . . . 118
Information DisplaysDriver Information Center (DIC)(Base Level) . . . . . . . . . . . . . . . . 119
Driver Information Center (DIC)(Uplevel) . . . . . . . . . . . . . . . . . . . . 120
Vehicle MessagesVehicle Messages . . . . . . . . . . . . 123
Engine Power Messages . . . . . 124Vehicle Speed Messages . . . . . 124
Vehicle PersonalizationVehicle Personalization . . . . . . . 124

Chevrolet Silverado 4500HD/5500HD/6500HD Owner Manual (GMNA-Localizing-U.S.-12102101) - 2019 - crc - 10/2/18
96 Instruments and Controls
Controls
Steering WheelAdjustment
To adjust the steering wheel:
1. Hold the steering wheel andpull the lever.
2. Move the steering wheel upor down.
3. Release the lever to lock thewheel in place.
Do not adjust the steering wheelwhile driving.
Steering Wheel Controls
If equipped, some audio controlscan be adjusted at the steeringwheel.
g : For vehicles with OnStar or aBluetooth system, press to interactwith those systems. See OnStarOverview 0 428, Bluetooth(Overview) 0 174 or Bluetooth(Infotainment Controls) 0 175,or “Bluetooth (Overview)” in theinfotainment manual.
i : Press to reject an incomingcall or end a current call. Press tomute or unmute the infotainmentsystem when not on a call.
o or p : Press to go to theprevious or next menu option.
w orx : Press to go to the next orprevious selection.
V : Press to select a highlightedmenu option.
The favorite and volume switchesare on the back of the steeringwheel.

Chevrolet Silverado 4500HD/5500HD/6500HD Owner Manual (GMNA-Localizing-U.S.-12102101) - 2019 - crc - 10/2/18
Instruments and Controls 97
1. Favorite: When on a radiosource, press to select the nextor previous favorite. When on amedia source, press to selectthe next or previous track.
2. Volume: Press to increase ordecrease the volume.
Horn
To sound the horn, pressa on thesteering wheel.
Windshield Wiper/Washer
The windshield wiper control is onthe turn signal lever.
The windshield wipers are controlledby turning the band withz on it.
1 : Fast wipes.
w : Slow wipes.
3 INT : Turn the band up for morefrequent wipes or down for lessfrequent wipes.
OFF : Turns the windshieldwipers off.
8 : For a single wipe, turn to8,then release. For several wipes,hold the band on8 longer.
Clear ice and snow from the wiperblades before using them. If frozento the windshield, carefully loosen orthaw them. Damaged wiper bladesshould be replaced. See WiperBlade Replacement 0 316.
Heavy snow or ice can overload thewiper motor. An internal circuitbreaker to the motor will stop themotor until it cools down.
Wiper Parking
If the ignition is turned off while thewipers are onw,1, or3 INT,they will immediately stop.
If the windshield wiper lever is thenmoved to OFF before the driverdoor is opened or within 10 minutes,the wipers will restart and move tothe base of the windshield.
If the ignition is turned off while thewipers are performing wipes due towindshield washing, the wiperscontinue to run until they reach thebase of the windshield.
Windshield Washer
{ Warning
In freezing weather, do not usethe washer until the windshield iswarmed. Otherwise the washerfluid can form ice on thewindshield, blocking your vision.
L m : Push the paddle with thissymbol at the top of the turn signallever, to spray washer fluid andactivate the wipers. The wipers willcontinue until the paddle is releasedor the maximum wash time isreached. When the paddle isreleased, additional wipes may

Chevrolet Silverado 4500HD/5500HD/6500HD Owner Manual (GMNA-Localizing-U.S.-12102101) - 2019 - crc - 10/2/18
98 Instruments and Controls
occur depending on how long thewindshield washer had beenactivated. See Washer Fluid 0 308for information on filling thewindshield washer fluid reservoir.
CompassThe vehicle may have a compassdisplay on the Driver InformationCenter (DIC). The compass receivesits heading and other informationfrom the Global PositioningSystem (GPS) antenna and vehiclespeed information.
The compass system is designed tooperate for a certain number ofmiles or degrees of turn beforeneeding a signal from the GPSsatellites. When the compassdisplay shows CAL, drive thevehicle for a short distance in anopen area where it can receive aGPS signal. The compass systemwill automatically determine when aGPS signal is restored and providea heading again.
Clock
Setting the Time and Date withBase Radio Center StackControls
To set the time or date:
1. Select Settings on the HomePage, then select Timeand Date.
2. Select the desired function.
3. Turn the MENU knob toincrease or decrease the value.
4. Press the MENU knob to go tothe next value. After the lastvalue is selected, the systemwill update and return to theSettings menu. Press o BACKto go to the last menu andsave the changes.
Auto Set requires an active OnStaror connected service plan.
If auto timing is set, the timedisplayed on the clock may notupdate immediately when drivinginto a new time zone.
To set the clock display:
1. Select Settings on the HomePage, then select Timeand Date.
2. Select Clock Display.
3. Turn the MENU knob to Offor On.
4. Press the MENU knob toselect.
Press o BACK to go to the lastmenu and save the changes.
Setting the Time and Date withBase Radio TouchscreenControls
When Auto Set is enabled the timecannot be manually set.
1. Press {, then touch Settings.
2. Touch Time and Date, then SetTime or Set Date.
3. Touch + or − to adjust thevalue.
4. Touch« orª to adjust AMor PM for 12 hour format.

Chevrolet Silverado 4500HD/5500HD/6500HD Owner Manual (GMNA-Localizing-U.S.-12102101) - 2019 - crc - 10/2/18
Instruments and Controls 99
5. Touch3.
Setting the Clock Display
1. Press {, then touch Settings.
2. Touch Time and Date, thenClock Display.
3. Touch OFF or ON to turn theclock display off or on.
4. Touch3.
Using Auto Set
Auto Set requires an active OnStaror connected service plan.
If auto timing is set, the timedisplayed on the clock may notupdate immediately when drivinginto a new time zone.
1. Press {, then touch Settings.
2. Touch Time and Date, thenAuto Set.
3. Select from the availableselections.
4. Touch3.
Setting the 12/24 Hour Format
1. Press {, then touch Settings.
2. Touch Time and Date, thenselect 12h or 24h format.
3. Touch3.
Setting the Date Format
1. Press {, then touch Settings.
2. Touch Time and Date, then SetDate Format.
3. Select DD/MM/YYYY (day/month/year), MM/DD/YYYY(month/day/year), or YYYY/MM/DD (year/month/day)format.
4. Touch3.
Setting the Time and Date withUplevel Radio TouchscreenControls
To set the time:
1. Touch SETTINGS from theHome Page, then touch Timeand Date.
2. Touch Set Time and touch«orª to increase or decreasehours, minutes, and AM or PM.Touch 12–24 Hr for 12 or24 hour clock.
3. Touch [ to go back to theprevious menu.
Auto Set requires an active OnStaror connected service plan.
If auto timing is set, the timedisplayed on the clock may notupdate immediately when drivinginto a new time zone.
To set the date:
1. Touch SETTINGS from theHome Page, then touch Timeand Date.
2. Touch Set Date and touch«orª to increase or decreasemonth, day, or year.
3. Touch [ to go back to theprevious menu.

Chevrolet Silverado 4500HD/5500HD/6500HD Owner Manual (GMNA-Localizing-U.S.-12102101) - 2019 - crc - 10/2/18
100 Instruments and Controls
To set the clock display:
1. Touch SETTINGS and touchTime and Date.
2. Touch Clock Display and touchOff or On to turn the clockdisplay off or on.
3. Touch [ to go back to theprevious menu.
The clock settings can also beaccessed by touching the timedisplay, then touching Set.
Power OutletsPower Outlets 12-Volt DirectCurrent
Accessory power outlets can beused to plug in electrical equipment,such as a cell phone or MP3 player.
The vehicle may have up to fouraccessory power outlets.
Vehicles with a Center Console
. One or two in front of thecupholders on the centerconsole
. One inside the center console
. One on the rear of the centerconsole
Vehicles with Bench Seats
. One on the center stack belowthe climate control system
. One or two in the storage areaon the bench seat
Lift the cover to access and replacewhen not in use.
The power outlets on the centerstack and in front of the cupholdersare powered at all times. The poweroutlets inside the storage area andon the rear of the console arepowered when the ignition is on orin ACC/ACCESSORY, or whenRetained Accessory Power (RAP) isactive.
{ Warning
Power is always supplied to theoutlets. Do not leave electricalequipment plugged in when thevehicle is not in use because thevehicle could catch fire and causeinjury or death.
Caution
Leaving electrical equipmentplugged in for an extended periodof time while the vehicle is off willdrain the battery. Always unplugelectrical equipment when not inuse and do not plug in equipmentthat exceeds the maximum15 amp rating.
Certain power accessory plugs maynot be compatible with theaccessory power outlet and couldoverload vehicle or adapter fuses.If a problem is experienced, seeyour dealer.
When adding electrical equipment,be sure to follow the properinstallation instructions included withthe equipment. See Add-OnElectrical Equipment 0 266.
Chevrolet Silverado 4500HD/5500HD/6500HD Owner Manual (GMNA-Localizing-U.S.-12102101) - 2019 - crc - 10/2/18
Instruments and Controls 101
Caution
Hanging heavy equipment fromthe power outlet can causedamage not covered by thevehicle warranty. The poweroutlets are designed foraccessory power plugs only, suchas cell phone charge cords.
Power Outlet 110/120-VoltAlternating Current
Base Shown, Uplevel Similar
If equipped with this power outlet, itcan be used to plug in electricalequipment that uses a maximumlimit of 150 watts.
If equipped with a center console,the 110/120-volt power outlet is infront of the cupholders in the centerconsole.
If equipped with bench seats, the110/120-volt power outlet is on thecenter stack.
An indicator light on the outlet turnson to show it is in use. The lightcomes on when the ignition is on,equipment requiring less than 150watts is plugged into the outlet, andno system fault is detected.
The indicator light does not come onwhen the ignition is off or if theequipment is not fully seated intothe outlet.
If equipment is connected usingmore than 150 watts or a systemfault is detected, a protection circuitshuts off the power supply and theindicator light turns off. To reset thecircuit, unplug the item and plug itback in or turn the RAP off and thenback on. See Retained AccessoryPower (RAP) 0 214.
The power outlet is not designed forthe following, and may not workproperly if they are plugged in:
. Equipment with high initial peakwattage, such ascompressor-driven refrigeratorsand electric power tools

Chevrolet Silverado 4500HD/5500HD/6500HD Owner Manual (GMNA-Localizing-U.S.-12102101) - 2019 - crc - 10/2/18
102 Instruments and Controls. Other equipment requiring an
extremely stable power supply,such asmicrocomputer-controlledelectric blankets and touchsensor lamps
. Medical equipment
Wireless ChargingThe vehicle may have wirelesscharging on top of the centerconsole. See Center ConsoleStorage 0 94. The system operatesat 145 kHz and wirelessly chargesone Qi compatible mobile device.The power output of the system iscapable of charging at a rate up to1 amp (5W), as requested by thecompatible mobile device. SeeRadio Frequency Statement 0 424.
To check for phone or other devicecompatibility:
. See www.my.chevrolet.com/learn.
. Or, see your dealer for details.
{ Warning
Wireless charging can affect theoperation of an implantedpacemaker or other medicaldevices. If you have one, it isrecommended to consult withyour doctor before using thewireless charging system.
The vehicle must be on, in ACC/ACCESSORY, or RetainedAccessory Power (RAP) must beactive. The wireless chargingfeature may not correctly indicatecharging when the vehicle is in RAP.See Retained Accessory Power(RAP) 0 214.
The operating temperature is −20 °C(−4 °F) to 60 °C (140 °F) for thecharging system and 0 °C (32 °F) to35 °C (95 °F) for the phone.
{ Warning
Remove all objects from thecharging pad before chargingyour mobile device. Objects, suchas coins, keys, rings, paper clips,or cards, between the phone andcharging pad will become veryhot. On the rare occasion that thecharging system does not detectan object, and the object getswedged between the phone andcharger, remove the phone andallow the object to cool beforeremoving it from the chargingpad, to prevent burns.

Chevrolet Silverado 4500HD/5500HD/6500HD Owner Manual (GMNA-Localizing-U.S.-12102101) - 2019 - crc - 10/2/18
Instruments and Controls 103
To charge a mobile device:
1. Remove all objects from thecharging pad. The system maynot charge if there are anyobjects between the mobiledevice and charging pad.
2. Place the mobile device faceup against the alignment rib onthe charge pad.
3. The} will appear on the Von the infotainment display.This indicates that the mobiledevice is properly positionedand charging. If a mobiledevice is placed on thecharging pad and} does not
display, remove the mobiledevice from the pad, turn it180 degrees, and waitthree seconds before placing/aligning the mobile device onthe pad again.
Software Acknowledgements
Certain Wireless Charging Moduleproduct from LG Electronics, Inc.("LGE") contains the open sourcesoftware detailed below. Refer tothe indicated open source licenses(as are included following thisnotice) for the terms and conditionsof their use.
OSS Notice Information
To obtain the source code that iscontained in this product, pleasevisit http://opensource.lge.com. Inaddition to the source code, allreferred license terms, warrantydisclaimers and copyright noticesare available for download. LGElectronics will also provide opensource code to you on CD-ROM fora charge covering the cost ofperforming such distribution (suchas the cost of media, shipping, and
handling) upon email request [email protected]. This offer isvalid for three (3) years from thedate on which you purchased theproduct.
Freescale-WCT library
Copyright (c) 2012-2014 FreescaleSemiconductor, Inc.. All rightsreserved.
1. Redistributions of source codemust retain the above copyrightnotice, this list of conditionsand the following disclaimer.
2. Redistributions in binary formmust reproduce the abovecopyright notice, this list ofconditions and the followingdisclaimer in thedocumentation and/or othermaterials provided with thedistribution.
3. Neither the name of thecopyright holder nor the namesof its contributors may be usedto endorse or promote productsderived from this softwarewithout specific prior writtenpermission.
Chevrolet Silverado 4500HD/5500HD/6500HD Owner Manual (GMNA-Localizing-U.S.-12102101) - 2019 - crc - 10/2/18
104 Instruments and Controls
THIS SOFTWARE IS PROVIDEDBY THE COPYRIGHT HOLDERSAND CONTRIBUTORS "AS IS"AND ANY EXPRESS OR IMPLIEDWARRANTIES, INCLUDING, BUTNOT LIMITED TO, THE IMPLIEDWARRANTIES OFMERCHANTABILITY AND FITNESSFOR A PARTICULAR PURPOSEARE DISCLAIMED. IN NO EVENTSHALL THE COPYRIGHT HOLDEROR CONTRIBUTORS BE LIABLEFOR ANY DIRECT, INDIRECT,INCIDENTAL, SPECIAL,EXEMPLARY, ORCONSEQUENTIAL DAMAGES(INCLUDING, BUT NOT LIMITEDTO, PROCUREMENT OF
SUBSTITUTE GOODS ORSERVICES; LOSS OF USE, DATA,OR PROFITS; OR BUSINESSINTERRUPTION) HOWEVERCAUSED AND ON ANY THEORYOF LIABILITY, WHETHER INCONTRACT, STRICT LIABILITY,OR TORT (INCLUDINGNEGLIGENCE OR OTHERWISE)ARISING IN ANY WAY OUT OFTHE USE OF THIS SOFTWARE,EVEN IF ADVISED OF THEPOSSIBILITY OF SUCH DAMAGE.
Warning Lights,Gauges, andIndicatorsWarning lights and gauges cansignal that something is wrongbefore it becomes serious enoughto cause an expensive repair orreplacement. Paying attention to thewarning lights and gauges couldprevent injury.
Some warning lights come on brieflywhen the engine is started toindicate they are working. Whenone of the warning lights comes onand stays on while driving, or whenone of the gauges shows there maybe a problem, check the section thatexplains what to do. Waiting to dorepairs can be costly and evendangerous.
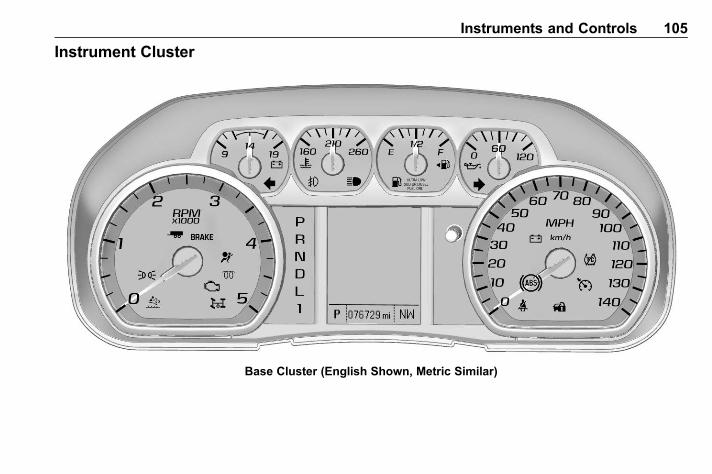
Chevrolet Silverado 4500HD/5500HD/6500HD Owner Manual (GMNA-Localizing-U.S.-12102101) - 2019 - crc - 10/2/18
Instruments and Controls 105
Instrument Cluster
Base Cluster (English Shown, Metric Similar)

Chevrolet Silverado 4500HD/5500HD/6500HD Owner Manual (GMNA-Localizing-U.S.-12102101) - 2019 - crc - 10/2/18
106 Instruments and Controls
Uplevel Cluster (English Shown, Metric Similar)

Chevrolet Silverado 4500HD/5500HD/6500HD Owner Manual (GMNA-Localizing-U.S.-12102101) - 2019 - crc - 10/2/18
Instruments and Controls 107
Cluster Menu (Uplevel Cluster)
There is an interactive display areain the center of the instrumentcluster.
Use the right steering wheel controlto open and scroll through thedifferent items and displays.
Press o to access the cluster
applications. Usew orx to scrollthrough the list of availableapplications. Not all applications willbe available on all vehicles.
. Info App. This is where theselected Driver InformationCenter (DIC) displays can beviewed. See “Driver InformationCenter (DIC) (Uplevel)” in theIndex.
. Audio
. Phone
. Navigation
. Options
Audio
Press V to select the Audio app,
then press p to enter the Audiomenu. In the Audio menu browse formusic, select from the favorites,or change the audio source. In themain view, usew orx to changethe station or go to the next orprevious track.
Phone
Press V to select the Phone app,
then press p to enter the Phonemenu. In the Phone menu, if there isno active phone call, view recentcalls, scroll through contacts, select
from the favorites, or change thephone source. If there is an activecall, mute the phone or switch tohandset operation.
Navigation
Press V to select the Navigation
app, then press p to enter theNavigation menu. If there is noactive route, you can resume thelast route and turn the voiceprompts on/off. If there is an activeroute, you can cancel the route.
Options
Press V to select the Options app.
Usew orx to scroll through itemsin the Options menu.
Units : Press p while Units isdisplayed to enter the Units menu.Choose English or metric units bypressing V while the desired item ishighlighted. A checkmark will bedisplayed next to the selected item.
Info Pages : Press p while InfoPages is displayed to enter the InfoPages menu and select the items to

Chevrolet Silverado 4500HD/5500HD/6500HD Owner Manual (GMNA-Localizing-U.S.-12102101) - 2019 - crc - 10/2/18
108 Instruments and Controls
be displayed in the Info app. See“Driver Information Center (DIC)(Uplevel)” in the Index.
Speed Warning : The SpeedWarning display allows the driver toset a speed that they do not want toexceed. To set the Speed Warning,press p when Speed Warning is
displayed, or press V on the mainview to set the speed value. Pressw orx to adjust the value. PressV to set the speed. Once the speedis set, this feature can be turned offby pressing V while viewing thispage. If the selected speed limit isexceeded, a pop-up warning isdisplayed with a chime.
Exhaust Filter : Displays thecurrent state of the DieselParticulate Filter (DPF). For manualcleaning/regeneration of the DPF,see Diesel Particulate Filter 0 217.
Software Information : Press pwhile Software Information ishighlighted to display open sourcesoftware information.
SpeedometerThe speedometer shows thevehicle's speed in either kilometersper hour (km/h) or miles perhour (mph).
OdometerThe odometer shows how far thevehicle has been driven, in eitherkilometers or miles.
Trip OdometerThe trip odometer shows how farthe vehicle has been driven sincethe trip odometer was last reset.
The trip odometer is accessed andreset through the Driver InformationCenter (DIC).See Driver Information Center (DIC)(Base Level) 0 119 or DriverInformation Center (DIC) (Uplevel)0 120.
TachometerThe tachometer displays the enginespeed in revolutions perminute (rpm).
Fuel Gauge
When the ignition is on, the fuelgauge indicates about how muchfuel is left in the tank.
There is an arrow near the fuelgauge pointing to the side of thevehicle the fuel cap is on.
When the indicator nears empty, thelow fuel light comes on. There still isa little fuel left, but the vehicleshould be refueled soon.

Chevrolet Silverado 4500HD/5500HD/6500HD Owner Manual (GMNA-Localizing-U.S.-12102101) - 2019 - crc - 10/2/18
Instruments and Controls 109
Here are four things that someowners ask about. None of theseshow a problem with the fuel gauge:
. At the service station, the fuelpump shuts off before the gaugereads full.
. It takes a little more or less fuelto fill up than the gaugeindicated. For example, thegauge may have indicated thetank was half full, but it actuallytook a little more or less thanhalf the tank's capacity to fillthe tank.
. The gauge moves a little whileturning a corner or speeding up.
. The gauge takes a few secondsto stabilize after the ignition isturned on, and goes back toempty when the ignition isturned off.
Engine Oil PressureGauge
The engine oil pressure gaugeshows the engine oil pressurein psi (pounds per square inch)when the engine is running.
Oil pressure can vary with enginespeed, outside temperature, coolanttemperature, and oil viscosity.
On some models, the oil pump willvary engine oil pressure accordingto engine needs. Oil pressure maychange quickly as the engine speedor load varies. This is normal. If theoil pressure warning light or Driver
Information Center (DIC) messageindicates oil pressure outside thenormal operating range, check thevehicle's oil as soon as possible.
See Engine Oil 0 295.
Caution
Lack of proper engine oilmaintenance can damage theengine. Driving with the engine oillow can also damage the engine.The repairs would not be coveredby the vehicle warranty. Checkthe oil level as soon as possible.Add oil if required, but if the oillevel is within the operating rangeand the oil pressure is still low,have the vehicle serviced. Alwaysfollow the maintenance schedulefor changing engine oil.

Chevrolet Silverado 4500HD/5500HD/6500HD Owner Manual (GMNA-Localizing-U.S.-12102101) - 2019 - crc - 10/2/18
110 Instruments and Controls
Engine CoolantTemperature Gauge
This gauge measures thetemperature of the vehicle's enginecoolant.
While driving under normaloperating conditions, if the needlemoves into the red warning area,the engine is too hot. Pull off theroad, stop the vehicle, and turn offthe engine as soon as possible.
Voltmeter Gauge
When the ignition is on, this gaugeindicates the battery voltage.
When the engine is running, thisgauge shows the condition of thecharging system. The gauge cantransition from a higher to lower or alower to higher reading. This isnormal. If the vehicle is operatingoutside the normal operating range,the charging system light comes on.See Charging System Light 0 113for more information. The voltmetergauge may also read lower when infuel economy mode. This is normal.
Readings outside the normaloperating range can also occurwhen a large number of electricalaccessories are operating in thevehicle and the engine is left idlingfor an extended period. Thiscondition is normal since thecharging system is not able toprovide full power at engine idle. Asengine speeds are increased, thiscondition should correct itself ashigher engine speeds allow thecharging system to create maximumpower.
The vehicle can only be driven for ashort time with the readings outsidethe normal operating range. If thevehicle must be driven, turn off allaccessories, such as the radio andair conditioner.
Readings outside the normaloperating range indicate a possibleproblem in the electrical system.Have the vehicle serviced as soonas possible.

Chevrolet Silverado 4500HD/5500HD/6500HD Owner Manual (GMNA-Localizing-U.S.-12102101) - 2019 - crc - 10/2/18
Instruments and Controls 111
Seat Belt Reminders
Seat Belt Reminder Light
There is a seat belt reminder lighton the instrument cluster.
When the vehicle is started, thislight flashes and a chime may comeon to remind the driver to fastentheir seat belt. Then the light stayson solid until the belt is buckled.This cycle may continue severaltimes if the driver remains orbecomes unbuckled while thevehicle is moving.
If the driver seat belt is buckled,neither the light nor the chimecomes on.
Airbag Readiness LightThis light shows if there is anelectrical problem with the airbagsystem. The system check includesthe airbag sensor(s), passengersensing system (if equipped), thepretensioners, the airbag modules,the wiring, and the crash sensingand diagnostic module. For moreinformation on the airbag system,see Airbag System 0 61.
The airbag readiness light comes onfor several seconds when thevehicle is started. If the light doesnot come on then, have it fixedimmediately.
{ Warning
If the airbag readiness light stayson after the vehicle is started orcomes on while driving, it meansthe airbag system might not beworking properly. The airbags inthe vehicle might not inflate in acrash, or they could even inflatewithout a crash. To help avoidinjury, have the vehicle servicedright away.
If there is a problem with the airbagsystem, a Driver Information Center(DIC) message may also come on.
Airbag On-Off LightIf the vehicle has an airbag on-offswitch, it also has a passengerairbag status indicator located in theoverhead console.

Chevrolet Silverado 4500HD/5500HD/6500HD Owner Manual (GMNA-Localizing-U.S.-12102101) - 2019 - crc - 10/2/18
112 Instruments and Controls
When the vehicle is started, thepassenger airbag status indicatorON and OFF will light for severalseconds as a system check. Then,after several more seconds, thestatus indicator ON or OFF will lightto let you know the status of thefront outboard passenger frontalairbag.
When the front outboard passengerairbag is manually turned off usingthe airbag on-off switch on theinstrument panel endcap, theindicator light OFF will come on andstay on as a reminder that theairbag has been turned off. Thislight will go off when the airbag hasbeen turned on. See Airbag On-OffSwitch 0 65 for more information,including important safetyinformation.
{ Warning
If the front outboard passengerfrontal airbag is turned off for aperson who is not in a risk groupidentified by the nationalgovernment, that person will nothave the extra protection of anairbag. In a crash, the airbag willnot be able to inflate and helpprotect the person sitting there.Do not turn off the front outboardpassenger frontal airbag unlessthe person sitting there is in a riskgroup identified by the nationalgovernment. See Airbag On-OffSwitch 0 65 for more information,including important safetyinformation.
{ Warning
If the airbag readiness light evercomes on and stays on, it meansthat something may be wrongwith the airbag system. Forexample, the front outboardpassenger frontal airbag couldinflate even though the airbagon-off switch is turned off.
To help avoid injury to yourself orothers, have the vehicle servicedright away. See Airbag ReadinessLight 0 111 for more information,including important safetyinformation.
If the word ON is lit, it means thatthe front outboard passenger frontalairbag is enabled, and may inflate.See Airbag On-Off Switch 0 65 formore information, includingimportant safety information.
If, after several seconds, both statusindicator lights remain on, or if thereare no lights at all, there may be a

Chevrolet Silverado 4500HD/5500HD/6500HD Owner Manual (GMNA-Localizing-U.S.-12102101) - 2019 - crc - 10/2/18
Instruments and Controls 113
problem with the lights or the airbagon-off switch. See your dealer forservice.
Charging System Light
The charging system light comes onbriefly when the ignition is turnedon, but the engine is not running, asa check to show the light is working.It should go out when the engine isstarted.
If the light stays on, or comes onwhile driving, there may be aproblem with the electrical chargingsystem. Have it checked by yourdealer. Driving while this light is oncould drain the battery.
When this light comes on, or isflashing, the Driver InformationCenter (DIC) also displays amessage.
If a short distance must be drivenwith the light on, be sure to turn offall accessories, such as the radioand air conditioner.
Malfunction IndicatorLamp (Check EngineLight)This light is part of the vehicle’semission control on-boarddiagnostic system. If this light is onwhile the engine is running, amalfunction has been detected andthe vehicle may require service. Thelight should come on to show that itis working when the ignition is onwith the engine not running. SeeIgnition Positions 0 208.
This light may also come on whenthe system has detected a problemwith the Diesel Exhaust Fluid (DEF)management system. See DieselExhaust Fluid 0 220.
Malfunctions are often indicated bythe system before any problem isnoticeable. Being aware of the lightand seeking service promptly whenit comes on may prevent damage.
Caution
If the vehicle is driven continuallywith this light on, the emissioncontrol system may not work aswell, the fuel economy may belower, and the vehicle may notrun smoothly. This could lead tocostly repairs that might not becovered by the vehicle warranty.

Chevrolet Silverado 4500HD/5500HD/6500HD Owner Manual (GMNA-Localizing-U.S.-12102101) - 2019 - crc - 10/2/18
114 Instruments and Controls
Caution
Modifications to the engine,transmission, exhaust, intake,or fuel system, or the use ofreplacement tires that do notmeet the original tirespecifications, can cause this lightto come on. This could lead tocostly repairs not covered by thevehicle warranty. This could alsoaffect the vehicle’s ability to passan Emissions Inspection/Maintenance test. SeeAccessories and Modifications0 290.
When the light is on, a malfunctionhas been detected. Diagnosis andservice may be required.
Poor fuel quality can causeinefficient engine operation and poordriveability, which may go awayonce the engine is warmed up.If this occurs, change the fuel brand.It may require at least one full tankof the proper fuel to turn the light off.See Fuel for Diesel Engines 0 241.
If the light remains on, see yourdealer.
Emissions Inspection andMaintenance Programs
If the vehicle requires an EmissionsInspection/Maintenance test, thetest equipment will likely connect tothe vehicle's Data LinkConnector (DLC).
The DLC is under the instrumentpanel to the left of the steeringwheel. Connecting devices that arenot used to perform an EmissionsInspection/Maintenance test or toservice the vehicle may affectvehicle operation. See Add-OnElectrical Equipment 0 266. Seeyour dealer if assistance is needed.
The vehicle may not passinspection if:
. The light is on when the engineis running.
. The light does not come onwhen the ignition is on with theengine not running.
. Critical emission control systemshave not been completelydiagnosed. If this happens, thevehicle would not be ready forinspection and might requireseveral days of routine drivingbefore the system is ready forinspection. This can happen ifthe 12-volt battery has recentlybeen replaced or run down, or ifthe vehicle has recently beenserviced.
See your dealer if the vehicle willnot pass or cannot be made readyfor the test.

Chevrolet Silverado 4500HD/5500HD/6500HD Owner Manual (GMNA-Localizing-U.S.-12102101) - 2019 - crc - 10/2/18
Instruments and Controls 115
Brake System WarningLightThe vehicle brake system consistsof two hydraulic circuits. If onecircuit is not working, the remainingcircuit can still work to stop thevehicle. For normal brakingperformance, both circuits need tobe working.
If the warning light comes on, thereis a brake problem. Have the brakesystem inspected right away.
This light should come on brieflywhen the engine is started. If it doesnot come on then, have it fixed so itwill be ready to warn you if there isa problem.
When the ignition is on, the brakesystem warning light also comes onwhen the parking brake is set. Thelight stays on if the parking brake
does not fully release. If it stays onafter the parking brake is fullyreleased, it means the vehicle has abrake problem.
If the light comes on while driving,pull off the road and stop carefully.The pedal might be harder to push,or the pedal can go closer to thefloor. It may take longer to stop.If the light is still on, have thevehicle towed for service. SeeTowing the Vehicle 0 347.
{ Warning
The brake system might not beworking properly if the brakesystem warning light is on.Driving with the brake systemwarning light on can lead to acrash. If the light is still on afterthe vehicle has been pulled offthe road and carefully stopped,have the vehicle towed forservice.
Antilock Brake System(ABS) Warning Light
This light comes on briefly when theengine is started.
If the light does not come on, have itfixed so it will be ready to warn ifthere is a problem.
If the light comes on while driving,stop as soon as it is safely possibleand turn off the vehicle. Then startthe engine again to reset thesystem. If the ABS light stays on,or comes on again while driving, thevehicle needs service. A chime mayalso sound when the light comes onsteady.
If the ABS light is the only light on,the vehicle has regular brakes, butthe antilock brakes are notfunctioning.

Chevrolet Silverado 4500HD/5500HD/6500HD Owner Manual (GMNA-Localizing-U.S.-12102101) - 2019 - crc - 10/2/18
116 Instruments and Controls
If both the ABS and the brakesystem warning light are on, thevehicle's antilock brakes are notfunctioning and there is a problemwith the regular brakes. See yourdealer for service.
See Brake System Warning Light0 115.
Tow/Haul Mode Light
For vehicles with the Tow/HaulMode feature, this light comes onwhen the Tow/Haul Mode has beenactivated.
See Tow/Haul Mode 0 227.
Traction Off Light
This light comes on briefly whilestarting the engine. If it does not,have the vehicle serviced by yourdealer. If the system is workingnormally, the indicator light thenturns off.
The traction off light comes on whenthe Traction Control System (TCS)has been turned off by pressing andreleasing the TCS button.
If the TCS is off, wheel spin is notlimited. Adjust driving accordingly.
See Traction Control System (TCS)0 235.
Wait-to-Start Light
This light comes on briefly whilestarting the engine, as a check toshow the light is working.
If the wait-to-start light comes on,the glow plug system is requiredand operating. Wait until the lightturns off before starting the engine.This light may not come on in warmtemperatures.
The fast warm-up glow plug systemmakes the wait-to-start light stay onfor a shorter amount of time thanmost diesel engines.
See Starting the Diesel Engine0 210.

Chevrolet Silverado 4500HD/5500HD/6500HD Owner Manual (GMNA-Localizing-U.S.-12102101) - 2019 - crc - 10/2/18
Instruments and Controls 117
Low Fuel Warning Light
This light is near the fuel gauge andcomes on briefly when the ignition isturned on as a check to show it isworking.
It also comes on when the fuel tankis low on fuel. The light turns offwhen fuel is added. If it does not,have the vehicle serviced.
Diesel Exhaust Fluid(DEF) Warning Light
This light, a Driver InformationCenter (DIC) message, and a chimecome on when there is an issue withthe Diesel Exhaust Fluid.
If the DEF level has not beencorrected, the light will continue toflash when the vehicle is started.The vehicle's speed may also belimited.
Also see Diesel Exhaust Fluid0 220.
Security Light
The security light should come onbriefly as the engine is started. If itdoes not come on, have the vehicleserviced by your dealer. If thesystem is working normally, theindicator light turns off.
If the light stays on and the enginedoes not start, there could be aproblem with the theft-deterrentsystem. See Immobilizer Operation0 38.
High-Beam On Light
This light comes on when thehigh-beam headlamps are in use.
See Headlamp High/Low-BeamChanger 0 133.

Chevrolet Silverado 4500HD/5500HD/6500HD Owner Manual (GMNA-Localizing-U.S.-12102101) - 2019 - crc - 10/2/18
118 Instruments and Controls
Front Fog Lamp Light
For vehicles with fog lamps, thislight comes on when the fog lampsare on.
The light goes out when the foglamps are turned off. See FogLamps 0 136.
Lamps On Reminder
This light comes on when theexterior lamps are in use. SeeExterior Lamp Controls 0 132.
Cruise Control Light
For vehicles with cruise control, thecruise control light is white when thecruise control is on and ready, andturns green when the cruise controlis set and active.
The light turns off when the cruisecontrol is turned off. See CruiseControl 0 237.
Power Take-Off Light
The vehicle may have a PowerTake-Off (PTO) light. Under normaloperating conditions, the PTO lightwill remain on throughout the PTOoperating cycle. If all conditionsrequired to engage PTO have notbeen met when enabling PTO, thePTO light will turn on, then turn offafter one second. See PowerTake-Off (PTO) 0 270.

Chevrolet Silverado 4500HD/5500HD/6500HD Owner Manual (GMNA-Localizing-U.S.-12102101) - 2019 - crc - 10/2/18
Instruments and Controls 119
Information Displays
Driver Information Center(DIC) (Base Level)The DIC displays are shown in thecenter of the instrument cluster. Thedisplays show the status of manyvehicle systems. The trip odometerreset stem in the instrument clusteris used to access the DIC menuitems.
DIC Menu Items
Turn the trip odometer reset stem toscroll through the following menuitems:
. Digital Speedometer
. Trip
. Fuel Range
. Average Fuel Economy
. Remaining Oil Life
. Diesel Exhaust Fluid Level
. Transmission Fluid Temperature
. Trailer Brake
. Hourmeter
. Exhaust Filter
. Unit
Digital Speedometer
The speedometer shows how fastthe vehicle is moving in eitherkilometers per hour (km/h) or milesper hour (mph). The speedometercannot be reset.
Trip
Turn the trip odometer reset stemuntil TRIP displays. The currentdistance traveled, in eitherkilometers (km) or miles (mi), sincethe last reset for the trip odometer isshown. The trip odometer can bereset to zero by pressing andholding the trip odometer reset stemwhile the trip odometer is displayed.
Fuel Range
This display shows the approximatedistance the vehicle can be drivenwithout refueling. The fuel rangeestimate is based on an average ofthe vehicle's fuel economy overrecent driving history and theamount of fuel remaining in the fueltank. Fuel range cannot be reset.
Average Fuel Economy
The Average Fuel Economy displayshows the approximate averageliters per 100 kilometers (L/100 km)or miles per gallon (mpg). Thisnumber reflects only theapproximate average fuel economythat the vehicle has right now, andwill change as driving conditionschange. This number is based onthe number of L/100 km (mpg)recorded since the last time thismenu item was reset. Reset thisdisplay by pressing the tripodometer reset stem.
Remaining Oil Life
Turn the trip odometer reset stemuntil REMAINING OIL LIFEdisplays. An estimate of the oil'sremaining useful life is shown.REMAINING OIL LIFE 99% means99% of the current oil life remains.
When the remaining oil life is low,the CHANGE ENGINE OIL SOONmessage will appear on the display.The oil should be changed as soonas possible. See Engine Oil 0 295.In addition to the engine oil life

Chevrolet Silverado 4500HD/5500HD/6500HD Owner Manual (GMNA-Localizing-U.S.-12102101) - 2019 - crc - 10/2/18
120 Instruments and Controls
system monitoring the oil life,additional maintenance isrecommended. See MaintenanceSchedule 0 361.
The Oil Life display must be resetafter each oil change. It will notreset itself. Do not reset the Oil Lifedisplay at any time other than whenthe oil has just been changed.It cannot be reset accurately untilthe next oil change. To reset theengine oil life system, see EngineOil Life System 0 298.
Diesel Exhaust Fluid Level
The Diesel Exhaust Fluid (DEF)level will be displayed as either OK,XX%, or LOW. When LOW appearson the display, add DEF as soon aspossible. See Diesel Exhaust Fluid0 220.
Transmission Fluid Temperature
The temperature of the automatictransmission fluid displays in eitherdegrees Celsius (°C) or degreesFahrenheit (°F).
Trailer Brake
On vehicles with the IntegratedTrailer Brake Control (ITBC) system,turn the trip odometer reset stemuntil TRAILER GAIN and TRAILEROUTPUT displays.
TRAILER GAIN shows the TrailerGain setting. This setting can beadjusted from 0.0 to 10.0 with eithera trailer connected or disconnected.
TRAILER OUTPUT shows thepower output to the trailer anytime atrailer with electric brakes isconnected. Output is displayed as abar graph. Dashes may appear inthe TRAILER OUTPUT display if atrailer is not connected.
Hourmeter
Displays the total number of hoursthe engine has run.
Exhaust Filter
Displays the current state of theDiesel Particulate Filter (DPF). Formanual cleaning/regeneration of theDPF, see Diesel Particulate Filter0 217.
Unit
This will change the displays on theinstrument cluster and DIC to eithermetric or English (US)measurements. To change the units,press the trip odometer reset stemwhen UNITS is displayed to enterthe Unit menu. Turn the tripodometer reset stem to switchbetween English and metric. Pressthe trip odometer reset stem whenthe desired setting is displayed.
Compass
The vehicle may have a compass inthe DIC. See Compass 0 98.
Driver Information Center(DIC) (Uplevel)The DIC displays are shown in thecenter of the instrument cluster inthe Info app. See Instrument Cluster0 105. The displays show the statusof many vehicle systems. Thecontrols for the DIC are on the rightsteering wheel control.

Chevrolet Silverado 4500HD/5500HD/6500HD Owner Manual (GMNA-Localizing-U.S.-12102101) - 2019 - crc - 10/2/18
Instruments and Controls 121
w orx : Press to move up ordown in a list. In the main view,press up and down to movebetween different info app pages.
o or p : Press to move betweenthe interactive display zones in thecluster.
V : Press to open a menu or selecta menu item. Press and hold toreset values on certain screens.
DIC Info Page Options
The info pages on the DIC can beturned on or off through theOptions menu.
1. Press o to access the clusterapplications.
2. Pressw orx to scroll to theOptions application.
3. Press V to enter theOptions menu.
4. Scroll to Info Pages andpress p.
5. Pressw orx to movethrough the list of possibleinformation displays.
6. Press V while an item ishighlighted to select ordeselect that item. When anitem is selected, a checkmarkwill appear next to it.
DIC Info Pages
The following is the list of allpossible DIC info page displays.Some may not be available for yourparticular vehicle. Some items maynot be turned on by default but canbe turned on through the Optionsapp. See “DIC Info Page Options”earlier in this section.
Speed : Shows the vehicle speed ineither kilometers per hour (km/h) ormiles per hour (mph). If equipped,press p to open the menu andselect to display speed limit signs.
Trip A or Trip B : Shows thecurrent distance traveled, in eitherkilometers (km) or miles (mi), sincethe trip odometer was last reset.
This also shows the approximateaverage liters per 100 kilometers (L/100 km) or miles per gallon (mpg).This number is calculated based onthe number of L/100 km (mpg)recorded since the last time thismenu item was reset. This numberreflects only the approximateaverage fuel economy that thevehicle has right now, and willchange as driving conditionschange.
Press and hold V while this displayis active to reset the trip odometerand the average fuel economy. TripA and Trip B can also be reset bypressing p and choosing reset.

Chevrolet Silverado 4500HD/5500HD/6500HD Owner Manual (GMNA-Localizing-U.S.-12102101) - 2019 - crc - 10/2/18
122 Instruments and Controls
Fuel Range : Shows theapproximate distance the vehiclecan be driven without refueling.LOW will be displayed when thevehicle is low on fuel. The fuelrange estimate is based on anaverage of the vehicle's fueleconomy over recent driving historyand the amount of fuel remaining inthe fuel tank.
Oil Life : Shows an estimate of theoil's remaining useful life.If REMAINING OIL LIFE 99% isdisplayed, that means 99% of thecurrent oil life remains.
When the remaining oil life is low,the CHANGE ENGINE OIL SOONmessage will appear on the display.The oil should be changed as soonas possible. See Engine Oil 0 295.In addition to the engine oil lifesystem monitoring the oil life,additional maintenance isrecommended in the MaintenanceSchedule. See MaintenanceSchedule 0 361.
The Oil Life display must be resetafter each oil change. It will notreset itself. Do not reset the Oil Life
display at any time other than whenthe oil has just been changed.It cannot be reset accurately untilthe next oil change. To reset theengine oil life system, press andhold V for several seconds whilethe Oil Life display is active. SeeEngine Oil Life System 0 298.
Fuel Economy : The centerdisplays the approximateinstantaneous fuel economy as anumber and bar graph. Displayedabove the bar graph is a runningaverage of fuel economy for themost recently traveled selecteddistance. Displayed below the bargraph is the best average fueleconomy that has been achieved forthe selected distance. The selecteddistance is displayed at the top ofthe page as “last xxx mi/km.”
Press p to select the distance or
reset best value. Usew andx to
choose the distance and press V.
Pressw andx to select “ResetBest Score.” Press V to reset the
best average fuel economy. Afterreset, the momentary average fueleconomy will display.
The display provides information onhow current driving behavior affectsthe running average and how wellrecent driving compares to the bestthat has been achieved for theselected distance.
Timer : This display can be used asa timer. To start the timer, press Vwhile this display is active. Thedisplay will show the amount of timethat has passed since the timer waslast reset. To stop the timer, press Vbriefly while this display is activeand the timer is running. To resetthe timer to zero, press and hold Vwhile this display is active, or pressp and select reset.
Speed Limit (If Equipped) : Showssign information, which comes froma roadway database in the onboardnavigation.
Engine Hours : Shows the totalnumber of hours the engine has run.

Chevrolet Silverado 4500HD/5500HD/6500HD Owner Manual (GMNA-Localizing-U.S.-12102101) - 2019 - crc - 10/2/18
Instruments and Controls 123
Fuel Filter Life : This display showsan estimate of the fuel filter'sremaining useful life. If 90% FuelFilter Life Remaining is displayed, itmeans 90% of the current fuel filterlife remains. The fuel filter lifesystem will alert when to change thefuel filter on a schedule consistentwith your driving conditions. Whenthe remaining fuel filter life is low,the CHANGE FUEL FILTERmessage will appear on the display.Change the fuel filter as soon aspossible.
Diesel Exhaust Fluid (DEF)Level : The DEF level will bedisplayed as either OK, XX%,or LOW. When LOW appears on thedisplay, add DEF as soon aspossible. See Diesel Exhaust Fluid0 220.
Transmission FluidTemperature : Shows thetemperature of the automatictransmission fluid in either degreesCelsius (°C) or degreesFahrenheit (°F).
Trailer Brake (If Equipped) : Onvehicles with the Integrated TrailerBrake Control (ITBC) system, thetrailer brake display appears inthe DIC.
TRAILER GAIN shows the trailergain setting. This setting can beadjusted from 0.0 to 10.0 with eithera trailer connected or disconnected.
TRAILER OUTPUT shows thepower output to the trailer anytime atrailer with electric brakes isconnected. Output is displayed as abar graph. Dashes may appear inthe OUTPUT display if a trailer isnot connected.
Blank Page : Shows noinformation.
Vehicle MessagesMessages displayed on the DICindicate the status of the vehicle orsome action that may be needed tocorrect a condition. Multiplemessages may appear one afteranother.
The messages that do not requireimmediate action can beacknowledged and cleared bypressing V. The messages thatrequire immediate action cannot becleared until that action isperformed.
All messages should be takenseriously; clearing the messagedoes not correct the problem.
If a SERVICE message appears,see your dealer.
Follow the instructions given in themessages. The system displaysmessages regarding the followingtopics:
. Service Messages
. Fluid Levels
. Vehicle Security

Chevrolet Silverado 4500HD/5500HD/6500HD Owner Manual (GMNA-Localizing-U.S.-12102101) - 2019 - crc - 10/2/18
124 Instruments and Controls. Brakes
. Ride Control Systems
. Driver Assistance Systems
. Cruise Control
. Lighting and Bulb Replacement
. Wiper/Washer Systems
. Doors and Windows
. Seat Belts
. Airbag Systems
. Engine and Transmission
. Battery
Engine Power Messages
ENGINE POWER IS REDUCED
This message displays when thevehicle's propulsion power isreduced. A reduction in propulsionpower can affect the vehicle's abilityto accelerate. If this message is on,but there is no observed reductionin performance, proceed to yourdestination. The performance maybe reduced the next time the vehicleis driven. The vehicle may be driven
while this message is on, butmaximum acceleration and speedmay be reduced. Anytime thismessage stays on, or displaysrepeatedly, the vehicle should betaken to your dealer for service assoon as possible.
Vehicle Speed Messages
SPEED LIMITED TOXXX KM/H (MPH)
This message shows that thevehicle speed has been limited tothe speed displayed. The limitedspeed is a protection for variouspropulsion and vehicle systems,such as lubrication, thermal,suspension, Teen Driver ifequipped, or tires.
VehiclePersonalizationUse the audio system controls toaccess the personalization menusfor customizing vehicle features.
The following are all possiblepersonalization features. Dependingon the vehicle, some may not beavailable.
Base Radio Audio SystemControls
MENU : Press to enter menus andselect menu items. Turn to scrollthrough the menus.
o BACK : Press to return to theprevious menu or exit.
Base Radio with TouchscreenAudio System Controls
{ : Press to access the HomePage Menu.
Q or R : Touch to scroll through themenus or setup items.
0 : Touch to exit or return to theprevious screen or menu.

Chevrolet Silverado 4500HD/5500HD/6500HD Owner Manual (GMNA-Localizing-U.S.-12102101) - 2019 - crc - 10/2/18
Instruments and Controls 125
Uplevel Radio Audio SystemControls
1. Touch the desired feature todisplay a list of availableoptions.
2. Select the desired featuresetting.
3. Press o BACK on the center
stack or touch [ to return tothe previous menu or exit.
Turn the ignition on to access theSettings menu, then selectSETTINGS from the Home Page onthe infotainment display.
Personalization Menus
The following list of menu items maybe available:
. Time and Date
. Rear Seat Reminder
. Language
. Valet Mode
. Radio
. Vehicle
. Bluetooth
. Apple CarPlay
. Android Auto
. USB Auto Launch
. Turn Display Off
. Voice
. Display
. Return to Factory Settings
. Software Information
. Wi-Fi
. Power Take-Off (PTO)
Detailed information for each menufollows.
Time and Date
Manually set the time and date. SeeClock 0 98.
Rear Seat Reminder
This allows for a chime and amessage when the rear door hasbeen opened before or duringoperation of the vehicle.
Select Off or On.
Language
Select Language, then select fromthe available language(s).
The selected language will displayon the system, and voicerecognition will reflect the selectedlanguage.
Valet Mode
This will lock the infotainmentsystem and steering wheel controls.It may also limit access to vehiclestorage locations, if equipped.
To enable valet mode:
1. Enter a four-digit code on thekeypad.
2. Select Enter to go to theconfirmation screen.
3. Re-enter the four-digit code.
Touch Lock or Unlock to lock orunlock the system. Touch Back togo back to the previous menu.

Chevrolet Silverado 4500HD/5500HD/6500HD Owner Manual (GMNA-Localizing-U.S.-12102101) - 2019 - crc - 10/2/18
126 Instruments and Controls
Radio
Select and the following maydisplay:
. Manage Favorites
. Number of Favorites Shown
. Audible Touch Feedback
. Text Scroll
. Tone Settings
. Auto Volume
. Maximum Startup Volume
. Audio Cue Volume
Manage Favorites
This allows favorites to be edited.See “Manage Favorites” in “RadioSetup” under Home Page (BaseRadio with Touchscreen) 0 149 orHome Page (Base Radio) 0 147 or“Manage Favorites” in “Settings”under “Radio” in the infotainmentmanual.
Number of Favorites Shown
Select to set the number of favoritesto display.
Select the desired number or selectAuto and the infotainment systemwill automatically adjust the numberof favorites shown.
Audible Touch Feedback
This allows Audible TouchFeedback to be turned on or off.
Select Off or On.
Text Scroll
Select to see text scroll on thescreen.
Select Off or On.
Tone Settings
Select to adjust the radio tone. See“Tone Settings” in AM-FM Radio(Base Radio with Touchscreen)0 152 or AM-FM Radio (BaseRadio) 0 150.
Auto Volume
This feature adjusts the volumebased on vehicle speed andambient noise.
Select Off, Low, Medium-Low,Medium, Medium-High, or High.
Maximum Startup Volume
This feature sets the maximumstartup volume. If the vehicle isstarted and the volume is greaterthan this level, the volume isadjusted to this level. To set themaximum startup volume, turn theMENU knob or touch + or − toincrease or decrease.
Audio Cue Volume
This feature sets the volume ofaudio files played at system startupand shutdown.
Select On, then touch + or − toincrease or decrease the volume.
Vehicle
Select and the following maydisplay:
. Climate and Air Quality
. Comfort and Convenience
. Lighting
. Power Door Locks
. Remote Lock, Unlock, Start

Chevrolet Silverado 4500HD/5500HD/6500HD Owner Manual (GMNA-Localizing-U.S.-12102101) - 2019 - crc - 10/2/18
Instruments and Controls 127
Climate and Air Quality
Select and the following maydisplay:
. Elevated Idle
. Auto Fan Speed
. Auto Rear Defog
Elevated Idle
This allows the feature to be turnedon and off. See “Elevated Idle” inStarting the Diesel Engine 0 210.
Select Off or On.
Auto Fan Speed
This feature will set the auto fanspeed.
Select Low, Medium, or High.
Auto Rear Defog
This feature will automatically turnon the rear defogger when it is coldoutside.
Select Off or On.
Comfort and Convenience
Select and the following maydisplay:
. Chime Volume
Chime Volume
This allows the selection of thechime volume level.
Turn the MENU knob or touch + or− to adjust the volume.
Lighting
Select and the following maydisplay:
. Vehicle Locator Lights
. Exit Lighting
Vehicle Locator Lights
This feature will flash the exteriorlamps and allows some of theexterior lamps and most of theinterior lamps to turn on brieflywhen K on the Remote KeylessEntry (RKE) transmitter is pressedto locate the vehicle.
Select Off or On.
Exit Lighting
This allows the selection of howlong the exterior lamps stay onwhen leaving the vehicle when it isdark outside.
Select Off, 30 Seconds, 60 Seconds,or 120 Seconds.
Power Door Locks
Select and the following maydisplay:
. Unlocked Door Anti Lock Out
. Auto Door Unlock
. Delayed Door Lock
Unlocked Door Anti Lock Out
When on, this feature will keep thedriver door from locking when thedoor is open. If Off is selected, theDelayed Door Lock menu will beavailable.
Select Off or On.
Auto Door Unlock
This allows selection of which of thedoors will automatically unlock whenthe vehicle is shifted into P (Park).

Chevrolet Silverado 4500HD/5500HD/6500HD Owner Manual (GMNA-Localizing-U.S.-12102101) - 2019 - crc - 10/2/18
128 Instruments and Controls
Select Off, All Doors, or Driver Door.
Delayed Door Lock
When on, this feature will delay thelocking of the doors. To override thedelay, press the power door lockswitch on the door.
Select Off or On.
Remote Lock, Unlock, Start
Select and the following maydisplay:
. Remote Unlock Light Feedback
. Remote Lock Feedback
. Remote Door Unlock
. Remote Start Auto Heat Seats
. Remote Window Operation
Remote Unlock Light Feedback
When on, the exterior lamps willflash when unlocking the vehiclewith the RKE transmitter.
Select Off or Flash Lights.
Remote Lock Feedback
This allows selection of what type offeedback is given when locking thevehicle with the RKE transmitter.
Select Off, Lights and Horn, LightsOnly, or Horn Only.
Remote Door Unlock
This allows selection of which doorswill unlock when pressing K on theRKE transmitter.
Select All Doors or Driver Door.
Remote Start Auto Heat Seats
If equipped and turned on, thisfeature will turn the heated seats onwhen using remote start oncold days.
Select Off or On.
Remote Window Operation
If equipped, this feature enables theremote operation of all windowsfrom the RKE transmitter. See“Remote Window Operation” inPower Windows 0 42.
Select Off or On.
Bluetooth
Select and the following maydisplay:
. Pair New Device
. Discoverable
. Device Information
. Device Management
. Change Pairing PIN
. Ringtones
. Sort Order
. Voice Mail Numbers
. Text Message Alerts
Pair New Device
Select to pair a new device. See“Pairing” under Bluetooth(Overview) 0 174 or Bluetooth(Infotainment Controls) 0 175 or“Pairing” in “Infotainment Controls”under “Bluetooth” in the infotainmentmanual.
Discoverable
This allows the system to find adevice.
Chevrolet Silverado 4500HD/5500HD/6500HD Owner Manual (GMNA-Localizing-U.S.-12102101) - 2019 - crc - 10/2/18
Instruments and Controls 129
Select Off or On.
Device Information
See information about the devicename, address, and PIN code.
Device Management
Select to connect to a differentphone source, disconnect a phone,or delete a phone.
Change Pairing PIN
Select to change the PIN of adevice.
Ringtones
Select to change the ring tone forthe specific phone. The phone doesnot need to be connected to changethe ring tones.
Sort Order
Select to change the order of thecontacts list.
Select First/Last or Last/First.
Voice Mail Numbers
This feature displays the voice mailnumber for all connected phones.To change the voice mail number,select EDIT. Type a new number,then select Save.
Text Message Alerts
This allows the feature to be turnedon or off.
Select Off or On.
Apple CarPlay
Select and the following maydisplay:
. Apple CarPlay
. Manage Apple CarPlay Devices
Apple CarPlay
This feature allows Apple devices tobe connected to the infotainmentsystem through a USB port.
Select Off or On.
Manage Apple CarPlay Devices
Select to manage Apple devices.Apple CarPlay must be on for thisfeature to be accessed.
Android Auto
Select and the following maydisplay:
. Android Auto
. Manage Android Auto Devices
Android Auto
This feature allows Android devicesto be connected to the infotainmentsystem through a USB port.
Select Off or On.
Manage Android Auto Devices
Select to manage Android devices.Android Auto must be on for thisfeature to be accessed.
USB Auto Launch
This allows Android and AppleCarPlay devices to automaticallyconnect when plugged into theUSB port.
Select Off or On.

Chevrolet Silverado 4500HD/5500HD/6500HD Owner Manual (GMNA-Localizing-U.S.-12102101) - 2019 - crc - 10/2/18
130 Instruments and Controls
Turn Display Off
Touch to turn the display off. Touchanywhere on the screen or anyradio button to turn the screenback on.
Voice
Select and the following maydisplay:
. Confidence Threshold
. Prompt Length
. Audio Feedback Speed
. Display “What Can I Say?” Tips
Confidence Threshold
This feature allows the adjustmentof the sensitivity of the speechrecognition system.
Select Confirm More orConfirm Less.
Prompt Length
This feature adjusts the voiceprompt length.
Select Short or Long.
Audio Feedback Speed
This feature adjusts the audiofeedback speed.
Select Slow, Medium, or Fast.
Display “What Can I Say?” Tips
This feature gives voicecommand tips.
Select Off or On.
Display
Select and the following maydisplay:
. Calibrate Touchscreen
. Turn Display Off
Calibrate Touchscreen
Select to calibrate the touchscreen,then follow the prompts.
Turn Display Off
Select to turn the display off. Touchanywhere on the infotainmentdisplay or press any infotainmentcontrol on the center stack to turnthe display on.
Return to Factory Settings
Select and the following maydisplay:
. Restore Vehicle Settings
. Clear All Private Data
. Restore Radio Settings
Restore Vehicle Settings
This allows vehicle settings to berestored.
Select Restore or Cancel.
Clear All Private Data
This allows all private information tobe cleared from the vehicle.
Select Delete or Cancel.
Restore Radio Settings
This allows radio settings to berestored.
Select Restore or Cancel.
Software Information
Select to view or update theinfotainment system currentsoftware information.

Chevrolet Silverado 4500HD/5500HD/6500HD Owner Manual (GMNA-Localizing-U.S.-12102101) - 2019 - crc - 10/2/18
Instruments and Controls 131
Wi-Fi
Select and the following maydisplay:
. Wi-Fi
. Manage Wi-Fi Networks
Wi-Fi
This feature allows Wi-Fi networksto be turned off or on.
Select Off or On.
Manage Wi-Fi Networks
Select to manage Wi-Fi networks.Wi-Fi must be on for this feature tobe accessed.
Power Take-Off (PTO) (IfEquipped)
There may be additional featuresthat can be customized for the PTO.See Power Take-Off (PTO) 0 270.See your dealer to enable thesefeatures.
Select and the following maydisplay:
. Standby Speed
. Set 1 Speed
. Set 2 Speed
. Tap Step Speed
. Shutdown Time
PTO STANDBY SPEED
This feature allows for modifying thePTO Standby Speed.
PTO SET 1 SPEED
This feature is available if thevehicle is configured for StationaryPreset PTO, and allows theselection of the PTO set 1 speed.
PTO SET 2 SPEED
This feature is available if thevehicle is configured for StationaryPreset PTO, and allows theselection of the PTO set 2 speed.
PTO TAP STEP SPEED
This feature is available if thevehicle is configured for StationaryVariable or Mobile PTO, and allowsthe selection of the PTO tap stepspeed.
PTO SHUTDOWN TIME
This feature is available if thevehicle is configured for StationaryPreset or Stationary Variable PTO,and allows the selection of the PTOshutdown time.

Chevrolet Silverado 4500HD/5500HD/6500HD Owner Manual (GMNA-Localizing-U.S.-12102101) - 2019 - crc - 10/2/18
132 Lighting
Lighting
Exterior LightingExterior Lamp Controls . . . . . . . 132Exterior Lamps OffReminder . . . . . . . . . . . . . . . . . . . 133
Headlamp High/Low-BeamChanger . . . . . . . . . . . . . . . . . . . . 133
Flash-to-Pass . . . . . . . . . . . . . . . . 133Daytime RunningLamps (DRL) . . . . . . . . . . . . . . . 134
Automatic HeadlampSystem . . . . . . . . . . . . . . . . . . . . . . 134
Hazard Warning Flashers . . . . . 135Turn and Lane-ChangeSignals . . . . . . . . . . . . . . . . . . . . . . 135
Fog Lamps . . . . . . . . . . . . . . . . . . . 136AuxiliaryRoof-Mounted Lamp . . . . . . . . 136
Exterior Cargo Lamps . . . . . . . . 137
Interior LightingInstrument Panel IlluminationControl . . . . . . . . . . . . . . . . . . . . . . 137
Dome Lamps . . . . . . . . . . . . . . . . . 138Reading Lamps . . . . . . . . . . . . . . 138
Lighting FeaturesEntry Lighting . . . . . . . . . . . . . . . . 139Exit Lighting . . . . . . . . . . . . . . . . . . 139Battery Load Management . . . 139Battery Power Protection . . . . . 140Exterior Lighting BatterySaver . . . . . . . . . . . . . . . . . . . . . . . 140
Exterior Lighting
Exterior Lamp Controls
The exterior lamp control is on theinstrument panel to the left of thesteering wheel.
O : Turns off the automaticheadlamps and Daytime RunningLamps (DRL). Turn the headlampcontrol to O again to turn theautomatic headlamps or DRLback on.
For vehicles first sold in Canada, offwill only work when the vehicle is inP (Park).
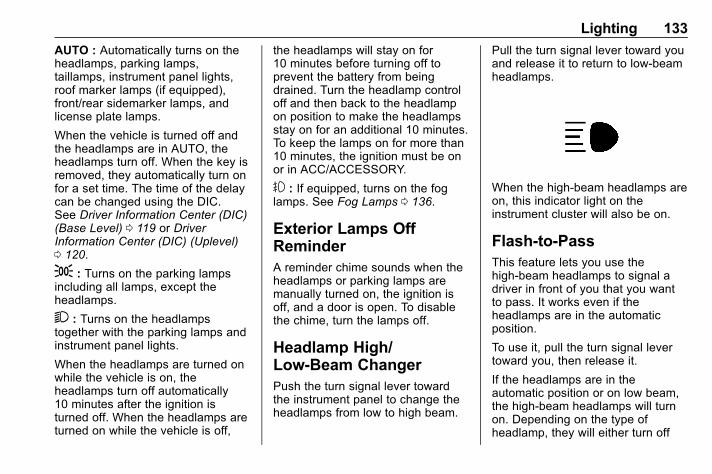
Chevrolet Silverado 4500HD/5500HD/6500HD Owner Manual (GMNA-Localizing-U.S.-12102101) - 2019 - crc - 10/2/18
Lighting 133
AUTO : Automatically turns on theheadlamps, parking lamps,taillamps, instrument panel lights,roof marker lamps (if equipped),front/rear sidemarker lamps, andlicense plate lamps.
When the vehicle is turned off andthe headlamps are in AUTO, theheadlamps turn off. When the key isremoved, they automatically turn onfor a set time. The time of the delaycan be changed using the DIC.See Driver Information Center (DIC)(Base Level) 0 119 or DriverInformation Center (DIC) (Uplevel)0 120.
; : Turns on the parking lampsincluding all lamps, except theheadlamps.
2 : Turns on the headlampstogether with the parking lamps andinstrument panel lights.
When the headlamps are turned onwhile the vehicle is on, theheadlamps turn off automatically10 minutes after the ignition isturned off. When the headlamps areturned on while the vehicle is off,
the headlamps will stay on for10 minutes before turning off toprevent the battery from beingdrained. Turn the headlamp controloff and then back to the headlampon position to make the headlampsstay on for an additional 10 minutes.To keep the lamps on for more than10 minutes, the ignition must be onor in ACC/ACCESSORY.
# : If equipped, turns on the foglamps. See Fog Lamps 0 136.
Exterior Lamps OffReminderA reminder chime sounds when theheadlamps or parking lamps aremanually turned on, the ignition isoff, and a door is open. To disablethe chime, turn the lamps off.
Headlamp High/Low-Beam ChangerPush the turn signal lever towardthe instrument panel to change theheadlamps from low to high beam.
Pull the turn signal lever toward youand release it to return to low-beamheadlamps.
When the high-beam headlamps areon, this indicator light on theinstrument cluster will also be on.
Flash-to-PassThis feature lets you use thehigh-beam headlamps to signal adriver in front of you that you wantto pass. It works even if theheadlamps are in the automaticposition.
To use it, pull the turn signal levertoward you, then release it.
If the headlamps are in theautomatic position or on low beam,the high-beam headlamps will turnon. Depending on the type ofheadlamp, they will either turn off

Chevrolet Silverado 4500HD/5500HD/6500HD Owner Manual (GMNA-Localizing-U.S.-12102101) - 2019 - crc - 10/2/18
134 Lighting
after a short duration or stay on aslong as you hold the lever towardyou. The high-beam indicator on theinstrument cluster will come on.Release the lever to return tonormal operation.
Daytime RunningLamps (DRL)DRL can make it easier for others tosee the front of the vehicle duringthe day. Fully functional DRL arerequired on all vehicles first sold inCanada.
The DRL system comes on whenthe following conditions are met:
. The ignition is on.
. The exterior lamp control isin AUTO.
. The transmission is not inP (Park).
. The light sensor determines it isdaytime.
When the DRL system is on, onlythe DRL are on. The taillamps,sidemarker lamps, instrument panellights, and other lamps will notbe on.
When it begins to get dark, theautomatic headlamp systemswitches from DRL to theheadlamps.
To turn off the DRL, turn the exteriorlamp control to O and then release.For vehicles first sold in Canada, offwill only work when the vehicle isparked.
Automatic HeadlampSystemWhen the exterior lamp control isset to AUTO and it is dark enoughoutside, the headlamps come onautomatically.
There is a light sensor on top of theinstrument panel. Do not cover thesensor, otherwise the headlampswill come on when they are notneeded.
The system may also turn on theheadlamps when driving through aparking garage or tunnel.
If the vehicle is started in a darkgarage, the automatic headlampsystem comes on immediately. If itis light outside when the vehicleleaves the garage, there is a slightdelay before the automaticheadlamp system changes to theDRL. During that delay, theinstrument cluster may not be asbright as usual. Make sure theinstrument panel brightness control

Chevrolet Silverado 4500HD/5500HD/6500HD Owner Manual (GMNA-Localizing-U.S.-12102101) - 2019 - crc - 10/2/18
Lighting 135
is in the full bright position. SeeInstrument Panel IlluminationControl 0 137.
When it is bright enough outside,the headlamps will turn off or maychange to Daytime RunningLamps (DRL).
The automatic headlamp systemturns off when the exterior lampcontrol is turned to O or the ignitionis off.
Lights On with Wipers
If the windshield wipers areactivated in daylight with the engineon, and the exterior lamp control isin AUTO, the headlamps, parkinglamps, and other exterior lampscome on. The transition time for thelamps coming on varies based onwiper speed. When the wipers arenot operating, these lamps turn off.Move the exterior lamp control to Oor; to disable this feature.
Hazard Warning Flashers
| : Press this button to make thefront and rear turn signal lampsflash on and off. Press again to turnthe flashers off.
When the hazard warning flashersare on, the vehicle's turn signals willnot work.
Turn and Lane-ChangeSignals
An arrow on the instrument clusterflashes in the direction of the turn orlane change.
Move the turn signal lever all theway up or down to signal a turn.
Raise or lower the lever for lessthan one second until the arrowstarts to flash to signal a lanechange. This causes the turnsignals to automatically flash threetimes. It will flash six times if Tow/Haul Mode is active. Holding theturn signal lever for more thanone second will cause the turnsignals to flash until the lever isreleased.

Chevrolet Silverado 4500HD/5500HD/6500HD Owner Manual (GMNA-Localizing-U.S.-12102101) - 2019 - crc - 10/2/18
136 Lighting
The lever returns to its startingposition whenever it is released.
If after signaling a turn or a lanechange the arrows flash rapidly ordo not come on, a signal bulb couldbe burned out. If equipped with LEDturn signals, see your dealer.
Replace any burned out bulbs. If abulb is not burned out, check thefuse. See Fuses and CircuitBreakers 0 320.
Turn Signal On Chime
If the turn signal is left on for morethan 1.2 km (0.75 mi), a chimesounds at each flash of the turnsignal. The message TURNSIGNAL ON will also appear in theDriver Information Center (DIC). Toturn the chime and message off,move the turn signal lever to the offposition.
Fog Lamps
If equipped, the control is on thecenter of the exterior lamp control,to the left of the steering column.
The ignition must be on for the foglamps to come on.
# : Press to turn the fog lamps onor off. A light will come on in theinstrument cluster.
When the fog lamps are turned on,the parking lamps automaticallyturn on.
When the headlamps are changedto high beam, the fog lamps go off.When the high-beam headlamps areturned off, the fog lamps will comeon again.
Some localities have laws thatrequire the headlamps to be on withthe fog lamps.
AuxiliaryRoof-Mounted LampIf equipped, this button includeswiring provisions for a dealer or aqualified service center to install anauxiliary roof lamp.
This button is on the overheadconsole.
When the wiring is connected to anauxiliary roof-mounted lamp,pressing the bottom of the buttonwill activate the lamp and illuminatean indicator light at the bottom of

Chevrolet Silverado 4500HD/5500HD/6500HD Owner Manual (GMNA-Localizing-U.S.-12102101) - 2019 - crc - 10/2/18
Lighting 137
this button. Pressing the top of thebutton will turn off the roof-mountedlamp and indicator.
The emergency roof lamp circuit isfused at 30 amps, so the totalcurrent draw of the attached lampsshould be less than this value. Theattachment points for the roof lampcircuits are two blunt cut wiresabove the overhead console: a darkgreen with blue stripe switchedpower wire and a black ground wire.
For information on roof-mountedemergency lamp installation, seewww.gmupfitter.com or contact yourdealer.
If the vehicle has this button, thevehicle may have the snow plowprep package. See Add-OnElectrical Equipment 0 266.
Exterior Cargo Lamps
The cargo lamp provides more lightin the cargo area or on the sides ofthe vehicle, if needed. The lights onthe outside mirrors also turn on,if equipped.
Press the switch to turn the cargolamp on or off. An indicator light willturn on when the lamp is turned on.The shift lever must be in P (Park)to operate the cargo lamp. Thelights on the outside rearviewmirrors turn on if the shift lever is inR (Reverse), N (Neutral),or P (Park).
Interior Lighting
Instrument PanelIllumination Control
This feature controls the brightnessof the steering wheel and instrumentpanel lights. The instrument panelillumination control is next to theexterior lamp control.
D : Move the thumbwheel up ordown to brighten or dim the lights.

Chevrolet Silverado 4500HD/5500HD/6500HD Owner Manual (GMNA-Localizing-U.S.-12102101) - 2019 - crc - 10/2/18
138 Lighting
Dome Lamps
There are dome lamps in theoverhead console and the headliner,if equipped.
To change the dome lamp settings,press the following:
OFF : Turns the lamps off, evenwhen a door is open.
DOOR : The lamps come onautomatically when a door isopened.
ON : Turns all dome lamps on.
Reading Lamps
There are reading lamps in theoverhead console and the headliner,if equipped. To operate, the ignitionmust be on or in ACC/ACCESSORY, or using RetainedAccessory Power (RAP).
Pressm orn next to each readinglamp to turn it on or off.

Chevrolet Silverado 4500HD/5500HD/6500HD Owner Manual (GMNA-Localizing-U.S.-12102101) - 2019 - crc - 10/2/18
Lighting 139
Lighting Features
Entry LightingSome exterior lamps and the interiorlamps turn on briefly at night, or inareas with limited lighting, when Kis pressed on the Remote KeylessEntry (RKE) transmitter. When adoor is opened, the interior lampscome on if the dome lamp control isin the DOOR position. After about30 seconds the exterior lamps turnoff. Entry lighting can be disabledmanually by changing the ignitionout of the OFF position, or bypressing the RKE transmitter Qbutton.
This feature can be changed. See“Vehicle Locator Lights” underVehicle Personalization 0 124.
Exit LightingSome exterior lamps and the interiorlamps come on at night, or in areaswith limited lighting when the key isremoved from the ignition. Theexterior and interior lamps remain
on for a set amount of time and thenautomatically turn off. The interiorlamps do not come on if the domelamp control is in the Off position.
The exterior lamps turn offimmediately by turning the exteriorlamps control off.
This feature can be changed. SeeVehicle Personalization 0 124.
Battery LoadManagementThe vehicle has Electric PowerManagement (EPM), whichestimates the battery's temperatureand state of charge. It then adjuststhe voltage for best performanceand extended life of the battery.
When the battery's state of chargeis low, the voltage is raised slightlyto quickly bring the charge back up.When the state of charge is high,the voltage is lowered slightly toprevent overcharging. The voltmetergauge or the voltage display on theDriver Information Center (DIC),if equipped, may show the voltage
moving up or down. This is normal.If there is a problem, an alert will bedisplayed.
The battery can be discharged atidle if the electrical loads are veryhigh. This is true for all vehicles.This is because the generator(alternator) may not be spinning fastenough at idle to produce all thepower that is needed for very highelectrical loads.
A high electrical load occurs whenseveral of the following are on, suchas: headlamps, high beams, foglamps, rear window defogger,climate control fan at high speed,heated seats, engine cooling fans,trailer loads, and loads plugged intoaccessory power outlets.
EPM works to prevent excessivedischarge of the battery. It does thisby balancing the generator's outputand the vehicle's electrical needs.It can increase engine idle speed togenerate more power, wheneverneeded. It can temporarily reducethe power demands of someaccessories.

Chevrolet Silverado 4500HD/5500HD/6500HD Owner Manual (GMNA-Localizing-U.S.-12102101) - 2019 - crc - 10/2/18
140 Lighting
Normally, these actions occur insteps or levels, without beingnoticeable. In rare cases at thehighest levels of corrective action,this action may be noticeable to thedriver. If so, a DIC message mightbe displayed and it is recommendedthat the driver reduce the electricalloads as much as possible.
Battery Power ProtectionThis feature shuts off the dome andreading lamps, if they are left on formore than 10 minutes after theignition is turned off. The cargolamp shuts off after 20 minutes. Thisprevents the battery fromrunning down.
Exterior Lighting BatterySaverThe exterior lamps turn off about10 minutes after the ignition isturned off, if the parking lamps orheadlamps have been manually lefton. This protects against drainingthe battery. To restart the 10-minute
timer, turn the exterior lamp controlto the O position and then back to
the; or2 position.
To keep the lamps on for more than10 minutes, the ignition must be onor in ACC/ACCESSORY.

Chevrolet Silverado 4500HD/5500HD/6500HD Owner Manual (GMNA-Localizing-U.S.-12102101) - 2019 - crc - 10/2/18
Infotainment System 141
InfotainmentSystem
IntroductionInfotainment . . . . . . . . . . . . . . . . . . 141Theft-Deterrent Feature . . . . . . 142Overview (Base Radio) . . . . . . . 142Overview (Base Radio withTouchscreen) . . . . . . . . . . . . . . . 146
Home Page (Base Radio) . . . . 147Home Page (Base Radio withTouchscreen) . . . . . . . . . . . . . . . 149
Software Updates . . . . . . . . . . . . 150
RadioAM-FM Radio (BaseRadio) . . . . . . . . . . . . . . . . . . . . . . 150
AM-FM Radio (Base Radiowith Touchscreen) . . . . . . . . . . . 152
Satellite Radio (BaseRadio) . . . . . . . . . . . . . . . . . . . . . . 154
Satellite Radio (Base Radiowith Touchscreen) . . . . . . . . . . . 154
Radio Reception . . . . . . . . . . . . . . 156Fixed Mast Antenna . . . . . . . . . . 156Multi-Band Antenna . . . . . . . . . . 156
Audio PlayersAvoiding Untrusted MediaDevices . . . . . . . . . . . . . . . . . . . . . 157
CD Player . . . . . . . . . . . . . . . . . . . . 157USB Port . . . . . . . . . . . . . . . . . . . . . 160Auxiliary Jack . . . . . . . . . . . . . . . . 165Bluetooth Audio . . . . . . . . . . . . . . 166
Voice RecognitionVoice Recognition . . . . . . . . . . . . 167
PhoneBluetooth (Overview) . . . . . . . . . 174Bluetooth (InfotainmentControls) . . . . . . . . . . . . . . . . . . . . 175
Apple CarPlay andAndroid Auto . . . . . . . . . . . . . . . . 180
Trademarks and LicenseAgreementsTrademarks and LicenseAgreements . . . . . . . . . . . . . . . . . 181
Introduction
InfotainmentBase radio information is included inthis manual. See the infotainmentmanual for information on otheravailable infotainment systems.
Read the following pages tobecome familiar with the features.
{ Warning
Taking your eyes off the road fortoo long or too often while usingany infotainment feature cancause a crash. You or otherscould be injured or killed. Do notgive extended attention toinfotainment tasks while driving.Limit your glances at the vehicledisplays and focus your attentionon driving. Use voice commandswhenever possible.
The infotainment system has built-infeatures intended to help avoiddistraction by disabling some

Chevrolet Silverado 4500HD/5500HD/6500HD Owner Manual (GMNA-Localizing-U.S.-12102101) - 2019 - crc - 10/2/18
142 Infotainment System
functions when driving. Thesefunctions may gray out when theyare unavailable. Many infotainmentfeatures are also available throughthe instrument cluster and steeringwheel controls.
Before driving:
. Become familiar with theoperation, center stack controls,and infotainment displaycontrols.
. Set up the audio by presettingfavorite stations, setting thetone, and adjusting thespeakers.
. Set up phone numbers inadvance so they can be calledeasily by pressing a singlecontrol or by using a single voicecommand if equipped withBluetooth phone capability.
See Distracted Driving 0 193.
To play the infotainment system withthe ignition off, see RetainedAccessory Power (RAP) 0 214.
Active Noise Cancellation (ANC)
If equipped, ANC reduces enginenoise in the vehicle’s interior. ANCrequires the factory-installed audiosystem, radio, speakers, amplifier (ifequipped), induction system, andexhaust system to work properly.Deactivation is required by yourdealer if related aftermarketequipment is installed.
Theft-Deterrent FeatureTheftLock is designed to discouragetheft of the vehicle's radio bylearning a portion of the VehicleIdentification Number (VIN). Theradio does not operate if it is stolenor moved to a different vehicle.
Overview (Base Radio)
Infotainment System Overview
The infotainment system iscontrolled by using the buttons onthe center stack and steering wheelcontrols, if equipped. See SteeringWheel Controls 0 96.

Chevrolet Silverado 4500HD/5500HD/6500HD Owner Manual (GMNA-Localizing-U.S.-12102101) - 2019 - crc - 10/2/18
Infotainment System 143
Radio with CD

Chevrolet Silverado 4500HD/5500HD/6500HD Owner Manual (GMNA-Localizing-U.S.-12102101) - 2019 - crc - 10/2/18
144 Infotainment System
Radio with TONE
1. q. Press to scroll down
through the favorite pagesfor each source.
2. Favorites/Soft Keys
. Press to select favoritestations.
. Press and hold to savefavorite stations.
. Press to select a screenbutton when displayed.
3. r. Press to scroll up through
the favorite pages for eachsource.
4. MENU
. Press to access the menufor the current audiosource.
. Press to select thehighlighted menu option.
. Turn to scroll through a list.
. Turn to manually select astation.
5. CD Slot (If Equipped)
6. o BACK
. Press to return to theprevious screen in a menu.
7. {. Press to go to the Home
Page from any point in thesystem.See Home Page (BaseRadio with Touchscreen)0 149 or Home Page (BaseRadio) 0 147.
8. X (If Equipped) or TONE (IfEquipped)
. PressX to eject the CD (ifequipped).
. Press TONE to open theTone Settings menu (ifequipped).
9. g orl. CD (If Equipped): Pressg to seek the beginning ofthe current or previoustrack. If the track hasplayed for less than

Chevrolet Silverado 4500HD/5500HD/6500HD Owner Manual (GMNA-Localizing-U.S.-12102101) - 2019 - crc - 10/2/18
Infotainment System 145
five seconds, it seeks theprevious track. If longerthan five seconds, thecurrent track will start fromthe beginning. Pressl toseek the next track.
. AM, FM, or SiriusXM (IfEquipped): Pressg orlto seek to the previous ornext strong station.
. CD (If Equipped): Pressand holdg to quicklyreverse through a track.Release the button to returnto playing speed. Press andholdl to fast forwardthrough a track. Releasethe button to return toplaying speed.
10. RADIO
. Press to change the audiosource between AM, FM,or SiriusXM, if equipped.
11. MEDIA
. Press to change the audiosource between CD, USB,AUX, and Bluetooth Audio,if equipped.
12. O. Press to turn the audio on.
. Press and hold to turn it off.
. When on, press to mute thesystem. Press again tounmute.
. Turn to increase ordecrease the volume.

Chevrolet Silverado 4500HD/5500HD/6500HD Owner Manual (GMNA-Localizing-U.S.-12102101) - 2019 - crc - 10/2/18
146 Infotainment System
Overview (Base Radio with Touchscreen) 1. {. Press to go to the Home
Page.See Home Page (BaseRadio with Touchscreen)0 149 or Home Page (BaseRadio) 0 147.
2. 7. Radio: Press and release to
go to the previous station orchannel. Press and hold tofast seek the next strongestprevious station or channel.
. USB/Bluetooth Music/Pictures: Press and hold togo to the previous content.Press and hold to fastrewind.
3. O. Press to turn the power on.
. Press and hold to turn thepower off.
. Press to mute the systemwhen on.

Chevrolet Silverado 4500HD/5500HD/6500HD Owner Manual (GMNA-Localizing-U.S.-12102101) - 2019 - crc - 10/2/18
Infotainment System 147. Turn to decrease or
increase the volume.
4. 6. Radio: Press and release to
go to the next station orchannel. Press and hold tofast seek the next strongeststation or channel.
. USB/Bluetooth Music/Pictures: Press and hold togo to the next content.Press and hold to fastforward.
5. #. Press and release to
access the phone screen,answer an incoming call,or access the device homescreen. Press and hold toaccess Press to Talk.
Home Page (Base Radio)
Home Page Features
The infotainment system displays aHome Page that makes it easy toaccess all of the applications. Turn
the MENU knob to highlight featureicons. Press the MENU knob toaccess the feature’s options.
Various functions are disabled whenthe vehicle is moving.
AUDIO : Select AUDIO to displaythe active source page. The sourcesavailable are AM, FM, SiriusXM (ifequipped), USB/iPod, AUX Input,and Bluetooth Audio (if equipped).See AM-FM Radio (Base Radio withTouchscreen) 0 152 or AM-FMRadio (Base Radio) 0 150, SatelliteRadio (Base Radio withTouchscreen) 0 154 or SatelliteRadio (Base Radio) 0 154, AuxiliaryJack 0 165, and Bluetooth Audio0 166.
PHONE : Select PHONE to displaythe Phone main page.See Bluetooth (Overview) 0 174 orBluetooth (Infotainment Controls)0 175.
NAV (Navigation, If Equipped) :Select NAV to display the OnStarTurn-by-Turn Navigation. SeeOnStar Overview 0 428, if equipped.
SETTINGS : Select SETTINGS todisplay the Settings main page. See“Setting Radio Preferences”following.
Setting Radio Preferences
Select the SETTINGS screen iconto display the Settings menu andthe following may display:
Time and Date : See Clock 0 98.
Language (Current Language) :This will set the display language inthe radio and instrument cluster.Select to display a list of languages.Select o BACK to go back to theprevious menu.
Valet Mode:
Using the circular numeric keypad,enter a four-digit code:
1. Turn the MENU knob tohighlight a number.
2. Press the MENU knob to selectit. Do this for each one of thefour digits. Select Enter to go tothe confirmation screen.

Chevrolet Silverado 4500HD/5500HD/6500HD Owner Manual (GMNA-Localizing-U.S.-12102101) - 2019 - crc - 10/2/18
148 Infotainment System
3. Re-enter the four-digit code.Select LOCK to lock thesystem.
4. Enter the four-digit code tounlock the system. Select oBACK to go back to theprevious menu.
Radio : See “Radio Setup” later inthis section.
Vehicle : See VehiclePersonalization 0 124.
Display : Press the MENU knob toturn the display on or off.
Return to Factory Settings : See“Return to Factory Settings” later inthis section.
Software Information (IfEquipped) : Press the MENU knobto select Save Vehicle Info to USB.Press the MENU knob again to startdownloading the vehicle informationto the USB.
Radio Setup
Press the RADIO button and thefollowing may display:
Manage Favorites:
. Turn the MENU knob and pressto select a favorite.
. To delete a favorite, pressthe button just below theDELETE screen button.
. To move a favorite, selectMOVE. Turn the MENU knobto select a new location, thenselect DROP to select thenew location.
. Select o BACK to go back tothe previous menu.
Number of Favorites Shown :Select Auto and the system willautomatically adjust the number offavorite pages when favorites areadded and removed, or select anumber from 5–25 to manuallyadjust the number of favoritesshown.
Audible Touch Feedback (IfEquipped) : Select Audible TouchFeedback to turn feedback off or on.
Auto Volume (If Equipped) : Thisfeature adjusts the volume based onvehicle speed. The options are Off,Low, Medium-Low, Medium,Medium-High, or High. Select thedesired volume.
Maximum Startup Volume : Thisfeature sets the maximum startupvolume. If the vehicle is started andthe volume is greater than this level,the volume is adjusted to this level.To set the maximum startup volume,Turn the MENU knob to increase ordecrease startup volume.
Return to Factory Settings
Select Return to Factory Settingsand the following may display:
Restore Vehicle Settings : Thisoption will restore factory vehiclepersonalization settings. SelectRestore Vehicle Settings. A screendisplays stating all vehiclecustomization settings will berestored to the factory settings.Select Cancel or Confirm.

Chevrolet Silverado 4500HD/5500HD/6500HD Owner Manual (GMNA-Localizing-U.S.-12102101) - 2019 - crc - 10/2/18
Infotainment System 149
Clear All Private Data (IfEquipped) : This option clears allprivate information from the vehicle.Select Clear All Private Data. SelectCancel or Confirm.
Restore Radio Settings : Thisoption will restore factory radiosettings. Select Restore RadioSettings. A screen displays statingall personalized radio settings willbe restored back to the factorysettings. Select Cancel or Confirm.
English and Metric UnitConversion
To change the display units betweenEnglish and metric units, see DriverInformation Center (DIC) (BaseLevel) 0 119 or Driver InformationCenter (DIC) (Uplevel) 0 120 orInstrument Cluster 0 105.
Home Page (Base Radiowith Touchscreen)
Touchscreen Buttons
Touchscreen buttons show on thescreen when available. When afunction is unavailable, the buttonmay gray out. When a function isselected, the button may highlight.
Home Page Features
Press { to go to the Home Page.
Audio : Touch to select AM, FM,SiriusXM (if equipped), USB/iPod/Bluetooth Audio, or AUX.
Gallery : Touch to view a picture ormovie.
Phone : Touch to activate thephone features (if equipped).See Bluetooth (Overview) 0 174 orBluetooth (Infotainment Controls)0 175.
Projection : Touch to access USBsupported devices when connected.See USB Port 0 160.
Settings : Touch to access thePersonalization menu. See VehiclePersonalization 0 124.
Climate : Touch to access theClimate menu.See Climate Control Systems (withHeater Only) 0 186 or ClimateControl Systems (with AirConditioning) 0 188.
OnStar : If equipped, touch toaccess the OnStar menu. SeeOnStar Overview 0 428.

Chevrolet Silverado 4500HD/5500HD/6500HD Owner Manual (GMNA-Localizing-U.S.-12102101) - 2019 - crc - 10/2/18
150 Infotainment System
Software Updates
Over-the-Air Software Updates
If equipped, the infotainment systemcan download and install selectsoftware updates over a wirelessconnection. The system will promptfor certain updates to bedownloaded and installed. There isalso an option to check for updatesmanually.
To manually check for updates,touch SETTINGS on the HomePage, followed by SoftwareInformation, and then SystemUpdate. Follow the on-screenprompts. The steps to check for,download and install updates mayvary by vehicle.
Downloading Over-the-Air vehiclesoftware updates requires Internetconnectivity, which can be accessedthrough the vehicle’s built-in OnStar4G LTE connection, if equipped andactive. If required, data plans areprovided by a third party. Optionally,a secure Wi-Fi hotspot such as acompatible mobile device hotspot,
home hotspot, or public hotspot canbe used. Applicable data rates mayapply.
To connect the infotainment systemto a secured mobile device hotspot,home hotspot, or public hotspot,touch SETTINGS on the HomePage, followed by Wi-Fi, and thenManage Wi-Fi Networks. Select theappropriate Wi-Fi network, andfollow the on-screen prompts.Download speeds may vary.
On most compatible mobile devices,activation of the Wi-Fi hotspot is inthe Settings menu under MobileNetwork Sharing, Personal Hotspot,Mobile Hotspot, or similar.
Availability of Over-the-Air vehiclesoftware updates varies by vehicleand country. For more informationon this feature, seemy.chevrolet.com/learn.
Radio
AM-FM Radio (BaseRadio)
Playing the Radio
While on the audio main page,press the RADIO button repeatedlyto cycle through the availablesources AM, FM, and SiriusXM (ifequipped) or press the MEDIAbutton repeatedly to cycle throughthe available sources BluetoothAudio (if equipped), USB, and AUX.
The steering wheel controls canalso be used to adjust the volume.See Steering Wheel Controls 0 96.
AM, FM, or SiriusXM (If Equipped)
To select AM, FM, or SiriusXM (ifequipped), press the RADIO buttonto toggle to the desired broadcastsource.
Press the MENU knob and thefollowing radio settings may display:

Chevrolet Silverado 4500HD/5500HD/6500HD Owner Manual (GMNA-Localizing-U.S.-12102101) - 2019 - crc - 10/2/18
Infotainment System 151
Tone Settings:
. Bass, Midrange, and Treble:Turn the MENU knob andhighlight. Press the MENU knobto select. Turn the MENU knobto adjust.
. Balance: Turn the MENU knobto highlight. Press the MENUknob to select. Turn the MENUknob left for more sound fromthe left speakers or right formore sound from the rightspeakers. The middle positionbalances the sound between theleft and right speakers.
. Fade: Turn the MENU knob tohighlight. Press the MENU knobto select. Turn the MENU knobto the left for more sound fromthe front speakers and to theright for more sound from therear speakers. The middleposition balances the soundbetween the front and rearspeakers.
. DSP: If equipped with a BoseSurround sound system, it willhave three DSP modes:
‐ Normal: Adjusts the audio toprovide the best sound for allseating positions.
‐ Driver: Adjusts the audio toprovide the best sound for thedriver.
‐ Centerpoint: Creates asurround sound from nearlyany audio source.
. EQ (Equalizer): If equipped witha Bose sound system, turn theMENU knob to highlight. Turnthe MENU knob to scroll throughthe options. Press the MENUknob to select. Press o BACKto go to the previous menu.
Station List : Select to display a listof AM or FM stations. Press oBACK to go to the previous menu.
Auto Volume : If equipped, thisfeature adjusts the volume based onthe vehicle speed. Select the levelbetween Off, Low, Medium-Low,Medium, Medium-High, and High.Press o BACK to go to theprevious menu.
EQ (Equalizer) Settings : In certainconfigurations, the available choicesare Manual and Talk.
Options for SiriusXM Only (IfEquipped)
SXM View : SXM view allows thechannel list to be viewed by channelname, artist playing on channel,or song playing on channel. Turnthe MENU knob to highlight andpress the MENU knob to select.Press o BACK to go to theprevious menu.
Channel List : Select to display alist of SiriusXM channels. Turn theMENU knob to highlight and pressthe MENU knob to select. Press oBACK to go to the previous menu.
Also see the radio settings commonfor all sources earlier in this section.
Finding a Station
Seeking a Station
Pressg orl to search for theprevious or next strongest station.

Chevrolet Silverado 4500HD/5500HD/6500HD Owner Manual (GMNA-Localizing-U.S.-12102101) - 2019 - crc - 10/2/18
152 Infotainment System
Tuning a Station
Turn the MENU knob to manuallyfind a station.
Storing Radio Station Presets
Up to 25 preset stations from allbands can be stored in the favoritelists in any order. Up to five stationscan be stored in each favorite pageand the number of favorites canbe set.
AM, FM, or SiriusXM (IfEquipped) : While on the activesource main page, such as AM, FM,or SiriusXM (if equipped), press andhold a favorites/soft key button onthe center stack.
Mixed-Audio Favorites
Media (if equipped) and Broadcastfavorites can be stored.
To display the favorites page, pressq or r on the center stack.
To manage favorites, see “ManageFavorites” under Home Page (BaseRadio with Touchscreen) 0 149 orHome Page (Base Radio) 0 147.
AM-FM Radio (BaseRadio with Touchscreen)
Playing the Radio
Audio Source Menu
{ : Press to go to the Home Page.
O : Press to turn on, mute,or unmute the system. Press andhold to turn off the system.
Selecting a Band
Press {, then touch AUDIO,Source, then select AM, FM,or SXM, if equipped. The last stationthat was playing starts playingagain.
System Settings
Auto Volume
This feature automatically adjuststhe radio volume to compensate forroad and wind noise.
The level of volume compensationcan be selected, or the feature canbe turned off.
1. Touch MENU from a sourcescreen.
2. Select Auto Volume.
3. Select the desired setting.
4. Touch3 to go back to thesource screen.
Tone Settings
The tone settings can be set foreach radio band and each audioplayer source.
Preset Tone Settings
. Touch MENU.
. Touch Tone Settings.
. Select a preset tone setting.
. Bass, Midrange, or Treble:Touch − or +.
. Fader or Balance: Adjust thefront/rear or left/right speakersby dragging the dot in thevehicle image on the screen.
Custom Tone Settings
. Touch MENU.
. Touch Tone Settings.

Chevrolet Silverado 4500HD/5500HD/6500HD Owner Manual (GMNA-Localizing-U.S.-12102101) - 2019 - crc - 10/2/18
Infotainment System 153. Touch Custom.
. Bass, Midrange, or Treble:Touch − or +.
. Fader or Balance: Adjust thefront/rear or left/right speakersby dragging the dot in thevehicle image on the screen.
Touch3 to go back to the sourcescreen.
Selecting an Auxiliary Device
Connect the auxiliary device to theAUX input terminal. Play will beginwhen the system has finishedreading the information on thedevice.
If the AUX device is alreadyconnected, press {, AUDIO,Source, then select the device.
Selecting a Station
Seek Tuning
If the radio station is not known:
Press7 or6 to automaticallysearch for available radio stations.
Manual Tuning
Continue touchingt oru tomanually change the radio station.
Direct Tune
From the AM or FM menu:
. Touch Tune.
. Enter the station number.
. Touch Go ort oru to go tothe previous or next station.
Favorite
. Touch S or T to scroll throughthe favorites.
. Touch on the station to select it.
Station List
. From the AM or FM menu,touch MENU.
. Select Station List.
. Touch Q or R to scroll throughthe list. Touch the station toselect it.
Update Station List
. From the AM or FM menu, touchMENU, then touch UpdateStation List. The broadcastinglist updating will begin.
. During the AM or FMbroadcasting list update, touchCancel to stop the updates.
Storing a Station as a Favorite
Stations from all bands can bestored in any order in the favoritepages.
Up to 25 stations can be stored.
Storing Stations
To store the station to a position inthe list, touch the correspondingbutton 1−5 until a beep is heard.
1. Select the desired station.
2. Touch S or T to select thedesired page of savedfavorites.

Chevrolet Silverado 4500HD/5500HD/6500HD Owner Manual (GMNA-Localizing-U.S.-12102101) - 2019 - crc - 10/2/18
154 Infotainment System
3. Touch and hold down any ofthe preset buttons to save thecurrent radio station to thatbutton of the selectedfavorites page.
To change a preset button, tune tothe new desired radio station andtouch and hold the preset button.
Satellite Radio (BaseRadio)
SiriusXM Satellite RadioService (If Equipped)
Vehicles with a SiriusXM satelliteradio tuner and a valid SiriusXMsatellite radio subscription canreceive SiriusXM programming.
SiriusXM is a satellite radio servicebased in the 48 contiguous UnitedStates and 10 Canadian provinces.SiriusXM satellite radio has a widevariety of programming andcommercial-free music, coast tocoast, and in digital-quality sound.A service fee is required to receivethe SiriusXM service. Seewww.siriusxm.com or call
1-888-601-6296 (U.S.); or seewww.siriusxm.ca or call1-877-438-9677 (Canada).
When SiriusXM is active, thechannel name and number,category name, song title, and artistdisplay on the screen.
Browsing SiriusXM Channels
To browse the SiriusXM channels:
1. Press the MENU knob.
2. Turn the MENU knob tohighlight SXM Channel List.
3. Turn the MENU knob tohighlight the desired SXMChannels.
Satellite Radio (BaseRadio with Touchscreen)Vehicles with an SXM SatelliteRadio tuner and a valid SiriusXMSatellite Radio subscription canreceive SiriusXM programming.
SiriusXM Satellite RadioService (If Equipped)
SiriusXM is a satellite radio servicebased in the 48 contiguous UnitedStates and 10 Canadian provinces.SiriusXM Satellite Radio has a widevariety of programming andcommercial-free music, coast tocoast, and in digital-quality sound.A service fee is required to receivethe SiriusXM service. For moreinformation, contact SiriusXM atwww.siriusxm.com or1-888-601-6296 (U.S.), andwww.siriusxm.ca or 1-877-438-9677(Canada).
Listening to SiriusXM Radio (IfEquipped)
1. Press {.
2. Touch AUDIO.
3. Touch Source.
4. Touch SXM and the mostrecent listened to SiriusXMchannel will display.

Chevrolet Silverado 4500HD/5500HD/6500HD Owner Manual (GMNA-Localizing-U.S.-12102101) - 2019 - crc - 10/2/18
Infotainment System 155
Selecting a Category
From Menu, touch Categories, thentouch the desired category or fromCategories, touch Q or R to find thedesired channel. Touch the channelto select it.
Selecting a Channel
Touchu ort and the previous ornext channel will be selected.
Touch and holdu ort to jumpfour channels backward or forward,then release the button at thedesired channel.
Using the Preset Buttons
Up to seven favorites pages can besaved, and each page can store upto five channels.
To change a preset button, tune tothe new desired channel and holdthe button.
Listening to Preset Channels
1. Continue touching S or T toselect the desiredfavorites page.
2. Touch the preset button tolisten to the channel saved tothat button.
Using the SiriusXM Menu
Operation
1. Touch MENU on the SXM radioscreen.
2. Touch the menu to select thedesired item or to display thedetail menu item.
3. Touch0 to return to theprevious menu.
Channel List
1. Touch Channel List from theSXM menu. The channel list isdisplayed.
2. Touch Q or R to find thedesired channel. Tune to thechannel by selecting it.
Tone Settings
From the tone settings menu, thesound features can be set up forSiriusXM audio and each audioplayer’s functions.
1. Touch Tone Settings. The tonesettings screen is displayed.See “Tone Settings” in AM-FMRadio (Base Radio withTouchscreen) 0 152 or AM-FMRadio (Base Radio) 0 150.
2. Touch OK.
Auto Volume
1. Touch Auto Volume. See “AutoVolume” in AM-FM Radio(Base Radio with Touchscreen)0 152 or AM-FM Radio (BaseRadio) 0 150.
2. Touch OK.
Categories
1. Touch Categories.
2. Touch Q or R to find thedesired category. Touch thecategory to select it.
Explicit Content Filter
When on, only a filtered list ofchannels will be received. When off,all regular SXM programmingsubscribed to will be received.
1. Touch SXM Explicit Filter.

Chevrolet Silverado 4500HD/5500HD/6500HD Owner Manual (GMNA-Localizing-U.S.-12102101) - 2019 - crc - 10/2/18
156 Infotainment System
2. Select On or Off.
Radio ReceptionFrequency interference and staticcan occur during normal radioreception if items such as phonechargers, vehicle convenienceaccessories, and external electronicdevices are plugged into theaccessory power outlet. If there isinterference or static, unplug theitem from the accessory poweroutlet.
FM
FM signals only reach about 16 to65 km (10 to 40 mi). Although theradio has a built-in electronic circuitthat automatically works to reduceinterference, some static can occur,especially around tall buildings orhills, causing the sound to fade inand out.
AM
The range for most AM stations isgreater than for FM, especially atnight. The longer range can causestation frequencies to interfere with
each other. Static can also occurwhen things like storms and powerlines interfere with radio reception.When this happens, try reducing thetreble on the radio.
SiriusXM Satellite RadioService
If equipped, SiriusXM SatelliteRadio Service provides digital radioreception. Tall buildings or hills caninterfere with satellite radio signals,causing the sound to fade in andout. In addition, traveling or standingunder heavy foliage, bridges,garages, or tunnels may cause lossof the SiriusXM signal for a periodof time.
Cell Phone Usage
Cell phone usage, such as makingor receiving phone calls, charging,or just having the phone on maycause static interference in theradio. Unplug the phone or turn it offif this happens.
Fixed Mast AntennaThe fixed mast antenna will gothrough most car washes as long asit is securely attached. If theantenna becomes slightly bent,straighten it out by hand. If it isbadly bent, replace it.
Occasionally check that the antennais tight at the base. If tightening isrequired, protect the paint fromdamage.
Multi-Band AntennaThe multi-band antenna is on theroof of the vehicle. The antenna isused for OnStar, the SiriusXMSatellite Radio Service System, andGPS (Global Positioning System),if the vehicle has these features.Keep the antenna clear ofobstructions for clear reception.

Chevrolet Silverado 4500HD/5500HD/6500HD Owner Manual (GMNA-Localizing-U.S.-12102101) - 2019 - crc - 10/2/18
Infotainment System 157
If the vehicle has a sunroof, and it isopen, reception can also beaffected.
Items on the roof of the vehicle caninterfere with the performance of theradio system and OnStar (ifequipped). Make sure themulti-band antenna is notobstructed.
Audio Players
Avoiding Untrusted MediaDevicesWhen using media devices such asCDs, DVDs, Blu-ray Discs, SDcards, USB devices, and mobiledevices, consider the source.Untrusted media devices couldcontain files that affect systemoperation or performance. Avoid useif the content or origin cannot betrusted.
CD PlayerIf the vehicle is equipped with a CDplayer, it can be used for CD andMP3 audio.
With the vehicle on, insert a discinto the slot, label side up. Press theMEDIA button to select CD as asource.
The system is capable ofplaying most:
. Audio CDs
. CD-R
. CD-RW
. MP3 or unprotected WMAformats
When playing any compatiblerecordable disc, the sound qualitycan be reduced due to disc quality,the method of recording, the qualityof the music that has beenrecorded, or the way the disc hasbeen handled.
There can be increased skipping,difficulty in finding tracks, and/ordifficulty in loading and ejecting.If these problems occur, check thedisc for damage or try a knowngood disc.
To avoid damage to the CD player:
. Do not use scratched ordamaged discs.
. Do not apply labels to discs. Thelabels could get caught in theplayer.
. Insert only one disc at a time.
. Keep the loading slot free offoreign materials, liquids, anddebris.

Chevrolet Silverado 4500HD/5500HD/6500HD Owner Manual (GMNA-Localizing-U.S.-12102101) - 2019 - crc - 10/2/18
158 Infotainment System. Use a marking pen to label the
top of the disc.
Loading and Ejecting Discs
To load a disc:
1. Turn the vehicle on.
2. Insert a disc into the slot, labelside up. The player pulls it inthe rest of the way. If the discis damaged or improperlyloaded, there is an error andthe disc ejects.
Playing an Audio CD
Press MEDIA until CD is selected.
On the CD main page, either a tracknumber displays at the beginning ofeach track, or Song, Artist, andAlbum information displays whenavailable.
Use the following screen controls toplay the disc:
t: While on the CD main page:
. Touch to seek to the beginningof the current or previous track.If the track has been playing forless than five seconds, it seeks
to the previous track. If longerthan five seconds, the currenttrack starts from the beginning.
. Touch and hold to fast reversethrough a track. Release thebutton to return to playingspeed. Elapsed time displays.
u: While on the CD main page:
. Touch to seek to the next track.
. Touch and hold to fast forwardthrough a track. Release thebutton to return to playingspeed. Elapsed time displays.
j /r: While on the CD main page,touch to pause. Touch again toresume.
Z: TouchZ to play the songs inrandom order. Touch again toturn off.
If a Blu-ray Disc or DVD disc isloaded into the disc player and theCD screen button is selected, amessage comes on the screen touse the Video application. TheVideo application is only availableon vehicles with Rear SeatEntertainment (RSE).
CD Menu
While on the CD main page, pressthe MENU knob to display the CDmenu and the following may display:
Browse : Select to display the filesor songs on the CD.
Tone Settings : Select to adjustBass, Midrange, Treble, Balance,Fade, and EQ (Equalizer). See“Tone Settings” under AM-FM Radio(Base Radio with Touchscreen)0 152 or AM-FM Radio (BaseRadio) 0 150.
Auto Volume : If equipped, thisfeature adjusts the volume based onthe vehicle speed. Select the levelbetween Off, Low, Medium-Low,Medium, Medium-High, and High.Press BACK to go to theprevious menu.
DSP : If equipped, this featureadjusts the pre-defined settings.See “DSP” in AM-FM Radio (BaseRadio with Touchscreen) 0 152 orAM-FM Radio (Base Radio) 0 150.

Chevrolet Silverado 4500HD/5500HD/6500HD Owner Manual (GMNA-Localizing-U.S.-12102101) - 2019 - crc - 10/2/18
Infotainment System 159
EQ (Equalizer) : If equipped, thisfeature adjusts the equalizersettings. See “EQ (Equalizer)” inAM-FM Radio (Base Radio withTouchscreen) 0 152 or AM-FMRadio (Base Radio) 0 150.
Error Messages
If Disc Error displays and/or the disccomes out, it could be for one of thefollowing reasons:
. The disc has an invalid orunknown format.
. The disc is very hot. Try the discagain when the temperaturereturns to normal.
. The road is very rough. Try thedisc again when the road issmoother.
. The disc is dirty, scratched, wet,or upside down.
. The air is very humid. Try thedisc again later.
. There was a problem whileburning the disc.
. The label is caught in the CDplayer.
If Disc Player Error displays, it couldbe for one of the following reasons:
. The player temperature istoo high.
. There are load or eject errors.
If the CD is not playing correctly forany other reason, try a knowngood CD.
If any error continues, contact yourdealer.
Playing an MP3 CD
To play an MP3 CD, follow the sameinstructions as “Playing anAudio CD.”
The following guidelines must bemet when creating an MP3 disc,otherwise the CD might not play:
. Sampling rate: 16 kHz,22.05 kHz, 24 kHz, 32 kHz,44.1 kHz, and 48 kHz
. Bit rates supported: 8, 16, 24,32, 40, 48, 56, 64, 80, 96, 112,128, 144, 160, 192, 224, 256,and 320 kbps
. Maximum number of folders:eight folders with 255 files perfolder
. Maximum of 1,000 files on a disc
. Recorded on a CD-R or CD-RW
Root Directory
The root directory is treated as afolder. All files contained directlyunder the root directory areaccessed prior to any root directoryfolders.
Empty Folders
If a root directory or folder is emptyor contains only folders, the playeradvances to the next folder in thefile structure that contains acompressed audio file. The emptyfolder(s) are not displayed ornumbered.
No Folder
When the CD only containscompressed audio files without anyfolders, all files are under the rootfolder.

Chevrolet Silverado 4500HD/5500HD/6500HD Owner Manual (GMNA-Localizing-U.S.-12102101) - 2019 - crc - 10/2/18
160 Infotainment System
USB Port
Using the USB Port
The infotainment system can playmusic by connecting an auxiliarydevice to the USB port.
USB Support
If equipped, there may be USBports in the center stack and in thecenter console storage. There mayalso be a USB port in the upperglove box.
USB Supported Devices
. USB Flash Drives
. Portable USB Hard Drives
Not all iPods and USB drives arecompatible with the USB port.
Make sure the iPod has the latestfirmware from Apple for properoperation. iPod firmware can beupdated using the latest iTunesapplication. See www.apple.com/itunes.
For help with identifying your iPod,see www.apple.com/support.
The USB port can play both lowerand upper case .mp3, .wma, .ogg,and .wav files stored on a USBstorage device.
Supported Apple Devices
To view supported devices in theU.S., see my.chevrolet.com/learn.
To view supported devices inCanada, seewww.chevroletowner.ca.
USB Supported File and FolderStructure
The infotainment system supports:
. FAT16
. FAT32
. exFAT
Connecting a USB StorageDevice or iPod/iPhone
To connect a USB storage device,connect the device to the USB port.
To connect an iPod/iPhone, connectone end of the device’s cable to theiPod/iPhone and the other end tothe USB port.
The iPod/iPhone charges while it isconnected to the vehicle if thevehicle is on or in ACC/ACCESSORY. See IgnitionPositions 0 208. When the vehicle isturned off, the iPod/iPhoneautomatically powers off and will notcharge or draw power from thevehicle's battery.
For more information on USBusage, see “Audio SystemInformation” following.
Audio System Information
The infotainment system can playthe music files contained in the USBstorage device or iPod/iPhoneproducts.
Using MP3/WMA/OGG/WAV Files
. Music files with .mp3, .wma,.ogg, and .wav file nameextensions can be played.
. MP3 files that can be played: Bitrate: 8 kbps to 320 kbps.Sampling frequency: 48 kHz,44.1 kHz, 32 kHz, 24 kHz, 22.05kHz, and 16 kHz.

Chevrolet Silverado 4500HD/5500HD/6500HD Owner Manual (GMNA-Localizing-U.S.-12102101) - 2019 - crc - 10/2/18
Infotainment System 161. Files with a bit rate above
128 kbps will result in higherquality sound.
. ID3 Tag information for MP3files, such as the album nameand the artist, can be played.
. To display album title, track title,and artist information, the fileshould be compatible with theID3 Tag V1 and V2 formats.
Using USB Storage Devices andan iPod/iPhone
. Use a USB or flash memory typestorage device. Do not connectusing a USB adaptor.
. Do not connect and reconnectthe USB device repeatedly in ashort time, as this may causestatic electricity and problemsusing the device.
. Use a USB device with a metalconnecting terminal.
. Connection with i-Stick TypeUSB storage devices may befaulty due to vehicle vibration.
. Do not touch the USBconnecting terminal.
. Only USB storage devicesformatted in FAT16/32 or exFATfile systems are recognized.NTFS and other file systems arenot recognized.
. The time it takes to process fileswill depend on the USB storagedevice type and capacity, andthe type of files stored.
. Some USB storage device filesmay not be compatible.
. Up to two USB devices and oneiPod can be played through aUSB hub. All devices may not besupported, depending on theperformance of the USB hub.If there is not enough powersupply, it may not operatenormally.
. Do not disconnect the USBstorage device while it is playing.This may cause damage to theproduct or affect theperformance of the USB device.
. Disconnect the USB storagedevice when the ignition isturned off. If the ignition is turnedon while the USB device is
connected, the USB device maybe damaged or may not operatenormally.
. USB storage devices can onlybe connected for playing music,viewing photo files,or upgrading.
. Do not use the USB terminal tocharge USB accessoryequipment. The heat generatedmay cause performance issuesor damage.
. Music files to which Digital RightManagement (DRM) is appliedcannot be played.
. USB storage device that are incapacity with a limit of 5,000files, such as music, photo,video, 15 stages of folderstructure can be used. Normalusage cannot be guaranteed fora storage device that exceedsthis limit. The iPod/iPhone canplay all music files that aresupported. The music file listswill only display up to 5,000 fileson the screen. These files aresorted in alphabetical order.

Chevrolet Silverado 4500HD/5500HD/6500HD Owner Manual (GMNA-Localizing-U.S.-12102101) - 2019 - crc - 10/2/18
162 Infotainment System. Some iPod/iPhone product
models may not support theconnectivity or functionality ofthis product.
. Only connect the iPod/iPhonewith connection cablessupported by iPod/iPhoneproducts. Other connectioncables cannot be used.
. The iPod/iPhone may bedamaged if it is connected to thevehicle with the ignition on.When not in use, disconnect theiPod/iPhone.
. When the iPod/iPhone isconnected to the USB port byusing the iPod/iPhone cable, theBluetooth music is notsupported.
. The iPod/iPhone playbackfunctions and the informationdisplayed may be different whenplayed on the infotainmentsystem.
. Refer to the table for theclassification items related to thesearch function provided by theiPod/iPhone.
USB Player
Playing Music from a USB Device
. Connect the USB device to theUSB port.
. Play will start automatically afterthe system has finished readingthe USB device.
. If a non-readable USB device isconnected, an error messagedisplays and the system willswitch to the previous audiofunction.
If the USB device is alreadyconnected:
1. Press {.
2. Touch AUDIO.
3. Touch Source.
4. Touch USB.
To stop the USB device and selectanother media source, touchSource, then select the othersource.
To remove the USB device, selectanother function, then remove theUSB device.
Pause
. Touch j to pause.
. Touch r to resume.

Chevrolet Silverado 4500HD/5500HD/6500HD Owner Manual (GMNA-Localizing-U.S.-12102101) - 2019 - crc - 10/2/18
Infotainment System 163
Changing to Next/Previous Files
. Touchl to change to thenext file.
. Touchg within five seconds ofthe playback time to play theprevious file.
Returning to the Beginning of theCurrent File
Touchg after five seconds of theplayback time.
Scanning Forward or Backward
Touch and holdg orl duringplayback to rewind or fast forward.Release the button to resumeplayback at normal speed.
Playing a File Randomly
TouchZ during playback.
. ON: Plays all files randomly.
. OFF: Returns to normalplayback.
Using the USB Music Menu
1. Touch Menu during playback.
2. Touch the desired menu.
Browse Music
1. Touch Browse Music.
2. Touch the desired music.
Tone Settings
. Touch Tone Settings. The ToneSettings menu is displayed. See“Tone Settings” in AM-FM Radio(Base Radio with Touchscreen)0 152 or AM-FM Radio (BaseRadio) 0 150.
Auto Volume
. Touch Auto Volume. The AutoVolume menu is displayed. See“Auto Volume” in AM-FM Radio(Base Radio with Touchscreen)0 152 or AM-FM Radio (BaseRadio) 0 150.
Traffic Program (If Equipped)
. Touch On or Off.
MTP (Media Transfer Protocol)
. Connect an MTP supporteddevice.
. Play will start automatically afterthe system has finished readingthe MTP device.
. If a non-readable MTP device isconnected, an error messagedisplays and the system willswitch to the previous audiofunction.
iPod/iPhone Player
This feature is limited to modelssupporting the iPod/iPhoneconnection.
Playing Music Files
. Connect the iPod/iPhone to theUSB port.
. Play will start from the previouslyplayed point after the systemhas finished reading the USBdevice.

Chevrolet Silverado 4500HD/5500HD/6500HD Owner Manual (GMNA-Localizing-U.S.-12102101) - 2019 - crc - 10/2/18
164 Infotainment System. If a non-readable USB device is
connected, an error messagedisplays and the system willswitch to the previous audiofunction.
If the iPod/iPhone is alreadyconnected:
1. Press {.
2. Touch AUDIO.
3. Touch Source.
4. Touch iPod.
To stop the device and selectanother media source, touchSource, then select the othersource.
To remove the device, selectanother function, then remove thedevice.
Pause
. Touch j to pause.
. Touch r to resume.
Changing to Next/Previous Song
. Touchl to change to thenext song.
. Touchg within two seconds ofthe playback time to play theprevious song.
Returning to the Beginning of theCurrent File
Touchg after two seconds of theplayback time.
Scanning Forward or Backward
Touch and holdg orl duringplayback to rewind or fast forward.Release the button to resumeplayback at normal speed.
Playing a File Randomly
TouchZ during playback.
. ON: Plays all files randomly.
. OFF: Returns to normalplayback.
Using the iPod Menu
. Touch Menu during playback.
. Touch the appropriateplay mode.
Browse Music
1. Touch Browse Music.
2. Touch the desired music.
Tone Settings
. Touch Tone Settings. The ToneSettings menu is displayed. See“Tone Settings” under AM-FMRadio (Base Radio withTouchscreen) 0 152 or AM-FMRadio (Base Radio) 0 150.
Auto Volume
. Touch Auto Volume. The AutoVolume menu is displayed. See“Auto Volume” under AM-FMRadio (Base Radio withTouchscreen) 0 152 or AM-FMRadio (Base Radio) 0 150.
Picture System Information
The infotainment system can viewpicture files stored on a USBstorage device and devices thatsupport Media TransferProtocol (MTP).
. Supported file extensions: .jpg,.bmp, .png, .gif.
. Animated GIF files are notsupported.

Chevrolet Silverado 4500HD/5500HD/6500HD Owner Manual (GMNA-Localizing-U.S.-12102101) - 2019 - crc - 10/2/18
Infotainment System 165. Some files may not operate due
to a different recording format orthe condition of the file.
Viewing Pictures
1. Connect the USB device to theUSB port.
2. Touch the screen to open to fullscreen. Touch the screen againto return to the previousscreen.
If the USB device is alreadyconnected:
1. Press {.
2. Touch GALLERY.
Some features are disabled whilethe vehicle is in motion.
Viewing a Slide Show
1. Touchz from the picturescreen.
2. Touch the screen to cancel theslide show during the slideshow playback.
Viewing a Previous or NextPicture
Touch S or T from the picturescreen.
Rotating a Picture
Touch w from the picture screen.
Enlarging a Picture
Touchx from the picture screen.
Using the USB Picture Menu
1. Touch MENU from the picturescreen.
2. Touch the appropriate menu:
. Slide Show Time: Allowsselection of the slide showinterval.
. Clock, Temp. Display:Allows selection of On orOff to show the clock andtemperature on the fullscreen.
. Display Settings: Adjustsfor Brightness and Contrast.
3. Touch0 to exit.
Auxiliary JackThis vehicle may have an AUX jackin the center console storage.
Possible auxiliary audio sourcesinclude:
. Laptop computer
. Audio music player
This jack is not an audio output. Donot plug headphones into theauxiliary input jack. Auxiliarydevices should be set up while thevehicle is in P (Park).
Connect a 3.5 mm (1/8 in) cablefrom the auxiliary device to theauxiliary input jack.
If an auxiliary device has alreadybeen connected, but a differentsource is currently active,repeatedly press MEDIA on thecenter stack to scroll through all ofthe available audio source screens,until the AUX source screen isshown.

Chevrolet Silverado 4500HD/5500HD/6500HD Owner Manual (GMNA-Localizing-U.S.-12102101) - 2019 - crc - 10/2/18
166 Infotainment System
Base Radio
Playing from the AUX Jack
An auxiliary device is playedthrough the audio system andcontrolled through the device itself.
AUX Menu
Press the MENU knob to display theAUX menu and the following maydisplay:
Tone Settings : Select to adjustBass, Midrange, Treble, Balance,Fade, and EQ (Equalizer). See“Tone Settings” in AM-FM Radio(Base Radio with Touchscreen)0 152 or AM-FM Radio (BaseRadio) 0 150.
Auto Volume : If equipped, see“Playing an Audio CD” previously inthis section.
DSP : If equipped, this featureadjusts the pre-defined settings.See “DSP” in AM-FM Radio (BaseRadio with Touchscreen) 0 152 orAM-FM Radio (Base Radio) 0 150.
EQ (Equalizer) : If equipped, thisfeature adjusts the pre-definedequalizer settings. See “EQ(Equalizer)” in AM-FM Radio (BaseRadio with Touchscreen) 0 152 orAM-FM Radio (Base Radio) 0 150.
Base Radio with Touchscreen
Play will begin when the system hasfinished reading the information onthe device.
Playing Music
To play the music from the device,if the device is already connected:
1. Press {.
2. Touch AUDIO.
3. Touch Source.
4. Touch AUX.
To adjust the tone settings, see“Audio Settings” in “SystemSettings” under AM-FM Radio (BaseRadio with Touchscreen) 0 152 orAM-FM Radio (Base Radio) 0 150.
Bluetooth AudioIf equipped, music may be playedfrom a paired Bluetooth device. See“Pairing” under Bluetooth(Overview) 0 174 or Bluetooth(Infotainment Controls) 0 175 forhelp pairing a device.
Volume and song selection may becontrolled by using the infotainmentcontrols or the phone/device.If Bluetooth Audio is selected andnothing is heard, check the volumesetting on both the phone/deviceand the infotainment system.
Launch music by touching MEDIAon the Home Page.
To play music via Bluetooth:
1. Power on the device, and pairto connect the device.
2. Once paired, go into the audioapplication from the HomePage or via the application tray.Select MEDIA until Bluetoothdisplays.

Chevrolet Silverado 4500HD/5500HD/6500HD Owner Manual (GMNA-Localizing-U.S.-12102101) - 2019 - crc - 10/2/18
Infotainment System 167
Bluetooth Audio Menu
Press the MENU screen button todisplay the Bluetooth Audio menu.The following may be available:
Tone: Turn the MENU knob toadjust the tone settings.
Press o BACK to go back to theprevious menu.
Manage Bluetooth Devices: Selectto go to the Bluetooth page to addor delete devices.
When selecting Bluetooth Audio, theradio may not be able to launch theaudio player on the connecteddevice to start playing. When thevehicle is not moving, use thephone to begin playback.
All devices launch audio differently.When selecting Bluetooth Audio asa source, the radio may show aspaused on the screen. Press playon the device or press r to beginplayback.
Some phones support sendingBluetooth music information todisplay on the radio. When the radioreceives this information, it willcheck to see if any is available anddisplay it. For more informationabout supported Bluetooth features,see www.gm.com/bluetooth for U.S.and Canada only.
Voice RecognitionIf equipped, voice recognition allowsfor hands-free operation within theaudio and phone applications. Thisfeature can be started by pressingg on the steering wheel or bytouching g on the infotainmentdisplay.
However, not all features withinthese areas are supported by voicecommands. Generally, only complextasks that require multiple manualinteractions to complete aresupported by voice commands.
For example, tasks that take morethan one or two button presses suchas selecting a song or artist to playfrom a media device would besupported by voice commands.Other tasks, like adjusting thevolume or seeking up or down areaudio features that are easilyperformed by pressing one or twobuttons, and are not supported byvoice commands.

Chevrolet Silverado 4500HD/5500HD/6500HD Owner Manual (GMNA-Localizing-U.S.-12102101) - 2019 - crc - 10/2/18
168 Infotainment System
In general there are flexible ways tospeak commands for completing thetasks. Most of them, exceptdestination entry and voice keypad,can be completed in a singlecommand. If the task takes morethan one command to complete, thefirst command would be to indicatethe kind of task that is to beperformed. The system replies withprompts that lead through a dialogto enter the necessary information.
Voice recognition can be used whenthe ignition is on or when RetainedAccessory Power (RAP) is active.See Retained Accessory Power(RAP) 0 214.
Using Voice Recognition
Voice recognition becomes availableonce the system has beeninitialized. This begins when theignition is turned on. Initializationmay take a few moments.
1. Press g on the steering wheelcontrol to activate voicerecognition, or touch g on theinfotainment display.
. If voice recognition isstarted from the steeringwheel control, theinstrument cluster displaysthe selections and visualdialog content.
. If voice recognition isstarted from theinfotainment display, theselections and visual dialogcontent are displayed onboth the infotainmentdisplay and the instrumentcluster display.
2. The audio system mutes andthe system plays a promptfollowed by a beep.
3. Wait until after the beepcompletes, then clearly speakone of the commandsdescribed in this section.
Press g to interrupt any voicerecognition system prompt. Forexample, if the prompt seemsto be taking too long to finish,press g again and the beepshould happen right away.
There are two voice prompt modessupported:
. Long verbal prompts: The longerprompts provide moreinformation regarding thesupported actions.
. Short prompts: The shortprompts provide simpleinstructions about what can bestated.
If a command is not spoken, thevoice recognition system says ahelp prompt.
Prompts and Screen Displays
While a voice recognition session isactive, there will be correspondingbuttons on screens displayed.Manual interaction in the voicerecognition session is permitted.Interaction during a voice sessionmay be completed entirely using

Chevrolet Silverado 4500HD/5500HD/6500HD Owner Manual (GMNA-Localizing-U.S.-12102101) - 2019 - crc - 10/2/18
Infotainment System 169
voice commands, or someselections may expedite a session.If a selection is made using amanual control, the dialog willprogress in the same way as if theselection were made through avoice command. Once the system isable to complete the task, or thesession is terminated, the voicerecognition dialog stops.
An example of this type of manualintervention is touching an entry of adisplayed number list instead ofspeaking the number associatedwith the entry desired.
Canceling Voice Recognition
. Touch { to terminate the voicerecognition session that wasinitiated by touching g on theinfotainment display.
. Press or say “Cancel” or “Exit” toterminate the voice recognitionsession and display the screenfrom which voice recognitionwas initiated.
. Pressi on the steering wheelcontrols to terminate the voicesession and display the screenfrom which voice recognitionwas initiated.
Helpful Hints for SpeakingCommands
Voice recognition can understandcommands that are either naturallystated in sentence form (Englishonly), or direct commands that statethe application and the task.
For languages that do not supportnatural language commands insentence form, use the directcommands shown as examples onthe display screen.
For best results:
. Listen for the prompt and waitfor the beep before saying acommand or reply.
. Say “Help” or look at the screendisplay for commands.
. Voice recognition systemprompts can be interruptedduring a prompt by pressing gagain.
For example, if the promptseems to be taking too long tofinish, or if what is beingprompted causes a need for animmediate reply, press g againand wait for the beep.
. Speak the command naturally,not too fast, not too slow. Usedirect commands without a lot ofextra words.
. Usually Phone and Audiocommands can be spoken in asingle command; for example,“Call Dave Smith at work,” “Play”followed by the artist or songname, or “Tune” followed by theradio station number.
There is no need to memorizespecific command words. Directcommands might be more clearlyunderstood by the system. Anexample of a direct command wouldbe “Call 555-1212.” Examples ofthese direct commands are

Chevrolet Silverado 4500HD/5500HD/6500HD Owner Manual (GMNA-Localizing-U.S.-12102101) - 2019 - crc - 10/2/18
170 Infotainment System
displayed on most of the screenswhile a voice session is active.If “Phone” or “Phone Commands,” isstated, the system understands thata phone call is requested and willrespond with questions until enoughdetails are gathered.
If the phone number has beensaved with a name and a place, thedirect command should includeboth, for example “Call Dave Smithat work.”
Using Voice Recognition forList Options
When a list is displayed, a voiceprompt will ask to confirm or selectan option from that list. A selectioncan be made by manually selectingthe item, or by speaking the linenumber for the item to select.
When a screen contains a list,options may be available but notdisplayed. The list on a voicerecognition screen functions thesame as a list on other screens.Scrolling can be used to helpdisplay other entries from the list.
Manually scrolling or paging the liston a screen during a voicerecognition session suspends thecurrent voice recognition event andplays the prompt “Make yourselection from the list using themanual controls or press the Backbutton to try again.”
If manual selection takes more than15 seconds, the session terminatesand prompts that it has timed out.The screen returns to the screenwhere voice recognition wasinitiated.
The Back Command
Say “Back” or press the Back buttonto go to the previous screen.
If in voice recognition, and “Back” isstated all the way through to theinitial screen, then “Back” is statedone more time, the voice recognitionsession will cancel.
Help
Say “Help” on any voice recognitionscreen and the help prompt for thescreen is played. Additionally, apop-up displays a text version of the
help prompt. Depending on howvoice recognition was initiated, theHelp pop-up will either display onthe instrument cluster or theinfotainment display. Touch Dismissto make the pop-up go away.
Pressing g while the help prompt isplaying will terminate the promptand a beep will be heard. Doing thiswill stop the help prompt so that avoice command can be used.
Voice Recognition for theRadio
Touch g on the infotainment displayto launch audio voice recognition.If g is touched in a radio screen, thevoice commands for radio andmedia features are available.
“Switch to AM” : Switch bands toAM and tune to the last AM radiostation.
“Switch to FM” : Switch bands toFM and tune to the last FM radiostation.

Chevrolet Silverado 4500HD/5500HD/6500HD Owner Manual (GMNA-Localizing-U.S.-12102101) - 2019 - crc - 10/2/18
Infotainment System 171
“Switch to SXM” : Switch bands toSiriusXM (if equipped) and tune tothe last SiriusXM channel.
“Tune to <AM frequency> AM” :Tune to the radio station whosefrequency is identified in thecommand (like “nine fifty”).
“Tune to <FM frequency> FM” :Tune to the radio station whosefrequency is identified in thecommand (like “one o onepoint one”).
“Tune to SXM <SXM channelnumber>” : Tune to the SiriusXM (ifequipped) radio station whosechannel number is identified in thecommand.
“Tune to SXM <SXM channelname>” : Tune to the SiriusXM (ifequipped) radio station whosechannel name is identified in thecommand.
Voice Recognition for AudioMy Media
If browsing My Media when thevoice button is selected, the voicerecognition commands for My Mediafeatures are available.
“Play Artist” : Begin a dialog toenter a specific Artist name.
“Play Artist <artist name>” :Begin playback of the mediaselection identified in the command.
“Play Album” : Begin a dialog toenter a specific album name.
“Play Album <album name>” :Begin playback of the identifiedalbum name in the command.
“Play Song” : Begin a dialog toenter a specific song name.
“Play Song <song name>” : Beginplayback of the identified songname in the command.
“Play Genre” : Begin a dialog toenter a specific genre.
“Play Genre <genre name>” :Begin playback of the mediaselection identified in the command.
“Play Playlist” : Begin a dialog toenter a specific playlist name.
“Play Playlist <playlist name>” :Begin playback of the identifiedplaylist in the command.
“Play <device name>” : Playmusic from a specific deviceidentified by name. The devicename is the name displayed on thescreen when the device is firstselected as an audio source.
“Play Chapter” : Begin a dialog toenter a specific name.
“Play Chapter <chapter name>” :Begin playback of the mediaselection identified in the command.
“Play Audiobook” : Begin a dialogto enter a specific name.
“Play Audiobook <audiobookname>” : Begin playback of themedia selection identified in thecommand.
“Play CD Track <tracknumber>” : Begin playback of theCD at the track identified in thecommand.

Chevrolet Silverado 4500HD/5500HD/6500HD Owner Manual (GMNA-Localizing-U.S.-12102101) - 2019 - crc - 10/2/18
172 Infotainment System
“Play Episode” : Begin a dialog toenter a specific name.
“Play Episode <episodename>” : Begin playback of themedia selection identified in thecommand.
“Play Podcast” : Begin a dialog toenter a specific name.
“Play Podcast <podcastname>” : Begin playback of themedia selection identified in thecommand.
“Play Video” : Begin a dialog toenter a specific name.
“Play Video <video name>” :Begin playback of the mediaselection identified in the command.
“My Media” : Begin a dialog toenter the desired media content.
Handling Large Amounts of MediaContent
It is expected that large amounts ofmedia content will be brought intothe vehicle. It may be necessary tohandle large amounts of mediacontent in a different way than
smaller amounts of media. Thesystem may limit the options ofvoice recognition by not allowingselection of song titles by voice atthe highest level if the number ofsongs exceeds the maximum limit.
Voice command option changesthrough media content limits are:
. Song files including otherindividual files of all media typessuch as audiobook chapters,podcast episodes, and videos.
. Album type folders includingtypes such as albums andaudiobooks.
There are no restrictions if thenumber of song files and albums isless than 4,000. When the numberof song files connected to thesystem is between 4,000 and 8,000,the content cannot be accesseddirectly with one command like“Play <song name>.”
The restriction is that the command“Play Song” must be spoken first;the system will then ask for the songname. The reply command would beto say the name of the song to play.
Similar limits exist for albumcontent. If there are more than4,000 albums, but less than 8,000,the content cannot be accesseddirectly with one command like,“Play <album name>.” Thecommand “Play Album” must first bespoken; the system will then ask forthe album name. The reply wouldbe to say the name of the albumto play.
Once the number of songs hasexceeded approximately 8,000,there is no support for accessing thesongs directly through voicecommands. There will still beaccess to the media content byusing commands for playlists,artists, and genres.
The access commands for playlists,artists, and genres are prohibitedafter the number of this type ofmedia exceeds 4,000.
The system will provide feedbackthe first time voice recognition isinitiated if it has become apparentthat any of these limits are reachedduring a device initializing process.

Chevrolet Silverado 4500HD/5500HD/6500HD Owner Manual (GMNA-Localizing-U.S.-12102101) - 2019 - crc - 10/2/18
Infotainment System 173
Voice Recognition for thePhone
“Call <contact name>” : Initiate acall to an entered contact. Thecommand may include location ifthe contact has location numbersstored.
“Call <contact name> At Home,”“At Work,” “On Mobile,” or “OnOther” : Initiate a call to an enteredcontact and location at home, atwork, on mobile device, or onanother phone.
“Call <phone number>” : Initiate acall to a standard phone numberseven or 10 digits in length, andalso 911, 411, or 611.
“Pair Phone” : Begins theBluetooth pairing process. Followinstructions on the radio display.
“Switch Phone” : Select a differentphone for outgoing calls.
“Voice Keypad” : Begins a dialogto enter special numbers likeinternational numbers. The numberscan be entered in groups of digitswith each group of digits being
repeated back by the system. If thegroup of digits is not correct, thecommand “Delete” will remove thelast group of digits and allow themto be re-entered. Once the entirenumber has been entered, thecommand “Call” will start dialing thenumber.
“Voice Mail” : Initiate a call to voicemail numbers.
Voice Recognition for OnStar(If Equipped)
“OnStar” : Begin OnStar VoiceRecognition.
Bluetooth Speech Recognition(If Equipped)
Voice Pass-Thru allows access tothe speech recognition commandson the cell phone. See your cellphone manufacturer’s user guide tosee if the cell phone supports thisfeature.
Activating this function will start theBluetooth Speech Recognition on aconnected phone.
The steering wheel controls areused to operate this function.
Press and hold g to activate.A voice session begins so that voicecommands can be given to Siri ormany other controls provided by thecell phone.
Press@ to exit or pressi toclose and return to the previousapplication prior to the start of VoicePass-Thru.

Chevrolet Silverado 4500HD/5500HD/6500HD Owner Manual (GMNA-Localizing-U.S.-12102101) - 2019 - crc - 10/2/18
174 Infotainment System
Phone
Bluetooth (Overview)Instructions for using the cell phonemay differ between infotainmentsystems. The base radio and baseradio with touchscreen instructionsare included in this manual. See theinfotainment manual for instructionson the uplevel radios.
Bluetooth-capable systems caninteract with many cell phones,allowing:
. Placement and receipt of calls ina hands-free mode.
. Sharing of the cell phone’saddress book or contact list withthe vehicle.
To minimize driver distraction,before driving, and with the vehicleparked:
. Become familiar with thefeatures of the cell phone.Organize the phone book andcontact lists clearly and delete
duplicate or rarely used entries.If possible, program speed dialor other shortcuts.
. Review the controls andoperation of the infotainmentsystem.
. Pair cell phone(s) to the vehicle.The system may not work withall cell phones. See “Pairing” inthis section.
. If the cell phone has voicedialing capability, learn to usethat feature to access theaddress book or contact list.
. See “Deleting a BluetoothDevice” in this section.
{ Warning
When using a cell phone, it canbe distracting to look too long ortoo often at the screen of thephone or the infotainment system.Taking your eyes off the road toolong or too often could cause acrash resulting in injury or death.Focus your attention on driving.
Vehicles with a Bluetooth systemcan use a Bluetooth-capable cellphone with a Hands-Free Profile tomake and receive phone calls. Theinfotainment system and voicerecognition are used to control thesystem. The system can be usedwith the ignition on or in ACC/ACCESSORY. The range of theBluetooth system can be up to 9.1 m(30 ft). Not all phones support allfunctions and not all phones workwith the Bluetooth system. For U.S.and Canada only, see www.gm.com/bluetooth for more information aboutcompatible phones.
Bluetooth Controls
Use the buttons on the center stack,infotainment display, and steeringwheel to operate the Bluetoothsystem.
Steering Wheel Controls
g : Press to answer incoming calls,confirm system information, andstart voice recognition.

Chevrolet Silverado 4500HD/5500HD/6500HD Owner Manual (GMNA-Localizing-U.S.-12102101) - 2019 - crc - 10/2/18
Infotainment System 175
i : Press to end a call, reject acall, or cancel an operation. Pressto mute or unmute the infotainmentsystem.
Infotainment System Controls
For information about how tonavigate the menu system using theinfotainment controls, see Overview(Base Radio with Touchscreen)0 146 or Overview (Base Radio)0 142.
MENU : Turn to scroll through a list.Press to select the highlighted listoption.
{ : Press to go to the Home Page.See Home Page (Base Radio withTouchscreen) 0 149 or Home Page(Base Radio) 0 147.
PHONE or # : Select to enter thephone main menu.See Bluetooth (Overview) 0 174 orBluetooth (Infotainment Controls)0 175.
Voice Recognition
If equipped, the voice recognitionsystem uses commands to controlthe system and dial phone numbers.
Noise : The system may notrecognize voice commands if thereis too much background noise, suchas noise from open windows or loudtalking inside the vehicle.
When to Speak : A tone sounds toindicate that the system is ready fora voice command. Wait for the toneand then speak.
How to Speak : Speak clearly in acalm and natural voice.
Audio System
When using the Bluetooth system,sound comes through the vehicle'sfront audio system speakers andoverrides the audio system. Use theO knob during a call to change thevolume level. The system maintainsa minimum volume level.
Bluetooth Audio Quality
Turn off the Echo and Noisecancellation feature on your phone,if supported, for the best hands-freeperformance.
See www.gm.com/bluetooth for U.S.and Canada only.
Bluetooth (InfotainmentControls)To use infotainment controls toaccess the menu system, seeOverview (Base Radio withTouchscreen) 0 146 or Overview(Base Radio) 0 142.
Pairing
A Bluetooth-enabled cell phonemust be paired to the Bluetoothsystem and then connected to thevehicle before it can be used. Seeyour cell phone manufacturer's userguide for Bluetooth functions beforepairing the cell phone. If a Bluetoothphone is not connected, calls will bemade using OnStar Hands-FreeCalling, if available. See OnStarOverview 0 428.

Chevrolet Silverado 4500HD/5500HD/6500HD Owner Manual (GMNA-Localizing-U.S.-12102101) - 2019 - crc - 10/2/18
176 Infotainment System
Pairing Information
. A Bluetooth phone with MP3capability cannot be paired tothe vehicle as a phone and anMP3 player at the same time.
. Up to 10 cell phones can bepaired to the Bluetooth system.
. The pairing process is disabledwhen the vehicle is moving.
. Pairing only needs to becompleted once, unless thepairing information on the cellphone changes or the cell phoneis deleted from the system.
. Only one paired cell phone canbe connected to the Bluetoothsystem at a time.
. If multiple paired cell phones arewithin range of the system, thesystem connects to the firstavailable paired cell phone in theorder that they were first pairedto the system.
When the Bluetooth device andinfotainment system aresuccessfully paired, the phone bookis downloaded automatically. This is
dependent on the type of the phonepaired. If the automatic downloaddoes not occur, proceed with thephone book download on thephone.
Pairing a Phone - SSP and NoPaired Device
When there is no paired device onthe infotainment system and SimpleSecure Pairing (SSP) is supported:
1. Press {.
2. Touch PHONE, press # on the
center stack, or press g on thesteering wheel without OnStar.
3. Touch Search Device.
4. Touch the desired device topair on the searched listscreen.
5. Touch Yes on the pop-upscreen of the Bluetooth deviceand infotainment system.
6. When the Bluetooth device andinfotainment system aresuccessfully paired, the phonescreen is displayed on theinfotainment system.
Pairing a Phone - SSP and PairedDevice
When a paired device is on theinfotainment system and SSP issupported:
1. Press {.
2. Touch Settings.
3. Touch Bluetooth, then DeviceManagement.
4. Touch the desired device topair. When the Bluetoothdevice and infotainment systemare successfully paired, Z / 5is displayed on the pair devicescreen. If no desired device isavailable go to Step 5.
5. Touch Search Device to searchfor the desired device.
6. Touch the desired device topair on the searched listscreen.
7. Touch Yes on the pop-upscreen of the Bluetooth deviceand infotainment system.

Chevrolet Silverado 4500HD/5500HD/6500HD Owner Manual (GMNA-Localizing-U.S.-12102101) - 2019 - crc - 10/2/18
Infotainment System 177. The connected phone is
highlighted by 5.
. Z / 5 indicates the hands-freeand phone music functions areenabled.
. 5 indicates only the hands-freefunction is enabled.
. Z indicates only Bluetoothmusic is enabled.
Pairing a Phone - No SSP and NoPaired Device
When there is no paired device onthe infotainment system and SSP isnot supported:
1. Press {.
2. Touch PHONE, press # on the
center stack, or press g on thesteering wheel without OnStar.
3. Touch Search Device.
4. Touch the desired device topair on the searched listscreen.
5. Input the PersonalIdentification Number (PIN)code (default: 1234) to theBluetooth device. When theBluetooth device andinfotainment system aresuccessfully paired, thePHONE screen is displayed onthe infotainment system.
When the connection fails, a failuremessage is displayed on theinfotainment system.
If a Bluetooth device was previouslyconnected, the infotainment systemexecutes the auto connection.However, if the Bluetooth setting onthe Bluetooth device is turned off, afailure message is displayed on theinfotainment system.
Pairing a Phone - No SSP andPaired Device
When a paired device is on theinfotainment system and SSP is notsupported:
1. Press {.
2. Touch Settings.
3. Touch Bluetooth, then DeviceManagement.
4. Touch the desired device topair. When the Bluetoothdevice and infotainment systemare successfully paired, Z / 5is displayed on the pair devicescreen. If no desired device isavailable go to Step 5.
5. Touch Search Device to searchfor the desired device.
6. Touch the desired device topair on the searched listscreen.
7. Input the PersonalIdentification Number (PIN)code (default: 1234) to theBluetooth device. When theBluetooth device andinfotainment system aresuccessfully paired, Z / 5 isdisplayed on the pair devicescreen.
. The connected phone ishighlighted by 5.

Chevrolet Silverado 4500HD/5500HD/6500HD Owner Manual (GMNA-Localizing-U.S.-12102101) - 2019 - crc - 10/2/18
178 Infotainment System
. Z / 5 indicates the hands-freeand phone music functions areenabled.
. 5 indicates only the hands-freefunction is enabled.
. Z indicates only Bluetoothmusic is enabled.
Connecting a Paired BluetoothDevice
1. Press {.
2. Touch Settings.
3. Touch Bluetooth, then DeviceManagement.
4. Touch the device to beconnected.
Checking the BluetoothConnection
1. Press {.
2. Touch Settings.
3. Touch Bluetooth, then DeviceManagement.
4. The paired device will show.
Disconnecting a Bluetooth Device
1. Press {.
2. Touch Settings.
3. Touch Bluetooth, then DeviceManagement.
4. Touch the name of the deviceto be disconnected.
5. Touch Disconnect.
Deleting a Bluetooth Device
1. Press {.
2. Touch Settings.
3. Touch Bluetooth, then DeviceManagement.
4. Touch the device to delete.
5. Touch Y.
6. Touch Delete.
Bluetooth Music
Before playing Bluetooth music,read the following information.
. A cell phone or Bluetooth devicethat supports Advanced AudioDistribution Profile (A2DP)
versions over 1.2 must beregistered and connected to theproduct.
. From the cell phone or Bluetoothdevice, find the Bluetooth devicetype to set/connect the item as astereo headset.
. e will appear on the screen ifthe stereo headset issuccessfully connected.
. The sound played by theBluetooth device is deliveredthrough the infotainment system.
. Bluetooth music can be playedonly when a Bluetooth devicehas been connected. To playBluetooth music, connect theBluetooth phone to theinfotainment system.
. If the Bluetooth device isdisconnected while playingphone music, the music isdiscontinued. The audiostreaming function may not besupported in some Bluetoothphones. Only one function canbe used at a time between theBluetooth hands-free or Phone

Chevrolet Silverado 4500HD/5500HD/6500HD Owner Manual (GMNA-Localizing-U.S.-12102101) - 2019 - crc - 10/2/18
Infotainment System 179
music function. For example,if you convert to Bluetoothhands-free while playing Phonemusic, the music isdiscontinued. Playing music fromthe vehicle is not possible whenthere are no music files stored inthe cell phone.
Playing Bluetooth Music
1. Press {.
2. Touch AUDIO.
3. Touch Source.
4. Touch Bluetooth.
Pause
Touch j to pause.
Touch r to resume.
Playing the Next Song
Touchl.
Playing the Previous Song
Touchg within two seconds ofplayback time to play theprevious song.
Returning to the Beginning of theCurrent Song
Touchg after two seconds ofplayback time.
Search
Touch and holdg orl to rewindor fast forward.
Playing Music Randomly
TouchZ during playback. Touchagain to return to normal play.
This function may not be supporteddepending on the Bluetooth device.
Do not change the track too quicklywhen playing Bluetooth music.
Conditions that may occur whenplaying Bluetooth music:
. It takes time to transmit datafrom the Bluetooth device to theinfotainment system.
. If the cell phone or Bluetoothdevice is not in the waitingscreen mode, it may notautomatically play.
. The infotainment systemtransmits the order to play fromthe Bluetooth device in theBluetooth music play mode.If this is done in a differentmode, then the device transmitsthe order to stop. Depending onthe Bluetooth device options,this order to play/stop may taketime to activate.
. If the Bluetooth music playbackis not functioning, then check tosee if the Bluetooth device is inthe waiting screen mode.
. Sounds may be cut off duringthe Bluetooth music playback.
. The infotainment system outputsthe audio from the cell phone orBluetooth device as it istransmitted.

Chevrolet Silverado 4500HD/5500HD/6500HD Owner Manual (GMNA-Localizing-U.S.-12102101) - 2019 - crc - 10/2/18
180 Infotainment System
Apple CarPlay andAndroid AutoIf equipped, Android Auto and/orApple CarPlay capability may beavailable through a compatiblesmartphone. If available,PROJECTION will appear on theHome Page of the infotainmentdisplay.
To use Android Auto or AppleCarPlay:
1. Download the Android Autoapp to your phone from theGoogle Play store. No app isrequired for Apple CarPlay.
2. Connect an Android phone oriPhone by using the factoryprovided phone USB cable andplugging into a USB data port.For best performance, it ishighly recommended to use thedevice’s factory-provided USBcable. Aftermarket orthird-party cables maynot work.
3. When the phone is firstconnected to activate AppleCarPlay or Android Auto, themessage “Device ProjectionPrivacy Consent” will appear.. Select Continue to launch
Apple CarPlay orAndroid Auto.
. Select Disable to removeApple CarPlay and AndroidAuto capability from thevehicle Settings menu.Other functions maystill work.
PROJECTION on the Home Pagewill change to Android Auto or AppleCarPlay depending on the phone.Android Auto and/or Apple CarPlaymay automatically launch upon USBconnection. If not, touch theANDROID AUTO and/or APPLECARPLAY icon on the Home Pageto launch.
Press { on the center stack toreturn to the Home Page.
For further information on how to setup Android Auto and Apple CarPlayin the vehicle, see my.chevrolet.comor see Customer Assistance Offices0 416.
Android Auto is provided by Googleand is subject to Google’s termsand privacy policy. Apple CarPlay isprovided by Apple and is subject toApple’s terms and privacy policy.Data plan rates apply. For AndroidAuto support see https://support.google.com/androidauto.For Apple CarPlay support seewww.apple.com/ios/carplay/. Appleor Google may change or suspendavailability at any time. AndroidAuto, Android, Google, Google Play,and other marks are trademarks ofGoogle Inc.; Apple CarPlay is atrademark of Apple Inc.

Chevrolet Silverado 4500HD/5500HD/6500HD Owner Manual (GMNA-Localizing-U.S.-12102101) - 2019 - crc - 10/2/18
Infotainment System 181
Trademarks andLicense AgreementsFCC Information
See Radio Frequency Statement0 424.
"Made for iPod" and "Made foriPhone" mean that an electronicaccessory has been designed toconnect specifically to iPod oriPhone and has been certified bythe developer to meet Appleperformance standards. Apple is notresponsible for the operation of thisdevice or its compliance with safetyand regulatory standards. Pleasenote that the use of this accessorywith iPod or iPhone may affectwireless performance. iPhone, iPod,iPod classic, iPod nano, iPod
shuffle, and iPod touch aretrademarks of Apple Inc., registeredin the U.S. and other countries.
Fees and Taxes: Subscription fee,taxes, one time activation fee, andother fees may apply. Subscriptionfee is consumer only. All fees andprogramming subject to change.Subscriptions subject to CustomerAgreement available atwww.siriusxm.com. SiriusXMservice only available in the48 contiguous United States andCanada.
In Canada: Some deterioration ofservice may occur in extremenorthern latitudes. This is beyondthe control of SiriusXM SatelliteRadio.
Explicit Language Notice: Channelswith frequent explicit language areindicated with an “XL” preceding thechannel name. Channel blocking isavailable for SiriusXM SatelliteRadio receivers by notifyingSiriusXM:
. USA Customers — Seewww.siriusxm.com or call1-888-601-6296.
. Canadian Customers — Seewww.siriusxm.ca or call1-877-438-9677.
It is prohibited to copy, decompile,disassemble, reverse engineer,hack, manipulate, or otherwisemake available any technology orsoftware incorporated in receiverscompatible with the SiriusXMSatellite Radio System or thatsupport the SiriusXM website, theOnline Service or any of its content.Furthermore, the AMBER voicecompression software included inthis product is protected byintellectual property rights includingpatent rights, copyrights, and tradesecrets of Digital VoiceSystems, Inc.

Chevrolet Silverado 4500HD/5500HD/6500HD Owner Manual (GMNA-Localizing-U.S.-12102101) - 2019 - crc - 10/2/18
182 Infotainment System
General Requirements:
1. A License Agreement fromSiriusXM is required for anyproduct that incorporatesSiriusXM Technology and/or foruse of any of the SiriusXMmarks to be manufactured,distributed, or marketed in theSiriusXM Service Area.
2. For products to be distributed,marketed, and/or sold inCanada, a separate agreementis required with CanadianSatellite Radio Inc. (operatingas SiriusXM Canada).
Other Information
The Bluetooth word mark and logosare owned by the Bluetooth SIG,Inc. and any use of such marks byGeneral Motors is under license.Other trademarks and trade namesare those of their respective owners.
Schedule I: Gracenote EULA
Music recognition technology andrelated data are provided byGracenote. Gracenote is theindustry standard in musicrecognition technology and relatedcontent delivery. For moreinformation visitwww.gracenote.com.
Music-related data from Gracenote,Inc., copyright 2000 to presentGracenote. Gracenote Software,copyright 2000 to presentGracenote. One or more patentsowned by Gracenote may apply tothis product and service. See theGracenote website for anon-exhaustive list of applicableGracenote patents. Gracenote,CDDB, MusicID, MediaVOCS, theGracenote logo and logotype, andthe "Powered by Gracenote" logo
are either registered trademarks ortrademarks of Gracenote in theUnited States and/or othercountries.
Gracenote Terms of Use
This application or device containssoftware from Gracenote, Inc. ofEmeryville, California ("Gracenote").The software from Gracenote (the"Gracenote Software") enables thisapplication to do disc or fileidentification and obtainmusic-related information, includingname, artist, track, and titleinformation ("Gracenote Data") fromonline servers or embeddeddatabases (collectively, "GracenoteServers") and to perform otherfunctions. You may use GracenoteData only by means of the intendedEnd-User functions of thisapplication or device.
This application or device maycontain content belonging toGracenote’s providers. If so, all ofthe restrictions set forth herein withrespect to Gracenote Data shallalso apply to such content and suchcontent providers shall be entitled to

Chevrolet Silverado 4500HD/5500HD/6500HD Owner Manual (GMNA-Localizing-U.S.-12102101) - 2019 - crc - 10/2/18
Infotainment System 183
all of the benefits and protectionsset forth herein that are available toGracenote.
You agree that you will useGracenote Data, the GracenoteSoftware, and Gracenote Serversfor your own personalnon-commercial use only. You agreenot to assign, copy, transfer ortransmit the Gracenote Software orany Gracenote Data to any thirdparty. YOU AGREE NOT TO USEOR EXPLOIT GRACENOTE DATA,THE GRACENOTE SOFTWARE,OR GRACENOTE SERVERS,EXCEPT AS EXPRESSLYPERMITTED HEREIN.
You agree that your non-exclusivelicense to use the Gracenote Data,the Gracenote Software, andGracenote Servers will terminate ifyou violate these restrictions. If yourlicense terminates, you agree tocease any and all use of theGracenote Data, the GracenoteSoftware, and Gracenote Servers.Gracenote reserves all rights inGracenote Data, the GracenoteSoftware, and the Gracenote
Servers, including all ownershiprights. Under no circumstances willGracenote become liable for anypayment to you for any informationthat you provide. You agree thatGracenote may enforce its rightsunder this Agreement against youdirectly in its own name.
The Gracenote service uses aunique identifier to track queries forstatistical purposes. The purpose ofa randomly assigned numericidentifier is to allow the Gracenoteservice to count queries withoutknowing anything about who youare. For more information, see theweb page for the Gracenote PrivacyPolicy for the Gracenote service.
The Gracenote Software and eachitem of Gracenote Data are licensedto you "AS IS." Gracenote makes norepresentations or warranties,express or implied, regarding theaccuracy of any Gracenote Data.Gracenote reserves the right todelete data from the GracenoteServers or to change datacategories for any cause thatGracenote deems sufficient. No
warranty is made that the GracenoteSoftware or Gracenote Servers areerror-free or that functioning ofGracenote Software or GracenoteServers will be uninterrupted.Gracenote is not obligated toprovide you with new enhanced oradditional data types or categoriesthat Gracenote may provide in thefuture and is free to discontinue itsservices at any time.
GRACENOTE DISCLAIMS ALLWARRANTIES EXPRESS ORIMPLIED, INCLUDING, BUT NOTLIMITED TO, IMPLIEDWARRANTIES OFMERCHANTABILITY, FITNESSFOR A PARTICULAR PURPOSE,TITLE, AND NON-INFRINGEMENT.GRACENOTE DOES NOTWARRANT THE RESULTS THATWILL BE OBTAINED BY YOURUSE OF THE GRACENOTESOFTWARE OR ANYGRACENOTE SERVER. IN NOCASE WILL GRACENOTE BELIABLE FOR ANYCONSEQUENTIAL OR

Chevrolet Silverado 4500HD/5500HD/6500HD Owner Manual (GMNA-Localizing-U.S.-12102101) - 2019 - crc - 10/2/18
184 Infotainment System
INCIDENTAL DAMAGES OR FORANY LOST PROFITS OR LOSTREVENUES.
Copyright 2013. Gracenote, Inc. AllRights Reserved.
Unicode
Copyright 1991-2013 Unicode, Inc.All rights reserved. Distributed underthe Terms of Use in http://www.unicode.org/copyright.html.
Free Type Project
Portions of this software arecopyright 2013 The FreeTypeProject (http://www.freetype.org). Allrights reserved.
iType
iType is a trademark of MonotypeImaging Inc. registered in the U.S.Patent & Trademark Office and maybe registered in certain otherjurisdictions.
Open Source SW
The open source code used in thisdevice can be downloaded at thewebpage shown in the informationat the center stack display. Further
information concerning the OSSlicenses is shown in the centerstack display.
QNX
Portions of this software arecopyright 2008-2013, QNX SoftwareSystems. All rights reserved.
Part C – EULA
Copyright 2013, Software SystemsGmbH & Co. KG. All RightsReserved.
The product you have purchased("Product") contains Software(Runtime Configuration No. 505962;"Software") which is distributed byor on behalf of the Productmanufacturer "Manufacturer") underlicense from Software Systems Co.("QSSC"). You may only use theSoftware in the Product and incompliance with the license termsbelow.
Subject to the terms and conditionsof this License, QSSC herebygrants you a limited, non-exclusive,non-transferable license to use theSoftware in the Product for the
purpose intended by theManufacturer. If permitted by theManufacturer, or by applicable law,you may make one backup copy ofthe Software as part of the Productsoftware. QSSC and its licensorsreserve all license+C31 rights notexpressly granted herein, and retainall right, title and interest in and toall copies of the Software, includingall intellectual property rightstherein. Unless required byapplicable law you may notreproduce, distribute or transfer,or de-compile, disassemble orotherwise attempt to unbundle,reverse engineer, modify or createderivative works of, the Software.You agree: (1) not to remove, coveror alter any proprietary notices,labels or marks in or on theSoftware, and to ensure that allcopies bear any notice contained onthe original; and (2) not to export theProduct or the Software incontravention of applicable exportcontrol laws.
EXCEPT TO THE EXTENTOTHERWISE REQUIRED BYAPPLICABLE LAW, QSSC AND ITS

Chevrolet Silverado 4500HD/5500HD/6500HD Owner Manual (GMNA-Localizing-U.S.-12102101) - 2019 - crc - 10/2/18
Infotainment System 185
LICENSORS PROVIDE THESOFTWARE ON AN "AS IS" BASIS,WITHOUT WARRANTIES ORCONDITIONS OF ANY KIND,EITHER EXPRESS OR IMPLIEDINCLUDING, WITHOUTLIMITATION, ANY WARRANTIESOR CONDITIONS OF TITLE,NON-INFRINGEMENT,MERCHANTABILITY OR FITNESSFOR A PARTICULAR PURPOSE.ANY WARRANTIES OR OTHERPROVISIONS OFFERED BY THEMANUFACTURER OR ITSDISTRIBUTOR(S) THAT DIFFERFROM THIS LICENSE AREOFFERED BY THEMANUFACTURER OR ITSDISTRIBUTOR(S) ALONE ANDNOT BY QSSC, ITS AFFILIATESOR THEIR LICENSORS. YOUASSUME ANY RISKSASSOCIATED WITH YOUR USEOF THE SOFTWARE UNDER THISLICENSE.
EXCEPT TO THE EXTENTOTHERWISE REQUIRED BYAPPLICABLE LAW (SUCH AS INTHE CASE OF DELIBERATE ORGROSSLY NEGLIGENT ACTS), IN
NO EVENT SHALL QSSC, ITSAFFILIATES OR THEIRLICENSORS BE LIABLE TO YOUUNDER ANY LEGAL THEORY,WHETHER IN TORT (INCLUDINGNEGLIGENCE), CONTRACT OROTHERWISE, FOR DAMAGES,INCLUDING ANY DIRECT,INDIRECT, SPECIAL, INCIDENTAL,OR CONSEQUENTIAL DAMAGESOF ANY CHARACTER ARISING ASA RESULT OF THIS LICENSE OROUT OF THE USE OR INABILITYTO USE THE PRODUCT(INCLUDING BUT NOT LIMITEDTO DAMAGES FOR LOSS OFGOODWILL, WORK STOPPAGE,PRODUCT FAILURE ORMALFUNCTION, OR ANY AND ALLOTHER COMMERCIAL DAMAGESOR LOSSES), EVEN IF QSSC, ITSAFFILIATES OR THEIRLICENSORS HAVE BEENADVISED OF THE POSSIBILITYOF SUCH DAMAGES.
WMA
This product is protected by certainintellectual property rights ofMicrosoft. Use or distribution of
such technology outside of thisproduct is prohibited without alicense from Microsoft.
For more information on theSoftware, including any open sourcesoftware license terms (andavailable source code) as well ascopyright attributions applicable tothe Runtime Configuration indicatedabove, please contact theManufacturer or contact QSSC at175 Terence Matthews Crescent,Kanata, Ontario, Canada K2M 1W8([email protected]).
END USER NOTICE
The marks of companies displayedby this product to indicate businesslocations are the marks of theirrespective owners. The use of suchmarks in this product does not implyany sponsorship, approval,or endorsement by such companiesof this product.

Chevrolet Silverado 4500HD/5500HD/6500HD Owner Manual (GMNA-Localizing-U.S.-12102101) - 2019 - crc - 10/2/18
186 Climate Controls
Climate Controls
Climate Control SystemsClimate Control Systems (withHeater Only) . . . . . . . . . . . . . . . . 186
Climate Control Systems (withAir Conditioning) . . . . . . . . . . . . 188
Air VentsAir Vents . . . . . . . . . . . . . . . . . . . . . 190
MaintenancePassenger Compartment AirFilter . . . . . . . . . . . . . . . . . . . . . . . . 190
Service . . . . . . . . . . . . . . . . . . . . . . . 191
Climate Control Systems
Climate Control Systems (with Heater Only)With this system, the heating and ventilation can be controlled.
1. Fan Control
2. Air Recirculation
3. Air Delivery Mode Controls
4. Defrost
5. TEMP (Temperature Control)
TEMP : Turn clockwise orcounterclockwise to increase ordecrease the temperature inside thevehicle.
9 : Turn clockwise orcounterclockwise to increase ordecrease the fan speed. Turn theknob all the way counterclockwiseto turn the fan off.

Chevrolet Silverado 4500HD/5500HD/6500HD Owner Manual (GMNA-Localizing-U.S.-12102101) - 2019 - crc - 10/2/18
Climate Controls 187
Air Delivery Mode Controls :PressY,\,[ , or- to changethe direction of the airflow. Anindicator light comes on in theselected mode button.
Y : Air is directed to the instrumentpanel outlets.
\ : Air is divided between theinstrument panel and floor outlets.
[ : Air is directed to the flooroutlets, with some air directed to thewindshield, side window, andsecond row floor outlets.
- : This mode clears the windowsof fog or moisture. Air is directed tothe windshield, floor outlets, andside window vents.
0 : Press to clear the windshieldof fog or frost more quickly. Air isdirected to the windshield and theside window vents. The systemautomatically forces outside air intothe vehicle.
Do not drive the vehicle until all thewindows are clear.
See Air Vents 0 190.
@ : Press to turn on recirculation.An indicator light comes on. Air isrecirculated to quickly cool theinside of the vehicle. It can also beused to help reduce outside air andodors that enter the vehicle.

Chevrolet Silverado 4500HD/5500HD/6500HD Owner Manual (GMNA-Localizing-U.S.-12102101) - 2019 - crc - 10/2/18
188 Climate Controls
Climate Control Systems (with Air Conditioning)With this system the heating, cooling, and ventilation can be controlled.
1. Fan Control
2. A/C (Air Conditioning)
3. Air Delivery Mode Controls
4. Defrost
5. TEMP (Temperature Control)
6. K (Rear Window Defogger, IfEquipped)
f (Heated Outside Mirror, IfEquipped)
8 (Outside Air, If Equipped)
7. @ Air Recirculation
TEMP : Turn clockwise orcounterclockwise to increase ordecrease the temperature inside thevehicle.
9 : Turn clockwise orcounterclockwise to increase ordecrease the fan speed. Turn theknob all the way counterclockwiseto turn the fan off.
Air Delivery Mode Controls :PressY,\,[ , or- to changethe direction of the airflow. Anindicator light comes on in theselected mode button.
Y : Air is directed to the instrumentpanel outlets.
\ : Air is divided between theinstrument panel and floor outlets.
[ : Air is directed to the flooroutlets, with some air directed to thewindshield and side window outlets.
- : This mode clears the windowsof fog or moisture. Air is directed tothe windshield, floor outlets, andside window vents.
0 : Press to clear the windshieldof fog or frost more quickly. Air isdirected to the windshield and theside window vents. The systemautomatically forces outside air intothe vehicle and the air conditioning

Chevrolet Silverado 4500HD/5500HD/6500HD Owner Manual (GMNA-Localizing-U.S.-12102101) - 2019 - crc - 10/2/18
Climate Controls 189
compressor will run, unless theoutside temperature is close tofreezing.
Do not drive the vehicle until all thewindows are clear.
See Air Vents 0 190.
@ : Press to turn on recirculation.An indicator light comes on. Air isrecirculated to quickly cool theinside of the vehicle. It can also beused to help reduce outside air andodors that enter the vehicle.
8 : If equipped, press to turn theoutside air mode on. An indicatorlight on the button comes on toshow that outside air is on. Whenselected, air from outside thevehicle circulates throughout thevehicle. The recirculation modecannot be used with the outsideair mode.
A/C : Press to turn the airconditioning system on or off. Anindicator light comes on to showthat the air conditioning is enabled.If the fan is turned off, the airconditioner will not run. The A/Clight will stay on even if the outsidetemperatures are below freezing.
Rear Window Defogger
K : If equipped, press to turn therear window defogger on or off. Anindicator light on the button comeson to show that the rear windowdefogger is on.
The rear window defogger onlyworks when the ignition is on. Thedefogger turns off if the ignition isturned to ACC/ACCESSORY or off.
If equipped with heated outsidemirrors, they turn on when the rearwindow defogger button is on. Theyhelp to clear fog or frost from thesurface of the mirrors.
Caution
Using a razor blade or sharpobject to clear the inside rearwindow can damage the rearwindow defogger. Repairs wouldnot be covered by the vehiclewarranty. Do not clear the insiderear window with sharp objects.

Chevrolet Silverado 4500HD/5500HD/6500HD Owner Manual (GMNA-Localizing-U.S.-12102101) - 2019 - crc - 10/2/18
190 Climate Controls
Air VentsUse the sliding knobs on the centerand side air vents to direct theairflow. Use the thumbwheels nearthe air vents to open or close off theairflow.
Air vents blow warm air on the sidewindows in cold weather. If Floor,Defog, or Defrost modes areselected, a small amount of air willcome from the vents close to thewindow. If the airflow is shut offusing the thumbwheels, warm airwill be directed to the otherinstrument panel vents. This isnormal operation.
Use the thumbwheels to turn ventairflow on or off based on the modeselected.
Operation Tips
. Clear away any ice, snow,or leaves from air inlets at thebase of the windshield that couldblock the flow of air into thevehicle.
. Clear snow off the hood toimprove visibility and helpdecrease moisture drawn intothe vehicle.
. Keep the path under the frontseats clear of objects to helpcirculate the air inside of thevehicle more effectively.
. Use of non-GM approved hooddeflectors can adversely affectthe performance of the system.Check with your dealer beforeadding equipment to the outsideof the vehicle.
Maintenance
Passenger CompartmentAir FilterThe filter reduces the dust, pollen,and other airborne irritants fromoutside air that is pulled into thevehicle.
The filter should be replaced as partof routine scheduled maintenance.See Maintenance Schedule 0 361.To find out what type of filter to use,see Maintenance ReplacementParts 0 405.

Chevrolet Silverado 4500HD/5500HD/6500HD Owner Manual (GMNA-Localizing-U.S.-12102101) - 2019 - crc - 10/2/18
Climate Controls 191
1. Open the lower glove box doorcompletely.
2. Remove the four screws fromaround the lower glove box.The door does not need to beremoved to access the screws.
3. Close the lower glove box doorand pull it from its frame toremove the entire unit.
4. Release the two tabs holdingthe service door. Open theservice door and remove theold filter.
5. Install the new air filter.
6. Close the service door andsecure the tabs.
7. Reverse the steps to reinstallthe glove box.
See your dealer if additionalassistance is needed.
ServiceAll vehicles have a label underhoodthat identifies the refrigerant used inthe vehicle. The refrigerant systemshould only be serviced by trainedand certified technicians. The airconditioning evaporator shouldnever be repaired or replaced byone from a salvage vehicle.It should only be replaced by a newevaporator to ensure proper andsafe operation.
During service, all refrigerantsshould be reclaimed with properequipment. Venting refrigerantsdirectly to the atmosphere is harmfulto the environment and may alsocreate unsafe conditions based oninhalation, combustion, frostbite,or other health-based concerns.
The air conditioning system requiresperiodic maintenance. SeeMaintenance Schedule 0 361.

Chevrolet Silverado 4500HD/5500HD/6500HD Owner Manual (GMNA-Localizing-U.S.-12102101) - 2019 - crc - 10/2/18
192 Driving and Operating
Driving andOperating
Driving InformationDistracted Driving . . . . . . . . . . . . 193Defensive Driving . . . . . . . . . . . . . 194Drunk Driving . . . . . . . . . . . . . . . . . 194Control of a Vehicle . . . . . . . . . . . 194Braking . . . . . . . . . . . . . . . . . . . . . . . 194Steering . . . . . . . . . . . . . . . . . . . . . . 195Off-Road Recovery . . . . . . . . . . . 195Loss of Control . . . . . . . . . . . . . . . 196Off-Road Driving . . . . . . . . . . . . . 196Driving on Wet Roads . . . . . . . . 201Hill and Mountain Roads . . . . . 202Winter Driving . . . . . . . . . . . . . . . . 203If the Vehicle Is Stuck . . . . . . . . 204Vehicle Load Limits . . . . . . . . . . . 205
Starting and OperatingNew Vehicle Break-In . . . . . . . . . 207Ignition Positions . . . . . . . . . . . . . 208Starting the Diesel Engine . . . . 210Engine Heater . . . . . . . . . . . . . . . . 212Retained AccessoryPower (RAP) . . . . . . . . . . . . . . . . 214
Shifting Into Park . . . . . . . . . . . . . 214Shifting out of Park . . . . . . . . . . . 215
Parking over ThingsThat Burn . . . . . . . . . . . . . . . . . . . 215
Engine ExhaustEngine Exhaust . . . . . . . . . . . . . . 216Running the Vehicle WhileParked . . . . . . . . . . . . . . . . . . . . . . 217
Diesel Particulate FilterDiesel Particulate Filter . . . . . . . 217
Diesel Exhaust FluidDiesel Exhaust Fluid . . . . . . . . . . 220
Automatic TransmissionAutomatic Transmission . . . . . . 223Manual Mode . . . . . . . . . . . . . . . . . 226Tow/Haul Mode . . . . . . . . . . . . . . . 227
Drive SystemsFour-Wheel Drive . . . . . . . . . . . . . 228
BrakesAntilock BrakeSystem (ABS) . . . . . . . . . . . . . . . 231
Parking Brake . . . . . . . . . . . . . . . . 233Exhaust Brake . . . . . . . . . . . . . . . . 234
Ride Control SystemsTraction ControlSystem (TCS) . . . . . . . . . . . . . . . 235
Air Suspension . . . . . . . . . . . . . . . 236
Cruise ControlCruise Control . . . . . . . . . . . . . . . . 237
Driver Assistance SystemsRear Vision Camera (RVC) . . . 240
FuelTop Tier Fuel . . . . . . . . . . . . . . . . . 240Fuel Additives . . . . . . . . . . . . . . . . 241Fuel for Diesel Engines . . . . . . . 241Biodiesel . . . . . . . . . . . . . . . . . . . . . 242Cold Weather Operation . . . . . . 243Water in Fuel . . . . . . . . . . . . . . . . . 243Running Out of Fuel . . . . . . . . . . 246Fuel Filter Replacement . . . . . . 247Filling the Tank . . . . . . . . . . . . . . . 248Filling a Portable FuelContainer . . . . . . . . . . . . . . . . . . . 250
Trailer TowingGeneral TowingInformation . . . . . . . . . . . . . . . . . . 250
Driving Characteristics andTowing Tips . . . . . . . . . . . . . . . . . 250
Trailer Towing . . . . . . . . . . . . . . . . 254Towing Equipment . . . . . . . . . . . . 257
Conversions and Add-OnsAdd-On ElectricalEquipment . . . . . . . . . . . . . . . . . . 266
Chevrolet Silverado 4500HD/5500HD/6500HD Owner Manual (GMNA-Localizing-U.S.-12102101) - 2019 - crc - 10/2/18
Driving and Operating 193
Adding a Snow Plow or SimilarEquipment . . . . . . . . . . . . . . . . . . 266
Power Take-Off (PTO) . . . . . . . . 270
Driving Information
Distracted DrivingDistraction comes in many formsand can take your focus from thetask of driving. Exercise goodjudgment and do not let otheractivities divert your attention awayfrom the road. Many localgovernments have enacted lawsregarding driver distraction. Becomefamiliar with the local laws inyour area.
To avoid distracted driving, keepyour eyes on the road, keep yourhands on the steering wheel, andfocus your attention on driving.
. Do not use a phone indemanding driving situations.Use a hands-free method toplace or receive necessaryphone calls.
. Watch the road. Do not read,take notes, or look upinformation on phones or otherelectronic devices.
. Designate a front seatpassenger to handle potentialdistractions.
. Become familiar with vehiclefeatures before driving, such asprogramming favorite radiostations and adjusting climatecontrol and seat settings.Program all trip information intoany navigation device prior todriving.
. Wait until the vehicle is parkedto retrieve items that have fallento the floor.
. Stop or park the vehicle to tendto children.
. Keep pets in an appropriatecarrier or restraint.
. Avoid stressful conversationswhile driving, whether with apassenger or on a cell phone.

Chevrolet Silverado 4500HD/5500HD/6500HD Owner Manual (GMNA-Localizing-U.S.-12102101) - 2019 - crc - 10/2/18
194 Driving and Operating
{ Warning
Taking your eyes off the road toolong or too often could cause acrash resulting in injury or death.Focus your attention on driving.
Refer to the infotainment sectionand/or infotainment manual on usingthat system and the navigationsystem, if equipped, includingpairing and using a cell phone.
Defensive DrivingDefensive driving means “alwaysexpect the unexpected.” The firststep in driving defensively is to wearthe seat belt. See Seat Belts 0 53.
. Assume that other road users(pedestrians, bicyclists, andother drivers) are going to becareless and make mistakes.Anticipate what they might doand be ready.
. Allow enough following distancebetween you and the driver infront of you.
. Focus on the task of driving.
Drunk DrivingDeath and injury associated withdrinking and driving is a globaltragedy.
{ Warning
Drinking and then driving is verydangerous. Your reflexes,perceptions, attentiveness, andjudgment can be affected by evena small amount of alcohol. Youcan have a serious — or evenfatal — collision if you drive afterdrinking.
Do not drink and drive or ride witha driver who has been drinking.Ride home in a cab; or if you arewith a group, designate a driverwho will not drink.
Control of a VehicleBraking, steering, and acceleratingare important factors in helping tocontrol a vehicle while driving.
BrakingBraking action involves perceptiontime and reaction time. Deciding topush the brake pedal is perceptiontime. Actually doing it isreaction time.
Average driver reaction time isabout three-quarters of a second. Inthat time, a vehicle moving at100 km/h (60 mph) travels 20 m(66 ft), which could be a lot ofdistance in an emergency.
Helpful braking tips to keep in mindinclude:
. Keep enough distance betweenyou and the vehicle in frontof you.
. Avoid needless heavy braking.
. Keep pace with traffic.
If the engine ever stops while thevehicle is being driven, brakenormally but do not pump thebrakes. Doing so could make thepedal harder to push down. If theengine stops, there will be somepower brake assist but it will beused when the brake is applied.

Chevrolet Silverado 4500HD/5500HD/6500HD Owner Manual (GMNA-Localizing-U.S.-12102101) - 2019 - crc - 10/2/18
Driving and Operating 195
Once the power assist is used up, itcan take longer to stop and thebrake pedal will be harder to push.
SteeringThe power steering system mayrequire maintenance. See PowerSteering Fluid 0 306.
If power steering assist is lostbecause the engine stops or thesystem malfunctions, the vehiclecan be steered but may requireincreased effort. See your dealer.
Caution
If the steering wheel is turneduntil it reaches the end of itstravel, and is held in that positionfor more than 15 seconds,damage may occur to the powersteering system and there may beloss of power steering assist.
Curve Tips. Take curves at a reasonable
speed.
. Reduce speed before entering acurve.
. Maintain a reasonable steadyspeed through the curve.
. Wait until the vehicle is out ofthe curve before acceleratinggently into the straightaway.
Steering in Emergencies. There are some situations when
steering around a problem maybe more effective than braking.
. Holding both sides of thesteering wheel allows you to turn180 degrees without removinga hand.
. Antilock Brake System (ABS)allows steering while braking.
Off-Road Recovery
The vehicle's right wheels can dropoff the edge of a road onto theshoulder while driving. Followthese tips:
1. Ease off the accelerator andthen, if there is nothing in theway, steer the vehicle so that itstraddles the edge of thepavement.
2. Turn the steering wheel aboutone-eighth of a turn, until theright front tire contacts thepavement edge.

Chevrolet Silverado 4500HD/5500HD/6500HD Owner Manual (GMNA-Localizing-U.S.-12102101) - 2019 - crc - 10/2/18
196 Driving and Operating
3. Turn the steering wheel to gostraight down the roadway.
Loss of Control
Skidding
There are three types of skids thatcorrespond to the vehicle's threecontrol systems:
. Braking Skid — wheels are notrolling.
. Steering or Cornering Skid —too much speed or steering in acurve causes tires to slip andlose cornering force.
. Acceleration Skid — too muchthrottle causes the drivingwheels to spin.
Defensive drivers avoid most skidsby taking reasonable care suited toexisting conditions, and by notoverdriving those conditions. Butskids are always possible.
If the vehicle starts to slide, followthese suggestions:
. Ease your foot off theaccelerator pedal and steer theway you want the vehicle to go.The vehicle may straighten out.Be ready for a second skid if itoccurs.
. Slow down and adjust yourdriving according to weatherconditions. Stopping distancecan be longer and vehiclecontrol can be affected whentraction is reduced by water,snow, ice, gravel, or othermaterial on the road. Learn torecognize warning clues — suchas enough water, ice, or packedsnow on the road to make amirrored surface — and slowdown when you have any doubt.
. Try to avoid sudden steering,acceleration, or braking,including reducing vehicle speedby shifting to a lower gear. Anysudden changes could causethe tires to slide.
Remember: Antilock brakes helpavoid only the braking skid.
Off-Road DrivingFour-wheel-drive vehicles can beused for off-road driving. Vehicleswithout four-wheel drive andvehicles not equipped with AllTerrain (AT) or On-Off Road (OOR)tires must not be driven off-roadexcept on a level, solid surface. Forcontact information about theoriginal equipment tires, see thewarranty manual.
One of the best ways for successfuloff-road driving is to control thespeed.
{ Warning
When driving off-road, bouncingand quick changes in directioncan easily throw you out ofposition. This could cause you tolose control and crash. You andyour passengers should alwayswear seat belts.
Chevrolet Silverado 4500HD/5500HD/6500HD Owner Manual (GMNA-Localizing-U.S.-12102101) - 2019 - crc - 10/2/18
Driving and Operating 197
Before Driving Off-Road. Have all necessary maintenance
and service work completed.
. Fuel the vehicle, fill fluid levels,and check inflation pressure inall tires, including the spare,if equipped.
. Read all the information aboutfour-wheel-drive vehicles in thismanual.
. Know the local laws that apply tooff-road driving.
To gain more ground clearance ifneeded, it may be necessary toremove the front fascia lower airdam, if equipped. However, drivingwithout the air dam reduces fueleconomy.
Caution
Operating the vehicle forextended periods without the frontfascia lower air dam installed cancause improper airflow to theengine. Reattach the front fasciaair dam after off-road driving.
Loading the Vehicle forOff-Road Driving
{ Warning
. Unsecured cargo on theload floor can be tossedabout when driving overrough terrain. You or yourpassengers can be struckby flying objects. Secure thecargo properly.
. Keep cargo in the cargoarea as far forward and aslow as possible. Theheaviest things should beon the floor, forward of therear axle.
. Heavy loads on the roofraise the vehicle's center ofgravity, making it more likelyto roll over. You can beseriously or fatally injured ifthe vehicle rolls over. Putheavy loads inside thecargo area, not on the roof.
For more information about loadingthe vehicle, see Vehicle Load Limits0 205 and Tires 0 331.
Environmental Concerns. Always use established trails,
roads, and areas that have beenset aside for public off-roadrecreational driving and obey allposted regulations.
. Do not damage shrubs, flowers,trees, or grasses or disturbwildlife.
. Do not park over things thatburn. See Parking over ThingsThat Burn 0 215.
Driving on Hills
Driving safely on hills requires goodjudgment and an understanding ofwhat the vehicle can and cannot do.
{ Warning
Many hills are simply too steepfor any vehicle. Driving up hillscan cause the vehicle to stall.
(Continued)

Chevrolet Silverado 4500HD/5500HD/6500HD Owner Manual (GMNA-Localizing-U.S.-12102101) - 2019 - crc - 10/2/18
198 Driving and Operating
Warning (Continued)
Driving down hills can cause lossof control. Driving across hills cancause a rollover. You could beinjured or killed. Do not drive onsteep hills.
Before driving on a hill, assess thesteepness, traction, andobstructions. If the terrain aheadcannot be seen, get out of thevehicle and walk the hill beforedriving further.
When driving on hills:
. Use a low gear and keep a firmgrip on the steering wheel.
. Maintain a slow speed.
. When possible, drive straight upor down the hill.
. Slow down when approachingthe top of the hill.
. Use headlamps even during theday to make the vehicle morevisible.
{ Warning
Driving to the top of a hill at highspeed can cause a crash. Therecould be a drop-off, embankment,cliff, or even another vehicle. Youcould be seriously injured orkilled. As you near the top of ahill, slow down and stay alert.
. Never go downhill forward orbackward with either thetransmission or transfer case inN (Neutral). The brakes couldoverheat and you could losecontrol.
{ Warning
If the vehicle has the two-speedelectronic transfer case, shiftingthe transfer case to N (Neutral)can cause your vehicle to rolleven if the transmission is inP (Park). This is because theN (Neutral) position on the
(Continued)
Warning (Continued)
transfer case overrides thetransmission. You or someoneelse could be injured. If leavingthe vehicle, set the parking brakeand shift the transmission toP (Park). Shift the transfer case toany position but N (Neutral).
. When driving down a hill, keepthe vehicle headed straightdown. Use a low gear becausethe engine will work with thebrakes to slow the vehicle andhelp keep the vehicle undercontrol.
{ Warning
Heavy braking when going downa hill can cause your brakes tooverheat and fade. This couldcause loss of control and you orothers could be injured or killed.Apply the brakes lightly when
(Continued)

Chevrolet Silverado 4500HD/5500HD/6500HD Owner Manual (GMNA-Localizing-U.S.-12102101) - 2019 - crc - 10/2/18
Driving and Operating 199
Warning (Continued)
descending a hill and use a lowgear to keep vehicle speed undercontrol.
If the vehicle stalls on a hill:
1. Apply the brakes to stop thevehicle, and then apply theparking brake.
2. Shift into P (Park) and thenrestart the engine.
. If driving uphill when thevehicle stalls, shift toR (Reverse), release theparking brake, and backstraight down.
. Never try to turn the vehiclearound. If the hill is steepenough to stall the vehicle,it is steep enough to causeit to roll over.
. If you cannot make it up thehill, back straight downthe hill.
. Never back down a hill inN (Neutral) using only thebrake. The vehicle can rollbackward quickly and youcould lose control.
. If driving downhill when thevehicle stalls, shift to alower gear, release theparking brake, and drivestraight down the hill.
3. If the vehicle cannot berestarted after stalling, set theparking brake, shift intoP (Park), and turn the vehicleoff. Block the wheels withchocks for added safety whenparking on a grade.
3.1. Leave the vehicle andseek help.
3.2. Stay clear of the path thevehicle would take if itrolled downhill.
. Avoid turns that take the vehicleacross the incline of the hill.A hill that can be driven straightup or down might be too steep todrive across. Driving across anincline puts more weight on the
downhill wheels, which couldcause a downhill slide or arollover.
. Surface conditions can be aproblem. Loose gravel, muddyspots, or even wet grass cancause the tires to slip sideways,downhill. If the vehicle slipssideways, it can hit somethingthat will trip it — a rock, a rut,etc. — and roll over.
. Hidden obstacles can make thesteepness of the incline moresevere. If a rock is driven acrosswith the uphill wheels, or if thedownhill wheels drop into a rutor depression, the vehicle can tilteven more.
. If an incline must be drivenacross, and the vehicle starts toslide, turn downhill. This shouldhelp straighten out the vehicleand prevent the side slipping.

Chevrolet Silverado 4500HD/5500HD/6500HD Owner Manual (GMNA-Localizing-U.S.-12102101) - 2019 - crc - 10/2/18
200 Driving and Operating
{ Warning
Getting out of the vehicle on thedownhill side when stoppedacross an incline is dangerous.If the vehicle rolls over, you couldbe crushed or killed. Always getout on the uphill side of thevehicle and stay well clear of therollover path.
Parking on a Hill
Parking on a hill or steep grade isnot advised. See “Parking on Hills”in Driving Characteristics andTowing Tips 0 250 for more detailedinformation.
If parking on a hill or steep grade:
1. Press the brake pedal to stopthe vehicle, and then apply theparking brake.
2. Shift into P (Park), and thenturn the vehicle off.
3. Block the wheels with chocks.
Driving in Mud, Sand, Snow,or Ice
Use a low gear when driving inmud — the deeper the mud, thelower the gear. Keep the vehiclemoving to avoid getting stuck.
Traction changes when driving onsand. On loose sand, such as onbeaches or sand dunes, the tirestend to sink into the sand. Thisaffects steering, accelerating, andbraking. Drive at a reduced speedand avoid sharp turns or abruptmaneuvers.
Traction is reduced on hard packedsnow and ice and it is easy to losecontrol. Reduce vehicle speed whendriving on hard packed snowand ice.
{ Warning
Driving on frozen lakes, ponds,or rivers can be dangerous. Iceconditions vary greatly and thevehicle could fall through the ice;
(Continued)
Warning (Continued)
you and your passengers coulddrown. Drive your vehicle on safesurfaces only.
Driving in Water
{ Warning
Driving through rushing water canbe dangerous. Deep water cansweep your vehicle downstreamand you and your passengerscould drown. If it is only shallowwater, it can still wash away theground from under your tires.Traction could be lost, and thevehicle could roll over. Do notdrive through rushing water.

Chevrolet Silverado 4500HD/5500HD/6500HD Owner Manual (GMNA-Localizing-U.S.-12102101) - 2019 - crc - 10/2/18
Driving and Operating 201
Caution
Do not drive through standingwater if it is deep enough to coverthe wheel hubs, axles, or exhaustpipe. Deep water can damage theaxle and other vehicle parts.
If the standing water is not too deep,drive through it slowly. At fasterspeeds, water can get into theengine and cause it to stall. Stallingcan occur if the exhaust pipe isunder water. Do not turn off theignition when driving through water.If the exhaust pipe is under water,the engine will not start. When goingthrough water, the brakes get wetand it may take longer to stop. See“Driving on Wet Roads” later in thissection.
After Off-Road Driving
Remove any brush or debris thathas collected on the underbody orchassis, or under the hood. Theseaccumulations can be a fire hazard.
After operation in mud or sand,have the brake linings cleaned andchecked. These substances cancause glazing and uneven braking.Check the body structure, driveline,steering, suspension, wheels, tires,and exhaust system for damage andcheck the fuel lines and coolingsystem for any leakage.
More frequent maintenance serviceis required. See MaintenanceSchedule 0 361.
Driving on Wet RoadsRain and wet roads can reducevehicle traction and affect yourability to stop and accelerate.Always drive slower in these typesof driving conditions and avoiddriving through large puddles anddeep-standing or flowing water.
{ Warning
Wet brakes can cause crashes.They might not work as well in aquick stop and could causepulling to one side. You couldlose control of the vehicle.
After driving through a largepuddle of water or a car/vehiclewash, lightly apply the brakepedal until the brakes worknormally.
Flowing or rushing water createsstrong forces. Driving throughflowing water could cause thevehicle to be carried away. If thishappens, you and other vehicleoccupants could drown. Do notignore police warnings and bevery cautious about trying to drivethrough flowing water.
Hydroplaning
Hydroplaning is dangerous. Watercan build up under the vehicle'stires so they actually ride on thewater. This can happen if the road is

Chevrolet Silverado 4500HD/5500HD/6500HD Owner Manual (GMNA-Localizing-U.S.-12102101) - 2019 - crc - 10/2/18
202 Driving and Operating
wet enough and you are going fastenough. When the vehicle ishydroplaning, it has little or nocontact with the road.
There is no hard and fast rule abouthydroplaning. The best advice is toslow down when the road is wet.
Other Rainy Weather Tips
Besides slowing down, other wetweather driving tips include:
. Allow extra following distance.
. Pass with caution.
. Keep windshield wipingequipment in good shape.
. Keep the windshield washer fluidreservoir filled.
. Have good tires with propertread depth. See Tires 0 331.
. Turn off cruise control.
Hill and Mountain RoadsDriving on steep hills or throughmountains is different than drivingon flat or rolling terrain. Tips include:
. Keep the vehicle serviced and ingood shape.
. Check all fluid levels and brakes,tires, cooling system, andtransmission.
. Shift to a lower gear when goingdown steep or long hills.
{ Warning
Using the brakes to slow thevehicle on a long downhill slopecan cause brake overheating, canreduce brake performance, andcould result in a loss of braking.Shift the transmission to a lowergear to let the engine assist thebrakes on a steep downhill slope.
{ Warning
Coasting downhill in N (Neutral)or with the ignition off isdangerous. This can causeoverheating of the brakes andloss of steering assist. Alwayshave the engine running and thevehicle in gear.
. Drive at speeds that keep thevehicle in its own lane. Do notswing wide or cross thecenter line.
. Be alert on top of hills;something could be in your lane(e.g., stalled car, crash).
. Pay attention to special roadsigns (e.g., falling rocks area,winding roads, long grades,passing or no-passing zones)and take appropriate action.

Chevrolet Silverado 4500HD/5500HD/6500HD Owner Manual (GMNA-Localizing-U.S.-12102101) - 2019 - crc - 10/2/18
Driving and Operating 203
Winter Driving
Driving on Snow or Ice
Snow or ice between the tires andthe road creates less traction orgrip, so drive carefully. Wet ice canoccur at about 0 °C (32 °F) whenfreezing rain begins to fall. Avoiddriving on wet ice or in freezing rainuntil roads can be treated.
For Slippery Road Driving:
. Accelerate gently. Acceleratingtoo quickly causes the wheels tospin and makes the surfaceunder the tires slick.
. The Antilock Brake System(ABS) improves vehicle stabilityduring hard stops, but thebrakes should be applied soonerthan when on dry pavement.See Antilock Brake System(ABS) 0 231.
. Allow greater following distanceand watch for slippery spots. Icypatches can occur on otherwiseclear roads in shaded areas.The surface of a curve or anoverpass can remain icy when
the surrounding roads are clear.Avoid sudden steeringmaneuvers and braking whileon ice.
. Turn off cruise control.
Blizzard Conditions
Stop the vehicle in a safe place andsignal for help. Stay with the vehicleunless there is help nearby.If possible, use RoadsideAssistance. See RoadsideAssistance Program 0 418. To gethelp and keep everyone in thevehicle safe:
. Turn on the hazard warningflashers.
. Tie a red cloth to an outsidemirror.
{ Warning
Snow can trap engine exhaustunder the vehicle. This maycause exhaust gases to getinside. Engine exhaust containscarbon monoxide (CO), which
(Continued)
Warning (Continued)
cannot be seen or smelled. It cancause unconsciousness and evendeath.
If the vehicle is stuck in snow:
. Clear snow from the base ofthe vehicle, especially anyblocking the exhaust pipe.
. Open a window about 5 cm(2 in) on the vehicle sidethat is away from the wind,to bring in fresh air.
. Fully open the air outlets onor under the instrumentpanel.
. Adjust the climate controlsystem to circulate the airinside the vehicle and setthe fan speed to the highestsetting. See “ClimateControl Systems.”
For more information about CO,see Engine Exhaust 0 216.

Chevrolet Silverado 4500HD/5500HD/6500HD Owner Manual (GMNA-Localizing-U.S.-12102101) - 2019 - crc - 10/2/18
204 Driving and Operating
To save fuel, run the engine forshort periods to warm the vehicleand then shut the engine off andpartially close the window. Movingabout to keep warm also helps.
If it takes time for help to arrive,when running the engine, push theaccelerator pedal slightly so theengine runs faster than the idlespeed. This keeps the batterycharged to restart the vehicle and tosignal for help with the headlamps.Do this as little as possible, tosave fuel.
If the Vehicle Is StuckSlowly and cautiously spin thewheels to free the vehicle whenstuck in sand, mud, ice, or snow.See “Rocking the Vehicle to Get ItOut” later in this section.
The Traction Control System canoften help to free a stuck vehicle.See Traction Control System (TCS)0 235. If TCS cannot free thevehicle, see “Rocking the Vehicle toGet it Out” following.
{ Warning
If the vehicle's tires spin at highspeed, they can explode, and youor others could be injured. Thevehicle can overheat, causing anengine compartment fire or otherdamage. Spin the wheels as littleas possible and avoid goingabove 56 km/h (35 mph).
For information about using tirechains on the vehicle, see TireChains 0 343.
Rocking the Vehicle to GetIt Out
Turn the steering wheel left andright to clear the area around thefront wheels. For four-wheel-drivevehicles, shift into Four-Wheel DriveHigh. Turn the TCS off. Shift backand forth between R (Reverse) anda forward gear, spinning the wheelsas little as possible. To preventtransmission wear, wait until thewheels stop spinning before shiftinggears. Slowly spinning the wheels in
the forward and reverse directionscauses a rocking motion that couldfree the vehicle. If that does not getthe vehicle out after a few tries, itmight need to be towed out. SeeTowing the Vehicle 0 347. Recoveryhooks can be used, if the vehiclehas them.
Recovery Hooks
{ Warning
Never pull on recovery hooksfrom the side. The hooks couldbreak and you and others couldbe injured. When using recoveryhooks, always pull the vehiclefrom the front.

Chevrolet Silverado 4500HD/5500HD/6500HD Owner Manual (GMNA-Localizing-U.S.-12102101) - 2019 - crc - 10/2/18
Driving and Operating 205
Caution
Never use recovery hooks to towthe vehicle. The vehicle could bedamaged, and the repairs wouldnot be covered by the vehiclewarranty.
There are recovery hooks at thefront of the vehicle. Use them if thevehicle is stuck off-road and needsto be pulled some place to continuedriving.
Vehicle Load LimitsIt is very important to know howmuch weight the vehicle cancarry. This weight is called thevehicle capacity weight andincludes the weight of alloccupants, cargo, and allnonfactory-installed options.
{ Warning
Do not load the vehicle anyheavier than the GrossVehicle Weight Rating(GVWR), or either themaximum front or rear GrossAxle Weight Rating (GAWR).This can cause systems tobreak and change the way thevehicle handles. This couldcause loss of control and acrash. Overloading can alsoreduce stopping distance,damage the tires, and shortenthe life of the vehicle.
Certification/Tire Label
Label Example
1. Gross Weight Rating ofthe Front Axle
2. Tire Size for Front Axle3. Tire Size for Rear Axle4. Gross Weight Rating of
the Rear Axle
A vehicle-specific Certification/Tire label may be attached tothe driver-side door frame. Thelabel may show the size of thevehicle's original tires and theinflation pressures needed toobtain the gross weight capacityof the vehicle. This is calledGross Vehicle Weight

Chevrolet Silverado 4500HD/5500HD/6500HD Owner Manual (GMNA-Localizing-U.S.-12102101) - 2019 - crc - 10/2/18
206 Driving and Operating
Rating (GVWR). The GVWRincludes the weight of thevehicle, all occupants, fuel, andcargo.
The Certification/Tire label alsomay show the maximum weightsfor the front and rear axles,called Gross Axle WeightRating (GAWR). To determinethe actual loads on the front andrear axles, weigh the vehicle ata weigh station. Your dealer canhelp with this. Be sure to spreadthe load equally on both sides ofthe centerline.
Caution
Overloading the vehicle maycause damage. Repairs would notbe covered by the vehiclewarranty. Do not overload thevehicle.
Using heavier suspensioncomponents to get addeddurability might not change theweight ratings. Ask your dealerto help load the vehicle theright way.
{ Warning
Things you put inside thevehicle can strike and injurepeople in a sudden stop orturn, or in a crash.
. Put things in the cargoarea of the vehicle. Try tospread the weight evenly.
. Never stack heavierthings, like suitcases,inside the vehicle so thatsome of them are abovethe tops of the seats.
. Do not leave anunsecured child restraintin the vehicle.
(Continued)
Warning (Continued)
. When you carrysomething inside thevehicle, secure itwhenever you can.
. Do not leave a seatfolded down unless youneed to.
Add-On Equipment
When carrying removable items,a limit on how many peoplecarried inside the vehicle maybe necessary. Be sure to weighthe vehicle before buying andinstalling the new equipment.

Chevrolet Silverado 4500HD/5500HD/6500HD Owner Manual (GMNA-Localizing-U.S.-12102101) - 2019 - crc - 10/2/18
Driving and Operating 207
Caution
Overloading the vehicle maycause damage. Repairs would notbe covered by the vehiclewarranty. Do not overload thevehicle.
Remember not to exceed theGross Axle WeightRating (GAWR) of the front orrear axle.
Starting andOperating
New Vehicle Break-In
Caution
The vehicle does not need anelaborate break-in. But it willperform better in the long run ifyou follow these guidelines:
. Keep the vehicle speed at88 km/h (55 mph) or less forthe first 805 km (500mi).
. Do not drive at any oneconstant speed, fast or slow,for the first 805 km (500 mi).Do not make full-throttlestarts. Avoid downshifting tobrake or slow the vehicle.
. Avoid making hard stops forthe first 322 km (200mi) orso. During this time the newbrake linings are not yetbroken in. Hard stops withnew linings can mean
(Continued)
Caution (Continued)
premature wear and earlierreplacement. Follow thisbreaking-in guideline everytime you get new brakelinings.
. Do not tow a trailer duringbreak-in. See Trailer Towing0 254 for the trailer towingcapabilities of the vehicleand more information.
Following break-in, engine speedand load can be graduallyincreased.

Chevrolet Silverado 4500HD/5500HD/6500HD Owner Manual (GMNA-Localizing-U.S.-12102101) - 2019 - crc - 10/2/18
208 Driving and Operating
Ignition Positions
0. Stopping the Engine/LOCK/OFF
1. ACC/ACCESSORY
2. ON/RUN
3. START
The ignition switch has fourpositions.
To shift out of P (Park), the ignitionmust be in ON/RUN and the brakepedal must be applied.
0 (Stopping the Engine/LOCK/OFF) : This position turns off thevehicle. It also locks the ignition, thetransmission, and the steeringcolumn, if equipped with a lockingsteering column.
To turn off the vehicle:
1. Make sure that the vehicle isstopped.
2. Shift to P (Park).
3. Continue to hold the brakepedal, then set the parkingbrake. See Parking Brake0 233.
4. Push the key all the way in thesteering column (1), then turnthe key to LOCK/OFF (2).
5. Remove the key.
6. Release the brake pedal.
See your dealer if the key can beremoved in any other position.
Retained Accessory Power (RAP)will remain active. See RetainedAccessory Power (RAP) 0 214.
A warning chime will sound whenthe driver door is opened and thekey is in the ignition.
If equipped with a locking steeringcolumn, the steering can bind withthe front wheels turned off center,which may prevent key rotation outof LOCK/OFF. If this happens, movethe steering wheel from right to leftwhile turning the key to ACC/ACCESSORY. If this does not work,then the vehicle needs service.

Chevrolet Silverado 4500HD/5500HD/6500HD Owner Manual (GMNA-Localizing-U.S.-12102101) - 2019 - crc - 10/2/18
Driving and Operating 209
{ Warning
Turning off the vehicle whilemoving may cause loss of powerassist in the brake and steeringsystems and disable the airbags.While driving, turn off the vehicleonly in an emergency.
In an emergency, if the vehiclecannot be pulled over and must beturned off while driving:
1. Push the key all the way intoward the steering column,then turn the key to ACC/ACCESSORY.
2. Brake using firm and steadypressure. Do not pump thebrakes repeatedly. This maydeplete power assist, requiringincreased brake pedal force.
3. Shift the vehicle to N (Neutral).This can be done while thevehicle is moving. Continuebraking and steer the vehicle toa safe location.
4. Come to a complete stop.
5. Shift to P (Park) with anautomatic transmission,or Neutral with a manualtransmission.
6. Continue to hold the brakepedal, then set the parkingbrake. See Parking Brake0 233.
7. Push the key all the way intoward the steering column,then turn the ignition toLOCK/OFF.
8. Remove the key.
9. Release the brake pedal.
Caution
Use the correct key, make sure itis all the way in — or pushed allthe way in toward the steeringcolumn when turning off thevehicle — and turn it only withyour hand.
1 (ACC/ACCESSORY) : Thisposition allows features such as theinfotainment system to operate
while the vehicle is off. It alsounlocks the steering column,if equipped with a locking steeringcolumn. Use this position if thevehicle must be pushed or towed.See Retained Accessory Power(RAP) 0 214.
From ON/RUN, push the key all theway in toward the steering column,then turn the key to ACC/ACCESSORY.
If the key is left in ACC/ACCESSORY with the engine off,the battery could drain and thevehicle may not start.
A warning chime will sound whenthe driver door is opened and thekey is in the ignition.
2 (ON/RUN) : This position can beused to operate the electricalaccessories and to display someinstrument cluster warning andindicator lights. This position canalso be used for service anddiagnostics, and to verify the properoperation of the malfunctionindicator lamp as may be requiredfor emission inspection purposes.

Chevrolet Silverado 4500HD/5500HD/6500HD Owner Manual (GMNA-Localizing-U.S.-12102101) - 2019 - crc - 10/2/18
210 Driving and Operating
The switch stays in this positionwhen the engine is running. Thetransmission is also unlocked in thisposition.
If the key is left in ON/RUN with theengine off, the battery could drainand the vehicle may not start.
3 (START) : This is the position thatstarts the engine. When the enginestarts, release the key. The ignitionreturns to ON/RUN for driving.
Starting the DieselEngineThe diesel engine starts differentlythan a gasoline engine.
Caution
If the steering wheel is turneduntil it reaches the end of itstravel, and is held in that positionwhile starting the vehicle, damagemay occur to the hydraulic powersteering system and there may beloss of power steering assist.
Move the shift lever to P (Park) orN (Neutral). To restart the enginewhen the vehicle is already moving,use N (Neutral) only.
Caution
Do not try to shift to P (Park) if thevehicle is moving. If you do, youcould damage the transmission.Shift to P (Park) only when thevehicle is stopped.
Starting the Engine
1. Turn the ignition key toON/RUN.
Observe the wait-to-start light.See Wait-to-Start Light 0 116.This light may not come on ifthe engine is warm.
2. If the wait-to-start light is on,wait until this light goes off.Turn the ignition key to START,then release the ignition key.The engine will continue tocrank until the engine starts.
The engine has a fast warm-upglow plug system. Thewait-to-start light will illuminatefor a much shorter time thanmost diesel engines, due to therapid heating of the glow plugsystem.
Caution
If the wait-to-start light stays onafter starting the vehicle, thevehicle may not run properly.Have the vehicle servicedright away.
3. If the engine does not startafter 15 seconds of cranking,turn the ignition off. Waitone minute for the crankingmotor to cool, then try thesame steps again.
If you are trying to start the engineafter you have run out of fuel, followthe steps in Running Out of Fuel0 246.

Chevrolet Silverado 4500HD/5500HD/6500HD Owner Manual (GMNA-Localizing-U.S.-12102101) - 2019 - crc - 10/2/18
Driving and Operating 211
When the engine is cold, let it runfor a few minutes before driving.This lets oil pressure build up. Theengine will sound louder when itis cold.
For turbo protection, engine powerat speeds above idle may be limitedif the engine is cold. This protectioncan last up to a maximum of40 seconds at extreme cold coolantand ambient temperatures.
Cold Weather Starting
Use the recommended engine oilwhen the outside temperature dropsbelow freezing. See Engine Oil0 295. When the outsidetemperature drops below –18 °C (0 °F), use of the engine coolant heateris recommended.
If you experience longer crankingtimes, notice an unusual amount ofexhaust smoke, or are at higherelevations (over 2 135 m or 7,000 ft),you may use the engine coolantheater. See Engine Heater 0 212.
See Fuel for Diesel Engines 0 241for information on what fuel to use incold weather.
If the Diesel Engine Will NotStart
If the vehicle runs out of fuel, seeRunning Out of Fuel 0 246.
If the vehicle is not out of fuel, andthe engine will not start:
Turn the ignition key to ON/RUN.After the wait-to-start light goes off,turn the ignition key to START.
If the light does not go off, wait afew seconds, then try starting theengine again. See your dealer assoon as possible for a startingsystem check.
If the light comes on and then goesoff and you know the batteries arecharged, but the engine still will notstart, the vehicle needs service.
If the light does not come on whenthe engine is cold, the vehicleneeds service.
If the batteries do not have enoughcharge to start the engine, seeBattery - North America 0 312.
Check that the correct engine oilhas been used and changed atappropriate intervals. If the wrong oilis used, the engine may be harderto start.
Be sure to use the proper fuel forexisting weather conditions. SeeFuel for Diesel Engines 0 241.
If the engine starts, runs a shorttime, then stops, the vehicle needsservice.
{ Warning
Do not use gasoline or startingaids, such as ether, in the airintake. They could damage theengine, which may not becovered by the vehicle warranty.They could also cause a fire,which could cause seriouspersonal injury.
Engine Idle Variations
Under certain conditions the engineidle speed can vary or be elevated.Change in idle speed is normal anddoes not indicate a problem. Normal

Chevrolet Silverado 4500HD/5500HD/6500HD Owner Manual (GMNA-Localizing-U.S.-12102101) - 2019 - crc - 10/2/18
212 Driving and Operating
conditions that can raise idle speedare low voltage, DPF regeneration,air conditioning compressor loads,and engine warmup. These speedscan range from approximately 600to 1000 rpm.
Elevated Idle
The engine has a cold temperaturehigh idle feature which elevates theengine idle speed from base idle to1050 to 1100 rpm when outsidetemperatures are below 0 °C (32 °F),and the engine coolant temperatureis below 65 °C (150 °F). This featureenhances heater performance byraising the engine coolanttemperature faster.
When the engine is started, it willslowly ramp up to the high idlespeed after a delay of a fewseconds up to approximatelytwo minutes. For this method towork properly there must be nothrottle or brake pedal faults.
The engine idle speed will return tonormal once the following conditionsare met:
. Engine coolant temperaturereaches 65 °C (150 °F)
. Air intake temperature reaches0 °C (32 °F)
The high idle speed will betemporarily interrupted and theengine speed will return to normal ifany of the following conditionsoccur:
. The brake pedal is applied.
. The accelerator pedal ispressed.
. The transmission is shifted outof P (Park) or N (Neutral).
. Vehicle speed is detected.
Once these inputs are removed, theengine idle speed will slowly rampback up to high idle after the normaldelay, if the conditions for enginecoolant temperature and air intaketemperature are still met.
Engine HeaterThe engine heater can provideeasier starting and better fueleconomy during engine warm-up incold weather conditions at or below−18 °C (0 °F). Vehicles with anengine heater should be plugged inat least four hours before starting.An internal thermostat in theplug-end of the cord may exist,which will prevent engine heateroperation at temperatures above−18 °C (0 °F).
{ Warning
Do not plug in the engine blockheater while the vehicle is parkedin a garage or under a carport.Property damage or personalinjury may result. Always park thevehicle in a clear open area awayfrom buildings or structures.
To Use the Engine Heater
1. Turn off the engine.

Chevrolet Silverado 4500HD/5500HD/6500HD Owner Manual (GMNA-Localizing-U.S.-12102101) - 2019 - crc - 10/2/18
Driving and Operating 213
Check the heater cord fordamage. If it is damaged, donot use it. See your dealer fora replacement. Inspect thecord for damage yearly.
2. Plug the cord into theconnector near the battery box.
3. Plug the cord into a grounded110-volt AC outlet that isprotected by a ground faultdetection function.
{ Warning
Improper use of the heater cordor an extension cord can damagethe cord and may result inoverheating and fire.
. Plug the cord into athree-prong electrical utilityreceptacle that is protectedby a ground fault detection
(Continued)
Warning (Continued)
function. An ungroundedoutlet could cause anelectric shock.
. Use a weatherproof,heavy-duty, 15 amp-ratedextension cord if needed.Failure to use therecommended extensioncord in good operatingcondition, or using adamaged heater orextension cord, could makeit overheat and cause a fire,property damage, electricshock, and injury.
. Do not operate the vehiclewith the heater cordpermanently attached to the
(Continued)
Warning (Continued)
vehicle. Possible heatercord and thermostatdamage could occur.
. While in use, do not let theheater cord touch vehicleparts or sharp edges.
. Before starting the vehicle,unplug the cord. Keep thecord away from any movingparts.
4. Before starting the engine, besure to unplug the cord.
The length of time the heater shouldremain plugged in depends onseveral factors. Ask a dealer in thearea where you will be parking thevehicle for the best advice on this.

Chevrolet Silverado 4500HD/5500HD/6500HD Owner Manual (GMNA-Localizing-U.S.-12102101) - 2019 - crc - 10/2/18
214 Driving and Operating
Retained AccessoryPower (RAP)Some vehicle accessories may beused after the ignition is turned off.
The power windows and sunroof,if equipped, will continue to work forup to 10 minutes or until any door isopened.
The infotainment system willcontinue to work for 10 minutes,until the driver door is opened,or until the ignition is turned on orplaced in ACC/ACCESSORY.
Shifting Into Park
{ Warning
It can be dangerous to get out ofthe vehicle if the automatictransmission shift lever is not fullyin P (Park) with the parking brakefirmly set. The vehicle can roll. Donot leave the vehicle when theengine is running unless youhave to. If you have left the
(Continued)
Warning (Continued)
engine running, the vehicle canmove suddenly. You or otherscould be injured. To be sure thevehicle will not move, even whenyou are on fairly level ground,always set the parking brake andmove the shift lever to P (Park).
1. Hold the brake pedal down,then set the parking brake. SeeParking Brake 0 233.
2. Move the shift lever into theP (Park) position by pulling theshift lever toward you andmoving it up as far as it will go.
3. Push the ignition key in,towards the steering columnand then turn the ignition off.
4. Remove the key and take itwith you. If you can leave thevehicle with the ignition key inyour hand, the vehicle is inP (Park).
Leaving the Vehicle with theEngine Running
{ Warning
It can be dangerous to get out ofthe vehicle if the automatictransmission shift lever is not fullyin P (Park) with the parking brakefirmly set. The vehicle can roll. Donot leave the vehicle when theengine is running unless youhave to. If you have left theengine running, the vehicle canmove suddenly. You or otherscould be injured. To be sure thevehicle will not move, even whenyou are on fairly level ground,always set the parking brake andmove the shift lever to P (Park).
If you have to leave the vehicle withthe engine running, be sure thevehicle is in P (Park) and theparking brake is firmly set beforeyou leave it. After you move the shiftlever into P (Park), hold the regularbrake pedal down. Then, see if you

Chevrolet Silverado 4500HD/5500HD/6500HD Owner Manual (GMNA-Localizing-U.S.-12102101) - 2019 - crc - 10/2/18
Driving and Operating 215
can move the shift lever away fromP (Park) without first pulling it towardyou. If you can, it means that theshift lever was not fully locked intoP (Park).
Torque Lock
If you are parking on a hill and youdo not shift the transmission intoP (Park) properly, the weight of thevehicle may put too much force onthe parking pawl in thetransmission. You may find it difficultto pull the shift lever out of P (Park).This is called torque lock. Toprevent torque lock, set the parkingbrake and then shift into P (Park)properly before you leave thedriver seat.
When you are ready to drive, movethe shift lever out of P (Park) beforeyou release the parking brake.
If torque lock does occur, you mayneed to have another vehicle pushyours a little uphill to take some ofthe pressure from the parking pawlin the transmission. You will then beable to pull the shift lever out ofP (Park).
Shifting out of ParkThis vehicle is equipped with anelectronic shift lock release system.The shift lock release system isdesigned to prevent movement ofthe shift lever out of P (Park), unlessthe ignition is on and the brakepedal is applied.
The shift lock release is alwaysfunctional except in the case of anuncharged or low voltage (less than9 volt) battery.
If the vehicle has an unchargedbattery or a battery with low voltage,try charging or jump starting thebattery. See Jump Starting - NorthAmerica 0 343.
To shift out of P (Park):
1. Apply the brake pedal.
2. Move the shift lever to thedesired position.
If you still are unable to shift out ofP (Park):
1. Ease the pressure on the shiftlever.
2. While holding down the brakepedal, push the shift lever allthe way into P (Park).
3. Move the shift lever to thedesired position.
If you are still having a problemshifting, then have the vehicleserviced soon.
Parking over ThingsThat Burn
{ Warning
Things that can burn could touchhot exhaust parts under thevehicle and ignite. Do not parkover papers, leaves, dry grass,or other things that can burn.

Chevrolet Silverado 4500HD/5500HD/6500HD Owner Manual (GMNA-Localizing-U.S.-12102101) - 2019 - crc - 10/2/18
216 Driving and Operating
Engine Exhaust
{ Warning
Engine exhaust contains carbonmonoxide (CO), which cannot beseen or smelled. Exposure to COcan cause unconsciousness andeven death.
Exhaust may enter the vehicle if:
. The vehicle idles in areaswith poor ventilation(parking garages, tunnels,deep snow that may blockunderbody airflow or tailpipes).
. The exhaust smells orsounds strange or different.
. The exhaust system leaksdue to corrosion or damage.
. The vehicle exhaust systemhas been modified,damaged, or improperlyrepaired.
(Continued)
Warning (Continued)
. There are holes or openingsin the vehicle body fromdamage or aftermarketmodifications that are notcompletely sealed.
If unusual fumes are detected orif it is suspected that exhaust iscoming into the vehicle:
. Drive it only with thewindows completely down.
. Have the vehicle repairedimmediately.
Never park the vehicle with theengine running in an enclosedarea such as a garage or abuilding that has no fresh airventilation.
{ Warning
Breathing diesel engine exhaustexposes you to chemicals knownto the State of California to causecancer and birth defects or otherreproductive harm.
. Always start and operatethe engine in awell-ventilated area.
. If in an enclosed area, ventthe exhaust to the outside.
. Do not modify or tamperwith the exhaust system.
. Do not idle the engineexcept as necessary. Formore information go towww.P65warnings.ca.gov/diesel.
See California Proposition65 Warning 0 290 and the backcover.

Chevrolet Silverado 4500HD/5500HD/6500HD Owner Manual (GMNA-Localizing-U.S.-12102101) - 2019 - crc - 10/2/18
Driving and Operating 217
Running the VehicleWhile ParkedIt is better not to park with theengine running.
If the vehicle is left with the enginerunning, follow the proper steps tobe sure the vehicle will not move.See Shifting Into Park 0 214 andEngine Exhaust 0 216.
If parking on a hill and pulling atrailer, see Driving Characteristicsand Towing Tips 0 250.
Diesel ParticulateFilterThe vehicle has a Diesel ParticulateFilter (DPF) as part of the exhaustsystem to reduce vehicle emissions.The DPF requires a unique exhausttailpipe with an exhaust cooler. Theexhaust cooler mixes air with theexhaust to lower the temperaturebefore it leaves the tailpipe.
The DPF, the tailpipe, or otherexhaust system components mustnot be altered. Inspect regularly andclean any mud or dirt from theexhaust cooler, especially where theexhaust cooler connects to thetailpipe and the openings wherefresh air enters the cooler.
The DPF will clean itself as part ofnormal operation. Several factorsincluding fuel consumed, hours ofengine operation, and miles drivenare monitored by the Engine ControlModule (ECM). The self-cleaningoccurs approximately once per tankof fuel.
Caution
Damage can occur to the DPFcomponents if the required UltraLow Sulfur Diesel (15 ppm sulfurmaximum) fuel and either CJ-4 orCK-4 engine oil are not used.This damage would not becovered by the vehicle warranty.
Under certain driving conditions,such as stop-and-go traffic, the filtercannot clean itself. A messagecomes on when the DPF is dirty andneeds to perform a self cleaning.
For the filter to clean itself, thevehicle must be driven above50 km/h (30 mph) until the messagegoes off. This will take about30 minutes.
{ Warning
During DPF self cleaning orduring extended idling in P (Park),the exhaust system and exhaust
(Continued)
Chevrolet Silverado 4500HD/5500HD/6500HD Owner Manual (GMNA-Localizing-U.S.-12102101) - 2019 - crc - 10/2/18
218 Driving and Operating
Warning (Continued)
gases are very hot. Things thatburn could touch hot exhaustparts under the vehicle and ignite.You or others could be burned.Do not park, or idle for anextended period of time, near orover papers, leaves, dry grass,or other things that can burn.Keep the exhaust area clear ofmaterial that could ignite or burn.See Parking over Things ThatBurn 0 215.
Caution
Extended idle should be avoidedbecause the DPF system is notcapable of self cleaning at idle.During extended idle operation,monitor the instrument clustertelltale lights and DriverInformation Center for messagesand take appropriate indicated
(Continued)
Caution (Continued)
action. Continued idling with thewarning light/message on couldcause irreversible damage to theDPF requiring repair and possiblereplacement that might not becovered by the vehicle warranty.
You will also notice a change in theexhaust sound and engine idlespeed. This is normal.
If you continue to drive with the DPFwarning message on and theexhaust filter is not cleaned asrequired, the malfunction indicatorlamp and the ENGINE POWER ISREDUCED message will come onand dealer service is necessary.See Malfunction Indicator Lamp(Check Engine Light) 0 113.
Vehicles with the DPF have specificfuel and engine oil requirements.See Fuel for Diesel Engines 0 241and Engine Oil 0 295.
Extended idling in P (Park) cancause exhaust parts and gases tobecome very hot. Keep the exhaustarea clear of material that couldignite or burn. See Parking overThings That Burn 0 215.
If equipped with PowerTake-Off (PTO), monitor theinstrument cluster for lights relatedto the DPF.
See Accessories and Modifications0 290 for important information ifyou are considering addingaccessories or modifying thevehicle.
Manual Regeneration of DieselParticulate Filter
If equipped, this feature allows formanual cleaning/regeneration of theDPF when it is unable to cleanitself. It may be necessary toperform a manual regeneration ifdriving conditions — such asextended slow speed, stop-and-gotraffic, extended idles, short drivecycles, or stationary PTOoperation — prevent DPFself-cleaning.

Chevrolet Silverado 4500HD/5500HD/6500HD Owner Manual (GMNA-Localizing-U.S.-12102101) - 2019 - crc - 10/2/18
Driving and Operating 219
Manual regeneration can only beused when the DPF has become atleast 90% full. At 100% full, it willattempt to automatically self-clean ifproper driving conditions are met.The DPF will clean itself if thevehicle can be driven above50 km/h (30 mph) for about30 minutes.
A Driver Information Center (DIC)message displays when manualregeneration is possible.
Scroll through the DIC pages to findthe Exhaust Filter menu. Dependingon whether the vehicle has a baseor uplevel cluster, it may be underthe Options menu.
If the vehicle cannot be stoppedwhen the DIC message firstindicates cleaning is available,automatic self-cleaning may havebegun. If conditions cannot be metfor self-cleaning to complete, andmanual regeneration is selected, itmay take up to four minutes for thesystem to switch to manualregeneration. When the switchoccurs, a DIC message prompts tostart the cleaning process.
{ Warning
Do not leave the vehicle duringthe regeneration.
Make sure that there are noflammables near the muffler, DPFand exhaust pipe which mayresult in a fire.
Remember that the temperatureof exhaust gases is high enoughto burn you. You and others couldbe seriously injured.
Before starting the manualregeneration, make sure all of thefollowing safety conditions are met:
. The vehicle is parked on levelground, away from anyflammable materials.
. The vehicle is parked outdoors,away from any walls orbuildings.
. The vehicle is at least 3 m (10 ft)from any obstructions ormaterials that may combustor melt.
. The shift lever is in P (Park).
. The fuel tank is at leastone-eighth full.
. All fluids are at the proper level.
. No diagnostic trouble codeshave been set, and themalfunction indicator lamp isnot on.
. The engine coolant temperatureis above 71 °C (160 °F).
After making sure all of the safetyconditions have been met, press thetrip odometer reset stem or@ onthe steering wheel control for atleast one second to select Start onthe DIC.
Follow the instructions in the DICmessages. Choose ACCEPT toacknowledge that all of these safetyconditions have been met and toactivate regeneration.
If the DIC returns to the previousscreen, then one or more of thenecessary operating conditions hasnot been met.

Chevrolet Silverado 4500HD/5500HD/6500HD Owner Manual (GMNA-Localizing-U.S.-12102101) - 2019 - crc - 10/2/18
220 Driving and Operating
Continue to follow the instructions inthe DIC messages. Press and holdthe exhaust brake switch on thecenter stack below the climatecontrols for more thanthree seconds, and then release it,to begin the regeneration process.
If the EXHAUST BRAKE ONmessage displays, then the switchwas released too soon. Press itagain to turn off the exhaust brake,then try again when the DICmessage prompts.
When manual regeneration begins,the engine speed increases, theengine cooling fan sound increases,and a DIC message indicates thatcleaning is in progress.
A DIC message will display whencleaning has completed. Themessage will remain as long ascleaning is not necessary. Cleaningcould take up to 30 minutes. Uponcompletion, the engine will return tonormal idle, but exhaustcomponents will remain hot forseveral minutes. Do not move thevehicle until the exhaust has hadtime to cool. Manual regenerationcan be canceled at any time bypressing the brake pedal or turningthe engine off. Unusual noises maybe heard if regeneration isinterrupted.
Diesel Exhaust Fluid
{ Warning
Avoid getting Diesel ExhaustFluid (DEF) on your skin or inyour eyes as it could causeirritation. For more safety,handling, and storage information,see the Diesel Exhaust Fluidcontainer label.
Caution
Do not mix fuel with DEF, and donot put DEF in the fuel tank. Thiscould lead to costly repairs thatmight not be covered by thevehicle warranty.
Diesel Exhaust Fluid (DEF) is usedwith diesel engines to reduce theamount of regulated emissionsproduced. Products such as AdBlueare types of DEF, and are approvedfor use in the vehicle as long asthey have an API certification label

Chevrolet Silverado 4500HD/5500HD/6500HD Owner Manual (GMNA-Localizing-U.S.-12102101) - 2019 - crc - 10/2/18
Driving and Operating 221
or meet ISO 22241.The fluid level inthe DEF tank must be maintainedfor the vehicle to run properly. DEFfreezes when exposed totemperatures below −11 °C (12 ° F).For DEF tank capacity seeCapacities and Specifications 0 408.
It is normal to hear the DEF systempurge fluid back into the tank afterthe vehicle is shut off.
Locating Diesel Exhaust Fluid
DEF can be purchased at yourdealer. It can also be purchased atauthorized vehicle and truckdealerships. Additionally, somediesel truck fueling stations orretailers may have DEF forpurchase. For vehicles with anactive OnStar or connected serviceplan, OnStar can help to locate aDEF retailer. See RecommendedFluids and Lubricants 0 398.
Filling the DEF Tank
Caution
Use only DEF that is GMapproved, or fluid containing theAPI certified or ISO 22241 label.The use of other fluids coulddamage the system, requiringcostly repairs that will not becovered by the vehicle warranty.
It is recommended to fill the DEFtank on level ground and when thevehicle is not running.
When adding fluid, it isrecommended to fill the DEF tank.For DEF tank capacity seeCapacities and Specifications 0 408.
Caution
Do not overfill the DEF tank anddo not allow DEF to contact thefinished surfaces of the vehicle,as it could damage the vehicle
(Continued)
Caution (Continued)
finish. If DEF is spilled duringfilling, wipe any affected surfacewith a damp cloth.
Do not overfill the DEF tank. Whenfluid reaches the top of the fill pipe,stop filling.
The def tank fill is on the rear of thepassenger-side front quarter fender.
The DEF cap is blue.

Chevrolet Silverado 4500HD/5500HD/6500HD Owner Manual (GMNA-Localizing-U.S.-12102101) - 2019 - crc - 10/2/18
222 Driving and Operating
In certain cold conditions, it ispossible to find some frozen DEF inthe DEF fill pipe opening. If thiscondition prevents the filling of aDEF tank, place the vehicle in awarm garage overnight.
Exhaust Fluid Low
As the DEF level drops, the DriverInformation Center (DIC) will displaywarnings. DEF level status isavailable on the DIC under thevehicle Information button. See“Exhaust Fluid Level” in DriverInformation Center (DIC) (BaseLevel) 0 119 or Driver InformationCenter (DIC) (Uplevel) 0 120.
To avoid vehicle speed limitations,fill the DEF tank at the firstopportunity after a low fluid levelwarning. If DEF is added before theEXHAUST FLUID EMPTY REFILLNOW message appears, it may takeseveral km/mi for the DIC messageto update.
If vehicle speed has been limitedand DEF has been added, it maytake up to 30 seconds after enginestart with the vehicle stopped for the
refill message to clear. If the vehicleis driven before the DIC messageclears, vehicle speed will still belimited. If the DIC message clearswhile driving, the speed limitationwill be removed gradually.
If DEF is added under freezingconditions, additional time may berequired to remove speedlimitations, and it may require lessfluid to fill the DEF tank.
Based on driving conditions andvehicle configuration, the amountneeded to fill the tank will vary. Asthe fluid level nears empty, thesemessages will appear every timethe vehicle is started.
If these warnings are ignored andthe DEF tank becomes empty, theDIC will indicate the action neededand distance until vehicle speed islimited.
The speed limitation will occur in aseries of steps, with the final speedlimitation being 8 km/h (5 mph)accompanied by a flashing warninglight and chimes. It is recommendedto fully fill the DEF tank, but at least
7.6 L (2 gal) of DEF must be addedto release the vehicle from thespeed limitation. See Capacitiesand Specifications 0 408, DieselExhaust Fluid (DEF) Warning Light0 117, and Recommended Fluidsand Lubricants 0 398.
Exhaust Fluid Quality Poor
Use only DEF that is GM approved,or fluid containing the API certifiedor ISO 22241 label.
DEF has an expiration date. If thesystem detects poor quality,or contaminated or diluted DEF, theDIC will display EXHAUST FLUIDQUALITY POOR - SEE OWNERSMANUAL NOW and will show thedistance until vehicle speed islimited.
The speed limitation will occur in aseries of steps, with the final speedlimitation being 8 km/h (5 mph)accompanied by a flashing warninglight and chimes.
Adding fresh DEF to the systemmay resolve the problem, dependingon several factors. If the message

Chevrolet Silverado 4500HD/5500HD/6500HD Owner Manual (GMNA-Localizing-U.S.-12102101) - 2019 - crc - 10/2/18
Driving and Operating 223
persists, see your dealer oradditional DIC messages maydisplay.
Service Exhaust Fluid System
If a problem occurs with the DEFsystem, the DIC message SERVICEEXHAUST FLUID SYSTEM - SEEOWNERS MANUAL NOW displaysand will show the distance untilvehicle speed is limited.
The speed limitation will occur in aseries of steps, with the final speedlimitation being 8 km/h (5 mph)accompanied by a flashing warninglight and chimes.
In some cases this message willclear itself, indicating that the DEFsystem was able to correct thecondition. If the message persists,see your dealer or additional DICmessages may display.
Service Emission System
If a problem occurs with the vehicleemission system, the DIC displaysthe message SERVICE EMISSIONSYSTEM - SEE OWNERSMANUAL NOW and will show thedistance until vehicle speed islimited.
The speed limitation will occur in aseries of steps, with the final speedlimitation being 80km/h (50 mph)accompanied by chimes.
In some cases this message willclear itself, indicating that theemission system was able to correctthe condition. If the messagepersists, see your dealer oradditional DIC messages maydisplay.
AutomaticTransmissionIf equipped, there is an electronicshift lever position indicator withinthe instrument cluster. This displaycomes on when the ignition key isturned on.
There are several different positionsfor the shift lever.
Heavy-Duty 6-Speed AutomaticTransmission Shown, Others
Similar
See “Range Selection Mode” underManual Mode 0 226.
P : This position locks the rearwheels. Use P (Park) when startingthe engine because the vehiclecannot move easily.

Chevrolet Silverado 4500HD/5500HD/6500HD Owner Manual (GMNA-Localizing-U.S.-12102101) - 2019 - crc - 10/2/18
224 Driving and Operating
When parked on a hill, especiallywhen the vehicle has a heavy load,you might notice an increase in theeffort to shift out of P (Park). See“Torque Lock” under Shifting IntoPark 0 214.
{ Warning
It is dangerous to get out of thevehicle if the shift lever is not fullyin P (Park) with the parking brakefirmly set. The vehicle can roll.
Do not leave the vehicle when theengine is running. If you have leftthe engine running, the vehiclecan move suddenly. You or otherscould be injured. To be sure thevehicle will not move, even whenyou are on fairly level ground,always set the parking brake andmove the shift lever to P (Park).See Shifting Into Park 0 214 andDriving Characteristics andTowing Tips 0 250.
R : Use this gear to back up.
Caution
Shifting to R (Reverse) while thevehicle is moving forward coulddamage the transmission. Therepairs would not be covered bythe vehicle warranty. Shift toR (Reverse) only after the vehicleis stopped.
To rock the vehicle back and forth toget out of snow, ice, or sand withoutdamaging the transmission, see Ifthe Vehicle Is Stuck 0 204.
N : In this position, the engine doesnot connect with the wheels. Torestart the engine when the vehicleis already moving, useN (Neutral) only.
Also, use N (Neutral) when thevehicle is being towed.
{ Warning
Shifting into a drive gear while theengine is running at high speed isdangerous. Unless your foot isfirmly on the brake pedal, thevehicle could move very rapidly.You could lose control and hitpeople or objects. Do not shiftinto a drive gear while the engineis running at high speed.
Caution
Shifting out of P (Park) orN (Neutral) with the enginerunning at high speed maydamage the transmission. Therepairs would not be covered bythe vehicle warranty. Be sure theengine is not running at highspeed when shifting the vehicle.

Chevrolet Silverado 4500HD/5500HD/6500HD Owner Manual (GMNA-Localizing-U.S.-12102101) - 2019 - crc - 10/2/18
Driving and Operating 225
Caution
A transmission hot message maydisplay if the automatictransmission fluid is too hot.Driving under this condition candamage the vehicle. Stop and idlethe engine to cool the automatictransmission fluid. This messageclears when the transmission fluidhas cooled sufficiently.
D : This position is for normaldriving. It provides the best fueleconomy. If more power is neededfor passing, press the acceleratorpedal down.
. Going less than about 55 km/h(35 mph), push the acceleratorpedal about halfway down.
. Going about 55 km/h (35 mph) ormore, push the accelerator allthe way down.
By doing this, the vehicle shiftsdown to the next gear and hasmore power.
Use D (Drive) and Tow/Haul Modewhen towing a trailer, carrying aheavy load, driving on steep hills,or driving off-road. Shift thetransmission to a lower gearselection if the transmission shiftstoo often.
Downshifting the transmission inslippery road conditions could resultin skidding. See “Skidding” underLoss of Control 0 196.
The vehicle has a shift stabilizationfeature that adjusts the transmissionshifting to the current drivingconditions in order to reduce rapidupshifts and downshifts. This shiftstabilization feature is designed todetermine, before making anupshift, if the engine is able tomaintain vehicle speed by analyzingthings such as vehicle speed,throttle position, and vehicle load.If the shift stabilization featuredetermines that a current vehiclespeed cannot be maintained, thetransmission does not upshift andinstead holds the current gear.
In some cases, this could appear tobe a delayed shift, however thetransmission is operating normally.
The transmission uses adaptiveshift controls. The adaptive shiftcontrol process continuallycompares key shift parameters topre-programmed ideal shifts storedin the transmission’s computer. Thetransmission constantly makesadjustments to improve vehicleperformance according to how thevehicle is being used, such as witha heavy load or when thetemperature changes. During thisadaptive shift control process,shifting might feel different as thetransmission determines the bestsettings.
When temperatures are very cold,the transmission's gear shiftingcould be delayed providing morestable shifts until the engine warmsup. Shifts could be more noticeablewith a cold transmission. Thisdifference in shifting is normal.

Chevrolet Silverado 4500HD/5500HD/6500HD Owner Manual (GMNA-Localizing-U.S.-12102101) - 2019 - crc - 10/2/18
226 Driving and Operating
L : This position allows selection ofa range of gears appropriate forcurrent driving conditions.If equipped, see “Range SelectionMode” under Manual Mode 0 226.
Caution
Spinning the tires or holding thevehicle in one place on a hillusing only the accelerator pedalmay damage the transmission.The repair will not be covered bythe vehicle warranty. If the vehicleis stuck, do not spin the tires.When stopping on a hill, use thebrakes to hold the vehicle inplace.
Kickdown Mode
If equipped, the accelerator pedalprovides an additional downshiftafter pressing through the kickdownfeature.
It requires extra pedal pressure nearthe end of its travel to engage.
Manual Mode
Range Selection Mode
If equipped, Range Selection Modehelps control the vehicle'stransmission and vehicle speedwhile driving downhill or towing atrailer by letting you select a desiredrange of gears.
To use this feature:
1. Move the shift lever toL (Manual Mode).
2. Press the plus/minus buttonson the shift lever to select thedesired range of gears forcurrent driving conditions.
When the shift lever is moved fromD (Drive) to L (Manual Mode), anumber displays next to the L,indicating the current transmissionrange.
This number is the highest gear thatthe transmission will command whileoperating in L (Manual Mode). Allgears below that number areavailable. As driving conditionschange, the transmission canautomatically shift to lower gears.For example, when L5 is selected,1 (First) through 5 (Fifth) gears areautomatically shifted by thetransmission, but 6 (Sixth) cannot beused until the plus/minus button onthe shift lever is used to change tothe range.
Grade Braking is not available whenRange Selection Mode is active.See Tow/Haul Mode 0 227.
While using Range Selection Mode,cruise control and the Tow/HaulMode can be used.
If the vehicle has an exhaust brake,it can also be used, but will notautomatically downshift thetransmission. See Exhaust Brake0 234

Chevrolet Silverado 4500HD/5500HD/6500HD Owner Manual (GMNA-Localizing-U.S.-12102101) - 2019 - crc - 10/2/18
Driving and Operating 227
Caution
Spinning the tires or holding thevehicle in one place on a hillusing only the accelerator pedalmay damage the transmission.The repair will not be covered bythe vehicle warranty. If the vehicleis stuck, do not spin the tires.When stopping on a hill, use thebrakes to hold the vehicle inplace.
Low Traction Mode
If equipped, Low Traction Modeassists in vehicle acceleration whenroad conditions are slippery, suchas with ice or snow. While thevehicle is at a stop, select L2 usingRange Selection Mode. This willlimit torque to the wheels and helpto prevent the tires from spinning.
Tow/Haul Mode
Vehicles with an automatictransmission have a Tow/HaulMode. The Tow/Haul Mode adjuststhe transmission shift pattern toreduce shift cycling. This providesincreased performance, vehiclecontrol, and enhanced transmissionand engine cooling when drivingdown steep hills or mountaingrades, when towing, or whenhauling heavy loads.
The selector button is on the shiftlever. Turn the Tow/Haul Mode onand off by pressing the button.When the Tow/Haul Mode isenabled, a light on the instrumentcluster will come on.
See Tow/Haul Mode Light 0 116 andHill and Mountain Roads 0 202.Also see “Tow/Haul Mode” underTowing Equipment 0 257.
Tow/Haul Mode Grade Braking
Tow/Haul Mode Grade Braking isonly enabled while the Tow/HaulMode is selected and the vehicle isnot in the Range Selection Mode.See “Tow/Haul Mode” listedpreviously and Manual Mode 0 226.Tow/Haul Mode Grade Brakingassists in maintaining desiredvehicle speeds when driving ondownhill grades by using the engineand transmission to slow thevehicle.

Chevrolet Silverado 4500HD/5500HD/6500HD Owner Manual (GMNA-Localizing-U.S.-12102101) - 2019 - crc - 10/2/18
228 Driving and Operating
On vehicles with a diesel engine,Tow/Haul Mode Grade Braking canbe enabled or disabled by pressingthe Tow/Haul Mode button. Use theexhaust brake and Tow/Haul Modefor maximum grade braking.
See Towing Equipment 0 257.
For other forms of grade braking,see Cruise Control 0 237.
Drive Systems
Four-Wheel DriveIf equipped with four-wheel drive,the engine's driving power can besent to all four wheels for extratraction.
Caution
Do not drive on clean, dry
pavement in 4 m and 4 n (ifequipped) for an extended periodof time. These conditions maycause premature wear on thevehicle’s powertrain.
Driving on clean, dry pavement in4 m or 4 n may:
. Cause a vibration to be felt inthe steering system.
. Cause tires to wear faster.
. Make the transfer case harder toshift, and cause it to run noisier.
Caution
Extended high-speed operation in
4 n may damage or shorten thelife of the drivetrain.
Engagement noise and bump whenshifting between 4 n and 4 m, withthe engine running, is normal.
Manual Locking Hubs
{ Warning
It is dangerous to get out of thevehicle if the shift lever is not fullyin P (Park) with the parking brakefirmly set. The vehicle can roll.
Do not leave the vehicle when theengine is running. If you have leftthe engine running, the vehiclecan move suddenly. You or otherscould be injured. To be sure thevehicle will not move, even whenyou are on fairly level ground,
(Continued)

Chevrolet Silverado 4500HD/5500HD/6500HD Owner Manual (GMNA-Localizing-U.S.-12102101) - 2019 - crc - 10/2/18
Driving and Operating 229
Warning (Continued)
always set the parking brake andmove the shift lever to P (Park).See Shifting Into Park 0 214.
The locking hubs are on each endof the front axle and must bemanually turned to LOCK before thefour-wheel drive modes canbe used.
The hubs may remain in the LOCKposition when road surface tractionconditions are variable or it is
unsafe to unlock them. Turn thelocking hubs to FREE when it issafe to do so.
When four-wheel drive is no longerneeded turn the locking hubs toFREE. If the hubs are locked intwo-wheel drive you may experiencedriveline vibration.
Electronic Transfer Case
Use the transfer case knob, next tothe steering wheel, to shift into andout of four-wheel drive for extratraction.
All of the lights will flash on then offmomentarily when the ignition isturned on. The light that remains onwill indicate the state of thetransfer case.
If the indicator mark on the switchdoes not match up with the lightthen that likely means the switchwas moved when the ignitionwas off.
The indicator mark on the switchmust line up with the indicator lightbefore a shift can be commanded.To command a shift rotate thetransfer case switch to the newdesired position. The light will flashmeaning that the shift is in progress.When the shift is completed the newposition will be illuminated. If thetransfer case cannot complete ashift command, it will go back to itslast chosen setting.
Delayed shifts from 4 m to 2 m may beexperienced due to uneven tirewear, low tire pressure, high vehicleloading, or cold temperatures.

Chevrolet Silverado 4500HD/5500HD/6500HD Owner Manual (GMNA-Localizing-U.S.-12102101) - 2019 - crc - 10/4/18
230 Driving and Operating
Caution
Shifting the transmission into gearbefore the requested modeindicator light has stoppedflashing could damage thetransfer case.
The settings are:
N (Neutral) : Use only when thevehicle needs to be towed. SeeTowing the Vehicle 0 347 and“Shifting Into N (Neutral)” later inthis section.
2 m (Two-Wheel Drive High) : Usefor driving on most streets andhighways. The front axle is notengaged. This setting provides thebest fuel economy.
4 n (Four-Wheel Drive Low) : Thissetting engages the front axle anddelivers extra torque. Choose 4 n ifdriving off-road in deep sand, deepmud, or deep snow, and while
climbing or descending steep hills.When engaged, keep vehicle speedbelow 48 km/h (30 mph).
4 m (Four-Wheel Drive High) : Usewhen extra traction is needed. Thefront axle engages and helps whendriving on snowy or icy roads, whenoff-roading, or when plowing snow.
Shifting Into 4 High from 2 High
The ignition must be on and thevehicle must be moving less than16 km/h (10 mph). Turn the knob to4 m. The indicator light will remain onthe selected setting when the shift iscomplete. If the vehicle is movingmore than 16 km/h (10 mph), theindicator light will flash and the shiftwill not occur. If the shift does notoccur, turn the knob back to theoriginal position and attempt theshift again.
Shifting Into 2 High from 4 High
The ignition must be on and thevehicle must be moving less than16 km/h (10 mph). Turn the knob to2 m. The indicator light will remain onthe selected setting when the shift is
complete. If the vehicle is movingmore than 16 km/h (10 mph), theindicator light will flash and the shiftwill not occur. If the shift does notoccur, turn the knob back to theoriginal position and attempt theshift again.
Shifting Into 4 Low
The ignition must be on and thevehicle speed must be less than4 km/h (3 mph) with the transmissionin N (Neutral). Turn the knob to 4 n.Wait for the 4 n indicator light to stopflashing before shifting thetransmission into gear. The indicatorlight will remain on the selectedsetting when the shift is complete.If the vehicle is moving more than4 km/h (3 mph), the indicator lightwill flash and the shift will not occur.If the shift does not occur, turn theknob back to the original positionand attempt the shift again.

Chevrolet Silverado 4500HD/5500HD/6500HD Owner Manual (GMNA-Localizing-U.S.-12102101) - 2019 - crc - 10/4/18
Driving and Operating 231
Shifting Out of 4 Low
The ignition must be on and thevehicle speed must be less than4 km/h (3 mph) with the transmissionin N (Neutral). Turn the knob to 4 mor 2 m. Wait for the indicator light tostop flashing before shifting thetransmission into gear. The indicatorlight will remain on the selectedsetting when the shift is complete.If the vehicle is moving more than4 km/h (3 mph), the indicator lightwill flash and the shift will not occur.If the shift does not occur, turn theknob back to the original positionand attempt the shift again.
Shifting Into N (Neutral)
The vehicle must be stopped withthe transfer case in the 2 m position.Shift the transmission to N (Neutral)and apply the brake. Turn the knobclockwise until it stops and hold itthere for more than 10 seconds.The N will flash and then remain onwhen the shift is complete. If theshift does not occur, turn the knobback to the original position andattempt the shift again.
Shifting Out of N (Neutral)
The vehicle must be stopped. Shiftthe transmission to N (Neutral) andapply the brake. Turn the knob to 2m. The indicator light will flash andthen remain on the selected settingwhen the shift is complete. If theshift does not occur, turn the knobback to the original position andattempt the shift again.
Brakes
Antilock BrakeSystem (ABS)ABS is designed to enhance overallvehicle safety when a vehicle isdriven within its safe operatinglimits. ABS cannot compensate for avehicle which is being drivenbeyond the physical limits of control.Drivers operating an ABS equippedvehicle should employ safe drivingpractices and assume no additionaldriving risks.
{ Warning
To prevent property damage,personal injury, and/or death,if the ABS warning indicatorcomes on, have the ABS systemrepaired immediately as stoppingdistances may increase undercertain braking conditions. Takeevery precaution to prevent wheellockup, which could result in lossof vehicle control.

Chevrolet Silverado 4500HD/5500HD/6500HD Owner Manual (GMNA-Localizing-U.S.-12102101) - 2019 - crc - 10/2/18
232 Driving and Operating
The Antilock Brake System is amandated feature included in thehydraulic brake system.It electronically monitors vehiclewheel speed at all times, and onlyengages when wheel lock isimminent. The standard hydraulicbrake system controls normalbraking when the ABS is notengaged.
ABS Operation
ABS requires no changes in drivingpractices. For the best stoppingperformance with or without ABS,modulate — do not pump — thebrake pedal until the vehicle slowsto the desired speed or stops. Beaware that ABS on a towing vehicledoes not control brakes on towedvehicles. Towed vehicles may ormay not have ABS. ABS will preventlockup of controlled wheels if youover-brake for existing roadconditions. Optimum vehicle controlfor existing road conditions will beprovided as a result of the ABSpreventing wheel lockup at speedsabove approximately 6 km/h(4 mph). The ABS cannot provide
any better braking and steeringcapability than the available roadtraction will permit. If the road isslippery, it will take longer to stopthan on a dry road. Steeringmaneuverability will be similarlylimited. Vehicle speed must bereduced to compensate for theextended time and distance requiredto stop or slow the vehicle onslippery roads.
The wheel hubs carry exciter ringsused by the axle mounted sensorsto transmit wheel speed informationto the ABS electronic control unitlocated on the chassis frame. Thecontrol unit monitors and comparesall wheel speed inputs to determineif any wheel(s) are about to lock.If wheel lockup is about to occur,the control unit commands theappropriate modulator valve toadjust pressure delivery to preventwheel lockup.
If over-braking causes wheel lockupon the rear drive axles whileretarding devices are in operation,
the ABS will interrupt and disablethe retarder until the lockup situationhas stopped.
The ABS is equipped with a warningindicator in the instrument cluster.Each time the ignition is turned on,the ABS warning indicator willilluminate for several seconds andthen turn off. If an ABS fault isdetected, the warning indicator willstay on steady and ABS fault codeswill be electronically stored in theABS controller.
Antilock Driving Tips. Use controlled, even pressure to
stop the vehicle, being carefulnot to skid. Most effectivestopping will be achieved in thissituation.
. If the vehicle begins to skid,maintain even pressure on thebrake pedal. The ABS controllerwill rapidly cycle the brakes onthe skidding wheel(s), whilemaintaining even pressure onthe non-skidding wheels.

Chevrolet Silverado 4500HD/5500HD/6500HD Owner Manual (GMNA-Localizing-U.S.-12102101) - 2019 - crc - 10/2/18
Driving and Operating 233. While maintaining even pressure
on the brake pedal, steer aroundany hazardous objects inyour path.
. Attempt to steer clear of traffic,pedestrians, or other obstacleswhile you are in an emergencybraking situation. ABS will allowyou to steer the vehicle duringbraking while it comes to a fullstop. ABS is not an excuse totake unnecessary risks. Alwaysdrive carefully and stay a safedistance away from the vehiclein front of you.
. Do not pump the brake pedalduring a skid unless the ABSsystem is not functioning.
ABS Self-Check
If an antilock fault develops,standard brake system operation ismaintained. The brake system is stilloperational, but the antilock systemdoes not operate to prevent wheellockup if you over apply the brakesfor existing conditions.
If the ABS indicator staysilluminated, have the systemserviced immediately.
A warning light on the instrumentcluster indicates the status of theABS. If the system is workingnormally when the ignition is turnedon, the ABS indicator comes on forseveral seconds before going out.
Parking Brake
Set the parking brake by holding theregular brake pedal down, thenpushing down the parking brakepedal.
If the ignition is on, the brakesystem warning light will come on.See Brake System Warning Light0 115.
Caution
Driving with the parking brake oncan overheat the brake systemand cause premature wear ordamage to brake system parts.Make sure that the parking brakeis fully released and the brakewarning light is off before driving.
To release the parking brake, holdthe regular brake pedal down, thenpush down momentarily on theparking brake pedal until you feelthe pedal release. Slowly pull yourfoot up off the parking brake pedal.If the parking brake is not releasedwhen you begin to drive, a DICmessage will appear and a chimewill sound warning you that theparking brake is still on.

Chevrolet Silverado 4500HD/5500HD/6500HD Owner Manual (GMNA-Localizing-U.S.-12102101) - 2019 - crc - 10/2/18
234 Driving and Operating
Exhaust BrakeThe exhaust brake can be used toenhance the vehicle brake systemand reduce brake lining wear.
Downshifts may be automaticallyselected to increase engine speed,which increases the effectiveness ofthe exhaust brake. The number ofdownshifts selected is determinedby the length of time the brakes areapplied and the rate the vehicle isslowing. The system delivers thecorrect amount of braking to assistin vehicle control. The heavier thevehicle load, the more active theengine exhaust brake will be. Use ofthe exhaust brake will help maintainvehicle speed when used withcruise control. See Cruise Control0 237.
Automatic downshifts will not occurif the vehicle is in Range SelectionMode. See Manual Mode 0 226.
The exhaust brake only activateswhen the transmission torqueconverter is locked. This can varybased on vehicle speed, gear,and load.
To activate the system, press theexhaust brake switch. A light in theswitch will come on when theexhaust brake is activated. Theswitch must be pressed at eachvehicle start for the system to beactive.
The Driver Information Center (DIC)displays the message EXHAUSTBRAKE ON for approximatelythree seconds, then clears.
To turn the brake off, press theexhaust brake switch a second time.The DIC displays the messageEXHAUST BRAKE OFF forapproximately three seconds, thenclears.
The exhaust brake will be moreactive when in Tow/Haul Mode.
A light comes on in the instrumentcluster when the exhaust brake andTow/Haul are activated. The switchmust be pressed at each vehiclestart for the system to be active.

Chevrolet Silverado 4500HD/5500HD/6500HD Owner Manual (GMNA-Localizing-U.S.-12102101) - 2019 - crc - 10/2/18
Driving and Operating 235
Ride Control Systems
Traction ControlSystem (TCS)
System Operation
The vehicle has a Traction ControlSystem (TCS).. This system helpslimit wheel spin and assist the driverin maintaining control, especially onslippery road conditions.
TCS activates if it senses any of thedrive wheels are spinning orbeginning to lose traction. When thishappens, TCS applies the brakes tothe spinning wheel(s) and reducesengine power to limit wheel spin.
If cruise control is being used andtraction control begins to limit wheelspin, cruise control will disengage.Cruise control may be turned backon when road conditions allow.
TCS comes on automatically whenthe vehicle is started and begins tomove. The system may be heard orfelt while operating or while
performing diagnostic checks. Thisis normal and does not mean thereis a problem with the vehicle.
It is recommended to leave TCS onfor normal driving conditions, but itmay be necessary to turn TCS off ifthe vehicle gets stuck in sand, mud,ice, or snow. See If the Vehicle IsStuck 0 204 and “Turning theSystems Off and On” later in thissection.
The indicator light for TCS is in theinstrument cluster. This light will:
. Flash when TCS is limitingwheel spin
. Turn on and stay on when TCSis not working
If TCS fails to turn on or to activate,a message displays in the DriverInformation Center (DIC), and dcomes on and stays on to indicate
that the system is inactive and is notassisting the driver in maintainingcontrol. The vehicle is safe to drive,but driving should be adjustedaccordingly
If d comes on and stays on:
1. Stop the vehicle.
2. Turn the engine off and wait15 seconds.
3. Start the engine.
Drive the vehicle. If d comes onand stays on, the vehicle may needmore time to diagnose the problem.If the condition persists, see yourdealer.
Turning the System Off and On
The button for TCS is on the centerstack.

Chevrolet Silverado 4500HD/5500HD/6500HD Owner Manual (GMNA-Localizing-U.S.-12102101) - 2019 - crc - 10/2/18
236 Driving and Operating
Caution
Do not repeatedly brake oraccelerate heavily when TCS isoff. The vehicle driveline could bedamaged.
To turn off TCS, press and releaseg. The traction off light i displaysin the instrument cluster. Theappropriate message will display inthe DIC.
To turn TCS on again, press andrelease g. The traction off light idisplayed in the instrument clusterwill turn off.
If TCS is turned off and then atsome point the cruise control isturned on by either set or resume,TCS will be turned back on and thei light will turn off.
Adding accessories can affect thevehicle performance. SeeAccessories and Modifications0 290.
Air Suspension
Caution
To prevent ride degradation andsuspension damage, the vehiclemust not be operated on the roadwithout air in the suspensionair bags.
If equipped, the air suspensionmaintains vehicle ride quality anddriver comfort.
Air Suspension Air Dump
If equipped, air suspension allowsthe rear suspension to betemporarily lowered by severalinches.
The system is controlled by the AirSuspension Dump (ASD) switch inthe center stack. This switchcontrols solenoids, which direct airto the suspension dump and heightvalve.
Pressing the ASD switch when thevehicle is in PARK and the ignitionkey is in ON/RUN position releasesair supplied to the rear suspension,lowering (dumping) the rear airsuspension for loading. Theindicator on the ASD switchilluminates.

Chevrolet Silverado 4500HD/5500HD/6500HD Owner Manual (GMNA-Localizing-U.S.-12102101) - 2019 - crc - 10/2/18
Driving and Operating 237
When the vehicle is shifted out ofPARK, air is filled into the systemand the indicator on the switchturns off.
Vehicles with air suspension havean AUX warning lamp immediatelyto the left of the ASD switch. Thesuspension may refill slowly if thislamp is on.
Cruise Control
{ Warning
Cruise control can be dangerouswhere you cannot drive safely ata steady speed. Do not usecruise control on winding roads orin heavy traffic.
Cruise control can be dangerouson slippery roads. On such roads,fast changes in tire traction cancause excessive wheel slip, andyou could lose control. Do not usecruise control on slippery roads.
With cruise control a speed of about40 km/h (25 mph) or more can bemaintained without keeping yourfoot on the accelerator. Cruisecontrol does not work at speedsbelow about 40 km/h (25 mph).
See “Tow/Haul Mode GradeBraking” under Tow/Haul Mode0 227 for an explanation of howcruise control interacts with theRange Selection Mode, Tow/HaulMode, and Grade Braking systems.
If the cruise control is being usedand the Traction Control system(TCS) begins to limit wheel spin, thecruise control will automaticallydisengage. When road conditionsallow you to safely use it again,cruise control can be turnedback on.
If the brakes are applied, cruisecontrol disengages.
5 : Press to turn the system on oroff. The indicator light is white whencruise control is on and turns offwhen cruise control is off.

Chevrolet Silverado 4500HD/5500HD/6500HD Owner Manual (GMNA-Localizing-U.S.-12102101) - 2019 - crc - 10/2/18
238 Driving and Operating
+RES : If there is a set speed inmemory, press briefly to resume tothat speed or press and hold toaccelerate. If cruise control isalready active, use to increasevehicle speed.
SET− : Press briefly to set thespeed and activate cruise control.If cruise control is already active,use to decrease vehicle speed.
* : Press to disengage cruisecontrol without erasing the setspeed from memory.
Setting Cruise Control
If5 is on when not in use, SET− or+RES could get pressed and go intocruise when not desired. Keep 5off when cruise is not being used.
1. Press5 to turn the cruisesystem on.
2. Get up to the desired speed.
3. Press and release SET−.
4. Remove your foot from theaccelerator.
The cruise control indicator on theinstrument cluster turns green aftercruise control has been set to thedesired speed. See InstrumentCluster 0 105.
Resuming a Set Speed
If the cruise control is set at adesired speed and then the brakesare applied or* is pressed, thecruise control is disengaged withouterasing the set speed from memory.
Once the vehicle speed reachesabout 40 km/h (25 mph) or more,briefly press +RES. The vehiclereturns to the previous set speed.
Increasing Speed While UsingCruise Control
If the cruise control system isalready activated:
. Press and hold +RES until thedesired speed is reached, thenrelease it.
. To increase vehicle speed insmall increments, briefly press+RES. For each press, thevehicle goes about 1 km/h(1 mph) faster.
The speedometer reading can bedisplayed in either English or metricunits. See Instrument Cluster 0 105.The increment value used dependson the units displayed.
Reducing Speed While UsingCruise Control
If the cruise control system isalready activated:
. Press and hold SET– until thedesired lower speed is reached,then release it.
. To slow down in smallincrements, briefly press SET–.For each press, the vehicle goesabout 1 km/h (1 mph) slower.
The speedometer reading can bedisplayed in either English or metricunits. See Instrument Cluster 0 105.The increment value used dependson the units displayed.

Chevrolet Silverado 4500HD/5500HD/6500HD Owner Manual (GMNA-Localizing-U.S.-12102101) - 2019 - crc - 10/2/18
Driving and Operating 239
Passing Another Vehicle WhileUsing Cruise Control
Use the accelerator pedal toincrease the vehicle speed. Whenyou take your foot off the pedal, thevehicle will slow down to theprevious set cruise speed. Whilepressing the accelerator pedal orshortly following the release tooverride cruise control, brieflypressing SET– will result in cruisecontrol set to the current vehiclespeed.
Using Cruise Control on Hills
How well the cruise control workson hills depends on the vehiclespeed, the load, and the steepnessof the hills. When going up steephills, pressing the accelerator pedalmay be necessary to maintainvehicle speed.
While going downhill:
. Cruise Grade Braking is enabledwhen the vehicle is started andcruise control is active. It is notenabled in Range SelectionMode. It assists in maintainingdriver selected speed whendriving on downhill grades byusing the engine andtransmission to slow the vehicle.
To disable and enable CruiseGrade Braking for the currentignition key cycle, press andhold the Tow/Haul button forfive seconds. A DIC messagedisplays.
. Cruise Grade Braking is enabledwhen Tow/Haul Mode is on, theexhaust brake is on, or bothare on.
For other forms of descent control,see Tow/Haul Mode 0 227.
Ending Cruise Control
There are four ways to end cruisecontrol:
. Step lightly on the brake pedal.
. Press*.
. Shift the transmission toN (Neutral).
. To turn off cruise control,press5.
Erasing Speed Memory
The cruise control set speed iserased from memory if 5 is pressedor the ignition is turned off.

Chevrolet Silverado 4500HD/5500HD/6500HD Owner Manual (GMNA-Localizing-U.S.-12102101) - 2019 - crc - 10/2/18
240 Driving and Operating
Driver AssistanceSystems
Rear VisionCamera (RVC)If equipped, the Rear VisionCamera (RVC) may help the driverpark or avoid objects. Always checkaround the vehicle when parking orbacking.
When the vehicle is shifted intoR (Reverse), the RVC displays animage of the area behind the vehiclein the infotainment display. Theprevious screen displays when thevehicle is shifted out of R (Reverse)after a short delay. To return to theprevious screen sooner, press anybutton on the infotainment system,shift into P (Park), or reach a vehiclespeed of approximately12 km/h (8 mph).
Displayed images may be farther orcloser than they appear. The areadisplayed is limited and objects that
are close to either corner of thebumper or under the bumper do notdisplay.
{ Warning
The camera(s) do not displaychildren, pedestrians, bicyclists,crossing traffic, animals, or anyother object outside of thecameras’ field of view, below thebumper, or under the vehicle.Shown distances may be differentfrom actual distances. Do notdrive or park the vehicle usingonly these camera(s). Alwayscheck behind and around thevehicle before driving. Failure touse proper care may result ininjury, death, or vehicle damage.
Fuel
Top Tier FuelGM recommends the use of TOPTIER Diesel Fuel to keep the engineclean, reduce engine deposits, andmaintain optimal vehicleperformance. Look for the TOPTIER Logo or seewww.toptiergas.com for a list of TOPTIER Diesel Fuel marketers andapplicable countries.

Chevrolet Silverado 4500HD/5500HD/6500HD Owner Manual (GMNA-Localizing-U.S.-12102101) - 2019 - crc - 10/2/18
Driving and Operating 241
Fuel AdditivesTOP TIER Detergent Diesel ishighly recommended for use withyour vehicle. If your area does nothave TOP TIER Detergent Diesel,GM recommends the use ofACDelco Diesel Fuel Conditioner.This will help maintain optimalengine performance. GM does notrecommend other aftermarket dieseladditives.
If low-quality diesel is used forrefueling, GM recommends addingACDelco Fuel System TreatmentPlus-Diesel to help clean enginedeposits. This is available only atyour GM dealer.
Fuel for Diesel EnginesThe selection of a high-quality fuelis important for maintaining optimumvehicle performance. Diesel fuelshould meet or exceed the minimumrequirements in the most currentversions of the local fuel standards
Do not use fuel with more than 15ppm sulfur.
Do not use a diesel blend containingmore than 20% biodiesel by volume.
Caution
Use of fuel that does not complywith the required technicalstandards can lead to enginepower loss, increased wear,or engine damage and may voidyour warranty.
Some improper fuels are:
. Diesel fuel with the additionof gasoline.
. Diesel fuel mixed withengine oil or automatictransmission fluid.
. Triglyceride fuels, such asraw vegetable oil or animalfat, in any form, includingwith blends of diesel orbiodiesel.
. Marine diesel fuel andfuel oils.
(Continued)
Caution (Continued)
. Diesel-water emulsions,such as Aquazole.
. Aftermarket diesel fueladditives, which containalcohols, organo-metallicadditives, or wateremulsifiers.
Caution
If the vehicle is accidentallyrefueled with gasoline, do notcontinue driving the vehicle.Driving the vehicle will damagethe fuel system. Have the vehicletowed to a qualified technician tohave the gasoline removed fromthe tank and fuel system. Refuelwith Ultra Low Sulfur Diesel fuel.It is also recommended to havethe fuel system flushed with UltraLow Sulfur Diesel, to ensure allgasoline is removed.

Chevrolet Silverado 4500HD/5500HD/6500HD Owner Manual (GMNA-Localizing-U.S.-12102101) - 2019 - crc - 10/2/18
242 Driving and Operating
Some conditions, such as dirty fuel,may decrease fuel filter life and aCHANGE FUEL FILTER messagemay come on in the DriverInformation Center (DIC).
Climate Grade Diesel Fuels
At temperatures below 0 °C (32 °F),avoid using biodiesel blends above5% by volume. Using such a fuelmay cause fuel filter plugging,system gelling, and freezing, whichmay adversely impact vehiclestarting.
Severe winter grade diesel fuel,such as 1-D diesel fuel or Arcticgrade diesel fuel, can be used inextreme cold temperatures (below−18 °C or 0 °F); however, doing sowill reduce power and fuel economy.Avoid using severe winter grade fuelin warm or hot climates. It can resultin stalling, poor starting, anddamage to the fuel injection system.
Fuels improperly blended for coldtemperature operation may result inrestricted fuel filters. The vehicle isequipped with a fuel heating systemto prevent gelling or waxing of
conventional diesel fuel andbiodiesel blends, but may notprevent all cases.
In case of severe winter conditions,the fuel filter may become cloggedby wax naturally present in the fuel.To unclog it, move the vehicle to awarm garage area and allow thefilter to warm up. The fuel filter mayneed to be replaced. See Fuel FilterReplacement 0 247.
BiodieselBiodiesel is a renewable fuelproduced from vegetable oils oranimal fats that have beenchemically modified to make itcompatible with diesel fuel.
Caution
Do not use home-made biodieselor home test kits because thequality cannot be verified byapproved scientific methods. Donot use raw vegetable oil or otherunmodified bio-oils, fats,
(Continued)
Caution (Continued)
or blends of vegetable oil withdiesel. They could damage thefuel system and engine, anddamages would not be coveredby the vehicle warranty.
Biodiesel Blends
Fuels with a biodiesel content up to20% by volume may be used (e.g.,named B20). Only use biodieselblends up to 20% by volume thatcomply with your country’s orregion’s fuel standards.
Caution
Do not use blends containingmore than 20% biodiesel. Anyengine, fuel system, or exhaustafter-treatment system damagewould not be covered by thevehicle warranty.

Chevrolet Silverado 4500HD/5500HD/6500HD Owner Manual (GMNA-Localizing-U.S.-12102101) - 2019 - crc - 10/2/18
Driving and Operating 243
As a renewable fuel, biodieselprovides some environmentalbenefits. However, biodiesel hasunique properties and needs to behandled differently than diesel fuel.Its use presents additional risks andmay not be appropriate in allsituations. Certain vehicle operatingmodes increase these risks andshould be avoided.
Biodiesel fuel quality degrades withtime and exposure to hightemperature quicker than Ultra LowSulfur Diesel fuel. More frequentrefueling provides the bestopportunity to have a supply of freshfuel. Storage at hot ambienttemperatures will acceleratebiodiesel degradation.
If the vehicle is not driven often anduses little fuel, or if it is stored forextended periods of time, avoid theuse of biodiesel blended fuelsabove 5% by volume. When thevehicle is stored for longer than onemonth, it should be run out ofbiodiesel to below one-quarter tank,
refueled with biodiesel-free fuel, anddriven several kilometers (miles)before storage.
Cold Weather OperationIn cold weather, the fuel filter maybecome clogged by wax naturallypresent in the fuel. To unclog it,move the vehicle to a warm garagearea and allow the filter to warm up.The fuel filter may need to bereplaced. See Fuel FilterReplacement 0 247.
At temperatures below 0 °C (32 °F),it is recommended to avoid usingbiodiesel blends above 5% blend.This blend may cause fuel filterplugging, system gelling, andfreezing that may affect vehiclestarting. You may need to turn theignition on and off a few timesbefore the vehicle will start. Also,idle the vehicle for a couple ofminutes before accelerating.
It is recommended to use Ultra LowSulfur No. 1-D diesel fuel or a blendof No. 1-D and No. 2-D diesel fuel toenhance vehicle operation in cold
weather at temperatures below 0 °C(32 °F). Use of No. 1-D diesel fuelmay lower the fuel economy. Foradditional information for better coldweather operation, see EngineHeater 0 212.
Water in FuelImproper fuel tank inspection orcleaning, or contaminated fuel fromsuppliers, can cause water to bepumped into the fuel tank along withthe diesel fuel. If a WATER IN FUELSERVICE REQUIRED messagedisplays, the water must be drainedimmediately.
{ Warning
Diesel fuel containing water is stillcombustible. You or others couldbe burned. If the fuel needs to bedrained, keep sparks, flames, andsmoking materials away from themixture.

Chevrolet Silverado 4500HD/5500HD/6500HD Owner Manual (GMNA-Localizing-U.S.-12102101) - 2019 - crc - 10/2/18
244 Driving and Operating
Caution
Water in the diesel fuel cancorrode internal components ofthe fuel system and lead tosevere damage. It can alsosupport fungus or bacteriagrowth, which can damage thefuel system and Fuel OperatedHeater (FOH) (if equipped). Evenwith a diesel fuel biocide, the fuelsystem may still need to becleaned. Your dealer can adviseof the appropriate solution.
If the fuel tank needs to bepurged to remove water, see yourdealer or a qualified technician.Improper purging can damage thefuel system and block the FOH.
Water in Fuel Troubleshooting
If the WATER IN FUEL SERVICEREQUIRED message comes on:
ProblemRecommended
Action
Messagedisplays butgoes off duringthe ignitioncycle.
The fuel filter ispartially filledwith water. Drainthe waterimmediately.See "RemovingWater from theFuel Filter"following.
ProblemRecommended
Action
Messagedisplays andstays on.
Drain the fuelfilterimmediately.If no water canbe drained, andthe temperatureis belowfreezing, thenwater may befrozen in thefilter. Move thevehicle to awarm location tothaw the water,then drain thefuel. If water stilldoes not drain,see your dealer.

Chevrolet Silverado 4500HD/5500HD/6500HD Owner Manual (GMNA-Localizing-U.S.-12102101) - 2019 - crc - 10/2/18
Driving and Operating 245
ProblemRecommended
Action
Immediatelyafter refueling,messagedisplays andstays on.
A large amountof water is in thefuel tank. Drainthe fuel filterimmediately.If the messagestays on orcomes back onwithoutrefueling, thenfuel tank purgingis required. Seeyour dealer.If the messagedisplays and thevehicle stalls orruns rough, donot drive untilthe watercontaminatedfuel is drained.
Caution
Driving with this message on candamage the fuel injection systemand the engine. If the messagecomes on right after a refuel,water was pumped into the fueltank. Turn off the engine anddrain the water immediately.
Removing Water from the FuelFilter
To drain water:
1. Turn the engine off and applythe parking brake.
2. Place a container under thefilter drain valve. The filter drainvalve is on the bottom of thefuel filter located under thevehicle on the driver side,inside the frame rail.
3. Open the drain valve by turningit counterclockwise. Allow thefilter to drain until all of thewater has been removed.Close the valve.
4. Properly dispose of the watercontaminated fuel.

Chevrolet Silverado 4500HD/5500HD/6500HD Owner Manual (GMNA-Localizing-U.S.-12102101) - 2019 - crc - 10/2/18
246 Driving and Operating
5. Start the engine and let it runfor a few minutes. During thedraining process, air may haveentered the fuel system. If theengine stalls, the fuel systemmay need to be primed. See“Fuel Priming” following.
Fuel Priming
For the fuel system to work properly,the fuel lines must be full of fuel.If air gets in, the fuel lines need tobe primed before operating thevehicle.
If air is present, the following mayhave happened:
. The vehicle ran out of fuel.
. The fuel filter was removed.
. The fuel lines were removed ordisconnected.
. The fuel filter water drain valvewas opened while the enginewas running.
Priming the Fuel System
There is an electric priming pumpthat will bring fuel to the engine andeliminate air in the fuel lines. Toprime the engine:
1. Correct any condition thatcaused the loss of prime.
2. Turn the ignition on for30 seconds. Do not start theengine. The fuel pump will startpriming.
3. Turn the ignition off, then backto START, and crank theengine for 15 seconds.
4. If the engine does not start,repeat Steps 2 and 3 until theengine starts.
If the engine does not startafter repeating Steps 2 and 3three times, turn the ignition offfor 60 seconds.
5. Repeat the above steps untilthe engine starts.
6. If the engine starts, but doesnot run smoothly, increase theengine speed slightly.
7. If the engine starts and runsbut stalls again, turn theignition off for 60 seconds.
8. When the engine starts, let itidle for a few minutes andcheck the filter for any leaks.
Running Out of Fuel
{ Warning
Diesel fuel is combustible. It couldstart a fire if it gets on hot engineparts. You could be burned. Catchany fuel from the air bleed valve,and wipe up any spilled fuel witha cloth.
If the engine has stalled due torunning out of fuel, try the followingsteps to restart it:
1. If parked on a level surface,add at least 7.6 L (2 gal) offuel. Up to 18.9 L (5 gal) maybe needed if parked on aslope.

Chevrolet Silverado 4500HD/5500HD/6500HD Owner Manual (GMNA-Localizing-U.S.-12102101) - 2019 - crc - 10/2/18
Driving and Operating 247
2. Follow the fuel primingprocedure earlier in this sectionto prime the fuel filter.
3. Turn the ignition key to STARTfor 10 to 15 seconds at a timeuntil the engine starts. If theengine tries to run, but doesnot run smoothly, increase therpm slightly by using theaccelerator pedal. This will helpforce air through the system.
4. Return to Step 2 if the enginestalls and will not restart.
5. After a few attempts, if theengine still does not start, seeyour dealer.
Fuel Filter Replacement
{ Warning
Diesel fuel is flammable. It couldstart a fire if something ignites it,and people could be burned. Donot let it get on hot engine parts,and keep matches or otherignition sources away.
The fuel filter is on the driver side,inside the frame rail.
To replace the fuel filter:
1. Drain any water from the filter.See “Removing Water from theFuel Filter” in Water in Fuel0 243.
Keep the engine off until theprocedure is completed.
2. Apply the parking brake.
3. Remove the filter element capby turning it counterclockwise.
4. Remove the filter element.If there is any dirt on the filtersealing surface, clean it off.
5. Install the new filter elementand o-ring.
6. Reinstall and tighten the filtercap to the housing.
7. Use the fuel filter primingprocedure to prime the fuelfilter. See “Fuel Priming” inWater in Fuel 0 243.
8. Start the engine and let it idlefor five minutes. Check the fuelfilter and air bleed valve forleaks.
9. Reset the fuel filter monitor.See Driver Information Center(DIC) (Base Level) 0 119 orDriver Information Center (DIC)(Uplevel) 0 120.

Chevrolet Silverado 4500HD/5500HD/6500HD Owner Manual (GMNA-Localizing-U.S.-12102101) - 2019 - crc - 10/2/18
248 Driving and Operating
Filling the Tank
{ Warning
Fuel vapors and fuel fires burnviolently and can cause injury ordeath.
Follow these guidelines:
. To help avoid injuries to youand others, read and followall the instructions on thefuel pump island.
. Turn off the engine whenrefueling.
. Keep sparks, flames, andsmoking materials awayfrom fuel.
. Do not leave the fuel pumpunattended.
. Avoid using electronicdevices while refueling.
. Do not re-enter the vehiclewhile pumping fuel.
(Continued)
Warning (Continued)
. Keep children away fromthe fuel pump and never letchildren pump fuel.
. Fuel can spray out if the fuelcap is opened too quickly.This spray can happen if thetank is nearly full, and ismore likely in hot weather.Open the fuel cap slowlyand wait for any hiss noiseto stop, then unscrew thecap all the way.
To remove the fuel cap, turn itslowly counterclockwise.
Dual Tank Fueling
If your vehicle is equipped with dualfuel tanks, each tank must be filledthrough its own fill port.
Fueling Precautions
{ Warning
Overfilling the fuel tank by morethan three clicks of a standard fillnozzle may cause:
. Vehicle performance issues,including engine stalling anddamage to the fuel system.
. Fuel spills.
. Potential fuel fires.
Federal Motor Carrier SafetyRegulations require the driver orany employee of a motor carrier toobserve the following requirements:
. Do not fuel a motor vehicle withthe engine running, except whenit is necessary to run the engineto fuel the vehicle.
. Do not smoke or expose anyopen flame in the vicinity of avehicle being fueled.

Chevrolet Silverado 4500HD/5500HD/6500HD Owner Manual (GMNA-Localizing-U.S.-12102101) - 2019 - crc - 10/2/18
Driving and Operating 249. Do not fuel a motor vehicle
unless the nozzle of the fuelhose is continuously in contactwith the intake pipe of thefuel tank.
. Do not permit any other personto engage in such activities aswould be likely to result in fire orexplosion.
Be careful not to spill fuel. Wait afew seconds after you have finishedpumping before removing thenozzle. Clean fuel from paintedsurfaces as soon as possible.
Diesel fuel can foam when filling thetank. This can cause the automaticpump nozzle to shut off, even if thetank is not full. If this happens, waitfor the foaming to stop, and then fillthe tank more slowly.
{ Warning
Heat coming from the engine cancause the fuel to expand andforce the fuel out of the tank.If something ignites the fuel, a fire
(Continued)
Warning (Continued)
could start. To help avoid this, fillthe tank slowly and only until thenozzle shuts off. Do not top it off.Clean up any spilled fuel.
When replacing the fuel cap, turn itclockwise until it clicks. Make surethe cap is fully installed.
{ Warning
If a fire starts while you arerefueling, do not remove thenozzle. Shut off the flow of fuel byshutting off the pump or bynotifying the station attendant.Leave the area immediately.
Caution
If a new fuel cap is needed, besure to get the right type of capfrom your dealer. The wrong type
(Continued)
Caution (Continued)
of fuel cap might not fit properlyand could damage the fuel tankand emissions system.
Accidental Refueling withGasoline
Caution
If the vehicle is accidentallyrefueled with gasoline, do notcontinue driving the vehicleexcept to get to a location whereit can be stopped safely. Drivingthe vehicle will damage the fuelsystem. Have the vehicle towedto a qualified technician to havethe gasoline removed from thetank and fuel system. Flush thefuel system with Ultra Low SulfurDiesel fuel to ensure all gasolineis removed.

Chevrolet Silverado 4500HD/5500HD/6500HD Owner Manual (GMNA-Localizing-U.S.-12102101) - 2019 - crc - 10/2/18
250 Driving and Operating
Reserve Fuel
No extra supply of fuel for thepropulsion of the vehicle or for theoperation of accessories shall becarried on any motor vehicle, exceptin a properly mounted fuel tank ortanks.
Filling a Portable FuelContainer
{ Warning
Filling a portable fuel containerwhile it is in the vehicle can causefuel vapors that can ignite eitherby static electricity or othermeans. You or others could bebadly burned and the vehiclecould be damaged. Always:
. Use approved fuelcontainers.
. Remove the container fromthe vehicle, trunk, or pickupbed before filling.
(Continued)
Warning (Continued)
. Place the container on theground.
. Place the nozzle inside thefill opening of the containerbefore dispensing fuel, andkeep it in contact with the fillopening until filling iscomplete.
. Fill the container no morethan 95% full to allow forexpansion.
. Do not smoke, lightmatches, or use lighterswhile pumping fuel.
. Avoid using electronicdevices.
Trailer Towing
General TowingInformationOnly use towing equipment that hasbeen designed for the vehicle.Contact your dealer or traileringdealer for assistance with preparingthe vehicle to tow a trailer. Read theentire section before towing a trailer.
To tow a disabled vehicle, seeTowing the Vehicle 0 347.
Driving Characteristicsand Towing Tips
{ Warning
You can lose control when towinga trailer if the correct equipment isnot used or the vehicle is notdriven properly. For example,if the trailer is too heavy or thetrailer brakes are inadequate forthe load, the vehicle may not stop
(Continued)
Chevrolet Silverado 4500HD/5500HD/6500HD Owner Manual (GMNA-Localizing-U.S.-12102101) - 2019 - crc - 10/2/18
Driving and Operating 251
Warning (Continued)
as expected. You and otherscould be seriously injured. Thevehicle may also be damaged,and the repairs would not becovered by the vehicle warranty.Pull a trailer only if all the steps inthis section have been followed.Ask your dealer for advice andinformation about towing a trailerwith the vehicle.
Driving with a Trailer
Trailering is different than justdriving the vehicle by itself.Trailering means changes inhandling, acceleration, braking,durability, and fuel economy.Successful, safe trailering takescorrect equipment, and it has to beused properly.
The following information has manytime-tested, important trailering tipsand safety rules. Many of these are
important for your safety and that ofyour passengers. Read this sectioncarefully before pulling a trailer.
When towing a trailer:
. Become familiar with and followall state and local laws thatapply to trailer towing. Theserequirements vary from state tostate.
. State laws may require the useof extended side view mirrors.Even if not required, you shouldinstall extended side viewmirrors if your visibility is limitedor restricted while towing.
. Do not tow a trailer during thefirst 800 km (500 mi) of vehicleuse to prevent damage to theengine, axle, or other parts.
. It is recommended to performthe first oil change before heavytowing.
. During the first 800 km (500 mi)of trailer towing, do not driveover 80 km/h (50 mph) and donot make starts at full throttle.
. Vehicles can tow in D (Drive).Tow/Haul Mode is recommendedfor heavier trailers. See Tow/Haul Mode 0 227. If thetransmission downshifts toooften, a lower gear may beselected using Manual Mode.See Manual Mode 0 226.
{ Warning
To prevent serious injury or deathfrom carbon monoxide (CO),when towing a trailer:
. Do not drive with theliftgate, trunk/hatch,or rear-most window open.
. Fully open the air outlets onor under the instrumentpanel.
. Adjust the climate controlsystem to a setting thatbrings in only outside air.See “Climate ControlSystems” in the Index.
(Continued)

Chevrolet Silverado 4500HD/5500HD/6500HD Owner Manual (GMNA-Localizing-U.S.-12102101) - 2019 - crc - 10/2/18
252 Driving and Operating
Warning (Continued)
For more information aboutcarbon monoxide, see EngineExhaust 0 216.
Towing a trailer requires experience.The combination of the vehicle andtrailer is longer and not asresponsive as the vehicle itself. Getused to the handling and braking ofthe combination by driving on alevel road surface before driving onpublic roads.
The trailer structure, the tires, andthe brakes must be all be rated tocarry the intended cargo.Inadequate trailer equipment cancause the combination to operate inan unexpected or unsafe manner.Before driving, inspect all trailerhitch parts and attachments, safetychains, electrical connectors, lamps,tires, and mirrors. See TowingEquipment 0 257. If the trailer haselectric brakes, start thecombination moving and thenmanually apply the trailer brake
controller to check the trailer brakeswork. During the trip, occasionallycheck that the cargo and trailer aresecure and that the lamps and anytrailer brakes are working.
Following Distance
Stay at least twice as far behind thevehicle ahead as you would whendriving without a trailer. This canhelp to avoid heavy braking andsudden turns.
Passing
More passing distance is neededwhen towing a trailer. Thecombination of the vehicle andtrailer will not accelerate as quicklyand is much longer than the vehiclealone. It is necessary to go muchfarther beyond the passed vehiclebefore returning to the lane. Passon level roadways. Avoid passingon hills if possible.
Backing Up
Hold the bottom of the steeringwheel with one hand. To move thetrailer to the left, move that hand tothe left. To move the trailer to the
right, move that hand to the right.Always back up slowly and,if possible, have someoneguide you.
Making Turns
Caution
Turn more slowly and make widerarcs when towing a trailer toprevent damage to your vehicle.Making very sharp turns couldcause the trailer to contact thevehicle.
Make wider turns than normal whentowing, so trailer will not go over softshoulders, over curbs, or strike roadsigns, trees, or other objects.Always signal turns well in advance.Do not steer or brake suddenly.
Driving on Grades
Reduce speed and shift to a lowergear before starting down a long orsteep downhill grade. If the

Chevrolet Silverado 4500HD/5500HD/6500HD Owner Manual (GMNA-Localizing-U.S.-12102101) - 2019 - crc - 10/2/18
Driving and Operating 253
transmission is not shifted down, thebrakes may overheat and result inreduced braking efficiency.
The vehicle can tow in D (Drive).Shift the transmission to a lowergear if the transmission shifts toooften under heavy loads and/or hillyconditions.
When towing at higher altitudes,engine coolant will boil at a lowertemperature than at lower altitudes.If the engine is turned offimmediately after towing at highaltitude on steep uphill grades, thevehicle could show signs similar toengine overheating. To avoid this,let the engine run, preferably onlevel ground, with the transmissionin P (Park) for a few minutes beforeturning the engine off. If theoverheat warning comes on, seeEngine Overheating 0 305.
Parking on Hills
{ Warning
To prevent serious injury or death,always park your vehicle andtrailer on a level surface whenpossible.
When parking your vehicle and yourtrailer on a hill:
1. Press the brake pedal, but donot shift into P (Park) yet. Turnthe wheels into the curb iffacing downhill or into traffic iffacing uphill.
2. Have someone place chocksunder the trailer wheels.
3. When the wheel chocks are inplace, gradually release thebrake pedal to allow the chocksto absorb the load of the trailer.
4. Reapply the brake pedal. Thenapply the parking brake andshift into P (Park).
5. Release the brake pedal.
Leaving After Parking on a Hill
1. Apply and hold the brakepedal.
. Start the engine.
. Shift into a gear.
. Release the parking brake.
2. Let up on the brake pedal.
3. Drive slowly until the trailer isclear of the chocks.
4. Stop and have someone pickup and store the chocks.
Maintenance when TrailerTowing
The vehicle needs service moreoften when used to tow trailers. SeeMaintenance Schedule 0 361. It isespecially important to check theautomatic transmission fluid, engineoil, axle lubricant, belts, coolingsystem, and brake system beforeand during each trip.
Check periodically that all nuts andbolts on the trailer hitch are tight.
Chevrolet Silverado 4500HD/5500HD/6500HD Owner Manual (GMNA-Localizing-U.S.-12102101) - 2019 - crc - 10/2/18
254 Driving and Operating
Engine Cooling When TrailerTowing
The cooling system may temporarilyoverheat during severe operatingconditions. See Engine Overheating0 305.
Trailer Towing
Caution
Towing a trailer improperly candamage the vehicle and result incostly repairs not covered by thevehicle warranty. To tow a trailercorrectly, follow the directions inthis section and see your dealerfor important information abouttowing a trailer with the vehicle.
Trailering is different than justdriving the vehicle by itself.Trailering means changes inhandling, acceleration, braking,durability, and fuel economy.Successful, safe trailering takescorrect equipment, and it has to beused properly.
The following information has manytime-tested, important trailering tipsand safety rules. Many of these areimportant for your safety and that ofyour passengers. Read this sectioncarefully before pulling a trailer.
Trailer Weight
{ Warning
Never exceed the towing capacityfor your vehicle.
Safe trailering requires monitoringthe weight, speed, altitude, roadgrades, outside temperature,dimensions of the front of the trailer,and how frequently the vehicle isused to tow a trailer.
Trailer Weight Ratings
When towing a trailer, the combinedweight of the vehicle, vehiclecontents, trailer, and trailer contentsmust be below all of the maximumweight ratings for the vehicle,including:
. GCWR: Gross Combined WeightRating
. GVWR: Gross Vehicle WeightRating
. Maximum Trailer Weight Rating
. GAWR-RR: Gross Axle WeightRating-Rear
. Maximum Trailer Tongue WeightRating
See "Trailer Brakes" later in thissection to determine if brakes arerequired based on your trailer'sweight.
The only way to be sure the weightis not exceeding any of theseratings is to weigh the tow vehicleand trailer combination, fully loadedfor the trip, getting individualweights for each of these items.

Chevrolet Silverado 4500HD/5500HD/6500HD Owner Manual (GMNA-Localizing-U.S.-12102101) - 2019 - crc - 10/2/18
Driving and Operating 255
{ Warning
You and others could be seriouslyinjured or killed if the trailer is tooheavy or the trailer brakes areinadequate for the load. Thevehicle may be damaged, and therepairs would not be covered bythe vehicle warranty.
Only tow a trailer if all the steps inthis section have been followed.Ask your dealer for advice andinformation about towing a trailer.
Gross Combined WeightRating (GCWR)
GCWR is the total allowable weightof the completely loaded vehicleand trailer including any fuel,passengers, cargo, equipment, andaccessories. Do not exceed theGCWR for your vehicle. The GCWRfor the vehicle is on the Tow RatingChart following.
To check that the weight of thevehicle and trailer are within theGCWR for the vehicle, follow thesesteps:
. Start with the "curb weight" fromthe trailering information label
. Add the weight of the trailerloaded with cargo and ready forthe trip
. Add the weight of all passengers
. Add the weight of all cargo in thevehicle
. Add the weight of hitch hardwaresuch as a draw bar, ball, loadequalizer bars, or sway bars
. Add the weight of anyaccessories or aftermarketequipment added to the vehicle
The resulting weight cannot exceedthe GCWR value shown on theTrailering Information Label.
The gross combined weight canalso be confirmed by weighing thetruck and trailer on a public scale.The truck and trailer should beloaded for the trip with passengersand cargo.
Gross Vehicle WeightRating (GVWR)
For information about the vehicle'smaximum load capacity, see VehicleLoad Limits 0 205. When calculatingthe GVWR with a trailer attached,the trailer tongue weight must beincluded as part of the weight thevehicle is carrying.
Maximum Trailer Weight
Use the tow rating chart todetermine how much the trailer canweigh, based on the vehicle modeland options.

Chevrolet Silverado 4500HD/5500HD/6500HD Owner Manual (GMNA-Localizing-U.S.-12102101) - 2019 - crc - 10/2/18
256 Driving and Operating
Vehicle Transmission Axle RatioMaximum Trailer
Weight (2) GCWR *
4500/5500/6500 2WD Allison 1700 4:10/4:30/4:56/4.88 (1) 11 818 kg (26,000 lb)
4500/5500/650 2WD Allison 1750 4:10/4:30/4:56/4.88 (1) 16 636 kg (30,000 lb)
6500 2WD Allison 2700 4:10/4:30/4:56/4.88 (1) 11 818 kg (26,000 lb)
4500/5500/6500 4WD Allison 1700 4:30 (1) 11 818 kg (26,000 lb)
4500/5500/6500 4WD Allison 1750 4:30 (1) 16 636 kg (30,000 lb)
6500 4WD Allison 2700 4:30 (1) 11 818 kg (26,000 lb)* The Gross Combined Weight Rating (GCWR) is the totally allowable weight of the completely loaded vehicle andtrailer including passengers, cargo equipment and conversions. The GCWR for the vehicle should not be exceeded.(1) Maximum Trailer Weight cannot be provided because total vehicle weight is unknown.(2) Choose an appropriate hitch and load the truck and trailer within the limits of GCWR, GVWR, and RGAWR.
Trailer Tongue Weight
The trailer tongue weight contributesto the Gross Vehicle Weight (GVW).GVW includes the CURB WEIGHTof your vehicle, any passengers,cargo, equipment and the trailertongue weight. Vehicle options,passengers, cargo, and equipmentreduce the maximum allowable
tongue weight the vehicle can carry,which also reduces the maximumallowable trailer weight.
Trailer Load Balance
The correct trailer load balancemust be maintained to ensure trailerstability. Incorrect load balance is aleading cause of trailer sway.

Chevrolet Silverado 4500HD/5500HD/6500HD Owner Manual (GMNA-Localizing-U.S.-12102101) - 2019 - crc - 10/2/18
Driving and Operating 257
The trailer tongue weight (1) shouldbe 10–15% and fifth-wheel orgooseneck kingpin weight should be15–25% of the total loaded trailerweight (2). Some specific trailertypes, such as boat trailers, falloutside of this range. Always referto the trailer owner’s manual for therecommended trailer tongue weightfor each trailer. Never exceed themaximum loads for your vehicle,hitch and trailer.
The trailer load balance percentageis calculated as: weight (1) dividedby weight (2) times 100.
After loading the trailer, separatelyweigh the trailer and then the trailertongue and calculate the trailer loadbalance percentage to see if theweights and distribution areappropriate for your vehicle. If thetrailer weight is too high, it may bepossible to transfer some of thecargo into your vehicle. If the trailertongue weight is too high or too low,it may be possible to rearrangesome of the cargo inside of thetrailer.
Do not exceed the maximumallowable tongue weight for yourvehicle. Use the shortest hitchextension available to position thehitch ball closer to your vehicle. Thiswill help reduce the effect of thetrailer tongue weight on the trailerhitch and the rear axle.
Rear Gross Axle Weight Rating(GAWR-RR)
The GAWR-RR is the total weightthat can be supported by the rearaxle of the vehicle. Do not exceedthe GAWR-RR for the vehicle, withthe tow vehicle and trailer fullyloaded for the trip including theweight of the trailer tongue. If usinga weight-distributing hitch, do notexceed the GAWR-RR beforeapplying the weight distributionspring bars.
Towing Equipment
Hitches
Always use the correct hitchequipment for your vehicle.Crosswinds, large trucks going by,and rough roads can affect thetrailer and the hitch.
Proper hitch equipment for yourvehicle helps maintain control of thevehicle-trailer combination. Manytrailers can be towed using aweight-carrying hitch which has acoupler latched to the hitch ball, or atow eye latched to a pintle hook.Other trailers may require a

Chevrolet Silverado 4500HD/5500HD/6500HD Owner Manual (GMNA-Localizing-U.S.-12102101) - 2019 - crc - 10/2/18
258 Driving and Operating
weight-distributing hitch that usesspring bars to distribute the trailertongue weight between your vehicleand trailer axles. Fifth-wheel andgooseneck hitches may alsobe used.
Avoid sharp turns when using astep-bumper hitch to preventdamage. Make wider turns toprevent contact between your trailerand your bumper.
Tires. Do not tow a trailer while using a
compact spare tire on thevehicle.
. Tires must be properly inflated tosupport loads while towing atrailer. See Tires 0 331 forinstructions on proper tireinflation.
Safety Chains
Always attach chains between thevehicle and the trailer, and attachthe chains to the holes on the trailerhitch platform. Instructions about
safety chains may be provided bythe hitch manufacturer or by thetrailer manufacturer.
Cross the safety chains under thetongue of the trailer to help preventthe tongue from contacting the roadif it becomes separated from thehitch. Always leave just enoughslack so the combination can turn.Never allow safety chains to drag onthe ground.
Trailer Brakes
Loaded trailers over 675 kg (1,500lb) must be equipped with brakesystems and with brakes for eachaxle. Trailer braking equipmentconforming to Canadian StandardsAssociation (CSA) requirementCAN3-D313, or its equivalent, isrecommended.
State or local regulations mayrequire trailers to have their ownbraking system if the loaded weightof the trailer exceeds certainminimums that can vary from stateto state. Read and follow theinstructions for the trailer brakes sothey are installed, adjusted, and
maintained properly. Never attemptto tap into your vehicle's hydraulicbrake system. If you do, both thevehicle anti-lock brakes and thetrailer brakes may not function,which could result in a crash.
Auxiliary Battery
If equipped, the vehicle's auxiliarybattery can be used to supplyelectrical power to additionalequipment.
Caution
To prevent draining the auxiliarybattery, always turn off electricalequipment when not in use anddo not use any equipment thatmay exceed themaximum amperage rating of30 amps.

Chevrolet Silverado 4500HD/5500HD/6500HD Owner Manual (GMNA-Localizing-U.S.-12102101) - 2019 - crc - 10/2/18
Driving and Operating 259
Trailer Wiring Harness
Basic Trailer Wiring
Heavy-Duty Trailer Wiring HarnessPackage
If equipped, the trailer wiringharness, with a 7-pin connector anda 4-pin connector, is mounted onthe frame at the rear of the vehicle.
1. Ground
2. Tail Lamps
3. Left Turn/Brake
4. Right Turn/Brake
1. Left Turn/Brake
2. Tail Lamps
3. Reverse Lamps
4. Battery Feed
5. Right Turn/Brake
6. Electric Brakes
7. Ground
Use only a round, seven-wireconnector with flat blade terminalsmeeting SAE J2863 specificationsfor proper electrical connectivity.
The seven-wire harness containsthe following trailer circuits:
Stop/TurnSignal Left
Yellow/Blue
Stop/TurnSignal Right
Green/Brown
Tail/ParkingLamps Gray/Brown
Reverse Lamps White/Green
Battery Feed Red/Violet
Ground Black
Electric TrailerBrake
Blue
Electric Brake Control WiringProvisions
If the vehicle is not equipped withan integrated trailer brake controller,and the trailer has electric brakes, atrailer brake controller needs to beinstalled on the vehicle. The brakecontroller should be installed byyour dealer or a qualified servicecenter.
If equipped, wiring provisions for anaftermarket electric trailer brakecontroller are included with the

Chevrolet Silverado 4500HD/5500HD/6500HD Owner Manual (GMNA-Localizing-U.S.-12102101) - 2019 - crc - 10/2/18
260 Driving and Operating
vehicle as part of the trailer wiringpackage. The harness contains thefollowing circuits:
Electric TrailerBrakes
Blue
Battery FeedRed/Black orRed/Blue
Brake ApplySignal White/Blue
Ground Black
It will be necessary to have atechnician connect the 12-voltpower to the engine compartmentfuse block.
Refer to the aftermarket electrictrailer brake controller owner'smanual to determine wire colorcoding of the electric trailer brakecontroller. The wire colors on thebrake controller may be differentfrom the vehicle.
Trailer Lamps
Always check all trailer lamps areworking at the beginning of eachtrip, and periodically on longer trips.
Turn Signals When Towing aTrailer
When properly connected, the trailerturn signals should will illuminate toindicate the vehicle is turning,changing lanes, or stopping. Whentowing a trailer, the arrows on theinstrument cluster will illuminateeven if the trailer is not properlyconnected or the bulbs areburned out.
Tow/Haul Mode
For instructions on how to enterTow/Haul mode, see Tow/HaulMode 0 227.
Tow/Haul assists when pulling aheavy trailer or a large orheavy load.
Tow/Haul Mode is designed to bemost effective when the vehicle andtrailer combined weight is at least75% of the vehicle's GrossCombined Weight Rating (GCWR).See “Weight of the Trailer” underTrailer Towing 0 254.
Tow/Haul Mode is most useful whentowing a heavy trailer or carrying alarge or heavy load:
. through rolling terrain
. in stop-and-go traffic
. in busy parking lots
Operating the vehicle in Tow/HaulMode when lightly loaded or nottowing will not cause damage;however, it is not recommended andmay result in unpleasant engine andtransmission driving characteristicsand reduced fuel economy.
Integrated Trailer BrakeControl System
The vehicle may have an IntegratedTrailer Brake Control (ITBC) systemfor use with electric trailer brakes ormost electric over hydraulic trailerbrake systems. These instructionsapply to both types of electric trailerbrakes.

Chevrolet Silverado 4500HD/5500HD/6500HD Owner Manual (GMNA-Localizing-U.S.-12102101) - 2019 - crc - 10/2/18
Driving and Operating 261
This symbol is on the Trailer BrakeControl Panel on vehicles with anITBC system. The power output tothe trailer brakes is proportional tothe amount of vehicle braking. Thisavailable power output to the trailerbrakes can be adjusted to a widerange of trailering situations.
The ITBC system is integrated withthe vehicle’s anti-lock brake system.In trailering conditions that causethe vehicle’s anti-lock brake systemto activate, power sent to thetrailer's brakes will be automaticallyadjusted to minimize trailer wheellock-up. This does not imply that thetrailer has anti-lock brakes.
If the vehicle’s brake or anti-lockbrake systems are not functioningproperly, the ITBC system may notfunction fully or at all. Make sure all
of these systems are fullyoperational to allow the ITBCsystem to function properly.
The ITBC system is poweredthrough the vehicle's electricalsystem. Turning the ignition off willalso turn off the ITBC system. TheITBC system is fully functional onlywhen the ignition is in ON/RUN.
{ Warning
Connecting a trailer that has anair brake system may result inreduced or complete loss of trailerbraking, including increasedstopping distance or trailerinstability which could result inserious injury, death, or propertydamage. Only use the ITBCsystem with electric or electricover hydraulic trailer brakesystems.
Trailer Brake Control Panel
1. Manual Trailer Brake ApplyLever
2. Trailer Gain AdjustmentButtons
The ITBC control panel is on theinstrument panel to the left of thesteering column. See InstrumentPanel 0 6. The control panel allowsadjustment to the amount of output,referred to as Trailer Gain, availableto the trailer brakes and allowsmanual application of the trailerbrakes. Use the ITBC control panel

Chevrolet Silverado 4500HD/5500HD/6500HD Owner Manual (GMNA-Localizing-U.S.-12102101) - 2019 - crc - 10/2/18
262 Driving and Operating
and the DIC trailer brake displaypage to adjust and display poweroutput to the trailer brakes.
Trailer Brake DIC Display Page
The ITBC display page indicates
. Trailer Gain setting
. Output to the trailer brakes
. Trailer connection
. System operational status
To display
. Scroll through the DIC menupages
. Press a Trailer Gain (+) or (-)button
. Activate the Manual TrailerBrake Apply Lever
TRAILER GAIN:
Press a Trailer Gain button to recallthe current Trailer Gain setting.Each press and release of the gainbuttons will then change the TrailerGain setting. Press the TrailerGain (+) or (-) to adjust. Press andhold to continuously adjust theTrailer Gain. To turn the output to
the trailer off, adjust the Trailer Gainsetting to 0.0. This setting can beadjusted from 0.0 to 10.0 with atrailer connected or disconnected.
TRAILER OUTPUT: This displaysanytime a trailer with electric brakesis connected. Output to the trailerbrakes is based on the amount ofvehicle braking present and relativeto the Trailer Gain setting. Output isdisplayed from 0 to 100% for eachgain setting.
The Trailer Output will indicate “- - -- - -” on the Trailer Brake DisplayPage whenever the following occur:
. No trailer is connected
. A trailer without electric brakesis connected (no DIC messagewill display)
. A trailer with electric brakes hasbecome disconnected, a CHECKTRAILER WIRING messagedisplays on the DIC
. There is a fault present in thewiring to the trailer brakes, aCHECK TRAILER WIRINGmessage displays on the DIC
. The ITBC system is not workingdue to a fault, a SERVICETRAILER BRAKE SYSTEMmessage displays in the DIC
Manual Trailer Brake Apply Lever
Slide this lever left to apply thetrailer’s electric brakes independentof the vehicle’s brakes. Use thislever to adjust Trailer Gain toachieve the proper power output tothe trailer brakes. The trailer's andthe vehicle's brake lamps will comeon when either vehicle brakes ormanual trailer brakes are appliedand properly connected.
Trailer Gain Adjustment Procedure
Trailer Gain should be set for aspecific trailering condition and itmust be readjusted anytime vehicleloading, trailer loading, or roadsurface conditions change.

Chevrolet Silverado 4500HD/5500HD/6500HD Owner Manual (GMNA-Localizing-U.S.-12102101) - 2019 - crc - 10/2/18
Driving and Operating 263
{ Warning
Trailer brakes that areover-gained or under-gained maynot stop the vehicle and the traileras intended and can result in acrash. Always follow theinstructions to set the Trailer Gainfor the proper trailer stoppingperformance.
To adjust Trailer Gain for eachtowing condition:
1. Drive the vehicle with the trailerattached on a level roadsurface representative of thetowing condition and free oftraffic at about 32 to 40 km/h(20 to 25 mph) and fully applythe Manual Trailer Brake ApplyLever.
NoteAdjusting Trailer Gain at speedslower than 32 to 40 km/h (20 to25 mph) may result in an incorrectgain setting.
2. Adjust the Trailer Gain, usingthe Trailer Gain (+) or (-)adjustment buttons, to justbelow the point of trailer wheellock-up, indicated by trailerwheel squeal or tire smokewhen a trailer wheel locks.
NoteTrailer wheel lock-up may not occurif towing a heavily loaded trailer. Inthis case, adjust the Trailer Gain tothe highest allowable setting for thetowing condition.
3. Readjust Trailer Gain anytimevehicle loading, trailer loading,or road surface conditionschange or if trailer wheellock-up is noticed at any timewhile towing.
Other ITBC-Related DIC Messages
TRAILER CONNECTED: Thismessage will briefly display when atrailer with electric brakes is firstconnected to the vehicle. Thismessage will automatically turn offin about 10 seconds. This messagecan be acknowledged before itautomatically turns off.
CHECK TRAILER WIRING: Thismessage will display if:
. The ITBC system firstdetermines connection to atrailer with electric brakes andthen the trailer harness becomesdisconnected the vehicle.
If the disconnect occurs whilethe vehicle is stationary, thismessage will automatically turnoff in about 30 seconds. Thismessage will also turn off if it isacknowledged or if the trailerharness is reconnected.
If the disconnect occurs whilethe vehicle is moving, thismessage will continue until theignition is turned off. Thismessage will also turn off if it isacknowledged or if the trailerharness is reconnected.
. There is an electrical fault in thewiring to the trailer brakes. Thismessage will continue as longas there is an electrical fault inthe trailer wiring. This messagewill also turn off if it isacknowledged.

Chevrolet Silverado 4500HD/5500HD/6500HD Owner Manual (GMNA-Localizing-U.S.-12102101) - 2019 - crc - 10/2/18
264 Driving and Operating
To determine whether the electricalfault is on the vehicle side or trailerside of the trailer wiring harnessconnection:
1. Disconnect the trailer wiringharness from the vehicle.
2. Turn the ignition off.
3. Wait 10 seconds, then turn theignition back to RUN.
4. If the CHECK TRAILERWIRING message reappears,the electrical fault is on thevehicle side.
If the CHECK TRAILERWIRING message onlyreappears when connecting thetrailer wiring harness to thevehicle, the electrical fault is onthe trailer side.
SERVICE TRAILER BRAKESYSTEM: This message will displaywhen there is a problem with theITBC system. If this messagecontinues over multiple ignitioncycles, have the vehicle serviced.
If either the CHECK TRAILERWIRING or SERVICE TRAILERBRAKE SYSTEM message displayswhile driving, the ITBC system maynot be fully functional or may notfunction at all. When trafficconditions allow, carefully pull thevehicle over to the side of the roadand turn the ignition off. Check thewiring connection to the trailer andturn the ignition back on. If either ofthese messages continues, eitherthe vehicle or trailer needs service.
A GM dealer may be able todiagnose and repair problems withthe trailer. However, any diagnosisand repair of the trailer is notcovered under the vehicle warranty.Contact your trailer dealer forassistance with trailer repairs andtrailer warranty information.
Aftermarket Electronic TrailerSway Control Devices
Some trailers may come equippedwith an electronic device designedto reduce or control trailer sway.Aftermarket equipmentmanufacturers also offer similar
devices that connect to the wiringbetween the trailer and the vehicle.These devices may interfere withthe vehicle’s trailer brake systemsor other systems, includingintegrated anti-sway systems,if equipped. Messages related totrailer connections or trailer brakescould appear on the DIC. Theeffects of these aftermarket deviceson vehicle handling or trailer brakeperformance is not known.
{ Warning
Use of aftermarket electronictrailer sway control devices couldresult in reduced trailer brakeperformance, loss of trailerbrakes, or other malfunctions, andresult in a crash. You or otherscould be seriously injured orkilled. Before using one of thesedevices:
. Ask the device or trailermanufacturer if the devicehas been thoroughly tested
(Continued)

Chevrolet Silverado 4500HD/5500HD/6500HD Owner Manual (GMNA-Localizing-U.S.-12102101) - 2019 - crc - 10/2/18
Driving and Operating 265
Warning (Continued)
for compatibility with themake, model, and year ofyour vehicle and anyoptional equipment installedon your vehicle.
. Before driving, check thetrailer brakes are workingproperly, if equipped. Drivethe vehicle with the trailerattached on a level roadsurface that is free of trafficat about 32-40 km/h(20-25 mph) and fully applythe manual trailer brakeapply lever. Also, check thetrailer brake lamps andother lamps are functioningcorrectly.
. If the trailer brakes are notoperating properly at anytime, or if a DIC messageindicates problems with thetrailer connections or trailerbrakes, carefully pull the
(Continued)
Warning (Continued)
vehicle over to the side ofthe road when trafficconditions allow.
Trailer Tires
Special Trailer (ST) tires differ fromvehicle tires. Trailer tires aredesigned with stiff sidewalls to helpprevent sway and to support heavyloads. These features can make itdifficult to determine if the trailer tirepressures are low only based on avisual inspection.
Always check all trailer tirepressures before each trip when thetires are cool. Low trailer tirepressure is a leading cause of trailertire blow-outs.
Trailer tires deteriorate over time.The trailer tire sidewall will show theweek and year the tire wasmanufactured. Many trailer tiremanufacturers recommendreplacing tires more than sixyears old.
Overloading is another leadingcause of trailer tire blow-outs. Neverload your trailer with more weightthan the tires are designed tosupport. The load rating is locatedon the trailer tire sidewall.
Always know the maximum speedrating for the trailer tires beforedriving. This may be significantlylower than the vehicle tire speedrating. The speed rating may be onthe trailer tire sidewall. If the speedrating is not shown, the defaulttrailer tire speed rating is 105 km/h(65 mph).
Chevrolet Silverado 4500HD/5500HD/6500HD Owner Manual (GMNA-Localizing-U.S.-12102101) - 2019 - crc - 10/2/18
266 Driving and Operating
Conversions andAdd-Ons
Add-On ElectricalEquipment
{ Warning
The Data Link Connector (DLC) isused for vehicle service andEmission Inspection/Maintenancetesting. See Malfunction IndicatorLamp (Check Engine Light) 0 113.A device connected to the DLC —such as an aftermarket fleet ordriver-behavior tracking device —may interfere with vehiclesystems. This could affect vehicleoperation and cause a crash.Such devices may also accessinformation stored in the vehicle’ssystems.
Caution
Some electrical equipment candamage the vehicle or causecomponents to not work andwould not be covered by thevehicle warranty. Always checkwith your dealer before addingelectrical equipment.
Add-on equipment can drain thevehicle's 12-volt battery, even if thevehicle is not operating.
The vehicle has an airbag system.Before attempting to add anythingelectrical to the vehicle, seeServicing the Airbag-EquippedVehicle 0 67 and Adding Equipmentto the Airbag-Equipped Vehicle0 68.
For information on wiring auxiliaryswitches, see www.gmupfitter.comor contact your dealer.
Adding a Snow Plow orSimilar Equipment
Caution
Do not exceed 72 km/h (45 mph)with a snow plow mounted to thevehicle. The vehicle couldoverheat and be damaged.
Before installing a snow plow on thevehicle, follow these guidelines:
Caution
If the vehicle does not have thesnow plow prep package, RPOVYU, adding a plow can damagethe vehicle, and the repairs wouldnot be covered by the vehiclewarranty. Unless the vehicle wasbuilt to carry a snow plow, do notadd one to the vehicle. If thevehicle has RPO VYU, then thepayload the vehicle can carry willbe reduced when a snow plow is
(Continued)
Chevrolet Silverado 4500HD/5500HD/6500HD Owner Manual (GMNA-Localizing-U.S.-12102101) - 2019 - crc - 10/2/18
Driving and Operating 267
Caution (Continued)
installed. The vehicle can bedamaged if either the front or rearaxle ratings or the Gross VehicleWeight Rating (GVWR) areexceeded.
The plow the vehicle can carrydepends on many things, such as:
. The options the vehicle camewith, and the weight of thoseoptions.
. The weight and number ofpassengers to be carried.
. The weight of items added to thevehicle, like a tool box ortruck cap.
. The total weight of anyadditional cargo to be carried.
For example, if the snow plowweighs 318 kg (700 lb), the totalweight of all occupants and cargoinside the cab should not exceed135 kg (300 lb). This means that youmay only be able to carry onepassenger. Even this may be too
much if there is other equipmentalready adding to the weight of thevehicle.
To safely carry a snow plow on thevehicle:
. Follow all aftermarket snow plowmanufacturer’s instructions forthe operation and transportationof the snow plow.
. With a snow plow attached, theengine coolant temperaturegauge may show a highertemperature than while drivingwithout one. The snow plowcould block the airflow to theradiator. This could be morenoticeable as vehicle speedincreases. At speeds above72 km (45 mph), this may causethe engine coolant to overheat.
. To increase the airflow, move thesnow plow blade postion.
. If driving more than 24 km(15 mi), angle the plow bladeposition.
. Make sure the weight on thefront and rear axles does notexceed the axle rating for each.
. For the front axle, if more cargoor passengers must be carried,appropriate counter ballast mustbe installed rear of the rear axle.Counter ballast must be properlysecured so it will not moveduring driving.
. Rear ballast may be required toensure a proper front and rearweight distribution ratio, eventhough the actual weight at thefront axle may be less than thefront axle rating.
. The snow plow manufacturer orinstaller can assist indetermining the amount of rearballast required, to help makesure the snow plow/vehiclecombination does not exceedthe GVW rating, the front andrear axle ratings, and the frontand rear weight distribution ratio.
. The total vehicle must notexceed the GVW rating.

Chevrolet Silverado 4500HD/5500HD/6500HD Owner Manual (GMNA-Localizing-U.S.-12102101) - 2019 - crc - 10/2/18
268 Driving and Operating
Front axle reserve capacity is thedifference between the Gross AxleWeight Rating (GAWR) and the frontaxle weight of the vehicle with fullfuel and passengers. This is theamount of weight that can be addedto the front axle before reaching thefront GAWR.
United States
Canada
The front axle reserve capacity forthe vehicle is in the lower rightcorner of the Certification/Tire label.
To calculate the amount of weightany front accessory, such as a snowplow, is adding to the front axle, usethis formula:
(W x (A +W.B.)) /W.B.= Weight theaccessory is adding to thefront axle.
Where:W = Weight of added accessoryA = Distance that the accessoryis in front of the front axleW.B. = Vehicle Wheelbase
For example, adding a 318 kg(700 lb) snow plow actually addsmore than 318 kg (700 lb) to thefront axle. Using the formula, if thesnow plow is 122 cm (4 ft) in front ofthe front axle and the wheelbase is305 cm (10 ft), then:
W = 318 kg (700 lb)A = 122 cm (4 ft)

Chevrolet Silverado 4500HD/5500HD/6500HD Owner Manual (GMNA-Localizing-U.S.-12102101) - 2019 - crc - 10/2/18
Driving and Operating 269
W.B. = 305 cm (10 ft)
(W x (A +W.B.)/W.B. =(318 x (122 + 305))/305 = 445 kg(980 lb)
This means if the front axle reservecapacity is more than 445 kg(980 lb), the snow plow could beadded without exceeding thefront GAWR.
Heavier equipment can be added onthe front of the vehicle if less cargoor fewer passengers are carried,or by positioning cargo toward therear. This reduces the load on thefront. However, the front GAWR,rear GAWR, and Gross VehicleWeight Rating (GVWR) must neverbe exceeded.
{ Warning
On some vehicles that havecertain front mounted equipment,such as a snow plow, it may bepossible to load the front axle tothe front Gross Axle WeightRating (GAWR) but not have
(Continued)
Warning (Continued)
enough weight on the rear axle tohave proper braking performance.If the brakes cannot workproperly, the vehice could crash.Always follow the snow plowmanufacturer or installer'srecommendation for rear ballastto ensure a proper front and rearweight distribution ratio.Maintaining a proper front andrear weight distribution ratio isnecessary to provide properbraking performance.
Total vehicle reserve capacity is thedifference between the GVWR andthe weight of the truck with full fueland passengers. It is the amount ofweight that can be added to thevehicle before reaching the GVWR.Reserve capacity numbers areintended as a guide when selectingthe amount of equipment or cargothe truck can carry. If unsure of thevehicle's front, rear, or total weight,
go to a weigh station and weigh thevehicle. Your dealer can also helpwith this.
The total vehicle reserve capacityfor the vehicle is in the lower rightcorner of the Certification/Tire labelas shown previously.
See your dealer for additionaladvice and information about usinga snow plow on the vehicle. Also,see Vehicle Load Limits 0 205.
Emergency Roof LampProvisions
Vehicles with the RPO VYU snowplow prep package also have anemergency roof lamp provisionpackage, RPO TRW. Wiring for theemergency roof lamp is providedabove the overhead console. SeeAuxiliary Roof-Mounted Lamp 0 136for switch location.

Chevrolet Silverado 4500HD/5500HD/6500HD Owner Manual (GMNA-Localizing-U.S.-12102101) - 2019 - crc - 10/2/18
270 Driving and Operating
Power Take-Off (PTO)If equipped, the Power Take-Off(PTO) is a GM Upfitter integratedsystem that is used to create anauxiliary power source for runningadd-on equipment, such as saltspreaders, snow plows, winches,and lift buckets. The PTO systemcontrols engine speed to valueshigher than normal base idle, PTOload relay engagement, and remotestarting and shutdown of the engine.
When installing PTO aftermarketequipment, the PTO wiring andoperation recommendationsprovided by the service manual andGM Upfitter documentation must bestrictly followed.
Refer to the bulletins in the UpfitterIntegration websitewww.gmupfitter.com for the PowerTake Off (PTO) operatingdescription and application guide.
{ Warning
Engine exhaust contains CarbonMonoxide (CO), which cannot beseen or smelled. Exposure to COcan cause unconsciousness oreven death. Never operate PTOin an enclosed area such as agarage or building that has nofresh air ventilation. See EngineExhaust 0 216.
Caution
If the key is in the ignition duringRemote PTO operation, thevehicle can be shifted out ofP (Park). Even though PTO willbe disengaged, depending onPTO Upfitter application, personalinjury or property damage mayresult from vehicle movement.Always remove the key from theignition before operatingRemote PTO.
Primary PTO Operating Modes
PTO modes of operation are:
. Preset
Stationary operation only: In-cabcontrol is standard, remotecontrol is available.
. Variable
Stationary operation only: In-cabcontrol is standard, remotecontrol is available.
. Mobile
In-cab control only.
. Operator Selectable In-CabMode (OSIM)
OSIM is for in-caboperation only.
OSIM is for vehicles that requireboth stationary and mobilemodes. OSIM is available via theGM Service Tool only. During theconfiguration of OSIM, twomodes must be paired. Theoptions for pairing are: stationarypreset and mobile, or stationaryvariable and mobile. Duringactivation of OSIM, the operator

Chevrolet Silverado 4500HD/5500HD/6500HD Owner Manual (GMNA-Localizing-U.S.-12102101) - 2019 - crc - 10/2/18
Driving and Operating 271
must select one of the twomodes within the pre-configuredpairing. If an OSIM mode is notselected, PTO will not operate.
OSIM modes of operation are:
‐ Stationary
For stationary mode, theconfiguration may bestationary preset or stationaryvariable.
‐ Mobile
For mobile mode, theconfiguration is variable only.
Selection between OSIMpairings is not available.
Remote modes are notavailable.
The factory default programmingenables in-cab control. Forstationary modes, a GM ServiceTool can reprogram the system toallow for remote control and disablethe in-cab control.
All PTO modes provide for enginerpm control and PTO load relaycontrol.
All PTO modes provide for safetyinterlocks for PTO loaddisengagement.
Remote PTO modes provide forremote engine starting andshutdown.
Stationary in-cab and Remote PTOmodes provide for engine shutdowndue to critical engine conditions, aswell as a timed engine shutdownfeature. For emergency vehicleapplications, engine shutdown dueto critical engine conditions and thetimer based feature is not available.
Preset PTO
Preset Enable Conditions –In-Cab Operation
To enable PTO:
1. With the engine running, shiftthe vehicle into P (Park) andset the parking brake. Do notpress the brake pedal.
2. Confirm that cruise controlis off.
3. Press and release the PTOin-cab switch below the climatecontrols in the center stack.The PTO indicator light willblink rapidly until the PTO loadrelay becomes engaged andwill then be on steady. Theengine will advance to the PTOStandby Speed.
4. Once the PTO Standby Speedis reached, use SET− and+RES on the cruise control toreach the Set 1 or Set 2 PTOengine speeds.
The accelerator pedal isdisabled and cannot be used tooverride the PTO presetspeeds.
Factory Default PTO EngineSpeeds
Standby 900 rpm
Set 1 (SET−) 1200 rpm
Set 2 (+RES) 1900 rpm

Chevrolet Silverado 4500HD/5500HD/6500HD Owner Manual (GMNA-Localizing-U.S.-12102101) - 2019 - crc - 10/2/18
272 Driving and Operating
The first time a vehicle is usedfor PTO:
1. The PTO Control setting on theGM Service Tool isprogrammed to Interior ModePTO Switch.
2. Check the correct operation ofthe default PTO presetstationary mode to observe thethree idle up speeds. The PTOfunction should be confirmedbefore any wiring modificationsare done or anyreprogramming is attempted.See your dealer if the defaultpresets are not functioningproperly.
3. The PTO indicator light will notinitially reflect the status of thePTO load until the PTO loadrelay is wired into the system.The PTO load relay output isenabled as a factory default.When the PTO indicator light iseither blinking or on solid, thePTO relay output will beactivated.
Preset Enable Conditions –Remote Operation
This requires programming with theGM Service Tool and remote switchpanel provided by GM Upfitter.
1. Confirm that cruise controlis off.
2. Set the parking brake and shiftthe transmission into P (Park).
3. Turn the engine off. Remove orplace the key in the ignition offposition. Lock the vehicle,if desired.
4. Confirm the hood is closed.
5. From outside the vehicle, pressand release the Remote PTOArm switch.
6. Within five seconds, open andclose the Remote PTO EngineStart/Shutdown switch.
7. The horn will chirp, and thenengine starting will beautomatically initiated. ThePTO system will then elevateengine rpm to PTO StandbySpeed and engage the PTOload relay.
8. The Remote PTO Set switchcan now be used to accomplishthe PTO Set 1 and Set 2engine speeds.
The accelerator pedal isdisabled when Remote PTOoperation is selected.
Preset Enable Conditions –Remote Operation In-Cab Enable
This requires programming with theGM Service Tool and remote switchpanel provided by GM Upfitter.
Starting remote operation in-cab:
1. With the engine running, shiftthe vehicle into P (Park),release the brake pedal, andset the parking brake.
2. Confirm that cruise controlis off.
3. Confirm the hood is closed.
4. Press and release the in-cabPTO switch.
5. The horn will chirp, the PTOload relay will engage, and theengine will advance to the PTOStandby Speed.

Chevrolet Silverado 4500HD/5500HD/6500HD Owner Manual (GMNA-Localizing-U.S.-12102101) - 2019 - crc - 10/2/18
Driving and Operating 273
6. The Remote PTO Set switchmay be used to select PTO Set1 and Set 2 engine speeds.
The accelerator pedal is disabledwhen Remote PTO operation isselected.
The operator may exit the vehicle.
{ Warning
If the key is in the ignition duringRemote PTO operation, thevehicle can be shifted out ofP (Park) by an unauthorizedoperator. Even though PTO willbe disengaged, depending onPTO Upfitter application, personalinjury or property damage mayresult from vehicle movement.The operator must ensure that thevehicle is secured againstunauthorized access duringRemote PTO operation.
Remote PTO operation may beended by pressing the brake pedalat which time the PTO load relaydisengages and the engine returns
to base idle speed. The vehicle maybe driven after the parking brake isreleased.
Preset Enable Conditions –Operator Selectable In-CabMode (OSIM)
This requires programming with theGM Service Tool and requirespairing OSIM stationary preset withOSIM mobile mode. If OSIM pairinghas been configured, initiate OSIMpreset operation:
1. With the engine running, shiftthe vehicle into P (Park) andrelease the brake pedal, andset the parking brake.
2. Confirm cruise control is off.
3. Confirm the hood is closed.
4. Press and release the in-cabPTO switch. The PTO indicatorlight will blink slowly.
5. Within 10 seconds, press andrelease SET− on the cruisecontrol.
6. The PTO indicator light willchange to solid when the PTOload relay becomes engaged.
The engine speed will advanceto the PTO Standby Speed.Press and release SET− on thecruise control to select the PTOSet 1 speed. Press and release+RES on the cruise control toselect the PTO Set 2 speed.
. The PTO load relay engagesimmediately when the PTOoperation is initiated by theswitch input. The transmissiontorque converter is unlocked.The torque converter will lockupon reaching stable PTOStandby Speed (default = 900rpm) so maximum power isavailable.
. The first elevated engine speed,PTO Standby Speed, is notintended as a working speed butas a verification that the systemis active and ready to go to aworking speed. This speed canbe modified to a working speedwith the GM Service Tool. Theupper limit for PTO StandbySpeed is 1500 rpm.

Chevrolet Silverado 4500HD/5500HD/6500HD Owner Manual (GMNA-Localizing-U.S.-12102101) - 2019 - crc - 10/2/18
274 Driving and Operating. The remote switches and relay
connections are made at thePTO Upfitter Connector locatedon the chassis frame behindthe cab.
. The PTO Control setting on theService Tool must beprogrammed to Remote PTOMode Switch before the remoteswitches can be used.
. The PTO relay is programmed tobe enabled in the factory defaultconfiguration.
. Refer to the service manual orgo to the Upfitter Integrationwebsite www.gmupfitter.com fordetails, advanced programmingfeatures, and usage with aremovable pendant.
Variable PTO
Variable Enable Conditions –In-Cab Operation
To enable PTO:
1. With the engine running, shiftthe vehicle into P (Park) andset the parking brake. Do notpress the brake pedal.
2. Press and release the PTOin-cab switch below the climatecontrols in the center stack.The PTO indicator light willblink rapidly until the PTO loadrelay becomes engaged andwill then be on steady. Theengine will advance to the PTOStandby Speed.
3. Once PTO Standby Speed isreached, SET− and +RES onthe cruise control can be usedto tap up and tap down theengine speed. Factory settingfor the tap step is 100 rpm andthe setting for the ramp rate is150 rpm/sec. The GM ServiceTool can enable the capabilityto change the default value fortap step via the RadioCustomization menu. Thedefault values for both tap stepand ramp rate can be changedwith the GM Service Tool. Theaccelerator pedal is disabled,and cannot be used to controlPTO engine speed.
Variable Enable Conditions –Remote Operation
This requires programming with theGM Service Tool and theappropriate remote switch panelprovided by GM Upfitter.
1. Confirm that cruise controlis off.
2. Set the parking brake and shiftthe transmission into P (Park).
3. Turn the engine off. Remove orplace the key in the ignition offposition. Lock the vehicle,if desired.
4. The hood must be closed.
5. From outside the vehicle, pressand release the Remote PTOArm switch.
6. Within five seconds, open andclose the Remote PTO EngineStart/Shutdown switch.
7. The horn will chirp, and thenengine starting will beautomatically initiated. ThePTO system will then elevate

Chevrolet Silverado 4500HD/5500HD/6500HD Owner Manual (GMNA-Localizing-U.S.-12102101) - 2019 - crc - 10/2/18
Driving and Operating 275
engine rpm to PTO StandbySpeed and engage the PTOload relay.
Variable Enable Conditions –Remote Operation In-Cab EnableStarting Remote Operation fromIn-Cab
This requires programming with theGM Service Tool and remote switchpanel provided by GM Upfitter.
1. With the engine running, shiftthe vehicle into P (Park),release the brake pedal, andset the parking brake.
2. Confirm cruise control is off.
3. Confirm the hood is closed.
4. Press and release the PTOin-cab switch.
5. The horn will chirp, the PTOload relay will engage, and theengine will advance to the PTOStandby Speed.
The operator may exit the vehicle.
{ Warning
If the key is in the ignition duringRemote PTO operation, thevehicle can be shifted out ofP (Park) by an unauthorizedoperator. Even though PTO willbe disengaged, depending onPTO Upfitter application, personalinjury or property damage mayresult from vehicle movement.The operator must ensure that thevehicle is secured againstunauthorized access duringRemote PTO operation.
The accelerator pedal is disabledwhen Remote PTO operation isselected.
Remote PTO operation can beended by pressing the brake pedal.The PTO load relay disengages andthe engine returns to base idlespeed. The vehicle may be drivenafter the parking brake is released.
. The desired engine operatingspeed can now beaccomplished. Two versions ofengine rpm control are available,switches or potentiometer,depending on which one wasinstalled.
‐ Switches – the Remote PTOSet and Resume switches canbe used to tap up and tapdown to the desired enginespeed.
‐ Potentiometer – a RemotePTO Throttle Potentiometercan be used as a continuousvariable throttle control to dialin the desired engine speed.
Variable EnableConditions – OSIM
This requires programming with theGM Service Tool and specificpairing of stationary variable andmobile modes. Remote operation isnot available.

Chevrolet Silverado 4500HD/5500HD/6500HD Owner Manual (GMNA-Localizing-U.S.-12102101) - 2019 - crc - 10/2/18
276 Driving and Operating
If OSIM pairing has beenconfigured, initiate OSIM stationaryvariable operation:
1. With the engine running, shiftthe vehicle into P (Park),release the brake pedal, andset the parking brake.
2. Confirm cruise control is off.
3. Confirm the hood is closed.
4. Press and release the PTOin-cab switch. The PTOindicator light will blink slowly.
5. Within 10 seconds, press andrelease SET− on the cruisecontrol. The PTO load relay willengage and the PTO indicatorlight will change to solid. Theengine speed will advance tothe PTO Standby Speed.
6. The desired operating speedmay be achieved by tapping upand down with +RES andSET− on the cruise control.
. The PTO load relay engagesimmediately when the PTOoperation is initiated by theswitch input. The transmissiontorque converter is unlocked.The torque converter will lockupon reaching stable PTOStandby Speed (default = 900rpm) so maximum power isavailable.
. The first elevated engine speed,PTO Standby Speed, is notintended as a working speed butas a verification that the systemis active and ready to go to aworking speed.
. The relay connections are madeat the PTO Upfitter Connectorlocated on the chassis framebehind the cab.
. The engine speeds can beadjusted between the low ofPTO Standby Speed and thehigh of PTO Max Engine speedlimits. Both values can bemodified from the factory default
settings with the GM ServiceTool. Based on the value chosenfor PTO Max Engine Speed, thePTO menu in the center stackmay show speeds that are notavailable.
. Factory setting for the tap step is100 rpm and the setting for ramprate is 150 rpm/sec. The defaultvalue for tap step can bemodified via the RadioCustomization menu. Thedefault values for both tap stepand ramp rate can be changedwith the GM Service Tool.
. The PTO load relay is enabledas the factory defaultprogrammed setting.
. Refer to the service manual orgo to the GM Upfitter Integrationwebsite www.gmupfitter.com fordetails.

Chevrolet Silverado 4500HD/5500HD/6500HD Owner Manual (GMNA-Localizing-U.S.-12102101) - 2019 - crc - 10/2/18
Driving and Operating 277
Mobile PTO
Mobile Enable Conditions –In-Cab Operation Only
This requires programming with theGM Service Tool.
1. The engine must be running.
2. The parking brake must bereleased.
3. Confirm that cruise controlis off.
4. Engine rpm must be less than1500 rpm.
5. Shift the transmission to M1,M2, or M3.
6. Tap the brake pedal and thendo not press the brake pedal.
7. Keep the driver door closed.The driver door can be keptopen if reconfigured using theGM Service Tool. Seewww.gmupfitter.com.
8. Press and release the PTOin-cab switch below the climatecontrols in the center stack.Then within 10 seconds pressand release +RES on the
cruise control. The PTOindicator light will blink slowlybetween presses. The PTOindicator light will then blinkrapidly until the PTO loadbecomes engaged, and thencome on steady. The enginespeed will remain at the currentthrottle setting or advance toPTO Standby Speed,whichever value is greater.If the engine rpm is above1500 rpm, the PTO relay willnot engage until the enginerpm drops below 1500 rpm.
9. Once engaged, if additionalengine speed is desired, useeither the cruise control or theaccelerator pedal to temporarilyadjust the engine speed.
‐ +RES on the cruise controlcan be used to tap up, or ifcontinuously held to rampup, to the desired operatingspeed. SET− on the cruisecontrol can be used to tapdown or coast down ifcontinuously held to thedesired engine speed. Top
limit is PTO Max EngineSpeed, default 2100 rpm andprogrammable to 2900 rpm.Lower limit is PTO StandbySpeed, default 900 rpm withprogram range from baseidle to 900 rpm.
‐ The accelerator pedal can beused to achieve the desiredspeed. When the desiredspeed is reached, SET− onthe cruise control would beused to capture and maintainthat speed. Normal tap upand tap down can then beused to fine tune the setting.
In Mobile PTO mode, the vehiclespeed achieved is the result of thecurrent engine speed requested andthe transmission gear rangeselected. When the vehicle isplaced in M2 or M3, the vehicle willupshift according to engine rpm setpoint, and vehicle speed willincrease. To prevent upshifts andmaintain lower vehicle speeds,place the vehicle in M1.

Chevrolet Silverado 4500HD/5500HD/6500HD Owner Manual (GMNA-Localizing-U.S.-12102101) - 2019 - crc - 10/2/18
278 Driving and Operating
Mobile Enable Conditions –Operator Selectable In-CabMode (OSIM)
This requires programming with theGM Service Tool and specificpairing mobile mode with eitherstationary preset or variable.Remote operation is not available.
See “Mobile PTO” previously in thissection.
PTO System DisengageConditions
Preset or Variable StationaryModes – In-Cab Operation
To disengage PTO, do one of thefollowing:
. Press the brake pedal. Theengine returns to base idle, butthe PTO load relay remainsengaged. The PTO indicatorlight will blink slowly indicatingthat a PTO set speed is stillstored in memory. Uponreleasing the brake, the factorydefault programming is for theengine speed to remain at curbidle. A press and release of
+RES on the cruise control willrestore engine rpm to the lastPTO set speed. The PTOsystem can also be programmedto return engine rpm to the PTOStandby Speed setting.
. Press* on the cruise control.The engine returns to base idle,but the PTO load relay remainsengaged. The PTO indicatorlight will blink slowly indicatingthat a PTO set speed is stillstored in memory. Activating+RES on the cruise control willrestore engine rpm to the lastPTO set speed.
. Press and release the PTOin-cab switch. The PTO loadrelay disengages and the enginereturns to base idle. The PTOindicator light will turn off,indicating the PTO load relay isdisengaged and the stored setspeed has been cleared frommemory.
Stationary Modes (Preset orVariable) – Remote Control
To disengage PTO:
. Open the Remote PTO EngineStart/Shutdown switch. Loadrelay disengages and the enginewill stop.
. If equipped, press the PTOEmergency Stop switch. Loadrelay disengages and the enginewill stop. Refer to the bulletins inthe Upfitter Integration websitewww.gmupfitter.com for thePower Take Off (PTO) operatingdescription and applicationguide.
. With the key in the ignition androtated to the RUN position,press the brake pedal. The PTOload relay disengages and theengine returns to base idlespeed. The vehicle may bedriven.

Chevrolet Silverado 4500HD/5500HD/6500HD Owner Manual (GMNA-Localizing-U.S.-12102101) - 2019 - crc - 10/2/18
Driving and Operating 279
Stationary Modes will alsodisengage if:
. Vehicle movement is detected.
. The parking brake is released.
. The transmission is shifted outof P (Park).
. The ignition is cycled from onto off.
. The PTO feedback signal is lostindicating the load is disengagedif used. Seewww.gmupfitter.com.
. Cruise control becomes enabled.
. There is a timed auto-engineshutdown: This feature will shutdown the engine automaticallyafter a predefined time. PTOmust be operational for thisfunction to be active. Thisfeature is not available foremergency vehicle applications.
. There is an engine shutdownbased on critical engine or PTOsystem fault conditions: Thisfeature will shut down the enginewhen PTO is operating if acritical engine condition such aslow oil, low oil pressure, hotengine, hot transmission, lowfuel, or Diesel Particulate Filterregeneration is detected by thevehicle system. If PTO operationis continued when critical engineconditions are present, a hornchirp warning will occur after 30–60 seconds. The engine will shutdown two minutes after the hornwarning. The engine can berestarted with the ignition key orwith the Remote PTO enginestart controls. The horn warningand engine shutdown will againoccur if the critical enginecondition is still present. Thisfeature is not available foremergency vehicle applications.
Resume memory speed is clearedfor the above actions.
When Remote PTO engine startinghas been initialized with the ignitionkey in the RUN position, the shiftlever will remain locked if the brakepedal is pressed and a shift fromP (Park) is attempted while theengine is running and PTO is active(standby mode). A shift out ofP (Park) will not be allowed until oneof the following actions is taken bythe vehicle operator:
. Press the Remote PTO EngineStart/Shutdown switch.
. Press the PTO in-cab switch(only if the PTO in-cab RemoteStart/Stop feature is enabled).This requires programming withthe GM Service Tool.
. Press5 on the cruise control.
. Release the parking brake.
Chevrolet Silverado 4500HD/5500HD/6500HD Owner Manual (GMNA-Localizing-U.S.-12102101) - 2019 - crc - 10/2/18
280 Driving and Operating
Mobile Mode
To disengage PTO:
. Press the brake pedal. The PTOsystem releases control ofengine speed, but the PTO loadrelay remains engaged. Theengine will return to base idleunless the accelerator pedal ispressed. The PTO load relayremains engaged. The PTOindicator light will blink slowlyindicating that a PTO set speedis still stored in memory. Uponreleasing the brake, the factorydefault programming is for theengine speed to remain at curbidle awaiting an input from +RESon the cruise control to restoreengine rpm to the last PTO setspeed. The system can also beprogrammed to return enginerpm to the PTO Standby Speedsetting.
. Press* on the cruise control.The engine returns to base idle,but the PTO load relay remainsengaged. The PTO indicatorlight will blink slowly indicating
that a PTO set speed is stillstored in memory. Pressing+RES on the cruise control willrestore engine rpm to the lastPTO set speed.
. Press the PTO in-cab switch.Load relay disengages and theengine returns to base idle. ThePTO indicator light will turn off,indicating the PTO load relay isdisengaged and the stored setspeed has been cleared frommemory.
Mobile Mode will also disengage if:
. PTO feedback input is lost. Theengine speed is returned to thePTO Standby speed setting andthe load is still engaged. This isconfigurable with the GMService Tool.
. Vehicle Speed exceeds MaxVehicle Speed. Factory defaultsetting = 94 km/h (58 mph). PTOrelay will re-engage andadvance to the last enginespeed stored in memory whenboth the Vehicle Speed isreduced below 94 km/h (58 mph)
and the engine speed rampsdown below the maximum PTOengagement speed (1500 rpmfactory default setting).
. Engine Speed exceeds MaxEngine Speed for more than15 seconds. Factory defaultsetting = 2100 rpm.
. 5 on the cruise control ispressed.
. The parking brake is applied.
. The shift lever is moved out ofmanual shift selection, M1,M2, or M3.
Resume memory speed is clearedfor the above actions.
Although the PTO system attemptsto limit accelerator and PTO switchinputs to comply with maximumspeed and/or rpm parameters, somevehicle operating conditions such asdownhill acceleration can cause thevehicle speed or engine rpm toexceed these limits. In those cases,the PTO system may disengage.

Chevrolet Silverado 4500HD/5500HD/6500HD Owner Manual (GMNA-Localizing-U.S.-12102101) - 2019 - crc - 10/2/18
Driving and Operating 281
Operator Selectable In-CabMode (OSIM)
To disable OSIM Stationary PTO:
. Press and release the PTOin-cab switch.
To disable OSIM Mobile PTO:
. Press and release the PTOin-cab switch.
Prolonged or Extended PTOOperation
When operating the vehicle instationary PTO mode, the DieselParticulate Filter (DPF) will continueto filter the exhaust and accumulatesoot. The engine control system,depending on the speed and loadbeing applied by the PTO, may notbe able to generate enough energyor adequate heat needed to clean orregenerate the DPF. Continuedoperation under conditions that donot allow effective regeneration orcleaning will eventually plug theDPF and result in reduced power.The ENGINE POWER ISREDUCED Driver InformationCenter (DIC) message and
malfunction indicator lamp will bedisplayed, and dealer service will berequired to return the vehicle tonormal, full power operation. Toprevent this from occurring,frequently monitor the vehicle duringPTO operation, paying particularattention to the CLEAN EXHAUSTFILTER SEE OWNER MANUALNOW DIC warning message. If theDIC message is displayed duringPTO operation, see DieselParticulate Filter 0 217 forinformation on how to clean orregenerate the DPF.
PTO Operational SpeedControl
Variable PTO operational speedcontrol provides the followingfunctions:
Cruise Control SET− (In-Cab) orRemote PTO Set 1 Switch
SET : Press and hold theaccelerator to obtain the desiredengine speed, then press andrelease SET− on the cruise control.The current engine speed will bemaintained. This action can be
repeated as desired to capture ahigher rpm value. The PTO setspeed cannot exceed 2900 rpm.
TAP DOWN : Press and releaseSET− on the cruise control toreduce the engine speed byincrements of 100 rpm. The tapdown engine speed increments canbe adjusted by the GM Service Tool.The Service Tool can enable theoption for adjustment of tap downengine speed increments throughthe Radio Customization menu.
COAST : Press and hold SET− onthe cruise control to reduce the rpmat 150 rpm/sec until the desiredengine speed is reached or until theinitial PTO Standby Speed isreached.
In-Cab Cruise Control +RES orRemote PTO Set 2 Switch
RESUME : After a PTO set speedhas been met, a Resume Speedmessage is retained after anapplication of the brake pedal.Engine speed will reduce to basicidle speed. The PTO indicator lightwill blink slowly indicating the

Chevrolet Silverado 4500HD/5500HD/6500HD Owner Manual (GMNA-Localizing-U.S.-12102101) - 2019 - crc - 10/2/18
282 Driving and Operating
previous PTO set speed has beenretained in memory. Press andrelease +RES on the cruise controlto resume the previous PTO setspeed.
TAP UP : Press and release +RESon the cruise control to increase theengine speed by increments of 100rpm (factory preset value). The tapup engine speed increments can beadjusted by the GM Service Tool.The Service Tool can enable theoption for adjustment of tap upengine speed increments throughthe Radio Customization menu.
ACCEL : Press and hold +RES onthe cruise control to increase therpm by 150 rpm/sec until thedesired engine speed is reached oruntil the maximum allowable PTOset speed is reached. Alternatively,the engine speed acceleration canbe adjusted through the RadioCustomization menu.
Factory Preset Parameters
The following table lists the factorypreset parameters. These may bealtered by the GM Service Tool toconfigure the various PTO features.

Chevrolet Silverado 4500HD/5500HD/6500HD Owner Manual (GMNA-Localizing-U.S.-12102101) - 2019 - crc - 10/2/18
Driving and Operating 283
ProgrammableParameters
Factory Setting Minimum Value Maximum Value
PTO Option Configuration VEHICLE STATIONARY,PRESET SPEED
VEHICLE STATIONARY,PRESET SPEED
VEHICLE STATIONARY,VARIABLE SPEEDVEHICLE MOBILE,VARIABLE SPEED
PTO Control In-Cab PTO Mode In-Cab PTO Mode, RemotePTO Mode, OperatorIn-Cab SelectableMode (OSIM)
Type of Set SwitchOperation
MOMENTARY MOMENTARY LATCHING
PTO SET 1 Engine SpeedAfter PTO On
DISABLED DISABLED ENABLED
PTO Load Feedback DISABLED DISABLED ENABLED
PTO Relay ENABLED DISABLED ENABLED
Keep PTO Relay Engagedduring Braking or upon
Pressing *
ENABLED DISABLED ENABLED

Chevrolet Silverado 4500HD/5500HD/6500HD Owner Manual (GMNA-Localizing-U.S.-12102101) - 2019 - crc - 10/2/18
284 Driving and Operating
ProgrammableParameters
Factory Setting Minimum Value Maximum Value
Action after Brake IsReleased
RETURN TO BASEIDLE rpm
RETURN TO BASEIDLE rpm
RETURN TOSTANDBY rpm
Max. vehicle speed may belimited to 64 km/h (40 mph)if this is programmed withthe GM Service Tool.
Set Low Fuel Level forEngine Shutdown
15% 0% 25%
Engine Run Time with PTOActive Timer
ENABLED DISABLED ENABLED
Engine Run Time whilePTO Is Active
420 min 10 min 3480 min
PTO Max. Engine Speed 2100 rpm 1100 rpm 2900 rpm
Min. Engine Speed forPTO Engagement
500 rpm 500 rpm 1000 rpm
Max. Engine Speed forPTO Engagement
1500 rpm 1000 rpm 1800 rpm
PTO Standby rpm 900 rpm 700 rpm 1500 rpm
PTO Set Speed 1 1200 rpm 1100 rpm 2900 rpm
PTO Set Speed 2 1900 rpm 1900 rpm 2900 rpm

Chevrolet Silverado 4500HD/5500HD/6500HD Owner Manual (GMNA-Localizing-U.S.-12102101) - 2019 - crc - 10/2/18
Driving and Operating 285
ProgrammableParameters
Factory Setting Minimum Value Maximum Value
Engine Speed Tap Step 100 rpm 4 rpm 500 rpm
Engine Speed Ramp Rate 150 rpm 4 rpm 150 rpm
Maximum Vehicle Speed 94 km/h (58 mph) 30 km/h (19 mph) 94 km/h (58 mph)
Minimum RemotePotentiometer Threshold
2% 0% 50%
Maximum RemotePotentiometer Threshold
95% 50% 100%
Remote Set SwitchTransition to Low Voltage(<33% of Ignition Voltage)
SET SPEED 1 STANDBY SPEED, SET SPEED 1, or SET SPEED 2
Remote Set SwitchTransition to Open State(>33% of Ignition, and
<67% of Ignition Voltage)
PTO STANDBY STANDBY SPEED, SET SPEED 1, or SET SPEED 2
Remote Set SwitchTransition to High Voltage(>67% of Ignition Voltage)
SET SPEED 2 STANDBY SPEED, SET SPEED 1, or SET SPEED 2
Horn Chirps during aRemote Start Event
ENABLED DISABLED ENABLED
Personalization Menu ENABLED DISABLED ENABLED

Chevrolet Silverado 4500HD/5500HD/6500HD Owner Manual (GMNA-Localizing-U.S.-12102101) - 2019 - crc - 10/2/18
286 Driving and Operating
ProgrammableParameters
Factory Setting Minimum Value Maximum Value
Standby Speed Menu DISABLED DISABLED ENABLED
Set 1 Speed Menu(In Stationary Preset)
DISABLED DISABLED ENABLED
Set 2 Speed Menu(In Stationary Preset)
DISABLED DISABLED ENABLED
Engine Run ShutdownTime Menu
(In Stationary Preset)
DISABLED DISABLED ENABLED
Engine Speed TapStep Menu
(In Stationary Variable andMobile)
DISABLED DISABLED ENABLED
Remote Set Switch SpeedControl
DISABLED DISABLED ENABLED
Remote Throttle SpeedControl
DISABLED DISABLED ENABLED
Remote Engine Start DISABLED DISABLED ENABLED
Remote Engine Shutdown DISABLED DISABLED ENABLED
Throttle Override ENABLED DISABLED ENABLED
Throttle Override Timer 10 Minutes 10 Minutes 13 Minutes

Chevrolet Silverado 4500HD/5500HD/6500HD Owner Manual (GMNA-Localizing-U.S.-12102101) - 2019 - crc - 10/2/18
Driving and Operating 287
ProgrammableParameters
Factory Setting Minimum Value Maximum Value
Driver Door Status Usage ENABLED DISABLED ENABLED
Remote PTO In CabControl
DISABLED DISABLED ENABLED
If the PTO factory presetparameters do not match thesettings described above, then theymay have already been altered inorder to satisfy the requirements ofthe installed PTO system and bodyequipment.
The following PTO settings are alsooffered via the vehicle customizationscreens, which can be enabled byyour service technician. Theseinclude the following parameters:
. PTO Standby rpm
. PTO Set 1 Speed
. PTO Set 2 Speed
. Tap Step Speed
. PTO Engine Run Timer
Driver Information Center (DIC)Warning Messages
If the PTO indicator light does notremain on, it indicates that not allPTO enabling conditions have beenmet. One or more of the followingDIC messages may display if thePTO will not engage and theappropriate action must be taken.
. PTO: SHIFT TO PARK (P)(Stationary mode only)
. PTO: SET PARK BRAKE(Stationary mode only)
. PTO: PRESS & RELEASEBRAKE (Mobile mode only)
. PTO: RELEASE BRAKE TOENGAGE PTO
. PTO: REDUCE VEHICLESPEED
. PTO: REDUCE ENGINE SPEED
. PTO: DISENGAGE CRUISECONTROL
. PTO: ACCELERATION UPONBRAKE RELEASE
. PTO: SERVICE PTO
. PTO: SHIFT TO M1, M2 OR M3(Mobile mode only)
. Action Required CleaningExhaust Filter Continue Driving(DPF Only)
. Action Required CleaningExhaust Filter Must ContinueDriving (DPF Only)

Chevrolet Silverado 4500HD/5500HD/6500HD Owner Manual (GMNA-Localizing-U.S.-12102101) - 2019 - crc - 10/2/18
288 Driving and Operating. Exhaust Filter Cleaning
Available Go to Options Menu(DPF Only)
In addition, the PTO indicator lightwill light when all conditionsrequired to engage PTO have notbeen met. When enabling PTO, thePTO indicator light will turn on, thenturn off after one second. Undernormal operating conditions, thePTO indicator light will remain onthroughout the PTO operating cycle.
Additional in-vehicle PTO moduleinformation can be accessed by theservice technician to aid introubleshooting. Also see theservice manual for moreinformation.
The GM service technician canaccess Service Tool information thatwill contain reasons why PTO maynot engage and why PTO mayunexpectedly disengage due tosystem conditions.
See www.gmupfitter.com forinformation on the installation ofwiring and programming for PTOaftermarket equipment.
Diesel Particulate FilterCleaning During PTOOperation
This feature is only available onFleet and Commercial vehicles. Toverify that the vehicle has thisfeature, see www.gmupfitter.com tocontact the GM Upfitter IntegrationGroup for assistance.
If equipped, this feature allows formanual cleaning/regeneration of theDiesel Particulate Filter (DPF) whenit is unable to clean itself. It may benecessary to perform a manualregeneration if driving conditions —such as extended slow speed,stop-and-go traffic, extended idles,short drive cycles, or stationary PTOoperation — prevent DPFself-cleaning.
Manual regeneration can only beused when the DPF has become atleast 90% full. At 100% full, it willattempt to automatically self-clean ifproper driving conditions are met.The DPF will clean itself if the
vehicle can be driven above50 km/h (30 mph) for about30 minutes.
Manual regeneration can be usedduring a stationary PTO session.However it is strongly recommendedthat the exhaust filter be cleanedbefore continuous PTO. If manualregeneration is operatingconcurrently with PTO then the PTOsystem will retain control of theengine speed. Low PTO enginespeeds will cause regeneration totake longer. To initiate a manualDPF regeneration, see “ManualRegeneration of Diesel ParticulateFilter” under Diesel Particulate Filter.

Chevrolet Silverado 4500HD/5500HD/6500HD Owner Manual (GMNA-Localizing-U.S.-12102101) - 2019 - crc - 10/2/18
Vehicle Care 289
Vehicle Care
General InformationGeneral Information . . . . . . . . . . 290California Proposition65 Warning . . . . . . . . . . . . . . . . . 290
California PerchlorateMaterials Requirements . . . . . 290
Accessories andModifications . . . . . . . . . . . . . . . . 290
Vehicle ChecksDoing Your OwnService Work . . . . . . . . . . . . . . . 291
Hood . . . . . . . . . . . . . . . . . . . . . . . . . 291Engine CompartmentOverview . . . . . . . . . . . . . . . . . . . . 294
Engine Oil . . . . . . . . . . . . . . . . . . . . 295Engine Oil Life System . . . . . . . 298Automatic TransmissionFluid . . . . . . . . . . . . . . . . . . . . . . . . 299
Engine Air Cleaner/Filter . . . . . . 299Cooling System . . . . . . . . . . . . . . 301Engine Overheating . . . . . . . . . . 305Engine Fan . . . . . . . . . . . . . . . . . . . 306Power Steering Fluid . . . . . . . . . 306Washer Fluid . . . . . . . . . . . . . . . . . 308Brakes . . . . . . . . . . . . . . . . . . . . . . . 308Brake Fluid . . . . . . . . . . . . . . . . . . . 311
Battery - North America . . . . . . 312Four-Wheel Drive . . . . . . . . . . . . . 313Front Axle . . . . . . . . . . . . . . . . . . . . 314Rear Axle . . . . . . . . . . . . . . . . . . . . 314Noise Control System . . . . . . . . 315Starter Switch Check . . . . . . . . . 316Wiper Blade Replacement . . . . 316Glass Replacement . . . . . . . . . . 317
Headlamp AimingHeadlamp Aiming . . . . . . . . . . . . 317
Bulb ReplacementBulb Replacement . . . . . . . . . . . . 318Halogen Bulbs . . . . . . . . . . . . . . . . 318LED Lighting . . . . . . . . . . . . . . . . . 318Headlamps, Front Turn Signal,Sidemarker, and ParkingLamps . . . . . . . . . . . . . . . . . . . . . . 318
Fog Lamps . . . . . . . . . . . . . . . . . . . 319Taillamps . . . . . . . . . . . . . . . . . . . . . 319Center High-MountedStoplamp (CHMSL) andCargo Lamp . . . . . . . . . . . . . . . . . 319
Electrical SystemElectrical System Overload . . . 320Fuses and Circuit Breakers . . . 320Engine Compartment FuseBlock . . . . . . . . . . . . . . . . . . . . . . . . 321
Instrument Panel Fuse Block(Right) . . . . . . . . . . . . . . . . . . . . . . 324
Instrument Panel FuseBlock (Left) . . . . . . . . . . . . . . . . . 327
Wheels and TiresTires . . . . . . . . . . . . . . . . . . . . . . . . . . 331Tire Pressure . . . . . . . . . . . . . . . . . 332Tire Inspection . . . . . . . . . . . . . . . . 334Tire Rotation . . . . . . . . . . . . . . . . . 335When It Is Time for NewTires . . . . . . . . . . . . . . . . . . . . . . . . 337
Wheel Alignment and TireBalance . . . . . . . . . . . . . . . . . . . . . 339
Wheel Replacement . . . . . . . . . . 339Tire Chains . . . . . . . . . . . . . . . . . . . 343If a Tire Goes Flat . . . . . . . . . . . . 343
Jump StartingJump Starting - NorthAmerica . . . . . . . . . . . . . . . . . . . . . 343
Towing the VehicleTowing the Vehicle . . . . . . . . . . . 347
Appearance CareExterior Care . . . . . . . . . . . . . . . . . 351Interior Care . . . . . . . . . . . . . . . . . . 356

Chevrolet Silverado 4500HD/5500HD/6500HD Owner Manual (GMNA-Localizing-U.S.-12102101) - 2019 - crc - 10/2/18
290 Vehicle Care
General InformationFor service and parts needs, visityour dealer. You will receivegenuine GM parts and GM-trainedand supported service people.
Genuine GM parts have one ofthese marks:
California Proposition65 Warning
{ Warning
Most motor vehicles, includingthis one, as well as many of itsservice parts and fluids, containand/or emit chemicals known tothe State of California to causecancer and birth defects or otherreproductive harm. Engineexhaust, many parts andsystems, many fluids, and somecomponent wear by-productscontain and/or emit thesechemicals. For more informationgo to www.P65Warnings.ca.gov/passenger-vehicle.
See Battery - North America 0 312,Jump Starting - North America0 343, Engine Exhaust 0 216, andthe back cover.
California PerchlorateMaterials RequirementsCertain types of automotiveapplications, such as airbaginitiators, seat belt pretensioners,and lithium batteries contained inRemote Keyless Entry transmitters,may contain perchlorate materials.Special handling may be necessary.For additional information, seewww.dtsc.ca.gov/hazardouswaste/perchlorate.
Accessories andModificationsAdding non-dealer accessories ormaking modifications to the vehiclecan affect vehicle performance andsafety, including such things asairbags, braking, stability, ride andhandling, emissions systems,aerodynamics, durability, andelectronic systems like antilockbrakes, traction control, and stabilitycontrol. These accessories ormodifications could even causemalfunction or damage not coveredby the vehicle warranty.

Chevrolet Silverado 4500HD/5500HD/6500HD Owner Manual (GMNA-Localizing-U.S.-12102101) - 2019 - crc - 10/2/18
Vehicle Care 291
Damage to suspension componentscaused by modifying vehicle heightoutside of factory settings will not becovered by the vehicle warranty.
Damage to vehicle componentsresulting from modifications or theinstallation or use of non-GMcertified parts, including controlmodule or software modifications, isnot covered under the terms of thevehicle warranty and may affectremaining warranty coverage foraffected parts.
GM Accessories are designed tocomplement and function with othersystems on the vehicle. See yourdealer to accessorize the vehicleusing genuine GM Accessoriesinstalled by a dealer technician.
Also, see Adding Equipment to theAirbag-Equipped Vehicle 0 68.
Vehicle Checks
Doing Your OwnService Work
{ Warning
It can be dangerous to work onyour vehicle if you do not havethe proper knowledge, servicemanual, tools, or parts. Alwaysfollow owner’s manual proceduresand consult the service manualfor your vehicle before doing anyservice work.
If doing some of your own servicework, use the proper servicemanual. It tells you much moreabout how to service the vehiclethan this manual can. To order theproper service manual, seePublication Ordering Information0 423.
This vehicle has an airbag system.Before attempting to do your ownservice work, see Servicing theAirbag-Equipped Vehicle 0 67.
Keep a record with all parts receiptsand list the mileage and the date ofany service work performed.
Caution
Even small amounts ofcontamination can cause damageto vehicle systems. Do not allowcontaminants to contact the fluids,reservoir caps, or dipsticks.
Hood
{ Warning
Failure to latch the hood properlymay permit the hood to openunexpectedly. To avoid personalinjury and property damage,make sure the hood latches aresecured before driving and thelatch rubber is not cracked, splitor loose. See your dealer if any ofthese conditions exist.

Chevrolet Silverado 4500HD/5500HD/6500HD Owner Manual (GMNA-Localizing-U.S.-12102101) - 2019 - crc - 10/2/18
292 Vehicle Care
{ Warning
Components under the hood canget hot from running the engine.To help avoid the risk of burningunprotected skin, never touchthese components until they havecooled, and always use a glove ortowel to avoid direct skin contact.
Clear any snow from the hoodbefore opening.
To open the hood:
1. Go to the driver side of thevehicle and pull up on the hoodlatch, then go to the passengerside and pull up on the otherhood latch.
2. Carefully tilt the hood forwardusing the front of the hood,where indicated by arrows,until it comes to a vertical stop.
3. The hood actuator lock, locatedon the passenger side, will lockto secure the hood.
{ Warning
To avoid personal injury, makesure the hood is fully open beforeperforming underhood service.If the hood is not fully opened, theengine could start. You or otherscould be injured.
Before closing the hood, be sure allthe filler caps are on properly.

Chevrolet Silverado 4500HD/5500HD/6500HD Owner Manual (GMNA-Localizing-U.S.-12102101) - 2019 - crc - 10/2/18
Vehicle Care 293
To close the hood:
1. Lift up on the hood actuatorstrut lock, located on thepassenger side, to unlock theactuator strut and allow thehood to be closed.
2. Carefully tilt the hood backusing the front of the hood,where indicated by arrows,until it is lowered all the way.
3. Secure the hood by securingthe hood latches on thepassenger and driver side.
{ Warning
Do not drive the vehicle if thehood is not latched completely.The hood could open fully, blockyour vision, and cause a crash.You or others could be injured.Always close the hood completelybefore driving.
The Driver Information Center (DIC)will display a message if the hood isnot fully closed. Stop and turn offthe vehicle, check the hood forobstructions, and close the hoodagain. Check to see if the messagestill appears on the DIC.

Chevrolet Silverado 4500HD/5500HD/6500HD Owner Manual (GMNA-Localizing-U.S.-12102101) - 2019 - crc - 10/2/18
294 Vehicle Care
Engine Compartment Overview

Chevrolet Silverado 4500HD/5500HD/6500HD Owner Manual (GMNA-Localizing-U.S.-12102101) - 2019 - crc - 10/2/18
Vehicle Care 295
1. Windshield Washer FluidReservoir. See “Adding WasherFluid” under Washer Fluid0 308.
2. Engine Air Cleaner/Filter 0 299.
3. Battery Distribution Block.
4. Engine Coolant Surge Tankand Pressure Cap. SeeCooling System 0 301.
5. Engine Cooling Fan (Out ofView). See Cooling System0 301.
6. Automatic TransmissionDipstick. See AutomaticTransmission Fluid 0 299.
7. Engine Oil Fill Cap. See “Whento Add Engine Oil” underEngine Oil 0 295.
8. Engine Oil Dipstick. See“Checking Engine Oil” underEngine Oil 0 295.
9. Power Steering FluidReservoir. See Power SteeringFluid 0 306.
10. Brake Fluid Reservoir. SeeBrake Fluid 0 311.
11. Auxiliary Fuse Block. SeeEngine Compartment FuseBlock 0 321.
12. Underhood Fuse Block. SeeEngine Compartment FuseBlock 0 321.
Engine OilTo ensure proper engineperformance and long life, carefulattention must be paid to engine oil.Following these simple, butimportant steps will help protectyour investment:
. Use engine oil approved to theproper specification and of theproper viscosity grade. See“Selecting the Right Engine Oil”in this section.
. Check the engine oil levelregularly and maintain theproper oil level. See “CheckingEngine Oil” and “When to AddEngine Oil” in this section.
. Change the engine oil at theappropriate time. See Engine OilLife System 0 298.
. Always dispose of engine oilproperly. See “What to Do withUsed Oil” in this section.
Checking Engine Oil
Check the engine oil level regularly,every 650 km (400 mi), especiallyprior to a long trip. The engine oildipstick handle is a loop. SeeEngine Compartment Overview0 294 for the location.
{ Warning
The engine oil dipstick handlemay be hot; it could burn you.Use a towel or glove to touch thedipstick handle.
If a low oil Driver Information Center(DIC) message displays, check theoil level.
Follow these guidelines:
. To get an accurate reading, parkthe vehicle on level ground.Check the engine oil level afterthe engine has been off for atleast two hours. Checking the

Chevrolet Silverado 4500HD/5500HD/6500HD Owner Manual (GMNA-Localizing-U.S.-12102101) - 2019 - crc - 10/2/18
296 Vehicle Care
engine oil level on steep gradesor too soon after engine shutoffcan result in incorrect readings.Accuracy improves whenchecking a cold engine prior tostarting. Remove the dipstickand check the level.
. If unable to wait two hours, theengine must be off for at least15 minutes if the engine iswarm, or at least 30 minutes ifthe engine is not warm. Pull outthe dipstick, wipe it with a cleanpaper towel or cloth, then push itback in all the way. Remove itagain, keeping the tip down, andcheck the level.
When to Add Engine Oil
If the oil is below the cross-hatchedarea at the tip of the dipstick andthe engine has been off for at least
15 minutes, add 1 L (1 qt) of therecommended oil and then recheckthe level. See “Selecting the RightEngine Oil” later in this section foran explanation of what kind of oil touse. For engine oil crankcasecapacity, see Capacities andSpecifications 0 408.
Caution
Do not add too much oil. Oillevels above or below theacceptable operating rangeshown on the dipstick are harmfulto the engine. If the oil level isabove the operating range (i.e.,the engine has so much oil thatthe oil level gets above thecross-hatched area that showsthe proper operating range), theengine could be damaged. Drainthe excess oil or limit driving ofthe vehicle, and seek a serviceprofessional to remove theexcess oil.
See Engine Compartment Overview0 294 for the location of the engineoil fill cap.
Be sure to add enough oil to put thelevel somewhere in the properoperating range. Push the dipstickall the way back in when through.
Selecting the Right Engine Oil
Specification
Oils designated as API CJ-4 orCK-4 are required for the vehicle.The CJ-4 or CK-4 designation canappear either alone or incombination with other AmericanPetroleum Institute (API)designations, such as API CJ-4/SL.These letters show API levels ofquality.

Chevrolet Silverado 4500HD/5500HD/6500HD Owner Manual (GMNA-Localizing-U.S.-12102101) - 2019 - crc - 10/2/18
Vehicle Care 297
American Petroleum Institute (API)Symbol
This doughnut-shaped logo(symbol) is used on most oilcontainers to help you select thecorrect oil. It means that the oil hasbeen certified by the AmericanPetroleum Institute.
Look for this on the oil container,and use only those oils that displaythis logo.
Caution
Use only engine oils that have thedesignation CJ-4 or CK-4 for thediesel engine. Failure to use therecommended oil can damage theDPF and result in engine damagenot covered by the vehiclewarranty.
Viscosity Grade
Use SAE 15W-40 viscosity gradeengine oil.
When it is very cold, below −18 °C(0 °F), use SAE 5W-40 to improvecold starting. These numbers on theoil container show its viscosity,or thickness.

Chevrolet Silverado 4500HD/5500HD/6500HD Owner Manual (GMNA-Localizing-U.S.-12102101) - 2019 - crc - 10/2/18
298 Vehicle Care
When selecting an oil of theappropriate viscosity grade, alwaysselect an oil of the correctspecification. See “Specification”earlier in this section.
Engine Oil Additives/EngineOil Flushes
Do not add anything to the oil. Therecommended oils with the APIservice symbol are all that isneeded for good performance andengine protection.
Engine oil system flushes are notrecommended and could causeengine damage not covered by thevehicle warranty.
What to Do with Used Oil
Used engine oil contains certainelements that can be unhealthy foryour skin and could even causecancer. Do not let used oil stay onyour skin for very long. Clean yourskin and nails with soap and water,or a good hand cleaner. Wash orproperly dispose of clothing or rags
containing used engine oil. See themanufacturer's warnings about theuse and disposal of oil products.
Used oil can be a threat to theenvironment. If you change yourown oil, be sure to drain all the oilfrom the filter before disposal. Neverdispose of oil by putting it in thetrash or pouring it on the ground,into sewers, or into streams orbodies of water. Recycle it by takingit to a place that collects used oil.
Engine Oil Life System
When to Change Engine Oil
This vehicle has a computer systemthat indicates when to change theengine oil and filter. This is basedon a combination of factors whichinclude engine revolutions, enginetemperature, and miles driven.Based on driving conditions, themileage at which an oil change isindicated can vary considerably. Forthe oil life system to work properly,the system must be reset every timethe oil is changed.
On some vehicles, when the systemhas calculated that oil life has beendiminished, a CHANGE ENGINEOIL SOON message comes on toindicate that an oil change isnecessary. Change the oil as soonas possible within the next 1 000 km(600 mi). It is possible that, if drivingunder the best conditions, the oil lifesystem might indicate that an oilchange is not necessary for up to ayear. The engine oil and filter mustbe changed at least once a yearand, at this time, the system mustbe reset. For vehicles without theCHANGE ENGINE OIL SOONmessage, an oil change is neededwhen the REMAINING OIL LIFEpercentage is near 0%. Your dealerhas trained service people who willperform this work and reset thesystem. It is also important to checkthe oil regularly over the course ofan oil drain interval and keep it atthe proper level.
If the system is ever resetaccidentally, the oil must bechanged at 5 000 km (3,000 mi)

Chevrolet Silverado 4500HD/5500HD/6500HD Owner Manual (GMNA-Localizing-U.S.-12102101) - 2019 - crc - 10/2/18
Vehicle Care 299
since the last oil change.Remember to reset the oil lifesystem whenever the oil is changed.
How to Reset the Engine OilLife System
Reset the system whenever theengine oil is changed so that thesystem can calculate the nextengine oil change. Always reset theengine oil life to 100% after every oilchange. It will not reset itself. Toreset the engine oil life system:
1. Display the REMAINING OILLIFE on the DIC. If the vehicledoes not have DIC buttons, thevehicle must be in P (Park) toaccess this display.See Driver Information Center(DIC) (Base Level) 0 119 orDriver Information Center (DIC)(Uplevel) 0 120.
2. Press and hold V, or the tripodometer reset stem if thevehicle does not have DICbuttons, for several seconds.The oil life will changeto 100%.
The oil life system can also be resetas follows:
1. Display the REMAINING OILLIFE on the DIC.See Driver Information Center(DIC) (Base Level) 0 119 orDriver Information Center (DIC)(Uplevel) 0 120.
2. Fully press the acceleratorpedal slowly three times withinfive seconds.
3. Display the REMAINING OILLIFE on the DIC. If the displayshows 100%, the system isreset.
If the vehicle has a CHANGEENGINE OIL SOON message and itcomes back on when the vehicle isstarted and/or the REMAINING OILLIFE is near 0%, the engine oil lifesystem has not been reset. Repeatthe procedure.
Automatic TransmissionFluid
When to Check and Change
Refer to the Allison AutomaticTransmission Manual.
Engine Air Cleaner/FilterThe air cleaner/filter assembly is onthe front corner of the enginecompartment on the passenger sideof the vehicle. See EngineCompartment Overview 0 294.
1. Air restriction gauge2. Air cleaner/filter

Chevrolet Silverado 4500HD/5500HD/6500HD Owner Manual (GMNA-Localizing-U.S.-12102101) - 2019 - crc - 10/2/18
300 Vehicle Care
Air Restriction Gauge
The air restriction gauge indicateshow much engine air cleaner filtercapacity has been used and howmuch filter capacity remains.It measures maximum restriction ofthe filter element when the engine isoperated at full load and locks atthat point. This feature allows you toread the maximum restriction withthe engine shut down.
The gauge is mounted just behindthe engine air cleaner and is visibleon the passenger side of the enginecompartment.
Do not reset the gauge until it hasbeen determined that air cleanerservice is required.
If the gauge is in the red zone,replace the air cleaner/filter andthen reset the gauge by twisting theblack knob until the gauge is in thecomplete green zone.
When to Inspect the Engine AirCleaner/Filter
For intervals on changing andinspecting the engine air filter, seeMaintenance Schedule 0 361.
How to Inspect the Engine AirCleaner/Filter
Do not start the engine or have theengine running with the engine airfilter housing open. Before removingthe engine air filter, make sure that
the engine air filter housing andnearby components are free of dirtand debris. Remove the engine airfilter. Lightly tap and shake theengine air filter (away from thevehicle) to release dust and dirt.Inspect the engine air filter fordamage, and replace if damaged.Do not clean the engine air filter orcomponents with water orcompressed air. When changing theair filter, remove the dust valve fromthe front intake air duct and cleanout any debris if necessary.
Caution
Water sprayed into or on the airintake box in the enginecompartment may damage the airfilter or electrical components. Donot spray water into or on the airintake box.
To inspect and replace the filter:
1. Tilt the hood open. See Hood0 291.

Chevrolet Silverado 4500HD/5500HD/6500HD Owner Manual (GMNA-Localizing-U.S.-12102101) - 2019 - crc - 10/2/18
Vehicle Care 301
2. Remove the four screws fromthe housing cover.
3. Raise the housing cover. Takecare not to move the aircleaner/filter housing base, toavoid any air leaks.
4. Remove the air cleaner/filterfrom the housing base. Takecare to dislodge as little dirt aspossible.
5. Clean the air cleaner/filtersealing surface and thehousing base.
6. Install the engine air cleaner/filter.
7. Lower the air cleaner/filterhousing cover and secure withthe four screws.
8. Tilt the hood to close. SeeHood 0 291.
See Maintenance Schedule 0 361 todetermine when to replace theengine air cleaner/filter.
{ Warning
Operating the engine with the aircleaner/filter off can cause you orothers to be burned. Use cautionwhen working on the engine. Donot start the engine or drive thevehicle with the air cleaner/filteroff, as flames may be present ifthe engine backfires.
Caution
If the air cleaner/filter is off, dirtcan easily get into the engine,which could damage it. Alwayshave the air cleaner/filter in placewhen driving.
Cooling SystemThe cooling system allows theengine to maintain the correctworking temperature.
1. Coolant Surge Tank

Chevrolet Silverado 4500HD/5500HD/6500HD Owner Manual (GMNA-Localizing-U.S.-12102101) - 2019 - crc - 10/2/18
302 Vehicle Care
2. Coolant Surge TankPressure Cap
3. Engine Cooling Fan (Outof View)
{ Warning
Do not touch heater or radiatorhoses, or other engine parts.They can be very hot and canburn you. Do not run the engine ifthere is a leak; all coolant couldleak out. That could cause anengine fire and can burn you. Fixany leak before driving thevehicle.
Engine Coolant
{ Warning
Plain water, or other liquids suchas alcohol, can boil before theproper coolant mixture will. Withplain water or the wrong mixture,the engine could get too hot butthere would not be an overheat
(Continued)
Warning (Continued)
warning. The engine could catchfire and you or others could beburned.
The cooling system in the vehicle isfilled with DEX-COOL enginecoolant mixture.See Recommended Fluids andLubricants 0 398 and MaintenanceSchedule 0 361.
The following explains the coolingsystem and how to add coolantwhen it is low. If there is a problemwith engine overheating, see EngineOverheating 0 305.
A 50/50 mixture of clean, drinkablewater and DEX-COOL coolant will:
. Give freezing protection down to−37 °C (−34 °F).
. Give boiling protection up to 129°C (265 °F).
. Protect against rust andcorrosion.
. Help keep the proper enginetemperature.
. Let the warning lights andgauges work as they should.
What to Use
Use a 50/50 mixture of clean,drinkable water and DEX-COOLcoolant which will not damagealuminum parts. If using thismixture, nothing else needs to beadded.
If coolant has to be added morethan four times a year, have yourdealer check the vehicle coolingsystem.
Caution
Do not use anything other than amix of DEX-COOL coolant thatmeets GM StandardGMW3420 and clean, drinkablewater. Anything else can causedamage to the engine coolingsystem and the vehicle, whichwould not be covered by thevehicle warranty.

Chevrolet Silverado 4500HD/5500HD/6500HD Owner Manual (GMNA-Localizing-U.S.-12102101) - 2019 - crc - 10/2/18
Vehicle Care 303
Never dispose of engine coolant byputting it in the trash, or by pouringit on the ground or into sewers,streams, or bodies of water. Havethe coolant changed by anauthorized service center, familiarwith legal requirements regardingused coolant disposal. This will helpprotect the environment and yourhealth.
Checking Coolant
The coolant surge tank is in theengine compartment on thepassenger side of the vehicle. SeeEngine Compartment Overview0 294 for location.
The coolant surge tank is dividedinto two sides. The upper portioncoolant level should be at or above,the bottom of the indicator arrows.The coolant level must be checkedwhen the engine is cold and thevehicle must be on a level surface.
The lower portion will be mostlyempty, depending on the operatingtemperature.
{ Warning
Turning the surge tank pressurecap when the engine and radiatorare hot can allow steam andscalding liquids to blow out andburn you badly. Never turn thesurge tank pressure cap— even alittle—when the engine andradiator are hot.
Adding Coolant
Caution
If coolant is changed or added,always add enough to fill thesystem completely or enginedamage may occur.
If more coolant is needed, add theproper DEX-COOL coolant mixtureat the surge tank, but be careful notto spill it.

Chevrolet Silverado 4500HD/5500HD/6500HD Owner Manual (GMNA-Localizing-U.S.-12102101) - 2019 - crc - 10/2/18
304 Vehicle Care
{ Warning
Spilling coolant on hot engineparts can burn you. Coolantcontains ethylene glycol and it willburn if the engine parts are hotenough.
{ Warning
Steam and scalding liquids from ahot cooling system are underpressure. Turning the pressurecap, even a little, can cause themto come out at high speed andyou could be burned. Never turnthe cap when the cooling system,including the pressure cap, is hot.Wait for the cooling system andpressure cap to cool.
{ Caution
Failure to follow the specificcoolant fill procedure could causethe engine to overheat and couldcause system damage. If coolantis not visible in the surge tank,contact your dealer.
If no coolant is visible in the surgetank, add coolant as follows:
1. Remove the coolant surge tankpressure cap when the coolingsystem, including the coolantsurge tank pressure cap andupper radiator hose, is nolonger hot.
Turn the pressure cap slowlyclockwise about one-half turn.If a hiss is heard, wait for thatto stop. A hiss means there isstill some pressure left.
2. Keep turning the pressure capslowly, and remove it.
3. Slowly fill the coolant surgetank. Do not let the coolantlevel go above the indicatedmark in the tank until after theengine comes to the operatingtemperature in Step 4.
4. With the coolant surge tankpressure cap off, start theengine and let it run until the

Chevrolet Silverado 4500HD/5500HD/6500HD Owner Manual (GMNA-Localizing-U.S.-12102101) - 2019 - crc - 10/2/18
Vehicle Care 305
engine coolant temperaturegauge indicates approximately90 °C (195 °F).
By this time, the coolant levelinside the coolant surge tankmay be lower. If the level islower, slowly add more of theproper mixture to the coolantsurge tank until it reaches theindicated mark.
5. Replace the pressure cap. Besure the pressure cap islocked.
6. Verify coolant level after theengine is shut off and thecoolant is cold. If necessary,repeat coolant fill procedureSteps 1–6.
If the coolant level is still low afterhaving followed these steps twice,have the coolant system checked bya certified technician at the dealerfor a possible leak.
Caution
If the pressure cap is not tightlyinstalled, coolant loss and enginedamage may occur. Be sure thecap is properly and tightlysecured.
Engine OverheatingThere is an engine coolanttemperature gauge on theinstrument cluster.
If Steam Is Coming from theEngine Compartment
{ Warning
Steam and scalding liquids from ahot cooling system are underpressure. Turning the pressurecap, even a little, can cause themto come out at high speed andyou could be burned. Never turnthe cap when the cooling system,
(Continued)
Warning (Continued)
including the pressure cap, is hot.Wait for the cooling system andpressure cap to cool.
Caution
Do not run the engine if there is aleak in the engine cooling system.This can cause a loss of allcoolant and can damage thesystem and vehicle. Have anyleaks fixed right away.
If No Steam Is Coming fromthe Engine Compartment
A Driver Information Center (DIC)message, along with a low coolantcondition, can indicate a seriousproblem.
If there is an engine overheatwarning and the vehicle does nothave a low coolant condition, andno steam is heard or seen, the

Chevrolet Silverado 4500HD/5500HD/6500HD Owner Manual (GMNA-Localizing-U.S.-12102101) - 2019 - crc - 10/2/18
306 Vehicle Care
problem may not be too serious.Sometimes the engine can get alittle too hot when the vehicle:
. Climbs a long hill on a hot day.
. Stops after high-speed driving.
. Idles for long periods in traffic.
. Tows a trailer. See “Driving onGrades” under DrivingCharacteristics and Towing Tips0 250.
If the DIC message comes on withno sign of steam, try this for aminute or so:
1. In heavy traffic, let the engineidle in N (Neutral) whilestopped. If it is safe to do so,pull off the road, shift toP (Park) or N (Neutral), and letthe engine idle.
2. Turn on the heater to full hot atthe highest fan speed andopen the window as necessary.
If the vehicle no longer has theoverheat warning, the vehicle canbe driven. Just to be safe, driveslower for about 10 minutes. If thewarning does not come back on,
drive normally and have the coolingsystem checked for proper fill andfunction.
If the warning continues, pull over,stop, and park the vehicleright away.
If there is still no sign of steam andthe vehicle is equipped with anengine driven cooling fan, pushdown the accelerator until theengine speed is about twice as fastas normal idle speed for at leastfive minutes while the vehicle isparked. If the warning is still there,turn off the engine and get everyoneout of the vehicle until it cools down.
The decision may be made not to tiltthe hood, but to get service helpright away.
Engine FanThe vehicle has a clutched enginecooling fan. When the clutch isengaged, the fan spins faster toprovide more air to cool the engine.In most everyday driving conditions,the fan is spinning slower and theclutch is not fully engaged. This
improves fuel economy and reducesfan noise. Under heavy vehicleloading, trailer towing, and/or highoutside temperatures, the fan speedincreases as the clutch more fullyengages, so an increase in fannoise may be heard. This is normaland should not be mistaken as thetransmission slipping or makingextra shifts. It is merely the coolingsystem functioning properly. The fanwill slow down when additionalcooling is not required and theclutch disengages.
This fan noise may also be heardwhen starting the engine. It will goaway as the fan clutch partiallydisengages.
Power Steering FluidSee Engine Compartment Overview0 294 for reservoir location.
When to Check Power SteeringFluid
It is not necessary to regularlycheck power steering fluid unlessthere is a leak suspected in thesystem or an unusual noise is

Chevrolet Silverado 4500HD/5500HD/6500HD Owner Manual (GMNA-Localizing-U.S.-12102101) - 2019 - crc - 10/2/18
Vehicle Care 307
heard. A fluid loss in this systemcould indicate a problem. Have thesystem inspected and repaired.
How to Check Power SteeringFluid
The fluid level should be betweenthe MIN HOT and MAX HOT levelson the reservoir if the fluid is hotwhen checked. If the fluid is coldwhen checked, the fluid level shouldbe between the MIN COLD andMAX COLD levels on the reservoir.
To check the power steering fluid:
1. Tilt the hood open. See Hood0 291.
2. Check to see if the fluid level isat or above the MIN HOT leveland below the MAX HOT levelif the fluid is hot, or if the fluidlevel is at or above the MINCOLD level and below theMAX COLD line if the fluidis cold.
3. If the fluid is low, wipe the capand the top of the reservoirclean.
4. Turn the cap counterclockwiseand remove.
5. Fill the reservoir to theindicated MAX COLD or MAXHOT level.
6. Replace the cap and verify it issecure.
7. Tilt the hood closed. See Hood0 291.
What to Use
To determine what kind of fluid touse, see Recommended Fluids andLubricants 0 398. Always use theproper fluid.
Caution
Use of the incorrect fluid maydamage the vehicle and thedamages may not be covered bythe vehicle warranty. Always use
(Continued)

Chevrolet Silverado 4500HD/5500HD/6500HD Owner Manual (GMNA-Localizing-U.S.-12102101) - 2019 - crc - 10/2/18
308 Vehicle Care
Caution (Continued)
the correct fluid listed inRecommended Fluids andLubricants 0 398.
Washer Fluid
What to Use
When windshield washer fluid needsto be added, be sure to read themanufacturer's instructions beforeuse. Use a fluid that has sufficientprotection against freezing in anarea where the temperature may fallbelow freezing.
Adding Washer Fluid
The vehicle has a low washer fluidmessage on the DIC that comes onwhen the washer fluid is low. Themessage is displayed for15 seconds at the start of eachignition cycle. When the WASHERFLUID LOW ADD FLUID messagedisplays, washer fluid will need tobe added to the windshield washerfluid reservoir.
Open the cap with the washersymbol on it. Add washer fluid untilthe tank is full. See EngineCompartment Overview 0 294 forreservoir location.
Caution
. Do not use washer fluid thatcontains any type of waterrepellent coating. This cancause the wiper blades tochatter or skip.
. Do not use engine coolant(antifreeze) in thewindshield washer. It candamage the windshieldwasher system and paint.
. Do not mix water withready-to-use washer fluid.Water can cause the
(Continued)
Caution (Continued)
solution to freeze anddamage the washer fluidtank and other parts of thewasher system.
. When using concentratedwasher fluid, follow themanufacturer instructions foradding water.
. Fill the washer fluid tankonly three-quarters full whenit is very cold. This allowsfor fluid expansion iffreezing occurs, which coulddamage the tank if it iscompletely full.
Brakes
{ Warning
To prevent property damage,personal injury, and/or death,always check and maintainbrakes in proper condition and
(Continued)

Chevrolet Silverado 4500HD/5500HD/6500HD Owner Manual (GMNA-Localizing-U.S.-12102101) - 2019 - crc - 10/2/18
Vehicle Care 309
Warning (Continued)
adjustment. Out-of-adjustmentbrakes could cause reducedbraking ability.
Downhill Operation
{ Warning
To prevent property damage,personal injury, and/or death, donot attempt to gear down if theengine is at or near maximumspeed (rpm). Under theseconditions, it will be impossible toshift into a lower gear and couldresult in possible vehicle runaway.
Always descend hills with extremecare, relying mainly on the enginebraking effect to control vehiclespeed. Heed warning signs postedfor any grade. Stop and checkbrakes for condition and adjustmentat available pull off areas beforestarting a descent.
Observe the following precautions:
. Never coast downhill. Servicebrakes alone should not be usedto control speed on majordowngrades. Brakes will fadefrom overuse.
. Use the service brakes inaddition to other ways of slowingdown the vehicle. Whendescending long gradesrequiring use of the brakes,short applications (three tofive seconds in duration) shouldbe made rather than long,continuous applications. Thisminimizes temperature rise andbrake fade.
Hydraulic Brakes
{ Warning
The brake system might not beworking properly if the brakesystem warning light is on.Driving with the brake systemwarning light on can lead to a
(Continued)
Warning (Continued)
crash. If the light is still on afterthe vehicle has been pulled offthe road and carefully stopped,have the vehicle towed forservice.
The hydraulic brake systemincorporates standard braking,Antilock Braking (ABS), andAutomatic Traction Control (ATC)into one fully integrated hydraulicbrake system. With the hydraulicbrake system, braking energy isstored, similar to an air brakesystem, resulting in faster responsetimes and shorter stoppingdistances. This is accomplishedusing motor/pump assemblies thatpressurize the system by pumpingbrake fluid into accumulators. Thisis similar to the air compressor of anair brake system pressurizing the airtanks.
The system includes a mastercylinder that provides the normalpedal “feel” and transfers the pedal

Chevrolet Silverado 4500HD/5500HD/6500HD Owner Manual (GMNA-Localizing-U.S.-12102101) - 2019 - crc - 10/2/18
310 Vehicle Care
force, via brake fluid, to the maincomponents of the hydraulic brakesystem.
The motor/pumps will runmomentarily with the ignition on oroff to maintain accumulatorpressure. Therefore, whenever thebrake pedal is pressed when theignition is off, the motor/pumps maybe heard.
Split System Feature
{ Warning
To prevent property damage,personal injury, and/or death,if part of the brake system fails,reduce speed and employ safedriving practices as stoppingdistance may increase under thefailed condition since only onesection of the brake system isoperating. Have the brake systemrepaired immediately. Loss ofbraking capability could cause acrash.
The system is divided into twoseparate but identical channels: theprimary channel (controls front axle)and the secondary channel (controlsrear axle). The master cylinderprovides brake lines that are routedto the front and rear brake channels.
With the split brake system, thevehicle should have reasonablebrake control should one of the twochannels fail. If one of the motor/pump related systems fails, youmay not detect any difference in thefeel of the pedal, but with a defect inthe master cylinder circuit, you mayexperience a longer pedal stroke toattain desired stopping. With anysystem failure, one of the instrumentcluster warning indicators willturn on.
Hydraulic Brake BoosterSystem
{ Warning
To prevent property damage,personal injury, and/or death,if part of the brake system fails,reduce speed and employ safedriving practices as stoppingdistance may increase under thefailed condition since only onesection of the brake system isoperating. Have the brake systemrepaired immediately. Loss ofbraking capability could cause acrash.
The system receives fluid pressurefrom the power steering pump toprovide power assist during braking.
The hydraulic booster has a backuppump which will provide hydraulicboost at a reduced rate if the normalsource of fluid is interrupted. Thesignal for operation of the backuppump comes from the flow switch.If normal flow is interrupted, the flow

Chevrolet Silverado 4500HD/5500HD/6500HD Owner Manual (GMNA-Localizing-U.S.-12102101) - 2019 - crc - 10/2/18
Vehicle Care 311
switch will close and activate therelay, which will turn on thebackup pump.
Under normal operating conditions,noise of the fluid flowing through thebooster may be heard whenever thebrake is applied. This is normal andshould be no reason for concern.
If braking performance or pedalresponse becomes very poor, evenwhen the pedal is strongly applied,this may indicate the presence of airin the hydraulic system or fluidleakage. Safely stop the vehicle assoon as possible and have thevehicle serviced right away.
Brake Fluid
The brake master cylinder reservoiris filled with GM approved DOT 3brake fluid as indicated on the
reservoir cap. See EngineCompartment Overview 0 294 forthe location of the reservoir.
Checking Brake Fluid
With the vehicle in P (Park) on alevel surface, the brake fluid levelshould be between the minimumand maximum marks on the brakefluid reservoir.
There are only two reasons why thebrake fluid level in the reservoir maygo down:
. Normal brake lining wear. Whennew linings are installed, thefluid level goes back up.
. A fluid leak in the brakehydraulic system. Have thebrake hydraulic system fixed.With a leak, the brakes will notwork well.
Always clean the brake fluidreservoir cap and the area aroundthe cap before removing it.
Do not top off the brake fluid.Adding fluid does not correct a leak.If fluid is added when the linings areworn, there will be too much fluid
when new brake linings areinstalled. Add or remove fluid, asnecessary, only when work is doneon the brake hydraulic system.
{ Warning
If too much brake fluid is added, itcan spill on the engine and burn,if the engine is hot enough. Youor others could be burned, andthe vehicle could be damaged.Add brake fluid only when work isdone on the brake hydraulicsystem.
When the brake fluid falls to a lowlevel, the brake warning light comeson. See Brake System WarningLight 0 115.
Brake fluid absorbs water over timewhich degrades the effectiveness ofthe brake fluid. Replace brake fluidat the specified intervals to preventincreased stopping distance. SeeMaintenance Schedule 0 361.

Chevrolet Silverado 4500HD/5500HD/6500HD Owner Manual (GMNA-Localizing-U.S.-12102101) - 2019 - crc - 10/2/18
312 Vehicle Care
What to Add
Use only GM approved DOT 3brake fluid from a clean, sealedcontainer. See RecommendedFluids and Lubricants 0 398.
{ Warning
The wrong or contaminated brakefluid could result in damage to thebrake system. This could result inthe loss of braking leading to apossible injury. Always use theproper GM approved brake fluid.
Caution
If brake fluid is spilled on thevehicle's painted surfaces, thepaint finish can be damaged.Immediately wash off any paintedsurface.
Battery - North America
The batteries are located on theoutboard side of the left frame rail,under the cab. The batteries are in acarrier with the cover retained byhold down straps.
The original equipment batteries aremaintenance free. Do not removethe caps and do not add fluid.
Refer to the replacement numbershown on the original battery labelwhen new batteries are needed.
{ Warning
WARNING: Battery posts,terminals, and relatedaccessories contain lead and leadcompounds, chemicals known tothe State of California to causecancer and birth defects or otherreproductive harm. Batteries alsocontain other chemicals known tothe State of California to causecancer. WASH HANDS AFTERHANDLING. For more informationgo to www.P65Warnings.ca.gov/passenger-vehicle.
See California Proposition65 Warning 0 290 and the backcover.
Vehicle Storage
{ Warning
Batteries have acid that can burnyou and gas that can explode.You can be badly hurt if you are
(Continued)

Chevrolet Silverado 4500HD/5500HD/6500HD Owner Manual (GMNA-Localizing-U.S.-12102101) - 2019 - crc - 10/2/18
Vehicle Care 313
Warning (Continued)
not careful. See Jump Starting -North America 0 343 for tips onworking around a battery withoutgetting hurt.
Infrequent Usage: Remove theblack, negative (−) cable from thebattery to keep the battery fromrunning down.
Extended Storage: Remove theblack, negative (−) cable from thebattery or use a battery tricklecharger.
Four-Wheel Drive
Transfer Case
When to Check Lubricant
Refer to Maintenance Schedule0 361 to determine when to checkthe lubricant.
1. Fill Plug2. Drain Plug
To get an accurate reading, thevehicle should be on a levelsurface.
If the level is below the bottom ofthe fill plug (1) hole, located on thetransfer case, some lubricant willneed to be added. Add enoughlubricant to raise the level to thebottom of the fill plug (1) hole. Usecare not to overtighten the plug.
Do not overfill the transfer case asthis may cause seepage aroundbearing caps.
When to Change Lubricant
See Maintenance Schedule 0 361 todetermine how often to change thelubricant.
What to Use
See Recommended Fluids andLubricants 0 398 to determine whatkind of lubricant to use.

Chevrolet Silverado 4500HD/5500HD/6500HD Owner Manual (GMNA-Localizing-U.S.-12102101) - 2019 - crc - 10/2/18
314 Vehicle Care
Front AxleWhen to Check and ChangeLubricant
It is not necessary to regularlycheck front axle fluid unless a leakis suspected, or an unusual noise isheard. A fluid loss could indicate aproblem. Have it inspected andrepaired.
How to Check Lubricant
To get an accurate reading, thevehicle should be on a levelsurface.
The fluid level should be even withthe bottom of the fill plug hole. Addonly enough fluid to reach theproper level.
What to Use
See Recommended Fluids andLubricants 0 398 to determine whatkind of lubricant to use.
Rear Axle
When to Check Lubricant
It is not necessary to regularlycheck rear axle fluid unless a leak issuspected or an unusual noise isheard. A fluid loss could indicate aproblem. Have it inspected andrepaired.
All axle assemblies are filled byvolume of fluid during production.They are not filled to reach a certainlevel. When checking the fluid levelon any axle, variations in thereadings can be caused by factoryfill differences between the minimumand the maximum fluid volume.Also, if a vehicle has just beendriven before checking the fluid
level, it may appear lower thannormal because fluid has traveledout along the axle tubes and hasnot drained back to the sump area.Therefore, a reading takenfive minutes after the vehicle hasbeen driven will appear to have alower fluid level than a vehicle thathas been stationary for an hour ortwo. The rear axle assembly mustbe supported on a flat, level surfaceto get a true reading.
How to Check Lubricant
To get an accurate reading, thevehicle should be on a levelsurface.

Chevrolet Silverado 4500HD/5500HD/6500HD Owner Manual (GMNA-Localizing-U.S.-12102101) - 2019 - crc - 10/2/18
Vehicle Care 315
The fluid level should be even withthe bottom of the fill plug hole,located on the rear axle. Add onlyenough fluid to reach the properlevel.
What to Use
See Recommended Fluids andLubricants 0 398 to determine whatkind of lubricant to use.
Noise Control System
Noise Emissions Warranty
General Motors warrants to the firstperson who purchases this vehiclefor purposes other than resale andto each subsequent purchaser thatthis vehicle as manufactured byGeneral Motors, was designed, builtand equipped to conform at the timeit left General Motors’s control withall applicable U.S. EPA NoiseControl Regulations. This warrantycovers this vehicle as designed,built and equipped by GeneralMotors, and is not limited to anyparticular part, component or
system of the vehicle manufacturedby General Motors. Defects indesign, assembly or in any part,component or system of the vehicleas manufactured by GeneralMotors, which, at the time it leftGeneral Motors’s control, causednoise emissions to exceed Federalstandards, are covered by thiswarranty for the life of the vehicle.
The following information relates tocompliance with federal noiseemission standards for vehicles witha Gross Vehicle Weight Rating(GVWR) of more than 4 536 kg(10,000 lb). The MaintenanceSchedule provides information onmaintaining the noise control systemto minimize degradation of the noiseemission control system during thelife of the vehicle. The noise controlsystem warranty is given in thewarranty manual.
These standards apply only tovehicles sold in the United States.
TAMPERING WITH NOISECONTROL SYSTEMPROHIBITED
Federal law prohibits the followingacts or the causing thereof:
1. The removal or renderinginoperative by any person,other than for purposes ofmaintenance, repair,or replacement, of any deviceor element of designincorporated into any newvehicle for the purpose of noisecontrol prior to its sale ordelivery to the ultimatepurchaser or while it is inuse; or
2. The use of the vehicle aftersuch device or element ofdesign has been removed orrendered inoperative by anyperson.

Chevrolet Silverado 4500HD/5500HD/6500HD Owner Manual (GMNA-Localizing-U.S.-12102101) - 2019 - crc - 10/2/18
316 Vehicle Care
Among those acts presumed toconstitute tampering are the actslisted below.
Insulation:
Removal of the noise shields or anyunderhood insulation.
Engine:
Removal or rendering the enginespeed governor, if equipped,inoperative so as to allow enginespeed to exceed manufacturerspecifications.
Fan and Drive:
. Removal of the fan clutch,if equipped, or rendering theclutch inoperative.
. Removal of the fan shroud,if equipped.
Air Intake:
. Removal of the air cleanersilencer.
. Modification of the air cleaner.
Exhaust:
. Removal of the muffler and/orresonator.
. Removal of the exhaust pipesand exhaust pipe clamps.
Starter Switch Check
Neutral Safety Switch
Check the operation of thetransmission neutral safety switch.Try to start the vehicle in all shiftselector positions. The startershould only operate when the shiftselector is in Neutral or Park.
Wiper Blade ReplacementWindshield wiper blades should bereplaced periodically. SeeMaintenance Schedule 0 361.
Replacement blades come indifferent types and are removed indifferent ways. For proper type andlength, see MaintenanceReplacement Parts 0 405.
Caution
Allowing the wiper arm to touchthe windshield when no wiperblade is installed could damagethe windshield. Any damage thatoccurs would not be covered bythe vehicle warranty. Do not allowthe wiper arm to touch thewindshield.
Front Wiper BladeReplacement
To replace the front wiper blades:
1. Pull the windshield wiperassembly away from thewindshield.

Chevrolet Silverado 4500HD/5500HD/6500HD Owner Manual (GMNA-Localizing-U.S.-12102101) - 2019 - crc - 10/2/18
Vehicle Care 317
2. Lift up on the latch in themiddle of the wiper bladewhere the wiper arm attaches.
3. With the latch open, pull thewiper blade down toward thewindshield far enough torelease it from the J-hookedend of the wiper arm.
4. Remove the wiper blade.
5. Reverse Steps 1–3 for wiperblade replacement.
Caution
Damage may occur if the wiperblades are not in contact with thewindshield before turning on thewiper system.
Glass ReplacementIf the windshield or front side glassmust be replaced, see your dealerto determine the correctreplacement glass.
Headlamp AimingHeadlamp aim has been preset andshould need no further adjustment.
If the vehicle is damaged in a crash,the headlamp aim may be affected.If adjustment to the headlamps isnecessary, see your dealer.
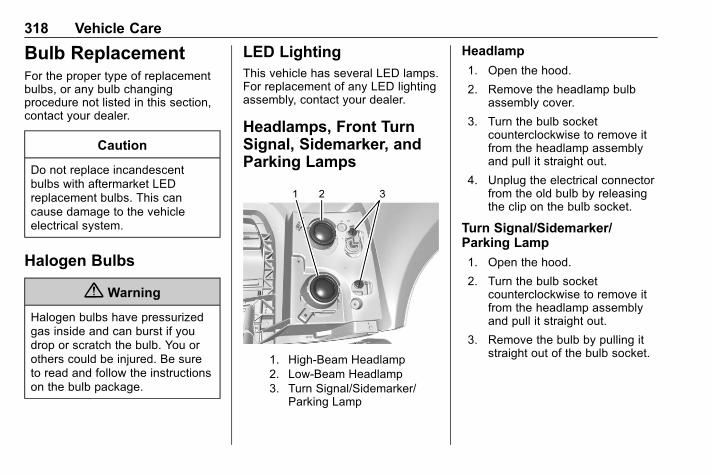
Chevrolet Silverado 4500HD/5500HD/6500HD Owner Manual (GMNA-Localizing-U.S.-12102101) - 2019 - crc - 10/2/18
318 Vehicle Care
Bulb ReplacementFor the proper type of replacementbulbs, or any bulb changingprocedure not listed in this section,contact your dealer.
Caution
Do not replace incandescentbulbs with aftermarket LEDreplacement bulbs. This cancause damage to the vehicleelectrical system.
Halogen Bulbs
{ Warning
Halogen bulbs have pressurizedgas inside and can burst if youdrop or scratch the bulb. You orothers could be injured. Be sureto read and follow the instructionson the bulb package.
LED LightingThis vehicle has several LED lamps.For replacement of any LED lightingassembly, contact your dealer.
Headlamps, Front TurnSignal, Sidemarker, andParking Lamps
1. High-Beam Headlamp2. Low-Beam Headlamp3. Turn Signal/Sidemarker/
Parking Lamp
Headlamp
1. Open the hood.
2. Remove the headlamp bulbassembly cover.
3. Turn the bulb socketcounterclockwise to remove itfrom the headlamp assemblyand pull it straight out.
4. Unplug the electrical connectorfrom the old bulb by releasingthe clip on the bulb socket.
Turn Signal/Sidemarker/Parking Lamp
1. Open the hood.
2. Turn the bulb socketcounterclockwise to remove itfrom the headlamp assemblyand pull it straight out.
3. Remove the bulb by pulling itstraight out of the bulb socket.

Chevrolet Silverado 4500HD/5500HD/6500HD Owner Manual (GMNA-Localizing-U.S.-12102101) - 2019 - crc - 10/2/18
Vehicle Care 319
Fog LampsTo replace the front fog lamp bulb:
1. Locate the fog lamp in the frontbumper.
2. Disconnect the electricalconnector from the fog lampbulb by pressing the connectorrelease and pulling theconnector straight out of thefog lamp bulb.
3. Remove the fog lamp bulb fromthe housing by turningcounterclockwise and pulling itstraight out of the assembly.
4. Replace the bulb and reverseSteps 1–3 to reinstall.
Taillamps
1. Back-Up Lamp2. Stoplamp/Taillamp/Turn
Signal Lamp
To replace one of these bulbs:
1. Remove the four screws.
2. Lift the lens off the lampassembly.
3. Turn the old bulbcounterclockwise and pull itstraight out from the socket.
Center High-MountedStoplamp (CHMSL) andCargo Lamp
1. Cargo Lamp Bulbs2. Center High-Mounted
Stoplamp (CHMSL) Bulb

Chevrolet Silverado 4500HD/5500HD/6500HD Owner Manual (GMNA-Localizing-U.S.-12102101) - 2019 - crc - 10/2/18
320 Vehicle Care
To replace one of these bulbs:
1. Remove the two screws and liftoff the lamp assembly.
2. Turn the bulb socketcounterclockwise and pull itstraight out.
3. Pull the bulb straight out fromthe socket.
Electrical System
Electrical SystemOverloadThe vehicle has fuses to protectagainst an electrical systemoverload. Fuses also protect powerdevices in the vehicle.
Replace a bad fuse with a new oneof the identical size and rating.
If there is a problem on the road anda fuse needs to be replaced, thereare some spare fuses and a fusepuller in the left instrument panelfuse block. The same amperagefuse can also be borrowed. Choosesome feature of the vehicle that isnot needed to use and replace it assoon as possible.
Headlamp Wiring
An electrical overload may causethe lamps to go on and off, or insome cases to remain off. Have theheadlamp wiring checked right awayif the lamps go on and off orremain off.
Windshield Wipers
If the wiper motor overheats due toheavy snow or ice, the windshieldwipers will stop until the motor coolsand will then restart.
Although the circuit is protectedfrom electrical overload, overloaddue to heavy snow or ice maycause wiper linkage damage.Always clear ice and heavy snowfrom the windshield before using thewindshield wipers.
If the overload is caused by anelectrical problem and not snow orice, be sure to get it fixed.
Fuses and CircuitBreakersThe wiring circuits in the vehicle areprotected from short circuits by acombination of fuses and circuitbreakers. This greatly reduces thechance of damage caused byelectrical problems.
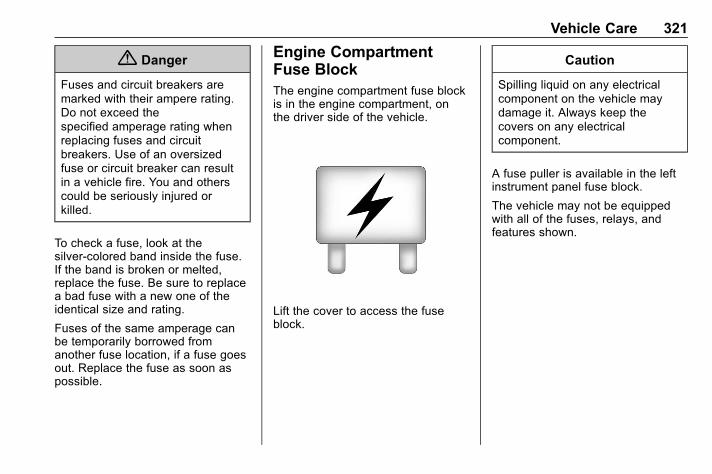
Chevrolet Silverado 4500HD/5500HD/6500HD Owner Manual (GMNA-Localizing-U.S.-12102101) - 2019 - crc - 10/2/18
Vehicle Care 321
{ Danger
Fuses and circuit breakers aremarked with their ampere rating.Do not exceed thespecified amperage rating whenreplacing fuses and circuitbreakers. Use of an oversizedfuse or circuit breaker can resultin a vehicle fire. You and otherscould be seriously injured orkilled.
To check a fuse, look at thesilver-colored band inside the fuse.If the band is broken or melted,replace the fuse. Be sure to replacea bad fuse with a new one of theidentical size and rating.
Fuses of the same amperage canbe temporarily borrowed fromanother fuse location, if a fuse goesout. Replace the fuse as soon aspossible.
Engine CompartmentFuse BlockThe engine compartment fuse blockis in the engine compartment, onthe driver side of the vehicle.
Lift the cover to access the fuseblock.
Caution
Spilling liquid on any electricalcomponent on the vehicle maydamage it. Always keep thecovers on any electricalcomponent.
A fuse puller is available in the leftinstrument panel fuse block.
The vehicle may not be equippedwith all of the fuses, relays, andfeatures shown.

Chevrolet Silverado 4500HD/5500HD/6500HD Owner Manual (GMNA-Localizing-U.S.-12102101) - 2019 - crc - 10/2/18
322 Vehicle Care
Fuses Usage
1 Left high-beam
Fuses Usage
2 Right high-beam
3 Wash pump
Fuses Usage
7 Upfitter 3 & 4
8 Fog lamp
9 Regulated voltagecontrol
10 Upfitter 1 & 2
12 Four wheeldrive TREC
13 Left rear stop/turn lamp
14 Right rear stop/turn lamp
17 IECL 1
22 IECL 2
26 Right rear amber
27 Horn
32 Rear defog
33 Heated Mirror
34 Left park lamps
37 Master disconnectlow air
39 Air dryer

Chevrolet Silverado 4500HD/5500HD/6500HD Owner Manual (GMNA-Localizing-U.S.-12102101) - 2019 - crc - 10/2/18
Vehicle Care 323
Fuses Usage
40 Miscellaneousignition
41 Trailer park lamp
42 Right park lamp
44 Fuel pump
45 Low air pressure
46 Engine controlmodule ignition
47 Transmissionignition
49 Transmissioncontrol modulebattery
50 A/C clutch
52 Front wiper
53 Stop lamp
54 Trailerreverse lamp
55 Trailerbackup lamp
56 Air dump
57 Left rear amber
Fuses Usage
58 Trailer brake
62 Integrated chassiscontrol module
63 Accessory power
66 Auxiliaryunderhoodelectrical center
68 Anti-lock brakingsystem pump
69 Spare
73 Left trailer stop/turn lamp
75 Spare
78 Engine controlmodule battery
79 Cab heater Auxbattery
81 Right trailer stop/turn lamp
82 FTZM
83 Anti-lock brakingsystem valve
Fuses Usage
84 Trailer battery
85 Engine
86 Engine controlmodule
91 Engine controlmodule throttlecontrol
92 Cooling fan clutch
Relays Usage
5 Wash pump
23 Defog rear
35 Park lamp
36 Run/crank
43 Low air presssure
59 A/C control
64 Left rear amber
70 Spare
77 ECM

Chevrolet Silverado 4500HD/5500HD/6500HD Owner Manual (GMNA-Localizing-U.S.-12102101) - 2019 - crc - 10/2/18
324 Vehicle Care
Auxiliary Fuse Block
Fuses Usage
7 Spare
8 Diesel exhaust fluidheater
9 Starter
10 Fuel heater
11 Smart sensors
12 SCRPM
13 Spare
Relays Usage
1 Starter
2 Fuel heater
3 SCR control
4 Fuel pump
5 Fan driver
6 Powertrain Sensor
Instrument Panel FuseBlock (Right)
The right instrument panel fuseblock access door is on thepassenger side edge of theinstrument panel.
Pull off the cover to access the frontof the fuse block.

Chevrolet Silverado 4500HD/5500HD/6500HD Owner Manual (GMNA-Localizing-U.S.-12102101) - 2019 - crc - 10/2/18
Vehicle Care 325
To access the back of the fuseblock:
1. Push the tabs at the top of fuseblock down.
2. Pull the top of the fuse blockoutward.
3. Reverse Steps 1–2 to reinstall.

Chevrolet Silverado 4500HD/5500HD/6500HD Owner Manual (GMNA-Localizing-U.S.-12102101) - 2019 - crc - 10/2/18
326 Vehicle Care
The vehicle may not be equippedwith all of the fuses, relays, andfeatures shown.
Fuses Usage
1 Accessory poweroutlet 3
Fuses Usage
2 Accessory poweroutlet 4
3 Upfitter Switch 3 & 4
4 –
5 –
6 Upfitter Switch 3 & 4
7 Body control module 4
8 Body control module 8
9 Spare
10 Cargo lamp
11 –
12 –
14 –
15 Steering wheelcontrols
16 –
17 –
18 Radio
19 Spare
20 Sunroof

Chevrolet Silverado 4500HD/5500HD/6500HD Owner Manual (GMNA-Localizing-U.S.-12102101) - 2019 - crc - 10/2/18
Vehicle Care 327
Fuses Usage
21 –
22 –
23 Airbag/Info
24 –
25 –
26 Export/Power take off/Special equipmentoption/Battery 1
27 USB ports/Obstacledetection
28 Body control module 2
29 –
30 –
31 Upfitter 3
32 Special equipmentoption/Battery 2
33 –
34 –
35 Air conditioninginverter
36 –
Fuses Usage
37 Spare
38 –
39 Upfitter 4
40 –
41 –
42 Right door windowmotor
43 Front blower
44 Infotainment
45 Body control module 6
46 Body control module 7
47 Passenger seat
Relays Usage
48 –
49 –
50 Retained accessorypower/Accessory
51 Upfitter 3
52 Upfitter 4
Instrument Panel FuseBlock (Left)
The left instrument panel fuse blockaccess door is on the driver sideedge of the instrument panel.
Pull off the cover to access the frontof the fuse block.

Chevrolet Silverado 4500HD/5500HD/6500HD Owner Manual (GMNA-Localizing-U.S.-12102101) - 2019 - crc - 10/2/18
328 Vehicle Care
To access the back of the fuseblock:
1. Push the tabs at the top of fuseblock down.
2. Pull the top of the fuse blockoutward.
3. Reverse Steps 1–2 to reinstall.

Chevrolet Silverado 4500HD/5500HD/6500HD Owner Manual (GMNA-Localizing-U.S.-12102101) - 2019 - crc - 10/2/18
Vehicle Care 329
The vehicle may not be equippedwith all of the fuses, relays, andfeatures shown.
Fuses Usage
1 Accessory poweroutlet 2
Fuses Usage
2 Special equipmentoption/Retainedaccessory power
3 Universal garage dooropener/Interiorrearview mirror
4 –
5 Upfitter Switch 1 & 2
6 Body control module 3
7 Body control module 5
8 Mirror window module
9 Spare
10 Accessory poweroutlet/Retainedaccessory power
11 Accessory poweroutlet battery
12 Accessory poweroutlet 1/Cigarettelighter
13 Discrete logic ignitionswitch
14 Switch backlighting

Chevrolet Silverado 4500HD/5500HD/6500HD Owner Manual (GMNA-Localizing-U.S.-12102101) - 2019 - crc - 10/2/18
330 Vehicle Care
Fuses Usage
15 –
16 –
17 Body control module 1
18 Upfitter Switch 1 & 2
19 Upfitter 2
20 –
21 –
22 Heating, ventilation,and air conditioning/Auxiliary heating,ventilation, and airconditioning/Ignition
23 Instrument cluster/Ignition sensingdiagnostic module/Ignition
24 Spare
25 Data link connector/Driver seat module
26 Passive entry/Passivestart/Heating,ventilation, and airconditioning
Fuses Usage
27 Spare
28 Spare
29 Spare
30 Special equipmentoption/Automatic levelcontrol
31 Accessory/Run/Crank
32 Spare
33 Spare
34 Instrument cluster
35 –
36 Spare
37 Upfitter 1
38 Spare
39 –
40 Left doors
41 Driver power seat
42 –
43 Left heated, cooled orventilated seats (ifequipped)
Fuses Usage
44 Right heated, cooledor ventilated seats (ifequipped)
45 Spare
46 –
Relays Usage
47 –
48 Upfitter 2
49 Retained accessorypower/Accessory
50 Run/Crank
51 Upfitter 1

Chevrolet Silverado 4500HD/5500HD/6500HD Owner Manual (GMNA-Localizing-U.S.-12102101) - 2019 - crc - 10/2/18
Vehicle Care 331
Wheels and Tires
TiresTire Warnings
{ Warning
To prevent property damage,personal injury, and/or deathalways follow theseinstructions when mountingtires on wheels:
. Only personnel who havehad proper training andexperience should mountor remove tires from rimsor wheels.
. Use only heavy-duty rimsor approved rims forradial tires. It may benecessary to contactyour wheel and rim
(Continued)
Warning (Continued)
distributor to determine ifyour rims are approvedfor radial tires.
. If a tube is to be used,make sure special radialtire tubes are usedbecause of the increasedflexing of the sidewallson radial tires.
. Never use antifreeze,silicones,or petroleum-basedlubricants when mountingradial tires. Only anapproved lubricantshould be used as an aidfor mounting tires.
. Always inflate tires in asafety cage.
{ Warning
To prevent property damage,personal injury, or death:
. Do not mix stud-pilotedwheels or fasteners withhub-piloted wheels orfasteners. Mixing wheeltypes may causepremature wheel failure.
. Do not change from steelwheels or a steel innerand aluminum outerwheel combination toaluminum wheels withoutchanging the mountinghardware since thethicker aluminum wheelsrequire longer studs. Insome cases with flangenut mounting systems,changing the hub andstud assembly may berequired. Improperly
(Continued)

Chevrolet Silverado 4500HD/5500HD/6500HD Owner Manual (GMNA-Localizing-U.S.-12102101) - 2019 - crc - 10/2/18
332 Vehicle Care
Warning (Continued)
mixing components couldcause wheel or fastenerfailures.
. Do not mix foreign (notmade in North America)wheel mounting partswith domestic (made inNorth America) parts.Many foreign wheelcomponents look similarto, but are not exactly thesame as, domestic madecomponents. Mixingcomponents can causewheel or fastenerfailures.
{ Warning
To prevent property damage,personal injury, and/or death,do not mount tube-type tires
(Continued)
Warning (Continued)
on tubeless wheels ortubeless tires on tube-typewheels.
{ Warning
This vehicle may be equippedwith high-pressuresteel-reinforced sidewall tires.Specialized training andequipment are required forservicing high-pressuresteel-reinforced sidewall tires,including inflating, deflating,installing, removing, mountingor re-seating the tire on thewheel. To avoid personalinjury, death or propertydamage, only qualified dealersor service providers withappropriate equipment shouldservice these tires. For
(Continued)
Warning (Continued)
inflating, always make surethe tire and wheel assembly issecurely fastened to thevehicle or placed in safetycage, use a clip-on chuck airhose extension and stand atleast 12 feet away to the sideof the tire.
Tire Pressure
{ Warning
To prevent property damage,personal injury, and/or death,for field maintenance, onlyinflate and load tires to themaximum of the least-ratedtire on the axle. Due to tiremanufacturers re-marking tiresto conform to the Sl (metric)system, tires marked with old
(Continued)

Chevrolet Silverado 4500HD/5500HD/6500HD Owner Manual (GMNA-Localizing-U.S.-12102101) - 2019 - crc - 10/2/18
Vehicle Care 333
Warning (Continued)
and new loads or inflationpressures could be placed onthe same vehicle.
Maintaining the correct amountof air pressure is a veryimportant maintenance practiceto ensure safe vehicle operationand long life for the tires.
Failure to maintain correctinflation pressure may result insudden tire destruction,improper vehicle handling, andmay cause rapid and irregulartire wear. Therefore, inflationpressures should be checkeddaily and always beforelong-distance trips.
Underinflation
Do not allow tires to becomeunderinflated. Increased flexingdue to underinflation causesheat buildup within the tire
components. This leads toreduced strength, breakdown ofthe rubber compounds andpossible separation of the tirecomponents (such as ply andtread separation and reducedretreadability).
Underinflation is also theprimary cause of blowouts. Inaddition, low inflation causes anincrease in rolling resistance.This results in reduced fuelmileage, a loss in tread life, anduneven wear due to increasedtread movement. To determineproper inflation, refer to the tireinflation range stated on the tiresidewall and the tiremanufacturer’s tireload-pressure charts.
Checking Inflation
Check the tires daily and alwaysbefore long-distance trips
Follow the tire manufacturer’srecommended cold inflationpressure for the tire size, type,
load range (ply rating), and axleloading typical for youroperation. Each steer axle tireload will equal one-half the steeraxle loading; each drive tire loadwill be one-quarter the axleloading, if fitted with four tires.
Always check the inflationpressure when the tires are cold.Never bleed air from hot tires torelieve normal pressure buildup.Normal increases in pressureduring operation will be 69 to103 kPa (10 to 15 psi), which isallowable in truck tires. Tires onthe same axle should have thesame air pressure as thecorresponding other tire(s) onthat axle. All tires on thesteering axle should be within21 kPa (3 psi) of each other. Alldrive axle tires should be within34 kPa (5 psi) of each other.
To minimize rim corrosion, it isimportant to keep moisture fromthe inside of tires and proper

Chevrolet Silverado 4500HD/5500HD/6500HD Owner Manual (GMNA-Localizing-U.S.-12102101) - 2019 - crc - 10/2/18
334 Vehicle Care
selection of air compressorequipment, proper air linerouting, and the use of shop airdryers is strongly recommendedto prevent moisture in thehigh-pressure air used for tireinflation.
Tire Inspection
{ Warning
To prevent property damage,personal injury, and/or death,always maintain your tires ingood condition. Frequentlycheck and maintain correctinflation pressures asspecified by tiremanufacturers. Inspectperiodically for abnormal wearpatterns and repair/replace cutor broken tire casing. Alwaysuse experienced, trainedpersonnel with proper
(Continued)
Warning (Continued)
equipment and correctprocedures to mount orremove tires and wheels.
Check the condition of the tiresfor abnormal wear patterns andproper inflation pressures. Cutor broken tire casings must berepaired or replaced.
Check the tread depth and tireinflation. Check to see if thetread is evenly worn. Minimumtread depth is 3 mm (4/32 in) onsteering tires. Look for cuts orother damage to the tread orsidewalls. Check for missing,broken, or damaged valve capand stem.
Check that the dual wheels,if equipped, are evenlyseparated, and that the tires arenot touching one another.
Tires should be inspected for thefollowing conditions. If any arepresent, the tire should beremoved and repaired,retreaded, or scrapped as thecondition indicates.
. Any blister, bump, or raisedportion anywhere on thesurface of the tire tread orsidewall (other than a bumpmade by a repair). Theseindicate the start of internalseparation.
. Any cut that reaches to thebelt or ply cords or any cutthat is large enough to growin size and depth.
. Any nail or puncturing object.
. If any stone or object is heldby a tread groove and isstarting to drill into the treadbase, remove the object.
Proper tire inflation, toe-inadjustment, loads, and roadspeeds are important factors

Chevrolet Silverado 4500HD/5500HD/6500HD Owner Manual (GMNA-Localizing-U.S.-12102101) - 2019 - crc - 10/2/18
Vehicle Care 335
governing tire life, steering ease,maneuverability, fuel economy,and ride quality.
Tire RotationTires should be rotated every12 000 km (7,500 mi). SeeMaintenance Schedule 0 361.
Tires are rotated to achieve auniform wear for all tires. Thefirst rotation is the mostimportant.
Anytime unusual wear isnoticed, rotate the tires as soonas possible, check for proper tireinflation pressure, and check fordamaged tires or wheels. If theunusual wear continues after therotation, check the wheelalignment.See When It Is Time for NewTires 0 337 and WheelReplacement 0 339.
Dual Tire Rotation
When the vehicle is new,or whenever a wheel, wheelbolt, or wheel nut is replaced orserviced, check the wheel nuttorque after 160, 1 600, and10 000 km (100, 1,000, and6,000 mi) of driving. For propertorque and wheel nut tighteninginformation, see “Wheel NutTorque” under Capacities andSpecifications 0 408.
The outer tire on a dual wheelsetup generally wears fasterthan the inner tire. Tires lastlonger and wear more evenly ifthey are rotated.See Tire Inspection 0 334 andTire Rotation 0 335. Also seeMaintenance Schedule 0 361.
{ Warning
If the vehicle is operated with atire that is underinflated, the tirecan overheat. An overheated tirecan lose air suddenly or catchfire. You or others could beinjured. Properly inflate all tires,including the spare.
See Tire Pressure 0 332, forinformation on proper tireinflation.

Chevrolet Silverado 4500HD/5500HD/6500HD Owner Manual (GMNA-Localizing-U.S.-12102101) - 2019 - crc - 10/2/18
336 Vehicle Care
Use this rotation pattern whenrotating the tires (exceptpolished forged aluminumwheels).
Vehicles with polished forgedaluminum wheels have twounique wheels; an aluminumfront and rear outer wheels, andsteel rear inner wheels. Thealuminum wheels can only berotated from the front and rearouter positions. The steelwheels can only be rotated onthe rear inner positions.
Use this rotation pattern whenrotating the tires if the vehiclehas polished forged aluminumwheels. The steel spare wheelcan be used in any position inthe event of a flat tire. Analuminum spare wheel can beused in front or rear outerpositions only.
When installing dual wheels,check that the vent holes in theinner and outer wheels on eachside are lined up.
Adjust the front and rear tires tothe recommended inflationpressure on the Tire andLoading Information label afterthe tires have been rotated.See Tire Pressure 0 332 andVehicle Load Limits 0 205.
Check that all wheel nuts areproperly tightened. See “WheelNut Torque” under Capacitiesand Specifications 0 408.
{ Warning
Rust or dirt on a wheel, or on theparts to which it is fastened, canmake wheel nuts become looseafter time. The wheel could comeoff and cause a crash. Whenchanging a wheel, remove anyrust or dirt from places where thewheel attaches to the vehicle. Inan emergency, a cloth or a papertowel can be used; however, usea scraper or wire brush later toremove all rust or dirt.
Lightly coat the inner diameter ofthe wheel hub opening withwheel bearing grease after awheel change or tire rotation toprevent corrosion or rustbuild-up. Do not get grease onthe flat wheel mounting surfaceor on the wheel nuts or bolts.
Check that the spare tire, if thevehicle has one, is storedproperly.

Chevrolet Silverado 4500HD/5500HD/6500HD Owner Manual (GMNA-Localizing-U.S.-12102101) - 2019 - crc - 10/2/18
Vehicle Care 337
When It Is Time for NewTiresTire Replacement
{ Warning
To prevent property damage,personal injury, and/or death, it isrecommended that you neverreplace vehicles tires with lowerroad speed rating. However, inthe event you should change/replace vehicle tires with those ofa lower road speed rating, it willbe necessary for you to take yourvehicle to the dealer to have theroad speed engine parameterchanged to match the new tirerating.
Retread tires are not recommendedfor use on steering axles of trucks.
. Front (Steering) Axle — Tiresmust be removed when the treadis worn to 3 mm (4/32 in) or less.Retread or rotate worn tires todrive position.
. Rear Axle — Tires must beremoved when the tread is wornto 2 mm (2/32 in).
If a rib tire is used on the front axleand lug or off-road type on the rearaxle positions:
. Front (Steering) Axle — Replacethe front tires when the tread isworn to 3 mm (4/32 in) or less.
. Rear Axle — Tires must beremoved when the tread is wornto 2 mm (2/32 in) or less. Tiresidentified with the wordregroovable molded on thesidewall can be regrooved.A minimum of 2.38 mm (3/32 in)of under tread must be left at thebottom of the grooves.
Never mix bias and radial tires onthis vehicle.
It is recommended for best overallperformance that only radial tires beused on this vehicle.
Never mix different tire sizes orconstructions on the same axle.
Tire replacement should be to tireswith GHG emission performance asgood, or better than tires originallyequipped on the vehicle. Consultwith the tire manufacturer for tirespecifications.
Replacement Tire Size and LoadRating
{ Warning
To prevent property damage,personal injury, and/or death, donot load tires beyond their ratedcapacity as this decreases tirelife, requiring more frequentreplacement of tires. Overloadingcreates an unsafe condition thatmay result in sudden air loss froma tire failure resulting in a crash.
The Tire/Certification Label found onthe driver-side door frame of yourvehicle, indicates the size of theoriginal equipment tires installed oneach axle of the vehicle.

Chevrolet Silverado 4500HD/5500HD/6500HD Owner Manual (GMNA-Localizing-U.S.-12102101) - 2019 - crc - 10/2/18
338 Vehicle Care
Label Example
1. Gross Weight Rating of theFront Axle
2. Tire Size for Front Axle3. Tire Size for Rear Axle4. Gross Weight Rating of the
Rear Axle
The Tire/Certification Label istypically found on the driver-sidedoor frame of the vehicle.It indicates the size of the originalequipment tires installed on eachaxle of the vehicle.
The load rating of the tires installedon your vehicle at the time ofproduction is at or in excess of theGross Axle Weight Rating (GAWR)on the Tire/Certification Label.When replacing the tires be sure the
replacement tire load rating (listedseparately in pounds and kilogramson the tire sidewall for single or dualapplications) multiplied by thenumber of tires on that axle is equalto or higher than the specified listedSteer Axle or Drive Axle GAWR.Failure to do so will adversely affectmaximum load-carrying capacity.Tires with the same sizespecifications do not always havethe same load specification. SeeVehicle Load Limits 0 205.
Dual Tires Matching
Dual tires should be matched usingtires of equivalent size. Tires whichdiffer more than 6 mm (1/4 in) indiameter or 19 mm (3/4 in) incircumference should not bemounted on the same dual wheelassembly.
Wear
Radial tires can exhibit three typesof normal wear patterns: even,erosion, or chamfer.
Even wear is a sign that the tire isbeing properly used and maintained.
Erosion wear has also been calledrolling wear, channel, or river wear.Erosion wear is found more often atfree rolling tires. This is anindication that the tire is being usedin a slow wearing operation. Whathappens is that the belt plies areheld very rigid and the tread is notallowed to distort as it passesthrough the contact area. Wear willonly occur at the edge of the tread.No corrective action is required.If erosion gets to be 2 mm (1/16 in)or more, the tire may be rotated to adrive axle.
Chamfer or shoulder wear with tiresinflated properly, is a normaltendency of most radial tire designs.If both inside and outside shouldersare wearing evenly around the tire,no further action is required.Overinflation is not effective incorrecting this effect.
Irregular Wear
If irregular wear is present, checkthe axle alignment, tire pressure,wheel balance, shock andsuspension component condition,and wheel bearing end play.

Chevrolet Silverado 4500HD/5500HD/6500HD Owner Manual (GMNA-Localizing-U.S.-12102101) - 2019 - crc - 10/2/18
Vehicle Care 339
This condition not only shortens tirelife, but will adversely affect thehandling of your vehicle.
Rotating tires from one wheelposition to another is a way oftenused to even out many types ofirregular wear or to avoid italtogether. See Tire Rotation 0 335.
Irregular wear can be minimized by:
. Using the right inflation pressurefor the load being carried.
. Maintaining proper front wheelalignment especially toe-in tospecifications.
. Maintaining proper tire andwheel balance.
. Maintaining shock absorbersand suspension components.
. Maintain proper wheel bearingadjustment.
Wheel Alignment and TireBalanceMaintaining front axle alignment isvery important to achievingmaximum tire life and vehiclecontrol. Inspecting steer axle tires inthe first 5 000 km (3,000 mi) –16 000 km (10,000 mi) of servicemiles will generally show if tires arewearing normally.
. Rapid outside shoulder wear onboth tires indicates too muchtoe-in.
. Rapid inside shoulder wear onboth tires indicates too muchtoe-out.
. Excessive wear on the inside oroutside of one steer tire, but notthe other, can indicate a toe-in ortoe-out condition coupled with amisaligned front or rear axle.
. Pulling to the right or left canindicate misalignment of thefront or rear axle, unequal tirepressures, or a damaged /mismatched tire.
Wheel Replacement
{ Warning
To prevent property damage,personal injury, and/or deathalways follow theseinstructions when mountingtires on wheels:
. Only personnel who havehad proper training andexperience should mountor remove tires from rimsor wheels.
. Use only heavy-duty rimsor approved rims forradial tires. It may benecessary to contactyour wheel and rimdistributor to determine ifyour rims are approvedfor radial tires.
(Continued)

Chevrolet Silverado 4500HD/5500HD/6500HD Owner Manual (GMNA-Localizing-U.S.-12102101) - 2019 - crc - 10/2/18
340 Vehicle Care
Warning (Continued)
. If a tube is to be used,make sure special radialtire tubes are usedbecause of the increasedflexing of the sidewallson radial tires.
. Never use antifreeze,silicones,or petroleum-basedlubricants when mountingradial tires. Only anapproved lubricantshould be used as an aidfor mounting tires.
. Always inflate tires in asafety cage.
{ Warning
To prevent property damage,personal injury, or death:
. Do not mix stud-pilotedwheels or fasteners withhub-piloted wheels orfasteners.
. Do not mix foreign (notmade in North America)wheel mounting parts withdomestic (made in NorthAmerica) parts. Manyforeign wheel componentslook similar to, but are notexactly the same as,domestic madecomponents. Mixingcomponents can causewheel or fastener failures.
. Do not change fromaluminum wheels to steelwheels, or vice-versa,without changing themounting hardware. In somecases with flange nut
(Continued)
Warning (Continued)
mounting systems, changingthe hub and stud assemblymay be required. Mixingcomponents could causewheel or fastener failures.
{ Warning
To prevent property damage,personal injury, and/or death,when installing the tire and rimassembly on disc brake-equippedaxles, make sure the tire valvestem clears the brake caliper. Theuse of either a GM valve stemretainer or a tire manufacturer’sstem forming tool is the onlyacceptable method of obtainingclearance when necessary.Failure to obtain proper clearancemay result in rapid tire deflation.
Check for damaged or bent wheels.Check to see that all lug nuts arepresent and not loose. Look for rust

Chevrolet Silverado 4500HD/5500HD/6500HD Owner Manual (GMNA-Localizing-U.S.-12102101) - 2019 - crc - 10/2/18
Vehicle Care 341
trails around the nuts. Ensure thatno cracks or damage are present atwheel mount holes.
Check for leaks on outboard orinboard sides of wheel. Verify thatthe oil level in the hub is correct.
Wheel and Tire Balancing
Out-of-round or out-of-balancewheels or tires can cause vehiclevibration, bounce, and shimmy.Replace damaged or out-of-roundwheels. Out-of-round tires andwheel assemblies can sometimesbe corrected by rechecking the tirerelative to the wheel. The tire andwheel assembly should thereafterbe dynamically balanced andreinspected while spinning for anout of round condition.
Hub-Piloted Wheel InstallationProcedure
{ Warning
To prevent property damage,personal injury, and/or death, useonly the same type and stylewheels and mounting hardware toreplace original parts. Failure todo so may result in an assemblythat looks fine but does not fittogether properly. This couldcause wheel or fastener failures.
Out-of-round tires and wheelassemblies can sometimes becorrected by re-clocking the tirerelative to the wheel.
Tightening procedure for discwheels with flange nuts(hub-piloted):
1. Clean the mating surfaces ofthe hub, drum, and wheel(s) aswell as the wheel studs andwheel nuts with a wire brushprior to assembly.
2. Lubricate the two-piece wheelnuts by putting two drops of oilin the slot between the nut andwasher and spin the washer tospread the oil around thenut-to-washer contact surface.
3. Carefully lubricate the wheelstud threads by wiping themwith a freshly oiled cloth. Donot get the oil on any othersurfaces or the wheel clampingeffectiveness will be reduced.
4. To prevent aluminum wheelsfrom getting stuck on the hubdue to corrosion, apply a thincoat of anti-seize compound ordisc brake corrosion controlgrease to the hub pilotpads only.
5. Slide the inner and outerwheels (if duals) or the steerwheel over the wheel studsand onto the pilot pads of thehub. Care must be taken toavoid damage to the studthreads while positioning thewheel. Ensure that the wheel isresting on the pilot pads and isagainst the brake drum.

Chevrolet Silverado 4500HD/5500HD/6500HD Owner Manual (GMNA-Localizing-U.S.-12102101) - 2019 - crc - 10/2/18
342 Vehicle Care
6. Hand-start all wheel nuts toprevent cross-threading.
7. Starting with the nut at 12o’clock position and using theappropriate star or crisscrosspattern, run the wheel nutsdown the wheel studs with animpact wrench until they aresnug against the wheel. Thepurpose of this step is to snugthe wheel(s) in the correctposition, not to apply the finaltorque. The tightening of eachnut should be stoppedimmediately when the wheel iscontacted, and result in awheel nut torque well below thefinal specified torque.
8. Use a calibrated torque wrenchto apply the specified torque toeach wheel nut in thesequence specified in thewheel nut torque sequencediagram above. See Capacitiesand Specifications 0 408.
9. All wheels undergo a processcalled joint settling whenplaced in service after a wheelinstallation has beenperformed. This process resultsin a reduction in the torque onthe wheel nuts. To correct thiscondition, operate the vehiclenormally for approximately80 km (50 mi), then use acalibrated torque wrench tore-torque the wheel nuts tospecification using theappropriate pattern shown inthe wheel nut torque sequencediagram.
10. As part of a daily pretripinspection, look for loose ormissing wheel nuts. Also, lookfor rust streaks extendingoutward from the wheel nuts.This can be an indicator that
one or more wheel nuts areloose, even if they cannot beturned by hand. Normalperiodic maintenance shouldalso include checking thewheel nut torque with a torquewrench.
Wheel Nut Torque Maintenance
Tighten and maintain the wheel andrim mounting nuts to the propertorque. Loose nuts or overtightenednuts can lead to premature wearand possible failure of the wheel,rim, and/or mounting hardware.
Used Replacement Wheels
{ Warning
Replacing a wheel with a usedone is dangerous. How it hasbeen used or how far it has beendriven may be unknown. It couldfail suddenly and cause a crash.When replacing wheels, use anew GM original equipmentwheel.

Chevrolet Silverado 4500HD/5500HD/6500HD Owner Manual (GMNA-Localizing-U.S.-12102101) - 2019 - crc - 10/2/18
Vehicle Care 343
Tire Chains
Caution
To prevent property damage,never drive with chains on thefront tires of a four-wheel drivevehicle without also putting themon the rear tires. The lack of rearchains could cause the rear of thevehicle to slide and swing around.
Refer to the chain manufacturer’srecommendation for correct tirechain usage, installation, andremoval.
If a Tire Goes Flat
{ Warning
To prevent property damage,personal injury, and/or death,if wheels or tires must bechanged, obtain expert tireservice help. Mounting anddemounting of tires should onlybe performed by qualifiedpersonnel using necessary safetyprocedures and equipment.
Jump Starting
Jump Starting - NorthAmericaFor more information about thevehicle batteries, see Battery -North America 0 312.
If the vehicle's batteries are rundown, you may want to use anothervehicle and some jumper cables tostart your vehicle. Be sure to usethe following steps to do it safely.
{ Warning
WARNING: Battery posts,terminals, and relatedaccessories contain lead and leadcompounds, chemicals known tothe State of California to causecancer and birth defects or otherreproductive harm. Batteries alsocontain other chemicals known tothe State of California to causecancer. WASH HANDS AFTER
(Continued)

Chevrolet Silverado 4500HD/5500HD/6500HD Owner Manual (GMNA-Localizing-U.S.-12102101) - 2019 - crc - 10/2/18
344 Vehicle Care
Warning (Continued)
HANDLING. For more informationgo to www.P65Warnings.ca.gov/passenger-vehicle.
See California Proposition65 Warning 0 290 and the backcover.
{ Warning
Batteries can hurt you. They canbe dangerous because:
. They contain acid that canburn you.
. They contain gas that canexplode or ignite.
. They contain enoughelectricity to burn you.
If you do not follow these stepsexactly, some or all of thesethings can hurt you.
Caution
If the jumper cables areconnected or removed in thewrong order, electrical shortingmay occur and damage thevehicle. The repairs would not becovered by the vehicle warranty.Always connect and remove thejumper cables in the correct order,making sure that the cables donot touch each other or othermetal.
1. Discharged Battery RemotePositive Terminal
2. Good Battery PositiveTerminal
3. Discharged BatteryNegative Grounding Point(on the battery or on thevehicle frame)
4. Good Battery NegativeTerminal
The jump start negative groundingpoint (3) and the remote positiveterminal (1) for the dischargedbattery are on the driver side of thevehicle beneath the driver side door.
The jump start positive terminal (2)and negative terminal (4) are on thebattery of the vehicle providing thejump start.
The remote positive terminal jumpstart connection for the dischargedbatteries is under a red cover.Remove the cover to expose theterminal.
1. Check the other vehicle.It must have a 12-volt batterywith a negative ground system.

Chevrolet Silverado 4500HD/5500HD/6500HD Owner Manual (GMNA-Localizing-U.S.-12102101) - 2019 - crc - 10/2/18
Vehicle Care 345
Caution
If the other vehicle does not havea 12-volt system with a negativeground, both vehicles can bedamaged. Only use a vehicle thathas a 12-volt system with anegative ground for jump starting.
2. With the vehicle having twobatteries, you should knowbefore you begin that,especially in cold weather, youmay not be able to get enoughpower from a single battery inanother vehicle to start yourdiesel engine. Using thebattery that is closer to thestarter will reduce electricalresistance.
3. Get the vehicles close enoughso the jumper cables canreach, but be sure the vehiclesare not touching each other.If they are, it could cause anunwanted ground connection.You would not be able to start
your vehicle, and the badgrounding could damage theelectrical systems.
To avoid the possibility of thevehicles rolling, set the parkingbrake firmly on both vehiclesinvolved in the jump startprocedure. Put the automatictransmission in P (Park) or amanual transmission in Neutralbefore setting the parkingbrake. If you have afour-wheel-drive vehicle, besure the transfer case is in adrive gear, not in N (Neutral).
Caution
If any accessories are left on orplugged in during the jumpstarting procedure, they could bedamaged. The repairs would notbe covered by the vehiclewarranty. Whenever possible, turnoff or unplug all accessories oneither vehicle when jump starting.
4. Turn the ignition off on bothvehicles. Unplug unnecessaryaccessories plugged into theaccessory power outlets. Turnoff the radio and all the lampsthat are not needed. This willavoid sparks and help saveboth batteries. And it couldsave the radio!
5. Locate the positive (+) andnegative (−) terminal locationson the other vehicle.
{ Warning
Using a match near a battery cancause battery gas to explode.People have been hurt doing this,and some have been blinded.Use a flashlight if you need morelight.
Battery fluid contains acid thatcan burn you. Do not get it onyou. If you accidentally get it inyour eyes or on your skin, flushthe place with water and getmedical help immediately.

Chevrolet Silverado 4500HD/5500HD/6500HD Owner Manual (GMNA-Localizing-U.S.-12102101) - 2019 - crc - 10/2/18
346 Vehicle Care
{ Warning
Fans or other moving engineparts can injure you badly. Keepyour hands away from movingparts once the engine is running.
6. Check that the jumper cablesdo not have loose or missinginsulation. If they do, you couldget a shock. The vehiclescould be damaged too.
Before you connect the cables,here are some basic things youshould know. Positive (+) willgo to positive (+) or to a remotepositive (+) terminal if thevehicle has one. Negative (−)will go to the vehicle frame orthe battery negative (−) underthe battery cover.
Do not connect positive (+) tonegative (−) or you will get ashort that would damage thebattery and maybe otherparts too.
7. Remove the battery cover (2)by disengaging the batterycover retaining straps (1).
8. Connect one end of the redpositive (+) cable to the remotepositive (+) terminal (1) of thevehicle with the dischargedbattery.
9. Do not let the other end touchmetal. Connect it to thepositive (+) terminal (2) of thegood battery. Use a remotepositive (+) terminal if thevehicle has one.
10. Connect one end of the blacknegative (−) cable to thenegative (−) terminal (4) of thegood battery. Use a remotenegative (−) terminal if thevehicle has one.
Do not let the other end touchanything until the next step.
11. Connect the other end of thenegative (−) cable to anegative grounding point (3) onthe battery negative terminal oron the vehicle frame.
12. Start the vehicle with the goodbattery and run the engine for awhile.
13. Try to start the vehicle that hadthe dead batteries. If it will notstart after a few tries, itprobably needs service.
Caution
If the jumper cables areconnected or removed in thewrong order, electrical shorting
(Continued)

Chevrolet Silverado 4500HD/5500HD/6500HD Owner Manual (GMNA-Localizing-U.S.-12102101) - 2019 - crc - 10/2/18
Vehicle Care 347
Caution (Continued)
may occur and damage thevehicle. The repairs would not becovered by the vehicle warranty.Always connect and remove thejumper cables in the correct order,making sure that the cables donot touch each other or othermetal.
Jumper Cable Removal
Reverse the sequence exactly whenremoving the jumper cables.
After starting the disabled vehicleand removing the jumper cables,allow it to idle for several minutes.
Towing the Vehicle
{ Warning
To prevent property damage,personal injury, and/or death,always use both tow hooks toprevent possible overloading andbreaking of individual hooks. Thisvehicle is equipped with dual towhooks for recovery purposes only.
{ Warning
To prevent property damage,personal injury, or death, observethe following warning:
. Always install wheel chockswhen manually releasingthe parking brake, or thevehicle can roll.
. For towing, make sure thevehicle is securelyconnected to the tow vehicleand tow vehicle parking
(Continued)
Warning (Continued)
brake is applied beforereleasing the disabledvehicle’s parking brake.
Caution
To prevent property damage,observe the following: Due tomany variables that exist intowing, positioning, and lifting,towing is the sole responsibility ofthe towing operator.
. If lifting and towing thevehicle from the rear,disconnect the driveshaft atthe front axle location.
. If lifting and towing thevehicle from the front,disconnect the driveshaft atthe rear axle location.
(Continued)

Chevrolet Silverado 4500HD/5500HD/6500HD Owner Manual (GMNA-Localizing-U.S.-12102101) - 2019 - crc - 10/2/18
348 Vehicle Care
Caution (Continued)
. If towing the vehicle andneither end is lifted off theground, both driveshaftsmust be disconnected at theaxle locations.
Important factors to keep in mindwhen using tow hooks:
. Use both tow hooks whenretrieving the vehicle.
. Use a slow steady pull; do notjerk on the hooks.
. Tow hooks are not designed fortowing, only for retrieval.
Before moving the towed vehicle,check for adequate road clearanceof vehicle components. Unload thetowed vehicle prior to towing toreduce any abnormal loads to thevehicle components resulting fromthe towing procedures. Beforetowing, be sure to fully release theparking brake. See Parking Brake0 233.
Tow Hooks
Two tow hooks are recessed intothe front bumper of the vehicle.
Towing Vehicle with FrontWheels Suspended
Caution
To prevent vehicle, engine,or transmission damage, vehiclesshould not be towed, even short
(Continued)
Caution (Continued)
distances, without suspending therear wheels or removing the axleshafts or propeller shaft.
In the event the chassis isequipped with a tandem axle andthe vehicle is to be towed fromthe front, the forward rear axlemay be raised to clear the roadsurface and secured to the frameby chains or U-bolts, allowingonly the rear axle to contact theroad surface. Axle shafts must beremoved from the rear axleassembly. The wheel hub endsmust be covered to prevent lossof axle lubricant and entrance ofcontaminants. Use extreme carein securing the chains or U-boltsto prevent possible damage ofbrake lines, hoses, or othercomponents.

Chevrolet Silverado 4500HD/5500HD/6500HD Owner Manual (GMNA-Localizing-U.S.-12102101) - 2019 - crc - 10/2/18
Vehicle Care 349
Caution
To avoid severe transmissiondamage, when lifting and towingthe vehicle from the front, be sureto disconnect the driveshaft at therear axle location.
When it is necessary to tow avehicle with the front wheelssuspended, extra precautions mustbe taken to avoid transmission ordifferential damage. Proceed asfollows:
Remove the axle shafts from theaxle assembly to prevent the wheelsfrom driving the differential and thetransmission. The wheel hub endsmust be covered to prevent loss ofaxle lubricant and entrance ofcontaminants. If axle shafts are notremoved, removal of propellershafts at the rear axle will berequired.
Towing Vehicles with DriverControlled Differential Lock
Removing Axle Shafts BeforeTowing
Caution
To prevent differential and/ortransmission damage on vehiclesthat must be towed to a servicefacility with the drive axle wheelson the ground, it is necessary toremove the axle shafts before thevehicle is towed. Failure to heedthis caution may result in vehicleand/or engine componentdamage.
Caution
Do not use a chisel or wedge toloosen axle shafts and dowels.The chisel or wedge can damagehub, axle shafts, and oil seals if
(Continued)
Caution (Continued)
used. Failure to heed this cautionmay result in vehicle and/orengine component damage.
One of the axle shafts has two setsof splines: one set to engage withthe differential side gear and oneset to engage with the shift collar forthe differential lock. It may benecessary to rotate the shaft slightlyto align the side gear spline teethwith the clutch collar teeth in orderto remove the axle shaft.
1. Shift the main differential to thelocked (engaged) position.
2. Remove the cap screws andwashers or stud nuts andwashers from the flanges ofboth axle shafts.
3. Loosen the tapered dowels inthe flanges of both axle shaftsby holding a 3.8 cm (1.5 in)diameter brass drift or hammer

Chevrolet Silverado 4500HD/5500HD/6500HD Owner Manual (GMNA-Localizing-U.S.-12102101) - 2019 - crc - 10/2/18
350 Vehicle Care
against the axle shaft centerand hitting it with a 2–3 kg (5–6 lb) hammer.
4. Remove the tapered dowelsand both axle shafts from theaxle assembly.
5. Assemble a cover over theopenings of both wheel ends toprevent the loss of lubricantand keep dirt from the wheelbearing cavities.
Installing Axle Shafts
1. Remove the covers from thewheel ends.
2. Shift the differential lock to thelocked (engaged) position.
3. Install the driver and passengerside axle shafts as follows:
3.1. Place the gaskets on thewheel hub studs.
3.2. Push the passenger sideaxle shaft into the wheelend and housing until theshaft stops against thedifferential shift collar.
3.3. Push the axle shaftfarther into the housinguntil the shaft stopsagainst the differentialside gear.
3.4. Push down on the axleshaft flange and rotatethe shaft until the splinesof the shaft and side gearare engaged.
3.5. Push the axle shaftcompletely into thehousing until the axleshaft flange and gasketare flush against thewheel hub.
3.6. Install the driver side axleshaft and gasket into thewheel end.
4. If tapered dowels are required,install them at each stud andinto the flange of the axle shaft.Use a punch or drift andhammer if needed.
5. Install the fasteners and tightento the correct torque value.Refer to the appropriateservice manual section.
Towing Vehicle with RearWheels Suspended
Caution
To prevent damage to the cabroof or air deflector when towingthe vehicle backwards (rearwheels suspended), the airdeflector must be removed.Failure to heed this caution mayresult in vehicle and/or enginecomponent damage.
Caution
To avoid severe transmissiondamage, when lifting and towingthe vehicle from the rear, be sureto disconnect the driveshaft at thefront axle location.

Chevrolet Silverado 4500HD/5500HD/6500HD Owner Manual (GMNA-Localizing-U.S.-12102101) - 2019 - crc - 10/2/18
Vehicle Care 351
Whenever possible, it is preferableto tow a disabled vehicle from therear by raising the rear of thechassis by the rear axles.
When towing a vehicle with the rearof the chassis suspended, the frontwheels must be locked in thestraight ahead position.
Appearance Care
Exterior Care
Locks
Locks are lubricated at the factory.Use a de-icing agent only whenabsolutely necessary, and have thelocks greased after using. SeeRecommended Fluids andLubricants 0 398.
Washing the Vehicle
To preserve the vehicle's finish,wash it often and out of directsunlight.
{ Warning
Do not power wash any part ofthe vehicle’s interior, including thevinyl floor covering. This coulddamage safety and other systemsin the vehicle, which would not becovered by the vehicle warranty.
Caution
Do not use petroleum-based,acidic, or abrasive cleaningagents as they can damage thevehicle's paint, metal, or plasticparts. If damage occurs, it wouldnot be covered by the vehiclewarranty. Approved cleaningproducts can be obtained fromyour dealer. Follow allmanufacturer directions regardingcorrect product usage, necessarysafety precautions, andappropriate disposal of anyvehicle care product.
Caution
Avoid using high-pressurewashes closer than 30 cm (12 in)to the surface of the vehicle. Useof power washers exceeding8,274 kPa (1,200 psi) can resultin damage or removal of paintand decals.

Chevrolet Silverado 4500HD/5500HD/6500HD Owner Manual (GMNA-Localizing-U.S.-12102101) - 2019 - crc - 10/2/18
352 Vehicle Care
Caution
Do not power wash anycomponent under the hood that
has thise symbol.
This could cause damage thatwould not be covered by thevehicle warranty.
If using an automatic car wash,follow with the car washinstructions. The windshield wipermust be turned off. Remove anyaccessories that may be damagedor interfere with the car washequipment.
Rinse the vehicle well, beforewashing and after, to remove allcleaning agents completely. If theyare allowed to dry on the surface,they could stain.
Dry the finish with a soft, cleanchamois or an all-cotton towel toavoid surface scratches and waterspotting.
Finish Care
Application of aftermarket clearcoatsealant/wax materials is notrecommended. If painted surfacesare damaged, see your dealer tohave the damage assessed andrepaired. Foreign materials such ascalcium chloride and other salts, icemelting agents, road oil and tar, treesap, bird droppings, chemicals fromindustrial chimneys, etc., candamage the vehicle's finish if theyremain on painted surfaces. Washthe vehicle as soon as possible.If necessary, use non-abrasivecleaners that are marked safe forpainted surfaces to remove foreignmatter.
Occasional hand waxing or mildpolishing should be done to removeresidue from the paint finish. Seeyour dealer for approved cleaningproducts.
Do not apply waxes or polishes touncoated plastic, vinyl, rubber,decals, simulated wood, or flat paintas damage can occur.
Caution
Machine compounding oraggressive polishing on abasecoat/clearcoat paint finishmay damage it. Use onlynon-abrasive waxes and polishesthat are made for a basecoat/clearcoat paint finish on thevehicle.
To keep the paint finish looking new,keep the vehicle garaged orcovered whenever possible.
Protecting Exterior Bright MetalMoldings
Caution
Failure to clean and protect thebright metal moldings can resultin a hazy white finish or pitting.This damage would not becovered by the vehicle warranty.

Chevrolet Silverado 4500HD/5500HD/6500HD Owner Manual (GMNA-Localizing-U.S.-12102101) - 2019 - crc - 10/2/18
Vehicle Care 353
The bright metal moldings on thevehicle are aluminum, chrome,or stainless steel. To preventdamage always follow thesecleaning instructions:
. Be sure the molding is cool tothe touch before applying anycleaning solution.
. Use only approved cleaningsolutions for aluminum, chrome,or stainless steel. Somecleaners are highly acidic orcontain alkaline substances andcan damage the moldings.
. Always dilute a concentratedcleaner according to themanufacturer’s instructions.
. Do not use cleaners that are notintended for automotive use.
. Use a nonabrasive wax on thevehicle after washing to protectand extend the molding finish.
Cleaning Exterior Lamps/Lenses, Emblems, Decals, andStripes
Use only lukewarm or cold water, asoft cloth, and a car washing soapto clean exterior lamps, lenses,emblems, decals and stripes. Followinstructions under "Washing theVehicle" previously in this section.
Lamp covers are made of plastic,and some have a UV protectivecoating. Do not clean or wipe themwhile they are dry.
Do not use any of the following onlamp covers:
. Abrasive or caustic agents
. Washer fluids and other cleaningagents in higher concentrationsthan suggested by themanufacturer
. Solvents, alcohols, fuels,or other harsh cleaners
. Ice scrapers or other hard items
. Aftermarket appearance caps orcovers while the lamps areilluminated, due to excessiveheat generated
Caution
Failure to clean lamps properlycan cause damage to the lampcover that would not be coveredby the vehicle warranty.
Caution
Using wax on low gloss blackfinish stripes can increase thegloss level and create anon-uniform finish. Clean lowgloss stripes with soap andwater only.
Air Intakes
Clear debris from the air intakes,between the hood and windshield,when washing the vehicle.

Chevrolet Silverado 4500HD/5500HD/6500HD Owner Manual (GMNA-Localizing-U.S.-12102101) - 2019 - crc - 10/2/18
354 Vehicle Care
Windshield and Wiper Blades
Clean the outside of the windshieldwith glass cleaner.
Clean rubber blades using a lint-freecloth or paper towel soaked withwindshield washer fluid or a milddetergent. Wash the windshieldthoroughly when cleaning theblades. Bugs, road grime, sap, anda buildup of vehicle wash/waxtreatments may cause wiperstreaking.
Replace the wiper blades if they areworn or damaged. Damage can becaused by extreme dustyconditions, sand, salt, heat, sun,snow, and ice.
Weatherstrips
Apply weatherstrip lubricant onweatherstrips to make them lastlonger, seal better, and not stick orsqueak. Lubricate weatherstripsonce a year. Hot, dry climates mayrequire more frequent application.Black marks from rubber material onpainted surfaces can be removed by
rubbing with a clean cloth. SeeRecommended Fluids andLubricants 0 398.
Tires
Use a stiff brush with tire cleaner toclean the tires.
Caution
Using petroleum-based tiredressing products on the vehiclemay damage the paint finish and/or tires. When applying a tiredressing, always wipe off anyoverspray from all paintedsurfaces on the vehicle.
Wheels and Wheel Trim
Use a soft, clean cloth with mildsoap and water to clean the wheels.After rinsing thoroughly with cleanwater, dry with a soft, clean towel.A wax may then be applied.
Caution
Chrome wheels and chromewheel trim may be damaged if thevehicle is not washed after drivingon roads that have been sprayedwith magnesium chloride orcalcium chloride. These are usedon roads for conditions such asdust and ice. Always wash thechrome with soap and water afterexposure.
Caution
To avoid surface damage onwheels and wheel trim, do notuse strong soaps, chemicals,abrasive polishes, cleaners,or brushes. Use only GMapproved cleaners. Do not drivethe vehicle through an automaticcar wash that uses siliconecarbide tire/wheel cleaning
(Continued)

Chevrolet Silverado 4500HD/5500HD/6500HD Owner Manual (GMNA-Localizing-U.S.-12102101) - 2019 - crc - 10/2/18
Vehicle Care 355
Caution (Continued)
brushes. Damage could occurand the repairs would not becovered by the vehicle warranty.
Brake System
Visually inspect brake lines andhoses for proper hook-up, binding,leaks, cracks, chafing, etc. Inspectdisc brake pads for wear and rotorsfor surface condition. Inspect drumbrake linings/shoes for wear orcracks. Inspect all other brake parts.
Steering, Suspension, andChassis Components
Visually inspect steering,suspension, and chassiscomponents for damaged, loose,or missing parts or signs of wear atleast once a year.
Inspect power steering for properattachment, connections, binding,leaks, cracks, chafing, etc.
Caution
Lubrication of applicable steering/suspension points should not bedone unless the temperature is−12 °C (10 °F) or higher,or damage could result.
Body Component Lubrication
Lubricate all key lock cylinders, andthe steel fuel door hinge unless thecomponents are plastic. Applyingsilicone grease on weatherstripswith a clean cloth will make themlast longer, seal better, and not stickor squeak.
Underbody Maintenance
At least twice a year, spring and fall,use plain water to flush anycorrosive materials from theunderbody. Take care to thoroughlyclean any areas where mud andother debris can collect. If equippedwith power assist steps, extendthem and then use a high pressurewash to clean all joints and gaps.
Do not directly power wash thetransfer case and/or front/rear axleoutput seals. High pressure watercan overcome the seals andcontaminate the fluid. Contaminatedfluid will decrease the life of thetransfer case and/or axles andshould be replaced.
Sheet Metal Damage
If the vehicle is damaged andrequires sheet metal repair orreplacement, make sure the bodyrepair shop applies anti-corrosionmaterial to parts repaired orreplaced to restore corrosionprotection.
Original manufacturer replacementparts will provide the corrosionprotection while maintaining thevehicle warranty.
Finish Damage
Quickly repair minor chips andscratches with touch-up materialsavailable from your dealer to avoidcorrosion. Larger areas of finishdamage can be corrected in yourdealer's body and paint shop.

Chevrolet Silverado 4500HD/5500HD/6500HD Owner Manual (GMNA-Localizing-U.S.-12102101) - 2019 - crc - 10/2/18
356 Vehicle Care
Chemical Paint Spotting
Airborne pollutants can fall uponand attack painted vehicle surfacescausing blotchy, ring-shapeddiscolorations, and small, irregulardark spots etched into the paintsurface. Refer to “Finish Care”previously in this section.
Interior CareTo prevent dirt particle abrasions,regularly clean the vehicle's interior.Immediately remove any soils.Newspapers or dark garments cantransfer color to the vehicle’sinterior.
Use a soft bristle brush to removedust from knobs and crevices on theinstrument cluster. Using a mildsoap solution, immediately removehand lotions, sunscreen, and insectrepellent from all interior surfaces orpermanent damage may result.
Use cleaners specifically designedfor the surfaces being cleaned toprevent permanent damage. Applycleaners directly to the cleaning
cloth. Do not spray cleaners on anyswitches or controls. Removecleaners quickly.
Before using cleaners, read andfollow all safety instructions on thelabel. While cleaning the interior,open the doors and windows to getproper ventilation.
To prevent damage, do not cleanthe interior using the followingcleaners or techniques:
. Never use a razor or any othersharp object to remove soil fromany interior surface.
. Never use a brush with stiffbristles.
. Never rub any surfaceaggressively or with too muchpressure.
. Do not use laundry detergents ordishwashing soaps withdegreasers. For liquid cleaners,use approximately 20 drops per3.8 L (1 gal) of water.A concentrated soap solution will
create streaks and attract dirt.Do not use solutions that containstrong or caustic soap.
. Do not heavily saturate theupholstery when cleaning.
. Do not use solvents or cleanerscontaining solvents.
Interior Glass
To clean, use a terry cloth fabricdampened with water. Wipe dropletsleft behind with a clean dry cloth.If necessary, use a commercialglass cleaner after cleaning withplain water.
Caution
To prevent scratching, never useabrasive cleaners on automotiveglass. Abrasive cleaners oraggressive cleaning may damagethe rear window defogger.
Cleaning the windshield with waterduring the first three to six monthsof ownership will reduce tendencyto fog.

Chevrolet Silverado 4500HD/5500HD/6500HD Owner Manual (GMNA-Localizing-U.S.-12102101) - 2019 - crc - 10/2/18
Vehicle Care 357
Speaker Covers
Vacuum around a speaker covergently, so that the speaker will notbe damaged. Clean spots with waterand mild soap.
Coated Moldings
Coated moldings should be cleaned.
. When lightly soiled, wipe with asponge or soft, lint-free clothdampened with water.
. When heavily soiled, use warmsoapy water.
Fabric/Carpet/Suede
Start by vacuuming the surfaceusing a soft brush attachment. If arotating vacuum brush attachment isbeing used, only use it on the floorcarpet. Before cleaning, gentlyremove as much of the soil aspossible:
. Gently blot liquids with a papertowel. Continue blotting until nomore soil can be removed.
. For solid soils, remove as muchas possible prior to vacuuming.
To clean:
1. Saturate a clean, lint-freecolorfast cloth with water.Microfiber cloth isrecommended to prevent linttransfer to the fabric or carpet.
2. Remove excess moisture bygently wringing until water doesnot drip from the cleaning cloth.
3. Start on the outside edge of thesoil and gently rub toward thecenter. Fold the cleaning clothto a clean area frequently toprevent forcing the soil in to thefabric.
4. Continue gently rubbing thesoiled area until there is nolonger any color transfer fromthe soil to the cleaning cloth.
5. If the soil is not completelyremoved, use a mild soapsolution followed only by plainwater.
If the soil is not completelyremoved, it may be necessary touse a commercial upholsterycleaner or spot lifter. Test a small
hidden area for colorfastness beforeusing a commercial upholsterycleaner or spot lifter. If ringformation occurs, clean the entirefabric or carpet.
After cleaning use a paper towel toblot excess moisture.
Cleaning High Gloss Surfacesand Vehicle Information andRadio Displays
Use a microfiber cloth on high glosssurfaces or vehicle displays. First,use a soft bristle brush to removedirt that can scratch the surface.Then gently clean by rubbing with amicrofiber cloth. Never use windowcleaners or solvents. Periodicallyhand wash the microfiber clothseparately, using mild soap. Do notuse bleach or fabric softener. Rinsethoroughly and air dry beforenext use.

Chevrolet Silverado 4500HD/5500HD/6500HD Owner Manual (GMNA-Localizing-U.S.-12102101) - 2019 - crc - 10/2/18
358 Vehicle Care
Caution
Do not attach a device with asuction cup to the display. Thismay cause damage and wouldnot be covered by the vehiclewarranty.
Instrument Panel, Leather,Vinyl, Other Plastic Surfaces,Low Gloss Paint Surfaces andNatural Open Pore WoodSurfaces
Use a soft microfiber clothdampened with water to removedust and loose dirt. For a morethorough cleaning, use a softmicrofiber cloth dampened with amild soap solution.
Caution
Soaking or saturating leather,especially perforated leather, aswell as other interior surfaces,may cause permanent damage.
(Continued)
Caution (Continued)
Wipe excess moisture from thesesurfaces after cleaning and allowthem to dry naturally. Never useheat, steam, or spot removers. Donot use cleaners that containsilicone or wax-based products.Cleaners containing thesesolvents can permanently changethe appearance and feel ofleather or soft trim, and are notrecommended.
Do not use cleaners that increasegloss, especially on the instrumentpanel. Reflected glare can decreasevisibility through the windshieldunder certain conditions.
Caution
Use of air fresheners may causepermanent damage to plasticsand painted surfaces. If an airfreshener comes in contact with
(Continued)
Caution (Continued)
any plastic or painted surface inthe vehicle, blot immediately andclean with a soft cloth dampenedwith a mild soap solution.Damage caused by air freshenerswould not be covered by thevehicle warranty.
Care of Seat Belts
Keep belts clean and dry.
{ Warning
Do not bleach or dye seat beltwebbing. It may severely weakenthe webbing. In a crash, theymight not be able to provideadequate protection. Clean andrinse seat belt webbing only withmild soap and lukewarm water.Allow the webbing to dry.
Chevrolet Silverado 4500HD/5500HD/6500HD Owner Manual (GMNA-Localizing-U.S.-12102101) - 2019 - crc - 10/2/18
Service and Maintenance 359
Service andMaintenance
General InformationGeneral Information . . . . . . . . . . 359
Maintenance ScheduleMaintenance Schedule . . . . . . . 361
Special Application ServicesSpecial ApplicationServices . . . . . . . . . . . . . . . . . . . . 367
Owner Checks and ServicesOwner Checks and Services(Inspection Guide) . . . . . . . . . . 368
Additional Maintenanceand CareAdditional Maintenance andCare (Lubrication) . . . . . . . . . . . 379
Additional Maintenance andCare (MaintenanceInstructions) . . . . . . . . . . . . . . . . . 383
Recommended Fluids,Lubricants, and PartsRecommended Fluids andLubricants . . . . . . . . . . . . . . . . . . . 398
Maintenance ReplacementParts . . . . . . . . . . . . . . . . . . . . . . . . 405
Maintenance RecordsMaintenance Records . . . . . . . . 406
General InformationYour vehicle is an importantinvestment. This section describesthe required maintenance for thevehicle. Follow this schedule to helpprotect against major repairexpenses resulting from neglect orinadequate maintenance. It mayalso help to maintain the value ofthe vehicle if it is sold. It is theresponsibility of the owner to haveall required maintenance performed.
Your dealer has trained technicianswho can perform requiredmaintenance using genuinereplacement parts. They haveup-to-date tools and equipment forfast and accurate diagnostics. Manydealers have extended evening andSaturday hours, courtesytransportation, and onlinescheduling to assist with serviceneeds.
Your dealer recognizes theimportance of providingcompetitively priced maintenanceand repair services. With trainedtechnicians, your dealer is the place

Chevrolet Silverado 4500HD/5500HD/6500HD Owner Manual (GMNA-Localizing-U.S.-12102101) - 2019 - crc - 10/2/18
360 Service and Maintenance
for routine maintenance such as oilchanges and tire rotations andadditional maintenance items liketires, brakes, batteries, and wiperblades.
Caution
Damage caused by impropermaintenance can lead to costlyrepairs and may not be coveredby the vehicle warranty.Maintenance intervals, checks,inspections, recommended fluids,and lubricants are important tokeep the vehicle in good workingcondition.
Do not have chemical flushes thatare not approved by GMperformed on the vehicle. Theuse of flushes, solvents, cleaners,or lubricants that are notapproved by GM could damagethe vehicle, requiring expensiverepairs that are not covered bythe vehicle warranty.
The Tire Rotation and RequiredServices are the responsibility of thevehicle owner. It is recommended tohave your dealer perform theseservices every 12 000 km/7,500 mi.Proper vehicle maintenance helps tokeep the vehicle in good workingcondition, improves fuel economy,and reduces vehicle emissions.
Because of the way people usevehicles, maintenance needs vary.There may need to be morefrequent checks and services. TheAdditional Required Services -Normal are for vehicles that:
. Carry passengers and cargowithin recommended limits onthe Tire and Loading Informationlabel. See Vehicle Load Limits0 205.
. Are driven on reasonable roadsurfaces within legal drivinglimits.
. Use the recommended fuel. SeeFuel for Diesel Engines 0 241.
Refer to the information in theMaintenance Schedule AdditionalRequired Services - Normal chart.
The Additional Required Services -Severe are for vehicles that are:
. Mainly driven in heavy city trafficin hot weather.
. Mainly driven in hilly ormountainous terrain.
. Driven in deep water, mud, or inunusually dusty conditions.
. Frequently driving loaded nearor at capacity.
Refer to the information in theMaintenance Schedule AdditionalRequired Services - Severe chart.
{ Warning
Performing maintenance work canbe dangerous and can causeserious injury. Performmaintenance work only if therequired information, proper tools,and equipment are available.If they are not, see your dealer tohave a trained technician do thework. See Doing Your OwnService Work 0 291.

Chevrolet Silverado 4500HD/5500HD/6500HD Owner Manual (GMNA-Localizing-U.S.-12102101) - 2019 - crc - 10/2/18
Service and Maintenance 361
MaintenanceScheduleOwner Checks and Services
At Each Fuel Stop
. Check the engine oil level. SeeEngine Oil 0 295.
Once a Month
. Check the tire inflationpressures. See Tire Pressure0 332.
. Inspect the tires for wear. SeeTire Inspection 0 334.
. Check the windshield washerfluid level. See Washer Fluid0 308.
Engine Oil Change
When the CHANGE ENGINE OILSOON message displays, have theengine oil and filter changed withinthe next 1 000 km/600 mi. If drivenunder the best conditions, theengine oil life system may notindicate the need for vehicle servicefor up to a year. The engine oil and
filter must be changed at least oncea year and the oil life system mustbe reset. Your trained dealertechnician can perform this work.If the engine oil life system is resetaccidentally, service the vehiclewithin 5 000 km/3,000 mi since thelast service. Reset the oil lifesystem when the oil is changed.See Engine Oil Life System 0 298.
Passenger Compartment AirFilter
The passenger compartment airfilter removes dust, pollen, andother airborne irritants from outsideair that is pulled into the vehicle.The filter should be replaced as partof routine scheduled maintenance.Inspect the passenger compartmentair filter every 36 000 km/22,500 mior two years, whichever comes first.Replace if necessary. More frequentreplacement may be needed if thevehicle is driven in areas with heavytraffic, areas with poor air quality,or areas with high dust levels.Replacement may also be needed ifthere is a reduction in airflow,excessive window fogging, or odors.
Power Take Off (PTO) andExtended Idle Use
When the vehicle is used with thePTO equipment or used in a waythat requires extended idle time,one hour of use shall be deemedthe same as 53 km (33 mi). See“Hourmeter” under DriverInformation Center (DIC) (BaseLevel) 0 119 or Driver InformationCenter (DIC) (Uplevel) 0 120.
Air Conditioning Desiccant(Replace Every Seven Years)
The air conditioning system requiresmaintenance every seven years.This service requires replacement ofthe desiccant to help the longevityand efficient operation of the airconditioning system. This servicecan be complex. See your dealer.
Tire Rotation and RequiredServices Every 12 000 km/7,500 mi
Rotate the tires, if recommended forthe vehicle, and perform thefollowing services. See TireRotation 0 335.

Chevrolet Silverado 4500HD/5500HD/6500HD Owner Manual (GMNA-Localizing-U.S.-12102101) - 2019 - crc - 10/2/18
362 Service and Maintenance. Check engine oil level and oil
life percentage. If needed,change engine oil and filter, andreset oil life system.See Engine Oil 0 295 andEngine Oil Life System 0 298.
. Check engine coolant level. SeeCooling System 0 301.
. Check windshield washer fluidlevel. See Washer Fluid 0 308.
. Check tire inflation pressures.See Tire Pressure 0 332.
. Inspect tire wear. See TireInspection 0 334.
. Visually check for fluid leaks.
. Inspect engine air cleaner filter.See Engine Air Cleaner/Filter0 299.
. Inspect brake system. SeeExterior Care 0 351.
. Visually inspect steering,suspension, and chassiscomponents for damage,including cracks or tears in therubber boots, loose or missingparts, or signs of wear at leastonce a year. See Exterior Care
0 351. Lubricate the suspensionand steering components atleast every other oil change.(If equipped with grease fittings)
. Inspect power steering forproper attachment, connections,binding, leaks, cracks,chafing, etc.
. Visually inspect halfshafts anddrive shafts for excessive wear,lubricant leaks, and/or damageincluding: tube dents or cracks,constant velocity joint oruniversal joint looseness,cracked or missing boots, looseor missing boot clamps, centerbearing excessive looseness,loose or missing fasteners, andaxle seal leaks.
. Check restraint systemcomponents. See Safety SystemCheck 0 59.
. Visually inspect fuel system fordamage or leaks.
. Visually inspect exhaust systemand nearby heat shields forloose or damaged parts.
. Lubricate body components. SeeExterior Care 0 351.
. Check accelerator pedal fordamage, high effort, or binding.Replace if needed.
. Check front axle wheel bearingoil level.
. Check air compressor air tankfor leaks (if equipped).
. Check air compressor dischargeline for blockage (if equipped).
. Check air dryer heater andpurge valve (if equipped).
. Lubricate front axle tie rod endsand drag link ends (severeservice applications).
. Lubricate front axle king pinsand busings (severe serviceapplications). See Front Axle0 314.
. Check rear axle lubricant level(severe service applications).
. Lubricate steering intermediateshaft slip joint and steering geardust seal.

Chevrolet Silverado 4500HD/5500HD/6500HD Owner Manual (GMNA-Localizing-U.S.-12102101) - 2019 - crc - 10/2/18
Service and Maintenance 363. Check operation of service
brakes (severe serviceapplications).
. Check operation of parkingbrake (severe serviceapplications).
Additional Required ServicesEvery 24 000 km/15,000 mi
. Check front axle wheel bearingend play.
. Lubricate standard U-joints andslip joint on drive shaft (identifiedby non-booted slip joint) or everythree months, whichever comesfirst.
. Lubricate the suspension andsteering components at leastevery other oil change or every12 months, whichever comesfirst. (If equipped with greasefittings).
. Visually inspect accessory drivebelts every 24 000 km(15,000 mi) or every ten years,whichever comes first. Inspectfor fraying, excessive cracking,or damage; replace if needed.
. Check generator, starter, andbattery for proper function.
. Check power steering fluid level.
Vehicles that operate under normalservice conditions require thefollowing every 24 000 km/15,000 mi:
. Lubricate front axle tie rod endsand drag link ends.
. Lubricate front axle king pinsand busings. See Front Axle0 314.
. Check rear axle lubricant level.
. Lubricate steering intermediateshaft slip joint and steering geardust seal.
. Check operation of servicebrakes.
. Check operation of parkingbrake.

Chevrolet Silverado 4500HD/5500HD/6500HD Owner Manual (GMNA-Localizing-U.S.-12102101) - 2019 - crc - 10/2/18
364 Service and Maintenance
Additional Required Services
Maintenance ScheduleAdditional RequiredServices - Normal
12000km/7,500mi
24000km/15,000mi
36000km/22,500mi
48000km/30,000mi
60000km/37,500mi
72000km/45,000mi
84000km/52,500mi
96000km/60,000mi
108000km/67,500mi
120000km/75,000mi
132000km/82,500mi
144000km/90,000mi
156000km/97,500mi
168000km/105,000mi
180000km/112,500mi
192000km/120,000mi
204000km/127,500mi
216000km/135,000mi
228000km/142,500mi
240000km/150,000mi
Rotate tires and perform Required Services.Check engine oil level and oil life percentage.Change engine oil and filter, if needed.
@ @ @ @ @ @ @ @ @ @ @ @ @ @ @ @ @ @ @ @
Replace passenger compartment air filter. (1) @ @ @ @ @ @
Replace engine air cleaner filter. (2) @ @ @
Change transfer case fluid, if equipped with4WD. (3) @ @ @
Drain and fill engine cooling system. (4) @
Replace brake fluid. (5) @
Replace fuel filter. (6) @ @ @ @ @ @
Re-torque front and rear axle U-bolt nuts. (7) @ @ @ @
Change 4x2 front axle wheel bearing oil (includingsynthetic). (8) @
Change 4x4 front axle wheel bearing grease(including synthetic). (8) @
Change rear axle oil (vocational applications). (8) @ @
Inspect rear axle wheel ends for leaks, lube level/condition, and check end play with dialindicator. (8)
@
Change power steering fluid and filter. @
Replace windshield wiper blades. (9) @ @ @ @ @ @ @ @ @ @
Change front axle oil @ @

Chevrolet Silverado 4500HD/5500HD/6500HD Owner Manual (GMNA-Localizing-U.S.-12102101) - 2019 - crc - 10/2/18
Service and Maintenance 365
Footnotes — MaintenanceSchedule Additional RequiredServices - Normal
(1) Or every two years, whichevercomes first. More frequentreplacement may be needed if thevehicle is driven in areas with heavytraffic, poor air quality, areas withhigh dust levels or are sensitive toenvironmental allergens. Filterreplacement may also be needed ifyou notice reduced airflow, windowsfogging up, or odors. Your local GMService location can help youdetermine when it is the right time toreplace your filter.
(2) Or every four years, whichevercomes first. If driving in dustyconditions, inspect the filter at eachoil change or more often as needed.
(3) Do not directly power wash thetransfer case and/or front/rear axleoutput seals. High pressure watercan overcome the seals andcontaminate the fluid. Contaminatedfluid will decrease the life of thetransfer case and/or drive axles andshould be replaced.
(4) Or every five years, whichevercomes first. See Cooling System0 301.
(5) Replace brake fluid everytwo years. See Brake Fluid 0 311.
(6) Or every two years, or when theCHANGE FUEL FILTER message inthe Driver Information Center (DIC)comes on, whichever comes first.The fuel filter may need to bereplaced more often based onbiodiesel usage, driving in climateswith severe dust, off-road driving,or towing a trailer for extendedperiods.
(7) U-bolts nuts should bere-torqued after the first 1 600 km(1,000 mi) and then approximatelyevery 58 000 km (36,000 mi)thereafter.
(8) Or every 12 months, whichevercomes first.
(9) Or every 12 months, whichevercomes first. See Wiper BladeReplacement 0 316.

Chevrolet Silverado 4500HD/5500HD/6500HD Owner Manual (GMNA-Localizing-U.S.-12102101) - 2019 - crc - 10/2/18
366 Service and Maintenance
Maintenance ScheduleAdditional RequiredServices - Severe
12000km/7,500mi
24000km/15,000mi
36000km/22,500mi
48000km/30,000mi
60000km/37,500mi
72000km/45,000mi
84000km/52,500mi
96000km/60,000mi
108000km/67,500mi
120000km/75,000mi
132000km/82,500mi
144000km/90,000mi
156000km/97,500mi
168000km/105,000mi
180000km/112,500mi
192000km/120,000mi
204000km/127,500mi
216000km/135,000mi
228000km/142,500mi
240000km/150,000mi
Rotate tires and perform Required Services.Check engine oil level and oil life percentage.Change engine oil and filter, if needed.
@ @ @ @ @ @ @ @ @ @ @ @ @ @ @ @ @ @ @ @
Replace passenger compartment air filter. (1) @ @ @ @ @ @
Replace engine air cleaner filter. (2) @ @ @
Change automatic transmission fluid and filter. @ @ @
Change transfer case fluid, if equipped with4WD. (3) @ @ @ @ @ @
Drain and fill engine cooling system. (4) @
Replace brake fluid. (5) @
Replace fuel filter. (6) @ @ @ @ @ @
Re-torque front and rear axle U-bolt nuts. (7) @ @ @ @
Change 4x2 front axle wheel bearing oil (includingsynthetic). (8) @
Change 4x4 front axle wheel bearing grease(including synthetic). (8) @
Change rear axle oil (vocational applications). (8) @ @
Inspect rear axle wheel ends for leaks, lube level/condition, and check end play with dialindicator. (8)
@
Change power steering fluid and filter. @
Replace windshield wiper blades. (9) @ @ @ @ @ @ @ @ @ @

Chevrolet Silverado 4500HD/5500HD/6500HD Owner Manual (GMNA-Localizing-U.S.-12102101) - 2019 - crc - 10/2/18
Service and Maintenance 367
Footnotes — MaintenanceSchedule Additional RequiredServices - Severe
(1) Or every two years, whichevercomes first. More frequentreplacement may be needed if thevehicle is driven in areas with heavytraffic, poor air quality, areas withhigh dust levels or are sensitive toenvironmental allergens. Filterreplacement may also be needed ifyou notice reduced airflow, windowsfogging up, or odors. Your local GMService location can help youdetermine when it is the right time toreplace your filter.
(2) Or every four years, whichevercomes first. If driving in dustyconditions, inspect the filter at eachoil change or more often as needed.
(3) Do not directly power wash thetransfer case and/or front/rear axleoutput seals. High pressure watercan overcome the seals andcontaminate the fluid. Contaminatedfluid will decrease the life of thetransfer case and/or drive axles andshould be replaced.
(4) Or every five years, whichevercomes first. See Cooling System0 301.
(5) Replace brake fluid everytwo years. See Brake Fluid 0 311.
(6) Or every two years, or when theCHANGE FUEL FILTER message inthe Driver Information Center (DIC)comes on, whichever comes first.The fuel filter may need to bereplaced more often based onbiodiesel usage, driving in climateswith severe dust, off-road driving,or towing a trailer for extendedperiods.
(7) U-bolts nuts should bere-torqued after the first 1 600 km(1,000 mi) and then approximatelyevery 58 000 km (36,000 mi)thereafter.
(8) Or every 12 months, whichevercomes first.
(9) Or every 12 months, whichevercomes first. See Wiper BladeReplacement 0 316.
Special ApplicationServices. Vehicles with Dual Wheels:
Check dual wheel nut torque at160, 1 600, and 10 000 km (100,1,000, and 6,000 mi) of driving.Repeat this service whenever atire/wheel is serviced orremoved.
. Have underbody flushing serviceperformed. See “UnderbodyMaintenance” in Exterior Care0 351.
. At least annually, clean theexterior of the cooling system.
. Transmission fluid and filter mayneed to be replaced periodically.Refer to the Allison AutomaticTransmission Manual for specificservice instructions andrecommendations, requiredcapacities, and transmissionfluids.

Chevrolet Silverado 4500HD/5500HD/6500HD Owner Manual (GMNA-Localizing-U.S.-12102101) - 2019 - crc - 10/2/18
368 Service and Maintenance
Owner Checks andServices
Owner Checks andServices (InspectionGuide)
Introduction
{ Warning
To prevent property damage,personal injury, and/or death,when servicing the vehicle, parkon a flat level surface, set theparking brake, turn the engine off,and install wheel chocks.
{ Warning
To prevent property damage,personal injury, and/or death,have a qualified technicianregularly check operation of
(Continued)
Warning (Continued)
transmission neutral start switch.If unit starts in gear, the vehiclemay inadvertently move.
To be sure your vehicle is ready tooperate, conduct a pre-tripinspection at the beginning of eachwork period. This section gives theoperator suggested guidelines to beused in performing tractor and trailerpre-trip inspections. Safety is themost important and obvious reasonfor doing a pre-trip inspection.Depending on the optional featuresof the vehicle being used and anypossible aftermarket items installedon the vehicle, these guidelinesshould be modified to include othernecessary inspection points. Followthe steps in this section and checkthem off to ensure a proper vehicleinspection procedure. The pages inthis section may be reproducedlocally and used on a regular basis.
If any component or system doesnot pass this inspection, it must becorrected before operating thevehicle. Take your time goingthrough the pre-trip inspection.Remember that a careful pre-tripinspection saves time by eliminatingunscheduled stops to correct afaulty item.
Vehicle Inspection
Preparation
Perform the following tasks prior toconducting the pre-trip inspection.
. Apply the parking brake.
. Turn on the parking lamps andhazard warning flashers.
. Unhook the hood latches andraise the hood. Inspect bothhood latches to confirm properoperation.
. Check under the vehicle for oil,fuel, coolant leaks, or othersigns of damage.
Exterior Lamps Check
Check the exterior lamps byperforming the following steps:

Chevrolet Silverado 4500HD/5500HD/6500HD Owner Manual (GMNA-Localizing-U.S.-12102101) - 2019 - crc - 10/2/18
Service and Maintenance 369
1. Turn the ignition on or to ACC/ACCESSORY.
2. Switch the headlamps to thefully on position and activatethe fog lamps. Ensure that theheadlamps are in low-beammode. (Turn off high-beam.)
3. Turn on the cargo lamp.
4. Walk around the vehicle andinspect illumination of lights.Parking lamps, hazard warningflashers, low-beam headlamps,and fog lamps should all beilluminated. The cargo lampshould also be illuminated.
5. Turn on the high-beamheadlamps.
6. Verify that the high-beamheadlamps are now illuminatedand the fog lamps haveswitched off.
Left Side Cab Area
1. Wipers and Cowl Tray: Checkthe windshield wiper arms forproper spring tension and thewiper blades for damage.Inspect the cowl tray for dirt,debris, snow, or ice that wouldkeep the cowl tray fromdraining properly. Clean allitems from the cowl tray asneeded.
2. Windshield: Check for damageto the windshield and clean,if dirty.
3. Cab Structure: Check the bodypanels such as doors, roof, andfenders for signs of breaks ordamage. Check the conditionof cab mounting brackets andtilt hood latches.
4. Battery Box: Inspect fordamage and secure mountingof the battery box.
5. Batteries and Cables: Unlatchand remove the battery boxcover. Check that batteries aresecured and the cases are notbroken or leaking. Ensure thecables are free from damage.Tops of batteries and terminalsmust be clean and free fromforeign material.
6. Inspect hood latch/hold down.

Chevrolet Silverado 4500HD/5500HD/6500HD Owner Manual (GMNA-Localizing-U.S.-12102101) - 2019 - crc - 10/2/18
370 Service and Maintenance
Left Side Engine Compartment
1. Radiator and Charge AirCooler: Check for loosemounting and damage. Inspectcondition of all hoses fordamage, cracks, and leaks.Inspect for foreign material onface of cooling package.Carefully brush away collectedmaterials without bendingcooling fins to maintain properairflow through coolingpackage.
2. Power Steering Fluid: Verifythat the fluid level is betweenthe Cold or Hot (as applicable)MIN and MAX marks.
3. Automatic Transmission Fluid:Verify the fluid levels. Refer tothe Allison AutomaticTransmission Manual.
4. Brake Fluid Level: Duringnormal vehicle operation andservicing, the fluid level willvary between the MIN andMAX lines on the mastercylinder mounted frontreservoir. Do not fill the mastercylinder to the top of thereservoir. Overfilling may leadto overflow. Do not add fluidabove the MAX line.
5. Oil Level: Use the dipstick toverify that the oil level is in theproper operating range. SeeEngine Oil 0 295.
Check the electrical wiring forproper security, damage, andchafing.
Check for signs of fluid puddlesunder the vehicle or wetcomponents in the enginecompartment.
Left Side Front of Vehicle
{ Warning
To prevent property damage,personal injury, and/or death,if wheels or tires must bechanged, obtain expert tireservice help. Mounting anddemounting of tires should only
(Continued)

Chevrolet Silverado 4500HD/5500HD/6500HD Owner Manual (GMNA-Localizing-U.S.-12102101) - 2019 - crc - 10/2/18
Service and Maintenance 371
Warning (Continued)
be performed by qualifiedpersonnel using necessary safetyprocedures and equipment.
{ Warning
To prevent property damage,personal injury, and/or death, donot operate the vehicle if there isa loss of steering or suspension,which could cause loss of vehiclecontrol.
Retread tires are not recommendedfor use on steering axles of trucks.
1. Steering Gear: Look formissing or loose fasteners,power steering fluid leaks, anddamage to the power steeringhoses.
2. Brake Caliper and Hose:Check to see that the brakecaliper is not cracked ordamaged and is securely
mounted. Check for broken,loose, or missing parts. Checkfor cracked, worn, or frayedhoses and for securecouplings.
3. Shock Absorber: Check forcracks, leaks, and missing orbroken mounting bolts orbushings.
4. Frame: Check for cracks orbends in the frame. Make surethere are no loose, cracked,bent, broken or missingcrossmembers,or crossmember fasteners.
5. Spring Suspension: Check thecondition of the spring forcracks, breaks, or shifting.Inspect the spring hangerfasteners, shackles, U-bolts,and nuts for wear, damage,and tightness.
6. Brake Pads and Rotor: Withthe brakes released, check tosee that the brake linings(where visible) are not worn
excessively thin, less than6 mm (0.25 in),or contaminated by lubricant.
7. Wheel and Lug Nuts: Check fordamaged or bent wheel. Checkto see that all lug nuts arepresent and not loose. Look forrust trails around nuts. Ensurethat no cracks or damage arepresent at wheel mount holes.
8. Tire: Check the tread depthand tire inflation. Note if thetread is evenly worn. Minimumtread depth is 3 mm (4/32 in)on all tires. Look for cuts orother damage to the tread orsidewalls. Check for missing,broken, or damaged valve capand stem.
9. Hub: Check for obvious leakson the outboard or inboardsides of the wheel. Verify thatthe oil level in the hub iscorrect.

Chevrolet Silverado 4500HD/5500HD/6500HD Owner Manual (GMNA-Localizing-U.S.-12102101) - 2019 - crc - 10/2/18
372 Service and Maintenance
10. Steering Linkage: Inspect theconnecting links, arms, rods,and steering intermediate shaftfor worn, damaged, loose,or missing components.
Front of Vehicle
1. Grille: Inspect for damage andsecurity. Check the bug screenfor damage and cleanliness.
2. Hood and Fenders: Check thehood panels and fenders forsigns of breaks or damage.Ensure the hood opens andcloses properly.
3. Lighting System: Lower thehood and inspect the parking,clearance, identification lights,turn signals, fog lamps, andreflectors on the hood, bumper,and cab. They should be clean,operational, and the propercolor.
4. Bumper: Inspect for damageand security.
5. Headlamps: Lenses should beclean. If equipped, check theDaytime Running Lamps.
Right Side Front of Vehicle
{ Warning
To prevent property damage,personal injury, and/or death,if wheels or tires must bechanged, obtain expert tireservice help. Mounting anddemounting of tires should onlybe performed by qualifiedpersonnel using necessary safetyprocedures and equipment.
{ Warning
To prevent property damage,personal injury, and/or death, donot operate the vehicle if there isa loss of steering or suspension,which could cause loss of vehiclecontrol.
Retread tires are not recommendedfor use on steering axles of trucks.

Chevrolet Silverado 4500HD/5500HD/6500HD Owner Manual (GMNA-Localizing-U.S.-12102101) - 2019 - crc - 10/2/18
Service and Maintenance 373
1. Shock Absorber: Check forcracks, leaks, and missing orbroken mounting bolts orbushings.
2. Brake Caliper and Hoses:Check for broken, loose,or missing parts. Check forcracked, worn, or frayed hoses,and for secure couplings.
3. Frame: Check for cracks orbends in the frame. Make surethere are no loose, cracked,bent, broken, or missingcrossmembers or crossmemberfasteners.
4. Steering Linkage: Inspect theconnecting links, arms, androds for worn, damaged, loose,or missing components.
5. Tire: Check the tread depthand tire inflation. Note if thetread is evenly worn. Minimumtread depth is 3 mm (4/32 in)on all tires. Look for cuts orother damage to the tread orsidewalls. See if the valve capsand stems are missing, broken,or damaged.
6. Brake Pads and Rotor: Withthe brakes released, check tosee that the brake linings(where visible) are not wornexcessively thin, less than6 mm (0.25 in),or contaminated by lubricant.Where visible, check the discbrake caliper wear indicator tosee that the brake pads/rotorare not worn excessively.
7. Hub: Check for obvious leakson the outboard or inboardsides of the wheel. Verify thatthe oil level in the hub iscorrect.
8. Wheel and Lug Nuts: Check fordamaged or bent wheel. Checkto see that all the lug nuts arepresent and not loose. Look forrust trails around the nuts.Ensure that no cracks ordamage are present at thewheel mount holes.
9. Spring Suspension: Check thecondition of the spring forcracks, breaks, or shifting.Inspect the spring hanger
fasteners, shackles, U-bolts,and nuts for wear, damage,and tightness.
Right Side Engine Compartment
1. Cowl Vent: Ensure the air inletcover is free of dirt and debris.
{ Warning
Steam and scalding liquids from ahot cooling system are underpressure. Turning the pressurecap, even a little, can cause themto come out at high speed and
(Continued)

Chevrolet Silverado 4500HD/5500HD/6500HD Owner Manual (GMNA-Localizing-U.S.-12102101) - 2019 - crc - 10/2/18
374 Service and Maintenance
Warning (Continued)
you could be burned. Never turnthe cap when the cooling system,including the pressure cap, is hot.Wait for the cooling system andpressure cap to cool.
2. Coolant Level: Do not removethe pressure cap unless thecoolant is cool. Ensure the fluidlevel, if cold, is within theminimum and maximum fluidlevel range as marked on theplastic translucent reservoir.If hot, the fluid level must beabove the minimum mark, butbelow the fill neck.
3. Air Cleaner: Check the aircleaner housing and hoses forloose connections or damage.For element replacement, seeEngine Air Cleaner/Filter 0 299.
4. Radiator and Charge AirCooler: Check for loosemounting and damage. Inspectthe condition of all the hosesfor damage, cracks, and leaks.
Inspect for foreign material onthe face of the coolingpackage. Carefully brush awaythe collected materials withoutbending the cooling fins tomaintain proper airflow throughthe cooling package.
5. Drive Belts (Out of View):Inspect all belts for frays,cracks, loose fibers, or visiblesigns of wear. With the engineoff, press on all belts to test forproper belt tensionerperformance.
6. Windshield Washer Fluid Level:Inspect the reservoir and verifythat the fluid level is not emptyand has enough fluid to lastuntil the next inspection.If additional fluid is required,see “Lubricant and SealerSpecifications” underCapacities and Specifications0 408, for the correct fluid typebefore filling. Do not use waterin freezing climates.
Check the electrical wiring forproper security, damage, andchafing.
Check for signs of fluid puddlesunder the vehicle, or wetcomponents in the enginecompartment.
Right Side of Cab
1. Cab Structure: Check the bodypanels such as doors, fairings,air shield, and cab extendersfor signs of breaks or damage.Check the condition of cabmounting brackets and tilt hoodlatches.
2. Diesel Exhaust Fluid (DEF)Tank: Check to see that theDEF tank and cap are secured

Chevrolet Silverado 4500HD/5500HD/6500HD Owner Manual (GMNA-Localizing-U.S.-12102101) - 2019 - crc - 10/2/18
Service and Maintenance 375
and make sure there are noleaks or damage at the tank,DEF lines, or coolant lines.
Right Side Under Vehicle
{ Warning
To prevent property damage,personal injury, and/or death,maintain adequate clearancebetween all parts of the exhaustsystem and all hoses, wires, andlines for engine cooling, brakesystem, fuel system, power
(Continued)
Warning (Continued)
steering system, and electricalsystem. Heat damage to hoses,wires, or lines may cause vehiclemalfunction.
1. Frame: Check for cracks orbends in the frame. Make surethere are no loose, cracked,bent, broken or missingcrossmembers,or crossmember fasteners.
2. Transmission: Inspect forleaks.
3. Drive Shaft: Ensure that all theshaft couplings are secure.
4. Exhaust System: Check to seethat all the component partsare securely mounted and nocracks, holes, or severe dentsare visible. Evidence of sootbuild up around the clamps orconnections is a clear indicatorof a leak being present. Ensure
that all the hoses, wires, andair lines are secured away fromexhaust components.
Check the electrical wiring forproper security, damage, andchafing.
Additional Under ChassisInspection for 4x4 Models
1. Transfer Case: Inspect for fluidlevels, leaks, and/or any signsof external damage.
2. Front Drive Axle: Inspect forfluid levels, leaks, and/or anysigns of external damage.

Chevrolet Silverado 4500HD/5500HD/6500HD Owner Manual (GMNA-Localizing-U.S.-12102101) - 2019 - crc - 10/2/18
376 Service and Maintenance
Right Side Rear of Vehicle
{ Warning
To prevent property damage,personal injury, and/or death,if wheels or tires must bechanged, obtain expert tireservice help. Mounting anddemounting of tires should onlybe performed by qualifiedpersonnel using necessary safetyprocedures and equipment.
1. Spring Suspension: Checkcondition of the spring forcracks, breaks, or shifting.Inspect the spring hangerfasteners, shackles, U-bolts,and nuts for wear, damage,and tightness.
2. Brake Caliper and Hoses:Check for cracked, worn,or frayed hoses, and for securecouplings. Check for broken,loose, or missing parts.
3. Torque Rods and ShockAbsorbers: Check to see thatthe torque rods are notcracked, broken, or missing.Check the shock absorbers forcracks or leaks. There shouldbe no missing or brokenmounting bolts or wornbushings.
4. Frame: Check for cracks orbends in the frame. Make surethere are no loose, cracked,bent, broken, or missingcrossmembers or crossmemberfasteners.
5. Wheel and Lug Nuts: Check fordamaged or bent wheels.Check to see that all the lugnuts are present and not loose.Look for rust trails around nuts.Ensure that no cracks ordamage are present at thewheel mount holes.
6. Brake Pads and Rotor: Withthe brakes released, check tosee that the brake linings(where visible) are not wornexcessively thin, less than6 mm (0.25 in),or contaminated by lubricant.Where visible, check the discbrake caliper wear indicator tosee that the brake pads/rotorare not worn excessively.
7. Tires: Check the tread depthand tire inflation. Note if thetread is evenly worn. Minimumtread depth is 3 mm (4/32 in)on all tires. Look for cuts orother damage to the treadsidewalls. See if the valve capsand stems are missing, broken,or damaged. Check dualspacing to ensure that the dual

Chevrolet Silverado 4500HD/5500HD/6500HD Owner Manual (GMNA-Localizing-U.S.-12102101) - 2019 - crc - 10/2/18
Service and Maintenance 377
wheels are evenly separated,and that the tires are nottouching one another.
8. Hub: Check for obvious leakingon outside or inside of thewheel. Inspect axle flanges andwheel seals for leaks and loosemounting hardware or brokenitems. Check the lube level,if equipped with sight glass.
Check the electrical wiring forproper security, damage, andchafing.
Rear of Vehicle
1. Frame: Check for cracks orbends in the frame. Make surethere are no loose, cracked,bent, broken, or missingcrossmembers or crossmemberfasteners.
2. Taillamps and Reflectors:Check to see that the reflectorsand taillamps are clean. Makesure none are missing orbroken. Rear taillamps shouldbe clean, unbroken, and red incolor.
Check the electrical wiring forproper security, damage, andchafing.
Left Side Rear of Vehicle
{ Warning
To prevent property damage,personal injury, and/or death,if wheels or tires must bechanged, obtain expert tireservice help. Mounting anddemounting of tires should onlybe performed by qualifiedpersonnel using necessary safetyprocedures and equipment.
1. Frame: Check for cracks orbends in the frame. Make surethere are no loose, cracked,bent, broken, or missingcrossmembers or crossmemberfasteners.
2. Spring Suspension: Checkcondition of the spring forcracks, breaks, or shifting.Inspect the spring hangerfasteners, shackles, U-bolts,and nuts for wear, damage,and tightness.
3. Hub: Check for obvious leakingon outside or inside of thewheel. Inspect the axle flanges

Chevrolet Silverado 4500HD/5500HD/6500HD Owner Manual (GMNA-Localizing-U.S.-12102101) - 2019 - crc - 10/2/18
378 Service and Maintenance
and wheel seals for leaks andloose mounting hardware orbroken items. Check lube level,if equipped with sight glass.
4. Wheel and Lug Nuts: Check fordamaged or bent wheels.Check to see that all the lugnuts are present and not loose.Look for rust trails around nuts.Ensure that no cracks ordamage are present at thewheel mount holes.
5. Fuel Tank(s): Check to see thatthe fuel tank and cap aresecured, and make sure thereis no damage or leaks at thetank or fuel lines.
6. Brake Caliper and Hoses:Check for cracked, worn,or frayed hoses, and for securecouplings. Check for broken,loose, or missing parts.
7. Tires: Check the tread depthand tire inflation. Note if thetread is evenly worn. Minimumtread depth is 3 mm (4/32 in)on all tires. Look for cuts orother damage to the tread
sidewalls. See if the valve capsand stems are missing, broken,or damaged. Check dualspacing to ensure that dualwheels are evenly separated,and that the tires are nottouching one another.
8. Torque Rods and ShockAbsorbers: Check to see thatthe torque rods are notcracked, broken, or missing.Check shock absorbers forcracks or leaks. There shouldbe no missing or brokenmounting bolts or wornbushings.
9. Brake Pads and Rotor: Withbrakes released, check to seethat the brake linings (wherevisible) are not wornexcessively thin, less than6 mm (0.25 in),or contaminated by lubricant.Where visible, check the discbrake caliper wear indicator tosee that the brake pads/rotorare not worn excessively.
Check electrical wiring for propersecurity, damage, and chafing.
Cab Interior Inspection
. Safety/Emergency Equipment:Prior to entering the cab, verifythat the vehicle is equipped withthe proper equipment. Walkaround the vehicle and checkthat all steps and grab handles,inside and out, as well asbehind, are tight and clean. Useextreme caution and maintainthree points of contact at alltimes.
. Doors: Check the door latchesfor positive closing, latching, andlocking. Ensure the windows areclean and operate properly andsmoothly.
. Accelerator: Press theaccelerator pedal and verify thatit operates smoothly without anybinding or irregular feel. Removefoot from the accelerator andmake sure the engine returns toidle immediately.

Chevrolet Silverado 4500HD/5500HD/6500HD Owner Manual (GMNA-Localizing-U.S.-12102101) - 2019 - crc - 10/2/18
Service and Maintenance 379. Steering Play: Check for smooth
operation. Check for excessivelooseness in the steeringlinkages. The steering wheelshould have less than10 degrees of free play:approximately 5 cm (2 in) at therim of a 45 cm (18 in) steeringwheel.
. Seats: Be sure the seats arefirmly engaged to avoid forwardor rearward movement whenstarting or stopping. Make surethat the seats and tether strapsare free from damage andsecured to the floor.
. Horn(s): Check to see that thehorn(s) operate properly.
. Mirrors: Check the mirrors forproper adjustment, damage,cleanliness, and propermounting. If equipped, check thepower mirrors and the heatedmirrors for proper operation.
. Windshield and Wipers: Checkthe windshield for cracks, dirt,illegal stickers, or other viewingobstructions. Ensure the wipersand windshield washer arefunctioning properly.
. Heater/Defroster: Check to besure that heater/defroster isworking. Verify adequate airflowfrom the louvers and vents.Operate the temperature andmode controls to verify properoperation.
AdditionalMaintenance and Care
Additional Maintenanceand Care (Lubrication)
Lubrication and Fluids
All new vehicles are lubricated atthe factory. Once the vehicle is inoperation, regular lubrication andmaintenance intervals (based on thetype of service and road conditions)must be established and performed.Load weight, vehicle speed, roadconditions, and weather conditionsall contribute to lubricationfrequency. Performing thoroughlubrication and maintenance at thespecified intervals will ensure anoutstanding vehicle life and willreduce overall operating expense.
Only lubricants of superior qualityshould be used. The use of inferiorproducts will reduce the service lifeof the vehicle or result in failure ofits components.

Chevrolet Silverado 4500HD/5500HD/6500HD Owner Manual (GMNA-Localizing-U.S.-12102101) - 2019 - crc - 10/2/18
380 Service and Maintenance
Components requiring lubricationand fluid check shown in thismanual are typical representations.
Caution
Use of the incorrect fluids andlubricants may damage thevehicle and the damages may notbe covered by the vehiclewarranty. Always use the correctfluids and lubricants. SeeRecommended Fluids andLubricants 0 398.
Wipe clean all dirt and debris fromgrease fittings before applyinggrease. If the fitting is not cleaned,dirt can be pushed into thecomponent with the grease. Alwaysfill grease to the point where oldgrease and contaminants are forcedout from the part and only newgrease comes out. If a fitting doesnot accept lubrication due todamage or internal stoppage,replace with a new fitting. Remove
excess grease from fittings andother surfaces after applyinggrease.

Chevrolet Silverado 4500HD/5500HD/6500HD Owner Manual (GMNA-Localizing-U.S.-12102101) - 2019 - crc - 10/2/18
Service and Maintenance 381
Components Requiring Lubrication

Chevrolet Silverado 4500HD/5500HD/6500HD Owner Manual (GMNA-Localizing-U.S.-12102101) - 2019 - crc - 10/2/18
382 Service and Maintenance
Components Requiring Fluid Check and Fill

Chevrolet Silverado 4500HD/5500HD/6500HD Owner Manual (GMNA-Localizing-U.S.-12102101) - 2019 - crc - 10/2/18
Service and Maintenance 383
Additional Maintenanceand Care (MaintenanceInstructions)
Introduction
{ Warning
It can be dangerous to work onyour vehicle if you do not havethe proper knowledge, servicemanual, tools, or parts. Alwaysfollow owner’s manual proceduresand consult the service manualfor your vehicle before doing anyservice work.
Your vehicle has been engineeredand manufactured to provideeconomical service. However, it isthe owner's responsibility to see thatthe vehicle receives proper care andmaintenance to ensure highperformance.
Quality GM service parts areavailable through your GM dealer.If GM service parts are not used,
the owner must make sure that theparts used are equivalent to GMservice parts.
As with any vehicle, care should betaken to prevent being injured whenperforming maintenance or repairsor making any checks. Improper orincomplete service could result inthe vehicle not working properly,which in turn, may result in personalinjury or damage to the vehicle or itsequipment. If you have anyquestions about performing someservice, consult your dealer or havethe service done by a skilledtechnician.
Maintenance Guidelines
{ Warning
To prevent property damage,personal injury, and/or death,perform proper and timelymaintenance and service to yourvehicle.
{ Warning
To prevent property damage,personal injury, and/or death, donot make modifications to anypart, component, or system of thevehicle, as that can adverselyaffect the quality and reliability ofyour vehicle.
{ Warning
To prevent property damage,personal injury, and/or death, useonly genuine GM service parts.The use of inferior parts canadversely affect the quality andreliability of your vehicle.
{ Warning
Performing maintenance work canbe dangerous and can causeserious injury. Perform
(Continued)

Chevrolet Silverado 4500HD/5500HD/6500HD Owner Manual (GMNA-Localizing-U.S.-12102101) - 2019 - crc - 10/2/18
384 Service and Maintenance
Warning (Continued)
maintenance work only if therequired information, proper tools,and equipment are available.If they are not, see your dealer tohave a trained technician do thework. See Doing Your OwnService Work 0 291.
{ Warning
To prevent property damage,personal injury, or death whenservicing the vehicle, park on aflat level surface, set the parkingbrake, turn off the engine, andinstall wheel chocks.
{ Danger
To prevent property damage,personal injury, and/or death,always disconnect the ground
(Continued)
Danger (Continued)
battery terminal first, then thepositive cable. Whenreconnecting the battery cables,connect the positive cables first,and then reconnect the negativecables. Failure to follow thiswarning may result in a directbattery short, which is a fire orexplosion hazard.
{ Warning
To prevent damage to electricalcomponents during electricwelding operations, follow thesecautions: Prior to electric welding,disconnect any negative andpositive battery cables thatconnect the batteries to thevehicle. Be sure the detachedconnectors are not touching thevehicle. If welding close to anelectronic component, temporarily
(Continued)
Warning (Continued)
remove that component. Attachthe welder ground cable as closeas possible to the part beingwelded.
When servicing your vehicle always:
. Turn off the ignition, unless theprocedure calls for a runningengine.
. Set the parking brake and installwheel chocks.
. Use support stands, not a jack,whenever you must be under araised vehicle.
. Do not smoke.
. Wear safety glasses for eyeprotection.
. Operate engine only in awell-ventilated area.
. Do not work on brakes or clutchunless proper precautions aretaken to prevent inhaling frictionmaterial dust.

Chevrolet Silverado 4500HD/5500HD/6500HD Owner Manual (GMNA-Localizing-U.S.-12102101) - 2019 - crc - 10/2/18
Service and Maintenance 385. Do not wear loose clothing,
hanging jewelry, watches,or rings. Tie up long hair andavoid rotating machinery.
. Avoid contact with hot metalparts; allow hot components tocool before working on them.
. Correct any problems that wererevealed during inspection priorto operating the vehicle.
Supporting Your Vehicle forService
{ Warning
To prevent property damage,personal injury, and/or death,always use floor stands tosupport the vehicle beforeworking under it. Using only ajack could allow the vehicle to fall.
When performing service repairs ona vehicle, first:
1. Park the vehicle on a levelconcrete floor.
2. Set the parking brake and/orblock wheels to prevent thevehicle from moving.
3. Select a jack with a ratedcapacity sufficient to lift thevehicle.
4. Raise the vehicle with the jackapplied to the axle. Do not usethe bumper as a lifting point.
5. Support the vehicle with floorstands under the axle(s).
If axle or suspension componentsare to be serviced, support thevehicle with floor stands underframe side members, preferablybetween the axles.
Chassis Lubrication
New vehicles are lubricated at thefactory. After the vehicle is placed inoperation, regular lubrication andmaintenance intervals, based on thetype of service and road conditions,should be established. The loadscarried, speed, road and weatherconditions all contribute to thefrequency of lubrication intervals.Thorough lubrication and
maintenance at the specifiedintervals will ensure outstandinglifecycle value and will reduceoverall operating expense.
In some types of operation, andwhere operating conditions areextremely severe (such as in deepwater, mud, or unusually dustyconditions), the vehicle may requirelubrication after every 24 hours ofoperation.
Only lubricants of superior qualityshould be used. The use of inferiorproducts will reduce the service lifeof the vehicle or result in failure ofits components. See RecommendedFluids and Lubricants 0 398.
The lubrication intervals specifiedshould be performed at whateverinterval occurs first, whether it iskilometers (miles), hours, or months.
See Maintenance Schedule 0 361.

Chevrolet Silverado 4500HD/5500HD/6500HD Owner Manual (GMNA-Localizing-U.S.-12102101) - 2019 - crc - 10/2/18
386 Service and Maintenance
Front Axle
Inspection and Lubrication (4x2Models)
Check to make sure that the frontaxle mounting U-bolts, attaching ormounting bolts, and nuts aresecurely tightened. Loose ormisaligned front axles will affectvehicle alignment, front tire wear,and handling.
Re-torque the U-bolt nuts after thefirst 1 600 km (1,000 mi) and every58 000 km (36,000 mi) thereafter.
Observe the following whenchecking the front axle fordamaged, binding, or worn parts,and adequate lubrication:
. Kingpin wear inspection requiresthat no weight is on the tires.
. Kingpin and kingpin bushinglubrication requires that thevehicle weight is off the tires andthe front wheels are turned fullyto the left or right prior toinstalling grease distribution.
. Kingpin thrust bushinglubrication requires that thevehicle weight is resting on thetires.
. Power grease guns may beused; however, a hand-pumpedgrease gun is recommended foroptimal grease distribution withineach component joint.
. Inspect, lubricate, and adjust thewheel bearings at regularintervals.See Additional Maintenance andCare (Lubrication) 0 379 orAdditional Maintenance andCare (Maintenance Instructions)0 383 and MaintenanceSchedule 0 361.
Inspection and Lubrication (4x4Models)
Proper lubrication and inspectionsof the front drive components mustbe followed. Both the front driveaxle and the transfer case oil levelmust be checked periodically, andalso inspected for possible oil loss.
The proper lubrication level is to thebottom of the oil fill hole with thevehicle on level ground.
Observe the front axle for damaged,binding, or worn parts, andadequate lubrication.
Make sure the axle mounting U-boltnuts, attaching or mounting boltsand nuts, are securely tightened.Loose or misaligned rear axles willaffect vehicle alignment, front tirewear, and handling.
Re-torque the U-bolt nuts asneeded. See Capacities andSpecifications 0 408.
Normal Maintenance
During operation, the air and oilinside the hub/wheel cavityexpands. It is normal for a mist of oilto be present on the outside of thehubcap around the vent slit or hole.Over time, if not wiped off, this filmmay collect dust and appearunsightly. If the entire face and endof the hubcap become wet with oil,investigate the cause. Refer to theservice manual for repairprocedures.

Chevrolet Silverado 4500HD/5500HD/6500HD Owner Manual (GMNA-Localizing-U.S.-12102101) - 2019 - crc - 10/2/18
Service and Maintenance 387
Routinely clean the hubcap toensure that the lubricant level canbe easily observed through the clearwindow as intended.
In situations where the window isclean on the outside, but discoloredon the inside, check the lubricantlevel by removing the rubber fill/ventplug and insert a finger intothe hole.
The specified lubricant level for GMclear window type hubcaps is fromthe minimum line to 0.8 cm (5/16 in)above the minimum line.
If the lubricant level suddenly dropsdramatically below the minimumlevel, see the service manual fordiagnostic procedure.
Alignment
Maintaining front axle alignment isvery important to achievingmaximum tire life and vehiclecontrol. Inspecting steer axle tires inthe first 5 000 km(3,000 mi)-16 000 km (10,000 mi) ofservice will generally show if tiresare wearing normally.
. Rapid outside shoulder wear onboth tires indicates too muchtoe-in.
. Rapid inside shoulder wear onboth tires indicates too muchtoe-out.
. Excessive wear on the inside oroutside of one steer tire, but notthe other, can indicate a toe-in ortoe-out condition coupled with amisaligned front or rear axle.
. Pulling to the right or left canindicate misalignment of thefront or rear axle, unequal tirepressures, or a damaged/mismatched tire.
See Tires 0 331 for additionalrelated information.
Brakes
General Information
{ Warning
To prevent personal injury ordeath, avoid breathing brakelining fiber dust. Always use arespirator while performing brakemaintenance. Follow precautionslisted below.
{ Warning
To prevent property damage,personal injury, and/or death,always check and maintainbrakes in proper condition andadjustment. Out-of-adjustmentbrakes could cause reducedbraking ability.

Chevrolet Silverado 4500HD/5500HD/6500HD Owner Manual (GMNA-Localizing-U.S.-12102101) - 2019 - crc - 10/2/18
388 Service and Maintenance
{ Warning
All new GM vehicles usenon-asbestos brake linings.However, exposure to excessiveamounts of brake material dustmay be a potentially serioushealth hazard. To help protectyourself and others, follow all ofthe precautions in this Sectionwhen servicing the brakes.
Follow these precautions:
. Always wear a respiratorapproved by National Institutefor Occupational Safety andHealth (NIOSH) or Mine SafetyAppliances (MSA) during allbrake service procedures. Wearthe respirator from removal ofthe wheels through assembly.
. Never use compressed air or drybrushing to clean brake parts orassemblies.
. Clean brake parts andassemblies in the open air.During disassembly, carefully
place all parts on the floor toprevent getting dust into the air.Use an industrial vacuumcleaner with a HEPA filtersystem to clean dust from thebrake drums, backing plates,and other brake parts. Afterusing the vacuum, remove anyremaining dust with a ragsoaked in water and wrung untilnearly dry.
. Never use compressed air or drysweeping to clean the workarea. Use an industrial vacuumcleaner with a HEPA filtersystem and rags soaked inwater and wrung until nearly dry.Dispose of used rags with careto prevent getting dust into theair. Use an approved respiratorwhen emptying vacuum cleanersand handling used rags.
. Wash your hands before eating,drinking, or smoking. Vacuumyour work clothes after use, andthen launder them separately,without shaking them, to preventfiber dust from getting intothe air.
Hydraulic Brakes
Brake Inspection and Adjustment
This inspection or adjustmentshould only be performed byqualified service personnel andmust be in accordance withinstructions provided in the servicemanual.
Establish a regular schedule forperiodic cleaning, lubrication, andinspection, based on the type ofvehicle operation. It is difficult topredetermine an exact maintenanceinterval (time or mileage) sincevehicles are used in a variety ofapplications and conditions.See Maintenance Schedule 0 361and Owner Checks and Services(Inspection Guide) 0 368.
On a periodic basis of at least onceper year, inspect the entire brakesystem for:
. The proper operation of theservice and parking brakes.
. The condition of the discs,calipers, and ABS exciter teeth.
. Hydraulic fluid leaks.

Chevrolet Silverado 4500HD/5500HD/6500HD Owner Manual (GMNA-Localizing-U.S.-12102101) - 2019 - crc - 10/2/18
Service and Maintenance 389. Hose or pipe damage.
. The condition of the ABS wheelspeed sensors and wiring.
. Proper ABS wheel speedsensor-to-exciter teeth gap.
Inspect brake lining at everymaintenance interval. During severeservice operations or prolongedperiods of stop-and-go operation,the brakes may require morefrequent inspection. Establishinspection intervals that provide forlining replacement before damageto the disc occurs. Excessive liningwear may allow the metal brakeshoe to damage the brake disc.
Brake Lines, Hoses, and Fittings
. Check lines for kinks, dents,corrosion, or ruptures.
. Check hoses for abrasion, kinks,soft spots, ruptures, collapse,cracks, twists, or loose framesupports. When replacing ahose, be sure there is enoughclearance to prevent the newhose from rubbing against othercomponents.
. Examine all connections forleaks.
. Repair or replace brake linetubes, hoses, or fittings asrequired.
Fluid Precautions
The brake system consists of twocompletely separate hydraulicsystems operating with two differentand incompatible fluids: powersteering fluid and hydraulic brakefluid.
{ Warning
The wrong or contaminated brakefluid could result in damage to thebrake system. This could result inthe loss of braking leading toinjury, death, or property damage.Always use the proper GMapproved brake fluid.
Caution
If brake fluid is spilled on thevehicle's painted surfaces, thepaint finish can be damaged.Immediately wash off any paintedsurface.
The following should always beobserved to avoid fluidcontamination. Use only properlyidentified and specified (orequivalent) fluids, and add fluidsonly to the following locations:
. Brake fluid to the brake mastercylinder.
. Power steering fluid to the powersteering fluid pump reservoir.
Brake Fluid Level
During normal vehicle operation andservicing, the fluid level will varybetween the bottom of the ring (full)and 2.5 cm (1 in) in the mastercylinder mounted front reservoir. Donot fill the master cylinder to the topof the reservoir. Overfilling may leadto overflow. A MIN and MAX

Chevrolet Silverado 4500HD/5500HD/6500HD Owner Manual (GMNA-Localizing-U.S.-12102101) - 2019 - crc - 10/2/18
390 Service and Maintenance
indicator are located on thereservoir. Do not add fluid above theMAX line.
Check and refill the brake fluidreservoir:
1. Clean the reservoir caps beforeremoval to prevent dirt or waterfrom entering the reservoir.
2. Visually inspect the fluid level.
3. If necessary, add brake fluidfrom a clean unopenedcontainer.
4. Use only DOT 3 brake fluidcertified to meet manufacturerspecifications.
5. Fill the brake fluid reservoir tothe MAX line, but do notexceed the MAX fillspecifications.
If brake fluid must be addedfrequently to maintain the properlevel in the master cylinder, there iseither rapid pad wear or a fluidsystem leak. A more frequent andthorough brake inspection isrequired.
Electrical
Batteries
Battery life and performance variesgreatly depending on duty cycle.Conditions such as short runsbetween starts, low ambientoperating temperatures, use ofbattery current without the enginerunning, and vibration will reducebattery life. Battery life is alsoaffected by the condition ofinterrelated components, such asalternators, battery cables,connections, engine startability, andstarter. To maximize battery life, it isimportant to keep electricalcomponents, battery boxes, and the
engine in top condition and tominimize or eliminate electricalloads when the engine is notrunning.
Battery life can be extended bykeeping the batteries fully chargedat all times. Periodically chargingthe batteries with a battery chargermay be able to charge the batteriesmore completely than the vehicle’salternator in certain severeapplications. Use a battery charger(float charger) that automaticallyreduces amperage or shuts offwhen the batteries are fully charged.Use of a Midtronics 55-Amp PowerSupply/Smart (Battery) Charger,Model Number PCX550,Part Number PSC550CCKIT (orequivalent), available through yourGM dealer, is recommended.
Cold batteries resist charging.Battery performance can beimproved by regularly or evenperiodically storing vehicles andcharging batteries with an automaticfloat charger for 8 to 24 hours in awarm garage during the cold wintermonths.

Chevrolet Silverado 4500HD/5500HD/6500HD Owner Manual (GMNA-Localizing-U.S.-12102101) - 2019 - crc - 10/2/18
Service and Maintenance 391
Caution
To prevent property damage, donot allow batteries to becomeheavily discharged and exposedto subfreezing weather that willcause them to freeze and becomedamaged.
Your vehicle utilizesmaintenance-free batteries, whichwill not require the periodic additionof water. Wipe the tops of thebatteries clean to prevent a slowcurrent flow through the dirt,resulting in a loss of charge. Besure the terminals are clampedtightly and that the battery isclamped securely in the battery box.
For best results:
. Do not mix and match batterymodels/manufacturers in thesame battery pack.
. Do not use batteries withdiffering CCA ratings in thesame battery pack.
. Do not use batteries with morethan one year difference in theinstalled age of batteries in thesame battery pack.
Battery Cables
Caution
To prevent property damage,when working around theterminals and battery, use extracare to prevent shorting. A goodpractice is to insulate pliers andscrewdrivers. Do not checkbattery condition by shorting(flashing) across terminals.
Battery cable terminals must beclean and tight. Use a mixture of hotwater and common baking soda forremoving terminal corrosion and forcleaning the top of the battery.Brighten the contact surfaces withsteel wool, apply a light coat ofdielectric grease, and reassemble.Be sure the terminals are clampedtightly. See your dealer for greasespecifications.
Electrical Charging and StartingSystem Test
At every Preventive Maintenance(PM), fully charge the batteriesusing an automatic float charger.Then, have a qualified technicianperform an electrical system test,available through your dealer, tocatch electrical system problemsbefore they cause further damage tothe batteries and prevent a strandedvehicle. The test will check foralternator amperage output, startercurrent draw, and battery amperagecapacity. This type of testing willdetect weaknesses that may not yetbe apparent during normal dailyoperations.
TerminalInspection-Cleaning-CorrosionProtection
Periodically inspect electricalconnectors on the engine, battery,and frame for corrosion andtightness. Inspect exposed cablesfor fraying or signs of abrasion.Exposed terminals, such ascranking motor, alternator, andfeed-through studs should be

Chevrolet Silverado 4500HD/5500HD/6500HD Owner Manual (GMNA-Localizing-U.S.-12102101) - 2019 - crc - 10/2/18
392 Service and Maintenance
cleaned and recoated with adielectric grease, paste or sprayprotectant. The inspection/cleaning/corrosion protection should includefeed-through connections, powerand ground cable connections forbatteries, engines, and thestarter stud.
Connectors that are more subject tocorrosion may be disassembled andsprayed internally with a lightcoating of dielectric grease. Usegrease sparingly, as too muchgrease will not allow air to escapefrom the connection, and thiscompressed air will push out theseals in the electrical connectors.
Accessory Feed Connections
{ Danger
Fuses and circuit breakers aremarked with their ampere rating.Do not exceed thespecified amperage rating whenreplacing fuses and circuitbreakers. Use of an oversized
(Continued)
Danger (Continued)
fuse or circuit breaker can resultin a vehicle fire. You and otherscould be seriously injured orkilled.
Vehicle electrical systems arecomplex and often includeelectronic components, such asengine and transmission controls,instrument panels, antilock brakes.While most systems still operate onbattery voltage (12 volts), somesystems can be as high as 90 voltsor as low as 5 volts. Refer to theElectrical Circuit Diagram Manuals,available from your GM dealer, toensure that any body lights andaccessories are connected tocircuits that are both appropriateand not overloaded. No modificationshould be made to any vehiclecontrol system without firstcontacting your GM dealer.
Engine
General Information
For complete operation andmaintenance information pertainingto your engine, refer to the EngineOperation and Maintenance Manualprovided with the vehicle.
For effective emission control andlow operating cost, it is importantthat maintenance operations beperformed at the specified periodsor mileage intervals indicated in theEngine Operation and MaintenanceManual.
Service intervals are based onaverage operating conditions. Incertain environments and locations,more frequent servicing will berequired.
The required maintenanceoperations may be performed at aservice establishment. Anyreplacement parts used for requiredmaintenance services or repairsshould be genuine OEM serviceparts. Use of inferior replacementparts hinders engine and emission

Chevrolet Silverado 4500HD/5500HD/6500HD Owner Manual (GMNA-Localizing-U.S.-12102101) - 2019 - crc - 10/2/18
Service and Maintenance 393
control operations; it also canreduce engine life and/or jeopardizethe warranty.
Receipts covering the performanceof regular maintenance should beretained in the event questions ariseconcerning maintenance. Thereceipts should be transferred toeach subsequent owner of theengine (vehicle).
For information regarding routinescheduled maintenance such asreplacement of oil, filters, coolant,belts, belt tensioners, etc., andinspection and adjustment of items,such as valve lash, etc., refer to theEngine Operation and MaintenanceManual supplied with the vehicle.
Engine Fluids andContaminated Material
Engine fluids (oil, fuel, and coolant)may be a hazard to human healthand the environment. Handle allfluids and other contaminatedmaterials (such as filters, rags) inaccordance with applicableregulations. Recycle or dispose of
engine fluids, filters, and othercontaminated materials according toapplicable regulations.
Fuel System
Frequently inspect the condition ofthe fuel tanks and mountinghardware, fuel tank cap and vent,fuel lines, clips, and routing. Atevery Preventive Maintenance (PM),or daily if necessary, drain waterand sediment from the fuel/waterseparator filter. Be sure to use theproper fuel/water separator filterelement with the correct partnumber and filter efficiency rating.
Fuel Tank Draining and Cleaning
Periodically (annually isrecommended) drain water andsediment from the fuel tank. Drainand flush sediment from the fueltank at least every 12 months ormore frequently if fuel quality or typeof fuel dictates.
Since Ultra-Low Sulfur Diesel(ULSD) fuel tends to absorb morewater and engines are operating athigher temperatures, microbe
growth in the fuel tanks has becomemore prevalent. Microbe growthresults in more contaminants in thefuel and reduces fuel filter life. Sincefuel tank draining does not removeall microbes, fuel tank drainingalone will not eliminate the problem.If microbe growth is found inthe fuel:
1. Drain and clean the fuel tank(s)every 12 months or more often.Clean the tanks with aprofessional fuel tank cleaningsystem (available through yourdealer) or have your dealerperform the service for you.
2. Treat the vehicle fuel tanks andbulk tanks regularly with abiocide from a reputablevendor.
3. Purchase fuel only fromvendors that pretreat their fuelwith biocides.
4. Periodically test the fuelsupplied by your fuel vendor forthe presence of microbes.

Chevrolet Silverado 4500HD/5500HD/6500HD Owner Manual (GMNA-Localizing-U.S.-12102101) - 2019 - crc - 10/2/18
394 Service and Maintenance
Frame
GM Truck chassis are manufacturedwith frame rails of high strengthsteel, and each must be handled ina specific manner to ensuremaximum service life. Beforeattempting frame repair ormodification, consult the servicemanual or your dealer.
Noise Emissions -Maintenance, Use, and Repair
Instructions for ProperMaintenance
In order to comply with federalexterior noise regulations, yourvehicle may be equipped with noiseemission items that must beproperly maintained, used, andrepaired. Depending upon thevehicle configuration, it mayincorporate all or some of thefollowing:
Air Intake System
. Air Cleaner – should beinspected and its location shouldnot be altered. Do not alter inletand outlet piping.
Body
. Wheel Well – splash shields,cab shields, and underhoodinsulation should be inspectedfor deterioration, dislocation, andorientation and repaired orreplaced as necessary.
Cooling System
. Check fan for damage to blades.Replace, if damaged, withmanufacturer's recommendedparts. Inspect for fan-to-shroudinterference and any damage toshroud, such as cracks andholes.
. Fan speed ratio should not bechanged and fan spacerdimensions and position shouldnot be altered.
. Inspect for proper operation offan clutch, making sure that thefan is disengaged when coolingof engine is not required.
Engine Noise Shields/Blankets
. Engine valve covers, oil pans,and block covers are made todamp out engine mechanical
noise and, if needed, should bereplaced with original equipmentparts.
Exhaust System
. Inspect for leaks at various jointconnections and tighten clamps.Make visual inspection forcracks or holes in muffler andtailpipe. Always replace withmanufacturer's recommendedparts. Tailpipe elbow or offsettailpipe orientation must not bechanged from standard positionas originally received.
. To prevent abnormal changes invehicle sound level, it isnecessary for the owner toperform inspections andnecessary maintenance at theintervals shown in themaintenance schedules, andrecord them on the maintenancerecord form provided.

Chevrolet Silverado 4500HD/5500HD/6500HD Owner Manual (GMNA-Localizing-U.S.-12102101) - 2019 - crc - 10/2/18
Service and Maintenance 395
Drive Shafts
At the regular lubrication interval,check universal joints, slip joints,slip joint boot, and carrier bearingsfor any evidence of wear orlooseness.
{ Warning
If vibrations from the drive shaftare felt, stop the vehicleimmediately. Possible injury ordamage to the drive shaft or othercomponents could occur, whichcould cause a crash resulting ininjury, death, or property damage.
Suspension
Caution
To prevent property damage, donot adjust air suspension heightto any setting other than thespecified setting. Altering theheight setting will change the
(Continued)
Caution (Continued)
driveline angle and may result inunwarrantable componentdamage, such as transmissioncomponent damage.
If equipped with the optional airsuspension for the rear axle, verifyair suspension height at engine oilchange intervals. See theappropriate service manual.
Suspension alignment must bemaintained at all times.
See Capacities and Specifications0 408 for proper U-bolt torquevalues.
Periodically:
. Check the condition of springleaves for evidence of fatigue,bending, or breakage.
. Check the condition ofsuspension mounting bracketsand bushings.
. Ensure that suspension mounts(such as brackets, bushings,fasteners) are tight.
. Ensure that torque rod mountingfasteners are tight.
. Check U-bolts as follows:
5.1. After the chassis has beenoperating under load for1 600 km (1,000 mi) or sixmonths, whichever comesfirst, the U-bolt nuts mustbe torqued again.
5.2. Thereafter, the U-bolt nutsmust be torqued every58 000 km (36,000 mi).Torque interval may belowered to 40 000 km(25,000 mi) to synchronizewith oil change interval.
Front Suspension
The front suspension should beregularly inspected for loose, worn,or broken components. Frontsuspensions/axles should bechecked periodically for properalignment to promote maximumtire life.

Chevrolet Silverado 4500HD/5500HD/6500HD Owner Manual (GMNA-Localizing-U.S.-12102101) - 2019 - crc - 10/2/18
396 Service and Maintenance
Rear Suspension
The rear suspension should beregularly inspected for loose, worn,or broken components. Rearsuspensions/axles should bechecked periodically for properalignment to promote maximumtire life.
On vehicles equipped with theoptional air suspension, the airsuspension components, includingair bags, height control valves, airlines, and fittings should beinspected for wear, damage, andaudible air leaks.
Steering
General Information
{ Warning
To prevent property damage,personal injury, and/or death,always follow recommendedprocedures for steering systemmaintenance. Maintain the
(Continued)
Warning (Continued)
steering system in propercondition; otherwise, reducedsteering ability could result.
. Have a technician examine thesteering mechanism. Minoradjustments could head offfurther problems.
. Check tie rod ends, drag linkends, and kingpins. Joints andfasteners must be tight.Articulating joints must be welllubricated.
. Check for installation and spreadof cotter pins and tightness ofnuts at both ends of the tie rodand drag link.
. Maintain proper power steeringfluid levels.
. Check that pitman arm (steeringarm at steering gear) mountingis tight and locked. Checksystem for leaks or hosechafing.
. Regularly inspect steeringcolumn joint bolts and steeringlinkage, particularly forbody-to-chassis clearance.
Have any steering problemscorrected at once by a qualifiedservice technician.
Tightening Steering IntermediateShaft Joint Bolts
As a good maintenance practice, itis recommended that steeringintermediate shaft joint bolts bechecked for tightness every193 000 km (120,000 mi) orannually, whichever occurs first.
Lubrication Points
The steering shaft is lubricated atthree points. For the correctmaintenance interval, seeMaintenance Schedule 0 361.
Power Steering
Whenever the power steeringsystem has been drained andrefilled for any reason, air must bebled from the system beforereturning the vehicle to service.Failure to properly bleed the

Chevrolet Silverado 4500HD/5500HD/6500HD Owner Manual (GMNA-Localizing-U.S.-12102101) - 2019 - crc - 10/2/18
Service and Maintenance 397
hydraulic system can result indegradation of power systemperformance.
Consult your GM dealer for fillingand bleeding the system.
The power steering fluid filter islocated inside the power steeringreservoir. To remove the filter,unscrew the large cap on the powersteering reservoir and unscrew thefilter. Reverse the procedure toinstall the new filter.

Chevrolet Silverado 4500HD/5500HD/6500HD Owner Manual (GMNA-Localizing-U.S.-12102101) - 2019 - crc - 10/4/18
398 Service and Maintenance
Recommended Fluids, Lubricants, and Parts
Recommended Fluids and LubricantsFluids and lubricants identified below by name, part number, or specification can be obtained from your dealer.
Usage Fluid/Lubricant
Chassis Lubrication, Rear DrivelineCenter Spline
Chassis Lubricant (GM Part No. 12377985) or lubricant meetingrequirements of NLGI #2, Category LB or GC-LB.
Diesel Exhaust AftertreatmentSystem
Diesel Exhaust Fluid (GM Part No. 19286291) or Diesel Exhaust Fluid thatmeets ISO 22241 or displays the API Diesel Exhaust FluidCertification Mark.
Engine Coolant 50/50 mixture of clean, drinkable water and use only DEX-COOL coolant.See Cooling System 0 301.
Engine Oil Engine oils with the letters CJ-4 or CK-4 are required for your vehicle. TheCJ-4 or CK-4 designation can appear either alone or in combination withother American Petroleum Institute (API) designations, such as API CJ-4/SL. These letters show API levels of quality. To determine the preferredviscosity for your vehicle's diesel engine, see Engine Oil 0 295.
Front and Rear Axle See your dealer.
Front Axle Propshaft Spline Chassis Lubricant (GM Part No. 12377985) or lubricant meetingrequirements of NLGI #2, Category LB or GC-LB.
Hydraulic Brake System DOT 3 Hydraulic Brake Fluid (GM Part No. 19353126).
Hydraulic Power Steering System GM Power Steering Fluid (GM Part No. 19329450).

Chevrolet Silverado 4500HD/5500HD/6500HD Owner Manual (GMNA-Localizing-U.S.-12102101) - 2019 - crc - 10/2/18
Service and Maintenance 399
Usage Fluid/Lubricant
Key Lock Cylinders, Hood Hinges,Body Door Hinge Pins, Hinges, Latch
Bolt, and Linkage
Multi-Purpose Lubricant, Superlube (GM Part No. 12346241).
Transfer Case (Four-Wheel Drive) See your dealer.
Weatherstrip Conditioning Weatherstrip Lubricant (GM Part No. 3634770, in Canada 10953518) orequivalent.
Weatherstrip Squeaks Synthetic Grease with Teflon, Superlube (GM Part No. 12371287).
Windshield Washer Automotive windshield washer fluid that meets regional freeze protectionrequirements.

Chevrolet Silverado 4500HD/5500HD/6500HD Owner Manual (GMNA-Localizing-U.S.-12102101) - 2019 - crc - 10/2/18
400 Service and Maintenance
Lubricant and Sealer Specifications
Component Component Vendor/Lubrication Type Viscosity Applicable Temperatures
Non-driving Front Axle
Front Axle WheelBearing Oil
Mineral Oil 75W −40 °C to −26 °C (−40 °F to−15 °F)
75W-80 −40 °C to 27 °C (−40 °F to80 °F)
75W-90 −40 °C to 27 °C (−40 °F to80 °F)
75W-140 −40 °C and above (−40 °Fand above)
80W-90 −26 °C to 38 °C (−15 °F to100 °F)
80W-140 −26 °C and above (−15 °Fand above)
85W-140 −12 °C and above (10 °F andabove)

Chevrolet Silverado 4500HD/5500HD/6500HD Owner Manual (GMNA-Localizing-U.S.-12102101) - 2019 - crc - 10/2/18
Service and Maintenance 401
Component Component Vendor/Lubrication Type Viscosity Applicable Temperatures
Front Axle WheelBearing Oil (4x2)(Continued)
Multipurpose EP gear lube of API GL-5quality meeting MIL-PRF-2105E specsincluding synthetic lubricants.Do not mix conventional (mineral based)lubricants with synthetic lubricants.
75W −40 °C to −0 °C (−40 °F to−32 °F)
75W-90 −40 °C to 38 °C (−40 °F to100 °F)
75W-140 −40 °C and above (−40 °Fand above)
80W −26 °C to 21 °C (−15 °F to70 °F)
80W-140 −26 °C and above (−15 °Fand above)
90W −12 °C to 38 °C (10 °F to100 °F)
85W-40 −12 °C and above (10 °F andabove)
140W 4 °C and above (40 °F andabove)

Chevrolet Silverado 4500HD/5500HD/6500HD Owner Manual (GMNA-Localizing-U.S.-12102101) - 2019 - crc - 10/2/18
402 Service and Maintenance
Component Component Vendor/Lubrication Type Viscosity Applicable Temperatures
Front Axle Tie RodEnds, Drag Link,Kingpins, andBushings
Dana Spicer axle: NLGI #2 LithiumComplex Based Moly grease orequivalent GC/LB NLGI #2Multi-purpose Lithium Complex grease.Dana Spicer axle: With chassis load onaxle, force grease through thrustbearings; then with axle lifted clear offloor, force grease between kingpin andbushing surfaces.
– –
Front Drive Axle (4x4)
Front DriveAxle Oil
API, GL5, MIL-PRF-2015E, or SAEJ2360
SAE 80W / 90 −25 °C to 38 °C (−13°F to100°F)
Synthetic 75W-90 −40 °C to 38 °C (−40 °F to100 °F)
Steering
Steering GearLubricant
NLGI #2 Lithium Complex Based Molygrease or equivalent GC/LB NLGI #2Multi-purpose Lithium Complex grease
– –
SteeringIntermediate ShaftU-Joints / Slip JointLubricant
NLGI #2 Lithium Complex Based Molygrease or equivalent GC/LB NLGI #2Multi-purpose Lithium Complex grease
– –

Chevrolet Silverado 4500HD/5500HD/6500HD Owner Manual (GMNA-Localizing-U.S.-12102101) - 2019 - crc - 10/2/18
Service and Maintenance 403
Component Component Vendor/Lubrication Type Viscosity Applicable Temperatures
Drive Shaft
U-Joint Lubricant Lithium Complex Based Moly grease orequivalent GC/LB NLGI #2Multi-purpose Lithium Complex grease
– –
Transmission
Allison-ConventionalAutomaticTransmission Fluid(ATF) Fill/Change
Refer to the Allison Automatic Transmission Manual.

Chevrolet Silverado 4500HD/5500HD/6500HD Owner Manual (GMNA-Localizing-U.S.-12102101) - 2019 - crc - 10/2/18
404 Service and Maintenance
Component Component Vendor/Lubrication Type Viscosity Applicable Temperatures
Rear Axle
Rear Drive Axle(s) Mineral Oil — Gear oil meetingMIL-PRF-2105E, API MT-1, GL-5
75W −40 °C to −26 °C (−40 °F to−15 °F)
75W-80 −40 °C to 27 °C (−40 °F to80 °F)
75W-90 −40 °C to 38 °C (−40 °F to100 °F)
75W-140 −40 °C and above (−40 °Fand above)
80W-90 −26 °C to 38 °C (−15 °F to100 °F)
80W-140 −26 °C and above (−15 °Fand above)
85W-140 −12 °C and above (10 °F andabove)
2837 Synthetic Lubricant.Do not mix conventional (mineral bases)lube with synthetic oil.
75W-90 All Temperatures

Chevrolet Silverado 4500HD/5500HD/6500HD Owner Manual (GMNA-Localizing-U.S.-12102101) - 2019 - crc - 10/2/18
Service and Maintenance 405
Component Component Vendor/Lubrication Type Viscosity Applicable Temperatures
Electrical
Terminals—Lubricant SealingGrease
472141-C1 – –
Connectors—Dielectric Grease
NYOGEL 760 G – –
Maintenance Replacement PartsReplacement parts identified below by name, part number, or specification can be obtained from your dealer.
Part GM Part Number ACDelco Part Number
Engine Air Cleaner/Filter 84262965 A3231C
Fuel Filter 23304096 TP1015
Engine Oil Filter 12684038 PF26
Passenger Compartment Air Filter 23281440 CF188
Wiper Blades
Driver Side – 55 cm (21.7 in) 23417074 –
Passenger Side – 55 cm (21.7 in) 23417074 –
Use only the specified filters.

Chevrolet Silverado 4500HD/5500HD/6500HD Owner Manual (GMNA-Localizing-U.S.-12102101) - 2019 - crc - 10/2/18
406 Service and Maintenance
Maintenance RecordsAfter the scheduled services are performed, record the date, odometer reading, who performed the service, and thetype of services performed in the boxes provided. Retain all maintenance receipts.
DateOdometerReading
Serviced By Services Performed

Chevrolet Silverado 4500HD/5500HD/6500HD Owner Manual (GMNA-Localizing-U.S.-12102101) - 2019 - crc - 10/2/18
Technical Data 407
Technical Data
Vehicle IdentificationVehicle IdentificationNumber (VIN) . . . . . . . . . . . . . . . 407
Vehicle DataCapacities andSpecifications . . . . . . . . . . . . . . . 408
Engine Drive Belt Routing . . . . 412
Vehicle Identification
Vehicle IdentificationNumber (VIN)
The Vehicle Identification Number(VIN) is on the driver door. The VINand model description arenecessary when orderingreplacement parts or servicemanuals.
Engine Identification
The eighth character in the VIN isthe engine code. This codeidentifies the vehicle's engine,specifications, and replacementparts. See “Engine Specifications”under Capacities and Specifications0 408 for the vehicle's engine code.

Chevrolet Silverado 4500HD/5500HD/6500HD Owner Manual (GMNA-Localizing-U.S.-12102101) - 2019 - crc - 10/2/18
408 Technical Data
Vehicle Data
Capacities and SpecificationsThe following approximate capacities are given in metric and English conversions. See Recommended Fluids andLubricants 0 398.
Application
Capacities
Metric English
Cooling System* 45.0 L 12.0 gal
Diesel Exhaust Fluid (DEF) Tank** 26.5 L 7.0 gal
Engine Oil with Filter 9.5 L 10.0 qt
Power Steering Fluid 4.0 L 8.5 pt
Front Drive Axles (4x4 Only) 2.6 L 5.5 pt
Rear Axle Unit Refill Capacities
Dana Spicer S110 5.9 L 12.5 pt
Dana Spicer S130 5.9 L 12.5 pt
Transfer Case (4x4 Only) 2.84 L 6.0 pt

Chevrolet Silverado 4500HD/5500HD/6500HD Owner Manual (GMNA-Localizing-U.S.-12102101) - 2019 - crc - 10/2/18
Technical Data 409
Application
Capacities
Metric English
*Cooling system refill capacities vary considerably due to differences in engine models and optional equipment, inaddition to the amount of coolant remaining in the system after draining. Total capacity is approximately30 L (8 gal).If the system has been flushed with water or cleaner, a significant amount of the rinse water will remain in thesystem. In this case, refilling with a mixture with a higher percentage (60–66%) of coolant concentrate is advised inorder to achieve a final mixture closer to 50/50. Fill the system and run the vehicle until the thermostat opens.Before adding any fluid, check the coolant concentration and add additional water or concentrated undilutedcoolant to adjust the concentration. Run the vehicle and retest for coolant volume level (set to MAX line) andconcentration level.
**Do not overfill the DEF tank. See Diesel Exhaust Fluid 0 220.
A variety of transmissions are available for your vehicle. Refer to the Allison Automatic Transmission Manual forthe most up-to-date specific service instructions, required capacities, and transmission fluids.
All quantities are approximate. When adding, be sure to fill to the appropriate level, as recommended in thismanual. Recheck fluid level after filling.
Engine Specifications
Engine VIN Code Type
6.6L 8-Cylinder Turbo Diesel (L5D Engine) PV V8

Chevrolet Silverado 4500HD/5500HD/6500HD Owner Manual (GMNA-Localizing-U.S.-12102101) - 2019 - crc - 10/2/18
410 Technical Data
Torque Specifications
U-Bolt Nut Torque Charts
RPO Code Rear Suspension TypeTorque
Y lb-ft
GR4 6 100 kg (13,500 lb) Capacity, RR, Springs, Vari-Rate 353–407 260–300
FU7 7 000 kg (15,500 lb) Capacity, RR, Springs, Vari-Rate 353–407 260–300
GR3 4 900 kg (11,000 lb) Capacity, Variable Rate SpringSuspension
353–407 260-300
G40 5 400 kg (12,000 lb) Capacity, International RideOptimized Suspension (IROS)
353–407 260–300
GP1 6 100 kg (13,500 lb) Capacity, International RideOptimized Suspension (IROS)
353–407 260–300
GP8 7 000 kg (15,500 lb) Capacity, International RideOptimized Suspension (IROS)
353–407 260–300
For all other vendor supplied suspensions, refer to the vendor's website for proper torque specifications.
RPO Code Front Suspension TypeTorque
Y lb-ft
FSN 3 600 kg (8,000 lb) Capacity, Spring Parabolic, TaperLeaf; with Shock Absorbers
235–265 173–195

Chevrolet Silverado 4500HD/5500HD/6500HD Owner Manual (GMNA-Localizing-U.S.-12102101) - 2019 - crc - 10/2/18
Technical Data 411
RPO Code Front Suspension TypeTorque
Y lb-ft
FK6 3 100 kg (7,000 lb) Capacity, Spring Parabolic, TaperLeaf; with Shock Absorbers
235–265 173–195
F95 2 700 kg (6,000 lb) Capacity, Spring Taper Leaf,Shackle Type; with Shock Absorbers
235–265 173–195
FTV 3 400 kg (7,500 lb) Capacity, Spring Taper Leaf,Shackle Type; with Shock Absorbers
235–265 173–195
Disc Wheel Nut Torque Chart
Lug Nut Size Lug Nut Type Socket SizeTorque
Y lb-ft
22 mm 2 piece 33 mm 610–678 450–500
Carefully lubricate the wheel stud threads by wiping them with a freshly oiled cloth. Keep lubricant away from theflange nut washer surface and flat on the disc wheel.

Chevrolet Silverado 4500HD/5500HD/6500HD Owner Manual (GMNA-Localizing-U.S.-12102101) - 2019 - crc - 10/2/18
412 Technical Data
Engine Drive Belt Routing
6.6L V8 Engine (Single Generatorwithout Air Compressor)
6.6L V8 Engine (Single Generatorwith Air Compressor)
6.6L V8 Engine Engine (DualGenerator without Air
Compressor)

Chevrolet Silverado 4500HD/5500HD/6500HD Owner Manual (GMNA-Localizing-U.S.-12102101) - 2019 - crc - 10/2/18
Technical Data 413
6.6L V8 Engine Engine (DualGenerator with Air Compressor)

Chevrolet Silverado 4500HD/5500HD/6500HD Owner Manual (GMNA-Localizing-U.S.-12102101) - 2019 - crc - 10/2/18
414 Customer Information
CustomerInformation
Customer InformationCustomer SatisfactionProcedure . . . . . . . . . . . . . . . . . . . 414
Customer AssistanceOffices . . . . . . . . . . . . . . . . . . . . . . 416
Customer Assistance for TextTelephone (TTY) Users . . . . . 417
Online Owner Center . . . . . . . . . 417GM Mobility ReimbursementProgram . . . . . . . . . . . . . . . . . . . . 418
Roadside AssistanceProgram . . . . . . . . . . . . . . . . . . . . 418
Scheduling ServiceAppointments . . . . . . . . . . . . . . . 420
Courtesy TransportationProgram . . . . . . . . . . . . . . . . . . . . 420
Collision Damage Repair . . . . . 421Publication OrderingInformation . . . . . . . . . . . . . . . . . . 423
Radio FrequencyStatement . . . . . . . . . . . . . . . . . . . 424
Reporting Safety DefectsReporting Safety Defects tothe United StatesGovernment . . . . . . . . . . . . . . . . . 425
Reporting Safety Defects tothe CanadianGovernment . . . . . . . . . . . . . . . . . 425
Reporting Safety Defects toGeneral Motors . . . . . . . . . . . . . 425
Vehicle Data Recording andPrivacyVehicle Data Recording andPrivacy . . . . . . . . . . . . . . . . . . . . . . 426
Event Data Recorders . . . . . . . . 426OnStar . . . . . . . . . . . . . . . . . . . . . . . 427Infotainment System . . . . . . . . . . 427
Customer Information
Customer SatisfactionProcedureYour satisfaction and goodwill areimportant to your dealer and toChevrolet. Normally, any concernswith the sales transaction or theoperation of the vehicle will beresolved by your dealer's sales orservice departments. Sometimes,however, despite the best intentionsof all concerned, misunderstandingscan occur. If your concern has notbeen resolved to your satisfaction,the following steps should be taken:
STEP ONE : Discuss your concernwith a member of dealershipmanagement. Normally, concernscan be quickly resolved at that level.If the matter has already beenreviewed with the sales, service,or parts manager, contact the ownerof your dealership or the generalmanager.
STEP TWO : If after contacting amember of dealership management,it appears your concern cannot be

Chevrolet Silverado 4500HD/5500HD/6500HD Owner Manual (GMNA-Localizing-U.S.-12102101) - 2019 - crc - 10/2/18
Customer Information 415
resolved by your dealership withoutfurther help, in the U.S., call theChevrolet Customer AssistanceCenter at 1-800-222-1020. InCanada, call General Motors ofCanada Customer Care Centre at1-800-263-3777 (English),or 1-800-263-7854 (French).
We encourage you to call thetoll-free number in order to give yourinquiry prompt attention. Have thefollowing information available togive the Customer Assistancerepresentative:
. Vehicle IdentificationNumber (VIN). This is availablefrom the vehicle registration ortitle, or the plate at the top left ofthe instrument panel and visiblethrough the windshield.
. Dealership name and location.
. Vehicle delivery date andpresent mileage.
When contacting Chevrolet,remember that your concern willlikely be resolved at a dealer'sfacility. That is why we suggestfollowing Step One first.
STEP THREE — U.S. Owners :Both General Motors and yourdealer are committed to makingsure you are completely satisfiedwith your new vehicle. However,if you continue to remain unsatisfiedafter following the procedureoutlined in Steps One and Two, youcan file with the Better BusinessBureau (BBB) Auto Line Program toenforce your rights.
The BBB Auto Line Program is anout-of-court program administeredby the Council of Better BusinessBureaus to settle automotivedisputes regarding vehicle repairs orthe interpretation of the New VehicleLimited Warranty. Although you maybe required to resort to this informaldispute resolution program prior tofiling a court action, use of theprogram is free of charge and yourcase will generally be heard within40 days. If you do not agree with thedecision given in your case, youmay reject it and proceed with anyother venue for relief availableto you.
You may contact the BBB Auto LineProgram using the toll-freetelephone number or write them atthe following address:
BBB Auto Line ProgramCouncil of Better Business Bureaus,Inc.3033 Wilson BoulevardSuite 600Arlington, VA 22201
Telephone: 1-800-955-5100http://www.bbb.org/council/programs-services/dispute-handling-and-resolution/bbb-auto-line
This program is available in all50 states and the District ofColumbia. Eligibility is limited byvehicle age, mileage, and otherfactors. General Motors reservesthe right to change eligibilitylimitations and/or discontinue itsparticipation in this program.
STEP THREE — CanadianOwners : In the event that you donot feel your concerns have beenaddressed after following theprocedure outlined in Steps One

Chevrolet Silverado 4500HD/5500HD/6500HD Owner Manual (GMNA-Localizing-U.S.-12102101) - 2019 - crc - 10/2/18
416 Customer Information
and Two, General Motors of CanadaCompany wants you to be aware ofits participation in a no-chargeMediation/Arbitration Program.General Motors of CanadaCompany has committed to bindingarbitration of owner disputesinvolving factory-related vehicleservice claims. The programprovides for the review of the factsinvolved by an impartial third partyarbiter, and may include an informalhearing before the arbiter. Theprogram is designed so that theentire dispute settlement process,from the time you file your complaintto the final decision, should becompleted in about 70 days. Webelieve our impartial program offersadvantages over courts in mostjurisdictions because it is informal,quick, and free of charge.
For further information concerningeligibility in the Canadian MotorVehicle Arbitration Plan (CAMVAP),call toll-free 1-800-207-0685, or callthe General Motors Customer CareCentre, 1-800-263-3777 (English),1-800-263-7854 (French),or write to:
The Mediation/Arbitration Programc/o Customer Care CentreGeneral Motors of CanadaCompanyMail Code: CA1-163-0051908 Colonel Sam DriveOshawa, Ontario L1H 8P7
Your inquiry should be accompaniedby the Vehicle IdentificationNumber (VIN).
Customer AssistanceOfficesChevrolet encourages customers tocall the toll-free number forassistance. However, if a customerwishes to write or e-mail Chevrolet,the letter should be addressed to:
United States and Puerto Rico
Chevrolet Motor DivisionChevrolet Customer AssistanceCenterP.O. Box 33170Detroit, MI 48232-5170www.Chevrolet.com
1-800-222-10201-800-833-2438 (For TextTelephone Devices (TTYs))Roadside Assistance:1-888-899-1327
From U.S. Virgin Islands:
1-800-496-9994

Chevrolet Silverado 4500HD/5500HD/6500HD Owner Manual (GMNA-Localizing-U.S.-12102101) - 2019 - crc - 10/2/18
Customer Information 417
Canada
General Motors of CanadaCompanyCustomer Care Centre, Mail Code:CA1-163-0051908 Colonel Sam DriveOshawa, Ontario L1H 8P7www.gm.ca
1-800-263-3777 (English)1-800-263-7854 (French)1-800-263-3830 (For TextTelephone devices (TTYs))Roadside Assistance:1-800-268-6800
Overseas
Please contact the local GeneralMotors Business Unit.
Customer Assistance forText Telephone (TTY)UsersTo assist customers who are deaf,hard of hearing, or speech-impairedand who use Text Telephones(TTYs), Chevrolet has TTYequipment available at its CustomerAssistance Center. Any TTY user in
the U.S. can communicate withChevrolet by dialing:1-800-833-2438. TTY users inCanada can dial 1-800-263-3830.
Online Owner Center
Online Owner Experience(U.S.) my.chevrolet.com
The Chevrolet online ownerexperience allows interaction withChevrolet and keeps importantvehicle-specific information in oneplace.
Membership Benefits
E : Download owner’s manualsand view vehicle-specific how-tovideos.
G : View maintenance schedules,alerts, and Vehicle DiagnosticInformation. Schedule serviceappointments.
I : View and print dealer-recordedservice records and self-recordedservice records.
D : Select a preferred dealer andview locations, maps, phonenumbers, and hours.
r : Track your vehicle’s warrantyinformation.
J : View active recalls by VehicleIdentification Number (VIN). SeeVehicle Identification Number (VIN)0 407.
H : View GM Card, SiriusXMSatellite radio (if equipped), andOnStar account information (ifequipped).
F : Chat with online helprepresentatives.
See my.chevrolet.com to registeryour vehicle.
Chevrolet Owner Centre(Canada)www.chevroletowner.ca
Visit the Chevrolet Owner Centre:
. Chat live with online helprepresentatives.

Chevrolet Silverado 4500HD/5500HD/6500HD Owner Manual (GMNA-Localizing-U.S.-12102101) - 2019 - crc - 10/2/18
418 Customer Information. Locate owner resources such as
lease-end, financing, andwarranty information.
. Retrieve your favorite articles,quizzes, tips, and multimediagalleries organized into theFeatured Articles and Auto CareSections.
. Download owner’s manuals.
. Find theChevrolet-recommendedmaintenance services.
GM MobilityReimbursement Program
This program is available toqualified applicants for costreimbursement, up to certain limits,of eligible aftermarket adaptiveequipment required for the vehicle,
such as hand controls or awheelchair/scooter lift for thevehicle.
To learn about the GM Mobilityprogram, see www.gmmobility.comor call the GM Mobility AssistanceCenter at 1-800-323-9935. TextTelephone (TTY) users, call1-800-833-9935.
General Motors of Canada also hasa Mobility program. See www.gm.caor call 1-800-GM-DRIVE(800-463-7483) for details. TTYusers call 1-800-263-3830.
Roadside AssistanceProgramFor U.S.-purchased vehicles, call1-888-899-1327. (Text Telephone(TTY): 1-888-889-2438.)
For Canadian-purchased vehicles,call 1-800-268-6800.
Service is available 24 hours a day,365 days a year.
Calling for Assistance
When calling Roadside Assistance,have the following informationready:
. Your name, home address, andhome telephone number
. Telephone number of yourlocation
. Location of the vehicle
. Model, year, color, and licenseplate number of the vehicle
. Odometer reading, VehicleIdentification Number (VIN), anddelivery date of the vehicle
. Description of the problem
Coverage
Services are provided for theduration of the vehicle’s powertrainwarranty.
In the U.S., anyone driving thevehicle is covered. In Canada, aperson driving the vehicle withoutpermission from the owner is notcovered.

Chevrolet Silverado 4500HD/5500HD/6500HD Owner Manual (GMNA-Localizing-U.S.-12102101) - 2019 - crc - 10/2/18
Customer Information 419
Roadside Assistance is not a part ofthe New Vehicle Limited Warranty.General Motors North America andChevrolet reserve the right to makeany changes or discontinue theRoadside Assistance program atany time without notification.
General Motors North America andChevrolet reserve the right to limitservices or payment to an owner ordriver if they decide the claims aremade too often, or the same type ofclaim is made many times.
Services Provided. Emergency Fuel Delivery:
Delivery of enough fuel for thevehicle to get to the nearestservice station.
. Lock-Out Service: Service tounlock the vehicle if you arelocked out. A remote unlock maybe available if you have OnStar.For security reasons, the drivermust present identificationbefore this service is given.
. Emergency Tow from a PublicRoad or Highway: Tow to thenearest Chevrolet dealer for
warranty service, or if the vehiclewas in a crash and cannot bedriven. Assistance is not givenwhen the vehicle is stuck in thesand, mud, or snow.
. Flat Tire Change: Service tochange a flat tire with the sparetire. The spare tire, if equipped,must be in good condition andproperly inflated. It is the owner'sresponsibility for the repair orreplacement of the tire if it is notcovered by the warranty.
. Battery Jump Start: Service tojump start a dead battery.
. Trip Interruption Benefits andAssistance: If your trip isinterrupted due to a warrantyevent, incidental expenses maybe reimbursed within thePowertrain warranty period.Items considered are reasonableand customary hotel, meals,rental car, or a vehicle beingdelivered back to the customer,up to 500 miles.
Services Not Included inRoadside Assistance. Impound towing caused by
violation of any laws
. Legal fines
. Mounting, dismounting,or changing of snow tires,chains, or other traction devices
Service is not provided if a vehicleis in an area that is not accessibleto the service vehicle or is not aregularly traveled or maintainedpublic road, which includes ice andwinter roads. Off-road use is notcovered.
Services Specific toCanadian-Purchased Vehicles. Fuel Delivery: Reimbursement
is up to 7 liters. If available,diesel fuel delivery may berestricted. Propane and otherfuels are not provided throughthis service.
. Lock-Out Service: Vehicleregistration is required.

Chevrolet Silverado 4500HD/5500HD/6500HD Owner Manual (GMNA-Localizing-U.S.-12102101) - 2019 - crc - 10/2/18
420 Customer Information. Trip Interruption Benefits and
Assistance: Must be over150 km from where your trip wasstarted to qualify.Pre-authorization, originaldetailed receipts, and a copy ofthe repair orders are required.Once authorization has beenreceived, the RoadsideAssistance advisor will help tomake arrangements and explainhow to receive payment.
. Alternative Service: Ifassistance cannot be providedright away, the RoadsideAssistance advisor may givepermission to get localemergency road service. You willreceive payment, up to $100,after sending the original receiptto Roadside Assistance.Mechanical failures may becovered, however any cost forparts and labor for repairs notcovered by the warranty are theowner responsibility.
Scheduling ServiceAppointmentsWhen the vehicle requires warrantyservice, contact your dealer andrequest an appointment. Byscheduling a service appointmentand advising the service consultantof your transportation needs, yourdealer can help minimize yourinconvenience.
If the vehicle cannot be scheduledinto the service departmentimmediately, keep driving it until itcan be scheduled for service,unless, of course, the problem issafety related. If it is, please callyour dealership, let them know this,and ask for instructions.
If your dealer requests you to bringthe vehicle for service, you areurged to do so as early in the workday as possible to allow forsame-day repair.
Courtesy TransportationProgramTo enhance your ownershipexperience, we and our participatingdealers are proud to offer CourtesyTransportation, a customer supportprogram for vehicles with theBumper-to-Bumper (Base WarrantyCoverage period in Canada),extended powertrain, and/orhybrid-specific warranties in boththe U.S. and Canada.
Several Courtesy Transportationoptions are available to assist inreducing inconvenience whenwarranty repairs are required.
Courtesy Transportation is not apart of the New Vehicle LimitedWarranty. A separate bookletentitled “Limited Warranty andOwner Assistance Information”furnished with each new vehicleprovides detailed warranty coverageinformation.

Chevrolet Silverado 4500HD/5500HD/6500HD Owner Manual (GMNA-Localizing-U.S.-12102101) - 2019 - crc - 10/2/18
Customer Information 421
Transportation Options
Warranty service can generally becompleted while you wait. However,if you are unable to do so, yourdealer may offer the followingtransportation options:
Shuttle Service
This includes one-way or round-tripshuttle service within reasonabletime and distance parameters ofyour dealer's area.
Public Transportation or FuelReimbursement
If overnight warranty repairs areneeded, and public transportation isused, the expense must besupported by original receipts andwithin the maximum amount allowedby GM for shuttle service. If U.S.customers arrange their owntransportation, limitedreimbursement for reasonable fuelexpenses may be available. Claimamounts should reflect actual costsand be supported by originalreceipts. See your dealer forinformation.
Courtesy Rental Vehicle
For an overnight warranty repair, thedealer may provide an availablecourtesy rental vehicle or provide forreimbursement of a rental vehicle.Reimbursement is limited and mustbe supported by original receipts aswell as a signed and completedrental agreement and meet state/provincial, local, and rental vehicleprovider requirements.Requirements vary and may includeminimum age requirements,insurance coverage, credit card, etc.Additional fees such as fuel usagecharges, taxes, levies, usage fees,excessive mileage, or rental usagebeyond the completion of the repairare also your responsibility.
It may not be possible to provide alike vehicle as a courtesy rental.
Additional ProgramInformation
All program options, such as shuttleservice, may not be available atevery dealer. Contact your dealerfor specific availability.
General Motors reserves the right tounilaterally modify, change,or discontinue CourtesyTransportation at any time and toresolve all questions of claimeligibility pursuant to the terms andconditions described herein at itssole discretion.
Collision Damage RepairIf the vehicle is involved in acollision and it is damaged, have thedamage repaired by a qualifiedtechnician using the properequipment and quality replacementparts. Poorly performed collisionrepairs diminish the vehicle resalevalue, and safety performance canbe compromised in subsequentcollisions.
Collision Parts
Genuine GM Collision parts are newparts made with the same materialsand construction methods as theparts with which the vehicle wasoriginally built. Genuine GMCollision parts are the best choice toensure that the vehicle's designed
Chevrolet Silverado 4500HD/5500HD/6500HD Owner Manual (GMNA-Localizing-U.S.-12102101) - 2019 - crc - 10/2/18
422 Customer Information
appearance, durability, and safetyare preserved. The use of GenuineGM parts can help maintain the GMNew Vehicle Limited Warranty.
Recycled original equipment partsmay also be used for repair. Theseparts are typically removed fromvehicles that were total losses inprior crashes. In most cases, theparts being recycled are fromundamaged sections of the vehicle.A recycled original equipment GMpart may be an acceptable choice tomaintain the vehicle's originallydesigned appearance and safetyperformance; however, the history ofthese parts is not known. Such partsare not covered by the GM NewVehicle Limited Warranty, and anyrelated failures are not covered bythat warranty.
Aftermarket collision parts are alsoavailable. These are made bycompanies other than GM and maynot have been tested for the vehicle.As a result, these parts may fitpoorly, exhibit premature durability/corrosion problems, and may notperform properly in subsequent
collisions. Aftermarket parts are notcovered by the GM New VehicleLimited Warranty, and any vehiclefailure related to such parts is notcovered by that warranty.
Repair Facility
GM also recommends that youchoose a collision repair facility thatmeets your needs before you everneed collision repairs. Your dealermay have a collision repair centerwith GM-trained technicians andstate-of-the-art equipment, or beable to recommend a collision repaircenter that has GM-trainedtechnicians and comparableequipment.
Insuring the Vehicle
Protect your investment in the GMvehicle with comprehensive andcollision insurance coverage. Thereare significant differences in thequality of coverage afforded byvarious insurance policy terms.Many insurance policies providereduced protection to the GMvehicle by limiting compensation fordamage repairs through the use of
aftermarket collision parts. Someinsurance companies will notspecify aftermarket collision parts.When purchasing insurance, werecommend that you ensure that thevehicle will be repaired with GMoriginal equipment collision parts.If such insurance coverage is notavailable from your currentinsurance carrier, consider switchingto another insurance carrier.
If the vehicle is leased, the leasingcompany may require you to haveinsurance that ensures repairs withGenuine GM Original EquipmentManufacturer (OEM) parts orGenuine Manufacturer replacementparts. Read the lease carefully, asyou may be charged at the end ofthe lease for poor quality repairs.
If a Crash Occurs
If there has been an injury, callemergency services for help. Do notleave the scene of a crash until allmatters have been taken care of.Move the vehicle only if its position

Chevrolet Silverado 4500HD/5500HD/6500HD Owner Manual (GMNA-Localizing-U.S.-12102101) - 2019 - crc - 10/2/18
Customer Information 423
puts you in danger, or you areinstructed to move it by a policeofficer.
Give only the necessary informationto police and other parties involvedin the crash.
For emergency towing seeRoadside Assistance Program0 418.
Gather the following information:
. Driver name, address, andtelephone number
. Driver license number
. Owner name, address, andtelephone number
. Vehicle license plate number
. Vehicle make, model, andmodel year
. Vehicle IdentificationNumber (VIN)
. Insurance company and policynumber
. General description of thedamage to the other vehicle
Choose a reputable repair facilitythat uses quality replacement parts.See “Collision Parts” earlier in thissection.
If the airbag has inflated, see WhatWill You See after an AirbagInflates? 0 64.
Managing the Vehicle DamageRepair Process
In the event that the vehicle requiresdamage repairs, GM recommendsthat you take an active role in itsrepair. If you have a pre-determinedrepair facility of choice, take thevehicle there, or have it towed there.Specify to the facility that anyrequired replacement collision partsbe original equipment parts, eithernew Genuine GM parts or recycledoriginal GM parts. Remember,recycled parts will not be covered bythe GM vehicle warranty.
Insurance pays the bill for the repair,but you must live with the repair.Depending on your policy limits,your insurance company mayinitially value the repair usingaftermarket parts. Discuss this with
the repair professional, and insist onGenuine GM parts. Remember,if the vehicle is leased, you may beobligated to have the vehiclerepaired with Genuine GM parts,even if your insurance coveragedoes not pay the full cost.
If another party's insurancecompany is paying for the repairs,you are not obligated to accept arepair valuation based on thatinsurance company's collision policyrepair limits, as you have nocontractual limits with that company.In such cases, you can have controlof the repair and parts choices aslong as the cost stays withinreasonable limits.
Publication OrderingInformation
Service Manuals
Service manuals have the diagnosisand repair information on theengine, transmission, axle,suspension, brakes, electricalsystem, steering system, body, etc.

Chevrolet Silverado 4500HD/5500HD/6500HD Owner Manual (GMNA-Localizing-U.S.-12102101) - 2019 - crc - 10/2/18
424 Customer Information
Customer Literature
Owner’s manuals are writtenspecifically for owners and areintended to provide basicoperational information about thevehicle. The owner’s manualincludes the Maintenance Schedulefor all models.
Customer literature publicationsavailable for purchase includeowner’s manuals, warrantymanuals, infotainment manuals, andportfolios. Portfolios include anowner’s manual, warranty manual,infotainment manual, if applicable,and zip lock bag or pouch.
Current and Past Models
Service manuals and customerliterature are available for manycurrent and past model year GMvehicles.
To order, call 1-800-551-4123Monday–Friday, 8:00 a.m.–6:00 p.m.eastern time
For credit card orders only (VISA,MasterCard, or Discover), seeHelm, Inc. at: www.helminc.com.
To order by mail, write to:
Helm, IncorporatedAttention: Customer Service47911 Halyard DrivePlymouth, MI 48170
Make checks payable in U.S. funds.
Radio FrequencyStatementThis vehicle has systems thatoperate on a radio frequency thatcomplies with Part 15/Part 18 of theFederal CommunicationsCommission (FCC) rules and withInnovation, Science and EconomicDevelopment (ISED) Canada'sRSP-100 / license-exempt RSS's /ICES-001.
Operation is subject to the followingtwo conditions:
1. The device may not causeharmful interference.
2. The device must accept anyinterference received, includinginterference that may causeundesired operation of thedevice.
Changes or modifications to any ofthese systems by other than anauthorized service facility could voidauthorization to use this equipment.

Chevrolet Silverado 4500HD/5500HD/6500HD Owner Manual (GMNA-Localizing-U.S.-12102101) - 2019 - crc - 10/2/18
Customer Information 425
Reporting SafetyDefects
Reporting Safety Defectsto the United StatesGovernmentIf you believe that your vehiclehas a defect which could causea crash or could cause injury ordeath, you should immediatelyinform the National HighwayTraffic Safety Administration(NHTSA) in addition to notifyingGeneral Motors.
If NHTSA receives similarcomplaints, it may open aninvestigation, and if it finds thata safety defect exists in a groupof vehicles, it may order a recalland remedy campaign.However, NHTSA cannotbecome involved in individualproblems between you, yourdealer, or General Motors.
To contact NHTSA, you may callthe Vehicle Safety Hotlinetoll-free at 1-888-327-4236 (TTY:1-800-424-9153); go to http://www.safercar.gov; or write to:
Administrator, NHTSA1200 New Jersey Avenue, S.E.Washington, D.C. 20590
You can also obtain otherinformation about motor vehiclesafety from http://www.safercar.gov.
Reporting Safety Defectsto the CanadianGovernmentIf you live in Canada, and youbelieve that the vehicle has asafety defect, notify TransportCanada immediately, and notifyGeneral Motors of CanadaCompany. Call TransportCanada at 1-800-333-0510;go to:
www.tc.gc.ca/recalls (English)
www.tc.gc.ca/rappels (French)
or write to:
Transport CanadaMotor Vehicle Safety DirectorateDefect Investigations andRecalls Division80 Noel StreetGatineau, QC J8Z 0A1
Reporting Safety Defectsto General MotorsIn addition to notifying NHTSA (orTransport Canada) in a situation likethis, notify General Motors.
In the U.S., call 1-800-222-1020,or write:
Chevrolet Motor DivisionChevrolet Customer AssistanceCenterP.O. Box 33170Detroit, MI 48232-5170

Chevrolet Silverado 4500HD/5500HD/6500HD Owner Manual (GMNA-Localizing-U.S.-12102101) - 2019 - crc - 10/2/18
426 Customer Information
In Canada, call 1-800-263-3777(English) or 1-800-263-7854(French), or write:
General Motors of CanadaCompanyCustomer Care Centre, Mail Code:CA1-163-0051908 Colonel Sam DriveOshawa, Ontario L1H 8P7
In Mexico, call 01-800-466-0811.
In other Central America andCaribbean Countries, call52-722-236-0680.
Vehicle DataRecording andPrivacyThe vehicle has a number ofcomputers that record informationabout the vehicle’s performance andhow it is driven. For example, thevehicle uses computer modules tomonitor and control engine andtransmission performance, tomonitor the conditions for airbagdeployment and deploy them in acrash, and, if equipped, to provideantilock braking to help the drivercontrol the vehicle. These modulesmay store data to help the dealertechnician service the vehicle.Some modules may also store dataabout how the vehicle is operated,such as rate of fuel consumption oraverage speed. These modules mayretain personal preferences, such asradio presets, seat positions, andtemperature settings.
Event Data RecordersThis vehicle is equipped with anevent data recorder (EDR). Themain purpose of an EDR is torecord, in certain crash or nearcrash-like situations, such as an airbag deployment or hitting a roadobstacle, data that will assist inunderstanding how a vehicle’ssystems performed. The EDR isdesigned to record data related tovehicle dynamics and safetysystems for a short period of time,typically 30 seconds or less. TheEDR in this vehicle is designed torecord such data as:
. How various systems in yourvehicle were operating;
. Whether or not the driver andpassenger safety belts werebuckled/fastened;
. How far (if at all) the driver wasdepressing the accelerator and/or brake pedal; and,
. How fast the vehicle wastraveling.

Chevrolet Silverado 4500HD/5500HD/6500HD Owner Manual (GMNA-Localizing-U.S.-12102101) - 2019 - crc - 10/2/18
Customer Information 427
These data can help provide abetter understanding of thecircumstances in which crashes andinjuries occur.
NoteEDR data are recorded by yourvehicle only if a non-trivial crashsituation occurs; no data arerecorded by the EDR under normaldriving conditions and no personaldata (e.g., name, gender, age, andcrash location) are recorded.However, other parties, such as lawenforcement, could combine theEDR data with the type ofpersonally identifying data routinelyacquired during a crashinvestigation.
To read data recorded by an EDR,special equipment is required, andaccess to the vehicle or the EDR isneeded. In addition to the vehiclemanufacturer, other parties, such aslaw enforcement, that have thespecial equipment, can read theinformation if they have access tothe vehicle or the EDR.
GM will not access these data orshare it with others except: with theconsent of the vehicle owner or,if the vehicle is leased, with theconsent of the lessee; in responseto an official request by police orsimilar government office; as part ofGM's defense of litigation throughthe discovery process; or, asrequired by law. Data that GMcollects or receives may also beused for GM research needs or maybe made available to others forresearch purposes, where a need isshown and the data is not tied to aspecific vehicle or vehicle owner.
OnStarIf the vehicle is equipped withOnStar and has an active serviceplan, additional data may becollected through the OnStarsystem. This includes informationabout the vehicle’s operation;collisions involving the vehicle; theuse of the vehicle and its features;and, in certain situations, thelocation and approximate GPSspeed of the vehicle. Refer to the
OnStar Terms and Conditions andPrivacy Statement on the OnStarwebsite.
See OnStar Additional Information0 430.
Infotainment SystemIf the vehicle is equipped with anavigation system as part of theinfotainment system, use of thesystem may result in the storage ofdestinations, addresses, telephonenumbers, and other trip information.See the infotainment manual forinformation on stored data and fordeletion instructions.

Chevrolet Silverado 4500HD/5500HD/6500HD Owner Manual (GMNA-Localizing-U.S.-12102101) - 2019 - crc - 10/2/18
428 OnStar
OnStar
OnStar OverviewOnStar Overview . . . . . . . . . . . . . 428
OnStar ServicesEmergency . . . . . . . . . . . . . . . . . . . 429Security . . . . . . . . . . . . . . . . . . . . . . 430
OnStar Additional InformationOnStar AdditionalInformation . . . . . . . . . . . . . . . . . . 430
OnStar Overview
= Voice Command Button
Q Blue OnStar Button
> Red Emergency Button
This vehicle may be equipped with acomprehensive, in-vehicle systemthat can connect to an OnStarAdvisor for Emergency, Security,Navigation, Connections, andDiagnostics Services. OnStarservices may require a paid serviceplan and data plan. OnStar requiresthe vehicle battery and electricalsystem, cellular service, and GPSsatellite signals to be available andoperating. OnStar acts as a link toexisting emergency serviceproviders. OnStar may collectinformation about you and yourvehicle, including locationinformation. See OnStar User
Terms, Privacy Statement, andSoftware Terms for more detailsincluding system limitations atwww.onstar.com (U.S.) orwww.onstar.ca (Canada).
The OnStar system status light isnext to the OnStar buttons. If thestatus light is:
. Solid Green: System is ready.
. Flashing Green: On a call.
. Red: Indicates a problem.
. Off: System is off. Press Qtwice to speak with an OnStarAdvisor.
PressQ or call 1-888-4ONSTAR(1-888-466-7827) to speak to anAdvisor.
Functionality of the Voice Commandbutton may vary by vehicle andregion.

Chevrolet Silverado 4500HD/5500HD/6500HD Owner Manual (GMNA-Localizing-U.S.-12102101) - 2019 - crc - 10/2/18
OnStar 429
Press= to:
. Open the OnStar app on theinfotainment display. See theinfotainment manual forinformation on how to use theOnStar app.
Or
. Make a call, end a call,or answer an incoming call.
. Give OnStar Hands-Free Callingvoice commands.
. Give OnStar Turn-by-TurnNavigation voice commands.
. Obtain and customize the Wi-Fihotspot name or SSID andpassword, if equipped.
PressQ to connect to anAdvisor to:
. Verify account information orupdate contact information.
. Get driving directions.
. Receive a Diagnostic check ofthe vehicle's key operatingsystems.
. Receive Roadside Assistance.
. Manage Wi-Fi Settings,if equipped.
Press> to get a priority connectionto an OnStar Advisor available 24/7 to:
. Get help for an emergency.
. Be a Good Samaritan orrespond to an AMBER Alert.
. Get assistance in severeweather or other crisis situationsand find evacuation routes.
OnStar Services
EmergencyEmergency Services require anactive safety and security plan. WithAutomatic Crash Response, built-insensors can automatically alert aspecially trained OnStar Advisorwho is immediately connected in tothe vehicle to help.
Press> for a priority connection toan OnStar Advisor who can contactemergency service providers, directthem to your exact location, andrelay important information.
With OnStar Crisis Assist, speciallytrained Advisors are available24 hours a day, 7 days a week, toprovide a central point of contact,assistance, and information during acrisis.
With Roadside Assistance, Advisorscan locate a nearby service providerto help with a flat tire, a batteryjump, or an empty gas tank.

Chevrolet Silverado 4500HD/5500HD/6500HD Owner Manual (GMNA-Localizing-U.S.-12102101) - 2019 - crc - 10/2/18
430 OnStar
SecurityIf equipped, OnStar provides theseservices:
. With Stolen Vehicle Assistance,OnStar Advisors can use GPS topinpoint the vehicle and helpauthorities quickly recover it.
. With Remote Ignition Block,if equipped, OnStar can blockthe engine from being restarted.
. With Stolen Vehicle Slowdown,if equipped, OnStar can workwith law enforcement togradually slow the vehicle down.
Theft Alarm Notification
If equipped, if the doors are lockedand the vehicle alarm sounds, anotification by text, e-mail, or phonecall will be sent. If the vehicle isstolen, an OnStar Advisor can workwith authorities to recover thevehicle.
OnStar AdditionalInformationIn-Vehicle Audio Messages
Audio messages may play importantinformation at the following times:
. Prior to vehicle purchase. PressQ to set up an account.
. After change in ownership andat 90 days.
Transferring Service
PressQ to request account transfereligibility information. The Advisorcan cancel or change accountinformation.
Selling/Transferring theVehicle
Call 1-888-4ONSTAR(1-888-466-7827) immediately toterminate your OnStar or connectedservices if the vehicle is disposedof, sold, transferred, or if thelease ends.
Reactivation for SubsequentOwners
PressQ and follow the prompts tospeak to an Advisor as soon aspossible. The Advisor will updatevehicle records and explain OnStaror connected service options.
How OnStar Service Works
Automatic Crash Response,Emergency Services, Crisis Assist,Stolen Vehicle Assistance, RemoteServices, Roadside Assistance, andHands-Free Calling are available onmost vehicles. Not all OnStarservices are available everywhereor on all vehicles. For moreinformation, a full description ofOnStar services, system limitations,and OnStar User Terms, PrivacyStatement, and Software Terms:
. Call 1-888-4ONSTAR(1-888-466-7827).
. See www.onstar.com (U.S.).
. See www.onstar.ca (Canada).
. Call TTY 1-877-248-2080.

Chevrolet Silverado 4500HD/5500HD/6500HD Owner Manual (GMNA-Localizing-U.S.-12102101) - 2019 - crc - 10/2/18
OnStar 431
. PressQ to speak with anAdvisor.
OnStar or connected servicescannot work unless the vehicle is ina place where OnStar has anagreement with a wireless serviceprovider for service in that area. Thewireless service provider must alsohave coverage, network capacity,reception, and technologycompatible with OnStar orconnected services. Serviceinvolving location information aboutthe vehicle cannot work unless GPSsignals are available, unobstructed,and compatible with the OnStarhardware. OnStar or connectedservices may not work if the OnStarequipment is not properly installedor it has not been properlymaintained. If equipment or softwareis added, connected, or modified,OnStar or connected services maynot work. Other problems beyondthe control of OnStar — such ashills, tall buildings, tunnels, weather,electrical system design andarchitecture of the vehicle, damage
to the vehicle in a crash, or wirelessphone network congestion orjamming — may prevent service.
See Radio Frequency Statement0 424.
Services for People withDisabilities
Advisors provide services to helpwith physical disabilities andmedical conditions.
PressQ to help:
. Locate a gas station with anattendant to pump gas.
. Find a hotel, restaurant, etc.,that meets accessibility needs.
. Provide directions to the closesthospital or pharmacy in urgentsituations.
TTY Users
OnStar has the ability tocommunicate to deaf,hard-of-hearing, or speech-impairedcustomers while in the vehicle. Theavailable dealer-installed TTYsystem can provide in-vehicle
access to all OnStar services,except Virtual Advisor and OnStarTurn-by-Turn Navigation.
If equipped, TTY mode can beturned on or off by touchingSettings, then Apps, and thenPhone. When TTY mode is on,phone calls can be made orreceived with OnStar using theinfotainment display.
OnStar Personal IdentificationNumber (PIN)
A PIN is needed to access someOnStar services. The PIN will needto be changed the first time whenspeaking with an Advisor. Tochange the OnStar PIN, contact anOnStar Advisor by pressingQ orcalling 1-888-4ONSTAR.
Warranty
OnStar equipment may bewarranted as part of the vehiclewarranty.

Chevrolet Silverado 4500HD/5500HD/6500HD Owner Manual (GMNA-Localizing-U.S.-12102101) - 2019 - crc - 10/2/18
432 OnStar
Languages
The vehicle can be programmed torespond in multiple languages.PressQ and ask for an Advisor.Advisors are available in English,Spanish, and French. Availablelanguages may vary by country.
Potential Issues
OnStar cannot perform RemoteDoor Unlock or Stolen VehicleAssistance after the vehicle hasbeen off continuously for 10 dayswithout an ignition cycle. If thevehicle has not been started for10 days, OnStar can contactRoadside Assistance or a locksmithto help gain access to the vehicle.
Global PositioningSystem (GPS). Obstruction of the GPS can
occur in a large city with tallbuildings; in parking garages;around airports; in tunnels andunderpasses; or in an area withvery dense trees. If GPS signalsare not available, the OnStarsystem should still operate to
call OnStar. However, OnStarcould have difficulty identifyingthe exact location.
. In emergency situations, OnStarcan use the last stored GPSlocation to send to emergencyresponders.
A temporary loss of GPS can causeloss of the ability to send aTurn-by-Turn Navigation route. TheAdvisor may give a verbal route ormay ask for a call back after thevehicle is driven into an open area.
Cellular and GPS Antennas
Cellular reception is required forOnStar to send remote signals tothe vehicle. Do not place items overor near the antenna to preventblocking cellular and GPS signalreception.
Unable to Connect to OnStarMessage
If there is limited cellular coverageor the cellular network has reachedmaximum capacity, this message
may come on. PressQ to try thecall again or try again after driving afew miles into another cellular area.
Vehicle and Power Issues
OnStar services require a vehicleelectrical system, wireless service,and GPS satellite technologies to beavailable and operating for featuresto function properly. These systemsmay not operate if the battery isdischarged or disconnected.
Add-on Electrical Equipment
The OnStar system is integratedinto the electrical architecture of thevehicle. Do not add any electricalequipment. See Add-On ElectricalEquipment 0 266. Added electricalequipment may interfere with theoperation of the OnStar system andcause it to not operate.
Vehicle Software Updates
OnStar or GM may remotely deliversoftware updates or changes to thevehicle without further notice orconsent. These updates or changesmay enhance or maintain safety,

Chevrolet Silverado 4500HD/5500HD/6500HD Owner Manual (GMNA-Localizing-U.S.-12102101) - 2019 - crc - 10/2/18
OnStar 433
security, or the operation of thevehicle or the vehicle systems.Software updates or changes mayaffect or erase data or settings thatare stored in the vehicle, such asOnStar Hands-Free Calling nametags, saved navigation destinations,or pre-set radio stations. NeitherOnStar nor GM is responsible forany affected or erased data orsettings. These updates or changesmay also collect personalinformation. Such collection isdescribed in the OnStar privacystatement or separately disclosed atthe time of installation. Theseupdates or changes may also causea system to automaticallycommunicate with GM servers tocollect information about vehiclesystem status, identify whetherupdates or changes are available,or deliver updates or changes. Anactive OnStar agreement constitutesconsent to these software updatesor changes and agreement thateither OnStar or GM may remotelydeliver them to the vehicle.
Privacy
The complete OnStar PrivacyStatement may be found atwww.onstar.com (U.S.),or www.onstar.ca (Canada). Werecommend that you review it. If youhave any questions, call1-888-4ONSTAR (1-888-466-7827)or pressQ to speak with anAdvisor. Users of wirelesscommunications are cautioned thatthe privacy of any information sentvia wireless cellular communicationscannot be assured. Third partiesmay unlawfully intercept or accesstransmissions and privatecommunications without consent.
OnStar - SoftwareAcknowledgements
Certain OnStar components includelibcurl and unzip software and otherthird party software. Below are thenotices and licenses associated withlibcurl and unzip and for other thirdparty software please see http://opensource.lge.com/index
www.onstar.com/us/en/
libcurl:
COPYRIGHT AND PERMISSIONNOTICE
Copyright (c) 1996 - 2010, DanielStenberg, <[email protected]>.
All rights reserved.
Permission to use, copy, modify,and distribute this software for anypurpose with or without fee ishereby granted, provided that theabove copyright notice and thispermission notice appear in allcopies.
THE SOFTWARE IS PROVIDED“AS IS,” WITHOUT WARRANTY OFANY KIND, EXPRESS ORIMPLIED, INCLUDING BUT NOTLIMITED TO THE WARRANTIESOF MERCHANTABILITY, FITNESSFOR A PARTICULAR PURPOSEAND NONINFRINGEMENT OFTHIRD PARTY RIGHTS. IN NOEVENT SHALL THE AUTHORS ORCOPYRIGHT HOLDERS BELIABLE FOR ANY CLAIM,DAMAGES OR OTHER LIABILITY,WHETHER IN AN ACTION OFCONTRACT, TORT OR

Chevrolet Silverado 4500HD/5500HD/6500HD Owner Manual (GMNA-Localizing-U.S.-12102101) - 2019 - crc - 10/2/18
434 OnStar
OTHERWISE, ARISING FROM,OUT OF OR IN CONNECTIONWITH THE SOFTWARE OR THEUSE OR OTHER DEALINGS INTHE SOFTWARE.
Except as contained in this notice,the name of a copyright holder shallnot be used in advertising orotherwise to promote the sale, useor other dealings in this Softwarewithout prior written authorization ofthe copyright holder.
unzip:
This is version 2005-Feb-10 of theInfo-ZIP copyright and license. Thedefinitive version of this documentshould be available at ftp://ftp.info-zip.org/pub/infozip/license.html indefinitely.
Copyright (c) 1990-2005 Info-ZIP. Allrights reserved.
For the purposes of this copyrightand license, “Info-ZIP” is defined asthe following set of individuals:
Mark Adler, John Bush, Karl Davis,Harald Denker, Jean-Michel Dubois,Jean-loup Gailly, Hunter Goatley, Ed
Gordon, Ian Gorman, ChrisHerborth, Dirk Haase, Greg Hartwig,Robert Heath, Jonathan Hudson,Paul Kienitz, David Kirschbaum,Johnny Lee, Onno van der Linden,Igor Mandrichenko, Steve P. Miller,Sergio Monesi, Keith Owens,George Petrov, Greg Roelofs, KaiUwe Rommel, Steve Salisbury,Dave Smith, Steven M. Schweda,Christian Spieler, Cosmin Truta,Antoine Verheijen, Paul von Behren,Rich Wales, Mike White.
This software is provided “as is,”without warranty of any kind,express or implied. In no event shallInfo-ZIP or its contributors be heldliable for any direct, indirect,incidental, special or consequentialdamages arising out of the use of orinability to use this software.
Permission is granted to anyone touse this software for any purpose,including commercial applications,and to alter it and redistribute itfreely, subject to the followingrestrictions:
1. Redistributions of source codemust retain the above copyrightnotice, definition, disclaimer,and this list of conditions.
2. Redistributions in binary form(compiled executables) mustreproduce the above copyrightnotice, definition, disclaimer,and this list of conditions indocumentation and/or othermaterials provided with thedistribution. The sole exceptionto this condition is redistributionof a standard UnZipSFX binary(including SFXWiz) as part of aself-extracting archive; that ispermitted without inclusion ofthis license, as long as thenormal SFX banner has notbeen removed from the binaryor disabled.
3. Altered versions–including, butnot limited to, ports to newoperating systems, existingports with new graphicalinterfaces, and dynamic,shared, or static libraryversions–must be plainlymarked as such and must not

Chevrolet Silverado 4500HD/5500HD/6500HD Owner Manual (GMNA-Localizing-U.S.-12102101) - 2019 - crc - 10/2/18
OnStar 435
be misrepresented as beingthe original source. Suchaltered versions also must notbe misrepresented as beingInfo-ZIP releases–including,but not limited to, labeling ofthe altered versions with thenames “Info-ZIP” (or anyvariation thereof, including, butnot limited to, differentcapitalizations), “PocketUnZip,” “WiZ” or “MacZip”without the explicit permissionof Info-ZIP. Such alteredversions are further prohibitedfrom misrepresentative use ofthe Zip-Bugs or Info-ZIP e-mailaddresses or of theInfo-ZIP URL(s).
4. Info-ZIP retains the right to usethe names “Info-ZIP,” “Zip,”“UnZip,” “UnZipSFX,” “WiZ,”“Pocket UnZip,” “Pocket Zip,”and “MacZip” for its ownsource and binary releases.

Chevrolet Silverado 4500HD/5500HD/6500HD Owner Manual (GMNA-Localizing-U.S.-12102101) - 2019 - crc - 10/2/18
436 Connected Services
ConnectedServices
Connected ServicesNavigation . . . . . . . . . . . . . . . . . . . . 436Connections . . . . . . . . . . . . . . . . . . 437Diagnostics . . . . . . . . . . . . . . . . . . . 439
Connected Services
NavigationNavigation requires a specificOnStar or connected service plan.
PressQ to receive Turn-by-Turndirections or have them sent to thevehicle’s navigation screen,if equipped.
Turn-by-Turn Navigation
1. PressQ to connect to anAdvisor.
2. Request directions to bedownloaded to the vehicle.
3. Follow the voice-guidedcommands.
Using Voice CommandsDuring a Planned Route
Functionality of the Voice Commandbutton, if equipped, may vary byvehicle and region. For somevehicles, press= to open the
OnStar app on the infotainmentdisplay. For other vehicles press=as follows.
Cancel Route
1. Press=. System responds:“OnStar ready,” then a tone.
2. Say “Cancel route.” Systemresponds: “Do you want tocancel directions?”
3. Say “Yes.” System responds:“OK, request completed, thankyou, goodbye.”
Route Preview
1. Press=. System responds:“OnStar ready,” then a tone.
2. Say “Route preview.” Systemresponds with the next threemaneuvers.
Repeat
1. Press=. System responds:“OnStar ready,” then a tone.

Chevrolet Silverado 4500HD/5500HD/6500HD Owner Manual (GMNA-Localizing-U.S.-12102101) - 2019 - crc - 10/2/18
Connected Services 437
2. Say “Repeat.” Systemresponds with the last directiongiven, then responds with“OnStar ready,” then a tone.
Get My Destination
1. Press=. System responds:“OnStar ready,” then a tone.
2. Say “Get my destination.”System responds with theaddress and distance to thedestination, then responds with“OnStar ready,” then a tone.
Send Destination to Vehicle
Directions can be sent to thevehicle’s navigation screen,if equipped.
PressQ, then ask the Advisor todownload directions to the vehicle’snavigation system, if equipped. Afterthe call ends, the navigation screenwill provide prompts to begin drivingdirections. Routes that are sent tothe navigation screen can only becanceled through the navigationsystem.
See www.onstar.com (U.S.) orwww.onstar.ca (Canada).
ConnectionsThe following services help withstaying connected.
For coverage maps, seewww.onstar.com (U.S.) orwww.onstar.ca (Canada).
Ensuring Security
. Change the default passwordsfor the Wi-Fi hotspot andmyChevrolet mobile application.Make these passwords differentfrom each other and use acombination of letters, numbers,and symbols to increase thesecurity.
. Change the default name of theSSID (Service Set Identifier).This is your network’s name thatis visible to other wirelessdevices. Choose a unique nameand avoid family names orvehicle descriptions.
Wi-Fi Hotspot (If Equipped)
The vehicle may have a built-inWi-Fi hotspot that provides accessto the Internet and web content at4G LTE speed. Up to seven mobiledevices can be connected. A dataplan is required. Use the in-vehiclecontrols only when it is safe todo so.
1. To retrieve Wi-Fi hotspotinformation, press= to openthe OnStar app on theinfotainment display, thenselect Wi-Fi Hotspot. On somevehicles, touch Wi-Fi or Wi-FiSettings on the screen.
2. The Wi-Fi settings will displaythe Wi-Fi hotspot name (SSID),password, and on somevehicles, the connection type(no Internet connection, 3G,4G, 4G LTE), and signal quality(poor, good, excellent).
3. To change the SSID orpassword, pressQ or call1-888-4ONSTAR to connectwith an Advisor. On some

Chevrolet Silverado 4500HD/5500HD/6500HD Owner Manual (GMNA-Localizing-U.S.-12102101) - 2019 - crc - 10/2/18
438 Connected Services
vehicles, the SSID andpassword can be changed inthe Wi-Fi Hotspot menu.
After initial set-up, your vehicle’sWi-Fi hotspot will connectautomatically to your mobiledevices. Manage data usage byturning Wi-Fi on or off on yourmobile device, using themyChevrolet mobile app, or bycontacting an OnStar Advisor. Onsome vehicles, Wi-Fi can also bemanaged from the Wi-FiHotspot menu.
MyChevrolet Mobile App (IfAvailable)
Download the myChevrolet mobileapp to compatible Apple andAndroid smartphones. Chevroletusers can access the followingservices from a smartphone:
. Remotely start/stop the vehicle,if factory-equipped.
. Lock/unlock doors, if equippedwith automatic locks.
. Activate the horn and lamps.
. Check the vehicle’s fuel level, oillife, or tire pressure,if factory-equipped with the TirePressure Monitor System.
. Send destinations to the vehicle.
. Locate the vehicle on a map(U.S. market only).
. Turn the vehicle's Wi-Fi hotspoton/off, manage settings, andmonitor data consumption,if equipped.
. Locate a dealer and scheduleservice.
. Request roadside assistance.
. Set a parking reminder with pindrop, take a photo, make a note,and set a timer.
. Connect with Chevrolet on socialmedia.
Features are subject to change. FormyChevrolet mobile app informationand compatibility, seemy.chevrolet.com.
An active OnStar or connectedservice plan may be required.A compatible device,
factory-installed remote start, andpower locks are required. Data ratesapply. See www.onstar.com fordetails and system limitations.
Remote Services
Contact an OnStar Advisor tounlock the doors or sound the hornand flash the lamps.
Marketplace
OnStar Advisors can provide offersfrom restaurants and retailers onyour route, help locate hotels,or book a room. These servicesvary by market.
OnStar Hands-Free Calling
Make and receive calls with thebuilt-in wireless calling service,which requires available minutes.Functionality of the Voice Commandbutton may vary by vehicle andregion. For some vehicles, press=to open the OnStar app on theinfotainment display, then selectHands-Free calling. For othervehicles press= as follows.

Chevrolet Silverado 4500HD/5500HD/6500HD Owner Manual (GMNA-Localizing-U.S.-12102101) - 2019 - crc - 10/2/18
Connected Services 439
Make a Call
1. Press=. System responds:“OnStar ready.”
2. Say “Call.” System responds:“Call. Please say the name ornumber to call.”
3. Say the entire number withoutpausing, including a “1” and thearea code. System responds:“OK, calling.”
Calling 911 Emergency
1. Press=. System responds:“OnStar ready.”
2. Say “Call.” System responds:“Call. Please say the name ornumber to call.”
3. Say “911” without pausing.System responds: “911.”
4. Say “Call.” System responds:“OK, dialing 911.”
Retrieve My Number
1. Press=. System responds:“OnStar ready.”
2. Say “My number.” Systemresponds: “Your OnStarHands-Free Calling number is,”then says the number.
End a Call
Press=. System responds: “Callended.”
Verify Minutes and Expiration
Press= and say “Minutes” then“Verify” to check how many minutesremain and their expiration date.
If equipped, press= and touchAccount Services to view thenumber of remaining minutes,available Wi-Fi data, and otheraccount information.
DiagnosticsBy monitoring and reporting on thevehicle's key systems, OnStarAdvanced Diagnostics, if equipped,provides a way to keep up onmaintenance. Capabilities vary bymodel. See www.onstar.com fordetails and system limitations.Features are subject to change. Forupdates on feature capabilities, seemy.chevrolet.com. Message anddata rates may apply.

Chevrolet Silverado 4500HD/5500HD/6500HD Owner Manual (GMNA-Localizing-U.S.-12102101) - 2019 - crc - 10/2/18
440 Special Equipment Options
Special EquipmentOptions
SEO Available OptionsAuxiliary OverheadSwitch Bank . . . . . . . . . . . . . . . . 440
SEO AvailableOptions
Auxiliary OverheadSwitch BankThe auxiliary overhead switch bank,in the overhead console behind thesunglasses storage, providesadditional power necessary formany applications.
Refer to the bulletins in the UpfitterIntegration website,www.gmupfitter.com, for wiringinformation.

Chevrolet Silverado 4500HD/5500HD/6500HD Owner Manual (GMNA-Localizing-U.S.-12102101) - 2019 - crc - 10/2/18
Index 441
Index AAccessories andModifications . . . . . . . . . . . . . . . . . . 290
Accessory Power . . . . . . . . . . . . . . . 214Add-On Electrical Equipment . . . 266Adding a Snow Plow orSimilar Equipment . . . . . . . . . . . . . 266
Additional InformationOnStar . . . . . . . . . . . . . . . . . . . . . . . 430
Additional Maintenanceand Care . . . . . . . . . . . . . . . . .379, 383
AdjustmentsLumbar, Front Seats . . . . . . . . . . . .48
AgreementsTrademarks and License . . . . . 181
Air Cleaner/Filter, Engine . . . . . . . 299Air Conditioning . . . . . . . . . . .186, 188Air Filter, PassengerCompartment . . . . . . . . . . . . . . . . . 190
Air Suspension . . . . . . . . . . . . . . . . . 236Air Vents . . . . . . . . . . . . . . . . . . . . . . . 190Airbag SystemCheck . . . . . . . . . . . . . . . . . . . . . . . . . .68How Does an AirbagRestrain? . . . . . . . . . . . . . . . . . . . . .64
What Makes an AirbagInflate? . . . . . . . . . . . . . . . . . . . . . . . .64
Airbag System (cont'd)What Will You See after anAirbag Inflates? . . . . . . . . . . . . . . .64
When Should an AirbagInflate? . . . . . . . . . . . . . . . . . . . . . . . .63
Where Are the Airbags? . . . . . . . .62AirbagsAdding Equipment to theVehicle . . . . . . . . . . . . . . . . . . . . . . . .68
Light On-Off . . . . . . . . . . . . . . . . . . .111On-Off Light . . . . . . . . . . . . . . . . . . .111On-Off Switch . . . . . . . . . . . . . . . . . .65Readiness Light . . . . . . . . . . . . . . .111Servicing Airbag-EquippedVehicles . . . . . . . . . . . . . . . . . . . . . . .67
System Check . . . . . . . . . . . . . . . . . .61AlarmVehicle Security . . . . . . . . . . . . . . . .37
AM-FM Radio . . . . . . . . . . . . . .150, 152AntennaFixed Mast . . . . . . . . . . . . . . . . . . . 156Multi-band . . . . . . . . . . . . . . . . . . . . 156
Antilock Brake System (ABS) . . . 231Warning Light . . . . . . . . . . . . . . . . . .115
Appearance CareExterior . . . . . . . . . . . . . . . . . . . . . . . 351Interior . . . . . . . . . . . . . . . . . . . . . . . . 356

Chevrolet Silverado 4500HD/5500HD/6500HD Owner Manual (GMNA-Localizing-U.S.-12102101) - 2019 - crc - 10/2/18
442 Index
Apple CarPlay andAndroid Auto . . . . . . . . . . . . . . . . . . 180
Assistance Program,Roadside . . . . . . . . . . . . . . . . . . . . . . 418
AudioBluetooth . . . . . . . . . . . . . . . . . . . . . 166Theft-Deterrent Feature . . . . . . . 142
Audio PlayersCD . . . . . . . . . . . . . . . . . . . . . . . . . . . 157
AutomaticHeadlamp System . . . . . . . . . . . . 134Transmission . . . . . . . . . . . . . . . . . 223Transmission Fluid . . . . . . . . . . . 299
Automatic TransmissionManual Mode . . . . . . . . . . . . . . . . . 226
AuxiliaryRoof Mounted Lamp . . . . . . . . . . 136
Auxiliary Jack . . . . . . . . . . . . . . . . . . . 165Auxiliary OverheadSwitch Bank . . . . . . . . . . . . . . . . . . . 440
Avoiding Untrusted MediaDevices . . . . . . . . . . . . . . . . . . . . . . . 157
Axle, Front . . . . . . . . . . . . . . . . . . . . . . 314Axle, Rear . . . . . . . . . . . . . . . . . . . . . . 314
BBatteryExterior Lighting BatterySaver . . . . . . . . . . . . . . . . . . . . . . . 140
Load Management . . . . . . . . . . . . 139Power Protection . . . . . . . . . . . . . 140
Battery - North America . . . .312, 343Biodiesel . . . . . . . . . . . . . . . . . . . . . . . 242Blade Replacement, Wiper . . . . . 316BluetoothOverview . . . . . . . . . . . . . . . . 174, 175
Bluetooth Audio . . . . . . . . . . . . . . . . 166BrakeExhaust . . . . . . . . . . . . . . . . . . . . . . 234System Warning Light . . . . . . . . .115
Brakes . . . . . . . . . . . . . . . . . . . . . . . . . . 308Antilock . . . . . . . . . . . . . . . . . . . . . . . 231Fluid . . . . . . . . . . . . . . . . . . . . . . . . . . .311Parking . . . . . . . . . . . . . . . . . . . . . . . 233
Braking . . . . . . . . . . . . . . . . . . . . . . . . . 194Break-In, New Vehicle . . . . . . . . . . 207Bulb ReplacementCenter High-MountedStoplamp (CHMSL) andCargo Lamp . . . . . . . . . . . . . . . . . 319
Fog Lamps . . . . . . . . . . . . . . . . . . . 319
Bulb Replacement (cont'd)Halogen Bulbs . . . . . . . . . . . . . . . . 318Headlamp Aiming . . . . . . . . . . . . . 317Headlamps . . . . . . . . . . . . . . . . . . . 318Headlamps, Front TurnSignal, Sidemarker, andParking Lamps . . . . . . . . . . . . . . 318
Taillamps . . . . . . . . . . . . . . . . . . . . . 319
CCalibration . . . . . . . . . . . . . . . . . . . . . . . 98CaliforniaPerchlorate MaterialsRequirements . . . . . . . . . . . . . . . 290
CaliforniaProposition65 Warning . . . . . . . . . .290, 312, 343,
Back CoverCameraRear Vision (RVC) . . . . . . . . . . . . 240
Canadian Vehicle Owners . . . . . . . . 2Capacities andSpecifications . . . . . . . . . . . . . . . . . 408
Carbon MonoxideEngine Exhaust . . . . . . . . . . . . . . . 216Winter Driving . . . . . . . . . . . . . . . . 203
Caution, Danger, and Warning . . . . 2

Chevrolet Silverado 4500HD/5500HD/6500HD Owner Manual (GMNA-Localizing-U.S.-12102101) - 2019 - crc - 10/2/18
Index 443
CD Player . . . . . . . . . . . . . . . . . . . . . . 157Center Console Storage . . . . . . . . . 94Center High-MountedStoplamp (CHMSL) andCargo Lamp . . . . . . . . . . . . . . . . . . . 319
Center Seat . . . . . . . . . . . . . . . . . . . . . 47Chains, Tire . . . . . . . . . . . . . . . . . . . . 343ChargingWireless . . . . . . . . . . . . . . . . . . . . . . 102
Charging System Light . . . . . . . . . 113CheckEngine Light (MalfunctionIndicator) . . . . . . . . . . . . . . . . . . . . .113
Child RestraintsInfants and Young Children . . . . .71Lower Anchors and Tethersfor Children . . . . . . . . . . . . . . . . . . .76
Older Children . . . . . . . . . . . . . . . . . .69Securing . . . . . . . . . . . . . . . . 85, 87, 88Systems . . . . . . . . . . . . . . . . . . . . . . . .73
Circuit Breakers . . . . . . . . . . . . . . . . 320CleaningExterior Care . . . . . . . . . . . . . . . . . 351Interior Care . . . . . . . . . . . . . . . . . . 356
Climate ControlSystems . . . . . . . . . . . . . . . . .186, 188Air Conditioning . . . . . . . . . 186, 188Heating . . . . . . . . . . . . . . . . . . 186, 188
Clock . . . . . . . . . . . . . . . . . . . . . . . . . . . . 98Cluster, Instrument . . . . . . . . . . . . . 105Cold Weather Operation . . . . . . . . 243Collision Damage Repair . . . . . . . 421CompartmentsStorage . . . . . . . . . . . . . . . . . . . . . . . . .92
Compass . . . . . . . . . . . . . . . . . . . . . . . . 98Connected ServicesConnections . . . . . . . . . . . . . . . . . . 437Diagnostics . . . . . . . . . . . . . . . . . . . 439Navigation . . . . . . . . . . . . . . . . . . . . 436
ConnectionsConnected Services . . . . . . . . . . 437
Control of a Vehicle . . . . . . . . . . . . . 194Convex Mirrors . . . . . . . . . . . . . . . . . . 39CoolantEngine Temperature Gauge . . .110
Cooling . . . . . . . . . . . . . . . . . . . .186, 188Cooling System . . . . . . . . . . . . . . . . . 301Courtesy TransportationProgram . . . . . . . . . . . . . . . . . . . . . . . 420
Cruise Control . . . . . . . . . . . . . . . . . . 237Light . . . . . . . . . . . . . . . . . . . . . . . . . . .118
Cupholders . . . . . . . . . . . . . . . . . . . . . . 93Customer Assistance . . . . . . . . . . . 417Offices . . . . . . . . . . . . . . . . . . . . . . . . 416Text Telephone (TTY)Users . . . . . . . . . . . . . . . . . . . . . . . 417
Customer InformationPublications OrderingInformation . . . . . . . . . . . . . . . . . . 423
Customer SatisfactionProcedure . . . . . . . . . . . . . . . . . . . . . 414
DDamage Repair, Collision . . . . . . . 421Danger, Warning, and Caution . . . . 2Data CollectionInfotainment System . . . . . . . . . . 427OnStar . . . . . . . . . . . . . . . . . . . . . . . 427
Data Recorders, Event . . . . . . . . . 426Daytime RunningLamps (DRL) . . . . . . . . . . . . . . . . . . 134
Defensive Driving . . . . . . . . . . . . . . . 194DiagnosticsConnected Services . . . . . . . . . . 439
DieselStarting Your Engine . . . . . . . . . . 210
Diesel Exhaust Fluid . . . . . . . . 28, 220Diesel Exhaust Fluid (DEF)Warning Light . . . . . . . . . . . . . . . . . 117
Diesel Particulate Filter . . . . . . . . . 217Distracted Driving . . . . . . . . . . . . . . . 193Dome Lamps . . . . . . . . . . . . . . . . . . . 138DoorLocks . . . . . . . . . . . . . . . . . . . . . . . . . . .35
Chevrolet Silverado 4500HD/5500HD/6500HD Owner Manual (GMNA-Localizing-U.S.-12102101) - 2019 - crc - 10/2/18
444 Index
Door (cont'd)Power Locks . . . . . . . . . . . . . . . . . . . .36
Drive Belt Routing, Engine . . . . . . 412Driver InformationCenter (DIC) . . . . . . . . . . . . . 119, 120
DrivingCharacteristics andTowing Tips . . . . . . . . . . . . . . . . . 250
Defensive . . . . . . . . . . . . . . . . . . . . . 194Drunk . . . . . . . . . . . . . . . . . . . . . . . . . 194For Better Fuel Economy . . . . . . .24Hill and Mountain Roads . . . . . . 202If the Vehicle is Stuck . . . . . . . . . 204Loss of Control . . . . . . . . . . . . . . . 196Off-Road . . . . . . . . . . . . . . . . . . . . . 196Off-Road Recovery . . . . . . . . . . . 195Vehicle Load Limits . . . . . . . . . . . 205Wet Roads . . . . . . . . . . . . . . . . . . . 201Winter . . . . . . . . . . . . . . . . . . . . . . . . 203
EElectrical Equipment,Add-On . . . . . . . . . . . . . . . . . . . . . . . 266
Electrical SystemEngine Compartment FuseBlock . . . . . . . . . . . . . . . . . . . . . . . . 321
Fuses and Circuit Breakers . . . 320
Electrical System (cont'd)Instrument Panel FuseBlock . . . . . . . . . . . . . . . . . . . 324, 327
Overload . . . . . . . . . . . . . . . . . . . . . 320EmergencyOnStar . . . . . . . . . . . . . . . . . . . . . . . 429
EngineAir Cleaner/Filter . . . . . . . . . . . . . 299Check Light (MalfunctionIndicator) . . . . . . . . . . . . . . . . . . . . .113
Compartment Overview . . . . . . . 294Coolant TemperatureGauge . . . . . . . . . . . . . . . . . . . . . . .110
Cooling System . . . . . . . . . . . . . . . 301Drive Belt Routing . . . . . . . . . . . . 412Exhaust . . . . . . . . . . . . . . . . . . . . . . 216Fan . . . . . . . . . . . . . . . . . . . . . . . . . . . 306Heater . . . . . . . . . . . . . . . . . . . . . . . . 212Oil Life System . . . . . . . . . . . . . . . 298Oil Pressure Gauge . . . . . . . . . . 109Overheating . . . . . . . . . . . . . . . . . . 305Power Messages . . . . . . . . . . . . . 124Running While Parked . . . . . . . . 217Starting Your Diesel . . . . . . . . . . 210
EnginesDiesel Fuel . . . . . . . . . . . . . . . . . . . 241
Entry Lighting . . . . . . . . . . . . . . . . . . . 139Equipment, Towing . . . . . . . . . . . . . 257
Event Data Recorders . . . . . . . . . . 426Exhaust Brake . . . . . . . . . . . . . . . . . . 234Exhaust FluidDiesel . . . . . . . . . . . . . . . . . . . . . . . . 220
Exit Lighting . . . . . . . . . . . . . . . . . . . . 139Extender, Seat Belt . . . . . . . . . . . . . . 59Exterior Cargo Lamps . . . . . . . . . . 137Exterior Lamp Controls . . . . . . . . . 132Exterior Lamps Off Reminder . . . 133Exterior Lighting BatterySaver . . . . . . . . . . . . . . . . . . . . . . . . . 140
FFanEngine . . . . . . . . . . . . . . . . . . . . . . . . 306
Filter . . . . . . . . . . . . . . . . . . . . . . . . . . . . 217Replacement (Fuel) . . . . . . . . . . . 247
Filter,Engine Air Cleaner . . . . . . . . . . . 299
Fixed Mast Antenna . . . . . . . . . . . . 156Flash-to-Pass . . . . . . . . . . . . . . . . . . . 133Flashers, Hazard Warning . . . . . . 135Flat Tire . . . . . . . . . . . . . . . . . . . . . . . . 343Floor Console Storage . . . . . . . . . . . 94FluidAutomatic Transmission . . . . . . 299Brakes . . . . . . . . . . . . . . . . . . . . . . . . .311Diesel Exhaust . . . . . . . . . . . . . . . . .28

Chevrolet Silverado 4500HD/5500HD/6500HD Owner Manual (GMNA-Localizing-U.S.-12102101) - 2019 - crc - 10/2/18
Index 445
Fluid (cont'd)Four-Wheel DriveTransfer Case . . . . . . . . . . . . . . . 228
Power Steering . . . . . . . . . . . . . . . 306Washer . . . . . . . . . . . . . . . . . . . . . . . 308
Fog Lamps . . . . . . . . . . . . . . . . . . . . . 136Bulb Replacement . . . . . . . . . . . . 319
Folding Mirrors . . . . . . . . . . . . . . . . . . 40Four-Wheel Drive . . . . . . . . . .228, 313Frequency StatementRadio . . . . . . . . . . . . . . . . . . . . . . . . . 424
Front Axle . . . . . . . . . . . . . . . . . . . . . . 314Front Fog LampLight . . . . . . . . . . . . . . . . . . . . . . . . . . .118
Front SeatsAdjustment . . . . . . . . . . . . . . . . . . . . .47Heated . . . . . . . . . . . . . . . . . . . . . . . . .50
FuelAdditives . . . . . . . . . . . . . . . . . . . . . 241Biodiesel . . . . . . . . . . . . . . . . . . . . . 242Cold Weather Operation . . . . . . 243Diesel Engines . . . . . . . . . . . . . . . 241Economy Driving . . . . . . . . . . . . . . .24Filling a Portable FuelContainer . . . . . . . . . . . . . . . . . . . 250
Filling the Tank . . . . . . . . . . . . . . . 248Filter Replacement . . . . . . . . . . . 247Gauge . . . . . . . . . . . . . . . . . . . . . . . . 108
Fuel (cont'd)Low Fuel Warning Light . . . . . . . .117Running out of Fuel . . . . . . . . . . . 246Top Tier . . . . . . . . . . . . . . . . . . . . . . 240Water in Fuel . . . . . . . . . . . . . . . . . 243
Fuel for Diesel Engines . . . . . . . . . 241FusesEngine Compartment FuseBlock . . . . . . . . . . . . . . . . . . . . . . . . 321
Fuses and Circuit Breakers . . . 320Instrument Panel FuseBlock . . . . . . . . . . . . . . . . . . . 324, 327
GGaugesEngine CoolantTemperature . . . . . . . . . . . . . . . . .110
Engine Oil Pressure . . . . . . . . . . 109Fuel . . . . . . . . . . . . . . . . . . . . . . . . . . 108Odometer . . . . . . . . . . . . . . . . . . . . . 108Speedometer . . . . . . . . . . . . . . . . . 108Tachometer . . . . . . . . . . . . . . . . . . . 108Trip Odometer . . . . . . . . . . . . . . . . 108Voltmeter . . . . . . . . . . . . . . . . . . . . . .110Warning Lights andIndicators . . . . . . . . . . . . . . . . . . . 104
General InformationService and Maintenance . . . . . 359
General Information (cont'd)Towing . . . . . . . . . . . . . . . . . . . . . . . . 250Vehicle Care . . . . . . . . . . . . . . . . . . 290
Glass Replacement . . . . . . . . . . . . . 317Glove Box . . . . . . . . . . . . . . . . . . . . . . . 92GM Mobility ReimbursementProgram . . . . . . . . . . . . . . . . . . . . . . . 418
HHalogen Bulbs . . . . . . . . . . . . . . . . . . 318Hazard Warning Flashers . . . . . . . 135Head Restraints . . . . . . . . . . . . . . . . . 46HeadlampsAiming . . . . . . . . . . . . . . . . . . . . . . . . 317Automatic . . . . . . . . . . . . . . . . . . . . . 134Bulb Replacement . . . . . . . . . . . . 318Daytime RunningLamps (DRL) . . . . . . . . . . . . . . . . 134
Flash-to-Pass . . . . . . . . . . . . . . . . . 133Headlamps, Front TurnSignal, Sidemarker, andParking Lamps . . . . . . . . . . . . . . 318
High-Beam On Light . . . . . . . . . . .117High/Low Beam Changer . . . . . 133Lamps On Reminder . . . . . . . . . .118
Heated Front Seats . . . . . . . . . . . . . . 50Heated Mirrors . . . . . . . . . . . . . . . . . . . 41

Chevrolet Silverado 4500HD/5500HD/6500HD Owner Manual (GMNA-Localizing-U.S.-12102101) - 2019 - crc - 10/2/18
446 Index
HeaterEngine . . . . . . . . . . . . . . . . . . . . . . . . 212
Heating . . . . . . . . . . . . . . . . . . . .186, 188High-Beam On Light . . . . . . . . . . . . 117Hill and Mountain Roads . . . . . . . . 202Home Page . . . . . . . . . . . . . . . .147, 149Hood . . . . . . . . . . . . . . . . . . . . . . . . . . . 291Horn . . . . . . . . . . . . . . . . . . . . . . . . . . . . . 97How to Wear Seat BeltsProperly . . . . . . . . . . . . . . . . . . . . . . . . 54
HVAC . . . . . . . . . . . . . . . . . . . . . .186, 188
IIgnition Positions . . . . . . . . . . . . . . . 208Immobilizer . . . . . . . . . . . . . . . . . . . . . . 38Infants and Young Children,Restraints . . . . . . . . . . . . . . . . . . . . . . 71
InformationPublication Ordering . . . . . . . . . . 423
Infotainment . . . . . . . . . . . . . . . . . . . . 141Infotainment System . . . . . . . . . . . . 427Instrument Cluster . . . . . . . . . . . . . . 105Instrument PanelStorage Area . . . . . . . . . . . . . . . . . . .92
Interior Rearview Mirrors . . . . . . . . . 41Introduction . . . . . . . . . . . . . . . . . . . . . . . 2
JJackAuxiliary . . . . . . . . . . . . . . . . . . . . . . 165
Jump Starting - NorthAmerica . . . . . . . . . . . . . . . . . . . . . . . 343
KKeyless EntryRemote (RKE) System . . . . . . . . .32
Keys . . . . . . . . . . . . . . . . . . . . . . . . . . . . . 29
LLampsAuxiliary RoofMounted Lamp . . . . . . . . . . . . . . 136
Daytime Running (DRL) . . . . . . 134Dome . . . . . . . . . . . . . . . . . . . . . . . . . 138Exterior Cargo . . . . . . . . . . . . . . . . 137Exterior Controls . . . . . . . . . . . . . . 132Exterior Lamps OffReminder . . . . . . . . . . . . . . . . . . . 133
Exterior Lighting BatterySaver . . . . . . . . . . . . . . . . . . . . . . . 140
Malfunction Indicator(Check Engine) . . . . . . . . . . . . . .113
On Reminder . . . . . . . . . . . . . . . . . .118Reading . . . . . . . . . . . . . . . . . . . . . . 138
Lamps (cont'd)Taillamps . . . . . . . . . . . . . . . . . . . . . 319
Lap Belt . . . . . . . . . . . . . . . . . . . . . . . . . 59Lap-Shoulder Belt . . . . . . . . . . . . . . . 56LATCH SystemReplacing Parts after aCrash . . . . . . . . . . . . . . . . . . . . . . . . .85
LATCH, Lower Anchors andTethers for Children . . . . . . . . . . . . 76
LED Lighting . . . . . . . . . . . . . . . . . . . . 318LightingEntry . . . . . . . . . . . . . . . . . . . . . . . . . 139Exit . . . . . . . . . . . . . . . . . . . . . . . . . . . 139Illumination Control . . . . . . . . . . . 137LED . . . . . . . . . . . . . . . . . . . . . . . . . . 318
LightsAirbag On-Off . . . . . . . . . . . . . . . . . .111Airbag Readiness . . . . . . . . . . . . . .111Antilock Brake System(ABS) Warning . . . . . . . . . . . . . . .115
Brake System Warning . . . . . . . .115Charging System . . . . . . . . . . . . . .113Check Engine (MalfunctionIndicator) . . . . . . . . . . . . . . . . . . . . .113
Cruise Control . . . . . . . . . . . . . . . . .118Diesel Exhaust Fluid (DEF) . . . .117Flash-to-Pass . . . . . . . . . . . . . . . . . 133Front Fog Lamp . . . . . . . . . . . . . . .118

Chevrolet Silverado 4500HD/5500HD/6500HD Owner Manual (GMNA-Localizing-U.S.-12102101) - 2019 - crc - 10/2/18
Index 447
Lights (cont'd)High-Beam On . . . . . . . . . . . . . . . . .117High/Low Beam Changer . . . . . 133Low Fuel Warning . . . . . . . . . . . . .117Power Take-off . . . . . . . . . . . . . . . .118Seat Belt Reminders . . . . . . . . . . .111Security . . . . . . . . . . . . . . . . . . . . . . .117Tow/Haul Mode . . . . . . . . . . . . . . . .116Traction Off . . . . . . . . . . . . . . . . . . . .116Wait to Start . . . . . . . . . . . . . . . . . . .116
LocksDoor . . . . . . . . . . . . . . . . . . . . . . . . . . . .35Lockout Protection . . . . . . . . . . . . . .36Power Door . . . . . . . . . . . . . . . . . . . . .36Safety . . . . . . . . . . . . . . . . . . . . . . . . . .36
Loss of Control . . . . . . . . . . . . . . . . . 196Low Fuel Warning Light . . . . . . . . . 117Lower Anchors and Tethersfor Children (LATCHSystem) . . . . . . . . . . . . . . . . . . . . . . . . 76
Lumbar Adjustment . . . . . . . . . . . . . . 48Front Seats . . . . . . . . . . . . . . . . . . . . .48
MMaintenanceRecords . . . . . . . . . . . . . . . . . . . . . . 406
Maintenance and CareAdditional . . . . . . . . . . . . . . . . 379, 383
Maintenance Schedule . . . . . . . . . 361Recommended Fluids andLubricants . . . . . . . . . . . . . . . . . . . 398
Transfer Case . . . . . . . . . . . . . . . . 228Malfunction Indicator Lamp . . . . . 113Manual Mirrors . . . . . . . . . . . . . . . . . . 39Manual Mode . . . . . . . . . . . . . . . . . . . 226Manual Windows . . . . . . . . . . . . . . . . 42MediaAvoiding Untrusted Devices . . 157
MessagesEngine Power . . . . . . . . . . . . . . . . 124Vehicle . . . . . . . . . . . . . . . . . . . . . . . 123Vehicle Speed . . . . . . . . . . . . . . . . 124
MirrorsAutomatic DimmingRearview . . . . . . . . . . . . . . . . . . . . . .41
Convex . . . . . . . . . . . . . . . . . . . . . . . . .39Folding . . . . . . . . . . . . . . . . . . . . . . . . .40Heated . . . . . . . . . . . . . . . . . . . . . . . . .41Manual . . . . . . . . . . . . . . . . . . . . . . . . .39Manual Rearview . . . . . . . . . . . . . . .41Power . . . . . . . . . . . . . . . . . . . . . . . . . .40Trailer Tow . . . . . . . . . . . . . . . . . . . . . .39
Mirrors, Interior Rearview . . . . . . . . 41Multi-band Antenna . . . . . . . . . . . . . 156
NNavigationConnected Services . . . . . . . . . . 436
New Vehicle Break-In . . . . . . . . . . . 207Noise Control System . . . . . . . . . . 315
OOdometer . . . . . . . . . . . . . . . . . . . . . . . 108Trip . . . . . . . . . . . . . . . . . . . . . . . . . . . 108
Off-Road . . . . . . . . . . . . . . . . . . . . . . . 196Driving . . . . . . . . . . . . . . . . . . . . . . . . 196Recovery . . . . . . . . . . . . . . . . . . . . . 195
OilEngine . . . . . . . . . . . . . . . . . . . . . . . . 295Engine Oil Life System . . . . . . . 298Engine Oil Pressure Gauge . . . 109
Older Children, Restraints . . . . . . . 69Online Owner Center . . . . . . . . . . . 417OnStar . . . . . . . . . . . . . . . . . . . . . . . . . 427OnStar AdditionalInformation . . . . . . . . . . . . . . . . . . . . 430
OnStar Emergency . . . . . . . . . . . . . 429OnStar Overview . . . . . . . . . . . . . . . 428OnStar Security . . . . . . . . . . . . . . . . 430OperationFog Lamps . . . . . . . . . . . . . . . . . . . 136
OutletsPower . . . . . . . . . . . . . . . . . . . . . . . . 100

Chevrolet Silverado 4500HD/5500HD/6500HD Owner Manual (GMNA-Localizing-U.S.-12102101) - 2019 - crc - 10/2/18
448 Index
Overhead Switch Bank . . . . . . . . . 440Overheating, Engine . . . . . . . . . . . . 305Overview . . . . . . . . . . . . . . . . . .142, 146Owner Checks and Services . . . . 368
PParkShifting Into . . . . . . . . . . . . . . . . . . . 214Shifting Out of . . . . . . . . . . . . . . . . 215
ParkingBrake . . . . . . . . . . . . . . . . . . . . . . . . . 233Over Things That Burn . . . . . . . 215
Passenger Compartment AirFilter . . . . . . . . . . . . . . . . . . . . . . . . . . 190
Perchlorate MaterialsRequirements, California . . . . . . 290
PersonalizationVehicle . . . . . . . . . . . . . . . . . . . . . . . 124
PhoneApple CarPlay andAndroid Auto . . . . . . . . . . . . . . . . 180
Bluetooth . . . . . . . . . . . . . . . . 174, 175PortUSB . . . . . . . . . . . . . . . . . . . . . . . . . . 160
PowerDoor Locks . . . . . . . . . . . . . . . . . . . . .36Mirrors . . . . . . . . . . . . . . . . . . . . . . . . . .40Outlets . . . . . . . . . . . . . . . . . . . . . . . 100
Power (cont'd)Protection, Battery . . . . . . . . . . . . 140Retained Accessory (RAP) . . . 214Seat Adjustment . . . . . . . . . . . . . . . .48Steering Fluid . . . . . . . . . . . . . . . . . 306Windows . . . . . . . . . . . . . . . . . . . . . . .42
Power Take-Off (PTO) . . . . . . . . . . 270Power Take-Off Light . . . . . . . . . . . 118Pregnancy, Using Seat Belts . . . . 58PrivacyVehicle Data Recording . . . . . . . 426
ProgramCourtesy Transportation . . . . . . 420
Proposition65 Warning,California . . . . . . . . . . . .290, 312, 343,
Back CoverPublication OrderingInformation . . . . . . . . . . . . . . . . . . . . 423
RRadio Frequency Statement . . . . 424Radio Reception . . . . . . . . . . . . . . . . 156RadiosAM-FM Radio . . . . . . . . . . . . 150, 152Satellite . . . . . . . . . . . . . . . . . . . . . . . 154
Reading Lamps . . . . . . . . . . . . . . . . . 138Rear Axle . . . . . . . . . . . . . . . . . . . . . . . 314
Rear Seats . . . . . . . . . . . . . . . . . . . . . . 51Rear Vision Camera (RVC) . . . . . 240Rearview Mirrors . . . . . . . . . . . . . . . . 41Automatic Dimming . . . . . . . . . . . . .41
Reclining Seatbacks . . . . . . . . . . . . . 49RecognitionVoice . . . . . . . . . . . . . . . . . . . . . . . . . 167
Recommended Fluids andLubricants . . . . . . . . . . . . . . . . . . . . . 398
RecordsMaintenance . . . . . . . . . . . . . . . . . . 406
Reimbursement Program,GM Mobility . . . . . . . . . . . . . . . . . . . 418
Remote Keyless Entry (RKE)System . . . . . . . . . . . . . . . . . . . . . . . . . 32
Remote Vehicle Start . . . . . . . . . . . . 34ReplacementGlass . . . . . . . . . . . . . . . . . . . . . . . . . 317
Replacement PartsAirbags . . . . . . . . . . . . . . . . . . . . . . . . .69Maintenance . . . . . . . . . . . . . . . . . . 405
Replacing Airbag System . . . . . . . . 69Replacing LATCH SystemParts after a Crash . . . . . . . . . . . . . 85
Replacing Seat Belt SystemParts after a Crash . . . . . . . . . . . . . 60
Reporting Safety DefectsCanadian Government . . . . . . . . 425

Chevrolet Silverado 4500HD/5500HD/6500HD Owner Manual (GMNA-Localizing-U.S.-12102101) - 2019 - crc - 10/2/18
Index 449
Reporting Safety Defects (cont'd)General Motors . . . . . . . . . . . . . . . 425U.S. Government . . . . . . . . . . . . . 425
RestraintsWhere to Put . . . . . . . . . . . . . . . . . . .75
Retained AccessoryPower (RAP) . . . . . . . . . . . . . . . . . . 214
Ride Control SystemsAir Suspension . . . . . . . . . . . . . . . 236
RoadsDriving, Wet . . . . . . . . . . . . . . . . . . 201
Roadside AssistanceProgram . . . . . . . . . . . . . . . . . . . . . . . 418
Rotation, Tires . . . . . . . . . . . . . . . . . . 335Routing, Engine Drive Belt . . . . . . 412Running out of Fuel . . . . . . . . . . . . . 246Running the Vehicle WhileParked . . . . . . . . . . . . . . . . . . . . . . . . 217
SSafety Defects ReportingCanadian Government . . . . . . . . 425General Motors . . . . . . . . . . . . . . . 425U.S. Government . . . . . . . . . . . . . 425
Safety Locks . . . . . . . . . . . . . . . . . . . . . 36Safety System Check . . . . . . . . . . . . 59Satellite Radio . . . . . . . . . . . . . . . . . . 154Scheduling Appointments . . . . . . . 420
Seat Belts . . . . . . . . . . . . . . . . . . . . . . . 53Care . . . . . . . . . . . . . . . . . . . . . . . . . . . .60Extender . . . . . . . . . . . . . . . . . . . . . . . .59How to Wear Seat BeltsProperly . . . . . . . . . . . . . . . . . . . . . . .54
Lap Belt . . . . . . . . . . . . . . . . . . . . . . . .59Lap-Shoulder Belt . . . . . . . . . . . . . .56Reminders . . . . . . . . . . . . . . . . . . . . .111Replacing after a Crash . . . . . . . .60Use During Pregnancy . . . . . . . . . .58
SeatsAdjustment, Front . . . . . . . . . . . . . . .47Center Seat . . . . . . . . . . . . . . . . . . . .47Head Restraints . . . . . . . . . . . . . . . .46Heated Front . . . . . . . . . . . . . . . . . . .50Lumbar Adjustment, Front . . . . . .48Power Adjustment, Front . . . . . . .48Rear . . . . . . . . . . . . . . . . . . . . . . . . . . . .51Reclining Seatbacks . . . . . . . . . . . .49
Securing ChildRestraints . . . . . . . . . . . . . . 85, 87, 88
SecurityLight . . . . . . . . . . . . . . . . . . . . . . . . . . .117OnStar . . . . . . . . . . . . . . . . . . . . . . . 430Vehicle . . . . . . . . . . . . . . . . . . . . . . . . .37Vehicle Alarm . . . . . . . . . . . . . . . . . . .37
Service . . . . . . . . . . . . . . . . . . . . . . . . . 191
Service (cont'd)Accessories andModifications . . . . . . . . . . . . . . . . 290
Climate ControlSystem . . . . . . . . . . . . . . . . . 186, 188
Doing Your Own Work . . . . . . . . 291Maintenance Records . . . . . . . . 406Maintenance, GeneralInformation . . . . . . . . . . . . . . . . . . 359
Scheduling Appointments . . . . . 420ServicesSpecial Application . . . . . . . . . . . 367
Servicing the Airbag . . . . . . . . . . . . . 67ShiftingInto Park . . . . . . . . . . . . . . . . . . . . . . 214Out of Park . . . . . . . . . . . . . . . . . . . 215
Signals, Turn andLane-Change . . . . . . . . . . . . . . . . . 135
Snow Plow . . . . . . . . . . . . . . . . . . . . . 266Software Updates . . . . . . . . . . . . . . 150Special Application Services . . . . 367Special Equipment OptionsAuxiliary OverheadSwitch Bank . . . . . . . . . . . . . . . . . 440
Specifications andCapacities . . . . . . . . . . . . . . . . . . . . . 408
Speedometer . . . . . . . . . . . . . . . . . . . 108Start Vehicle, Remote . . . . . . . . . . . 34

Chevrolet Silverado 4500HD/5500HD/6500HD Owner Manual (GMNA-Localizing-U.S.-12102101) - 2019 - crc - 10/2/18
450 Index
Starter Switch Check . . . . . . . . . . . 316Starting the Diesel Engine . . . . . . 210Steering . . . . . . . . . . . . . . . . . . . . . . . . 195Fluid, Power . . . . . . . . . . . . . . . . . . 306Wheel Adjustment . . . . . . . . . . . . . .96Wheel Controls . . . . . . . . . . . . . . . . .96
Storage AreasCenter Console . . . . . . . . . . . . . . . . .94Floor Console . . . . . . . . . . . . . . . . . .94Glove Box . . . . . . . . . . . . . . . . . . . . . .92Instrument Panel . . . . . . . . . . . . . . .92Sunglasses . . . . . . . . . . . . . . . . . . . . .93
Storage Compartments . . . . . . . . . . 92Stuck Vehicle . . . . . . . . . . . . . . . . . . . 204Sun Visors . . . . . . . . . . . . . . . . . . . . . . . 44Sunglass Storage . . . . . . . . . . . . . . . . 93SwitchesAirbag On-Off . . . . . . . . . . . . . . . . . . .65Auxiliary Overhead . . . . . . . . . . . 440
Symbols . . . . . . . . . . . . . . . . . . . . . . . . . . 3SystemInfotainment . . . . . . . . . . . . . 141, 427Noise Control . . . . . . . . . . . . . . . . . 315
TTachometer . . . . . . . . . . . . . . . . . . . . . 108Taillamps . . . . . . . . . . . . . . . . . . . . . . . 319Text Telephone (TTY) Users . . . . 417
Theft-Deterrent Systems . . . . . . . . . 38Immobilizer . . . . . . . . . . . . . . . . . . . . .38
Time . . . . . . . . . . . . . . . . . . . . . . . . . . . . . 98Tires . . . . . . . . . . . . . . . . . . . . . . . . . . . . 331Chains . . . . . . . . . . . . . . . . . . . . . . . . 343If a Tire Goes Flat . . . . . . . . . . . . 343Inspection . . . . . . . . . . . . . . . . . . . . 334Pressure . . . . . . . . . . . . . . . . . . . . . . 332Rotation . . . . . . . . . . . . . . . . . . . . . . 335Wheel Alignment and TireBalance . . . . . . . . . . . . . . . . . . . . . 339
Wheel Replacement . . . . . . . . . . 339When It Is Time for NewTires . . . . . . . . . . . . . . . . . . . . . . . . 337
Top Tier Fuel . . . . . . . . . . . . . . . . . . . 240Tow/Haul Mode . . . . . . . . . . . . . . . . . 227Tow/Haul Mode Light . . . . . . . . . . . 116TowingDriving Characteristics . . . . . . . . 250Equipment . . . . . . . . . . . . . . . . . . . . 257General Information . . . . . . . . . . 250Trailer . . . . . . . . . . . . . . . . . . . . . . . . 254Vehicle . . . . . . . . . . . . . . . . . . . . . . . 347
TractionControl System (TCS) . . . . . . . . 235Off Light . . . . . . . . . . . . . . . . . . . . . . .116
Trademarks and LicenseAgreements . . . . . . . . . . . . . . . . . . . 181
TrailerTow Mirrors . . . . . . . . . . . . . . . . . . . . .39Towing . . . . . . . . . . . . . . . . . . . . . . . . 254
Transfer Case . . . . . . . . . . . . . . . . . . 228TransmissionAutomatic . . . . . . . . . . . . . . . . . . . . . 223Fluid, Automatic . . . . . . . . . . . . . . 299
Transportation Program,Courtesy . . . . . . . . . . . . . . . . . . . . . . 420
Trip Odometer . . . . . . . . . . . . . . . . . . 108Turn and Lane-ChangeSignals . . . . . . . . . . . . . . . . . . . . . . . . 135
UUpdatesSoftware . . . . . . . . . . . . . . . . . . . . . . 150
USB Port . . . . . . . . . . . . . . . . . . . . . . . 160Using This Manual . . . . . . . . . . . . . . . . 2
VVehicleAlarm System . . . . . . . . . . . . . . . . . .37Canadian Owners . . . . . . . . . . . . . . . 2Control . . . . . . . . . . . . . . . . . . . . . . . 194Identification Number (VIN) . . . 407Load Limits . . . . . . . . . . . . . . . . . . . 205Messages . . . . . . . . . . . . . . . . . . . . 123Personalization . . . . . . . . . . . . . . . 124Remote Start . . . . . . . . . . . . . . . . . . .34

Chevrolet Silverado 4500HD/5500HD/6500HD Owner Manual (GMNA-Localizing-U.S.-12102101) - 2019 - crc - 10/2/18
Index 451
Vehicle (cont'd)Security . . . . . . . . . . . . . . . . . . . . . . . .37Speed Messages . . . . . . . . . . . . . 124Towing . . . . . . . . . . . . . . . . . . . . . . . . 347
Vehicle CareTire Pressure . . . . . . . . . . . . . . . . . 332
Vehicle Data Recording andPrivacy . . . . . . . . . . . . . . . . . . . . . . . . 426
Ventilation, Air . . . . . . . . . . . . . . . . . . 190Visors . . . . . . . . . . . . . . . . . . . . . . . . . . . 44Voice Recognition . . . . . . . . . . . . . . 167Voltmeter Gauge . . . . . . . . . . . . . . . 110
WWait to Start Light . . . . . . . . . . . . . . 116WarningBrake System Light . . . . . . . . . . . .115Caution and Danger . . . . . . . . . . . . . 2
Warning Lights, Gauges, andIndicators . . . . . . . . . . . . . . . . . . . . . 104
WarningsHazard Flashers . . . . . . . . . . . . . . 135
Washer Fluid . . . . . . . . . . . . . . . . . . . 308Water in Fuel . . . . . . . . . . . . . . . . . . . 243WheelsAlignment and Tire Balance . . 339Replacement . . . . . . . . . . . . . . . . . 339
When It Is Time for NewTires . . . . . . . . . . . . . . . . . . . . . . . . . . 337
Where to Put the Restraint . . . . . . 75Windows . . . . . . . . . . . . . . . . . . . . . . . . 41Manual . . . . . . . . . . . . . . . . . . . . . . . . .42Power . . . . . . . . . . . . . . . . . . . . . . . . . .42
WindshieldWiper/Washer . . . . . . . . . . . . . . . . . .97
WinterDriving . . . . . . . . . . . . . . . . . . . . . . . . 203
Wiper Blade Replacement . . . . . . 316Wireless Charging . . . . . . . . . . . . . . 102

84642602 B
C
M
Y
CM
MY
CY
CMY
K
19_CHEV_Silverado_4500HD_5500HD_6500HD_COV_en_US_84642602B_2018OCT08.ai 1 10/9/2018 9:51:05 AM19_CHEV_Silverado_4500HD_5500HD_6500HD_COV_en_US_84642602B_2018OCT08.ai 1 10/9/2018 9:51:05 AM