CONSTRUCTING WOODEN TOYS
69
CONSTRUCTING WOODEN TOYS Plans and instructions for making 15 toys, including techniques and jigs for machining small parts safely By Charlie Bierman, Charlie Pinkus, and Steve Naiman With Graphics by William White
-
Upload
khangminh22 -
Category
Documents
-
view
1 -
download
0
Transcript of CONSTRUCTING WOODEN TOYS
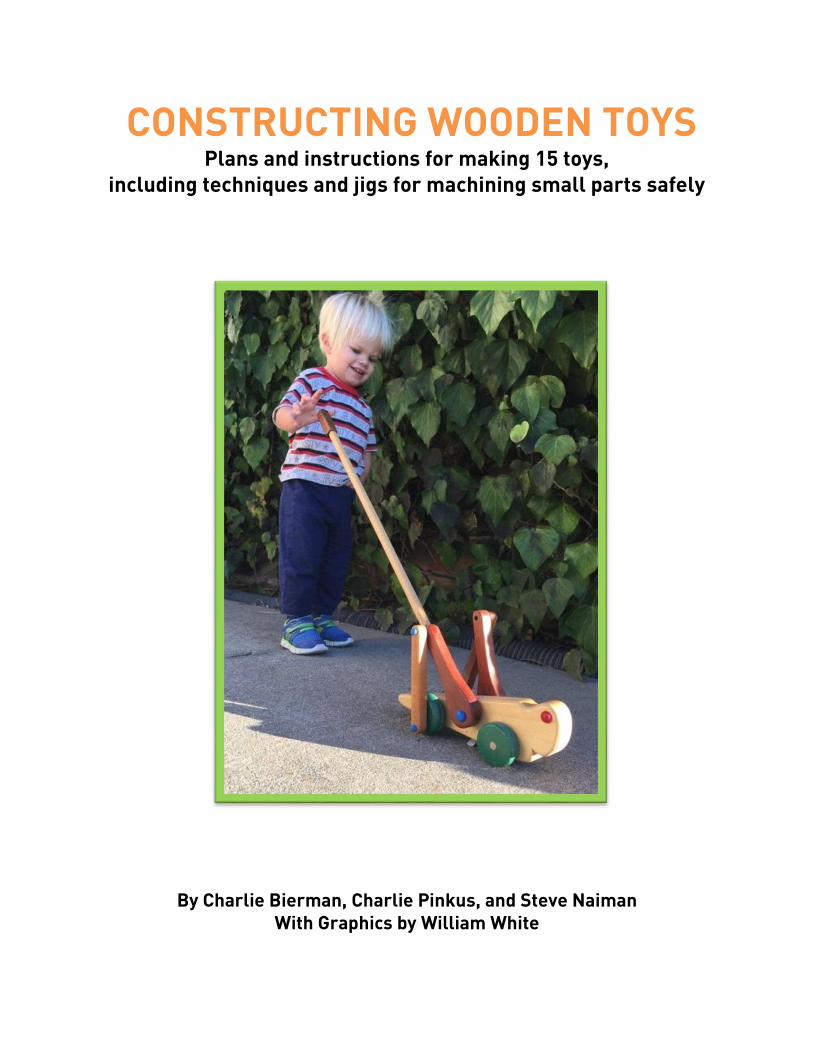
CONSTRUCTING WOODEN TOYS Plans and instructions for making 15 toys,
including techniques and jigs for machining small parts safely
By Charlie Bierman, Charlie Pinkus, and Steve Naiman With Graphics by William White

2
Toy photographs by
Lynn Rybarczyk Andy Patterson
Front and back cover designs by
Sejal Pinkus
Copyright San Diego Fine Woodworkers Association © 2018
All proceeds are used by the SDFWA to support the toy donation program
and other Association activities. For comments, suggestions, or questions
about this book, please contact us at [email protected].

3
In memory of
Helen and Charlie Bierman

4
Dedicated to Charlie Bierman
We worked with Charlie Bierman for 15 years, sharing many days together
building wooden toys for donation through the San Diego Fine Woodworkers
Association Toy Program or preparing materials for others to use in toy
making.
Charlie was an innovator, perfectionist, and an extraordinary teacher. He
was constantly designing new toys and finding better and safer ways to build
them. For 20 years he was the leader of a toy building workshop of 15
members that still meets once a week and produces over 500 toys a year for
donation.
He organized and instructed a four weekend course at Palomar Community
College for many years, and he coordinated the work of other toy building
workshops in San Diego County. To our knowledge, no toy left the Toy
Program for donation without his stamp of approval for operation and safety.
Some years ago Charlie put together a pamphlet of instructions on the
methods that he and others had developed to safely machine small toy parts
and to mass produce these parts so that a number of duplicates of a toy could
be produced efficiently. This pamphlet was used many times in workshops
he gave over the years.
In 2016 he asked us to help him convert the material in this pamphlet into a
full-length book, along with step-by-step instructions for building 15 of the
most popular wooden toys made by the Toy Program. We met regularly to
hash out ideas, review copy, and make decisions regarding content.
Charlie died in August 2017. He was working on this project up to the day he
died. This book will serve as one of his many legacies, and we hope the reader
enjoys using it as much as we enjoyed working with Charlie.
Steve Naiman
Charlie Pinkus
June, 2018
5
Table of Contents
1. Safe Toys and Woodworking Safety ....................................................................... 8
Introduction ......................................................................................................................... 8
Safety .................................................................................................................................. 8
How Children Play with Toys ............................................................................................ 11
Part I. Toys ................................................................................................................ 12
2. Getting Started ...................................................................................................... 13
Tools.................................................................................................................................. 14
Materials ............................................................................................................................ 15
Dimensions ....................................................................................................................... 16
Holes for Rotating Axles.................................................................................................... 18
Glue Joints for Dowels, Axle Pegs and Wood Buttons ..................................................... 19
Sub-assemblies ................................................................................................................. 20
On to Toy Building ............................................................................................................. 22
3. Small Cars and Trucks .......................................................................................... 23
4 . Weedwacker ........................................................................................................ 29
5. Circle Animal Puzzle ............................................................................................. 36
6. Duck (Push or Pull) ............................................................................................... 40
7. Doll Bed/Cradle ..................................................................................................... 49
8. Honey Bee ............................................................................................................ 57
9. School Bus ............................................................................................................ 66
10. Counting 1 - 2 - 3 - 4 ........................................................................................... 74
11. Hopping Frogs ..................................................................................................... 80
12. Car Transporter ................................................................................................... 91
13. Grasshopper ..................................................................................................... 101
14. Mouse ............................................................................................................... 111
15. Hippo ................................................................................................................ 120
16. Rolling Rattle ..................................................................................................... 129
17. Helicopter .......................................................................................................... 138
Part II. Jigs and Techniques .................................................................................... 150
18. Shaping Parts .................................................................................................... 151
Forming the Wood Blank................................................................................................. 151
Steps for Making the Body of a Toy ................................................................................ 152

6
Band Sawing ................................................................................................................... 153
Making Wheels ................................................................................................................ 154
Circle Cutting Jig ............................................................................................................. 155
Using a Router ................................................................................................................ 158
Router Jigs ...................................................................................................................... 161
Other Cutting Jigs ........................................................................................................... 164
19. Drilling ............................................................................................................... 165
Drilling Methods .............................................................................................................. 165
Types of Drill Bits ............................................................................................................ 166
Reaming Out Holes ......................................................................................................... 169
Drilling Holes in Small Round Objects ............................................................................ 170
Other Jigs to Assist in Drilling ......................................................................................... 171
20. Sanding ............................................................................................................. 177
Patching and Sanding ..................................................................................................... 177
Sanding Jigs .................................................................................................................... 177
21. Finishing ............................................................................................................ 183
Color on Toys .................................................................................................................. 184
Painted Decorations ........................................................................................................ 185
Jigs Used in Finishing ..................................................................................................... 186
22. Assemble .......................................................................................................... 189
Wheels on Dowels .......................................................................................................... 189
Gluing Wheels onto Axles ............................................................................................... 191
Affixing Toy Parts with Axle Pegs ................................................................................... 192
Trouble Shooting and Corrective Actions ....................................................................... 193
Appendix .................................................................................................................. 194
Suppliers of Wooden Toy Parts ...................................................................................... 194
Other Books on Making Wooden Toys ........................................................................... 194
Decimal Sizes of Selected Drill Bits ................................................................................ 195
7
Preface
The Toy Program of the San Diego Fine Wood-
workers Association (SDFWA) takes pride in
making quality wooden toys for donation to
children throughout San Diego County. Since
the inception of the Program about 25 years ago,
the Association has given away approximately
35,000 toys to over 50 non-profit organizations
that serve children, such as day care centers,
health clinics, and pre-schools.
The purpose of this book is two-fold: first, to
provide plans and step-by-step instructions for
making fifteen of the Program’s most popular
toys; second, to share a number of tips,
techniques, and jigs unique to toy making that
members of the Toy Program have found to be of
great use for safely machining small toy parts.
The SDFWA toy workshops make 20 to 50 toys
for donation at the same time. Some of the jigs
described in this book were designed to make
duplicates of toy parts that are interchangeable.
We hope that the information in this book will
help you find pleasure in making wooden toys
for your children, grandchildren, and friends, as
well as for donation.
More information about the SDFWA can be
found at: www.sdfwa.org.
Acknowledgements
We are indebted to a number of people who
helped with various aspects of this book. This
work would not have been possible without the
excellent drawings produced by Bill White. In
addition, we thank Lynn Rybarczyk and Andy
Patterson for taking photographs of the toys
included in the book and Sejal Pinkus for
designing the covers. We are very grateful to
Susan Davis for her thorough editing and
suggestions, and Mike Davis for technical
support.
Incorporated in this book are the ideas, know-
ledge and skills of many members of the SDFWA
Toy Program. In particular, we thank Bob
Dodds, Ed Gladney, Dan McNaughton, and
Mark Tally who contributed drafts of several of
the chapters. We also appreciate the reviews
and comments on this work by Jeff Bratt, Roger
Solheid, Dale Stauffer, and the support of the
Board of Directors of SDFWA. Finally, we thank
Augie and Shikari – our toy testers.

1. Safe Toys and Woodworking Safety
8
1. Safe Toys and Woodworking Safety
Introduction
This book is divided into two parts. If you are
like the authors, you will want to get started
constructing toys as soon as possible. Therefore,
in Part I (Chapters 2 – 17) we include plans and
instructions for making fifteen toys designed to
amuse and educate.
Each of Chapters 3 though 17 is devoted to a
different toy, and each of these chapters is self-
contained. Therefore, it is possible to skip
around and work on only the toys you are most
interested in making.
Chapter 2, the first chapter of Part I, gives some
important instructions and tables used
throughout the book. It is suggested that you
skim through this chapter to become familiar
with the things that will be referred to often in
Chapters 3 – 17, before starting to construct
toys.
Part II (Chapters 18 – 22) is on toy making
techniques and jigs. It is divided into chapters
on each aspect of toy making, from shaping the
body of a toy to assembly. These chapters
include tips that apply to all the toys described in
Part I, from machining small parts safely to
examples of the jigs that have enabled the
SDFWA Toy Program members to efficiently
make 20 to 50 toys at a time for donation.
The remainder of this chapter provides some
very important information on safety for you
and for the child playing with toys, along with
observations on how the design of toys
influences the ways that children play with
them.
Safety
Personal Safety
A number of the woodworking procedures
presented in this book require cutting, drilling,
and routing operations on small parts. It is
essential that these parts are held firmly, either
in a vise or with a clamp, in order to safely
complete operations on them.1
It is also essential that fingers are kept as far
away as possible from tools. This can be difficult
in making wooden toys, because toys are very
small projects as woodworking projects go.
1 Disclaimer: Neither the authors nor the SDFWA (its directors and officers) assume responsibility for any injuries suffered or damages or losses incurred
arising from the use of the information contained in Constructing Wooden Toys.

1. Safe Toys and Woodworking Safety
9
Remember to:
• Take your time - do not rush a procedure.
• Check and double check measurements.
• Avoid shortcuts – look for the safe way to complete every operation.
• Understand plans and instructions before beginning work on a toy.
Be constantly aware of potential dangers
associated with using hand and power tools.
Always be familiar with the safe procedures for
using your tools, and never override safety
measures out of laziness, fatigue, anger,
impatience, or the desire for speed.
If you are not comfortable with a procedure or
instruction that you see in this book or
elsewhere, find another way to do it. If it seems
dangerous to you, it probably is.
Finally, if you have not already taken a
woodworking course during which you have
passed a safety test, we strongly advise you do so
before embarking on the projects contained in
this book.
Woodworking can be very enjoyable, but
it can also be dangerous. Don’t let an
accident ruin your enjoyment.
Safety of Toys
To insure that the wooden toys you make are safe for children to use, ask yourself the
following questions:
1. Does the toy have smooth edges and corners and no rough surfaces?
2. Are all parts securely attached?
3. If it is a toy that has wheels, such as a car, does it roll freely when pushed
on a hard surface?
4. If the toy has mechanical parts, does it work properly when pushed
across a hard surface?
5. Do all loose, small parts satisfy the United States Consumer Products
Safety Commission’s regulations for small parts for toys?
If you cannot say “yes” to all of these questions, repair the toy before letting a child play
with it.
Small Parts Regulation
The purpose of this regulation is to prevent
deaths and injuries to children under three from
choking on, inhaling or swallowing small
objects.
Figure 1-1 shows the anti-swallow test
device developed by the Consumer Product
Safety Commission.

1. Safe Toys and Woodworking Safety
10
Questionable parts are placed in the cavity of the
test device. If a small part fits completely into
the cylinder, and the toy or product from which
it came is intended for use by children under
three, the toy or product is banned because it
presents a choking hazard.
If the part protrudes above the cavity, it is
considered safe. If you plan to design wooden
toys, it would be useful to have a copy of this test
device. It can be purchased2 or made.
Following are the steps to make the device (see
Figure 1-2 for the plan):
1. Start with a block of wood 2" wide, 3" long,
and 2" deep.
2. Drill a 1 ¼" hole centered on one of the 2" x
2" ends through the entire 3" block.
3. Take a 1 ¼" dowel and trim the end at a 45
degree angle.
4. From the end that was cut at 45 degrees, cut
off 2" from the longest side of the 45 degree
angle. You should now have a piece of 1 ¼"
dowel with one end cut at 45 degrees. The
short side should measure ¾"; the long side
should be 2".
5. Test that the dowel slides into the 1 ¼" hole
cut into the 2" x 2" x 3" block of wood so
that the flat end is square with the bottom of
the cavity as shown in Figure 1-2. It might
be necessary to sand the dowel to get it to fit.
6. Remove the dowel, put glue around the
lower inside of the cavity, and glue the dowel
in place.
7. The test device created should have the same
cavity as the device shown in Figure 1-1.
2 Anti-swallow test devices can be found by searching the internet, for example “Safety 1st Small Objects Tester”. The cost is approximately $10.
Figure 1-1. Anti-swallow Test Device
Figure 1-2. Plan for Making Anti-
swallow Device

1. Safe Toys and Woodworking Safety
11
How Children Play with Toys
There are many different types of toys, and
children will find many different ways to play
with any given toy. It is, however, important to
distinguish between some common types of toys
in terms of how children might play with them.
One basic distinction is between toys that are
propelled, such as a toy car pushed along a floor,
and toys whose pieces are manipulated, such as
a puzzle. Furthermore, toys are propelled in one
of three ways: either by a push stick, a pull
string, or by hand.
The toy building chapters that follow include
four push toys and four pull toys, including two
toys that can be made as either a push or pull
toy. In addition, there are four toys designed to
be propelled by hand, and the remaining three
toys are manipulated but not propelled, for
example, the doll bed/cradle (Chapter 7).
The importance of the distinction between push
and pull toys follows. .
Push Stick Toys
Push toys are considered better than pull toys
for children learning to walk. This is because
children want to watch the motion of the toy. If
the toy needs to be pulled, the child will have to
walk backward to see it. Obviously this can
lead to falls and bumps that can be mostly
avoided by having the child push the toy.
In addition to allowing the child to watch the toy
as he/she walks forward, the push stick also
provides greater control over the movement of
the toy and teaches directional control.
The push stick is a sub-assembly that is used on
four to six of the toys described in this book.
Rather than repeat the instructions for each toy,
the steps for making a push stick and its grip are
given in Chapter 2.
Pull String Toys
There are some toys that can be built with either
a push stick or a pull string. The duck (Chapter
6) is an example. However, there are some toys
that cannot make use of a push stick, for
example, the honey bee (Chapter 8). To propel
such toys, a child must either propel it by hand
or use a pull string.
A toy with a pull string should only be used by a
child who is comfortable walking backward
because it is natural that the child will want to
look at the toy as it is being pulled.
Since several toys in this book use a pull string,
suggestions for making and attaching a pull
string are given in Chapter 2.

Part I. Toys
12
Part I. Toys

2. Getting Started
13
2. Getting Started
This chapter includes information that is used in most of the toy chapters. It is
often referred to by the instructions in those chapters, thus avoiding repetition.
It is suggested that you skim through this chapter to become familiar with the
topics covered here, because you will likely need to refer to it later.
The tools and materials you will need to make the toys in Chapters 3 through 17
are descibed here. Also included is important information about the dimensions
for some commonly used toy parts.
At the end of the chapter are instructions for making subassemblies for push
sticks and pull strings used by a number of the toys, and critical information on
glued parts and rotational parts.
How to Proceed
In planning this book, the authors had originally
intended the toy chapters to be used by
beginners as well as experienced woodworkers,
and that a limited number of power tools would
be required.
It soon became apparent that power tools were
going to be essential in order to build many of
the toys. However, for the reader with few if any
power tools, we suggest beginning by making
small cars and trucks (Chapter 3), the
weedwacker push toy (Chapter 4), the circle
animal puzzle (Chapter 5), or the doll bed/cradle
(Chapter 7).
It has already been noted that once you become
familiar with the content in this chapter, you can
skip around among the 15 toy chapters (3
through 17) to work on only the toys you are
most interested in making.
Each of the toy chapters is self-contained.
However, in order to make them self-contained
we have needed to provide some repetition or
reminders in these chapters. To limit the
repetition, we make liberal use of boxes
throughout the book that refer the reader to
more information about an instruction or topic.
The boxes are color coded as follows:
Red Box
A warning about an important instruction or a reference to a sub-assembly described elsewhere.
Green Box
A reference to more information about a topic,
including how to make jigs to safely machine small parts.
2. Getting Started
14
Tools
We all have different woodworking experiences
and skills, not to mention different tools. It is
assumed, however, that the reader has basic skill
and knowledge of woodworking practices and
tools.
Although there are occasional exceptions, to
build each toy requires the following general
steps:
• Create rectangular blocks of wood (called
“blanks”) out of which the main part, the
body of the toy, and other parts are made.
• Transfer the design of the body and other
parts to the blanks. Templates for all the
major parts are given in each chapter.
• Drill holes while the blanks are still
rectangular.
• Rough cut-out the parts from the blanks.
• Sand the body and other parts to the outline
on the blank.
• Round over edges and do finish sanding.
• Seal the parts, apply a top coat of finish, and
assemble the toy.
Depending on the tools you have available there
are a variety of ways to accomplish these steps.
Below are lists of tools that can be used for the
operations described above. In general, for each
operation the list is arranged from the most
preferred tool to the least preferred. Using the
least perferred tools can be a challenge for
making most of the toys, but this will depend on
your skill and patience.
Cutting Tools Needed
You will generally need one tool from each of the following groups to
perform the given operation:
Cutting straight edges
• Table saw
• Chop (miter) saw
• Circular saw
• Hand saw
Cutting curves
• Bandsaw
• Scroll saw
• Jig (saber) saw
• Coping saw
Drilling holes
Rounding over edges
• Stationary router (that is, a router
attached to a router table)
• Wood rasp
• Block plane
• Sanding block
Sanding
• Oscillating spindle sander
• Stationary belt sander
• Stationary disk sander
• Sanding drums
• Sanding block
• Drill press
• Hand power drill
• Hand drill

2. Getting Started
15
Other Tools and Supplies
Following are some general tools and supplies that are needed for
many of the toy construction projects in this book, along with some
measuring instruments that would be useful to have available.
Other tools
• Clamps
• Phillips head screw driver
• Drill bits (see section on Dimensions)
• Center punch or nail
• Roundover bits (⅛" to ¼")
Supplies
• De-waxed shellac
• Water-based polyurethane
• Wood glue
• Wood molding glue
• Sand paper (80 – 150 grit)
• Foam sanding pad (fine grit)
Measuring instruments
• Metal rulers (6 inches and longer)
• Tape measure
• Metal square
• Caliper (to measure diameters)
• Protractor
• Compass
Tools Needed for Each Toy
Specific tools required to make each toy are generally not indicated by the step-by-step instructions in Chapters 3 - 17. Rather, it is up to the reader to select the best tool at your disposal. Any tools unique to building a given toy will be referred to as “special tools” in each chapter, for example, the size and type of drill bits needed.
Materials
Hardwood is generally preferred for the body of
a toy. However, in many cases a toy’s body
needs to be made out of wood that is 1 ½ to 2
inches thick. This thickness of hardwood is
generaly not found at a hardware or do-it-
yourself lumber store.
It might be possible to purchase short pieces of
thick hardwood such as oak, maple, birch,
cherry, walnut, and mahogany, to name a few,
from your local lumber mill or woodworkers’
store. Short pieces of hardwood left over from
furniture making projects often provide enough
wood for making a toy.
We generally avoid softwoods, but some that are
of good quality are acceptable. However, fir is
not recommended because it contains resin that
can clog sandpaper and tools, and construction
lumber should be avoided since it presents a
challenge in accurately locating and drilling
holes into it.

2. Getting Started
16
A good alternative to purchasing thick or wide
pieces of hardwood is to glue together more
accessible ¾" thick pieces to form the wood
blanks needed for a toy.
Making Thicker and Wider Toy Blanks
See Chapter 18, pp. 151-2
Often it is necessary to purchase parts like small
wheels, axle pegs and wood buttons. Local craft
stores might stock these parts, but the variety
will be limited. It is best to purchase these parts
through suppliers that can be found on the
internet, and these parts are generally
reasonably priced. The Appendix lists several
suppliers of these parts.
Large wheels are used in a number of the toys in
Part I. These can be very expensive to purchase,
so methods for making them are described in
Part II. These methods can also be used to make
small wheels, if that is preferred to purchasing
them.
You will find the dowels, washers, screws, and
eyelets that are used to make some toys at your
local hardware store.
Dimensions
THIS IS VERY IMPORTANT! At the
beginning of the instructions for making each
toy are two tables listing the parts needed. The
first shows the wood parts that need to be
machined – called the "Cut List."3 Most of these
parts will be cut from blanks of wood. Some will
be cut from purchased parts. The second table
gives the list of "Other Parts" usually purchased
parts requiring little or no modification.
Both tables give the dimensions of the part or
wood blanks for the toy being constructed.
However, it is IMPORTANT to note that in
many cases the main part of the toy, the "body,"
requires a thickness of wood that can vary.
Often a range of thicknesses is given, allowing
some flexibility in using the wood that is
available. In such cases the toy can be made
regardless of the exact thickness of the body.
This flexibility in thickness for the wood chosen
for the body means that the dimensions of other
parts used to construct this toy might need to be
adjusted in length because they depend on the
thickness of the body. For example, this would
be the case for the length of an axle that needs to
pass through the body of a toy car.
Therefore, when dowels are listed to be used for
the axle of a toy, the length given is long enough
to be used with whatever thickness is chosen for
the body and the phrase "cut-to-fit" will follow
the item.
After deciding on the thickness of the toy’s body,
it is important to check the dimensions of all the
other parts to be certain they will work with the
chosen thickness of the body. It might be
necessary to adjust the dimensions of these
parts.
3 “Machined” refers to cutting out, rounding over edges, sanding, and drilling operations.

2. Getting Started
17
Cut Lists and Dimensions
Don't be concerned that the dimensions for
some parts shown in the Cut List are a bit
greater than the dimensions given on a diagram
for the part.
This is because the dimensions for a part that
need to be shaped from a blank will be given
oversize to help in transferring the template for
the part to the blank and in cutting out the
shape.
This usually applies to the body of the toy, but
can also apply to some of the parts to be
attached to the body.
Templates
In each chapter there are templates for many of
the parts that need to be cut from blanks. The
templates are used to draw an outline of the part
on the blank. Use tracing paper or a photo copy
of the template to do this, being certain to not
only draw the outline but also mark any holes
that need to be drilled into the part.
Drill Bits and Hole Sizes for Glue Joints and Rotating Axles
Some of the small toy parts used for the toys in
Part I are purchased, for example dowel rods,
axle pegs, and wooden buttons. It is essential to
have the correct size drill bit for creating the
holes in which these parts will fit.
In some cases the parts will be glued into the
hole; in other cases the part will need to move
freely, for example a wheel axle.
Unfortunately, some of the drill bits needed to
create the holes for these parts are not in the
group of six to 12 drill bits commonly sold as a
set. Although individual drill bits of almost any
size can be purchased at a store that specializes
in woodworking tools4, if you plan to make a
number of toys, an investment in a large set of
drill bits containing fractional sizes, letter sizes,
and decimal sizes is very useful.5 See the
Appendix for a complete list of the decimal
equivalents of a wide range of drills.
A large selection of drill bit sizes will provide a
wider option for making a good glue joint with
dowels, axle pegs, and wooden buttons.
The table on the next page shows the commonly
used toy parts and the normal drill bit sizes to
create a glue joint or to create a hole for a
rotating axle. Use this table with caution. It is
best to check the size of holes in a piece of scrap
wood, especially for holes that are to make a glue
joint.
4 For example, Rockler Woodworking and Hardware. 5 Harbor Freight sells a set of 115 bits that will cover
all needs. Look for it on sale!
2. Getting Started
18
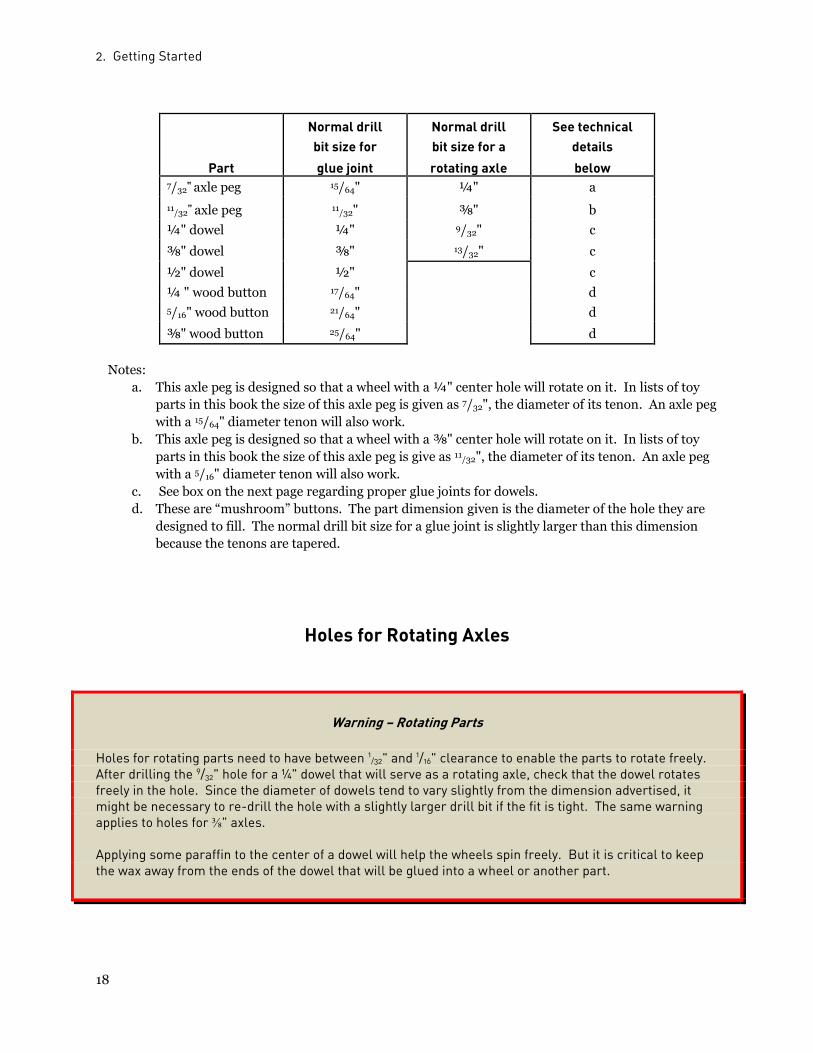
Normal drill Normal drill See technical bit size for bit size for a details
Part glue joint rotating axle below 7/32
" axle peg 15/64" ¼" a
11/32
" axle peg 11/32" ⅜" b
¼" dowel ¼" 9/32" c
⅜" dowel ⅜" 13/32" c
½" dowel ½"
c
¼ " wood button 17/64" d
5/16" wood button 21/64" d
⅜" wood button 25/64" d
Notes:
a. This axle peg is designed so that a wheel with a ¼" center hole will rotate on it. In lists of toy
parts in this book the size of this axle peg is given as 7/32", the diameter of its tenon. An axle peg
with a 15/64" diameter tenon will also work.
b. This axle peg is designed so that a wheel with a ⅜" center hole will rotate on it. In lists of toy
parts in this book the size of this axle peg is give as 11/32", the diameter of its tenon. An axle peg
with a 5/16" diameter tenon will also work.
c. See box on the next page regarding proper glue joints for dowels.
d. These are “mushroom” buttons. The part dimension given is the diameter of the hole they are
designed to fill. The normal drill bit size for a glue joint is slightly larger than this dimension
because the tenons are tapered.
Holes for Rotating Axles
Warning – Rotating Parts
Holes for rotating parts need to have between 1/32" and 1/16" clearance to enable the parts to rotate freely.
After drilling the 9/32" hole for a ¼" dowel that will serve as a rotating axle, check that the dowel rotates freely in the hole. Since the diameter of dowels tend to vary slightly from the dimension advertised, it might be necessary to re-drill the hole with a slightly larger drill bit if the fit is tight. The same warning applies to holes for ⅜" axles. Applying some paraffin to the center of a dowel will help the wheels spin freely. But it is critical to keep the wax away from the ends of the dowel that will be glued into a wheel or another part.

2. Getting Started
19
Glue Joints for Dowels, Axle Pegs and Wood Buttons
Warning – Glue Joints
We have found that purchased dowels, wood buttons, and axle pegs might have diameters that vary from their advertised dimensions. This is true not only from parts purchased from different manufacturers but also from the same manufacturer. For example, it would not be unusual for a ¼" (0.250") dowel purchased for the axle of a toy to actually have a diameter as small as 0.240" or as large as 0.255" Since this dowel will need to form a solid glue joint with the ¼" hole in a wheel, the fit should be tested in the wheel or by using a piece of scrap wood before gluing. Therefore, before gluing a dowel, axle peg, or wood button into a hole, find out if it is necessary to make adjustments for too loose or too tight a fit. The Test: A dowel (axle peg, or wood button) should fit easily into the hole in which it is to be glued without applying force. It should fit snuggly and should not fall out when the object in which it is placed is turned over. Test the fit in the center hole of purchased wheels, and test the fit by drilling a hole in a piece of scrap wood before drilling a hole in a toy part. Correction for a Loose Fit: In gluing a dowel into the center hole of a wheel, if the dowel is loose and a small amount undersized, a thicker glue6 should be used. If it is a very loose fit, try to find a larger diameter dowel. When gluing a dowel, axle peg, or wood button into a part for a toy and the fit is loose when tested in a piece of scrap wood, either use thicker glue or use a smaller drill bit to make the hole in the part. Correction for a Tight Fit: On the other hand, if the dowel, axle peg, or wood button is oversized and will not fit into the hole unless forced, a slightly larger drill bit will need to be used to re-drill the hole or to ream it out (see Chapter 19, p. 169), or the end of the part that is to fit into the hole will need to be sanded until a good fit is achieved. Another option: An investment in a few “lettered” size drill bits is a great help in achieving good fits for dowels, axle pegs, and buttons. In the case of ¼" (0.250”) holes, the “C” (0.242"), “D” (0.246"), “F” (0.257") and “G” (0.261") lettered drill bits are very useful. For ⅜" (0.375") holes, the “T” (0.358"), “U” (0.368"), “V” (0.377"), and “W” (0.386") lettered drill bits are very useful.
6 For example, Titebond Molding and Trim Glue can be used to create a glue joint in a slightly oversized hole.

2. Getting Started
20
Sub-assemblies
Push Stick and Grip (Figure 2-1)
1. Cut the push stick from a ½" diameter dowel. Most hardware stores stock these dowels and they are generally 3 feet long. The length should be cut to suit the child that will be using the toy. Without specific knowledge about the user, a common length is 17 ⅞" - enabling two push sticks from one dowel.
2. The design of the handle grip is shown in Figure 2-2. Although the grip is optional, it might make it easier for a child to hold onto the stick when pushing the toy. Cut a piece of hardwood ¾" by ¾" by 2 ½" long. Round over all edges of the grip to a ⅛" radius, then sand the entire grip and the dowel.
3. To safely drill the ½" hole ¾" deep into the end of the handle grip, clamp the grip securely in a vice or to fence of a drill press.
4. Test the fit of the dowel in the hole drilled at the end of the grip to determine if it will make a good the glue joint with the grip. If the fit is tight, sand ¾" of the end of the dowel until a good fit is achieved. See warning on glue joints (p. 19).
Figure 2-1. Push Stick with Handle Grip Attached
Figure 2-2. Handle Grip
2. Getting Started
21
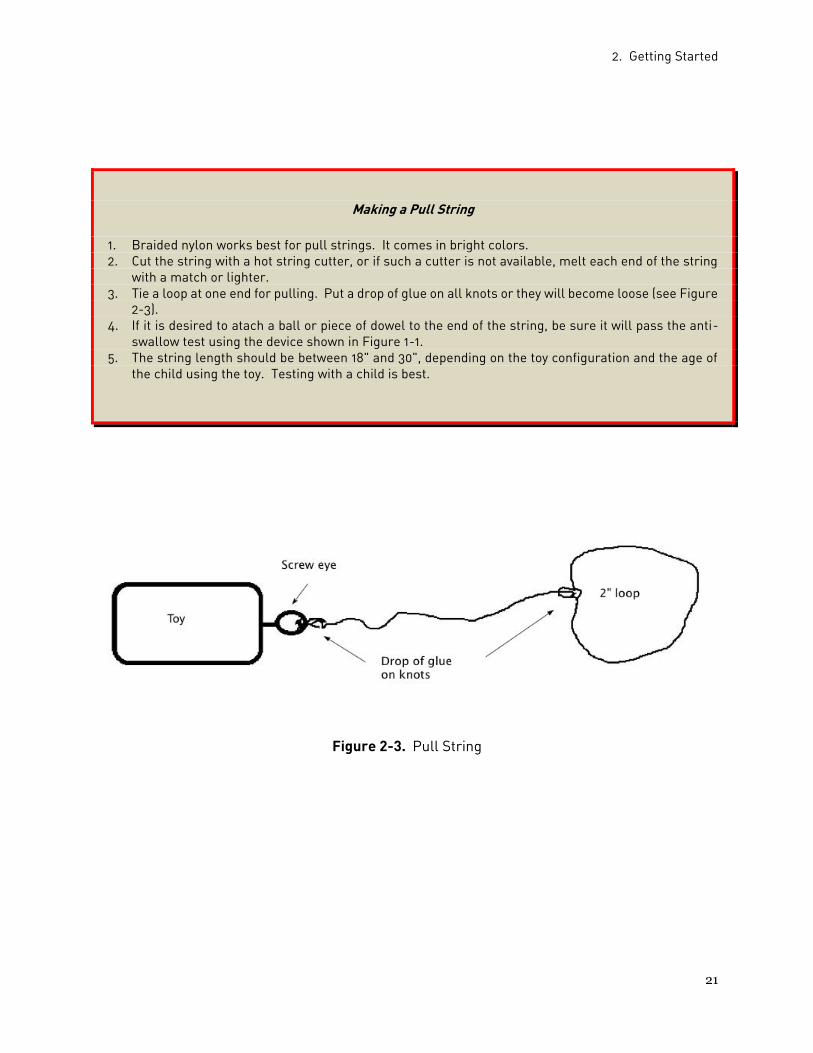
Making a Pull String
1. Braided nylon works best for pull strings. It comes in bright colors. 2. Cut the string with a hot string cutter, or if such a cutter is not available, melt each end of the string
with a match or lighter. 3. Tie a loop at one end for pulling. Put a drop of glue on all knots or they will become loose (see Figure
2-3). 4. If it is desired to atach a ball or piece of dowel to the end of the string, be sure it will pass the anti-
swallow test using the device shown in Figure 1-1. 5. The string length should be between 18" and 30", depending on the toy configuration and the age of
the child using the toy. Testing with a child is best.
Figure 2-3. Pull String

2. Getting Started
22
On to Toy Building
At the start of each of the toy chapters you will
find: the list of materials needed to make the
toy, plans including all dimensions, a list of
special tools required for that toy, and step-by-
step instructions for machining and finishing the
parts and assembling the toy. When needed, a
template (actual-size drawing) is provided for
tracing the outline of the parts on wood blanks.
In most cases several different types of tools
could be used to fashion a given part of a toy.
For example, in cutting out the body of a toy
whose shape is curved, we generally prefer
making a rough cut with a band saw, then
smoothing out the edges with a drum or
oscillating spindle sander. But if you don’t have
access to a band saw, a scroll or jigsaw will
suffice, or perhaps even a coping saw, and you
can always sand by hand.
The list of tools you could use for a given
operation, shown earlier in this chapter, are
ordered by the generally most preferred tool to
the least preferred. There are exceptions,
however, and they will be noted in the individual
toy chapters.
Finally, it is recommended that you review all
the instructions for building a given toy to
determine if the tools at your disposal will
enable you to accomplish all the cutting
operations required.

150
Part II. Jigs and Techniques

18. Shaping Parts
151
18. Shaping Parts
Most of the toys described in Section I of this book have a main part, called the “body” of
the toy. If the toy has moving parts, they are uusally attached to the body. Making the
body or any other part of the toy starts with a square or rectangular block of wood – the
wood blank.
If a template is going to be used in cutting out a part, the dimensions of the wood blank in
the Cut List will be slightly greater than the part to allow for transfering the design from
the template to the blank and cutting out the part.
Forming the Wood Blank
The first challenge in beginning a toy building
project is to obtain the size of wood needed for
the parts.
Although it might be possible to obtain a
rectangular block of wood with the length
required, it might not be possible to find the
width or thickness needed. Many of the toys
described in Section I required parts to be made
out of wood that is thicker than ¾" – the
standard thickness of most readily available
lumber.
Unless you have made furniture requiring wood
that is 1" to 2 ½" thick and have scraps left over,
it is unlikely you will have the lumber out of
which the wood blank for the body and other toy
parts can be obtained. In addition to the
thickness, finding the proper width can also be a
challenge.
There is a simple solution to these problems -
gluing together two or more pieces of wood to
form the thickness and/or width needed.
Wide Blanks
Gluing two or more pieces of wood together to
form a wider block of wood is a fairly easy
process. In addition to the wood, the supplies
and tools needed include wood glue and clamps.
The process is known as edge gluing, that is,
gluing the individual pieces of wood edge-to-
edge. If you have never done this before, we
suggest searching the internet for “edge gluing”
videos that will demonstrate the procedure.38
Here is a brief summary of edge gluing. Critical
to the process is making certain the edges are
perfectly straight and square to each other.
Then apply glue to both edges and clamp the
pieces together every 12".
Let the glue set for about 30 minutes, then
scrape off any glue that has squeesed out from
the edges. Clean up the surfaces by sanding or
passing through a planer. Repeat with a third
piece of wood, if necessary.
38 See for example, “3 steps to great glue ups: edge
joints” produced by the FineWoodworking magazine.

18. Shaping Parts
152
Thick Blanks
Creating a thick blank from two or more pieces
of wood is known as face gluing, that is, gluing
together the faces of two or more pieces. The
procedure is similar to edge gluing. Searching
the internet for “face gluing” will provide videos
that offer tips on this process.
Steps for Making the Body of a Toy
The normal steps for making the body of a wooden toy are:
1. Work out the machining and sanding
sequence.
2. Start with a square or rectangular wood
blank. Sand all surfaces to remove saw
and/or milling marks. If the wood blank has
been created by edge or face gluing together
two or more pieces of wood, it is necessary
to check the blank to see that all surfaces
and edges are clear of glue and are square.
Sand with the direction of the grain.
The Blank
3. Do any accessible straight saw cuts.
4. If the body has a curved shape, transfer the
shape of the body from a template to the
block of wood, creating an outline on the
wood. Mark hole locations using the plan or
template.
Outline of Part with Hole Locations
5. Drill holes in the body while the blank is still
rectangular. The square edge of the blank
makes it easier to clamp the blank against
the fence of a drill press in order to align the
holes. This is especially important if making
duplicate copies of the toy.
Holes Drilled in Blank
6. Cut the contour of the body to within 1/32" to
1/16" of the outline. (There are cases where
contouring will precede some drilling and
straight cuts.)

18. Shaping Parts
153
Body Cut from Blank
7. Sand the body contour to the outline on the
block of wood.
8. Do any necessary round over of edges.
(Sometimes rounding over edges, if done on
a router, will need to be completed before
drilling some of the holes. Holes in the edge
can prevent the round over bit bearing from
running smoothly along an edge.)
Router Safety
DO NOT USE a router to round over edges of toy parts UNLESS the router is station-ary, that is, attached to a router table. See p. 158.
9. Sand out any saw or milling marks or burn
marks from cuts and rounding over, and
then sand all surfaces and edges.
View the body in strong light. If surfaces are
not well prepared, a clear finish will em-
phasize defects. If necessary, sand some
more.
Band Sawing
Bandsaw Safety
This is not intended to cover all the safety
aspects in using the band saw, but just a few key
issues in cutting parts for toys:
1. Always keep the upper blade guide about ¼"
above the work piece. This not only reduces
the chance of getting your fingers near the
blade teeth, but also provides better blade
support for truer, smoother cuts.
2. When cutting small parts, keep your fingers
out of the danger zone – the area 1 ¼" from
the blade teeth or the area of the table insert.
3. Use the correct blade for the job: ½" or
wider hook blades for re-sawing; standard
and skip tooth blades for scrolling. Match
the blade width to the smallest radius
required.
4. When cutting dowels, grip them securely to
prevent rotation.
5. While the blade is moving, do not back up
the wood on long cuts or curves. Shut off
the bandsaw before backing up.
Remember: be alert and safety
conscious at all times.

18. Shaping Parts
154
Key Bandsaw Set-up Procedures and Adjustment
1. Guide blocks for the blade must be smooth,
true, flat and properly adjusted. Regularly
remove and re-grind them. Even metal
guides become “grooved,” allowing the blade
to move around no matter how well
adjusted.
2. Follow the band saw manual for the correct
guide block adjustment gap. It is usually
0.003 – 0.005".
3. Make sure the blade has not been “pushed”
out of its true path with the band saw blade
wheels.
4. When all adjustments have been made,
check that the blade is square to the band
saw table.
5. Check that there is proper tension on the
blade. One way to do this is to raise the
upper guide 6" with the power off. Then
push the blade sideways with your finger.
The blade should not deflect more than ¼"
if under proper tension.39
Making Wheels
Wheels up to 2" in diameter can be purchased at
economical prices. This is not true for the larger
wheels needed on some of the toys described in
Part I. If only a few large wheels are needed, it
still might pay to purchase them.
Wheels that resemble car or truck tires are best
purchased. However, there are ways to make
wheels of any size if you have access to a drill
press or a band saw. These wheels will have flat
surfaces. See, for example, the hippo (Chapter
15) or rolling rattle (Chapter 16).
Chapter 19 describes a simple way to make
wheels using a drill press and hole saw.
Following are are two methods to make large
wheels using a bandsaw – freehand and using a
special purpose jig.
Freehand Method
This method takes considerable practice and
patience.
39 Finewoodworking.com/2012/11/09/
1. Use a compass to draw the wheel on a square
blank of wood that is slightly larger than the
desired wheel.
2. Drill the center hole, usually either ¼" or ⅜" in
diameter.
3. Follow the pattern as closely as possible as you
cut out the wheel. It is best to do this with a
bandsaw or scroll saw. Try to cut out the wheel
to within 1/32" to 1/16" of the pencil outline on the
blank.
4. Sand to the outline. A stationary belt or disk
sander works best for this operation, in
conjunction with the circle sanding jig described
in Chapter 2o. If this equipment is not available,
sanding can be also be done using a hand
sanding block.
5. Round over the edges to a ⅛" or 3/16" radius,
either by hand or using a router installed in a
router table in conjunction with the jig described
later in this chapter.

18. Shaping Parts
155
6. Sand all surfaces of the wheel with 150 grit
sandpaper.
An easier way to make wheels on a bandsaw
requires the use of a jig. Searching the internet
will provide many different examples and
demonstrations of bandsaw circle cutting jigs.
The simple jig described here is designed for
making wheels for toys.
Circle Cutting Jig Making the Jig
1. Cut a strip of hardwood to fit the miter slot
on your bandsaw. It should be snug but also
able to easily slide back and forth without
binding. Cut the thickness to be less than
the depth of the slot.
2. Cut a piece of ¾" plywood approximately
the size of your bandsaw table to serve as the
base of the jig. It must extend at least 1" to
the left of the blade and at least 3" to the
right of the miter slot, and it must be long
enough to cover the depth of the table.
3. Place the base on the bandsaw table to mark
the location of the miter slot, then glue the
strip from Step 1 to the bottom of the base,
making sure it is square to the front edge of
the plywood.
Reinforce the strip by drilling and counter-
sinking a few ¾" screws or using ¾" brads
through the strip and into the base.
4. Make a stop block - a piece of wood approx-
imately ¾" x 1" x 4" long. On the bottom of
the base glue this block along the back edge.
Reinforce it by drilling and countersinking
several drywall screws through it into the
base. Figure 18-1 shows the jig to this point.
5. After the glue dries, place the base on your
bandsaw table with the guide strip in the
miter slot, turn on the bandsaw, and push
the base toward the blade until the base
stops because the stop block has engaged the
front of the bandsaw table.
Figure 18-1. Circle Cutting Jig Base
6. After turning off the bandsaw, remove the
base and draw a line perpendicular to the
cut at the point where the cut ended.
Measure from the cut along this line the
radius of the circle desired. In Figure 18-2,
marks have been put at 1 1/16", 2 1/16", and
3 1/16" from the cut. These will be the center
holes for making circles that are 2", 4", and
6" in diameter. The 1/16" added to each
radius above allows room for sanding. (To
sand circles, see the jig described in Chapter
20.)
Attaching a screw on the face of the stop
block will help to fine tune the jig (see Figure
18-2).
18. Shaping Parts
156
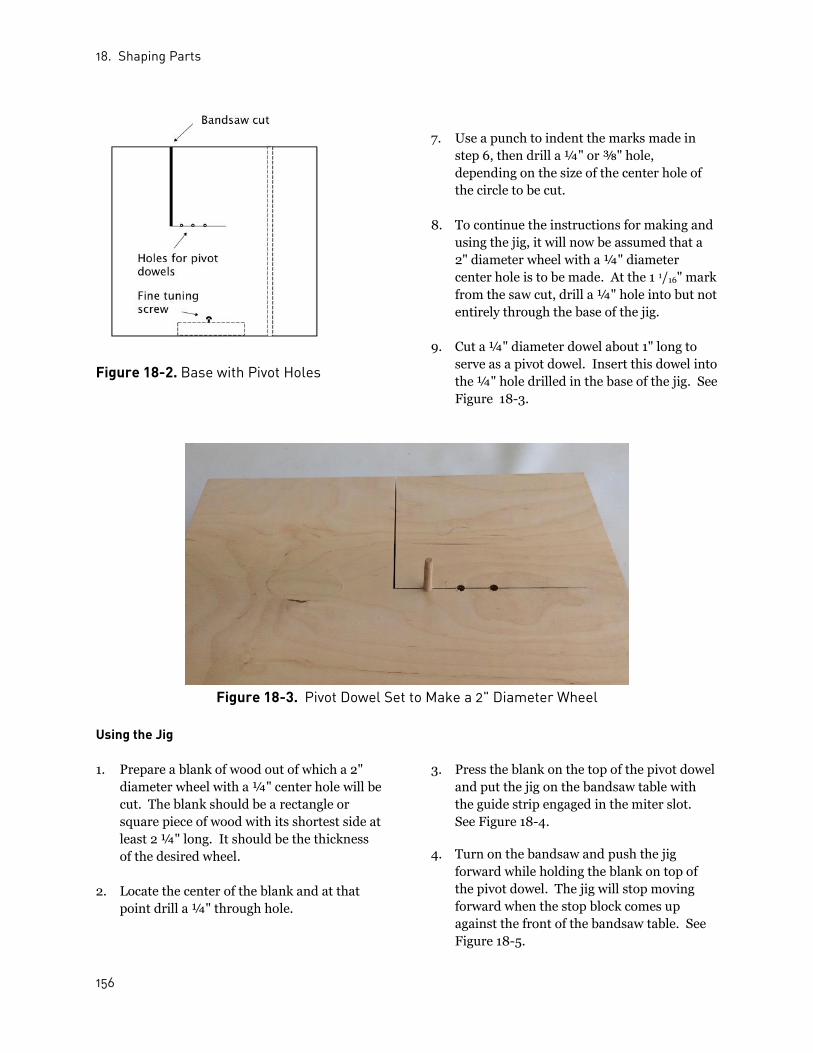
Figure 18-2. Base with Pivot Holes
7. Use a punch to indent the marks made in
step 6, then drill a ¼" or ⅜" hole,
depending on the size of the center hole of
the circle to be cut.
8. To continue the instructions for making and
using the jig, it will now be assumed that a
2" diameter wheel with a ¼" diameter
center hole is to be made. At the 1 1/16" mark
from the saw cut, drill a ¼" hole into but not
entirely through the base of the jig.
9. Cut a ¼" diameter dowel about 1" long to
serve as a pivot dowel. Insert this dowel into
the ¼" hole drilled in the base of the jig. See
Figure 18-3.
Figure 18-3. Pivot Dowel Set to Make a 2" Diameter Wheel
Using the Jig
1. Prepare a blank of wood out of which a 2"
diameter wheel with a ¼" center hole will be
cut. The blank should be a rectangle or
square piece of wood with its shortest side at
least 2 ¼" long. It should be the thickness
of the desired wheel.
2. Locate the center of the blank and at that
point drill a ¼" through hole.
3. Press the blank on the top of the pivot dowel
and put the jig on the bandsaw table with
the guide strip engaged in the miter slot.
See Figure 18-4.
4. Turn on the bandsaw and push the jig
forward while holding the blank on top of
the pivot dowel. The jig will stop moving
forward when the stop block comes up
against the front of the bandsaw table. See
Figure 18-5.

18. Shaping Parts
157
Figure 18-4.
(Note: the upper blade guide is higher than the
recommended ¼" above the work piece in
Figure 18-4 and the following photographs in
order to better show the use of the jig. In
practice it should be lower.)
Figure 18-5.
5. Keep the jig pressed against the front of the
bandsaw table as you slowly turn the blank
on the pivot dowel into the moving bandsaw
blade. See Figure 18-6.
Figure 18-6.
6. When a complete circle has been cut out,
stop the bandsaw blade and slide the jig off
the blade through the original cut made in
the blank.
Fine Tuning Jig
Keep an eye on the bandsaw blade as the blank is
turned into it. The blade bending off a vertical
position is an indication that the jig is out of
adjustment. If this happens, stop the bandsaw
and check that the center of the pivot hole is
lined up with the front of the blade teeth.
Adjusting the screw in the front edge of the stop
block, where it engages with the front of the
bandsaw table, can help to make fine
adjustments to the location of the jig.
Making More Pivot Dowel Locations
The jig described above has a row of ¼" pivot
dowel holes for different size circles. There is a
simple way to add more pivot hole locations or
holes for circles that need a ⅜" center hole and
thus need a ⅜" pivot dowel.
Simply screw a second stop block onto the
original one (see Figure 18-7). This will pull the
jig back the width of the added stop block,
enabling another row of pivot dowel holes. To
do this, it will be necessary to either remove the
fine tuning screw on the original stop block or
drill a hole in the back side of the additional stop
block to cover this screw.
After adding the second stop block, put the jig on
the bandsaw table and push it forward through
the saw cut made earlier until the added stop
block is stopped by the front of the bandsaw
table. Now draw the new line perpendicular to
the end of the bandsaw blade. Along this new
line drill additional holes for pivot dowels to
make the desired circle diameters and center
holes. Alternatively, it is easy enough to make
another one of these jigs.

18. Shaping Parts
158
Figure 18-7.
Using a Router
In toy making, the router is used primarily for rounding over edges of toy parts. This
helps to create smooth edges and child safe toys. The router is also used to shape parts
when making duplicate parts, using the technique of template routing.
Since toy parts are small and hard to clamp to a work bench, using a router is not
recommended unless it is stationary (attached to a router table).
Router Table
Rounding over edges or shaping parts are
techniques that should be done using a router
table.
To obtain the best results:
1. The router table must be flat and the insert
must be flat and flush with the table. A
sagging table or table insert will give uneven
round overs. This will result in excessive
sanding to repair the “step” created or
partial round over.
2. The roundover bit must be precisely ad-
justed relative to the table surface to give a
full round over, but without creating a
“step” in the bottom surface (see Figure
18-8).
3. The router bit must be sharp and the guide
roller (bearing) free turning.
Making a Router Table
Instructions for making a simple router table can be found on the internet by searching “building a router table.”

18. Shaping Parts
159
Figure 18-8. Roundover Bit Set-up
Routing Techniques
To achieve a smooth finish with few or no burn
marks (some woods like cherry and maple burn
easily), the following procedures will help:
1. The work piece must be moved against the
rotational direction of the cutter (see Figure 18-
9). It is very dangerous to move the piece with
the direction of the cutter, since this may cause
your work piece and your hand to be pulled into
the cutter.
2. When routing small parts, it is best to use a
clamp, jig, or push stick to keep your fingers a
safe distance from the router bit.
3. Use only enough pressure on the work piece to
maintain contact with the router bit.
4. Keep firm downward pressure on the part
against the table.
5. Never stop the work piece movement against
the cutter. Do the cutting in a series of
overlapping sweeps.
6. The feed rate is not really critical, but too
slow a rate can produce burn marks, and too
fast a rate is likely to cause the finish to be
rough. Reducing cutter RPM is an
alternative technique.
7. When using a roundover bit, initially set the
bit slightly low. After the first cut, the bit
should be raised to the correct setting and the
roundover re-cut. This second pass will
remove a small amount of material, resulting
in a cleaner cut.

18. Shaping Parts
160
Figure 18-9. Correct Method of Feeding Work Piece into Router Bit (Top View)
Rounding Over Toy Edges
To add realism to animals, cars, etc. the edges of
nearly all toy parts are rounded over. Also, the
round over provides a safer edge for children
who handle the toys, or who might fall on them.
The roundover size (size of roundover bit) for
the toys in Part I is specified in the instructions
for each toy and was chosen to suit the type of
toy.
In rounding over edges, sharp router bits are a
necessity to minimize sanding. Sanding out
burn marks is not fun! Burn marks may be
avoided by using a variable speed router. If burn
marks occur, reduce router RPM up to one half.
Reduce feed rate also.
Plan ahead regarding the drilling of holes in a
part and the rounding over of edges. It has been
recommended to drill holes before the part has
been cut out from a rectangular blank, in order
to have a square edge on which to register the
part for drilling. However, there are cases in
which the holes might interfere with the router
bearing when doing round overs. In such cases,
it is recommended to round over before drilling
those holes, or round over by hand sanding.
18. Shaping Parts
161
Router Jigs
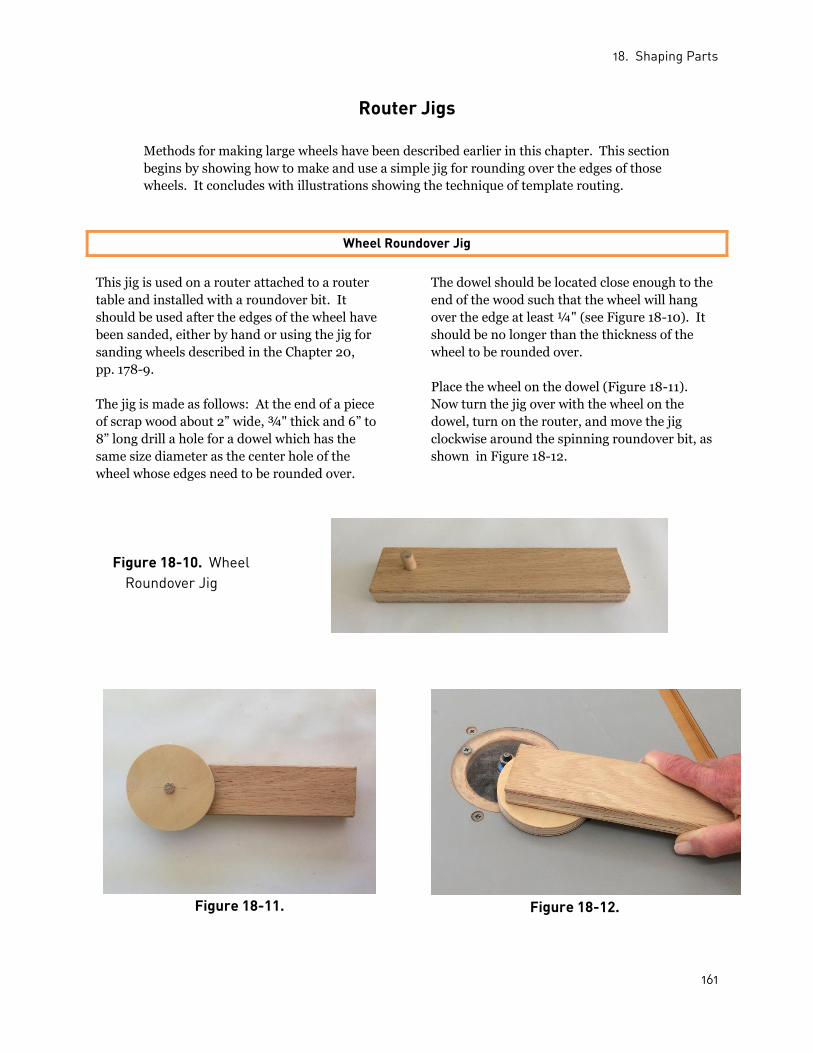
Methods for making large wheels have been described earlier in this chapter. This section
begins by showing how to make and use a simple jig for rounding over the edges of those
wheels. It concludes with illustrations showing the technique of template routing.
Wheel Roundover Jig
This jig is used on a router attached to a router
table and installed with a roundover bit. It
should be used after the edges of the wheel have
been sanded, either by hand or using the jig for
sanding wheels described in the Chapter 20,
pp. 178-9.
The jig is made as follows: At the end of a piece
of scrap wood about 2” wide, ¾" thick and 6” to
8” long drill a hole for a dowel which has the
same size diameter as the center hole of the
wheel whose edges need to be rounded over.
The dowel should be located close enough to the
end of the wood such that the wheel will hang
over the edge at least ¼" (see Figure 18-10). It
should be no longer than the thickness of the
wheel to be rounded over.
Place the wheel on the dowel (Figure 18-11).
Now turn the jig over with the wheel on the
dowel, turn on the router, and move the jig
clockwise around the spinning roundover bit, as
shown in Figure 18-12.
Figure 18-10. Wheel Roundover Jig
Figure 18-11.
Figure 18-12.
18. Shaping Parts
162
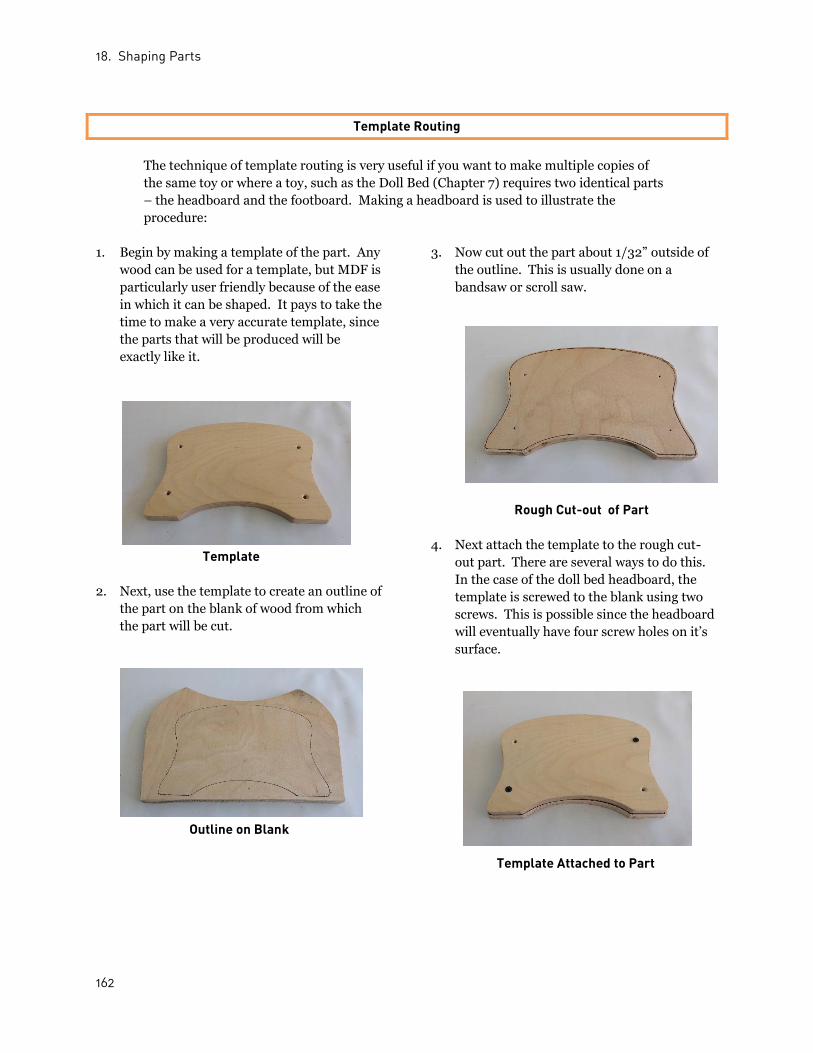
Template Routing
The technique of template routing is very useful if you want to make multiple copies of
the same toy or where a toy, such as the Doll Bed (Chapter 7) requires two identical parts
– the headboard and the footboard. Making a headboard is used to illustrate the
procedure:
1. Begin by making a template of the part. Any
wood can be used for a template, but MDF is
particularly user friendly because of the ease
in which it can be shaped. It pays to take the
time to make a very accurate template, since
the parts that will be produced will be
exactly like it.
Template
2. Next, use the template to create an outline of
the part on the blank of wood from which
the part will be cut.
Outline on Blank
3. Now cut out the part about 1/32” outside of
the outline. This is usually done on a
bandsaw or scroll saw.
Rough Cut-out of Part
4. Next attach the template to the rough cut-
out part. There are several ways to do this.
In the case of the doll bed headboard, the
template is screwed to the blank using two
screws. This is possible since the headboard
will eventually have four screw holes on it’s
surface.
Template Attached to Part
18. Shaping Parts
163
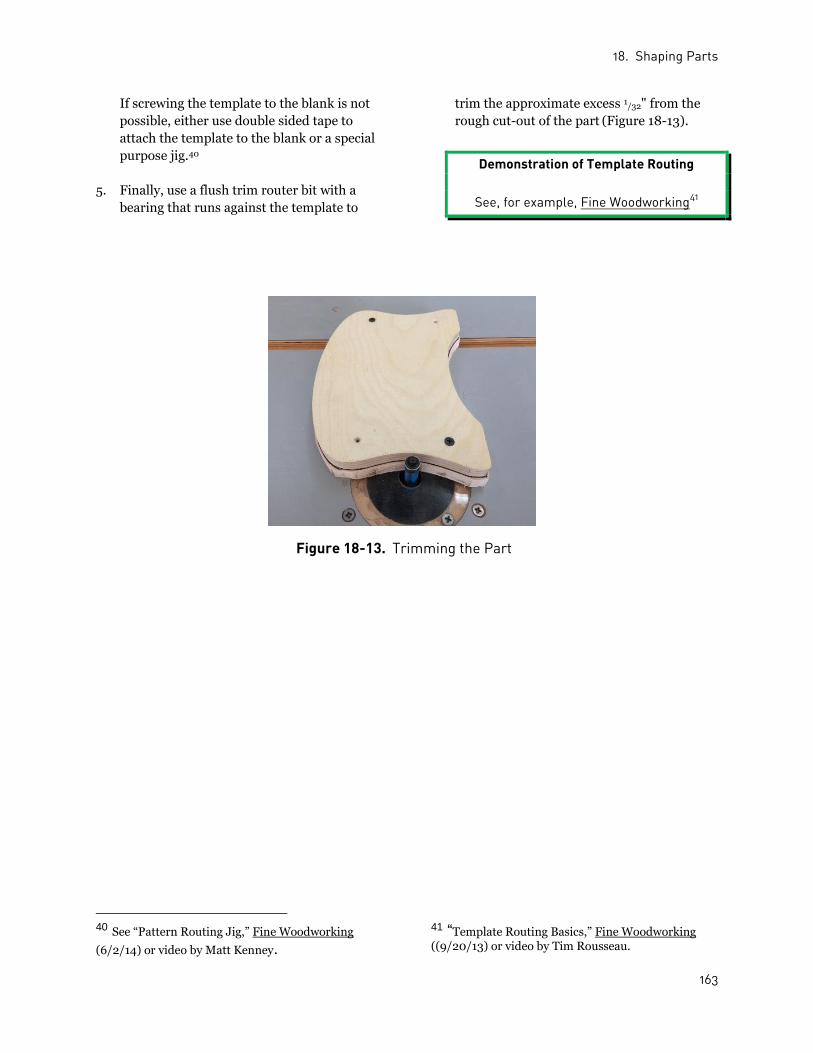
If screwing the template to the blank is not
possible, either use double sided tape to
attach the template to the blank or a special
purpose jig.40
5. Finally, use a flush trim router bit with a
bearing that runs against the template to
trim the approximate excess 1/32" from the
rough cut-out of the part (Figure 18-13).
Demonstration of Template Routing
See, for example, Fine Woodworking41
Figure 18-13. Trimming the Part
40 See “Pattern Routing Jig,” Fine Woodworking
(6/2/14) or video by Matt Kenney.
41 “Template Routing Basics,” Fine Woodworking ((9/20/13) or video by Tim Rousseau.

18. Shaping Parts
164
Other Cutting Jigs
Because of safety concerns, toy builders often
create jigs as they are building a toy. Following
is an example of one such jig used to machine
the small hubs of the Honey Bee wings (Chapter
8).
These hubs are made from 1 ¼" pieces of ½"
dowel. They require a hole drilled in one end
and a slot cut in the other end. Chapter 8 has
descibed ways of doing these two operations.
Figure 18-14 shows a jig that provides another
way to cut the slots.
Making the Jig
The jig is made from a piece of wood 3" wide, 9"
long and at least 1 ¼" thick. The width and
length dimensions are not critical.
Along the length of one face of the board (call
this the top) draw a center line. Along this line
drill ½" diameter holes about 1" apart. These
holes should be 1" deep and be drilled with a
brad point bit to create a flat bottom.
Figure 18-14. Jig to Cut Slot in Honey Bee Hubs
Next drill two ¼" holes from one side through
the width. These holes should be located ½"
down from the top toward each end of the jig,
and counter sunk on one side.
Finally, saw the board in half, lengthwise, along
the exact center of the holes and re-assemble it
with two ¼" machine bolts, placing the head of
the bolts in the countersunk holes.
Using the Jig
Place the 1 ¼" pieces of ½" dowel for the wing
hubs of the honey bee toy into the holes, pushing
them down to the bottom of the holes. Then
tighten the machine bolts. Next adjust the table
saw blade to a height of about ¾". Warning:
Make sure the bolts are well above the saw
blade.
Adjust the table saw fence so that the blade will
cut through the middle of each hub, and make a
cut as shown in Figure 18-14. The height of the
blade might need to be adjusted by experiment-
ing with the jig.
The end product will be hubs cut as shown in
Figure 18-15.
Figure 18-15. Slots Cut in Honey Bee Hubs
19. Drilling
165
19. Drilling
This chapter begins with a review of drilling methods, the types of drill bits used to make
wooden toys, and the drill bit sizes to use. It also includes how to cut out and sand large
wheels using a drill press, and some useful jigs for locating drill holes and holding small
round parts for drilling.
Drilling Methods
Toy making requires smooth bores and clean
entry and exits for holes, especially holes used
for rotating axles. The following guidelines
should help to achieve the desired results:
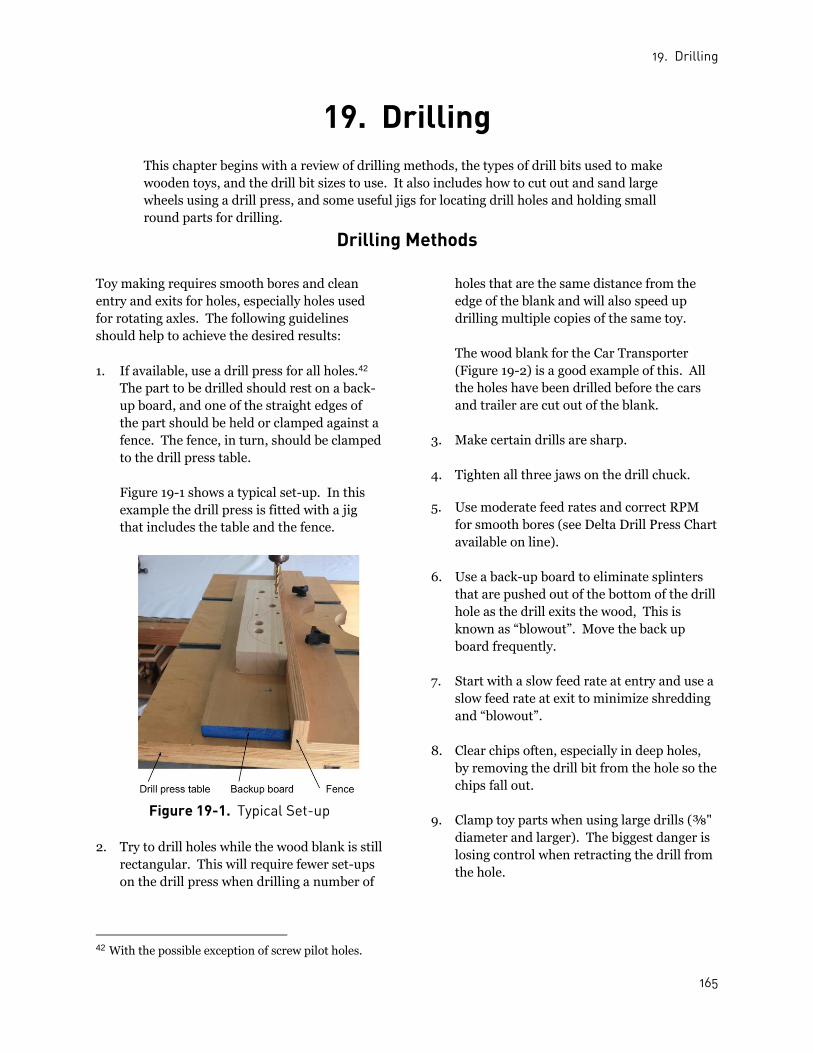
1. If available, use a drill press for all holes.42
The part to be drilled should rest on a back-
up board, and one of the straight edges of
the part should be held or clamped against a
fence. The fence, in turn, should be clamped
to the drill press table.
Figure 19-1 shows a typical set-up. In this
example the drill press is fitted with a jig
that includes the table and the fence.
Figure 19-1. Typical Set-up
2. Try to drill holes while the wood blank is still
rectangular. This will require fewer set-ups
on the drill press when drilling a number of
42 With the possible exception of screw pilot holes.
holes that are the same distance from the
edge of the blank and will also speed up
drilling multiple copies of the same toy.
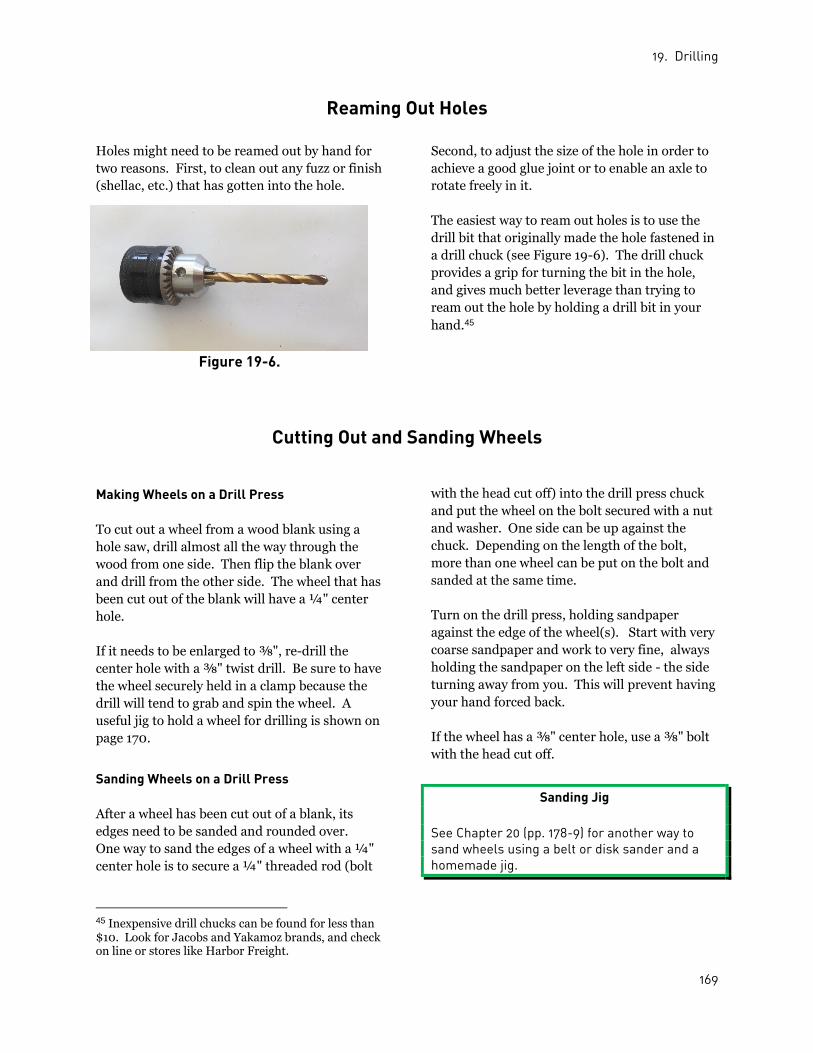
The wood blank for the Car Transporter
(Figure 19-2) is a good example of this. All
the holes have been drilled before the cars
and trailer are cut out of the blank.
3. Make certain drills are sharp.
4. Tighten all three jaws on the drill chuck.
5. Use moderate feed rates and correct RPM
for smooth bores (see Delta Drill Press Chart
available on line).
6. Use a back-up board to eliminate splinters
that are pushed out of the bottom of the drill
hole as the drill exits the wood, This is
known as “blowout”. Move the back up
board frequently.
7. Start with a slow feed rate at entry and use a
slow feed rate at exit to minimize shredding
and “blowout”.
8. Clear chips often, especially in deep holes,
by removing the drill bit from the hole so the
chips fall out.
9. Clamp toy parts when using large drills (⅜"
diameter and larger). The biggest danger is
losing control when retracting the drill from
the hole.

19. Drilling
166
Figure 19-2. Wood Blank for Car Transporter
Types of Drill Bits
Figure 19-3 shows the common drill bits used in toy making:
Twist Bit Brad Point Bit Forstner Bit Hole Saw Spade Bit
Figure 19-3. Common Woodworking Drill Bits
Twist Drill Bits. The twist drill bit is the most
common “household” bit, but it is not ideal for
drilling wood. Its advantages are that it comes
in a large variety of sizes, is the least expensive
drill bit, is easily sharpened, and if used correctly
gives very acceptable results.
Using the right speed (revolutions per minute -
RPM) will help get smooth bores. Often twist
bits are run too slowly. HSS (high-speed steel)
bits can take lots of RPM in wood.
Sharp drills and moderate feed rates are
especially important when using twist bits to
achieve the smooth bores needed for axle holes.
Brad Point Drill Bits. Brad point drills are
preferred over twist drills because they give
smoother, more accurate bores. However, they
are not available in the variety of sizes needed
for all toy making operations.
Follow RPM charts when using brad point drills.
Do not use brad point drills with drill bushings.
Bushings will ruin the cutting edges of these
bits.If a brad point drill is being used to drill
through a piece of wood, start on one side and
drill deep enough so the point of the bit just
comes out the other side. Then turn the wood
over and finish the hole by drilling from the
other side.
Forstner Drill Bits. These drill bits are
especially useful for larger diameter holes. They
are the only drills that can be used for drilling on
a slant surface (see Figure 19-4) or creating flat
bottom holes.

19. Drilling
167
Figure 19-4. Drilling on a Slant with a Forstner Bit
When using a Forstner bit, keep the RPM down,
especially for larger size drills. These bits get
overheated very easily due to their design. With
some kinds of wood, especially plywood, chips
jam up. It is usually necessary to clear chips
more frequently when using these bits.
Forstner bits can also be used for drilling an
interrupted surface, as shown in Figure 19-5.
This illustration shows a large hole being drilled
next to and partially over a smaller hole. This
was used in cutting out the cavity for the heli-
copter drive mechanism (Chapter 17, p. 141).
Hole Saw. If bore smoothness is not critical,
large drill holes can be achieved using a hole
saw. Hole saws are especially useful in toy
making for cutting out large wheels. They come
in a variety of sizes, from ½" to over 8" in
diameter.
When a hole saw is being used to cut out a
wheel, start on one side and drill almost through
the wood. Then turn the wood over and finish
the hole by drilling from the other side. Keep in
mind that the diameter given for a hole saw is
the saw's outside diameter. Therefore, use a
hole saw with a diameter that is at least ⅛"
larger than the diameter of the wheel you want
to make.
Figure 19-5. Drilling an Interrupted Surface with a Forstner Bit
Spade Drill Bit. These bits are used mostly in
construction, for example, for putting holes
through studs. They drill deep holes quickly.
Although seldom used in toy making because
they tend to leave a ragged hole, there are
occasions where they are useful. One such case
occurred in cutting out the yoke for the Rolling
Rattle (Chapter 16). A spade drill with spurs is
preferred.
If a spade drill bit is being used to drill a through
hole in a piece of wood, start on one side and
drill more than half way through so the point of
the drill just comes out the other side. Then turn
the wood over and finish the hole by drilling
from the other side.
19. Drilling
168
What Size Drill to Use?
In toy making, drilled holes are usually for one
of two purposes: as a way to glue one part (a
dowel, wood button, or axle peg) to another; or
to receive an axle (dowel or axle peg), which
needs to move freely in the drilled hole.
Clearly the use of the hole is one important issue
in determining the size of the hole to be drilled.
Another important issue stems from the fact that
dowels of a given diameter actually are seldom
the exact diameter stated by the manufacturer.
A given size dowel can vary enough to cause a
problem in obtaining a good glue joint, even
dowels from the same manufacturer as well as
from one manufacturer to another.
Therefore, before drilling a hole for a glue joint
or moveable axle, be certain to obtain an
accurate measurement of the diameter of the
dowel or the diameter of the tenon being used.
(This is why it is recommend to have a caliper as
one of your basic measuring instruments.) To
the diameter add the following clearances:
• A hole made for a movable ¼"or ⅜"
diameter dowel or an axle peg should be at
least 1/32" (about 0.032 inches) larger in
diameter than the dowel or tenon that is to
be moveable in the hole. Larger diameter
dowels require more clearance.
• A hole made for a glue joint should be
slightly loose – approximately 0.005 inches
Larger in diameter than the dowel or tenon
being glued into it.44
Once a drill bit has been chosen for the hole, it is
recommended that a test hole be drilled in a
piece of scrap wood to see how the dowel, axle
peg or wood button being used fits the hole. If
the hole does not seem to be satisfactory, try a
different size drill bit until the fit works.
Achieving proper glue joints for parts to be glued
into a hole is particularly important in order to
avoid parts becoming loose and causing a
potential choking hazard. Using the test for
proper fits given in Chapter 2 (pp. 19) or the
spacing given above to determine if a hole has a
proper glue joint is strongly recommended.
The table in Chapter 2 (p. 18) gives the normal
drills bits to be used with different size dowels,
wheels, axle pegs and wood buttons. It is
provided as a starting point in selecting the
correct size drill to be used, keeping in mind the
purpose for the hole (glue joint or moveable
part) and the actual size of the dowel, axle peg,
or wood button to be used.
The drill size suggestions provided in this table
apply whether using manufactured wheels or
custom made wheels. Certain "lettered" drills are
particularly useful for creating good glue joints
for ¼" dowels. They are D (.246" in diameter),
F (.257"), and G (.261"). For gluing ⅜" dowels,
the following "lettered" drills are useful: U
(.358" in diameter), V (.377") and W (.386").
See Appendix A for decimal equivalents of
fractional, lettered, and millimeter-sized drills.
44 0.005 inches is approximately the thickness of two pieces of newspaper.
19. Drilling
169
Reaming Out Holes
Holes might need to be reamed out by hand for
two reasons. First, to clean out any fuzz or finish
(shellac, etc.) that has gotten into the hole.
Second, to adjust the size of the hole in order to
achieve a good glue joint or to enable an axle to
rotate freely in it.
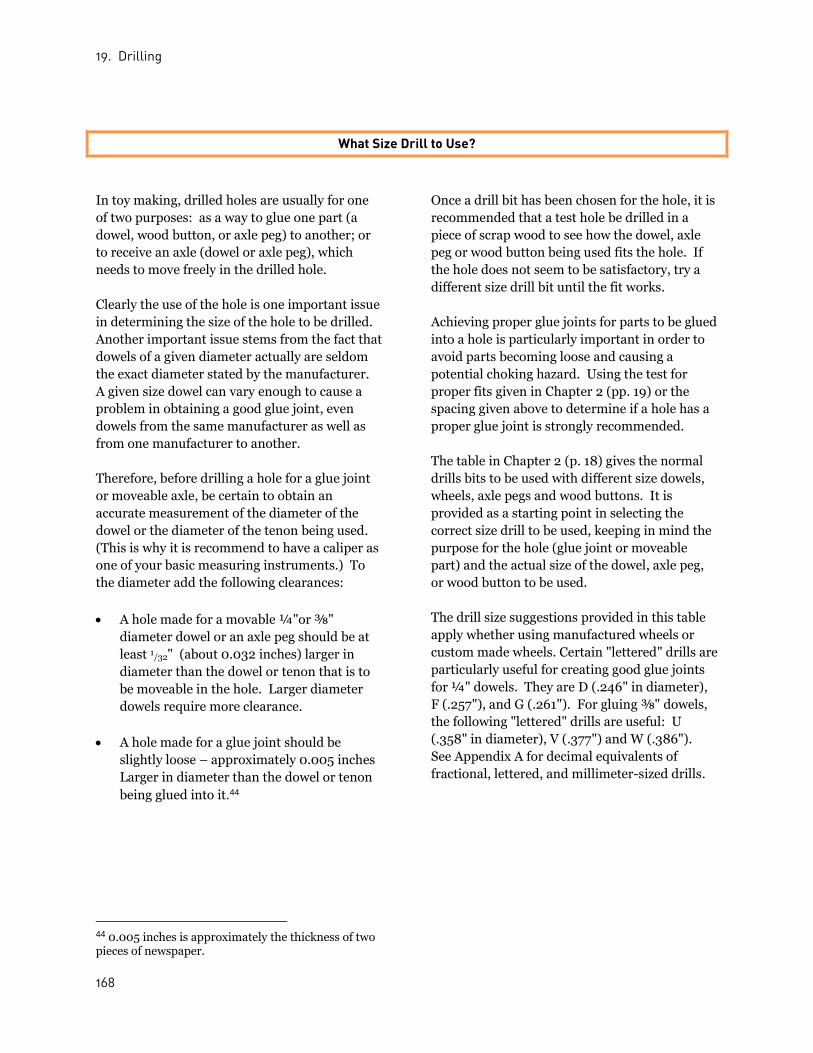
The easiest way to ream out holes is to use the
drill bit that originally made the hole fastened in
a drill chuck (see Figure 19-6). The drill chuck
provides a grip for turning the bit in the hole,
and gives much better leverage than trying to
ream out the hole by holding a drill bit in your
hand.45
Figure 19-6.
Cutting Out and Sanding Wheels
Making Wheels on a Drill Press
To cut out a wheel from a wood blank using a
hole saw, drill almost all the way through the
wood from one side. Then flip the blank over
and drill from the other side. The wheel that has
been cut out of the blank will have a ¼" center
hole.
If it needs to be enlarged to ⅜", re-drill the
center hole with a ⅜" twist drill. Be sure to have
the wheel securely held in a clamp because the
drill will tend to grab and spin the wheel. A
useful jig to hold a wheel for drilling is shown on
page 170. Sanding Wheels on a Drill Press
After a wheel has been cut out of a blank, its
edges need to be sanded and rounded over.
One way to sand the edges of a wheel with a ¼"
center hole is to secure a ¼" threaded rod (bolt
45 Inexpensive drill chucks can be found for less than $10. Look for Jacobs and Yakamoz brands, and check on line or stores like Harbor Freight.
with the head cut off) into the drill press chuck
and put the wheel on the bolt secured with a nut
and washer. One side can be up against the
chuck. Depending on the length of the bolt,
more than one wheel can be put on the bolt and
sanded at the same time.
Turn on the drill press, holding sandpaper
against the edge of the wheel(s). Start with very
coarse sandpaper and work to very fine, always
holding the sandpaper on the left side - the side
turning away from you. This will prevent having
your hand forced back.
If the wheel has a ⅜" center hole, use a ⅜" bolt
with the head cut off.
Sanding Jig
See Chapter 20 (pp. 178-9) for another way to sand wheels using a belt or disk sander and a homemade jig.

19. Drilling
170
Drilling Holes in Small Round Objects
At times a hole must be drilled in a circular piece
of wood, such as a wheel or a dowel to be used as
a spacer.
This is necessary when making several of the
toys in Section I. See, for example, making the
spacers for the Mouse (Chapter 14) and
Helicopter (Chapter 17), and enlarging the
center hole of a wheel for the Helicopter.
Small round objects cannot be held by hand
while drilling, and they are usually too small to
clamp securely. A simple solution is to make a
"wooden pliers."
Take a piece of scrap wood and drill a hole in
one end the size of the object (wheel or dowel)
that needs to be drilled. Using a bandsaw or a
scroll saw, cut a “V” wedge from the hole to the
end of the piece of wood. See Figure 19-7.
The wedge forms a handle that can be griped or
clamped to hold the object that needs to be
drilled.
The wheel in Figure 19-6 has a ¼" center hole
that needs to be enlarged for a ⅜" axle. Place
the wheel in the pliers, grip the ends to hold the
wheel securely, then drill the larger center hole,
as shown in Figure 19-8.
Figure 19-7. Wood Pliers to Hold Round Objects
If the end of the pliers shows signs of breaking
when gripped or clamped too tighten on the
object, a bolt can be placed through the end to
hold it securely.
Round over the edges of the handle to make the
pliers more comfortable to hold.
Figure 19-8. Wood Pliers in Action
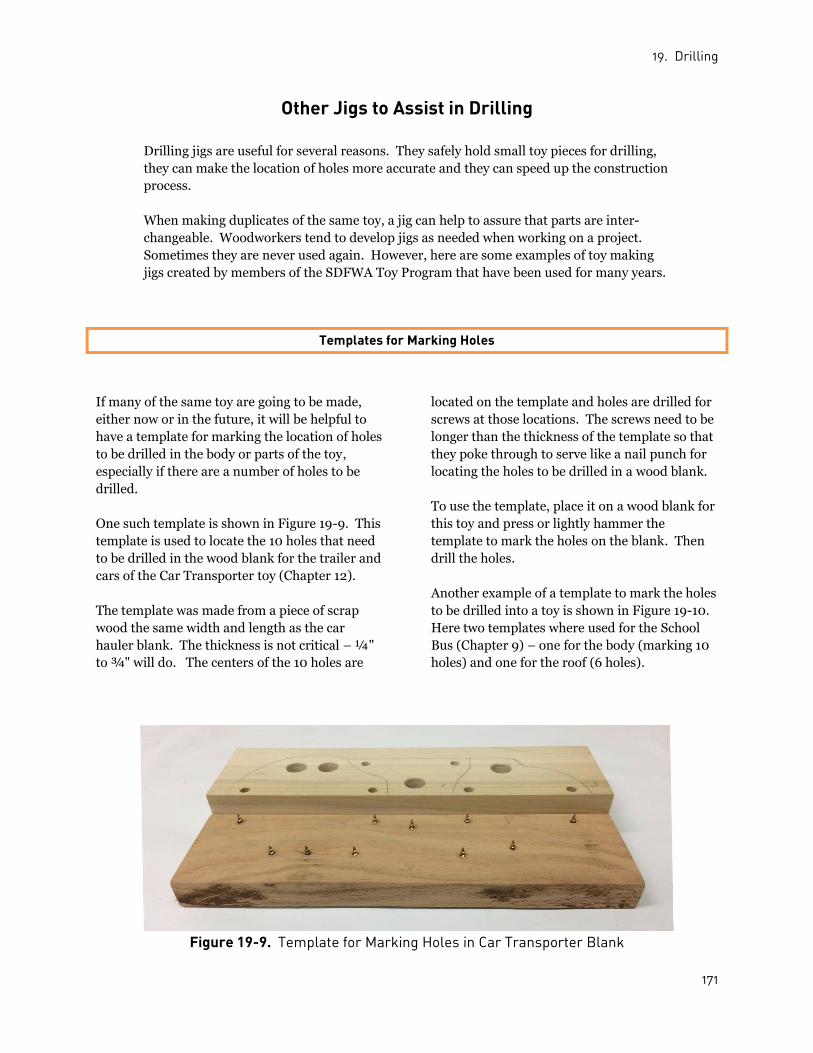
19. Drilling
171
Other Jigs to Assist in Drilling
Drilling jigs are useful for several reasons. They safely hold small toy pieces for drilling,
they can make the location of holes more accurate and they can speed up the construction
process.
When making duplicates of the same toy, a jig can help to assure that parts are inter-
changeable. Woodworkers tend to develop jigs as needed when working on a project.
Sometimes they are never used again. However, here are some examples of toy making
jigs created by members of the SDFWA Toy Program that have been used for many years.
Templates for Marking Holes
If many of the same toy are going to be made,
either now or in the future, it will be helpful to
have a template for marking the location of holes
to be drilled in the body or parts of the toy,
especially if there are a number of holes to be
drilled.
One such template is shown in Figure 19-9. This
template is used to locate the 10 holes that need
to be drilled in the wood blank for the trailer and
cars of the Car Transporter toy (Chapter 12).
The template was made from a piece of scrap
wood the same width and length as the car
hauler blank. The thickness is not critical – ¼"
to ¾" will do. The centers of the 10 holes are
located on the template and holes are drilled for
screws at those locations. The screws need to be
longer than the thickness of the template so that
they poke through to serve like a nail punch for
locating the holes to be drilled in a wood blank.
To use the template, place it on a wood blank for
this toy and press or lightly hammer the
template to mark the holes on the blank. Then
drill the holes.
Another example of a template to mark the holes
to be drilled into a toy is shown in Figure 19-10.
Here two templates where used for the School
Bus (Chapter 9) – one for the body (marking 10
holes) and one for the roof (6 holes).
Figure 19-9. Template for Marking Holes in Car Transporter Blank

19. Drilling
172
Figure 19-10. School Bus Hole Drilling Templates
Hole for Push Stick
A number of the toys described in Part I re-
quired a ½" hole for a push stick. Often this
hole needs to be drilled at an angle on an odd
shape on the top of the toy's body.
Unlike other holes that are drilled in the body of
a toy when it is a rectangular blank, this hole can
not be drilled until the body has been cut out of
the blank, making it very difficult to hold the toy
for drilling the push stick hole into the edge.
What is needed is a special purpose jig that can
hold the toy's body at the correct angle for the
push stick hole. An example of such a jig follows
(Figure 19-11).
This jig is used to drill the hole behind the head
of the Duck (Chapter 6). Such jigs are simple to
make. They require a vertical stand to which is
attached a piece of wood in the shape of the
bottom of the toy. This piece is rotated in the
desired direction for drilling the push stick hole
and attached to the stand. The stand can then
be clamped to the drill press table and the toy
placed on it for drilling.
Figure 19-11. Drilling the Push Stick Hole in the Duck

19. Drilling
173
Other Angled Holes
Push sticks are not the only holes drilled at an
odd angle. Another example are the holes for
the antenna of the Honey Bee (Chapter 8). Like
the push stick, these holes need to be drilled into
the edge of the toy after the body is cut out.
A further complication is that these holes are not
perpendicular to the edge. A special purpose jig
used to hold the body of the bee and to achieve
the correct angle is shown in Figure 19-12.
The sides of the jig are at a 10-degree angle to
the base, tilting outward from each side (See
Figure 19-12A).
The body of the honey bee is placed in the jig
and wedged up against one side (Figure 19-12B).
The jig is put up against the fence of a drill press
(Figure 19-12C) and the antenna hole is drilled
into that side.
Then the wedge is removed and the body is
wedged against the opposite side of the jig and
that hole is drilled.
A B C
Figure 19-12. Jig for Drilling Honey Bee Antenna Holes
Doll Bed Drilling Jig
When a toy has mutlitple similar parts, it is
useful to have a jig that can help to make the
parts interchangeable and to achieve accurate
hole locations.
The final example of a special purpose drilling
jig is one that is used to make the three 9/32"
holes in each of the four bed rails and the six ½"
holes in the bed bottom of the Doll Bed (see
Chapter 7).
The jig is shown in Figure 19-13. Instructions
for making and using it follow.

19. Drilling
174
Figure 19-13. Doll Bed Rail and Base Drilling Jig
Making the Doll Bed Drilling Jig
The jig, shown in Figure 19-13, is made as
follows:
1. Use a ½" to ⅜" thick piece of plywood or
MDF that is at least 8" wide and 14" long for
a base.
2. On one of the long (14") edges attach a fence
that comes approximately 1" above the base.
It can be made out of the same material used
for the base or any scrap wood and can be
attached to the edge of the base using dry-
wall screws.
3. With the base and fence away from you,
attach another fence on the right (short) side
of the base. It should also rise about 1"
above the base and should be about 6" long.
Attach this side fence to the edge of the base
and to the end of the longer side fence with
drywall screws.
4. Attach a piece ½" thick wood of any type to
the inside of the short side fence to serve as
a spacer. Make the spacer about 4" long and
2" high so that it can be easily screwed to the
short side fence on the inside of the base. It
needs to be positioned exactly ⅝" from the
long side fence so that a ⅝"wide bed rail can
fit between its edge and the long side fence.
5. Measuring from the side fence (not the ½"
spacer), place three marks on the long fence,
each 3 ½" apart.
6. Cut a 3 ½" spacer from one of the pieces of
wood used to make the rails. The
dimensions of this spacer need to be 3 ½"
long, ⅝" wide, and ¾" thick. Cut a second
spacer that is 3 ½" wide with any length and
thickness.
Using the Jig
Following are instructions for using the Doll Bed
rail and base drilling jig:
1. After putting a 9
/32"
drill bit into the chuck of
the drill press, clamp the jig on the drill press
table such that the tip of the drill bit is lined
up with the third 3 ½" mark on the base
(from the right side) and is 5/16"
from the long
side fence (see left side photo in Figure 19-
14).
The dark line on the base in Figure 19-13 is
the line along which the drill is to be located.
Once the jig is properly lined up and
clamped, it will remain in that location until
all three holes are drilled into all the bed
rails.

19. Drilling
175
2. A bed rail is placed along the long side fence
as shown in the right photo of Figure 19-14,
slipping its end in the slot between the ½"
spacer attached to the short side fence and
the long side fence.
Figure 19-14. Drilling Three Holes for the Bed Rail Spacers
3. Drill a 9
/32"
hole ½" deep (the left hole on the
rail). Next rotate the ra1l 180 degrees to
drill the 9
/32"
hole on what was the right end.
The jig should remain clamped in place.
Only the bed rail is moved for drilling each
successive hole.
4. Remove the rail and replace it with the
3 ½" spacer. Then put the rail up against
the spacer and drill the 9
/32"
hole in the
center of the rail (Figure 19-15). This
completes drilling three holes on one side of
the rail.
Figure 19-15. Drilling Center Hole in Rail

19. Drilling
176
5. Repeat for all the rails that need to be
drilled. Recall that each bed uses four rails.
6. Replace the 9/32"
drill bit with a ½" brad
point or Forstner drill bit. Clamp the jig on
the drill press table such that the tip of the
drill bit is once again lined up with the third
3 ½" mark on the base of the jig and is ½"
from the long side fence.
7. Place a bed base on the jig with its narrow
end against the ½" spacer on the right side,
as show in the left photo of Figure 19-16.
8. If more than one bed is being made, place a
second base on top of the first. It is possible
to drill the ½" holes in three or four bases at
one time, but do not drill through the
bottom base. It serves as a back-up board to
prevent splintering.
9. As with the rails, flip the board 180 degrees
to drill the hole on the other end, then place
the 3 ½" x 3 ½" spacer up against the right
side and place the bed base against it to drill
the center ½" hole. See the right photo in
Figure 19-16.
10. Flip the bed base over and repeat the ½"
holes on the other side of the base.
Figure 19-16. Drilling the Doll Bed Base
20. Sanding
177
20. Sanding
At this point all the parts of a toy have been made. The next step is to be certain these
parts are ready to have paint or a clear finish applied. Rough edges, saw marks, and any
defects must be addressed by sanding and perhaps patching before finishing can begin.
In addition, if edges have not been rounded over using a router, sanding the edges to
create roundovers will be necessary. Proper sanding is key to a quality looking toy. Like
most woodworking projects, sanding, finishing and assembly take about one half the total
time in producing the project.
Patching and Sanding
Patch defects prior to sanding. This way patch
overruns will be removed for a uniform finish.
Match the wood color to a reasonable degree if
using a clear finish coat.
Sanding begins with coarse sand paper (60 to 80
grit) used to sand out saw and other machining
marks. Employ power sanding as much as
possible for eliminating machine marks (surface
roughness) and for “fine tuning” (smoothing
out) contours that were cut on the band saw.
Sand with the grain. Use disk sanding sparingly
because circular marks are hard to remove. Belt,
random orbit and oscillating spindle sanders all
work very well.
As a final step before applying finish, hand sand
all parts including rounded over edges with 120
to 150 grit sandpaper. Remove all tool burn
marks if not already removed. Break any sharp
edges or corners not rounded.
Between Coats of Finish
A fine or extra fine foam pad works well to
smooth the first coat (sealer coat) of finish.
Shellac is usually used for this first coat, and it
has the tendency to raise the wood grain.
However, the grain can be easily smoothed with
a foam sanding pad.
Sand very lightly on edges and corners. If the
shellac sealer is removed, the final coat of water-
based polyurethane will leave blotchy light-
colored areas.
Sanding Jigs
There are several jigs that are very useful in sanding small parts. The first, referred to in
Chapter 18, is used to sand wheels cut out freehand, on a bandsaw, or by a hole saw. The
second is used to round over or chamfer the ends of dowels.
Sometimes a special purpose jig needs to be created for sanding a very small toy part. An
example is given at the end of this chapter.
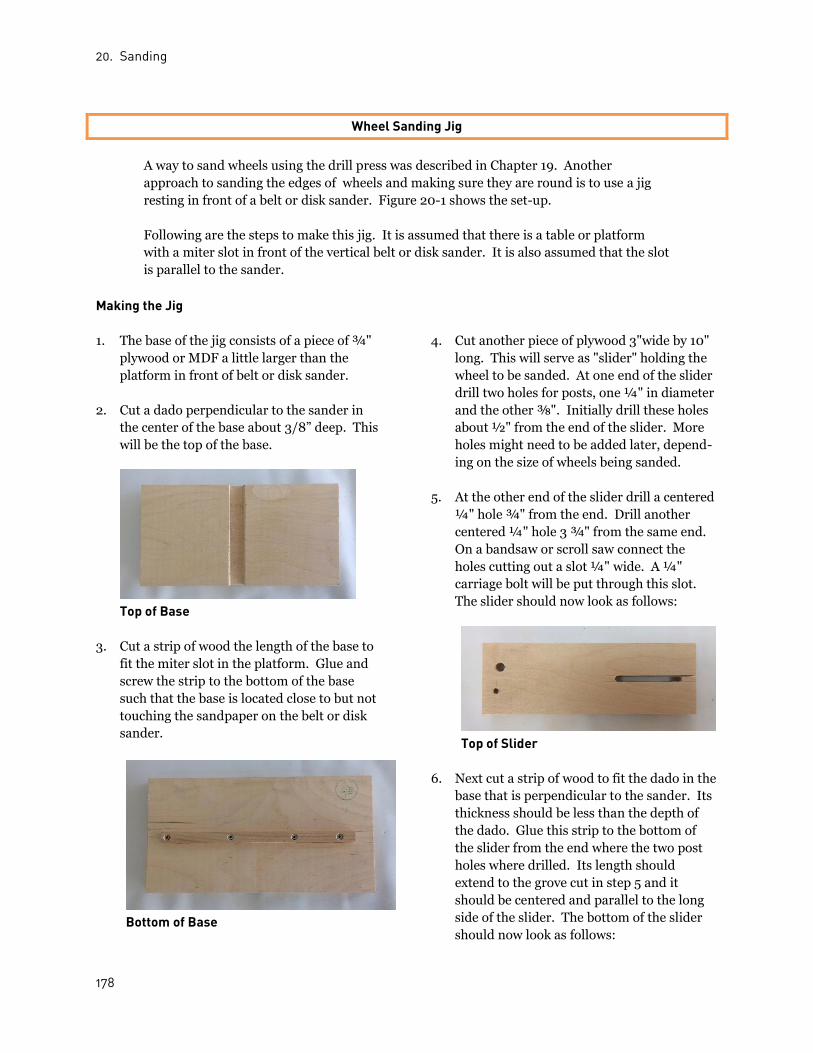
20. Sanding
178
Wheel Sanding Jig
A way to sand wheels using the drill press was described in Chapter 19. Another
approach to sanding the edges of wheels and making sure they are round is to use a jig
resting in front of a belt or disk sander. Figure 20-1 shows the set-up.
Following are the steps to make this jig. It is assumed that there is a table or platform
with a miter slot in front of the vertical belt or disk sander. It is also assumed that the slot
is parallel to the sander.
Making the Jig
1. The base of the jig consists of a piece of ¾"
plywood or MDF a little larger than the
platform in front of belt or disk sander.
2. Cut a dado perpendicular to the sander in
the center of the base about 3/8” deep. This
will be the top of the base.
Top of Base
3. Cut a strip of wood the length of the base to
fit the miter slot in the platform. Glue and
screw the strip to the bottom of the base
such that the base is located close to but not
touching the sandpaper on the belt or disk
sander.
Bottom of Base
4. Cut another piece of plywood 3"wide by 10"
long. This will serve as "slider" holding the
wheel to be sanded. At one end of the slider
drill two holes for posts, one ¼" in diameter
and the other ⅜". Initially drill these holes
about ½" from the end of the slider. More
holes might need to be added later, depend-
ing on the size of wheels being sanded.
5. At the other end of the slider drill a centered
¼" hole ¾" from the end. Drill another
centered ¼" hole 3 ¾" from the same end.
On a bandsaw or scroll saw connect the
holes cutting out a slot ¼" wide. A ¼"
carriage bolt will be put through this slot.
The slider should now look as follows:
Top of Slider
6. Next cut a strip of wood to fit the dado in the
base that is perpendicular to the sander. Its
thickness should be less than the depth of
the dado. Glue this strip to the bottom of
the slider from the end where the two post
holes where drilled. Its length should
extend to the grove cut in step 5 and it
should be centered and parallel to the long
side of the slider. The bottom of the slider
should now look as follows:
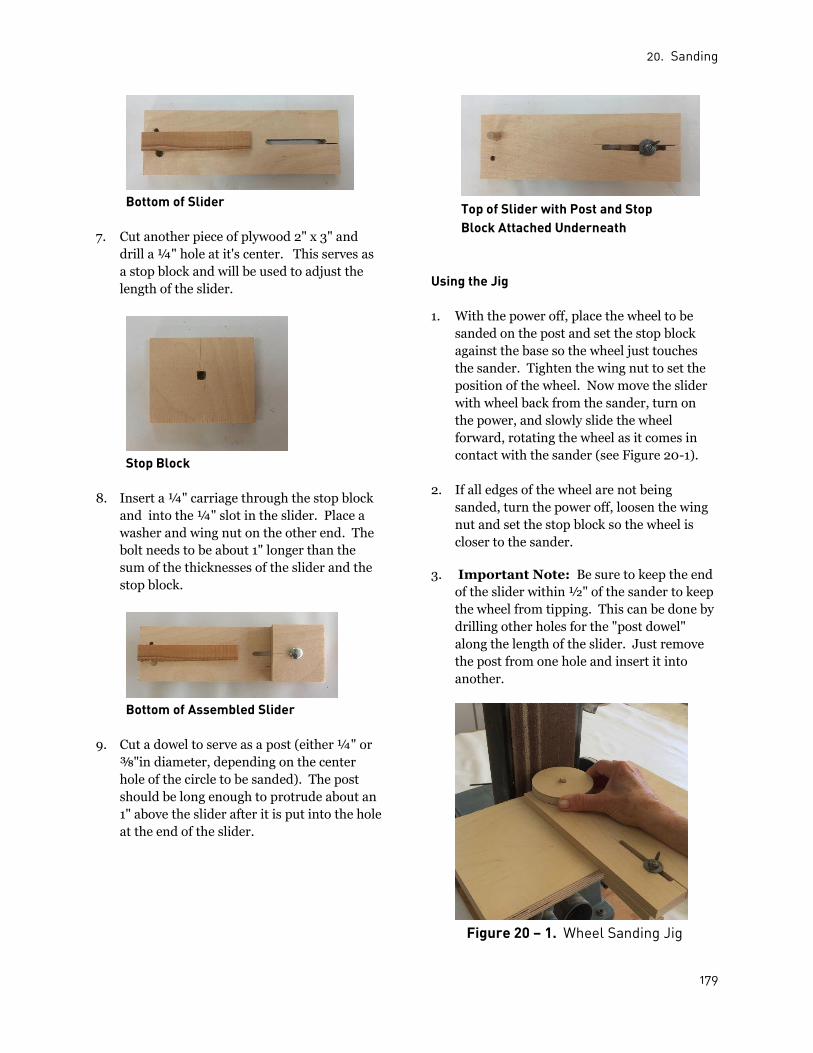
20. Sanding
179
Bottom of Slider
7. Cut another piece of plywood 2" x 3" and
drill a ¼" hole at it's center. This serves as
a stop block and will be used to adjust the
length of the slider.
Stop Block
8. Insert a ¼" carriage through the stop block
and into the ¼" slot in the slider. Place a
washer and wing nut on the other end. The
bolt needs to be about 1" longer than the
sum of the thicknesses of the slider and the
stop block.
Bottom of Assembled Slider
9. Cut a dowel to serve as a post (either ¼" or
⅜"in diameter, depending on the center
hole of the circle to be sanded). The post
should be long enough to protrude about an
1" above the slider after it is put into the hole
at the end of the slider.
Top of Slider with Post and Stop Block Attached Underneath
Using the Jig
1. With the power off, place the wheel to be
sanded on the post and set the stop block
against the base so the wheel just touches
the sander. Tighten the wing nut to set the
position of the wheel. Now move the slider
with wheel back from the sander, turn on
the power, and slowly slide the wheel
forward, rotating the wheel as it comes in
contact with the sander (see Figure 20-1).
2. If all edges of the wheel are not being
sanded, turn the power off, loosen the wing
nut and set the stop block so the wheel is
closer to the sander.
3. Important Note: Be sure to keep the end
of the slider within ½" of the sander to keep
the wheel from tipping. This can be done by
drilling other holes for the "post dowel"
along the length of the slider. Just remove
the post from one hole and insert it into
another.
Figure 20 – 1. Wheel Sanding Jig

20. Sanding
180
Dowel Sanding and Chamfering Jig
There are times when the end of a dowel will have to be sanded square if the end is rough
or was poorly cut off from a long piece of dowel, or it might need to be rounded or
chamfered for a wheel axle.
When using a dowel as an axle for a car or truck wheel, rounding over or chamfering the
end before gluing into the wheel gives a more finished look (Figure 20-2) and might make
the wheel appear to have a hub cap.
Figure 20-2. Chamfered Dowel to Form a Hub Cap
Making the Jig
This jig is made from two pieces of wood. The
horizontal base is about 9" long, 1 ½" wide, and
at least ½" thick. The exact dimensions are not
critical. The vertical piece attached to the end
should be about 2 ½" x 2 ½", with a thickness of
at least ¾".
On the top of the vertical piece are notches in
which a dowel will rest. The notches can be cut
with a round or triangular file, or using a
bandsaw set at 45 degrees.
The jig in Figure 20-3 has three notches. The
center notch is parallel to the sides. The notches
on either side are at a 45-degree angle to the
side. The notch on the right is large enough to
hold ⅜"dowel, the one on the left is a bit
narrower for a ¼" dowel. These notches can be
modified to suit your needs.
Figure 20-3. Dowel Sanding/ Chamfering Jig
Once the two pieces of wood have been
prepared, attach the vertical notched piece to the
end of the horizontal base using two screws
through the bottom of the base.

20. Sanding
181
Using the Jig
Clamp the jig to the table in front of a belt or
disk sander with the notched end almost
touching the sandpaper (see Figure 20-4).
A dowel whose end is to be sanded square is
placed in the center notch perpendicular to the
sandpaper. Rest a finger of one hand on top of
the dowel to keep it horizontal. Turn the sander
on and with the other hand gently push the end
of the dowel while turning it toward the sander
to achieve a smooth, squared-off end.
To chamfer or round over the end of a dowel,
place the dowel in either the left or right side
notch again holding it with a finger from one
hand and pushing the dowel toward the sander
with the other hand while slowly turning the
dowel. See Figure 20-5.
Figure 20-4. Jig Clamped to Table
Figure 20-5. Chamfering the End of a Dowel

20. Sanding
182
A Special Purpose Chamfer Jig for Small Parts
This jig puts a chamfer on a very small part – the 1 ¼" long by ½" diameter dowels used
to make the wing hubs of the Honey Bee (Chapter 8).
Making the Jig
1. Start with a piece of 1" thick scrap wood
about 5" x 5". One way to get this thickness
is to surface glue together two pieces of ½"
plywood.
2. Toward the top of one edge draw two
parallel lines, ½" apart, and at a 45-degree
angle to the edge. The upper line should be
1 ½" long; the lower line should be ⅞" long.
3. Chisel out a ½" deep hole between the two
lines. Next hammer a finishing nail as close
to the edge as possible.
4. Repeat with a second set of parallel lines
about 1" below the first set (Figure 20-6).
Using the Jig
1. Place the 1 ¼" wing hub dowels in the jig
(Figure 20-7). The notches in the end of the
dowels will already have been cut. (See
Chapter 8 or the special purpose jig at the
end of Chapter 18 on ways to cut this notch.)
2. Put the jig on the platform in front of a belt
sander, turn on the sander, and gradually
bring the jig up against the sandpaper to
chamfer one side of the dowel (Figure 20-8).
3. Remove the jig from the platform, turn the
dowel over and repeat the chamfer on the
other side of the notch.
Figure 20-6. Figure 20-7. Figure 20-8.

21. Finishing
183
21. Finishing
All finishes used in toy making must be non-
toxic when dry. Shellac for sealing, acylic craft
paint, and water-based polyurethane for a hard
clear finish are safe to use on toys. Some spray
paints and oil based finishes are also safe –
check the labels.
Applying finish to a toy is not essential, but it
will add to the attractiveness of the toy and make
it easier to keep it clean. There are, of course,
many different types of finishes that could be
used. This chapter describes the ones we have
used for many years that have been found to
provide very good results.
Thorough sanding is required before finishing.
Then mask off any ends of parts that will be
glued, for example the end of an axle peg. Parts
of a toy are usually finished separately before the
toy is assembled. There are exceptions, how-
ever, when the toy or some parts are assembled
before finishing. Clear Finishes
Most toys are made out of hardwoods, so they
deserve a clear finish to show off their beauty.
One of the attactions of wooden toys is seeing
the interesting wood grain from which they are
made. Although children enjoy playing with
colorful toys, the interesting shades of natural
wood grain can also be appealing. Shellac Shellac is recommended as the first coat of
finish. It serves to seal the wood. It will also
bring out the color and grain of wood. This is
particularly important if the next coat is a clear
finish. Shellac can be wiped on or brushed on.
46 Zinsser makes a shellac called Seal Coat which is 100% wax free. It is available at most paint stores.
However, shellac tends to raise the grain of
wood, that is, cause the surface of the wood to
feel rough. Once dry, the piece will need to be
lightly sanded with 320 grit sandpaper or a fine
sanding pad before applying the next coat of
finish. Don't forget to clean off the dust after
sanding.
The foam pad minimizes cutting through the
shellac at the edges. In addition to removing
raised wood grain, sanding also helps bond the
next coat of finish (polylurethane or paint).
In using shellac apply a two-pound cut of de-
waxed shellac with a rag, brush, or spray gun.
The purpose for using a de-waxed shellac is to
assure that the final coat will create a good bond
with the sealer.46
If the plan is to use a stain on the toy, do not use
shellac.
Polyurethane47
The preferred final coat is water-based gloss or
semi-gloss polyurethane, applied by brush or
spray gun. Water-based polyurethane gives a
shiny, hardwearing finish to toys. It also dries
quickly, and a second coat can often be applied
without sanding again, if done within several
hours of the first coat.
Both shellac and water-based polyurethane are
environmentally friendly coatings. If the toy or
part of the toy is to be painted, it is still recom-
mended that it first be sealed with shellac. It is
also a good idea to apply a coat of water-based
polyurethane after the paint has dried, especially
if an acrylic craft paint or flat paint has been
used.
47 Many companies make water-based polyurethane. If you prefer an oil-based finish, the Salad Bowl Finish by General Finishes is non-toxic when cured.
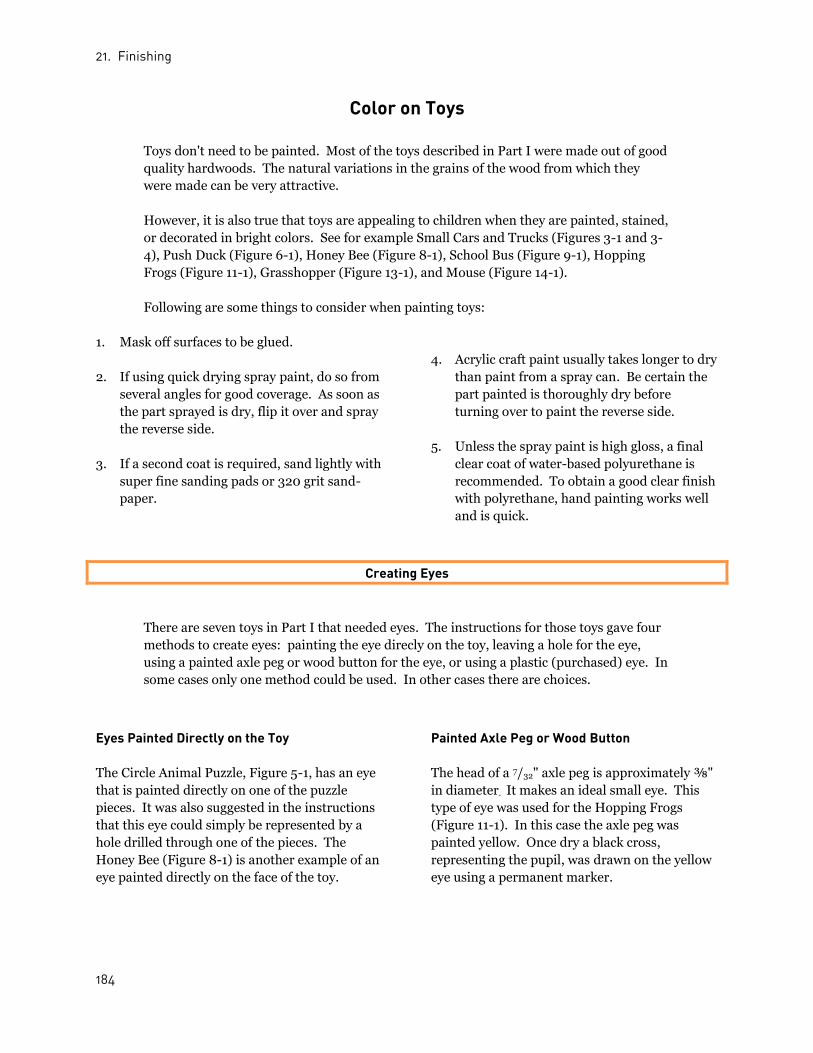
21. Finishing
184
Color on Toys
Toys don't need to be painted. Most of the toys described in Part I were made out of good
quality hardwoods. The natural variations in the grains of the wood from which they
were made can be very attractive.
However, it is also true that toys are appealing to children when they are painted, stained,
or decorated in bright colors. See for example Small Cars and Trucks (Figures 3-1 and 3-
4), Push Duck (Figure 6-1), Honey Bee (Figure 8-1), School Bus (Figure 9-1), Hopping
Frogs (Figure 11-1), Grasshopper (Figure 13-1), and Mouse (Figure 14-1).
Following are some things to consider when painting toys:
1. Mask off surfaces to be glued.
2. If using quick drying spray paint, do so from
several angles for good coverage. As soon as
the part sprayed is dry, flip it over and spray
the reverse side.
3. If a second coat is required, sand lightly with
super fine sanding pads or 320 grit sand-
paper.
4. Acrylic craft paint usually takes longer to dry
than paint from a spray can. Be certain the
part painted is thoroughly dry before
turning over to paint the reverse side.
5. Unless the spray paint is high gloss, a final
clear coat of water-based polyurethane is
recommended. To obtain a good clear finish
with polyrethane, hand painting works well
and is quick.
Creating Eyes
There are seven toys in Part I that needed eyes. The instructions for those toys gave four
methods to create eyes: painting the eye direcly on the toy, leaving a hole for the eye,
using a painted axle peg or wood button for the eye, or using a plastic (purchased) eye. In
some cases only one method could be used. In other cases there are choices.
Eyes Painted Directly on the Toy
The Circle Animal Puzzle, Figure 5-1, has an eye
that is painted directly on one of the puzzle
pieces. It was also suggested in the instructions
that this eye could simply be represented by a
hole drilled through one of the pieces. The
Honey Bee (Figure 8-1) is another example of an
eye painted directly on the face of the toy.
Painted Axle Peg or Wood Button
The head of a 7/32" axle peg is approximately ⅜"
in diameter. It makes an ideal small eye. This
type of eye was used for the Hopping Frogs
(Figure 11-1). In this case the axle peg was
painted yellow. Once dry a black cross,
representing the pupil, was drawn on the yellow
eye using a permanent marker.

21. Finishing
185
Another example is the Grasshopper shown in
Figure 13-1. It has a 7/32" axle peg eye painted
red. For slightly larger eyes, use a 11/32" axle peg.
It's head is approximately ½" in diameter. This
is the type of eye used by the Grasshopper in
Figure 13-5. The ½" wood mushroom button
can also be used to create this larger size eye.
Plastic (Purchased) Eyes
The Push Duck (Figure 6-1) and the Mouse
(Figure 14-1) show the use of a plastic eye.
These type of eyes, purchased from craft
suppliers, often come with a tenon and can be
glued to the toy the same way an axle peg eye
would be glued. Without a tenon they would be
glued directly to body.
Choices for Eyes
Most of the examples sited thus far allow for
choices in how to create eyes for the toy.
However, this was not the case for the Hippo
(Figure 15-1) which uses an eye that must be an
axle peg. Here the axle peg serves to allow the
jaw to rotate, as well as being the eye.
Painted Decorations
The entire toy does not need to be painted to
make it attractive. In many cases a small
amount of decoration will suffice. Examples of
this are the Weedwacker (Figure 4-1), where
only the tips of the blades have color, and the
Rolling Rattle (Figure 16-1), where only the
rattles are painted.
In the case of the Hippo (Figure 15-1), just the
eyes and teeth were painted, and this small
amount of paint makes the color stand out even
more.
The Doll bed/cradle presents a unique situation
for decorating. We like to have some color on
the headboard or footboard or both, but not all
designs will work. If you paint a decoration on
the headboard or footboard when the toy is a
bed, it might look very strange when the toy is
turned over to become a cradle. For this reason
we have found that flowers work very well, or
some abstract design.
In painting a child's name on the bed, we have
found it works best to paint the name twice, first
in a curve that follows the curve of the
headboard when the toy is a bed, then as a
similar curve when the bed is turned over to
become a cradle (see Figure 7-1). This way the
name can be read in each direction.

21. Finishing
186
Jigs Used in Finishing
The remainder of this chapter shows some simple jigs that can be useful when finising
toys.
Whether wiping, brushing, or spraying on the finish, lay the parts on triangular strips of
wood (Figure 21-1). This technique maximizes air circulation during drying, and
minimizes contact with the surface of the part.
The triangular strips can be ripped out of ¾" square stock. Sand the strips enough to
eliminate shreds and splinters of wood.
Figure 21-1.
Finishing Wheels
There are some easy to make jigs to help with
the finishing of wheels. Wheels that have not
been glued in place can be strung on undersized
dowels and suspended across a notched card-
board box to hold them in place (Figure 21-2), or
placed on small pieces of tapered dowels in-
serted in holes in a piece of scrap wood (Figure
21-3). A pencil sharpener is an easy way to
taper the dowels.

21. Finishing
187
Figure 21-2. Figure 21-3.
The notched cardboard box will also work for the
body of a toy that has more than one through
hole, for example, a car. In this case use two
undersized dowels to support the car, one in
each axle.
For wheels that have been glued to an axle, drill
holes in a piece of scrap wood slightly larger
than the diameter of the axle and stand the axles
with wheels attached in the holes (Figure 21-4).
Figure 21-4.
Finishing the Heads of Axle Pegs
When sealing or painting the heads of axle pegs,
it is important to keep the tenon clear of finish.
First, cut the tenons of the pegs to the required
length, if this is necessary. Then smooth or
break the edges that were cut off.
Use a painting board (Figure 21-5) when
applying the finish. The painting board is simply
a piece of Masonite or scrap wood. Drill 5/16"
diameter or 7/16" diameter holes into the board,
depending on the size of axle pegs.

21. Finishing
188
Insert the pegs into the holes. Their heads
should be flush with the top of the board. Then
set the board on supports on top of a drop cloth,
or attach it to two supports.
Apply the finish to the heads of the pegs. During
the drying process, push the pegs upward a
couple of times to avoid the heads adhering to
the board. When dry, simply place the board on
a clean surface, turn it over, and the pegs will all
pop out for retrieval.
Figure 21-5.

22. Assemble
189
22. Assemble
With all construction, including sub-assemblies, and finishing completed, it is time to
assemble the parts. Some parts are glued in place, for example the mouse ears to the
mouse head. In such cases this could be done before or after finish is applied, depending
on how the parts are being finished.
In practically all cases, however, assembly involves dowels, wood buttons, or axle pegs
being glued into wheels, legs, or the body of the toy. These final steps are most important
because they will assure the toy is fully functional, that is, the movement of the wheels
and other parts work as intended. If they don't, see the trouble shooting suggestions and
corrective measures at the end of this chapter.
Wheels on Dowels
Wheels glued to dowels are designed to rotate in
a hole in the body of a toy. The folowing de-
scription assumes wheels are being attached to
the axles of a car, but the same procedure would
apply to any toy with wheels:
1. Sand the whole dowel being used for this
project with 220 or 320 grit sandpaper
before cutting it into axles.
2. Ream holes by hand to remove paint and
fuzz. When reaming out wheel center holes,
select a drill bit that will create a hole that
makes a good glue joint with the axle being
used. Don't forget to ream out the holes in
the body of the car in which axles must
freely rotate.
Glue Joints
See Chapter 2 (p. 19) on testing and achiev-ing good glue joints.
48 The spacers should be about 1
/32" thick (.02 -
.04"). The plastic clip that is used to seal the
outer bag of a loaf of bread makes a good spacer
Reaming Out Holes
See Chapter 19, p. 169.
3. Cut the dowel over-size that is being used for
the axle. Sand one end either squared-off or
chamfered. Figure 22-1 shows examples of
these two ways to finish the ends of axles.
The axles of the two wheels from the left are
squared-off; the one on the right is
chamfered to look like a hubcap.
Sanding Ends of Dowels
Chapter 20 (pp. 180-1) describes a jig that can be used to sand the ends of axles to give them a squared off or rounded look.
4. Dry assemble one wheel on the end of the
axle that was sanded. Size the axle length by
inserting the axle with wheel attached
through the axle hole with a washer and a
spacer48 on the side of the axle where the
wheel is attached.
or A piece of cardboard from a cereal box will also
work.

22. Assemble
190
5. On the other side of the car insert on the
axle the second wheel up against a washer,
spacer, and the body of the car. Mark the
location where the axle is to be trimmed
(Figure 22-2). If the end is to be chamfered,
place the mark about 1/8" from the edge of
the wheel; if squared-off place the mark at
the edge of the wheel.
6. Disassemble the wheels and axle from the
car and trim the axle where marked. Sand
the end and break (round over) the corners
or chamfer the end.
7. Glue one wheel to one end of the axle. (See
gluing suggestions in the next section).
Allow the glue to set.
8. Re-assemble the axle with one wheel
attached (Figure 22-3), making sure to put a
washer and spacer on each side of the body.
Use the instructions given in the next
section for attaching the second wheel. Let
the glue set. When dry remove the spacers
and test the rotation of the wheels.
Figure 22-1. Squared off and Chamfered Axles
Figure 22-2. Figure 22-3.
Another Approach to Sizing Axles
Rather than cutting the axle oversize, then
cutting it to fit the vehicle once one wheel has
been dry assembled to the axle, another
approach is to cut the axle to length before
assembling the wheels. (This was done in
Chapter 12, Car Transporter.)
This approach requires careful measurements
that must include the width of the vehicle, and
the width of two wheels, two washers, and two
spacers. To this length add ¼" if the ends of the
axles are to be chamfered to make them look like
hubcaps.

22. Assemble
191
Gluing Wheels onto Axles
The following procedure assumes that paint or a clear finish has already been applied to
the wheel and the center hole of the wheel has been reamed out to remove paint and fuzz.
1. Put glue in wheel hole using a toothpick, nail, or piece of ⅛" dowel.
2. Wipe off excess glue from the inside of the wheel.
3. Insert axle (dowel) from the inside of the wheel.
4. Wipe off excess glue pushed to the outside of wheel.
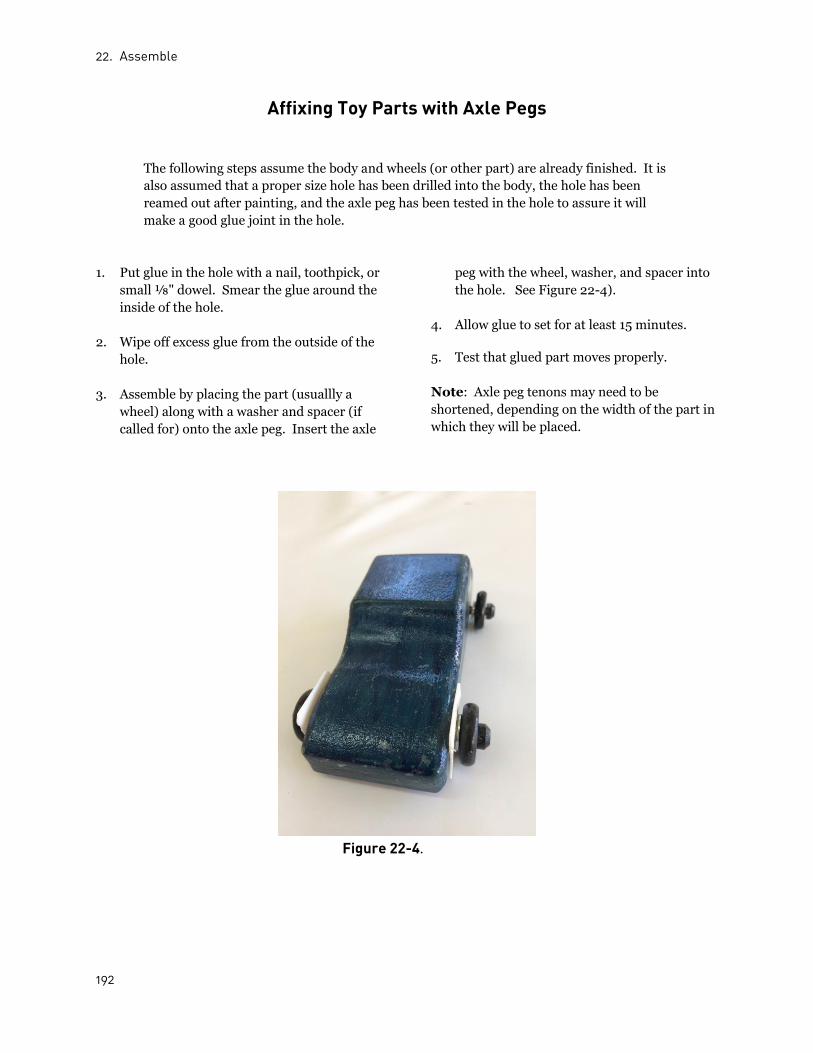
22. Assemble
192
Affixing Toy Parts with Axle Pegs
The following steps assume the body and wheels (or other part) are already finished. It is
also assumed that a proper size hole has been drilled into the body, the hole has been
reamed out after painting, and the axle peg has been tested in the hole to assure it will
make a good glue joint in the hole.
1. Put glue in the hole with a nail, toothpick, or
small ⅛" dowel. Smear the glue around the
inside of the hole.
2. Wipe off excess glue from the outside of the
hole.
3. Assemble by placing the part (usuallly a
wheel) along with a washer and spacer (if
called for) onto the axle peg. Insert the axle
peg with the wheel, washer, and spacer into
the hole. See Figure 22-4).
4. Allow glue to set for at least 15 minutes.
5. Test that glued part moves properly.
Note: Axle peg tenons may need to be
shortened, depending on the width of the part in
which they will be placed.
Figure 22-4.
193
Trouble Shooting and Corrective Actions
Attention to the gluing and assembling steps in this chapter will help to assure good
results. However, if the assembly of parts is not going well, such as an axle not moving
freely when fitting in the body of a toy, it will be necessary to take corrective action (not a
hammer!). Following are some general guidelines for preventing or solving problems in
assembling toys:
1. If there is a problem with a part, analyze it and search for ways to enable the part to
correctly function before proceeding to assemble additional parts or additional
units. This might involve:
a. Checking that the part's dimensions are correct,
b. Looking for rough spots which could be hanging up the part,
c. Seeing if there are proper clearances for moving parts, or
d. Re-visiting the instructions to determine that they have been followed.
2. The best approach we can advise is to assemble as much of the toy as possible
without gluing, that is, dry assemble the toy. This approach has been suggested in
most of the toy building chapters. If the parts that are to be glued are fitting
properly, the toy should hold together without glue in order to test that its moving
parts are working properly.
3. Take precautions before assembling, such as, reaming out holes that might have
gotten sealer, paint, or clear finish in them.
4. If making multiple copies of a toy, test any jigs that are being used after making two
or three toys to determine that you are getting good results, before making a large
batch of the same toy.
In putting together the instructions for making the 15 toys in Chapters 3 – 17, we have
tried to insert warnings or suggestions that will prevent problems from occuring. We
hope these have helped and that you find success in constructing wooden toys.

Appendix
194
Appendix
Some Suppliers of Wooden Toy Parts
A search of the internet will provide a number of suppliers of wooden toy parts. Following
are few that appear to have a wide range of parts. Check the web pages of these and
others firms to compare costs and sizes of the parts you need.
American Woodcrafters Supply
Armor Crafts
California Dowels and Turnings, Inc.
Casey's Wood Products, Inc.
Woodworks Ltd.
Some Other Books on Making Wooden Toys
Here is a small selection of the many books on toy building that have been produced over
the years. Noted are special features of these books.
Makowicki, Jim. Making Heirloom Toys. The Taunton Press, 1996.
Features transportation toys (cars, trains, trolleys, planes and boats).
Nelson, John R., Jr. American Folk Toys. The Taunton Press, 1998.
Includes a wide variety of toys made years ago that can still delight children of all
ages today.
Wakefield, David. Animated Animal Toys in Wood. Fox Chapel Publishing, 2014.
Contains lots of good tips for making animals that move.
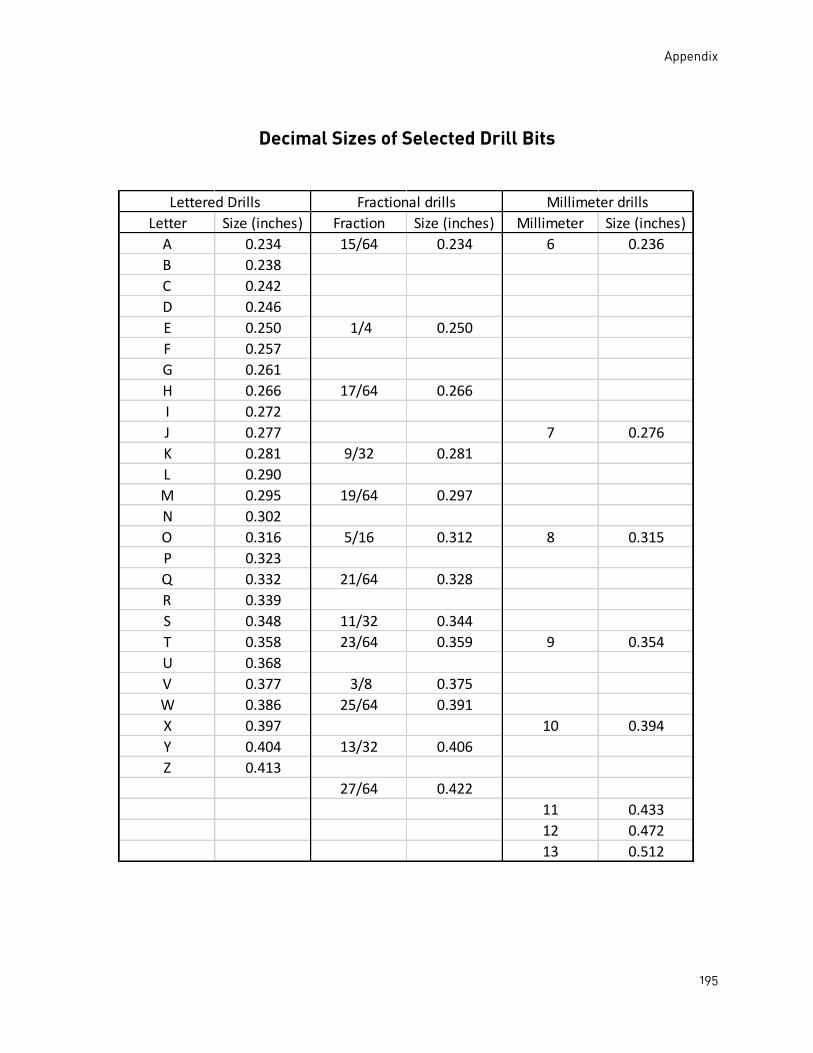
Appendix
195
Decimal Sizes of Selected Drill Bits
Letter Size (inches) Fraction Size (inches) Millimeter Size (inches)
A 0.234 15/64 0.234 6 0.236
B 0.238
C 0.242
D 0.246
E 0.250 1/4 0.250
F 0.257
G 0.261
H 0.266 17/64 0.266
I 0.272
J 0.277 7 0.276
K 0.281 9/32 0.281
L 0.290
M 0.295 19/64 0.297
N 0.302
O 0.316 5/16 0.312 8 0.315
P 0.323
Q 0.332 21/64 0.328
R 0.339
S 0.348 11/32 0.344
T 0.358 23/64 0.359 9 0.354
U 0.368
V 0.377 3/8 0.375
W 0.386 25/64 0.391
X 0.397 10 0.394
Y 0.404 13/32 0.406
Z 0.413
27/64 0.422
11 0.433
12 0.472
13 0.512
Lettered Drills Fractional drills Millimeter drills

Appendix
196
The Authors and Illustrator
Charlie Bierman. After serving in the Army during World War II, Bierman earned a degree in engineering. He was employed in the aerospace industry and worked for many years on the launches of the Atlas rockets. After retiring he took up woodworking, and this led to toy building. He was the leader of the El Cajon, California toy making group for over 20 years.
Charlie Pinkus. An undergraduate degree in industrial engineering led Pinkus to pursue graduate degrees in operations research. On completing his studies, he taught in departments of engineering, mathematics, and technology and operations management for 35 years. On retiring he took some woodworking courses, one of which was on toy building taught by Charlie Bierman.
Steve Naiman. Naiman spent over 25 years teaching woodshop to junior high school students in El Cajon. After retiring it was natural for him to continue woodworking and he joined the toy making group in El Cajon. He is now leader of the group and once again teaching woodworking, but this time to seniors.
Bill White. White had a 22-year career in the Navy, from which he retired as a Lieutenant Commander. He always had an interest in woodworking, so after retirement he became head carpenter in the La Mesa/Spring Valley School District. On retiring from his second career he joined the El Cajon toy making group.