conpal LAN Crypt Admin manual version 4.00.1 - Status
175
-
Upload
khangminh22 -
Category
Documents
-
view
2 -
download
0
Transcript of conpal LAN Crypt Admin manual version 4.00.1 - Status

Contents
1 Overview ........................................................................................................................ 3
1.1 What is conpal LAN Crypt? ...................................................................................... 3
1.2 Data protection using conpal LAN Crypt ................................................................... 5
1.3 Transparent encryption ............................................................................................ 6
1.4 Architecture ............................................................................................................ 11
2 Getting started ............................................................................................................ 14
2.1 Certificates ............................................................................................................. 14
2.2 Installation .............................................................................................................. 18
2.3 Unattended installation ........................................................................................... 19
2.4 Upgrading .............................................................................................................. 20
2.5 Uninstallation .......................................................................................................... 21
3 Administration ............................................................................................................ 22
3.1 Required steps ....................................................................................................... 23
3.2 Preparations for administering conpal LAN Crypt ................................................... 24
3.3 Master Security Officers ......................................................................................... 28
3.4 Administration: overview ........................................................................................ 32
3.5 Central Settings ...................................................................................................... 36
3.6 Displaying all LAN Crypt keys ................................................................................ 59
3.7 Showing selected users and certificates ................................................................. 61
3.8 Creating a Security Officer ..................................................................................... 63
3.9 Logging on to Administration .................................................................................. 77
3.10 Importing groups and users .................................................................................. 78
3.11 Assigning Security Officers to organizational units ............................................... 90
3.12 Properties of groups ............................................................................................. 97
3.13 Properties of users ............................................................................................. 100
3.14 Security environment design .............................................................................. 103
3.15 Generating keys ................................................................................................. 103
3.16 Encryption rules ................................................................................................. 111
3.17 Encryption tags .................................................................................................. 122
3.18 Assigning certificates .......................................................................................... 124
3.19 Providing encryption rules - generating policy files ............................................. 134
3.20 Database logging ............................................................................................... 139
4 conpal LAN Crypt Configuration ............................................................................. 146
4.1 Client Settings ...................................................................................................... 147
4.2 LAN Crypt Administration Settings ....................................................................... 157
4.3 Unhandled Drives, Unhandled Applications, Unhandled Devices............................... 159
5 APPENDIX ................................................................................................................. 162
5.1 Logging ................................................................................................................ 162
5.2 Permissions.......................................................................................................... 165
6 Legal notices ............................................................................................................. 172
7 Technical Support ..................................................................................................... 173
conpal LAN Crypt provides transparent file encryption. It was developed to enable users within
large organizations to exchange data confidentially. In this situation, encrypted files can be
stored locally on the user’s hard disk or on a removable medium or even on network drives.
The encryption process is completely transparent for users. It takes place automatically when
the files are created or saved. These files are also decrypted transparently when their data is
read. This process is performed by a filter driver that is integrated in the file system on a Win-
dows computer. As of version 4.0.0, conpal LAN Crypt offers for the first time the option of
performing the file encryption using a future-proof mini filter driver. This modern file filter driver
will completely replace the legacy file filter driver in future that was part of all previous installa-
tions. During installation, conpal LAN Crypt from version 4.0.0 offers the choice of both file filter
drivers. The set file filter driver can be changed at any time on the client. If you change the file
filter driver, you have to restart the client computer afterwards. After restarting the computer,
all encryption and decryption functions then take place with the currently activated file filter
driver. The conpal LAN Crypt filter driver works in a similar fashion to a virus scanner: it iden-
tifies which files are to be accessed and performs the appropriate encryption or decryption
operation on them. Whenever a user moves a file into a trusted directory, the file is encrypted
on that user’s computer, and each time another trusted user, who is a member of the same
group, reads the file from this directory, it is transferred to this user in encrypted form. The file
is not decrypted until it reaches the target computer, where the user can change it. Then it is
encrypted again before being returned to the encrypted directory.
Encrypted files are not "assigned" to individual users. Any user who has the right key can
access the encrypted file. This allows administrators to create logical user groups whose mem-
bers can share encrypted files. This process can be compared with a bunch of keys, just like
you use in daily life: conpal LAN Crypt provides users and user groups with a bunch of keys,
and the individual keys can be used to open different doors or safes.
Unauthorized users may be able to physically access these encrypted files (but only from
workstations without conpal LAN Crypt). However, without conpal LAN Crypt authorization they
will not be able to read them.
As a result, a file is always protected, even if no access protection is defined for the file system
itself, if the network is attacked, or the employees do not comply with the organization’s secu-
rity policy.
If you need to protect your intellectual property, which is stored in files, from unauthorized
access over the LAN, on file servers, on local hard disks or even on removable media, conpal
LAN Crypt is your product of choice.
The Security Officer (SO) can specify which files and folders are to be protected by conpal
LAN Crypt, centrally, by defining one or more encryption rules. For example, to ensure that all
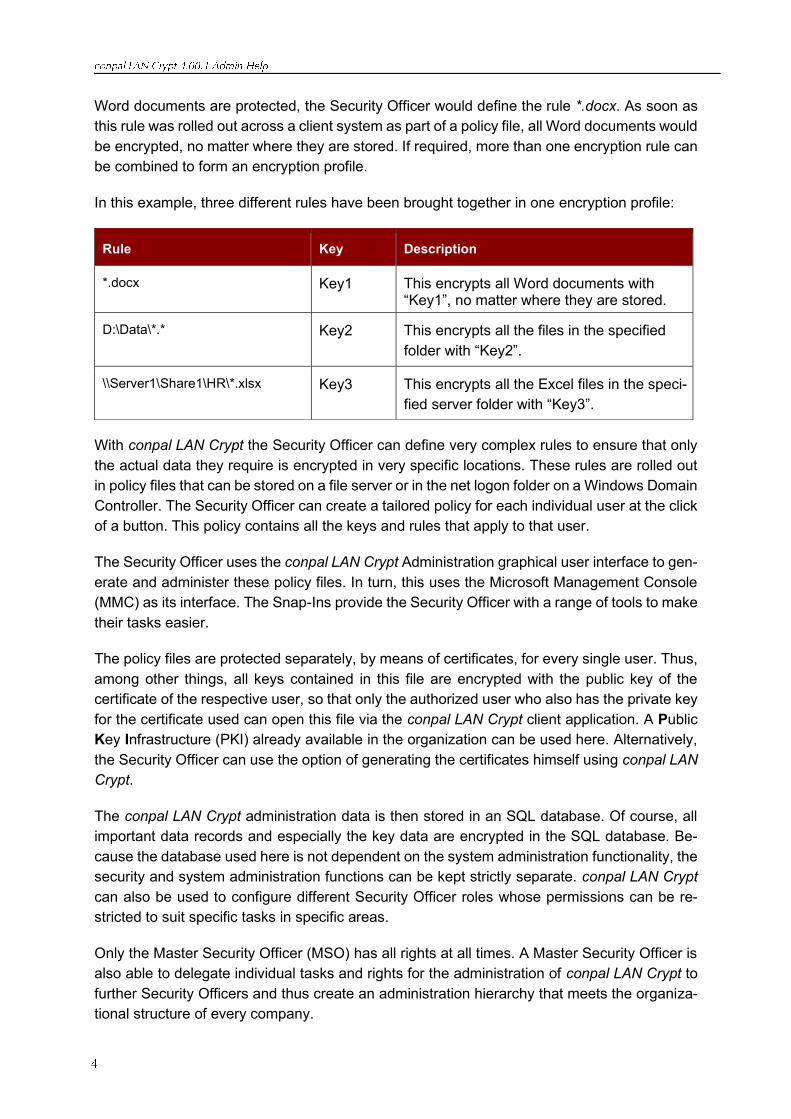
Word documents are protected, the Security Officer would define the rule *.docx. As soon as
this rule was rolled out across a client system as part of a policy file, all Word documents would
be encrypted, no matter where they are stored. If required, more than one encryption rule can
be combined to form an encryption profile.
In this example, three different rules have been brought together in one encryption profile:
With conpal LAN Crypt the Security Officer can define very complex rules to ensure that only
the actual data they require is encrypted in very specific locations. These rules are rolled out
in policy files that can be stored on a file server or in the net logon folder on a Windows Domain
Controller. The Security Officer can create a tailored policy for each individual user at the click
of a button. This policy contains all the keys and rules that apply to that user.
The Security Officer uses the conpal LAN Crypt Administration graphical user interface to gen-
erate and administer these policy files. In turn, this uses the Microsoft Management Console
(MMC) as its interface. The Snap-Ins provide the Security Officer with a range of tools to make
their tasks easier.
The policy files are protected separately, by means of certificates, for every single user. Thus,
among other things, all keys contained in this file are encrypted with the public key of the
certificate of the respective user, so that only the authorized user who also has the private key
for the certificate used can open this file via the conpal LAN Crypt client application. A Public
Key Infrastructure (PKI) already available in the organization can be used here. Alternatively,
the Security Officer can use the option of generating the certificates himself using conpal LAN
Crypt.
The conpal LAN Crypt administration data is then stored in an SQL database. Of course, all
important data records and especially the key data are encrypted in the SQL database. Be-
cause the database used here is not dependent on the system administration functionality, the
security and system administration functions can be kept strictly separate. conpal LAN Crypt
can also be used to configure different Security Officer roles whose permissions can be re-
stricted to suit specific tasks in specific areas.
Only the Master Security Officer (MSO) has all rights at all times. A Master Security Officer is
also able to delegate individual tasks and rights for the administration of conpal LAN Crypt to
further Security Officers and thus create an administration hierarchy that meets the organiza-
tional structure of every company.
Rule Key Description
*.docx Key1 This encrypts all Word documents with “Key1”, no matter where they are stored.
D:\Data\*.* Key2 This encrypts all the files in the specified
folder with “Key2”.
\\Server1\Share1\HR\*.xlsx Key3 This encrypts all the Excel files in the speci-
fied server folder with “Key3”.
conpal LAN Crypt guarantees that sensitive files can be stored securely on file servers and
workstations. The data is transmitted securely over LAN or WAN networks, as encryption and
decryption are performed in RAM on the client workstation. There is no need to install special
security software on the file server itself.
The policy files include all the rules, access rights and keys required for transparent encryption.
In order for a user to be able to encrypt and decrypt data with conpal LAN Crypt on his work-
station, he must be able to access his policy file. This is done through a network share for the
location where the policy file is located. The policy file is encrypted and protected from unau-
thorized use by a certificate. To be able to use them, the user must have the private key of his
certificate and know the password.
All encryption/decryption tasks run transparently on the client workstation with minimal user
interaction.
conpal LAN Crypt allows trusted users to be organized into different trusted groups by defining
different rights for directories and files. These rights are grouped into encryption profiles for the
users. The user can access the policy file containing the encryption profile by owning the pri-
vate key assigned to the certificate.
All conpal LAN Crypt users, whose policy file contains the same encryption profile, are mem-
bers of a trusted group. They do not need to worry about encryption or key exchange. They
only have to be able to access the policy files to have their data encrypted or decrypted trans-
parently, as soon as they open or close it.
As the encryption profiles are distributed via policy files, all organizational forms can be
mapped from a centralized LAN model, in which users are administered centrally, to a remote
model in which users work on notebooks.
conpal LAN Crypt supports Windows as well as macOS and for mobile devices Android and
iOS / iPadOS.
A separate administration computer is used to configure conpal LAN Crypt and administer
encryption profiles. To draw a clear distinction between Windows administration and conpal
LAN Crypt administration, the role of a security officer must be established. The security officer
defines encryption profiles in policy files to specify which encrypted data is to be stored in
particular directories, and who is allowed to access this data. After creating the policy files on
the administration station, the security officer deploys them.
A standard Windows tool, the Microsoft Management Console (MMC), is used to administer
conpal LAN Crypt. The conpal LAN Crypt Administration user interface consists of snap-ins for
the MMC. conpal LAN Crypt Administration stores most of the objects to be administered (user
data, keys, encryption paths, etc.) in their own database.

There are two major benefits to using this database approach instead of just Windows tools
such as Active Directory:
◼ System administration and security administration can be kept strictly separate. This is
because conpal LAN Crypt uses a dedicated database, and is totally independent of
system administration. The keys in the conpal LAN Crypt administration database are
encrypted and thus protected against unauthorized access. In addition, this database
prevents the conpal LAN Crypt system from being changed unintentionally (e.g. if the
system administrator deletes a required security object).
◼ On the other hand, it is often not a good idea to allow people who are not system admin-
istrators to change the system configuration. It is obvious that assigning permission to
write data for system administration is a real problem. This is another good reason for
storing conpal LAN Crypt-specific data in a separate database.
To provide the best possible protection, conpal LAN Crypt’s functions are divided into two
parts:
◼ conpal LAN Crypt User functions
The conpal LAN Crypt user functions include the encryption and decryption information
for data. This information is required for everyday tasks using conpal LAN Crypt. As soon
as a user is permitted to access the encryption information, the files are encrypted and
decrypted transparently. No further user interaction is required. In addition, conpal LAN
Crypt has a range of display functions that allow the user to view "their" encryption profile
and the keys provided to him.
◼ conpal LAN Crypt Security Officer functions
The conpal LAN Crypt Administration offers functions that are reserved for a Security
Officer. Encryption rules can only be administered if you have a Security Officer certifi-
cate. Only then is it possible to create new encryption profiles or manage existing ones,
for example.
Both components can be installed separately.
For the user, transparent encryption means that all data stored in an encrypted form (in en-
crypted folders or drives) is automatically decrypted in RAM when opened by an application.
When the file is saved, it is automatically encrypted again.
◼ Every file for which there is an encryption rule is encrypted automatically.
◼ If files are copied or moved to an encrypted folder, they are encrypted in accordance with
the encryption rule that applies to that folder. You can, of course, also define different
encryption rules for different file extensions or names in the same folder. Encryption is
not specific to folders. It depends entirely on encryption rules!
◼ When encrypted files are renamed, they remain encrypted (provided there is not a dif-
ferent encryption rule, or no encryption rule, for the new file name/file extension).
◼ If you copy or move encrypted files to a location where the current encryption rule is no
longer valid, they remain encrypted, as persistent encryption is enabled by default.
◼ If you copy or move encrypted files to a location where the current encryption rule is no
longer valid, but a different encryption rule is valid, these files are first decrypted and
then encrypted again according to the new encryption rule.
◼ Transparent encryption is applied to all file operations. The user remains completely un-
aware of these processes while working with encrypted data, because they all run in the
background.
◼ Persistent encryption can be used to prevent a user from unintentionally decrypting files
when copying or moving them to a folder for which no encryption rule exists.
If the user does not own the appropriate key, they are not permitted to access the encrypted
data in a folder. The user cannot read, copy, move, rename, or in any other way interact with
the encrypted files in this folder.
If the user has the key with which the files are encrypted, he can open and work with these
files at any time, even if no encryption rule refers to these files in his encryption profile.
For performance reasons, conpal LAN Crypt does not change the encryption status when com-
plete folders are moved using Windows Explorer. This means that no encryption, decryption
or re-encryption is carried out when a folder is moved or renamed.
If files were encrypted, they remain encrypted in the new folder or in the new storage location.
If the user owns the appropriate key, they can work with these files as usual.
Note: However, this only applies if there is no encryption rule for the new storage location. If
there is, however, the files will be encrypted according to the encryption rule applicable to the
new storage location.
Moving files and folders securely: conpal LAN Crypt also enables files and folders to be
moved securely. The files are also encrypted, decrypted or re-encrypted as required in accord-
ance with the applicable encryption rules. The source files are securely deleted (“wiped”) after
being moved.
This function is available via the Secure move entry in the Windows Explorer context menu
under the item conpal LAN Crypt. A dialog can then be used to select the location to which
the files are to be moved.
If the Persistent Encryption function is deactivated, a file for decryption only needs to be
copied or moved to a location or folder for which no encryption rule exists. It will then be auto-
matically decrypted.
However, this is only the case if
◼ an appropriate encryption profile has been loaded,
◼ the user has the right key,
◼ no encryption rule for the new location exists in the active encryption profile.
If your encryption profile is loaded, you can delete any encrypted file for which you own the key.
Note: Deleting files actually means you move them to the Windows Recycle Bin. To provide
the highest level of security, files encrypted by conpal LAN Crypt remain encrypted in the Re-
cycle Bin. For emptying the Recycle Bin no key is necessary.
The following files and folders are automatically excluded from encryption (even if an encryp-
tion rule has been defined for these files):
◼ Files in the conpal LAN Crypt installation folder.
◼ Files in the Windows installation folder.
◼ Policy File Cache.
Location is specified in conpal LAN Crypt Administration and displayed on the Profile
tab of the Status dialog.
◼ Root directory of the System drive. Subfolders are not excluded.
◼ Indexed Locations (search-ms).
Files normally remain encrypted by conpal LAN Crypt only as long as they are subject to an
encryption policy. Files would therefore be decrypted if they were copied or moved to a folder
for which no encryption rule applies.
If you do not want unwanted plaintext copies of encrypted files to be created, Persistent En-
cryption can prevent this. With the Persistent Encryption you can ensure that encrypted files
are not decrypted when they are moved or copied.
Security Officers or System Administrators can deactivate this behavior in the conpal LAN Crypt
configuration via a group policy (GPO) in Windows. By default, this function is already activated
in conpal LAN Crypt. If Persistent Encryption is deactivated, encrypted files will be decrypted
and stored in plain text, when they are copied / moved to a location which is not defined in the
encryption rule.
For Persistent Encryption the following rules apply:
◼ The conpal LAN Crypt driver only keeps the name of the file without any path information.
Only this name can be used for comparison and therefore will only catch situations where
the name of the source and the target file is identical. If the file is renamed during the
copy operation, the resulting file is considered to be a “different” file and thus not subject
to the Persistent Encryption.
◼ When a user saves an encrypted file with Save As under a different file name in a loca-
tion not covered by an encryption rule, the file will be plain text.
◼ Information about files is kept for a limited time only. If the operation takes too long (more
than 15 seconds), the newly created file is considered to be a different, independent file
and thus not subject to the Persistent Encryption.
As mentioned above, Persistent Encryption tries to ensure that an encrypted file retains its
encryption state, for example its original encryption key. This works perfectly fine if the file is
relocated to a folder with no applicable encryption policy. But if the file is copied or moved to a
location where an encryption policy applies, the encryption policy has higher priority and thus
overrules Persistent Encryption. The file will end up encrypted with the key defined in the
encryption rule and not with the one that was originally used.
An Ignore path rule also overrides Persistent Encryption, thus ensuring that encrypted files
which are copied to a folder with an applicable Ignore path are stored in plain!
An Ignore path rule is primarily used for files that are accessed very frequently, and for files
which do not have a particular reason to be encrypted. This improves system performance.
Note: There is no access protection for files in folders that are subject to an ignore path rule
if the mini-filter is used as the encryption driver.
An Exclude path rule also overrides Persistent Encryption, thus ensuring that encrypted
files that are copied to a folder with an applicable Exclude path are stored in plain!!
Note: For files in folders that are subject to an Exclude path rule, access protection still exists.
Due to technical reasons Persistent Encryption has some limitations or in other words the ac-
tual result of Persistent Encryption might not always meet the expectations of the user.
Here are some common scenarios where the Persistent Encryption falls short:
Files that are supposed to remain plain are encrypted
◼ PLAIN files are copied to multiple locations with and without applying encryption
rules.
If a plain file is copied to several locations at the same time, with one having an encryp-
tion rule applied, the other copies of that file might be encrypted too, although the original
file is not encrypted. If the file is copied to an encrypted location in the first place, the file
is added to the drivers internal list. When the second copy is created anywhere else, the
driver does find the file name in its list and therefore encrypts the second copy, too.
◼ Create a file with the same name after accessing an encrypted file.
If an encrypted file is opened (accessed) and a new file with the same name is created
shortly afterwards, the newly created file will be encrypted with the same key as the file
that was opened first.
Note: This only applies if the same application/thread is used for reading the encrypted
file as well as creating the new one.
A common use case: In Windows Explorer right-click in a folder with encryption rule and
click New > Text Document. Immediately right-click in a folder without encryption rule
and click New > Text Document. The second file will be encrypted, too.
Files are not encrypted
◼ Multiple copies of a file are created
If copies of an encrypted file are created in the same folder as the original file, these
copies are not encrypted. Since the created copies have different file names (for example
doc.txt vs. doc - Copy.txt) the matching of the file name fails and therefore they are not
encrypted by Persistent Encryption.
If a DLP product identifies data that needs to be encrypted, it can use the conpal LAN Crypt
Client API to encrypt these files. In conpal LAN Crypt Administration, you can define different
encryption tags that specify the conpal LAN Crypt key to be used.
The Client API can use these predefined encryption tags in order to apply special keys for
different content, for example the encryption tag <CONFIDENTIAL> to encrypt all files that are
categorized as confidential by your DLP product.
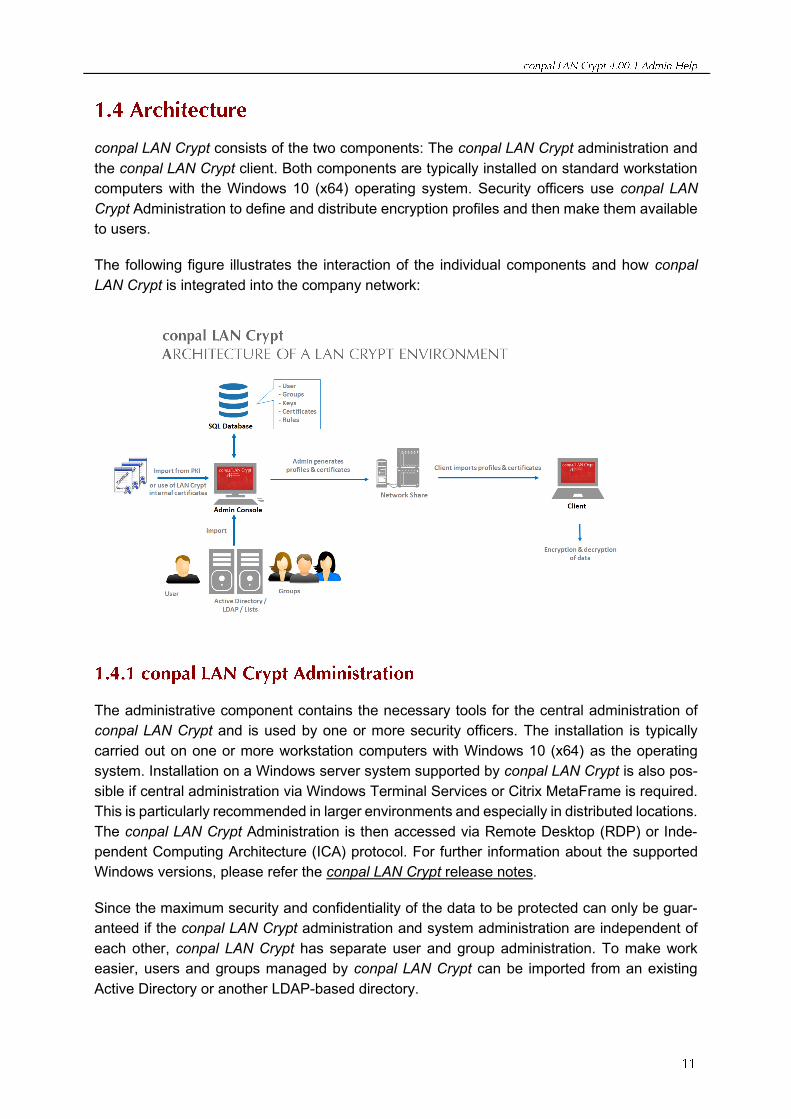
conpal LAN Crypt consists of the two components: The conpal LAN Crypt administration and
the conpal LAN Crypt client. Both components are typically installed on standard workstation
computers with the Windows 10 (x64) operating system. Security officers use conpal LAN
Crypt Administration to define and distribute encryption profiles and then make them available
to users.
The following figure illustrates the interaction of the individual components and how conpal
LAN Crypt is integrated into the company network:
The administrative component contains the necessary tools for the central administration of
conpal LAN Crypt and is used by one or more security officers. The installation is typically
carried out on one or more workstation computers with Windows 10 (x64) as the operating
system. Installation on a Windows server system supported by conpal LAN Crypt is also pos-
sible if central administration via Windows Terminal Services or Citrix MetaFrame is required.
This is particularly recommended in larger environments and especially in distributed locations.
The conpal LAN Crypt Administration is then accessed via Remote Desktop (RDP) or Inde-
pendent Computing Architecture (ICA) protocol. For further information about the supported
Windows versions, please refer the conpal LAN Crypt release notes.
Since the maximum security and confidentiality of the data to be protected can only be guar-
anteed if the conpal LAN Crypt administration and system administration are independent of
each other, conpal LAN Crypt has separate user and group administration. To make work
easier, users and groups managed by conpal LAN Crypt can be imported from an existing
Active Directory or another LDAP-based directory.
The conpal LAN Crypt administration requires an SQL database to store configuration data
and to manage conpal LAN Crypt users and groups. The database can be installed locally on
the administration system if the Microsoft SQL Server Express Edition is used. For larger in-
stallations with several security officers, the use of a central database system in the form of a
Microsoft SQL or Oracle server is recommended.
Security Officers are responsible for defining the security policy used in their organization.
They specify the policies and ensure that they are implemented, modified and adhered to cor-
rectly. Smaller companies will usually manage with just one Security Officer. Larger organiza-
tions often have several Security Officers who usually work at departmental or site level and
are organized into a hierarchy. conpal LAN Crypt can also represent and reflect the various
hierarchy levels involved in this situation.
At the top of the hierarchy stands one or more Master Security Officers: they must be present
when the conpal LAN Crypt database is generated. These officers define the first policies and
decide whether the Four-eyes-principal rule (two Security Officer necessary for authentication)
is to be used for actions that impact security issues. Each Security Officer is assigned particular
administrative permissions which define their fundamental rights. Their area of responsibility
can also be limited to a few user groups by Access Control Lists (ACLs).
conpal LAN Crypt uses Key Encryption Keys (KEKs) to administer access rights for users. These
are encrypted and stored in the SQL database and, like all database contents, are protected
from being changed with MAC and hash values. Administration tasks are arranged in such a way
that a Security Officer can only ever know the name of a key and not its actual value. This means
they can work with key objects and create encryption rules. The flexibility of permission control
procedures mean that a wide range of scenarios can be covered. For example, a Section Head
can define keys and assign folders. In the next work step, a central Security Officer can generate
the encryption profile. As a result, the keys remain under central control.
conpal LAN Crypt recognizes two automatically-generated key types: user keys and group
keys. User keys are generated for individual users and can be used for generic encryption
rules, such as the encryption of home directories or local or temporary folders. Each user has
precisely one user key. If data protected by a user key has to be recovered in an emergency,
the Security Officer must assign this specific key to another user. This type of recovery requires
a special administrative permission and can be linked with a „Four-eyes-principal rule” (ap-
proval by a second person) to ensure that it is not misused. A similar concept is also available
for user groups: this is the group key (see “Re-assigning specific keys“).
Note: For information on an emergency recovery of the conpal LAN Crypt administration, for
example if the certificate of the Master Security Officer is damaged, see Chapter 3.5.10 "The
Recovery Keys tab" on page 52.
The policy files include all the rules, access rights and keys required for transparent encryption.
Before a user is able to encrypt/decrypt data using the conpal LAN Crypt software installed on
the client workstation, they first need to access the encryption information stored in a policy
file. In this situation the policy files are stored either on a file server or in a domain controller’s
Net logon share.
Note: You do not need to install conpal LAN Crypt components on file servers or domain con-
trollers. To facilitate the administration of the conpal LAN Crypt user groups and client com-
puters, however, it can be helpful to install the administrative template files (*.ADMX files)
supplied with the admin console on an administrative workstation (RSAT). These enable sim-
ple and clear administration of the most important settings for the conpal LAN Crypt clients.
The policy file is protected against unauthorized access by a certificate. Only the owner of the
certificate has access to the private key belonging to the certificate, and can therefore use this
certificate to access the relevant encryption information. If self-signed certificates are being
used these are also stored on a fileserver and the user will require read access rights, to enable
them to use the certificates. conpal LAN Crypt also supports the use of certificates stored on
smartcards, USB tokens or suitable hardware boards.
Note: You can use conpal LAN Crypt without having to use smartcards or tokens to store
certificates.
The paths to the policy files (from the user’s point of view) and other conpal LAN Crypt settings
are identified by mechanisms in the operating system.
A conpal LAN Crypt trusted group consists of a number of users with the same encryption
profile. Policy files for every single user are generated in Administration. All conpal LAN Crypt
users who have the same profile stored in their policy file are members of an authorization
group. They do not need to worry about encryption or key exchange. They only have to be
able to access the policy file to have their data encrypted or decrypted transparently, as soon
as they close or open it.
The conpal LAN Crypt Client is installed on the Windows systems (PCs, workstations, note-
books, terminal servers) on which you want encryption to be performed. In addition to the filter
driver required for encryption and decryption, the client component has a range of other op-
tional components:
◼ Explorer extensions for initial and explicit encryption.
◼ A user application for loading and deleting encryption rules as well as activating and
deactivating encryption.
◼ A user application for displaying all the settings and rules that are active on the client.
This is for example important in support cases.
◼ A user application for initial encryption.
◼ Token support so that token-based certificates can be used to access stored encryption
information.
After starting the conpal LAN Crypt client, it accesses the folder with its PKCS#12 container
(*.P12 file) and its policy file via mechanisms of the operating system (registry settings, group
policies). When accessing the PKCS#12 container for the first time, the user must enter a PIN
that a security officer has given him in a secure way. The user certificate is then stored in the
local certificate memory of the operating system, i.e., linked to the loaded Windows profile. The
certificate allows access to the encrypted parts of the policy file via the “Profile Encryption Key
- PEK”. If the certificate is stored on a hardware-based token supported by the client compo-
nent, no further user interaction is required for encryption and decryption after the token has
been unlocked.
The conpal LAN Crypt Client then loads the policy file with its settings and keys.
conpal LAN Crypt uses certificates and public/private key pairs to secure encryption infor-
mation stored in policy files. Only the owner of a certificate can access the private key that
belongs to that certificate and is therefore able to use it to access the encryption information.
Which certificates can be used and where do they come from:
◼ A company either has its own Public Key Infrastructure (PKI) or uses a Trust Center to
create certificates for the users. In this case, existing certificates can be used.
◼ Alternatively, the conpal LAN Crypt Administration component can generate self-signed
certificates. These certificates can only be used by conpal LAN Crypt! The certificates
also have a Critical Extension to show applications that they must not be used. These
are simple certificates (comparable to Class-1 certificates) which comply with the X.509
standard.
In conpal LAN Crypt you can configure whether a critical extension is added to a newly gener-
ated certificate or not.
Note: In certain situation other applications will ignore these Critical Extensions on conpal LAN
Crypt certificates. This will then cause problems with these self-signed certificates. In such
cases you must explicitly deactivate all the areas of use for conpal LAN Crypt certificates with
the Microsoft Management Console’s certificate snap-in to prevent these certificates from be-
ing used in other applications.
The certificates are assigned to the users within the conpal LAN Crypt Administration compo-
nent.
Important information about how to use certificates:
◼ conpal LAN Crypt only uses the Microsoft Crypto API for certificate functionality.
◼ conpal LAN Crypt supports all Cryptographic Service Providers (CSPs) that comply with
certain standards (e.g., RSA key length at least 2048 bits). They include, among others,
the Microsoft Enhanced CSP.
Note: The Microsoft Standard CSP (Microsoft Base CSP) cannot be used.
If you have any questions about the compatibility of other CSPs, please contact the support
team. (see Technical Support on page 173).
As conpal LAN Crypt aims to provide the highest possible security, it is necessary to use strong
CSPs such as the Microsoft Strong Cryptographic Service Provider. These CSPs allow the
use of keys that are up to 16384 bits long and provide strong encryption algorithms (such as
AES).
You will also need to activate the following option when importing a certificate using the certif-
icate import wizard: Enable strong private key protection.
You will be prompted to enter the password every time the private key is used by an application.
After you click Finish in the certificate import wizard, the Importing a new private exchange key
dialog is displayed. Click on Set Security Level, to set the security level again:
◼ High
If you select High, you will need to enter a password to confirm that you are using a
private key. In the next dialog box, enter a new password.
◼ Medium
If you select Medium, the system displays a prompt in which you are asked to confirm
the use of a private key by clicking OK.
Highest Security Level with Automatically-Imported Private Exchange Keys
(*.p12, *.pfx)
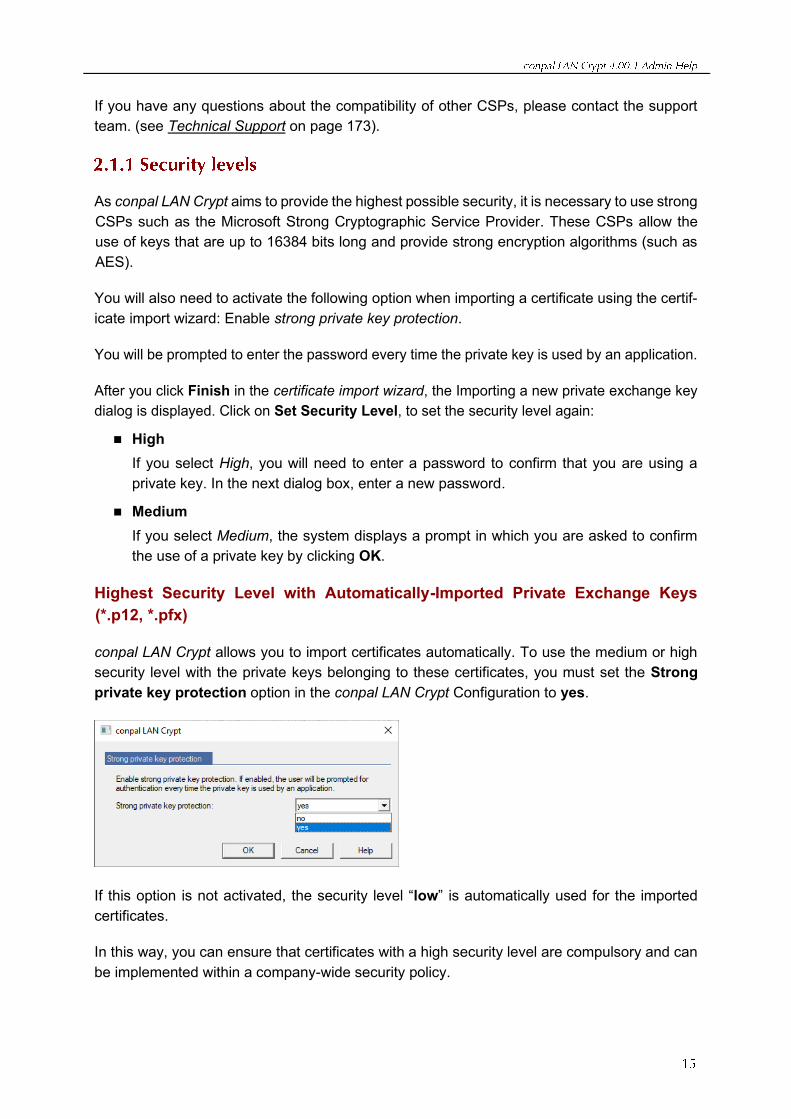
conpal LAN Crypt allows you to import certificates automatically. To use the medium or high
security level with the private keys belonging to these certificates, you must set the Strong
private key protection option in the conpal LAN Crypt Configuration to yes.
If this option is not activated, the security level “low” is automatically used for the imported
certificates.
In this way, you can ensure that certificates with a high security level are compulsory and can
be implemented within a company-wide security policy.
Note: If the highest security level is being used, conpal LAN Crypt users must enter the pass-
word for the private key once, at the Windows logon prompt, and again manually, each time
an encryption rule is loaded.
Smartcard:
If certificates stored on smartcards are used, the password only has to be entered once. As
long as the smartcard remains in the card reader there is no need to enter the password again.
Note: We recommend that you set this option to high before starting conpal LAN Crypt
Administration for the first time. If not, the initial Master Security Officer’s certificate is used
without security level “high”, when it is created by conpal LAN Crypt, and not, for example,
imported from a smartcard.
Note: Windows caches PINs for 24 hours by default. Using software certificates may cause
security problems when you log on to conpal LAN Crypt Administration and when additional
authorization is provided. We strongly recommend that you deactivate this feature.
To do so, set these values:
"PrivKeyCacheMaxItems"=dword:00000000
„PrivKeyCachePurgeIntervalSeconds"=dword:00000000
Under the key:
HKEY_LOCAL_MACHINE\
SOFTWARE\
Policies\
Microsoft\
Cryptography
If you do this, the PINs will not be cached.
◼ The certificate must include a public key.
◼ The private key for the assigned certificate must be available before a user can access
the encryption profile.
◼ Only certificates stored in User Configuration in the Personal Certificates, Other People
and Active Directory User Object certificate stores, and in Local Computers in the Per-
sonal Certificates certificate store, are listed by conpal LAN Crypt. conpal LAN Crypt
ignores certificates that are stored in other locations!
You can use the Certificate Management Console snap-in to import and organize certificates.
◼ Only the public key is used to “associate” a certificate with conpal LAN Crypt’s encryption
information. You do not need to know the private key. The private key remains the prop-
erty of the certificate’s owner, who is the only person who can access the encryption
information.
We recommend that you have the certificates available and ready to use before you start in-
stalling conpal LAN Crypt. The certificates then appear in the Certificates dialog immediately
after conpal LAN Crypt has been installed, and can be used right away.
Note: conpal LAN Crypt does not administer certificates. However, you can do so using your
company’s own PKI infrastructure or by using trust centers.
conpal LAN Crypt carries out extended certificate verification. This means that certificates are
not accepted until their entire certificate chain (evaluation of a Certificate Revocation List) has
been checked.
Extended certificate verification is carried out for these certificates:
◼ For certificates which are provided when a Master Security Officer is created. Only cer-
tificates which pass the entire check are displayed.
◼ For certificates which are created after a recovery key has been used to assign a new
certificate to a Security Officer. Only certificates which pass the entire check are dis-
played.
◼ For certificates which are used by Security Officers to log on to the conpal LAN Crypt
database. If the certificates cannot be checked, access is denied.
◼ For certificates which are used for additional authorizations.
These are the preconditions for extended certificate verification:
◼ The certificate being used must include a CRL.
Some PKIs allow you to define a CRL in the certificate itself. If a CRL has been defined,
the list is evaluated. You may need to download a CRL from the issuer via the network
for this purpose. If the certificate cannot be verified, the encryption profile is not loaded.
◼ A CRL has been loaded into the local certificate store.
Note: You may need a network connection before you can evaluate a CRL. If this connection
cannot be established, access will be denied, even though the certificate itself may be valid.
As the use of certificates is handled by using Cryptographic Service Providers (CSPs), smart-
cards are supported automatically when a smartcard CSP is used. You can therefore handle
access to encryption information by using certificates on smartcards.
Note: If you want to use certificates on smartcards, please make sure that the smartcard
reader, the associated middleware and a corresponding Cryptographic Service Provider (CSP)
are correctly installed and operational!
Note: You can only install conpal LAN Crypt if you have Windows Administrator privileges.
1. Go to the Install directory of your unzipped installation package and double-click on the
LCAdmin.msi file.
An installation wizard guides you as you install conpal LAN Crypt Admin, which is a very
simple process. Click Next.
2. The License Agreement dialog is displayed.
Select I accept the license agreement in the License Agreement dialog. If you do not
do this, you will not be able to install conpal LAN Crypt! Click Next.
3. The Destination Folder dialog appears.
Select where you want to install conpal LAN Crypt. If you do not change this setting, the
installation takes place under:
<System Drive>:\Program Files (x86)\conpal\LAN Crypt\Administration\
Click Next.
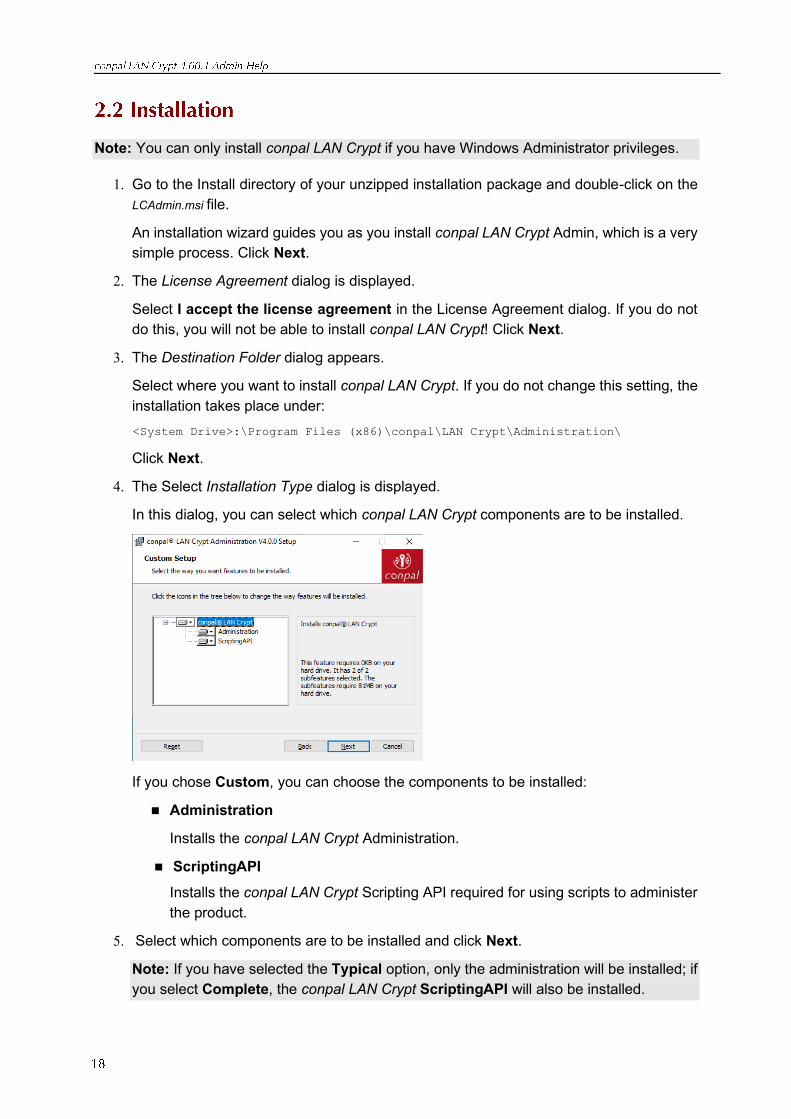
4. The Select Installation Type dialog is displayed.
In this dialog, you can select which conpal LAN Crypt components are to be installed.
If you chose Custom, you can choose the components to be installed:
◼ Administration
Installs the conpal LAN Crypt Administration.
◼ ScriptingAPI
Installs the conpal LAN Crypt Scripting API required for using scripts to administer
the product.
5. Select which components are to be installed and click Next.
Note: If you have selected the Typical option, only the administration will be installed; if
you select Complete, the conpal LAN Crypt ScriptingAPI will also be installed.

6. After having checked your settings, click Install in the Ready to Install the Application
dialog. The installation process starts.
7. If the installation is successful, a dialog box appears. In it, click Finish to complete the
installation.
Unattended installation means you can install conpal LAN Crypt automatically on a large num-
ber of computers.
The Install folder contains the LCAdmin.msi file required for an unattended installation.
The following list shows which components must be installed and the way in which you specify
them for an unattended installation.
The keywords indicate how the individual components must be specified under AddLocal= if
an installation is performed without user interaction. The names of the individual keywords for
the components are case-sensitive!
AddLocal=Administration
Installs only the conpal LAN Crypt Administration.
AddLocal=Administration,ScriptApi
In addition to the conpal LAN Crypt Administration the Scripting-API will be installed.
Example:
msiexec /i lcadmin.msi /qn AddLocal=Administration
In the example only the conpal LAN Crypt Administration will be installed without user interaction.
Note: If you do not specify a component, a complete installation will be performed.
To perform an unattended installation, you must run msiexec with specific parameters.
Mandatory parameters:
/I
Specifies which installation package is to be installed.
/QN
Installation without user interaction (unattended setup).
Name of the *.msi file: lcadmin.msi
Syntax: msiexec /i <path>\lcadmin.msi /qn
Optional Parameters:
/L*xv <path + filename>
Logs the complete installation procedure in the location specified under <path + filename>.
Example:
msiexec /i C:\Install\lcadmin.msi /qn /L*xv c:\Log\log.txt
This carries out a complete installation of conpal LAN Crypt. The program is installed in the
default installation directory
(<System drive>:\Program Files (x86)\conpal\LAN Crypt\Administration .
The .msi file is located in the Install folder of conpal LAN Crypt installation package.
For upgrading conpal LAN Crypt 3.97 or 4.00 to this version of conpal LAN Crypt Administration
the following steps are necessary:
◼ Installing the new version
◼ Upgrading the existing database
◼ Running the upgrade wizard
Note: The first logon after upgrading has to be performed by a Master Security Officer.
If you are using a LAN Crypt version older than version 3.90, you must first upgrade to conpal
LAN Crypt version 3.97 before you install version 4.0x.
Install the new version as described.
Note: Make sure that all instances of conpal LAN Crypt Administration are closed before you
install the new version.
Using the command line tool CreateTables.exe you can upgrade the structure of the tables
in your conpal LAN Crypt database. The tool is available in the \Install folder of your installation
package.
Note: Logon to the database has to performed with privileges that allow creation and modifi-
cation of the database schema.
Command line syntex:
CreateTables <ODBCName[.OwnerName]> <SQL dialect> <action>
CreateTables.exe offers the following parameters for creating tables in other configurations:
ODBCName:
The name used for the ODBC data source.
OwnerName:
For the database to be addressed correctly, the database owner has to be specified for
Oracle databases. The owner has to be specified in CAPITALS.
SQL dialect:
m ... Microsoft SQL server 2012 (SP4), 2016 (SP2), 2017 or 2019
o12 ... Oracle Version 12
o19 ... Oracle Version 19
Actions:
u ... Update of the database structure
Example 1:
CreateTables SGLCSQLServer m u
Example 2:
CreateTables SGLCSQLServer.SGLC o19 u
After an intermediate upgrade to version 3.97, the login information must be entered again
under Central Settings on the server page. If you use a Microsoft directory service, do as
follows:
◼ Enter the Domain name under Domain or Server Name.
◼ Enter the User Name as username@Domainname.
Note: You can only uninstall conpal LAN Crypt if you have Windows Administrator privileges.
1. Select Start, Settings, Apps.
2. Select conpal LAN Crypt Administration from the list of installed programs.
3. Click Uninstall to uninstall the conpal LAN Crypt Administration.
4. If you really want to uninstall the conpal LAN Crypt Administration, confirm the warning
message displayed by clicking OK.
5. Restart the system to complete the uninstallation process.
Note: When uninstalling conpal LAN Crypt the contents of the conpal LAN Crypt Database is
preserved. If required, the database has to be deleted separately by using operating system
tools or the database administration tool. Also, all user specific settings remain on the system
(registry keys, group policy settings and so on).
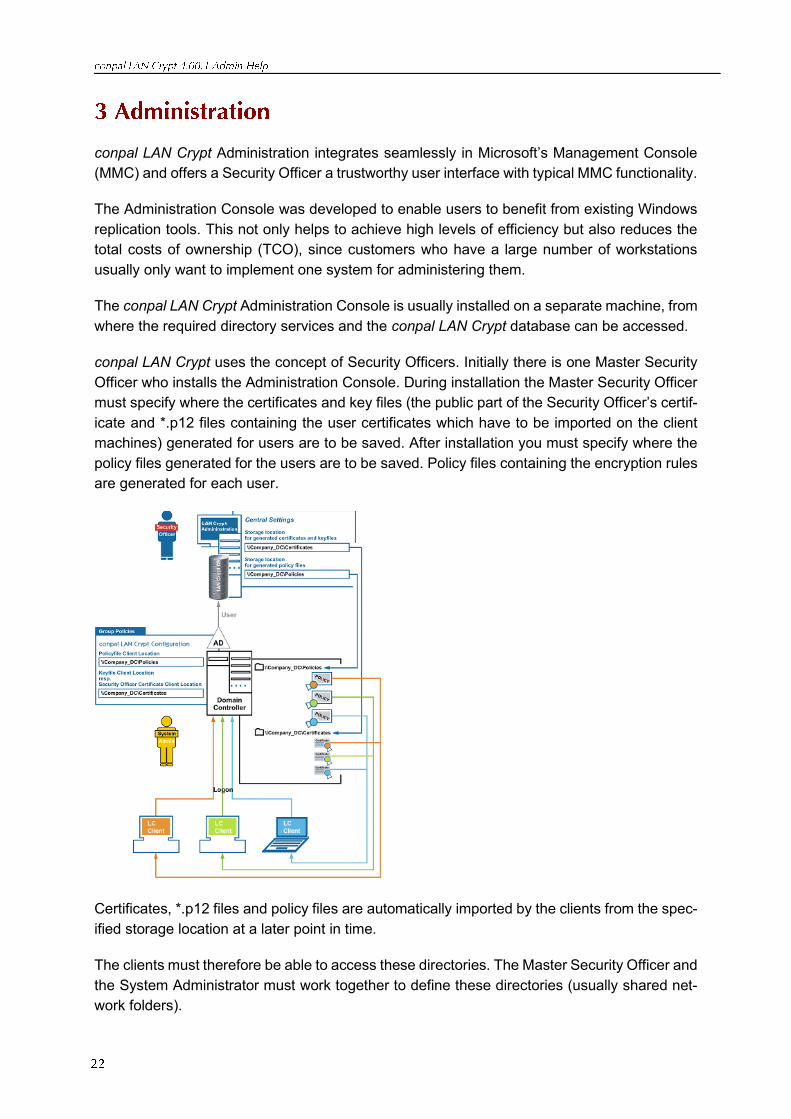
conpal LAN Crypt Administration integrates seamlessly in Microsoft’s Management Console
(MMC) and offers a Security Officer a trustworthy user interface with typical MMC functionality.
The Administration Console was developed to enable users to benefit from existing Windows
replication tools. This not only helps to achieve high levels of efficiency but also reduces the
total costs of ownership (TCO), since customers who have a large number of workstations
usually only want to implement one system for administering them.
The conpal LAN Crypt Administration Console is usually installed on a separate machine, from
where the required directory services and the conpal LAN Crypt database can be accessed.
conpal LAN Crypt uses the concept of Security Officers. Initially there is one Master Security
Officer who installs the Administration Console. During installation the Master Security Officer
must specify where the certificates and key files (the public part of the Security Officer’s certif-
icate and *.p12 files containing the user certificates which have to be imported on the client
machines) generated for users are to be saved. After installation you must specify where the
policy files generated for the users are to be saved. Policy files containing the encryption rules
are generated for each user.
Certificates, *.p12 files and policy files are automatically imported by the clients from the spec-
ified storage location at a later point in time.
The clients must therefore be able to access these directories. The Master Security Officer and
the System Administrator must work together to define these directories (usually shared net-
work folders).
Clients can use group policies when they log on to a domain controller to find out how to access
these files. The System Administrator specifies the storage locations in the conpal LAN Crypt
Configuration Console. conpal LAN Crypt is configured in the group policy object that is valid
for the users.
conpal LAN Crypt clients do not need to connect to the conpal LAN Crypt database.
The information required for finding certificates, *.p12 files and policy files can be found at
logon in group policies. These files are then automatically transferred to the clients.
To import a certificate, a user must have a password. In the case of certificates generated by
conpal LAN Crypt, the p12pwlog.csv file contains the passwords and can be used, for example,
to create a PIN letter.
Preparations:
◼ Optional: Installation of the DBMS (Microsoft or Oracle). Creation of a new database
"LANCRYPT". The databases prepended in the DBMS should not be used for conpal
LAN Crypt!
◼ Add data source (32-bit ODBC) as system DSN (see chapter 3.2.2).
◼ Create database tables with CreateTables (or extend them during an upgrade).
◼ System Administrator: Define settings in the conpal LAN Crypt configuration console.
◼ Create initial Master Security Officer.
◼ Define the storage locations in the Admin Console:
o for User key files and Security Officer certificates generated by conpal LAN Crypt
o for Security Officer key files generated by conpal LAN Crypt
o for the password log file of the automatically generated passwords of the key files
(only if the certificates are generated by conpal LAN Crypt)
o for policy files generated by conpal LAN Crypt (please contact the system adminis-
trator to implement these steps)
Note: If you are using an Oracle database and access the database from Administration
Consoles on different machines, you should now also specify the code page settings (see
“The Database tab“ on page 54).
◼ Create additional (Master) Security Officers
◼ Define rights for Security Officers
◼ Import objects (Organizational Units, groups, users) from the directory service (e.g. Active
Directory)
◼ Create conpal LAN Crypt groups and fill them with the objects imported from the directory
service (users, groups)
◼ Assign the conpal LAN Crypt groups and the responsible Security Officer to the individual
organizational units or regions, as well as define their rights
◼ Create keys
◼ Create encryption rules
Note: We recommend defining encryption rules only in conpal LAN Crypt groups. En-
cryption rules in directly imported directory objects represent a security risk and are also
prone to errors.
◼ Generate and assign certificates for the users
◼ Generate policy files for the users.
After installation, you must work through the following steps before you can start administering
conpal LAN Crypt:
◼ Optional: install database management system
This is only necessary if your database system does not include a database you want to use
for administering conpal LAN Crypt.
conpal LAN Crypt supports the following database systems:
◼ Microsoft SQL Server 2012 SP4 (incl. Express)
◼ Microsoft SQL Server 2016 SP2 (incl. Express)
◼ Microsoft SQL Server 2017 (incl. Express)
◼ Microsoft SQL Server 2019 (incl. Express)
◼ Oracle 12
◼ Oracle19
Note: If you are using an Oracle database, you must install the Oracle client before you
can use conpal LAN Crypt Administration. If you select the “runtime” variant of the Oracle
client you must also install the Oracle ODBC driver.
conpal LAN Crypt does not support Microsoft ODBC for Oracle.
Make sure that you do not use any of the manufacturer’s reserved key words when you
generate database objects.
◼ Specifying a data source (ODBC)
If you want to use your own database system, you must know the access data for the
database you want to use so that you can specify the data source.
◼ Creating database tables
After specifying the data source, you have to create the conpal LAN Crypt tables in the
database using the tool provided with your software (CreateTables.exe).
The following description refers to the Microsoft SQL Server 2019 Express Edition. For this ex-
emplary description, the default settings of this version have been used as much as possible.
To install the database system, do as follows:
1. Download a current version of Microsoft SQL Server Express (for example, Microsoft SQL
Server 2019 Express) from the Microsoft Web site. Then double-click the installation file in
the download folder. For Microsoft SQL Server 2019 Express, this is SQL2019-SSEI-Expr.exe.
Note: Download the 64-bit version of Microsoft SQL Server 2019 Express Edition from
www.microsoft.com.
2. Accept the license agreement and click Next.
3. The installation files are extracted and the installation wizard starts.
4. Follow the installation wizard instructions and accept the default settings.
Default settings: The following description of preparatory steps refers to the default
settings. If you make any changes (authentication method, database instance), you have
to take them into account when specifying the data source and creating the database
tables.
Database authentication: By default, the Express Edition uses Windows authentica-
tion. A prerequisite for using Windows authentication is that the user who logs on to the
database has Windows administrator rights.
Master database: By default, the existing master database is used when specifying the
data source. In general, we recommend NOT to use the master database since it may
cause problems when upgrading the Express Edition or the SQL Server version.
You can create a separate database for conpal LAN Crypt and specify it when adding
the data source. For the Microsoft SQL Server 2019 Express Edition you can create a
database by using the following command on the command line:
osql -E -S .\SQLEXPRESS -Q “CREATE DATABASE <name_of_the_database>“
A database with the specified name using Windows authentication is created.
With parameter -U, for example, you can specify a user name for authentication. To see
all parameters, type osql -?.
You can also use another version of Microsoft SQL Server Express (conpal LAN Crypt
Version 4 supports Microsoft SQL Server Express from version 2012).
You can also download Microsoft SQL Server Management Studio Express, which is
available for free, and use it to create a separate database.
In the next step, a data source has to be specified so that conpal LAN Crypt can use the
database system.
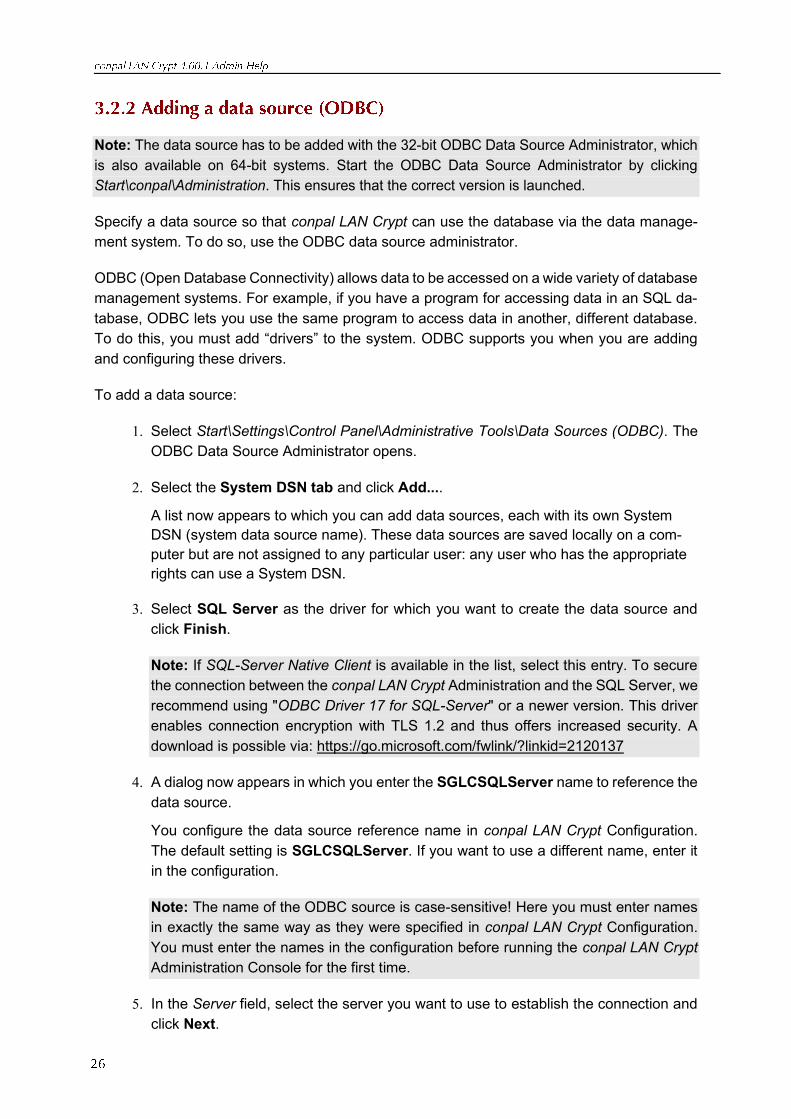
Note: The data source has to be added with the 32-bit ODBC Data Source Administrator, which
is also available on 64-bit systems. Start the ODBC Data Source Administrator by clicking
Start\conpal\Administration. This ensures that the correct version is launched.
Specify a data source so that conpal LAN Crypt can use the database via the data manage-
ment system. To do so, use the ODBC data source administrator.
ODBC (Open Database Connectivity) allows data to be accessed on a wide variety of database
management systems. For example, if you have a program for accessing data in an SQL da-
tabase, ODBC lets you use the same program to access data in another, different database.
To do this, you must add “drivers” to the system. ODBC supports you when you are adding
and configuring these drivers.
To add a data source:
1. Select Start\Settings\Control Panel\Administrative Tools\Data Sources (ODBC). The
ODBC Data Source Administrator opens.
2. Select the System DSN tab and click Add....
A list now appears to which you can add data sources, each with its own System
DSN (system data source name). These data sources are saved locally on a com-
puter but are not assigned to any particular user: any user who has the appropriate
rights can use a System DSN.
3. Select SQL Server as the driver for which you want to create the data source and
click Finish.
Note: If SQL-Server Native Client is available in the list, select this entry. To secure
the connection between the conpal LAN Crypt Administration and the SQL Server, we
recommend using "ODBC Driver 17 for SQL-Server" or a newer version. This driver
enables connection encryption with TLS 1.2 and thus offers increased security. A
download is possible via: https://go.microsoft.com/fwlink/?linkid=2120137
4. A dialog now appears in which you enter the SGLCSQLServer name to reference the
data source.
You configure the data source reference name in conpal LAN Crypt Configuration.
The default setting is SGLCSQLServer. If you want to use a different name, enter it
in the configuration.
Note: The name of the ODBC source is case-sensitive! Here you must enter names
in exactly the same way as they were specified in conpal LAN Crypt Configuration.
You must enter the names in the configuration before running the conpal LAN Crypt
Administration Console for the first time.
5. In the Server field, select the server you want to use to establish the connection and
click Next.
6. Accept the default settings in the next dialog. If you accept the option With Windows
NT authentication using the network login ID you specify that Windows user data
is to be used to log on to the database system. You do not need to enter a password.
Click Next.
7. Choose as default database the database (e.g. LANCrypt) that you have created for
conpal LAN Crypt and confirm it.
8. In the next dialog, accept the default settings and click Finish.
Using the command line tool CreateTables.exe you create the required tables in your conpal
LAN Crypt database.
The tool is available in the Install directory of your unzipped installation package.
Note: Logon to the database has to be performed with privileges that allow creation and mod-
ification of the database schema.
To create the table in your database, do as follows:
1.) Enter the following on the command line: CreateTables SGLCSQLServer m c.
If you have used the defaults during installation, configuration of the database sys-
tem is now complete. You can now start conpal LAN Crypt Administration.
CreateTables <ODBCName[.OwnerName]> <SQL Dialect > <Action>
CreateTables.exe offers the following parameters for creating the tables in different configu-
rations:
ODBC Name:
The name you used for the ODBC data source.
Owner Name
For the database to be addressed correctly, the database owner has to be specified for
Oracle databases. The owner has to be specified in CAPITALS.
SQL Dialect:
m ... Microsoft SQL Server
o12 ... Oracle 12 or newer Version
o19 ... Oracle 19 or newer Version
Actions:
c ... Create all tables
Example 1:
CreateTables SGLCSQLServer m c
Example 2:
CreateTables SGLCSQLServer.SGLC o19 c
conpal LAN Crypt uses the concept of Security Officers. Initially there is one Master Security
Officer, who can delegate tasks later on by creating additional Security Officers and assigning
them specific rights for the administration of conpal LAN Crypt. The first Master Security Officer
may even create additional Master Security Officers.
ACLs are used to define the rights assigned to the Security Officers created by a Master Se-
curity Officer. Individual Security Officers can then be assigned to different organizational units
in central Administration. Their rights then apply exclusively to the organizational unit to which
they have been assigned. These rights are inherited downwards in the organizational hierarchy
until other rights are assigned.
After you have set up the database system and the data source, the next step, when conpal
LAN Crypt Administration Console runs for the first time, is to create an initial Master Security
Officer.
A Master Security Officer always has all existing rights.
Note: When creating the initial Master Security Officer, you must also define the storage loca-
tion for the certificates and key files generated by conpal LAN Crypt. The public part of the
Security Officer’s certificate (*.cer), which is needed by the clients, is also stored there. User
certificates (*.p12 files) are also imported from this directory later on. The folder you defined
with the System Administrator should already be available (network share).
All settings made when creating the initial Master Security officer can be changed at a later
point in time under Central Settings in the conpal LAN Crypt Administration Console.
After the Administration function runs for the first time (Start, conpal, Administration), and you
log on to the database, you see the wizard for creating the initial Master Security officer.
Enter the data for the initial Master Security Officer. The name you enter here is used as a
Common Name in the certificate if you use certificates generated by conpal LAN Crypt. E-Mail
Address and Comments are optional. Click Next.
Note: The e-mail address is added to the password log file for certificates generated by conpal
LAN Crypt. It can, for example, be used to create a PIN letter via e-mail.

In the Wizard’s second dialog, specify the storage locations for
◼ generated certificates (*.cer) and key files (*.p12)
◼ generated Security Officer certificates and
◼ the log file for the automatically-generated passwords of generated key files.
conpal LAN Crypt can generate self-signed certificates if required. The key files (* .p12) gen-
erated for the users in this way contain the private keys as well as the certificates. These are
generated when assigning the certificates for the users. The associated storage location must
be specified in the second dialog of the assistant. Generally, this is a network share that these
files are made available to users.
The public part of the Security Officer certificate (*.cer) is also saved here.
Users must be provided their key files or certificates (*.p12), policy files, and the public portion
of the certificate (*.cer file) of the security officer who created and signed the user certificates.
This is done for the conpal LAN Crypt Client configuration using group policies or registry set-
tings (if no Active Directory is available or should not be used for security reasons). With these
settings the client gets the appropriate access paths. We recommend the use of UNC paths
and FQD names.
If a corresponding "*.cer" file is found that contains the public key of the Security Officer certif-
icate, it is automatically imported.
Note: To use the described functionality, the corresponding paths must be set in the conpal
LAN Crypt configuration.
Alternatively, the users' key files and the public part of the Security Officer certificate can be
distributed manually. In this case make sure that both are imported by the clients.
Note: The public certificate of the security officer who created the policy files must always be
imported by the clients.
If you change the path on which the public certificates (*.cer) of the Security Officers and the
key files (*.p12) of the users are stored, e. g. after you have created additional Security Offic-
ers, you must copy these files to the new location. Otherwise, the public part of the Security
Officers certificates will not be found by the conpal LAN Crypt clients. The key files for users
must also be generated under the new path.
conpal LAN Crypt stores Security Officer certificates in *.p12 files, for example, as backups.
Here you can specify the folder to which they are saved.
Note: Because they involve sensitive data it is vital that you protect them against unauthorized
access!
The storage location and name for the password log file of the generated PKCS#12 files can
be specified here (default name: p12pwlog.csv). This file contains the passwords of the gen-
erated PKCS#12 key files (*.p12). This can e. g. also be used to create a PIN letter.
Note: You should protect this file and under no circumstances save it in the same folder as the
Policy files.
With conpal LAN Crypt you can easily protect the password log file. To do so, install the Ad-
ministration and Client on the same computer. After creating the initial Master Security Officer,
create an encryption rule that encrypts the password log file, generate a profile for the initial
Master Security Officer, and load the profile. The encryption key used should only be available
to Master Security Officers and Security Officers that have the right to create certificates.
Note: If you install both conpal LAN Crypt components, Admin Console and Client application
on the same computer, they must be of the same version.
Running the initial encryption wizard will encrypt the password log file. To ensure that the
password for the initial Master Security Officer was not compromised while the file was not
encrypted, create a new certificate and assign it to the initial Master Security Officer.
Note: If the Security Officer who is assigning certificates has no file system right to change the
password log file, conpal LAN Crypt will not be able to generate certificates.
Click Next.
In the Wizard’s third dialog, specify the period of validity for the certificates generated by conpal
LAN Crypt and assign an existing certificate, or one generated by conpal LAN Crypt, to the
Security Officer.
If you use a certificate generated by conpal LAN Crypt, it is valid for the specified period. All
certificates generated after this one also has this period of validity.
You must select an encryption certificate that will be used to secure the Security Officer’s data.
Alternatively, you can also select a signature certificate that the Security Officer can use to
authenticate themselves to conpal LAN Crypt Administration. If you do not specify a signature
certificate, the encryption certificate will also be used as a means of authentication.
Click the Browse... button to select an existing certificate or to have conpal LAN Crypt gener-
ate a new one. In the next dialog, click New Certificate. Select the new certificate from the list
and click OK.
Note: If you want to use an existing certificate, this certificate must be available. If you are
using a software certificate, it must be loaded into the certificate store. If the certificate is saved
on a token, the token must be attached to the system. To import a certificate, click Import
Certificate.
Click Next.
In the wizard’s fourth dialog you can enter a region with the appropriate prefix. When conpal
LAN Crypt generates the key, it attaches this prefix at the beginning of the key name. It always
uses the prefix of the region assigned to the Security Officer who generated the key. This prefix
makes it clear which administrative unit the key is to be used for. In the Central Settings for
the Administration Console, you can create additional regions and then assign them to the
different Security Officers. This procedure is particularly useful in distributed environments.
You must specify a location. In distributed databases the location is used to clearly assign
logged events within conpal LAN Crypt database logging.
You must specify the location even if you are not using a distributed database. This ensures
that the entries can be clearly assigned when the database is distributed at a later point in
time.
When you click Finish conpal LAN Crypt creates the Initial Master Security Officer and displays
the logon dialog for conpal LAN Crypt Administration.
Later, all Security Officers that have the right to log on to the conpal LAN Crypt Administration
database will be displayed in this dialog.
In this dialog, select the newly-created Master Security Officer and click OK. conpal LAN Crypt
Administration Console opens.
Note: After you log on, a dialog appears to tell you that a recovery Key has not yet been gener-
ated. If you do not have a recovery key, there is the risk that all your administrative data and all
encrypted data will be lost in case of an emergency (for example if you lose a certificate).
This dialog appears every time a Master Security Officer logs on until a recovery key has been
generated. If you activate the Don’t warn me again option you can prevent this dialog from
appearing even if no recovery key has been generated. To avoid possible data loss, you
should generate a recovery key.
When conpal LAN Crypt is installed, the SGLCAdmin.msc file is saved to the conpal LAN
Crypt installation folder. Click this entry, via the Windows Start menu (Start/conpal/Administra-
tion) to open a window in the Management Console that displays only those snap-ins required
for the conpal LAN Crypt Administration Console.
You can also add the snap-in for the conpal LAN Crypt Administration Console to the Manage-
ment Console’s normal view (File\Add/Remove Snap-In - conpal LAN Crypt Administration).
Even when you add the snap-in you still need the password for the conpal LAN Crypt admin-
istration database.
Who is logged on?
The status bar shows which Security Officer is currently logged on. You can also see whether
they are a Master Security Officer or a Security Officer.
Many of conpal LAN Crypt’s functions appear as icons in the Administration Console Tool
bar. The function and number of icons in the tool bar depend on which tab is selected at any
particular time.
You can also select all the functions that appear as these icons from the relevant context menu.
Right-click the conpal LAN Crypt Administration tab to display the node’s properties and
modify them if required. You will find a description of these properties in the following sections.
In the conpal LAN Crypt Administration Console you can specify actions that are required to
be confirmed prior to execution. To do this, click Properties in the context menu for the con-
pal LAN Crypt Administration root node.
The following dialog displays these actions:
If you select an action, you must confirm that you want to perform it before it is carried out.
The action is not carried out until you have confirmed it.
You can make this setting for the following actions:
◼ Confirm creating group reference
Creating a reference to an existing group has to be confirmed. Select group > right
mouse button > copy > select other group > right mouse button > paste > confirmation
Note: All Copy, Cut and Paste operations can either be done by using the context menu or
by using the Drag & Drop or Drag & Drop + CTRL functionality.
◼ Confirm move group to other group
Moving of a group to a different group has to be confirmed.
◼ Confirm delete group from database
Deleting of a group has to be confirmed.
◼ Confirm remove shortcut from group
Deleting of a group reference has to be confirmed.
◼ Confirm remove all shortcuts from group
If there is a reference to a group in a different group, e.g. in group1 and group2 there is
a link to group3, deleting this reference has to be confirmed (select group3 > right-hand
mouse button > select Remove Links).
◼ Confirm remove keys from group
Deleting of keys, which was used in an encryption rule and have been deactivated after-
wards, has to be confirmed. Used keys are marked in the Administration and reside in
the database also if they have been removed from a group. Keys which have not been
used yet, will also be deleted from the database if they are removed from a group.
◼ Confirm attaching key to group
Keys which were used in an encryption rule and have been removed from all groups
reside in the database and are displayed under the node Central Settings / All LAN
Crypt Keys. From there they can be re-assigned to a group via Drag & Drop. This action
has to be confirmed.
◼ Confirm creating key reference in group
Inserting a link to a key in a group (e.g. by dragging and dropping it from one group to a
different group) has to be confirmed. Keys are always copied or a link to them is inserted.
Cutting keys is not possible.
◼ Confirm remove key reference from group
Removing a link to a key from a group has to be confirmed.
Which Security Officer is logged on?
This dialog also shows which Security Officer is currently logged on. The Security Of-
ficer’s name is displayed at the bottom of the dialog. The status bar of the conpal LAN
Crypt Administration also shows which Security Officer is currently logged on.
The User Settings tab is where you can influence how information is displayed in conpal LAN
Crypt Administration.
Activate
◼ Add domain name to each group name, to display the relationship between conpal LAN
Crypt groups and domains in conpal LAN Crypt Administration. This option is especially
useful if conpal LAN Crypt is to be used for several different domains.
◼ Show Selected users and certificates, to display all users (and their certificates) that
have been imported into conpal LAN Crypt under the Central Settings node.
Note: You should be aware that it will take several minutes to display all the users and
certificates in larger installations. You must then restart conpal LAN Crypt Administration
so that the changes you made in the Show Selected users and certificates option be-
come effective.
◼ Show parents of users, to display a particular user’s parent group under the node Mem-
bers and certificates for group. This enables you to see at a glance whether the conpal
LAN Crypt database contains any users that are not assigned to any group. You must
then restart conpal LAN Crypt Administration so that the changes you made in the Dis-
play user parent option become effective.
◼ Disable caching of user lists
To improve performance, conpal LAN Crypt usually creates user lists in the background
and also continues creating them when a user toggles to a different node in Administra-
tion. The results of these lists are buffered so that no database access is required when
the list is called again. This saves a lot of time if large lists are involved.
However, in environments with several parallel conpal LAN Crypt administrators (termi-
nal servers), this may sometimes lead to increased memory requirements. To prevent
this, simply activate this option. As a result, the lists are not buffered and the list will not
continue being created when the user leaves the node or changes to a different one. We
recommend you only use this option if you are actually experiencing problems with
memory capacity.
Changes to the database made in the same session are not automatically transferred to
a list.
You can update the changes at any time by pressing F5.
Note: Any changes to settings mentioned above are not stored in the database. They are
personal settings which are saved for every user in the Microsoft Management Console
snap-in.

In the Central Settings node, you can define different properties for conpal LAN Crypt Administra-
tion, centrally.
To do so, click Properties in the context menu for the Central Settings node. Alternatively,
select this and click the “Properties” icon in the conpal LAN Crypt Administration Tool bar. You
can then view these properties in a number of tabs and modify them if necessary.
Note: The Additional Authorization tab, the Recovery Key tab and the Regions tab can only be
displayed by Master Security Officers. The Server tab and the Configuration tab can only be dis-
played by Security Officers who do have the global permission Change Configuration. The global
permission Change Configuration is also required for changing the paths on the Directories tab.
Only Master Security Officers can make changes in the Algorithm tab, the Certificates tab and
the Resolving rules tab.
conpal LAN Crypt has these encryption algorithms:
◼ AES-128
◼ AES-256
◼ 3DES (not recommended)
◼ DES (not recommended)
◼ IDEA (not recommended)
◼ XOR (not recommended)
Select the algorithms you want to use. The algorithms you select here can be used later on
when you generate different keys.
Note: If these settings are changed later (for example, if 3DES is removed from the list of
available algorithms), none of the keys that have already been generated or the data encrypted
with them is affected. If an algorithm is affected it is simply not available when you generate a
new key later on. If you select algorithms that are no longer considered secure, you will receive
a corresponding security notice. You can still choose these algorithms.
Default algorithm
Here you select which default algorithm is to be used to automatically generate user and group
keys. AES with either 256 or alternatively 128-bit key length is recommended as the standard
algorithm because it offers the highest security.
Problems with duplicated internal key names may occur when several conpal LAN Crypt in-
stallations are combined into one, for example due to a company or departmental merger.
For this reason, every key is identified by its own Global Unique ID (GUID). The GUID is usually
generated randomly by conpal LAN Crypt and cannot be changed afterwards.
However, if files that have been encrypted with conpal LAN Crypt are to be exchanged between
two companies, you will need a method that allows you to generate a common key.
This is the only way of ensuring that a file encrypted with, for example, the CRYPTOKEY key from
company “A” can be decrypted by company “B”. Before this can happen, company “B” must also
generate a key called CRYPTOKEY which has the same settings as the key from company “A”.
This also affects the GUID of the key and the encryption algorithm.
To handle this situation, conpal LAN Crypt has an option which allows you to enter the GUID
manually when you generate a new key. To enable this, simply activate the Allow Security
Officers to define the GUID for newly created keys (default is a random GUID) option.
Key value
By activating the option Allow Security Officers to define the GUID for newly created keys
(default is a random GUID) you can ensure that only Security Officers who have the global
permissions Create Keys and Create Profiles can generate keys (name and value). If the Se-
curity Officer does not assign a value to the key when creating it, the value will be generated
automatically when the key is saved.
If this option is active, Security Officers who do not have the Create Profiles right cannot gen-
erate keys.
The use of group keys (<GROUPKEY>) in encryption rules also is not possible for these se-
curity officers.
For group keys, whose values are generated when policy files are generated, the values are
also generated immediately when they are used to create an encryption rule.
Note: The option Allow Security Officers to define the GUID for newly created keys (de-
fault is a random GUID) does not affect the use of user-specific keys (<USERKEY>) in encryption
rules!
Note: In principle, conpal LAN Crypt also offers the option of creating keys without a value.
Such keys can be used in the administration without restrictions. However, this can cause
problems with distributed databases. An example of the use of a reference to a key would be
if policy files are generated in a replication time window at different locations that contain keys
without a value (manually created keys without a value, group key <GROUPKEY>). When
generating the policy files, a separate value for the key would consequently be generated at
each location. The result would be a key with two different values.

Here you can specify key length (1024, 2048, 4096 Bit) and validity for new certificates gener-
ated by conpal LAN Crypt.
Under Friendly name for newly created certificates, you can specify a name for certificates
created by conpal LAN Crypt. All certificates get this name and can therefore easily be identi-
fied as conpal LAN Crypt certificates.
If you activate the Add critical extensions to newly created certificates option, a critical
extension that indicates to other applications that they must not use these certificates, is added
to newly created certificates.
You can also specify a warning period, in days, within which the system displays a warning (if
the rules are canceled, or by marking certificates yellow in the list). For example, if you enter
30 days here, a warning message is displayed approximately one month before the certificate
expires that the certificate will soon no longer be valid and must be renewed.
Select this option if you want the system to ignore users to whom no certificate has been
assigned, when generating policy files. As a result, no policy files are generated for these
users.
Note: If a user is created, and this option is selected, and no certificate has yet been assigned
to the user, the system does not display a warning if it is unable to create policy files for this
user when resolving (applying) the encryption rules.
Note: This setting is only applied to clients of version 3.90 or higher. conpal recommends
choosing sort method 2. This guarantees the highest possible compatibility with other settings.
Here you can choose from three different sort methods. Sort method 3 is the default method
which is used by Client versions below 3.90. The sort method could not be changed in LAN
Crypt in previous versions and corresponded to sort method 3. Sort method 3 is therefore
considered the default sort method. The following sort methods can be set:
◼ Sort method 1
1. Ignore rules
2. Exclude rules
3. Encryption rules
◼ Sort method 2 (recommended only for new installations)
1. Ignore rules
2. Exclude rules
3. Encryption rules specified as absolute paths without wildcards
4. Encryption rules specified as absolute paths with wildcards not including sub-folders
5. Encryption rules specified as absolute paths with wildcards including sub-folders
6. All other encryption rules
An absolute path is either a UNC path (begins with double backslash) or <drive letter>:\
Examples of how to use a reference to a key:
\\server\share\*.* or
c:\confidential\*.*
◼ Sort method 3 (default)
Sort method 3 does not distinguish between ignore, exclude and encryption rules.
The rules are sorted in the following order:
1. All absolute paths without wildcards
2. All absolute paths with wildcards not including sub-folders
3. All absolute paths with wildcards including sub-folders
4. All other rules
Within one of the above sections (for example: Sort method 3 - All other rules), the rules
are ordered depending on how precise the path definition is.
The order is as follows:
1. UNC paths.
2. Paths starting with <drive letter>: Here the backslash after the drive letter is not con-
sidered.
3. All other paths.
Additionally:
- Paths with more backslashes are listed before paths with fewer backslashes.
- Paths without wildcards are listed before paths with *. and *.* wildcards.
Note: Changes to this option become effective on the clients after new profiles have
been generated and distributed.
Select which encryption format should be used by the conpal LAN Crypt Client
Here you can configure which file encryption mode is used by the clients. conpal LAN Crypt
supports the following encryption modes:
◼ CBC format (versions 3.50 or higher)
This format is used by client versions 3.50 and higher. These clients can read files en-
crypted in OFB mode (legacy format). The file encryption mode for new files is CBC.
◼ XTS-AES format (versions 3.90 or higher)
This format can be used by client versions 3.90 and higher. These clients can read files
encrypted in OFB and CBC mode. File encryption mode for new files is XTS-AES. This
mode will only be used for AES keys. If a file is encrypted with a key using another
algorithm, CBC encryption mode is used instead.
For client versions below 3.90 only the following configuration is valid:
CBC format for encryption with the optional usage of Legacy format as „old encryption format”.
All other settings are ignored by these clients. They use CBC or Legacy format by default.
Use this encryption file format until a defined date
During an upgrade process an old encryption mode can be configured. This old encryption
mode is active until a specified date. Starting with this date all clients must be migrated to
support the configured file encryption mode. Otherwise, new clients create encrypted files us-
ing the configured mode, but these files cannot be read by older clients.
Depending on the setting for the encryption format to be used, the following formats can be
selected here:
◼ Legacy format (versions 2.x, 3.0x, 3.1x)
◼ CBC format (version 3.50 or higher) is only available if XTS-AES is configured as en-
cryption file format.
CBC requires a client version 3.50 or higher. Older clients evaluate the Use this encryp-
tion file format until a defined date setting only, if Legacy format is selected.
You must specify the date until which the old format is used to encrypt files. After this
date, or if the option is cleared, the files are written with the new encryption format. Any
changes to this option are only effective on the clients after new profiles have been gen-
erated and distributed.
After all clients have been updated, we recommend that you perform initial encryption
with the initial encryption tool. You thereby ensure that only the new conpal LAN Crypt
encryption format is used.
This change becomes effective the next time the encryption rules are resolved.
Note: In general, conpal recommends encode all files that are still encrypted with the obsolete
OFB encryption mode to (AES) XTS using the initial encryption.
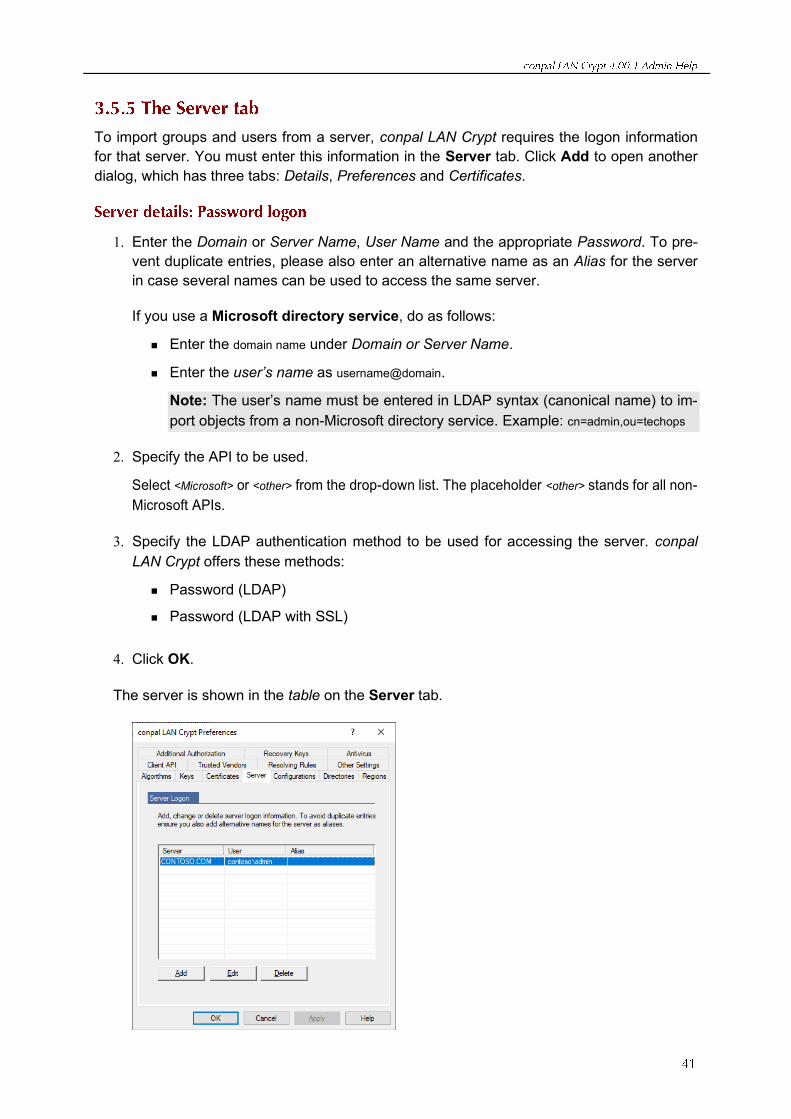
To import groups and users from a server, conpal LAN Crypt requires the logon information
for that server. You must enter this information in the Server tab. Click Add to open another
dialog, which has three tabs: Details, Preferences and Certificates.
1. Enter the Domain or Server Name, User Name and the appropriate Password. To pre-
vent duplicate entries, please also enter an alternative name as an Alias for the server
in case several names can be used to access the same server.
If you use a Microsoft directory service, do as follows:
◼ Enter the domain name under Domain or Server Name.
◼ Enter the user’s name as username@domain.
Note: The user’s name must be entered in LDAP syntax (canonical name) to im-
port objects from a non-Microsoft directory service. Example: cn=admin,ou=techops
2. Specify the API to be used.
Select <Microsoft> or <other> from the drop-down list. The placeholder <other> stands for all non-
Microsoft APIs.
3. Specify the LDAP authentication method to be used for accessing the server. conpal
LAN Crypt offers these methods:
◼ Password (LDAP)
◼ Password (LDAP with SSL)
4. Click OK.
The server is shown in the table on the Server tab.
If conpal LAN Crypt cannot perform the logon to the server successfully, an error message will
be displayed in the conpal LAN Crypt Administration.
1. Enter the Server Name. To prevent duplicate entries, please also enter an alternative
name as an Alias for the server in case several names can be used to access the same
server.
2. Specify the API to be used.
Select <Microsoft> or <other> from the drop-down list. The placeholder <other> stands for all non-
Microsoft APIs.
3. Specify the LDAP authentication method to be used for accessing the server. conpal
LAN Crypt offers these methods for anonymous logon:
◼ Anonymous (LDAP)
◼ Anonymous (LDAP with SSL)
4. Click OK.
The server is shown in the table on the Server tab.
If conpal LAN Crypt cannot perform the logon to the server successfully, an error message will
be displayed in the conpal LAN Crypt Administration.
Identification of an Object
conpal LAN Crypt uses a precise, unchanging GUID (Global Unique ID) to identify imported
objects in the Active Directory. This GUID is also used to synchronize the database and direc-
tory service, because, for example, the names of individual single objects can change, to en-
sure that updates in the Active Directory are mirrored in the database, and that no new object
is generated in the database because of a new name in the Active Directory.
However, some other directory services do not use this type of ID. In this case conpal LAN
Crypt provides another way of unambiguously identifying objects. conpal LAN Crypt can be
configured so that certain LDAP attributes are used to uniquely identify the objects. You con-
figure these attributes in conpal LAN Crypt Administration.
The settings <default> and <other> are always available. Usually, the <default> setting will be
sufficient for the server, to which the setting refers. The attributes evaluated by the <standard>
setting always appear below <default>. In this way you can show which attributes are evalu-
ated in the default setting. You can also assign a specific attribute if all these attributes are

already present in the directory service concerned. Use <other> to specify an attribute other
than those that are already displayed.
Caution: If you enter an attribute here, make sure that it contains data that will unambiguously
identify the object.
◼ Object GUID
Here you specify which attribute is used for identification. If you leave the setting at
<standard>, both attributes, GUID and objectGUID are evaluated.
If you want to use another LDAP attribute to identify the objects, select <other> under
objectGUID and enter the name of the LDAP attribute in the entry field beside it. This at-
tribute must contain data that will unambiguously identify the object.
◼ GUID attribute has a binary value
This option only affects how the GUID appears in the object Properties dialogs. To dis-
play these correctly, activate this option if the GUID you use has a binary value. If you
are not sure what to do, activate this option.
◼ Username Attribute
This setting only affects how users are displayed in the conpal LAN Crypt Administration
Console. The users are displayed in a group’s Properties dialog and in the User and
Certificates snap-in.
You can select one of the existing attributes or enter an LDAP attribute by selecting
<other>. <default> evaluates (CN and SN).
◼ Logonname attribute
Special meaning that is attached to the attribute for the logon name. conpal LAN Crypt
names the policy files after the user logon name. A user can only logon if their logon
name and policy file name are identical.
Here you can specify, which LDAP attribute is used to define the user’s logon name.
<default> evaluates SAMAccountName, userPrincipalName and UID. If two or three of these at-
tributes are already present in the directory service, you can select the one which de-
fines the user’s logon name.
Select <other> to specify another directory service attribute that contains the logon name.
Note: If the name in the attribute contains the @character, conpal LAN Crypt cuts off the
name at this point. This may cause problems, for example, if e-mail addresses are used.
◼ Attribute for E-Mail Address
This attribute is added to self-generated certificates.
◼ Attribute for comment
Like the e-mail address, this attribute can be used to identify user objects. This is espe-
cially useful if the user’s name and the logon name cannot be used by the wizard to
identify objects when certificates are being assigned. At this point you can enter the
name of the attribute that the wizard is to use to identify the correct user when certificates
are being assigned.
Note: If empty attributes are imported during synchronization (for example due to the fact
that an attribute was deleted in the AD), conpal LAN Crypt comments are not affected. Exist-
ing entries are maintained. New attribute contents overwrite existing comments.
If you select <default>, comments are not imported.
◼ Certificates
On the Certificates tab, specify whether the certificates that were assigned to the user
in the LDAP directory, are to be transferred when the user is imported into the conpal
LAN Crypt database.
You do not have to assign certificates to these users in the conpal LAN Crypt Admin-
istration Console anymore. Here you can also specify an attribute which contains the
user’s certificate.
Note: Certificates assigned this way are not checked (expiration time, on a CRL, etc.)!
Activate the
Automatically assign certificates while importing users
option, if certificates from the LDAP directory are to be automatically imported and as-
signed to the user when they are imported to the conpal LAN Crypt database.
<default> evaluates userCertificate and userCertificate;binary.
Click <other> to specify another attribute that contains the certificate.
When you click OK conpal LAN Crypt transfers the logon information to the servers list.
You can also edit or delete these details in this list.
Note: The settings you make here are always saved in the current configuration record for the
Security Officer. If no configuration records have yet been created, the system uses the
<DEFAULT CONFIGURATION> configuration record.
Note: In the Central Settings node on the Directories tab, environment variables such as
%LOGONSERVER% etc. cannot be used for path specifications.
You must specify where the policy files generated for the users are to be saved.
Enter the storage location (usually a network drive that has been shared with the user) in the
input field.
Note: Check that the user can access this folder, as the generated (policy) files are loaded or
copied from it when the user logs on.
Note: You must also specify the storage location for the policy files from the client’s point of
view. You will find this setting under the conpal LAN Crypt Configuration (see “Policy file
Client Location” on page 150.
If you use different conpal Client versions, you have to make sure that all of your conpal Clients
can read the generated policy files.
Note: As of version 4, conpal LAN Crypt no longer supports older policy file formats (such as
“*.pol.bz2” or “*.pol”). If you are using older client versions of LAN Crypt, you may have to
upgrade to version 3.97 before installing version 4. The current format of the policy files is
“*.xml.bz2”. This format is supported by LAN Crypt from version 3.90. The format for policy
files is predefined and cannot be changed from version 4.
If you activate this option, conpal LAN Crypt generates two policy files for each user. One file
has the Novell logon name and the other has the Windows user name. The contents of these
files are identical.
Using the Novell logon name must also be specified in LAN Crypt Configuration/Client Settings
before you can use it to log on.
Note: This function is no longer supported by conpal LAN Crypt Version 4.
conpal LAN Crypt can generate self-signed certificates (*.p12 key files) and assign them to the
users if required. These certificates are created and assigned in the Admin Console via the
node Selected users and certificates. Alternatively, this feature is also available through the
Groups / Members and Certificates of Group nodes.
Note: If the node Selected users and certificates is not displayed in the Admin Console,
check under the node conpal LAN Crypt Administration, after clicking Properties in the con-
text menu, whether the option Show "Selected users and certificates" is displayed in the User
Settings tab is activated.
The path where these files should be stored must be specified in the Admin Console in the
Central Settings node on the Directories tab. The clients receive this access path either via
a setting in the conpal LAN Crypt group policy (“Keyfile Client Location”) or via an entry in the
registry, for example via a registry file.
The conpal LAN Crypt Client first searches for a matching certificate in the local certificate
store of the computer, then (if none was found) in the path defined by GPO or via the registry
setting. Also, the public part of the Security Officer certificate (*.cer), is stored by the admin
console in this path (GPO setting "Security Officer Certificate Client Location").
So that conpal LAN Crypt automatically recognizes the user key files, the file names must
match the user’s logon name ("Logonname.p12").
When conpal LAN Crypt finds the correct file, it displays a PIN dialog. You must send a PIN
letter to tell the user this PIN (which is in the password log file). The certificate and associated
key are automatically imported after the user enters the PIN.
If conpal LAN Crypt finds a *.cer file that contains the public part of the Security Officer’s cer-
tificate, it automatically imports it.
Alternatively, you can distribute the key files for the users and the public part of the Security
Officer certificate manually. If you do this, make sure that the clients import both of them.
Note: The clients have to import the public part of the certificate of the particular Security
Officer who generated the policy files. If you change the path on which the “*.cer” files of the
Security Officers and the “*.p12” files of the users are stored, after you have created Security
Officers, you must copy their “*.cer” files to the new location. Otherwise, the public parts of the
Security Officers certificates will not be found.
In conpal LAN Crypt you can define a uniform password for all user key files.
To do this, copy a file that contains the password you want (up to 32 characters) to the same
directory that contains the password log file (see “Logfile for passwords of keyfiles” on next
page).
The file containing the password has to have the same name as the corresponding password
log file (default name: p12pwlog.csv) but has to have the file extension “*.pwd” (similar to the
default name of the password log file: p12pwlog.pwd). If the system finds this type of file, all
generated user key files will have this password.
Note: If you are using a "Default password for user key files", there must not be multiple key files
(".p12") of the same user in the storage location for generated certificates and key files (.p12).
In this file, if you enter *logonname* as the keyword, instead of the default password, the current
logon name will be used as the password.
Note: “*.p12” files for Security Officers are ALWAYS given a random password because they
have higher security.
conpal LAN Crypt stores Security Officer certificates in “*.p12” files, for example, as backups.
Here you can specify the folder to which they are saved.
Note: Because they involve sensitive data it is vital that you protect them against unauthorized access!
Here you can specify the storage location and name for the log file for the generated PKCS#12
files (default name: p12pwlog.csv). This file contains the passwords for the generated
PKCS#12 files and can be used, for example, to create a PIN letter.
The password log file contains the following information (the keywords in brackets represent
the column headers in the “*.csv” file):
◼ Date of generation (CreateDate)
◼ Time of generation (CreateTime)
◼ Expiration Date (ExpirationDate)
◼ Exact time when validity ends (ExpirationTime)
◼ User name (Name)
◼ Logon name (Logonname)
◼ E-mail address (EMail)
◼ Generation mode (Mode). Possible values are:
<GUI>- certificate was generated in the user’s Properties dialog.
<SO>- certificate of a Security Officer. Was generated when the Security Officer was created.
<WIZARD>- certificate was generated using the Certificate Assignment Wizard.
◼ File name (FileName)
◼ Password (Password)
Note: You should protect this file and under no circumstances save it in the same folder as the
policy files.
Note: If the Security Officer who is assigning certificates has no file system right to change the
password log file, conpal LAN Crypt will not be able to generate certificates.
In conpal LAN Crypt you can set up regions to make key administration easier and less com-
plex. Each region is assigned to a specific Security Officer who is then responsible for it. When
this Security Officer generates keys, the system automatically adds the prefix for this region at
the beginning of the key names. As a result, you can always see the administrative unit for
which each key was generated. This approach is particularly useful in distributed environ-
ments.
You can define regions by clicking Properties on the context menu of the Central Settings
node in the Regions tab. The regions displayed here can be assigned to the Security Officers
when they are created. You can define a new region by clicking Add. In the Name for the region
input field, enter an appropriate name (e.g. New York) for the region in question and in the
Prefix for this region input field, enter the corresponding prefix for the region (e.g. NY). By
clicking on the OK button, the new region is added to the list of existing regions.
To change or delete an existing region, select it and then click Edit or Delete.
Note: You can only delete a region if it is not assigned to a Security Officer.
Using the Configurations tab in the Central Settings node, individual configuration sets can
be created for each region. A configuration set defined in this way is then only valid for the
respective region. The administration of individual regions can be done by selected Security
Officers, if you assign them to the respective region.
The configuration records contain all the details that can be entered on the Directories tab:
◼ the storage location for generated policy files
◼ the storage location for generated certificates and user key files
◼ the storage location for generated Security Officer key files
◼ the storage location and name of the password log file
◼ the options for the policy files
The configuration records are always assigned to an existing region. Usually, a Security Officer
assigned to a region can only ever use the configuration records that have been generated for
this region. The exception is the <DEFAULT CONFIGURATION> configuration record, which can
be used in every region.
By using one particular configuration for one organizational unit (region) you easily ensure that
the correct paths can be set for one or more Security Officers, and that all Security Officers
always use the same paths to save the generated files (e.g., certificates, policy files, password
log file).
Changes on the Directories tab are always saved in the currently-assigned configuration record.
Note: The global permission Change Configuration specifies whether a Security Officer is per-
mitted to change their own configuration settings. If a Security Officer does not have this right,
they can only use the selected paths.
If a Security Officer changes an existing configuration record, they also change the configura-
tion for all the Security Officers who are also assigned to this configuration!
To generate a configuration record, proceed as follows:
1. Select an existing region, for which you want to create the configuration record, or
select <no region> to create a configuration record to which Security Officers who are
not in a region can be assigned.
2. In New Name enter a name for the new configuration record (e.g. New York).
3. Select an existing configuration record in the list.
The system copies this configuration record and saves it with the new name. Click
Copy.
4. If you want to edit the configuration record, select it and click Edit.
5. You see a dialog which is the same as the Directories dialog in Properties. Here, enter
the appropriate paths and define the policy file options. Click OK.
6. The system now displays the new configuration record in the list, in the appropriate
region, and you can use it to create more Security Officers. To change the configura-
tion (and the region) of an existing configuration record, select the Properties tab for
the particular Security Officer.
7. You can create as many additional configuration records as you require.
In conpal LAN Crypt you can define that particular actions require additional authorization by
least one more Security Officer. Additional authorization can be required for the following ac-
tions:
Actions Necessary permissions
Change Additional Authorization
Settings
Can only be performed by a Master Security Officer.
Change Recovery Key Can only be performed by a Master Security Officer.
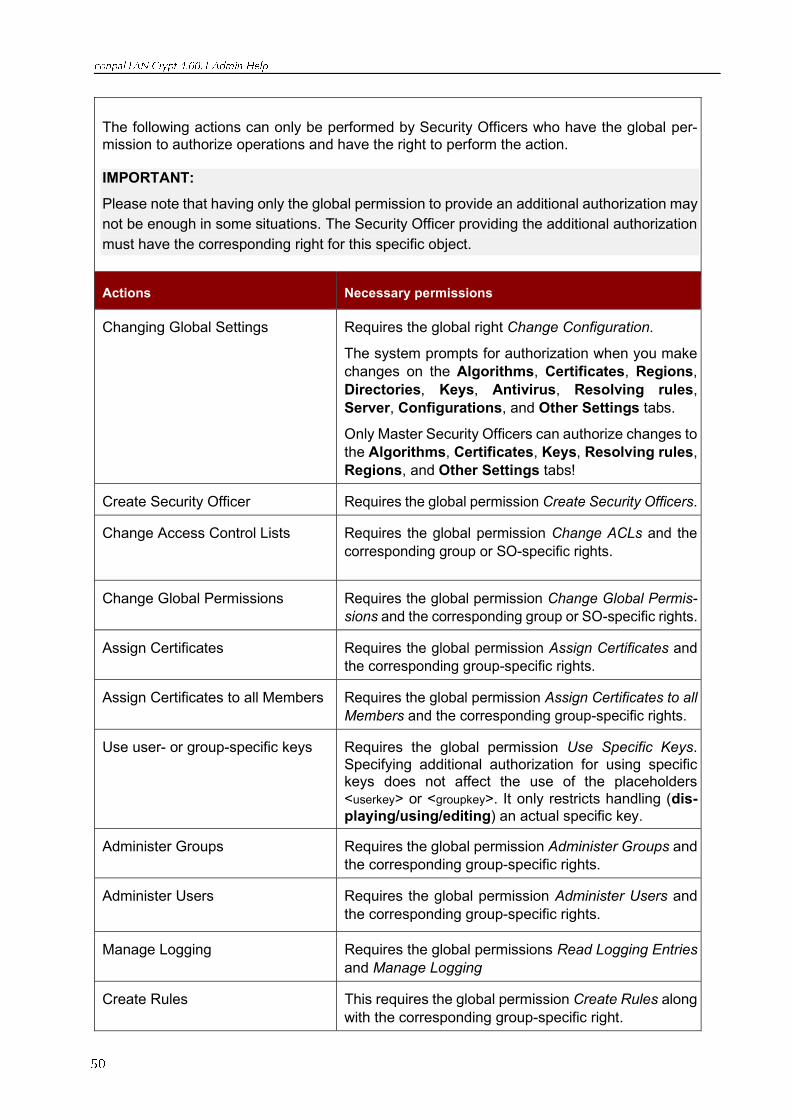
The following actions can only be performed by Security Officers who have the global per-
mission to authorize operations and have the right to perform the action.
IMPORTANT:
Please note that having only the global permission to provide an additional authorization may
not be enough in some situations. The Security Officer providing the additional authorization
must have the corresponding right for this specific object.
Actions Necessary permissions
Changing Global Settings Requires the global right Change Configuration.
The system prompts for authorization when you make
changes on the Algorithms, Certificates, Regions,
Directories, Keys, Antivirus, Resolving rules,
Server, Configurations, and Other Settings tabs.
Only Master Security Officers can authorize changes to
the Algorithms, Certificates, Keys, Resolving rules,
Regions, and Other Settings tabs!
Create Security Officer Requires the global permission Create Security Officers.
Change Access Control Lists Requires the global permission Change ACLs and the
corresponding group or SO-specific rights.
Change Global Permissions Requires the global permission Change Global Permis-
sions and the corresponding group or SO-specific rights.
Assign Certificates Requires the global permission Assign Certificates and
the corresponding group-specific rights.
Assign Certificates to all Members Requires the global permission Assign Certificates to all
Members and the corresponding group-specific rights.
Use user- or group-specific keys Requires the global permission Use Specific Keys.
Specifying additional authorization for using specific keys does not affect the use of the placeholders
<userkey> or <groupkey>. It only restricts handling (dis-
playing/using/editing) an actual specific key.
Administer Groups Requires the global permission Administer Groups and
the corresponding group-specific rights.
Administer Users Requires the global permission Administer Users and
the corresponding group-specific rights.
Manage Logging Requires the global permissions Read Logging Entries
and Manage Logging
Create Rules This requires the global permission Create Rules along
with the corresponding group-specific right.
Actions Necessary permissions
Create or Move Keys Requires the global permission Create Keys along with
the corresponding group-specific right.
Create Profiles Requires the global permission Create Profiles as well
as the corresponding group-specific permission.
Display Key Value Requires the global permission Read Key. Additional
authorization is required when checking the Display
Key value option in a key ‘s properties dialog.
Note: If additional authorization is to be required for the execution of certain actions, this setting
also applies to the closely related actions.
If an additional authorization is necessary for one of these actions, you must specify how many
Security Officers are required for that action.
To do this, select that action. When you double-click the selected action, a dialog opens in which
you can specify how many Security Officers are required. When you click OK conpal LAN Crypt
updates the list on the Additional Authorization tab within the Central Settings node.
A message is displayed if the system recognizes that the required number of Security Officers
is not available.
Note: The system cannot precisely find out how many Security Officers are actually available.
The number you require may not actually be available even though the message does not
appear. For example, a Security Officer’s rights may have been changed afterwards or a Se-
curity Officer may have been deleted.
Caution: If you are informed that the required Security Officers are not available and you
specify that at least one additional Security Officer is required when defining the number of
required Security Officers and you confirm your setting with OK and close the dialog, the set-
ting will nevertheless be adopted due to technical reasons.
This will lead to a situation where actions requiring additional authorization can no longer be
carried out as the necessary Security Officers are not available. If this setting is specified for
the Change Additional Authorization Settings option, the settings in this dialog can no
longer be modified.
The setting can only be changed by generating a recovery key (see “Waiving additional authori-
zation“ on next page).
A similar situation can be caused by deleting Security Officers as the system does not check
whether the required number of Security Officers for additional authorization is still available
after deleting a Security Officer. conpal LAN Crypt only ensures that a Master Security Officer
exists in the system.
Note: If you do not use tokens for additional authorization, we recommend to set Strong private
key protection to Yes.
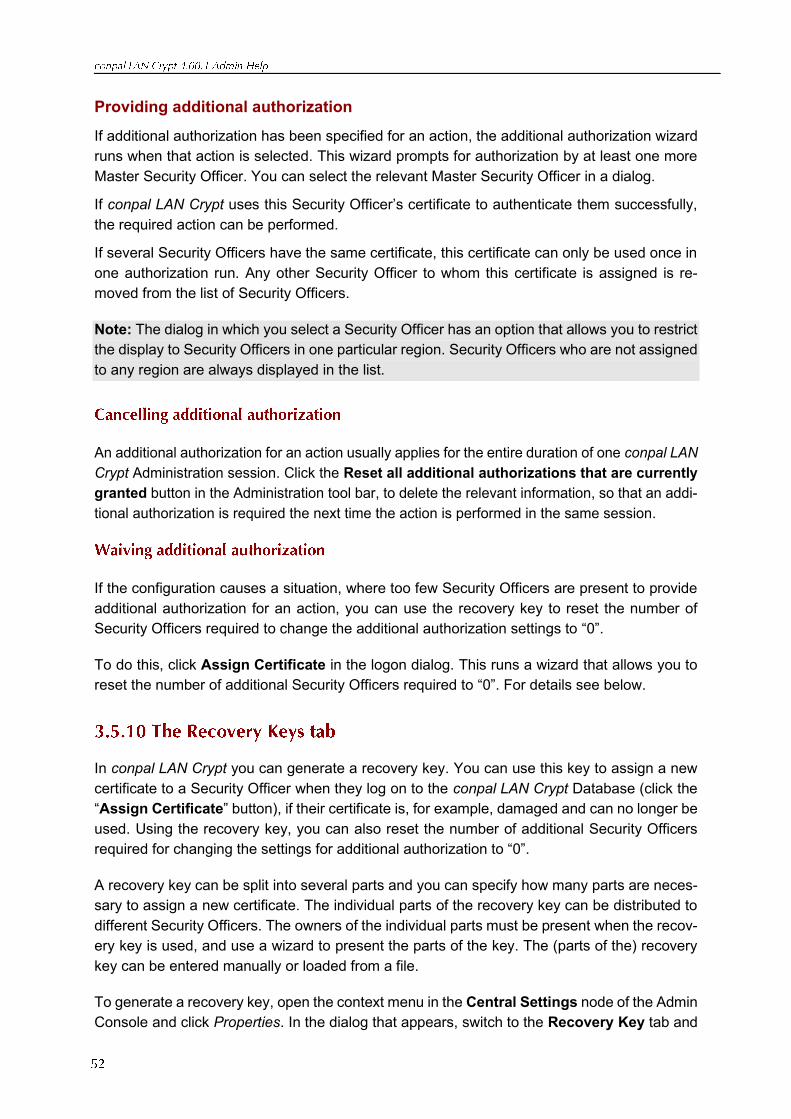
Providing additional authorization
If additional authorization has been specified for an action, the additional authorization wizard
runs when that action is selected. This wizard prompts for authorization by at least one more
Master Security Officer. You can select the relevant Master Security Officer in a dialog.
If conpal LAN Crypt uses this Security Officer’s certificate to authenticate them successfully,
the required action can be performed.
If several Security Officers have the same certificate, this certificate can only be used once in
one authorization run. Any other Security Officer to whom this certificate is assigned is re-
moved from the list of Security Officers.
Note: The dialog in which you select a Security Officer has an option that allows you to restrict
the display to Security Officers in one particular region. Security Officers who are not assigned
to any region are always displayed in the list.
An additional authorization for an action usually applies for the entire duration of one conpal LAN
Crypt Administration session. Click the Reset all additional authorizations that are currently
granted button in the Administration tool bar, to delete the relevant information, so that an addi-
tional authorization is required the next time the action is performed in the same session.
If the configuration causes a situation, where too few Security Officers are present to provide
additional authorization for an action, you can use the recovery key to reset the number of
Security Officers required to change the additional authorization settings to “0”.
To do this, click Assign Certificate in the logon dialog. This runs a wizard that allows you to
reset the number of additional Security Officers required to “0”. For details see below.
In conpal LAN Crypt you can generate a recovery key. You can use this key to assign a new
certificate to a Security Officer when they log on to the conpal LAN Crypt Database (click the
“Assign Certificate” button), if their certificate is, for example, damaged and can no longer be
used. Using the recovery key, you can also reset the number of additional Security Officers
required for changing the settings for additional authorization to “0”.
A recovery key can be split into several parts and you can specify how many parts are neces-
sary to assign a new certificate. The individual parts of the recovery key can be distributed to
different Security Officers. The owners of the individual parts must be present when the recov-
ery key is used, and use a wizard to present the parts of the key. The (parts of the) recovery
key can be entered manually or loaded from a file.
To generate a recovery key, open the context menu in the Central Settings node of the Admin
Console and click Properties. In the dialog that appears, switch to the Recovery Key tab and
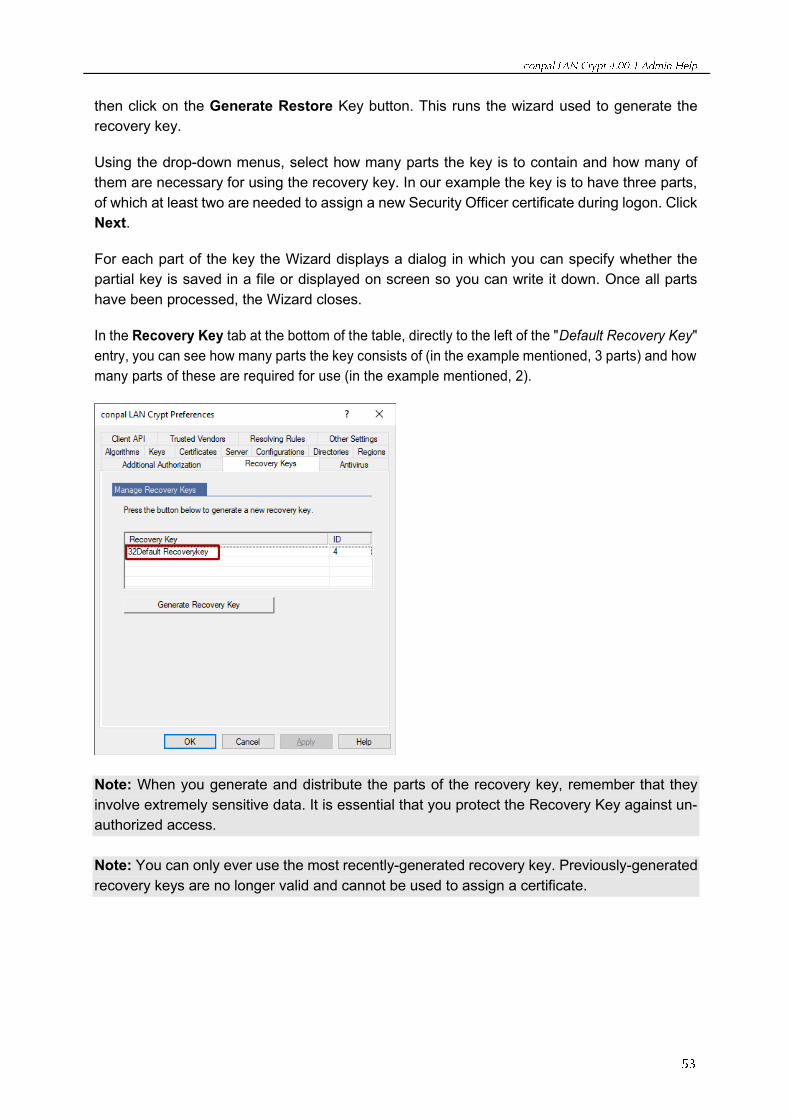
then click on the Generate Restore Key button. This runs the wizard used to generate the
recovery key.
Using the drop-down menus, select how many parts the key is to contain and how many of
them are necessary for using the recovery key. In our example the key is to have three parts,
of which at least two are needed to assign a new Security Officer certificate during logon. Click
Next.
For each part of the key the Wizard displays a dialog in which you can specify whether the
partial key is saved in a file or displayed on screen so you can write it down. Once all parts
have been processed, the Wizard closes.
In the Recovery Key tab at the bottom of the table, directly to the left of the "Default Recovery Key"
entry, you can see how many parts the key consists of (in the example mentioned, 3 parts) and how
many parts of these are required for use (in the example mentioned, 2).
Note: When you generate and distribute the parts of the recovery key, remember that they
involve extremely sensitive data. It is essential that you protect the Recovery Key against un-
authorized access.
Note: You can only ever use the most recently-generated recovery key. Previously-generated
recovery keys are no longer valid and cannot be used to assign a certificate.
If it is no longer possible to log on to the conpal LAN Crypt database (e.g. because a certificate
has expired), click Assign Certificate, in the logon dialog, to start the Recovery Key Wizard.
If a dialog informs you that the certificate cannot be used, after you have selected a Security
Officer, you can start the wizard from there.
Follow the instructions on the screen.
This wizard contains a dialog in which you can reset to “0” the number of Security Officers
needed to change the settings for additional authorization.
This ensures that no situation can arise in which additional authorization is no longer possible
because there are no Security Officers who can perform it.
If you activate this option, a single Security Officer can change the settings for additional au-
thorization afterwards.
Note: This setting is only necessary if you use an Oracle database, which is accessed over
Administration Consoles on different machines. The setting can only be made by a Master
Security Officer!
Oracle’s National Language Support (NLS) converts text for the user so that it is always dis-
played in the same way, no matter which character set is used, even if the characters’ numeric
encoding is different because of the different character sets.
Example: WE8MSWIN1252: ü=FC00, AL16UTF16: ü=7C00.
If text is added to the database and extracted using a different character set, this could lead to
errors when calculating the checksum (MAC), as, for example if characters were converted to
binary, the binary data would cause problems for the MAC.
To avoid these errors, make sure that the same code page / character set is used on all ma-
chines that access the database over the Oracle client.
In the Database tab you can specify a character set, which has to be used on all the machines,
from which the database is accessed. When starting the Administration Console conpal LAN
Crypt checks whether or not the settings of the Oracle client match the settings in the database.
If not, a warning is displayed and the Administration Console will not start up.
In the edit field, enter the character set to be used on the Oracle clients to allow a logon to the
database. On an Oracle client this setting is in the registry under the value NLS_Lang (Lan-
guage.Territory.CharacterSet, example: GERMAN_GERMANY.WE8MSWIN1252).
The character set of the current machine is displayed under INFO: in the Database tab. Usu-
ally this character set must also to be used by all other clients which access the database.
Note: We recommend that you use only one-character set! If you use more than one-character
set, errors may occur when calculating the checksum (MAC). However, in general, it is possible
to use more than one-character set. Despite this, you should only use more than one if the
character sets are largely identical and differ only by a few characters. You should identify
these characters and not use them for database entries!
conpal LAN Crypt allows you to deactivate the character sets check. If the edit field is left blank,
no check is performed and it is always possible to log on to the Administration Console. Please
be aware, that this may lead to errors, when the checksum (MAC) is calculated.
To prevent errors occurring when a character set is specified (for example typing errors), which
may lead to the situation in which the Master Security Officer, who made the setting, can no
longer log on to the Administration Console, conpal LAN Crypt checks the data that was en-
tered when you press Apply or OK. If the specified character set does not match the one
currently used on this machine, a message is appearing and the character set that is currently
valid is added to the edit field. The Database tab remains on the screen, to check the data that
was entered. If necessary, change the settings and press Apply or OK again.
For virus scanners to be able to scan files encrypted with conpal LAN Crypt, you have to spec-
ify the scanners here. The antivirus software entered there is thus explicitly authorized to ac-
cess encrypted files and can recognize virus signatures during the scan process even in conpal
LAN Crypt encrypted files.
To add a virus scanner, click Add. Enter the following data in the dialog displayed:
◼ A name for the antivirus software (this name is displayed on the Antivirus tab under
Product).
◼ The name of the executable file that performs the virus scan.
Enable the Use Authenticode verification option.
Note: We recommend using an Authenticode signed virus scanner by all means to specify the
scanner here and to enable Authenticode verification. Only this verification ensures that the
executable is truly the required executable of the virus scanner and that only trustworthy ap-
plications are given the explicitly desired access to encrypted files.
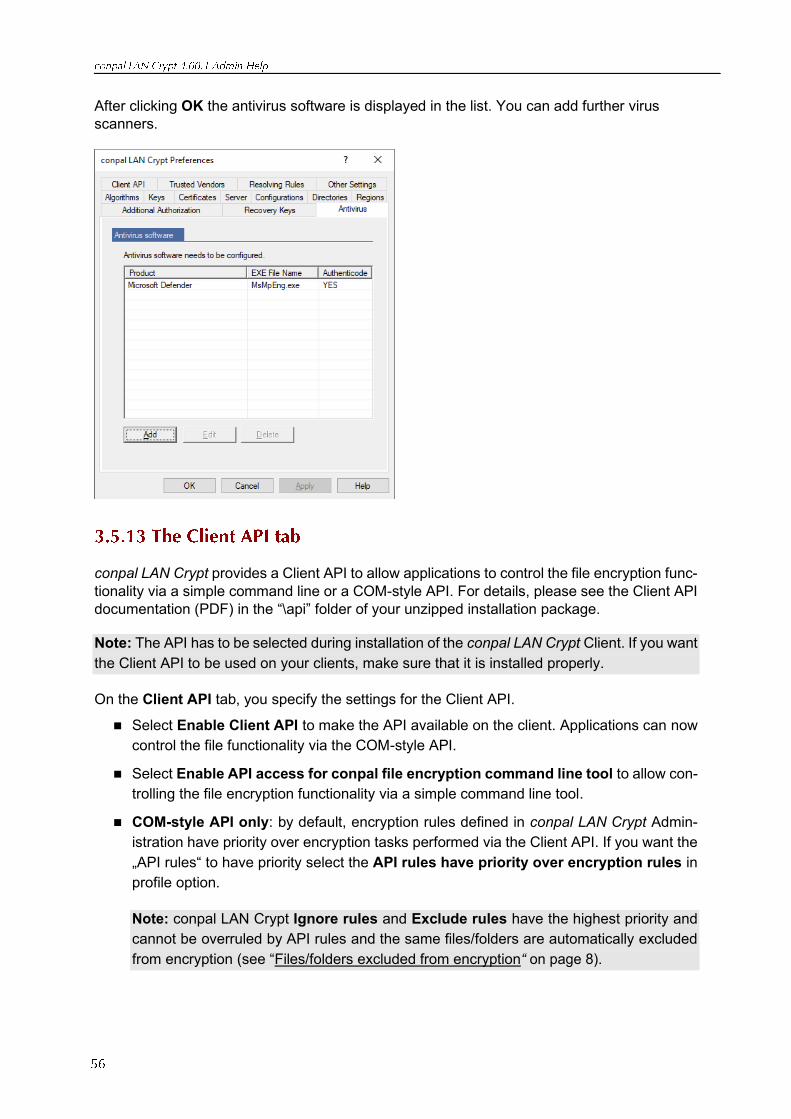
After clicking OK the antivirus software is displayed in the list. You can add further virus
scanners.
conpal LAN Crypt provides a Client API to allow applications to control the file encryption func-
tionality via a simple command line or a COM-style API. For details, please see the Client API
documentation (PDF) in the “\api” folder of your unzipped installation package.
Note: The API has to be selected during installation of the conpal LAN Crypt Client. If you want
the Client API to be used on your clients, make sure that it is installed properly.
On the Client API tab, you specify the settings for the Client API.
◼ Select Enable Client API to make the API available on the client. Applications can now
control the file functionality via the COM-style API.
◼ Select Enable API access for conpal file encryption command line tool to allow con-
trolling the file encryption functionality via a simple command line tool.
◼ COM-style API only: by default, encryption rules defined in conpal LAN Crypt Admin-
istration have priority over encryption tasks performed via the Client API. If you want the
„API rules“ to have priority select the API rules have priority over encryption rules in
profile option.
Note: conpal LAN Crypt Ignore rules and Exclude rules have the highest priority and
cannot be overruled by API rules and the same files/folders are automatically excluded
from encryption (see “Files/folders excluded from encryption“ on page 8).
Since API access is restricted to allowed applications, you have to specify which applications
are allowed to use it. To do so:
1. click Add on the Client API tab.
2. Specify the name of the application which is allowed to use the client API.
3. Specify the executable which is accessing the conpal LAN Crypt Client API.
4. If you want Authenticode signed executables only to access the API select the Execut-
able file must be Authenticode signed option.
5. If you want only executables signed by trusted vendors to be used additionally select the
Executable file must be Authenticode signed by a trusted vendor option. This ensures
that only executables are accepted which are signed using the certificate that is registered
as Signature certificate of a vendor on the Trusted Vendors tab.
6. Optionally enter a comment.
After clicking OK the application is displayed in the list. You can add further applications.
On the Trusted Vendors tab you can register vendors which are accepted to Authenticode
sign an executable to access the Client API.
To add a trusted vendor
1. click Add on the Trusted Vendors tab.
2. Enter the name of the vendor.
3. Enter the vendor ‘s signature certificate.
If selected on the Client API tab the API will only accept executables which are Authen-
ticode signed using this certificate.
4. Optionally enter a comment.
After clicking OK the vendor is displayed in the list. You can add further vendors.
conpal LAN Crypt can be configured to automatically create an ACL with the viewing right for
the root group for a newly created Security Officer. Requirement is that the Security Officer
has the global permission Administer groups or Administer users. This guarantees that the
Security Officer can access (view and/or edit) all groups they are responsible for.
If you select the Set group permissions for security officers who are allowed to adminis-
ter groups or users option, ACLs for the root group are created automatically.
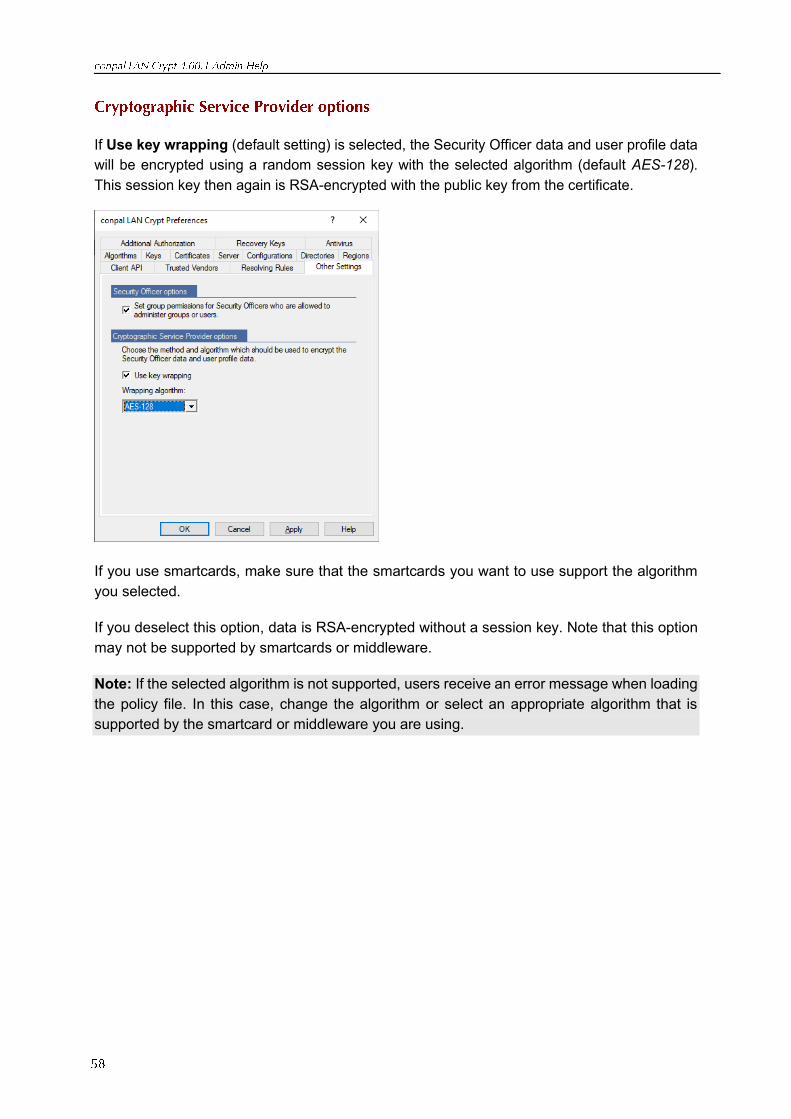
If Use key wrapping (default setting) is selected, the Security Officer data and user profile data
will be encrypted using a random session key with the selected algorithm (default AES-128).
This session key then again is RSA-encrypted with the public key from the certificate.
If you use smartcards, make sure that the smartcards you want to use support the algorithm
you selected.
If you deselect this option, data is RSA-encrypted without a session key. Note that this option
may not be supported by smartcards or middleware.
Note: If the selected algorithm is not supported, users receive an error message when loading
the policy file. In this case, change the algorithm or select an appropriate algorithm that is
supported by the smartcard or middleware you are using.
By selecting the All LAN Crypt keys node you can display an overview of all the keys that are
currently being managed by conpal LAN Crypt. You can view the following information here:
◼ Long key name.
◼ The algorithm used for the key.
◼ Information about whether the key is enabled.
◼ Information about who created the key (Creator).
◼ Information about whether the key should be inherited.
◼ Information about for which group the key was created.
◼ Information about whether the key is in use.
◼ Information about the Comment field.
In the default view, all created keys of the respective groups are displayed. By right-clicking on
the All LAN Crypt keys node, you can use the context menu to change the view of keys in the
right-hand window to view all the specific keys, such as all existing group keys (<GROUPKEY>)
and user keys (<USERKEY>).
Click a column header to sort the table contents in ascending or descending sequence, to find
the information you require.
In addition to sorting key information, you can also search for a particular key. To do this, right-
click All LAN Crypt keys node and then select Find a key from the context menu.
Note: The Find a key function is also available for the Keys for Group node in every group.
To add a key to a group, you also need the right Copy Keys for the group the key is in as well
as the right Create key for the group the key is to be added to.
If a key does not belong to any group, it will not be displayed to a security officer using the
Find a key function. Only a Master Security Officer can assign such a key to a group.
This starts a wizard which will help you find the key you want. In step 1 you can specify whether
you want to search for the key using its GUID or its name. You can use certain SQL placehold-
ers for this.
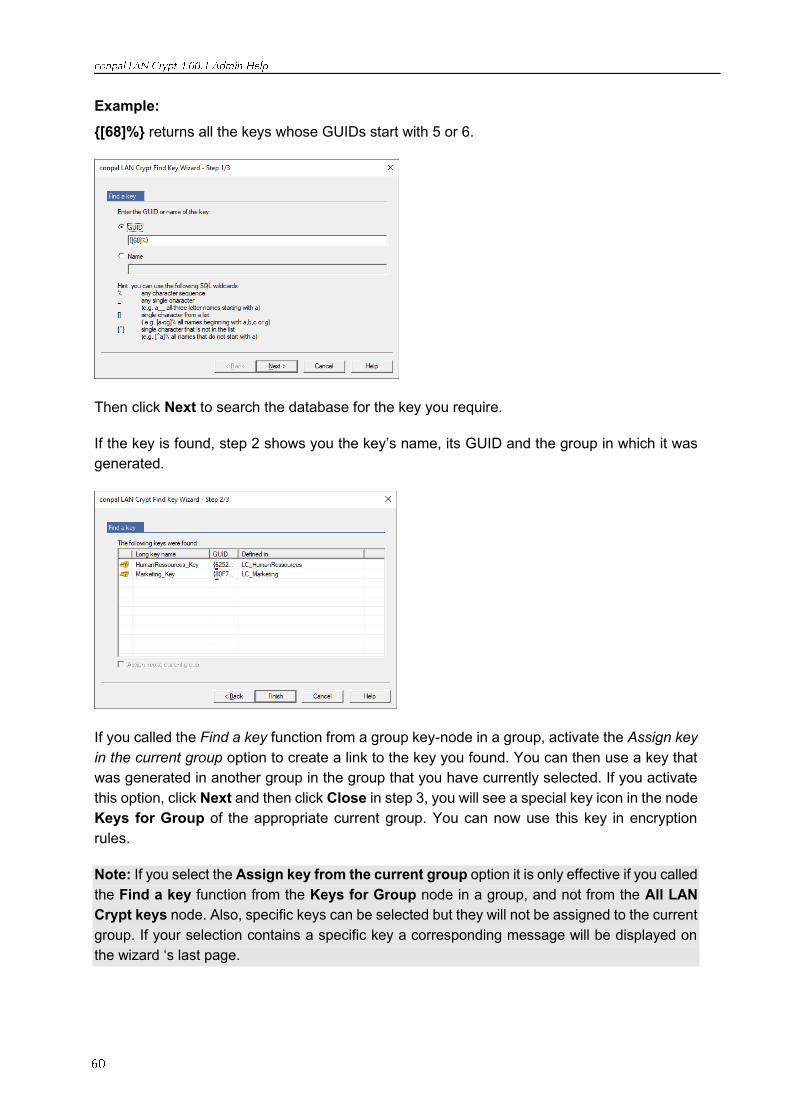
Example:
{[68]%} returns all the keys whose GUIDs start with 5 or 6.
Then click Next to search the database for the key you require.
If the key is found, step 2 shows you the key’s name, its GUID and the group in which it was
generated.
If you called the Find a key function from a group key-node in a group, activate the Assign key
in the current group option to create a link to the key you found. You can then use a key that
was generated in another group in the group that you have currently selected. If you activate
this option, click Next and then click Close in step 3, you will see a special key icon in the node
Keys for Group of the appropriate current group. You can now use this key in encryption
rules.
Note: If you select the Assign key from the current group option it is only effective if you called
the Find a key function from the Keys for Group node in a group, and not from the All LAN
Crypt keys node. Also, specific keys can be selected but they will not be assigned to the current
group. If your selection contains a specific key a corresponding message will be displayed on
the wizard ‘s last page.
The Selected users and certificates node is only available, if the Show “Selected users and
certificates” option is active in the conpal LAN Crypt Administration user settings (see “User
settings” on page 35).
Upon clicking node Selected users and certificates a dialog will be displayed for selecting
the users to be shown. As displaying all users can be very time-consuming, conpal LAN Crypt
allows you to define search criteria to filter the search process.
Note: If the system is set to cache user lists, you have to update the display either via the icon
shown in the toolbar or by pressing F5 first, to be able to enter new search criteria.
Select option Display matching users to activate the input fields for defining your search criteria.
The following user information will be retrieved from the conpal LAN Crypt database:
◼ Logon name
◼ User name
◼ Assignment between user and certificate
◼ Requestor of the certificate
◼ Serial number of the certificate
◼ Date from which the certificate is valid
◼ Date up to which the certificate is valid
◼ Name of the parent group
You can define search criteria based on these attributes. conpal LAN Crypt searches for de-
fined character strings in the user attributes retrieved.
In the first drop-down list, you can select the attribute(s) on which the search process is to be
applied.
In addition, you can define whether the selected attribute should correspond to the character
string entered (should be) or if only users are to be displayed, for whom the selected attribute
does not correspond to the character string entered (must not be).
In the drop-down list on the right-hand side, you can enter the character string conpal LAN
Crypt searches for in the defined attribute.

You can use the following SQL wildcards for entering the character string:
% any character sequence
_ single character
(e.g. a__ means search for all names containing three characters and starting with “a”)
[ ] single character from a list
(e.g. [a-cg]% means search for all names starting with “a”, “b”, “c” or “g”)
[^] single character not contained in a list
(e.g. [^a]% search for all names not starting with “a”)
You can specify up to three conditions for the search process.
If you enter more than one condition, you can define how these conditions are to be combined
(AND/OR).
Right-click Selected users and certificates node to use all functions of the certificate snap-
in that are available for each individual group (see “Assigning certificates“ on page 124).
At this point, the certificate assignment wizard is only available to Master Security Officers. If
a Security Officer has the appropriate permissions, they can use the Properties menu to assign
a certificate to one specific user.
However, if the Security Officer does not have any permissions for this user, the corresponding
icon is displayed.

For the users displayed in the right dialog box in the Selected users and certificates node,
the Delete User and Delete functions are available via the context menu if you select one or
more users. If a user has not yet been assigned a certificate, you can recognize this by the
fact that his user icon is displayed "grayed out". Users who already have a valid certificate can
be recognized by the fact that their user icon is displayed in “green”.
“Delete User” menu item in the context menu
With Delete User, you can delete an existing user from the conpal LAN Crypt database. After
you have executed Delete User, the user is no longer displayed in the Selected users and
certificates node.
“Delete” menu item in the context menu
The Delete menu item is only available for users with a green, yellow or red user icon. With
Delete you can delete the assignment of the certificate for the previously marked users. After-
wards, the color of the user icon changes to "gray" for these. These users then no longer have
an assigned certificate.
Notes: If the color of the user icon is displayed in "red", it means that the certificate of this user
has expired. On the other hand, if the color of the user icon is "yellow", it means that the cer-
tificate of the affected user will expire soon (within the configured warning period).
Master Security Officers and entitled Security Officers can create additional Security Officers.
These Security Officers can then be assigned to individual organizational units. Initially they
are granted global rights that define precisely which tasks they can perform. Once Security
Officers have been assigned to an organizational unit (an object in conpal LAN Crypt Admin-
istration), ACLs can be used to restrict their rights again to suit this particular object.
Note: If a Security Officer’s global rights do not permit them to perform a particular action, an
ACL cannot be used to grant them the right for this action.
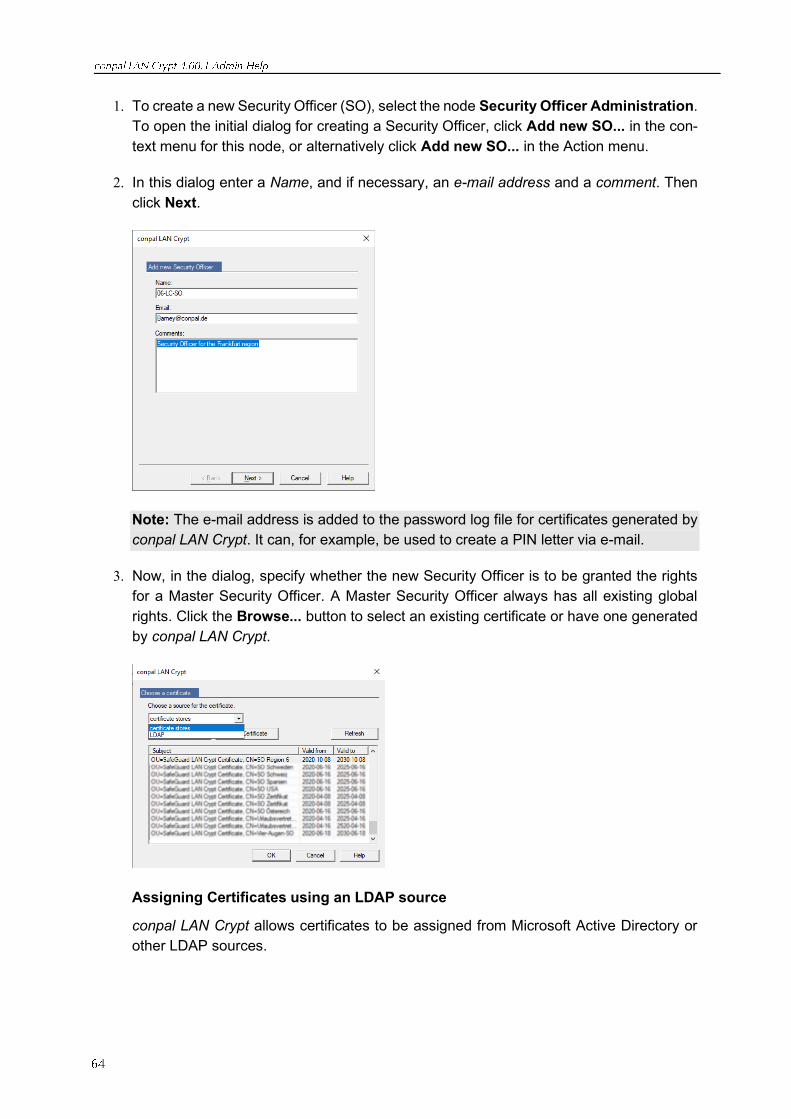
1. To create a new Security Officer (SO), select the node Security Officer Administration.
To open the initial dialog for creating a Security Officer, click Add new SO... in the con-
text menu for this node, or alternatively click Add new SO... in the Action menu.
2. In this dialog enter a Name, and if necessary, an e-mail address and a comment. Then
click Next.
Note: The e-mail address is added to the password log file for certificates generated by
conpal LAN Crypt. It can, for example, be used to create a PIN letter via e-mail.
3. Now, in the dialog, specify whether the new Security Officer is to be granted the rights
for a Master Security Officer. A Master Security Officer always has all existing global
rights. Click the Browse... button to select an existing certificate or have one generated
by conpal LAN Crypt.
Assigning Certificates using an LDAP source
conpal LAN Crypt allows certificates to be assigned from Microsoft Active Directory or
other LDAP sources.
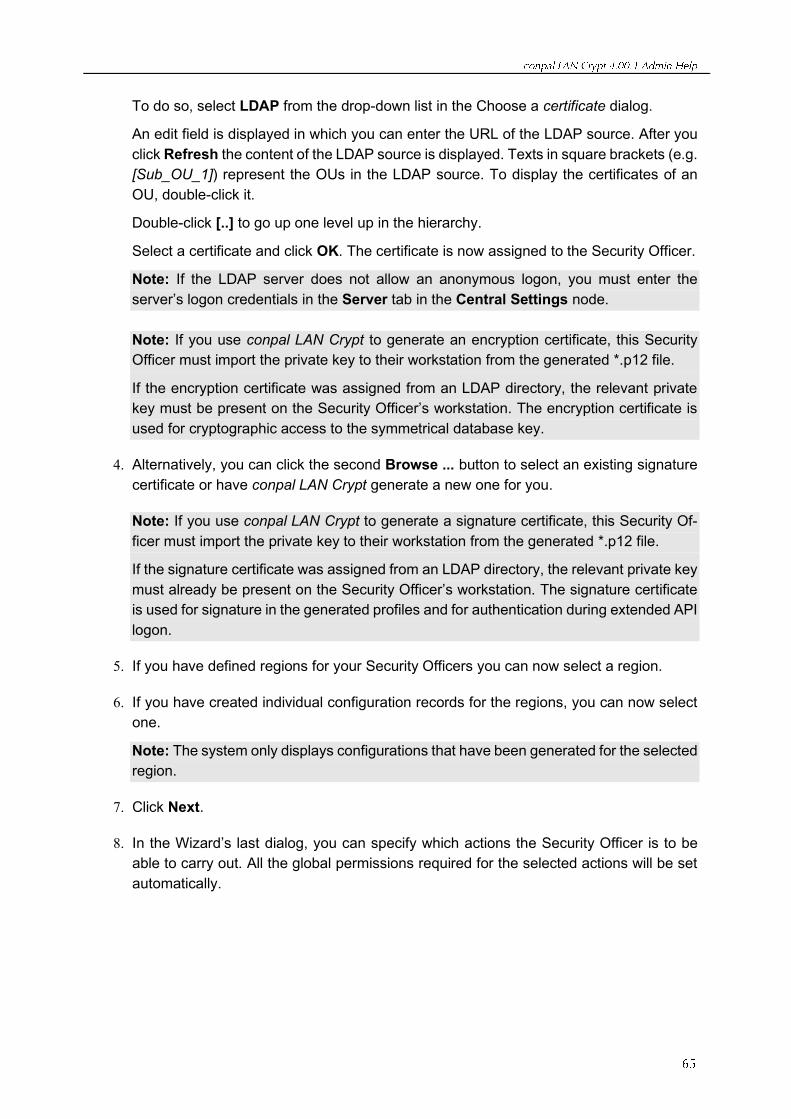
To do so, select LDAP from the drop-down list in the Choose a certificate dialog.
An edit field is displayed in which you can enter the URL of the LDAP source. After you
click Refresh the content of the LDAP source is displayed. Texts in square brackets (e.g.
[Sub_OU_1]) represent the OUs in the LDAP source. To display the certificates of an
OU, double-click it.
Double-click [..] to go up one level up in the hierarchy.
Select a certificate and click OK. The certificate is now assigned to the Security Officer.
Note: If the LDAP server does not allow an anonymous logon, you must enter the
server’s logon credentials in the Server tab in the Central Settings node.
Note: If you use conpal LAN Crypt to generate an encryption certificate, this Security
Officer must import the private key to their workstation from the generated *.p12 file.
If the encryption certificate was assigned from an LDAP directory, the relevant private
key must be present on the Security Officer’s workstation. The encryption certificate is
used for cryptographic access to the symmetrical database key.
4. Alternatively, you can click the second Browse ... button to select an existing signature
certificate or have conpal LAN Crypt generate a new one for you.
Note: If you use conpal LAN Crypt to generate a signature certificate, this Security Of-
ficer must import the private key to their workstation from the generated *.p12 file.
If the signature certificate was assigned from an LDAP directory, the relevant private key
must already be present on the Security Officer’s workstation. The signature certificate
is used for signature in the generated profiles and for authentication during extended API
logon.
5. If you have defined regions for your Security Officers you can now select a region.
6. If you have created individual configuration records for the regions, you can now select
one.
Note: The system only displays configurations that have been generated for the selected
region.
7. Click Next.
8. In the Wizard’s last dialog, you can specify which actions the Security Officer is to be
able to carry out. All the global permissions required for the selected actions will be set
automatically.
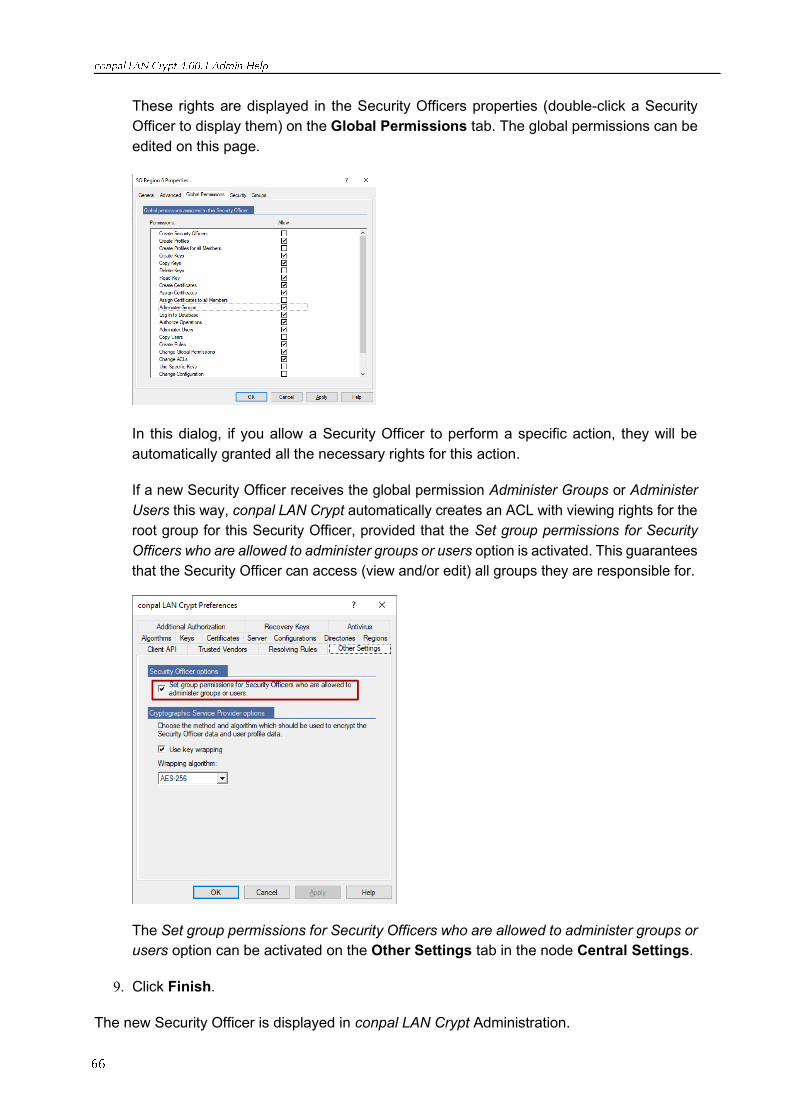
These rights are displayed in the Security Officers properties (double-click a Security
Officer to display them) on the Global Permissions tab. The global permissions can be
edited on this page.
In this dialog, if you allow a Security Officer to perform a specific action, they will be
automatically granted all the necessary rights for this action.
If a new Security Officer receives the global permission Administer Groups or Administer
Users this way, conpal LAN Crypt automatically creates an ACL with viewing rights for the
root group for this Security Officer, provided that the Set group permissions for Security
Officers who are allowed to administer groups or users option is activated. This guarantees
that the Security Officer can access (view and/or edit) all groups they are responsible for.
The Set group permissions for Security Officers who are allowed to administer groups or
users option can be activated on the Other Settings tab in the node Central Settings.
9. Click Finish.
The new Security Officer is displayed in conpal LAN Crypt Administration.
The Security Officer must be granted global rights. If the Security Officer Administration
node is selected, all existing Security Officers are displayed in the right-hand console pane.
Double-click a Security Officer to open the tabs containing the properties assigned to them.
On the Global Permissions tab you grant the Security Officer the “basic rights” needed to
administer conpal LAN Crypt. If, when they were created, the Security Officer was already
granted the right to perform some actions these necessary rights are already active.
Note: A Master Security Officer always has all existing global permissions.
A Security Officer can be granted the following global permissions:
Note: Click Allow to select all global permissions at once. Click again to deselect all global
permissions.
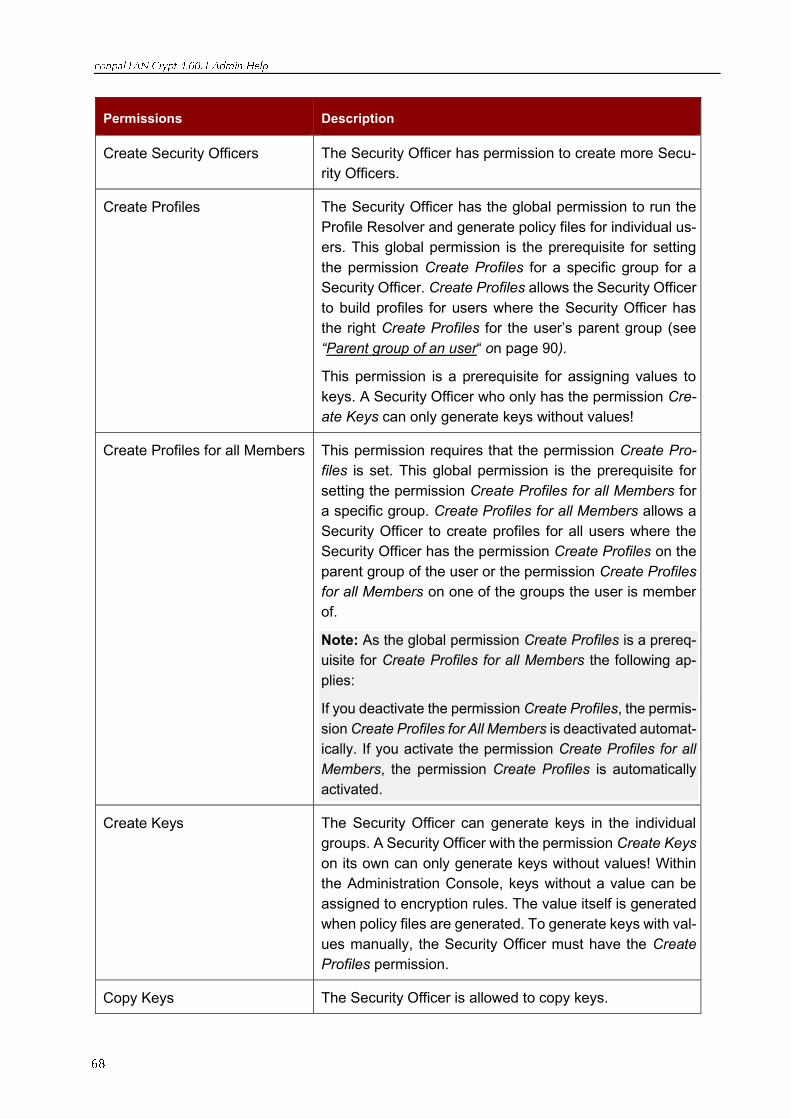
Permissions Description
Create Security Officers The Security Officer has permission to create more Secu-
rity Officers.
Create Profiles The Security Officer has the global permission to run the
Profile Resolver and generate policy files for individual us-
ers. This global permission is the prerequisite for setting
the permission Create Profiles for a specific group for a
Security Officer. Create Profiles allows the Security Officer
to build profiles for users where the Security Officer has
the right Create Profiles for the user’s parent group (see
“Parent group of an user“ on page 90).
This permission is a prerequisite for assigning values to
keys. A Security Officer who only has the permission Cre-
ate Keys can only generate keys without values!
Create Profiles for all Members
This permission requires that the permission Create Pro-
files is set. This global permission is the prerequisite for
setting the permission Create Profiles for all Members for
a specific group. Create Profiles for all Members allows a
Security Officer to create profiles for all users where the
Security Officer has the permission Create Profiles on the
parent group of the user or the permission Create Profiles
for all Members on one of the groups the user is member
of.
Note: As the global permission Create Profiles is a prereq-
uisite for Create Profiles for all Members the following ap-
plies:
If you deactivate the permission Create Profiles, the permis-
sion Create Profiles for All Members is deactivated automat-
ically. If you activate the permission Create Profiles for all
Members, the permission Create Profiles is automatically
activated.
Create Keys The Security Officer can generate keys in the individual
groups. A Security Officer with the permission Create Keys
on its own can only generate keys without values! Within
the Administration Console, keys without a value can be
assigned to encryption rules. The value itself is generated
when policy files are generated. To generate keys with val-
ues manually, the Security Officer must have the Create
Profiles permission.
Copy Keys The Security Officer is allowed to copy keys.
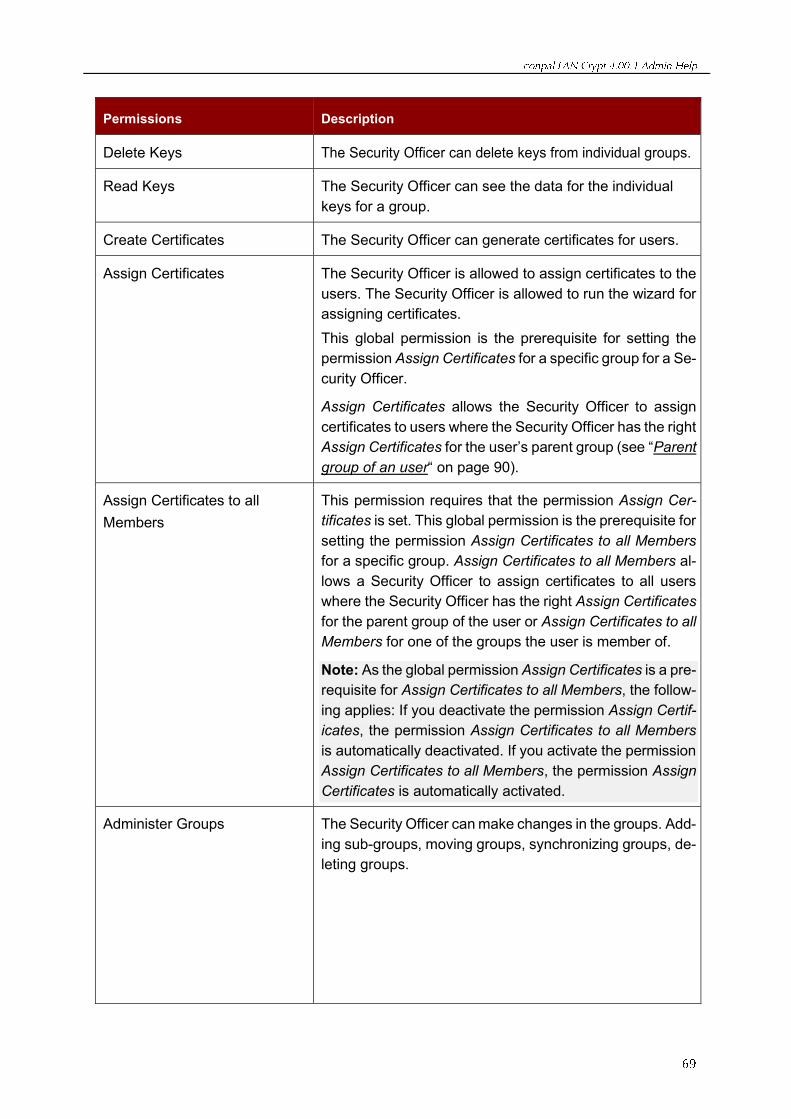
Permissions Description
Delete Keys The Security Officer can delete keys from individual groups.
Read Keys The Security Officer can see the data for the individual
keys for a group.
Create Certificates The Security Officer can generate certificates for users.
Assign Certificates The Security Officer is allowed to assign certificates to the
users. The Security Officer is allowed to run the wizard for
assigning certificates.
This global permission is the prerequisite for setting the
permission Assign Certificates for a specific group for a Se-
curity Officer.
Assign Certificates allows the Security Officer to assign
certificates to users where the Security Officer has the right
Assign Certificates for the user’s parent group (see “Parent
group of an user“ on page 90).
Assign Certificates to all
Members
This permission requires that the permission Assign Cer-
tificates is set. This global permission is the prerequisite for
setting the permission Assign Certificates to all Members
for a specific group. Assign Certificates to all Members al-
lows a Security Officer to assign certificates to all users
where the Security Officer has the right Assign Certificates
for the parent group of the user or Assign Certificates to all
Members for one of the groups the user is member of.
Note: As the global permission Assign Certificates is a pre-
requisite for Assign Certificates to all Members, the follow-
ing applies: If you deactivate the permission Assign Certif-
icates, the permission Assign Certificates to all Members
is automatically deactivated. If you activate the permission
Assign Certificates to all Members, the permission Assign
Certificates is automatically activated.
Administer Groups The Security Officer can make changes in the groups. Add-
ing sub-groups, moving groups, synchronizing groups, de-
leting groups.
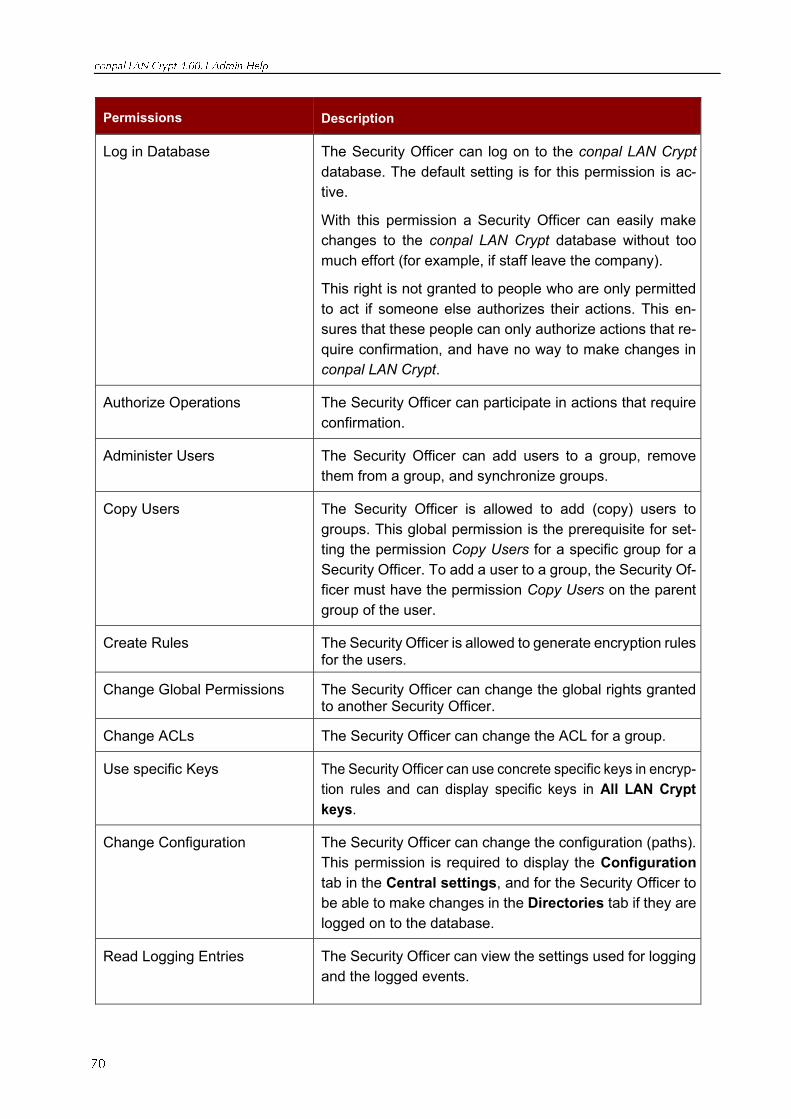
Permissions Description
Log in Database The Security Officer can log on to the conpal LAN Crypt
database. The default setting is for this permission is ac-
tive.
With this permission a Security Officer can easily make
changes to the conpal LAN Crypt database without too
much effort (for example, if staff leave the company).
This right is not granted to people who are only permitted
to act if someone else authorizes their actions. This en-
sures that these people can only authorize actions that re-
quire confirmation, and have no way to make changes in
conpal LAN Crypt.
Authorize Operations The Security Officer can participate in actions that require
confirmation.
Administer Users The Security Officer can add users to a group, remove
them from a group, and synchronize groups.
Copy Users The Security Officer is allowed to add (copy) users to
groups. This global permission is the prerequisite for set-
ting the permission Copy Users for a specific group for a
Security Officer. To add a user to a group, the Security Of-
ficer must have the permission Copy Users on the parent
group of the user.
Create Rules The Security Officer is allowed to generate encryption rules for the users.
Change Global Permissions The Security Officer can change the global rights granted to another Security Officer.
Change ACLs The Security Officer can change the ACL for a group.
Use specific Keys The Security Officer can use concrete specific keys in encryp-
tion rules and can display specific keys in All LAN Crypt
keys.
Change Configuration The Security Officer can change the configuration (paths).
This permission is required to display the Configuration
tab in the Central settings, and for the Security Officer to
be able to make changes in the Directories tab if they are
logged on to the database.
Read Logging Entries The Security Officer can view the settings used for logging
and the logged events.

Permissions Description
Manage Logging The Security Officer can change the logging settings. They
are permitted to archive, delete and check entries.
Import Directory Objects The Security Officer can import OUs, groups and users from
a directory service and add them to the conpal LAN Crypt
database. Before they can import Directory Objects, the Se-
curity Officer also needs the Administer Groups permission
and the Administer Users permission. These are set auto-
matically when the Importing Directory Objects permission
is selected. If a Security Officer does not have this permis-
sion, the Directory Objects node (used to import OUs,
groups and users) is not displayed in the Administration
Console.
When granting global permissions, please note the following points:
◼ A Security Officer does not have a global permission unless they have been specifically
granted it!
◼ A Security Officer can only change those permissions that they personally possess.
◼ A Security Officer cannot change an ACL that describes their own permissions.
◼ Some rights can only be granted if you have another right. When you select this type of
permission, the other permission is set automatically.
◼ conpal LAN Crypt can be configured to automatically create an ACL with viewing rights
for the root group for a newly created Security Officer. It is required that the Security
Officer has the global permission Administer group or Administer users. This guarantees
that the Security Officer can access (view and/or edit) all groups he is responsible for.
This behavior has to be activated on the Other settings tab in Central Settings.
◼ If a Security Officer is changed and receives either the global permission Administer
Groups or Administer Users and does not have an ACL for the root group, it will be
created. The ACL has viewing rights for the group. Existing ACLs are not changed.
Select the global permissions you want to grant to the Security Officer and click Apply.
Click OK to close the dialog.
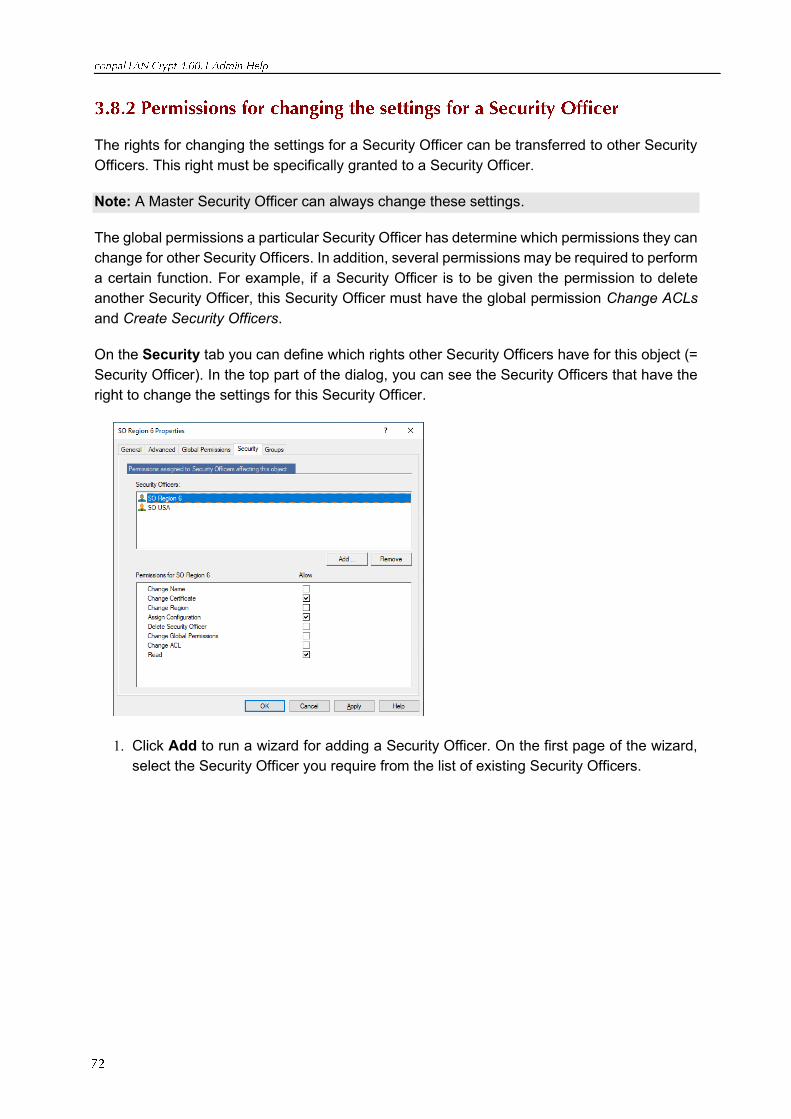
The rights for changing the settings for a Security Officer can be transferred to other Security
Officers. This right must be specifically granted to a Security Officer.
Note: A Master Security Officer can always change these settings.
The global permissions a particular Security Officer has determine which permissions they can
change for other Security Officers. In addition, several permissions may be required to perform
a certain function. For example, if a Security Officer is to be given the permission to delete
another Security Officer, this Security Officer must have the global permission Change ACLs
and Create Security Officers.
On the Security tab you can define which rights other Security Officers have for this object (=
Security Officer). In the top part of the dialog, you can see the Security Officers that have the
right to change the settings for this Security Officer.
1. Click Add to run a wizard for adding a Security Officer. On the first page of the wizard,
select the Security Officer you require from the list of existing Security Officers.
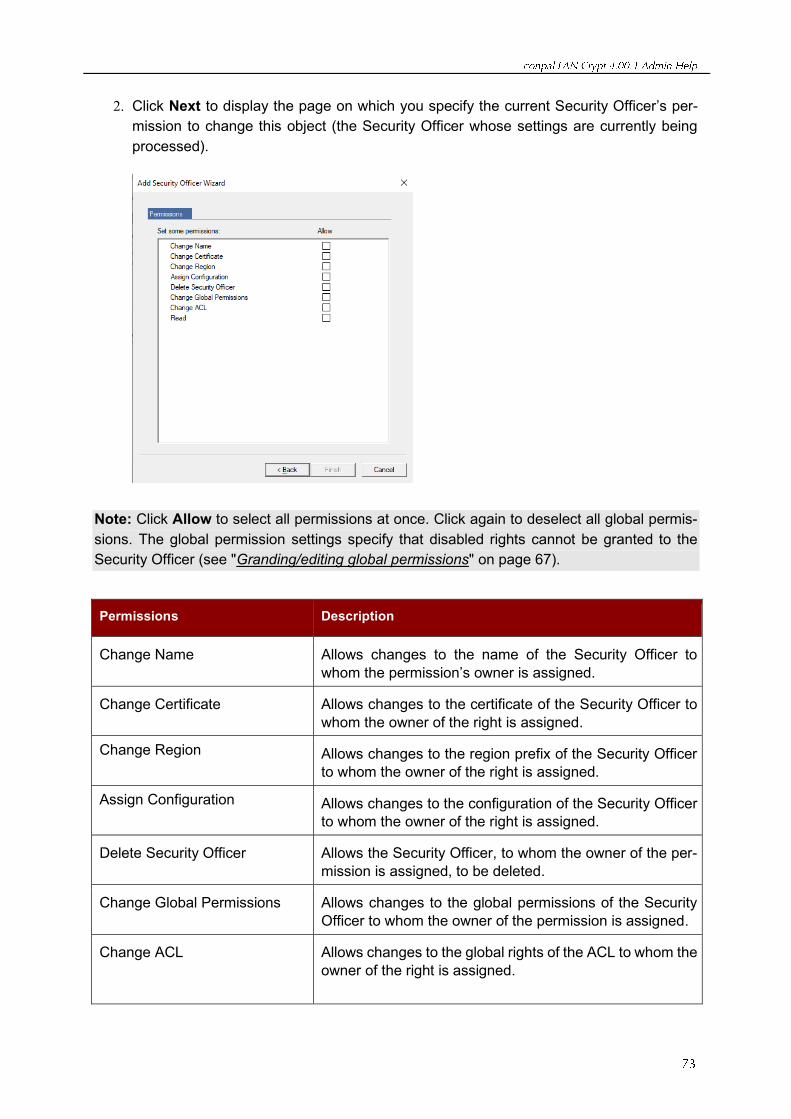
2. Click Next to display the page on which you specify the current Security Officer’s per-
mission to change this object (the Security Officer whose settings are currently being
processed).
Note: Click Allow to select all permissions at once. Click again to deselect all global permis-
sions. The global permission settings specify that disabled rights cannot be granted to the
Security Officer (see "Granding/editing global permissions" on page 67).
Permissions Description
Change Name Allows changes to the name of the Security Officer to
whom the permission’s owner is assigned.
Change Certificate Allows changes to the certificate of the Security Officer to
whom the owner of the right is assigned.
Change Region Allows changes to the region prefix of the Security Officer
to whom the owner of the right is assigned.
Assign Configuration Allows changes to the configuration of the Security Officer
to whom the owner of the right is assigned.
Delete Security Officer Allows the Security Officer, to whom the owner of the per-
mission is assigned, to be deleted.
Change Global Permissions Allows changes to the global permissions of the Security
Officer to whom the owner of the permission is assigned.
Change ACL Allows changes to the global rights of the ACL to whom the
owner of the right is assigned.
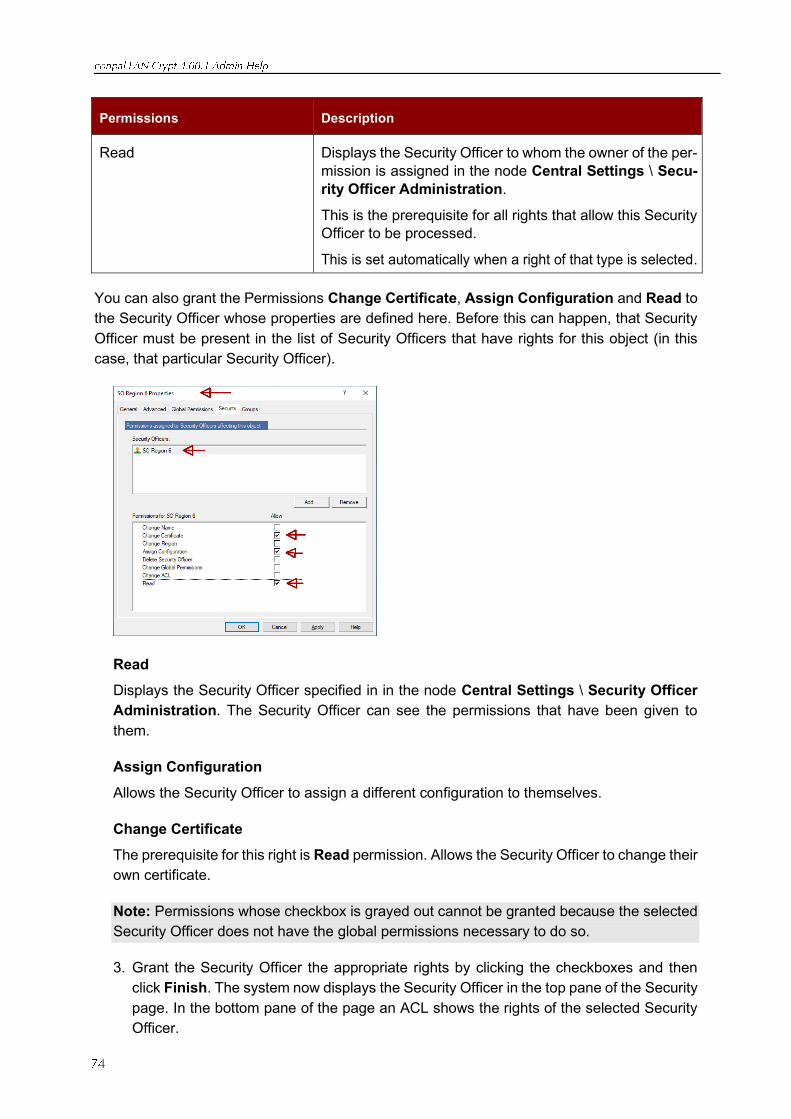
Permissions Description
Read Displays the Security Officer to whom the owner of the per-
mission is assigned in the node Central Settings \ Secu-
rity Officer Administration.
This is the prerequisite for all rights that allow this Security
Officer to be processed.
This is set automatically when a right of that type is selected.
You can also grant the Permissions Change Certificate, Assign Configuration and Read to
the Security Officer whose properties are defined here. Before this can happen, that Security
Officer must be present in the list of Security Officers that have rights for this object (in this
case, that particular Security Officer).
Read
Displays the Security Officer specified in in the node Central Settings \ Security Officer
Administration. The Security Officer can see the permissions that have been given to
them.
Assign Configuration
Allows the Security Officer to assign a different configuration to themselves.
Change Certificate
The prerequisite for this right is Read permission. Allows the Security Officer to change their
own certificate.
Note: Permissions whose checkbox is grayed out cannot be granted because the selected
Security Officer does not have the global permissions necessary to do so.
3. Grant the Security Officer the appropriate rights by clicking the checkboxes and then
click Finish. The system now displays the Security Officer in the top pane of the Security
page. In the bottom pane of the page an ACL shows the rights of the selected Security
Officer.
To view the rights of a specific Security Officer for all groups/OUs for which the Security Officer
has any right, go to Security Officer Administration node and double-click the relevant Se-
curity Officer.
In the Security Officers properties dialog, select the Groups tab. This tab contains two list
views:
◼ The upper list view shows you all groups/OUs for which this Security Officer has permis-
sions.
◼ The second list view shows the corresponding rights of the Security Officer for the se-
lected group/OU.
This way you can easily get an overview of all rights a specific Security Officer has for the
different groups in your organizational structure.
Note: You cannot change the rights of a Security Officer in this view. Changing rights is only
possible in the properties dialog of a group.
Note: Only groups a Security Officer has rights for (Allow or Deny) are displayed. Groups for
which a Security Officer has inherited rights are not displayed.
The different ways in which you can change or renew an (M)SO certificate is described below:
Variant 1: Via Security Officer Administration
1. Start conpal LAN Crypt Administration and log on as the Master Security Officer. You
can also log on as a Security Officer if this Security Officer has the permission to change
the certificate for the Security Officers concerned. This can also include the Security
Officer themselves, if they have the appropriate permissions and their certificate is still
valid.
2. Switch to the Central settings node and from there go to the Security Officer Admin-
istration node.
3. Right-click the Security Officer concerned and select the Properties entry from the con-
text menu.
4. Go to the Advanced tab.
5. In Encryption certificate click the Browse … button to select a new encryption certificate
for the Security Officer.
6. You can also go to Signature certificate (optional) and click Browse … to select new
signature certificate for the Security Officer.
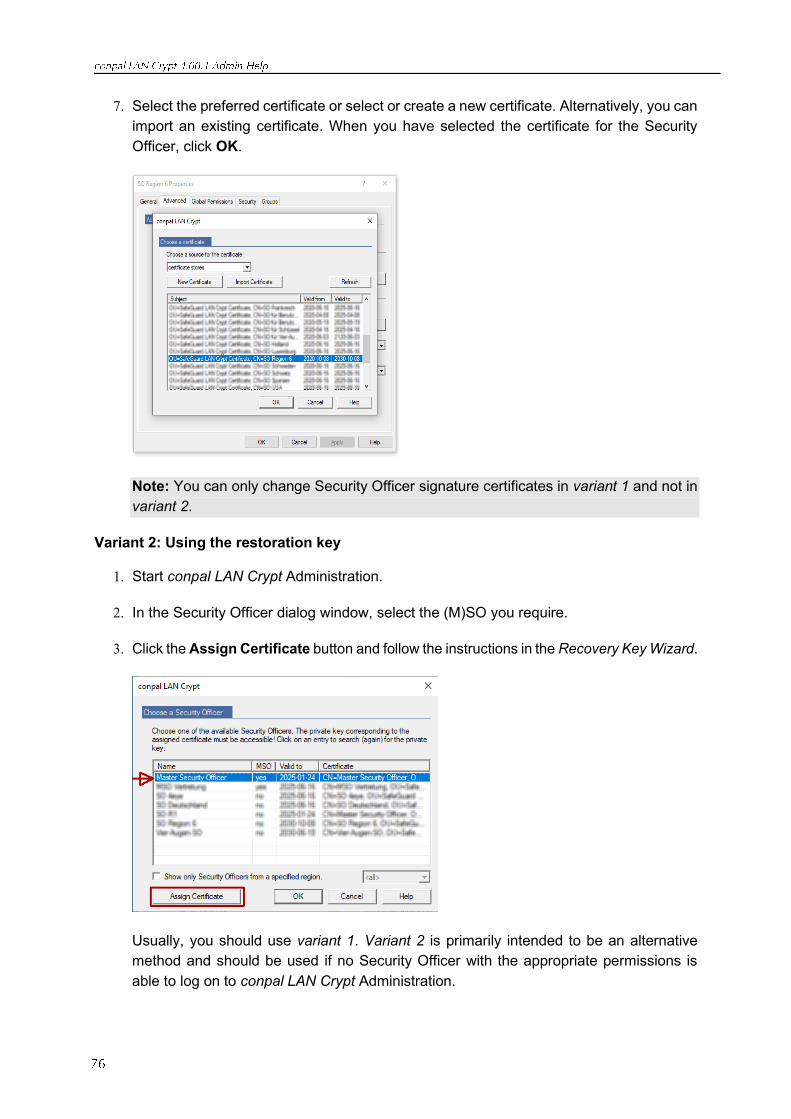
7. Select the preferred certificate or select or create a new certificate. Alternatively, you can
import an existing certificate. When you have selected the certificate for the Security
Officer, click OK.
Note: You can only change Security Officer signature certificates in variant 1 and not in
variant 2.
Variant 2: Using the restoration key
1. Start conpal LAN Crypt Administration.
2. In the Security Officer dialog window, select the (M)SO you require.
3. Click the Assign Certificate button and follow the instructions in the Recovery Key Wizard.
Usually, you should use variant 1. Variant 2 is primarily intended to be an alternative
method and should be used if no Security Officer with the appropriate permissions is
able to log on to conpal LAN Crypt Administration.
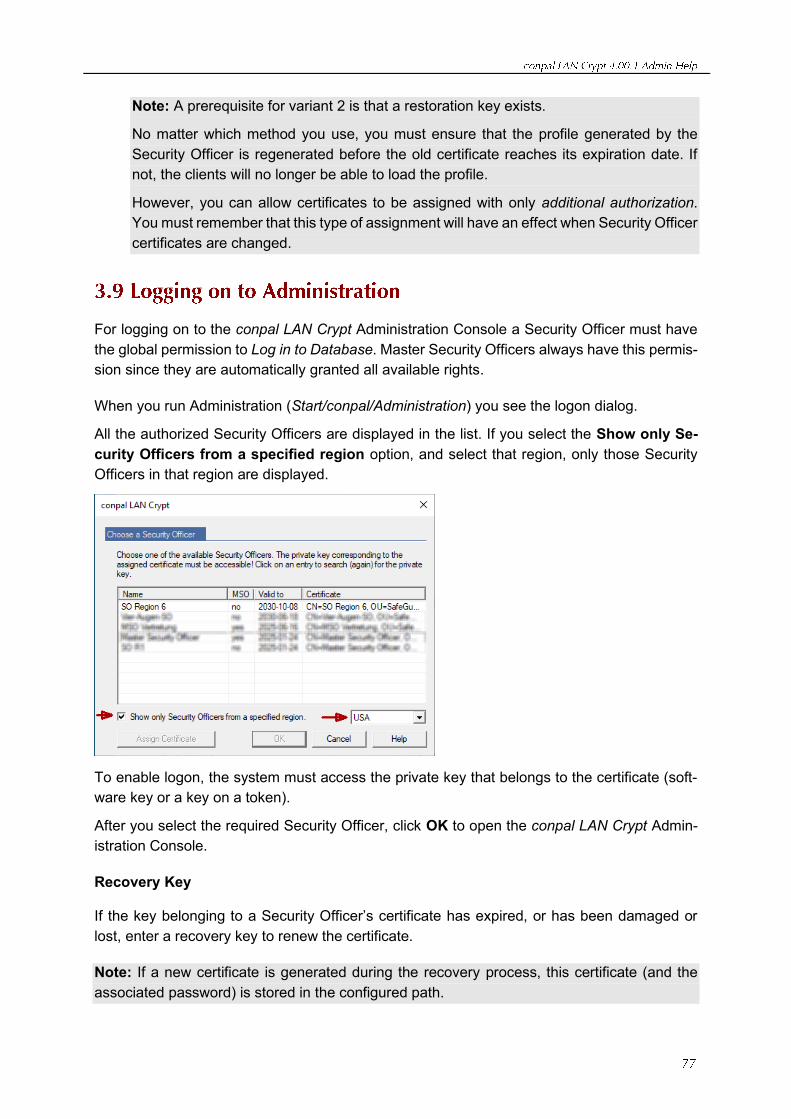
Note: A prerequisite for variant 2 is that a restoration key exists.
No matter which method you use, you must ensure that the profile generated by the
Security Officer is regenerated before the old certificate reaches its expiration date. If
not, the clients will no longer be able to load the profile.
However, you can allow certificates to be assigned with only additional authorization.
You must remember that this type of assignment will have an effect when Security Officer
certificates are changed.
For logging on to the conpal LAN Crypt Administration Console a Security Officer must have
the global permission to Log in to Database. Master Security Officers always have this permis-
sion since they are automatically granted all available rights.
When you run Administration (Start/conpal/Administration) you see the logon dialog.
All the authorized Security Officers are displayed in the list. If you select the Show only Se-
curity Officers from a specified region option, and select that region, only those Security
Officers in that region are displayed.
To enable logon, the system must access the private key that belongs to the certificate (soft-
ware key or a key on a token).
After you select the required Security Officer, click OK to open the conpal LAN Crypt Admin-
istration Console.
Recovery Key
If the key belonging to a Security Officer’s certificate has expired, or has been damaged or
lost, enter a recovery key to renew the certificate.
Note: If a new certificate is generated during the recovery process, this certificate (and the
associated password) is stored in the configured path.
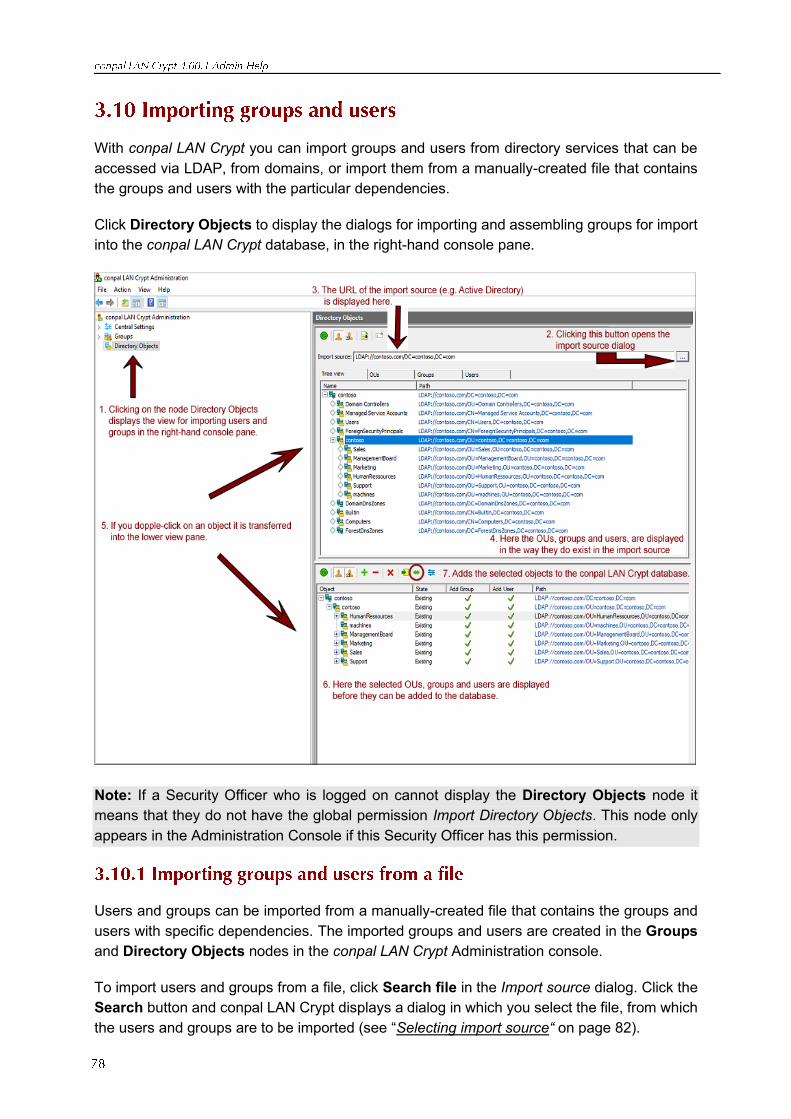
With conpal LAN Crypt you can import groups and users from directory services that can be
accessed via LDAP, from domains, or import them from a manually-created file that contains
the groups and users with the particular dependencies.
Click Directory Objects to display the dialogs for importing and assembling groups for import
into the conpal LAN Crypt database, in the right-hand console pane.
Note: If a Security Officer who is logged on cannot display the Directory Objects node it
means that they do not have the global permission Import Directory Objects. This node only
appears in the Administration Console if this Security Officer has this permission.
Users and groups can be imported from a manually-created file that contains the groups and
users with specific dependencies. The imported groups and users are created in the Groups
and Directory Objects nodes in the conpal LAN Crypt Administration console.
To import users and groups from a file, click Search file in the Import source dialog. Click the
Search button and conpal LAN Crypt displays a dialog in which you select the file, from which
the users and groups are to be imported (see “Selecting import source“ on page 82).
The import file is a simple text file with no specific file extension (we suggest you use “*.lcg” as
the default extension). The contents of this file have to meet certain requirements.
An import file consists of several sections. The sections are separated by an arbitrary number
of blank lines.
Each section represents a user or a group.
Each section consists of a header and a fixed number of lines, each starting with a keyword.
Lines must end with a new line character. There may be no other new lines between the lines
in a section.
The header is the section name in square brackets. The section name is used to define the
membership of users and groups.
The keywords define the users and groups data as it appears in their Properties dialog.
Keywords Description
type= USER
GROUP
Defines whether the imported object represents a user (USER)
or a group (GROUP).
name= Defines a user’s logon name. This is displayed under Logon
name in the conpal LAN Crypt Administration console.
display=
optional
Allows you to define a user name that is not identical to the logon
name.
This appears as the Username in the conpal LAN Crypt Admin-
istration console.
If no name is specified here, the logon name entered under
name= is displayed under Username in the conpal LAN Crypt
Administration console.
mail=
optional
Allows you to enter the user’s e-mail address. This is displayed
on the Details tab in the user’s properties.
Note: The e-mail address is added to the password log file for
certificates generated by conpal LAN Crypt. For example, it can
be used to create a PIN letter via e-mail.
Keywords Description
members= When groups are used, this defines which users and other
groups are members of a particular group.
To add a member, enter the section name which identifies the
user or the group (e.g. U_BKA,G_conpal).
Enter commas to separate each group member’s name from
the next.
Note: If you type // at the beginning of a line you can type a comment on that line, anywhere
in the import file.
Note: Entries in the import file are NOT case sensitive (do not distinguish between capitals
and lower-case letters)!
Example:
[U_RS1]
type=USER
name=RS1
Display=Ralph Smith
// my comment ...
[U_PW1]
type=USER
name=PW1
[U_JG1]
type=USER
name=JG1
[U_JFU]
type=USER
name=JFU
[G_COMPANY]
type=GROUP
name=Company members=G_QA, G_NI, G_FFM, G_HG, U_JFU
// my comment ... ...
[G_QA] type=GROUP name=QA members=U_JFU, U_PW1
[G_PDM] type=GROUP name=JG1 members=U_RLU
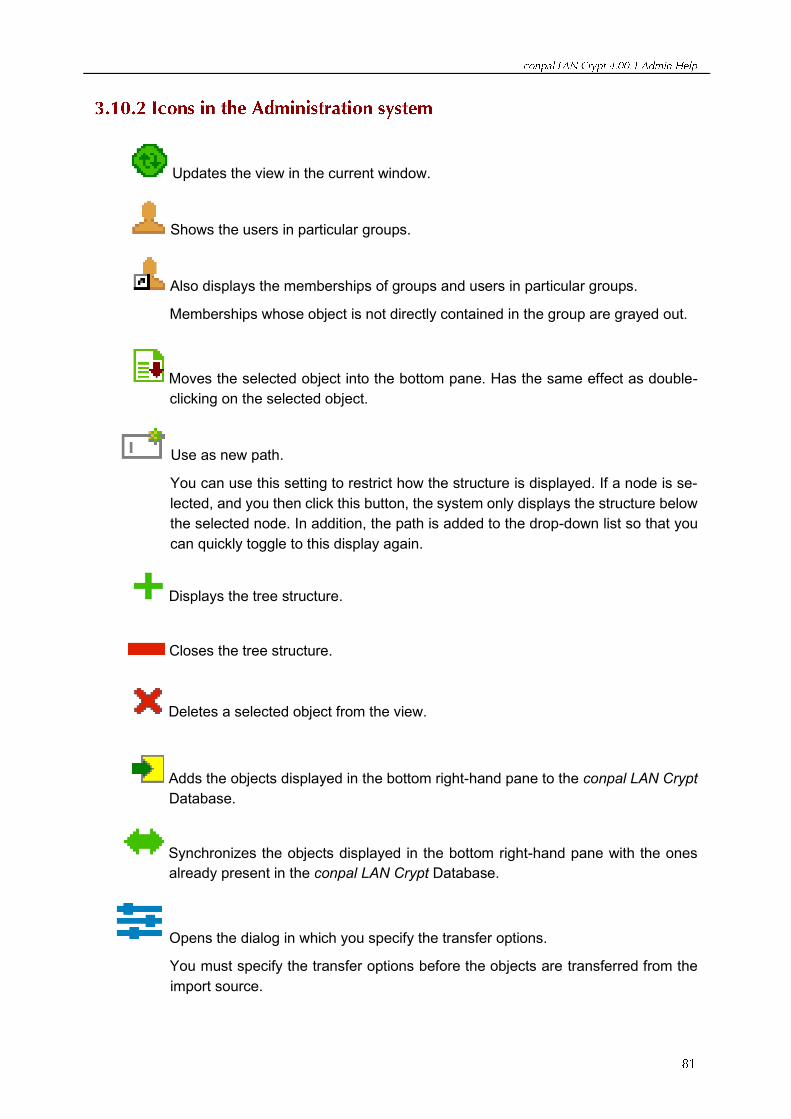
Updates the view in the current window.
Shows the users in particular groups.
Also displays the memberships of groups and users in particular groups.
Memberships whose object is not directly contained in the group are grayed out.
Moves the selected object into the bottom pane. Has the same effect as double-
clicking on the selected object.
Use as new path.
You can use this setting to restrict how the structure is displayed. If a node is se-
lected, and you then click this button, the system only displays the structure below
the selected node. In addition, the path is added to the drop-down list so that you
can quickly toggle to this display again.
Displays the tree structure.
Closes the tree structure.
Deletes a selected object from the view.
Adds the objects displayed in the bottom right-hand pane to the conpal LAN Crypt
Database.
Synchronizes the objects displayed in the bottom right-hand pane with the ones
already present in the conpal LAN Crypt Database.
Opens the dialog in which you specify the transfer options.
You must specify the transfer options before the objects are transferred from the
import source.
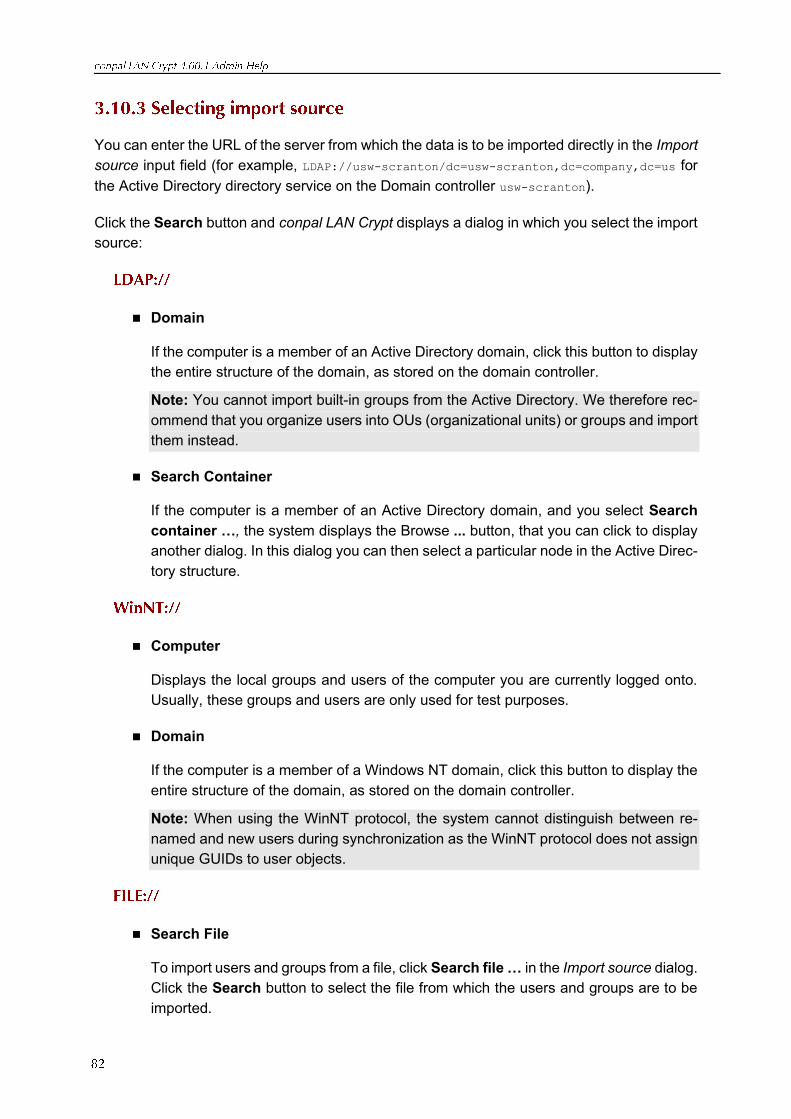
You can enter the URL of the server from which the data is to be imported directly in the Import
source input field (for example, LDAP://usw-scranton/dc=usw-scranton,dc=company,dc=us for
the Active Directory directory service on the Domain controller usw-scranton).
Click the Search button and conpal LAN Crypt displays a dialog in which you select the import
source:
◼ Domain
If the computer is a member of an Active Directory domain, click this button to display
the entire structure of the domain, as stored on the domain controller.
Note: You cannot import built-in groups from the Active Directory. We therefore rec-
ommend that you organize users into OUs (organizational units) or groups and import
them instead.
◼ Search Container
If the computer is a member of an Active Directory domain, and you select Search
container …, the system displays the Browse ... button, that you can click to display
another dialog. In this dialog you can then select a particular node in the Active Direc-
tory structure.
◼ Computer
Displays the local groups and users of the computer you are currently logged onto.
Usually, these groups and users are only used for test purposes.
◼ Domain
If the computer is a member of a Windows NT domain, click this button to display the
entire structure of the domain, as stored on the domain controller.
Note: When using the WinNT protocol, the system cannot distinguish between re-
named and new users during synchronization as the WinNT protocol does not assign
unique GUIDs to user objects.
◼ Search File
To import users and groups from a file, click Search file … in the Import source dialog.
Click the Search button to select the file from which the users and groups are to be
imported.
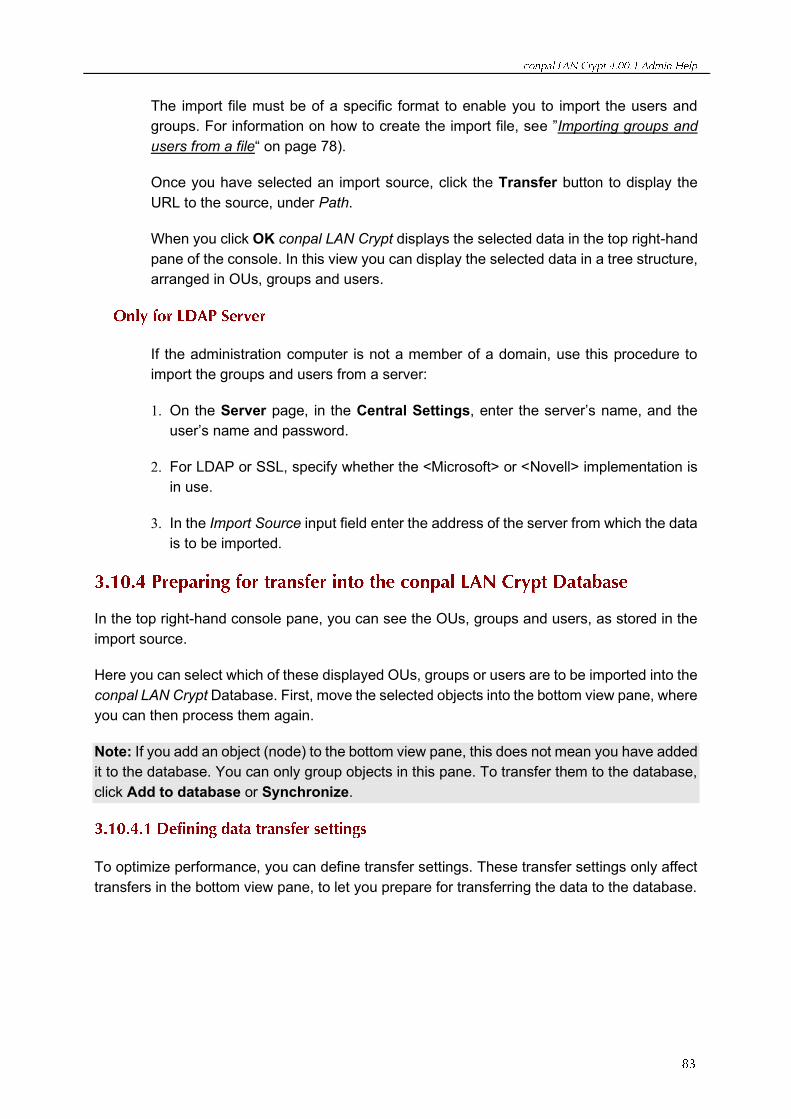
The import file must be of a specific format to enable you to import the users and
groups. For information on how to create the import file, see ”Importing groups and
users from a file“ on page 78).
Once you have selected an import source, click the Transfer button to display the
URL to the source, under Path.
When you click OK conpal LAN Crypt displays the selected data in the top right-hand
pane of the console. In this view you can display the selected data in a tree structure,
arranged in OUs, groups and users.
If the administration computer is not a member of a domain, use this procedure to
import the groups and users from a server:
1. On the Server page, in the Central Settings, enter the server’s name, and the
user’s name and password.
2. For LDAP or SSL, specify whether the <Microsoft> or <Novell> implementation is
in use.
3. In the Import Source input field enter the address of the server from which the data
is to be imported.
In the top right-hand console pane, you can see the OUs, groups and users, as stored in the
import source.
Here you can select which of these displayed OUs, groups or users are to be imported into the
conpal LAN Crypt Database. First, move the selected objects into the bottom view pane, where
you can then process them again.
Note: If you add an object (node) to the bottom view pane, this does not mean you have added
it to the database. You can only group objects in this pane. To transfer them to the database,
click Add to database or Synchronize.
To optimize performance, you can define transfer settings. These transfer settings only affect
transfers in the bottom view pane, to let you prepare for transferring the data to the database.
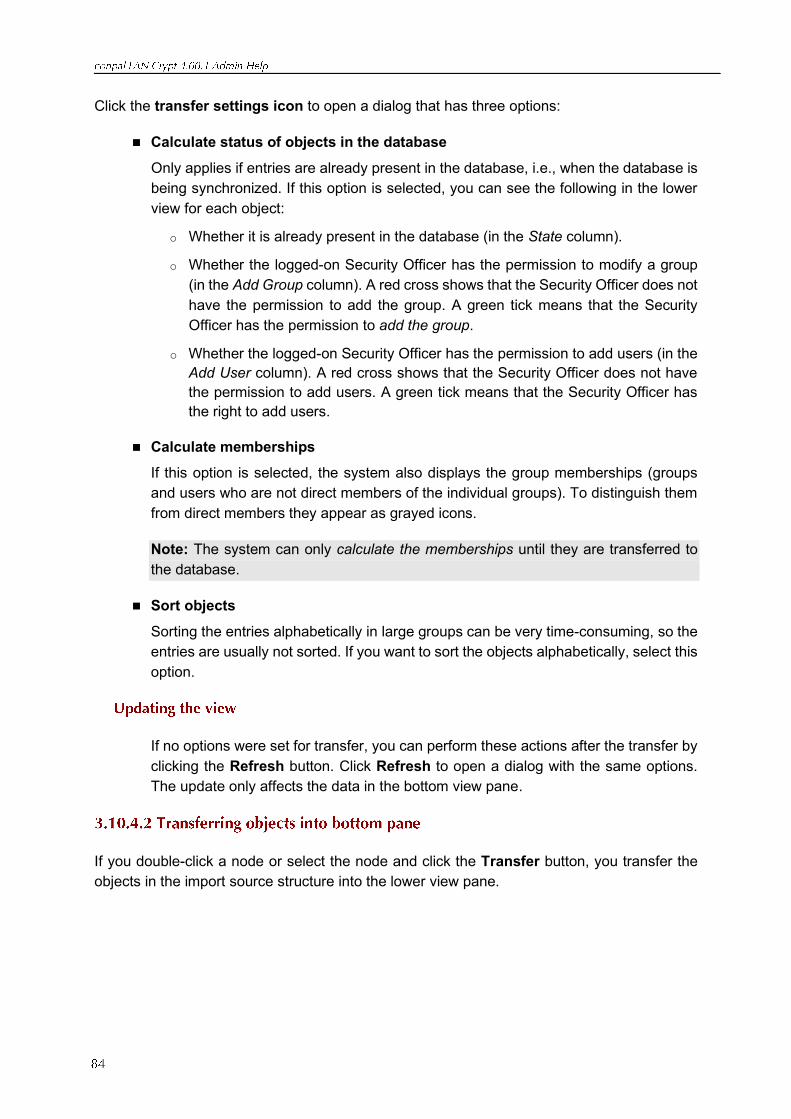
Click the transfer settings icon to open a dialog that has three options:
◼ Calculate status of objects in the database
Only applies if entries are already present in the database, i.e., when the database is
being synchronized. If this option is selected, you can see the following in the lower
view for each object:
o Whether it is already present in the database (in the State column).
o Whether the logged-on Security Officer has the permission to modify a group
(in the Add Group column). A red cross shows that the Security Officer does not
have the permission to add the group. A green tick means that the Security
Officer has the permission to add the group.
o Whether the logged-on Security Officer has the permission to add users (in the
Add User column). A red cross shows that the Security Officer does not have
the permission to add users. A green tick means that the Security Officer has
the right to add users.
◼ Calculate memberships
If this option is selected, the system also displays the group memberships (groups
and users who are not direct members of the individual groups). To distinguish them
from direct members they appear as grayed icons.
Note: The system can only calculate the memberships until they are transferred to
the database.
◼ Sort objects
Sorting the entries alphabetically in large groups can be very time-consuming, so the
entries are usually not sorted. If you want to sort the objects alphabetically, select this
option.
If no options were set for transfer, you can perform these actions after the transfer by
clicking the Refresh button. Click Refresh to open a dialog with the same options.
The update only affects the data in the bottom view pane.
If you double-click a node or select the node and click the Transfer button, you transfer the
objects in the import source structure into the lower view pane.
Before the objects are transferred a dialog appears in which you can specify how the individual
containers and objects are to be transferred.
◼ Only transfer this object
Adds the selected object without its contents.
◼ Transfer direct members as well
Adds all objects present in the selected container.
◼ Transfer members recursively
Adds all objects that are present in this container and also all objects that are mem-
bers and are present in another container. The members are transferred with their
entire hierarchy.
Select the option you require and click OK to transfer the objects to the bottom view pane so
they are ready to add to the conpal LAN Crypt Database.
Before transferring them to the database, you can add more groups to this view (for example,
from other sources) and then add everything to the database in one step.
Objects are not added to the conpal LAN Crypt Database until they have been grouped in the
lower view pane and you click the Add to database or Synchronize button there.
Note: If you add objects to an existing structure, you must always start by adding them to the
database. To do this, click the Add to database button.
Synchronization is only used if the only change is in the relationships between the objects.
When you click Add to database, the system adds the objects and then starts the synchroni-
zation process. This begins with a dialog that has three options.
◼ Synchronize complete database
If you select this option the system synchronizes all the entries present in the conpal
LAN Crypt Database with the ones in the import source. Changes are displayed in
another screen that is shown next.
Select this option, if objects were deleted from the AD and they should also be deleted
from the database.
Note: If a complex structure is involved complete synchronization may take a long time.
◼ Synchronize only visible entries
Refers to the selection in the bottom right-hand pane in the Administration Console.
◼ Recalculate all relationships
If you select this option the system recalculates all memberships according to their
import source and adds them to the database again. Memberships are even added if
they have been switched off in the display in the bottom right-hand console pane (the
Calculate memberships option in the transfer settings has been switched off).
◼ Use visible relationships
If you select this option, only the relations displayed in the bottom right-hand console
pane are added to the database. "Hidden memberships" are not added to the data-
base (Calculate memberships is deactivated in the transfer settings).
Note: If this option is used during synchronization, and memberships for objects pre-
sent in the database are not displayed in the bottom right-hand console pane, any
memberships present in the database are deleted.
When you select an option and click OK the system displays a dialog that documents synchro-
nization. You must confirm the changes in this dialog.
◼ All entries
Displays all changes in a list. Corresponds to the total number of entries on the other
pages.
◼ Deleted objects
Displays objects that have been deleted in the import source (server) since the last
synchronization, but are still present in the conpal LAN Crypt Database.
◼ New relationships in the directory
Displays the objects and memberships that have been added to the conpal LAN Crypt
Database, or new ones that have been created in the import source (server) since the
last synchronization, and have not yet been transferred into the database.
◼ Old relationships in the database
Displays objects and memberships that are still present in the database but are no
longer in the import source. For example, groups may have been deleted, or mem-
berships changed on the server.
Note: The synchronization run only evaluates those objects that have been imported at least
once from an import source to the database.
If objects are deleted in an import source, these changes are only implemented in the database
if the Synchronize complete database option is selected. Groups and users added manually in
the Administration Console are not evaluated during synchronization and therefore do not ap-
pear on these pages.
You can cancel the action for each object listed in this view by clicking on that action (remove
the tick). Only the selected actions (the ones with a tick) are performed. Click OK to complete
the data synchronization run.
Once the OUs (organizational units), groups and users have been imported, the Security Of-
ficers responsible for them can be assigned to each OU.
To add a new group manually, select the node/group to which you want to add the new group,
and click New Group in the context menu.
Enter a name for the new group in the Group Name field and click OK. The system now dis-
plays the group in the conpal LAN Crypt Administration console.
In the group’s Properties dialog, you can add existing users to the group or create new users.
Unlike imported groups, you can use drag and drop to move manually created groups within
the group’s hierarchy.
To create relationships between groups, you can copy a group and insert it in a different group.
A group inserted this way is displayed as a shortcut in the parent group. As a result, the
members of the inserted group inherit all keys and encryption rules of the parent group. The
prerequisite for inheriting keys is that these keys are defined as inheritable in the parent group.
Rights for editing the group are NOT inherited.
Since this group is only inserted in the new place as a shortcut, encryption rules, members,
certificates and keys are not shown there. These values are only visible in the “real” group in
the hierarchy. The inherited keys can also be used there to create encryption rules.
To add a group to another group via a shortcut:
1. Select the relevant group, open its context menu, and select Copy.
2. Select the target group, into which you want to insert the group, and click Insert in the
target group’s context menu. You can also create the shortcut by pressing CTRL and
dragging and dropping the group onto the target group.
3. The system will prompt you to confirm that you want to add the group. Click OK to confirm
this.
4. The group is now displayed as a shortcut under the other group.
In this way you can easily grant all members of one group all the rights of a different group.
For example: if you want to grant the members of Team 1 the same rights as the members of
Team 2, for a limited amount of time, (for example so that Team 1 can support Team 2 in a
project), you simply add a shortcut to Team 1’s group in Team 2’s group. Then generate new
policy files. Next time the members of Team 1 log on, they have access to Team 2’s data.
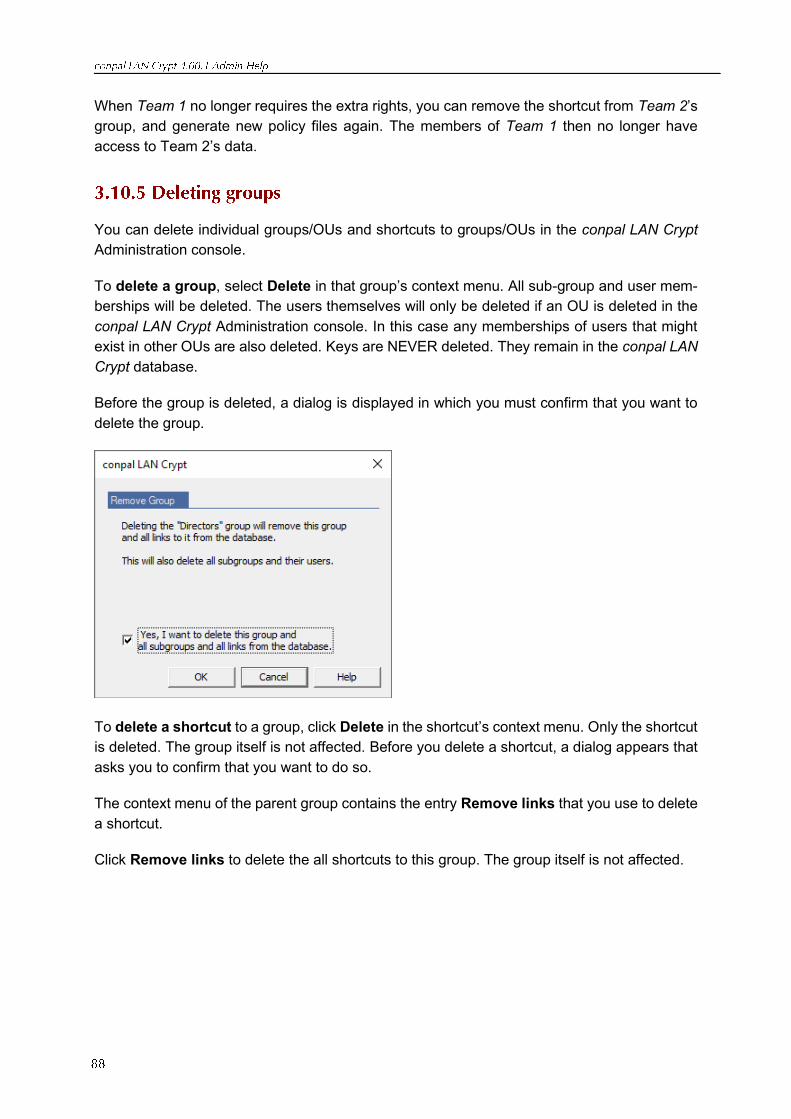
When Team 1 no longer requires the extra rights, you can remove the shortcut from Team 2’s
group, and generate new policy files again. The members of Team 1 then no longer have
access to Team 2’s data.
You can delete individual groups/OUs and shortcuts to groups/OUs in the conpal LAN Crypt
Administration console.
To delete a group, select Delete in that group’s context menu. All sub-group and user mem-
berships will be deleted. The users themselves will only be deleted if an OU is deleted in the
conpal LAN Crypt Administration console. In this case any memberships of users that might
exist in other OUs are also deleted. Keys are NEVER deleted. They remain in the conpal LAN
Crypt database.
Before the group is deleted, a dialog is displayed in which you must confirm that you want to
delete the group.
To delete a shortcut to a group, click Delete in the shortcut’s context menu. Only the shortcut
is deleted. The group itself is not affected. Before you delete a shortcut, a dialog appears that
asks you to confirm that you want to do so.
The context menu of the parent group contains the entry Remove links that you use to delete
a shortcut.
Click Remove links to delete the all shortcuts to this group. The group itself is not affected.
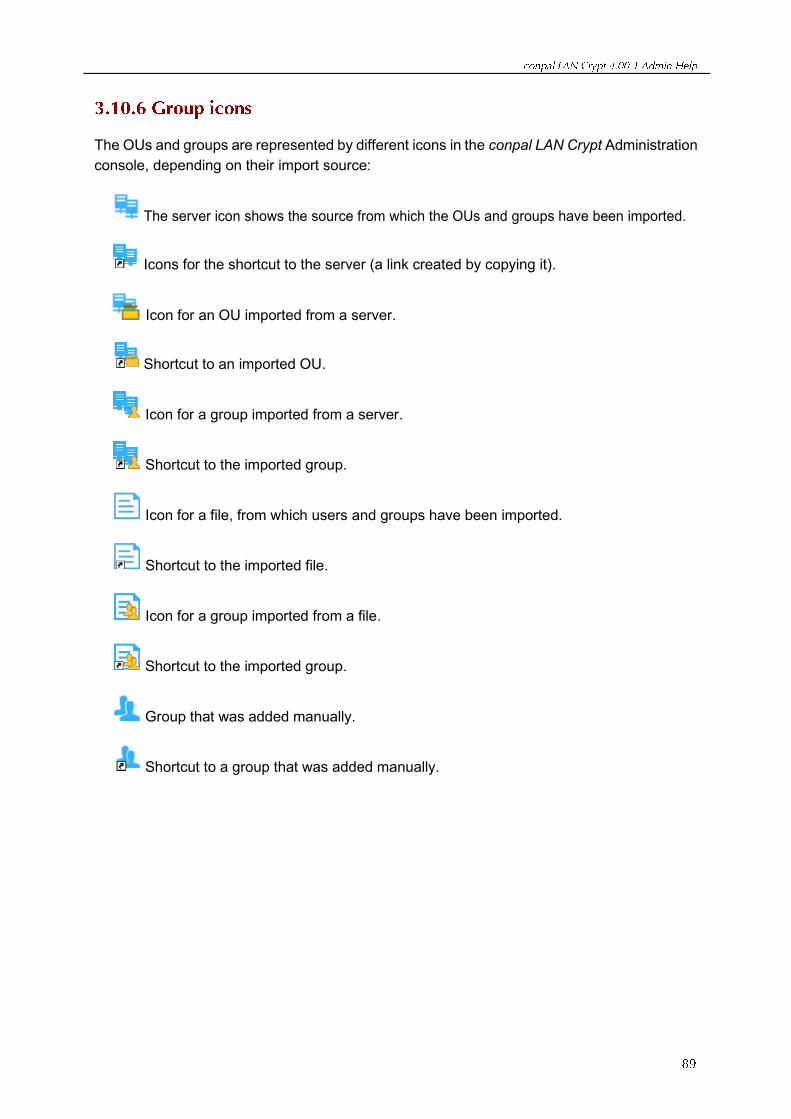
The OUs and groups are represented by different icons in the conpal LAN Crypt Administration
console, depending on their import source:
The server icon shows the source from which the OUs and groups have been imported.
Icons for the shortcut to the server (a link created by copying it).
Icon for an OU imported from a server.
Shortcut to an imported OU.
Icon for a group imported from a server.
Shortcut to the imported group.
Icon for a file, from which users and groups have been imported.
Shortcut to the imported file.
Icon for a group imported from a file.
Shortcut to the imported group.
Group that was added manually.
Shortcut to a group that was added manually.
After OUs, groups and users have been imported into conpal LAN Crypt Administration, Master
Security Officers can assign individual Security Officers to the various organizational units.
The Security Officer can then use the rights they have been given to process the organizational
units to which they have been assigned.
To ensure that a Security Officer can only edit the organizational unit for which they are re-
sponsible, the Master Security Officer can “hide” the other nodes from this Security Officer.
This means that the node is visible but cannot be edited.
If the Security Officer logs on to conpal LAN Crypt Administration, they can only see the part
of the organizational structure for which they are responsible.
A user in conpal LAN Crypt can be a member of more than one group, but has one dedicated
group that is their parent group:
◼ When importing the user through LDAP, the parent group is the OU the user belongs to.
◼ When importing the user through a file, the parent group is the group the user is member
of, as defined in the file.
◼ When creating a new user through the group properties dialog, the parent group is the
group from which the group properties dialog was opened.
In the conpal LAN Crypt Administration console, the parent group is shown as a column in the
Selected users and certificates node or as a column in the Members and Certificates of
Group node (when configured on the User Settings tab, see “User Settings” on page 35).
The parent group of a user impacts the evaluation of rights in the following situations:
◼ Viewing the properties of a user: Security Officers can view the properties of a user when
they have the rights Read and Visible for the parent group of the user.
◼ Modifying the properties of a user: Security Officers can modify the properties of a user
when they have the global permission Administer Users and the permissions Add User
and Delete User on the parent group of the user.
◼ Creating Profiles: If Create Profiles is set for a group for a Security Officer, the Security
Officer is allowed to build profiles for all members of the group, where the group is also
the parent object of the group. The Security Officer is not allowed to create profiles for
users who are only members of the group and have a different parent group. This re-
quires the permission Create Profiles for all Members.
◼ Assigning Certificates: If Assign Certificates is set for a group, the Security Officer is
allowed to assign certificates to all members of the group, where the group is also the
parent object of the group. The Security Officer is not allowed to assign certificates to
users who are only members of the group and have a different parent group. This re-
quires the permission Assign Certificates to all Members.
◼ Copying Users: When a Security Officer wants to add a user to a group by using prop-
erties dialog of a group (on the tab Members with the Add button), the Security Officer
must have the permission Copy Users for the parent group of the user.
1. To permit a Security Officer to see a node in Administration, you must first set the Visible
right in the base node in the organization structure.
2. To do this, select the base node in the structure and click Properties in the context menu
to open the Properties dialog for this node.
3. Toggle to the Security tab and click Add.
Here you can select the Security Officer you want to assign to process the groups.
Note: Several Security Officers can be assigned to the same group.
4. Click Next to display the Permissions dialog for this Security Officer. Here, select the
Visible permission and then click Finish. This permission is inherited downwards through
the group hierarchy, which means the Security Officer can now view all groups.
If the Security Officer logs on to the database with these settings, they can see the entire
Administration structure but cannot edit it.
5. In the next step you can now hide (suppress) the groups in the Administration Console
you do not want the Security Officer to see because they have no rights to access them.
6. To do this, select these groups, open their Properties dialogs and select the Security tab.
7. Here, set Visible to Deny for the groups that are to be hidden for the Security Officer.
Note: If a Security Officer has been explicitly refused a right to a hierarchically superior group
this right cannot be assigned to a subordinate group. We therefore recommend that you only
assign a Security Officer Read and View permissions to a hierarchically superior group so that
they can assign rights to subordinate groups without causing any problems.
Note: conpal LAN Crypt can be configured to automatically create an ACL holding the visible
right on the root group for a newly created Security Officer. It is required that the Security
Officer has the global permission Administer Groups or Administer Users. This guarantees that
the Security Officer can access (view and/or edit) all groups he is responsible for.
This behavior has to be activated on the Other Settings tab in the node Central Settings.
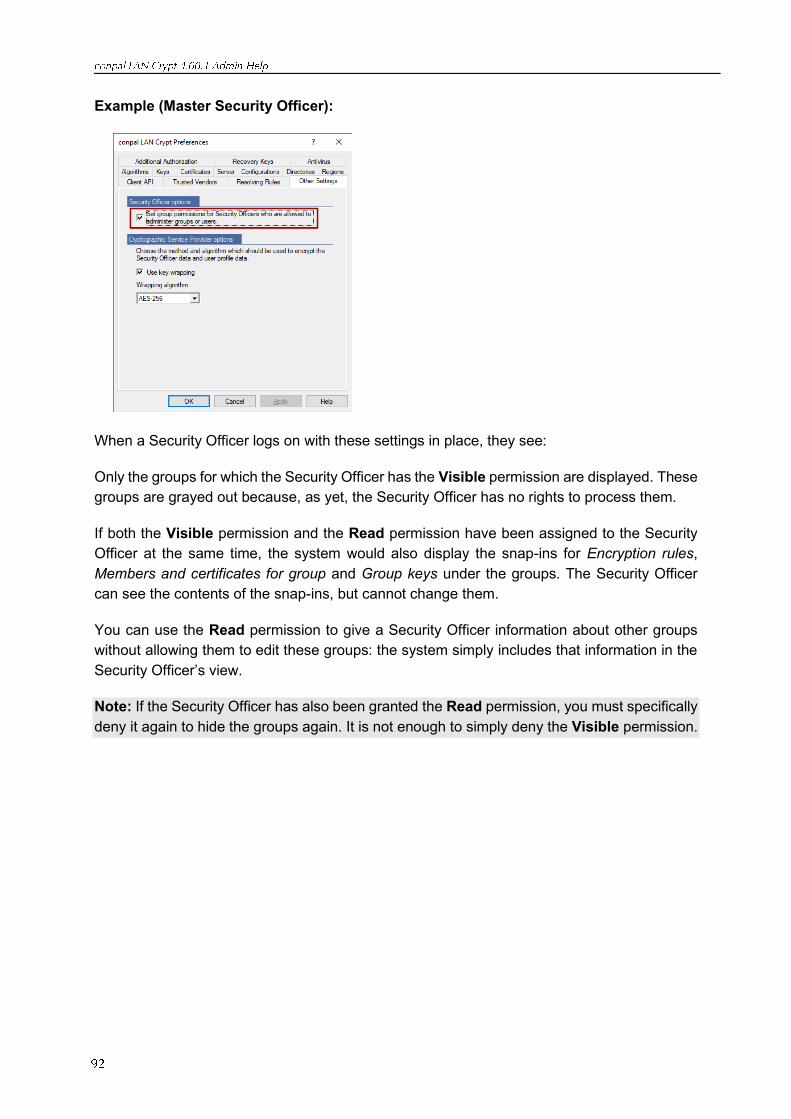
Example (Master Security Officer):
When a Security Officer logs on with these settings in place, they see:
Only the groups for which the Security Officer has the Visible permission are displayed. These
groups are grayed out because, as yet, the Security Officer has no rights to process them.
If both the Visible permission and the Read permission have been assigned to the Security
Officer at the same time, the system would also display the snap-ins for Encryption rules,
Members and certificates for group and Group keys under the groups. The Security Officer
can see the contents of the snap-ins, but cannot change them.
You can use the Read permission to give a Security Officer information about other groups
without allowing them to edit these groups: the system simply includes that information in the
Security Officer’s view.
Note: If the Security Officer has also been granted the Read permission, you must specifically
deny it again to hide the groups again. It is not enough to simply deny the Visible permission.
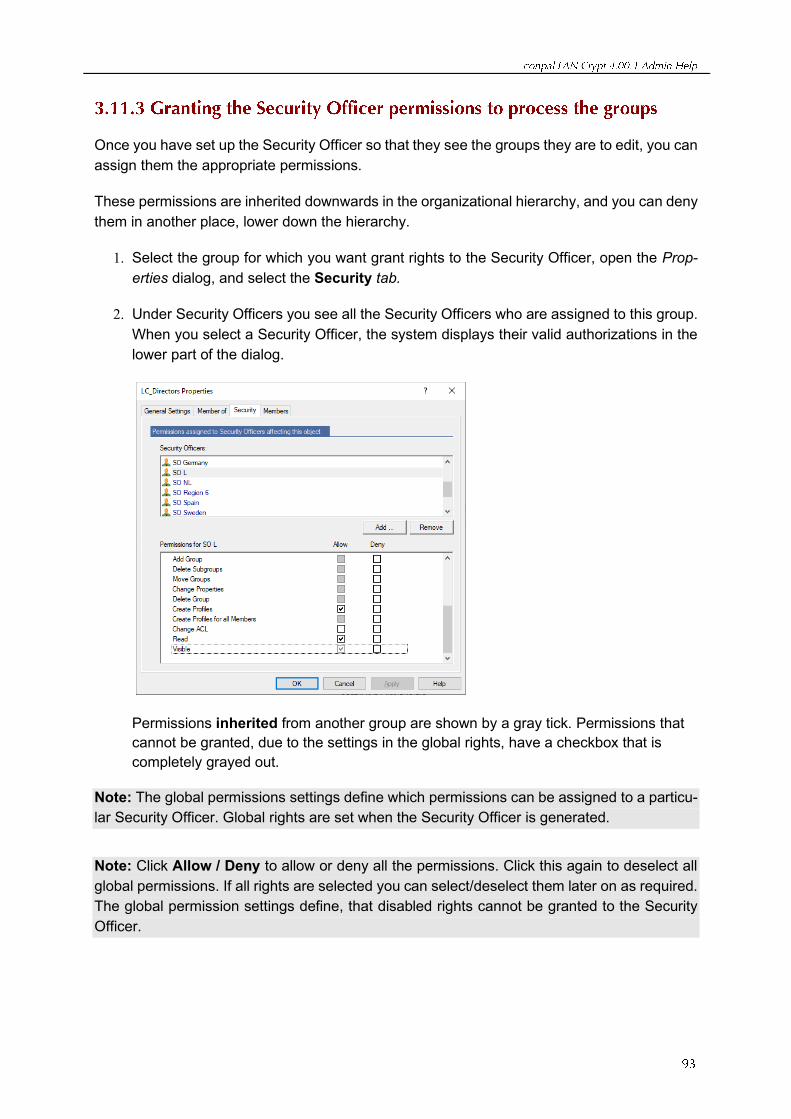
Once you have set up the Security Officer so that they see the groups they are to edit, you can
assign them the appropriate permissions.
These permissions are inherited downwards in the organizational hierarchy, and you can deny
them in another place, lower down the hierarchy.
1. Select the group for which you want grant rights to the Security Officer, open the Prop-
erties dialog, and select the Security tab.
2. Under Security Officers you see all the Security Officers who are assigned to this group.
When you select a Security Officer, the system displays their valid authorizations in the
lower part of the dialog.
Permissions inherited from another group are shown by a gray tick. Permissions that
cannot be granted, due to the settings in the global rights, have a checkbox that is
completely grayed out.
Note: The global permissions settings define which permissions can be assigned to a particu-
lar Security Officer. Global rights are set when the Security Officer is generated.
Note: Click Allow / Deny to allow or deny all the permissions. Click this again to deselect all
global permissions. If all rights are selected you can select/deselect them later on as required.
The global permission settings define, that disabled rights cannot be granted to the Security
Officer.
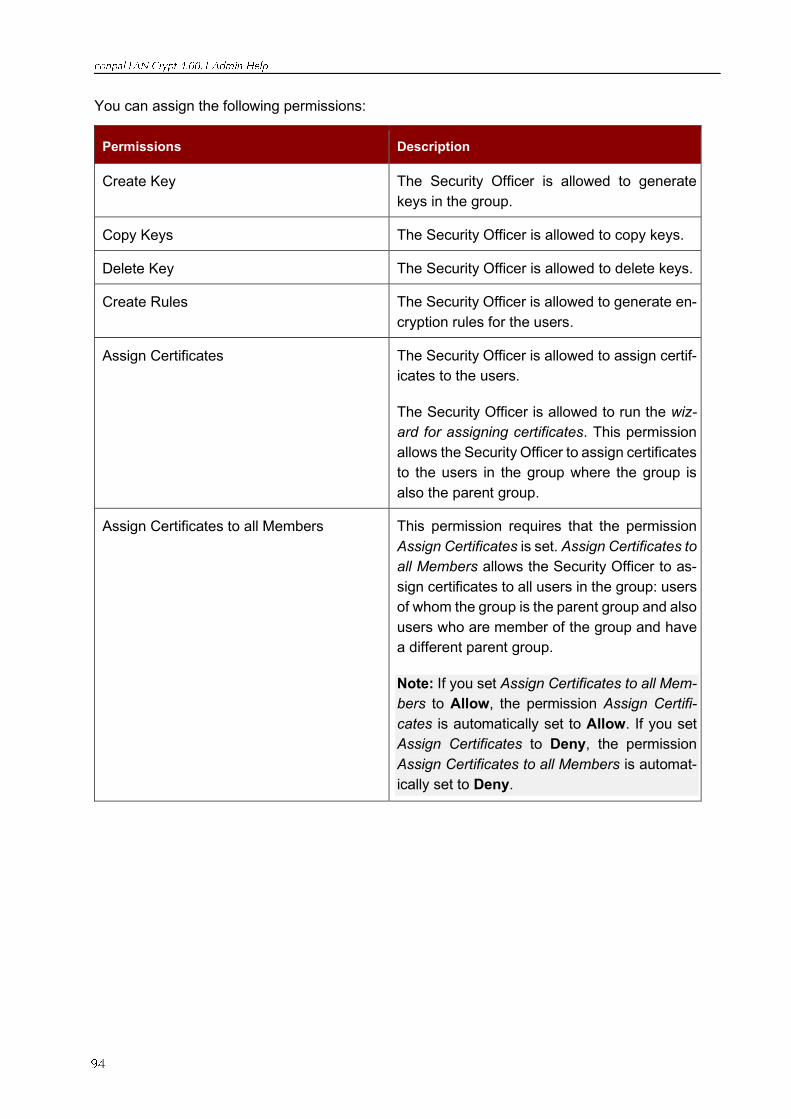
You can assign the following permissions:
Permissions Description
Create Key The Security Officer is allowed to generate
keys in the group.
Copy Keys The Security Officer is allowed to copy keys.
Delete Key The Security Officer is allowed to delete keys.
Create Rules The Security Officer is allowed to generate en-
cryption rules for the users.
Assign Certificates The Security Officer is allowed to assign certif-
icates to the users.
The Security Officer is allowed to run the wiz-
ard for assigning certificates. This permission
allows the Security Officer to assign certificates
to the users in the group where the group is
also the parent group.
Assign Certificates to all Members This permission requires that the permission
Assign Certificates is set. Assign Certificates to
all Members allows the Security Officer to as-
sign certificates to all users in the group: users
of whom the group is the parent group and also
users who are member of the group and have
a different parent group.
Note: If you set Assign Certificates to all Mem-
bers to Allow, the permission Assign Certifi-
cates is automatically set to Allow. If you set
Assign Certificates to Deny, the permission
Assign Certificates to all Members is automat-
ically set to Deny.
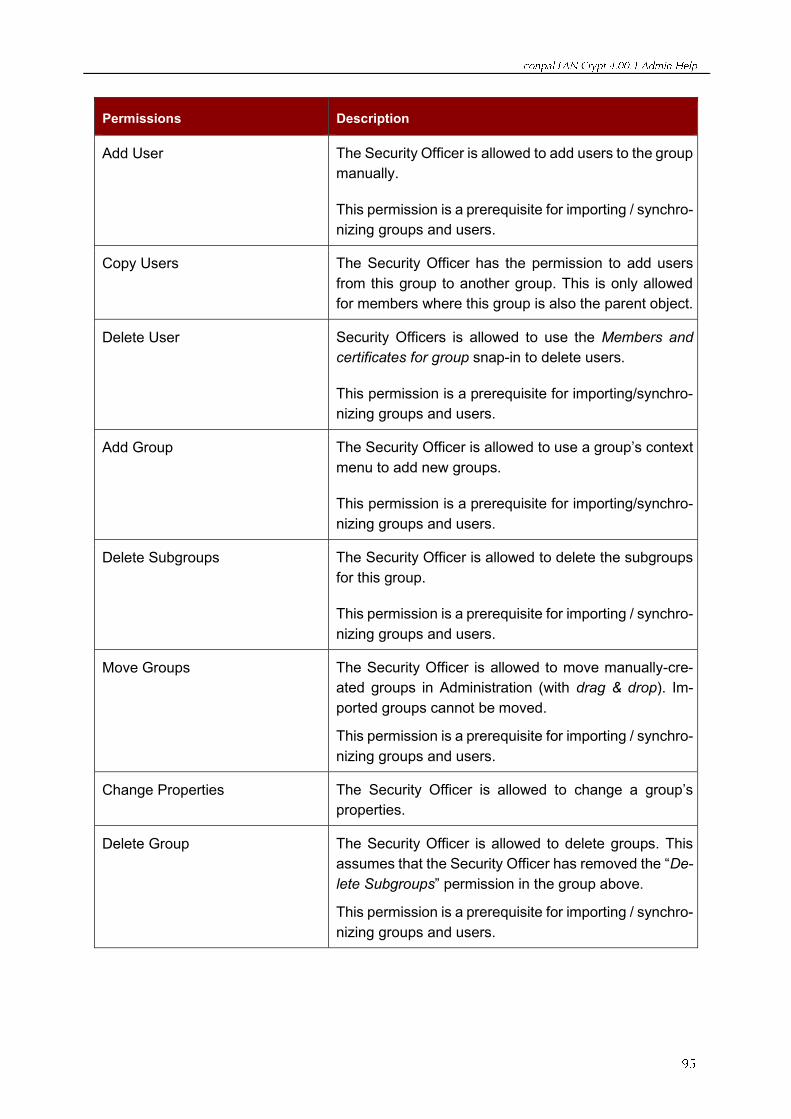
Permissions Description
Add User The Security Officer is allowed to add users to the group
manually.
This permission is a prerequisite for importing / synchro-
nizing groups and users.
Copy Users The Security Officer has the permission to add users
from this group to another group. This is only allowed
for members where this group is also the parent object.
Delete User Security Officers is allowed to use the Members and
certificates for group snap-in to delete users.
This permission is a prerequisite for importing/synchro-
nizing groups and users.
Add Group The Security Officer is allowed to use a group’s context
menu to add new groups.
This permission is a prerequisite for importing/synchro-
nizing groups and users.
Delete Subgroups The Security Officer is allowed to delete the subgroups
for this group.
This permission is a prerequisite for importing / synchro-
nizing groups and users.
Move Groups The Security Officer is allowed to move manually-cre-
ated groups in Administration (with drag & drop). Im-
ported groups cannot be moved.
This permission is a prerequisite for importing / synchro-
nizing groups and users.
Change Properties The Security Officer is allowed to change a group’s
properties.
Delete Group The Security Officer is allowed to delete groups. This
assumes that the Security Officer has removed the “De-
lete Subgroups” permission in the group above.
This permission is a prerequisite for importing / synchro-
nizing groups and users.
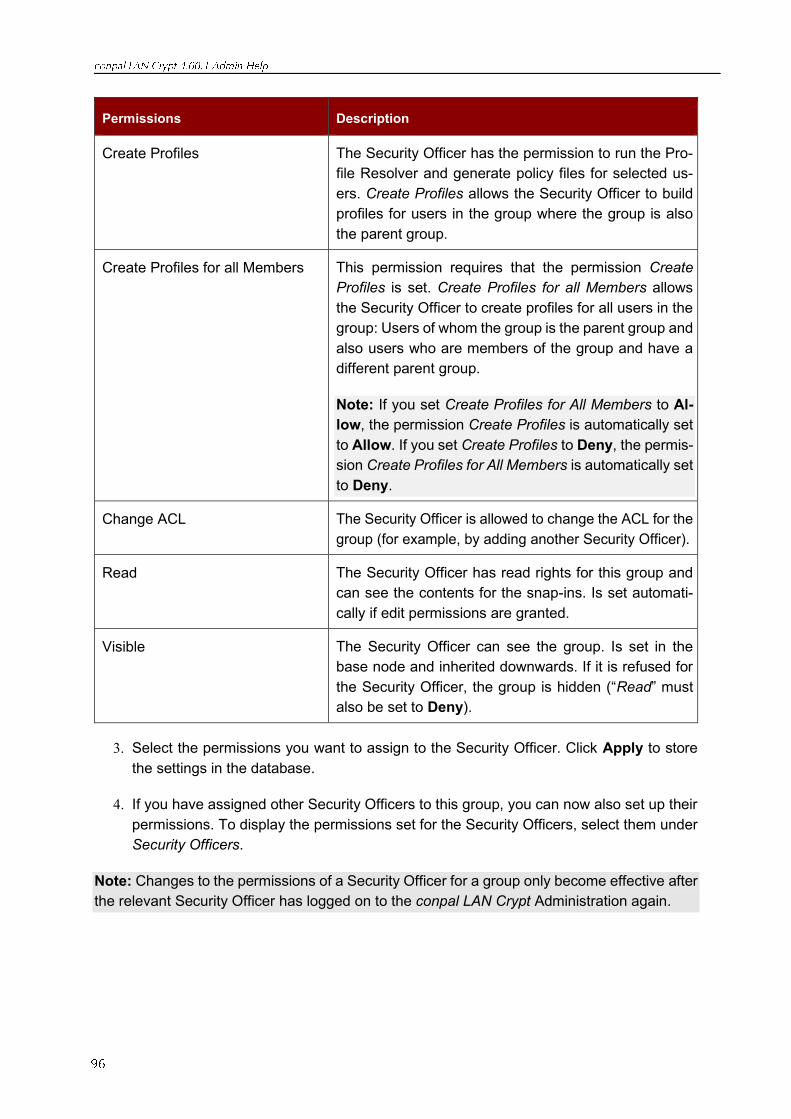
Permissions Description
Create Profiles The Security Officer has the permission to run the Pro-
file Resolver and generate policy files for selected us-
ers. Create Profiles allows the Security Officer to build
profiles for users in the group where the group is also
the parent group.
Create Profiles for all Members This permission requires that the permission Create
Profiles is set. Create Profiles for all Members allows
the Security Officer to create profiles for all users in the
group: Users of whom the group is the parent group and
also users who are members of the group and have a
different parent group.
Note: If you set Create Profiles for All Members to Al-
low, the permission Create Profiles is automatically set
to Allow. If you set Create Profiles to Deny, the permis-
sion Create Profiles for All Members is automatically set
to Deny.
Change ACL The Security Officer is allowed to change the ACL for the
group (for example, by adding another Security Officer).
Read The Security Officer has read rights for this group and
can see the contents for the snap-ins. Is set automati-
cally if edit permissions are granted.
Visible The Security Officer can see the group. Is set in the
base node and inherited downwards. If it is refused for
the Security Officer, the group is hidden (“Read” must
also be set to Deny).
3. Select the permissions you want to assign to the Security Officer. Click Apply to store
the settings in the database.
4. If you have assigned other Security Officers to this group, you can now also set up their
permissions. To display the permissions set for the Security Officers, select them under
Security Officers.
Note: Changes to the permissions of a Security Officer for a group only become effective after
the relevant Security Officer has logged on to the conpal LAN Crypt Administration again.
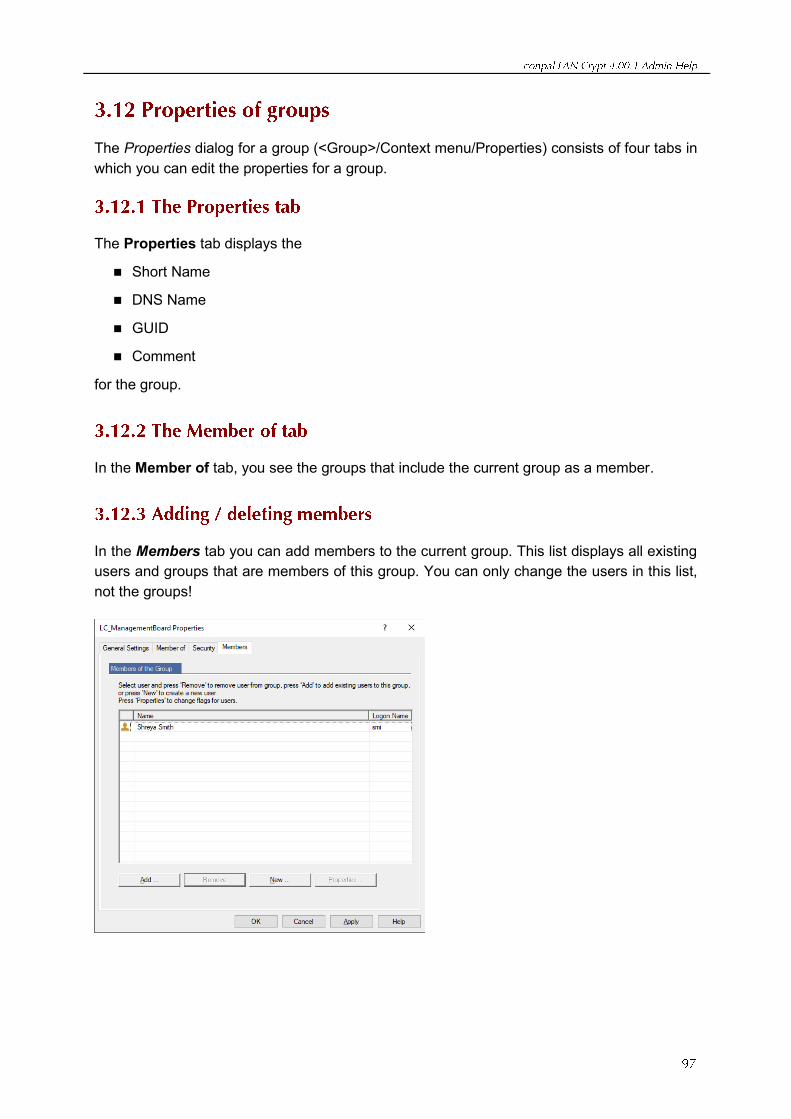
The Properties dialog for a group (<Group>/Context menu/Properties) consists of four tabs in
which you can edit the properties for a group.
The Properties tab displays the
◼ Short Name
◼ DNS Name
◼ GUID
◼ Comment
for the group.
In the Member of tab, you see the groups that include the current group as a member.
In the Members tab you can add members to the current group. This list displays all existing
users and groups that are members of this group. You can only change the users in this list,
not the groups!
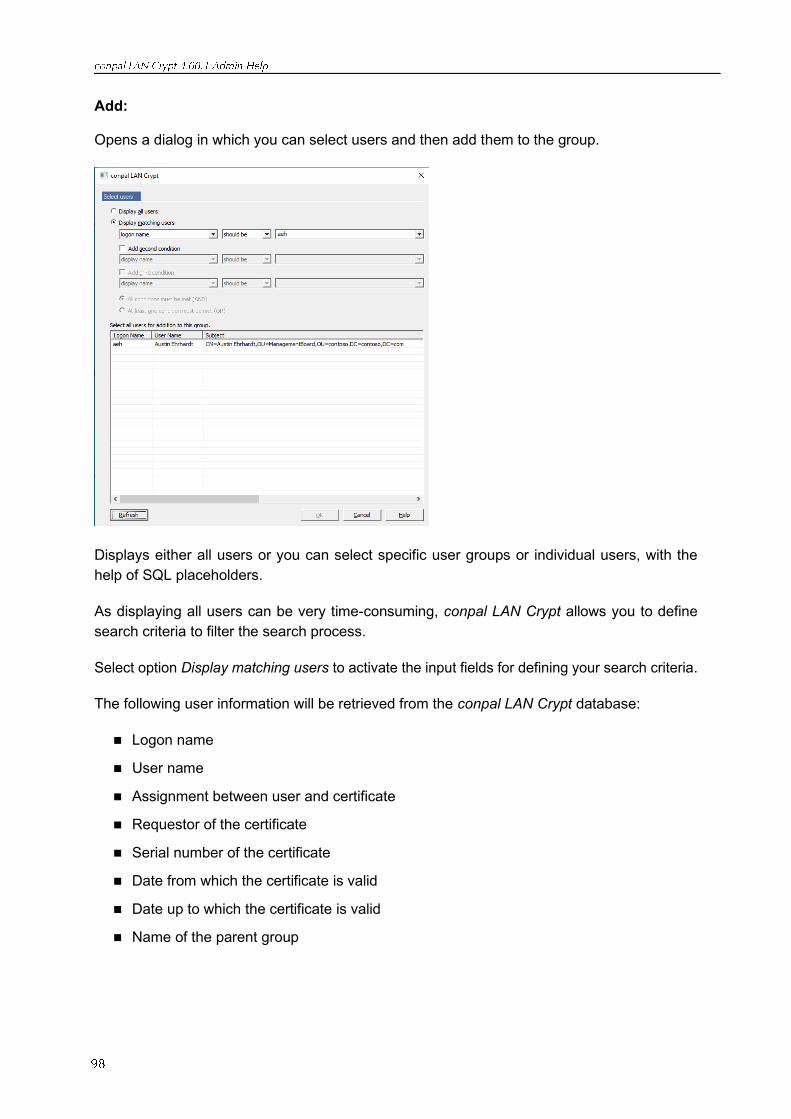
Add:
Opens a dialog in which you can select users and then add them to the group.
Displays either all users or you can select specific user groups or individual users, with the
help of SQL placeholders.
As displaying all users can be very time-consuming, conpal LAN Crypt allows you to define
search criteria to filter the search process.
Select option Display matching users to activate the input fields for defining your search criteria.
The following user information will be retrieved from the conpal LAN Crypt database:
◼ Logon name
◼ User name
◼ Assignment between user and certificate
◼ Requestor of the certificate
◼ Serial number of the certificate
◼ Date from which the certificate is valid
◼ Date up to which the certificate is valid
◼ Name of the parent group

You can define search criteria based on these attributes. conpal LAN Crypt searches for de-
fined character string in the user attributes retrieved.
In the first drop-down list, you can select the attribute(s) on which the search process is to be
applied.
In addition, you can define whether the selected attribute should correspond to the character
string entered (should be) or if only users are to be displayed, for whom the selected attribute
does not correspond to the character string entered (must not be).
In the drop-down list on the right-hand side, you can enter the character string conpal LAN
Crypt searches for in the defined attribute.
You can use the following SQL wildcards for entering the character string:
% any character sequence
_ single character
(e.g., a__ means search for all names containing three characters and
starting with a)
[] single character from a list
(e.g., [a-cg]% means search for all names starting with a, b, c
or g)
[^] single character not contained in a list
(e.g., [^a]% search for all names not starting with a)
You can specify up to three conditions for the search process
If you enter more than one condition, you can define how these conditions are to be combined
(AND/OR).
If you click OK, all users whose names are selected in the list are transferred to the current
group.
New:
Opens a dialog in which you can create a new user.
Delete:
Deletes the selected user membership from the current group.
Note: If the user is not a member of any other group, they are deleted from the conpal LAN
Crypt database!
If the user is a member of more than one group and the current group is the parent group of
the user, the resulting action depends on the type of the group:
◼ If the group is an Organizational Unit or root group and the user is a member of another
OU or root group, this OU or root group becomes the parent group of the user. If there
is no other OU or root group the user is member of, the user is deleted (similar to Active
Directory where a user is deleted, when the OU the user belongs to is deleted).
◼ If the group is a simple group (not an OU and not a root group), one of the other groups
the user belongs to becomes the parent group of the user.
Properties:
Displays the properties of the selected user.
Note: A user can only exist once in a particular container. If you try to create / add a user to a
container in which they are already present, a message is displayed informing you that this is
not possible.
However, more than one user with the same name can be present in the system, as long as
they are not in the same container.
On the Security tab, a Security Officer can also add Security Officers to the current group and
assign them rights to the group. The prerequisite for this action is that the Security Officer who
wants to add another Security Officer has the Change ACL permission.
Note: If the Security Officer adds Security Officers to the group, the Security Officer can assign
their own permissions (and only those permissions) to those Security Officers.
A Security Officer cannot add themselves to an ACL or edit their rights in an ACL.
The Properties dialog for a user (<user>/Context menu/Properties) consists of four tabs in
which you can edit the properties for a user.
The Certificates tab displays all the certificates that are assigned to a user. In this tab you can
also create a new conpal LAN Crypt certificate for the user, add a certificate from the certificate
store and import a certificate from a file (see Assigning a certificate to a user on page 125).
The Groups tab displays the groups in which the current user is a member.
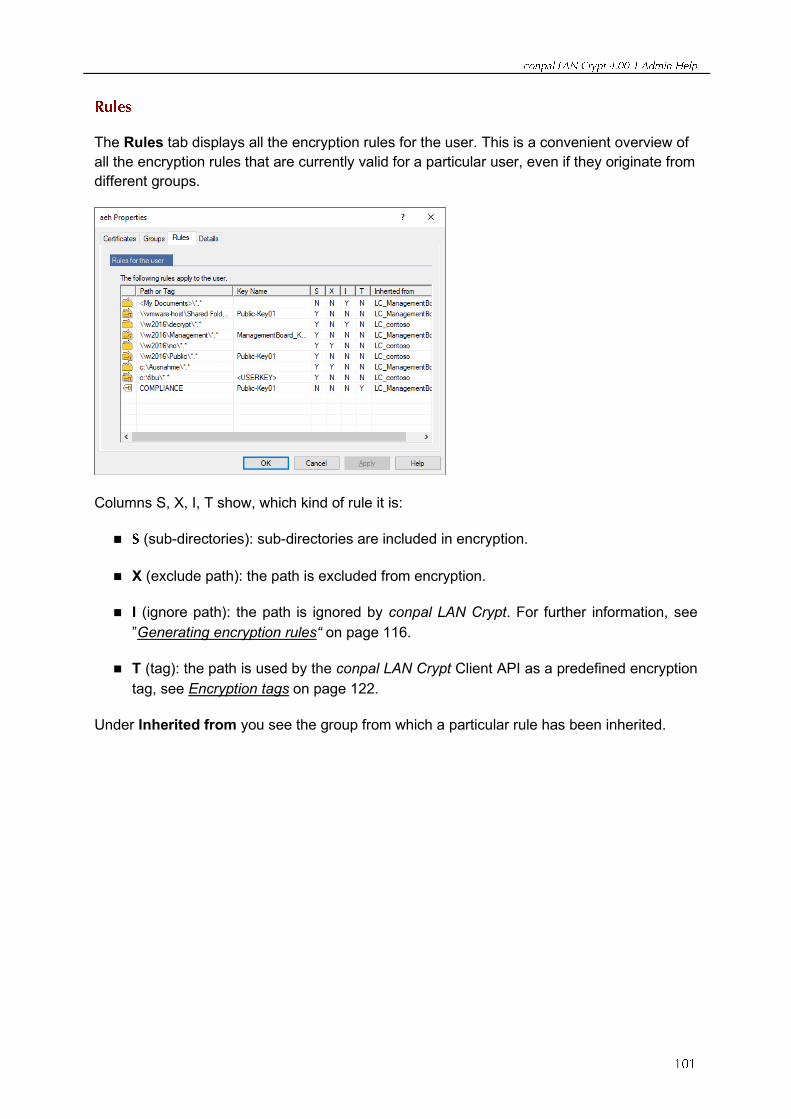
The Rules tab displays all the encryption rules for the user. This is a convenient overview of
all the encryption rules that are currently valid for a particular user, even if they originate from
different groups.
Columns S, X, I, T show, which kind of rule it is:
◼ (sub-directories): sub-directories are included in encryption.
◼ X (exclude path): the path is excluded from encryption.
◼ I (ignore path): the path is ignored by conpal LAN Crypt. For further information, see
”Generating encryption rules“ on page 116.
◼ T (tag): the path is used by the conpal LAN Crypt Client API as a predefined encryption
tag, see Encryption tags on page 122.
Under Inherited from you see the group from which a particular rule has been inherited.
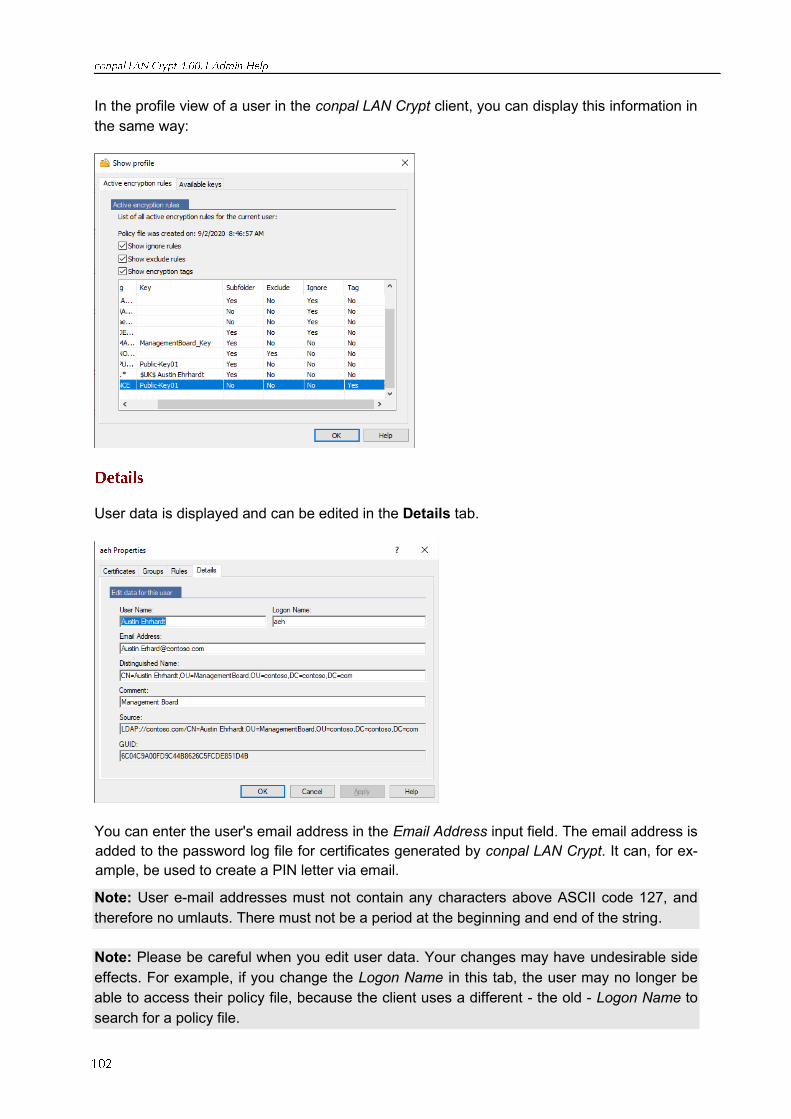
In the profile view of a user in the conpal LAN Crypt client, you can display this information in
the same way:
User data is displayed and can be edited in the Details tab.
You can enter the user's email address in the Email Address input field. The email address is
added to the password log file for certificates generated by conpal LAN Crypt. It can, for ex-
ample, be used to create a PIN letter via email.
Note: User e-mail addresses must not contain any characters above ASCII code 127, and
therefore no umlauts. There must not be a period at the beginning and end of the string.
Note: Please be careful when you edit user data. Your changes may have undesirable side
effects. For example, if you change the Logon Name in this tab, the user may no longer be
able to access their policy file, because the client uses a different - the old - Logon Name to
search for a policy file.
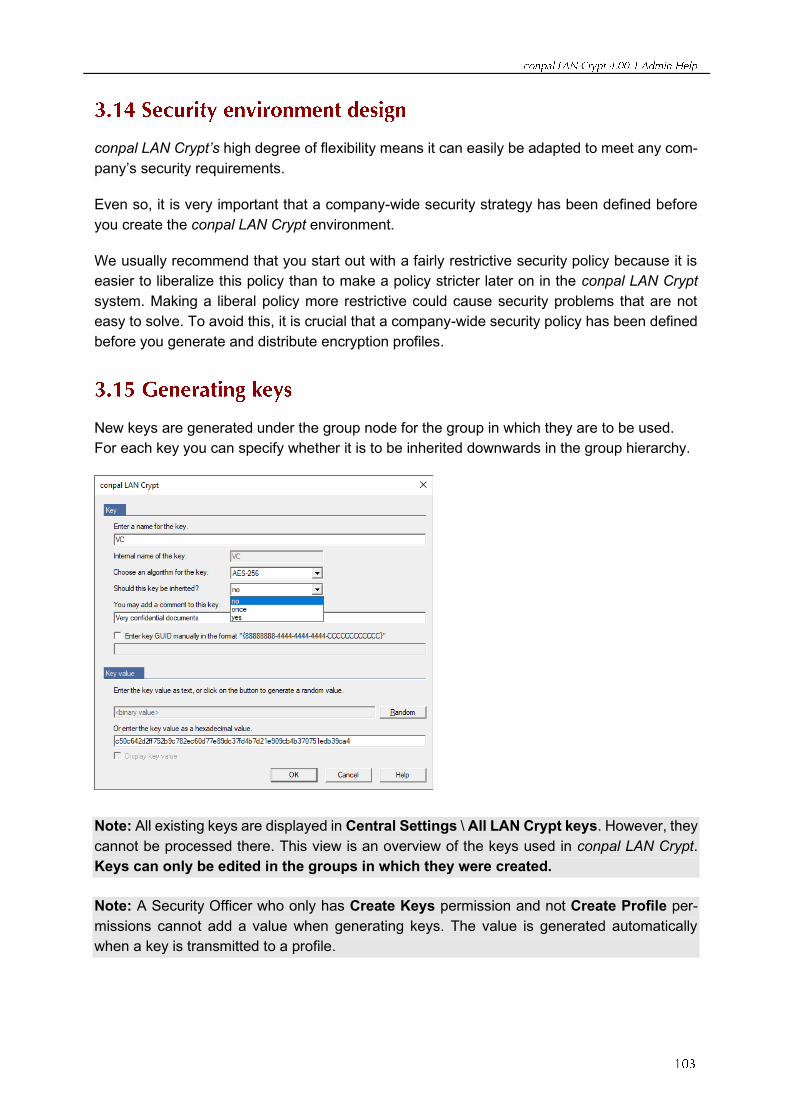
conpal LAN Crypt’s high degree of flexibility means it can easily be adapted to meet any com-
pany’s security requirements.
Even so, it is very important that a company-wide security strategy has been defined before
you create the conpal LAN Crypt environment.
We usually recommend that you start out with a fairly restrictive security policy because it is
easier to liberalize this policy than to make a policy stricter later on in the conpal LAN Crypt
system. Making a liberal policy more restrictive could cause security problems that are not
easy to solve. To avoid this, it is crucial that a company-wide security policy has been defined
before you generate and distribute encryption profiles.
New keys are generated under the group node for the group in which they are to be used.
For each key you can specify whether it is to be inherited downwards in the group hierarchy.
Note: All existing keys are displayed in Central Settings \ All LAN Crypt keys. However, they
cannot be processed there. This view is an overview of the keys used in conpal LAN Crypt.
Keys can only be edited in the groups in which they were created.
Note: A Security Officer who only has Create Keys permission and not Create Profile per-
missions cannot add a value when generating keys. The value is generated automatically
when a key is transmitted to a profile.
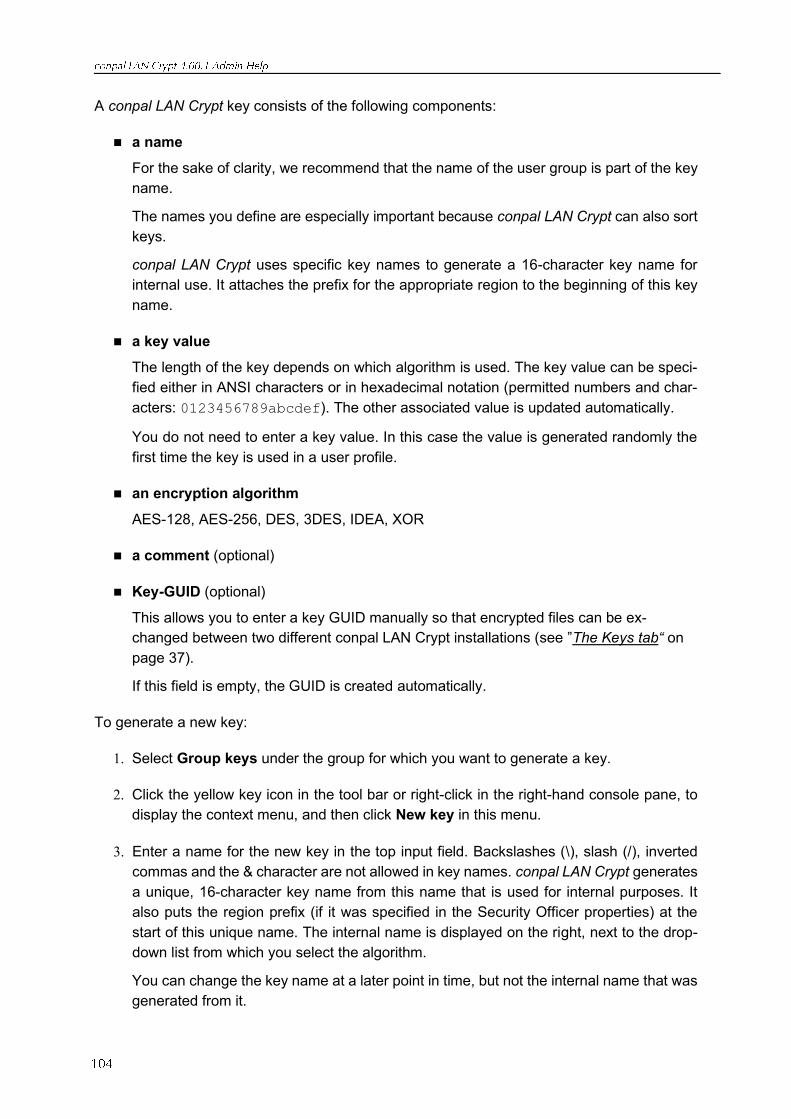
A conpal LAN Crypt key consists of the following components:
◼ a name
For the sake of clarity, we recommend that the name of the user group is part of the key
name.
The names you define are especially important because conpal LAN Crypt can also sort
keys.
conpal LAN Crypt uses specific key names to generate a 16-character key name for
internal use. It attaches the prefix for the appropriate region to the beginning of this key
name.
◼ a key value
The length of the key depends on which algorithm is used. The key value can be speci-
fied either in ANSI characters or in hexadecimal notation (permitted numbers and char-
acters: 0123456789abcdef). The other associated value is updated automatically.
You do not need to enter a key value. In this case the value is generated randomly the
first time the key is used in a user profile.
◼ an encryption algorithm
AES-128, AES-256, DES, 3DES, IDEA, XOR
◼ a comment (optional)
◼ Key-GUID (optional)
This allows you to enter a key GUID manually so that encrypted files can be ex-
changed between two different conpal LAN Crypt installations (see ”The Keys tab“ on
page 37).
If this field is empty, the GUID is created automatically.
To generate a new key:
1. Select Group keys under the group for which you want to generate a key.
2. Click the yellow key icon in the tool bar or right-click in the right-hand console pane, to
display the context menu, and then click New key in this menu.
3. Enter a name for the new key in the top input field. Backslashes (\), slash (/), inverted
commas and the & character are not allowed in key names. conpal LAN Crypt generates
a unique, 16-character key name from this name that is used for internal purposes. It
also puts the region prefix (if it was specified in the Security Officer properties) at the
start of this unique name. The internal name is displayed on the right, next to the drop-
down list from which you select the algorithm.
You can change the key name at a later point in time, but not the internal name that was
generated from it.
4. Select an encryption algorithm from the drop-down list.
Here you can only see the algorithms that you have made available in the Central Settings.
Note: Please always choose a secure algorithm, such as AES-256 or AES-128 to en-
crypt your data, as encryption algorithms such as XOR, IDEA, DES or 3DES are no
longer considered secure!
5. Specify whether the key can be inherited in the group or not:
◼ No
The key is not inherited and is therefore only available in the current group.
◼ Once
The key is inherited in the group(s) in the next hierarchy level below the current group.
◼ Yes
The key is inherited in all groups in the hierarchy levels below the current group, and
is available there for generating encryption rules.
6. Enter a comment for this key in the next input field.
7. If necessary, click the Enter key GUID manually in {88888888-4444-4444-4444-…}
format check box and enter the GUID you require (this is only possible if the “Security
Officers can define the GUID for new keys” option is active in “Central Settings”). The
predefined GUID {88888888-4444-4444-4444-CCCCCCCCCCCC} cannot simply be
accepted for use here. You must change it in every case.
8. Enter a hexadecimal value (letters A-F, numbers 0-9) or a character string in the ANSI
input field for the key value. The other associated value is updated automatically. Alter-
natively, click Random (recommended) to have conpal LAN Crypt calculate a value.
9. Click OK.
The new key is displayed in the Administration Console.
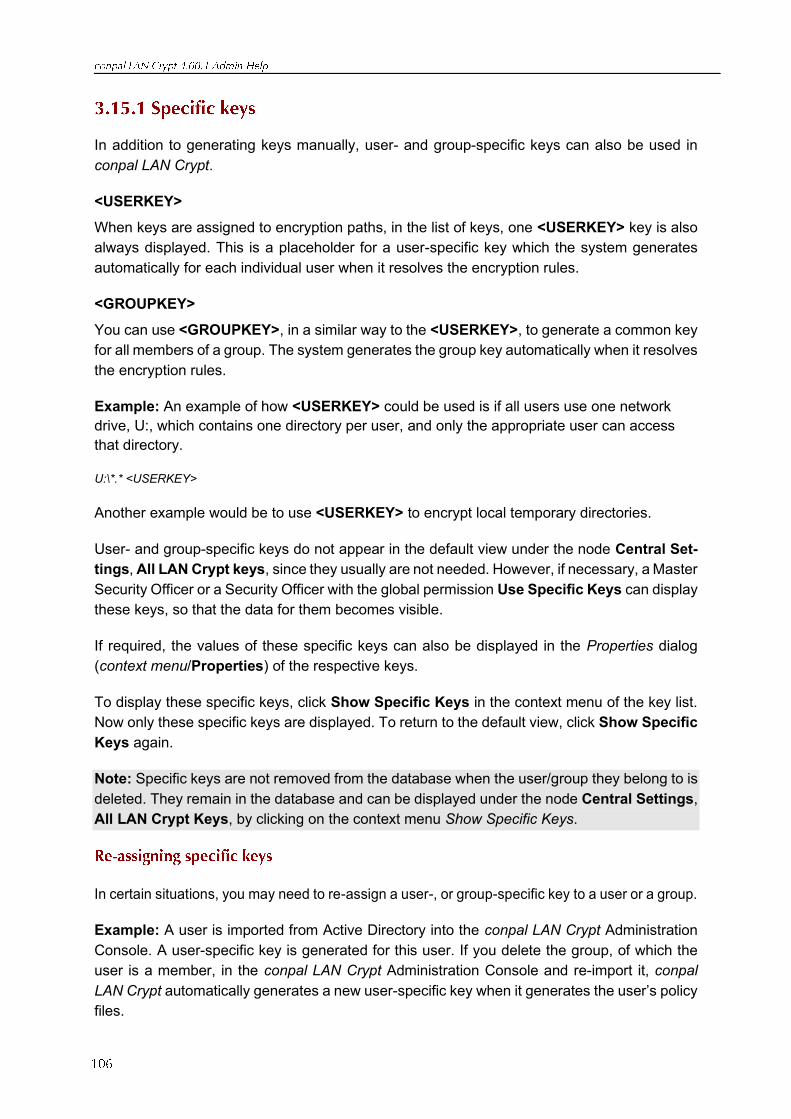
In addition to generating keys manually, user- and group-specific keys can also be used in
conpal LAN Crypt.
<USERKEY>
When keys are assigned to encryption paths, in the list of keys, one <USERKEY> key is also
always displayed. This is a placeholder for a user-specific key which the system generates
automatically for each individual user when it resolves the encryption rules.
<GROUPKEY>
You can use <GROUPKEY>, in a similar way to the <USERKEY>, to generate a common key
for all members of a group. The system generates the group key automatically when it resolves
the encryption rules.
Example: An example of how <USERKEY> could be used is if all users use one network
drive, U:, which contains one directory per user, and only the appropriate user can access
that directory.
U:\*.* <USERKEY>
Another example would be to use <USERKEY> to encrypt local temporary directories.
User- and group-specific keys do not appear in the default view under the node Central Set-
tings, All LAN Crypt keys, since they usually are not needed. However, if necessary, a Master
Security Officer or a Security Officer with the global permission Use Specific Keys can display
these keys, so that the data for them becomes visible.
If required, the values of these specific keys can also be displayed in the Properties dialog
(context menu/Properties) of the respective keys.
To display these specific keys, click Show Specific Keys in the context menu of the key list.
Now only these specific keys are displayed. To return to the default view, click Show Specific
Keys again.
Note: Specific keys are not removed from the database when the user/group they belong to is
deleted. They remain in the database and can be displayed under the node Central Settings,
All LAN Crypt Keys, by clicking on the context menu Show Specific Keys.
In certain situations, you may need to re-assign a user-, or group-specific key to a user or a group.
Example: A user is imported from Active Directory into the conpal LAN Crypt Administration
Console. A user-specific key is generated for this user. If you delete the group, of which the
user is a member, in the conpal LAN Crypt Administration Console and re-import it, conpal
LAN Crypt automatically generates a new user-specific key when it generates the user’s policy
files.
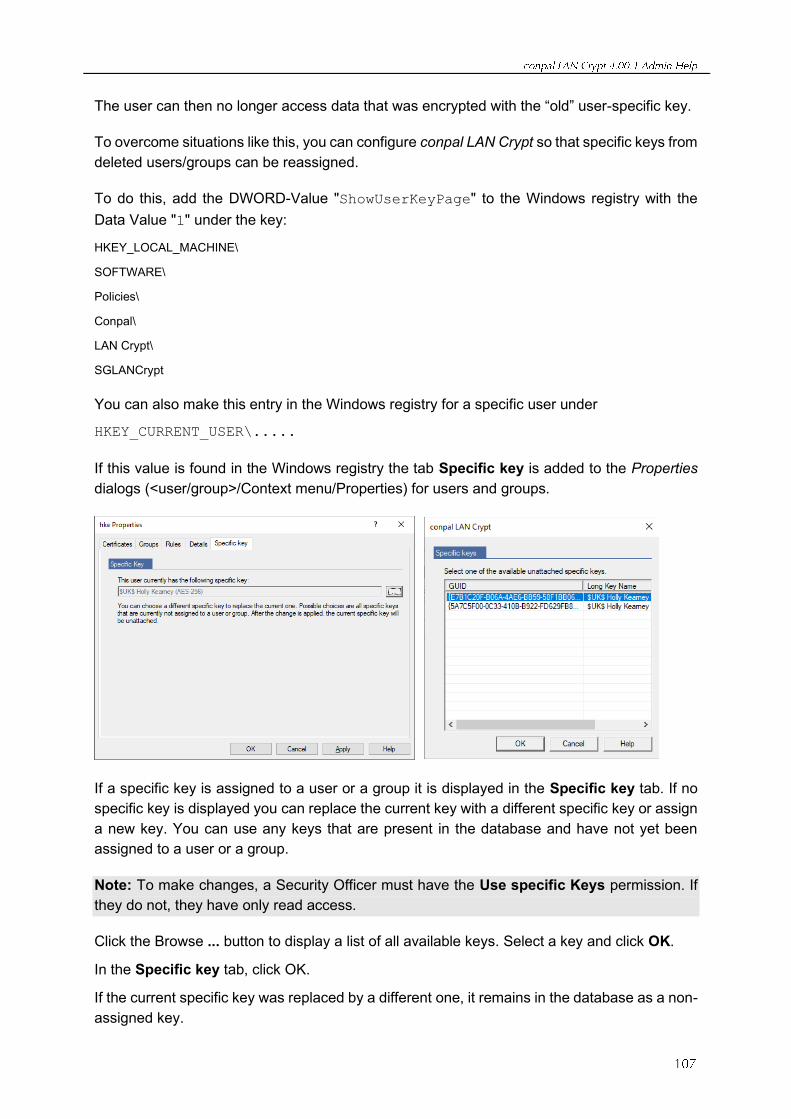
The user can then no longer access data that was encrypted with the “old” user-specific key.
To overcome situations like this, you can configure conpal LAN Crypt so that specific keys from
deleted users/groups can be reassigned.
To do this, add the DWORD-Value "ShowUserKeyPage" to the Windows registry with the
Data Value "1" under the key:
HKEY_LOCAL_MACHINE\
SOFTWARE\
Policies\
Conpal\
LAN Crypt\
SGLANCrypt
You can also make this entry in the Windows registry for a specific user under
HKEY_CURRENT_USER\.....
If this value is found in the Windows registry the tab Specific key is added to the Properties
dialogs (<user/group>/Context menu/Properties) for users and groups.
If a specific key is assigned to a user or a group it is displayed in the Specific key tab. If no
specific key is displayed you can replace the current key with a different specific key or assign
a new key. You can use any keys that are present in the database and have not yet been
assigned to a user or a group.
Note: To make changes, a Security Officer must have the Use specific Keys permission. If
they do not, they have only read access.
Click the Browse ... button to display a list of all available keys. Select a key and click OK.
In the Specific key tab, click OK.
If the current specific key was replaced by a different one, it remains in the database as a non-
assigned key.
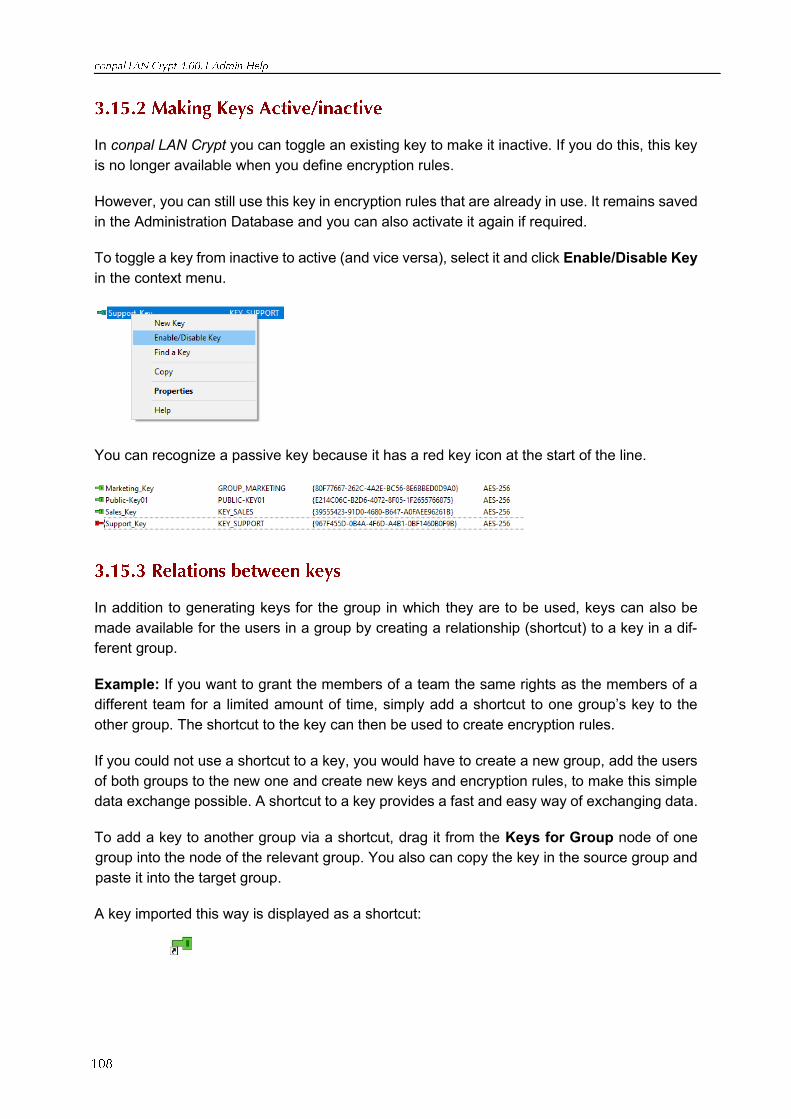
In conpal LAN Crypt you can toggle an existing key to make it inactive. If you do this, this key
is no longer available when you define encryption rules.
However, you can still use this key in encryption rules that are already in use. It remains saved
in the Administration Database and you can also activate it again if required.
To toggle a key from inactive to active (and vice versa), select it and click Enable/Disable Key
in the context menu.
You can recognize a passive key because it has a red key icon at the start of the line.
In addition to generating keys for the group in which they are to be used, keys can also be
made available for the users in a group by creating a relationship (shortcut) to a key in a dif-
ferent group.
Example: If you want to grant the members of a team the same rights as the members of a
different team for a limited amount of time, simply add a shortcut to one group’s key to the
other group. The shortcut to the key can then be used to create encryption rules.
If you could not use a shortcut to a key, you would have to create a new group, add the users
of both groups to the new one and create new keys and encryption rules, to make this simple
data exchange possible. A shortcut to a key provides a fast and easy way of exchanging data.
To add a key to another group via a shortcut, drag it from the Keys for Group node of one
group into the node of the relevant group. You also can copy the key in the source group and
paste it into the target group.
A key imported this way is displayed as a shortcut:
A Security Officer must have these global permissions before they can insert shortcuts to keys:
◼ Create Keys
◼ Copy Keys
In the source group they must also have the group-specific right
◼ Create Keys
and
◼ Copy Keys
in the target group.
To delete a shortcut the Security Officer must have the global and group-specific Delete Keys
permission.
Keys inserted as shortcuts have the following properties:
◼ They will NOT be inherited, and are therefore only available in the group in which
they have been created. NOT in sub-groups.
◼ If the “original” key is deleted, all shortcuts are also removed.
Note: In the same way as for “normal” group keys, if you remove a reference it does not mean
that the rule, in which they have been used, is no longer valid. To remove access to data you
must delete the corresponding encryption rule and generate a new policy file. The client must
load the new policy file for the first time, to prevent a user from accessing this data.
You can only delete a key from the group in which it was generated. You must deactivate the
key before deleting it.
If you delete keys that are in use, they are removed from the group, but remain in the database
as unassigned keys and are displayed in Central settings/All LAN Crypt keys.
If you need this key again later (for example, to access an encrypted backup of old data), you
can simply drag it from the list of all LAN Crypt keys into the relevant group, where you can
use it again. A Security Officer can add a key to any group for which they have the Create
Keys permission. The key is actually added to group; it is not a shortcut.
Note: If you delete a key which has been never used in an encryption rule, it is actually deleted
from the database. The key is no longer displayed under All LAN Crypt keys.
Under the following conditions keys can be actually deleted (under the node All LAN Crypt
keys) from the database:
◼ You must be logged on as a Master Security Officer.
◼ The keys must not be used in any encryption rule.
◼ The key must not be present in any group.
◼ The key must not be a specific key assigned to a user or group.
◼ The key must be deactivated.
After you have generated a key, you can change its name, the type of inheritance specified for
it, and the comment.
You can see whether a key was already used in the used column in the console.
To change a key, go to the group in which the key was generated and double-click the relevant
key name. You see a dialog in which you can change the key.
The Properties dialog displays information about the selected key. In this dialog you can
change the long key name and the settings that define whether or not the key can be inherited.
You cannot change the 16-character unique key name for internal use that was generated by
conpal LAN Crypt.
Note: To edit a key, the Security Officer must have the group-specific Create Key permission
for the groups in which the key was generated. Keys that do not belong to a particular group
cannot be changed.
Double-click a key to display its properties.
The Properties dialog consists of three tabs:
◼ The Key tab displays a key’s data. In this tab you can change the long key name and
the settings that define whether or not the key can be inherited. Click Display key value
to display the key’s value.
◼ The Groups tab displays all the groups in which the key is available and can be used to
create encryption rules.
◼ The Rules tab displays all the encryption rules in which the key is used.
The Groups and Rules tabs are for information only. No changes can be made here.
The conpal LAN Crypt encryption rules define precisely which data can be encrypted with
each key. An encryption rule consists of an encryption path and a key.
Note: When you specify the path for an encryption rule, you must also specify the files or file
types. You can also use wildcards (e.g. "*.*").
The encryption rules defined for a group make up one conpal LAN Crypt encryption profile.
The encryption profile for a group can contain different encryption rules, each one used to
encrypt a specific type of data.
You can encrypt entire drives, removable media (such as USB flash drives), optical drives,
network shares, folders (including sub-folders), particular file types (identified by their file ex-
tension) and individual files (identified by their file name or parts of a file name).
When you generate the individual encryption rules the system displays all the keys that are
present in the group. The conpal LAN Crypt Security Officer can now assign the appropriate
keys to define what data a user should be able to access.
Encryption rules are always generated per group. They consist of a path and a key, and are
created in the node Encryption Rules and Tags. It is easy to generate an encryption rule
because you enter the path details, choose a key and select different options in the same
dialog.
The Path, key selection and various options are summarized in a dialog so that an encryption
rule can be easily created. Encryption rules can be changed later as required, e.g. if the previ-
ously selected algorithm for a key no longer meets the required security requirements. In this
case the previously used key (e.g., with IDEA algorithm) could be replaced by a new key with
used a higher security algorithm (e.g. AES-XTS 256 bit). After performing an initial encryption,
all existing files would then be encrypted with the new key and higher security algorithm.
Note: If a previously used key is to be replaced by another key for an existing encryption rule,
the old key must remain in the possession of the user. The old key is then required for the re-
encryption of existing encrypted data that is still encrypted with this key. To do this, assign the
old key as key without path to the respective users (see “key without path“ on page 120).
Note: conpal generally recommends encrypting all data according to AES with a key
length of 256 bits. Data that is still encrypted with an outdated algorithm (e.g., DES, 3DES,
IDEA, XOR) should definitely be re-encrypted to AES 256 bit as soon as possible for security
reasons.
Encryption rules are always inherited by subordinate groups.
Note: Do not define an encryption rule for the folder “Temporary Internet Files“.
The encryption paths define which data is to be encrypted. You define them in the Encryption
Rules and Tags node under the relevant group node. They then apply to all users who are
present in that group.
Note: Paths to *.zip files or compressed folders cannot be used as encryption paths.
conpal LAN Crypt supports relative path definitions. A relative path definition specifies a path
to a directory or a file that does not identify the disk drive involved, or the next highest directory
in the hierarchy. If you select a relative path definition, the system encrypts each directory that
matches that path definition.
You can use relative paths in two ways:
◼ Entry: \my_data\*.*
encrypts every “my_data” folder in the ROOT directories.
For example, these would be the following folders:
C:\my_data\*.*
D:\my_data\*.*
F:\my_data\*.*
Z:\my_data\*.*
◼ Entry: my_data\*.*
encrypts EVERY “my_data” folder.
Example:
C:\company\my_data\*.*
Z:\Departments\development\Team1\my_data\*.*
In both cases all files in the “my_data” folders are encrypted.
If a directory path begins with a backslash, the relative path definition only applies to root di-
rectories.
By selecting the <Boot Volume> option, you can encrypt files located on the system drive
(where Windows is also installed). After selecting this option, you can also customize the pre-
defined entry "*.*" (this applies to all files) in the input field as well.
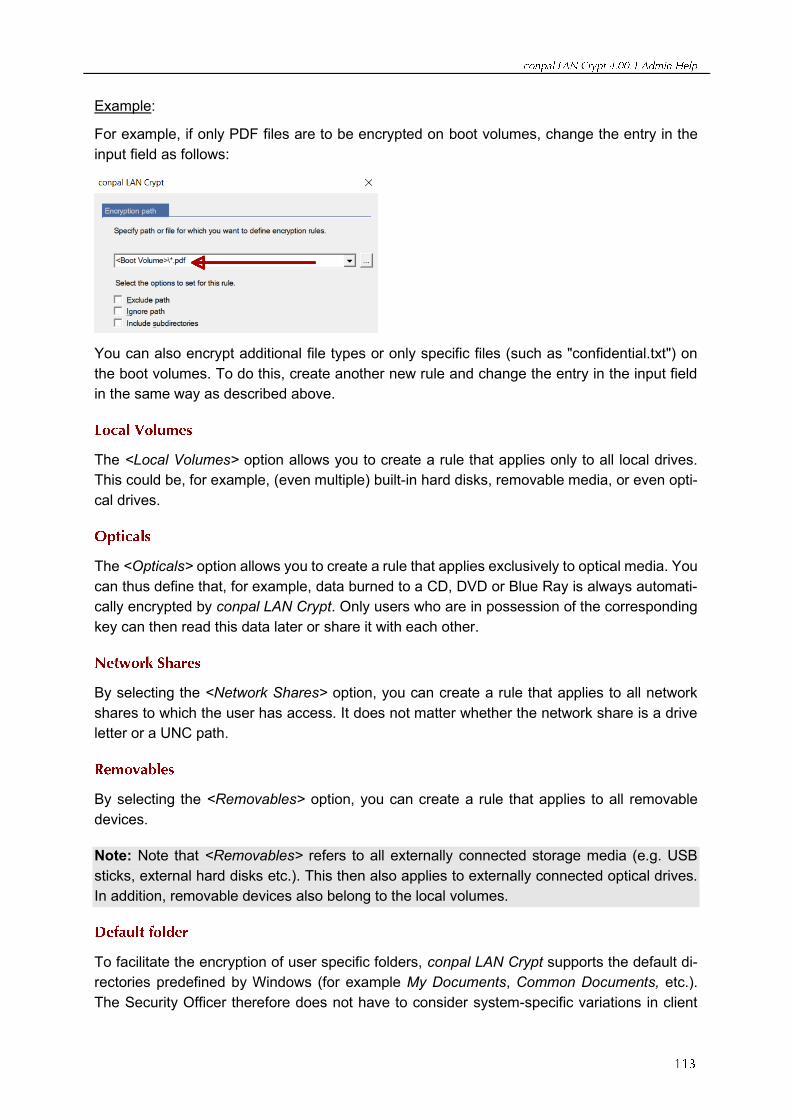
Example:
For example, if only PDF files are to be encrypted on boot volumes, change the entry in the
input field as follows:
You can also encrypt additional file types or only specific files (such as "confidential.txt") on
the boot volumes. To do this, create another new rule and change the entry in the input field
in the same way as described above.
The <Local Volumes> option allows you to create a rule that applies only to all local drives.
This could be, for example, (even multiple) built-in hard disks, removable media, or even opti-
cal drives.
The <Opticals> option allows you to create a rule that applies exclusively to optical media. You
can thus define that, for example, data burned to a CD, DVD or Blue Ray is always automati-
cally encrypted by conpal LAN Crypt. Only users who are in possession of the corresponding
key can then read this data later or share it with each other.
By selecting the <Network Shares> option, you can create a rule that applies to all network
shares to which the user has access. It does not matter whether the network share is a drive
letter or a UNC path.
By selecting the <Removables> option, you can create a rule that applies to all removable
devices.
Note: Note that <Removables> refers to all externally connected storage media (e.g. USB
sticks, external hard disks etc.). This then also applies to externally connected optical drives.
In addition, removable devices also belong to the local volumes.
To facilitate the encryption of user specific folders, conpal LAN Crypt supports the default di-
rectories predefined by Windows (for example My Documents, Common Documents, etc.).
The Security Officer therefore does not have to consider system-specific variations in client
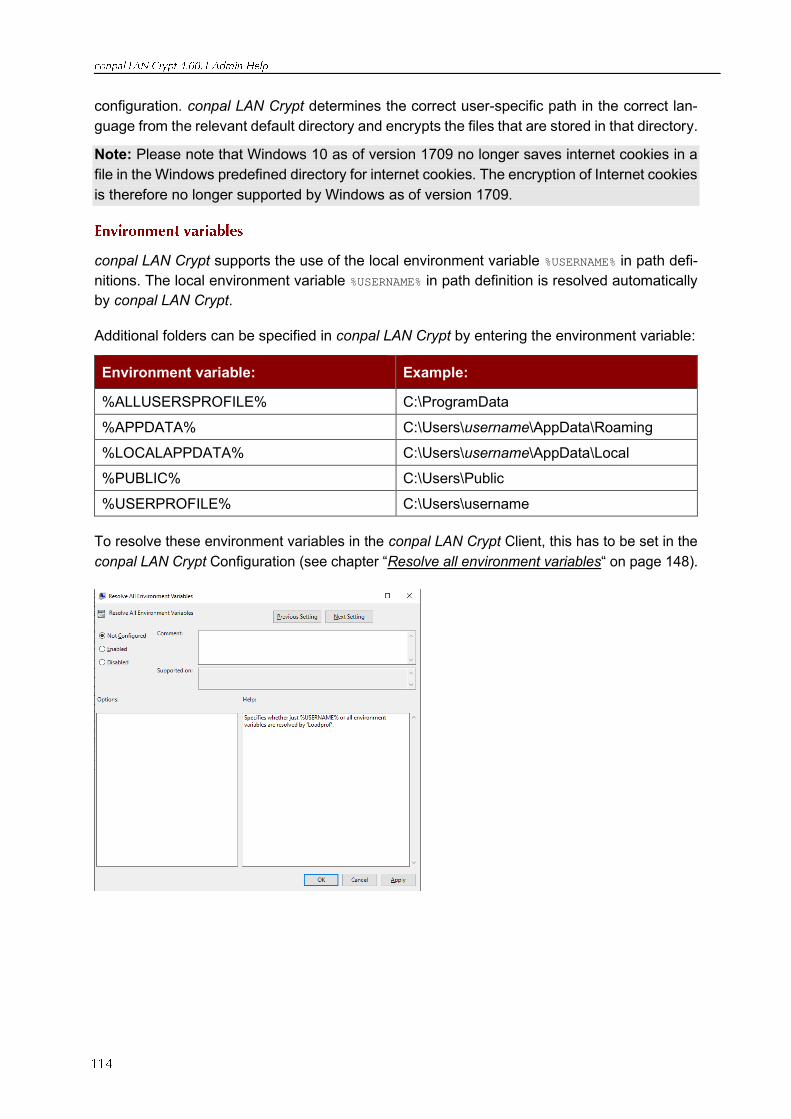
configuration. conpal LAN Crypt determines the correct user-specific path in the correct lan-
guage from the relevant default directory and encrypts the files that are stored in that directory.
Note: Please note that Windows 10 as of version 1709 no longer saves internet cookies in a
file in the Windows predefined directory for internet cookies. The encryption of Internet cookies
is therefore no longer supported by Windows as of version 1709.
conpal LAN Crypt supports the use of the local environment variable %USERNAME% in path defi-
nitions. The local environment variable %USERNAME% in path definition is resolved automatically
by conpal LAN Crypt.
Additional folders can be specified in conpal LAN Crypt by entering the environment variable:
Environment variable: Example:
%ALLUSERSPROFILE% C:\ProgramData
%APPDATA% C:\Users\username\AppData\Roaming
%LOCALAPPDATA% C:\Users\username\AppData\Local
%PUBLIC% C:\Users\Public
%USERPROFILE% C:\Users\username
To resolve these environment variables in the conpal LAN Crypt Client, this has to be set in the
conpal LAN Crypt Configuration (see chapter “Resolve all environment variables“ on page 148).
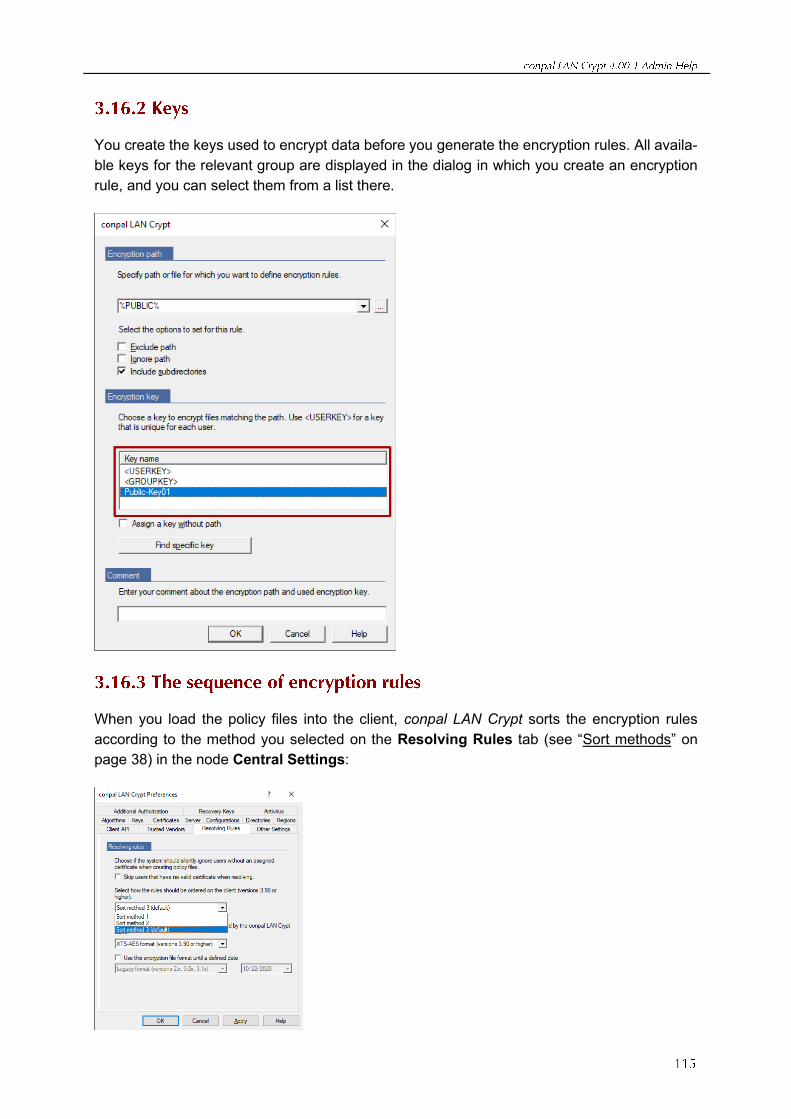
You create the keys used to encrypt data before you generate the encryption rules. All availa-
ble keys for the relevant group are displayed in the dialog in which you create an encryption
rule, and you can select them from a list there.
When you load the policy files into the client, conpal LAN Crypt sorts the encryption rules
according to the method you selected on the Resolving Rules tab (see “Sort methods” on
page 38) in the node Central Settings:
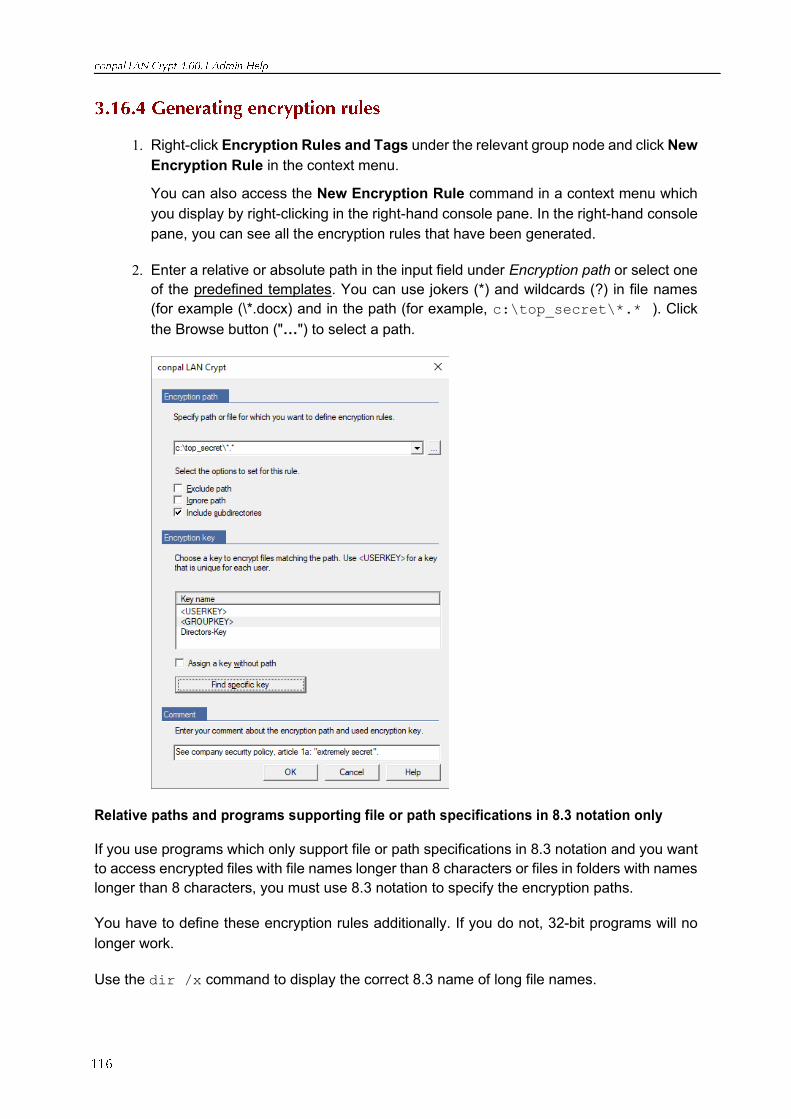
1. Right-click Encryption Rules and Tags under the relevant group node and click New
Encryption Rule in the context menu.
You can also access the New Encryption Rule command in a context menu which
you display by right-clicking in the right-hand console pane. In the right-hand console
pane, you can see all the encryption rules that have been generated.
2. Enter a relative or absolute path in the input field under Encryption path or select one
of the predefined templates. You can use jokers (*) and wildcards (?) in file names
(for example (\*.docx) and in the path (for example, c:\top_secret\*.* ). Click
the Browse button ("…") to select a path.
Relative paths and programs supporting file or path specifications in 8.3 notation only
If you use programs which only support file or path specifications in 8.3 notation and you want
to access encrypted files with file names longer than 8 characters or files in folders with names
longer than 8 characters, you must use 8.3 notation to specify the encryption paths.
You have to define these encryption rules additionally. If you do not, 32-bit programs will no
longer work.
Use the dir /x command to display the correct 8.3 name of long file names.

3. Three options appear under Encryption path:
◼ Exclude path
◼ Ignore path
◼ Include subdirectories
Here you must define an encryption rule that excludes this data from encryption. To do this,
select the Exclude path option in the Encryption Rules dialog. As a result, the files specified
in the encryption rule are not encrypted. By default, this option is not selected.
This option can be used in an encryption rule to exclude individual files, file types or subfolders
of a path for which an encryption rule already exists from encryption. This is achieved by activat-
ing the Exclude path option in the new encryption rule dialog. This means that the files specified
in the encryption rule are not encrypted. By default, this option is disabled. You can also change
this for existing encryption rules by selecting an existing rule with a double click or via the Prop-
erties context menu.
Example:
All files with the file extension *.TXT are to be excluded from encryption.
First line:
Entry C:\MYDIR\*.TXT, Exclude path, no key: excludes all files with the file extension .TXT
in the MYDIR folder from encryption.
Second line:
Entry C:\MYDIR\*.*, Exclude path not selected, encrypts all files in the MYDIR folder (ex-
cept *.TXT files) with the specified key.
Subdirectories or subfolders are not included in encryption unless specified. To include all
subdirectories or subfolders in encryption, select the Include subdirectories option.
Example:
Entry: c:\company\my_data\*.* Include subdirectories
This encryption rule encrypts all the files in:
C:\company\my_data
C:\company\my_data\project X
C:\company\my_data\project X\demo

conpal LAN Crypt includes the Ignore path option. conpal LAN Crypt simply ignores files af-
fected by this type of encryption rule.
In contrast to the Exclude path option, this also means there is no access control for these
files. You can open them (the encrypted contents are displayed), move and delete them, etc.
Despite this, the system checks files in folders that are excluded from encryption to see
whether or not they are actually encrypted. In this way conpal LAN Crypt can discover whether
files in folders of this kind are encrypted or not. You cannot access encrypted data. conpal
LAN Crypt simply ignores files in folders for which the Ignore path option has been selected!
conpal LAN Crypt does not check them, and users can access encrypted files.
Note: At this point we would like to point out that legacy and mini filter drivers sometimes
behave differently with the conpal LAN Crypt Client. While the Ignore path rule for a folder
means that the access protection for files is also deactivated when the mini filter encryption
driver is activated, the access protection for files still exists in such folders, if the legacy filter
encryption driver is activated.
This option is primarily used for files that are accessed very frequently, and that there is no
particular reason to encrypt. This improves system performance. The installation location of
conpal LAN Crypt or that of Windows itself is also ignored by the encryption. In principle, no files
can be encrypted or decrypted in locations for which the Ignore path option has been selected.
These files are completely ignored by conpal LAN Crypt.
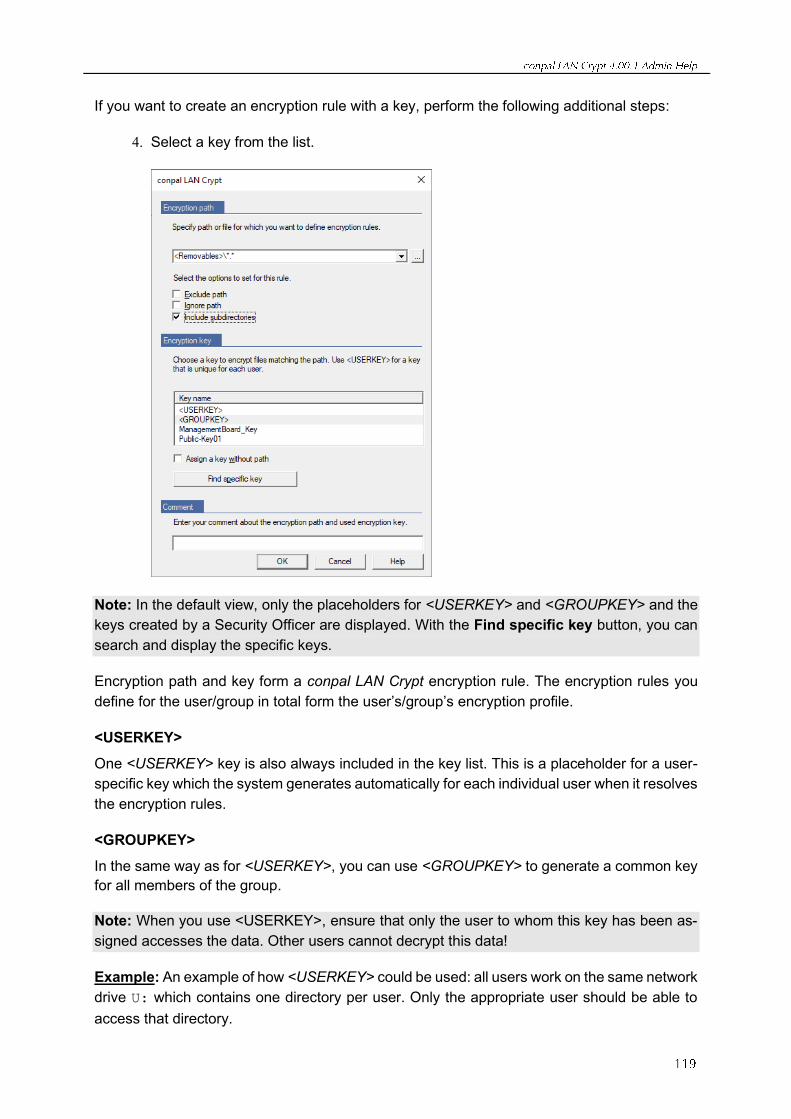
If you want to create an encryption rule with a key, perform the following additional steps:
4. Select a key from the list.
Note: In the default view, only the placeholders for <USERKEY> and <GROUPKEY> and the
keys created by a Security Officer are displayed. With the Find specific key button, you can
search and display the specific keys.
Encryption path and key form a conpal LAN Crypt encryption rule. The encryption rules you
define for the user/group in total form the user’s/group’s encryption profile.
<USERKEY>
One <USERKEY> key is also always included in the key list. This is a placeholder for a user-
specific key which the system generates automatically for each individual user when it resolves
the encryption rules.
<GROUPKEY>
In the same way as for <USERKEY>, you can use <GROUPKEY> to generate a common key
for all members of the group.
Note: When you use <USERKEY>, ensure that only the user to whom this key has been as-
signed accesses the data. Other users cannot decrypt this data!
Example: An example of how <USERKEY> could be used: all users work on the same network
drive U: which contains one directory per user. Only the appropriate user should be able to
access that directory.
An encryption rule to specify this could look like this:
U:\*.* <USERKEY>
Another example would be to use <USERKEY> to encrypt local temporary directories.
The list of defined encryption paths also includes a placeholder called Assign a key without a path.
This is used to give users a key that they can use to encrypted data for which there is no
encryption path. This may happen, for example, if encrypted files are copied to a location for
which no encryption rules have been defined (with encryption deactivated). They can then use
this key to access these files with the appropriate key. A key without a path is usually also
required to re-encrypt data, and always when there is no longer an encryption rule for this (old)
key (see also the note in the section "Encryption rules" on page 111).
If a key is assigned without a path, the system automatically creates a new placeholder to
allow other keys without a path to be generated.
5. Select the relevant options.
6. Under Comment you can enter a description or information for the encryption rule
created.
7. Click OK.
The new encryption rule is displayed in the conpal LAN Crypt Administration.
To edit existing encryption rules, select them and click Properties in the context menu. You
can also double-click the relevant entry.
Note: Encryption rules can only be changed in the groups in which they were created.
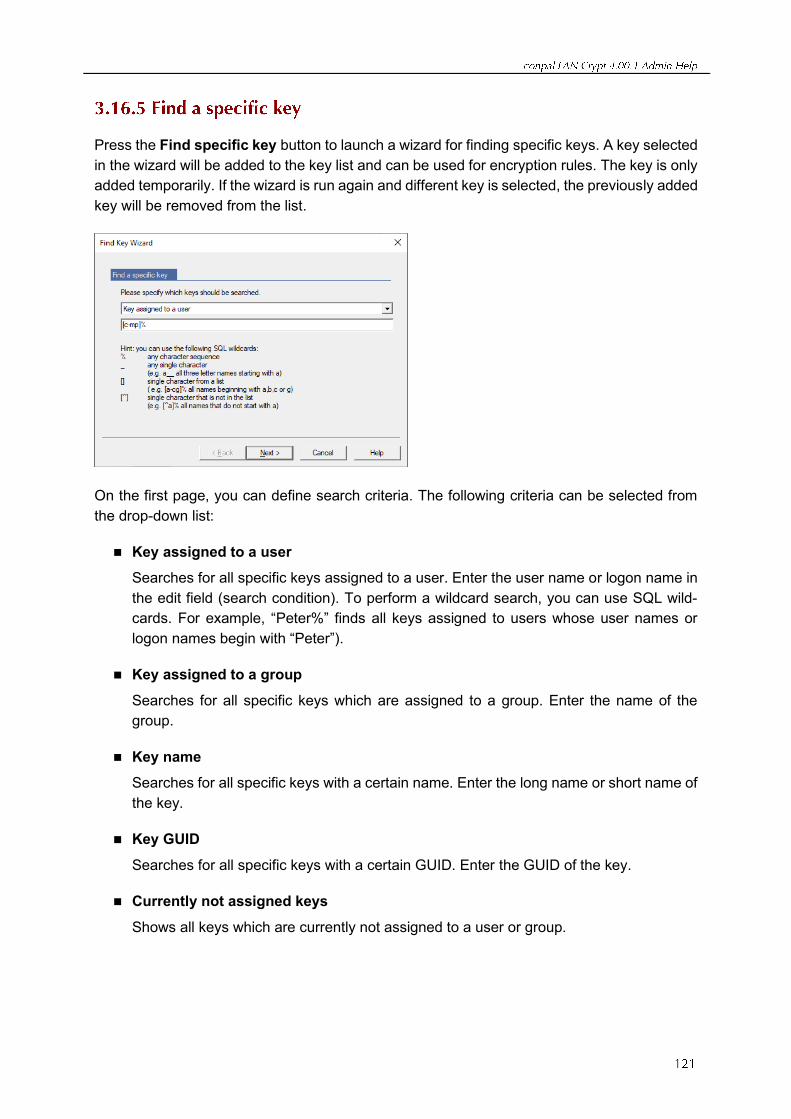
Press the Find specific key button to launch a wizard for finding specific keys. A key selected
in the wizard will be added to the key list and can be used for encryption rules. The key is only
added temporarily. If the wizard is run again and different key is selected, the previously added
key will be removed from the list.
On the first page, you can define search criteria. The following criteria can be selected from
the drop-down list:
◼ Key assigned to a user
Searches for all specific keys assigned to a user. Enter the user name or logon name in
the edit field (search condition). To perform a wildcard search, you can use SQL wild-
cards. For example, “Peter%” finds all keys assigned to users whose user names or
logon names begin with “Peter”).
◼ Key assigned to a group
Searches for all specific keys which are assigned to a group. Enter the name of the
group.
◼ Key name
Searches for all specific keys with a certain name. Enter the long name or short name of
the key.
◼ Key GUID
Searches for all specific keys with a certain GUID. Enter the GUID of the key.
◼ Currently not assigned keys
Shows all keys which are currently not assigned to a user or group.
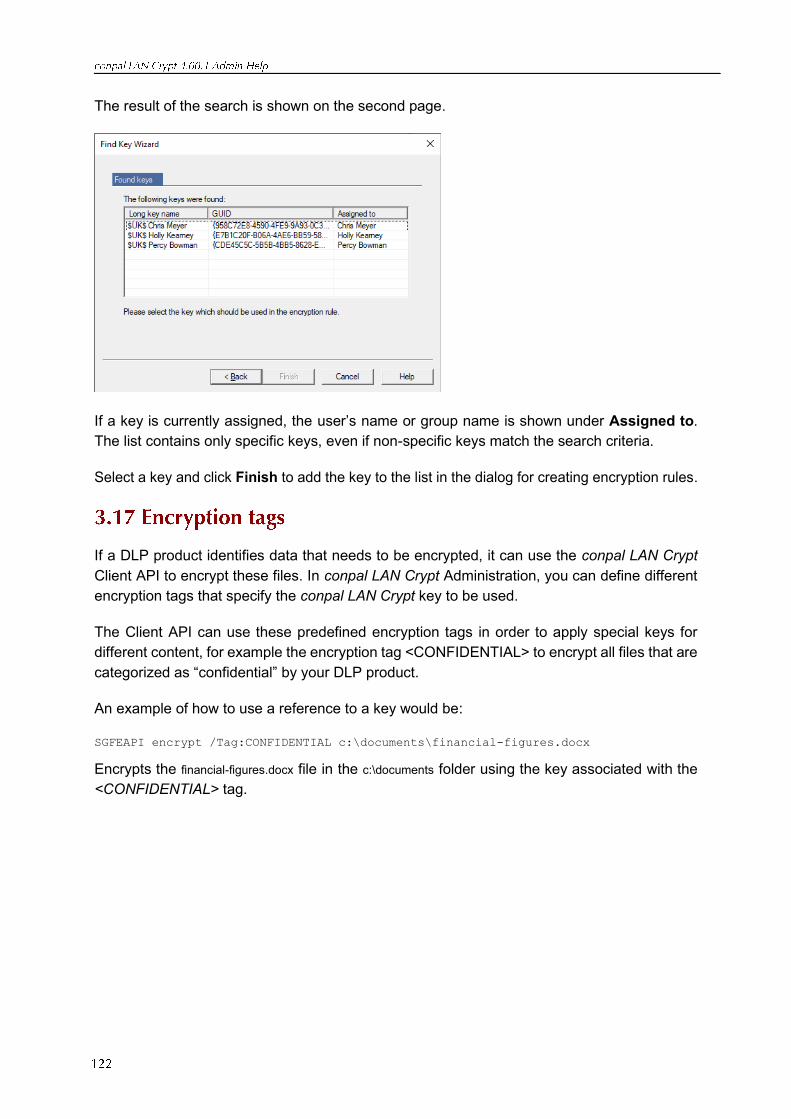
The result of the search is shown on the second page.
If a key is currently assigned, the user’s name or group name is shown under Assigned to.
The list contains only specific keys, even if non-specific keys match the search criteria.
Select a key and click Finish to add the key to the list in the dialog for creating encryption rules.
If a DLP product identifies data that needs to be encrypted, it can use the conpal LAN Crypt
Client API to encrypt these files. In conpal LAN Crypt Administration, you can define different
encryption tags that specify the conpal LAN Crypt key to be used.
The Client API can use these predefined encryption tags in order to apply special keys for
different content, for example the encryption tag <CONFIDENTIAL> to encrypt all files that are
categorized as “confidential” by your DLP product.
An example of how to use a reference to a key would be:
SGFEAPI encrypt /Tag:CONFIDENTIAL c:\documents\financial-figures.docx
Encrypts the financial-figures.docx file in the c:\documents folder using the key associated with the
<CONFIDENTIAL> tag.
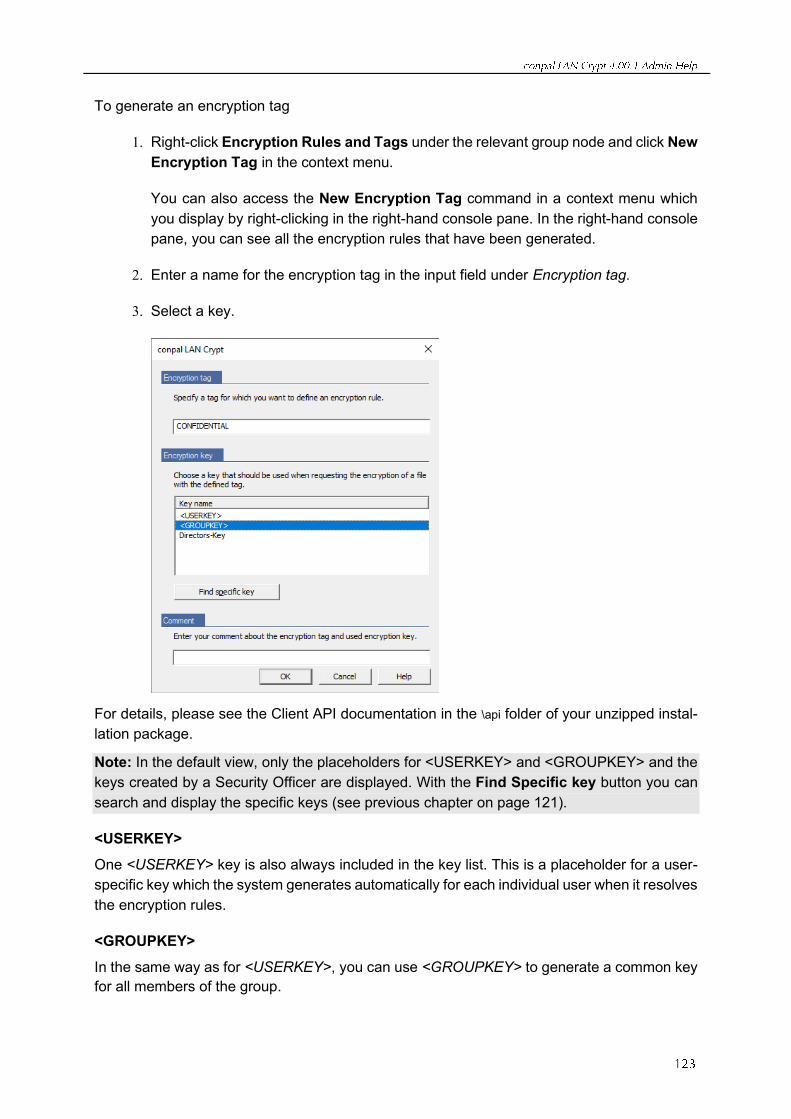
To generate an encryption tag
1. Right-click Encryption Rules and Tags under the relevant group node and click New
Encryption Tag in the context menu.
You can also access the New Encryption Tag command in a context menu which
you display by right-clicking in the right-hand console pane. In the right-hand console
pane, you can see all the encryption rules that have been generated.
2. Enter a name for the encryption tag in the input field under Encryption tag.
3. Select a key.
For details, please see the Client API documentation in the \api folder of your unzipped instal-
lation package.
Note: In the default view, only the placeholders for <USERKEY> and <GROUPKEY> and the
keys created by a Security Officer are displayed. With the Find Specific key button you can
search and display the specific keys (see previous chapter on page 121).
<USERKEY>
One <USERKEY> key is also always included in the key list. This is a placeholder for a user-
specific key which the system generates automatically for each individual user when it resolves
the encryption rules.
<GROUPKEY>
In the same way as for <USERKEY>, you can use <GROUPKEY> to generate a common key
for all members of the group.

Note: When you use <USERKEY>, ensure that only the user to whom this key has been as-
signed accesses the data. Other users cannot decrypt this data!
4. Under Comment you can enter a description or information for the encryption tag created.
5. Click OK.
The new encryption tag is displayed in the conpal LAN Crypt Administration.
To edit existing encryption tags, select them and click Properties in the context menu. You
can also double-click the relevant entry.
Each profile is protected by its owner’s public key. This public key must be assigned to the
user in conpal LAN Crypt Administration, via their certificate.
Each profile is protected with the public key of its owner. Via the conpal LAN Crypt Administra-
tion each user is assigned a certificate (*.p12 file). This file also contains the private key. The
private key is protected against unauthorized access by PIN. conpal LAN Crypt writes the
corresponding PIN into the password log file (p12pwlog.csv). This file should always be
specially protected against unauthorized access. To realize this, the (Master) Security Officer
on the conpal LAN Crypt Administration could install the conpal LAN Crypt Client application
and create an encryption rule for the password log file.
It is recommended that the certificates are already available for use in the certificate store or
in a directory (for example, LDAP) before you begin assigning them. You can use standard
Windows tools to import the certificates into the relevant certificate store.
conpal LAN Crypt has a Certificate Assignment Wizard that assigns certificates automatically.
Note: If a Windows user who assigns a certificate has no right to change the password log file
in the file system, no conpal LAN Crypt certificates can be generated.
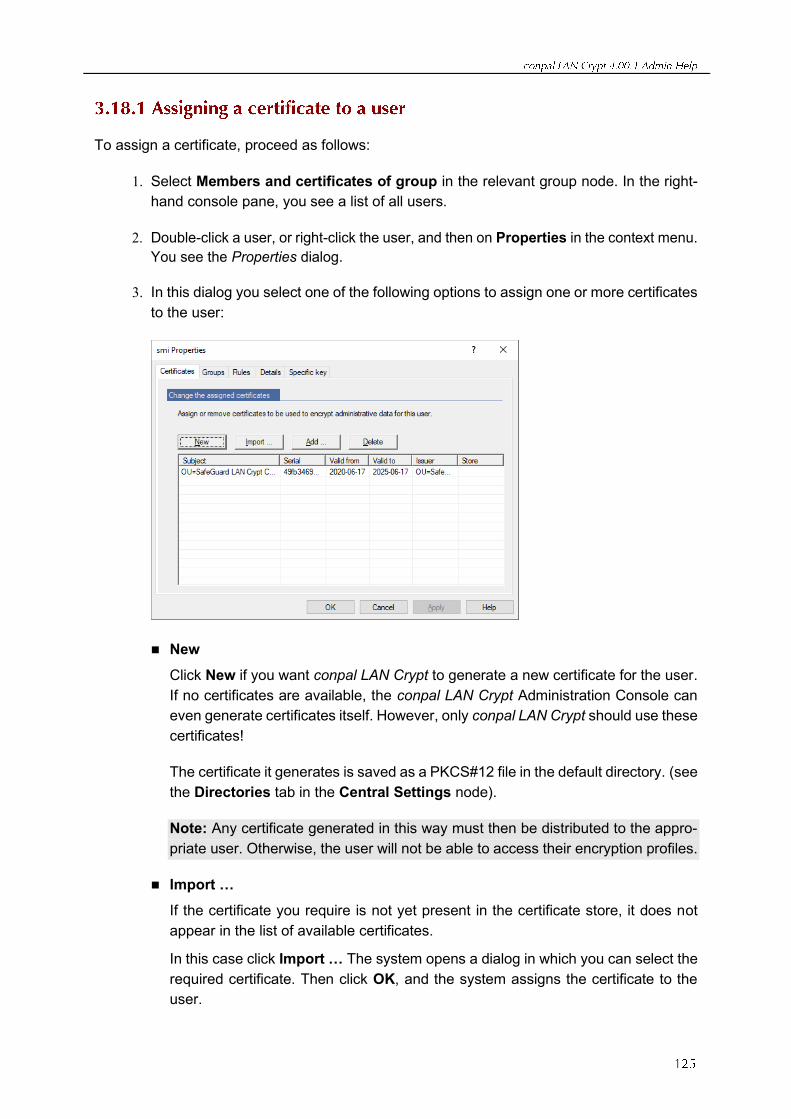
To assign a certificate, proceed as follows:
1. Select Members and certificates of group in the relevant group node. In the right-
hand console pane, you see a list of all users.
2. Double-click a user, or right-click the user, and then on Properties in the context menu.
You see the Properties dialog.
3. In this dialog you select one of the following options to assign one or more certificates
to the user:
◼ New
Click New if you want conpal LAN Crypt to generate a new certificate for the user.
If no certificates are available, the conpal LAN Crypt Administration Console can
even generate certificates itself. However, only conpal LAN Crypt should use these
certificates!
The certificate it generates is saved as a PKCS#12 file in the default directory. (see
the Directories tab in the Central Settings node).
Note: Any certificate generated in this way must then be distributed to the appro-
priate user. Otherwise, the user will not be able to access their encryption profiles.
◼ Import …
If the certificate you require is not yet present in the certificate store, it does not
appear in the list of available certificates.
In this case click Import … The system opens a dialog in which you can select the
required certificate. Then click OK, and the system assigns the certificate to the
user.
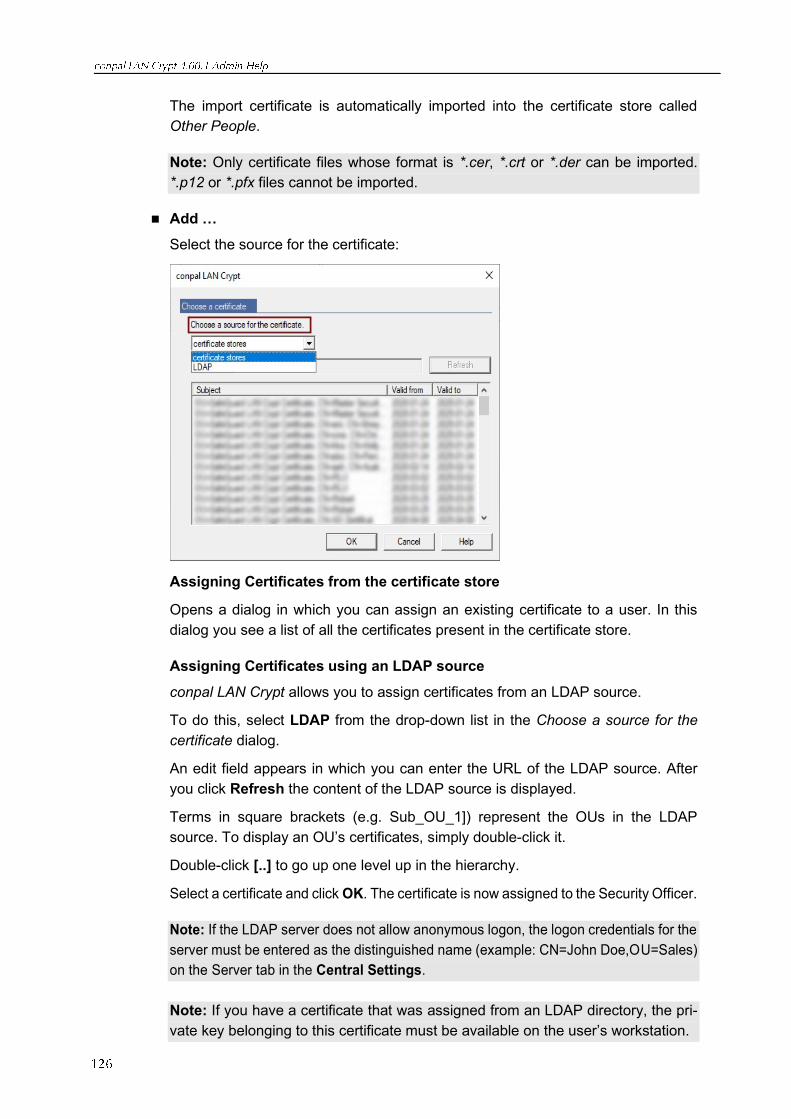
The import certificate is automatically imported into the certificate store called
Other People.
Note: Only certificate files whose format is *.cer, *.crt or *.der can be imported.
*.p12 or *.pfx files cannot be imported.
◼ Add …
Select the source for the certificate:
Assigning Certificates from the certificate store
Opens a dialog in which you can assign an existing certificate to a user. In this
dialog you see a list of all the certificates present in the certificate store.
Assigning Certificates using an LDAP source
conpal LAN Crypt allows you to assign certificates from an LDAP source.
To do this, select LDAP from the drop-down list in the Choose a source for the
certificate dialog.
An edit field appears in which you can enter the URL of the LDAP source. After
you click Refresh the content of the LDAP source is displayed.
Terms in square brackets (e.g. Sub_OU_1]) represent the OUs in the LDAP
source. To display an OU’s certificates, simply double-click it.
Double-click [..] to go up one level up in the hierarchy.
Select a certificate and click OK. The certificate is now assigned to the Security Officer.
Note: If the LDAP server does not allow anonymous logon, the logon credentials for the
server must be entered as the distinguished name (example: CN=John Doe,OU=Sales)
on the Server tab in the Central Settings.
Note: If you have a certificate that was assigned from an LDAP directory, the pri-
vate key belonging to this certificate must be available on the user’s workstation.
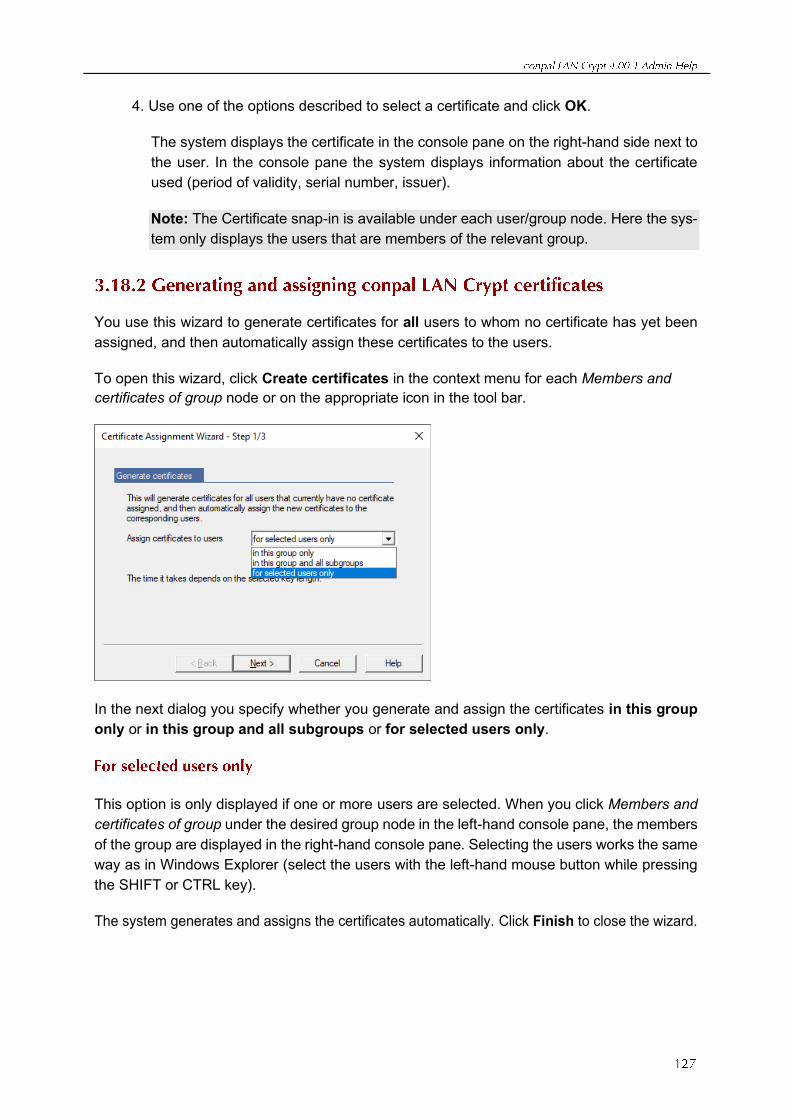
4. Use one of the options described to select a certificate and click OK.
The system displays the certificate in the console pane on the right-hand side next to
the user. In the console pane the system displays information about the certificate
used (period of validity, serial number, issuer).
Note: The Certificate snap-in is available under each user/group node. Here the sys-
tem only displays the users that are members of the relevant group.
You use this wizard to generate certificates for all users to whom no certificate has yet been
assigned, and then automatically assign these certificates to the users.
To open this wizard, click Create certificates in the context menu for each Members and
certificates of group node or on the appropriate icon in the tool bar.
In the next dialog you specify whether you generate and assign the certificates in this group
only or in this group and all subgroups or for selected users only.
This option is only displayed if one or more users are selected. When you click Members and
certificates of group under the desired group node in the left-hand console pane, the members
of the group are displayed in the right-hand console pane. Selecting the users works the same
way as in Windows Explorer (select the users with the left-hand mouse button while pressing
the SHIFT or CTRL key).
The system generates and assigns the certificates automatically. Click Finish to close the wizard.
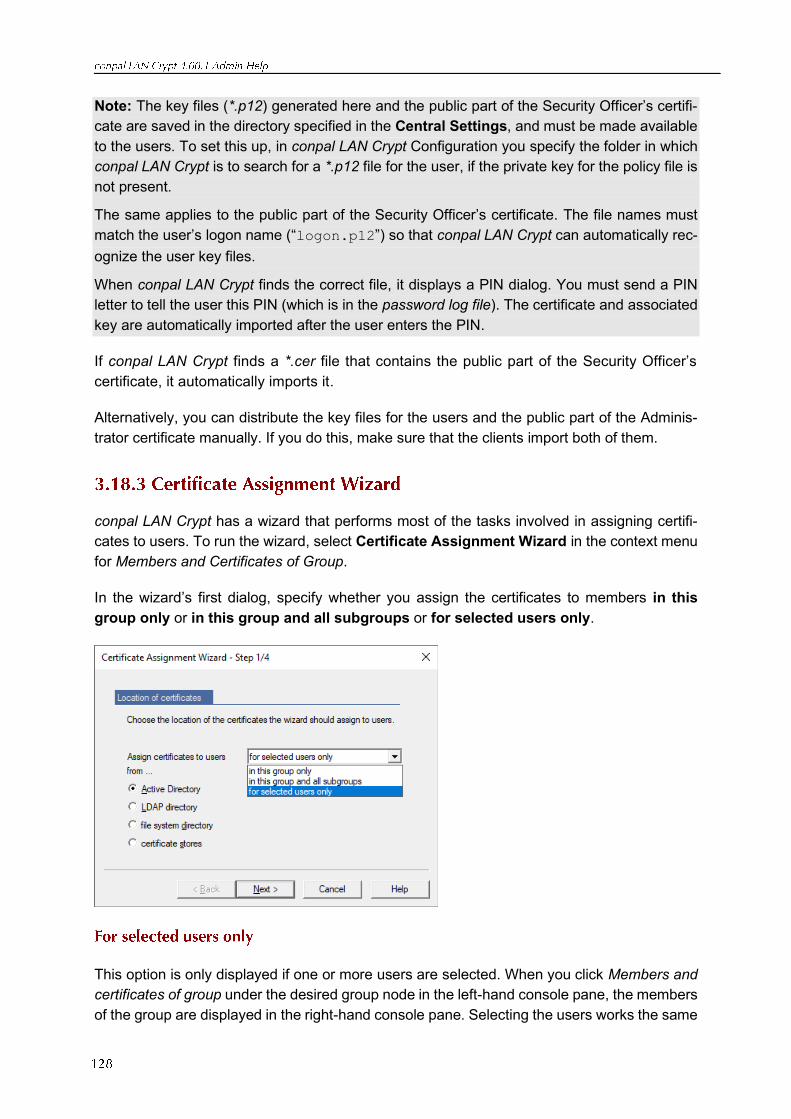
Note: The key files (*.p12) generated here and the public part of the Security Officer’s certifi-
cate are saved in the directory specified in the Central Settings, and must be made available
to the users. To set this up, in conpal LAN Crypt Configuration you specify the folder in which
conpal LAN Crypt is to search for a *.p12 file for the user, if the private key for the policy file is
not present.
The same applies to the public part of the Security Officer’s certificate. The file names must
match the user’s logon name (“logon.p12”) so that conpal LAN Crypt can automatically rec-
ognize the user key files.
When conpal LAN Crypt finds the correct file, it displays a PIN dialog. You must send a PIN
letter to tell the user this PIN (which is in the password log file). The certificate and associated
key are automatically imported after the user enters the PIN.
If conpal LAN Crypt finds a *.cer file that contains the public part of the Security Officer’s
certificate, it automatically imports it.
Alternatively, you can distribute the key files for the users and the public part of the Adminis-
trator certificate manually. If you do this, make sure that the clients import both of them.
conpal LAN Crypt has a wizard that performs most of the tasks involved in assigning certifi-
cates to users. To run the wizard, select Certificate Assignment Wizard in the context menu
for Members and Certificates of Group.
In the wizard’s first dialog, specify whether you assign the certificates to members in this
group only or in this group and all subgroups or for selected users only.
This option is only displayed if one or more users are selected. When you click Members and
certificates of group under the desired group node in the left-hand console pane, the members
of the group are displayed in the right-hand console pane. Selecting the users works the same
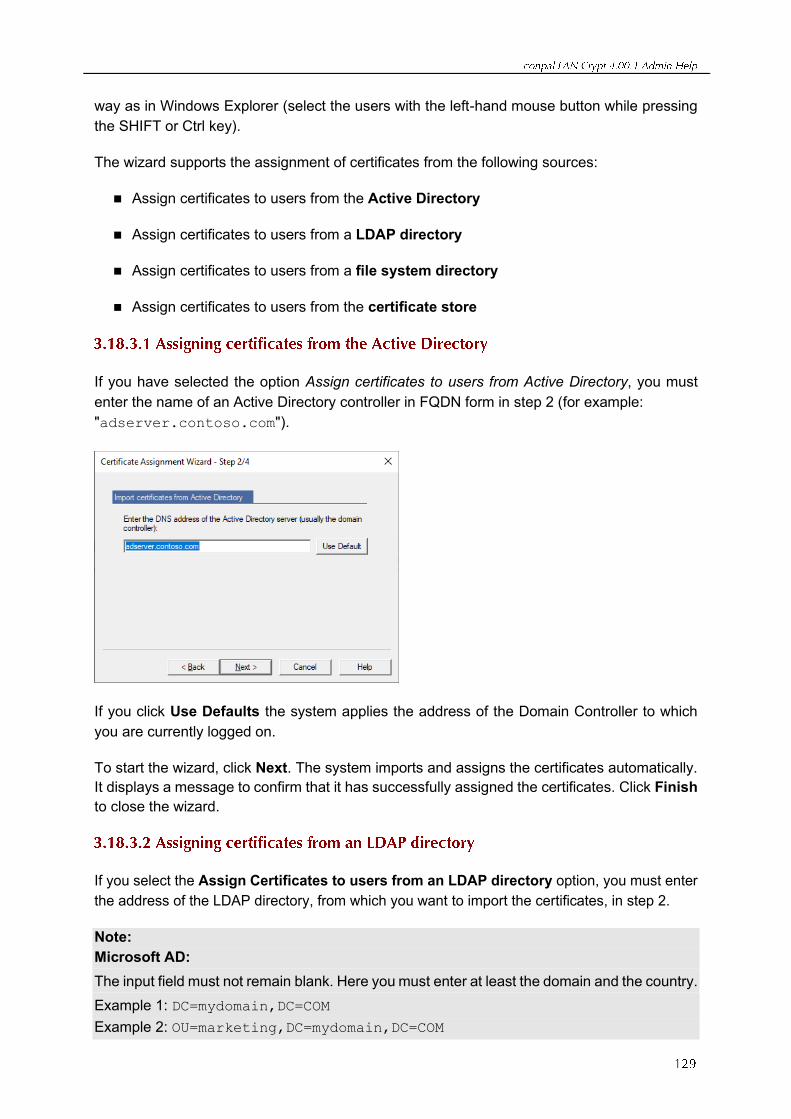
way as in Windows Explorer (select the users with the left-hand mouse button while pressing
the SHIFT or Ctrl key).
The wizard supports the assignment of certificates from the following sources:
◼ Assign certificates to users from the Active Directory
◼ Assign certificates to users from a LDAP directory
◼ Assign certificates to users from a file system directory
◼ Assign certificates to users from the certificate store
If you have selected the option Assign certificates to users from Active Directory, you must
enter the name of an Active Directory controller in FQDN form in step 2 (for example:
"adserver.contoso.com").
If you click Use Defaults the system applies the address of the Domain Controller to which
you are currently logged on.
To start the wizard, click Next. The system imports and assigns the certificates automatically.
It displays a message to confirm that it has successfully assigned the certificates. Click Finish
to close the wizard.
If you select the Assign Certificates to users from an LDAP directory option, you must enter
the address of the LDAP directory, from which you want to import the certificates, in step 2.
Note:
Microsoft AD:
The input field must not remain blank. Here you must enter at least the domain and the country.
Example 1: DC=mydomain,DC=COM
Example 2: OU=marketing,DC=mydomain,DC=COM
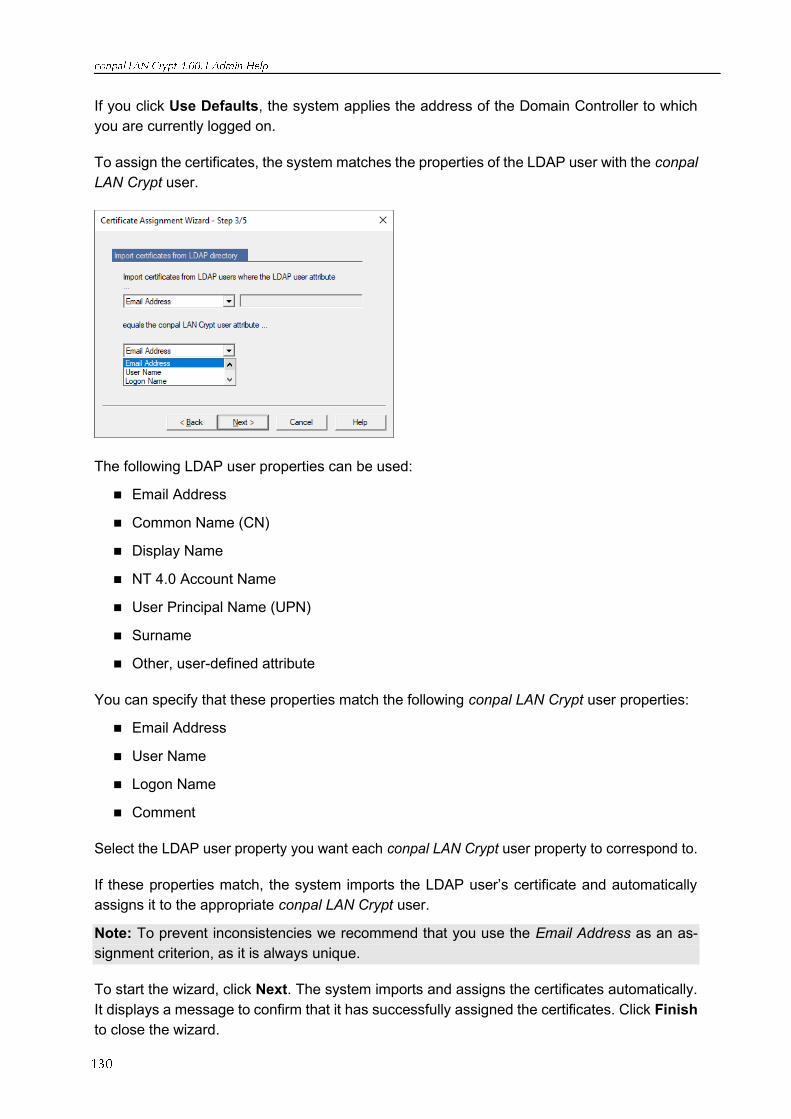
If you click Use Defaults, the system applies the address of the Domain Controller to which
you are currently logged on.
To assign the certificates, the system matches the properties of the LDAP user with the conpal
LAN Crypt user.
The following LDAP user properties can be used:
◼ Email Address
◼ Common Name (CN)
◼ Display Name
◼ NT 4.0 Account Name
◼ User Principal Name (UPN)
◼ Surname
◼ Other, user-defined attribute
You can specify that these properties match the following conpal LAN Crypt user properties:
◼ Email Address
◼ User Name
◼ Logon Name
◼ Comment
Select the LDAP user property you want each conpal LAN Crypt user property to correspond to.
If these properties match, the system imports the LDAP user’s certificate and automatically
assigns it to the appropriate conpal LAN Crypt user.
Note: To prevent inconsistencies we recommend that you use the Email Address as an as-
signment criterion, as it is always unique.
To start the wizard, click Next. The system imports and assigns the certificates automatically.
It displays a message to confirm that it has successfully assigned the certificates. Click Finish
to close the wizard.
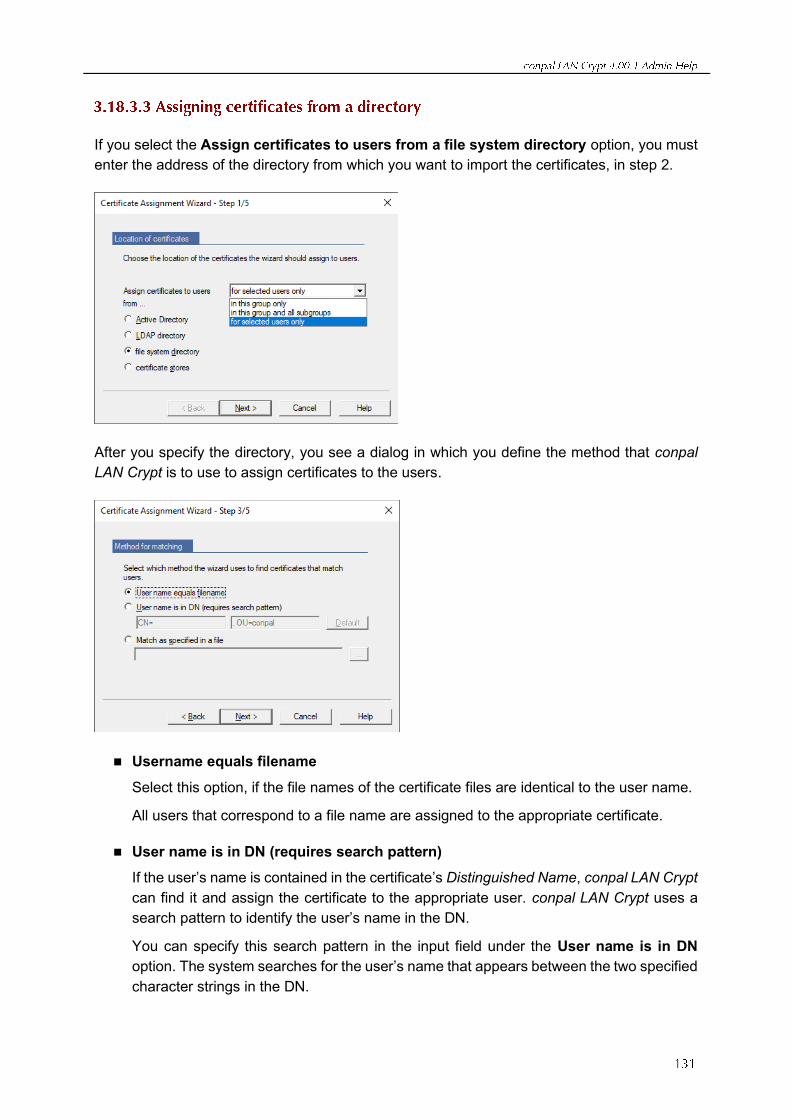
If you select the Assign certificates to users from a file system directory option, you must
enter the address of the directory from which you want to import the certificates, in step 2.
After you specify the directory, you see a dialog in which you define the method that conpal
LAN Crypt is to use to assign certificates to the users.
◼ Username equals filename
Select this option, if the file names of the certificate files are identical to the user name.
All users that correspond to a file name are assigned to the appropriate certificate.
◼ User name is in DN (requires search pattern)
If the user’s name is contained in the certificate’s Distinguished Name, conpal LAN Crypt
can find it and assign the certificate to the appropriate user. conpal LAN Crypt uses a
search pattern to identify the user’s name in the DN.
You can specify this search pattern in the input field under the User name is in DN
option. The system searches for the user’s name that appears between the two specified
character strings in the DN.
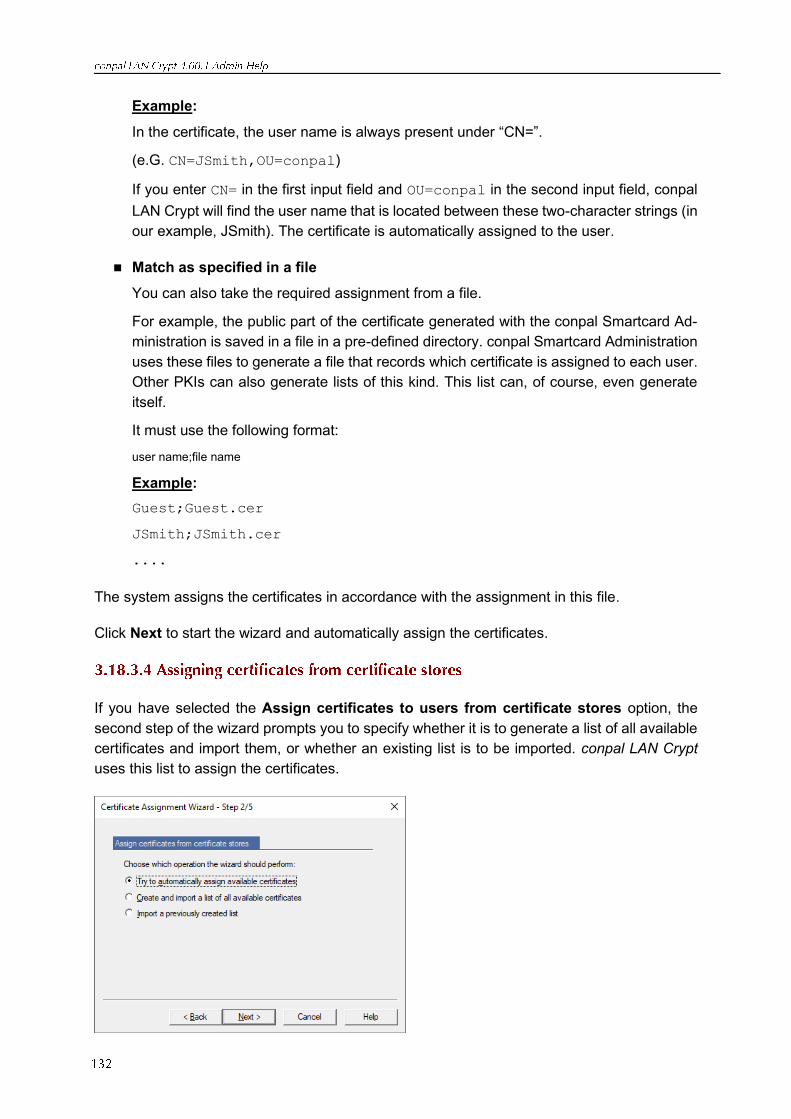
Example:
In the certificate, the user name is always present under “CN=”.
(e.G. CN=JSmith,OU=conpal)
If you enter CN= in the first input field and OU=conpal in the second input field, conpal
LAN Crypt will find the user name that is located between these two-character strings (in
our example, JSmith). The certificate is automatically assigned to the user.
◼ Match as specified in a file
You can also take the required assignment from a file.
For example, the public part of the certificate generated with the conpal Smartcard Ad-
ministration is saved in a file in a pre-defined directory. conpal Smartcard Administration
uses these files to generate a file that records which certificate is assigned to each user.
Other PKIs can also generate lists of this kind. This list can, of course, even generate
itself.
It must use the following format:
user name;file name
Example:
Guest;Guest.cer
JSmith;JSmith.cer
....
The system assigns the certificates in accordance with the assignment in this file.
Click Next to start the wizard and automatically assign the certificates.
If you have selected the Assign certificates to users from certificate stores option, the
second step of the wizard prompts you to specify whether it is to generate a list of all available
certificates and import them, or whether an existing list is to be imported. conpal LAN Crypt
uses this list to assign the certificates.
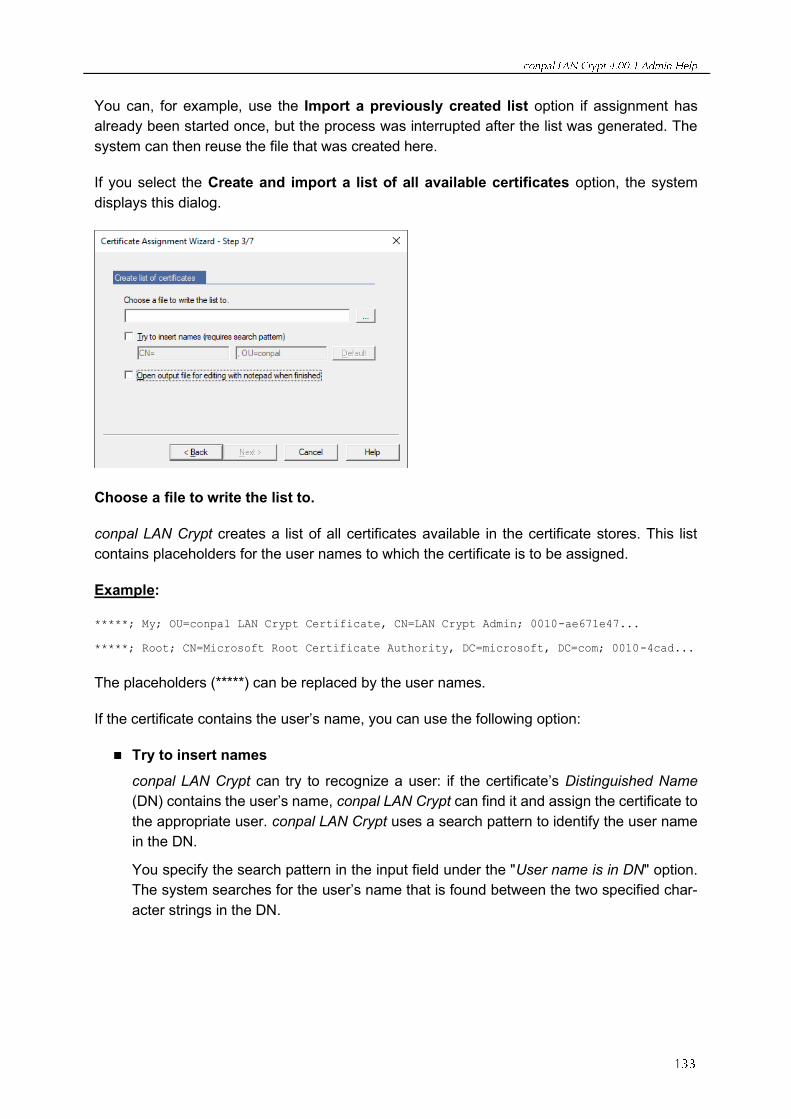
You can, for example, use the Import a previously created list option if assignment has
already been started once, but the process was interrupted after the list was generated. The
system can then reuse the file that was created here.
If you select the Create and import a list of all available certificates option, the system
displays this dialog.
Choose a file to write the list to.
conpal LAN Crypt creates a list of all certificates available in the certificate stores. This list
contains placeholders for the user names to which the certificate is to be assigned.
Example:
*****; My; OU=conpal LAN Crypt Certificate, CN=LAN Crypt Admin; 0010-ae671e47...
*****; Root; CN=Microsoft Root Certificate Authority, DC=microsoft, DC=com; 0010-4cad...
The placeholders (*****) can be replaced by the user names.
If the certificate contains the user’s name, you can use the following option:
◼ Try to insert names
conpal LAN Crypt can try to recognize a user: if the certificate’s Distinguished Name
(DN) contains the user’s name, conpal LAN Crypt can find it and assign the certificate to
the appropriate user. conpal LAN Crypt uses a search pattern to identify the user name
in the DN.
You specify the search pattern in the input field under the "User name is in DN" option.
The system searches for the user’s name that is found between the two specified char-
acter strings in the DN.
Example:
In the certificate, the user’s name is always present under "CN=".
(e.g. CN=JSmith,OU=conpal)
If you enter CN= in the first input field, and enter OU=conpal in the second input field,
conpal LAN Crypt will find the user’s name that is located between these two-character
strings (in our example, JSmith). The system replaces the placeholder with the user’s
name and automatically assigns the certificate to the user.
◼ Open output file for editing with Notepad when finished
If this option is selected the system opens the list of certificates after it has been gener-
ated. You can now edit this list. You can replace the placeholder with the user’s name in
the relevant certificates. When you save the list, the system uses the edited version to
assign certificates.
Click Next to start the wizard and automatically assign the certificates.
conpal LAN Crypt saves every profile that has been generated (or changed) in its Administra-
tion Database. Here they do not yet have any effect on individual users.
To resolve individual profiles and building the policy files, a conpal LAN Crypt Security Officer
must run the conpal LAN Crypt Profile Resolver. This generates policy files for each user in
accordance with the settings made in the Administration Console. The next time a user logs
on, the system loads the new encryption profile.
Note: You must always generate new policy files after you change settings in the conpal LAN
Crypt Administration console (added new keys, added new rules, ...). The changes become
effective for users, after they load the new policy files onto their machines.
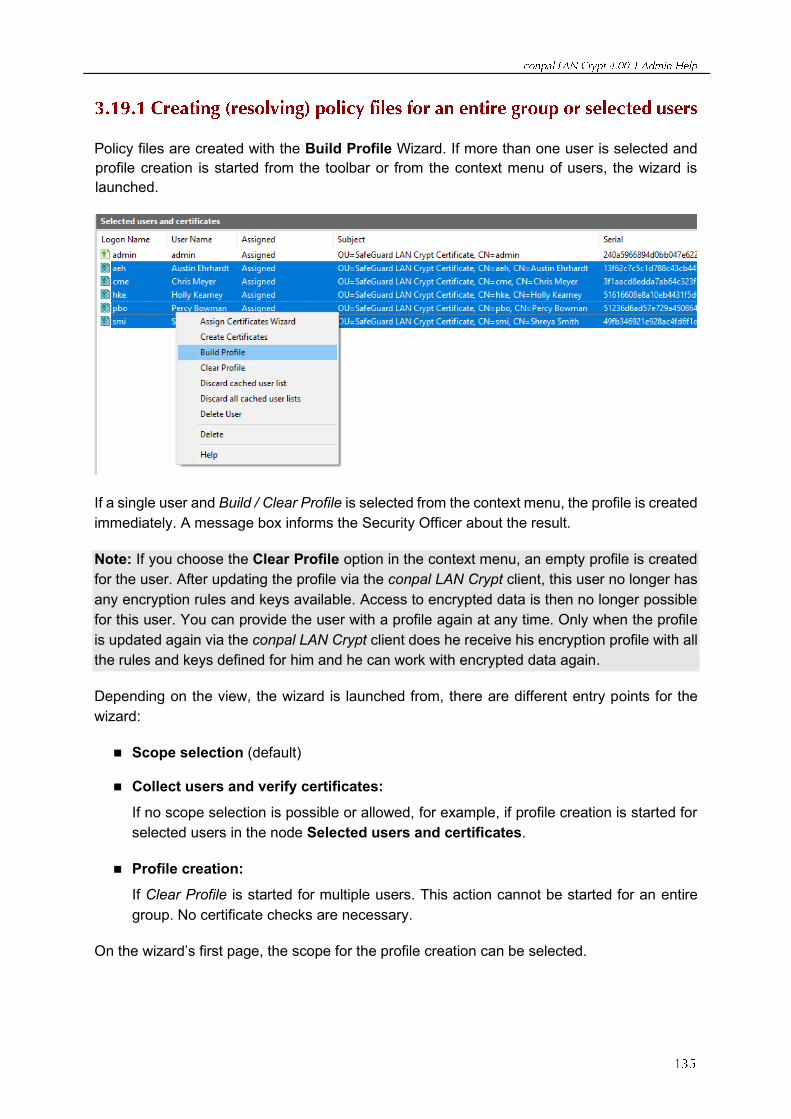
Policy files are created with the Build Profile Wizard. If more than one user is selected and
profile creation is started from the toolbar or from the context menu of users, the wizard is
launched.
If a single user and Build / Clear Profile is selected from the context menu, the profile is created
immediately. A message box informs the Security Officer about the result.
Note: If you choose the Clear Profile option in the context menu, an empty profile is created
for the user. After updating the profile via the conpal LAN Crypt client, this user no longer has
any encryption rules and keys available. Access to encrypted data is then no longer possible
for this user. You can provide the user with a profile again at any time. Only when the profile
is updated again via the conpal LAN Crypt client does he receive his encryption profile with all
the rules and keys defined for him and he can work with encrypted data again.
Depending on the view, the wizard is launched from, there are different entry points for the
wizard:
◼ Scope selection (default)
◼ Collect users and verify certificates:
If no scope selection is possible or allowed, for example, if profile creation is started for
selected users in the node Selected users and certificates.
◼ Profile creation:
If Clear Profile is started for multiple users. This action cannot be started for an entire
group. No certificate checks are necessary.
On the wizard’s first page, the scope for the profile creation can be selected.
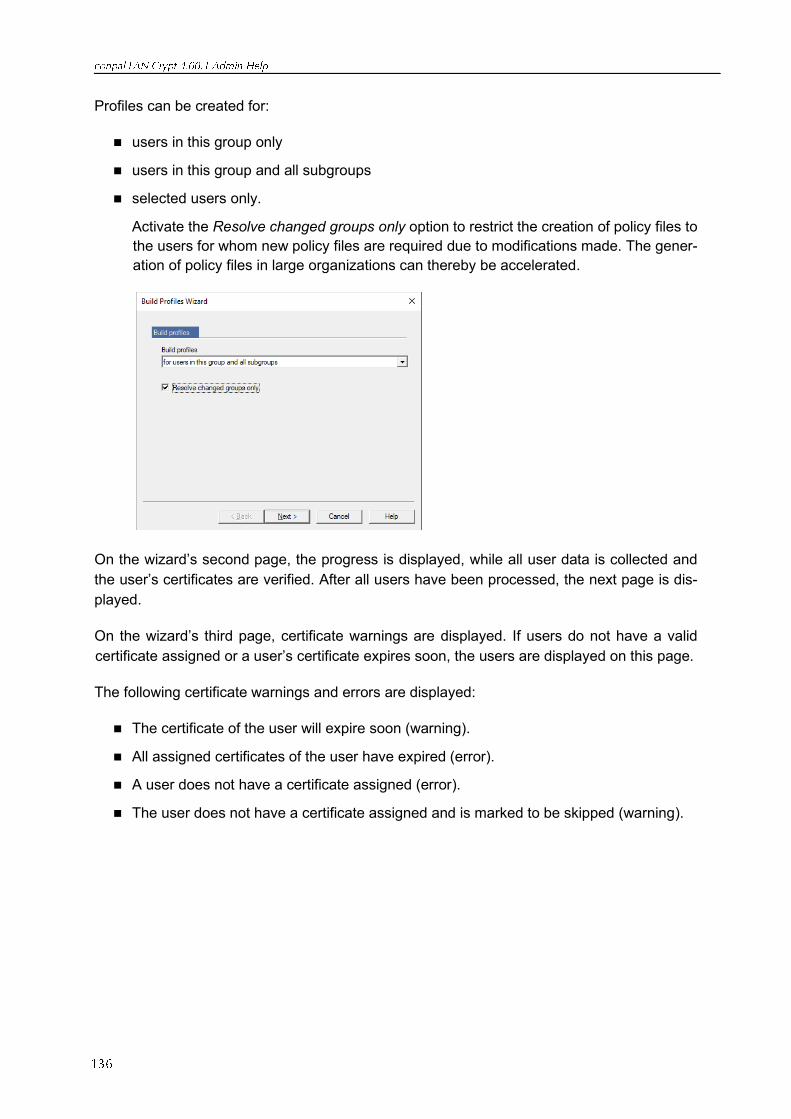
Profiles can be created for:
◼ users in this group only
◼ users in this group and all subgroups
◼ selected users only.
Activate the Resolve changed groups only option to restrict the creation of policy files to
the users for whom new policy files are required due to modifications made. The gener-
ation of policy files in large organizations can thereby be accelerated.
On the wizard’s second page, the progress is displayed, while all user data is collected and
the user’s certificates are verified. After all users have been processed, the next page is dis-
played.
On the wizard’s third page, certificate warnings are displayed. If users do not have a valid
certificate assigned or a user’s certificate expires soon, the users are displayed on this page.
The following certificate warnings and errors are displayed:
◼ The certificate of the user will expire soon (warning).
◼ All assigned certificates of the user have expired (error).
◼ A user does not have a certificate assigned (error).
◼ The user does not have a certificate assigned and is marked to be skipped (warning).
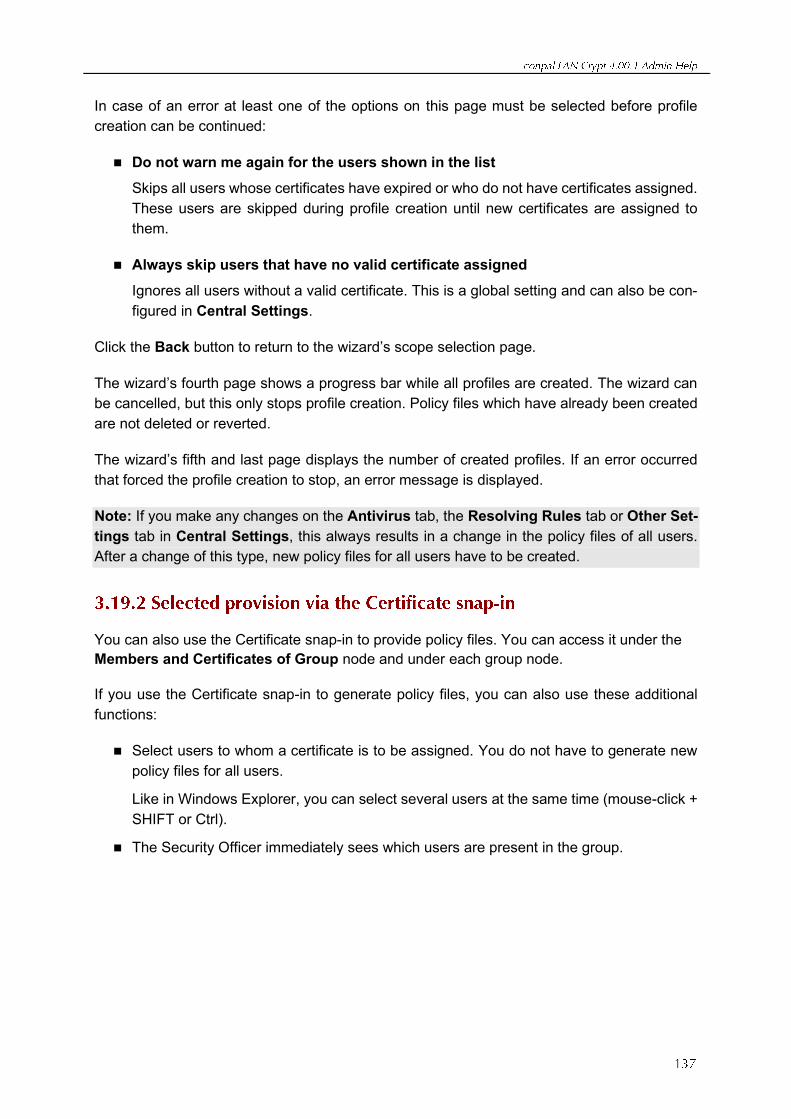
In case of an error at least one of the options on this page must be selected before profile
creation can be continued:
◼ Do not warn me again for the users shown in the list
Skips all users whose certificates have expired or who do not have certificates assigned.
These users are skipped during profile creation until new certificates are assigned to
them.
◼ Always skip users that have no valid certificate assigned
Ignores all users without a valid certificate. This is a global setting and can also be con-
figured in Central Settings.
Click the Back button to return to the wizard’s scope selection page.
The wizard’s fourth page shows a progress bar while all profiles are created. The wizard can
be cancelled, but this only stops profile creation. Policy files which have already been created
are not deleted or reverted.
The wizard’s fifth and last page displays the number of created profiles. If an error occurred
that forced the profile creation to stop, an error message is displayed.
Note: If you make any changes on the Antivirus tab, the Resolving Rules tab or Other Set-
tings tab in Central Settings, this always results in a change in the policy files of all users.
After a change of this type, new policy files for all users have to be created.
You can also use the Certificate snap-in to provide policy files. You can access it under the
Members and Certificates of Group node and under each group node.
If you use the Certificate snap-in to generate policy files, you can also use these additional
functions:
◼ Select users to whom a certificate is to be assigned. You do not have to generate new
policy files for all users.
Like in Windows Explorer, you can select several users at the same time (mouse-click +
SHIFT or Ctrl).
◼ The Security Officer immediately sees which users are present in the group.
◼ The system displays certificate icons next to the user name to show the certificates’ status:
▪ red means:
the certificate has expired.
▪ yellow means:
the certificate is running within the configured expiration warning period.
▪ Green means:
everything is OK.
▪ Grey means:
either no certificate was assigned to the user, or that user was missed out when the
system assigned certificates.
To provide the policy files, select the required users and then click the blue gear icon in the
tool bar or on Build Profile in the selected user’s context menu.
You can use the Certificate snap-in to clear the profiles of one or more users. Clearing a profile
means generating an empty profile. The user has to log on once to an empty policy file, to
overwrite the settings of the current policy file cached on their machine. After that they can no
longer access encrypted data.
To clear a profile, select the user in the Certificate snap-in and click the Clear profile for
selected user icon or click Clear profile in the context menu.
You can select several users (select the users with the left mouse button while holding down
the SHIFT key) and clear their profiles by clicking the icon.
Note: The settings in conpal LAN Crypt Central Settings define how profiles are cleared. The
process for clearing profiles is similar to the one for building profiles.

conpal LAN Crypt logs events that are triggered by the conpal LAN Crypt Administration Con-
sole in the conpal LAN Crypt database. With conpal LAN Crypt’s logging functions you can
specify which events are to be logged, archive events and check log entries.
The global permissions Read Logging Entries and Manage Logging control how Security
Officers access the logging module. These rights can be granted to Security Officers by the
Master Security Officer.
Read Logging Entries The Security Officer can see the settings for log-
ging and the logged events.
Manage Logging The Security Officer can change the settings for
logging. They are allowed to archive, delete and
check entries.
Basic settings for logging can be made in the conpal LAN Crypt Administration Console under
the Logging node in the Central Settings. This node can only be viewed by Security Officers,
who have at least the Read Logging Entries permission.
The basic settings can only be made by a Master Security Officer. They can be given additional
security by adding a second level of authorization (scenario Manage Logging; requires the
global permissions Read Logging Entries and Manage Logging).
The basic settings also specify which events are to be logged. Only a Master Security Officer
can specify this.
Note: Events, which occur before a Security Officer logs on, cannot be logged directly to the
database. They are cached, and written to the database after the next successful logon.
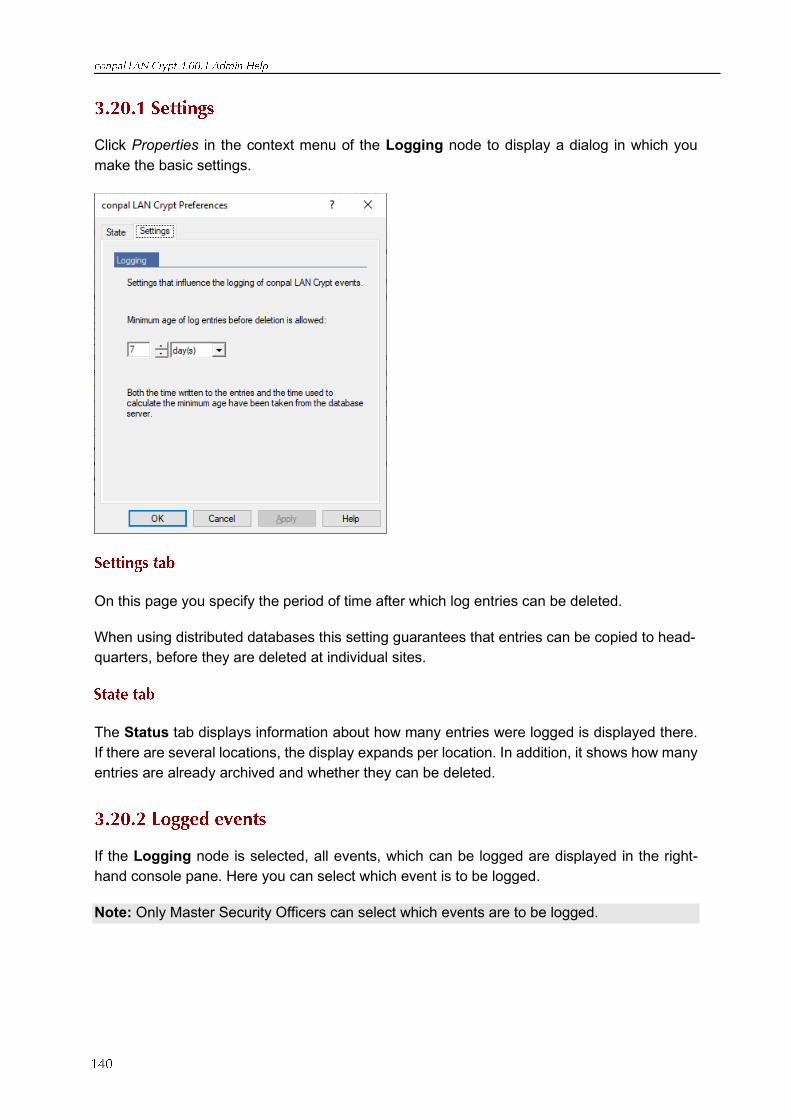
Click Properties in the context menu of the Logging node to display a dialog in which you
make the basic settings.
On this page you specify the period of time after which log entries can be deleted.
When using distributed databases this setting guarantees that entries can be copied to head-
quarters, before they are deleted at individual sites.
The Status tab displays information about how many entries were logged is displayed there.
If there are several locations, the display expands per location. In addition, it shows how many
entries are already archived and whether they can be deleted.
If the Logging node is selected, all events, which can be logged are displayed in the right-
hand console pane. Here you can select which event is to be logged.
Note: Only Master Security Officers can select which events are to be logged.
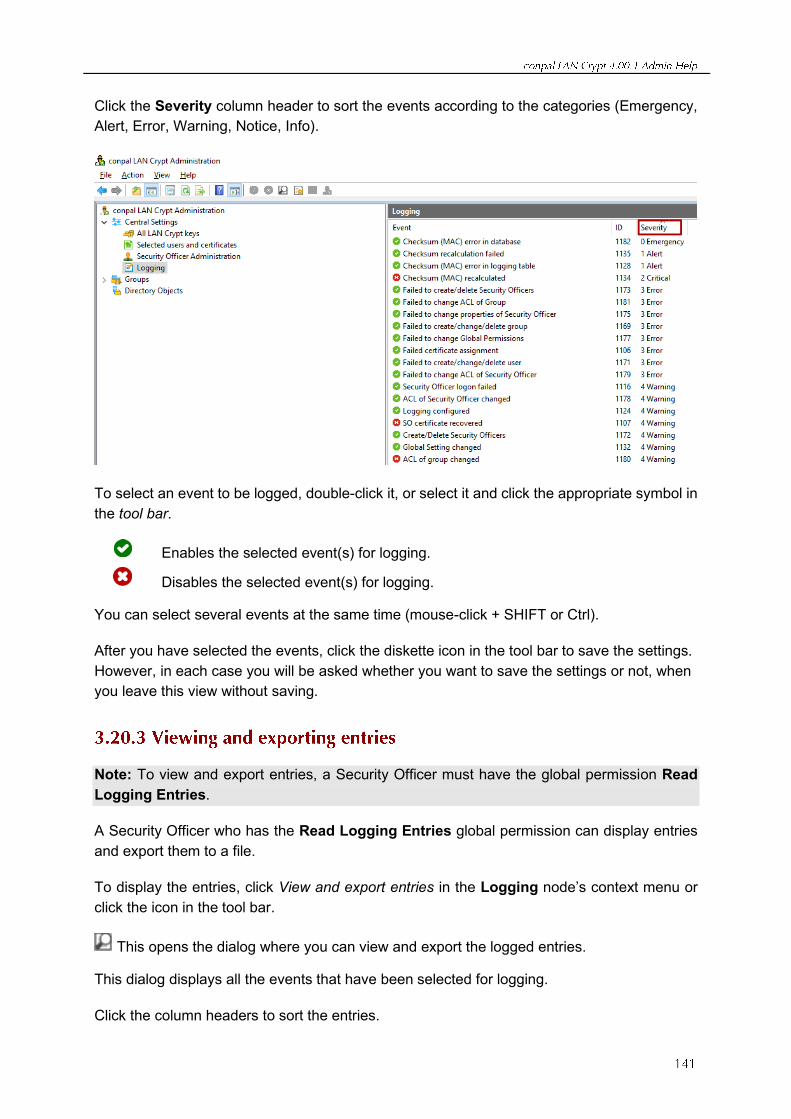
Click the Severity column header to sort the events according to the categories (Emergency,
Alert, Error, Warning, Notice, Info).
To select an event to be logged, double-click it, or select it and click the appropriate symbol in
the tool bar.
. Enables the selected event(s) for logging.
Disables the selected event(s) for logging.
You can select several events at the same time (mouse-click + SHIFT or Ctrl).
After you have selected the events, click the diskette icon in the tool bar to save the settings.
However, in each case you will be asked whether you want to save the settings or not, when
you leave this view without saving.
Note: To view and export entries, a Security Officer must have the global permission Read
Logging Entries.
A Security Officer who has the Read Logging Entries global permission can display entries
and export them to a file.
To display the entries, click View and export entries in the Logging node’s context menu or
click the icon in the tool bar.
This opens the dialog where you can view and export the logged entries.
This dialog displays all the events that have been selected for logging.
Click the column headers to sort the entries.
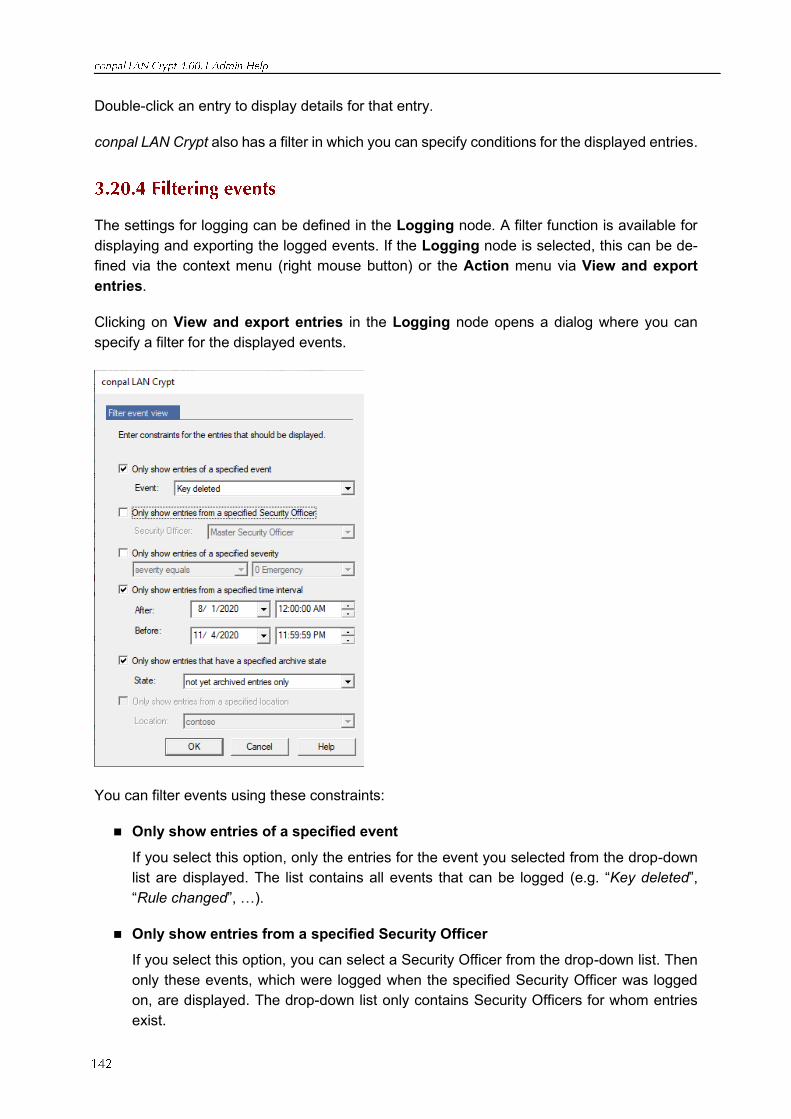
Double-click an entry to display details for that entry.
conpal LAN Crypt also has a filter in which you can specify conditions for the displayed entries.
The settings for logging can be defined in the Logging node. A filter function is available for
displaying and exporting the logged events. If the Logging node is selected, this can be de-
fined via the context menu (right mouse button) or the Action menu via View and export
entries.
Clicking on View and export entries in the Logging node opens a dialog where you can
specify a filter for the displayed events.
You can filter events using these constraints:
◼ Only show entries of a specified event
If you select this option, only the entries for the event you selected from the drop-down
list are displayed. The list contains all events that can be logged (e.g. “Key deleted”,
“Rule changed”, …).
◼ Only show entries from a specified Security Officer
If you select this option, you can select a Security Officer from the drop-down list. Then
only these events, which were logged when the specified Security Officer was logged
on, are displayed. The drop-down list only contains Security Officers for whom entries
exist.
◼ Only show entries of a specified severity
If you select this option, you can select a particular level of severity or a range of severity,
for which entries should be displayed. Severity is less or equal and Severity is greater or
equal refers to the number before the severity level.
◼ Only show entries from a specified time interval
If you select this option, you can define a period of time, in which the entries were logged.
◼ Only show entries that have specified archive state
If you select this option, you can specify whether archived entries only or not yet archived
entries only are displayed (entries that have already been archived remain in the data-
base until they are deleted). If this option is not selected, both type of entries is displayed.
◼ Only show entries from a specified location
Select this option to specify a location from which entries are to be displayed. If you are
using a distributed database there may be several locations involved. The way in which
the database is replicated determines which locations can be displayed.
Note: Even after executing the View and export entries function, the filter can be defined by
clicking the Filter button in the View Events dialog. Alternatively, this function is also available
via the View menu and after selecting Filter.
Note: A Security Officer needs the global permission Manage Logging before they can ar-
chive, delete and check entries.
A Security Officer who has the global permission Manage Logging can archive, delete and
check logged entries.
Click Archive, delete and check entries in the Logging node’s context menu or click the
symbol in the task bar to launch a wizard for carrying out these tasks.
Launches the wizard to archive, delete and check logged entries.

To archive entries, select Archive entries and click Next.
In the next dialog, enter:
◼ Date and time of the last entry that is to be archived. All entries from that time to the
present will be archived. In addition, at this point you can also archive by location (if
available).
Note: Different locations are only selectable if you are working with a distributed data-
base. Which locations are selectable at this point depends on how the database is rep-
licated. Only one location is shown in the graphic above. The location is always the entry
you defined during the installation of conpal LAN Crypt. This entry cannot be changed
afterwards.
◼ The name of the file the entries should be written to.
Click Next. In the next dialog you can see how many entries have been selected. Click Next.
When all the entries have been archived, the wizard’s last dialog is displayed. Click Finish to
close the wizard.
Entries that have already been archived remain in the database and can be deleted. Their
state is set to Archived.
To delete archived entries, select Delete archived entries and click Next.
In the next dialog, specify:
◼ Date and time of the last entry that is to be deleted. All entries from that time to the
present will be deleted.
Note: The last possible time depends on the specified minimum age of log entries, which
you can define on the Settings tab of the Logging node.
◼ The location (if available) from which entries are to be deleted.
Click Next. In the next dialog you can see how many entries have been selected. Click Next.
When all entries have been deleted, the wizard’s last dialog is displayed. Click Finish to close
the wizard.
To check the integrity of logged events, select Check archive integrity and click Next.
In the next dialog, select which data you want to check. You can select the entries in the data-
base or archived entries to be checked.
To check entries in a distributed database, select which location’s entries are to be checked.
If you want to check an archive, select a file by clicking the Browse ... button.
Click Next. In the next dialog you can see how many entries have been selected.
Click Next. When all entries have been checked, the wizard’s last dialog is displayed. The
result of the integrity check is displayed. If the data has been manipulated, an appropriate
warning is displayed.
Click Finish to close the wizard.
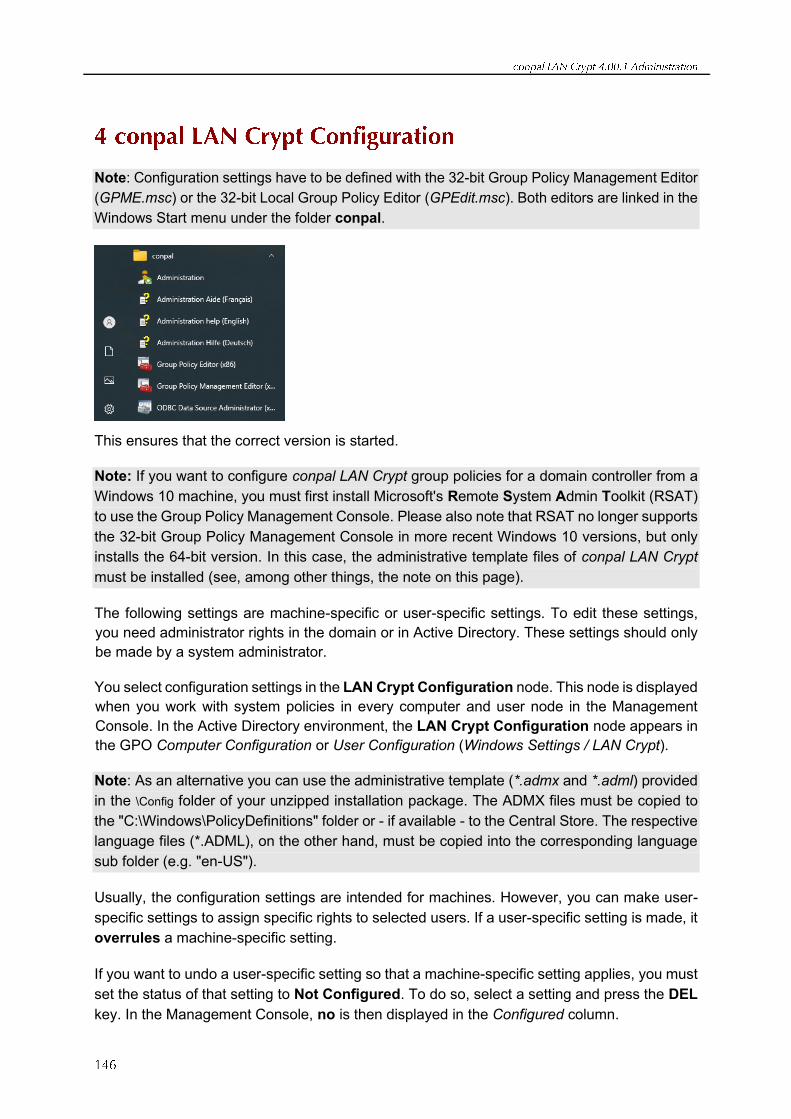
Note: Configuration settings have to be defined with the 32-bit Group Policy Management Editor
(GPME.msc) or the 32-bit Local Group Policy Editor (GPEdit.msc). Both editors are linked in the
Windows Start menu under the folder conpal.
This ensures that the correct version is started.
Note: If you want to configure conpal LAN Crypt group policies for a domain controller from a
Windows 10 machine, you must first install Microsoft's Remote System Admin Toolkit (RSAT)
to use the Group Policy Management Console. Please also note that RSAT no longer supports
the 32-bit Group Policy Management Console in more recent Windows 10 versions, but only
installs the 64-bit version. In this case, the administrative template files of conpal LAN Crypt
must be installed (see, among other things, the note on this page).
The following settings are machine-specific or user-specific settings. To edit these settings,
you need administrator rights in the domain or in Active Directory. These settings should only
be made by a system administrator.
You select configuration settings in the LAN Crypt Configuration node. This node is displayed
when you work with system policies in every computer and user node in the Management
Console. In the Active Directory environment, the LAN Crypt Configuration node appears in
the GPO Computer Configuration or User Configuration (Windows Settings / LAN Crypt).
Note: As an alternative you can use the administrative template (*.admx and *.adml) provided
in the \Config folder of your unzipped installation package. The ADMX files must be copied to
the "C:\Windows\PolicyDefinitions" folder or - if available - to the Central Store. The respective
language files (*.ADML), on the other hand, must be copied into the corresponding language
sub folder (e.g. "en-US").
Usually, the configuration settings are intended for machines. However, you can make user-
specific settings to assign specific rights to selected users. If a user-specific setting is made, it
overrules a machine-specific setting.
If you want to undo a user-specific setting so that a machine-specific setting applies, you must
set the status of that setting to Not Configured. To do so, select a setting and press the DEL
key. In the Management Console, no is then displayed in the Configured column.
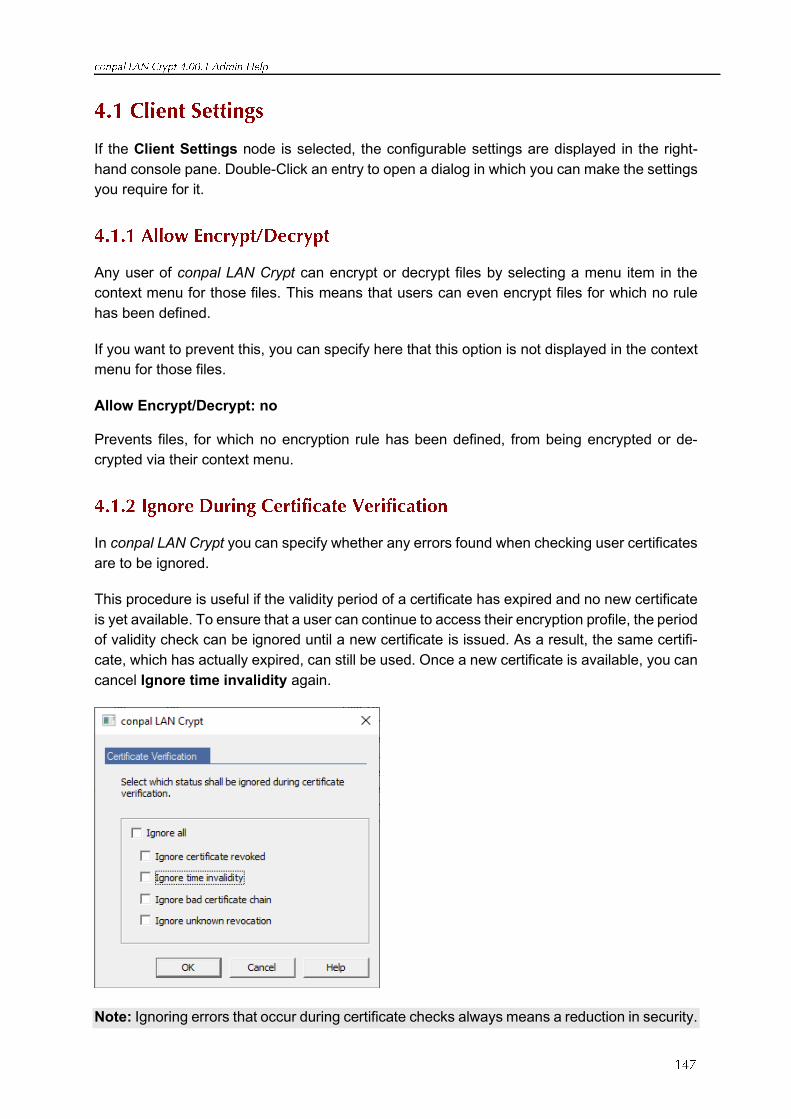
If the Client Settings node is selected, the configurable settings are displayed in the right-
hand console pane. Double-Click an entry to open a dialog in which you can make the settings
you require for it.
Any user of conpal LAN Crypt can encrypt or decrypt files by selecting a menu item in the
context menu for those files. This means that users can even encrypt files for which no rule
has been defined.
If you want to prevent this, you can specify here that this option is not displayed in the context
menu for those files.
Allow Encrypt/Decrypt: no
Prevents files, for which no encryption rule has been defined, from being encrypted or de-
crypted via their context menu.
In conpal LAN Crypt you can specify whether any errors found when checking user certificates
are to be ignored.
This procedure is useful if the validity period of a certificate has expired and no new certificate
is yet available. To ensure that a user can continue to access their encryption profile, the period
of validity check can be ignored until a new certificate is issued. As a result, the same certifi-
cate, which has actually expired, can still be used. Once a new certificate is available, you can
cancel Ignore time invalidity again.
Note: Ignoring errors that occur during certificate checks always means a reduction in security.
◼ Ignore certificate revoked
If a certificate is on a Certificate Revocations List, which is evaluated during logon, it may
not actually be used for logging on. Nevertheless, a user can continue to access their
encryption profile even if this option is selected.
◼ Ignore time invalidity
Even if the validity period of a certificate has expired, the user can continue to access
their encryption profile, if this option is selected.
◼ Ignore bad certificate chain
The user can continue to access their encryption profile even if the public part of the is-
suer’s certificate is not available on the client machine or is kept in the wrong certificate
store.
◼ Ignore unknown revocation
When PKIs from some vendors write reasons for the revocation of a certificate to a CRL,
they do not comply with common standards. You cannot usually use a certificate if the
reason for revocation is not known. However, if this option is selected, the user can con-
tinue to access their encryption profile.
Note: Please note that ignoring errors found when checking user certificates usually means
compromising the company’s security policy. The conpal LAN Crypt Client does not recognize
an unknown revocation status, in accordance with RFC 5280. Therefore, give a different rea-
son for revoking a certificate.
These settings can also be defined under Server Settings. Certificates are verified out both
when a Security Officer logs on to the conpal LAN Crypt Administration Console, and when an
additional authorization is performed.
conpal LAN Crypt resolves the environment variable %USERNAME% for paths.
Here you can specify whether other environment variables are to be resolved in paths.
However, using other environment variables in paths may create problems if users are able to
change them. This may result in the path data no longer functioning correctly in the encryption
profile. In addition, environment variables could affect different paths depending on the Win-
dows version.
Here you can specify which menu options are visible in the conpal LAN Crypt user menu on a
client computer. By default, all menu options are displayed. If you suppress a menu option
here, it is not displayed on the client computer. This means that this functionality is also not
available on this client. This enables you, for example, to prevent decryption from being
switched off (deactivated) on a client computer.
As the conpal LAN Crypt driver is always loaded when you boot a workstation, all the files have
already been checked to if they are encrypted, and therefore also that they have the appropri-
ate access rights, even if no user-specific encryption profile has yet been loaded. This may
slow down performance in this phase.
However, if you make a machine-specific setting in conpal LAN Crypt’s configuration you can
configure the conpal LAN Crypt driver to ignore specific drives or folders until the user’s en-
cryption profile has been loaded.
Double-click Default Ignore Rules in the Client Settings to open a dialog in which you can
specify the directories (for example, "c:\*.*;d:\*.*") that conpal LAN Crypt’s driver is to ignore.
If you enter more than one path, separate each path by a semicolon.
However, if you use this rule you must take into account that conpal LAN Crypt’s specific ac-
cess check will not be carried out until the user’s encryption profile is loaded.
Example:
If you enter "c:\*.*;d:\*.*" as the Default Ignore Rules, the driver will ignore all folders
on the C and D drives until the user’s encryption profile is loaded.
Even if you use conpal LAN Crypt on a terminal server, you can speed up performance by using
the Default Ignore Rules setting. If, for example, several users are working on the same terminal
server, but only one of them uses conpal LAN Crypt, you can tell the driver to ignore all the other
users’ sessions. Because no encryption profile has been loaded for them, only the Default Ig-
nore Rules apply to them.
Note: Please note that the entries you define here also include all subfolders.
Note: Please note that during a new installation (not an update) of conpal LAN Crypt the default
'Ignore rule' is predefined with the value "*". As a result, the specific access protection of conpal
LAN Crypt is inactive for all paths and files until the user's profile is loaded. Users may delete
encrypted files during this period or when they have unloaded their profile. This is true even if
they do not have a key for the files stored there.
You can change this, if you define a path for the default 'Ignore rule' (e.g. "C:\Program Files\*.*").
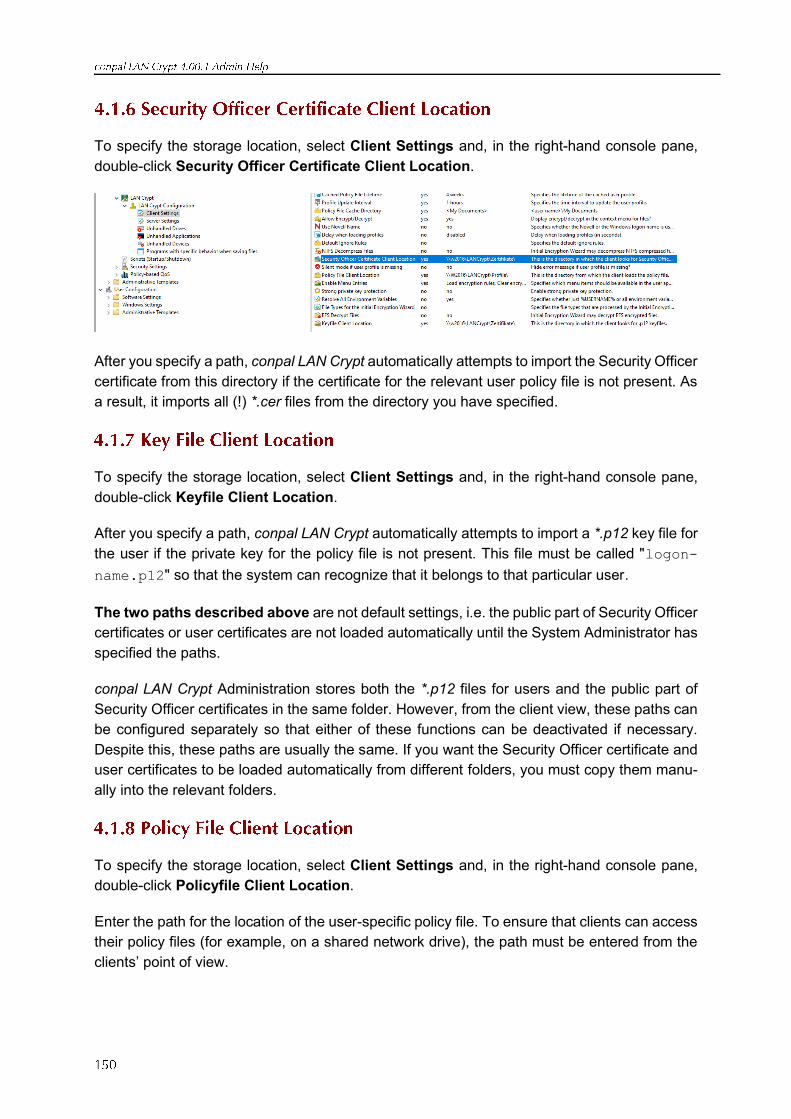
To specify the storage location, select Client Settings and, in the right-hand console pane,
double-click Security Officer Certificate Client Location.
After you specify a path, conpal LAN Crypt automatically attempts to import the Security Officer
certificate from this directory if the certificate for the relevant user policy file is not present. As
a result, it imports all (!) *.cer files from the directory you have specified.
To specify the storage location, select Client Settings and, in the right-hand console pane,
double-click Keyfile Client Location.
After you specify a path, conpal LAN Crypt automatically attempts to import a *.p12 key file for
the user if the private key for the policy file is not present. This file must be called "logon-
name.p12" so that the system can recognize that it belongs to that particular user.
The two paths described above are not default settings, i.e. the public part of Security Officer
certificates or user certificates are not loaded automatically until the System Administrator has
specified the paths.
conpal LAN Crypt Administration stores both the *.p12 files for users and the public part of
Security Officer certificates in the same folder. However, from the client view, these paths can
be configured separately so that either of these functions can be deactivated if necessary.
Despite this, these paths are usually the same. If you want the Security Officer certificate and
user certificates to be loaded automatically from different folders, you must copy them manu-
ally into the relevant folders.
To specify the storage location, select Client Settings and, in the right-hand console pane,
double-click Policyfile Client Location.
Enter the path for the location of the user-specific policy file. To ensure that clients can access
their policy files (for example, on a shared network drive), the path must be entered from the
clients’ point of view.
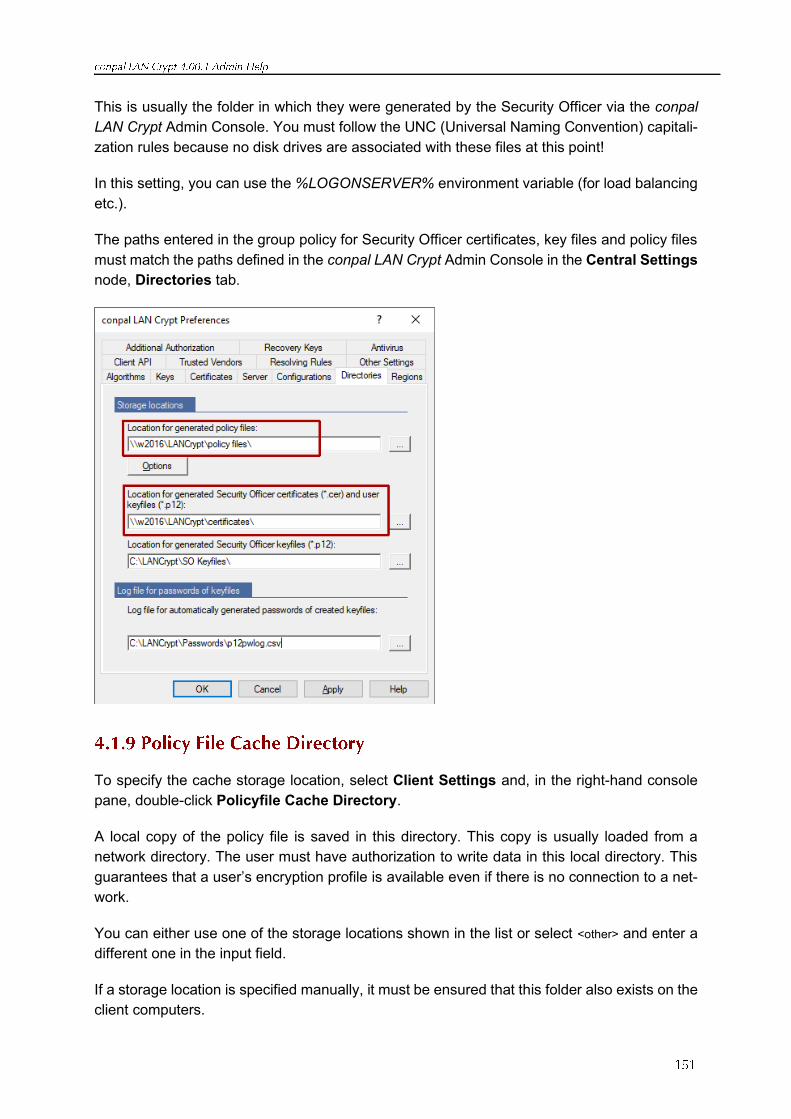
This is usually the folder in which they were generated by the Security Officer via the conpal
LAN Crypt Admin Console. You must follow the UNC (Universal Naming Convention) capitali-
zation rules because no disk drives are associated with these files at this point!
In this setting, you can use the %LOGONSERVER% environment variable (for load balancing
etc.).
The paths entered in the group policy for Security Officer certificates, key files and policy files
must match the paths defined in the conpal LAN Crypt Admin Console in the Central Settings
node, Directories tab.
To specify the cache storage location, select Client Settings and, in the right-hand console
pane, double-click Policyfile Cache Directory.
A local copy of the policy file is saved in this directory. This copy is usually loaded from a
network directory. The user must have authorization to write data in this local directory. This
guarantees that a user’s encryption profile is available even if there is no connection to a net-
work.
You can either use one of the storage locations shown in the list or select <other> and enter a
different one in the input field.
If a storage location is specified manually, it must be ensured that this folder also exists on the
client computers.
Note: If you want to remove a user from your conpal LAN Crypt environment, you have to
consider that the local copy remains saved on the computer. As long as this is the case, the
user can access data with the rights contained therein.
To prevent this, you should create an empty policy file for this user. To do so, Clear the policy
file and remove the user from all groups. (see “Clearing Profiles“ on page 138).
Here, you can specify a period of time (in seconds) that will pass before the user profile is
loaded. This delay is for example important, if a certificate on a token is used. The delay in
loading the profile ensures that the token can be accessed when the certificate is required.
Typical value: 20 seconds.
If you define specific file types here, only the files of the specified type will be processed by the
Initial Encryption Wizard. The user cannot change this setting in the Initial Encryption Wizard!
This setting only affects files for which an encryption rule exists.
If a folder contains also other files of a file type specified here, they will not be included in initial
encryption. They will only be encrypted when the user opens and saves them again.
If you intend to let the user define this setting themselves in the Initial Encryption Wizard, leave
the setting at not configured.
If you specified file types here and you intend to let the user make a selection later, set the
setting back to Not configured again.
Note: This setting only applies to the Initial Encryption Wizard. If encryption is started via the
Explorer extension “Encrypt according to profile”, the setting does not have any effect.
Specify the file types in a list separated by semicolons.
Example: docx;xlsx;pdf;txt
When a user logs on to Windows, their cached profile will be loaded first. conpal LAN Crypt
then checks whether a new policy file is available for the user by establishing a connection to
the specified location of the policy file (network drive). If a new policy file is found there, the
cached user profile will be updated.
This approach has the advantage that the user can start working with encrypted files while
conpal LAN Crypt checks whether a new version of the policy file exists.

If the network drive is not accessible, the user works with the cached user profile until it can
be updated.
If this option is set to Not Configured, the behavior of conpal LAN Crypt is as described.
Using this setting you can change the standard behavior.
Note: You can set an option to Not Configured by selecting it and click Delete in its context
menu (right-click). In the Configured column, no will be displayed besides the relevant option.
Here you can specify for how long the cached policy will be valid on the client computers.
Within the time period defined here the policy file is valid on the client and the user can access
encrypted data, even if there is no connection to the file location on the policy share.
The time period during which policy files are cached and are therefore valid can be defined in
days or weeks.
When the specified time period expires conpal LAN Crypt tries to load the policy file from the
network drive to update it again. If this is not possible, the policy file will be unloaded. The user
can no longer access encrypted data. The policy file will only be updated and loaded again,
when a valid policy file is available (for example at the next logon with a connection to the client
location for policy files). The user can access encrypted data again. The counter for the dura-
tion of cache storage is reset.
By specifying the duration of cache storage, you can on the one hand ensure that the client
computers are provided with up-to-date policy files in regular intervals and that users use up-
to-date policies at all times. On the other hand, you can prevent users from working with the
same policy files for an unlimited time period since a user can continue working with a cached
version of the policy file for an unlimited time period, if this option is set to Not Configured.
The counter for the permitted duration of cache storage will be reset in the following situations:
◼ The storage location of the policy files is accessible and a valid policy file was transferred
to the client (e. g. at user logon or triggered by a specified update interval), however, the
policy file is not new compared to the existing one.
◼ A new policy file is available and has been loaded successfully.
The counter for the permitted duration of cache storage will NOT be reset in the following
situations:
◼ The client computer tries to receive a new policy file. However, the storage location of
the policy files is not accessible.
◼ A new policy file was transferred. However, it could not be loaded due to an error.
◼ A new policy file is available. However, it requires a new certificate. The user does not
have this certificate or is not able to load it.
If updating the policy file fails, the expiry time of the cached policy file will be displayed in a
balloon tooltip on the client computer. The user can then initiate a manual update via the conpal
LAN Crypt Tray Icon. An automatic update will also be carried out according to the update
interval settings for the user profile.
If this option is set to "0", the policy file will not be cached. This means that users receive their
user profiles when logging on, if the file location of policy file is accessible. If it is not accessible
or an error occurs when loading the profile, the user cannot access encrypted files.
This setting enables the Initial Encryption Wizard to process NTFS compressed files. If you set
the NTFS Decompress Files option to yes, the wizard decompresses NTFS compressed files
and encrypts them, if an applies.
If you set the NTFS Decompress Files option to no, the Initial Encryption Wizard will ignore
NTFS compressed files. They will not be encrypted, even if an encryption rule has been spec-
ified for them.
After configuring this option, users cannot change it in the Initial Encryption Wizard! Users can
only configure this option themselves in the Initial Encryption Wizard, if it has been set to not
configured here.
Note: When you compress files with NTFS, which have already been encrypted by conpal
LAN Crypt, these files can no more decrypted by conpal LAN Crypt. An error message is dis-
played when trying to decrypt such files. Files that you want to compress with NTFS must not
have previously been encrypted with conpal LAN Crypt.
This setting enables the Initial Encryption Wizard to process EFS encrypted files. If you set the
EFS Decrypt Files option to yes, the wizard decrypts EFS encrypted files and encrypts them
again if a conpal LAN Crypt encryption rule applies.
If you set the EFS Decrypt Files option to no, the Initial Encryption Wizard will ignore EFS
encrypted files. They will not be re-encrypted by conpal LAN Crypt, even if an encryption rule
has been specified for them.
After configuring this option, users cannot change it in the Initial Encryption Wizard! Users can
only configure this option themselves in the Initial Encryption Wizard, if it has been set to not
configured here.
Note: You can set an option to Not configured by selecting it and click Delete in its context
menu (right-click). In the Configured column, no will be displayed besides the relevant option.
This setting defines how often conpal LAN Crypt checks for new policy files and updates them
if necessary.
For updating policy files conpal LAN Crypt needs access to the network drive on which the
policy files are stored. conpal LAN Crypt checks whether a new version of the policy file exists
on the network drive and updates the policy file on the client computer if required.
conpal LAN Crypt automatically carries out all steps required for successfully loading the user
profile (if necessary, searching for new certificates, verifying new certificates, etc.). The old
profile will only be replaced by the new profile and the new profile will only be loaded, if no
errors occur during the process. Afterwards, the counter for the duration of cache storage will
be reset. If the policy files are identical, the counter will also be reset.
The update interval can be specified in minutes, hours, days and weeks.
Note: conpal LAN Crypt does not allow any update intervals shorter than 15 minutes. If this
option is set to not configured, policy files are not updated automatically.
If the default setting applies, conpal LAN Crypt shows an error message, if the system does
not find a user profile.
Here you can specify that this error message is to be suppressed, if no user profile is found.
If you set Hide error message to yes, the error message will not be displayed.
Note: This setting can be particularly helpful in terminal server environments if not all users
should work with conpal LAN Crypt.
Files usually only remain encrypted for as long as they are subject to an encryption rule. For
example, if a user copies an encrypted file into a folder for which no encryption rule has been
defined, the file will be decrypted in the target folder. If you set Persistent Encryption to yes,
you can ensure that files remain encrypted even when they are moved or copied.
To deactivate this function, double-click Persistent Encryption and select no in the list field
of Enable Persistent Encryption.
Here you can specify that the user is prompted for authentication every time the private key is
used by conpal LAN Crypt. If you enable this setting, it also applies to the Security Officer (see
"Enable Strong Private Key Protection" under "LAN Crypt Administration Settings" on page 157).
Here you can specify the CSP and hash algorithm.
The CSP for importing a private key must be selected.
Note: A change of this setting affects both the conpal LAN Crypt clients and the conpal LAN
Crypt Administration Console. For example, the CSP setting "Microsoft Base Smart Card
Crypto Provider" would require login with a smart card in both cases.
Note: You must make these settings for the server. They have no effect on the client computers
apart from one exception ("Enable Strong Private Key Protection").
However, it is vital that you make these server settings before you start the Administration
function for the first time, if you do not use the standard settings!
Here you can specify that the (Master) Security Officer is prompted for authentication every
time the private key is used by conpal LAN Crypt. If you enable this setting, it also applies to
the clients (see "Strong private key protection" under "Client Settings" on page 156).
Note: On computers on which you use the conpal LAN Crypt ScriptingAPI, you must deactivate
this setting via the group policy. The password query would otherwise always require user
interaction when executing a script.
Here you specify the SQL dialect that is to be used for communication with the ODBC data
source.
Select:
◼ MS SQL-Server
◼ Oracle
◼ Standard-SQL
This will then be used in your system configuration.
Here you enter the Database Owner to ensure that the database you are using can be ad-
dressed correctly.
For the MS SQL Server, the default value "dbo" for the generator must not be changed. This
only needs to be changed if you are using an Oracle database.
Attention: If you are using an Oracle database, you must enter the Database Owner here in
CAPITAL LETTERS. This must be the same name that was used during the creation of the
database tables.
Here you enter the name that is to be used to access the ODBC data source.
conpal LAN Crypt uses SGLCSQL Server as the default name for the ODBC data source. If
you want to use a different name, enter it here before you run conpal LAN Crypt Administration
for the first time.
Note: The name for the ODBC data source is case sensitive! The name you enter here must
be identical to the name that was entered when the ODBC data source was created. Until
version 4.0.3 of conpal LAN Crypt only 32-bit ODBC data sources can be used.
Here you can specify which certificate status is to be ignored when a Security Officer logs on
or when certificates are assigned in administration console.
The used Hash Algorithm is only displayed at this point. It has to be configured in Client Settings.
By default, when conpal LAN Crypt assigns certificates from the certificate store, it only uses cer-
tificates that have the values Key Encipherment and/or Data Encipherment set for the "key usage"
property.
However, in Check Certificate Extensions you can specify that this check is not carried out,
which enables conpal LAN Crypt to use certificates with other properties.
Check Certificate Extensions: no permits the use of certificates with other properties.
Note: However, whether or not these types of certificates can be used with conpal LAN Crypt
depends on which CSP you are using. If you decide to switch off this check, ensure that the
type of certificate you want to use can actually be used with conpal LAN Crypt.
In conpal LAN Crypt you can specify that drives, applications and devices (network file sys-
tems) are to be "unhandled" (ignored) by conpal LAN Crypt’s filter driver and therefore ex-
cluded from transparent encryption/decryption.
A backup program is an example of an application that might not be handled (known as "un-
handled"). If you want backup data to remain encrypted, you can exclude this application from
the encryption/decryption process. The data then remains encrypted when it is backed up.
You can significantly improve performance by excluding entire disk drives. If, for example, no
encryption is to be performed on the “E:” drive, it can simply be defined as an "ignored drive".
Alternatively, you could define a rule for this disk drive using the "Ignore encryption rule" option.
When you mark a drive as "unhandled", the filter driver does not process the profile so file
operations are performed more quickly.
You will find these settings in the LAN Crypt configuration node.
Note: As these are machine-specific settings, they do not come into effect until you restart the
client computer.
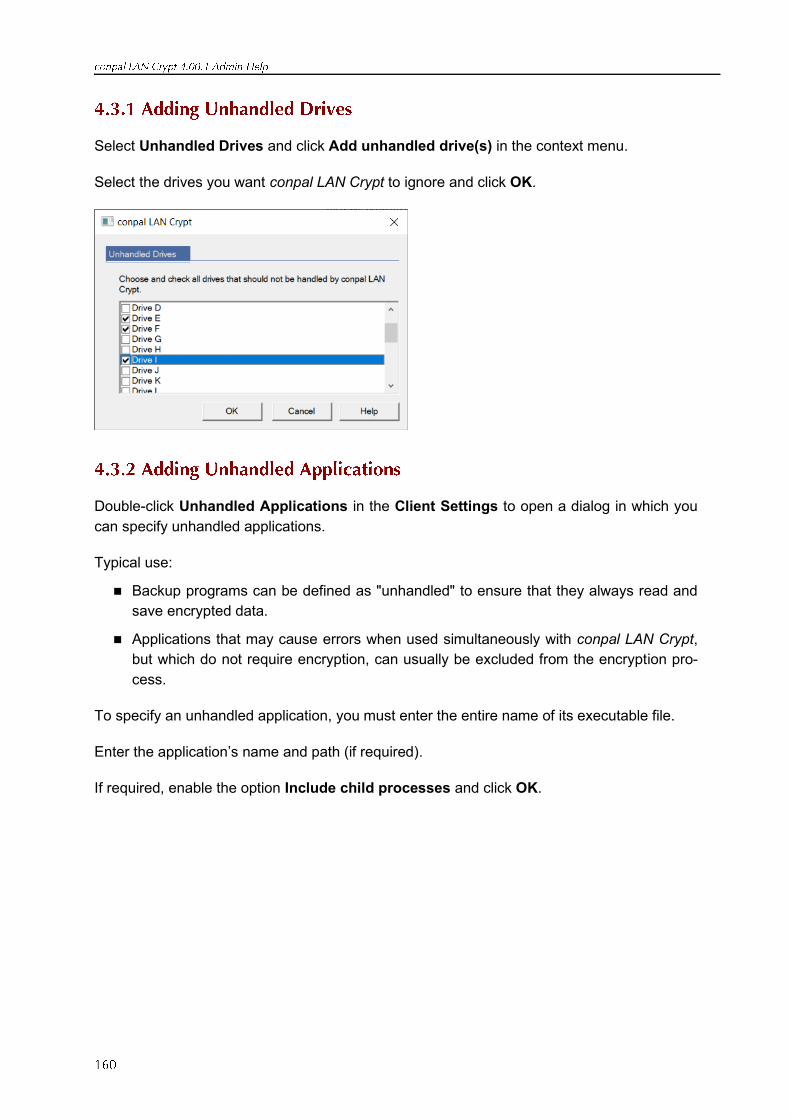
Select Unhandled Drives and click Add unhandled drive(s) in the context menu.
Select the drives you want conpal LAN Crypt to ignore and click OK.
Double-click Unhandled Applications in the Client Settings to open a dialog in which you
can specify unhandled applications.
Typical use:
◼ Backup programs can be defined as "unhandled" to ensure that they always read and
save encrypted data.
◼ Applications that may cause errors when used simultaneously with conpal LAN Crypt,
but which do not require encryption, can usually be excluded from the encryption pro-
cess.
To specify an unhandled application, you must enter the entire name of its executable file.
Enter the application’s name and path (if required).
If required, enable the option Include child processes and click OK.
Double-click Unhandled Devices in the Client Settings to open a dialog in which you can
specify Unhandled Devices.
The Unhandled Devices dialog displays network file systems and certain types of drives that
you can exclude from the conpal LAN Crypt encryption process. For technical reasons you
cannot exclude single network drives here. You can only exclude entire network file systems.
The pre-defined devices listed here are:
◼ Client for Microsoft Networks
◼ Microsoft Client for Netware
◼ Novell Client for Netware
◼ Citrix Client Drive Mapping
◼ Multiple UNC provider
◼ Boot Volume
◼ Removables
◼ Opticals
◼ Local Volumes
◼ Network Shares
Note: Security officers can exclude individual (network) disk drives from the encryption pro-
cess by creating an encryption rule for this purpose.
In addition to these standard network file systems, you can also exclude specific devices by
entering their device names. This may be useful if file systems from third-party suppliers are
being used and you want to exclude them from the encryption process.
Enter the Device(s) name and click OK.
Administrators can use tools such as OSR’s Device Tree to display the names of file systems
currently being used on the system.
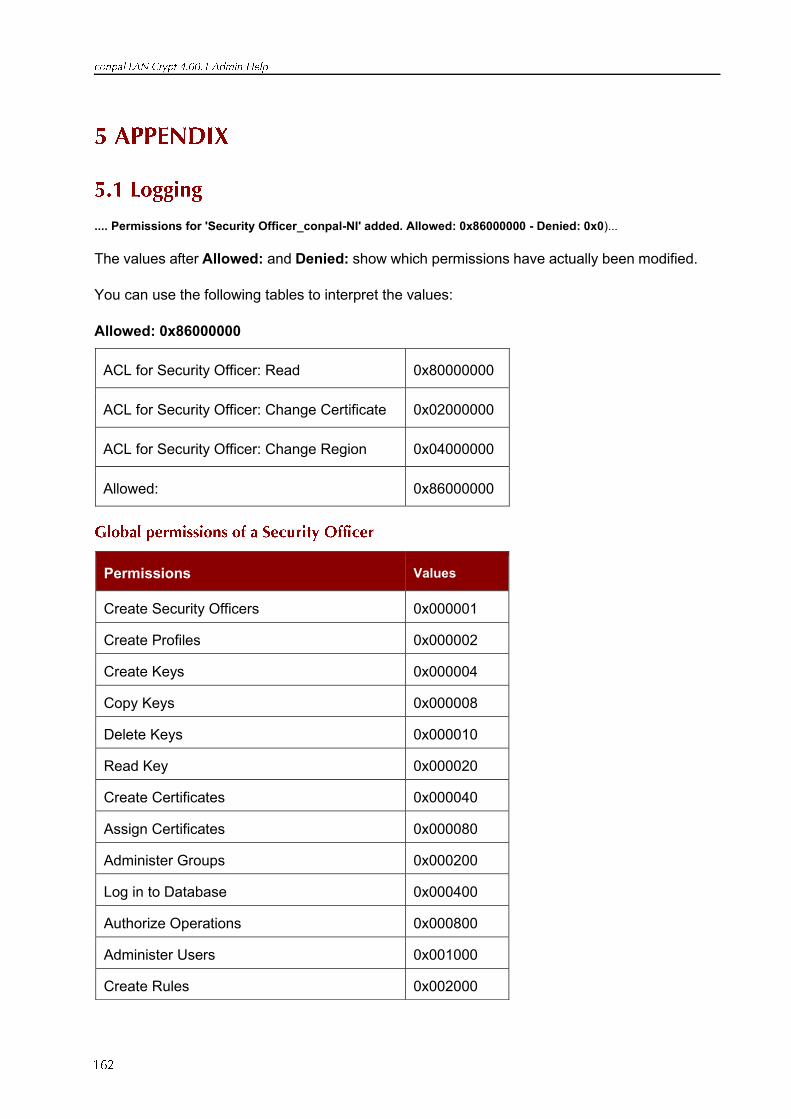
.... Permissions for 'Security Officer_conpal-NI' added. Allowed: 0x86000000 - Denied: 0x0)...
The values after Allowed: and Denied: show which permissions have actually been modified.
You can use the following tables to interpret the values:
Allowed: 0x86000000
ACL for Security Officer: Read 0x80000000
ACL for Security Officer: Change Certificate 0x02000000
ACL for Security Officer: Change Region 0x04000000
Allowed: 0x86000000
Permissions Values
Create Security Officers 0x000001
Create Profiles 0x000002
Create Keys 0x000004
Copy Keys 0x000008
Delete Keys 0x000010
Read Key 0x000020
Create Certificates 0x000040
Assign Certificates 0x000080
Administer Groups 0x000200
Log in to Database 0x000400
Authorize Operations 0x000800
Administer Users 0x001000
Create Rules 0x002000
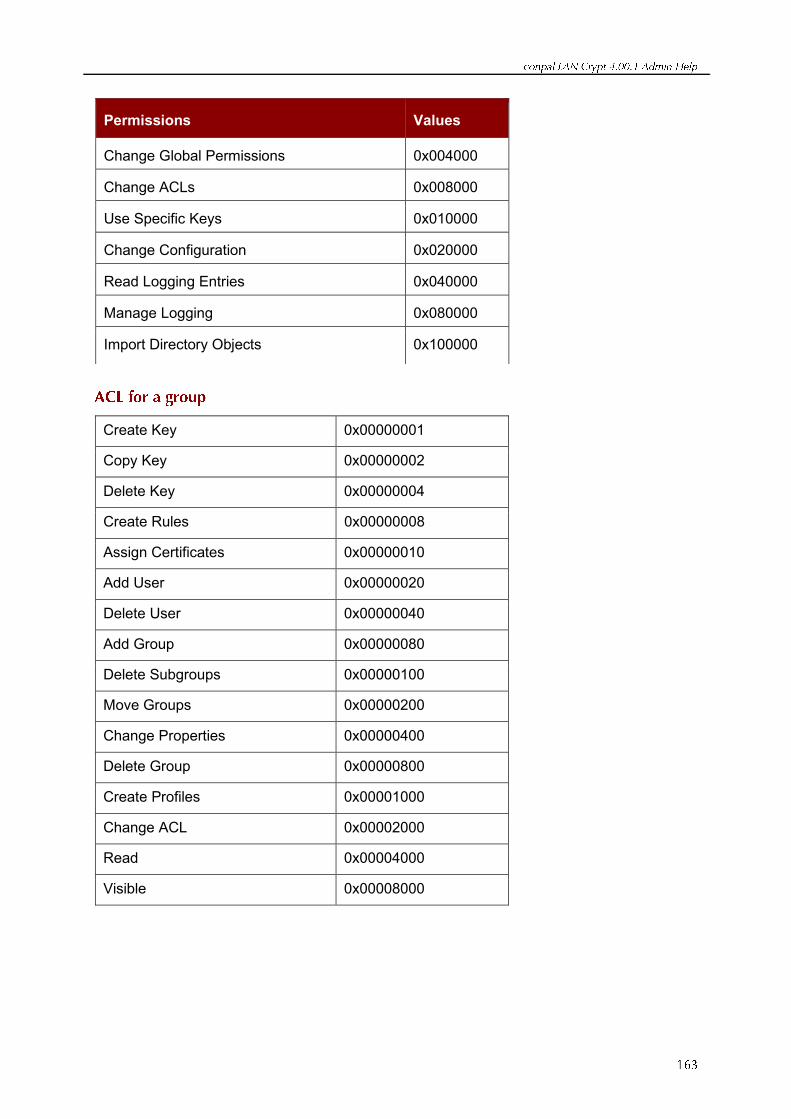
Create Key 0x00000001
Copy Key 0x00000002
Delete Key 0x00000004
Create Rules 0x00000008
Assign Certificates 0x00000010
Add User 0x00000020
Delete User 0x00000040
Add Group 0x00000080
Delete Subgroups 0x00000100
Move Groups 0x00000200
Change Properties 0x00000400
Delete Group 0x00000800
Create Profiles 0x00001000
Change ACL 0x00002000
Read 0x00004000
Visible 0x00008000
Permissions Values
Change Global Permissions 0x004000
Change ACLs 0x008000
Use Specific Keys 0x010000
Change Configuration 0x020000
Read Logging Entries 0x040000
Manage Logging 0x080000
Import Directory Objects 0x100000
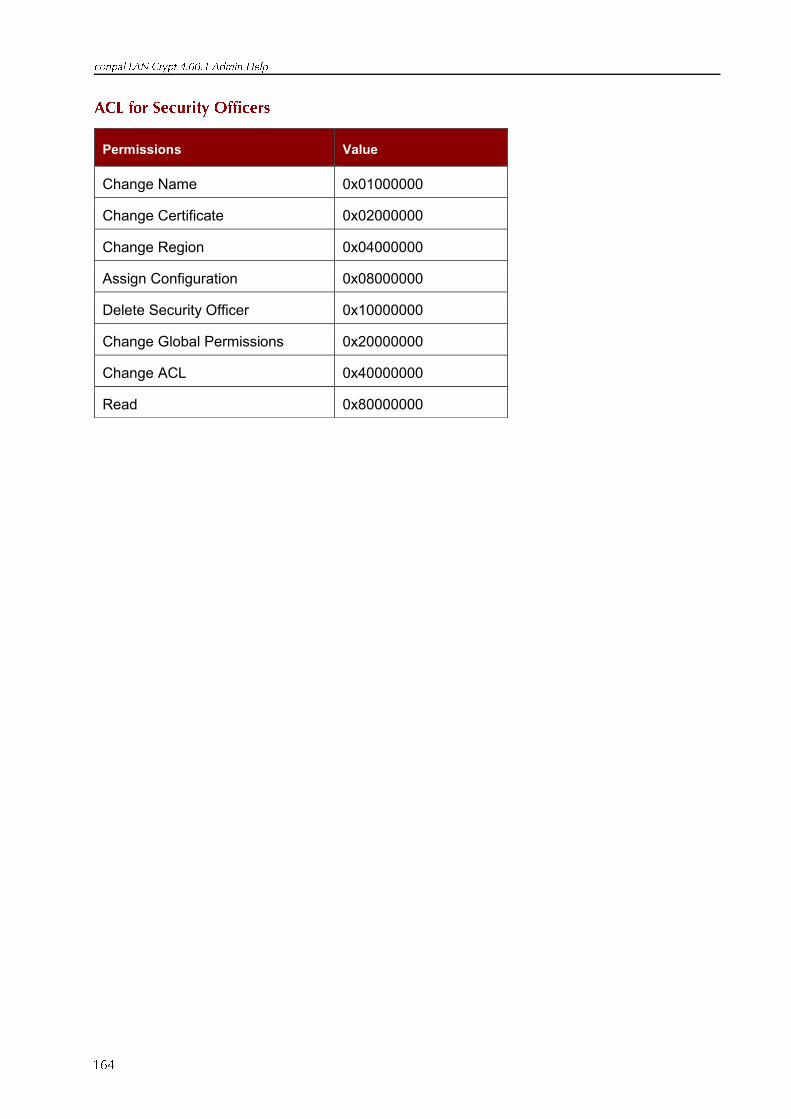
Permissions Value
Change Name 0x01000000
Change Certificate 0x02000000
Change Region 0x04000000
Assign Configuration 0x08000000
Delete Security Officer 0x10000000
Change Global Permissions 0x20000000
Change ACL 0x40000000
Read 0x80000000
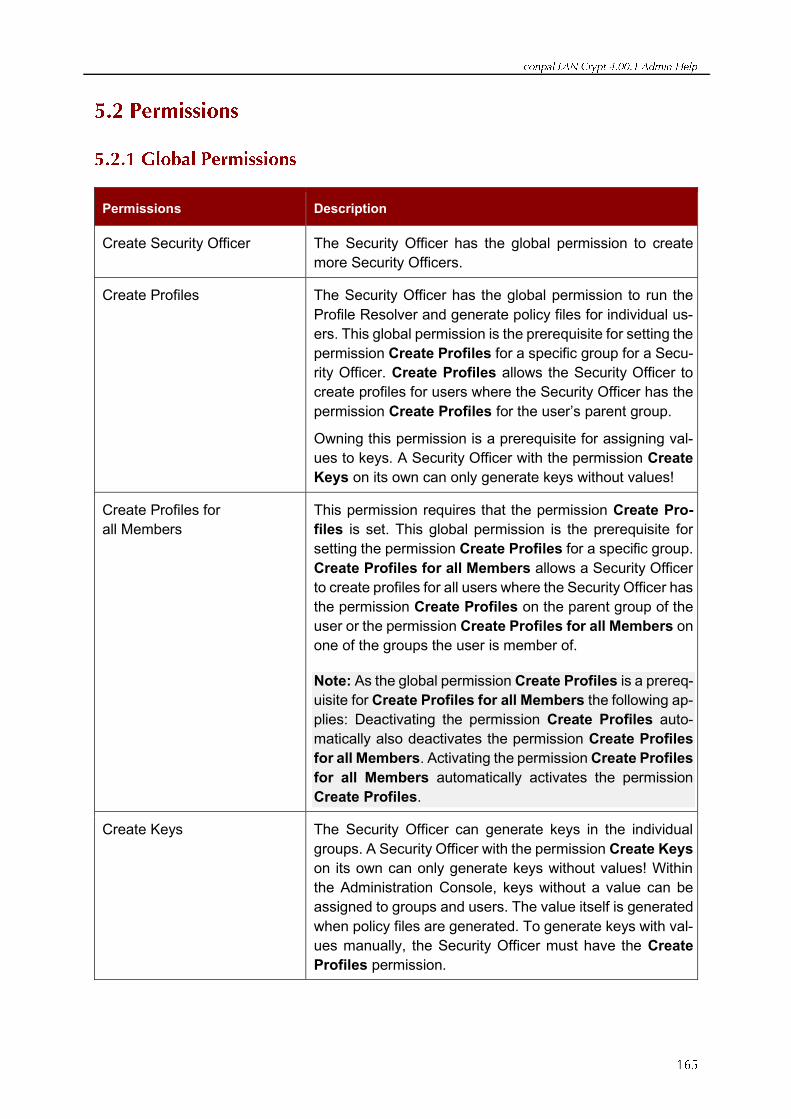
Permissions Description
Create Security Officer The Security Officer has the global permission to create
more Security Officers.
Create Profiles The Security Officer has the global permission to run the
Profile Resolver and generate policy files for individual us-
ers. This global permission is the prerequisite for setting the
permission Create Profiles for a specific group for a Secu-
rity Officer. Create Profiles allows the Security Officer to
create profiles for users where the Security Officer has the
permission Create Profiles for the user’s parent group.
Owning this permission is a prerequisite for assigning val-
ues to keys. A Security Officer with the permission Create
Keys on its own can only generate keys without values!
Create Profiles for
all Members
This permission requires that the permission Create Pro-
files is set. This global permission is the prerequisite for
setting the permission Create Profiles for a specific group.
Create Profiles for all Members allows a Security Officer
to create profiles for all users where the Security Officer has
the permission Create Profiles on the parent group of the
user or the permission Create Profiles for all Members on
one of the groups the user is member of.
Note: As the global permission Create Profiles is a prereq-
uisite for Create Profiles for all Members the following ap-
plies: Deactivating the permission Create Profiles auto-
matically also deactivates the permission Create Profiles
for all Members. Activating the permission Create Profiles
for all Members automatically activates the permission
Create Profiles.
Create Keys The Security Officer can generate keys in the individual
groups. A Security Officer with the permission Create Keys
on its own can only generate keys without values! Within
the Administration Console, keys without a value can be
assigned to groups and users. The value itself is generated
when policy files are generated. To generate keys with val-
ues manually, the Security Officer must have the Create
Profiles permission.
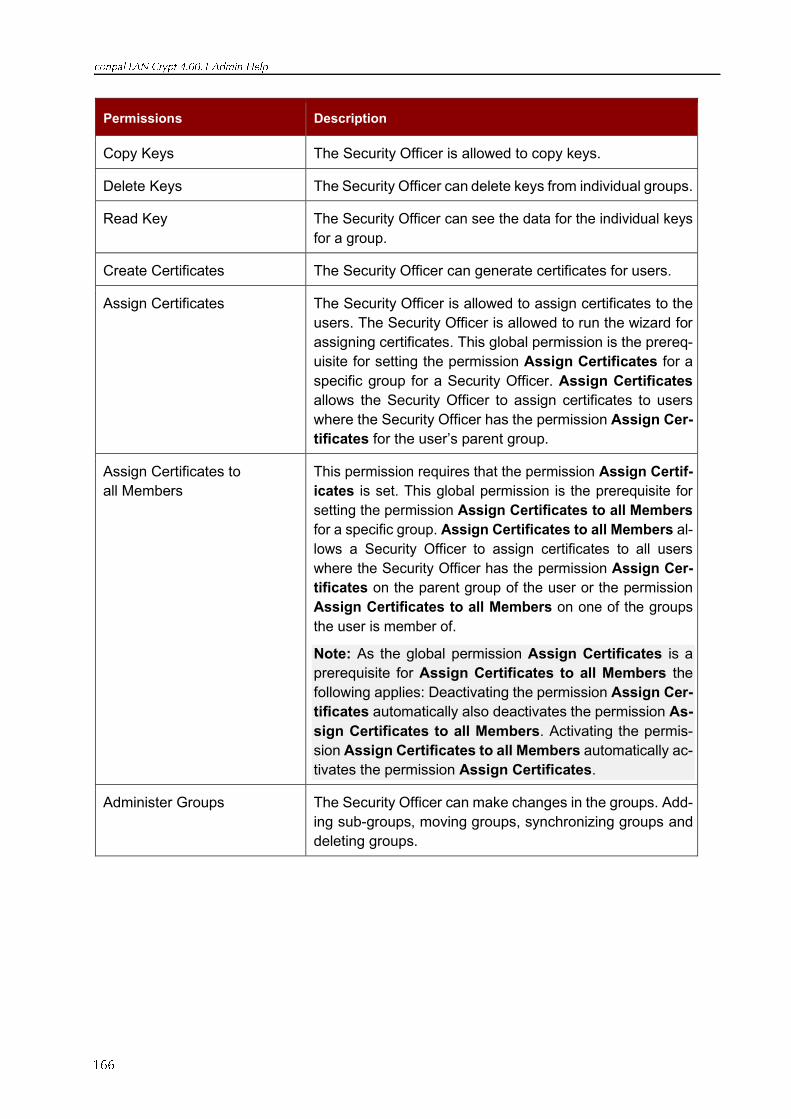
Permissions Description
Copy Keys The Security Officer is allowed to copy keys.
Delete Keys The Security Officer can delete keys from individual groups.
Read Key The Security Officer can see the data for the individual keys
for a group.
Create Certificates The Security Officer can generate certificates for users.
Assign Certificates The Security Officer is allowed to assign certificates to the
users. The Security Officer is allowed to run the wizard for
assigning certificates. This global permission is the prereq-
uisite for setting the permission Assign Certificates for a
specific group for a Security Officer. Assign Certificates
allows the Security Officer to assign certificates to users
where the Security Officer has the permission Assign Cer-
tificates for the user’s parent group.
Assign Certificates to
all Members
This permission requires that the permission Assign Certif-
icates is set. This global permission is the prerequisite for
setting the permission Assign Certificates to all Members
for a specific group. Assign Certificates to all Members al-
lows a Security Officer to assign certificates to all users
where the Security Officer has the permission Assign Cer-
tificates on the parent group of the user or the permission
Assign Certificates to all Members on one of the groups
the user is member of.
Note: As the global permission Assign Certificates is a
prerequisite for Assign Certificates to all Members the
following applies: Deactivating the permission Assign Cer-
tificates automatically also deactivates the permission As-
sign Certificates to all Members. Activating the permis-
sion Assign Certificates to all Members automatically ac-
tivates the permission Assign Certificates.
Administer Groups The Security Officer can make changes in the groups. Add-
ing sub-groups, moving groups, synchronizing groups and
deleting groups.
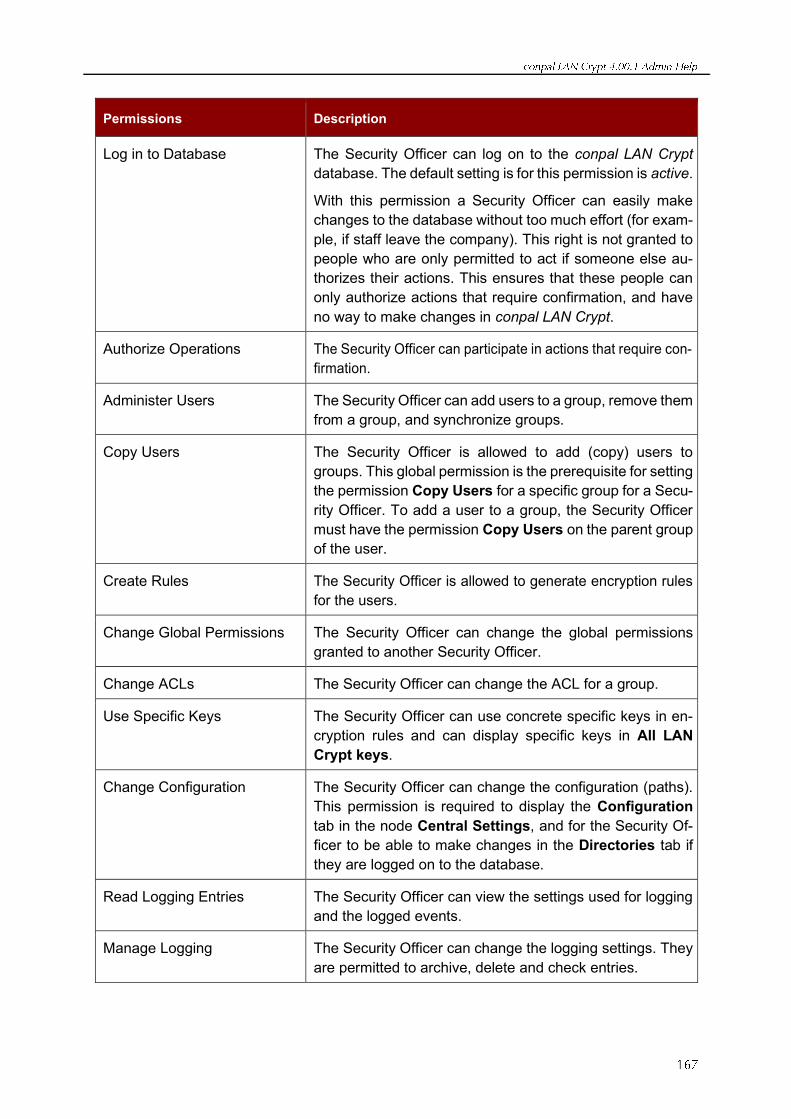
Permissions Description
Log in to Database The Security Officer can log on to the conpal LAN Crypt
database. The default setting is for this permission is active.
With this permission a Security Officer can easily make
changes to the database without too much effort (for exam-
ple, if staff leave the company). This right is not granted to
people who are only permitted to act if someone else au-
thorizes their actions. This ensures that these people can
only authorize actions that require confirmation, and have
no way to make changes in conpal LAN Crypt.
Authorize Operations The Security Officer can participate in actions that require con-
firmation.
Administer Users The Security Officer can add users to a group, remove them
from a group, and synchronize groups.
Copy Users The Security Officer is allowed to add (copy) users to
groups. This global permission is the prerequisite for setting
the permission Copy Users for a specific group for a Secu-
rity Officer. To add a user to a group, the Security Officer
must have the permission Copy Users on the parent group
of the user.
Create Rules The Security Officer is allowed to generate encryption rules
for the users.
Change Global Permissions The Security Officer can change the global permissions
granted to another Security Officer.
Change ACLs The Security Officer can change the ACL for a group.
Use Specific Keys The Security Officer can use concrete specific keys in en-
cryption rules and can display specific keys in All LAN
Crypt keys.
Change Configuration The Security Officer can change the configuration (paths).
This permission is required to display the Configuration
tab in the node Central Settings, and for the Security Of-
ficer to be able to make changes in the Directories tab if
they are logged on to the database.
Read Logging Entries The Security Officer can view the settings used for logging
and the logged events.
Manage Logging The Security Officer can change the logging settings. They
are permitted to archive, delete and check entries.
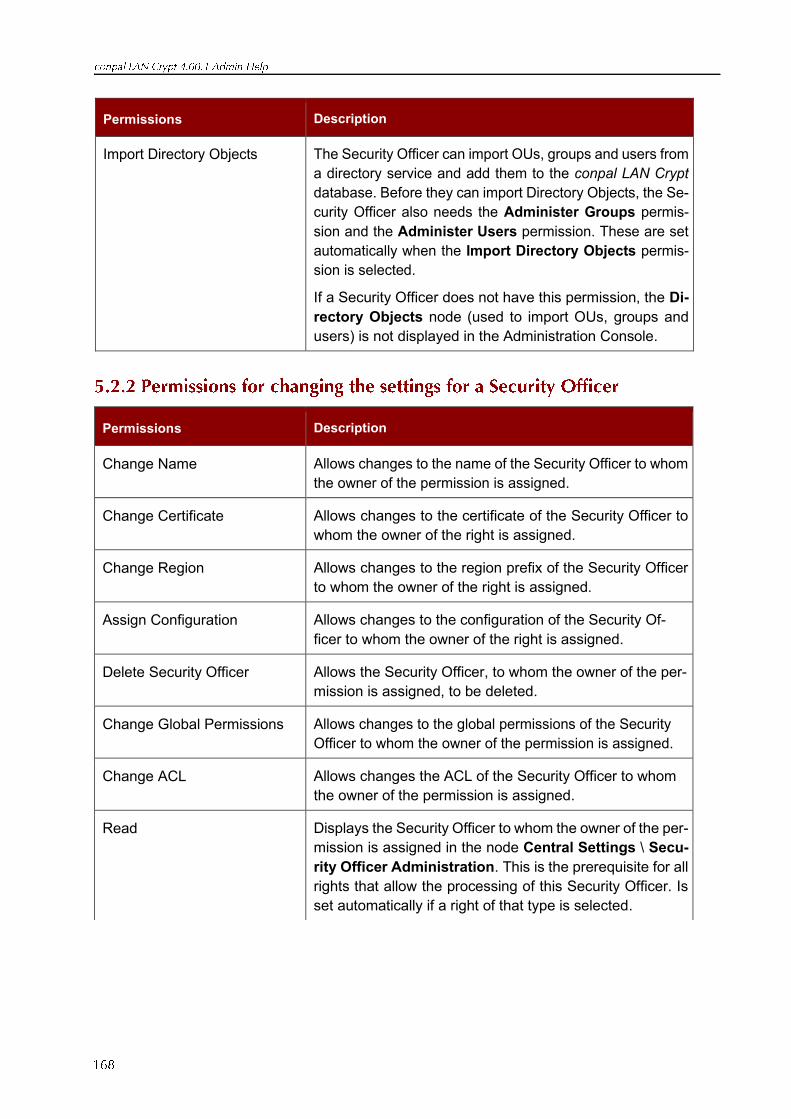
Permissions Description
Import Directory Objects The Security Officer can import OUs, groups and users from
a directory service and add them to the conpal LAN Crypt
database. Before they can import Directory Objects, the Se-
curity Officer also needs the Administer Groups permis-
sion and the Administer Users permission. These are set
automatically when the Import Directory Objects permis-
sion is selected.
If a Security Officer does not have this permission, the Di-
rectory Objects node (used to import OUs, groups and
users) is not displayed in the Administration Console.
Permissions Description
Change Name Allows changes to the name of the Security Officer to whom
the owner of the permission is assigned.
Change Certificate Allows changes to the certificate of the Security Officer to
whom the owner of the right is assigned.
Change Region Allows changes to the region prefix of the Security Officer
to whom the owner of the right is assigned.
Assign Configuration Allows changes to the configuration of the Security Of-
ficer to whom the owner of the right is assigned.
Delete Security Officer Allows the Security Officer, to whom the owner of the per-
mission is assigned, to be deleted.
Change Global Permissions Allows changes to the global permissions of the Security
Officer to whom the owner of the permission is assigned.
Change ACL Allows changes the ACL of the Security Officer to whom
the owner of the permission is assigned.
Read Displays the Security Officer to whom the owner of the per-
mission is assigned in the node Central Settings \ Secu-
rity Officer Administration. This is the prerequisite for all
rights that allow the processing of this Security Officer. Is
set automatically if a right of that type is selected.
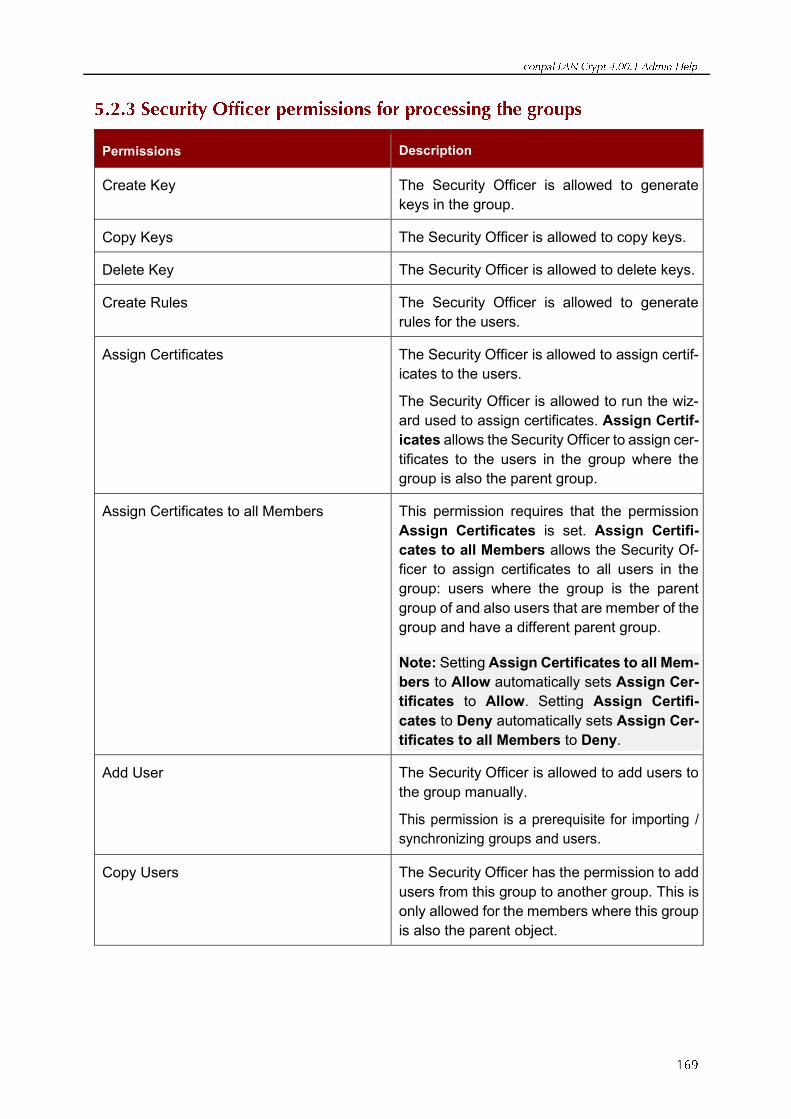
Permissions Description
Create Key The Security Officer is allowed to generate
keys in the group.
Copy Keys The Security Officer is allowed to copy keys.
Delete Key The Security Officer is allowed to delete keys.
Create Rules The Security Officer is allowed to generate
rules for the users.
Assign Certificates The Security Officer is allowed to assign certif-
icates to the users.
The Security Officer is allowed to run the wiz-
ard used to assign certificates. Assign Certif-
icates allows the Security Officer to assign cer-
tificates to the users in the group where the
group is also the parent group.
Assign Certificates to all Members This permission requires that the permission
Assign Certificates is set. Assign Certifi-
cates to all Members allows the Security Of-
ficer to assign certificates to all users in the
group: users where the group is the parent
group of and also users that are member of the
group and have a different parent group.
Note: Setting Assign Certificates to all Mem-
bers to Allow automatically sets Assign Cer-
tificates to Allow. Setting Assign Certifi-
cates to Deny automatically sets Assign Cer-
tificates to all Members to Deny.
Add User The Security Officer is allowed to add users to
the group manually.
This permission is a prerequisite for importing /
synchronizing groups and users.
Copy Users The Security Officer has the permission to add
users from this group to another group. This is
only allowed for the members where this group
is also the parent object.
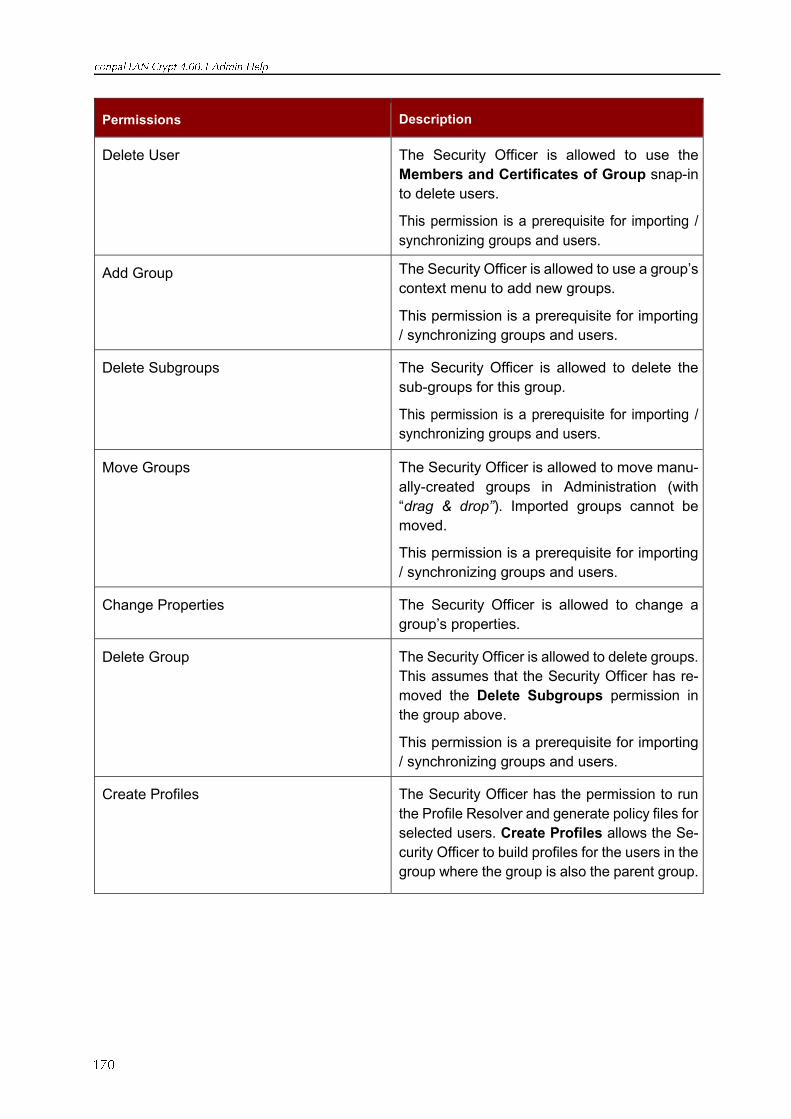
Permissions Description
Delete User The Security Officer is allowed to use the
Members and Certificates of Group snap-in
to delete users.
This permission is a prerequisite for importing /
synchronizing groups and users.
Add Group The Security Officer is allowed to use a group’s
context menu to add new groups.
This permission is a prerequisite for importing
/ synchronizing groups and users.
Delete Subgroups The Security Officer is allowed to delete the
sub-groups for this group.
This permission is a prerequisite for importing /
synchronizing groups and users.
Move Groups The Security Officer is allowed to move manu-
ally-created groups in Administration (with
“drag & drop”). Imported groups cannot be
moved.
This permission is a prerequisite for importing
/ synchronizing groups and users.
Change Properties The Security Officer is allowed to change a
group’s properties.
Delete Group The Security Officer is allowed to delete groups.
This assumes that the Security Officer has re-
moved the Delete Subgroups permission in
the group above.
This permission is a prerequisite for importing
/ synchronizing groups and users.
Create Profiles The Security Officer has the permission to run
the Profile Resolver and generate policy files for
selected users. Create Profiles allows the Se-
curity Officer to build profiles for the users in the
group where the group is also the parent group.

Permissions Description
Create Profiles for all Members This permission requires that the permission
Create Profiles is set. Create Profiles for all
Members allows the Security Officer to create
profiles for all users in the group: users where
the group is the parent group of and also users
that are member of the group and have a dif-
ferent parent group.
Note: Setting Create Profiles for all Members
to Allow automatically sets Create Profiles to
Allow. Setting Create Profiles to Deny auto-
matically sets Create Profiles for all Members
to Deny.
Change ACL The Security Officer is allowed to change the
ACL for the group (for example, by adding an-
other Security Officer).
Read The Security Officer has read rights for this
group and can see the contents for the snap-
ins. Is set automatically, if edit permissions are
granted.
Visible The Security Officer can see the group. Is set in
the base node and inherited downwards. If it is
refused for the Security Officer, the group is hid-
den (the permission Read must also be denied).

Copyright © 2018 - 2021 conpal GmbH, 1996 - 2018 Sophos Limited and Sophos Group. All
rights reserved. conpal®, AccessOn® and AuthomaticOn® are registered trademarks of conpal
GmbH.
All other product and company names mentioned are trademarks or registered trademarks of
their respective owners.
No part of this publication may be reproduced, stored in a retrieval system, or transmitted, in
any form or by any means, electronic, mechanical, photocopying, recording or otherwise un-
less you are either a valid license where the documentation can be reproduced in accordance
with the license terms or you otherwise have the prior permission in writing of the copyright
owner.
You find copyright information on third party suppliers in the 3rd Party Software document in
your product directory.
You can find technical support for conpal products in any of these ways:
▪ At https://support.conpal.de registered customers with active maintenance contracts get
access to downloads, documentation and knowledge items.
Download the client product documentation at
▪ https://docs.lancrypt.com/de/client/lc_400_hdeu.pdf in German language, at
▪ https://docs.lancrypt.com/en/client/lc_400_heng.pdf in English language and at
▪ https://docs.lancrypt.com/fr/client/lc_400_hfra.pdf in French language.
Download the product documentation for conpal LAN Crypt Portable at
▪ https://docs.lancrypt.com/de/client/lc_portable_100_hdeu.pdf in German language and at
▪ https://docs.lancrypt.com/en/client/lc_portable_100_heng.pdf in English language.
Download the client product documentation for macOS at
▪ https://docs.lancrypt.com/de/client/lc_macOS_100_hdeu.pdf in German language and at
▪ https://docs.lancrypt.com/en/client/lc_macOS_100_heng.pdf in English language.
Download the admin product documentation at
▪ https://docs.lancrypt.com/de/admin/lc_401_ahdeu.pdf in German language, at
▪ https://docs.lancrypt.com/en/admin/lc_401_aheng.pdf in English language and at
▪ https://docs.lancrypt.com/fr/admin/lc_401_ahfra.pdf in French language.
As a registered maintenance customer send an email to:
including your conpal software version number(s), operating system(s) and patch level(s), and
the text of any error messages.