Connecting to Your Database - Appeon InfoMaker® 2017 R3
164
Connecting to Your Database Appeon InfoMaker® 2017 R3 FOR WINDOWS
-
Upload
khangminh22 -
Category
Documents
-
view
0 -
download
0
Transcript of Connecting to Your Database - Appeon InfoMaker® 2017 R3

Connecting to Your Database
Appeon InfoMaker® 2017 R3
FOR WINDOWS

DOCUMENT ID: DC37791-01-1700-01
LAST REVISED: July 26, 2018
Copyright © 2018 by Appeon Limited. All rights reserved.
This publication pertains to Appeon software and to any subsequent release until otherwiseindicated in new editions or technical notes. Information in this document is subject tochange without notice. The software described herein is furnished under a license agreement,and it may be used or copied only in accordance with the terms of that agreement.
Upgrades are provided only at regularly scheduled software release dates. No part of thispublication may be reproduced, transmitted, or translated in any form or by any means,electronic, mechanical, manual, optical, or otherwise, without the prior written permission ofAppeon Limited.
Appeon and other Appeon products and services mentioned herein as well as their respectivelogos are trademarks or registered trademarks of Appeon Limited.
SAP and other SAP products and services mentioned herein as well as their respective logosare trademarks or registered trademarks of SAP and SAP affiliate company.
Java and all Java-based marks are trademarks or registered trademarks of Oracle and/or itsaffiliates in the U.S. and other countries.
Unicode and the Unicode Logo are registered trademarks of Unicode, Inc.
All other company and product names mentioned may be trademarks of the respectivecompanies with which they are associated.
Use, duplication, or disclosure by the government is subject to the restrictions set forthin subparagraph (c)(1)(ii) of DFARS 52.227-7013 for the DOD and as set forth in FAR52.227-19(a)-(d) for civilian agencies.
Appeon Limited, 1/F, Shell Industrial Building, 12 Lee Chung Street, Chai Wan District,Hong Kong

ContentsI Introduction to Database Connections .................................................................... 1
1 Understanding Data Connections ................................................................... 21.1 How to find the information you need .................................................. 21.2 Accessing data in InfoMaker ................................................................ 31.3 Accessing the Demo Database ............................................................ 41.4 Using database profiles ........................................................................ 4
1.4.1 About creating database profiles ................................................ 51.4.2 Creating a database profile ........................................................ 8
1.5 What to do next .................................................................................... 9II Working with Standard Database Interfaces ....................................................... 10
2 Using the ODBC Interface ............................................................................ 112.1 Using the ODBC interface .................................................................. 11
2.1.1 What is ODBC? ........................................................................ 112.1.2 Using ODBC in InfoMaker ........................................................ 122.1.3 Components of an ODBC connection ...................................... 122.1.4 Types of ODBC drivers ............................................................ 142.1.5 Ensuring the proper ODBC driver conformance levels ............. 16
2.1.5.1 What are ODBC conformance levels? ........................... 162.1.6 Obtaining ODBC drivers ........................................................... 182.1.7 Getting help with ODBC drivers ............................................... 18
2.2 Preparing ODBC data sources ........................................................... 182.3 Defining ODBC data sources ............................................................. 19
2.3.1 How InfoMaker accesses the data source ............................... 192.3.1.1 PBODB170 initialization file ............................................ 192.3.1.2 ODBCINST registry entries ............................................ 202.3.1.3 ODBC registry entries .................................................... 202.3.1.4 Database profiles registry entry ...................................... 21
2.3.2 Defining multiple data sources for the same data .................... 222.3.3 Displaying Help for ODBC drivers ............................................ 22
2.3.3.1 Help for any ODBC driver .............................................. 222.3.4 Selecting an ODBC translator .................................................. 23
2.4 Defining the ODBC interface .............................................................. 232.5 SAP SQL Anywhere ........................................................................... 23
2.5.1 Supported versions for SQL Anywhere .................................... 242.5.2 Basic software components for SQL Anywhere ....................... 242.5.3 Preparing to use the SQL Anywhere data source .................... 252.5.4 Defining the SQL Anywhere data source ................................. 262.5.5 Support for Transact-SQL special timestamp columns ............. 282.5.6 What to do next ........................................................................ 29
2.6 PostgreSQL ........................................................................................ 293 Using the JDBC Interface ............................................................................. 31
3.1 About the JDBC interface ................................................................... 313.1.1 What is JDBC? ......................................................................... 313.1.2 Components of a JDBC connection ......................................... 323.1.3 JDBC registry entries ............................................................... 333.1.4 Supported versions for JDBC ................................................... 34

3.1.5 Supported JDBC datatypes ...................................................... 343.2 Preparing to use the JDBC interface .................................................. 343.3 Defining the JDBC interface ............................................................... 35
4 Using the OLE DB interface ......................................................................... 374.1 About the OLE DB interface ............................................................... 37
4.1.1 What is OLE DB? ..................................................................... 374.1.2 Components of an OLE DB connection ................................... 394.1.3 Obtaining OLE DB data providers ............................................ 404.1.4 Supported versions for OLE DB ............................................... 40
4.2 Preparing to use the OLE DB interface .............................................. 414.3 Defining the OLE DB interface ........................................................... 42
5 Using the ADO.NET interface ...................................................................... 445.1 About ADO.NET ................................................................................. 445.2 About the InfoMaker ADO.NET database interface ............................ 45
5.2.1 Components of an ADO.NET connection ................................. 455.2.2 OLE DB data providers ............................................................ 46
5.3 Preparing to use the ADO.NET interface ........................................... 475.4 Defining the ADO.NET interface ........................................................ 48
III Working with Native Database Interfaces ........................................................... 506 Using Native Database Interfaces ................................................................ 51
6.1 About native database interfaces ....................................................... 516.1.1 What is a native database interface? ....................................... 516.1.2 Components of a database interface connection ..................... 516.1.3 Using a native database interface ............................................ 52
6.2 Informix ............................................................................................... 536.2.1 Supported versions for Informix ............................................... 536.2.2 Supported Informix datatypes ................................................... 54
6.2.2.1 Informix DateTime datatype ........................................... 546.2.2.2 Informix Time datatype ................................................... 556.2.2.3 Informix Interval datatype ............................................... 55
6.2.3 Basic software components for Informix .................................. 556.2.4 Preparing to use the Informix database ................................... 566.2.5 Defining the Informix database interface .................................. 57
6.2.5.1 Specifying the server name ............................................ 586.2.6 What to do next ........................................................................ 58
6.3 Microsoft SQL Server ......................................................................... 586.3.1 Supported versions for SQL Server ......................................... 586.3.2 Supported SQL Server datatypes ............................................ 596.3.3 Basic software components for Microsoft SQL Server ............. 596.3.4 Preparing to use the SQL Server database ............................. 606.3.5 Defining the SQL Server database interface ............................ 626.3.6 Migrating from the MSS or OLE DB database interfaces ......... 626.3.7 SQL Server 2008 features ....................................................... 65
6.3.7.1 New database parameters ............................................. 656.3.7.2 Support for new datatypes in SQL Server 2008 ............. 666.3.7.3 T-SQL enhancements .................................................... 696.3.7.4 Unsupported SQL Server 2008 features ........................ 71
6.3.8 Notes on using the SNC interface ............................................ 71

6.4 Oracle ................................................................................................. 726.4.1 Supported versions for Oracle .................................................. 726.4.2 Supported Oracle datatypes ..................................................... 726.4.3 Basic software components for Oracle ..................................... 736.4.4 Preparing to use the Oracle database ..................................... 74
6.4.4.1 What to do next .............................................................. 766.4.5 Defining the Oracle database interface .................................... 76
6.4.5.1 Specifying the Oracle server connect descriptor ............ 766.4.6 Using Oracle stored procedures as a data source ................... 77
6.4.6.1 What is an Oracle stored procedure? ............................ 776.4.6.2 What you can do with Oracle stored procedures ............ 776.4.6.3 Using Oracle stored procedures with result sets ............ 776.4.6.4 Using a large-object output parameter ........................... 80
6.4.7 Using Oracle user-defined types .............................................. 806.4.8 What to do next ........................................................................ 82
6.5 Adaptive Server Enterprise ................................................................. 826.5.1 Supported versions for Adaptive Server ................................... 826.5.2 Supported Adaptive Server datatypes ...................................... 826.5.3 Basic software components for Adaptive Server ...................... 836.5.4 Preparing to use the Adaptive Server database ....................... 84
6.5.4.1 What to do next .............................................................. 866.5.5 Defining the Adaptive Server database interface ..................... 866.5.6 Using Open Client security services ......................................... 87
6.5.6.1 What are Open Client security services? ....................... 876.5.6.2 Requirements for using Open Client securityservices ....................................................................................... 876.5.6.3 Security services DBParm parameters ........................... 88
6.5.7 Using Open Client directory services ....................................... 896.5.7.1 What are Open Client directory services? ...................... 896.5.7.2 Requirements for using Open Client directoryservices ....................................................................................... 896.5.7.3 Specifying the server name with Open Client directoryservices ....................................................................................... 906.5.7.4 Directory services DBParm parameters ......................... 91
6.5.8 Using PRINT statements in Adaptive Server storedprocedures ......................................................................................... 916.5.9 Creating a DataWindow based on a heterogeneous cross-database join ..................................................................................... 916.5.10 What to do next ...................................................................... 92
6.6 Installing InfoMaker stored procedures in Adaptive Serverdatabases .................................................................................................. 92
6.6.1 What are the InfoMaker stored procedure scripts? .................. 926.6.1.1 PBSYC.SQL script ......................................................... 936.6.1.2 PBSYC2.SQL script ....................................................... 94
6.6.2 How to run the scripts .............................................................. 956.6.2.1 Using ISQL to run the stored procedure scripts ............. 956.6.2.2 Using SQL Advantage to run the stored procedurescripts .......................................................................................... 96

6.7 DirectConnect ..................................................................................... 976.7.1 Using the DirectConnect interface ............................................ 97
6.7.1.1 Connecting through the DirectConnect middlewareproduct ........................................................................................ 976.7.1.2 Connecting through the Open ServerConnectmiddleware product .................................................................... 986.7.1.3 Selecting the type of connection .................................... 98
6.7.2 Basic software components for the DirectConnectinterface ............................................................................................. 986.7.3 Supported versions for the DirectConnect interface ............... 1006.7.4 Supported DirectConnect interface datatypes ........................ 1016.7.5 Preparing to use the database with DirectConnect ................ 1016.7.6 Defining the DirectConnect interface ...................................... 103
6.8 Creating the extended attribute system tables in DB2 databases ..... 1046.8.1 Creating the extended attribute system tables ....................... 1046.8.2 Using the DB2SYSPB.SQL script .......................................... 104
IV Working with Database Connections ............................................................... 1067 Managing Database Connections ............................................................... 107
7.1 About database connections ............................................................ 1077.1.1 When database connections occur ........................................ 1077.1.2 Using database profiles .......................................................... 109
7.2 Connecting to a database ................................................................ 1097.2.1 Selecting a database profile ................................................... 1107.2.2 What happens when you connect .......................................... 1117.2.3 Specifying passwords in database profiles ............................. 111
7.3 Maintaining database profiles ........................................................... 1127.4 Sharing database profiles ................................................................. 112
7.4.1 About shared database profiles .............................................. 1127.4.2 Setting up shared database profiles ....................................... 1137.4.3 Using shared database profiles to connect ............................ 1147.4.4 Making local changes to shared database profiles ................. 1157.4.5 Maintaining shared database profiles ..................................... 116
7.5 Importing and exporting database profiles ....................................... 1167.6 About the InfoMaker extended attribute system tables ..................... 117
7.6.1 Logging on to your database for the first time ........................ 1187.6.2 Displaying the InfoMaker extended attribute system tables .... 1187.6.3 Contents of the extended attribute system tables .................. 1207.6.4 Controlling system table access ............................................. 121
7.6.4.1 Setting Use Extended Attributes or Read Only tocontrol access ........................................................................... 1217.6.4.2 Granting permissions on system tables to controlaccess ....................................................................................... 123
8 Setting Additional Connection Parameters ................................................. 1248.1 Basic steps for setting connection parameters ................................. 1248.2 About the Database Profile Setup dialog box ................................... 1258.3 Setting database parameters ........................................................... 125
8.3.1 Setting database parameters in the developmentenvironment ..................................................................................... 125

8.4 Setting database preferences ........................................................... 1258.4.1 Setting database preferences in the developmentenvironment ..................................................................................... 126
8.4.1.1 Setting AutoCommit and Lock in the databaseprofile ........................................................................................ 1268.4.1.2 Setting preferences in the Database Preferencesproperty sheet ........................................................................... 127
9 Troubleshooting Your Connection .............................................................. 1319.1 Overview of troubleshooting tools .................................................... 1319.2 Using the Database Trace tool ......................................................... 131
9.2.1 About the Database Trace tool .............................................. 1319.2.1.1 How you can use the Database Trace tool .................. 1319.2.1.2 Location of the Database Trace log ............................. 1329.2.1.3 Contents of the Database Trace log ............................ 1329.2.1.4 Format of the Database Trace log ............................... 133
9.2.2 Starting the Database Trace tool ........................................... 1339.2.3 Stopping the Database Trace tool .......................................... 1349.2.4 Specifying a nondefault Database Trace log .......................... 1349.2.5 Using the Database Trace log ................................................ 135
9.2.5.1 Viewing the Database Trace log .................................. 1359.2.5.2 Annotating the Database Trace log .............................. 1369.2.5.3 Deleting or clearing the Database Trace log ................ 136
9.2.6 Sample Database Trace output .............................................. 1369.3 Using the ODBC Driver Manager Trace ........................................... 138
9.3.1 About ODBC Driver Manager Trace ....................................... 1389.3.2 Starting ODBC Driver Manager Trace .................................... 139
9.3.2.1 Starting ODBC Driver Manager Trace .......................... 1399.3.3 Stopping ODBC Driver Manager Trace .................................. 140
9.3.3.1 Stopping ODBC Driver Manager Trace ........................ 1409.3.4 Viewing the ODBC Driver Manager Trace log ........................ 1409.3.5 Sample ODBC Driver Manager Trace output ......................... 141
9.4 Using the JDBC Driver Manager Trace ............................................ 1439.4.1 About JDBC Driver Manager Trace ........................................ 1439.4.2 Starting JDBC Driver Manager Trace ..................................... 143
9.4.2.1 Starting JDBC Driver Manager Trace ........................... 1449.4.3 Stopping JDBC Driver Manager Trace ................................... 145
9.4.3.1 Stopping JDBC Driver Manager Trace ......................... 1459.4.4 Viewing the JDBC Driver Manager Trace log ......................... 146
V Appendix ............................................................................................................ 147A Adding Functions to the PBODB170 Initialization File ............................... 148
A.1 About the PBODB170 initialization file ............................................. 148A.1.1 Adding functions to PBODB170.INI ....................................... 148
A.1.1.1 Adding functions to an existing section in the file ......... 149A.1.1.2 Adding functions to a new section in the file ................ 151
Index ...................................................................................................................... 154


Part I. Introduction toDatabase Connections
This part introduces data connections in InfoMaker. It gives an overview of the concepts andprocedures for connecting to a database in the InfoMaker development environment.

Understanding Data Connections Appeon InfoMaker® 2017 R3
Connecting to Your Database Page 2
1 Understanding Data ConnectionsAbout this chapter
This chapter gives an overview of the concepts and procedures for connecting to a databasein the InfoMaker development environment.
1.1 How to find the information you need
What's in this book
This book describes how to connect to your database in the InfoMaker developmentenvironment.
Basic connection procedure
The following table gives an overview of the connection procedure and indicates where youcan find detailed information about each step.
Table 1.1: Basic connection procedure
Step Action Details See
1 (Optional) Get anintroduction to databaseconnections in InfoMaker.
If necessary, learnmore about howInfoMaker connectsto a database in thedevelopment environment.
Chapter 1 (this chapter)
2 Prepare to use the datasource or database beforeconnecting to it for the firsttime in InfoMaker.
Outside InfoMaker, installthe required network,database server, anddatabase client softwareand verify that you canconnect to the database.
For ODBC data sources:Using the ODBC Interface
For JDBC data sources:Using the JDBC Interface
For OLE DB data sources:Using the OLE DBinterface
For ADO.NET datasources: Using theADO.NET interface
For native databaseinterfaces: Using NativeDatabase Interfaces
3 Install the ODBC driver,OLE DB data provider,ADO.NET data provider, ornative database interface.
Install the driver , databaseprovider, or native databaseinterface required to accessyour data.
For a list of what issupported on your platform:"Supported DatabaseInterfaces" in online Help
4 Define the data source(ODBC connections andsome OLE DB drivers).
Create the requiredconfiguration for a datasource accessed throughODBC.
For ODBC data sources:Using the ODBC Interface

Understanding Data Connections Appeon InfoMaker® 2017 R3
Connecting to Your Database Page 3
Step Action Details See
5 Define the databaseinterface.
Create the database profile. For ODBC data sources:Using the ODBC Interface
For JDBC data sources:Using the JDBC Interface
For OLE DB data sources:Using the OLE DBinterface
For ADO.NET datasources: Using theADO.NET interface
For native databaseinterfaces: Using NativeDatabase Interfaces
6 Connect to the data sourceor database.
Access the data inInfoMaker.
Managing DatabaseConnections
7 (Optional) Set additionalconnection parameters.
If necessary, set DBParmparameters and databasepreferences to fine-tuneyour database connectionand take advantage ofDBMS-specific featuresthat your interface supports.
For procedures: SettingAdditional ConnectionParameters
For DBParm descriptions:
online Help
For database preferencedescriptions:
online Help
8 (Optional) Troubleshoot thedata connection.
If necessary, use the tracetools to troubleshootproblems with yourconnection.
Troubleshooting YourConnection
1.2 Accessing data in InfoMakerThere are several ways to access data in the InfoMaker development environment:
• Through one of the standard database interfaces such as ODBC, JDBC, OLE DB, orADO.NET
• Through one of the native database interfaces
Standard database interfaces
A standard database interface communicates with a database through a standard-compliantdriver (in the case of ODBC and JDBC) or data provider (in the case of OLE DB andADO.NET). The standard-compliant driver or data provider translates the abstract functioncalls defined by the standard's API into calls that are understood by a specific database. Touse a standard interface, you need to install the standard's API and a suitable driver or data

Understanding Data Connections Appeon InfoMaker® 2017 R3
Connecting to Your Database Page 4
provider. Then, install the standard database interface you want to use to access your DBMSby selecting the interface in the InfoMaker Setup program.
InfoMaker currently supports the following standard interfaces:
• Open Database Connectivity (ODBC)
• Java Database Connectivity (JDBC)
• Microsoft's Universal Data Access Component OLE DB
• Microsoft's ADO.NET
Native database interfaces
A native database interface communicates with a database through a direct connection. Itcommunicates to a database using that database's native API.
To access data through one of the native database interfaces, you must first install theappropriate database software on the server and client workstations at your site. Then, installthe native database interface that accesses your DBMS by selecting the interface in theInfoMaker Setup program.
For example, if you have the appropriate SAP Adaptive Server Enterprise server and clientsoftware installed, you can access the database by installing the Adaptive Server Enterprisedatabase interface.
InfoMaker with other SAP products
If your version of InfoMaker was provided with another SAP product, see the Help for thatproduct for information about database connectivity features.
1.3 Accessing the Demo Database
InfoMaker includes a standalone SQL Anywhere database called the PB Demo Database. Thedatabase is installed automatically. You access tables in the Demo Database when you usethe InfoMaker tutorial.
A SQL Anywhere database is considered an ODBC data source, because you access it withthe SQL Anywhere ODBC driver.
1.4 Using database profiles
What is a database profile?
A database profile is a named set of parameters stored in your system registry that defines aconnection to a particular database in the InfoMaker development environment. You mustcreate a database profile for each data connection.
What you can do
Using database profiles is the easiest way to manage data connections in theInfoMaker development environment. For example, you can:
• Select a database profile to connect to or switch between databases

Understanding Data Connections Appeon InfoMaker® 2017 R3
Connecting to Your Database Page 5
• Edit a database profile to customize a connection
• Delete a database profile if you no longer need to access that data
• Import and export database profiles to quickly share connection parameters
For more information
For instructions on using database profiles, see Managing Database Connections
1.4.1 About creating database profiles
You work with two dialog boxes when you create a database profile in InfoMaker: theDatabase Profiles dialog box and the interface-specific Database Profile Setup dialog box.
Using the Database painter to create database profiles
The Database painter is an optional InfoMaker painter. If the Database painter isinstalled, you can also create database profiles from the Database painter's Objectsview. However, opening the Database painter to define profiles and/or connect to adatabase uses more system resources than using the Database Profiles dialog box.
Database Profiles dialog box
The Database Profiles dialog box uses an easy-to-navigate tree control format to display yourinstalled database interfaces and defined database profiles. You can create, edit, and deletedatabase profiles from this dialog box.
Understanding Data Connections Appeon InfoMaker® 2017 R3
Connecting to Your Database Page 6
When you run the InfoMaker Setup program, it updates the Vendors list in the PowerBuildersection in the HKEY_LOCAL_MACHINE registry key with the interfaces you install. TheDatabase Profiles dialog box displays the same interfaces that appear in the Vendors list.
Where the Vendors list is stored
The Sybase\PowerBuilder\17.0\Vendors key in HKEY_LOCAL_MACHINE\SOFTWARE is used for InfoMaker as well as PowerBuilder.
For detailed instructions on using the Database Profiles dialog box to connect to a databaseand manage your profiles, see Managing Database Connections
Database Profile Setup dialog box
Each database interface has its own Database Profile Setup dialog box where you can setinterface-specific connection parameters. For example, if you install the O90 interface andthen select it and click New in the Database Profiles dialog box, the Database Profile Setup -Oracle 9i dialog box displays, containing settings for those connection options that apply tothis interface.
Preview tab unavailable in InfoMaker
PowerScript connection syntax does not apply to InfoMaker. Therefore, the DatabaseProfile Setup dialog box in InfoMaker does not include a Preview tab for copyingPowerScript connection syntax into a script.

Understanding Data Connections Appeon InfoMaker® 2017 R3
Connecting to Your Database Page 7
The Database Profile Setup dialog box groups similar connection parameters on the sametab page and lets you easily set their values by using check boxes, drop-down lists, and textboxes. Basic (required) connection parameters are on the Connection tab page, and additionalconnection options (DBParm parameters and SQLCA properties) are on the other tab pages.
Supplying sufficient information in the Database Profile Setup dialog box
For some database interfaces, you might not need to supply values for all boxes inthe Database Profile Setup dialog box. If you supply the profile name and click OK,InfoMaker displays a series of dialog boxes to prompt you for additional information whenyou connect to the database.
This information can include:
User ID or login ID

Understanding Data Connections Appeon InfoMaker® 2017 R3
Connecting to Your Database Page 8
Password or login password
Database name
Server name
For some databases, supplying only the profile name does not give InfoMaker enoughinformation to prompt you for additional connection values. For these interfaces, you mustsupply values for all applicable boxes in the Database Profile Setup dialog box.
For information about the values you should supply for your connection, click Help in theDatabase Profile Setup dialog box for your interface.
1.4.2 Creating a database profile
To create a new database profile for a database interface, you must complete the DatabaseProfile Setup dialog box for the interface you are using to access the database.
When using InfoMaker
The Database Profile Setup dialog box in InfoMaker does not include the Preview tab.
To create a database profile for a database interface:
1. Click the Database Profile button in the PowerBar.
The Database Profiles dialog box displays, listing your installed database interfaces. Tosee a list of database profiles defined for a particular interface, click the plus sign to theleft of the interface name or double-click the interface name to expand the list.
2. Highlight an interface name and click New.
The Database Profile Setup dialog box for the selected interface displays. For example,if you select the SYC interface, the Database Profile Setup - Adaptive Server Enterprisedialog box displays.
Client software and interface must be installed
To display the Database Profile Setup dialog box for your interface, the requiredclient software and native database interface must be properly installed andconfigured. For specific instructions for your database interface, see the chapter onusing the interface.
3. On the Connection tab page, type the profile name and supply values for any other basicparameters your interface requires to connect.
For information about the basic connection parameters for your interface and the valuesyou should supply, click Help.
About the DBMS identifier
You do not need to specify the DBMS identifier in a database profile. When youcreate a new profile for any installed database interface, InfoMaker generates thecorrect DBMS connection syntax for you.

Understanding Data Connections Appeon InfoMaker® 2017 R3
Connecting to Your Database Page 9
4. (Optional) On the other tab pages, supply values for any additional connection options(DBParm parameters and SQLCA properties) to take advantage of DBMS-specificfeatures that your interface supports.
For information about the additional connection parameters for your interface and thevalues you should supply, click Help.
5. Click OK to save your changes and close the Database Profile Setup dialog box. (Tosave your changes on a particular tab page without closing the dialog box, click Apply.)
The Database Profiles dialog box displays, with the new profile name highlighted under theappropriate interface. The database profile values are saved in the system registry.
1.5 What to do nextFor instructions on preparing to use and then defining an ODBC data source, see Using theODBC Interface
For instructions on preparing to use and then defining a JDBC database interface, see Usingthe JDBC Interface
For instructions on preparing to use and then defining an OLE DB data provider, see Usingthe OLE DB interface
For instructions on preparing to use and then defining an ADO.NET data provider, see Usingthe ADO.NET interface
For instructions on preparing to use and then defining a native database interface, see UsingNative Database Interfaces

Part II. Working withStandard Database Interfaces
This part describes how to set up and define database connections accessed through one ofthe standard database interfaces.

Using the ODBC Interface Appeon InfoMaker® 2017 R3
Connecting to Your Database Page 11
2 Using the ODBC InterfaceAbout this chapter
This chapter gives an introduction to the ODBC interface and then describes how to prepareto use the data source, how to define the data source, and how to define the ODBC databaseprofile. It also describes how to use the SQL Anywhere ODBC driver.
For more information
This chapter gives general information about preparing to use and defining each ODBC datasource. For more detailed information:
• Use the online Help provided by the driver vendor, as described in Displaying Help forODBC drivers. This Help provides important details about using the data source.
• Check to see if there is a technical document that describes how to connect to your ODBCdata source. Any updated information about connectivity issues is available from the theAppeon Support Web site at https://support.appeon.com/.
2.1 Using the ODBC interface
You can access a wide variety of ODBC data sources in InfoMaker. This section describeswhat you need to know to use ODBC connections to access your data in InfoMaker.
ODBC drivers and data sources
For a complete list of the ODBC drivers supplied with InfoMaker and the data sourcesthey access, see "Database Interfaces" in online Help.
2.1.1 What is ODBC?
The ODBC API
Open Database Connectivity (ODBC) is a standard application programming interface (API)developed by Microsoft. It allows a single application to access a variety of data sourcesfor which ODBC-compliant drivers exist. The application uses Structured Query Language(SQL) as the standard data access language.
The ODBC API defines the following:
• A library of ODBC function calls that connect to the data source, execute SQL statements,and retrieve results
• A standard way to connect and log in to a DBMS
• SQL syntax based on the X/Open and SQL Access Group (SAG) CAE specification (1992)
• A standard representation for datatypes
• A standard set of error codes
Accessing ODBC data sources
Using the ODBC Interface Appeon InfoMaker® 2017 R3
Connecting to Your Database Page 12
Applications that provide an ODBC interface, like InfoMaker, can access data sources forwhich an ODBC driver exists. An ODBC data source driver is a dynamic link library (DLL)that implements ODBC function calls. The application invokes the ODBC driver to access aparticular data source.
Accessing Unicode data
Using the ODBC interface, InfoMaker can connect, save, and retrieve data in both ANSI/DBCS and Unicode databases but does not convert data between Unicode and ANSI/DBCS.When character data or command text is sent to the database, InfoMaker sends a Unicodestring. The driver must guarantee that the data is saved as Unicode data correctly. WhenInfoMaker retrieves character data, it assumes the data is Unicode.
A Unicode database is a database whose character set is set to a Unicode format, such asUTF-8, UTF-16, UCS-2, or UCS-4. All data must be in Unicode format, and any data savedto the database must be converted to Unicode data implicitly or explicitly.
A database that uses ANSI (or DBCS) as its character set might use special datatypes to storeUnicode data. These datatypes are NCHAR, NVARCHAR, and NVARCHAR2. Columnswith this datatype can store only Unicode data. Any data saved into such a column must beconverted to Unicode explicitly. This conversion must be handled by the database server orclient.
2.1.2 Using ODBC in InfoMaker
What you can do
The following ODBC connectivity features are available in InfoMaker:
• Connect to an SQL Anywhere standalone database (including the Demo Database) usingthe SQL Anywhere ODBC driver and the ODBC interface.
• Create and delete local SQL Anywhere databases.
For instructions, see the User's Guide.
• Use SAP-supplied DataDirect ODBC drivers to access your data.
For a list of the ODBC drivers supplied, see "Database Interfaces" in online Help.
• Use Level 1 or later ODBC-compliant drivers obtained from vendors other than SAP toaccess your data.
See Obtaining ODBC drivers.
• Use Microsoft's ODBC Data Source Administrator to define ODBC data sources.
See Defining ODBC data sources.
2.1.3 Components of an ODBC connection
How an ODBC connection is made
When you access an ODBC data source in InfoMaker, your connection goes through severallayers before reaching the data source. It is important to understand that each layer represents

Using the ODBC Interface Appeon InfoMaker® 2017 R3
Connecting to Your Database Page 13
a separate component of the connection, and that each component might come from adifferent vendor.
Because ODBC is a standard API, InfoMaker uses the same interface to access every ODBCdata source. As long as a driver is ODBC compliant, InfoMaker can access it through theODBC interface to the ODBC Driver Manager. The development environment and theODBC interface work together as the application component.
The following figure shows the general components of an ODBC connection.
Figure: Components of an ODBC connection
Component descriptions
The following table gives the provider and a brief description of each ODBC componentshown in the diagram:
Table 2.1: Provider and function of ODBC connection components
Component Provider What it does
Application SAP Calls ODBC functions to submit SQL statements,catalog requests, and retrieve results from a data source.

Using the ODBC Interface Appeon InfoMaker® 2017 R3
Connecting to Your Database Page 14
Component Provider What it doesInfoMaker uses the same ODBC interface to access allODBC data sources.
ODBC DriverManager
Microsoft Installs, loads, and unloads drivers for an application.
Driver Driver vendor Processes ODBC function calls, submits SQL requeststo a particular data source, and returns results to anapplication.
If necessary, translates an application's request so that itconforms to the SQL syntax supported by the back-enddatabase. See Types of ODBC drivers.
Data source DBMS ordatabase vendor
Stores and manages data for an application. Consistsof the data to be accessed and its associated DBMS,operating system, and (if present) network software thataccesses the DBMS.
2.1.4 Types of ODBC drivers
When InfoMaker is connected to an ODBC data source, you might see messages from theODBC driver that include the words single-tier or multiple-tier. These terms refer to the twotypes of drivers defined by the ODBC standard.
Single-tier driver
A single-tier ODBC driver processes both ODBC functions and SQL statements. In otherwords, a single-tier driver includes the data access software required to manage the datasource file and catalog tables. An example of a single-tier ODBC driver is one that accessesXbase files, such as the DataDirect dBASE ODBC driver.
Figure: Single-tier ODBC driver

Using the ODBC Interface Appeon InfoMaker® 2017 R3
Connecting to Your Database Page 15
Multiple-tier driver
A multiple-tier ODBC driver processes ODBC functions, but sends SQL statements to thedatabase engine for processing. Unlike the single-tier driver, a multiple-tier driver does notinclude the data access software required to manage the data directly.
An example of a multiple-tier ODBC driver is the SQL Anywhere driver.
Figure: Multi-tier ODBC driver

Using the ODBC Interface Appeon InfoMaker® 2017 R3
Connecting to Your Database Page 16
2.1.5 Ensuring the proper ODBC driver conformance levels
You can access data in InfoMaker with ODBC drivers obtained from vendors other thanSAP, such as DBMS vendors.
An ODBC driver obtained from another vendor must meet certain conformance requirementsto ensure that it works properly with InfoMaker. This section describes how to make sureyour driver meets these requirements.
2.1.5.1 What are ODBC conformance levels?
InfoMaker can access many data sources for which ODBC-compliant drivers exist. However,ODBC drivers manufactured by different vendors might vary widely in the functions theyprovide.

Using the ODBC Interface Appeon InfoMaker® 2017 R3
Connecting to Your Database Page 17
To ensure a standard level of compliance with the ODBC interface, and to provide a meansby which application vendors can determine if a specific driver provides the functions theyneed, ODBC defines conformance levels for drivers in two areas:
• API
Deals with supported ODBC function calls
• SQL grammar
Deals with supported SQL statements and SQL datatypes
API conformance levels
ODBC defines three API conformance levels, in order of increasing functionality:
• Core
A set of core API functions that corresponds to the functions in the ISO Call LevelInterface (CLI) and X/Open CLI specification
• Level 1
Includes all Core API functions and several extended functions usually available in anOLTP relational DBMS
• Level 2
Includes all Core and Level 1 API functions and additional extended functions
To ensure the proper ODBC driver API conformance level:
• SAP recommends that the ODBC drivers you use with InfoMaker meet Level 1 orhigher API conformance requirements. However, InfoMaker might also work withdrivers that meet Core level API conformance requirements.
SQL conformance levels
ODBC defines three SQL grammar conformance levels, in order of increasing functionality:
• Minimum
A set of SQL statements and datatypes that meets a basic level of ODBC conformance
• Core
Includes all Minimum SQL grammar and additional statements and datatypes that roughlycorrespond to the X/Open and SAG CAE specification (1992)
• Extended
Includes all Minimum and Core SQL grammar and an extended set of statements anddatatypes that support common DBMS extensions to SQL
To ensure the proper ODBC driver SQL conformance level:
• SAP recommends that the ODBC drivers you use with InfoMaker meet Core orhigher SQL conformance requirements. However, InfoMaker might also work withdrivers that meet Minimum level SQL conformance requirements.

Using the ODBC Interface Appeon InfoMaker® 2017 R3
Connecting to Your Database Page 18
2.1.6 Obtaining ODBC drivers
Two sources
There are two ways that you can obtain ODBC drivers for use with InfoMaker:
• From SAP (recommended)
Install one or more of the ODBC drivers shipped with InfoMaker. You can do this whenyou first install InfoMaker, or later.
• From another vendor
InfoMaker lets you access data with any Level 1 or higher ODBC-compliant driversobtained from a vendor other than SAP. In most cases, these drivers will work withInfoMaker.
2.1.7 Getting help with ODBC drivers
To ensure that you have up-to-date and accurate information about using your ODBC driverwith InfoMaker, get help as needed by doing one or more of the following:
Table 2.2:
To get help on Do this
Using the ODBC Data Source Administrator Click the Help button on each tab.
Completing the ODBC setup dialog box foryour driver
Click the Help button (if present) in theODBC setup dialog box for your driver.
Using SQL Anywhere See the SQL Anywhere documentation.
Using an ODBC driver obtained from avendor other than SAP
See the vendor's documentation for thatdriver.
Troubleshooting your ODBC connection Check for a technical document thatdescribes how to connect to your ODBCdata source. Updated information aboutconnectivity issues is available on thethe Appeon Support Web site at https://support.appeon.com/.
2.2 Preparing ODBC data sources
The first step in connecting to an ODBC data source is preparing the data source. Thisensures that you are able to connect to the data source and use your data in InfoMaker.
You prepare to use a data source outside InfoMaker before you start the product, define thedata source, and connect to it. The requirements differ for each data source, but in general,preparing to use a data source involves the following steps.
To prepare to use an ODBC data source with InfoMaker:
1. If network software is required to access the data source, make sure it is properlyinstalled and configured at your site and on the client workstation.

Using the ODBC Interface Appeon InfoMaker® 2017 R3
Connecting to Your Database Page 19
2. If database software is required, make sure it is properly installed and configured onyour computer or network server.
3. Make sure the required data files are present on your computer or network server.
4. Make sure the names of tables and columns you want to access follow standard SQLnaming conventions.
Avoid using blank spaces or database-specific reserved words in table and columnnames. Be aware of the case-sensitivity options of the DBMS. It is safest to use alluppercase characters when naming tables and columns that you want to access inInfoMaker.
Backquote character not allowed as a delimiter
The online Help supplied for the DataDirect ODBC drivers indicates that you can usethe backquote (`) character, also known as the grave character, as a delimiter for tableand column names that do not follow standard SQL naming conventions. However,InfoMaker does not currently allow use of the backquote character as a delimiter fortable and column names.
5. If your database requires it, make sure the tables you want to access have uniqueindexes.
6. Install both of the following using the InfoMaker Setup program:
• The ODBC driver that accesses your data source
• The ODBC interface
2.3 Defining ODBC data sourcesEach ODBC data source requires a corresponding ODBC driver to access it. When youdefine an ODBC data source, you provide information about the data source that the driverrequires in order to connect to it. Defining an ODBC data source is often called configuringthe data source.
After you prepare to use the data source, you must define it using Microsoft's ODBC DataSource Administrator utility. This utility can be accessed from the Control Panel in Windowsor InfoMaker's Database painter.
The rest of this section describes what you need to know to define an ODBC data source inorder to access it in the InfoMaker development environment.
2.3.1 How InfoMaker accesses the data source
When you access an ODBC data source in InfoMaker, there are several initialization files andregistry entries on your computer that work with the ODBC interface and driver to make theconnection.
2.3.1.1 PBODB170 initialization file
Contents

Using the ODBC Interface Appeon InfoMaker® 2017 R3
Connecting to Your Database Page 20
PBODB170.INI is installed in the Appeon\Shared\PowerBuilder or Appeon\Shared\PowerBuilder\x64 directory. InfoMaker uses PBODB170.INI to maintain access to extendedfunctionality in the back-end DBMS, for which ODBC does not provide an API call.Examples of extended functionality are SQL syntax or DBMS-specific function calls.
Editing
In most cases, you do not need to edit PBODB170.INI. In certain situations, however, youmight need to add functions to PBODB170.INI for your back-end DBMS.
For instructions, see Adding Functions to the PBODB170 Initialization File.
2.3.1.2 ODBCINST registry entries
Contents
The ODBCINST initialization information is located in the HKEY_LOCAL_MACHINE\SOFTWARE\ODBC\ODBCINST.INI registry key. When you install an ODBC-compliantdriver supplied by SAP or another vendor, ODBCINST.INI is automatically updated with adescription of the driver.
This description includes:
• The DBMS or data source associated with the driver
• The drive and directory of the driver and setup DLLs (for some data sources, the driver andsetup DLLs are the same)
• Other driver-specific connection parameters
Editing
You do not need to edit the registry key directly to modify connection information. If yourdriver uses the information in the ODBCINST.INI registry key, the key is automaticallyupdated when you install the driver. This is true whether the driver is supplied by SAP oranother vendor.
2.3.1.3 ODBC registry entries
Contents
ODBC initialization information is located in the HKEY_CURRENT_USER\SOFTWARE\ODBC\ODBC.INI registry key. When you define a data source for a particular ODBCdriver, the driver writes the values you specify in the ODBC setup dialog box to theODBC.INI registry key.
The ODBC.INI key contains a subkey named for each defined data source. Each subkeycontains the values specified for that data source in the ODBC setup dialog box. The valuesmight vary for each data source but generally include the following:
• Database
• Driver
• Optional description
Using the ODBC Interface Appeon InfoMaker® 2017 R3
Connecting to Your Database Page 21
• DBMS-specific connection parameters
Editing
Do not edit the ODBC subkey directly to modify connection information. Instead, use a tooldesigned to define ODBC data sources and the ODBC configuration automatically, such asthe ODBC Data Source Administrator.
2.3.1.4 Database profiles registry entry
Contents
Database profiles for all data sources are stored in the registry in HKEY_CURRENT_USER\SOFTWARE\Sybase\PowerBuilder\17.0\DatabaseProfiles.
Editing
You should not need to edit the profiles directly to modify connection information. Thesefiles are updated automatically when InfoMaker creates the database profile as part of theODBC data source definition.
You can also edit the profile in the Database Profile Setup dialog box or complete theDatabase Preferences property sheet in InfoMaker to specify other connection parametersstored in the registry. (For instructions, see Setting Additional Connection Parameters)
Example
The following example shows a portion of the database profile for the PB Demo DB datasource:
DBMS=ODBCDatabase=PB Demo DBUserId=dbaDatabasePassword=LogPassword=ServerName=LogId=Lock=DbParm=ConnectString='DSN=PB Demo DB;UID=dba;PWD=sql'Prompt=0
This registry entry example shows the two most important values in a database profile for anODBC data source:
• DBMS
The DBMS value (ODBC) indicates that you are using the ODBC interface to connect tothe data source.
• DBParm
The ConnectString DBParm parameter controls your ODBC data source connection. Theconnect string must specify the DSN (data source name) value, which tells ODBC whichdata source you want to access. When you select a database profile to connect to a datasource, ODBC looks in the ODBC.INI registry key for a subkey that corresponds to thedata source name in your profile. ODBC then uses the information in the subkey to loadthe required libraries to connect to the data source. The connect string can also contain theUID (user ID) and PWD (password) values needed to access the data source.

Using the ODBC Interface Appeon InfoMaker® 2017 R3
Connecting to Your Database Page 22
2.3.2 Defining multiple data sources for the same data
When you define an ODBC data source in InfoMaker, each data source name must be unique.You can, however, define multiple data sources that access the same data, as long as the datasources have unique names.
For example, assume that your data source is an SQL Anywhere database located in C:\SQLAnywhere\SALES.DB. Depending on your application, you might want to specify differentsets of connection parameters for accessing the database, such as different passwords anduser IDs.
To do this, you can define two ODBC data sources named Sales1 and Sales2 that specify thesame database (C:\SQL Anywhere\SALES.DB) but use different user IDs and passwords.When you connect to the data source using a profile created for either of these data sources,you are using different connection parameters to access the same data.
Figure: Using two data sources to access a database
2.3.3 Displaying Help for ODBC drivers
The online Help for ODBC drivers in InfoMaker is provided by the driver vendors. It giveshelp on:
• Completing the ODBC setup dialog box to define the data source
• Using the ODBC driver to access the data source
2.3.3.1 Help for any ODBC driver
Use the following procedure to display vendor-supplied Help when you are in the ODBCsetup dialog box for ODBC drivers supplied with InfoMaker.
To display Help for any ODBC driver:
1. Click the Help button in the ODBC setup dialog box for your driver.
A Help window displays, describing features in the setup dialog box.

Using the ODBC Interface Appeon InfoMaker® 2017 R3
Connecting to Your Database Page 23
2. Click the Contents button in the Help window to display additional Help topics for thisdriver.
Another Help window displays, listing the topics you can view.
3. Click an underlined topic to display its Help window.
2.3.4 Selecting an ODBC translator
What is an ODBC translator?
The ODBC drivers supplied with InfoMaker allow you to specify a translator when youdefine the data source. An ODBC translator is a DLL that translates data passing betweenan application and a data source. Typically, translators are used to translate data from onecharacter set to another.
What you do
Follow these steps to select a translator for your ODBC driver.
To select a translator when using an ODBC driver:
1. In the ODBC setup dialog box for your driver, display the Select Translator dialog box.
The way you display the Select Translator dialog box for SAP-supplied ODBC driversdepends on the driver and Windows platform you are using. Click Help in your driver'ssetup dialog box for instructions on displaying the Select Translator dialog box.
In the Select Translator dialog box, the translators listed are determined by the values inyour ODBCINST.INI registry key.
2. Select a translator to use from the Installed Translators list.
If you need help using the Select Translator dialog box, click Help.
3. Click OK.
The Select Translator dialog box closes and the driver performs the translation.
2.4 Defining the ODBC interfaceTo define a connection through the ODBC interface, you must create a database profile bysupplying values for at least the basic connection parameters in the Database Profile Setup -ODBC dialog box. You can then select this profile at any time to connect to your data sourcein the development environment.
For information on how to define a database profile, see Using database profiles.
2.5 SAP SQL AnywhereThis section describes how to prepare and define an SAP SQL Anywhere data source in orderto connect to it using the SQL Anywhere ODBC driver.
SQL Anywhere includes two database servers -- a personal database server and a networkdatabase server. For information about using SQL Anywhere, see the SQL Anywheredocumentation.

Using the ODBC Interface Appeon InfoMaker® 2017 R3
Connecting to Your Database Page 24
2.5.1 Supported versions for SQL Anywhere
The SQL Anywhere ODBC driver supports connection to local and remote databases createdwith the following:
• InfoMaker running on your computer
• SQL Anywhere 17.x
• SQL Anywhere 16.x
• SQL Anywhere 12.x
2.5.2 Basic software components for SQL Anywhere
The following figure shows the basic software components required to connect to an SQLAnywhere data source in InfoMaker.
Figure: Components of an SQL Anywhere connection

Using the ODBC Interface Appeon InfoMaker® 2017 R3
Connecting to Your Database Page 25
2.5.3 Preparing to use the SQL Anywhere data source
Before you define and connect to an SQL Anywhere data source in InfoMaker, follow thesesteps to prepare the data source.
To prepare an SQL Anywhere data source:
1. Make sure the database file for the SQL Anywhere data source already exists. You cancreate a new database by:

Using the ODBC Interface Appeon InfoMaker® 2017 R3
Connecting to Your Database Page 26
• Launching the Create SQL Anywhere Database utility. This utility can be accessedfrom the Utilities folder for the ODBC interface in the Database profile or Databasepainter when InfoMaker is running on your computer.
This method creates a local SQL Anywhere database on your computer, and alsocreates the data source definition and database profile for this connection. (Forinstructions, see the User's Guide.)
• Creating the database some other way, such as with InfoMaker running on anotheruser's computer or by using SQL Anywhere outside InfoMaker. (For instructions, seethe SQL Anywhere documentation.)
2. Make sure you have the log file associated with the SQL Anywhere database so that youcan fully recover the database if it becomes corrupted.
If the log file for the SQL Anywhere database does not exist, the SQL Anywheredatabase engine creates it. However, if you are copying or moving a database fromanother computer or directory, you should copy or move the log file with it.
2.5.4 Defining the SQL Anywhere data source
When you create a local SQL Anywhere database, InfoMaker automatically creates the datasource definition and database profile for you. Therefore, you need only use the followingprocedure to define an SQL Anywhere data source when you want to access an SQLAnywhere database not created using InfoMaker on your computer.
To define an SQL Anywhere data source for the SQL Anywhere driver:
1. Select Create ODBC Data Source from the list of ODBC utilities in the DatabaseProfiles dialog box or the Database painter.
2. Select User Data Source and click Next.
3. On the Create New Data Source page, select the SQL Anywhere driver and click Finish.
The ODBC Configuration for SQL Anywhere dialog box displays:

Using the ODBC Interface Appeon InfoMaker® 2017 R3
Connecting to Your Database Page 27
4. You must supply the following values:
• Data source name on the ODBC tab page
• User ID and password on the Login tab page
• Database file on the Database tab page
Use the Help button to get information about boxes in the dialog box.

Using the ODBC Interface Appeon InfoMaker® 2017 R3
Connecting to Your Database Page 28
Using the Browse button
When you use the Browse button to supply the Database File name (for example,SALES.DB), this name also displays without the extension in both the Data SourceName and Database Name boxes. This might change values that you previouslysupplied in these boxes. If you want to specify a different name for the data source ordatabase, you can edit one or both of these boxes after using the Browse button.
5. (Optional) To select an ODBC translator to translate your data from one character set toanother, click the Select button on the ODBC tab.
See Selecting an ODBC translator.
6. Click OK to save the data source definition.
Specifying a Start Line value
When the SQL Anywhere ODBC driver cannot find a running personal or network databaseserver using the PATH variable and Database Name setting, it uses the commands specifiedin the Start Line field to start the database servers.
Specify one of the following commands in the Start Line field on the Database tab, where n isthe version of SQL Anywhere you are using.
Table 2.3:
Specify this command To
dbengn.exe Start the personal database server and thedatabase specified in the Database File box
rtengn.exe Start the runtime database server and thedatabase specified in the Database File box
For information on completing the ODBC Configuration For SQL Anywhere dialog box, seethe SQL Anywhere documentation.
2.5.5 Support for Transact-SQL special timestamp columns
When you work with an SQL Anywhere table in the Data Pipeline or Database painter, thedefault behavior is to treat any column named timestamp as an SQL Anywhere Transact-SQLspecial timestamp column.
Creating special timestamp columns
You can create a Transact-SQL special timestamp column in an SQL Anywhere table.
To create a Transact-SQL special timestamp column in an SQL Anywhere table in InfoMaker:
1. Give the name timestamp to any column having a timestamp datatype that you wanttreated as a Transact-SQL special timestamp column. Do this in one of the followingways:

Using the ODBC Interface Appeon InfoMaker® 2017 R3
Connecting to Your Database Page 29
• In the painter -- Select timestamp as the column name. (For instructions, see theUser's Guide.)
• In a SQL CREATE TABLE statement -- Follow the CREATE TABLE example.
2. Specify timestamp as the default value for the column. Do this in one of the followingways:
• In the painter -- Select timestamp as the default value for the column. (Forinstructions, see the User's Guide.)
• In a SQL CREATE TABLE statement -- Follow the CREATE TABLE example.
3. If you are working with the table in the Data Pipeline painter, select the initial valueexclude for the special timestamp column from the drop-down list in the Initial Valuecolumn of the workspace.
You must select exclude as the initial value to exclude the special timestamp columnfrom INSERT or UPDATE statements.
For instructions, see the User's Guide.
CREATE TABLE example
The following CREATE TABLE statement defines an SQL Anywhere tablenamed timesheet containing three columns: employee_ID (integer datatype), hours(decimal datatype), and timestamp (timestamp datatype and timestamp default value):
CREATE TABLE timesheet ( employee_ID INTEGER, hours DECIMAL, timestamp TIMESTAMP default timestamp )
Not using special timestamp columns
If you want to change the default behavior, you can specify that InfoMaker not treat SQLAnywhere columns named timestamp as Transact-SQL special timestamp columns.
To specify that InfoMaker not treat columns named timestamp as a Transact-SQL specialtimestamp column:
• Edit the SAP SQL Anywhere section of the PBODB170 initialization file to change thevalue of SQLSrvrTSName from 'Yes' to 'No'.
After making changes in the initialization file, you must reconnect to the database tohave them take effect. See Adding Functions to the PBODB170 Initialization File
2.5.6 What to do next
For instructions on connecting to the ODBC data source, see Connecting to a database.
2.6 PostgreSQLPowerBuilder apps can connect with the PostgreSQL 10 (32-bit and 64-bit) (ANSI andUnicode) database through the PostgreSQL ODBC driver.

Using the ODBC Interface Appeon InfoMaker® 2017 R3
Connecting to Your Database Page 30
Note
The PostgreSQL database cannot be used as the data source for stored procedure; andPBODB170.INI must be configured first in order for connecting with the PostgreSQLdatabase through ODBC interface. For how to configure the PBODB170.INI file, seeAdding Functions to the PBODB170 Initialization File.

Using the JDBC Interface Appeon InfoMaker® 2017 R3
Connecting to Your Database Page 31
3 Using the JDBC InterfaceAbout this chapter
This chapter describes the JDBC interface and explains how to prepare to use this interfaceand how to define the JDBC database profile.
For more information
For more detailed information about JDBC, go to the Java web site.
3.1 About the JDBC interfaceYou can access a wide variety of databases through JDBC in InfoMaker. This sectiondescribes what you need to know to use JDBC connections to access your data in InfoMaker.
3.1.1 What is JDBC?
The JDBC API
Java Database Connectivity (JDBC) is a standard application programming interface(API) that allows a Java application to access any database that supports Structured QueryLanguage (SQL) as its standard data access language.
The JDBC API includes classes for common SQL database activities so that you can openconnections to databases, execute SQL commands, and process results. Consequently,Java programs have the capability to use the familiar SQL programming model of issuingSQL statements and processing the resulting data. The JDBC classes are included in Java1.1+ and Java 2 as the java.sql package.
The JDBC API defines the following:
• A library of JDBC function calls that connect to a database, execute SQL statements, andretrieve results
• A standard way to connect and log in to a DBMS
• SQL syntax based on the X/Open SQL Call Level Interface or X/Open and SQL AccessGroup (SAG) CAE specification (1992)
• A standard representation for datatypes
• A standard set of error codes
How JDBC APIs are implemented
JDBC API implementations fall into two broad categories: those that communicate with anexisting ODBC driver (a JDBC-ODBC bridge) and those that communicate with a nativedatabase API (a JDBC driver that converts JDBC calls into the communications protocolused by the specific database vendor). The InfoMaker implementation of the JDBC interfacecan be used to connect to any database for which a JDBC-compliant driver exists.
The InfoMaker JDB interface
A Java Virtual Machine (JVM) is required to interpret and execute the bytecode of a Javaprogram. The InfoMaker JDB interface supports the Sun Java Runtime Environment (JRE)versions 1.2 and later.

Using the JDBC Interface Appeon InfoMaker® 2017 R3
Connecting to Your Database Page 32
3.1.2 Components of a JDBC connection
How a JDBC connection is made
In InfoMaker when you access a database through the JDBC interface, your connection goesthrough several layers before reaching the database. It is important to understand that eachlayer represents a separate component of the connection, and that each component mightcome from a different vendor.
Because JDBC is a standard API, InfoMaker uses the same interface to access every JDBC-compliant database driver.
The following figure shows the general components of a JDBC connection.
Figure: Components of a JDBC connection
The JDBC DLL
InfoMaker provides the pbjdb170.dll. This DLL runs with the Sun Java RuntimeEnvironment (JRE) versions 1.1 and later.
InfoMaker Java package

Using the JDBC Interface Appeon InfoMaker® 2017 R3
Connecting to Your Database Page 33
InfoMaker includes a small package of Java classes that gives the JDBC interface the level oferror-checking and efficiency (SQLException catching) found in other InfoMaker interfaces.The package is called pbjdbc12170.jar and is found in Appeon\Shared\PowerBuilder.
The Java Virtual Machine
The Java Virtual Machine (JVM) is a component of Java development software. Whenyou install InfoMaker, the Sun Java Development Kit (JDK), including the Java RuntimeEnvironment (JRE), is installed on your system in Appeon\Shared\PowerBuilder. ForInfoMaker 2017 and later, JDK 1.4 is installed. This version of the JVM is started when youuse a JDBC connection or any other process that requires a JVM and is used throughout theInfoMaker session.
If you need to use a different JVM, see the instructions in Preparing to use the JDBCinterface. For more information about how the JVM is started, see the chapter on deployingyour application in the User's Guide.
The JDBC drivers
The JDBC interface can communicate with any JDBC-compliant driver including SAPSybase jConnect for JDBC and the Oracle and IBM Informix JDBC drivers. These driversare native-protocol, all-Java drivers -- that is, they convert JDBC calls into the SQL syntaxsupported by the databases.
Accessing Unicode data
Using the ODBC interface, InfoMaker can connect, save, and retrieve data in both ANSI/DBCS and Unicode databases but does not convert data between Unicode and ANSI/DBCS.When character data or command text is sent to the database, InfoMaker sends a Unicodestring. The driver must guarantee that the data is saved as Unicode data correctly. WhenInfoMaker retrieves character data, it assumes the data is Unicode.
A Unicode database is a database whose character set is set to a Unicode format, such asUTF-8, UTF-16, UCS-2, or UCS-4. All data must be in Unicode format, and any data savedto the database must be converted to Unicode data implicitly or explicitly.
A database that uses ANSI (or DBCS) as its character set might use special datatypes to storeUnicode data. These datatypes are NCHAR, NVARCHAR, and NVARCHAR2. Columnswith this datatype can store only Unicode data. Any data saved into such a column must beconverted to Unicode explicitly. This conversion must be handled by the database server orclient.
3.1.3 JDBC registry entries
When you access data through the InfoMaker JDBC interface, InfoMaker uses an internalregistry to maintain definitions of SQL syntax, DBMS-specific function calls, and defaultDBParm parameter settings for the back-end DBMS. This internal registry currently includessubentries for SQL Anywhere, Adaptive Server Enterprise, and Oracle databases.
In most cases you do not need to modify the JDBC entries. However, if you do need tocustomize the existing entries or add new entries, you can make changes to the systemregistry by editing the registry directly or executing a registry file. Changes you introduce inthe system registry override the InfoMaker internal registry entries. See the egreg.txt file inAppeon\Shared\PowerBuilder for an example of a registry file you could execute to changeentry settings.

Using the JDBC Interface Appeon InfoMaker® 2017 R3
Connecting to Your Database Page 34
3.1.4 Supported versions for JDBC
The InfoMaker JDBC interface uses the pbjdb170.dll to access a database through a JDBCdriver.
To use the JDBC interface to access the jConnect driver, use jConnect Version 4.2 orhigher or jConnect Version 5.2 or higher. For information on jConnect, see your SAPdocumentation.
To use the JDBC interface to access the Oracle JDBC driver, use Oracle 8 JDBC driverVersion 8.0.4 or higher. For information on the Oracle JDBC driver, see your Oracledocumentation.
3.1.5 Supported JDBC datatypes
Like ODBC, the JDBC interface compiles, sorts, presents, and uses a list of datatypes thatare native to the back-end database to emulate as much as possible the behavior of a nativeinterface.
3.2 Preparing to use the JDBC interfaceBefore you define the interface and connect to a database through the JDBC interface, followthese steps to prepare the database for use:
1. Configure the database server for its JDBC connection and install its JDBC-compliantdriver and network software.
2. Install the JDBC driver.
3. Set or verify the settings in the CLASSPATH environment variable and the Java tab of theSystem Options dialog box.
Step 1: Configure the database server
You must configure the database server to make JDBC connections as well as install theJDBC driver and network software.
To configure the database server for its JDBC connection:
1. Make sure the database server is configured to make JDBC connections. Forconfiguration instructions, see your database vendor's documentation.
2. Make sure the appropriate JDBC driver software is installed and running on the databaseserver.
The driver vendor's documentation should provide the driver name, URL format, andany driver-specific properties you need to specify in the database profile. For notesabout the jConnect driver, see Configuring the jConnect driver.
3. Make sure the required network software (such as TCP/IP) is installed and running onyour computer and is properly configured so that you can connect to the database serverat your site.
You must install the network communication driver that supports the network protocoland operating system platform you are using.

Using the JDBC Interface Appeon InfoMaker® 2017 R3
Connecting to Your Database Page 35
For installation and configuration instructions, see your network or databaseadministrator.
Step 2: Install the JDBC driver
In the InfoMaker Setup program, select the Typical install, or select the Custom install andselect the JDBC driver.
Step 3: Set or verify the settings in the CLASSPATH variable and Java tab
Set or verify that the settings in the PATH and CLASSPATH environment variables point tothe appropriate, fully-qualified file names.
If you are using the JDK installed with InfoMaker, you do not need to make any changes tothese environment variables.
If you are using JDK 1.2 or later, you do not need to include any Sun Java VM packages inyour CLASSPATH variable, but your PATH environment variable must include an entry forthe Sun Java VM library, jvm.dll (for example, path\ JDK122\JRE\bin\classic).
Configuring the jConnect driver
If you are using the SAP Sybase jConnect driver, make sure to complete the requiredconfiguration steps such as installing the JDBC stored procedures in AdaptiveServer databases. Also, verify that the CLASSPATH environment variable on yourmachine includes an entry pointing to the location of the jConnect driver. For example, if youare using jConnect 5.5, you should include an entry similar to the following:
C:\Program Files\SAP\Shared\jConnect-5_5\classes\jconn2.jar
For more information about configuring jConnect, see the jConnect for JDBC documentation.
3.3 Defining the JDBC interfaceDefining the profile
To define a connection through the JDBC interface, you must create a database profile bysupplying values for at least the basic connection parameters in the Database Profile Setup -JDBC dialog box. You can then select this profile at any time to connect to your database inthe development environment.
For information on how to define a database profile, see Using database profiles.
Specifying connection parameters
To provide maximum flexibility (as provided in the JDBC API), the JDBC interface supportsdatabase connections made with different combinations of connection parameters:
• Driver name, URL, and Properties
You should specify values for this combination of connection parameters if you need todefine driver-specific properties. When properties are defined, you must also define theuser ID and password in the properties field.
For example, when connecting to the jConnect driver, the following values should beentered in the Driver-Specific Properties field:
SQLINITSTRING=set TextSize 32000; user=system;password=manager;

Using the JDBC Interface Appeon InfoMaker® 2017 R3
Connecting to Your Database Page 36
• Driver name, URL, User ID, and Password
You should specify values for this combination of connection parameters if you do notneed to define any driver-specific properties.
Driver Name: com.sybase.jdbc.SybDriverURL: jdbc:sybase:Tds:localhost:2638Login ID: dbaPassword: sql
• Driver name and URL
You should specify values for this combination of connections parameters when the userID and password are included as part of the URL.
For example, when connecting to the Oracle JDBC driver, the URL can include the user IDand password:
jdbc:oracle:thin:userid/password@host:port:dbname
Specifying properties when connecting to jConnect
If you plan to use the blob datatype in InfoMaker, you should be aware that jConnectimposes a restriction on blob size. Consequently, before you make your databaseconnection from InfoMaker, you might want to reset the blob size to a value greaterthan the maximum size you plan to use.
To set blob size, define the jConnect property SQLINITSTRING in the Driver-Specific Properties box on the Connection page. The SQLINITSTRING property isused to define commands to be passed to the back-end database server:
SQLINITSTRING=set TextSize 32000;
Remember that if you define a property in the Driver-Specific Properties box, youmust also define the user ID and password in this box.
Specifying the appropriate Java Virtual Machine (JVM)
Since the JDB interface supports several JVMs, you must specify which version of theJVM you want to use. For consistent behavior, the same version of the JVM used duringdevelopment should be used at runtime.
Set the JavaVM DBParm on the Options tab page to select the appropriate JVM. The defaultvalue is JRE 1.4. The following table lists the supported JVMs and their correspondingJavaVM DBParm value.
Table 3.1: Available Java VMs and JavaVM DBParm values
JVM DBParm Value
Sun JRE 1.2 Sun1.2
Sun JRE 1.3 Sun1.3
Sun JRE 1.4 Sun1.4

Using the OLE DB interface Appeon InfoMaker® 2017 R3
Connecting to Your Database Page 37
4 Using the OLE DB interfaceAbout this chapter
This chapter describes the OLE DB interface and then explains how to prepare to use thisinterface and how to define the OLE DB database profile.
For more information
This chapter gives general information about using the OLE DB interface. For more detailedinformation:
• See the Data Access section in the Microsoft MSDN library.
• Use the online Help provided by the data provider vendor.
• Check to see if there is a technical document that describes how to connect to your OLEDB data provider. Any updated information about connectivity issues is available from theAppeon Support Web site at https://support.appeon.com/.
4.1 About the OLE DB interface
You can access a wide variety of data through OLE DB data providers in InfoMaker. Thissection describes what you need to know to use OLE DB connections to access your data inInfoMaker.
Supported OLE DB data providers
For a complete list of the OLE DB data providers supplied with InfoMaker and thedata they access, see "Supported Database Interfaces" in online Help.
4.1.1 What is OLE DB?
OLE DB API
OLE DB is a standard application programming interface (API) developed by Microsoft.It is a component of Microsoft's Data Access Components software. OLE DB allows anapplication to access a variety of data for which OLE DB data providers exist. It providesan application with uniform access to data stored in diverse formats, such as indexed-sequential files like Btrieve, personal databases like Corel Paradox, productivity tools such asspreadsheets and electronic mail, and SQL-based DBMSs.
The OLE DB interface supports direct connections to SQL-based databases.
Accessing data through OLE DB
Applications like InfoMaker that provide an OLE DB interface can access data for which anOLE DB data provider exists. An OLE DB data provider is a dynamic link library (DLL) thatimplements OLE DB function calls to access a particular data source.
The InfoMaker OLE DB interface can connect to any OLE DB data provider that supportsthe OLE DB object interfaces listed in the following table. An OLE DB data provider mustsupport these interfaces in order to adhere to the Microsoft OLE DB 2.0 specification.

Using the OLE DB interface Appeon InfoMaker® 2017 R3
Connecting to Your Database Page 38
Table 4.1: Required OLE DB interfaces
IAccessor IDBInitialize
IColumnsInfo IDBProperties
ICommand IOpenRowset
ICommandProperties IRowset
ICommandText IRowsetInfo
IDBCreateCommand IDBSchemaRowset
IDBCreateSession ISourcesRowset
In addition to the required OLE DB interfaces, InfoMaker also uses the OLE DB interfaceslisted in the following table to provide further functionality.
Table 4.2: Additional OLE DB interfaces
OLE DB interface Use in InfoMaker
ICommandPrepare Preparing commands and retrieving column information.
IDBInfo Querying the data provider for its properties. If this interface is notsupported, database connections might fail.
IDBCommandWithParametersQuerying the data provider for parameters.
IErrorInfo Providing error information.
IErrorRecords Providing error information.
IIndexDefinition Creating indexes for the extended attribute system tables. Alsocreating indexes in the Database painter. If this interface is notsupported, InfoMaker looks for index definition syntax in thepbodb170.ini file.
IMultipleResults Providing information.
IRowsetChange Populating the extended attribute system tables when they are created.Also, for updating blobs.
IRowsetUpdate Creating the extended attribute system tables.
ISQLErrorInfo Providing error information.
ISupportErrorInfo Providing error information.
ITableDefinition Creating the extended attribute system tables and also for creatingtables in the Database painter. If this interface is not supported, thefollowing behavior results:
• InfoMaker looks for table definition syntax in the pbodb170.ini file
• InfoMaker catalog tables cannot be used
• DDL and DML operations, like modifying columns or editing datain the database painter, do not function properly
ITransactionLocal Supporting transactions. If this interface is not supported,InfoMaker defaults to AutoCommit mode.

Using the OLE DB interface Appeon InfoMaker® 2017 R3
Connecting to Your Database Page 39
Accessing Unicode data
Using the OLE DB interface, InfoMaker can connect, save, and retrieve data in both ANSI/DBCS and Unicode databases but does not convert data between Unicode and ANSI/DBCS.When character data or command text is sent to the database, InfoMaker sends a Unicodestring. The data provider must guarantee that the data is saved as Unicode data correctly.When InfoMaker retrieves character data, it assumes the data is Unicode.
A Unicode database is a database whose character set is set to a Unicode format, such asUTF-8, UTF-16, UCS-2, or UCS-4. All data must be in Unicode format, and any data savedto the database must be converted to Unicode data implicitly or explicitly.
A database that uses ANSI (or DBCS) as its character set might use special datatypes to storeUnicode data. These datatypes are NCHAR, NVARCHAR, and NVARCHAR2. Columnswith this datatype can store only Unicode data. Any data saved into such a column must beconverted to Unicode explicitly. This conversion must be handled by the database server orclient.
4.1.2 Components of an OLE DB connection
When you access an OLE DB data provider in InfoMaker, your connection goes throughseveral layers before reaching the data provider. It is important to understand that each layerrepresents a separate component of the connection, and that each component might comefrom a different vendor.
Because OLE DB is a standard API, InfoMaker uses the same interface to access everyOLE DB data provider. As long as an OLE DB data provider supports the object interfacesrequired by InfoMaker, InfoMaker can access it through the OLE DB interface.
The following figure shows the general components of a OLE DB connection.
Figure: Components of an OLE DB connection

Using the OLE DB interface Appeon InfoMaker® 2017 R3
Connecting to Your Database Page 40
4.1.3 Obtaining OLE DB data providers
There are two ways you can obtain OLE DB data providers for use with InfoMaker:
• From SAP (recommended)
Install the OLE DB data providers shipped with InfoMaker. You can do this either whenyou first install InfoMaker or later.
• From another vendor
InfoMaker lets you access data with any OLE DB data provider obtained from a vendorother than SAP if that data provider supports the OLE DB object interfaces required byInfoMaker. In most cases, these drivers work with InfoMaker. However, SAP might nothave tested the drivers to verify this.
4.1.4 Supported versions for OLE DB
The OLE DB interface uses a DLL named PBOLE170.DLL to access a database through anOLE DB data provider.

Using the OLE DB interface Appeon InfoMaker® 2017 R3
Connecting to Your Database Page 41
Required OLE DB version
To use the OLE DB interface to access an OLE DB database, you must connectthrough an OLE DB data provider that supports OLE DB version 2.0 or later. Forinformation on OLE DB specifications, see Microsoft Universal Data Access website.
4.2 Preparing to use the OLE DB interfaceBefore you define the interface and connect to a data provider through the OLE DB:
1. Install and configure the database server, network, and client software.
2. Install the OLE DB interface and the OLE DB data provider that accesses your datasource.
3. Install Microsoft's Data Access Components software on your machine.
4. If required, define the OLE DB data source.
Step 1: Install and configure the data server
You must install and configure the database server and install the network software and clientsoftware.
To install and configure the database server, network, and client software:
1. Make sure the appropriate database software is installed and running on its server.
You must obtain the database server software from your database vendor. Forinstallation instructions, see your database vendor's documentation.
2. Make sure the required network software (such as TCP/IP) is installed and running onyour computer and is properly configured so that you can connect to the data server atyour site. You must install the network communication driver that supports the networkprotocol and operating system platform you are using.
For installation and configuration instructions, see your network or data sourceadministrator.
3. If required, install the appropriate client software on each client computer on whichInfoMaker is installed.
Client software requirements
To determine client software requirements, see your database vendor's documentation.To access supported remote Informix databases through the Informix data provider,you need Informix Connect for Windows platforms, version 2.x, or the Informix ClientSoftware Development Kit for Windows platforms, version 2.x.
Step 2: Install the OLE DB interface and data provider
In the InfoMaker Setup program, select the Custom install and select the OLE DB providerthat accesses your database. You can install one or more of the OLE DB data providersshipped with InfoMaker, or you can install data providers from another vendor later.

Using the OLE DB interface Appeon InfoMaker® 2017 R3
Connecting to Your Database Page 42
Step 3: Install the Microsoft Data Access Components software
The InfoMaker OLE DB interface requires the functionality of the Microsoft Data AccessComponents (MDAC) version 2.6 software.
To check the version of MDAC on your computer, download and run the MDAC ComponentChecker utility from the Microsoft Data Access Downloads page.
If MDAC version 2.6 is not installed, you can install it by running the filemdac_typ.exe found in the Support directory.
OLE DB data providers installed with MDAC
When you run the mdac_typ file, several Microsoft OLE DB data providers areautomatically installed, including the providers for SQL Server ( SQLOLEDB) andODBC (MSDASQL).
Step 4: Define the OLE DB data source
Once the OLE DB data provider is installed, you might have to define the OLE DB datasource the data provider will access. How you define the data source depends on the OLE DBdata provider you are using and the vendor who provided it.
To define a data source for one of the OLE DB data providers shipped with InfoMaker, usethe DataDirect OLE DB Administrator. This utility is named PBadmin and can be found inSAP\Shared\DataDirect.
If you are connecting to an ODBC data provider (such as Microsoft's OLE DB Provider forODBC), you must define the ODBC data source as you would if you were using a directODBC connection. To define an ODBC data source, use Microsoft's ODBC Data SourceAdministrator. This utility can be accessed through the Control Panel in Windows or throughthe Database painter.
4.3 Defining the OLE DB interface
Using the OLE DB Database Profile Setup
To define a connection through the OLE DB interface, you must create a database profile bysupplying values for at least the basic connection parameters in the Database Profile Setup --OLE DB dialog box. You can then select this profile anytime to connect to your data in thedevelopment environment.
For information on how to define a database profile, see Using database profiles.
Specifying connection parameters
You must supply values for the Provider and Data Source connection parameters. Select adata provider from the list of installed data providers in the Provider drop-down list. The DataSource value varies depending on the type of data source connection you are making. Forexample:
• If you are using Microsoft's OLE DB Provider for ODBC to connect to the PB Demo DB,you select MSDASQL as the Provider value and enter the actual ODBC data source name(in this case PB Demo DB) as the Data Source value.

Using the OLE DB interface Appeon InfoMaker® 2017 R3
Connecting to Your Database Page 43
• If you are using Microsoft's OLE DB Provider for SQL Server, you select SQLOLEDB asthe Provider value and enter the actual server name as the Data Source value. In the caseof Microsoft SQL Server, you must also use the Extended Properties field to provide thedatabase name (for example, Database=Pubs) since you can have multiple instances of adatabase.
• If you are using the PB OLE DB Provider to connect to an Oracle8i database, you selectSybase.Oracle8ADOProvider as the Provider value and enter the actual data source name(which you should have previously defined using the DataDirect OLE DB Administrator)as the Data Source value.
Using the Data Link API
The Data Link option allows you to access Microsoft's Data Link API, which allows you todefine a file or use an existing file that contains your OLE DB connection information. AData Link file is identified with the suffix .udl.
To launch this option, select the File Name check box on the Connection tab and double-click on the button next to the File Name box. (You can also launch the Data Link API in theDatabase painter by double-clicking on the Manage Data Links utility included with the OLEDB interface in the list of Installed Database Interfaces.)
For more information on using the Data Link API, see Microsoft Universal Data Access website.
Using a Data Link file versus setting the DBParm parameters
If you use a Data Link file to connect to your data source, all other settings you makein the OLE DB Database Profile Setup dialog box are ignored.

Using the ADO.NET interface Appeon InfoMaker® 2017 R3
Connecting to Your Database Page 44
5 Using the ADO.NET interfaceAbout this chapter
This chapter describes the ADO.NET interface and explains how to prepare to use thisinterface and how to define an ADO.NET database profile.
For more information
This chapter gives general information about using the ADO.NET interface. For moredetailed information:
• See the Data Access and .NET development sections in the Microsoft MSDN library.
• Use the online Help provided by the data provider vendor.
• Check to see if there is a technical document that describes how to connect to yourADO.NET data provider. Any updated information about connectivity issues is availablefrom the Appeon Support Web site at https://support.appeon.com/.
5.1 About ADO.NETADO.NET is a set of technologies that provides native access to data in the Microsoft .NETFramework. It is designed to support an n-tier programming environment and to handle adisconnected data architecture. ADO.NET is tightly integrated with XML and uses a commondata representation that can combine data from disparate sources, including XML.
One of the major components of ADO.NET is the .NET Framework data provider, whichconnects to a database, executes commands, and retrieves results.
Microsoft provides .NET Framework data providers for SQL Server and OLE DB withthe .NET Framework, and data providers for ODBC and Oracle can be downloaded from theMicrosoft Web site. You can also obtain .NET Framework data providers from other vendors,such as the .NET Framework Data Provider for Adaptive Server Enterprise from SAP.
To connect to a database using the InfoMaker ADO.NET database interface, you must usea .NET Framework data provider.
Accessing Unicode data
Using the ADO.NET interface, InfoMaker can connect, save, and retrieve data in both ANSI/DBCS and Unicode databases but does not convert data between Unicode and ANSI/DBCS.When character data or command text is sent to the database, InfoMaker sends a Unicodestring. The data provider must guarantee that the data is saved as Unicode data correctly.When InfoMaker retrieves character data, it assumes the data is Unicode.
A Unicode database is a database whose character set is set to a Unicode format, such asUTF-8, UTF-16, UCS-2, or UCS-4. All data must be in Unicode format, and any data savedto the database must be converted to Unicode data implicitly or explicitly.
A database that uses ANSI (or DBCS) as its character set might use special datatypes to storeUnicode data. These datatypes are NCHAR, NVARCHAR, and NVARCHAR2. Columnswith this datatype can store only Unicode data. Any data saved into such a column must beconverted to Unicode explicitly. This conversion must be handled by the database server orclient.

Using the ADO.NET interface Appeon InfoMaker® 2017 R3
Connecting to Your Database Page 45
5.2 About the InfoMaker ADO.NET database interface
You can use the InfoMaker ADO.NET database interface to connect to a data source suchas Adaptive Server Enterprise, Oracle, and Microsoft SQL Server, as well as to data sourcesexposed through OLE DB and XML, in much the same way as you use the InfoMaker ODBCand OLE DB database interfaces.
Performance
You might experience better performance if you use a native database interface. Theprimary purpose of the ADO.NET interface is to support shared connections withother database constructs such as the .NET DataGrid in Appeon DataWindow .NET.
5.2.1 Components of an ADO.NET connection
When you access a database using ADO.NET in InfoMaker, your connection goes throughseveral layers before reaching the database. It is important to understand that each layerrepresents a separate component of the connection, and that components might come fromdifferent vendors.
The InfoMaker ADO.NET interface consists of a driver (pbado170.dll) and a server(pbdata170.dll). Both DLLs must be deployed with an application that connects to a databaseusing ADO.NET.
In this release, the InfoMaker database interface for ADO.NET supports the .NET namespaceSystem.Data.OleDb, which is the .NET Framework data provider for OLE DB.
Additional .NET Framework data providers will be supported in future releases. Please seethe release bulletin for the latest information.
The following figure shows the general components of an ADO.NET connection using theOLE DB .NET Framework data provider.
Figure: Components of an ADO.NET OLE DB connection

Using the ADO.NET interface Appeon InfoMaker® 2017 R3
Connecting to Your Database Page 46
5.2.2 OLE DB data providers
When you use the .NET Framework data provider for OLE DB, you connect to a databasethrough an OLE DB data provider, such as Microsoft's SQLOLEDB or MSDAORA or a dataprovider from another vendor.
The .NET Framework Data Provider for OLE DB does not work with the MSDASQLprovider for ODBC, and it does not support OLE DB version 2.5 interfaces.
You can use any OLE DB data provider that supports the OLE DB interfaces listed in thefollowing table with the OLE DB .NET Framework data provider. For more informationabout supported providers, see the topic on .NET Framework data providers in theMicrosoft .NET Framework Developer's Guide.

Using the ADO.NET interface Appeon InfoMaker® 2017 R3
Connecting to Your Database Page 47
Table 5.1: Required interface support for OLE DB data providers
OLE DB object Required interfaces
OLE DB Services IDataInitialize
DataSource IDBInitialize
IDBCreateSession
IDBProperties
IPersist
Session ISessionProperties
IOpenRowset
Command ICommandText
ICommandProperties
MultipleResults IMultipleResults
RowSet IRowset
IAccessor
IColumnsInfo
IRowsetInfo (only required ifDBTYPE_HCHAPTER is supported)
Error IErrorInfo
IErrorRecords
After you install the data provider, you might need to define a data source for it. To definea data source for one of the OLE DB data providers shipped with InfoMaker, use theDataDirect OLE DB Administrator. This utility is named PBadmin and can be found in SAP\Shared\DataDirect.
5.3 Preparing to use the ADO.NET interface
Before you define the interface and connect to a database using ADO.NET:
1. Install and configure the database server, network, and client software.
2. Install the ADO.NET interface.
3. Install Microsoft's Data Access Components version 2.6 or later software on yourmachine.
Step 1: Install and configure the data server
You must install and configure the database server and install the network software and clientsoftware.
To install and configure the database server, network, and client software:
1. Make sure the appropriate database software is installed and running on its server.

Using the ADO.NET interface Appeon InfoMaker® 2017 R3
Connecting to Your Database Page 48
You must obtain the database server software from your database vendor. Forinstallation instructions, see your database vendor's documentation.
2. Make sure the required network software (such as TCP/IP) is installed and running onyour computer and is properly configured so that you can connect to the data server atyour site. You must install the network communication driver that supports the networkprotocol and operating system platform you are using.
For installation and configuration instructions, see your network or data sourceadministrator.
3. If required, install the appropriate client software on each client computer on whichInfoMaker is installed.
Client software requirements
To determine client software requirements, see your database vendor's documentation.
Step 2: Install the ADO.NET interface
In the InfoMaker Setup program, select the Custom install and select the ADO.NET databaseinterface. You can also install one or more of the OLE DB data providers shipped withInfoMaker, or you can install data providers from another vendor later.
Step 3: Install the Microsoft Data Access Components software
The InfoMaker ADO.NET interface requires the functionality of the Microsoft Data AccessComponents (MDAC) version 2.6 software.
To check the version of MDAC on your computer, download and run the MDAC ComponentChecker utility from the Microsoft Data Access Downloads page.
If MDAC version 2.6 is not installed, you can install it by running the filemdac_typ.exe found in the Support directory.
OLE DB data providers installed with MDAC
When you run the mdac_typ file, several Microsoft OLE DB data providers areautomatically installed, including the provider for SQL Server, SQLOLEDB, whichcan be used with ADO.NET.
5.4 Defining the ADO.NET interfaceUsing the ADO.NET Database Profile Setup
To define a connection using the ADO.NET interface, you must create a database profile bysupplying values for at least the basic connection parameters in the Database Profile Setup --ADO.NET dialog box. You can then select this profile at any time to connect to your data inInfoMaker.
For information on how to define a database profile, see Using database profiles.
Specifying connection parameters
You must supply a value for the Namespace and DataSource connection parameters and forthe User ID and Password. When you use the System.Data.OleDb namespace, you must alsoselect a data provider from the list of installed data providers in the Provider drop-down list.

Using the ADO.NET interface Appeon InfoMaker® 2017 R3
Connecting to Your Database Page 49
The Data Source value varies depending on the type of data source connection you aremaking. For example:
• If you are using Microsoft's OLE DB Provider for SQL Server, you select SQLOLEDB asthe Provider value and enter the actual server name as the Data Source value. In the caseof Microsoft SQL Server, you must also use the Extended Properties field to provide thedatabase name (for example, Database=Pubs) since you can have multiple instances of adatabase.
• If you are using the DataDirect OLE DB Provider to connect to an Oracle8i database,you select Sybase.Oracle8ADOProvider as the Provider value and enter the actual datasource name (which you should have previously defined using the DataDirect OLE DBAdministrator) as the Data Source value.
Using the Data Link API with OLE DB
The Data Link option allows you to access Microsoft's Data Link API, which allows you todefine a file or use an existing file that contains your OLE DB connection information. AData Link file is identified with the suffix .udl.
To launch this option, select the File Name check box on the Connection page and double-click the button next to the File Name box. (You can also launch the Data Link API in theDatabase painter by double-clicking the Manage Data Links utility included with the OLEDB interface in the list of Installed Database Interfaces.)
For more information on using the Data Link API, see Microsoft Universal Data Access website.
Using a Data Link file versus setting the DBParm parameters
If you use a Data Link file to connect to your data source, all other settings you makein the OLE DB Database Profile Setup dialog box are ignored.

Part III. Working withNative Database Interfaces
This part describes how to set up and define database connections accessed through one ofthe native database interfaces.
Using Native Database Interfaces Appeon InfoMaker® 2017 R3
Connecting to Your Database Page 51
6 Using Native Database InterfacesAbout this chapter
This chapter describes the native database interfaces. For each supported interface, itthen explains how to prepare to use the database and define any unique database interfaceparameters so that you can access your data.
For more information
This chapter gives general information about using each native database interface. For moredetailed information:
• Check to see if there is a technical document that describes how to connect to yourdatabase. Any updated information about connectivity issues is available from the theAppeon Support Web site at https://support.appeon.com/.
• Ask your network or system administrator for assistance when installing and setting up thedatabase server and client software at your site.
6.1 About native database interfaces
The native database interfaces provide native connections to many databases and DBMSs.This section describes how the native database interfaces access these databases.
For a complete list of the supported native database interfaces, see "Supported DatabaseInterfaces" in online Help.
6.1.1 What is a native database interface?
A native database interface is a direct connection to your data in InfoMaker.
Each native database interface uses its own interface DLL to communicate with a specifieddatabase through a vendor-specific database API. For example, the Adaptive Server interfaceuses a DLL named PBSYC170.DLL to access the database, while the Oracle databaseinterface accesses the database through PBO90170.DLL (Oracle9i), PBO10170.DLL(Oracle10g), and PBO90170.DLL(Oracle11g and Oracle12c).
In contrast, a standard database interface uses a standard API to communicate with thedatabase. For example, InfoMaker can use a single-interface DLL (PBODB170.DLL) tocommunicate with the ODBC Driver Manager and corresponding driver to access any ODBCdata source.
6.1.2 Components of a database interface connection
When you use a native database interface to access a database, your connection goes throughseveral layers before reaching the data. Each layer is a separate component of the connectionand each component might come from a different vendor.
Figure: Components of a database connection

Using Native Database Interfaces Appeon InfoMaker® 2017 R3
Connecting to Your Database Page 52
For diagrams showing the specific components of your connection, see "Basic softwarecomponents" in the section in this chapter for your native database interface.
6.1.3 Using a native database interface
You perform several basic steps to use a native database interface to access a database.
About preparing to use the database

Using Native Database Interfaces Appeon InfoMaker® 2017 R3
Connecting to Your Database Page 53
The first step in connecting to a database through a native database interface is to prepare touse the database. Preparing the database ensures that you will be able to access and use yourdata in InfoMaker.
You must prepare the database outside InfoMaker before you start the product, then definethe database interface and connect to it. The requirements differ for each database -- but ingeneral, preparing a database involves four basic steps.
To prepare to use your database with InfoMaker:
1. Make sure the required database server software is properly installed and configured atyour site.
2. If network software is required, make sure it is properly installed and configured at yoursite and on the client computer so that you can connect to the database server.
3. Make sure the required database client software is properly installed and configured onthe client computer. (Typically, the client computer is the one running InfoMaker.)
You must obtain the client software from your database vendor and make sure that theversion you install supports all of the following:
The operating system running on the client computer
The version of the database that you want to access
The version of InfoMaker that you are running
4. Verify that you can connect to the server and database you want to access outsideInfoMaker.
For specific instructions to use with your database, see "Preparing to use the database" in thesection in this chapter for your native database interface.
About installing native database interfaces
After you prepare to use the database, you must install the native database interface thataccesses the database. See the instructions for each interface for more information.
About defining native database interfaces
Once you are ready to access the database, you start InfoMaker and define the databaseinterface. To define a database interface, you must create a database profile by completing theDatabase Profile Setup dialog box for that interface.
For general instructions, see About creating database profiles. For instructions about definingdatabase interface parameters unique to a particular database, see "Preparing to use thedatabase" in the section in this chapter for your database interface.
6.2 InformixThis section describes how to use the native IBM Informix database interface in InfoMaker.
6.2.1 Supported versions for Informix
You can access the following Informix databases using the native Informix databaseinterface:

Using Native Database Interfaces Appeon InfoMaker® 2017 R3
Connecting to Your Database Page 54
• Informix 12.x
• Informix 10.x
• Informix Dynamic Server
• Informix-OnLine and Informix-SE version 9.x
InfoMaker provides the I10 interface in the PBIN10170.DLL to connect through Informix-Connect version 10.x/12.x client software.
Accessing Unicode data
InfoMaker can connect, save, and retrieve data in ANSI/DBCS databases. The Informixnative driver does not currently support access to Unicode databases.
6.2.2 Supported Informix datatypes
The Informix database interface supports the Informix datatypes listed in the followingtable in reports and forms.
Table 6.1: Supported datatypes for Informix
Byte (a maximum of 231 bytes) Integer (4 bytes)
Character (1 to 32,511 bytes) Money
Date Real
DateTime Serial
Decimal SmallInt (2 bytes)
Float Text (a maximum of 231 bytes)
Interval VarChar (1 to 255 bytes)
Exceptions
Byte, text, and VarChar datatypes are not supported in Informix SE.
6.2.2.1 Informix DateTime datatype
The DateTime datatype is a contiguous sequence of boxes. Each box represents a componentof time that you want to record. The syntax is:
DATETIME largest_qualifier TO smallest_qualifier
InfoMaker defaults to Year TO Fraction(5).
For a list of qualifiers, see your Informix documentation.
To create your own variation of the DateTime datatype:
1. In the Database painter, create a table with a DateTime column.

Using Native Database Interfaces Appeon InfoMaker® 2017 R3
Connecting to Your Database Page 55
For instructions on creating a table, see the User's Guide.
2. In the Columns view, select Pending Syntax from the Objects or pop-up menu.
The Columns view displays the pending changes to the table definition. These changesexecute only when you click the Save button to save the table definition.
3. Select Copy from the Edit or pop-up menu.
or
Click the Copy button.
The SQL syntax (or the portion you selected) is copied to the clipboard.
4. In the ISQL view, modify the DateTime syntax and execute the CREATE TABLEstatement.
For instructions on using the ISQL view, see the User's Guide.
6.2.2.2 Informix Time datatype
The Informix database interfaces also support a time datatype. The time datatype is a subsetof the DateTime datatype. The time datatype uses only the time qualifier boxes.
6.2.2.3 Informix Interval datatype
The interval datatype is one value or a sequence of values that represent a component of time.The syntax is:
INTERVAL largest_qualifier TO smallest_qualifier
InfoMaker defaults to Day(3) TO Day.
For more about interval datatypes, see your Informix documentation.
6.2.3 Basic software components for Informix
The following figure shows the basic software components required to access an Informixdatabase using the native Informix database interfaces.
Figure: Components of an Informix connection

Using Native Database Interfaces Appeon InfoMaker® 2017 R3
Connecting to Your Database Page 56
6.2.4 Preparing to use the Informix database
Before you define the database interface and connect to an Informix database in InfoMaker,follow these steps to prepare the database for use:
1. Install and configure the required database server, network, and client software.
2. Install the native Informix IN9 database interface.
3. Verify that you can connect to the Informix server and database outside InfoMaker.
Step 1: Install and configure the database server
You must install and configure the required database server, network, and client software forInformix.
To install and configure the required database server, network, and client software:
1. Make sure the Informix database server software and database network software isinstalled and running on the server specified in your database profile.
Using Native Database Interfaces Appeon InfoMaker® 2017 R3
Connecting to Your Database Page 57
You must obtain the database server and database network software from Informix.
For installation instructions, see your Informix documentation.
2. Install the required Informix client software on each client computer on whichInfoMaker is installed.
Install Informix Connect or the Informix Client SDK (which includes Informix Connect)and run the SetNet32 utility to configure the client registry settings.
You must obtain the Informix client software from IBM. Make sure the version of theclient software you install supports all of the following:
The operating system running on the client computer
The version of the database that you want to access
The version of InfoMaker that you are running
For installation instructions, see your Informix documentation.
3. Make sure the Informix client software is properly configured so that you can connect tothe Informix database server at your site.
For example, when you install Informix-Connect client software, it automatically createsthe correct configuration file on your computer.
The configuration file contains default parameters that define your networkconfiguration, network protocol, and environment variables. If you omit these valuesfrom the database profile when you define the native Informix database interface, theydefault to the values specified in your configuration file.
For instructions on setting up the Informix configuration file, see your Informixdocumentation.
4. If required by your operating system, make sure the directory containing the Informixclient software is in your system path.
Step 2: Install the database interface
In the InfoMaker Setup program, select the Typical install, or select the native Informixdatabase interface in the Custom install.
Step 3: Verify the connection
Make sure you can connect to the Informix server and database you want to access fromoutside InfoMaker.
To verify the connection, use any Windows-based utility (such as the InformixILOGIN.EXE program) that connects to the database. When connecting, be sure to specifythe same parameters you plan to use in your InfoMaker database profile to access thedatabase.
For instructions on using ILOGIN.EXE, see your Informix documentation.
6.2.5 Defining the Informix database interface
To define a connection through an Informix database interface, you must create a databaseprofile by supplying values for at least the basic connection parameters in the Database

Using Native Database Interfaces Appeon InfoMaker® 2017 R3
Connecting to Your Database Page 58
Profile Setup - Informix IN9 dialog box. You can then select this profile at any time toconnect to your database in the development environment.
For information on how to define a database profile, see Using database profiles.
6.2.5.1 Specifying the server name
When you specify the server name value, you must use the following format to connect to thedatabase through the Informix interface:
host_name@server_name
Table 6.2:
Parameter Description
host_name The name of the host computer running the Informix database server. Thiscorresponds to the Informix HOSTNAME environment variable.
server_name The name of the server containing the Informix database. This correspondsto the Informix SERVER environment variable.
For example, to use the IN9 interface to connect to an Informix database server namedserver01 running on a host machine named sales, type the host name (sales) in the HostName box and the server name (server01) in the Server box on the Connection tab in theDatabase Profile Setup - Informix IN9 dialog box. InfoMaker saves this server name assales@server01 in the database profile entry in the system registry.
6.2.6 What to do next
For instructions on connecting to the database, see Connecting to a database
6.3 Microsoft SQL Server
This section describes how to use the Microsoft SQL Server Native Client database interfacein InfoMaker.
6.3.1 Supported versions for SQL Server
You can access Microsoft SQL Server 2008 R2, 2012, 2014, 2016, or 2017 databasesusing the SQL Native Client interface. The SQL Native Client interface uses a DLLnamed PBSNC170.DLL to access the database. The interface uses the SQL Native Client(sqlncli.h and sqlncli.dll) on the client side and connects using OLE DB.
To take advantage of these features, you need to use the SNC interface. The SQL Server 2008R2 or later SQL Native Client software must be installed on the client computer.
PBODB initialization file not used
Connections made directly through OLE DB use the PBODB initialization file to setsome parameters, but connections made using the SNC interface do not depend on thePBODB initialization file.

Using Native Database Interfaces Appeon InfoMaker® 2017 R3
Connecting to Your Database Page 59
6.3.2 Supported SQL Server datatypes
The SQL Native Client database interface supports the datatypes listed in the followingtable.
Table 6.3: Supported datatypes for Microsoft SQL Server 2005
Binary Real
Bit SmallDateTime
Character (fewer than 255 characters) SmallInt
DateTime SmallMoney
Decimal Text
Float Timestamp
Identity TinyInt
Image VarBinary(max)
Int VarBinary(n)
Money VarChar(max)
Numeric VarChar(n)
NVarChar(max) XML
NVarChar(n)
The XML datatype is a built-in datatype in SQL Server 2005 that enables you to store XMLdocuments and fragments in a SQL Server database. You can use this datatype as a columntype when you create a table.
Additional datatypes are supported for SQL Server 2008. For more information, see Supportfor new datatypes in SQL Server 2008.
In SQL Server 2005, the VarChar(max), NVarChar(max), and VarBinary(max) datatypesstore very large values (up to 2^31 bytes). You can use these datatypes to obtain metadata,define new columns, and query data from the columns. You can also use them to pipelinedata.
6.3.3 Basic software components for Microsoft SQL Server
You must install the software components in the following figure to access a database withthe SQL Native Client interface. Microsoft SQL Server Native Client software contains aSQL OLE DB provider and ODBC driver in a single DLL.
Figure: Components of a Microsoft SQL Server connection

Using Native Database Interfaces Appeon InfoMaker® 2017 R3
Connecting to Your Database Page 60
6.3.4 Preparing to use the SQL Server database
Before you define the database interface and connect to a Microsoft SQL Server database inInfoMaker, follow these steps to prepare the database for use:
1. Install and configure the required database server, network, and client software.
2. Install the SQL Native Client database interface.
3. Verify that you can connect to the Microsoft SQL Server server and database outsideInfoMaker.
Step 1: Install and configure the database server

Using Native Database Interfaces Appeon InfoMaker® 2017 R3
Connecting to Your Database Page 61
You must install and configure the database server, network, and client software for SQLServer.
To install and configure the database server, network, and client software:
1. Make sure the Microsoft SQL Server database software is installed and running on theserver specified in your database profile.
You must obtain the database server software and required licenses from MicrosoftCorporation. For installation instructions, see your Microsoft SQL Serverdocumentation.
Upgrading from an earlier version of SQL Server
For instructions on upgrading to a later version of SQL Server or installing italongside an earlier version, see your Microsoft SQL Server documentation.
2. If you are accessing a remote SQL Server database, make sure the required networksoftware (for example, TCP/IP) is installed and running on your computer and isproperly configured so that you can connect to the SQL Server database server at yoursite.
For installation and configuration instructions, see your network or databaseadministrator.
3. Install the required Microsoft SQL Native Client software on each client computer onwhich InfoMaker is installed.
You must obtain the SQL Native Client software from Microsoft. Make sure the versionof the client software you install supports all of the following:
The operating system running on the client computer
The version of the database that you want to access
The version of InfoMaker that you are running
For installation instructions, see your Microsoft SQL Server documentation.
4. Make sure the SQL Native Client client software is properly configured so that you canconnect to the SQL Server database server at your site.
For configuration instructions, see your Microsoft SQL Server documentation.
5. Make sure the directory containing the SQL Native Client software is in your systempath.
6. Make sure only one copy of the Sqlncli.dll file is installed on your computer.
Step 2: Install the database interface
In the InfoMaker Setup program, select the Custom install and select the SQL Native Clientdatabase interface.
Step 3: Verify the connection

Using Native Database Interfaces Appeon InfoMaker® 2017 R3
Connecting to Your Database Page 62
Make sure you can connect to the SQL Server server and database you want to access fromoutside InfoMaker.
To verify the connection, use any Windows-based utility that connects to the database.When connecting, be sure to specify the same parameters you plan to use in your InfoMakerdatabase profile to access the database.
6.3.5 Defining the SQL Server database interface
To define a connection through the SQL Native Client interface, you must create a databaseprofile by supplying values for at least the basic connection parameters in the DatabaseProfile Setup - SQL Native Client dialog box. You can then select this profile at any time toconnect to your database in the development environment.
For information on how to define a database profile, see Creating a database profile. For newfeatures that require special settings in the database profile, see SQL Server 2008 features.For a comparison of the database parameters you might have used with existing applicationsand those used with the SNC database interface, see Migrating from the MSS or OLE DBdatabase interfaces.
6.3.6 Migrating from the MSS or OLE DB database interfaces
In earlier releases of InfoMaker, the MSS native interface was provided for connection toMicrosoft SQL Server. This native interface was based on Microsoft DB-LIB functionality,which is no longer supported by Microsoft and is not Unicode-enabled. The MSS interfacewas removed in InfoMaker 10.0.
Prior to the introduction of SQL Server 2005 and SQL Native Client, Microsoftrecommended using the OLE DB database interface and MDAC to connect to SQL Server.You can continue to use this solution if you do not need to take advantage of new features inSQL Server 2005 or later versions.
This section provides a comparison between database parameters you might have used inexisting applications with the parameters you can use with the SNC database interface.
MSS database parameters supported by SNC
The following table shows the database parameters and preferences that could be set in theDatabase Profile Setup dialog box for the discontinued MSS native database interface forMicrosoft SQL Server, and indicates whether they are supported by the SNC interface.
The column on the left shows the tab page in the Database Profile Setup dialog box for MSS.The parameters and preferences may be on different tab pages in the SNC profile.
Table 6.4: MSS parameters supported by SNC
MSS SNC
Connection tab:
Language Not supported
Lock Supported (Transaction tab)
AutoCommit Supported

Using Native Database Interfaces Appeon InfoMaker® 2017 R3
Connecting to Your Database Page 63
MSS SNC
CommitOnDisconnect Supported
System tab:
Log Not supported
SystemProcs Not supported
PBCatalogOwner Supported
Transaction tab:
Async Not supported
DBGetTime Not supported
CursorLock Not supported
CursorScroll Not supported
StaticBind Supported
MaxConnect Not supported
Syntax tab:
DBTextLimit Supported (as PBMaxTextSize onTransaction tab)
DateTimeAllowed Not supported
OptSelectBlob Not supported
Network tab:
AppName Supported (System tab)
Host Supported (System tab)
PacketSize Supported (System tab)
Secure Supported (as TrustedConnection on Generaltab)
OLE DB database parameters supported by SNC
The following table shows the database parameters and preferences that can be set in theDatabase Profile Setup dialog box for the OLE DB standard interface for Microsoft SQLServer, and indicates whether they are supported by the SNC interface.
The column on the left shows the tab page in the Database Profile Setup dialog box for OLEDB. The parameters and preferences may be on different tab pages in the SNC profile.
Table 6.5: OLE DB parameters supported by SNC
OLE DB SNC
Connection tab:
Provider Not supported
DataSource Supported at runtime (asSQLCA.ServerName)

Using Native Database Interfaces Appeon InfoMaker® 2017 R3
Connecting to Your Database Page 64
OLE DB SNC
DataLink Supported
Location Not supported
ProviderString Supported
System tab:
PBCatalogOwner Supported
ServiceComponents Not supported
AutoCommit Supported (General tab)
CommitOnDisconnect Supported (General tab)
StaticBind Supported (Transaction tab)
DisableBind Supported (Transaction tab)
Init_Prompt Not supported
TimeOut Supported
LCID Not supported
Transaction tab:
Block Supported
PBMaxBlobSize Supported
Mode Not supported
Lock Supported
Syntax tab:
DelimitIdentifier Supported
IdentifierQuoteChar Not supported
DateFormat Supported
TimeFormat Supported
DecimalSeparator Supported
OJSyntax Supported
Security tab:
EncryptPassword Not supported
CacheAuthentication Not supported
PersistSensitive Not supported
MaskPassword Not supported
PersistEncrypted Not supported
IntegratedSecurity Supported (TrustedConnection on Generaltab)
ImpersonationLevel Not supported
ProtectionLevel Not supported
Additional database parameters

Using Native Database Interfaces Appeon InfoMaker® 2017 R3
Connecting to Your Database Page 65
The SNC interface also supports the Encrypt, TrustServerCertificate, and SPCacheparameters (on the System tab page) and the Identity parameter (on the Syntax tab page).
SPCache database parameter
You can control how many stored procedures are cached with parameter information bymodifying the setting of the SPCache database parameter. The default is 100 procedures. Toturn off caching of stored procedures, set SPCache to 0.
For more information about database parameters supported by the SNC interface, seeConnection Reference.
6.3.7 SQL Server 2008 features
InfoMaker support for connections to SQL Server 2008 databases includes new databaseparameters as well as support for new SQL Server datatypes. To connect to SQL Server 2008from InfoMaker, you must install the SNC 10.0 driver.
6.3.7.1 New database parameters
Provider parameter
The Provider DBParm parameter for the SQL Native Client (SNC) interface allows youto select the SQL Server version that you want to connect to. You can set this parameterin script to SQLNCLI (for the SNC 9.0 driver that connect to SQL Server 2005), toSQLNCLI10 (for the SNC 10.0 driver that connects to SQL Server 2008), or SQLNCLI11(for the SNC 11.0 that connectc to SQL Server 2012 or later). Otherwise, you can select oneof these providers on the Connection tab of the Database Profile Setup dialog box for theSNC interface.
If you do not set or select a provider, the default selection is SQLNCLI (SNC 9.0 forSQL Server 2005). This allows existing SNC interface users to be able to migrate toInfoMaker 2017 and later without any modifications. If InfoMaker fails to connect with theSQLNCLI provider, it will attempt to connect to SQLNCLI10 provider. However, if youexplicitly set the provider and the connection fails, InfoMaker displays an error message.
Failover parameter
The FailoverPartner DBParm parameter allows you to set the name of a mirror server,thereby maintaining database availability if a failover event occurs. You can also set thename of the mirror server on the System tab of the Database Profile Setup dialog box for theSNC interface.
When failover occurs, the existing InfoMaker connection to SQL Server is lost. The SNCdriver releases the existing connection and tries to reopen it. If reconnection succeeds,InfoMaker triggers the failover event.
The following conditions must be satisfied for InfoMaker to trigger the failover event:
• The FailoverPartner DBParm is supplied at connect time
• The SQL Server database is configured for mirroring
• InfoMaker is able to reconnect successfully when the existing connection is lost

Using Native Database Interfaces Appeon InfoMaker® 2017 R3
Connecting to Your Database Page 66
When failover occurs:
• InfoMaker returns an error code (998) and triggers the failover event
• Existing cursors cannot be used and should be closed
• Any failed database operation can be tried again
• Any uncommitted transaction is lost. New transactions must be started
6.3.7.2 Support for new datatypes in SQL Server 2008
Date and time datatypes
The following table lists new SQL Server 2008 date and time datatypes and the PowerScriptdatatypes that they map to:
Table 6.6:
SQL Serverdatatype
PowerScript datatype
DATE Date
TIME Time (Supports only up to 6 fractional seconds precision although SQLServer datatype supports up to 7 fractional seconds precision.)
DATETIME2 DateTime (Supports only up to 6 fractional seconds precision although SQLServer datatype supports up to 7 fractional seconds precision.)
The SQL Server 2008 DATETIMEOFFSET datatype is not supported in InfoMaker 2017 andlater.
Precision settings
When you map to a table column in a SQL Server 2008 database, InfoMaker includes acolumn labeled "Dec" in the Column Specifications view of the Report painter, and a textbox labeled "Fractional Seconds Precision" in the Column (Object Details) view of theDatabase painter. These fields allow you to list the precision that you want for the TIME andDATETIME2 columns.
The precision setting is for table creation only. When retrieving or updating the data in acolumn, InfoMaker uses only up to six decimal places precision for fractional seconds, evenif you enter a higher precision value for the column.
Filestream datatype
The FILESTREAM datatype allows large binary data to be stored directly in an NTFSfile system. Transact-SQL statements can insert, update, query, search, and back upFILESTREAM data.
The SQL Server Database Engine implements FILESTREAM as a Varbinary(max) datatype.The InfoMaker SNC interface maps the Varbinary(max) datatype to a BLOB datatype, soto retrieve or update filestream data, use the SelectBlob or UpdateBlob SQL statements,
Using Native Database Interfaces Appeon InfoMaker® 2017 R3
Connecting to Your Database Page 67
respectively. To specify that a column should store data on the file system, you must includethe FILESTREAM attribute in the Varbinary(max) column definition. For example:
CREATE TABLE FSTest ( GuidCol1 uniqueidentifier ROWGUIDCOL NOT NULL UNIQUE DEFAULT NEWID(), IntCol2 int, varbinaryCol3 varbinary(max) FILESTREAM);
Do not use PowerScript file access functions with FILESTREAM data
You can access FILESTREAM data by declaring and using the Win32 API functionsdirectly in InfoMaker applications. However, existing InfoMaker file access functionscannot be used to access FILESTREAM files. For more information about accessingFILESTREAM data using Win32 APIs, see the MSDN SQL Server Developer CenterWeb site at http://msdn.microsoft.com/en-us/library/bb933877(SQL.100).aspx.
Using CLR datatypes in InfoMaker
The binary values of the .NET Common Language Runtime (CLR) datatypes can be retrievedfrom a SQL Server database as blobs that you could use in InfoMaker applications to updateother columns in the database. If their return values are compatible with InfoMaker datatypes,you can use CLR datatype methods in PowerScript, dynamic SQL, embedded SQL or inreport objects, because the SQL script is executed on the SQL Server side.
The CLR datatypes can also be mapped to Strings in PowerScript, but the retrieved data is ahexadecimal string representation of binary data.
You can use the ToString method to work with all datatypes that are implemented as CLRdatatypes, such as the HierarchyID datatype, Spatial datatypes, and User-defined types.
HierarchyID datatype
HierarchyID is a variable length, system datatype that can store values representing nodes ina hierarchical tree, such as an organizational structure. A value of this datatype represents aposition in the tree hierarchy.
ISQL Usage
You can use HierarchyID columns with CREATE TABLE, SELECT, UPDATE, INSERT,and DELETE statements in the ISQL painter. For example:
CREATE TABLE Emp ( EmpId int NOT NULL, EmpName varchar(20) NOT NULL, EmpNode hierarchyid NULL);
To insert HierarchyID data, you can use the canonical string representation of HierarchyID orany of the methods associated with the HierarchyID datatype as shown below.
INSERT into Emp VALUES (1, 'Scott', hierarchyid::GetRoot());INSERT into Emp VALUES (2, 'Tom' , '/1/'); DECLARE @Manager hierarchyid SELECT @Manager = hierarchyid::GetRoot() FROM Emp INSERT into Emp VALUES (2, 'Tom', @Manager.GetDescendant(NULL,NULL));

Using Native Database Interfaces Appeon InfoMaker® 2017 R3
Connecting to Your Database Page 68
DECLARE @Employee hierarchyid SELECT @Employee = CAST('/1/2/3/4/' AS hierarchyid) INSERT into Emp VALUES (2, 'Jim' , @Employee);
You cannot select the HierarchyID column directly since it has binary data, and the ISQLpainter Results view does not display binary columns. However, you can retrieve theHierarchyID data as a string value using the ToString method of HierarchyID. For example:
Select EmpId, EmpName, EmpNode.ToString() from Emp;
You can also use the following methods on HierarchyID columns to retrieve its data:GetAncestor, GetDescendant, GetLevel, GetRoot, IsDescendant, Parse, and Reparent. Ifone of these methods returns a HierarchyID node, then use ToString to convert the data to astring. For example:
Select EmpId, EmpName, EmpNode.GetLevel() from Emp;Select EmpId, EmpName, EmpNode.GetAncestor(1).ToString() from Emp;
HierarchyID columns can be updated using a String value or a HierarchyID variable:
Update Emp Set EmpNode = '/1/2/' where EmpId=4;Delete from Emp where EmpNode = '/1/2/';
PowerScript Usage
You can use HierarchyID columns in embedded SQL statements for SELECT, INSERT,UPDATE, and DELETE operations. HierarchyID data can be retrieved either as a String or asa Binary(Blob) datatype using the SelectBlob statement.
When using a String datatype to retrieve HierarchyID data, use the ToString method.Otherwise the data will be a hexadecimal representation of the binary HierarchyID value.
The following example shows how you can use HierarchyID methods in embedded SQL:
long idString hid,nameSelect EmpId, EmpName, EmpNode.ToString() into :id, :name, :hid from Emp where EmpId=3;Select EmpId, EmpName, EmpNode.GetLevel() into :id, :name, :hid from Emp where EmpId=3;Blob bSelectblob EmpNode into :b from Emp where EmpId =2;
DataWindow Usage
Reports do not directly support the HierarchyID datatype. But you can convert theHierarchyID to a string using the ToString method or an associated HierarchyID method inthe data source SQL. For example:
SELECT EmpId, EmpName, EmpNode.ToString() FROM Emp; SELECT EmpId, EmpName, EmpNode.GetLevel() FROM Emp;
Spatial datatypes
Microsoft SQL Server 2008 supports two spatial datatypes: the geometry datatype and thegeography datatype. In SQL Server, these datatypes are implemented as .NET CommonLanguage Runtime (CLR) datatypes.

Using Native Database Interfaces Appeon InfoMaker® 2017 R3
Connecting to Your Database Page 69
Although the InfoMaker SNC interface does not work with CLR datatypes, you can convertthe spatial datatypes into strings (with the ToString function) and use them in PowerScript,in the ISQL painter, in embedded SQL, and in reports. This is similar to the way you use theHierarchyID datatype. The SelectBlob SQL statement also lets you retrieve binary values forthese datatypes.
The geography and geometry datatypes support eleven different data objects, or instancetypes, but only seven of these types are instantiable: Points, LineStrings, Polygons, andthe objects in an instantiable GeometryCollection (MultiPoints, MultiLineStrings, andMultiPolygons). You can create and work with these objects in a database, calling methodsassociated with them, such as STAsText, STArea, STGeometryType, and so on.
For example:
CREATE TABLE SpatialTable (id int IDENTITY (1,1), GeomCol geometry);INSERT INTO SpatialTable (GeomCol) VALUES ( geometry::STGeomFromText( 'LINESTRING (100 100,20 180,180 180)',0));select id, GeomCol.ToString() from SpatialTable;select id, GeomCol.STAsText(), GeomCol.STGeometryType(), GeomCol.STArea() from SpatialTable;
User-defined types
User-defined types (UDTs) are implemented in SQL Server as CLR types and integratedwith .NET. Microsoft SQL Server 2008 eliminates the 8 KB limit for UDTs, enabling thesize of UDT data to expand dramatically.
Although the InfoMaker SNC interface does not directly support UDT datatypes, you can usethe ToString method to retrieve data for UDTs in the same way as for other CLR datatypessuch as HierarchyId or the spatial datatypes. However, if a UDT datatype is mapped to aString datatype in PowerScript, UDT binary values will be retrieved as hexadecimal strings.To retrieve or update data in binary form (blob) from a UDT, you can use the SelectBlob orUpdateBlob SQL statements, respectively.
You can use any of the associated methods of UDT or CLR datatypes that return compatibledata (such as String, Long, Decimal, and so on) for InfoMaker applications.
6.3.7.3 T-SQL enhancements
MERGE statement
The MERGE Transact-SQL statement performs INSERT, UPDATE, or DELETE operationson a target table or view based on the results of a join with a source table. You can useMERGE statement in the ISQL painter and in PowerScript using dynamic SQL. For example
String mySQLmySQL = "MERGE INTO a USING b ON a.keycol = b.keycol " & + "WHEN MATCHED THEN "& + "UPDATE SET col1 = b.col1,col2 = b.col2 " & + "WHEN NOT MATCHED THEN " & + "INSERT (keycol, col1, col2, col3)" & + "VALUES (b.keycol, b.col1, b.col2, b.col3) " & + "WHEN SOURCE NOT MATCHED THEN " & + "DELETE;"EXECUTE IMMEDIATE :Mysql;

Using Native Database Interfaces Appeon InfoMaker® 2017 R3
Connecting to Your Database Page 70
Using the MERGE statement in ISQL
A MERGE statement must be terminated by a semicolon. By default the ISQL painteruses a semicolon as a SQL terminating character, so to use a MERGE statement inISQL, the terminating character must be changed to a colon (:), a forward slash (/), orsome other special character.
Grouping sets
GROUPING SETS is an extension of the GROUP BY clause that lets you define multiplegroupings in the same query. GROUPING SETS produce a single result set, makingaggregate querying and reporting easier and faster. It is equivalent to a UNION ALLoperation for differently grouped rows.
The GROUPING SETS, ROLLUP, and CUBE operators are added to the GROUP BYclause. A new function, GROUPING_ID, returns more grouping-level information than theexisting GROUPING function. (The WITH ROLLUP, WITH CUBE, and ALL syntax is notISO compliant and is therefore deprecated.)
The following example uses the GROUPING SETS operator and the GROUPING_IDfunction:
SELECT EmpId, Month, Yr, SUM(Sales) AS Sales FROM Sales GROUP BY GROUPING SETS((EmpId, ROLLUP(Yr, Month)));SELECT COL1, COL2, SUM(COL3) AS TOTAL_VAL, GROUPING(COL1) AS C1, GROUPING(COL2) AS C2, GROUPING_ID(COL1, COL2) AS GRP_ID_VALUE FROM TEST_TBL GROUP BY ROLLUP (COL1, COL2);
You can use the GROUPING SETS operator in the ISQL painter, in PowerScript (embeddedSQL and dynamic SQL) and in reports (syntax mode).
Row constructors
Transact-SQL now allows multiple value inserts within a single INSERT statement. You canuse the enhanced INSERT statement in the ISQL painter and in PowerScript (embedded SQLand dynamic SQL). For example:
INSERT INTO Employees VALUES ('tom', 25, 5), ('jerry', 30, 6), ('bok', 25, 3);
When including multiple values in a single INSERT statement with host variables, you mustset the DisableBind DBParm to 1. If you use literal values as in the above example, you caninsert multiple rows in a single INSERT statement regardless of the binding setting.
Compatibility level
In SQL Server 2008, the ALTER DATABASE statement allows you to set the databasecompatibility level (SQL Server version), replacing the sp_dbcmptlevel procedure. You canuse this syntax in the ISQL painter and in PowerScript (dynamic SQL). For example:
ALTER DATABASE <database_name> SET COMPATIBILITY_LEVEL = {80 | 90 | 100}80 = SQL Server 2000 90 = SQL Server 2005
Using Native Database Interfaces Appeon InfoMaker® 2017 R3
Connecting to Your Database Page 71
100 = SQL Server 2008
Compatibility level affects behaviors for the specified database only, not for the entiredatabase server. It provides only partial backward compatibility with earlier versions of SQLServer. You can use the database compatibility level as an interim migration aid to workaround differences in the behaviors of different versions of the database.
Table hints
The FORCESEEK table hint overrides the default behavior of the query optimizer. Itprovides advanced performance tuning options, instructing the query optimizer to use anindex seek operation as the only access path to the data in the table or view that is referencedby the query. You can use the FORCESEEK table hint in the ISQL painter, in PowerScript(embedded SQL and dynamic SQL), and in reports (syntax mode).
For example:
Select ProductID, OrderQty from SalesOrderDetail with (FORCESEEK);
6.3.7.4 Unsupported SQL Server 2008 features
The InfoMaker SNC interface does not support the User-Defined Table Type (a user-definedtype that represents the definition of a table structure) that was introduced in SQL Server2008.
6.3.8 Notes on using the SNC interface
SQL batch statements
The SNC interface supports SQL batch statements. However, they must be enclosed in aBEGIN...END block or start with the keyword DECLARE:
• Enclosed in a BEGIN...END block:
BEGININSERT INTO t_1 values(1, 'sfdfs')INSERT INTO t_2 values(1, 'sfdfs')SELECT * FROM t_1SELECT * FROM t_2END
• Starting with the keyword DECLARE:
DECLARE @p1 int, @p2 varchar(50)SELECT @p1 = 1EXECUTE sp_4 @p1, @p2 OUTPUTSELECT @p2 AS 'output'
You can run the batch of SQL statements in the Database painter. For example:
String batchSQL //contains a batch of SQL statementsDECLARE my_cursor DYNAMIC CURSOR FOR SQLSA ;PREPARE SQLSA FROM :batchSQL ;OPEN DYNAMIC my_cursor ;//first result setFETCH my_cursor INTO . . .//second result setFETCH my_cursor INTO . .

Using Native Database Interfaces Appeon InfoMaker® 2017 R3
Connecting to Your Database Page 72
. . .CLOSE my_cursor ;
Connection pooling
The SNC interface pools connections automatically using OLE DB pooling. To disable OLEDB pooling, type the following in the Extended Properties box on the Connection tab page inthe Database Profile Setup dialog box:
OLE DB Services=-4
Triggers and synonyms in the Database painter
In the Objects view for SNC profiles in the Database painter, triggers display for tables in theTables folder and Microsoft SQL Server 2005 synonyms display for tables and views.
6.4 Oracle
This section describes how to use the native Oracle database interfaces in InfoMaker.
6.4.1 Supported versions for Oracle
InfoMaker provides two Oracle database interfaces. These interfaces use different DLLs andaccess different versions of Oracle.
Table 6.7: Supported native database interfaces for Oracle
Oracle interface DLL
O10 Oracle 10g PBO10170.DLL
ORA Oracle 11g/12c PBORA170.DLL
The ORA database interface allows you to connect to Oracle 11g/12c servers using Oracle11g/12c Database Client or Oracle 11g/12c Instant Client. It includes partial support for theXMLType datatype that it maps to the PowerBuilder String datatype. It also supports sessionand connection pooling, load balancing, the Oracle Client Cache, setting of an applicationdriver name, and access through a proxy. Oracle 11g clients can also connect to Oracle 10gservers.
The O10 database interface allows you to connect to Oracle 10g servers using Oracle10g Database Client or Oracle 10g Instant Client. It supports BINARY_FLOAT andBINARY_DOUBLE datatypes and increased size limits for CLOB and NCLOB datatypes.Oracle 10g clients can connect to Oracle 10g servers.
For more information
Updated information about supported versions of databases might be availableelectronically on the the Appeon Support Web site at https://support.appeon.com/ orin the InfoMaker Release Bulletin.
6.4.2 Supported Oracle datatypes
The Oracle database interfaces support the Oracle datatypes listed in the following table inreports:

Using Native Database Interfaces Appeon InfoMaker® 2017 R3
Connecting to Your Database Page 73
Table 6.8: Supported datatypes for Oracle
Bfile NChar (Oracle9i and later only)
Blob Number
Char NVarChar2 (Oracle9i and later only)
Clob Raw
Date TimeStamp (Oracle9i and later only)
Float VarChar
Long VarChar2
LongRaw
Accessing Unicode data
Using the O90 database interface, InfoMaker can connect, save, and retrieve data in bothANSI/DBCS and Unicode databases but does not convert data between Unicode and ANSI/DBCS. When character data or command text is sent to the database, InfoMaker sends aUnicode string. The driver must guarantee that the data is saved as Unicode data correctly.When InfoMaker retrieves character data, it assumes the data is Unicode.
Using the O84 database interface, InfoMaker detects whether the Oracle client variableNS_LANG is set. If the variable is set to a value that requires UTF-8 or DBCS characters,InfoMaker converts command text (such as SELECT * FROM emp) to the appropriatecharacter set before sending the command to the database. However, if DisableBind is set to0 (the default), InfoMaker always binds string data as Unicode data.
A Unicode database is a database whose character set is set to a Unicode format, such asUTF-8, UTF-16, UCS-2, or UCS-4. All data must be in Unicode format, and any data savedto the database must be converted to Unicode data implicitly or explicitly.
A database that uses ANSI (or DBCS) as its character set might use special datatypes to storeUnicode data. These datatypes are NCHAR, NVARCHAR, and NVARCHAR2. Columnswith this datatype can store only Unicode data. Any data saved into such a column must beconverted to Unicode explicitly. This conversion must be handled by the database server orclient.
TimeStamp datatype
The Oracle9i TimeStamp datatype is an extension of the Date datatype. It stores the year,month, and day of the Date value plus hours, minutes, and seconds:
Timestamp[fractional_seconds_precision]
The fractional_seconds_precision value is optional and provides the number of digits forindicating seconds. The range of valid values for use with InfoMaker is 0-6.
6.4.3 Basic software components for Oracle
You must install the software components in the following figure to access an Oracledatabase in InfoMaker.
Figure: Components of an Oracle connection

Using Native Database Interfaces Appeon InfoMaker® 2017 R3
Connecting to Your Database Page 74
6.4.4 Preparing to use the Oracle database
Before you define the database interface and connect to an Oracle database in InfoMaker,follow these steps to prepare the database for use:
1. Install and configure the required database server, network, and client software.
2. Install the native Oracle database interface for the version of Oracle you want to access.
3. Verify that you can connect to the Oracle server and database outside InfoMaker.
Preparing an Oracle database for use with InfoMaker involves these three basic tasks.
Step 1: Install and configure the database server
You must install and configure the database server, network, and client software for Oracle.

Using Native Database Interfaces Appeon InfoMaker® 2017 R3
Connecting to Your Database Page 75
To install and configure the database server, network, and client software:
1. Make sure the Oracle database software is installed on your computer or on the serverspecified in your database profile.
For example, with the Oracle O84 interface you can access an Oracle 8.0.x or Oracle8idatabase server.
You must obtain the database server software from Oracle Corporation.
For installation instructions, see your Oracle documentation.
2. Make sure the supported network software (such as TCP/IP) is installed and running onyour computer and is properly configured so that you can connect to the Oracle databaseserver at your site.
The Hosts and Services files must be present on your computer and properly configuredfor your environment.
You must obtain the network software from your network vendor or database vendor.
For installation and configuration instructions, see your network or databaseadministrator.
3. Install the required Oracle client software on each client computer on which InfoMakeris installed.
You must obtain the client software from Oracle Corporation. Make sure the clientsoftware version you install supports all of the following:
The operating system running on the client computer
The version of the database that you want to access
The version of InfoMaker that you are running
Required client software versions
To use the Oracle 8.0.x and Oracle8i (O84) interface or the Oracle9i (O90) interface,you must install Oracle Net client software version 8.0.4 or later.
4. Make sure the Oracle SQL*Net or Net client software is properly configured so that youcan connect to the Oracle database server at your site.
Installing SQL*Net software places the correct configuration file in the Oracle directoryon your computer. For example, if you are using SQL*Net version 2.x, the requiredconfiguration file is called TNSNAMES.ORA.
The configuration file provides information that Oracle needs to find and connect to thedatabase server at your site. To modify and view the information in TNSNAMES.ORA,use an Oracle tool designed to edit the configuration file (such as Oracle NetworkManager or the SQL*Net Easy Configuration utility).
For information about setting up Oracle configuration files, see your SQL*Net or Netdocumentation.

Using Native Database Interfaces Appeon InfoMaker® 2017 R3
Connecting to Your Database Page 76
5. If required by your operating system, make sure the directory containing the Oracleclient software is in your system path.
Step 2: Install the database interface
In the InfoMaker Setup program, select the Typical install or select the Custom install andselect the Oracle database interfaces you require.
For a list of the Oracle database interfaces available, see Supported versions for Oracle.
Step 3: Verify the connection
Make sure you can connect to the Oracle database server and log in to the database you wantto access from outside InfoMaker.
Some possible ways to verify the connection are by running the following Oracle tools:
• Accessing the database server
Tools such as Oracle TNSPING (or any other ping utility) check whether you can reach thedatabase server from your computer.
• Accessing the database
Tools such as Oracle SQL*Plus check whether you can log in to the Oracle database youwant to access and perform database operations. It is a good idea to specify the sameconnection parameters you plan to use in your InfoMaker database profile to access thedatabase.
6.4.4.1 What to do next
For instructions on defining the Oracle database interface in InfoMaker, see Defining theOracle database interface.
6.4.5 Defining the Oracle database interface
To define a connection through an Oracle database interface, you must create a databaseprofile by supplying values for at least the basic connection parameters in the DatabaseProfile Setup dialog box for your Oracle interface. You can then select this profile at any timeto connect to your database in the development environment.
For information on how to define a database profile, see Using database profiles.
6.4.5.1 Specifying the Oracle server connect descriptor
To connect to an Oracle database server that resides on a network, you must specify theproper connect descriptor in the Server box on the Connection tab of the Database ProfileSetup dialog box for your Oracle interface. The connect descriptor specifies the connectionparameters that Oracle uses to access the database.
For help determining the proper connect descriptor for your environment, see your Oracledocumentation or system administrator.
Specifying a connect descriptor
The syntax of the connect descriptor depends on the Oracle client software you are using.

Using Native Database Interfaces Appeon InfoMaker® 2017 R3
Connecting to Your Database Page 77
If you are using Net version 8.x or later, the syntax is:
OracleServiceName
If you are using SQL*Net version 2.x, the syntax is:
@ TNS: OracleServiceName
Table 6.9:
Parameter Description
@ The at ( @ ) sign is required
TNS The identifier for the Oracle TransparentNetwork Substrate (TNS) technology
: The colon ( : ) is required
OracleServiceName The service name assigned to your serverin the Oracle configuration file for yourplatform
Net version 8.x example
To use Net version 8.x or later client software to connect to the service named ORA8, typethe following connect descriptor in the Server box on the Connection tab of the DatabaseProfile Setup dialog box for Oracle 8.x and later:ORA8.
6.4.6 Using Oracle stored procedures as a data source
This section describes how you can use Oracle stored procedures.
6.4.6.1 What is an Oracle stored procedure?
Oracle defines a stored procedure (or function) as a named PL/SQL program unit thatlogically groups a set of SQL and other PL/SQL programming language statements togetherto perform a specific task.
Stored procedures can take parameters and return one or more result sets (also called cursorvariables). You create stored procedures in your schema and store them in the data dictionaryfor use by multiple users.
6.4.6.2 What you can do with Oracle stored procedures
Ways to use Oracle stored procedures
In your InfoMaker application, you can use an Oracle stored procedure as a data source forreports.
Procedures with a single result set
You can use stored procedures that return a single result set in reports, but not when using theRPCFUNC keyword to declare the stored procedure as an external function or subroutine.
6.4.6.3 Using Oracle stored procedures with result sets
Overview of basic steps

Using Native Database Interfaces Appeon InfoMaker® 2017 R3
Connecting to Your Database Page 78
The following procedure assumes you are creating the stored procedure in the ISQL view ofthe Database painter in InfoMaker.
To use an Oracle stored procedure with a result set:
1. Set up the ISQL view of the Database painter to create the stored procedure.
2. Create the stored procedure with a result set as an IN OUT (reference) parameter.
3. Create reports that use the stored procedure as a data source.
Setting up the Database painter
When you create a stored procedure in the ISQL view of the Database painter, you mustchange the default SQL statement terminator character to one that you do not plan to use inyour stored procedure syntax.
The default SQL terminator character for the Database painter is a semicolon (;). If you planto use a semicolon in your Oracle stored procedure syntax, you must change the painter'sterminator character to something other than a semicolon to avoid conflicts. A good choice isthe backquote ( ` ) character.
To change the default SQL terminator character in the Database painter:
1. Connect to your Oracle database in InfoMaker as the System user.
For instructions, see Defining the Oracle database interface.
2. Open the Database painter.
3. Select Design>Options from the menu bar.
The Database Preferences property sheet displays. If necessary, click the General tab todisplay the General property page.
4. Type the character you want (for example, a backquote) in the SQL TerminatorCharacter box.
5. Click Apply or OK.
The SQL Terminator Character setting is applied to the current connection and all futureconnections (until you change it).
Creating the stored procedure
After setting up the Database painter, you can create an Oracle stored procedure that has aresult set as an IN OUT (reference) parameter. InfoMaker retrieves the result set to populate areport.
There are many ways to create stored procedures with result sets. The following proceduredescribes one possible method that you can use.
For information about when you can use stored procedures with single and multiple resultsets, see What you can do with Oracle stored procedures.

Using Native Database Interfaces Appeon InfoMaker® 2017 R3
Connecting to Your Database Page 79
To create Oracle stored procedures with result sets:
1. Make sure your Oracle user account has the necessary database access and privileges toaccess Oracle objects (such as tables and procedures).
Without the appropriate access and privileges, you will be unable to create Oracle storedprocedures.
2. Assume the following table amed tt exists in your Oracle database:
Table 6.10:
a b c
1 Newman sysdate
2 Everett sysdate
3. Create an Oracle package that holds the result set type and stored procedure. The resulttype must match your table definition.
For example, the following statement creates an Oracle package named spm that holdsa result set type named rctl and a stored procedure named proc1. The tt%ROWTYPEattribute defines rctl to contain all of the columns in table tt. The procedure proc1 takesone parameter, a cursor variable named rc1 that is an IN OUT parameter of type rctl.
CREATE OR REPLACE PACKAGE spm IS TYPE rctl IS REF CURSOR RETURN tt%ROWTYPE; PROCEDURE proc1(rc1 IN OUT rctl);END;`
4. Create the Oracle stored procedure separately from the package you defined.
The following example shows how to create a stored procedure named spm_proc 1 thatreturns a single result set.
The IN OUT specification means that InfoMaker passes the cursor variable (rc1 or rc2) byreference to the Oracle procedure and expects the procedure to open the cursor. After theprocedure call, InfoMaker fetches the result set from the cursor and then closes the cursor.
spm_proc1 example for reports
The following statements create spm_proc1 that returns one result set. You can use thisprocedure as the data source for a report in InfoMaker.
CREATE OR REPLACE PROCEDURE spm_proc1(rc1 IN OUT spm.rctl)ASBEGIN OPEN rc1 FOR SELECT * FROM tt;END;
Error checking
If necessary, check the Oracle system table public.user_errors for a list of errors.
Creating the report
After you create the stored procedure, you can define the report that uses the stored procedureas a data source.

Using Native Database Interfaces Appeon InfoMaker® 2017 R3
Connecting to Your Database Page 80
You can use Oracle stored procedures that return a single result set in a report.
The following procedure assumes that your Oracle stored procedure returns only a singleresult set.
To create a report using an Oracle stored procedure with a result set:
1. Select a presentation style on the DataWindow page of the New dialog box and clickOK.
2. Select the Stored Procedure icon and click OK.
The Select Stored Procedure wizard page displays, listing the stored proceduresavailable in your database.
3. Select the stored procedure you want to use as a data source, and click Next.
4. Complete the wizard to define the report.
When you preview the report, InfoMaker fetches the result set from the cursor in orderto populate the report. If you selected Retrieve on Preview on the Choose Data Sourcepage in the wizard, the result set displays in the Preview view when the DataWindowopens.
For more instructions on defining reports, see the User's Guide.
6.4.6.4 Using a large-object output parameter
You can define a large object (LOB) as an output parameter for an Oracle stored procedureor function to retrieve large-object data. There is no limit on the number of LOB outputarguments that might be defined for each stored procedure or function.
6.4.7 Using Oracle user-defined types
What InfoMaker supports
When you use the O84 and O90 database interfaces, InfoMaker supports SQL CREATETYPE and CREATE TABLE statements for Oracle user-defined types (objects) in theISQL view of the Database painter. It correctly handles SQL SELECT, INSERT, UPDATE,and DELETE statements for user-defined types in the Database and Report painters.
What you can do
This means that using these database interfaces in InfoMaker, you can:
Table 6.11:
Do this In
Use Oracle syntax to create user-definedtypes
Database painter
Use Oracle syntax to create tables withcolumns that reference user-defined types
Database painter
View columns in Oracle tables that referenceuser-defined types
Database painter

Using Native Database Interfaces Appeon InfoMaker® 2017 R3
Connecting to Your Database Page 81
Do this In
Manipulate data in Oracle tables that haveuser-defined types
Database painter
Report painter
Reports
Export Oracle table syntax containing use-defined types to a log file
Database painter
Invoke methods of objects columns Report painter (Compute tab in SQLToolbox)
Example
Here is a simple example that shows how you might create and use Oracle 8 user-definedtypes in InfoMaker.
For more information about Oracle user-defined types, see your Oracle 8 documentation.
To create and use Oracle 8 and later user-defined types:
1. In the ISQL view of the Database painter, create two Oracle user-defined types:ball_stats_type and player_type.
Here is the Oracle syntax to create ball_stats_type. Notice that the ball_stats object oftype ball_stats_type has a method associated with it called get_avg.
CREATE OR REPLACE TYPE ball_stats_type AS OBJECT (bat_avg NUMBER(4,3),rbi NUMBER(3),MEMBER FUNCTION get_avg RETURN NUMBER,PRAGMA RESTRICT_REFERENCES (get_avg,WNDS,RNPS,WNPS));CREATE OR REPLACE TYPE BODY ball_stats_type ASMEMBER FUNCTION get_avg RETURN NUMBER ISBEGINRETURN SELF.bat_avg;END;END;
Here is the Oracle SQL syntax to create player_type. Player_type references the user-defined type ball_stats_type. InfoMaker supports such nesting graphically in theDatabase, Report, and Table painters (see step 3).
CREATE TYPE player_type AS OBJECT (player_no NUMBER(2),player_name VARCHAR2(30),ball_stats ball_stats_type);
2. In the Database painter, create an Oracle 8 table named lineup that references these user-defined types.
Here is the Oracle SQL syntax to create the lineup table and insert a row. Lineupreferences the player_type user-defined type.
CREATE TABLE lineup (position NUMBER(2) NOT NULL, player player_type);INSERT INTO lineup VALUES (1,player_type (5, 'Manny Ramirez', ball_stats_type (0.342, 46)));
3. Display the lineup table in the Database or Report painter.
InfoMaker uses the following structure->member notation to display the table:
lineup======

Using Native Database Interfaces Appeon InfoMaker® 2017 R3
Connecting to Your Database Page 82
positionplayer->player_noplayer->player_nameplayer->ball_stats->bat_avgplayer->ball_stats->rbi
4. To access the get_avg method of the object ball_stats contained in the object columnplayer, use the following structure->member notation when defining a computed columnfor the report. For example, when working in the Report painter, you could use thisnotation on the Compute tab in the SQL Toolbox:
player->ball_stats->get_avg()
6.4.8 What to do next
For instructions on connecting to the database, see Connecting to a database.
6.5 Adaptive Server Enterprise
This section describes how to use the Adaptive Server Enterprise database interface inInfoMaker.
Client Library API
The Adaptive Server database interface uses the Open Client CT-Library (CT-Lib)application programming interface (API) to access the database.
When you connect to an Adaptive Server database, InfoMaker makes the requiredcalls to the API. Therefore, you do not need to know anything about CT-Lib to usethe database interface.
6.5.1 Supported versions for Adaptive Server
You can access Adaptive Server versions 15.x and 16.x using the Adaptive Server databaseinterface. Use of this interface to access other Open Server programs is not supported.
The Adaptive Server database interface uses a DLL named PBSYC170.DLL to access thedatabase through the Open Client CT-Lib API.
6.5.2 Supported Adaptive Server datatypes
The Adaptive Server interface supports the SAP datatypes listed in the following table inreports.
Table 6.12: Supported datatypes for Adaptive Server Enterprise
Binary Numeric
Bit NVarChar (ASE 12.5 only)
Char (see Column-length limits) Real
DateTime SmallDateTime
Decimal SmallInt
Double precision SmallMoney

Using Native Database Interfaces Appeon InfoMaker® 2017 R3
Connecting to Your Database Page 83
Float Text
Identity Timestamp
Image TinyInt
Int VarBinary
Money VarChar
NChar (ASE 12.5 only) BigTime (ASE 15.5 or later)
BigDateTime (ASE 15.5 or later)
Accessing Unicode data
InfoMaker can connect, save, and retrieve data in both ANSI/DBCS and Unicode databases.When character data or command text is sent to the database, InfoMaker sends a DBCS stringif the UTF8 database parameter is set to 0 (the default). If UTF8 is set to 1, InfoMaker sendsa UTF-8 string.
The database server must be configured correctly to accept UTF-8 strings. See the descriptionof the UTF-8 database parameter in the online Help for more information.
A Unicode database is a database whose character set is set to a Unicode format, such asUTF-8, UTF-16, UCS-2, or UCS-4. All data must be in Unicode format, and any data savedto the database must be converted to Unicode data implicitly or explicitly.
A database that uses ANSI (or DBCS) as its character set might use special datatypes to storeUnicode data. These datatypes are NCHAR, NVARCHAR, and NVARCHAR2. Columnswith this datatype can store only Unicode data. Any data saved into such a column must beconverted to Unicode explicitly. This conversion must be handled by the database server orclient.
Column-length limits
Adaptive Server 12.0 and earlier have a column-length limit of 255 bytes. Adaptive Server12.5.x supports wider columns for Char, VarChar, Binary, and VarBinary datatypes,depending on the logical page size and the locking scheme used by the server.
In InfoMaker, you can use these wider columns for Char and VarChar datatypes withAdaptive Server 12.5.x when the following conditions apply:
• The Release database parameter is set to 12.5 or 12.5.1.
• You are accessing the database using Open Client 12.5.x.
The database must be configured to use a larger page size to take full advantage of the widestlimits.
For detailed information about wide columns and configuration issues, see the AdaptiveServer 12.5.x documentation on the SAP web site. For more information about the Releasedatabase parameter, see the online Help.
6.5.3 Basic software components for Adaptive Server
You must install the software components in the following figure to access an AdaptiveServer database in InfoMaker.

Using Native Database Interfaces Appeon InfoMaker® 2017 R3
Connecting to Your Database Page 84
Figure: Components of an Adaptive Server Enterprise connection
6.5.4 Preparing to use the Adaptive Server database
Before you define the interface and connect to an Adaptive Server database in InfoMaker,follow these steps to prepare the database for use:
1. Install and configure the required database server, network, and client software.
2. Install the Adaptive Server database interface.
3. Verify that you can connect to Adaptive Server outside InfoMaker.
4. Install the required InfoMaker stored procedures in the sybsystemprocs database.

Using Native Database Interfaces Appeon InfoMaker® 2017 R3
Connecting to Your Database Page 85
Preparing an Adaptive Server database for use with InfoMaker involves these four basictasks.
Step 1: Install and configure the database server
You must install and configure the database server, network, and client software for AdaptiveServer.
To install and configure the database server, network, and client software:
1. Make sure the Adaptive Server database software is installed on the server specified inyour database profile.
You must obtain the database server software from SAP.
For installation instructions, see your Adaptive Server documentation.
2. Make sure the supported network software (for example, TCP/IP) is installed andrunning on your computer and is properly configured so that you can connect to thedatabase server at your site.
You must install the network communication driver that supports the network protocoland operating system platform you are using. The driver is installed as part of the Net-Library client software.
For installation and configuration instructions, see your network or databaseadministrator.
3. Install the required Open Client CT-Library (CT-Lib) software on each client computeron which InfoMaker is installed.
You must obtain the Open Client software from SAP. Make sure the version of OpenClient you install supports all of the following:
The operating system running on the client computer
The version of Adaptive Server that you want to access
The version of InfoMaker that you are running
Required client software versions
To use the SYC Adaptive Server interface, you must install Open Client version10.0.4 or later.
4. Make sure the Open Client software is properly configured so that you can connect tothe database at your site.
Installing the Open Client software places the SQL.INI configuration file in theAdaptive Server directory on your computer.
SQL.INI provides information that Adaptive Server needs to find and connect to thedatabase server at your site. You can enter and modify information in SQL.INI by usingthe configuration utility that comes with the Open Client software.
For information about setting up the SQL.INI or other required configuration file, seeyour Adaptive Server documentation.

Using Native Database Interfaces Appeon InfoMaker® 2017 R3
Connecting to Your Database Page 86
5. If required by your operating system, make sure the directory containing the Open Clientsoftware is in your system path.
6. Make sure only one copy of each of the following files is installed on your clientcomputer:
• Adaptive Server interface DLL
• Network communication DLL (for example, NLWNSCK.DLL for Windows Sockets-compliant TCP/IP)
• Database vendor DLL (for example, LIBCT.DLL)
Step 2: Install the database interface
In the InfoMaker Setup program, select the Typical install, or select the Custom install andselect the Adaptive Server Enterprise (SYC) database interface.
Step 3: Verify the connection
Make sure you can connect to the Adaptive Server database server and log in to the databaseyou want to access from outside InfoMaker.
Some possible ways to verify the connection are by running the following tools:
• Accessing the database server
Tools such as the Open Client/Open Server Configuration utility (or any Ping utility) checkwhether you can reach the database server from your computer.
• Accessing the database
Tools such as ISQL (interactive SQL utility) check whether you can log in to the databaseand perform database operations. It is a good idea to specify the same connectionparameters you plan to use in your InfoMaker database profile to access the database.
Step 4: Install the InfoMaker stored procedures
InfoMaker requires you to install certain stored procedures in the sybsystemprocs databasebefore you connect to an Adaptive Server database for the first time. InfoMaker uses thesestored procedures to get information about tables and columns from the DBMS systemcatalog.
Run the SQL script or scripts required to install the InfoMaker stored procedures in thesybsystemprocs database.
For instructions, see Installing InfoMaker stored procedures in Adaptive Server databases.
6.5.4.1 What to do next
For instructions on defining the Adaptive Server database interface in InfoMaker, seeDefining the Adaptive Server database interface.
6.5.5 Defining the Adaptive Server database interface
To define a connection through the Adaptive Server interface, you must create a databaseprofile by supplying values for at least the basic connection parameters in the Database

Using Native Database Interfaces Appeon InfoMaker® 2017 R3
Connecting to Your Database Page 87
Profile Setup - Adaptive Server Enterprise dialog box. You can then select this profileanytime to connect to your database in the development environment.
For information on how to define a database profile, see Using database profiles.
6.5.6 Using Open Client security services
The Adaptive Server interface provides several DBParm parameters that support Open Client11.1.x or later network-based security services in your application. If you are using therequired database, security, and InfoMaker software, you can build applications that takeadvantage of Open Client security services.
6.5.6.1 What are Open Client security services?
Open Client 11.1.x or later security services allow you to use a supported third-party securitymechanism (such as CyberSafe Kerberos) to provide login authentication and per-packetsecurity for your application. Login authentication establishes a secure connection, and per-packet security protects the data you transmit across the network.
6.5.6.2 Requirements for using Open Client security services
To use Open Client security services in your application, all of the following must be true:
• Accessing Adaptive Server through Open Client 11.1.1x or later
You are accessing an Adaptive Server database server using Open Client Client-Library(CT-Lib) 11.x or later software
• Have network security mechanism and driver
You have the required SAP-supported network security mechanism and SAP-suppliedsecurity driver properly installed and configured for your environment. Depending onyour operating system platform, examples of supported security mechanisms include:Distributed Computing Environment (DCE) security servers and clients, CyberSafeKerberos, and Windows NT LAN Manager Security Services Provider Interface (SSPI).
For information about the third-party security mechanisms and operating systemplatforms that Appeon has tested with Open Client security services, see the Open Clientdocumentation.
• Can access the secure server outside InfoMaker
You must be able to access a secure Adaptive Server server using Open Client 11.1.x orlater software from outside InfoMaker.
To verify the connection, use a tool such as ISQL or SQL Advantage to make sure you canconnect to the server and log in to the database with the same connection parameters andsecurity options you plan to use in your InfoMaker application.
• Using database interface
You are using the SYC Adaptive Server interface to access the database.
• Release DBParm parameter set to the appropriate value for your database

Using Native Database Interfaces Appeon InfoMaker® 2017 R3
Connecting to Your Database Page 88
You have set the Release DBParm parameter to 11, 11.5, 12, 12.5, or 12.5.1 to specify thatyour application should use the appropriate version of the Open Client CT-Lib software.
For instructions, see Release in the online Help.
• Security mechanism and driver support requested service
The security mechanism and driver you are using must support the service requested by theDBParm parameter.
6.5.6.3 Security services DBParm parameters
If you have met the requirements described in Requirements for using Open Client securityservices, you can set the security services DBParm parameters in the Database Profile Setupdialog box for your connection.
There are two types of DBParm parameters that you can set to support Open Client securityservices: login authentication and per-packet security.
Login authentication DBParms
The following login authentication DBParm parameters correspond to Open Client 11.1.x orlater connection properties that allow an application to establish a secure connection.
Sec_Channel_Bind
Sec_Cred_Timeout
Sec_Delegation
Sec_Keytab_File
Sec_Mechanism
Sec_Mutual_Auth
Sec_Network_Auth
Sec_Server_Principal
Sec_Sess_Timeout
For instructions on setting these DBParm parameters, see their descriptions in online Help.
Per-packet security DBParms
The following per-packet security DBParm parameters correspond to Open Client 11.1.xor later connection properties that protect each packet of data transmitted across a network.Using per-packet security services might create extra overhead for communications betweenthe client and server.
Sec_Confidential
Sec_Data_Integrity
Sec_Data_Origin
Sec_Replay_Detection
Sec_Seq_Detection
For instructions on setting these DBParm parameters, see their descriptions in online Help.

Using Native Database Interfaces Appeon InfoMaker® 2017 R3
Connecting to Your Database Page 89
6.5.7 Using Open Client directory services
The Adaptive Server interface provides several DBParm parameters that support Open Client11.1.x or later network-based directory services in your application. If you are using therequired database, directory services, and InfoMaker software, you can build applications thattake advantage of Open Client directory services.
6.5.7.1 What are Open Client directory services?
Open Client 11.1.x or later directory services allow you to use a supported third-partydirectory services product (such as the Windows NT Registry) as your directory serviceprovider. Directory services provide centralized control and administration of the networkentities (such as users, servers, and printers) in your environment.
6.5.7.2 Requirements for using Open Client directory services
To use Open Client directory services in your application, all of the following must be true:
• You are accessing an Adaptive Server database server using Open Client Client-Library(CT-Lib) 11.x or later software
• You have the required SAP-supported directory service provider software and SAP-supplied directory driver properly installed and configured for your environment.Depending on your operating system platform, examples of supported securitymechanisms include: the Windows NT Registry, Distributed Computing Environment CellDirectory Services (DCE/CDS), Banyan StreetTalk Directory Assistance (STDA), andNovell NetWare Directory Services (NDS).
For information about the directory service providers and operating system platforms thatAppeon has tested with Open Client directory services, see the Open Client documentation.
• You must be able to access a secure Adaptive Server server using Open Client 11.1.x orlater software from outside InfoMaker.
To verify the connection, use a tool such as ISQL or SQL Advantage to make sure you canconnect to the server and log in to the database with the same connection parameters anddirectory service options you plan to use in your InfoMaker application.
• You are using the SYC Adaptive Server interface to access the database.
• You must use the correct syntax as required by your directory service provider whenspecifying the server name in a database profile. Different providers require differentsyntax based on their format for specifying directory entry names.
For information and examples for different directory service providers, see Specifying theserver name with Open Client directory services.
• You have set the Release DBParm parameter to 11, 11.5, 12, 12.5, or 12.5.1 to specify thatyour application should use the behavior of the appropriate version of the Open Client CT-Lib software.
For instructions, see Release (Adaptive Server Enterprise) in the online Help.
• The directory service provider and driver you are using must support the service requestedby the DBParm parameter.

Using Native Database Interfaces Appeon InfoMaker® 2017 R3
Connecting to Your Database Page 90
6.5.7.3 Specifying the server name with Open Client directory services
When you are using Open Client directory services in a InfoMaker application, you must usethe syntax required by your directory service provider when specifying the server name in adatabase profile to access the database.
Different directory service providers require different syntax based on the format they use forspecifying directory entry names. Directory entry names can be fully qualified or relative tothe default (active) Directory Information Tree base (DIT base) specified in the Open Client/Server configuration utility.
The DIT base is the starting node for directory searches. Specifying a DIT base is analogousto setting a current working directory for UNIX or MS-DOS file systems. (You can specifya nondefault DIT base with the DS_DitBase DBParm parameter. For information, seeDS_DitBase in the online Help.)
Windows NT Registry server name example
This example shows typical server name syntax if your directory service provider is theWindows NT Registry.
Node name: SALES:software\sybase\server\SYS12NTDIT base: SALES:software\sybase\serverServer name: SYS12NT
To specify the server name in a database profile:
• Type the following in the Server box on the Connection tab in the Database ProfileSetup dialog box. Do not start the server name with a backslash (\).
SYS12NT
DCE/DCS server name example
This example shows typical server name syntax if your directory service provider isDistributed Computing Environment Cell Directory Services (DCE/CDS).
Node name: /.../boston.sales/dataservers/sybase/SYS12DIT base: /../boston.sales/dataserversServer name: sybase/SYS12
To specify the server name in a database profile:
• Type the following in the Server box on the Connection tab in the Database ProfileSetup dialog box. Do not start the server name with a slash (/).
sybase/SYS12
Banyan STDA server name example
This example shows typical server name syntax if your directory service provider is BanyanStreetTalk Directory Assistance (STDA).
Node name: SYS12@sales@chicagoDIT base: chicagoServer name: SYS12@sales
To specify the server name in a database profile:
• Type the following in the Server box on the Connection tab in the Database ProfileSetup dialog box. Do not end the server name with @.

Using Native Database Interfaces Appeon InfoMaker® 2017 R3
Connecting to Your Database Page 91
SYS12@sales
Novell NDS server name example
This example shows typical server name syntax if your directory service provider is NovellNetWare Directory Services (NDS).
Node name: CN=SYS12.OU=miami.OU=sales.O=sybaseDIT base: OU=miami.OU=sales.O=sybaseServer name: SYS12
To specify the server name in a database profile:
• Type the following in the Server box on the Connection tab in the Database ProfileSetup dialog box. Do not start the server name with CN=.
SYS12
6.5.7.4 Directory services DBParm parameters
If you have met the requirements described in Requirements for using Open Client directoryservices, you can set the directory services DBParm parameters in a database profile for yourconnection.
The following DBParm parameters correspond to Open Client 11.1.x or later directoryservices connection parameters:
DS_Alias
DS_Copy
DS_DitBase
DS_Failover
DS_Password (Open Client 12.5 or later)
DS_Principal
DS_Provider
DS_TimeLimit
For instructions on setting these DBParm parameters, see their descriptions in the onlineHelp.
6.5.8 Using PRINT statements in Adaptive Server stored procedures
The SYC Adaptive Server database interface allows you to use PRINT statements in yourstored procedures for debugging purposes.
This means, for example, that if you turn on Database Trace when accessing the databasethrough the SYC interface, PRINT messages appear in the trace log but they do not returnerrors or cancel the rest of the stored procedure.
6.5.9 Creating a DataWindow based on a heterogeneous cross-database join
This functionality is available through the use of Adaptive Server's Component IntegrationServices. Component Integration Services allows you to connect to multiple remote

Using Native Database Interfaces Appeon InfoMaker® 2017 R3
Connecting to Your Database Page 92
heterogeneous database servers and define multiple proxy tables that reference the tablesresiding on those servers.
For information on how to create proxy tables, see the Adaptive Server documentation.
6.5.10 What to do next
For instructions on connecting to the database, see Connecting to a database.
6.6 Installing InfoMaker stored procedures in Adaptive Serverdatabases
This section describes how to install InfoMaker stored procedures in an Adaptive Serverdatabase by running SQL scripts provided for this purpose.
Appeon recommends that you run these scripts outside InfoMaker before connecting toan Adaptive Server database for the first time through the Adaptive Server (SYC DBMSidentifier) native database interface. Although the PBSYC development environment will runwithout the InfoMaker stored procedures created by these scripts, the stored procedures arerequired for full functionality.
6.6.1 What are the InfoMaker stored procedure scripts?
What you do
In order to work with an Adaptive Server database in InfoMaker, you or your systemadministrator should install certain stored procedures in the database before you connect toAdaptive Server from InfoMaker for the first time.
You must run the InfoMaker stored procedure scripts only once per database server, and notbefore each InfoMaker session. If you have already installed the InfoMaker stored proceduresin your Adaptive Server database before connecting in InfoMaker on any supported platform,you need not install the stored procedures again before connecting in InfoMaker on adifferent platform.
InfoMaker stored procedures
A stored procedure is a group of precompiled and preoptimized SQL statements thatperforms some database operation. Stored procedures reside on the database server wherethey can be accessed as needed.
InfoMaker uses these stored procedures to get information about tables and columns fromthe Adaptive Server system catalog. (The InfoMaker stored procedures are different from thestored procedures you might create in your database.)
SQL scripts
InfoMaker provides SQL script files for installing the required stored procedures insybsystemprocs database:
Table 6.13:
Script Use for
PBSYC.SQL Adaptive Server databases

Using Native Database Interfaces Appeon InfoMaker® 2017 R3
Connecting to Your Database Page 93
Script Use for
PBSYC2.SQL Adaptive Server databases to restrict theSelect Tables list
Where to find the scripts
The stored procedure scripts are located in the Server directory on the InfoMaker installationpackage. The Server directory contains server-side installation components that arenot installed with InfoMaker on your computer.
6.6.1.1 PBSYC.SQL script
What it does
The PBSYC.SQL script contains SQL code that overwrites stored procedures that correspondto the same version of InfoMaker in the Adaptive Server sybsystemprocs database and thenre-creates them.
The PBSYC.SQL script uses the sybsystemprocs database to hold the InfoMaker storedprocedures. This database is created when you install Adaptive Server.
When to run it
Before you connect to an Adaptive Server database in InfoMaker for the first time using theSYC DBMS identifier, you or your database administrator must run the PBSYC.SQL scriptonce per database server into the sybsystemprocs database.
Run PBSYC.SQL if the server at your site will be accessed by anyone using the InfoMakerdevelopment environment or by deployment machines.
If you or your database administrator have already run the current version of PBSYC.SQL toinstall InfoMaker stored procedures in the sybsystemprocs database on your server, you neednot rerun the script to install the stored procedures again.
For instructions on running PBSYC.SQL, see How to run the scripts.
Stored procedures it creates
The PBSYC.SQL script creates the following InfoMaker stored procedures in the AdaptiveServer sybsystemprocs database. The procedures are listed in the order in which the scriptcreates them.
Table 6.14:
PBSYC.SQL storedprocedure
What it does
sp_pb100columnLists the columns in a table.
sp_pb100pkcheckDetermines whether a table has a primary key.
sp_pb100fktableLists the tables that reference the current table.
sp_pb100procdescRetrieves a description of the argument list for a specified stored procedure.
sp_pb100proclistLists available stored procedures and extended stored procedures.
If the SystemProcs DBParm parameter is set to 1 or Yes (the default),sp_pb100proclist displays both system stored procedures and

Using Native Database Interfaces Appeon InfoMaker® 2017 R3
Connecting to Your Database Page 94
PBSYC.SQL storedprocedure
What it does
user-defined stored procedures. If SystemProcs is set to 0 or No,sp_pb100proclist displays only user-defined stored procedures.
sp_pb100text Retrieves the text of a stored procedure from the SYSCOMMENTS table.
sp_pb100table Retrieves information about all tables in a database, including those forwhich the current user has no permissions.
PBSYC.SQL contains the default version of sp_pb100table. If you want toreplace the default version of sp_pb100table with a version that restricts thetable list to those tables for which the user has SELECT permission, you canrun the PBSYC2.SQL script, described in PBSYC2.SQL script.
sp_pb100index Retrieves information about all indexes for a specified table.
6.6.1.2 PBSYC2.SQL script
What it does
The PBSYC2.SQL script contains SQL code that drops and re-creates one InfoMaker storedprocedure in the Adaptive Server sybsystemprocs database: a replacement version ofsp_pb100table.
The default version of sp_pb100table is installed by the PBSYC.SQL script. InfoMaker usesthe sp_pb100table procedure to build a list of all tables in the database, including those forwhich the current user has no permissions. This list displays in the Select Tables dialog boxin InfoMaker.
For security reasons, you or your database administrator might want to restrict the table listto display only those tables for which a user has permissions. To do this, you can run thePBSYC2.SQL script after you run PBSYC.SQL. PBSYC2.SQL replaces the default versionof sp_pb100table with a new version that displays a restricted table list including only tablesand views:
• Owned by the current user
• For which the current user has SELECT authority
• For which the current user's group has SELECT authority
• For which SELECT authority was granted to PUBLIC
When to run it
If you are accessing an Adaptive Server database using the SYC DBMS identifier inInfoMaker, you must first run PBSYC.SQL once per database server to install the requiredInfoMaker stored procedures in the sybsystemprocs database.
After you run PBSYC.SQL, you can optionally run PBSYC2.SQL if you want to replacesp_pb100table with a version that restricts the table list to those tables for which the user hasSELECT permission.
If you do not want to restrict the table list, there is no need to run PBSYC2.SQL.

Using Native Database Interfaces Appeon InfoMaker® 2017 R3
Connecting to Your Database Page 95
For instructions on running PBSYC2.SQL, see How to run the scripts.
Stored procedure it creates
The PBSYC2.SQL script creates the following InfoMaker stored procedure in the AdaptiveServer sybsystemprocs database:
Table 6.15:
PBSYC2.SQL storedprocedure
What it does
sp_pb100table Retrieves information about those tables in the database for which thecurrent user has SELECT permission.
This version of sp_pb100table replaces the default version ofsp_pb100table installed by the PBSYC.SQL script.
6.6.2 How to run the scripts
You can use the ISQL or SQL Advantage tools to run the stored procedure scripts outsideInfoMaker.
6.6.2.1 Using ISQL to run the stored procedure scripts
ISQL is an interactive SQL utility that comes with the Open Client software on the Windowsplatforms. If you have ISQL installed, use the following procedure to run the InfoMakerstored procedure scripts.
For complete instructions on using ISQL, see your Open Client documentation.
To use ISQL to run the InfoMaker stored procedure scripts:
1. Connect to the sybsystemprocs Adaptive Server database as the system administrator.
2. Open one of the following files containing the InfoMaker stored procedure script youwant to run:
PBSYC.SQL
PBSYC2.SQL
3. Issue the appropriate ISQL command to run the SQL script with the user ID, servername, and (optionally) password you specify. Make sure you specify uppercase andlowercase exactly as shown:
isql /U sa /S SERVERNAME /i pathname /P { password }
Table 6.16:
Parameter Description
sa The user ID for the system administrator. Do not change this user ID.
SERVERNAMEThe name of the computer running the Adaptive Server database.
pathname The drive and directory containing the SQL script you want to run.

Using Native Database Interfaces Appeon InfoMaker® 2017 R3
Connecting to Your Database Page 96
Parameter Description
password (Optional) The password for the sa (system administrator) user ID. Thedefault Adaptive Server installation creates the sa user ID without apassword. If you changed the password for sa during the installation,replace password with your new password.
For example, if you are using InfoMaker and are accessing the stored procedure scriptsfrom d:\server\, type either of the following:
isql /U sa /S TESTDB /i d:\server\pbsyb.sql /Pisql /U sa /S SALES /i d:\server\pbsyc.sql /P adminpwd
6.6.2.2 Using SQL Advantage to run the stored procedure scripts
SQL Advantage is an interactive SQL utility that comes with the Open Client software on theWindows platform. If you have SQL Advantage installed, use the following procedure to runthe InfoMaker stored procedure scripts.
For complete instructions on using SQL Advantage, see your Open Client documentation.
To use SQL Advantage to run the InfoMaker stored procedure scripts:
1. Start the SQL Advantage utility.
2. Open a connection to the sybsystemprocs Adaptive Server database as the systemadministrator.
3. Open one of the following files containing the InfoMaker stored procedure script youwant to run:
PBSYC.SQL
PBSYC2.SQL
4. Delete the use sybsystemprocs command and the go command at the beginning of eachscript.
SQL Advantage requires that you issue the use sybsystemprocs command byitself, with no other SQL commands following it. When you open a connectionto the sybsystemprocs database in step 2, you are in effect issuing the usesybsystemprocs command. This command should not be issued again as part of thestored procedure script.
Therefore, to successfully install the stored procedures, you must delete the lines shownin the following table from the beginning of the InfoMaker stored procedure scriptbefore executing the script.
Table 6.17:
Before executing this script Delete these lines
PBSYC.SQL use sybsystemprocs
go

Using Native Database Interfaces Appeon InfoMaker® 2017 R3
Connecting to Your Database Page 97
Before executing this script Delete these lines
PBSYC2.SQL use sybsystemprocs
go
5. Execute all of the statements in the SQL script.
6. Exit the SQL Advantage session.
6.7 DirectConnect
This section describes how to use the DirectConnect interface in InfoMaker.
6.7.1 Using the DirectConnect interface
The DirectConnect interface uses SAP Sybase's Open Client CT-Library (CT-Lib) APIto access a database through SAP Sybase middleware data access products such as theDirectConnect for OS/390 component of MainFrame Connect and Open ServerConnect.
Accessing Unicode data
InfoMaker can connect, save, and retrieve data in both ANSI/DBCS and Unicode databases.When character data or command text is sent to the database, InfoMaker sends a DBCS stringif the UTF8 database parameter is set to 0 (the default). If UTF8 is set to 1, InfoMaker sendsa UTF-8 string.
The database server must have the UTF-8 character set installed. See the description of theUTF-8 database parameter in the online Help for more information.
A Unicode database is a database whose character set is set to a Unicode format, such asUTF-8, UTF-16, UCS-2, or UCS-4. All data must be in Unicode format, and any data savedto the database must be converted to Unicode data implicitly or explicitly.
A database that uses ANSI (or DBCS) as its character set might use special datatypes to storeUnicode data. These datatypes are NCHAR, NVARCHAR, and NVARCHAR2. Columnswith this datatype can store only Unicode data. Any data saved into such a column must beconverted to Unicode explicitly. This conversion must be handled by the database server orclient.
6.7.1.1 Connecting through the DirectConnect middleware product
SAP Sybase DirectConnect is a data access server that provides a standardized middlewareinterface between your applications and your enterprise data sources. Data access services toa particular database are defined in a DirectConnect server. Since a DirectConnect server cansupport multiple access services, you can access multiple databases through a single server.
When you use the DirectConnect interface to connect to a particular database, yourconnection is routed through the access service for that database. An access service consistsof a named set of configuration properties and a specific access service library.
To access DB2 data on an IBM mainframe through a DirectConnect server, you can use theDirectConnect interface to connect through either a DirectConnect for MVS access service ora DirectConnect Transaction Router Service (TRS).

Using Native Database Interfaces Appeon InfoMaker® 2017 R3
Connecting to Your Database Page 98
TRS provides fast access to a DB2/MVS database by using remote stored procedures. TheDirectConnect interface supports both versions of the TRS library: TRSLU62 and TRSTCP.
The DirectConnect server operates in two modes: SQL transformation and passthrough.The DirectConnect interface for DB2/MVS uses passthrough mode, which allows yourInfoMaker application to have direct access to the capabilities of the DB2/MVS data source.
6.7.1.2 Connecting through the Open ServerConnect middleware product
SAP Sybase's Open ServerConnect supports mainframe applications that retrieve andupdate data stored on the mainframe that SAP Sybase client applications can execute. Clientapplications can connect directly to a DB2/MVS database through an Open ServerConnectapplication residing on the mainframe, eliminating the need for an intermediate gateway likeDirectConnect. (This type of connection is also known as a gateway-less connection.) Inaddition, an Open ServerConnect application presents mainframe Remote Procedure Calls(RPCs) as database stored procedures to the client application.
To access DB2 data on an IBM mainframe through Open ServerConnect, you can use theDirectConnect interface to connect through Open ServerConnect for IMS and MVS.
6.7.1.3 Selecting the type of connection
To select how InfoMaker accesses the database, use the Choose Gateway drop-down list onthe Connection tab of the DirectConnect Database Profile Setup dialog box and select one ofthe following:
• Access Service
• Gatewayless
• TRS
All the DBParm parameters defined for the DirectConnect interface are applicable to all threeconnections except the following:
• HostReqOwner applies to Access Service and Gatewayless only
• Request, ShowWarnings, and SystemOwner apply to Access Service only
• UseProcSyntax applies to Gatewayless only
See the online help for the complete list of DBParm parameters applicable to theDirectConnect interface.
6.7.2 Basic software components for the DirectConnect interface
The following figure shows the basic software components required to access a databaseusing the DirectConnect interface and the DirectConnect middleware data access product.
Figure: Components of a DirectConnect connection using DirectConnect middleware

Using Native Database Interfaces Appeon InfoMaker® 2017 R3
Connecting to Your Database Page 99
The following figure shows the basic software components required to access a databaseusing the DirectConnect interface and the Open ServerConnect middleware data accessproduct.
Figure: Components of a DirectConnect connection using Open ServerConnect middleware

Using Native Database Interfaces Appeon InfoMaker® 2017 R3
Connecting to Your Database Page 100
6.7.3 Supported versions for the DirectConnect interface
The DirectConnect interface uses a DLL named PBDIR170.DLL to access a databasethrough either DirectConnect or Open ServerConnect.
Required DirectConnect versions
To access a DB2/MVS database through the access service, it is stronglyrecommended that you use DirectConnect for MVS access service version 11.1.1p4 orlater.
To access a DB2/MVS database through TRS, it is strongly recommended that youuse DirectConnect TRS version 11.1.1p4 or later.
For information on DirectConnect for MVS and TRS, see your DirectConnectdocumentation.
Required Open ServerConnect versions
To access a DB2/MVS database through Open ServerConnect, it is stronglyrecommended that you use Open ServerConnect IMS and MVS version 4.0 or later.

Using Native Database Interfaces Appeon InfoMaker® 2017 R3
Connecting to Your Database Page 101
For information on Open ServerConnect for MVS, see your Open ServerConnectdocumentation.
6.7.4 Supported DirectConnect interface datatypes
The DirectConnect interface supports the InfoMaker datatypes listed in the following table inreports.
Table 6.18: Supported datatypes for DirectConnect
Char (fewer than 255 characters) Long VarChar
Char for Bit Data Real
Date SmallInt
Decimal Time
Double Precision Timestamp (DateTime)
Float VarChar
Integer VarChar for Bit Data
6.7.5 Preparing to use the database with DirectConnect
Before you define the interface and connect to a database through the DirectConnectinterface, follow these steps to prepare the database for use:
1. Install and configure the SAP Sybase middleware data access products, network, andclient software.
2. Install the DirectConnect interface.
3. Verify that you can connect to your middleware product and your database outsideInfoMaker.
4. Create the extended attribute system tables outside InfoMaker.
Step 1: Install and configure the SAP Sybase middleware product
You must install and configure the SAP Sybase middleware data access product, network,and client software.
To install and configure the SAP Sybase middleware data access product, network, and clientsoftware:
1. Make sure the appropriate database software is installed and running on its server.
You must obtain the database server software from your database vendor.
For installation instructions, see your database vendor's documentation.
2. Make sure the appropriate DirectConnect access service software is installed andrunning on the DirectConnect server specified in your database profile.
or

Using Native Database Interfaces Appeon InfoMaker® 2017 R3
Connecting to Your Database Page 102
Make sure the appropriate Open ServerConnect software is installed and running on themainframe specified in your database profile.
3. Make sure the required network software (such as TCP/IP) is installed and running onyour computer and is properly configured so you that can connect to the DirectConnectserver or mainframe at your site.
You must install the network communication driver that supports the network protocoland operating system platform you are using.
For installation and configuration instructions, see your network or databaseadministrator.
4. Install the required Open Client CT-Library (CT-Lib) software on each client computeron which InfoMaker is installed.
You must obtain the Open Client software from SAP. Make sure the version of OpenClient you install supports both of the following:
The operating system running on the client computer
The version of InfoMaker that you are running
Required Open Client versions
To use the DirectConnect interface, you must install Open Client.
For information about Open Client, see your Open Client documentation.
5. Make sure the Open Client software is properly configured so you can connect to themiddleware data access product at your site.
Installing the Open Client software places the SQL.INI configuration file in theSQL Server directory on your computer. SQL.INI provides information that SQL Serveruses to find and connect to the middleware product at your site. You can enter andmodify information in SQL.INI with the configuration utility or editor that comes withthe Open Client software.
For information about editing the SQL.INI file, see Editing the SQL.INI file. For moreinformation about setting up SQL.INI or any other required configuration file, see yourSQL Server documentation.
6. If required by your operating system, make sure the directory containing the Open Clientsoftware is in your system path.
7. Make sure only one copy of each of the following files is installed on your clientcomputer:
• DirectConnect interface DLL
• Network communication DLL (such as NLWNSCK.DLL for Windows Sockets-compliant TCP/IP)
• Open Client DLLs (such as LIBCT.DLL and LIBCS.DLL)

Using Native Database Interfaces Appeon InfoMaker® 2017 R3
Connecting to Your Database Page 103
Step 2: Install the interface
In the InfoMaker Setup program, select the Typical install, or select the Custom install andselect the Direct Connect Interface (DIR).
Step 3: Verify the connection
Make sure you can connect to the your middleware product and your database and log in tothe database you want to access from outside InfoMaker.
Some possible ways to verify the connection are by running the following tools:
• Accessing the database server
Tools such as the Open Client/Open Server Configuration utility (or any Ping utility) checkwhether you can reach the database server from your computer.
• Accessing the database
Tools such as ISQL or SQL Advantage (interactive SQL utilities) check whether you canlog in to the database and perform database operations. It is a good idea to specify the sameconnection parameters you plan to use in your InfoMaker database profile to access thedatabase.
Step 4: Create the extended attribute system tables
InfoMaker uses a collection of five system tables to store extended attribute information.When using the DirectConnect interface, you must create the extended attribute system tablesoutside InfoMaker to control the access rights and location of these tables.
Run the DB2SYSPB.SQL script outside InfoMaker using the SQL tool of your choice.
For instructions, see Creating the extended attribute system tables in DB2 databases.
Editing the SQL.INI file
Make sure the SQL.INI file provides an entry about either the access service being used andthe DirectConnect server on which it resides or the Open ServerConnect program being usedand the mainframe on which it resides.
For the server object name, you need to provide the exact access service name as it is definedin the access service library configuration file on the DirectConnect server. You must alsospecify the network communication DLL being used, the TCP/IP address or alias used forthe DirectConnect server on which the access service resides, and the port on which theDirectConnect server listens for requests:
[access_service_name]query=network_dll,server_alias,server_port_no
InfoMaker users must also specify the access service name in the SQLCA.ServerNameproperty of the Transaction object.
6.7.6 Defining the DirectConnect interface
To define a connection through the DirectConnect interface, you must create a databaseprofile by supplying values for at least the basic connection parameters in the DatabaseProfile Setup - DirectConnect dialog box. You can then select this profile anytime to connectto your database in the development environment.

Using Native Database Interfaces Appeon InfoMaker® 2017 R3
Connecting to Your Database Page 104
For information on how to define a database profile, see Using database profiles.
6.8 Creating the extended attribute system tables in DB2 databasesThis section describes how InfoMaker creates the extended attribute system tables in yourDB2 database to store extended attribute information. It then explains how to use theDB2SYSPB.SQL script to create the extended attribute system tables outside InfoMaker.
You can use the DB2SYSPB.SQL script if you are connecting to the IBM DB2 family ofdatabases through any of the following database interfaces:
• ODBC interface
• SAP Sybase DirectConnect interface
6.8.1 Creating the extended attribute system tables
When you create or modify a table in InfoMaker, the information you provide is storedin five system tables in your database. These system tables contain extended attributeinformation such as the text to use for labels and column headings, validation rules, displayformats, and edit styles. (These system tables are different from the system tables provided byyour DB2 database.)
By default, the extended attribute system tables are created automatically the first time a userconnects to the database using InfoMaker.
When you use the DirectConnect interface
When you use the DirectConnect interface, the extended attribute system tables arenot created automatically. You must run the DB2SYSPB.SQL script to create thesystem tables as described in Using the DB2SYSPB.SQL script.
To ensure that the extended attribute system tables are created with the proper access rights:
• Make sure the first person to connect to the database with InfoMaker has sufficientauthority to create tables and grant permissions to PUBLIC.
This means that the first person to connect to the database should log in as the databaseowner, database administrator, system user, system administrator, or system owner, asspecified by your DBMS.
6.8.2 Using the DB2SYSPB.SQL script
Why do this
If you are a system administrator at a DB2 site, you might prefer to create the extendedattribute system tables outside InfoMaker for two reasons:
• The first user to connect to the DB2 database using InfoMaker might not have the properauthority to create tables.
• When InfoMaker creates the extended attribute system tables, it places them in the defaulttablespace. This might not be appropriate for your needs.

Using Native Database Interfaces Appeon InfoMaker® 2017 R3
Connecting to Your Database Page 105
When using the DirectConnect interface
You must create the extended attribute system tables outside InfoMaker if you areusing the DirectConnect interface. You need to decide which database and tablespaceshould store the system tables. You might also want to grant update privileges only tospecific developers or groups.
What you do
To create the extended attribute system tables, you run the DB2SYSPB.SQL script outsideInfoMaker. This script contains SQL commands that create and initialize the system tableswith the table owner and tablespace you specify.
Where to find DB2SYSPB.SQL
The DB2SYSPB.SQL script is in the Server directory on the InfoMaker installation package.This directory contains server-side installation components and is not installed withInfoMaker on your computer.
You can access the DB2SYSPB.SQL script by copying it to your computer.
Use the following procedure from the database server to create the extended attribute systemtables in a DB2 database outside InfoMaker. This procedure assumes you are accessing theDB2SYSPB.SQL script in d:\server\.
To create the extended attribute system tables in a DB2 database outside InfoMaker:
1. Log in to the database server or gateway as the system administrator.
2. Use any text editor to modify d:\server\DB2SYSPB.SQL for your environment. You cando any of the following:
• Change all instances of PBOwner to another name.
Specifying SYSIBM is prohibited
You cannot specify SYSIBM as the table owner. This is prohibited by DB2.
• Change all instances of database.tablespace to the appropriate value.
• Add appropriate SQL statement delimiters for the tool you are using to run the script.
• Remove comments and blank lines if necessary.
PBCatalogOwner
If you changed PBOwner to another name in the DB2SYSPB.SQL script, you mustspecify the new owner name as the value for the PBCatalogOwner DBParm parameterin your database profile. For instructions, see PBCatalogOwner in the online Help.
3. Save any changes you made to the DB2SYSPB.SQL script.
4. Execute the DB2SYSPB.SQL script from the database server or gateway using the SQLtool of your choice.

Part IV. Working withDatabase Connections
This part describes how to establish, manage, and troubleshoot database connections.

Managing Database Connections Appeon InfoMaker® 2017 R3
Connecting to Your Database Page 107
7 Managing Database ConnectionsAbout this chapter
After you install the necessary database software and define the database interface, you canconnect to the database from InfoMaker. Once you connect to the database, you can workwith the tables and views stored in that database.
This chapter describes how to connect to a database in InfoMaker, maintain database profiles,and share database profiles.
Terminology
In this chapter, the term database refers to both of the following unless otherwise specified:
• A database or DBMS that you access with a standard database interface and appropriatedriver
• A database or DBMS that you access with the appropriate native database interface
7.1 About database connections
This section gives an overview of when database connections occur in InfoMaker. It also tellswhy you should use database profiles to manage your database connections.
7.1.1 When database connections occur
Connections in InfoMaker
In the development environment, the setting of the Automatically Connect to Databasesystem option controls whether InfoMaker connects to the database when you open a painterrequiring a connection (the default) or automatically when you start InfoMaker.
The Automatically Connect to Database option has no effect in InfoMaker applicationsat runtime. Like PowerBuilder, InfoMaker connects to your database when you run anapplication that accesses the database.
To set the Automatically Connect to Database option in InfoMaker:
1. Select Windows>System Options from the PowerBar.
The System Options dialog box displays.

Managing Database Connections Appeon InfoMaker® 2017 R3
Connecting to Your Database Page 108
2. On the General tab page, select or clear the Automatically Connect to Database checkbox as follows:
Select the check box
The next time you start InfoMaker, it automatically connects to the database at startupand stays connected throughout the session until you exit.
Clear the check box
(Default) The next time you start InfoMaker, it connects to the database only when youopen one of the following painters requiring a connection: Database, Report, Form, DataPipeline, or Query. It does not connect to the database automatically at startup.
3. Click OK or Apply.
InfoMaker saves your AutoConnect setting in the registry.

Managing Database Connections Appeon InfoMaker® 2017 R3
Connecting to Your Database Page 109
How InfoMaker determines the database to access
InfoMaker connects to the database you used last when you open a painter that accesses thedatabase. InfoMaker determines which database you used last by reading a setting in theregistry.
What's in this book
This book describes how to connect to your database when you are working in the InfoMakerdevelopment environment.
7.1.2 Using database profiles
What is a database profile?
A database profile is a named set of parameters stored in the registry that defines aconnection to a particular database in the InfoMaker development environment.
Why use database profiles?
Creating and using database profiles is the easiest way to manage your database connectionsin InfoMaker because you can:
• Select a database profile to establish or change database connections. You can easilyconnect to another database anytime during an InfoMaker session. This is particularlyuseful if you often switch between different database connections.
• Edit a database profile to modify or supply additional connection parameters.
• Delete a database profile if you no longer need to access that data.
• Import and export profiles.
Because database profiles are created when you define your data and are stored in theregistry, they have the following benefits:
• They are always available to you.
• Connection parameters supplied in a database profile are saved until you edit or delete thedatabase profile.
7.2 Connecting to a database
To establish or change a database connection in InfoMaker, use a database profile. You canselect the database profile for the database you want to access in the Database Profiles dialogbox.
Using the Database painter to select a database profile
The Database painter is an optional InfoMaker painter. If the Database painter isinstalled, you can select the database profile for the database you want to accessfrom the Database painter's Objects view. However, this method uses more systemresources than using the Database Profile dialog box.
Managing Database Connections Appeon InfoMaker® 2017 R3
Connecting to Your Database Page 110
7.2.1 Selecting a database profile
You can select a database profile from the Database Profiles dialog box.
To connect to a database using the Database Profiles dialog box:
Database Profile button
If your PowerBar does not include the Database Profile button, use the customizefeature to add the button to the PowerBar. Having the Database Profile button on yourPowerBar is useful if you frequently switch connections between different databases.For instructions on customizing toolbars, see the User's Guide.
The Database Profiles dialog box displays, listing your installed database interfaces.
Where the interface list comes from
When you run the Setup program, it updates the Vendors list in the registry with theinterfaces you install. The Database Profiles dialog box displays the same interfacesthat appear in the Vendors list.
1. Click the Database Profile button in the PowerBar.
or
Select Tools>Database Profile from the PowerBar.
2. Click the plus sign (+) to the left of the interface you are using.
or
Double-click the name.
The list expands to display the database profiles defined for your interface.
3. Select the name of the database profile you want to access and click Connect.
or
Display the pop-up menu for a database profile and select Connect.
InfoMaker connects to the specified database and returns you to the painter workspace.
Database painter Objects view
You can select a database profile from the Database painter Objects view.
To connect to a database using the Database painter:
1. Click the Database painter button in the PowerBar.
The Database painter displays. The Objects view lists your installed database interfaces.
Where the interface list comes from
When you run the Setup program, it updates the Vendors list in the registry with theinterfaces you install. The Database painter Objects view displays the same interfacesthat appear in the Vendors list.

Managing Database Connections Appeon InfoMaker® 2017 R3
Connecting to Your Database Page 111
2. Click the plus sign (+) to the left of the interface you are using.
or
Double-click the name.
The list expands to display the database profiles defined for your interface.
3. Select the name of the database profile you want to access and click the Connect button.
or
Display the pop-up menu for a database profile and select Connect.
7.2.2 What happens when you connect
Connection parameters
When you connect to a database by selecting its database profile, InfoMaker writes theprofile name and its connection parameters to the registry key HKEY_CURRENT_USER\Software\Sybase\PowerBuilder\17.0\DatabaseProfiles\PowerBuilder.
Each time you connect to a different database, InfoMaker overwrites the "most-recentlyused" profile name in the registry with the name for the new database connection.
What you get connected to
When you start InfoMaker (with the Automatically Connect to Database system optionselected) or open a painter that accesses the database, you are connected to the database youused last. InfoMaker determines which database this is by reading the registry.
7.2.3 Specifying passwords in database profiles
As shown in the completed Database Profile Setup dialog box for Employees, your passworddoes not display when you specify it in the Database Profile Setup dialog box.
However, when InfoMaker stores the values for this profile in the registry, the actualpassword does display, albeit in encrypted form, in the DatabasePassword or LogPasswordfield.
Suppressing display in the profile registry entry
To suppress password display in the profile registry entry, do the following when you create adatabase profile.
To suppress password display in the profile registry entry:
1. Select the Prompt For Database Information check box on the Connection tab in theDatabase Profile Setup dialog box.
This tells InfoMaker to prompt for any missing information when you select this profileto connect to the database.
2. Leave the Password box blank. Instead, specify the password in the dialog box thatdisplays to prompt you for additional information when you connect to the database.
What happens

Managing Database Connections Appeon InfoMaker® 2017 R3
Connecting to Your Database Page 112
When you specify the password in response to a prompt instead of in the Database ProfileSetup dialog box, the password does not display in the registry entry for this profile.
For example, if you do not supply a password in the Database Profile Setup - Adaptive ServerEnterprise dialog box when creating a database profile, the Client Library Login dialog boxdisplays to prompt you for the missing information.
7.3 Maintaining database profiles
You can easily edit or delete an existing database profile in InfoMaker.
You can edit a database profile to change one or more of its connection parameters. You candelete a database profile when you no longer need to access its data. You can also change aprofile using either the Database Profile dialog box or the Database painter.
What happens
When you edit or delete a database profile, InfoMaker either updates the database profileentry in the registry or removes it.
Deleting a profile for an ODBC data source
If you delete a database profile that connects to an ODBC data source,InfoMaker does not delete the corresponding data source definition from the ODBCinitialization file. This lets you re-create the database profile later if necessary withouthaving to redefine the data source.
7.4 Sharing database profiles
When you work in InfoMaker, you can share database profiles among users.
Sharing database profiles between SAP tools
Since the database profiles used by PowerBuilder, InfoMaker, and DataWindowDesigner are stored in a common registry location, database profiles you create in anyof these tools are automatically available for use by the others, if the tools are runningon the same computer.
This section describes what you need to know to set up, use, and maintain shared databaseprofiles in InfoMaker.
7.4.1 About shared database profiles
What you can do
You can share database profiles in the InfoMaker development environment by specifying thelocation of a file containing the profiles you want to share. You specify this location in theDatabase Preferences property sheet in the Database painter.
Where to store a shared profile file
To share database profiles among all InfoMaker users at your site, store a profile file on anetwork file server accessible to all users.

Managing Database Connections Appeon InfoMaker® 2017 R3
Connecting to Your Database Page 113
What happens
When you share database profiles, InfoMaker displays shared database profiles from the fileyou specify as well as those from your registry.
Shared database profiles are read-only. You can select a shared profile to connect to adatabase -- but you cannot edit, save, or delete profiles that are shared. (You can, however,make changes to a shared profile and save it on your computer, as described in Making localchanges to shared database profiles.)
How to do it
To set up shared database profiles in InfoMaker, you specify the location of the filecontaining shared profiles in the Database painter's Database Preferences property sheet.
For instructions, see Setting up shared database profiles.
7.4.2 Setting up shared database profiles
What you do
You set up shared database profiles in the Database Preferences property sheet.
To set up shared database profiles:
1. In the Database painter, select Design>Options from the menu bar.
The Database Preferences property sheet displays. If necessary, click the General tab todisplay the General property page.
2. In the Shared Database Profiles box, specify the location of the file containing thedatabase profiles you want to share. Do this in either of the following ways:
• Type the location (path name) in the Shared Database Profiles box.
• Click the Browse button to navigate to the file location and display it in the SharedDatabase Profiles box.
In the following example, c:\work\share.ini is the location of the file containing thedatabase profiles to be shared:

Managing Database Connections Appeon InfoMaker® 2017 R3
Connecting to Your Database Page 114
3. Do one of the following:
• Click Apply to apply the Shared Database Profiles setting to the current connectionand all future connections without closing the Database Preferences property sheet.
• Click OK to apply the Shared Database Profiles setting to the current connection andall future connections and close the Database Preferences property sheet.
InfoMaker saves your Shared Database Profiles setting in the registry.
7.4.3 Using shared database profiles to connect
You select a shared database profile to connect to a database the same way you select aprofile stored in your registry. You can select the shared profile in the Database Profilesdialog box or from the File>Connect menu.

Managing Database Connections Appeon InfoMaker® 2017 R3
Connecting to Your Database Page 115
Database Profiles dialog box
You can select and connect to a shared database profile in the Database Profiles dialog box.
To select a shared database profile in the Database Profiles dialog box:
1. Click the Database Profile button in the PowerBar.
or
Select Tools>Database Profile from the PowerBar.
The Database Profiles dialog box displays, listing both shared and local profiles. Sharedprofiles are denoted by a network icon and the word (Shared).
2. Select the name of the shared profile you want to access and click Connect.
InfoMaker connects to the selected database and returns you to the painter workspace.
7.4.4 Making local changes to shared database profiles
Because shared database profiles can be accessed by multiple users running InfoMaker, youshould not make changes to these profiles. However, if you want to modify and save a copyof a shared database profile for your own use, you can edit the profile and save the modifiedcopy in your computer's registry.

Managing Database Connections Appeon InfoMaker® 2017 R3
Connecting to Your Database Page 116
To save changes to a shared database profile in your registry:
1. In the Database Profiles dialog box, select the shared profile you want to edit and clickthe Edit button.
2. In the Database Profile Setup dialog box that displays, edit the profile values as neededand click OK.
A message box displays, asking if you want to save a copy of the modified profile toyour computer.
3. Click Yes.
InfoMaker saves the modified profile in your computer's registry.
7.4.5 Maintaining shared database profiles
If you maintain the database profiles for InfoMaker at your site, you might need to updateshared database profiles from time to time and make these changes available to your users.
Because shared database profiles can be accessed by multiple users running InfoMaker, it isnot a good idea to make changes to the profiles over a network. Instead, you should make anychanges locally and then provide the updated profiles to your users.
To maintain shared database profiles at your site:
1. Make and save required changes to the shared profiles on your own computer. Thesechanges are saved in your registry.
For instructions, see Making local changes to shared database profiles.
2. Export the updated profile entries from your registry to the existing file containingshared profiles.
For instructions, see Importing and exporting database profiles.
3. If they have not already done so, have each user specify the location of the new profilesfile in the Database Preferences property sheet so that they can access the updatedshared profiles on their computer.
For instructions, see Setting up shared database profiles.
7.5 Importing and exporting database profiles
Why do this
Each database interface provides an Import Profile(s) and an Export Profile(s) option. Youcan use the Import option to import a previously defined profile for use with an installeddatabase interface. Conversely, you can use the Export option to export a defined profile foruse by another user.
The ability to import and export profiles provides a way to move profiles easily betweendevelopers. It also means you no longer have to maintain a shared file to maintain profiles. It

Managing Database Connections Appeon InfoMaker® 2017 R3
Connecting to Your Database Page 117
is ideal for mobile development when you cannot rely on connecting to a network to share afile.
What you do
This section describes how to import and export a profile.
To import a profile:
1. Highlight a database interface and select Import Profile(s) from the pop-up menu. (In theDatabase painter, select Import Profile(s) from the File or pop-up menu.)
2. From the Select Profile File dialog box, select the file whose profiles you want to importand click Save.
3. Select the profile(s) you want to import from the Import Profile(s) dialog box and clickOK.
The profiles are copied into your registry. If a profile with the same name already exists, youare asked if you want to overwrite it.
To export a profile:
1. Highlight a database interface and select Export Profile(s) from the pop-up menu. (In theDatabase painter, select Export Profile(s) from the File or pop-up menu.)
2. Select the profile(s) you want to export from the Export Profile(s) dialog box and clickOK.
The Export Profile(s) dialog box lists all profiles defined in your registry regardless ofthe database interface for which they were defined. By default, the profiles defined forthe selected database interface are marked for export.
3. From the Select Profile File dialog box, select a directory and a file in which to save theexported profile(s) and click Save.
The exported profiles can be saved to a new or existing file. If saved to an existing file,the profile(s) are added to the existing profiles. If a profile with the same name alreadyexists, you are asked if you want to overwrite it.
7.6 About the InfoMaker extended attribute system tables
InfoMaker uses a collection of five system tables (formerly known as the Powersoftrepository) to store extended attribute information (such as display formats, validationrules, and font information) about tables and columns in your database. You can also defineextended attributes when you create or modify a table in InfoMaker.
This section tells you how to:
• Make sure the InfoMaker extended attribute system tables are created with the properaccess rights when you log in to your database for the first time

Managing Database Connections Appeon InfoMaker® 2017 R3
Connecting to Your Database Page 118
• Display and open an InfoMaker extended attribute system table
• Understand the kind of information stored in the InfoMaker extended attribute systemtables
• Control extended attribute system table access
7.6.1 Logging on to your database for the first time
By default, InfoMaker creates the extended attribute system tables the first time you connectto a database.
To ensure that InfoMaker creates the extended attribute system tables with the proper accessrights to make them available to all users, the first person to connect to the database withInfoMaker must log in with the proper authority.
To ensure proper creation of the InfoMaker extended attribute system tables:
• Make sure the first person to connect to the database with InfoMaker has sufficientauthority to create tables and grant permissions to PUBLIC.
This means that the first person to connect to the database should log in as the databaseowner, database administrator, system user, system administrator, or system owner, asspecified by your DBMS.
Creating the extended attribute system tables when using the DirectConnectinterface
When you are using the DirectConnect interface, the InfoMaker extended attributesystem tables are not created automatically the first time you connect to a database.You must run the DB2SYSPB.SQL script to create the system tables, as described inUsing the DB2SYSPB.SQL script.
7.6.2 Displaying the InfoMaker extended attribute system tables
InfoMaker updates the extended attribute system tables automatically whenever you changethe information for a table or column. The InfoMaker extended attribute system tables aredifferent from the system tables provided by your DBMS.
You can display and open InfoMaker extended attribute system tables in the Database painterjust like other tables.
To display the InfoMaker extended attribute system tables:
1. In the Database painter, highlight Tables in the list of database objects for the activeconnection and select Show System Tables from the pop-up menu.

Managing Database Connections Appeon InfoMaker® 2017 R3
Connecting to Your Database Page 119
2. The InfoMaker extended attribute system tables and DBMS system tables display in thetables list, as follows:
• InfoMaker system tables
The five system tables are: pbcatcol, pbcatedt, pbcatfmt, pbcattbl, and pbcatvld.
• DBMS system tables
The system tables supplied by the DBMS usually have a DBMS-specific prefix (suchas sys or dbo).

Managing Database Connections Appeon InfoMaker® 2017 R3
Connecting to Your Database Page 120
3. Display the contents of a InfoMaker system table in the Object Layout, Object Details,and/or Columns views.
For instructions, see the User's Guide.
Do not edit the extended attribute system tables
Do not change the values in the InfoMaker extended attribute system tables.
7.6.3 Contents of the extended attribute system tables
InfoMaker stores five types of extended attribute information in the system tables asdescribed in the following table.
Table 7.1: Extended attribute system tables
System table Informationabout
Attributes
pbcatcol Columns Names, comments, headers, labels, case, initial value,and justification
pbcatedt Edit styles Edit style names and definitions
pbcatfmt Display formats Display format names and definitions
pbcattbl Tables Name, owner, default fonts (for data, headings andlabels), and comments

Managing Database Connections Appeon InfoMaker® 2017 R3
Connecting to Your Database Page 121
System table Informationabout
Attributes
pbcatvld Validation rules Validation rule names and definitions
For more about the InfoMaker system tables, see the Appendix in the User's Guide.
Prefixes in system table names
For some databases, InfoMaker precedes the name of the system table with a defaultDBMS-specific prefix. For example, the names of InfoMaker system tables have theprefix DBO in a SQL Server database (such as DBO.pbcatcol), or SYSTEM in anORACLE database (such as SYSTEM.pbcatfmt).
The preceding table gives the base name of each system table without the DBMS-specific prefix.
7.6.4 Controlling system table access
To control access to the InfoMaker system tables at your site, you can specify thatInfoMaker not create or update the system tables or that the system tables be accessible onlyto certain users or groups.
You can control system table access by doing any of the following:
• Setting Use Extended Attributes
Set the Use Extended Attributes database preference in the Database Preferences propertysheet in the Database painter.
• Setting Read Only
Set the Read Only database preference in the Database Preferences property sheet in theDatabase painter.
• Granting permissions on the system tables
Grant explicit permissions on the system tables to users or groups at your site.
7.6.4.1 Setting Use Extended Attributes or Read Only to control access
To control system table access by setting Use Extended Attributes or Read Only:
1. Select Design>Options from the menu bar.
The Database Preferences dialog box displays. If necessary, click the General tab todisplay the General property page.
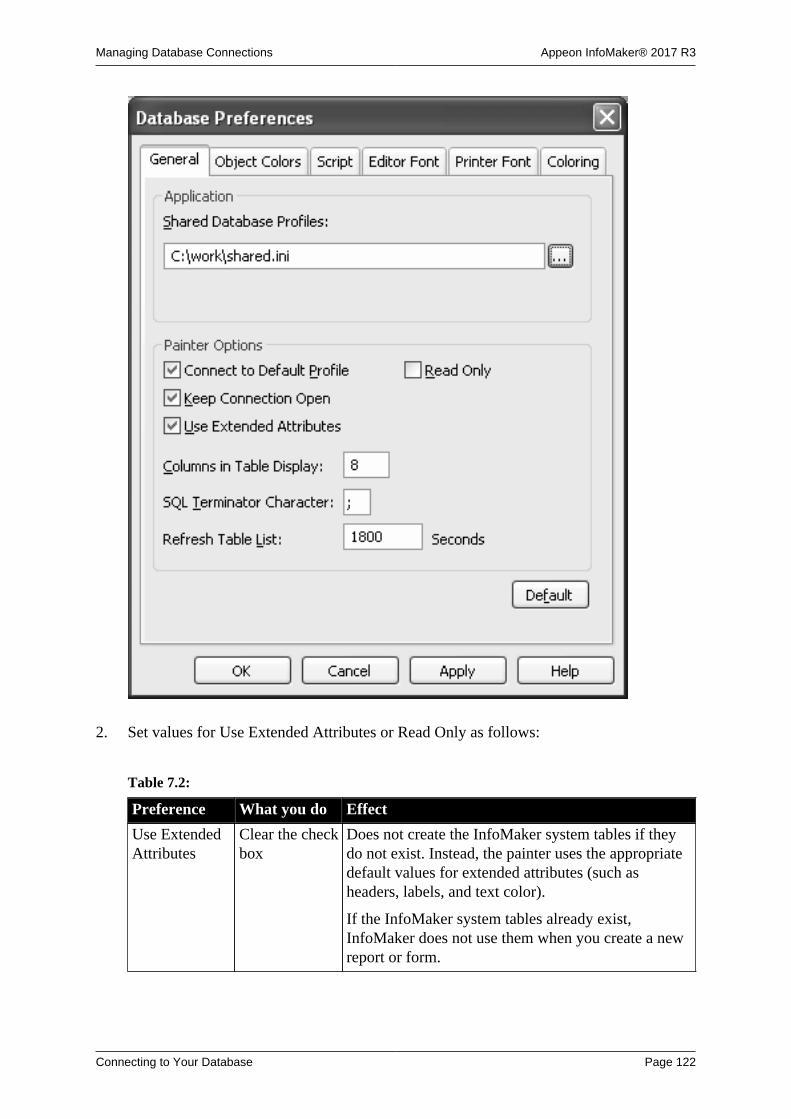
Managing Database Connections Appeon InfoMaker® 2017 R3
Connecting to Your Database Page 122
2. Set values for Use Extended Attributes or Read Only as follows:
Table 7.2:
Preference What you do Effect
Use ExtendedAttributes
Clear the checkbox
Does not create the InfoMaker system tables if theydo not exist. Instead, the painter uses the appropriatedefault values for extended attributes (such asheaders, labels, and text color).
If the InfoMaker system tables already exist,InfoMaker does not use them when you create a newreport or form.

Managing Database Connections Appeon InfoMaker® 2017 R3
Connecting to Your Database Page 123
Preference What you do Effect
Read Only Select thecheck box
If the InfoMaker system tables already exist,InfoMaker uses them when you create a new report orform, but does not update them.
You cannot modify (update) information in thesystem tables or any other database tables in theDataWindow painter or Form painter when the ReadOnly check box is selected.
3. Do one of the following:
• Click Apply to apply the preference settings to the current connection and all futureconnections without closing the Database Preferences property sheet.
• Click OK to apply the preference settings to the current connection and all futureconnections and close the Database Preferences property sheet.
InfoMaker saves your preference settings in the registry.
7.6.4.2 Granting permissions on system tables to control access
If your DBMS supports SQL GRANT and REVOKE statements, you can control access tothe InfoMaker system tables. The default authorization for each repository table is:
GRANT SELECT, UPDATE, INSERT, DELETE ON table TO PUBLIC
After the system tables are created, you can (for example) control access to them by grantingSELECT authority to end users and SELECT, UPDATE, INSERT, and DELETE authority todevelopers.This technique offers security and flexibility that is enforced by the DBMS itself.

Setting Additional Connection Parameters Appeon InfoMaker® 2017 R3
Connecting to Your Database Page 124
8 Setting Additional Connection ParametersAbout this chapter
To fine-tune your database connection and take advantage of DBMS-specific features thatyour interface supports, you can set additional connection parameters at any time. Theseadditional connection parameters include:
• Database parameters
• Database preferences
These connection parameters are described in the Database Connectivity section in the onlineHelp.
This chapter describes how to set database parameters and database preferences inInfoMaker.
8.1 Basic steps for setting connection parameters
This section gives basic steps for setting database parameters and database preferences inInfoMaker.
To set database parameters:
1. Learn how to set database parameters in the development environment.
See Setting database parameters.
2. Determine the database parameters you can set for your database interface.
For a table listing each supported database interface and the database parameters youcan use with that interface, see "Database parameters and supported database interfaces"in the online Help.
3. Read the description of the database parameter you want to set in the online Help.
4. Set the database parameter for your database connection.
To set database preferences:
1. Learn how to set database preferences in the development environment.
See Setting database preferences.
2. Determine the database preferences you can set for your DBMS.
For a table listing each supported database interface and the database preferences youcan use with that interface, see "database parameters and supported database interfaces"in the online Help.
3. Read the description of the database preference you want to set in the online Help.
4. Set the database preference for your database connection.

Setting Additional Connection Parameters Appeon InfoMaker® 2017 R3
Connecting to Your Database Page 125
8.2 About the Database Profile Setup dialog boxThe interface-specific Database Profile Setup dialog box makes it easy to set additionalconnection parameters in the development environment. You can:
• Supply values for connection options supported by your database interface
Each database interface has its own Database Profile Setup dialog box that includessettings only for those connection parameters supported by the interface. Similarparameters are grouped on the same tab page. The Database Profile Setup dialog box forall interfaces includes the Connection tab. Depending on the requirements and features ofyour interface, one or more other tab pages might also display.
• Easily set additional connection parameters in the development environment
You can specify additional connection parameters (database parameters and transactionobject properties) with easy-to-use check boxes, drop-down lists, and text boxes.InfoMaker generates the proper syntax automatically when it saves your database profile inthe system registry.
8.3 Setting database parametersIn InfoMaker, you can set database parameters by editing the Database Profile Setup dialogbox for your connection.
8.3.1 Setting database parameters in the development environment
Editing database profiles
To set database parameters for a database connection in the InfoMaker developmentenvironment, you must edit the database profile for that connection.
Character limit for strings
Strings containing database parameters that you specify in the Database Profile Setup dialogbox for your connection can be up to 999 characters in length.
What you do
You set database parameters in the Database Profile Setup dialog box for your connection.
8.4 Setting database preferencesHow to set
The way you set connection-related database preferences in InfoMaker varies, as summarizedin the following table.
Table 8.1: Database preferences and where they can be set
Database preference Set in development environment by editing
AutoCommit Database Profile Setup dialog box for yourconnection
Lock Database Profile Setup dialog box for yourconnection

Setting Additional Connection Parameters Appeon InfoMaker® 2017 R3
Connecting to Your Database Page 126
Database preference Set in development environment by editing
Shared Database Profiles Database Preferences property sheet
Connect DB at Startup Database Preferences property sheet
Connect to Default Profile Database Preferences property sheet
Read Only Database Preferences property sheet
Keep Connection Open Database Preferences property sheet
Use Extended Attributes Database Preferences property sheet
SQL Terminator Character Database Preferences property sheet
The following sections give the steps for setting database preferences in the developmentenvironment.
For more information
For information about using a specific database preference, see its description in the onlineHelp.
8.4.1 Setting database preferences in the development environment
There are two ways to set database preferences in the InfoMaker development environmenton all supported development platforms, depending on the preference you want to set:
• Set AutoCommit and Lock (Isolation Level) in the Database Profile Setup dialog box foryour connection
ADO.NET
For ADO.NET, Isolation is a database parameter.
• Set all other database preferences in the Database Preferences property sheet in theDatabase painter
8.4.1.1 Setting AutoCommit and Lock in the database profile
The AutoCommit and Lock (Isolation Level) preferences are properties of thedefault Transaction object, SQLCA. For AutoCommit and Lock to take effect in theInfoMaker development environment, you must specify them before you connect to adatabase. Changes to these preferences after the connection occurs have no effect on thecurrent connection.
To set AutoCommit and Lock before InfoMaker connects to your database, you specify theirvalues in the Database Profile Setup dialog box for your connection.
To set AutoCommit and Lock (Isolation Level) in a database profile:
1. Display the Database Profiles dialog box.
2. Click the plus sign (+) to the left of the interface you are using.
or
Double-click the interface name.

Setting Additional Connection Parameters Appeon InfoMaker® 2017 R3
Connecting to Your Database Page 127
The list expands to display the database profiles defined for your interface.
3. Select the name of the profile you want and click Edit.
The Database Profile Setup dialog box for the selected profile displays.
4. On the Connection tab page, supply values for one or both of the following:
• Isolation Level
If your database supports the use of locking and isolation levels, select the isolationlevel you want to use for this connection from the Isolation Level drop-down list.(The Isolation Level drop-down list contains valid lock values for your interface.)
• AutoCommit Mode
The setting of AutoCommit controls whether InfoMaker issues SQL statementsoutside (True) or inside (False) the scope of a transaction. If your database supportsit, select the AutoCommit Mode check box to set AutoCommit to True or clear theAutoCommit Mode check box (the default) to set AutoCommit to False.
For example, in addition to values for basic connection parameters (Server, Login ID,Password, and Database), the Connection tab page for the following SAP AdaptiveServer Enterprise profile named Sales shows nondefault settings for Isolation Leveland AutoCommit Mode.
5. Click OK to close the Database Profile Setup dialog box.
InfoMaker saves your settings in the database profile entry in the registry.
8.4.1.2 Setting preferences in the Database Preferences property sheet
To set the following connection-related database preferences, complete the DatabasePreferences property sheet in the InfoMaker Database painter:
• Shared Database Profiles
• Connect to Default Profile
• Read Only
• Keep Connection Open
• Use Extended Attributes
• SQL Terminator Character
Other database preferences
The Database Preferences property sheet also lets you set other database preferencesthat affect the behavior of the Database painter itself. For information about the otherpreferences you can set in the Database Preferences property sheet, see the User'sGuide.
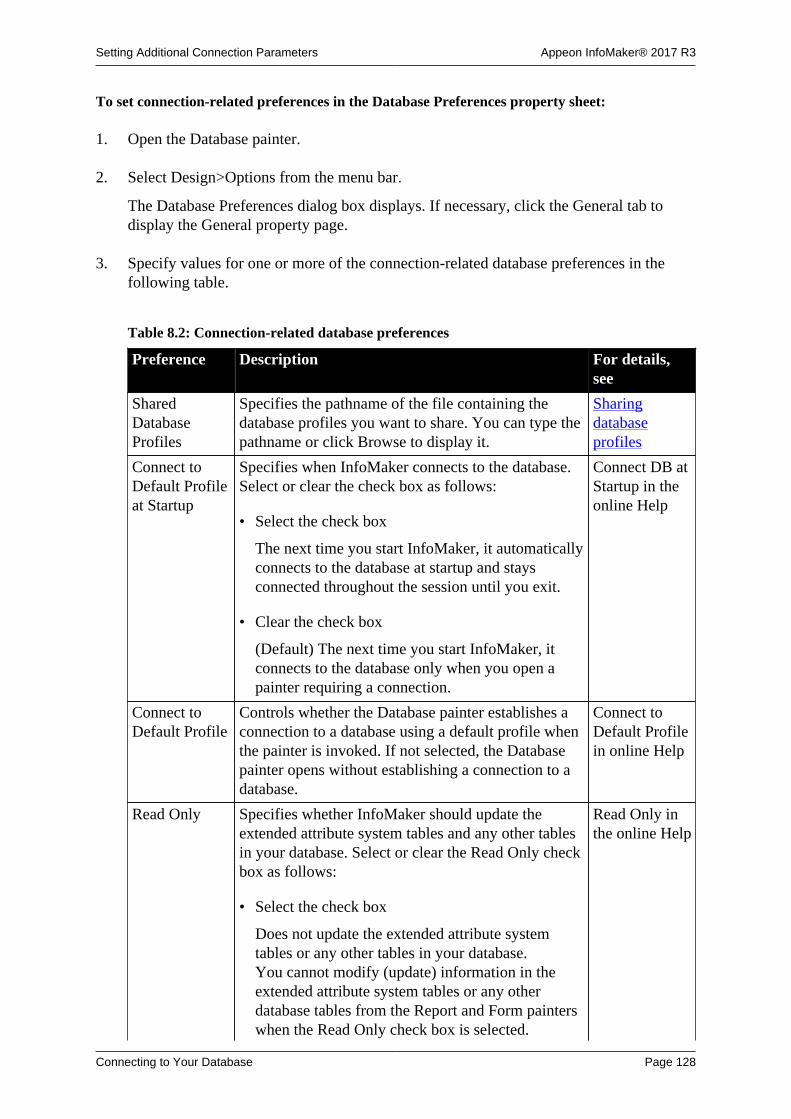
Setting Additional Connection Parameters Appeon InfoMaker® 2017 R3
Connecting to Your Database Page 128
To set connection-related preferences in the Database Preferences property sheet:
1. Open the Database painter.
2. Select Design>Options from the menu bar.
The Database Preferences dialog box displays. If necessary, click the General tab todisplay the General property page.
3. Specify values for one or more of the connection-related database preferences in thefollowing table.
Table 8.2: Connection-related database preferences
Preference Description For details,see
SharedDatabaseProfiles
Specifies the pathname of the file containing thedatabase profiles you want to share. You can type thepathname or click Browse to display it.
Sharingdatabaseprofiles
Connect toDefault Profileat Startup
Specifies when InfoMaker connects to the database.Select or clear the check box as follows:
• Select the check box
The next time you start InfoMaker, it automaticallyconnects to the database at startup and staysconnected throughout the session until you exit.
• Clear the check box
(Default) The next time you start InfoMaker, itconnects to the database only when you open apainter requiring a connection.
Connect DB atStartup in theonline Help
Connect toDefault Profile
Controls whether the Database painter establishes aconnection to a database using a default profile whenthe painter is invoked. If not selected, the Databasepainter opens without establishing a connection to adatabase.
Connect toDefault Profilein online Help
Read Only Specifies whether InfoMaker should update theextended attribute system tables and any other tablesin your database. Select or clear the Read Only checkbox as follows:
• Select the check box
Does not update the extended attribute systemtables or any other tables in your database.You cannot modify (update) information in theextended attribute system tables or any otherdatabase tables from the Report and Form painterswhen the Read Only check box is selected.
Read Only inthe online Help

Setting Additional Connection Parameters Appeon InfoMaker® 2017 R3
Connecting to Your Database Page 129
Preference Description For details,see
• Clear the check box
(Default) Updates the extended attribute systemtables and any other tables in your database.
KeepConnectionOpen
When you connect to a database in PowerBuilderwithout using a database profile, specifies whenPowerBuilder closes the connection. Select or clearthe Keep Connection Open check box as follows:
• Select the check box
(Default) Stays connected to the databasethroughout your session and closes the connectionwhen you exit
• Clear the check box
Opens the connection only when a painter requestsit and closes the connection when you close apainter or finish compiling a script
PowerBuilder only
Keep Connection Open has no effect in InfoMaker.
KeepConnectionOpen in theonline Help
Use ExtendedAttributes
Specifies whether InfoMaker should create and usethe extended attribute system tables. Select or clearthe Use Extended Attributes check box as follows:
• Select the check box
(Default) Creates and uses the extended attributesystem tables
• Clear the check box
Does not create the extended attribute systemtables
Use ExtendedAttributes inthe online Help
Columns inTable Display
Specify the number of table columns to be displayedwhen InfoMaker displays a table graphically. Thedefault is eight.
SQLTerminatorCharacter
Specifies the SQL statement terminator characterused in the ISQL view in the Database painter inInfoMaker.
The default terminator character is a semicolon (;).If you are creating stored procedures and triggers inthe ISQL view of the database painter, change theterminator character to one that you do not expect to
SQL TerminatorCharacter inthe online Help

Setting Additional Connection Parameters Appeon InfoMaker® 2017 R3
Connecting to Your Database Page 130
Preference Description For details,see
use in the stored procedure or trigger syntax for yourDBMS. A good choice is the backquote (`) character.
Refresh TableList
Specify how frequently you want the table list tobe refreshed from the database. The default is 30minutes.
4. Do one of the following:
• Click Apply to apply the preference settings to the current connection without closingthe Database Preferences property sheet.
• Click OK to apply the preference settings to the current connection and close theDatabase Preferences property sheet.
InfoMaker saves your preference settings in the database section of IM.INI.

Troubleshooting Your Connection Appeon InfoMaker® 2017 R3
Connecting to Your Database Page 131
9 Troubleshooting Your ConnectionAbout this chapter
This chapter describes how to troubleshoot your database connection in InfoMaker by usingthe following tools:
• Database Trace
• ODBC Driver Manager Trace
• JDBC Driver Manager Trace
9.1 Overview of troubleshooting toolsWhen you use InfoMaker, there are several tools available to trace your database connectionin order to troubleshoot problems:
Table 9.1: Database trace tools
Use this tool To trace a connection to
Database Trace Any database that InfoMaker accessesthrough one of the database interfaces
ODBC Driver Manager Trace An ODBC data source only
JDBC Driver Manager Trace A JDBC database only
9.2 Using the Database Trace toolThe section describes how to use the Database Trace tool.
9.2.1 About the Database Trace tool
The Database Trace tool records the internal commands that InfoMaker executes whileaccessing a database. You can trace a database connection in the development environment.
InfoMaker writes the output of Database Trace to a log file named PBTRACE.LOG (bydefault) or to a nondefault log file that you specify. When you enable database tracing forthe first time, InfoMaker creates the log file on your computer. Tracing continues until youdisconnect from the database.
Using the Database Trace tool with one connection
You can use the Database Trace tool for only one DBMS at a time and for onedatabase connection at a time.
For example, if your application connects to both an ODBC data source and anAdaptive Server Enterprise database, you can trace either the ODBC connection orthe Adaptive Server Enterprise connection, but not both connections at the same time.
9.2.1.1 How you can use the Database Trace tool
You can use information from the Database Trace tool to help you understand whatInfoMaker is doing internally when you work with your database. Examining the informationin the log file can help you:

Troubleshooting Your Connection Appeon InfoMaker® 2017 R3
Connecting to Your Database Page 132
• Understand how InfoMaker interacts with your database
• Identify and resolve problems with your database connection
• Provide useful information to Technical Support if you call them for help with yourdatabase connection
If you are familiar with InfoMaker and your DBMS, you can use the information in the log tohelp troubleshoot connection problems on your own.
If you are less experienced or need help, run the Database Trace tool before you callTechnical Support. You can then report or send the results of the trace to the TechnicalSupport representative who takes your call.
9.2.1.2 Location of the Database Trace log
PBTRACE.LOG
By default, InfoMaker writes output of the Database Trace tool to a file namedPBTRACE.LOG in your Windows directory.
Nondefault log file
If you prefer, you can specify a nondefault name and location for the log file when you useDatabase Trace. For instructions, see Specifying a nondefault Database Trace log.
9.2.1.3 Contents of the Database Trace log
The Database Trace tool records the following information in the log file when you trace adatabase connection:
• Parameters used to connect to the database
• Time to perform each database operation (in milliseconds)
• The internal commands executed to retrieve and display table and column informationfrom your database. Examples include:
• Preparing and executing SQL statements such as SELECT, INSERT, UPDATE, andDELETE
• Getting column descriptions
• Fetching table rows
• Binding user-supplied values to columns (if your database supports bind variables)
• Committing and rolling back database changes
• Disconnecting from the database
• Shutting down the database interface

Troubleshooting Your Connection Appeon InfoMaker® 2017 R3
Connecting to Your Database Page 133
9.2.1.4 Format of the Database Trace log
The specific content of the Database Trace log file depends on the database you are accessingand the operations you are performing. However, the log uses the following basic format todisplay output:
COMMAND: (time) {additional_information}
Table 9.2:
Parameter Description
COMMAND The internal command that InfoMaker executes to perform the databaseoperation.
time The number of milliseconds it takes InfoMaker to perform the databaseoperation. The precision used depends on your operating system's timingmechanism.
additional_information(Optional) Additional information about the command. The informationprovided depends on the database operation.
Example
The following portion of the log file shows the commands InfoMaker executes to fetch tworows from a database table:
FETCH NEXT: (77 MilliSeconds) dept_id= dept_name=Business ServicesFETCH NEXT: (4 MilliSeconds) dept_id= dept_name=Corporate Management
For a more complete example of Database Trace output, see Sample Database Trace output.
9.2.2 Starting the Database Trace tool
By default, the Database Trace tool is turned off in InfoMaker. You can start it to trace yourdatabase connection.
To start the Database Trace tool:
1. Open the Database Profile Setup dialog box for the connection you want to trace.
2. On the Connection tab, select the Generate Trace check box and click OK or Apply.(The Generate Trace check box is located on the System tab in the OLE DB DatabaseProfile Setup dialog box.)
The Database Profiles dialog box displays with the name of the edited profilehighlighted.
For example, here is the relevant portion of a database profile entry for Adaptive Server12.5 Test. The setting that starts Database Trace is DBMS:
[Default] [value not set]AutoCommit "FALSE"Database "qadata"DatabasePassword "00"DBMS "TRACE SYC Adaptive Server Enterprise"DbParm "Release='12.5'"

Troubleshooting Your Connection Appeon InfoMaker® 2017 R3
Connecting to Your Database Page 134
Lock ""LogId "qalogin"LogPassword "00171717171717"Prompt "FALSE"ServerName "Host125"UserID ""
3. Click Connect in the Database Profiles dialog box to connect to the database.
A message box displays stating that database tracing is enabled and indicating whereInfoMaker will write the output. (By default, InfoMaker writes Database Trace output toa log file named PBTRACE.LOG.)
For instructions on specifying your own name and location for the Database Trace logfile, see Specifying a nondefault Database Trace log.
4. Click OK.
InfoMaker connects to the database and starts tracing the connection.
9.2.3 Stopping the Database Trace tool
Once you start tracing a particular database connection, InfoMaker continues sending traceoutput to the log until you do one of the following:
• Reconnect to the same database with tracing stopped
• Connect to another database for which you have not enabled tracing
To stop the Database Trace tool:
1. In the Database Profile Setup dialog box for the database you are tracing, clear theGenerate Trace check box on the Connection tab.
2. Click OK in the Database Profile Setup dialog box.
The Database Profiles dialog box displays with the name of the edited profilehighlighted.
3. Right-click on the connected database and select Re-connect from the dropdown menuin the Database Profiles dialog box.
InfoMaker connects to the database and stops tracing the connection.
9.2.4 Specifying a nondefault Database Trace log
In the InfoMaker development environment, you can specify a nondefault name and locationfor the log file when you use Database Trace.
What you can do
By specifying a nondefault Database Trace log to use in the development environment, youcan:
• Control where InfoMaker writes the output of the Database Trace tool
• Give the log file a name and location that best meets the development needs at your site

Troubleshooting Your Connection Appeon InfoMaker® 2017 R3
Connecting to Your Database Page 135
By default, InfoMaker writes Database Trace output to a log file namedPBTRACE.LOG located in your Windows directory. You can override this default in thedevelopment environment by editing your InfoMaker initialization file.
How to do it
To specify a nondefault Database Trace log file:
1. Open the InfoMaker initialization file for editing.
You can use the File Editor (in InfoMaker) or any text editor (outside InfoMaker).
2. Create an entry named DBTraceFile in the [Database] section of the initialization file,using the following syntax to specify a nondefault log file:
DBTraceFile=log_file_pathname
For example:
[Database]...DBTraceFile=c:\temp\mydbtrce.log
3. Save your changes to the initialization file.
The next time you use the Database Trace tool to trace a connection in the developmentenvironment, InfoMaker writes the output to the log file you specified instead of to thedefault PBTRACE.LOG file.
For instructions on starting Database Trace, see Starting the Database Trace tool.
9.2.5 Using the Database Trace log
InfoMaker writes the output of the Database Trace tool to a file named PBTRACE.LOG (bydefault) or to a nondefault log file that you specify. To use the trace log, you can do thefollowing anytime:
• View the Database Trace log with any text editor
• Annotate the Database Trace log with your own comments
• Delete the Database Trace log or clear its contents when it becomes too large
For information about where to find PBTRACE.LOG, see Location of the Database Tracelog.
For instructions about specifying your own Database Trace log to use in the developmentenvironment, see Specifying a nondefault Database Trace log.
9.2.5.1 Viewing the Database Trace log
You can display the contents of the log file anytime during an InfoMaker session.
To view the contents of the log file:
1. Open the log file in one of the following ways:
2. Use the File Editor in InfoMaker. (For instructions, see the User's Guide.)

Troubleshooting Your Connection Appeon InfoMaker® 2017 R3
Connecting to Your Database Page 136
3. Use any text editor outside InfoMaker.
Leaving the log file open
If you leave the log file open as you work in InfoMaker, the Database Trace tool doesnot update the log.
9.2.5.2 Annotating the Database Trace log
When you use the Database Trace log as a troubleshooting tool, it might be helpful to addyour own comments or notes to the file. For example, you can specify the date and time ofa particular connection, the versions of database server and client software you used, or anyother useful information.
To annotate the log file:
1. Open the PBTRACE.LOG file in one of the following ways:
• Use the File Editor in InfoMaker. (For instructions, see the User's Guide.)
• Use any text editor outside InfoMaker.
2. Edit the log file with your comments.
3. Save your changes to the log file.
9.2.5.3 Deleting or clearing the Database Trace log
Each time you connect to a database with tracing enabled, InfoMaker appends the traceoutput of your connection to the existing log. As a result, the log file can become very largeover time, especially if you frequently enable tracing when connected to a database.
To keep the size of the log file manageable:
1. Do either of the following periodically:
2. Open the log file, clear its contents, and save the empty file.
3. Provided that you use the default PBTRACE.LOG or the same nondefault file the nexttime you connect to a database with tracing enabled, InfoMaker will write to this emptyfile.
4. Delete the log file.
5. InfoMaker will automatically create a new log file the next time you connect to adatabase with tracing enabled.
9.2.6 Sample Database Trace output
This section gives an example of Database Trace output that you might see in the log file andbriefly explains each portion of the output.
The example traces a connection to an ODBC database named Sample. The outputwas generated while running an InfoMaker application that displays information about

Troubleshooting Your Connection Appeon InfoMaker® 2017 R3
Connecting to Your Database Page 137
employees in each department. The SELECT statement shown retrieves information from theEmployee table to display the names of employees in department 100.
The precision (for example, milliseconds) used when Database Trace records internalcommands depends on your operating system's timing mechanism. Therefore, the timingprecision in your Database Trace log might vary from this example.
Connect to database
DIALOG CONNECT TO TRACE SYCAdaptive Server Enterprise:USERID=SERVER=HOST12DATA=QATESTDPPARM=Release='12'
Prepare SELECT statement
PREPARE: SELECT employee.emp_id, employee.emp_lname,employee.emp_fname, employee.dept_id FROM employeeWHERE ( employee.dept_id = 100 )ORDER BY employee.emp_lname ASC (94 MilliSeconds)
Get column descriptions
DESCRIBE: (0 MilliSeconds)name=emp_id,len=4,type=????,pbt5,dbt3,ct0,dec0name=emp_lname,len=21,type=CHAR,pbt1,dbt1,ct0,dec0name=emp_fname,len=21,type=CHAR,pbt1,dbt1,ct0,dec0name=dept_id,len=4,type=????,pbt5,dbt3,ct0,dec0
Bind memory buffers to columns
BIND SELECT OUTPUT BUFFER (DataWindow):(890 MilliSeconds)name=emp_id,len=4,type=FLOAT,pbt3,dbt3,ct0,dec0name=emp_lname,len=21,type=CHAR,pbt1,dbt1,ct0,dec0name=emp_fname,len=21,type=CHAR,pbt1,dbt1,ct0,dec0name=dept_id,len=4,type=FLOAT,pbt3,dbt3,ct0,dec0
Execute SELECT statement
EXECUTE: (0 MilliSeconds)
Fetch rows from result set
FETCH NEXT: (156 MilliSeconds) emp_id= emp_lname=Jones emp_fname=Alan dept_id=FETCH NEXT: (0 MilliSeconds) emp_id= emp_lname=Ciccone emp_fname=Peter dept_id=FETCH NEXT: (0 MilliSeconds) emp_id= emp_lname=Houston emp_fname=Mary dept_id=FETCH NEXT: (0 MilliSeconds) emp_id= emp_lname=Smith emp_fname=Susan dept_id=FETCH NEXT: (0 MilliSeconds) emp_id= emp_lname=Stein emp_fname=David dept_id=FETCH NEXT: (0 MilliSeconds) emp_id= emp_lname=Watson emp_fname=Linda dept_id=FETCH NEXT: (0 MilliSeconds)

Troubleshooting Your Connection Appeon InfoMaker® 2017 R3
Connecting to Your Database Page 138
Error 1 (rc 100)
Commit database changes
COMMIT: (55 MilliSeconds )
Disconnect from database
DISCONNECT: (0 MilliSeconds)
Shut down database interface
SHUTDOWN DATABASE INTERFACE: (203 MilliSeconds)
9.3 Using the ODBC Driver Manager TraceThis section describes how to use the ODBC Driver Manager Trace tool.
9.3.1 About ODBC Driver Manager Trace
You can use the ODBC Driver Manager Trace tool to trace a connection to any ODBC datasource that you access in InfoMaker through the ODBC interface.
Unlike the Database Trace tool, the ODBC Driver Manager Trace tool cannot traceconnections through one of the native database interfaces.
What this tool does
ODBC Driver Manager Trace records information about ODBC API calls (such asSQLDriverConnect, SQLGetInfo, and SQLFetch) made by InfoMaker while connected to anODBC data source. It writes this information to a default log file named SQL.LOG or to a logfile that you specify.
What both tools do
The information from ODBC Driver Manager Trace, like Database Trace, can help you:
• Understand what InfoMaker is doing internally while connected to an ODBC data source
• Identify and resolve problems with your ODBC connection
• Provide useful information to Technical Support if you call them for help with yourdatabase connection
When to use this tool
Use ODBC Driver Manager Trace instead of the Database Trace tool if you want moredetailed information about the ODBC API calls made by InfoMaker.
Performance considerations
Turning on ODBC Driver Manager Trace can slow your performance while workingin InfoMaker. Therefore, use ODBC Driver Manager Trace for debugging purposesonly and keep it turned off when you are not debugging.
SQL.LOG file
InfoMaker writes ODBC Driver Manager Trace output to a default log file named SQL.LOGor to a log file that you specify. The default location of SQL.LOG is in your root directory.

Troubleshooting Your Connection Appeon InfoMaker® 2017 R3
Connecting to Your Database Page 139
9.3.2 Starting ODBC Driver Manager Trace
To start ODBC Driver Manager Trace in order to trace your ODBC connection, you must edityour database profile.
9.3.2.1 Starting ODBC Driver Manager Trace
To start ODBC Driver Manager Trace, edit the database profile for the connection you wantto trace, as described in the following procedure.
To start ODBC Driver Manager Trace:
1. Open the Database Profile Setup-ODBC dialog box for the ODBC connection you wantto trace.
2. On the Options tab, select the Trace ODBC API Calls check box.
3. (Optional) To specify a log file where you want InfoMaker to write the output of ODBCDriver Manager Trace, type the path name in the Trace File box.
or
(Optional) Click Browse to display the pathname of an existing log file in the Trace Filebox.
By default, if the Trace ODBC API Calls check box is selected and no trace fileis specified, InfoMaker sends ODBC Driver Manager Trace output to the defaultSQL.LOG file.
4. Click OK or Apply.
or
Right-click on the connected database and select Re-connect from the dropdown menuin the Database Profiles dialog box.
The Database Profiles dialog box displays with the name of the edited profilehighlighted.
InfoMaker saves your settings in the database profile entry in the registry in theHKEY_CURRENT_USER\Software\Sybase\PowerBuilder\17.0\DatabaseProfiles key.
For example, here is the relevant portion of a database profile entry for an ODBCdata source named Employee. The settings that start ODBC Driver Manager Trace(corresponding to the ConnectOption DBParm parameter) are emphasized.
DBMS "ODBC"...DbParm "ConnectString='DSN=Emloyee;UID=dba;PWD=00c61737',ConnectOption='SQL_OPT_TRACE,SQL_OPT_TRACE_ON;SQL_OPT_TRACEFILE,C:\Temp\odbctrce.log'"

Troubleshooting Your Connection Appeon InfoMaker® 2017 R3
Connecting to Your Database Page 140
5. Click Connect in the Database Profiles dialog box to connect to the database.
or
Right-click on the connected database and select Re-connect from the dropdown menuin the Database Profiles dialog box.
InfoMaker connects to the database, starts tracing the ODBC connection, and writesoutput to the log file you specified.
9.3.3 Stopping ODBC Driver Manager Trace
Once you start tracing an ODBC connection with ODBC Driver Manager Trace,InfoMaker continues sending trace output to the log file until you stop tracing. After you stoptracing as described in the following sections, you must reconnect to have the changes takeeffect.
9.3.3.1 Stopping ODBC Driver Manager Trace
To stop ODBC Driver Manager Trace:
1. Open the Database Profile Setup - ODBC dialog box for the connection you are tracing.
For instructions, see Starting ODBC Driver Manager Trace.
2. On the Options tab, clear the Trace ODBC API Calls check box.
If you supplied the pathname of a log file in the Trace File box, you can leave itspecified in case you want to restart tracing later.
3. Click OK in the Database Profile Setup - ODBC dialog box.
The Database Profiles dialog box displays, with the name of the edited profilehighlighted.
4. Click Connect in the Database Profiles dialog box.
or
Right-click on the connected database and select Re-connect from the dropdown menuin the Database Profiles dialog box.
InfoMaker connects to the database and stops tracing the connection.
9.3.4 Viewing the ODBC Driver Manager Trace log
You can display the contents of the ODBC Driver Manager Trace log file anytime duringan InfoMaker session.
Location of SQL.LOG
For information about where to find the default SQL.LOG file, see About ODBCDriver Manager Trace.
To view the contents of the log file:
1. Open SQL.LOG or the log file you specified in one of the following ways:

Troubleshooting Your Connection Appeon InfoMaker® 2017 R3
Connecting to Your Database Page 141
2. Use the File Editor in InfoMaker. (For instructions, see the User's Guide.)
3. Use any text editor outside InfoMaker.
Leaving the log file open
If you leave the log file open as you work in InfoMaker, ODBC Driver ManagerTrace does not update it.
9.3.5 Sample ODBC Driver Manager Trace output
This section shows a partial example of output from ODBC Driver Manager Trace to giveyou an idea of the information it provides. The example is part of the trace on an ODBCconnection to the PB Demo DB.
For more about a particular ODBC API call, see your ODBC documentation.
PB100 179:192 EXIT SQLSetConnectOption with return code 0 (SQL_SUCCESS) HDBC 0x036e1300 UWORD 104 <SQL_OPT_TRACE> UDWORD 1
PB100 179:192 ENTER SQLSetConnectOption HDBC 0x036e1300 UWORD 105 <SQL_OPT_TRACEFILE> UDWORD 160694373PB100 179:192 EXIT SQLSetConnectOption with return code 0 (SQL_SUCCESS) HDBC 0x036e1300 UWORD 105 <SQL_OPT_TRACEFILE> UDWORD 160694373PB100 179:192 ENTER SQLDriverConnectW HDBC 0x036e1300 HWND 0x004607fa WCHAR * 0x1f4be068 [ -3] "******\ 0" SWORD -3 WCHAR * 0x1f4be068 SWORD 8 SWORD * 0x00000000 UWORD 1 <SQL_DRIVER_COMPLETE>PB100 179:192 EXIT SQLDriverConnectW with return code 0 (SQL_SUCCESS) HDBC 0x036e1300 HWND 0x004607fa WCHAR * 0x1f4be068 [ -3] "******\ 0" SWORD -3 WCHAR * 0x1f4be068 SWORD 8 SWORD * 0x00000000 UWORD 1 <SQL_DRIVER_COMPLETE>PB100 179:192 ENTER SQLGetInfoW HDBC 0x036e1300 UWORD 6 <SQL_DRIVER_NAME> PTR 0x036e2098 SWORD 6 SWORD * 0x0012cd30PB100 179:192 EXIT SQLGetInfoW with return code 1 (SQL_SUCCESS_WITH_INFO) HDBC 0x036e1300 UWORD 6 <SQL_DRIVER_NAME> PTR 0x036e2098 [ 6] "DB\ 0" SWORD 6 SWORD * 0x0012cd30 (22) DIAG [01004] [Sybase][ODBC Driver]Data truncated (0) PB100 179:192 ENTER SQLGetInfoW HDBC 0x036e1300 UWORD 10 <SQL_ODBC_VER> PTR 0x036e39f8 SWORD 100 SWORD * 0x0012cd38PB100 179:192 EXIT SQLGetInfoW with return code 0 (SQL_SUCCESS) HDBC 0x036e1300 UWORD 10 <SQL_ODBC_VER> PTR 0x036e39f8 [ 20] "03.51.0000" SWORD 100 SWORD * 0x0012cd38 (20)PB100 179:192 ENTER SQLGetInfoW HDBC 0x036e1300 UWORD 2 <SQL_DATA_SOURCE_NAME> PTR 0x036e3c88

Troubleshooting Your Connection Appeon InfoMaker® 2017 R3
Connecting to Your Database Page 142
SWORD 512 SWORD * 0x0012cc32PB100 179:192 EXIT SQLGetInfoW with return code 0 (SQL_SUCCESS) HDBC 0x036e1300 UWORD 2 <SQL_DATA_SOURCE_NAME> PTR 0x036e3c88 [ 28] "PB Demo DB V4" SWORD 512 SWORD * 0x0012cc32 (28)PB100 179:192 ENTER SQLGetInfoW HDBC 0x036e1300 UWORD 16 <SQL_DATABASE_NAME> PTR 0x036e3c88 SWORD 512 SWORD * 0x0012cc32PB100 179:192 EXIT SQLGetInfoW with return code 0 (SQL_SUCCESS) HDBC 0x036e1300 UWORD 16 <SQL_DATABASE_NAME> PTR 0x036e3c88 [ 16] "easdemo4" SWORD 512 SWORD * 0x0012cc32 (16)PB100 179:192 ENTER SQLGetInfoW HDBC 0x036e1300 UWORD 25 <SQL_DATA_SOURCE_READ_ONLY> PTR 0x036e3c88 SWORD 512 SWORD * 0x0012cc32PB100 179:192 EXIT SQLGetInfoW with return code 0 (SQL_SUCCESS) HDBC 0x036e1300 UWORD 25 <SQL_DATA_SOURCE_READ_ONLY> PTR 0x036e3c88 [ 2] "N" SWORD 512 SWORD * 0x0012cc32 (2)PB100 179:192 ENTER SQLGetInfoW HDBC 0x036e1300 UWORD 13 <SQL_SERVER_NAME> PTR 0x036e3c88 SWORD 512 SWORD * 0x0012cc32PB100 179:192 EXIT SQLGetInfoW with return code 0 (SQL_SUCCESS) HDBC 0x036e1300 UWORD 13 <SQL_SERVER_NAME> PTR 0x036e3c88 [ 16] "easdemo4" SWORD 512 SWORD * 0x0012cc32 (16)PB100 179:192 ENTER SQLGetInfoW HDBC 0x036e1300 UWORD 17 <SQL_DBMS_NAME> PTR 0x036e3c88 SWORD 512 SWORD * 0x0012cab6PB100 179:192 EXIT SQLGetInfoW with return code 0 (SQL_SUCCESS) HDBC 0x036e1300 UWORD 17 <SQL_DBMS_NAME> PTR 0x036e3c88 [ 48] "SQL Anywhere" SWORD 512 SWORD * 0x0012cab6 (48)PB100 179:192 ENTER SQLGetInfoW HDBC 0x036e1300 UWORD 6 <SQL_DRIVER_NAME> PTR 0x036e1a10 SWORD 550 SWORD * 0x0012cbbcPB100 179:192 EXIT SQLGetInfoW with return code 0 (SQL_SUCCESS) HDBC 0x036e1300 UWORD 6 <SQL_DRIVER_NAME> PTR 0x036e1a10 [ 22] "DBODBC7.DLL" SWORD 550 SWORD * 0x0012cbbc (22)PB100 179:192 ENTER SQLAllocStmt HDBC 0x036e1300 HSTMT * 0x0012d0b4 PB100 179:192 EXIT SQLAllocStmt with return code 0 (SQL_SUCCESS) HDBC 0x036e1300 HSTMT * 0x0012d0b4 ( 0x036e1c48)PB100 179:192 ENTER SQLGetTypeInfo HSTMT 0x036e1c48 SWORD 0 <SQL_ALL_TYPES>

Troubleshooting Your Connection Appeon InfoMaker® 2017 R3
Connecting to Your Database Page 143
9.4 Using the JDBC Driver Manager Trace
This section describes how to use the JDBC Driver Manager Trace tool.
9.4.1 About JDBC Driver Manager Trace
You can use the JDBC Driver Manager Trace tool to trace a connection to any database thatyou access in InfoMaker through the JDBC interface.
Unlike the Database Trace tool, the JDBC Driver Manager Trace tool cannot traceconnections through one of the native database interfaces.
What this tool does
JDBC Driver Manager Trace logs errors and informational messages originating fromthe Driver object currently loaded (such as SAP Sybase's jConnect JDBC driver) whenInfoMaker connects to a database through the JDBC interface. It writes this information toa default log file named JDBC.LOG or to a log file that you specify. The amount of traceoutput varies depending on the JDBC driver being used.
What both tools do
The information from JDBC Driver Manager Trace, like Database Trace, can help you:
• Understand what InfoMaker is doing internally while connected to a database through theJDBC interface
• Identify and resolve problems with your JDBC connection
• Provide useful information to Technical Support if you call them for help with yourdatabase connection
When to use this tool
Use JDBC Driver Manager Trace instead of the Database Trace tool if you want moredetailed information about the JDBC driver.
Performance considerations
Turning on JDBC Driver Manager Trace can slow your performance while working inInfoMaker. Therefore, use JDBC Driver Manager Trace for debugging purposes onlyand keep it turned off when you are not debugging.
JDBC.LOG file
InfoMaker writes JDBC Driver Manager Trace output to a default log file namedJDBC.LOG or to a log file that you specify. The default location of JDBC.LOG is a tempdirectory.
9.4.2 Starting JDBC Driver Manager Trace
To start JDBC Driver Manager Trace in order to trace your JDBC connection, you must edityour database profile.

Troubleshooting Your Connection Appeon InfoMaker® 2017 R3
Connecting to Your Database Page 144
9.4.2.1 Starting JDBC Driver Manager Trace
To start JDBC Driver Manager Trace, edit the database profile for the connection you want totrace, as described in the following procedure.
To start JDBC Driver Manager Trace:
Preview tab not in InfoMaker
The Preview tab is not available in the Database Profile Setup dialog box inInfoMaker.
1. Open the Database Profile Setup - JDBC dialog box for the JDB connection you want totrace.
2. On the Options tab, select the Trace JDBC Calls check box.

Troubleshooting Your Connection Appeon InfoMaker® 2017 R3
Connecting to Your Database Page 145
3. (Optional) To specify a log file where you want InfoMaker to write the output of JDBCDriver Manager Trace, type the pathname in the Trace File box.
or
(Optional) Click Browse to display the pathname of an existing log file in the Trace Filebox.
By default, if the Trace JDBC Calls check box is selected and no alternative tracefile is specified, InfoMaker sends JDBC Driver Manager Trace output to the defaultJDBC.LOG file.
4. Click OK or Apply.
The Database Profiles dialog box displays with the name of the edited profilehighlighted.
InfoMaker saves your settings in the database profile entry in the registry.
For example, here are the DBMS and DBParm string values of a database profile entryfor a database named Employee. The settings that start JDBC Driver Manager Trace(corresponding to the TraceFile DBParm parameter) are emphasized.
DBMS "TRACE JDBC"DbParm "Driver='com.sybase.jdbc.SybDriver', URL='jdbc:sybase:Tds:199.93.178.151: 5007/tsdata',JavaVM='Sun1.3',TraceFile= 'c:\temp\jdbc.log'"
5. Click Connect in the Database Profiles dialog box to connect to the database.
or
Right-click on the connected database and select Re-connect from the dropdown menuin the Database Profiles dialog box.
InfoMaker connects to the database, starts tracing the JDBC connection, and writesoutput to the log file you specified.
9.4.3 Stopping JDBC Driver Manager Trace
Once you start tracing a JDBC connection with JDBC Driver Manager Trace, InfoMakercontinues sending trace output to the log file until you stop tracing.
9.4.3.1 Stopping JDBC Driver Manager Trace
To stop JDBC Driver Manager Trace:
1. Open the Database Profile Setup - JDBC dialog box for the connection you are tracing.
For instructions, see Starting JDBC Driver Manager Trace.
2. On the Options tab, clear the Trace JDBC Calls check box.
If you supplied the pathname of a log file in the Trace File box, you can leave itspecified in case you want to restart tracing later.
3. Click OK in the Database Profile Setup - JDBC dialog box.

Troubleshooting Your Connection Appeon InfoMaker® 2017 R3
Connecting to Your Database Page 146
The Database Profiles dialog box displays, with the name of the edited profilehighlighted.
4. Click Connect in the Database Profiles dialog box.
or
Right click on the connected database and select Re-connect from the dropdown menuin the Database Profiles dialog box.
InfoMaker connects to the database and stops tracing the connection.
9.4.4 Viewing the JDBC Driver Manager Trace log
You can display the contents of the JDBC Driver Manager Trace log file anytime duringan InfoMaker session.
Location of JDBC.LOG
For information about where to find the default JDBC.LOG file, see About JDBCDriver Manager Trace.
To view the contents of the log file:
1. Open JDBC.LOG or the log file you specified in one of the following ways:
2. Use the File Editor in InfoMaker. (For instructions, see the User's Guide.)
3. Use any text editor outside InfoMaker.
Leaving the log file open
If you leave the log file open as you work in InfoMaker, JDBC Driver Manager Tracedoes not update the log.

Part V. AppendixThe Appendix describes how to modify the PBODB170 initialization file.

Adding Functions to the PBODB170 Initialization File Appeon InfoMaker® 2017 R3
Connecting to Your Database Page 148
Appendix A. Adding Functions to thePBODB170 Initialization FileAbout this appendix
In general, you do not need to modify the PBODB170 initialization file. In certainsituations, however, you might need to add functions to the PBODB170 initialization file forconnections to your back-end DBMS through the ODBC interface in InfoMaker.
This appendix describes how to add functions to the PBODB170 initialization file ifnecessary.
A.1 About the PBODB170 initialization file
What is the PBODB170 initialization file?
When you access data through the ODBC interface, InfoMaker uses the PBODB170initialization file (PBODB170.INI) to maintain access to extended functionality in theback-end DBMS for which ODBC does not provide an API call. Examples of extendedfunctionality are SQL syntax or function calls specific to a particular DBMS.
See also: Where is PBODB170.INI?
Editing PBODB170.INI
In most cases, you do not need to modify PBODB170.INI. Changes to this file can adverselyaffect InfoMaker. Change PBODB170.INI only if you are asked to do so by a TechnicalSupport representative.
However, you can edit PBODB170.INI if you need to add functions for your back-endDBMS.
If you modify PBODB170.INI, first make a copy of the existing file. Then keep a record ofall changes you make. If you call Technical Support after modifying PBODB170.INI, tell therepresentative that you changed the file and describe the changes you made.
A.1.1 Adding functions to PBODB170.INI
PBODB170.INI lists the functions for certain DBMSs that have ODBC drivers. If you needto add a function to PBODB170.INI for use with your back-end DBMS, you can do either ofthe following:
• Existing sections
Add the function to the Functions section for your back-end database if this section existsin PBODB170.INI.
• New sections
Create new sections for your back-end DBMS in PBODB170.INI and add the function tothe newly created Functions section.

Adding Functions to the PBODB170 Initialization File Appeon InfoMaker® 2017 R3
Connecting to Your Database Page 149
A.1.1.1 Adding functions to an existing section in the file
If sections for your back-end DBMS already exist in PBODB170.INI, use the followingprocedure to add new functions.
To add functions to an existing section in PBODB170.INI:
1. Open PBODB170.INI in one of the following ways:
• Use the File Editor in InfoMaker. (For instructions, see the User's Guide.)
• Use any text editor outside InfoMaker.
2. Locate the entry for your back-end DBMS in the DBMS Driver/DBMS Settings sectionof PBODB170.INI.
For example, here is thePBODB170.INI entry for SQL Anywhere:
;*********************************************;DBMS Driver/DBMS Settings see comments at end;of file;*********************************************...[SQL Anywhere]PBSyntax='WATCOM50_SYNTAX'PBDateTime='STANDARD_DATETIME'PBFunctions='SQL Anywhere_FUNCTIONS'PBDefaultValues='autoincrement,current date, current time,current timestamp,timestamp, null,user'PBDefaultCreate='YES'PBDefaultAlter='YES'PBDefaultExpressions='YES'DelimitIdentifier='YES'PBDateTimeInvalidInSearch='NO'PBTimeInvalidInSearch='YES'PBQualifierIsOwner='NO'PBSpecialDataTypes='WATCOM_SPECIALDATATYPES'IdentifierQuoteChar='"'PBSystemOwner='sys,dbo'PBUseProcOwner='YES'SQLSrvrTSName='YES'SQLSrvrTSQuote='YES'SQLSrvrTSDelimit='YES'ForeignKeyDeleteRule='Disallow if Dependent Rows Exist (RESTRICT),Delete any Dependent Rows (CASCADE),Set Dependent Columns to NULL (SET NULL)'TableListType='GLOBAL TEMPORARY'
3. Find the name of the section in PBODB170.INI that contains function information foryour back-end DBMS.
To find this section, look for a line similar to the following in the DBMS Driver/DBMSSettings entry:
PBFunctions='section_name'
For example, the following line in the DBMS Driver/DBMS Settings entry for SQLAnywhere indicates that the name of the Functions section is ASA_FUNCTIONS:

Adding Functions to the PBODB170 Initialization File Appeon InfoMaker® 2017 R3
Connecting to Your Database Page 150
PBFunctions='ASA_FUNCTIONS'
4. Find the Functions section for your back-end DBMS in PBODB170.INI.
For example, here is the Functions section for SQL Anywhere:
;*********************************************;Functions;*********************************************[ASA_FUNCTIONS]AggrFuncs=avg(x),avg(distinct x),count(x), count(distinct x),count(*),list(x), list(distinct x),max(x),max(distinct x), min(x),min(distinct x),sum(x),sum(distinct x)Functions=abs(x),acos(x),asin(x),atan(x), atan2(x,y),ceiling(x),cos(x),cot(x),degrees(x), exp(x),floor(x),log(x),log10(x), mod(dividend,divisor),pi(*),power(x,y), radians(x),rand(),rand(x), remainder(dividend,divisor),round(x,y), sign(x),sin(x),sqrt(x),tan(x), "truncate"(x,y),ascii(x),byte_length(x), byte_substr(x,y,z),char(x),char_length(x), charindex(x,y),difference(x,y)insertstr(x,y,z), lcase(x),left(x,y),length(x), locate(x,y,z), lower(x),ltrim(x),patindex('x',y),repeat(x,y), replicate(x,y),right(x,y),rtrim(x), similar(x,y),soundex(x),space(x),str(x,y,z), string(x,...),stuff(w,x,y,z),substr(x,y,z), trim(x),ucase(x),upper(x),date(x), dateformat(x,y),datename(x,y),day(x), dayname(x),days(x),dow(x),hour(x),hours(x), minute(x),minutes(x),minutes(x,y),month(x), monthname(x),months(x),months(x,y),now(*), quarter(x),second(x),seconds(x),seconds(x,y), today(*),weeks(x),weeks(x,y),year(x),years(x), years(x,y),ymd(x,y,z),dateadd(x,y,z), datediff(x,y,z),datename(x,y),datepart(x,y), getdate(),cast(x as y),convert(x,y,z), hextoint(x),inttohex(x), connection_property(x,...),datalength(x), db_id(x),db_name(x),db_property(x), next_connection(x),next_database(x), property(x),property_name(x), property_number(x),property_description(x), argn(x,y,...),coalesce(x,...), estimate(x,y,z),estimate_source(x,y,z), experience_estimate(x,y,z),ifnull(x,y,z), index_estimate(x,y,z),isnull(x,...), number(*),plan(x),traceback(*)
5. To add a new function, type a comma followed by the function name at the end of theappropriate function list, as follows:
• Aggregate functions
Add aggregate functions to the end of the AggrFuncs list.
• All other functions
Add all other functions to the end of the Functions list.

Adding Functions to the PBODB170 Initialization File Appeon InfoMaker® 2017 R3
Connecting to Your Database Page 151
Case sensitivity
If the back-end DBMS you are using is case sensitive, be sure to use the required casewhen you add the function name. The following example shows a new function forSQL Anywhere added at the end of the Functions list:
;********************************************* ;Functions ;********************************************* [ASA_FUNCTIONS] AggrFuncs=avg(x),avg(distinct x),count(x), count(distinct x),count(*),list(x), list(distinct x),max(x),max(distinct x), min(x),min(distinct x),sum(x),sum(distinct x) Functions=abs(x),acos(x),asin(x),atan(x), atan2(x,y),ceiling(x),cos(x),cot(x),degrees(x), exp(x),floor(x),log(x),log10(x), mod(dividend,divisor),pi(*),power(x,y), radians(x),rand(),rand(x), ... number(*),plan(x),traceback(*),newfunction()
6. Save your changes to PBODB170.INI.
A.1.1.2 Adding functions to a new section in the file
If entries for your back-end DBMS do not exist in PBODB170.INI, use the followingprocedure to create the required sections and add the appropriate functions.
Before you start
For more about the settings to supply for your back-end DBMS in PBODB170.INI,read the comments at the end of the file.
To add functions to a new section in PBODB170.INI:
1. Open PBODB170.INI in one of the following ways:
• Use the File Editor in InfoMaker. (For instructions, see the User's Guide.)
• Use any text editor outside InfoMaker.
2. Edit the DBMS Driver/DBMS Settings section of the PBODB170 initialization file toadd an entry for your back-end DBMS.
Finding the name
The name required to identify the entry for your back-end DBMS in the DBMSDriver/DBMS Settings section is in PBODB170.INI.
Make sure that you:
• Follow the instructions in the comments at the end of PBODB170.INI.

Adding Functions to the PBODB170 Initialization File Appeon InfoMaker® 2017 R3
Connecting to Your Database Page 152
• Use the same syntax as existing entries in the DBMS Driver/DBMS Settings sectionof PBODB170.INI.
• Include a section name for PBFunctions.
For example, here is the relevant portion of an entry for a DB2/2 database:
;***********************************************;DBMS Driver/DBMS Settings;***********************************************[DB2/2]...PBFunctions='DB22_FUNCTIONS'...
3. Edit the Functions section of PBODB170.INI to add an entry for your back-end DBMS.
Make sure that you:
• Follow the instructions in the comments at the end of PBODB170.INI.
• Use the same syntax as existing entries in the Functions section of PBODB170.INI.
• Give the Functions section the name that you specified for PBFunctions in the DBMSDriver/DBMS Settings entry.
For example:
;***********************************************;Functions;***********************************************[DB22_FUNCTIONS]AggrFuncs=avg(),count(),list(),max(),min(),sum()Functions=curdate(),curtime(),hour(), ...
4. Type a comma followed by the function name at the end of the appropriate function list,as follows:
• Aggregate functions
Add aggregate functions to the end of the AggrFuncs list.
• All other functions
Add all other functions to the end of the Functions list.
Case sensitivity
If the back-end DBMS you are using is case sensitive, be sure to use the requiredcase when you add the function name. The following example shows (in bold) a newDB2/2 function named substr() added at the end of the Functions list:
;***********************************************
;Functions
;***********************************************

Adding Functions to the PBODB170 Initialization File Appeon InfoMaker® 2017 R3
Connecting to Your Database Page 153
[DB22_FUNCTIONS]
AggrFuncs=avg(),count(),list(),max(),min(),sum()
Functions=curdate(),curtime(),hour(), substr()
5. Save your changes to PBODB170.INI.

Index Appeon InfoMaker® 2017 R3
Connecting to Your Database Page 154
Index
AAdaptive Server
software components, 83supported data types, 82supported versions, 82
Adaptive Server databaseprepare to use, 84
Adaptive Server database interfacedefine, 86
Adaptive Server stored proceduresuse Print statement, 91
ADO.NETabout, 44
ADO.NET connectioncomponents, 45
ADO.NET interfacedefine, 48prepare to use, 47
Cconnection parameters
set, 124
Ddatabase connections
about, 107database interface connection
component, 51database parameters
set, 125database preferences
set, 125Database Profile Setup dialog box, 125database profiles
about, 5create, 8import and export, 116maintain, 112select, 110share, 112specify passwords, 111use, 4, 109
Database profiles registry entry, 21Database Trace log
specify, 134use, 135
Database Trace outputsample, 136
Database Trace toolabout, 131start, 133stop, 134
DB2SYSPB.SQL script, 104demo database
access, 4DirectConnect database
prepare to use, 101DirectConnect interface
define, 103software components, 98supported data types, 101supported versions, 100use, 97
Eextended attribute system tables
about, 117contents, 120control access, 121create, 104display, 118
IInfoMaker stored procedure scripts, 92Informix
DateTime data type, 54Interval data type, 55software components, 55supported data types, 54supported versions, 53Time data type, 55
Informix databaseprepare to use, 56
Informix database interfacedefine, 57
JJDBC
supported data types, 34supported versions, 34
JDBC connectioncomponents, 32
JDBC Driver Manager Traceabout, 143start, 143

Index Appeon InfoMaker® 2017 R3
Connecting to Your Database Page 155
stop, 145JDBC Driver Manager Trace log
view, 146JDBC interface
about, 31define, 35prepare to use, 34
JDBC registry entries, 33
Nnative database interface
use, 52native database interfaces
about, 51
OODBC connection
components, 12ODBC data sources
define, 19multiple data sources, 22prepare, 18
ODBC Driver Manager Traceabout, 138start, 139stop, 140
ODBC Driver Manager Trace logview, 140
ODBC Driver Manager Trace outputsample, 141
ODBC driversconformance levels, 16obtain, 18types, 14
ODBC interfacedefine, 23use, 11
ODBC registry entries, 20ODBC translator
select, 23ODBCINST registry entries, 20OLE DB
supported versions, 40OLE DB connection
components, 39OLE DB data providers, 46
obtain, 40OLE DB interface
about, 37
define, 42prepare to use, 41
Open Client directory servicesuse, 89
Open Client security servicesuse, 87
Oraclesoftware components, 73supported data types, 72supported versions, 72
Oracle databaseprepare to use, 74
Oracle database interfacedefine, 76
Oracle stored proceduresuse as data source, 77
Oracle user-defined typesuse, 80
PPBODB170 initialization file, 19
about, 148add functions, 148
PostgreSQL, 29
Sshared database profiles
about, 112maintain, 116make local changes, 115set up, 113use to connect, 114
SQL Anywheresoftware components, 24supported versions, 24Transact-SQL special timestamp columns,28
SQL Anywhere data sourcedefine, 26prepare to use, 25
SQL Server2008 features, 65software components, 59supported data types, 59supported versions, 58use SNC interface, 71
SQL Server databaseprepare to use, 60
SQL Server database interface

Index Appeon InfoMaker® 2017 R3
Connecting to Your Database Page 156
define, 62