Compact Titrator - Hogentogler
156
Compact Titrator G10S/G20S Operating Instructions
-
Upload
khangminh22 -
Category
Documents
-
view
0 -
download
0
Transcript of Compact Titrator - Hogentogler

Compact TitratorG10S/G20S
Ope
ratin
g In
stru
ctio
ns
30297204C 7/17/2017 4:24 PM - Schema ST4 PDF engine - Layout by Victor Mahler
Com
pact
Titr
ator


Table of Contents
1 Introduction 5
2 Safety information 62.1 Definition of signal words and warning symbols.............................................................. 62.2 Product-specific safety notes ......................................................................................... 6
3 Design and function 83.1 Instrument................................................................................................................... 8
3.1.1 Overview...................................................................................................... 83.1.2 Titrator rear panel connections........................................................................ 93.1.3 Terminal ...................................................................................................... 9
3.2 User interface .............................................................................................................. 103.2.1 Home screen ................................................................................................ 103.2.2 Input field types ............................................................................................ 103.2.3 Keypads ...................................................................................................... 113.2.4 Menu Structure.............................................................................................. 113.2.5 Specific user dialogues .................................................................................. 123.2.5.1 Start Analysis.......................................................................................... 123.2.5.2 Online screen general titrations GT ............................................................ 13
4 Installation 144.1 Standard equipment ..................................................................................................... 14
4.1.1 Scope of delivery........................................................................................... 144.1.2 Unpack the titrator ......................................................................................... 164.1.3 Position the titrator ........................................................................................ 164.1.4 Connect the titrator to the power supply ........................................................... 164.1.5 Disconnect the titrator from the power supply ................................................... 164.1.6 Install the titration stand................................................................................. 174.1.6.1 Attach the titration stand to the titrator ........................................................ 174.1.6.2 Swivel the titration stand .......................................................................... 174.1.6.3 Attaching and removing the titration vessel................................................. 174.1.6.4 Recommended positions for sensors, tubes and stirrers............................... 184.1.7 Connect the compact stirrer ............................................................................ 184.1.8 Connect the measuring electrode .................................................................... 194.1.9 Insert and connect a burette ........................................................................... 194.1.10 Connect a Rondolino TTL sample changer ....................................................... 19
4.2 Optional equipment...................................................................................................... 204.2.1 Installing the solvent manager ........................................................................ 204.2.2 Connecting the solvent manager ..................................................................... 20
5 Operating the instrument 225.1 Start up the titrator and shut down the titrator .................................................................. 225.2 Running a general titration ............................................................................................ 22
5.2.1 Preparation .................................................................................................. 225.2.2 Rinsing and filling the burette ......................................................................... 235.2.3 Calibrating and testing the sensor ................................................................... 235.2.3.1 Calibrate the sensor................................................................................. 235.2.3.2 Test the pH-sensor .................................................................................. 245.2.4 Determining the titer ...................................................................................... 245.2.5 Run an EQP titration ...................................................................................... 255.2.5.1 Prepare the sample ................................................................................. 255.2.5.2 Configure the method............................................................................... 255.2.5.3 Create an indirect shortcut ........................................................................ 265.2.5.4 Perform the analysis................................................................................ 26
5.3 Creating and handling Shortcuts .................................................................................... 265.4 Creating Methods......................................................................................................... 275.5 Modifying or Deleting Methods ...................................................................................... 285.6 Starting Methods.......................................................................................................... 285.7 Stop methods .............................................................................................................. 29
Table of Contents 1Compact Titrator

5.7.1 Suspending or stopping an analysis................................................................ 295.7.2 Suspending of ongoing analysis by the titrator.................................................. 30
5.8 Customizing touch screen and signals ........................................................................... 305.8.1 Changing the language.................................................................................. 305.8.2 Changing the screen settings.......................................................................... 305.8.3 Configuring the audio-signals......................................................................... 305.8.4 Configuring the keyboards.............................................................................. 31
6 Methods 326.1 Method templates ........................................................................................................ 32
6.1.1 Standard method templates............................................................................ 326.1.2 Mettler method templates ............................................................................... 33
6.2 Method syntax – rules for establishing a method ............................................................. 336.2.1 Types and possible numbers of loops ............................................................. 346.2.2 Possible numbers of method functions ............................................................ 346.2.3 Method functions within a loop ....................................................................... 356.2.4 Method functions outside of a loop.................................................................. 35
6.3 Overview of Method functions........................................................................................ 366.4 Description of method functions..................................................................................... 37
6.4.1 Title ............................................................................................................ 376.4.2 Sample ........................................................................................................ 376.4.3 Sample (titer) ............................................................................................... 386.4.4 Sample (calibration) ..................................................................................... 396.4.4.1 pH sensor test......................................................................................... 396.4.5 Titration stand............................................................................................... 416.4.6 Pump .......................................................................................................... 416.4.7 Stir .............................................................................................................. 416.4.8 Dispense (normal)........................................................................................ 416.4.9 Measure (normal)......................................................................................... 426.4.10 Titration (EQP).............................................................................................. 446.4.11 Mode........................................................................................................... 496.4.12 Titration (EP)................................................................................................ 496.4.13 Titration(LearnEQP)....................................................................................... 516.4.14 Calculation................................................................................................... 526.4.15 Record......................................................................................................... 536.4.16 End of sample .............................................................................................. 546.4.17 Titer............................................................................................................. 546.4.18 Calibration ................................................................................................... 556.4.19 Blank........................................................................................................... 566.4.20 Auxiliary value .............................................................................................. 576.4.21 Auxiliary instrument....................................................................................... 586.4.21.1 Control type: 24V output .......................................................................... 586.4.21.2 Control type: Stirrer .................................................................................. 586.4.21.3 Control type: Out TTL (Single pin).............................................................. 596.4.21.4 Control type: TTL input (single pin)............................................................ 596.4.21.5 Control type: RS-232............................................................................... 596.4.22 Drain ........................................................................................................... 60
7 Series Templates 617.1 Sample or Standard Parameters .................................................................................... 61
8 Calculation and Results 638.1 Symbols for calculations............................................................................................... 638.2 Calculation formulas .................................................................................................... 648.3 Results proposal lists ................................................................................................... 64
8.3.1 Result proposals inside of loops ..................................................................... 658.3.1.1 Result proposals for "Calculation type=Direct titration" ................................. 658.3.1.2 Result proposals for "Calculation type=Automatic back titration" ................... 668.3.1.3 Result proposals for "Calculation type=Manual back titration"....................... 688.3.1.4 Result proposals for "Calculation type=Blank-compensated" ........................ 698.3.1.5 Result proposals for "Calculation type=2nd titration function" ....................... 718.3.1.6 Result proposals for "Calculation type=Others" ........................................... 73
Table of Contents2 Compact Titrator
8.3.1.7 Result proposals for the method type "Titer"................................................ 748.3.2 Result proposals outside of loops ................................................................... 74
8.4 Results ....................................................................................................................... 74
9 Setup 779.1 Chemicals................................................................................................................... 77
9.1.1 Titrants ........................................................................................................ 789.1.2 Auxiliary reagents.......................................................................................... 789.1.3 Calibration standards .................................................................................... 799.1.4 Titer standards.............................................................................................. 809.1.5 Substances .................................................................................................. 81
9.2 Hardware.................................................................................................................... 819.2.1 Sensors ....................................................................................................... 819.2.1.1 Value ranges from sensor measuring units and control band........................ 859.2.1.2 Sensor Calibration and Sensor Test ........................................................... 859.2.2 Pumps......................................................................................................... 879.2.3 Peripherals................................................................................................... 889.2.3.1 Balance ................................................................................................. 889.2.3.2 USB-Stick ............................................................................................... 899.2.3.3 Printer and USB data export...................................................................... 899.2.3.4 PC settings ............................................................................................. 919.2.3.5 Network settings...................................................................................... 929.2.3.6 Network storage ...................................................................................... 929.2.4 Titration stands ............................................................................................. 939.2.4.1 Auto stand.............................................................................................. 939.2.4.2 Manual stand ......................................................................................... 939.2.4.3 Rondolino TTL ........................................................................................ 949.2.5 Auxiliary instruments ..................................................................................... 94
9.3 User settings ............................................................................................................... 959.3.1 Language..................................................................................................... 959.3.2 Screen ......................................................................................................... 959.3.3 Audio signals ............................................................................................... 969.3.4 Shortcuts...................................................................................................... 969.3.5 Keyboards.................................................................................................... 96
9.4 Global settings ............................................................................................................ 969.4.1 System ........................................................................................................ 969.4.2 User Management ......................................................................................... 979.4.3 Analysis and resources behavior..................................................................... 98
9.5 Values ........................................................................................................................ 999.6 Maintenance & Service ................................................................................................. 100
9.6.1 MT service.................................................................................................... 1009.6.2 Import/Export................................................................................................ 1019.6.3 Reset to factory settings ................................................................................. 1029.6.4 Titrator firmware history ................................................................................. 1029.6.5 Board firmware ............................................................................................. 1029.6.6 Terminal ...................................................................................................... 1029.6.7 Board data ................................................................................................... 1029.6.8 Drives.......................................................................................................... 1029.6.9 Burettes ....................................................................................................... 1039.6.10 Update......................................................................................................... 103
10 Manual Operations 10410.1 Stirrer ......................................................................................................................... 10410.2 Pump......................................................................................................................... 104
10.2.1 Pump .......................................................................................................... 10510.2.2 Drain ........................................................................................................... 10510.2.3 Fill............................................................................................................... 10510.2.4 Stirrer........................................................................................................... 106
10.3 Sensor........................................................................................................................ 10610.3.1 Temperature sensor....................................................................................... 10610.3.2 Potentiometric Sensor .................................................................................... 10710.3.3 Polarized sensor ........................................................................................... 107
Table of Contents 3Compact Titrator

10.4 Auxiliary Instrument...................................................................................................... 10810.5 Burette........................................................................................................................ 110
10.5.1 Rinse burette ................................................................................................ 11010.5.2 Rinse multiple burettes................................................................................... 11110.5.3 Dispense...................................................................................................... 11110.5.4 Manual titration............................................................................................. 112
11 Analysis Sequences 11411.1 Starting an Analysis ..................................................................................................... 11411.2 Analysis Sequence Steps .............................................................................................. 115
11.2.1 Analysis sequence ........................................................................................ 115
12 Analysis Data 118
13 Titrator Evaluation Procedure 11913.1 Standard Evaluation Procedure...................................................................................... 11913.2 Minimum / Maximum................................................................................................... 12013.3 Segmented Evaluation .................................................................................................. 12013.4 Asymmetric ................................................................................................................. 121
14 Transporting the titrator 123
15 Care and maintenance 12415.1 Cleaning..................................................................................................................... 12415.2 Maintenance ............................................................................................................... 124
16 Disposal 125
17 Technical data 12617.1 Titrator........................................................................................................................ 12617.2 Supported peripherals................................................................................................... 128
18 Optional accessories 13018.1 Titration kits ................................................................................................................ 13018.2 Titration stands............................................................................................................ 13018.3 Titration vessels........................................................................................................... 13318.4 Drying tubes................................................................................................................ 13418.5 Sensors ...................................................................................................................... 134
18.5.1 Temperature senors....................................................................................... 13418.5.2 Color sensors ............................................................................................... 13518.5.3 Plug & Play titration electrodes ....................................................................... 13518.5.4 Classical electrodes (not Plug & Play)............................................................. 13618.5.5 Ion-selective and gas-sensitive electrodes (half cells) ....................................... 13618.5.6 Combined ISE with integrated reference electrode .............................................. 137
18.6 Software ..................................................................................................................... 13818.7 Sample changers......................................................................................................... 13818.8 Dosing and pumps ...................................................................................................... 13818.9 Printers....................................................................................................................... 14118.10 Balances .................................................................................................................... 14118.11 Miscellaneous accessories............................................................................................ 142
19 Appendix 14319.1 Predefined calibration standards for pH sensors .............................................................. 143
19.1.1 Temperature related values............................................................................. 14319.1.1.1 METTLER TOLEDO ................................................................................... 14319.1.1.2 DIN / NIST .............................................................................................. 14419.1.1.3 MERCK .................................................................................................. 14519.1.1.4 FLUKA.................................................................................................... 14519.1.1.5 FISHER .................................................................................................. 14619.1.1.6 JIS / JJG ................................................................................................ 147
19.2 System validation ........................................................................................................ 147
Index 149
Table of Contents4 Compact Titrator

Introduction 5Compact Titrator
1 IntroductionThank you for choosing a METTLER TOLEDO Compact Titrator. The Compact Titrator is an easy-to-operateinstrument for titrations.
About this documentThe instructions in this document refer to titrators running firmware version 5.2.0 or higher.For third party licenses and open source attribution files, see the following link:
u www.mt.com/licenses
If you have any additional questions, contact your authorized METTLER TOLEDO dealer or service represen-tative.
u www.mt.com/contact
Conventions and symbols
Refers to an external document.
Note for useful information about the product.
Elements of instructions§ Prerequisites
1 Steps2 ...
ð Intermediate resultsð Results

Safety information6 Compact Titrator
2 Safety information• Read and understand the information in these Operating Instructions before you use the instrument.• Keep these Operating Instructions for future reference.• Include these Operating Instructions if you pass on the instrument to other parties.If the instrument is not used according to the information in these Operating Instructions or if it is modified,the safety of the instrument may be impaired and Mettler-Toledo GmbH assumes no liability.
2.1 Definition of signal words and warning symbolsSafety notes are marked with signal words and warning symbols. These show safety issues and warnings.Ignoring the safety notes may lead to personal injury, damage to the instrument, malfunctions and falseresults.
Signal words
WARNING for a hazardous situation with medium risk, possibly resulting in death or severeinjury if not avoided.
NOTICE for a hazardous situation with low risk, resulting in damage to the instrument, othermaterial damage, malfunctions and erroneous results, or loss of data.
Warning symbols
Electrical shock
2.2 Product-specific safety notesIntended useThis instrument is designed to be used in laboratories by trained staff. The instrument is suitable for theprocessing of reagents and solvents.Any other type of use and operation beyond the limits of technical specifications without written consentfrom Mettler-Toledo GmbH is considered as not intended.
Responsibilities of the instrument ownerThe instrument owner is the person that uses the instrument for commercial use or places the instrument atthe disposal of the staff. The instrument owner is responsible for product safety and the safety of staff, usersand third parties.METTLER TOLEDO assume that the instrument owner provides the necessary protective gear, appropriatetraining for the daily work and for dealing with potential hazards in their laboratory.
Safety notes
WARNINGDanger of death or serious injury due to electric shock!Contact with parts that contain a live current can lead to injury and death.1 Only use a METTLER TOLEDO power cable and AC adapter designed for your
instrument.2 Connect the power cable to a grounded power outlet.3 Keep all electrical cables and connections away from liquids.4 Replace damaged power cables and AC adapters immediately.
NOTICEDanger of damaging the touch screen with pointed or sharp objects!Pressing on the touch screen with pointed or sharp objects may damage it.− Operate the touch screen by applying gentle pressure with the pad of your finger.

Safety information 7Compact Titrator
NOTICEDanger of damage to the instrument due to incorrect parts!Using incorrect parts with the instrument can damage the Instrument or cause theinstrument to malfunction.− Only use parts supplied with the instrument, listed accessories and spare parts from
METTLER TOLEDO.

Design and function8 Compact Titrator
3 Design and function
3.1 Instrument
3.1.1 Overview
1 Titrant bottle drying tube 8 Power button
2 Dispensing tube 9 Indicator light (LED)
3 Compact stirrer 10 Touchscreen
4 Titrant bottle 11 Burette arrestment knob
5 Electrode 12 Burette
6 Titration stand 13 Suction tube
7 Titration vessel

Design and function 9Compact Titrator
3.1.2 Titrator rear panel connections
Connection Use Example
STIRRER PUMP Stirrer/pump Solvent manager/compact stirrer/pump
SENSOR Measuring electrode DGi115-SC
REF Reference input to SENSOR
PT1000 PT1000 temperature sensor DT1000
TTL-I/O Sample changer Rondolino
POWER SUPPLY AC adapter AC adapter
COM Balance MS analysis balance
ETHERNET Network Link to LabX PC software via network
PC PC connection via USB Link to LabX PC software via USBinterface
USB 1/USB 2 Printer/Memory stick/USB hub USB-P25 compact printer
CAN OUT CAN connection For service use
3.1.3 Terminal
Nr. Name Function
1 Info button Accesses the interactive online help for the content of the current dialog.
2 Touch screen Displays information and can be used to enter information.
3 Home button Returns you to the home screen from any menu position.
4 Reset button Ends all tasks that are currently running.

Design and function10 Compact Titrator
3.2 User interface
3.2.1 Home screen541 2 3
678
9
Home
Methods
Seriestemplates
Results
Setup
Manual
Tasks
StartUser dataLog out
Name Explanation
1 Shortcut area Shows indirect and direct shortcuts for frequently used methods. Shortcuts aresaved in the user profile and can be defined, changed and deleted by the user.
2 Indirect shortcut An indirect shortcut opens the window Start analysis of the method.
3 Direct shortcut A direct shortcut starts the method without opening the window Start analysis.
4 Status bar The status bar contains the current menu item, user name as well as date andtime.
5 Instrument status Shows the current working status of the instrument.
BlueNo measurement running
GreenMeasurement running
6 Start Switch to direct measurement (quick start for the defined standardmeasurement of this instrument).
7 User data Opens a window with information about the currently logged in user.
8 Log out Directly log out the current user. The window Login opens after logging out.
9 Menus MethodsCreate and handle methods for every measurement type.
Series templatesOpen the menu for series templates for every method available on theinstrument.
ResultsDisplay all measurement results, print out or export them. Visit detail infor-mation about every single result.
SetupDefine all system settings in this menu, e.g,, hardware settings, usermanagement or user preferences. These settings are usually made duringinstallation of the instrument.
ManualDisplay the manual operations available on the instrument.
3.2.2 Input field typesVarious fields and lists allow you to enter or view data. Buttons on the right side show the type of the field orlist.
Text input fieldAny text comprised of letters (up tp 30 characters), numbers and symbols can beentered into these fields.

Design and function 11Compact Titrator
Text input field (extended)Any text comprised of letters (up to 500 characters), numbers and symbols can beentered into these fields.
Number input fieldNumbers, formulas and auxiliary values can be entered into these fields.
Drop-down listA drop-down list opens from which you can select an entry.
ShortlistA shortlist opens from which you can select an entry.
Formula fieldA formula must be entered in these fields.
Info fieldThe displayed content is only for information (read only).
3.2.3 Keypads
Alphabetic keypad Numeric keypad
Cancel Preview OK
Method ID
4
1
23
5
6
Cancel OK
Enter auxiliary value
1
2
• Tap (1) to see how your input looks like.• Tap (2) for capital letters.• Tap (3) for lowercase letters.• Tap (4) to switch to a numeric keypad and
(2) to turn back to alphanumeric.• Tap (5) to delete all entered letters or
numbers.• Tap (6) to delete the last entered letter or
number.
• Tap (1) to delete all entered numbers.• Tap (2) to delete the last entered number.
3.2.4 Menu StructureMethodsThe menu Methods has no submenus.
Series templatesThe menu Series templates has no submenus.
ResultsThe menu Results has the following submenus.
• All resultsStatistics
• Samples• Undo all
SetupThe menu Setup has the following submenus.

Design and function12 Compact Titrator
Menu level 2 Menu level 3
Chemicals Titrants
Auxiliary reagents
Calibration standards
Titer standards
Substances
User settings Language
Screen
Audio signal
Shortcuts
Keyboard
Values Blanks
Auxiliary values
Hardware Sensors
Pumps
Peripherals
Titration Stands
Auxiliary Instruments
Global settings System
User management
Analysis and resources behavior
Mainten. & Service MT-Service
Import / Export
Reset to factory settings
Titrator firmware history
Board firmware
Terminal
Board data
Drives
Burettes
Update
ManualThe menu Manual has the following submenus.
• Stirrer• Sensor• Burette• Pump• Auxiliary instrument
3.2.5 Specific user dialogues
3.2.5.1 Start Analysis
An analysis - whether it be a single or multiple determination - can be started on the titrator in severaldifferent ways:
• By choosing Start from the method editor.
• By choosing Start from the Homescreen.
• By using a shortcut (or direct shortcut) from the Homescreen.
• By choosing Start from the screen Series.

Design and function 13Compact Titrator
• By choosing Calibration or Titer from the screen Setup dialog (in order to start a calibration or titerdetermination).
The screen Start analysis is always the first screen to appear once you choose Start, Calibration, Sensortest or Titer or the corresponding shortcut.
Note• When a direct shortcut is activated, the screen Start analysis does not appear and the respective
method starts immediately, provided that the other settings allow this.
• The parameters for the previously used method or series appear in the screen Start analysis, so that thesame method can immediately be started again.
• Of course, all of the settings can also be adjusted prior to pressing Start. The type and number ofsettings displayed in the screenStart analysis depends on the type of analysis to be started and theresources used.
3.2.5.2 Online screen general titrations GT
The Online screen is displayed when an analysis or manual operation is being performed.The method ID of the current method or the type of manual operation is displayed in the title bar. In thenavigation bar below, the sample index, e.g. displayed as "Sample 2/5" (second of a total of five samples)and loop index, displayed as "Loop 1/3" (first of three loops) are shown. (The Loop index is only displayedif the method actually contains more than one loop). The navigation path is displayed in the navigation barwhile a manual operation is being performed. The remainder of the online dialog is divided into a graphicalarea (left) and a data area (right). During a titration or measurement, the graphical area displays themeasurement curve.The Online dialog for a titration of type GT contains the following buttons:
ResultsThe Results button is used to display the results and statistics for the analyzed samples after the analysis.
AxesYou can select the units for the horizontal and vertical axes from a list.
Measured valuesAs an alternative to the online dialog, you can use the Measured values button to display a table ofmeasured values during the analysis.
SamplesChoose Samples to change sample and series data.
SuspendYou can choose Suspend to displays the Suspending options dialog. You can save the series data or skipthe sample or loop. In this dialog, you also have the option to continue the analysis or to stop it definitely
Note• Depending on the type of method function being performed, the online dialog displays various data
such as measured values, remaining run times, volume dispensed, stirrer speed, duration of theanalysis, or temperature.

Installation14 Compact Titrator
4 Installation
4.1 Standard equipment
4.1.1 Scope of delivery
Part Order number G10S G20S G20SRondolino
Compact Titrator – • • •
Sample changer Rondolino TTL 51108500 - - •
Replacement burette (DV1020),complete 20 mL
51107502 • • •
External power supply(100...240 V)
30298362 • • •
Power cable (country-specific) – • • •
Protective cover for touchscreen 51105567 • • •
Titration stand without accessories 51109118 • • -
Spacing ring 23842 • • -
Clamping ring 25652 • • -
Threaded ring 25652 • • -
Cap (for titration stand) 51107608 • • -
Clamping screw 51109084 • • •
Electrode holder 51109059 - - •
Reduction for electrode holder 51109052 - - •
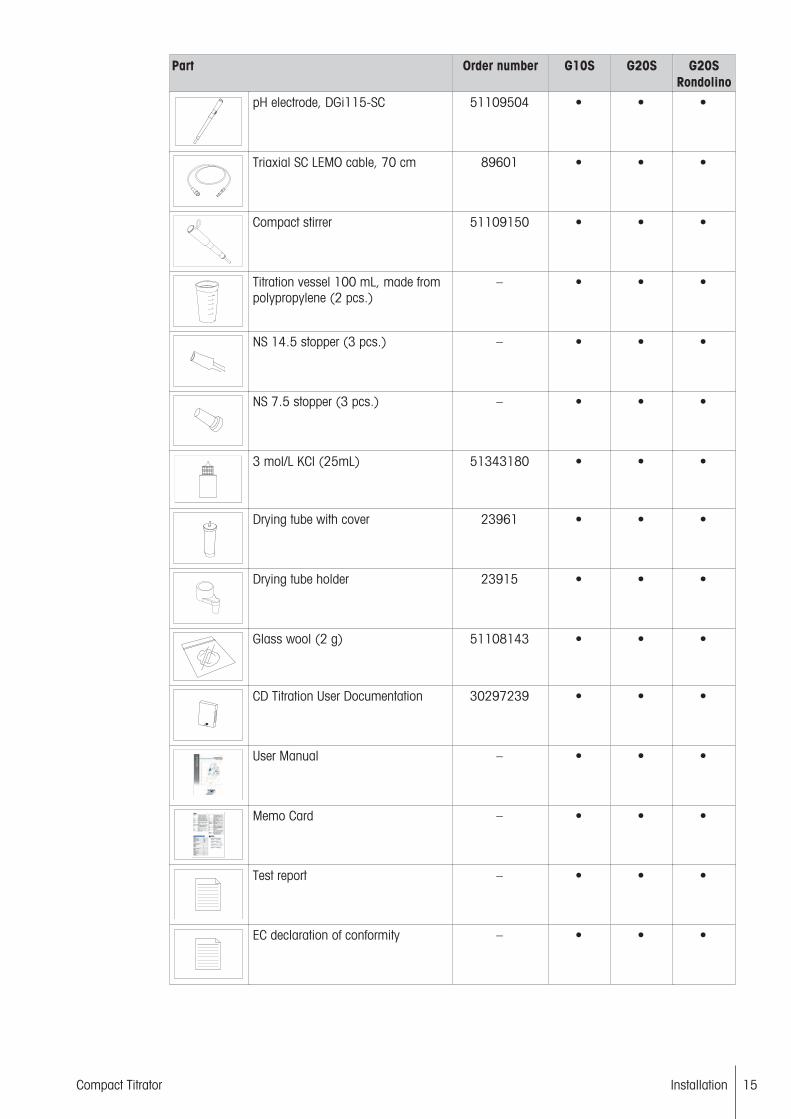
Installation 15Compact Titrator
Part Order number G10S G20S G20SRondolino
pH electrode, DGi115-SC 51109504 • • •
Triaxial SC LEMO cable, 70 cm 89601 • • •
Compact stirrer 51109150 • • •
Titration vessel 100 mL, made frompolypropylene (2 pcs.)
– • • •
NS 14.5 stopper (3 pcs.) – • • •
NS 7.5 stopper (3 pcs.) – • • •
3 mol/L KCl (25mL) 51343180 • • •
Drying tube with cover 23961 • • •
Drying tube holder 23915 • • •
Glass wool (2 g) 51108143 • • •
CD Titration User Documentation 30297239 • • •
User Manual – • • •
Memo Card – • • •
Test report – • • •
EC declaration of conformity – • • •
Installation16 Compact Titrator
4.1.2 Unpack the titrator1 Remove the titrator (and accessories) from the protective packing material.2 Store the packing material for later transport over long distances.3 Check if you received all parts listed in the scope of delivery.4 Inspect the parts visually for flaws or damage.5 If parts are missing or damaged, report it immediately and file a freight claim if needed.
4.1.3 Position the titratorThe instrument has been developed for indoor operation in a well-ventilated area. The following siterequirements apply:• The ambient conditions are within the limits specified in the technical data.• No powerful vibrations• No direct sunlight• No corrosive gas atmosphere• No explosive atmosphere• No powerful electric or magnetic fields
4.1.4 Connect the titrator to the power supply
WARNINGDanger of death or serious injury due to electric shock!Contact with parts that contain a live current can lead to injury and death.1 Only use a METTLER TOLEDO power cable and AC adapter designed for your
instrument.2 Connect the power cable to a grounded power outlet.3 Keep all electrical cables and connections away from liquids.4 Replace damaged power cables and AC adapters immediately.
NOTICEDanger of damage to the AC adapter due to overheating!If the AC adapter is covered or in a container, it is not sufficiently cooled and overheats.1 Do not cover the AC adapter.2 Do not put the AC adapter in a container.
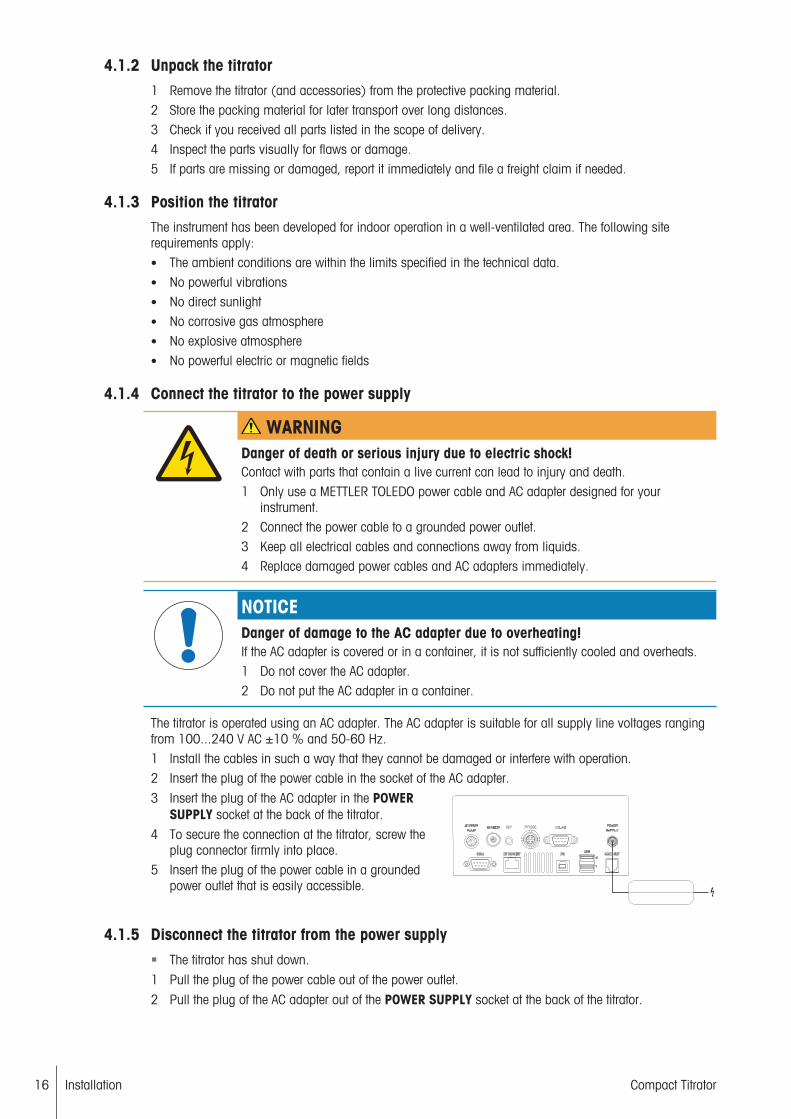
The titrator is operated using an AC adapter. The AC adapter is suitable for all supply line voltages rangingfrom 100...240 V AC ±10 % and 50-60 Hz.1 Install the cables in such a way that they cannot be damaged or interfere with operation.2 Insert the plug of the power cable in the socket of the AC adapter.
3 Insert the plug of the AC adapter in the POWERSUPPLY socket at the back of the titrator.
4 To secure the connection at the titrator, screw theplug connector firmly into place.
5 Insert the plug of the power cable in a groundedpower outlet that is easily accessible.
4.1.5 Disconnect the titrator from the power supply
§ The titrator has shut down.
1 Pull the plug of the power cable out of the power outlet.
2 Pull the plug of the AC adapter out of the POWER SUPPLY socket at the back of the titrator.
Installation 17Compact Titrator
4.1.6 Install the titration stand
4.1.6.1 Attach the titration stand to the titrator
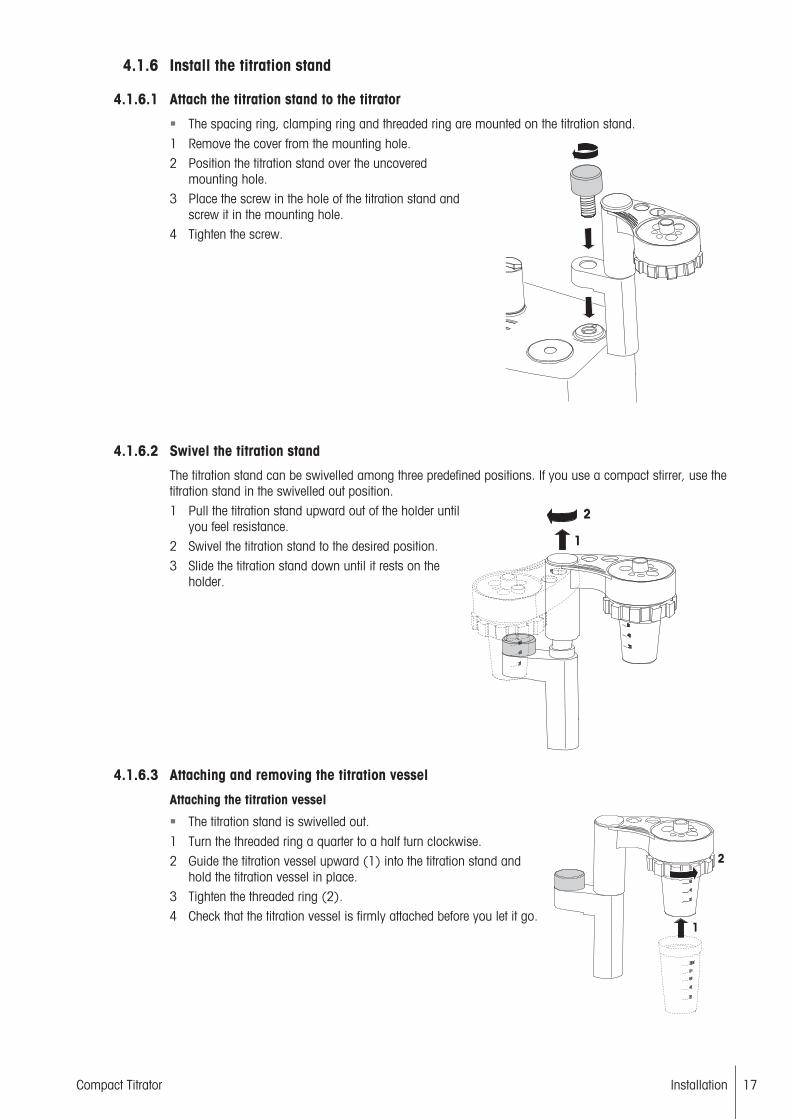
§ The spacing ring, clamping ring and threaded ring are mounted on the titration stand.
1 Remove the cover from the mounting hole.2 Position the titration stand over the uncovered
mounting hole.3 Place the screw in the hole of the titration stand and
screw it in the mounting hole.4 Tighten the screw.
4.1.6.2 Swivel the titration stand
The titration stand can be swivelled among three predefined positions. If you use a compact stirrer, use thetitration stand in the swivelled out position.1 Pull the titration stand upward out of the holder until
you feel resistance.2 Swivel the titration stand to the desired position.3 Slide the titration stand down until it rests on the
holder.
4.1.6.3 Attaching and removing the titration vessel
Attaching the titration vessel
§ The titration stand is swivelled out.
1 Turn the threaded ring a quarter to a half turn clockwise.2 Guide the titration vessel upward (1) into the titration stand and
hold the titration vessel in place.3 Tighten the threaded ring (2).4 Check that the titration vessel is firmly attached before you let it go.

Installation18 Compact Titrator
Removing the titration vessel
§ The titration stand is swivelled out.
1 Hold the titration vessel with one hand.2 Turn the threaded ring a quarter to a half turn clockwise (1).3 Pull the titration vessel downward (2) out of the titration stand.
4.1.6.4 Recommended positions for sensors, tubes and stirrers
1 Dispensing tube
1
2
3
46
7
8
5
2 Sensor
3 Sensor or rinsing unit
4 Sensor
5 Compact stirrer
6 Dispensing tube
7 Sensor
8 Dispensing tube
4.1.7 Connect the compact stirrer1 Insert the compact stirrer into the correct opening in
the titration stand.2 Shut down the titrator.
3 Plug the compact stirrer into the STIRRER PUMPsocket on the rear of the titrator.
4 Start up the titrator.ð The titrator detects the connected compact stirrer.
Installation 19Compact Titrator
4.1.8 Connect the measuring electrode
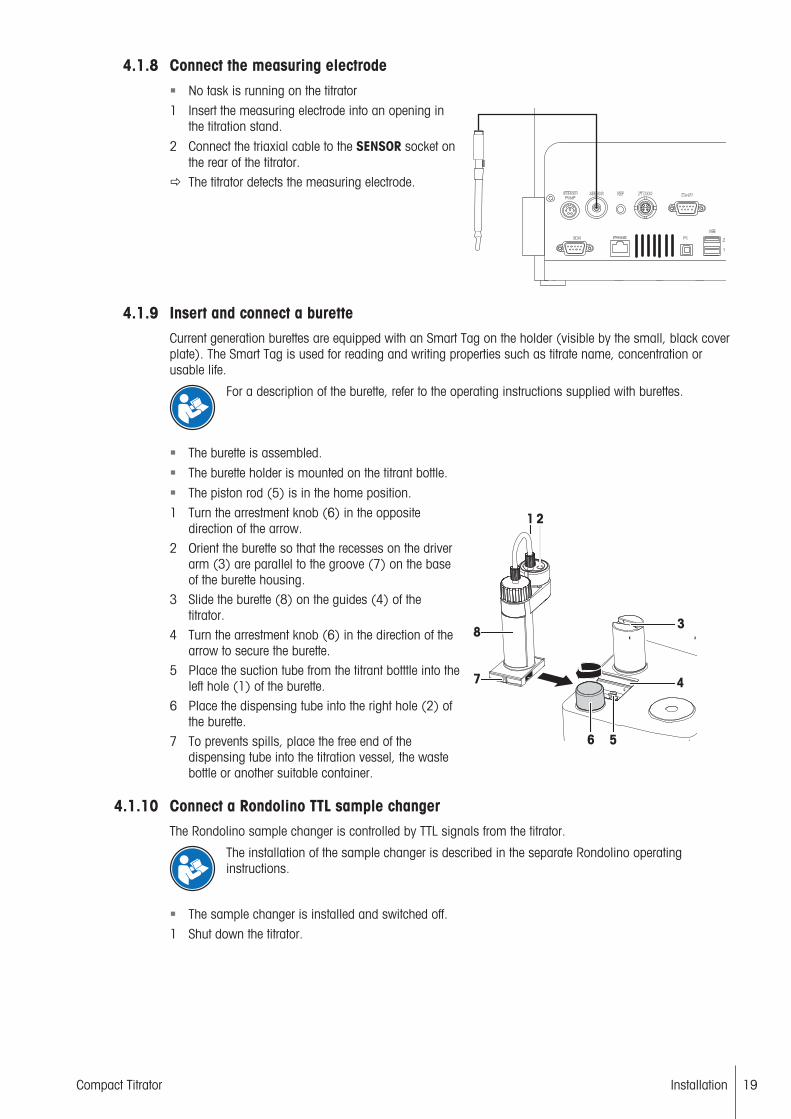
§ No task is running on the titrator
1 Insert the measuring electrode into an opening inthe titration stand.
2 Connect the triaxial cable to the SENSOR socket onthe rear of the titrator.
ð The titrator detects the measuring electrode.
4.1.9 Insert and connect a buretteCurrent generation burettes are equipped with an Smart Tag on the holder (visible by the small, black coverplate). The Smart Tag is used for reading and writing properties such as titrate name, concentration orusable life.
For a description of the burette, refer to the operating instructions supplied with burettes.
§ The burette is assembled.
§ The burette holder is mounted on the titrant bottle.
§ The piston rod (5) is in the home position.
1 2
3
56
7 4
8
1 Turn the arrestment knob (6) in the oppositedirection of the arrow.
2 Orient the burette so that the recesses on the driverarm (3) are parallel to the groove (7) on the baseof the burette housing.
3 Slide the burette (8) on the guides (4) of thetitrator.
4 Turn the arrestment knob (6) in the direction of thearrow to secure the burette.
5 Place the suction tube from the titrant botttle into theleft hole (1) of the burette.
6 Place the dispensing tube into the right hole (2) ofthe burette.
7 To prevents spills, place the free end of thedispensing tube into the titration vessel, the wastebottle or another suitable container.
4.1.10 Connect a Rondolino TTL sample changerThe Rondolino sample changer is controlled by TTL signals from the titrator.
The installation of the sample changer is described in the separate Rondolino operatinginstructions.
§ The sample changer is installed and switched off.
1 Shut down the titrator.

Installation20 Compact Titrator
2 Plug the cable supplied with the sample changerinto the TTL-I/O socket on the sample changer.
3 Plug the cable into the TTL-I/Osocket on the rearpanel of the titrator.
4 Start up the titrator.5 Switch on the sample changer.ð The titrator automatically detects the sample
changer.
4.2 Optional equipment
4.2.1 Installing the solvent manager
1 Place the flat seal (7) on the opening of the bottle.2 Screw the solvent manager (5) onto the bottle.3 Loosen the threaded sleeve (3) on the solvent manager (5).4 Push the thin end of the suction tube (1) through the threaded
sleeve (3), so that it is just below the screw top.5 Tighten the threaded sleeve (3).6 Fill a drying tube (4) with molecular sieve.7 Press the drying tube (4) into the appropriate opening of the solvent
manager.8 With a silicone tube (167 mm) (2), connect the drying tube (4) of the
bottle to the appropriate adapter of the solvent manager.9 To ensure that the system has no leaks, check all tubes and closing
points for firm seating.
4.2.2 Connecting the solvent managerThe installation of the solvent manager is described in the solvent manager kit installation manual. Thefollowing describes how to connect the solvent manager to the titrator on its own or in combination with thecompact stirrer.

Installation 21Compact Titrator
Connecting only the solvent manager
1 Turn the titrator off.2 Plug the cable supplied with the
solvent manager into the "STIRRERPUMP" socket on the rear of thetitrator.
3 Turn the titrator on.ð The titrator automatically detects the
solvent manager.
ME-51109889
PUMP STIRRER
Connecting the solvent manager and a compact stirrer
Note• Correct functionality will only be provided if you use a Y cable "ME - 51109889" with Index C or higher
(cable included in solvent manager kit).1 Turn the titrator off.2 Connect the Y cable to the "STIRRER / PUMP" socket on the rear of the titrator.3 Connect the "PUMP" connection of the Y cable to the solvent manager.4 Connect the "STIRRER" connection of the Y cable to the compact stirrer.5 Turn the titrator on.ð The titrator automatically detects the solvent manager and the compact stirrer.
Operating the instrument22 Compact Titrator
5 Operating the instrument
5.1 Start up the titrator and shut down the titratorThe power button is fitted with an LED and mounted on the front of the titrator. The LED indicates theoperating status.
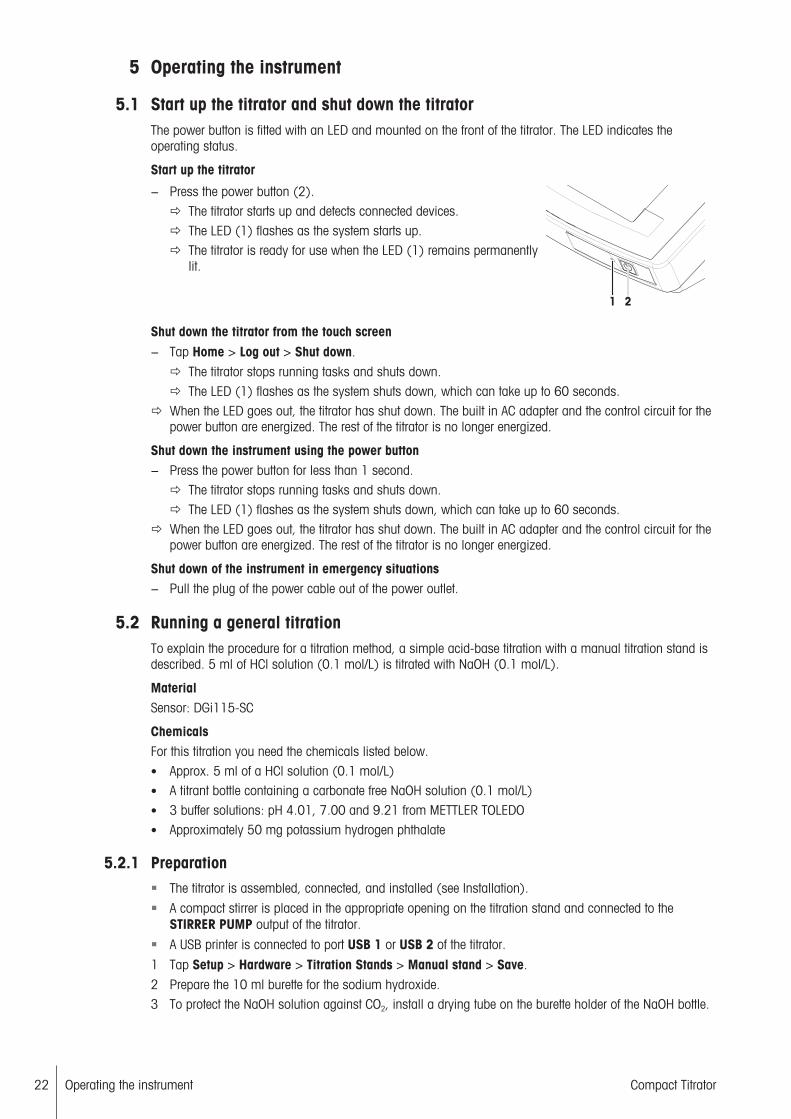
Start up the titrator
− Press the power button (2).ð The titrator starts up and detects connected devices.ð The LED (1) flashes as the system starts up.ð The titrator is ready for use when the LED (1) remains permanently
lit.
1 2
Shut down the titrator from the touch screen− Tap Home > Log out > Shut down.
ð The titrator stops running tasks and shuts down.ð The LED (1) flashes as the system shuts down, which can take up to 60 seconds.
ð When the LED goes out, the titrator has shut down. The built in AC adapter and the control circuit for thepower button are energized. The rest of the titrator is no longer energized.
Shut down the instrument using the power button− Press the power button for less than 1 second.
ð The titrator stops running tasks and shuts down.ð The LED (1) flashes as the system shuts down, which can take up to 60 seconds.
ð When the LED goes out, the titrator has shut down. The built in AC adapter and the control circuit for thepower button are energized. The rest of the titrator is no longer energized.
Shut down of the instrument in emergency situations− Pull the plug of the power cable out of the power outlet.
5.2 Running a general titrationTo explain the procedure for a titration method, a simple acid-base titration with a manual titration stand isdescribed. 5 ml of HCl solution (0.1 mol/L) is titrated with NaOH (0.1 mol/L).
MaterialSensor: DGi115-SC
ChemicalsFor this titration you need the chemicals listed below.• Approx. 5 ml of a HCl solution (0.1 mol/L)• A titrant bottle containing a carbonate free NaOH solution (0.1 mol/L)• 3 buffer solutions: pH 4.01, 7.00 and 9.21 from METTLER TOLEDO• Approximately 50 mg potassium hydrogen phthalate
5.2.1 Preparation
§ The titrator is assembled, connected, and installed (see Installation).
§ A compact stirrer is placed in the appropriate opening on the titration stand and connected to theSTIRRER PUMP output of the titrator.
§ A USB printer is connected to port USB 1 or USB 2 of the titrator.
1 Tap Setup > Hardware > Titration Stands > Manual stand > Save.
2 Prepare the 10 ml burette for the sodium hydroxide.3 To protect the NaOH solution against CO2, install a drying tube on the burette holder of the NaOH bottle.
Operating the instrument 23Compact Titrator
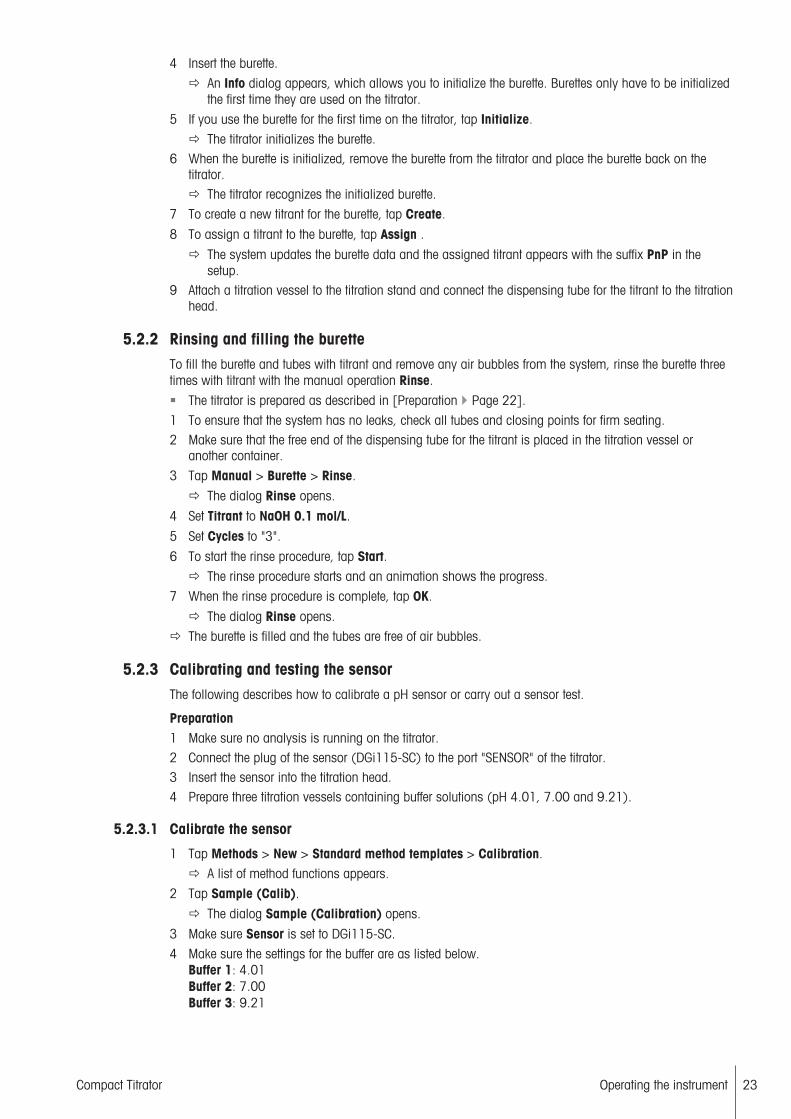
4 Insert the burette.
ð An Info dialog appears, which allows you to initialize the burette. Burettes only have to be initializedthe first time they are used on the titrator.
5 If you use the burette for the first time on the titrator, tap Initialize.
ð The titrator initializes the burette.6 When the burette is initialized, remove the burette from the titrator and place the burette back on the
titrator.ð The titrator recognizes the initialized burette.
7 To create a new titrant for the burette, tap Create.
8 To assign a titrant to the burette, tap Assign .
ð The system updates the burette data and the assigned titrant appears with the suffix PnP in thesetup.
9 Attach a titration vessel to the titration stand and connect the dispensing tube for the titrant to the titrationhead.
5.2.2 Rinsing and filling the buretteTo fill the burette and tubes with titrant and remove any air bubbles from the system, rinse the burette threetimes with titrant with the manual operation Rinse.
§ The titrator is prepared as described in [Preparation } Page 22].
1 To ensure that the system has no leaks, check all tubes and closing points for firm seating.2 Make sure that the free end of the dispensing tube for the titrant is placed in the titration vessel or
another container.
3 Tap Manual > Burette > Rinse.
ð The dialog Rinse opens.
4 Set Titrant to NaOH 0.1 mol/L.
5 Set Cycles to "3".
6 To start the rinse procedure, tap Start.ð The rinse procedure starts and an animation shows the progress.
7 When the rinse procedure is complete, tap OK.
ð The dialog Rinse opens.
ð The burette is filled and the tubes are free of air bubbles.
5.2.3 Calibrating and testing the sensorThe following describes how to calibrate a pH sensor or carry out a sensor test.
Preparation1 Make sure no analysis is running on the titrator.2 Connect the plug of the sensor (DGi115-SC) to the port "SENSOR" of the titrator.3 Insert the sensor into the titration head.4 Prepare three titration vessels containing buffer solutions (pH 4.01, 7.00 and 9.21).
5.2.3.1 Calibrate the sensor
1 Tap Methods > New > Standard method templates > Calibration.
ð A list of method functions appears.
2 Tap Sample (Calib).ð The dialog Sample (Calibration) opens.
3 Make sure Sensor is set to DGi115-SC.
4 Make sure the settings for the buffer are as listed below.Buffer 1: 4.01Buffer 2: 7.00Buffer 3: 9.21

Operating the instrument24 Compact Titrator
5 Tap OK > Saveð The new method is saved in the method list, with the next free ID and with the title Calibration.
6 Tap Start.ð The dialog Start analysis opens.
7 To ensure that the system has no leaks, check all tubes and closing points for firm seating.
8 Tap Start.ð The system asks you to attach the titration vessel with sample 1 to the titration arm.
9 Attach the titration vessel with the buffer solution with pH 4.01 to the titration arm and tap OK.
ð The measurement starts after the stirring time.ð During the measurement the online screen displays the time, the measured value in [mV] and a
curve.ð During the calibration, the system will output a record on the printer.ð When the measurement is completed, the system asks you to attach the titration vessel with the next
sample to the titration arm.10 Remove the titration vessel from the titration arm.11 Rinse the electrode with deionized water.12 Repeat the last 3 steps for the buffer solution with pH 7.00 and the buffer solution with pH 9.21.
ð When the calibration is completed, the calibration data is automatically copied to the setup.
5.2.3.2 Test the pH-sensor
1 Tap Methods > New > Standard method templates > Sensor test.ð A list of method functions appears.
2 Tap Sample (Calib).ð The dialog Sample (Calibration) opens.
3 Make sure Sensor is set to DGi115-SC.
4 Make sure the settings for the buffer are as listed below.Buffer 1: 4.01Buffer 2: 7.00Buffer 3: 9.21
5 Tap OK > Saveð The new method is saved in the method list with the next free ID and with the title Sensor test.
6 Tap Start.ð The dialog Start analysis opens.
7 To ensure that the system has no leaks, check all tubes and closing points for firm seating.
8 Tap Start.ð The system asks you to attach the titration vessel with sample 1 to the titration arm.
9 Attach the tiration vessel with the buffer solution with pH 4.01 to the titration arm and tap OK.
ð The measurement starts after the stirring time.ð During the measurement the online screen displays the time, measurement in [mV] and the curve.ð During the pH-sensor test, the system will output a record on the printer.ð When the measurement is completed, the system asks you to attach the titration vessel with the next
sample to the titration arm.10 Remove the titration vessel from the titration arm.11 Rinse the electrode with deionized water.12 Repeat the last 3 steps for the buffer solution with pH 7.00 and the buffer solution with pH 9.21.
ð When the pH-sensor test is completed, the data is automatically copied to the setup.
5.2.4 Determining the titer1 Weigh about 50 mg of potassium hydrogen phthalate and dissolve it in a titration vessel containing
deionized water.

Operating the instrument 25Compact Titrator
2 Tap Methods > New > Standard method template > Titer with EQP.
ð A list of method functions appears.
3 Tap Sample (Titer).4 Set the parameter Entry to Before and tap OK.
5 Tap Titration (EQP) > Termination.
6 Activate After number of recognized EQPs, set Number of EQPs to 1 and tap OK.
7 To exit the method function, tap OK8 To save the new method, tap Save.
9 To ensure that the system has no leaks, check all tubes and closing points for firm seating.
10 Tap Start.ð The Start analysis dialog opens.
11 Enter the sample size.
12 Tap Start.ð The titer determination begins.ð The titrator asks you to add sample 1/1.
13 Attach the titration vessel with potassium hydrogen phthalate solution to the titration head and tap OK.
ð The titration starts after the stirring time.ð During the titer determination, the online screen displays the measured pH values over the titrated
volume in [mL].ð After the titer determination is completed, the titer is copied to the setup.
14 After the titer determination is completed, rinse the sensor with deionized water.
5.2.5 Run an EQP titration
5.2.5.1 Prepare the sample
1 Fill 5 ml HCl (0.1 mol/L) into a titration vessel and dilute it with approx. 50 mL deionized water.2 Attach the titration vessel to the titration arm.
5.2.5.2 Configure the method
1 Tap Methods > New > Standard method template > EQP.
2 Tap Title.
3 Enter a title for the new method in the field Title and tap OK.
4 Tap Sample.
5 In the parameter ID 1 enter your choice of ID for the sample to be analyzed.
6 Set Entry type to Volume.
7 Set Lower limit to 6.0 mL.
8 Set Upper limit to 50.0 mL.
9 Set Entry to Before and tap OK.
10 Tap Titration (EQP) > Termination.
11 Activate the parameter After number of recognized EQPs, set Number of EQPs to 1 and tap OK.
12 To exit the method function, tap OK.
13 Tap Calculation R1.
14 Tap Result proposals.
15 Select the result Content with the unit mol/L.
ð The main parameters in the method function Calculation R1 are filled in automatically.
16 Set M [g/mol] to Hydrochloric acid and tap OK.
17 Tap Calculation R2.
18 Tap Delete.
19 Tap Save.

Operating the instrument26 Compact Titrator
5.2.5.3 Create an indirect shortcut
1 Tap Start.ð The Start analysis window opens.
2 Tap AddToHome.
ð The Shortcut parameters window opens.
3 Enter a name for the shortcut in Description.
4 Make sure Immediate start is deactivated.
5 Tap Save.
ð The home screen with the new shortcut opens.
5.2.5.4 Perform the analysis
1 To ensure that the system has no leaks, check all tubes and closing points for firm seating.2 Select the shortcut on the home screen.
ð The dialog Start analysis opens.
3 In the parameter Enter sample size enter the sample size.
4 Tap Start.ð You are prompted to add the sample.
5 If the titration vessel is not attached to the titration arm, attach the titration vessel containing the HClsolution to the titration arm and tap OK.
ð The titration starts after the pre-stirring period.ð During the titration, the screen displays the measured pH values over the titrated volume in [mL].ð After the titration, a record is printed.ð All results are saved.
6 After the titration, rinse the sensor with deionized water.
7 To view the saved result, tap Home > Results.
5.3 Creating and handling Shortcuts• Shortcuts (1, 2) can be created for methods,
series templates and manual operations.• With a shortcut (1) it is possible to access the
dialog Start analysis with one tap on thehomescreen.
• With a shortcut (2) it is possible to start amethod, series or manual operation with one tapon the homescreen.
• The number of shortcuts depends on the type oftitrator. If more than 12 shortcuts can becreated, they can be placed on two screens. Tap(3) to switch between these two screens.
• Each user can manage the shortcuts that he hascreated in the instrument setup.
Home
Methods
Seriestemplates
Results
Setup
Manual
Tasks
StartUser dataLog out
1 2
3
Types of shortcuts
Method
Sample Series

Operating the instrument 27Compact Titrator
Manual operation
Creating a shortcut1 Select Methods and choose your method category.
2 Create a new method or choose an existing method in the list.
3 Tap Start.ð The Start analysis dialog opens. You can change some parameters or add some information to this
method.
4 Tap AddToHome to create a shortcut.
5 Define the shortcut parameters.
6 Tap Save.
ð The shortcut is now set on the homescreen.
Deleting a shortcut1 Select Setup > User settings > Shortcuts.
2 Select the shortcut which you want to delete in the list.
3 Tap Delete.
ð The shortcut is deleted.
Changing an existing shortcut§ At least one shortcuts has been created.
1 Tap Setup > User settings > Shortcuts.
ð A list of existing shortcuts opens.2 Tap the shortcut you want to change.
3 If needed, change the settings for Description and Immediate start.4 To change the position of the shortcut on the homescreen, tap .
ð A dialog opens that shows the free positions and the occupied positions on the homescreen.5 Tap on the free position, where the shortcut should be placed.
ð The dialog closes.
6 To save the settings, tap Save.
Parameters Description ValuesType Shows the type of action the shortcut stands for. Method | Series |
Manual operation
Description Any name for the shortcut. Arbitrary
Immediate start The method, series, or manual operation can be startedimmediately. This enables you to start the analysis without anyinterfering dialog.
Activ | Inactive
Homescreenposition
Defines the position of the shortcut on the homescreen. -
Created by Shows the name of the user who created the shortcut. -
5.4 Creating MethodsYou create a new method by changing the parameters of a delivered method template and saving it under anew method ID.
Navigation: Home > Methods1 Tap New to create a new method on the basis of a template.
2 From the available templates, in Mettler method templates or Standard method templates, choose theone that is most similar to the method you wish to create.ð You can now modify this method in line with your requirements by inserting or removing method
functions or modifying its parameters.

Operating the instrument28 Compact Titrator
3 In the method function Title, enter a new method ID. Afterwards, a new method will be stored under thismethod ID.
4 Assign a title to your new method.5 Select available method functions to modify their parameters in line with your requirements.
6 Tap Insert to add additional method functions to the template.
7 Now use the arrow-shaped button to select the required position for the new method function in themethod. (You will only be able to insert the method functions that are allowed in the correspondinglocation based on the method syntax.)
8 From the list, select the method function that you want to insert.9 Modify the individual parameters of the method function in line with the resources.
ð The new method function appears in the method.
10 To delete a method function, select the function in question and then tap Delete.
ð The method function disappears from the method.
11 After inserting all required method functions, tap Save.
ð The method is saved under the method ID and appears in the list of available methods.
Note• When establishing a new method, follow the rules specified by the instrument.
5.5 Modifying or Deleting MethodsYou can change user methods or Mettler methods and store them under new method IDs.
Note• Once a Mettler method has been modified, you will only be able to save it as a copy (or as a user
method) with a new method ID.
Navigation: Home > Methods1 From the displayed list of methods, select the method that you want to modify.2 As soon as the methods functions of the selected method appear on the screen, you can modify the
method.
3 In the method function Title, enter a new method ID. Afterwards, a new method will be stored under thismethod ID. You can enter up to twenty alphanumeric characters.
4 Select available method functions to modify their parameters in line with your requirements.
5 Choose Insert to add additional method functions to the template.
6 Now use the arrow-shaped Insert button to select the required position for the new method function inthe method. (You will only be able to insert the method functions that are allowed in the correspondinglocation based on the method syntax.)
7 From the list, select the method function that you want to insert.8 Modify the individual parameters of the method function.ð The new method function appears in the method.
1 To delete a method function, select the function in question and then choose Delete.
2 After you have made all of the necessary adjustments, you can store the method in the titrator bychoosing Save.
Deleting MethodsYou can easily delete user-defined methods from the titrator. Select:
Navigation: Home > Methods1 Select the method that you want to delete.
2 Choose Delete method to delete the method from the titrator's memory.
5.6 Starting MethodsThe titrator offers various ways of starting a method:• From the method editor
• By choosing Start from the Home dialog

Operating the instrument 29Compact Titrator
• By using a shortcut on the Home screen
• Via the Series dialog
• By using the Setup dialog (to perform a calibration or titer determination)
You can use the method editor to start any method stored in the titrator.
1 From the displayed list in the Methods dialog, select the method that you wish to start (Home >Methods).
2 As soon as the method functions of the selected method appear on the screen, you can open the Startanalysis screen by choosing Start.
3 Choose Start again to reach an overview screen on the resources required for the method. (Only if thiswas defined in the analysis sequence settings.)
4 To execute the method, confirm the screen by choosing OK.
5.7 Stop methods
5.7.1 Suspending or stopping an analysis
1 Tap Suspend (1) to suspend the currentanalysis.
ð The dialog Suspending options opens.
Time remaining
SuspendSamples
Tasks
1
Speed
Results
Stir
2 Tap Save series data (1) to save the currentsample series. Only the completed samples willbe saved.ð If the maximum permitted number of series
has been reached, the series is not saved.ð Sample data from a method that is waiting in
a queue can be saved by selecting Suspend> Save series data.
3 Tap Skip sample (2) to skip the current sampleand continue with the next sample of the series.
ð The current sample is marked in Results asExcl..
4 Tap Skip loop (3) to skip the loop and continuewith the next loop of the series.
ð The loop is marked in Results as Excl..5 Tap Continue (4) to continue with the current
sample.
6 Tap Stop definitely (5) to stop the currentmethod.
Save series data
Continue Stopdefinitely
Tasks
1
2
3
4
Suspending options
Skip sample
Skip loop
5
Note• If a Calib. loop is skipped, the analysis continues in accordance with the corresponding method
function Calibration.
• If required, it is possible to include a skipped sample (Excl.) into a statistic manually in the dialogResults.

Operating the instrument30 Compact Titrator
5.7.2 Suspending of ongoing analysis by the titratorThe titrator can interrupt an analysis that is in progress for the following reasons:• Exceeding the specified termination parameter "Termination" for the methods "titration (EQP) and
titration (EP)".• Due to end or equivalent points not being found during learn titrations.
If no end or equivalent points are found during a learn titration an error message appears and theanalysis is interrupted. You have the option of either canceling the titration or continuing after filling anew burette.
5.8 Customizing touch screen and signalsNavigation: Setup > User settings
5.8.1 Changing the languageIn the menu Language you can set the language of the touch screen and the language for printing.
1 Tap Setup > User settings > Language.
2 Customize the settings.
3 To save the settings, tap Save.
Parameters Description ValuesTouchscreen Defines the language for operation of the terminal. German | English |
French | Italian |Spanish | Portuguese |Chinese | Russian |Polish | Korean
Record Defines the language in which the reports are to be printed out. German | English |French | Italian |Spanish | Portuguese |Chinese | Russian |Polish | Korean
5.8.2 Changing the screen settingsIn the menu Screen you can customize following features.
• The color of the status bar, the borders and the buttons.• The brightness of the touch screen.• Activate or deactivate the screen saver and set the time before the screen saver is activated.
1 Tap Setup > User settings > Screen.
2 Customize the settings.
3 To save the settings, type Save.
Parameters Description ValuesPrimary color Here various color schemes for the user interface can be
selected.Gray | Blue | Green |Red
Brightness Specifies the display brightness in [%]. 50 | 60 | 70 | 80 |90 | 100 [%]
Screen saver Here you can define whether the screen saver should be used. Activ | Inactive
Wait time Defines how long in [min] the system should wait after theuser's last action on the terminal before activating the screensaver.
1…1000
5.8.3 Configuring the audio-signalsIn the menu Audio signal you can define if a tap on a button is confirmed by a beep.
1 Tap Setup > User settings > Audio signal .2 Customize the settings.

Operating the instrument 31Compact Titrator
3 To save the settings, type Save.
Parameters Description ValuesAt push of abutton
Enables a beep when tapping on the touch screen. Activ | Inactive
5.8.4 Configuring the keyboardsIn the menu Keyboards you can set the layout of the alphanumeric and the numeric keyboards.
1 Tap Setup > User settings > Keyboards.
2 Customize the settings.
3 To save the settings, type Save.
Parameters Description ValuesABC keyboard Determines the layout of the alphanumeric input field. English | French |
German
123 keyboard Defines the organization of the keys for the numeric input field. Calculator | Phone

Methods32 Compact Titrator
6 MethodsTo carry out an analysis with the titrator, you require a method. A method is an analysis program andconsists of a sequence of method functions (some with method subfunctions), which are processed by thetitrator in sequence.In this chapter, you will learn how to access and define methods.The basic building blocks of a titration method consist of sample preparation, stirring and wait times, theactual titration, result calculation and a record. The titrator defines these partial steps as functions thatconsist of parameters whose values can be changed.
LoopsWithin a method you can define one loop, which can run the series analysis n-times. (see Method Syntax -Rules for Creating a Method").The beginning and end of a sample loop are defined by the method functions "Sample" and "End ofSample". The "End of Sample" method function is executed, and the sample loop stopped, only after the lastsample in a series.There are the following loop types:
• A sample loop is for analyzing a sample.
• A calibration loop is for calibrating a sensor.
• A titer loop is for determining the titer of a titrant.
Types of MethodsThe titrator distinguishes between the following method types with different objectives:
• GTGTMethod for general titration (contains only sample loops or mixed loops)
• Calibrationmethod for sensor calibration (contains only calibration loops).
• TiterMethod for titer determination, contains only titer loops
Predefined methods• Mettler method templates
A number of methods have already been stored in the instrument. These methods were developed byMETTLER TOLEDO for specific uses and can be used for the corresponding analysis.
• Standard method templatesWhen creating methods you can revert to method templates, which specify the structure of the method,and whose parameters already contain the most suitable default values.
Method IDYou can distinguish between different types of method and individual methods of the same type using theirID:• Each method has its own unique method identification.• The method ID of the Mettler methods is composed of the starting letter "M" followed by a sequential
number (M001, M002, …). However, the method ID can be freely chosen when you save a method.
6.1 Method templates
6.1.1 Standard method templatesWhen you create a new method, the method templates prescribe the sequence of the method functions.These method templates are not application-specific, but are dependent on the type of titrator. They allowthe user to establish user methods quickly and easily. Most of the settings in the method functions thatoccur in a standard method already have default values.To convert a method template into a user method, it has to be saved under a method ID.
Title Description Method typeEQP Equivalence point titration General titration
EP End point titration General titration
Methods 33Compact Titrator
Measure Is used for the controlled transfer of a sensormeasuring value.
General titration
Lern-EQP Is used to determine the best parameters forcarrying out an EQP titration.
General titration
Titer with EQP Titer determination by EQP titration Titer determination
Titer with EP Titer determination by EP titration Titer determination
Calibration Sensor calibration (linear regression for allmeasurement points)
Calibration
Segmented calibration Sensor calibration, taking into account non-linearsensor behavior
Calibration
Blank with EQP Blank value determination of a solvent using theequivalence point titration
General titration
Blank with EP Blank value determination of a solvent using theend point titration
General titration
pH Sensor test To check the slope, zero point and drift of pH-sensors.
Calibration
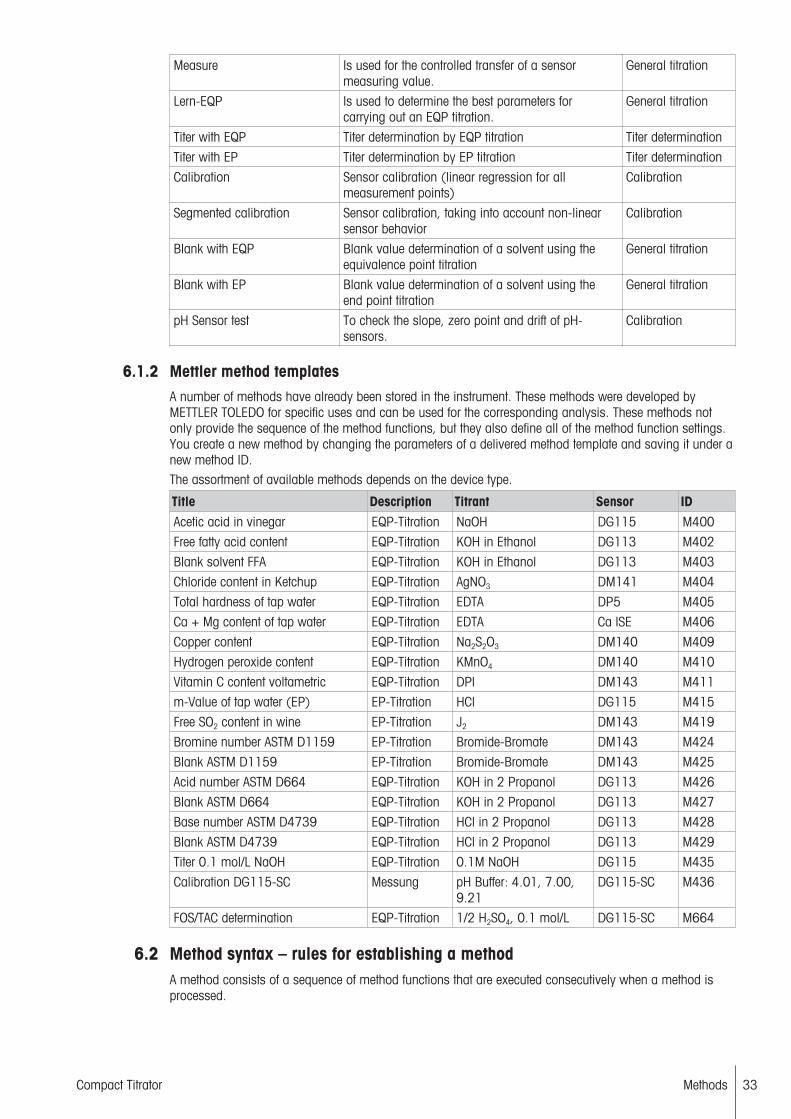
6.1.2 Mettler method templatesA number of methods have already been stored in the instrument. These methods were developed byMETTLER TOLEDO for specific uses and can be used for the corresponding analysis. These methods notonly provide the sequence of the method functions, but they also define all of the method function settings.You create a new method by changing the parameters of a delivered method template and saving it under anew method ID.The assortment of available methods depends on the device type.
Title Description Titrant Sensor IDAcetic acid in vinegar EQP-Titration NaOH DG115 M400
Free fatty acid content EQP-Titration KOH in Ethanol DG113 M402
Blank solvent FFA EQP-Titration KOH in Ethanol DG113 M403
Chloride content in Ketchup EQP-Titration AgNO3 DM141 M404
Total hardness of tap water EQP-Titration EDTA DP5 M405
Ca + Mg content of tap water EQP-Titration EDTA Ca ISE M406
Copper content EQP-Titration Na2S2O3 DM140 M409
Hydrogen peroxide content EQP-Titration KMnO4 DM140 M410
Vitamin C content voltametric EQP-Titration DPI DM143 M411
m-Value of tap water (EP) EP-Titration HCl DG115 M415
Free SO2 content in wine EP-Titration J2 DM143 M419
Bromine number ASTM D1159 EP-Titration Bromide-Bromate DM143 M424
Blank ASTM D1159 EP-Titration Bromide-Bromate DM143 M425
Acid number ASTM D664 EQP-Titration KOH in 2 Propanol DG113 M426
Blank ASTM D664 EQP-Titration KOH in 2 Propanol DG113 M427
Base number ASTM D4739 EQP-Titration HCl in 2 Propanol DG113 M428
Blank ASTM D4739 EQP-Titration HCl in 2 Propanol DG113 M429
Titer 0.1 mol/L NaOH EQP-Titration 0.1M NaOH DG115 M435
Calibration DG115-SC Messung pH Buffer: 4.01, 7.00,9.21
DG115-SC M436
FOS/TAC determination EQP-Titration 1/2 H2SO4, 0.1 mol/L DG115-SC M664
6.2 Method syntax – rules for establishing a methodA method consists of a sequence of method functions that are executed consecutively when a method isprocessed.

Methods34 Compact Titrator
Method functions can be located within a loop or outside of a loop. Method functions within a loop areperformed for each sample if the loop contains more than one sample. Method functions outside of a loopare only performed once.
As an example, the list below shows the method functions for the standard method template Measure(normal).• Title• Sample• Titration stand (Manual stand)• Stir• Measure (normal)• Calculation R1• End of sample• RecordThe method function Sample marks the beginning of the loop and the method function End of samplemarks the end of the loop. This means, that if this loop contains two samples, the method functionsSample, Titration stand (Manual stand), Stir, Measure (normal) and Calculation R1 are performed foreach sample. The method function End of sample is performed, after the second sample is analysed. Theloop is stopped and the method function Record is performed.
The number of loops and method functions allowed in a method differs depending on the method type andtitrator type. When establishing a method, certain rules (method syntax) must be followed. These funda-mental rules are described below.
6.2.1 Types and possible numbers of loopsThe following table shows the maximum number of loops, the maximum numbers of method functions andthe allowed loop types for the different types of titrators and method types.
Method type Permissible looptypes
Maximum numberof loops per
method
Maximum number of method functionsper method
G10S G20S
General titration Sample loopTiter loopCalibration loop
1 10 12
Titer Titer loop 1 10 12
Calibration Calibration loop 1 10 12
6.2.2 Possible numbers of method functionsThe following table shows the maximum number of method functions that can be used within a method.
Method function Max. number method functions
Title 1
Sample 1
Sample (Titer) 1
Sample (Calibration) 1
Titration stand 1
Pump 1
Stir 2
Dispense (normal) 1
Measure (normal) 1
Titration (EP) 2
Titration (EQP) 2
Titration (Learn EQP) 2
Calculation 3

Methods 35Compact Titrator
Method function Max. number method functions
End of sample 1
Titer 1
Calibration 1
Auxiliary value 1
Blank 1
Auxiliary instrument 2
Drain 1
Record 2
6.2.3 Method functions within a loopThe method functions that are permitted within a loop are limited and depend on the loop type. Follow therules listed below when you place a method function within a loop.
• One method function Titration stand must appear immediately after the loop-initializing functionsSample, Sample (Calib) or Sample (Titer). Additional method functions Titration stand can be usedin other position within the loop.
• The method function Record must be inserted after the method function that generates the results therecord should contain.
• The method function Calculation must be inserted after the method function that determines the rawresults for the calculation.
• A calibration loop must contain exactly one method function Measure (normal).• A titer loop must contain at least one method function titration.The table below shows the method functions allowed within a loop.
Method function General titration, Titer Calibration
Titration stand • •
Pump • •
Stir • •
Dispense (normal) • •
Measure (normal) • •
Titration (EP) • –
Titration (EQP) • –
Titration (Learn EQP) • –
Calculation • •
Auxiliary value • •
Blank • •
Auxiliary instrument • •
Drain • •
Record • •
6.2.4 Method functions outside of a loopIn addition to the preset method function Title, which always appears at the start, additional methodfunctions can be inserted outside of a loop depending on the method type. Follow the rules listed belowwhen you place a method function outside of a loop.
• The method function Calibration must appear immediately after the method function End of sample of acalibration loop.
• The method function Titer must appear immediately after the method function End of sample of a titerloop.
Method function General titration, Calibration, Titer
Drain •

Methods36 Compact Titrator
Method function General titration, Calibration, Titer
Calculation •
Blank •
Dispense (normal) •
Auxiliary instrument •
Auxiliary value •
Calibration (position is fixed) •
Pump •
Record •
Titer (position is fixed) •
6.3 Overview of Method functions
Method function Explanation Inside loop Outside loop
Title Title and characteristics of the method. No Yes
Sample Start of a sample loop. Start of loop
Sample (Titer) Start of a loop for titer determination Start of loop
Sample (Calibration) Start of a loop for sensor calibration. Start of loop
Titration stand Selects titration stand. Yes No
Pump Pumps a defined volume of a liquid. Yes Yes
Stir Activates a stirrer. Yes No
Dispense (normal) Dispenses a defined quantity of titrant. Yes Yes
Measure (normal) For the controlled acquisition of ameasured value from a sensor.
Yes No
Titration (EQP) Conducts an equivalence-point titration. Yes No
Titration (Learn EQP) Conducts an equivalence-point titrationto determine optimal settings for theparameters of an equivalence-pointtitration. Once the equivalence point isfound, the Titration (Learn EQP) istransformed into a Titration (EQP) withthe optimal parameters. If the analysishas more than one sample, thesubsequent samples are titrated andanalyzed with these optimal parameters.
Yes No
Titration (EP) Conducts an end-point titration. Yes No
Calculation Converts the analysis results. Yes Yes
End of sample Concludes a sample loop. End of loop
Titer Assigns the result of a titer sample loopto a titer.
No Yes
Calibration Assigns the result of a calibration loop toa sensor.
No Yes
Auxiliary value Assigns a result or an arbitrary value toan auxiliary value and updates the valuestored in Setup.
Yes Yes
Blank Assigns a result or an arbitrary value to ablank and updates the value stored inSetup.
Yes Yes
Auxiliary instrument Activates external auxiliary instruments. Yes Yes
Drain Drains a volume from the sample vessel. Yes Yes
Record Defines the record data to be output tothe printer.
Yes Yes
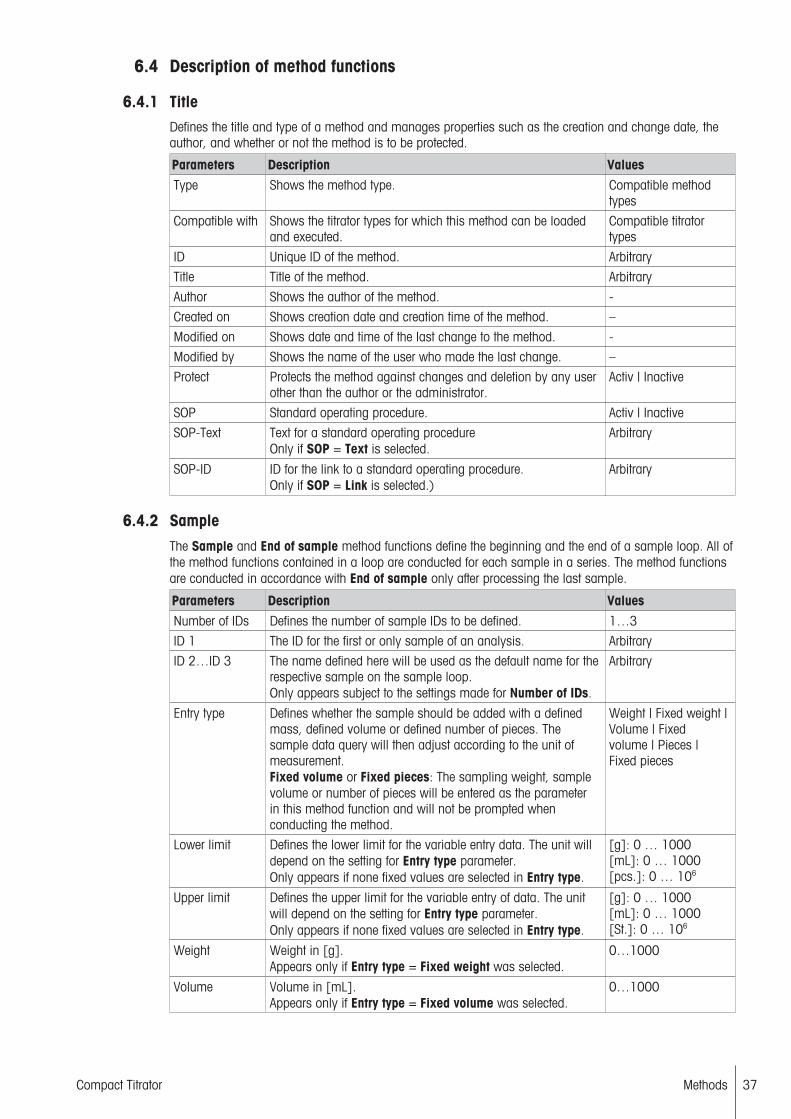
Methods 37Compact Titrator
6.4 Description of method functions
6.4.1 TitleDefines the title and type of a method and manages properties such as the creation and change date, theauthor, and whether or not the method is to be protected.
Parameters Description ValuesType Shows the method type. Compatible method
types
Compatible with Shows the titrator types for which this method can be loadedand executed.
Compatible titratortypes
ID Unique ID of the method. Arbitrary
Title Title of the method. Arbitrary
Author Shows the author of the method. -
Created on Shows creation date and creation time of the method. –
Modified on Shows date and time of the last change to the method. -
Modified by Shows the name of the user who made the last change. –
Protect Protects the method against changes and deletion by any userother than the author or the administrator.
Activ | Inactive
SOP Standard operating procedure. Activ | Inactive
SOP-Text Text for a standard operating procedureOnly if SOP = Text is selected.
Arbitrary
SOP-ID ID for the link to a standard operating procedure.Only if SOP = Link is selected.)
Arbitrary
6.4.2 SampleThe Sample and End of sample method functions define the beginning and the end of a sample loop. All ofthe method functions contained in a loop are conducted for each sample in a series. The method functionsare conducted in accordance with End of sample only after processing the last sample.
Parameters Description ValuesNumber of IDs Defines the number of sample IDs to be defined. 1…3
ID 1 The ID for the first or only sample of an analysis. Arbitrary
ID 2…ID 3 The name defined here will be used as the default name for therespective sample on the sample loop.Only appears subject to the settings made for Number of IDs.
Arbitrary
Entry type Defines whether the sample should be added with a definedmass, defined volume or defined number of pieces. Thesample data query will then adjust according to the unit ofmeasurement.Fixed volume or Fixed pieces: The sampling weight, samplevolume or number of pieces will be entered as the parameterin this method function and will not be prompted whenconducting the method.
Weight | Fixed weight |Volume | Fixedvolume | Pieces |Fixed pieces
Lower limit Defines the lower limit for the variable entry data. The unit willdepend on the setting for Entry type parameter. Only appears if none fixed values are selected in Entry type.
[g]: 0 … 1000[mL]: 0 … 1000[pcs.]: 0 … 106
Upper limit Defines the upper limit for the variable entry of data. The unitwill depend on the setting for Entry type parameter.Only appears if none fixed values are selected in Entry type.
[g]: 0 … 1000[mL]: 0 … 1000[St.]: 0 … 106
Weight Weight in [g]. Appears only if Entry type = Fixed weight was selected.
0…1000
Volume Volume in [mL].Appears only if Entry type = Fixed volume was selected.
0…1000
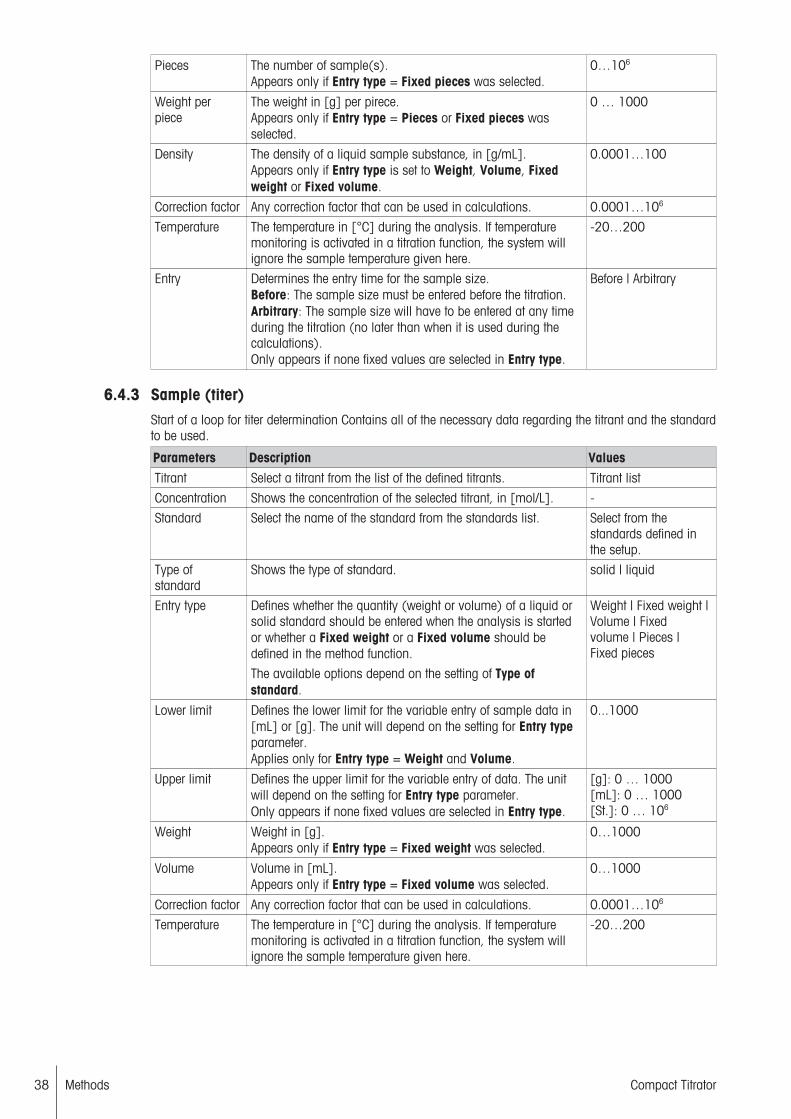
Methods38 Compact Titrator
Pieces The number of sample(s).Appears only if Entry type = Fixed pieces was selected.
0…106
Weight perpiece
The weight in [g] per pirece.Appears only if Entry type = Pieces or Fixed pieces wasselected.
0 … 1000
Density The density of a liquid sample substance, in [g/mL].Appears only if Entry type is set to Weight, Volume, Fixedweight or Fixed volume.
0.0001…100
Correction factor Any correction factor that can be used in calculations. 0.0001…106
Temperature The temperature in [°C] during the analysis. If temperaturemonitoring is activated in a titration function, the system willignore the sample temperature given here.
-20…200
Entry Determines the entry time for the sample size.Before: The sample size must be entered before the titration.Arbitrary: The sample size will have to be entered at any timeduring the titration (no later than when it is used during thecalculations). Only appears if none fixed values are selected in Entry type.
Before | Arbitrary
6.4.3 Sample (titer)Start of a loop for titer determination Contains all of the necessary data regarding the titrant and the standardto be used.
Parameters Description ValuesTitrant Select a titrant from the list of the defined titrants. Titrant list
Concentration Shows the concentration of the selected titrant, in [mol/L]. -
Standard Select the name of the standard from the standards list. Select from thestandards defined inthe setup.
Type ofstandard
Shows the type of standard. solid | liquid
Entry type Defines whether the quantity (weight or volume) of a liquid orsolid standard should be entered when the analysis is startedor whether a Fixed weight or a Fixed volume should bedefined in the method function.
The available options depend on the setting of Type ofstandard.
Weight | Fixed weight |Volume | Fixedvolume | Pieces |Fixed pieces
Lower limit Defines the lower limit for the variable entry of sample data in[mL] or [g]. The unit will depend on the setting for Entry typeparameter. Applies only for Entry type = Weight and Volume.
0...1000
Upper limit Defines the upper limit for the variable entry of data. The unitwill depend on the setting for Entry type parameter.Only appears if none fixed values are selected in Entry type.
[g]: 0 … 1000[mL]: 0 … 1000[St.]: 0 … 106
Weight Weight in [g]. Appears only if Entry type = Fixed weight was selected.
0…1000
Volume Volume in [mL].Appears only if Entry type = Fixed volume was selected.
0…1000
Correction factor Any correction factor that can be used in calculations. 0.0001…106
Temperature The temperature in [°C] during the analysis. If temperaturemonitoring is activated in a titration function, the system willignore the sample temperature given here.
-20…200

Methods 39Compact Titrator
Entry Determines the entry time for the sample size.Before: The sample size must be entered before the titration.Arbitrary: The sample size will have to be entered at any timeduring the titration (no later than when it is used during thecalculations). Only appears if none fixed values are selected in Entry type.
Before | Arbitrary
6.4.4 Sample (calibration)Start of a loop for sensor calibration. Contains all of the necessary data regarding the sensor and thecalibration standard.
Parameters Description ValuesSensor type Specifies the type of sensor that is calibrated pH | ISE | Temperature
Sensor Defines the sensor used to perform the measurement. List of availablesensors
Action Defines if a calibration or a sensor test is performed. Calibration | Sensortest
Unit The unit of measure to be used for the measurement; the unitwill depend on the sensor type selected.
mV | pH | ppm | pM |pX | %T | A | µA | °C |K | °F
Ion charge Shows the ion charge for the selected ISE sensor. Arbitrary
Automatic bufferrecognition
Defines whether the titrator should automatically identify thebuffers via the pH buffer list. Only possible for pH sensors.
Activ | Inactive
pH buffer list Defines the pH buffer list to be used for the calibration of a pHsensor.
Select from the pHbuffer lists (Auto pHbuffer lists) defined inSetup.
List ofstandards
Defines the standards list to be used for the calibration of anISE or conductivity sensor.
Select from thestandards lists definedin Setup.
Calibration Here you can define whether the calibration of a pH or ISEsensor should be done in a linear or segmented manner.
Linear | Segmented
Number ofbuffers
The number of buffers to be used for the calibration of a pHsensor.
1…9
Number ofstandards
The number of standards to be used for the calibration of anISE sensor.
1…9
Buffer 1…9 Defines the buffers used for the calibration or sensor test of apH sensor.For the calibration, up to nine buffers can be selected from thepH buffer list.For the sensor test, two buffers must be selected from the pHbuffer list.
List of available pHbuffers
Standards 1…9 For the calibration of an ISE sensor, up to nine standards canbe selected from the standards list.
Select from thestandards list.
Standard Select the name of the standard from the standards list. Select from thestandards defined inthe setup.
Temperature The temperature during the calibration in [°C] if temperatureacquisition has not been selected in the method functionMeasure (normal). Does not appear for temperature sensors.
-20°C…200°C
6.4.4.1 pH sensor test
The sensor test is used to check the slope, zero point and drift of pH sensors.The test can be started either by using a method or sample series via the "Calibration" method function ordirectly from the Setup of the sensor concerned (see also "[Setup: Hardware > Sensors > Sensor Calibrationand Sensor Test } Page 85]").

Methods40 Compact Titrator
Note• The calibration data of the pH sensor is not affected by the test.• The results of the sensor test can be printed out.
Starting the sensor test via a methodStart the sensor test as follows:1 Select a method of the "Calibration" type or create the appropriate method.2 Select the "Sample (Calibration)" method function.
3 In the Sample (Calibration) dialog window, select the following parameters:- "Sensor type" = "pH"- "Action" = "Sensor test"
4 Specify the buffer parameters to be used (See "Methods: Method functions > Sample (Calibration)". Thesensor test is carried out using two buffer solutions.
5 Press OK.
6 Select the "Calibration" method function
7 Define the following parameters in the Calibration dialog:
Parameters Description ValuesMessageoutside limits
Defines whether a message opens that informs the user thatthe value lies outside of the limits.
Activ | Inactive
Stop outsidelimits
Defines whether the analysis is stopped if the value liesoutside the defined limits.
Activ | Inactive
Min. slope 1-8 The lower limit for the slope, in [%]. (100% refers to -59.16mV/pH.)
10…200
Max. Slope 1-8 The upper limit for the slope, in [%]. 10…200
Min. zero point1-8
The lower limit for the zero point. -100…100
Max. zero point1-8
The upper limit for the zero point. -100…100
Min. drift The minimum drift value in [mV/30s]. -100 to 100
Max. drift The maximum drift value in [mV/30s]. -100 to 100
Note• If the values are within the limits, the sensor test is regarded as having been passed.• Slope and drift relate to 25°C.To provide an overview, the relevant method functions have been summarized and listed in the followingtable:
Method functions for the pH sensor test
Method function DescriptionSample (Calibration) This method function is used firstly in order to carry out a calibration and
secondly for the sensor test. It is selected via the "Action" parameter. Onlytwo buffers can be defined for the sensor test.
Measure (normal) The measured values of both calibration solutions (pH buffers) aredetermined here. In addition, another drift determination is carried out forthe second buffer.
Calibration In the method, the "Calibration" method function for the sensor test isplaced after the "End of sample" method function. Essentially,"Calibration" corresponds to a calculation function. In the process, itcalculates the calibration parameters from the measured values of thecalibration loop and the calibration standard values (pH buffer values).These are then compared with the inputted limit values for the zero point,slope and drift.
Record The results of the sensor test are displayed in the "Overview" section ofthe record. The various selection parameters for titration curves (E – V,dE/dV – V, etc.) which are available during standard titration are invalidfor the record.

Methods 41Compact Titrator
See also2 Sample (calibration) } Page 39
6.4.5 Titration standThe method type determines which titration stands are available.The following titration stands have no parameters that are specific for the titration stand.
• Auto stand• Manual stand• RondolinoThese titration stands are available for the following method types:
• General titration• Titer• Calibration
Parameters Description ValuesType Defines the type of the titration stand. Available titration
stands
Titration stand Defines which titration stand is to be used. List of availabletitration stands
6.4.6 PumpYou can use this method function to drain a reagent into a sample vessel.
Parameters Description ValuesAuxiliaryreagent
The auxiliary reagent to be added. List of availableauxiliary reagents
Volume Defines the volume in [mL] to be pumped. 0…1000
6.4.7 StirActivates or deactivates (speed ="0") the stirrer of the current titration stand.
Parameters Description ValuesSpeed Defines the stirring speed in [%]. 0…100
Duration The stirring time, in [sec].After the stirring time has elapsed, the titrator will continue tothe next method function without switching off the stirrer. Thestirrer is switched off after the analyis is finished or the beakeris changed.The stirrer output is defined by the prior method functionTitration stand.
0 … 105
6.4.8 Dispense (normal)You can use this method function to dispense a precisely defined quantity of titrant.The smallest increment (dV(min)) is 1/20000 of the burette volume, i.e. for the following burettes:1 mL burette: dV(min) = 0.05 µL5 mL burette: dV(min) = 0.25 µL10 mL burette: dV(min) = 0.50 µL20 mL burette: dV(min) = 1 µL
Parameters Description ValuesTitrant Select a titrant from the list of the defined titrants. Titrant list
Concentration Shows the concentration of the selected titrant, in [mol/L]. -
Volume Volume in [mL]. 0.0001…1000

Methods42 Compact Titrator
Dosing rate Defines the dosing rate (not including the filling time), in [mL/min]. You can also select a burette type-dependent maximumnumber.
0.01…60
6.4.9 Measure (normal) For the controlled acquisition of a measured value from a sensor. If a temperature sensor or a is selectedfor the measurement, the subfunction Temperature acquisition is omitted.
Subfunction: Sensor
Parameters Description ValuesType The type of sensor to be used to perform the measurement. mV | pH | ISE |
Phototrode | Polarized| Temperature
Sensor Defines the sensor used to perform the measurement. List of availablesensors
Unit The unit of measure to be used for the measurement; the unitwill depend on the sensor type selected.
mV | pH | ppm | pM |pX | %T | A | µA | °C |K | °F
Indication Defines how to do the indication. Depending on the unit ofmeasure: [mV] = Voltametric, [µA] = Amperometric.
Voltametric | Ampero-metric
Ipol Ipol is the polarization current for the voltametric indication. 0.0…24.0 µA
Upol Defines the polarization voltage [mV], for an amperometricindication.
Only for polarized sensors and Indication = Amperometric.
0…2000.0
Ion charge Shows the ion charge for the selected ISE sensor. Arbitrary
Subfunction: Temperature acquisition
Parameters Description ValuesTemperatureacquisition
Defines whether to record the temperature, with the aid of atemperature sensor, during the execution of the analysisfunction.
Activ | Inactive
Temperaturesensor
Defines which temperature sensor to use for the temperatureacquisition.
Only for Temperature acquisition = Active.
Sensor list
Unit Defines the temperature unit to be used. °C | K | °F
Subfunction: Stir
Parameters Description ValuesSpeed Defines the stirring speed in [%]. 0…100
Subfunction: Acquisition of Measured Values
Parameters Description ValuesAcquisition Defines how the measured value is acquired.
Equilibrium controlled: The measured value is acquired assoon as it stabilizes.Fix: The measured value is acquired after a defined waitingperiod.Set value: The measured value is acquired as soon as it hasexceeded, or fallen short of, a specific set value, or as soon asit is within a range defined by the lower and upper limits. (TheSet Value option is not available if the method function is usedwithin a Sample (Calib) loop.)
Equilibriumcontrolled | Fix | Setvalue
The following parameters are available for the sensor types: mV, pH, ISE, Phototrode, Polarized

Methods 43Compact Titrator
Parameters Description ValuesdE Defines the measured value interval. As soon as the change in
the measured value over the time period dt is less than dE, themeasured value will be acquired. This occurs within thedefined time interval of t(min) to t(max).dE is specified in the unchanged unit of the sensor per second:- mV for the mV sensor type, pH, ISE, phototrode andpolarized voltametric sensor- µA for polarized sensor.
0.1 … 15
dt Defines the time component, in [sec] for dE/dt.
Only if Acquisition = Equilibrium controlled1…150
t(min) Earliest possible time for the measured value acquisition, in[sec].
Only if Acquisition = Equilibrium controlled.
1…150
t(max) Latest possible time for the measured value acquisition, in[sec].
Only if Acquisition = Equilibrium controlled
1…105
Time Waiting time, in [sec], before acquisition of a measured value.
Only if Acquisition = Fix1…105
Mode Mode for the measured value acquisition of the "set value".E > set value acquires the measured value as soon as the setvalue has been exceeded.E < set value acquires the measured value as soon as themeasured value falls below the set value. Not available withina calibration loop.Only for Acquisition = Set value.
E > set value | E < setvalue
Set value Set value in the sensor unit. Measured values will be acquiredafter they exceed or fall below this value, depending on themode setting.
Only if Acquisition = Set value. Not available within acalibration loop.
(See "Value Ranges ofSensor MeasuringUnits and ControlBand")
t(max) Latest time for the measured value acquisition, in [sec].
Only if Acquisition = Set value. Not available within acalibration loop.
1…105
Mean value The system finds a mean value for the saved measured value,using a maximum of 10 measured values.
Activ | Inactive
No. ofmeasuredvalues
When you want to calculate a mean value, you can define thenumber of measured values used to find that mean value here.
1…10
dt Defines the time interval, in [sec], for the measured valueacquisition of the measured values to be averaged.
Only if Mean value = Active
1…60
You can define the following parameters for the sensor type Temperature
Parameters Description ValuesdT Defines the measured value interval. As soon as the change in
the measured value during the time period dt is less than dT,the measured value will be acquired. This occurs within thedefined time interval of t(min) to t(max).This value is specified in the unchanged unit of the sensor, persecond:°C | K | °F
Only if Acquisition = Equilibrium controlled
0.1 … 10 Unit: °C |K | °F
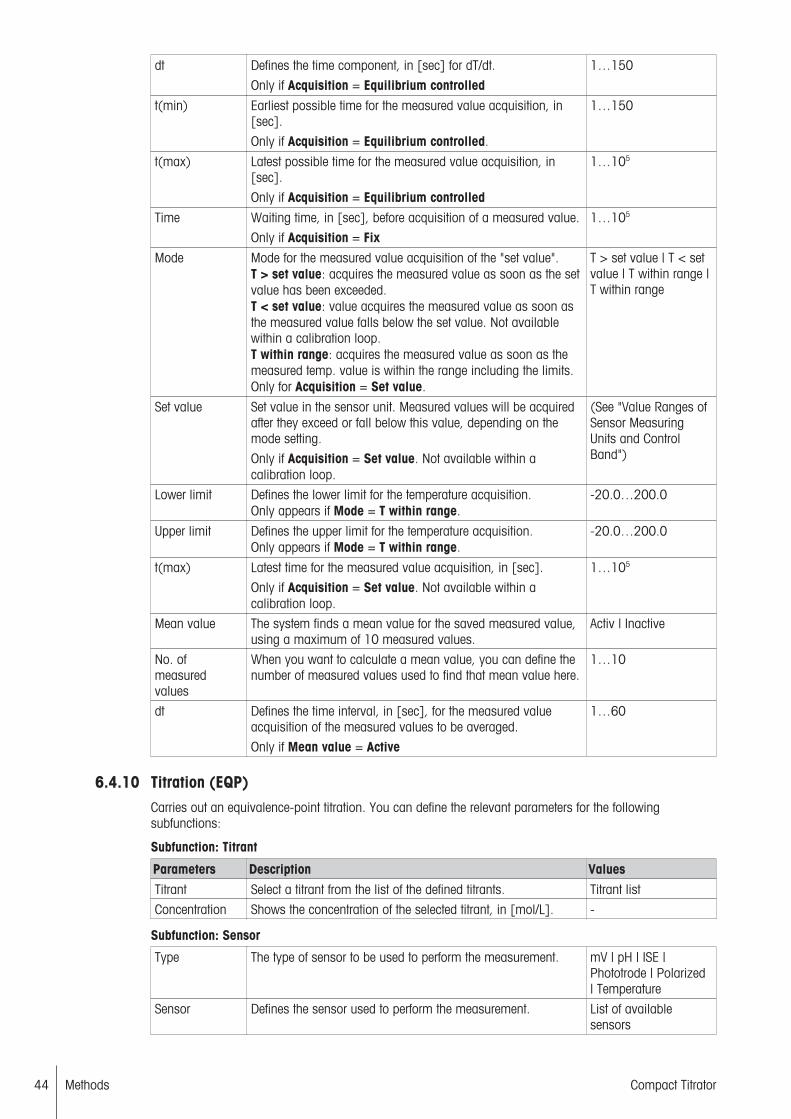
Methods44 Compact Titrator
dt Defines the time component, in [sec] for dT/dt.
Only if Acquisition = Equilibrium controlled1…150
t(min) Earliest possible time for the measured value acquisition, in[sec].
Only if Acquisition = Equilibrium controlled.
1…150
t(max) Latest possible time for the measured value acquisition, in[sec].
Only if Acquisition = Equilibrium controlled
1…105
Time Waiting time, in [sec], before acquisition of a measured value.
Only if Acquisition = Fix1…105
Mode Mode for the measured value acquisition of the "set value".T > set value: acquires the measured value as soon as the setvalue has been exceeded.T < set value: value acquires the measured value as soon asthe measured value falls below the set value. Not availablewithin a calibration loop.T within range: acquires the measured value as soon as themeasured temp. value is within the range including the limits.Only for Acquisition = Set value.
T > set value | T < setvalue | T within range |T within range
Set value Set value in the sensor unit. Measured values will be acquiredafter they exceed or fall below this value, depending on themode setting.
Only if Acquisition = Set value. Not available within acalibration loop.
(See "Value Ranges ofSensor MeasuringUnits and ControlBand")
Lower limit Defines the lower limit for the temperature acquisition.Only appears if Mode = T within range.
-20.0…200.0
Upper limit Defines the upper limit for the temperature acquisition.Only appears if Mode = T within range.
-20.0…200.0
t(max) Latest time for the measured value acquisition, in [sec].
Only if Acquisition = Set value. Not available within acalibration loop.
1…105
Mean value The system finds a mean value for the saved measured value,using a maximum of 10 measured values.
Activ | Inactive
No. ofmeasuredvalues
When you want to calculate a mean value, you can define thenumber of measured values used to find that mean value here.
1…10
dt Defines the time interval, in [sec], for the measured valueacquisition of the measured values to be averaged.
Only if Mean value = Active
1…60
6.4.10 Titration (EQP)Carries out an equivalence-point titration. You can define the relevant parameters for the followingsubfunctions:
Subfunction: Titrant
Parameters Description ValuesTitrant Select a titrant from the list of the defined titrants. Titrant list
Concentration Shows the concentration of the selected titrant, in [mol/L]. -
Subfunction: Sensor
Type The type of sensor to be used to perform the measurement. mV | pH | ISE |Phototrode | Polarized| Temperature
Sensor Defines the sensor used to perform the measurement. List of availablesensors
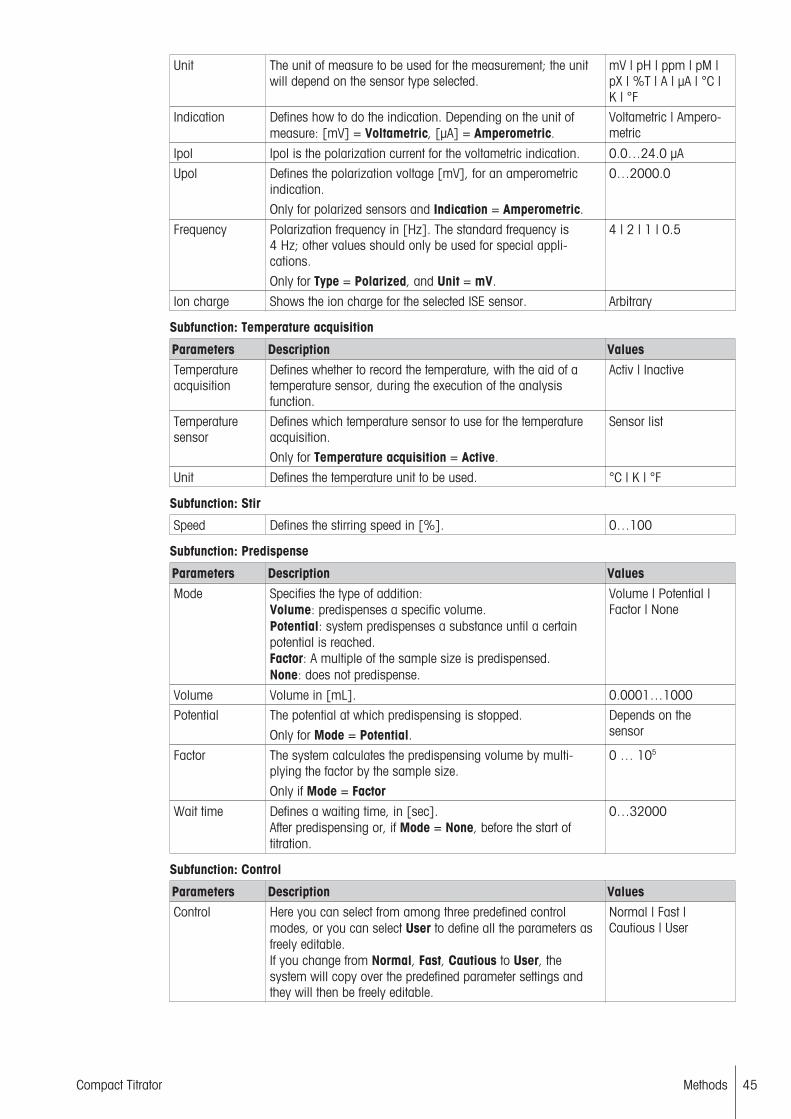
Methods 45Compact Titrator
Unit The unit of measure to be used for the measurement; the unitwill depend on the sensor type selected.
mV | pH | ppm | pM |pX | %T | A | µA | °C |K | °F
Indication Defines how to do the indication. Depending on the unit ofmeasure: [mV] = Voltametric, [µA] = Amperometric.
Voltametric | Ampero-metric
Ipol Ipol is the polarization current for the voltametric indication. 0.0…24.0 µA
Upol Defines the polarization voltage [mV], for an amperometricindication.
Only for polarized sensors and Indication = Amperometric.
0…2000.0
Frequency Polarization frequency in [Hz]. The standard frequency is4 Hz; other values should only be used for special appli-cations.
Only for Type = Polarized, and Unit = mV.
4 | 2 | 1 | 0.5
Ion charge Shows the ion charge for the selected ISE sensor. Arbitrary
Subfunction: Temperature acquisition
Parameters Description ValuesTemperatureacquisition
Defines whether to record the temperature, with the aid of atemperature sensor, during the execution of the analysisfunction.
Activ | Inactive
Temperaturesensor
Defines which temperature sensor to use for the temperatureacquisition.
Only for Temperature acquisition = Active.
Sensor list
Unit Defines the temperature unit to be used. °C | K | °F
Subfunction: Stir
Speed Defines the stirring speed in [%]. 0…100
Subfunction: Predispense
Parameters Description ValuesMode Specifies the type of addition:
Volume: predispenses a specific volume.Potential: system predispenses a substance until a certainpotential is reached.Factor: A multiple of the sample size is predispensed.None: does not predispense.
Volume | Potential |Factor | None
Volume Volume in [mL]. 0.0001…1000
Potential The potential at which predispensing is stopped.
Only for Mode = Potential.Depends on thesensor
Factor The system calculates the predispensing volume by multi-plying the factor by the sample size.
Only if Mode = Factor
0 … 105
Wait time Defines a waiting time, in [sec].After predispensing or, if Mode = None, before the start oftitration.
0…32000
Subfunction: Control
Parameters Description ValuesControl Here you can select from among three predefined control
modes, or you can select User to define all the parameters asfreely editable.If you change from Normal, Fast, Cautious to User, thesystem will copy over the predefined parameter settings andthey will then be freely editable.
Normal | Fast |Cautious | User

Methods46 Compact Titrator
Mode Select an application depending on the sensor type. Theselected application will then provide its own specificparameter set.
Not available for Control = User.
Application list
Showparameters
Here you can select whether to display the preset parametersof the control modes Normal, Fast or Cautious as non-editable info fields.
Not for Control = User.
Activ | Inactive
Titrant addition Defines whether to always dispense the same volume definedby dV (Incremental) or to adjust the volume to be titrated perstep as the titration progresses (Dynamic).
Only for Control = User.
Dynamic | Incremental
dE(set value) Defines the potential difference targeted per titrant addition.
Only for Control = User and Titrant addition = Dynamic.
[mV/µA] 0.1…100[mS/µS] 0.01…100
dT(set value) Defines the temperature difference in the unit of the temperaturesensor that is targeted for a temperature sensor per titrantaddition.
For Control = User and Titrant addition = Dynamic only.
0.1…100
dV(min) Defines the minimum amount for a titrant addition, in [mL].
For Control = User and Titrant addition = Dynamic only.
0.0001…1
dV(max) Defines the maximum amount for a titrant addition, in [mL].
For Control = User and Titrant addition = Dynamic only.
0.0001…10
dV Defines the volume increment, in [mL], for the incrementaltitrant addition.
For Control = User and Titrant addition = Incremental only.
0.0001…10
Meas. val.acquisition
Type of measuring value acquisition:Equilibrium controlled: The system acquires the measuredvalue and makes the next titrant addition as soon as a stablemeasured value is established.Fixed time: The measured values acquisition and the titrantaddition occur according to fixed time intervals.
Only for Control = User.
Equilibrium controlled| Fixed time
dE As soon as the change in the measured value during the timeperiod dt is less than dE, the measured value will be acquired.Acquisition takes place no earlier than after t(min) and nolater than after t(max). Then the next titrant addition isconducted.
For Control = User and Meas. val. acquisition = Equilibriumcontrolled only.
[mV/µA] 0.1 … 15[mS/µS] 0.01 … 15
dT As soon as the change in the measured value during the timeperiod dt is less than dT, the measured value will be acquired.Acquisition takes place no earlier than after t(min) and nolater than after t(max). Then the next titrant addition isconducted.
For Control = User and Meas. val. acquisition = Equilibriumcontrolled for a temperature sensor only.
1…150
dt Defines the time interval, in [sec], for calculating dE/dt (or dT/dt for a temperature sensor).
For Control = User and Meas. val. acquisition = Equilibriumcontrolled only.
0.1…15
t(min) Earliest possible time for the measured value acquisition, in[sec].
Only for Control = User and Meas. val. acquisition =Equilibrium controlled.
0.5…150

Methods 47Compact Titrator
t(max) Latest possible time for the measured value acquisition, in[sec].
Only for Control = User and Meas. val. acquisition =Equilibrium controlled.
1…105
dt Defines the time interval, in [sec], for Fixed time.
For Control = User and Meas. val. acquisition = Fixed timeonly.
0.5…6000
Subfunction: Evaluation and Recognition
Parameters Description ValuesProcedure Defines which evaluation procedure to use. Standard |
Asymmetric |Minimum | Maximum |Segmented
Threshold Defines the threshold (absolute amount) that must beexceeded for the recognition of an EQP.Procedure = Minimum and Maximum: This threshold valuerefers to the original curve [UoM]Procedure = Standard and Asymmetric: It refers to the 1stderivative of the original curve [UoM*/mL].Procedure = Segmented: It refers to the 2nd derivative of theoriginal curve [UoM/mL].
Standard,Asymmetric andSegmented: 0 … 106
Minimum andMaximum: Dependson the sensor
* UoM: Unit of Measurement
Tendency Defines the tendency for which the EQP is to be detected.
For Procedure = Standard, Asymmetric and Segmented.
Positive | Negative |None
Ranges You can define up to three recognition ranges. Outside theseranges, the system will recognize neither EQP's nor EQPcandidates.Depending on what is defined here, upper and lower limits aredefined for each recognition range and also whether additionalEQP criteria are to be used for each recognition range.
1 | 2 | 3 | 0
Range type 1…3
Defines the type of the definition range.Potential: each range is defined by an upper limit and a lowerlimit of a potential.Volume: each range is defined by an upper limit and a lowerlimit of a volume.Potential & volume: each range is defined by an upper limitand a lower limit of a potential and an upper and a lower limitof a volume.
Potential | Volume |Potential & volume
Lower limitpotential 1…3
Defines the lower limit for the recognition range as potential.The unit of measure will depend on the sensor used.
Depends on thesensor
Upper limitpotential 1…3
Defines the upper limit for the recognition range as potential.The unit of measure will depend on the sensor used.
Depends on thesensor
Lower limitvolume 1…3
Defines the lower limit for the recognition range as volume. 1…1000 mL
Upper limitvolume 1…3
Defines the upper limit for the recognition range as volume. 1…1000 mL

Methods48 Compact Titrator
Add. EQPcriteria
Defines whether to take additional EQP criteria into consid-eration. The available selection will depend on the evaluationprocedure chosen. They can be defined individually for eachrecognition range or for the overall recognition range (Ranges= 0).Last EQP: The system only considers the quantity of EQPsdefined.Steepest jump: The system only considers the number ofsteepest jumps defined.Lowest value: The system only considers the number oflowest values defined.Highest value: The system only considers the number ofhighest values defined.
Last EQP | Steepestjump | Lowest value |Highest value | No
Last jumps The quantity of last jumps to be taken into consideration.
Only for Add. EQP criteria = Last EQP.
1…9
Steepest jumps The quantity of steepest jumps to be taken into consideration.
Only for Add. EQP criteria = Steepest jump.
1…9
Lowest values The quantity of lowest values to be taken into consideration.
Only for Add. EQP criteria = Lowest value.
1…9
Highest values The quantity of highest values to be taken into consideration.
Only for Add. EQP criteria = Highest value.
1…9
Subfunction: Termination
Parameters Description ValuesAt Vmax Defines the maximum volume, in [mL], at which the titration
must be terminated if it has not been terminated already.0.1…1000
At potential Defines whether to terminate the titration after reaching adefined potential (with the correct tendency!).
Activ | Inactive
Potential The potential at which to terminate the titration. The unit ofmeasure will depend on the sensor used.
Only if At potential = Active
-100 ... 100(See "Value Ranges ofSensor MeasuringUnits and ControlBand")
Terminationtendency
Defines for which tendency the titration should be terminated.
Only for At potential = Active.
Positive | Negative |None
At slope Defines whether to terminate the titration after reaching adefined slope. This absolute value must be exceeded by onemeasured value and then be greater than two measuredvalues to result in termination.
Activ | Inactive
Slope The slope, in [unit of measure/mL], at which to terminate thetitration.Only if At slope = Active
0 ... 105
After number ofrecognizedEQPs
Specifies whether the titration should be terminated after therecognition of a specific quantity of EQP candidates. The EQPcandidates must fulfill the following conditions:- It lies within the recognition range defined in Ranges.- It is above the threshold defined in Threshold- It show the correct tendency as defined in Tendency. If noadditional EQP criteria should be considered, then EQPcandidate = EQP applies.
Activ | Inactive
Number ofEQPs
Defines the quantity of EQP candidates after the recognition ofwhich the system should terminate the titration.Only if After number of recognized EQPs = Active
1…30

Methods 49Compact Titrator
Combinedterminationcriteria
Inactive: Termination as soon as the first of the selectedcriteria from the (Potential | Slope | After number ofrecognized EQPs) group has been fulfilled.Active: Termination as soon as all the selected criteria havebeen fulfilled. Termination of the titration in any case if themaximum volume is reached.
Activ | Inactive
6.4.11 ModeAn application mode can be selected in the Control subfunction for the EQP titration method functions if theControl setting is not set to User. Application modes are available for various types of titration (acid/base,redox, argentometry, etc.). If an application mode is selected, the settings for the Control subfunction will bespecified based on what is best for the primary uses for the corresponding type of titration. The user canchoose between three different parameter sets for each application mode (Control Normal, Fast andCautious).
Sensor type Unit Unit fordE(setvalue)and dE
Mode
pH pH mV Acid / Base
mV Acid / Base (non aqu.)
mV mV mV Precipitation
Precipitation (non aqu.)
Redox
ISE mV mV Precipitation
ppm
pX
pM
Phototrode mV mV Precipitation
%T Complexation
A
Polarized mV mV Redox
µA µA Redox
Temperature °C °C, °F, K Acid / Base
°F
K
6.4.12 Titration (EP)Carries out an end-point titration. You can define the relevant parameters for the following subfunctions:
Subfunction: Titrant
Parameters Description ValuesTitrant Select a titrant from the list of the defined titrants. Titrant list
Concentration Shows the concentration of the selected titrant, in [mol/L]. -
Subfunction: Sensor
Parameters Description ValuesType The type of sensor to be used to perform the measurement. mV | pH | ISE |
Phototrode | Polarized| Temperature
Sensor Defines the sensor used to perform the measurement. List of availablesensors

Methods50 Compact Titrator
Unit The unit of measure to be used for the measurement; the unitwill depend on the sensor type selected.
mV | pH | ppm | pM |pX | %T | A | µA | °C |K | °F
Indication Defines how to do the indication. Depending on the unit ofmeasure: [mV] = Voltametric, [µA] = Amperometric.
Voltametric | Ampero-metric
Ipol Ipol is the polarization current for the voltametric indication. 0.0…24.0 µA
Upol Defines the polarization voltage [mV], for an amperometricindication.
Only for polarized sensors and Indication = Amperometric.
0…2000.0
Ion charge Shows the ion charge for the selected ISE sensor. Arbitrary
Subfunction: Temperature acquisition
Parameters Description ValuesTemperatureacquisition
Defines whether to record the temperature, with the aid of atemperature sensor, during the execution of the analysisfunction.
Activ | Inactive
Temperaturesensor
Defines which temperature sensor to use for the temperatureacquisition.
Only for Temperature acquisition = Active.
Sensor list
Unit Defines the temperature unit to be used. °C | K | °F
Subfunction: Stir
Parameters Description ValuesSpeed Defines the stirring speed in [%]. 0…100
Subfunction: Predispense
Parameters Description ValuesMode Specifies the type of addition:
Volume: predispenses a specific volume.Potential: system predispenses a substance until a certainpotential is reached.Factor: A multiple of the sample size is predispensed.None: does not predispense.
Volume | Potential |Factor | None
Volume Volume in [mL]. 0.0001…1000
Potential The potential at which predispensing is stopped.
Only for Mode = Potential.Depends on thesensor
Factor The system calculates the predispensing volume by multi-plying the factor by the sample size.
Only if Mode = Factor
0 … 105
Wait time Defines a waiting time, in [sec].After predispensing or, if Mode = None, before the start oftitration.
0…32000
Subfunction: Control
Parameters Description ValuesEnd point type Absolute: Titration is ended when the absolute measured value
is reached.Relative: The system will take into consideration the differencebetween the desired end point and the measured value at thestart of the titration.
Absolute | Relative
Tendency Defines the direction of change for the measured value duringthe titrant addition. If the starting potential, end point andtendency are inconsistent at the start of the analysis, thesystem will terminate the analysis immediately.
For End point type = Absolute only.
Positive | Negative |None

Methods 51Compact Titrator
End point value The defined titration end point. The unit will depend on thesensor used.
(See "Value Rangesfrom SensorMeasuring Units andControl Band")
Control band This number defines the width of the control band. Outside thecontrol band, the system will titrate with the maximumdispensing rate. The smaller the control band, the faster thetitrator will react to a deviation from the potential of the definedend point. When the measurement curve reaches the controlband, the titrator will slow down the titrant addition toapproach the end point in a cautious manner. The unit willdepend on the sensor used.
(See "Value Rangesfrom SensorMeasuring Units andControl Band")
Dosing rate(max)
The maximum dosing rate in [mL/min]. 0.001…60
Dosing rate(min)
The minimum dosing rate in [µL/min]. 1…104
Subfunction: Termination
Parameters Description ValuesAt EP Defines whether to terminate the titration after reaching the end
point.If Inactive is selected, after reaching the end point the systemwill continue acquiring measured values without adding titrantuntil the maximum time period is reached.
Activ | Inactive
Terminationdelay
The termination delay which defines the time period, in [sec],between reaching the end point and terminating the titration. Ifduring the termination delay the measured value drops belowthe end point, the system will add further increments andrestart the termination delay.(Only if "at EP" = "yes" is selected.)
0…108
At Vmax Defines the maximum volume, in [mL], at which the titrationmust be terminated if it has not been terminated already.
0.1…1000
Max. time Defines the maximum time of the titration, in [sec]. 0…108 | ∞
6.4.13 Titration(LearnEQP) Titration (Learn EQP) is used to determine the best parameters for carrying out an EQP titration. As soonas the settings have been successfully recorded, the titration detection in the method is converted to aTitration (EQP) with the recorded settings. If the analysis has more than one sample, the subsequentsamples are titrated and analyzed with the recorded settings parameters.You can determine the relevant parameters for the following subfunctions:
Subfunction: Titrant
Parameters Description ValuesTitrant Select a titrant from the list of the defined titrants. Titrant list
Concentration Shows the concentration of the selected titrant, in [mol/L]. -
Subfunction: Sensor
Parameters Description ValuesType The type of sensor to be used to perform the measurement. mV | pH | ISE |
Phototrode | |
Sensor Defines the sensor used to perform the measurement. List of availablesensors
Unit The unit of measure to be used for the measurement; the unitwill depend on the sensor type selected.
mV | pH | ppm | pM |pX | %T | A | µA | °C |K | °F
Ion charge Shows the ion charge for the selected ISE sensor. Arbitrary

Methods52 Compact Titrator
Subfunction: Temperature acquisition
Parameters Description ValuesTemperatureacquisition
Defines whether to record the temperature, with the aid of atemperature sensor, during the execution of the analysisfunction.
Activ | Inactive
Temperaturesensor
Defines which temperature sensor to use for the temperatureacquisition.
Only for Temperature acquisition = Active.
Sensor list
Unit Defines the temperature unit to be used. °C | K | °F
Subfunction: Stir
Parameters Description ValuesSpeed Defines the stirring speed in [%]. 0…100
6.4.14 Calculation
Define limits for the resultsIf Result limits is activated, the titrator checks if the result falls within the limits defined in Lower limit andUpper limit. If the result lies outside the limits, it is marked as such.
Configure the action of the system if the result lies outside the limitsThe table below shows the settings for the four possible actions of the system if the value of the result liesoutside of the limits.
Action of the system Message outside limits Stop outside limitsThe analysis continues.The user is not informed that the value lies outsideof the limits.
Inactive Inactive
A message opens and informs the user that thevalue lies outside of the limits.The analysis is interrupted until the user confirmsthe message.
Active Inactive
The analysis is stopped.A message opens and informs the user that thevalue lies outside of the limits.
Active Active
The analysis is stopped.The user is not informed that the value lies outsideof the limits.
Inactive Active
Parameter description
Parameters Description ValuesResult type Predefined: a predefined result from the proposal list has to
be used and the parameters Result unit, Formula, andConstant C= cannot be changed. The parameters Result,Result unit, Formula, and Constant C= are adjusted automat-ically in accordance with the parameter settings in the methodfunction Sample, Sample (KF) or Sample (StandardAddition) .User defined: All parameters can be changed. There is noautomatic adjustment of the parameters Result, Result unit,Formula, and Constant C=
Predefined | Userdefined
Calculation type Using this parameter you can perform calculations for thelisted categories.For the selection of the result from the proposal list, you haveto consider the Parameter Entry type used in the methodfunction Sample. If there is a difference between Calculationtype and Entry type in Sample, an error message appears.
Direct titration | Backtitration autom. (onlyG20S) | Back titrationmanual | Blankcomp. | 2nd titrationfunction | Other

Methods 53Compact Titrator
FormulaResultResult unitConstant C=
These parameters are automatically set for result proposals ifyou have selected the parameter Result type = Predefined(these parameters depend on the selected Calculation typeand the Entry type in the method function Sample.If you have selected Result type = User defined you can editthe parameters Result, Result unit and Constant C=. Formulais not editable.
Arbitrary | Constant C=only a number isallowed
Selected EQP You can enter equivalence points (EQP) which you want toconsider for the calculation. This parameter is only available ifTitration (EQP) is selected in a loop.
1 ... 10
Auxiliary value Defines which of the predefined auxiliary values shall be usedin this calculation.
Aux. val. 1...3
Blank Defines which of the predefined blank values shall be used inthis calculation.
Blank 1...3
M [g/mol] Defines the molar mass of the substance [g/mol].
Only in method function GT (general titration).
List of concentration/titer standards andsubstances
z (Equivalentnumber)
Shows the equivalent number (z) of the molar mass entry.
Only in method function GT (general titration).
-
Decimal places The number of decimal places for the result. 0…6
Result limits Defines whether limits should be observed for the result. If thisfunction is activated, there will be a message in the record ifthe result falls outside the defined limits.
Activ | Inactive
Lower limit Defines the lower limit of the result. -108 … 108
Upper limit Defines the upper limit of the result. -108…108
Messageoutside limits
Defines whether a message opens that informs the user thatthe value lies outside of the limits.
Activ | Inactive
Stop outsidelimits
Defines whether the analysis is stopped if the value liesoutside the defined limits.
Activ | Inactive
Record statistics Specifies whether statistics should also be issued with theresults in the report along with the result.The statistics are not printed, if in the method function Recordthe parameter Results is not selected.
Activ | Inactive
6.4.15 RecordThis method function defines the type and scope of the data to be output for a record using the printer (seePeripherals > Printer.If the method function Record is placed within a sample loop, the record will include all previous methodfunctions within the current sample loop.
If the method function Record is placed outside of a sample loop, the record will include all previousmethod functions listed after the last sample loop in the method procedure. A few settings are not availableoutside of a loop.
Parameters Description ValuesSummary States whether or not a short summary of the results should
appear at the top of the protocol.Inactive | Per sample |Per series out of loop:Activ | Inactive
Results The results from the Calculation method functions. Anystatistic selected will be recorded after the last sample of aseries or multiple determination.
within loop: Persample | Per series |Inactive Out of Loop: Activ |Inactive
Raw results The raw results produced during the determination within loop: Persample | Per series |No Out of Loop: Activ |Inactive

Methods54 Compact Titrator
Table ofmeasuredvalues
The table of measured values of the current sample (notavailable out of loop).
Activ | Inactive
Sample data The sample data of a sample loop. (Not available outside ofloop)
Per sample | Perseries | Inactive
Resource data All data in the setup regarding the resources used in themethod.
Per sample | Perseries | Inactive
E - V Titration curve of the current sample. The potential is plottedagainst the volume (not available out of loop).
Last titration function |All titration functions |Inactive
dE/dV - V The 1st derivation of the titration curve, potential againstvolume (with linear coordinate representation) (not availableout of loop).
Last titration function |All titration functions |Inactive
log dE/dV - V The 1st derivative of the titration curve for potential againstvolume. (With logarithmic ordinate display) (not availableoutside of loop)
Last titration function |All titration functions |Inactive
d²E/dV² - V The 2nd derivative of the titration curve for potential againstvolume. (With linear coordinate display) (not available out ofloop)
Last titration function |All titration functions |Inactive
E - t Titration curve of the current sample. The potential is plottedversus the time. (Not available outside of loop)
Last titration function |All titration functions |Inactive
V - t Titration curve of the current sample. The volume is plottedversus the time. (Not available outside of loop)
Last titration function |All titration functions |Inactive
dV/dt - t The 1st Derivative of the titration curve volume againsttime" (not available out of loop).
Last titration function |All titration functions |Inactive
T - t Titration curve of the current sample. The temperature is plottedversus the time. (Not available outside of loop)
Last titration function |All titration functions |Inactive
E - V & dE/dV -V
Two superposed titration curves E - V and dE/dV - V for thecurrent sample. (Not available outside of loop)
Last titration function |All titration functions |Inactive
V - t & dV/dt - t Two overlaid titration curves V - t and dV/dt - t of the currentsample (not available out of loop).
Last titration function |All titration functions |Inactive
Method Printout of the method used. Activ | Inactive
Series data All data from the series run. Activ | Inactive
Calibrationcurve
The sensor unit of measurement is plotted against themeasured values of all samples (not available within loop).
Activ | Inactive
6.4.16 End of sampleThe End of sample method function closes a sample loop. A sample loop refers to the range of a methodthrough which a sample series will pass for each sample. The commencement of a sample loop isspecified using the Sample method function.
6.4.17 TiterThe Titer method function is only available outside a loop. This method function assigns the result of asample loop to a titer and updates the value stored in Setup.
Define limits for the result assigned to the titerIf Limits is activated, the titrator checks if the result falls within the limits defined in Lower limit and Upperlimit. If the result lies outside the limits, it is not assigned to the titer.

Methods 55Compact Titrator
Configure the action of the system if the result lies outside the limitsThe table below shows the settings for the four possible actions of the system if the value of the result liesoutside of the limits.
Action of the system Message outside limits Stop outside limitsThe analysis continues.The user is not informed that the value lies outsideof the limits.
Inactive Inactive
A message opens and informs the user that thevalue lies outside of the limits.The analysis is interrupted until the user confirmsthe message.
Active Inactive
The analysis is stopped.A message opens and informs the user that thevalue lies outside of the limits.
Active Active
The analysis is stopped.The user is not informed that the value lies outsideof the limits.
Inactive Active
Parameters Description ValuesTitrant Shows the titrant used in the method function. -
Concentration Shows the concentration of the selected titrant, in [mol/L]. -
TITER= Specifies for how many results the titer should be determined.(For i=1, i does not have to be defined.)
Mean[Ri], i=1…30
Limits Determines whether limits should be taken into account foracquisition of a value. If the value is outside these limits, thevalue is not transferred to Setup.
Activ | Inactive
Messageoutside limits
Defines whether a message opens that informs the user thatthe value lies outside of the limits.
Activ | Inactive
Stop outsidelimits
Defines whether the analysis is stopped if the value liesoutside the defined limits.
Activ | Inactive
Lower limit Defines the lower limit of a value.
Only if Limits = Active0…100
Upper limit Defines the upper limit of the concentration limit.
Only if Limits = Active0.1…100
6.4.18 CalibrationThis method function assigns the result of a calibration loop to a sensor and updates the sensor setup.Calibration is only performed outside a loop. This method function can be applied both for Calibration andSensor test. The calibration can be performed for Action = Calibration in the Sample (Calib) methodfunction and the sensor test for Action = Sensor test.
Define limits for the result assigned to the sensorIf Limits is activated, the titrator checks if the result falls within the limits defined in Min. slope, Max. Slope,Min. zero point and Max. zero point.• If the result of a calibration lies outside the limits, it is not assigned to the sensor.• If the result of a pH test lies outside the limits, the sensor does not pass the test.
Configure the action of the system if the result lies outside the limitsThe table below shows the settings for the four possible actions of the system if the value of the result liesoutside of the limits.
Action of the system Message outside limits Stop outside limitsThe analysis continues.The user is not informed that the value lies outsideof the limits.
Inactive Inactive
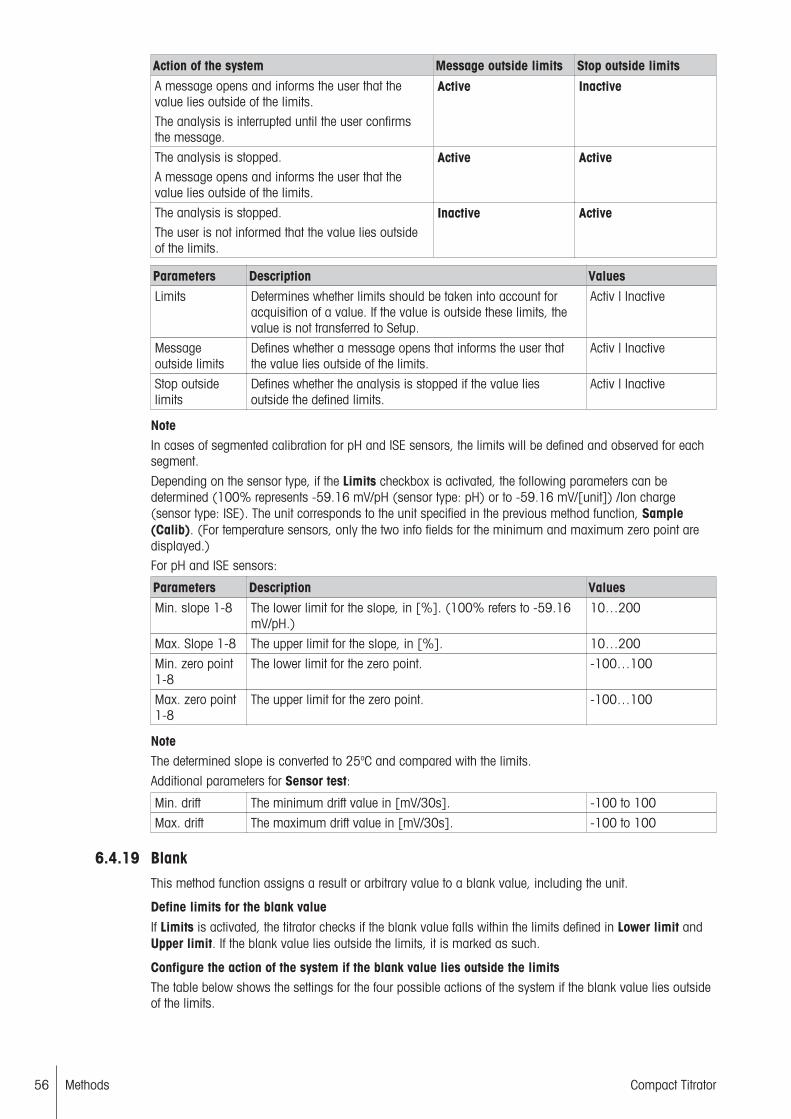
Methods56 Compact Titrator
Action of the system Message outside limits Stop outside limitsA message opens and informs the user that thevalue lies outside of the limits.The analysis is interrupted until the user confirmsthe message.
Active Inactive
The analysis is stopped.A message opens and informs the user that thevalue lies outside of the limits.
Active Active
The analysis is stopped.The user is not informed that the value lies outsideof the limits.
Inactive Active
Parameters Description ValuesLimits Determines whether limits should be taken into account for
acquisition of a value. If the value is outside these limits, thevalue is not transferred to Setup.
Activ | Inactive
Messageoutside limits
Defines whether a message opens that informs the user thatthe value lies outside of the limits.
Activ | Inactive
Stop outsidelimits
Defines whether the analysis is stopped if the value liesoutside the defined limits.
Activ | Inactive
NoteIn cases of segmented calibration for pH and ISE sensors, the limits will be defined and observed for eachsegment.
Depending on the sensor type, if the Limits checkbox is activated, the following parameters can bedetermined (100% represents -59.16 mV/pH (sensor type: pH) or to -59.16 mV/[unit]) /Ion charge(sensor type: ISE). The unit corresponds to the unit specified in the previous method function, Sample(Calib). (For temperature sensors, only the two info fields for the minimum and maximum zero point aredisplayed.)For pH and ISE sensors:
Parameters Description ValuesMin. slope 1-8 The lower limit for the slope, in [%]. (100% refers to -59.16
mV/pH.)10…200
Max. Slope 1-8 The upper limit for the slope, in [%]. 10…200
Min. zero point1-8
The lower limit for the zero point. -100…100
Max. zero point1-8
The upper limit for the zero point. -100…100
NoteThe determined slope is converted to 25oC and compared with the limits.
Additional parameters for Sensor test:
Min. drift The minimum drift value in [mV/30s]. -100 to 100
Max. drift The maximum drift value in [mV/30s]. -100 to 100
6.4.19 BlankThis method function assigns a result or arbitrary value to a blank value, including the unit.
Define limits for the blank valueIf Limits is activated, the titrator checks if the blank value falls within the limits defined in Lower limit andUpper limit. If the blank value lies outside the limits, it is marked as such.
Configure the action of the system if the blank value lies outside the limitsThe table below shows the settings for the four possible actions of the system if the blank value lies outsideof the limits.

Methods 57Compact Titrator
Action of the system Message outside limits Stop outside limitsThe analysis continues.The user is not informed that the value lies outsideof the limits.
Inactive Inactive
A message opens and informs the user that thevalue lies outside of the limits.The analysis is interrupted until the user confirmsthe message.
Active Inactive
The analysis is stopped.A message opens and informs the user that thevalue lies outside of the limits.
Active Active
The analysis is stopped.The user is not informed that the value lies outsideof the limits.
Inactive Active
Parameters Description ValuesName Shows the name of the value. Blank 1...3
Value B= Here you can enter a number or you can select a formula fromthe proposal list (via the Proposal button).
1 ... 120 | Mean value[R1…R3]
Unit The units in which the blank is specified. Arbitrary
Limits Determines whether limits should be taken into account foracquisition of a value. If the value is outside these limits, thevalue is not transferred to Setup.
Activ | Inactive
Messageoutside limits
Defines whether a message opens that informs the user thatthe value lies outside of the limits.
Activ | Inactive
Stop outsidelimits
Defines whether the analysis is stopped if the value liesoutside the defined limits.
Activ | Inactive
Lower limit Defines the lower limit of the value.
Only if Limits = Active-108 … 108
Upper limit Defines the upper limit of the value.
Only if Limits = Active-108 … 108
6.4.20 Auxiliary valueThis method function assigns a result or arbitrary value to an auxiliary value.
Define limits for the auxiliary valueIf Limits is activated, the titrator checks if the auxiliary value falls within the limits defined in Lower limitand Upper limit. If the auxiliary value lies outside the limits, it is marked as such.
Configure the action of the system if the auxiliary value lies outside the limitsThe table below shows the settings for the four possible actions of the system if the auxiliary value liesoutside of the limits.
Action of the system Message outside limits Stop outside limitsThe analysis continues.The user is not informed that the value lies outsideof the limits.
Inactive Inactive
A message opens and informs the user that thevalue lies outside of the limits.The analysis is interrupted until the user confirmsthe message.
Active Inactive
The analysis is stopped.A message opens and informs the user that thevalue lies outside of the limits.
Active Active

Methods58 Compact Titrator
Action of the system Message outside limits Stop outside limitsThe analysis is stopped.The user is not informed that the value lies outsideof the limits.
Inactive Active
Parameters Description ValuesName Shows the name of the value. Aux. val. 1...3
Formula H= Here you can enter a formula that will be used to convert theresult of the sample loop to the auxiliary value. You can alsoenter a number or an auxiliary value.
Formula | Auxiliaryvalue | Number
Limits Determines whether limits should be taken into account foracquisition of a value. If the value is outside these limits, thevalue is not transferred to Setup.
Activ | Inactive
Messageoutside limits
Defines whether a message opens that informs the user thatthe value lies outside of the limits.
Activ | Inactive
Stop outsidelimits
Defines whether the analysis is stopped if the value liesoutside the defined limits.
Activ | Inactive
Lower limit Defines the lower limit of the value.
Only if Limits = Active-108 … 108
Upper limit Defines the upper limit of the value.
Only if Limits = Active-108 … 108
6.4.21 Auxiliary instrumentThis method function activates external auxiliary instruments and enables the titrator to be controlled bysuch auxiliary instruments. The parameters described in the following can be defined for all control types.These are followed by parameters that can be defined explicitly for the relevant control type:
Parameters Description ValuesControl type The control type of the auxiliary instrument. Output 24 V | Stirrer |
Out TTL (Single pin) |Input TTL (Single pin) |RS-232
Name Specify a descriptive name of your choice. Arbitrary
6.4.21.1 Control type: 24V output
Parameters Description ValuesMode Defines the mode for controlling the control output.
Fixed time: The control output is switched on for the definedtime interval.On | Off: The control outlet is switched on or off. After a sampleseries the control outlet is automatically switched off.
On | Off | Fixed time
Time A time span in [sec] can be defined here for which the controloutlet should be switched on.
Only if Mode = Fixed time.
0…106
6.4.21.2 Control type: Stirrer
Parameters Description ValuesMode Defines the mode for controlling the control output.
Fixed time: The control output is switched on for the definedtime interval.On | Off: The control outlet is switched on or off. After a sampleseries the control outlet is automatically switched off.
On | Off | Fixed time

Methods 59Compact Titrator
Time A time span in [sec] can be defined here for which the controloutlet should be switched on.
Only if Mode = Fixed time.
0…106
Speed Defines the stirring speed in [%]. 0…100
6.4.21.3 Control type: Out TTL (Single pin)
Parameters Description ValuesMode Defines the mode for controlling the control output. For TTL
signals, the number and type of the output signals isdetermined.Fixed time: The control output is switched on for the definedtime period.On | Off: The control output is switched on or off.Input controlled: A signal received at the control inlet controlsthe control outlet. The Auxiliary instrument function isterminated as soon as the signal changes at the control inputor after a defined maximum time has expired.Sequential: The control output runs through a definedsequence.
On | Off | Fixed time |Input controlled |Sequential
Time A time span in [sec] can be defined here for which the controloutlet should be switched on.
Only if Mode = Fixed time.
0…106
Input Select the auxiliary instrument to serve as the signal input(control input).
Only if Mode = Input controlled.
Auxiliary instrument
Output signal Normal: The signal is transmitted without conversion.Inverted: The signal is transmitted in inverted form.
Only if Mode = Input controlled.
Normal | Inverted
Max. time The maximum waiting time for a signal change, in [sec].After it expires, the method is continued even if no signalchange was detected.Only for signal inputs.
0…106
Number ofpulses
The number of impulses in the planned sequence.
Only if Mode = Sequential.0…104
Pulse duration The duration of a pulse in [sec] (time switched on + timeswitched off).
Only if Mode = Sequential.
0…106
Interval Defines the time span, in [sec], between two impulse starts.
Only if Mode = Sequential.0…106 | 0…104
6.4.21.4 Control type: TTL input (single pin)
Parameters Description ValuesInput signal Indicates whether an rising or a falling input signal should be
detected.Rising | Falling
Max. time The maximum waiting time for a signal change, in [sec].After it expires, the method is continued even if no signalchange was detected.Only for signal inputs.
0…106
6.4.21.5 Control type: RS-232
Parameters Description ValuesSend outputsequence
Defines whether an output sequence should be sent. Activ | Inactive
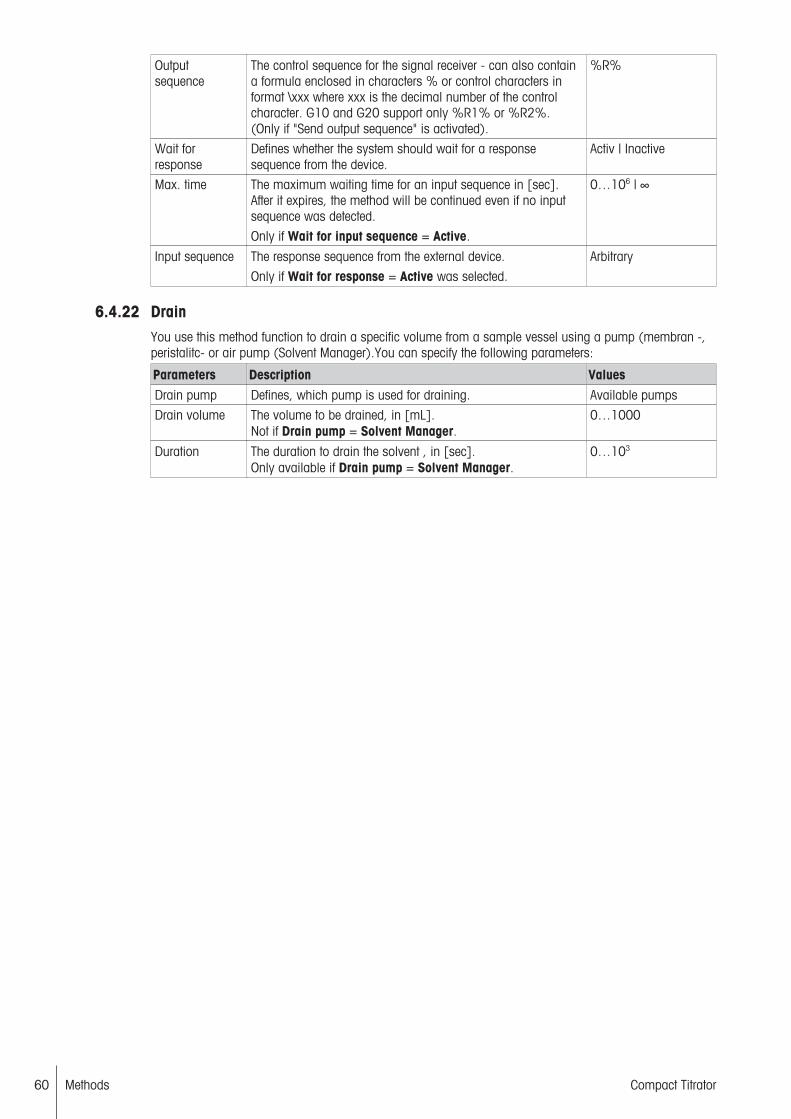
Methods60 Compact Titrator
Outputsequence
The control sequence for the signal receiver - can also containa formula enclosed in characters % or control characters informat \xxx where xxx is the decimal number of the controlcharacter. G10 and G20 support only %R1% or %R2%.(Only if "Send output sequence" is activated).
%R%
Wait forresponse
Defines whether the system should wait for a responsesequence from the device.
Activ | Inactive
Max. time The maximum waiting time for an input sequence in [sec].After it expires, the method will be continued even if no inputsequence was detected.
Only if Wait for input sequence = Active.
0…106 | ∞
Input sequence The response sequence from the external device.
Only if Wait for response = Active was selected.
Arbitrary
6.4.22 DrainYou use this method function to drain a specific volume from a sample vessel using a pump (membran -,peristalitc- or air pump (Solvent Manager).You can specify the following parameters:
Parameters Description ValuesDrain pump Defines, which pump is used for draining. Available pumps
Drain volume The volume to be drained, in [mL].Not if Drain pump = Solvent Manager.
0…1000
Duration The duration to drain the solvent , in [sec].Only available if Drain pump = Solvent Manager.
0…103

Series Templates 61Compact Titrator
7 Series TemplatesYou can use series templates to gather up to 303 individual samples to form a Sample series. All samplesin the series are analyzed one after the other with a defined method (analysis template for sequentialprocessing of samples using the same method).
Note• You can create a shortcut on the Homescreen for all series templates.• A maximum of 60 sample series can be stored in the titrator.If you select a series template from this list by clicking on it, you can change its parameters or delete theentire template.
Navigation: New > Series templates
Parameters Description ValuesSample seriesID
Here you can assign any ID to the sample series. Arbitrary
Method ID Here you can select the Method ID for the relevant method. Method list
Comment You can enter a brief comment about the series. Arbitrary
Number ofsamples
Defines the number of samples to be analyzed. The numberdepends on the selected titration stand.
1…303
Number ofstandards
The number of standards to be analyzed with a method orseries.
1…303
Number ofbuffers
The number of buffers to be used for the calibration of a pHsensor.
1…9
During the creation of a sample series, you can choose Samples to display the loop list (method type: GT)or to the standard list (method type Titer and Calibration). From these lists, you can change predefinedsample or standard data or you can create new sample or standards.
7.1 Sample or Standard ParametersThe sample list, which can be opened by choosing Samples in the series parameter window, displays allsamples of a loop with a number, the first ID, and the sample size (depending on entry type - see "Methodfunctions: Sample"). You can also edit the samples here.
Note• Series IDs must be unique, although sample IDs do not have to be.• For titer loops, the standard name and the sample size are listed, and for calibration loops the name of
the list of standards and the individual standards.Select an entry from the list. You can define the following parameters for each sample, depending on thetype of the loop (Sample, Titer, Calibration):
Parameters Description ValuesNumber Defines the number of the sample. 1…303
ID A user-defined name for the ID of the sample, in accordancewith the "Sample" method function.
Arbitrary
Sample size You can enter the sample size here.For fixed entry types, this field only appears as an info field.
0…1000 [g] | [mL]0…106 [pcs.]
*The entered value of the sample size has to be valid within the range which is configured in the Samplemethod function of the relevant method.
Weight perpiece
The weight in [g] per pirece.Appears only if Entry type = Pieces or Fixed pieces wasselected.
0 … 1000
Density The density of the sample for the entry types "Weight", "Fixedweight", "Volume" and "Fixed volume".
0.0001…100
Comment You can enter a brief comment about the series. Arbitrary
Correction factor Any correction factor that can be used in calculations. 0.0001…106

Series Templates62 Compact Titrator
Temperature The temperature in [°C] during the analysis. If temperaturemonitoring is activated in a titration function, the system willignore the sample temperature given here.
-20…200
NoteFor entering the sample parameters, particularly for numerous samples, the titrator provides you withassistance in the entry windows of the ID 1 and Sample size parameters:
These extra icons are a quick, direct way to jump to the entry window of the previous sample or nextsample.
You can also choose Sample ID 1 and "Sample size" to switch directly between the entry windows for thesample parameters ID 1 and Sample size.
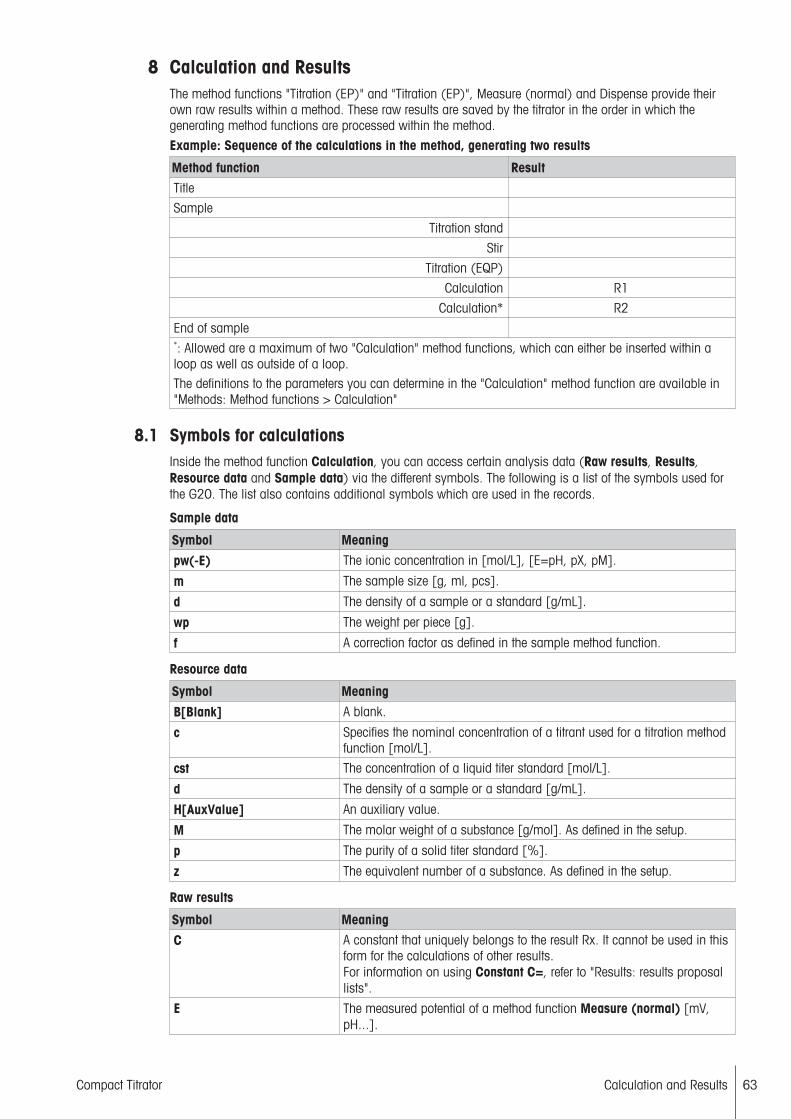
Calculation and Results 63Compact Titrator
8 Calculation and ResultsThe method functions "Titration (EP)" and "Titration (EP)", Measure (normal) and Dispense provide theirown raw results within a method. These raw results are saved by the titrator in the order in which thegenerating method functions are processed within the method.
Example: Sequence of the calculations in the method, generating two results
Method function ResultTitle
Sample
Titration stand
Stir
Titration (EQP)
Calculation R1
Calculation* R2
End of sample*: Allowed are a maximum of two "Calculation" method functions, which can either be inserted within aloop as well as outside of a loop.The definitions to the parameters you can determine in the "Calculation" method function are available in"Methods: Method functions > Calculation"
8.1 Symbols for calculationsInside the method function Calculation, you can access certain analysis data (Raw results, Results,Resource data and Sample data) via the different symbols. The following is a list of the symbols used forthe G20. The list also contains additional symbols which are used in the records.
Sample data
Symbol Meaning
pw(-E) The ionic concentration in [mol/L], [E=pH, pX, pM].
m The sample size [g, ml, pcs].
d The density of a sample or a standard [g/mL].
wp The weight per piece [g].
f A correction factor as defined in the sample method function.
Resource data
Symbol Meaning
B[Blank] A blank.
c Specifies the nominal concentration of a titrant used for a titration methodfunction [mol/L].
cst The concentration of a liquid titer standard [mol/L].
d The density of a sample or a standard [g/mL].
H[AuxValue] An auxiliary value.
M The molar weight of a substance [g/mol]. As defined in the setup.
p The purity of a solid titer standard [%].
z The equivalent number of a substance. As defined in the setup.
Raw results
Symbol Meaning
C A constant that uniquely belongs to the result Rx. It cannot be used in thisform for the calculations of other results.For information on using Constant C=, refer to "Results: results proposallists".
E The measured potential of a method function Measure (normal) [mV,pH...].

Calculation and Results64 Compact Titrator
Symbol Meaning
Q Substance quantity used up to the end point or equivalence point of atitration method function [mmol].
QE(H[AuxValue]) Consumption up to the auxiliary value in [mmol].
QEND The total substance quantity used up to the end of a titration methodfunction [mmol].
QENDDi The total substance quantity in [mmol] used during a dispensing methodfunction.
T The measured temperature in a Measure (normal) method function(direct measurement with temperature sensor or concomitant temperatureacquisition) [°C], [K], [°F].
VEND Titrant volume used up to the end of a titration method function [mL].
VEQ (=V) Titrant consumption up to the end point or equivalence point of a titrationmethod function. For multiple equivalence points, the consumption iscalculated from the previous equivalence point [mL].
VEX The excess of titrant added after reaching the end point or equivalencepoint of a titration method function [mL].
VE(x) The titrant volume used until the potential x is reached during a titrationmethod function [mL].
Results
Symbol Meaning
Rx A result x.
Mean[Rx] The mean value of a result Rx.
8.2 Calculation formulasCalculation formulas are used in the "Calculate" method function.One typical example for a formula within the "Calculation" method function would be the expression R=VEQ.In this case, the consumed volume of titrant up to the point at which the end point is reached is assigned toR. All the symbols can be used for analysis data in relations like this. The analysis data to be used must begenerated by the method before the "Calculate" method function.Auxiliary values and blanks defined in the setup can generally be used in formulas in the same manner assymbols. The general form for an auxiliary value is: H[Name] (as defined in the setup).
8.3 Results proposal listsProposal listIn the Calculation dialog window (see "Methods: Method functions > Calculation"), using the Resultproposals button, specified results with unit, formula and constants can be selected.
Proposal lists for the Sample and Sample (Titer) method functions are dependent on the Entry typeparameter. When the Entry type is modified, a validation is immediately carried out to determine whetherthe selected calculation exists in the corresponding entry type.
Result type: PredefinedAfter selecting a result from the proposal list, the Result unit, Formula and Constant C= fields are automat-ically populated and can not be modified. The values for Result, Result unit and Entry type defined in theSample method function are used to determine the value for Formula.
Result type: User definedIf the parameter Result type is set to User defined, you can modify Result, Result unit and Constant C=;but not Formula.The mode User defined only offers empty proposal lists. A result can only be selected in Predefined mode.If you switch the mode to User defined, a number can be entered for Constant C=.
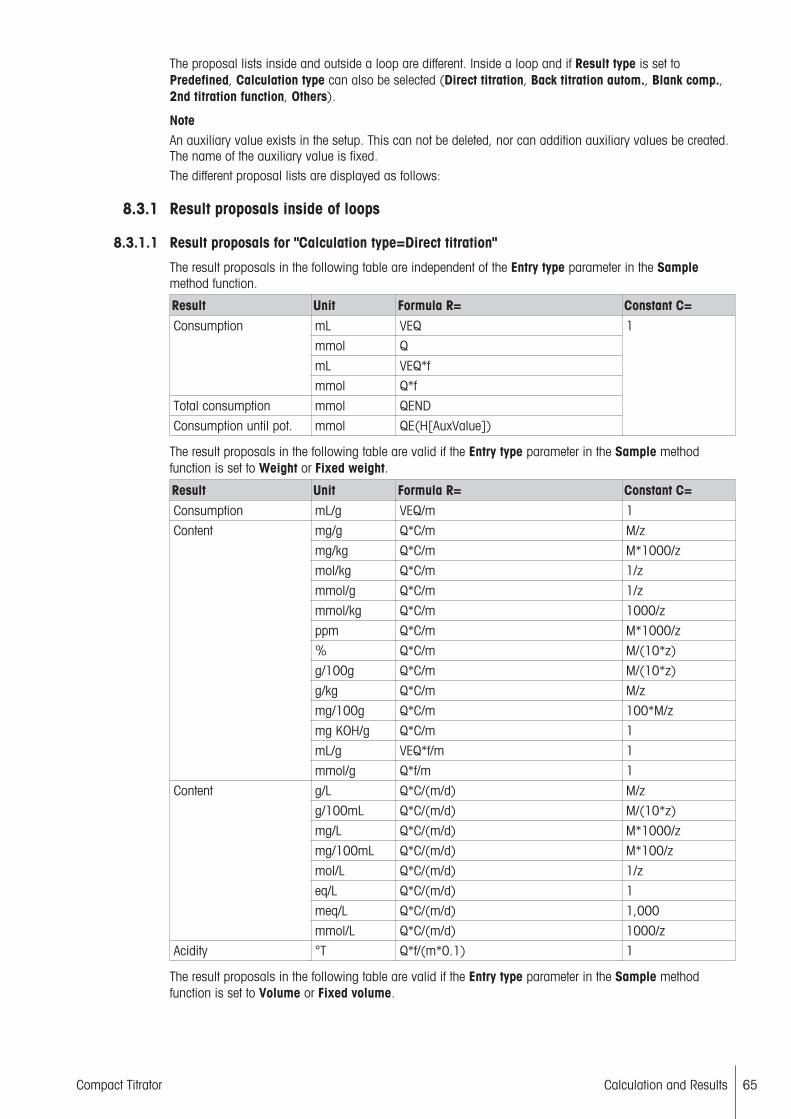
Calculation and Results 65Compact Titrator
The proposal lists inside and outside a loop are different. Inside a loop and if Result type is set toPredefined, Calculation type can also be selected (Direct titration, Back titration autom., Blank comp.,2nd titration function, Others).
NoteAn auxiliary value exists in the setup. This can not be deleted, nor can addition auxiliary values be created.The name of the auxiliary value is fixed.The different proposal lists are displayed as follows:
8.3.1 Result proposals inside of loops
8.3.1.1 Result proposals for "Calculation type=Direct titration"
The result proposals in the following table are independent of the Entry type parameter in the Samplemethod function.
Result Unit Formula R= Constant C=Consumption mL VEQ 1
mmol Q
mL VEQ*f
mmol Q*f
Total consumption mmol QEND
Consumption until pot. mmol QE(H[AuxValue])
The result proposals in the following table are valid if the Entry type parameter in the Sample methodfunction is set to Weight or Fixed weight.
Result Unit Formula R= Constant C=Consumption mL/g VEQ/m 1
Content mg/g Q*C/m M/z
mg/kg Q*C/m M*1000/z
mol/kg Q*C/m 1/z
mmol/g Q*C/m 1/z
mmol/kg Q*C/m 1000/z
ppm Q*C/m M*1000/z
% Q*C/m M/(10*z)
g/100g Q*C/m M/(10*z)
g/kg Q*C/m M/z
mg/100g Q*C/m 100*M/z
mg KOH/g Q*C/m 1
mL/g VEQ*f/m 1
mmol/g Q*f/m 1
Content g/L Q*C/(m/d) M/z
g/100mL Q*C/(m/d) M/(10*z)
mg/L Q*C/(m/d) M*1000/z
mg/100mL Q*C/(m/d) M*100/z
mol/L Q*C/(m/d) 1/z
eq/L Q*C/(m/d) 1
meq/L Q*C/(m/d) 1,000
mmol/L Q*C/(m/d) 1000/z
Acidity °T Q*f/(m*0.1) 1
The result proposals in the following table are valid if the Entry type parameter in the Sample methodfunction is set to Volume or Fixed volume.

Calculation and Results66 Compact Titrator
Result Unit Formula R= Constant C=Consumption mL/mL VEQ/m 1
Content mg/g Q*C/(m*d) M/z
mg/kg Q*C/(m*d) M*1000/z
mol/kg Q*C/(m*d) 1/z
mmol/g Q*C/(m*d) 1/z
mmol/kg Q*C/(m*d) 1000/z
ppm Q*C/(m*d) M*1000/z
% Q*C/(m*d) M/(10*z)
g/100g Q*C/(m*d) M/(10*z)
g/kg Q*C/(m*d) M/z
mg/100g Q*C/(m*d) 100*M/z
mg KOH/g Q*C/(m*d) 1
mL/g VEQ*f/(m*d) 1
mmol/g Q*f/(m*d) 1
Content g/L Q*C/m M/z
g/100mL Q*C/m M/(10*z)
mg/L Q*C/m M*1000/z
mg/100mL Q*C/m M*100/z
mol/L Q*C/m 1/z
eq/L Q*C/m 1
meq/L Q*C/m 1,000
mmol/L Q*C/m 1000/z
Acidity °T Q*f/((m*d)*0.1) 1
The result proposals in the following table are valid if the Entry type parameter in the Sample methodfunction is set to Pieces or Fixed pieces.
Result Unit Formula R= Constant C=Content mg/g Q*C/(m*wp) M/z
mg/kg Q*C/(m*wp) M*1000/z
mol/kg Q*C/(m*wp) 1/z
mmol/g Q*C/(m*wp) 1/z
mmol/kg Q*C/(m*wp) 1000/z
ppm Q*C/(m*wp) M*1000/z
% Q*C/(m*wp) M/(10*z)
g/100g Q*C/(m*wp) M/(10*z)
g/kg Q*C/(m*wp) M/z
mg/100g Q*C/(m*wp) 100*M/z
mg KOH/g Q*C/(m*wp) 1
mL/g VEQ*f/(m*wp) 1
mmol/g Q*f/(m*wp) 1
Acidity °T Q*f/((m*wp)*0.1) 1
8.3.1.2 Result proposals for "Calculation type=Automatic back titration"
The result proposals in the following table are independent of the Entry type parameter in the Samplemethod function.
Result Unit Formula R= Constant C=Consumption mL VEQ 1
mmol Q 1

Calculation and Results 67Compact Titrator
Result Unit Formula R= Constant C=Total consumption mmol QEND 1
Consumption until pot. mmol QE(H[AuxValue]) 1
The result proposals in the following table are valid if the Entry type parameter in the Sample methodfunction is set to Weight or Fixed weight.
Result Unit Formula R= Constant C=Consumption mL/g VEQ/m 1
Content mg/g (QENDDi-Q)*C/m M/z
mg/kg M*1000/z
mol/kg 1/z
mmol/g
mmol/kg 1000/z
ppm M*1000/z
% M/(10*z)
g/100g
g/kg M/z
mg/100g 100*M/z
Content g/L (QENDDi-Q)*C/(m/d) M/z
g/100mL M/(10*z)
mg/L M*1000/z
mg/100mL M*100/z
mol/L 1/z
eq/L 1
meq/L 1,000
mmol/L 1000/z
The result proposals in the following table are valid if the Entry type parameter in the Sample methodfunction is set to Volume or Fixed volume.
Result Unit Formula R= Constant C=Consumption mL/mL VEQ/m 1
Content mg/g (QENDDi-Q)*C/(m*d) M/z
mg/kg M*1000/z
mol/kg 1/z
mmol/g
mmol/kg 1000/z
ppm M*1000/z
% M/(10*z)
g/100g
g/kg M/z
mg/100g 100*M/z
Content g/L (QENDDi-Q)*C/m M/z
g/100mL M/(10*z)
mg/L M*1000/z
mg/100mL M*100/z
mol/L 1/z
eq/L 1
meq/L 1,000
mmol/L 1000/z

Calculation and Results68 Compact Titrator
The result proposals in the following table are valid if the Entry type parameter in the Sample methodfunction is set to Pieces or Fixed pieces.
Result Unit Formula R= Constant C=Content mg/g (QENDDi-Q)*C/(m*wp) M/z
mg/kg M*1000/z
mol/kg 1/z
mmol/g
mmol/kg 1000/z
ppm M*1000/z
% M/(10*z)
g/100g
g/kg M/z
mg/100g 100*M/z
8.3.1.3 Result proposals for "Calculation type=Manual back titration"
The result proposals in the following table are independent of the Entry type parameter in the Samplemethod function.
Result Unit Formula R= Constant C=Consumption mL VEQ 1
mmol Q 1
Total consumption mmol QEND 1
Consumption until pot. mmol QE(H[AuxValue]) 1
The result proposals in the following table are valid if the Entry type parameter in the Sample methodfunction is set to Weight or Fixed weight.
Result Unit Formula R= Constant C=Consumption mL/g VEQ/m 1
Content mg/g (H[AuxValue] –Q) * C/m M/z
mg/kg M*1000/z
mol/kg 1/z
mmol/g 1/z
mmol/kg 1000/z
ppm M*1000/z
% M/(10*z)
g/100g 1/z
g/kg M/z
mg/100g 100*M/z
Content g/L (H[AuxValue]–Q) * C/(m/d) M/z
g/100mL M/(10*z)
mg/L M*1000/z
mg/100mL M*100/z
mol/L 1/z
eq/L 1
meq/L 1,000
mmol/L 1000/z
Rebelein g/L (H[AuxValue]-Q)*C/(f*(m/d)) 1000
The result proposals in the following table are valid if the Entry type parameter in the Sample methodfunction is set to Volume or Fixed volume.

Calculation and Results 69Compact Titrator
Result Unit Formula R= Constant C=Consumption mL/mL VEQ/m 1
Content mg/g (H[AuxValue] –Q) * C/(m*d) M/z
mg/kg M*1000/z
mol/kg 1/z
mmol/g 1/z
mmol/kg 1000/z
ppm M*1000/z
% M/(10*z)
g/100g 1/z
g/kg M/z
mg/100g 100*M/z
Content g/L (H[AuxValue]–Q) * C/m M/z
g/100mL M/(10*z)
mg/L M*1000/z
mg/100mL M*100/z
mol/L 1/z
eq/L 1
meq/L 1,000
mmol/L 1000/z
Rebelein g/L (H[AuxValue]-Q)*C/(f*m) 1000
The result proposals in the following table are valid if the Entry type parameter in the Sample methodfunction is set to Pieces or Fixed pieces.
Result Unit Formula R= Constant C=Content mg/g (H[AuxValue] –Q) * C/(m*wp) M/z
mg/kg M*1000/z
mol/kg 1/z
mmol/g 1/z
mmol/kg 1000/z
ppm M*1000/z
% M/(10*z)
g/100g 1/z
g/kg M/z
mg/100g 100*M/z
8.3.1.4 Result proposals for "Calculation type=Blank-compensated"
The result proposals in the following table are independent of the Entry type parameter in the Samplemethod function.
Result Unit Formula R= Constant C=Consumption mL VEQ 1
mmol Q
Total consumption mmol QEND
Consumption until pot. mmol QE(H[AuxValue])
The result proposals in the following table are valid if the Entry type parameter in the Sample methodfunction is set to Weight or Fixed weight.
Result Unit Formula R= Constant C=Consumption mL/g VEQ/m 1

Calculation and Results70 Compact Titrator
Result Unit Formula R= Constant C=Content mg/g (Q–B[Blank]) * C/m M/z
mg/kg M*1000/z
mol/kg 1/z
mmol/g 1/z
mmol/kg 1000/z
ppm M*1000/z
% M/(10*z)
g/100g M/(10*z)
g/kg M/z
mg/100g 100*M/z
mg KOH/g (QE(H[AuxValue])-B[Blank]) * C/m M/z
meq/kg (Q-B[Blank])*1000/m) 1
Bromine number g/100g (QEND-B[Blank])*C/m M/(10*z)
Calculation g/mol 1000*m/((Q-B[Blank])*f 1
Content g/L (Q–B[Blank]) * C/(m/d) M/z
g/100mL M/(10*z)
mg/L M*1000/z
mg/100mL M*100/z
mol/L 1/z
eq/L 1
meq/L 1,000
mmol/L 1000/z
The result proposals in the following table are valid if the Entry type parameter in the Sample methodfunction is set to Volume or Fixed volume.
Result Unit Formula R= Constant C=Consumption mL/g VEQ/m 1
mL/mL VEQ/m
Content mg/g (Q–B[Blank]) * C/(m*d) M/z
mg/kg M*1000/z
mol/kg 1/z
mmol/g 1/z
mmol/kg 1000/z
ppm M*1000/z
% M/(10*z)
g/100g M/(10*z)
g/kg M/z
mg/100g 100*M/z
mg KOH/g (QE(H[AuxValue])-B[Blank]) * C/(m*d) M/z
meq/kg (Q-B[Blank])*1000/(m*d) 1
Bromine number g/100g (QEND-B[Blank])*C/(m*d) M/(10*z)
Calculation g/mol 1000*(m*d)/((Q-B[Blank])*f 1

Calculation and Results 71Compact Titrator
Result Unit Formula R= Constant C=Content g/L (Q–B[Blank]) * C/m M/z
g/100mL M/(10*z)
mg/L M*1000/z
mg/100mL M*100/z
mol/L 1/z
eq/L 1
meq/L 1,000
mmol/L 1000/z
The result proposals in the following table are valid if the Entry type parameter in the Sample methodfunction is set to Pieces or Fixed pieces.
Result Unit Formula R= Constant C=Content mg/g (Q–B[Blank]) * C/(m*wp) M/z
mg/kg M*1000/z
mol/kg 1/z
mmol/g 1/z
mmol/kg 1000/z
ppm M*1000/z
% M/(10*z)
g/100g M/(10*z)
g/kg M/z
mg/100g 100*M/z
mg KOH/g (QE(H[AuxValue])-B[Blank]) * C/(m*wp)
M/z
meq/kg (Q-B[Blank])*1000/(m*wp) 1
Bromine No. g/100g (QEND-B[Blank])*C/(m*wp) M/(10*z)
8.3.1.5 Result proposals for "Calculation type=2nd titration function"
The result proposals in the following table are independent of the Entry type parameter in the Samplemethod function.
Result Result unit Formula R= Constant C=Consumption mL (VEQ[2] + VEX) 1
(VEQ[2] + VEND)
mmol (Q[2] + QEX)
(Q[2] + QEND)
mL (VEQ[2] + VEX)*f
(VEQ[2] + VEND)*f
mmol (Q[2] + QEX)*f
(Q[2] + QEND)*f
Total consumption mmol QEND[2] + QEX
QEND[2] + QEND
Consumption until pot. mmol QE(H[AuxValue])[2] + QEX
QE(H[AuxValue])[2] + QEND
The result proposals in the following table are valid if the Entry type parameter in the Sample methodfunction is set to Weight or Fixed weight.
Result Result unit Formula R= Constant C=Consumption mL/g (VEQ[2] + VEX)/m 1
(VEQ[2] + VEND)/m

Calculation and Results72 Compact Titrator
Result Result unit Formula R= Constant C=Content mg/g (Q[2] + QEX)*C/m
and(Q[2] + QEND)*C/m
M/z
mg/kg M*1000/z
mol/kg 1/z
mmol/g 1/z
mmol/kg 1000/z
ppm M*1000/z
% M/(10*z)
g/100g M/(10*z)
g/kg M/z
mg/100g 100*M/z
Content g/L (Q[2] + QEX)*C/(m/d)and(Q[2] + QEND)*C/(m/d)
M/z
g/100mL M/(10*z)
mg/L M*1000/z
mg/100mL M*100/z
mol/L 1/z
eq/L 1
meq/L 1,000
mmol/L 1000/z
mL/g (VEQ[2] + VEX)*f/m 1
(VEQ[2] + VEND)*f/m
mmol/g (Q[2] + QEX)*f/m 1
(Q[2] + QEND)*f/m
The result proposals in the following table are valid if the Entry type parameter in the Sample methodfunction is set to Volume or Fixed volume.
Result Result unit Formula R= Constant C=Consumption mL/mL (VEQ[2] + VEX)/m 1
(VEQ[2] + VEND)/m
Content mg/g (Q[2] + QEX)*C/(m*d)and(Q[2] + QEND)*C/(m*d)
M/z
mg/kg M*1000/z
mol/kg 1/z
mmol/g 1/z
mmol/kg 1000/z
ppm M*1000/z
% M/(10*z)
g/100g M/(10*z)
g/kg M/z
mg/100g 100*M/z

Calculation and Results 73Compact Titrator
Result Result unit Formula R= Constant C=Content g/L (Q[2] + QEX)*C/m
and(Q[2] + QEND)*C/m
M/z
g/100mL M/(10*z)
mg/L M*1000/z
mg/100mL M*100/z
mol/L 1/z
eq/L 1
meq/L 1,000
mmol/L 1000/z
mL/g (VEQ[2] + VEX)*f/(m*d) 1
(VEQ[2] + VEND)*f/(m*d)
mmol/g (Q[2] + QEX)*f/(m*d) 1
(Q[2] + QEND)*f/(m*d)
The result proposals in the following table are valid if the Entry type parameter in the Sample methodfunction is set to Pieces or Fixed pieces.
Result Result unit Formula R= Constant C=Content mg/g (Q[2] + QEX)*C/(m*wp)
and(Q[2] + QEND)*C/(m*wp)
M/z
mg/kg M*1000/z
mol/kg 1/z
mmol/g 1/z
mmol/kg 1000/z
ppm M*1000/z
% M/(10*z)
g/100g M/(10*z)
g/kg M/z
mg/100g 100*M/z
mL/g (VEQ[2] + VEX)*f/(m*wp) 1
(VEQ[2] + VEND)*f/(m*wp)
mmol/g (Q[2] + QEX)*f/(m*wp) 1
(Q[2] + QEND)*f/(m*wp)
8.3.1.6 Result proposals for "Calculation type=Others"
For Calibration, the results proposals for Calculation type=Others also apply.
The result proposals in the following table are independent of the Entry type parameter in the Samplemethod function.
Result Unit Formula R= Constant C=Potential mV E 1
pH pH
Ion conc. pX
pM
ppm
Absorption A
Transmission %T
Current μA
Temperature °C T 1
K
°F

Calculation and Results74 Compact Titrator
Result Unit Formula R= Constant C=Ion conc. mmol/L pw(-E)*1000 1
mol/L pw(-E)
Initial potential pH EST
The result proposals in the following table are valid if the Entry type parameter in the Sample methodfunction is set to Volume or Fixed volume.
Result Unit Formula R= Constant C=TAC mg/L CaCO3 (20/m)*VE(5.0)*250 1
FOS mg/LCH3COOH
(((20/m)*(VE(4.4)-VE(5.0))*1.66)-0.15)*500
FOS/TAC – R2/R1
8.3.1.7 Result proposals for the method type "Titer"
The result proposals in the following table are valid if the Entry type parameter in the Sample methodfunction is set to Weight or Fixed weight.
Result Unit Formula R= Constant C=Titer -- m/(VEQ*c*C) M/(10*p*z)
-- d/(cst*z)
The result proposals in the following table are valid if the Entry type parameter in the Sample methodfunction is set to Volume or Fixed volume.
Result Unit Formula R= Constant C=Titer -- m/(VEQ*c*C) 1/(cst*z)
8.3.2 Result proposals outside of loopsThe result proposals in the following table are independent of the Entry type parameter in the Samplemethod function.
Result Unit Formula R= Constant C=Mean value -- Mean[R1] 1
Mean value -- Mean[R2] 1
Mean value -- Mean[R3] 1
8.4 ResultsThe Results dialog can be accessed directly from Homescreen using the relevant button.
Note• The system only saves the results from the last analysis (series or individual sample).• When you start a new analysis, you will lose the results from the previous analysis.• You can see the results immediately after they are generated.
You can use the various buttons in the "Results" dialog to access different functions. You can, for example,
• view all results of the last analysis• view statistics, perform an outlier test and if necessary, exclude samples from the statistics.• perform recalculations for results in which certain raw data (e.g. sample sizes) have to be adapted
retrospectively for a single sample or for all samples in a series.• view and print the status and the calculated results of each individual sample.Results are retained until new results are generated by methods. The results of the "older" of the two sampleseries are replaced.
All the changes performed on the saved results can be reversed with the "Undo changes" button.
NoteChanges to results are indicated by an asterisk in the record. Example: VEQ*.

Calculation and Results 75Compact Titrator
All resultsYou can use the All Results button to view the results of the last analysis and print them if a printer isconnected to the titrator (see "Printer").
From the Results dialog, you also have the following additional options:
• Samples View or print the results of an individual sample or exclude the entire sample (see "Results:Samples")
• Statistics Switch to the "Statistics" dialog (see "Results: Statistics")
Delete all resultsYou can use this button to delete all the data (raw data, raw results, and results) saved by the titrator in theresults range.
Undo changesIf you make changes to the results saved by the titrator after the analysis, you can use Undo all to discardthem. Afterward, the system will reinstate the initial status directly after the conclusion of the analysis, in itsoriginal and unchanged state.
StatisticsFor results within a sample loop, you can display and print out statistics.
NoteThe statistics are only created if more than one sample was analyzed in the corresponding loop.The following calculated values will be displayed as statistical components:• Mean value x of a result Rx (Mean [Rx])
• Standard deviation s
• Relative standard deviation srel
• Number of samples per loop nTOT
If a result was excluded from the statistics, all the results from that sample will always be excluded as well.The system will then recalculate the statistics without the excluded sample and label them accordingly. Ifthe sample's results are then put back into the statistical evaluation, the label will be removed from thestatistics.
From the Statistics dialog, you also have the following additional options:
• Samples View, print, or exclude the results of an individual sample (see "Samples")
• Results View or print all results (see "All Results")
• Outlier test Perform a test for outliers in the statistical evaluation.
SamplesYou can use the Samples button to display and print the status and calculated results for each individualsample. The same applies for a series of additional data sets that can be accessed via "Data". This will letyou view and print the sample, method and resource data for each sample and view and print the rawresults and the measured values.
You can use the Exclude button in the Results: Samples dialog to exclude individual samples from thestatistical evaluation. The system will not delete the results of the samples excluded in this way but merelylabel them as excluded. They will no longer be included in the statistics. Samples that have been excludedcan be returned to the statistics at any time by choosing "Include".
After a sample is excluded, all affected calculations (inside and outside of loops) are performed again.
Outlier testIf the results of individual samples in a measurement series deviate greatly from the calculated mean value,it may make sense to question the significance of these (few) results and treat them as "outliers".Outliers will have the following effects on the overall result of an analysis:• The mean value is significantly shifted higher or lower.• The standard deviation is increased.• The distribution of the individual values around the mean value is distorted and no longer follows a
normal distribution.The titrator has an automatic function for identifying and labeling outliers. You can call this function from theStatistics dialog using the "Outlier test" softkey.

Calculation and Results76 Compact Titrator
NoteYou can run an outlier test if you have the results from more than three samples.The procedure used by the titrator is the Grubbs outlier test. For this procedure, the measured value [x*] thathas the greatest deviation from the calculated mean value is analyzed.This number is used in the followingequation, together with the mean value [ ] and the standard deviation [s]:
PG = x - x*
s
The test variable [PG] is then compared with the corresponding value in the Grubbs table G (N, 90%),which in turn depends on the number of measured values N:
N (number of samples) 1 2 3 4 5 6 7 8 9 10
90 % - - 1.15 1.46 1.67 1.82 1.94 2.03 2.11 2.18
N (number of samples) 11 12 13 14 15 16 17 18 19 20
90 % 2.23 2.29 2.33 2.37 2.41 2.44 2.48 2.5 2.53 2.56
N (number of samples) 21 22 23 24 25 26 27 28 29 30
90 % 2.58 2.6 2.61 2.63 2.65 2.67 2.69 2.7 2.72 2.74
N (number of samples) 31 32 33 34 35 36 37 38 39 40
90 % 2.75 2.77 2.78 2.79 2.81 2.82 2.83 2.84 2.86 2.87
N (number of samples) 41 42 43 44 45 46 47 48 49 50
90 % 2.88 2.89 2.9 2.91 2.92 2.92 2.93 2.94 2.95 2.96
N (number of samples) 51 52 53 54 55 56 57 58 59 60
90 % 2.97 2.97 2.98 2.99 3 3 3.01 3.02 3.02 3.03
N (number of samples) 61 62 63 64 65 66 67 68 69 70
90 % 3.03 3.04 3.04 3.05 3.05 3.06 3.06 3.07 3.07 3.08
N (number of samples) 71 72 73 74 75 76 77 78 79 80
90 % 3.08 3.08 3.09 3.09 3.1 3.1 3.11 3.11 3.12 3.12
N (number of samples) 81 82 83 84 85 86 87 88 89 90
90 % 3.12 3.13 3.13 3.14 3.14 3.15 3.15 3.16 3.16 3.17
N (number of samples) 91 92 93 94 95 96 97 98 99 100
90 % 3.17 3.17 3.18 3.18 3.19 3.19 3.2 3.2 3.21 3.21
N (number of samples) 101 102 103 104 105 106 107 108 109 110
90 % 3.21 3.22 3.22 3.22 3.23 3.23 3.23 3.23 3.24 3.24
N (number of samples) 111 112 113 114 115 116 117 118 119 120
90 % 3.24 3.22 3.25 3.25 3.26 3.26 3.26 3.26 3.27 3.27
If the calculated test variable PG is greater than the corresponding value taken from the table, the measuredvalue x* is identified as an outlier and marked accordingly.After an outlier has been identified, the test is repeated with the remaining measured values (without thealready identified outlier) using the newly calculated mean value and new standard deviation. This processis repeated continually until no further outlier can be identified.It is then the user's responsibility to exclude any identified outliers from the statistics. After confirmation, theentire sample is excluded and the statistics are recalculated without the identified and excluded outliers.

Setup 77Compact Titrator
9 SetupThis section tells you how to set up the titrator in accordance with your requirements so that you can carryout titration.
Chemicals Titrants
Auxiliary reagents
Calibration standards
Concentration and titer standards
Substances
Hardware Sensors
Pumps
Peripherals
Titration Stands
Auxiliary Instruments
User settings Language
Screen
Audio signal
Shortcuts
Keyboard
Global settings System
User management
Analysis and resources behavior
Values Blank
Auxiliary values
Mainten. & Service MT-Service
Import / Export
Reset to factory settings
Titrator firmware history
Board firmware
Terminal
Board data
Drives
Burettes
Update
9.1 ChemicalsNavigation: Home > Setup > ChemicalsIn Chemicals, configure and manage the titrant, auxiliary reagents, titer standard, and other substances.You can view and print out lists of chemicals that have already been defined. You can also specify newchemicals or delete created chemicals. Auxiliary reagents must be assigned to a pump with which they canbe added.
Settings Explanation
Titrants Titrants are managed together with burettes and burette drive.
Auxiliary reagent Auxiliary reagents are liquid chemicals that can be used to aid the titrationprocess.
Calibration standards Calibration standards are used for the calibration of sensors.
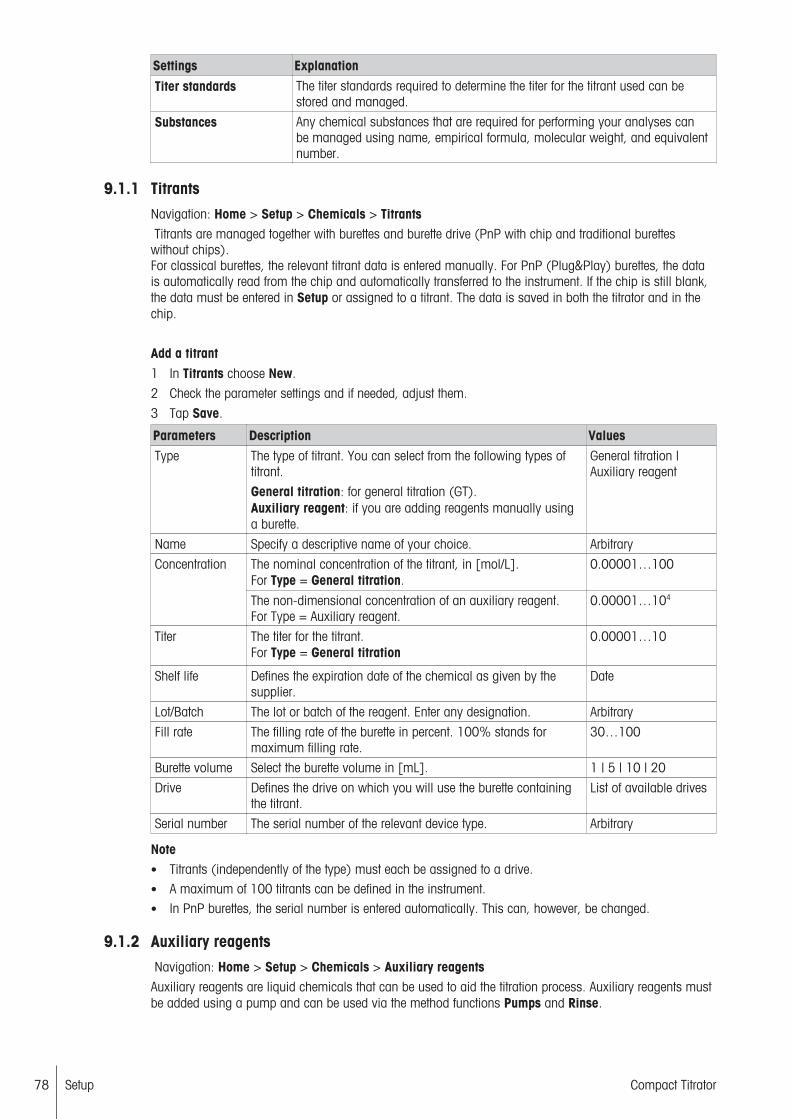
Setup78 Compact Titrator
Settings Explanation
Titer standards The titer standards required to determine the titer for the titrant used can bestored and managed.
Substances Any chemical substances that are required for performing your analyses canbe managed using name, empirical formula, molecular weight, and equivalentnumber.
9.1.1 TitrantsNavigation: Home > Setup > Chemicals > Titrants Titrants are managed together with burettes and burette drive (PnP with chip and traditional buretteswithout chips).For classical burettes, the relevant titrant data is entered manually. For PnP (Plug&Play) burettes, the datais automatically read from the chip and automatically transferred to the instrument. If the chip is still blank,the data must be entered in Setup or assigned to a titrant. The data is saved in both the titrator and in thechip.
Add a titrant1 In Titrants choose New.
2 Check the parameter settings and if needed, adjust them.
3 Tap Save.
Parameters Description ValuesType The type of titrant. You can select from the following types of
titrant.
General titration: for general titration (GT).Auxiliary reagent: if you are adding reagents manually usinga burette.
General titration |Auxiliary reagent
Name Specify a descriptive name of your choice. Arbitrary
Concentration The nominal concentration of the titrant, in [mol/L].For Type = General titration.
0.00001…100
The non-dimensional concentration of an auxiliary reagent.For Type = Auxiliary reagent.
0.00001…104
Titer The titer for the titrant.For Type = General titration
0.00001…10
Shelf life Defines the expiration date of the chemical as given by thesupplier.
Date
Lot/Batch The lot or batch of the reagent. Enter any designation. Arbitrary
Fill rate The filling rate of the burette in percent. 100% stands formaximum filling rate.
30…100
Burette volume Select the burette volume in [mL]. 1 | 5 | 10 | 20
Drive Defines the drive on which you will use the burette containingthe titrant.
List of available drives
Serial number The serial number of the relevant device type. Arbitrary
Note• Titrants (independently of the type) must each be assigned to a drive.• A maximum of 100 titrants can be defined in the instrument.• In PnP burettes, the serial number is entered automatically. This can, however, be changed.
9.1.2 Auxiliary reagents Navigation: Home > Setup > Chemicals > Auxiliary reagentsAuxiliary reagents are liquid chemicals that can be used to aid the titration process. Auxiliary reagents mustbe added using a pump and can be used via the method functions Pumps and Rinse.

Setup 79Compact Titrator
Adding an auxiliary reagent− In Auxiliary reagents choose [New].
ð The windows to edit the parameters opens.Define the following parameters for each auxiliary reagent here:
Parameters Description ValuesName Specify a descriptive name of your choice. Arbitrary
Pump Use this setting to select a pump. List of availablepumps
Note• Auxiliary reagents must be assigned to a pump with which they can be added.• A maximum of 50 auxiliary reagents can be defined in the instrument.
9.1.3 Calibration standardsNavigation: Home > Setup > Chemicals > Calibration standardsCalibration standards are used for the calibration of sensors. The instrument contains various calibrationstandard lists for the calibration of pH sensors (pH buffer lists), ISE sensors (ISE standard lists) andconductivity sensors (conductivity standard lists) (see Appendix). In this dialog, you can view and print thepredefined lists stored in the titrator, and create additional user-defined calibration standard lists for pHbuffers and ISE and conductivity standards.
Adding a user-defined calibration standard lists1 In Calibration standards, choose [New].
ð The windows to edit the parameters opens.2 Edit the parameters and save the settings.ð After you have created a calibration standard list, you can add various buffers and standards to this list,
depending on the type selected.
Parameters Description ValuesType Select the corresponding type for the new calibration standard
list.pH | Auto pH | ISE |Conductivity
Name Specify a descriptive name of your choice. Arbitrary
Unit The unit of measure to be used will depend on the typeselected.
pH | pM | pX | ppm |mS/cm | µS/cm
Base list Add the calibration standard lists of various pH buffers byselecting them from the list.Only for Type = Auto pH.
List of availablecalibration standards
Ref. temperature Define the reference temperature of the buffer. -20…200
Note• To delete a user-defined calibration standard list from the titrator, you must first access the parameters in
the list via [Info]. From this dialog, you can delete the calibration standard list from the titrator memoryby selecting [Delete].
• A maximum of 20 user-defined calibration standard lists and 10 auto pH buffer lists can be defined inthe titrator.
Adding a pH Calibration Standard (pH Buffer)
§ After creating a calibration standard list of the type pH, add various pH buffers to it.
1 Add various pH buffers by choosing [New].
2 Enter the respective pH value of the buffer, based on the reference temperature from the calibrationstandard list and tap [OK].
ð To reflect the temperature influence of a pH buffer, enter a maximum of 20 value pairs for eachindividual buffer composed of the temperature and corresponding pH value.
3 Choose a buffer and add various values by choosing [New].
4 Enter the respective pH value of the buffer, based on the reference temperature from the calibrationstandard list.

Setup80 Compact Titrator
5 Save the list by tapping [Save].
Adding a pH Calibration Standard (pH buffer) of type Auto pH
§ For a calibration standard list of the type Auto pH, the various pH buffers are detected by the titratorautomatically. In order to ensure positive identification, the pH values of the individual solutions mustdiffer from each other by at least two units.
1 Add various pH buffers to the calibration standard list by choosing [Add] and selecting them from thespecified list.
2 Save the list by tapping [Save].
ð By doing so, the titrator offers only suitable pH buffers in order to ensure that the selected pH buffersalways differ from each other by at least two pH points.
Note• The temperature dependency of the individual pH buffers is also taken from the base list and cannot be
edited, only viewed.
Adding an ISE Calibration Standard (ISE Standard)
§ After creating a calibration standard list of the type ISE, you can add various ISE standards to it.
1 Add various ISE standards to it by choosing [New].
2 Enter the corresponding value for the standard in the desired unit of measure, based on the referencetemperature from the calibration standard list and tap [OK].
ð To reflect the temperature influence of an ISE standard, enter a maximum of 20 value pairs for eachindividual standard composed of the temperature and corresponding standard value.
3 Choose a buffer and add various values by choosing [New].
4 Save the list by tapping [Save].
Adding a Conductivity Calibration Standard (Conductivity Standard)
§ After creating a calibration standard list of the type Conductivity, add various conductivity standards toit.
1 Add various conductivity standards to it by choosing [New].
2 Enter the conductivity for each standard based on the reference temperature from the calibrationstandard list and tap [OK].
ð To reflect the temperature influence of a conductivity standard, enter a maximum of 20 value pairsfor each individual standard composed of the temperature and corresponding conductivity value.
3 Choose a buffer and add various values by choosing [New].
4 Save the list by tapping [Save].
9.1.4 Titer standardsNavigation: Home > Setup > Chemicals > Titer standardsThe titer standards required to determine the titer for the titrant used can be stored and managed in thetitrator.
Add a standard1 In Titer standards, choose New.
2 Check the parameter settings and if needed, adjust them.
3 Tap Save.
Parameters Description ValuesType Defines whether it is a liquid or solid titer standard. solid | liquid
Name Specify a descriptive name of your choice. Arbitrary
Purity The purity of a solid standard, in percent.Only for Type = solid.
0.001…100.000
Concentration The concentration of a liquid standard, in [mol/L].Only for Type = liquid.
0.00001…100
M The molar mass of a solid standard, in [g/mol]. 10-5…103
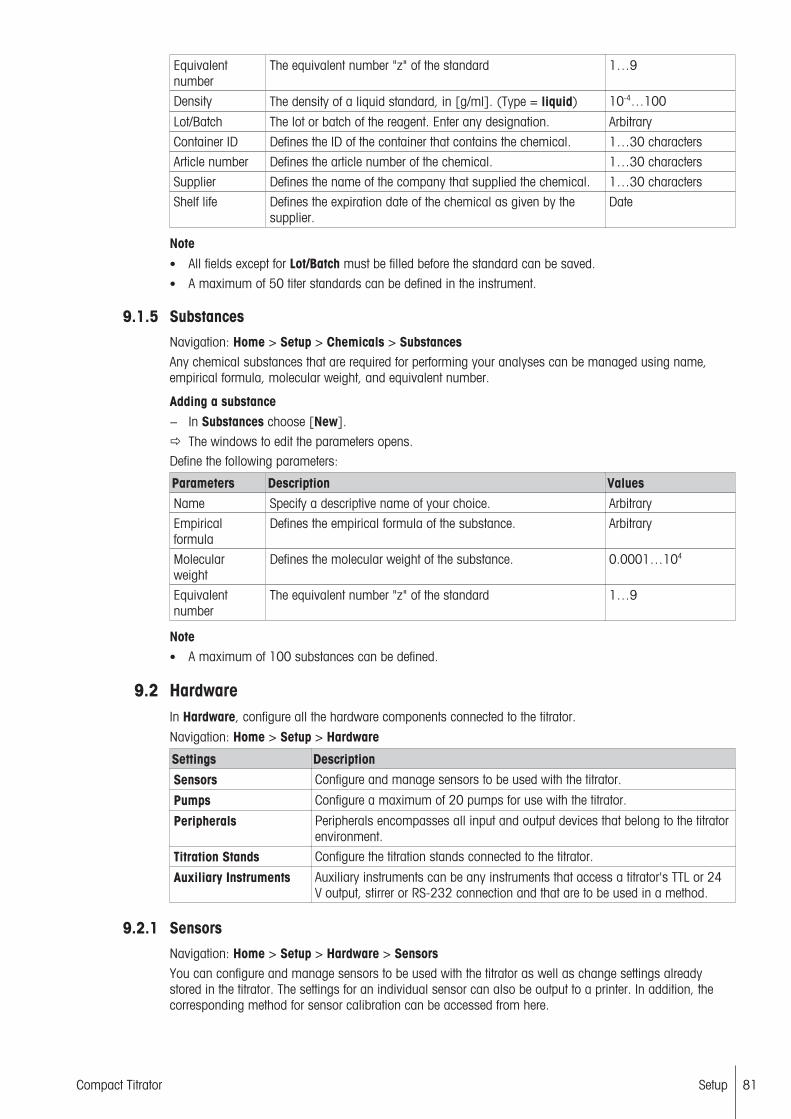
Setup 81Compact Titrator
Equivalentnumber
The equivalent number "z" of the standard 1…9
Density The density of a liquid standard, in [g/ml]. (Type = liquid) 10-4…100
Lot/Batch The lot or batch of the reagent. Enter any designation. Arbitrary
Container ID Defines the ID of the container that contains the chemical. 1…30 characters
Article number Defines the article number of the chemical. 1…30 characters
Supplier Defines the name of the company that supplied the chemical. 1…30 characters
Shelf life Defines the expiration date of the chemical as given by thesupplier.
Date
Note• All fields except for Lot/Batch must be filled before the standard can be saved.
• A maximum of 50 titer standards can be defined in the instrument.
9.1.5 SubstancesNavigation: Home > Setup > Chemicals > SubstancesAny chemical substances that are required for performing your analyses can be managed using name,empirical formula, molecular weight, and equivalent number.
Adding a substance− In Substances choose [New].
ð The windows to edit the parameters opens.Define the following parameters:
Parameters Description ValuesName Specify a descriptive name of your choice. Arbitrary
Empiricalformula
Defines the empirical formula of the substance. Arbitrary
Molecularweight
Defines the molecular weight of the substance. 0.0001…104
Equivalentnumber
The equivalent number "z" of the standard 1…9
Note• A maximum of 100 substances can be defined.
9.2 HardwareIn Hardware, configure all the hardware components connected to the titrator.
Navigation: Home > Setup > Hardware
Settings Description
Sensors Configure and manage sensors to be used with the titrator.
Pumps Configure a maximum of 20 pumps for use with the titrator.
Peripherals Peripherals encompasses all input and output devices that belong to the titratorenvironment.
Titration Stands Configure the titration stands connected to the titrator.
Auxiliary Instruments Auxiliary instruments can be any instruments that access a titrator's TTL or 24V output, stirrer or RS-232 connection and that are to be used in a method.
9.2.1 SensorsNavigation: Home > Setup > Hardware > SensorsYou can configure and manage sensors to be used with the titrator as well as change settings alreadystored in the titrator. The settings for an individual sensor can also be output to a printer. In addition, thecorresponding method for sensor calibration can be accessed from here.

Setup82 Compact Titrator
Note• A maximum of 50 sensors can be defined in the device.• Each sensor is associated with a specific type. Each sensor type can deliver measured values in one or
more units of measure. The following table provides information regarding which units of measure canbe selected for a corresponding sensor type:
Sensor type Default unit of measure Eligible units of measure
mV mV mV
pH pH pH | mV
ISE pM pM / pX | ppm | mV
Phototrode %T %T | A | mV
Polarized mV mV | µA
Temperature °C °C | K | °F
1)Plug and Play sensors (PnP) are available for pH or mV measurements.• Changing the unit of measurement for a sensor may render the calibration parameters and expiration
date parameters meaningless and result in their subsequent omission. This may also mean that thecalibration parameters are recalculated by the titrator (for temperature sensors), or that another set ofcalibration parameters is displayed (for ISE sensors).
Adding a sensor− In Sensors choose [New].
ð The windows to edit the parameters opens.
Plug and Play sensors (PnP)• If a PnP sensor is connected to the sensor input, this automatically generates an entry in the setup. All
information (sensor name, type or inputs) is updated by the titrator (if a PnP sensor is not connected,the entry "PnP" appears for the sensor input ).
• The setup may contain several PnP sensors with identical sensor IDs but with different sensor inputinformation. When the analysis starts, a validation is carried out during which the user is prompted toremove a sensor. For several PnP sensors with the same ID, all entries apart from one are deleted whenthe sensors are removed.
The following settings are available for configuring a sensor depending on the sensor type selected:
Sensor type: mV
Parameters Description ValuesName Specify a descriptive name of your choice. Arbitrary
Unit Defines the unit of measure that is used for the measurement. mV
Sensor input Defines the input the sensor is connected to. List of available inputs
Serial number The serial number of the relevant device type. Arbitrary
Sensor type: pH
Parameters Description ValuesName Specify a descriptive name of your choice. Arbitrary
Unit The unit of measure to be used for the measurement; the unitwill depend on the sensor type selected.
pH
Sensor input Defines the input the sensor is connected to. List of available inputs
Serial number The serial number of the relevant device type. Arbitrary
Calibration Determines the calibration type.Displayed if Unit is set to pH.
Linear | Segmented
Zero point The pH value where the sensor reads 0.0 mV. -100…100
Slope (TCalib) The slope of the sensor at the calibration temperature in [mV/pH].
-100…100
Slope (25.0°C) Defines the slope of the sensor at 25.0 °C in [mV/pH]. Theslope is calculated based on the value of Slope (TCalib) andCalib. temperature.
-100…100
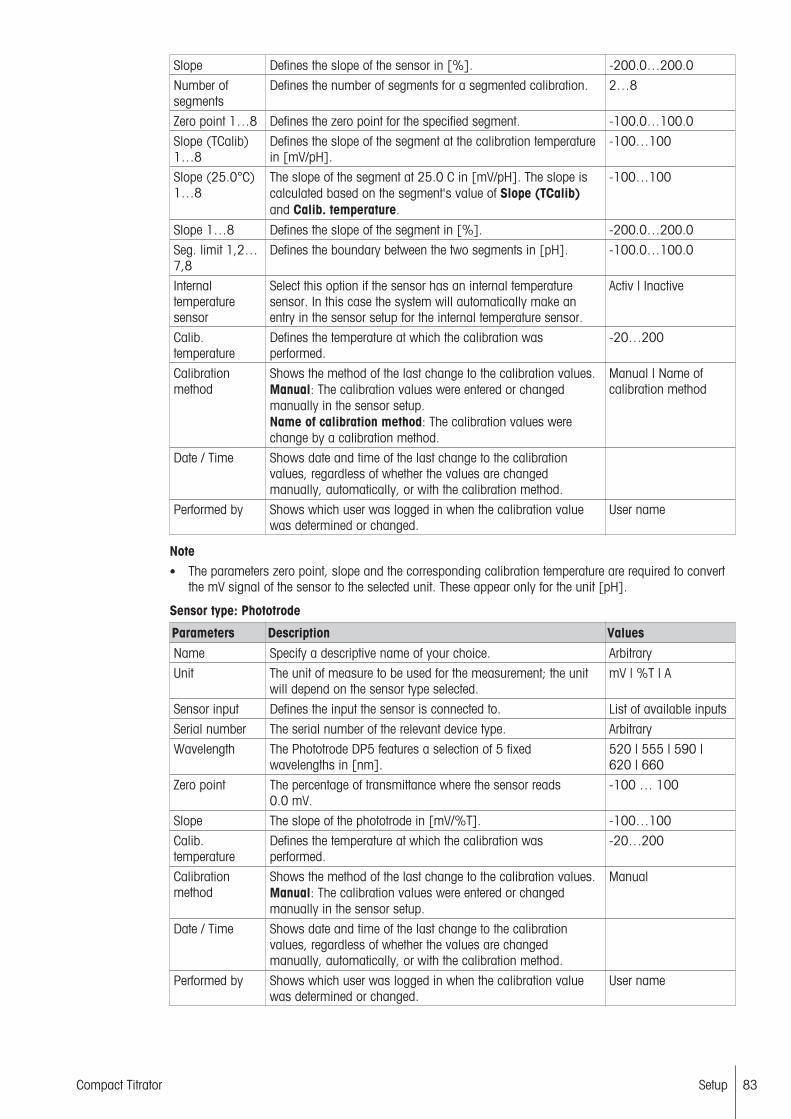
Setup 83Compact Titrator
Slope Defines the slope of the sensor in [%]. -200.0…200.0
Number ofsegments
Defines the number of segments for a segmented calibration. 2…8
Zero point 1…8 Defines the zero point for the specified segment. -100.0…100.0
Slope (TCalib)1…8
Defines the slope of the segment at the calibration temperaturein [mV/pH].
-100…100
Slope (25.0°C)1…8
The slope of the segment at 25.0 C in [mV/pH]. The slope iscalculated based on the segment's value of Slope (TCalib)and Calib. temperature.
-100…100
Slope 1…8 Defines the slope of the segment in [%]. -200.0…200.0
Seg. limit 1,2…7,8
Defines the boundary between the two segments in [pH]. -100.0…100.0
Internaltemperaturesensor
Select this option if the sensor has an internal temperaturesensor. In this case the system will automatically make anentry in the sensor setup for the internal temperature sensor.
Activ | Inactive
Calib.temperature
Defines the temperature at which the calibration wasperformed.
-20…200
Calibrationmethod
Shows the method of the last change to the calibration values.Manual: The calibration values were entered or changedmanually in the sensor setup.Name of calibration method: The calibration values werechange by a calibration method.
Manual | Name ofcalibration method
Date / Time Shows date and time of the last change to the calibrationvalues, regardless of whether the values are changedmanually, automatically, or with the calibration method.
Performed by Shows which user was logged in when the calibration valuewas determined or changed.
User name
Note• The parameters zero point, slope and the corresponding calibration temperature are required to convert
the mV signal of the sensor to the selected unit. These appear only for the unit [pH].
Sensor type: Phototrode
Parameters Description ValuesName Specify a descriptive name of your choice. Arbitrary
Unit The unit of measure to be used for the measurement; the unitwill depend on the sensor type selected.
mV | %T | A
Sensor input Defines the input the sensor is connected to. List of available inputs
Serial number The serial number of the relevant device type. Arbitrary
Wavelength The Phototrode DP5 features a selection of 5 fixedwavelengths in [nm].
520 | 555 | 590 |620 | 660
Zero point The percentage of transmittance where the sensor reads0.0 mV.
-100 … 100
Slope The slope of the phototrode in [mV/%T]. -100…100
Calib.temperature
Defines the temperature at which the calibration wasperformed.
-20…200
Calibrationmethod
Shows the method of the last change to the calibration values.Manual: The calibration values were entered or changedmanually in the sensor setup.
Manual
Date / Time Shows date and time of the last change to the calibrationvalues, regardless of whether the values are changedmanually, automatically, or with the calibration method.
Performed by Shows which user was logged in when the calibration valuewas determined or changed.
User name

Setup84 Compact Titrator
Note• The parameter Calib. temperature cannot be edited for segmented calibration; in this case, the system
displays an information field.
Sensor type: Polarized
Parameters Description ValuesName Specify a descriptive name of your choice. Arbitrary
Unit The unit of measure to be used for the measurement; the unitwill depend on the sensor type selected.
mV | µA
Sensor input Defines the input the sensor is connected to. List of available inputs
Serial number The serial number of the relevant device type. Arbitrary
Sensor type: Temperature
Parameters Description ValuesName Specify a descriptive name of your choice. Arbitrary
Unit The unit of measure to be used for the measurement; the unitwill depend on the sensor type selected.
°C | K | °F
Sensor input Defines the input the sensor is connected to. List of available inputs
Serial number The serial number of the relevant device type. Arbitrary
Zero point The adjusted point from the theoretical value for reading0.0 °C.
-20 … 200 [°C]-4.0 … 392 [°F]253.2 … 473.2 [K]
Calibrationmethod
Shows the method of the last change to the calibration values.Manual: The calibration values were entered or changedmanually in the sensor setup.Name of calibration method: The calibration values werechange by a calibration method.
Manual | Name ofcalibration method
Date / Time Shows date and time of the last change to the calibrationvalues, regardless of whether the values are changedmanually, automatically, or with the calibration method.
Performed by Shows which user was logged in when the calibration valuewas determined or changed.
User name
Sensor type: ISE
Parameters Description ValuesName Specify a descriptive name of your choice. Arbitrary
Ion charge Shows the ion charge for the selected ISE sensor. Arbitrary
Unit The unit of measure to be used for the measurement; the unitwill depend on the sensor type selected.
pM | pX | ppm
Sensor input Defines the input the sensor is connected to. List of available inputs
Serial number The serial number of the relevant device type. Arbitrary
Calibration Determines the calibration type.Not displayed if Unit is set to mV.
Linear | Segmented
Zero point The pM or pX value where the sensor reads 0.0 mV. -100…100
Slope (TCalib) The slope of the sensor at the calibration temperature in [mV/pX] or [mV/pM].
-100…100
Slope (25.0°C) Defines the slope of the sensor at 25.0 °C in [mV/pX] or [mv/pM]. The slope is calculated based on the value of Slope(TCalib) and Calib. temperature.
-100…100
Number ofsegments
Defines the number of segments for a segmented calibration. 2…8
Zero point 1…8 Defines the zero point for the specified segment. -100.0…100.0
Slope (TCalib)1…8
Defines the slope of the segment at the calibration temperaturein in [mV/pX] or [mv/pM].
-100…100
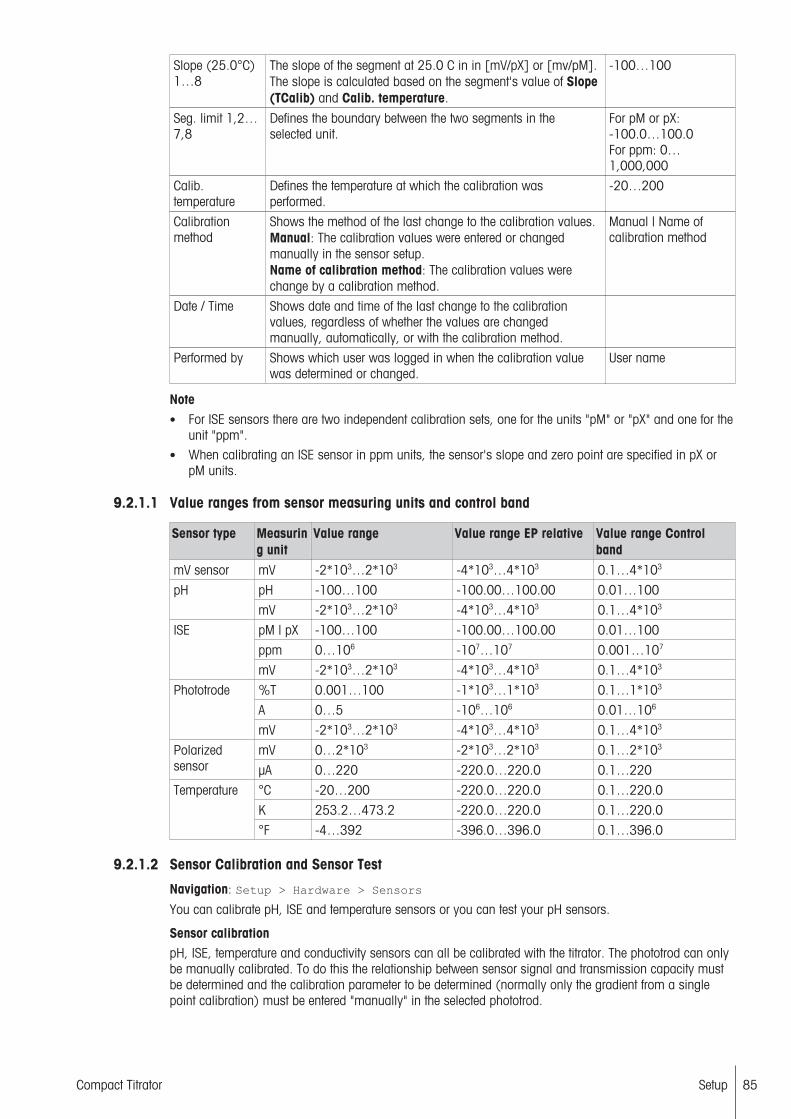
Setup 85Compact Titrator
Slope (25.0°C)1…8
The slope of the segment at 25.0 C in in [mV/pX] or [mv/pM].The slope is calculated based on the segment's value of Slope(TCalib) and Calib. temperature.
-100…100
Seg. limit 1,2…7,8
Defines the boundary between the two segments in theselected unit.
For pM or pX:-100.0…100.0For ppm: 0…1,000,000
Calib.temperature
Defines the temperature at which the calibration wasperformed.
-20…200
Calibrationmethod
Shows the method of the last change to the calibration values.Manual: The calibration values were entered or changedmanually in the sensor setup.Name of calibration method: The calibration values werechange by a calibration method.
Manual | Name ofcalibration method
Date / Time Shows date and time of the last change to the calibrationvalues, regardless of whether the values are changedmanually, automatically, or with the calibration method.
Performed by Shows which user was logged in when the calibration valuewas determined or changed.
User name
Note• For ISE sensors there are two independent calibration sets, one for the units "pM" or "pX" and one for the
unit "ppm".• When calibrating an ISE sensor in ppm units, the sensor's slope and zero point are specified in pX or
pM units.
9.2.1.1 Value ranges from sensor measuring units and control band
Sensor type Measuring unit
Value range Value range EP relative Value range Controlband
mV sensor mV -2*103…2*103 -4*103…4*103 0.1…4*103
pH pH -100…100 -100.00…100.00 0.01…100
mV -2*103…2*103 -4*103…4*103 0.1…4*103
ISE pM | pX -100…100 -100.00…100.00 0.01…100
ppm 0…106 -107…107 0.001…107
mV -2*103…2*103 -4*103…4*103 0.1…4*103
Phototrode %T 0.001…100 -1*103…1*103 0.1…1*103
A 0…5 -106…106 0.01…106
mV -2*103…2*103 -4*103…4*103 0.1…4*103
Polarizedsensor
mV 0…2*103 -2*103…2*103 0.1…2*103
µA 0…220 -220.0…220.0 0.1…220
Temperature °C -20…200 -220.0…220.0 0.1…220.0
K 253.2…473.2 -220.0…220.0 0.1…220.0
°F -4…392 -396.0…396.0 0.1…396.0
9.2.1.2 Sensor Calibration and Sensor Test
Navigation: Setup > Hardware > Sensors
You can calibrate pH, ISE and temperature sensors or you can test your pH sensors.
Sensor calibrationpH, ISE, temperature and conductivity sensors can all be calibrated with the titrator. The phototrod can onlybe manually calibrated. To do this the relationship between sensor signal and transmission capacity mustbe determined and the calibration parameter to be determined (normally only the gradient from a singlepoint calibration) must be entered "manually" in the selected phototrod.
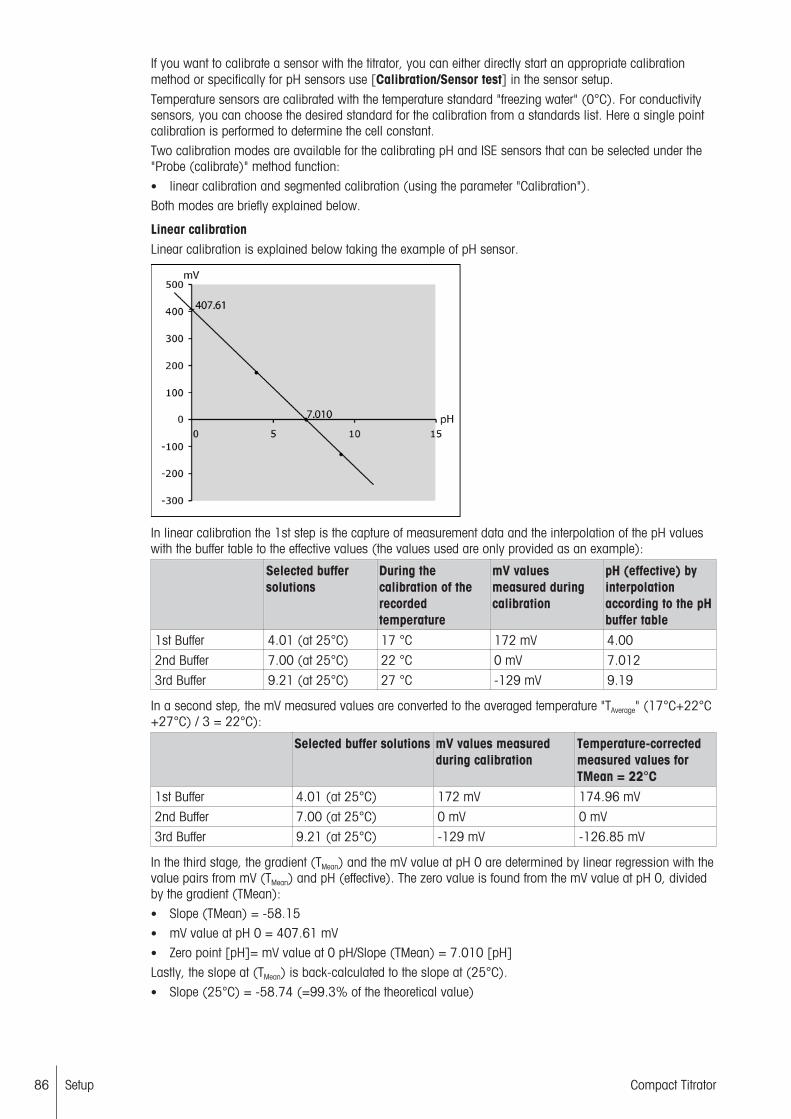
Setup86 Compact Titrator
If you want to calibrate a sensor with the titrator, you can either directly start an appropriate calibrationmethod or specifically for pH sensors use [Calibration/Sensor test] in the sensor setup.
Temperature sensors are calibrated with the temperature standard "freezing water" (0°C). For conductivitysensors, you can choose the desired standard for the calibration from a standards list. Here a single pointcalibration is performed to determine the cell constant.Two calibration modes are available for the calibrating pH and ISE sensors that can be selected under the"Probe (calibrate)" method function:• linear calibration and segmented calibration (using the parameter "Calibration").Both modes are briefly explained below.
Linear calibrationLinear calibration is explained below taking the example of pH sensor.
In linear calibration the 1st step is the capture of measurement data and the interpolation of the pH valueswith the buffer table to the effective values (the values used are only provided as an example):
Selected buffersolutions
During thecalibration of therecordedtemperature
mV valuesmeasured duringcalibration
pH (effective) byinterpolationaccording to the pHbuffer table
1st Buffer 4.01 (at 25°C) 17 °C 172 mV 4.00
2nd Buffer 7.00 (at 25°C) 22 °C 0 mV 7.012
3rd Buffer 9.21 (at 25°C) 27 °C -129 mV 9.19
In a second step, the mV measured values are converted to the averaged temperature "TAverage" (17°C+22°C+27°C) / 3 = 22°C):
Selected buffer solutions mV values measuredduring calibration
Temperature-correctedmeasured values forTMean = 22°C
1st Buffer 4.01 (at 25°C) 172 mV 174.96 mV
2nd Buffer 7.00 (at 25°C) 0 mV 0 mV
3rd Buffer 9.21 (at 25°C) -129 mV -126.85 mV
In the third stage, the gradient (TMean) and the mV value at pH 0 are determined by linear regression with thevalue pairs from mV (TMean) and pH (effective). The zero value is found from the mV value at pH 0, dividedby the gradient (TMean):• Slope (TMean) = -58.15• mV value at pH 0 = 407.61 mV• Zero point [pH]= mV value at 0 pH/Slope (TMean) = 7.010 [pH]Lastly, the slope at (TMean) is back-calculated to the slope at (25°C).• Slope (25°C) = -58.74 (=99.3% of the theoretical value)

Setup 87Compact Titrator
Segmented calibrationWith segmented calibration, no linear regression is performed across all measured points; instead, linesegments that connect the individual calibration points are used. In this way allowance can be made for anon-linear performance of the sensor over a larger measurement range. For n standard solutions, (n-1)segments are evaluated.The segmented calibration is explained below taking the example of an ISE sensor (F- ).
Just as in the case of linear segmentation initially the readings are recorded:
During the calibration ofthe recordedtemperature
Standard value (pX) atmeasuring temperature
mV values measuredduring calibration
Standard 1 25 °C 4.00 (at 25°C) 162.0 mV
Standard 2 25 °C 2.00 (at 25°C) 42.0 mV
Standard 3 25 °C 9.21 (at 25°C) -15.0 mV
The mV measured values are then converted to the averaged temperature (not necessary in the examplebecause the temperature is constantly 25°C) and a linear regression is conducted for each segment. Thusfor each segment a gradient and the mV value at pH 0 are determined (both related to the meantemperature) and from both values the zero point is respectively calculated:
During thecalibration of therecordedtemperature
mV value at 0 pH(based on TMean)
Slope (TMean) Zero point [pX]
Segment 1 25 °C -78.00 mV 60.00 1.30
Segment 2 25 °C -72.00 mV 57.00 1.26
Afterward, the slope is converted to the reference temperature of 25°C (not necessary in this example,because (TMean) is already 25°C.
9.2.2 PumpsNavigation: Home > Setup > Hardware > Pumps
Solvent ManagersOne Solvent Manager can be defined on a titrator. You cannot configure a Solvent Manager individually.Predefined settings are used when you connect a Solvent Manager to the back of the titrator or the samplechanger.
Parameters Description ValuesType Defines the type of pump. Available pump types
Name Specify a descriptive name of your choice. Arbitrary
Pump output The output where you want to operate the pump. Available outputs

Setup88 Compact Titrator
Peristaltic and membrane pumpsYou can configure a maximum of 20 pumps for use with the titrator. Starting from the pump list, you canadd new pumps or select existing ones and change their settings. The list can also be printed and pumpscan be deleted.You can set up different pumps. For each pump, you need to specify an explicit, user-defined name, thepumping rate and the connection from which the pump should operate.Steps to add a pump:
− In Pumps choose [New].
ð The window to edit the parameters opens.
Parameters Description ValuesType Defines the type of pump. Available pump types
Name Specify a descriptive name of your choice. Arbitrary
Pump output The output where you want to operate the pump. Available outputs
Max. pump rate Displays the pump rate in [mL/min] when the pump isoperated at 100%. This is stated by the manufacturer ordetermined experimentally.
0.1…1000
9.2.3 Peripherals Navigation: Home > Setup > Hardware > Peripherals These settings encompass all input and output devices that belong to the titrator environment but that arenot essential instruments for processing an analysis (peripherals cannot be accessed in methods). Thecomputer also counts as a peripheral device. The list of all peripheral instruments defined in the titrator,together with the parameters of each individual instrument can be printed out by a printer.
9.2.3.1 Balance
Navigation: Home > Setup > Hardware > Peripherals > Balance Before defining a balance, you need to select the balance type. The titrator supports the following types ofbalance:
Balance type Supported balancesMettler AB | PB | PB-S | AB-S | PB-E | AB-E | College-S | SB | CB | GB | College-B |
HB | AG | PG | PG-S | SG | HG | XP | XS | XA | XPE | XSE | XVE | AX | MX |UMX | PR | SR | HR | AT | MT | UMT | PM | AM | SM | CM | MS | ML
Sartorius Sartorius
More --
METTLER TOLEDO BalancesThese balances support Plug'n'Play and are automatically recognized and configured by the titrator.For automatic balance recognition, you need to ensure the following:1. The balance has been started up and is connected to the titrator by a suitable cable,2. The balance has been set to "Bidirectional" (if necessary, set the "Host" parameter accordingly),3. The parameters for the RS-232 interface on the balance correspond with those on the titrator.
Note• As long as the balance is not connected to the titrator, the settings "Baud Rate", "Data Bit", "Stop Bit",
"Parity" and "Handshake" can be entered manually. These are however automatically overwritten withthe values identified by the PnP as soon as the user sets the same transmission parameters at thebalance and the titrator.
Sartorius | OthersAfter you have selected this option and the system has recognized the balance, you can define the followingparameters:
Parameters Description ValuesName Specify a descriptive name of your choice. Arbitrary
Serial number The serial number of the relevant device type. Arbitrary

Setup 89Compact Titrator
Connection The serial port to which the device is connected. Possibleconnections are located on the mainboard, the analog boardand the conductivity board.
MB/COM1 | MB/COM2
Baud rate The baud rate for data transmission via the RS-232 interface. 1200 | 2400 | 4800 |9600 | 19200
Data bit Defines the number of data bits. 7 | 8
Stop bit Defines the number of stop bits. (2 stop bits can only beselected if 7 data bits are also selected at the same time.)
1 | 2
Parity Defines the parity protocol. Even | Odd | None
Handshake Data transmission via the RS-232 interface. (Only thehandshake option "Xon-Xoff" is available for serial connectionson the analog and conductivity board in conjunction with abaud rate of 9600.)
None | Xon-Xoff
Note• The settings for the baud rate, data bit, stop bit, parity, and handshake must agree for the balance and
titrator!
• If None is selected as balance type that means that no balance is to be connected to the titrator.
9.2.3.2 USB-Stick
Navigation: Home > Setup > Hardware > Peripherals > USB-StickCommercially available USB sticks from USB Version 1.1 are supported.You can assign a relevant name to the USB stick.
9.2.3.3 Printer and USB data export
Navigation: Home > Setup > Hardware > Peripherals > PrinterThe type of printer and data export via the USB interface is defined by Printer type.
Parameters Description ValuesPrinter type Selection of a printer. USB printer | USB
compact printer | USBdata export | PDF filewriter | XML file writer
The available printers can be divided in 3 groups depending on the kind of output.
Printer Paper Files XML stream
USB printer • - -
USB compact printer • - -
USB data export - - •
Network printer • - -
PDF file writer - • -
XML file writer - • -
Printing and data export can be triggered by the options listed below. Not all printers support all options.
• Method function Record inside or outside of loops
• Print button at the bottom of setup screens or result screens
• Specific settings in the method function Calculation, Instruction, Titration (LearnEQP). Only supportedby USB printer and Network printer.
• Save results CSV in Setup > Global settings > Analysis and resources behavior > Analysissequence settings
RecordWith the method function Record you can define which types of data are output. Not all printers support alltypes of data. For a detailed description of the parameters see chapter "Record".

Setup90 Compact Titrator
MF Record inside of loop
Parameter USB Printer / Networkprinter / PDF file writer
USB compact printer USB data export / XMLfile writer
Summary • • Export of predefined data(sample data, resultsand table of measuresvalues) if set to Persample or Per series.
Results • • Settings are ignored.
Raw results • •
Table of measuredvalues
• - •
Sample data • • Settings are ignored.
Resource data • •
Charts • -
Method • •
Series data • •
MF Record outside of loop
Parameter USB Printer / Networkprinter / PDF file writer
USB compact printer USB data export / XMLfile writer
Summary • • Predefined data export ifactivated.
Results • • Settings are ignored.
Raw results • •
Resource data • •
Calibration curve • -
Method • •
Series data • •
Print buttonThe print button allows you to print out lists and parameter settings. In the menu Results, statistics can beprinted in addition.Printing with the print button is only supported by the printers listed below.• USB printer• USB compact printer• Network printer• PDF file writerThe parameters depend on the selected printer type and are described below.
USB printer, USB compact printerThe USB printer supports printers with PCL protocol version 4 and higher.The USB compact printer does not support all languages.
Parameters Description ValuesStatus Indicates whether the selected printer type is installed. Installed
Name Specify a descriptive name of your choice. Arbitrary
Serial number The serial number of the relevant device type. Arbitrary
Connection Information on the USB port to which the printer is connected.PnP is displayed if the printer is not connected to the titrator.
USB 1/2
USB data exportFor USB data export to an RS interface you will need the USB data export box. If the USB data export box isconnected to the titrator using the USB interface, it is automatically detected (PnP detection).
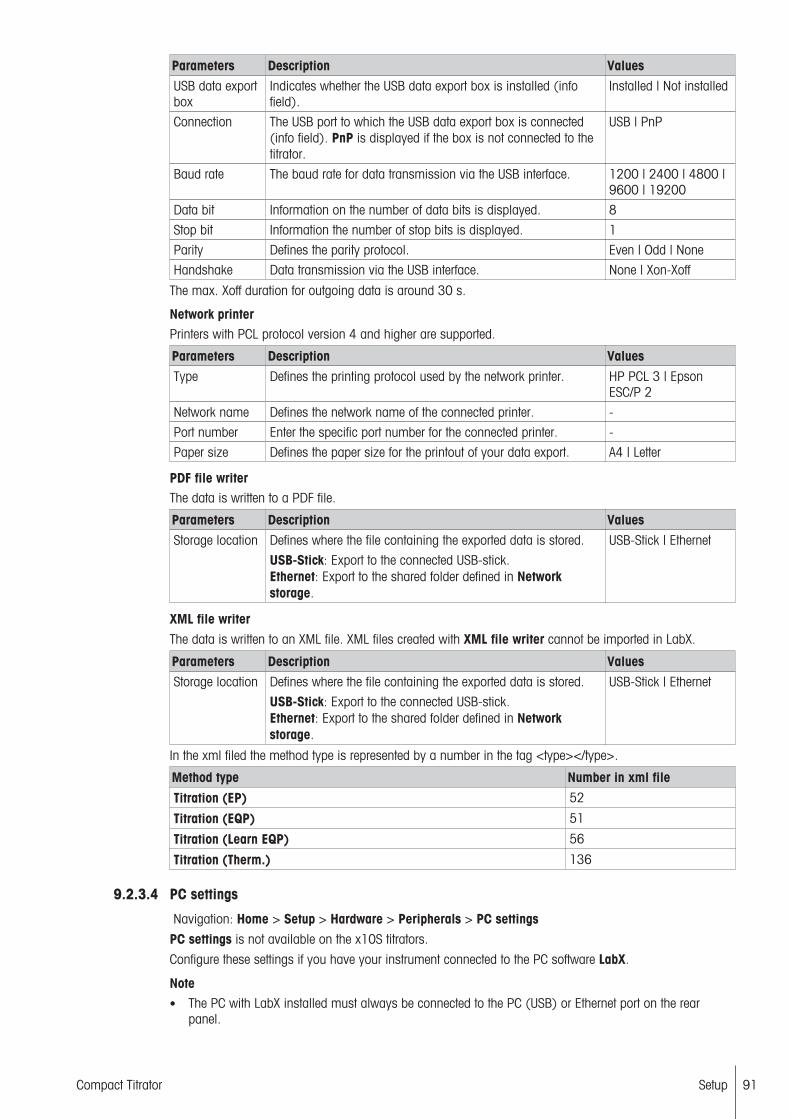
Setup 91Compact Titrator
Parameters Description ValuesUSB data exportbox
Indicates whether the USB data export box is installed (infofield).
Installed | Not installed
Connection The USB port to which the USB data export box is connected(info field). PnP is displayed if the box is not connected to thetitrator.
USB | PnP
Baud rate The baud rate for data transmission via the USB interface. 1200 | 2400 | 4800 |9600 | 19200
Data bit Information on the number of data bits is displayed. 8
Stop bit Information the number of stop bits is displayed. 1
Parity Defines the parity protocol. Even | Odd | None
Handshake Data transmission via the USB interface. None | Xon-Xoff
The max. Xoff duration for outgoing data is around 30 s.
Network printerPrinters with PCL protocol version 4 and higher are supported.
Parameters Description ValuesType Defines the printing protocol used by the network printer. HP PCL 3 | Epson
ESC/P 2
Network name Defines the network name of the connected printer. -
Port number Enter the specific port number for the connected printer. -
Paper size Defines the paper size for the printout of your data export. A4 | Letter
PDF file writerThe data is written to a PDF file.
Parameters Description ValuesStorage location Defines where the file containing the exported data is stored.
USB-Stick: Export to the connected USB-stick.Ethernet: Export to the shared folder defined in Networkstorage.
USB-Stick | Ethernet
XML file writerThe data is written to an XML file. XML files created with XML file writer cannot be imported in LabX.
Parameters Description ValuesStorage location Defines where the file containing the exported data is stored.
USB-Stick: Export to the connected USB-stick.Ethernet: Export to the shared folder defined in Networkstorage.
USB-Stick | Ethernet
In the xml filed the method type is represented by a number in the tag <type></type>.
Method type Number in xml file
Titration (EP) 52
Titration (EQP) 51
Titration (Learn EQP) 56
Titration (Therm.) 136
9.2.3.4 PC settings
Navigation: Home > Setup > Hardware > Peripherals > PC settingsPC settings is not available on the x10S titrators.
Configure these settings if you have your instrument connected to the PC software LabX.
Note• The PC with LabX installed must always be connected to the PC (USB) or Ethernet port on the rear
panel.

Setup92 Compact Titrator
• After the settings have been modified, it may be necessary to restart the instrument.
Parameters Description ValuesConnect to LabXat start-up
If this parameter is activated, a connection to LabX will beestablished on startup.
Activ | Inactive
Connection type Defines how the titrator is connected to the PC, either via thenetwork connection or via the USB connection.
Ethernet | USB
Status Information on the connection status from the instrument toLabX.
Connected | Discon-nected
Port number Defines the port for a network connection of the titrator to LabX.Only appears for Connection type = Ethernet.
1024…65535
9.2.3.5 Network settings
Navigation: Home > Setup > Hardware > Peripherals > Network settingsConfigure these settings if you have your instrument connected to a network.
Parameters Description ValuesObtain IPaddressautomatically
Indicates whether the IP address should be automaticallyobtained over the network.
Activ | Inactive
IP address If the IP is not to be automatically obtained, you can enter ithere.
000.000.000.000 …255.255.255.255
Subnet mask If you want to run the instrument on a local subnetwork, youcan define the subnet mask here that you want to use to linkthe subnet's IP address.
000.000.000.000 …255.255.255.255
Standardgateway
This is where you can enter the address of the standardgateway for communication between the various networks.
000.000.000.000 …255.255.255.255
9.2.3.6 Network storage
Navigation: Home > Setup > Hardware > Peripherals > Network storageConfigure these settings if you want to save data on a shared folder of a network drive. The instrument andthe network drive have to be in the same subnet.
Parameters Description ValuesTransfer via Method for transferring data (only Network share). -
Server PC or server name. Users should have read-write access.Maximum 60 alphanumeric characters.
-
Share name Name of the share which is defined for the shared folder. -
User name Type in the user name for accessing the shared folder. Theuser name must be defined in the setup for the shared folder.
-
Domain Domain name of the server where the shared folder is located. -
Password Password for the network share. -
Target folder Defines the name of the Target folder where the data is saved.The Target folder is a subfolder in the shared folder.
-
First folder level Defines if a subfolder is created in the folder defined in Targetfolder and how the subfolder is named.None: No subfolder is created.User name: A subfolder is created. The user name is used asname for the subfolder.Titrator ID: A subfolder is created. The titrator ID is used asname for the subfolder.Date: A subfolder is created. The date is used as name for thesubfolder.Method ID: A subfolder is created. The method ID is used asname for the subfolder.
None | User name |Titrator ID | Date |Method ID

Setup 93Compact Titrator
Second folderlevel
Defines if a subfolder is created in the folder defined in Firstfolder level and how the subfolder is named.None: No subfolder is created.User name: A subfolder is created. The user name is used asname for the subfolder.Titrator ID: A subfolder is created. The titrator ID is used asname for the subfolder.Date: A subfolder is created. The date is used as name for thesubfolder.Method ID: A subfolder is created. The method ID is used asname for the subfolder.
Only if First folder level is activated.
None | User name |Titrator ID | Date |Method ID
9.2.4 Titration stands
Starting from the titration stand list, you can add new titration stands or select existing ones and modifytheir parameters. Furthermore the list can be printed out or individual titration stands can be deleted,whereby one of each type must be in the list.The following types of titration stand can be connected:
• Auto stand• External stand• Manual stand• Rondolino TTL
Add a titration stand1 Go to Home > Setup > Hardware > Titration Stands2 In Titration Stands tap New.
ð The window to edit the parameters opens.
3 In Type choose the type of titration stand to be added.
ð The parameters for the selected titration stand are displayed.4 Edit the parameters according to the type of titration stand.
Parameters Description ValuesType Defines the type of the titration stand. Available titration
stands
9.2.4.1 Auto stand
If you use an auto stand, the popup window that reminds you to add the respective sample does notappear. Thus an interruption-free analysis sequence can be guaranteed for multiple determinations with anautomation unit. The selected titration stand defines the stirrer output used in following method functionsrequiring a function Stir.
Parameters Description ValuesType Defines the type of the titration stand. Available titration
stands
Name Defines the name of the titration stand. Additional titrationstands of a kind will have an index number assigned.
List of availablenames
Stirrer output Defines the stirrer output. Available stirreroutputs
9.2.4.2 Manual stand
The manual stand is typically used for the METTLER TOLEDO Manual Titration Stands. Before each samplein the series is analyzed, a popup window requesting confirmation that the respective sample is in placewill appear. The selected titration stand defines the stirrer output used in following method functionsrequiring a function Stir.

Setup94 Compact Titrator
Parameters Description ValuesType Defines the type of the titration stand. Available titration
stands
Name Defines the name of the titration stand. Additional titrationstands of a kind will have an index number assigned.
List of availablenames
Stirrer output Defines the stirrer output. Available stirreroutputs
9.2.4.3 Rondolino TTL
The Rondolino sample changer can hold 9 samples to be tested in sequence. The Rondolino connects tothe TTL port on the titrator. The selected titration stand defines the stirrer output used in following methodfunctions requiring a function Stir.
Parameters Description ValuesType Defines the type of the titration stand. Available titration
stands
Name Defines the name of the titration stand. Additional titrationstands of a kind will have an index number assigned.
List of availablenames
Stirrer output Defines the stirrer output. Available stirreroutputs
Connection Indicates the connection type. Available connections
9.2.5 Auxiliary instrumentsNavigation: Home > Setup > Hardware > Auxiliary instrumentAuxiliary instruments can be any instruments that access a titrator's TTL or 24 V output, stirrer or RS-232connection and that are to be used in a method (e.g. valves, dispensers).An auxiliary instrument is switched on for a predefined period or switched on and then switched off againvia the corresponding command. The instruments are controlled via the method function Auxiliaryinstrument.Auxiliary instruments form part of a method, while peripherals are classified as input/output devices(printers, balances, barcode readers etc.), which do not have direct access to methods.Starting from the auxiliary instrument list, you can add new auxiliary instruments or select existing ones ormodify their parameters. Furthermore the list can be printed out at a printer or selected auxiliary instrumentscan be deleted.
Note• A maximum of 50 auxiliary instruments can be saved in the titrator.
Adding an auxiliary instrument1 In Auxiliary instrument choose [New].
ð The windows to edit the parameters opens.
2 In Control type you must first select the manner in which the auxiliary instrument is to be controlled.
ð After you have selected the relevant type, you can determine the parameters.
Parameters Description ValuesName Specify a descriptive name of your choice. Arbitrary
Control type The control type of the auxiliary instrument. Output 24 V | Stirrer |Out TTL (Single pin) |Input TTL (Single pin) |RS-232
Output 24 V/Stirrer (0-18V output)
Parameters Description ValuesOutput Information on the used output. STIRRER | PUMP

Setup 95Compact Titrator
TTL
Parameters Description ValuesOutput Indicates which port and which pin on the titrator you want to
use for the auxiliary instrument.TTL-Out 1 | TTL-Out 2 |TTL-Out 3 | TTL-Out 4
Input The input where the auxiliary instrument should be queried. TTL-In 1 | TTL-In 2
RS-232
Parameters Description ValuesConnection Information on the serial port to which the device is connected. COM
Baud rate The baud rate for data transmission via the RS-232 interface. 1200 | 2400 | 4800 |9600 | 19200
Data bit Defines the number of data bits. 7 | 8
Stop bit Defines the number of stop bits. (2 stop bits can only beselected if 7 data bits are also selected at the same time.)
1 | 2
Parity Defines the parity protocol. Even | Odd | None
Handshake Data transfer via the RS-232 interface. None | Xon-Xoff
9.3 User settingsNavigation: Home > Setup > User settingsThese settings contains the options that can be made specifically for each currently logged in user.You can configure the language, the screen settings (for the touchscreen), the layout of the alphanumericand numeric keyboard, the use of beeps, and shortcuts for each user.
9.3.1 Language Navigation: Home > Setup > User settings > LanguageDefine the following parameters:
Parameters Description ValuesTouchscreen Defines the language for operation of the terminal. German | English |
French | Italian |Spanish | Portuguese |Chinese | Russian |Polish | Korean
Record Defines the language in which the reports are to be printed out. German | English |French | Italian |Spanish | Portuguese |Chinese | Russian |Polish | Korean
Note• For the Chinese and Korean language settings, it is not possible to print using the USB-P25 tape printer.• For Polish, records can be printed on the USB-P25 tape printer without special characters.
9.3.2 Screen Navigation: Home > Setup > User settings > ScreenDefine the following parameters:
Parameters Description ValuesPrimary color Here various color schemes for the user interface can be
selected.Gray | Blue | Green |Red
Brightness Specifies the display brightness in [%]. 50 | 60 | 70 | 80 |90 | 100 [%]
Screen saver Here you can define whether the screen saver should be used. Activ | Inactive

Setup96 Compact Titrator
Wait time Defines how long in [min] the system should wait after theuser's last action on the terminal before activating the screensaver.
1…1000
9.3.3 Audio signalsNavigation: Home > Setup > User > Audio signalDefine the following parameter:
Parameters Description ValuesAt push of abutton
Enables a beep when tapping on the touch screen. Activ | Inactive
9.3.4 Shortcuts Navigation: Home > Setup > User settings > ShortcutsThe number of shortcuts depends on the titrator type.Each user can manage the shortcuts that they have created. Individual shortcuts can be selected anddeleted and the following parameters of a shortcut can be changed:
Parameters Description ValuesType Shows the type of action the shortcut stands for. Method | Series |
Manual operation
Description Any name for the shortcut. Arbitrary
Immediate start The method, series, or manual operation can be startedimmediately. This enables you to start the analysis without anyinterfering dialog.
Activ | Inactive
Homescreenposition
Defines the position of the shortcut on the homescreen. -
Created by Shows the name of the user who created the shortcut. -
9.3.5 Keyboards Navigation: Home > Setup > User settings > KeyboardsIn this dialog, you can define the layout for the alphanumeric and the numeric input fields. The followingsettings are available:
Parameters Description ValuesABC keyboard Determines the layout of the alphanumeric input field. English | French |
German
123 keyboard Defines the organization of the keys for the numeric input field. Calculator | Phone
9.4 Global settingsNavigation: Setup > Global settingsIn Global settings, you can make general settings on the titrator that apply for all users. The settings in thiswindow can only be changed by users with the appropriate authorizations.The settings include:
• System settings that apply for all users.
• User management for creating user accounts.
• The settings for Analysis and resources behavior determining the actions of the titrator before, duringand after the performance of an analysis, and the response of the titrator when resources are deleted orwhen PnP resources are identified.
9.4.1 SystemNavigation: Home > Global settings > System
Titrator identificationYou can enter and assign any ID consisting of at least four characters to the titrator.

Setup 97Compact Titrator
Parameters Description ValuesTitrator ID Define the instrument identification. -
Titrator Indicates the titrator type. Titrator types
Serial number Information on the serial number of the instrument. -
Titrator FWversion
Information on the firmware version of the instrument. -
Date / TimeYou can define the format used to display the date and time and set the titrator date and time.
Parameters Description ValuesDate format Defines the format for displaying the date. mm/dd/yyyy | dd/mm/
yyyy
Time format Defines the format for displaying the time. 24h | a.m./p.m.
Date Enter the current date. -
Time Enter the current time. -
Header and footerDefine whether all printouts generated by the titrator should have a header or footer. The content of theseheaders and footers can be entered directly into the respective setting.As part of the end of record, signature fields are appended to the respective printout consisting of a decla-ration (e.g. Approved by) followed by an empty line. A personal signature can be then be entered on thisline.
Parameters Description ValuesHeader Activates the header on print outs. Activ | Inactive
Text Defines the text for the header.Only for Header = Active.
Arbitrary
Footer Activates the footer on print outs. Activ | Inactive
Text Defines the text for the footer.Only for Footer = Active.
Arbitrary
End of report Select the information to be printed at the end of a report. Created by | Modifiedby | Checked by |Approved by
Data storageIn this menu you can define if data is stored and if data is deleted when the instrument shuts down.
Parameters Description ValuesDelete data onshut down
Define if analysis data is to be deleted from the titrator memorywhen the titrator is shut down.
Activ | Inactive
No storage ofresults
Results are not stored and cannot be viewed anymore aftertermination of a method.
Activ | Inactive
9.4.2 User ManagementNavigation: Home > Setup > Global settings > User managementIn the user management, you can add and delete users. A default user is already configured in theinstrument. You can enter a maximum of 30 users.
1 In User management tap [User] to open the list of users.
2 To add a new user, tap [New].- or -Edit an existing user.
You can define the following parameters for each user account:
Parameters Description ValuesUser name The user's login ID. Arbitrary
Full name The user's full name. Arbitrary

Setup98 Compact Titrator
User group The user group to which the user is assigned. Expert | Routine-User
Description Any description for the user account or for the user. Arbitrary
Created by Shows the name of the administrator who created the useraccount.
-
Created on Shows the date and time the user account was created. -
Modified by Shows the name of the administrator who modified the useraccount.
-
Modified on Shows the date and time of the last change to the useraccount.
-
9.4.3 Analysis and resources behaviorThe settings that you make here relate to the sequence of the analysis of samples or series with the aid ofmethods.• You can define the actions of the titrator when started, during an analysis and afterward.• You can also program the response of the titrator to the deletion of resources or when it identifies PnP
resources.
Analysis sequence settingsThe analysis sequence settings can only be modified if no tasks are currently being performed by thetitrator.You can make the following settings that influence the sequence of an analysis.
Parameters Description ValuesShow requiredresources atstart
When an analysis is started a screen appears displaying allresources required for the analysis and their status (available,not-available, locked or in use). If an individual entry isselected from this screen then the user receives additionalinformation about the respective resource.However, if "no" is selected, then the required resources arestill checked when the analysis is started and if necessary, anappropriate error message is issued.
Activ | Inactive
Show SOP If an SOP (standard operating procedure) has been defined inthe Title method function then this will be displayed before themethod is started provided that Active has been selected.
Activ | Inactive
Show resultsafter analysis
If a manual or external titration stand is being used, then theresults for a sample are automatically displayed after theyhave been analyzed and must be acknowledged by the userbefore the analysis can be continued. With Auto stand theresults are displayed for a certain period and are not to beconfirmed.The activated parameter is valid for the following functions:Analysis: the results for a sample are shownCalibration/Loop: The results of the calibration are shown(slope, zero point)Sensor test: The results of the test are shown (slope, zeropoint, drift and sensor test OK / not OK)
Activ | Inactive
Check localprinterconnection andwait
When selected, the availability of a printer is checked at thebeginning of the method.If not selected and no printer is connected, the method functionRecord is skipped. If a printer is connected, the methodfunction Record is executed even if this parameter is notselected.
Only for USB printer, USB compact printer.
Activ | Inactive

Setup 99Compact Titrator
Save resultsCSV
Defines if some of the sample date and some of the results aresaved to a CSV file.No: No data is saved.To USB-Stick: The CSV files are saved on the connected USBstick. If a USB-stick is not detected during the data writing, youcan stop the process or you can plug in another USB stick forthe data writing.
To network: The CSV files are saved in the shared folderdefined in Network storage.
Note• A CSV file is exported for each sample when the method
function End of sample is reached. There is no exportoutside of a loop.
• The method function Calculation must be included insidethe loop.
• The export is in the record language.• When importing the CSV file into excel make sure, the data
formats match.
To USB-Stick | Tonetwork | No
Check USB-Stickconnection andwait
If this parameter is activated, the presence of a USB - Stick isvalidated at the start of the analysis.Only for Save results CSV = To USB-Stick.
Activ | Inactive
Resources behaviorUse the following parameters to configure how the titrator responds to the deletion of resources and itsresponse to the automatic identification of PnP resources.
Parameters Description ValuesInformationwhen deletingresources
Defines if a confirmation will be requested before a resource isdeleted.
Activ | Inactive
Informationwhen recog-nizing PnPresources
Defines if a confirmation will be requested every time a PnPresource is identified.
Activ | Inactive
Pump and stirrer detection
Parameters Description ValuesStirrer detection Defines if the automatic stirrer detection is activated. This may
be necessary, for example, if you connect additional devicesvia the stirrer outputs that are not automatically identified bythe titrator.
Activ | Inactive
Pump detection Defines if the automatic pump detection is activated. This maybe necessary, for example, if you connect additional devicesvia the pump outputs that are not automatically identified bythe titrator.
Activ | Inactive
9.5 ValuesNavigation: Home > Setup > ValuesThere are three blank values and three auxiliary values which can be used in formulas for calculations.These values cannot be deleted or renamed and no additional values can be created.
Blank valuesA blank value, which is assigned to a solvent, can be transferred to methods by using the method functionBlank.
1 In Values, select Blank values.
2 Tap the entry of a blank value to edit the corresponding parameters.ð The windows to edit the parameters opens.

Setup100 Compact Titrator
Parameters Description ValuesName Shows the name of the value. Blank 1...3
Unit The units in which the blank is specified. Arbitrary
Value Here you can enter a numerical value. -108…108
Determinationmethod
Method name of the method used for the determination. Method name
Date / Time Date and time of the determination. Date and time
Performed by Name of the user performing the determination. User name
Note• When a blank is assigned with the method function Blank, this is updated in the settings immediately
after completion of the method function.
Auxiliary valuesThe auxiliary value can be assigned to a result via the formula in the method function Calculation.
1 In Values, select Auxiliary values.
2 Tap the entry of an auxiliary value to edit the corresponding parameters.ð The windows to edit the parameters opens.
Parameters Description ValuesName Shows the name of the value. Aux. val. 1...3
Comment A brief comment (e.g. unit) to the auxiliary value can beentered .
Arbitrary
Value Here you can enter a numerical value. -108…108
Determinationmethod
Method name of the method used for the determination. Method name
Date / Time Date and time of the determination. Date and time
Performed by Name of the user performing the determination. User name
9.6 Maintenance & ServiceNavigation: Home > Setup > Mainten. & Service
9.6.1 MT serviceNavigation: Home > Setup > Mainten. & Service > MT-ServiceIn this dialog, you can view and print out a list of the most recent (max. 10) METTLER TOLEDO services.Under each date, the user name of the METTLER TOLEDO service technicians and the date and time of theservice appointment are displayed. The most recently performed service always appears at the top of thelist.You can change the service life (in days) of the last service date and configure the titrator to issue awarning at a defined time before the service life elapses (requires administrator rights).
− In MT-Service tap [Settings].
ð The windows to edit the parameters opens.
Parameters Description ValuesInitial operation Defines the date of the initial operation of the titrator. Date
Last service Shows the date of the last service. Date
Service life Defines the service life (in days) from the most recentlyperformed service.
0…104
Next service Shows the due date of the next service. Date
Reminder Determines whether the titrator should issue a warning beforethe service life expires.
Only if Monitoring usable life = Active.
Activ | Inactive

Setup 101Compact Titrator
Days beforeexpiration
Determines the number of days before expiry of the service lifethat the titrator should issue a warning.The value entered here must be smaller than the service life.(Appears only if "Reminder" is activated.)
0...1000
9.6.2 Import/ExportNavigation: Home > Setup > Mainten. & Service > Import / Export You can use this function to save titrator data on a USB stick (export) and reload the data back to a titratorlater on (import).Thus is it possible to create a backup of most data that has been changed from the titrator's default settings.Uploading data from a backup copy results in the existing data in the titrator being overwritten. In this wayyou can immediately duplicate the status of one titrator in another one or restore titrator settings after repair.The following two rules should be observed:• Memory copies can only be imported from the same titrator type.• Memory copies, user management and methods can only be imported from the same or from a lower
firmware version.You can select whether you want to export or import a backup copy, an individual method, all methods orthe user management.A memory copy includes the information listed below.• All parameters of methods and series• Setup including all resources• User settings• Global settings (incl. user management)• Settings for manual operations
A memory copy does not contain all saved results, data saved on a PnP component and the defaultparameters for manual operations.
Import/export of individual methodsWhen you import/export an individual method, you can select which method is to be exported or imported.You require the right to edit methods.
Import/export of all methodsWhen you export all methods, all methods are exported to individual XML files on the USB-stick.When you Import all methods, all method related XML files on the USB-stick are checked and when amethod is compatible with the titrator type, the method is imported. If not enough memory is free, amessage is displayed. The user has to delete existing user or mettler methods on the titrator before he canimport the methods. The user is asked whether an existing method should be overwritten if a method withthe same method ID exists
Import/export of user management settingsWhen you import/export user management settings, the entire user management settings with all users andtheir properties are exported or imported.
1 Open Setup > Mainten. & Service > Import / Export.2 Configure the following parameters:
Parameters Description ValuesAction Here you can select whether you wish to export the titrator data
to a memory stick or to import it from a memory stick to atitrator.
Export | Import
Data Defines which data is exported or imported. Memory copy: Exports or imports a backup copy.Single method: Exports or imports an individual method.All methods: Exports or imports all methods.User management: Exports or imports the user management.
Memory copy | Singlemethod | All methods |User management
Method ID Defines which method is imported or exported. Method list

Setup102 Compact Titrator
9.6.3 Reset to factory settings
NOTICEDanger of data loss due to reset!In the process of resetting the titrator all data and changes to settings made by users ofthe titrator are erased.− Back up all data and settings.
Navigation: Home > Setup > Mainten. & Service > Reset to factory settings
9.6.4 Titrator firmware historyNavigation: Home > Setup > Mainten. & Service > Titrator firmware history The Titrator firmware history button displays a list of the firmware updates or model upgrades. The firstentry in the list represents the initial operation of the titrator.All list entries are stored with date, type, FW version and the user name of the user who performed theaction.
9.6.5 Board firmwareNavigation: Home > Setup > Mainten. & Service > Board firmwareDisplay a list of all boards and burette drives available on the titrator along with the relevant firmwareversion. You can carry out an update.
9.6.6 TerminalNavigation: Home > Setup > Mainten. & Service > TerminalDisplay the chip ID of the terminal and adjust the touchscreen.If the alignment of the touch-sensitive areas of the screen correspond not exactly with the position of thebuttons e.g. after a software update was performed, then you can solve this error by executing this function.
1 In Terminal tap [Adjust touchscreen].
ð The instrument will reboot and the adjustment screen appears.2 Touch and hold a touch screen stylus (resistive) on the center of the target until it moves to the next
position on the screen.3 Repeat this procedure until a message appears.4 Tap the screen to confirm or wait for 30 seconds for canceling (timeout).ð The instrument will reboot.
Note• Tap the center of the target as accurately as possible otherwise the process has to be repeated several
times.• Make sure not to touch any other locations on the screen and the fix key areas while doing this
adjustment.• Make sure not to touch the screen with your hand.• Keep accurate angle for your usage.• The adjustment process cannot be aborted.
9.6.7 Board dataNavigation: Home > Setup > Mainten. & Service > Board dataDisplay and print out a list of all the boards fitted in the titrator. Each board is listed by name and modulelocation.If a board is selected from the list, then its chip ID and all data on available inputs and outputs includingthe adjustment data will be displayed.
9.6.8 DrivesNavigation: Home > Setup > Mainten. & Service > Drives

Setup 103Compact Titrator
Display and print a list of all connected drives. The list contains the position, serial number, chip-ID andstatus of each drive.
9.6.9 BurettesNavigation: Home > Setup > Mainten. & Service > BurettesDisplay and print out a list of connected PnP burettes. Each PnP burette is listed with its chip ID, serialnumber, volume and position of the attached drive.
9.6.10 UpdateNavigation: Home > Setup > Mainten. & Service > UpdateIt is possible to update the firmware of your titrator. If you want to update the firmware of your titrator,contact your authorized METTLER TOLEDO dealer or service representative.
u www.mt.com/contact

Manual Operations104 Compact Titrator
10 Manual OperationsYou can use manual operations to access various titrator functions that are not directly connected to theexecution of an analysis, but that might be useful during the sample preparation, for example.You can call up the following manual operations from here with the relevant titrator components:
Hardwarecomponents
Possible manual operations Possible usages
Stirrer Stir Dissolve a solid sample
Sensor Measure Determine the pH or temperature of a solution
Burette Rinse Rinse burette before changing a titrant
Rinse multiple burettes Rinsing several burettes simultaneously
Dispense Dispense during sample preparation
Manual titration Manual titration using a color indicator
Pump Pump Pump auxiliary reagents in and out, fill and emptysample vessels, replace the solvent (for Karl Fischerwater determination)
Auxiliaryinstrument
Control Activating an external pump
Note• It is not possible to perform parallel execution of multiple manual operations.• The resource parameters in all editable fields can be changed temporarily (only for the execution of the
manual operation in question) and can vary from the setup settings. The changes made will not becopied over to the setup, however.
10.1 StirrerTo switch a connected stirrer on or off for a definable time interval and at a definable stirring speed, selectthe following:
Navigation: Home > Manual > Stirrer1 Make a selection in Titration stand.
2 Enter the stir time in [sec] or select "∞" for an infinite duration.
3 Tap [Start] to start the stirrer.
ð The stirrer starts. Tap [Stop] to stop the stirrer at any time (terminating the manual operation).Define the following parameters:
Parameters Description ValuesTitration stand Defines which titration stand is to be used. List of available
titration stands
Stirrer output Information on the used stirrer output. STIRRER
Speed Defines the stirring speed in [%]. 0…100
Stir time The stirring time, in [sec], during which the stirrer should be inoperation. Select "∞" for unlimited stirring time.
0…104 | ∞
Note• Entries made here will only be applied to the manual operation and will have no effect on the instrument
settings.
10.2 PumpWithin Pump, the following actions are available.
• Pump• Drain• Fill

Manual Operations 105Compact Titrator
Parameters Description ValuesAction Determines the actions for the pump process. Fill | Pump | Drain
For Drain and Fill you can activate and configure a stirrer.
The parameters available for each action and stirrers are described in the following chapter.
10.2.1 PumpThis manual operation will use a connected pump to pump in any volume of auxiliary reagent or -depending on the connection of the tubes - to drain it from the titration vessel.Proceed as follows to start a pump process:
1 Go to Home > Manual > Pump.
2 Set Action to Pump3 Select the pump and adjust the pump rate.4 Enter the volume in [mL] to be added.
5 Tap Start to start the procedure.
ð The procedure starts. Tap Stop to stop the procedure at any time.You can determine the following parameters:
Parameters Description ValuesAuxiliaryreagent
The auxiliary reagent to be added. List of availableauxiliary reagents
Pump Use this setting to select a pump. List of availablepumps
Max. pump rate Displays the pump rate in as defined in the settings. Changingthis value does not change the rate of the pump, only the timecalculated for the addition.
0.1…1000 mL/min
Pump output The output where you want to operate the pump. Available outputs
Volume The volume to be dispensed, in [mL]. Select "∞" for unlimitedpumping.
0…1000 | ∞
10.2.2 Drain
Parameters Description ValuesDrain pump Defines, which pump is used for draining. Available pumps
Pump output The output where you want to operate the pump. Available outputs
Drain duration Defines the pumping time for draining a fluid.The duration of the drain operation for the tubes should be aslong as possible to ensure that the tubes are completely free ofliquids following draining.
0...1000 s | ∞
Max. pump rate Displays the pump rate in as defined in the settings. Changingthis value does not change the rate of the pump, only the timecalculated for the addition.
0.1…1000 mL/min
See also2 Stirrer } Page 106
10.2.3 Fill
Parameters Description ValuesFill pump Defines, which pump is used for filling. Available pumps
Pump output The output where you want to operate the pump. Available outputs
Fill time Defines the pumping time for filling a titration vessel. 0...1000 s | ∞
Max. pump rate Displays the pump rate in as defined in the settings. Changingthis value does not change the rate of the pump, only the timecalculated for the addition.
0.1…1000 mL/min
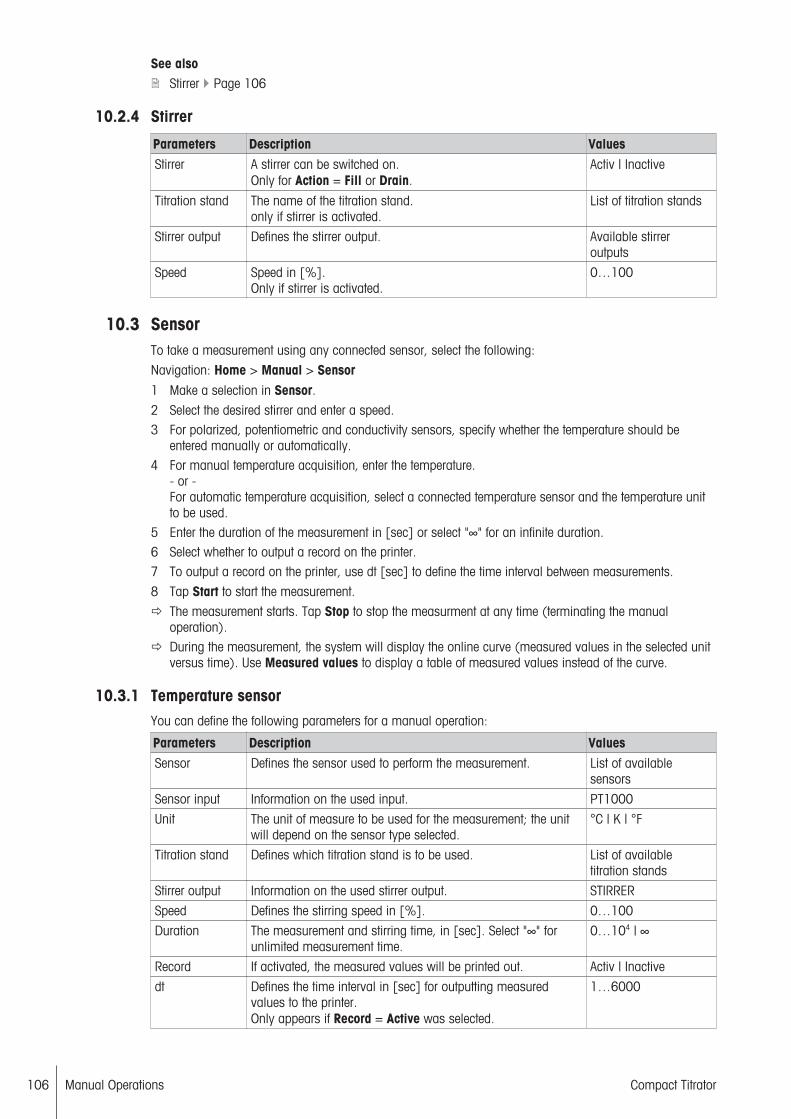
Manual Operations106 Compact Titrator
See also2 Stirrer } Page 106
10.2.4 Stirrer
Parameters Description ValuesStirrer A stirrer can be switched on.
Only for Action = Fill or Drain.Activ | Inactive
Titration stand The name of the titration stand.only if stirrer is activated.
List of titration stands
Stirrer output Defines the stirrer output. Available stirreroutputs
Speed Speed in [%].Only if stirrer is activated.
0…100
10.3 SensorTo take a measurement using any connected sensor, select the following:
Navigation: Home > Manual > Sensor1 Make a selection in Sensor.2 Select the desired stirrer and enter a speed.3 For polarized, potentiometric and conductivity sensors, specify whether the temperature should be
entered manually or automatically.4 For manual temperature acquisition, enter the temperature.
- or -For automatic temperature acquisition, select a connected temperature sensor and the temperature unitto be used.
5 Enter the duration of the measurement in [sec] or select "∞" for an infinite duration.6 Select whether to output a record on the printer.7 To output a record on the printer, use dt [sec] to define the time interval between measurements.
8 Tap Start to start the measurement.
ð The measurement starts. Tap Stop to stop the measurment at any time (terminating the manualoperation).
ð During the measurement, the system will display the online curve (measured values in the selected unitversus time). Use Measured values to display a table of measured values instead of the curve.
10.3.1 Temperature sensorYou can define the following parameters for a manual operation:
Parameters Description ValuesSensor Defines the sensor used to perform the measurement. List of available
sensors
Sensor input Information on the used input. PT1000
Unit The unit of measure to be used for the measurement; the unitwill depend on the sensor type selected.
°C | K | °F
Titration stand Defines which titration stand is to be used. List of availabletitration stands
Stirrer output Information on the used stirrer output. STIRRER
Speed Defines the stirring speed in [%]. 0…100
Duration The measurement and stirring time, in [sec]. Select "∞" forunlimited measurement time.
0…104 | ∞
Record If activated, the measured values will be printed out. Activ | Inactive
dt Defines the time interval in [sec] for outputting measuredvalues to the printer.Only appears if Record = Active was selected.
1…6000

Manual Operations 107Compact Titrator
Note• Entries made here will only be applied to the manual operation and will have no effect on the instrument
settings.
10.3.2 Potentiometric SensorPotentiometric sensors are potentiometric indicator electrode, such as glass electrodes for pH measurement,Redox electrode for measuring the redox potential or ion-selective electrodes (ISE) for determining of ioncontent in the solution. Below, the editable parameters are listed for both potentiometric sensors andphotrodes used for turbidimetric and color induced titrations:
Parameters Description ValuesSensor Defines the sensor used to perform the measurement. List of available
sensors
Unit The unit of measure to be used for the measurement; the unitwill depend on the sensor type selected.
mV | pH | pM | A | %T
Titration stand Defines which titration stand is to be used. List of availabletitration stands
Stirrer output Information on the used stirrer output. STIRRER
Speed Defines the stirring speed in [%]. 0…100
Temperaturemanual
Defines whether to enter the temperature manually (Active) orvia a temperature sensor (Inactive).
Activ | Inactive
Temperature If the temperature is entered manually, you can enter it here, in[°C].Only appears if Temperature manual = Active was selected.
-20…200
Temperaturesensor
Here you can select the required temperature sensor.Only appears if Temperature manual = Inactive is selected.
List of availablesensors
Sensor input Information on the used input. PT1000
Temperatureunit
The unit of measure for the temperature measurement.Only appears if Temperature manual = Inactive was selected.
°C | K | °F
Duration The measurement and stirring time, in [sec]. Select "∞" forunlimited measurement time.
0…104 | ∞
Record If activated, the measured values will be printed out. Activ | Inactive
dt Defines the time interval in [sec] for outputting measuredvalues to the printer.Only appears if Record = Active was selected.
1…6000
Note• The parameters for temperature acquisition or entering the temperature, Temperature manual,
Temperature, Temperature sensor, Sensor input and Temperature unit are omitted for mV sensorsand the phototrode.
• Entries made here will only be applied to the manual operation and will have no effect on the instrumentsettings.
10.3.3 Polarized sensorYou can define the following parameters for a manual operation:
Parameters Description ValuesSensor Defines the sensor used to perform the measurement. List of available
sensors
Sensor input Information on the used input. SENSOR
Indication Defines how to do the indication. Depending on the unit ofmeasure: [mV] = Voltametric, [µA] = Amperometric.
Voltametric | Ampero-metric
Ipol Ipol is the polarization current for the voltametric indication. 0.0…24.0 µA

Manual Operations108 Compact Titrator
Upol Defines the polarization voltage [mV], for an amperometricindication.
Only for polarized sensors and Indication = Amperometric.
0…2000.0
Titration stand Defines which titration stand is to be used. List of availabletitration stands
Stirrer output Information on the used stirrer output. STIRRER
Speed Defines the stirring speed in [%]. 0…100
Temperaturemanual
Defines whether to enter the temperature manually (Active) orvia a temperature sensor (Inactive).
Activ | Inactive
Temperature If the temperature is entered manually, you can enter it here, in[°C].Only appears if Temperature manual = Active was selected.
-20…200
Temperaturesensor
Here you can select the required temperature sensor.Only appears if Temperature manual = Inactive is selected.
List of availablesensors
Sensor input Information on the used input. PT1000
Temperatureunit
The unit of measure for the temperature measurement.Only appears if Temperature manual = Inactive was selected.
°C | K | °F
Duration The measurement and stirring time, in [sec]. Select "∞" forunlimited measurement time.
0…104 | ∞
Record If activated, the measured values will be printed out. Activ | Inactive
dt Defines the time interval in [sec] for outputting measuredvalues to the printer.Only appears if Record = Active was selected.
1…6000
Note• Entries made here will only be applied to the manual operation and will have no effect on the instrument
settings.
10.4 Auxiliary InstrumentNavigation: Home > Manual > Auxiliary instrumentSelectively control here the titrator's inputs and outputs. You can transmit outgoing signals and queryincoming signals. This lets you check whether the communication is functioning between the titrator and aconnected auxiliary instrument. In this way, manually triggered auxiliary instrument functions can be usedas support for a titration.To activate an auxiliary instrument, proceed as follows:
1 In Control type, select the auxiliary instrument to be controlled.
2 Enter the specific communication parameters for the control type.
3 Tap [Start] to start the procedure.
ð The procedure starts. Tap [Stop] to stop the procedure at any time.The following parameters are available, depending on the type:
Parameters Description ValuesControl type The control type of the auxiliary instrument. Output 24 V | Stirrer |
Out TTL (Single pin) |Input TTL (Single pin) |RS-232
For Control type = Output 24 V, the following parameters are available:
Parameters Description ValuesName Select the auxiliary instrument to be controlled from the list. Auxiliary instrument
Output Information on the used output. PUMP
Duration The time, in [sec], the auxiliary instrument should be switchedon. Select "∞" for unlimited time.
0…104 | ∞

Manual Operations 109Compact Titrator
Note• An auxiliary instrument controlled by the control type Output 24 V can be switched on and off or
operated for a defined period of time.
For Control type = TTL , the following parameters are available:
Parameters Description ValuesName Select the auxiliary instrument to be controlled from the list. Auxiliary instrument
Output Indicates which port and which pin on the titrator you want touse for the auxiliary instrument.
TTL-Out 1 | TTL-Out 2 |TTL-Out 3 | TTL-Out 4
Mode Determines the number and type of TTL signal issued.Fixed time: The control output is switched on for the definedtime period.Input controlled: A signal received at the control inlet controlsthe control outlet. The Auxiliary Instrument function will beterminated as soon as the signal changes at the control inletor after a defined maximum time has expired.Sequential: The control output runs through a definedsequence.
Fixed time | Inputcontrolled | Sequential
Duration The time, in [sec], the auxiliary instrument should be switchedon. Select "∞" for unlimited time.
0…104 | ∞
Input aux. instr. The name of the auxiliary instrument to serve as the signalinput (control input).Only appears for Mode = Input controlled.
List of auxiliaryinstrument
Input The input where the auxiliary instrument should be queried. TTL-In 1 | TTL-In 2
Input signal Indicates whether an rising or a falling input signal should bedetected.
Rising | Falling
Max. wait time The maximum waiting time for a signal change. After itexpires, the method will be continued even if no inputsequence was detected.Only appears for Mode = Input controlled.
0…104 | ∞
Output signal Normal: The signal is transmitted without conversion.Inverted: The signal is transmitted in inverted form.
Only if Mode = Input controlled.
Normal | Inverted
Number ofpulses
The number of impulses in the planned sequence.
Only if Mode = Sequential.0…104
Pulse duration The duration of a pulse, in [sec].Only appears for Mode = Sequential.
0…104
Interval Defines the time span, in [sec], between two impulse starts.
Only if Mode = Sequential.0…106 | 0…104
• If Mode = Input controlled was selected, the system checks the incoming input signal until themaximum time expires or a signal is received.
For Control type = Input TTL (Single pin), the following parameters are available:
Parameters Description ValuesName Select the auxiliary instrument to be controlled from the list. Auxiliary instrument
Input The input where the auxiliary instrument should be queried. TTL-In 1 | TTL-In 2
Input signal Indicates whether an rising or a falling input signal should bedetected.
Rising | Falling
Max. wait time The maximum waiting time for a signal change. After itexpires, the method will be continued even if no inputsequence was detected.Only appears for Mode = Input controlled.
0…104 | ∞

Manual Operations110 Compact Titrator
Note• Use the control type Input TTL (Single pin) to wait for a rising or falling input signal. The manual
operation will be ended as soon as an input signal is received or the maximum waiting time isexceeded.
For Control type = Stirrer, the following parameters are available:
Parameters Description ValuesName Select the auxiliary instrument to be controlled from the list. Auxiliary instrument
Speed Defines the stirring speed in [%]. 0…100
Duration The time, in [sec], the auxiliary instrument should be switchedon. Select "∞" for unlimited time.
0…104 | ∞
Note• An auxiliary instrument controlled by the control type Stirrer can be switched on and off or operated for
a defined period of time.
For Control type = RS-232, the following parameters are available:
Parameters Description ValuesName Select the auxiliary instrument to be controlled from the list. Auxiliary instrument
Connection The serial port to which the device is connected. COM
Outputsequence
Defines the output sequence to be transmitted by the titrator.ASCII control characters are generated with sequences startedby the backslash character followed by three digits. Forexample:\013 for Carriage Return\010 for line feed.
ASCII characters
Wait forresponse
Defines whether the system should wait for a responsesequence from the device.
Activ | Inactive
Input sequence The response sequence from the external device.
Only if Wait for response = Active was selected.
Arbitrary
Max. wait time The maximum waiting time for a signal change. After itexpires, the method will be continued even if no inputsequence was detected.Only appears for Mode = Input controlled.
0…104 | ∞
Note• Use the control type RS-232 to transmit any signal and (if you so specify) to wait for a response.
10.5 Burette
10.5.1 Rinse buretteNavigation: Home > Manual > Burette > RinseThis operation lets you rinse a burette and its connecting tubes and fill it with fresh titrant, for example if youwant to remove air bubbles from the system.1 Select the titrant you want to rinse with.2 Select the drive on which the titrant is installed. (For PnP burettes, the system automatically selects the
appropriate drive.)3 Enter the number of cycles you want to run.4 Enter the discharge volume in [%] to define the percentage of the burette's total volume that you want to
discharge during each rinse passage.5 Enter the filling rate in [%] to define the speed at which you want to refill the burette. (100% is the
maximum rate.)
6 Tap Start to start the procedure.
ð The procedure starts. Tap Stop to stop the procedure at any time.
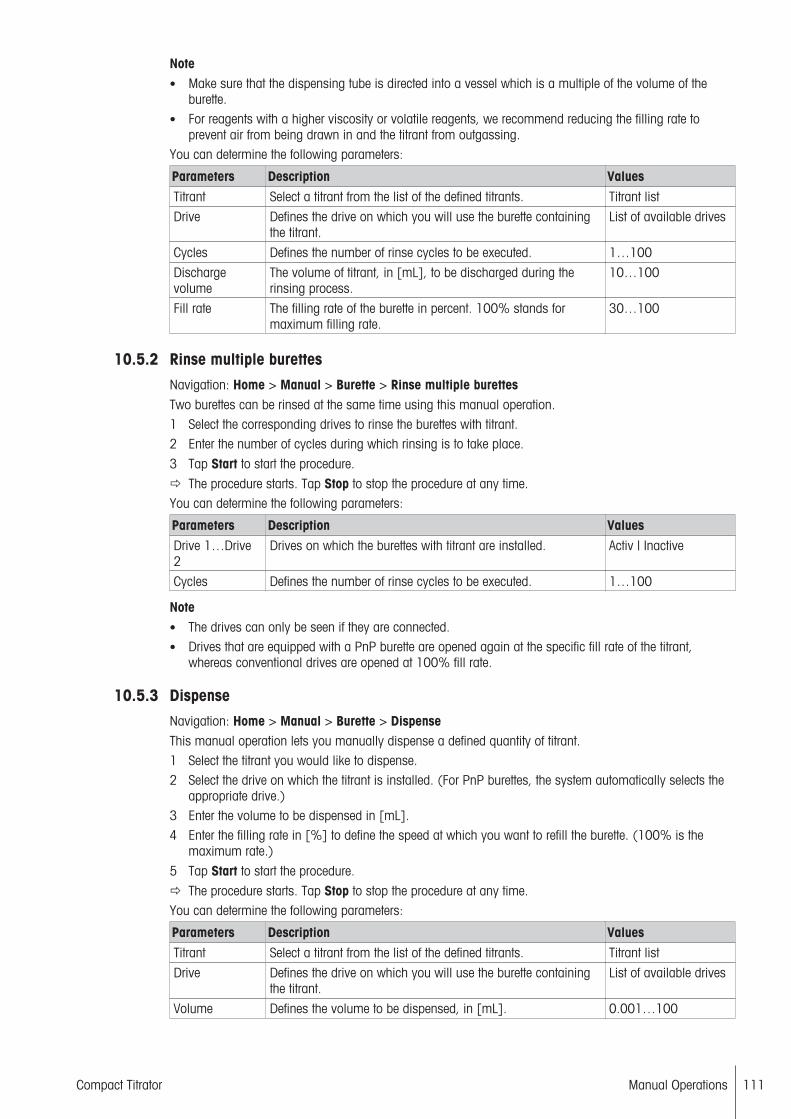
Manual Operations 111Compact Titrator
Note• Make sure that the dispensing tube is directed into a vessel which is a multiple of the volume of the
burette.• For reagents with a higher viscosity or volatile reagents, we recommend reducing the filling rate to
prevent air from being drawn in and the titrant from outgassing.You can determine the following parameters:
Parameters Description ValuesTitrant Select a titrant from the list of the defined titrants. Titrant list
Drive Defines the drive on which you will use the burette containingthe titrant.
List of available drives
Cycles Defines the number of rinse cycles to be executed. 1…100
Dischargevolume
The volume of titrant, in [mL], to be discharged during therinsing process.
10…100
Fill rate The filling rate of the burette in percent. 100% stands formaximum filling rate.
30…100
10.5.2 Rinse multiple burettesNavigation: Home > Manual > Burette > Rinse multiple burettesTwo burettes can be rinsed at the same time using this manual operation.1 Select the corresponding drives to rinse the burettes with titrant.2 Enter the number of cycles during which rinsing is to take place.
3 Tap Start to start the procedure.
ð The procedure starts. Tap Stop to stop the procedure at any time.You can determine the following parameters:
Parameters Description ValuesDrive 1…Drive2
Drives on which the burettes with titrant are installed. Activ | Inactive
Cycles Defines the number of rinse cycles to be executed. 1…100
Note• The drives can only be seen if they are connected.• Drives that are equipped with a PnP burette are opened again at the specific fill rate of the titrant,
whereas conventional drives are opened at 100% fill rate.
10.5.3 DispenseNavigation: Home > Manual > Burette > DispenseThis manual operation lets you manually dispense a defined quantity of titrant.1 Select the titrant you would like to dispense.2 Select the drive on which the titrant is installed. (For PnP burettes, the system automatically selects the
appropriate drive.)3 Enter the volume to be dispensed in [mL].4 Enter the filling rate in [%] to define the speed at which you want to refill the burette. (100% is the
maximum rate.)
5 Tap Start to start the procedure.
ð The procedure starts. Tap Stop to stop the procedure at any time.You can determine the following parameters:
Parameters Description ValuesTitrant Select a titrant from the list of the defined titrants. Titrant list
Drive Defines the drive on which you will use the burette containingthe titrant.
List of available drives
Volume Defines the volume to be dispensed, in [mL]. 0.001…100

Manual Operations112 Compact Titrator
Fill rate The filling rate of the burette in percent. 100% stands formaximum filling rate.
30…100
10.5.4 Manual titrationNavigation: Manual > Burette > Manual titrationTo perform a manually controlled titration, proceed as follows:1 Select the titrant you would like to titrate with.2 Select the drive on which the titrant is installed. (For PnP burettes, the system automatically selects the
appropriate drive.)3 Enter the filling rate in [%] to define the speed at which you want to refill the burette. (100% is the
maximum rate.)4 Select the sensors you would like to use for the measurement from the list of sensors defined in the
setup.5 Select the stirrer output for the stirrer and enter a speed.6 Specify whether the temperature should be entered manually or automatically.7 For manual temperature acquisition, enter the temperature.
- or -For automatic temperature acquisition, select a connected temperature sensor and the temperature unitto be used.
8 Select whether the results should be given in the form of consumption (of the titrant) or content (in thesample).
9 Select the measurement unit and the number of decimal places for the results.
10 For results given as content, select the sample's entry type (Volume or Weight) and enter the samplequantity m, the density d (for entry types Volume or Weight), the molar mass M and the equivalentnumber z for the substance to be tested.
11 Specify whether a record should be output to the printer and select which elements should be containedin that record (Results, Table of measured values and Curve).
12 Tap Start to start the manual titration and move to the online dialog.
13 Tap Dispense once to add a minimum volume of titrant. If you touch and hold Dispense, the systemwill continuously add titrant.ð The dispensing rate will increase as you hold down the button.ð After you release the button, the system will titrate at the minimum speed again the next time you tap
the button.
14 Tap Exit to end the manual titration.
During the manual titration, the system will display the measured value, the titrant consumption, and acurve (measured value versus consumption) on the screen. After you finish, a record can automatically beoutput to the printer. You can also view the results, measured values and curve on the screen.
Note• For the results of the manual titration, the system takes as a basis the titrant consumption until the
conclusion of the titration. The EQP is not calculated!You can determine the following parameters:
Parameters Description ValuesTitrant Select a titrant from the list of the defined titrants. Titrant list
Drive Defines the drive on which you will use the burette containingthe titrant.
List of available drives
Fill rate The filling rate of the burette in percent. 100% stands formaximum filling rate.
30…100
Sensor Defines the sensor used to perform the measurement. List of availablesensors
Sensor input The input to which you want to connect the sensor. SENSOR | PT1000
Unit The unit of measure to be used for the measurement; the unitwill depend on the sensor type selected.
mV | pH | ppm | pM |pX | %T | A | µA | °C |K | °F

Manual Operations 113Compact Titrator
Ipol Ipol is the polarization current for the voltametric indication. 0.0…24.0 µA
Upol Defines the polarization voltage [mV], for an amperometricindication.
Only for polarized sensors and Indication = Amperometric.
0…2000.0
Titration stand Defines which titration stand is to be used. List of availabletitration stands
Speed Defines the stirring speed in [%]. 0…100
Temperaturemanual
Defines whether to enter the temperature manually (Active) orvia a temperature sensor (Inactive).
Activ | Inactive
Temperature If the temperature is entered manually, you can enter it here, in[°C].Only appears if Temperature manual = Active was selected.
-20…200
Temperaturesensor
Here you can select the required temperature sensor.Only appears if Temperature manual = Inactive is selected.
List of availablesensors
Sensor input The input to which you want to connect the sensor. SENSOR | PT1000
Temperatureunit
The unit of measure for the temperature measurement.Only appears if Temperature manual = Inactive was selected.
°C | K | °F
Result Select whether to output the result of the manual titration as theamount of titrant consumed or as the content in the sample.
Consumption | Content
Unit The unit for stating the result in the form of the titrantconsumption.Only for Result = Consumption.
mL | mmol
Unit The unit for stating the result as the sample content.Only for Result = Content.
mol/L | mol/kg | g/L |g/kg | % | ppm
Decimal places Specify the required number of decimal places for the results. 1...4
Entry type The entry type for the sample size.Only for Result = Content
Weight | Volume
Sample size The sample size, in [mL] or in [g], depending on the entrytype selected.Only for Result = Content.
0.0001…100
Density The density of the sample substance to be determined, in [g/mL].Only for Result = Content.
0.0001…100
M [g/mol] Defines the molar mass of the substance [g/mol].
Only in method function GT (general titration).
List of concentration/titer standards andsubstances
Record Defines whether to output a record to the printer after thetitration.
Activ | Inactive
Incl. result Here you can specify whether the record should contain all theresults.Only appears for Record = Active.
Activ | Inactive
Incl. table ofmeasuredvalues
Here you can specify whether the record should contain a tableof measured values.Only appears for Record = Active.
Activ | Inactive
Incl. curve Here you can specify whether the record should contain acurve.Only appears for Record = Active.
Activ | Inactive
Note• The parameters for temperature acquisition or entering the temperature, Temperature manual,
Temperature, Temperature sensor, Sensor input and Temperature unit are omitted for mV sensorsand the phototrode.
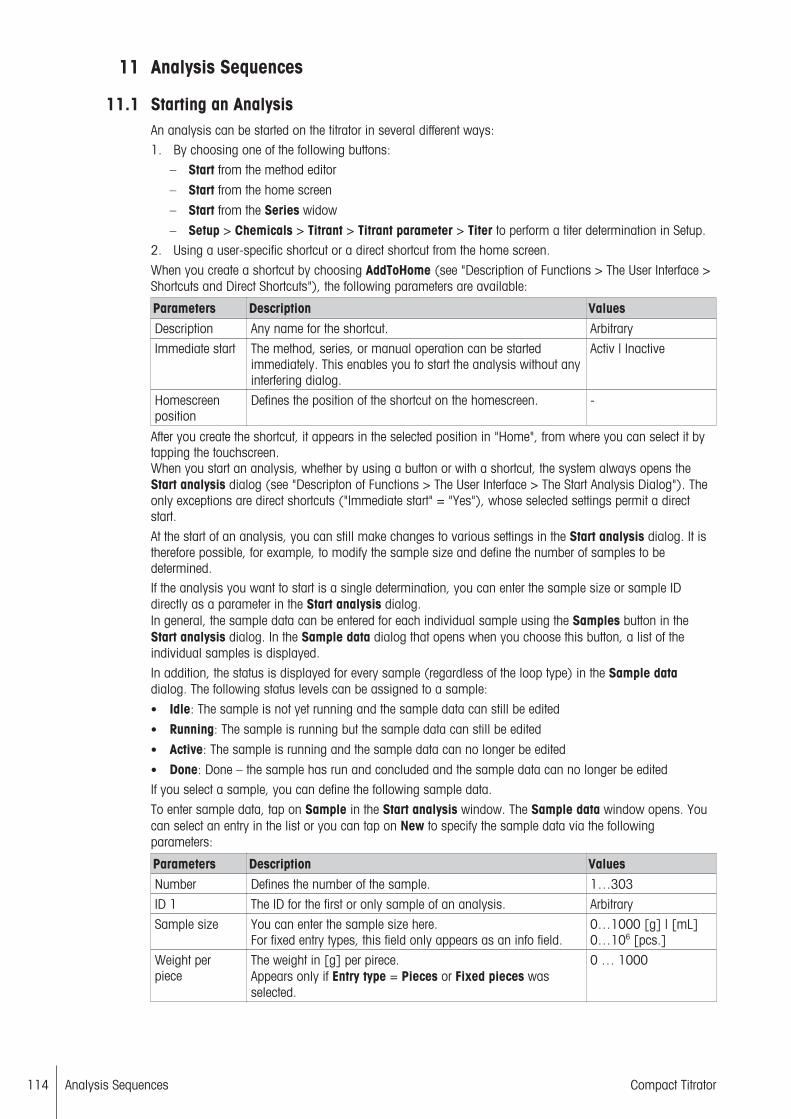
Analysis Sequences114 Compact Titrator
11 Analysis Sequences
11.1 Starting an AnalysisAn analysis can be started on the titrator in several different ways:1. By choosing one of the following buttons:
– Start from the method editor
– Start from the home screen
– Start from the Series widow
– Setup > Chemicals > Titrant > Titrant parameter > Titer to perform a titer determination in Setup.
2. Using a user-specific shortcut or a direct shortcut from the home screen.
When you create a shortcut by choosing AddToHome (see "Description of Functions > The User Interface >Shortcuts and Direct Shortcuts"), the following parameters are available:
Parameters Description ValuesDescription Any name for the shortcut. Arbitrary
Immediate start The method, series, or manual operation can be startedimmediately. This enables you to start the analysis without anyinterfering dialog.
Activ | Inactive
Homescreenposition
Defines the position of the shortcut on the homescreen. -
After you create the shortcut, it appears in the selected position in "Home", from where you can select it bytapping the touchscreen.When you start an analysis, whether by using a button or with a shortcut, the system always opens theStart analysis dialog (see "Descripton of Functions > The User Interface > The Start Analysis Dialog"). Theonly exceptions are direct shortcuts ("Immediate start" = "Yes"), whose selected settings permit a directstart.
At the start of an analysis, you can still make changes to various settings in the Start analysis dialog. It istherefore possible, for example, to modify the sample size and define the number of samples to bedetermined.If the analysis you want to start is a single determination, you can enter the sample size or sample IDdirectly as a parameter in the Start analysis dialog.In general, the sample data can be entered for each individual sample using the Samples button in theStart analysis dialog. In the Sample data dialog that opens when you choose this button, a list of theindividual samples is displayed.
In addition, the status is displayed for every sample (regardless of the loop type) in the Sample datadialog. The following status levels can be assigned to a sample:
• Idle: The sample is not yet running and the sample data can still be edited
• Running: The sample is running but the sample data can still be edited
• Active: The sample is running and the sample data can no longer be edited
• Done: Done – the sample has run and concluded and the sample data can no longer be edited
If you select a sample, you can define the following sample data.
To enter sample data, tap on Sample in the Start analysis window. The Sample data window opens. Youcan select an entry in the list or you can tap on New to specify the sample data via the followingparameters:
Parameters Description ValuesNumber Defines the number of the sample. 1…303
ID 1 The ID for the first or only sample of an analysis. Arbitrary
Sample size You can enter the sample size here.For fixed entry types, this field only appears as an info field.
0…1000 [g] | [mL]0…106 [pcs.]
Weight perpiece
The weight in [g] per pirece.Appears only if Entry type = Pieces or Fixed pieces wasselected.
0 … 1000

Analysis Sequences 115Compact Titrator
Density You can enter the sample's density, in [g/mL], here.Does not appear for the Entry type = Pieces and Fixedpieces.
0…100
Comment You can enter a brief comment about the series. Arbitrary
Correction factor Any correction factor that can be used in calculations. 0.0001…106
Temperature The temperature in [°C] during the analysis. If temperaturemonitoring is activated in a titration function, the system willignore the sample temperature given here.
-20…200
You can enter the following parameters in the Start analysis dialog, depending on the type of analysis to bestarted and the resources used:
Parameters Description ValuesType The type of analysis to be started. Method | Series
Number ofsamples
Defines the number of samples to be analyzed. The numberdepends on the selected titration stand.
1…303
Number ofstandards
The number of standards to be analyzed with a method orseries.
1…303
ID 1 The ID for the first or only sample of an analysis. Arbitrary
Sample type Defines the type of sample used in the sample loop. Thesample type is shown in the method editor, the sample datawindow and the report.
Sample | Standard |Blank
Sample size You can enter the sample size here.For fixed entry types, this field only appears as an info field.
0…1000 [g] | [mL]0…106 [pcs.]
• All the parameters that can be edited in the Start analysis dialog or the sample data dialog willoverwrite the settings defined in the method for the same parameters.
• All non-editable parameters that are displayed as an info field are only shown for orientation purposesand list the settings from the method.
• If the sample size must be entered before the analysis but the user does not do so, the user will berequired to enter it immediately before the start of the analysis.
11.2 Analysis Sequence StepsDuring the processing of an analysis, starting from the start of the analysis and sample addition through tothe results display, the titrator displays a range of dialog windows, some of which the user has to confirmin order for the analysis to continue. These dialog windows are used to ensure faultless processing, andalso to provide the user with information.Depending on the required degree of automation for an analysis, it can, however, be useful and desirable todeactivate particular security questions or information dialogs to ensure that the sequence is processedwithout interruption. Below are some process flow examples.
11.2.1 Analysis sequenceFor GT analyses, the sequence with the use of a manual or with the use of an automatic titration stand isshown. In each case, you are told where the individual screens can be switched off in the user interface.• Analysis sequence for an analysis with a titration stand of the type "Manual stand":
<Start>
Dialog: Analysis start Can be switched off for the start via shortcut with the"Immediate start" parameter during the creation ormanagement of a shortcut.
<Start>

Analysis Sequences116 Compact Titrator
Check: Resources Can be switched off with the "Show required resources at start"parameter in the analysis sequence settings. (An errormessage will appear if the resources have already beenallocated or are missing.)
<OK>
Request: Sample size Appears when "Entry" = "Before" was selected in the "Sample"method function and the sample size = 0. Can be avoided byselected a "fixed" entry type.
<OK>
Add sample Can be switched off for the start via shortcut with the"Immediate start" parameter during the creation ormanagement of a shortcut for the first sample.
<OK>
Dialog: Online
Request: Sample size For "Entry" = "Arbitary" parameter in the "Sample" methodfunction.
<OK>
Results This can be switched on or off via the "Show results afteranalysis" parameter.(Navigation: Setup > Global settings > Analysis and resourcesbehavior > Analysis sequence setting).
<OK>
Homescreen / Analysis start
• Analysis sequence for an analysis with a titration stand of the type "Auto stand" or "Rondolino TTL":
<Start>
Dialog: Analysis start Can be switched off for the start via shortcut with the"Immediate start" parameter during the creation ormanagement of a shortcut.

Analysis Sequences 117Compact Titrator
<Start>
Check: Resources Can be switched off with the "Show required resources at start"parameter in the analysis sequence settings (Navigation:Setup > Global settings > Analysis and resources behavior >Analysis sequence settings).
<OK>
Online Dialog
Results Can be switched off with the "Show results after analysis"parameter in the analysis sequence settings (Navigation:Setup > Global settings > Analysis and resources behavior >Analysis sequence settings).Note:At the end of a series, all results are listed. The display of thislist can be switched on or off via the "Show results afteranalysis" parameter.
Homescreen / Analysis start

Analysis Data118 Compact Titrator
12 Analysis DataThe "Analysis data" include different types of data that can be used at various times during the planning andexecution of an analysis.The system differentiates between the following types of analysis data:
Raw data Raw data are defined when you create a method or series. They areautomatically generated and stored during the analyses. Raw dataare always created for each analysis and cannot be influenced bythe user.
Method data All data for the method run.
Series data All data from the series run, such as e.g. the series ID and thenumber of samples.
Sample data All data from the analyzed samples, such as e.g. the sample size,sample density and sample ID.
Resource data Data for all resources used during the execution of an analysis (forexample, titrant, auxiliary instrument). The data for a resource arecopied from the setup at the time when it is used in an analysis.
Table of measured values Tables of measured values are created by some method functionsduring an analysis and can be output in the record.
Raw results Raw results are data determined by the titrator during an analysis,such as used titrant volumes and measured values.The raw results can be converted into the actual analysis results inthe "Calculate" method function using the appropriate symbols andformulas.Some of the raw results are always produced automatically andothers are only generated when used within a calculation.
Results Results are the results of the conversions of raw results run withinthe "Calculate" method function. The results of an analysis can beinfluenced by the user.
Of these, the following can be used in calculations:• Sample data (such as the sample size or the sample density)• Resource data (e.g. mole quantity and equivalence quantity for a substance )• Raw results (e.g. blank)• Results (the results of a calculation can then be used in a subsequent calculation).

Titrator Evaluation Procedure 119Compact Titrator
13 Titrator Evaluation ProcedureThe identification of equivalence point candidates within a defined recognition range can be done using fourdifferent evaluation methods:• Standard• Minimum / Maximum• Segmented• AsymmetricWhich method you use for the evaluation will depend on the type of titration or the form of the resultingtitration curve. The procedure to be used is defined in the "Evaluation and recognition" method subfunctionof the "Titration (EQP)".
13.1 Standard Evaluation ProcedureThe titrator's standard evaluation procedure is based on the chemical model of a classic acid-base titration.In this model, the equivalence point of such a titration will be at the point of inflection of the S-shapedtitration curve and the curve will be symmetrical with regard to this inflection point.E
V
(1)
For the recognition of an inflection point using thestandard procedure, the titrator will always look at onegroup of measured values (a "measured valuewindow"). It will examine whether an inflection point isdetectable for that group of measured values. Thiswindow will then be shifted along the curve by onemeasured value and reexamined for points of inflection.The system repeats this procedure until it detects noinflection point twice in a row. It then uses the inflectionpoints found to define the most suitable one as the finalinflection point of the titration.
(1) Inflection pointThe standard evaluation procedure initially only identifies points of inflection. Criteria defined by the user inthe method can influence whether and when an inflection point is to be registered as an EQP candidate.If so defined in the method, the following criteria will have to be fulfilled:• The inflection point must lie within a recognition range.• It must be above a threshold (refers to the first derivative).• The titration curve must demonstrate a specified tendency in the area of the inflection point.EQPs are only detected in the range of the measured curve which is the specified by the "Tendency"parameter (Positive, Negativ), refer to method function "Titration (EQP): Evaluation and Recognition".If these criteria are fulfilled, the inflection point becomes an EQP candidate.The additional EQP criteria can now be used to influence which EQP candidates are ultimately recognizedas equivalence points.For the standard evaluation, the additional EQP criteria "Last EQP" and "Steepest jump" are available. Theycan be selected individually for each defined recognition range.
NoteThese criteria can be defined in the "Evaluation and recognition" subfunction of the "Titration EQP" methodfunctions.

Titrator Evaluation Procedure120 Compact Titrator
E [mV]
V [mL]
1
2 (EQP)
3
4 (EQP)
5
Theoretical example for the evaluation of a titration curve with five points of inflection
Explanation:This titration curve shows five points of inflection (1 – 5).Inflection points 1, 2 and 4 are recognized as EQP candidates, since only these points lie within the 2recognition ranges while also fulfilling the "Tendency" and "Threshold" parameters.The specified "Additional EQP criteria" then determine whether the EQP candidates are actually recognizedas EQP. These additional EQP criteria can be defined for every recognition range.In the example shown above, the following were specified as additional EQP criteria:Recognition Range 1: "Last EQP"Recognition Range 2: "No"Of the two EQP candidates found in Recognition Range 1, the system only identifies the second one as anEQP due to the "Final jump" criterion. The first one remains merely an EQP candidate.The termination criterion defined was that the titration should be terminated after the recognition of three EQPcandidates ("Termination after EQP" = "3"). In the above example the titration is terminated on identificationof the 4th turning point (3rd EQP candidate).
13.2 Minimum / MaximumThe result of this evaluation is the calculated minimum (maximum) of the measured titration points. Theclassic example of a titration curve with a minimum is the photometrically indexed surfactant determination.E
V
The minimum (maximum) is calculated using apolynomial approximation of the titration curve in therange of the minimum (maximum). The equivalencepoint recognition is done directly from the titration curvedata.
13.3 Segmented EvaluationVarious indication methods (including photometry, conductometry, and amperometry) generate titrationcurves with linear or approximately linear sections (segmented curves). The titrator uses individualprocedures to evaluate these curves. For a precise determination of the equivalence point, it is veryimportant that these curves have both linear segments and a clear bend.

Titrator Evaluation Procedure 121Compact Titrator
V
∆E/ ∆V
V
V
E
∆2E/ ∆V 2
Titration curveThe titration curve contains two more less linearsegments and a bend between these two segments. Theevaluation of segmented curves is generally done withthe aid of the standard procedure for S-shaped curves,with the system using as its evaluation basis not thetitration curve's measured points but the data calculatedfrom them in the first derivative.
1. DerivativeThe first derivative of a segmented curve is the first todemonstrate the typical S shape. Its inflection point isthe titration's equivalence point.
2. DerivativeThe threshold references the second derivative of thetitration curve. In other words, the equivalence point fora defined threshold must be above this thresholdnumber.EQPs are only detected in the range of the measuredcurve which is the specified by the "Tendency"parameter (Positive, Negativ), refer to method function"Titration (EQP): Evaluation and Recognition". Withinthe segmented procedure the tendency refers to the 1.derivative.
13.4 AsymmetricFor markedly asymmetrical curves, the standard procedure can result in a systematic error. The differencebetween the true equivalence point and the point of inflection can be greater than the normally achievableprecision. For these cases, the titrator uses an evaluation that uses the Tubbs method.This empirical approximation method is a procedure for the evaluation of asymmetrical, analog-registeredtitration curves. It can also be used for digitally recorded titration curves. The Tubbs procedure result will becloser to the true equivalence point for some asymmetrical curves than the inflection point.This evaluation procedure is based on the following considerations:
E
V
M
M
1
2
EQP
Each of the two branches of the titration curve will havea writable osculating circle with a minimal radius. Therelationship between the two radii is determined by thecurve's asymmetry. The intersection of the connectinglines between the circle center points M1 and M2 andthe titration curve produces the desired equivalencepoint. Theoretical calculations show that the true equiv-alence point for asymmetrical titration curves willalways lie between the inflection point and the branch ofthe titration curve with the greater degree of curvature(i.e. the smaller osculating circle).
The titrator uses a hyperbola to approximate those parts of the titration curve located in the area of thegreatest curvature. For each approximated hyperbola, the system determines the peak (the point with thegreatest curvature). The center points of the assigned smallest osculating circles are the focal points of bothhyperbolas. The intersection of the connection lines from the two focal points and the titration curveproduces the desired equivalence point, as shown above.

Titrator Evaluation Procedure122 Compact Titrator
The evaluation requires at least six measured values in the area of the greatest curvature before and afterthe titration curve's inflection point. If the course of the titration curve does not permit the inclusion of theosculating circles, the titrator will use the standard procedure to calculate the equivalence point. You will benotified of this in the record of the "raw results".EQPs are only detected in the range of the measured curve which is the specified by the "Tendency"parameter (Positive, Negativ), refer to method function "Titration (EQP): Evaluation and Recognition".

Transporting the titrator 123Compact Titrator
14 Transporting the titratorIf you transport the titrator over long distances, use the original packaging.1 Empty all tubes.2 Empty the titration vessel.3 Shut down the titrator.4 Unplug the titrator.5 Remove all cable connections.6 Remove the titration vessel from the titration stand.7 Remove all tubes.8 Remove all burettes.9 Move the titrator to the new location.
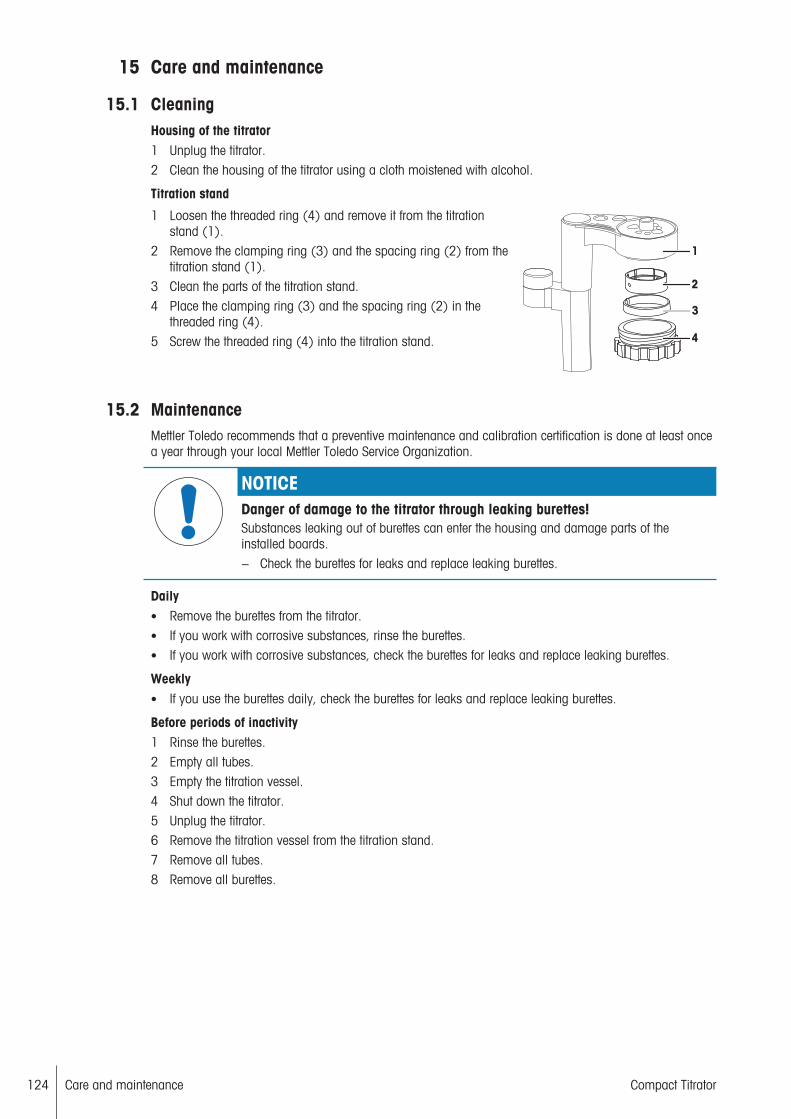
Care and maintenance124 Compact Titrator
15 Care and maintenance
15.1 CleaningHousing of the titrator1 Unplug the titrator.2 Clean the housing of the titrator using a cloth moistened with alcohol.
Titration stand
1 Loosen the threaded ring (4) and remove it from the titrationstand (1).
2 Remove the clamping ring (3) and the spacing ring (2) from thetitration stand (1).
3 Clean the parts of the titration stand.4 Place the clamping ring (3) and the spacing ring (2) in the
threaded ring (4).5 Screw the threaded ring (4) into the titration stand.
1
2
3
4
15.2 MaintenanceMettler Toledo recommends that a preventive maintenance and calibration certification is done at least oncea year through your local Mettler Toledo Service Organization.
NOTICEDanger of damage to the titrator through leaking burettes!Substances leaking out of burettes can enter the housing and damage parts of theinstalled boards.− Check the burettes for leaks and replace leaking burettes.
Daily• Remove the burettes from the titrator.• If you work with corrosive substances, rinse the burettes.• If you work with corrosive substances, check the burettes for leaks and replace leaking burettes.
Weekly• If you use the burettes daily, check the burettes for leaks and replace leaking burettes.
Before periods of inactivity1 Rinse the burettes.2 Empty all tubes.3 Empty the titration vessel.4 Shut down the titrator.5 Unplug the titrator.6 Remove the titration vessel from the titration stand.7 Remove all tubes.8 Remove all burettes.

Disposal 125Compact Titrator
16 DisposalIn conformance with the European Directive 2012/19/EU on Waste Electrical andElectronic Equipment (WEEE) this device may not be disposed of in domestic waste. Thisalso applies to countries outside the EU, per their specific requirements. Please dispose of this product in accordance with local regulations at the collecting pointspecified for electrical and electronic equipment. If you have any questions, pleasecontact the responsible authority or the distributor from which you purchased this device.Should this device be passed on to other parties (for private or professional use), thecontent of this regulation must also be related.Thank you for your contribution to environmental protection.

Technical data126 Compact Titrator
17 Technical data
17.1 Titrator
Power supply Input voltage 100…240 V AC ±10 %
Input frequency 50–60 Hz
Primary connection socket 3 pin, IEC C14
Power consumption 24 VA
Connected load 24 V DC, 1.25 A
Secondary connection plug 2 pin, DC plug
CPU Processor Arm Cortex
SDRAM 512 MB
Flash memory 1 GB (industrial SD card)
Dimensions Width 210 mm
Depth 333 mm
Height 308 mm (with titration stand)
320 mm (ready-to-operatedevice)
Weight 4.2 kg
Materials Titrator housing Crastin® PBT
Cover sheet PET
Protective cover Copolymer
Chassis Stainless steel
Titration stand Crastin® PBT
Lid (titration beaker) Polypropylene
Threaded ring Polypropylene
Three hole adapter Polypropylene
Dispensing tube / extractiontube
FEP
Air tubes Silicone
O-ring (screw top) EPDM
O-ring (threaded ring) FEP / silicone
Sealing ring (bottle) PTFE / silicone
Seal (dispensing tube /extraction tube)
PTFE
Connecting piece Polypropylene
Ambient conditions Ambient temperature +5 °C - 40 °C
Relative humidity Max. 80 % (non-condensing) at31 °C, linear fall to 50 % at 40 °C
Use In interior spaces
Overvoltage category II
Pollution degree 2
Max. installation height 2000 m (above sea level)
COM Socket 9-pin male D-sub
Configuration Full-duplex
Baud rate 1200…19200
Handshake X-On / X-Off
Galvanic isolation No
ESD stability Min. 1000 V
Short-circuit protection Yes

Technical data 127Compact Titrator
USB1 / USB2 USB host USB full speed
Max. power load 700 mA max. for each port
PC USB client USB 2
Ethernet Socket RJ45
Speed 10/100 MBit/s
TTL-I/O Socket 9-pin female D-sub
Inputs 2
Outputs 4
Galvanic isolation No
CAN OUT Socket RJ12
Speed 500 kBit/s
Voltage 24 VDC ±10%
Current Max. 500 mA
Stirrer / pump Socket 5-pin mini-DIN
Pump detection Yes
Stirrer detection Yes
Pump voltage 24 V DC ±5 % 400 mA maximalcurrent for normal operation
Stirrer voltage range 0 to 18 V DC ±10 % 300 mAmaximal current for normaloperation
SENSOR
pH/mV sensor input Socket Triaxial
Measuring range ± 2000 mV
Resolution 0.1 mV
Limits of error 0.2 mV
Polarized sensor input: Upol Voltage source: Range 0...2000 mV AC
Voltage source: Resolution 0.1 mV
Voltage source: Limits of error 12 mV
Measuring range 0 ...200 µA
Resolution 0.1 µA
Limits of error 0.2 µA
Polarized sensor input: Ipol Current source: Range 0...24 µA AC
Current source: Resolution 0.1 µA
Current source: Limits of error 1.2 µA
Measuring range 0 - 2000 mV
Resolution 0.1 mV
Limits of error 2 mV
pH Reference input Socket 4 mm
Temperature input Socket 4-pin LEMO
Sensor Pt1000
Measuring range -20 - 130 °C
Resolution 0.1 °C
Limits of error 0.2 °C

Technical data128 Compact Titrator
Burette drive Drive Stepper motor
Resolution 1/20000 of the burette volume
Limits of error 0.2% of the respective volume
Filling time Minimum 20 sec at 100% fillingrate
Discharge time Minimum 20 sec
Burette detection Yes
Thread length 50 mm
Thread pitch 1 mm
Resolver (magnetic) 32 pulse/360°
Pulse / full stroke 1600
Resolver resolution 0.0625% of burette volume
Interchangeable burettes Volume 1, 5, 10 and 20 ml
Drive and burette limits oferror
According to ISO 8655-3
Materials that come intocontact with titrants
Fluoroplastic, borsilicate glass,ceramic
Display Technology Color TFT
Size 5.7"
Resolution VGA 640 x 480 pixels
Backlighting LED
Brightness control Per software 50–100%
Input Technology Full-coverage resistive touchscreen
Contains runtime modules from decNumber (c) Copyright IBM Corporation 2001, 2004. All rights reserved.
Power ManagementThe devices have a power management system which prevents the titrator from switching off unexpectedlyin the event of a power overload. Tasks which would cause a power overload, because a number ofpumps, stirrers and burette drives are already in use, cannot be started at all. A notification brings the startattempt to the attention of the user. It is advisable, if possible, to connect pumps and stirrers directly tosample changers or other devices which have their own power supply, such as a TBox, instead of to thetitrator itself.
17.2 Supported peripheralsBalancesBalances can connect to the COM interface of the titrator. METTLER TOLEDO balances must be equippedwith an RS-232 interface or an appropriate adapter. For a list of connection cables, see "Optional acces-sories".
Manufacturer Type RS LocalCan NoteMETTLER TOLEDO AB / PB • • COM ports
AB-S / PB-S • COM ports
AG / PG / PR • COM ports
AT / MT / UMT • COM ports
AX / MX / UMX • o COM ports
PG-S • o COM ports
XP • o COM ports
XS • o COM ports
MS • COM ports
ML • COM ports
Sartorius Various • COM ports
• Standard o Option

Technical data 129Compact Titrator
PrinterPrinters can be connected to the USB1 or USB2 interface of the titrator. PCL-compatible printers from variousmanufacturers are supported. The METTLER TOLEDO USB-P25 is a robust and easy-to-operate matrixprinter which prints onto standard quality paper. A current list of supported printers can be found on theInternet at: http://www.mt.com/titration-printers.
Manufacturer Type NoteVarious Generic PCL printers Connection via USB1 or USB2
METTLER TOLEDO USB-P25 Connection via USB1 or USB2
METTLER TOLEDO P-56RUE Connection via USB1 or USB2
METTLER TOLEDO P-58RUE Connection via USB1 or USB2
NoteA standard USB hub can be used if more than two devices are to be connected to the USB connections ofthe titrator.
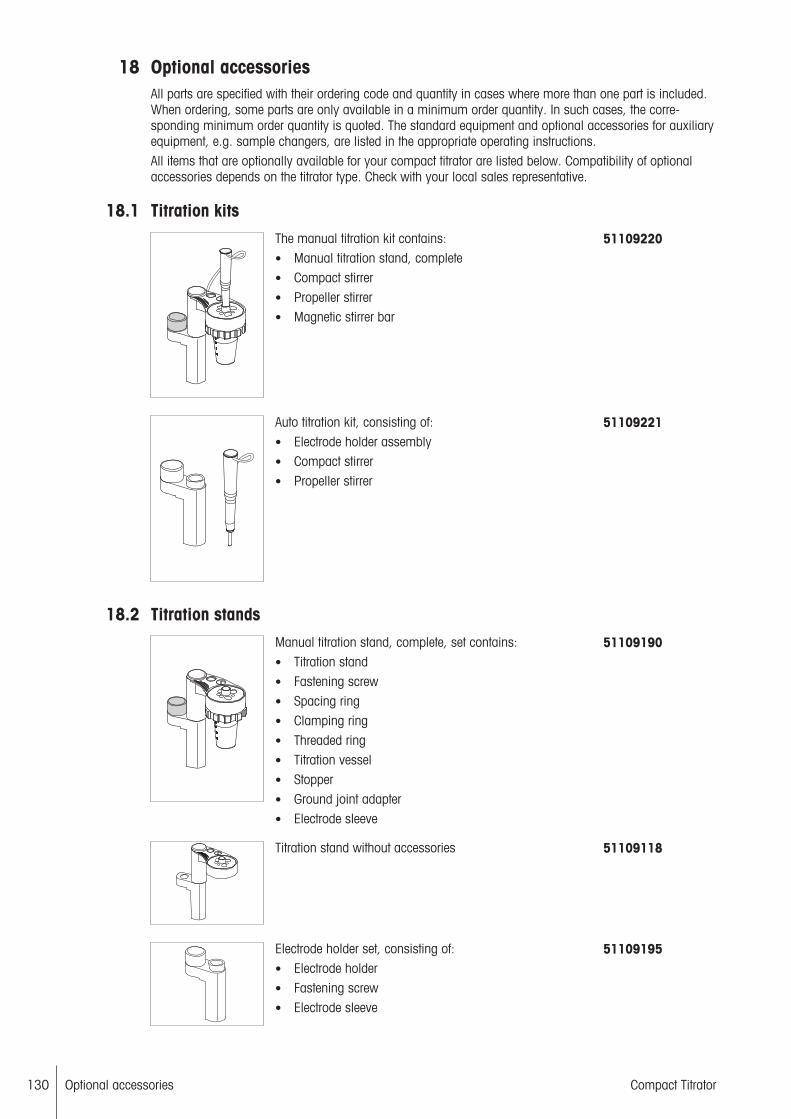
Optional accessories130 Compact Titrator
18 Optional accessoriesAll parts are specified with their ordering code and quantity in cases where more than one part is included.When ordering, some parts are only available in a minimum order quantity. In such cases, the corre-sponding minimum order quantity is quoted. The standard equipment and optional accessories for auxiliaryequipment, e.g. sample changers, are listed in the appropriate operating instructions.All items that are optionally available for your compact titrator are listed below. Compatibility of optionalaccessories depends on the titrator type. Check with your local sales representative.
18.1 Titration kitsThe manual titration kit contains:• Manual titration stand, complete• Compact stirrer• Propeller stirrer• Magnetic stirrer bar
51109220
Auto titration kit, consisting of:• Electrode holder assembly• Compact stirrer• Propeller stirrer
51109221
18.2 Titration standsManual titration stand, complete, set contains:• Titration stand• Fastening screw• Spacing ring• Clamping ring• Threaded ring• Titration vessel• Stopper• Ground joint adapter• Electrode sleeve
51109190
Titration stand without accessories 51109118
Electrode holder set, consisting of:• Electrode holder• Fastening screw• Electrode sleeve
51109195
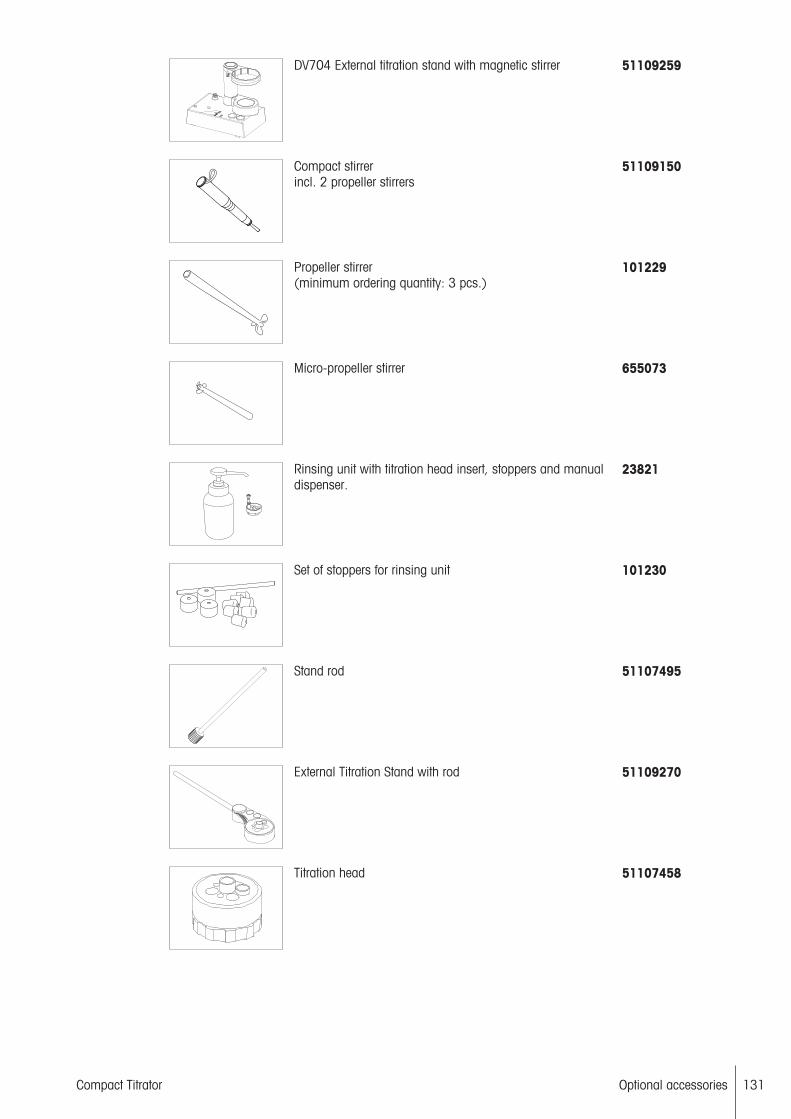
Optional accessories 131Compact Titrator
DV704 External titration stand with magnetic stirrer 51109259
Compact stirrerincl. 2 propeller stirrers
51109150
Propeller stirrer(minimum ordering quantity: 3 pcs.)
101229
Micro-propeller stirrer 655073
Rinsing unit with titration head insert, stoppers and manualdispenser.
23821
Set of stoppers for rinsing unit 101230
Stand rod 51107495
External Titration Stand with rod 51109270
Titration head 51107458

Optional accessories132 Compact Titrator
Threaded ring 25652
Clamping ring 25653
Spacing ring 23842
Clamping screw 51109084
Electrode sleeve 25654
Cap (for titration stand) 51107608
NS 14.5 stopper 23451
NS 7.5 stopper 23452
Adapter for dispensing tube 51109169

Optional accessories 133Compact Titrator
Weighing boats (5 pieces.)Glass dia. 20 x 60Glass dia. 30 x 80PE dia. 38 x 100
239512395223954
Gas inlet 23721
18.3 Titration vesselsBeakers PP (120 pcs.) 100 mL, polypropylene, standard
51109388
Beakers PP (480 pcs.) 100 mL, polypropylene, standard
51109389
Beakers PP (1400 pcs.) 100 mL, polypropylene, standard
101974
Beakers PP red (1400 pcs.) 100 mL, polypropylene
25777
Glass beakers 100 mL20 pcs.
101446
Glass titration vessels, 5 - 20 mL(set of 20 pcs.)
51108125
Thermostatable beaker 100 mL1 pcs
23517

Optional accessories134 Compact Titrator
Glass titration vessels, 250 mL (set of 10 pcs.)
23515
Plastic cap for titration vessels(set of 16 pcs.)
101448
18.4 Drying tubesDrying tube with cover 23961
Molecular sieve250 g
71478
Drying tube holder 23915
18.5 Sensors3 Mol/L KCl (25mL) 51343180
Sensor Extension Cable LEMO 120 cm 30259608
18.5.1 Temperature senors
DT1000 temperature sensor150 mm
51109828

Optional accessories 135Compact Titrator
18.5.2 Color sensors
DP5 phototrode(incl. power supply unit) for color indicated titrations, trans-mission measurement at 520, 555, 590, 620, 660 nm
51109300
18.5.3 Plug & Play titration electrodes
Triaxial SC LEMO cableLength: 72 cmLength: 100 cmLength: 160 cm(For Plug & Play – and traditional titration electrodes)
896018960251108034
DGi101-SC PnP combined pH electrode (ceramic diaphragm) for smallvolumes in aqueous medium.
51109507
DGi102-Mini PnP combined pH electrode (ceramic diaphragm) for smallvolumes in aqueous medium.
51109508
DGi112-Pro PnP combined pH electrode (moving sleeve junction) fordirect pH value measurements and acid/base titrations incomplex, aqueous matrixes (for example, galvanic baths,condensation)
51109501
DGi113-SC PnP combined pH electrode (moving sleeve junction) fortitration in non-aqueous media.
51109502
DGi114-SC PnP combined pH electrode (moving sleeve junction) fordirect pH value measurements and titrations in complex,aqueous media
51109503
DGi115-SC PnP combined pH electrode (with sleeve junction) for directpH value measurements and acid/base titrations in aqueousmedia with low ion concentration.
51109504
DGi116-Solvent PnP combined pH electrode (moving sleeve junction) fortitration in non-aqueous media.
51109505
DGi117-Water PnP combined pH electrode with sleeve junction andintegrated temperature sensor for direct pH valuemeasurements and acid/base titrations with simultaneoustemperature acquisition in low-ion or weakly bufferedaqueous media
51109506
DMi101-SC PnP combined platinum ring electrode (ceramic diaphragm)for redox titration with small volumes
51109523
DMi102-SC PnP combined silver ring electrode (ceramic diaphragm) forargentometric titration with small volumes
51109533
DMi140-SC PnP combined platinum ring electrode (ceramic diaphragm)for redox titration
51109520
DMi141-SC PnP combined silver ring electrode (ceramic diaphragm) forargentometric titrations
51109530
DMi144-SC PnP combined platinum ring electrode (ceramic diaphragm)for redox titration, in particular for CSB titration using theRondo sample changer
51109521
Optional accessories136 Compact Titrator
DMi145-SC PnP combined silver ring electrode with moving sleevejunction for argentometric titrations in complex samples
51109531
DMi147-SC PnP combined platinum ring electrode for redox titration at aconstant pH value
51109522
DMi148-SC PnP combined silver ring electrode for argentometrictitrations at a constant pH value
51109532
18.5.4 Classical electrodes (not Plug & Play)
DG111-SC Combined pH electrode for titrations in aqueous medium 89596
DG113-SC Combined glass electrode with moveable sleeve junction fortitrations in non-aqueous medium
89632
DG115-SC Combined glass electrode with sleeve junction for titrationsin aqueous medium
89806
DM140-SC Combined platinum ring electrode for redox titrations 89598
DM141-SC Combined silver ring electrodes for argentometric titration 89599
DM143-SC Double platinum pin electrode 51107699
DX200 Reference electrode for ion selective electrodes 89935
Au805-S7/120 Half-cell with gold ring for RedOx titration of highly oxidizingsamples
59904381
Sb850-S7/120 Half-cell with antimony for acid/base titration, plastic shaft 59904405
PT885-NS-S7/105 Double platinum ring electrode for measuring very low bromindexes.
59904435
Triaxial SC Lemo (Classic)Length: 72 cmLength: 100 cmLength: 160 cm(For classic titration electrodes, especially for amperometricand voltametric titrations with DM143-SC)
511091835110918451109185
MultiPin - LEMO / Pt1000 CableLength: 70 cmLength: 100 cm(For DGi117-Water pH electrode with built in temperaturesensor)
5110954451109545
18.5.5 Ion-selective and gas-sensitive electrodes (half cells)
DX207 DX207-Li+ lithium ISE 51107673
DX218 DX218-NH4+ ammonium ISE 51340900
DX219 DX219-F- fluoride ISE 51340500
DX222 DX222-Na+sodium ISE 30079616
DX224 DX224-Mg2+ magnesium ISE 51340263
DX226 DX226-CN- cyanide ISE 51107681
DX232 DX232-S2- sulfide ISE 51107675

Optional accessories 137Compact Titrator
DX235 DX235-Cl- chloride ISE 51340400
DX239 DX239-K+ potassium ISE 51340700
DX240 DX240-Ca2+ calcium ISE 51340600
DX258 DX258-SCN- thiocyanate ISE 51107870
DX262 DX262-NO3- nitrate ISE 51340800
DX264 DX264-Cu2+ copper ISE 51107678
DX280 DX280-Br- bromide ISE 51340300
DX287 DX287-BF4- tetrafluoroborate ISE 51107676
DX312 DX312-Cd2+ cadmium ISE 51107672
DX327 DX327-I- iodide ISE 51107680
DX337 DX337-Ba2+ barium ISE 51107674
DX407 DX407-Pb2+ lead ISE 51107873
DS500 Tenside-sensitive electrode 51107670
DS800-TwoPhase Tenside-sensitive electrode 51109540
GSE ammonia GSE ammonia electrode 51341000
GSE nitrogen oxide GSE nitrogen oxide electrode 51341100
GSE carbon dioxide GSE carbon dioxide electrode 51341200
18.5.6 Combined ISE with integrated reference electrode
Adjustable cone for use with sensors 22986
Ag+/S2- perfectION™ comb Ag+/S2- Lemo 51344800
Ca2+ perfectION™ comb Ca2+ Lemo 51344803
Cl- perfectION™ comb Cl- Lemo 51344806
CN- perfectION™ comb CN- Lemo 51344809
Cu2+ perfectION™ comb Cu2+ Lemo 51344812
F- perfectION™ comb F- Lemo 51344815
I- perfectION™ comb I- Lemo 51344818
K+ perfectION™ comb K+ Lemo 51344821
Na+ perfectION™ comb Na+ 51344724
NO3- perfectION™ comb NO3- Lemo 51344827
Pb2+ perfectION™ comb Pb2+ Lemo 51344830
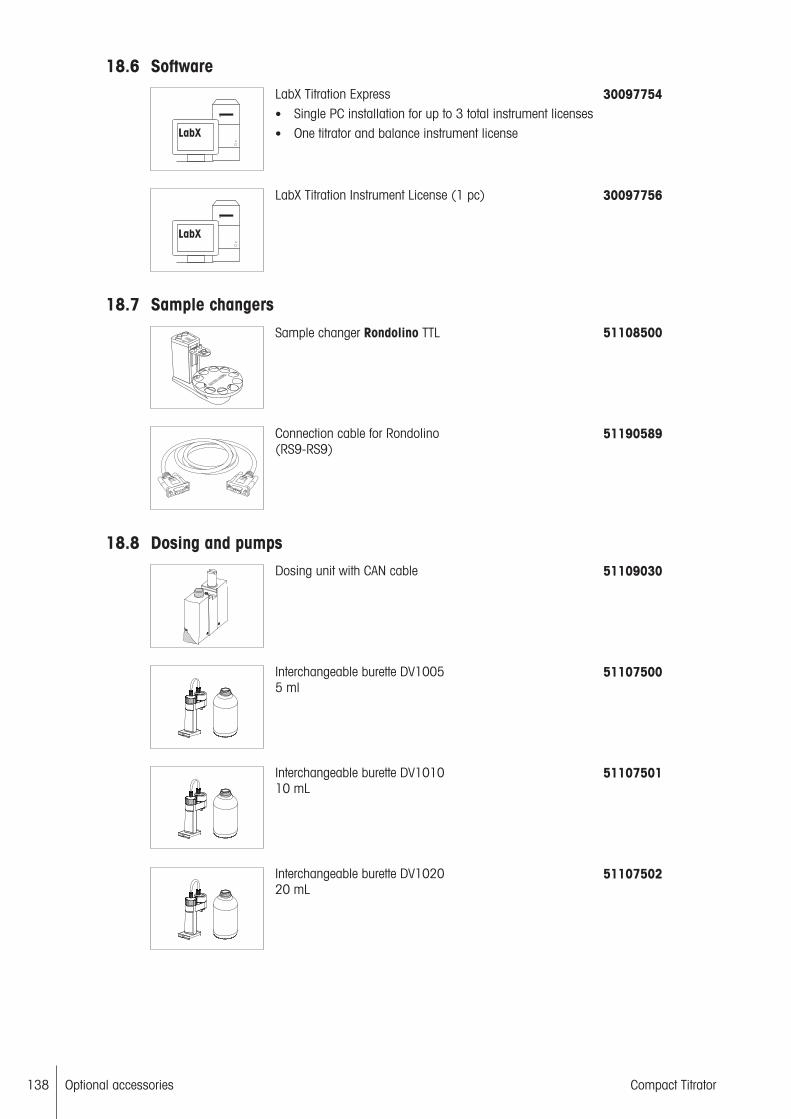
Optional accessories138 Compact Titrator
18.6 SoftwareLabX Titration Express• Single PC installation for up to 3 total instrument licenses• One titrator and balance instrument license
30097754
LabX Titration Instrument License (1 pc) 30097756
18.7 Sample changers
Sample changer Rondolino TTL 51108500
Connection cable for Rondolino(RS9-RS9)
51190589
18.8 Dosing and pumpsDosing unit with CAN cable 51109030
Interchangeable burette DV10055 ml
51107500
Interchangeable burette DV101010 mL
51107501
Interchangeable burette DV102020 mL
51107502

Optional accessories 139Compact Titrator
Interchangeable burette DV10011 ml
51107503
Dispensing tube with siphon tip 100 cm 25961
Siphon tips (5 pcs.) 23240
Solvent manager kit• Solvent manager set• Clear glass bottle, 1L• Pump tubing• Y-cables
51105652
Reagent changing set with:• Extraction adapter for Coulometer cell• Park sleeve• PTFE extraction tube 800 mm (23936)• Screw top (23937)• Drying tube with cover (23961)• 2 flat seals (23981) (minimum order quantity 5 pcs)
51105606
Flat seal (minimum order quantity 5 pcs.) 23981
Solvent Manager set with:• Silicone tube 850 mm• Silicone tube 170 mm• Drying tube with cover• 2 flat seals
51105600
Silicone tube (pressure tube to solvent manager) 850 mm
51105581
Draining tube / Dispensing tube 51107481
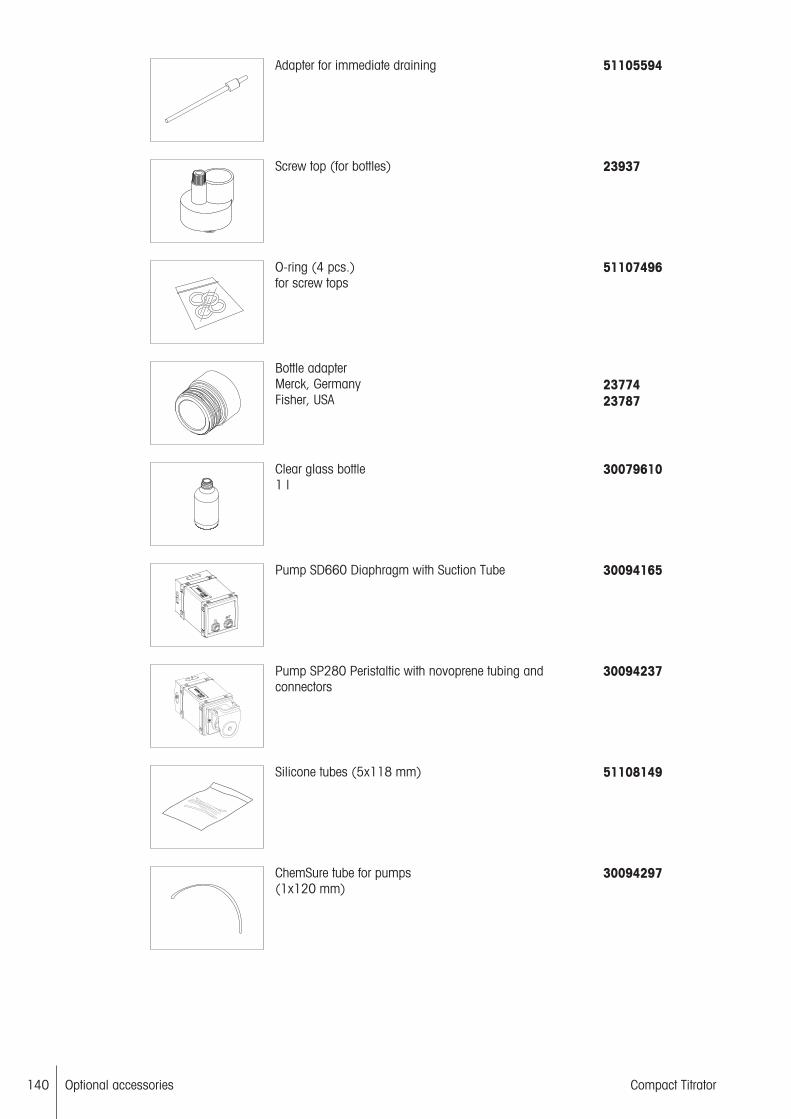
Optional accessories140 Compact Titrator
Adapter for immediate draining 51105594
Screw top (for bottles) 23937
O-ring (4 pcs.)for screw tops
51107496
Bottle adapterMerck, Germany Fisher, USA
2377423787
Clear glass bottle1 l
30079610
Pump SD660 Diaphragm with Suction Tube 30094165
Pump SP280 Peristaltic with novoprene tubing andconnectors
30094237
Silicone tubes (5x118 mm) 51108149
ChemSure tube for pumps(1x120 mm)
30094297

Optional accessories 141Compact Titrator
Novoprene tubes (1x1 m + 10x118 mm) 51190969
Brown glass bottle1 l
71296
Y cable stirrer/pump, 5-pin 51109889
18.9 PrintersLab equip access. data writer USB-P25/01 11124301
Lab equip access. data writer P-56RUE 30094673
Lab equip access. data writer P-58RUE 30094674
18.10 Balances
www.mt.com
XPE204
F
F
METTLER T
OLED
O
StaticDetect
Analytical balances• XPE, XSE, XS• MS, ML, ME-T, ME
–
Precision balances• XPE, XS• MS, ML, ME-T, ME
–
Connection cable for METTLER TOLEDO balance (MiniMettler)
229029
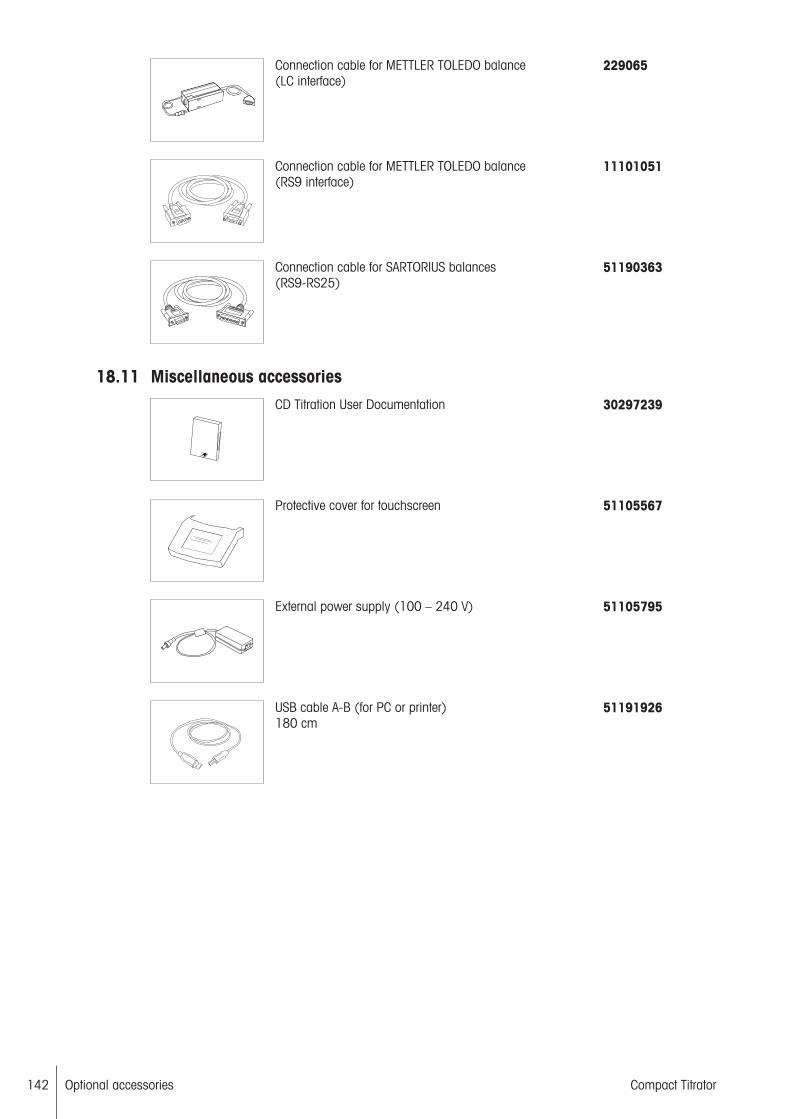
Optional accessories142 Compact Titrator
Connection cable for METTLER TOLEDO balance (LC interface)
229065
Connection cable for METTLER TOLEDO balance (RS9 interface)
11101051
Connection cable for SARTORIUS balances(RS9-RS25)
51190363
18.11 Miscellaneous accessoriesCD Titration User Documentation 30297239
Protective cover for touchscreen 51105567
External power supply (100 – 240 V) 51105795
USB cable A-B (for PC or printer)180 cm
51191926

Appendix 143Compact Titrator
19 Appendix
19.1 Predefined calibration standards for pH sensorsMETTLER TOLEDO EU(Ref. 25°C)
METTLER TOLEDO USA(Ref. 25°C)
DIN (19266) /NIST (Ref.25°C)
DIN (19267) (Ref.25°C)
MERCK (Ref. 20°C)
2.00 1.68 1.680 1.09 1.00
4.01 4.01 3.557 3.06 2.00
4.60 7.00 3.775 4.65 3.00
7.00 10.01 4.008 6.79 4.00
9.21 6.865 9.23 4.66
10.00 7.416 12.75 5.00
11.00 9.184 6.00
10.014 6.88
12.454 7.00
8.00
9.00
9.22
10.00
11.00
12.00
13.00
Fluka (Ref. 20°C) Novartis (Fluka) (Ref.20°C)
FISHER (Ref. 25°C) JIS Z 8802 (Ref. 25°C) JJG119 (Ref. 25°C)
1.00 4.00 1.00 1.679 1.680
2.00 7.00 2.00 4.008 3.559
3.00 9.00 3.00 6.865 4.003
4.00 4.00 7.413 6.864
5.00 5.00 9.180 7.409
6.00 6.00 10.01 9.182
7.00 7.00 12.460
8.00 8.00
9.00 8.991
10.00 10.00
11.00 11.00
12.00
13.00
19.1.1 Temperature related values
19.1.1.1 METTLER TOLEDO
METTLER TOLEDO EU (Ref. 25°C)Temp. [°C] pH
0 2.03 4.01 4.66 7.12 9.52 10.65 11.90
5 2.02 4.01 4.65 7.09 9.45 10.52 11.72
10 2.01 4.00 4.64 7.06 9.38 10.39 11.54
15 2.00 4.00 4.63 7.04 9.32 10.26 11.36
20 2.00 4.00 4.62 7.02 9.26 10.13 11.18
25 2.00 4.01 4.60 7.00 9.21 10.00 11.00
30 1.99 4.01 4.61 6.99 9.16 9.87 10.82
35 1.99 4.02 4.62 6.98 9.11 9.74 10.64
40 1.98 4.03 4.63 6.97 9.06 9.61 10.46
45 1.98 4.04 4.64 6.97 9.03 9.48 10.28
50 1.98 4.06 4.66 6.97 8.99 9.35 10.10
55 1.98 4.08 4.67 6.98 8.96 9.22 9.92
60 1.98 4.10 4.69 6.98 8.93 9.09 9.74
70 1.99 4.16 4.71 7.00 8.88 8.96 9.56

Appendix144 Compact Titrator
Temp. [°C] pH
80 2.00 4.22 4.73 7.04 8.83 8.83 9.38
90 2.00 4.30 4.75 7.09 8.79 8.70 9.20
95 2.00 4.35 4.77 7.12 8.77 8.57 9.02
METTLER TOLEDO USA (Ref. 25°C)Temp. [°C] pH
5 1.67 4.01 7.09 10.25
10 1.67 4.00 7.06 10.18
15 1.67 4.00 7.04 10.12
20 1.68 4.00 7.02 10.06
25 1.68 4.01 7.00 10.01
30 1.68 4.01 6.99 9.97
35 1.69 4.02 6.98 9.93
40 1.69 4.03 6.97 9.89
45 1.70 4.04 6.97 9.86
50 1.71 4.06 6.97 9.83
19.1.1.2 DIN / NIST
DIN (19266) / NIST (Ref. 25°C)Temp. [°C] pH
0 1.666 3.577 3.863 4.010 6.984 7.534 9.464 10.317 13.423
5 1.668 3.573 3.837 4.004 6.950 7.502 9.392 10.248 13.207
10 1.670 3.569 3.819 4.001 6.922 7.474 9.331 10.180 13.003
15 1.672 3.565 3.801 4.001 6.900 7.451 9.277 10.121 12.810
20 1.676 3.561 3.787 4.003 6.880 7.432 9.228 10.066 12.627
25 1.680 3.557 3.775 4.008 6.865 7.416 9.184 10.014 12.454
30 1.685 3.553 3.766 4.015 6.853 7.405 9.144 9.970 12.289
35 1.691 3.549 3.759 4.026 6.845 7.396 9.110 9.928 12.133
40 1.697 3.549 3.754 4.036 6.837 7.389 9.076 9.892 11.984
45 1.704 3.544 3.751 4.049 6.834 7.386 9.046 9.856 11.841
50 1.712 3.548 3.748 4.064 6.833 7.384 9.018 9.830 11.705
55 1.715 3.554 3.750 4.075 6.834 7.382 8.985 9.804 11.574
60 1.723 3.560 3.753 4.091 6.836 7.380 8.962 9.778 11.449
70 1.743 3.580 3.763 4.126 6.845 7.378 8.921 9.752 11.324
80 1.766 3.609 3.780 4.164 6.859 7.376 8.885 9.726 11.199
90 1.792 3.650 3.802 4.205 6.877 7.374 8.850 9.700 11.074
95 1.806 3.674 3.815 4.227 6.886 7.372 8.833 9.674 10.949
DIN (19267) (Ref. 25°C)Temp. [°C] pH
0 1.08 3.12 4.67 6.89 9.48 13.89
5 1.08 3.11 4.67 6.87 9.43 13.63
10 1.09 3.10 4.66 6.84 9.37 13.37
15 1.09 3.09 4.66 6.82 9.32 13.16
20 1.09 3.07 4.65 6.80 9.27 12.96
25 1.09 3.06 4.65 6.79 9.23 12.75
30 1.10 3.05 4.65 6.78 9.18 12.61
35 1.10 3.05 4.65 6.77 9.13 12.45
40 1.10 3.04 4.66 6.76 9.09 12.29
45 1.10 3.04 4.67 6.76 9.04 12.09
50 1.11 3.04 4.68 6.76 9.00 11.98
60 1.11 3.04 4.70 6.76 8.92 11.69
70 1.11 3.04 4.72 6.76 8.88 11.43
80 1.12 3.05 4.75 6.78 8.85 11.19
90 1.13 3.07 4.79 6.80 8.82 10.99

Appendix 145Compact Titrator
19.1.1.3 MERCK
MERCK (Ref. 20°C)Temp. [°C] pH
0 0.96 2.01 3.05 4.05 4.68 5.06 6.04 6.98
5 0.99 2.01 3.05 4.04 4.68 5.05 6.02 6.95
10 0.99 2.01 3.03 4.02 4.67 5.02 6.01 6.92
15 0.99 2.00 3.01 4.01 4.67 5.01 6.00 6.90
20 1.00 2.00 3.00 4.00 4.66 5.00 6.00 6.88
25 1.01 2.00 3.00 4.01 4.66 5.00 6.02 6.86
30 1.01 2.00 3.00 4.01 4.66 5.00 6.03 6.86
35 1.01 2.00 3.00 4.01 4.66 5.00 6.03 6.85
40 1.01 2.00 2.98 4.01 4.67 5.00 6.04 6.84
45 1.01 2.00 2.98 4.01 4.67 5.01 6.05 6.84
50 1.01 2.00 2.97 4.00 4.68 5.01 6.06 6.84
60 1.02 2.00 2.97 4.00 4.69 5.04 6.10 6.84
70 1.02 2.01 2.97 4.00 4.70 5.05 6.12 6.84
80 1.02 2.01 2.97 4.00 4.71 5.10 6.17 6.86
90 1.02 2.01 2.96 4.00 4.72 5.14 6.24 6.88
MERCK (Ref. 20°C) (continued)Temp. [°C] pH
0 7.13 8.15 9.24 9.46 10.26 11.45 12.58 13.80
5 7.07 8.10 9.16 9.40 10.17 11.32 12.41 13.59
10 7.05 8.07 9.11 9.33 10.11 11.20 12.26 13.37
15 7.02 8.04 9.05 9.28 10.05 11.10 12.10 13.18
20 7.00 8.00 9.00 9.22 10.00 11.00 12.00 13.00
25 6.98 7.96 8.95 9.18 9.94 10.90 11.88 12.83
30 6.98 7.94 8.91 9.14 9.89 10.81 11.72 12.67
35 6.96 7.92 8.88 9.10 9.84 10.72 11.67 12.59
40 6.95 7.90 8.85 9.07 9.83 10.64 11.54 12.41
45 6.95 7.88 8.82 9.04 9.79 10.56 11.44 12.28
50 6.95 7.85 8.79 9.01 9.74 10.48 11.33 12.15
60 6.96 7.83 8.73 8.96 9.67 10.33 11.04 11.75
70 6.96 7.80 8.70 8.93 9.62 10.19 10.90 11.61
80 6.97 7.78 8.66 8.89 9.55 10.06 10.70 11.39
90 7.00 7.75 8.64 8.85 9.49 9.93 10.48 11.15
19.1.1.4 FLUKA
FLUKA (Ref. 20°C)Temp. [°C] pH
0 0.94 1.99 3.03 4.03 5.05 6.03
10 0.99 1.99 3.02 4.02 5.02 6.01
20 1.00 2.00 3.00 4.00 5.00 6.00
30 1.00 2.00 3.00 4.00 5.00 6.02
40 1.01 2.00 2.99 4.00 5.00 6.04
50 1.01 2.00 2.98 4.00 5.02 6.06
60 1.01 2.00 2.98 4.00 5.04 6.09
70 1.01 2.00 2.98 4.00 5.07 6.13
80 1.02 2.00 2.98 4.00 5.10 6.18
90 1.02 2.00 2.97 4.00 5.13 6.24
FLUKA (Ref. 20°C) (continued)Temp. [°C] pH
0 7.13 8.18 9.24 10.24 11.45 12.58 13.71
10 7.05 8.09 9.11 10.10 11.20 12.26 13.35
20 7.00 8.00 9.00 10.00 11.00 12.00 13.00
30 6.98 7.94 8.93 9.90 10.81 11.75 12.66

Appendix146 Compact Titrator
Temp. [°C] pH
40 6.97 7.90 8.86 9.82 10.64 11.53 12.37
50 6.96 7.86 8.80 9.75 10.48 11.31 12.10
60 6.96 7.82 8.75 9.68 10.33 11.09 11.84
70 6.97 7.80 8.71 9.62 10.19 10.88 11.61
80 6.98 7.77 8.67 9.55 10.06 10.68 11.40
90 7.00 7.75 8.64 9.49 9.93 10.48 11.20
NOVARTIS (FLUKA) (Ref. 20°C)Temp. [°C] pH
0 4.01 7.11 9.20
5 4.00 7.08 9.15
10 4.00 7.05 9.10
15 4.00 7.02 9.05
20 4.00 7.00 9.00
25 4.01 6.98 8.96
30 4.01 6.97 8.91
35 4.02 6.96 8.88
40 4.03 6.95 8.84
45 4.04 6.94 8.80
50 4.06 6.94 8.77
55 4.07 6.93 8.74
60 4.09 6.93 8.71
65 4.11 6.93 8.69
70 4.13 6.94 8.67
75 4.14 6.94 8.65
80 4.16 6.95 8.63
85 4.18 6.96 8.61
90 4.21 6.97 8.60
95 4.23 6.98 8.59
19.1.1.5 FISHER
FISHER (Ref. 25°C)Temp. [°C] pH
0 4.01 5.05 6.07 7.13 8.15 9.166 10.34 11.80
5 0.95 1.98 2.98 3.99 5.04 6.05 7.10 8.13 9.126 10.26 11.69
10 0.98 1.98 2.97 4.00 5.03 6.06 7.07 8.08 9.089 10.19 11.46
15 1.01 2.02 3.00 3.99 4.99 6.05 7.05 8.01 9.055 10.12 11.31
20 1.01 2.00 3.00 4.00 5.00 6.00 7.02 8.00 9.022 10.06 11.17
25 1.00 2.00 3.00 4.00 5.00 6.00 7.00 8.00 8.991 10.00 11.00
30 1.02 2.00 3.02 4.01 5.01 5.99 6.99 8.00 8.961 9.94 10.88
35 1.03 2.02 3.03 4.02 5.01 5.98 6.98 7.95 8.930 9.90 10.76
40 1.02 2.01 3.03 4.03 5.04 5.97 6.97 7.94 8.902 9.85 10.62
45 1.03 2.01 3.04 4.04 5.06 5.97 6.97 7.94 8.874 9.81 10.52
50 1.03 2.01 3.04 4.06 5.08 5.96 6.97 7.93 8.845 9.78 10.41
55 4.07 6.97 8.815 9.74
60 4.09 6.98 8.784 9.70
65 4.11 6.99 9.68
70 4.13 7.00 9.65
75 4.14 7.02 9.63
80 4.16 7.03 9.62
85 4.18 7.06 9.61
90 4.21 7.08 9.60
95 4.23 7.11 9.60

Appendix 147Compact Titrator
19.1.1.6 JIS / JJG
JIS Z 8802 (Ref. 25°C)Temp. [°C] pH
0 1.666 4.003 6.984 7.534 9.464 10.32
5 1.668 3.999 6.951 7.500 9.395 10.24
10 1.670 3.998 6.923 7.472 9.332 10.18
15 1.672 3.999 6.900 7.448 9.276 10.12
20 1.675 4.002 6.881 7.429 9.225 10.06
25 1.679 4.008 6.865 7.413 9.180 10.01
30 1.683 4.015 6.853 7.400 9.139 9.97
35 1.688 4.024 6.844 7.389 9.102 9.92
40 1.694 4.035 6.838 7.380 9.068 9.89
45 1.700 4.047 6.834 7.373 9.038 9.86
50 1.707 4.060 6.833 7.367 9.011 9.83
55 1.715 4.075 6.834 7.361 8.985 9.80
60 1.723 4.091 6.836 7.355 8.962 9.77
70 1.743 4.126 6.845 7.349 8.921 9.74
80 1.766 4.164 6.859 7.343 8.885 9.71
90 1.792 4.205 6.877 7.337 8.850 9.68
95 1.806 4.227 6.886 7.331 8.833 9.65
JJG119 (Ref. 25°C)Temp. [°C] pH
0 1.668 3.599 4.006 6.981 7.515 9.458 13.416
5 1.669 3.591 3.999 6.949 7.490 9.391 13.210
10 1.671 3.583 3.996 6.921 7.467 9.330 13.011
15 1.673 3.575 3.996 6.898 7.445 9.276 12.820
20 1.676 3.567 3.998 6.879 7.426 9.226 12.637
25 1.680 3.559 4.003 6.864 7.409 9.182 12.460
30 1.684 3.551 4.010 6.852 7.395 9.142 12.292
35 1.688 3.547 4.019 6.844 7.386 9.105 12.130
40 1.694 3.547 4.029 6.838 7.380 9.072 11.975
45 1.700 3.550 4.042 6.834 7.379 9.042 11.828
50 1.706 3.555 4.055 6.833 7.383 9.015 11.697
55 1.713 3.563 4.070 6.834 7.387 8.990 11.553
60 1.721 3.573 4.087 6.837 7.391 8.968 11.426
70 1.739 3.596 4.122 6.847 7.399 8.926 11.172
80 1.759 3.622 4.161 6.862 7.407 8.890 10.918
90 1.782 3.648 4.203 6.881 7.415 8.856 10.664
95 1.795 3.660 4.224 6.891 7.419 8.839 10.537
19.2 System validationThe products / systems were tested in respect of functionality and specification prior to shipment. In order tosupport GLP and validation requirements, we will make the following documents available to authorizedpersons for inspection:• Performance specifications• Market and technical requirements• Quality plan• Project management system• Plan and Test results• Review reportsMETTLER TOLEDO, Analytical will retain possession of all documents and their reproductions and may wishto conclude a nondisclosure agreement with those requesting access to these documents.

Appendix148 Compact Titrator

Index 149Compact Titrator
IndexAAdjustment
Touch screen 102All Results 75Analysis and Resources Behavior
Analysis Sequence Settings 98Resource Behavior 99
Analysis data 118Analysis Sequence 115Analysis, starting 114Application Modes 49Asymmetric evaluation procedure 121Auto Stand 93Auxiliary instruments 94Auxiliary reagents 78
BBalance 88Beep 96Blank value 99Board data 102Board firmware 102Burettes 103
CCalculations
Results 63Calibration standards 79Chemicals 77
Auxiliary reagents 78Calibration standards 79Substances 81Titer standards 80Titrants 78
Configure USB stick 89Configuring a balance 88Control band 85Control Type
24V Output 58Input TTL (Single Pin) 59Out TTL (Single Pin) 59RS-232 59Stirrer 58
Curve progressionMinimum / Maximum 120
DDate and time 97Deleting results 75
Disposal 125Drives 103
EEmergency
Shut down 22End-Point Titration 49Equivalence-Point Titration 44Evaluation and Calculation 118Evaluation procedure
asymetric 121Introduction 119
FFirmware History 102
GGlobal settings
Analysis and Resources Behavior 98System 96User Management 97
HHardware 81
Balance 88Network settings 92Network storage 92PC settings 91Peripherals 88Printer 89Titration stands 93USB-Stick 89
IIdentification, titrator 96Import/Export, data 101Interrupt Analysis
User 30Ion Selective Sensors 84ISE Sensors 84
KKeyboard layout
Define 96
LLanguage, setting 95Learn Titration (EQP) 51Linear Calibration 86
Index150 Compact Titrator
MManual operation
Auxiliary instruments 108Dispense 111Manual titration 112Pump 105
Manual operationsSensor 106Stirrer 104
Manual Stand 93Measure (Normal) 42Method
Delete 28Start 28
Method editor 32Method functions, parameters
Auxiliary Instrument 58Auxiliary value 57Blank Value 56Calculation 52Calibration 55Dispense (Normal) 41Drain 60End of Sample 54Measure (Normal) 42Pump 41Record 53Sample 37Sample (Calibration) 39Sample (Titer) 38Stir 41Titer 54Titration (EP) 49Titration (EQP) 44Titration (LearnEQP) 51Titration Stand 41
Method ID 32Method syntax 33Method Templates 32Method Types 32Methods
Creating 27Modify 28
Mettler methods 33METTLER TOLEDO balances 88Minimum / Maximum
Curve progression 120mV Sensors 82
NNetwork printer
Parameter 91Network settings 92Network storage 92
OOnline Dialog 13Outlier test 75
PPC settings 91PDF file writer
Parameter 91Peripherals 88
Balance 88Balances 89Printer 89USB data export 89USB stick 89
pH Sensor 82pH sensor test 39Phototrode 83Plug and Play Sensors
Setup 82Polarized Sensor
Measure With 107Polarized Sensors 84Predefined methods 32Printer 89
PDF file writer 89Setup 89USB data export 89XML file writer 89
Pump and Stirrer Detection 99Pumps 87
RReset to factory settings 102Result type
Predefined 64User defined 64
Results proposals 64Results, deleting 75Rinse Burette 110Rinse Multiple Burettes 111Rondolino 94

Index 151Compact Titrator
SSafety Information
Signal words 6Warning Symbols 6
Sample 37Sample parameters 61Sample Results 75Sample, Titer, Calibration
Loops 32Screen, setting 95Segmented
Evaluation procedure 120Segmented evaluation procedure 120Sensor
Potentiometric 107Sensor calibration
Linear Calibration 86Segmented Calibration 87Setup 85
Sensor testMethod function: Calibration 40Method functions 39MF Calibration 56Setup 85
Sensors, manual operations 106Series templates 61Service & Maintenance
Board data 102Board firmware 102Burettes 103Data Import/Export 101Drives 103Reset to factory settings 102Titrator Firmware History 102Update 103
Settingsglobal 96
SetupChemicals 77
Setup menu 77Shortcuts
Manage 96Shut down
Emergency 22Signal words 6Standard evaluation procedure 119Start analysis 12Starting analysis 115Statistics 75
Stirrer 104Substances 81Suspending options 13Symbols for calculations 63System settings 96
TTemperature Sensor 84
Measure With 106Time and date 97Title, parameters 37Titrants 78Titration
Network settings 92Network storage 92PC settings 91
Titration (EP) 49Titration (LearnEQP) 51Titration stand
Setting up 93Titrator identification 96Touch screen adjustment 102
UUndo all 75Undo Changes 75Updating 103USB compact printer 89
Parameter 90USB data export 89
Parameter 90USB data export box 90USB printer
Parameter 90USB-Stick 89User settings
Keyboards 96Language 95Screen 95Shortcuts 96
VValue ranges
Control band 85Sensors 85
ValuesBlank 99
WWarning Symbols 6

Index152 Compact Titrator
XXML file writer
Parameter 91


Mettler-Toledo GmbHIm Langacher 448606 Greifensee, Switzerlandwww.mt.com/contact
Subject to technical changes.© Mettler-Toledo GmbH 07/201730297204C
For more informationwww.mt.com/titration
30297204
30297204C 7/17/2017 4:24 PM - Schema ST4 PDF engine - Layout by Victor Mahler