COMMUNITY CENTER INTERIOR RENOVATION PROJECT
180
CITY OF YORBA LINDA CALIFORNIA PLANS AND SPECIFICATIONS FOR THE COMMUNITY CENTER INTERIOR RENOVATION PROJECT August 2019 CITY OF YORBA LINDA 4845 CASA LOMA AVENUE YORBA LINDA, CALIFORNIA 92886
-
Upload
khangminh22 -
Category
Documents
-
view
0 -
download
0
Transcript of COMMUNITY CENTER INTERIOR RENOVATION PROJECT

CITY OF YORBA LINDA CALIFORNIA
PLANS AND SPECIFICATIONS
FOR THE
COMMUNITY CENTER INTERIOR RENOVATION PROJECT
August 2019
CITY OF YORBA LINDA 4845 CASA LOMA AVENUE
YORBA LINDA, CALIFORNIA 92886

i
CITY OF YORBA LINDA
TABLE OF CONTENTS FOR THE
COMMUNITY CENTER
INTERIOR RENOVATION PROJECT
NOTICE INVITING SEALED BIDS ............................................................................... NIB-1 INSTRUCTIONS TO BIDDERS ....................................................................................... IB-1 PROPOSAL DOCUMENTS Proposal ................................................................................................................... P-1 Bidders information .................................................................................................. P-3 List of Subcontractors ............................................................................................... P-4 References ............................................................................................................... P-5 Contractor's Licensing Statement ........................................................................... P-6 Bid Bond ................................................................................................................... P-7 Non-Collusion Affidavit ............................................................................................. P-9 Proposal Bid Sheets ............................................................................................... P-10 CONTRACT DOCUMENTS Contract Agreement .............................................................................................. CA-1 Faithful Performance Bond....................................................................................... B-2 Material and Labor Payment Bond ........................................................................... B-4 Certification Labor Code .......................................................................................... C-1 GENERAL SPECIFICATIONS Scope of Work ....................................................................................................... GS-1 Location of Work ................................................................................................... GS-1 Traffic Requirements ............................................................................................. GS-2 Special Requests .................................................................................................. GS-2 Project Inspections ................................................................................................ GS-2 Supervision and Skills ........................................................................................... GS-2 Emergency Response….. ..................................................................................... GS-2 License and Permits .............................................................................................. GS-2 Dress Code and Appearance ................................................................................ GS-3 Safety Orders ........................................................................................................ GS-3 Utility Requirements .............................................................................................. GS-3 The City’s Right to do Work ................................................................................... GS-4 Cooperation and Collateral Work .......................................................................... GS-5 Flow and Acceptance of Water ............................................................................. GS-5 Protection of Property during Inclement Weather ................................................. GS-5 Protection of Existing Facilities and Structures ..................................................... GS-5 Removal of Water.................................................................................................. GS-5

ii
Standard Specifications ......................................................................................... GS-6 Wage Rates and Labor Code Requirements ........................................................ GS-7 Resolution of Construction Claims ........................................................................ GS-8 Clayton Act and Cartwright Act ........................................................................... GS-10 Substitutions and Securities ................................................................................ GS-11 Method of Payment ............................................................................................. GS-11 Hours of Work and Scheduling ........................................................................... GS-11 Sound Control Requirements .............................................................................. GS-12 Construction and Maintenance Equipment Vehicles ........................................... GS-12 Additions/Deletions to Specifications .................................................................. GS-12 SPECIAL PROVISIONS Part 1 - General Provisions ................................................................................... SP-1 Part 2 - Construction Materials………………………………………………………SP-16 ARCHITECTURAL DRAWINGS ………………………………………………. APPENDIX A Finish Plan……………………………………………………………………………A-1.0 Elevations………………………………………………………..…………………..A-1.1 Elevations …………………………………………………………………………...A-1.2 Kitchen Room 1 Floorplan …………………………………………………………A-1.3 Kitchen Room 1 Elevation -Wall 1…………………………………………………A-1.4 Kitchen Room 1 Elevation -Wall 2…………………………………………………A-1.5 Kitchen Room 1 Elevation -Wall 3…………………………………………………A-1.6 FINISH SPECIFICATIONS …………………………………………………….. APPENDIX B Millwork…………………………………………………………………………………B-90 Paint…………………………………………………………………………………...B-126 Resilient Flooring……………………………………………………………………..B-131 Rubber Wall Base………………………………………….…………………………B-145 Wall Covering…………………………………………………………………………B-148 Wall Protection……………………………………………………………………..…B-158 Wall Accessories……………………………………………………………………..B-170

NIB-1
CITY OF YORBA LINDA
NOTICE INVITING SEALED BIDS
FOR THE
COMMUNITY CENTER INTERIOR RENOVATION PROJECT
NOTICE IS HEREBY GIVEN that sealed bids will be received by the City of Yorba Linda, as AGENCY, for furnishing all materials, equipment, tools, labor and incidentals as required for the above stated project in strict accordance with the specifications and drawings on file at the office of the City Clerk of the City of Yorba Linda. Bids will be received at the office of the City Clerk, City of Yorba Linda, until 10:00 AM on Monday, September 16, 2019, at which time and place the bids will be publicly opened and read aloud. Bids shall be submitted in sealed envelopes marked on the outside, “SEALED BID FOR COMMUNITY CENTER INTERIOR RENOVATION PROJECT– DO NOT OPEN WITH REGULAR MAIL.” The work to be constructed hereunder is located at the Yorba Linda Community Center, 4501 Casa Loma Avenue, Yorba Linda, CA, 92886. The work generally consists of construction services, but is not limited to; painting interior walls, preparing wall surfaces, patch and repair walls; installation of new wall covering, flooring, cabinets, and the inspection; and cleanup of the facility. A PRE-BID JOB SITE INSPECTION HAS BEEN SCHEDLUED FOR THURSDAY, AUGUST 29, 2019 at 1:00 PM, AT THE JOB SITE (4501 CASA LOMA AVE., YORBA LINDA, CA, 92886). ALL CONTRACTORS SHOULD BE PREPARED TO CONDUCT FIELD MEASUREMENTS AND CALCULATIONS TO PROPERLY PREPARE THE BID PROPOSAL. The Agency reserves the right, after opening bids, to reject any or all bids, or to make award to the lowest responsible bidder and reject all other bids; to waive any informality in the bidding; and to accept any bid or portion thereof; and to take all bids under advisement for a period of Ninety (90) calendar days. Bids will be compared on the basis of the Engineer's estimate of the quantities of the several items of work as shown on the Bid Sheets. Only such plans, specifications, and items of work as are appropriate shall apply to the work as bid.

NIB-2
At the time of contract award, the contractor shall possess a Class A Contractor's License or a combination of Specialty Contractor's License(s) adequate to perform the work herein described. All subcontractors shall have equivalent licenses for their specific trades. The contractor and all subcontractors shall have a valid City of Yorba Linda business license prior to commencing work. Each bid must be accompanied by a certified or cashier's check, or by a corporate surety bond on the form furnished by the AGENCY, as a guarantee that the bidder will, if an award is made to him in accordance with the terms of his bid, promptly secure workmen's compensation insurance and liability insurance, execute a contract in the required form, and furnish satisfactory bonds for the faithful performance of the contract and for the payment of claims of material and laborers thereunder. Said check or bidder's bond shall be in an amount not less than 10 percent of the amount of the bid. The Performance Bond shall be not less than 100 percent of the total amount of the bid price named in the contract. The Payment Bond shall be not less than 100 percent of the total amount of the bid price named in the contract. The AGENCY reserves the right to reject any bond if, in the opinion of the AGENCY Attorney, the Surety's acknowledgment is not in the form included in the contract documents or in another form substantially as prescribed by law. Minimum wage rates for this project have been predetermined by the Secretary of Labor. If there is a difference between the minimum wage rates predetermined by the Secretary of Labor and the prevailing wage rates as determined by the State for similar classifications of labor, the Contractor and his subcontractors shall pay not less than the higher wage rate. In accordance with provisions of Section 1773.2 (amended 1977) of the California Labor Code copies of the prevailing rate of per diem wages as determined by the State Director of Industrial Relations are on file in the office of the Engineering Department of the City of Yorba Linda. It shall be mandatory upon the Contractor to whom the contract is awarded and upon any subcontractor under him to pay not less than said specified rates to all workmen employed by them in the execution of the contract. CONTRACTOR’S REGISTRATION: In accordance with Labor Code section 1771.1, a contractor or subcontractor shall not be qualified to (a) bid on a or be listed in a bid proposal or (b) engage in the performance of any contract for public work, unless currently registered and qualified to perform the public work pursuant to Labor Code section 1725.5. A bid shall not be accepted nor any contractor or subcontract entered into without proof of the contractor or subcontractor’s current registration to perform the public work pursuant to Labor Code section 1725.5. COMPLIANCE MONITORING AND ENFORCEMENT: Pursuant to Labor Code section 1771.4, Contractor’s performance of the work described in this Notice Inviting Bids is subject to compliance monitoring and enforcement by the California Department of Industrial Relations.
NIB-3
The City of Yorba Linda hereby notifies all bidders that it will affirmatively insure that in any contract entered into pursuant to this advertisement, Disadvantaged Business and Women's Business Enterprises will be afforded full opportunity to submit bids in response to this invitation and will not be discriminated against on the grounds of race, creed, color, or national origin in consideration for an award. The Contract Documents call for monthly progress payments based upon the Engineer's estimate of the percentage of work completed. The AGENCY will retain 5 percent of each progress payment as security for completion of the balance of the work. At the request and expense of the successful bidder, the City will pay the amounts so retained upon compliance with the requirements of Government Code Section 4590 and the provisions of the Contract Documents pertaining to the Substitution of Securities. Complete sets of said contract documents shall be made available by contacting Kelly Ridenour at [email protected] or on the City’s website at www.YorbaLindaCA.gov. Dated this ___ day of , 2019. CITY OF YORBA LINDA CALIFORNIA BY: Marcia Brown City Clerk 4845 Casa Loma Avenue Yorba Linda, CA 92886 (714) 961-7100

IB-1
CITY OF YORBA LINDA
INSTRUCTIONS TO BIDDERS FOR
COMMUNITY CENTER
INTERIOR RENOVATION PROJECT 1. PROPOSAL FORMS Bids shall be submitted in writing on the Proposal forms provided by the AGENCY.
All information requested therein must be clearly and legibly set forth in the manner and form indicated. The AGENCY will not consider any proposal not meeting these requirements.
2. PROPOSAL GUARANTEE (BID BOND) Proposals must be accompanied by a proposal guarantee consisting of a certified
check or bid bond payable to the AGENCY in the minimum amount of ten percent (10%) of the total amount bid. Any proposal not accompanied by such a guarantee will not be considered. If a bidder to whom a contract is awarded fails or refuses to execute the contract documents or furnish the required insurance policies and bonds as set forth in those documents, the proposal guarantee shall be forfeited to the AGENCY. The proposal guarantees of all bidders will be held until the successful bidder has properly executed all contract documents.
3. NON-COLLUSION AFFIDAVIT Bidder shall declare that the only persons or parties interested in the proposal as
principals are those named therein; that no officer, agent, or employee of the AGENCY is personally interested, directly or indirectly, in the proposal; that the proposal is made without connection to any other individual, firm, or corporation making a bid for the same work; and that the proposal is in all respects fair and without collusion or fraud. The Non-Collusion Affidavit shall be executed and submitted with the proposal.
4. PROPOSAL BID SHEET Bidders shall give unit prices for each and all of the items set forth. No aggregate
bids will be considered. The bidder shall set forth for each item of work, in clearly legible figures, a unit item price and a total for the item in the respective spaces provided for this purpose. The quantities listed in the Bid sheets are supplied to give an indication of the general scope of work, but the accuracy of figures is not guaranteed and the bidder shall make his own estimates from the drawings and to verify all measurements prior to bidding. In case of a variation between the unit price and the totals shown by the bidder, the unit price will be considered to be the bid.

IB-2
5. DELIVERY OF PROPOSAL
Proposals may be mailed or delivered by messenger. However, it is the bidder's responsibility alone to ensure delivery of the proposal to the hands of the AGENCY's designated official prior to the bid-opening hour stipulated in the "Notice Inviting Sealed Bids." Late proposals will not be considered. Proposals shall be enclosed in a sealed envelope plainly marked on the outside, “SEALED BID FOR COMMUNITY CENTER INTERIOR RENOVATION PROJECT– DO NOT OPEN WITH REGULAR MAIL.”
6. WITHDRAWAL OF PROPOSALS A proposal may be withdrawn by a written request signed by the bidder. Such
requests must be delivered to the AGENCY's designated official prior to the bid-opening hour stipulated in the "Notice Inviting Sealed Bids". The withdrawal of a proposal will not prejudice the right of the bidder to submit a new proposal, providing there is time to do so. Proposals may not be withdrawn after said hour without forfeiture of the proposal guarantee.
7. IRREGULAR PROPOSALS Unauthorized conditions, limitations, or provisions attached to a proposal will
render it irregular and may cause its rejection. The completed proposal forms shall be without interlineation, alterations, or erasures. Alternative proposals will not be considered unless specifically requested. No oral, telegraphic, or telephonic proposal, modification, or withdrawal will be considered.
8. TAXES No mention shall be made in the proposal of Sales Tax, Use Tax, or any other tax,
as all amounts bid will be deemed and held to include any such taxes, which may be applicable.
9. DISQUALIFICATION OF BIDDERS In the event that any bidder acting as a prime contractor has an interest in more
than one proposal, all such proposals will be rejected, and the bidder will be disqualified. This restriction does not apply to subcontractors or suppliers who may submit quotations to more than one bidder.
No contract will be executed unless the bidder is licensed in accordance with the provisions of the State Business and Professions Code.

IB-3
10. INTERPRETATION OF PLANS AND DOCUMENTS If any person contemplates submission of a bid for the proposed contract and is in
doubt as to the true meaning of any part of the plans, specifications or other proposed contract documents, or finds discrepancies in, or omissions from, the drawings or specifications, he may submit to the City Representative of said AGENCY a written request for an interpretation or correction thereof. The person submitting the request will be responsible for its prompt delivery. Any interpretation or correction of the proposed documents shall be made only by addendum duly issued and copy of such addendum will be mailed or delivered to each person receiving a set of such documents. The City Representative will not be responsible for any other explanation or interpretations of the proposed documents. Request for Information (RFI) must be made to the City Representative, via email - [email protected], no later than 10:00 AM, Thursday, September 5, 2019.
Parks and Recreation Department City of Yorba Linda 714-961-7160 11. ADDENDA OR BULLETINS The effect of all addenda to the Contract Documents shall be considered in the bid,
and said addenda shall be made a part of the contract documents and shall be returned with them. Before submitting his bid, each bidder shall inform himself as to whether or not any addenda have been issued, and failure to cover in this bid any such addenda issued, may render his bid irregular, and may result in its rejection by the AGENCY.
12. LEGAL RESPONSIBILITIES All proposals must be submitted, filed, made, and executed in accordance with
State and Federal laws relating to bids for contracts of this nature whether the same are expressly referred to herein or not.
Any Bidder submitting a proposal shall by such action thereby agree to each and
all of the terms, conditions, provisions, and requirements set forth, contemplated, and referred to in the Plans, Specifications, and Contract Documents, and to full compliance therewith.
13. AWARD OF CONTRACT Following a review of the bids, the AGENCY shall determine whether to award the
contract or to reject all bids. The award of contract, if made, will be to the lowest responsible Bidder as determined solely by the AGENCY. At the time of contract award, the successful Bidder shall possess a State of California Class A
IB-4
Contractor’s License or a combination of Specialty Contractor’s License(s) adequate to perform the work here-in described. All subcontractors shall have equivalent licenses for their specific trades issued by the State of California. The Contractor and all subcontractors shall have a valid City of Yorba Linda business license prior to commencing any work. Additionally, the AGENCY reserves the right to reject any or all proposals, to accept any bid or portion thereof, to waive any irregularity, and to take the bids under advisement for the period of time stated in the "Notice Inviting Sealed Bids", all as may be required to provide for the best interests of the AGENCY. In no event will an award be made until all necessary investigations are made as to the responsibility and qualifications of the Bidder to whom the award is contemplated.
No bidder may withdraw his proposal for a period of ninety (90) days after the time set for opening thereof. However, the AGENCY will return all proposal guarantees within ten (10) days after the award of the contract or rejection of the bids, as the case may be, to the respective bidders whose proposals they accompany.
14. LABOR CODE
Pursuant to the provisions of Section 1773 of the Labor Code of the State of California, the AGENCY has obtained the general provisions rate of per diem wages and the general prevailing rate for holiday and overtime work in this locality for each craft, classification or type of workman needed to execute the contract from the State Director of the Department of Industrial Relations. These rates are on file with the Clerk of the AGENCY, and copies will be made available to any interested party on request. It shall be the responsibility of the prime Contractor to comply with all applicable sections of the Labor Code. Travel and subsistence payments to each workman needed to execute the work shall be made as such travel and subsistence payments are defined in the applicable collective bargaining agreements filed in accordance with Section 1773.8 of the Labor Code. The Contractor shall comply with the provisions of Section 1774 of the Labor Code. Failure to comply with the subject section will subject the Contractor to penalty and forfeiture provisions of Section 1775 of the Labor Code. Pursuant to the provisions of Section 1770 of the Labor Code, the general prevailing rate of wages has been ascertained (which rate includes employer payments for health and welfare, vacation, pension and similar purposes) applicable to the work to be done, for straight time, overtime, Saturday, Sunday and holiday work. The holiday wage rate listed shall be applicable to all holidays recognized in the collective bargaining agreement of the particular craft, classification or type of workmen concerned.

IB-5
The AGENCY will not recognize any claim for additional compensation because of the payment by the Contractor of any wage rate in excess of the prevailing wage rate or the Federal Minimum Wage Rate (whichever is greater) as set forth in the contract. The possibility of wage increases is one of the elements to be considered by the Contractor in determining his bid, and will not under any circumstances be considered as the basis of a claim against the AGENCY on the contract. The Contractor and subcontractors shall comply with Section 1777.6 which stipulates that it shall be unlawful to refuse to accept otherwise qualified employees as registered apprentices solely on the grounds of race, religious creed, color, national origin, ancestry, sex, or age, except as provided in Section 3077, of such employee. CONTRACTOR’S REGISTRATION: In accordance with Labor Code section 1771.1, a contractor or subcontractor shall not be qualified to (a) bid on a or be listed in a bid proposal or (b) engage in the performance of any contract for public work, unless currently registered and qualified to perform the public work pursuant to Labor Code section 1725.5. A bid shall not be accepted nor any contractor or subcontract entered into without proof of the contractor or subcontractor’s current registration to perform the public work pursuant to Labor Code section 1725.5.
15. WORKER'S COMPENSATION CERTIFICATE Section 3700 of the State Labor Code requires that every employer shall secure
the payment compensation by either being insured against liability to pay compensation with one or more insurers or by securing a certificate of consent to self-insure from the State Director of Industrial Relations.
In accordance with this section and with Section 1861 of the State Labor Code, the
Contractor shall sign a Compensation Insurance Certificate, which is included with the Contract Agreement, and submit same to City along with the other required contract documents, prior to performing any work. Reimbursement for this requirement shall be considered as included in the various items of work.
16. CLAYTON ACT AND CARTWRIGHT ACT In accordance with Section 7103 of the Public Contract Code, in entering into a
public works contract or a subcontract to supply goods, services or materials pursuant to a public works contract, the contractor or subcontractor offers and agrees to assign to the awarding body all rights, and interest in and all causes of action it may have under Section 4 of the Clayton Act (15 U.S.C. Sec. 15) or under the Cartwright Act (Chapter 2(commencing with Section 16700) of Part 2 of Division 7 of the Business and Professions Code), arising from purchases of goods, services, or materials pursuant to the public works contract or the subcontract. This assignment shall be made and become effective at the time the

IB-6
awarding body tenders final payment to the Contractor, without further acknowledgment by the parties.
17. SUBLETTING AND SUBCONTRACTING. Pursuant to the Subletting and Subcontracting Fair Practices Act (commencing
with Section 4100 of the Public Contract Code), bidders are required to list in their proposal the name and location of place of business of each subcontractor who will perform work or labor or render services in or about the construction of the work or improvement or a subcontractor who specially fabricates and installs a portion of the work or improvement according to detailed drawings contained in the Plans and Specifications in excess of 1/2 of 1% of this prime Contractor's total bid or $10,000, whichever is greater. Failure to list a subcontractor for a portion of the work means that the prime Contractor will do that portion of the work. It is the AGENCY's intent for the Subletting and Subcontracting Fair Practices Act to apply to all phases of the work.
18. SUBSTITUTION OF SECURITIES In conformance with the State of California Government Code, Chapter 13, Section
4590, the Contractor may substitute securities for any monies withheld by the Agency to ensure performance under the contract.
At the request and expense of the Contractor, securities equivalent to the amount withheld shall be deposited with the City, or with a State or federally chartered bank as the escrow agent, who shall pay such monies to the Contractor upon notification by AGENCY of Contractor’s satisfactory completion of the contract.
The type of securities deposited and the method of release shall be approved by the City Attorney’s office.

P-1
CITY OF YORBA LINDA
PROPOSAL
COMMUNITY CENTER INTERIOR RENOVATION PROJECT
TO CITY OF YORBA LINDA, as AGENCY: In accordance with AGENCY's "Notice Inviting Sealed Bids", the undersigned BIDDER hereby proposes to furnish all materials, equipment, tools, labor, and incidentals required for the above stated project as set forth in the Plans, Specifications, and Contract Documents therefore, and to perform all work in the manner and time prescribed therein. BIDDER declares that this proposal is based upon careful examination of the work site, Plans, Specifications, Instructions to Bidders, and Contract Documents. If this proposal is accepted for award, BIDDER agrees to enter into a contract with AGENCY at the unit and/or lump sum prices set forth in the following Proposal Bid Sheet. BIDDER understands that failure to enter into a contract in the manner and time prescribed will result in forfeiture to AGENCY of the Bid Bond accompanying this proposal. BIDDER understands that a bid is required for the entire work that the estimated quantities set forth in the Proposal Bid Sheet are solely for the purpose of comparing bids, and that final compensation under the contract will be based upon the actual quantities of work satisfactorily completed. It is agreed that the unit and/or lump sum prices bid include all appurtenant expenses, taxes, royalties, and fees. In the case of discrepancies in the amounts bid, unit prices shall govern over extended amounts. LICENSE REQUIREMENT: At the time of contract award, the CONTRACTOR shall possess a State of California Class A Contractor’s License or a combination of Specialty Contractor’s License(s) adequate to perform the work here-in described. All subcontractors shall have equivalent licenses for their specific trades. The Contractor and all subcontractors shall have a valid City of Yorba Linda business license prior to commencing any work. BIDDER agrees and acknowledges that he is aware of the provisions of Section 3700 of the Labor Code which requires every employer to be insured against liability for workman’s compensation or to undertake self-insurance in accordance with the provisions of that code, and that the BIDDER will comply with such provisions of that code before commencing the performance of this Contract if awarded to it. BIDDER certifies that in all previous contracts or subcontracts, all reports which may have been due under the requirements of any agency, State, or Federal equal employment opportunity orders have been satisfactorily filed, and that no such reports are currently outstanding. BIDDER declares that the only persons or parties interested in this proposal as principals are those named herein; that no officer, agent, or employee of the AGENCY is personally interested, directly or indirectly, in this proposal; that this proposal is made without connection to any other individual, firm, or corporation making a bid for the same work; and that this proposal is in all respects fair and without collusion or fraud. BIDDER certifies that affirmative action has been taken to seek out and consider disadvantaged business enterprises for those portions of the work to be subcontracted, and that such affirmative

P-2
actions have been carefully documented, that said documentation is open to inspection, and that said affirmative action will remain in effect for the life of any contract awarded hereunder. Furthermore, BIDDER certifies that affirmative action will be taken to meet all equal employment opportunity requirements of the contract documents. BIDDER'S NAME DATE __________________________ BIDDER'S ADDRESS: BY
(Print Name) (Signature) PHONE NO. ( ) TITLE Subscribed and sworn to before me BY (Print Name) this day of , 2019
(Signature of Notary Public) (Signature)
TITLE
(SEAL)

P-3
BIDDER'S INFORMATION BIDDER certifies that the following information is true and correct: Bidder's Name Business Address Telephone: ( ) State Contractor's License No. and Class Original Date Issued ______________ Expiration Date DIR Contractor Registration Number__ The following are the names, titles, addresses, and phone numbers of all individuals, firm members, partners, joint ventures, and/or corporate officers having a principal interest in this proposal: The dates of any voluntary or involuntary bankruptcy judgments against any principal having an interest in this proposal are as follows: All current and prior DBA's, alias, and/or fictitious business names for any principal having an interest in this proposal are as follows: Subscribed and sworn to before me By______________________________ (Print Name) this day of , 2019. _________ (Signature) ________________________________________ (Signature of Notary Public)
Title (SEAL)
Date _________________ , 2019.

P-4
BIDDER’S NAME LIST OF SUBCONTRACTORS BIDDER proposes to subcontract certain portions of the work, and to procure materials and equipment from suppliers and vendors as follows: Subcontractor name Address License No. and Class Percent of Total Contract Specific Items of Work Subcontractor name Address License No. and Class Percent of Total Contract Specific Items of Work Subcontractor name Address License No. and Class Percent of Total Contract Specific Items of Work Subcontractor name Address License No. and Class Percent of Total Contract Specific Items of Work

P-5
BIDDER’S NAME REFERENCES The following are the names, addresses, and phone numbers for three (3) public agencies for which BIDDER has performed similar work within the past two years: Agency Name Address Phone No. Contact: Description of Work Agency Name Address Phone No. Contact: Description of Work Agency Name Address Phone No. Contact: Description of Work DESIGNATION OF SURETIES The following are the names, addresses, and phone numbers for all brokers and sureties from whom BIDDER intends to procure insurance and bonds: Name Address Phone No. Name Address Phone No. Name Address Phone No. Name Address Phone No.

P-6
CONTRACTOR'S LICENSING STATEMENT Bidder certifies that the following is true and correct. The undersigned is licensed in accordance with the laws of the State of California providing for the registration of Contractors. Contractor's License Number ___________________________________ Name of Individual Contractor (Print or type): Signature of Owner(s) Business Address or Name of Company Business Address Officers: Name: Title: Name: Title: Name: Title: or Name of Corporation Business Address Corporation organized under the laws of the State of Subscribed and sworn to before me this ______ day of ____________, 2019 Signature of President of Corp./Company _________________________________ ____________________________________ (Signature of Notary Public) Signature of Secretary of Corp./Company
(SEAL) (SEAL)

P-7
BID BOND (PAGE 1 OF 2)
CITY OF YORBA LINDA
BID BOND FOR THE
COMMUNITY CENTER
INTERIOR RENOVATION PROJECT
KNOW ALL MEN BY THESE PRESENTS that , as BIDDER, and _____ as SURETY, are held and firmly bound unto the City of Yorba Linda, as AGENCY, in the penal sum of dollars ($ ), which is ten percent (10%) or more of the total amount bid by BIDDER to AGENCY for the above stated project, for the payment of which sum, BIDDER and SURETY agree to be bound, jointly and severally, firmly by these presents. THE CONDITIONS OF THIS OBLIGATION ARE SUCH that, whereas BIDDER is about to submit a bid to AGENCY for the above stated project, if said bid is rejected, or if said bid is accepted and a contract is awarded and entered into by BIDDER and BIDDER files the required Faithful Performance and Labor and Material Bonds in the manner and time specified, then this obligation shall be null and void, otherwise it shall remain in full force and effect in favor of AGENCY. In the event suit is brought upon this bond by AGENCY and judgment is recovered, the Surety shall pay all costs incurred by the AGENCY in such suit, including reasonable attorney's fee to be fixed by the Court.
WITNESS our hands this ________ day of _____________, 2019.
CONTRACTOR (CORPORATION)-TYPE
(SEAL) By:
President
By: Secretary/Treasurer
Subscribed and sworn to before me this ______ day of _____________, 2019. Seal of Notary ____________________________ (Signature of Notary Public) (SEAL)

P-8
BID BOND (PAGE 2 OF 2)
SURETY'S NAME-TYPE Mailing Address
(SEAL) By: Name (print) Signature Title
Subscribed and sworn to before me this ______ day of _______________, 2019. ___________________________________ (SEAL) (Signature of Notary Public)

P-9
BIDDER’S NAME NON-COLLUSION AFFIDAVIT TO BE EXECUTED BY BIDDER AND SUBMITTED WITH BID STATE OF CALIFORNIA )
) SS COUNTY OF ) , being first duly sworn, deposes and says that he or she is of _______________________________________ the party making the foregoing bid that the bid is not made in the interest of, or on behalf of, any undisclosed person, partnership, company, association, organization, or corporation; that such bid is genuine and not collusive or sham; that said bidder has not directly or indirectly induced or solicited any other bidder to put in a false or sham bid, and has not directly or indirectly colluded, conspired, connived, or agreed with any bidder or anyone else to put in a sham bid, or that anyone shall refrain from bidding; that the bidder has not in any manner, directly or indirectly, sought by agreement, communication, or conference with anyone to fix the bid price of the bidder or any other bidder, or to fix any overhead, profit, or cost element of the bid price, or of that of any other bidder, or to secure any advantage against the public body awarding the contract of anyone interested in the proposed contract; that all statements contained in the bid are true; and further, that the bidder has not, directly or indirectly, submitted his or her bid price or any breakdown thereof, or the contents thereof, or divulged information or data relative thereto, or paid, and will not pay, any fee to any corporation, partnership, company association, organization, bid depository, or to any member or agency thereof to effectuate a collusive or sham bid." Signed __________________________________ __________________________________ __________________________________ Title Subscribed and sworn to before me this _____ day of _________________, 2019. Seal of Notary _____________________________________________ Notary Public

P-10
Page 1 of 4 BIDDER’S NAME
CITY OF YORBA LINDA
PROPOSAL BID SHEETS FOR THE
COMMUNITY CENTER
INTERIOR RENOVATION PROJECT BASE BID
ITEM NO.
ITEM DESCRIPTION QUANTITY UNIT UNIT PRICE TOTAL
1 MOBILIZATION 1 LS $ $ 2 Provide labor to remove and replace
furniture in office areas. 1,200 SF $ $
3 Remove Chair Rails, Hand Rails and Corner Guards - Patch and repair walls
1 LS $ $
4 Provide labor to remove existing wall coverings - and prepare walls for new vinyl wall covering. Excludes wall resurfacing.
22,068 SF $ $
5 WC1 Wall Protection supplied and installed 992 SF $ $ 6 WC2 Wall Protection supplied and installed 3,360 SF $ $ 7 WC3 Fabric Wall Covering 541 LY $ $ 8 WC4 Fabric Wall Covering 65 LY $ $ 9 WC5 Vinyl Wall Covering 1,219 LY $ $ 10 P1 Provide Material and Labor to Paint.
Includes 1 coat of primer and 2 coats of paint
27,040 SF $ $
11 P2 Provide material and labor to paint. Includes one coat of tinted primer and 2 coats of paint
1,700 SF $ $
12 P3 Provide material and labor to paint. Includes 1 coat of tinted primer and 2 coats of paint
600 SF $ $
13 P4 Provide material and labor to paint. Includes 1 coat of tinted primer and 2 coats of paint
500 SF $ $
14 P5 Provide material and labor to paint. Includes 1 coat of tinted primer and 2 coats of paint
500 SF $ $
15 P6 Provide material and labor to paint - interior door frames
89 EA $ $
16 Paint Fire Extinguisher Cases - 10 EA $ $ 17 LVT1 Luxury Vinyl Tile supplied and
installed. Includes 3 Calcium Chloride, Concrete Moisture Tests, labor to remove and dispose of existing VCT flooring.
130 SF $ $
SUB-TOTAL “A”: $

P-11
Page 2 of 4 BIDDER’S NAME
CITY OF YORBA LINDA
PROPOSAL BID SHEETS FOR THE
COMMUNITY CENTER
INTERIOR RENOVATION PROJECT BASE BID (cont)
ITEM NO.
ITEM DESCRIPTION QUANTITY UNIT UNIT PRICE TOTAL
18 B1 Rubber Wall Base supplied and installed 400 LF $ $ 19 J1 J-Cap supplied and installed - at top of
Korogard Traffic Patterns 23 EA $ $
20 J2 J-Cap supplied and installed - at top and bottom molding of Inpro Elements Panels
115 EA $ $
21 CG1 Corner Guard supplied and installed - at outer corners of Korogard Traffic Patterns
92 EA $ $
22 CG2 Corner Guard supplied and installed - at outer corners of Inpro Elements Panels
59 EA $ $
23 PL1 Plastic Laminate Cabinets supplied and installed
1 @ $ $
24 PL2 Plastic Laminate Cabinets supplied and installed
1 @ $ $
25 SS1 Solid Surface supplied and installed at 1.5" square eased edge
1 @ $ $
26 HW1 Cabinet Hardware Pulls supplied and installed
1 EA $ $
27 Provide labor and materials to protect adjacent areas -
1 @ $ $
28 Detail clean areas after completion of each phase - Work to be completed in 10 phases.
1 @ $ $
SUB-TOTAL “B”: $
SUB-TOTAL “A”: $
TOTAL BID IN FIGURES: $
TOTAL BASE BID IN WORDS:_______________________________________________________ ________________________________________________________________________DOLLARS
AND______________________________________________________________CENTS

P-12
Page 3 of 4 BIDDER’S NAME
CITY OF YORBA LINDA
PROPOSAL BID SHEETS FOR THE
COMMUNITY CENTER
INTERIOR RENOVATION PROJECT
LABOR RATE SCHEDULE
ITEM NO.
ITEM DESCRIPTION
QUANTITY UNIT UNIT PRICE
1 Labor to resurface and prime walls. 1 SF $
NOTE: The estimated quantities listed in the Proposal Bid Sheet(s) are supplied to give an
indication of the general scope of the work, but the accuracy of these figures is not guaranteed and the bidder shall make his own estimates from the drawings. In case of a variation between the unit price and the totals shown by the bidder, the unit price will be considered to be the bid. Except where a lump sum is requested, in the case of a variation between the unit price and the total(s) shown by the bidder, the unit price will be used to calculate the total for the item based on the number of units involved in the item.
Upon completion of the construction, if the actual quantities show either an increase or decrease from the quantities given in the Proposal Bid Sheet(s), the Contract Unit Price will prevail. Full compensation to be paid will be the contract price for the actual work completed, and no additional compensation will be allowed therefore. Payment will not be made for materials wasted or disposed of in a manner not called for under the Contract, this includes rejected material not unloaded from vehicles.
City reserves the right to reject all Bids.

P-13
Page 4 of 4 BIDDER’S NAME
CITY OF YORBA LINDA
PROPOSAL BID SHEETS FOR THE
COMMUNITY CENTER
INTERIOR RENOVATION PROJECT PROPOSAL No compensation will be allowed for disposing of rejected or excess material. The City reserves the right to reject all bids and to increase or decrease the amount of any quantity shown on the Proposal Bid Sheets. Award of contract shall be base on lowest responsible bidder’s base bid, in the event of awarding additive alternate(s), the award will be determined by the lowest responsible bidder’s total of base bid plus additive alternate(s) selected. In case of a variation between the unit price and the totals shown by the bidder, the total cost will be considered to be the bid. Bidder's Name Telephone No. IN WITNESS WHEREOF, BIDDER executes and submits this proposal with the names, titles, hands, and seals of all forenamed principals this ______ day of ______________, 2019.
BIDDER ________________________________________________
________________________________________________________
________________________________________________________
________________________________________________________ Subscribed and sworn to before me this _____ day of ____________, 2019. SIGNATURE NOTARY PUBLIC _______________________________
By______________________________________ (PRINT)
________________________________________
(SIGNATURE) (SEAL)
Title____________________________________
CA-1
CITY OF YORBA LINDA CONSTRUCTION CONTRACT
COMMUNITY CENTER
INTERIOR RENOVATION PROJECT
1. PARTIES AND DATE.
This Contract is made and entered into this day of , 2019, by and between the City of Yorba Linda, a municipal organization organized under the laws of the State of California with its principal place of business at 4845 Casa Loma Avenue, Yorba Linda, California 92886 (“City”) and [INSERT NAME], a [INSERT TYPE OF ENTITY - CORPORATION, PARTNERSHIP, SOLE PROPRIETORSHIP OR OTHER LEGAL ENTITY], with its principal place of business at [INSERT ADDRESS] (“Contractor”). City and Contractor are sometimes individually referred to as “Party” and collectively as “Parties” in this Contract.
2. RECITALS.
2.1 City. City is a municipal corporation organized under the laws of the State of California, with power to contract for services necessary to achieve its purpose.
2.2 Contractor. Contractor desires to perform and assume responsibility for the provision of interior painting, wall covering, and flooring services required by the City on the terms and conditions set forth in this Contract. Contractor represents that it is experienced in providing interior painting, wall covering, and flooring services to public clients, that it and its employees or subcontractors have all necessary licenses and permits to perform such interior painting, wall covering, and flooring services in the State of California, and that it is familiar with the plans of City.
2.3 Project. City desires to engage Contractor to render such services for the COMMUNITY CENTER INTERIOR RENOVATION PROJECT (“Project”) as set forth in this Contract.
2.4 Project Documents & Certifications. Contractor has obtained, and delivers concurrently herewith, PERFORMANCE BOND, PAYMENT BOND, INSURANCE DOCUMENTS AND OTHER CERTIFICATIONS as required by the Contract.
3. TERMS
3.1 Incorporation of Documents. This Contract includes and hereby incorporates in full by reference the following documents, including all exhibits, drawings, specifications and documents therein, and attachments and addenda thereto:

CA-2
Plans and Specifications for COMMUNITY CENTER INTERIOR RENOVATION PROJECT
3.2 Contractor’s Basic Obligation; Scope of Work. Contractor promises and agrees, at its own cost and expense, to furnish to the Owner all labor, materials, tools, equipment, services, and incidental and customary work necessary to fully and adequately complete the Project, including all structures and facilities necessary for the Project or described in the Contract (hereinafter sometimes referred to as the “Work”), for a Total Contract Price as specified pursuant to this Contract. All Work shall be subject to, and performed in accordance with the above referenced documents, as well as the exhibits attached hereto and incorporated herein by reference. The plans and specifications for the Work are further described in Exhibit “A” attached hereto and incorporated herein by this reference. Special conditions, if any, relating to the Work are described in Exhibit ”B” attached hereto and incorporated herein by this reference.
3.3 Change in Scope of Work. Any change in the scope of the Work, method of performance, nature of materials or price thereof, or any other matter materially affecting the performance or nature of the Work shall not be paid for or accepted unless such change, addition or deletion is approved in advance and in writing by a valid change order executed by the City.
3.4 Period of Performance and Liquidated Damages. Contractor shall perform and complete all Work under this Contract within 90 working days from the date of the Notice to Proceed. Contractor shall perform its Work in strict accordance with any completion schedule, construction schedule or project milestones developed by the City. Such schedules or milestones may be included as part of Exhibits “A” or “B” attached hereto, or may be provided separately in writing to the Contractor. Contractor agrees that if such Work is not completed within the aforementioned Contract Time and/or pursuant to any such completion schedule, construction schedule or project milestones developed pursuant to provisions of the Contract, it is understood, acknowledged and agreed that the City will suffer damage. Pursuant to Government Code Section 53069.85, Contractor shall pay to the City as fixed and liquidated damages the sum of Five Hundred Dollars ($500.00) per day for each and every calendar day of delay beyond the Contract Time or beyond any completion schedule, construction schedule or Project milestones established pursuant to the Contract.
3.5 Standard of Performance; Performance of Employees. Contractor shall perform all Work under this Contract in a skillful and workmanlike manner, and consistent with the standards generally recognized as being employed by professionals in the same discipline in the State of California. Contractor represents and maintains that it is skilled in the professional calling necessary to perform the Work. Contractor warrants that all employees and subcontractors shall have sufficient skill and experience to perform the Work assigned to them. Finally, Contractor represents that it, its employees and subcontractors have all licenses, permits, qualifications and approvals of whatever nature that are legally required to perform the Work, including a City Business License, and that such licenses and approvals shall be maintained throughout the term of this Contract. As provided for in the indemnification provisions of

CA-3
this Contract, Contractor shall perform, at its own cost and expense and without reimbursement from the City, any work necessary to correct errors or omissions which are caused by the Contractor’s failure to comply with the standard of care provided for herein. Any employee who is determined by the City to be uncooperative, incompetent, a threat to the safety of persons or the Work, or any employee who fails or refuses to perform the Work in a manner acceptable to the City, shall be promptly removed from the Project by the Contractor and shall not be re-employed on the Work.
3.6 Control and Payment of Subordinates; Contractual Relationship. City retains Contractor on an independent contractor basis and Contractor is not an employee of City. Any additional personnel performing the work governed by this Contract on behalf of Contractor shall at all times be under Contractor’s exclusive direction and control. Contractor shall pay all wages, salaries, and other amounts due such personnel in connection with their performance under this Contract and as required by law. Contractor shall be responsible for all reports and obligations respecting such additional personnel, including, but not limited to: social security taxes, income tax withholding, unemployment insurance, and workers’ compensation insurance.
3.7 City’s Basic Obligation. City agrees to engage and does hereby engage Contractor as an independent contractor to furnish all materials and to perform all Work according to the terms and conditions herein contained for the sum set forth above. Except as otherwise provided in the Contract, the City shall pay to Contractor, as full consideration for the satisfactory performance by the Contractor of the services and obligations required by this Contract, the above referenced compensation in accordance with compensation provisions set forth in the Contract.
3.8 Compensation and Payment.
3.8.1 Amount of Compensation. As consideration for performance of the Work required herein, City agrees to pay Contractor the Total Contract Price of [INSERT WRITTEN DOLLAR AMOUNT] Dollars ($[INSERT NUMERICAL DOLLAR AMOUNT]) (“Total Contract Price”) provided that such amount shall be subject to adjustment pursuant to the applicable terms of this Contract or written change orders approved and signed in advance by the City.
3.8.2 Payment of Compensation. If the Work is scheduled for completion in thirty (30) or less calendar days, City will arrange for payment of the Total Contract Price upon completion and approval by City of the Work. If the Work is scheduled for completion in more than thirty (30) calendar days, City will pay Contractor on a monthly basis as provided for herein. On or before the fifth (5th) day of each month, Contractor shall submit to the City an itemized application for payment in the format supplied by the City indicating the amount of Work completed since commencement of the Work or since the last progress payment. These applications shall be supported by evidence which is required by this Contract and such other documentation as the City may require. The Contractor shall certify that the Work for which payment is requested has been done and that the materials listed are stored where indicated. Contractor may be

CA-4
required to furnish a detailed schedule of values upon request of the City and in such detail and form as the City shall request, showing the quantities, unit prices, overhead, profit, and all other expenses involved in order to provide a basis for determining the amount of progress payments.
City shall review and pay all progress payment requests in accordance with the provisions set forth in Section 20104.50 of the California Public Contract Code. No progress payments will be made for Work not completed in accordance with this Contract.
3.8.3 Contract Retentions. From each approved progress estimate, five percent (5%) will be deducted and retained by the City, and the remainder will be paid to Contractor. All Contract retainage shall be released and paid to the Contractor and subcontractors pursuant to California Public Contract Code Section 7107.
3.8.4 Other Retentions. In addition to Contract retentions, the City may deduct from each progress payment an amount necessary to protect City from loss because of: (1) liquidated damages which have accrued as of the date of the application for payment; (2) any sums expended by the City in performing any of Contractor’s obligations under the Contract which Contractor has failed to perform or has performed inadequately; (3) defective Work not remedied; (4) stop notices as allowed by state law; (5) reasonable doubt that the Work can be completed for the unpaid balance of the Total Contract Price or within the scheduled completion date; (6) unsatisfactory prosecution of the Work by Contractor; (7) unauthorized deviations from the Contract; (8) failure of the Contractor to maintain or submit on a timely basis proper and sufficient documentation as required by the Contract or by City during the prosecution of the Work; (9) erroneous or false estimates by the Contractor of the value of the Work performed; (10) any sums representing expenses, losses, or damages as determined by the City, incurred by the City for which Contractor is liable under the Contract; and (11) any other sums which the City is entitled to recover from Contractor under the terms of the Contract or pursuant to state law, including Section 1727 of the California Labor Code. The failure by the City to deduct any of these sums from a progress payment shall not constitute a waiver of the City’s right to such sums.
3.8.5 Substitutions for Contract Retentions. In accordance with California Public Contract Code Section 22300, the City will permit the substitution of securities for any monies withheld by the City to ensure performance under the Contract. At the request and expense of the Contractor, securities equivalent to the amount withheld shall be deposited with the City, or with a state or federally chartered bank in California as the escrow agent, and thereafter the City shall then pay such monies to the Contractor as they come due. Upon satisfactory completion of the Contract, the securities shall be returned to the Contractor. For purposes of this Section and Section 22300 of the Public Contract Code, the term “satisfactory completion of the contract” shall mean the time the City has issued written final acceptance of the Work and filed a Notice of Completion as required by law and provisions of this Contract. The Contractor shall be the beneficial owner of any securities substituted for monies withheld and shall

CA-5
receive any interest thereon. The escrow agreement used for the purposes of this Section shall be in the form provided by the City.
3.8.6 Payment to Subcontractors. Contractor shall pay all subcontractors for and on account of work performed by such subcontractors in accordance with the terms of their respective subcontracts and as provided for in Section 10262 of the California Public Contract Code. Such payments to subcontractors shall be based on the measurements and estimates made and progress payments provided to Contractor pursuant to this Contract.
3.8.7 Title to Work. As security for partial, progress, or other payments, title to Work for which such payments are made shall pass to the City at the time of payment. To the extent that title has not previously been vested in the City by reason of payments, full title shall pass to the City at delivery of the Work at the destination and time specified in this Contract. Such transferred title shall in each case be good, free and clear from any and all security interests, liens, or other encumbrances. Contractor promises and agrees that it will not pledge, hypothecate, or otherwise encumber the items in any manner that would result in any lien, security interest, charge, or claim upon or against said items. Such transfer of title shall not imply acceptance by the City, nor relieve Contractor from the responsibility to strictly comply with the Contract, and shall not relieve Contractor of responsibility for any loss of or damage to items.
3.9 Termination. This Contract may be terminated by City at any time by giving Contractor three (3) days advance written notice. In the event of termination by City for any reason other than the fault of Contractor, City shall pay Contractor for all Work performed up to that time as provided herein. In the event of breach of the Contract by Contractor, City may terminate the Contract immediately without notice, may reduce payment to the Contractor in the amount necessary to offset City’s resulting damages, and may pursue any other available recourse against Contractor. Contractor may not terminate this Contract except for cause.
In the event this Contract is terminated in whole or in part as provided, City may procure, upon such terms and in such manner as it may determine appropriate, services similar to those terminated. Further, if this Contract is terminated as provided, City may require Contractor to provide all finished or unfinished documents, data, diagrams, drawings, materials or other matter prepared or built by Contractor in connection with its performance of this Contract.
3.10 Completion of Work. When the Contractor determines that it has completed the Work required herein, Contractor shall so notify City in writing and shall furnish all labor and material releases required by this Contract. City shall thereupon inspect the Work. If the Work is not acceptable to the City, the City shall indicate to Contractor in writing the specific portions or items of Work which are unsatisfactory or incomplete. Once Contractor determines that it has completed the incomplete or unsatisfactory Work, Contractor may request a reinspection by the City. Once the Work is acceptable to City, City shall pay to Contractor the Total Contract Price remaining to be paid, less any amount which City may be authorized or directed by law to retain.

CA-6
Payment of retention proceeds due to Contractor shall be made in accordance with Section 7107 of the California Public Contract Code.
3.11 City’s Representative. The City hereby designates Jeff Ruth, or his or her designee, to act as its representative for the performance of this Contract (“City’s Representative”). City’s Representative shall have the power to act on behalf of the City for all purposes under this Contract. Contractor shall not accept direction or orders from any person other than the City’s Representative or his or her designee.
3.12 Contractor’s Representative. Before starting the Work, Contractor shall submit in writing the name, qualifications and experience of its proposed representative who shall be subject to the review and approval of the City (“′Contractor’s Representative”). Following approval by the City, the Contractor’s Representative shall have full authority to represent and act on behalf of the Contractor for all purposes under this Contract. The Contractor’s Representative shall supervise and direct the Work, using his best skill and attention, and shall be responsible for all construction means, methods, techniques, sequences and procedures and for the satisfactory coordination of all portions of the Work under this Contract. Contractor’s Representative shall devote full time to the Project and either he or his designee, who shall be acceptable to the City, shall be present at the Work site at all times that any Work is in progress and at any time that any employee or subcontractor of Contractor is present at the Work site. Arrangements for responsible supervision, acceptable to the City, shall be made for emergency Work which may be required. Should Contractor desire to change its Contractor’s Representative, Contractor shall provide the information specified above and obtain the City’s written approval.
3.13 Contract Interpretation. Should any question arise regarding the meaning or import of any of the provisions of this Contract or written or oral instructions from City, the matter shall be referred to City’s Representative, whose decision shall be binding upon Contractor.
3.14 Loss and Damage. Contractor shall be responsible for all loss and damage which may arise out of the nature of the Work agreed to herein, or from the action of the elements, or from any unforeseen difficulties which may arise or be encountered in the prosecution of the Work until the same is fully completed and accepted by City. However, Contractor shall be responsible for damage proximately caused by Acts of God, within the meaning of Section 4150 of the California Government Code, only to the extent of five percent (5%) of the Total Contract Price as specified herein. In the event of damage proximately caused by “Acts of God,” the City may terminate this Contract upon three (3) days advanced written notice.
3.15 Indemnification. Contractor shall defend, indemnify and hold the City, its officials, officers, employees, volunteers and agents free and harmless from any and all claims, demands, causes of action, costs, expenses, liability, loss, damage or injury, in law or equity, to property or persons, including wrongful death, in any manner arising out of or incident to any acts, omissions or willful misconduct of Contractor, its officials, officers, employees, agents, consultants and contractors arising out of or in connection
CA-7
with the performance of the Work or this Contract, including without limitation the payment of all consequential damages and attorneys fees and other related costs and expenses. Contractor shall defend, at Contractor’s own cost, expense and risk, any and all such aforesaid suits, actions or other legal proceedings of every kind that may be brought or instituted against City, its directors, officials officers, employees, agents or volunteers. Contractor shall pay and satisfy any judgment, award or decree that may be rendered against City or its directors, officials, officers, employees, agents or volunteers, in any such suit, action or other legal proceeding. Contractor shall reimburse City and its directors, officials, officers, employees, agents and/or volunteers, for any and all legal expenses and costs incurred by each of them in connection therewith or in enforcing the indemnity herein provided.
3.16 Insurance.
3.16.1 Time for Compliance. Contractor shall not commence Work under this Contract until it has provided evidence satisfactory to the City that it has secured all insurance required under this section. In addition, Contractor shall not allow any subcontractor to commence work on any subcontract until it has provided evidence satisfactory to the City that the subcontractor has secured all insurance required under this section.
3.16.2 Types of Insurance Required. As a condition precedent to the effectiveness of this Contract for work to be performed hereunder and without limiting the indemnity provisions of the Contract, the Contractor in partial performance of its obligations under such Contract, shall procure and maintain in full force and effect during the term of the Contract, the following policies of insurance. If the existing policies do not meet the insurance requirements set forth herein, Contractor agrees to amend, supplement or endorse the policies to do so.
3.16.2.1 Commercial General Liability. Commercial General Liability Insurance which affords coverage at least as broad as Insurance Services Office “occurrence” Form CG 0001, with minimum limits of at least $1,000,000 per occurrence, and if written with an aggregate, the aggregate shall be double the per occurrence limit.
The policy shall contain no endorsements or provisions limiting coverage for (1) explosion, collapse or underground hazard (XCU); (2) products and completed operations; (3) contractual liability; (4) third party action over claims; (5) cross liability exclusion for claims or suits by one insured against another; or (6) contain any other exclusions contrary to this Contract.
3.16.2.2 Automobile Liability. Automobile Liability Insurance with coverage at least as broad as Insurance Services Office Form CA 0001 covering “Any Auto” (Symbol 1) with minimum limits of $1,000,000 each accident.
3.16.2.3 Contractors Pollution Liability. (Include this clause if there is a pollution liability exposure.)

CA-8
Contractors Pollution Liability Insurance covering all of the contractor's operations to include onsite and offsite coverage for bodily injury (including death and mental anguish), property damage, defense costs and cleanup costs with minimum limits of $5 million per loss and $10 million total all losses. The policy shall contain no endorsements or provisions limiting contractual liability or coverage for cross liability of claims or suits by one insured against another. Non-owned disposal site coverage shall be provided if handling, storing or generating hazardous materials or any material/substance otherwise regulated under environmental laws/regulations. For projects involving transportation of hazardous waste/materials, include coverage for loading/unloading from the project site to final disposal locations, and all disposal locations shall be scheduled as non-owned disposal sites. If coverage is written on a claims-made basis, the retroactive date shall precede the effective date of the initial Contract and continuous coverage will be maintained or an extended reporting period will be exercised for a period of at least three (3) years from termination or expiration of this Contract.
3.16.2.4 Builder's Risk Insurance. (Include this clause if structures are not to be covered under the City's Property Insurance Program.)
Builder's Risk Insurance for any property constructed on behalf of the City, to cover "all risk" of physical loss providing coverage for loss or damage from collapse, including collapse resulting from design error. The value insured shall cover 100% of the completed Contract cost and shall be maintained until full acceptance of the Work.
3.16.2.5 Professional Liability. (Include this clause for construction managers and design-build contractors.)
Professional Liability Insurance with minimum limits of $3,000,000. Covered professional services shall specifically include all work to be performed under the Contract and delete any exclusions that may potentially affect the work to be performed (for example, any exclusions relating to lead, asbestos, pollution, testing, underground storage tanks, laboratory analysis, soil work, etc.).
If coverage is written on a claims-made basis, the retroactive date shall precede the effective date of the Initial Contract and continuous coverage will be maintained or an extended reporting period will be exercised for a period of at least three (3) years from termination or expiration of this Contract.
3.16.2.6 Workers’ Compensation. Workers’ Compensation Insurance, as required by the State of California and Employer’s Liability Insurance, with a limit of not less than $1,000,000 per accident for bodily injury and disease.

CA-9
3.16.3 Endorsements. Required insurance policies shall not be in compliance if they include any limiting provision or endorsement that has not been submitted to the City for approval.
3.16.3.1 The policy or policies of insurance required by Section 3.16.2.1 (Commercial General Liability) and 3.16.2.3 (Contractors Pollution Liability) shall be endorsed to provide the following:
(1) Additional Insured: The City, its officials, officers, employees, agents, and volunteers shall be additional insureds with regard to liability and defense of suits or claims arising out of the performance of the Agreement.
Additional Insured Endorsements shall not (1) be restricted
to "ongoing operations"; (2) exclude "contractual liability"; (3) restrict coverage to "sole" liability of Contractor; or (4) contain any other exclusions contrary to the Contract.
(2) Cancellation: Required insurance policies shall not be
canceled or the coverage reduced until a thirty (30) day written notice of cancellation has been served upon the City except ten (10) days shall be allowed for non-payment of premium.
3.16.3.2 The policy or policies of insurance required by Section
3.16.2.2 (Automobile Liability) and 3.16.2.5 (Professional Liability) shall be endorsed to provide the following:
(1) Cancellation: Required insurance policies shall not be canceled or the coverage reduced until a thirty (30) day written notice of cancellation has been served upon the City except ten (10) days shall be allowed for non-payment of premium.
3.16.3.3 The policy or policies of insurance required by Section
3.16.2.4 (Builder's All Risk) shall be endorsed to provide the following:
(1) Waiver of Subrogation: A waiver of subrogation stating that the insurer waives all rights of subrogation against the indemnified parties.
(2) Cancellation: Required insurance policies shall not be
canceled or the coverage reduced until a thirty (30) day written notice of cancellation has been served upon the City except ten (10) days shall be allowed for non-payment of premium.
CA-10
(3) Loss Payee: Losses payable under this policy shall be adjusted with the Named Insured and paid to City as its interests may appear.
3.16.3.4 The policy or policies of insurance required by Section
3.16.2.6 (Workers' Compensation) shall be endorsed to provide the following:
(1) Waiver of Subrogation: A waiver of subrogation stating that the insurer waives all rights of subrogation against the indemnified parties.
(2) Cancellation: Required insurance policies shall not be
canceled or the coverage reduced until a thirty (30) day written notice of cancellation has been served upon the City except ten (10) days shall be allowed for non-payment of premium.
3.16.4 Primary and Non-Contributing Insurance. All insurance coverages shall be primary and any other insurance, deductible, or self-insurance maintained by the indemnified parties shall not contribute with this primary insurance. Policies shall contain or be endorsed to contain such provisions. 3.16.5 Waiver of Subrogation. Required insurance coverages shall not prohibit Contractor from waiving the right of subrogation prior to a loss. Contractor shall waive all subrogation rights against the indemnified parties. Policies shall contain or be endorsed to contain such provisions. 3.16.6 Deductible. Any deductible or self-insured retention must be approved in writing by the City and shall protect the indemnified parties in the same manner and to the same extent as they would have been protected had the policy or policies not contained a deductible or self-insured retention. 3.16.7 Evidence of Insurance. The Contractor, concurrently with the execution of the Contract, and as a condition precedent to the effectiveness thereof, shall deliver either certified copies of the required policies, or original certificates and endorsements on forms approved by the City. The certificates and endorsements for each insurance policy shall be signed by a person authorized by that insurer to bind coverage on its behalf. At least fifteen (15 days) prior to the expiration of any such policy, evidence of insurance showing that such insurance coverage has been renewed or extended shall be filed with the City. If such coverage is cancelled or reduced, Contractor shall, within ten (10) days after receipt of written notice of such cancellation or reduction of coverage, file with the City evidence of insurance showing that the required insurance has been reinstated or has been provided through another insurance company or companies. 3.16.8 Failure to Maintain Coverage. Contractor agrees to suspend and cease all operations hereunder during such period of time as the required insurance

CA-11
coverage is not in effect and evidence of insurance has not been furnished to the City. The City shall have the right to withhold any payment due Contractor until Contractor has fully complied with the insurance provisions of this Contractor.
In the event that the Contractor's operations are suspended for failure to maintain required insurance coverage, the Contractor shall not be entitled to an extension of time for completion of the Work because of production lost during suspension.
3.16.9 Acceptability of Insurers. Each such policy shall be from a company or companies with a current A.M. Best's rating of no less than A:VII and authorized to do business in the State of California, or otherwise allowed to place insurance through surplus line brokers under applicable provisions of the California Insurance Code or any federal law. 3.16.10 Insurance for Subcontractors. All Subcontractors shall be included as additional insureds under the Contractor's policies, or the Contractor shall be responsible for causing Subcontractors to purchase the appropriate insurance in compliance with the terms of these Insurance Requirements, including adding the City as an Additional Insured to the Subcontractor's policies.
3.17 Bond Requirements.
3.17.1 Payment Bond. If required by law or otherwise specifically requested by City in Exhibit “B” attached hereto and incorporated herein by reference, Contractor shall execute and provide to City concurrently with this Contract a Payment Bond in an amount required by the City and in a form provided or approved by the City. If such bond is required, no payment will be made to Contractor until the bond has been received and approved by the City.
3.17.2 Performance Bond. If specifically requested by City in Exhibit “B” attached hereto and incorporated herein by reference, Contractor shall execute and provide to City concurrently with this Contract a Performance Bond in an amount required by the City and in a form provided or approved by the City. If such bond is required, no payment will be made to Contractor until the bond has been received and approved by the City.
3.17.3 Bond Provisions. Should, in City’s sole opinion, any bond become insufficient or any surety be found to be unsatisfactory, Contractor shall renew or replace the effected bond within (ten) 10 days of receiving notice from City. In the event the surety or Contractor intends to reduce or cancel any required bond, at least thirty (30) days prior written notice shall be given to the City, and Contractor shall post acceptable replacement bonds at least ten (10) days prior to expiration of the original bonds. No further payments shall be deemed due or will be made under this Contract until any replacement bonds required by this Section are accepted by the City. To the extent, if any, that the Total Contract Price is increased in accordance with the Contract, the Contractor shall, upon request of the City, cause the amount of the bond to be

CA-12
increased accordingly and shall promptly deliver satisfactory evidence of such increase to the City. To the extent available, the bonds shall further provide that no change or alteration of the Contract (including, without limitation, an increase in the Total Contract Price, as referred to above), extensions of time, or modifications of the time, terms, or conditions of payment to the Contractor, will release the surety. If the Contractor fails to furnish any required bond, the City may terminate the Contract for cause.
3.17.4 Surety Qualifications. Only bonds executed by an admitted surety insurer, as defined in California Code of Civil Procedure Section 995.120, shall be accepted. The surety must be a California-admitted surety with a current A.M. Best’s rating no less than A:VII and satisfactory to the City. If a California-admitted surety insurer issuing bonds does not meet these requirements, the insurer will be considered qualified if it is in conformance with Section 995.660 of the California Code of Civil Procedure, and proof of such is provided to the City.
3.18 Safety. Contractor shall execute and maintain its work so as to avoid injury or damage to any person or property. Contractor shall comply with the requirements of the specifications relating to safety measures applicable in particular operations or kinds of work. In carrying out its Work, the Contractor shall at all times be in compliance with all applicable local, state and federal laws, rules and regulations, and shall exercise all necessary precautions for the safety of employees appropriate to the nature of the Work and the conditions under which the Work is to be performed. Safety precautions as applicable shall include, but shall not be limited to, adequate life protection and life saving equipment; adequate illumination for underground and night operations; instructions in accident prevention for all employees, such as machinery guards, safe walkways, scaffolds, ladders, bridges, gang planks, confined space procedures, trenching and shoring, fall protection and other safety devices, equipment and wearing apparel as are necessary or lawfully required to prevent accidents or injuries; and adequate facilities for the proper inspection and maintenance of all safety measures. Furthermore, Contractor shall prominently display the names and telephone numbers of at least two medical doctors practicing in the vicinity of the Project, as well as the telephone number of the local ambulance service, adjacent to all telephones at the Project site.
3.19 Warranty. Contractor warrants all Work under the Contract (which for purposes of this Section shall be deemed to include unauthorized work which has not been removed and any non-conforming materials incorporated into the Work) to be of good quality and free from any defective or faulty material and workmanship. Contractor agrees that for a period of one year (or the period of time specified elsewhere in the Contract or in any guarantee or warranty provided by any manufacturer or supplier of equipment or materials incorporated into the Work, whichever is later) after the date of final acceptance, Contractor shall within ten (10) days after being notified in writing by the City of any defect in the Work or non-conformance of the Work to the Contract, commence and prosecute with due diligence all Work necessary to fulfill the terms of the warranty at its sole cost and expense. Contractor shall act sooner as requested by the City in response to an emergency. In addition, Contractor shall, at its sole cost and expense, repair and
CA-13
replace any portions of the Work (or work of other contractors) damaged by its defective Work or which becomes damaged in the course of repairing or replacing defective Work. For any Work so corrected, Contractor’s obligation hereunder to correct defective Work shall be reinstated for an additional one year period, commencing with the date of acceptance of such corrected Work. Contractor shall perform such tests as the City may require to verify that any corrective actions, including, without limitation, redesign, repairs, and replacements comply with the requirements of the Contract. All costs associated with such corrective actions and testing, including the removal, replacement, and reinstitution of equipment and materials necessary to gain access, shall be the sole responsibility of the Contractor. All warranties and guarantees of subcontractors, suppliers and manufacturers with respect to any portion of the Work, whether express or implied, are deemed to be obtained by Contractor for the benefit of the City, regardless of whether or not such warranties and guarantees have been transferred or assigned to the City by separate agreement and Contractor agrees to enforce such warranties and guarantees, if necessary, on behalf of the City. In the event that Contractor fails to perform its obligations under this Section, or under any other warranty or guaranty under this Contract, to the reasonable satisfaction of the City, the City shall have the right to correct and replace any defective or non-conforming Work and any work damaged by such work or the replacement or correction thereof at Contractor’s sole expense. Contractor shall be obligated to fully reimburse the City for any expenses incurred hereunder upon demand.
3.20 Laws and Regulations. Contractor shall keep itself fully informed of and in compliance with all local, state and federal laws, rules and regulations in any manner affecting the performance of the Contract or the Work, including all Cal/OSHA requirements, and shall give all notices required by law. Contractor shall be liable for all violations of such laws and regulations in connection with Work. If the Contractor observes that the drawings or specifications are at variance with any law, rule or regulation, it shall promptly notify the City in writing. Any necessary changes shall be made by written change order. If the Contractor performs any work knowing it to be contrary to such laws, rules and regulations and without giving written notice to the City, the Contractor shall be solely responsible for all costs arising therefrom. Contractor shall defend, indemnify and hold City, its officials, directors, officers, employees and agents free and harmless, pursuant to the indemnification provisions of this Contract, from any claim or liability arising out of any failure or alleged failure to comply with such laws, rules or regulations.
3.21 Permits and Licenses. Contractor shall be responsible for securing City permits and licenses necessary to perform the Work described herein, including, but not limited to, a City Business License. While Contractor will not be charged a fee for any City permits, Contractor shall pay the City’s applicable business license fee.
3.22 Trenching Work. If the Total Contract Price exceeds $25,000 and if the Work governed by this Contract entails excavation of any trench or trenches five (5) feet or more in depth, Contractor shall comply with all applicable provisions of the California Labor Code, including Section 6705. To this end, Contractor shall submit for City’s review and approval a detailed plan showing the design of shoring, bracing, sloping, or

CA-14
other provisions to be made for worker protection from the hazard of caving ground during the excavation of such trench or trenches. If such plan varies from the shoring system standards, the plan shall be prepared by a registered civil or structural engineer.
3.23 Hazardous Materials and Differing Conditions. As required by California Public Contract Code Section 7104, if this Contract involves digging trenches or other excavations that extend deeper than four (4) feet below the surface, Contractor shall promptly, and prior to disturbance of any conditions, notify City of: (1) any material discovered in excavation that Contractor believes to be a hazardous waste that is required to be removed to a Class I, Class II or Class III disposal site; (2) subsurface or latent physical conditions at the site differing from those indicated by City; and (3) unknown physical conditions of an unusual nature at the site, significantly different from those ordinarily encountered in such contract work. Upon notification, City shall promptly investigate the conditions to determine whether a change order is appropriate. In the event of a dispute, Contractor shall not be excused from any scheduled completion date and shall proceed with all Work to be performed under the Contract, but shall retain all rights provided by the Contract or by law for making protests and resolving the dispute.
3.24 Underground Utility Facilities. To the extent required by Section 4215 of the California Government Code, City shall compensate Contractor for the costs of: (1) locating and repairing damage to underground utility facilities not caused by the failure of Contractor to exercise reasonable care; (2) removing or relocating underground utility facilities not indicated in the construction drawings; and (3) equipment necessarily idled during such work. Contractor shall not be assessed liquidated damages for delay caused by failure of City to provide for removal or relocation of such utility facilities.
3.25 Prevailing Wages. Contractor is aware of the requirements of California Labor Code Section 1720, et seq., and 1770, et seq., as well as California Code of Regulations, Title 8, Section 16000, et seq., (“Prevailing Wage Laws”), which require the payment of prevailing wage rates and the performance of other requirements on “public works” and “maintenance” projects. If the Services are being performed as part of an applicable “public works” or “maintenance” project, as defined by the Prevailing Wage Laws, and if the total compensation is $1,000 or more, Contractor agrees to fully comply with such Prevailing Wage Laws. City shall provide Contractor with a copy of the prevailing rates of per diem wages in effect at the commencement of this Contract. Contractor shall make copies of the prevailing rates of per diem wages for each craft, classification or type of worker needed to execute the Services available to interested parties upon request, and shall post copies at the Contractor’s principal place of business and at the project site. Contractor shall defend, indemnify and hold the City, its elected officials, officers, employees and agents free and harmless from any claim or liability arising out of any failure or alleged failure to comply with the Prevailing Wage Laws.
3.26 Apprenticeable Crafts. When Contractor employs workmen in an apprenticeable craft or trade, Contractor shall comply with the provisions of Section 1777.5 of the California Labor Code with respect to the employment of properly

CA-15
registered apprentices upon public works. The primary responsibility for compliance with said section for all apprenticeable occupations shall be with Contractor.
3.27 Hours of Work. Contractor is advised that eight (8) hours labor constitutes a legal day’s work. Pursuant to Section 1813 of the California Labor Code, Contractor shall forfeit a penalty of $25.00 per worker for each day that each worker is permitted to work more than eight (8) hours in any one calendar day and forty (40) hours in any one calendar week, except when payment for overtime is made at not less than one and one-half (1-1/2) times the basic rate for that worker.
3.28 Payroll Records. In accordance with the requirements of California Labor Code Section 1776, Contractor shall keep accurate payroll records which are either on forms provided by the Division of Labor Standards Enforcement or which contain the same information required by such forms. Responsibility for compliance with California Labor Code Section 1776 shall rest solely with Contractor, and Contractor shall make all such records available for inspection at all reasonable hours.
3.29 Contractor’s Labor Certification. By its signature hereunder, Contractor certifies that he is aware of the provisions of Section 3700 of the California Labor Code which require every employer to be insured against liability for Worker’s Compensation or to undertake self-insurance in accordance with the provisions of that Code, and agrees to comply with such provisions before commencing the performance of the Work. A certification form for this purpose, which is attached to this Contract as Exhibit “C” and incorporated herein by reference, shall be executed simultaneously with this Contract.
3.30 Labor and Material Releases. Contractor shall furnish City with labor and material releases from all subcontractors performing work on, or furnishing materials for, the work governed by this Contract prior to final payment by City.
3.31 Equal Opportunity Employment. Contractor represents that it is an equal opportunity employer and that it shall not discriminate against any employee or applicant for employment because of race, religion, color, national origin, ancestry, sex, age or other interests protected by the State or Federal Constitutions. Such non-discrimination shall include, but not be limited to, all activities related to initial employment, upgrading, demotion, transfer, recruitment or recruitment advertising, layoff or termination.
3.32 Anti-Trust Claims. This provision shall be operative if this Contract is applicable to California Public Contract Code Section 7103.5. In entering into this Contract to supply goods, services or materials, the Contractor hereby offers and agrees to assign to the City all rights, title, and interest in and to all causes of action it may have under Section 4 of the Clayton Act (15 U.S.C. Section 15) or under the Cartwright Act (Chapter 2, commencing with Section 16700, of Part 2 of Division 7 of the Business and Professions Code) arising from purchases of goods, services, or materials pursuant to the Contract. This assignment shall be made and become

CA-16
effective at the time the City tender final payment to the Contractor, without further acknowledgment by the Parties.
3.33 Notices. All notices hereunder and communications regarding interpretation of the terms of the Contract or changes thereto shall be provided by the mailing thereof by registered or certified mail, return receipt requested, postage prepaid and addressed as follows:
City Contractor City of Yorba Linda [INSERT NAME] 4845 Casa Loma Avenue [INSERT ADDRESS] Yorba Linda, CA 92886 [INSERT ADDRESS] Attn: Jeff Ruth Attn: [INSERT NAME]
Any notice so given shall be considered received by the other Party three (3) days after deposit in the U.S. Mail as stated above and addressed to the Party at the above address. Actual notice shall be deemed adequate notice on the date actual notice occurred, regardless of the method of service.
3.34 Entire Contract; Modification. This Contract contains the entire agreement of the Parties with respect to the subject matter hereof, and supersedes all prior negotiations, understandings or agreements. This Contract may only be modified by a writing signed by both Parties.
3.35 Time of Essence. Time is of the essence in the performance of this Contract.
3.36 Assignment Forbidden. Contractor shall not, either voluntarily or by action of law, assign or transfer this Contract or any obligation, right, title or interest assumed by Contractor herein without the prior written consent of City. If Contractor attempts an assignment or transfer of this Contract or any obligation, right, title or interest herein, City may, at its option, terminate and revoke the Contract and shall thereupon be relieved from any and all obligations to Contractor or its assignee or transferee.
3.37 Governing Law. This Contract shall be governed by the laws of the State of California. Venue shall be in Orange County.
3.38 Counterparts. This Contract may be executed in counterparts, each of which shall constitute an original.
3.39 Successors. The Parties do for themselves, their heirs, executors, administrators, successors, and assigns agree to the full performance of all of the provisions contained in this Contract.

CA-17
3.40 Attorneys’ Fees. If either Party commences an action against the other Party, either legal, administrative or otherwise, arising out of or in connection with this Contract, the prevailing Party in such action shall be entitled to have and recover from the losing Party reasonable attorneys’ fees and all other costs of such action.
3.41 Claims of $375,000 or Less. Notwithstanding any other provision herein, claims of $375,000 or less shall be resolved pursuant to the alternative dispute resolution procedures set forth in California Public Contract Code §§ 20104, et seq.
3.42 Prohibited Interests.
3.42.1 Solicitation. Contractor maintains and warrants that it has not employed nor retained any company or person, other than a bona fide employee working solely for Contractor, to solicit or secure this Contract. Further, Contractor warrants that it has not paid nor has it agreed to pay any company or person, other than a bona fide employee working solely for Contractor, any fee, commission, percentage, brokerage fee, gift or other consideration contingent upon or resulting from the award or making of this Contract. For breach or violation of this warranty, City shall have the right to terminate this Contract without liability.
3.42.2 Conflict of Interest. For the term of this Contract, no member, officer or employee of City, during the term of his or her service with City, shall have any direct interest in this Contract, or obtain any present or anticipated material benefit arising therefrom. In addition, Contractor agrees to file, or to cause its employees or subcontractors to file, a Statement of Economic Interest with the City’s Filing Officer as required under state law in the performance of the Work.
3.43 Certification of License. Contractor certifies that as of the date of execution of this Contract, Contractor has a current contractor’s license of the classification indicated below under Contractor’s signature.
3.44 Authority to Enter Agreement. Contractor has all requisite power and authority to conduct its business and to execute, deliver and perform the Contract. Each Party warrants that the individuals who have signed this Contract have the legal power, right and authority to make this Contract and bind each respective Party.
IN WITNESS WHEREOF, each of the Parties has caused this Contract to be executed on the day and year first above written.
[Signatures on following page.]

CA-18
CITY OF YORBA LINDA [INSERT NAME OF CONTRACTOR] By: By: Mayor Name: Title: Attest:
[If Corporation, TWO SIGNATURES, President OR Vice President AND Secretary, AND CORPORATE SEAL OF CONTRACTOR REQUIRED]
By: Marcia Brown By:
City Clerk Name:
Title: Approved as to Form: By: Classification of Contractor’s License
Rutan & Tucker LLP City Attorney

ORANGE\KSD\4984 BBK: DECEMBER 2003
A-1
EXHIBIT “A”
PLANS AND SPECIFICATIONS
The following plans and specifications are incorporated into this Contract herein by this reference:
COMMUNITY CENTER INTERIOR RENOVATION PROJECT
PLANS AND SPECIFICATIONS AUGUST 2019

ORANGE\KSD\4984 BBK: DECEMBER 2003
B-1
EXHIBIT “B”
SPECIAL CONDITIONS
THE CITY REQUIRES CONTRACTOR TO FURNISH PAYMENT AND PERFORMANCE BONDS PURSUANT TO SECTIONS 3.17.1 AND 3.17.2 OF THE
CONTRACT.

ORANGE\KSD\4984 BBK: DECEMBER 2003
B-2
FAITHFUL PERFORMANCE BOND
FOR COMMUNITY CENTER INTERIOR RENOVATION PROJECT
KNOW ALL MEN BY THESE PRESENTS, that ,as
CONTRACTOR, and as SURETY,
are held and firmly bound unto the CITY OF YORBA LINDA as AGENCY, in the penal sum of:
Dollars
($ ) which is one hundred percent (100%) of the total contract amount for the
above stated project, for the payment of which sums CONTRACTOR and SURETY agree to be bound,
jointly and severally, firmly by these presents.
THE CONDITIONS OF THIS OBLIGATION ARE SUCH that, whereas CONTRACTOR has been
awarded and is about to enter into the annexed Contract Agreement with AGENCY for the above stated
project, if CONTRACTOR faithfully performs and fulfills all obligations under the contract documents in
the manner and time specified therein, then this obligation shall be null and void; otherwise it shall remain
in full force and effect in favor of AGENCY; provided that any alterations in the obligations or time for
completion made pursuant to the terms of the contract documents shall not in any way release either
CONTRACTOR or SURETY and notice of such alterations is hereby waived by SURETY.
WITNESS our hands this day of , 2019.
(seal)
CONTRACTOR (CORPORATION-TYPE) By: PRESIDENT By: SECRETARY/TREASURER
NOTE: SIGNATURE OF CORPORATE OFFICIALS AND SURETY OFFICIALS MUST BE NOTARIZED

ORANGE\KSD\4984 BBK: DECEMBER 2003
B-3
PERFORMANCE BOND (Page 2)
(seal) SURETY’S NAME-TYPE MAILING ADDRESS (SURETY) By: Name Title
NOTE: SIGNATURE OF CORPORATE OFFICIALS AND SURETY OFFICIALS MUST BE NOTARIZED
BOND APPROVED AS TO FORM:
CITY ATTORNEY - CITY OF YORBA LINDA

ORANGE\KSD\4984 BBK: DECEMBER 2003
B-4
MATERIAL AND LABOR PAYMENT BOND
FOR COMMUNITY CENTER INTERIOR RENOVATION PROJECT
KNOW ALL MEN BY THESE PRESENTS, that ,as
CONTRACTOR, and as SURETY,
are held and firmly bound unto THE CITY OF YORBA LINDA as AGENCY, in the penal sum of:
Dollars
($ ), which is one hundred percent (100%) of the total contract amount for the above
stated project, for the payment of which sums CONTRACTOR and SURETY agree to be bound, jointly
and severally, firmly by these presents.
THE CONDITIONS OF THIS OBLIGATION ARE SUCH that, whereas CONTRACTOR has been
awarded and is about to enter into the annexed Contract Agreement with AGENCY for the above stated
project, if CONTRACTOR or any subcontractor fails to pay for any labor or materials of any kind used in
the performance of the work to be done under said contract, or fails to submit amounts due under the
State Unemployment Insurance Act with respect to said labor, SURETY will pay for the same in an
amount not exceeding the sum set forth above, which amount shall insure to the benefit of all persons
entitled to file claims under the State Code of Civil Procedures; provided that any alternations in the work
to be done, materials to be furnished, or time for completion made pursuant to the terms of the contract
documents shall not in any way release either CONTRACTOR or SURETY and notice of such alterations
is hereby waived by SURETY.
WITNESS our hand this day of , 2019 (seal) CONTRACTOR (CORPORATION-TYPE) By: President By: Secretary/Treasurer
NOTE: SIGNATURE OF CORPORATE OFFICIALS AND SURETY OFFICIALS MUST BE NOTARIZED

ORANGE\KSD\4984 BBK: DECEMBER 2003
B-5
PAYMENT BOND (Page 2)
(seal) Surety’s Name - Type Mailing Address (Surety) By: Name Title NOTE: SIGNATURE OF CORPORATE OFFICIALS AND SURETY MUST BE NOTARIZED BOND APPROVED AS TO FORM: CITY ATTORNEY - CITY OF YORBA LINDA

C-1
EXHIBIT “C”
CERTIFICATION LABOR CODE - SECTION 1861
I, the undersigned Contractor, am aware of the provisions of Section 3700,
et seq., of the California Labor Code which require every employer to be insured against
liability for Worker’s Compensation or to undertake self-insurance in accordance with
the provisions of the Code, and I, the undersigned Contractor, agree to and will comply
with such provisions before commencing the performance of the Work on this Contract.
[INSERT CONTRACTOR’S NAME]
By: [INSERT NAME] [INSERT TITLE]

GS-1
CITY OF YORBA LINDA
GENERAL SPECIFICATIONS
FOR THE
COMMUNITY CENTER INTERIOR RENOVATION PROJECT
SCOPE OF WORK The work generally consists of providing phased construction services in occupied space, but is not limited to; paint, wallcovering, patch and repair walls, flooring, cabinets, countertops, and the inspection and cleanup of the facility. Remove and replace furniture office areas for installation of new wallcovering. Remove all existing wallcovering, hand rails, chair/crash rails, wallcovering accessories, wall fixtures, face plates, switch plates, and other similar items in lobbies, hallways, restroom vestibules, staff offices and the following Rooms: Imperial, Yorba, Game, Club, Multi-Purpose, Activity A and Activity B. Apply protection over items unable to be removed (fire alarm pull stations, strobes, etc.). Prepare surfaces for new finishes including repairing and filling all gaps, holes prior to painting and installation. Replace with new as noted on Finish Plan A-1.0 (APPENDIX A). Paint walls, ceilings, soffits, fire extinguisher cases and interior door frames as defined in APPENDIX A. Remove existing flooring, cabinets, wall base and millwork in Break Room. Install new cabinets per Kitchen Room 1 drawings (APPENDIX A). Prepare surfaces for new finishes. Replace with new as noted on Finish Plan A-1.0 (APPENDIX A). Remove existing wall base in Activity Rooms A & B and Vestibule to Hallway 105. Prepare surfaces for new wall base. Replace with new as noted on Finish Plan A-1.0 (APPENDIX A). LOCATION OF WORK The location and limits of the work is at Yorba Linda Community Center, 4501 Casa Loma Ave, Yorba Linda, CA, 92886. Work will be phased to minimize disruption in occupied space. Quote must include phasing plan and project durations in accordance with working hours outlined. Work shall not interfere with scheduled events, including setup of those events. TIME OF COMPLETION The Contractor shall complete all work in every detail within 90 working days from the date of the Notice to Proceed.

GS-2
TRAFFIC REQUIREMENTS The Contractor shall provide delineation in accordance with, and comply with, the latest editions of the HPWA, APWA, the Work Area Traffic Control Handbook (“W.A.T.C.H.” handbook) and the California Manual of Traffic Controls (refer to signage, barriers, and lane closure sections). No street closures shall be made without the prior approval of the City Representative and appropriate encroachment permit(s) as required. SPECIAL REQUESTS The Contractor may be requested by the City representative to perform special tasks that are above the normal scheduled work (i.e., citizen requests, coordination with special work orders relative to City functions, special event preparation). It is intended that the Specifications are indicative of the work to be anticipated by the Contractor and will allow for reasonable additional work or altered work schedules at no additional cost to the City. PROJECT INSPECTIONS Upon request, the Contractor will walk the project area with the City representative for the purpose of determining compliance with the Specifications or to discuss required work. Typically, the inspections are daily and require the presence of the contract supervisor. Inspections may be required more frequently at the discretion of the City Representative. SUPERVISION AND SKILLS The Contractor shall assign a supervisor within the city limits of the City of Yorba Linda, working regular working hours for the duration of this Contract. The supervisor shall be capable of communicating effectively both in written and spoken English and background must include experience on projects of the type presented in this specification. The Contractor shall outfit the supervisor with a cellular phone capable of receiving and making calls within the City limits and surrounding areas. EMERGENCY RESPONSE The Contractor shall be available twenty-four (24) hours per day, seven (7) days per week to respond to all emergencies within two (2) hours of notification or “attempted notification.” If Contractor cannot be notified or does not respond in a timely manner, any costs incurred, by the City to remediate the situation, will be paid by the Contractor. LICENSE AND PERMITS At the time of contract award, the CONTRACTOR shall possess a State of California Class A Contractor’s License or a combination of Specialty Contractor’s License(s) adequate to perform the work here-in described. All subcontractors shall have

GS-3
equivalent licenses for their specific trades. The Contractor and all subcontractors shall have a valid City of Yorba Linda business license prior to commencing any work. DRESS CODE AND APPEARANCE All Contractors’ personnel shall be required to wear a uniform shirt bearing company name while on the project. Uniform shall present a neat and clean appearance of personnel at all times. Uniform shall consist of a shirt and jacket with company name and employee name. SAFETY ORDERS Contractor shall be responsible for providing a safe work place, and be responsible for compliance with standards and regulations of the California Occupational Safety and Health Act (Cal/OSHA), Federal Occupational Safety and Health Act (OSHA), California Division of Industrial Safety (CDIS), State of California Manual of Traffic Controls, California Department of Food and Agriculture (CDFA) Laws and Regulations, and any other applicable governmental law or City risk management standards. UTILITY REQUIREMENTS The Contractor is advised of the existence of the utility notification service provided by UNDERGROUND SERVICE ALERT (USA). USA member utilities will provide the Contractor with the precise locations of their substructures in the construction area when the Contractor gives at least 48 hours notice to the Underground Service Alert by calling 1-800-227-2600. Contractor shall provide the agency with proof of contact with USA upon request. The Contractor shall notify the following agencies at least 48 hours in advance of excavating around any of their structures. The utility companies listed below can be contacted as indicated. 1. Southern California Gas Company 6. MWD (Distribution) P.O. Box 54153 1919 State College Boulevard Los Angeles, CA 90054-0153 P.O. Box 3334 Kiren Callanan (213) 217-7474 Anaheim, CA 92803 Steve Alcala (714) 634-3185 7. Orange County Sanitation District P.O. Box 8127 2. AT&T Fountain Valley, CA 92728-8127 3939 East Coronado Street Lynn Elliot (714) 962-2411 Anaheim, CA 92807 Greg Griffith (714) 237-6019 8. Golden State Water Company 500 Cameron 3. Southern California Edison Company Placentia, CA 92870 (Distribution) Terry Murphy (714) 528-1463 ext108 1851 W. Valencia Drive Fullerton, CA 92633 9. Southern California Gas Company

GS-4
Jeff Cessna (714) 870-3149 (Transmission) 9400 Oakdale Avenue 4. Yorba Linda Water District Chatsworth, CA 91311-6511 4622 Plumosa Drive Rosalyn Squires (818) 701-4546 P.O. Box 309 Yorba Linda, CA 92886 10. Southern California Edison Company Ken Vecchiarelli (714) 701-3100 (Transmission) 14799 Chestnut Street 5. Time Warner Westminster, CA 92683 7441 Chapman Avenue Lisa Salinas (714) 934-0838 Garden Grove, CA 92841 Don Simons (714) 903-8347 11. MWD 3972 Valley View Yorba Linda, CA 92886 Rick Bicker (714) 577-5084 The California Public Utilities Commission mandates that, in the interest of public safety, main line gas valves be maintained in a manner to be readily accessible and in good operating condition. The Contractor shall notify the Southern California Gas Company's Headquarters Planning Office at (714) 369-0680 at least 2 working days prior to the start of construction. The Contractor shall exercise extreme care to protect all existing utilities in place whether shown on the plans or not, and shall assume full responsibility for all damage resulting from his operations. The Contractor shall coordinate with each utility company as to the requirements and methods for protection of their facilities during the construction period, and shall be responsible for preparation and processing of any required plans or permits. The Contractor shall assume full responsibility to maintain uninterrupted service for all utilities. By submitting a bid, the Contractor acknowledges the above referenced utility work to be done in conjunction with this project. The Contractor shall schedule his work and conduct his operations so as to permit access and time for the required utility work to be accomplished during the progress of the work. The Contractor shall coordinate with each utility company as to the extent of required work and the time required to do so. The Contractor shall include this time in his schedule. Payment for the above, if any, shall be deemed as included in the items of work as shown on the proposal bid sheet(s) and no additional compensation will be allowed. THE CITY’S RIGHT TO DO WORK The City reserves the right to do any work as required within the contract area. If such alterations affect the provision of this Agreement, the Contractor will be asked to submit justification and an estimated cost as a result of the alterations.

GS-5
COOPERATION AND COLLATERAL WORK The Contractor shall recognize that during the course of the contract other activities and operations will be conducted by the City and/or other contractors. These activities will include but are not limited to: turf and landscape maintenance; landscape refurbishment; irrigation system maintenance, modification or repair; construction; and storm related operations. The Contractor may be required to modify or curtail certain operations and shall promptly comply with any request made by the City representative. FLOW AND ACCEPTANCE OF WATER It is anticipated that storm, surface or other waters will be encountered at various times and locations during the work herein contemplated. The Contractor, by submitting a bid, acknowledges that he has investigated the risk arising from such waters and has prepared his bid accordingly, and Contractor, by submitting a bid, assumes all of said risk. PROTECTION OF PROPERTY DURING INCLEMENT WEATHER During periods of inclement weather, the Contractor will provide supervisory inspection of the project during regular working hours to prevent or minimize possible damage. The Contractor shall submit a report identifying any damage to the City representative attached to a site map identifying location of damage and cost estimate to repair/replace. It is the Contractor's responsibility for removing debris accumulated by winds or other typical or non-typical environmental conditions. PROTECTION OF EXISTING FACILITIES AND STRUCTURES The Contractor shall exercise care in protecting from damage all existing facilities, structures, and utilities, both above surface and underground, on the City's property. Any damage to City property deemed to be caused by the Contractor's neglect shall be corrected or paid for by the Contractor at no additional cost to the City. If the City requests or directs the Contractor to perform work in a given area, it will be the Contractor's responsibility to verify and locate any underground systems, (i.e., utility lines). This does not release the Contractor of the responsibility for taking reasonable precaution when working in these areas. Any damage or problems shall be reported immediately to the City. REMOVAL OF WATER The Contractor shall provide and maintain at all times during construction ample means and devices to promptly remove and properly dispose of all water entering the excavations

GS-6
or other parts of the work. No concrete footing or floor shall be laid in water nor shall water be allowed to rise over them until the concrete or mortar has set at least two (2) hours. Water shall not be allowed to rise unequally against any walls for a period of twenty-eight (28) days. Dewatering for the structures and pipelines shall commence when ground water is first encountered, and shall be continuous until such time as water can be allowed to rise in accordance with the above statement. Dewatering shall be accomplished by well points or some other method, which will insure a dry hold and preservation of final lines and grade of the bottoms of excavation, all subject to the approval of the City’s representative. Dewatering methods and disposal of water from dewatering operations shall be the sole responsibility of the Contractor and shall conform to the requirements of the State Regional Water Quality Control Board, the requirements of the National Pollution Discharge Elimination System (NPDES), and the Federal Clean Water Act. Full compensation for dewatering shall be considered as included in the contract prices paid for the related items of work, and no additional compensation will be allowed therefore. STANDARD SPECIFICATIONS The Standard Specifications of the AGENCY are contained in the latest edition of the STANDARD SPECIFICATIONS FOR PUBLIC WORKS CONSTRUCTION, including all supplements, as written and promulgated by the Joint Cooperative Committee of the Southern California Chapter of the American Public Works Association and the Southern California District of the Associated General Contractors of California. Copies of these Standard Specifications are available from the publisher: Building News, Incorporated P.O. Box 3031 Terminal Annex Los Angeles, California 90051 (213) 202-7775 The Standard Specifications set forth above will control the general provisions for this contract except as amended by the Plans, General Specifications, Special Provisions, or other contract documents. The section numbers of the following Special Provisions coincide with those of the said Standard Specifications. Only those sections requiring amendment or elaboration, or specifying options, are called out. In case of conflict between the Standard Specifications and the General Specifications or Special Provisions, the General Specifications and Special Provisions shall take precedence over and be used in lieu of such conflicting portions of the Standard Specifications. References in the Special Provisions to "CALTRANS Standard Specifications" shall mean the Standard Specifications (latest edition) of the State of California, Department of

GS-7
Transportation. Copies of these specifications and standard drawings may be obtained from: State of California - Department of Transportation Central Publication Distribution Unit 6002 Folsom Boulevard Sacramento, California 95819 References in the Special Provisions to Standard Plans shall mean those specific standard plans as selected by the City’s representative from the Standard Plans of the City of Yorba Linda, and where applicable, the APWA Standard Plans for Public Works Construction (latest edition) the Standard Plans of the County of Orange and State Department of Transportation, (latest edition). References in the Special Provisions and on the Signal Plans to the “CALTRANS Standard Plans” shall mean the applicable Standard Plans of the State of California, Business and Transportation Agency, Department of Transportation, (latest edition). Where the Plans or Specifications describe portions of the work in general terms, but not in complete detail, it is understood that the item is to be furnished and installed complete and in place and that only the best general practice is to prevail and that only materials and workmanship of the first quality are to be used. Unless otherwise specified, the Contractor shall furnish all labor, materials, tools, equipment and incidentals, and do all the work involved in executing the contract. WAGE RATES AND LABOR CODE REQUIREMENTS Wage Rates The Contractor and all Subcontractors shall be required to adhere to the general prevailing rate of per diem wages as determined and published by the State Director of the Department of Industrial Relations, pursuant to Section 1770, 1773 and 1773.2 of the California Labor Code. Copies of these rates and the latest revisions thereto are on file in the Office of the Secretary of the Board of Directors and are available for review upon request. If there is a difference between the minimum wage rates predetermined by the Secretary of Labor and the general prevailing wage rates determined by the Director of the California Department of Industrial Relations for similar classifications of labor, the Contractor and subcontractors shall pay not less than the higher wage rate. The Agency will not accept lower State wage rates not specifically included in the Federal minimum wage determinations. This includes "helper" (or other classifications based on hours of experience) or any other classification not appearing in the Federal wage determinations. Where Federal wage determinations do not contain the State wage rate determination otherwise available for use by the Contractor and subcontractors, the Contractor and subcontractors shall pay not less than the Federal minimum wage rate which most closely approximates the duties of the employees in question.

GS-8
Attention is directed to the provisions of Sections 1774, 1775, 1776, 1777.5 and 1777.6 of the State Labor Code, excerpt copies of which are contained in Appendix II of these Specifications. Sections 1774 and 1775 require the Contractor and all Subcontractors to pay not less than the prevailing wage rates to all workmen employed in the execution of the contract and specify forfeitures and penalties for failure to do so. The minimum wages to be paid are those determined by the State Director of the Department of Industrial Relations. Section 1776 requires the Contractor and all Subcontractors to keep accurate payroll records, specifies the contents thereof, their inspection and duplication procedures and certain notices required of the Contractor pertaining to their location. Apprentices Section 1777.5 requires the Contractor or Subcontractor employing tradesmen in any apprenticeable occupation to apply to the Joint Apprenticeship Committee nearest the site of the public works project and which administers the apprenticeship program in that trade for a certificate of approval. The certificate will also fix the ratio of apprentices to journeymen to be used in the performance of the contract. The Contractor is required to make contributions to funds established for the administration of apprenticeship programs if he employs registered apprentices or journeymen in any apprenticeable trade and if other Contractors on the public works site are making such contributions. The Contractor must also comply with the requirements regarding Federal trainees noted in the Federal Requirements Section of these Special Provisions. Information relative to apprenticeship standards, contributions, wage schedules and other requirements may be obtained from the State Director of Industrial Relations or from the Division of Apprenticeship Standards. RESOLUTION OF CONSTRUCTION CLAIMS OF $375,000 OR LESS. Effective January 1, 1991, Section 20104 et seq. of the California Public Contract Code prescribes a process utilizing informal conferences, nonbinding judicially supervised mediation, and judicial arbitration to resolve disputes on construction claims of $375,000 or less. "Public work" has the same meaning as in Section 3100 and 3106 of the Civil Code, ..." (20104 (b) (1)). "Claim" means a separate demand by the contractor for (A) a time extension, (B) payment of money or damages arising from work done by or on behalf of the Contractor pursuant to the contract for a public work and payment of which is not otherwise entitled to, or (C) and amount the payment of which is disputed by the local agency. (20401(b) (2)).

GS-9
The following requirements apply to all contracts entered into after January 1, 1991, and all claims to which this section applies: (All references are to Section 20141.2 et seq.). (a) The claim shall be in writing and include the documents necessary to substantiate
the claim. Claims must be filed on or before the date of final payment. Nothing in this subdivision is intended to extend the time limit or supersede notice requirements otherwise provided by contract for the filing of claims.
(b) (1) For claims of less than fifty thousand dollars ($50,000), the local agency shall
respond in writing to any written claim within 45 days of receipt of the claim, or may request, in writing, within 30 days of receipt of the claim, any additional documentation supporting the claim or relating to defenses or claims the local agency may have against the claimant.
(2) If additional information is thereafter required, it shall be requested and
provided pursuant to this subdivision, upon mutual agreement of the local agency and the claimant.
(3) The local agency's written response to the claim, as further documented, shall
be submitted to the claimant within 30 days after receipt of the further documentation, or within a period of time no greater than that taken by the claimant in producing the additional information or requested documentation, whichever is greater.
(c) (1) For claims over fifty thousand dollars ($50,000) and less than or equal to three
hundred seventy-five thousand dollars ($375,000), the local agency shall respond on writing to all written claims within 60 days of receipt of the claim, or may request, in writing, within 30 days of receipt of the claim, any additional documentation supporting the claim or relating to defenses or claims the local agency may have against the claimant.
(2) If additional information is thereafter required, it shall be requested and
provided pursuant to this subdivision, upon mutual agreement of the local agency and the claimant.
(3) The local agency's written response to the claim, as further documented, shall
be submitted to the claimant within 30 days after the receipt of further documentation, or within a period of time no greater than that taken by the claimant in producing the additional information or requested documentation, whichever is greater.
(d) If the claimant disputes the local agency's written response, or the local agency fails
to respond within the time prescribed, the claimant may so notify the local agency, in writing, either within 15 days of receipt of the local agency's response or within 15 days of the local agency's failure to respond within the time prescribed, respectively, and demand an informal conference to meet and confer for settlement of the issues

GS-10
in dispute. Upon a demand, the local agency shall schedule a meet and confer conference within 30 days for settlement of the dispute.
(e) If following the meet and confer conference the claim or any portion remains in
dispute, the claimant may file a claim pursuant to Chapter 1 (commencing with Section 900) and Chapter 2 (commencing with Section 910) of Part 3 of Division 3.6 of Title 1 of the Government Code. For purposes of those provisions, the running of the period of time within which a claim must be filed shall be tolled from the time the claimant submits his or her written claim pursuant to subdivision (a) until the time the claim is denied, including any period of time utilized by the meet and confer conference.
20104.4. The following procedures are established for all civil actions filed to resolve claims subject to this article:
(a) Within 60 days, but no earlier than 30 days, following the filing or responsive pleadings, the court shall submit the matter to nonbinding mediation unless waived by mutual stipulation of both parties. The mediation process shall provide for the selection within 15 days by both parties of a disinterested third person as mediator, shall be commenced within 30 days of the submittal, and shall be concluded within 15 days from the commencement of the mediation unless a time requirement is extended upon a good cause showing to the court.
(b) (1) If the matter remains in dispute, the case shall be submitted to judicial
arbitration pursuant to Chapter 2.5 (commencing with Section 1141.10) of Title 3 Part 3 of the Code of Civil Procedure, notwithstanding Section 1141.11 of that code. The Civil Discovery Act of 1986 (Article 3 (commencing with Section 2016) of Chapter 3 of Title 3 of Part 4 of the Code of Civil Procedure) shall apply to any proceeding brought under this subdivision consistent with the rules pertaining to judicial arbitration.
(2) In addition to Chapter 2.5 (commencing with Section 1141.10) of Title 3 Part 3 of the Code of Civil Procedure, (A) arbitrators shall, when possible, be experienced in construction law, and (B) any party appealing an arbitration award who does not obtain a more favorable judgment shall, in addition to payment of costs and fees under that chapter, also pay the attorney's fees on appeal of the other party.
20104.6. (a) No local agency shall fail to pay money as to any portion of a claim, which is undisputed except as otherwise provided in the contract. (b) In any suit filed under Section 20104.4, the local agency shall pay interest at the legal rate on any arbitration award or judgment. The interest shall begin to accrue on the date the suit is filed in a court of law."
CLAYTON ACT AND CARTWRIGHT ACT Section 4551 of the State Government Code specifies that in executing a public works contract with the AGENCY to supply goods, services or materials, the CONTRACTOR

GS-11
or Subcontractor(s) offers and agrees to assign to the AGENCY all rights, title, and interest in and to all causes of action it may have under Section 4 of the Clayton Act (15 U.S.C. Sec. 15) or under the Cartwright Act (Chapter 2 commencing with Sec. 16700) of Part 2 of Division 7 of the Business and Professional Code arising from purchase of goods, services or materials pursuant to the contract or subcontract. This assignment shall become effective when the AGENCY tenders final payment to the CONTRACTOR without further acknowledgment by the parties. SUBSTITUTION OF SECURITIES In conformance with the State of California Government Code Chapter 13, Section 4590, the CONTRACTOR may substitute securities for any monies withheld by the AGENCY to ensure performance under the contract. At the request and expense of the CONTRACTOR, securities equivalent to the amount withheld shall be deposited with the City or with a State or Federally chartered bank as the escrow agent who shall pay such monies to the CONTRACTOR upon notification by AGENCY of CONTRACTOR’s satisfactory completion of the contract. The type of securities deposited and the method of release shall be approved by the City Attorney’s office. METHOD OF PAYMENT Invoices The Contractor shall present an invoice for work completed during the previous month. The invoice shall reflect work required by this specification at the predetermined contracted amount and also reflect extra work assigned during the period.
i. Required reports shall be submitted with the monthly invoice and shall be reflective of the work functions accomplished during that period. Failure to submit monthly reports will delay payment.
ii. Monthly invoices shall be mailed to:
City of Yorba Linda Parks and Recreation Department 4845 Casa Loma Avenue Yorba Linda, CA 92886
HOURS OF WORK AND SCHEDULING Normal work hours are from 6:00 AM to 4:00 PM, Monday through Friday. The Contractor shall perform his work at such times as to minimize disturbance or interference to resident convenience, pedestrian or vehicle circulation.

GS-12
SOUND CONTROL REQUIREMENTS The Contractor shall comply with all local sound control and noise level rules, regulations, and ordinances, which apply to any work performed pursuant to this agreement. Each internal combustion engine used for any purpose on the job or related to the job shall be equipped with a muffler of a type recommended by the manufacturer of such equipment. No internal combustion engine shall be operated on the project without said muffler. Full compensation for conforming to the requirements of this section shall be considered as included in the prices paid for the various contract items of work involved and no additional compensation will be allowed therefore. CONSTRUCTION MAINTENANCE EQUIPMENT VEHICLES The Contractor shall take all necessary precautions for the safe operation of equipment and the protection of the public from injury and damage from such equipment. All equipment deemed by the City representative to be unsafe, in disrepair, or unsatisfactory shall be repaired or replaced immediately at no additional cost to the City. All transportation vehicles shall have the Contractor’s name clearly visible. ADDITIONS/DELETIONS TO SPECIFICATIONS The City reserves the right to make additions, deletions, revisions, and/or otherwise modify the General Maintenance Requirements and Specific Work Requirements. Any changes in this Specification that may cause the Contractor to incur additional expense shall be negotiated with the City representative upon written request and justification.

SP-1
CITY OF YORBA LINDA
SPECIAL PROVISIONS
FOR
COMMUNITY CENTER INTERIOR RENOVATION PROJECT
The section numbers of the following Special Provisions coincide with those of the latest edition of the Standard Specifications for Public Works Construction ("Green Book"). Only those sections requiring amendment or elaboration, or specifying options, are called out. PART 1 - GENERAL PROVISIONS SECTION 1 - TERMS, DEFINITIONS, ABBREVIATIONS AND SYMBOLS. 1-2 DEFINITIONS. Agency/City - City of Yorba Linda Board - City Council Caltrans - California Department of Transportation County - County of Orange Agency Inspector - City’s representative Federal - United States of America State - State of California SECTION 2 - SCOPE AND CONTROL OF THE WORK. 2-1 AWARD AND EXECUTION OF CONTRACT. Within ten (10) working days after the date of the Notice of Award, the Contractor shall execute and return the following contract documents to the Agency: Contract Agreement Faithful Performance Bond Material and Labor Payment Bond Public Liability and Property Damage Insurance Certificate Automobile Insurance Certificate Worker's Compensation Insurance Certificate Failure to comply with the above will result in annulment of the award and forfeiture of the Proposal Guarantee at the sole discretion of Agency.

SP-2
The Contract Agreement shall not be considered binding upon the Agency until executed by the authorized Agency officials. A corporation to which an award is made may be required, before the Contract Agreement is executed by the Agency, to furnish evidence of its corporate existence, of its right to enter into contracts in the State of California, and that the officers signing the contract and bonds for the corporation have the authority to do so. 2-4 CONTRACT BONDS. Both the Faithful Performance Bond and the Material and Labor Bond shall each be for not less than one hundred percent (100%) of the total contract amount. The Labor and Material Bond shall remain in force until thirty-five (35) days after the date of recordation of the Notice of Completion. The Faithful Performance Bond for electrical/mechanical equipment will be held for six (6) months after said date. 2-5 PLANS AND SPECIFICATIONS. 2-5.1 General. The Contractor shall maintain a control set of Plans and Specifications on the project site at all times. All final locations determined in the field, and any deviations from the Plans and Specifications, shall be marked in red on this control set to show the as-constructed conditions. Upon completion of all work, the Contractor shall return the control set to the City’s representative. Final payment will not be made until this requirement has been met. 2-5.3.3 Submittals. For each type of product, include data sheets, preparation requirements and application instructions. Four (4) original of each product submittal shall be transmitted to the City’s representative.
1. Submit Samples on rigid backing, no smaller than 7 inches X 10 inches (177 mm X 254 mm) or larger than 8.5 inches X 11 inches (216 mm X 280 mm).
2. Label each Sample with project name, manufacturer, style, color name and number, and application area.
One (1) photocopy of the submittal shall be returned to the Contractor with the Submittal Response Form appropriately marked.

SP-3
2-5.3.3 Submittals. The Contractor shall furnish for approval, within fifteen (15) working days following award of the Contract, all submittals as required on the Plans or in the Specifications. This provision shall not authorize any extension of time for performance of the Contract. The City’s representative will check and approve such samples, within ten (10) working days from receipt of same, only for conformance with design concept of work and for compliance with information given in Contract Documents. Work shall be in accordance with approved submittals. Unless specified otherwise, sampling, preparation of samples, and tests shall be in accordance with the latest standards of the American Society for Testing and Materials. Samples of materials and/or articles shall, upon demand, be submitted for tests or examinations and consideration before incorporation of same in work started. The Contractor shall be solely responsible for delays due to samples not being submitted in time to allow for proper time to make tests. Acceptance or rejection will be expressed in writing. The City’s representative shall have sole discretion as to the acceptance or rejection of submittals. Materials furnished must be equal to approved samples in every respect. Samples which are of value after testing will remain the property of the Contractor. 2-8 RIGHT-OF-WAY. The Agency will acquire all rights of way, easements and rights of entry as required for this project. The Contractor shall verify that the acquisition(s) is completed prior to beginning any work outside of the public right of way. In the event the required easements have not yet been acquired by the Agency, the Contractor shall conduct his operation so as to confine his work to the limits of the existing right-of-way. SECTION 3 - CHANGES IN WORK. 3-3.2.4 Markup. The markups mentioned hereinafter shall include, but are not limited to, all costs for the services of superintendents, project managers, timekeepers and other personnel not working directly on the change order and pickup or yard trucks used by the above personnel. These costs shall be reported as labor or equipment elsewhere except when actually performing work directly on the change order and then shall only be reported at the labor classification of the work performed.

SP-4
SECTION 4 - CONTROL OF MATERIALS 4-1 MATERIALS AND WORKMANSHIP
4-1.3.1 General. The Agency will pay for inspection and materials testing. The Contractor shall pay for retests and re-inspections due to failure to meet specifications. 4-1.6 Trade Names of Equals. The Agency is requiring sole-source products for completion of the proposed work. Substitutions will not be allowed, without prior pre-approval of equal. SECTION 5 - UTILITIES 5-1 LOCATION. The Contractor shall notify the utilities designated in the General Specifications at least 48 hours in advance of excavating around any of their structures. The existence and locations of utilities shown on the Plans have been determined by a search of the available records as provided by the respective utility owner. The exact locations have not been determined by potholing unless so indicated on the Plans. The Contractor shall determine the exact location of all existing utilities prior to commencing work. The Contractor agrees to be fully responsible for any and all damages which may be caused by his failure to exactly locate and preserve any and all underground utilities, whether shown on the plans or not. In the event the Contractor encounters underground utilities not shown on the plans, he shall verify the exact location of the utility and immediately notify the City’s representative, regardless of whether the unknown utility conflicts with the proposed construction or not. In the event of such a previously unknown conflict, the Contractor shall immediately notify the City’s representative as to the extent, if any, of delays or additional costs resulting from said conflict. The Contractor shall perform work and provide necessary materials to disconnect or relocate existing utilities as indicated. Record on record drawings all existing utility termination points before disconnecting. Relocate existing utilities at the direction of the City’s representative only if utility conflicts cannot be resolved or avoided. Relocation of utilities will be a changed condition. When uncharted or incorrectly charted underground piping or other utilities and services are encountered during site work operations, notify the applicable utility company immediately to obtain procedure directions. Cooperate with the applicable utility company in maintaining active services in operation.

SP-5
SECTION 6 - PROSECUTION, PROGRESS, AND ACCEPTANCE OF THE WORK. 6-1 CONSTRUCTION SCHEDULE AND COMMENCEMENT OF WORK. The Contractor's proposed Construction Schedule shall be submitted to the City’s representative within ten (10) working days after the date of the Notice of Award of Contract. The schedule shall be supported by written statements from each supplier of materials or equipment indicating that all orders have been placed and acknowledged, and setting forth the dates that each item will be delivered. Prior to issuing the Notice to Proceed, the City’s representative will schedule a pre-construction meeting with the respective Contractor to review the proposed Construction Schedule and delivery dates, arrange the utility coordination, discuss construction methods, and clarify inspection procedures. The Contractor shall submit periodic Progress Reports to the City’s representative by the tenth day of each month. The report shall include an updated Construction Schedule. Any deviations from the original schedule shall be explained. Progress payments will be withheld pending receipt of any outstanding reports. 6-7 TIME OF COMPLETION. 6-7.1 General. The time for completion shall be as set forth in the General Specifications (see Page GS-1). 6-7.2 Working Day. The Contractor's activities shall be confined to the hours between 6:00 AM and 5:00 PM, Monday through Friday, excluding holidays. Deviation from these hours will not be permitted without the prior consent of the City’s representative, except in emergencies involving immediate hazard to persons or property. Work shall be prohibited any time on Saturday, Sunday or Federal Holidays. Deviation from these hours will not be permitted without the prior consent of the City’s representative, except in emergencies involving immediate hazard to persons or property. In the event of either a requested or emergency deviation, inspection service fees will be charged against the Contractor. The service fees will be calculated at overtime rates including benefits, overhead, and travel time. The service fees will be deducted from any amounts due the Contractor.

SP-6
Construction activities during Agency Special Events may be restricted by Agency to exclude all or part of the work on primary arterial or access roads to the Special Events as determined by City’s representative. The Contractor shall be responsible to ascertain the exact times of any such events within his proposed construction schedule which may restrict his operation and shall adjust his schedule accordingly. The construction restrictions shall only be for the actual days the events occur. All costs for maintaining traffic control, protection of work site and remobilization shall be deemed as included in the lump sum contract for clearing and grubbing shown on the bid sheet and no additional compensation will be allowed. 6-9 LIQUIDATED DAMAGES. It is agreed by the parties to the Contract that time is of the essence and that in the case that all the work is not complete before or upon the expiration of the time limit set forth, damage will be sustained by the City of Yorba Linda. For each consecutive calendar day in excess of the time specified for the completion of the work, the Contractor shall pay to the Agency Five Hundred dollars ($500.00). In addition, the City of Yorba Linda shall have the right to charge to the Contractor and to deduct from payments for the work the actual cost to the City of Yorba Linda engineering, inspection, superintendence, and other overhead expenses, which are directly chargeable to the Contract and which accrue during the period of such delay. The expenses and damages described above shall be deducted from any money due the Contractor under this Contract. The Contractor and his sureties shall be liable for any excess cost. SECTION 7 - RESPONSIBILITIES OF THE CONTRACTOR. 7-1 CONTRACTOR'S EQUIPMENT AND FACILITIES. A noise level limit of 86 dbA at a distance of fifty feet (50') shall apply to all construction equipment on or related to the job whether owned by the Contractor or not. The use of excessively loud warning signals shall be avoided except in those cases required for the protection of personnel. 7-2 LABOR. 7-2.2 Laws. The Contractor, and all subcontractors, suppliers and vendors, shall comply with all Agency, State, and Federal orders regarding affirmative action to ensure equal employment opportunities and fair employment practices. Failure to file any report due under said orders will result in suspension of periodic progress payments. The Contractor shall ensure unlimited access to the job site for all equal employment opportunity compliance officers.

SP-7
7-3 LIABILITY INSURANCE. 7-3.1 Indemnification. The Contractor shall indemnify and save harmless the City of Yorba Linda, from all claims or suits for damages arising from his prosecution of the contract work, as more fully described in Subsection 7-3.2 "Contractor's Liability". The Contractor shall maintain during the life of the contract a protective liability policy. The policy shall provide for not less than the following amounts: Bodily Injury $ 500,000 each person
$1,000,000 each accident $1,000,000 aggregate products and completed operations Property Damage $1,000,000 each accident Worker's Compensation Statutory All liability insurance policies shall bear an endorsement or shall have attached a rider whereby it is provided that, in the event of expiration or proposed cancellation of such policies for any reason whatsoever, the Agency shall be notified by registered mail, return receipt requested, giving a sufficient time before the date thereof to comply with any applicable law or statute, but in no event less than 30 days before expiration or cancellation is effective. The following statement shall be included on the insurance certificate as an endorsement: "Additional Insured: The insurer agrees that the City and its City Council, and/or all City Council appointed groups, committees, boards, consultants and any other City Council appointed body, and/or elective and appointive officers, servants or employees of the City when acting as such are additional insured hereunder, for the acts of the insured, and such insurance shall be primary to any insurance of the City." The Contractor agrees to protect, defend and indemnify the City of Yorba Linda against loss, damage or expense by reason of any suit, claims, demands, judgments and causes of action caused by the Contractor, his employees, agents or any subcontractor or by any third party arising out of or in consequence of the performance of all or any operations covered by the Certificate of Insurance. The Contractor, at his option, may include such coverage under his Public Liability coverage. 7-3.2 Contractor's Liability. The City of Yorba Linda, its City Council, City’s representative, or Consultant shall not be answerable or accountable in any manner, for any loss or damage that may happen to the work or any part thereof; or for any of the materials or other things used or employed in performing the work; or for injury to any person or persons, either workmen

SP-8
or the public; or for damage to adjoining property from any cause which might have been prevented by the Contractor, or his workmen, or any one employed by him; against all of which injuries or damages to persons and property the Contractor having control over such work must properly guard. The Contractor shall be responsible for any damage to any person or property resulting from defects or obstructions at any time before its completion and final acceptance, and shall indemnify and save harmless the City of Yorba Linda, its City Council, City’s representative, and Consultant from all suits or actions of every name and description, brought for, or on account of, any injuries or damages received or sustained by any person or persons, by the Contractor, his servants or agents, in the construction of the work or by or in consequence of any negligence in guarding the same, in improper materials used in its construction, or by or on account of any act or omission of the Contractor or his agents, and so much of the money due the Contractor under and by virtue of the Contract as shall be considered necessary by the City may be retained by the City until disposition has been made of such suits or claims for damages aforesaid. If, in the opinion of the City’s representative, the precautions taken by the Contractor are not safe or adequate at any time during the life of the Contract, he may order the Contractor to take further precautions, and if the Contractor shall fail to do so, the City’s representative may order the work done by others and charge the Contractor for the cost thereof, such cost to be deducted from any moneys due or becoming due the Contractor. Failure of the City’s representative to order such additional precautions, however, shall not relieve the Contractor from his full responsibility for public safety. From time to time, during the period of this contract, the City may be served with claims, as a result of conduct by Contractor, which claims are for property damage or other damage in amounts of $250.00 or less. These claims may be resolved informally by City, within City's discretion, and charged back against Contractor by funds held in retention to meet these claims. The City will appoint a Claims Administrator who will act on behalf of the City and Contractor. The Administrator will recommend to City the resolution of any claim. The Claims Administrator's recommendation for payment shall be paid by Contractor within 30 days of the date of the recommendation. If Contractor fails to make payment to claimant within 30 days of the Administrator's decision, the City may make payment to the claimant and withhold, as retention, sufficient funds to reimburse City upon completion of the contract. Prior to making his recommendation, the Administrator will obtain from Contractor all evidence relevant to the claim. Contractor will have ten days from the date requested by the Administrator to submit any evidence in the defense of the claim. Failure to do so waives any objection by Contractor to payment of the claim if, after an independent investigation, it is the opinion of the Administrator to make payment of that claim. 7-5 PERMITS. Prior to the start of any work, the Contractor shall take out the applicable City of Yorba Linda permits and make arrangements for City of Yorba Linda inspections. Requests

SP-9
for inspections shall be made to the City of Yorba Linda, as lead Agency, 24 hours in advance of need. The City of Yorba Linda will waive the usual permit fees. The Contractor and all Subcontractors shall each obtain any and all other permits, licenses, inspections, certificates, or authorizations required by any governing body or public utility. Payment for permits, unless otherwise noted herein, shall be included in the bid items of work and no additional compensation will be allowed. 7-7 COOPERATION AND COLLATERAL WORK. The Contractor is advised as to the possibility of other construction projects within the proposed construction zone by the City of Yorba Linda, other governing agencies or private enterprises. In the event of such projects, the Contractor shall coordinate with the applicable parties as to the extent of any time required to complete their work and shall schedule his work and conduct his operations so as to permit access and time as required for the concurrent work. The Contractor shall immediately notify the City’s representative in the event of a delay in scheduling caused solely by this concurrent work. Payment for the above, if any, shall be deemed as included in the items of work as shown on the proposal bid sheet and no additional compensation will be allowed. 7-10 PUBLIC CONVENIENCE AND SAFETY. 7-10.1 Traffic and Access. When entering or leaving roadways carrying public traffic, the Contractor's equipment, whether empty or loaded, shall in all cases yield to public traffic. The Contractor shall notify in writing all affected property owners of the proposed construction schedule a minimum of 48 hours, but not more than 72 hours, in advance of any limitation or closure of access to their property. Form of said notice shall be as approved by the City’s representative and shall contain the date and time of the closure. In the event of delay, whether beyond the control of the Contractor or not, the Contractor shall notify all affected property owners as to the extent of the delay and his revised schedule. In the event of delay over 72 hours, the Contractor shall re-notify the property owners as described above. Payment for notification and coordination as per Section 7-10 as modified herein shall be included in the compensation paid for the various items of work and no additional compensation will be allowed. The "Notices" will be furnished by the Contractor. 7-10.2 Storage of Equipment and Materials.

SP-10
No storage of tools or equipment will be allowed on site without prior approval by the City Representative. 7-10.3 Street Closures, Detours, Barricades. It shall be the Contractor's responsibility to furnish a detailed detour signing and barricade plan for Agency approval. Detours shall be in accordance with Caltrans standards. The Contractor shall submit detailed drawings of any proposed detour(s) to the City’s representative for approval prior to the commencement of work. All traffic control devices, flaggers, labor and materials shall be included. The Contractor shall provide, at his expense, advanced warning signs advising the public of the impending major construction project and his proposed schedule. Said signs shall be posted at all major approaches to the construction zones a minimum of two weeks prior to the start of construction. The Contractor shall be responsible for providing temporary access to all driveways at the end of each work day. The Contractor shall provide and maintain all other signs, barricades, pedestals, flashers, delineators and other necessary facilities for the protection of the public within the limits of the construction area. The Contractor shall also post proper signs to notify the public regarding detours and the condition of the roadway, all in accordance with the provisions of the Vehicle Code and the current State of California Department of Transportation Manual of Warning Signs, Lights and Devices for Use in Performance of Work Upon Highways. Special emphasis shall be placed on use of "CONSTRUCTION ZONE AHEAD" (C18R) signs at the beginning, end, and any access and/or intersection streets with roads under construction. Portable delineators shall be placed as necessary for proper delineation of the travel way. The spacing between delineators shall not exceed fifty feet (50') on tangents or twenty-five feet (25') on curves except when used for lane closure. When closure of half the roadway requires one way traffic, the Contractor shall provide two (2) flaggers, equipped with working two (2) way radios, one (1) at each end of the work area, with signing and delineation as per W.A.T.C.H. manual. When used for lane closures, the fluorescent traffic cones or portable delineators shall be placed at intervals not to exceed the following: Tapers 25 Feet Edge of Closed Lane Tangents 100 Feet Curves 50 Feet

SP-11
If the traffic cones or portable delineators are damaged, displaced or not in an upright position, from any cause, said cones or portable delineators shall immediately be replaced or restored to their original location, in an upright position, by the Contractor. The Contractor shall furnish competent flagmen as are necessary to give adequate warning to traffic or to the public of any dangerous conditions to be encountered. Flagmen, while on duty and assigned to give warnings to the public that the highway is under construction and of any dangerous conditions to be encountered as a result thereof, shall perform their duties and shall be provided with the necessary equipment in accordance with the current "Instructions to Flagmen," of the Department of Transportation. The equipment shall be furnished and kept clean and in good repair by the Contractor, at his expense. Should the Contractor appear to be neglectful or negligent in furnishing warning and protective measures as provided, the City’s representative may direct attention to the existence of a hazard and the necessary warning and protective measures shall be furnished and installed by the Contractor at his expense. Should the City’s representative point out the inadequacy of warning and protective measures, such action on the part of the City’s representative shall not relieve the Contractor from responsibility for public safety or abrogate his obligation to furnish and pay for these devices. The Contractor shall also be required to post "Temporary No Parking" signs during each working day, forty-eight (48) hours in advance. Contractor shall notify the following entities at least forty-eight (48) hours in advance of any street closure or restriction to access.
1. Fire Department 2. Police Department 3. Schools and School Bus Organizations 4. Trash Collectors
All existing stop signs, street name signs and regulatory signs shall be maintained in visible locations during construction and permanently relocated or removed as directed by the plans and the City’s representative. Signs which need not be maintained during construction or permanently relocated, shall be salvaged to the Agency. Full compensation for conforming to this article shall be considered as included in the Lump Sum Bid Price for Mobilization and no additional compensation shall be allowed. 7-10.4 Public Safety 7-10.4.1 Safety Orders.

SP-12
The Contractor shall comply with the provisions of any Agency ordinances or regulations regarding requirements for the protection of excavations and the nature of such protection. In accordance with Section 6500 of the Labor Code, the Contractor is required to obtain a permit from the Division of Industrial Safety for any trench or excavation of five feet or more in depth and into which a person is required to descent. Prior to beginning of excavations requiring shoring, the Contractor shall designate in writing to the City’s representative someone whose responsibility it is to supervise the project safety measures and someone whose responsibility it is to supervise the installation and removal of sheeting, shoring and bracing. In addition to shoring the excavations in accordance with the minimum requirements of Industrial Safety Orders, it shall be the Contractor's responsibility to provide any and all additional shoring required to support the sides of the excavation against the effects of load which may exceed those desired by using the criteria set forth in the Industrial Safety Orders. The Contractor shall be solely responsible for any damages which may result from his failure to provide adequate shoring of the excavation under any and all of the conditions of loading which may exist or which may arise during construction of the project. In accordance with Section 7104 of the Public Contract code, any public works contract which involves excavations that extend deeper than four feet below the surface shall provide as follows:
(a) That the Contractor shall promptly, and before the following conditions are disturbed, notify the public entity, in writing, of any:
1. Material that the Contractor believes may be
material that is hazardous waste, as defined in Section 25117 of the Health and Safety Code, that is required to be removed to a Class I, Class II, or Class III disposal site in accordance with provisions of existing law.
2. Subsurface or latent physical conditions at the site
differing from those indicated.
3. Unknown physical conditions at the site of any unusual nature, different materially from those ordinarily encountered and generally as inherent in work of the character provided for in the contract.
(b) The that public entity shall promptly investigate the conditions,
and if it finds that the conditions do materially so differ, or do involve hazardous waste, and cause a decrease or increase in the Contractor's cost of, or the time required for, performance of

SP-13
any part of the work shall issue a change order under the procedures described in the contract.
(c) That, in the event that a dispute arises between the public entity
and the Contractor whether the conditions materially differ, or involve hazardous waste, or cause a decrease or increase in the Contractor's cost of, or time required for, performance of any part of the work, the Contractor shall not be excused from any scheduled completion date provided for by the contract, but shall proceed with all work to be performed under the contract. The Contractor shall retain any and all rights provided either by contract or by law which pertain to the resolution of disputes and protests between the contracting parties.
7-15 PAYROLL RECORDS. Payroll records, if requested by the Agency, shall be submitted to the Agency by the tenth day of each month. Progress payments will be withheld pending receipt of any outstanding reports. SECTION 8 - FACILITIES FOR AGENCY PERSONNEL. 8-2 FIELD OFFICE FACILITIES. A field office shall not be required. SECTION 9 - MEASUREMENT AND PAYMENT. 9-3 PAYMENT. 9-3.2 Partial and Final Payment. The closure date for periodic progress payments will be five (5) working days prior to the first Monday of each month. The final progress payment will not be released until the Contractor returns the control set of Plans and Specifications showing the as-constructed conditions. Partial payments, except the final payment, shall not be made for periods of less than one month. To claim a partial payment on the amount due or the final payment itself, the Contractor shall obtain approval of measurement of quantity of work completed from the City’s representative, or his designated representative, and shall prepare an invoice showing bid items, unit bid price, quantity completed, quantity previously paid, total quantity as of the date of invoice, amount claimed on the invoice, previous payment, amount to be retained, and the contract amount. The Contractor may substitute securities in lieu of retention as permitted by the provisions of the Standard Specifications. The amount to be retained by the City shall be 5% of the work

SP-14
completed as of the date of the payment request. The invoice shall be submitted to the City’s representative two weeks prior to the second or fourth Tuesday of the month, the days on which payments are placed in the warrant lists for Council approval. Such payments are made by the Finance Department during the week in which they are approved by the City Council. After completion of the contract, the City Council shall, upon recommendation of the City’s representative, accept the work as completed and authorize the final payment. The final payment shall be the entire sum found to be due the Contractor after deducting there from all previous payments and all amounts to be kept and all amounts to be retained under the provisions of the contract. All prior partial estimates and payments shall be subject to correction in the final estimate and payment. The final payment of the retention amount to the Contractor shall be made thirty-five (35) days from the date of the recording of the Notice of Completion of the work after it is accepted by the City and shall be made on a duly certified voucher therefore, except as State Law may permit Contractor to receive said final payment prior to said thirty-five (35) day period after acceptance of work by the City. It is mutually agreed among the parties to the contract that no certificate given or payment made under the contract, except the final certificate of final payment, shall be conclusive evidence of full or substantial performance of this contract; no payment shall be construed to be an acceptance of any defective work or improper material. Unless a written notice of protest disagreeing with the approved final payment and a notice of intention of additional claims is filed with the City’s representative prior to the acceptance of the final payment, the acceptance of the final payment by the Contractor shall release the City, the City Council, and the City’s representative from any and all claims or liabilities on account of work performed by the Contractor under the contract or any alternations thereof. SUBSTITUTION OF SECURITIES In conformance with the State of California Public Contract Code Section 22300, the contractor may substitute securities for any monies withheld by the Agency to ensure performance under the contract. At the request and expense of the Contractor, the Contractor has the option to deposit securities, which have been approved by the Agency, and deposited with a State or Federally chartered bank as the escrow agent. Said securities will be used as a substitute for retention earnings required to be withheld by the Agency, pursuant to the construction contract. Said securities shall have no obligation to any other construction contract for substitution of securities in lieu of retention. When the Contractor deposits the Agency approved securities with the escrow agent, the escrow agent shall notify the Agency within 10 calendar days of the deposit. Said securities shall be evaluated

SP-15
quarterly by the escrow agent to verify the current market value. If the current market value of said securities falls below the required amount, the escrow agent shall notify the Contractor and require additional securities and/or cash to be submitted for Agency approval, and be held in the escrow account to meet the Contractor's obligations. Said securities shall be held by the escrow agent until such time as the escrow agent receives written notification from the Agency that the Contractor has satisfactorily completed his contract obligations. The type of securities deposited and the method of release shall be approved by the City Attorney's office. 9-3.3 Delivered Materials. Materials and equipment delivered but not incorporated into the work will not be included in the estimate for progress payment, subject to the discretion of the City City’s representative. 9-3.4 Best Management Practices Per the Federal Clean Water Act, the Contractor is required to eliminate pollution to waters of the United States in regards to building this project. This project will require the Contractor to implement “Best Management Practices”. This work, for instance would include but not be limited to site cleanliness, immediately cleaning up spilled materials, sealing cans containing liquid immediately after use, removing loose dirt from the site, storing cement or plaster under an enclosure, etc. and will be paid under the bid item Best Management Practices.

SP-16
PART 2 -CONSTRUCTION MATERIALS SECTION 201 – INTERIOR PAINTING AND RELATED MATERIALS 201 - GENERAL 201.1 RELATED DOCUMENTS Drawings and general provisions of the Contract, including General and Supplementary Conditions and Division 01 Specification Sections, apply to this Section. 201.2 SUMMARY Section includes surface preparation and the application of paint systems on the following interior substrates listed in 3.6 Interior Painting Schedule. 201.3 DEFINITIONS
• PDCA: Painting & Decorating Contractors of America www.pdca.org . • SSPC: The Society for Protective Coatings publishes Scopes of SSPC Surface
Preparation Standards and Specifications www.sspc.org . • Dunn-Edwards Conformance Chart: D-E CONFORMANCE TABLE
201.4 ACTION SUBMITTALS
1. Product Data: For each type of product. Include preparation requirements and application instructions.
2. LEED v.4 Requirements: Interior paints and coatings must pass CDPH Standard Method V1.1 (also called section 01350) emissions testing; and they must comply with the VOC content limits of the California ARB 2007 Suggested Control Measure for Architectural Coatings.
3. Samples for Initial Selection: For each type of topcoat product. 4. Samples for Verification: For each type of paint system and in each color and
gloss of topcoat. a. Submit Samples on rigid backing, no smaller than 7 inches X 10 inches
(177 mm X 254 mm) or larger than 8.5 inches X 11 inches (216 mm X 280 mm).
b. Label each Sample for project, architect, general contractor, painting contractor, paint color name and number, paint brand name, "P" number if applicable, and application area.
5. Product List: For each product indicated, include the following: a. Cross-reference to paint system and locations of application areas. Use
same designations indicated on Drawings and in schedules. b. VOC content.

SP-17
201.5 MAINTENANCE MATERIAL SUBMITTALS Furnish extra materials that match products installed and that are packaged with protective covering for storage and identified with labels describing contents.
1. Paint: Provide not less than 1 gal. (3.8L) of each material and color applied. 201.6 QUALITY ASSURANCE
1. Mockups: Apply mockups of each paint system indicated and each color and finish selected to verify preliminary selections made under Sample submittals and to demonstrate aesthetic effects and set quality standards for materials and execution.
a. Architect will select one surface to represent surfaces and conditions for application of each paint system specified in Part 3.
i. Vertical and Horizontal Surfaces: Provide samples of at least 100 sq. ft. (9 sq. m).
ii. Other Items: Architect will designate items or areas required. b. Final approval of color selections will be based on mockups.
i. If preliminary color selections are not approved, apply additional mockups of additional colors selected by Architect at no added cost to Owner.
c. Approval of mockups does not constitute approval of deviations from the Contract Documents contained in mockups unless Architect specifically approves such deviations in writing.
d. Subject to compliance with requirements, approved mockups may become part of the completed Work if undisturbed at time of Substantial Completion.
201.7 DELIVERY, STORAGE, AND HANDLING
1. Store materials not in use in tightly covered containers in well-ventilated areas with ambient temperatures continuously maintained at not less than 45 deg F (7 deg C).
a. Maintain containers in clean condition, free of foreign materials and residue.
b. Remove rags and waste from storage areas daily. 201.8 FIELD CONDITIONS
1. Apply paints only when temperature of surfaces to be painted and ambient air temperatures are between 50 and 90 degrees F (10 and 32 degrees C).
2. Do not apply paints when relative humidity exceeds 85 percent; at temperatures less than 5 degrees F (3 degrees C) above the dew point; or to damp or wet surfaces.
3. Painting contractor should follow proper painting practices and exercise judgment based on his or her experience and project specific conditions as to when to proceed.
SECTION 202 – PRODUCTS

SP-18
202.1 MANUFACTURERS 1. Basis-of-Design Product: Provide products listed from the Dunn-Edwards
Corporation. 202.2 PAINT, GENERAL
1. Material Compatibility: a. Provide materials for use within each paint system that are compatible
with one another and substrates indicated, under conditions of service and application as demonstrated by manufacturer, based on testing and field experience.
b. For each coat in a paint system, provide products recommended in writing by manufacturers of topcoat for use in paint system and on substrate indicated.
2. VOC Content: Provide material that comply with VOC limits of authorities having jurisdiction.
3. Colorants: The use of colorants containing hazardous chemicals, such as ethylene glycol, is prohibited and zero VOC colorants should be used whenever possible.
4. Colors: As selected by the Architect. SECTION 203 - EXECUTION 203.1 EXAMINATION
1. Examine substrates and conditions, with Applicator present, for compliance with requirements for maximum moisture content and other conditions affecting performance of the Work.
2. Maximum Moisture Content of Substrates: When measured with an electronic moisture meter as follows: a. Concrete: 12 percent. b. Masonry (Clay and CMU): 12 percent. c. Wood: 15 percent. d. Gypsum Board: 12 percent. e. Plaster: 12 percent.
3. Gypsum Board Substrates: Verify that finishing compound is sanded smooth. 4. Plaster Substrates: Verify that plaster is fully cured, including pH testing to determine
that alkalinity is within limits established by the manufacturer. 5. Spray-Textured Ceiling Substrates: Verify that surfaces are dry. 6. Verify suitability of substrates, including surface conditions and compatibility with
existing finishes and primers. 7. Proceed with coating application only after unsatisfactory conditions have been
corrected. a. Application of coating indicates acceptance of surfaces and conditions.
203.2 PREPARATION
1. Comply with manufacturer's written instructions.

SP-19
2. Remove hardware, covers, plates, and similar items already in place that are removable and are not to be painted. If removal is impractical or impossible because of size or weight of item, provide surface-applied protection before surface preparation and painting.
a. After completing painting operations, use workers skilled in the trades involved to reinstall items that were removed. Remove surface-applied protection if any.
3. Clean substrates of substances that could impair bond of paints, including dust, dirt, oil, grease, and incompatible paints and encapsulants.
a. Remove incompatible primers and re-prime substrate with compatible primers or apply tie coat as required to produce paint systems indicated.
203.3 APPLICATION
1. Apply paints according to manufacturer's written instructions. a. Use applicators and techniques suited for paint and substrate indicated. b. Paint surfaces behind movable equipment and furniture same as similar
exposed surfaces. Before final installation, paint surfaces behind permanently fixed equipment or furniture with prime coat only.
c. Paint front and backsides of access panels, removable or hinged covers, and similar hinged items to match exposed surfaces.
d. Do not paint over labels of independent testing agencies or equipment name, identification, performance rating, or nomenclature plates.
e. Primers specified in painting schedules may be omitted on items that are factory primed or factory finished if acceptable to topcoat manufacturers.
2. Tint each undercoat to a lighter shade of the finish coat (not to exceed 2 ounces of colorant) to facilitate identification of each coat if multiple coats of same material are to be applied.
3. If undercoats or other conditions show through topcoat, apply additional coats until cured film has a uniform paint finish, color, and appearance.
4. Apply paints to produce surface films without cloudiness, spotting, holidays, laps, brush marks, roller tracking, runs, sags, ropiness, or other surface imperfections. Cut in sharp lines and color breaks.
203.4 FIELD QUALITY CONTROL
1. Dry Film Thickness Testing: Owner may engage the services of a qualified testing and inspecting agency to inspect and test paint for dry film thickness.
a. Contractor shall touch up and restore painted surfaces damaged by testing.
b. If test results show that dry film thickness of applied paint does not comply with paint manufacturer's written recommendations, Contractor shall pay for testing and apply additional coats as needed to provide dry film thickness that complies with paint manufacturer's written recommendations.

SP-20
203.5 CLEANING AND PROTECTION 1. At end of each workday, remove rubbish, empty cans, rags, and other discarded
materials from Project site. 2. After completing paint application, clean spattered surfaces. Remove spattered
paints by washing, scraping, or other methods. Do not scratch or damage adjacent finished surfaces.
3. Protect work of other trades against damage from paint application. Correct damage to work of other trades by cleaning, repairing, replacing, and refinishing, as approved by Architect, and leave in an undamaged condition.
4. At completion of construction activities of other trades, touch up and restore damaged or defaced painted surfaces.

APPENDIX "A"
City
of Y
orba
Lin
da, 2
019

City of Yorba Linda, 2019
APPEN
DIX "A
"
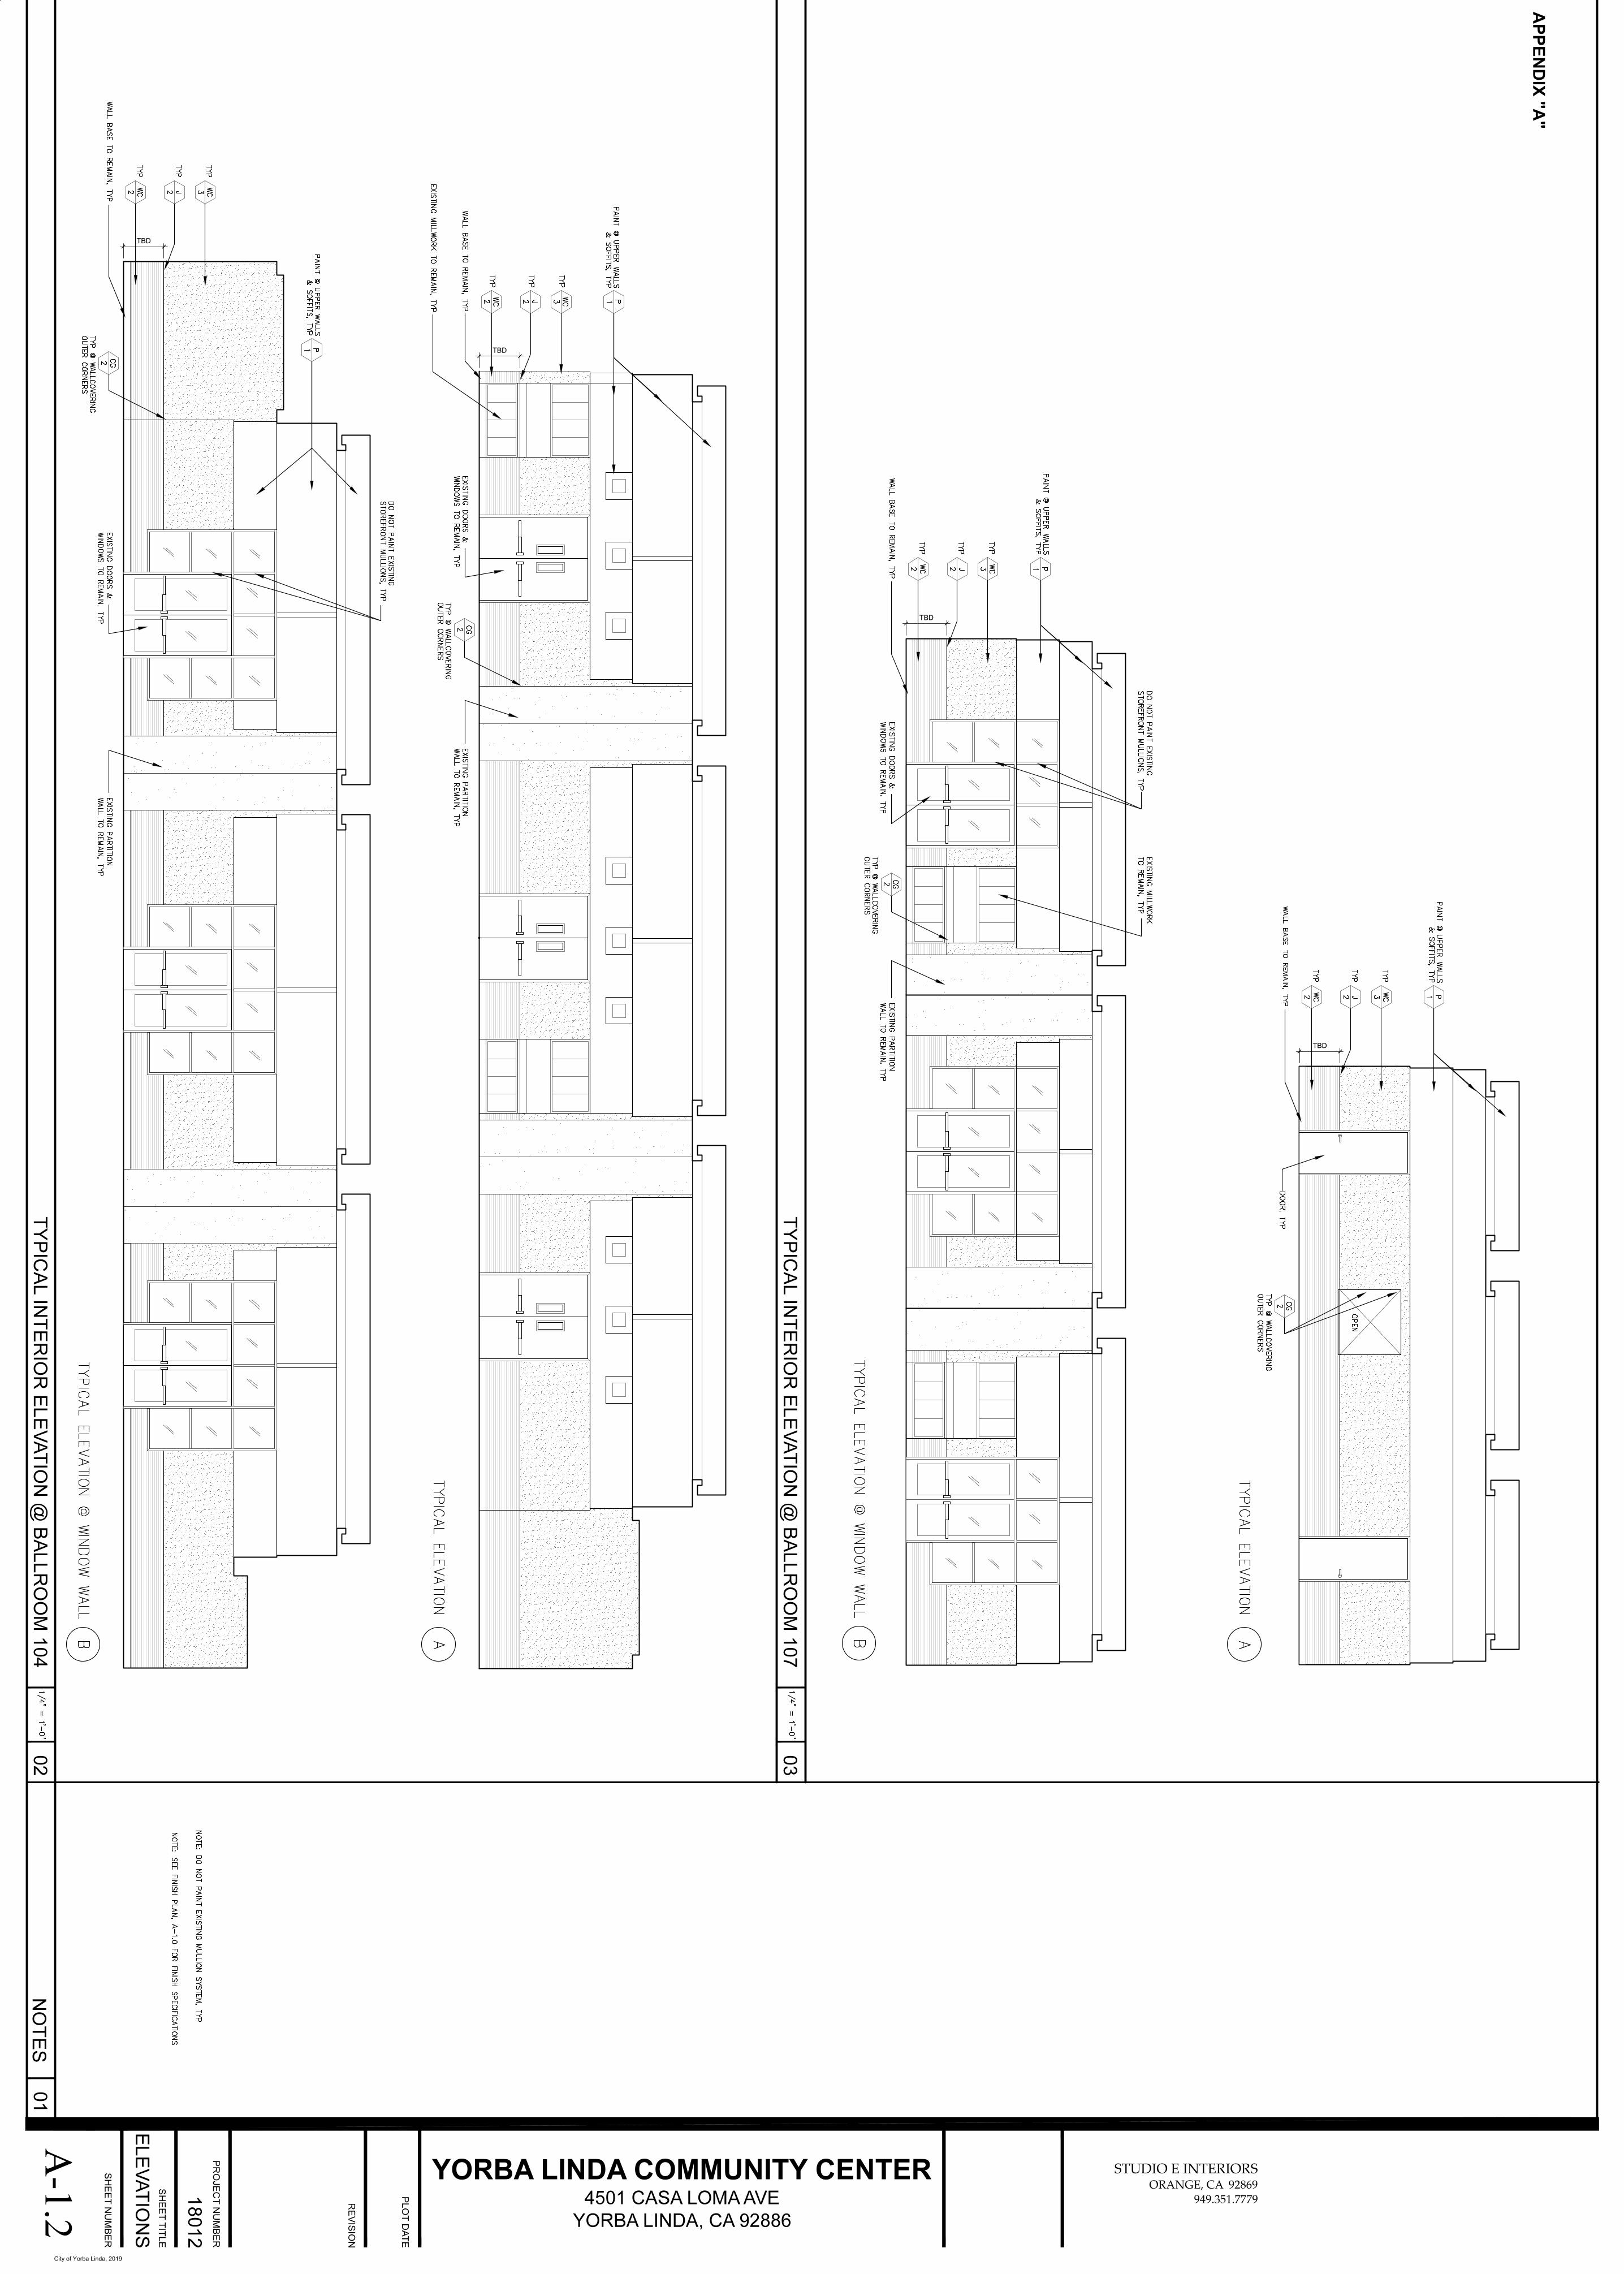
City of Yorba Linda, 2019
APPEN
DIX "A
"
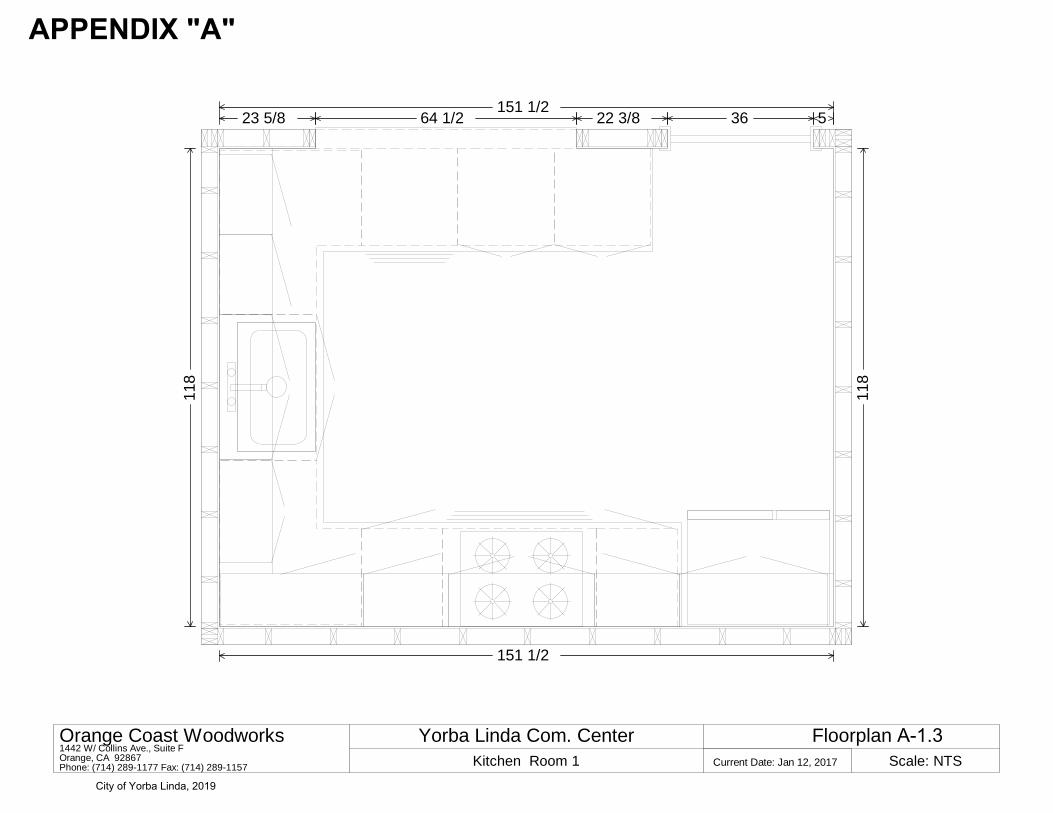
151 1/2
118
23 5/8 64 1/2 22 3/8 36 5151 1/2
118
Orange Coast Woodworks1442 W/ Collins Ave., Suite FOrange, CA 92867Phone: (714) 289-1177 Fax: (714) 289-1157
Yorba Linda Com. CenterKitchen Room 1 Current Date: Jan 12, 2017
Floorplan A-1.3 Scale: NTS
City of Yorba Linda, 2019
APPENDIX "A"

A-1.4
City of Yorba Linda, 2019
APPENDIX "A"

A-1.5
City of Yorba Linda, 2019
APPENDIX "A"

A-1.6
City of Yorba Linda, 2019
APPENDIX "A"

L A M I N A T E S U R F A C E S
F R O M F O R M I C A C O R P O R A T I O N
H o w
t o
I n s t a l l
a
C o u n t e r t o p
For more information:In the United States, call 1-800-FORMICA™.In Canada, call (800) 363-1405.In Mexico, call (525)530-3135.
Formica and the Formica logo areregistered trademarks of The Diller Corporation.1-800-FORMICA™ is a trademark ofThe Diller Corporation.
© 2005 Formica CorporationCincinnati, OH 45241Printed in U.S.A.Form No. 02-045 (07/05)
APPENDIX "B"
City of Yorba Linda, 2019 90

Jig Saw
Drill and Drill Bit
Block Plane
Belt Sander
Smooth File
Hand Laminate Trimmerwith carbide cutter
C-Clamps(for holding "build-up" blocks andend caps or splash to glue and screw)
Safety Glasses
Tape Measure
Rubber Mallet
Level
Square
Hammer
Handsaw
J-Roller
Scriber-Compass
Adjustable Wrench
Screwdriver
Sandpaper
Caulk Gun
Heat-ConductiveAluminum Tape
Installing your own countertop is an opportunity forself-expression – and money savings. To help you do the job efficiently and with style, we've listed all the essential materials you will need, as well as nine simple steps for installing your new countertop.
Here are some essentials for a typical L-shaped kitchen countertop with a cutout for a sink or rangetop installation:
Countertop sections (order standard lengths). Your dealer should be able to miter cut and machine the fastening-bolt T-slots (underside of the joint).Fastening bolts (for drawing miter joints tight).Tube of sealant (for caulking joints).End splash and/or end caps (kits, as required).These should be available from your dealer.Non-flammable contact adhesive (for fastening end caps, unless kit has pre-applied adhesive for "iron-on" method).White glue (for fastening "build-up" blocks).
ToolsRequired
Introduction
MaterialsRequired
City of Yorba Linda, 2019
APPENDIX "B"

Check for proper length. Allow desired overhang. End caps should be used on all exposed ends (end cap kits). End splashes should be used where top butts wall (end splash kit). Additional material should be allowed to scribe for a tight fit to end wall.
Place your countertop upside down on a flat surface. Choose strips of wood thick enough to allow the countertop surface to match the front build-up. Glue strips around perimeter of countertop.
1 3Step
Fitting to
Length
Step
Build Up
Cover the Formica® brand laminate surface in the area to be sawed with a strip of masking tape and draw a pencil line on the tape to serve as your cutting guide. Use a fine-tooth handsaw(10 to 12 point) and always cut into the laminate surface to avoid chipping. Sand or file the cut to assure a smooth surface.
To apply end caps, set household iron at medium heat. Iron cap onto the end of the countertop with a back-and-forth motion. Let set for one minute, then tap the cap carefully with a rubber mallet. Finish trimming with a fine file, applying pressure only on the up strokes. Complete instructions are included in the end cap kit.
To apply end caps using non pre-glued end caps, apply a contact adhesive to both the substrate and the laminate. Follow manufacturer's guidelines for when adhesive is ready for bonding. Roll laminate with a J-roller. Finish trimming with a fine file, applying only pressure in the up strokes. If using a laminate trimmer with a flush trim carbide router bit, remove excess laminate and file smooth applying only pressure in the up strokes.
2 4Step
Cutting
Step
Applying
End
Caps
City of Yorba Linda, 2019
APPENDIX "B"

Always follow manufacturer's directions for installing appliances. Place the sink or rangetop rim on the back side of the countertop, where the appliance is to be located. Mark all the way aroundthe edge of the rim. Use a jig saw to cut the hole 1/4" to 3/8" smaller than the line. All cutout corners should have clean,chip-free radii. Apply two layers of heat-conductive aluminumtape around rangetop cutout.
The countertop can be scribed to match the wall surface. The top is provided with a scribe edge on the backsplash for this purpose. Place the top on the cabinet. Use a scriber-compass to mark the top edge of the countertop, then belt-sand orblock-plane to the line. This will contour the countertop to the wall. Put top in place, check for level and stability, and then secure to cabinets with wood screws.
Step 5 7Making Cutouts
for Sinks or
Rangetops Step
Scribing
If your kitchen requires an L- or U-shaped top, precut miters should be joined at this point in the installation. Apply a beadof sealant to each mitered edge. Tighten fasteners only enough to hold them in place. Align front edges and tighten fasteners. Tap surfaces to align (use wood blocks to avoid damaging the surface). Then tighten fasteners securely.
You may find it more convenient to install the sink faucets, 3/8" supply tubing and basket drain now, before dropping the sink into place. This is important if space behind the installed bowl is too tight for easy connection of plumbing fittings. All sinks must be sealed with sealant to avoid water damage to base material.
Step 6 8Joining
Miters
Step
Installing
Sinks
City of Yorba Linda, 2019
APPENDIX "B"

Remove excess sealant from sink area or end splash. The Formica® brand laminate surface of your new countertopis highly resistant to staining, wear and heat. It is not, however, completely impervious to chemicals, scratches and hot objects.
Cleaning. Formica brand laminate-clad countertops may be cleaned with a clean, non-abrasive, damp cotton cloth and a mild liquid detergent or household cleaner.
Heat Resistance. Avoid placing hot items on the counter-top. Use a trivet or a hot pad.
Surface Care. Use a cutting board to avoid damaging surface.
Use and Care Guidelines brochure (Form No. 02-110) is available by calling1-800-FORMICATM.
9Step
Finishing
Installation
and Care
How can you maintain the beauty of Formica brand laminate for years? Simply follow these easy care suggestions:
Clean with dampened cloth or sponge, using mild soap or detergent.Place hot objects on hot pads or trivets, as temperatures over 275˚F (135˚C) will damage the surface.Do not use abrasive pads, cleaners or powders.Use a cutting board to avoid surface damagefrom knives or sharp implements.Use self-cleaning waxto help minimize staining.Do not hammeron countertop withhard objects.
BeautyTips
FTB-XXXX Rev 1 (03-12-13 )
FTB-0832 Rev 1 (03-12-13)
City of Yorba Linda, 2019
APPENDIX "B"

Doityourself
Installation Instructions for Easy Laminated Surfaces Give your kitchen or bath a fresh new look with Formica® brand laminate. With careful planning you can do-it-yourself without the wait or additional laborcosts. You can get results that will make you glad you did it yourself.Formica® brand laminate is easy to install, easy to clean and care for. That means your new countertops will give you years of carefree pleasure and enjoyment. Choose from a large variety of colors and patterns to get the look you want.
Step 1 Getting StartedHaving the right tools on hand will make the job go quickly and easily. Keep in mind that you should work in a well-ventilatedroom and wear safety glasses when using any power tool. Before beginning, read adhesive precautions and directions. If you are building new countertops, particleboard is recommended for the core material. On countertops with square edges,Formica® brand laminate can be installed over the existing laminate – provided it has been cleaned, degreased and lightly sanded.
Required tools and materials:
®
Brand LaminateFormica®
Surfacing
• Saber saw with metal cutting orfine-tooth cutting blades
• Safety glasses• J-roller• Router and laminate trimming bit
• Fine tooth mill file• Brush, roller and trowel
(see adhesive can for recommendations)• Formica® brand contact adhesive• Dowel rods
Step 2 Make the CutBefore cutting your laminate surface, check corners with a carpenter’s square so you won’t have problems later. Cut laminate with asaber saw, using a fine tooth blade or a table saw with fine carbide tipped blade. If needed, also cut edge strips for Formica® brandlaminate, or wood moldings can be used as edging.Warning: Measure surface to be covered carefully. Cut core material to size. Be sure to cut laminate surface 3/8" to 1/2" larger than the surface to be covered.
Step 3 Put it TogetherSurfaces Edges• Apply adhesive to back of laminate with • Apply adhesive to laminate edge strip,
a roller. Follow instructions on adhesive can following instructions on adhesive can• Apply adhesive to core (dirt-free • Apply 2 coats of adhesive to core edge
particleboard or old surface) of countertop• Allow adhesive to dry completely • Bond edge strip to core using pressure• Position dowel rods 6" apart on core• Position laminate on top of dowel rods• Align surfaces and slide rods out• Immediately apply pressure with a J-rollerNote: Some adhesives contain flammable solvents. Follow instructions on adhesive can.
Step 4 Finishing Touches• Trim excess with router and laminate trimming bit• File edge flush, removing sharp edgesNote: To prevent moisture damage to the core materials seal all seams, including a backsplash, with caulk.
For technical assistance call 1-800-FORMICA™Monday – Friday, 8:00 am to 4:30 pm EST02-155 (07/03)
City of Yorba Linda, 2019
APPENDIX "B"

Formica® Laminate by Formica Group 1
USE AND CARE GUIDELINES
Formica® Laminate and ColorCore2TM by Formica Group are
designed for beauty and durability. Like any surfacing materials
they can be damaged by abuse and carelessness. When used as
recommended with proper use and care, the end result is years
of satisfaction.
PROTECTING THE SURFACE
Before selecting the surface material, consider the type of use
it will receive, as well as its texture, color, and reflective values.
A rough-textured surface has different advantages, depending
upon use, than a smooth-textured surface. For example, high-
gloss finish laminates are not recommended for use in heavy-duty
applications such as countertops. Dark colors tend to enhance
scratches, marring and fingerprints.
SCRATCH AND ImPACT PROTECTION
Formica Brand Laminate and ColorCore2 surfacing material are
resistant to scratches and impacts under normal use conditions.
Use cutting boards, chopping blocks, or other
protective surfaces.
• Do not chop, slice, pound, or hammer on any laminate surface.
• Knives or other sharp utensils may slice or scratch the surface.
• Heavy blows from a hammer or meat tenderizer may crack or
gouge the surface.
Use place mats, doilies, and trivets on laminate surfaces
when necessary.
• Ceramics and abrasive objects can cause scratching and
premature wear – do not slide these items across surface.
Follow recommendations for cleaning – do not use abrasive
cleaners, steel wool, sandpaper, or Scotch-Brite® scouring
pads (see Cleaning section inside).
HOT OBjECTS
Cookware still hot from the stove, oven or microwave, as well as
electric skillets, waffle irons, curling irons and hot rollers, should
not be placed directly on laminate surfaces. Prolonged exposure
to temperatures of 140°F (60°C) or higher may cause the laminate
to separate from the core material. Use a trivet, insulated hot pad
or other protective device beneath all hot cookware, heat
generating appliances, or other heated objects.
• Formica BrandLaminate and ColorCore2 surfacing
material can withstand heat up to 275°F (135°C) for short
periods of time.
Avoid ironing or placing a hot iron on laminate surfaces.
Do not place lighted cigarettes directly on laminate surfaces.
ORDINARY CLEANING
Formica Brand Laminate and ColorCore2 surfacing material are
very easy to clean.
• In most cases, you only need to use a clean, damp, non-
abrasive cotton cloth and a mild liquid detergent or
household cleaner.
• Rinse with clean water, using a clean, non-abrasive cotton cloth.
• Do not flood the laminate, especially near seams, since water
can penetrate and cause the substrate to swell.
• Dry the surface with a soft, clean, non-abrasive cotton cloth.
For specific types of surfaces, use the following care guidelines.
mATTE AND SPARkLE FINISH LAmINATES
Especially hard-to-clean areas may require special attention.
Use a nylon bristled hand or vegetable brush, along with a mild
liquid detergent-and-water solution or household cleaner. Clean
the soiled area using a rotating motion. Rinse and dry the surface
as indicated above.
SCULPTURE AND DImENSIONAL FINISH LAmINATES
These surfaces may require special attention to clean the
depressed areas. Use a nylon-bristled hand or vegetable brush,
along with a mild liquid detergent-and-water solution or house-
hold cleaner. Clean the soiled area, using a rotating motion.
Rinse and dry the surface as indicated above.
HIGH GLOSS FINISH LAmINATES
If residual streaks and smears remain after normal cleaning,
use a mild glass cleaner and then dry with a clean, non-abrasive
cotton cloth. Avoid exterior glass cleaner.
ABRASIvES
Abrasive pads, scouring powders or cleaners may permanently
dull and scratch the laminate surface making it susceptible
to staining.
Ceramics, including unglazed materials and other abrasive
objects, can cause scratching and premature wear – do not slide
these items across surface.
CHEmICAL DAmAGE
Never use cleaners containing acid, alkali, or sodium hypochlorite.
These cleaners will mar, etch, corrode, and permanently discolor
the laminate surface. Also, make sure that bottles, rags, and
other materials contaminated with these cleaners never contact
the laminate surface. Accidental spills or splatters from these
compounds should be wiped off immediately, and the area rinsed
thoroughly with water.
FORmICA® LAmINATE AND COLORCORE2Tm BY FORmICA GROUP USE AND CARE GUIDE / WARRANTY
City of Yorba Linda, 2019
APPENDIX "B"

Formica® Laminate by Formica Group 2
ExAmPLES OF CLEANERS CONTAINING ACID, ALkALI, OR SODIUm
HYPOCHLORITE INCLUDE, BUT ARE NOT LImITED TO:
ceramic cooktop cleaners oven cleaners
chlorine bleach rust removers
coffeepot cleaners some countertop cleaners
drain cleaners some disinfectants
lime scale removers toilet bowl cleaners
metal cleaners tub and tile cleaners
SPECIAL CLEANING RECOmmENDATIONS
RESIDUAL GLUE
Sometimes new decorative laminate has a streaky appearance
caused by contact adhesive used during fabrication. Clean with
a non-abrasive cotton cloth and an adhesive solvent such as
Formica® Brand Non-flammable Contact Adhesive Solvent. Use
solvent sparingly, as excessive amounts may delaminate edges.
Read and follow all warnings and instructions on the labels of all
solvent products.
PAINT AND vARNISH
Remove most oil-base paints, varnishes and lacquers from
decorative laminate surfaces with a suitable solvent. Read and
follow all warnings and instructions on the labels of all solvent
products, and remember that most solvents are extremely
flammable. Use solvent sparingly, as excessive amounts may
delaminate edges. Remove most water-based paints with an
ammoniated household cleaner. For stubborn paint spots, gently
use a plastic, non-metallic, non-abrasive pad. Never use steel
wool or other abrasive scouring pads.
STAINS
To remove or minimize stains, use full strength Fantastik® All
Purpose Cleaner, Formula 409®, Pine-Sol® (original formulation)
or other mild household cleaner on the affected area, and allow
it to draw out the stain. Blot with a clean, damp, non-abrasive
cotton cloth, and then rinse with clean water. When a recom-
mended cleaner changes its formulation, the change may be
harmful to the laminate surface. Formica Corporation cannot be
held responsible for these changes. Solvents such as denatured
alcohol can also be used. Follow all directions and warnings on
the solvent label because many are extremely flammable.
STUBBORN OR “FUGITIvE” STAINS THAT mAY DISAPPEAR ON THEIR OWN,
AFTER A SHORT TImE OR AFTER REPEATED CLEANINGS, INCLUDE:
coffee and tea stains food stains
fingerprints glass rings
food dyes water marks
STAINS WHICH ARE STUBBORN OR EvEN PERmANENT, AND mAY NOT
DISAPPEAR, INCLUDE:
cash register inks lemon juice
food pricing ink marking pen inks
indelible inks newsprint
label inks wood stains
SOmE mATERIALS AND LIqUIDS, SUCH AS DYES AND PHARmACEUTICAL
PRODUCTS, WILL PERmANENTLY STAIN LAmINATE. ExAmPLES INCLUDE:
dermatological povidone-iodine
hair dyes and rinses Red-2B dye
laundry bluing silver nitrate
Mercurochrome® tannic acid
peroxides tar compounds
These stains may be reduced by applying a paste of baking soda
and water on the area to pull out the stain. The paste will be
slightly abrasive, so do not rub. wipe up the paste with a clean,
damp, non-abrasive cotton cloth, and then rinse clean with water.
Periodic application of a self-cleaning wax can help minimize
future staining.
Scotch-Brite® is a registered trademark of 3M Company. Fantastik®
is a registered trademark of DowBrands Inc. Formula 409® and Pine
Sol® are registered trademarks of The Clorox Company. Mercuro-
chrome® is a licensed trademark of Beckton Dickson.
LImITED WARRANTY
Formica Corporation expressly warrants that, for a period of
(1) one year from the date of first sale, these products will be
reasonably free of defects in materials and workmanship, and
that when properly handled and fabricated, will conform, within
accepted tolerance, to applicable manufacturing specifications.
Colors subject to dye lot variations. This limited warranty only
applies to Formica Brand Laminate which is stored, handled,
fabricated and installed in the manner recommended by Formica
Corporation. Due to the variety of uses and applications to which
Formica Brand Laminate may be put, FORmICA CORPORATION CAN
mAkE NO WARRANTY THAT THIS PRODUCT IS SUITABLE FOR ANY
PARTICULAR PURPOSE AND CAN mAkE NO OTHER WARRANTIES,
ExPRESSED OR ImPLIED, OTHER THAN THOSE SET FORTH ABOvE.
DISCLAImER OF WARRANTIES
THE WARRANTIES SET FORTH HEREIN OR IN FORmICA CORPORATION’S
WARRANTY DOCUmENTS WITH RESPECT TO A PRODUCT ARE THE
ONLY WARRANTIES mADE BY FORmICA CORPORATION IN CONNEC-
TION WITH THESE PRODUCTS, AND ARE ExPRESSLY IN LIEU OF ANY
OTHER WARRANTIES, ExPRESS OR ImPLIED, INCLUDING WITHOUT
LImITATION, ANY WARRANTY OF mERCHANTABILITY OR FITNESS FOR
A PARTICULAR PURPOSE. PRODUCTS SOLD BY FORmICA CORPORA-
TION ARE SOLD ONLY TO THE SPECIFICATION SPECIFICALLY SET
FORTH BY FORmICA CORPORATION IN WRITING. FORmICA CORPO-
RATION’S SOLE OBLIGATION FOR A REmEDY TO BUYER SHALL BE
REPAIR OR REPLACEmENT TO NON-CONFORmING PRODUCTS, OR AT
THE OPTION OF FORmICA CORPORATION , RETURN OF THE PRODUCT
AND REFUND OF THE PURCHASE PRICE. BUYER ASSUmES ALL RISk
WHATSOEvER AS TO THE RESULT OF THE USE OF THE PRODUCTS
PURCHASED, WHETHER USED SINGLY OR IN COmBINATION WITH
OTHER SUBSTANCES.
FORmICA® LAmINATE AND COLORCORE2Tm BY FORmICA GROUP USE AND CARE GUIDE / WARRANTY ConTInueD
City of Yorba Linda, 2019
APPENDIX "B"

Formica® Laminate by Formica Group 3
LImITATION OF LIABILITY
No claim by buyer of any kind, including claims for indemnification,
whether as to quality or amount of products delivered or for non-
delivery of products, shall be greater in amount than the purchase
price of the products in respect of which damages are claimed.
IN NO EvENT SHALL FORmICA CORPORATION BE LIABLE TO BUYER
FOR ANY SPECIAL, INDIRECT, INCIDENTAL, RELIANCE, ExEmPLARY,
OR CONSEqUENTIAL DAmAGES OR COvER, OR LOSS OF PROFIT,
REvENUE OR USE , IN CONNECTION WITH, ARISING OUT OF, OR AS
A RESULT OF, THE SALE, DELIvERY, SERvICING, USE OR LOSS OF
USE OF THE PRODUCTS SOLD HEREUNDER, OR FOR ANY LIABILITY
OF BUYER TO ANY THIRD PARTY WITH RESPECT THERETO. BUYER
SHALL INSPECT FOR NONCONFORmITY PROmPTLY UPON RECEIPT.
Failure by buyer to give Formica Corporation written notice of
claim within 30 days from date of delivery or, in the case of non-
delivery from the date fixed for delivery, shall constitute a waiver
by buyer of all claims in respect of such products.
mANUFACTURER
Formica Corporation
10155 Reading Road
Cincinnati, Ohio 45241-5279
TECHNICAL SERvICES
Technical assistance may be obtained through your local
Formica® Brand Products Distributor or from Formica Corporation
trained representatives in sales offices throughout the country.
To assist these representatives, Formica Corporation maintains
a sales technical services staff in Cincinnati, Ohio. For technical
assistance, contact your distributor or sales representative; write
the company directly at Formica Corporation Technical Services
Department, 10155 Reading Road, Cincinnati, oH, 45241; call
(513) 786-3048 or 1-800-FoRMICA™; or fax (513) 786-3195.
In Canada, call 1-800-363-1405. In Mexico, call (525) 530-3135.
For the most current technical information, go to www.formica.com.
Formica, the Formica Anvi l logo and ColorCore are registered trademarks of The Dil ler Corporation. 1-800-FoRMICA, ZIP-CHIP and ColorCore2 are trademarks of The Dil ler Corporation. The products and manufacturing processes of Formica Corporation are protected under U.S. and foreign patents.
Al l ® brands are registered trademarks of the respective owners. All ™ brands are trademarks of the respective owners.
For warranty information, please visit www.formica.com or cal l 1-800-FoRMICA™.
GreenGuard environmental Institute Formica® high-pressure laminate (HPL) is GreenGuard Indoor Air Qual ity Certi f ied under the GreenGuard Standard for Low-Emitting Products.
©2008 Formica Corporation Cincinnati, Ohio 45241 Printed in the USA
FORmICA® LAmINATE AND COLORCORE2Tm BY FORmICA GROUP USE AND CARE GUIDE / WARRANTY ConTInueD
FTB-0841 Rev 1 (03-12-13)City of Yorba Linda, 2019
APPENDIX "B"

Panolam Industries International, Inc. | 1 Corporate Drive, Suite 725, Shelton, CT 06484 | 877.726.6526 | www.panolam.com
NEVAMAR® High Pressure Laminate (HPL) is the brand name for our line of durable, high performance, high pressure laminates (HPL). This is the surface solution of choice for high-use applications on surfaces in hospitals, stores, hotels, offices, lobbies, restaurants, and educational institutions. NEVAMAR® decorative surfaces come in a wide assortment of treatments designed to withstand fire, chemicals, abrasions and the general wear and tear of high traffic areas. NEVAMAR® HPL also features our exclusive Armored Protection (ARP®) which has been recognized as a performance standard among decorative high pressure laminates. It resists wear and keeps our laminates looking new longer. For more information, please visit our website www.nevamar.com or call 877-726-6526.
SECTION 064025
HIGH PRESSURE LAMINATES
PART 1 - GENERAL
1.1 SUMMARY
A. Provide high pressure laminates (HPL) for interior horizontal and vertical surfaces.
B. Related Sections: Coordinate with work of other sections including the following:
1. Section 062023 – Interior Finish Carpentry.2. Section 064116 – Plastic Laminate Faced Architectural Cabinets.3. Section 064219 – Plastic Laminate Faced Wood Paneling.4. Section 066400 – Plastic Paneling.5. Section 102113 – Plastic Laminate Clad Toilet Compartments.6. Section 105123 – Plastic Laminate Clad Lockers.7. Section 123216 – Manufactured Plastic Laminate Faced Casework.8. Section 123553 – Plastic Laminate Clad Laboratory Casework.9. Section 123623 – Plastic Laminate Clad Countertops.
1.2 SUBMITTALS
A. Product Data: Submit manufacturer’s literature including product characteristics, accessories and limitations.
B. Selection Samples: Submit samples of colors and finishes if requested by architect.
C. Verification Samples: Submit samples of selected materials specified to verify color and finish.
D. Industry Certifications and Standards: Submit copy of documentation indicating compliance.
1.3 QUALITY ASSURANCE
A. Manufacturer: Minimum of 5-years experience manufacturing similar products.
1.4 DELIVERY, STORAGE AND HANDLING
A. Deliver materials and products in unopened factory labeled packages. Store and handle in strict compliancewith manufacturer’s instructions and recommendations.
HIGH PRESSURE LAMINATES064025 - 1
High Pressure Laminates (HPL)
Guide Specification
City of Yorba Linda, 2019
APPENDIX "B"

Panolam Industries International, Inc. | 1 Corporate Drive, Suite 725, Shelton, CT 06484 | 877.726.6526 | www.panolam.com
1.5 WARRANTY
A. Manufacturer’s Warranty: Provide manufacturer’s standard warranty against defects in manufacturing.
PART 2 - PRODUCTS
2.1 HIGH PRESSURE LAMINATES
A. Manufacturer: Panolam Industries International, Inc., 1 Corporate Drive, Suite 725, Shelton, CT 06484.Tel: 877-726-6526, Fax: 203-225-0050. Web: www.panolam.com. Panels shall comply with the following:
1. General Purpose Grade: HGS complying with NEMA LD3.2. Horizontal Grade: HGL complying with NEMA LD3.3. Horizontal Forming Grade: HGP complying with NEMA LD3.4. Vertical Forming Grade: VGP complying with NEMA LD3.5. Sheet Thickness: As selected from manufacturer’s standard thicknesses.
HGS 0.048 (1.2 mm); HGL 0.039 inches (1.0 mm); HGP 0.039 inches (1.0 mm);VGP 0.028 inches (0.7 mm).
6. Sheet Width: As selected from manufacturer’s standard widths of 30 inches (762 mm),36 inches (914 mm), 48 inches (1219 mm), and 60 inches (1524 mm).
7. Sheet Length: As selected from manufacturer’s standard lengths of 96 inches (2438 mm),120 inches (3048 mm) and 144 inches (3658 mm).
8. Color and Texture: As selected by architect from manufacturer’s full range.9. Adhesive: Types as recommended by manufacturer.
PART 3 - EXECUTION
3.1 EXAMINATION
A. Examine substrates for compliance with requirements for installation tolerances and other conditionsaffecting performance. Proceed with installation only after unsatisfactory conditions have beencorrected.
3.2 INSTALLATION
A. Install products in strict accordance with manufacturer’s instructions and approved submittals.1. Clean substrate of dirt, dust, waxes, and other bond breaking substances prior to
beginning installation.2. Follow adhesive manufacturer’s recommendations for set and application times.3. Apply pressure to entire panel face with laminate type roller, removing trapped air and ensure
proper adhesion between surfaces.
3.3 ADJUSTING AND CLEANING
A. Replace installations out of plumb and not aligned with adjacent panels and construction.
B. Clean panel face to remove soiling, stains, dust, and dirt using clean rags, and cleaning agentsas instructed by manufacturer.
C. Leave installation clean, free of residue and debris resulting from work of this section.
END OF SECTION
HIGH PRESSURE LAMINATES064025 - 2
Panolam Industries International, Inc. | 1 Corporate Drive, Suite 725, Shelton, CT 06484 | 877.726.6526 | www.panolam.com
07/2018City of Yorba Linda, 2019
APPENDIX "B"

Three standard grades of Nevamar® High Pressure Laminate are suitable for most applications:
General Purpose Type NG48 is most often used in horizontal applications where high impact resistance and a durable, decorative surface is required.
Postforming Type NF39 is designed for manufacturing countertops and other horizontal surfaces where the laminate may be heated and rolled over the substrate edge to eliminate seams.
Type NF28 is designed for applications where impact resistance is less critical. Type NF28 can also be postformed.
Product Description
High pressure laminate is manufactured in a flat press by combining decorative papers saturated in melamine resin with phenolic-impregnated kraft layers at pressures exceeding 1000 psi (6.9 MPa) and temperatures approaching 300˚F (150˚C). The panels are trimmed to size and the backs are sanded to facilitate bonding. The thickness of the laminate is determined by the number of kraft layers used. The laminating process combines the durability of melamine resins with the aesthetics of decorative papers creating a surfacing material that has been the standard for many years.
Most textured finish items are produced with Nevamar’s exclusive Armored Protection® Surface and have all the properties of conventional laminate. But it also has superior abrasion and scuff resistance due to a very thin deposit of microscopic particles of aluminum oxide on the conventional melamine layer. Armored Protection® Surface has significantly better wear value than the NEMA standard for laminates. It also offers superior resistance to scuffing and retain a “brand new” appearance during most of their useful life. All other properties meet the normal NEMA test requirements.
Standard Nominal Sizes
Typical Uses
Nevamar® standard laminate is designed for either horizontal, vertical, or postforming applications. This laminate is seen on countertops, tables, vanities, interior doors, cabinets, contract furniture, and retail store fixtures.
Fabrication Tips
When working with Nevamar® HPL, these techniques will produce a quality application.
1. Proper conditioning of the laminate, substrate,and backing sheet minimizes possible warping,shrinking, or expansion of assembled panels.Ideally, all components should be conditioned at70˚F to 75˚F (21˚C to 25˚C) and 45 to 50 percentrelative humidity for 48-hours prior to assembly.
2. Always bond laminate to a suitable substratesuch as medium to high density fiberboard,particleboard, or metals. It should not be glueddirectly to plaster walls, gypsum wallboard, orconcrete.
3. Recommended adhesives include solvent or water-based contact cement, white glue (PVA), epoxy, andhot melt glue. Consult your adhesive supplier forspecific application requirements.
4. The use of a backing sheet is recommended tominimize warpage. The thickness of the backingsheet should be relatively equal to the thickness ofthe decorative laminate on the face of the assembly.
5. All saw blades and router bits used for cuttingshould be carbide tipped. Feed rate should be slowand tool speed should be high.
Technical Bulletin
High Pressure Laminate
Type Thickness* Width* Length Colors
NG48 (in.)
(mm)
0.048
1.2
36,48,60
914,1219,1524
96,120,144
2438,3048,3658
All solids, patterns &
woodgrains
NF39 (in.)
(mm)
0.039
1.0
36,48,60
914,1219,1524
96,120,144
2438,3048,3658
All solids, patterns &
woodgrains
NF28 (in.)
(mm)
0.028
0.7
36,48,60
914,1219,1524
96,120,144
2438,3048,3658
All solids, patterns &
woodgrains
*Other widths and thicknesses available upon request.
City of Yorba Linda, 2019
APPENDIX "B"

6. All edges of laminate should be filed smooth withfile direction towards substrate to help preventstress cracks and to minimize chipping.
7. Inside corners of cutouts for electrical outlets, sinks,etc., should have a minimum radius of 1/8” (3 mm)and be filed smooth. This reduces the likelihood ofstress cracks.
8. When fasteners are required, it is advisable to firstdrill an oversized hole through the laminate. Thisreduces the likelihood of stress cracks.
9. See the Nevamar® Postforming Technical Bulletinfor postforming application tips.
10. All laminate is intended for interior use only, andshould not be exposed to extreme humidity,continuous sunlight, or temperatures above 275˚F(135˚C) for extended periods of time.
Technical InformationPhysical Properties
NEMA TYPICAL TYPICAL TYPICALLD 3-2005 NEVAMAR® NEVAMAR NEVAMAR® TEST VALUES NEMA STD. VALUES NEMA STD. VALUES NEMA STD.Method NG48 HGS NF39 HGP F28 VGP
Thickness (in.) 0.048 ± 0.003 0.048 ± 0.005 0.039 ± 0.005 0.039 ± 0.005 0.028 ± 0.003 0.028 ± 0.004 (mm) 1.2 ± 0.12 1.2 ± 0.12 1.0 ± 0.12 1.0 ± 0.12 0.7 ± 0.1 0.7 ± 0.1
Appearance 3.1 Complies Complies Complies
Light Resistance 3.3 no effect Slight effect no effect Slight effect no effect Slight effect
Cleanabililty 3.4 7-11 20 (max) 7-10 20 (max) 7-10 20 (max)
Stain 1-10 No effect No effect No effect No effect No effect No effectStain 11-15 No effect Moderate effect No effect Moderate effect No effect Moderate effect
Boiling Water Resistance 3.5 No effect No effect No effect Slight effect No effect Slight effect
High Temperature Resistance 3.6 No effect Slight effect No effect Slight effect No effect Slight effect
Ball Impact Resistance (in.) 3.8 66 50 (min.) 48 30 (min.) 40 20 (min.) (mm) 1676 1250 (min.) 750 (min.) 1016 500 (min.)
Radiant Heat Resistance (sec) 3.10 300 125 (min.) 275 100 (min.) 250 80 (min.)
Dimensional Change 3.11 Machine Direction (%) 0.35 0.50 (max.) 0.35 1.1 (max.) 0.35 1.1 (max.) Cross Direction (%) 0.75 0.90 (max.) 0.75 1.4 (max.) 0.75 1.4 (max.)
Room Temperature 3.12 Dimensional Stability
Machine Direction (%) 0.30 0.5 (max.) 0.25 1.0 (max.) 0.30 1.0 (max.) Cross Direction (%) 0.50 0.8 (max.) 0.45 1.3 (max.) 0.60 1.3 (max.)
Wear Resistance (cycles) 3.13 1000 400 (min.) 1000 400 (min.) 1000 400 (min.)
Formability (in) 3.14 Not applicable Not applicable 3/8 5/8 (min.) 1/4 1/2 (min.
(mm) Not applicable Not applicable 10 16 (min.) 7 13 (min.)
Blister Resistance (sec) 3.15 Not applicable Not applicable 60 55 (min.) 52 40 (min.)
Fire Test Data
High pressure decorative laminate is frequently used in installations governed by local fire codes. Burning characteristics of laminate are greatly influenced by the adhesive and substrate used. Listed below are typical flame spread index and smoke developed values for Nevamar® standard grade laminate. When specifying Class I or A rated laminate, refer to Nevamar® Fire Rated Technical Bulletin.
Sample Type Flame Configuration
Spread Index Smoke Developed Values
NG48NF39NF28
Bonded* to Inorganic
Cement Board
404035
1206535
CAN/ULC-S102MLaminated Plastic Surface Burning Characteristics
*Bonded with N® Sodium Silicate Sealer and Wonderbond® WB-104A with M-172L. All work should be designed, assembled, and installed in compliance with pertinent local fire codes.
City of Yorba Linda, 2019
APPENDIX "B"

Codes and Certifications
1. U.S. Federal Motor Vehicle Safety Standard #302“Flammability of Interior Materials.” Nevamar® TypeG48, F39, and F28 comply.
2. NSF-International Standard 35, “Laminated Plasticsfor Surfacing Food Service Equipment.” Nevamar®
Type G48, F39, and F28 comply.
3. American National Standards Institute/NationalElectrical Manufacturers Association (ANSI/NEMA),LD3-1995, “High- Pressure Decorative Laminate.”Nevamar® Type NG48, NF39, and NF28 comply.
4. MIL-P-17171E(SH), “High Pressure DecorativeLaminate.” Nevamar® NG48 complies with Type I.
5. U.S. Federal Specification L-P-508H, “PlasticSheet, Laminated, Decorative and Nondecorative.”Nevamar® Type NG48, NF39, and NF28 comply.
6. International Organization for Standardization,ISO-4586, “Decorative High Pressure Laminates(HPL).” Nevamar® Type NG48, NF39, and NF28comply.
Care and Maintenance
Nevamar® decorative laminate provides a durable surface that is easy to maintain using ordinary care.
To maintain the laminate’s lasting beauty, cleaning with a solution of warm water and liquid dishwashing detergent is all that should be required in most cases.
Stains may be removed with most non-abrasive household cleaners such as FORMULA 409®, GLASS PLUS® or WINDEX® with AMMONIA D®. Light scrubbing with a soft bristled brush may be necessary to remove
stains from the depth of the structure on some textured surfaces.
If the stain persists, use a paste of baking soda and water and apply with a soft bristled brush. Light scrubbing for 10-20 strokes should remove most stains. Although baking soda is a low abrasive, excessive scrubbing or exerting too much force may damage the decorative surface, especially if it has a gloss finish.
Stubborn stains that resist any of the above cleaning methods may require the use of undiluted household bleach. Apply the bleach to the stain and let stand no longer than 1 1/2 minutes. Rinse thoroughly with warm water and wipe dry. This step may be repeated if the stain appears to be going away and the color of the laminate has not been affected. WARNING: Prolonged exposure of the laminate surface to bleach will cause discoloration.
Many commercially available products contain substances that may damage or discolor a laminate surface. ABRASIVE CLEANERS SHOULD NOT BE USED. Particular care should be used with any products labeled CAUTION or WARNING. Any questions or concerns should be referred to the product’s manufacturer or call 1-877-726-6526. Do not allow harsh materials to remain in contact with the laminate surface. Examples of these are as follows:
• Toilet bowl cleaners• Chlorine bleach• Hydrogen Peroxide• Coffee pot cleaners• Oven cleaners• Hard water stain removers• Drain cleaners• Fruit and berry juice• Metal cleaners and polishes• Tub and tile cleaners
Formula 409 is a registered trademark for The Clorox Company of Oakland, CA 94612; Glass Plus is a registered trademark for The Dow Chemical Company of Indianapolis, IN 46268-0511; Windex is a registered trademark for S.C. Johnson
& Sons INC. of Racine, WI 53403-5011.
ASTM E-84/UL723“Standard Test Method for Surface BurningCharacteristics of Building Materials”
Sample Flame SmokeType Configuration Spread Index Developed Values
NG48 Unbonded 40 120NF39 40 65NF28 35 35
NG48 Bonded* to 55 85NF39 Inorganic 55 105NF28 Cement Board 35 40
NG48 Bonded* to 5/8” 95 95NF39 Particleboard 235 140NF28 160 160
NG48 Bonded* to 5/8” 160 110NF39 Fire Rated 110 130NF28 Particleboard 80 75
*Bonded with Pioneer P19NF contact cement. All work should be designed, assembled and installed in compliance with pertinent local fire codes.
City of Yorba Linda, 2019
APPENDIX "B"

Limited Warranty
Subject to the limitations set forth below, Panolam Industries International Inc. (Panolam) expressly warrants that our products are reasonably free of defects in material and workmanship, and when properly handled and fabricated will conform, within accepted tolerances, to applicable manufacturing specifications as set forth in our technical brochure. This warranty shall extend to the original buyer for a period of twelve (12) months from the date of shipment of this product by Panolam, and shall not be assignable by the original buyer. This warranty does not cover damage resulting from accident, misuse, alteration, abuse or lack of reasonable care.
Due to the variety of uses and applications to which this product may be put, and because the manufacturer has no control over the end products fabricated, the warranty set forth above is exclusive and in lieu of all warranties, expressed or implied, in fact or by operation of law or otherwise, or arising by course of dealing or performance, custom or usage in the trade, including, without limitation, the implied warranties of fitness for a particular purpose and merchantability, and Panolam shall have no obligation or liability to any person or entity in connection with or arising from the furnishing, sale, installation or repair, use or subsequent sale of any product supplied by it.
Our maximum liability arising out of the sale of the products or their use, whether based upon warranty, contract, tort or otherwise, shall not exceed the actual payments received by us in connection therewith. In no event shall we be liable for special, incidental or consequential damages, including, but not limited to, arising hereunder or from the loss of profits, or loss of use damages, sales of the products.
Headquarters
Panolam Industries International, Inc. One Corporate Drive, Suite 725 Shelton, CT 06484 1-877-726-6526www.panolam.com
© 2018 Panolam Industries International, Inc.
07/2018
City of Yorba Linda, 2019
APPENDIX "B"

ARCHITECTURAL SPECIFICATION PentalQuartz is a quartz-composite engineered stone that is suitable for virtually any interior surfacing application. PentalQuartz can be used for kitchen countertops, bathroom vanities, bar tops, wall cladding, shower and tub surrounds, and a variety of other indoor surfacing. PentalQuartz provides significant advantages over many natural stones including greater strength, stain resistance, scratch resistance, and consistency of colors and textures. Edit this Guide Specification according to project requirements. Samples, product literature, and any other product assistance are available by contacting Pental Surfaces at 206-768-3200 or by visiting our website at www.pentalquartz.com
Section 06 61 19 – QUARTZ SURFACING FABRICATIONS
Section 12 36 61 – QUARTZ SURFACING COUNTERTOPS
Part 1 – General
1.0 Related Documents Drawings and general provisions of the contract, including general and supplementary conditions and Division 1 Specification Sections, apply to this section.
1.1 Summary A. Section includes quartz surfacing (engineered stone) for:
1. Countertops2. Vanity Tops3. Tabletops4. Bar tops5. Windowsills6. Thresholds7. Interior wainscoting and wall cladding8. Shower and bath enclosures9. Reception areas10. Other interior applications as depicted in drawings.
B. Related Sections1. Division 1 Administrative, procedural and temporary work requirements.2. Division 5 Section Metal Fabrication for blocking3. Division 6 Section Rough Carpentry for blocking4. Division 6 Section Solid Surface Fabrications5. Division 7 Section Joint Sealers6. Division 9 Section Solid Surface Wall Cladding7. Division 9 Section Quartz Surface Wall Cladding8. Division 10 Section Quartz Surface Toilet Partitions9. Division 15 Section Plumbing Fixtures10. Division 16 Section Wiring Devices
City of Yorba Linda, 2019
APPENDIX "B"
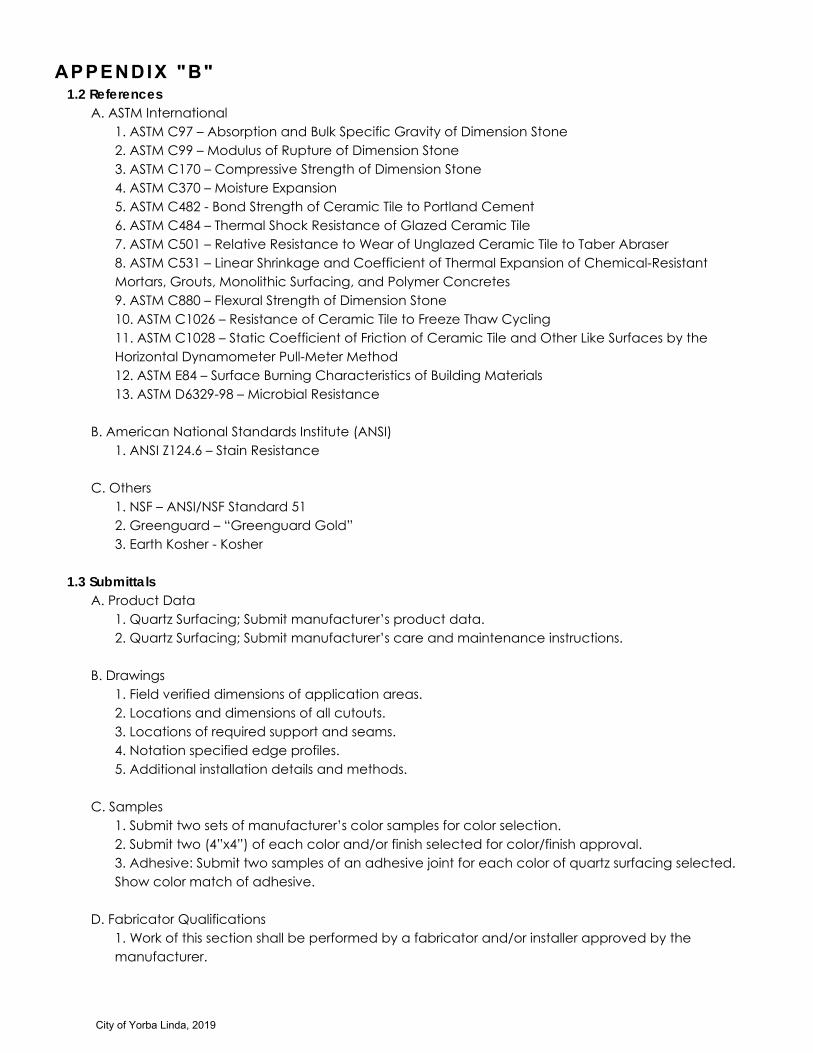
1.2 References A. ASTM International
1. ASTM C97 – Absorption and Bulk Specific Gravity of Dimension Stone2. ASTM C99 – Modulus of Rupture of Dimension Stone3. ASTM C170 – Compressive Strength of Dimension Stone4. ASTM C370 – Moisture Expansion5. ASTM C482 - Bond Strength of Ceramic Tile to Portland Cement6. ASTM C484 – Thermal Shock Resistance of Glazed Ceramic Tile7. ASTM C501 – Relative Resistance to Wear of Unglazed Ceramic Tile to Taber Abraser8. ASTM C531 – Linear Shrinkage and Coefficient of Thermal Expansion of Chemical-ResistantMortars, Grouts, Monolithic Surfacing, and Polymer Concretes9. ASTM C880 – Flexural Strength of Dimension Stone10. ASTM C1026 – Resistance of Ceramic Tile to Freeze Thaw Cycling11. ASTM C1028 – Static Coefficient of Friction of Ceramic Tile and Other Like Surfaces by theHorizontal Dynamometer Pull-Meter Method12. ASTM E84 – Surface Burning Characteristics of Building Materials13. ASTM D6329-98 – Microbial Resistance
B. American National Standards Institute (ANSI)1. ANSI Z124.6 – Stain Resistance
C. Others1. NSF – ANSI/NSF Standard 512. Greenguard – “Greenguard Gold”3. Earth Kosher - Kosher
1.3 Submittals A. Product Data
1. Quartz Surfacing; Submit manufacturer’s product data.2. Quartz Surfacing; Submit manufacturer’s care and maintenance instructions.
B. Drawings1. Field verified dimensions of application areas.2. Locations and dimensions of all cutouts.3. Locations of required support and seams.4. Notation specified edge profiles.5. Additional installation details and methods.
C. Samples1. Submit two sets of manufacturer’s color samples for color selection.2. Submit two (4”x4”) of each color and/or finish selected for color/finish approval.3. Adhesive: Submit two samples of an adhesive joint for each color of quartz surfacing selected.Show color match of adhesive.
D. Fabricator Qualifications1. Work of this section shall be performed by a fabricator and/or installer approved by themanufacturer.
City of Yorba Linda, 2019
APPENDIX "B"

1.4 Quality Assurance A. Delivery, Storage, and Handling
1. Observe manufacturer’s recommendations and handle accordingly in order to preventdamage or breakage.2. Brace parts as necessary.3. Transport in a near vertical position with finished face positioned towards finished face.4. Do not allow finished faces to rub during transportation or handling.
B. Storage and Protection1. Store in racks in near vertical position.2. Prevent warping and breakage.3. Store indoors and away from direct sun exposure.4. Store between 25⁰F and 130⁰F.5. Store with finished face towards finished face.
1.5 Warranty A. Commercial: Provide manufacturer’s Commercial 10 year Limited Warranty. Warranty againstmanufacturer defects when fabricated and installed by a manufacturer certified fabricator/installer.
B. Residential: Provide manufacturer’s Residential 15 year Limited Warranty. Warranty againstmanufacturer defects when fabricated and installed by a manufacturer certified fabricator/installer.
Part 2 – Products
2.1 Manufacturer A. Acceptable Manufacturer: Vicostone distributed by Pental Surfaces Inc. (PentalQuartz).www.pentalquartz.comB. Qualifications: Manufacturer shall be ISO 9001:2008 and ISO 14001 certified.C. Substitutions: None accepted
2.2 Materials A. Quartz Surfacing
1. Material must be homogenous in nature containing approx. 90-93% crushed quartz combinedwith high quality polymer resin and pigments to form slabs using Bretonstone® technology.
B. Thickness:1. 1.2 cm2. 2 cm3. 3 cm
C. Material Identification1. All slabs shall be identifiable by manufacturer’s markings on the back side of the slab includingslab item number, material finish, production batch, and serial numbers.
D. Color and Finish1. Color: [________ selected from Pental Surfaces stocked standard colors.2. Finish: [_______ selected from Pental Surfaces stocked finishes for each applicable color.
City of Yorba Linda, 2019
APPENDIX "B"

**All colors available in polished finish. Please consult PentalQuartz literature or website for availability of alternate finishes.
E. Exposed Edges (Corners)1. Countertop edge detail: [__________]2. Backsplash edge detail: [__________]3. Other application edge detail(s): [_______]
F. Material Performance Characteristics1. Water Absorption: ASTM C97 ≤0.03%2. Flexural Strength: ASTM C880 - 6,200-11,000 psi3. Compressive Strength: ASTM C170 - 22,000-28,000 psi4. Abrasion Resistance: ASTM C1243 - Volume of chord: V=89 194mm25. Freeze Thaw resistance: ASTM C1026 - No detects after 15 cycles6. Microbial resistance: ASTM D6329-98(2003) : Resistant to mold growth7. Resistance to chemical acids: ASTM C560 : Not affected8. Resistance to staining: AS2924.2-15:1998 - 5 No visible change9. Mohs hardness: EN101 6.0-7.0
2.3 Accessories A. Mounting Adhesives
1. Provide structural grade silicone or epoxy adhesive.2. Acceptable silicone manufacturers.
a. As specified [________].3. Acceptable Epoxy manufacturers.
a. Tenax U.S.Ab. Akemi North Americac. Bonstone Material Corp.d. As specified [______]
B. Quartz Surface Adhesive1. Provide epoxy or polyester adhesive as recommended by manufacturer for application andconditions of use.2. Acceptable manufacturersa. Tenax U.S.A.b. Akemi North Americac. Bonstone Materials Corp.3. Color: Adhesives shall be tinted to match quartz surfacing for all visible finished work.
C. [Fasteners] [Grout] [Hardware]: [_____________________].
D. Joint Sealant:1. Clear silicone sealant as recommended by manufacturer for application and for conditions ofuse.2. Provide anti-bacterial type in toilet, bath, food preparation areas, and [____].
E. Solvent: Product as recommended by adhesive manufacturer to clean surface of quartz surfacingto assure adhesion and not damage surface finish of quartz material.
F. Cleaning Agents: Non Abrasive, low pH cleanser or mild soap and water.
City of Yorba Linda, 2019
APPENDIX "B"

2.4 Fabrication A. Fabricator: Firm shall be certified by Pental Surfaces and have the ability to present written proofof such certification upon request.
B. Layout: Layout surfaces (as shown in drawings) to minimize joints and avoid L-shaped pieces ofquartz surfacing.
C. Inspection of Material:1. Inspect material for any defects prior to fabrication.2. Visually inspect material to be used in adjacent pieces to ensure acceptable color match.3. Material to be used in adjacent pieces shall be from the same batch and identifiedaccordingly.
D. Tools: All cutting and polishing shall be done using water cooled power tools.
E. Cutouts:1. Cutouts shall have a minimum 3/8 inch (10mm) inside radius.2. All exposed edges of cutouts shall be polished to match surface finish or per drawings.
F. Laminations:1. Laminate layers of quartz surfacing as required to create buildup of edges following proceduresrecommended by manufacturer.
Part 3 – Execution
3.1 Acceptable Installer A. Firm shall be certified by Pental Surfaces and have the ability to present written proof of suchcertification upon request.
3.2 Examination A. Site Verification
1. Verify dimensions by field measurements prior to fabrication and installation.2. Verify that substrate(s) supporting quartz surfaces are plumb, level, and flat to within 1/16 inch in10 feet, and that all necessary supports and blocking are in place and secure.3. [Base Cabinets: Shall be securely fixed to all adjoining units and back wall].
B. Material Inspection Review1. Verify all materials are free of damage.2. Do not install any damaged material until such pieces have been repaired or replaced.
3.3 Preparation A. General
1. Protect finished surfaces against scratches, dirt, and debris.2. Apply masking where necessary.3. Take necessary precautions to prevent other trades from contacting the finished surface.
3.4 Installation A. General Information:
1. Install materials in accordance with manufacturer’s recommendations.
City of Yorba Linda, 2019
APPENDIX "B"

B. Preliminary Installation:1. Position materials to verify correct size and position.2. Make any necessary size or finish adjustments using methods recommended by manufacturerusing water cooled power tools.3. Perform work away from installation area if possible to protect the jobsite and surface area fromdust and water.4. Allow gaps for expansion of not less than 1/8 inch for 10 feet when installing between walls orother fixed structures.
C. Permanent Installation:1. After verification of fit and finish:
a. Remove material from preliminary positions.b. Clean substrates of any dust or debris.c. Clean the back side of all quartz surfaces and joint surfaces with denatured alcohol.
2. Apply sufficient amount of mounting adhesive in accordance with manufacturer’srecommendations to provide a permanent and secure installation.3. Verify installation of quartz surface is plumb, level, square and flat within 1/16 inch in feet.4. [Fasteners] [Grout] [Hardware]: [________________________________].5. Position adjacent pieces of quartz surfaces in the same plane.
D. Joints1. Joints between adjacent pieces of quartz surfacing
a. Joints shall be flush, tight fitting, level, and neat.b. Securely join pieces with manufacturer’s recommended stone adhesive.c. Fill joints level to quartz surfacing.d. Clamp or brace quartz surfacing pieces in position until adhesive sets.
2. Joints between quartz surfacing and [backsplash] [wall] [tub] [shower] [other]a. Seal joint with silicone sealant as recommended by manufacturer.
3.5 Repair A. Repair or replace damaged material in a satisfactory manner.
3.6 Cleaning A. Remove masking, excess adhesive and/or sealant. Clean all exposed surfaces.
3.7 Protection A. Protect installed surfaces from damage by other trades.
3.8 Schedules A. [Site and job specific].
END OF SECTION
City of Yorba Linda, 2019
APPENDIX "B"

PENTALQUARTZ FABRICATION & INSTALLATION MANUAL
I. INTRODUCTION1. P u r p o s e
The purpose of this manual is to outline the basic technical requirements and provide suggestions andguidelines related to the fabrication and installation of PentalQuartz.
2. T e r m i n o l o g yThe phrase “PentalQuartz” when used in this document refers to any engineered stone slab, tile or cut tosize forms manufactured, marketed, and sold by Pental Granite & Marble or its approved distributors oragents.
"The Customer" used in this document refers to any person, firm or company placing an order with Pental Granite & Marble or its approved distributors ("the Company") for the purchase of PentalQuartz.
"Product Manual" used in this document refers to the technical information, specification, design, fabrication, maintenance and other data relating to the use and application of PentalQuartz.
3. G e n e r a l P r o d u c t I n f o r m a t i o nPentalQuartz is a composite of natural minerals and rocks, mainly quartz, bound with resin, pigments andother fillers. PentalQuartz is manufactured using the most advanced and latest technology from BretonSPA of Italy.
PentalQuartz is a high quality solid non-porous surface product that is resistant to scratches, heat, stains and water. PentalQuartz requires minimal maintenance, and when properly cared for, can remain in impeccable condition for years.
PentalQuartz is manufactured using the world renowned Breton Stone technology (Breton SPA of Italy). The quality of engineered stone will vary from brand to brand depending on the quality of resin and raw materials used in the manufacture of the stone. PentalQuartz has been manufactured using the highest quality of raw materials, as specified and recommended by Breton.
4. L i m i t a t i o n s & R e s p o n s i b i l i t i e sWe have taken care to provide complete information in this document. This information should be usedas a guide in the design, installation and care of PentalQuartz. No warranty, however implied orexpressed, is given in relation to the procedures outlined in this Product Manual except that which isrequired by law.
Pental Granite & Marble assumes that the designers, fabricators, and installers using PentalQuartz are familiar with all aspects outlined in this Product Manual and strictly adhere to the recommendations and specifications described herein. Any deviation from the recommended guidelines may result in the products not performing as expected and may result in the warranty becoming null and void.
Though every care and precaution has been taken in the preparation of this document, Pental Granite & Marble assumes no responsibility for errors and/or omissions, or for the damages resulting from the use of information contained in this Product Manual. Pental Granite & Marble shall not be liable for any loss of profit or any other loss or damage caused or alleged to have been caused either directly or indirectly as a result of any person solely relying upon any information contained in this Product Manual.
City of Yorba Linda, 2019
APPENDIX "B"

Pental Granite & Marble reserves the right to change or modify this Product Manual or its electronic version from time to time without notice, it is the responsibility of the Consumer to consult or contact Pental Granite & Marble for the latest version or updates.
II. APPLICATIONS for PentalQuartz1. I n t e r i o r A p p l i c a t i o n s
PentalQuartz is ideal for use in interior applications such as: kitchen countertops, bathroom vanities, tuband shower surrounds, fireplace mantles, walls, stairs, restaurants, hotels, hospitals, and laboratories, andalso wherever high quality, sanitary, and low maintenance countertops are required.
Exposure to unfiltered direct sunlight may result in color change and/or warping. Most windows manufactured in the last 30 years block a sufficient amount of the UV rays to prevent color change or warping, however it should be taken into account, especially in older homes. It is advisable to avoid direct unfiltered sunlight over a prolonged period on the surfaces used in the above applications.
2. F i r e p l a c e M a n t l e A p p l i c a t i o n sPentalQuartz can be used for fireplace mantles but is not recommended for fireplace surrounds.PentalQuartz should not make contact with the firebox or surfaces exceeding 212 °F (100 °C). Exposureto temperatures above 212°F may result in localized seam separation or material cracking if not properlyinstalled.
3. E x t e r i o r A p p l i c a t i o n sPental Granite & Marble does not recommend PentalQuartz for use in exterior applications.Its use in an exterior application will void the warranty.
III. PRODUCT SPECIFICATIONS1. S l a b S i z e s
PentalQuartz can be manufactured in a wide range of sizes and thicknesses to accommodate anyapplication. However, some may be available on a special order bases only. For information aboutavailability, minimum purchase quantities, and lead time, please contact your sales representative.
PentalQuartz slab sizes: 1.2cm (1/2”) – 3000mm x 1200mm (119x55) – Select colors only 2cm (3/4”) – 3000mm x 1400mm (119 x 55) 3cm (1 3/16”) – 3000mm x 1400mm (119 x 55) 3cm (1 3/16”) – 2997.2mm x 1400mm (118 x 26) – Select colors only 2cm (3/4”) – 3302mm x 1651mm (130 x 65) – Select colors only 3cm (1 3/16”) – 3302mm x 1651mm (130 x 65) – Select colors only
2. C o l o r & F i n i s hPentalQuartz has a color palette ranging from the subtle white and beige tones to darker blues, browns,and blacks.
PentalQuartz slabs are generally available in the polished finish, while select colors are available in a honed, brushed, or satin finish. However, a honed finish may be supplied to special projects in other colors on a case by case basis.
City of Yorba Linda, 2019
APPENDIX "B"
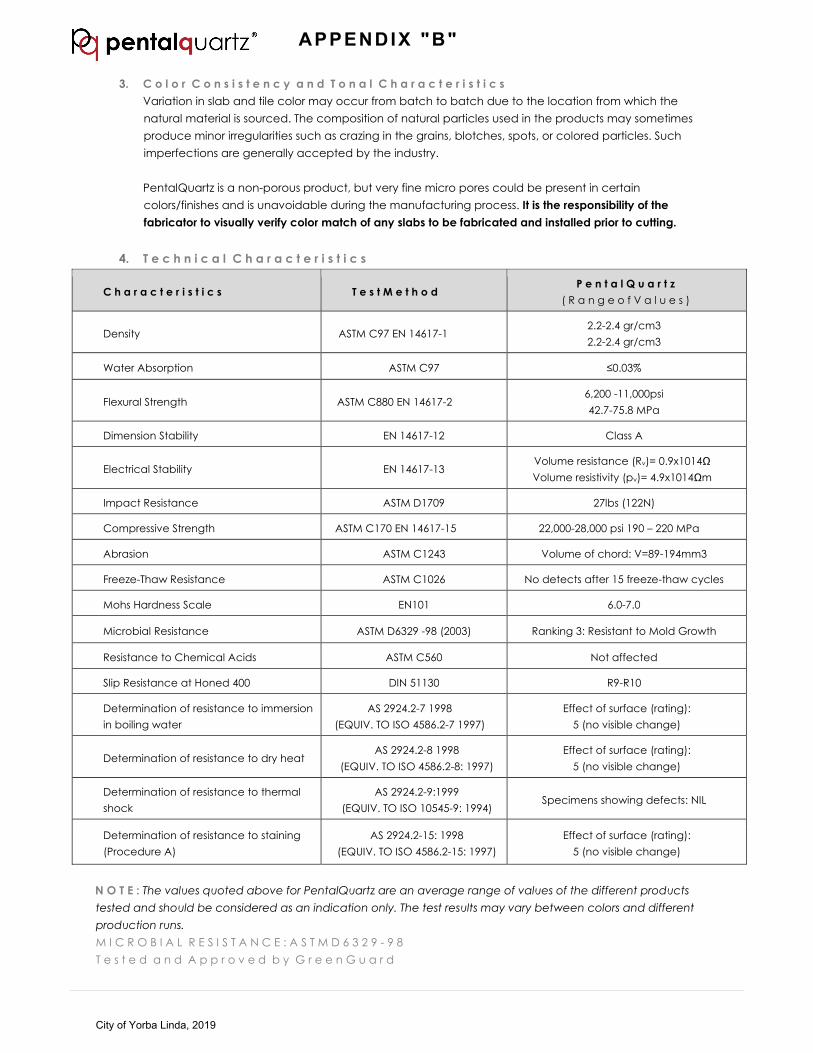
3. C o l o r C o n s i s t e n c y a n d T o n a l C h a r a c t e r i s t i c sVariation in slab and tile color may occur from batch to batch due to the location from which thenatural material is sourced. The composition of natural particles used in the products may sometimesproduce minor irregularities such as crazing in the grains, blotches, spots, or colored particles. Suchimperfections are generally accepted by the industry.
PentalQuartz is a non-porous product, but very fine micro pores could be present in certain colors/finishes and is unavoidable during the manufacturing process. It is the responsibility of the fabricator to visually verify color match of any slabs to be fabricated and installed prior to cutting.
4. T e c h n i c a l C h a r a c t e r i s t i c s
C h a r a c t e r i s t i c s T e s t M e t h o d P e n t a l Q u a r t z
( R a n g e o f V a l u e s )
Density ASTM C97 EN 14617-1 2.2-2.4 gr/cm3 2.2-2.4 gr/cm3
Water Absorption ASTM C97 ≤0.03%
Flexural Strength ASTM C880 EN 14617-2 6,200 -11,000psi 42.7-75.8 MPa
Dimension Stability EN 14617-12 Class A
Electrical Stability EN 14617-13 Volume resistance (Rv)= 0.9x10¹⁴Ω Volume resistivity (pv)= 4.9x10¹⁴Ωm
Impact Resistance ASTM D1709 27lbs (122N)
Compressive Strength ASTM C170 EN 14617-15 22,000-28,000 psi 190 – 220 MPa
Abrasion ASTM C1243 Volume of chord: V=89-194mm3
Freeze-Thaw Resistance ASTM C1026 No detects after 15 freeze-thaw cycles
Mohs Hardness Scale EN101 6.0-7.0
Microbial Resistance ASTM D6329 -98 (2003) Ranking 3: Resistant to Mold Growth
Resistance to Chemical Acids ASTM C560 Not affected
Slip Resistance at Honed 400 DIN 51130 R9-R10
Determination of resistance to immersion in boiling water
AS 2924.2-7 1998 (EQUIV. TO ISO 4586.2-7 1997)
Effect of surface (rating): 5 (no visible change)
Determination of resistance to dry heat AS 2924.2-8 1998
(EQUIV. TO ISO 4586.2-8: 1997) Effect of surface (rating):
5 (no visible change)
Determination of resistance to thermal shock
AS 2924.2-9:1999(EQUIV. TO ISO 10545-9: 1994)
Specimens showing defects: NIL
Determination of resistance to staining (Procedure A)
AS 2924.2-15: 1998 (EQUIV. TO ISO 4586.2-15: 1997)
Effect of surface (rating): 5 (no visible change)
N O T E : The values quoted above for PentalQuartz are an average range of values of the different products tested and should be considered as an indication only. The test results may vary between colors and different production runs. M I C R O B I A L R E S I S T A N C E : A S T M D 6 3 2 9 - 9 8 T e s t e d a n d A p p r o v e d b y G r e e n G u a r d
City of Yorba Linda, 2019
APPENDIX "B"

IV. GENERAL INSTRUCTIONS1. T a k i n g D e l i v e r y
When taking delivery of PentalQuartz, please remove the clear plastic covering to make sure of thefollowing: Check all the slabs for uniformity of color and granulometry (aggregate distribution) as slabs may
vary in color and granulometry from batch to batch. Check the slabs for any surface defects including: Contamination of grains, fine fissures, stains,
chipping, warping, and thickness variation. Do not transport slabs horizontally and use proper “A” frames to transport the slabs. Always keep the
polished surface protected and remove any sharp tools or implements from the vicinity of the slabsto avoid scratches on the polished surface.
If you detect any of the above defects after taking delivery of the slabs, and prior to cutting, do not proceed with the processing and return the slabs immediately.
2. P r o d u c t I d e n t i f i c a t i o nEach slab has a label with a serial number label on one side. This number is also referenced on yourpacking list. Serial number(s) of installed slabs must be given to the owner of the property of theinstallation for proper processing of the warranty.
If a slab is cut and used on two different installations, the serial number for the slab must be given to the owner of each property so they may each register their installation. The act of splitting the slab between different installations will not have any bearing on the warranty, as long as the installations would otherwise meet the warranty criteria. Any removal or intentional alteration of identifying information will void the material warranty.
V. DESIGN AND INSTALLATION GUIDE1. F a b r i c a t i n g P e n t a l Q u a r t z
Care should be taken when cutting and fabricating PentalQuartz. Tension within the slab can causecracking. Following these simple rules can minimize the chance of this occurring. For a plunge cut, prior to beginning the cut, drill a 1” relief hole at the termination point of the cut.
Always cut towards the relief hole.
City of Yorba Linda, 2019
APPENDIX "B"

For a “U” shaped cut, mark and drill relief holes where the cut lines will intersect. Always make theshortest cut first.
For an “L” shaped cut, mark and drill relief holes where the cut lines will intersect. Always cut theshortest length first, and cut towards the relief hole.
For a cut that will be the full length of the slab, either with a plunge cut, or starting at the edge,mark and drill a relief hole at the termination point of the cut, then cut towards the relief hole.
Fabrication of PentalQuartz requires a minimum radius for all inside corners of 3/8” or larger.
2. R e c o m m e n d e d W a t e r j e t S e t t i n g sFor the best results, be sure the cutting table is completely flat when fabricating PentalQuartz.
Orifice size: .0140Abrasive Flow Rate: .16
Initial cut for approximately the first 10-15 seconds at low pressure: 8,000 - 10,000 PSIThen increasing to high pressure for the balance of cutting the piece: 43,000 - 45,000 PSI
Feed Rate: 2.5 in/min. initially at low pressure. Increase to 3.5 - 3.75 in/min. for the remainder of thecutting at high pressure.
NOTE: Recommendations and settings may vary depending on a number of factors including but notlimited to equipment and abrasive materials used. Please consult with your equipment’s manufacturerfor optimal material cutting recommendations for your waterjet.
City of Yorba Linda, 2019
APPENDIX "B"

3. K i t c h e n / V a n i t y C a b i n e t sPrior to installing countertops, the cabinets and base units should be checked for the following: Strength and stability; the cabinets and substrate base should be able to withstand weight in excess
of 12lbs per Sq. Ft. All units are fastened to both the wall and between the base units. Cabinets are leveled properly. The top of the cabinets must be plumb, true, and flat. Make sure
that the level does not vary more than 1/16” over 10’. Remove any nails, screws or sharp edges from the surfaces where the tops would be placed.
4. I n s t a l l a t i o n o f C o u n t e r t o p sNo two kitchen countertops are the same, however there are some general guidelines for installingPentalQuartz countertops. As long as the base cabinets are level and they allow for the supportoutlined below, no additional support is needed when installing 3cm material. When installing anymaterial less than 3cm in thickness, you must ensure the countertop has proper support. For material lessthan 3cm thick, the base supporting the countertop can either be Complete Perimeter support orComplete Underlay support. Rarely will all the walls be perfectly square. Be sure to make allowances for such imperfections prior
to cutting. Clearance of at least 1/8” should be maintained between the PentalQuartz surface andsurrounding walls.
Countertops should be placed on a very sound and solid frame or a base which is perfectly plumb,level and true.
C o m p l e t e P e r i m e t e r S u b s t r a t e S u p p o r t Support the top, front, and back with a rail of not less than 3.5” in width and 5/8” thick. Then
support the back of the slab with rails 3.5” wide spaced at regular intervals of approximately24”, as shown below.
It is important to provide a minimum of 1/8” between the edge of the slab and the wall so thatany expansion in the wall or slab due to temperature variation can be accommodated. Anadditional gap of 1/8” per 5’ for all countertops exceeding 10’ should be provided.
Apply dabs of flexible 100% silicone adhesive at regular intervals of not less than 12” apart onthe back of the top, then place the top gently, and level the tops before the adhesive hardens.
City of Yorba Linda, 2019
APPENDIX "B"

C o m p l e t e U n d e r l a y S u b s t r a t e S u p p o r t Alternately, the complete surface area of the countertop can be supported over the kitchen cabinets with a full width self-supporting underlay made up of plywood with a minimum thickness of 5/8”.
5. P l a n n i n g a n d I n s t a l l a t i o n o f C o u t n e r t o p s w i t h J o i n t s & C u t O u t s . Do not place joint within 6 inches of a planned cut out, such as for a sink, cook top, etc. Due to various mechanical stresses experienced after installation, Pental Granite & Marble does not
recommend installing “L” shaped countertops without a joint at the corner of the “L” shape.Fabricator should use their own discretion when fabricating.
All the joints in the countertops should be well supported from underneath. All the joints should be properly cleaned with denatured alcohol to get rid of dust and grime. All the sides of the joints should be grooved or slotted in the middle so that the glue joining the two
slabs will be well distributed for good adhesion. Check that the countertop is well aligned, both along the joint(s) and also along the front. Check that the countertop is leveled properly and is plumb and true. Use paper masking tape at the joints so that the glue applied to the joints does not move to the
polished face.
City of Yorba Linda, 2019
APPENDIX "B"

Ensure that the joints are perfect and then place clamps at the joints until the adhesive setsproperly.
Once set, remove the masking tape and clean off any excess adhesive from the contact surfacewith denatured alcohol.
Do not fasten any mechanical fasteners like screws and nails directly into PentalQuartz. Seams should not be placed directly over a dishwasher or other appliance that may radiate heat.
If you are planning to make your cut outs onsite, it is essential that the operation is in an area where youcan use wet tools. It is not recommended that you cut the sink or cook top cut outs, on the top ofcabinets with dry cutting tools.
All the cut outs should be cut using only wet cutting tools to avoid generating excess heat to the tops and the corners. The radius of the corner should be around ¼”. When cut outs are planned allow an extra 1/8” between the appliance edges and the top cut out sides. This is essential to accommodate any expansion that may develop in the top due to temperature changes.
Care should be taken when installing appliances like cook tops and sinks, etc. Read the instructionmanual that was supplied by the appliance manufacturer prior to installing any appliances. Makesure that all brackets and supporting hardware are included.
Center the appliance in the cut out and make sure that you allow a minimum of 1/8” spacebetween the inside edges of the appliance and the cut out walls.
City of Yorba Linda, 2019
APPENDIX "B"

Position all the appliances in place and make sure that the seals provided with the appliances areproperly placed prior to tighten the fasteners. All fasteners should be only finger tight, never useforce in tightening the fasteners.
Any appliances weighing more than 11lbs should be adequately supported by the cabinet frames.
All of the joints between the countertop and the appliance edges can be sealed with a high qualitytransparent flexible sealant. Clean any excess sealant immediately.
Uneven thermal distribution may occur in areas above dishwashers and over hot water plumbingsystems which may cause the top to crack. To avoid this, all the hot water plumbing should bethermally insulated. It is a good practice to make the tap holes slightly oversized so that the hotplumbing system is not in direct contact with the product.
When installing a dishwasher, it is essential to fit an 18mm thick moisture resistant board or marineplywood above the dishwasher in the cabinet.
City of Yorba Linda, 2019
APPENDIX "B"

6. O v e r h a n g a n d S u p p o r t i n g B r a c k e t sAll overhangs should be properly supported. Any overhang that exceeds 8” for 2cm material, or 12” for2cm material with a 5/8” sub top, or 16” for 3cm material shall require the support of a 3/8” thick steelbar no less than 2.75” wide or appropriate L-Brackets placed underneath the top to support thepotential weight load. If a 1 ½” laminated edge is used, then a piece pasted to the top can extend thewhole width of the overhang to take away some of the stress placed on the overhang.
If the overhang is less than 20” then general practice is to provide a support base made up of timber and brackets placed approximately 20” apart. The brackets should be fastened to a backer plate, which is secured to the cabinet or wall with screws. All over hangs exceeding 20” should be supported with proper metal or solid wood legs.
Material Support Required
2cm (3/4”) 2cm (3/4”)
With 5/8” Sub Top 3cm (1 1/4”)
No Additional Support Required
Less than 8” (200mm)
Less than 12” (400mm)
Less than 16” (400mm)
Brackets Required at 24” (600mm)
Intervals
8 - 16” (200mm – 400mm)
12 - 20” (400mm – 600mm)
16 - 24” (400mm – 600mm)
Legs, Columns, or Panels Required at
24” (600mm)
Over 16” (400mm) Intervals
Over 20” (600mm) Intervals
Over 24” (600mm) Intervals
SUPPORT DETAILS FOR OVER HANG EXCEEDING 8”
City of Yorba Linda, 2019
APPENDIX "B"

7 . I n s t a l l a t i o n o f B a c k s p l a s h PentalQuartz can be used for a backsplash application in wet areas, behind wash basins, sinks, and behind cook tops. However, when installing backsplashes behind gas cook tops and heat generating appliances, it is important that the installer follow all instructions and safety requirements as outlined by the appliance manufacturers, as well as conform to any local building standards or codes.
The installer must also ensure that the following general guidelines are strictly followed: Make sure that the walls are vertical and free from dirt and grime. If needed clean the entire
surface. It is not advisable to install a backsplash on gyprock boards and any paper lined gypsum product. The backsplash pieces should be thoroughly cleaned on the back and on the top. Place them in
the area to be installed and check whether the pieces fit properly. After the pieces are fit satisfactorily, clean the contact surfaces with denatured alcohol and apply
dabs of transparent two part epoxy glue to both the surfaces of the contact and place thecladding. It is not advisable to use grout between the cladding and the countertop. Use a flexiblesilicon based sealant to fill the gap between the countertop and backsplash.
8. C l a d d i n g W a l l sPentalQuartz can be used for all internal cladding of walls and vertical applications. When designingand installing vertical panels and cladding, it is necessary to take the mass of the product into accountand the services of an experienced structural engineer should be sought during the design andinstallation phases.
If fasteners are needed for safe installation, care should always be taken. Damage caused by the attachment or use of Mechanical Fasteners is not covered by the warranty.
9. F a b r i c a t i n g W h i t e a n d V e i n e d C o l o r sDue to the Cristolbalite content inside several PentalQuartz colors, special care is needed whenfabricating the colors listed below:
BQ100 ThassosBQ8220 LatticeBQ8440 VenatinoBQ8270 CalacattaBQ8530 CarraraBQ8550 OnixaaBQ8628 StatuarioBQ8660 AvenzaBQ8670 BorghiniBQ8669 White MacaubasBQ8815 MisterioBQ8912 ArabescatoBQ8818 Crema ChiffonBQ8668 Icelake
As the fabricator you can try different combinations of polishing tools when polishing edges of BQ100/BQ8220 to find optimum working conditions. At the factory, the slabs are polished with the following combination of polishing tools:
City of Yorba Linda, 2019
APPENDIX "B"

Spindles: 7 The first time: 50 grit - 50 grit - 100 grit - 100 grit - 100 grit - 100 grit- 200 grit
Second time: 200 grit - 400 grit - 600 grit - 800 grit -1000 grit - 1200 grit - 1600 grit.
As fabricator equipment may vary, it is best to start the polishing process with 100 grit pads/stone and progress through the polishing process until the factory polish is matched. REMINDER: Surface polishing the face of the slab at any time will void the material warranty.
Relief cuts and relief holes are effective ways to address mechanical stress in these colors. It is necessary to use one or both in the fabrication process to ensure that the slabs in these colors are not damaged during cutting.
To make a relief cut for a long section of material begin by measuring in from the adjacent edge 1 or 2 inches. Make the relief cut at that point parallel to the final edge of the slab for a distance of 20 inches. Once this cut is made, proceed with the long final cut to produce the final edge of the piece 1 or 2 inches back from the relief cut. The process for making and using relief holes is described in section 4.
1 0 . I n s t a l l a t i o n o f T i l e s As with any tile application it is important to follow the correct method for affixing the tile that is most suitable for that specific application. Installers tend to affix engineered tiles in the same way they handle ceramic tiles, using adhesives meant for ceramic tiles. However, such practices have led to failures in installation.
The environment of every tile installation is different, and the installations can be handled in a number of ways. If the final installation is to function successfully, it is important for installers to consider the following characteristics of materials that affect different aspects of an installation. Differential movement Structural deflections Foundation movements Thermal movements Moisture movements Radiant Heat Source Dimensional stability
Most importantly, the thermal movement (expansion and contraction) of engineered tiles should betaken into consideration when designing a tiling system. Engineered stones have a much higher linearthermal expansion when compared to natural stones and ceramic tiles.
City of Yorba Linda, 2019
APPENDIX "B"

Moisture movements both permanent and reversible may occur due to moisture content of the environment. Engineered stones have been known to possess appreciable reversible moisture movement.
Dimensional stability refers to the ability of an engineered stone tile to resist curling or warping when exposed to water contained in the adhesives. When the tile surface absorbs moisture, the surface of the wet side expands more than the dry side, and the result is that tiles tend to warp.
Adhesive manufacturers have vast experience in the installation of a tiling system using Engineered Stones. Accordingly, we strongly recommend that the installer consult the relevant manufacturers and seek their advice prior to installation of PentalQuartz slab and tile.
Custom Building Products: http://www.custombuildingproducts.com Mapei: http://www.mapei.com Laticrete: http://www.laticrete.com
Pental Granite & Marble, Inc. does not accept any responsibility nor does it recommend a particular method of installation. It is the responsibility of the installer/buyer to design the tiling system based on the advice obtained from the engineered tile adhesive manufacturers.
VI. CARE & MAINTENANCEPentalQuartz is a high quality solid non-porous product that is resistant to scratches, heat, and stains. However, PentalQuartz is not heat, stain and scratch proof. PentalQuartz requires minimal maintenance and the following care and maintenance guidelines will help to keep the surface in impeccable condition for years.
1. G e n e r a l R o u t i n e C a r e a n d M a i n t e n a n c ePentalQuartz is highly resistant to stains caused by fruit juices, liquid food coloring, coffee, tea, wine,grapes, soft drinks, paints, nail polish and remover, automotive fluids, and permanent markers. Should aspill occur, wipe off the stained area with any commonly available multi-purpose cleaner or householddetergent and then rinse the area with water immediately. For more stubborn spills and stains, repeatthe procedure several times and use a soft, non-metallic scouring pad to remove the stain. It is possiblethat some of the stubborn stains may leave a light mark or very slight discoloration of the stone.
2 . P r e v e n t i n g H e a t D a m a g e t o C o u n t e r t o p s PentalQuartz is designed and manufactured to withstand moderate heat but the product is not heat proof. The Thermal Shock resistance is increased with the increase of the thickness of the material; 3cm slabs are far more resistant to heat than a 1.2cm slab. Like any other composite material, PentalQuartz may be damaged by a sudden and/or lasting exposure to high temperatures, mainly at the edges and cut outs of the product, resulting in cracks. To prevent thermal shock, discoloration or other damages, it is necessary to use insulating pads or trivets when putting hot objects on the surface, and not to expose the surface to open flames or prolonged contact with very hot pots. We always recommend using a hot pad or trivet, especially when using cooking appliances such as electric frying pans, crock pots, or roaster ovens.
3. U s e o f C o m m o n K i t c h e n I m p l e m e n t sCommon kitchen implements including sharp knives won’t harm PentalQuartz, however continuedcutting in the same area directly on the surface may dull the polished finish over time. Care should betaken when moving heavy objects to avoid dropping heavy kitchen tools on the PentalQuartz surface.
City of Yorba Linda, 2019
APPENDIX "B"

4. R e m o v i n g F o r e i g n M a t e r i a l sIf food, chewing gum, nail polish, paint or any other foreign material is found sticking to the top/floor,simply scrape away the material with a sharp blade or sharp plastic scraper. The use of a metal scrapermay leave grey metal marks on the surface, and nylon non-abrasive scouring pad can easily removethem. Wash and rinse the surface in the normal way with water.
5. E x p o s u r e t o C h e m i c a l s a n d S o l v e n t sPentalQuartz can be permanently damaged by prolonged exposure to strong chemicals and solvents.It is advisable not to use hydrofluoric acid, or any product such as oven cleaners or drain cleanerscontaining trichlorethane or methylene chloride and paint strippers.
6. E x p o s u r e t o D i r e c t S u n l i g h tWhen exposed to direct sunlight PentalQuartz slabs and tiles may result in color change and warping. Itis advisable to avoid direct sunlight over a prolonged period.
7. M a i n t e n a n c e o f F l o o r sDust, grit, and barrier materials from the floors should be removed on a daily basis by sweeping with asoft brush. Sand, rocks or other debris can scratch the Quartz Based Tile floor and those surfaces shouldalways be kept free from dust, sand and soil. PentalQuartz surfaces can be easily cleaned with warmwater and mild household detergent using a standard mop. Make sure the floor is completely drybefore allowing people to walk on it.
8. M a i n t e n a n c e o f H o n e d a n d S a t i n F i n i s h e sPentalQuartz is offered in several finishes including polished, honed, satin, and brushed. Just as eachfinish has a different look, it also has slightly different characteristics.
Some colors are available in our HONED or SATIN finish which offers the soft appearance of a lower sheen compared to the POLISHED finish. The HONED and SATIN finishes require slightly more maintenance than our polished finished materials. Since the honed or satin finish actually creates more surface area to the material it has the potential to show more signs of living from daily use. Possible marks from metal cookware or utensils, fingerprints, food and beverages, and other items placed on, or moved across the countertop, may be visible on the surface. Most marks can be easily removed with a cloth or sponge, or by using household cleaners such as a cleaning eraser or carefully scrubbing with a sponge and a non-abrasive cleaner such as Soft Scrub Advanced Cleaner®. Over time the Honed or Satin finish will develop character and a patina unique to each customer. Honed and satin finishes can be cleaned using the same products and methods as other finishes. Please see our care and maintenance guide at: PentalQuartz.com
Be aware of the unique characteristics of honed and satin finishes; these will be more likely to show scuffs, marks, and fingerprints, and will require more frequent or intense cleaning and maintenance to keep them free from marks.
The warranty issued by Pental Granite & Marble for PentalQuartz covers manufacturing defects, however the temporary marks that commonly occur on honed and satin finishes are inherent to the material, and are not covered under the terms of the warranty.
9. C l e a r S h i p p i n g P l a s t i c R e m o v a lPentalQuartz is protected during transportation by a protective plastic cover. The plastic and its acrylicadhesive should be removed using the method described below. Strip away plastic sheeting. Wash away the remaining adhesive with “warm” water and a small amount of mild soap. Warm is
defined as between 104°-120° Fahrenheit. Clean the whole surface of the slab.
City of Yorba Linda, 2019
APPENDIX "B"

Wait for 5-10 minutes. Repeat steps 2 and 3 as necessary until the surface is free of adhesive. Rinse with cool water.
Note: Do NOT use chemicals such as alcohol or denatured alcohol! The use of solvents to remove the film causes the adhesive to dissolve and create a chemical reaction which may change the appearance of the slab surface and will not be covered under the product warranty.
10. A d v i c e t o t h e I n s t a l l e rIt is the duty of the installer to advise customers of the important aspects of Care and Maintenance forPentalQuartz.
Please visit the link below to learn more about safety when cutting natural stone and engineered stone slabs. Please keep in touch with OSHA and MIA for the most updated information. http://www.marble-institute.com/silica/
City of Yorba Linda, 2019
APPENDIX "B"

Technical Bulletin Proper use of Chemicals on quartz surfaces
While quartz is very resistant to various chemicals, there is a risk of damage to the finished surface from prolonged exposure to certain chemicals.
Proper use of denatured alcohol and other chemicals:
1. Denatured alcohol may safely be used to remove excess adhesive near edge details andmaterial seams. Denatured alcohol may also be used to clean the finished surface of PentalQuartz of stains, fabrication markings, or templating residue.
2. Acetone should not be used on quartz surfaces for any reason.3. Denatured alcohol should be applied to a cloth for cleaning and not poured directly on the
material surface.4. Chemical bottles or metal cans should not be left on the material surface as it is possible to
trap liquid under the container and cause damage to the Pental Quartz finish.5. Denatured alcohol soaked cloths should not be placed or left on the material surface for
prolonged periods of time as this can cause damage to the material finish.6. It is possible for denatured alcohol or other chemicals to become trapped under the protective
plastic on slabs during the fabrication process. In order to avoid this potential issue it is againrecommended to only apply denatured alcohol to a cloth for cleaning and not pour the liquidon the slab surface. Make sure to clean any spills immediately and remove plastic from anyareas exposed to the chemical spill.
7. Below is a list of other chemicals that could potentially damage or affect the finish on PentalQuartz. This list is not all inclusive as there are other potential chemicals that may damage thematerial. The degree of any damage experienced may vary based upon the chemical,concentration, and the length of time of exposure.
• Dyes, stains, drain cleaners, oven cleaners, paint thinner or strippers.• Stone sealers, enhancers, agers, or other topical treatments.• Solvents such as acetone, nail polish, lacquer thinner, or bleach (short-term exposure is
acceptable for purpose of cleaning difficult stains, but these chemicals should beremoved and thoroughly rinsed away within five minutes of application)
• Chlorinated solvents such as trichloroethylene or methylene chloride• Benzene, toluene, methyl ethyl ketone• Concentrated acids such as hydrocyanic acid, hydrofluoric acid, hydrochloric acid,
sulfuric acid, nitric acid, or muriatic acid.• Chemicals with high alkaline/PH levels above 8.5
In case of contact with any of the above chemicals, immediately rinse thoroughly with water.
City of Yorba Linda, 2019
APPENDIX "B"

P e n t a l Q u a r t z ; T e c h n i c a l C h a r a c t e r i s t i c s
C H A R A C T E R I S T I C S T E S T M E T H O D P e n t a l Q u a r t z ( R a n g e o f V a l u e s )
79C MTSA ytisneDEN 14617-1
2.2-2.4 gr/cm3
2.2-2.4 gr/cm3
%30.0≤ 79C MTSA noitprosbA retaW
Flexural Strength ASTM C880 EN 14617-2
6,200 -11,000psi 42.7-75.8 MPa
A ssalC 21-71641 NE ytilibatS noisnemiD
R( ecnatsiser emuloV 31-71641 NE ytilibatS lacirtcelE v)= 0.9x10¹⁴Ω Volume resistivity (pv)= 4.9x10¹⁴Ωm
)N221( sbl72 9071D MTSA ecnatsiseR tcapmI
071C MTSA htgnertS evisserpmoCEN 14617-15
22,000-28,000 psi 190 – 220 MPa
mm491-98=V :drohc fo emuloV 3421C MTSA noisarbA 3
oN 6201C MTSA ecnatsiseR wahT-ezeerF detects after 15 freeze-thaw cycles
0.7-0.6 101NE elacS ssendraH shoM
D MTSA ecnatsiseR laiborciM 6329 -98 (2003) Ranking 3: Resistant to Mold Growth
detceffa toN 065C MTSA sdicA lacimehC ot ecnatsiseR
01R-9R 03115 NID 004 denoH ta ecnatsiseR pilS
Determination of resistance to immersion in boiling water
AS 2924.2-7 1998 (EQUIV. TO ISO 4586.2-7 1997)
Effect of surface (rating): 5 (no visible change)
Determination of resistance to dry heat AS 2924.2-8 1998(EQUIV. TO ISO 4586.2-8: 1997)
Effect of surface (rating): 5 (no visible change)
Determination of resistance to thermal shock AS 2924.2-9:1999(EQUIV. TO ISO 10545-9: 1994)
Specimens showing defects: NIL
Determination of resistance to staining (Procedure A)
AS 2924.2-15: 1998 (EQUIV. TO ISO 4586.2-15: 1997)
Effect of surface (rating): 5 (no visible change)
N O T E : T h e v a l u e s q u o t e d a b o v e f o r P e n t a l Q u a r t z a r e a n
a v e r a g e r a n g e o f v a l u e s o f t h e d i f f e r e n t p r o d u c t s t e s t e d a n d
s h o u l d b e c o n s i d e r e d a s a n i n d i c a t i o n o n l y . T h e t e s t r e s u l t s
m a y v a r y b e t w e e n c o l o r s a n d d i f f e r e n t p r o d u c t i o n r u n s .
M I C R O B I A L R E S I S T A N C E : A S T M D 6 3 2 9 - 9 8T e s t e d a n d A p p r o v e d b y G r e e n G u a r d
City of Yorba Linda, 2019
APPENDIX "B"

LUXURY VINYL PLANK
& TILE INSTALLATION GUIDE I
Product Handling and Site Conditions
1. Check batch and product details and quantity are correct and match purchase order.
2. Store cartons of tile and/or plank with cartons stacked one on top of the other. Do not
store on end or sides, or allow cartons to bend during storage or transportation.
3. Acclimate product to job site conditions by delivering all materials, including adhesives
and maintenance products, to the job site at least 48 hours prior to installation. Store
all products at 65° to 85° Fahrenheit (18° to 29° Celsius) for 48 hours prior to
installation.
4. The space where flooring is to be installed shall be fully enclosed and the permanent
HVAC system shall be operational prior to installing flooring. The temperature shall be
65° to 85° Fahrenheit (18° to 29° Celsius) for 48 hours before installation, during
installation and for 48 hours after installation. The temperature of the space shall be
kept at a minimum of 50° Fahrenheit (10° Celsius) continually after installation.
5. To prevent damage to the newly installed flooring the installation of flooring products
should be installed after all other trades have completed their work. To further prevent
damage after install until space is occupied, use of a reinforced fiber-based temporary
floor protector product is strongly recommended.
6. To prevent adhesion problems with direct-glue installations, areas to receive resilient
flooring shall be permanently dry, clean, smooth, level and structurally sound. They shall
be free of all contaminants, including but not limited to: dust, solvents, paint, wax, oil,
grease, residual adhesive, adhesive removers, curing, sealing, hardening or parting
MILLIKEN LVT INSTALLATION GUIDE Date: 07/2018
All instructions and recommendations in this guide are based on the most recent information and installation
techniques available, please follow this guide to ensure a trouble free and warranty supported installation.
Always check millikenfloors.com for latest installation, warranty and maintenance guides. It is the
responsibility of the installer to ensure that the most current documents are used during installation.
Contact Milliken Technical support if there are any specific concerns or questions prior to installation
City of Yorba Linda, 2019
APPENDIX "B"

compounds, alkaline salts, excessive carbonation or laitance, mold, mildew; any foreign material that might
prevent a proper adhesive bond.
7. Install flooring perpendicular to direct light sources, including large windows, etc. Use of suitable window
coverings during the times of most direct sunlight is recommended.
8. Never install LVT outdoors.
9. During installation, mix and install planks from several different cartons to minimize shade variation.
APPROVED SUBSTRATES
The following are approved substrates for installation of Milliken Luxury Vinyl Tile. See the next section for proper
testing and substrate preparation prior to installing your Milliken floorcovering.
All substrates regardless of composition must be smooth and flat to within 3/16” (4.76mm) in 10 feet or achieve
an “F32” rating by use of mechanical grinding/sanding or suitable Portland cement-based patching and leveling
compounds.
• Above, on or below-grade concrete without hydrostatic pressure, excess moisture or alkalinity. Must be
fully cured and dry, free from curing compounds, sealers etc.
• Above or on grade lightweight concrete, properly prepared and without hydrostatic pressure, excess
moisture or alkalinity
• Above or on grade Gypsum concrete surfaces, properly prepared, sealed and without hydrostatic pressure,
excess moisture or alkalinity
• Properly prepared and well bonded existing resilient floor covering
• Cement Terrazzo, ceramic tile, marble – see adhesive for proper preparation.
• Certain metal floors – see adhesive for proper types and preparation. May require use of a 2-part epoxy;
contact Milliken Technical Support for assistance
• Radiant heated floors where heat does not exceed 85°F (29°C)
• APA registered underlayment, sanded face exterior grade with minimum rating of B-C plugged face
• APA registered exterior grade plywood sanded and plugged face with ratings as follows: B-C, or better
• Milliken sound control underlayment
The following are not approved substrates for installing Milliken glue down Luxury Vinyl Tile:
• Epoxy terrazzo
• Rubber, cork or asphalt tiles
• Textured or cushion backed resilient flooring
• “Sleeper” floor systems and other uneven or unstable substrates
• Plywood floors that have been installed directly over a concrete slab
• Luan, OSB, particle or chip boards, CCA (pressure treated), oil treated or other coated plywood
City of Yorba Linda, 2019
APPENDIX "B"

• CDX or other plywood with knots or open defects
• Underlayment made of pine or other soft woods
• Masonite™ or other hardboard underlayment
• Raised access flooring unless accessibility is not required
• Hardwood flooring
• Uneven or unstable substrates
• Paint, wax, oil, grease, residual adhesive, mold, mildew, and other foreign materials that might prevent
adhesive bond
SUBSTRATE PREPARATION
All substrates must be properly prepared and tested according to the following guidelines.
1. Concrete Subfloorsa. Shall be in accordance with the most current version of ASTM F710 – Standard Practice for Preparing
Concrete to receive Resilient Flooring
b. All patching and leveling is to be in accordance with the most current version of ASTM F2678 – Standard
Practice for Preparing Underlayment’s, Thick Poured Gypsum Concrete Underlayment’s, Thick Poured
Lightweight Cellular Concrete Underlayment’s and Concrete Subfloors with Underlayment Patching
Compounds to receive Resilient Flooring
c. Concrete slab construction shall be in accordance to industry standards for specification related to concrete
mix design, curing methods and drying times to prevent moisture problems.
d. On-grade and below-grade slabs should be installed with a suitable vapor retarder directly underneath the
concrete slab.
e. New concrete shall be properly cured and dried prior to the installation of floor covering. Curing agents,
surface hardeners and other membranes or compounds shall be mechanically removed immediately after
initial cure to allow the slab to properly dry before installation. Approximately 30 days per 1” of slab
thickness.
f. All concrete substrates, regardless of grade or age of slab, must be properly tested using one of the
methods outlined below for warranty to apply. Acceptable test methods are ASTM F 1869 Calcium Chloride
Test or ASTM F 2170 In Situ Relative Humidity. Testing shall be conducted according to the instructions of
the manufacturer of the testing equipment.
ASTM F 1869 Calcium Chloride Test
i When using Milliken LVT TPS adhesive, Moisture Vapor Emission Rate (MVER) should not exceed 12 lbs.
/1,000ft2/24 hours. For Milliken Acousti-Loc LVT adhesive, Moisture Vapor Emission Rate (MVER) should not
exceed 10 lbs. /1,000ft2/24 hours. Floor covering should not be installed until concrete is sufficiently dry or
until corrective measures are taken by the contractor.
ii Testing should only be done when the test site is at the same temperature and humidity expected during
normal use; or at a temperature of 65° - 80°F (18° - 26° C) and 45% - 50% humidity.
iii A minimum of 3 test areas per the first 1,000 square feet (100 M2) is required, with 1 additional test area for
every additional 1,000ft2 (100 M2).
City of Yorba Linda, 2019
APPENDIX "B"

iv The test area shall be clean and free from any contaminants or foreign substances, and shall be exposed in this
manner for 24 hours prior to performing the test.
ASTM F 2170 In-Situ Relative Humidity Test Instructions
i Relative humidity of the slab shall not exceed 99% when using Milliken LVT TPS Adhesive, and 95% when using
Milliken Acousti-Loc LVT adhesive. Floor covering should not be installed until concrete is sufficiently dry or
until corrective measures are taken by the contractor.
ii Testing should only be done when the test site is at the same temperature and humidity expected during
normal use; or at a temperature of 65° - 80°F (18° - 26° C) and 45% - 50% humidity for minimum 48 hours prior
to testing.
iii A minimum of 3 test holes for the first 1,000ft2 (100 M2) and one additional test hole for each 1,000ft2 (100
M2) thereafter.
iv Test holes are to be drilled at a depth of 40% of slab thickness (one-side drying) or 20% of slab thickness (two-
sides drying).
v Test holes should be allowed to acclimate for 72 hours prior to insertion of the test probe. Reusable probes
should equilibrate at least 1 hour prior to use in the next test area.
Concrete Alkalinity / pH Test
i Testing should only be done when the test site is at the same temperature and humidity expected during
normal use; or at a temperature of 65° - 80°F (18° - 26° C) and 45% - 50% humidity for minimum 48 hours prior
to testing.
ii Using distilled water, place drops of water to form a small puddle approximately 1” in diameter.
iii Wait 60 seconds, then dip a portion of the pH paper into the water.
iv Acceptable pH levels of the concrete are between 5 and 12 when compared to the color chart provided in the
test kit. If higher Milliken Acousti-loc adhesive must be used
Concrete Slab Preparation
i Concrete slabs shall be clean and smooth prior to installing floor coverings. Remove all sealers, curing agents
and compounds, grease, oil, adhesive removers, old adhesive residue, dirt, paint, etc. to ensure a clean bond
surface for the adhesives.
ii Concrete floors shall be smooth and level to prevent irregularities, roughness or other defects from
telegraphing through the new resilient flooring. The surface of the slab shall be flat to within 3/16” in 10 feet.
iii Uneven areas should be mechanically ground to smoothness.
iv Cracks, depressions or other similar irregularities should be leveled using a suitable Portland cement based
patching compound. Follow the patch manufacturer’s instructions regarding mixing and applications.
v Overly porous, dusty, flaky or soft concrete surfaces are not suitable for resilient floor coverings. It may be
necessary to mechanically remove the top layer concrete in such cases and/or these surfaces may need to be
primed and covered with a cement based underlayment compound. Follow the patching or leveling compound
manufacturer’s instructions regarding preparation of the concrete surface, priming, mixing of the product,
thickness of application and drying time for resilient floor covering installation.
vi Expansion joints, isolation joints, control joints or other moving joints in the concrete slab shall not be filled
with patching compound or covered with resilient flooring.
City of Yorba Linda, 2019
APPENDIX "B"

2. Gypsum and Lightweight Cellular Concrete SubstratesGypsum and lightweight concrete subfloors and substrates should in accordance with the listed standard.
Unprimed gypsum surfaces may have a dusty surface and a very open, porous surface, which will lead to an
adhesion bond failure if not properly sealed and treated. It is the responsibility of the installation contractor to
obtain verification from the GC, architect, owner or party responsible for the site that the gypsum was properly
sealed with the gypsum manufacturer’s recommended sealer. If this data is not available, conduct testing
according to the appropriate ASTM Test Method for Gypsum Surfaces.
a. Gypsum surfaces shall be in accordance with and properly prepared to the appropriate ASTM specifications
as listed in the above Reference Section
b. All patching and levelling is to be in accordance with ASTM F2678 (latest version), Standard Practice for
Preparing Panel Underlayment’s, Thick Poured Gypsum Concrete Underlayment’s and Concrete Subfloors
with Underlayment Patching Co to Receive Resilient Flooring Compounds
Conduct a surface porosity test to ensure that the surface is properly sealed. If the water is quickly absorbed,
stop the installation and Milliken Technical Services.
3. Wood Subfloorsa. A combination of wood subfloor and panel underlayment construction shall be a minimum of 1” in
total thickness.
b. There shall be at least 18” of well-ventilated air space beneath all wood subfloors. Crawl spaces shall
be insulated and protected by a suitable vapor barrier.
c. Wood subfloors installed directly on concrete or over “sleeper” joist systems are not acceptable for
use under Milliken Luxury Vinyl Tile.
d. Panels designed as suitable underlayment shall be at a minimum:
i. Minimum ¼” in thickness
ii. Dimensionally stable
iii. Fully sanded face to eliminate grain texture or show through
iv. Have a written manufacturer’s warranty and installation instructions
v. Be free of substances such as ink, fillers and resins which may lead to staining
of the resilient flooring
vi. Have all knots, voids and defects properly plugged and sanded
e. Panels shall be installed according to manufacturer’s instructions regarding stapling pattern, sanding
and filling of joints, and acclimation to installed environment.
f. Milliken will not cover or accept responsibility for the following:
i Joint telegraphing, either as a “ridge” or “valley”
ii Grain or texture telegraphing
iii Discoloration of finished flooring due to materials used for filling of voids and defects in the
face of the underlayment
iv Use of Luan Plywood underlayment
g. Unacceptable substrates shall be covered using a ¼” or thicker panel underlayment recommended for
commercial use. Consult underlayment manufacturer for:
1) Recommended uses of product
City of Yorba Linda, 2019
APPENDIX "B"

2) Warranty coverage
3) Joint spacing
4) Nailing or stapling pattern
5) Seam treatment
h. Suitable underlayment panels include Artic (Baltic) Birch, A/C grade plywood with sanded face, or
other underlayment grade exterior plywood.
4. Existing Resilient Flooringa. When installing Milliken LVT over existing resilient floors, the existing flooring must be:
i. Single layer only
ii. Thoroughly stripped of all wax, floor finish, dirt and other contaminants that may affect
adhesive bond
iii. Be firmly bonded to the substrate
iv. Flat and smooth with no curling edges or loose seams
v. Dry and free from excessive moisture. All concrete floors shall be tested for moisture
regardless of age or grade level. Do not assume that an existing floor is free of moisture
related issues. Conduct testing per Section 1.d above.
vi. Must not be of a cushion back, floating, or perimeter bonded floor
Milliken is not responsible for problems leading to or from indentations, telegraphing of old floor or
adhesion release of old floor after the Milliken LVT is installed.
5. Old Adhesivesa. Adhesive residue shall be properly prepared prior to the installation of Milliken LVT. It is
recommended that mechanical scraping or grinding be used as a primary means of removing old
adhesive residue.
b. Residues include, but are not limited to carpet, vinyl, VCT, and or wood flooring adhesives.
c. Black cutback/asphalt adhesives shall be scraped by hand to remove any loose patches, trowel ridges
and puddles so that only a thin residue layer remains. This layer shall then be properly covered using
a Portland based patching compound properly mixed with the manufacturer’s recommended
latex/acrylic additive.
d. If chemical/liquid adhesive removers are utilized, the manufacturer’s recommended instructions for
cleaning after use of the remover shall be followed fully. Milliken is not responsible for any adhesive
failures, indentation, bubbling, or delamination of new flooring due to improper cleaning of residue
left from liquid adhesive removers.
6. Other substratesa. Cement terrazzo and metal floors may be suitable for installation and need to be properly prepared for
adhesion. Most will need to be prepared with a suitable Portland-based cement patching compound,
see manufacturer’s recommendations for use and preparation of subfloor.
b. Ceramic, porcelain, marble and granite tiles are suitable as substrates when the following conditions
are met:
i. Tiles must be properly bonded with intact grout joints and free of cracks
ii. Surface of tile and grout joints should be free from sealers, coatings, dirt and contaminants.
City of Yorba Linda, 2019
APPENDIX "B"

iii. Properly prepare the surface of tiles by grinding any high areas and using a suitable Portland
based leveling compound and primer to fill in all low areas. Follow leveling compound
manufacturer’s recommendations for surface preparation and application of product.
The following are not suitable substrates for installation of Milliken LVT:
Rubber, cork, or asphalt tiles; epoxy terrazzo flooring; stained or painted concrete and any other material
covered in the sections above and listed as unsuitable.
Unsuitable substrates should be covered with an approved ¼” wood underlayment or suitable Portland-based cement
leveler or patching compound. Always follow the manufacturer’s recommended practices when covering an existing
substrate.
WARNING!
DO NOT SAND, DRY SWEEP, BEAD BLAST, SHOT BLAST OR USE ANY OTHER MECHANICAL MEANS
TO PULVERIZE EXISTING TILE FLOORING, BACKING, LINING FELT, ASPHALTIC “CUT - BACK” OR
ANY OTHER ADHESIVES. THESE PRODUCTS MAY CONTAIN ASBESTOS FIBERS AND /OR
CRYSTALLINE SILICA. AVOID CRE ATING DUST. INHALATION OF SUCH DUST IS A CANCER AND RE
SPIRATORY TRACT HAZARD. SMOKING BY INDIVIDUALS EXPOSED TO
ASBESTOS FIBERS GREATLY INCREASES THE RISK OF SERIOUS BODILY HARM. UNLESS POSITIVELY
CERTAIN THAT THE PRODUCT IS A NON - ASBE STOS CONTAINING MATERIAL, YOU MUST PRESUME IT CONTAINS
ASBESTOS. REGULATIONS MAY REQUIRE THAT THE MATERIAL BE TESTED TO DETER MINE ASBESTOS CONTENT.
INSTALLING MILLIKEN LUXURY VINYL PLANK
1. General
a. When using more than one carton, make sure that the cartons are all the same dye lot. Different
lots may have a variation in color, texture or gloss so they should not be mixed in the same room. Contact
Milliken before installing product from differing runs or lots.
b. Milliken plank simulates wood planks, and can be installed in the same pattern as a wood plank
floor in a random pattern, staggered design, diagonally or other design.
c. Planks are best in appearance when lying parallel to the longest walls in the room.
d. Milliken products can be cut using a tile cutter or a utility knife. Keep knife blades sharp for easy,
accurate and safe cuts. Fit tiles to walls, columns, door jambs, etc. using the same methods other floor
tiles; overlap, pattern scribe, wall scribe and free hand.
e. If it is necessary to heat the planks to achieve a cut, heat slightly from the back only with minimal heat
setting (a standard hair dryer will produce enough heat). Carefully make cuts with a sharp utility knife on
the heated plank.
2. Adhesive selection
City of Yorba Linda, 2019
APPENDIX "B"
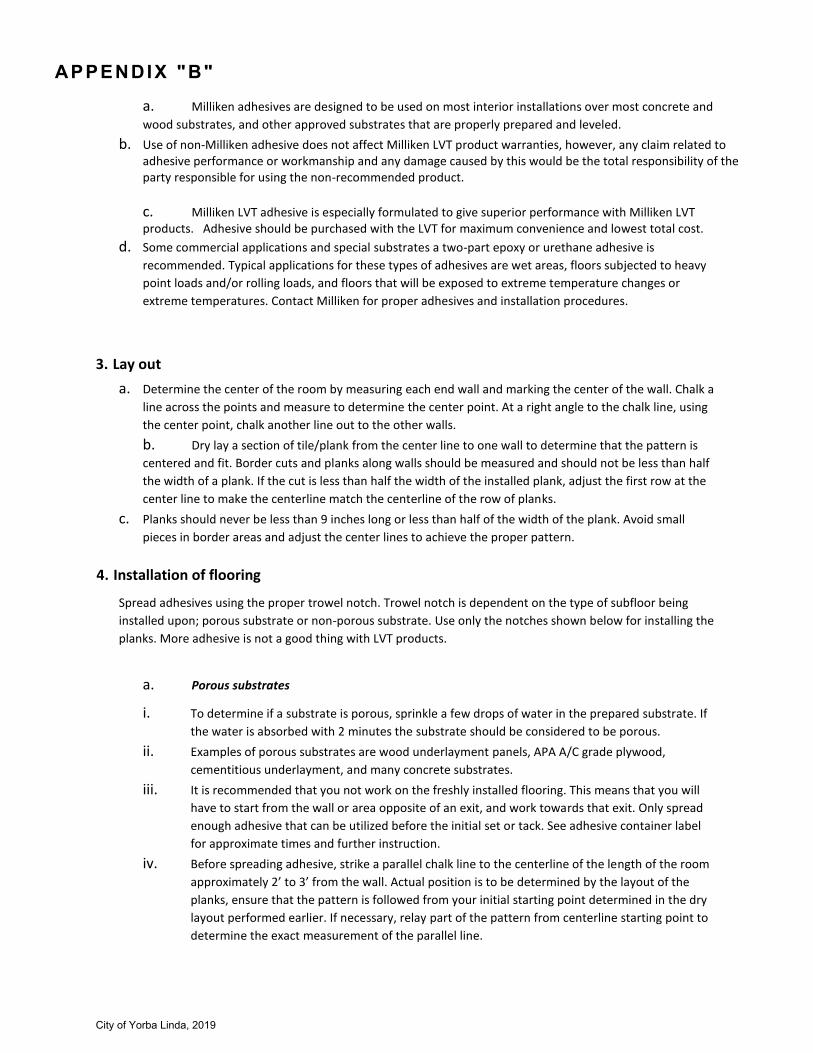
a. Milliken adhesives are designed to be used on most interior installations over most concrete and
wood substrates, and other approved substrates that are properly prepared and leveled.
b. Use of non-Milliken adhesive does not affect Milliken LVT product warranties, however, any claim related toadhesive performance or workmanship and any damage caused by this would be the total responsibility of theparty responsible for using the non-recommended product.
c. Milliken LVT adhesive is especially formulated to give superior performance with Milliken LVTproducts. Adhesive should be purchased with the LVT for maximum convenience and lowest total cost.
d. Some commercial applications and special substrates a two-part epoxy or urethane adhesive is
recommended. Typical applications for these types of adhesives are wet areas, floors subjected to heavy
point loads and/or rolling loads, and floors that will be exposed to extreme temperature changes or
extreme temperatures. Contact Milliken for proper adhesives and installation procedures.
3. Lay out
a. Determine the center of the room by measuring each end wall and marking the center of the wall. Chalk a
line across the points and measure to determine the center point. At a right angle to the chalk line, using
the center point, chalk another line out to the other walls.
b. Dry lay a section of tile/plank from the center line to one wall to determine that the pattern is
centered and fit. Border cuts and planks along walls should be measured and should not be less than half
the width of a plank. If the cut is less than half the width of the installed plank, adjust the first row at the
center line to make the centerline match the centerline of the row of planks.
c. Planks should never be less than 9 inches long or less than half of the width of the plank. Avoid small
pieces in border areas and adjust the center lines to achieve the proper pattern.
4. Installation of flooring
Spread adhesives using the proper trowel notch. Trowel notch is dependent on the type of subfloor being
installed upon; porous substrate or non-porous substrate. Use only the notches shown below for installing the
planks. More adhesive is not a good thing with LVT products.
a. Porous substrates
i. To determine if a substrate is porous, sprinkle a few drops of water in the prepared substrate. If
the water is absorbed with 2 minutes the substrate should be considered to be porous.
ii. Examples of porous substrates are wood underlayment panels, APA A/C grade plywood,
cementitious underlayment, and many concrete substrates.
iii. It is recommended that you not work on the freshly installed flooring. This means that you will
have to start from the wall or area opposite of an exit, and work towards that exit. Only spread
enough adhesive that can be utilized before the initial set or tack. See adhesive container label
for approximate times and further instruction.
iv. Before spreading adhesive, strike a parallel chalk line to the centerline of the length of the room
approximately 2’ to 3’ from the wall. Actual position is to be determined by the layout of the
planks, ensure that the pattern is followed from your initial starting point determined in the dry
layout performed earlier. If necessary, relay part of the pattern from centerline starting point to
determine the exact measurement of the parallel line.
City of Yorba Linda, 2019
APPENDIX "B"

v. For Porous substrates, spread adhesive with a 1/16” x 1/16” x 1/16” square-notch trowel in an
area that can be installed within the working time of the adhesive.
vi. The adhesive should be allowed to dry to the touch sufficient to prevent slippage. Loss of
adhesion can result if the flooring is not installed within the working time of the adhesive.
vii. Roll the area with a 100lb. roller in both directions immediately after installation.
b. Non-porous substrates
i. If during the test performed above the water is not absorbed into the substrate, this is
considered a non-porous installation.
ii. Examples of non-porous substrates are steel troweled concrete, staircases, terrazzo, ceramic tile,
metal, existing fully-adhered non-cushion backed resilient flooring and poured polymeric floors.
Be sure you are using the proper adhesive on non-porous substrates.
iii. For Non-porous substrates, spread adhesive with a 1/16” x 1/32” x 1/32” u-notch trowel in an
area that can be installed within the working time of the adhesive.
iv. Immediately roll the installation with a 100 pound, 3-section roller to ensure proper transfer of
adhesive to LV plank backing.
Do not install flooring into wet adhesives on non-porous substrates.
c. After determining the starting point and spreading your adhesive; continue to lay the tile by
tightly butting the edges of the plank together, making sure that the runs are parallel to your
centerline or layout lines.
d. Be sure to stagger all end joints by at least 6” or the width of one plank. If need be, vary the
length of your planks during installation to ensure that end joints are not bunched and a randomness
is achieved in the pattern.
e. If you need to be directly on freshly laid planks, use of a kneeling board is recommended to
evenly distribute weight across the planks and keep them from creeping in the wet adhesive.
f. During installation, roll the floor with a 3-section 100 lb. roller to ensure proper transference of
adhesive to the plank backing.
g. Tiles can be cut using a vinyl/ VCT tile cutter or using a utility knife with heavy-duty blades by scoring
and snapping tiles carefully along the score line. Use a steel straight edge for cutting tile along the
length with a utility knife.
After Installation
1. Be sure planks are set, flat and have tight edges. Re-roll the entire installation, along the length and width
of the planks with a 3-section 100 lb. roller to ensure all tiles are properly set into the adhesive. If
necessary, weigh down any loose planks overnight to ensure bond. Adhesive can be carefully reactivated
using a heat gun after drying to reinstall planks.
2. Clean adhesive residue from the face of the flooring following these directions:
City of Yorba Linda, 2019
APPENDIX "B"

a. Wet adhesive residue on the surface of the planks can be cleaned with a clean, white cloth dampened
with warm, soapy water. Do not use excess water as this can seep between the seams of planks and
lead to an adhesion failure!
b. Dry adhesive residue can be cleaned with mineral spirits or denatured alcohol and a clean cloth in a
sparingly manner. Carefully follow the directions on the mineral spirits container. Please note:
improper use of any chemical can harm the finish of the LVT.
c. Do not pour soapy water, mineral spirits or denatured alcohol directly on the LV planks.
d. If working with epoxy or urethane adhesives you must clean these up while wet according to the
adhesive manufacturer’s instructions, which can be generally found on the container label.
3. Proper rolling of floors during and after installation is a must on Luxury Vinyl products. Use a 3-section,
100 pound roller to set flooring into the adhesives.
4. In the event that the plank flooring is not the last portion of the construction project, the floor must be
protected from construction traffic and damage. Wait 24 hours and utilize a reinforced fiber protective
board or a heavy kraft paper (min. 60 lbs.) and cover the floor. Failure to wait 24 hours before covering
can impact adhesive curing.
IMPORTANT
Acclimation - Store products at 65° to 85° Fahrenheit (18° to 29° Celsius) for 48 hours prior to installation
Storage – Store cartons flat, do not stand on end. Do not store in direct sunlight
City of Yorba Linda, 2019
APPENDIX "B"

MILLIKEN ADHESIVES
Milliken adhesives are engineered to be used on a variety of interior installations including most concrete, wood and other approved substrates that are properly prepared.
Use of non-Milliken adhesives does not affect Milliken LVT product warranties, however, any claim related to adhesive performance or workmanship and any damage caused by this would be the total responsibility of the party responsible for using the non-recommended product.
Milliken LVT adhesives are specially formulated to give superior performance with Milliken LVT products. Adhesives should be purchased with the LVT for maximum convenience and lowest total cost.
City of Yorba Linda, 2019
APPENDIX "B"

City of Yorba Linda, 2019
APPENDIX "B"

City of Yorba Linda, 2019
APPENDIX "B"
dnoss
Oval

SM
*Information sur le niveau d’émission de substances volatiles dans l’air intérieur, présentant un risque de toxicité par inhalation, sur une échelle de classe allant de A+ (très faibles émissions) à C (fortes émissions).
Customer Concierge 800.824.2246 | millikenfloors.com © 2016 Milliken & Company
SPECIFICATION SHEET DATE: 02/12/16
Luxury Vinyl Tile
Milliken LVT AdhesiveSee installation instructions for more information on adhesive use.
12-Year Limited Commercial Wear1-Year Manufacturing Defect WarrantySee warranty document for full details of terms and coditions.
WARRANTIES ADHESIVE
Construction High Performance Luxury Vinyl Tile
Finish Adámas™ UV-Cured Polyurethane
Wear Layer Thickness 28 mil (0.7 mm)
Overall Thickness .100” (2.5 mm)
Edge Profile Micro Bevel
Critical Radiant Flux (ASTM E648) Pass - Class I
Smoke Density (ASTM E662) Pass - <450
Flexibility (ASTM F137) Pass
Heat Stability by Color Change (ASTM F1514) Pass
Light Stability (ASTM F1515) Pass
Static Coefficient of Friction (ASTM D2047) Pass
Dimensional Stability (ASTM F2199) Pass
Resistance to Chemicals (ASTM F925) Pass
Static Load Limit (ASTM F970) Pass
Installation Glue down
Tile Size 7” x 48” (17.78 cm x 121.92 cm)
Pieces Per Box 15
Weight Per Box 29.10 lb (13.20 kg)
Quantity Per Box 35.0 ft² (3.25 m²)
Warranty 12 Year Limited Commercial Wear Warranty
WOODEucalyptus Saligna
City of Yorba Linda, 2019
APPENDIX "B"
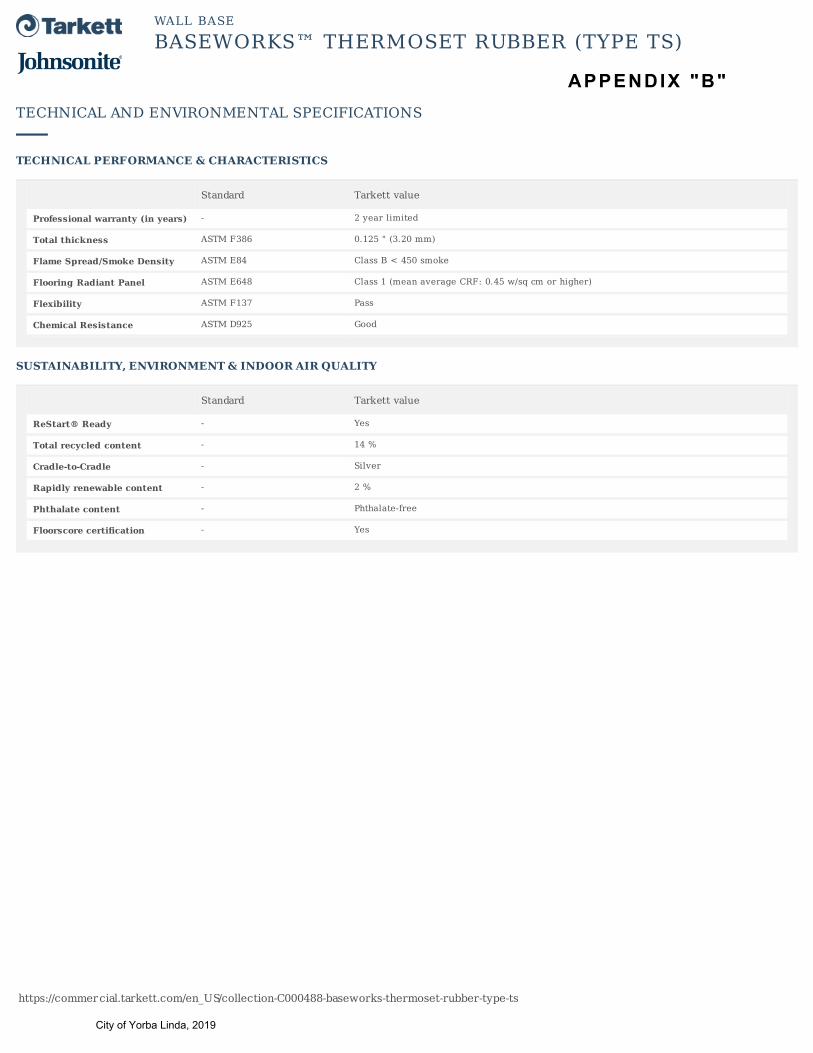
https://commercial.tarkett.com/en_US/collection-C000488-baseworks-thermoset-rubber-type-ts
WALLBASE
BASEWORKS™THERMOSETRUBBER(TYPETS)
TECHNICALPERFORMANCE&CHARACTERISTICS
Standard Tarkettvalue
Professionalwarranty(inyears) - 2yearlimited
Totalthickness ASTMF386 0.125"(3.20mm)
FlameSpread/SmokeDensity ASTME84 ClassB<450smoke
FlooringRadiantPanel ASTME648 Class1(meanaverageCRF:0.45w/sqcmorhigher)
Flexibility ASTMF137 Pass
ChemicalResistance ASTMD925 Good
SUSTAINABILITY,ENVIRONMENT&INDOORAIRQUALITY
Standard Tarkettvalue
ReStart®Ready - Yes
Totalrecycledcontent - 14%
Cradle-to-Cradle - Silver
Rapidlyrenewablecontent - 2%
Phthalatecontent - Phthalate-free
Floorscorecertification - Yes
TECHNICALANDENVIRONMENTALSPECIFICATIONS
City of Yorba Linda, 2019
APPENDIX "B"
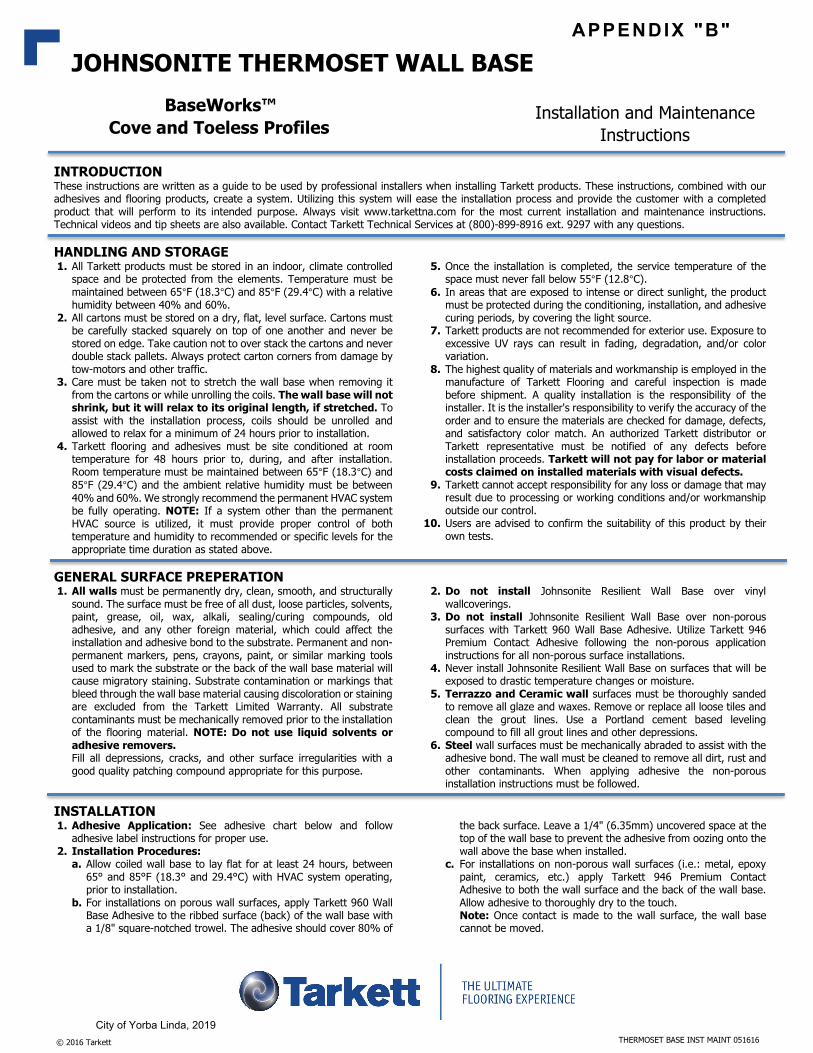
JOHNSONITE THERMOSET WALL BASE
© 2016 Tarkett
THERMOSET BASE INST MAINT 051616
BaseWorks™
Cove and Toeless Profiles Installation and Maintenance
Instructions
INTRODUCTION These instructions are written as a guide to be used by professional installers when installing Tarkett products. These instructions, combined with our adhesives and flooring products, create a system. Utilizing this system will ease the installation process and provide the customer with a completed product that will perform to its intended purpose. Always visit www.tarkettna.com for the most current installation and maintenance instructions. Technical videos and tip sheets are also available. Contact Tarkett Technical Services at (800)-899-8916 ext. 9297 with any questions.
HANDLING AND STORAGE 1. All Tarkett products must be stored in an indoor, climate controlled
space and be protected from the elements. Temperature must bemaintained between 65°F (18.3°C) and 85°F (29.4°C) with a relativehumidity between 40% and 60%.
2. All cartons must be stored on a dry, flat, level surface. Cartons mustbe carefully stacked squarely on top of one another and never bestored on edge. Take caution not to over stack the cartons and neverdouble stack pallets. Always protect carton corners from damage bytow-motors and other traffic.
3. Care must be taken not to stretch the wall base when removing itfrom the cartons or while unrolling the coils. The wall base will notshrink, but it will relax to its original length, if stretched. Toassist with the installation process, coils should be unrolled andallowed to relax for a minimum of 24 hours prior to installation.
4. Tarkett flooring and adhesives must be site conditioned at roomtemperature for 48 hours prior to, during, and after installation.Room temperature must be maintained between 65°F (18.3°C) and
85°F (29.4°C) and the ambient relative humidity must be between
40% and 60%. We strongly recommend the permanent HVAC systembe fully operating. NOTE: If a system other than the permanentHVAC source is utilized, it must provide proper control of bothtemperature and humidity to recommended or specific levels for theappropriate time duration as stated above.
5. Once the installation is completed, the service temperature of thespace must never fall below 55°F (12.8°C).
6. In areas that are exposed to intense or direct sunlight, the productmust be protected during the conditioning, installation, and adhesivecuring periods, by covering the light source.
7. Tarkett products are not recommended for exterior use. Exposure toexcessive UV rays can result in fading, degradation, and/or colorvariation.
8. The highest quality of materials and workmanship is employed in themanufacture of Tarkett Flooring and careful inspection is madebefore shipment. A quality installation is the responsibility of theinstaller. It is the installer's responsibility to verify the accuracy of theorder and to ensure the materials are checked for damage, defects,and satisfactory color match. An authorized Tarkett distributor orTarkett representative must be notified of any defects beforeinstallation proceeds. Tarkett will not pay for labor or materialcosts claimed on installed materials with visual defects.
9. Tarkett cannot accept responsibility for any loss or damage that mayresult due to processing or working conditions and/or workmanshipoutside our control.
10. Users are advised to confirm the suitability of this product by theirown tests.
GENERAL SURFACE PREPERATION 1. All walls must be permanently dry, clean, smooth, and structurally
sound. The surface must be free of all dust, loose particles, solvents,paint, grease, oil, wax, alkali, sealing/curing compounds, oldadhesive, and any other foreign material, which could affect theinstallation and adhesive bond to the substrate. Permanent and non-permanent markers, pens, crayons, paint, or similar marking toolsused to mark the substrate or the back of the wall base material willcause migratory staining. Substrate contamination or markings thatbleed through the wall base material causing discoloration or stainingare excluded from the Tarkett Limited Warranty. All substratecontaminants must be mechanically removed prior to the installationof the flooring material. NOTE: Do not use liquid solvents oradhesive removers.Fill all depressions, cracks, and other surface irregularities with agood quality patching compound appropriate for this purpose.
2. Do not install Johnsonite Resilient Wall Base over vinylwallcoverings.
3. Do not install Johnsonite Resilient Wall Base over non-poroussurfaces with Tarkett 960 Wall Base Adhesive. Utilize Tarkett 946Premium Contact Adhesive following the non-porous applicationinstructions for all non-porous surface installations.
4. Never install Johnsonite Resilient Wall Base on surfaces that will beexposed to drastic temperature changes or moisture.
5. Terrazzo and Ceramic wall surfaces must be thoroughly sandedto remove all glaze and waxes. Remove or replace all loose tiles andclean the grout lines. Use a Portland cement based levelingcompound to fill all grout lines and other depressions.
6. Steel wall surfaces must be mechanically abraded to assist with theadhesive bond. The wall must be cleaned to remove all dirt, rust andother contaminants. When applying adhesive the non-porousinstallation instructions must be followed.
INSTALLATION 1. Adhesive Application: See adhesive chart below and follow
adhesive label instructions for proper use.2. Installation Procedures:
a. Allow coiled wall base to lay flat for at least 24 hours, between65° and 85°F (18.3° and 29.4°C) with HVAC system operating,prior to installation.
b. For installations on porous wall surfaces, apply Tarkett 960 WallBase Adhesive to the ribbed surface (back) of the wall base witha 1/8" square-notched trowel. The adhesive should cover 80% of
the back surface. Leave a 1/4" (6.35mm) uncovered space at the top of the wall base to prevent the adhesive from oozing onto the wall above the base when installed.
c. For installations on non-porous wall surfaces (i.e.: metal, epoxypaint, ceramics, etc.) apply Tarkett 946 Premium ContactAdhesive to both the wall surface and the back of the wall base.Allow adhesive to thoroughly dry to the touch.Note: Once contact is made to the wall surface, the wall basecannot be moved.
City of Yorba Linda, 2019
APPENDIX "B"

© 2016 Tarkett
THERMOSET BASE INST MAINT 051616
Technical Services Department
30000 Aurora Road, Solon, Ohio 44139
(800) 899-8916 ext 9297
Fax (440) 632-5643
email: [email protected]
www.tarkettna.com
d. Position wall base on wall surface and roll with a small hand roller.Always roll back to starting point to prevent stretchingthe wall base.
e. Use a clean white cloth dampened with water to remove wetadhesive from wall base, substrate, floor covering and tools.
f. Dried adhesive may require the use of denatured alcohol appliedto a clean white cloth. (Follow manufacturer's precautions whenusing denatured alcohol.)
CORNER INSTALLATION 1. Factory Made Outside Corners:
a. Install factory made corners before installing wall base.b. Trowel adhesive to ribbed back of wall base corner.c. Position corner in place and roll to ensure proper adhesive bond.d. Attention should be given to a tight and even fit to the corner.Note: Tarkett 946 Premium Contact Adhesive may be usedto ensure a faster setup at the corner.
2. Field-Made Inside Corners:a. Install wall base and terminate into the corner.b. Position another piece of wall base on opposing wall, without
adhesive, approximately 1" from the installed piece.c. Utilize dividers; place one pin at the top of the installed piece and
one pin at the top of the uninstalled piece. Carefully, move thedividers downward in a straight vertical motion, allowing the pinof the dividers to follow the profile of the installed piece. At thesame time, place adequate pressure on the pin to transfer and/orscribe the profile onto the surface of the uninstalled piece.
d. Use a utility knife to cut the scribe line on the uninstalled wallbase, apply adhesive, and position the trimmed section into place.
3. Field-Made Outside Cornersa. Stop application of adhesive to wall base approximately 18"
(45cm) from the outside corner of the wall.b. Position the wall base at the corner and pencil line the back of the
wall base where the bend is required.c. Lay the wall base on the floor with the back up. Utilizing a top-set
or pull-type gouge tool, make a shallow notch along the pencilline.
d. Note: The notch depth should not exceed one-quarter the totalthickness of the wall base.
e. Reposition the wall base corner on the wall. The corner of the wallshould fit snugly into the notched recess on the back of the wallbase.
f. Apply adhesive and roll firmly into place.Note: Tarkett 946 Premium Contact Adhesive may be usedto ensure a faster setup at the corner.
ADHESIVE CLEAN UP Excess adhesive should be removed during the installation process. 960 Wall Base Adhesive
♦ Use a clean white cloth dampened with water to remove wetadhesive from floor covering and tools.
♦ Dried adhesive may require the use of denatured alcohol applied toa clean white cloth. (Follow manufacturer's precautions when usingdenatured alcohol.)
946 Premium Contact Adhesive ♦ Use a clean white cloth dampened with water to remove wet adhesive
from floor covering and tools.♦ Dried adhesive may require the use of denatured alcohol applied to a
clean white cloth. (Follow manufacturer's precautions when usingdenatured alcohol.)
MAINTENANCE 1. Wait 72 hours after installation before performing initial cleaning.2. A regular maintenance program must be started after the initial
cleaning.3. Johnsonite Resilient Wall Base is maintained with regular wiping
using a wet, clean, soft, white cloth.
4. A mild detergent may be added to the water.5. Coarse scrubbing media or harsh cleaning chemicals may damage
the surface of the wall base.
ADHESIVE SELECTION CHART Application and Coverage Moisture / pH Limits
Notes Products Adhesive Porous Non-Porous RH% CaCl2 pH
BaseWorks 960 Wall Base
Adhesive
1/8 x 1/8 x 1/8 SQ
4" = 200-250 lf. 6" = 100-150 lf.
2.5" = 300-350 lf.
USE 946 PREMIUM CONTACT ADHESIVE
N/A N/A N/A POROUS ONLY
BaseWorks 946 Premium
Contact Adhesive
Applied with
Brush or Roller
1 kg (.95 quart) unit
24 – 36 sq. ft.
6 kg (1.44 gallon) unit
144 – 215 sq. ft.
Applied with
Brush or Roller
1 kg (.95 quart) unit
24 – 36 sq. ft.
6 kg (1.44 gallon) unit
144 – 215 sq. ft.
80% 5 lbs. 9 Coverage based on both sides
City of Yorba Linda, 2019
APPENDIX "B"

carnegiefabrics.com ( 800 ) 727-6770
Installation Instructions
Textile Wallcovering Installation
S T O R A G E
E X A M I N AT I O N S
W A L L P R E P A R AT I O N
A D H E S I V E
H A N G I N G
C L E A N - U P
Rolls of paperbacked fabric should be stored so that a minimum weight rests on each piece. Do not stand on end.
All wallcoverings must be examined for pattern, color and quality. Make sure that multiple rolls match each other. If you encounter any problems, do not hang more than three drops without notifying the specifier and getting his or our approval to proceed. Irregularity of weaves, heavy slubs, pieces of flax and variations in shades are characteristic of linen. Obvious weaving bars or defects are marked by our inspectors with tape and should be cut out.
The walls must be completely smooth. The walls should be prepared with a quality wallcovering primer chosen at the discretion of the installer.
Use clear wallcovering adhesive. Adhesives should not be thinned with chemical solvent.
When hanging laminated fabric, apply the adhesive to the paper backing. When hanging acrylic backed fabric, apply the adhesive to the wall. We recommend table trimming and butting. Use a new blade for each sheet. If the wallcovering tends to curl away from the top or bottom of the wall, prime the top or bottom edges of the wall with adhesive. Allow to become tacky before hanging fabric.
Do not wash seams with water. Any excess adhesive which comes through at the seams should be allowed to dry and should then be removed with a dry brush. When removing excess adhesive from the ceiling and the baseboard, protect the fabric from water. Do not wet the fabric.
City of Yorba Linda, 2019
APPENDIX "B"

Topknot7358 | A3
$21.50Use: WallcoveringsSolution: High Performance WallcoveringContents: 100% PolypropyleneInspired by the Scandinavian trends of texture and craft,Topknot successfully combines the look of natural wool withhigh performance capabilities.A $3.00 per yard cut charge applies to orders under 50 yardsCOLORS
A1 A2 A3 A4 A5 A6 A7 A8
A9
Product SpecificationsWidth54" (137 cm)BackingAcrylicWarranty10 yearsCountry of OriginDenmark
Flame RetardancyASTM E84 Class A / Class 1Cleaning CodeWS & BC-Water/Solvent & BleachCleanable
Alternate UsesPanels, Upholstery
City of Yorba Linda, 2019
APPENDIX "B"

ALPINE 7362, ARCTIC 7360, TOP KNOT 7358 by carnegie fabrics
Health ProductDeclaration v2.1
created via: HPDC Online Builder
CLASSIFICATION: 12 0520PRODUCT DESCRIPTION: POLYPROLYENE WALLCOVERING FABRIC
Section 1: Summary Nested Method / Product Threshold
CONTENT INVENTORYInventory Reporting Format
Nested Materials Method Basic Method
Threshold Disclosed Per Material Product
Threshold level 100 ppm 1,000 ppm Per GHS SDS Per OSHA MSDS Other
Residuals/ImpuritiesResiduals/ImpuritiesConsidered in 1 of 1 Materials
Explanation(s) providedfor Residuals/Impurities?
Yes No
Yes No
Yes No
Yes No
Are All Substances Above the Threshold Indicated:
CharacterizedPercent Weight and Role Provided?
ScreenedUsing Priority Hazard Lists with Results Disclosed?
IdentifiedName and Identifier Provided?
CONTENT IN DESCENDING ORDER OF QUANTITY
Summary of product contents and results from screening individual chemicalsubstances against HPD Priority Hazard Lists and the GreenScreen for SaferChemicals®. The HPD does not assess whether using or handling thisproduct will expose individuals to its chemical substances or any health risk.Refer to Section 2 for further details.MATERIAL | SUBSTANCE | RESIDUAL OR IMPURITYGREENSCREEN SCORE | HAZARD TYPEPOLYPROPYLENE [ POLYPROPYLENE LT-UNK ]
Number of Greenscreen BM-4/BM3 contents ... 0Contents highest concern GreenScreenBenchmark or List translator Score ... LT-UNKNanomaterial ... NoINVENTORY AND SCREENING NOTES:
VOLATILE ORGANIC COMPOUND (VOC) CONTENTVOC Content data is not applicable for this product category.
CERTIFICATIONS AND COMPLIANCE See Section 3 for additional listings.VOC emissions: CDPH Standard Method V1.1 (Section 01350/CHPS) - ZeroVOC emissions
CONSISTENCY WITH OTHER PROGRAMS
No pre-checks completed or disclosed.
Third Party Verified?
Yes No
PREPARER: Self-Prepared VERIFIER: VERIFICATION #:
SCREENING DATE: 2018-08-16PUBLISHED DATE: 2018-08-16 EXPIRY DATE: 2021-08-16
ALPINE 7362, ARCTIC 7360, TOP KNOT 7358 hpdrepository.hpd-collaborative.org
HPD v2.1 created via HPDC Builder Page 1 of 4
City of Yorba Linda, 2019
APPENDIX "B"

Section 2: Content in Descending Order of Quantity
This section lists contents in a product based on specific threshold(s) and reports detailed health information including hazards. ThisHPD uses the inventory method indicated above, which is one of three possible methods:
Basic Inventory method with Product-level threshold.Nested Material Inventory method with Product-level thresholdNested Material Inventory method with individual Material-level thresholds
Definitions and requirements for the three inventory methods and requirements for each data field can be found in the HPD OpenStandard version 2.1, available on the HPDC website at: www.hpd-collaborative.org/hpd-2-1-standard
POLYPROPYLENE %: 100.0000 - 100.0000 HPD URL: http://www.carnegiefabrics.com
PRODUCT THRESHOLD: 1000 ppm RESIDUALS AND IMPURITIES CONSIDERED: Yes
RESIDUALS AND IMPURITIES NOTES: There are no known impurities and residuals
OTHER MATERIAL NOTES: These patterns will be stocked with an acrylic back coating
POLYPROPYLENE ID: 9003-07-0
%: 100.0000 - 100.0000 GS: LT-UNK RC: None NANO: No ROLE: based material
HAZARDS: AGENCY(IES) WITH WARNINGS:
None Found No warnings found on HPD Priority lists
SUBSTANCE NOTES: This product is made with 100% single yarns and contains not other finishes.
ALPINE 7362, ARCTIC 7360, TOP KNOT 7358 hpdrepository.hpd-collaborative.org
HPD v2.1 created via HPDC Builder Page 2 of 4
City of Yorba Linda, 2019
APPENDIX "B"

Section 3: Certifications and Compliance
This section lists applicable certification and standards compliance information for VOC emissions and VOC content. Other types ofhealth or environmental performance testing or certifications completed for the product may be provided.
VOC EMISSIONS CDPH Standard Method V1.1 (Section 01350/CHPS) - Zero VOCemissions
CERTIFYING PARTY: Self-declaredAPPLICABLE FACILITIES: allCERTIFICATE URL:
https://berkeleyanalytical.com/lab-services/voc-emissions-testing/
ISSUE DATE: 2018-05-01
EXPIRY DATE: 2019-05-01
CERTIFIER OR LAB: BerkeleyAnalytical
CERTIFICATION AND COMPLIANCE NOTES:
Section 4: Accessories
This section lists related products or materials that the manufacturer requires or recommends for installation (such as adhesives orfasteners), maintenance, cleaning, or operations. For information relating to the contents of these related products, refer to theirapplicable Health Product Declarations, if available.No accessories are required for this product.
Section 5: General Notes
SPECIAL POLYPROPYLENE WALLCOVERING FABRIC
ALPINE 7362, ARCTIC 7360, TOP KNOT 7358 hpdrepository.hpd-collaborative.org
HPD v2.1 created via HPDC Builder Page 3 of 4
City of Yorba Linda, 2019
APPENDIX "B"

Section 6: References
MANUFACTURER INFORMATION
MANUFACTURER: carnegie fabrics ADDRESS: 110 N CENTRE AVE, CARNEGIE FABRICS 110 N CENTRE AVE, CARNEGIE FABRICS ROCKVILLE CENTER NY 11570, United States WEBSITE: WWW.CARNEGIEFABRICS.COM
CONTACT NAME: CHARLES GRIFFIN TITLE: DIRECTOR of TECHNICAL SERVICES PHONE: 5163073756 EMAIL: [email protected]
KEY
OSHA MSDS Occupational Safety and Health Administration Material Safety Data SheetGHS SDS Globally Harmonized System of Classification and Labeling of Chemicals Safety Data Sheet
Hazard TypesAQU Aquatic toxicityCAN CancerDEV Developmental toxicityEND Endocrine activityEYE Eye irritation/corrosivityGEN Gene mutation
GLO Global warmingMAM Mammalian/systemic/organ toxicityMUL Multiple hazardsNEU NeurotoxicityOZO Ozone depletionPBT Persistent Bioaccumulative Toxic
PHY Physical Hazard (reactive)REP Reproductive toxicityRES Respiratory sensitizationSKI Skin sensitization/irritation/corrosivityLAN Land ToxicityNF Not found on Priority Hazard Lists
GreenScreen (GS)BM-4 Benchmark 4 (prefer-safer chemical)BM-3 Benchmark 3 (use but still opportunity for improvement)BM-2 Benchmark 2 (use but search for safer substitutes)BM-1 Benchmark 1 (avoid - chemical of high concern)BM-U Benchmark Unspecified (insuficient data to benchmark)
LT-P1 List Translator Possible Benchmark 1LT-1 List Translator Likely Benchmark 1LT-UNK List Translator Benchmark Unknown (insufficientinformation from List Translator lists to benchmark)NoGS Unknown (no data on List Translator Lists)
Recycled TypesPreC Preconsumer (Post-Industrial)PostC PostconsumerBoth Both Preconsumer and PostconsumerUnk Inclusion of recycled content is unknownNone Does not include recycled content
Other Terms Inventory Methods:
Nested Method / Material Threshold Substances listed within each material per threshold indicated per materialNested Method / Product Threshold Substances listed within each material per threshold indicated per productBasic Method / Product Threshold Substances listed individually per threshold indicated per product
Nano Composed of nano scale particles or nanotechnologyThird Party Verified Verification by independent certifier approved by HPDCPreparer Third party preparer, if not self-prepared by manufacturerApplicable facilities Manufacturing sites to which testing applies
The Health Product Declaration (HPD) Open Standard provides for the disclosure of product contents and potential associated human andenvironmental health hazards. Hazard associations are based on the HPD Priority Hazard Lists, the GreenScreen List Translator™, and whenavailable, full GreenScreen® assessments. The HPD Open Standard v2.1 is not:
a method for the assessment of exposure or risk associated with product handling or use,a method for assessing potential health impacts of: (i) substances used or created during the manufacturing process or (ii) substancescreated after the product is delivered for end use.
Information about life cycle, exposure and/or risk assessments performed on the product may be reported by the manufacturer in appropriateNotes sections, and/or, where applicable, in the Certifications section.The HPD Open Standard was created and is supported by the Health Product Declaration Collaborative (the HPD Collaborative), a customer-ledorganization composed of stakeholders throughout the building industry that is committed to the continuous improvement of building productsthrough transparency, openness, and innovation throughout the product supply chain.The product manufacturer and any applicable independent verifier are solely responsible for the accuracy of statements and claims made in thisHPD and for compliance with the HPD standard noted.
City of Yorba Linda, 2019
APPENDIX "B"

koroseal.com 855.753.5474
ARCHITECT’S SPECIFICATIONS
1. GENERAL
1.01 Scope Furnish a vinyl wallcovering as specified in the contract documents.
1.02 Sample Submit a sample of each type and color to be installed for the architect’s approval.
1.03 Certificate of Compliance Submit manufacturer’s certification that wallcovering furnished meets or exceeds the architect’s specification requirements.
1.04 Warranties Furnish a written warranty against defects in material or workmanship for five (5) yeaars from the date of shipment.
1.05 Product Delivery Storage and Handling Deliver vinyl wallcovering and adhesive to the job site in unbroken or undamaged containers and clearly marked with the supplier’s identification label. Store vinyl wallcoverings in a flat position to avoid damage to rollends. Store materials in a clean, dry storage area with temperature maintained above 550 F with normal humidity. DO NOT CROSS STACK THIS MATERIAL.
1.06 Project Conditions Areas where wallcovering will be installed shall have a constant minimum temperature of not less than 600 F for at least seven days prior to and throughout installation period and for seven days thereafter.
2. PRODUCTS
2.01 Vinyl Wallcovering Shall meet Federal Specification CCC-W408A and the CFFA-W 101-D, Quality Standard for Vinyl Coated Fabric Wallcovering.The wallcovering Type I, Type II or Type III desired shall bespecified. The vinyl wallcovering shall contain mildew inhibitors.
2.02 Vinyl Wallcovering (Protected Film) Shall meet the requirements as listed in 2.01 and in addition have a 0.37 thick protective film factory-applied to the wallcovering surface.
2.03 Burning Characteristics The manufacturer shall certify at the time of shipment that the materials furnished meet the published flame spread and smoke development Fire Hazard Classification Rating(s) of those products when tested according to ASTM-E84 Tunnel Test.
2.04 UL Label All products shall be UL labeled assuring complete compliance with all specifications and requirements through continuous inspection by UL inspectors.
2.05 Fire Detection Characteristics The vinyl wallcovering shall contain the Early Warning Effect formulation which provides early warning to potential fire conditions. The vinyl wallcovering shall contain thermoparticulating ingredients which, when heated to approximately 3000 F, emit a colorless, odorless vapor that activates ionization smoke detectors when installed according to manufacturer’s specifications. Evidence of the Early Warning Effect shall be based on the ASTM E603 standard guide for room fire experiments.
2.06 Protective Coating The vinyl wallcovering shall have a protective coating applied to its surface to minimize migration of stains into the vinyl and, therefore, offer stain protection from a variety of staining agents and provide greater ease of cleanability.
2.07 Adhesive The adhesive used must be manufacturer’s recommended adhesive and must contain mildew inhibitors.
2.08 Primers The primer used must be manufacturer’s recommended primer.
City of Yorba Linda, 2019
APPENDIX "B"

koroseal.com 855.753.5474
ARCHITECT’S SPECIFICATIONS
3. EXECUTION
3.01 Inspection (a) Installer shall inspect all areas and conditions under which vinylwallcoverings are to be installed. Installer shall notify the contractorand architect in writing of any conditions detrimental to the properand timely completion of the installation; work will proceed onlywhen conditions have been corrected and accepted by theinstaller.
(b) Substrate shall be checked with a suitable “Moisture Meter”.Moisture shall not exceed 4%.
3.02 Surface Preparation (a) Wall surfaces shall be free from defects and imperfections thatcould show through the finished covered surface.
(b) Sand-finished plaster shall be smoothed, cinder or cementblocks shall be plastered, or otherwise rendered smooth, and oldwallcoverings shall be removed.
(c) For new drywall construction, manufacturer’s recommendedprimer should be used before application of wallcovering for easeof future removal when redecorating.
(d) Glossy surfaces shall either be sanded to dull surface, or acoat of manufacturer’s recommended primer applied prior toinstallation of wallcovering.
(e) If there is any evidence of mildew, it must be removed and thewall surface treated to inhibit further mildew growth.
(f) All painted surfaces should be evaluated for the possibility ofpigment bleed-through. If there is any possibility, a coat of sealer,recommended by the manufacturer, should be applied beforeapplication of the wallcovering.
(g) Do not install vinyl wallcovering over oilbased wood stains asa bleed-through may occur.
3.03 Installation (a) Wallcovering shall be installed by experienced workers andcontractors in strict accordance with the manufacturer’s printed instructions using vinyl wallcovering adhesive recommended by the manufacturer (WHEAT PASTE SHALL NOT BE USED). It is absolutely imperative that installer read the manufacturer’s instruction sheet in each roll before installing the vinyl wallcovering. Permanent building light shall be available for installation.
(b) Installer, before cutting, shall examine pattern and color anddetermine that they are the correct pattern and color as specified.
(c) Installer shall install each roll in sequence starting with largestroll number and each strip in same sequence as cut from roll. Ifpattern is not random, examine for repeat design. Some patternsshould be lined up, matched or reversed for best results. Ifnecessary, trim selvage deep enough to assure color uniformity.
(d) After application of three strips, an inspection should be madeand if there are any variations in color or pattern which are feltto be excessive, the wallcovering distributor or manufacturer’srepresentative should be notified for his inspection before anyfurther wallcovering is installed.
(e) Always bring material six (6) inches around inside andoutside corners being sure to fit into corners to avoid bridging orspanning.
(f) The wallcovering should be smoothed to the hanging surfacewith a stiff bristled sweep brush or a flexible broad-knife toeliminate air bubbles.
(g) Remove excess adhesive along finished seam immediately aftereach wallcovering strip is applied. Use of clean, warm water, anatural sponge, and clean towels are recommended for this use. Itis very important to change water often to maintain cleanliness.
3.04 Clean-up Completion Upon completion of work, remove surplus materials, rubbish and debris, resulting from the wallcovering installation. Leave areas in neat, clean and orderly condition
City of Yorba Linda, 2019
APPENDIX "B"

koroseal.com 855.753.5474
INSTALLATION INSTRUCTIONS
STOP! PLEASE READ BEFORE USING If you have any questions about the proper installation of this product, please call your Distributor or contact your Sales Representative before proceeding.
PREPARATION OF GOODS Examine goods to assure that pattern, color, quantity and quality are as ordered. Separate goods by shade lot number and organize in roll number sequence.
PREPARATION OF SURFACE Surfaces to be covered must be clean, smooth, dry and structurally sound. Loose paint or other wallcoverings must be removed. In order to ensure maximum smoothness of installation, nail heads, nicks, gouges, and other surface imperfections should be sanded smooth and sealed. On new walls, dry wall joints should be sanded smooth and sealed. On new walls, dry wall joints should be taped, bedded and sanded smooth.
Mold and mildew require moisture in order to grow and therefore it is important to check the walls with a suitable moisture meter. Moisture content should not exceed 4%. Excessive moisture in wall needs to be corrected prior to the installation of the wallcovering. Remove any mold and mildew from existing wall and treat surfaces to inhibit future growth.
Koroseal | Vicrtex | Studios wallcovering (the “wallcoverings”) can be installed over almost any surface which has been properly prepared. Do not hang vinyl over ball point pen writing, wax crayon, ink marker, oil based stains or any foreign matter that may bleed through the vinyl. Painted surfaces should be checked for possibility of pigment bleed through. It is suggested that lead pencil be used to mark vinyl or wall as pencil marks do not bleed.
Glossy surfaces should either be sanded to dull the surface or an application of Professional R-35 heavy duty primer should be made.
If future strippability is desired, a primer must be used. Some drywall joint compounds contrast with the drywall paper surface, showing strong light and dark colored areas. Very lightly colored, light-weight wallcoverings may allow show-through due to their limited amount of opacity. Should this situation occur, we recommend that you use a primer, then Heavy Duty Clay-Based Adhesive. If after applying three (3) strips, there is some question of appearance, stop and contact your distributor.
City of Yorba Linda, 2019
APPENDIX "B"
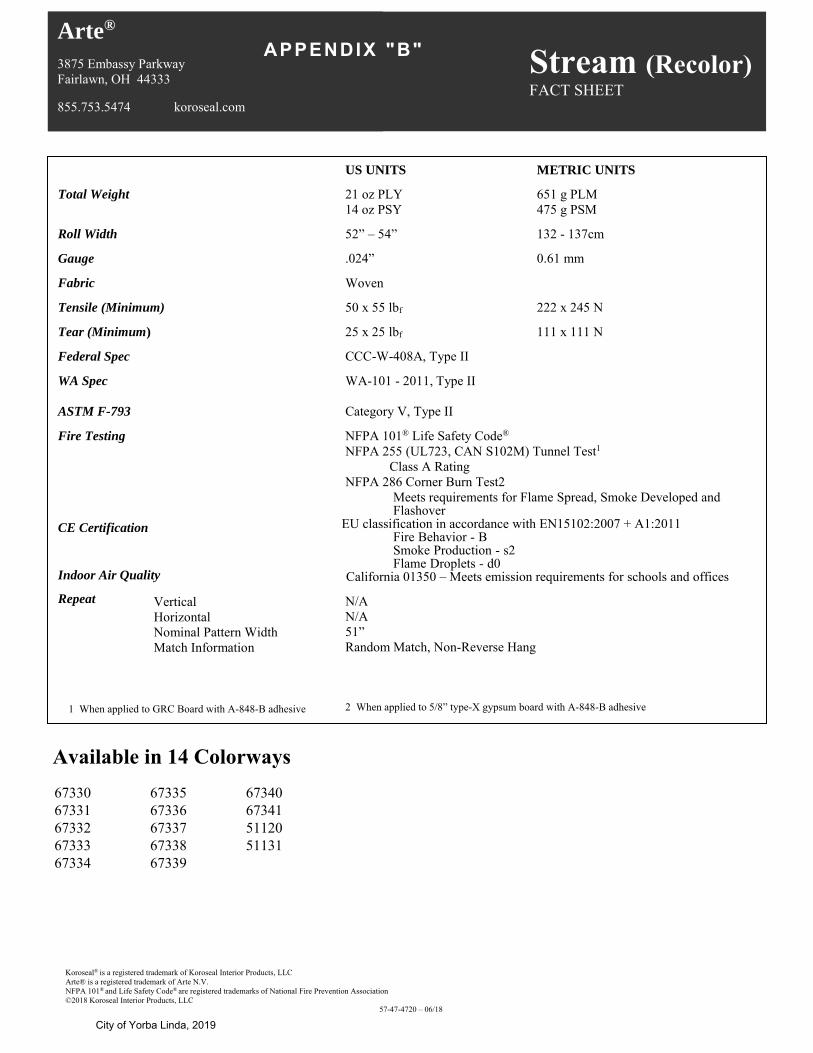
–
Arte®
3875 Embassy Parkway Fairlawn, OH 44333
855.753.5474 koroseal.com
Stream (Recolor)FACT SHEET
US UNITS METRIC UNITS
21 oz PLY 651 g PLM 14 oz PSY 475 g PSM
52” – 54” 132 - 137cm
.024” 0.61 mm
Woven
50 x 55 lbf 222 x 245 N
25 x 25 lbf 111 x 111 N
CCC-W-408A, Type II
WA-101 - 2011, Type II
Category V, Type II
Total Weight
Roll Width
Gauge
Fabric
Tensile (Minimum)
Tear (Minimum)
Federal Spec
WA Spec
ASTM F-793
Fire Testing
CE Certification
Indoor Air Quality
Repeat Vertical Horizontal Nominal Pattern Width Match Information
NFPA 101® Life Safety Code® NFPA 255 (UL723, CAN S102M) Tunnel Test1
Class A RatingNFPA 286 Corner Burn Test2
Meets requirements for Flame Spread, Smoke Developed andFlashover
EU classification in accordance with EN15102:2007 + A1:2011 Fire Behavior - BSmoke Production - s2Flame Droplets - d0
California 01350 – Meets emission requirements for schools and offices
N/A N/A 51” Random Match, Non-Reverse Hang
2 When applied to 5/8” type-X gypsum board with A-848-B adhesive
Available in 14 Colorways
Koroseal® is a registered trademark of Koroseal Interior Products, LLC Arte® is a registered trademark of Arte N.V. NFPA 101® and Life Safety Code® are registered trademarks of National Fire Prevention Association ©2018 Koroseal Interior Products, LLC
57-47-4720 – 06/18
67330 67335 6734067331 67336 6734167332 67337 5112067333 67338 5113167334 67339
1 When applied to GRC Board with A-848-B adhesive
City of Yorba Linda, 2019
APPENDIX "B"
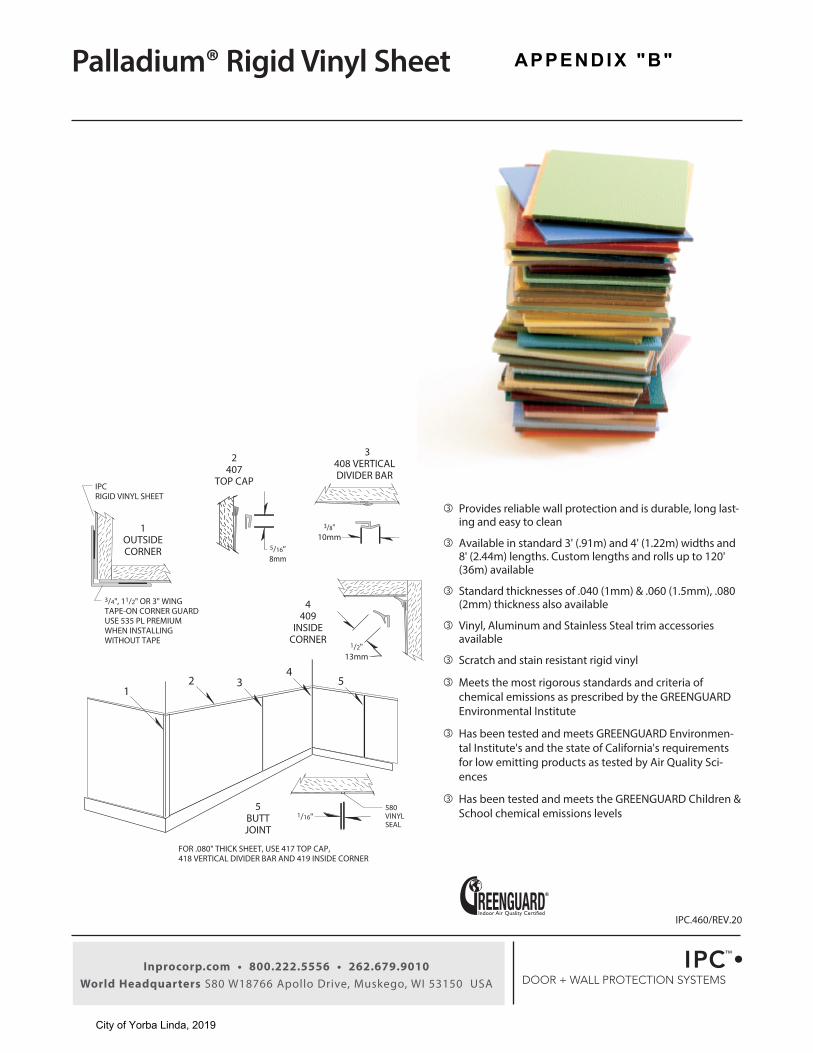
IPC.460/REV.20
IPCRIGID VINYL SHEET
3/4", 11/2" OR 3" WING TAPE-ON CORNER GUARDUSE 535 PL PREMIUMWHEN INSTALLING WITHOUT TAPE
3/8"10mm
5/16"8mm
1/2"13mm
1
1OUTSIDECORNER
2
2407
TOP CAP
3408 VERTICALDIVIDER BAR
34
4409
INSIDECORNER
5
1/16"5
BUTTJOINT
580 VINYL SEAL
FOR .080" THICK SHEET, USE 417 TOP CAP, 418 VERTICAL DIVIDER BAR AND 419 INSIDE CORNER
Provides reliable wall protection and is durable, long last-ing and easy to clean
Available in standard 3' (.91m) and 4' (1.22m) widths and 8' (2.44m) lengths. Custom lengths and rolls up to 120' (36m) available
Standard thicknesses of .040 (1mm) & .060 (1.5mm), .080 (2mm) thickness also available
Vinyl, Aluminum and Stainless Steal trim accessories available
Scratch and stain resistant rigid vinyl
Meets the most rigorous standards and criteria of chemical emissions as prescribed by the GREENGUARD Environmental Institute
Has been tested and meets GREENGUARD Environmen-tal Institute's and the state of California's requirements for low emitting products as tested by Air Quality Sci-ences
Has been tested and meets the GREENGUARD Children & School chemical emissions levels
Inprocorp.com • 800.222.5556 • 262.679.9010 World Headquarters S80 W18766 Apollo Drive, Muskego, WI 53150 USA
Palladium® Rigid Vinyl Sheet
City of Yorba Linda, 2019
APPENDIX "B"

PART 1 - GENERAL1.01 SUMMARYA. Palladium® Rigid Vinyl Sheet for wall protection and
decoration1.02 SECTION INCLUDESA. Palladium® Rigid Vinyl Sheet 1.03 REFERENCESA. American Society for Testing and Materials (ASTM)B. National Building Code of Canada (NBC)C. National Fire Protection Association (NFPA)D. Society of Automotive Engineers (SAE)E. Underwriters Laboratory (UL)F. Underwriters Laboratory of Canada (ULC)G. Uniform Building Code (UBC)1.04 SYSTEM DESCRIPTIONA. Performance Requirements: Provide Palladium®
Rigid Vinyl Sheet systems that conform to the following requirements of regulatory agencies andthe quality control of IPC Door and Wall Protection Systems™, InPro Corporation.
1. Fire Performance Characteristics: Provide UL Classified Palladium® Rigid Vinyl Sheet conforming with the NFPA Class A fire rating. Surface burning characteristics as determined by UL-723 (ASTM E-84), for Palladium® Rigid Vinyl Sheet installed with 3M Fastbond 30, InPro Bond Adhesive, or Formulated Solutions, LLC “XT-2000+" Adhesive shall be a maximum flame spread of 20 and a maximum smoke developed of 350 for .060" (1.5mm) thick material. Provide ULC (Canada) listed Palladium® Rigid Vinyl Sheet conforming to the requirements of the National Building Code of Canada 2010, Subsection 3.1.13. Surface burning characteristics, as determined by CAN/ULC-S102.2, shall be flame spread of 15 and smoke developed of 30.
2. Self Extinguishing: Provide Palladium® Rigid Vinyl Sheet with a CC1 classification, as tested in accordance with the procedures specified in ASTM D-635-74, Standard Test Method for Rate of Burning and/or Extent and Time of Burning of Self-Supporting Plastics in a Horizontal Position, asreferenced in UBC 52-4-1988.
3. Provide sheet materials that have been tested and results filed in compliance with article 15, part 1120of the New York State uniform fire prevention and building code. DOS # 09960-930.504.4001.
4. Impact Strength: Provide Palladium® Rigid Vinyl Sheet that has an Impact Strength of 30.4 ft-lbs/ inch of thickness as tested in accordance with theprocedures specified in ASTM D-256-90b, Impact Resistance of Plastics.
5. Chemical and Stain Resistance: Provide Palladium®Rigid Vinyl Sheet that shows resistance to stain when tested in accordance with applicable provisions of ASTM D-543.
6. GREENGUARD Certified: Provide GREENGUARD Certi-fied material. Profiles shall meet the requirements of GREENGUARD Certification Standards for Low-Emit-ting Products and GREENGUARD Product Emission Standard for Children & Schools.
7. Fungal and Bacterial Resistance: Provide Palladium® Rigid Vinyl Sheet that does not support fungal or bacterial growth as tested in accordance with ASTMG-21 and ASTM G-22.
8. Color Consistency: Provide components matched inaccordance with SAE J-1545 - (Delta E) with a color difference no greater than 1.0 units using CIE Lab, CIE CMC, CIE LCh, Hunter Lab or similar color space scale systems.
1.05 SUBMITTALSA. Product Data: Manufacturer's printed product
data for each type of Palladium® Rigid Vinyl Sheetspecified.
B. Detail Drawings: Mounting details with theappropriate adhesives for specific project substrates.
C. Samples: Verification samples of Palladium® Rigid Vinyl Sheet , 8" (203mm) square, of each type andcolor indicated.
D. Manufacturer's Installation Instruction: Printed installation instructions for Palladium® Rigid VinylSheet.
1.06 DELIVERY, STORAGE AND HANDLINGA. Deliver materials in unopened factory packaging to
the jobsiteB. Inspect materials at delivery to assure that specified
products have been received.C. Store in original packaging in a climate controlled
location away from direct sunlight.1.07 PROJECT CONDITIONSA. Environmental Requirements: Products must
be installed in an interior climate controlled environment.
1.08 WARRANTYA. Standard IPC Limited Lifetime Warranty against
material and manufacturing defects.
PART 2 - PRODUCTS2.01 MANUFACTURERA. Acceptable Manufacturer:
IPC Door and Wall Protection Systems, InPro Corporation, PO Box 406 Muskego, WI 53150 USA; Telephone: 800.222.5556, Fax: 888.715.8407, www.inprocorp.com
B. Substitutions: Not permittedC. Provide all Palladium® Rigid Vinyl Sheet and wall
protection from a single source.2.02 MANUFACTURED UNITSA. Rigid Vinyl Sheet1. Palladium® Rigid Vinyl Sheet OptionsItem # Dimensions Thickness305 3'x8' (.91m x 2.44m) .040" = 3/64" (1mm), available306 3'x8' (.91m x 2.44m) .060" = 1/16" (1.5mm),
available405 4'x8' (1.22m x 2.44m) .040" = 3/64" (1mm),
standard406 4'x8' (1.22m x 2.44m) .060" = 1/16" (1.5mm),
standard410 4'x8' (1.22m x 2.44m) .080" = 5/64" (2mm),
availableAlso available:
3' x 10' (.91m x 3.04m) sheets - thickness, .040" (1mm) and .060" (1.5mm)3' x 80' (.91m x 24.3m) rolls - thickness, .060" (1.5mm)3' x 120' (.91m x 36.5m) rolls - thickness, .040" (1mm)4' x 10' (1.22m x 3.04m) sheets - thickness, . .040" (1mm), .060" (1.5mm) and .080" (2mm)4' x 80' (1.22m x 24.3m) rolls - thickness, .060" (1.5mm) 4' x 120' (1.22m x 36.5m) rolls - thickness, .040" (1mm) Custom sizes - availableBacking - unbacked
2. Accessories:A.Vinyl
407 Top Cap; Length: 8' (2.44m) standard, 10' (3.04m) available 408 Vertical Divider Bar; Length: 8' (2.44m) standard, 10' (3.04m) available 409 Inside Corner; Length: 8' (2.44m) standard, 10' (3.04m) available417 Top Cap for .080" sheet; Length: 8' (2.44m) standard, 10' (3.04m) available418 Vertical Divider Bar for .080" sheet; Length: 8' (2.44m) standard, 10' (3.04m) available419 Inside Corner for .080" sheet; Length: 8' (2.44m) standard, 10' (3.04m) available
B. Stainless Steel407SS Stainless Steel Top Cap; Length: 8' (2.44m) standard408SS Stainless Steel Vertical Divider Bar; Length: 8' (2.44m) standard
C. Faux Metal (vinyl)407M Metallic Top Cap; Length: 8' (2.44m) standard408M Metallic Vertical Divider Bar; Length: 8' (2.44m) standard409M Metallic Inside Corner; Length: 8' (2.44m)
standardD. Aluminum
407A Aluminum Top Cap; Length: 8' (2.44m) standard, 10' (3.04m) available.408A Aluminum Vertical Divider Bar; Length: 8' (2.44m) standard, 10' (3.04m) available.409A Aluminum Inside Corner; Length: 8' (2.44m) standard, 10' (3.04m) available.420A Aluminum Outside Corner ; Length: 8' (2.44m)standard, 10' (3.04m) available.
E. Outside Corners3448, 3496, 11248 or 11296 Outside Corner
F. Color Matched Caulk580 Color matched VinylSeal
2.03 MATERIALSA. Vinyl: Palladium® Rigid Vinyl Sheet shall be
manufactured from chemical and stain resistant polyvinyl chloride with the addition of impact modifiers. No plasticizers shall be added (plasticizersmay aid in bacterial growth).
2.04 ACCESSORIESA. Top caps, inside corners, divider bars and outside
corners shall be made of extruded PVC. B. Stainless steel top caps shall be made of #400 series
stainless steel.C. Stainless steel vertical divider bars shall be #400
series stainless steel on galvanized steel.D. Aluminum top caps, inside corners, divider bars shall
be extruded from 6063-T5 aluminum.2.05 FINISHESA. Color or pattern of Palladium® Rigid Vinyl Sheet to
be selected by the architect from the Palladium® Rigid Vinyl Sheet finish selection. Surface shall havea velvet texture.
B. Vinyl Accessories: Top caps, inside corners, dividerbars and outside corners shall be of a color matching the IPC.
C. Stainless Steel Accessories: Top caps and divider bars shall have a polished finish.
D. Aluminum Accessories: Top caps, inside corners anddivider bars shall be clear anodized.
PART 3 - EXECUTION3.01 EXAMINATIONA. Examine areas and conditions in which the rigid
vinyl sheet will be installed.1. Complete all finishing operations, including
painting, before beginning installation of rigid vinylsheet materials.
B. Wall surface shall be dry and free from dirt, grease and loose paint.
3.02 PREPARATIONA. General: Prior to installation, clean substrate to
remove dust, debris and loose particles.3.03 INSTALLATIONA. General: Locate the Palladium® Rigid Vinyl Sheet as
indicated on the approved detail drawing for the appropriate substrate and in compliance with the IPC installation instructions. Install level and plumb at the height indicated on the drawings.
B. Installation of Palladium® Rigid Vinyl Sheet1. Adhere to substrate with InPro Bond, a freeze-thaw
stable, nonflammable, high strength, water based adhesive that trowels on and allows approximately 20 minutes working time before firming.
2. Adhere to substrate with XT-2000+, a freeze-thaw stable,nonflammable, high strength, water based adhesive that trowels on and allows approximately20 minutes working time before firming.
3. Adhere to substrate with Fastbond 30, a nonflammable, high strength, water-dispersed contact adhesive, with very little odor. Smooth rollsurface.
3.04 CLEANINGA. At completion of the installation, clean surfaces in
accordance with the IPC clean-up and maintenanceinstructions.
Inprocorp.com • 800.222.5556 • 262.679.9010 World Headquarters S80 W18766 Apollo Drive, Muskego, WI 53150 USA
Palladium® Rigid Vinyl SheetSuggested Specifications
City of Yorba Linda, 2019
APPENDIX "B"

Installation Hotline • 866.EZINPROInprocorp.com • 800.222.5556 • 262.679.9010
World Headquarters S80 W18766 Apollo Drive, Muskego, WI 53150 USA
Installation InstructionsPalladium® Rigid Sheet/Rubrail or Palladium® G2 Sheet/Rubrail
IPC.461/REV.18
Storage
Flat sheet - Store Palladium® Rigid Sheet in a clean, dry, interior area at temperatures between 50° F and 95° F [10°-35°C]. Keep out of direct sunlight. Make sure sheet is well supported.
• Store in a clean, dry, interior area• Avoid direct sunlight• Store between 50°F and 95°F [10°-35°C]
Rolled Sheet – Unroll sheet material immediately upon receipt and store in clean, dry, interior area at temperatures between 50° F and 95° F [10°-35°C]. Keep out of direct sunlight. If the rolled material does not lay fl at, reverse roll the sheet until it does lay fl at. Make sure sheet is well supported. Keep sheet length to a maximum of 12' [3.6M]. When install-ing rolled sheet, follow the non-porous installation instructions.
• Unroll rolled sheet immediately• Reverse roll material until it lays completely fl at.• Store in a clean, dry, interior area• Avoid direct sunlight.• Store between 50°F and 95°F [10°-35° C].• Keep sheet length to a maximum of 12' [3.6M].’• For rolled sheet, follow non-porous installation steps.
Acclimate24 hours before the installation, acclimate the sheet material and ad-hesive in the environmentally controlled area where it will be installed. This area requires a temperature between 65°F and 80°F [18°-27°C]and a humidity level less than 80%. Maintain a constant temperature between 65°F - 80°F [18°-27°C]and a constant humidity level less than 80% in the installation area 24 hours before installation, during the entire installa-tion and 48 hours after the installation.
Recommended ToolsPaint/Primer (if needed), Chalk Line or Laser Level, Level, InPro #545 Trowel, 1/8” [4mm] V-notches with ½” [13mm] spacing
between notches, Recommended Adhesive – InPro Bond, XT-2000+ or 3M Fastbond 30, Smooth foam paint roller (for contact cement), Straight Edge, Utility knife with extra blades, Painter Tape, InPro #333, Extension Roller, 9" [229mm] wide, Clean cloths, Water
.250[6.4mm]
OVERLAPWITH COVE BASE
RIGID SHEET/RUBRAIL
INPRO BOND/XT-2000/3M FASTBOND 30
SUBSTRATE(PROVIDED BY OTHERS)
RIGID SHEET/RUBRAIL
1/4" [6.4mm]OVERLAP WITH
COVE BASE
SUBSTRATE(PROVIDED BY OTHERS)
INPRO BOND/XT-2000/ 3M FASTBOND 30
Important
• Acclimate sheet and adhesives in the environmentally controlled installation area.• Acclimate sheet and adhesives at temperatures between 65°F and 80°F [18°-27°C].• Acclimate sheet and adhesives at humidity less than 80%.• Maintain a constant temperature and humidity 24 hours before, during and 48hours after installation.
HEIGHT PER PLAN
City of Yorba Linda, 2019
APPENDIX "B"

Installation Hotline • 866.EZINPROInprocorp.com • 800.222.5556 • 262.679.9010
World Headquarters S80 W18766 Apollo Drive, Muskego, WI 53150 USA
Installation InstructionsPalladium® Rigid Sheet/Rubrail or Palladium® G2 Sheet/Rubrail
COLOR MATCH SEAL(OPTIONAL)
INPRO #333EXTENSION ROLLER
PALLADIUM® RIGID SHEET
INPRO BOND, XT-2000+, OR
3M FASTBOND 30
INPRO #545TROWEL
407TOP CAP
407AOPTIONAL
ALUMINUMTOP CAP
409INSIDE
CORNER
409AOPTIONAL
ALUMINUMINSIDE
CORNER
408VERTICALDIVIDER
408AOPTIONAL
ALUMINUMVERTICALDIVIDER
TAPE-ONCORNERGUARD
420AOPTIONAL
ALUMINUMCORNERGUARD
City of Yorba Linda, 2019
APPENDIX "B"

Installation Hotline • 866.EZINPROInprocorp.com • 800.222.5556 • 262.679.9010
World Headquarters S80 W18766 Apollo Drive, Muskego, WI 53150 USA
Installation InstructionsPalladium® Rigid Sheet/Rubrail or Palladium® G2 Sheet/Rubrail
Wall PreparationWalls must be free from dirt, grease and loose paint. Remove any coatings designed to improve clean-up since these coatings may aff ect adhesion. Glossy surfaces may require sanding or priming to help promote adhesion.
New drywall or plaster – Walls must be smooth and wiped clean to remove dust. Seal or prime walls with paint or primer that does not contain Polyvinyl Acetate (PVAc). Allow paint/primer to dry in accordance with the manufacturers application instructions.
• Remove Dust and Dirt• Seal walls with paint/primer.• DO NOT use paint/primer that contains Polyvinyl Acetate (PVAc)
Painted Drywall or Plaster - Test painted walls for adhesion by applying a 12” x 12” [305mm x 305mm] pieces of Palladium® Rigid Sheet in an inconspicuous area. Allow the test sheet to remain adhered for 24 hours. Remove test sheet, If paint has softened, strip the paint off the wall and reseal with a recommended paint/primer.
• Test the wall to make sure paint is compatible with adhesive.• Strip the paint off wall if adhesives softens paint after testing.
Concrete and Concrete Masonry Units – Fill surface of concrete walls with an appropriate fi ller to make it smooth. Seal or prime walls with paint or primer that does not contain Polyvinyl Acetate (PVAc). Allow paint/primer to dry in accordance with the manufacturers application instructions. Unfi lled grout lines may telegraph through the sheet, especially with thinner sheet thicknesses.
• Fill concrete to make smooth.• Seal concrete with paint/primer.• DO NOT use paint/primer that contains Polyvinyl Acetate (PVAc)
Non-Porous Substrates - Some non-porous substrates include metal, ceramic tile, high-pressure laminate, epoxy painted walls, vinyl wall covering (VWC) and rigid sheet. InPro Bond and XT-2000+ adhesives can be used to apply rigid sheet to securely adhered vinyl wallcovering or rigid sheet and other non-porous substrates. Adhering rigid sheet over existing sheet or VWC will increase smoke generation and fl ame spread and negate the Class A fi re rating. If you choose to do this, follow the non-porous installation instructions.
City of Yorba Linda, 2019
APPENDIX "B"
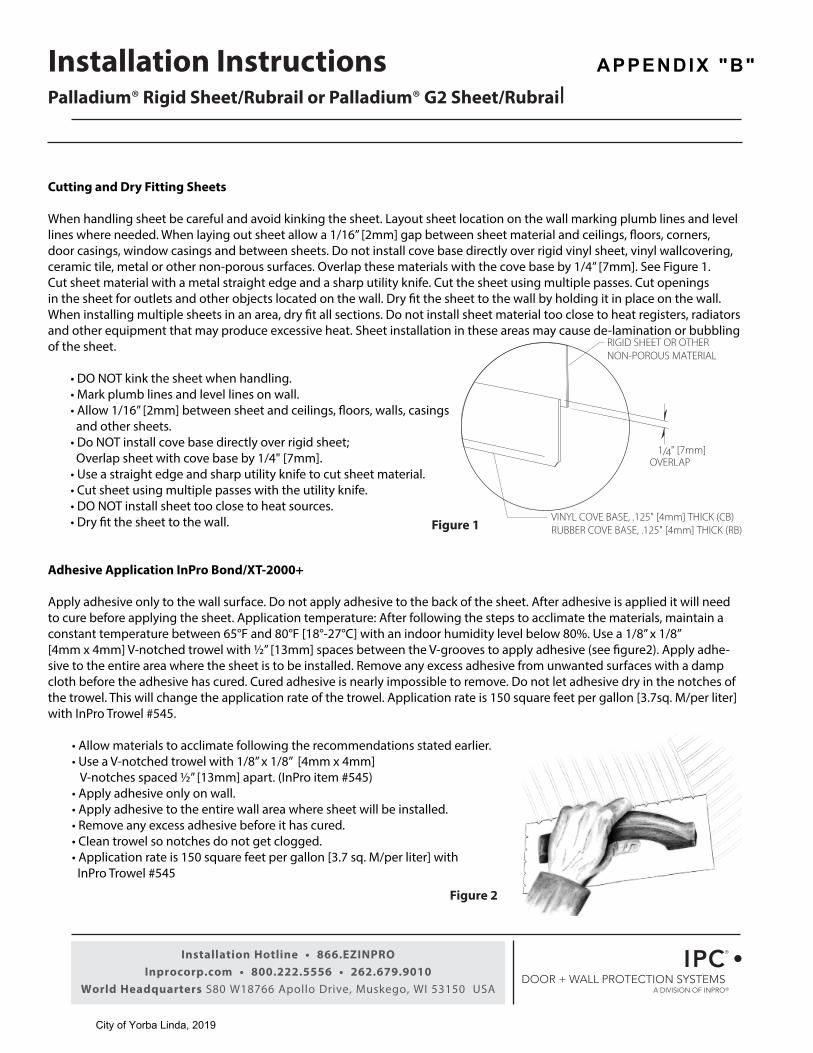
Installation Hotline • 866.EZINPROInprocorp.com • 800.222.5556 • 262.679.9010
World Headquarters S80 W18766 Apollo Drive, Muskego, WI 53150 USA
Installation InstructionsPalladium® Rigid Sheet/Rubrail or Palladium® G2 Sheet/Rubrail
Cutting and Dry Fitting Sheets
When handling sheet be careful and avoid kinking the sheet. Layout sheet location on the wall marking plumb lines and level lines where needed. When laying out sheet allow a 1/16” [2mm] gap between sheet material and ceilings, fl oors, corners, door casings, window casings and between sheets. Do not install cove base directly over rigid vinyl sheet, vinyl wallcovering, Do not install cove base directly over rigid vinyl sheet, vinyl wallcovering, ceramic tile, metal or other non-porous surfaces. Overlap these materials with the cove base by 1/4” [7mm]. See Figure 1ceramic tile, metal or other non-porous surfaces. Overlap these materials with the cove base by 1/4” [7mm]. See Figure 1.Cut sheet material with a metal straight edge and a sharp utility knife. Cut the sheet using multiple passes. Cut openings in the sheet for outlets and other objects located on the wall. Dry fi t the sheet to the wall by holding it in place on the wall. When installing multiple sheets in an area, dry fi t all sections. Do not install sheet material too close to heat registers, radiators and other equipment that may produce excessive heat. Sheet installation in these areas may cause de-lamination or bubbling of the sheet.
• DO NOT kink the sheet when handling.• Mark plumb lines and level lines on wall.• Allow 1/16” [2mm] between sheet and ceilings, fl oors, walls, casings
and other sheets.• Do NOT install cove base directly over rigid sheet;Overlap sheet with cove base by 1/4" [7mm].
• Use a straight edge and sharp utility knife to cut sheet material.• Cut sheet using multiple passes with the utility knife.• DO NOT install sheet too close to heat sources.• Dry fi t the sheet to the wall.
Adhesive Application InPro Bond/XT-2000+
Apply adhesive only to the wall surface. Do not apply adhesive to the back of the sheet. After adhesive is applied it will need to cure before applying the sheet. Application temperature: After following the steps to acclimate the materials, maintain a constant temperature between 65°F and 80°F [18°-27°C] with an indoor humidity level below 80%. Use a 1/8” x 1/8” [4mm x 4mm] V-notched trowel with ½” [13mm] spaces between the V-grooves to apply adhesive (see fi gure2). Apply adhe-sive to the entire area where the sheet is to be installed. Remove any excess adhesive from unwanted surfaces with a damp cloth before the adhesive has cured. Cured adhesive is nearly impossible to remove. Do not let adhesive dry in the notches of the trowel. This will change the application rate of the trowel. Application rate is 150 square feet per gallon [3.7sq. M/per liter]with InPro Trowel #545.
• Allow materials to acclimate following the recommendations stated earlier.• Use a V-notched trowel with 1/8” x 1/8” [4mm x 4mm]
V-notches spaced ½” [13mm] apart. (InPro item #545)• Apply adhesive only on wall.• Apply adhesive to the entire wall area where sheet will be installed.• Remove any excess adhesive before it has cured.• Clean trowel so notches do not get clogged.• Application rate is 150 square feet per gallon [3.7 sq. M/per liter] withInPro Trowel #545
Figure 2
1/4" [7mm]OVERLAP
RIGID SHEET OR OTHERNON-POROUS MATERIAL
VINYL COVE BASE, .125" [4mm] THICK (CB)RUBBER COVE BASE, .125" [4mm] THICK (RB)Figure 1
City of Yorba Linda, 2019
APPENDIX "B"

Installation Hotline • 866.EZINPROInprocorp.com • 800.222.5556 • 262.679.9010
World Headquarters S80 W18766 Apollo Drive, Muskego, WI 53150 USA
Installation InstructionsPalladium® Rigid Sheet/Rubrail or Palladium® G2 Sheet/Rubrail
Adhesive Curing, Porous Substrate
Temperature and humidity levels will aff ect the time it takes for adhesive to cure. Under ideal conditions cure time should be 45-60 minutes. It could be signifi cantly longer, but not more than 3 hours. When fi rst applied the adhesive is white. As it cures,it becomes translucent and tacky. Install the sheet material when 60-75% of the adhesive has become translucent or whenit becomes tacky and does not transfer to your fi nger. Fans will increase air movement and reduce cure time. The installer is
responsible for determining the cure time of the adhesive, based on job site conditions. Do a test installation if needed.
• Adjust cure time for temperature and humidity level.• Allow adhesive to become 60-75% translucent or let adhesive become tacky and not transfer to your fi nger when
touched.• Use fans to reduce cure time.• The installer is responsible for determining the cure time of the adhesive, based on job site conditions.
• Do a test installation, if needed.
Adhesive Curing, Non-Porous Substrate (follow these steps for rolled sheet)
Some non-porous substrates include metal, ceramic tile, high-pressure laminate, epoxy painted walls, and vinyl wall covering. When applying adhesives to these substrates, moisture in the adhesive will not be absorbed by the substrate. Longer cure times are required. Allow the adhesive to become 90% translucent. Let the adhesive become tacky and not transfer to your fi nger when touched. Temperature and humidity levels will aff ect the time it takes for adhesive to cure. Cure times may range from 1 hour but not more than 3 hours. Fans will increase air movement and reduce cure time. The installer is responsible
for determining the cure time of the adhesive, based on job site conditions. Do a test installation if needed. Align the sheet perfectly, since the longer cure time makes the adhesive behave like contact cement. Readjusting the sheet may be diffi cult or impossible.
• Allow adhesive to cure longer (at least an hour but not more than three hours)• Allow the adhesive become 90% translucent and let adhesive become tacky and not transfer to your fi nger whentouched.• Use fans to reduce cure time.• The installer is responsible for determining the cure time of the adhesive, based on job site conditions.
• Do a test installation, if needed.• Position the sheet perfectly, since adhesive behaves like contact cement.
City of Yorba Linda, 2019
APPENDIX "B"

Installation Hotline • 866.EZINPROInprocorp.com • 800.222.5556 • 262.679.9010
World Headquarters S80 W18766 Apollo Drive, Muskego, WI 53150 USA
Installation InstructionsPalladium® Rigid Sheet/Rubrail or Palladium® G2 Sheet/Rubrail
Positioning Sheet
Wipe the back of the sheet to remove any dust. After the adhesive has cured, position the sheet on the wall aligning the edges with plumb lines or level lines. Hold sheets back from ceiling, fl oors, corners, casings and other sheets by 1/16” [2mm] to allow for expansion (see fi gure 3). If needed reposition the sheet on the wall by carefully pulling it back and re-aligning it to the wall. Use an extension roller (InPro item # 333) to fi rmly embed the sheet into the adhesive (see fi gure 4). Apply heavy body pressure to every square inch of sheet, starting at the center and working to the edges, making sure it is bonded se-curely to the wall.
• Wipe the back of sheet to remove dust.• Position sheet on wall• Allow 1/16” [2mm] gaps for expansion.• Reposition sheet before rolling if needed.• Roll entire sheet with extension roller, starting at the center and working to the edges.
1/16" [2mm] GAP
Figure 3
Figure 4
City of Yorba Linda, 2019
APPENDIX "B"

Installation Hotline • 866.EZINPROInprocorp.com • 800.222.5556 • 262.679.9010
World Headquarters S80 W18766 Apollo Drive, Muskego, WI 53150 USA
Installation InstructionsPalladium® Rigid Sheet/Rubrail or Palladium® G2 Sheet/Rubrail
Trim Pieces (see fi gure 5)
If using trim pieces with an InPro Bond or XT-2000 installation, install the fi rst sheet on the wall. Cut trim pieces with a metal straight edge and sharp utility knife. Slide vertical divider bars or inside corners on the next sheet to be installed. Overlap the edge of the sheet on the wall with the divider bar or inside corner. With aluminum divider bars, slide sheet into the divider bar. When using top caps and vertical divider bars, notch the back of the top cap where it intersects with the divider bar (see fi g-ure 6). Install the top cap by sliding it on the top edge of the sheet after the sheet is in place. Roll all trim pieces and the entire sheet with an extension roller (InPro item # 333). Stainless Steel Trim - Cut stainless steel trim with a hack saw or similar. Tape exposed surfaces with painters tape to help protect it when cutting.
• Cut trim pieces with a sharp utility knife.• Overlap trim piece over the fi rst sheet installed.• Notch the back of the top cap where it intersects the vertical divider bar.• Slide top cap on edge of sheet after sheet is on wall.• Roll all trim pieces and entire sheet with extension roller.• Cut stainless steel trim with a hack saw or similar.
SHEET
3/8 "10mm
5/16 "8mm
1/2"13mm
1OUTSIDECORNER
2TOP CAP
3VERTICALDIVIDER BAR 4
INSIDECORNER 1/16"
5BUTTJOINT
580 VINYL SEAL
12 3
45
FOR .080" [2mm] THICK SHEET, USE 417 TOP CAP, 418 VERTICAL DIVIDER BAR AND 419 INSIDE CORNER
3/4", 1-1/2" OR 3" [19mm, 38mm, or 76mm] WINGTAPE-ON CORNER GUARDUSE 535 PL PREMIUMWHEN INSTALLINGWITHOUT TAPE
2ALUMINUM
TOP CAP
3ALUMINUMDIVIDER
BAR
4ALUMINUM
INSIDECORNER
1ALUMINUMOUTSIDE CORNER
[2mm]
VERTICALDIVIDERBAR
TOPCAP
NOTCHBACK OFTOP CAPAT VERTICALDIVIDER BARLOCATIONS
BACK OF SHEET TRIM
Figure 5
Figure 6
City of Yorba Linda, 2019
APPENDIX "B"

Installation Hotline • 866.EZINPROInprocorp.com • 800.222.5556 • 262.679.9010
World Headquarters S80 W18766 Apollo Drive, Muskego, WI 53150 USA
Installation InstructionsPalladium® Rigid Sheet/Rubrail or Palladium® G2 Sheet/Rubrail
Contact Cement Application
Apply 3M Fastbond 30 Contact Cement to the back of the sheet and on the wall with a smooth foam paint roller or brush. Let the contact cement completely dry on both surfaces. Contact cement should not transfer to your hand when touched. If areas remain wet, adhesion problems will occur. Drying time will vary depending on the temperature and the humidity level. Drying time can be as little as ½-hour, but could be signifi cantly longer depending on conditions. Once the contact cement is dry, apply the sheet to the wall within 4 hours. If using trim pieces, cut and slide them on the sheet before coating the back of the sheet with contact cement. Remove any excess contact cement with a water dampened cloth before the contact cement dries.
• Apply contact cement to the back of sheet and the wall• Let both surfaces completely dry.• Adjust drying time for the jobsite conditions.• Once dry apply the sheet to the wall within 4 hours.• If using trim pieces slide them on the back of sheet before coating with contact cement.• Remove excess contact cement before it dries.• Coverage - 680 sq. ft./gallon
Positioning Sheet (Contact Cement)
Carefully position the sheet on the wall, by aligning the edges of the sheet to the level/plumb lines. Hold sheets back from ceilings, fl oors, corners, casings and other sheets by 1/16” [2mm] to allow for expansion. Do not install cove base directly over Do not install cove base directly over rigid vinyl sheet, vinyl wallcovering, ceramic tile, metal or other non-porous surfaces. Overlap these materials with the cove rigid vinyl sheet, vinyl wallcovering, ceramic tile, metal or other non-porous surfaces. Overlap these materials with the cove base by 1/4”. [7mm]. base by 1/4”. [7mm]. Once the sheet makes contact with the wall it will be permanently bonded. Repositioning the sheet will be impossible without damaging the sheet and/or the wall. The use of “paper slip sheets” between the rigid sheet material and the wall may help with the positioning of sheet material. After positioned, roll all trim pieces and the entire sheet with an extension roller (InPro item # 333). Start at the center and work to the edges of the sheet.
• Carefully position sheet to wall.• Use “Slip Sheets” to help position sheet material.• Allow 1/16” [2mm] gaps for expansion.• Do NOT install cove base directly over rigid sheet; overlap sheet with cove base by 1/4".[7mm]• Roll trim pieces and the entire sheet with an extension roller, starting at the center and working to the edges.
Vinylseal Color Matched Caulk
Use Vinylseal to fi ll in the joints between sheets. Apply masking tape along both edges of the joint. Cut the spout on the tube at a 45° angle. Apply the color matched caulk to the joint. With a putty knife or fi nger, remove excess caulk from the joint. Immediately after applying the caulk remove the painters tape. If sinking occurs, reapply Vinylseal following the same steps. Remove unwanted caulk, before it cures, with a water dampened cloth.
• Apply masking tape on the edges of the joint.• Apply caulk to joint and remove excess with putty knife or fi nger.• Remove painters tape before caulk cures.• Repeat caulk application if sinking occurs.• Remove unwanted caulk before it cures.
City of Yorba Linda, 2019
APPENDIX "B"
Installation Hotline • 866.EZINPROInprocorp.com • 800.222.5556 • 262.679.9010
World Headquarters S80 W18766 Apollo Drive, Muskego, WI 53150 USA
Installation InstructionsPalladium® Rigid Sheet/Rubrail or Palladium® G2 Sheet/Rubrail
Clean-up
Completion: Immediately upon completion of installation, clean sheet and remove layout marks excess adhesive and surface blemishes. Cured adhesive is diffi cult to remove. Use mineral spirits and rub gently with a soft cloth. After adhesive is removed, wipe the area with a general purpose cleaner like fantastic®. Rinse the area with a water dampened cloth. Dry with a clean soft cloth.
• Upon Completion, remove layout marks, excess adhesive and surface blemishes.• Cured Adhesive.• Use mineral spirits and gently rub.• Follow by wiping with a cleaner like fantastic®.• Rinse sheet with water dampened cloth.
Maintenance
Rigid Sheet:
For general cleaning, use Antibacterial fantastik® All Purpose Cleaner Heavy Duty. Use a clean, lint-free cloth and wipe clean.For tough stains, like markers, pencil, white marks, and rubber heel marks, the following was shown to be most eff ective: Do not use any abrasive cleaning cloths or sponges.
• Zep® Heavy Duty Citrus Degreaser• Clorox® Clean-up with Bleach• Antibacterial fantastik® All Purpose Cleaner Heavy Duty1. Spray products onto sheet and wipe with a dampened cloth.2. Repeat process if stain remains. If cleaning product residue remains, rinse with water.
Note: Any reference to a specifi c branded product does not constitute an endorsement by InPro Corporation.
After Installation
Maintain environmentally controlled conditions after the installation. Large temperature changes can cause de-lamina-tion.
• Maintain environmentally controlled conditions.• Large temperature changes can cause de-lamination.
City of Yorba Linda, 2019
APPENDIX "B"

korogard.com 855.753.5474
PROTECTIVE WALLCOVERINGS / SHEET
Koroseal Wall Protection Systems Traffic Patterns Wallcovering Installation Instructions
1. Semi-rigid Traffic Patterns Wallcovering is intended for use only in temperature-controlled environments. It must be installed at a constanttemperature between 65ºF (18˚C) and 75ºF (24˚C). This constant temperature must be maintained 24 hours-a-day for minimum of 48 hoursbefore, during, and after installation. Do not install if relative humidity is greater than 80%. Remove dust, dirt, grease, oil, loose paint, scale,and any existing wallcovering. Resurface uneven wall surfaces and damaged walls. Wall surfaces should be smooth, clean, well-sealed,and dry. Wall moisture content should not exceed 4%.
2. Locate and install KOROSEAL’s Traffic Patterns Wallcovering in accordance with architectural drawings and specifications. When required,KOROSEAL shop drawings should be used in conjunction with these documents.
3. Lay out work to be completed, including all component work. Check material for any damage that may have incurred during shipmentand/or handling at job site.
4. Note that pattern of wallcovering is oriented lengthwise. Please review, as installation may require that pattern be applied verticallyrequiring that the wallcovering be applied in a “soldiered” manner. Also, depending upon the required height, a soldiered application mayoffer the best material yield.
5. Be aware that slight but detectable shade variations may occur within a production order. For best results, the sheets should be installed ina sequence that is as close as possible to the production sequence. Consequently, they are packaged in sequence and each is identifiedon its backside with its position within production. They are typically produced in batches of ten and the identifying number will be batchnumber – batch sheet number, i.e. (batch) 1 – (sheet) 1, 1-2, 1-3 up to 1-10, then (batch) 2-1, 2-2, and so on. Also, this identifying numberwill always be located at the leading end of each sheet.
6. If hanging with long edges of sheets abutting, before doing so, examine pattern for color uniformity and repeat in design. Pattern mayrequire registering or reversing in order to ensure color and/or pattern uniformity. Also, use the full width of material to the greatest extentpossible for the most satisfactory results. If you have questions about the proper method of hanging a particular pattern, please contact yourdistributor or sales representative before proceeding.
7. In a proper, temperature-controlled environment, edge-to-edge butt-seaming is recommended. However, the suitability of the factory edgesis not guaranteed. Field trimming and/or double-cutting may be required. Also, 1/16” gaps should be maintained at side corners,doorframes, window frames, etc. Gaps can be treated with color-matched caulk. Edge, seam, and corner moldings may be used as part ofinstallation. When using any of these components, cut each piece to the appropriate length and assemble appropriately with regard to typeof adhesive used.
8. Fastbond™ 30-NF Contact Cement: Apply contact cement with brush or roller to both wallcovering and substrate. (See manufacturer’sinstructions and precautions on side of container.) Additional contact cement may be required if substrate is not properly sealed. Allowthe contact cement to dry completely. Application of sheet to the substrate must occur and be completed within four hours. Once contactcement has dried, use a slip-sheet to properly position sheet on substrate. Remove slip-sheet carefully while removing any entrapped air untilentire surface of wallcovering has contacted the substrate. A level should be used in conjunction with application of sheets to ensure properalignment.
9. XT-2000+™ Mastic Adhesive: Apply adhesive to substrate with 1/16” (1.59mm) x 1/16” (1.59mm) square-notched trowel. (Seemanufacturer’s instructions and precautions on side of container.) Allow approximately 45 minutes (or longer, depending on temperatureand humidity) for adhesive to become tacky and “leg” between finger and surface when touched and pulled away. Do not install into wetadhesive, but do not allow it to become too dry either. Properly position sheet to substrate, and carefully/methodically smooth into adhesiveremoving any entrapped air until entire surface has contacted the substrate. A level should be used in conjunction with application of sheetsto ensure proper alignment.
10. 10. Interlock’s Spray-Lock FRP Adhesive: Spray adhesive onto substrate obtaining thorough coverage. (See manufacturer’s includedinstructions.) Allow adhesive to dry until there is no adhesive transfer when lightly touched. Do not install into wet adhesive, but do not allowit to remain open longer than two hours. Properly position sheet to substrate and carefully/methodically smooth into adhesive removing anyentrapped air until entire surface has contacted the substrate. Roll with heavy-pressure roller to complete bonding. A level should be used inconjunction with application of sheets to ensure proper alignment.
11. With all three bonding methods, after sheet is attached to substrate, apply heavy pressure to sheet with a high-pressure roller, thoroughlyrolling from center area out.
12. Permanent building lights should be available and operating during installation. If, after applying three pieces of wallcovering, there is somequestion of appearance or adequacy of the application,stop and contact your distributor orsalesrepresentative.
13. Traffic Patterns’ characteristics are similar to our Korogard Protective Wallcovering. For additional information, please consult our“Installation Manual.” If there are any questions, please call your local KOROSEAL representative.
City of Yorba Linda, 2019
APPENDIX "B"

korogard.com 855.753.5474
TRAFFIC PATTERNS WALL PROTECTION
Traffic Patterns Decorative Wall Protection is “the answer.” Providing durable wall protection with aesthetic appeal, Traffic Patterns offers the attractiveness and variety of Koroseal, Vicrtex, and Koroseal Studios wallcoverings. Traffic Patterns is manufactured from woven (osnaburg), fabric-backed and non-woven 21 oz. wall protection; custom weights up to 28 oz. are available. This unparalleled product can be specified in your choice Koroseal, Vicrtex, and Koroseal Studios wallcovering laminated over an impact-resistant base and capped with protective film. Traffic Patterns is designed for use in light- to medium-abuse areas subject to soiling, marring, and scuffing. The finished thickness for Traffic Patterns is .030” (0.76mm); custom thickness up to .060” (1.55mm) are available.
Traffic Patterns Decorative Wall Protection is chemical- and stain-resistant to prevent discoloration and surface damage from strong cleansing agents. All Traffic Patterns Decorative Wall Protection are fire rated for Surface Burning Characteristics and meet national building code standards. For more information on Traffic Patterns, please call your local Korogard distributor.
City of Yorba Linda, 2019
APPENDIX "B"

.040"1.01mm
.060"1.52mm
INSIDE CORNER
DIVIDER BAR
TOP CAP
15/32"[11.79mm]
3/8"[9.53mm]
3/8"[9.42mm]
OUTSIDE CORNER
3/8"[9.52mm]
DOC.
SCALE
DATE:
CADIPC. /rev
10/05/12
1:1
094 1
Aluminum Trim Piecesfor IPC® Rigid Sheet
City of Yorba Linda, 2019
APPENDIX "B"

Installation Hotline • 866.EZINPROInprocorp.com • 800.222.5556 • 262.679.9010
World Headquarters S80 W18766 Apollo Drive, Muskego, WI 53150 USA
Please read all instructions before installing corner guard. Installation Instructions
Aluminum Corner Guard
SECTION VIEWS
Safety Glasses, Tape Measure, Level, Power Miter Saw, 1O” Blade with 60-80 Carbide Tipped TeethRecommended tools
Important
1. Acclimate materials 24 hrsbefore installation. Maintaintemperature controlledenvironment after installation
2. Install in accordance withmanufacturer’s installationinstructions. Failure to do sowill void the warranty.
CEMENT ON
1 1/2" [38.1mm]
3/4" [19.1mm]
R1/8"[R3.2mm]
CUSTOM SIZES INCLUDE WING SIZE,HEIGHT, ANGLES RADIUS AND GAUGE
OR
STUD/BACKER(BY OTHER)
IPC.1332/REV2
City of Yorba Linda, 2019
APPENDIX "B"

Installation Hotline • 866.EZINPROInprocorp.com • 800.222.5556 • 262.679.9010
World Headquarters S80 W18766 Apollo Drive, Muskego, WI 53150 USA
Please read all instructions before installing corner guard. Installation Instructions
Aluminum Corner Guard Components and Fasteners
SHOWN AT 1 1/2”
CEMENT ON 1 1/2" [38.1mm]
3/4" [19.1mm]
R1/8"[R3.2mm]
CUSTOM SIZES INCLUDE WING SIZE,HEIGHT, ANGLES RADIUS AND GAUGE
OR
City of Yorba Linda, 2019
APPENDIX "B"

Installation Hotline • 866.EZINPROInprocorp.com • 800.222.5556 • 262.679.9010
World Headquarters S80 W18766 Apollo Drive, Muskego, WI 53150 USA
Please read all instructions before installing corner guard. Installation Instructions
Aluminum Corner Guard Exploded View assembly
ALUMINUMCORNER GUARD(CEMENT ON)
City of Yorba Linda, 2019
APPENDIX "B"

Installation Hotline • 866.EZINPROInprocorp.com • 800.222.5556 • 262.679.9010
World Headquarters S80 W18766 Apollo Drive, Muskego, WI 53150 USA
Please read all instructions before installing corner guard. Installation Instructions
Aluminum Corner Guard
Please read all instructions before installing corner guards.
Material must be stored, installed and used in environmentally controlled conditions.
1. Prior to installation:a. Allow corner guards to reach room temperature beforeinstalling.b. The wall surface that the corner guards are to be appliedmust be dry and free of dirt, dust, oil, loose pain, wax andgrease.
2. Use IPC #535Heavy-Duty Adhesive to adhere corner guards. Apply a bead of IPC #535 in a zig-zag pattern over the back of the corner guard.
3. Immediately position corner guard on the wall and apply pres-sure until a tight fit is achieved. An extension roller will aid this step. Additional bracing may be required during installation to insure complete contract with the wall.
4. Remove protective plastic film from exposed surface.
Adhesive Coverage: One 10.6 oz cartridge of IPC #535 Heavy-Du-ty Adhesive will adhere the following corner guards based on an approximate cover of 70 lf per cartridge.
Wing Size Height # of Corner Guardsper cartridge
3/4", 1-1/2" 3' 113/4", 1-1/2" 4' 83/4", 1-1/2" 8' 43/4", 1-1/2" 9' 33/4", 1-1/2" 12' 3
3/4" OR 11/2" WINGALUMINUMCORNER GUARD
DRYWALL
COVE BASE
IPC #535HEAVY-DUTY
ADHESIVEON
BACK OFCORNER
GUARD
City of Yorba Linda, 2019
APPENDIX "B"

Inprocorp.com • 800.222.5556 • 262.679.9010 World Headquarters S80 W18766 Apollo Drive, Muskego, WI 53150 USA
AluminumCorner Guards
Aluminum Corner Guard
3/4" (19mm) wing, 1-1/2" (38mm) wing
Manufactured in 4' (1.22m) and 8' (2.44m) standard
heights,
Manufactured from 5005-H34 aluminum
Clear anodized fi nish
IPC.1376/REV.1
#535 HEAVY DUTYADHESIVE
ALUMINUMCORNERGUARD .080" 2mm
3/4" 19mmor
11/2" 38mm
City of Yorba Linda, 2019
APPENDIX "B"

Inprocorp.com • 800.222.5556 • 262.679.9010 World Headquarters S80 W18766 Apollo Drive, Muskego, WI 53150 USA
Aluminum Corner GuardSuggested Specifications
PART 1 – GENERAL
1.01 SUMMARY
A. Corner guard system for wall protection:
1.02 SECTION INCLUDES
A. Aluminum Corner Guard Systems
1.03 SUBMITTALS
A. Product data for each type of corner guard specified.
B. Detail drawings indicating mounting details with the
appropriate adhesives for specific project substrates.
C. Samples for verification purposes of corner guard, 6"
(152mm) long, in full size profiles of each type indicated.
D. Cleaning and maintenance instructions for door and
wall protection systems.
1.04 DELIVERY, STORAGE AND HANDLING
A. Deliver materials in unopened factory packaging to
the jobsite and store in original packaging in a climate
controlled location away from direct sunlight.
1.05 PROJECT CONDITIONS
A. Products must be installed in an interior climate
controlled environment.
1.06 WARRANTY
A. Standard IPC Limited Lifetime Warranty against material
and manufacturing defects.
PART 2 - PRODUCTS
2.01 MANUFACTURER
A. Acceptable Manufacturer: IPC Door and Wall Protection
Systems, InPro Corporation, PO Box 406 Muskego, WI
53150 USA; Telephone: 800.222.5556, Fax: 888.715.8407,
www.inprocorp.com
B. Substitutions: Not permitted
C. Provide all corner guards and wall protection from a
single source.
2.02 MANUFACTURED UNITS
A. Corner Guards
1. Aluminum Corner Guards
Size
3/4"(19mm) x 3/4"(19mm) x .080"(2.3mm) thick
1-1/2"(38mm) x 1-1/2"(38mm) x .080"(2.3mm) thick
Length: 4' (1.21m) and 8' (2.43m)
Attachment - #535 Heavy Duty Adhesive
2.03 MATERIALS
A. Aluminum: Aluminum Corner Guards shall be
manufactured from 5005-H34 aluminum,
2.04 COMPONENTS
A. Attachment
1. Adhesive: Field applied heavy-duty adhesive.
2.05 FINISHES
A. Aluminum corner guards shall have a clear anodized
finish. Finish shall be to 204R1 specification.
PART 3 - EXECUTION
3.01 EXAMINATION
A. Examine areas and conditions in which the corner
guard systems will be installed.
1. Complete all finishing operations, including painting,
before beginning installation of corner guards.
B. Wall surface shall be dry and free from dirt, grease and
loose paint.
3.02 PREPARATION
A. General: Prior to installation, clean substrate to remove
dust, debris and loose particles.
3.03 INSTALLATION
A. General: Locate the corner guard as indicated on the
approved detail drawing for the appropriate substrate
and in compliance with the IPC installation instructions.
Install corner guard level and plumb at the height
indicated on the drawings.
B. Installation of Aluminum Corner Guards:
1. Surface must be dry, clean and properly sealed.
2. Apply a bead of PL Premium Heavy Duty Adhesive in a
zigzag pattern over the back of each wing of the corner
guard. Position corner guard on the wall and apply
pressure until a tight fit is achieved.
3. Remove the protective plastic covering from the
exposed surface of the corner guard.
3.04 CLEANING
A. At completion of the installation, clean surfaces in
accordance with the IPC clean up and maintenance
instructions.
City of Yorba Linda, 2019
APPENDIX "B"

korogard.com 855.753.5474
ANODIZED ALUMINUM CORNER GUARDS
Korogard Anodized Aluminum Corner Guards are a sleek and attractive option for corner protection. Easily installed, these guards provide support for low- to medium-impact areas. Anodized Aluminum Corner Guards are offered in Satin, Bronze, and Black, and in 4’ (1.2m), 6’ (1.8m), 8’ (2.4m), and 12’ (3.6m) lengths. All colors are available with a standard 90º angle and measure 1/2” (12.7mm) x 1/2” (12.7mm).
Korogard Anodized Aluminum Corner Guards are backed by a limited five-year warranty. All Korogard protective products color-coordinate with a multitude of Koroseal and Vicrtex Wallcoverings for a systems approach to wall protection.
For more information on Korogard Corner Guards or the Koroseal Wall Protection System, please call your local Korogard distributor.
City of Yorba Linda, 2019
APPENDIX "B"

korogard.com 855.753.5474
ANODIZED ALUMINUM CORNER GUARDS
Koroseal Interior Products, LLC.
City of Yorba Linda, 2019
APPENDIX "B"

korogard.com 855.753.5474
CORNER GUARDS
Surface Adhered Corner Guard
Warning: Surface Adhered Corner Guards, particularly the adhesive-backed models, may not adhere properly at installation due to a variety of field conditions beyond our control. Korogard Wall Protection Systems accepts no liability, nor expresses or implies any warranty regarding the effectiveness of the application/installation of these products. We recommend a trial installation to determine the general effectiveness of same, although adhesion problems with individual Corner Guards may still occur.
1. Locate and install Korogard Surface Adhered Corner Guard in accordance with architectural drawings and specifications.
2. Lay out work to be completed at the base of the substrate. Check the material for any damage that may have occurred duringshipment and/or handling at job site.
3. Prior to installation, allow Corner Guards to reach room temperature. Inspect wall corners to confirm sound construction and repair ifnecessary. Thoroughly clean wall surfaces to assure proper Corner Guard adhesion. CAUTION: Other cleaning agents maydamage certain types of wall finishes. Use the appropriate manufacturer-recommended cleaning agent and proceed with care.
4. If the wall surface is unusual in composition and/or texture or exhibits other characteristics that may jeopardize the effectiveness ofthe installation method, please contact your local Korogard representative for assistance before proceeding with installation.
5. Dry-fit the Corner Guard to the wall corner to assure proper height and fit.
6. Korogard Surface Adhered Corner Guards are provided in specified heights with or without factory-applied adhesive backing. If noadhesive has been provided, use only contact adhesive, Loctite PL 200 Construction Adhesive, or Liquid Nails Tub Surrounds &Shower Walls Adhesive and follow manufacturer’s recommended procedures.
7. If adhesive-backed Corner Guards have been provided, carefully peel back and thoroughly remove the release liner from back ofCorner Guard. Do not allow exposed adhesive to contact substances that will adhere and contaminate the adhesive surface.
8. Holding the Korogard Surface Adhered Corner Guard at an angle, carefully place and seat its bottom end against the corner at theproper location. Using care, fit the Corner Guard to the corner, progressing from bottom to top, applying pressure with fingers andpalm to assure that it is seated precisely on the corner. If Corner Guards are full height, it is best that two people perform thisoperation.Note: Repositioning after contact is detrimental to the adhesive bond.
9. After placement, inspect the Corner Guard from top to bottom to confirm proper fit and surface contact. Using a high-pressure roller,firmly and thoroughly roll both wings of the Corner Guard to assure full and complete adhesion.
10. Wipe down installed Korogard Surface Adhered Corner Guard with soap and water to remove any dirt or grime.
11. If there are any questions, please call your local Korogard representative.
City of Yorba Linda, 2019
APPENDIX "B"

1. Examine goods to assure quantity and quality are asordered. Lay out the work to be completed, including allparts, along the base of the wall. The parts will includethose supplied by Walltalkers and those the installer mustsupply. Walltalkers supplies the extruded aluminum trim andsteel mounting clips in the quantities ordered. The installermust supply the hardware, #10 X 1-1/2” truss head sheetmetal screws, for most installations. Masonry anchors andmanufacturer specified hardware should be used for concreteand block walls. One screw and/or anchor is required foreach mounting clip; clips are installed 16” on center.
2. If aluminum tray is also being installed, do so beforeinstalling trim. Determine the location of the trim on the wall.Mark the inside dimensions on the wall with somethingthat will not permanently damage that surface. (Ex. If thematerial being framed is a walltalkers dry erase surface,use a dry erase marker to make the level and plumblines.) Install the dry erase material and then overlap theedges with the trim. Overlapping will ensure a good edgeappearance on the writing surface.
3. Using the wall measurements, measure, mark, and cutthe aluminum trim pieces to size. Use a miter saw with afine-tooth carbide tip blade. Most installations will require afull-length marker tray, terminating at the outside edges of thedry erase material. See diagram below. In those cases, threepieces of trim will be required; the top and two side pieces.The bottom of the side pieces will terminate flush with thetopside of the marker tray. The cut edges of trim can also bemitered to 45°angles, if desired.
4. Install the steel clips 1/16” outside the markings on the wall.The clips should be installed every 16” on center, makingsolid contact with the wall stud, with the #10 X 1-1/2”screws. If the clip screws do not contact the studs, as withsome of the vertically mounted pieces, use plastic wallanchors. The angled side of the clips, i.e. the flat beveledside, should always be mounted toward the ceiling onhorizontal runs, while the rounded edge faces the floor. Forvertical runs, the angled side faces the material being framed.
5. Install the trim pieces to the clips. Place the aluminum trim overthe angled side of the steel clips. Hold the face of the trayat a 45°angle from the wall. Hook the trim piece over thebeveled edges of the clips and apply pressure with the healof the hand to the side not locked in; trim will snap into thelocked position. Repeat the same steps with all pieces of trim.
6. If a splice is required, follow the detail below. The splicedpieces of aluminum require a clean right angle cut for thejoint to have a good appearance. Mount a steel clip on thewall at the splice location; one half of the clip should line upinside each piece of trim.
ALUMINUM TRIM INSTALLATION INSTRUCTIONS
walltalkers.com 855.753.5474
StudDrywall Splice
Trim Clip
Tray End Cap Aluminum Tray
Aluminum Trim
Sheet Metal Screw
Walltalkers Just-Rite®
Just-Rite® Grid Mag-Rite® EZ-Rite® Koro-Rite® Matte-Rite™ Project-Rite™
City of Yorba Linda, 2019
APPENDIX "B"
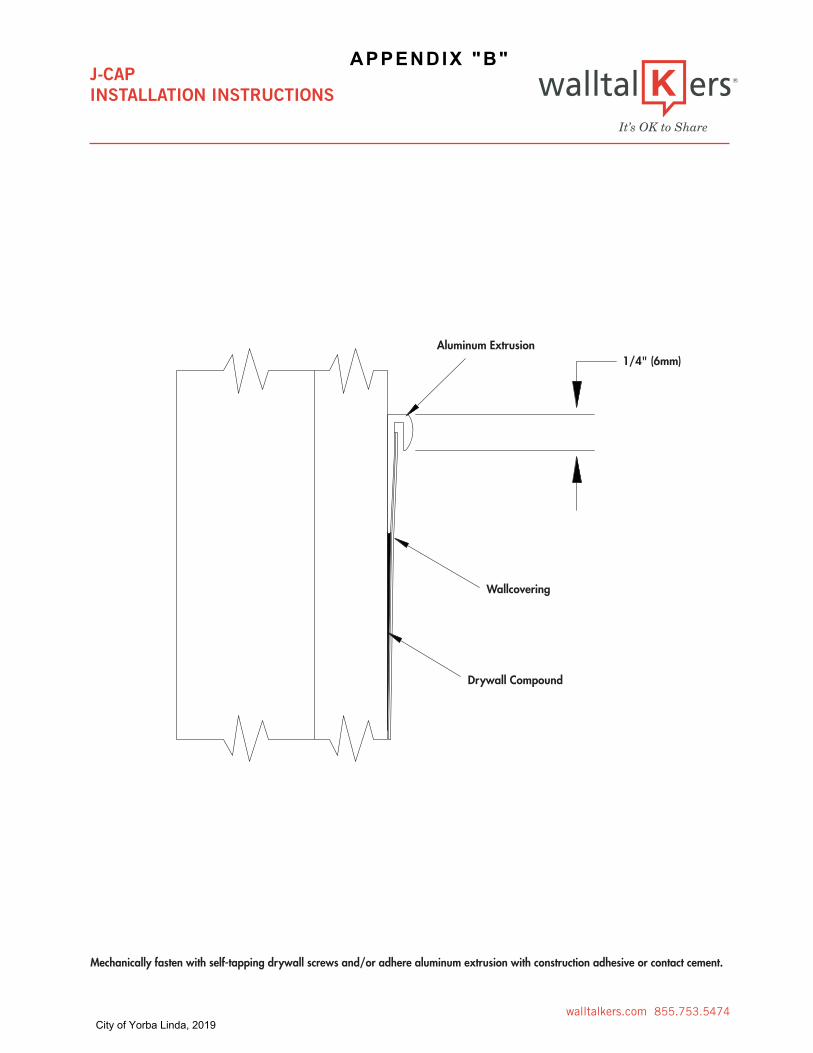
J-CAPINSTALLATION INSTRUCTIONS
walltalkers.com 855.753.5474
Aluminum Extrusion
Wallcovering
Drywall Compound
1/4" (6mm)
Mechanically fasten with self-tapping drywall screws and/or adhere aluminum extrusion with construction adhesive or contact cement.
City of Yorba Linda, 2019
APPENDIX "B"

korogard.com 855.753.5474
TRAFFIC PATTERNS WALL PROTECTION
City of Yorba Linda, 2019
APPENDIX "B"
180