
Color Atlas of Cosmetic Oculofacial Surgery, 2nd Edition
277
Close Print Page Close Print Page Color Atlas of Cosmetic Oculofacial Surgery, 2nd Edition By William P. Chen, MD, FACS and Jemshed A. Khan, MD Key Features Offers the expertise of oculoplastic surgeons who are fellows of the American Society of Ophthalmic Plastic and Reconstructive Surgery. Evaluates and recommends the most effective treatment for each patient problem to help you create the best possible results. Illustrates every procedure with clear original line drawings and crisp color photographs for step-by-step visual guidance. Website Features Consult the book from any computer at home, in your office, or at any practice location. Instantly locate the answers to your clinical questions via a simple search query. Quickly find out more about any bibliographical citation by linking to its MEDLINE abstract. Getting started To start browsing, use the table of contents on the left. Click to expand the contents of a section or chapter. Clicking the chapter or section title itself will take you to that section. Alternatively, search the book using the search function above, or look up a term in the complete index . For further information on Expert Consult, view a demo of the site . Copyright © 2010 Elsevier Inc. All rights reserved. Read our Terms and Conditions of Use and our Privacy Policy. For problems or suggestions concerning this service, please contact: [email protected]
-
Upload
khangminh22 -
Category
Documents
-
view
0 -
download
0
Transcript of Color Atlas of Cosmetic Oculofacial Surgery, 2nd Edition

Close Print Page
Close Print Page
Color Atlas of Cosmetic Oculofacial Surgery, 2nd EditionBy William P. Chen, MD, FACS and Jemshed A. Khan, MDKey FeaturesOffers the expertise ofoculoplastic surgeons whoare fellows of the AmericanSociety of Ophthalmic Plasticand Reconstructive Surgery.Evaluates and recommendsthe most effective treatmentfor each patient problem tohelp you create the bestpossible results.Illustrates every procedurewith clear original linedrawings and crisp colorphotographs for step-by-stepvisual guidance.
Website FeaturesConsult the book from anycomputer at home, in youroffice, or at any practicelocation.Instantly locate theanswers to your clinicalquestions via a simple searchquery.Quickly find out more aboutany bibliographical citation bylinking to its MEDLINEabstract.
Getting startedTo start browsing, use the table of contents on the left. Click
to expand the contents of a section or chapter. Clickingthe chapter or section title itself will take you to that section.Alternatively, search the book using the search functionabove, or look up a term in the complete index.For further information on Expert Consult, view a demo ofthe site.
Copyright © 2010 Elsevier Inc. All rights reserved. Read our Terms and Conditions of Use and ourPrivacy Policy.
For problems or suggestions concerning this service, please contact: [email protected]

Close Dramroo
Color Atlas of Cosmetic Oculofacial Surgery
Second Edition

Close Print Page
William PD Chen, MD, FACSClinical Professor of Ophthalmology, UCLA School of Medicine, Los Angeles, California; andSenior Surgical Attending, Eye Plastic Surgery Service, Harbor-UCLA Medical Center,Torrance, California, USA
Jemshed A Khan, MDKhan Eyelid and Facial Plastic Surgery, Overland Park, Kansas, USA
© 2010, Elsevier Inc All rights reserved.
Copyright © 2010 Elsevier Inc. All rights reserved. Read our Terms and Conditions of Use and ourPrivacy Policy.
For problems or suggestions concerning this service, please contact: [email protected]

Close Print Page
Copyright
SAUNDERS is an imprint of Elsevier Inc.
© 2010, Elsevier Inc All rights reserved.
First published 2004
Figures 6.20, 8.1a, 8.2, 8.3a, 8.4a, 8.5a, 10.15b, 10.19b, 10.23b, 10.27b, 11.8b, 11.11b,11.16b and 11.18b © Linda Warren. Reprinted by kind permission of Linda Warren.
No part of this publication may be reproduced or transmitted in any form or by any means,electronic or mechanical, including photocopying, recording, or any information storage andretrieval system, without permission in writing from the publisher. Permissions may be soughtdirectly from Elsevier's Rights Department: phone: (+1) 215 239 3804 (+1) 215 2393804 (US) or (+44) 1865 843830 (UK); fax: (+44) 1865 853333; e-mail:[email protected]. You may also complete your request on-line via theElsevier website at http://www.elsevier.com/permissions .
ISBN 978-1-4160-6210-3
British Library Cataloguing in Publication.jpga
A catalogue record for this book is available from the British Library
Library of Congress Cataloging in Publication.jpga
A catalog record for this book is available from the Library of Congress
Notice
Medical knowledge is constantly changing. Standard safety precautions must be followed,but as new research and clinical experience broaden our knowledge, changes in treatmentand drug therapy may become necessary or appropriate. Readers are advised to check themost current product information provided by the manufacturer of each drug to beadministered to verify the recommended dose, the method and duration of administration,and contraindications. It is the responsibility of the practitioner, relying on experience andknowledge of the patient, to determine dosages and the best treatment for each individualpatient. Neither the Publisher nor the author assume any liability for any injury and/ordamage to persons or property arising from this publication.
The Publisher
Printed in China

Close Print Page
Last digit is the print number: 9 8 7 6 5 4 3 2 1
Commissioning Editor: Russell Gabbedy
Development Editor: Sven Pinczewski
Editorial Assistant: Rachael Harrison and Kirsten Lowson
Project Manager: Alan Nicholson
Design: Stewart Larking
Illustration Manager: Gillian Richards
Illustrators: Linda Warren, Jenni Miller, Annabel Milne, Jennifer Rose and AmandaWilliams
Marketing Managers (UK/USA): John Canelon / William Veltre
Copyright © 2010 Elsevier Inc. All rights reserved. Read our Terms and Conditions of Use and ourPrivacy Policy.
For problems or suggestions concerning this service, please contact: [email protected]

Close Print Page
Preface
It has been at least five to six years since the very popular First Edition of CosmeticOculofacial Surgery (Chen, Khan, and McCord) was written. Further evolution in lasers,BOTOX® applications, hyaluronic acid fillers as well as less invasive aesthetic techniqueshave added to the choices available for physicians and patients.
The Second Edition is a robust upgrade to this field and includes additions in contentcovering concepts of fat pad repositioning via lower blepharoplasty, use of BOTOX® in themandibular and platysmal region, fractional CO2 laser in facial resurfacing, and the specificindications and various injection techniques for hyaluronic acid fillers in the oculofacial areas.Colors have been added to all diagrams, where appropriate. All the desirable features fromthe original edition, including arrangement of text, high resolution images and drawings onthe same page, Pearls and Pitfalls, instructional tables, outlines and clinical pathways havebeen continued to make this a valuable instructional manual. Most of all, the Second Editioncomes with a comprehensive new DVD that illustrates the procedures, narrated by the twomain authors. This color atlas should be useful for beginning as well as advanced audiencesincluding ophthalmologists, plastic surgeons, facial cosmetic surgeons, dermatologists, aswell as residents and house officers in these related fields.
We are grateful for the added participation of Dr Stuart Seiff, who shares with us the newchapter on his use of dermal fillers including hydroxyappatite as well as Botox applications;and Dr Michael McCracken who has been a Co-Instructor with Dr Jemshed Khan for theircourse on ‘Use of Hyaluronic Acid Filler' at the Annual Meeting of the American Academy ofOphthalmology.
All of the standard techniques that have withstood the test of time have been retained orupgraded in details. This included forehead and eyebrow treatment, upper and lowerblepharoplasty, lower blepharoplasty coupled with cheeklift, laser upper blepharoplasty,transconjunctival laser lower blepharoplasty as well as ptosis repair. The fascinating topic ofAsian Blepharoplasty with concepts of eyelid crease and its biodynamic are furthereluc.jpged in two new chapters: one covering the concept of a glide zone and its dynamics inhealthy as well as scarred upper eyelid, and the other describing the advanced concept ofbeveled approach in revisional Asian Blepharoplasty.
Dr Clinton McCord, who was one of the original co-authors from the first edition of this text,currently has a beautiful two volume book on Eyelid and Periorbital Surgery; he is mostgracious in allowing us to continue use of his previous content from our first edition, includingthe important topics of mid-face cheeklift and endoscopic brow-lift.
It has been a pleasure for me to work with Russell Gabbedy (Commissioning Editor) andSven Pinczewski (Senior Developmental Editor) at the Elsevier, London office. I wish tothank Alan Nicholson (Project Manager) of the Edinburgh office, Fraser Johnston and ColinMcEwan for guiding the video/DVD project; and Annabel Milne (medical illustration) as well

Close Print Page
as Lee Bowers (proofreading) for their assistance in the course of this project. Without thissterling team, my life would have been much more unruly. Lastly, I wish to express mygratitude to Dr Jemshed Khan, my co-author, for walking the publishing journey with me onemore time.
William PD Chen, MD, FACS
Copyright © 2010 Elsevier Inc. All rights reserved. Read our Terms and Conditions of Use and ourPrivacy Policy.
For problems or suggestions concerning this service, please contact: [email protected]

Close Print Page
Close Print Page
List of Contributors
William PD Chen, MD, FACSClinical Professor of Ophthalmology, UCLA School of Medicine, Los Angeles, CaliforniaSenior Surgical Attending, Eye Plastic Surgery Service, Harbor-UCLA Medical Center,Torrance, CA, USA
Jemshed A Khan, MDKhan Eyelid and Facial Plastic Surgery, Overland Park, KS, USA
Clinton J McCord, MDPaces Plastic Surgery, Atlanta, Associate Clinical Professor of Plastic Surgery, EmoryUniversity School of Medicine, Atlanta, GA, USA
Michael S McCracken, MDClinical Instructor, Department of Ophthalmology, University of Colorado Health SciencesCenter, Denver, CO, USA
Stuart R Seiff, MD, FACSChief, Emeritus Professor of Ophthalmology, Department of Ophthalmology, San FranciscoGeneral Hospital, San Francisco, CA, USA
Copyright © 2010 Elsevier Inc. All rights reserved. Read our Terms and Conditions of Use and ourPrivacy Policy.
For problems or suggestions concerning this service, please contact: [email protected]

Close Print Page
Close Print Page
Dedication
To my parents, Fred and Katie.
William PD Chen
To my wife, Michelle, and my sons, Alex, Corey, and Christopher.
Jemshed A Khan
Copyright © 2010 Elsevier Inc. All rights reserved. Read our Terms and Conditions of Use and ourPrivacy Policy.
For problems or suggestions concerning this service, please contact: [email protected]

Close Print Page
Chapter 1 – Examination and Interactions with Aesthetic Patients
William PD Chen,Jemshed A Khan
Dr Chen's viewpoint
Cosmetic blepharoplasty is one of the most popular forms of aesthetic surgery of the face. The surgicaloutcome is intimately related to the interaction of the upper eyelids with the forehead and brows, as wellas the lower eyelids, lateral canthi, and the midface and cheek's topography. Therefore, in any discussionand examination of a patient concerning this form of surgery, an astute clinician should consider theentire face, and not confine attention to only the superficial upper and lower eyelid skin layers. Thisawareness of surrounding as well as deeper structures will ultimately yield much better surgical outcomeand a happier patient.
In my initial office consultation with a new patient, I first listen to his or her complaints, and mentallyclassify these into relative orders (or wish list) of which include those that can be improved upon, versustransient improvement or no improvement at all. I then assess from the patient's personality andtemperament the degree of enthusiasm or tolerance he or she possesses towards surgery. Ultimately, thesurgeon and the patient need to mutually agree on what is comfortable, beneficial, and worthwhile for thepatient to undertake. This may include time commitment as to postoperative healing course, financialmatters, as well as overall general medical conditions that may have a bearing on the type of surgery andanesthesia recommended.
I always try to encourage patients to speak their mind, even if they may be embarrassed, and I try tofacilitate this in an environment free of stress. Very often, patients may be overly self-conscious about anissue that matters very little to anyone they interact with, or the surgeon may need to point out an extremecondition that requires correction before the aesthetic outcome can be achieved, such as involutionalptosis in conjunction with upper eyelid hooding. It is important to customize individual aspects of yourparticular technique for that patient. For example, I have not performed two exactly identical proceduresamong any of my patients who have come to me to have Asian blepharoplasty.
After an adequate prioritization of goals with the patient, I then explain what the procedure involves,before, during, and after the surgery, and what is expected of the patient. This includes the ma.jpgorypreoperative cessation of aspirin products, non-steroidal anti-inflammatory drugs, as well asanticoagulants like coumadin and heparin.
The patients need to be quizzed as to whether they are taking any herbal formulas, ginseng compounds,or herbal teas, which frequently may contain therapeutics with anticoagulative properties (‘circulatory-promoting, blood-flow-promoting' ingredients in traditional Chinese medicine).
The patient is given a detailed written list of preoperative and postoperative instructions with regard tobed rest during the first day, use of ice compresses as well as antibiotic ointments, what to expect, andinstructions to call me should there be any unexpected outcome or medical emergency. The office staffare trained to make a follow-up telephone call to the patient the day after surgery, both to verify that thepatient is stable and to confirm a return.jpge for suture removal.
In the patient chart, I record particular aspects of his or her facial structure (ptosis, ectropion, entropion,lateral canthal dehiscence, thinning of levator and aponeurosis, forehead brow overaction, prominentsulcus) (Fig. 1.1), what was mentioned to the patient (for example, one upper lid margin is half amillimeter lower than the other, one eye is more sunken and shows a more prominent sulcus), the

patient's response and preferences (high crease, low crease, shape of crease line selected), as well asskin texture and pre-existent thinning of lower lid skin and telangiectatic blood vessels observed, pluswhat I tell patients as to whether their stated preferences could be achieved (Fig. 1.2). If a patient hasthick dry skin, or oily complexion, superficial furuncles, or rosacea, these are all noted on my plan ofmanagement for this patient (Fig. 1.3).
Figure 1.1 Elderly man with lower lid ectropion and cheek ptosis.

Figure 1.2 Actual drawing of patient's clinical findings on medical records.

Figure 1.3 Asian female who developed postoperative upper lid cellulitis.
Postoperative dietary recomme.jpgions are also offered to facilitate uneventful and non-inflammatoryhealing of the skin (this is an aspect of traditional Chinese medicine that bewilders Western medicalpractitioners somewhat).
In California, informed consent for surgery is ma.jpgory and we implement it in the office as well as in theoutpatient surgical facilities. All aesthetic patients – for that matter, all patients in my offices – must haveadequate photographic documentation of their current conditions. Typically, this includes a frontal view,oblique side views, upgaze and downgaze, and, most importantly if the patient has had previoussurgeries, a close-up macro view of the existent surgical lines or lid-crease scar. This last item has beenextremely useful for fully informing the patients in many of the revision cases that I have performed. Inthis very litigious climate, adequate documentation is truly the best policy.
As regards photographic media, I have shifted to digital photography since 1997. I still use a Sony Mavicacamera which take images in the 800×600 pixels range and stores them on flat 3.5-inch floppy disks (costless than 30 cents each). The disk is conveniently kept in each patient's chart and can be used forpreparing simple Powerpoint presentations for teaching purposes and community lectures (Fig. 1.4). I usetwo other higher-resolution cameras for more detailed images of selective conditions when I need themfor publication purposes. The cameras are a Sony Cybershot with 8 megapixels and a third one withvideo capturing capabilities.

Close Print Page
Figure 1.4 Digital cameras. On the left is a Sony Mavica™ that uses floppy disks for storage; on the right is a SonyCybershot™ camera that uses memory sticks.
If a patient appears extremely nervous, I usually try to call them the night before the procedure, to makesure all is well. On the day of surgery, in the preoperative area, I greet patients again and reiterate thegoal(s) of the surgery. If there is any discrepancy between what I told the patient and what they think andexpect of the surgery, I would always defer the surgery until another day, although this is extremely rare.
Copyright © 2010 Elsevier Inc. All rights reserved. Read our Terms and Conditions of Use and our Privacy Policy. For problems or suggestions concerning this service, please contact: [email protected]

Close Print Page
Dr Khan's viewpoint
Several critical issues should be resolved during the preoperative consultation with a patientwho desires aesthetic periocular surgery. The present discussion will focus narrowly on onlythose issues unique to aesthetic patients. First and foremost, the surgeon should elicit fromthe patient a designation of those specific topographic facial features that the patient wouldwish improved. Oftentimes, patients express concern that their periocular facial features arecommunicating unintended signals such as disapproval (glabellar frown lines), tiredness(lower eyelid fat pad herniation or upper eyelid ptosis), worry or aging (crow's-feet).Otherwise stated, the face is malfunctioning as an organ of communication.[1]
After ascertaining and documenting the patient's concerns as well as recording photographicappearance, the surgeon should evaluate the facial features for the anatomic basis of thepatient's concerns. Many times, the patient's concerns are related to familial, gravitational, orage-related facial changes. The examination should also search for concurrent facialconditions that may complicate management of the patient's concerns. For example,herniating lower eyelid fat pads may be accompanied by festoons, periocular skinpigmentation, tear-trough deformity, midface descent, malar edema, skin wrinkling, andhorizontal eyelid laxity. In the upper eyelids, complicating factors may include eyebrowptosis, secondary eyebrow elevation, eyelid ptosis, lagophthalmos, prolapse of the lacrimalglands, asymmetrical eyelid creases or folds, and prominent retro-orbicularis oculi fat(ROOF). Documentation of the examination includes notation of any complicating facialfeatures or findings.
The next step is for the surgeon to educate the patient regarding the anatomic basis for thepatient's concerns as well as any relevant concurrent conditions. From this discussion onecan proceed to outline the range of surgical options available that address the underlyinganatomic causes of the patient's concerns. One should actively solicit and receive thepatient's feedback as to which options best meet the patient's needs. During this portion ofthe discussion it is critical that the surgeon clearly establishes, in the patient's mind,reasonable postoperative expectations as to the degree of surgical improvement associatedwith the various surgical options. Patients who cannot accept a ‘marked definite andnoticeable improvement' as opposed to a ‘perfect result' are sometimes poor cand.jpges foraesthetic surgery. Informed consent regarding the risks, consequences, benefits, andalternatives of surgery consists of both a discussion with the patient as well as a signedconsent document.
Finally, it is important to keep in mind that properly informed patients will not, and should not,always choose the surgical option that most effectively addresses their physical concerns.This is because the patient must also factor in other considerations, including cost,invasiveness, surgical risk, the location and visibility of surgical incisions, recovery times,postoperative morbidity, and procedure length. Indeed, the goal is not to invariably create thebest aesthetic improvement, but rather to educate the patients to the point that they can

Close Print Page
select those procedures which best meet the patient's aesthetic goals while also respectingthe patient's financial constraints, tolerance for surgical risk, and desires regarding rapidity ofrecovery.
Copyright © 2010 Elsevier Inc. All rights reserved. Read our Terms and Conditions of Use and ourPrivacy Policy.
For problems or suggestions concerning this service, please contact: [email protected]

Close Print Page
Close Print Page
References
1. Khan J.A.: Aesthetic surgery: diagnosing and healing the miscues of human facialexpression. Ophthal Plast Reconstr Surg 2001; 17:4-6.
Copyright © 2010 Elsevier Inc. All rights reserved. Read our Terms and Conditions of Use and ourPrivacy Policy.
For problems or suggestions concerning this service, please contact: [email protected]

Close Print Page
Upper Eyelid of Asians Without Crease
Approximately half of all Asians have some form of an upper eyelid crease; thus, there are about 50% ofAsians who do not have a crease. This seems to affect Asians of Han origin, including the Chinese,Koreans, Japanese, and China's minority tribes. The incidence within any given family appears to parallelthe above statistic in that I often elicit the history that one of the parents has an upper lid crease whereasthe other parent does not, and this also seems to hold true among the siblings.
In the past, the stereotypic conclusion that all Asians are without an upper eyelid crease may stem fromthe fact that Western plastic surgeons often may get to examine only those Asians who have no creaseand therefore seek their services, although many do not.
We will describe some of the commonly observed features in Asians who do not have a crease (Figs 2.1& 2.2), and also, among the Asians who do have a crease, what crease shape and size these tend to be.

Figure 2.1 Cross-section of Asian upper eyelid without crease.(Reproduced with permission from Chen WP. Asian blepharoplasty. In: Oculoplastic surgery: theessentials. New York: Thieme; 2001:211–24.)

Figure 2.2 Asian upper eyelid with no crease.
Asians, as compared with Americans and Europeans, tend to be more petite. This is simply anobservation that their body height, weight, and facial features all tend to be lesser in dimension. Theupper tarsal plate (tarsus) of Asians usually measures only in the 6.5 to 8mm range, with the tarsal heightin the majority, when measured over the central portion of the upper lid, being within 6.5 to 7.5mm. Theupper border of the superior tarsus normally corresponds to where a natural upper lid crease would sit,assuming that this is measured in a young adult and that there has not been any involutional change inthe lid skin or levator aponeurosis. Compared with a non-Asian's upper tarsus, which is often in the 9–10.5mm range, this is a substantial difference. The critical importance of this clinical observation has todo with the placement of the height (or width as measured from the upper eyelash margin) of the desiredcrease. If one were to assume that 10 or 11mm is a standard crease and apply it to an Asian face, theresultant look will not be aesthetically acceptable, due to its high placement and proximity to the midsegment of the upper eyelid skin. Other complications, including injury to underlying tissues such as theseptum and levator, as well as inadvertent creation of multiple creases and segmentation, may occur.
It has been postulated that Asians without an upper lid crease have a lower point of fusion of the orbitalseptum onto the anterior surface of the upper tarsus, or that the lower positioning of the preaponeuroticfat pad is the culprit that disrupted or prevented crease formation. It is uncertain as to which came first –whether the inferior point of fusion of septum to aponeurosis is the reason for absent crease or the lowermigration of the fat. Rather, the true reason may be multifactorial and these are just findings byassociation.
There are at least four types of fat seen in the upper eyelids: ▪ pretarsal fat; ▪ preseptal or suborbicularis oculi fat; ▪ postseptal (preaponeurotic) or orbital fat; and

▪ submuscular or sub-brow fat.
The preseptal fat of the upper lid and the sub-brow fat seem to occupy contiguous space within the samegeneral tissue plane over the periorbital and supra-brow regions. All four types of fat pads have beenobserved among Asians with or without an upper lid crease, as well as in Caucasians with crease, thusthese four types of fat are not unique to Asians. It is just that among Asians without a crease, theintermingling of these four types of fat seem to be of a greater extent and the boundaries are much lessdistinct (Fig. 2.3).
Figure 2.3 Upright view of left upper eyelid incision showing three zones of fat pads in this Asian patient: lowest of thethree is the pure yellowish pretarsal fat pads located in the anterior surface of the upper tarsus and anterior to the openedorbital septum above it; above it is the orange-pinkish vascularized preaponeurotic (postseptal) fat pads with capillariesrunning horizontally through; and the sub-brow fat pads above the preaponeurotic fat. On top, the sub-brow fat appears paleyellowish, and is located anterior to the opened orbital septum. It may extend inferiorly to become the preseptal fat.
Most Asians have some form of medial canthal folds, even among those who have a crease. The medialcanthal fold may be present with the nasally tapered crease (which is a shape prevalent in two-thirds tothree-quarters of those who have a crease) or with the parallel crease shape. Both are compatible,natural, and not pathologic at all. The majority of requests for medial canthoplasty or epicanthoplasty orepicanthal fold excision are based on preconceived perception or on patients who have pathologicepicanthus associated with congenital blepharophimosis syndrome as reported in the Western medicalliterature.
Lash ptosis, a secondary downward angulation of the upper eyelashes as a result of the presence of afold of redundant skin over the ciliary margin, is a feature often seen in Asians without a crease (Fig. 2.4).It seldom causes any direct corneal touch or symptoms, and is not to be equated with true trichiasis.Rarely, one does see patients who have corneal touch as a result of prominent eye position, and, evenmore rare, one may see some Asians who may have very coarse, kinky or straight upper eyelashes, as is

sometimes seen in older individuals with the floppy eyelid syndrome.
Figure 2.4 Lash ptosis with straight lashes pointing down.
Epiblepharon is another curious finding sometimes seen in younger Asian patients near the medialportion of their lower eyelids. It may result in secondary trichiasis and can be relieved by simpleinfraciliary excision of this redundant skin–muscle fold.
Distichiasis, especially medially over the upper as well as the lower lids, may occur and is treated byAsian blepharoplasty of the upper eyelid without any need for tarsal rotation; and in the lower lid by acombination of excision of epiblepharon and/or segmental tarsal rotation.
Asians often manifest a subtle head-back position, with the forehead-to-chin plane about 5–10 degreestilted backwards. Perhaps this is an adaptive head posture to allow greater pupillary clearance with thepresence of a single eyelid's redundant fold. We will come back to discuss this point in the section onpostoperative management of Asian blepharoplasty patients in Chapter 7.
Curiously, some Asians may manifest a relatively poor upgaze in the absence of clinically noticeableptosis or known neuromuscular disorders. Some other patients may have only fair or borderline levatorfunction; these patients may have true ptosis and this will present a challenge when the time comes toperform ptosis repair as well as attempting to crease a dynamic upper lid crease.
The above two conditions are often associated with an overactive forehead or brow action, as acompensatory move.
The aesthetic purposes of creating an upper lid crease are several fold:
▪ to enhance and create a visually apparent eyelid opening, in terms of both the vertical as well asthe perceived horizontal dimensions of the palpebral fissure size;

▪ to create a more consistent platform for the application of cosmetics, eye-shadow, and eyeliners;
▪ to correct and reverse the downward angulation of the upper eyelashes in patients with absentcrease;
▪ to improve on the vision of those who notice any partial field block or interference in their visual
field as a result of the lashes, whether it is secondary trichiasis, or visual awareness of the lashes,which is like seeing through a picket fence when they are down-turned;
▪ to allow freedom from cosmetic application for those who desire it that way; and
▪ to free the patient from the continued need for application of other non-surgical adjunctive meansin order to achieve the goals mentioned above.
Of these, some are aesthetically based and others have a true functional basis.
There are some patients who spend 30 minutes to 2 hours in the morning using adhesive glue, varioustissue tapes, and even physical manipulations using wires, hairpins, and tooth picks in order to create atemporary crease. Some have been doing it for years and are plainly tired of it.
A nasally tapered crease tends to have a medially converging upper lid crease that may or may notcompletely join or touch the medial canthal skin (Fig. 2.5).
Figure 2.5 Asian upper eyelid with nasally tapered crease.
A parallel crease runs parallel across the upper lid margin, staying concentric to the upper lid margin, butdoes not converge medially (Fig. 2.6).

Figure 2.6 Asian upper eyelid with parallel crease.
The crease of a Eurasian may retain one of the two Asian crease shapes but at a wider separation fromthe lid margin; such subjects often have a lager tarsal plate like their parent on the non-Asian side.
Partial crease, segmented crease, and multiple creases (usually no more than two) are further sub-sets ofthe ethnic variants and may be seen in one or in both upper eyelids. It may create asymmetry issues forpatients when one side has this condition while the other upper lid is either with or without a crease.
Terminology with respect to Asian lid structures
Commonly, Chinese refer to a nasally tapered crease as an ‘inner crease' (converging inward to innercanthus), and the parallel crease as an ‘outer crease' (‘away' from inner: ‘outer' also means to deviate

Close Print Page
from).
Copyright © 2010 Elsevier Inc. All rights reserved. Read our Terms and Conditions of Use and our Privacy Policy. For problems or suggestions concerning this service, please contact: [email protected]

Close Print Page
Anatomy of Upper Eyelid in Caucasians and Non-Asians
The so-called ‘Western' or European upper eyelid is distinguished from the ‘Asian' upper eyelid by severalanatomic differences which produce a ‘Western' eyelid crease that is higher and more defined (Figs 2.7–2.9, Table 2.1). These differences may reflect several features typical to the ‘Western' eyelid: ▪ absence of pretarsal descent of the preseptal fat pad; ▪ fusion of the orbital septum with the levator aponeurosis above the tarsal plate; ▪ a tarsal plate of greater vertical dimension; and
▪ a lid crease that begins in the medial upper eyelid rather than extending from the medial canthalarea.

Figure 2.7 Sagital cross-section of the ‘Western' upper eyelid.(Reproduced with permission from Chen WP. Oculoplastic surgery: the essentials. New York: Thieme;2001:212.)

Figure 2.8 The surface features of a youthful ‘Western' eyelid.

Figure 2.9 The surface features of an aged ‘Western' eyelid.
Table 2.1: -- Anatomic differences between the ‘Western’ and ‘Asian’ eyelid.Anatomic feature ‘Western’ eyelid ‘Asian’ eyelidPreseptal fat pad location Preseptal Preseptal and pretarsalSeptum-levator fusion point Above tarsus As low as pretarsal planeTarsal height 9-10.5mm 6.5-8.0mmMedial lid crease origin Medial eyelid MedialcanthusPresence of crease 100% 50%
These eyelid changes correlate broadly with racial phenotypes. Of course, these differences representgeneralizations and are only broadly representative rather than specific to individuals of variousethnicities.
The epidermis and dermis of the human eyelid is among the thinnest of the human body and ischaracterized by loose underlying connective tissue and an absence of subcutaneous fat. It is thiscombination of an easily engorged layer of loose connective tissue and the impermeable yet highlydistensible overlying eyelid skin that permits the exaggerated accumulation of edema that characterizesthe postoperative eyelid. The upper eyelid skin is divided into a pretarsal area, a preseptal, and aperiorbital area. Since the preseptal skin is not anchored to underlying structures, a fold of preseptal skinoften overhangs the pretarsal skin and obscures the eyelid crease. The upper eyelid crease is formed byan anterior leaflet of the levator aponeurosis which inserts within the orbicularis oculi. In youth, there isgood apposition of the pretarsal eyelid skin to the underlying orbicularis, levator, and tarsus.
Human eyelid skin
▪ Epidermis may be only three to four cell layers thick ▪ Combined epidermis and dermis is less than 1mm thick ▪ Partially translucent
Deep to the loose subcutaneous connective tissue layer lies the orbicularis oculi muscle (Fig. 2.10). Theorbicularis oculi serves to close the eyelids and is divided into three contiguous portions: pretarsal,preseptal, and orbital. Each of these layers functions slightly differently, as is demonstrated by theirdiffering origins and insertions. The muscle of Riolan is a specialized portion of the pretarsal orbicularis

oculi that corresponds to the gray line and helps to maintain eversion of the eyelashes.
Figure 2.10 The orbicularis oculi and muscles of facial expression.(Reproduced with permission from Chen WP. Oculoplastic surgery: the essentials. New York: Thieme;2001:5.)
Posterior to the orbicularis oculi muscle is the submuscular fascia (also termed the retro-orbicularis fasciaand the orbicularis fascia). Running within this well-defined surgical plane are vertically oriented bloodvessels and the motor and sensory nerves to the orbicularis and skin. This fascia creates a moderateadherence between the orbicularis and the underlying septum or levator aponeurosis. This fascial planemay be readily divided with strong traction and sharp dissection – thus dividing the eyelid into anteriorand posterior lamellae (Fig. 2.11).

Figure 2.11 Cross-section of upper lid, showing orbital septum, preseptal fat, and preaponeurotic (postseptal) fat.(Reproduced with permission from Chen WP. Oculoplastic surgery: the essentials. New York: Thieme;2001:4.)
The orbital septum (septum orbitale) restrains the central preaponeurotic fat and nasal fat pad of theupper eyelid both anteriorly and inferiorly (Fig. 2.12). In the ‘Western' upper eyelid, the inferior extent ofthe orbital septum fuses with the levator aponeurosis at the height of the upper border of the tarsal plate.It is the fusion of these two structures that is believed to limit the inferior descent of the preponeurotic fatpads. Hence, the relatively high point of fusion of the aponeurosis and levator in the ‘Western' eyelidcontributes to a broader and higher visible pretarsal platform than is seen in the ‘Asian' eyelid.

Figure 2.12 This well-defined plane of the orbital septum is revealed following removal of the overlying skin and preseptalorbicularis oculi.
The levator palpebrae superioris is the retractor of the upper eyelid. The distal 14–20mm of the levatormuscle is tendinous. The transition from skeletal muscle fibers to glistening white aponeurosis occurs atthe level of Whitnall's ligament. Beyond the point of fusion with the orbital septum, the aponeurosiscontinues inferiorly to insert onto the tarsal plate, pretarsal orbicularis oculi, and pretarsal eyelid skin –thus maintaining apposition of the anterior and posterior eyelid lamella below the eyelid crease. Themedial and lateral horns of the levator muscle are attachments towards the medial and lateral canthi.
The orbital and palpebral lobes of the lacrimal gland straddle the lateral segment of the levator muscle(Fig. 2.13). The tarsal plate of the upper eyelid is 9–10.5mm high and 29mm wide in the ‘Western' eyelid.Extending from the lateral commissure to the punctum medially, the tarsus is anchored by the medial andlateral canthal tendons. These three structures (the tarsus and the canthal tendons) form atarsoligamentous band or sling that helps maintain apposition of the upper eyelid to the globe. The tarsuscontains the meibomian glands and their orifices.

Close Print Page
Figure 2.13 Lateral portion of upper lid, showing lacrimal gland.(Reproduced with permission from Chen WP. Oculoplastic surgery: the essentials. New York: Thieme;2001:17.
Müller's sympathetically innervated smooth muscle arises from the undersurface of the levator palpebraesuperioris and descends 15mm to insert on the superior border of the tarsus. Müller's muscle provides 2–3mm of eyelid lift in primary gaze.
Müller's muscle and the tarsus are lined posteriorly by the tarsal and palpebral conjunctiva. Theconjunctiva is rich in mucus-secreting goblet cells. Accessory lacrimal glands of Krause and Wolfringreside between the upper tarsal border and the superior fornix. Laterally, the superior fornix is penetratedby the lacrimal gland ductules.
Copyright © 2010 Elsevier Inc. All rights reserved. Read our Terms and Conditions of Use and our Privacy Policy. For problems or suggestions concerning this service, please contact: [email protected]

Close Print Page
Anatomy of the Lower Lid
Clinically, we do not observe a significant difference between the lower eyelid of Caucasians, Blacks,Hispanics and that of Asians; therefore it will be discussed as one topic. The anatomy of the lower eyelidis very ill defined and is best shown using a series of layered illustrations (Figs 2.14–2.22).
Figure 2.14 The facial changes and cheek laxity that occur with aging.

Figure 2.15 The periorbital foraminas, where nerves and blood vessels exit at the deepest plane.(Reproduced with permission of Dr Clinton D McCord, Jr)

Figure 2.16 The origins of the deep mimetic muscles in the area of the maxilla.(Reproduced with permission of Dr Clinton D McCord, Jr)

Figure 2.17 The next layer of tissues, which is the suborbicularis oculi fat of the lower eyelid. It extends to the brow andbecomes the retro-orbicularis oculi fat (ROOF) under the upper lid.(Reproduced with permission of Dr Clinton D McCord, Jr)

Figure 2.18 The next layer, comprising the pretarsal, preseptal, and periorbital orbicularis oculi muscles. It functions as aclosure muscle for the eyelids.(Reproduced with permission of Dr Clinton D McCord, Jr)

Figure 2.19 The deep portion of the malar fat pads lying over the orbicularis muscles. It is just under and permeated by thesuperficial musculo-aponeurotic system (SMAS).(Reproduced with permission of Dr Clinton D McCord, Jr)

Figure 2.20 The location of the midfacial extent of the superficial musculo-aponeurotic system (SMAS). It lies over thedeep portion of the malar fat. The superficial portion of the malar fat lies over the SMAS. The SMAS is blocked inferiorly bythe nasolabial fold.(Reproduced with permission of Dr Clinton D McCord, Jr)

Figure 2.21 Overlying skin and formation of the nasolabial fold.(Reproduced with permission of Dr Clinton D McCord, Jr)

Close Print Page
Figure 2.22 The orbital malar ligament. It originates from the orbital rim and combines with (and is considered to be part of)the superficial musculo-aponeurotic system.(Reproduced with permission of Dr Clinton D McCord, Jr)
Copyright © 2010 Elsevier Inc. All rights reserved. Read our Terms and Conditions of Use and our Privacy Policy. For problems or suggestions concerning this service, please contact: [email protected]

Close Print Page
Close Print Page
Dr Chen's Preoperative Regimen
For cosmetic blepharoplasty, Dr Chen routinely prescribes 10mg of Valium plus one tablet ofVicodin at 60–90 minutes prior to the procedure. This allows a good period of time for thes.jpgive and analgesic effect to take place. Patients may have been nervous and sleeplessthe night prior to coming in, or they may have had to travel from a distance, and most willenjoy the relaxation.
About 10 minutes before the scheduled time, he greets his patient and goes through thefollowing check list: 1. Reaffirm the physical findings previously observed and discussed with the patient. 2. Reaffirm the goals of the patient for the surgery that day. 3. Ask if there are any unanswered questions. 4. Take photographs.
The patient is positioned on the operating table in a supine position. A soft foam cushionheadrest as well as knee and back support are provided. The nursing staff attach theappropriate monitoring leads, including electrocardiographic, pulse oximetry, as well asgrounding pads for monopolar cautery or a radiofrequency transmitter lead.
Copyright © 2010 Elsevier Inc. All rights reserved. Read our Terms and Conditions of Use and ourPrivacy Policy.
For problems or suggestions concerning this service, please contact: [email protected]

Close Print Page
Close Print Page
Intraoperative Regimen
Dr Chen uses 2% xylocaine with 1:100 000 epinephrine, mixing 10mL with 150 units ofhyaluronidase, if available. He then mixes 1mL of the 2% xylocaine with 9mL of injectablesaline to yield a relatively painless injection (pH balanced, diluted to 0.2% xylocaine and 1:1000 000 epinephrine).
A dose of 0.5mL of 0.2% xylocaine is applied subcutaneously per eyelid. He then waits 2minutes. Clinical blanching of the skin is observed. Further infiltration of about 0.75–1.5mL of2% xylocaine (full concentration) per eyelid is then given submuscularly.
A drop of proparacaine is applied per eye for topical anesthesia of the cornea, conjunctiva,and inner surface of the eyelids. The nursing staff prepare the operative field with theappropriate disinfective soap or solutions.
Via a pre-placed butterfly, intravenous aliquots of Versed (midazolam) 0.5mg may be utilized,should further s.jpgion be necessary. Nasal oxygen or room air may be supplied.
Surgical drapes are applied. Dr Chen uses paper drapes as well as an operculated 3M#1020 adhesive drape to minimize any potential gaseous communication between theoperative field and the rest of the face under the paper drape. A drop of tetracaine is appliedper eye for longer lasting effect.
A black corneo-scleral shell that conforms to the curvature of the cornea and sclera islubricated with sterile Lacrilube ophthalmic ointment and then applied over the eye to beoperated on. The procedure commences.
Ice-cold saline solution is used on the operative field.
In selected patients or those who prefer a deeper level of conscious s.jpgion or generalanesthesia, the use of an anesthesiologist may be prearranged. This category includes thosepatients who required cheeklift/midface repositioning, as well as a significant number ofthose requiring revisions.
Copyright © 2010 Elsevier Inc. All rights reserved. Read our Terms and Conditions of Use and ourPrivacy Policy.
For problems or suggestions concerning this service, please contact: [email protected]

Close Print Page
Close Print Page
Preoperative Regimen of Dr Khan
Most incisional cosmetic procedures are performed in an ambulatory surgery center wheremonitored anesthesia care is delivered by certified registered nurse anesthetists (CRNA).Patients are greeted and reassured preoperatively and the procedures are confirmed. In thepreoperative holding area, supplemental oxygen is provided via nasal cannulae, pulseoximetry and cardiac telemetry are monitored and a heparin lock is placed for intravenousaccess. In the holding area, patients are rendered amnestic and briefly unconscious withintravenous Versed and Propofol prior to injection with local anesthetic. Usually, the localanesthetic consists of lidocaine 2% with epinephrine 1:100 000 mixed 1:1 with Marcaine0.75%.
In the operating room, the patient is prepped and then draped with cloth towels. Metalprotective eye shields and wet cloth towels are placed if CO2 laser is to be used.Supplemental oxygen is provided via nasal cannulae, and pulse oximetry, blood pressuremonitoring, and cardiac telemetry are continued. Propofol is delivered intraoperatively by theCRNA, if needed. In patients in whom deeper levels of s.jpgion or even unconsciousness arerequired, supplemental oxygen is delivered to the nasopharynx via a nasal trumpet so as tomaintain pO2 levels despite respiratory depression. This technique allows CO2 laserresurfacing to be performed without any local anesthetic or endotracheal intubation.Supplemental local anesthetic is often used intraoperatively.
For in-office upper eyelid blepharoplasty, anesthetic discomfort is reduced when each eyelidis pre-injected subcutaneously with 0.75mL solution lidocaine 2% with epinephrine 1:100 000mixed 1:1 with nonpreserved saline. This is followed by an injection of 0.75mL lidocaine 2%with epinephrine 1:100 000. The subcutaneous anesthetic bolus is then milked andmanipulated to cover the entire surgical site.
Following surgery, erythromycin ophthalmic ointment may be placed on the eyes or incisions.Patients generally are recovered and discharged within 30 minutes. The eyes and incisionsare not usually patched. Stitches (usually 6-0 Prolene) are usually removed 9–12 days aftersurgery.
Copyright © 2010 Elsevier Inc. All rights reserved. Read our Terms and Conditions of Use and ourPrivacy Policy.
For problems or suggestions concerning this service, please contact: [email protected]

Close Print Page
Postoperative Considerations
The following is a sample of Dr McCord's postoperative instructions for his patients:
Scars
Incisions for a blepharoplasty are made in the natural crease of the upper lid, whichdisguises the final thin scar so that one would have to look very closely in the mirror todetermine where an incision had been made, if one can see it at all. In the lower lid, the skinincision is made as close as possible beneath the lash line, and many times extends past thecorner of the eye for several millimeters if needed. These incisions leave imperceptible scars.The only area of incision that may be noticeable for a period of time is the outside corner ofthe eye, in the laugh line area. Some people may require a longer incision or stitch line at theoutside corner of the eye in a slightly downsloping direction. This is needed so that the skinmay be tensed in the proper way to get good cheekbone definition, and this is trueparticularly if they have extra folds in the lower cheekbone or mid cheek area. If it isnecessary to carry the incision into this area, there usually occurs a small red line, which willfade with time. If one does require an incision above the eyebrow, as will be discussed withthe direct brow lift, the incision line is more conspicuous but can be covered with cosmeticsuntil the incision line fades. Although it is unusual to have to do so, dermabrasion cansmooth out incision lines that are more conspicuous than one would like, if they do notsmooth out on their own. Incisions behind the hairline leave no visible scars and, with thenewer techniques, little if any hair loss.
It is important to understand the natural history of healing and scar formation. Tissue gluecauses enough healing within a week or 10 days such that the incision is strong enough andthe stitches can be removed at that time. The incision lines, however, then begin to ‘knit'.This process includes the ingrowth of many blood vessels, extracellular material, and othertissue that goes into those areas to strengthen the tissue. During this period of ‘knitting' (5–6weeks), the incision lines will become tight, firm, and reddened, which is the body's responseto any cut or incision. This process may not be noticeable to other people but may benoticeable to the patient, and is more a source of frustration than any discomfort. When thebody finally recognizes the fact that the tissues are healed enough to suit its purpose (6–7weeks), the extra blood vessels and cellular material will leave and the incision lines willsoften, bleach, and then fade. The maximum relaxation occurs in about 4 to 5 months.During this period of time – or, for that matter, any time after – it is extremely important toavoid any sunburn or exposure to ultraviolet light in those areas, as this may aggravate andintensify the activity in the incision line.
Copyright © 2010 Elsevier Inc. All rights reserved. Read our Terms and Conditions of Use and ourPrivacy Policy.

Close Print Page
For problems or suggestions concerning this service, please contact: [email protected]

Close Print Page
Close Print Page
Stitches
The stitches used are generally nylon stitches or very fine silk sutures, which are removed in5 to 7 days. Immediately after removal of the stitches, no creams or cosmetics should beused, to avoid tiny cysts that may form along the stitch tracks. About 7–10 days must go byto allow smoothing over of the stitch holes; after this time, one may use cosmetics and cover-up creams, if desired, over the incision lines. Surgical staples or the mini screws associatedwith the endoscopic eyebrow–forehead lift are usually removed at 10–14 days.
Copyright © 2010 Elsevier Inc. All rights reserved. Read our Terms and Conditions of Use and ourPrivacy Policy.
For problems or suggestions concerning this service, please contact: [email protected]

Close Print Page
Close Print Page
Anesthesia
For the standard eyelid surgery – either upper lids or lower lids by themselves, or upper andlower lids at the same time – usually the surgery can be done with deep s.jpgion (twilightsleep) and local anesthesia that numbs the eyelids. Most people sleep through theprocedure. Dr McCord prefers general anesthesia. If one is going to have eyelid surgerycombined with the mini-lift of the forehead, or a cheeklift performed with a lower lidblepharoplasty, then a very light ‘general' anesthetic is preferred because of the length of theprocedure and patient comfort. These procedures can easily be performed on an outpatientbasis; however, some people may elect to spend the night after surgery in hospital, for whichmost hospitals will provide a special rate.
Copyright © 2010 Elsevier Inc. All rights reserved. Read our Terms and Conditions of Use and ourPrivacy Policy.
For problems or suggestions concerning this service, please contact: [email protected]

Close Print Page
What to expect immediately after surgery
Accentuated appearance
It is normal in the lower lid to have an accentuated tightness in the outside corners, giving anupslant appearance, in the immediate postoperative period and for a while thereafter (usually3–4 weeks). This is necessary because of the need to strengthen the lower lid tendon toprevent a pulling down of the lower lid in the swollen period after surgery. This appearance istemporary, but is necessary to prevent the complication of scleral show (excessive whiteshowing under the eye).
Bruising and swelling
There is great variation among individuals with regards to bruising and swelling. It is veryrare for a person to get no bruising or swelling at all. Most people will have a puffy andpurplish appearance to the eyelids. With the ‘standard amount' of bruising and swellingusually seen, most people are presentable for public appearances (with make-up) in 10–14days.
It is very important for patients to avoid all medications containing aspirin, aspirin-likemedications, or any true blood thinners before surgery and for a week after surgery. It is alsoimportant to have their blood pressure controlled, in that if the blood pressure is elevated atthe time of surgery, they will most certainly bruise more. The most important thing to do toreduce postoperative bruising and swelling is to use ice compresses continuously for the first48 hours after surgery and as much as possible thereafter. On no occasion should heatcompresses be applied to the eyelids during this period. Sometimes, before and aftersurgery, special medications are given, such as low-dose cortisone, to help prevent thetissue reacting so much to the surgery.
Eye lubrication and blurred vision
Our main concern for the health of the eye is the prevention of ‘dry spots' that can occur aftersurgery. Because there will be some ‘tightness' of the eyelids following surgery, we requirethe patient to apply lubricants to his or her eyes, particularly at nighttime, to avoid anydryness or symptoms of dryness. All tear production is examined before surgery; however, insome rare situations, a person may be required to use lubricating drops after surgery to allowhis or her eyes to be comfortable. Immediately after surgery, we prefer the use of ointments,which are much more effective at preventing dry spots; however, most people do not likethem because they do blur the vision. This extra lubrication is needed right after theoperation for protection of the eye from dry spots and chemosis. To reduce postoperative

chemosis, we apply a 6-0 nylon tarsorrhaphy suture through the upper and lower tarsalplates 1mm lateral to temporal limbus prior to completion of the case. After the stitches areremoved, one can, in most cases, switch to artificial teardrops, which do not blur the vision.
Physical activity
The first 2 days are completely devoted to ice compresses and head elevation and remainingquiet. Walking around and sedentary activity can take place following the first 2 days untilsuture removal. The ice compresses can be used intermittently during this period (usually 30minutes, four to five times a day). It would be possible to drive a car during this period if therewas a definite need; however, the vision will be very blurred from the use of the ointment andthe stiffness of the eyelids. There should be no exercise (aerobics, jogging, etc.) the firstweek. In the second week, no exercise should occur that places a strain on the incisions;however, some walking and stretching can be done.
Only after the first 2 weeks should exercise that raises the heart rate be undertaken. The‘extra blood' that may be pumped through the operated area might cause swelling. If thisoccurs, then the patient should stop and apply ice to the area.
Common patient worries
The two things that generally concern people the most immediately after surgery are: ▪ body image; and ▪ blurred vision.
Body image
Most people have a puffy and purplish look to their eyelids immediately after surgery. Therewill also be the overly tight or very tense look in the corners of their eyes if they have hadlower lid surgery. This appearance can cause initial ‘patient remorse' since they may nothave seen themselves with this appearance unless they have had previous surgery. This is,of course, the normal appearance following this type of surgery, and, with time, the puffinessand bruising will go away and their eyelid contours will resume to the desired appearance.
Blurred vision
Immediately after surgery, the patients' vision will be blurred to the point that they will not beable to read very well. The reasons are that their eyelids, which are basically windshieldwipers, will be stiff for a period of time and will not be able to wipe (their cornea) properly.Also, they will be using lubricating ointment in their eyes to prevent dry spots, which will addto the blurring.
It is very important that the patient's family or those who will be caring for the patient aftersurgery know and expect these changes so they will not have concern.
Copyright © 2010 Elsevier Inc. All rights reserved. Read our Terms and Conditions of Use and ourPrivacy Policy.
For problems or suggestions concerning this service, please contact: [email protected]

Close Print Page

Close Print Page
Close Print Page
Safety With Blepharoplasty Surgery
Our goal is to try to have the happiest patient possible following surgery, with the bestpossible improvement in the person's appearance, but not at the expense of eye safety. Theeyelids are not decorations and their purpose is to protect the eye. They must functionproperly following any eyelid surgery. There is always some stiffness after eyelid surgery ofthis type, which may persist for a while; however, patients who have good eye moisture andgood eye movements usually do fine. Many patients do use some artificial teardrops aftersurgery. Our approach is to be safe and conservative in the amount of skin that is removed.If there are some residual folds after healing (not quite enough skin taken), they can easilybe trimmed later in the office. If too much skin is removed, it is not an easy situation to rectify,as this may require skin recruitment from elsewhere.
Copyright © 2010 Elsevier Inc. All rights reserved. Read our Terms and Conditions of Use and ourPrivacy Policy.
For problems or suggestions concerning this service, please contact: [email protected]

Close Print Page
Close Print Page
Secondary Surgery or ‘Touch-up' Surgery
For primary patients who require secondary or ‘touch-up' surgery, if it seems appropriate,there is no surgical charge, but medical supplies (stitches, etc.) are charged for. If it isestablished that there is no contraindication, residual folds can be removed, or, if needed,adjustment of the lower lid can be done. The most common touch-up is removal of folds ofskin in the upper lid at the outside corner just under the brow, or adjustment of the outsidecorner of the lower lid. If the adjustment is more than minor, it must be done on an outpatientbasis at a surgical facility.
Copyright © 2010 Elsevier Inc. All rights reserved. Read our Terms and Conditions of Use and ourPrivacy Policy.
For problems or suggestions concerning this service, please contact: [email protected]

Close Print Page
Close Print Page
Complications of Surgery
Fortunately, there are few true complications – most of the postoperative concerns arewhether or not to do any ‘touch-up' work – however, it is important to discuss here some ofthe complications associated with any eyelid surgery. A very serious complication would besome unfavorable reaction to the anesthetic medicine, either the local or the other agentsthat are used. Eyelid complications, as mentioned before, are usually a lower lid pull down orout turning following surgery, owing to shrinkage of skin or excessive skin removal in thatarea. This is much more of a risk in people who have extremely lax lower lids and can beaggravated if, in addition, the person has serious bruising or hematoma formation. In suchpeople, additional tightening of the ligaments in the lower lid is deemed necessary to preventthis complication. Other possible complications include infection and hemorrhage.
Copyright © 2010 Elsevier Inc. All rights reserved. Read our Terms and Conditions of Use and ourPrivacy Policy.
For problems or suggestions concerning this service, please contact: [email protected]

Close Print Page
Close Print Page
Insurance Claims and Office Policy
Patients should not expect any insurance company to pay the surgical fee for surgery thatmay be considered cosmetic or medically unnecessary in nature. If patients feel that theywould like to involve their insurance company, they are strongly advised to attempt to get a‘prior approval' from such. Unfortunately, many insurance companies will only give equivocalstatements regarding possible future coverage of surgery. If, in the ‘prior approval', theinsurance company indicates a specific amount they will pay for the surgery, then thatamount will be subtracted from the patient's presurgical deposit. If the insurance companywill not commit to a definite amount, then the patient will be responsible for the full surgicaldeposit, and, after surgery, any amount the insurance pays will be reimbursed to the patient.
Copyright © 2010 Elsevier Inc. All rights reserved. Read our Terms and Conditions of Use and ourPrivacy Policy.
For problems or suggestions concerning this service, please contact: [email protected]

Close Print Page
Close Print Page
Other Interested Parties
As mentioned previously, in many cases a spouse or close friend will be involved in apatient's postoperative care and observe the patient in his or her postoperative course. Ifthey have not had the opportunity to make the preoperative consultation visits with thepatient, they will be unfamiliar with the usual side effects of surgery and what is normal aftersurgery. For their awareness, they should read the information sheets provided. In mostcases, it may be appropriate for them to see the preoperative videos in the office or haveconsultation with the surgeon before surgery, for better understanding of blepharoplastysurgery and its possible postoperative side effects.
Copyright © 2010 Elsevier Inc. All rights reserved. Read our Terms and Conditions of Use and ourPrivacy Policy.
For problems or suggestions concerning this service, please contact: [email protected]

Close Print Page
Chapter 4 – Endoscopic-assisted Eyebrow Surgery
Clinton D McCord Jr
The upper lid and the eyebrow behave as a unit and are interdependent. Commonly, eyebrow proceduresare needed for stabilization before performing the upper lid blepharoplasty. Because of this sequence, theeyebrow procedures are discussed first.
Normally, eyebrows are positioned above the level of the superior orbital rim, but, with age, may migratebelow the rim, causing redundancy and folding of the upper eyelid skin. This process also produces anarrowed spacing between the eyebrow hairs and the lashes, which can cause a frowning appearance inthe patient. The mechanics of brow ptosis are similar to those of a curtain rod that has loosened andfallen, causing folding in the curtain.
It is important to recognize the problem of eyebrow laxity before performing upper lid blepharoplasty,because failure to correct brow laxity or displacement before the blepharoplasty will impair the result.
The aim of upper lid blepharoplasty is to remove redundant skinfolds and produce a clear strip of skinabove the eyelash line (the eye-shadow space in females). In order for the surgeon to achieve this, anypre-existing laxity or ptosis of the eyebrows must be surgically corrected. Eyebrow procedures, in mostcases, must be performed before the blepharoplasty procedure.
Anatomy
It is important to have firm knowledge of anatomy in the eyebrow area to avoid complications and toproduce the best possible result with eyebrow surgery. Appreciation of the anatomic relationship of thefrontal branch of the facial nerve to the fascial layers is important to define the safe level of dissection forprotecting the nerve when operating in the brow and temporal region.
Fascia and attachments
There are three fascial layers in the temporal region that are important landmarks for localization of thefrontal branch of the facial nerve. The superficial temporal fascia is the most superficial layer. The deeptemporal fascia is made up of a superficial layer and a deep layer (Fig. 4.1).

Figure 4.1 (A) The fascial and muscular planes in the scalp and forehead area. The course of the frontal branch of thefacial nerve is shown traveling through the superficial temporal fascia.(Reproduced with permission from Chen WP. Oculoplastic surgery: the essentials. New York: Thieme;2001:127.)

Figure 4.1b (B) On the temporal side of the face, the galea aponeurosis covers the fascia of the temporalis muscle asthe superficial temporal fascia (SMAS, superficial musculo-aponeurotic system). Just superior to the zygomatic arch, thetemporal branch of the facial nerve and the anterior branch of the superficial temporal artery lie within this plane of theSMAS. The galea splits into the superficial and deep temporal fasciae (DTF) at the superior origin of the temporalis muscleon the skull. Further inferiorly, at the line of fusion, the deep temporal fascia splits into a superficial and a deep layer, withboth attaching to the zygoma. The superficial temporal fat pad lies deep to the superficial layer of the DTF, whereas thedeep temporal fat pad beneath the deep layer of the DTF is a superior extension for the buccal fat pad. Below the zygoma,the parotid gland lies between the SMAS and the masseter muscle. Further inferiorly, the SMAS is contiguous with theplatysma muscle. The masticatory muscles of the temporalis and medial pterygoid insert onto the medial side of themandible, whereas the masseter inserts onto the lateral side.(Reproduced with permission from Chen WP. Oculoplastic surgery: the essentials. New York: Thieme;2001:127.)
The superficial temporal fascia is the layer that contains the frontal branch of the facial nerve on its deepsubaponeurotic surface. This layer represents an extension of the submuscular aponeurotic system(SMAS). The subaponeurotic plane consists of loose areolar tissue that separates the superficialtemporal fascia from the deep temporal fascia. The subaponeurotic plane is avascular and extendsinferiorly to the zygomatic arch. The temporal region of the subaponeurotic space and the subperiostealspace are connected by division of the periosteal reflection along the superior temporal line that marksthe origin of the deep temporal fascia. This transition zone lies along the anterior crest of the temporal

bone.
The deep temporal fascia is a dense double-layered fascia covering the temporalis muscle. The temporalline of fusion is a transverse line at the level of the superior orbital rim, extending laterally over the fascia,and represents fusion of the two layers superior to this line. The fascia is separated inferior to the line bythe superficial temporal fat pad, which is located between the superficial and deep layers of the deeptemporal fascia and extends to the level of the zygomatic arch. The deep temporal fat pad lies beneaththe deep temporal fascia 2cm above the zygomatic arch and overlies the temporalis muscle and tendon;it is an extension of the buccal fat pad through the zygomatic arch.
The galea is contiguous with the superficial temporal fascia, and the periosteum of the skull is continuouswith the deep temporal fascia. The confluence of these fascial planes to the skull and attachment to thebrow tissue have a characteristic configuration known as the fusion line and orbital ligament. Thisconfluence produces a vertical band 5–6mm wide just medial to the temporal fusion line of the skull,which has a continuation as the superior temporal line. In this area, the deep layers of the superficialtemporal fascia and the galea are bonded to the periosteum and fixed to the bone (Fig. 4.2). At the edgeof the orbital rim in this fusion line is a fibrous band attached to the bone, called the orbital ligament,which can limit superficial temporal fascia movement and effectively tethers the lateral eyebrow to theorbital rim.

Close Print Page
Figure 4.2 The insertion lines of the fascia planes on the skull in the placement of the temporal fusion line and orbitalligament.(Reproduced with permission from Chen WP. Oculoplastic surgery: the essentials. New York: Thieme;2001:127.)
Copyright © 2010 Elsevier Inc. All rights reserved. Read our Terms and Conditions of Use and our Privacy Policy. For problems or suggestions concerning this service, please contact: [email protected]

Close Print Page
Close Print Page
Motor and sensory nerves
The frontal branch of the facial nerve provides motor innervation to the frontalis andcorrugator muscles. The course and depth of the nerve has been well defined and extendsalong a line beginning 0.5cm below the tragus to 1.5cm above the lateral aspect of the brow.
The frontal branch lies within the superficial temporal fascia as it traverses the zygomaticarch, and is at greatest risk for injury at this level.
Superior to the zygomatic arch, the nerve is superficial to the superficial layer of the deeptemporal fascia, within the superficial temporal fascia.
The supratrochlear and supraorbital nerves provide sensory innervation to the scalp,forehead, and eyelid region. The ophthalmic (V1) division of the trigeminal nerve traversesthe cavernous sinus and enters the orbit through the superior orbital fissure. The ophthalmicnerve has three divisions: frontal, nasociliary, and lacrimal. The frontal nerve runs along thesuperior aspect of the orbit and divides into the supratrochlear and supraorbital nerves. Thesupratrochlear nerve emerges from the medial aspect of the superior orbital rim and providessensory innervation to the glabella, medial forehead, medial upper eyelid, and conjunctiva.The supraorbital nerve exits the orbit in the central aspect of the superior orbital rim mostcommonly through a notch. A true supraorbital foramen exists as an anatomic variant in 25%of orbits. The supraorbital nerve provides sensory innervation to the scalp, lateral forehead,lateral upper eyelid, and conjunctiva.
Copyright © 2010 Elsevier Inc. All rights reserved. Read our Terms and Conditions of Use and ourPrivacy Policy.
For problems or suggestions concerning this service, please contact: [email protected]

Close Print Page
Muscles of animation
The musculature in the forehead and brow that contributes to animation in the forehead and glabellaregion includes the frontalis, procerus, and corrugator supercilii muscles (Fig. 4.3).
Figure 4.3 The protractor muscles of the brow and eyelid area. The corrugator and procerus muscles together with aportion of orbicularis nasally are brow depressors. Laterally, orbicularis fibers act as depressors of the tail of the brow.(Reproduced with permission from Chen WP. Oculoplastic surgery: the essentials. New York: Thieme;2001:128.)
The frontalis muscle travels above the galea and is the elevator of the eyebrow and glabella area. Itsinsertion does not extend past the fusion line and has reduced effect in the lateral brow. It is a pairedmuscle that is an extension of the galea aponeurotica and occipitalis muscle. The vertically oriented fibersinsert into the supraorbital dermis and elevate the eyebrow during contraction. Increased frontalis activity,which is needed to maintain an elevated brow position in response to brow ptosis, can cause transverselines across the forehead. The frontalis muscle is a primary brow elevator and should therefore not beweakened during a procedure aimed at brow elevation.
The procerus muscle is a midline muscle that originates from the nasal bones and upper lateralcartilages. The vertically oriented fibers insert into the dermis of the glabella at the medial border of the

Close Print Page
frontalis. Contraction of the procerus causes inferior and medial displacement of the medial eyebrow anda transverse line at the nasal radix. The procerus muscle has innervation from the buccal branch of thefacial nerve. The procerus is a primary brow depressor and therefore should be weakened to achievemedial brow elevation.
The corrugator supercilii muscle is a paired muscle that originates from the periosteum of the superiormedial orbital rim. The fibers are oriented in an oblique direction, inserting into the dermis of the medialeyebrow skin with lateral interdigitations with the medial portion of the orbicularis oculi muscle.Contraction of the corrugator muscles causes inferior and medial displacement of the eyebrow and thevertical oblique lines of the glabella. Weakening the medial portion of the corrugator contributes to medialbrow elevation and correction of glabellar frown lines. The lateral portion of the corrugator is felt toproduce slight lateral brow elevation and should be preserved. Motor innervation of the corrugator is fromthe frontal branch of the facial nerve.
Copyright © 2010 Elsevier Inc. All rights reserved. Read our Terms and Conditions of Use and our Privacy Policy. For problems or suggestions concerning this service, please contact: [email protected]

Close Print Page
Close Print Page
Changes in the Eyebrow with Age
The development of eyebrow laxity and ptosis with aging is attributed to the progressive laxity of the scalpand forehead soft tissues over time. This mechanism, aided by gravity, can produce an overallsymmetrical downward displacement of the eyebrow with narrowing of the spacing between the eyebrowsand eyelashes (decreased brow–lash distance). There are specific forces and tissue conditions in thelateral and nasal eyebrow that may allow selective depression of those areas. In the lateral portion or tailof the eyebrow, the force of orbicularis contracture, and increased mobility, allowed by fatty layers in thearea, are added to the forces of gravity and laxity, causing more selective brow ptosis in that area. In thenasal portion of the brow, the depressor muscles, corrugator supraciliaris, and procerus, together withcontracture of some local orbicularis fibers, serve to counteract the lifting effect of the frontalis muscle andbring the nasal brow downward (Fig. 4.4). The shape of the eyebrow is usually more arched in femalesand flatter in males, and may remain so with age.
Figure 4.4 The normal brow spacing and position (left) and the downward displacement of the brow from forcescounteracting the frontalis muscle elevation (right).(Reproduced with permission from Chen WP. Oculoplastic surgery: the essentials. New York: Thieme;2001:131.)
Copyright © 2010 Elsevier Inc. All rights reserved. Read our Terms and Conditions of Use and our Privacy Policy. For problems or suggestions concerning this service, please contact: [email protected]

Close Print Page
Endoscopic-assisted Eyebrow Forehead Lift
In recent years, it has been more common to perform the eyebrow forehead lift with endoscopicassistance through small incisions. I use this procedure primarily in females for correction of ptosis in thenasal two-thirds of the brow and the frowning contracture lines in the glabellar area. I also use thisprocedure, usually supplemented with an internal browpexy performed through an upper blepharoplastyincision, to correct ptosis or laxity in the lateral third of the brow.
Surgical technique and instrumentation
Instrumentation includes a camera and video equipment, endoscope, light source, retractor, andendoscopic surgical instruments (graspers and periosteal elevators with varying curves). Theseinstruments are used to create the subperiosteal optical space, in which the procedure is performed. Thedevelopment of this space is the primary requirement in endoscopic surgery, and visibility is maintainedby a retractor-mounted endoscopic system (Fig. 4.5).

Figure 4.5 Endoscopic system and instrumentations. (A) Variety of periosteal elevators, insulated grasper, insulatedscissors and endoscope in irrigating sleeve. (B) Endoscope and detached irrigating sleeve, and endoscope in irrigatingsleeve.(Instruments courtesy of Snowdon Pencer.) (Reproduced with permission from McCord CD. Eyelidsurgery: principles and techniques. Philadelphia: Lippincott-Raven; 1995:369.)
Various camera systems include one-chip, three-chip, and digital formats. The video cart setup generallyincludes a high-resolution video monitor, VCR and printer, camera source, and a light source withfiberoptic attachment to the endoscope. The currently available endoscopes are rigid, glass, Hopkins rod-type endoscopes. Because the size of the optical cavity that can be created during endoscopic brow lift islimited, the 5mm external diameter endoscope size is recommended. Various angles of visualization withthe endoscope are available, but the 30-degree downward view is most commonly used to view theanatomy in the supraorbital region. The optical cavity is maintained through tissue retraction using theretractor-mounted endoscopic system or with the use of a special sleeve or spoon that extends beyondthe end of the endoscope (Fig. 4.6).

Figure 4.6 Endoscopic sleeve with retracting spoon extension.(Reproduced with permission from Chen WP. Oculoplastic surgery: the essentials. New York: Thieme;2001:131.)
The patient is placed on the operating table with the head extended slightly beyond the headrest, tofacilitate clearance for the use of the endoscope and instruments. The procedure is usually performedunder general anesthesia. Generous infiltration with 0.25% Xylocaine with epinephrine (1:400 000) isused in the scalp and forehead area for hemostasis (Fig. 4.7).

Figure 4.7 Operating room setup and orientation of surgeon to patient.(Reproduced with permission from Chen WP. Oculoplastic surgery: the essentials. New York: Thieme;2001:133.)
Placement of scalp incisions
Three scalp incisions are made – one midline and two lateral (Fig. 4.8). The location of the lateralincisions depends on the desired vector of pull on the eyebrow. In patients who have unusually severenasal brow laxity and glabellar folding, the incisions are placed closer to the midline incision, to gainmaximum traction, and closer to the nasal brow and glabellar area. In patients with general brow laxity,the lateral incisions are placed in a wider pattern and slanted to produce both nasal and some temporalelevation. All incisions are placed behind the hairline to minimize scar visibility. If possible, incisionsshould avoid sites of maximal hairline recession.

Figure 4.8 Placement of three incisions for endoscopic-assisted eyebrow forehead lift. The central incision serves as aport for the endoscope. The lateral incisions serve only as openings for placement of screw fixation. Position A for thelateral incisions is used for patients who require maximum nasal brow and glabellar lift. Position B is for patients who needmore general brow elevation.(Reproduced with permission from Chen WP. Oculoplastic surgery: the essentials. New York: Thieme;2001:131.)
Creation of an optical space
The initial optical space is created with a subperiosteal dissection using a straight elevator through thethree scalp incisions. Undermining in the subperiosteal space extends initially to within 1cm of thesupraorbital rim and to the superior temporal line laterally. Undermining behind the scalp incisions is alsoperformed to prevent redundancy and folding when the forehead and scalp are advanced posteriorly (Fig.4.9). The subperiosteal plane has an advantage of firm postoperative reattachment with healing followingbrow elevation. Initially, subperiosteal dissection is begun anteriorly through the central incision withoutusing the endoscope, stopping 1–2cm above the superior orbital rim.

Figure 4.9 Left: Placement of three incisions for endoscopic-assisted eyebrow forehead lift. The central incision serves asa port for the endoscope. The lateral incisions serve only as openings for placement of screw fixation. Right: The area ofperiosteal undermining performed for visualization before the endoscope is inserted.(Reproduced with permission from Chen WP. Oculoplastic surgery: the essentials. New York: Thieme;2001:132.)
At this point, the endoscope with a retraction sleeve and spoon is inserted through the central incision intothe optical cavity to continue subperiosteal dissection in the lower forehead under endoscopicvisualization. The dissection then proceeds down to the superior orbital rim with direct visualization (Fig.4.10). Several different sizes and curves of periosteal elevators are available for use, depending on thecontour of the frontal bone and the distance from the brow to the hairline.

Figure 4.10 Insertion of the endoscope with retracting spoon through the central incision and the insertion of a periostealelevator (or other endoscopic tool) through a lateral incision (left). The spoon extension on the endoscope allows betterretraction of the brow tissue for visualization (right).(Reproduced with permission from Chen WP. Oculoplastic surgery: the essentials. New York: Thieme;2001:132.)
Periosteal release
Once adequate visualization of the optical cavity to the orbital rim has been achieved, the surgeon placesa horizontal relaxing incision through the periosteum. The periosteum is divided along the edge of thesupraorbital rim transversely with a relaxing incision using a sharp periosteal elevator (Fig. 4.11). Acurved periosteal hook or curved endoscopic scissors can be used to divide the periosteum. Periostealdivision continues laterally along the orbital rim to the level of the lateral canthus using a narrow, curvedelevator. The procerus and corrugator muscles can then be visualized centrally once the periosteum isdivided.

Figure 4.11 Intraoperative endoscopic images showing creation of relaxing incision through the periosteum at the level ofthe superior orbital rim. (A) Insertion of reversed sharp periosteal elevator to the periosteum. Initial periosteal incision (B) andextension laterally (C).(Reproduced with permission from Chen WP. Oculoplastic surgery: the essentials. New York: Thieme;2001:133.)
Resection of corrugator and procerus muscles
Once the opening of the periosteum has been completed, biopsy forceps are introduced and used toresect portions of the procerus and corrugator muscles that cause the glabellar frown lines. Hypertrophyof the procerus or corrugator muscles produced by repeated frowning is improved by the myectomy,which weakens these muscles. A variety of biopsy forceps are available; however, blunt-tipped Takahashibiopsy forceps allow precise muscle resection, which minimizes the potential overdissection of theunderlying subcutaneous tissue and dermis, which could result in a visible deformity in the glabellarregion. Removal of the procerus is first performed in the midline at the level of the superior orbital rim.Dissection then proceeds laterally, with removal of the corrugator on both sides of the supratrochlearnerve (Fig. 4.12). The supratrochlear nerve crosses the corrugator and is deep to the orbicularis oculifibers. A nerve hook can be used to retract the supratrochlear nerve. The supratrochlear nerves can beseen with the underlying oblique fibers of the corrugator muscle and the transverse supratrochlear vein.The supraorbital nerves are visualized laterally. Following procerus and corrugator myectomy, inspectionfor hemostasis is performed. Electrocautery using an insulated grasper controls any bleeding points.

Figure 4.12 (A) Insertion through the opening in the periosteum of a grasping device for partial resection of corrugator andprocerus muscles. Branches of the supratrochlear nerve are contained within the corrugator and should be spared. Thesupraorbital nerve is usually visualized laterally in the notch but is away from the resection area.(Reproduced with permission from Chen WP. Oculoplastic surgery: the essentials. New York: Thieme;2001:134.)

Figure 4.12 (B) Endoscopic images showing excision of corrugator muscles. Top left and right: Stripping of the corrugatoron the right side utilizing a Takahashi biopsy forceps. Bottom left: Forceps pointing at left corrugator, with portion ofsupratrochlear nerve visible within the muscle. Bottom right: View of glabellar area after corrugators have been strippedbilaterally.
Brow and forehead elevation and fixation
The forehead and scalp are then advanced upward and retracted to produce brow elevation so thatfixation of the tissue can be performed. Several methods of fixation have been used. This author favorsthe screw fixation methods. Screw fixation methods have included the permanent placement of surgicalscrews that anchor galeal support sutures or are temporary percutaneous screws that are removed 1 to 2weeks after surgery and rely on periosteal adhesions for permanency. Only the lateral incisions are usedfor fixation. A guarded drill bit 4mm in depth (Fig. 4.13) is used to place a drill hole in the calvarium at theposterior edge of the lateral incisions. There is some repositioning of the lateral incisions posteriorly bytraction before the drill holes are made. A 2mm-diameter titanium screw, 12mm in length, is then placedin the hole, thereby allowing an 8mm length to traverse the scalp so that the screw head remains externalto the scalp (Fig. 4.14).

Figure 4.13 A drill bit with a 4mm guard used to create drill holes in the calvarium at the posterior edges of the lateral scalpincisions.(Reproduced with permission from Chen WP. Oculoplastic surgery: the essentials. New York: Thieme;2001:135.)

Figure 4.14 Placement of screw in the calvarium at the posterior edge of a lateral incision.(Reproduced with permission from Chen WP. Oculoplastic surgery: the essentials. New York: Thieme;2001:135.)
Once the screw is secured at the posterior aspect of the lateral radial incisions (Fig. 4.15), the scalp isadvanced posteriorly along the vector of the incision with a single-hook retractor (Fig. 4.16).

Figure 4.15 Positioning of the 12mm screw in the calvarium.(Reproduced with permission from Chen WP. Oculoplastic surgery: the essentials. New York: Thieme;2001:135.)

Figure 4.16 Retraction of scalp with large skin hook to advance the forehead upward and scalp posteriorly, to cause a liftin the brow. Upward counterforce on the forehead is also used.(Reproduced with permission from Chen WP. Oculoplastic surgery: the essentials. New York: Thieme;2001:135.)
After the scalp has been advanced to achieve proper brow elevation with some consideration forovercorrection, surgical staples are placed posterior to the screw to close the incision and maintain thescalp advancement (Fig. 4.17). All remaining scalp incisions are closed with staples.

Close Print Page
Figure 4.17 Placement of staples behind the screw so that the advanced scalp and forehead position is maintainedpostoperatively.(Reproduced with permission from Chen WP. Oculoplastic surgery: the essentials. New York: Thieme;2001:136.)
Staple and screw removal occurs 10 to 14 days after surgery. No drains are required. The postoperativeedema is mild and the incidence of hematoma is low.
Views of a patient before and after endoscopic eyebrow forehead lift are seen in Figure 4.18.
Figure 4.18 Views of a patient before and after endoscopic eyebrow forehead lift.(Reproduced with permission from Chen WP. Oculoplastic surgery: the essentials. New York: Thieme;2001:136.)
Copyright © 2010 Elsevier Inc. All rights reserved. Read our Terms and Conditions of Use and our Privacy Policy. For problems or suggestions concerning this service, please contact: [email protected]

Close Print Page
FURTHER READING
Bostwick J., Eaves F.F., Nahai F.: Endoscopic plastic surgery, St Louis, Quality MedicalPublishing, 1995.
Codner M.A.: Endoscopic forehead lift. In: McCord CD, ed. Eyelid surgery: principles andtechniques, New York: Lippincott-Raven; 1995:368-379.
Daniel R.K., Tirkantis B.: Endoscopic forehead lift: an operative technique. Plast ReconstrSurg 1996; 98:1148-1157.
Isse N.G.: Endoscopic facial rejuvenation: endoforehead, the functional lift, casereports. Aesth Plast Surg 1994; 18:21-29.
Kinze D.M.: An anatomically based study of the mechanism of eyebrow ptosis. PlastReconstr Surg 1996; 97:1321-1332.
Kinze D.M.: Limited incision forehead lift for eyebrow elevation to enhance upperblepharoplasty. Plast Reconstr Surg 1996; 97:1334-1342.
Lempke B.N., Stasior G.O.: The anatomy of eyebrow ptosis. ArchOphthalmic 1982; 100:981-986.
Loomis M.G.: Endoscopic brow fixation without brow fixation or miniscrews. Plast ReconstrSurg 1996; 98:373-374.
McCord C.D.: Brow surgery. In: McCord CD, ed. Eyelid surgery: principles and techniques, New York: Lippincott-Raven; 1995:166-170.
Pakkanen M., Salisbury A.V., Ersek R.A.: Biodegradable positive fixation for the endoscopicbrow lift. Plast Reconstr Surg 1996; 98:1087-1090.
Steinsapir K.D., Shorr N., Hoenig J., Goldberg R.A., Baylis H.I., Morrow D.: The endoscopicforehead lift. Ophthalmic Plast Reconstr Surg 1998; 14:107-118.
Stuzin J.M., Wagstrom L., Kawamoto H.K., Wolfe S.A.: Anatomy of the frontal branch of thefacial nerve: the significance of the temporal fat pad. Plast Reconstr Surg 1989; 83:265-271.
Vasconez L.O.: Coronal facelift with endoscopic techniques. Plast SurgForum 1992; 15:229.
Copyright © 2010 Elsevier Inc. All rights reserved. Read our Terms and Conditions of Use and ourPrivacy Policy.
For problems or suggestions concerning this service, please contact: [email protected]

Close Print Page

Close Print Page
Chapter 5 – Upper Blepharoplasty
William PD Chen
Surgical Technique
At the mid portion of the upper lid crease, the upper lid is anesthetized through skin subcutaneously withno more than 2mL of 2% Xylocaine with 1:100 000 dilution epinephrine, through a 30-gauge needle. Theanesthetic solution is lightly massaged several times to spread it evenly across medially and laterally.After 2 minutes to allow for vasoconstriction to set in, the surgical field is draped. A corneal protector isapplied. I prefer to inject the nasal fat pad quadrant only after I have reached the preaponeurotic space,with an open view.
Figure 5.3
Clinical pearls

▪ Avoid using large-gauge needles during injection. ▪ Avoid any repeated passage through the orbicularis layers to reduce the chance of bleeding.
▪ Inject slowly, from a perpendicular orientation over the central preseptal area of the orbicularis;then massage to both sides.
▪ Use diluted Xylocaine mix (see Chapter 3), or use bicarbonate supplement to decrease stingingsensation from the acidity of the full-strength injection.
Pitfalls
▪ Regional nerve block is often unnecessary, as some patients are bordered by transient torsionaldiplopia and ptosis from involvement of the levator muscle and superior oblique tendon.
Designing the skin excision
The central position of the upper lid crease is marked centrally at 8.5 to 10mm above the lashes infemales, in a semicircular configuration. Medially, it tapers down to 5mm from the lashes and may angleupward in the vicinity of the upper punctum. Laterally, the crease line is carried to about 6mm from thelash line and then the marking is angled upward, pointing toward the end of the brow.
In men, I prefer to mark the crease centrally at 8–9mm, and in a parallel shape. The medial extent of thelower line of incision is about 7mm and the lateral extent about 8mm from the lash line, rendering it moreof a parallel crease shape.
For Asians, the existing crease is measured. The central height of the tarsus is similarly measured byeverting the tarsus. If the two measurements are identical, the patient's original crease line is used as thelower marking for incision. If the current crease measures more than the central tarsal height, this authorprefers to transcribe the tarsal height measurement onto the skin side as a yardstick to the proper heightfor the new crease.

Figure 5.4
Clinical pearls
▪ Allow adequate amount of time for anesthetic solution to spread out and egress; this will reducethe tissue distortion.
▪ If the tissues are marked before injection, one tends to make an excessively high incision and
often inadvertently injure the levator. This can cause cicatricial lagophthalmos on downgaze aswell as upgaze.
▪ The use of hyaluronidase (Wydase), when available, is a helpful adjunct towards achieving thecorrect incision height and ultimately the crease height.
Pitfalls
▪ In men, the crease looks best if it is close to and along the superior tarsal border.
▪ Avoid excessive fat removal, especially in men, as it will exaggerate the sulcus.

For marking the upper line of the skin excision ellipse, the bunching technique is used only at the lateralcanthus. The proper amount of bunching in this area should show some slight eversion of lashes. Onemay maximize the skin excision laterally and should minimize the skin excision centrally and nasally. Anylagophthalmos in the upper lid is poorly tolerated if it occurs in the central or nasal portion of the lid. Oneway of ensuring symmetry in the final upper lid crease position is to measure the distance of the superiorline of incision from the brow hairs above.
Clinical pearls
▪ The superior line of the ellipse should be measured from the inferior edge of the brow hairs andgenerally is located at the juncture of the thick and thin skin of the upper lid (Fig. 5.5). Equaldistances from the upper line of incision to the brow hairs will give even creases postoperatively ifthe brow positions are symmetrical on both sides.
▪ To create symmetry in an asymmetric condition, an asymmetric amount of excision has to be
performed on the two sides. One should match and equalize the pretarsal distances (crease-to-lashes) as well as the brow-to-crease distances bilaterally.

Close Print Page
Figure 5.5
Pitfalls
▪ Bunching to determine the amount of skin removal should not be used in the central or nasalportion of the eyelid because the amount of skin excision in these areas should be conservative.If bunching is used medially and centrally, one risks excising too much tissue, which may resultin anterior lamella shortage.
▪ Avoid high incision and fixation as it may impinge on the levator muscle's ability to contract(upgaze) and relax (downgaze).
▪ Avoid excessive excision of skin medially, as it will result in cicatricial ectropion.
Copyright © 2010 Elsevier Inc. All rights reserved. Read our Terms and Conditions of Use and our Privacy Policy. For problems or suggestions concerning this service, please contact: [email protected]
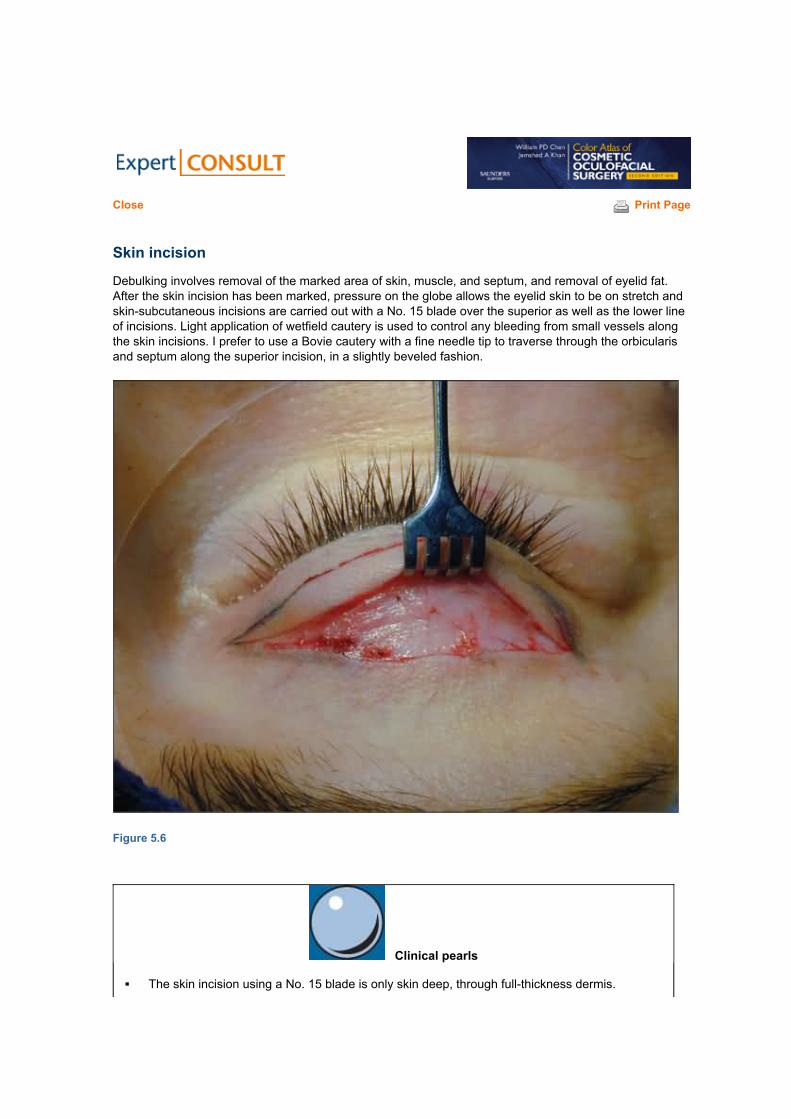
Close Print Page
Skin incision
Debulking involves removal of the marked area of skin, muscle, and septum, and removal of eyelid fat.After the skin incision has been marked, pressure on the globe allows the eyelid skin to be on stretch andskin-subcutaneous incisions are carried out with a No. 15 blade over the superior as well as the lower lineof incisions. Light application of wetfield cautery is used to control any bleeding from small vessels alongthe skin incisions. I prefer to use a Bovie cautery with a fine needle tip to traverse through the orbicularisand septum along the superior incision, in a slightly beveled fashion.
Figure 5.6
Clinical pearls
▪ The skin incision using a No. 15 blade is only skin deep, through full-thickness dermis.

Close Print Page
▪ There is a tendency to make the incision on the skin based on the outer border of the markedincision lines. To counteract this tendency, concentrate on following the incision based on theouter edge of the lower line of incision (the crease incision), and to go on the inner border of theupper marked line. This gives a safer margin of error – the crease-to-lash distance (pretarsalplatform) will not be over-exaggerated into a very high upper lid crease, nor will the crease-to-brow distance be overly shortened. The total amount of resected skin–muscle–septum willremain the same as what was intended and marked.
Pitfalls
▪ Carefully use the radiofrequency unit in making the skin incision, as one may go through deepermuscular layers inadvertently.
Copyright © 2010 Elsevier Inc. All rights reserved. Read our Terms and Conditions of Use and our Privacy Policy. For problems or suggestions concerning this service, please contact: [email protected]

Close Print Page
Transection through the upper incision line's orbicularis layer
A Bovie cutting needle is used to transect through the orbicularis layer to reach the orbital septum.Typically, a rant is created through the septum and protruding preaponeurotic fat pad can be observed.Bipolar cautery is used to cauterize bleeding small vessels in the muscle layers.
Blunt-tipped Westcott spring scissors are used to open the septum medially and laterally in a transversefashion.
Figure 5.7
Clinical pearls
▪ The beveling upward of the direction of cutting (using the Bovie tip) through the orbicularis layer

along the upper line of incision allows a more uniform distribution of the Bovie's thermal stressas well as directing it away from the overlying skin incision.
▪ This allows access to the preaponeurotic space at a higher level from the superior tarsal border,
thereby making it more likely to reach and open the orbital septum safely and without injury tothe underlying levator aponeurosis.
Pitfalls
▪ Be extra cautious in controlling small vessel bleeding from the cut edges of the orbicularis.Untreated vessels often result in unsightly hematomas postoperatively.
The skin–orbicularis flap is retracted inferiorly using a Blair retractor, exposing the preaponeurotic fat,junctional fat (transitional fat), and, occasionally, the nasal fat pad. I use forceps and scissors to clear thepreaponeurotic fat from the underlying levator aponeurosis. A small infiltrate of Xylocaine may be injectedto the back of the preaponeurotic fat pad at this time, as well as over the nasal fat pad region. Dependingon the amount of excessive and prolapsing preaponeurotic fat, part of it or most of it may be excised. Acombination of bipolar and monopolar Bovie cautery, as well as Westcott scissors, are used to transectthe fat pedicle a small portion at a time, until the intended amount is removed, in a careful and controlledfashion.
Figure 5.8
Clinical pearls
▪ Using a hemostat to apply the clamp–cut–cautery technique of fat excision often yields somelevel of discomfort or a reactive jerk from the patient.
▪ After 0.5mL of Xylocaine has been applied, the gentle teasing and cutting using the combination
of bipolar as well as Bovie cautery is usually very atraumatic. It allows an even distribution of fatexcision across the width of the preaponeurotic space.
▪ It is important to reposit the remaining fat pedicle carefully into the antero-superior orbital space,

under the orbital septum. I try to avoid directly placing the cut edge of the fat near any cut edgesof the orbicularis or orbital septum to avoid any possibility of cicatrix formation.
▪ In the prominent-eyed patient, one should be conservative in preaponeurotic fat removal so as
not to accentuate the height of the upper crease, which may make the eye appear even moreprominent.
Pitfalls
▪ Avoid deep placement of the Bovie needle into the supero-medial orbital space behind theorbital rim, to avoid injury to the trochlea and the superior oblique tendon.
▪ The clamp–cut–cautery maneuver of fat excision may tend to focus the fat removal over only the
central one-third or one-half of the preaponeurotic space. It may create a central ‘divot' ofexcision.
Located over the medial extent of the incision is a distinctive and separate fat pad – the nasal fat pad.When clinically prominent, it may be excised. A Blair retractor is placed in the inner canthus, and withpressure on the globe, an incision is made with a cutting Bovie needle through the capsule covering thepale-yellow nasal fat. The nasal fat pad is teased out with forceps and a cotton applicator stick. Often aprominent vessel is seen and it can be selectively cauterized with bipolar cautery; then, a combination ofscissors and coagulation Bovie is used to excise the nasal fat pad. Bipolar cautery is used to reduce thefat and to cauterize the remaining stump vessels. The fat is reinspected for any potential bleedingvessels.

Figure 5.9 (A) Nasal fat pad.
Figure 5.9 (B) Space after nasal fat pad has been excised.

Clinical pearls
▪ It is important to recognize and identify the much larger vessels here in the nasal fat pad, so thatit is adequately cauterized before allowing it to retract into the deep orbital space.
▪ The placement and successive replacement of a retractor, as well as gentle ballotment on theglobe, helps in identifying the nasal fat pad.
▪ An application of bipolar cautery (instead of Bovie cautery) on the fat pad's capsule prior toincision with Westcott scissors is an alternative to what was stated above. It helps to open thenasal fat pocket without having to use Bovie cautery in this important sector of the orbital space,where the superior oblique trochlea and tendon are located.
Pitfalls
▪ Deep placement of the Bovie cautery tip in the nasal fat pad space is to be avoided. There is thepotential for pain and discomfort, as well as injury to the fourth-nerve structures.
There is a separate area of fat in the transitional zone between the preaponeurotic fat and the white nasalfat. This transitional fat (junctional fat) invests the conjoined septum and extension of Whitnall's ligamentthat forms the interpad septum.

Figure 5.10
Clinical pearls
▪ Removal of the transitional fat will produce a depression in the eyelid crease nasally; thus, itshould not be removed.

Pitfalls
▪ Avoid inadvertent weakening of the medial aspect of the levator aponeurosis. Dehiscence maylead to segmental ptosis.
An open view of the preaponeurotic platform is now possible. If there should be any prolapsed lobe of thelacrimal gland (Fig. 5.11A), it can be repositioned by first securing its capsule with a 5-0 Vicryl, thenpassing the needle to a point behind the supero-nasal orbital rim, taking a bite of the inner periorbitawithin the lacrimal gland fossa. When tied, the suture should retract the lacrimal gland behind the orbitalrim (Fig. 5.11B).
Figure 5.11
Clinical pearls
▪ If left without repositioning, the prolapsed lacrimal gland tends to leave a bulge that is noticeableand unsightly over the lateral preseptal area of the eyelid.
▪ Never excise any portion of the lacrimal gland lobe. ▪ Do not cauterize it in an attempt to reduce the lacrimal gland.
Pitfalls
▪ The repositioning stitch should engage only the capsule of the gland as you reposition it behindthe orbital rim in the lacrimal gland fossa.
▪ Do not encircle the lacrimal gland lobe with any suture element.

After fat reduction, the myocutaneous flap (redundant upper lid hooding) that is now hinged along thesuperior tarsal border can be trimmed along the lower line of the incision (Fig. 5.12A–D). (The moretraditional blepharoplasty stages involve removal of the skin and orbicularis muscle in two steps, as wellas the opening of the septum as a third step.) The flap is elevated with gentle traction, separating theedges of the skin incision while it is being excised. I use a Bovie tip on cutting mode to tease (cut) throughthe orbicularis that is holding the myocutaneous flap down along the superior tarsal border. Straightscissors may also be used, slanting away from the insertions of the levator aponeurosis so as not todisrupt them. Crease sutures that will be used in closure will repair any dehiscences in the levator, but itis wise to avoid any disruption in the levator attachments. Potential bleeding areas are in the orbicularisand subcutaneous layer of the lower crease incision. The pretarsal skin is retracted with cotton applicatorsticks to expose the inferior edge of the pretarsal orbicularis muscle, and bipolar cautery is used tocauterize any bleeding vessels in this area.
Figure 5.12 (A)

Figure 5.12 (B)

Figure 5.12 (C)
Figure 5.12 (D)

Clinical pearls
▪ It is important to be conservative during the first passage using the cutting Bovie tip as you
sever the flap of redundant skin–orbicularis tissues along the lower skin incision. This will allowyou some separation from the underlying levator.
▪ One may elect to further clean up the strip of orbicularis/fascial tissues that appear excessiveand overlie the superior tarsal border, by further excision along the lower skin edge.
▪ It is helpful to pause and control bleeders from the orbicularis with bipolar cautery as you cutalong with the Bovie cautery.
▪ At the lateral end of the myocutaneous flap, I try to shallow my plane of excision to reduce my
chance of cutting across any of the larger arterioles present within the periorbital orbicularismuscle.
Pitfalls
▪ Do not apply any coagulative Bovie cautery as it may excessively char and damage the levatormuscle fibers.
▪ If one encounters partial dehiscence of the levator, it should be repaired with 7-0 silk or 6-0Vicryl.
Before final skin closure, the interpad septum is lysed to reduce tethering of closure of the upper lid (Fig.5.13).

Close Print Page
Figure 5.13 Lysis of interpad septum.
Copyright © 2010 Elsevier Inc. All rights reserved. Read our Terms and Conditions of Use and our Privacy Policy. For problems or suggestions concerning this service, please contact: [email protected]

Close Print Page
Crease fixation
For patients who desire to have further enhancement of the upper lid crease, the crease may bereinforced by applying five to six 6-0 silk stitches, placing them in an interrupted fashion from the lowerskin incision, including a small bite of the levator aponeurosis directly above the superior tarsal border, toupper lid skin edge (Fig. 5.14A & B).
Figure 5.14 (C) Crease fixation sutures using Vicryl sutures, applying them from pretarsal skin to levator aponeurosisalong the superior tarsal border.
Instead of skin–levator–skin interrupted stitches, an approach using additional 6-0 Vicryl sutures may beused to fixate the pretarsal skin–muscle edge to the levator aponeurosis. Fig. 5.14(C) it is applied just1mm below the inferior skin edge, in a transcutaneous fashion and picking up a bite of the aponeurosisabove the superior tarsal border. The knot is then double-tied over the anterior pretarsal skin surface. It isusually applied in three locations: central, medial, and lateral third of the wound. It corrects anydehiscence of the levator that could have occurred with excision of the myocutaneous-septal flap. Thethree knots are cut away at 1 week after the operation, while each of their residual loops are left behindunderneath the pretarsal tissues to promote some wound reaction.

Close Print Page
This maneuver: ▪ ensures crease position; and ▪ prevents ptosis that may occur from undetected injury to the levator.
Clinical pearls
▪ Without crease fixation and anchoring, the upper lid preseptal skin muscle layers may balloondown and cover over the pretarsal platform space.
Copyright © 2010 Elsevier Inc. All rights reserved. Read our Terms and Conditions of Use and our Privacy Policy. For problems or suggestions concerning this service, please contact: [email protected]

Close Print Page
Skin closure
The upper blepharoplasty wound is normally closed with 6-0 nylon, 6-0 Prolene, or 7-0 silk (Fig. 5.15A &B). I favor starting at the medial end of the incision and working towards the lateral end, as the woundstress is greater at the lateral end.
Figure 5.15
At the lateral end of the upper blepharoplasty incision, I use an interlocking ‘baseball stitch' (firstpopularized by Dr Clinton McCord) to terminate the closure. Essentially, it is a far–far–near–near stitchthat is then interlocked to give stability and symmetry to the wound edges. (Similarly, I use this stitching inthe lateral portion of lower blepharoplasty closure as well as direct brow lift.)
The flowchart in Figure 5.16 outlines the approach to the treatment of patients with upper eyeliddermatochalasis and brow ptosis.

Close Print Page
Figure 5.16 Decision tree for management of upper lid dermatochalasis and eyebrow ptosis.(Reproduced with permission from Chen WP. Oculoplastic surgery: the essentials. New York: Thieme;2001:145.)
Copyright © 2010 Elsevier Inc. All rights reserved. Read our Terms and Conditions of Use and our Privacy Policy. For problems or suggestions concerning this service, please contact: [email protected]

Close Print Page
Close Print Page
FURTHER READING
McCord C.D.: Techniques in blepharoplasty. Ophthalmic Surg 1979; 10:40-55.
McCord C.D.: Upper blepharoplasty. In: McCord CD, ed. Eyelid surgery: principles andtechniques, New York: Lippincott-Raven; 1995:179-195.
Sheen J.H.: Supratarsal fixation in upper blepharoplasty. Plast Reconstr Surg 1974; 54:424-431.
Copyright © 2010 Elsevier Inc. All rights reserved. Read our Terms and Conditions of Use and ourPrivacy Policy.
For problems or suggestions concerning this service, please contact: [email protected]

Close Print Page
Chapter 6 – Direct Browlift, Internal Browpexy, Browplasty
William PD Chen
In the evaluation of patients with upper eyelid skin redundancy and hooding, it is important to note theupper brow position and check for eyebrow ptosis. The upper eyebrow normally rests above the superiororbital rim in females and at the level of the supraorbital rim in males. With aging, the brow may sag downto below the orbital rim. A ptotic brow can gravitate into the upper lid skin area, creating a secondaryeyelid hooding, which is relieved when the eyebrow is repositioned to its normal location. Symptoms mayinclude visual fatigue, visual field obstruction, and fatigue of the forehead muscles, as well as headaches.This process of brow ptosis also produces a narrowed spacing between the eyebrow hairs and thelashes, which can cause a frowning appearance in the patient. The presence of brow ptosis thereforeneeds to be addressed either before upper blepharoplasty or handled concurrently.
The following eyebrow procedures that are commonly used in conjunction with upper lid blepharoplastyare covered in detail in this chapter:
▪ Endoscopic-assisted eyebrow forehead lift (see Chapter 4) is used more commonly in females for
the nasal two-thirds of the brow and glabellar area. (It is commonly supplemented with the internalbrowpexy.)
▪ Direct eyebrow lift (p. 62) is used, generally, in males. It involves direct skin incision over the area
above the brow. It is also commonly supplemented with the internal browpexy, which corrects forlateral brow ptosis.
▪ Temporal forehead lift (p. 65) is used for the lateral third of the brow when there is severe skin
laxity lateral to the brow, beyond the lateral orbital rim. Performed through a subgaleal approach, itis commonly used as a supplement to the cheeklift procedure.
▪ Internal browpexy (p. 68) is performed through the upper blepharoplasty incision for correction oflaxity in the lateral third of the brow. It is commonly used by itself in conjunction with upper lidblepharoplasty or used as a supplement to the endoscopic eyebrow forehead lift or the directeyebrow lift for elevation of the lateral third or tail of the brow.
▪ Browplasty (p. 70) is used to correct fullness due to abundance of retro-orbicularis oculi brow fat(ROOF).
Direct Browlift
A sagging eyebrow can be corrected by a direct brow lift. After the eyebrow area is locally anesthetized,an above-brow incision line is designed from the medial to the lateral extent of the upper eyebrow hair, ina gentle curve with a slight lateral flare upward. A segment of the ptotic forehead skin, usually between 8and 10mm, is marked out parallel to this lower incision. A No. 15 blade is used to incise the upper andlower brow markings. The strip of ptotic forehead skin and subcutaneous tissue, down to the level of thefrontalis muscle, is excised using cutting Bovie cautery with a needle tip. The deep frontalis muscles arereapproximated to those at the deep plane of the upper incisional edge, using multiple interrupted 4-0Polydek sutures (ME-2 needle, Deknatel). The subcutaneous tissues are then closed using subcuticularplacement of 5-0 Vicryl. The skin is closed with 4-0 nylon in an interlocking running stitch. The nylonstitches may be kept in place for 10–14 days. In Figure 6.12, the long strand of the suture is locked underthe loop of the “far–far” passage.

Figure 6.12

Figure 6.1

Figure 6.2

Figure 6.3

Figure 6.4

Figure 6.5

Figure 6.6

Figure 6.7

Figure 6.8

Figure 6.9

Figure 6.10

Figure 6.11

Figure 6.13

Figure 6.14
Clinical pearls
▪ Direct browlift is well suited for men with a receding hairline, as it avoids further migration of thehairline.
▪ The wound can be easily disguised in patients with deep forehead furrows. ▪ The medial incision lines should taper well before the medial border of the brow hair is reached.
▪ The sutures need to be left in longer to avoid wound spreading due to the strength of frontalismuscle.
▪ Wound edges need to be closed in a slightly everted and tension-free fashion.
Pitfalls
▪ A prominent incision line will form medially in the thick skin of the forehead if the incision isextended too far medially.

Close Print Page
▪ One should avoid anchoring any of the deeper plane tissues to the underlying periosteum asthis will cause an immobile brow.
▪ Often, patients may complain of hypoesthesia over the forehead region.
Copyright © 2010 Elsevier Inc. All rights reserved. Read our Terms and Conditions of Use and our Privacy Policy. For problems or suggestions concerning this service, please contact: [email protected]

Close Print Page
Temporal Forehead Lift
A lateral brow sag can be corrected by a direct lateral brow lift, with the excision of the ptotic fore-headskin concentrating on the lateral extent of the supra-brow region (Fig. 6.15). Closure may be performedusing baseball stitching or interrupted sutures.
Figure 6.15
Clinical pearls
▪ A direct lateral brow lift is great for lateral sagging of the tail of the eyebrows. ▪ The incision is well hidden behind the hairline.
Copyright © 2010 Elsevier Inc. All rights reserved. Read our Terms and Conditions of Use and our Privacy Policy.

Close Print Page
For problems or suggestions concerning this service, please contact: [email protected]

Close Print Page
Mid-forehead Brow Lift
The mid-forehead brow lift is another variation of the direct brow lift. It is suitable for individuals with deepfurrows of the forehead and significant brow ptosis, and in patients who would benefit from forwardadvancement of the hairline. The procedure is especially appropriate for men with receding hairline orbaldness (Fig. 6.16).
Figure 6.16 Preoperative view of a patient being considered for mid-forehead brow lift.(Reproduced with permission from McCord CD. Eyelid surgery: principles and techniques. Philadelphia:Lippincott-Raven; 1995:177.)
After the forehead is anesthetized with frontal nerve block and local infiltration, McCord mentions thatwhen planning for the skin incisions, one should try to find two furrows and plan to make the initial incision

in the upper one and develop the flap for advancement inferiorly. If the amount of forehead skin to beresected coincides with a lower furrow, this will result in an ideal scar (Fig. 6.17).
Figure 6.17 Coronal forehead lift, mid-forehead incision. Surgical view showing the area of skin and forehead tissue to beexcised in this patient.(Reproduced with permission from McCord CD. Eyelid surgery: principles and techniques. Philadelphia:Lippincott-Raven; 1995:177.)
The resection of skin and development of the flap can occur in either the subgaleal or subcutaneousplane. The subgaleal flap is easier to elevate and to close with less scar. However, it transects thesensory nerves, with significant forehead numbness postoperatively. The subcutaneous flap does notcause quite as much sensory loss but closure is more difficult, with tension on the skin edges. When thewound is closed, separate galeal closure is needed if it is incised. The forehead skin is closed witheverting vertical mattress sutures (4-0 Prolene) and vertical mattress sutures (6-0 nylon) (Fig. 6.18A & B).

Close Print Page
Figure 6.18 Coronal forehead lift, mid-forehead incision. (A) The skin segment has been excised in this patient withclosure of the galea and vertical mattress skin closure. (B) Same patient, 6 weeks postoperatively.(Reproduced with permission from McCord CD. Eyelid surgery: principles and techniques. Philadelphia:Lippincott-Raven; 1995:177.)
Clinical pearls
▪ Typically, the second forehead wrinkle tends to cross the midline; therefore, the tissues betweenthe second and the third forehead wrinkles are excised, counting from the brow upward.
Copyright © 2010 Elsevier Inc. All rights reserved. Read our Terms and Conditions of Use and our Privacy Policy. For problems or suggestions concerning this service, please contact: [email protected]

Close Print Page
Lateral Brow Procedures Performed in Conjunction with Upper BlepharoplastyApproach
If there are certain aging changes in the brow that will not be corrected by upper lid blepharoplasty alone,and lateral brow procedures are appropriate, the following can be used at this stage of the upper lidblepharoplasty.
Internal browpexy
If there is enough laxity in the temporal one-third of the brow so that there is concern that residual skinfolds may persist there or that the lateral eye-shadow space may not form well postoperatively, aninternal browpexy should be performed laterally. This is an effective, convenient procedure for correctionof mild-to-moderate brow ptosis that can be performed through the wound of, and at the same time as, anupper blepharoplasty.
Steps of browpexy
Three to four double 4-0 Prolene sutures are used. Each of the sutures is passed transcutaneously fromthe skin below the ptotic brow through the eyelid skin (below the inferior eyebrow hairs) and exiting intothe sub-brow space over the superior orbital rim (Fig. 6.19A). The exit site under the brow flap is markedwith methylene blue. The needle is then passed through the periosteum at a location 5–10mm above thesuperior orbital rim (Fig. 6.19B). The suture is then passed to the underside of the brow flap, near themethylene blue marking. The transcutaneous end of the suture is then passed through and exits underthe brow flap. When the two ends are tied, this will result in the lower boundary of the ptotic brow beingelevated back to a point above the superior orbital rim, correcting the brow ptosis (Fig. 6.20).

Figure 6.19 Internal browpexy of right brow. (A) Dissection in the planes superficial to the periosteum and deep temporalfascia, exposing the juncture of the deep temporal fascia to the skull, the fusion point, and the orbital ligament. (B) A fixating4-0 Prolene suture has been placed in the deep temporal fascia at its point of fusion to the skull periosteum. The suture willsubsequently be inserted into the fat and orbicularis fibers under the flap at the level of the inferior eyebrow hairs and thentied for brow support.(Reproduced with permission from Chen WP. Oculoplastic surgery: the essentials. New York: Thieme;2001:129–30.)

Close Print Page
Figure 6.20 Steps showing internal browpexy performed over left brow.
The upper blepharoplasty wound may then be closed as described in the previous chapter.
Copyright © 2010 Elsevier Inc. All rights reserved. Read our Terms and Conditions of Use and our Privacy Policy. For problems or suggestions concerning this service, please contact: [email protected]

Close Print Page
Browplasty
Excessive lateral brow fullness or prominence can sometimes be a major complaint of the patientpresenting for an upper lid blepharoplasty. This excessive fullness may not be corrected by the usualexcision of skin and muscle using the standard upper lid blepharoplasty technique. This fullness can becaused by a prominent bony superior rim, but is most commonly caused by an abundance of the retro-orbicularis oculi brow fat (ROOF). When the ROOF layer hypertrophies, it may extend downward into theeyelid proper, where it becomes preseptal fat. In these patients, sculpting and surgical excision of theROOF can allow reduction in this overly prominent area. It is performed in conjunction with upperblepharoplasty through the same lid crease access.
Approach
It is performed by approaching the fat pads in a sub-orbicularis plane towards the superior orbital rim andas far lateral as the lateral orbital rim. An internal browpexy may be performed at the same time, ifnecessary, to correct for any brow ptosis.
Surgical technique
The upper edge of the blepharoplasty incision is retracted to expose the brow fat at the superior orbitalrim (Fig. 6.21, showing left upper lid). Two Blair rake retractors are inserted to retract the skin–muscleedge. The area of fat on the rim to be removed is marked with methylene blue and is then excised bygrasping the fat with Adson forceps and dissecting it free of the periosteum using the Bovie coagulatingneedle. Dissection should not extend nasally to the superior orbital notch so as to avoid damaging thenerves and vessels in that area. The upward dissection is performed until one is approximately 1cmabove the rim. A segment of fat usually measuring 1.0–1.5cm in vertical dimension and then taperingnasally and temporally is removed (Fig. 6.22). The resection should extend laterally to thefrontozygomatic suture. The periosteum is left intact to prevent the occurrence of postoperative adhesionsthat may hinder brow movement. Additional redundant skin may be produced after brow fat excision, andany redundant fold should be excised to prevent double folding in the crease area.

Figure 6.21

Close Print Page
Figure 6.22
Copyright © 2010 Elsevier Inc. All rights reserved. Read our Terms and Conditions of Use and our Privacy Policy. For problems or suggestions concerning this service, please contact: [email protected]

Close Print Page
FURTHER READING
Bostwick J., Eaves F.F., Nahai F.: Endoscopic plastic surgery, St Louis, Quality MedicalPublishing, 1995.
Codner M.A.: Endoscopic forehead lift. In: McCord CD, ed. Eyelid surgery: principles andtechniques, New York: Lippincott-Raven; 1995:368-379.
Daniel R.K., Tirkantits B.: Endoscopic forehead lift: an operative technique. Plast ReconstrSurg 1996; 98:1148-1157.
Isse N.G.: Endoscopic facial rejuvenation: endoforehead, the functional lift, casereports. Aesth Plast Surg 1994; 18:21-29.
Kinze D.M.: An anatomically based study of the mechanism of eyebrow ptosis. PlastReconstr Surg 1996; 97:1321-1332.
Kinze D.M.: Limited incision forehead lift for eyebrow elevation to enhance upperblepharoplasty. Plast Reconstr Surg 1996; 97:1334-1342.
Lempke B.N., Stasior G.O.: The anatomy of eyebrow ptosis. ArchOphthalmic 1982; 100:981-986.
Loomis M.G.: Endoscopic brow fixation without brow fixation or miniscrews. Plast ReconstrSurg 1996; 98:373-374.
McCord C.D., Doxanas M.T.: Browplasty and browpexy: an adjunct to blepharoplasty. PlastReconstr Surg 1990; 86:248-254.
McCord C.D.: Brow surgery. In: McCord CD, ed. Eyelid surgery: principles and techniques, New York: Lippincott-Raven; 1995:166-170.
Pakkanen M., Salisbury A.V., Ersek R.A.: Biodegradable positive fixation for the endoscopicbrow lift. Plast Reconstr Surg 1996; 98:1087-1090.
Steinsapir K.D., Shorr N., Hoenig J., Goldberg R.A., Baylis H.I., Morrow D.: The endoscopicforehead lift. Ophthalmic Plast Reconstr Surg 1998; 14:107-118.
Stuzin J.M., Wagstrom L., Kawamoto H.K., Wolfe S.A.: Anatomy of the frontal branch of thefacial nerve: the significance of the temporal fat pad. Plast Reconstr Surg 1989; 83:265-271.
Vasconez L.O.: Coronal facelift with endoscopic techniques. Plast SurgForum 1992; 15:229.

Close Print Page
Copyright © 2010 Elsevier Inc. All rights reserved. Read our Terms and Conditions of Use and ourPrivacy Policy.
For problems or suggestions concerning this service, please contact: [email protected]

Close Print Page
Chapter 7 – Asian Blepharoplasty of the Upper Eyelid
William PD Chen
The main reasons why Asians without an upper eyelid crease may elect to have a crease created havebeen discussed in Chapter 1. There are many fallacies in discussions of eyelid surgery for Asians. Theconventional view that Asian eyelid surgery started only after the Second World War, with industralizationand westernization of Asia, is in my opinion erroneous. There has always been a demand for this type ofcosmetic surgery in Asia; the earliest 20 descriptions of the double eyelid crease procedures werereported in the Japanese medical literature between 1896 and 1940. In the Western Hemisphere over thelast 40 years, there has been a simultaneous rise in demand as more Asians leave their homeland andsettle abroad. Demography shows that Asians seeking eyelid crease procedures are a relatively young,affluent, and educated group. However, despite being educated, the patients' understanding of what theywant, and of what can be achieved, may not be equivalent to the surgeon's own beliefs. They may not beaware of the normal wound healing processes and have unrealistic expectations. In addition, thephysician may not be fully informed of the nuances of this specialized and peculiar aspect of aestheticeyelid surgery. Most of the complications and suboptimal results may be linked to a lack ofcommunication between the patient and the surgeon, and the failure of the surgeon to observe certainbasic concepts and hidden dangers.
One of the most common fallacies is the notion that most Asians do not have an upper eyelid crease.This may be because, typically, only those subjects without a crease would consult an aesthetic surgeon.The lid crease occurs in varying incidence among different ethnic subsets of Asians,[1] whether Chinese,Korean, or Japanese, etc. It shows provincial and geographic variance (e.g. northern versus southernChinese; Japanese who are from the northern island of Hokkaido versus those from the more southernprovince of Kyushu). Overall, among Han ethnic groups (Chinese, Koreans, and Japanese), theprevalence of a crease is 50% (Fig. 7.1). Consequently, one in two Asians is likely to have an uppereyelid crease. This ratio holds true even among parents and their offspring – for instance, two out of foursiblings will have an upper eyelid crease, or one of the two parents will have a crease. The crease heightoften correlates with the vertical dimension of the superior tarsal plate, as measured over the centralportion above the pupillary aperture. Asians are, in general, smaller in physical dimensions relative tonon-Asians. Their tarsal plate height averages 6.5–8.0mm, and the upper lid crease, if present, is usuallynot greater than this distance from the eyelid margin (ciliary border). With respect to the depth of inwardfolding of the crease line, the crease is not any less prominent in Asians as compared with non-Asians.One of the reasons that the lateral canthus appears more upslanted may be the presence medially of afold of skin over the crease, partially blocking the upper medial half of the palpebral fissure. There havebeen recent reports describing a higher lateral canthal position among certain ethnic subset of Asians,although one certainly cannot deduce or generalize this finding to all Asians.
The current hypothesis regarding the lid crease is that it results from the presence of subcutaneousterminal interdigitations of the levator aponeurosis in the pretarsal as well as along the superior tarsalborder area. The distal terminations of the levator aponeurosis fibers blend into the intermuscular septaland connective tissue fibers of the pretarsal orbicularis oculi muscle,[2] resulting in an infolding along thesuperior tarsal border when the levator is contracting the tarsus upward (Figs 7.2 & 7.3).
The term ‘westernizing blepharoplasty' is still quite often used to describe the crease procedure thatAsians elect to undergo.[3] This can be complicating and misleading to the patient and physician alike.Such Asians really do not want to select the height and crease configuration of a Caucasian's or aWesterner's eye. Rather, most Asians who elect to have Asian blepharoplasty want to look like otherAsians who have a crease – a very different crease as compared with that of a Caucasian.

Communication between patients and physicians is further weakened by additional confusion interminology. The terms ‘outer double eyelid' and ‘inner double eyelid' do not refer to the higher creasefound in a Caucasian (Fig. 7.4) versus the lower crease seen in those Asians who possess a crease, norto any upslanting of the crease over the lateral canthus. Instead, they relate to the medial configuration(shape) of the crease among Asians. The term ‘outer double' simply signifies a crease that does notconverge to the medial canthus – I believe ‘parallel' is a more appropriate term anatomically (Fig. 7.5).The term ‘inner double eyelid' refers to a medially converging crease – I consider the term ‘nasallytapered crease' as more accurate here (Fig. 7.6). The original terms make sense only if one appreciatesthe Chinese origin of these words, as they are English translations from Kanji (literal meaning: ‘words ofthe Han race'), the language of the Han people. The abstract concepts are distorted in straighttranslation. Interestingly, the classical literature and Imperial court correspondences of Korean as well asJapanese cultures from the last 500 years both utilized Chinese Kanji. Overall, these terms are quiteconfusing for anyone who is not native to the Chinese written language. It is best to avoid using them formedicolegal reasons, since Chinese as well as non-Chinese Asians may be using them inaccurately.
The term ‘Asian blepharoplasty' was first used in a paper published in 1987 by this author.[1] The paperdescribed a distinctive surgical procedure customized specifically for those Asians without a crease whodesire to have a crease, and included details concerning the height and shape of such, and the surgicalmaneuvers needed to yield a crease that appears continuous, is predictable, and remains permanent innature.
Through an external incision approach, the objective of Asian blepharoplasty is to clear a trapezoidalblock of preaponeurotic tissues along the superior tarsal border, including the skin, orbicularis, orbitalseptum, as well as minimal preaponeurotic fat, in an equidepth and uniform fashion, to allow for optimalsurgical apposition of the terminal fibers of the levator aponeurosis to the undersurface of the skin alongthe superior tarsal border.[4–7] For a nasally tapered crease, one would design the crease to convergemedially. For a parallel crease, one would stay more level and equidistant along the lid margin.

Figure 7.1 Single eyelid without upper lid crease.
Figure 7.2 Cross-sectional view of an Asian upper eyelid without lid crease. The orbital septum tends to fuse with thelevator aponeurosis in a variable fashion from down over the anterior tarsal surface up to 5mm above the superior tarsalborder. Besides the typical preaponeurotic (postseptal or orbital) fat pad, there is often presence of submuscular(suborbicularis oculi muscle, or preseptal) islands of fat pads, as well as pretarsal fat globules. The submuscular orpreseptal fat may appear as an inferior extension of the sub-brow fat (or retro-orbicularis oculi fat). The upper tarsal platemeasures from 6.5 to 8.0mm in Asians. (See Fig. 2.3.)(Reproduced with permission from Chen WP. Oculoplastic surgery: the essentials. New York: Thieme;2001:212.)

Figure 7.3 Cross-sectional view of a typical Caucasian eyelid with a natural upper eyelid crease. Aponeurotic fibers forminterdigitations to the pretarsal orbicularis oculi muscle and a subdermal attachment along the superior tarsal border. Thelid crease is often a composite of the vector forces from several of these creases. The pretarsal region is more anchoredand firmer due to the presence of interdigitations of the terminal aponeurotic fibers. The orbital septum fuses with thelevator aponeurosis at a higher level as compared with most Asians. There is less presence of the preaponeurotic fatinferiorly. There may be less submuscular fat as well as pretarsal fat. The upper tarsus is often 8.0–11.0mm inCaucasians.(Reproduced with permission from Chen WP. Oculoplastic surgery: the essentials. New York: Thieme;2001:212.)

Figure 7.4 A typical semilunar crease for Caucasians. The crease is high by Asian norm and appears more separated fromthe lid margin over the central one-third of the eyelid.

Figure 7.5 A parallel crease configuration. The crease runs equidistant from the lid margin as it courses from the medial tolateral canthus.

Close Print Page
Figure 7.6 A nasally tapered crease configuration. The crease converges to the medial canthus and may either merge intoit or stay converging but separated.
Surgical method
The concept of upper eyelid crease configurations and the essential steps needed for predictableplacement of a lid crease among those Asians without a crease have been covered in my previouspublications.[1,4,5] My method is founded on accurate measurement of the central height of the uppertarsus, using it to determine the placement of the external incision line for creation of the crease. Theideal crease tends to be of either the nasally tapered type or of the parallel configuration. A medial upperlid fold is often present to some degree in the medial portion of the upper eyelid of Asians, whether theyhave a crease or not, and should not be considered pathologic, nor should it be automatically removed.Interestingly, the same small medial upper lid fold can be seen readily in non-Asians and evenEuropeans. (At present, the term ‘epicanthal fold' seems to be indiscriminately applied to any degree offold, no matter how small, and selectively applied to Asians, a practice I believe is unfortunate.)
Copyright © 2010 Elsevier Inc. All rights reserved. Read our Terms and Conditions of Use and our Privacy Policy. For problems or suggestions concerning this service, please contact: [email protected]

Close Print Page
Close Print Page
Premedications and surgical setup
The patient usually receives 10mg of diazepam (Valium) and one tablet of Vicodin or Tylenolwith codeine, orally, an hour before the procedure. The patient is placed in a supine position,and an intravenous line and electrocardiographic monitors are applied. A pulse oximeter thatprovides a real-time readout of the patient's pAO2 is applied. All patients are given a nasalcannula with 1–2L/min of room air flow (or oxygen). Intravenous Versed (midazolam) may beused in small aliquots of 0.5mg (0.5mL of 1mg/mL).
Copyright © 2010 Elsevier Inc. All rights reserved. Read our Terms and Conditions of Use and ourPrivacy Policy.
For problems or suggestions concerning this service, please contact: [email protected]

Close Print Page
Anesthetic mixture and injections
Two mixtures of local anesthetics are then prepared:
1. 10mL of 2% lidocaine (Xylocaine) containing 1:100 000 dilution of epinephrine is mixed with 150units of hyaluronidase, if available, and labeled ‘regular'. (This mixture is still acidic in nature.)
2. 1mL of the above mixture is further diluted with 9mL of injectable normal saline. This mixture now
has a pH closer to neutrality since it has been diluted with the buffering action of injectable normalsaline. The epinephrine concentration is now 1:1 000 000 (labeled ‘diluted').
A drop of topical anesthetic, 0.5% proparacaine hydrochloride (Ophthaine, Ophthetic) is applied overeach cornea for comfort prior to surgical preparation and draping. Using a 30-gauge half-inch needle,0.25–0.5mL of the diluted mixture is infiltrated subcutaneously over the superior tarsal border of the mid-portion of the lid. During the next 2 minutes, anesthesia takes effect and one can observe blanching ofthe eyelid skin from the powerful vasoconstrictive effect of the diluted epinephrine (Fig. 7.7).

Figure 7.7 Blanching of skin following injection of anesthetic mixture containing diluted epinephrine. Intensevasoconstriction is seen even with dilution of 1:1 000 000 epinephrine.
The regular mixture is then injected in the suborbicularis plane along the mid-section of the upper lid,usually applying less than 1.0mL per eyelid.
The purpose of this two-staged injection of local anesthetic is to allow for a relatively painless pre-infiltration to anesthetize the surgical field before the full strength of acidic 2% Xylocaine is given.[1] (Onemay add sodium bicarbonate to the 2% mix to achieve the same effect: for a 10% volume mixture, 1mL of8.4% sodium bicarbonate, containing 100mEq or 8.4g per 100mL, is mixed with 9mL of the 2%Xylocaine.) The hyaluronidase promotes dispersion of the anesthetic and greatly reduces any tissuedistortion, facilitating the identification of any crease line that the patient may have.
When confronted with a patient with a low threshold for pain, one may supplement the local fieldinfiltration with a frontal nerve block: a 30-gauge half-inch needle may be used to apply 1mL of theanesthetic into the supraorbital space just lateral to the supraorbital notch.
The eyelids and face are then prepared in the usual fashion for ophthalmic plastic surgery. The eyesagain receive a drop of topical anesthetic, this time using tetracaine hydrochloride for longer-lastingcorneal anesthesia. To eliminate the possible sensation of claustrophobia that may occur with drapingover the nose and midface, a single layer of sterile, moistened, porous gauze may be placed over thepatient's exposed nose and mouth. Black opaque corneal protectors are then applied under the eyelids.
Clinical pearls
▪ The use of diluted anesthetic solution helps to: ▪ decrease pain upon injection; ▪ decrease volume of anesthetic needed for injection; and
▪ create less tissue distortion as a result of less volume expansion and lessenedbleeding.
▪ It allows the surgeon to stay focused on the surgical plane.
▪ The use of nasally delivered room air or low-flow oxygen serves to decrease the patient's senseof claustrophobia.

Close Print Page
Pitfalls
▪ Never use nasal oxygen in an open system exposed to monopolar cautery, as it may causeignition and flaming.
▪ Always apply pulse oximetry to measure the pAO2 saturation. Preoperative s.jpgion andintraoperative s.jpgion may easily cause apnea in a sensitive patient.
Copyright © 2010 Elsevier Inc. All rights reserved. Read our Terms and Conditions of Use and our Privacy Policy. For problems or suggestions concerning this service, please contact: [email protected]

Close Print Page
The Advanced Concept of Triangular, Trapezoidal, and Rectangular Debulkingof Eyelid Tissues, as Applied in Asian Blepharoplasty – by William Chen MD
In the past, double eyelid procedures were carried out through various external incision methods, whichmay have involved removing skin,[8] skin with orbicularis,[9,10] skin with pretarsal fat,[11] or excision ofskin, muscle, orbital septum, and preaponeurotic fat.[12,13] They were all attempts at creating a clearplatform for the formation of adhesions between fibers of the levator aponeurosis and the subcutaneousstructure of the surgically created crease. However, because the excision may not be uniformly carriedout over the width of the crease, often an irregular platform of tissues anterior to the superior tarsal borderis left behind and this will interfere with the definition and formation of the crease.
The author's method[5] of triangular and trapezoidal debulking allows a systematic and uniform cleaningof the preaponeurotic platform over and along the superior tarsal border. As Figure 7.40 shows:
1. When skin excision (<2mm) is performed in conjunction with placement of the lid crease, retractingthe upper skin incision edge permits an upwardly beveled plane of dissection to proceed acrossthe supratarsal orbicularis oculi muscle and the lower portion of the orbital septum. (In Asianswithout a crease in the upper lid, the orbital septum is often fused to the levator aponeurosis at 2–4mm above the superior tarsal border, and it can be as low as halfway down the anterior surfaceof the tarsus.) The septum and underlying preaponeurotic fat pads may be easily identified.
2. The septum orbitale is opened horizontally. This trapezoid (viewed in cross-section) ofpreaponeurotic tissues, including sometimes a minimal amount of preaponeurotic fat, the orbitalseptum, supratarsal orbicularis, subcutaneous fat, and overlying skin (<2mm), all of which hingesalong the superior tarsal border, may be debulked. The anterior surface of this conceptualtrapezoid consists of the skin, while the posterior portion of the trapezoid is wider and includes allpreaponeurotic tissues from the opened orbital septum down to the superior tarsal border.
3. A small strand of the pretarsal orbicularis along the inferior skin incision may be trimmed off.
4. The trapezoidal debulking allows simple inward folding of the skin edges towards the underlyingaponeurosis, facilitating the surgical formation of the crease. (The microscopic study by Collin etal.[2] described insertions of distal strands of the levator aponeurosis into the septa in betweenpretarsal orbicularis oculi muscle fibers, rather than into any subdermal tissue along the lid creasein those eyelids that had crease. If true, formation of a crease may be facilitated by the abovesurgical maneuver, as it links the aponeurosis to the upper boundary of the pretarsal zone.)Vigorous dissection and debulking of pretarsal tissues is to be avoided for reasons mentionedpreviously.

Figure 7.40 Cross-sectional drawing of an Asian upper eyelid without upper lid crease. Black dots correspond to lines ofskin incision. The oblique solid arrows correspond to the transorbicularis vector from skin to orbital septum. Dotted arrowsshow possible plane of dissection through the preaponeurotic fat pads. Trapezoidal debulking of preaponeurotic tissues inAsian blepharoplasty may include all tissues bounded by the lower and oblique transorbicularis vectors, and that betweenthe skin and the orbital septum. Minimal fat excision may also be included.(Reproduced with permission from Chen WPD. Asian blepharoplasty: a surgical atlas. Newton, MA:Butterworth and Heinemann; 1995:165.)
When debulking is carried out without including any skin excision, the block of tissue removed willresemble a triangular configuration in cross-sectional view.
Should there be significant skin redundancy, the amount of skin included for excision is increased bymoving up the upper line of skin incision. The plane of dissection through the orbicularis then becomesless beveled and the trapezoidal debulking gradually transforms into more of a rectangular configuration.
Figure 7.41 shows the transorbicularis vector (Step 2) for the dissection plane rotating counter-clockwiseand leveling off as one takes away more skin and the upper line of skin incision – 1(U) – moves furtheraway from the superior tarsal border (level of STB).

Figure 7.41 Schematic drawing showing anterior lamella of upper eyelid, with orbicularis of the supratarsal region andskin lying anterior to the orbital septum. The first surgical step involves upper and lower lines of incisions, 1(U) and 1(L),above the superior tarsal border (STB). The second step involves an oblique transection through the orbicularis (2) via thetransorbicularis vector line. For the third step (3), upon reaching and opening of the orbital septum, one dissects inferiorlytowards the superior tarsal border. Step 4 shows a leveled excision of orbicularis and redundant skin above the superiortarsal border. The transorbicularis vector rotates and levels off as more skin needs to be removed, such that the cross-section of soft tissues that are debulked changes from a triangular, to a trapezoidal, and finally to a rectangularconfiguration.(Reproduced with permission from Chen WPD. Asian blepharoplasty: a surgical atlas. Newton, MA:Butterworth and Heinemann; 1995:166.)

In triangular debulking (without skin removal):
As you proceed to trapezoidal and rectangular debulking, the ratio of orbicularis to skin removal, asmeasured vertically, approaches 1:1 (with n=1).
The ratio will be below 1.0 only when the amount of skin redundancy is truly excessive, as in an elderlyperson, allowing the removal of excessive skin without compromising wound closure and predisposition toectropion and lagophthalmos of the upper lid. In this situation, a ‘reverse' trapezoidal block of tissue isremoved, with the height over the skin side greater than the height of the preseptal orbicularis removed.Even in this case with a large amount of skin removal, the traverse through the orbicularis muscle(transorbicularis vector) should still be perpendicular to the levator palpebrae superioris muscle.Therefore:
In young individuals,
In elderly individuals,
and, occasionally, <1.0 (where d = amount of resection)
In summary, the applications of trapezoidal debulking of the preaponeurotic platform in Asianblepharoplasty and its advantages are as follows:

Close Print Page
▪ Easier approach through the orbital septum and preaponeurotic space when the plane of
dissection is beveled. It lessens the possibility of injury to the levator aponeurosis when there is abuffer of preaponeurotic fat pad under the septum and on top of the levator.
▪ It allows for a controlled, uniform debulking of the junctional platform of tissues in the supratarsaland pretarsal area.
▪ It allows optimal formation of attachments between the levator aponeurosis and the inferior
subcutaneous tissues, or to the intermuscular septa within pretarsal orbicularis oculi fibers(pretarsal zone).
▪ It allows crease formation to be based on the individual's tarsus height.
▪ It reduces the rate of complications, including problems with asymmetry, shape, height, continuity,
permanency, segmentation of crease caused by uneven planes of dissection, fading and latedisappearance of crease, multiple creases, and persistent edema.[5]
In conclusion, this concept of triangular, trapezoidal, and rectangular debulking of the preaponeuroticplatform is applicable universally to upper eyelid surgery in all ethnic groups, and in cases withchallenging lid crease management problem. This latter topic will be covered in Chapter 15.
Copyright © 2010 Elsevier Inc. All rights reserved. Read our Terms and Conditions of Use and our Privacy Policy. For problems or suggestions concerning this service, please contact: [email protected]

Close Print Page
Close Print Page
REFERENCES
1. Chen W.P.: Asian blepharoplasty – anatomy and technique. J Ophthalmic Plast ReconstrSurg 1987; 3:135-140.
2. Collin J.R., Beard C., Wood I.: Experimental and clinical.jpga on the insertion of the levatorpalpebrae superioris muscle. Am J Ophthalmol 1978; 85:792-801.
3. Chen W.P.: A comparision of Caucasian and Asian blepharoplasty. OphthalmicPract 1991; 9:216-222.
4. Chen W.P. D.: Asian blepharoplasty: a surgical atlas, Newton, MA, Butterworth andHeinemann, 1995.
5. Chen W.P. D.: Concept of triangular, rectangular and trapezoidal debulking of eyelidtissues: application in Asian blepharoplasty. Plast Reconstr Surg 1996; 97:212-218.
6. Chen W.P. D.: Eyelid and eyelid skin diseases. In: Lee D, Higginbotham E, ed. Clinicalguide to comprehensive ophthalmology, New York: Thieme; 1998.
7. Chen W.P. D.: Oculoplastic surgery: the essentials, New York, Thieme, 2002.
8. Sayoc B.T.: Plastic construction of the superior palpebral fold. Am JOphthalmol 1954; 38:556-559.
9. Hayashi K.: The double eyelid operation. Jpn Rev Clin Ophthalmol 1938; 33:1000-1010.(Part 1);1098–110 (Part 2)
10. Fernandez L.R.: Double eyelid operation in the Oriental in Hawaii. Plast ReconstrSurg 1960; 25:257-264.
11. Inoue S.: The double eyelid operation. Jpn Rev Clin Ophthalmol 1947; 42:306.
12. Mitsui Y.: Plastic construction of a double eyelid. Jpn Rev Clin Ophthalmol 1950; 44:19.
13. Sayoc B.T.: Anatomic considerations in the plastic construction of a palpebral fold in thefull upper eyelid. Am J Ophthalmol 1996; 63:155-158.
Copyright © 2010 Elsevier Inc. All rights reserved. Read our Terms and Conditions of Use and ourPrivacy Policy.
For problems or suggestions concerning this service, please contact: [email protected]

Close Print Page
Lower Lid Blepharoplasty by Skin–muscle Flap Approach
The traditional lower blepharoplasty is indicated for patients who have aging changes, with underlyingskin laxity and some gravitional descent of structures. It is also indicated for some males with agingchanges who want a conservative approach.
The procedure starts by placement of a 4-0 silk as a traction suture over the central portion of the lowereyelid margin. An incisional line is marked approximately 1mm below the cilia from the medial canthustowards the lateral canthus; it is then slanted inferolaterally for approximately 6–8mm after reaching thelateral canthal angle. Ideally, the inferolateral incision would merge with one of the crow's-feet lines there(Fig. 8.1A & B).
Figure 8.1 (A) Infraciliary incision line for lower blepharoplasty.

Figure 8.1 (B) (upright view) right lower eyelid.
The initial skin incision starts over the inferolateral portion and is best performed using a No. 15 Bard-Parker blade. Small amounts of capillary bleeding are controlled using bipolar cautery. A cutting Boviecautery is then used to incise through the orbicularis layer to fashion a myocutaneous flap, starting at thelateral canthal area. Once a small space is initiated, a small Blair retractor is inserted and turned laterallyso that the traction is lateral. Straight sharp scissors are then inserted beneath the skin over the pretarsalregion, undermining the skin beneath the lashes. The incision over the infraciliary region is thencompleted using the straight scissors. Next, the orbicularis is undermined, and incised approximately 2–3mm below the inferior border of the tarsus, thereby avoiding the inferior tarsus arcade. The orbicularismuscle overlying the tarsus in the pretarsal region is not incised – this helps in preserving the lower lidtone. The myocutaneous flap is retracted with the Blair retractor inferiorly, while the lid margin is retractedsuperiorly with the traction suture or the surgeon's finger on a gauze pad.
Gentle pressure on the globe allows any fat to protrude forward. A needle-tipped Bovie cautery is thenused to incise the septum (Fig. 8.2). Incision into the central fat pocket is done first. Prolapsing andredundant fat may be excised using a combination of bipolar cautery first, followed by excision using theBovie needle on coagulation mode. The retractor is then repositioned towards the nasal direction,retracting the medial edge of the lower lid incision nasally, and with downward pressure the nasal fat padis made to protrude. The capsule is incised and the nasal fat pad, which is usually pale white, mayprotrude. The fat is similarly excised using bipolar cautery as well as the Bovie needle on coagulationmode. Any visible blood vessels should be carefully cauterized before allowing them to be reposited.Between the central and nasal fat pads lies the inferior oblique muscle and this should be protected. Thelateral fat pocket is removed, if necessary, after the lateral canthoplasty procedure is performed.

Figure 8.2 Drawing showing prolapse of fat through right lower eyelid incision.
Surgical technique of lateral canthoplasty
Often a patient will exhibit age-related laxity of the lower lid margin as well as lateral canthal dehiscence.The addition of this maneuver allows the surgeon to stabilize the eyelid fissure, correct for horizontallaxity of the lower eyelid, as well as adjust for the prominent-eye patient as seen in thyroid eye disease.This is performed before the lateral fat pad excision because it will affect the prominence of the lateral fatpad.
A lateral canthotomy is performed using scissors, connecting the incision with the inferolateral extensionof the skin incision line. An inferior cantholysis is performed over the superficial and deep portion of thelateral canthal tendon. The freed lower lid segment is draped under mild tension against the globe anddirected towards a point just above the lateral orbital tubercle in the area of the lateral orbital rim. Aredundant segment of the lower lid, measuring between 2 and 4mm, may be excised, depending onindividual findings. Capillary oozing from the inferior tarsal arcade is easily stopped with bipolar cautery.The reanchoring of the lateral portion of the tarsus may be performed using either a 5-0 Vicryl or an 5-14

needle or 4-0 Prolene suture on a P-2 needle (Ethicon) (Fig. 8.3A & B). The needle is inserted throughthe inferior portion of the tarsus, taking an intratarsal bite and then exiting through the upper portion of thetarsal plate, just below the lid margin so that it will remain buried when tied. This upper end of the sutureis then passed through the inner periorbita just above the lateral orbital tubercle and brought from insidethe lateral orbital rim outward. It is then reinserted from outside the lateral orbital rim inward and tightenedwith a double throw until the lower lid margin rests along the lower corneal limbus with the desiredtension. Lid tension is tested intraoperatively to confirm appropriate tightness. In persons who do notshow any horizontal laxity and in whom lower lid tightening is not performed, the tied suture may evencontain slack. When the knots are tied, care is taken to make sure that the suture knot will not protrudeand irritate the overlying skin.

Figure 8.3 (A) Right lower lid following resection of a lateral segment.
Figure 8.3 (B) Upright view of right lower lid following resection of a lateral segment.

Close Print Page
Copyright © 2010 Elsevier Inc. All rights reserved. Read our Terms and Conditions of Use and our Privacy Policy. For problems or suggestions concerning this service, please contact: [email protected]

Close Print Page
Undermining of the skin–muscle flap
It is important to undermine the skin–muscle flap over the malar area separating the septal strands andperiosteum from the myocutaneous flap (Fig. 8.4A & B). This allows for further smoothing of the malararea. Failure to do this will cause anterior distortion of the lateral fat pocket, requiring more resection.Once the myocutaneous flap is dissected free, the lateral fat pocket may be resected if necessary.
Figure 8.4 (A) View of right lower lid.
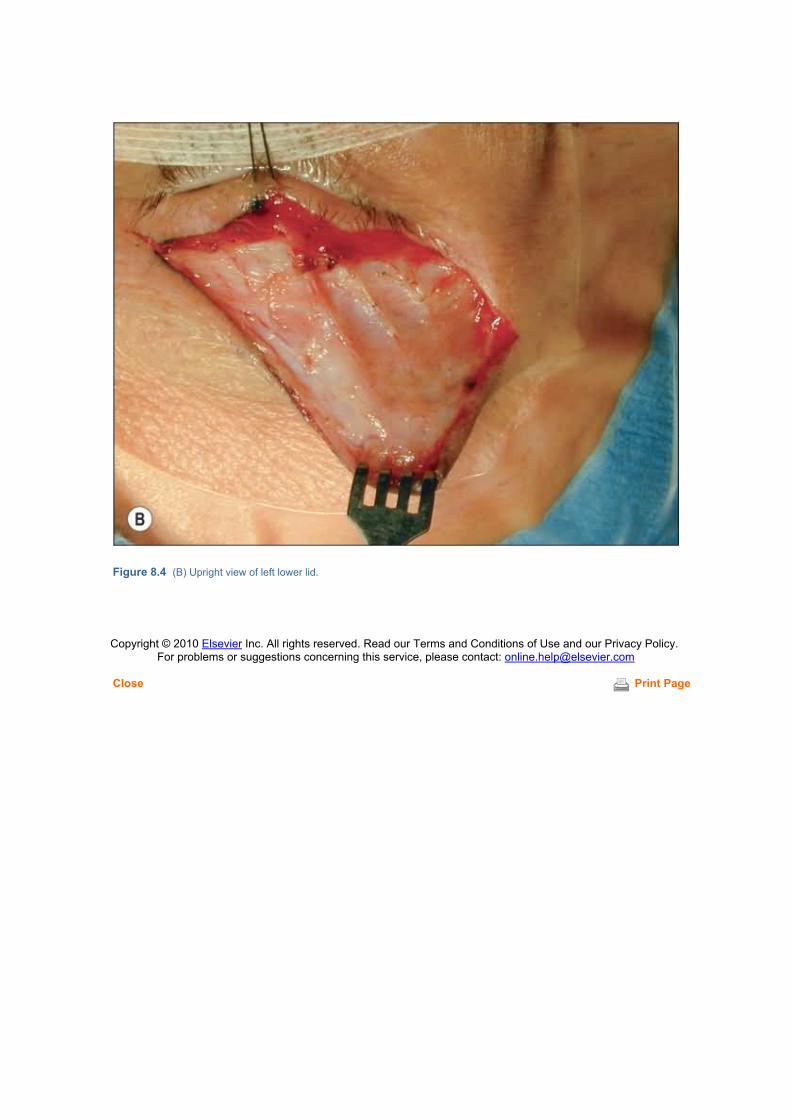
Close Print Page
Figure 8.4 (B) Upright view of left lower lid.
Copyright © 2010 Elsevier Inc. All rights reserved. Read our Terms and Conditions of Use and our Privacy Policy. For problems or suggestions concerning this service, please contact: [email protected]

Close Print Page
Close Print Page
Lateral fat pad excision
The lateral fat pad may be trimmed with a combination of bipolar and Bovie cautery followinghorizontal tightening and undermining of the skin–muscle flap. It is important to preserve thearcuate portion of the orbital septum laterally, to prevent recurrence of the lateral fat padprolapse. The lateral fat and the central fat are connected and can be teased from behindthis portion of the septum without severing it.
Copyright © 2010 Elsevier Inc. All rights reserved. Read our Terms and Conditions of Use and ourPrivacy Policy.
For problems or suggestions concerning this service, please contact: [email protected]

Close Print Page
Resection of the skin–muscle flap and periosteal fixation
The tip of the skin–muscle flap is stretched towards the superior tip of the ear to determine how much thelateral portion of the flap overlaps the underlying incision (Fig. 8.5A). The first triangle of excess tissue isexcised from the lateral portion of the skin–muscle flap. The flap is sutured at the lateral canthal angle'slateral periosteum to create a desired level of tension over the cheekbone and correct for any hollowingeffect in the lower lid. Trial positioning of the flap to the lateral rim may be performed until the desiredlevel of tension is obtained. For this maneuver, a 4-0 silk suture is used: it passes through the anchoringpoint located on the skin–muscle flap, then into the lateral periosteum at the desired position, and is thenbrought out through the skin–muscle layer of the upper edge of the incision at the lateral canthal area(Figs 8.5B & 8.6). The second triangle of excess skin–muscle flap is then trimmed along the infraciliaryincision line. This is usually a long and thin triangular strip.
Figure 8.5 (A) Segment of redundancy removed in lower blepharoplasty.

Figure 8.5 (B) Right lower lid (upright view)

Close Print Page
Figure 8.6 Upright view of right lower lid.
Trimming of the orbicularis muscle fibers from beneath the skin–muscle flap may be performed if thereseems to be excess, to further thin the lid down. These are orbicularis fibers that overlap the musclefibers preserved on the pretarsal area from the original incision. This is more applicable to women, to givea smooth look; in men, it is often left in place, to avoid an overly thinned appearance. The flap is evertedand examined for bleeders; any vessels that are actively bleeding are cauterized with bipolar cautery.
Copyright © 2010 Elsevier Inc. All rights reserved. Read our Terms and Conditions of Use and our Privacy Policy. For problems or suggestions concerning this service, please contact: [email protected]

Close Print Page
Close Print Page
Wound closure
Closure of the skin flap is performed using 7-0 silk sutures. The inferolateral region of the incision is bestclosed using a vertical mattress suture, taking care that both the skin edge and the deeper orbicularis areclosed. An alternative to this is the utilization of a ‘far–near near–far' type of baseball stitching using 7-0silk, which gives good wound approximation as well as tension control (Fig. 8.7). Meticulous closure isessential in this conspicuous area in order to avoid scarring. A small dog-ear may be seen laterally andcan be trimmed off.
Figure 8.7 Closure of blepharoplasty wound in right lower lid (upright view). The steristrip is retracting the right upper lid.
Copyright © 2010 Elsevier Inc. All rights reserved. Read our Terms and Conditions of Use and our Privacy Policy. For problems or suggestions concerning this service, please contact: [email protected]

Close Print Page
The Primary Cheeklift
The traditional lower blepharoplasty has only limited value in addressing anyone with significantgravitational ptosis of the midface or cheek, which is present in the majority of middle-aged patients. Thelower eyelid should not be considered as a structure that ages in isolation and behaves independently ofthe supporting contiguous structures beneath it. It is therefore best evaluated as part of the midfacestructure which is subjected to the same involutional laxity, ligamentous dehiscences, and atrophy, aswell as gravitational sagging. Lower blepharoplasty can therefore be performed as part of the midfacerejuvenation made possible through a cheeklift.
The cheeklift addresses the aging changes that occur in the triangular area from the nasolabial fold to theeyelids: ▪ eyelid fat protrusion; ▪ laxity and sagging of eyelid skin and midface skin; and ▪ descent of subcutaneous face fat and midface structures.
Subcutaneous sagging of orbicularis muscle and dropping of the malar fat pad cause a good part of thechanges that occur with age – when they are repositioned, this restores the face to a more youthfulappearance (see Fig. 2.14).
The trans-lid cheeklift (Fig. 8.8A) repositions the cheek in a more anatomically correct vector than thefacelift. The traditional facelift (Fig. 8.8B) should be more properly called a necklift with oblique vectorstowards the ear – the vertical-upward vector is the proper direction to restore the cheek and midfacecontours.

Figure 8.8 (A) Trans-lid cheeklift.

Figure 8.8 (B) Traditional facelift.
With our development of the trans-lid cheeklift, we now limit the dissection for facelift towards the neckarea (Fig. 8.8C), while the midface area is addressed exclusively through the lower lid.

Figure 8.8 (C)
To briefly review the anatomic layers of the midface (see Figs 2.15–2.22):
▪ The first layer, facial bone, shows the sensory nerves and origin of some facial mimetic muscles(Fig. 2.15).
▪ The next layer shows the mimetic muscles in place – the levator labii insertions at the orbital rimnasally are included in the dissection (Fig. 2.16).
▪ Then, on top of the mimetic muscles and under the orbicularis muscle, is a layer of fat called the
sub-orbicularis oculi fat (SOOF), which extends to the brow to become the retro-orbicularis oculi fat(ROOF) (Fig. 2.17).
▪ The next layer is the orbicularis muscle (Fig. 2.18).
▪ A deep portion of the malar fat pad lies on top of the orbicularis and is just under and permeatedby the superficial musculo-aponeurotic system (SMAS) (Fig. 2.19).
▪ The SMAS overlies the previous deep portion of the malar fat – and in turn the superficial portionof the malar fat lies above it. The SMAS is blocked inferiorly by the nasolabial fold (Fig. 2.20).
▪ And on top of that is the skin (Fig. 2.21).
One other structure that is important, which originates from the orbital rim and combines with (and isconsidered to be part of) the SMAS, is the orbital malar ligament (Fig. 2.22).

Surgical steps of the cheeklift
The cheeklift mechanics should be thought of as consisting of two important steps: ▪ anchoring of the canthus, which mainly controls the shape of the eyelid fissure; and
▪ anchoring of the cheek flap itself (inferior orbicularis arc), which really supports the lower lid andcheek
The skin–muscle flap is elevated and dissected to the inferior rim where the periosteum is incised. Figure8.9 shows the subperiosteal dissection of the flap from the rim, elevating the cheek tissue from thecheekbone.
Figure 8.9
The subperiosteal elevation is carried out over the zygomatic area but stops short of the nerve nasally –the periosteum usually needs release, particularly over the zygomatic area (Fig. 8.10A&B).

Figure 8.10
Further release is obtained by finger stretching (Fig. 8.11).

Figure 8.11 Finger stretching to loosen cheek flap.
The first of the two anchoring procedures is at the lateral canthus. Anchoring at the canthus controls theshape of the eyelid fissure. In patients with standard eye prominence, unmodified canthal anchoring canbe used (Fig. 8.12). The canthus is anchored at the level of inferior pupil edge and inside the lateralorbital rim. It is important always to include the upper lid in the fixation, for alignment and function ofeyelid closure.

Figure 8.12 Canthal anchoring – standard eye prominence.
With a deep-set or enophthalmic eye, and the prominent (or proptotic) eye, the horizontal direction of pullmust be modified to prevent the clotheslining upward in the deep-set eye, or, conversely, the clothesliningdownward in the prominent eye (Fig. 8.13).

Figure 8.13 Effect of horizontal vector with lateral canthoplasty orbicularis–cheek tightening.
Upward clotheslining in the deep-set eye produces an overly narrow fissure – a ‘squinty' eye. Thus, withthe deep-set eye, canthal anchoring is shifted downward and more internal, to prevent such effect (Figs8.14 & 8.15).

Figure 8.14 Canthoplasty – enophthalmic eye.

Figure 8.15 A patient with a deep-set eye – Hertel 15 – before and after a cheeklift with modification of canthal anchoring.
Downward clotheslining in the prominent eye produces scleral show. Thus, with a prominent eye, canthalanchoring is shifted upward, usually with slack, to prevent such effect (Figs 8.16 & 8.17).

Figure 8.16 Canthoplasty – prominent eye.

Figure 8.17 A patient with prominent eyes – Hertel 18mm a little over a week after a canthoplasty modified for theprominent eye.
With lower lid laxity (redundancy), tightening of the tarsoligamentous sling prevents buckling of the lowerlid and ectropion (Fig. 8.18).

Figure 8.18 Canthoplasty – lower lid laxity.
With increasing prominence of the globe, I routinely release the inferior retractors (capsulo-palpebralfascia) (Fig. 8.19).

Figure 8.19 Recession of capsulo-palpebral fascia.
With cases of more severe prominence, use of a primary spacer prevents postoperative scleral show –currently, Alloderm seems to work well (Figs 8.20 & 8.21).

Figure 8.20 Primary spacer.
Figure 8.21 A patient with prominent eyes – Hertel 19 – after cheeklift with primary spacer.
The other major anchoring step is anchoring the inferior arc of the orbicularis muscle in the cheeklift flap.This supports the lower lid and the cheek.
To isolate a portion of the inferior arc of the orbicularis muscle, a subcutaneous dissection is performeddown to the inferior edge of the muscle into the SMAS (Fig. 8.22).

Figure 8.22
The muscle flap usually will be pulled in a different vector than the skin flap (Fig. 8.23).

Figure 8.23 Development of orbicularis flap.
The anchoring of the orbicularis muscle is very important – it is the handle of the cheeklift. With its fixationand anchoring, it redrapes the cheek and it also provides a sling-like support for the lower lid. Also, withits redraping, the eyelid fat is repositioned by tension of the flap on the orbital septum which lines theinner surface of the flap.
Double anchoring is necessary – the base of the orbicularis muscle arc is anchored at the orbital rim atthe level of the lateral canthus, while the tip of the orbicularis muscle arc is anchored at varying places inthe deep temporal fascia (Fig. 8.24).

Figure 8.24 Anchoring of orbicularis muscle flap to periosteum and deep temporal fascia.
Before fixation of the muscle occurs, there are variations in the redraping of the orbicularis muscle flap.
In the non-prominent eye, an oblique or more horizontal vector can be used for attachment of the base ofthe flap for optimal smoothing of the cheek and the nasolabial fold (Fig. 8.25).

Figure 8.25 Non-prominent eye.
In patients with a prominent eye, a vertical vector must be used to prevent the clotheslining effect on thelower lid (Fig. 8.26).

Figure 8.26 Prominent eye.
Before the suture is placed in the flap, the anchoring suture is first double-loop stitched in the periosteumat the lateral orbital rim (Fig. 8.27A).
The fixating suture for anchoring the base of the flap is placed at the inferior edge of the orbicularis – inthe SMAS (Fig. 8.27B).

Figure 8.27 Periosteal stitch.
It is then brought through the muscle–SMAS flap with a quilting suture (Fig. 8.28A,B).
Figure 8.28 Anchoring of the base of the orbicularis flap.
After anchoring the base of the flap at the orbital rim, the tip of the flap is then fixated to the deeptemporal fascia (Fig. 8.29A,B).

Figure 8.29 Fixation of tip of flap.
Figure 8.30 shows suturing the tip of the flap to the deep temporal fascia – some redundant muscle isusually trimmed.

Figure 8.30
A good bit of skin is usually vertically recruited over the lateral half of the lid margin; it may be excisedafter careful assessment (Fig. 8.31A & B).

Figure 8.31

Figure 8.32 (A) Before and (B) after.

Figure 8.33 Oblique views. (A) Before and (B) after.

Figure 8.34 (A) Before and (B) after.
Figure 8.35 (A) Before and (B) after.

Figure 8.36 Frontal view. (A) Before and (B) after.

Figure 8.37 Oblique view. (A) Before and (B) after.

Figure 8.38 (A) Before and (B) after.
Figure 8.39 (A) Before and (B) after.
Figure 8.40 (A) Before and (B) after.
Figure 8.41 (A) Before and (B) after.

Close Print Page
Figure 8.42
A special case – a patient with facial dystrophy and severe eye prominence. Dermis fat grafts wereplaced in the malar area as a cheek filler. I was responsible for the eyelids and cheek and used a primaryspacer of autogenous dermis to normalize the eyelid fissure.
Recently, I reviewed 195 cheeklift procedures performed over approximately 18 months, 151 of whichwere primary cheeklifts. Using the described techniques, only four cases (2.6%) required any revision – arate that is quite acceptable for a cosmetic procedure.
Copyright © 2010 Elsevier Inc. All rights reserved. Read our Terms and Conditions of Use and our Privacy Policy. For problems or suggestions concerning this service, please contact: [email protected]

Close Print Page
Chapter 9 – Avoidance of Complications with Lower Lid BlepharoplastyCheeklift
Clinton D McCord Jr
Anchoring techniques are the heart of not only the prevention of problems but also the correction ofproblems.
The term ‘anchoring' refers to the two main fixation points in a cheeklift:
▪ anchoring of the lateral eyelid tendons – canthoplasty or -pexy, which controls the shape of theeyelid fissure; and
▪ anchoring of the inferior arch of the orbicularis muscle, which provides support for the lower lid andpositions the mid-cheek.
The approach to the lower lid surgery is to perform cheeklifts through transcutaneous eyelid incisions withoptimum redraping of skin.
The two most common problems after cheeklift are: ▪ abnormalities in the shape of the eyelid fissure from failure of canthal anchoring; and
▪ retraction and sagging of the lower lid and cheek from failure of anchoring of the inferior orbicularismuscle.
Eyelid fissure shape is the result of the position and curvature of the upper and lower lids. Excellentstudies have shown mathematically that upper lid curvature is almost solely the result of the indentation ofthe globe on the lid. This is not so with the lower lid, where indentation does play some role, but the toneand position and laxity of the canthal attachments of the lower lid are the most important.
Normal eyelid fissure shape varies, but, in general, the lower lid edge reaches the inferior limbus – thecanthal angle is as high as the inferior pupillary edge.
The downward displacement of the canthus and lower lid that occurs with age is a constant.
Figure 9.1 summarizes the variety of modifications that must be made in lateral canthoplasties with thevarying conditions of: ▪ a standard positioned eye; ▪ a lower lid with horizontal laxity; ▪ a prominent eye; and ▪ an enophthalmic eye.
Patients with a greater degree of eye prominence usually will require additional steps to prevent scleralshow. Loosening of the retractors in the lower lid by recession of the capsulo-palpebral fascia will gainsome upward movement of the lid edge in prominent-eyed patients (see Fig. 8.19). Those with veryprominent eyes will require primary insertion of spacer material (see Fig. 8.20). This may includeautogenous fascia lata or autologous dermis (Alloderm) primarily to elevate the lower lid margin toprevent scleral show.
It is the anchoring of the flap of the inferior arc of the orbicularis muscle that is the handle of the cheekliftand acts as a sling to support the lower lid.
The sub-orbicularis oculi fat (SOOF) and malar fat are fused to the muscle by the interdigitation of thesuperficial musculo-aponeurotic system (SMAS) and are redraped upward as the muscle is redraped.

Periorbital eyelid fat and prolapsed anterior orbital fat are repositioned by the tension of the reanchoredflap on the orbital septum, which is on the posterior surface of the muscle flap.
Double anchoring of the orbicularis muscle flap is necessary: the base of the muscle flap is anchored inthe periosteum at the lateral rim, while the tip of the muscle flap is anchored at varying places in the deeptemporal fascia superolateral to the lateral orbital tubercle (see Fig. 8.24).
The vector of redraping of the muscle flap must vary according to eye prominence. In the non-prominenteye, a more oblique vector can be used for maximum smoothing (Fig. 9.2). With prominent eyes, avertical vector of redraping must be used to prevent the downward clotheslining effect.
There are many techniques described to perform the cheeklift from a distant incision, with differentvectors needed for canthal anchoring and muscle flap anchoring. However, because of the variations ineye prominence and laxity, it is difficult to see how performing a cheeklift from a single remote vector cantake into account these needed variations.
In many patients, there may be combined reasons for problems. When selecting a procedure to correct aproblem following cheeklift, it is important to choose one that is anatomically appropriate.
The complications that occur following cheeklifts need to be accurately diagnosed as: ▪ primarily an anchoring problem; ▪ primarily a skin shortage problem; or ▪ failure to recognize eye prominence.
To summarize the techniques needed to correct postoperative problems following cheeklifts:
▪ anchoring – muscle flap, canthus – through lateral canthoplasty, orbicularis muscle flap, periostealflap;
▪ skin recruitment – vertical skin recruitment with a secondary cheeklift, by reanchoring theorbicularis flap; and
▪ use of spacer – for prominent eyes and in scarring.
With regards to problems arising from poor anchoring at the canthus (canthal anchoring for fissureabnormalities), three reconstructive procedures are available: ▪ a repeat simple canthoplasty, for simple shape problems; ▪ periosteal flap canthoplasty (Fig. 9.3A); and ▪ canthoplasty with fascia sling to the lower lid (Fig. 9.3B).
If stronger anchoring is needed:
▪ Phimosis and too much upward slant is corrected by reanchoring with a simple canthoplasty at 1week (Fig. 9.4).
▪ Too much downward slant is corrected by reanchoring with a simple canthoplasty (Fig. 9.5).
Good canthal anchoring is needed for eyelid closure. Normally, there is a very firm attachment of thetarsal plates at the lateral rim (Fig. 9.6), so that when the circular orbicularis muscles contract, the circularcontracture is translated into a vertical vector, resulting in apposition of the lid margins (upper lid comingdown and lower lid going up (Fig. 9.7)). With good anchoring laterally, a vertical vector of closure isrestored by the firm canthal anchoring (Fig. 9.8). With poor anchoring, the vertical vector of closure is lost,so that when the circular muscles contract, it creates fishmouthing with poor closure of the eyelids (Fig.9.9).
These closure problems can be subtle. For example, this was a patient with chronic chemosis. Severalplastic surgeons and an experienced oculoplastic surgeon referred her for evaluation. Her chemosis wasrefractory to all medical treatment (Figs 9.10 & 9.11). On close inspection, I noticed a mild fishmouthingand poor closure. She did have corneal signs of mild exposure. One week after canthal anchoring andcheeklift revision, good eyelid closure and complete clearing of the chemosis were achieved (Fig. 9.12).
The patient shown in Figure 9.13A exhibited postoperative phimosis or narrowing of the fissure, whichwas resistant to simple canthoplasty. This was corrected by reanchoring with a periosteal strip

canthoplasty (B).
Figures 9.14 & 9.15 similarly show correction by canthoplasty and fascia sling.
The other major anchoring problem can occur in the muscle flap supporting the cheek and lid – slippagecan result in a relative shortage of skin. In patients with severe skin deficiency, a secondary cheeklift withvertical reanchoring of the muscle flap will produce an amazing amount of vertical recruitment of skin intothe lower lid (Figs 9.16–9.22).
Dr Rod Hester of Atlanta and I used staged excision of scars and skin recruitment with secondaryanchoring procedures on this patient with laser burn (Fig. 9.21). I was responsible for the eyelids withanchoring procedures. We were able to get to this point. The patient has only recently had very small skingrafts at the outside corner of the lids (Fig. 9.22).
The situation may arise when the periosteum is inadequate for reanchoring of the muscle flap (Fig. 9.23A)– if so, a drill hole is needed for anchoring. This is most commonly placed at the lateral canthus (Figs9.23B & 9.24).
In retracted lids with very prominent eyes, insertion of a spacer is needed to lengthen the lid upward –now, most commonly, Alloderm is used (Figs 9.25–9.28).
There is a higher revision rate in reconstructive cheeklift patients. Among 44 consecutive cases, 38%required more than one surgery and almost 10% required more than two operations.
To correct postoperative problems related to cheeklift, the following are often needed: ▪ anchoring; ▪ vertical recruitment; and ▪ insertion of spacer.
Figure 9.1 Variations in canthal anchoring (lateral canthoplasty) technique.

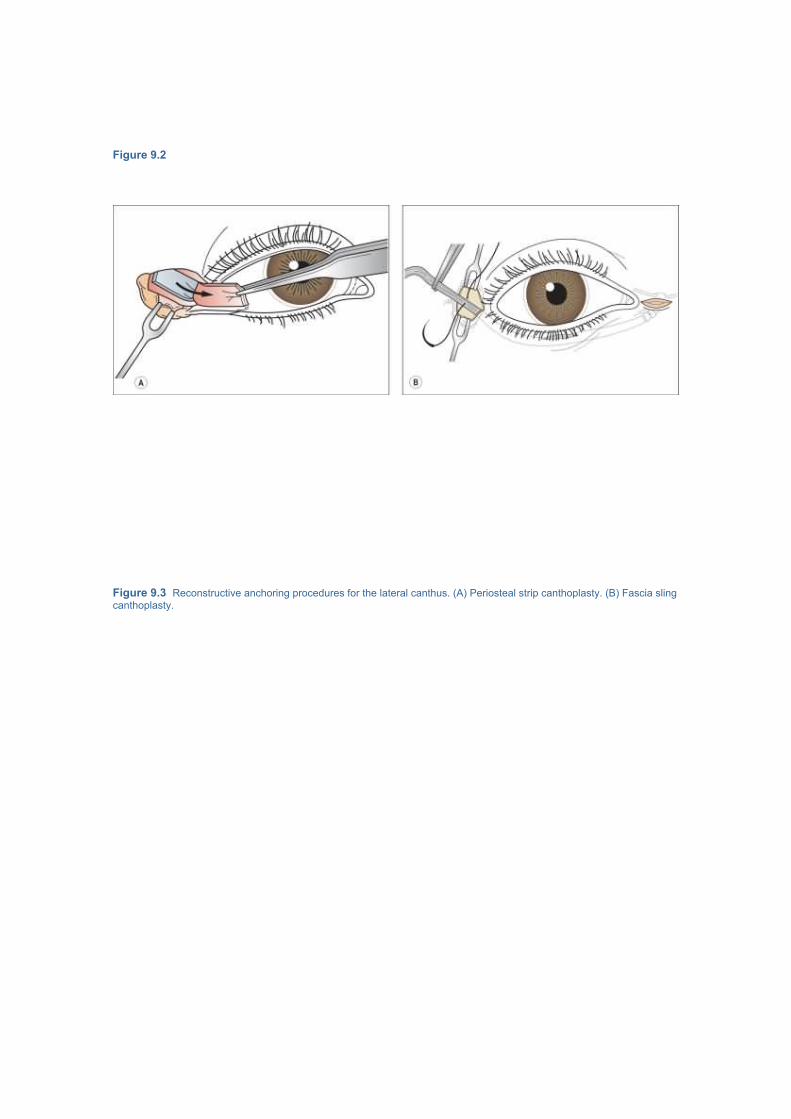
Figure 9.2
Figure 9.3 Reconstructive anchoring procedures for the lateral canthus. (A) Periosteal strip canthoplasty. (B) Fascia slingcanthoplasty.

Figure 9.4

Figure 9.5
Figure 9.6

Figure 9.7

Figure 9.8 Normal blinking and closure of eyelids.
Figure 9.9 Poor closure – fishmouthing seen in poor canthal position or anchoring.

Figure 9.10

Figure 9.11

Figure 9.12
Figure 9.13

Figure 9.14 Canthoplasty with fascia sling. (A) Before and (B) after.
Figure 9.15 Canthoplasty with fascia sling. (A) Before and (B) after.

Figure 9.16 Secondary cheeklift. Vertical reanchoring of the orbicularis muscle flap with skin recruitment.

Figure 9.17 Skin-deficient lids – correction by secondary cheeklift. (A) Before and (B) after correction.

Figure 9.18 Skin-deficient lids – correction by secondary cheeklift. (A) Before and (B) after correction.

Figure 9.19 Skin-deficient lids – correction by secondary cheeklift. (A) Before and (B) after correction.

Figure 9.20 A more challenging case for skin recruitment. Correction by secondary cheeklift. Reanchoring and recruitmenttwice was needed. (A) Before and (B) after correction.

Figure 9.21 This was the greatest challenge to.jpge for skin recruitment – laser burns from resurfacing.
Figure 9.22 After staged excision of scars, skin recruitment with secondary anchoring procedures, plus small skin grafts atthe outer corner of the lids.

Figure 9.23 (A) Periosteal anchoring. (B) Application of drill hole.
Figure 9.24 Before and after drill-hole fixation.

Figure 9.25 Insertion of spacer (Alloderm).
Figure 9.26 (A) A patient with prominent eyes and lower lid retraction. (B) After insertion of spacer.

Figure 9.27 Correction by simple spacer insertion. (A) Before and (B) after correction.

Close Print Page
Figure 9.28 Correction by spacer insertion and secondary vertical cheeklift. (A) Before and (B) after correction.
Copyright © 2010 Elsevier Inc. All rights reserved. Read our Terms and Conditions of Use and our Privacy Policy. For problems or suggestions concerning this service, please contact: [email protected]

Close Print Page
Patient Selection
The goal of cosmetic upper eyelid blepharoplasty in the Caucasian patient is usually to improveappearance by reducing the gravitational and age-related redundancy, descent, and herniation of theupper eyelid tissues. Many other age-related changes also exist but are much more difficult to address.These include loss of skin elasticity, flaccid skin and orbicularis, eyelash thinning and shortening,pigmentary changes, loss of subcutaneous and eyebrow fat, descent of the lid crease and fold, andtextural skin surface changes. One should examine and document common concurrent conditionsincluding eyelid ptosis.
Patient selection considerations (Figs 10.1 & 10.2): ▪ primary problem is redundant upper eyelid skin, orbicularis, and oftentimes, fat ▪ no significant eyelid margin malposition ▪ satisfactory eyebrow position ▪ satisfactory lacrimal gland position.
Figure 10.1 (A) Excellent cand.jpge for upper eyelid blepharoplasty. Primary problem is isolated redundancy, descent, andherniation of the upper eyelid tissues.

Figure 10.1 (B) Same patient after upper eyelid blepharoplasty.

Figure 10.2 Poor cand.jpge for upper eyelid blepharoplasty, given underlying eyebrow asymmetry.
Figure 10.3 Clinical pathway for laser blepharoplasty of the upper eyelid.(Reproduced with permission from Chen WP. Oculoplastic surgery: the essentials. New York L Thieme;2001:176.)
The margin reflex distance (MRD) obtained with eyebrows manually raised (referred to as MRDb) ishighly predictive of the post-blepharoplasty MRD. Balloting the globe while lifting the eyebrow andexamining the superior sulcus helps determine which fat pads should be resected. Any pre-existingeyebrow ptosis, eyelid ptosis or nasal webbing should be documented and emphasized to the patient(Figs 10.4 & Figs 10.5). While the brows are manually raised (and the superior sulcus is examined forevidence of herniating nasal and preaponeurotic fat pads) one should also search for lacrimal glandprolapse (Fig. 10.6). Finally, the extent of lateral hooding and retro-orbicularis oculi fat (ROOF) should benoted.

Figure 10.4 With the eyebrows in a normal position one cannot determine from the MRD whether or not there is also anunderlying eyelid ptosis.

Figure 10.5 With the eyebrows manually elevated, one can determine from the MRDb that there is also a relative eyelidptosis.

Figure 10.6 While the brows are manually raised, the superior sulcus is examined. Note evidence of herniating nasal fatpad and lacrimal gland prolapse.
Search for lagophthalmos by having the patient passively close their eyelids as if sleeping (Fig. 10.7). Slit-lamp corneal evaluation, rose Bengal or fluorescein epithelial staining or Schirmer tear help screen for dryeye patients. An ocular examination including Bell's phenomenon testing and cranial nerve VII testingmay help document any pre-existing ophthalmic pathology. At this point, the surgeon should have a clearunderstanding of the patient's expectations, surgical risk factors, and underlying anatomic eyelidchanges. With this information, the surgeon may now proceed to negotiate a surgical plan that safelymeets the patient's needs and expectations.
Figure 10.7 Demonstration of lagophthalmos.

Close Print Page
Copyright © 2010 Elsevier Inc. All rights reserved. Read our Terms and Conditions of Use and our Privacy Policy. For problems or suggestions concerning this service, please contact: [email protected]

Close Print Page
Laser Instruments, Safety, Selection, and Parameters
Useful instruments include a millimeter ruler, 0.3mm toothed platform forceps, needle holder, stitchscissors, and hemostat. Metal globe shields or guards will be needed. Bipolar or other cautery device isalso necessary. Since there is a combustion hazard associated with CO2 laser use, the patient should bedraped with wet cloth towels. The superb hemostasis achieved by the CO2 laser is due to the zone ofcoagulative and thermal injury created by the laser (Fig. 10.8).
Figure 10.8 Histopathological examination of CO2 laser eyelid incision. Note the purple zone of thermal injury surroundingthe laser-created tissue cleft.(Image courtesy of Brian Biesman, MD).
Please see Chapter 11 for discussion of CO2 laser parameters and laser safety.
CO2 laser (10,600nm)
▪ Focused spot size of 0.3mm or less ▪ Wattage setting usually around 6–7W ▪ Continuous wave or pulsed setting ▪ Articulated arm beam delivery

Close Print Page
Copyright © 2010 Elsevier Inc. All rights reserved. Read our Terms and Conditions of Use and our Privacy Policy. For problems or suggestions concerning this service, please contact: [email protected]

Close Print Page
Surgical Steps
1.1. Mark the proposed upper eyelid crease
When marking the eyelid skin for excision, always remember that the inferior border of the skin incisionusually becomes the postoperative eyelid crease. If the inferior incisions are misplaced or asymmetrical,then the final results will be askew. Therefore, careful initial skin markings are critical. In Caucasianeyelids, the inferior incision is usually marked 9 to 11mm superior to the central eyelid margin, 4mmsuperior to the upper punctum, and 6mm superior to the lateral canthal angle (Figs 10.9 & Figs 10.10).These markings are usually lower in Asian or Oriental eyelids and higher when one desires a higher lidcrease and fold. The female eyelid usually has a higher arched crease compared to the male eyelid. Inthe Asian eyelid, be certain that the incision height and curvature is a natural extension of any pre-existing epicanthal folds. The eyelid crease (and inferior marking) usually curves somewhat downwardsas it extends towards the medial canthus and lateral canthus.
Figure 10.9 An inked millimeter calibrated caliper is used to mark the medial aspect of the upper eyelid crease 4mmsuperior to the punctum.

Close Print Page
Figure 10.10 An inked millimeter calibrated caliper is used to mark the central aspect of the upper eyelid crease 9–11mmsuperior to the eyelid margin.
Copyright © 2010 Elsevier Inc. All rights reserved. Read our Terms and Conditions of Use and our Privacy Policy. For problems or suggestions concerning this service, please contact: [email protected]

Close Print Page
2. Determine the safe amount of skin removal with pinch technique
Perfectly symmetrical skin markings are the fou.jpgion upon which the success of the remainder of theoperation rests. Any asymmetry will carry forward in the operation and adversely affect the final outcome.With the patient supine, determine the amount of skin removal using pinch or other techniques (Fig.10.11). While pinching, be certain that the lids can passively close. This should prevent postoperativelagophthalmos due to excessive skin removal. The medial extent of removal is superior to the punctumbut should be moved laterally when there is a tendency to medial canthal webbing. The tendency towardsnasal webbing may be determined preoperatively: gently pinch the lateral walls of the nasal bridge andtug inferiorly. By observing the medial canthal area for webbing during this maneuver, one can judge thetendency to webbing. The lateral extent of removal is often determined by hooding and may be limited bythe lateral orbital rim. Ink the margins for resection (Fig. 10.12) and then remeasure with calipers toensure perfect symmetry. A pinch forceps is shown in Fig. 10.13.
Figure 10.11 Pinch technique: the inferior jaw of the forceps engages the inferior skin mark.
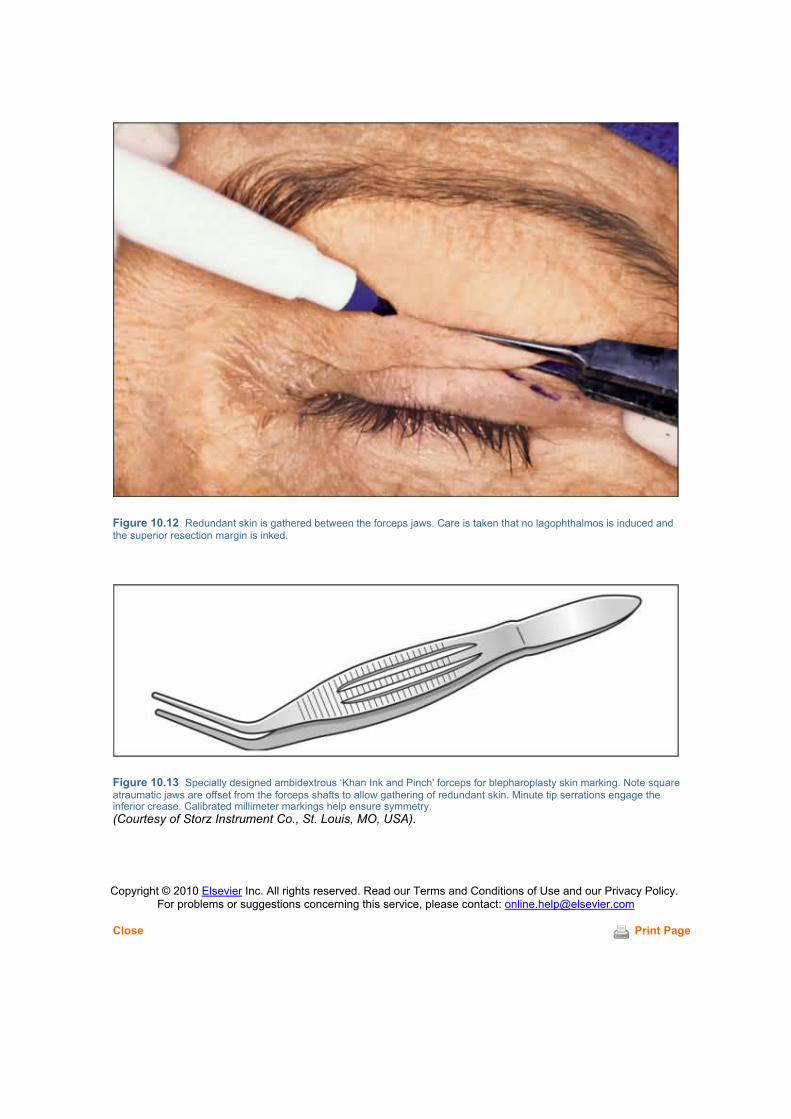
Close Print Page
Figure 10.12 Redundant skin is gathered between the forceps jaws. Care is taken that no lagophthalmos is induced andthe superior resection margin is inked.
Figure 10.13 Specially designed ambidextrous ‘Khan Ink and Pinch' forceps for blepharoplasty skin marking. Note squareatraumatic jaws are offset from the forceps shafts to allow gathering of redundant skin. Minute tip serrations engage theinferior crease. Calibrated millimeter markings help ensure symmetry.(Courtesy of Storz Instrument Co., St. Louis, MO, USA).
Copyright © 2010 Elsevier Inc. All rights reserved. Read our Terms and Conditions of Use and our Privacy Policy. For problems or suggestions concerning this service, please contact: [email protected]

Close Print Page
3. Excise the skin and orbicularis to expose the orbital septum
Local anesthesia with or without intravenous s.jpgion provides adequate patient comfort forblepharoplasty. Sublingual diazepam (5.0mg tab) helps reduce anxiety when the procedure is performedentirely under local anesthesia. The local anesthetic consists of 2% lidocaine hydrochloride (Xylocainewith epinephrine 1:200000) mixed 1:1 with 0.75% bupivacaine hydrochloride (Marcaine). For betterdiffusion of anesthetic, hyaluronidase (Wydase) is often added. Approximately 1.5–2.0mL of anestheticsolution is injected subcutaneously via a 30-gauge needle into the mid-portion of each eyelid. The raisedsubcutaneous bleb of anesthetic is then digitally massaged medially and laterally. Waiting 10 to 20minutes allows the epinephrine to create a hemostatic effect, although this is not necessary with CO2laser blepharoplasty since the laser seals smaller vessels (Fig. 10.14).
Figure 10.14 Final appearance of skin marked for excision.
When incising the skin and orbicularis, be very careful of the levator aponeurosis which may be directlybeneath the orbicularis at the inferior incision (Fig. 10.15). The author usually excises skin and orbicularisas a single specimen, but separate layered excision is also acceptable. One may excise just skin andspare the orbicularis muscle to reduce the risk of lagophthalmos. When excising the skin–muscle ellipse,apply strong traction and countertraction while developing the surgical plane. Stay in the plane of thepostorbicularis fascia, being careful to avoid transecting the levator aponeurosis inferiorly (Figs 10.16 &Figs 10.17).

Figure 10.15 Left upper eyelid. Incision of the skin and orbicularis. Keep the beam perpendicular to the skin surface andrepeat passes with wound gently spread until through the orbicularis. Note the distinctive reddish-brown color of theorbicularis muscle, and the pale septum visible between the divided orbicularis edges. Be very careful of the levatoraponeurosis, which may be directly beneath the orbicularis at the inferior incision.

Figure 10.16 Left upper eyelid. Excise the skin–muscle ellipse. Apply strong traction and countertraction to developsurgical plane. Stay in the plane of the postorbicularis fascia, being careful to avoid transecting the levator inferiorly.

Close Print Page
Figure 10.17 Left upper eyelid following excision of the skin–muscle ellipse. Note the clean surgical dissection withminimal heme. The expanse of the orbital septum is clearly visible, as are the orbicularis edges.
Copyright © 2010 Elsevier Inc. All rights reserved. Read our Terms and Conditions of Use and our Privacy Policy. For problems or suggestions concerning this service, please contact: [email protected]

Close Print Page
4. Incise the septum and expose and excise the central fat pad
The central preaponeurotic fat of the upper eyelid is removed in less than half of patients. When the fatpad is excessive and requires excision, the overlying orbital septum must be divided before the central fatcan prolapse. The orbital septum is opened laterally or nasally. Buttonhole the septum until fat prolapsesfreely. It is often helpful to ballot the globe in order to inspect and visualize the underlying(preaponeurotic) postseptal fat pocket (Fig. 10.18). The entire horizontal width of the exposed septummay then be divided (Fig. 10.19). Be sure to identify the exposed upper eyelid fat pad and underlyinglevator muscle. Grasp the fat pad with forceps and bluntly strip it free of the underlying levator muscle andaponeurosis (Fig. 10.20). Excise the central fat pad to the level of the orbital rim or Whitnall's ligament.The fat pad may be excised across a closed hemostat, or divided against a backstop. Avoid the lacrimalgland laterally (Fig. 10.21). Adequate hemostasis is important because of the caliber of vesselsassociated with the fat pocket. Be careful to avoid the supraorbital neurovascular bundle located adjacentto the medial aspect of the central fat pad – the supraorbital notch is often a palpable landmark.

Figure 10.18 Left upper eyelid. Buttonhole the orbital septum laterally or nasally. As much as possible, keep the laserpointed tangential or away from the globe. Ballot the globe and inspect to visualize the underlying postseptal fat pocket.Buttonhole the septum until fat prolapses freely.
Figure 10.19 Left upper eyelid. Divide the entire horizontal width of the exposed septum over a backstop such as adripping wet cotton-tipped applicator or metal guard.

Figure 10.20 Left upper eyelid. Identify the exposed upper eyelid fat pad and underlying levator muscle. Grasp the fat padwith forceps. Bluntly strip it free of the levator muscle and aponeurosis.

Close Print Page
Figure 10.21 Excise the fat pad to the level of the orbital rim or Whitnall's ligament. The fat pad may be excised across aclosed hemostat, or divided against a backstop. Avoid the lacrimal gland laterally.
Copyright © 2010 Elsevier Inc. All rights reserved. Read our Terms and Conditions of Use and our Privacy Policy. For problems or suggestions concerning this service, please contact: [email protected]

Close Print Page
5. Mobilize and excise the nasal fat pad
The nasal fat pad is excised in most cosmetic blepharoplasty patients. Bluntly spread the fascia over thenasal fat pad with hemostats. Ballot the globe to bring the fat pad forward. Make an ‘X'-shaped incisionover the bulging septum and underlying nasal fat pad. Deepen the incision until fat prolapses (Fig. 10.22).Grasp and immobilize the protruding knuckle of fat and then use a cotton-tipped applicator to bluntly stripaway tissues retaining the nasal fat pad (Fig. 10.23). Do not forcefully tug on the nasal fat pad as this maytear deeper vessels at the base of the pad. The base of the nasal fat pad usually requires supplementallocal anesthesia injection. The fat pad may be excised across a closed hemostat, or divided against abackstop. Again, adequate hemostasis is important because of the caliber of vessels associated with thefat pocket (Fig. 10.24).
Figure 10.22 Left upper eyelid. Hemostat jaws are opened to bluntly spread the fascia over the nasal fat pad. The globe isthen balloted to bring the fat pad forward. An ‘X'-shaped incision is made over the nasal fat pad and deepened until fatprolapses.

Close Print Page
Figure 10.23 The prolapsing fat pad is grasped and immobilized and a cotton-tipped applicator is used to bluntly stripaway tissues retaining the nasal fat pad. The base of the nasal fat pad may require local anesthesia injection for pain control.The fat pad is divided over a hemostat or metal backstop, and the wound inspected for residual fat.
Figure 10.24 Appearance of surgical field following fat pad excision. Note the levator muscle and aponeurosis, as well asthe ROOF tissues overlying the orbital rim.
Copyright © 2010 Elsevier Inc. All rights reserved. Read our Terms and Conditions of Use and our Privacy Policy. For problems or suggestions concerning this service, please contact: [email protected]

Close Print Page
6. Excision of ROOF fat if necessary
If necessary, the retro-orbicularis oculi fat (ROOF) may be excised. This is usually helpful in patients withoverhanging, thick, redundant eyebrow tissues obscuring the lateral half of the orbital rim (Figs 10.25 &Figs 10.26).
Figure 10.25 Cand.jpge for ROOF excision. Note the redundant lateral tissue.

Figure 10.26 Patient following ROOF excision. Note the definition of the lateral superior orbital rims.
To excise ROOF, grasp the orbicularis of the upper wound edge. Trim the orbicularis and underlyingROOF flush with the skin edge. Reflect the ROOF from the deep connective tissue overlying the orbitalrim (Fig. 10.27). Do not expose bare periosteum because the skin may become adherent after surgery(Fig. 10.28). This is a bloody dissection, so be prepared to cauterize any bleeders.
Figure 10.27 The ROOF tissue is reflected in the avascular supraperiosteal plane.

Close Print Page
Figure 10.28 Care is taken to leave a layer of loose tissue overlying the periosteum.
Copyright © 2010 Elsevier Inc. All rights reserved. Read our Terms and Conditions of Use and our Privacy Policy. For problems or suggestions concerning this service, please contact: [email protected]

Close Print Page
7. Closure of incision
Initial ‘air knot'
Close the skin incision with running 5-0 Prolene suture on a tapered needle. Absorbable suture is avoidedin laser eyelid blepharoplasty because the tensile strength is not maintained long enough to reliably avoiddehiscence. To aid in the removal of non-absorbable Prolene eyelid sutures, one should begin theincision with an ‘air knot' and end with a slip knot. This technique avoids the discomfort associated withcutting any knots close to the skin surface (Fig. 10.29).
Figure 10.29 (A) An ‘air knot' is used at the beginning of closure. It is started by passing the 5-0 Prolene through a smallskin bite. (B) The wooden end of a cotton-tipped applicator is placed over the skin bite. (C) The two suture ends are tied overthe wooden end of a cotton-tipped applicator as a simple square knot. (D) The wooden tip is removed. The knot is well awayfrom the skin surface, thereby allowing relatively painless removal by severing either half of the loop.(Images courtesy Dylan Yu, MD)
Incision closure and final slip knot
After the initial air knot, the incision is closed as follows. Take only superficial running dermal bites

(0.5mm depth) across the eyelid using a tapered needle to reduce bleeding from the vascular orbicularis.Other options include recreating the eyelid crease by placing three stitches through dermis of the upperskin edge or the orbicularis and then through the surface of the levator aponeurosis or tarsus along thesuperior tarsal border. Deeper (1.5mm depth) and wider bites are taken lateral to the outer canthal angleto prevent dehiscence (Fig. 10.30).
Figure 10.30 (A) Note the ‘air knot' at the beginning of the closure. The bites are dermal only and the orbicularis is avoidedto reduce bleeding. The tapered needle also significantly reduces bleeding. (B) To begin the slip knot, the terminal sutureend is looped over the needle holder tip. The loop is grasped with forceps, the needle holder released, and the suture distalto the loop is grasped. (C) The suture distal to the loop is pulled backwards through the loop with the needle holder. Usingforceps to stabilize the loop aids in this procedure. (D) The closure is completed with the simple slip knot tied above the skinsurface. When removing the suture postoperatively, the external loop of the medial ‘air knot' is cut, the running suture is cutmidway across the lid, and the two ends are pulled out. There is no need to cut the slip knot. Note the wider and deeper biteslateral to the canthal angle.(Images courtesy Dylan Yu, MD)
Final appearance and postoperative care
At the conclusion of the case one should be able to see the intended degree of surgical improvement(Fig. 10.31 A & B). It may be helpful for the patient to see the immediate appearance as well sincepostoperative swelling will worsen the appearance over several days.

Close Print Page
Figure 10.31 (A) Patient prior to laser upper eyelid blepharoplasty. (B) Same patient immediately following laser uppereyelid blepharoplasty with ROOF tissue excision.
Ointment is applied to the incision and to the inferior cul-de-sac if the patient is not blinking fully. Stitchesare left in for 7–15 days. No patches are placed.
Postoperative instructions include frequent ice packs, erythromycin ointment to the incision once daily,elevating the head at night or sleeping in a recliner, and avoiding strenuous activity for 1 week.
Copyright © 2010 Elsevier Inc. All rights reserved. Read our Terms and Conditions of Use and our Privacy Policy. For problems or suggestions concerning this service, please contact: [email protected]

Close Print Page
Chapter 11 – CO2 Laser Transconjunctival Lower Blepharoplasty and FatRepositioning
Jemshed A Khan
Patient Selection
Transconjunctival laser blepharoplasty is ideal for addressing isolated lower eyelid fat pad herniation (Fig.11.1). Compared to other approaches, the transconjunctival technique avoids any cutaneous stitches orincisions, disrupts neither the orbicularis layer nor its motor innervation, and affords a remarkably briefconvalescence.
Figure 11.1 (A) Excellent cand.jpge for transconjunctival blepharoplasty. Primary problem is isolated to lower eyelid fat padherniation. (B) Same patient following transconjunctival blepharoplasty.
However, the transconjunctival technique does not address common concurrent eyelid conditions such aseyelid laxity, wrinkles, festoons, malar edema and folds, tear trough deformity, and suborbicularis oculi fat(SOOF) descent (Fig. 11.2). The transconjunctival approach is often combined with other procedures toaddress any of the previously listed concurrent conditions, and may be modified to allow repositioning ofthe lower eyelid fat pads to address tear trough deformities (Fig. 11.3).

Figure 11.2 Poor cand.jpge for transconjunctival blepharoplasty, given significant eyelid wrinkles and festoons.
Figure 11.3 Clinical pathway for laser blepharoplasty of the lower eyelid.
It is important to determine preoperatively the relative extent of fat prolapse when the patient is upright.For example, some patients may have only nasal fat pad prolapse and not require any other fat padremoval. In others, one fat pad may herniate more than another, so these findings should be noted aheadof time and may be referred to during surgery.
When tear trough deformity is a concern, this may be addressed through fat repositioning which isdiscussed in the supplemental steps at the end of this chapter.
Patient selection
▪ Primary problem is lower eyelid fat pad herniation

Close Print Page
▪ No significant eyelid margin malposition ▪ Satisfactory lower eyelid skin without significant wrinkling ▪ Satisfactory midface continuum ▪ No significant tear-trough deformity
Copyright © 2010 Elsevier Inc. All rights reserved. Read our Terms and Conditions of Use and our Privacy Policy. For problems or suggestions concerning this service, please contact: [email protected]

Close Print Page
Laser Selection and Parameters
Incisional CO2 lasers suitable for blepharoplasty are available from several manufacturers includingLumenis (formerly the medical laser division of Coherent Inc. and Sharplan/ESC) and Nidek. Eachcompany uses a slightly different CO2 delivery system and actual incisional parameters vary accordingly.A small spot size of 0.3mm or less is important to reduce the zone of thermal injury. CO2 lasers that use ahollow waveguide (rather than an articulated) arm to transmit the beam from the laser tube to thehandpiece are not recommended because the exit beam is divergent rather than coherent, collimated,and focused (Figs 11.4 & Figs 11.5) Appropriate formal didactic training in laser blepharoplasty and lasersafety is essential and is beyond the scope of this chapter. Further references are provided.
Figure 11.4 Articulated arm. The rigid articulated arm of the UltraPulse CO2 laser delivers focused, collimated, andcoherent laser energy to the handpiece.

Close Print Page
Figure 11.5 Focused handpiece. The focused handpiece converts the collimated output of the articulated arm into asmaller and more intensely focused spot that is used to divide tissue.
Parameters of CO2 laser (10 600nm)
▪ Focused spot size of 0.3mm or less ▪ Wattage setting varies by manufacturer ▪ Continuous-wave or pulsed setting ▪ Articulated-arm beam delivery
Copyright © 2010 Elsevier Inc. All rights reserved. Read our Terms and Conditions of Use and our Privacy Policy. For problems or suggestions concerning this service, please contact: [email protected]

Close Print Page
Laser Safety
Laser safety is crucial because of the numerous hazards associated with unsafe laser blepharoplasty(Fig. 11.6). The surgeon must acquire appropriate knowledge, motor skills, and laser-safe instrumentationbefore embarking upon laser blepharoplasty (Fig. 11.7; Table 11.1). Complete discussion of this issue isbeyond the scope of this chapter. For further information, see Reference 3.
Figure 11.6 Corneal injury caused by CO2 laser during blepharoplasty procedure.

Close Print Page
Figure 11.7 Safety instruments used during CO2 laser blepharoplasty have an antireflective finish. Instruments (right toleft) include Westcott scissors, micro needle holder, pair of matte-finish Desmarres retractors, modified Khan–Jaeger lasereyelid plate, ‘propeller' laser backstop, Castroviejo 0.5mm platform tying forceps, pair of metal scleral guards, laserhandpiece, and hemostat. Top: Bipolar cautery forceps. Bottom: Laser blepharoplasty clamp.
Table 11.1: -- Safety issues for laser blepharoplasty.Globe protection Metal interpositional shield or scleral shieldTissue protection Metal backstop or hemostatTissue protection Appropriate laser, laser settings and laser focusLaser reflection hazard Antireflection treatment of metal instrumentsCombustion hazard Use wet drapesOperator smoke hazard Use smoke evacuator and laser masksOperator ocular hazard Wear wavelength-appropriate laser-safe gogglesGovernmental standards Follow OSHA and State standards
Copyright © 2010 Elsevier Inc. All rights reserved. Read our Terms and Conditions of Use and our Privacy Policy. For problems or suggestions concerning this service, please contact: [email protected]

Close Print Page
Anatomic Landmarks and Surgical Tips
The location of the inferior oblique muscle should be clearly envisioned prior to embarking upontransconjunctival blepharoplasty. The inferior oblique is reliably located in the cleft or separation betweenthe nasal and central fat pads (Fig. 11.8). The inferior oblique muscle originates from the periosteumadjacent to the proximal bony nasolacrimal duct and passes inferior to the nasal fat pad and superior tothe central fat pad. Arising from the inferior oblique is an expansion of connective tissue that sometimesrestrains the contiguous fat of the central and lateral fat pads. This tissue, termed the arcuate expansion,may be divided if necessary (Fig. 11.9).
Figure 11.8 Inverted view of left lower eyelid. Inferior oblique muscle is reliably located in the cleft or separation betweenthe nasal and central fat pads.

Close Print Page
Figure 11.9 The arcuate expansion sometimes constrains the central and temporal fat pads.
Clinical pearls
▪ Recommended instruments (Storz Instrument Co., St Louis, MO, USA) include a Khan–Jaeger
Laser Eyelid Plate, Castroviejo O.5mm toothed platform tying forceps, Desmarres retractor (dullfinish), bipolar cautery, hemostat (fine curved), protective metal scleral contact lens.
▪ The inferior oblique can always be located between the nasal and central fat pads.
▪ If the fat is restrained between the central and lateral fat pads, look for and divide the anteriorlylocated fibrous band of tissue (arcuate expansion).
▪ The lateral fat pad is easier to remove once separated from the underlying lower eyelidretractor.
Copyright © 2010 Elsevier Inc. All rights reserved. Read our Terms and Conditions of Use and our Privacy Policy. For problems or suggestions concerning this service, please contact: [email protected]

Close Print Page
Close Print Page
Surgical Steps
1.Prolapse the inferior fat pads and fornix
Adequate prolapse and exposure of the conjunctival fornix is an essential prelude to successfultransconjunctival incision (Fig. 11.10). The key to this step is to ballot the globe so as to prolapse the fatand conjunctiva anteriorly whilst simultaneously having the assistant retract the lower eyelid margin withtwo fingers. Retraction of the lower eyelid margin requires that the pads of the assistant's fingers beplaced directly upon the eyelid margin itself in order to exert sufficient inferior traction. When performedsuccessfully, a liberal horizontal roll of prolapsing fat and overlying conjunctiva will present itself quitereliably and visibly. The use of the titanium Khan–Jaeger plate allows one to ballot the globe posteriorly inorder to prolapse the fat anteriorly whilst also protecting the globe.
Figure 11.10 Demonstration of proper technique for fully prolapsing the inferior fornix. Note ballottement of globe andpositioning of assistant's fingers on the eyelid margin. Globe may be balloted posteriorly with Jaeger plate or metal scleralcontact lens. Assistant retracts lower eyelid margin with two fingers.
Copyright © 2010 Elsevier Inc. All rights reserved. Read our Terms and Conditions of Use and our Privacy Policy. For problems or suggestions concerning this service, please contact: [email protected]

Close Print Page
Close Print Page
2. Incise the conjunctiva
Conjunctival incision placement is important in order to efficiently expose the three underlying fat padswhile avoiding unintended injury to surrounding structures. The medial landmark for incision placement isthe inferior border of the lateral tip of the caruncle. The incision is carried laterally while staying 4mminferior to the tarsus and carried laterally where it curves towards the lateral canthal angle (Fig. 11.11).Alternatively, the incision maybe carried along the apex of the ridge of bulging tissue. This more posteriorapproach allows quicker and more direct access to the bulging fat pads, but also results in morechemosis of the bulbar conjunctiva.
Figure 11.11 Inverted view of right lower eyelid. Note that incision originates from the inferior border of the caruncle,extends laterally 4.0mm inferior to the lower edge of the tarsal plate, and extends to the lateral canthal angle.
Essential steps
▪ Begin at the inferior border of the lateral tip of the caruncle ▪ Continue laterally ▪ Stay 4mm below the base of the tarsal plate ▪ Continue to within 2mm of the lateral canthal angle ▪ Angle the beam towards the inferior the orbital rim
Copyright © 2010 Elsevier Inc. All rights reserved. Read our Terms and Conditions of Use and our Privacy Policy. For problems or suggestions concerning this service, please contact: [email protected]

Close Print Page
3. Expose the orbital septum
After carrying the incision deeper until it spreads open, one may either continue the incision deeper whileangling towards the orbital rim, or bluntly dissect the orbicularis off the orbital septum with a cotton-tippedapplicator (Fig. 11.12). With the former approach, one will often automatically expose the three fat pads ofthe lower eyelid, in which case surgical Step 4 may be omitted, except that it is still advisable to divide thelateral fat pad from the underlying lower eyelid retractors as described below.
Figure 11.12 The incision is deepened with the laser until it can be spread open with blunt dissection.
Essential steps
▪ Carry the incision deeper until it spreads open, exposing the septum ▪ Place a Desmarres retractor ▪ Grasp the inferior conjunctival wound edge with 0.5mm toothed forceps ▪

Close Print Page
Spread the wound farther open by sweeping a cotton-tipped applicator inferiorly across septum
Copyright © 2010 Elsevier Inc. All rights reserved. Read our Terms and Conditions of Use and our Privacy Policy. For problems or suggestions concerning this service, please contact: [email protected]

Close Print Page
4. Incise the septum over the nasal, central, and lateral fat pads
It is important to free each of the fat pads from any encumbering structures. Specifically, the overlyingorbital septum must be divided for each fat pad before the fat can prolapse freely (Fig. 11.13). The lateralfat pad may be more difficult to mobilize because the overlying septum may be adherent to the inferiorlateral orbital rim.
Figure 11.13 Inverted view of left lower eyelid. Separate incisions are placed over each fat pad.
Nasal fat pad
▪ Ballot the globe to bring the fat pad forward ▪ Make an ‘X'-shaped incision over the nasal fat pad ▪ Deepen the incision until fat prolapses

Close Print Page
Central fat pad
▪ Ballot the globe to bring the fat pad forward ▪ Make a 10–12mm horizontal incision over the central fat pad ▪ Place the incision 2–3mm superior to the inferior orbital rim ▪ Deepen the incision until fat prolapses
Lateral fat pad
▪ Expose the lateral fat pad ▪ Divide the fat pad from the underlying lower eyelid retractors ▪ Incise the overlying orbital septum
▪ Divide the arcuate expansion if necessary (fibrous anterior band separating the central andlateral fat pads)
Copyright © 2010 Elsevier Inc. All rights reserved. Read our Terms and Conditions of Use and our Privacy Policy. For problems or suggestions concerning this service, please contact: [email protected]

Close Print Page
5. Mobilize each fat pad
Nasal and central fat pads
The nasal and central fat pads generally prolapse quite easily (Figs 11.14 & Figs 11.15). It is important tobe aware of large vessels in the base of the nasal fat pad. An encircling fibrous band is often found at thebase of the nasal fat pad and may be bluntly stripped away. The inferior oblique muscle may be reliablylocated along the inferior and lateral edge of the nasal fat pad. The broad-based central fat pad is freedvia a horizontal incision that is both parallel to the inferior orbital rim and 3–4mm superior to the rim.

Figure 11.14 The nasal fat pad is mobilized with forceps and cotton-tipped applicator.

Figure 11.15 The central fat pad is mobilized through a horizontal incision.
Nasal fat pad
▪ Base of nasal fat pad may require supplemental local anesthesia injection ▪ Do NOT tug anteriorly on the fat pad ▪ Use a cotton-tipped applicator to strip away tissues retaining the nasal fat pad
Central fat pad
▪ Incision parallel and superior to the bony orbital rim ▪ Grasp prolapsing fat with forceps ▪ Do NOT tug anteriorly on the fat pad
▪ Use a cotton-tipped applicator to strip away tissues retaining the inferior aspect of the central fatpad
Lateral fat pad
The lateral fat pad is the most difficult to mobilize because it is adherent to the lower eyelid retractors andcovered by a sometimes thick septum that is densely adherent to the inferior lateral rim (Fig. 11.16).Exposure is further compromised by the lateral canthal tendon. In the lateral aspect of the lateral padthere are often blood vessels that may bleed profusely. Therefore, exposure is maximized by excising anydense overlying septum and also freeing the fat pad from the underlying lower eyelid retractors. Evenwhen properly mobilized, a deeper pad or further lateral fat may only become evident after first removingthe presenting lateral fat and balloting the globe.

Figure 11.16 (A & B) The arcuate expansion is a fibrous band obscuring the tip of the underlying laser probe.

Close Print Page
Figure 11.16 (C) The posterior face of the lateral fat pad is adherent to the lower eyelid retractors.
Essential steps
▪ The lateral fat may come out in two layers ▪ The lateral fat pad is adherent to the underlying lower eyelid retractors ▪ Sharply divide the lateral fat pad from the underlying retractors ▪ Lateral pad may be restrained by the arcuate expansion ▪ Divide arcuate expansion if necessary
Copyright © 2010 Elsevier Inc. All rights reserved. Read our Terms and Conditions of Use and our Privacy Policy. For problems or suggestions concerning this service, please contact: [email protected]

Close Print Page
6. Excise each fat pad flush with the orbital rim
Nasal and central fat pads
One can achieve remarkable postoperative lower eyelid symmetry by using the symmetric positions of thepaired inferior orbital rims. Therefore, it is important to use the bony inferior orbital rim as the solelandmark when deciding exactly where to transect the herniating lower eyelid fat. One can immobilize theherniating fat with a hemostat which rests upon the orbital rim. Thus assured, one can proceed withexcision of the fat. Other methods include piecemeal excision of the protruding fat. After excising theprotruding fat, it is important to immediately ballot and see if any more fat comes forward easily.

Figure 11.17 Demonstration of a moist cotton-tipped applicator employed as a backstop for laser division of the nasal fatpad.
Figure 11.18 The central fat pad is divided by CO2 laser over a clamped hemostat.
Essential steps
▪ Transect each fat pad flush with the inferior orbital rim ▪ Use a metal Desmarres, moist cotton-tipped applicator, or hemostat as a backstop ▪ The central fat pad prolapses easily and generally presents little difficulty
Lateral fat pad
Positioning a hemostat properly in the tight lateral area requires diligence and experience. It is notuncommon to find that more fat prolapses immediately following the first excision. Also, there may still be

a residual temporal bulge of fat that requires further division of the septum. Therefore, diligence andpatience are necessary to achieve adequate temporal fat excision (Fig. 11.19). Since the fat pads containvessels, the author always cauterizes the pedicle stump with additional bipolar cautery to reduce the riskof postoperative hemorrhage.

Close Print Page
Figure 11.19 The lateral fat pad is transected flush with the inferior orbital rim and requires use of a metal Desmarres,moist cotton-tipped applicator, or hemostat as a backstop.
Copyright © 2010 Elsevier Inc. All rights reserved. Read our Terms and Conditions of Use and our Privacy Policy. For problems or suggestions concerning this service, please contact: [email protected]

Close Print Page
Close Print Page
7. Reposition the eyelid and ballot to look for any residual bulging fat
Balloting is an important final step. Oftentimes, one may find residual fat that was overlooked earlier in theprocedure (Fig. 11.20). Such fat may not come forward until later in the procedure because it had beenconstrained by cautery or clamping of the overlying fat.
Figure 11.20 Finger pressure is applied to the protective shield in order to retropulse the globe and prolapse forward anyresidual excess fat.
Essential steps
▪ Ballot by applying firm pressure against the globe ▪ Examine the contours of both lower eyelids ▪ Look for any bulging or asymmetry ▪ Excise further fat as needed ▪ Look for and cauterize any bleeding points
Copyright © 2010 Elsevier Inc. All rights reserved. Read our Terms and Conditions of Use and our Privacy Policy. For problems or suggestions concerning this service, please contact: [email protected]

Close Print Page
8. Closure
Postoperatively, the patient is instructed to avoid significant lifting or straining for several days. Writteninstructions are given that include the warning signs of retrobulbar hemorrhage. Antibiotic ointment isapplied to the inferior fornix each evening, and contact lenses are not used for 1 week. Only a smallamount of ointment is placed in the fornix so as to avoid ointment entering the incision and causingointment granulomas. Icepacks are used for 7 days and the patient is instructed to elevate the head of thebed for 1 week when sleeping. Oral and topical corticosteroids are prescribed only when patients developsignificant postoperative chemosis or eyelid edema. Patients are warned of postoperative complicationsand instructed to check visual acuity every 2 hours for the first 24 hours. They are generally seen 9 to 14days following surgery.
Figure 11.21 Appearance at end of procedure.
Essential steps
▪ Tug upwards on the eyelid to prevent inversion or overriding of the wound ▪ No suture is used ▪ Remove eye shield ▪ Place ointment ▪ Reassure patient

Close Print Page
Copyright © 2010 Elsevier Inc. All rights reserved. Read our Terms and Conditions of Use and our Privacy Policy. For problems or suggestions concerning this service, please contact: [email protected]