2021 Ascent GSG 2nd
140
2021 Getting Started Guide Ascent Love. It’s what makes Subaru, Subaru.
-
Upload
khangminh22 -
Category
Documents
-
view
2 -
download
0
Transcript of 2021 Ascent GSG 2nd

Subaru of America, Inc. One Subaru Drive Camden, NJ 08103-9800
MSA5B2100A
Issued October 2020
Printed in USA 10/20
2021
Getting Started GuideAscent
Love. It’s what makes Subaru, Subaru.

© 2020 Subaru of America, Inc. Printed in USA. All rights reserved. Contents may not be reproduced in whole or in part without prior written permission of publisher. Speci�cations in this Guide are based on the latest product information available at the time of publication. Some images shown are for illustration purposes only. Some equipment shown in photography within this Guide is optional at extra cost. Speci�c options may be available only in combination with other options. Speci�c combinations of equipment or features may vary from time to time, and by geographic area. Subaru of America, Inc. reserves the right to change or discontinue at any time, without notice: Prices, colors, materials, equipment, accessories, speci�cations, models and packages, without incurring any obligation to make the same or similar changes on vehicles previously sold. Colors shown may vary due to reproduction and printing processes. Subaru of America, Inc. is not responsible for typographical errors. Aha™ is a trademark of Harman International Industries, Incorporated. Alcantara® is a registered trademark of Alcantara S.p.A., and Alcantara is produced by the Toray Group. App Store® is a registered trademark of Apple, Inc. Apple® is a registered trademark of Apple, Inc. Apple CarPlay® is a registered trademark of Apple, Inc. Android Auto™ is a trademark of Google, LLC. BBS® is a registered trademark of BBS Kraftahrzeugtechnik, AG. Bluetooth® is a registered trademark of Bluetooth SIG, Inc. Brembo® is a registered trademark of Freni Brembo, S.p.A. GreenEdge®
is a registered trademark of Harman International Industries, Incorporated. Glympse® is a registered trademark of Glympse, Inc. Grand Luxe® is a registered trademark of Seiren Co., Ltd. HARMAN® is a registered trademark of HARMAN International Industries, Incorporated. Harman Kardon® is a registered trademark of Harman International Industries, Incorporated. Quantum logic™ is a trademark of Harman International Industries, Incorporated. HD Radio® is a registered trademark of iBiquity Digital Corporation. HomeLink® and the HomeLink® house icon are registered trademarks of Gentex Corporation. iHeartRadio®
is a registered trademark of iHeartMedia, Inc. iPod® is a registered trademark of Apple, Inc. iTunes® is a registered trademark of Apple, Inc. Magellan® is a registered trademark of MiTAC International Corporation. Michelin® is a registered trademark of Compagnie Générale des Etablissments Michelin. Metal-Matrix Diaphragm (MMD®) is a registered trademark of Harman International Industries, Incorporated. MirrorLink™ is a trademark of Car Connectivity Consortium, LLC. Pandora® is a registered trademark of Pandora Media, Inc. SACHS® is a registered trademark of ZF Friedrichshafen AG. Siri® is a registered trademark of Apple, Inc. Smart Way® is a registered trademark of the U.S. Environmental Protection Agency. Stitcher™ is a trademark of Stitcher™, Inc. TomTom® is a registered trademark of TomTom International BV. TORSEN LSD® is a registered trademark of JTEKT TORSEN North America, Inc. SiriusXM® All Access Radio is a registered trademark of Sirius XM Radio, Inc. SiriusXM Traf�c® is a registered trademark of Sirius XM Radio, Inc. SiriusXM Travel Link® is a registered trademark of SiriusXM Radio, Inc. Ultrasuede® is a registered trademark of Toray Industries, Inc. Yelp® is a registered trademark of Yelp, Inc. Ascent, DriverFocus, and StarDrive, are trademarks of Subaru of America, Inc. Added Security, Crosstrek, Forester, Outback, StarTex and XV Crosstrek are registered trademarks of Subaru of America, Inc. BRZ, Con�dence in Motion, EyeSight, Impreza, Lineartronic, Legacy, S209, Subaru, SUBARU STARLINK®, SUBARU BOXER, tS (Design), WRX, STI and X-MODE are registered trademarks of Subaru Corporation.

PURPOSE OF THIS GUIDEWELCOME . . . . . . . . . . . . . . . . . 4IMPORTANT SAFETYINFORMATION . . . . . . . . . . . . . . 4OWNER’S RESOURCES. . . . . . . 4IN CASE OF EMERGENCY . . . . . 5TOWING YOUR ALL-WHEELDRIVE SUBARU . . . . . . . . . . . . . 6
ENTRY AND EXITKEYLESS ENTRY . . . . . . . . . . . . 7KEYLESS ACCESS WITH PUSHBUTTON START . . . . . . . . . . . . . 9POWER REAR GATE (PRG) . . . . 11
INSTRUMENT PANEL . . . . . . . . 14
GETTING COMFORTABLESEATING . . . . . . . . . . . . . . . . . . . 16TILT AND TELESCOPIC STEERINGCOLUMN. . . . . . . . . . . . . . . . . . . 19POWER EXTERIOR MIRRORS . . 19REAR VIEW MIRROR . . . . . . . . . 20CABIN VIEW MIRROR. . . . . . . . . 21POWER WINDOWS . . . . . . . . . . 21POWER MOONROOF . . . . . . . . 22CLIMATE CONTROL . . . . . . . . . . 23ACCESSORY CONNECTIONS . . 29
CONTROLSINSTRUMENT PANEL SWITCHES(LOWER LEFT) . . . . . . . . . . . . . . 30
AUDIO CONTROLS. . . . . . . . . . . 30ADVANCED ADAPTIVE CRUISECONTROL . . . . . . . . . . . . . . . . . . 31I/SET SWITCH. . . . . . . . . . . . . . . 31VIEW/ENTER Switch . . . . . . . . . . 32LIGHT CONTROLS . . . . . . . . . . . 32TURN SIGNALS . . . . . . . . . . . . . 34WINDSHIELD WIPERS . . . . . . . . 34REAR WINDOW WIPER . . . . . . . 35ONE-TOUCH INTERIORLIGHTING . . . . . . . . . . . . . . . . . . 35OVERHEAD CONSOLE. . . . . . . . 36
GAUGES AND WARNINGLIGHTS
COMBINATION METER . . . . . . . 37WARNING AND INDICATORLIGHTS . . . . . . . . . . . . . . . . . . . . 37
OPERATING THE VEHICLEIGNITION SWITCH . . . . . . . . . . . 38PUSH-BUTTON IGNITIONSWITCH . . . . . . . . . . . . . . . . . . . 38STARTING THE VEHICLE . . . . . . 38DRIVING THE VEHICLE . . . . . . . 39ELECTRONIC PARKING BRAKE(EPB) . . . . . . . . . . . . . . . . . . . . . 40X-MODE® . . . . . . . . . . . . . . . . . . 42TURNING OFF THE VEHICLE. . . 43
TABLE OF CONTENTS

REFUELINGFUEL FILLER LID . . . . . . . . . . . . 44FUEL . . . . . . . . . . . . . . . . . . . . . . 44FUEL CAPACITY . . . . . . . . . . . . . 44
PASSENGER/CARGO AREASACCESSING THE THIRD-ROW . 45EXITING THE THIRD-ROW . . . . . 45FOLDING THE REAR SEATS . . . 46CHILD SAFETY LOCKS . . . . . . . 47LATCH/ANCHOR . . . . . . . . . . . . 48REAR SEAT REMINDER . . . . . . . 48CARGO COVER . . . . . . . . . . . . . 49SPARE TIRE . . . . . . . . . . . . . . . . 50JACK AND TOOLS . . . . . . . . . . . 50
ENGINE COMPARTMENTHOOD PROP. . . . . . . . . . . . . . . . 512.4 L ENGINE . . . . . . . . . . . . . . . 52
ADDITIONAL SPECIFICATIONSNEW VEHICLE BREAK-IN. . . . . . 53ENGINE OIL . . . . . . . . . . . . . . . . 53ENGINE OIL CAPACITY . . . . . . . 53ROOF RAIL CAPACITY . . . . . . . 54TRAILER TOWING CAPACITY . . 54TIRE PRESSURE MONITORINGSYSTEM (TPMS) . . . . . . . . . . . . . 55
STARLINK OVERVIEWOVERVIEW OF YOUR MULTIMEDIASYSTEM . . . . . . . . . . . . . . . . . . . 56BUTTONS . . . . . . . . . . . . . . . . . . 56TOUCHSCREEN . . . . . . . . . . . . . 58STEERING WHEEL CONTROLS . . 59VOICE RECOGNITION . . . . . . . . 59
STARLINK HOMEHOME SCREEN ICONS . . . . . . . 62REARRANGING ICONS . . . . . . . 62ADDING SHORTCUTS . . . . . . . . 63
DRIVER PROFILECREATING A DRIVER PROFILE . 64
MULTIMEDIARADIO . . . . . . . . . . . . . . . . . . . . . 66MEDIA . . . . . . . . . . . . . . . . . . . . . 67
PHONEPAIRING A PHONE . . . . . . . . . . . 68MAKING A CALL. . . . . . . . . . . . . 68RECEIVING A CALL . . . . . . . . . . 69TEXT MESSAGES . . . . . . . . . . . . 70
APPSSUBARU STARLINK® IN-VEHICLEAPPS. . . . . . . . . . . . . . . . . . . . . . 71SUBARU STARLINK® MOBILEAPP . . . . . . . . . . . . . . . . . . . . . . . 73MYSUBARU . . . . . . . . . . . . . . . . 75
MAPS (if equipped)MAPS OVERVIEW. . . . . . . . . . . . 76CREATING HOME AND WORKPROFILES . . . . . . . . . . . . . . . . . . 76
STARLINK SAFETY ANDSECURITY
SAFETY AND SECURITYOVERVIEW . . . . . . . . . . . . . . . . . 77ENROLLMENT . . . . . . . . . . . . . . 78MYSUBARU INTEGRATION . . . . 78SUBARU STARLINK® WI-FIHOTSPOT . . . . . . . . . . . . . . . . . . 79
SETTINGS AND UPDATESSETTINGS AND UPDATESOVERVIEW . . . . . . . . . . . . . . . . . 80SOUND . . . . . . . . . . . . . . . . . . . . 81PHONE . . . . . . . . . . . . . . . . . . . . 81MAPS/NAVIGATION . . . . . . . . . . 82CLOCK . . . . . . . . . . . . . . . . . . . . 83
EYESIGHTEYESIGHT® OVERVIEW . . . . . . . 86OPERATION . . . . . . . . . . . . . . . . 87FUNCTIONS . . . . . . . . . . . . . . . . 87STEERING WHEEL CONTROLS . . 93EYESIGHT® ASSIST MONITOR(EAM). . . . . . . . . . . . . . . . . . . . . . 95LANE DEPARTURE WARNING ANDPRE-COLLISION BRAKINGSYSTEM OFF SWITCHES. . . . . . 96
TABLE OF CONTENTS
2

DRIVER ASSISTTECHNOLOGIES
REAR-VISION CAMERA . . . . . . . 97FRONT VIEW MONITOR . . . . . . 97BLIND-SPOT DETECTION (BSD)/REAR CROSS-TRAFFIC ALERT(RCTA) . . . . . . . . . . . . . . . . . . . . 98HIGH BEAM ASSIST (HBA) . . . . 99STEERING RESPONSIVEHEADLIGHTS (SRH) . . . . . . . . . . 99REVERSE AUTOMATIC BRAKING(RAB) . . . . . . . . . . . . . . . . . . . . . 99
CARE AND LIMITATIONSSTEREO CAMERAPRECAUTIONS . . . . . . . . . . . . . 100WINDSHIELD GLASS ANDDASHBOARD . . . . . . . . . . . . . . 100
FRONT VIEWASCENT . . . . . . . . . . . . . . . . . . 101
EYESIGHT DISCLAIMEREYESIGHT® DISCLAIMER . . . . 102
HOW TO APPENDIXHOW TO OVERVIEW. . . . . . . . . 103MEMORY HEIGHT . . . . . . . . . . 104MEMORY DRIVER’S SEAT . . . . 106BLUETOOTH® PAIRING . . . . . . 107ANDROID AUTO™ . . . . . . . . . . 115APPLE CARPLAY® . . . . . . . . . . 117WI-FI . . . . . . . . . . . . . . . . . . . . . 119MAPS . . . . . . . . . . . . . . . . . . . . 121FIRMWARE AND SOFTWAREUPDATES . . . . . . . . . . . . . . . . . 129
INDEX . . . . . . . . . . . . . . . . . . . . . 130
TABLE OF CONTENTS
3

WELCOMECongratulations on choosing a Subaru Ascent and welcome to the Subaru family!
Subaru is more than a car company™. We are committed to making the world a betterplace, and the Subaru Love Promise is our vision to show love and respect to all people atevery interaction with Subaru. We believe in building lifelong relationships with ourcustomers, earning your trust and exceeding your expectations by providing customerservice with integrity and compassion.
This Getting Started Guide will introduce you to your new Subaru Ascent by providinginformation on the basic operation and key features of your Subaru as well as theSTARLINK ® and EyeSight ® systems in your vehicle.
IMPORTANT SAFETY INFORMATIONThe Getting Started Guide is not intended as a substitute for the Owner’s Manuals. Westrongly encourage you to review the vehicle, STARLINK®, and EyeSight® Owner’sManuals to ensure complete understanding.
OWNER’S RESOURCESIf you’re having difficulty using any of the functions outlined in this guide, or to learn more,you can get more information from the followingsources:Your Subaru Owner’s Manuals:Located in the glovebox
Online Subaru Owner’s Resources:www.subaru.com/owners
Subaru Customer Support:www.subaru.com/customer-support
1-800-782-2783 (1-800-SUBARU3 )
PURPOSE OF THIS GUIDE
4

IN CASE OF EMERGENCY
SUBARU STARLINK® Safety and Security (subscription required)
SOS Emergency: Press the red“SOS” button on the overheadconsole in the event of anemergency to speak with aSUBARU STARLINK® CustomerCare Advisor.
Enhanced Roadside Assistance:Press the blue “i” button on theoverhead console or select the“Roadside Assistance” option inthe “MySubaru” menu on themultimedia system.
For more information, pleaserefer to “Safety and SecurityOverview” on page 77 or theSUBARU STARLINK® Safety and Security Owner’s Manual.
Subaru Roadside Assistance
Subaru Roadside Assistance:1-800-261-2155
Subaru Roadside Assistance is free and standard on your Subaru; there are no forms tocomplete. This service is available anytime during the 3-year/36,000-mile Subaru LimitedWarranty, whichever comes first. See your retailer for details and refer to the RoadsideAssistance guide in the owner’s information kit for the details on this coverage. A SubaruRoadside Assistance decal has been affixed to the driver’s door window.
Roadside assistance helps with:
• Towing to the nearest authorized Subaru retailer if you cannot safely drive your Subaru
• Jump-start if your battery is dead
• Gasoline delivery if you run out of gas
• Flat tire change to install your spare
• Emergency lockout service
• National Subaru retailer locator service, with phone numbers and location of the nearestretailer anywhere in the U.S. or Canada
NOTE: Specifically excluded from Subaru Roadside Assistance coverage are servicerequests or claims resulting from: accidents, vandalism, acts of God, violation of any laws,or vehicle modifications not recommended by the manufacturer.
SOS and Roadside Assistance Buttons
PURPOSE OF THIS GUIDE
5

TOWING YOUR ALL-WHEEL DRIVE SUBARUSince Subaru Symmetrical All-Wheel Drive distributes power to all four wheels, impropertowing may damage your AWD system. The best way to tow your Ascent is with a flatbedtruck by your Subaru retailer or a commercial towing service.
PURPOSE OF THIS GUIDE
6

KEYLESS ENTRY
1 Lock/Arm
• Press the lock/arm button to lock the doors, the rear gate,and the fuel door and to activate the security alarm. A chirpsounds and the hazard warning lights flash once.
• If any of the doors or the rear gate are not fully closed, fiverapid chirps sound and the hazard warning lights will flashto alert you.
• Press the lock/arm button three times to activate the vehiclefinder function. If you are within 30 feet of your Subaru, thehorn sounds once, and the hazard warning lights flash threetimes.
2 Unlock/Disarm
• Press the unlock/disarm button once to unlock the driver’sdoor and fuel door. To unlock all the doors and the reargate, briefly press the button twice. Two chirps sound andthe hazard warning lights flash twice.
• The interior lights will illuminate when you press theunlock/disarm button if they are set to the “DOOR” positionon the overhead console.
3 Rear Gate
• Press the rear gate button to unlock the rear gate.
• If your Subaru has a Power Rear Gate, press and hold thisbutton to open or close the rear gate.
4 Panic Alarm
• Press the panic alarm button to sound the horn and flashthe hazard warning lights.
• Press any button on the access key fob or transmitter to deactivate the panicalarm.
Transmitter
Access Key Fob
ENTRY AND EXIT
7
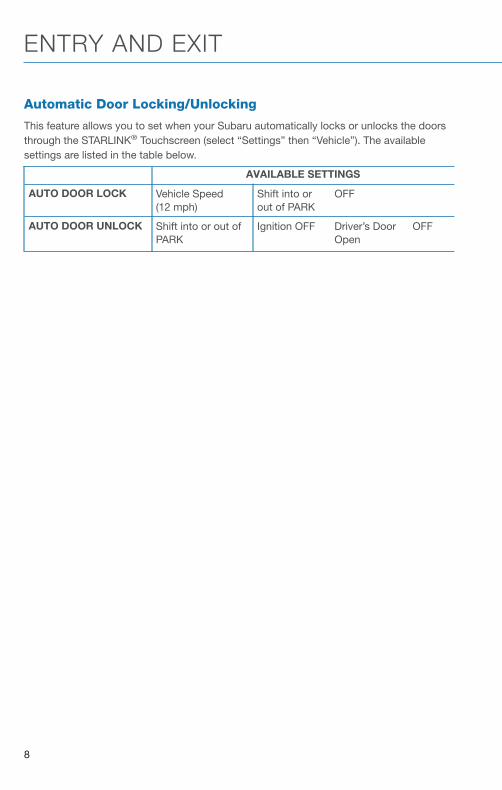
Automatic Door Locking/Unlocking
This feature allows you to set when your Subaru automatically locks or unlocks the doorsthrough the STARLINK® Touchscreen (select “Settings” then “Vehicle”). The availablesettings are listed in the table below.
AVAILABLE SETTINGS
AUTO DOOR LOCK Vehicle Speed(12 mph)
Shift into orout of PARK
OFF
AUTO DOOR UNLOCK Shift into or out ofPARK
Ignition OFF Driver’s DoorOpen
OFF
ENTRY AND EXIT
8

KEYLESS ACCESS WITH PUSH BUTTON START (ifequipped)The Keyless Access with Push-Button Start system features touch-activated door lockingor unlocking and push-button start functions without the key ever leaving your pocket orpurse. You can customize the touch-activated door locking or unlocking settings using thei/Set switch to navigate to “Vehicle Setting” then “Keyless Entry System” in theCombination Meter Display or through the STARLINK® Touchscreen by selecting“Settings” then “Vehicle”.
Unlocking Using Door Handles
Grip the driver’s door handle tounlock the driver’s door (or alldoors depending on the setting).Grip the front passenger’s doorhandle to unlock all doors and therear gate. Two chirps sound andthe hazard warning lights flashtwice.
Locking Using Door Handles
Close all the doors and the reargate and touch the door locksensor (two lines) on either frontdoor handle. All doors and therear gate lock. One chirp soundsand the hazard warning lightsflash once.
Door Unlock Sensor
Door Lock Sensor
ENTRY AND EXIT
9

Unlocking Using the Rear Gate
Press the rear gate opener buttonto unlock and open the rear gate(or also unlock all doorsdepending on the setting). Twochirps sound and the hazardwarning lights flash twice.
Locking Using the Rear Gate
Close all the doors and the reargate and press the rear lockbutton. All doors and the reargate lock. One chirp sounds andthe hazard warning lights flashonce.
Rear Gate Opener Button
Rear Lock Button
ENTRY AND EXIT
10

POWER REAR GATE (PRG) (if equipped)The Power Rear Gate allows automatic opening even when your arms are full, and a singletouch on the gate button lets it close and lock the entire vehicle. The opening height canalso be adjusted for spaces where clearance is limited.
Power Rear Gate Button
Opening the Power Rear Gate
Press and hold the Power RearGate Button on the instrumentpanel to automatically open therear gate. Two chirps sound andthe hazard warning lights flashtwice.
Stopping the Power Rear Gate
If you briefly press the PowerRear Gate Button while the reargate is opening, it will stop. Pressand briefly hold the button againto close the rear gate.
Closing the Power Rear Gate
Press and hold the Power Rear Gate Button on the instrument panel to close the rear gate.If you briefly press the button while the rear gate is closing, it will open.
The operation is the same using the Power Rear Gate Button on the access key fob ortransmitter.
NOTE: This button only functions to open the PRG when the doors are unlocked. If thedoors are locked, you will hear three rapid beeps from the vehicle.
Power Rear Gate Button
ENTRY AND EXIT
11

From the Rear of the Vehicle
Opening the Power Rear Gate
To open the rear gate, brieflypress the Rear Gate OpenerButton on the underside trim nearthe license plate, and the reargate automatically opens.
Stopping the Power Rear Gate
If you briefly press the PowerRear Gate Close Button on theinside edge of the rear gate whilethe gate is opening, it will stop.Press the button again to closethe rear gate.
Closing the Power Rear Gate
To close the rear gate, brieflypress the Power Rear Gate CloseButton on the inside edge of therear gate. If you press the buttonwhile the gate is closing, it willopen.
Rear Gate Opener Button
Power Rear Gate Close Button
ENTRY AND EXIT
12

Power Rear Gate Lock
Press the lock button on theinside edge of the rear gate. ThePower Rear Gate will close, andall doors, the rear gate, and thefuel lid will lock.
The Power Rear Gate also comes equipped with a memory height function, allowingyou to set the where the Power Rear Gate stops when it opens. For step by stepinstructions on setting the memory height, please refer to page 104.
Power Rear Gate Close and Lock Button
ENTRY AND EXIT
13

1 Power Windows (p. 21)
2 Power Exterior Mirrors (p. 19)
3 Instrument Panel Switches (p. 30)
4 I/Set Switch (p. 31)
5 Audio Controls (p. 30)
6 Light Controls (p. 32)
7 Combination Meter (p. 37)
INSTRUMENT PANEL
14

8 Advanced Adaptive Cruise Control (p. 31)
9 Multi-Function Display (MFD) (p. 32)
10 Windshield Wipers (p. 34)
11 SUBARU STARLINK® Multimedia Touchscreen (p. 56)
12 Climate Control System (p. 23)
13 CVT Selector (p. 39)
INSTRUMENT PANEL
15

SEATING
Manual Seats
1 Forward/Backward: Pullthe lever below the seat upand slide the seat forward orbackward. Release the leverand make sure the seat islocked into place.
2 Seat Height (Driver’s Seat):Pulling up or pushing downon the lever will raise orlower the seat cushion.
3 Recline Seatback: Pull thelever up to adjust theseatback. Release the leverand make sure the seatbackis locked into place.
Manual Seat Levers
GETTING COMFORTABLE
16

Power Driver’s Seat (if equipped)
1 Seat Position: Moving theswitch forward or backwardwill adjust the seat in thatdirection. Pulling up orpushing down on the back ofthe switch will adjust theseat height up or down.Pulling up or pushing downon the front of the switch willadjust the angle of the seatcushion.
2 Recline Seatback: Movingthe top of the switch forwardor backward will adjust theangle of the seatback.
3 Lumbar Support: Pressingthe front of the switch willincrease support. Pressingthe rear of the switch willdecrease support.
4 Thigh Extension (ifequipped): Pull up on thelever below the seat cushionto adjust the length.
Power Seat Controls
Thigh Extension
GETTING COMFORTABLE
17

Head Restraint Adjustment
Pull the head restraint up to raiseit. To lower the head restraint,push it down while pressing therelease button on the top of theseatback. Each head restraintshould be adjusted so that thecenter of the head restraint isclosest to the top of theoccupant’s ears.
The angle of the front headrestraints can be adjusted bytilting them forward. You will heara click when the restraint locks inplace. Pulling the head restraintas far forward as it will go allows itto return to the fully upright position.
Seatbelt Adjuster
To keep yourself comfortable andsafe, always position the seatbeltadjuster so the shoulder beltpasses over the middle of yourshoulder without touching yourneck. Pull the tab out and slidethe adjuster up or down to set theposition. Release the tab andmake sure the adjuster is lockedin place.
Release Button and Head Restraint Adjustment
Seatbelt Adjustment Tab
GETTING COMFORTABLE
18

TILT AND TELESCOPIC STEERING COLUMN
You can adjust both the heightand lengthwise position of thesteering wheel. Pull the lever onthe side of the steering columndown firmly to unlock, then adjustthe position of the steering wheel.Push the lever firmly back up tolock the column in place.
POWER EXTERIOR MIRRORS
Turn the knob to “L” (left side) or “R” (rightside) to select a mirror. Push the knob in thedirection you want to move the mirror. Turn theknob back to the center position whenfinished.
Steering Column Unlock
Power Mirror Knob
GETTING COMFORTABLE
19

Power Folding Mirrors (if equipped)
The Power Folding Mirrors make it easy toprotect your exterior mirrors when your Subaruis parked or being washed in an automatedcar wash. Press the switch to fold the exteriormirrors and press again to unfold. The switchworks with the ignition in the “ON” or “ACC”positions.
NOTE: Always ensure the mirrors areunfolded before driving.
REAR VIEW MIRROR
Auto-dimming Mirror (if equipped)
The auto-dimming function senses distracting glare duringnighttime driving and automatically dims to eliminate theglare and preserve your vision. Press the switch to turnauto-dimming on or off. A green LED indicator on theswitch illuminates when the function is on.
HomeLink® 5 Accessory Mirror (ifequipped)
The HomeLink® 5 accessory mirror provides threebuttons to replace devices such as garage dooropeners, gate openers, entry door locks, securitysystems, and home lighting. The Owner’s Manualprovides programming instructions, andwww.subaru.com/homelink has a helpful “how to”video.
NOTE: HomeLink® 5 may not be compatible with some older dooropeners or additional equipment may be required.
Power Folding Mirror Switch
GETTING COMFORTABLE
20

Smart Rearview Mirror (if equipped)
Pull the mode lever toward you to show the imagefrom the camera that is on the rear gate window. Thisis convenient to use when something inside yourAscent blocks your view out of the rear window. Pushthe mode lever away from you to use as a normalmirror.
CABIN VIEW MIRROR
Gently push the lid in theoverhead console on the “PUSH”mark, and the compartmentautomatically opens to theeyeglass holder. Push the lid backup halfway to use the cabin viewmirror. Push the lid up all the wayto close the mirror.
POWER WINDOWS
To open or close a window,partially press down or pull upand hold the correspondingswitch. The front windows have aone-touch auto up/downfunction. Fully press down or pullup and release to automaticallyopen or close a one-touchwindow.
Power Window Switches
GETTING COMFORTABLE
21

POWER MOONROOF (if equipped)With the ignition in the “ON” position, you can tilt and slide the moonroof.
Opening/Closing the Sunshade
1 Opening: Slide the switchrearward, briefly hold, andrelease to automaticallyopen the sunshade. To stopthe sunshade halfway, slidethe switch in either direction.
2 Closing: Slide switchforward, briefly hold, andrelease to automaticallyclose the sunshade. To stopthe sunshade halfway, slidethe switch in either direction.
Tilting the Moonroof
Press and hold the moonroof switch to tilt or lower the moonroof.
Sliding the Moonroof
3 Opening: Slide the switch rearward, briefly hold, and release to open the moonroof. Itwill stop slightly before the fully-open position to reduce wind noise. Slide the switchrearward again and release to fully open it.
4 Closing: Slide the switch forward, briefly hold, and release to close the moonroof. Itwill stop in the tilted position. Slide the switch forward and hold to fully close it.
Power Sunshade and Moonroof Switches
GETTING COMFORTABLE
22

CLIMATE CONTROL
Tri-Zone Automatic Climate Control
The Tri-Zone Automatic Climate Control system allows you to set separate temperaturesfor the driver, passenger, and rear seats. Set your desired temperature and let the systemautomatically make the adjustments for you. At any time, you can manually take control ofthe climate settings.
Operation in Automatic Mode
1 Automatic Control Button: This system automatically controls all of the climatesystem except defogging. Press “AUTO” to activate. Press “OFF” to turn off thesystem.
2 Temperature Control Dial: Turn the dial clockwise to increase the temperature orcounterclockwise to decrease the temperature. The temperature will appear on thescreen. You can adjust separate temperature settings for the driver’s side andpassenger’s side.
3 Tri-Zone Temperature SYNC Button: Press the button to synchronize the driver’s,passenger’s and rear temperatures to the driver’s temperature control dial.
When using automatic mode, the fan speed, airflow distribution, air-inlet control and airconditioning compressor are controlled automatically. To activate:
1. Press the “AUTO” button. The “FULL AUTO” indicator light illuminates on the climatecontrol display.
2. Set the preferred temperature using the temperature control dial.
If you operate any of the buttons other than “ON/OFF”, rear window defogger, “SYNC”, orthe temperature control dial, the “FULL” indicator light will turn off. The “AUTO” light willremain illuminated. You can then manually control the system as desired. Press the“AUTO” button to change back to “FULL AUTO” mode.
GETTING COMFORTABLE
23

Operation in Manual Mode
4 Air Conditioner Button: Press this button to activate or deactivate the airconditioning.
5 MAX A/C Button: Press this button for quickest cooling.
6 Airflow Mode Selection Button: Press the button to select the desired airflow mode.The selected mode – ventilation, ventilation 2, bi-level, feet, or feet-defrost – is shownon the display.
ICON MODE FUNCTION
Ventilation Instrument panel outlets
Ventilation 2Instrument panel outlets and less foot outlets than
bi-level
Bi-Level Instrument panel outlets and foot outlets
FeetFoot outlets, both side outlets of the instrument panel
and some through windshield defroster outlets
Feet-DefrostWindshield defroster outlets, foot outlets and both
side outlets of the instrument panel
DefrostWindshield defroster outlets and both side outlets of
the instrument panel
NOTE: The defroster button is used to activate the defrost airflow mode.
GETTING COMFORTABLE
24

7 Fan Speed Control Dial: Turn the fan speed control dial to increase or decrease fanspeed.
8 Recirculated/Outside Air Button: Press this button to prevent outside air fromentering your Subaru. Press the button again to allow outside air into your Subaru.NOTE: To prevent windshield fogging, do not remain in the recirculated mode for anextended period of time.
9 Defroster Button: Press this button to defrost or dehumidify the windshield and frontdoor windows.NOTE: The air conditioning may turn on to defrost the windshield more quickly.However, the indicator on the air conditioner button will not illuminate.
10 Rear Window Defogger Button: Press this button to turn on the defogger. It willautomatically turn off after about 15 minutes. If the window clears before then, pressthe button again to turn it off. If equipped, the outside mirror defogger and windshieldwiper de-icer will also activate. You can customize this function for continuousoperation through the Combination Meter Display (CMD) or the SUBARU STARLINK®
touch screen.
11 Rear Climate Control Button: Press this button to operate the rear climate controlwith the front climate control panel. Press the button while the rear climate control ison. Press and hold to lock the rear climate control. The lock indicator will illuminateon the front and rear climate control panels.
12 Rear Climate On and Off Button: Press this button to turn the rear climate controlsystem on or off.
GETTING COMFORTABLE
25

Rear Climate Control Panel (if equipped)
1 Temperature Control Button: Press the up or down arrow to increase or decreasethe temperature.
2 Fan Speed Control Button: Press the up or down arrow to increase or decrease thefan speed.
3 On/Off Button: Press this button to turn the rear climate control system on or off.
4 Airflow Mode Selection Button: Press this button to select the desired airflow mode.The selected mode — ventilation, bi-level or feet — is shown on the display.
5 Automatic Control Button: This system automatically controls all of the rear climatesystem. Press “AUTO” to activate. Press “OFF” to turn off the system.
To activate automatic mode:
1. Press the “AUTO” button. The “FULL AUTO” indicator light illuminates on the climatecontrol display.
2. Set the preferred temperature using the temperature control buttons.
If you use any of the buttons other that the temperature control buttons, the “FULL”indicator light will turn off. The “AUTO” light remains illuminated. You can then manuallycontrol the system as desired. Press the “AUTO” button to change back to “FULL AUTO”mode.
GETTING COMFORTABLE
26

Heated Seats (if equipped)
There are separate heated seat switches on the climate control panel for the driver andpassenger. Press the switch to activate the heated seat. Each time you press the switch,the mode will change as follows: High, Mid, Low, and Off. Yellow indictors illuminateindicating the level.
Ventilated Seats (if equipped)
There are separate ventilated seat switches on the climate control panel for the driver andpassenger. Press the switch to activate the ventilated seat. Each time you press theswitch, the mode will change as follows: High, Mid, Low, and Off. Blue indictors illuminateindicating the level.
GETTING COMFORTABLE
27

Second-row Heated Seats (if equipped)
There are separate heated seat switches on the rear climate control panel for each side.Press the switch to activate the heated seat. The heating mode changes to High, Low, andOff each time you press the switch, and yellow indictors illuminate indicating the level.
Heated Steering Wheel (if equipped)
To activate, pull the heated steering wheel switch withthe ignition in “ON” or “ACC”. The indicator light onthe switch will illuminate. To deactivate, pull the switchagain. The heater will stay on for approximately 30minutes.
Remote Engine Start with Climate Control
You can remotely start your Subaru and adjust the temperature using the STARLINK®
Safety and Security features through the MySubaru App (subscription required). Pleaserefer to your SUBARU STARLINK® Owner's Manual for a list of required vehicle conditionsfor this feature.
GETTING COMFORTABLE
28

ACCESSORY CONNECTIONS
1 Auxiliary Input Jack
The 3.5mm auxiliary inputjack is located below theclimate control panel. Youcan connect a portablemusic player to the auxiliaryjack and hear the musicstored on it through yourSubaru’s speakers. Press the“Source” button located onthe steering wheel or the“Media” button on theTouchscreen to select theauxiliary mode.
For more information, please refer to page 67 or your SUBARU STARLINK®
Owner’s Manual.
2 Dual USB Ports
The USB ports are located below the climate control panel, on the rear centerconsole, and, if equipped, in the third row area. You can connect a variety ofUSB-equipped devices to the front ports, such as portable music players orsmartphones, to enjoy your favorite music through your Subaru’s speakers. All portsprovide charging (5V, 2.1A) to devices. The ports in the second and third row are forcharging only.
For more information, please refer to page 67 or your SUBARU STARLINK®
Owner’s Manual.
Power Outlets:
Power outlets (12V) are located in the small storage area below the climate control paneland in the cargo area behind the 3rd row seats. Electrical power is available for use within-vehicle electrical appliances with a maximum power rating of 120W. If equipped, there isalso a 120V AC power outlet located on the back of the center console below the rearclimate control panel.
For more information, please refer to your Owner’s Manual.
Connection Ports
GETTING COMFORTABLE
29

INSTRUMENT PANEL SWITCHES (LOWER LEFT)The switches in the lower left of the instrument panel allow you to control severalconvenient and important features. Knowing their location and function will improve yourdriving experience.1 Power Rear Gate (if
equipped, p. 11)
2 One-touch Interior Lighting (ifequipped, p. 35)
3 Power Rear Gate Memory (ifequipped, p. 104)
4 Illumination Brightness(p. 33)
5 Vehicle Dynamics ControlOFF
6 Blind Spot Detection/RearCross Traffic Alert OFF (ifequipped, p. 98)
For more information, please refer to your EyeSight® and vehicle Owner’s Manuals.
AUDIO CONTROLS
1 Presets/Skip
2 Volume
3 Source
4 Voice Recognition
5 Call/End
For more information about your audio system and controls, please refer to page 59or the SUBARU STARLINK® Owner’s Manual.
1 2
5 6
3 4
CONTROLS
30

ADVANCED ADAPTIVE CRUISE CONTROL
1 Adaptive Cruise Control On/Off
2 Lane Keep Assist
3 Increase Distance
4 Decrease Distance
5 Resume (RES)/Increase Speed and Set(SET)/Decrease Speed
For more information on the AdvancedAdaptive Cruise Control switches, please referto page 93 or the EyeSight® Owner’s Manual.
I/SET SWITCH
The “i/Set” switch allows you to cycle throughuseful driving information in the CombinationMeter Display such as fuel consumption, drivingtime, speed, and tire pressure. You can changethe information displayed using the up anddown arrows.
When the Menu Entering Screen is displayed,pull and hold the “i/Set” switch to enter theMenu Screen for the ability to modify a numberof vehicle settings.
For more information, please refer to “Combination Meter Display” in your SubaruOwner’s Manual.
CONTROLS
31

VIEW/ENTER Switch
Use the arrows to cycle throughuseful information in theMulti-Function Display (MFD).Navigate to the “Settings” menuand hold the “VIEW/ENTER”switch to adjust a number of MFDsettings.
For more information, pleaserefer to “Multi-Function Display”in your Subaru Owner’s Manual.
LIGHT CONTROLS
1 AUTO: Rotate the end of the lever to setyour headlights to automatically turn onor off, depending on the level of lightoutside.NOTE: The sensitivity of the automaticheadlights can be adjusted through theSTARLINK® multimedia display.
2 Parking Lights: Rotate the end of thelever to turn on the instrument panellights, parking lights, side marker lights,tail lights, and license plate lights.
3 Headlights: Rotate the end of the lever to turn on the headlights, instrument panellights, parking lights, side marker lights, tail lights, and license plate lights.
4 High Beams: Push the lever forward to change from low beam to high beam. Whenset to the “AUTO” position, pushing the lever forward also activates the High BeamAssist (HBA) system. Pull the lever back to center to return to low beam.
5 Fog Lights: If equipped, rotate the dial to turn on the fog lights when the headlightsare on low beams in the ” or “AUTO” position.
CONTROLS
32

Illumination Brightness
When the light controls are on (inthe , , or “AUTO”position), and ambient light is low,rotating the illuminationbrightness dial on the instrumentpanel upward will make theinstrument panel illuminationbrighter. When the dial is fullyrotated upward (dots aligned), theinstrument panel illuminationstays at full brightness. Rotatingthe dial downward dims theinstrument panel illumination.
When the ambient light is bright,the illumination brightness is setto the maximum regardless of the position of the control dial.
Daytime Running Lights
The daytime running lights automatically turn on when the engine is running, the parkingbrake is released, the select lever is out of the “P” position, and the light switch is set toOff, “AUTO”, or “ ”. Always turn on the headlights when it’s dark outside by rotatingthe dial to the “ ” or “AUTO” position.
Illumination Brightness Dial
CONTROLS
33

TURN SIGNALS
Push fully up for the right turn signal and fullydown for left turn signal. Your Subaru also hasa one-touch lane changer feature: push slightlyup and release to signal a right lane change orpush slightly down and release to signal a leftlane change.
WINDSHIELD WIPERS
To turn on the wipers, press the wiper controllever down one position for intermittent, twopositions for low speed, or three positions forhigh speed. When the lever is in theintermittent position, rotate the dial to adjustthe operating interval of the wipers. To turn thewipers off, return the lever to the “OFF”position. For a single wipe, move the lever upfrom the off position.
Pull the lever toward you to wash thewindshield. The washer will spray and the wipers will operate while you pull the lever.
Rain Sensing Windshield Wipers (if equipped)
Press the wiper control lever down oneposition. When the wiper control lever is in the“AUTO” position, the wipers operateautomatically when the rain/light sensor on thewindshield glass detects moisture on thewindshield. Rotate the dial to adjust thesensitivity of the rain/light sensor. All otherfunctions of the wiper system work the sameas above.
NOTE: Make sure to turn off this functionbefore entering an automatic car wash.
CONTROLS
34

REAR WINDOW WIPER
Rotate the end of the lever up one position forintermittent, or two positions for continuousoperation.
When the lever in is the intermittent position,the wiper operates at intervals correspondingwith vehicle speed. When you move the selectlever to the “R” position, the wiper will switchto continuous operation. It will return tointermittent when you move the select leverout of “R”.
Rotate the dial up from the continuous operation position or down from the “OFF” positionto spray washer fluid. The washer will spray until you release the dial, then return to theprevious position and resume operation.
ONE-TOUCH INTERIOR LIGHTING (if equipped)
When your interior lights are set tothe “DOOR” position in theoverhead console, pressing theOne-Touch Interior LightingSwitch conveniently turns on theall the map lights and readinglights at once. Pressing the switchagain turns all the map andreading lights off. Once the lightsare turned on using the switch,you can also turn them off bylocking the doors using the keyfob/transmitter, door handle, orPower Rear Gate Lock Switch.
CONTROLS
35

OVERHEAD CONSOLE
1 SOS EmergencyAssistance: Press the“SOS” button to connectwith a SUBARU STARLINK®
Customer Care Advisor.(Subscription required.)Press and hold the button forabout two seconds to cancelthe call.
For more information,please refer to page 77 orthe SUBARU STARLINK®
Safety and Security Owner’sManual.
2 Enhanced Roadside Assistance: Press the “i” button to connect with a SUBARUSTARLINK® Roadside Assistance Provider. (Subscription required.) Press and holdthe button for about two seconds to cancel the call.
For more information, please refer to page 77 or the SUBARU STARLINK® Safetyand Security Owner’s Manual.
3 Lane Departure Warning OFF switch: Press and hold this switch for two seconds toturn off the Lane Departure Warning and the Lane Sway Warning function. Press andhold the switch again for two seconds to turn the systems back on.
For more information, please refer to page 96 or the EyeSight® Owner’s Manual.
4 Power Sunshade/Moonroof Switches: Operate these switches to open and closethe sunshade or tilt and slide the moonroof.
For more information, please refer to page 22 or your Owner’s Manual.
5 Pre-Collision Braking System OFF switch: Press and hold this switch for twoseconds to turn off the Pre-Collision Braking System and Pre-Collision ThrottleManagement. Press and hold the switch again for two seconds to turn the systemsback on.
For more information, please refer to page 96 or the EyeSight® Owner’s Manual.
6 Automatic Illumination: When the switch is in the “DOOR” position, the map lightsilluminate when any door is opened, the doors are unlocked using the remote keylessentry system or keyless access function, or the ignition is turned from “ON” or “ACC”to “LOCK”/“OFF”.
7 Map Lights: Press a map light to turn it on or off.
CONTROLS
36

COMBINATION METER
1 Tachometer
2 Combination Meter Display (CMD)
3 Speedometer
4 Fuel gauge
5 Trip meter and odometer
6 Select lever/gear position indicator
7 Engine coolant temperature gauge
WARNING AND INDICATOR LIGHTSRed lights indicate immediate attention is required. Some examples are:
Seatbeltwarning
Dooropen
Brake system
Yellow lights indicate caution. Some examples are:
Low fuelEngine oil
level warninglight
Tire pressurewarning light
Green and blue lights are for information. Some examples are:
Headlightindicator
light
Auto VehicleHold ON
High beamindicator
light
GAUGES AND WARNING LIGHTS
37

IGNITION SWITCHThe ignition switch has four positions:
LOCK/OFF: You can only insert or remove the key in this position.
ACC (Accessory): Provides power to the radio and accessory power outlets.
ON: All electrical systems are available. The key returns to this position after starting theengine.
START: Turn the key to this position to start the engine.
PUSH-BUTTON IGNITION SWITCH (if equipped)
Each time you press the ignition switch withoutdepressing the brake pedal, the ignition position willchange as follows: ACC, ON, OFF.
ACC (Accessory): Provides power to the radio andaccessory power outlets. Orange indicator illuminates.
ON: All electrical systems are available. Orangeindicator illuminates.
OFF: Power off and indicator off.
STARTING THE VEHICLE
Without Push-button Ignition
To start the engine:
1. Make sure the select lever is in the “P” position.
2. Using the key, turn the ignition switch to “START”.NOTE: Do not depress the accelerator pedal. Release the key as soon as the enginestarts.
With Push-button Ignition
To start the engine:
1. Sit in the driver’s seat with the access key fob.
2. Make sure the select lever is in the “P” position.
3. Depress the brake pedal.
4. When the Engine START/STOP button indicator turns green, briefly press and releasethe Engine START/STOP button.
OPERATING THE VEHICLE
38

DRIVING THE VEHICLE
Automatic Transmission Shift Mode
The Continuously VariableTransmission (CVT) iselectronically controlled andprovides two different drivingmodes: normal and manual.
Normal Mode
When the select lever is in the “D”(Drive) position, the transmissionis in normal shift mode. Theselect lever position indicator inthe Combination Meter Display(CMD) shows “D” and thetransmission automatically shiftsinto a suitable forward gear.
Manual Mode
In manual mode, you select the desired gear position to obtain necessary acceleration andengine braking. Move the select lever left from the “D” position into the “M” position toselect manual mode. The gear position indicator in the Combination Meter Display (CMD)shows the currently selected gear. Arrow-shaped indicators show when upshifting ordownshifting is available. To shift, use the paddle shift control switches behind the steeringwheel.
Paddle Shift Control Switches
You can shift gears using thepaddle shift control switches. Toupshift to the next higher gear,pull the “+” paddle on the righttoward you. To downshift to thenext lower gear, pull the “–”paddle on the left toward you.
You can temporarily shift gearseven when the select lever is inthe “D” position by pulling eitherthe “+” or “–” paddle toward you.Once vehicle speed stabilizes, thetransmission will switch back tonormal mode.
OPERATING THE VEHICLE
39
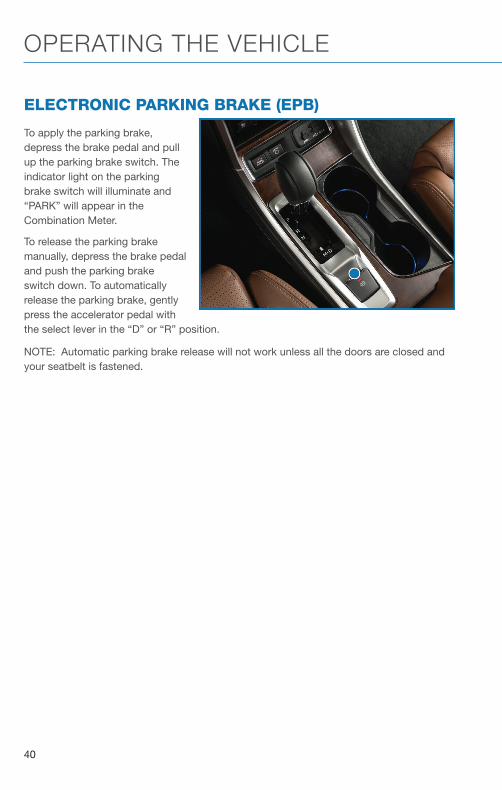
ELECTRONIC PARKING BRAKE (EPB)
To apply the parking brake,depress the brake pedal and pullup the parking brake switch. Theindicator light on the parkingbrake switch will illuminate and“PARK” will appear in theCombination Meter.
To release the parking brakemanually, depress the brake pedaland push the parking brakeswitch down. To automaticallyrelease the parking brake, gentlypress the accelerator pedal withthe select lever in the “D” or “R” position.
NOTE: Automatic parking brake release will not work unless all the doors are closed andyour seatbelt is fastened.
OPERATING THE VEHICLE
40

Auto Vehicle Hold (AVH)
Auto Vehicle Hold gives your feeta break by automatically holdingyour Subaru in place when at acomplete stop, such as a trafficsignal, even after you release thebrake pedal. Press the AutoVehicle Hold switch on the centerconsole to turn on the function.The AVH indicator in thecombination meter will illuminate.
While your Subaru is being heldby this function, the operationindicator in the combination meterwill illuminate. The function iscanceled when you depress theaccelerator pedal or the brakepedal.
Press the switch again to turn itoff. The function works with theselect lever in either the “D” or“R” position.
NOTE:
• For this system to work yourseatbelt must be fastened.
• Make sure to turn off thisfunction before entering anautomatic car wash.
ICON MODE
Auto Vehicle Hold ON
Auto Vehicle Hold INOPERATION
OPERATING THE VEHICLE
41

X-MODE®
X-MODE® is the integrated control system of theengine, All Wheel Drive, and Vehicle Dynamics Control(VDC) systems for driving with bad road conditions.Using X-MODE®, you can drive more comfortablyeven in slippery road conditions,such as mud or snow, includinguphill and downhill. You canactivate the system when thevehicle speed is less than12 mph. If the vehicle speedreaches 25 mph, the X-MODE®
system is canceled and can bereactivated once the once thevehicle speed is lower.
To activate the X-MODE® system,press the X-MODE® switch. Whilethe system is active, theX-MODE® indicator appears, andthe Multi-Function Display showssteering direction, vehicle angle,and power distribution. To deactivate X-MODE® press the X-MODE® switch again.
In certain situations, such as navigating a vehicle stuck in mud or snow, it may be helpfulto allow more wheel spin by turning off the VDC system. To turn off the VDC system, pushthe Vehicle Dynamics Control OFF switch located in the lower left console. Push theVehicle Dynamics Control OFF switch again to reactivate the VDC system.
Hill Descent Control (HDC)
This function helps maintain a constant vehicle speed when driving down steep hills ordeclines. HDC is automatically engaged with X-MODE® and functions with the select leverin the “D” or “R” position.
MFD X-MODE Display
X-MODE Switch
OPERATING THE VEHICLE
42

TURNING OFF THE VEHICLE
Without Push-button Ignition
To stop the engine:
1. Stop your Subaru completely.
2. Move the select lever to the “P” position.
3. Turn the ignition switch to “OFF”.
NOTE: The front windows will remain active for about 40 seconds and the SUBARUSTARLINK® Multimedia System will remain on for about three minutes or until a door isopened, whichever occurs first.
With Push-button Ignition
To stop the engine:
1. Stop your Subaru completely.
2. Move the select lever to the “P” position.
3. Press the ignition switch.
NOTE: The front windows will remain active for about 40 seconds and the SUBARUSTARLINK® Multimedia System will remain on for about three minutes or until a door isopened, whichever occurs first.
OPERATING THE VEHICLE
43

FUEL FILLER LID
The fuel filler lid is located toward the rear of thepassenger side. To open the lid:
1. Make sure your Subaru is stopped and the selectlever is placed in PARK. Then turn the ignition tothe "LOCK"/ "OFF" position.
2. The fuel filler lid is automatically unlocked when theignition is moved to the ”LOCK”/OFF” position, orby unlocking using the access key fob/transmitteror door handles.
3. Push the rear side of the lid.
4. When the lid opens slightly, open it further by hand.
While refueling, place the fuel filler cap on the capholder inside the lid.
After refueling, put the cap back on and turn itclockwise until you hear a clicking noise. Be certainnot to catch the tether under the cap while tightening.
To close the lid, press it until you hear it latch.
NOTE: If the fuel filler cap is not tightened until it clicks or if the tether is caught under thecap, the Check Engine warning light may illuminate.
FUELUse regular unleaded gasoline with an octane rating of 87 AKI or higher. Do not use fuelswith more than 15% ethanol.
For more information, please refer to the Owner’s Manual.
FUEL CAPACITYCapacity
Full Fuel Tank 19.3 US gallons
Low Fuel Warning Light 2.6 US gallons
Fuel Filler Lid and Cap
REFUELING
44

ACCESSING THE THIRD-ROW
While pulling up the lever on thesecond-row seat, fold theseatback forward and slide theseat toward the front.
EXITING THE THIRD-ROW
From the third-row seat, raise thelever on the second-rowseatback. The seatback of thesecond-row seat tips forward andthe seat can slide forward.
PASSENGER/CARGO AREAS
45

FOLDING THE REAR SEATS
Second-Row Seat
1 Tilt: Pull the lever and tilt theseatback forward.
2 Fold: After tilting theseatback, pull the lever tounlock the seatback and foldit down. To return theseatback to its originalposition, raise the seatbackuntil it locks into place,making sure that it issecurely locked.
PASSENGER/CARGO AREAS
46

Third-Row Seat
1 Fold: While pulling the strap,fold the seatback forward.
2 Return: To return theseatback to the uprightposition from inside yourAscent, lift the seatback up.From outside, pull up on thestrap on the back of theseatback. Lift the seat upsecurely until it locks inplace.
CHILD SAFETY LOCKS
The child safety locks are located on the insideedges of the rear doors. In the locked position,the rear doors can only be opened from theoutside.
PASSENGER/CARGO AREAS
47

LATCH/ANCHOR
Your Subaru is equipped with Lower Anchorsand Tethers for Children (LATCH). Formaximum safety, first carefully read the LATCHsystem instructions from the devicemanufacturer, as well as the installationinstructions in your Owner’s Manual, toproperly install the LATCH compatible restraintsystem. Use the appropriate seatbelts oranchorages provided in your Subaru. Childrenage 12 and under must properly occupy therear seat at all times.
REAR SEAT REMINDER
The Rear Seat Reminder system assists you inpreventing a child or pet from being left in yourSubaru. The system monitors the opening andclosing of the rear side door. It does notphysically sense the presence of a child or pet.
The system turns on if your Subaru is startedwithin 30 minutes of a rear side door openingor closing. It also turns on if a rear side door isopened and closed when your Subaru isrunning and stationary. The system remains onif your Subaru is turned off and back on againwithin 30 minutes and the rear side doorsremained closed.
When you turn your Subaru off, the system warns you audibly and with a “Reminder, Lookin Rear Seat” message in the Combination Meter Display (CMD).
The system operates only one time with each ignition cycle and opening and closing of arear side door. You can turn the Rear Seat Reminder off in the Combination Meter Display(CMD).
PASSENGER/CARGO AREAS
48

Passenger Occupant Detection and Seatbelt Reminders
To help keep your passengerssafe, your Subaru has apassenger occupant detectionand seatbelt reminder system foreach seat, including the secondand third rows.
If passengers in the second orthird row do not fasten theirseatbelts while the ignition is inthe "ON" position, the seatbeltwarning lights illuminate or blinkfor the specific seat, and awarning chime may sound.
For more information, pleaserefer to “Seatbelt Warning Light and Chime” in your Subaru Owner’s Manual.
CARGO COVER (if equipped)
Use the detachable cargo cover to protectcontents in the cargo area from direct sunlight.Pull the cover toward the rear of your Subaruand insert both ends of the cover into theguides.
Store the cover under the floor of the cargoarea when not in use. Instructions foroperation are included on the cargo coverhousing.
Cargo Area and Cover
PASSENGER/CARGO AREAS
49

SPARE TIRE
The spare tire is located in the spare tire holderlocated under the rear of your Ascent. Theholder has a hoist mechanism that can lowerand raise the spare tire.
For more information, please refer to yourSubaru Owner’s Manual.
JACK AND TOOLS
A jack and other maintenance tools, which areused to release the spare tire, are stored underthe cargo floor.
PASSENGER/CARGO AREAS
50

HOOD PROP
The hood prop is located in theleft front of the enginecompartment. Unfold it and insertthe end into the slot marked withan arrow.
ENGINE COMPARTMENT
51

2.4 L ENGINE
1 Brake Fluid Reservoir
2 Main Fuse Box
3 Battery
4 Windshield Washer Tank
5 Engine Oil Filler Cap
6 Radiator Cap
7 Engine Coolant Reservoir
8 Engine Oil Filter
9 Engine Oil Dipstick
10 Air Cleaner Element
Please refer to the Warranty and Maintenance Booklet for recommended replacementintervals.
ENGINE COMPARTMENT
52

NEW VEHICLE BREAK-INThe performance and long life of your Subaru are dependent on how you handle and carefor your Subaru while it is new.
Follow these instructions during the first 1,000 miles:
• Do not race the engine.
• Do not drive at one consistent engine or vehicle speed, either fast or slow.
• Avoid starting suddenly and rapid acceleration, except in an emergency.
• Avoid hard braking, except in an emergency.
ENGINE OILUse 0W-20 synthetic, with one of the following specifications:
• API classification SN or SN PLUS with the words “RESOURCE CONSERVING”.
• ILSAC GF-5, which can be identified with the ILSAC certification mark (Starburst mark).
ENGINE OIL CAPACITY
4.8 US quarts (during oil and filter change).
When the level is at the "low" mark, add approximately 1 quart ofengine oil in through the filler cap to bring the oil level to the “full”mark. For filler cap location see the engine compartment on page 52.1 Full Level
2 Low Level
ADDITIONAL SPECIFICATIONS
53

ROOF RAIL CAPACITYCROSS BARS DYNAMIC ROOF RAILS DYNAMIC ROOF RAILS STATIC
150 Pounds 176 Pounds 700 Pounds
For more information, please refer to your Owner’s Manual.
TRAILER TOWING CAPACITYAscent (Base) Models
Maximum total trailer weight* Maximum tongue weight*
2,000 pounds 200 pounds
Premium/Limited/Touring Models
Maximum total trailer weight* Maximum tongue weight*
5,000 pounds 500 pounds
*Towing a trailer with brakes.
NOTE:
• For models equipped with the BSD (Blind Spot Detection) and RCTA (Rear Cross TrafficAlert) driving support systems, when towing a trailer, it may be necessary to press theBSD/RCTA OFF switch to deactivate the system. The system may not operate asexpected due to obstruction of the radar waves. For details about the BSD/RCTA OFFswitch, refer to page 98 and/or your Owner’s Manual.
• For models equipped with the RAB (Reverse Automatic Braking) driving support system,when towing a trailer, it may be necessary to press the RAB button to deactivate thesystem. The system may not operate as expected due to obstruction of the sonarwaves. For details about the RAB button, refer to page 99 and/or your Owner’s Manual.
Please refer to your Owner’s Manual for complete details, especially if you plan to usethis vehicle for regular towing.
ADDITIONAL SPECIFICATIONS
54

TIRE PRESSURE MONITORING SYSTEM (TPMS)
Your Subaru has a Tire Pressure Monitoring System(TPMS). Individual tire pressure can be found in theCombination Meter Display. Use the “i/Set” switch todisplay the TPMS screen.
Tire pressure specification is on the tireinformation placard located on the driver’s sidedoor pillar.
TPMS Screen
Tire Specification Placard
ADDITIONAL SPECIFICATIONS
55

OVERVIEW OF YOUR MULTIMEDIA SYSTEMSUBARU STARLINK® Multimedia combines the radio along with the ability to connect yourphone* through Bluetooth® to the radio for making calls, sending text messages andlistening to your favorite songs on your phone.* Compatible smartphone and application required. For applications to operate, latest version of each
application required. Data provided by smartphone is displayed on the Touchscreen. Some state lawsprohibit the operation of handheld electronic devices while operating a vehicle. Smartphone appsshould only be launched when vehicle is safely parked. Your wireless carrier’s rates may apply.
Various Systems
Depending on your model and trim level there are several types of SUBARU STARLINK®
Multimedia systems. Some of the functions described in this guide will vary by system.
• 6.5-inch Multimedia Plus
• 8.0-inch Multimedia Plus
• 8.0-inch Multimedia Navigation
BUTTONS
Radio Functions
1 Power/Volume Control
Press the power/volumecontrol knob to mute orun-mute the audio. Rotatethe knob left to decrease orright to increase the volume.
2 Radio
Press the RADIO button todisplay the AM/FM/SXMscreen. The different tunermodes can be selected bytouching the source youwant to hear.
3 Media
Press the MEDIA button to display the media screen. Select the media source youwant to hear. Connected media will display in white.
4 Tune
Rotate the knob to change the radio station or select the next track/media file. Pressand hold the knob to display the sound settings screen.
STARLINK OVERVIEW
56

5 Seek
Press the seek up or seek down button to seek the next or previous radio frequency.You can also use the seek up or down buttons to select different audio tracks frommedia sources. Press and hold to fast-forward or rewind.
CD Player Functions
6 Load
Insert the disc into the loading slot. The CD will automatically be drawn in and beginplaying the first track.
7 Eject
Press the Eject button on the left side of the loading slot to remove the CD from theplayer.
Other Functions
8 Home
Displays the Home screen apps. The Home screen allows you to customize whichapps appear and rearrange the icons in a personalized order.
9 Map (if equipped)
Displays the map and navigation features available on the screen.
10 Apps
Displays the installed apps that are available on your vehicle. These apps can berearranged on your Home screen for your preference.
Controlling the Volume
Adjusting the Volume: Turn the VOLUME knob to adjust the volume. The volume stays atthe level you set after an ignition cycle.
Muting the Volume: You can mute the audio system by pressing the volume knob once,and un-mute the audio by pressing the knob again. It will un-mute automatically after anignition cycle.
Turning the System Off: To turn the audio system off, press and hold the volume knob forabout three seconds. The system remains off after an ignition cycle. Press the volumeknob again to turn the audio system back on.
STARLINK OVERVIEW
57

TOUCHSCREENOperations are performed by touching the screen directly with your finger.
MOTION ACTION USE
TouchQuickly touch and release once.
Changing andselecting varioussettings
Double Touch with one finger*Quickly touch and release twice with onefinger.
Enlarging the scaleof the map screen
Double Touch with two fingers*Quickly touch and release twice with twofingers.
Reducing the scaleof the map screen
Drag**Touch and drag your finger on the screento move the screen to the desiredposition.
• Scrolling the lists• Scrolling the
map screen*
Swipe**Quickly move the screen by swiping withyour finger.
• Scrolling the lists• Scrolling the
map screen*
Pinch*Move your two fingers further apart(pinch-out) to zoom in on the map. Moveyour two fingers closer together(pinch-in) to zoom out on the map.
Changing the scaleof the map screen
* 8-inch with Navi system only** The operations may not be performed on all screens.
STARLINK OVERVIEW
58

STEERING WHEEL CONTROLS
1 Presets/Skip: Press to toggle throughyour presets or change a track or mediafile. Press and hold to fast-forward orrewind.
2 Volume: Press the volume switch up ordown to increase or decrease thevolume.
3 Source: Press the source button tochange the audio sources between radiomodes and media modes.
4 Voice Recognition: Press to initiate thebuilt-in voice recognition system. Pressand hold to cancel voice recognition. Ifconnected to an iPhone, press and holdthe voice recognition button to initiate Siri.
5 Call/End: Press to receive or end a call without taking your hands off of the steeringwheel.
VOICE RECOGNITION
With SUBARU STARLINK®, simple voice commands can controlfeatures like navigation, entertainment, phone calls, and, on selectmodels, climate control. A microphone is located in the overheadconsole; however, you do not need to speak directly into it toactivate the voice command features.
Visitwww.subaru.com/engineering/starlink/multimedia.html for moreinformation.
Press the Voice Recognition button on the steering wheel to startthe voice recognition system. Press and hold the button to cancelthe system.
For help with what features are available with voice recognition, press the "Help" button onthe screen or press the voice recognition button and say "Help".
Starlink Audio Controls
STARLINK OVERVIEW
59

Tips
The system may not recognize the voice command due to various types of interference.Some causes for voice command interference are:
• The command is spoken too quickly or at a low or high volume.
• The command is incorrect or unclear.
• The window is open, the climate control system is set on high, or the ventilation isdirected toward the microphone.
• Passengers are talking while the command is spoken.
In some cases, you may not be able to use voice commands if the system cannot properlyrecognize the command. For example, the command is incorrect or unclear.
NOTE: The system is designed to recognize a variety of commands, but certain words,accents or speech patterns may be difficult for the system to recognize.
Google Assistant: May not work with all devices or may not be compatible with the audiosystem.
Siri Eyes Free: Press and hold the Voice Recognition Button when your phone isconnected via bluetooth for Siri Eyes Free.
STARLINK OVERVIEW
60

Common Commands
Below are examples of common commands that can be used with the voice recognitionsystem. Please refer to your SUBARU STARLINK® Owner’s Manual for a complete list.
VOICE COMMAND FUNCTION EXAMPLE
Dial [Number]Places a call to the phonenumber
Dial 555-123-4567
Call [Name] [Phone Type]Places a call to the contactname and phone type of thecontact from the phonebook
Call John Doe mobile
Navigate to [House Number,Street, City, State]1
Sets a destination to theaddress
Navigate to 1234 MainStreet, Lincoln, Washington
Show Map1 Displays the map screen Show Map
Where am I1Displays current location onmap
Where am I
Tune to [Frequency] (AM / FM)Switches to AM/FM andtunes to spoken frequency
Tune to 99.5 FM
Preset [Number]Switches to the presetchannel
Preset 3
Satellite Channel [Name /Channel Number]
Switches to satellite channelnumber
Satellite Channel PrimeCountry 55
Set Fan Speed to [1-7] 2 Sets the fan speed to thespoken fan speed
Set fan speed to 4
Set Temperature to[Number] 2,3
Sets the temperature to thespoken temperature
Set temperature to 70
Help Changes to help screen Help
Phone HelpDisplays a list of voicecommands related tocontrolling your phone
Phone Help
Media HelpDisplays a list of commandsrelated to the media
Media Help
Radio HelpDisplays a list of commandsrelated to the radio
Radio Help
Navigation Help1Displays a list of voicecommands related tonavigation
Navigation Help
1 8.0-inch Multimedia Navigation system only2 8.0-inch Multimedia Plus and 8.0-inch Multimedia Navigation system only3 When the A/C is off, the A/C setting will not change even if the voice command is accepted
STARLINK OVERVIEW
61

HOME SCREEN ICONS
Phone – Allows you to place and receive callsand text messages.
Map – Allows you to enter a destination andhave route guidance to get you where you aregoing.
Settings – Allows you to change the settingsto your personal choice for select systemsinside the vehicle.
Add Shortcut – Allows you to add icons forvarious functions to the home screen.
Apps – Entertainment and convenience applications that can beused to enhance your driving experience. The apps included are:MySubaru, Pandora®, Travel Link®, Android Auto™, SUBARUSTARLINK®, aha™, and Apple Car Play®.
Media – Allows you to play CDs, USB/iPod music, or Bluetooth®
audio by connecting to the device.
Radio – Allows you to select a station to listen to as well as pause and playback live radio.
REARRANGING ICONSYou can rearrange the icons on the Home Screen when the Home Screen Shortcutsfunction is turned on. You can turn on the Home Screen Shortcuts function by selecting“Settings”, then the “General” tab.
To rearrange icons on the Home Screen:
1. Select and hold the shortcut icon you want to move.
2. Drag the icon to the desired position and release.
3. To delete an icon, drag the icon to the bottom of the screen and release.
Home Screen Icons
STARLINK HOME
62

ADDING SHORTCUTSYou can add shortcut icons for various functions to the Home Screen when the HomeScreen Shortcut function is turned on. You can turn on the Home Screen Shortcutsfunction by selecting “Settings”, then the “General” tab.
To add shortcut icons to the Home Screen, press the "Home" button.
1. Select “Add Shortcut”.
2. Select the desired function.
3. Select the desired shortcut function.
4. Check that the shortcut icon is displayedon the Home screen.
STARLINK HOME
63

CREATING A DRIVER PROFILECreating a Driver Profile provides many benefits beyond just pairing a phone. The profilerecords and remembers station presets, sound preferences, home and work address (ifequipped with navigation), phone favorites, screen icons and placement, and thebackground wallpaper.
To create a driver profile:
1. On the Home screen, select “Settings”.Then, in the General menu, select “DriverProfile”.
2. Select “Add New Profile”.
3. Select “Enter Name” to display thekeyboard screen then type your name. Nowselect “Next” on this screen and thefollowing screen.
DRIVER PROFILE
64

4. Select a paired phone or pair a new phone(see page 107 and page 111 in the How ToAppendix). Then select “Next”.
5. Enter a Home Address and Work Address(if equipped with navigation). Then select“Next”.
6. Select a Wallpaper then select “Next”.
7. Select “Finish”.
Retrieving a Driver Profile
The system automatically retrieves the profile once you are in your Subaru with theSTARLINK® multimedia system on and your phone’s Bluetooth® active. You can alsomanually retrieve or change the profile by following these steps:
1. Press the “Home” button and then select “Settings”.
2. In the General menu, select “Driver Profile”.
3. Select the profile you want to use, and then select “Activate”.
DRIVER PROFILE
65

RADIO
AM/FM Radio
Your Subaru is equipped standard with AM/FMradio, including HD Radio®. HD Radio®
technology allows you to receive digitalbroadcasts (where available) in addition toanalog broadcasts. Digital broadcasts providefree, crystal clear audio with no static ordistortion.
Visit www.hdradio.com for moreinformation and a guide to available radio stations andprogramming.
Satellite Radio
A SiriusXM® Satellite Radio is a tunerdesigned exclusively to receive broadcastsprovided under a separate subscription. Aftera free trial period, a subscription is necessaryto continue service.
For more information or to subscribe, visitwww.siriusxm.com.
MULTIMEDIA
66

Presets
You can preset 18 stations. Presets can be setfor SiriusXM®, FM, or AM stations, allowingyou to switch among the three with the pressof a single button. To preset a radio station:
1. Tune to the desired channel.
2. Press and hold the desired preset stationbutton at the bottom of the screen.
MEDIA
Bluetooth®
Your Subaru has Bluetooth® hands-free technology to manage your phone and audiosystems. Bluetooth®-enabled mobile phones link directly through your Touchscreenautomatically once connected. Bluetooth® Hands-free allows you to receive and initiatecalls, or play music directly from your device while keeping it stowed for safety.
For step-by-step instructions on how to pair a Bluetooth® device to the Touchscreen,please see page 107 for Android devices or page 111 for Apple devices. A QR code andlink to more information on pairing a Bluetooth® device can also be found on page 68.
CD
The CD player holds a single disc. To access the CD menu, put a CD in the player or selectthe CD icon on the “Media” Screen. Depending on the CD format, the CD album art workmay appear on the Touchscreen.
USB / iPod
You can plug in a USB memory storage device or iPod into the USB ports. This will bringup the media screen with controls. If using an iPod, make sure to use an Apple certifiedcable or MFi certified cable for proper operation.
Aux Input
The Aux jack is a port that allows input from anaudio device such as MP3 players, portablemusic players, and iPods. To access the Auxmenu, plug in the device to the Aux jack andthe menu will appear, or select the Aux menufrom the “Media” Screen.
MULTIMEDIA
67

PAIRING A PHONE
To begin using your Bluetooth® Hands-free device you must firstpair your phone with the system. Phone pairing provides access tothe contact list on your phone and allows you to use the voicerecognition system to make and receive calls. The system can alsoread incoming text messages, as well as allowing you to reply totexts or send short messages. The system automatically reconnectsto your Bluetooth® device and will remember your driver profile.
For instructions on how to pair your phone to the Touchscreen,see page 107 for Android devices or page 111 for Apple devices.
Visit https://www.subaru.com/owners/index.html for completedetails on what is available by connecting a phone to the Touchscreen.
MAKING A CALL
Once your phone is paired, you can make a callthrough voice recognition by pressing the “VoiceRecognition Switch” on the steering wheel. Afterpressing the “Voice Recognition Switch”, wait for the“Voice Guidance” screen to appear on theTouchscreen and say “Call [name and phone type]” or“Dial [number]”.
To make a call from the Touchscreen, start by pushing the “Home” button and then select“Phone”. After the phone screen displays, select the method you would like to use to makea call.
• Overview – Allows you to call the last number.
• Favorites – Allows you to place a call to one of your favorites on your phone.
• Recent – Allows you to call someone that has recently called you or that you called.
• Keypad – Allows you to dial any number you would like.
• Phonebook – Displays the phonebook from your phone.
PHONE
68

RECEIVING A CALLTo receive a call, press the “Talk Switch” on the steering wheel or the “Talk Button” on theTouchscreen.
To reject a call, press the “End Switch” on the steering wheel or the “End Button” on theTouchscreen.
PHONE
69

TEXT MESSAGES
Received messages can be forwarded fromthe connected Bluetooth® phone, enablingchecking and replying using the system. Touse this function, it is necessary to set thephonebook download function to ON. When aShort Message Service (SMS)/ MultimediaMessaging Service (MMS) is received, theincoming message screen pops up with soundand is ready to be retrieved using theTouchscreen. Select “Play” to listen to the message or “View” to see the message on thescreen. This button may not be available if thevehicle is moving.
If there is more than one unread message, ascreen will appear allowing you to either viewyour inbox or ignore the message.
Depending on the type of Bluetooth® phoneconnected, received messages may not betransferred to the message inbox. If the phonedoes not support the message function, this function cannot be used.
Depending on the Bluetooth® phone type, the screen display may differ, and it may not bepossible to use certain functions.
PHONE
70

SUBARU STARLINK® IN-VEHICLE APPS
SUBARU STARLINK® Multimedia offers advanced connectivitythrough Apple CarPlay®, Android Auto™, and Pandora® apps.Wireless pairing and hands-free smartphone operation allow forsafe and easy connection to your favorite apps and content. Youcan access news, navigation, music, podcasts, and more throughthe available SUBARU STARLINK® app.
For a complete list of all the apps available, visitwww.subaru.com/engineering/starlink/multimedia.html.
aha™ by HARMAN
aha is a cloud-based application that connects to the system andgives you access to your favorite web content safely and easily.There are thousands of available stations spanning internet radio,personalized music, audiobooks, Facebook, Twitter, restaurant andhotel searches, weather and more. For more about aha, visitwww.aharadio.com.
To use the aha application, connect your iPhone or Android devicevia Bluetooth®. When connecting an iPhone or Android device withthe aha application installed, you can control, view, and hear ahacontent through the system.
With the 8.0-inch Multimedia Navigation function, you may also display Points Of Interest(POI) information from the aha application on the map screen and route to these POIs.
Pandora®
Pandora is a free, personalized radio that offers effortless and endless music enjoyment.To use the Pandora application, first install the Pandora application on your smartphone.Then connect your iPhone or Android device via Bluetooth®.
NOTE: Some vehicles might be incompatible with this app depending on differencebetween models and software version.
APPS
71

Android Auto™
Android Auto can be used to view maps, play music,and place calls by connecting your Android device tothe system. You can also run supported applications.To use the Android Auto application, connect yourAndroid device to the USB port.
For more information on connecting your phone,please refer to page 115.
For details on services or operations, visit the AndroidAuto sites: www.android.com/auto/ orwww.support.google.com/androidauto/
Apple CarPlay®
Apple CarPlay can be used to view maps, play music, and placecalls by connecting your iPhone to the system. You can also runsupported applications. To use the Apple CarPlay application,connect your iPhone to the USB port.
For more information on connecting your iPhone, please referto page 118.
For details on services or operations, check the Apple CarPlay site:www.apple.com/ios/carplay/
SiriusXM® Travel Link
SiriusXM® U.S. satellite and data services areavailable only in the 48 states of thecontiguous USA and DC.
Data service information, which is comprisedof sports, weather, stocks and fuel prices, canbe received via the SiriusXM® Radio, with theoption to turn on or off weather alerts.
To receive the data service information in thevehicle, a subscription to the SiriusXM® Satellite Radio Service is necessary following afree trial.
APPS
72

SUBARU STARLINK® MOBILE APPThere are several key applications that can be loaded to your phone and used while in yourSubaru to help you while you drive. You must also download and log in to the SUBARUSTARLINK® app on your phone to use these apps.
To download the SUBARU STARLINK® app, go to the Apple App Store or the Google PlayStore and search for SUBARU STARLINK® in the menu.
Below are a few apps that you may find helpful.
Quick Reference Guide
This is the digital version of the original printed GettingStarted Guide that is standard in all new Subaruvehicles. The app features In-Vehicle Help (IVH) thatprovides an interactive, searchable, model-specificconcierge through the Touchscreen.
APPS
73

Yelp
Yelp is a local guide powered by a community ofreviewers that helps you find great local businesses.
Chimani
Get the most comprehensive guide to all 417 nationalparks in the United States. Quickly learn about eachpark’s history and highlights.
eBird
Exclusive to Subaru vehicles, the eBird app tells youwhat birds are being seen near you in real time. Basedon a database of millions of bird sightings, eBird actsas a “digital coach” for finding birds. Use the app todecide where to go based on the distance to a greatbirding location and the species being seen there. Forexample, the app may tell you the nearest sighting of acertain species is 8 miles away and navigate you tothe last place it was seen. Full-screen photos help youconfirm your sightings.
APPS
74

MYSUBARUWhether you’re on the road or planning adventures, the MySubaru app makes loving everypart of owning your Subaru easy. Although the mobile app is great when you are on the go,you can also visit www.MySubaru.com from your computer to access the same functionsand to aid in planning your trip before you leave.You can download the MySubaru app from the Google Play Store orthe Apple App Store on your phone by searching MySubaru.
By creating an account, you can:
• Schedule service with a preferred Subaru retailer
• Get vehicle service reminders, recall alerts, and exclusivecoupons
• Track and record your service history
• Access resources like your owner’s manuals, how to videos andmore
• Have access to SUBARU STARLINK® Safety and Security features (must have an activeSUBARU STARLINK® subscription)
• Get help from 24-hour roadside assistance (24-hour roadside is included in standard3-year warranty, and after 3 years with a Concierge package)
Service Appointment Scheduler
The SUBARU STARLINK® ServiceAppointment Scheduler can help you set anappointment from the MySubaru website,Mobile App or the vehicle’s Touchscreen.Getting your Subaru vehicle to the Subaruprofessionals for service is easy, no matterwhere you are. If you are away from yourpreferred Subaru retailer for service, you canalways use Service Appointment Scheduler to locate any of our certified Subaru retailersnear your location.
STARLINK® Service Appointment Scheduler on your Touchscreen is a convenient way toset a service appointment. Simply select the MySubaru icon on the home screen andchoose “Make an Appointment” to get started.
APPS
75

MAPS OVERVIEWYour new SUBARU STARLINK® comes equipped with an integrated navigation system,powered by TomTom. We hope you enjoy the state-of-the-art navigation technology andoptimized mapping routes to guide you on safer, better, and more enjoyable journeys.
With your integrated navigation system, you can find destinations by address or search bypoints of interest, as well as save destinations in the system as favorites. You can alsocustomize route options and settings and find the nearest gas station along your route withthe touch of a button.
For more information and step by step directions on using your navigation system,please refer to page 121 or the STARLINK® Owner’s Manual.
CREATING HOME AND WORK PROFILESCreating a driver profile allows you to save your home address and work address in thenavigation system for ease of use.
For step by step instructions on creating a driver profile, please refer to page 64.
MAPS (if equipped)
76

SAFETY AND SECURITY OVERVIEWSTARLINK® Safety and Security services* are designed to help in your time of need. Theseinclude Advanced Automatic Collision Notification, SOS Emergency Assistance, EnhancedRoadside Assistance, Stolen Vehicle Recovery, the added convenience of Remote EngineStart with Climate Control, and so much more.
With the SUBARU STARLINK® system integrated into your vehicle, advanced safety andsecurity technology is just a button press away. The SUBARU STARLINK® experienceincludes in-vehicle call center support, maintenance and diagnostic alerts as well asremote services that keep you connected to your Subaru vehicle.
Located in the overhead console of most Subaru vehicles are the red SOS and bluei-button . Both buttons link you to the SUBARU STARLINK® call centers that arethere to support you 24 hours a day, 7 days a week.
The SOS button is for SOS Emergency Assistance.
The i-button is for Enhanced Roadside Assistance or Concierge (if subscribed).
• Press the SOS button for SOS Emergency Assistance.*
• Press the i-button for Enhanced Roadside Assistance* or Concierge* (if subscribed).*
• To cancel a SOS Emergency Assistance, Enhanced Roadside Assistance or a Conciergecall, press and hold the same button for approximately two seconds or select the “EndCall” button if displayed on the Touchscreen.
Head to www.Subaru.com/STARLINK to see all the SUBARUSTARLINK® subscription services and packages.* Access to STARLINK® Safety and Security services requires an active
STARLINK® subscription. Remote Engine Start available on keyless accesswith push-button start vehicles. Remote Engine Start with Climate Controlavailable on vehicles with keyless access with push-button start andautomatic climate control. Not available on vehicles with manualtransmission.
STARLINK SAFETY AND SECURITY
77

ENROLLMENTTo enroll in SUBARU STARLINK® and access remote services, a MySubaru account isrequired. MySubaru is the Subaru owner website that allows you to access vehicle remoteservices, user preferences, diagnostic alerts and other useful features enabled by yourSTARLINK® Safety Plus, STARLINK® Security Plus and STARLINK® Conciergesubscription.
Your retailer may have created an account for you during the delivery process. However,you can also create a MySubaru account on www.mysubaru.com.
Enrollment in SUBARU STARLINK® can be done online at MySubaru.com, through theMySubaru Mobile App, at your Subaru retailer or by calling a STARLINK® Customer CareRepresentative at:1-855-753-2495
NOTE: Please have your Vehicle Identification Number (VIN) available, as you will need itto complete this step. After the enrollment process, you will learn more about the featuresin detail at MySubaru.com.
MYSUBARU INTEGRATIONThe connection between you and your Subaru has never been simpler, and the MySubaruwebsite (MySubaru.com) and MySubaru Mobile Application are the best ways to stay intouch with your Subaru vehicle. From MySubaru, you can access the following informationand STARLINK® Safety and Security services*:
• Remote Services
• Vehicle Health
• Usage Reports
• Service Appointment Scheduler
• Vehicle Maintenance Schedules
• Destination to Vehicle
• Service History
• Support Resources
* Internet access is purchased separately through AT&T with monthly, per gigabyte, and unlimited dataoptions available. Existing AT&T customers have the option to add an additional line to their AT&TMobile Share plan. Available on select models.
STARLINK SAFETY AND SECURITY
78

SUBARU STARLINK® WI-FI HOTSPOT
SUBARU STARLINK® in-vehicle Wi-Fi Hotspot keeps you and yourfamily connected using AT&T’s 4G LTE nationwide cellular network.Whether watching movies, playing games or even listening tomusic, your family won’t miss a beat with SUBARU STARLINK®
in-vehicle Wi-Fi Hotspot. Set up is quick and easy.
For more information on a subscription and step by stepenrollment instructions, please refer to page 120 or visit:https://www.att.com/plans/connected-car/subaru.html
STARLINK SAFETY AND SECURITY
79

SETTINGS AND UPDATES OVERVIEWMany settings can be customized for different features in your Subaru. In this section youwill find examples and instructions for some of the settings you can tailor to fit yourpreferences, as well as ways to keep your system updated.
Connect to Home Wi-Fi
Connecting to your Wi-Fi network can allowyou to update the software and maps. Toconnect to Wi-Fi, first go to the “Settings”screen, select “General”, and then select“Wi-Fi Settings”.
For step by step instructions on connecting to Wi-Fi, please refer to page 119 or yourSTARLINK® Owner’s Manual.
Performing Software Updates
Software updates provide enhancements to the system such as new features, addedsecurity, and upgraded functions.
You can ask your preferred Subaru retailer to update the system software. For the 8.0-inchMultimedia Plus and the 8.0-inch Multimedia Navigation systems, the system software canbe updated via a Wi-Fi network or using the aha application on your smartphone(depending on your smartphone communication and transfer speed). The update processinvolves downloading and installing the software update.
NOTE: System functionality will be restricted during installation.
For step-by-step instructions and more information, please refer to page 129 or yourSTARLINK® Owner’s Manual.
SETTINGS AND UPDATES
80

SOUNDTo change the sound settings, press the “Home” button, then select “Settings”, and thenselect “Sound”. Choose the setting you want to change.
SETTING FUNCTION
EQ and Sound Position Select to set sound settings.
Surround Select to turn the surround on/off.
Entertainment Volume Select to set audio volume.
Aux Volume Gain Select to set AUX volume gain.
Microphone Volume Select to adjust the mic sensitivity. This adjusts thespeaker’s voice during hands-free communication.
Navigation Volume Select to set the navigation prompt volume.(Navigation-equipped vehicles only).
Phone Volume Select to adjust the default volume of the other party’svoice.
Ringtone Volume Select to adjust the ringtone volume.
Speech/VR Volume Select to set the voice recognition prompts volume.
Alert Sounds Select to turn the Alert Sound on/off for traffic,weather, or SXM game information updates.
Beep Sounds Select to turn the sound beeps on/off.
Speed Volume Select to set the speed volume. The system adjusts tothe optimum volume and tone quality according tovehicle speed to compensate for increased vehiclenoise.
PHONEThis system supports Bluetooth®, a wireless data system. The hands-free system lets youmake and receive calls without taking your hands off the steering wheel.
In the sound settings menu, you can adjust the microphone, ringtone, and phone volume.
On the Home Screen, select "Settings", then select the "Phone" menu to manageconnected devices and access other phone settings.
SETTINGS AND UPDATES
81

MAPS/NAVIGATIONThere are many programmable map/navigation features that can be customized. Thesesettings are located under the "Settings" menu and then "Navigation". Listed in the tablebelow are some common settings you can customize for your convenience.
SETTING FUNCTION
Route Setting Allows you to select Fastest, Shortest or Economic.
Avoid Allows you to avoid things like highways, tolls, ferries,carpool lanes and unpaved roads.
Map Display Allows you to change the brightness by selecting auto,day or night.
Save as Home Allows you to input your home address.
Save as Work Allows you to input your work address.
POI Icons Allows you to turn the icons on/off.
Arrival Time Allows you to select either 12 hour time or 24 hour(military) time.
Auto Zoom Allows you to turn on/off.
Rest Stop Guidance Function Allows you to turn on/off.
Low Fuel Warning Allows you to turn on/off.
Checking for Map Updates
You can update the maps to the latest information. The maps should be checked andupdated regularly for the best possible navigation experience.
At www.subaru-maps.com, you can update the entire USA map at once via USB. Themaps can also be updated over the air. When updating over the air, you can update eightregions at a time. This allows you to update your home state without having to downloadthe entire map program for the United States. This option is great if you normally stay inyour home state and/or surrounding states.
Updating Maps Over-the-Air
To update your maps over the air, first Connect to a Wi-Fi network (see page 119). Mapupdates can be found by selecting “Settings”, then “Navigation” on the Touchscreen.
For more step by step directions for updating your maps through Wi-Fi, please refer topage 127.
SETTINGS AND UPDATES
82

Updating Maps Using Your PC/MAC
Maps can also be updated using a USB memory device, which willallow the entire map program to be updated at one time. This is agreat option if you are going to take a cross-country trip and yourmaps have not been updated in a while.
To update the map using a USB memory device, start by going towww.subaru-maps.com
CLOCKThe clock can be set manually or automatically. When set to “Auto”, the clockautomatically adjusts when a Bluetooth® connected phone is paired (vehicles withoutnavigation), or through the GPS signal (vehicles with navigation system).
Manually
Use the STARLINK® Touchscreen to set the clock:1 Press the “Home” button.
2 Select “Settings”.
3 Select “Vehicle”.
4 Select “Time/Date”.
5 Select “Mode”.
SETTINGS AND UPDATES
83

6 Select “Manual”.
7 Now adjust the time and date using the “+” and“-” buttons. Select the check mark when finished.
For black-and-white Multi-Function Display(MFD), use the “+” and “-” buttons next to theclock.
Automatically
To set the clock automatically, the “Auto” mode must be selected in the clock adjustmentsetting. To set the clock:1 Press the “Home” button.
2 Select “Settings”.
3 Select “Vehicle”.
4 Select “Time/Date”.
5 Select “Mode”.
SETTINGS AND UPDATES
84

6 Select “Auto”. Select the “Home” button whenfinished.
The clock automatically adjusts as follows:
• Systems with Navigation: Automatically adjusts theclock when a GPS signal is available.
• Systems without Navigation: Automatically adjuststhe clock when a phone is paired and connected viaBluetooth®. “Phonebook Download” must be enabled in the Phone Settings.
For step-by-step procedure to pair a phone to the SUBARU STARLINK® Touchscreen, seepage 107 for Android devices or page 111 for Apple devices.
SETTINGS AND UPDATES
85

EYESIGHT® OVERVIEW
Your Subaru features a variety of safetysystems that are the culmination of everythingSubaru Engineers know about safety. Thesesystems are referred to as “Driver AssistTechnologies” and add confidence to everytrip you and your passengers take. Workingtogether, these systems provide enhancedawareness, safety, and convenience in front,to the sides, and behind your Subaru. SubaruDriver Assist Technologies include:
• EyeSight® Driver Assist Technology
• Rear-Vision Camera
• Pre-Collision Braking
• Front View Monitor
• Blind-Spot Detection (BSD)
• Rear Cross-Traffic Alert (RCTA)
• Reverse Automatic Braking (RAB)
• High Beam Assist (HBA)
• Lane Departure Prevention
• Steering Responsive Headlights (SRH)
EYESIGHT
86

OPERATION
EyeSight® is a driver assist technology thatuses dual color cameras to serve as an extrapair of eyes on the road ahead to identifyvehicles in front, pedestrians, traffic lanes, orother objects. If need be, the EyeSight®
system can apply the brakes and/or reduceengine power to help avoid or reduce theseverity of a collision. During these events, thesystem will provide audible and visual alerts toassist you in making decisions.
Since the characteristics and limitations of theEyeSight® color cameras are similar to humaneyes, it is important that the cameras,windshield, and area in front of the camerasare treated with special care. Please refer to“Care and Limitations” on page 100 for moredetails.
FUNCTIONSThe EyeSight® system features several distinct functions designed to provide extraawareness, improve safety, reduce fatigue, and add peace of mind every time you driveyour Subaru. EyeSight® functions include:
• Pre-Collision Braking (PCB)
• Pre-Collision Brake Assist
• Pre-Collision Throttle Management
• Lane Departure Warning (LDW)
• Lane Sway Warning
• Lane Departure Prevention
• Advanced Adaptive Cruise Control• Advanced Adaptive Cruise Control (AACC)• Lane Centering
• Conventional Cruise Control
• Lead Vehicle Start Alert
EyeSight Cameras (inside)
EyeSight Cameras (outside)
EYESIGHT
87

Pre-Collision Braking
This function helps prevent or minimize afrontal collision with another vehicle,pedestrian, or other objects by providingvisual and audible warnings. Warnings aredisplayed in the Combination Meter Display(CMD) with audible beeps. If you take nocorrective action, the system automaticallyreduces engine power and applies the brakeswith increasing force to help prevent orminimize the collision.
This system can be turned on or off by usingthe Pre-Collision Braking System OFF switch(see page 96).
Pre-Collision Brake Assist
This function recognizes a possible collision with another vehicle, a pedestrian, or object infront while you are applying the brakes. If the system determines not enough force isapplied, it can assist by applying additional pressure to the braking system to decreasestopping distance.
This system can be turned on or off by using the Pre-Collision Braking System OFF switch(see page 96).
Pre-Collision Throttle Management
This function is designed to help prevent you from unintentionally accelerating into astopped vehicle or other obstacle by reducing engine power. Warnings are displayed in theCombination Meter Display (CMD) with audible beeps.
Pre-Collision Throttle Management is helpful when:
• You unintentionally place the select lever in the “D” position instead of the “R” positionand start to accelerate toward a parked car, wall or parking structure.
• While you are at a stop, the vehicle ahead of you accelerates, but then suddenly slowsdown or stops as you begin to accelerate.
This system can be turned on or off by using the Pre-Collision Braking System OFF switch(see page 96).
ObstacleDetected
EYESIGHT
88

Lane Departure Warning
This function provides audible and visualwarnings if you are about to depart your laneof travel. Using the EyeSight® camera, theLane Departure Warning function identifieslane markings when traveling at speeds ofapproximately 30 mph or greater. Thesewarnings are displayed in the CombinationMeter Display (CMD) with audible beeps. LaneDeparture Warning does not provide anycorrective actions.
You can turn this system on or off by usingthe Lane Departure Warning OFF switch (seepage 96).
Lane Sway Warning
This function detects repetitive or unusualside-to-side vehicle movement within a laneof travel that may indicate a drowsy orinattentive driver. Using the EyeSight®
camera, the Lane Sway Warning functionidentifies lane markings when traveling atspeeds of approximately 37 mph or greater.Warnings are displayed in the CombinationMeter Display (CMD) with audible beeps.Lane Sway Warning does not provide anycorrective actions.
You can turn this system on or off by usingthe Lane Departure Warning OFF switch (seepage 96).
LaneDeparture
Stay Alert
EYESIGHT
89

Lane Departure Prevention
This function provides steering assistance tokeep you in the lane of travel when driving onexpressways, freeways, and interstatehighways at approximately 37 mph or greater.Lane Departure Prevention uses the EyeSight®
camera to identify lane markings and assistssteering operation to help prevent lanedeparture.
This function is turned on or off using the LaneKeep Assist button on the right side of thesteering wheel. Once the system is turned on,a white Lane Keep Assist icon will bedisplayed on the Combination Meter Display(CMD). Lane marking graphics on the CMDchange to white to indicate that the right and/or left lane markings have been successfullyidentified by the EyeSight® camera. If the vehicle is about to depart the driving lane, thesystem assists steering by gently guiding the vehicle back into your lane. When the systemis actively providing assistance, the Lane Keep Assist icon in the CMD will change fromwhite to green.
Advanced Adaptive Cruise Control with Lane Centering
Advanced Adaptive Cruise Control is a driving support system intended to reduce theburden on you when driving on an expressway (including during congestion and whendriving at high speed). Advanced Adaptive Cruise Control and Lane Centering worktogether to assist you by automatically controlling the accelerator, brake, and steering.
Advanced Adaptive Cruise Control
This system provides cruise control with theability to keep a safe distance from the car infront of you. Using the EyeSight® camera, theAdvanced Adaptive Cruise Control functionidentifies vehicles in front of you in the samelane, and your vehicle follows the vehicle infront (up to the maximum of your set speed).While following, your vehicle will automaticallymaintain a following distance thatcorresponds to the speed of the vehicle infront. The vehicle is capable of beingcontrolled at a speed between 0 mph andapproximately 90 mph.
EYESIGHT
90
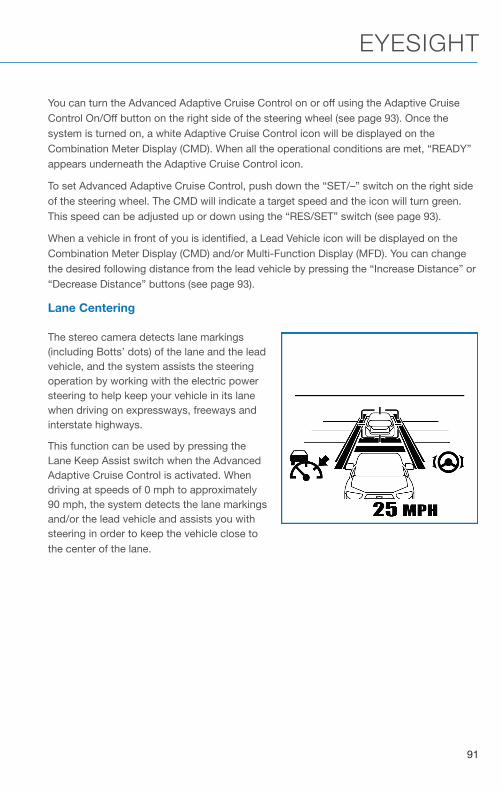
You can turn the Advanced Adaptive Cruise Control on or off using the Adaptive CruiseControl On/Off button on the right side of the steering wheel (see page 93). Once thesystem is turned on, a white Adaptive Cruise Control icon will be displayed on theCombination Meter Display (CMD). When all the operational conditions are met, “READY”appears underneath the Adaptive Cruise Control icon.
To set Advanced Adaptive Cruise Control, push down the “SET/–” switch on the right sideof the steering wheel. The CMD will indicate a target speed and the icon will turn green.This speed can be adjusted up or down using the “RES/SET” switch (see page 93).
When a vehicle in front of you is identified, a Lead Vehicle icon will be displayed on theCombination Meter Display (CMD) and/or Multi-Function Display (MFD). You can changethe desired following distance from the lead vehicle by pressing the “Increase Distance” or“Decrease Distance” buttons (see page 93).
Lane Centering
The stereo camera detects lane markings(including Botts’ dots) of the lane and the leadvehicle, and the system assists the steeringoperation by working with the electric powersteering to help keep your vehicle in its lanewhen driving on expressways, freeways andinterstate highways.
This function can be used by pressing theLane Keep Assist switch when the AdvancedAdaptive Cruise Control is activated. Whendriving at speeds of 0 mph to approximately90 mph, the system detects the lane markingsand/or the lead vehicle and assists you withsteering in order to keep the vehicle close tothe center of the lane.
EYESIGHT
91

Conventional Cruise Control
Conventional Cruise Control maintains aconstant traveling speed you set, but it doesnot adapt to the other vehicles in front of you.To activate Conventional Cruise Control, pressthe Adaptive Cruise Control On/Off button toset Advanced Adaptive Cruise Control intostandby status. Then, with Advanced AdaptiveCruise Control in standby status, press andhold the “Increase Distance” or “DecreaseDistance” button on the steering wheel forapproximately two seconds.
The Cruise Control indicator on theCombination Meter Display (CMD) will changefrom the Adaptive Cruise Control icon to theConventional Cruise Control icon. Use the accelerator to reach the desired speed, thenuse the RES +/SET - switch to set the vehicle speed.
Lead Vehicle Start Alert
This function will provide a visual and audiblealert when a stopped vehicle in front of youbegins to move, and your vehicle remainsstationary. Warnings are displayed in theCombination Meter Display (CMD) withaudible beeps. Lead Vehicle Start Alert ishelpful in situations where you may becometemporarily distracted at a traffic light, and thevehicle ahead begins to move.
This function can be customized. To changethis setting, use the steering wheel mounted“i/SET” switches to access the EyeSight®
settings menu on the CMD.
Vehicle AheadHas Moved
EYESIGHT
92

STEERING WHEEL CONTROLS
Advanced Adaptive Cruise Control
1 Adaptive Cruise Control On/Off: Pressto turn Advanced Adaptive Cruise Controlon or off.
2 Lane Keep Assist: Press to turn on or offLane Centering or Lane DeparturePrevention.
3 Increase Distance: Press to increase thefollowing distance setting while usingAdvanced Adaptive Cruise Control. Pressand hold to change to ConventionalCruise Control.
4 Decrease Distance: Press to decreasethe following distance setting while usingAdvanced Adaptive Cruise Control. Press and hold to change to Conventional CruiseControl.
5 Resume (RES)/Increase Speed and Set (SET)/Decrease Speed: Press the switchdown to set an initial target speed. Once set, press up or down to adjust the targetspeed.
• Adjust by 5 mph:
• Briefly press the switch up to increase the target speed by 5 mph.
• Briefly press the switch down to decrease the target speed by 5 mph.
• Adjust by 1 mph:
• Press and hold the switch up to increase the target speed in 1 mph increments.
• Press and hold the switch down to decrease the target speed in 1 mphincrements.
• The Cruise Control Acceleration Characteristics can be adjusted to four differentlevels depending on your preference. The four levels are:
• Lv. 1 Eco
• Lv. 2 Comfort
• Lv. 3 Standard
• Lv. 4 Dynamic
To change this setting, use the steering wheel mounted “i/SET” switches to accessthe EyeSight® settings menu on the Combination Meter Display (CMD).
Advanced Adaptive Cruise ControlSwitches
EYESIGHT
93

Customizing EyeSight® Settings
The EyeSight® system features customizationof certain preferences and warnings. Use thesteering wheel mounted “i/Set” and arrowswitches to navigate through the CombinationMeter Display (CMD) to adjust settings such as:
• Warning Volume: Min/Mid/Max
• Cruise Control Acceleration Characteristics:Eco/Comfort/ Standard/Dynamic
i/Set and Arrow Switches
EYESIGHT
94

EYESIGHT® ASSIST MONITOR (EAM)
The EyeSight® Assist Monitor (EAM) provides aheads-up display of EyeSight® system functions in thelower windshield area allowing you to keep your eyeson the road ahead.
The EAM indicators can be changed using thesteering wheel mounted “i/SET” switches to accessthe EyeSight® settings menu on the CombinationMeter Display (CMD). Below are the indications provided by the EAM function:
LEDCOLOR
PATTERN WARNING CONDITION
GreenSolid
illuminationA lead vehicle is detected ahead while Advanced AdaptiveCruise Control is operating.
Yellow
Flashing on oneside
The Lane Departure Warning is operating. The side wherethe vehicle has left its lane flashes, and the side that hasnot left its lane illuminates.
Flashingalternately
Lane Sway Warning is operating.
Flashingsimultaneously
• Steering wheel operation is not be detected for a certainperiod of time.
• Lane Centering or Lane Departure Prevention Functionwas canceled automatically by the system (flashingrapidly).
Red
Flashingsimultaneously(4) indicators
• Following Distance Warning, Pre-Collision BrakingSystem, Obstacle Detected Warning, or Pre-CollisionThrottle Management is operating.
• Lane Centering Function was canceled when there wasno operation of the steering wheel.
Flashing on oneside
Lane Centering Function is active and the vehicle appearslikely to depart the lane. The side where the vehicle has leftits lane flashes, and the side that has not left its laneilluminates.
EYESIGHT
95

LANE DEPARTURE WARNING AND PRE-COLLISIONBRAKING SYSTEM OFF SWITCHES
Lane Departure Warning OFF Switch
Press and hold this switch on the overhead consolefor two seconds to turn off the Lane DepartureWarning and Lane Sway Warning functions. Press andhold the switch again for two seconds to turn thefunctions on.
When these functions are off, a yellow Lane DepartureWarning OFF indicator will be illuminated in theCombination Meter. It may be helpful to turn these functions off when lane markings on theroad are inconsistent.
Pre-Collision Braking OFF Switch
Press and hold this switch on the overhead consolefor two seconds to turn off the Pre-Collision Braking,Pre-Collision Brake Assist, and Pre-Collision ThrottleManagement functions. Press and hold the switchagain for two seconds to turn the functions on.
When these functions are off, a yellow Pre-CollisionBraking OFF indicator illuminates in the CombinationMeter. It may be helpful to turn these functions off when using a drive-through carwash.
EYESIGHT
96

REAR-VISION CAMERA
This function provides a clear view of the areabehind the vehicle to help avoid obstacles.Using a wide-angle camera mounted on therear of the vehicle, an image is automaticallydisplayed on the multimedia screen when youplace the select lever in the “R” position. Thedisplayed image features a centerlineindicator, colored distance markers, anddynamic guidelines that move as the steering wheel is turned.
FRONT VIEW MONITOR (if equipped)
The Front View Monitor provides you withvisibility from the front grille shown in theMulti-Function Display, improving visibilitywhen making turns with an obstructed view orpulling into a narrow parking spot. A guide lineis also displayed to provide distance andwidth references.
Press the “VIEW” switch on thecenter console to display theFront View Monitor image on theMulti-Function Display (MFD). Youcan manually turn off the FrontView Monitor by pressing the“VIEW” switch again or thefunction will automatically turn off.
View/Enter Switch
DRIVER ASSIST TECHNOLOGIES
97

BLIND-SPOT DETECTION (BSD)/ REAR CROSS-TRAFFIC ALERT (RCTA) (if equipped)This system uses radar sensors mounted behind the rear bumper on the left and rightsides that warn you if another vehicle is sensed in your blind spots. These functionsprovide additional awareness when changing lanes or driving in reverse.
Blind-Spot Detection (BSD)
This function senses if a vehicle is in your blind spot and provides avisual warning (yellow light) in the corresponding side mirror frame.
Lane Change Assist (LCA)
Lane Change Assist (LCA) works with Blind Spot Detection toprovide an additional level of warning if you attempt to change laneswith a vehicle in your blind spot. LCA will rapidly flash the corresponding side mirrorindicator if you operate your turn signal when a vehicle is sensed in your blind spot.
Rear Cross-Traffic Alert (RCTA)
This function detects a vehicle approaching fromeither side as you reverse and provides audible andvisual warnings. Warnings will appear in the uppercorners of the Rear-Vision Camera display and sidemirrors, and audible beeping will sound.
BSD/RCTA can be turned on or off by pressing theBSD/RCTA OFF switch in the instrument panel. Whenthis function is off, a yellow BSD/RCTA OFF indicatorwill be displayed in Combination Meter.
DRIVER ASSIST TECHNOLOGIES
98

HIGH BEAM ASSIST (HBA)
This function uses the EyeSight® cameras to automatically switchthe headlights between high and low beam settings when anoncoming vehicle is detected, enhancing safety for both you andother drivers on the road.
To activate High Beam Assist, set the headlight control switch to the“AUTO” position and push the headlight lever forward to the high beam position. Thegreen HBA indicator will illuminate on the Combination Meter Display (CMD). When vehiclespeed is above approximately 20 mph, HBA will automatically switch between high andlow beams. When the high beams are activated, the blue high beam indicator will bedisplayed in the Combination Meter.
STEERING RESPONSIVE HEADLIGHTS (SRH)The Steering Responsive Headlights (SRH) system aims the headlight beams in thedirection you are steering, improving visibility at corners and intersections when driving atnight. You can turn the SRH system on or off using the steering wheel mounted “i/SET”switches to access the settings menu on the Combination Meter Display (CMD).
REVERSE AUTOMATIC BRAKING (RAB) (if equipped)
This system uses four rear bumper mounted sonarsensors to detect objects when moving between1 and 9 mph in reverse. RAB uses the Rear-VisionCamera image to display colored proximity alertswhen an object is detected. As an object becomescloser to the rear of your vehicle, audible beepsprovide additional awareness in three progressivelevels. If RAB determines that a collision with anobject is possible, the system can automatically applythe brakes to help prevent or minimize the impact.
In some cases, such as connecting a trailer, it may be helpful to temporarily turn thesystem off. RAB can be turned off using the Touchscreen buttons on the lower cornerswhen the select lever is in the “R” position.
Select and hold the “RAB ON” button in the lower part of the Touchscreenuntil it changes to “RAB OFF” to disable the automatic braking functions ofthe RAB system.
Select and hold the “P))) ON” button in the lower part of the Touchscreen untilit changes to “P))) OFF” to disable the audible beeping of the RAB system.
DRIVER ASSIST TECHNOLOGIES
99

STEREO CAMERA PRECAUTIONSYour EyeSight® stereo cameras are precision components that must be kept free fromobstruction and contamination, such as fingerprints or cleaning solutions. When thesystem detects that the stereo camera lenses are impaired, a malfunction indicator will bedisplayed and EyeSight® functions will not be available.
When you are in the vicinity of the EyeSight® stereo cameras, always observe the followingprecautions:
• Do not touch or attempt to clean the EyeSight® camera lenses inside the vehicle. Extracaution should be used when cleaning the inside of the windshield. Over-spray fromcleaning solutions may impair or even damage the camera lenses. Please inform otherswho may attempt to clean the windshield, such as car wash staff, of this precaution.
• Electronic Toll Collection devices, such as EZPassTM, must be installed in an area that doesnot obstruct the stereo cameras' field of vision. See "Prohibited Area" on page 101.
• Adjust the rearview mirror so it does not obstruct the stereo cameras' field of vision.
• Do not install any interior rearview mirror accessories, such as a wide-type mirror orhanging objects. Only approved Genuine SUBARU accessories may be installed.
For more detailed information, please refer to your EyeSight® Owner’s Manual.
WINDSHIELD GLASS AND DASHBOARDSince the characteristics and limitations of the EyeSight® stereo cameras are similar tohuman eyes, it is important that the area in front of the cameras be kept free from dirt,scratches, cracks, fogging, or accessories mounted to the windshield, hood or dashboard.Visual impairments or reflections can affect EyeSight® system performance. Extra cautionshould be taken when cleaning the windshield to prevent over-spray from cleaningsolutions.
The images in the following section outline those areas that must be kept clean and freefrom obstruction. Please refer to the Owner’s Manual for a complete listing of limitations.
CARE AND LIMITATIONS
100
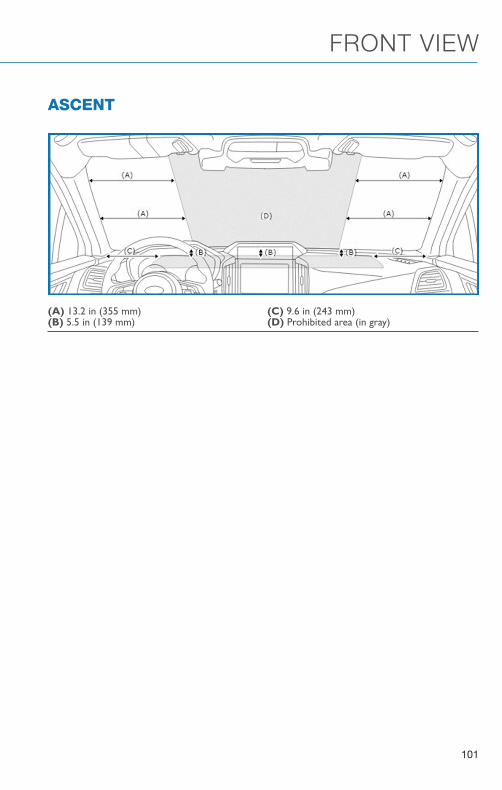
ASCENT
(A) 13.2 in (355 mm) (C) 9.6 in (243 mm)(B) 5.5 in (139 mm) (D) Prohibited area (in gray)
FRONT VIEW
101

EYESIGHT® DISCLAIMEREyeSight® is a driver assist technology which may not operate optimally under all drivingconditions. The driver is always responsible for safe and attentive driving. Systemeffectiveness depends on many factors such as vehicle maintenance, weather and roadconditions. See Owner’s Manual for complete details on system operations and limitations.
The Pre-Collision Braking system is designed to provide automatic braking that eitherprevents a collision or reduces the severity of a frontal impact.
The Pre-Collision Throttle Management system is designed to reduce acceleration andminimize the severity of certain frontal impacts.
Advanced Adaptive Cruise Control and Brake Light Recognition are designed to assist thedriver and are not substitutes for safe and attentive driving.
Lane Centering function operates only when used in conjunction with Advanced AdaptiveCruise Control.
Lane Departure Prevention operates only when the lane markings are visible, and systemeffectiveness depends on many factors.
Blind-Spot Detection, Lane Change Assist and Rear Cross Traffic Alert are systemsdesigned to assist the driver by monitoring the rear and side areas of the vehicle during alane change or reversing and are not a substitute for safe and attentive driving.
The Reverse Automatic Braking System is not a substitute for safe and attentive driving.System effectiveness depends on many factors, such as vehicle maintenance, weatherand road conditions. Always exercise caution and use vehicle mirrors and the Rear-VisionCamera when backing up. See Owner’s Manual for complete details on system operationand limitations.
EYESIGHT DISCLAIMER
102

HOW TO OVERVIEWThis “How To” appendix provides step-by-step instructions to easily connect with and usefeatures of your Ascent.If you need some help with these features or want tolearn more, we are here to assist you:Your Subaru Owner’s Manuals:Located in the glovebox
Online Subaru Owner’s Resources:www.subaru.com/owners
Subaru Customer Support:www.subaru.com/customer-support
1-800-782-2783 (1-800-SUBARU3 )
HOW TO APPENDIX
103

MEMORY HEIGHT (if equipped)You can set where the rear gate stops when it opens. This is a great feature to limit theupward travel of the rear gate to ensure you can reach it or to prevent the rear gate fromcontacting a garage ceiling. To set the height perform the following procedure with theignition switch in the “LOCK/OFF” position:
1 Make sure the MemoryHeight Switch is the “OFF”position (the switch is raisedand you can see a white lineon the top).
2 Open the rear gate using thePower Rear Gate Button.Pause the rear gate when itreaches the desired heightby pressing the Power RearGate Button on the reargate, instrument panel, orkey fob.
Memory Height Button
Power Rear Gate Button
HOW TO APPENDIX
104

3 Press the memory switch inthe instrument panel toselect the “ON” status(switch is depressed andyou can no longer see thewhite line on top).
4 With the rear gate at thedesired height, press andhold the Power Rear GateClose Button on the insideedge of the rear gate. Achirp will sound and thehazard warning lights willflash to confirm the height isset.
When the memory switch is in the “ON” status, the rear gate will stop at the set memoryheight when you use any of the Power Rear Gate buttons.
Memory Height Button
Power Rear Gate Close Button
HOW TO APPENDIX
105

MEMORY DRIVER’S SEAT (if equipped)You can set a seat position and retrieve it using the buttons on the driver’s door or theaccess key fob.To set a seat position with abutton:
1. Make sure the select lever is inthe “P” position.
2. Adjust the seat to the desiredposition.
3. While holding the “SET”button, press and hold eitherbutton “1” or “2”. A chirpsounds when the position isregistered.
To retrieve the seat position setwith a button:
1. Turn the ignition switch to “ON”.
2. While the select lever is in the “P” position, press button “1” or “2”.
To set a seat position with the access key fob:
1. Make sure the select lever is in the “P” position with the parking brake on and theignition “OFF”.
2. Adjust the seat to the desired position.
3. While holding the “SET” button, press and hold the unlock button on the access keyfob. A chirp sounds when the position is registered.
To retrieve the seat position set with the access key fob:
1. Hold the access key fob.
2. Unlock and open the driver’s door.
Memory Seat Buttons
HOW TO APPENDIX
106

BLUETOOTH® PAIRING
Pairing an Android Device
1. Start by selecting “Settings” on the Homescreen.
2. Select the Phone menu, then select “AddDevice” / “Add Phone”.
3. This screen will be displayed when pairingmode is in progress. The device name willmost likely be Subaru BT, but be sure tomake note of what name it is, so you canfind it on your phone.
HOW TO APPENDIX
107

4. On your Android device, go to “Settings”. (It can befound under apps.) Then select “ConnectedDevices” or “Connections”.
5. Now select “Bluetooth”. This will show a screen to“Pair New Device” or it will be showing the nearbydevices to add. Select “Subaru BT” if shown on thelist or “Pair New Device”.
HOW TO APPENDIX
108

6. Now select "OK" to pair with Subaru BT and select“Confirm” on the Touchscreen if the PIN matchesthe phone.
7. Make sure to allow access to your contactsand call history and select “Download” todownload the phonebook contacts.
HOW TO APPENDIX
109

8. If your phonebook or messages are notappearing, press the “Phone” icon on theHome screen. Next, select “ChangeDevice” in the Overview menu and ensurethe “Phonebook Download” is enabled.
9. If you still cannot access your phonebookor messages, go back to your phone’sBluetooth® settings and select the gearicon next to your vehicle’s device name andensure all settings are enabled.
HOW TO APPENDIX
110

Pairing an iOS/Apple Device
1. Start by selecting “Settings” on the Homescreen.
2. Go to the “Phone” screen and select “AddDevice” / “Add Phone”.
3. This screen will be displayed when pairingmode is in progress. The device name willmost likely be Subaru BT, but be sure tomake note of what name it is, so you canfind it on your phone.
4. On your iOS/Apple device, select “Settings”. Thelocation on the Home screen will vary.
HOW TO APPENDIX
111

5. Select “Bluetooth”.
6. Now select the device name (usually “Subaru BT”)on the Touchscreen.
HOW TO APPENDIX
112

7. Verify your iOS/Apple device PIN is correct andselect “Pair” on your phone and “Confirm” on theTouchscreen.
8. Select “Allow” on the “Allow Contacts andFavorites Sync?” screen, then select “Download” todownload the phonebook contacts.
HOW TO APPENDIX
113

9. On your iOS/Apple device, SubaruBT should nowbe listed under “Bluetooth Settings”. Select theblue “i” next to the device name. Then ensure“Show Notifications” and “Sync Contacts” areenabled.
10. Your iOS/Apple device is now paired. It isrecommended that you restart your Subaru tocomplete the process and ensure everything isfully synced.
11. If your phonebook or messages are notappearing, press the “Phone” icon on theHome screen. Next, select “ChangeDevice” in the Overview menu and ensurethe “Phonebook Download” is enabled.
HOW TO APPENDIX
114

ANDROID AUTO™
Cables
Always use a high-quality OEM USB cable.
Ensure the Android phone is fully up to date. Also verify that theAndroid Auto app, along with all other apps that work with AndroidAuto, are up to date. Android Auto might not function properly if oneof them is outdated or having an issue. The apps can bedownloaded from the Play Store.
For more information, visit: www.android.com/auto/
Connecting an Android Phone
1. To set up Android Auto, first plug theAndroid phone into the USB port of thevehicle using a quality OEM cable. The firsttime you plug in, this message will appear.Select “Accept”. After that, select “Accept”to any other prompts that appear. AndroidAuto might also need to download beforefunctioning on the vehicle; allow it to do so.
HOW TO APPENDIX
115

2. On the vehicle display screen, Android Autoshould auto launch the first time. If not,select the Android Auto Icon on the display.Select “Show Me How” for a quick guideon using Android Auto, or select “Skip” ifyou want to start using the app right away.
3. You will then be taken to the Home screenof the Android Auto app for your phone.
4. If Android Auto won’t launch, open theAndroid Auto app on the phone, then selectthe top left menu button. Select “Settings”,then “Connected Cars”, and finally selectthe top right menu icon and choose “Forgetall cars”.
If this does not work, uninstall the AndroidAuto app from the phone and reinstall fromthe Play Store.
HOW TO APPENDIX
116

Compatible Models
Android Auto is available on Android phones. To see if your phone iscompatible, please refer to the Android Auto website:https://www.android.com/phones/
APPLE CARPLAY®
Cables
Apple CarPlay requires compatible iPhones to be connected viayour Subaru’s USB port. Cables must be an 8-Pin Lightning MFiCertified cable (made for iPod/iPhone). Look for the Works withApple CarPlay or Made for iPod, iPhone, iPad icons when selectinga cable.
For more information, visit: www.apple.com/ios/carplay/
HOW TO APPENDIX
117

Connecting an iPhone
1. To set up Apple CarPlay, you will need toplug the iOS/Apple phone into the USB portof the vehicle. Make sure to use an MFicertified cable.
2. Select “Allow” on the iOS/Apple phonewhen prompted.
3. Select Apple CarPlay on the vehicle screen.This will bring you to the home screen ofyour phone in Apple CarPlay.
Ensure the iOS/Apple phone is fully up todate. Also ensure all apps that work onApple CarPlay are up to date. AppleCarPlay might not function correctly if oneof the apps is outdated or having an issue.Apps can be updated in the App Store.
Compatible Models
For a list of all the Apple phones that are compatible with AppleCarPlay, visit: www.apple.com/ios/carplay/
HOW TO APPENDIX
118

WI-FI
Connecting to a Wi-Fi Network
1. Display the General Settings screen bypressing the “Home” button, then select“Settings”. Make sure Wi-Fi is on.
2. Under the “General” tab, select “Wi-FiSettings”.
3. Select the desired network. If the network isa secure network, a lock symbol appearson the right side of the screen. If you areconnecting to a secure network, enter thepassword and select “Join”.
4. Select “Connect” to connect to the networkor “Disconnect” to disconnect from thenetwork. Selecting “Forget This Network”deletes the network.
5. Check that a confirmation messageappears when the connection is complete.If an error message appears, follow theguidance on the screen to try again.
HOW TO APPENDIX
119

Wi-Fi Hotspot Subscription
Internet access is purchased separately through AT&T with monthly,per gigabyte, and unlimited data options available. Existing AT&Tcustomers have the option to add an additional line to their AT&TMobile Share plan. Available on select models.
Shortly after you take delivery of your new Subaru, you will receivean email from AT&T for a one month free trial and how to activateyour free trial. To set up and enroll:
1. Select “Settings” from the Home screen.
2. Select “Wi-Fi Hotspot” to turn it on (if the Wi-Fi Hotpot is alreadyon then proceed to the next step).
3. Select Wi-Fi Hotspot Settings to view or update the following settings:
• Wi-Fi Network Name (SSID)
• SSID Broadcast (Network ON / OFF)
• Security Type (WPA / WPA2)
• Password
• Connected Devices (Maximum of 8 devices)
How to enroll:
1. Connect your tablet, smartphone or laptop to the SUBARU STARLINK® Wi-Fi Hotspotnetwork listed in the settings menu and open your preferred web browser on the deviceconnected.
2. Once the SUBARU STARLINK® Wi-Fi Hotspot homepage loads, follow the on-screeninstructions to create a new account or to add your vehicle to an already existing AT&TWireless account. You can also subscribe to the Wi-Fi Hotspot from the MySubaruwebsite or Mobile App.
You can also visit an AT&T store or their website for more information at:https://www.att.com/plans/connected-car/subaru.html
HOW TO APPENDIX
120

MAPS (if equipped)
Finding a Destination by Address
To search by address:
1. Start by pushing the “Map” button todisplay the map screen. Then, select“Menu”. Next select “Search by DestinationEnter Address”.
2. The keypad screen displays. As you typethe address or name of the destination,suggestions will display. Select the desireddestination.
3. The route calculation screen displays threerecommended routes at the bottom left ofthe screen. Select the desired route, thenselect “GO”. You can also press and holdthe route on the map to begin navigation.
HOW TO APPENDIX
121

Finding a Destination by POI
To search by Points Of Interest (POI):
1. Push the “Map” button to display the map screen.Then, select “Menu”, followed by “Nearby PlacesList of POI”.
2. Categories are listed alphabetically. Use the scrollbar on the right, if needed, to display morecategories, then make your selection.
3. Select the desired item from the list, then select“GO”.
4. The route calculation screen displays threerecommended routes at the bottom left of thescreen. Select the desired route, then select “GO”.You can also press and hold the route on the mapto begin navigation.
HOW TO APPENDIX
122

Route Options
You can set the navigation system to avoidvarious types of routes:
1. Select “Route Options” on the routecalculation screen.
2. Select the desired item to avoid.
3. Select the check mark in the upper rightcorner.
NOTE: The avoidance criteria for the route calculation can also be set from the navigationsettings screen.
Shortest/Fastest/Economic
You can set the route preferences to search forthe shortest, fastest, or most economic route.To do this:
1. Select “Settings” from the Home screen.
2. Select “Navigation”.
3. Select “Route Settings”.
4. Select the preference you would like to use:Shortest, Fastest, or Most Economic.
Saving Destination as a Favorite
Registered points can be set as a destination.To save a location as a favorite once you havearrived:
1. Select the current street name.
2. Select “Save”.
3. Select to save as Home, Work, or Favorite.
HOW TO APPENDIX
123

Guidance Screen Icons
The Guidance Screen Icons are the common icons used for the navigation guidance:
ICON EXPLANATION ICON EXPLANATION
Turn left. Stay in the left lane.
Turn right. Stay in the right lane.
U-Turn Left.Straight ahead at theintersection.
U-Turn right. Turn left at the T junction.
Keep left at the fork in theroad.
Turn right at the T junction.
Keep right at the fork in theroad.
Go left at the roundabout.
Turn left & sharp curve.You are half way to yourdestination.
Turn right & sharp curve.You have arrived at yourdestination.
Map Zoom
Once on the map screen, you can zoom in orout by touching the “+” or “-” buttons on thescreen. You can also use two fingers on thescreen and move them apart to zoom in ortogether to zoom out.
HOW TO APPENDIX
124

Map View/Perspective
The perspective of the map can be changedbetween 2D north-up, 2D heading-up, and 3D.To change the view, select the icon at theupper right of the screen. Each time the icon isselected, the view will change as well as theicon to match the map perspective.
Traffic Information
Road sections affected by traffic conditions are displayed in a different color on the map,and a small icon representing the type of traffic condition is displayed above the road.
A subscription to the SiriusXM® Satellite Radio Service is necessary to receive the dataservice in the vehicle (3 years included).
HOW TO APPENDIX
125

Nearest Gas Station
To find the nearest gas station, select any point on themap and then select the fuel icon in the lower rightcorner.
When driving on the highway during routeguidance, information on gas stations,restaurants, or rest areas near the next threehighway exits will be displayed.
Select the desired item from the list, and then select“GO” to navigate to the closest selected place.
Arrival Time/Distance
Displays the distance to the destination, the estimatedtravel time to the destination, or the estimated arrivaltime at the destination. Select the information box inthe lower right corner to change between modes.
Canceling Guidance
To cancel guidance, select “Menu” and then select“Cancel”.
HOW TO APPENDIX
126

Map Updates
You can update the entire USA map at once via USB by going to:www.subaru-maps.com
Maps can also be updated over a Wi-Fi network. To update yourmaps via Wi-Fi, follow this process:
1 Connect to a Wi-Fi network. If you need help with this, seepage 119.
2 On the Home screen, select “Settings” then “Navigation”.Next, select “Map Update” on the navigation setting screen.
3 Select “Select Region (Max up to 8)” toselect the regions you would like toupdate.
4 Select the regions for which maps are tobe updated.
5 Select “Back”.
HOW TO APPENDIX
127

6 Select “Check for Updates”.
7 Check the confirmation message, thenselect “Yes”.
8 This screen is displayed simultaneouslywith the start of the download andinstallation. Select the “X” in the upperright corner if you need to stop thedownload and installation.
HOW TO APPENDIX
128

FIRMWARE AND SOFTWARE UPDATESFor 8.0–inch Multimedia Plus and 8.0–inch Multimedia Navigation systems, you canupdate the system software via a Wi-Fi connection or the aha™ application on yoursmartphone (depending on your smartphone communication and transfer speed).
To accurately check for updates, make sure the clock is set to “Auto” with a GPS signalavailable (system with navigation) or a phone paired via Bluetooth® (system withoutnavigation). See page 83 for step by step directions on setting the clock. Systemfunctionality will be restricted during installation.
1. Connect to a Wi-Fi network or start the aha application on your smartphone (see page 119).
2. Return to the general settings screen (if needed, press the “Home” button, select“Settings”, and then select “General”).
3. Select “Check for Updates”.
• If “Automatically Check for Updates” is turned on at the general settings screen, anupdate check will be performed automatically before proceeding to the next step.
• If “Automatically Download Updates” is turned on at the general settings screen, thesoftware update will be downloaded automatically before proceeding to “UpdateInstallation”.
4. If the “Software Update Ready to Download” pop-up is displayed, select “DownloadNow” to begin the download. The download status progress is displayed in the upperright of the screen.
5. Select “Install Now” to start the installation process. The installation process will takeseveral minutes to complete. If you need to stop the installation process, press“Cancel”.
6. When the installation is complete, select “I Agree” on the confirmation message tocomplete the update process. By selecting “I Agree”, the system will restartautomatically.
HOW TO APPENDIX
129
2.4 L ENGINE . . . . . . . . . . . . . . . 52
A
ACCESSING THE THIRD-ROW . . . . . 45ACCESSORY CONNECTIONS . . . . . . 29ADDING SHORTCUTS . . . . . . . . . . 63ADVANCED ADAPTIVE CRUISE
CONTROL . . . . . . . . . . . . . . . . 31ANDROID AUTO™ . . . . . . . . . . . . 115
Cables . . . . . . . . . . . . . . . . . 115Compatible Models . . . . . . . . . . 117Connecting an Android Phone . . . . 115
APPLE CARPLAY® . . . . . . . . . . . . 117Cables . . . . . . . . . . . . . . . . . 117Compatible Models . . . . . . . . . . 118Connecting an iPhone . . . . . . . . 118
ASCENT . . . . . . . . . . . . . . . . . . 101AUDIO CONTROLS . . . . . . . . . . . . 30
B
BLIND-SPOT DETECTION (BSD)/ REARCROSS-TRAFFIC ALERT (RCTA) . . 98Blind-Spot Detection (BSD) . . . . . . 98Lane Change Assist (LCA) . . . . . . . 98Rear Cross-Traffic Alert (RCTA) . . . . 98
BLUETOOTH® PAIRING . . . . . . . . . 107Pairing an Android Device . . . . . . 107Pairing an iOS/Apple Device . . . . . 111
BUTTONS . . . . . . . . . . . . . . . . . 56CD Player Functions . . . . . . . . . . 57Controlling the Volume . . . . . . . . . 57Other Functions . . . . . . . . . . . . . 57Radio Functions . . . . . . . . . . . . . 56
C
CABIN VIEW MIRROR . . . . . . . . . . 21CARGO COVER . . . . . . . . . . . . . . 49CHILD SAFETY LOCKS . . . . . . . . . . 47CLIMATE CONTROL . . . . . . . . . . . 23
Heated Seats . . . . . . . . . . . . . . 27
Heated Steering Wheel . . . . . . . . 28Rear Climate Control Panel . . . . . . 26Remote Engine Start with ClimateControl . . . . . . . . . . . . . . . . . . 28Second-row Heated Seats . . . . . . 28Tri-Zone Automatic ClimateControl . . . . . . . . . . . . . . . . . . 23Ventilated Seats . . . . . . . . . . . . 27
CLOCK . . . . . . . . . . . . . . . . . . . 83Automatically . . . . . . . . . . . . . . 84Manually . . . . . . . . . . . . . . . . . 83
COMBINATION METER . . . . . . . . . . 37CREATING A DRIVER PROFILE . . . . . 64
Retrieving a Driver Profile . . . . . . . 65CREATING HOME AND WORK
PROFILES . . . . . . . . . . . . . . . . 76
D
DRIVING THE VEHICLE . . . . . . . . . . 39Automatic Transmission ShiftMode . . . . . . . . . . . . . . . . . . . 39Paddle Shift Control Switches . . . . . 39
E
ELECTRONIC PARKING BRAKE(EPB) . . . . . . . . . . . . . . . . . . . 40Auto Vehicle Hold (AVH) . . . . . . . . 41
ENGINE OIL . . . . . . . . . . . . . . . . 53ENGINE OIL CAPACITY . . . . . . . . . 53ENROLLMENT . . . . . . . . . . . . . . . 78EXITING THE THIRD-ROW . . . . . . . . 45EYESIGHT® DISCLAIMER . . . . . . . 102EYESIGHT® OVERVIEW . . . . . . . . . 86EYESIGHT® ASSIST MONITOR
(EAM) . . . . . . . . . . . . . . . . . . 95
F
FIRMWARE AND SOFTWAREUPDATES . . . . . . . . . . . . . . . 129
INDEX
130

FOLDING THE REAR SEATS . . . . . . . 46Second-Row Seat . . . . . . . . . . . 46Third-Row Seat . . . . . . . . . . . . . 47
FRONT VIEW MONITOR . . . . . . . . . 97FUEL . . . . . . . . . . . . . . . . . . . . 44FUEL CAPACITY . . . . . . . . . . . . . . 44FUEL FILLER LID . . . . . . . . . . . . . 44FUNCTIONS . . . . . . . . . . . . . . . . 87
Advanced Adaptive Cruise Control withLane Centering . . . . . . . . . . . . . 90Conventional Cruise Control . . . . . . 92Lane Departure Prevention . . . . . . 90Lane Departure Warning . . . . . . . . 89Lane Sway Warning . . . . . . . . . . 89Lead Vehicle Start Alert . . . . . . . . 92Pre-Collision Brake Assist . . . . . . . 88Pre-Collision Braking . . . . . . . . . . 88Pre-Collision Throttle Management . . 88
H
HIGH BEAM ASSIST (HBA) . . . . . . . 99HOME SCREEN ICONS . . . . . . . . . 62HOOD PROP . . . . . . . . . . . . . . . . 51HOW TO OVERVIEW . . . . . . . . . . 103
I
IGNITION SWITCH . . . . . . . . . . . . 38IMPORTANT SAFETY INFORMATION . . 4IN CASE OF EMERGENCY . . . . . . . . 5
Subaru Roadside Assistance . . . . . . 5SUBARU STARLINK® Safety andSecurity . . . . . . . . . . . . . . . . . . 5
INSTRUMENT PANEL SWITCHES (LOWERLEFT) . . . . . . . . . . . . . . . . . . 30
I/SET SWITCH . . . . . . . . . . . . . . . 31
J
JACK AND TOOLS . . . . . . . . . . . . 50
K
KEYLESS ACCESS WITH PUSH BUTTONSTART . . . . . . . . . . . . . . . . . . 9Locking Using Door Handles . . . . . . 9Locking Using the Rear Gate . . . . . 10Unlocking Using Door Handles . . . . . 9Unlocking Using the Rear Gate . . . . 10
KEYLESS ENTRY . . . . . . . . . . . . . . 7Automatic Door Locking/Unlocking . . 8
L
LANE DEPARTURE WARNING ANDPRE-COLLISION BRAKING SYSTEMOFF . . . . . . . . . . . . . . . . . . . 96Lane Departure Warning OFFSwitch . . . . . . . . . . . . . . . . . . 96Pre-Collision Braking OFF Switch . . 96
LATCH/ANCHOR . . . . . . . . . . . . . 48LIGHT CONTROLS . . . . . . . . . . . . 32
Daytime Running Lights . . . . . . . . 33Illumination Brightness . . . . . . . . . 33
M
MAKING A CALL . . . . . . . . . . . . . 68MAPS . . . . . . . . . . . . . . . . . . . 121
Arrival Time/Distance . . . . . . . . . 126Canceling Guidance . . . . . . . . . . 126Finding a Destination by Address . . 121Finding a Destination by POI . . . . . 122Guidance Screen Icons . . . . . . . . 124Map Updates . . . . . . . . . . . . . 127Map View/Perspective . . . . . . . . 125Map Zoom . . . . . . . . . . . . . . . 124Nearest Gas Station . . . . . . . . . . 126Route Options . . . . . . . . . . . . . 123Saving Destination as a Favorite . . 123Shortest/Fastest/Economic . . . . . 123Traffic Information . . . . . . . . . . . 125
MAPS/NAVIGATION . . . . . . . . . . . . 82Checking for Map Updates . . . . . . 82
INDEX
131

Updating Maps Over-the-Air . . . . . 82Updating Maps Using YourPC/MAC . . . . . . . . . . . . . . . . . 83
MAPS OVERVIEW . . . . . . . . . . . . . 76MEDIA . . . . . . . . . . . . . . . . . . . 67
Aux Input . . . . . . . . . . . . . . . . . 67Bluetooth® . . . . . . . . . . . . . . . . 67CD . . . . . . . . . . . . . . . . . . . . 67USB / iPod . . . . . . . . . . . . . . . . 67
MEMORY DRIVER’S SEAT . . . . . . . 106MEMORY HEIGHT . . . . . . . . . . . 104MYSUBARU . . . . . . . . . . . . . . . . 75
Service Appointment Scheduler . . . 75MYSUBARU INTEGRATION . . . . . . . 78
N
NEW VEHICLE BREAK-IN . . . . . . . . 53
O
ONE-TOUCH INTERIOR LIGHTING . . 35OPERATION . . . . . . . . . . . . . . . . 87OVERHEAD CONSOLE . . . . . . . . . . 36OVERVIEW OF YOUR MULTIMEDIA
SYSTEM . . . . . . . . . . . . . . . . . 56Various Systems . . . . . . . . . . . . 56
OWNER’S RESOURCES . . . . . . . . . . 4
P
PAIRING A PHONE . . . . . . . . . . . . 68PHONE . . . . . . . . . . . . . . . . . . . 81POWER EXTERIOR MIRRORS . . . . . 19
Power Folding Mirrors . . . . . . . . . 20POWER MOONROOF . . . . . . . . . . 22
Opening/Closing the Sunshade . . . . 22Sliding the Moonroof . . . . . . . . . . 22Tilting the Moonroof . . . . . . . . . . 22
POWER REAR GATE (PRG) . . . . . . . 11From the Rear of the Vehicle . . . . . 12Power Rear Gate Button . . . . . . . . 11Power Rear Gate Lock . . . . . . . . . 13
POWER WINDOWS . . . . . . . . . . . . 21PUSH-BUTTON IGNITION SWITCH . . 38
R
RADIO . . . . . . . . . . . . . . . . . . . . 66AM/FM Radio . . . . . . . . . . . . . . 66Presets . . . . . . . . . . . . . . . . . . 67Satellite Radio . . . . . . . . . . . . . . 66
REARRANGING ICONS . . . . . . . . . . 62REAR SEAT REMINDER . . . . . . . . . 48
Passenger Occupant Detection andSeatbelt Reminders . . . . . . . . . . . 49
REAR VIEW MIRROR . . . . . . . . . . . 20Auto-dimming Mirror . . . . . . . . . . 20HomeLink® 5 Accessory Mirror . . . 20Smart Rearview Mirror . . . . . . . . . 21
REAR-VISION CAMERA . . . . . . . . . 97REAR WINDOW WIPER . . . . . . . . . 35RECEIVING A CALL . . . . . . . . . . . . 69REVERSE AUTOMATIC BRAKING
(RAB) . . . . . . . . . . . . . . . . . . 99ROOF RAIL CAPACITY . . . . . . . . . . 54
S
SAFETY AND SECURITY OVERVIEW . . 77SEATING . . . . . . . . . . . . . . . . . . 16
Head Restraint Adjustment . . . . . . 18Manual Seats . . . . . . . . . . . . . . 16Power Driver’s Seat (if equipped) . . . 17Seatbelt Adjuster . . . . . . . . . . . . 18
SETTINGS AND UPDATESOVERVIEW . . . . . . . . . . . . . . . 80Connect to Home Wi-Fi . . . . . . . . 80Performing Software Updates . . . . . 80
SOUND . . . . . . . . . . . . . . . . . . . 81SPARE TIRE . . . . . . . . . . . . . . . . 50STARTING THE VEHICLE . . . . . . . . . 38
Without Push-button Ignition . . . . . 38With Push-button Ignition . . . . . . . 38
STEERING RESPONSIVE HEADLIGHTS(SRH) . . . . . . . . . . . . . . . . . . 99
INDEX
132

STEERING WHEEL CONTROLS . . . . . 59Advanced Adaptive Cruise Control . . 93Customizing EyeSight® Settings . . . 94
STEREO CAMERA PRECAUTIONS . . 100SUBARU STARLINK® IN-VEHICLE
APPS . . . . . . . . . . . . . . . . . . 71aha™ by HARMAN . . . . . . . . . . . 71Android Auto™ . . . . . . . . . . . . . 72Apple CarPlay® . . . . . . . . . . . . . 72Pandora® . . . . . . . . . . . . . . . . 71SiriusXM® Travel Link . . . . . . . . . . 72
SUBARU STARLINK® MOBILE APP . . 73Chimani . . . . . . . . . . . . . . . . . 74eBird . . . . . . . . . . . . . . . . . . . 74Quick Reference Guide . . . . . . . . 73Yelp . . . . . . . . . . . . . . . . . . . . 74
SUBARU STARLINK® WI-FIHOTSPOT . . . . . . . . . . . . . . . . 79
T
TEXT MESSAGES . . . . . . . . . . . . . 70TILT AND TELESCOPIC STEERING
COLUMN . . . . . . . . . . . . . . . . 19TIRE PRESSURE MONITORING SYSTEM
(TPMS) . . . . . . . . . . . . . . . . . . 55TOUCHSCREEN . . . . . . . . . . . . . . 58TOWING YOUR ALL-WHEEL DRIVE
SUBARU . . . . . . . . . . . . . . . . . 6TRAILER TOWING CAPACITY . . . . . . 54TURNING OFF THE VEHICLE . . . . . . 43
Without Push-button Ignition . . . . . 43With Push-button Ignition . . . . . . . 43
TURN SIGNALS . . . . . . . . . . . . . . 34
V
VIEW/ENTER Switch . . . . . . . . . . . 32VOICE RECOGNITION . . . . . . . . . . 59
Common Commands . . . . . . . . . . 61Tips . . . . . . . . . . . . . . . . . . . . 60
W
WARNING AND INDICATOR LIGHTS . . 37WELCOME . . . . . . . . . . . . . . . . . . 4WI-FI . . . . . . . . . . . . . . . . . . . . 119
Connecting to a Wi-Fi Network . . . 119Wi-Fi Hotspot Subscription . . . . . 120
WINDSHIELD GLASS ANDDASHBOARD . . . . . . . . . . . . . 100
WINDSHIELD WIPERS . . . . . . . . . . 34Rain Sensing Windshield Wipers . . . 34
X
X-MODE® . . . . . . . . . . . . . . . . . . 42Hill Descent Control (HDC) . . . . . . . 42
INDEX
133

NOTES
134

NOTES
135

NOTES
136


Subaru of America, Inc. One Subaru Drive Camden, NJ 08103-9800
MSA5B2100A
Issued October 2020
Printed in USA 10/20
2021
Getting Started GuideAscent
Love. It’s what makes Subaru, Subaru.