Cisco Solution for EMC VSPEX with Microsoft Private Cloud ...
121
Cisco Solution for EMC VSPEX with Microsoft Private Cloud Fast Track 4.0 with Windows Azure Pack Last Updated: September 9, 2014 Building Architectures to Solve Business Problems
-
Upload
khangminh22 -
Category
Documents
-
view
2 -
download
0
Transcript of Cisco Solution for EMC VSPEX with Microsoft Private Cloud ...
Cisco Solution for EMC VSPEX with Microsoft Private Cloud Fast Track 4.0 with Windows Azure PackLast Updated: September 9, 2014
Building Architectures to Solve Business Problems
Cisco Validated Design2
About the Authors
3
Tim Cerling
About the Authors
Tim Cerling, Technical Marketing Engineer, Cisco Systems
Tim Cerling is a Technical Marketing Engineer with Cisco's data center Group, focusing on delivering
customer-driven solutions on Microsoft Hyper-V and System Center products. Tim has been in the IT
business since 1979. He started working with Windows NT 3.5 on the DEC Alpha product line during his
19 year tenure with DEC, and he has continued working with Windows Server technologies since then
with Compaq, Microsoft, and now Cisco. During his twelve years as a Windows Server specialist at Mic-
rosoft, he co-authored a book on Microsoft virtualization technologies - Mastering Microsoft Virtualiza-
tion. Tim holds a BA in Computer Science from the University of Iowa.

Acknowledgment
AcknowledgmentFor their support and contribution to the design, validation, and creation of this Cisco Validated Design, we would like to thank:
Mike Mankovsky – Technical Leader Engineer, Cisco Systems
4
Acknowledgment
About Cisco Validated Design (CVD) Program
The CVD program consists of systems and solutions designed, tested, and documented to facilitate faster,
more reliable, and more predictable customer deployments. For more information visit
http://www.cisco.com/go/designzone.
ALL DESIGNS, SPECIFICATIONS, STATEMENTS, INFORMATION, AND RECOMMENDATIONS (COLLEC-
TIVELY, "DESIGNS") IN THIS MANUAL ARE PRESENTED "AS IS," WITH ALL FAULTS. CISCO AND ITS
SUPPLIERS DISCLAIM ALL WARRANTIES, INCLUDING, WITHOUT LIMITATION, THE WARRANTY OF
MERCHANTABILITY, FITNESS FOR A PARTICULAR PURPOSE AND NONINFRINGEMENT OR ARISING
FROM A COURSE OF DEALING, USAGE, OR TRADE PRACTICE. IN NO EVENT SHALL CISCO OR ITS SUP-
PLIERS BE LIABLE FOR ANY INDIRECT, SPECIAL, CONSEQUENTIAL, OR INCIDENTAL DAMAGES,
INCLUDING, WITHOUT LIMITATION, LOST PROFITS OR LOSS OR DAMAGE TO DATA ARISING OUT OF
THE USE OR INABILITY TO USE THE DESIGNS, EVEN IF CISCO OR ITS SUPPLIERS HAVE BEEN ADVISED
OF THE POSSIBILITY OF SUCH DAMAGES.
THE DESIGNS ARE SUBJECT TO CHANGE WITHOUT NOTICE. USERS ARE SOLELY RESPONSIBLE FOR
THEIR APPLICATION OF THE DESIGNS. THE DESIGNS DO NOT CONSTITUTE THE TECHNICAL OR
OTHER PROFESSIONAL ADVICE OF CISCO, ITS SUPPLIERS OR PARTNERS. USERS SHOULD CONSULT
THEIR OWN TECHNICAL ADVISORS BEFORE IMPLEMENTING THE DESIGNS. RESULTS MAY VARY
DEPENDING ON FACTORS NOT TESTED BY CISCO.
The Cisco implementation of TCP header compression is an adaptation of a program developed by the University of
California, Berkeley (UCB) as part of UCB’s public domain version of the UNIX operating system. All rights reserved.
Copyright © 1981, Regents of the University of California.
Cisco and the Cisco logo are trademarks or registered trademarks of Cisco and/or its affiliates in the U.S. and other coun-
tries. To view a list of Cisco trademarks, go to this URL: http://www.cisco.com/go/trademarks. Third-party trademarks
mentioned are the property of their respective owners. The use of the word partner does not imply a partnership relation-
ship between Cisco and any other company. (1110R).
Any Internet Protocol (IP) addresses and phone numbers used in this document are not intended to be actual addresses
and phone numbers. Any examples, command display output, network topology diagrams, and other figures included in
the document are shown for illustrative purposes only. Any use of actual IP addresses or phone numbers in illustrative
content is unintentional and coincidental.
© 2014 Cisco Systems, Inc. All rights reserved.
5About Cisco Validated Design (CVD) Program
Cisco Solution for EMC VSPEX with Microsoft Private Cloud Fast Track 4.0 with Windows Azure Pack
Prepare Environment to Add Windows Azure Pack to Fast Track
Note This document assumes that the Cisco UCS Solution for EMC VSPEX Microsoft Private Cloud Fast Track 4.0 CVD has been used to create a base environment. This document describes how to add the Windows Azure Pack to that previously installed environment.
Overview
Windows Azure is the Microsoft platform for the public cloud. You can use this platform in many different ways. For instance, you can use Windows Azure to build a web application that runs and stores its data in Microsoft data centers. You can use Windows Azure just to store data, with the applications that use this data running on-premises (that is, outside the public cloud). You can use Windows Azure to create virtual machines for development and test or to run production deployments of SharePoint and other applications. You can use Windows Azure to build massively scalable applications that have thousands or millions of users. A detailed description of the Windows Azure services can be found at: http://www.windowsazure.com/en-us/services/.
Windows Azure provides public-cloud platform as a service (PaaS) and infrastructure as a service (IaaS) with the addition of Windows Azure virtual machines. With the IaaS capability, Windows Azure becomes a core part of the Cloud OS vision. It is critical to have a deep understanding of Windows Azure services and architecture to be able to create hybrid cloud architectures.
Customers like the self-service capabilities provided by Microsoft Azure, so Microsoft has developed the Windows Azure Pack (WAP) to provide a similar self-service capability for private clouds. WAP is a collection of Windows Azure technologies, available to Microsoft customers at no additional cost for installation into your data center. It runs on top of Windows Server 2012 R2 and System Center 2012 R2
Americas Headquarters:Cisco Systems, Inc., 170 West Tasman Drive, San Jose, CA 95134-1706 USA
Prepare Environment to Add Windows Azure Pack to Fast Track
(the configuration previously described) and, through the use of the Windows Azure technologies, enables you to offer a rich, self-service, multi-tenant cloud, consistent with the public Windows Azure experience.
Windows Azure Pack includes the following capabilities:
• Management portal for tenants – A customizable self-service portal for provisioning, monitoring, and managing services such as Web Site Clouds, Virtual Machine Clouds, and Service Bus Clouds.
• Management portal for administrators – A portal for administrators to configure and manage resource clouds, user accounts, and tenant offers, quotas, and pricing.
• Service management API – A REST API that helps enable a range of integration scenarios including custom portal and billing systems.
• Web Site Clouds – A service that helps provide a high-density, scalable shared web hosting platform for ASP.NET, PHP, and Node.js web applications. The Web Site Clouds service includes a customizable web application gallery of open source web applications and integration with source control systems for custom-developed web sites and applications.
• Virtual Machine Clouds – A service that provides infrastructure-as-a-service (IaaS) capabilities for Windows and Linux virtual machines. The Virtual Machine Clouds service includes a VM template gallery, scaling options, and virtual networking capabilities.
• Service Bus Clouds – A service that provides reliable messaging services between distributed applications. The Service Bus Clouds service includes queued and topic-based publish/subscribe capabilities.
• SQL and MySQL – Services that provide database instances. These databases can be used in conjunction with the Web Sites service.
• Automation – The capability to automate and integrate additional custom services into the services framework, including a runbook editor and execution environment.
This document builds on the previously defined Cisco UCS Solution for EMC VSPEX Microsoft Private Cloud Fast Track 4.0 CVD. It assumes the Windows Server and System Center components have been installed according to the deployment guide. The instructions provided in this CVD help in deploying the components necessary to implement the Windows Azure Pack (WAP) on the Microsoft Private Cloud Fast Track.
Architecture
Within Windows Azure Pack, there are several deployment patterns, scaling from small to very large, and the IaaS PLA will focus on the following two design patterns, the two largest: Minimal Distributed Deployment and Scaled Distributed Deployment.
• The Minimal Distributed Deployment pattern encompasses a combined role installation based on whether the role is considered public facing or privileged service. This model is well-suited for large enterprises which wish to provide Windows Azure Pack services in a consolidated footprint.
• The Scaled Distributed Deployment pattern provides a Windows Azure Pack deployment which deploys each role independently, allowing for scale-out deployments based on specific needs. This pattern is well-suited for service providers who either expect large scale consumption of portal services or wish to deploy Windows Azure Pack roles in a manner which allows them to be selective about which roles they intend to expose to their customers.
The architecture shown in this CVD deploys the Minimal Distributed Deployment pattern. The Scaled Distributed Deployment pattern is meant for very large deployments, such as those of a service provider. It deploys each of the WAP roles on its own pair of load-balanced VMs. If needed, it is possible to scale
7Cisco Solution for EMC VSPEX with Microsoft Private Cloud Fast Track 4.0 with Windows Azure Pack
Prepare Environment to Add Windows Azure Pack to Fast Track
from the minimal to the scaled environment by deploying more VMs in a network load-balanced configuration and moving the WAP roles to the additional VMs. This CVD presents the Minimal Distributed Deployment pattern as it is most appropriate for corporate private clouds.
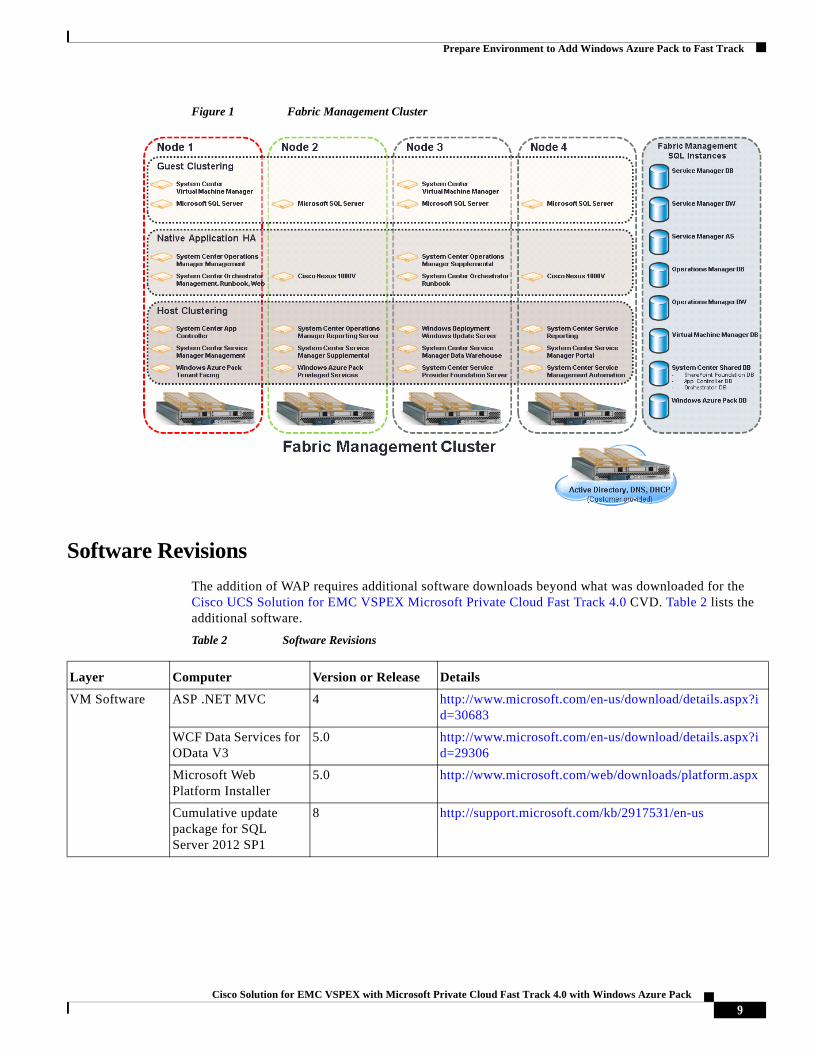
The architecture for this CVD was sized appropriately to allow for the addition of the WAP components. So the overall architecture does not change. Some of the component configurations for the Fabric Management Infrastructure do change. The Fabric Management Infrastructure for the Private Cloud Fast Track utilized three Cisco UCS B200 M3 Blade Servers in a Microsoft Failover Cluster configuration to host all the requisite System Center virtual machines. When adding the WAP components, make sure another B200 M3 Blade Server is added to the Fabric Management Cluster to provide maximum levels of availability.
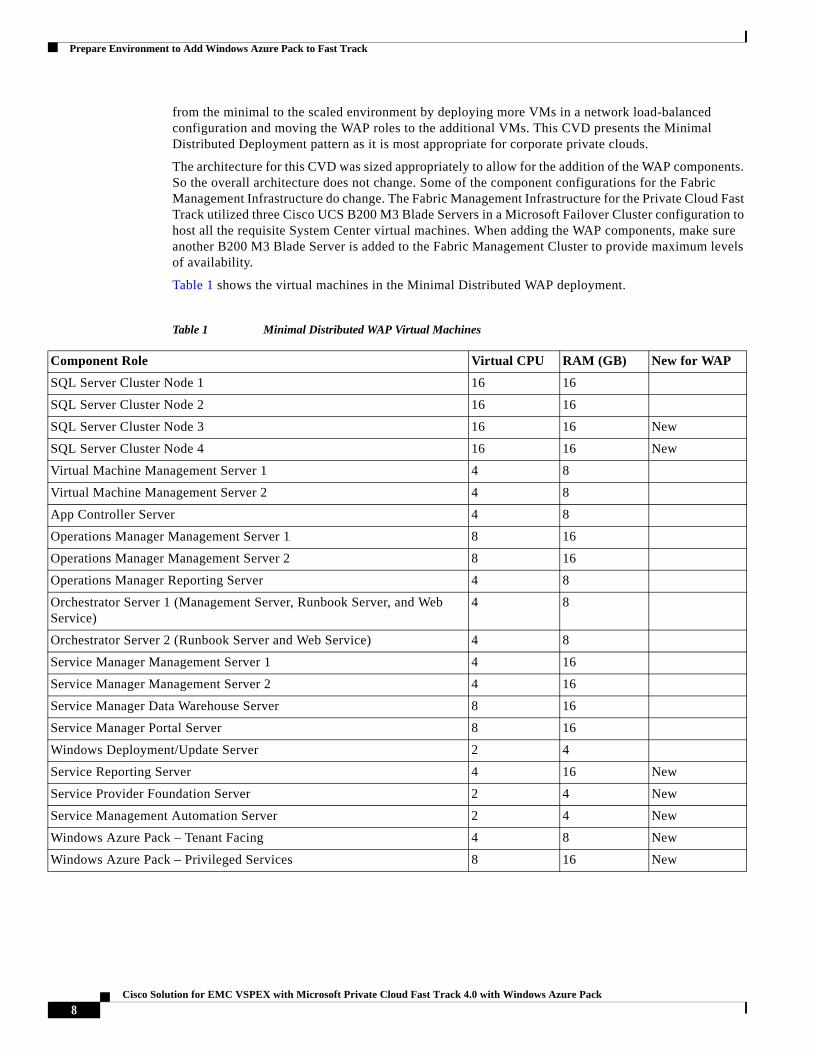
Table 1 shows the virtual machines in the Minimal Distributed WAP deployment.
Table 1 Minimal Distributed WAP Virtual Machines
Component Role Virtual CPU RAM (GB) New for WAP
SQL Server Cluster Node 1 16 16
SQL Server Cluster Node 2 16 16
SQL Server Cluster Node 3 16 16 New
SQL Server Cluster Node 4 16 16 New
Virtual Machine Management Server 1 4 8
Virtual Machine Management Server 2 4 8
App Controller Server 4 8
Operations Manager Management Server 1 8 16
Operations Manager Management Server 2 8 16
Operations Manager Reporting Server 4 8
Orchestrator Server 1 (Management Server, Runbook Server, and Web Service)
4 8
Orchestrator Server 2 (Runbook Server and Web Service) 4 8
Service Manager Management Server 1 4 16
Service Manager Management Server 2 4 16
Service Manager Data Warehouse Server 8 16
Service Manager Portal Server 8 16
Windows Deployment/Update Server 2 4
Service Reporting Server 4 16 New
Service Provider Foundation Server 2 4 New
Service Management Automation Server 2 4 New
Windows Azure Pack – Tenant Facing 4 8 New
Windows Azure Pack – Privileged Services 8 16 New
8Cisco Solution for EMC VSPEX with Microsoft Private Cloud Fast Track 4.0 with Windows Azure Pack
Prepare Environment to Add Windows Azure Pack to Fast Track
Figure 1 Fabric Management Cluster
Software Revisions
The addition of WAP requires additional software downloads beyond what was downloaded for the Cisco UCS Solution for EMC VSPEX Microsoft Private Cloud Fast Track 4.0 CVD. Table 2 lists the additional software.
Table 2 Software Revisions
Layer Computer Version or Release Details
VM Software ASP .NET MVC 4 http://www.microsoft.com/en-us/download/details.aspx?id=30683
WCF Data Services for OData V3
5.0 http://www.microsoft.com/en-us/download/details.aspx?id=29306
Microsoft Web Platform Installer
5.0 http://www.microsoft.com/web/downloads/platform.aspx
Cumulative update package for SQL Server 2012 SP1
8 http://support.microsoft.com/kb/2917531/en-us
9Cisco Solution for EMC VSPEX with Microsoft Private Cloud Fast Track 4.0 with Windows Azure Pack
Prepare Environment to Add Windows Azure Pack to Fast Track
Add Fourth Node to Fabric Management Cluster
The Fast Track CVD builds a Fabric Management cluster with three nodes. In order to handle the additional virtual machines required for WAP, and to continue to ensure high availability even during maintenance periods, a fourth node needs to be added to the failover cluster.
Prepare a fourth server with Windows Server 2012 R2 and configure it following the instructions in the Cisco UCS Solution for EMC VSPEX Microsoft Private Cloud Fast Track 4.0 CVD for the other nodes. Ensure you have performed the following steps:
• Installed and patched Windows Server 2012 R2
• Configured MPIO / PowerPath
• Installed Hyper-V
• Configured the networks to match the other Fabric Management cluster nodes
• Zoned and masked all the LUNs for the Fabric Management cluster
• Added the server to VMM
Once you have accomplished these steps, you should run a cluster validation to ensure everything is configured properly. When running a default cluster validation, the disks are failed back and forth among the nodes of the cluster. Since we now are working with an operational cluster, it is best to minimize the disruption disk failovers could cause. Because the validation will fail the disk, and not bring it down gracefully, this means the VMs would be restarting throughout all the disk tests.
To get around this, and still perform tests to ensure the disks are configured correctly, you can perform the disk tests on just the witness disk. Failing the witness disk among nodes will not cause any disruption for the running VMs. To run the validation test just using the witness disk, run the following PowerShell cmdlet:
Test-Cluster FT4-Infra01,FT4-Infra02,FT4-Infra03,FT4-Infra04 -Disk "<witness disk name>"
The output from this test will likely result in a display something like this:
WARNING: Cluster Configuration - Validate Resource Status: The test reported some warnings..WARNING: System Configuration - Validate Software Update Levels: The test reported some warnings..WARNING: Network - Validate Network Communication: The test reported some warnings..WARNING: Hyper-V Configuration - Validate Hyper-V Integration Services Version: The test reported some warnings..WARNING:Test Result:ClusterConditionallyApprovedTesting has completed successfully. The configuration appears to be suitable for clustering. However, you shouldreview the report because it may contain warnings which you should address to attain the highest availability.Test report file path: C:\Users\administrator\AppData\Local\Temp\Validation Report 2014.06.09 At 15.00.26.xml.mhtMode LastWriteTime Length Name---- ------------- ------ -----a--- 6/9/2014 3:04 PM 1275661 Validation Report 2014.06.09 At 15.00.26.xml.mht
There are several things that can readily cause these warnings. For example, if a VM is not running, the test will not be able to determine the Integration Services installed in the VM. Another common warning is the systems have different patches applied to them. This can happen because Microsoft will often supersede a patch with a newer patch. Since the node being added to the cluster was most likely built
10Cisco Solution for EMC VSPEX with Microsoft Private Cloud Fast Track 4.0 with Windows Azure Pack
Prepare Environment to Add Windows Azure Pack to Fast Track
after the first nodes of the cluster, it is not uncommon that it would not have the patches that were superseded, but only have the latest patch. The key is to open the .mht file listed in the test report file path with a browser and validate that the warnings are understood and acceptable.
Once you have validated the configuration is ready to add the node to the cluster, run the following PowerShell cmdlet to add the node:
Add-ClusterNode –Name FT4-Infra04 –Cluster FT4-InfraClus
After the node has been added to the cluster, open the Hyper-V Management console to change the default virtual machine paths. Follow these steps:
Create Virtual Machine Template in Virtual Machine Manager (VMM)
Deployment of WAP on top of the Fast Track Private Cloud requires the addition of at least eleven more virtual machines. With VMM in place, it makes sense to use its capabilities to quickly deploy the new VMs onto the Fabric Management cluster. If you have already created the necessary virtual machine templates during your regular operations of VMM, you may skip this section.
Create Initial Virtual Machine
From your management workstation, launch the VMM management console and follow these steps:
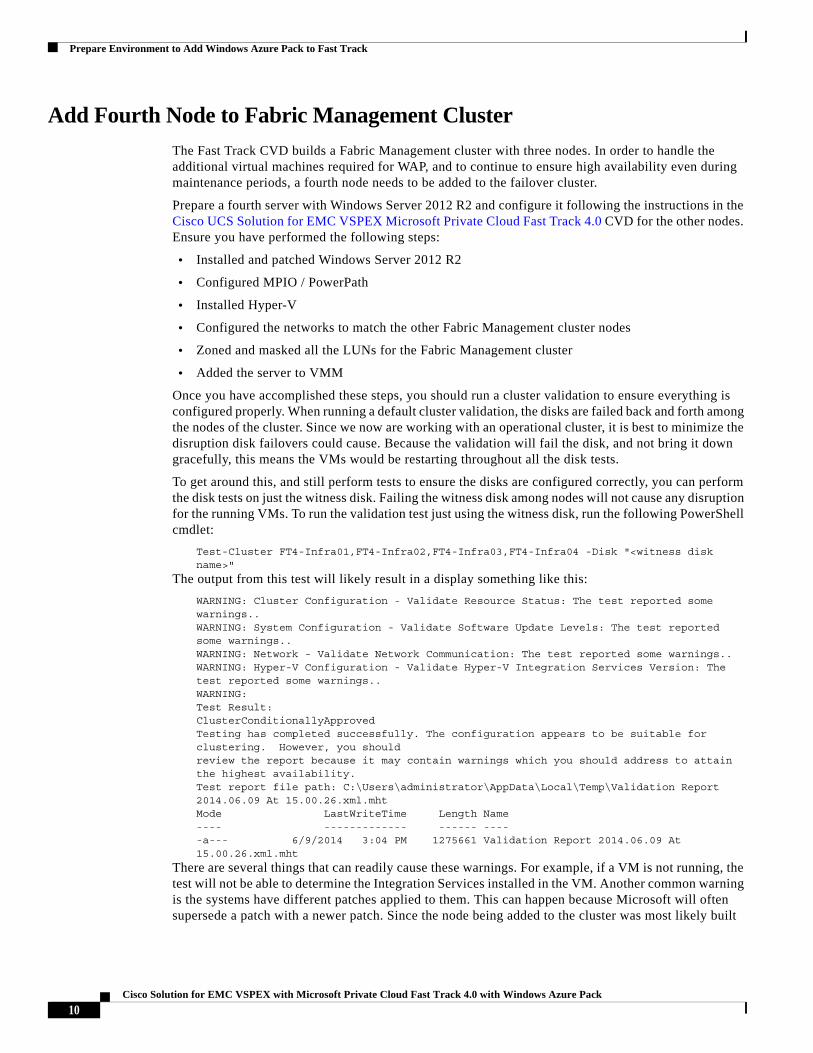
Right-click on the newly added Hyper-V node and select Hyper-V Settings…
Change the Virtual Hard Disks and Virtual Machine default locations to be on the appropriate CSV.
Click OK to accept the change.
11Cisco Solution for EMC VSPEX with Microsoft Private Cloud Fast Track 4.0 with Windows Azure Pack
Prepare Environment to Add Windows Azure Pack to Fast Track
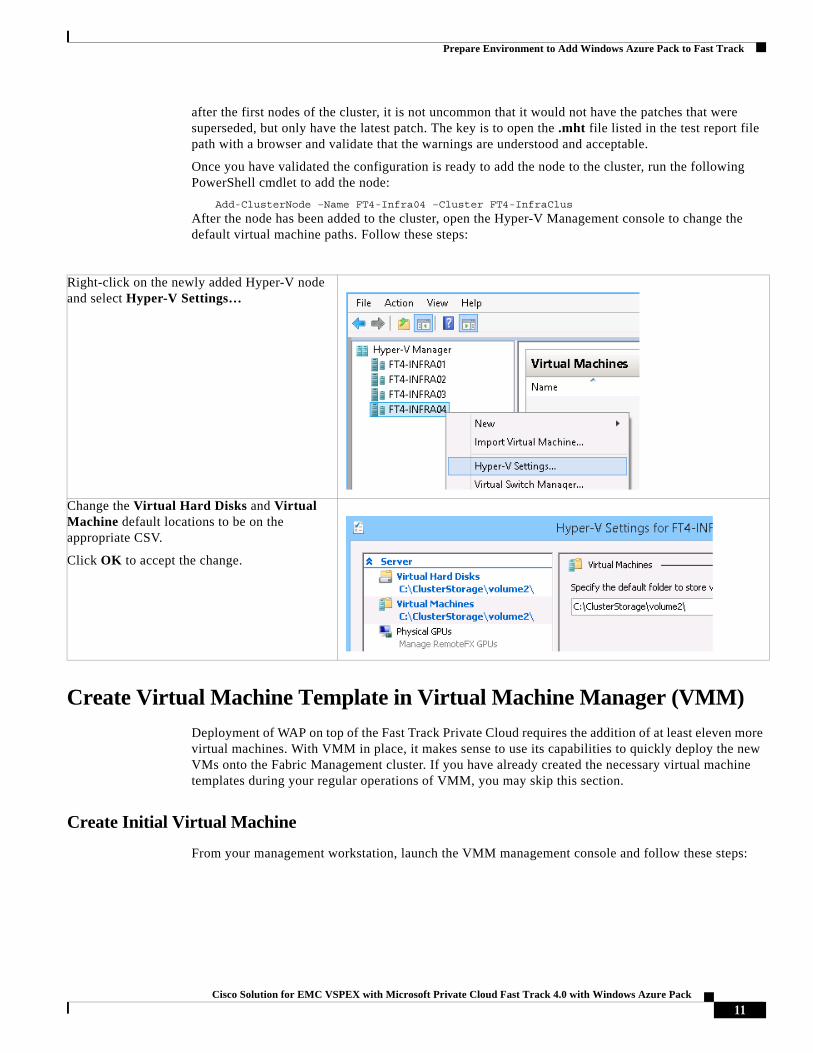
Select VMs and Services.
From the Home menu ribbon, click on Create Virtual Machine and select Create Virtual Machine.
In the Select Source window, click the Create the new virtual machine with a blank virtual hard disk radio button.
Click Next to continue.
12Cisco Solution for EMC VSPEX with Microsoft Private Cloud Fast Track 4.0 with Windows Azure Pack
Prepare Environment to Add Windows Azure Pack to Fast Track
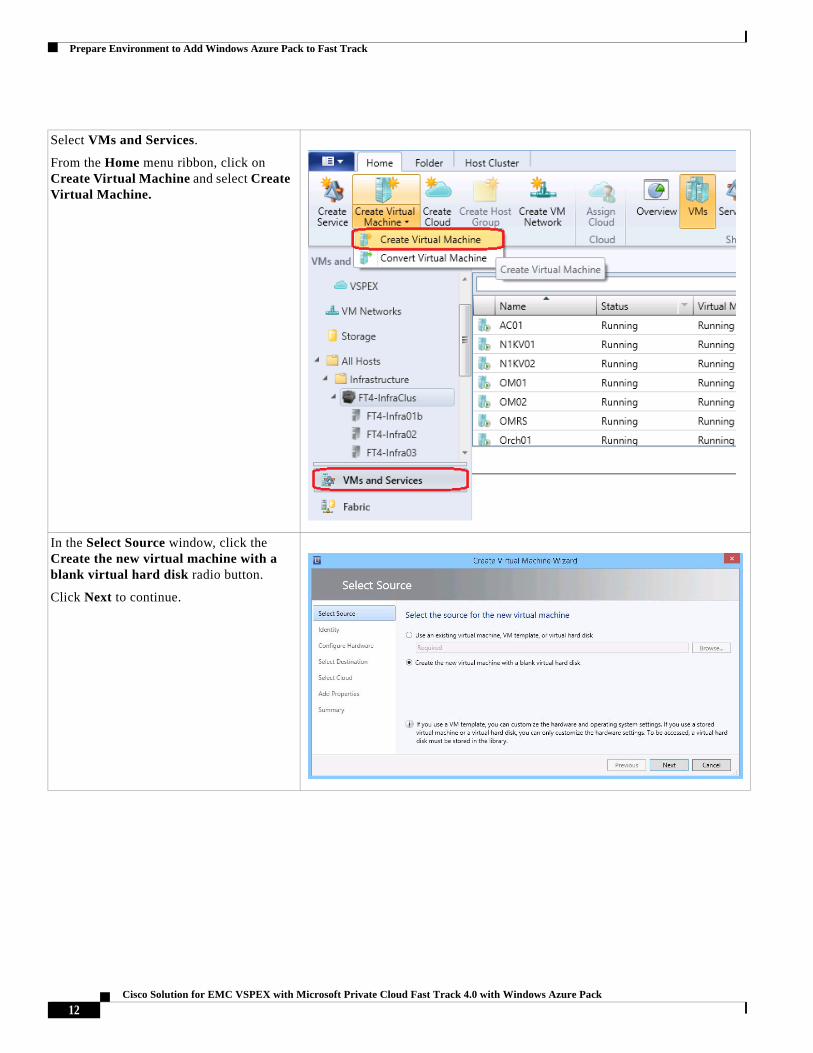
In the Identity window, enter a value for the Virtual Machine Name. Optionally, you can enter a Description.
From the Generation drop down menu, select Generation 2.
Click Next to continue.
In the Configure Hardware window, make these configuration settings:
• Cloud Capability Profile – Hyper-V
• Processor – 2 processors and Allow migration to a virtual machine host with a different processor version.
• Memory – 2048 MB and Static
• SCSI Adapter 0 – 50 GB and Fixed for ID 0. For the Virtual DVD drive, select Existing ISO image and browse the library to find the Windows Server 2012 R2 installation media. (Assumes you have copied the ISO to the library). If you have configured constrained delegation, you can select the Share file instead of copying it option.
• Network Adapter 1 – VMaccess
• Availability – Select the Make this virtual machine highly available check box.
Click Next to continue.
13Cisco Solution for EMC VSPEX with Microsoft Private Cloud Fast Track 4.0 with Windows Azure Pack
Prepare Environment to Add Windows Azure Pack to Fast Track
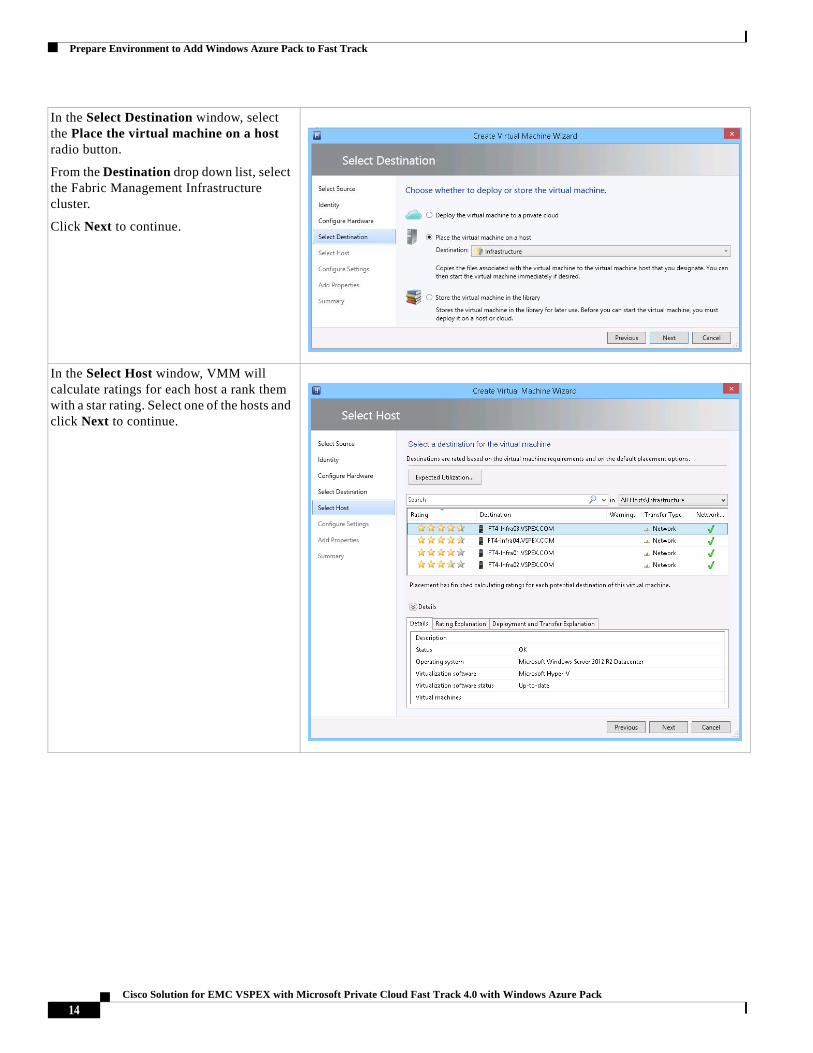
In the Select Destination window, select the Place the virtual machine on a host radio button.
From the Destination drop down list, select the Fabric Management Infrastructure cluster.
Click Next to continue.
In the Select Host window, VMM will calculate ratings for each host a rank them with a star rating. Select one of the hosts and click Next to continue.
14Cisco Solution for EMC VSPEX with Microsoft Private Cloud Fast Track 4.0 with Windows Azure Pack
Prepare Environment to Add Windows Azure Pack to Fast Track
Change Boot Order of Newly Created VM
Once the virtual machine has been created, you will need to install the operating system into the VM. The default firmware settings for a newly created Generation 2 VM places the hard drive as the boot device. Since the hard drive does not yet have the operating system installed on it, it is necessary to change the boot device before starting the VM to install the operating system. As with most things, you can use either a GUI or PowerShell to change the boot device. However, even though you would think you can work within the SCVMM management console, you need to use either the Failover Cluster Manager console or the Hyper-V Manager console. Using the Failover Cluster Manager console, follow these steps:
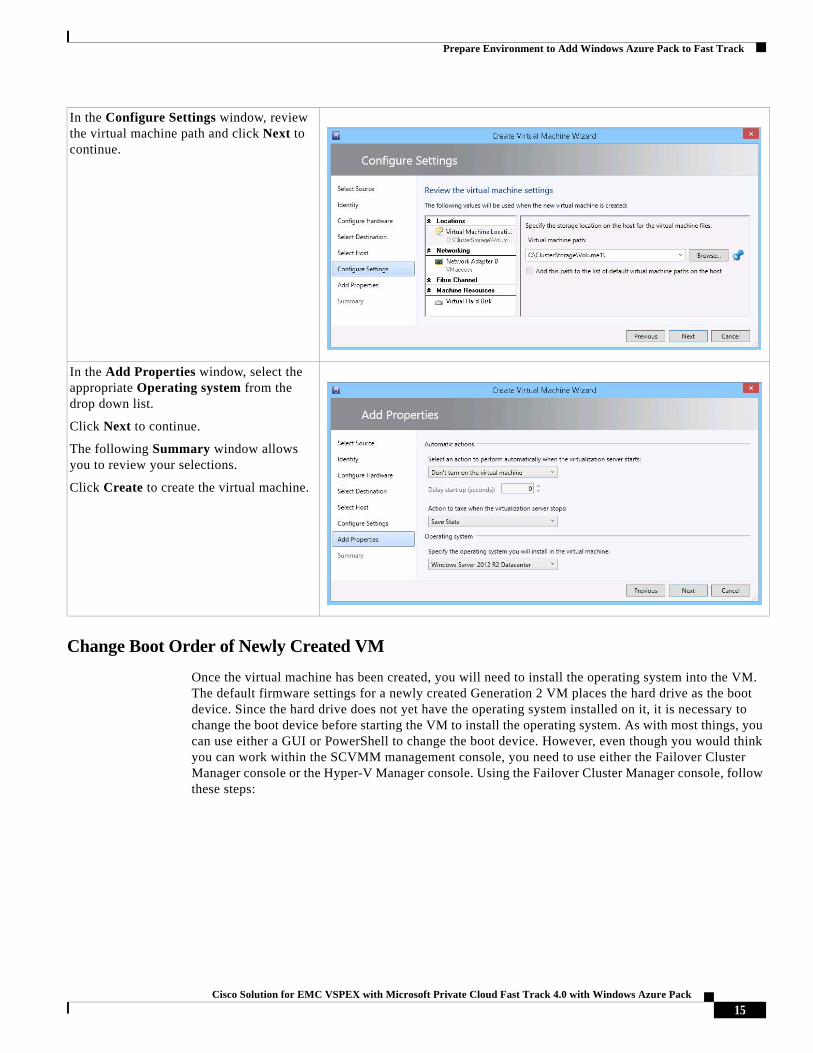
In the Configure Settings window, review the virtual machine path and click Next to continue.
In the Add Properties window, select the appropriate Operating system from the drop down list.
Click Next to continue.
The following Summary window allows you to review your selections.
Click Create to create the virtual machine.
15Cisco Solution for EMC VSPEX with Microsoft Private Cloud Fast Track 4.0 with Windows Azure Pack
Prepare Environment to Add Windows Azure Pack to Fast Track
Install the Windows Server 2012 R2 Operating System
The VMconnect (Virtual Machine Connection) capability (the ability to connect to a VM’s console) within SCVMM does not allow connections to a VM that is not running. Since we are booting from DVD instead of from the hard drive or the network, a Generation 2 VM requires depressing a key to tell the VM to boot from DVD. Therefore, as with setting the boot device, the installation of the Windows Server 2012 R2 operating system should be performed from either the Failover Cluster Manager console or the Hyper-V Manager console. To install the Windows Server 2012 R2 Operating System from the Failover Cluster Manager console, follow these steps:
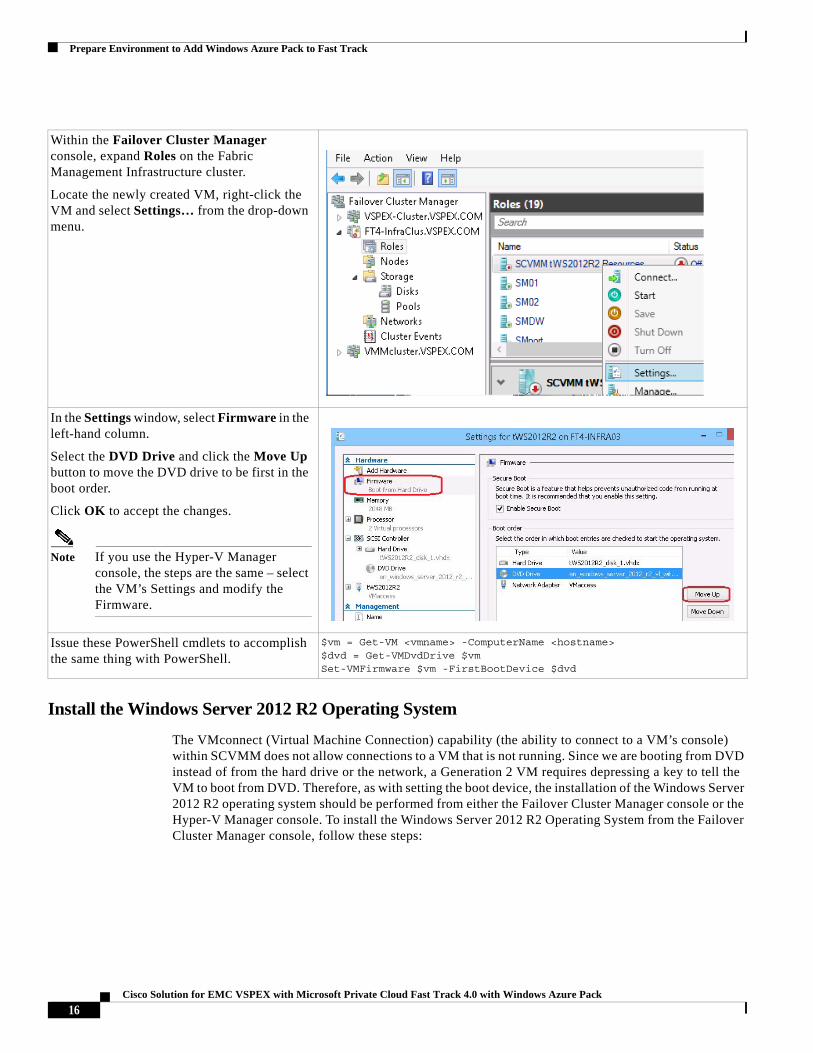
Within the Failover Cluster Manager console, expand Roles on the Fabric Management Infrastructure cluster.
Locate the newly created VM, right-click the VM and select Settings… from the drop-down menu.
In the Settings window, select Firmware in the left-hand column.
Select the DVD Drive and click the Move Up button to move the DVD drive to be first in the boot order.
Click OK to accept the changes.
Note If you use the Hyper-V Manager console, the steps are the same – select the VM’s Settings and modify the Firmware.
Issue these PowerShell cmdlets to accomplish the same thing with PowerShell.
$vm = Get-VM <vmname> -ComputerName <hostname>$dvd = Get-VMDvdDrive $vmSet-VMFirmware $vm -FirstBootDevice $dvd
16Cisco Solution for EMC VSPEX with Microsoft Private Cloud Fast Track 4.0 with Windows Azure Pack
Prepare Environment to Add Windows Azure Pack to Fast Track
You will proceed with a normal Windows Server 2012 R2 installation. Once that installation is completed, tailor the machine to ensure this base image, which we will next turn into a template, contains the components and options you want. For example, you should ensure the VM is fully patched, and you
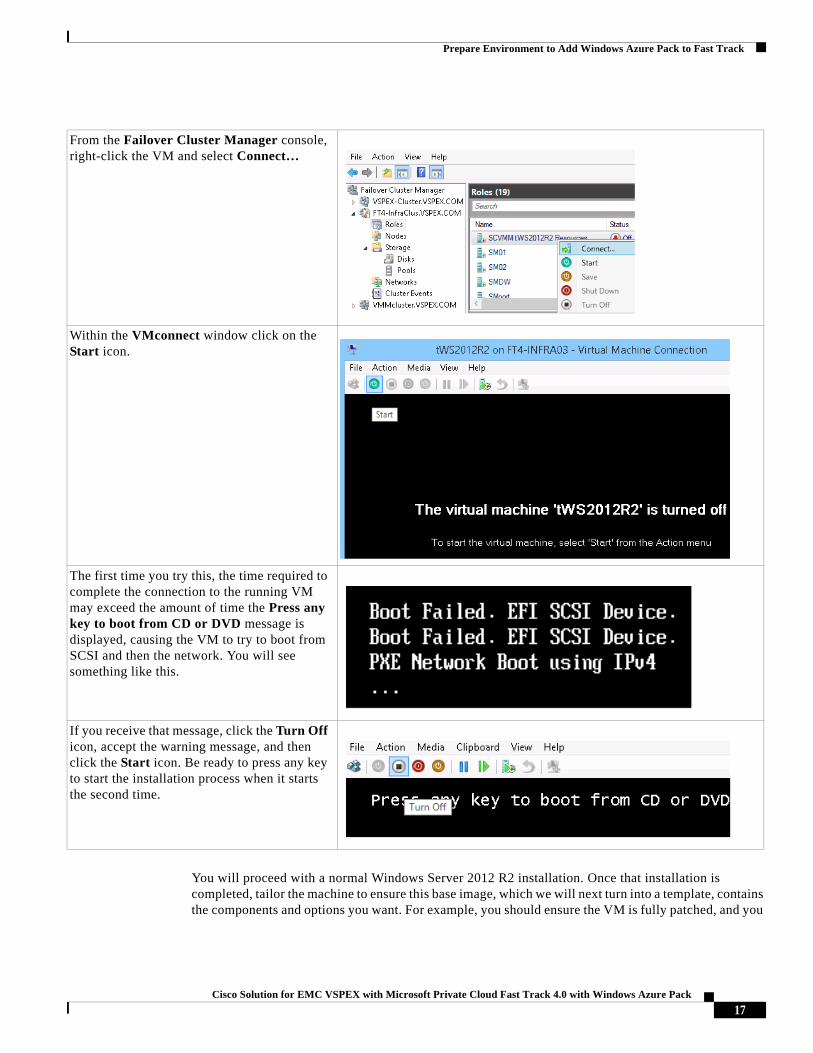
From the Failover Cluster Manager console, right-click the VM and select Connect…
Within the VMconnect window click on the Start icon.
The first time you try this, the time required to complete the connection to the running VM may exceed the amount of time the Press any key to boot from CD or DVD message is displayed, causing the VM to try to boot from SCSI and then the network. You will see something like this.
If you receive that message, click the Turn Off icon, accept the warning message, and then click the Start icon. Be ready to press any key to start the installation process when it starts the second time.
17Cisco Solution for EMC VSPEX with Microsoft Private Cloud Fast Track 4.0 with Windows Azure Pack
Prepare Environment to Add Windows Azure Pack to Fast Track
may want to set firewall rules or install management agents. You do not need to rename the VM or join it to the domain as this is going to be a VM template and creating a VM template causes the sysprep utility to run which will generalize the name and remove domain membership.
Note Not all applications can be sysprepped, so keep that in mind when tailoring this image.
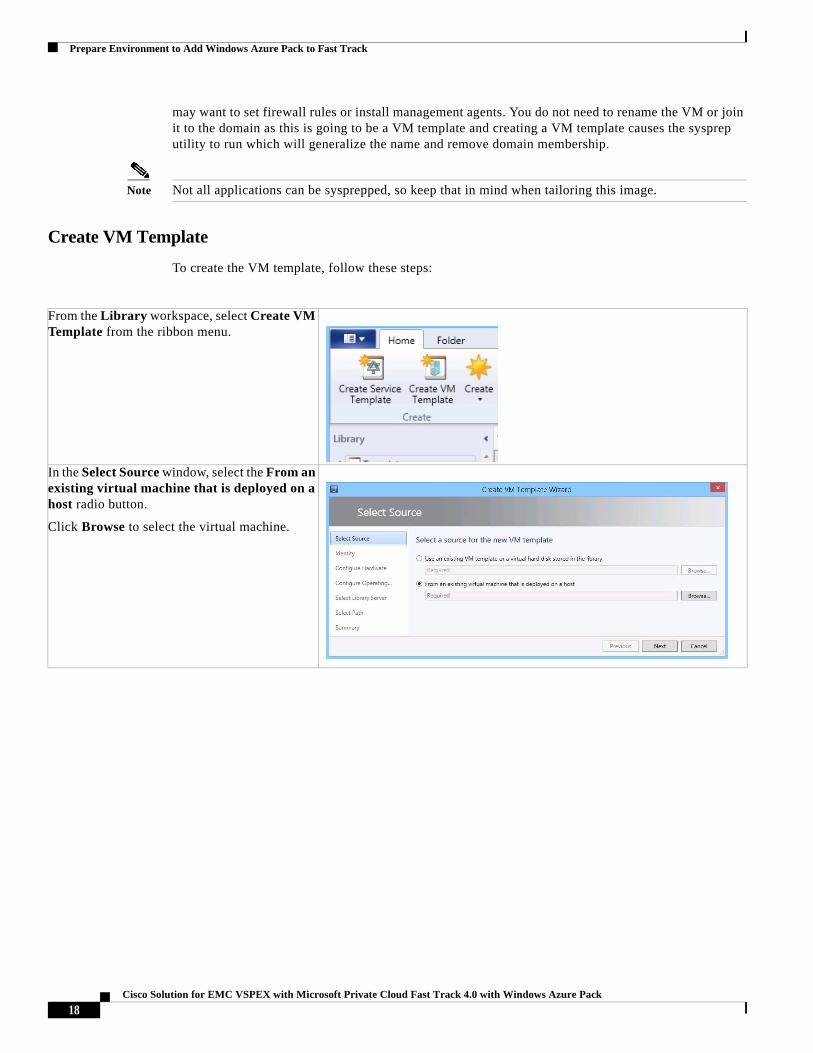
Create VM Template
To create the VM template, follow these steps:
From the Library workspace, select Create VM Template from the ribbon menu.
In the Select Source window, select the From an existing virtual machine that is deployed on a host radio button.
Click Browse to select the virtual machine.
18Cisco Solution for EMC VSPEX with Microsoft Private Cloud Fast Track 4.0 with Windows Azure Pack
Prepare Environment to Add Windows Azure Pack to Fast Track
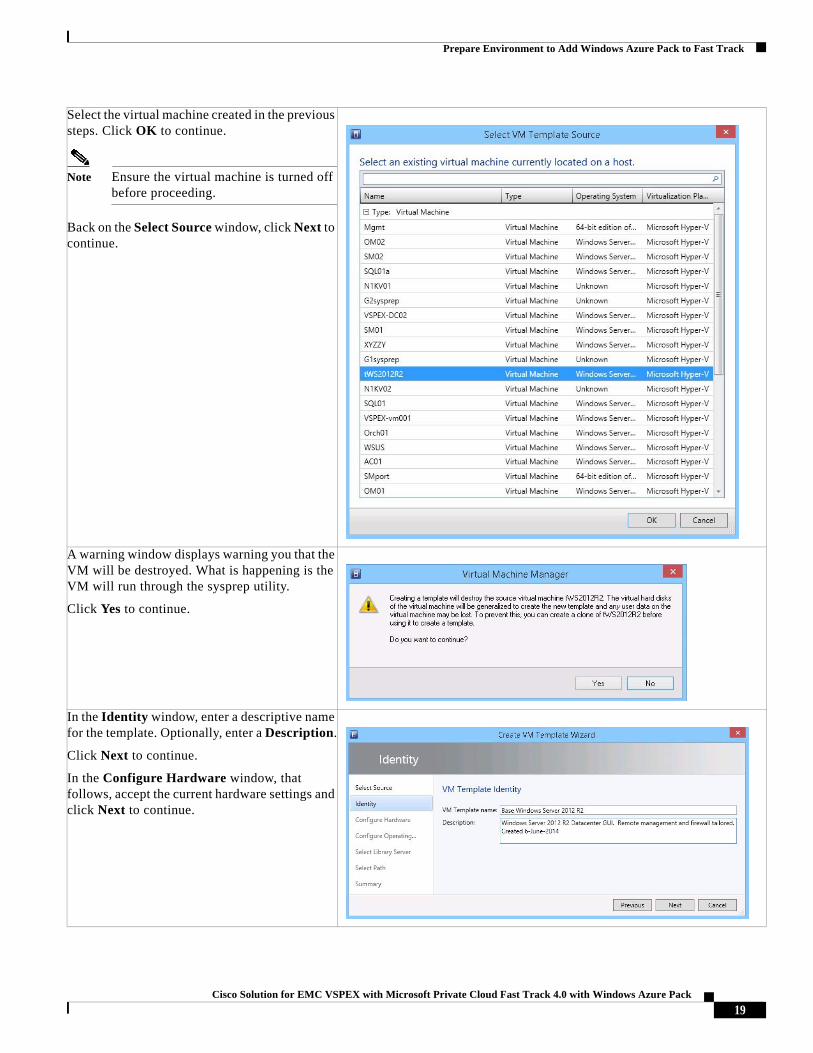
Select the virtual machine created in the previous steps. Click OK to continue.
Note Ensure the virtual machine is turned off before proceeding.
Back on the Select Source window, click Next to continue.
A warning window displays warning you that the VM will be destroyed. What is happening is the VM will run through the sysprep utility.
Click Yes to continue.
In the Identity window, enter a descriptive name for the template. Optionally, enter a Description.
Click Next to continue.
In the Configure Hardware window, that follows, accept the current hardware settings and click Next to continue.
19Cisco Solution for EMC VSPEX with Microsoft Private Cloud Fast Track 4.0 with Windows Azure Pack
Prepare Environment to Add Windows Azure Pack to Fast Track
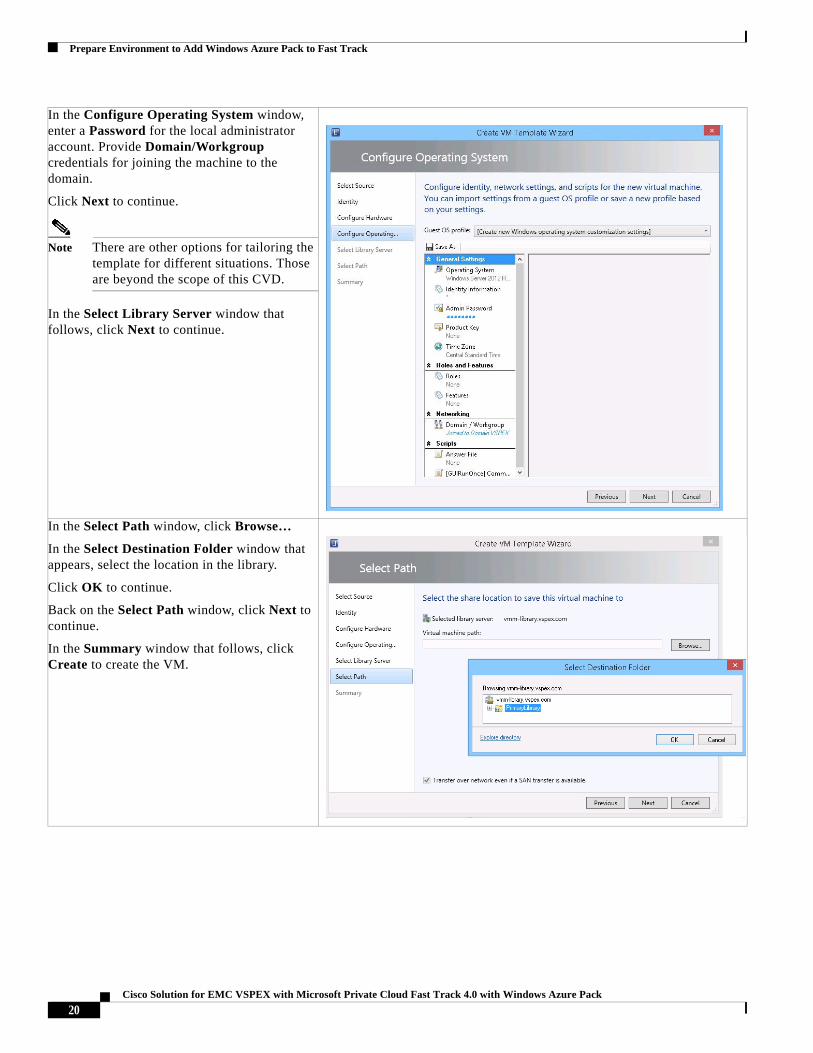
In the Configure Operating System window, enter a Password for the local administrator account. Provide Domain/Workgroup credentials for joining the machine to the domain.
Click Next to continue.
Note There are other options for tailoring the template for different situations. Those are beyond the scope of this CVD.
In the Select Library Server window that follows, click Next to continue.
In the Select Path window, click Browse…
In the Select Destination Folder window that appears, select the location in the library.
Click OK to continue.
Back on the Select Path window, click Next to continue.
In the Summary window that follows, click Create to create the VM.
20Cisco Solution for EMC VSPEX with Microsoft Private Cloud Fast Track 4.0 with Windows Azure Pack
Prepare Environment to Add Windows Azure Pack to Fast Track
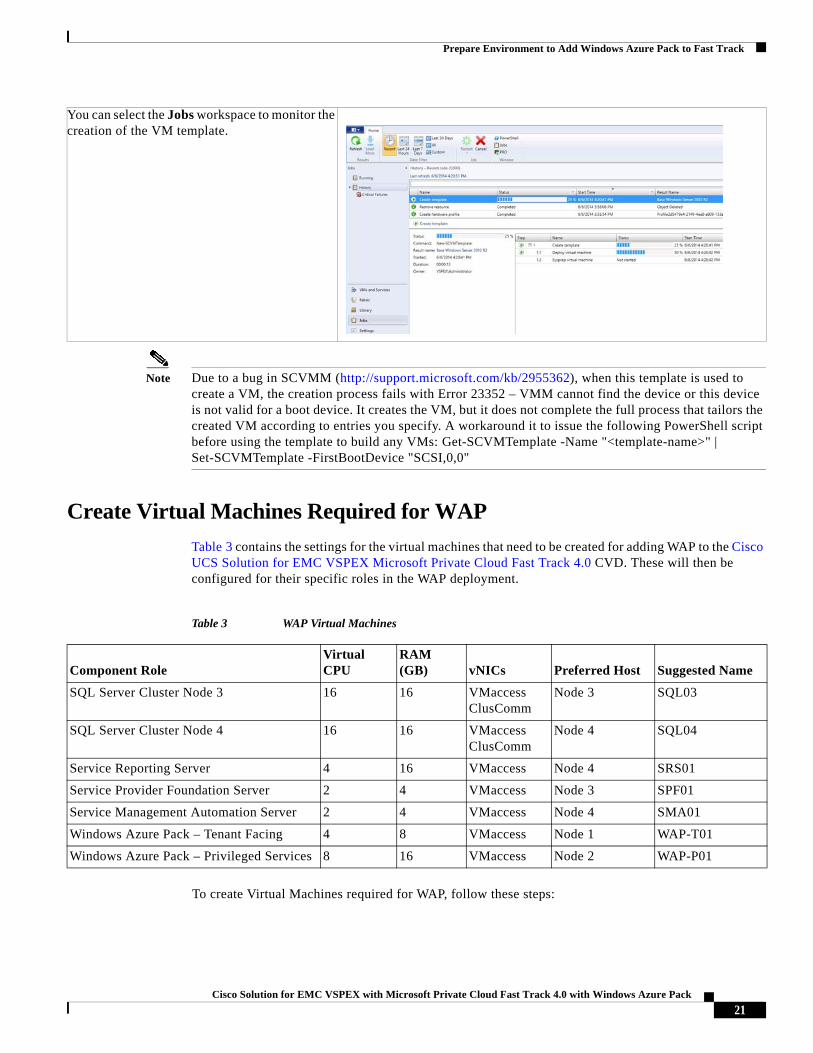
Note Due to a bug in SCVMM (http://support.microsoft.com/kb/2955362), when this template is used to create a VM, the creation process fails with Error 23352 – VMM cannot find the device or this device is not valid for a boot device. It creates the VM, but it does not complete the full process that tailors the created VM according to entries you specify. A workaround it to issue the following PowerShell script before using the template to build any VMs: Get-SCVMTemplate -Name "<template-name>" | Set-SCVMTemplate -FirstBootDevice "SCSI,0,0"
Create Virtual Machines Required for WAP
Table 3 contains the settings for the virtual machines that need to be created for adding WAP to the Cisco UCS Solution for EMC VSPEX Microsoft Private Cloud Fast Track 4.0 CVD. These will then be configured for their specific roles in the WAP deployment.
To create Virtual Machines required for WAP, follow these steps:
You can select the Jobs workspace to monitor the creation of the VM template.
Table 3 WAP Virtual Machines
Component RoleVirtual CPU
RAM (GB) vNICs Preferred Host Suggested Name
SQL Server Cluster Node 3 16 16 VMaccess ClusComm
Node 3 SQL03
SQL Server Cluster Node 4 16 16 VMaccess ClusComm
Node 4 SQL04
Service Reporting Server 4 16 VMaccess Node 4 SRS01
Service Provider Foundation Server 2 4 VMaccess Node 3 SPF01
Service Management Automation Server 2 4 VMaccess Node 4 SMA01
Windows Azure Pack – Tenant Facing 4 8 VMaccess Node 1 WAP-T01
Windows Azure Pack – Privileged Services 8 16 VMaccess Node 2 WAP-P01
21Cisco Solution for EMC VSPEX with Microsoft Private Cloud Fast Track 4.0 with Windows Azure Pack
Prepare Environment to Add Windows Azure Pack to Fast Track
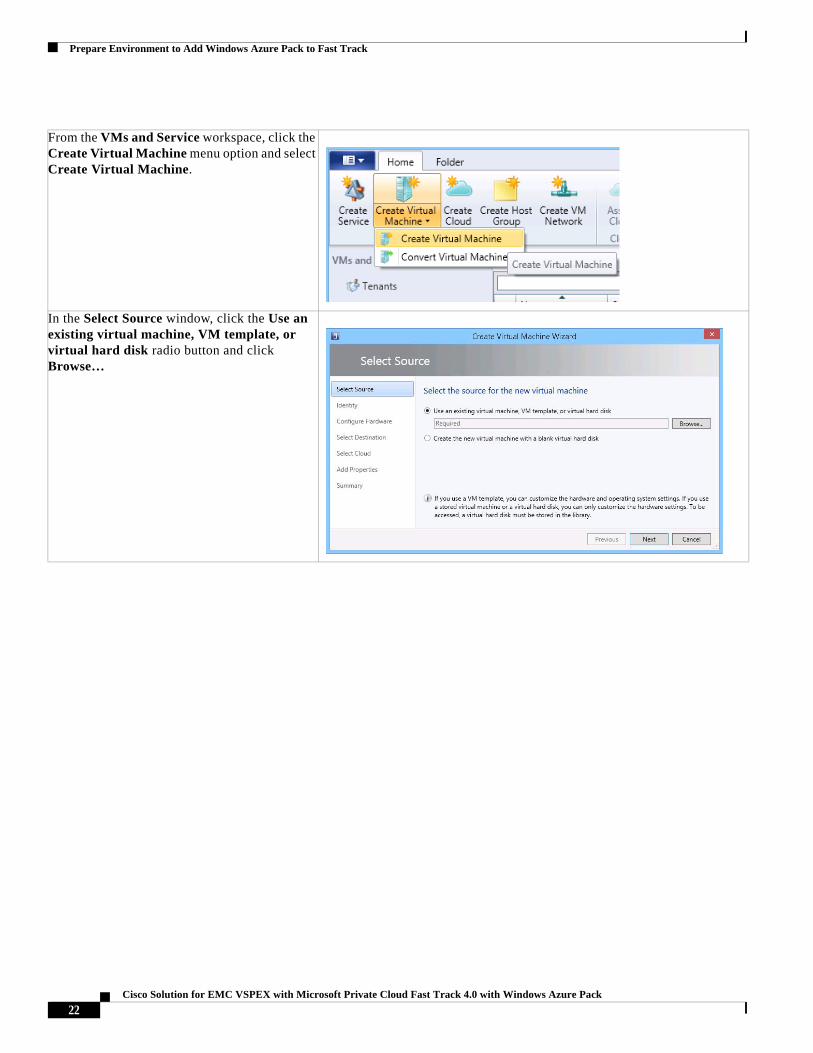
From the VMs and Service workspace, click the Create Virtual Machine menu option and select Create Virtual Machine.
In the Select Source window, click the Use an existing virtual machine, VM template, or virtual hard disk radio button and click Browse…
22Cisco Solution for EMC VSPEX with Microsoft Private Cloud Fast Track 4.0 with Windows Azure Pack
Prepare Environment to Add Windows Azure Pack to Fast Track
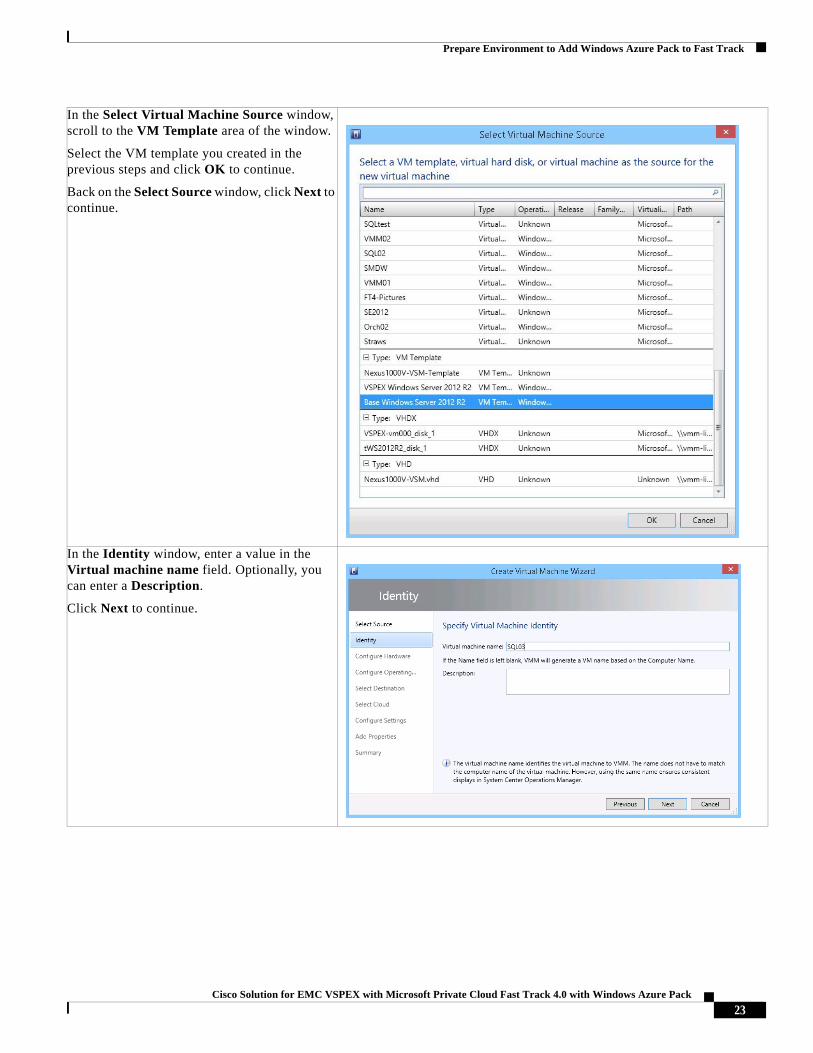
In the Select Virtual Machine Source window, scroll to the VM Template area of the window.
Select the VM template you created in the previous steps and click OK to continue.
Back on the Select Source window, click Next to continue.
In the Identity window, enter a value in the Virtual machine name field. Optionally, you can enter a Description.
Click Next to continue.
23Cisco Solution for EMC VSPEX with Microsoft Private Cloud Fast Track 4.0 with Windows Azure Pack
Prepare Environment to Add Windows Azure Pack to Fast Track
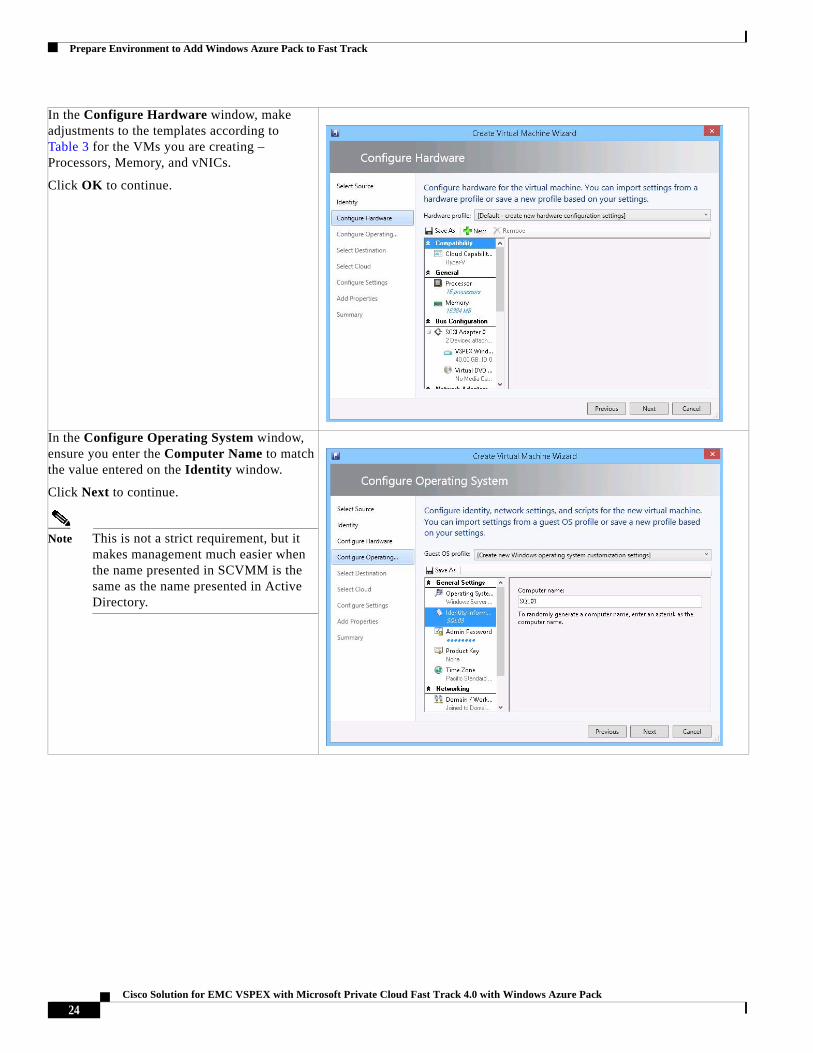
In the Configure Hardware window, make adjustments to the templates according to Table 3 for the VMs you are creating – Processors, Memory, and vNICs.
Click OK to continue.
In the Configure Operating System window, ensure you enter the Computer Name to match the value entered on the Identity window.
Click Next to continue.
Note This is not a strict requirement, but it makes management much easier when the name presented in SCVMM is the same as the name presented in Active Directory.
24Cisco Solution for EMC VSPEX with Microsoft Private Cloud Fast Track 4.0 with Windows Azure Pack
Prepare Environment to Add Windows Azure Pack to Fast Track
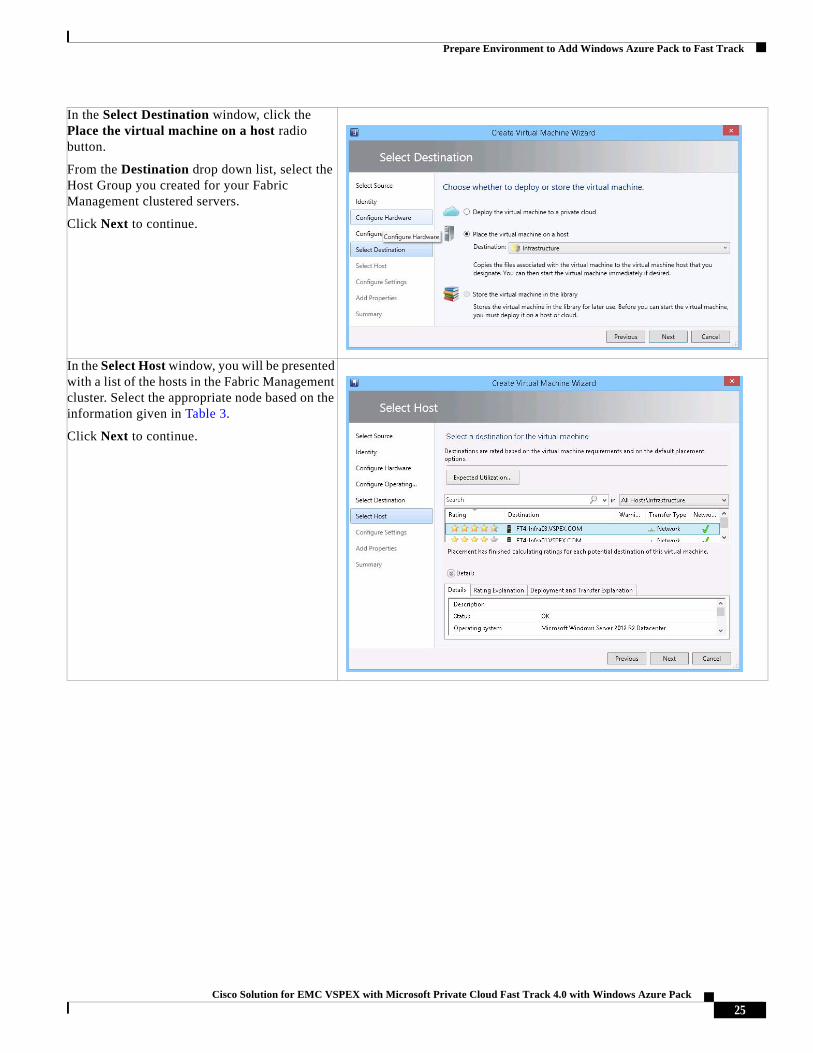
In the Select Destination window, click the Place the virtual machine on a host radio button.
From the Destination drop down list, select the Host Group you created for your Fabric Management clustered servers.
Click Next to continue.
In the Select Host window, you will be presented with a list of the hosts in the Fabric Management cluster. Select the appropriate node based on the information given in Table 3.
Click Next to continue.
25Cisco Solution for EMC VSPEX with Microsoft Private Cloud Fast Track 4.0 with Windows Azure Pack
Prepare Environment to Add Windows Azure Pack to Fast Track
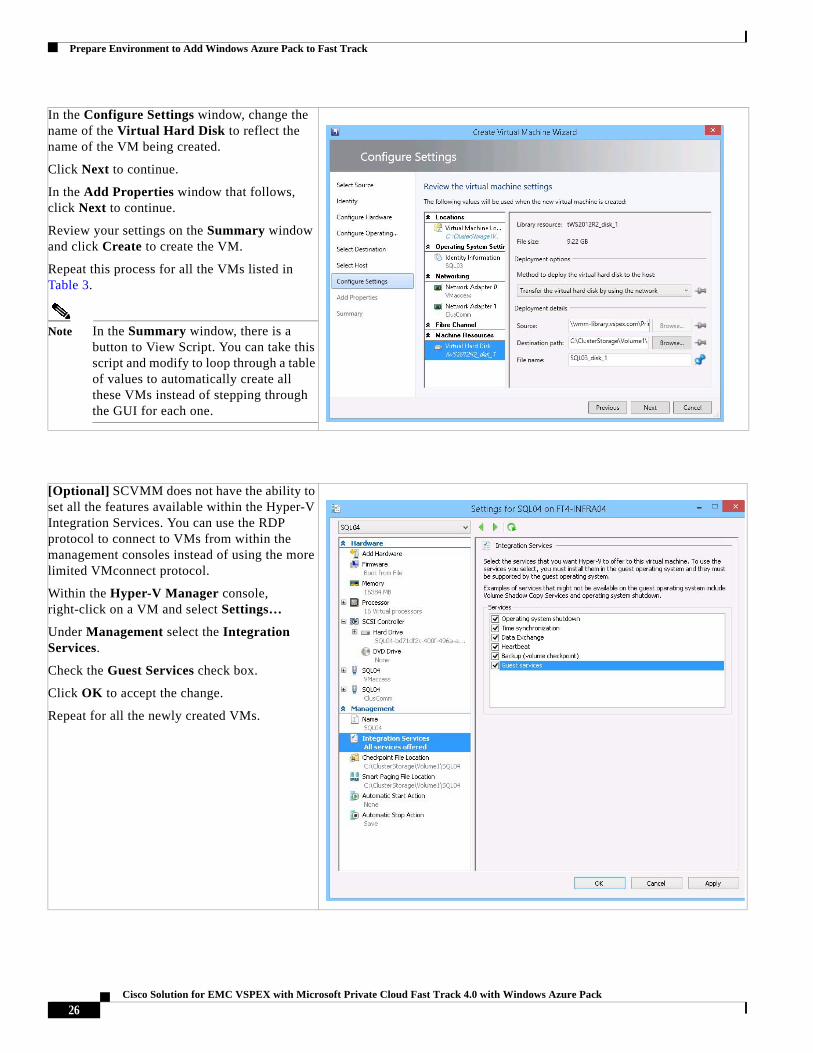
In the Configure Settings window, change the name of the Virtual Hard Disk to reflect the name of the VM being created.
Click Next to continue.
In the Add Properties window that follows, click Next to continue.
Review your settings on the Summary window and click Create to create the VM.
Repeat this process for all the VMs listed in Table 3.
Note In the Summary window, there is a button to View Script. You can take this script and modify to loop through a table of values to automatically create all these VMs instead of stepping through the GUI for each one.
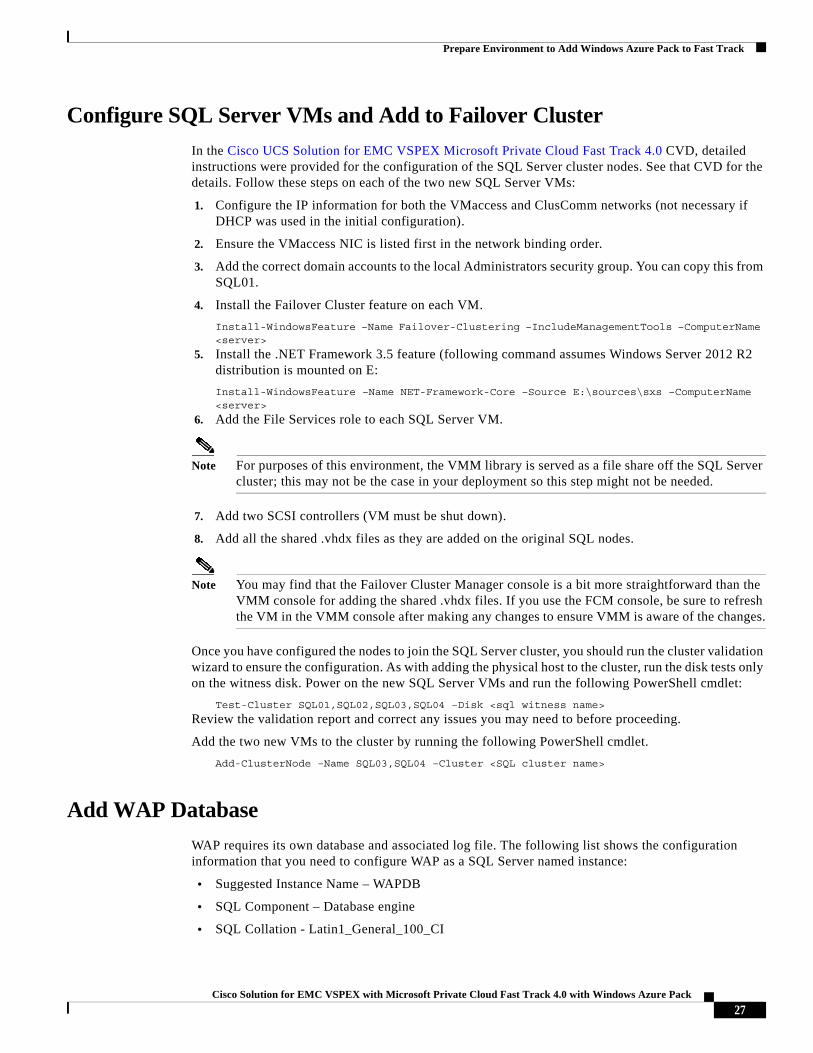
[Optional] SCVMM does not have the ability to set all the features available within the Hyper-V Integration Services. You can use the RDP protocol to connect to VMs from within the management consoles instead of using the more limited VMconnect protocol.
Within the Hyper-V Manager console, right-click on a VM and select Settings…
Under Management select the Integration Services.
Check the Guest Services check box.
Click OK to accept the change.
Repeat for all the newly created VMs.
26Cisco Solution for EMC VSPEX with Microsoft Private Cloud Fast Track 4.0 with Windows Azure Pack
Prepare Environment to Add Windows Azure Pack to Fast Track
Configure SQL Server VMs and Add to Failover Cluster
In the Cisco UCS Solution for EMC VSPEX Microsoft Private Cloud Fast Track 4.0 CVD, detailed instructions were provided for the configuration of the SQL Server cluster nodes. See that CVD for the details. Follow these steps on each of the two new SQL Server VMs:
1. Configure the IP information for both the VMaccess and ClusComm networks (not necessary if DHCP was used in the initial configuration).
2. Ensure the VMaccess NIC is listed first in the network binding order.
3. Add the correct domain accounts to the local Administrators security group. You can copy this from SQL01.
4. Install the Failover Cluster feature on each VM.
Install-WindowsFeature –Name Failover-Clustering –IncludeManagementTools –ComputerName <server>
5. Install the .NET Framework 3.5 feature (following command assumes Windows Server 2012 R2 distribution is mounted on E:
Install-WindowsFeature –Name NET-Framework-Core –Source E:\sources\sxs –ComputerName <server>
6. Add the File Services role to each SQL Server VM.
Note For purposes of this environment, the VMM library is served as a file share off the SQL Server cluster; this may not be the case in your deployment so this step might not be needed.
7. Add two SCSI controllers (VM must be shut down).
8. Add all the shared .vhdx files as they are added on the original SQL nodes.
Note You may find that the Failover Cluster Manager console is a bit more straightforward than the VMM console for adding the shared .vhdx files. If you use the FCM console, be sure to refresh the VM in the VMM console after making any changes to ensure VMM is aware of the changes.
Once you have configured the nodes to join the SQL Server cluster, you should run the cluster validation wizard to ensure the configuration. As with adding the physical host to the cluster, run the disk tests only on the witness disk. Power on the new SQL Server VMs and run the following PowerShell cmdlet:
Test-Cluster SQL01,SQL02,SQL03,SQL04 –Disk <sql witness name>
Review the validation report and correct any issues you may need to before proceeding.
Add the two new VMs to the cluster by running the following PowerShell cmdlet.
Add-ClusterNode –Name SQL03,SQL04 –Cluster <SQL cluster name>
Add WAP Database
WAP requires its own database and associated log file. The following list shows the configuration information that you need to configure WAP as a SQL Server named instance:
• Suggested Instance Name – WAPDB
• SQL Component – Database engine
• SQL Collation - Latin1_General_100_CI
27Cisco Solution for EMC VSPEX with Microsoft Private Cloud Fast Track 4.0 with Windows Azure Pack
Prepare Environment to Add Windows Azure Pack to Fast Track
• Storage Requirements – 2 shared .vhdx files
– Database 4 GB
– Log files 2 GB
• SQL Server Instance Drive Letters
– Install Drive – S:
– Data Drive – S:
– Log Drive – T:
– TempDB Drive – T:
• Cluster Service Name – (SQL Server) WAPDB
• Clustered IP Address – 192.168.10.87/24
• Listening TCP/IP Port – 10487
• Preferred Owners – Node3,Node4
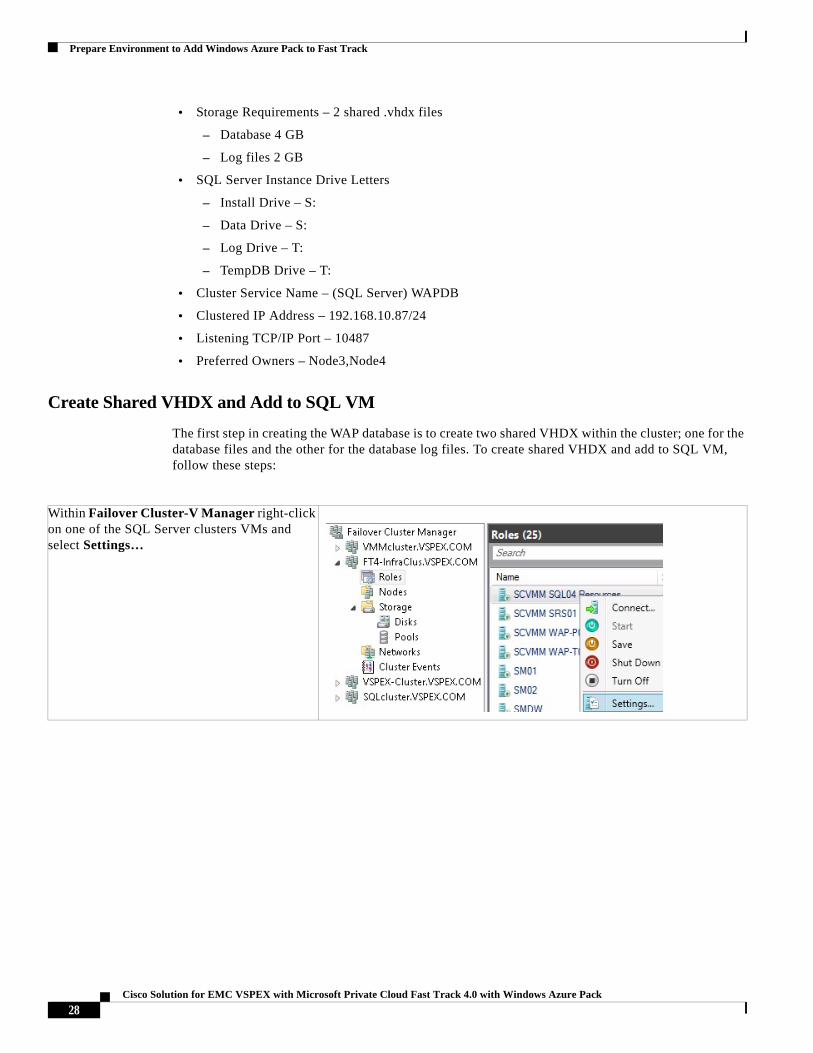
Create Shared VHDX and Add to SQL VM
The first step in creating the WAP database is to create two shared VHDX within the cluster; one for the database files and the other for the database log files. To create shared VHDX and add to SQL VM, follow these steps:
Within Failover Cluster-V Manager right-click on one of the SQL Server clusters VMs and select Settings…
28Cisco Solution for EMC VSPEX with Microsoft Private Cloud Fast Track 4.0 with Windows Azure Pack
Prepare Environment to Add Windows Azure Pack to Fast Track
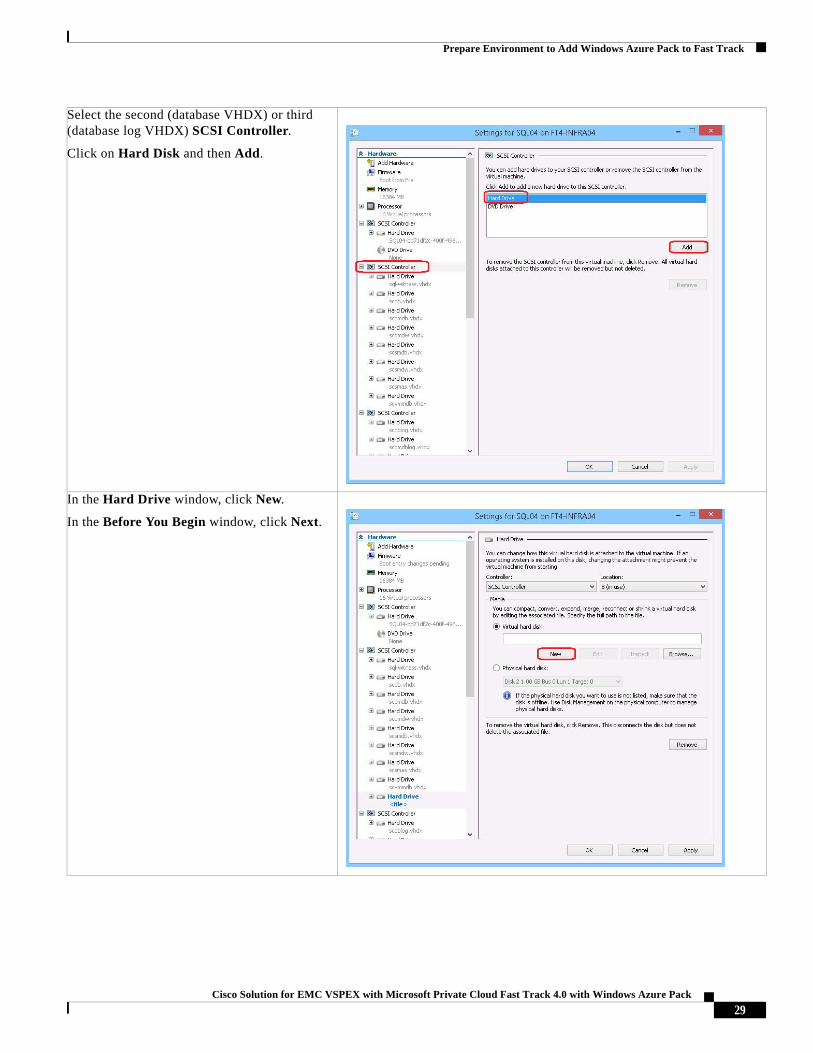
Select the second (database VHDX) or third (database log VHDX) SCSI Controller.
Click on Hard Disk and then Add.
In the Hard Drive window, click New.
In the Before You Begin window, click Next.
29Cisco Solution for EMC VSPEX with Microsoft Private Cloud Fast Track 4.0 with Windows Azure Pack
Prepare Environment to Add Windows Azure Pack to Fast Track
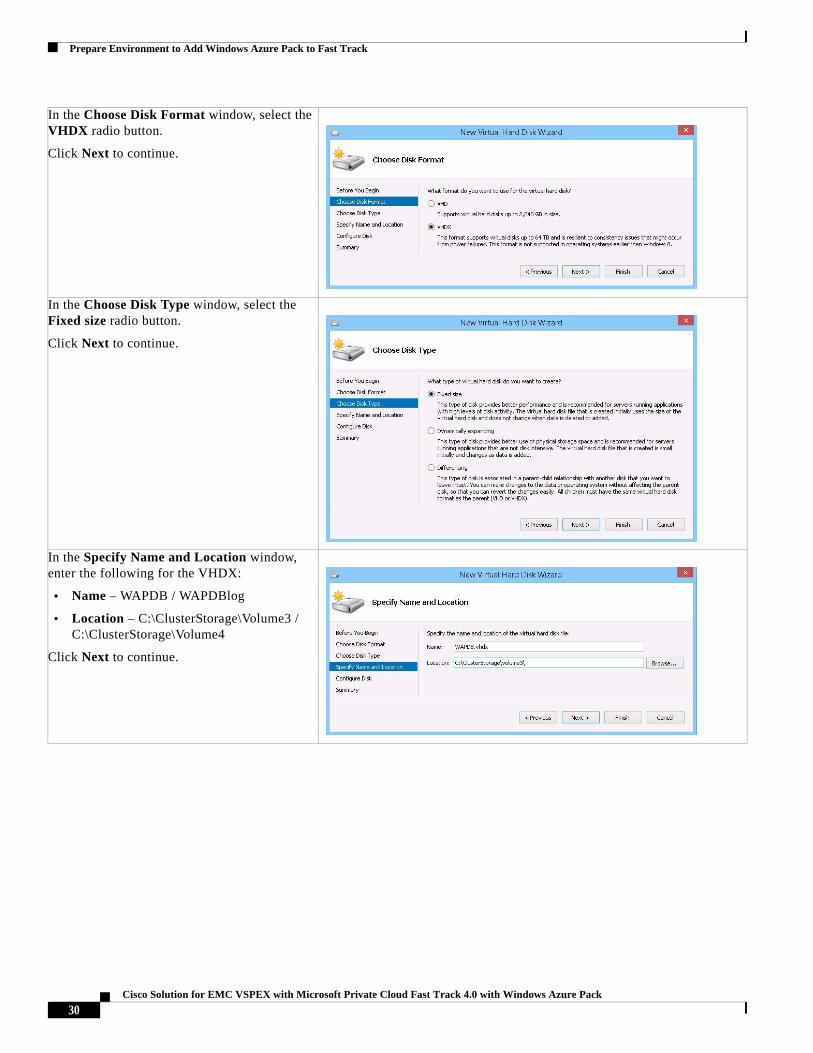
In the Choose Disk Format window, select the VHDX radio button.
Click Next to continue.
In the Choose Disk Type window, select the Fixed size radio button.
Click Next to continue.
In the Specify Name and Location window, enter the following for the VHDX:
• Name – WAPDB / WAPDBlog
• Location – C:\ClusterStorage\Volume3 / C:\ClusterStorage\Volume4
Click Next to continue.
30Cisco Solution for EMC VSPEX with Microsoft Private Cloud Fast Track 4.0 with Windows Azure Pack
Prepare Environment to Add Windows Azure Pack to Fast Track
Initialize and Format VHDX
The newly created VHDX need to be initialized and formatted. This can be done remotely from Server Manager on your management workstation. To initialize and format VHDX, follow these steps:
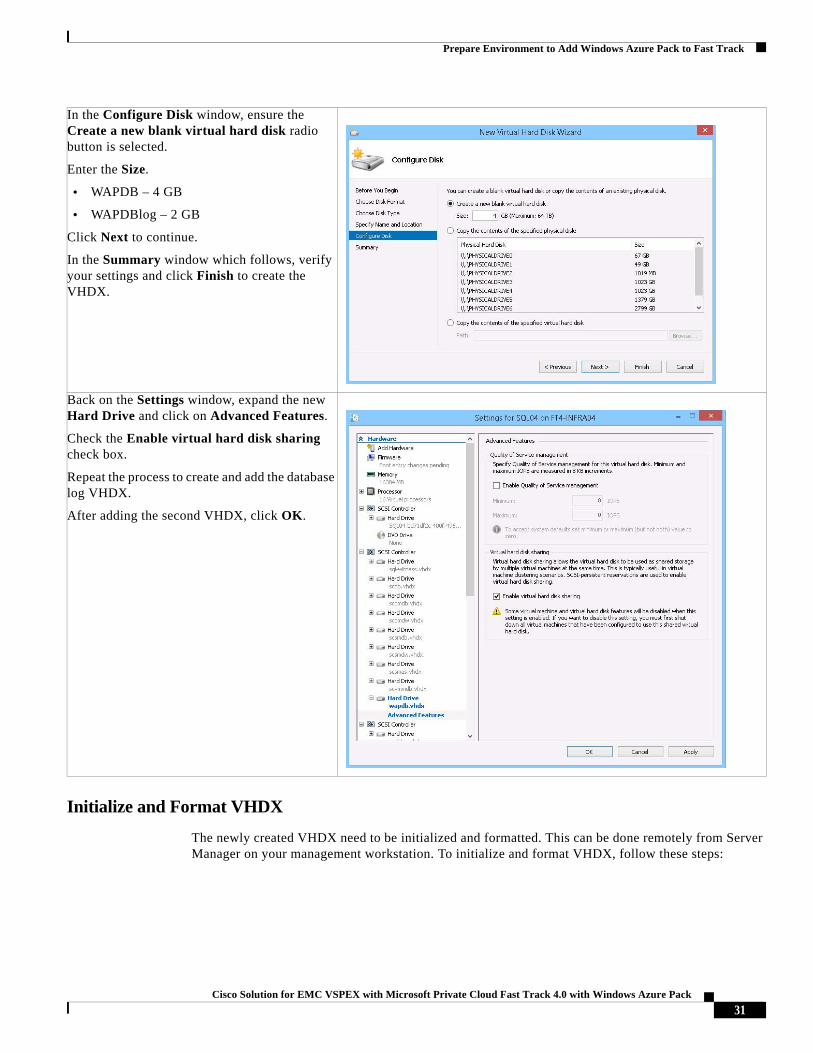
In the Configure Disk window, ensure the Create a new blank virtual hard disk radio button is selected.
Enter the Size.
• WAPDB – 4 GB
• WAPDBlog – 2 GB
Click Next to continue.
In the Summary window which follows, verify your settings and click Finish to create the VHDX.
Back on the Settings window, expand the new Hard Drive and click on Advanced Features.
Check the Enable virtual hard disk sharing check box.
Repeat the process to create and add the database log VHDX.
After adding the second VHDX, click OK.
31Cisco Solution for EMC VSPEX with Microsoft Private Cloud Fast Track 4.0 with Windows Azure Pack
Prepare Environment to Add Windows Azure Pack to Fast Track
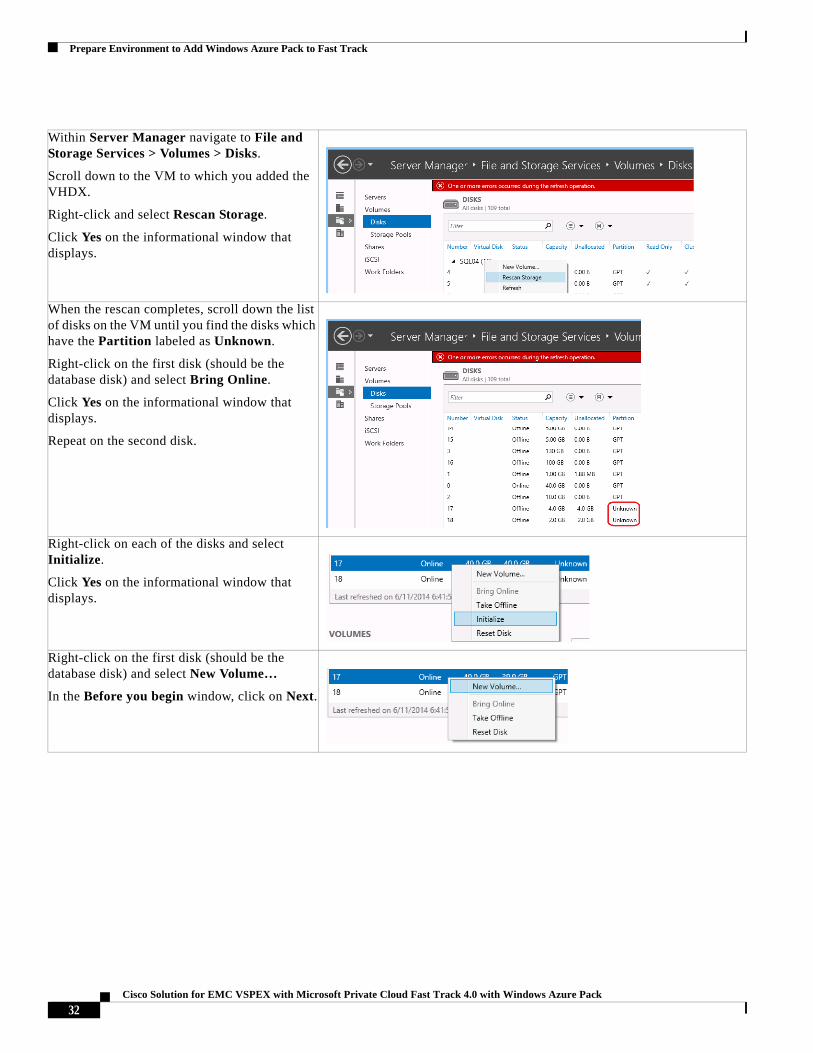
Within Server Manager navigate to File and Storage Services > Volumes > Disks.
Scroll down to the VM to which you added the VHDX.
Right-click and select Rescan Storage.
Click Yes on the informational window that displays.
When the rescan completes, scroll down the list of disks on the VM until you find the disks which have the Partition labeled as Unknown.
Right-click on the first disk (should be the database disk) and select Bring Online.
Click Yes on the informational window that displays.
Repeat on the second disk.
Right-click on each of the disks and select Initialize.
Click Yes on the informational window that displays.
Right-click on the first disk (should be the database disk) and select New Volume…
In the Before you begin window, click on Next.
32Cisco Solution for EMC VSPEX with Microsoft Private Cloud Fast Track 4.0 with Windows Azure Pack
Prepare Environment to Add Windows Azure Pack to Fast Track
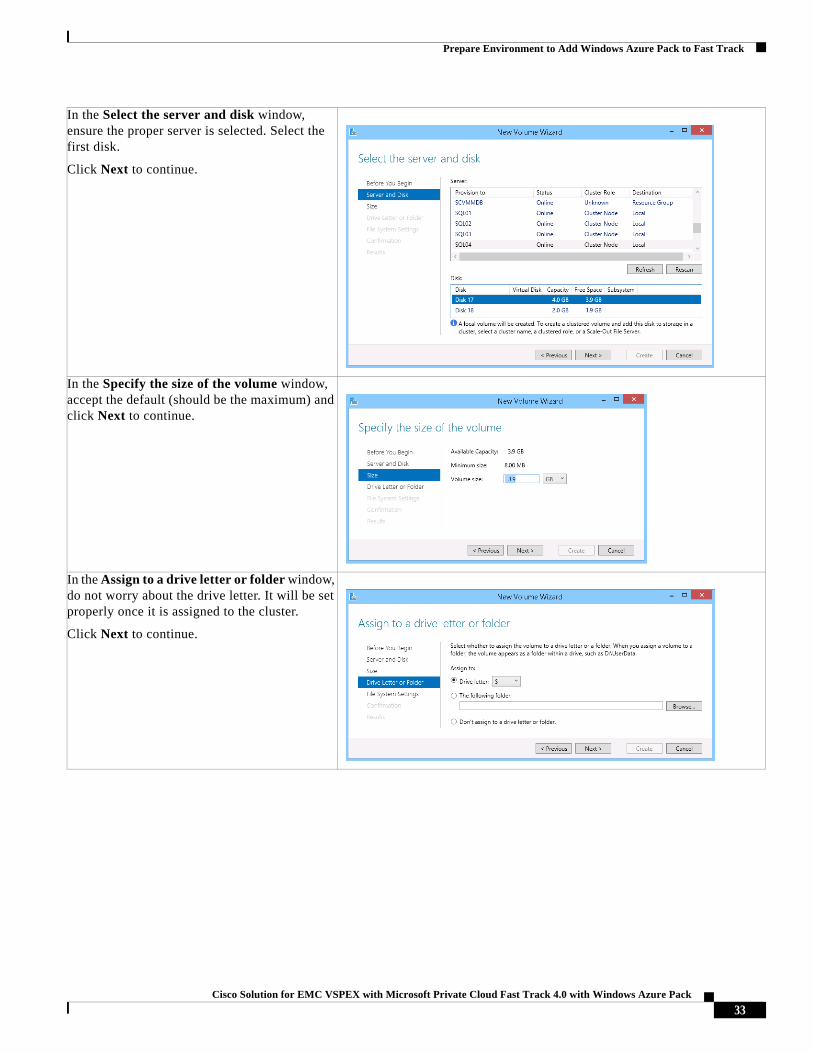
In the Select the server and disk window, ensure the proper server is selected. Select the first disk.
Click Next to continue.
In the Specify the size of the volume window, accept the default (should be the maximum) and click Next to continue.
In the Assign to a drive letter or folder window, do not worry about the drive letter. It will be set properly once it is assigned to the cluster.
Click Next to continue.
33Cisco Solution for EMC VSPEX with Microsoft Private Cloud Fast Track 4.0 with Windows Azure Pack
Prepare Environment to Add Windows Azure Pack to Fast Track
Configure Shared VHDX to SQL Server Cluster
It is now necessary to add these two VHDX to each of the other nodes of the SQL Server cluster as shared VHDX. Once added, the storage can be presented to the cluster itself. To configure shared VHDX to SQL Server Cluster, follow these steps:
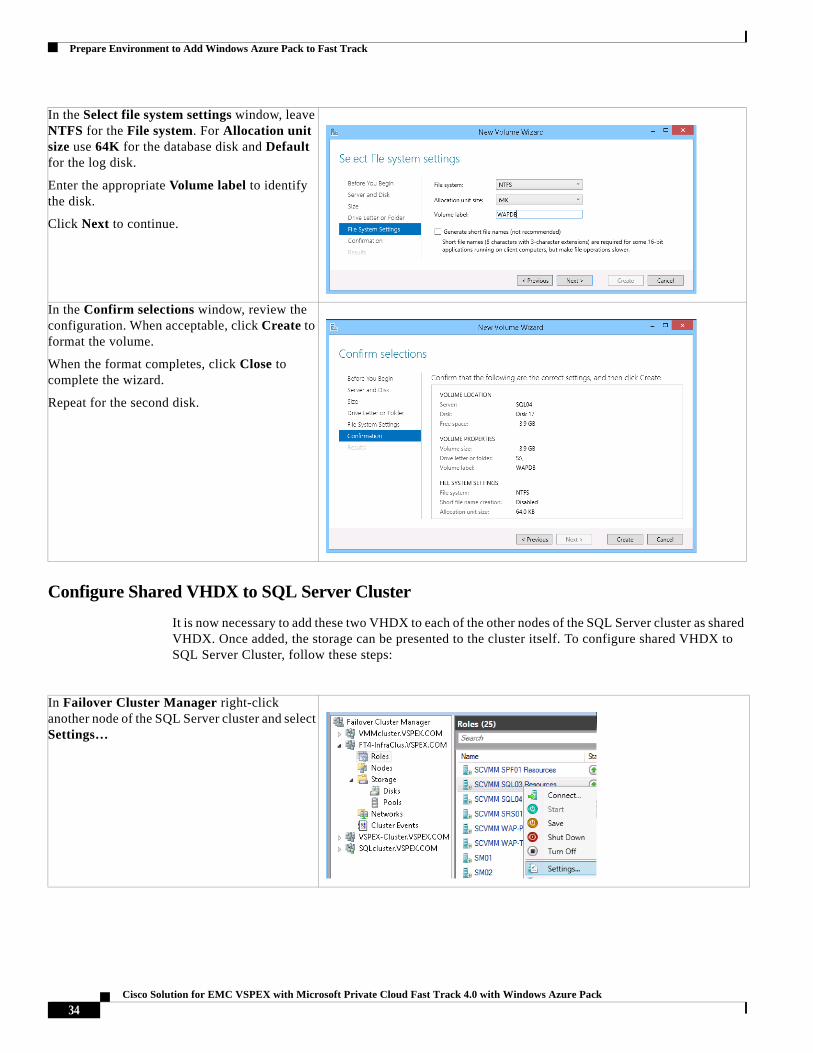
In the Select file system settings window, leave NTFS for the File system. For Allocation unit size use 64K for the database disk and Default for the log disk.
Enter the appropriate Volume label to identify the disk.
Click Next to continue.
In the Confirm selections window, review the configuration. When acceptable, click Create to format the volume.
When the format completes, click Close to complete the wizard.
Repeat for the second disk.
In Failover Cluster Manager right-click another node of the SQL Server cluster and select Settings…
34Cisco Solution for EMC VSPEX with Microsoft Private Cloud Fast Track 4.0 with Windows Azure Pack
Prepare Environment to Add Windows Azure Pack to Fast Track
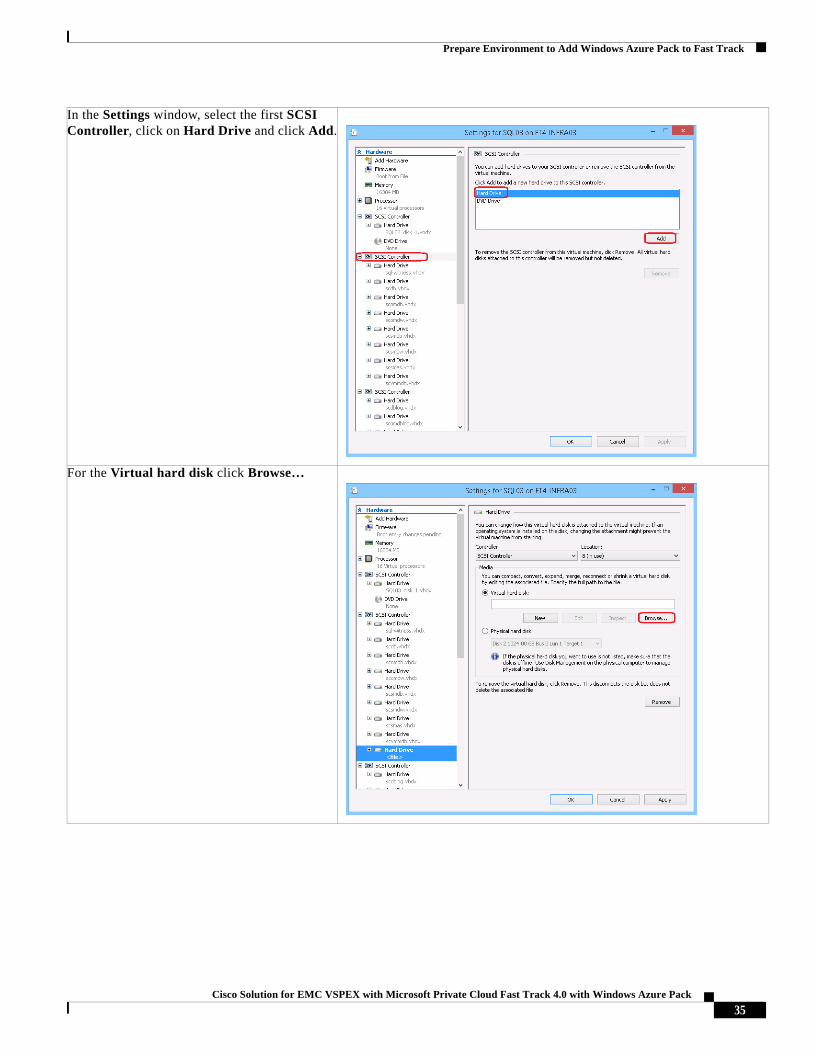
In the Settings window, select the first SCSI Controller, click on Hard Drive and click Add.
For the Virtual hard disk click Browse…
35Cisco Solution for EMC VSPEX with Microsoft Private Cloud Fast Track 4.0 with Windows Azure Pack
Prepare Environment to Add Windows Azure Pack to Fast Track
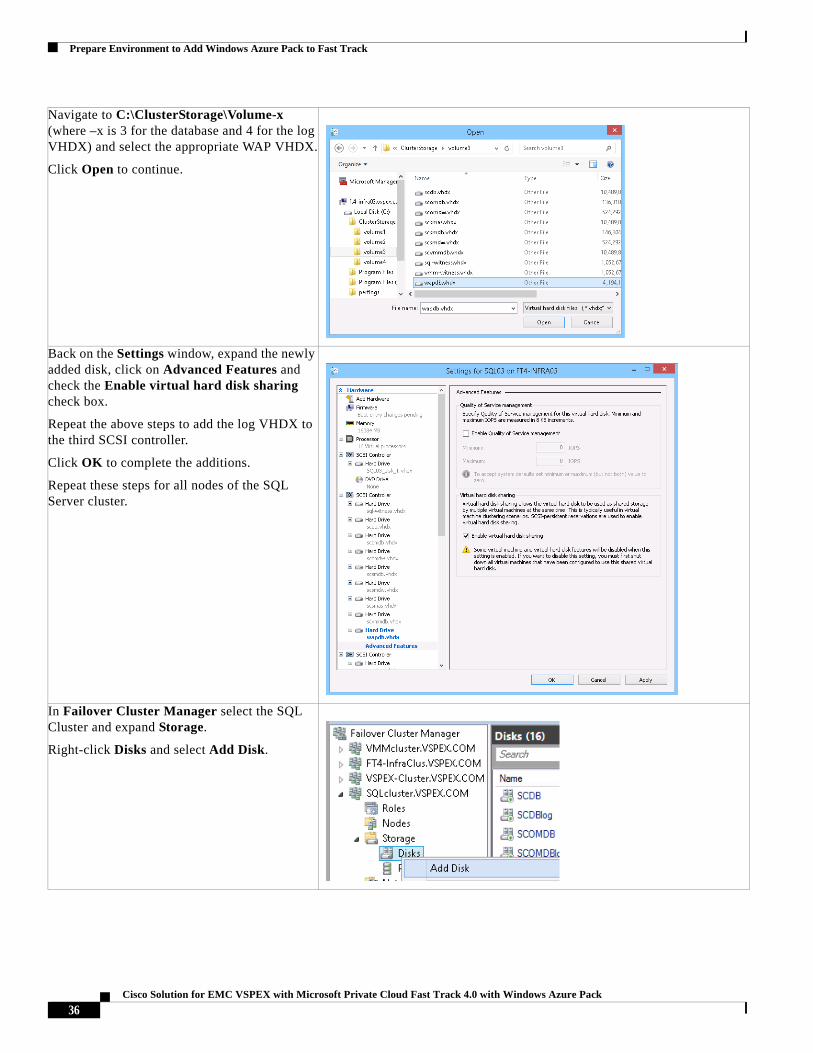
Navigate to C:\ClusterStorage\Volume-x (where –x is 3 for the database and 4 for the log VHDX) and select the appropriate WAP VHDX.
Click Open to continue.
Back on the Settings window, expand the newly added disk, click on Advanced Features and check the Enable virtual hard disk sharing check box.
Repeat the above steps to add the log VHDX to the third SCSI controller.
Click OK to complete the additions.
Repeat these steps for all nodes of the SQL Server cluster.
In Failover Cluster Manager select the SQL Cluster and expand Storage.
Right-click Disks and select Add Disk.
36Cisco Solution for EMC VSPEX with Microsoft Private Cloud Fast Track 4.0 with Windows Azure Pack
Prepare Environment to Add Windows Azure Pack to Fast Track
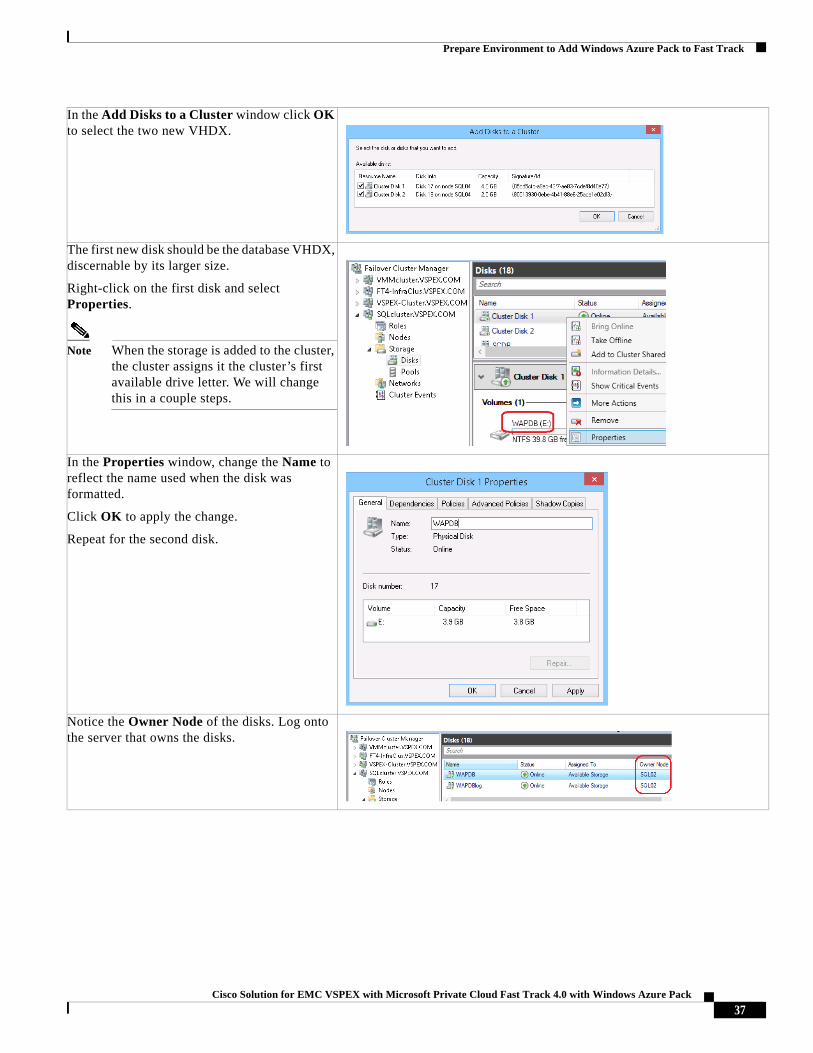
In the Add Disks to a Cluster window click OK to select the two new VHDX.
The first new disk should be the database VHDX, discernable by its larger size.
Right-click on the first disk and select Properties.
Note When the storage is added to the cluster, the cluster assigns it the cluster’s first available drive letter. We will change this in a couple steps.
In the Properties window, change the Name to reflect the name used when the disk was formatted.
Click OK to apply the change.
Repeat for the second disk.
Notice the Owner Node of the disks. Log onto the server that owns the disks.
37Cisco Solution for EMC VSPEX with Microsoft Private Cloud Fast Track 4.0 with Windows Azure Pack
Prepare Environment to Add Windows Azure Pack to Fast Track
Configure SQL Server Named Instances
On the first node of the SQL Server cluster, follow the instructions given in the “Install First Instance in Cluster” section of the Cisco UCS Solution for EMC VSPEX Microsoft Private Cloud Fast Track 4.0 CVD for installing a database instance to an existing SQL Server cluster to add the WAP database. Use the list at the beginning of this section for the values required for the installation.
Now that the nodes are part of the cluster and the WAP database instance is installed on the first node, follow the instructions given “Install the SQL Server Named Instance on the Guest Cluster (Additional Nodes)” section of the Cisco UCS Solution for EMC VSPEX Microsoft Private Cloud Fast Track 4.0 CVD to install SQL Server and configure the database instances on the two additional nodes.
Tip Remember to go through the steps to change the listening port for the WAPDB instance.
Note When you install the SQL Server named instances on the new nodes, you will receive a warning message about the version of SQL Server on the original nodes is later than the version on the new nodes. This is because the original nodes had a hotfix applied. Hotfixes are not distributed through Windows Update, so you need to download the cumulative update and apply it to each new node after you complete the SQL Server installation. The hotfix can be requested from http://support.microsoft.com/kb/2917531/en-us. Apply the hotfix after all SQL Server named instances are installed.
Post Installation Tasks
Configure Firewall Rules
Follow the instructions given in the “Configure Windows Firewall Settings for SQL Server Named Instances” section of the Cisco UCS Solution for EMC VSPEX Microsoft Private Cloud Fast Track 4.0 CVD to configure a specific IP port for the WAPDB instance.
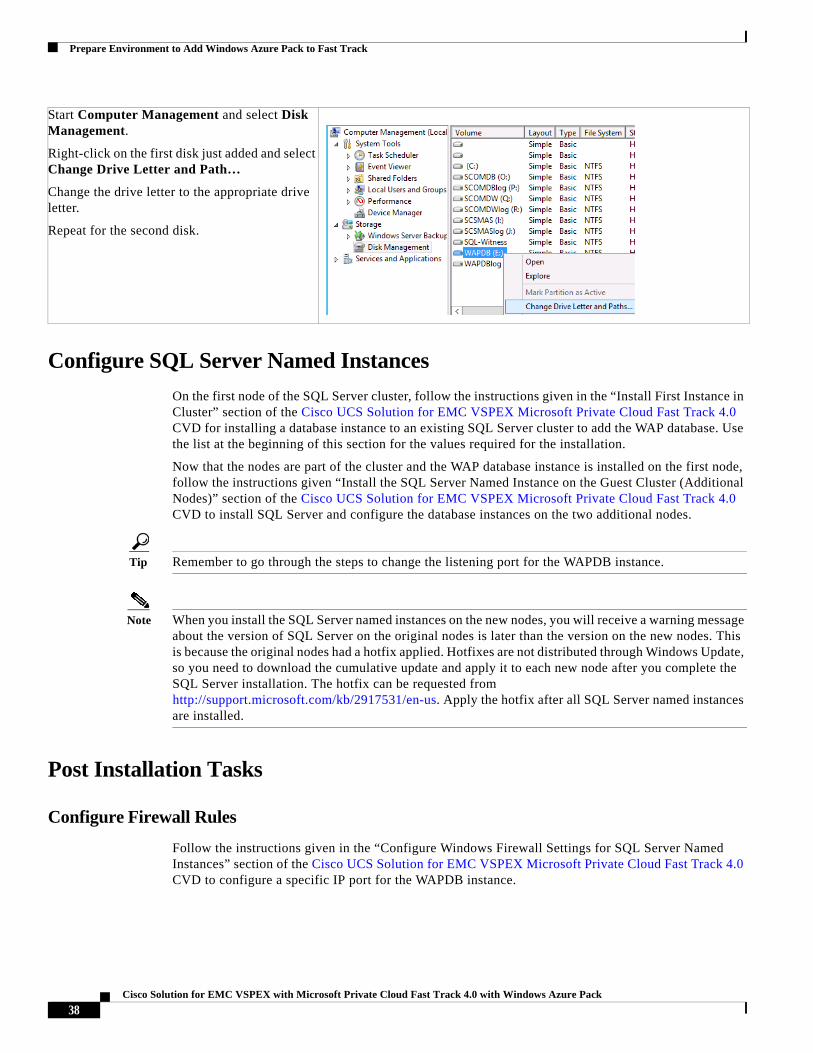
Start Computer Management and select Disk Management.
Right-click on the first disk just added and select Change Drive Letter and Path…
Change the drive letter to the appropriate drive letter.
Repeat for the second disk.
38Cisco Solution for EMC VSPEX with Microsoft Private Cloud Fast Track 4.0 with Windows Azure Pack

Prepare Environment to Add Windows Azure Pack to Fast Track
After following the instructions for configuring the IP port for the WAPDB named instance, configure the firewall rules for the SQL Server named instances on each new SQL Server VM. Below is a PowerShell script that can be executed remotely to configure these new rules. The original nodes do not have the firewall rule for the WAPDB instance. You will need to create it on those nodes. You can run the following PowerShell script against the existing nodes, also.
$RemoteSession = New-CimSession –ComputerName <server>New-NetFirewallRule -DisplayName "SQL Server Browser Service for Database Engine" -LocalPort 1434 -Protocol UDP -Action Allow –CimSession $RemoteSessionNew-NetFirewallRule -DisplayName "SQL Server Browser Service for Analysis Server" -LocalPort 2382 -Protocol TCP -Action Allow –CimSession $RemoteSessionNew-NetFirewallRule -DisplayName "SQL Server Named Instance SCDB" -LocalPort 10483 -Protocol TCP -Action Allow –CimSession $RemoteSessionNew-NetFirewallRule -DisplayName "SQL Server Named Instance SCVMMDB" -LocalPort 10484 -Protocol TCP -Action Allow –CimSession $RemoteSessionNew-NetFirewallRule -DisplayName "SQL Server Named Instance SCOMDB" -LocalPort 10485 -Protocol TCP -Action Allow –CimSession $RemoteSessionNew-NetFirewallRule -DisplayName "SQL Server Named Instance SCOMDW" -LocalPort 10486 -Protocol TCP -Action Allow –CimSession $RemoteSessionNew-NetFirewallRule -DisplayName "SQL Server Named Instance SCSMDB" -LocalPort 10480 -Protocol TCP -Action Allow –CimSession $RemoteSessionNew-NetFirewallRule -DisplayName "SQL Server Named Instance SCSMDW" -LocalPort 10481 -Protocol TCP -Action Allow –CimSession $RemoteSessionNew-NetFirewallRule -DisplayName "SQL Server Named Instance SCSMAS" -LocalPort 10482 -Protocol TCP -Action Allow –CimSession $RemoteSessionNew-NetFirewallRule -DisplayName "SQL Server Named Instance WAPDB" -LocalPort 10487 -Protocol TCP -Action Allow –CimSession $RemoteSession
Assign Preferred Owners for SQL Server Instances in Failover Cluster ManagerIn the Cisco UCS Solution for EMC VSPEX Microsoft Private Cloud Fast Track 4.0 CVD preferred owners were assigned to the two SQL Server nodes. With the addition of two new nodes, the preferred owners should be reassigned to recognize the additional nodes available. Follow the instructions given in “Assign Preferred Owners for SQL Server Instances in Failover Cluster Manager” section using the assignments in Table 4.
Table 4 Named Instance Preferred Owners
SQL Instance Preferred Owners
SCDB Node1, Node4
SCVMMDB Node1, Node4
WAPDB Node1, Node4
SCOMDB Node2, Node4
SCOMDW Node2, Node4
SCSMAS Node2, Node4
SCSMDB Node3, Node4
SCSMDW Node3, Node4
VMM-Library Node3, Node4
39Cisco Solution for EMC VSPEX with Microsoft Private Cloud Fast Track 4.0 with Windows Azure Pack
Service Management Automation (SMA)
Service Management Automation (SMA)Service Management Automation is included in the System Center 2012 R2 release as an add-on component of Windows Azure Pack allowing for the automation of various tasks, similar to those performed using Orchestrator runbooks.
Service Management Automation also incorporates the concept of a runbook for developing automated management sequences, but rather than use activities to piece together the tasks, Service Management Automation relies on PowerShell workflows. PowerShell workflows are based on Windows Workflow Foundation and allow for asynchronous task management of multiple devices in IT environments.
Service Management Automation is consists of three roles: the runbook worker(s), web service(s), and the Service Management Automation PowerShell module. The Web Service provides an endpoint to which Windows Azure Pack connects. It is also responsible for assigning runbook jobs to runbook workers and delegating access user rights to Service Management Automation. Runbook workers actually initiate runbook jobs and can be deployed in a distributed fashion for redundancy purposes. A Service Management Automation PowerShell module is also included which provides a set of additional cmdlets.
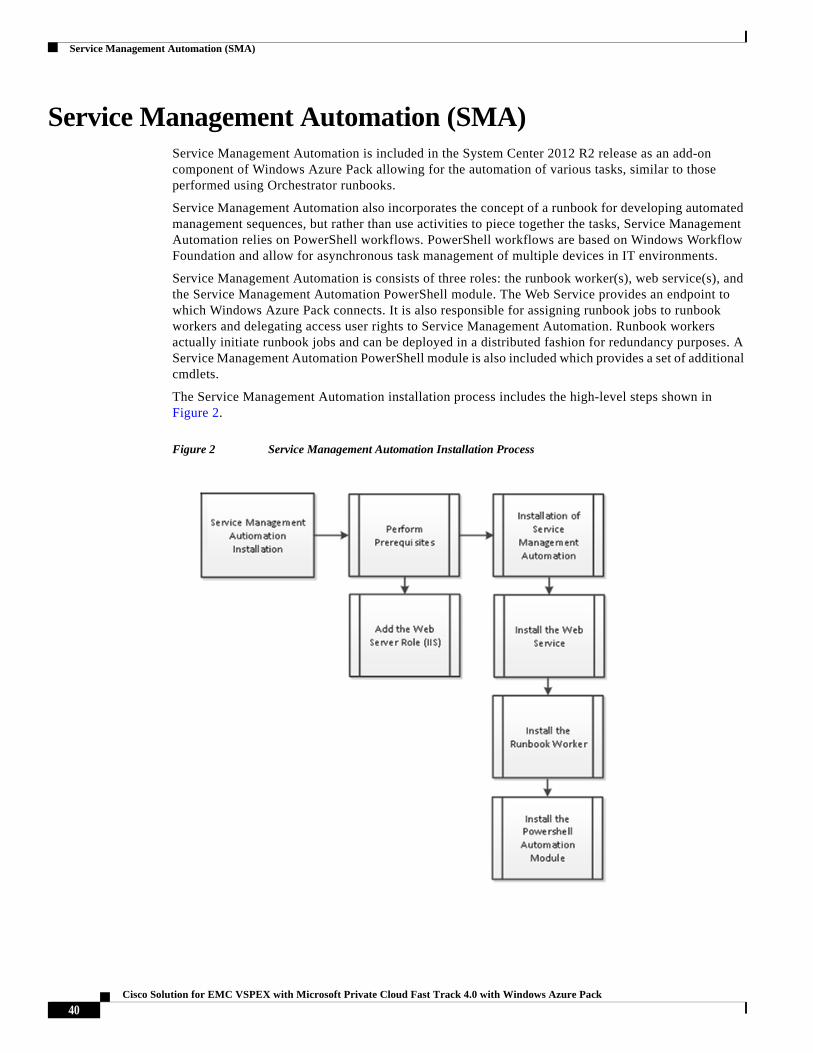
The Service Management Automation installation process includes the high-level steps shown in Figure 2.
Figure 2 Service Management Automation Installation Process
40Cisco Solution for EMC VSPEX with Microsoft Private Cloud Fast Track 4.0 with Windows Azure Pack
Service Management Automation (SMA)
Overview
Service Management Automation is a set of tools that is integrated as the Automation extension in Windows Azure Pack for Windows Server. IT professionals and IT developers can use automation to construct, run, and manage runbooks to integrate, orchestrate, and automate IT business processes. Automation runbooks run on the Windows PowerShell workflow engine.
Prerequisites
The following environment prerequisites must be met before proceeding.
Accounts
Verify that the following service accounts as shown Table 5 in have been created:
Groups
Verify that the following security groups as shown Table 6 have been created:
Add Web Server Role (IIS)
The Service Management Automation installation requires the Web Server Role and several additional role features. To add this role and features to the server, follow these steps:
Table 5 Service Manager Automation Accounts
User name Purpose Permissions
<DOMAIN>\ FT-SMA-SVC Service Manager Automation service account
Table 6 Service Manager Automation Security Groups
Group name Purpose Members
<DOMAIN>\ FT-SMA-Admins Service Manager Automation Admin group
41Cisco Solution for EMC VSPEX with Microsoft Private Cloud Fast Track 4.0 with Windows Azure Pack
Service Management Automation (SMA)
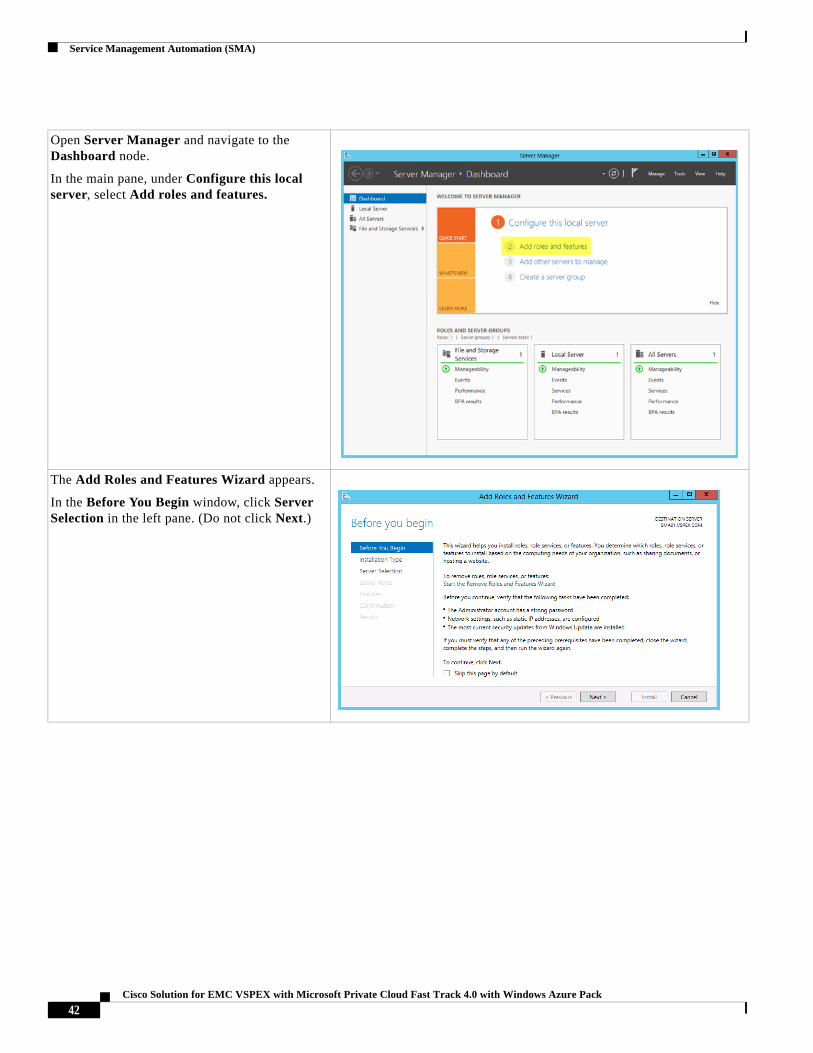
Open Server Manager and navigate to the Dashboard node.
In the main pane, under Configure this local server, select Add roles and features.
The Add Roles and Features Wizard appears.
In the Before You Begin window, click Server Selection in the left pane. (Do not click Next.)
42Cisco Solution for EMC VSPEX with Microsoft Private Cloud Fast Track 4.0 with Windows Azure Pack
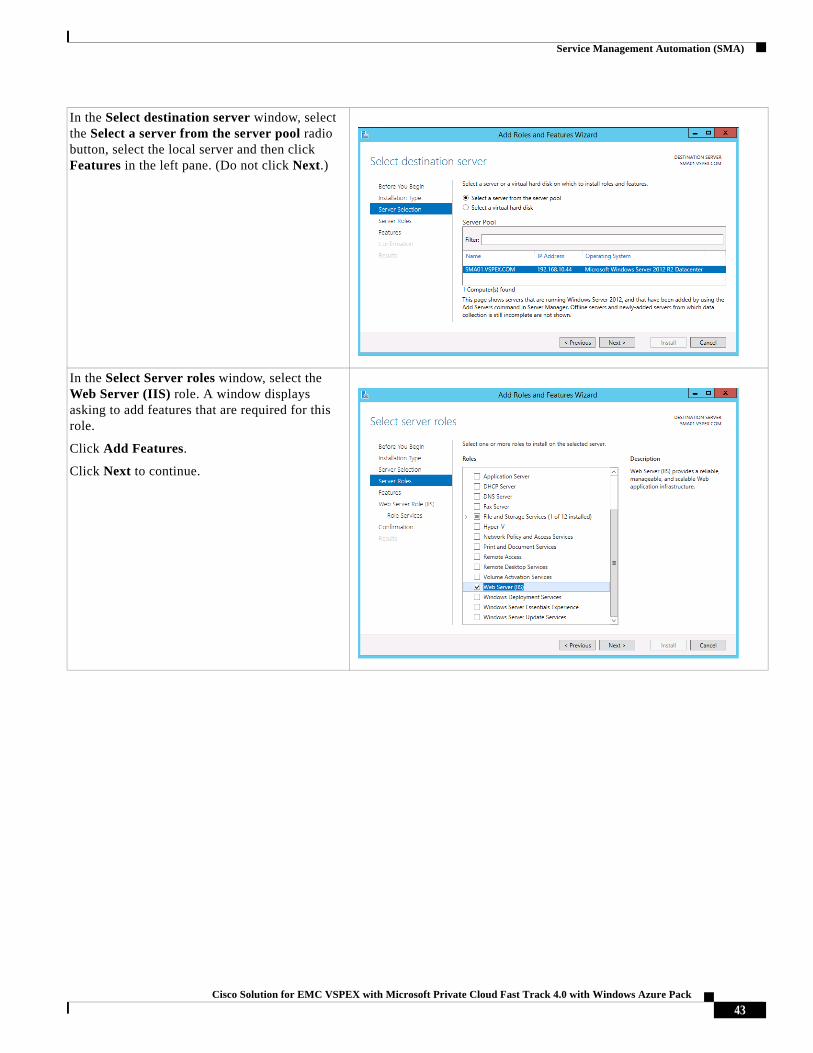
Service Management Automation (SMA)
In the Select destination server window, select the Select a server from the server pool radio button, select the local server and then click Features in the left pane. (Do not click Next.)
In the Select Server roles window, select the Web Server (IIS) role. A window displays asking to add features that are required for this role.
Click Add Features.
Click Next to continue.
43Cisco Solution for EMC VSPEX with Microsoft Private Cloud Fast Track 4.0 with Windows Azure Pack
Service Management Automation (SMA)
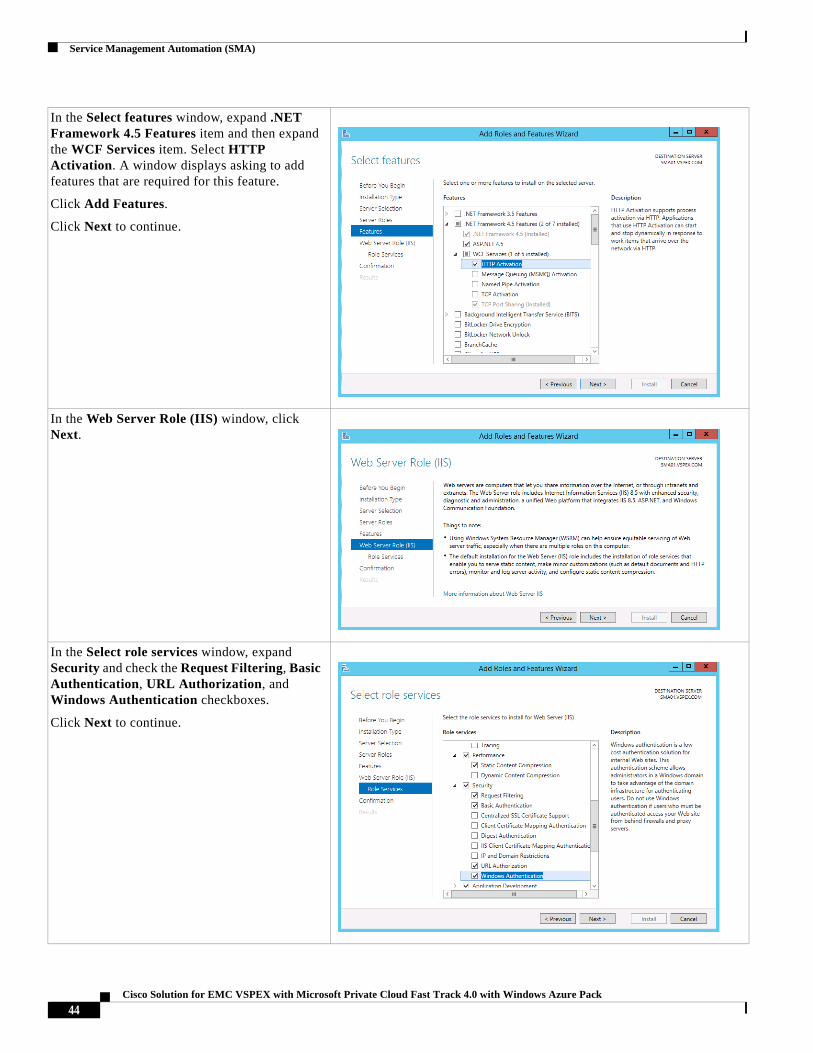
In the Select features window, expand .NET Framework 4.5 Features item and then expand the WCF Services item. Select HTTP Activation. A window displays asking to add features that are required for this feature.
Click Add Features.
Click Next to continue.
In the Web Server Role (IIS) window, click Next.
In the Select role services window, expand Security and check the Request Filtering, Basic Authentication, URL Authorization, and Windows Authentication checkboxes.
Click Next to continue.
44Cisco Solution for EMC VSPEX with Microsoft Private Cloud Fast Track 4.0 with Windows Azure Pack
Service Management Automation (SMA)
Request and Install an SSL Certificate
There are several ways to request an SSL certificate. The following procedure describes how to request the certificate through the IIS Manager console. This procedure assumes that you are running a Certificate Authority within your environment. If you are using externally requested certificates, your procedure will be different. To request the certificate through the IIS Manager console, follow these steps:
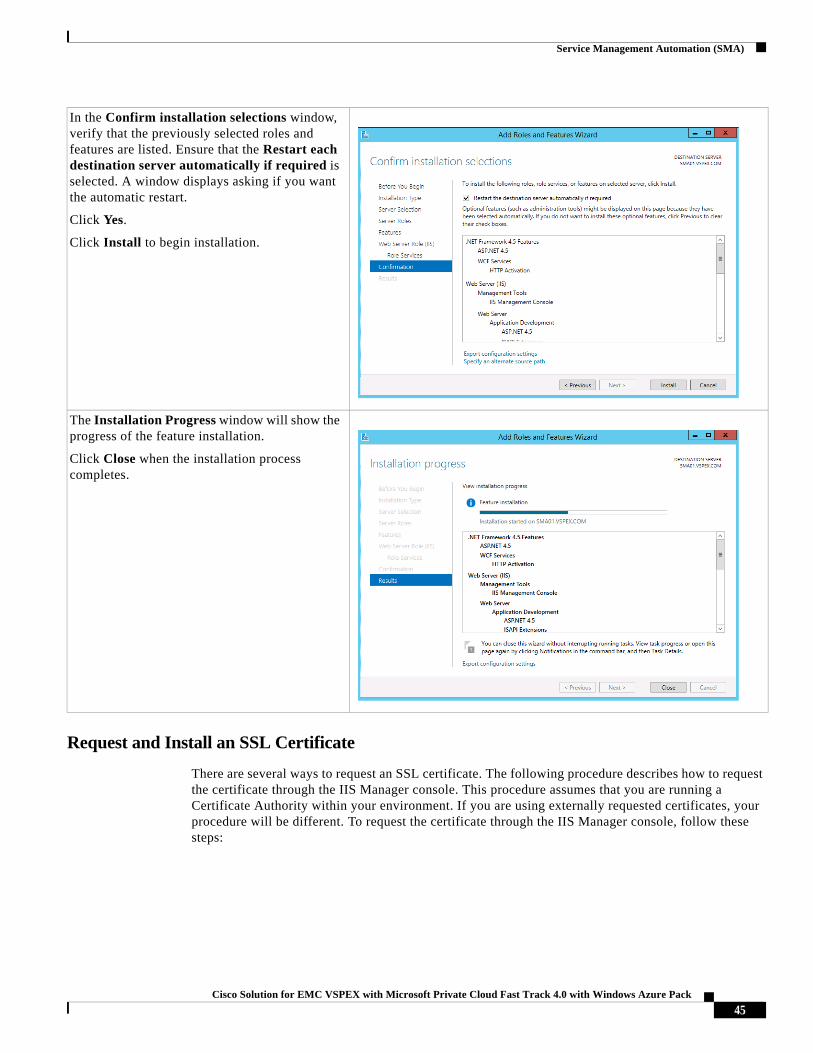
In the Confirm installation selections window, verify that the previously selected roles and features are listed. Ensure that the Restart each destination server automatically if required is selected. A window displays asking if you want the automatic restart.
Click Yes.
Click Install to begin installation.
The Installation Progress window will show the progress of the feature installation.
Click Close when the installation process completes.
45Cisco Solution for EMC VSPEX with Microsoft Private Cloud Fast Track 4.0 with Windows Azure Pack
Service Management Automation (SMA)
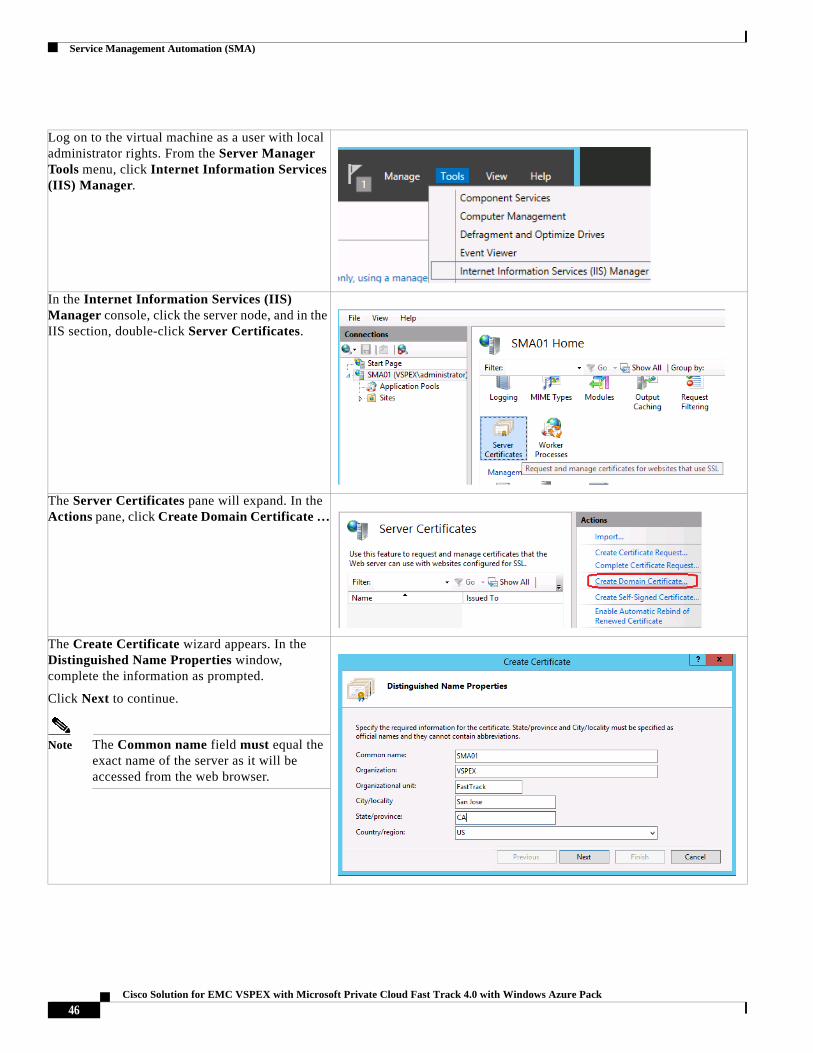
Log on to the virtual machine as a user with local administrator rights. From the Server Manager Tools menu, click Internet Information Services (IIS) Manager.
In the Internet Information Services (IIS) Manager console, click the server node, and in the IIS section, double-click Server Certificates.
The Server Certificates pane will expand. In the Actions pane, click Create Domain Certificate …
The Create Certificate wizard appears. In the Distinguished Name Properties window, complete the information as prompted.
Click Next to continue.
Note The Common name field must equal the exact name of the server as it will be accessed from the web browser.
46Cisco Solution for EMC VSPEX with Microsoft Private Cloud Fast Track 4.0 with Windows Azure Pack
Service Management Automation (SMA)
Installation
Install the Web Service
To install the Web Service, follow these steps:
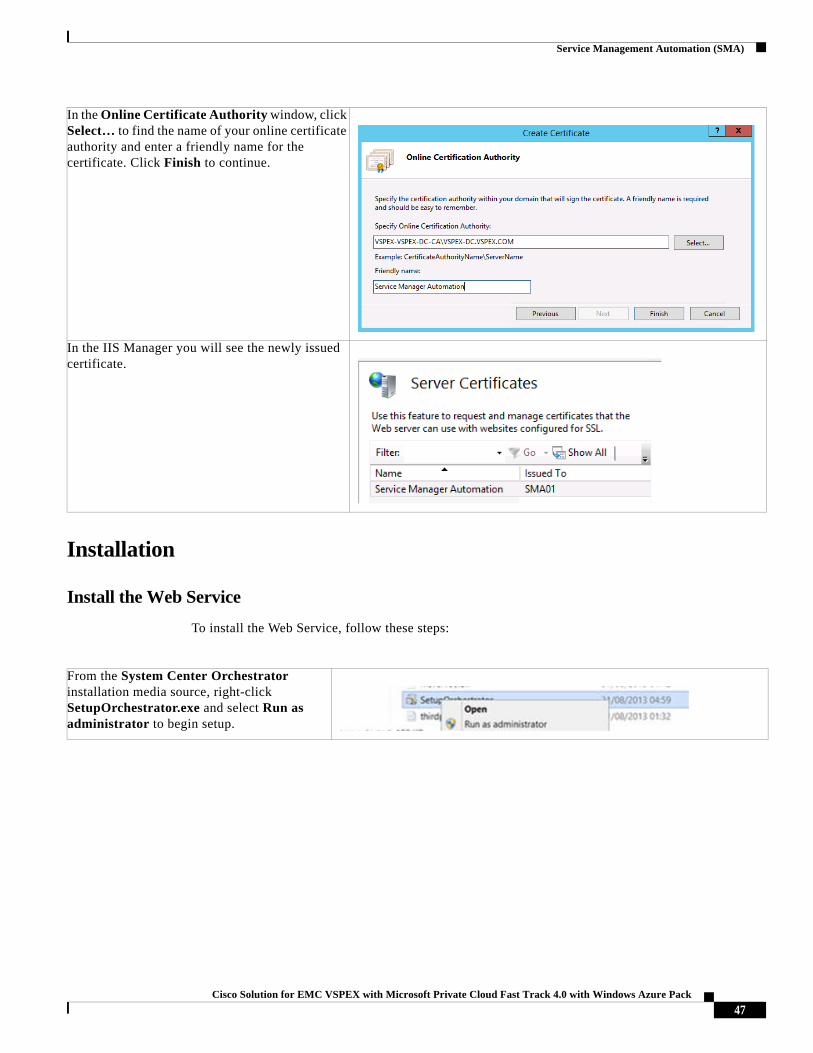
In the Online Certificate Authority window, click Select… to find the name of your online certificate authority and enter a friendly name for the certificate. Click Finish to continue.
In the IIS Manager you will see the newly issued certificate.
From the System Center Orchestrator installation media source, right-click SetupOrchestrator.exe and select Run as administrator to begin setup.
47Cisco Solution for EMC VSPEX with Microsoft Private Cloud Fast Track 4.0 with Windows Azure Pack
Service Management Automation (SMA)
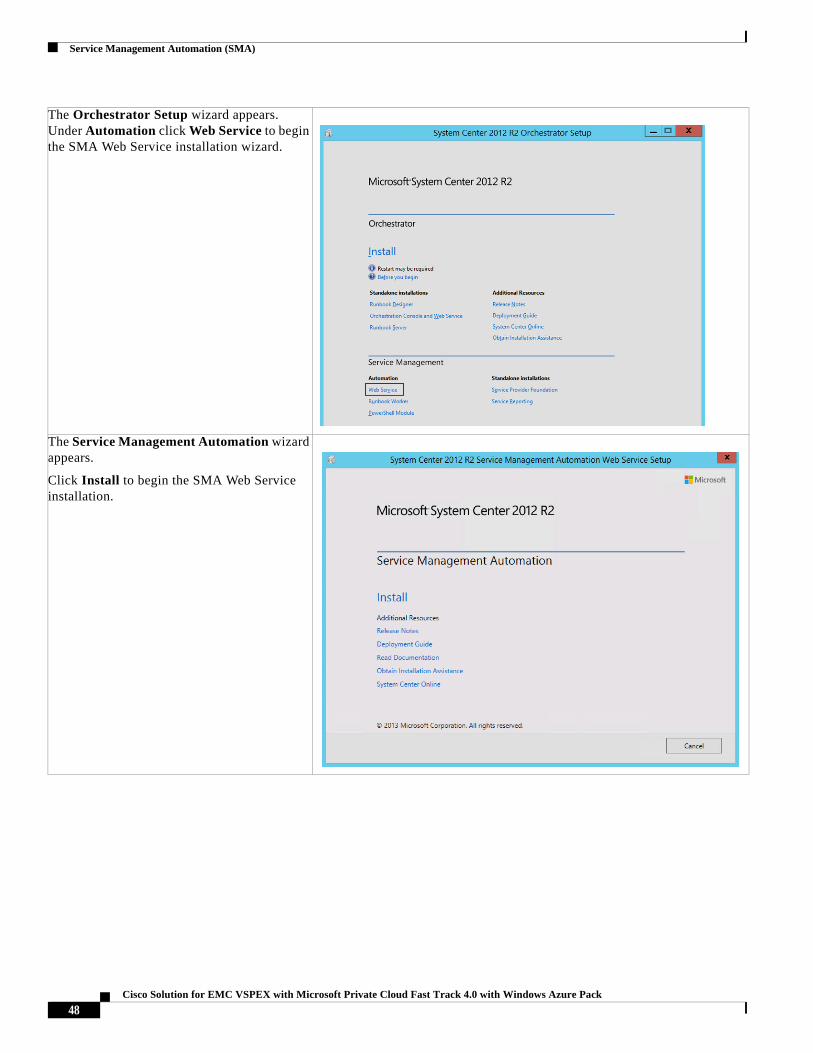
The Orchestrator Setup wizard appears. Under Automation click Web Service to begin the SMA Web Service installation wizard.
The Service Management Automation wizard appears.
Click Install to begin the SMA Web Service installation.
48Cisco Solution for EMC VSPEX with Microsoft Private Cloud Fast Track 4.0 with Windows Azure Pack
Service Management Automation (SMA)
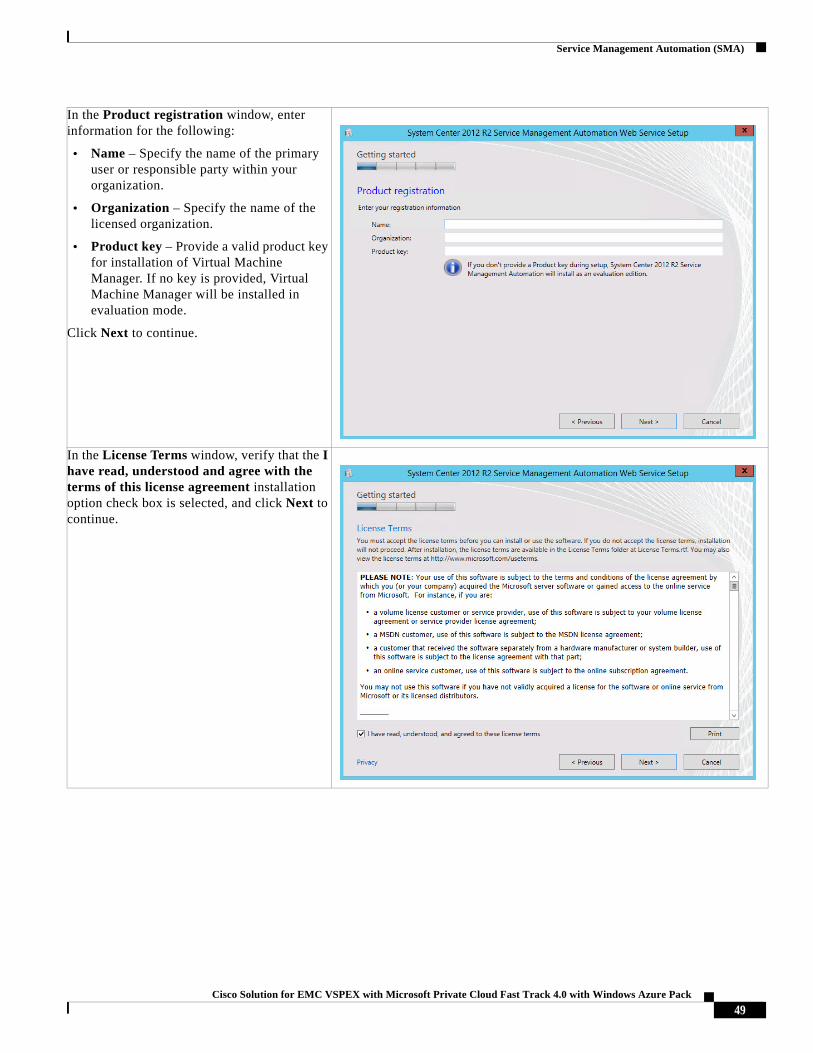
In the Product registration window, enter information for the following:
• Name – Specify the name of the primary user or responsible party within your organization.
• Organization – Specify the name of the licensed organization.
• Product key – Provide a valid product key for installation of Virtual Machine Manager. If no key is provided, Virtual Machine Manager will be installed in evaluation mode.
Click Next to continue.
In the License Terms window, verify that the I have read, understood and agree with the terms of this license agreement installation option check box is selected, and click Next to continue.
49Cisco Solution for EMC VSPEX with Microsoft Private Cloud Fast Track 4.0 with Windows Azure Pack

Service Management Automation (SMA)
In the Prerequisites window, the wizard will verify that all system prerequisites are met. If any prerequisites are not met, they will be displayed on the window. After you verify that the prerequisites are met, click Next to continue.
In the Configure the database server window, enter information for the following:
• Server – Specify the name of the database instance created for the shared System Center SQL instance.
• Port Number – Specify number of the SCDB port recorded earlier in the installation (found in the section on building the SQL Server cluster in the Cisco UCS Solution for EMC VSPEX Microsoft Private Cloud Fast Track 4.0 CVD)
• Database name – Specify the name of the database. In most cases, use the default value.
• Under Authentication Credentials select Windows Authentication.
Click Next to continue.
50Cisco Solution for EMC VSPEX with Microsoft Private Cloud Fast Track 4.0 with Windows Azure Pack
Service Management Automation (SMA)
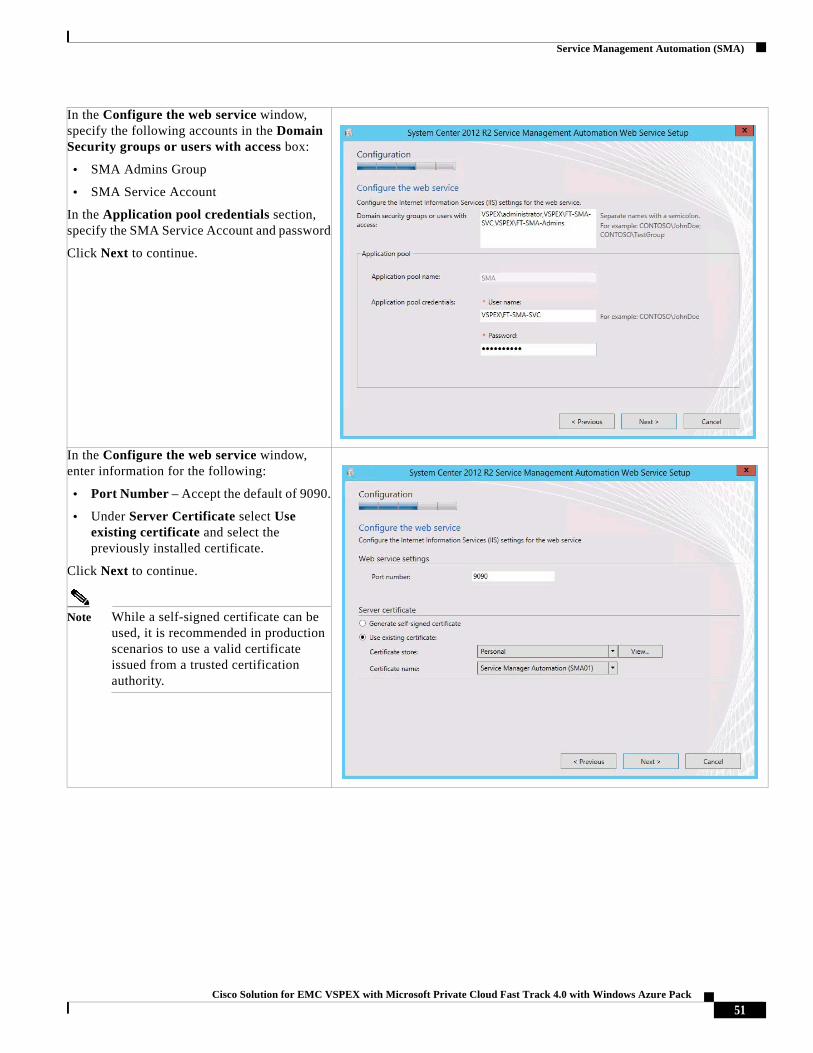
In the Configure the web service window, specify the following accounts in the Domain Security groups or users with access box:
• SMA Admins Group
• SMA Service Account
In the Application pool credentials section, specify the SMA Service Account and password
Click Next to continue.
In the Configure the web service window, enter information for the following:
• Port Number – Accept the default of 9090.
• Under Server Certificate select Use existing certificate and select the previously installed certificate.
Click Next to continue.
Note While a self-signed certificate can be used, it is recommended in production scenarios to use a valid certificate issued from a trusted certification authority.
51Cisco Solution for EMC VSPEX with Microsoft Private Cloud Fast Track 4.0 with Windows Azure Pack

Service Management Automation (SMA)
In the Specify a location for the web service files window, accept the default path, click Next to continue.
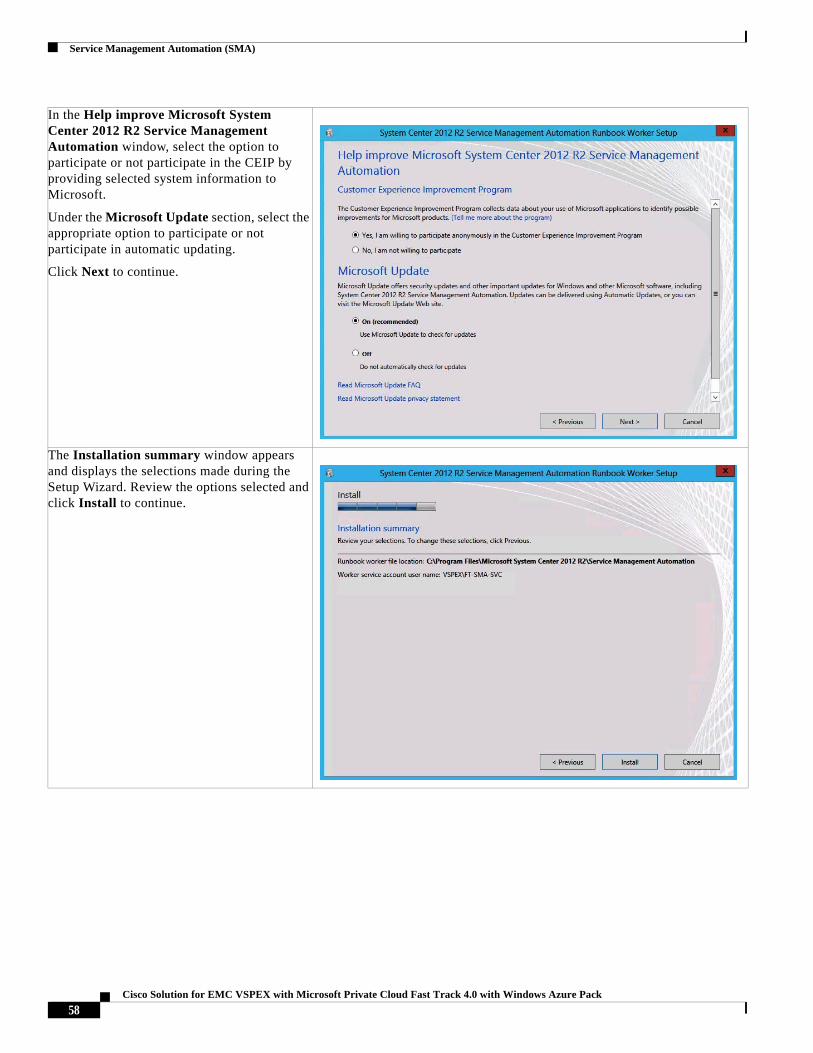
In the Help improve Microsoft System Center 2012 R2 Service Management Automation window, select the option to participate or not participate in the CEIP by providing selected system information to Microsoft.
Under the Microsoft Update section, select the appropriate option to participate or not participate in automatic updating.
Click Next to continue.
52Cisco Solution for EMC VSPEX with Microsoft Private Cloud Fast Track 4.0 with Windows Azure Pack
Service Management Automation (SMA)
Install the Runbook Worker
To install the Runbook Worker, follow these steps:
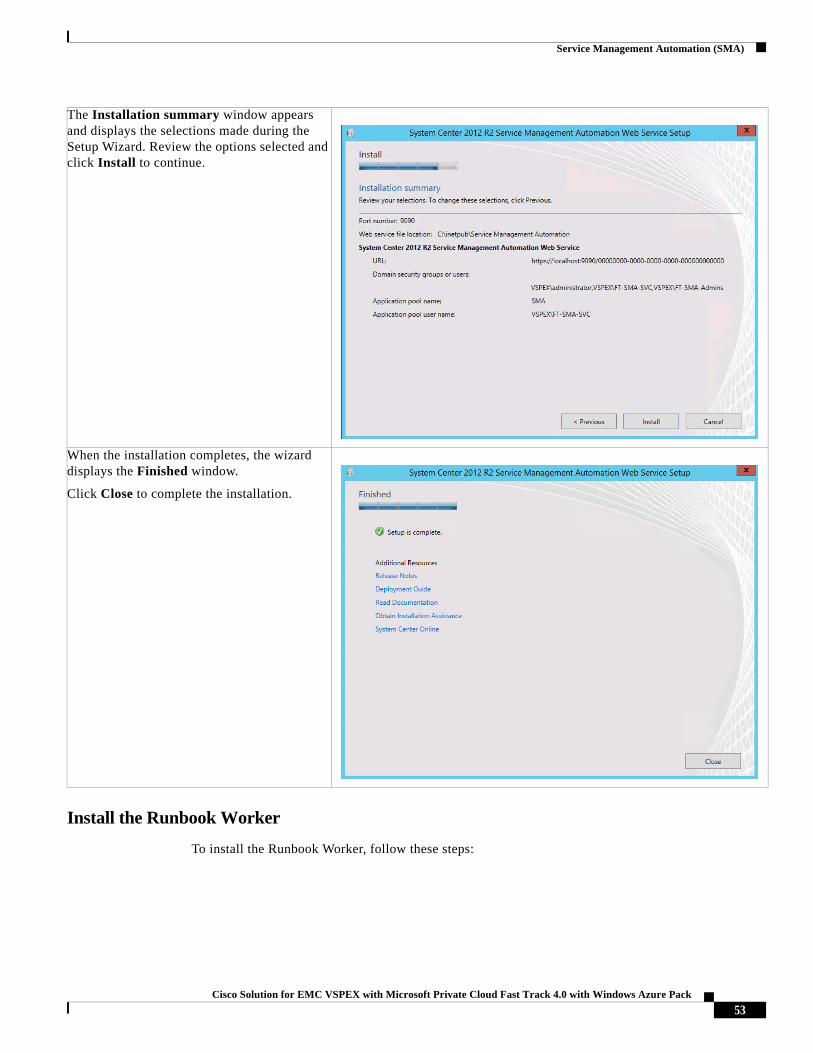
The Installation summary window appears and displays the selections made during the Setup Wizard. Review the options selected and click Install to continue.
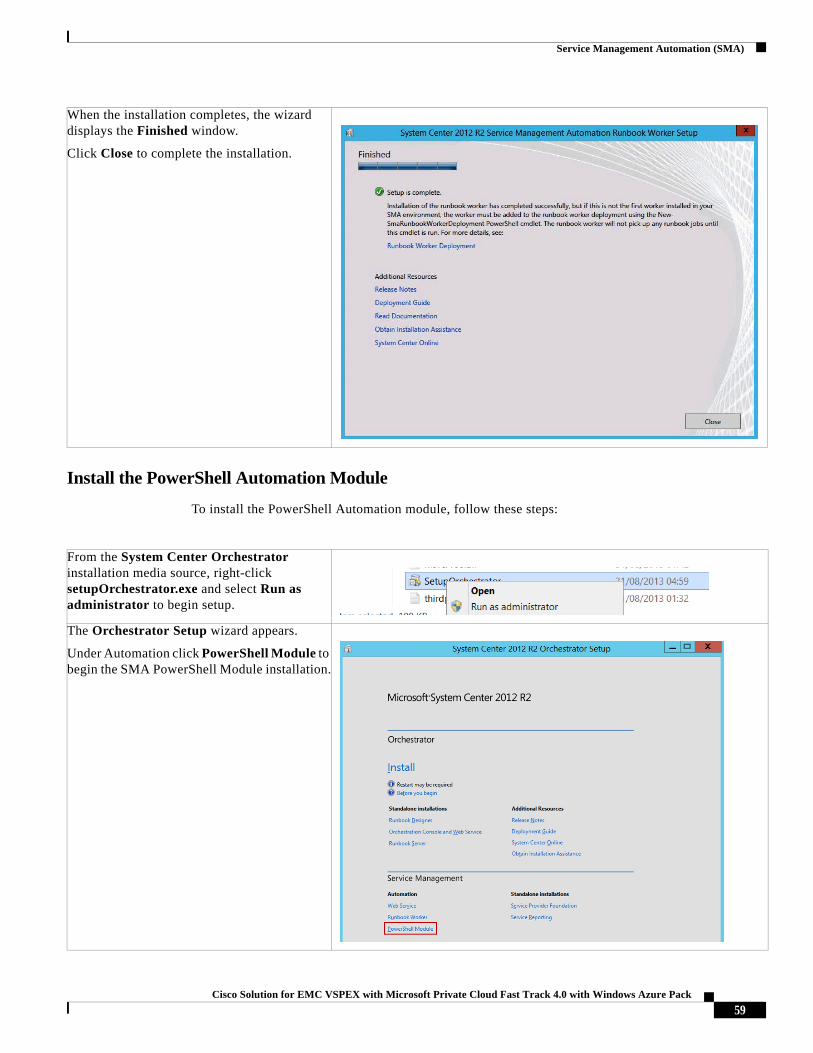
When the installation completes, the wizard displays the Finished window.
Click Close to complete the installation.
53Cisco Solution for EMC VSPEX with Microsoft Private Cloud Fast Track 4.0 with Windows Azure Pack
Service Management Automation (SMA)
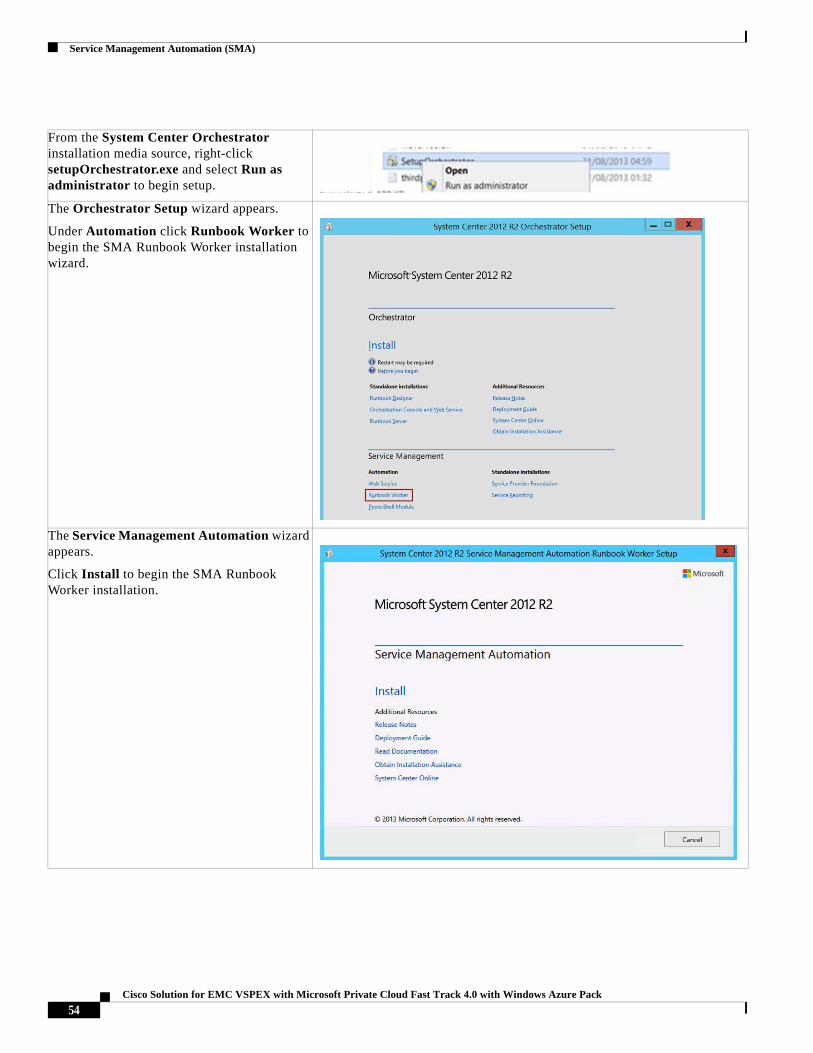
From the System Center Orchestrator installation media source, right-click setupOrchestrator.exe and select Run as administrator to begin setup.
The Orchestrator Setup wizard appears.
Under Automation click Runbook Worker to begin the SMA Runbook Worker installation wizard.
The Service Management Automation wizard appears.
Click Install to begin the SMA Runbook Worker installation.
54Cisco Solution for EMC VSPEX with Microsoft Private Cloud Fast Track 4.0 with Windows Azure Pack
Service Management Automation (SMA)
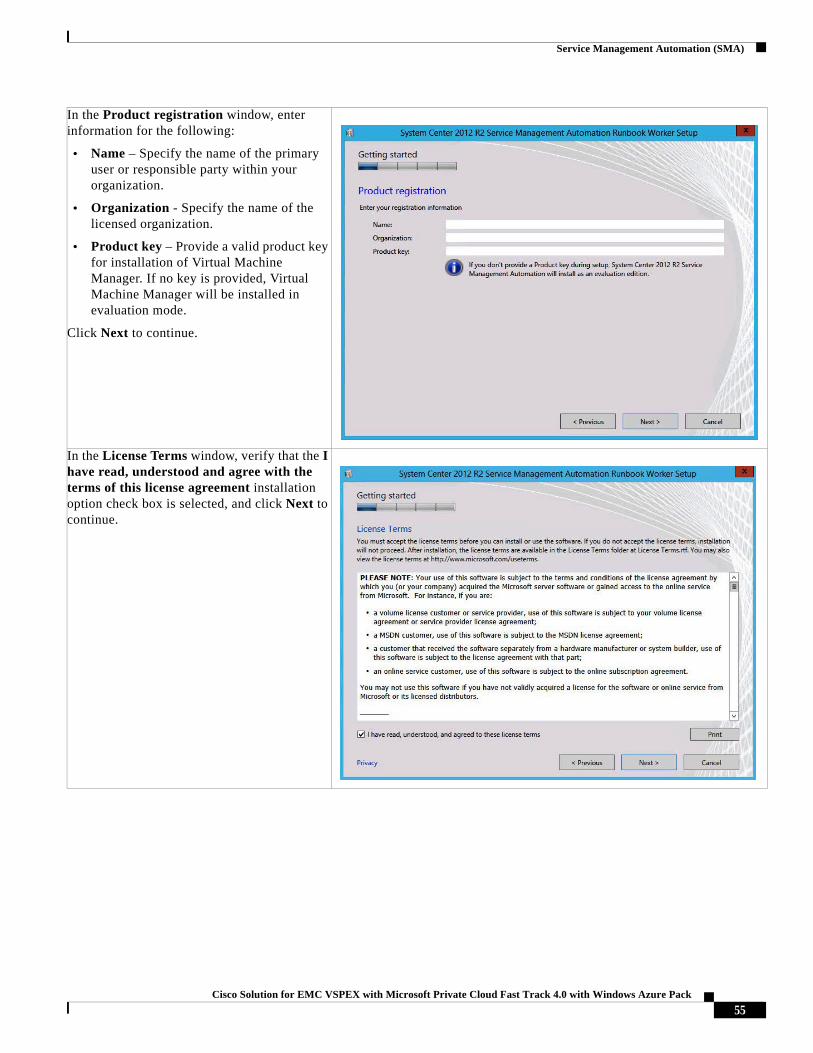
In the Product registration window, enter information for the following:
• Name – Specify the name of the primary user or responsible party within your organization.
• Organization - Specify the name of the licensed organization.
• Product key – Provide a valid product key for installation of Virtual Machine Manager. If no key is provided, Virtual Machine Manager will be installed in evaluation mode.
Click Next to continue.
In the License Terms window, verify that the I have read, understood and agree with the terms of this license agreement installation option check box is selected, and click Next to continue.
55Cisco Solution for EMC VSPEX with Microsoft Private Cloud Fast Track 4.0 with Windows Azure Pack
Service Management Automation (SMA)
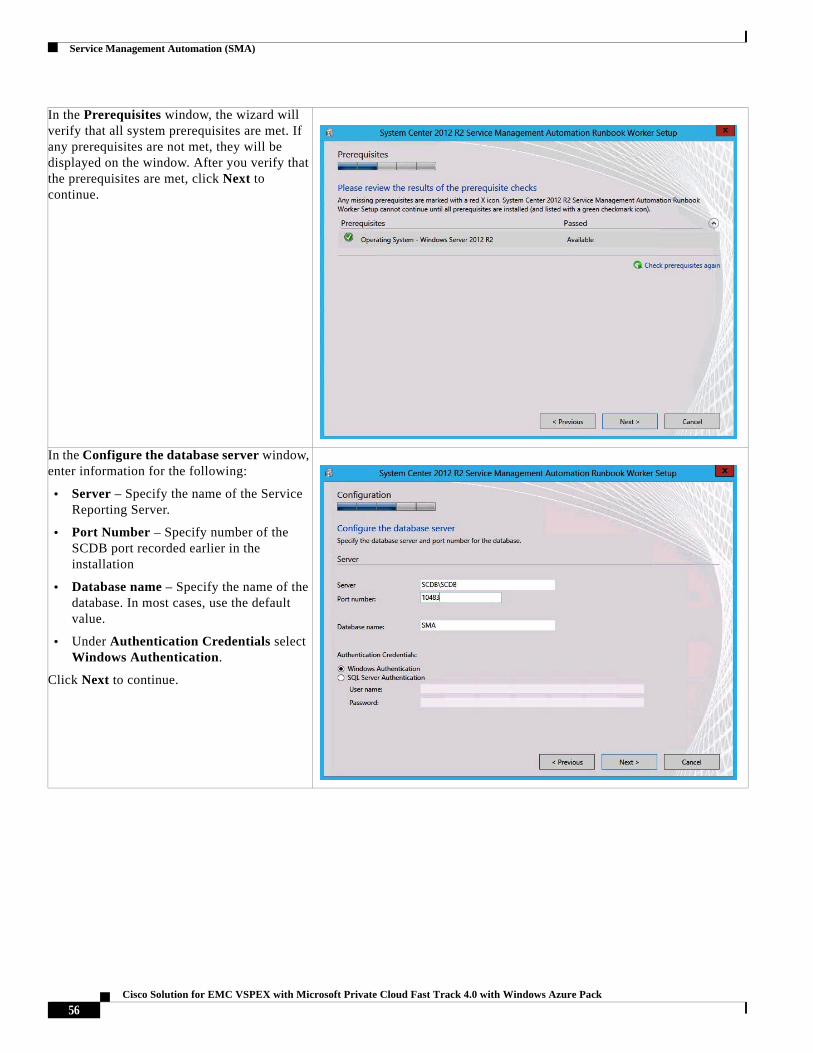
In the Prerequisites window, the wizard will verify that all system prerequisites are met. If any prerequisites are not met, they will be displayed on the window. After you verify that the prerequisites are met, click Next to continue.
In the Configure the database server window, enter information for the following:
• Server – Specify the name of the Service Reporting Server.
• Port Number – Specify number of the SCDB port recorded earlier in the installation
• Database name – Specify the name of the database. In most cases, use the default value.
• Under Authentication Credentials select Windows Authentication.
Click Next to continue.
56Cisco Solution for EMC VSPEX with Microsoft Private Cloud Fast Track 4.0 with Windows Azure Pack

Service Management Automation (SMA)
In the Configure the service account window, enter information for the following:
• Service account credentials – Specify the SMA Service account username and password.
Click Next to continue.
In the Specify a location for the runbook worker files window, accept the default path, click Next to continue.
57Cisco Solution for EMC VSPEX with Microsoft Private Cloud Fast Track 4.0 with Windows Azure Pack
Service Management Automation (SMA)
In the Help improve Microsoft System Center 2012 R2 Service Management Automation window, select the option to participate or not participate in the CEIP by providing selected system information to Microsoft.
Under the Microsoft Update section, select the appropriate option to participate or not participate in automatic updating.
Click Next to continue.
The Installation summary window appears and displays the selections made during the Setup Wizard. Review the options selected and click Install to continue.
58Cisco Solution for EMC VSPEX with Microsoft Private Cloud Fast Track 4.0 with Windows Azure Pack
Service Management Automation (SMA)
Install the PowerShell Automation Module
To install the PowerShell Automation module, follow these steps:
When the installation completes, the wizard displays the Finished window.
Click Close to complete the installation.
From the System Center Orchestrator installation media source, right-click setupOrchestrator.exe and select Run as administrator to begin setup.
The Orchestrator Setup wizard appears.
Under Automation click PowerShell Module to begin the SMA PowerShell Module installation.
59Cisco Solution for EMC VSPEX with Microsoft Private Cloud Fast Track 4.0 with Windows Azure Pack

System Center Service Provider Foundation
System Center Service Provider FoundationIn System Center 2012 R2, Service Provider Foundation (SPF) provides web service API that integrates with Virtual Machine Manager. Its primary purpose is to provide service providers and third party vendors with the ability to develop portals that seamlessly front end the infrastructure components of System Center.
The SPF architecture allows for compute resource management via a REST API that facilities communication with a web service via the OData protocol. Claims-based authentication can be used to verify authorized tenant resources assigned by the service provider. These resources are housed in a database.
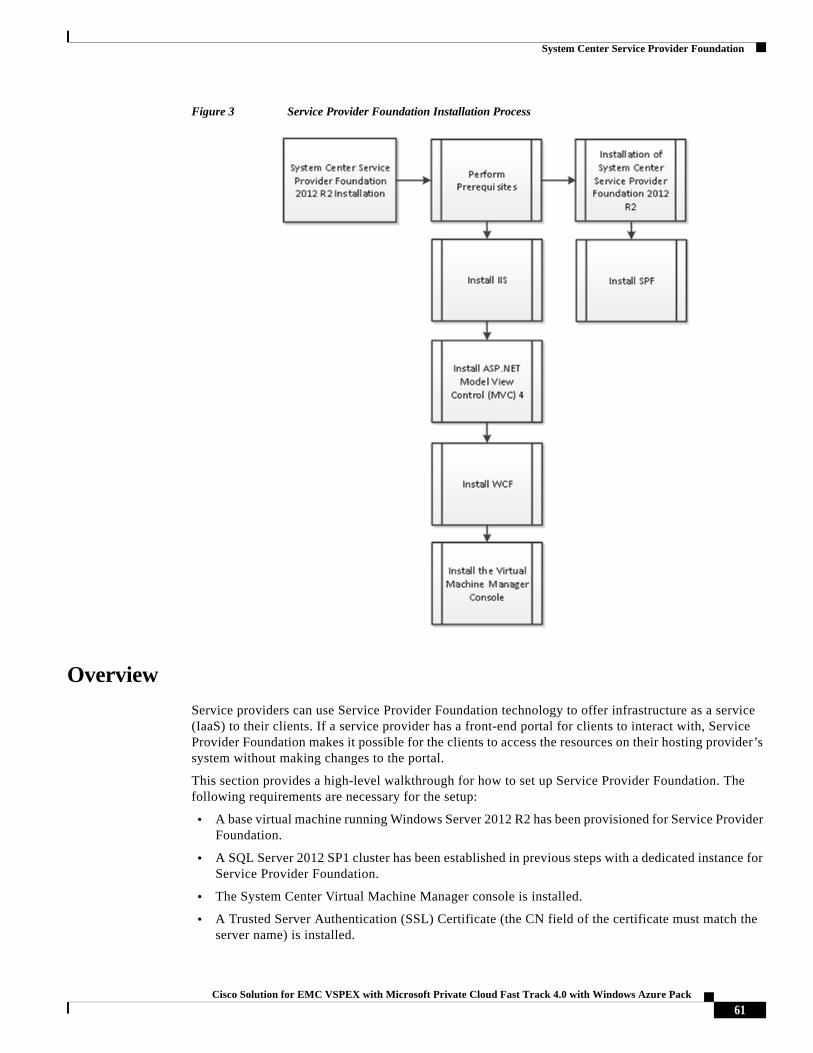
The System Center Service Provider Foundation (SPF) 2012 R2 installation process includes the high-level steps shown in Figure 3.
The Install will run silently to install the PowerShell Module. This takes only a few moments to run.
60Cisco Solution for EMC VSPEX with Microsoft Private Cloud Fast Track 4.0 with Windows Azure Pack
System Center Service Provider Foundation
Figure 3 Service Provider Foundation Installation Process
Overview
Service providers can use Service Provider Foundation technology to offer infrastructure as a service (IaaS) to their clients. If a service provider has a front-end portal for clients to interact with, Service Provider Foundation makes it possible for the clients to access the resources on their hosting provider’s system without making changes to the portal.
This section provides a high-level walkthrough for how to set up Service Provider Foundation. The following requirements are necessary for the setup:
• A base virtual machine running Windows Server 2012 R2 has been provisioned for Service Provider Foundation.
• A SQL Server 2012 SP1 cluster has been established in previous steps with a dedicated instance for Service Provider Foundation.
• The System Center Virtual Machine Manager console is installed.
• A Trusted Server Authentication (SSL) Certificate (the CN field of the certificate must match the server name) is installed.
61Cisco Solution for EMC VSPEX with Microsoft Private Cloud Fast Track 4.0 with Windows Azure Pack
System Center Service Provider Foundation
Prerequisites
The following environment prerequisites must be met before proceeding.
Accounts
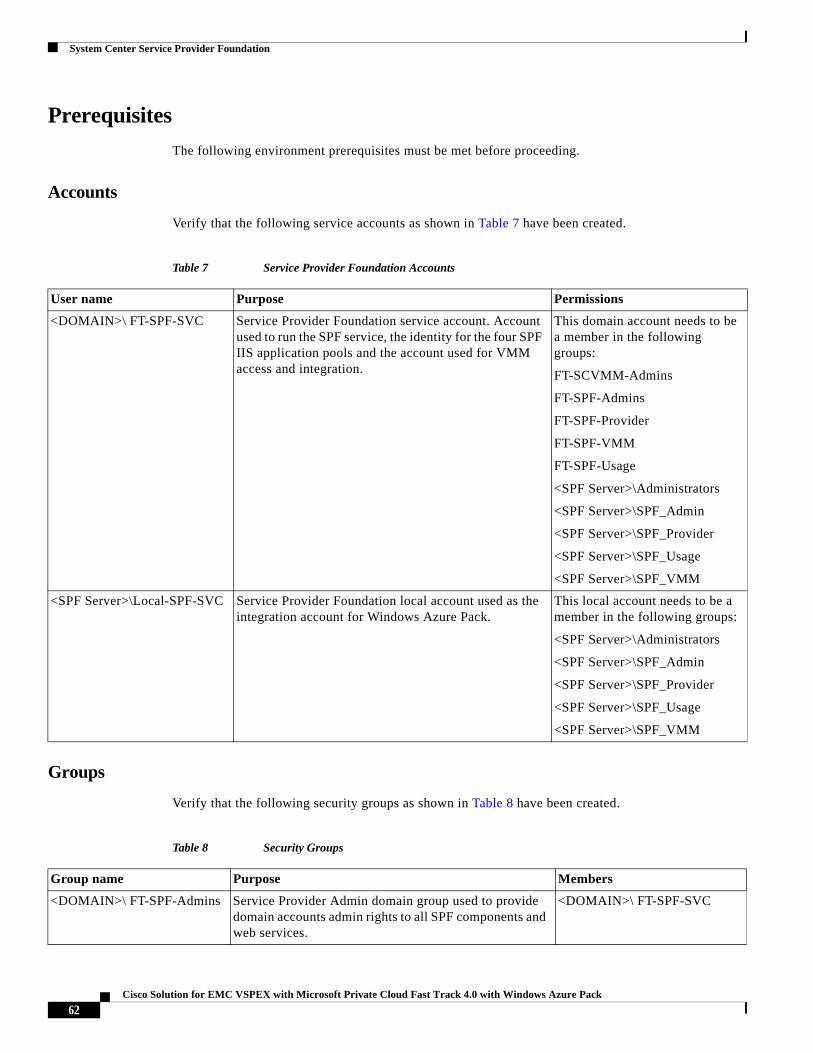
Verify that the following service accounts as shown in Table 7 have been created.
Groups
Verify that the following security groups as shown in Table 8 have been created.
Table 7 Service Provider Foundation Accounts
User name Purpose Permissions
<DOMAIN>\ FT-SPF-SVC Service Provider Foundation service account. Account used to run the SPF service, the identity for the four SPF IIS application pools and the account used for VMM access and integration.
This domain account needs to be a member in the following groups:
FT-SCVMM-Admins
FT-SPF-Admins
FT-SPF-Provider
FT-SPF-VMM
FT-SPF-Usage
<SPF Server>\Administrators
<SPF Server>\SPF_Admin
<SPF Server>\SPF_Provider
<SPF Server>\SPF_Usage
<SPF Server>\SPF_VMM
<SPF Server>\Local-SPF-SVC Service Provider Foundation local account used as the integration account for Windows Azure Pack.
This local account needs to be a member in the following groups:
<SPF Server>\Administrators
<SPF Server>\SPF_Admin
<SPF Server>\SPF_Provider
<SPF Server>\SPF_Usage
<SPF Server>\SPF_VMM
Table 8 Security Groups
Group name Purpose Members
<DOMAIN>\ FT-SPF-Admins Service Provider Admin domain group used to provide domain accounts admin rights to all SPF components and web services.
<DOMAIN>\ FT-SPF-SVC
62Cisco Solution for EMC VSPEX with Microsoft Private Cloud Fast Track 4.0 with Windows Azure Pack
System Center Service Provider Foundation
Add Web Server Role (IIS)
The Service Provider Foundation installation requires the Web Server Role and several additional role features. To add this role and features to the server, follow these steps:
<DOMAIN>\ FT-SPF-Provider
Service Provider domain group used to provide domain accounts access to the SPF Provider web service.
Appropriate domain accounts to be delegated permissions to services.
<DOMAIN>\ FT-SPF-VMM Service Provider domain group used to provide domain accounts access to the SPF VMM web service.
Appropriate domain accounts to be delegated permissions to services.
<DOMAIN>\ FT-SPF-Usage Service Provider domain group used to provide domain accounts access to the SPF Usage web service.
Appropriate domain accounts to be delegated permissions to services.
<SPF Server>\SPF_Admin Local group created by SPF setup process to provide access to the Admin web service. Domain groups and accounts must be added after setup completes.
This local group should contain the following members:
<SPF Server>\Local-SPF-SVC
<DOMAIN>\FT-SPF-Admins
<SPF Server>\SPF_Provider Local group created by SPF setup process to provide access to the Admin web service. Domain groups and accounts must be added after setup completes.
<SPF Server>\Local-SPF-SVC
<DOMAIN>\FT-SPF-Admins
<DOMAIN>\ FT-SPF-Provider
<SPF Server>\SPF_VMM Local group created by SPF setup process to provide access to the Admin web service. Domain groups and accounts must be added after setup completes.
<SPF Server>\Local-SPF-SVC
<DOMAIN>\FT-SPF-Admins
<DOMAIN>\ FT-SPF-VMM
<SPF Server>\SPF_Usage Local group created by SPF setup process to provide access to the Admin web service. Domain groups and accounts must be added after setup completes.
<SPF Server>\Local-SPF-SVC
<DOMAIN>\FT-SPF-Admins
<DOMAIN>\ FT-SPF-Usage
Table 8 Security Groups
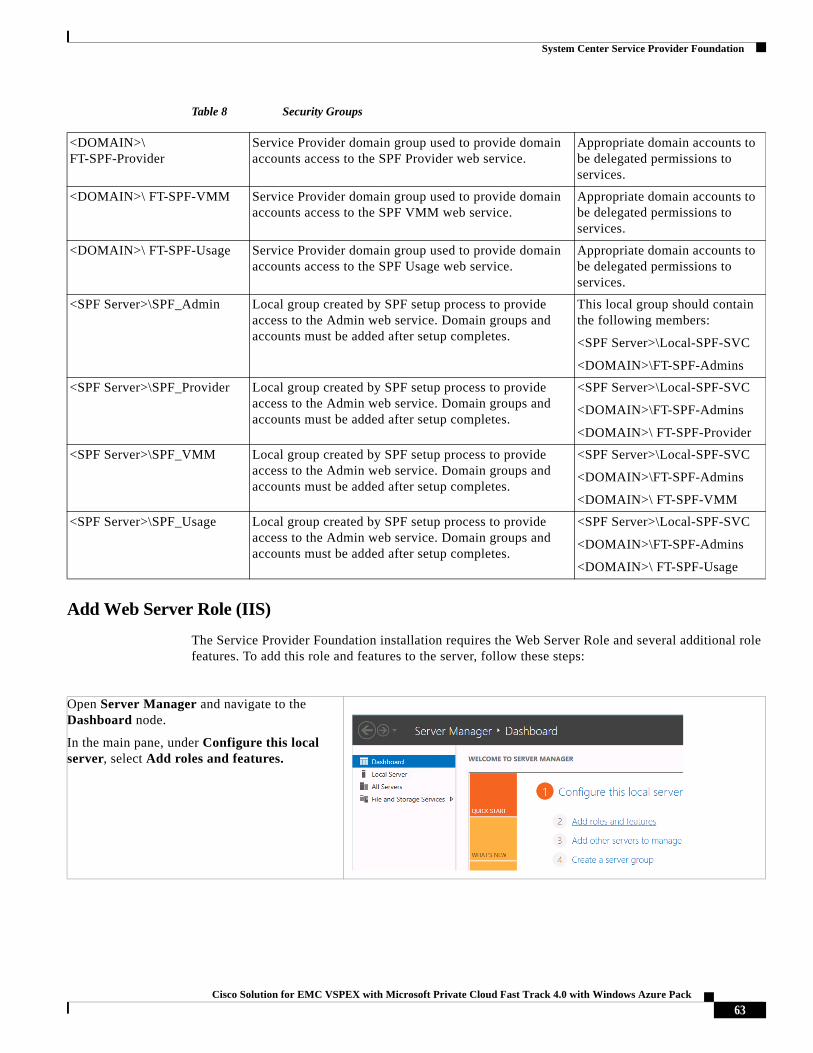
Open Server Manager and navigate to the Dashboard node.
In the main pane, under Configure this local server, select Add roles and features.
63Cisco Solution for EMC VSPEX with Microsoft Private Cloud Fast Track 4.0 with Windows Azure Pack
System Center Service Provider Foundation
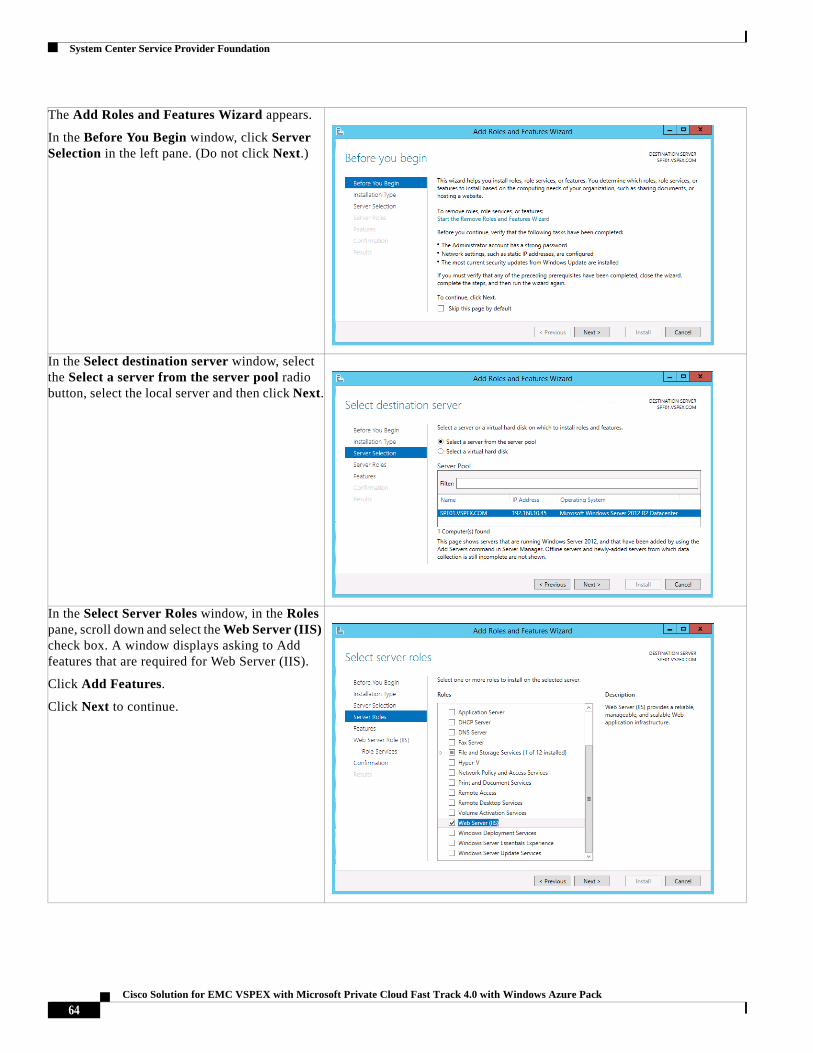
The Add Roles and Features Wizard appears.
In the Before You Begin window, click Server Selection in the left pane. (Do not click Next.)
In the Select destination server window, select the Select a server from the server pool radio button, select the local server and then click Next.
In the Select Server Roles window, in the Roles pane, scroll down and select the Web Server (IIS) check box. A window displays asking to Add features that are required for Web Server (IIS).
Click Add Features.
Click Next to continue.
64Cisco Solution for EMC VSPEX with Microsoft Private Cloud Fast Track 4.0 with Windows Azure Pack
System Center Service Provider Foundation
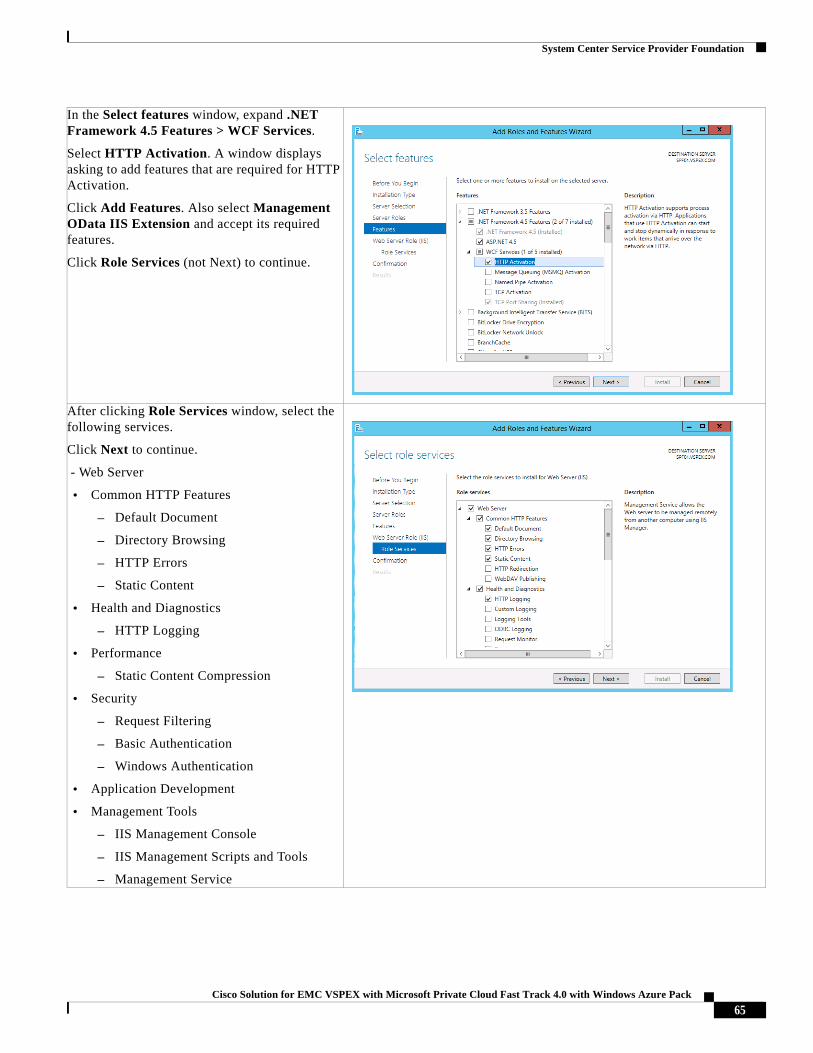
In the Select features window, expand .NET Framework 4.5 Features > WCF Services.
Select HTTP Activation. A window displays asking to add features that are required for HTTP Activation.
Click Add Features. Also select Management OData IIS Extension and accept its required features.
Click Role Services (not Next) to continue.
After clicking Role Services window, select the following services.
Click Next to continue.
- Web Server
• Common HTTP Features
– Default Document
– Directory Browsing
– HTTP Errors
– Static Content
• Health and Diagnostics
– HTTP Logging
• Performance
– Static Content Compression
• Security
– Request Filtering
– Basic Authentication
– Windows Authentication
• Application Development
• Management Tools
– IIS Management Console
– IIS Management Scripts and Tools
– Management Service
65Cisco Solution for EMC VSPEX with Microsoft Private Cloud Fast Track 4.0 with Windows Azure Pack

System Center Service Provider Foundation
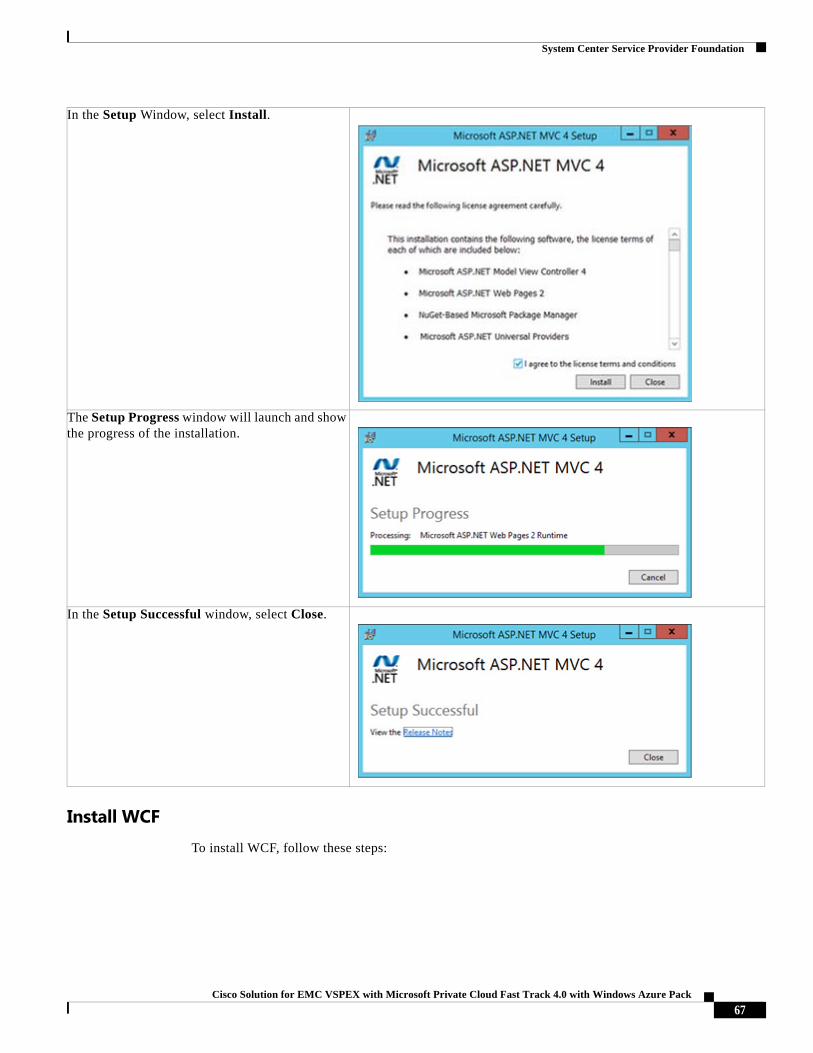
Install Microsoft ASP.NET Model View Control (MVC) 4
To install Microsoft ASP.NET Model View Control (MVC) 4, follow these steps:
In the Confirm installation selections window, verify that the previously selected roles and features are listed. Ensure that the Restart each destination server automatically if required is selected.
Clicking the restart option displays a verification window; click Yes on this window.
Click Install to begin installation.
The Installation Progress window will show the progress of the feature installation. Click Close when the installation process completes.
Right-click on the AspNetMVC4Setup.exe file and Run as administrator.
66Cisco Solution for EMC VSPEX with Microsoft Private Cloud Fast Track 4.0 with Windows Azure Pack
System Center Service Provider Foundation
Install WCFTo install WCF, follow these steps:
In the Setup Window, select Install.
The Setup Progress window will launch and show the progress of the installation.
In the Setup Successful window, select Close.
67Cisco Solution for EMC VSPEX with Microsoft Private Cloud Fast Track 4.0 with Windows Azure Pack
System Center Service Provider Foundation
Install the Virtual Machine Manager Console
To install the Virtual Machine Manager console on the target Service Provider Foundation virtual machine, follow these steps:
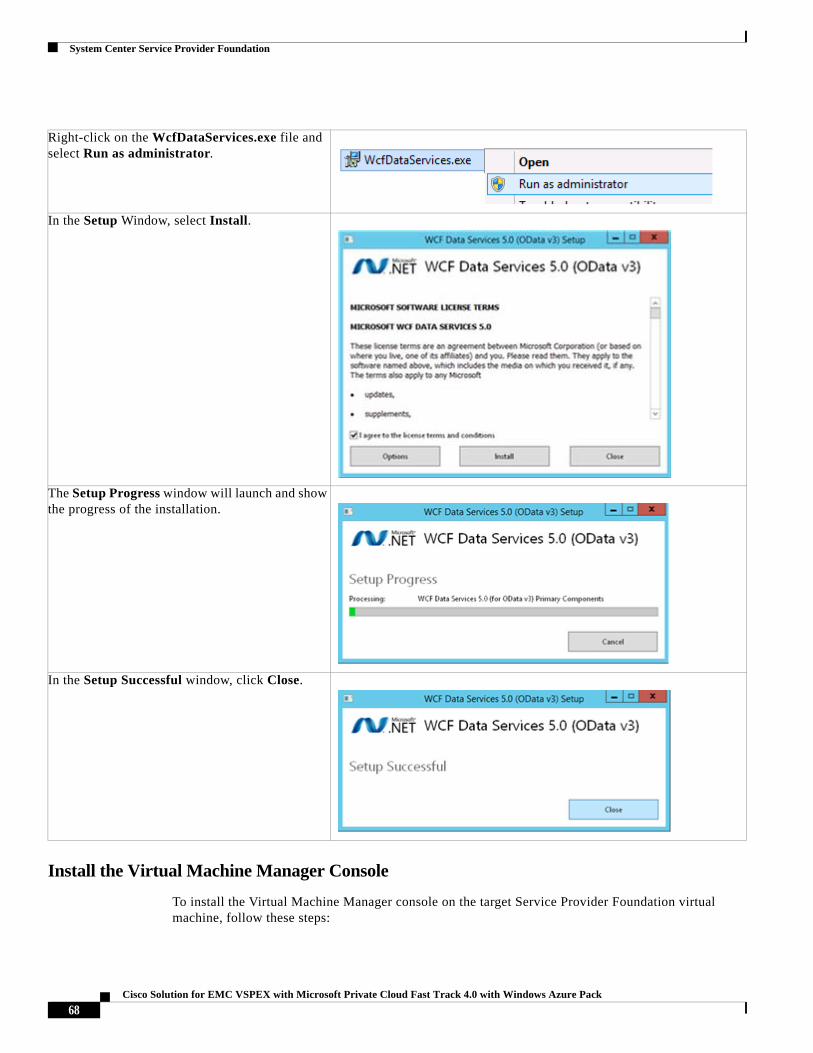
Right-click on the WcfDataServices.exe file and select Run as administrator.
In the Setup Window, select Install.
The Setup Progress window will launch and show the progress of the installation.
In the Setup Successful window, click Close.
68Cisco Solution for EMC VSPEX with Microsoft Private Cloud Fast Track 4.0 with Windows Azure Pack
System Center Service Provider Foundation
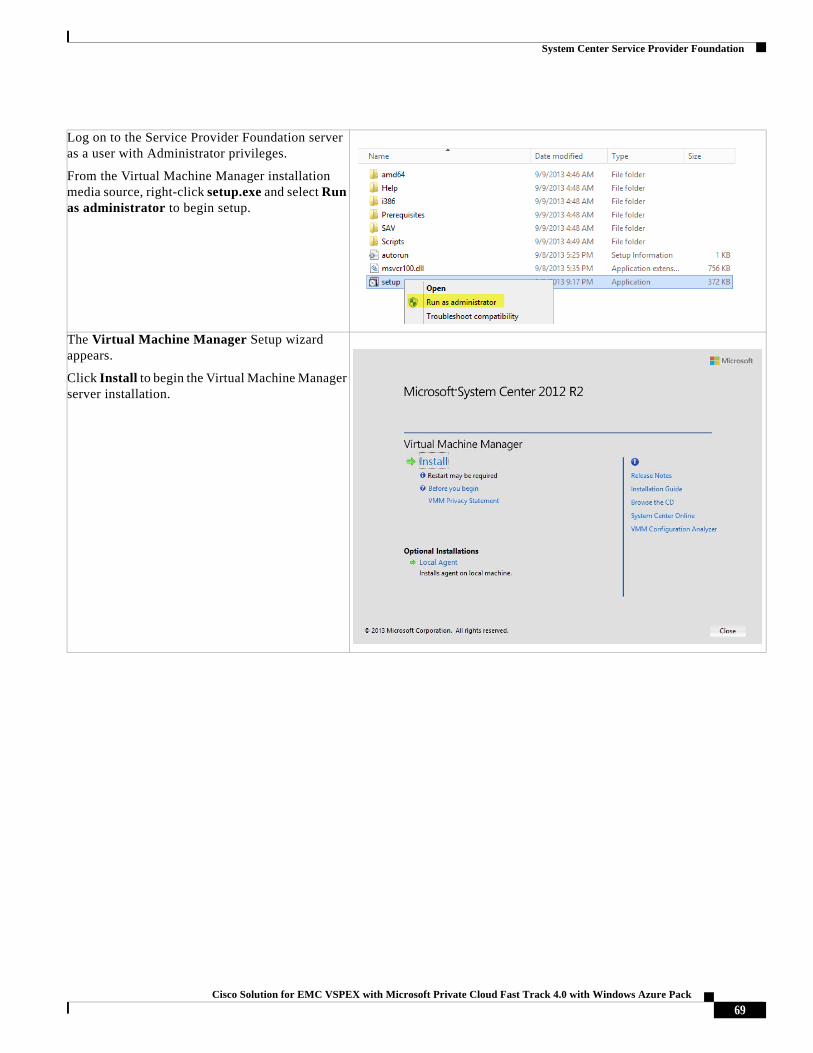
Log on to the Service Provider Foundation server as a user with Administrator privileges.
From the Virtual Machine Manager installation media source, right-click setup.exe and select Run as administrator to begin setup.
The Virtual Machine Manager Setup wizard appears.
Click Install to begin the Virtual Machine Manager server installation.
69Cisco Solution for EMC VSPEX with Microsoft Private Cloud Fast Track 4.0 with Windows Azure Pack
System Center Service Provider Foundation
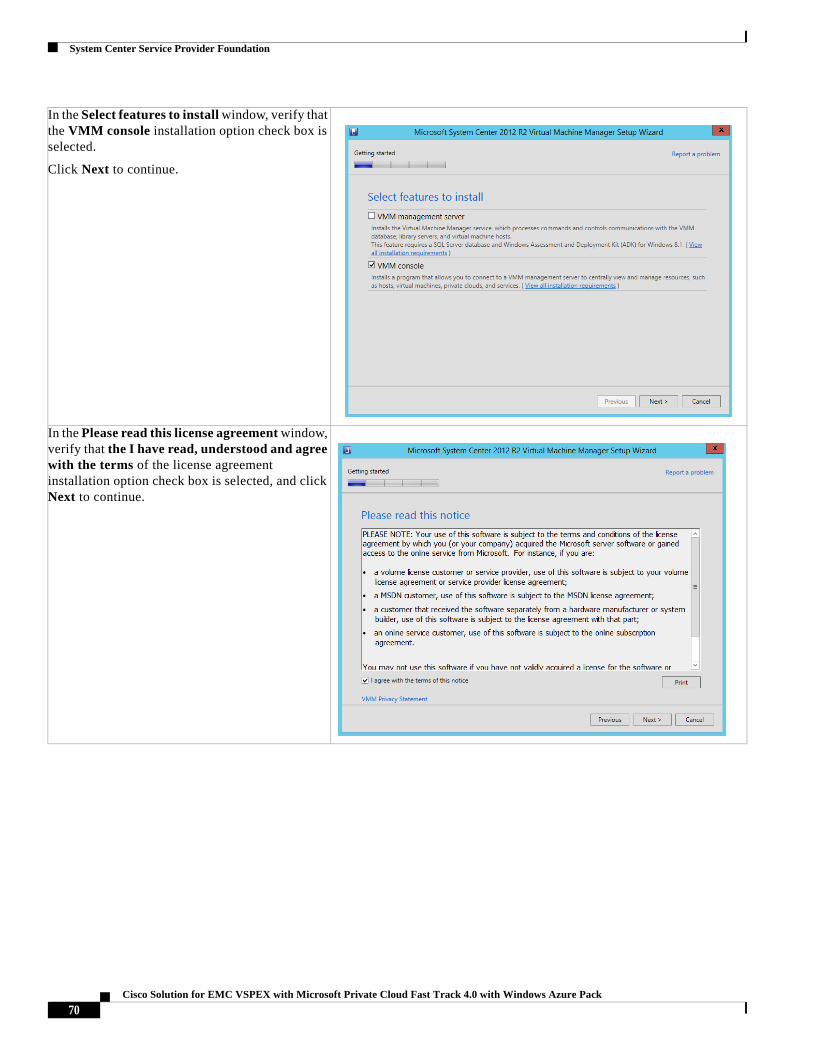
In the Select features to install window, verify that the VMM console installation option check box is selected.
Click Next to continue.
In the Please read this license agreement window, verify that the I have read, understood and agree with the terms of the license agreement installation option check box is selected, and click Next to continue.
70Cisco Solution for EMC VSPEX with Microsoft Private Cloud Fast Track 4.0 with Windows Azure Pack
System Center Service Provider Foundation
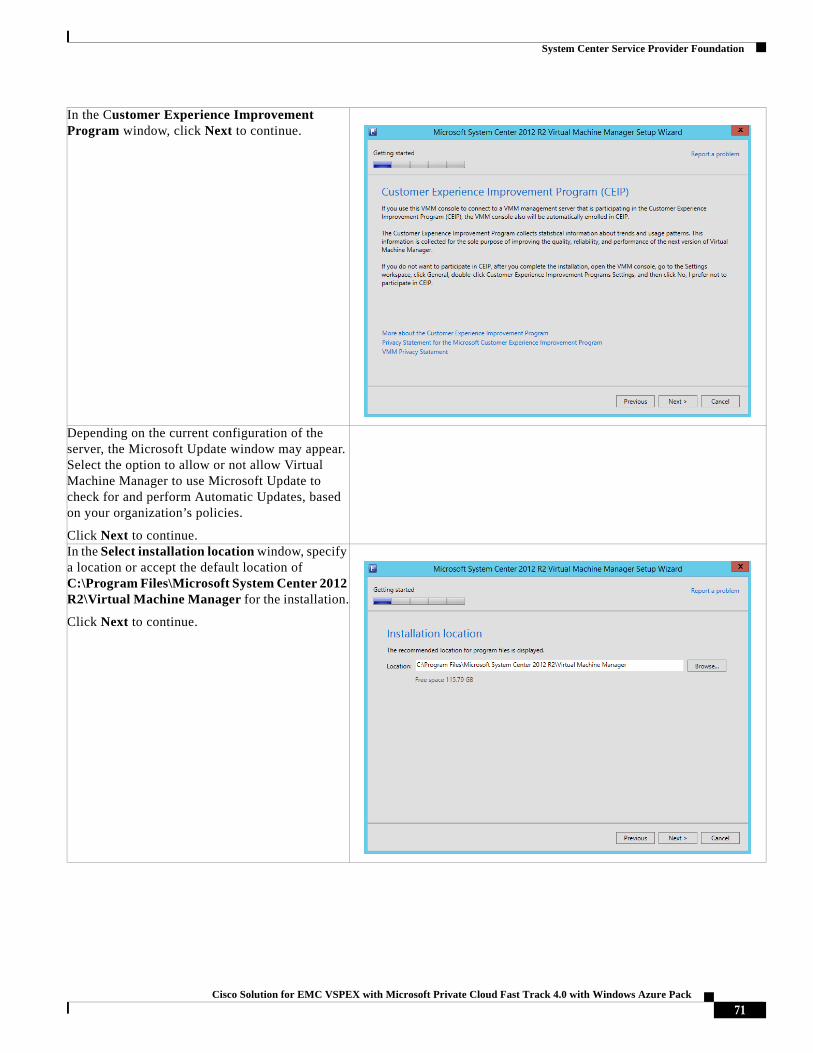
In the Customer Experience Improvement Program window, click Next to continue.
Depending on the current configuration of the server, the Microsoft Update window may appear. Select the option to allow or not allow Virtual Machine Manager to use Microsoft Update to check for and perform Automatic Updates, based on your organization’s policies.
Click Next to continue.In the Select installation location window, specify a location or accept the default location of C:\Program Files\Microsoft System Center 2012 R2\Virtual Machine Manager for the installation.
Click Next to continue.
71Cisco Solution for EMC VSPEX with Microsoft Private Cloud Fast Track 4.0 with Windows Azure Pack
System Center Service Provider Foundation
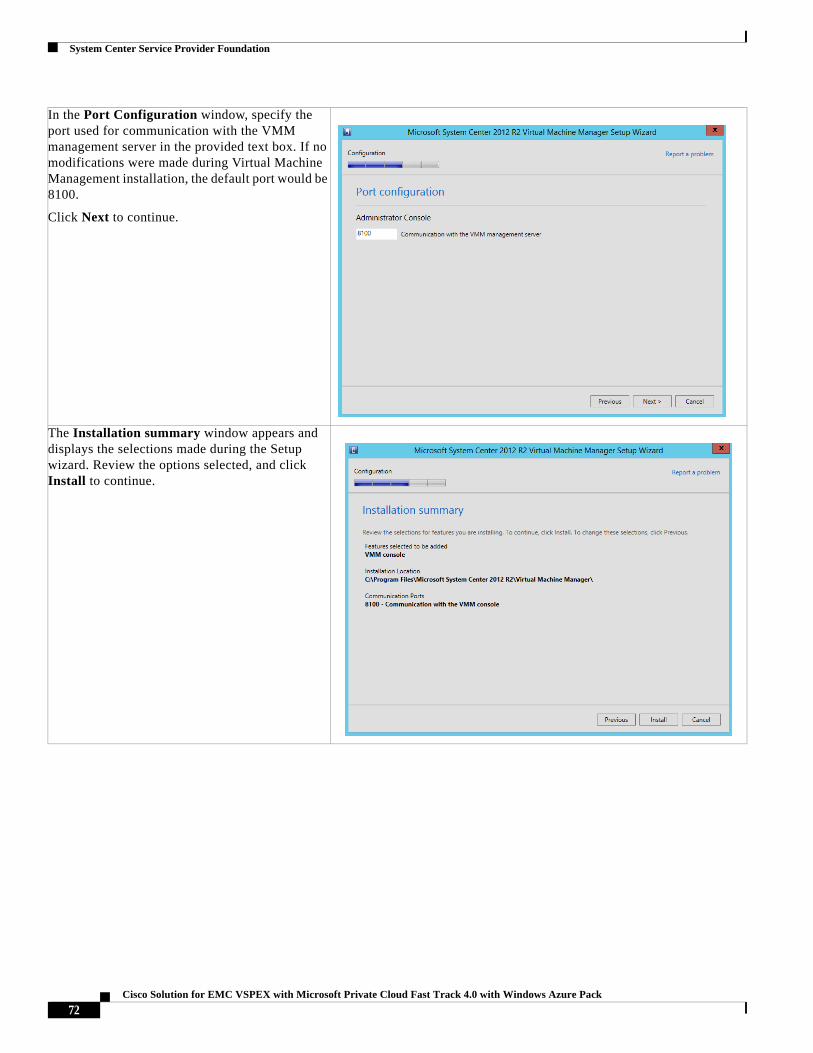
In the Port Configuration window, specify the port used for communication with the VMM management server in the provided text box. If no modifications were made during Virtual Machine Management installation, the default port would be 8100.
Click Next to continue.
The Installation summary window appears and displays the selections made during the Setup wizard. Review the options selected, and click Install to continue.
72Cisco Solution for EMC VSPEX with Microsoft Private Cloud Fast Track 4.0 with Windows Azure Pack

System Center Service Provider Foundation
Request and Install an SSL Certificate
There are several ways to request an SSL certificate. The following procedure describes how to request the certificate through the IIS Manager console. This procedure assumes that you are running a Certificate Authority within your environment. If you are using externally requested certificates, your procedure will be different. To request the certificate through the IIS Manager console, follow these steps:
When the installation completes, the wizard displays the Setup completed successfully window.
Click Close to complete the installation.
Log on to the virtual machine as a user with local administrator rights. From the Server Manager Tools menu, click Internet Information Services (IIS) Manager.
73Cisco Solution for EMC VSPEX with Microsoft Private Cloud Fast Track 4.0 with Windows Azure Pack

System Center Service Provider Foundation
In the Internet Information Services (IIS) Manager console, click the server node, and in the IIS section, double-click Server Certificates.
The Server Certificates pane will expand. In the Actions pane, click Create Domain Certificate …
The Create Certificate wizard appears.
In the Distinguished Name Properties window, complete the information as prompted.
Click Next to continue.
Note The Common Name field must be the exact name of the server as it will be accessed from the web browser.
74Cisco Solution for EMC VSPEX with Microsoft Private Cloud Fast Track 4.0 with Windows Azure Pack
System Center Service Provider Foundation
Installation
Install System Center Service Provider Foundation 2012 R2
To install Service Provider Foundation 2012 R2, follow these steps:
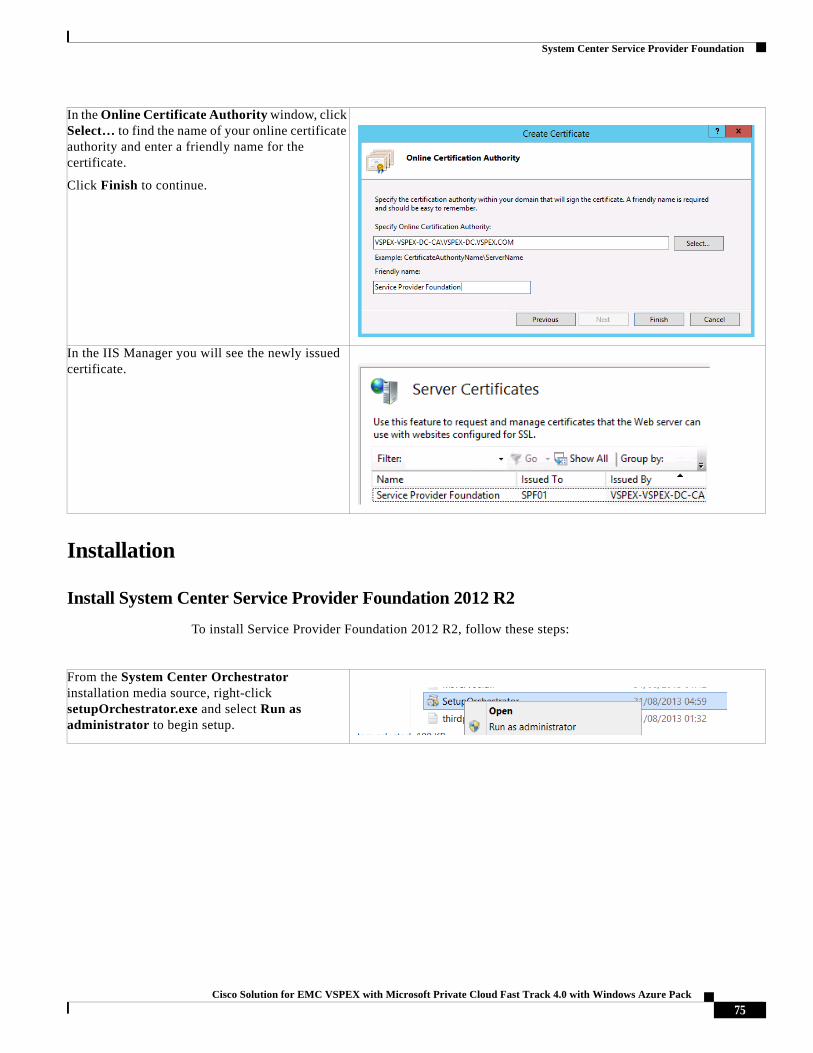
In the Online Certificate Authority window, click Select… to find the name of your online certificate authority and enter a friendly name for the certificate.
Click Finish to continue.
In the IIS Manager you will see the newly issued certificate.
From the System Center Orchestrator installation media source, right-click setupOrchestrator.exe and select Run as administrator to begin setup.
75Cisco Solution for EMC VSPEX with Microsoft Private Cloud Fast Track 4.0 with Windows Azure Pack
System Center Service Provider Foundation
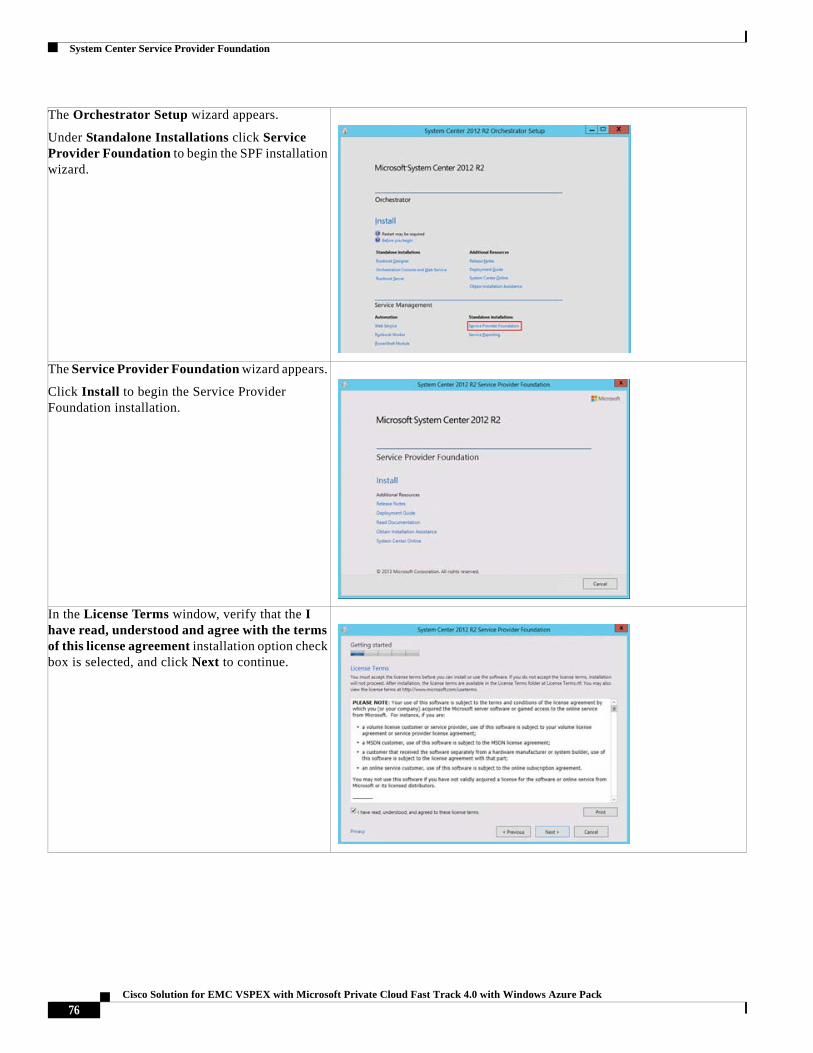
The Orchestrator Setup wizard appears.
Under Standalone Installations click Service Provider Foundation to begin the SPF installation wizard.
The Service Provider Foundation wizard appears.
Click Install to begin the Service Provider Foundation installation.
In the License Terms window, verify that the I have read, understood and agree with the terms of this license agreement installation option check box is selected, and click Next to continue.
76Cisco Solution for EMC VSPEX with Microsoft Private Cloud Fast Track 4.0 with Windows Azure Pack
System Center Service Provider Foundation
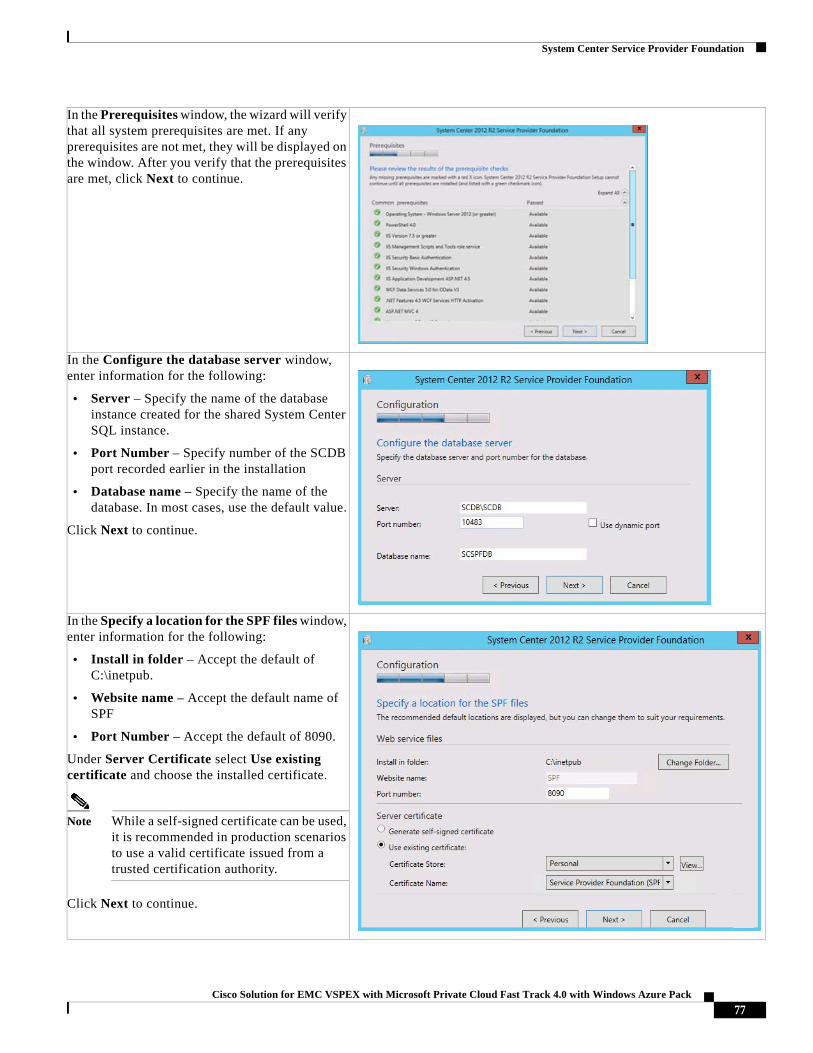
In the Prerequisites window, the wizard will verify that all system prerequisites are met. If any prerequisites are not met, they will be displayed on the window. After you verify that the prerequisites are met, click Next to continue.
In the Configure the database server window, enter information for the following:
• Server – Specify the name of the database instance created for the shared System Center SQL instance.
• Port Number – Specify number of the SCDB port recorded earlier in the installation
• Database name – Specify the name of the database. In most cases, use the default value.
Click Next to continue.
In the Specify a location for the SPF files window, enter information for the following:
• Install in folder – Accept the default of C:\inetpub.
• Website name – Accept the default name of SPF
• Port Number – Accept the default of 8090.
Under Server Certificate select Use existing certificate and choose the installed certificate.
Note While a self-signed certificate can be used, it is recommended in production scenarios to use a valid certificate issued from a trusted certification authority.
Click Next to continue.
77Cisco Solution for EMC VSPEX with Microsoft Private Cloud Fast Track 4.0 with Windows Azure Pack
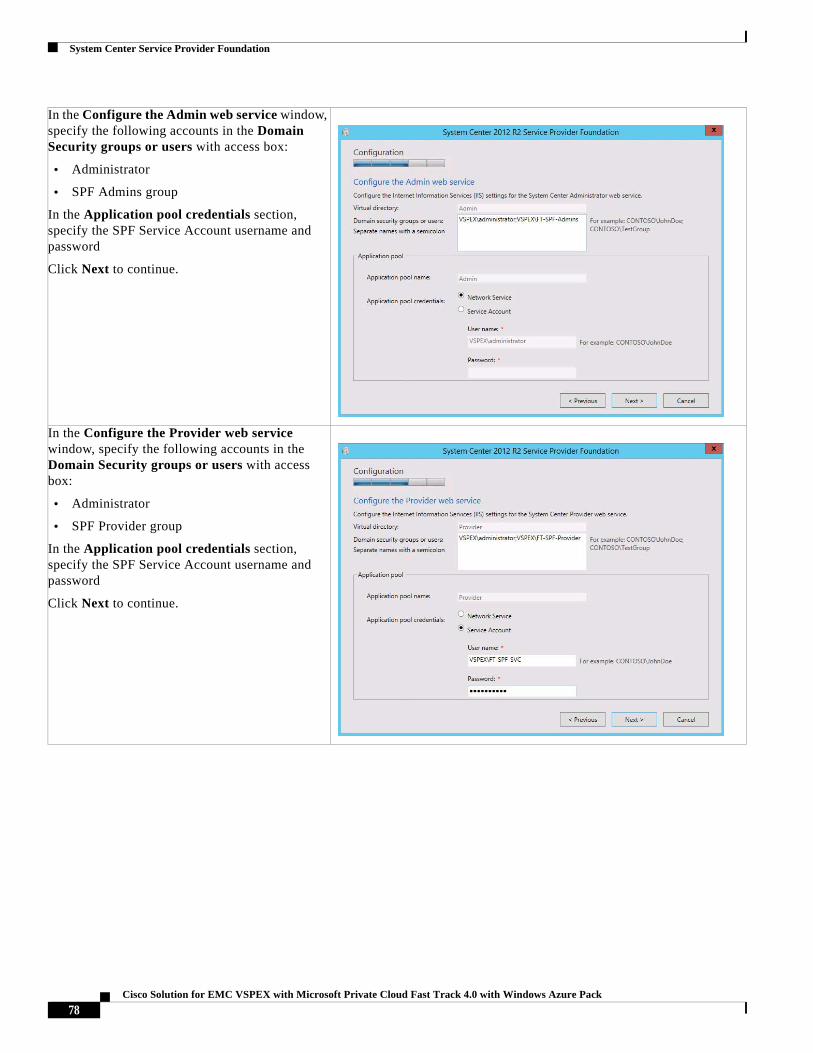
System Center Service Provider Foundation
In the Configure the Admin web service window, specify the following accounts in the Domain Security groups or users with access box:
• Administrator
• SPF Admins group
In the Application pool credentials section, specify the SPF Service Account username and password
Click Next to continue.
In the Configure the Provider web service window, specify the following accounts in the Domain Security groups or users with access box:
• Administrator
• SPF Provider group
In the Application pool credentials section, specify the SPF Service Account username and password
Click Next to continue.
78Cisco Solution for EMC VSPEX with Microsoft Private Cloud Fast Track 4.0 with Windows Azure Pack

System Center Service Provider Foundation
In the Configure the VMM web service window, specify the following accounts in the Domain Security groups or users with access box:
• Administrator
• SPF VMM group
In the Application pool credentials section, specify the SPF Service Account username and password
Click Next to continue.
In the Configure the Usage web service window, specify the following accounts in the Domain Security groups or users with access box:
• Administrator
• SPF Usage group
In the Application pool credentials section, specify the SPF Service Account username and password
Click Next to continue.
79Cisco Solution for EMC VSPEX with Microsoft Private Cloud Fast Track 4.0 with Windows Azure Pack
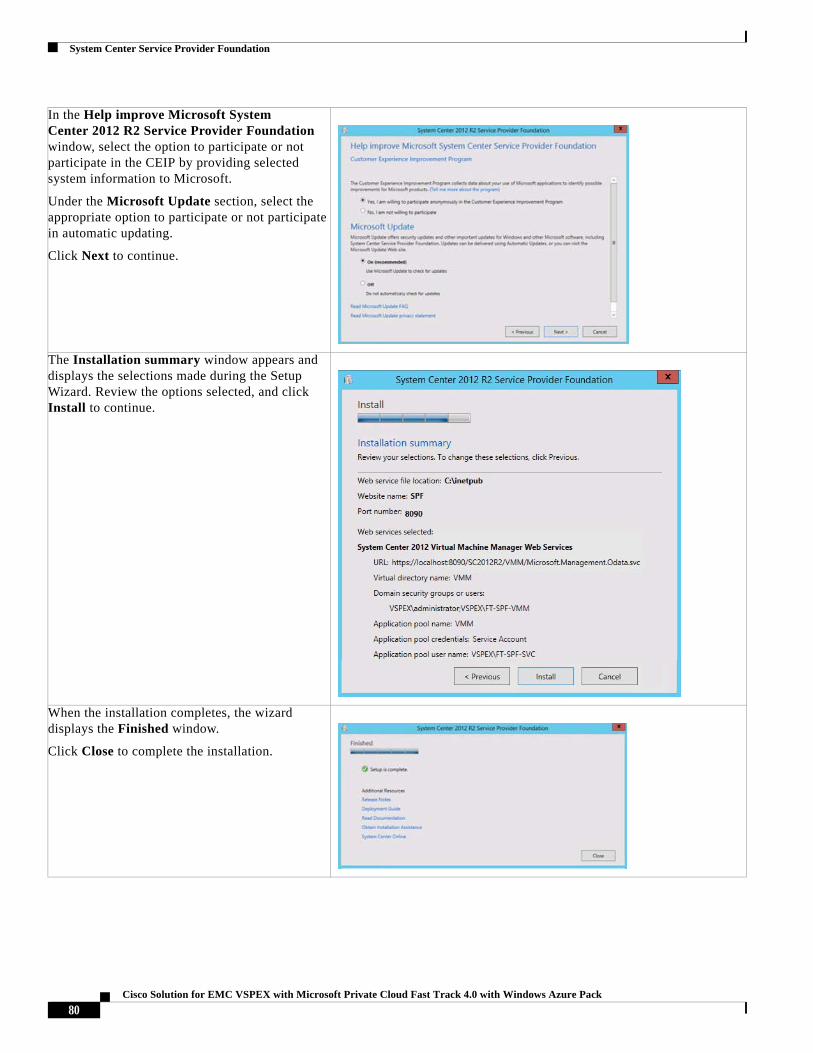
System Center Service Provider Foundation
In the Help improve Microsoft System Center 2012 R2 Service Provider Foundation window, select the option to participate or not participate in the CEIP by providing selected system information to Microsoft.
Under the Microsoft Update section, select the appropriate option to participate or not participate in automatic updating.
Click Next to continue.
The Installation summary window appears and displays the selections made during the Setup Wizard. Review the options selected, and click Install to continue.
When the installation completes, the wizard displays the Finished window.
Click Close to complete the installation.
80Cisco Solution for EMC VSPEX with Microsoft Private Cloud Fast Track 4.0 with Windows Azure Pack
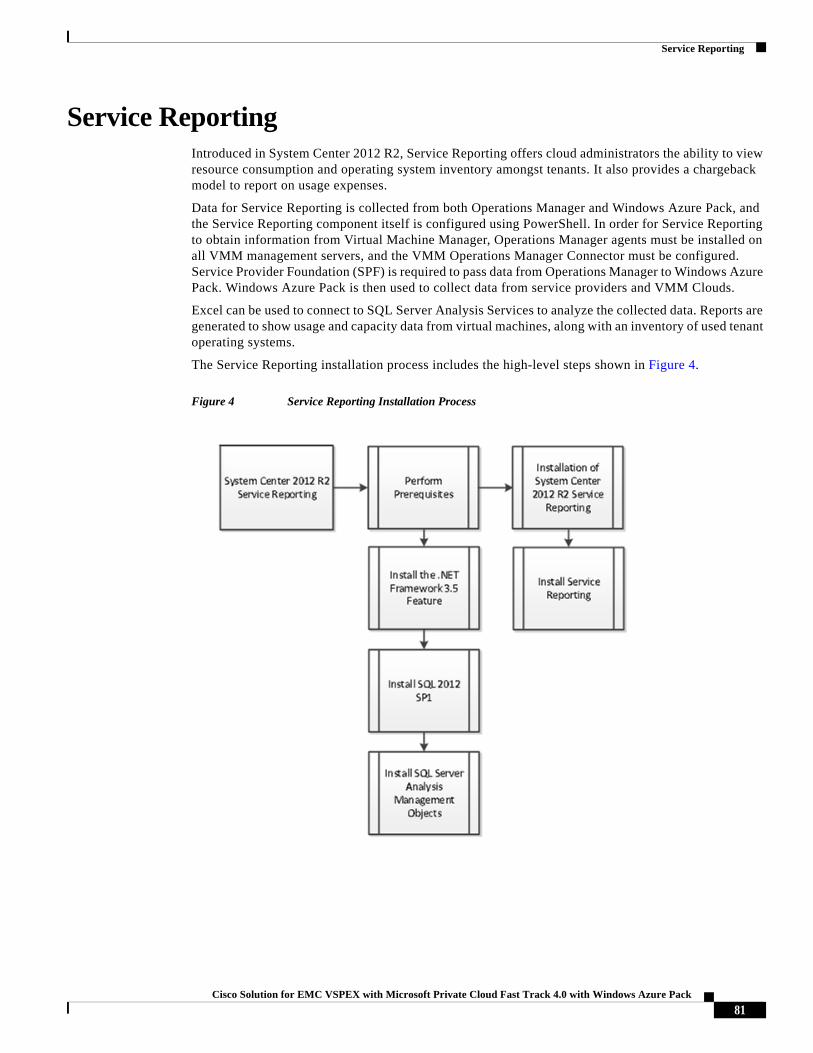
Service Reporting
Service ReportingIntroduced in System Center 2012 R2, Service Reporting offers cloud administrators the ability to view resource consumption and operating system inventory amongst tenants. It also provides a chargeback model to report on usage expenses.
Data for Service Reporting is collected from both Operations Manager and Windows Azure Pack, and the Service Reporting component itself is configured using PowerShell. In order for Service Reporting to obtain information from Virtual Machine Manager, Operations Manager agents must be installed on all VMM management servers, and the VMM Operations Manager Connector must be configured. Service Provider Foundation (SPF) is required to pass data from Operations Manager to Windows Azure Pack. Windows Azure Pack is then used to collect data from service providers and VMM Clouds.
Excel can be used to connect to SQL Server Analysis Services to analyze the collected data. Reports are generated to show usage and capacity data from virtual machines, along with an inventory of used tenant operating systems.
The Service Reporting installation process includes the high-level steps shown in Figure 4.
Figure 4 Service Reporting Installation Process
81Cisco Solution for EMC VSPEX with Microsoft Private Cloud Fast Track 4.0 with Windows Azure Pack
Service Reporting
Overview
Service Reporting in System Center 2012 R2 enables administrators at IT hosting providers to view tenant consumption of virtual machines, resources (computation, network, and storage), and operating system inventory in their infrastructure.
This section provides a high-level walkthrough for how to set up Service Reporting. The following requirements are necessary for the setup:
• A base virtual machine running Windows Server 2012 R2 has been provisioned for Service Reporting.
• .NET Framework 3.5 is installed.
Prerequisites
The following environment prerequisites must be met before proceeding.
Accounts
No specific service accounts are required for this component
Groups
No specific groups are required for this component.
Add .NET Framework 3.5
The Reporting Services installation requires that .NET Framework 3.5 is enabled to support installation. To enable .NET Framework 3.5, follow these steps:
82Cisco Solution for EMC VSPEX with Microsoft Private Cloud Fast Track 4.0 with Windows Azure Pack

Service Reporting
Open Server Manager and navigate to the Dashboard node. In the main pane, under Configure this local server, select Add roles and features.
The Add Roles and Features Wizard starts.
In the Before You Begin window, click Server Selection in the left pane. (Do not click Next.)
83Cisco Solution for EMC VSPEX with Microsoft Private Cloud Fast Track 4.0 with Windows Azure Pack
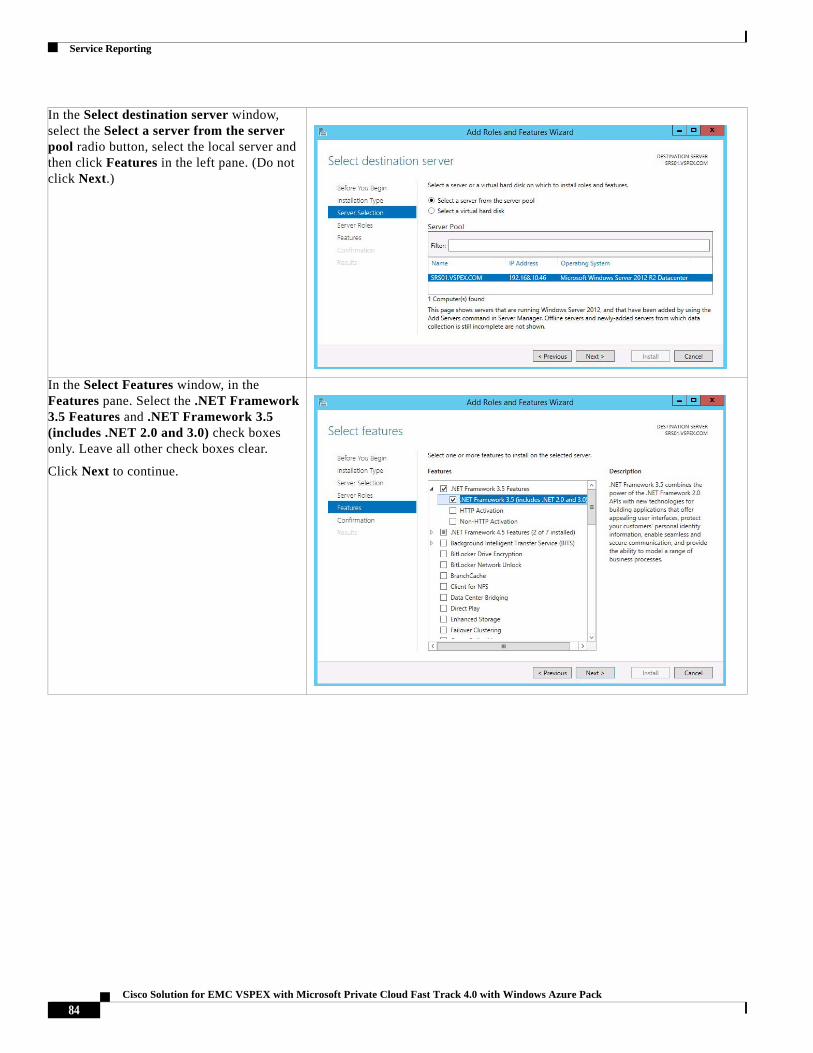
Service Reporting
In the Select destination server window, select the Select a server from the server pool radio button, select the local server and then click Features in the left pane. (Do not click Next.)
In the Select Features window, in the Features pane. Select the .NET Framework 3.5 Features and .NET Framework 3.5 (includes .NET 2.0 and 3.0) check boxes only. Leave all other check boxes clear.
Click Next to continue.
84Cisco Solution for EMC VSPEX with Microsoft Private Cloud Fast Track 4.0 with Windows Azure Pack
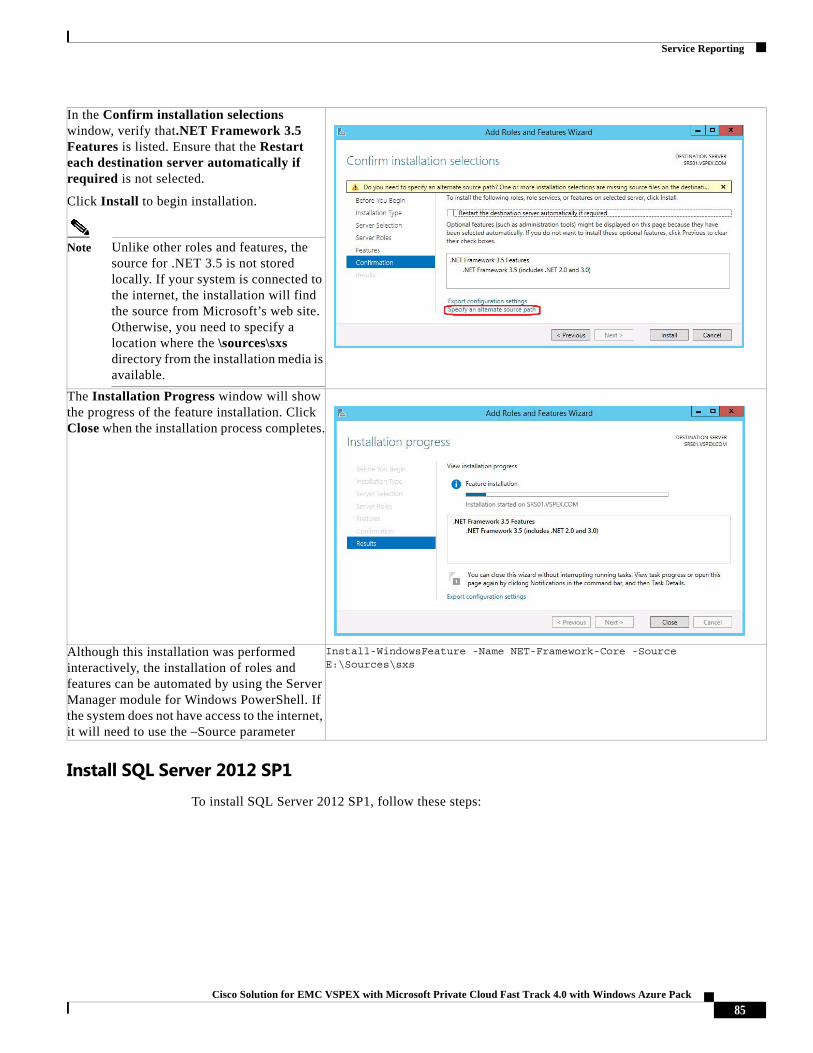
Service Reporting
Install SQL Server 2012 SP1To install SQL Server 2012 SP1, follow these steps:
In the Confirm installation selections window, verify that.NET Framework 3.5 Features is listed. Ensure that the Restart each destination server automatically if required is not selected.
Click Install to begin installation.
Note Unlike other roles and features, the source for .NET 3.5 is not stored locally. If your system is connected to the internet, the installation will find the source from Microsoft’s web site. Otherwise, you need to specify a location where the \sources\sxs directory from the installation media is available.
The Installation Progress window will show the progress of the feature installation. Click Close when the installation process completes.
Although this installation was performed interactively, the installation of roles and features can be automated by using the Server Manager module for Windows PowerShell. If the system does not have access to the internet, it will need to use the –Source parameter
Install-WindowsFeature -Name NET-Framework-Core -Source E:\Sources\sxs
85Cisco Solution for EMC VSPEX with Microsoft Private Cloud Fast Track 4.0 with Windows Azure Pack
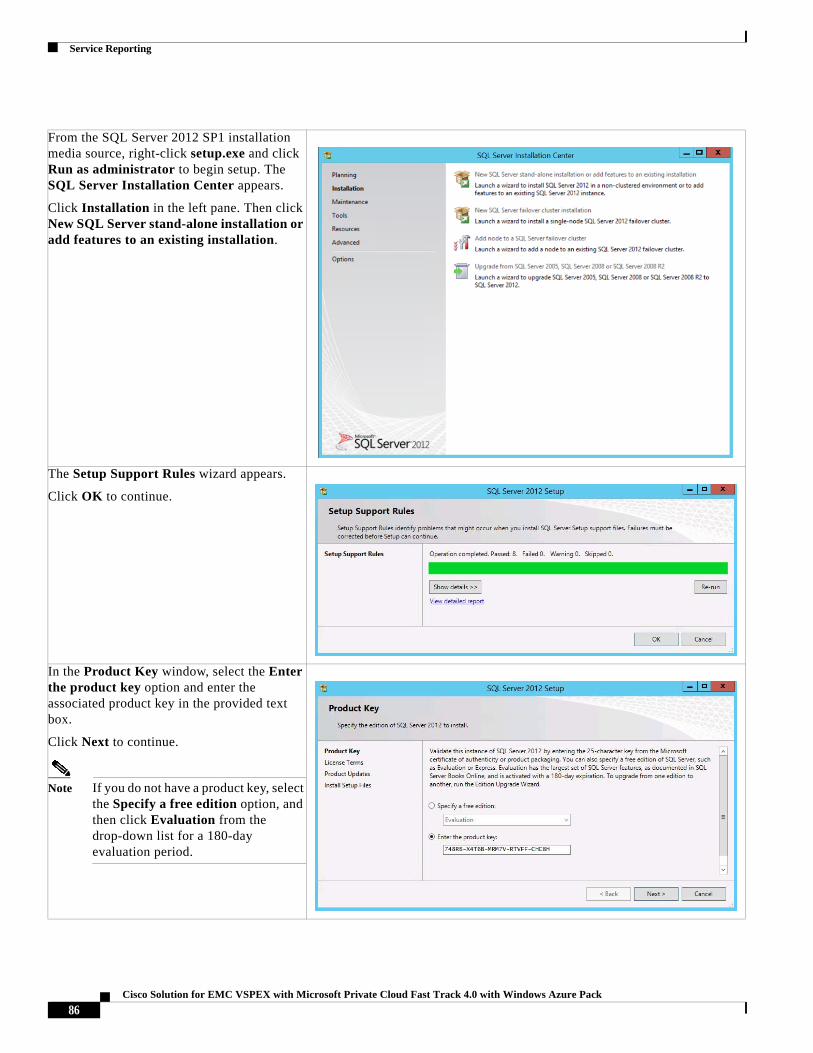
Service Reporting
From the SQL Server 2012 SP1 installation media source, right-click setup.exe and click Run as administrator to begin setup. The SQL Server Installation Center appears.
Click Installation in the left pane. Then click New SQL Server stand-alone installation or add features to an existing installation.
The Setup Support Rules wizard appears.
Click OK to continue.
In the Product Key window, select the Enter the product key option and enter the associated product key in the provided text box.
Click Next to continue.
Note If you do not have a product key, select the Specify a free edition option, and then click Evaluation from the drop-down list for a 180-day evaluation period.
86Cisco Solution for EMC VSPEX with Microsoft Private Cloud Fast Track 4.0 with Windows Azure Pack

Service Reporting
In the License Terms window, select the I accept the license terms check box. Select or clear the Send feature usage data to Microsoft check box, based on your organization’s policies, and click Next to continue.
In the Product Updates window, select the Include SQL Server product updates check box, and click Next to continue.
The setup files will be installed. No action required.
87Cisco Solution for EMC VSPEX with Microsoft Private Cloud Fast Track 4.0 with Windows Azure Pack
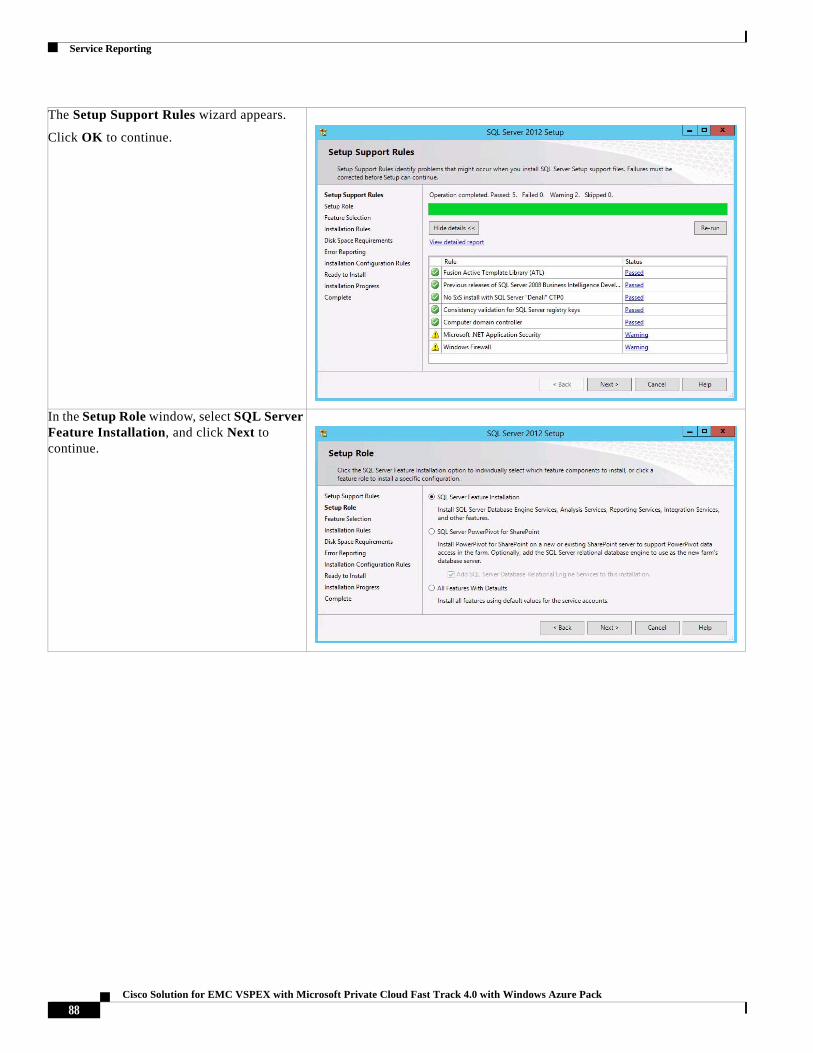
Service Reporting
The Setup Support Rules wizard appears.
Click OK to continue.
In the Setup Role window, select SQL Server Feature Installation, and click Next to continue.
88Cisco Solution for EMC VSPEX with Microsoft Private Cloud Fast Track 4.0 with Windows Azure Pack

Service Reporting
In the Feature Selection window, make the following selections:
• Database Engine Services
• Analysis Services
• Integration Services
• Management Tools-Basic
• Management Tools- Complete
When all selections are made, click Next to continue.
In the Installation Rules window, verify that each rule shows a Passed status. If any rule requires attention, remediate the issue and rerun the validation check.
Click Next to continue.
89Cisco Solution for EMC VSPEX with Microsoft Private Cloud Fast Track 4.0 with Windows Azure Pack
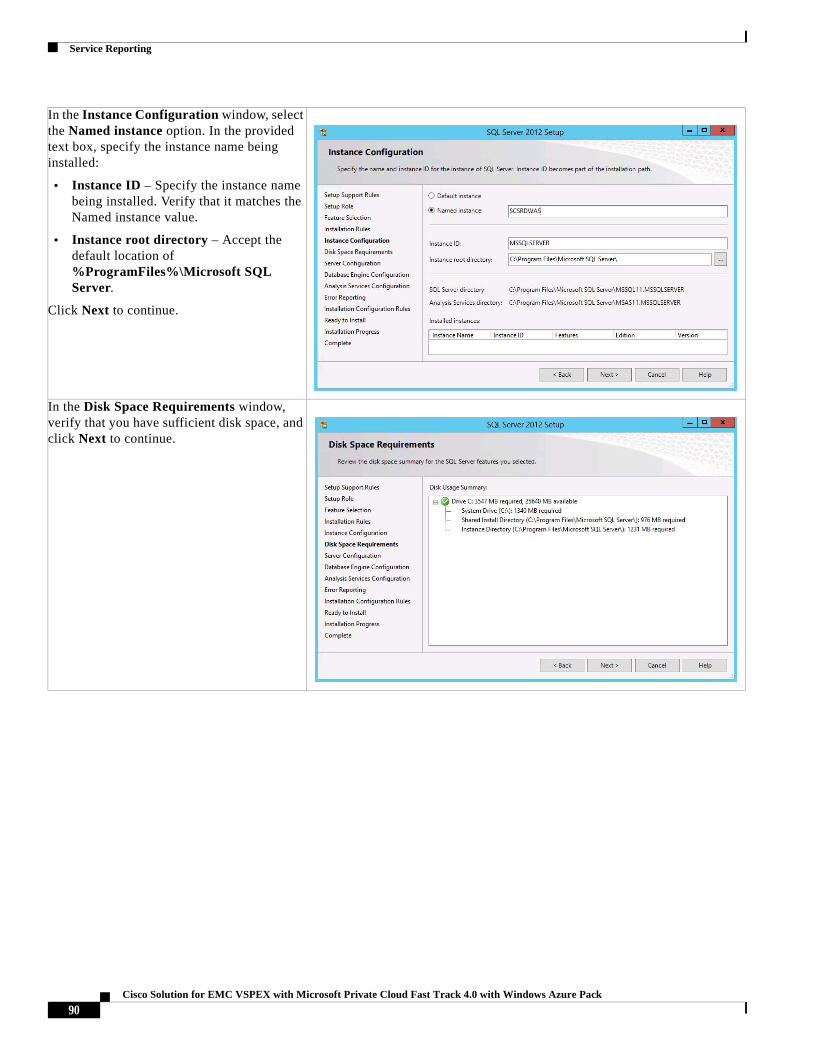
Service Reporting
In the Instance Configuration window, select the Named instance option. In the provided text box, specify the instance name being installed:
• Instance ID – Specify the instance name being installed. Verify that it matches the Named instance value.
• Instance root directory – Accept the default location of %ProgramFiles%\Microsoft SQL Server.
Click Next to continue.
In the Disk Space Requirements window, verify that you have sufficient disk space, and click Next to continue.
90Cisco Solution for EMC VSPEX with Microsoft Private Cloud Fast Track 4.0 with Windows Azure Pack
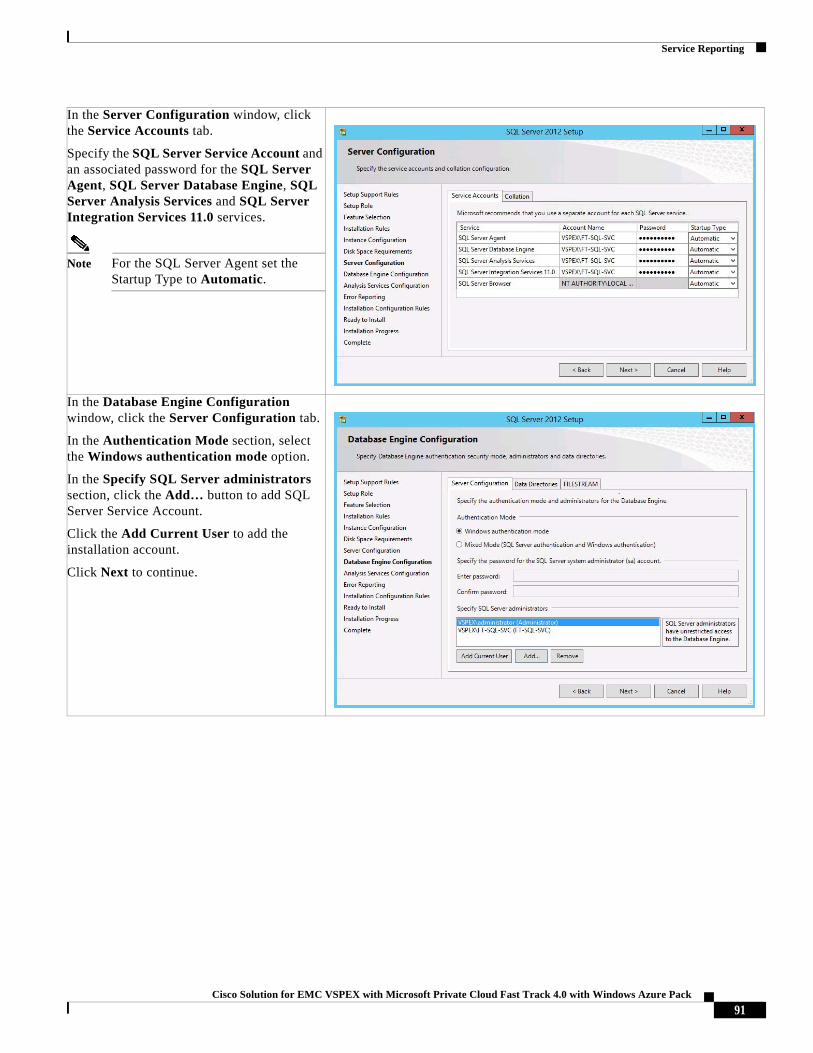
Service Reporting
In the Server Configuration window, click the Service Accounts tab.
Specify the SQL Server Service Account and an associated password for the SQL Server Agent, SQL Server Database Engine, SQL Server Analysis Services and SQL Server Integration Services 11.0 services.
Note For the SQL Server Agent set the Startup Type to Automatic.
In the Database Engine Configuration window, click the Server Configuration tab.
In the Authentication Mode section, select the Windows authentication mode option.
In the Specify SQL Server administrators section, click the Add… button to add SQL Server Service Account.
Click the Add Current User to add the installation account.
Click Next to continue.
91Cisco Solution for EMC VSPEX with Microsoft Private Cloud Fast Track 4.0 with Windows Azure Pack
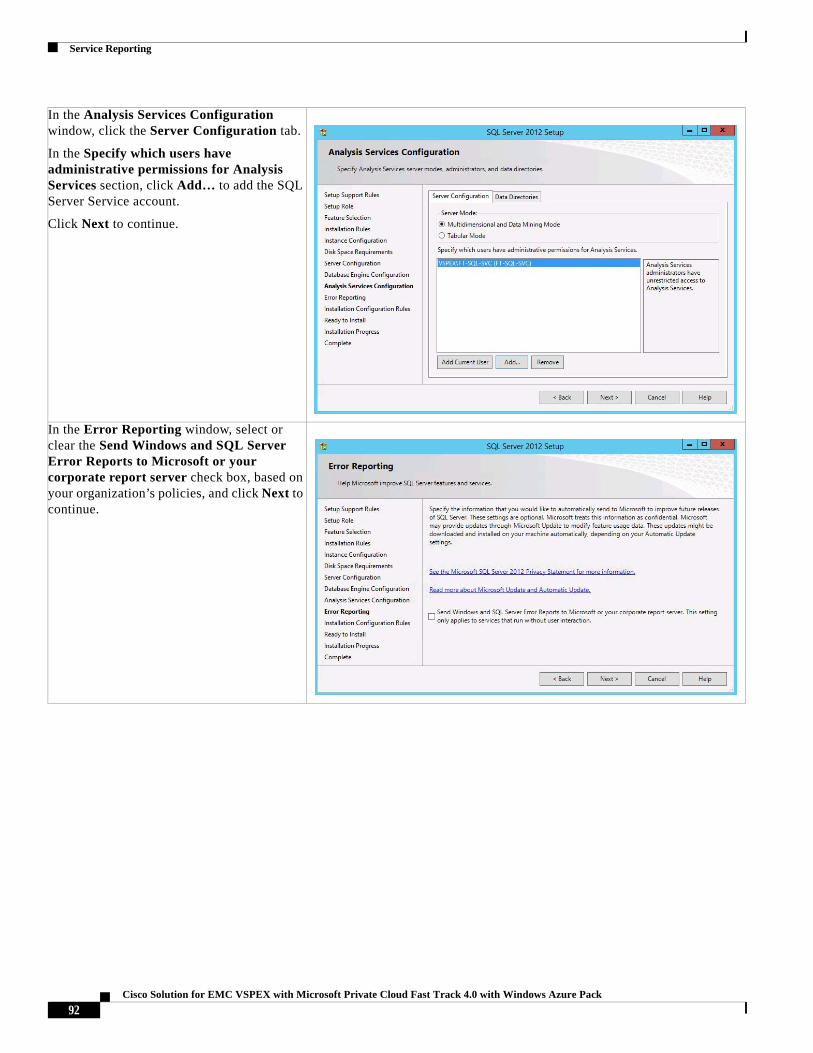
Service Reporting
In the Analysis Services Configuration window, click the Server Configuration tab.
In the Specify which users have administrative permissions for Analysis Services section, click Add… to add the SQL Server Service account.
Click Next to continue.
In the Error Reporting window, select or clear the Send Windows and SQL Server Error Reports to Microsoft or your corporate report server check box, based on your organization’s policies, and click Next to continue.
92Cisco Solution for EMC VSPEX with Microsoft Private Cloud Fast Track 4.0 with Windows Azure Pack
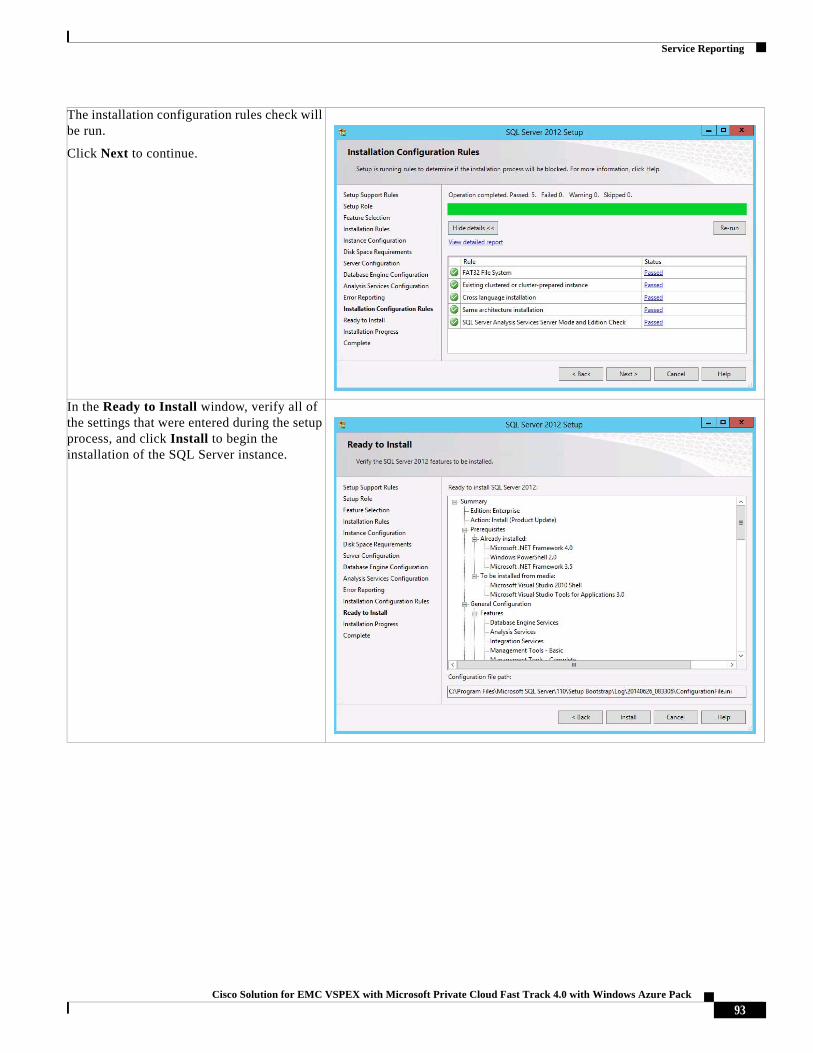
Service Reporting
The installation configuration rules check will be run.
Click Next to continue.
In the Ready to Install window, verify all of the settings that were entered during the setup process, and click Install to begin the installation of the SQL Server instance.
93Cisco Solution for EMC VSPEX with Microsoft Private Cloud Fast Track 4.0 with Windows Azure Pack
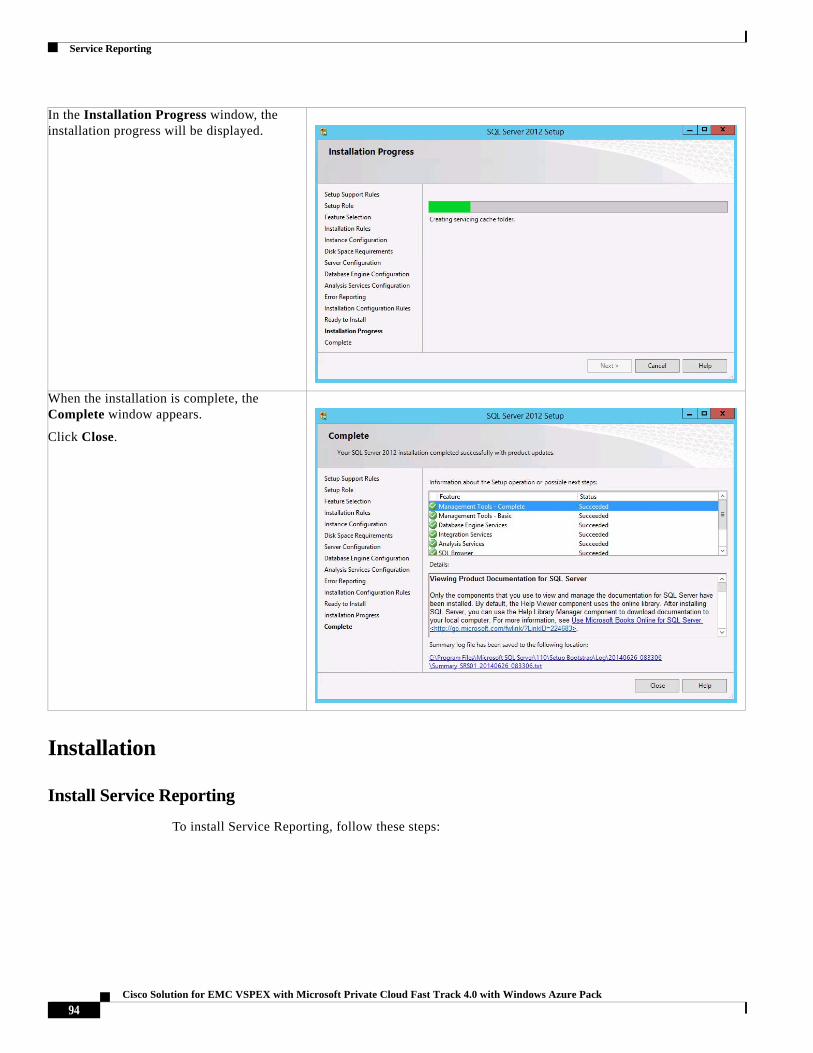
Service Reporting
Installation
Install Service Reporting
To install Service Reporting, follow these steps:
In the Installation Progress window, the installation progress will be displayed.
When the installation is complete, the Complete window appears.
Click Close.
94Cisco Solution for EMC VSPEX with Microsoft Private Cloud Fast Track 4.0 with Windows Azure Pack
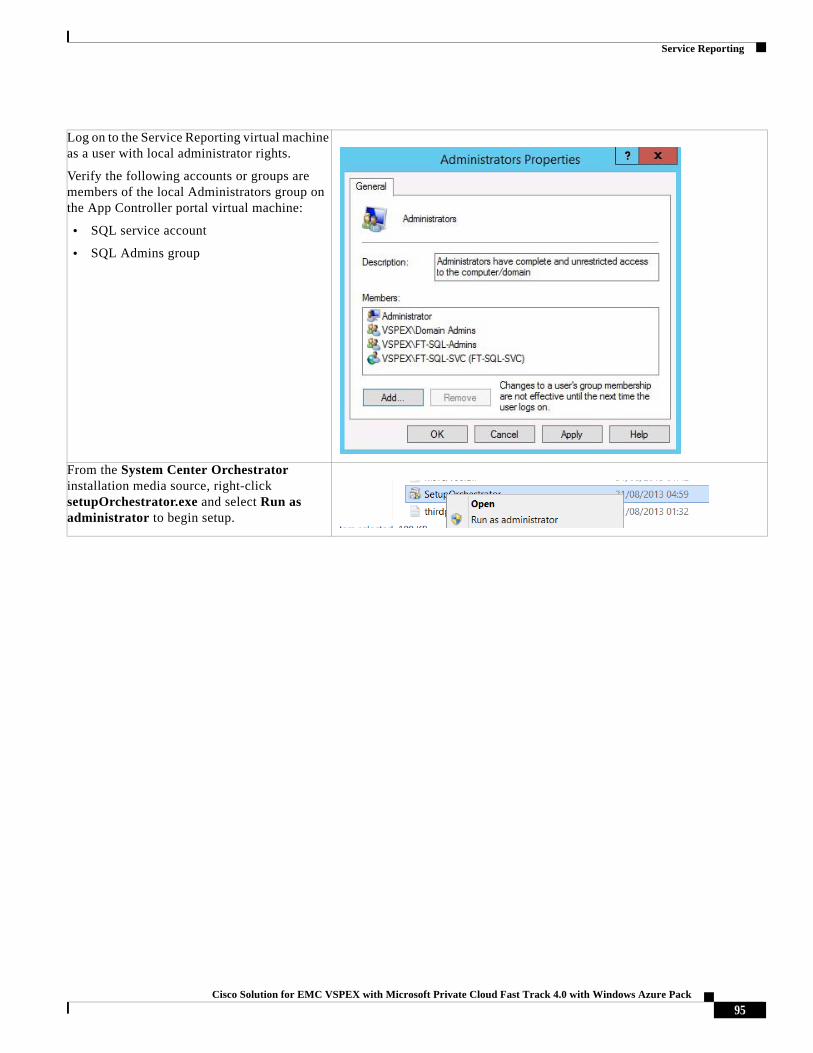
Service Reporting
Log on to the Service Reporting virtual machine as a user with local administrator rights.
Verify the following accounts or groups are members of the local Administrators group on the App Controller portal virtual machine:
• SQL service account
• SQL Admins group
From the System Center Orchestrator installation media source, right-click setupOrchestrator.exe and select Run as administrator to begin setup.
95Cisco Solution for EMC VSPEX with Microsoft Private Cloud Fast Track 4.0 with Windows Azure Pack
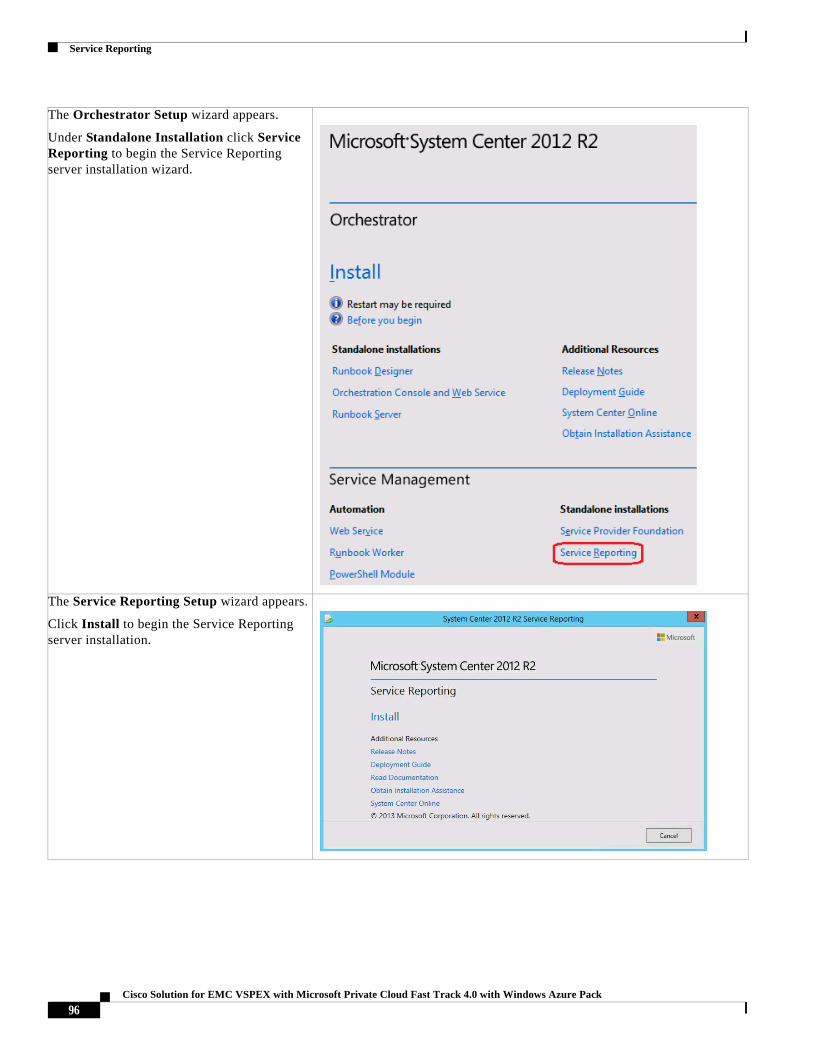
Service Reporting
The Orchestrator Setup wizard appears.
Under Standalone Installation click Service Reporting to begin the Service Reporting server installation wizard.
The Service Reporting Setup wizard appears.
Click Install to begin the Service Reporting server installation.
96Cisco Solution for EMC VSPEX with Microsoft Private Cloud Fast Track 4.0 with Windows Azure Pack
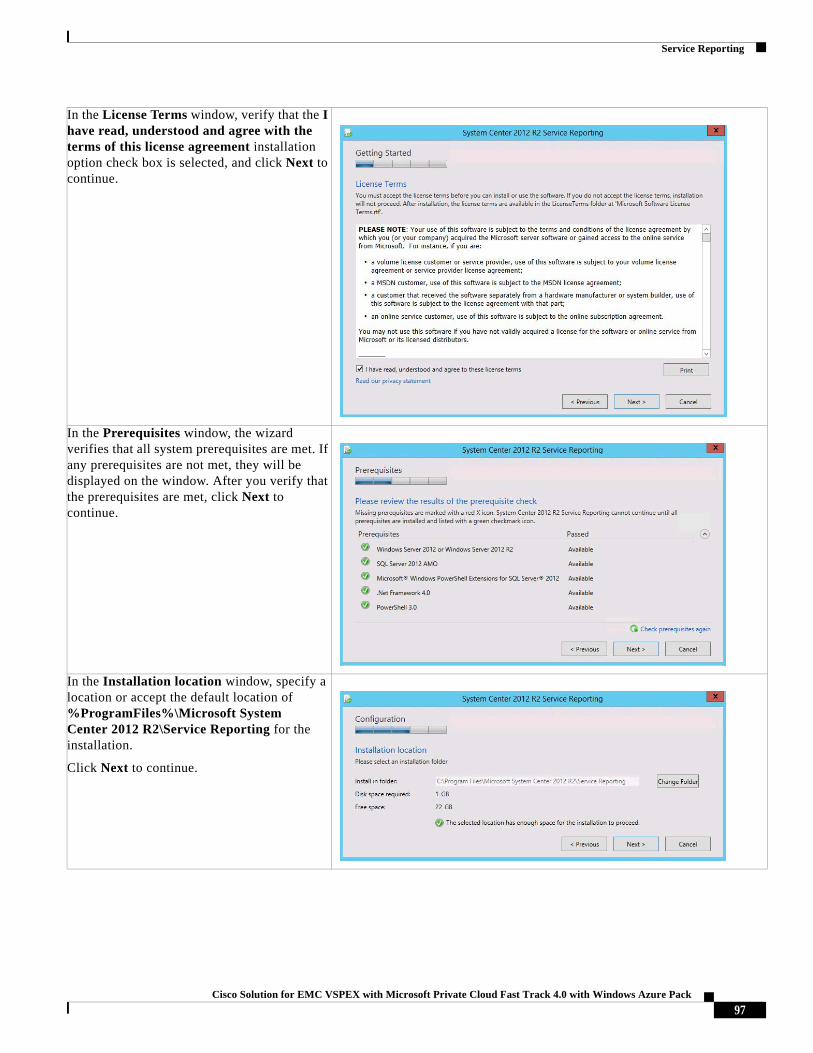
Service Reporting
In the License Terms window, verify that the I have read, understood and agree with the terms of this license agreement installation option check box is selected, and click Next to continue.
In the Prerequisites window, the wizard verifies that all system prerequisites are met. If any prerequisites are not met, they will be displayed on the window. After you verify that the prerequisites are met, click Next to continue.
In the Installation location window, specify a location or accept the default location of %ProgramFiles%\Microsoft System Center 2012 R2\Service Reporting for the installation.
Click Next to continue.
97Cisco Solution for EMC VSPEX with Microsoft Private Cloud Fast Track 4.0 with Windows Azure Pack
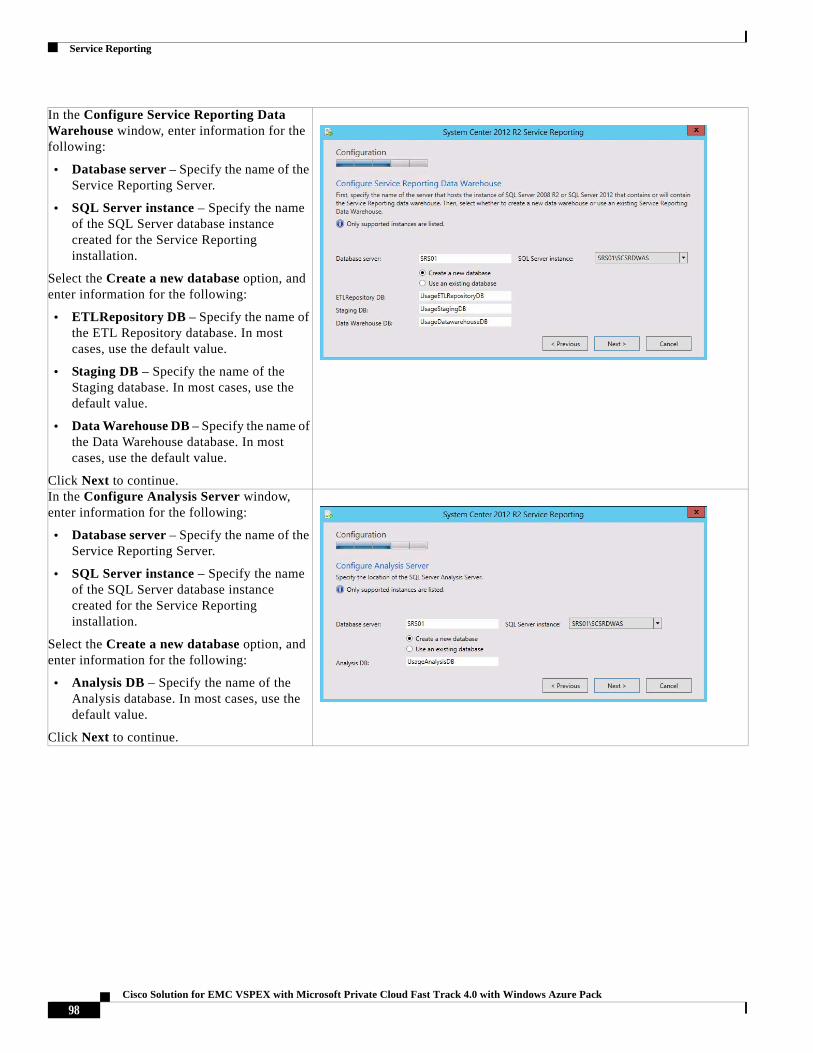
Service Reporting
In the Configure Service Reporting Data Warehouse window, enter information for the following:
• Database server – Specify the name of the Service Reporting Server.
• SQL Server instance – Specify the name of the SQL Server database instance created for the Service Reporting installation.
Select the Create a new database option, and enter information for the following:
• ETLRepository DB – Specify the name of the ETL Repository database. In most cases, use the default value.
• Staging DB – Specify the name of the Staging database. In most cases, use the default value.
• Data Warehouse DB – Specify the name of the Data Warehouse database. In most cases, use the default value.
Click Next to continue.In the Configure Analysis Server window, enter information for the following:
• Database server – Specify the name of the Service Reporting Server.
• SQL Server instance – Specify the name of the SQL Server database instance created for the Service Reporting installation.
Select the Create a new database option, and enter information for the following:
• Analysis DB – Specify the name of the Analysis database. In most cases, use the default value.
Click Next to continue.
98Cisco Solution for EMC VSPEX with Microsoft Private Cloud Fast Track 4.0 with Windows Azure Pack
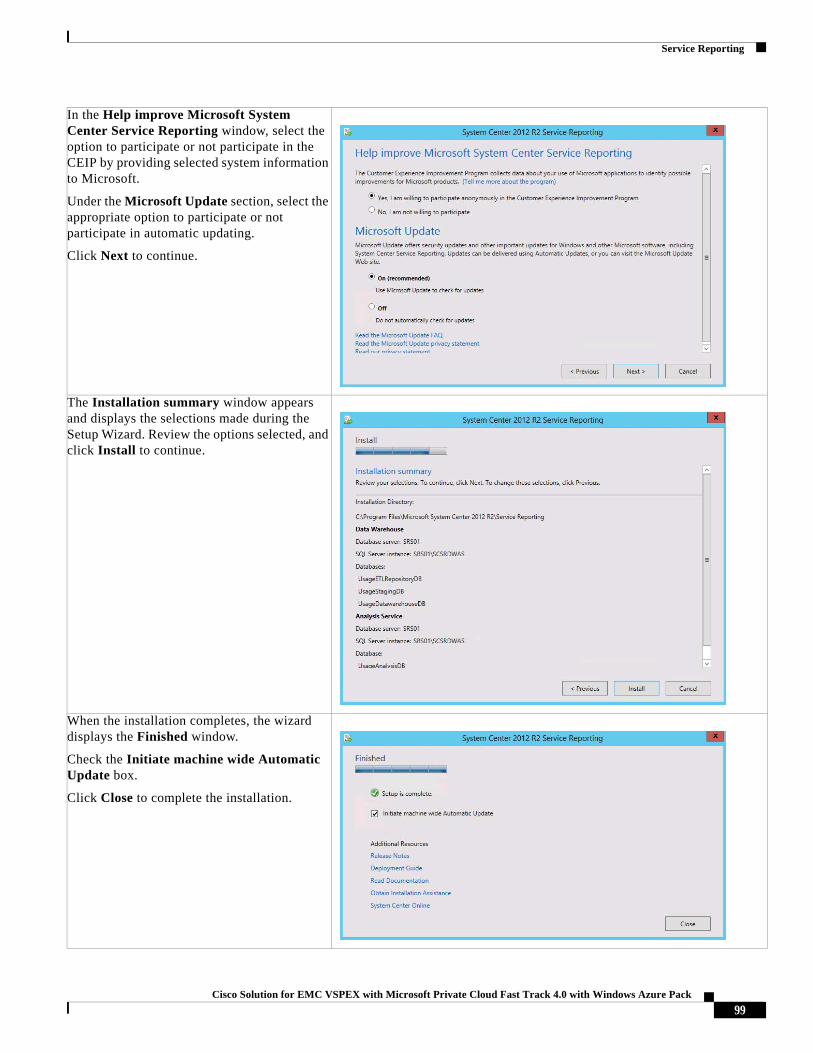
Service Reporting
In the Help improve Microsoft System Center Service Reporting window, select the option to participate or not participate in the CEIP by providing selected system information to Microsoft.
Under the Microsoft Update section, select the appropriate option to participate or not participate in automatic updating.
Click Next to continue.
The Installation summary window appears and displays the selections made during the Setup Wizard. Review the options selected, and click Install to continue.
When the installation completes, the wizard displays the Finished window.
Check the Initiate machine wide Automatic Update box.
Click Close to complete the installation.
99Cisco Solution for EMC VSPEX with Microsoft Private Cloud Fast Track 4.0 with Windows Azure Pack
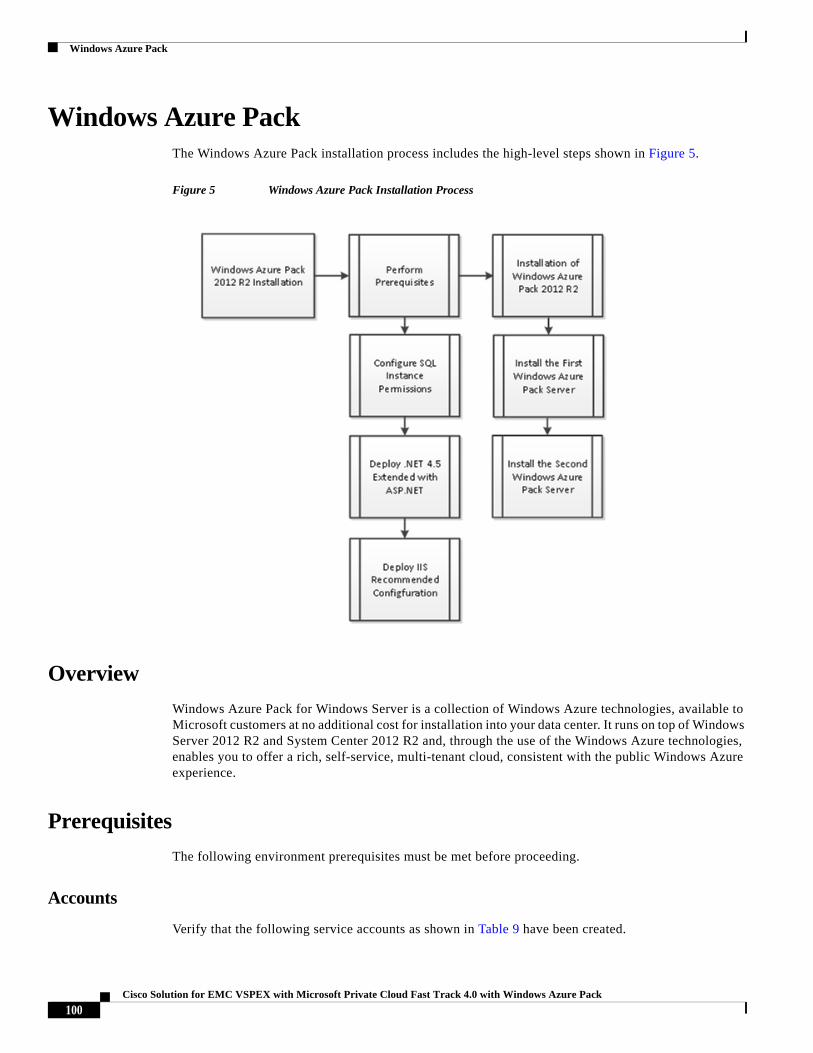
Windows Azure Pack
Windows Azure PackThe Windows Azure Pack installation process includes the high-level steps shown in Figure 5.
Figure 5 Windows Azure Pack Installation Process
Overview
Windows Azure Pack for Windows Server is a collection of Windows Azure technologies, available to Microsoft customers at no additional cost for installation into your data center. It runs on top of Windows Server 2012 R2 and System Center 2012 R2 and, through the use of the Windows Azure technologies, enables you to offer a rich, self-service, multi-tenant cloud, consistent with the public Windows Azure experience.
Prerequisites
The following environment prerequisites must be met before proceeding.
Accounts
Verify that the following service accounts as shown in Table 9 have been created.
100Cisco Solution for EMC VSPEX with Microsoft Private Cloud Fast Track 4.0 with Windows Azure Pack
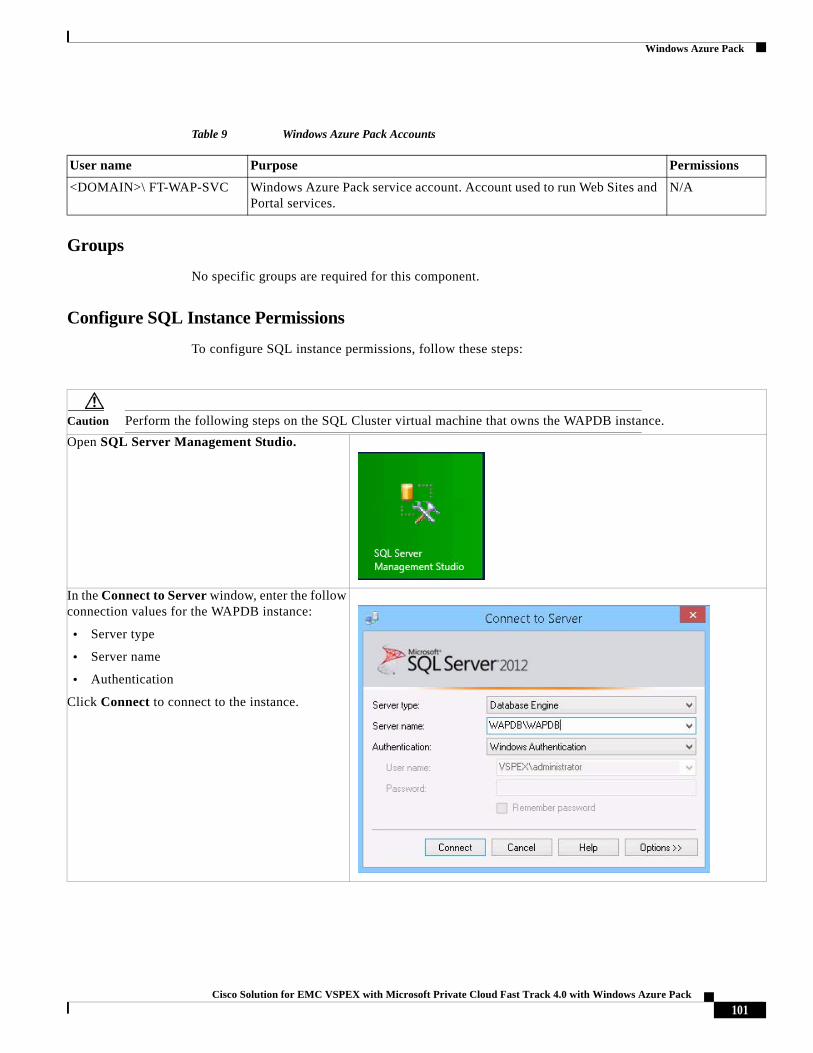
Windows Azure Pack
Groups
No specific groups are required for this component.
Configure SQL Instance Permissions
To configure SQL instance permissions, follow these steps:
Table 9 Windows Azure Pack Accounts
User name Purpose Permissions
<DOMAIN>\ FT-WAP-SVC Windows Azure Pack service account. Account used to run Web Sites and Portal services.
N/A
Caution Perform the following steps on the SQL Cluster virtual machine that owns the WAPDB instance.
Open SQL Server Management Studio.
In the Connect to Server window, enter the follow connection values for the WAPDB instance:
• Server type
• Server name
• Authentication
Click Connect to connect to the instance.
101Cisco Solution for EMC VSPEX with Microsoft Private Cloud Fast Track 4.0 with Windows Azure Pack
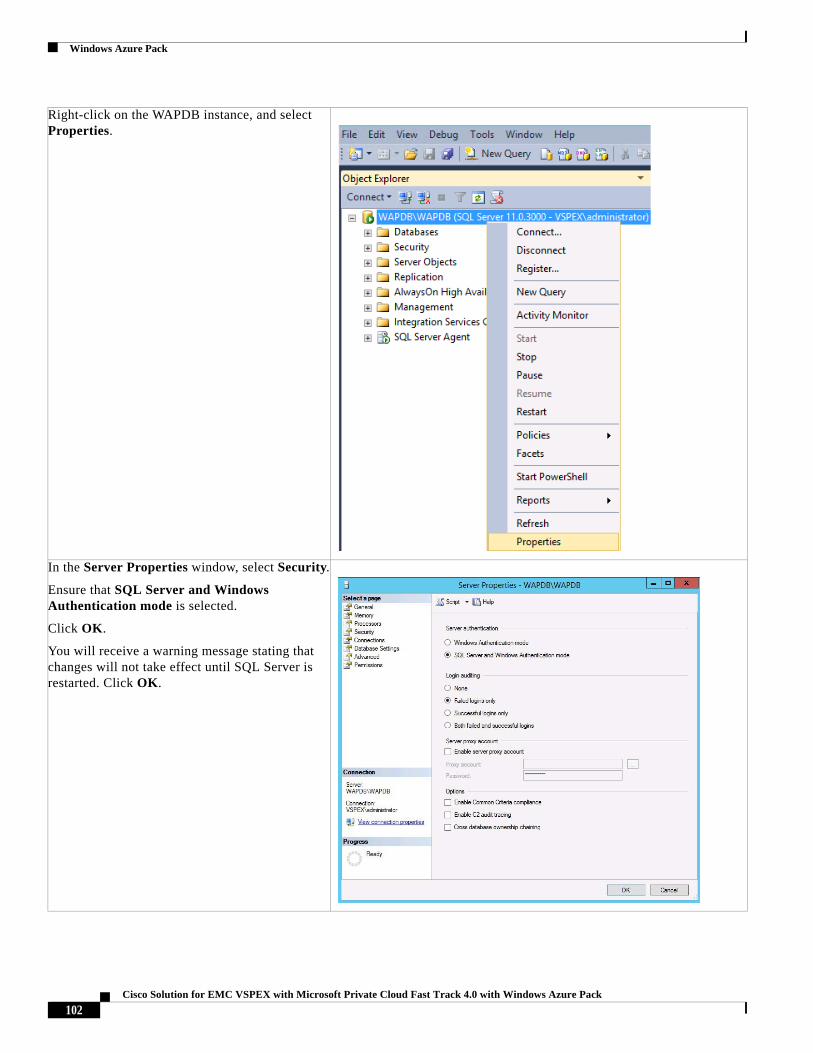
Windows Azure Pack
Right-click on the WAPDB instance, and select Properties.
In the Server Properties window, select Security.
Ensure that SQL Server and Windows Authentication mode is selected.
Click OK.
You will receive a warning message stating that changes will not take effect until SQL Server is restarted. Click OK.
102Cisco Solution for EMC VSPEX with Microsoft Private Cloud Fast Track 4.0 with Windows Azure Pack
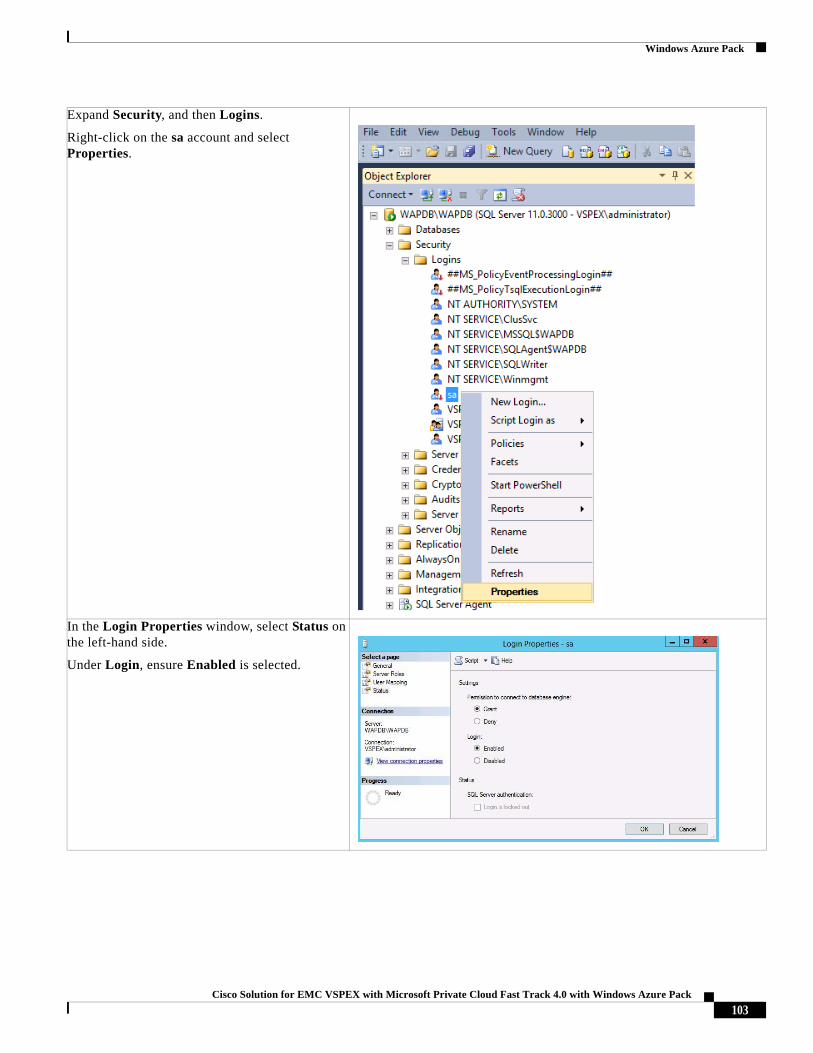
Windows Azure Pack
Expand Security, and then Logins.
Right-click on the sa account and select Properties.
In the Login Properties window, select Status on the left-hand side.
Under Login, ensure Enabled is selected.
103Cisco Solution for EMC VSPEX with Microsoft Private Cloud Fast Track 4.0 with Windows Azure Pack
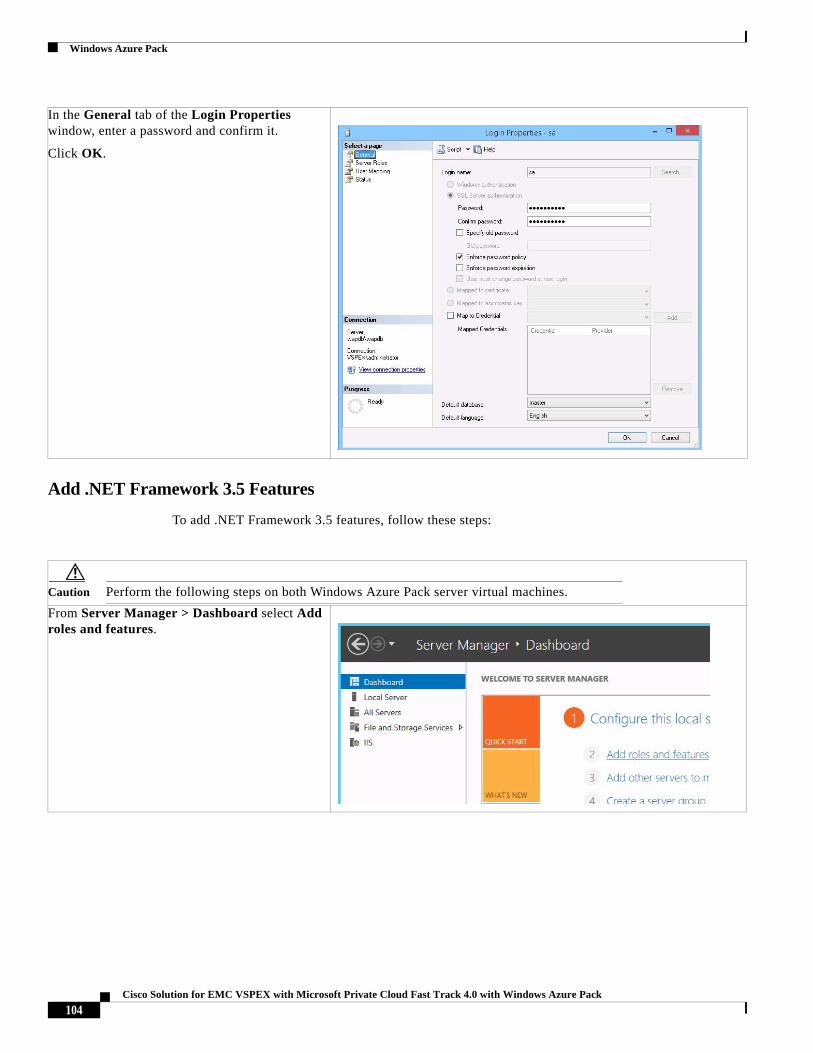
Windows Azure Pack
Add .NET Framework 3.5 Features
To add .NET Framework 3.5 features, follow these steps:
In the General tab of the Login Properties window, enter a password and confirm it.
Click OK.
Caution Perform the following steps on both Windows Azure Pack server virtual machines.
From Server Manager > Dashboard select Add roles and features.
104Cisco Solution for EMC VSPEX with Microsoft Private Cloud Fast Track 4.0 with Windows Azure Pack
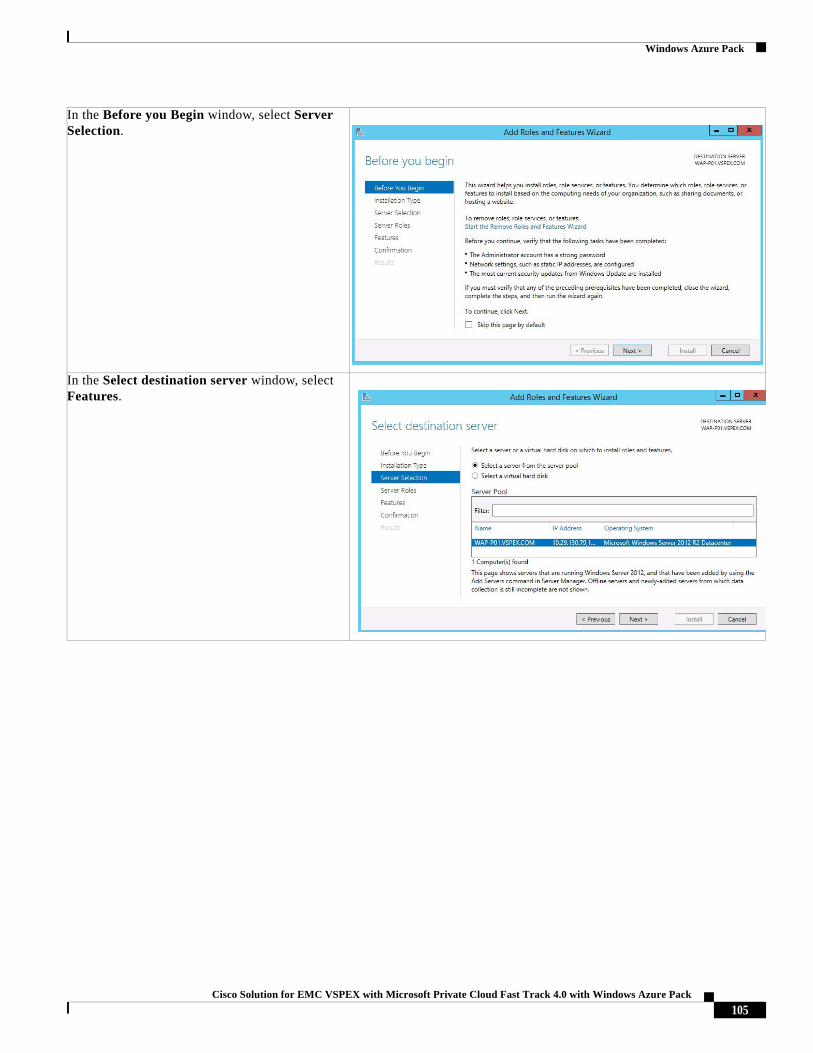
Windows Azure Pack
In the Before you Begin window, select Server Selection.
In the Select destination server window, select Features.
105Cisco Solution for EMC VSPEX with Microsoft Private Cloud Fast Track 4.0 with Windows Azure Pack

Windows Azure Pack
In the Select features window, expand .NET Framework 3.5 Features and select .NET Framework 3.5 (includes .Net 2.0 and 3.0).
Click Next to continue.
In the Confirm installation selections window, you may need to select Specify and alternate source path depending upon your internet connection.
Note .Net Framework 3.5 sources are not installed to disk during the operating system installation. They must be retrieved automatically from Microsoft.com or from an alternate source location.
106Cisco Solution for EMC VSPEX with Microsoft Private Cloud Fast Track 4.0 with Windows Azure Pack
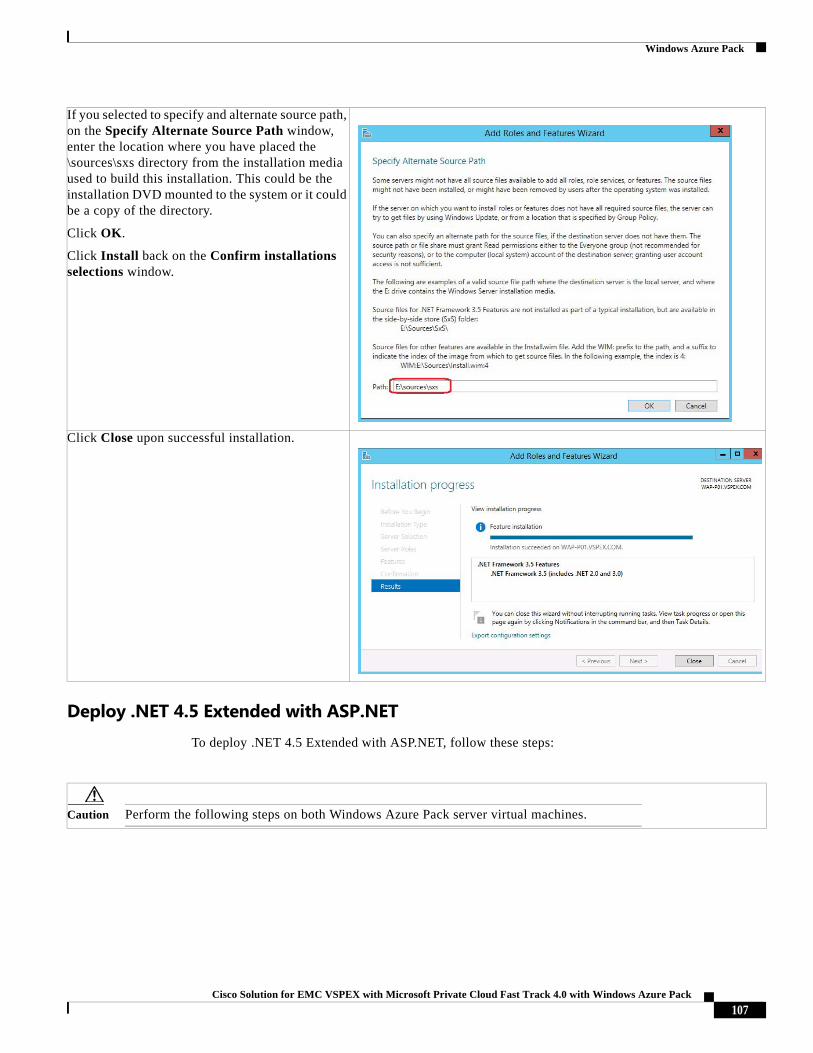
Windows Azure Pack
Deploy .NET 4.5 Extended with ASP.NETTo deploy .NET 4.5 Extended with ASP.NET, follow these steps:
If you selected to specify and alternate source path, on the Specify Alternate Source Path window, enter the location where you have placed the \sources\sxs directory from the installation media used to build this installation. This could be the installation DVD mounted to the system or it could be a copy of the directory.
Click OK.
Click Install back on the Confirm installations selections window.
Click Close upon successful installation.
Caution Perform the following steps on both Windows Azure Pack server virtual machines.
107Cisco Solution for EMC VSPEX with Microsoft Private Cloud Fast Track 4.0 with Windows Azure Pack
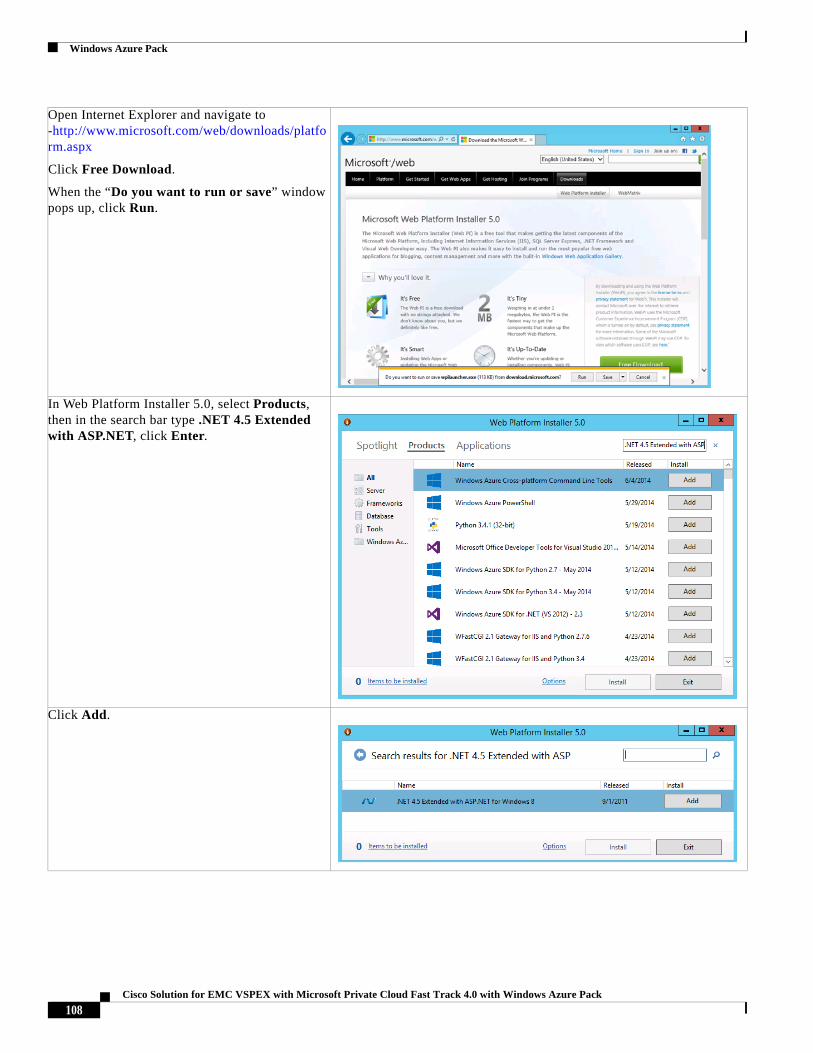
Windows Azure Pack
Open Internet Explorer and navigate to -http://www.microsoft.com/web/downloads/platform.aspx
Click Free Download.
When the “Do you want to run or save” window pops up, click Run.
In Web Platform Installer 5.0, select Products, then in the search bar type .NET 4.5 Extended with ASP.NET, click Enter.
Click Add.
108Cisco Solution for EMC VSPEX with Microsoft Private Cloud Fast Track 4.0 with Windows Azure Pack
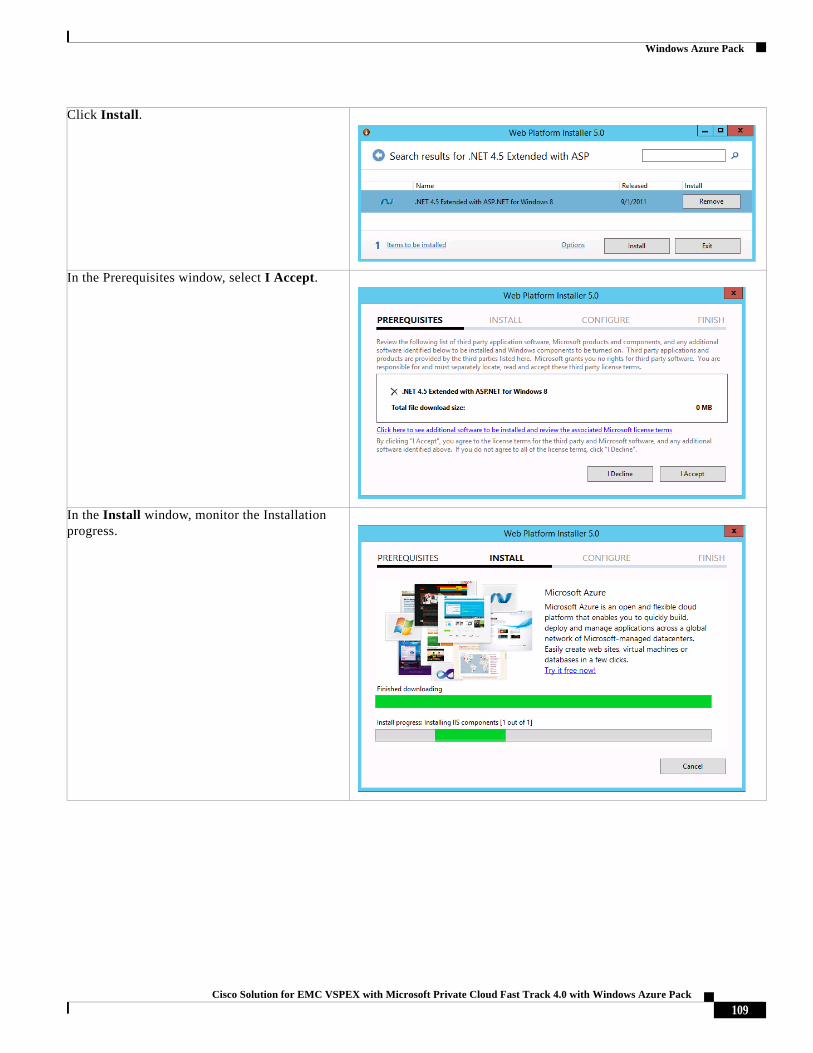
Windows Azure Pack
Click Install.
In the Prerequisites window, select I Accept.
In the Install window, monitor the Installation progress.
109Cisco Solution for EMC VSPEX with Microsoft Private Cloud Fast Track 4.0 with Windows Azure Pack
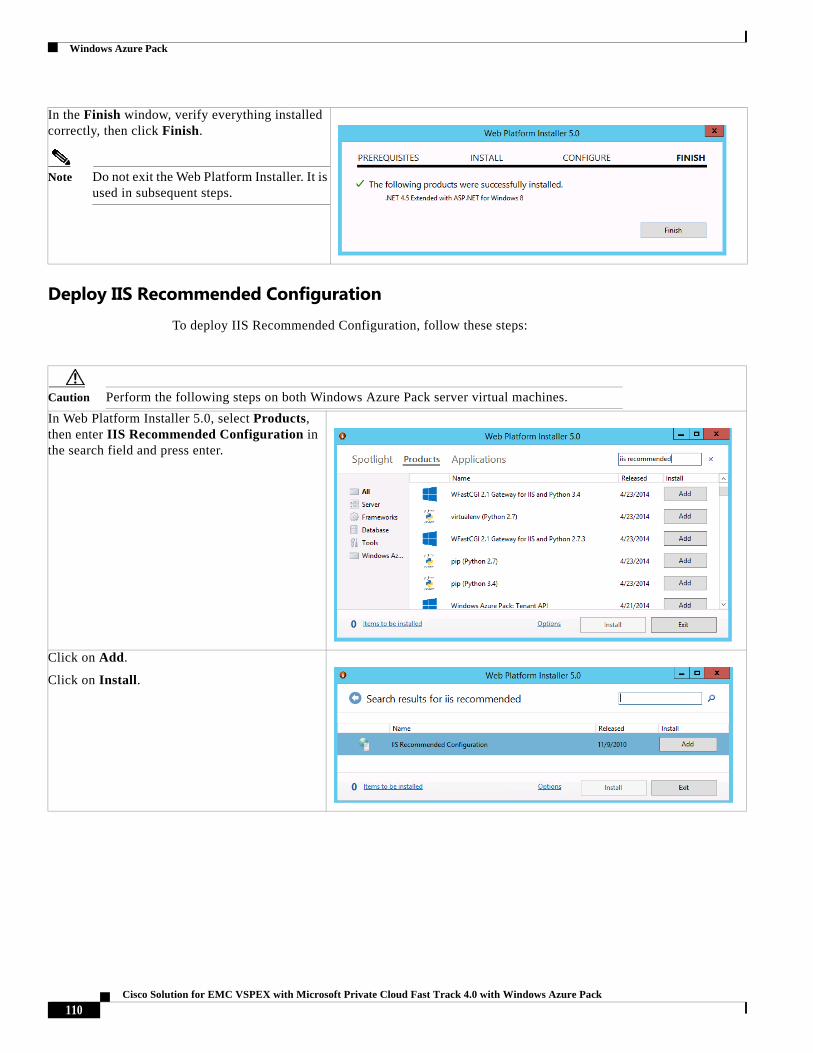
Windows Azure Pack
Deploy IIS Recommended ConfigurationTo deploy IIS Recommended Configuration, follow these steps:
In the Finish window, verify everything installed correctly, then click Finish.
Note Do not exit the Web Platform Installer. It is used in subsequent steps.
Caution Perform the following steps on both Windows Azure Pack server virtual machines.
In Web Platform Installer 5.0, select Products, then enter IIS Recommended Configuration in the search field and press enter.
Click on Add.
Click on Install.
110Cisco Solution for EMC VSPEX with Microsoft Private Cloud Fast Track 4.0 with Windows Azure Pack
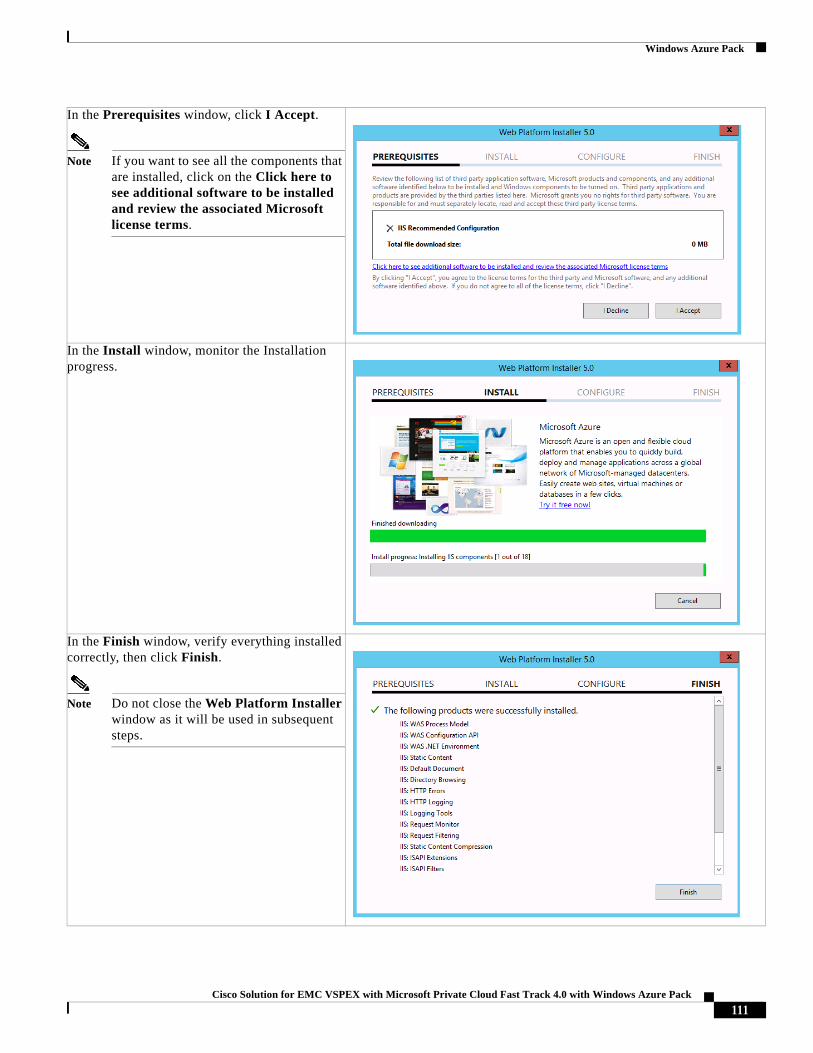
Windows Azure Pack
In the Prerequisites window, click I Accept.
Note If you want to see all the components that are installed, click on the Click here to see additional software to be installed and review the associated Microsoft license terms.
In the Install window, monitor the Installation progress.
In the Finish window, verify everything installed correctly, then click Finish.
Note Do not close the Web Platform Installer window as it will be used in subsequent steps.
111Cisco Solution for EMC VSPEX with Microsoft Private Cloud Fast Track 4.0 with Windows Azure Pack
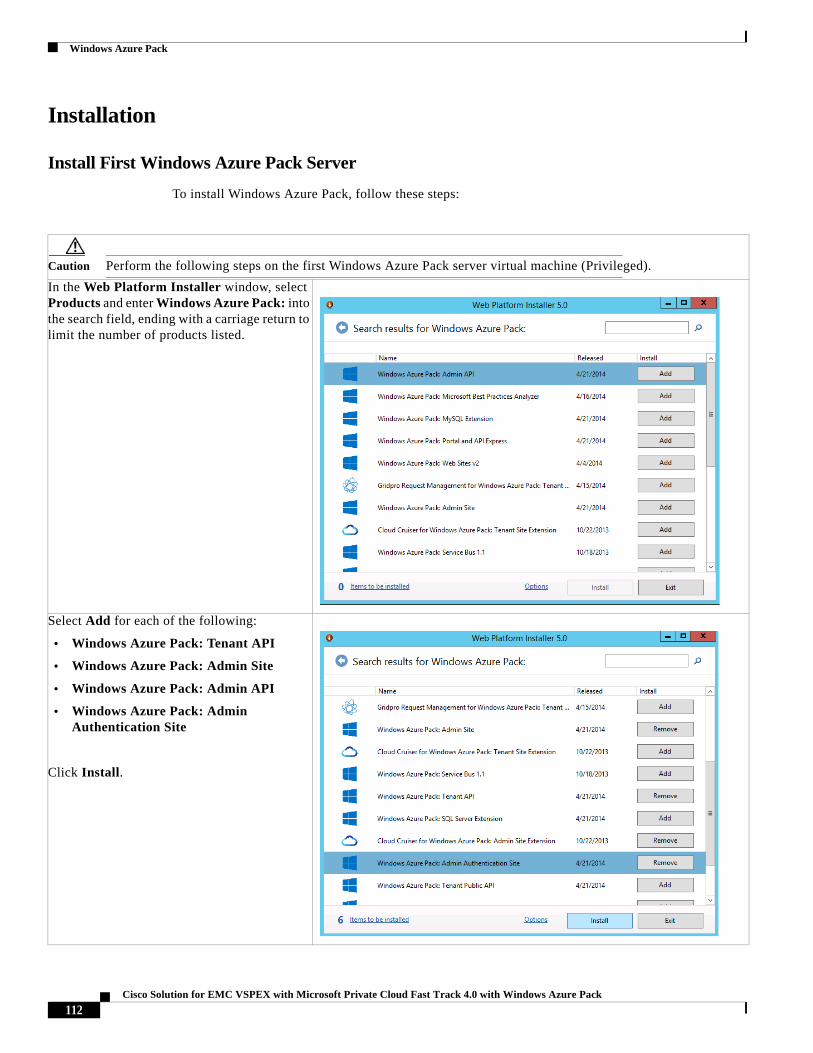
Windows Azure Pack
Installation
Install First Windows Azure Pack Server
To install Windows Azure Pack, follow these steps:
Caution Perform the following steps on the first Windows Azure Pack server virtual machine (Privileged).
In the Web Platform Installer window, select Products and enter Windows Azure Pack: into the search field, ending with a carriage return to limit the number of products listed.
Select Add for each of the following:
• Windows Azure Pack: Tenant API
• Windows Azure Pack: Admin Site
• Windows Azure Pack: Admin API
• Windows Azure Pack: Admin Authentication Site
Click Install.
112Cisco Solution for EMC VSPEX with Microsoft Private Cloud Fast Track 4.0 with Windows Azure Pack
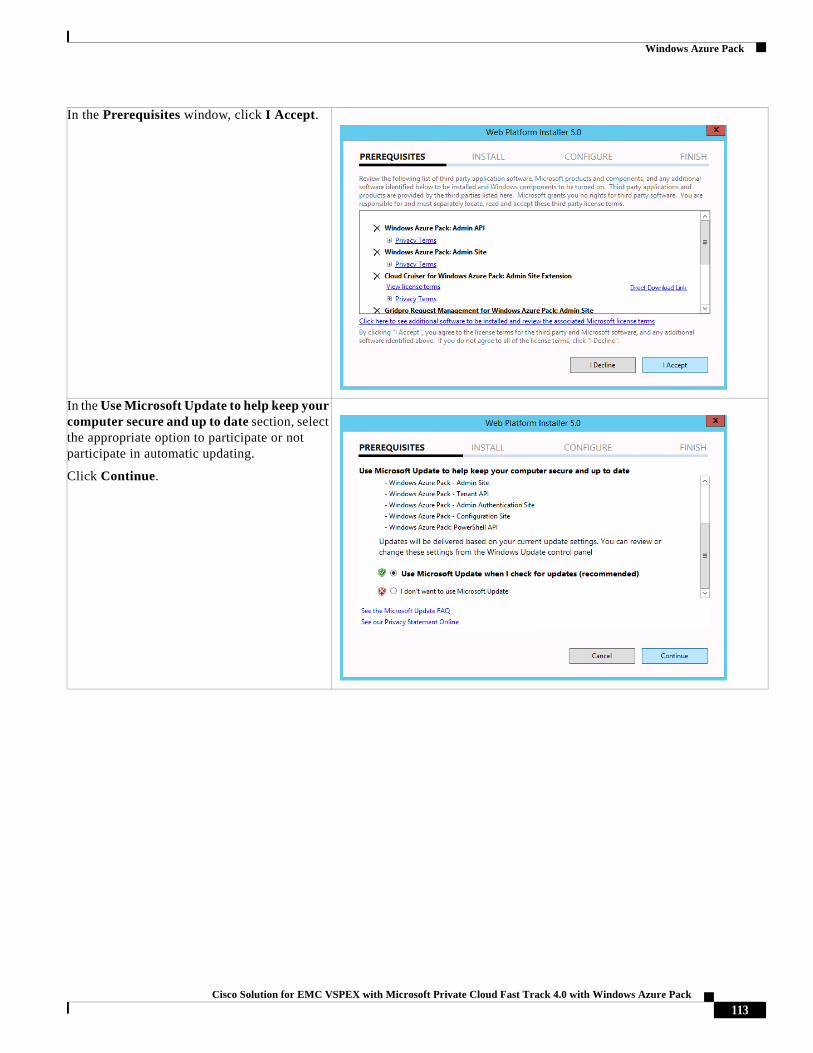
Windows Azure Pack
In the Prerequisites window, click I Accept.
In the Use Microsoft Update to help keep your computer secure and up to date section, select the appropriate option to participate or not participate in automatic updating.
Click Continue.
113Cisco Solution for EMC VSPEX with Microsoft Private Cloud Fast Track 4.0 with Windows Azure Pack
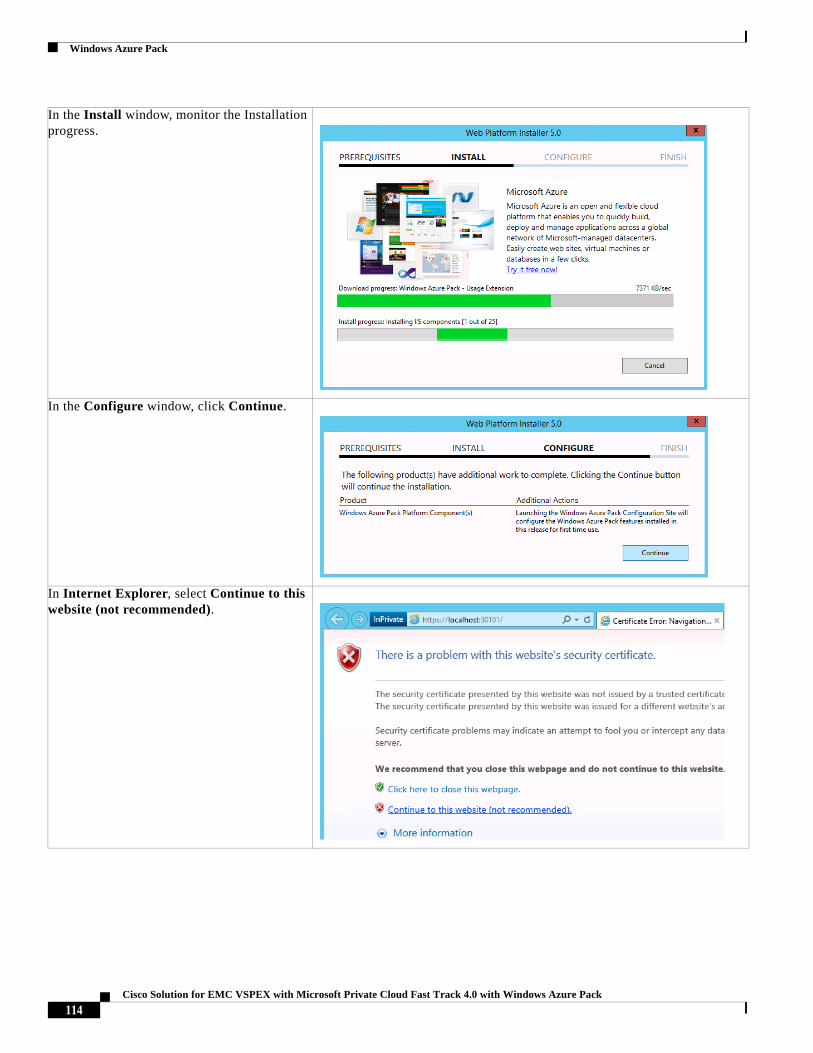
Windows Azure Pack
In the Install window, monitor the Installation progress.
In the Configure window, click Continue.
In Internet Explorer, select Continue to this website (not recommended).
114Cisco Solution for EMC VSPEX with Microsoft Private Cloud Fast Track 4.0 with Windows Azure Pack

Windows Azure Pack
In the Database Server Setup window, enter information for the following:
• Server Name – Specify the name of the Windows Azure Database Instance.
• Authentication Type – Specify SQL Server Authentication.
• Database Server Admin Username – Specify the Windows Azure Pack Database Instance sa account.
• Database Server Admin Password – Specify the Windows Azure Pack Database Instance sa password.
Under Configuration Store, specify and confirm a PassPhrase.
Click the Arrow to continue.
Note There is a timer on the login to the database. If that timer expires while completing the contents of this window, you may have to refresh the web page.
In the Customer Experience Improvement Program window, select the option to participate or not participate in the CEIP by providing selected system information to Microsoft.
Click the Arrow to continue.
In the Ready to configure window, verify the features.
Click the Check box to continue.
115Cisco Solution for EMC VSPEX with Microsoft Private Cloud Fast Track 4.0 with Windows Azure Pack
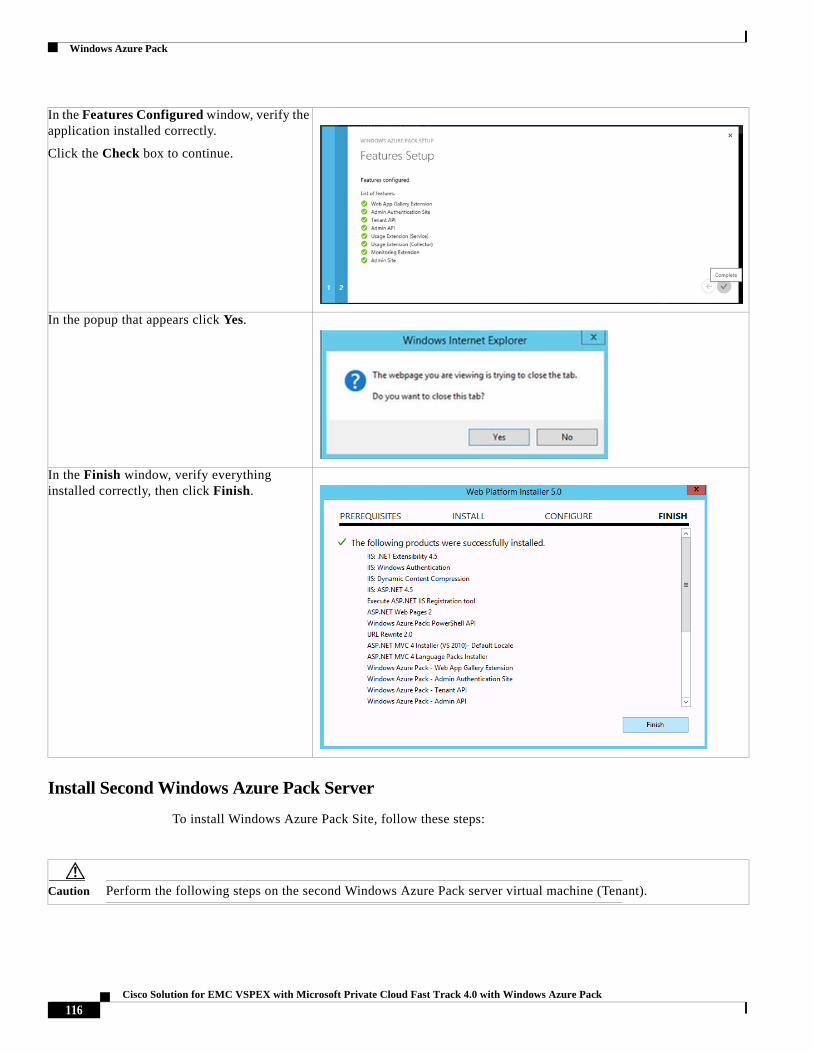
Windows Azure Pack
Install Second Windows Azure Pack Server
To install Windows Azure Pack Site, follow these steps:
In the Features Configured window, verify the application installed correctly.
Click the Check box to continue.
In the popup that appears click Yes.
In the Finish window, verify everything installed correctly, then click Finish.
Caution Perform the following steps on the second Windows Azure Pack server virtual machine (Tenant).
116Cisco Solution for EMC VSPEX with Microsoft Private Cloud Fast Track 4.0 with Windows Azure Pack
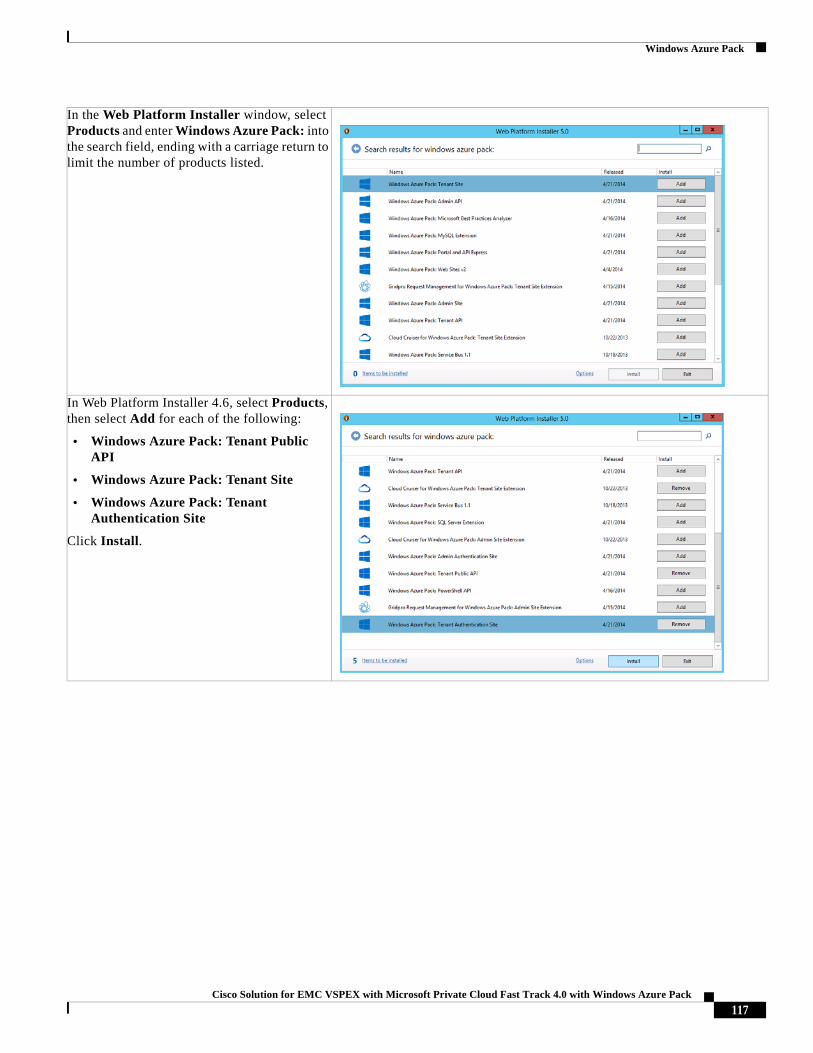
Windows Azure Pack
In the Web Platform Installer window, select Products and enter Windows Azure Pack: into the search field, ending with a carriage return to limit the number of products listed.
In Web Platform Installer 4.6, select Products, then select Add for each of the following:
• Windows Azure Pack: Tenant Public API
• Windows Azure Pack: Tenant Site
• Windows Azure Pack: Tenant Authentication Site
Click Install.
117Cisco Solution for EMC VSPEX with Microsoft Private Cloud Fast Track 4.0 with Windows Azure Pack

Windows Azure Pack
In the Prerequisites window, click I Accept.
In the Use Microsoft Update to help keep your computer secure and up to date section, select the appropriate option to participate or not participate in automatic updating.
Click Continue.
118Cisco Solution for EMC VSPEX with Microsoft Private Cloud Fast Track 4.0 with Windows Azure Pack
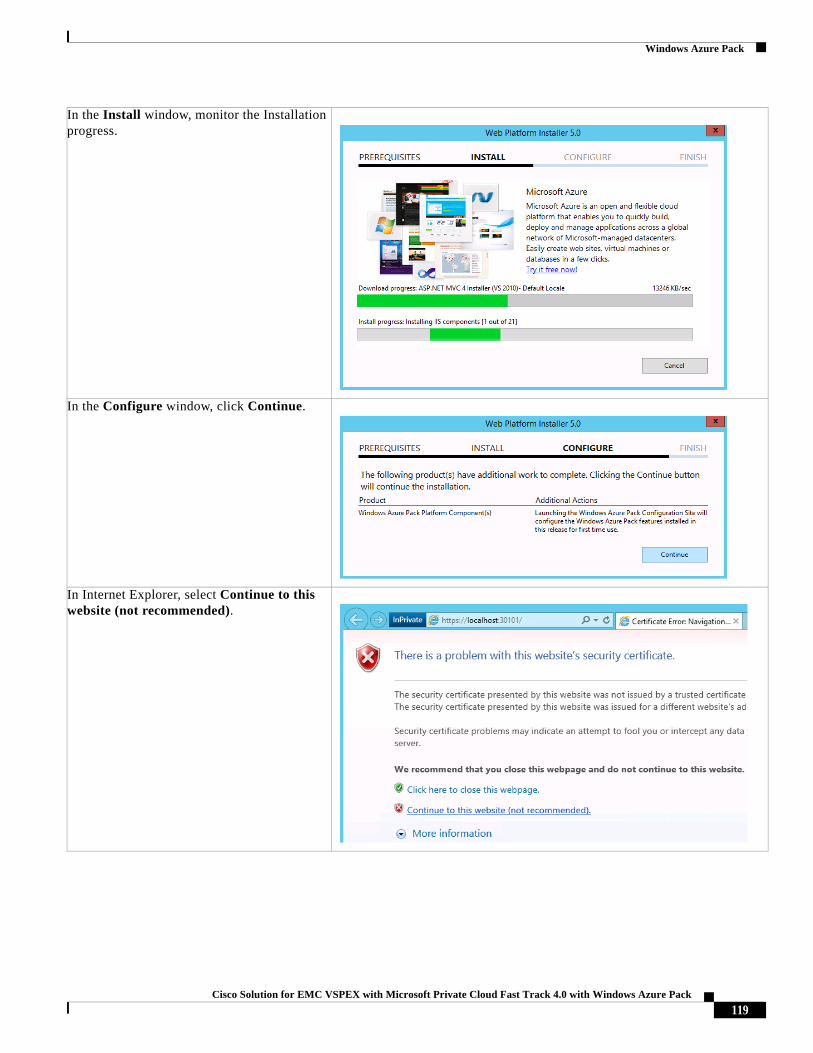
Windows Azure Pack
In the Install window, monitor the Installation progress.
In the Configure window, click Continue.
In Internet Explorer, select Continue to this website (not recommended).
119Cisco Solution for EMC VSPEX with Microsoft Private Cloud Fast Track 4.0 with Windows Azure Pack
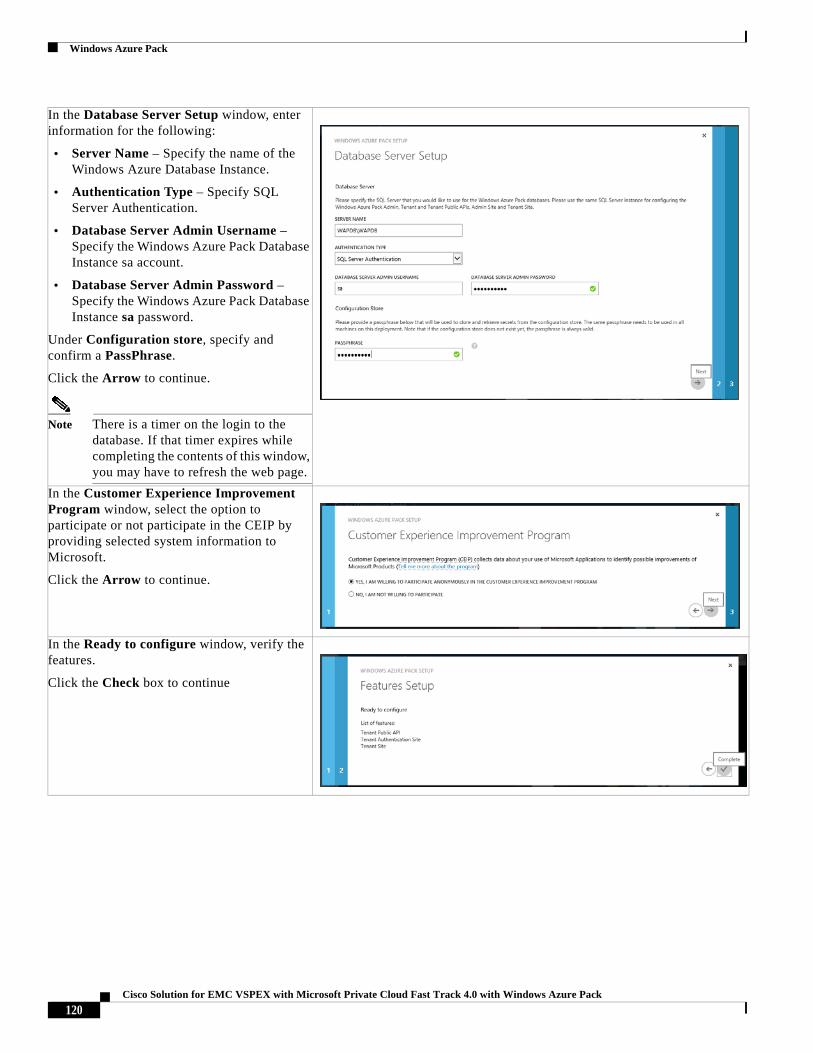
Windows Azure Pack
In the Database Server Setup window, enter information for the following:
• Server Name – Specify the name of the Windows Azure Database Instance.
• Authentication Type – Specify SQL Server Authentication.
• Database Server Admin Username – Specify the Windows Azure Pack Database Instance sa account.
• Database Server Admin Password – Specify the Windows Azure Pack Database Instance sa password.
Under Configuration store, specify and confirm a PassPhrase.
Click the Arrow to continue.
Note There is a timer on the login to the database. If that timer expires while completing the contents of this window, you may have to refresh the web page.
In the Customer Experience Improvement Program window, select the option to participate or not participate in the CEIP by providing selected system information to Microsoft.
Click the Arrow to continue.
In the Ready to configure window, verify the features.
Click the Check box to continue
120Cisco Solution for EMC VSPEX with Microsoft Private Cloud Fast Track 4.0 with Windows Azure Pack

Windows Azure Pack
In the Features Configured window, verify the application installed correctly.
Click the Check box to continue.
In the popup that appears select Yes.
In the Finish window, verify everything installed correctly, then click Finish.
121Cisco Solution for EMC VSPEX with Microsoft Private Cloud Fast Track 4.0 with Windows Azure Pack