Cisco SocialMiner User Guide Release 11.6(2)
74
Cisco SocialMiner User Guide Release 11.6(2) First Published: 2018-08-06 Americas Headquarters Cisco Systems, Inc. 170 West Tasman Drive San Jose, CA 95134-1706 USA http://www.cisco.com Tel: 408 526-4000 800 553-NETS (6387) Fax: 408 527-0883
-
Upload
khangminh22 -
Category
Documents
-
view
4 -
download
0
Transcript of Cisco SocialMiner User Guide Release 11.6(2)
Cisco SocialMiner User Guide Release 11.6(2)First Published: 2018-08-06
Americas HeadquartersCisco Systems, Inc.170 West Tasman DriveSan Jose, CA 95134-1706USAhttp://www.cisco.comTel: 408 526-4000
800 553-NETS (6387)Fax: 408 527-0883

THE SPECIFICATIONS AND INFORMATION REGARDING THE PRODUCTS IN THIS MANUAL ARE SUBJECT TO CHANGE WITHOUT NOTICE. ALL STATEMENTS,INFORMATION, AND RECOMMENDATIONS IN THIS MANUAL ARE BELIEVED TO BE ACCURATE BUT ARE PRESENTED WITHOUT WARRANTY OF ANY KIND,EXPRESS OR IMPLIED. USERS MUST TAKE FULL RESPONSIBILITY FOR THEIR APPLICATION OF ANY PRODUCTS.
THE SOFTWARE LICENSE AND LIMITED WARRANTY FOR THE ACCOMPANYING PRODUCT ARE SET FORTH IN THE INFORMATION PACKET THAT SHIPPED WITHTHE PRODUCT AND ARE INCORPORATED HEREIN BY THIS REFERENCE. IF YOU ARE UNABLE TO LOCATE THE SOFTWARE LICENSE OR LIMITED WARRANTY,CONTACT YOUR CISCO REPRESENTATIVE FOR A COPY.
The Cisco implementation of TCP header compression is an adaptation of a program developed by the University of California, Berkeley (UCB) as part of UCB's public domain version ofthe UNIX operating system. All rights reserved. Copyright © 1981, Regents of the University of California.
NOTWITHSTANDING ANY OTHERWARRANTY HEREIN, ALL DOCUMENT FILES AND SOFTWARE OF THESE SUPPLIERS ARE PROVIDED “AS IS" WITH ALL FAULTS.CISCO AND THE ABOVE-NAMED SUPPLIERS DISCLAIM ALL WARRANTIES, EXPRESSED OR IMPLIED, INCLUDING, WITHOUT LIMITATION, THOSE OFMERCHANTABILITY, FITNESS FOR A PARTICULAR PURPOSE AND NONINFRINGEMENT OR ARISING FROM A COURSE OF DEALING, USAGE, OR TRADE PRACTICE.
IN NO EVENT SHALL CISCO OR ITS SUPPLIERS BE LIABLE FOR ANY INDIRECT, SPECIAL, CONSEQUENTIAL, OR INCIDENTAL DAMAGES, INCLUDING, WITHOUTLIMITATION, LOST PROFITS OR LOSS OR DAMAGE TO DATA ARISING OUT OF THE USE OR INABILITY TO USE THIS MANUAL, EVEN IF CISCO OR ITS SUPPLIERSHAVE BEEN ADVISED OF THE POSSIBILITY OF SUCH DAMAGES.
Any Internet Protocol (IP) addresses and phone numbers used in this document are not intended to be actual addresses and phone numbers. Any examples, command display output, networktopology diagrams, and other figures included in the document are shown for illustrative purposes only. Any use of actual IP addresses or phone numbers in illustrative content is unintentionaland coincidental.
Cisco and the Cisco logo are trademarks or registered trademarks of Cisco and/or its affiliates in the U.S. and other countries. To view a list of Cisco trademarks, go to this URL: www.cisco.comgo trademarks. Third-party trademarks mentioned are the property of their respective owners. The use of the word partner does not imply a partnership relationship between Cisco and anyother company. (1721R)
© 2018 Cisco Systems, Inc. All rights reserved.
C O N T E N T S
Preface viiP R E F A C E
Change History vii
About this Guide vii
Audience vii
Related Documents viii
Obtaining Documentation and Submitting a Service Request viii
Documentation Feedback viii
SocialMiner 1C H A P T E R 1
Technology and Packaging 1
Launch and Use SocialMiner 3C H A P T E R 2
Account Locked After Five Failed Sign In Attempts 4
The SocialMiner Interface 4
Home Tab 5
Working with Contacts 7
Show Contacts by State 7
Change Contact State 8
Tagging Contacts 9
Replying to Contacts 10
Replying to a Chat Social Contact 11
Customer Chat 11
Replying to a Callback Contact 14
Replying to an Email Contact 14
Replying to a Task Contact 14
Settings 14
Cisco SocialMiner User Guide Release 11.6(2)iii
Chat Settings 14
Train Bayesian Filters 15
Show Tags 16
Search 16
SocialMiner Configuration 19C H A P T E R 3
Feeds 19
Push Feed 21
Chat Feed 22
Callback Feed 25
Email Feed 25
Task Feed 25
Campaigns 26
Add Campaign 26
Edit Campaign 27
Delete Campaign 27
Reply Templates 27
Add Custom Reply Template 28
Filters 28
Bayesian Filters 29
Author Filters 30
Script Filters 30
Notifications 31
Add and Edit Notifications 32
Notification Body Variables 33
System Administration 35C H A P T E R 4
System Administration Panel 35
System Status and Statistics 35
Active Directory 36
Mail Notifications Server 37
Proxy Settings 38
Public URL Prefix for Chat Invitation 39
XMPP Notifications Server 39
Cisco SocialMiner User Guide Release 11.6(2)iv
Contents
Purge Settings 39
Reporting Configuration 40
RTMT Download 40
RTMT Download Links 41
Platform Administration 41
System Logs 42
Language Pack 42
Certificates 42
Obtaining a CA-Signed Certificate 42
Self-Signed Certificates 43
Internet Explorer and Self-Signed Certificates 43
Firefox and Self-Signed Certificates 44
Google Chrome and Self-Signed Certificates 45
Avoid Sign in Overlays if the Reply Template Container Loads in an IFRAME in IE 45
Command Line Interface 45
Control Hack Lock Feature 46
utils ccp hack-lock enable 46
utils ccp hack-lock disable 46
utils ccp hack-lock reset-counters 47
utils ccp hack-lock status 47
Control Logging and Trace Levels 47
show ccptrace runtime server 47
show ccptrace webapp 48
set ccptrace 48
TLS Configuration Commands 49
set tls server min-version 49
set tls client min-version 50
show tls client min-version 50
show tls server min-version 50
Supported Commands and User Interface Options 51
System Backup and Restore 53
Quick Manual Backup Instructions 53
Define Backup Device 53
Backup the System to the Backup Device 54
Cisco SocialMiner User Guide Release 11.6(2)v
Contents
Restore From a Backup File 54
Change the SocialMiner Administrator Username and Password Using the CLI 55
Reset the Unified OS Platform Administrator Password 55
Reporting 57C H A P T E R 5
Configuring the SQL Connection to the SocialMiner Reporting Database 60
Design Guidance 61C H A P T E R 6
Advanced UI Options 61
Deployment Models 61
Hardware and Software Specifications 62
Ports 62
Provisioning 64
Provisioning Considerations for SocialMiner Chat 65
SocialMiner User Accounts and Security 66
VMware Open Virtual Format (OVF) 66
Developer Information 66
Cisco SocialMiner User Guide Release 11.6(2)vi
Contents
Preface
• Change History , on page vii• About this Guide, on page vii• Audience, on page vii• Related Documents, on page viii• Obtaining Documentation and Submitting a Service Request, on page viii• Documentation Feedback, on page viii
Change HistoryDateSeeChange
August 2018Initial Release of 11.6(2)
About this GuideThe guide describes how to perform administration tasks, configure feeds, filters, reply templates, andnotifications, set up campaigns, and view and respond to contacts in SocialMiner.
AudienceThis guide is intended for users who administer, configure and use Cisco SocialMiner to view and respondto customers.
This guide is written with the understanding that your system has been deployed by a partner or serviceprovider who has validated the deployment type, virtual machines, and database and has verified that yourcontact center can receive and send chats.
Cisco SocialMiner User Guide Release 11.6(2)vii
Related DocumentsLinkDocument or Resource
https://www.cisco.com/c/en/us/support/customer-collaboration/unified-contact-center-express/products-documentation-roadmaps-list.html
Cisco SocialMiner Documentation Guide
https://www.cisco.com/c/en/us/support/customer-collaboration/socialminer/tsd-products-support-series-home.html
cisco.com site for Cisco SocialMiner documentation
https://www.cisco.com/c/en/us/support/customer-collaboration/unified-contact-center-express/tsd-products-support-series-home.html
cisco.com site for Cisco Unified Contact CenterExpress documentation
Obtaining Documentation and Submitting a Service RequestFor information on obtaining documentation, using the Cisco Bug Search Tool (BST), submitting a servicerequest, and gathering additional information, see What's New in Cisco Product Documentation.
To receive new and revised Cisco technical content directly to your desktop, you can subscribe to the What'sNew in Cisco Product Documentation RSS feed. RSS feeds are a free service.
Documentation FeedbackTo provide comments about this document, send an email message to the following address:[email protected]
We appreciate your comments.
Cisco SocialMiner User Guide Release 11.6(2)viii
PrefaceRelated Documents
C H A P T E R 1SocialMiner
Cisco SocialMiner is a customer-care system that provides the ability to capture, filter, queue, and report onsocial contacts for social media engagement teams and contact center teams.
Cisco SocialMiner is a component in the customer care system that integrates with Cisco Unified ContactCenter Express solution and Cisco Unified Contact Center Enterprise solutions to provide digital channelcapabilities. In the Unified CCX deployments, SocialMiner provides the email and chat capabilities. In theUnified CCE deployments, SocialMiner provides the task routing and agent request API sets.
In addition to providing proactive social media customer care, SocialMiner supports routing chat and emailrequests when integrated with Unified Contact Center Express.
Email messages, and 'click-to-chat' requests captured by SocialMiner are referred to as contacts. SocialMinerstores the contacts and groups them into user-defined campaigns. Each campaign obtains contacts from oneor more feeds. SocialMiner presents chat, Twitter, Facebook and RSS contacts to customer-care personnelwho can search, review, categorize, and respond to them. SocialMiner produces reporting metrics on thehandling of all of the different contacts in a contact center regardless of channel.
Voice callback requests, task requests, Email messages , and 'click-to-chat' requests captured by SocialMinerare referred to as contacts. SocialMiner stores the contacts and groups them into user-defined campaigns.Each campaign obtains contacts from one or more feeds. SocialMiner presents chat contacts to customer-carepersonnel who can search, review, categorize, and respond to them.
• Technology and Packaging, on page 1
Technology and PackagingSocialMiner is a server software application that is packaged as a software appliance. The appliance runs asone VMware® virtual machine containing all of the following components:
• Cisco Unified Communications Operating System (Unified OS), an operating system based on RedhatLinux.
• Informix® embedded database. This database contains the SocialMiner configuration and reporting data.• Cassandra data store. This data store contains the contacts.• Solr indexer. This indexer contains contact search data.• Cisco SocialMiner runtime software.• OpenFire server for XMPP BOSH eventing.• Node.js - This is a javascript based runtime based on an event-driven, asynchronous I/O. Runs theSocialMiner Chat Gateway for integration with Facebook Messenger.
Cisco SocialMiner User Guide Release 11.6(2)1
Setup and administration are done through a browser-based interface that uses OpenSocial Gadgets. SocialMineris installed with the Shindig gadget container to render the gadgets (referred to as panels in SocialMinerdocumentation). All system features and setup can be performed using REST APIs.
Cisco SocialMiner User Guide Release 11.6(2)2
SocialMinerTechnology and Packaging
C H A P T E R 2Launch and Use SocialMiner
To launch SocialMiner, use a web browser to access the root of the web server (for information on supportedbrowsers, see SocialMiner Browsers).
Enter https://<servername> where <servername> is the name hostname or IP address of yourSocialMiner server.
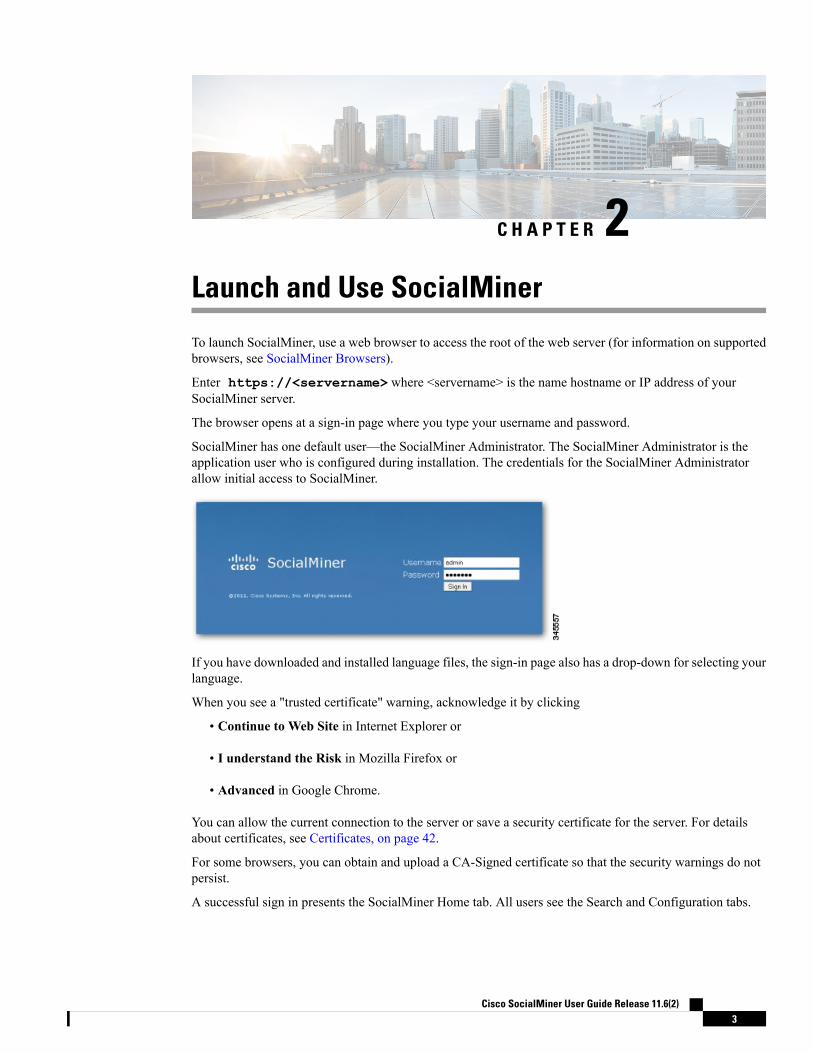
The browser opens at a sign-in page where you type your username and password.
SocialMiner has one default user—the SocialMiner Administrator. The SocialMiner Administrator is theapplication user who is configured during installation. The credentials for the SocialMiner Administratorallow initial access to SocialMiner.
If you have downloaded and installed language files, the sign-in page also has a drop-down for selecting yourlanguage.
When you see a "trusted certificate" warning, acknowledge it by clicking
• Continue to Web Site in Internet Explorer or
• I understand the Risk in Mozilla Firefox or
• Advanced in Google Chrome.
You can allow the current connection to the server or save a security certificate for the server. For detailsabout certificates, see Certificates, on page 42.
For some browsers, you can obtain and upload a CA-Signed certificate so that the security warnings do notpersist.
A successful sign in presents the SocialMiner Home tab. All users see the Search and Configuration tabs.
Cisco SocialMiner User Guide Release 11.6(2)3
If you sign in as the SocialMiner administrator, you also see the Administration tab. Certain SocialMinerfunctions are available only to the SocialMiner Administrator, such as access to the Active Directory on theAdministration tab where the SocialMiner Administrator can set up other users.
SocialMiner does not automatically sign out inactive users. Be sure to sign out when your work on SocialMineris complete.
Note
• Account Locked After Five Failed Sign In Attempts, on page 4• The SocialMiner Interface, on page 4• Working with Contacts, on page 7• Replying to Contacts, on page 10• Settings, on page 14• Search, on page 16
Account Locked After Five Failed Sign In AttemptsSocialMiner offers Hack Lock feature.
This feature is a security feature which prevents brute-force password attacks by locking out an administratoraccount from being accessed for a period of 30 minutes.
For security reasons, SocialMiner does not alert the user that their account is locked. The user must wait 30minutes and try again.
For information about controlling Hack Lock feature, see Control Hack Lock Feature, on page 46.
The SocialMiner InterfaceUse the SocialMiner interface to view and respond to contacts.
Internet postings, voice callback requests, and task requests, Email messages and Click-to-chat requestscaptured by SocialMiner are referred to as contacts. SocialMiner collects and routes the contacts to the contactcenter for an agent to handle. The following are different types of contacts:
• Callback Contacts—Contact is created in SocialMiner when a customer requests a call from a contactcenter agent.
• Chat Contacts—Contact is created when a customer requests a chat session with an agent.
• Email Contacts—Contact is created when a customer sends an email message to a contact center.
• Social Contacts—Contact is a post collected by SocialMiner. A social contact can be an email, chat, ortask. SocialMiner creates separate contacts for each interaction.
• Task contacts—Contact is created in SocialMiner when the customer submits a nonvoice request to acontact center agent.
SocialMiner stores the following information about each contact:
• Author—the username of the person who posted.• Creation date—the date the contact was first stored in SocialMiner.
Cisco SocialMiner User Guide Release 11.6(2)4
Launch and Use SocialMinerAccount Locked After Five Failed Sign In Attempts
• Title—the title of the post.• Description—the nature of the contact text.• Published date—the date the contact was published on the Internet. (Not all feeds have this.)• Source type—the type of feed that collected the contact.• Tags—the tags applied by SocialMiner users.
All contacts remain in the data store until they are purged.
SocialMiner documentation can be accessed by selecting the Documentation link in the title bar.
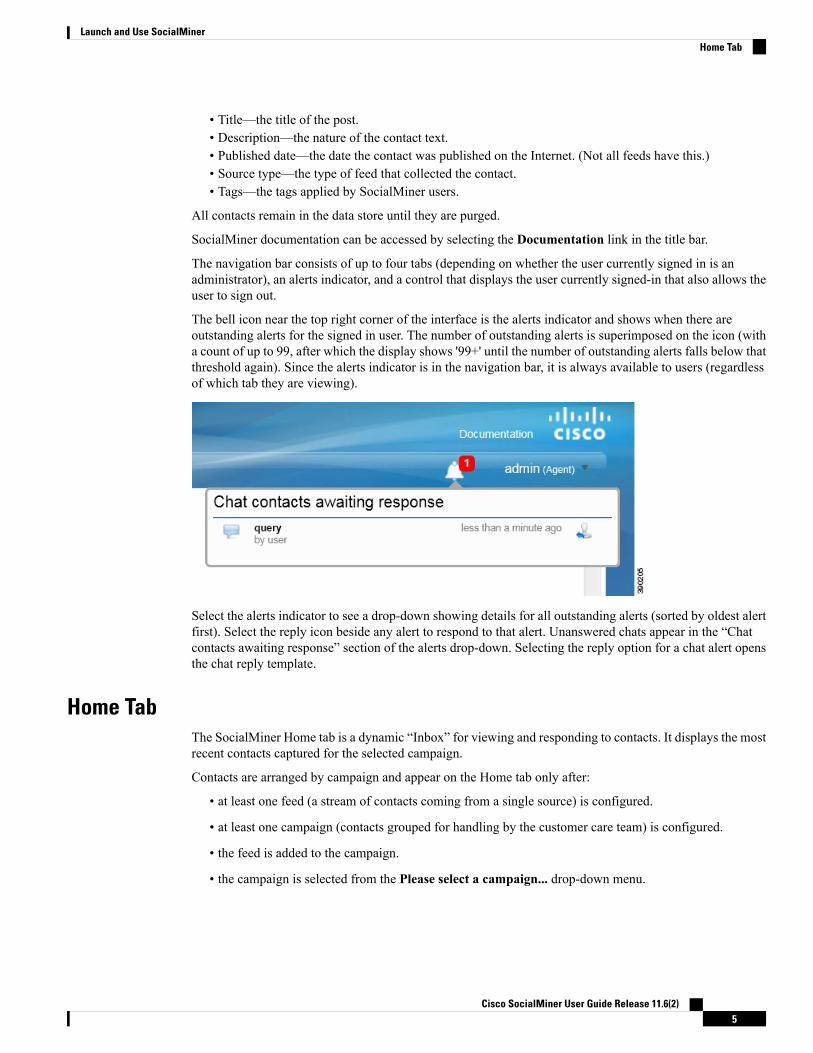
The navigation bar consists of up to four tabs (depending on whether the user currently signed in is anadministrator), an alerts indicator, and a control that displays the user currently signed-in that also allows theuser to sign out.
The bell icon near the top right corner of the interface is the alerts indicator and shows when there areoutstanding alerts for the signed in user. The number of outstanding alerts is superimposed on the icon (witha count of up to 99, after which the display shows '99+' until the number of outstanding alerts falls below thatthreshold again). Since the alerts indicator is in the navigation bar, it is always available to users (regardlessof which tab they are viewing).
Select the alerts indicator to see a drop-down showing details for all outstanding alerts (sorted by oldest alertfirst). Select the reply icon beside any alert to respond to that alert. Unanswered chats appear in the “Chatcontacts awaiting response” section of the alerts drop-down. Selecting the reply option for a chat alert opensthe chat reply template.
Home TabThe SocialMiner Home tab is a dynamic “Inbox” for viewing and responding to contacts. It displays the mostrecent contacts captured for the selected campaign.
Contacts are arranged by campaign and appear on the Home tab only after:
• at least one feed (a stream of contacts coming from a single source) is configured.
• at least one campaign (contacts grouped for handling by the customer care team) is configured.
• the feed is added to the campaign.
• the campaign is selected from the Please select a campaign... drop-down menu.
Cisco SocialMiner User Guide Release 11.6(2)5
Launch and Use SocialMinerHome Tab
A message bar appears periodically at the top of the page indicating that there are one or more new contacts
in the campaign. You can select the bar to refresh the results or select the refresh icon in the upper-rightcorner of the window. State changes and new tags made by one agent are immediately visible to all agentsworking in that campaign.
A small lock icon appears at the bottom of the Home tab (and on the chat reply template) to indicate the statusof the eventing and chat connection. The lock displays as locked if the connection is secure and as unlockedif the connection is not secure. The lock is grayed out if there is no connection.
Open the drop-down at the top left to select a campaign name and to see the contacts that have been returnedfor it. Contacts are sorted by time posted, with the newest at the top.
The information displayed for each contact includes:
• how old the contact is and the username of the author (4 days ago by harry99).• a hyperlink (showing all or part of the contact retrieved by SocialMiner).• icons to change the state of the contact (for those contacts whose state can be changed manually).• the name of the user responsible for the action that put the contact into its current state (Discarded:user3).
When the page is first loaded (or refreshed), you see the 50 newest contacts for the selected campaign. If thereare more than 50 contacts, selectMore Results at the bottom of the page to append the next 50. If theMoreResults button does not appear, there are no more results to view for this campaign at this time.
The title of any chat social contact is an active link if a transcript has been saved. Select the link to open awindow displaying the chat transcript. (The chat transcript only becomes available once a chat session isclosed. If one party in the chat does not close their window, then the system cannot generate the transcriptuntil the inactivity timeout expires.)
There are four ways to modify the display on the Home tab. You can:
• select a different campaign from the drop-down list at the top left.
• show social contacts in a given state by selecting a state from the drop-down at the top right.
• select the settings icon to
• set your chat alias,• enable or disable the Accessibility feature on the agent chat interface,• show or hide social contacts by tag• enable or disable training for a Bayesian filter.
Settings are user-specific. Your changes to settings determine what you see, butdo not affect what others see.
Note
• refresh the list with the newest social contacts.
Cisco SocialMiner User Guide Release 11.6(2)6
Launch and Use SocialMinerHome Tab
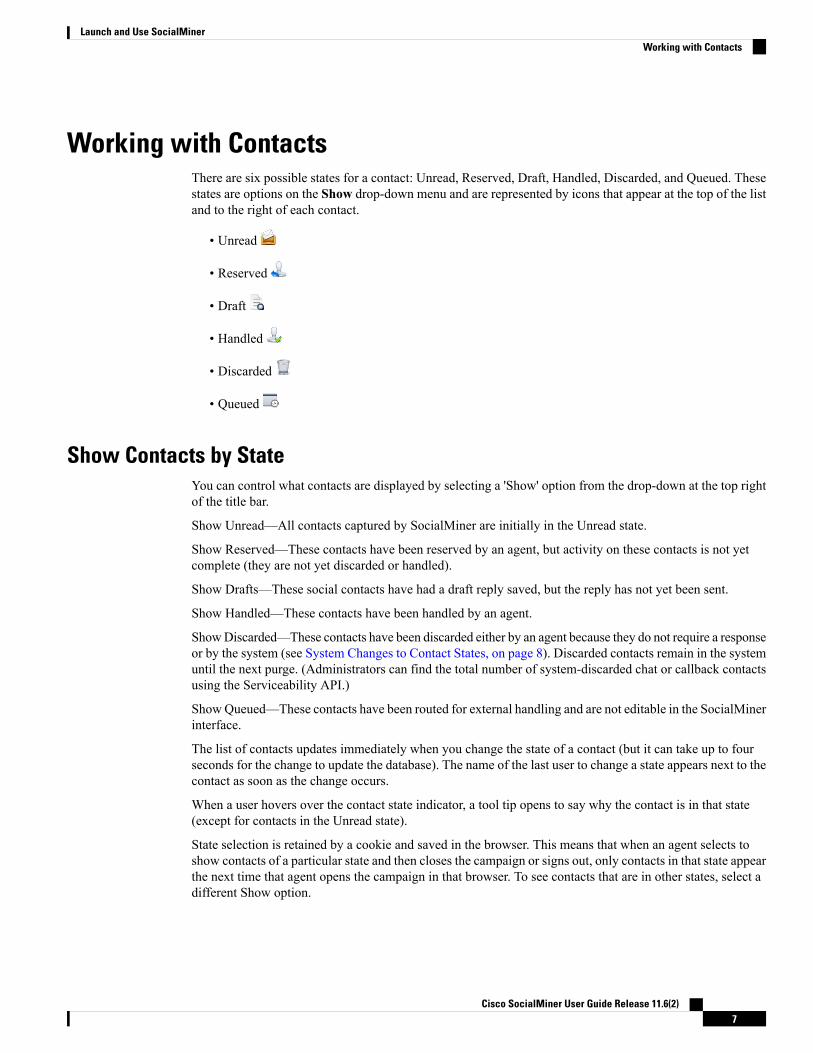
Working with ContactsThere are six possible states for a contact: Unread, Reserved, Draft, Handled, Discarded, and Queued. Thesestates are options on the Show drop-down menu and are represented by icons that appear at the top of the listand to the right of each contact.
• Unread
• Reserved
• Draft
• Handled
• Discarded
• Queued
Show Contacts by StateYou can control what contacts are displayed by selecting a 'Show' option from the drop-down at the top rightof the title bar.
Show Unread—All contacts captured by SocialMiner are initially in the Unread state.
Show Reserved—These contacts have been reserved by an agent, but activity on these contacts is not yetcomplete (they are not yet discarded or handled).
Show Drafts—These social contacts have had a draft reply saved, but the reply has not yet been sent.
Show Handled—These contacts have been handled by an agent.
ShowDiscarded—These contacts have been discarded either by an agent because they do not require a responseor by the system (see System Changes to Contact States, on page 8). Discarded contacts remain in the systemuntil the next purge. (Administrators can find the total number of system-discarded chat or callback contactsusing the Serviceability API.)
ShowQueued—These contacts have been routed for external handling and are not editable in the SocialMinerinterface.
The list of contacts updates immediately when you change the state of a contact (but it can take up to fourseconds for the change to update the database). The name of the last user to change a state appears next to thecontact as soon as the change occurs.
When a user hovers over the contact state indicator, a tool tip opens to say why the contact is in that state(except for contacts in the Unread state).
State selection is retained by a cookie and saved in the browser. This means that when an agent selects toshow contacts of a particular state and then closes the campaign or signs out, only contacts in that state appearthe next time that agent opens the campaign in that browser. To see contacts that are in other states, select adifferent Show option.
Cisco SocialMiner User Guide Release 11.6(2)7
Launch and Use SocialMinerWorking with Contacts
System Changes to Contact States
SocialMiner sets contacts to Discarded when it is over capacity (for chat and callback contacts), when acallback social contact has been cancelled, and after it recovers from a system failure. After recovery,SocialMiner looks for these types of contacts that were in these states before the system failure and discardsthem:
• Unread chat
• Reserved chat
• Queued callback
The tool tips displayed when a user hovers over these contact state indicators describe the situation that causedthe system to put the social contacts into this state. For example, callback social contacts that were successfullycancelled will display the tool tip "Callback was successfully cancelled" when you hover over them.
SocialMiner sets email contacts to Discarded when
• The folder on the Exchange server that contains the customer email is deleted.
• The customer email is deleted from the Exchange server.
• The feed on which the reply came in is deleted.
Change Contact StateA contact state can be changed by any user by clicking the contact state button. The name of the last user tochange a state appears next to the contact as soon as the change occurs: for example, Discarded: User2.
State changing can be done by different agents. For example, Agent1 can reserve a social contact, and Agent2can handle it.
To change the state of a contact, click the button to select the state for your intended action.
• Reply—Select this to respond to a contact. For social contacts, and for Chat contacts that come in on afeed that has the Cisco Chat reply template assigned, selecting this state opens the reply template. Thecontact transitions to the Draft (if Save Draft is selected) or Handled state and appears on the appropriatelist.
For Chat contacts that come in on a feed that has the Cisco Multi-Session Chat reply template assigned,the reply template does not open.
• Draft—Select this to display the draft response, edit it, and send it.
• Handle—Select this to move the contact directly to the Show Handled list.
• Discard—Select this to move the contact directly to the Show Discarded list.
The Show list updates immediately when you change the state of a contact.Note
Real-time synchronization: If one agent changes the state of a contact, other agents working in that campaignsee the change within a few seconds.
Cisco SocialMiner User Guide Release 11.6(2)8
Launch and Use SocialMinerChange Contact State
To undo a state change: show the list for that state, locate the contact, and click the button again to reversethe state.
For example, here is what you would do if you set a contact to Handled and then change your mind abouthandling it.
• Select Show Handled.
• Locate that contact.
• Click the Handle button. This removes the contact from the Show Handled list immediately. The contactis returned to the Show Unread list within a few seconds.
The state of a contact is universal across the SocialMiner system. For example, if one user handles a contact,the contact appears as handled in the browser interface for all other users. This also occurs if the contactappears in multiple campaigns.
When a chat session ends, the state change buttons for the social contact become inactive and are grayed out.
Contacts in the Queued state are not editable in the SocialMiner interface, therefore the state change buttonsfor those contacts are grayed out too. Additionally, for Queued contacts, you do not have the option to addtags to them (although you can remove tags from them).
Note
Tagging ContactsTags are labels that allow you to categorize contacts, to track workflow, and to set up notifications. Forexample, all social contacts that mention billing concerns could be tagged with Billing. You could then setup notifications to email social contacts with that tag to Customer Service. Use the Settings page to filter thelist of contacts to show only those contacts with a particular tag.
Contacts in the queued state are not editable from the SocialMiner user interface. You cannot add tags tothem, although you can remove tags from them in this state.
Note
Adding Tags
The Tag text field, a Tag button, and suggested tags are visible when you hover the cursor over a contact.
To add a tag to a contact, enter text in the tag text field and press Enter or click Tag. You can add a maximumof twenty tags to a contact.
You can also use Automatic tagging on the Feeds panel to specify up to ten tags that are applied to newcontacts as they are retrieved for a feed.
The most commonly used tags for the campaign appear as 'suggested tags' links to the right of the Tag button.These suggestions provide one-click tagging for commonly used tags. To add one or more suggested tags tothe contact, select the link for the suggested tag. The suggestions are specific to the campaign (not to the entireSocialMiner system) and are only updated on a refresh.
Click Refresh to see new suggested tags. If the contact is already tagged with a suggested tag, that tag doesnot appear on the list of suggested tags.
Cisco SocialMiner User Guide Release 11.6(2)9
Launch and Use SocialMinerTagging Contacts
Real-time synchronization
If one agent adds or deletes a tag for a contact, other agents working in that campaign see the addition ordeletion immediately.
Tips for tagging
• Tags are not case sensitive (Cisco and cisco are the same tag).
• Multiple tags must be separated by commas. For example, type the following into the tag text area--Cisco,TelePresence, Cisco TelePresence. Then click Tag to create these three tags:
• Cisco
• TelePresence
• Cisco TelePresence
• Do not use quotation marks around tags; use commas to separate them. If you type quotation marks, theybecome part of the tag.
Removing Tags
To remove a tag from a social contact, select the small, gray x at the right of the tag name.
Replying to ContactsReply to contacts by selecting the reply icon that appears beside contacts shown on the Home tab, in thesearch results display, and in the alerts indicator drop-down list.
You reply to chat contacts using reply templates (you do not reply directly to callback contacts). There arethree system-defined templates: Cisco Chat, Cisco Multi-session Chat, and Cisco Email. The SocialMinerAdministrator can add custom reply templates.
The Cisco Multi-session Chat reply template is the default reply template for Unified Contact Center Expressmulti-session chat. You cannot use this reply template in a standalone SocialMiner environment.
The Cisco Email reply template is the reply template that agents use to reply to email contacts when SocialMineris integrated with Unified Contact Center Express. You cannot use this reply template in a standaloneSocialMiner environment.
Note
Reply templates are configured on the Add/Edit Feed page for each feed type in a campaign. Certain feedtypes have default reply templates. A feed can have only one reply template.
SocialMiner uses the support available in your browser to provide spellcheck functionality. Refer to thedocumentation about language dictionary support for your browser for information.
Note
Cisco SocialMiner User Guide Release 11.6(2)10
Launch and Use SocialMinerReplying to Contacts
Replying to a Chat Social ContactWhen a customer submits a chat form, a new social contact opens in the chat campaign and the customerwaits for an agent. The agent who selects the Reply icon for that social contact launches the chat reply templateand enters into a dialogue with the customer.
A small lock icon appears at the bottom of the Home tab (and on the chat reply template) to indicate the statusof the eventing and chat connection. The lock displays as locked if the connection is secure and as unlockedif the connection is not secure. The lock is grayed out if there is no connection.
For a chat to occur, there must be at least one SocialMiner chat feed configured and the feed must be addedto a campaign.
Note
The agent types in the text-entry area and presses Enter.
The customer sees the agent's message and enters a response.
To Reply to a Chat Using the Cisco Chat Reply Template
1. Select a chat social contact. Select the Reply icon. The chat interface opens to show the customer's nameand any extension field data in the left panel.
2. Type a remark in the lower right panel and press Enter to begin the dialog.
Customer ChatA chat session is initiated when a customer submits a chat form to a chat feed in a campaign. Agents can thenrespond to the chat contacts in SocialMiner. These chat contacts must belong to a campaign that is set up witha chat feed.
SocialMiner supports a maximum of 120 (in a small deployment) and 400 (in a large deployment) simultaneouschat sessions between a customer and an agent.
Chat Transcript
When the chat ends, the customer is presented with an option to download the chat transcript as an HTMLfile. The chat ends when the customer clicks the End button or presses Ctrl-Shift-E. The chat can also beended if the agent ends the chat session. To download the transcript, the customer can click the Yes buttonor press CTRL-Shift-Y. The customer can click the No button or press CTRL-Shift-X to cancel.
The chat ends and the customer does not receive the chat transcript download option in the following scenarios:
• The session times out due to inactivity
• Customer closes the browser window
• Customer navigates to another URL from the browser window
• Customer refreshes the browser window
Chat Process
This is the flow of the chat process.
Cisco SocialMiner User Guide Release 11.6(2)11
Launch and Use SocialMinerReplying to a Chat Social Contact
The SocialMiner Administrator:
• Creates and saves a chat feed in SocialMiner, using the Cisco chat reply template.• Adds the chat feed to a campaign.• Copies the chat feed sample code and pastes it in a text editor.• Makes changes to the code, if needed.• Saves the code as HTML.• Publishes the HTML to a website.
The customer:
• Selects a Click-to-Chat (or similar) link or button on the website to open the chat feed form; then completesand submits it.
The customer sees a welcome message asking them to wait while they are connected to a customer carerepresentative.
If no agent responds before a defined timeout, the customer is sent a message indicating that they can continueto wait or try again later. If an error occurs during setup, the customer is sent a message indicating that chatis not available and to try again later.
SocialMiner:
• Sets up a chat session and creates a social contact in SocialMiner with the form data, the URL of the chatsession, and the URL of the chat reply template that serves as the chat gadget interface.
• Generates a chat, which appears in the chat campaign.
The agent:
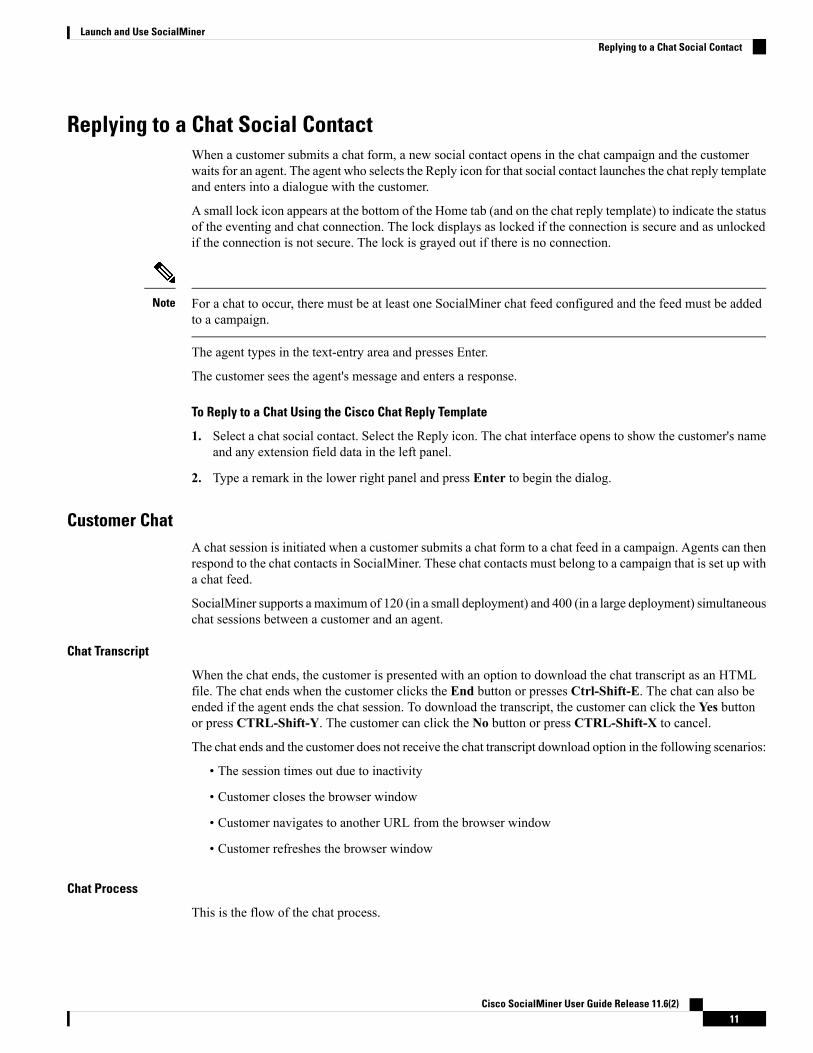
The agent selects the Reply icon for the social contact to enter the chat session and to display the Agent ChatReply template (similar to the example shown here). The conversation between the agent and customer beginsand the social contact state changes to Reserved. Information about the customer appears on the left side ofthe screen. The agent can use the font sizing buttons to increase or decrease the size of the font in the chatwindow. The agent can also press Ctrl-Shift-] to increase the font size or Ctrl-Shift-[ to decrease it.
The agent can end the chat session and close the chat reply template by clicking the End button or by pressingCtrl-Shift-E.
The customer:
Cisco SocialMiner User Guide Release 11.6(2)12
Launch and Use SocialMinerChat Process
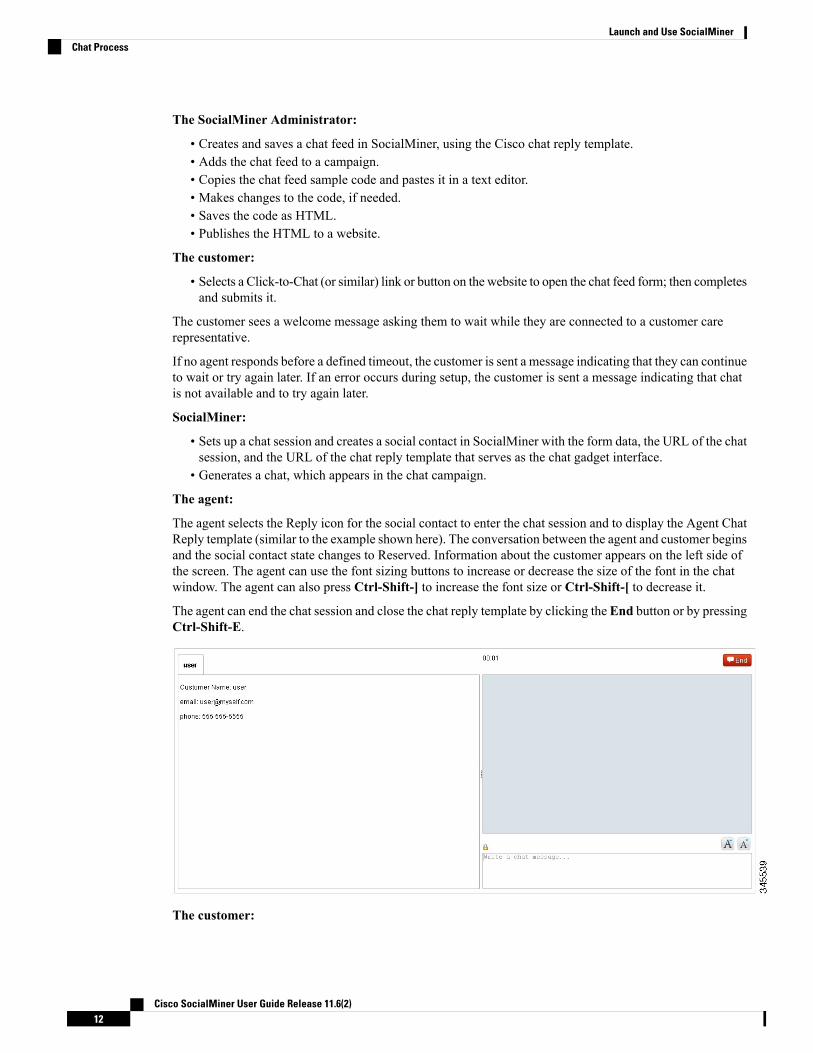
A customer chat interface opens when an agent joins. The chat interface supports accessibility using the JAWS'highlighted text' functionality.With JAWS configured to read highlighted text and Accessibility mode enabled,incoming chat messages and other events are highlighted briefly so JAWS can announce them. Customersenable Accessibility mode by pressing Ctrl-Shift-S.
Customers can use the font sizing buttons to increase or decrease the size of the font. Customers can alsopress Ctrl-Shift-] to increase the font size or Ctrl-Shift-[ to decrease it.
After the conversation is complete, the customer can click the End button or press Ctrl-Shift-E. This endsthe chat from the customer side and removes the customer from the chat room.
Alternately, if the chat session is closed by the agent, the customer is left alone in the chat room and the optionto download the chat transcript as an HTML file is presented to the customer.
For more information on chat transcript, see the Chat Transcript section.
Chat Behavior
In the chat session interface:
• Each party types a message and presses Enter. The agent receives the customer's message immediately.The customer receives the agent's response within five seconds, based on the timing of the response inrelation to the five-second polling interval.
• The agent sees a time marker next to each customer entry.• URLs and email addresses are actionable links.• When the agent ends the chat, the chat session is removed and the customer receives an end of conversationmessage. The social contact state changes to Handled.
• Once chat starts, there is no timeout for the agent but there is a user-defined customer inactivity timeout.By default, a customer who does not send a message for five minutes is removed from the chat session.
• Agents who navigate away from a chat (for example, to consult a web page) can reconnect by selectingReply to change the social contact state back to Unread, then selecting Reply again to reserve the socialcontact and rejoin the chat.
• After a chat ends, agents can search for the chat session transcript using the interface on the Search tab.
Cisco SocialMiner User Guide Release 11.6(2)13
Launch and Use SocialMinerChat Behavior

Chat Errors
If the server goes down, or if cookies are cleared on the customer side, the customer sees a "Connecting..."message, followed by an "Error connecting to server" message.
The provisioning section outlines information on system limitations for chat that, if exceeded, may also causechat errors.
Replying to a Callback ContactYou cannot reply directly to callback contacts.
When a customer submits a request for a callback (for example, they click on a "Call me" button), a newsocial contact is created in SocialMiner and a notification is sent to Unified Contact Center Enterprise (UnifiedCCE) requesting that a return call be placed.
The reply to the contact is the return phone call initiated by Unified CCE.
Replying to an Email ContactYou cannot reply directly to an email contact from SocialMiner.
When a customer sends an email message, a social contact is created in SocialMiner and a notification is sentto Unified Contact Center Express (Unified CCX). The Finesse agent desktop in Unified CCX is used to replyto the email contact.
Replying to a Task ContactYou cannot reply directly to task contacts. When a customer submits a request for a task, a new social contactis created in SocialMiner and a notification is sent to Unified Contact Center Enterprise (Unified CCE). Thereply to the contact is initiated from Finesse desktop.
SettingsUse this page to set your chat / contact/ callback alias, to enable or disable the Accessibility feature on theagent interface, to show or hide social contacts by tag and to enable or disable training for a Bayesian filter.
Select the Settings icon at the top right of the Home tab to open the Settings page.
Although tags and Bayesian filters are global (all users can see them), settings are user-specific. Your changesto settings determine what you see for the campaign, but do not effect what others see in the campaign.
You can customize the Home tab to show contacts with certain tags and to enable filter training for Bayesianfilters. (You need to add tags and add Bayesian filters before these options appear in Settings.) You can alsocustomize the appearance and function of the agent chat interface.
Chat SettingsThe default chat alias value "Agent" can be changed to a string of up to 40 characters (stored in the browseras a cookie). Agents use this value to define how they will be identified to users.
Cisco SocialMiner User Guide Release 11.6(2)14
Launch and Use SocialMinerChat Errors
When using a Firefox browser, the chat interface supports accessibility by using the JAWS 'highlighted text'functionality. With JAWS configured to read highlighted text and Accessibility mode enabled, incoming chatmessages and other events are highlighted briefly so JAWS can announce them. Note that the "EnableAccessibility for Agent Chat (Firefox only):" checkbox only appears when you sign in using a Firefox browser.
Check or uncheck the checkbox to enable or disable the Accessibility feature in the agent chat interface.
Train Bayesian FiltersThe Bayesian filter is a trainable filtering technology based on a Bayesian statistical probability model.Bayesian filters are not pre-programmed or configured with business rules. You must apply a Bayesian filterto a campaign and then train the filter to recognize the content of "good" contacts. When training a Bayesianfilter, you have the option to "train in" or "train out" each contact in a campaign. After a sufficient amount oftraining, the filter begins to exclude unwanted contacts from a campaign. You must add a Bayesian filterbefore you can train it.
Bayesian filters can be trained for many different uses.
• A filter can take a broad keyword search and narrow the results down to the posts related to a specificbrand. For example, a search for "Finesse" could return posts about hair products, Cisco software, anda move in the card game bridge. If the purpose of the campaign is to capture posts about the Cisco Finesse,a Bayesian filter can be trained to exclude the social contacts about hair care and playing bridge.
• A filter can be trained to look for social contacts with negative sentiment or positive sentiment.• Filters can also be trained to include or exclude social contacts written in specific languages.
When training a filter, it includes the complete text of the post—not just certain keywords. Therefore it offersmuch more sophisticated filtering capability than a keyword exclusion approach to filtering.
You can train a Bayesian filter using any campaign. If you have added a Bayesian filter, you can select it onthe Settings page to activate training mode (the default selection is None). To deactivate training, reselectNone.
Selecting a Bayesian filter enables filter training and changes the campaign display on the Home tab to showthe name of the filter at the top left and to show Plus (+) and Minus (-) training buttons for each social contact.
• Click + to 'train in' the social contact (indicating that this is the type of contact you would like the filterto keep in the campaign).
• Click - to 'train out' the social contact (indicating that this is the type of contact you would like the filterto reject).
Training settings are user-specific. Your changes do not impact what others see for the campaign.
The training does not impact the campaign until you edit the campaign and move the filter from Available toSelected.
Create a test campaign that mirrors an existing 'in production' campaign. Add several feeds to the test campaign(some that you know will have relevant posts and some with irrelevant posts). Create the filter and set the testcampaign to training mode. The more you train the filter, the better the filter will perform. It is important todo a significant amount of training before applying your filter to the production campaign.
Cisco SocialMiner User Guide Release 11.6(2)15
Launch and Use SocialMinerTrain Bayesian Filters
Show TagsBy default, a campaign shows contacts with all tags. You can refine the list to show only those contacts withcertain tags.
On the Settings page
1. Check Enable.
2. Select one or more tags.
3. Click OK.
For example, if you select Cisco and TelePresence from the tag list, only contacts with a Cisco tag or aTelePresence tag (or both), are displayed in the results.
To undo the tags and see all contacts again, return to the Settings page, uncheck Enable, and click OK.
Tab settings are user-specific. Your changes to Settings determine what you see on the Home tab but do notimpact what others see for the campaign.
SearchThe Search tab enables users to search for specific contacts on SocialMiner.
You can perform a default search or a field-specific search.
A default search is a freeform search. To perform a default search, enter the text that you want to search forin the Search field and then click Search. A default search searches the following fields:
• sc.author
• sc.title
• sc.tags
• sc.description
• sc.socialContactStatus
• sc.sourceType
• sc.isSoftLocked
• chat.agentName
• chat.agentNickname
• chat.transcript
The sc.title, sc.description, and chat.transcript field searches are not case-sensitive. To search in all otherfields, the search term you enter must be an exact (case-sensitive) match.
Cisco SocialMiner User Guide Release 11.6(2)16
Launch and Use SocialMinerShow Tags
For SocialMiner standalone chat or Unified CCX single-session chat, the chat.agentName is always saved inthe database in lower case text, no matter how an agent signs in. For example, if an agent signs in as JSmith,you must search for jsmith to find the contact.
Note
A field-specific search allows you to choose the field in which you want to search. Place your cursor in theSearch field and press the spacebar to view a drop-down list of searchable fields. Select the specific field youwant to search and enter a term (or more than one term enclosed in quotes) beside the field name.Wildcard-based searches using "?" (for a single character) and "*" (for multiple characters) are allowed.
When you start to type, the drop-down list of searchable fields is filtered based on what you type. For example,if you type chat, only the fields that contain chat appear.
Certain characters are special and cannot be included in the default search unless they are escaped—meaningeither enclosing them in quotes or proceeding them with a backslash. For example, if you want to include thecharacter + in your search, you need to enter \+ or "+". The same is true for the colon (:). To include it in yoursearch, you must enter \: or ":" to have it recognized. (For a full list of all special characters, see the Solr wiki.)
You can perform a field-specific search on the following fields:
• sc.author: The person who created the social contact.
• sc.link: The link to the social contact.
• sc.publishedDate: The date the social contact was published.
• sc.createdDate: The date the social contact was created.
• sc.socialContactStatus: The status of the social contact (unread, reserved, handled, discarded, draft, orqueued).
• sc.socialContactStatusDate: The date that the status of the social contact last changed.
• sc.tags: The tags applied to the social contact. Tags can be applied automatically by the system when thecontact enters a feed or manually by a user.
• sc.sourceType: The feed type to which the social contact belongs.
• chat.agentNickname: Nickname for the agent in the chat room.
• chat.agentName: Login username for the agent in the chat room.
• de.id: The social contact ID. This ID is upper-case. The field is case-sensitive.
SocialMiner also allows for a combination of default and field-specific searches using AND and OR operators.
For example, to search for a contact that contains the phrase "This is a test contact" and is authored by JohnSmith, you can search using any of the following criteria:
• sc.author:John* (wildcard in field-based search)
OR
• sc.author:"John Smith" AND test contact (a mix of field-based search and default search)
OR
• test contact (just the default search)
Cisco SocialMiner User Guide Release 11.6(2)17
Launch and Use SocialMinerSearch

Search results are displayed similarly to campaign results.
The title of any chat social contact is an active link if a transcript has been saved. Select the link to open awindow displaying the chat transcript. The chat transcript only becomes available once a chat session is closed.If one party in the chat does not close their window, then the system cannot generate the transcript until theinactivity timeout expires.
Email contacts appear in search results but the email messages cannot be viewed in SocialMiner. If you wantto view an email message, you must locate the message in the appropriate folder on the Exchange server andview it from there.
Cisco SocialMiner User Guide Release 11.6(2)18
Launch and Use SocialMinerSearch
C H A P T E R 3SocialMiner Configuration
This section outlines the initial setup that must be performed when SocialMiner is first installed as well asthe ongoing user-configurable options that can be used once the system is up and running.
The Feeds, Filters, and Campaigns panels are all found on the Configuration tab.
The Notifications and Reply Templates panels are found on the Administration tab.
You can sort and search the list appearing in any panel. Sort the list by selecting the heading or arrows at thetop of the panel. After you select a heading, an arrow appears indicating the sort method (ascending ordescending). To search a list, enter your search text in the Search text box above the list.
• Feeds, on page 19• Campaigns, on page 26• Reply Templates, on page 27• Filters, on page 28• Notifications, on page 31
FeedsThe Manage Feeds panel lets you view, delete, add, and edit feeds.
A feed is a stream of contacts coming from a single source. Setting up feeds is a foundational step for yourSocialMiner system. (You need to configure at least one feed and add it to a campaign before you can startseeing contacts on your home page.)
SocialMiner uses a process called de-duplication to automatically remove duplicate contacts. For example,if a user configures several overlapping feeds that capture the same result, then SocialMiner does not capturethe same contact twice. The de-duplication functionality relies on the unique URL of the post. BeforeSocialMiner creates a new contact in the data store, it verifies that the URL of that contact is not already inthe data store.
Feed types are:
• Push—Use this feed type to create social contacts. For example, by using an HTML form or to submitthe social contacts directly into the feed. (Only the SocialMiner Administrator sees Push as an option onthe feed Type drop-down.)
• Chat—Use this feed type to create social contacts for chat. (Only the SocialMiner Administrator seesChat as an option on the feed Type drop-down.)
Cisco SocialMiner User Guide Release 11.6(2)19
• Callback—This feed type receives incoming callback requests from the Callback API and, provided theyare properly tagged, triggers Connection to CCE notifications to forward the callback contact to CCEfor routing to a contact center agent. (Only the SocialMiner Administrator sees Callback as an option onthe feed Type drop-down.)
Callback feeds are only used when SocialMiner is deployed with Unified CCE.
• Email—An IMAP email feed. You can view email feeds in the SocialMiner user interface. However,you cannot create a new email feed or modify an existing one. Email feeds are only used when SocialMineris deployed with Unified CCX. In this integrated deployment, Unified CCX automatically creates emailfeeds as needed.
• Task— Use this feed type to submit incoming Task requests through the Task API. Task feeds are onlyused when SocialMiner is deployed with Unified CCE. If the feed is tagged properly, then the task contactis forwarded to Unified CCE for routing to a contact center agent through SocialMiner's CCE notification.
Icons are used as visual indicators to display the state of each feed. Hover the cursor over the icon to displaya tool tip that explains the state.
• The feed is operating normally.
• Scheduled. This is a brief interim state. Feeds are normally in this state for a very short time.
• An error occurred. Hover over the error icon to display a tool tip with the error text.
• The feed has been created, but is not assigned to any campaigns.
• The status of the feed cannot be determined.
Contacts retrieved by feeds are time-limited by the number of days defined in the Purge Social Contacts olderthan (days) setting of the Purge Settings tool on the Administration tab. The default is to retain social contactsfor 30 days.
If you change a feed (for example, to rename it, change the URL, or change the polling interval), you do notneed to re-add it to the campaign.
Adding and Editing Feeds
To create a feed, click New in the Manage Feeds panel. To edit the settings for a feed, select its name.
Select the feed type and complete the fields for the feed type. The fields vary by feed type, which are describedbelow.
Adding Feeds Using the Feed Bookmarklet
The link at the bottom of the Manage Feeds panel, Feed Bookmarklet, initiates the process to create abookmarklet in your browser that you can use to create feeds.
Deleting Feeds
Select the checkbox to the left of one or more feed names and clickDelete. A confirmation dialog box appears.Click OK to confirm deletion of the selected feed(s).
Cisco SocialMiner User Guide Release 11.6(2)20
SocialMiner ConfigurationFeeds

Polling Interval for Feeds
The polling interval controls how often SocialMiner updates the feed. A shorter polling interval providesmore frequent updates but creates more load on the SocialMiner server and on the sites publishing the feed.Some sites may have recommendations or restrictions on frequent polling and could block an application thatpolls too frequently.
The default SocialMiner polling interval for feeds is five minutes.
Minimum Age for Feeds
Use the minimum age setting to filter out recent posts.
Automatic Tags for Feeds
All feeds support automatic tagging, which allows you to specify up to 20 tags that are applied to new contactsfor a feed across all campaigns that include that feed.
To add an automatic tag to the feed, enter one or more (separated by commas) tags into the Automatic Tagstext box, then click Add.
To remove an automatic tag from the feed, select the small x next to the tag name.
Extension Fields in Push and Chat Feed Sample Code
Extension fields are a collection of custom name and value pairs that can be added to social contacts usingthe push feed and chat feed sample code. You can add social contact data to email and IM notifications byincluding extension fields as notification body variables.
You can add a maximum of 100 extension fields; up to one megabyte of information.
The following sections describe how to configure specific feed types. Fields marked with an asterisk (*) onthe form are required. All other fields are optional.
Push FeedThe push feed allows you to "push" social contacts directly to SocialMiner through HTTPS GET or POSTrequests. A push feed is an interface for generating a social contact through a web form. For example, youmight want to create a social contact to test the routing of email notifications. You might also want to createa social contact for a response to a feedback form on your website.
The SocialMiner Administrator can add, edit, and delete push feeds. Non-administrators can only see, use,and add push feeds to campaigns on the Configuration tab.
Configure a Push Feed
1. Access the Manage Feeds panel.2. Click New.3. Select Push as the feed type, then enter information in the following fields:
1. Name2. Description3. Reply template—the reply template to be used for replying to social contacts obtained from this feed.4. Automatic tags—provide automatic tags for the feed.
Cisco SocialMiner User Guide Release 11.6(2)21
SocialMiner ConfigurationPush Feed
4. Click Save to save the feed.5. Select the saved push feed from the list of feeds to open it in edit mode. You see a Sample Code link
which contains working HTML code containing the correct IP address and feed id values for the instanceyou are working on. It also displays the form fields you need to get from the user and some examples ofoptional fields you can include, such as tags and extension fields.
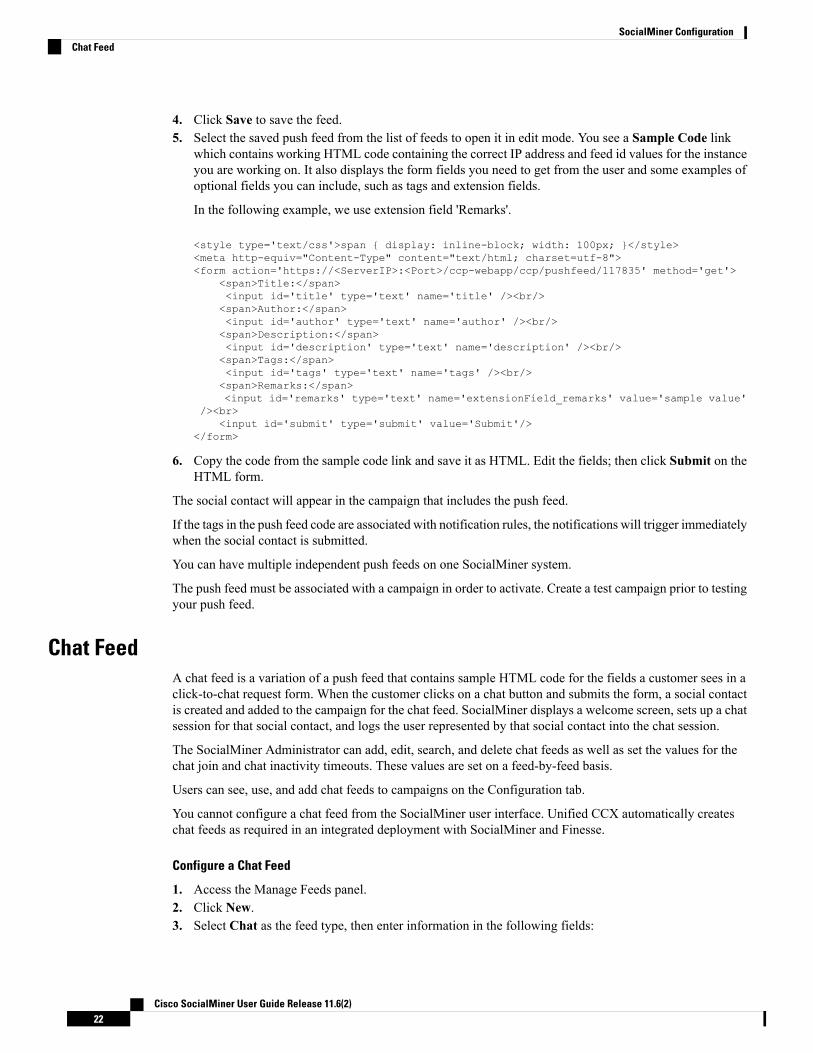
In the following example, we use extension field 'Remarks'.
<style type='text/css'>span { display: inline-block; width: 100px; }</style><meta http-equiv="Content-Type" content="text/html; charset=utf-8"><form action='https://<ServerIP>:<Port>/ccp-webapp/ccp/pushfeed/117835' method='get'>
<span>Title:</span><input id='title' type='text' name='title' /><br/><span>Author:</span><input id='author' type='text' name='author' /><br/><span>Description:</span><input id='description' type='text' name='description' /><br/><span>Tags:</span><input id='tags' type='text' name='tags' /><br/><span>Remarks:</span><input id='remarks' type='text' name='extensionField_remarks' value='sample value'
/><br><input id='submit' type='submit' value='Submit'/>
</form>
6. Copy the code from the sample code link and save it as HTML. Edit the fields; then click Submit on theHTML form.
The social contact will appear in the campaign that includes the push feed.
If the tags in the push feed code are associated with notification rules, the notifications will trigger immediatelywhen the social contact is submitted.
You can have multiple independent push feeds on one SocialMiner system.
The push feed must be associated with a campaign in order to activate. Create a test campaign prior to testingyour push feed.
Chat FeedA chat feed is a variation of a push feed that contains sample HTML code for the fields a customer sees in aclick-to-chat request form. When the customer clicks on a chat button and submits the form, a social contactis created and added to the campaign for the chat feed. SocialMiner displays a welcome screen, sets up a chatsession for that social contact, and logs the user represented by that social contact into the chat session.
The SocialMiner Administrator can add, edit, search, and delete chat feeds as well as set the values for thechat join and chat inactivity timeouts. These values are set on a feed-by-feed basis.
Users can see, use, and add chat feeds to campaigns on the Configuration tab.
You cannot configure a chat feed from the SocialMiner user interface. Unified CCX automatically createschat feeds as required in an integrated deployment with SocialMiner and Finesse.
Configure a Chat Feed
1. Access the Manage Feeds panel.2. Click New.3. Select Chat as the feed type, then enter information in the following fields:
Cisco SocialMiner User Guide Release 11.6(2)22
SocialMiner ConfigurationChat Feed
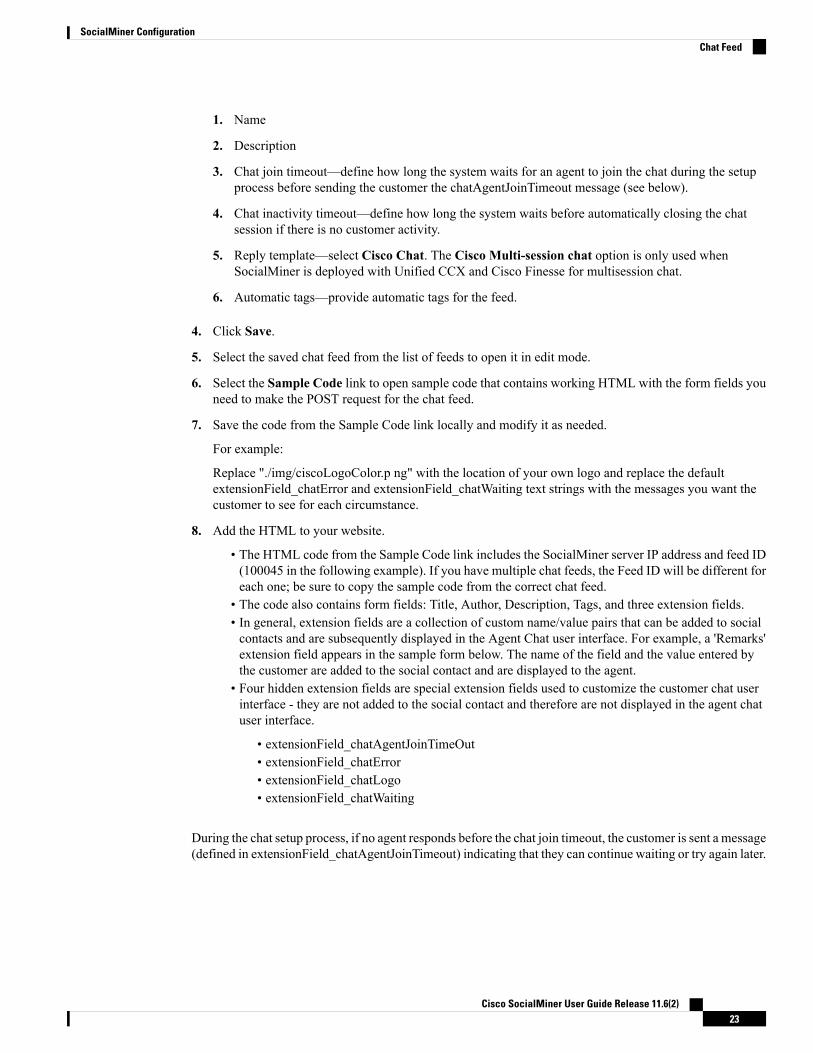
Name1.
2. Description
3. Chat join timeout—define how long the system waits for an agent to join the chat during the setupprocess before sending the customer the chatAgentJoinTimeout message (see below).
4. Chat inactivity timeout—define how long the system waits before automatically closing the chatsession if there is no customer activity.
5. Reply template—select Cisco Chat. The Cisco Multi-session chat option is only used whenSocialMiner is deployed with Unified CCX and Cisco Finesse for multisession chat.
6. Automatic tags—provide automatic tags for the feed.
4. Click Save.
5. Select the saved chat feed from the list of feeds to open it in edit mode.
6. Select the Sample Code link to open sample code that contains working HTML with the form fields youneed to make the POST request for the chat feed.
7. Save the code from the Sample Code link locally and modify it as needed.
For example:
Replace "./img/ciscoLogoColor.p ng" with the location of your own logo and replace the defaultextensionField_chatError and extensionField_chatWaiting text strings with the messages you want thecustomer to see for each circumstance.
8. Add the HTML to your website.
• The HTML code from the Sample Code link includes the SocialMiner server IP address and feed ID(100045 in the following example). If you have multiple chat feeds, the Feed ID will be different foreach one; be sure to copy the sample code from the correct chat feed.
• The code also contains form fields: Title, Author, Description, Tags, and three extension fields.• In general, extension fields are a collection of custom name/value pairs that can be added to socialcontacts and are subsequently displayed in the Agent Chat user interface. For example, a 'Remarks'extension field appears in the sample form below. The name of the field and the value entered bythe customer are added to the social contact and are displayed to the agent.
• Four hidden extension fields are special extension fields used to customize the customer chat userinterface - they are not added to the social contact and therefore are not displayed in the agent chatuser interface.
• extensionField_chatAgentJoinTimeOut• extensionField_chatError• extensionField_chatLogo• extensionField_chatWaiting
During the chat setup process, if no agent responds before the chat join timeout, the customer is sent a message(defined in extensionField_chatAgentJoinTimeout) indicating that they can continue waiting or try again later.
Cisco SocialMiner User Guide Release 11.6(2)23
SocialMiner ConfigurationChat Feed
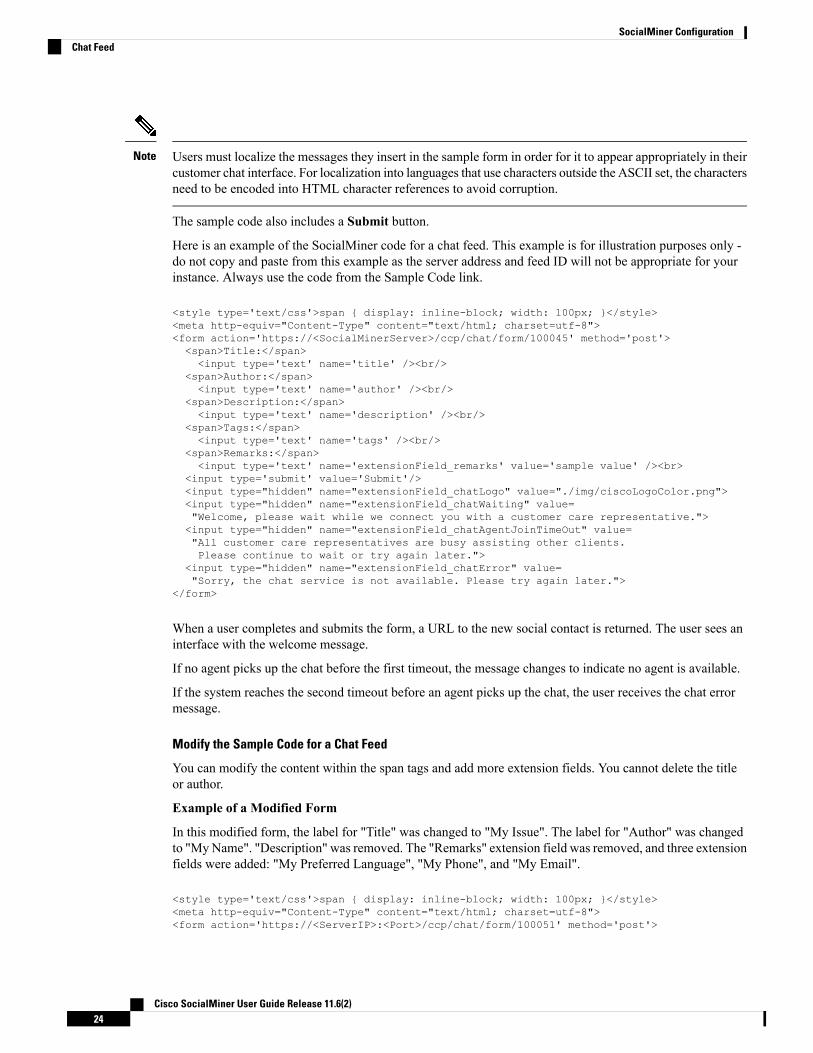
Users must localize the messages they insert in the sample form in order for it to appear appropriately in theircustomer chat interface. For localization into languages that use characters outside the ASCII set, the charactersneed to be encoded into HTML character references to avoid corruption.
Note
The sample code also includes a Submit button.
Here is an example of the SocialMiner code for a chat feed. This example is for illustration purposes only -do not copy and paste from this example as the server address and feed ID will not be appropriate for yourinstance. Always use the code from the Sample Code link.
<style type='text/css'>span { display: inline-block; width: 100px; }</style><meta http-equiv="Content-Type" content="text/html; charset=utf-8"><form action='https://<SocialMinerServer>/ccp/chat/form/100045' method='post'><span>Title:</span><input type='text' name='title' /><br/>
<span>Author:</span><input type='text' name='author' /><br/>
<span>Description:</span><input type='text' name='description' /><br/>
<span>Tags:</span><input type='text' name='tags' /><br/>
<span>Remarks:</span><input type='text' name='extensionField_remarks' value='sample value' /><br>
<input type='submit' value='Submit'/><input type="hidden" name="extensionField_chatLogo" value="./img/ciscoLogoColor.png"><input type="hidden" name="extensionField_chatWaiting" value="Welcome, please wait while we connect you with a customer care representative."><input type="hidden" name="extensionField_chatAgentJoinTimeOut" value="All customer care representatives are busy assisting other clients.Please continue to wait or try again later.">
<input type="hidden" name="extensionField_chatError" value="Sorry, the chat service is not available. Please try again later.">
</form>
When a user completes and submits the form, a URL to the new social contact is returned. The user sees aninterface with the welcome message.
If no agent picks up the chat before the first timeout, the message changes to indicate no agent is available.
If the system reaches the second timeout before an agent picks up the chat, the user receives the chat errormessage.
Modify the Sample Code for a Chat Feed
You can modify the content within the span tags and add more extension fields. You cannot delete the titleor author.
Example of a Modified Form
In this modified form, the label for "Title" was changed to "My Issue". The label for "Author" was changedto "MyName". "Description" was removed. The "Remarks" extension field was removed, and three extensionfields were added: "My Preferred Language", "My Phone", and "My Email".
<style type='text/css'>span { display: inline-block; width: 100px; }</style><meta http-equiv="Content-Type" content="text/html; charset=utf-8"><form action='https://<ServerIP>:<Port>/ccp/chat/form/100051' method='post'>
Cisco SocialMiner User Guide Release 11.6(2)24
SocialMiner ConfigurationChat Feed
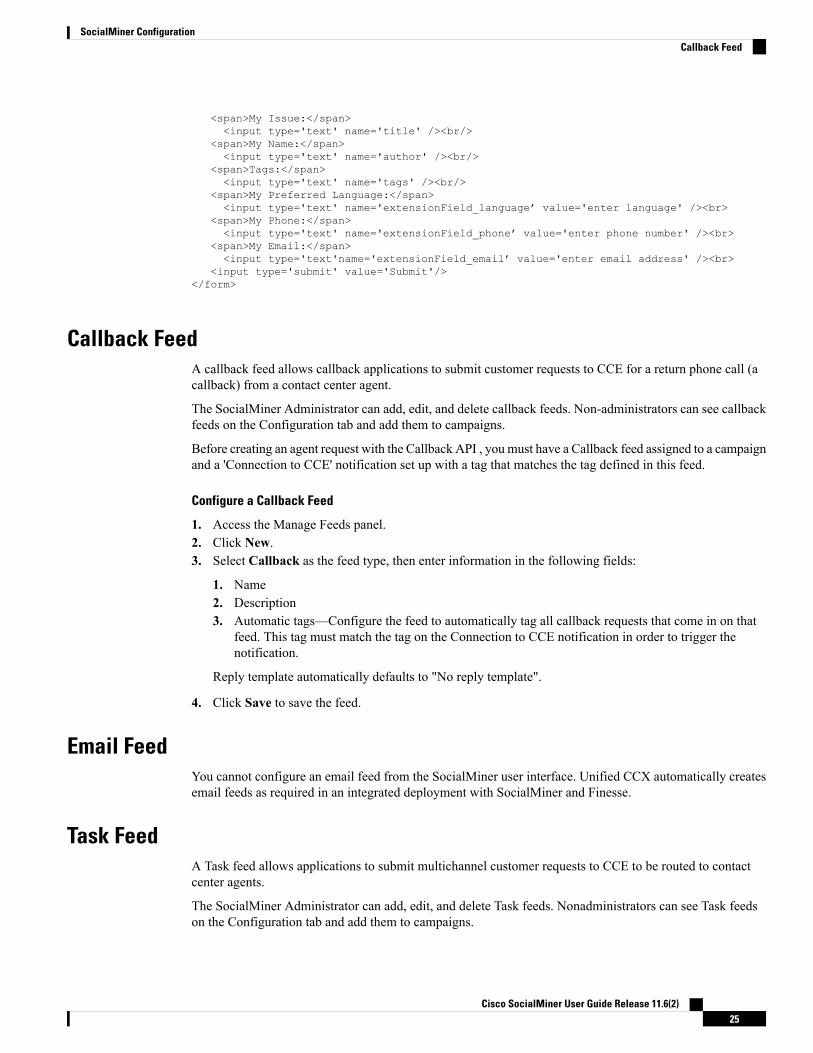
<span>My Issue:</span><input type='text' name='title' /><br/>
<span>My Name:</span><input type='text' name='author' /><br/>
<span>Tags:</span><input type='text' name='tags' /><br/>
<span>My Preferred Language:</span><input type='text' name='extensionField_language’ value='enter language' /><br>
<span>My Phone:</span><input type='text' name='extensionField_phone’ value='enter phone number' /><br>
<span>My Email:</span><input type='text'name='extensionField_email’ value='enter email address' /><br>
<input type='submit' value='Submit'/></form>
Callback FeedA callback feed allows callback applications to submit customer requests to CCE for a return phone call (acallback) from a contact center agent.
The SocialMiner Administrator can add, edit, and delete callback feeds. Non-administrators can see callbackfeeds on the Configuration tab and add them to campaigns.
Before creating an agent request with the Callback API , you must have a Callback feed assigned to a campaignand a 'Connection to CCE' notification set up with a tag that matches the tag defined in this feed.
Configure a Callback Feed
1. Access the Manage Feeds panel.2. Click New.3. Select Callback as the feed type, then enter information in the following fields:
1. Name2. Description3. Automatic tags—Configure the feed to automatically tag all callback requests that come in on that
feed. This tag must match the tag on the Connection to CCE notification in order to trigger thenotification.
Reply template automatically defaults to "No reply template".
4. Click Save to save the feed.
Email FeedYou cannot configure an email feed from the SocialMiner user interface. Unified CCX automatically createsemail feeds as required in an integrated deployment with SocialMiner and Finesse.
Task FeedA Task feed allows applications to submit multichannel customer requests to CCE to be routed to contactcenter agents.
The SocialMiner Administrator can add, edit, and delete Task feeds. Nonadministrators can see Task feedson the Configuration tab and add them to campaigns.
Cisco SocialMiner User Guide Release 11.6(2)25
SocialMiner ConfigurationCallback Feed
A default Task feed, campaign, Connection to CCE notification, and tag are created automatically when youadd SocialMiner as an External Machine in the Unified CCE Administration System Inventory tool. If thedefault Task feed, campaign, and notification have already been configured, they are updated to ensure thatthe feed is associated with a campaign and a Connection to CCE notification, and that the tags match.
Configure a Task Feed
1. Access the Manage Feeds panel.2. Click New.3. Select Task as the feed type, then enter information in the following fields:
1. Name2. Description3. Automatic tags—Configure the feed to automatically tag all requests that come in on that feed. This
tag must match the tag on the Connection to CCE notification in order to trigger the notification.
Reply template automatically defaults to "No reply template".
4. Click Save to save the feed.
CampaignsThe Manage Campaigns panel on the Configuration tab lists campaigns and shows the name, the number ofcontacts that match this campaign, a description.
You must create at least one campaign and select at least one feed for that campaign before you see anycontacts on the Home tab.
Campaigns group contacts for handling by the customer care team. Contacts are included in a campaign whenone or more feeds are selected to be part of the campaign. When a feed becomes part of a campaign, newcontacts that arrive on that feed are immediately added to the campaign and appear on the Home tab.
This list updates in real time (but depends on the configured polling interval of the campaign). For example,it updates when another user adds a new campaign to the system.
Results are updated every 10 seconds. The results number is bold if additional results were recently obtained.
Campaigns can also have filters that are used to narrow or modify the contacts that are included in the campaign.
Contacts can be discarded, but they are not actually removed from a campaign until they are purged or thecampaign is deleted.
Add CampaignTo add a campaign, click New in the Manage Campaigns panel.
Fill out the following fields, and then click Save to save the new campaign.
• Name (required)
• Description
Use the arrows in the Feeds and Filters panels to move one or several feeds and filters between the Availableand Selected panels. You can save a campaign without adding a feed, but no contacts will be retrieved forthat campaign. Adding a filter to a campaign is optional.
Cisco SocialMiner User Guide Release 11.6(2)26
SocialMiner ConfigurationCampaigns
Once you click Save, the contacts for the configured feeds are added to the campaign. Once added, contactscan be discarded but cannot be removed from the campaign except by a purge. If a feed is removed from acampaign, new contacts captured by that feed are no longer added to the campaign, but the contacts previouslyincluded are not removed until a purge.
If a feed is accidentally added to a campaign and the contacts must be removed immediately from that campaign,the only recourse is to delete the entire campaign and recreate it.
Note
Adding a feed to multiple campaigns does not duplicate the contacts in the data store; the contacts for thatfeed are simply counted in both campaigns.
Add a Chat Invitation Feed to a Campaign
A drop-down menu allows a SocialMiner user to add a chat invitation feed to a campaign.
The drop-down lists all available chat feeds. Select an appropriate chat feed to add to the campaign as thechat invitation feed and click Save. When a chat feed is selected as the chat invitation feed for a campaign,that feed is moved to the selected feed list (to ensure that the chat contact created when the chat invitation isaccepted by the customer comes back to the same campaign). If the chat feed designated as the chat invitationfeed is manually removed from the selected feed list, the chats will go to any other campaign(s) that includethat chat feed.
Edit CampaignTo edit a campaign, select the name of the campaign in the campaign list view.
Fill out the following fields, and then click Save to save your changes.
• Name (required)
• Description
Use the arrows in the Feeds and Filters panels to move one or several feeds and filters between the Availableand Selected panels.
Delete CampaignTo delete a campaign, check the checkbox to the left of one or more campaign names and click Delete. Aconfirmation dialog box appears. Click OK to confirm the deletion of the selected campaigns.
Reply TemplatesThe Manage Reply Templates panel in the Administration tab lists all available reply templates.
Only the Administrator (the application user created during installation) can access theManage Reply Templatespanel.
The panel lists the system-defined and the custom reply templates (the custom templates show both their nameand URL).
Cisco SocialMiner User Guide Release 11.6(2)27
SocialMiner ConfigurationEdit Campaign
There are three system-defined reply templates that cannot be edited or deleted.
• Cisco Chat is the default template for both standalone SocialMiner and Unified CCX single-session chatfeeds. This template opens the chat session for the agent and displays a message to the user indicatingthat the agent has joined.
• Cisco Email is the default template for Unified CCX email. You cannot use this template in a standaloneSocialMiner deployment.
• Cisco Multi-session Chat is the default template for Unified CCX multi-session chat. You cannot usethis reply template in a standalone SocialMiner deployment.
Custom templates
The SocialMiner Administrator can develop custom reply templates and use them for Push feeds (but not forchat or email feeds).
See below for information on adding custom reply templates.
Once added, selecting the reply template name allows you to edit the name and URL. Select the checkbox tothe left of one or more custom template names and click Delete to delete the reply template.
Reply templates must conform to the OpenSocial standard. Some tips for converting existing HTML pagesinto OpenSocial standard can be found here.
After you have created your reply template, host it on a webserver that is accessible by SocialMiner and usethe Reply Template panel to provide a name for the reply template and its location.
Add Custom Reply TemplateTo add a custom reply template
1. Click the New button in the Manage Reply Templates panel.
2. Enter a name.
3. Enter the URL for the location of the custom template code.
4. Click Save.
An example of code for a reply template is provided on the system athttps://<servername>/templates/reply/custom_reply_sample.jsp (where <servername> is the name of yourSocialMiner server).
The source code is commented and provides details on the SocialMiner javascript functions required. Additionaltraining for developing custom reply templates is available at the SocialMiner Lab Wiki.
For more information about using custom reply templates, see the Cisco SocialMiner Developer Guide.
Note
FiltersThe Manage Filters panel on the Configuration tab shows the name, type, and a description for each filter thatyou have created. An icon next to each filter shows its current state.
Cisco SocialMiner User Guide Release 11.6(2)28
SocialMiner ConfigurationAdd Custom Reply Template
A filter modifies and takes action on contacts as they enter the system and before they appear on the Hometab, allowing the customer care team to focus on the most actionable contacts.
Filters are run against contacts as they enter a campaign; they do not run retroactively against contacts thatare already in a campaign.
Context Service Integration filters are added to a campaign created from Unified CCX. Manual filters cannotbe added in the Unified CCX deployment.
Preinstalled Filters
Preinstalled filters are configuredwhen you install SocialMiner and aremanaged by the SocialMiner application.The Context Service Integration filter is a preinstalled filter. You cannot delete or modify preinstalled filters.
Filter States
Icons are used as visual indicators to display the state of each filter. Hover the cursor over the icon to displaya tooltip that explains the state.
• The filter is working properly.
• An error occurred in the uploaded script or the script filter violates SocialMiner security restrictions.Hover over the error icon to display a tooltip with the error text.
• The state of the filter cannot be determined (such as when the Runtime service is down) and duringa brief interim state while SocialMiner checks the state of the filter (after which the icon changes to redor green).
Cisco Support and the SocialMiner Forum on Cisco DevNet do not assist with Groovy script issues. Directall troubleshooting requests to your script developer.
Note
Deleting Filters
Select the check box to the left of one or more filter names and clickDelete to delete the filter. A confirmationdialog box appears. Click OK to confirm deletion of the selected filter.
Bayesian FiltersA Bayesian filter is a trainable filtering technology based on a Bayesian statistical probability model.
Add a Bayesian Filter
1. Access the Manage Filters panel on the Configuration tab.
2. Click New.
3. Select Bayesian as the filter type, then enter information in the following fields:
Name (must be unique)Description
4. Click Save.
Cisco SocialMiner User Guide Release 11.6(2)29
SocialMiner ConfigurationBayesian Filters
Once a Bayesian filter is added, go to Settings on the Home tab (see Train Bayesian Filters, on page 15) toenable training for the filter.
Edit a Bayesian Filter
1. Select the filter's name.
2. Change the field values.
3. Click Save.
Author FiltersThe author filter allows you to exclude social contacts created by specific authors from being included in acampaign. For example, you may want to filter out your own posts or posts from team members.
Adding an author filter to keep your posts from showing up in your campaign reduces the number of postsyou need to handle. It also improves the accuracy of the reporting metrics by excluding your own posts.
Add an Author Filter
1. Access the Manage Filters panel on the Configuration tab.2. Click New.3. Select Author as the filter type, then enter information in the following fields:
• Name (must be unique)• Desciption• Authors—enter the name of an author to exclude from the feed.• Repeat steps 2 and 3 for each additional author to be excluded from the feed.
4. Click Save.
Edit an Author Filter
1. Select the filter's name.
2. Change the field values.
3. Click Save.
Script FiltersThe SocialMiner Administrator can add, import, edit, and delete Script filters. Non-administrators can seescript filters on the Configuration tab and add them to campaigns.
You can upload multiple Groovy scripts and attach each to a SocialMiner script filter. There are examples ofscript filters in the SocialMiner Developer Guide and on Cisco DevNet.
SocialMiner runs scripts in Groovy 1.8.
Cisco SocialMiner User Guide Release 11.6(2)30
SocialMiner ConfigurationAuthor Filters
During the upload, SocialMiner performs a basic syntactic validation but cannot validate that the script willwork as expected. For this reason, test your scripts on a lab system before using them in production. SocialMineralso performs security checks on each script. For example, a script does not run if it shuts down the system,takes longer than 30 seconds to execute, or accesses the SocialMiner file system.
For more on script security, see the SocialMiner Developer Guide. You can also open the runtime error logsin the log directory to see the list of security breaches.
Under the filename "runtime/", open the Error-runtime log and search for SCRIPT_FILTER_EXCEPTION.
You can upload scripts that fail the security model and apply them to campaigns, but they have no effect onthe contacts. The Filters panel shows a red (failure) icon for the insecure script. Hover over the red "failedstate" icon for information about the error.
Note
To add a Script filter:
1. Click New on the Manage Filters panel.2. Select Script as the filter type, then enter information in the following fields:
• Name (must be unique)
• Description
3. Click the Browse/Choose File button (the button name varies by browser). Navigate to the groovy fileon your local machine or network and select it.
4. Click Save.
To edit a Script filter:
• Select the name of the filter.
• Click the Show Source button to open the groovy script file in a separate window .
You can review and select/copy (but not edit) the source. You can also upload a new script file in Editmode.
Errors can result if an editor such as Notepad is used to edit a script written in a language containing multi-bytecharacters. Eclipse and Notepad++ are the most reliable editors to use for editing scripts.
Note
NotificationsThe Manage Notifications panel on the Administration tab lets you view, delete, edit, and add notificationrules. You set up notification rules to send messages in reference to tagged contacts.
Only the SocialMiner Administrator, who is the application user created during install time, can use the toolsin the Manage Notifications panel.
Note
Cisco SocialMiner User Guide Release 11.6(2)31
SocialMiner ConfigurationNotifications
The Manage Notifications panel shows the following information for all defined notification rules:
• Name—the name of the notification.
• Type—the type of notification.
• State—the status of the notification.
• Tags—the tag or tags that trigger the notification.
• Campaign—the campaign associated with this notification.
Icons are used as visual indicators to display the state of each notification. Hover the cursor over the icon todisplay a tool tip that explains why the notification is in the current state and the last time the state changed.
• The notification is operating normally.
• The notification is in an unknown state.
• An error occurred. Mouse over the error icon to display a tool tip with the error text.
• The limit of 40 incoming callback contacts per minute was reached; any additional contacts arediscarded.
Administrators can add, edit, or delete notifications. See the section below for adding or editing notifications.
To delete a notification, select the checkbox next to the notification name and click Delete; then click OK inthe confirmation window.
IM and Email Notifications do not accept replies. The intent is to notify only; not to open a dialog.
If a reply template is associated with the social contact for which the notification is sent, selecting the link inthe IM or email opens the reply template for that social contact.
Add and Edit Notifications
Add
To add a notification, click the New button in the Manage Notifications panel.
Enter or edit the following fields:
• Type—Notification types are:
• Email—The notification is sent over email. A mail notifications server must be configured on theSystem Administration tab to use this type.
• IM—The notification is sent over IM. An XMPP notifications server must be configured on theSystem Administration tab to use this type.
• HTTP—Allows for notifications over HTTP using REST to contact an external service.
• Name—The name of the notification.
• Description—A brief description of the notification (optional).
• Campaign—Select a campaign with which you are associating this notification.
Cisco SocialMiner User Guide Release 11.6(2)32
SocialMiner ConfigurationAdd and Edit Notifications
• Tags—Define the tags for this notification. Notifications are sent when a social contact is tagged withone or more of these tags and exists in the selected campaign. Click Add after each tag you enter.Auto-tagging (or adding multiple tags in one operation) generates multiples of the same notifications tothe same recipients list. To remove a tag, select the x at the right of the tag name.
• Addresses—Enter an email address for this notification. ClickAdd after each address you enter. Addressesare used only for Email and IM notifications. To delete an address, select the x at the right of the address.
• Subject—The email subject for this notification. This field is available only for Email notifications andis blank by default. Enter a subject for email notification.
• Body—The body for this notification. This field is used only for Email notifications. HTML tags aresupported for Email notifications. The body of the message supports notification body variables. Formore information, see Notification Body Variables, on page 33.
• Message—The message for this notification. This field is similar to the body field used only for IMnotifications. IM notifications are sent using plain text. They also support notification body variables.For more information, see Notification Body Variables, on page 33.
• URL—The URL of a REST API that identifies where to send the notification. This field is used onlyfor HTTP notifications.
• Verify SSL certificates?—If checked, SSL certificates will be verified as trusted for notifications sentover SSL. If unchecked, certificates will not be verified. This checkbox is used only for HTTP notificationsand is checked by default.
• Username—If authentication is required for the URL to the REST API, enter the authorized username.This field is used only for HTTP notifications.
• Password—If authentication is required for the URL to the REST API, enter the password for theauthorized username. This field is used only for HTTP notifications.
• Request Type— Select the type of request for this notification. This field is used only for Connectionto CCE notifications.
• Dialed Number/Script Selector—Select a dialed number/script selector (configured in CCE) for thisnotification. This field is used only for Connection to CCE notifications for Callback requests.
Edit
Select the name of a notification rule to open a window where you can edit its fields.
Notification Body VariablesThe notification body for emails and instant messages can contain keywords in the syntax ${KEYWORD}.These keywords are replaced with values from the contact that they are associated with.
By default, the body of the message contains a variable for the URL of the contact, whichis${SC_SCREEN_URL}.
You can add the following variables to the body of the notification to include the value of the variable in thenotification. For Email Notifications, you can also use HTML tags to stylize the notification. IM notificationsare sent using plain text.
Cisco SocialMiner User Guide Release 11.6(2)33
SocialMiner ConfigurationNotification Body Variables
Keywords are listed here as all upper-case, but they are not case sensitive.Note
• ${SC_AUTHOR}—the author of the social contact (not available in all feeds).• ${SC_CREATED_DATE}—the date the social contact was created in the system.• ${SC_DESCRIPTION}—the description of the social contact.• ${SC_PUBLISHED_DATE}—the published date of the social contact (not available in all feeds).• ${SC_SCREEN_URL}—the URL to the social contact in the results gadget. Selecting this URL allowsyou to instantly reserve/reply to the social contact.
• ${SC_SOURCE_TYPE}—the feed type of the social contact• ${SC_TAGS}—the tags for this social contact.• ${SC_TITLE}—the title of the social contact.• ${SC_EXTENSION_FIELDS.<fieldname>}—adds a specific, named extension field for the socialcontact. You can add a maximum of 100 extension fields and up to one megabyte of information.
• ${SC_EXTENSION_FIELDS}—adds all extension fields that exist for the social contact. They appearin the body in alphabetical order by name in the format Name: Value. If no value was defined, you seeName: (-). If there are no extension fields, the variable is removed from the message body.
For example, if the body an email notification includes the following:
• The author of this Social Contact is: ${SC_AUTHOR}. <br />
• The message contents are as follows: ${SC_DESCRIPTION} .<br />
• You can Reserve or Reply to the Social Contact <a href="${SC_SCREEN_URL}">here</a>.
Cisco SocialMiner User Guide Release 11.6(2)34
SocialMiner ConfigurationNotification Body Variables
C H A P T E R 4System Administration
Most of SocialMiner system administration is performed using the System Administration panel. This sectiondescribes the parts of the panel as well as other administrative procedures including backup and restore,managing certificates, and changing the administrator password.
• System Administration Panel, on page 35• Language Pack, on page 42• Certificates, on page 42• Avoid Sign in Overlays if the Reply Template Container Loads in an IFRAME in IE, on page 45• Command Line Interface , on page 45• System Backup and Restore, on page 53• Change the SocialMiner Administrator Username and Password Using the CLI , on page 55• Reset the Unified OS Platform Administrator Password , on page 55
System Administration PanelOnly the SocialMiner Administrator, who is the application user created during install time, can use theadministration panel.
The administration panel on the administration tab provides access to system configuration and serviceabilitytools that must be set up for efficient system use. The top half of the display consists of software versioninformation, server status and system statistic indicators.
Below the indicators are a series of drawers that contain tools for configuring different system aspects (asdescribed below). Use the arrow buttons next to the headings to open the tool drawers.
System Status and StatisticsThe top section of the SystemAdministration panel has three types of system status and statistical information:
• Software versions:
• Application Software Version (the version of the Cisco Unified OS that SocialMiner is running on).
• Operating System Active Software Version (The current, active SocialMiner version).
• Operating System Inactive Software Version (the previous, inactive SocialMiner version - if any).
• Server status for:
Cisco SocialMiner User Guide Release 11.6(2)35
Data store•
• Indexer
• Runtime
• Eventing and Chat.
• the Hardware profile (a tool tip shows when you hover over the hardware icon to indicate if thesystem is a small or large deployment).
• the Mail Notifications Server (if configured).
• the external XMPP Notifications Server (used for Instant Messaging notifications, if configured).
• Three graphical meters show:
• the incoming rate of all social contacts (per hour) for this server.
• the number of concurrent signed-in user sessions with SocialMiner, including administrators andother users via web interfaces and other connected applications.
• the percentage of the disk being used.
Hover the cursor over these graphs to see information about current statistics and system limits.
The meters help you determine if a server is nearing any limits. If a meter is completely red
• consider asking users to sign out.• modify your feeds to reduce the number of incoming contacts.• increase your disk allocation.
Active DirectorySocialMiner uses Active Directory (AD) to manage and administer user access to the system. All users, withthe exception of the administration and reporting users, must be configured on a Microsoft Active Directoryserver to access SocialMiner.
The AD connection permits users configured in AD to access SocialMiner. You can configure the connectionto allow access for all users in AD or for only a specific group of users. Multiple, independent groups thatrequire isolated security and permissions should each deploy their own SocialMiner system.
To configure AD, open the Active Directory drawer on the System Administration panel and clickEdit. Enteror modify these fields and then click Save when finished.
• Enabled: Checkbox. When checked, the AD connection is active. If not checked, then only theadministrator can sign into SocialMiner.
• Host: Required if Enabled is checked. Provide the host name or IP address of the AD server.• Port: Required if Enabled is checked. Provide the port for AD. The default AD port is 3269. If you arenot using SSL, you must change the port to 3268.
• Use SSL: Checkbox. Checked by default. Uncheck if not using SSL. When checked, you must exchangesecurity certificates with the AD server before SSL can work (see below).
• Manager Distinguished Name: Required if Enabled is checked. Enter theManager Distinguished Nameused to sign in to the AD server. For example, on a default installation of Microsoft AD, the name is:CN=Administrator, CN=users, DC=MYSERVER, DC=COM. Replace MYSERVER and COM withyour hostname.
Cisco SocialMiner User Guide Release 11.6(2)36
System AdministrationActive Directory
• Manager Password: Required if Enabled is checked. The password for the AD Manager account.• Role Name: Optional. The AD role or AD group of users who are allowed to access SocialMiner. If thissetting is blank or set to "*", then all users in AD are allowed access to SocialMiner.
Exchanging security certificates with AD
To enable SSL for the AD connection, you must first exchange security certificates between the two servers.Enabling SSL is optional, but if you do not enable SSL, then username and password information is nottransmitted securely between SocialMiner and the Microsoft AD server.
To exchange security certificates, on the AD server:
1. Verify that the AD server has the Certificate Services service installed.2. Select All Programs > Administrative Tools > Certificate Authority.3. Expand the domain node and select Issued Certificates.4. Double click the certificate to open it.5. Open the Details tab and click Copy to file.6. An Export wizard opens. In the wizard select DER encoded binary.7. Use the wizard to select a location to save the file.8. Click Finish.
On the SocialMiner Server:
1. Open the Platform Administration drawer on the System Administration panel and select the link to theUnified OS Administration page.
2. Select Security > Certificate Management.3. Click Upload Certificate.4. For the Certificate Name, select tomcat-trust.5. In the Upload File field, select the file to upload by clicking Browse... Select the certificate file you saved
from the Active Directory server.6. Click Upload File.7. Restart the Cisco Tomcat service. Using the CLI, run the command utils service restart Cisco Tomcat.
Adding users
The Administration user (configured at install) and Reporting user accounts are the only accounts explicitlyconfigured on SocialMiner. The customer care representatives are configured in Microsoft AD.
When these users sign into SocialMiner, successfully authenticate against AD, and begin to take actions onthe system; their actions are associated with their AD user ID.
Mail Notifications ServerThe mail notifications server settings allow you to configure SMTP information for a mail notifications server.You must configure a mail notifications server if you intend to use the email notification feature.
The mail notifications server sends an email notification to alert users when a contact comes in to SocialMinerthat matches certain criteria. The mail notifications server is separate from the Exchange server used formulti-session email.
Note
Cisco SocialMiner User Guide Release 11.6(2)37
System AdministrationMail Notifications Server
To configure the mail notifications server, open the Mail Notifications Server drawer on the SystemAdministration panel and click Edit. Enter or modify these fields and then click Save when finished.
• Enabled: Check to enable the mail notifications server connection.• Mail Notifications Server Host: Required if Enabled is checked. The IP address or host name of themail notifications server. For Gmail, set this to smtp.gmail.com.
• Mail Notifications Server Port: Required if Enabled is checked. The port for the mail notificationsserver. Port 465 is the default for SSL/TLS connections (such as the Gmail SMTP server smtp.gmail.com).For non-SSL/TLS connections, the default port is 25. If you change the port for your mail notificationsserver from the default, use the new port number for this field.
• From Email Address: Required if Enabled is checked. The email address from which emails are sent.• Use Authentication: Check if the user has SMTP authentication to connect to the mail notificationsserver. When Use Authentication is checked, these two fields become editable.
• User Name: Required if Use Authentication is checked. The user name for signing in.• Password: Required if Use Authentication is checked. The password for the user name.
• Use SSL|TLS : Defaults to checked. Uncheck this if your mail notifications server does not support asecure connection. This must be checked if you are using the Gmail SMTP server (smtp.gmail.com).
Proxy Settings
Consult your Network Administrator for the proxy name and port. The same proxy is used across all feeds.If your server is behind a firewall, the SocialMiner Administrator may need to enable the feeds to use a proxy.
Note
To configure the proxy, open the Proxy Settings drawer on the System Administration panel and click Edit.Enter or modify these fields and then click Save when finished.
• Enable Proxy: Checkbox. When checked, feeds are accessed through the proxy server.• Hostname: Required when Enable Proxy is checked. The IP address or hostname of the proxy server.• Port: Required when Enable Proxy is checked. The port for the proxy server.• Exclusion Patterns: You can add and remove host names or IP addresses for servers not requiring aproxy.
• To add an exclusion, type the exclusion into the text box and click Add.• To remove an exclusion, select the red X to the right of the exclusion.• Wildcards are supported. For example“ *.cisco.com” excludes all servers with a cisco.com hostnameand “10.86*” excludes all IP addresses starting with 10.86.
• Proxy changes may take up to 30 seconds to take effect.• The exclusion list is limited to 255 total characters. (There is an additional character per item in the listthat acts as a separator.)
• SocialMiner should only need to access a proxy server if it sits behind a corporate network firewall andhas to use an http or https proxy server for accessing an outside network. You should not need to giveSocialMiner a private NAT address, and doing so is not currently supported.
Note
Cisco SocialMiner User Guide Release 11.6(2)38
System AdministrationProxy Settings
Public URL Prefix for Chat InvitationIn order for this to be succesful, use a reverse proxy or the SocialMiner server needs to be hosted in a DMZ.Use this tool to configure that customer-accessible URL.
Click the Edit button to enter a valid URL starting with http:// and click Save.
The defined prefix appears in the chat invitation link sent to the customer.
Public URL Prefix for Chat Invitation does not apply to SocialMiner integration with CCX for multisessionweb chat feature.
Note
XMPP Notifications ServerXMPP notifications server settings allow you to configure an XMPP notifications server so SocialMiner canuse instant messaging (IM) notifications. You must configure an XMPP notifications server if you intend touse the IM notification feature.
To configure the XMPP notifications server, open the XMPP Notifications Server drawer and click Edit.Enter or modify these fields and then click Save when finished.
• Enabled: Checkbox. Check to enable the XMPP notifications server connection.• XMPP Service Lookup: Check to enable XMPP Service Lookup. When enabled, the User Name'sdomain is used to connect to the correct XMPP Notifications Server.
• XMPPNotifications Server Host: The IP address or Hostname of the XMPP Notifications Server. Thisdoes not apply if XMPP Service Lookup is checked.
• XMPPNotifications Server Port: The port for the XMPP Notifications Server. This is set for port 5222by default. This does not apply if XMPP Service Lookup is checked.
• User Name: The user name (in full JID format, such as [email protected]), which is used to sign into the XMPP Notifications Server.
• Password: The password for the above User Name. NOTE: If you change your XMPP password for anyreason, change it here.
Purge SettingsDatabase purges are required to remove old data from the data store so that the disk does not fill up. Datastore purges occur on a continuous basis (every hour) based on the age of the contacts and disk usage.
The purge runs automatically 5 minutes after the runtime is started and then runs every 60 minutes. Each timethe purge runs, the first 30,000 contacts that are older than the number of days specified in the 'Purge SocialContacts older than (days)' setting are deleted. If no contacts meet the criteria, no contacts are purged. If morethan 30,000 contacts meet the criteria, only the first 30,000 are deleted. The next 30,000 are deleted at thenext purge 60 minutes later.
Important! Purge settings take effect as soon as you click Save; therefore, if the 'Emergency purge whendisk usage exceeds (%)' criterion is met, the purge starts immediately.
To configure purge settings, open the Purge Settings drawer and click Edit. Enter or modify these fields andthen click Save when finished.
• Data store purge settings:
Cisco SocialMiner User Guide Release 11.6(2)39
System AdministrationPublic URL Prefix for Chat Invitation
• Purge Social Contacts older than (days): Social contacts older than this number of days are purged.Values must be integers (no decimals) between 1 and 550.
• Emergency purge when disk usage exceeds (%): Begin an emergency purge if disk usage exceedsthis value. Valid values are 40–90. When an emergency purge executes, social contacts older thanthe number of days specified above are removed. If disk usage is still above the setting for this field,the purge continues removing social contacts (one day at a time) until the disk usage is below thethreshold for emergency purge.
• Reporting purge settings:
• Purge start time (HH:mm 24 hour format): The time, in 24 hour format (00:00 to 23:59), thatthe purge starts based on the local server time. By default this is set to 01:00 (1am) local servertime.
• Purge Social Contacts older than (days): Reporting records for social contacts older than thisnumber of days are purged when the purge starts. Values must be integers (no decimals) between1 and 550.
Reporting ConfigurationThe reporting configuration allows you to set or change the Informix password for the reporting user. Youcannot change the reporting user name; it is always "reportinguser". This username does not display until youedit and enter a password.
The reporting user is used by Cisco Unified Intelligence Center (CUIC) and third-party applications to accessthe reporting database. Details on the tables in the reporting database are available in the SocialMiner DeveloperGuide.
To set or change the password for the reporting user, open the Reporting Configuration drawer and enter anew password in the password field, and then click Save. Password is the only field you can edit.
You will also see reporting server and database information in this drawer. This information is required forthird-party connection to the database. The details include:
• Reporting Host: the hostname to use when connecting to the reporting database.• Reporting Port: the port for the reporting database server.• Reporting Server: the Informix server name for the reporting database. When configuring CUIC, thisis the "Instance".
• Reporting Database: the Informix database name for reporting.• Database Type: the type of database (Informix).
When configuring CUIC, you must select UTF-8 as the character set.
RTMT DownloadUse the RTMT (Real-Time Monitoring Tool) to troubleshoot issues in SocialMiner by downloading andanalyzing the service logs. You can download RTMT logs for the following services:
• SocialMiner Datastore Service• SocialMiner Indexer Service• SocialMiner Migration• SocialMiner ORM Service• SocialMiner Public REST API
Cisco SocialMiner User Guide Release 11.6(2)40
System AdministrationReporting Configuration
• SocialMiner REST API• SocialMiner Runtime Service• SocialMiner XMPP Server Service• SocialMiner Chat Gateway
For more information about using RTMT, see the Cisco Unified Real-Time Monitoring Tool AdministrationGuide available here:
https://www.cisco.com/c/en/us/support/unified-communications/unified-communications-manager-callmanager/products-maintenance-guides-list.html
RTMT Download LinksLinks are provided in the RTMT Download drawer to download the Unified Real Time Monitoring Tool(RTMT).
For details on installing and configuring RTMT, see Cisco Unified Real-TimeMonitoring Tool AdministrationGuide.
Audit Logs
SocialMiner 11.6 supports audit logging to keep track of changes made to configuration entities (e.g.Feeds/Campaigns, etc). It also identifies the id used to autheticate the request. The log file can be viewed viaRTMT tool by selecting the SocialMiner rest API option. The file titled ccp-audit.log is located at :/var/log/active/mmca/logs/ccp-audit.log
An audit log entry will contain the following fields:
DescriptionField
The date and time when the audit log entry was created .DATE TIME (e.g : 2016-10-27 18:44:55.405)
The HTTP request type of the request (e.gPUT/POST/DELETE/GET)
METHOD
The id used for authntication.USER ID
The URL context used while requesting.URL
The request data sent as part of the request.PAYLOAD
Textual description of the change e.g < CREATE |MODIFY | DELETE>
OPERATION
Log files can accomodate upto 100 MB of data, post which new files will get created. Old files earlier than 6months will be archived. The audit log files can be viewed via RTMT tool by selecting the SocialMiner restAPI option.
To retrieve the audit log file later, use the following CLI command from the admin prompt: file get activelogmmca/logs/ccpapi/ccp-audit.log
Platform AdministrationThe Platform Administration drawer provides links to the following interfaces of Cisco Unified OS:
Cisco SocialMiner User Guide Release 11.6(2)41
System AdministrationRTMT Download Links
• Cisco Unified Operating System Administration—Use tools on this interface to upgrade software and toimport certificates.
• CiscoUnified Serviceability—Only showsOS logs, SocialMiner logs are accessed from the SystemLogsdrawer.
• Disaster Recovery System—Use tools on this interface to perform back up and restore actions.
SocialMiner uses the same platform administration tools as Unified Communications Manager. Online helpis available with the tools.
System LogsThe System Logs drawer provides a link to perform a system health snapshot.
Important! Do not select the System Health Snapshot link unless directed to by Cisco TAC. Accessing thislink forces the system to stream all system parameters into a large XML file for download. System performanceis impacted while the snapshot is occurring.
Language PackDownload and install the language pack only if you want to see the SocialMiner interface in a language otherthan English.
The language pack for SocialMiner is delivered as a single COP file, the same way that SocialMiner deliversCOP files for patches. The file is available to download from Cisco.com at the following link:
http://software.cisco.com/download/type.html?mdfid=283613136&i=rm
The file contains a single installer for all language variants. The filename is of the format:
ccp-language-pack_18-11.6.1.10000-x.cop.sgn
where 11.6.1 is the release identifier.
Follow the instructions in Cisco SocialMiner User Guide to install the COP file for the language you want onyour SocialMiner interface.
CertificatesCertificates are used to ensure that browser communication is secure by authenticating clients and servers onthe Web. Users can purchase certificates from a certificate authority (CA signed certificates) or they can useself-signed certificates.
Obtaining a CA-Signed CertificateEach time you sign-in, the browser validates the certificate presented by the server. If the certificate is notsigned by a trusted root Certificate Authority (CA), the browser will typically not allow the connection untilthe user explicitly allows it. In order to avoid this, you must obtain a root certificate signed by a CA and installit onto SocialMiner.
Use the Certificate Management utility from Unified OS Administration to do this.
Open Unified OS Administration from the Administration tab > Platform Administration.
Cisco SocialMiner User Guide Release 11.6(2)42
System AdministrationSystem Logs
To Obtain the Certificates
1. Select Security > Certificate Management > Generate CSR.2. After the successful generation, click Download CSR.3. Use the CSR to obtain the signed application certificate and the CA root certificate from the CA.
To Upload the Certificates
1. When you receive the certificates, open Unified OS Administration from the Administration tab >Platform Administration.
2. Select Security > Certificate Management > Upload Certificate.3. Select the certificate name from the Certificate Name list.4. Upload the root certificate.
1. In the Upload dialog box, select tomcat trust from the drop-down.2. Browse to the file and click Open.3. Click Upload File.
5. Upload the application certificate.
1. In the Upload dialog box, select tomcat from the drop-down.2. Enter the name of the CA root in the Root Certificate text box.3. Browse to the file and click Open.4. Click Upload File.
For more information about CA-signed certificates, see the Security topics in the Unified OS Administrationonline help.
After You Upload the Certificates
1. Sign out of SocialMiner.2. Restart the XMPP Service. (SSH to SocialMiner and enter the command admin:utils service restart
SocialMiner XMPP Server) in the command line interface.3. Restart Tomcat. (SSH to SocialMiner and enter the command admin:utils service restart Cisco Tomcat)
in the command line interface.4. Sign in to SocialMiner.
Self-Signed CertificatesSelf-signed certificates (as the name implies) are signed by the same entity whose identity they certify, asopposed to being signed by a certificate authority. Self-signed certificates are not considered to be as secureas CA certificates, but they are used by default in many applications (including SocialMiner).
Browsers handle self-signed certificates in different ways. The sections below describe how to handle self-signedcertificates on the browsers supported for SocialMiner.
Internet Explorer and Self-Signed CertificatesWhen using an IE browser on a Windows machine, make sure your DNS server is properly configured andyou can resolve the fully qualified SocialMiner hostname to the SocialMiner IP address. Use a signed certificatefrom a trusted certificate authority (like Verisign).
Cisco SocialMiner User Guide Release 11.6(2)43
System AdministrationSelf-Signed Certificates
If you use a self-signed certificate (which is what is installed with SocialMiner), follow these steps to avoidgetting certificate warnings each time you sign in.
• In your Start menu, right click on IE and select "Run as Administrator".
• Enter the URL for your SocialMiner server in the address bar.
• When prompted by the security warning, click on Continue to this website (not recommended).
• Your address bar turns red and you see a certificate error next to the address bar. Select the certificateerror.
• Select View certificates at the bottom of the popup. This opens a certificate dialog.
• On the General tab, select Install Certificate....
• The certificate export wizard launches. Click Next.
• When prompted for where to store the certificates, select Place all certificates in the following store,then click Browse and select Trusted Root Certification Authorities.
• Click Ok, then click Next and Finish to complete the certificate import wizard.
• Click Yes when prompted about importing the certificate.
• Close and restart your browser to access SocialMiner.
Firefox and Self-Signed CertificatesDue to changes in the Firefox security model, there are additional self-signed certificates that must be acceptedto use the SocialMiner web application on Firefox.
When accessing a SocialMiner server using a newly installed Firefox browser (any version), Firefox attemptsto connect to the main port that SocialMiner uses first (port 443). If it cannot connect, it prompts the user toaccept the self-signed certificate.
If pop ups are blocked, you are given instructions on how to manually launch the certificate page. Also, if thecertificate window is closed before the certificate is accepted, the page will automatically re-launch.
Note
• If prompted, click I Understand the Risks, then click Add Exception.
• Click Confirm Security Exception.
Next, Firefox attempts to connect to port 7443 (the secure XMPP port). With Firefox, a second self-signedcertificate must now be accepted to use this port. SocialMiner displays a "Checking Connectivity..." screenduring this process
If the"Checking Connectivity..." screen persists after a few seconds, click Continue to proceed to the Firefoxcertificate acceptance screen (as above).
Click I Understand the Risks, then Add Exception, and Confirm Security Exception again.
Users need only go through this process the first time they use a new Firefox browser and self-signedcertificates. After the certificates are in place, users may not see the "Checking Connectivity..." screen (or itwill appear briefly and proceed to the SocialMiner sign on screen).
Cisco SocialMiner User Guide Release 11.6(2)44
System AdministrationFirefox and Self-Signed Certificates
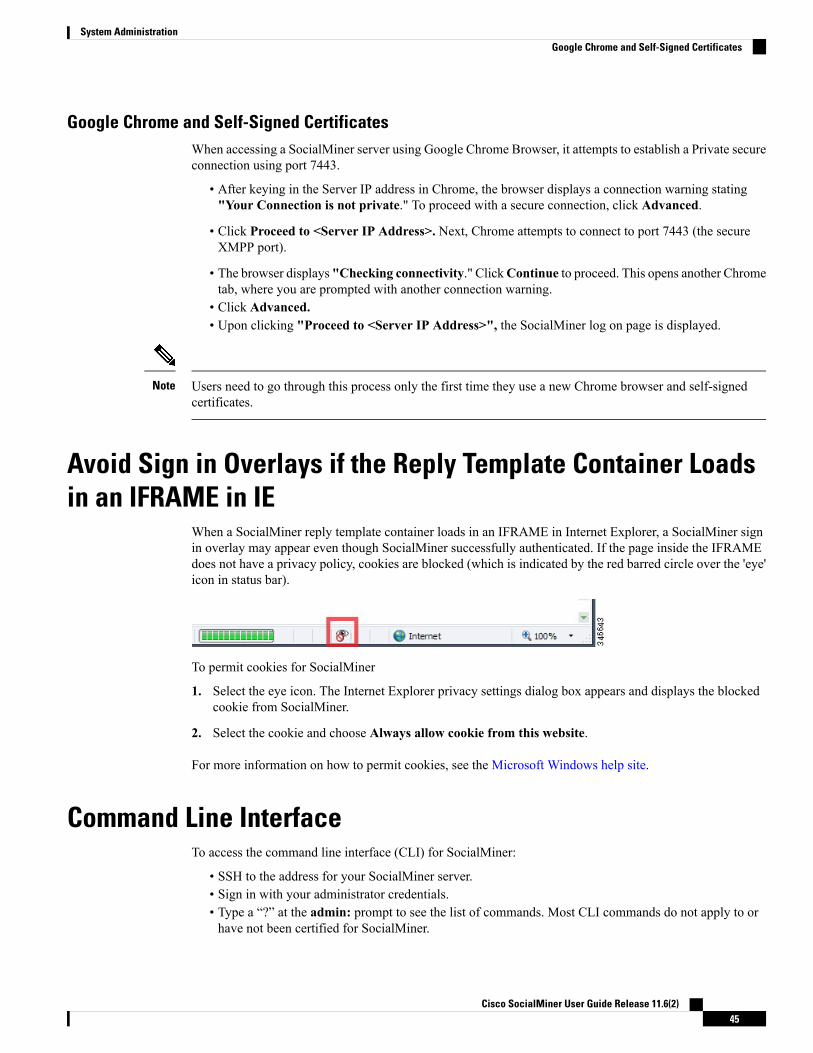
Google Chrome and Self-Signed CertificatesWhen accessing a SocialMiner server using Google Chrome Browser, it attempts to establish a Private secureconnection using port 7443.
• After keying in the Server IP address in Chrome, the browser displays a connection warning stating"Your Connection is not private." To proceed with a secure connection, click Advanced.
• Click Proceed to <Server IP Address>. Next, Chrome attempts to connect to port 7443 (the secureXMPP port).
• The browser displays "Checking connectivity." ClickContinue to proceed. This opens another Chrometab, where you are prompted with another connection warning.
• Click Advanced.• Upon clicking "Proceed to <Server IP Address>", the SocialMiner log on page is displayed.
Users need to go through this process only the first time they use a new Chrome browser and self-signedcertificates.
Note
Avoid Sign in Overlays if the Reply Template Container Loadsin an IFRAME in IE
When a SocialMiner reply template container loads in an IFRAME in Internet Explorer, a SocialMiner signin overlay may appear even though SocialMiner successfully authenticated. If the page inside the IFRAMEdoes not have a privacy policy, cookies are blocked (which is indicated by the red barred circle over the 'eye'icon in status bar).
To permit cookies for SocialMiner
1. Select the eye icon. The Internet Explorer privacy settings dialog box appears and displays the blockedcookie from SocialMiner.
2. Select the cookie and choose Always allow cookie from this website.
For more information on how to permit cookies, see the Microsoft Windows help site.
Command Line InterfaceTo access the command line interface (CLI) for SocialMiner:
• SSH to the address for your SocialMiner server.• Sign in with your administrator credentials.• Type a “?” at the admin: prompt to see the list of commands. Most CLI commands do not apply to orhave not been certified for SocialMiner.
Cisco SocialMiner User Guide Release 11.6(2)45
System AdministrationGoogle Chrome and Self-Signed Certificates
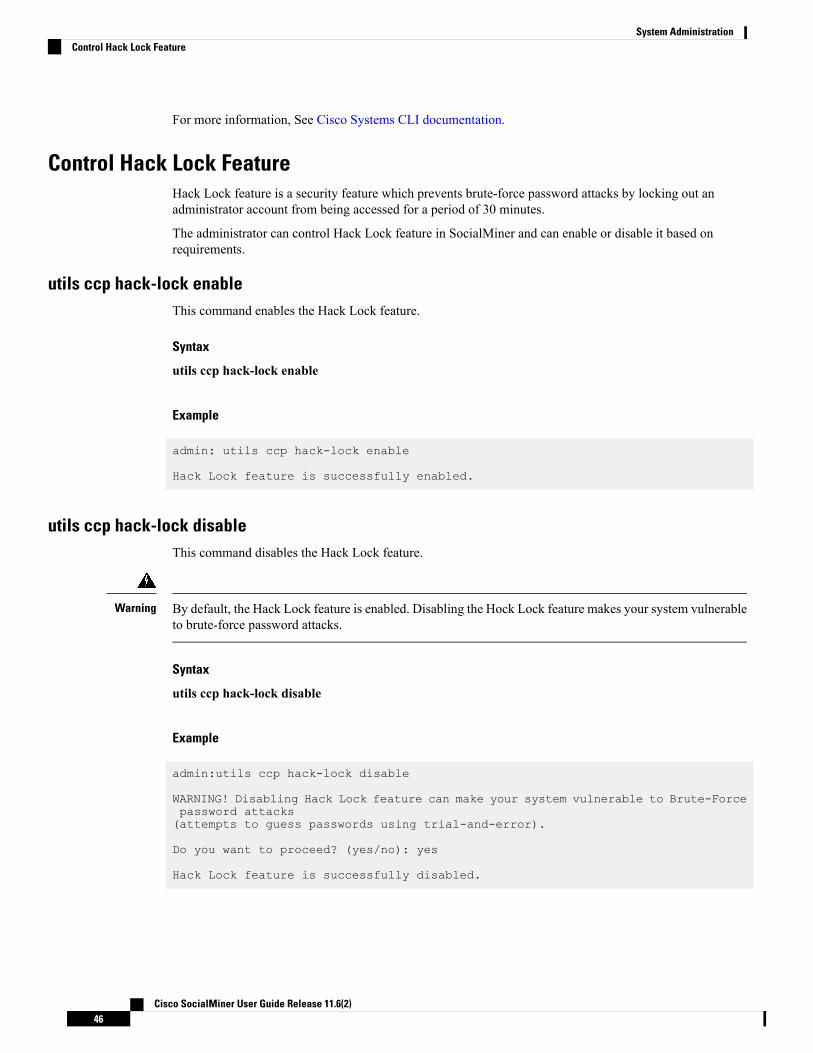
For more information, See Cisco Systems CLI documentation.
Control Hack Lock FeatureHack Lock feature is a security feature which prevents brute-force password attacks by locking out anadministrator account from being accessed for a period of 30 minutes.
The administrator can control Hack Lock feature in SocialMiner and can enable or disable it based onrequirements.
utils ccp hack-lock enableThis command enables the Hack Lock feature.
Syntax
utils ccp hack-lock enable
Example
admin: utils ccp hack-lock enable
Hack Lock feature is successfully enabled.
utils ccp hack-lock disableThis command disables the Hack Lock feature.
By default, the Hack Lock feature is enabled. Disabling the Hock Lock feature makes your system vulnerableto brute-force password attacks.
Warning
Syntax
utils ccp hack-lock disable
Example
admin:utils ccp hack-lock disable
WARNING! Disabling Hack Lock feature can make your system vulnerable to Brute-Forcepassword attacks(attempts to guess passwords using trial-and-error).
Do you want to proceed? (yes/no): yes
Hack Lock feature is successfully disabled.
Cisco SocialMiner User Guide Release 11.6(2)46
System AdministrationControl Hack Lock Feature
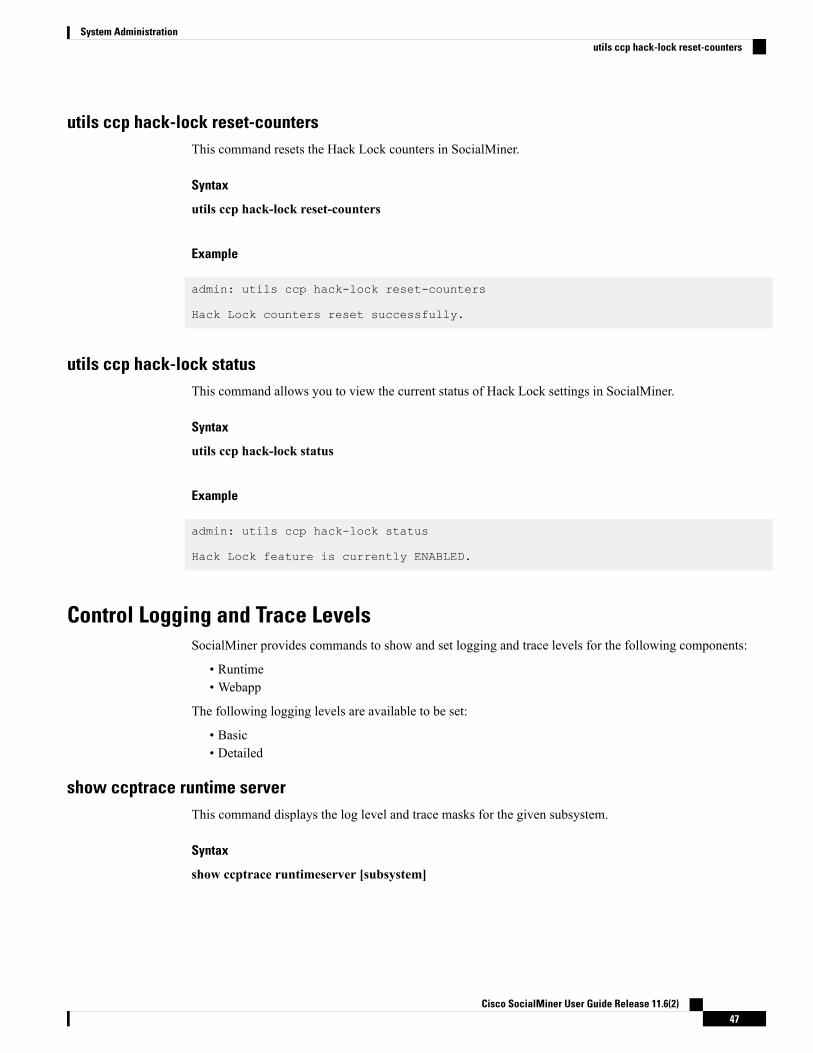
utils ccp hack-lock reset-countersThis command resets the Hack Lock counters in SocialMiner.
Syntax
utils ccp hack-lock reset-counters
Example
admin: utils ccp hack-lock reset-counters
Hack Lock counters reset successfully.
utils ccp hack-lock statusThis command allows you to view the current status of Hack Lock settings in SocialMiner.
Syntax
utils ccp hack-lock status
Example
admin: utils ccp hack-lock status
Hack Lock feature is currently ENABLED.
Control Logging and Trace LevelsSocialMiner provides commands to show and set logging and trace levels for the following components:
• Runtime• Webapp
The following logging levels are available to be set:
• Basic• Detailed
show ccptrace runtime serverThis command displays the log level and trace masks for the given subsystem.
Syntax
show ccptrace runtimeserver [subsystem]
Cisco SocialMiner User Guide Release 11.6(2)47
System Administrationutils ccp hack-lock reset-counters
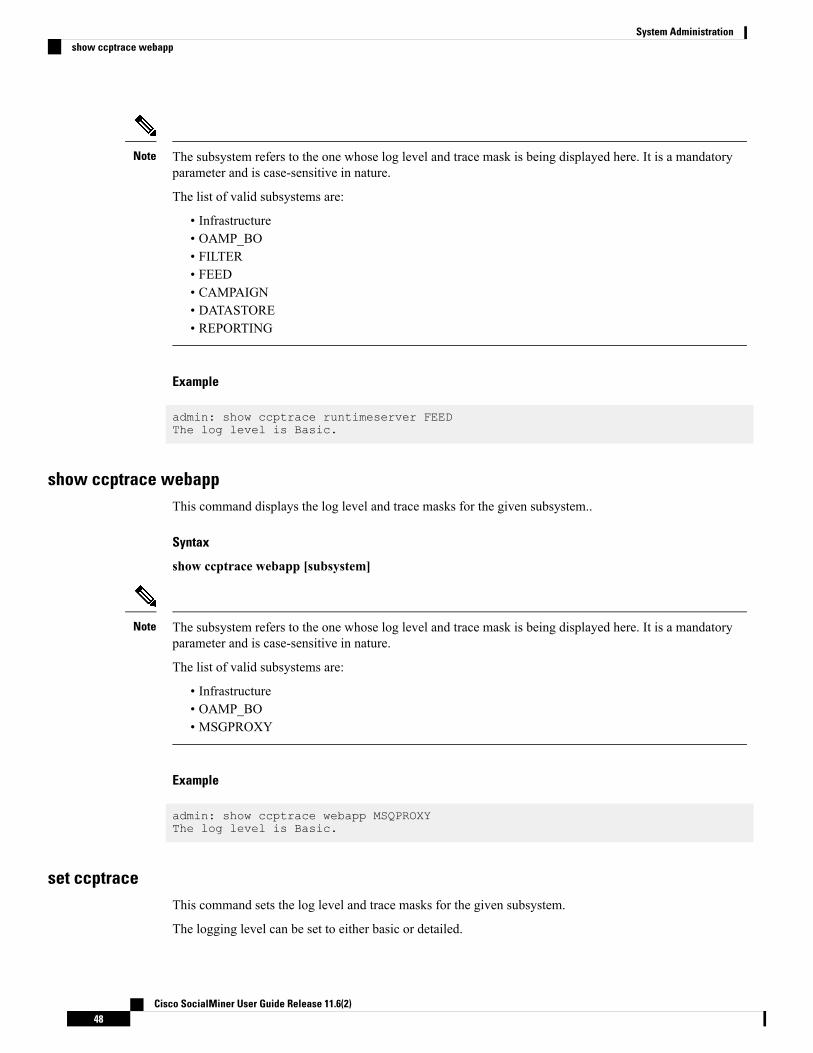
The subsystem refers to the one whose log level and trace mask is being displayed here. It is a mandatoryparameter and is case-sensitive in nature.
The list of valid subsystems are:
• Infrastructure• OAMP_BO• FILTER• FEED• CAMPAIGN• DATASTORE• REPORTING
Note
Example
admin: show ccptrace runtimeserver FEEDThe log level is Basic.
show ccptrace webappThis command displays the log level and trace masks for the given subsystem..
Syntax
show ccptrace webapp [subsystem]
The subsystem refers to the one whose log level and trace mask is being displayed here. It is a mandatoryparameter and is case-sensitive in nature.
The list of valid subsystems are:
• Infrastructure• OAMP_BO• MSGPROXY
Note
Example
admin: show ccptrace webapp MSQPROXYThe log level is Basic.
set ccptraceThis command sets the log level and trace masks for the given subsystem.
The logging level can be set to either basic or detailed.
Cisco SocialMiner User Guide Release 11.6(2)48
System Administrationshow ccptrace webapp
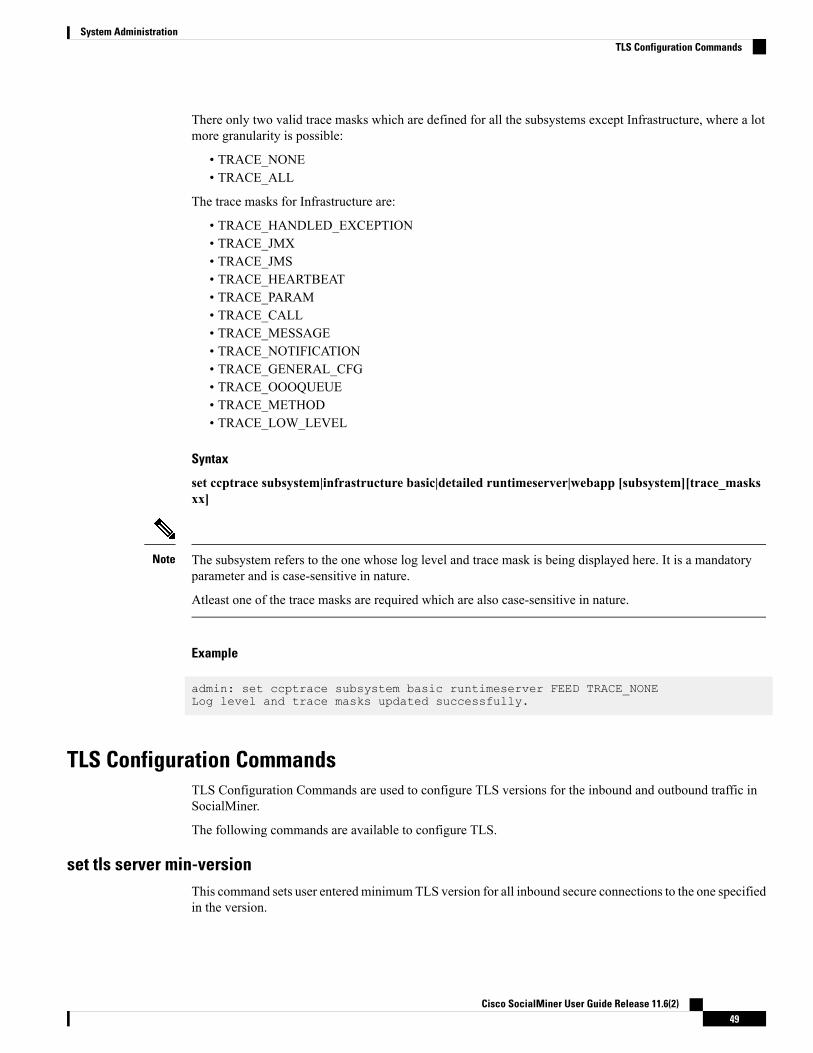
There only two valid trace masks which are defined for all the subsystems except Infrastructure, where a lotmore granularity is possible:
• TRACE_NONE• TRACE_ALL
The trace masks for Infrastructure are:
• TRACE_HANDLED_EXCEPTION• TRACE_JMX• TRACE_JMS• TRACE_HEARTBEAT• TRACE_PARAM• TRACE_CALL• TRACE_MESSAGE• TRACE_NOTIFICATION• TRACE_GENERAL_CFG• TRACE_OOOQUEUE• TRACE_METHOD• TRACE_LOW_LEVEL
Syntax
set ccptrace subsystem|infrastructure basic|detailed runtimeserver|webapp [subsystem][trace_masksxx]
The subsystem refers to the one whose log level and trace mask is being displayed here. It is a mandatoryparameter and is case-sensitive in nature.
Atleast one of the trace masks are required which are also case-sensitive in nature.
Note
Example
admin: set ccptrace subsystem basic runtimeserver FEED TRACE_NONELog level and trace masks updated successfully.
TLS Configuration CommandsTLS Configuration Commands are used to configure TLS versions for the inbound and outbound traffic inSocialMiner.
The following commands are available to configure TLS.
set tls server min-versionThis command sets user enteredminimumTLS version for all inbound secure connections to the one specifiedin the version.
Cisco SocialMiner User Guide Release 11.6(2)49
System AdministrationTLS Configuration Commands
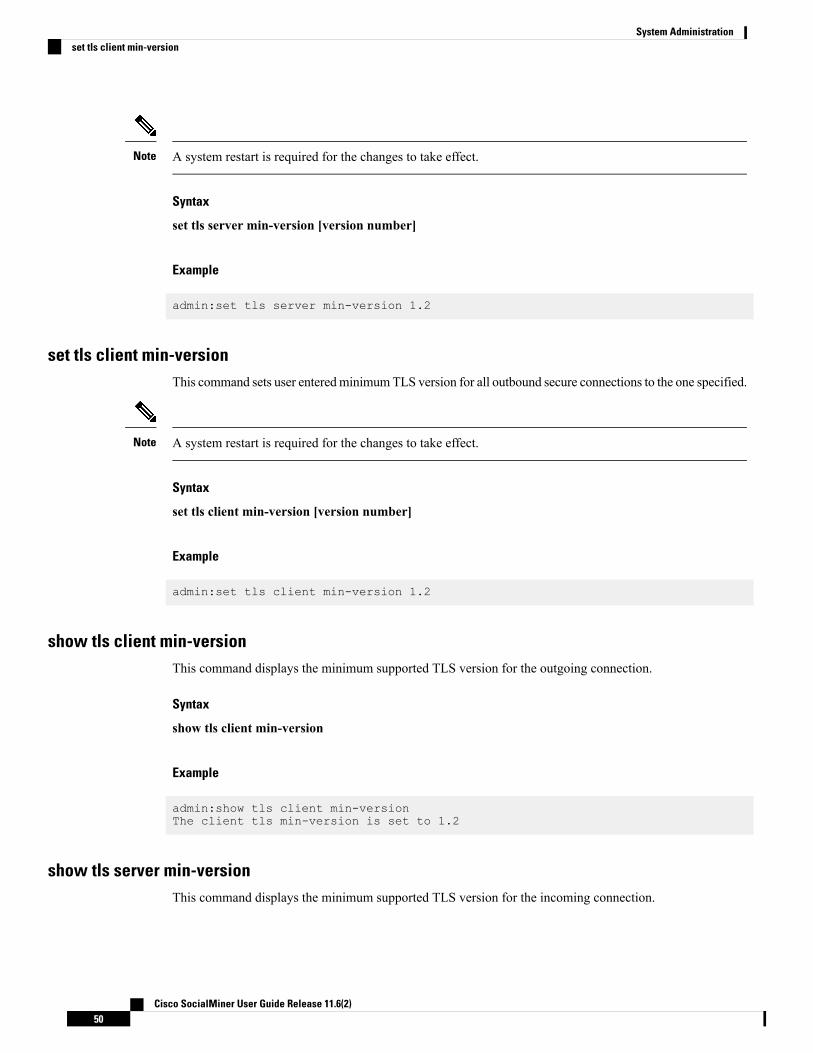
A system restart is required for the changes to take effect.Note
Syntax
set tls server min-version [version number]
Example
admin:set tls server min-version 1.2
set tls client min-versionThis command sets user enteredminimumTLS version for all outbound secure connections to the one specified.
A system restart is required for the changes to take effect.Note
Syntax
set tls client min-version [version number]
Example
admin:set tls client min-version 1.2
show tls client min-versionThis command displays the minimum supported TLS version for the outgoing connection.
Syntax
show tls client min-version
Example
admin:show tls client min-versionThe client tls min-version is set to 1.2
show tls server min-versionThis command displays the minimum supported TLS version for the incoming connection.
Cisco SocialMiner User Guide Release 11.6(2)50
System Administrationset tls client min-version
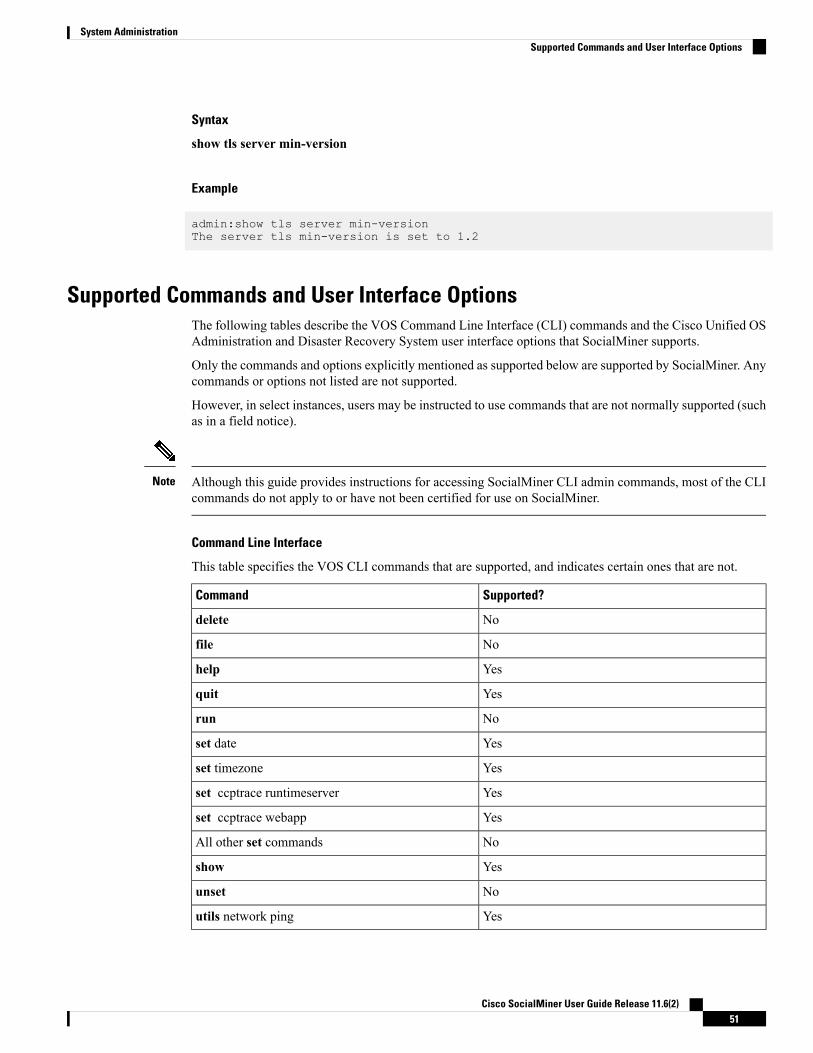
Syntax
show tls server min-version
Example
admin:show tls server min-versionThe server tls min-version is set to 1.2
Supported Commands and User Interface OptionsThe following tables describe the VOS Command Line Interface (CLI) commands and the Cisco Unified OSAdministration and Disaster Recovery System user interface options that SocialMiner supports.
Only the commands and options explicitly mentioned as supported below are supported by SocialMiner. Anycommands or options not listed are not supported.
However, in select instances, users may be instructed to use commands that are not normally supported (suchas in a field notice).
Although this guide provides instructions for accessing SocialMiner CLI admin commands, most of the CLIcommands do not apply to or have not been certified for use on SocialMiner.
Note
Command Line Interface
This table specifies the VOS CLI commands that are supported, and indicates certain ones that are not.
Supported?Command
Nodelete
Nofile
Yeshelp
Yesquit
Norun
Yesset date
Yesset timezone
Yesset ccptrace runtimeserver
Yesset ccptrace webapp
NoAll other set commands
Yesshow
Nounset
Yesutils network ping
Cisco SocialMiner User Guide Release 11.6(2)51
System AdministrationSupported Commands and User Interface Options
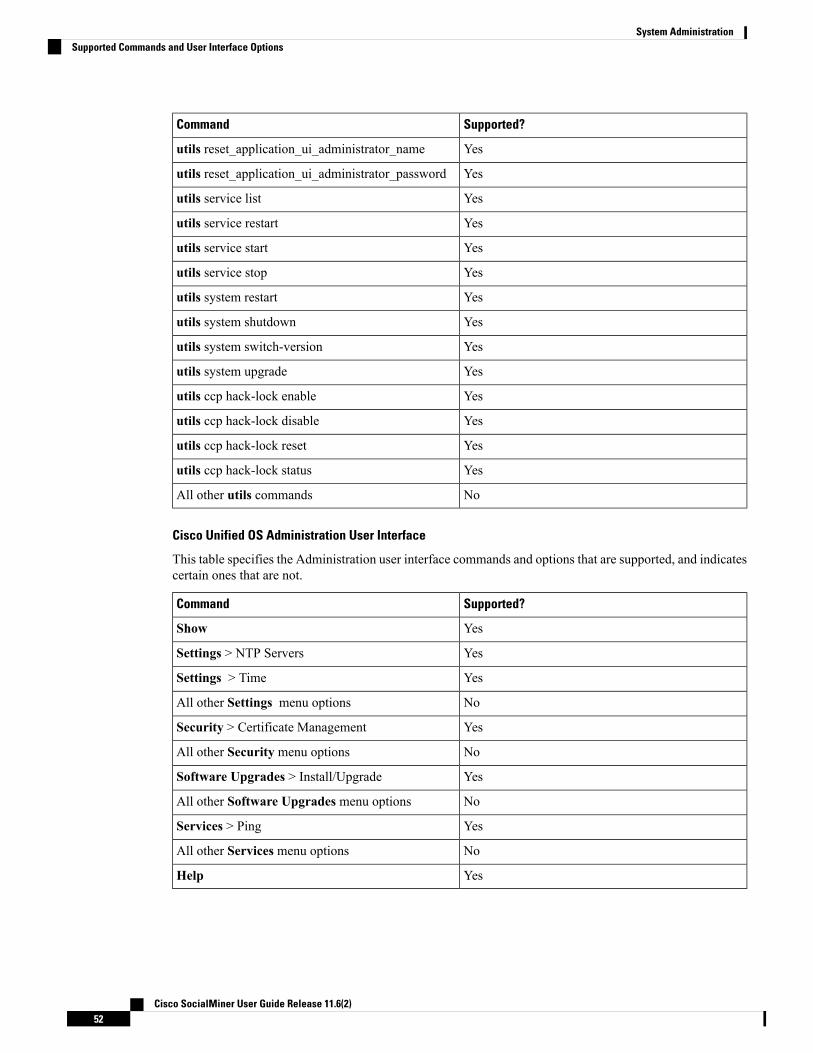
Supported?Command
Yesutils reset_application_ui_administrator_name
Yesutils reset_application_ui_administrator_password
Yesutils service list
Yesutils service restart
Yesutils service start
Yesutils service stop
Yesutils system restart
Yesutils system shutdown
Yesutils system switch-version
Yesutils system upgrade
Yesutils ccp hack-lock enable
Yesutils ccp hack-lock disable
Yesutils ccp hack-lock reset
Yesutils ccp hack-lock status
NoAll other utils commands
Cisco Unified OS Administration User Interface
This table specifies the Administration user interface commands and options that are supported, and indicatescertain ones that are not.
Supported?Command
YesShow
YesSettings > NTP Servers
YesSettings > Time
NoAll other Settings menu options
YesSecurity > Certificate Management
NoAll other Security menu options
YesSoftware Upgrades > Install/Upgrade
NoAll other Software Upgrades menu options
YesServices > Ping
NoAll other Services menu options
YesHelp
Cisco SocialMiner User Guide Release 11.6(2)52
System AdministrationSupported Commands and User Interface Options
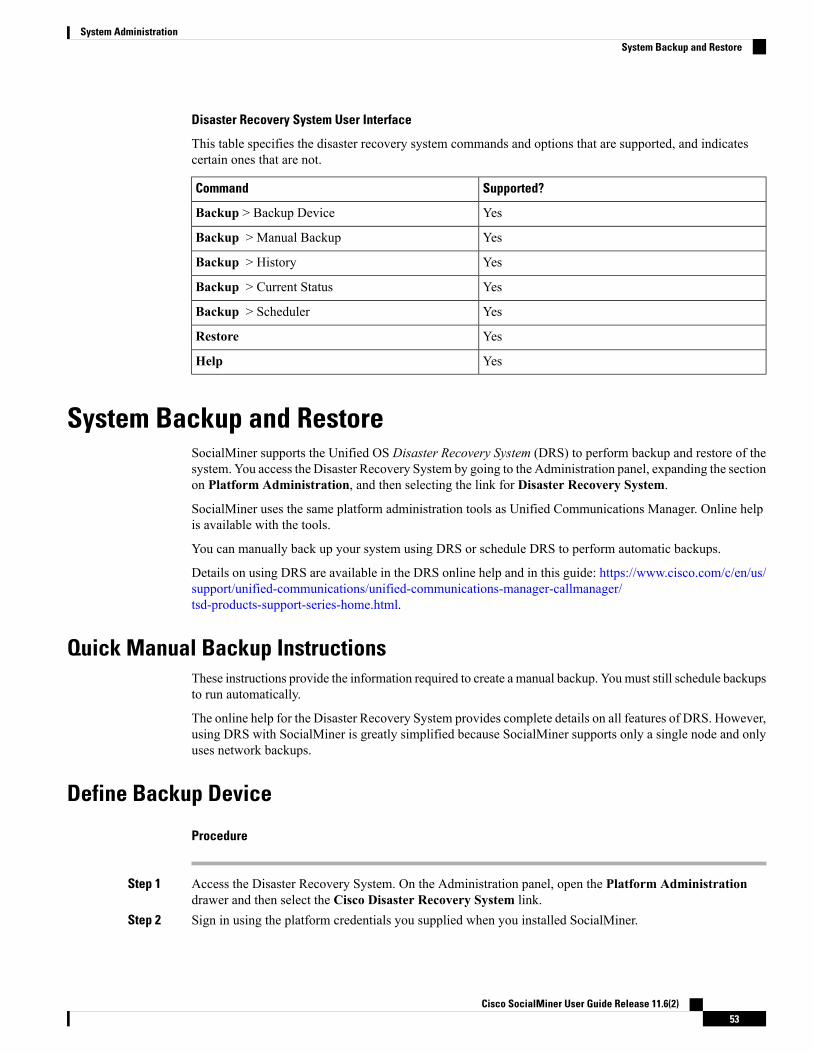
Disaster Recovery System User Interface
This table specifies the disaster recovery system commands and options that are supported, and indicatescertain ones that are not.
Supported?Command
YesBackup > Backup Device
YesBackup > Manual Backup
YesBackup > History
YesBackup > Current Status
YesBackup > Scheduler
YesRestore
YesHelp
System Backup and RestoreSocialMiner supports the Unified OS Disaster Recovery System (DRS) to perform backup and restore of thesystem. You access the Disaster Recovery System by going to the Administration panel, expanding the sectionon Platform Administration, and then selecting the link for Disaster Recovery System.
SocialMiner uses the same platform administration tools as Unified Communications Manager. Online helpis available with the tools.
You can manually back up your system using DRS or schedule DRS to perform automatic backups.
Details on using DRS are available in the DRS online help and in this guide: https://www.cisco.com/c/en/us/support/unified-communications/unified-communications-manager-callmanager/tsd-products-support-series-home.html.
Quick Manual Backup InstructionsThese instructions provide the information required to create a manual backup. Youmust still schedule backupsto run automatically.
The online help for the Disaster Recovery System provides complete details on all features of DRS. However,using DRS with SocialMiner is greatly simplified because SocialMiner supports only a single node and onlyuses network backups.
Define Backup Device
Procedure
Step 1 Access the Disaster Recovery System. On the Administration panel, open the Platform Administrationdrawer and then select the Cisco Disaster Recovery System link.
Step 2 Sign in using the platform credentials you supplied when you installed SocialMiner.
Cisco SocialMiner User Guide Release 11.6(2)53
System AdministrationSystem Backup and Restore
Step 3 Select Backup > Backup Device.Step 4 On the Backup Device List page, select Add New.Step 5 Provide a Device Name for the backup device. SocialMiner only supports backing up to a network directory.
Provide the network directory details for a server that supports SFTP.Step 6 Provide the number of backups to store on the network directory. The default is two, so only the two latest
backups are preserved.Step 7 Click Save. The system verifies the information you entered and saves the backup device.
You do not need to repeat these steps the next time you back up the system unless you want to back up to adifferent device or change the backup device settings.
Backup the System to the Backup Device
Procedure
Step 1 Access the Disaster Recovery System. On the Administration panel, open the Platform Administrationdrawer and then select the Cisco Disaster Recovery System link.
Step 2 Sign in using the platform credentials you supplied when you installed SocialMiner.Step 3 Select Backup >Manual Backup.Step 4 Select the backup device you created earlier from the drop-down menu in Select Backup Device.Step 5 In Selected Features, check SOCIALMINER.Step 6 Click Start Backup.Step 7 A warning appears indicating that you may need to use the security password if you try to restore later. Click
OK. The backup begins.Step 8 The backup page refreshes periodically providing the status of the backup. The page also displays the name
of the backup tar file that is being saved to the remote system.
Restore From a Backup File
Procedure
Step 1 Access the Disaster Recovery System. On the Administration panel, open the Platform Administrationdrawer and then select the Cisco Disaster Recovery System link.
Step 2 Sign in using the platform credentials you supplied when you installed SocialMiner.Step 3 Select Restore > Restore Wizard.Step 4 Select the backup device from the drop-down menu and select Next.Step 5 Select the backup file you want to use from the Tar file list drop-down menu and select Next.Step 6 In Selected Features check SOCIALMINER and click Next.
Cisco SocialMiner User Guide Release 11.6(2)54
System AdministrationBackup the System to the Backup Device
Step 7 On the warning on the page, select File Integrity Check, then select the Server to be restored (typically thehost name of the backed up system). Click Restore.
Step 8 The restoration status page refreshes periodically. When the restoration is complete, restart SocialMiner.
ChangetheSocialMinerAdministratorUsernameandPasswordUsing the CLI
Use the following procedure to change the SocialMiner Administrator username and password using the CLI.
When SocialMiner is configured in Unified CCX, ensure that you first update the new password in UnifiedCCX and then change the password in SocialMiner. This prevents the account getting locked due to theauthentication attempts from Unified CCX with the old password.
Note
Procedure
Step 1 Sign in using your current administrator credentials.Step 2 To change the administrator username, run the command utils reset_application_ui_administrator_name
and follow the prompts.Step 3 To change the administrator password, run the command utils reset_application_ui_administrator_password
and follow the prompts.
Reset the Unified OS Platform Administrator PasswordUse the following procedure to reset the Unified OS Platform Administrator password.
During this procedure, you must remove any CD or DVD from the disk drive (if any) and then insert a validCD or DVD into the disk drive to prove that you have physical access to the system.
Note
Before you begin
You must have a keyboard and monitor connected to the server. You cannot reset a password when the systemis connected through a secure shell session.
Procedure
Step 1 Sign in to the system using the following credentials:
Cisco SocialMiner User Guide Release 11.6(2)55
System AdministrationChange the SocialMiner Administrator Username and Password Using the CLI
a) Username: pwrecoveryb) Password: pwreset
TheWelcome to platform password reset window appears.
Step 2 Press any key to continue.Step 3 If you have a CD or DVD in the disk drive, remove it now.Step 4 Press any key to continue.
The system tests to ensure that the disk drive is empty.
Step 5 Insert a valid CD or DVD into the disk drive. You must use a data CD, not a music CD. The system tests toensure that you inserted the disk.
Step 6 After the system verifies that you inserted the disk, you are prompted to enter one of the following options tocontinue:
• Enter a to reset the administrator password.• Enter s to reset the security password.• Enter q to quit.
Step 7 Enter a new password of the type that you chose.Step 8 Reenter the new password.
The password must contain at least six characters. The system checks the new password for strength. If thepassword does not pass the strength check, you are prompted to enter a new password.
Step 9 After the system verifies the strength of the new password, the password is reset, and you are prompted topress any key to exit the password reset utility.
Cisco SocialMiner User Guide Release 11.6(2)56
System AdministrationReset the Unified OS Platform Administrator Password
C H A P T E R 5Reporting
SocialMiner maintains metrics on social and callback contact volume and agent activities. These metrics arestored in an SQL database for up to 550 days. The reporting database can be accessed using any SQL reportingtool including Cisco Unified Intelligence Center (CUIC). Access to this database requires that you configurea reporting user in the SocialMiner system administration.
To access SocialMiner as a third-party DSN, use a standalone CUIC server with a premium license.Note
There are two main categories of reports:
• Campaign Reports—These metrics provide an indication of the total posting volume by customers aswell as responsiveness to customers. These are what could be described as "customer facing" metrics.
• Agent Reports—These metrics provide an indication of agent productivity. These metrics could be usedto evaluate agent speed or they could be used to measure total workload.
The CUIC templates for SocialMiner are available for download here: https://software.cisco.com/download/release.html?mdfid=282163829&flowid=73207&softwareid=284697222&release=10.0.1&relind=AVAILABLE&rellifecycle=&reltype=latest.Choose your release from the menu on the left side of the page.
The following screen captures are examples of CUIC daily reports, each with different fields selected. Thecomplete SocialMiner reporting database schema is documented in the SocialMiner Developer Guide.
Cisco SocialMiner User Guide Release 11.6(2)57
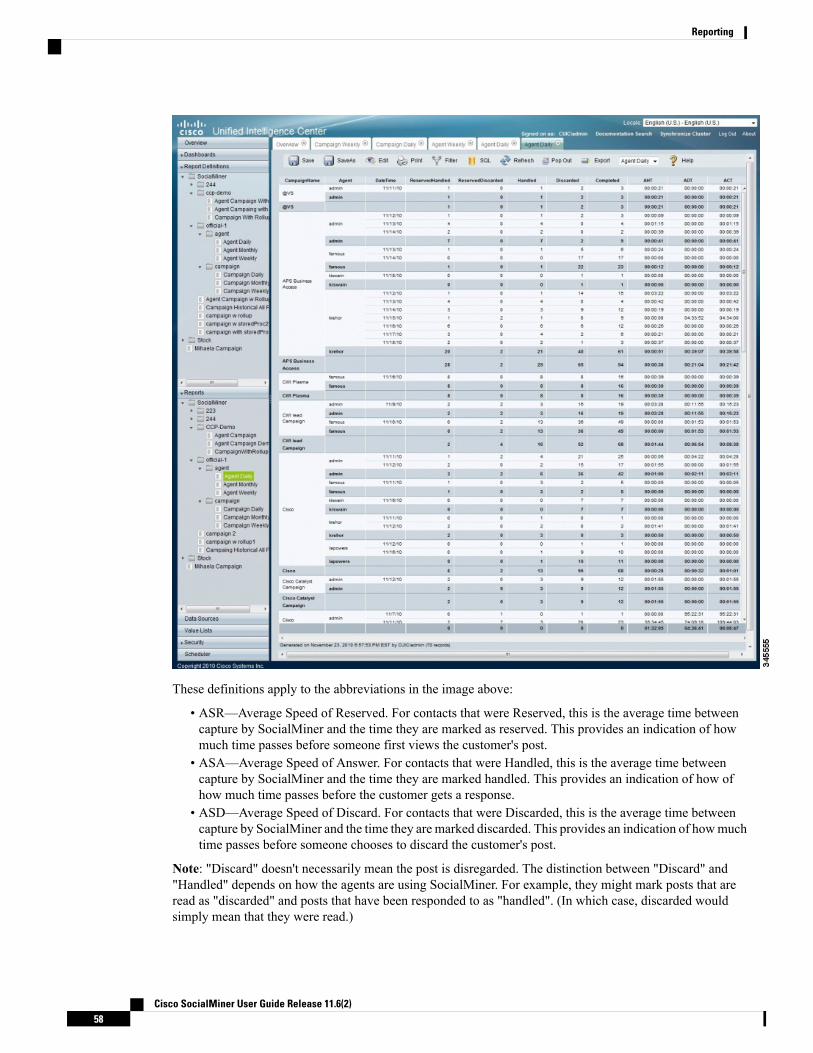
These definitions apply to the abbreviations in the image above:
• ASR—Average Speed of Reserved. For contacts that were Reserved, this is the average time betweencapture by SocialMiner and the time they are marked as reserved. This provides an indication of howmuch time passes before someone first views the customer's post.
• ASA—Average Speed of Answer. For contacts that were Handled, this is the average time betweencapture by SocialMiner and the time they are marked handled. This provides an indication of how ofhow much time passes before the customer gets a response.
• ASD—Average Speed of Discard. For contacts that were Discarded, this is the average time betweencapture by SocialMiner and the time they are marked discarded. This provides an indication of howmuchtime passes before someone chooses to discard the customer's post.
Note: "Discard" doesn't necessarily mean the post is disregarded. The distinction between "Discard" and"Handled" depends on how the agents are using SocialMiner. For example, they might mark posts that areread as "discarded" and posts that have been responded to as "handled". (In which case, discarded wouldsimply mean that they were read.)
Cisco SocialMiner User Guide Release 11.6(2)58
Reporting
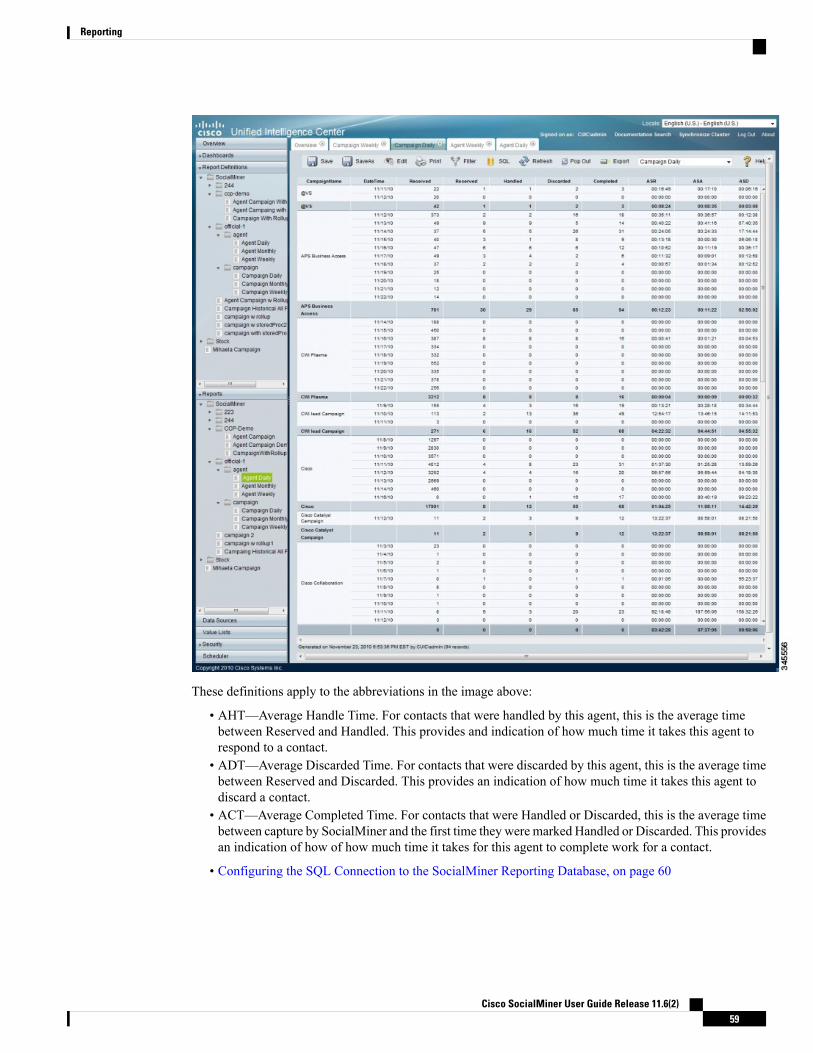
These definitions apply to the abbreviations in the image above:
• AHT—Average Handle Time. For contacts that were handled by this agent, this is the average timebetween Reserved and Handled. This provides and indication of how much time it takes this agent torespond to a contact.
• ADT—Average Discarded Time. For contacts that were discarded by this agent, this is the average timebetween Reserved and Discarded. This provides an indication of how much time it takes this agent todiscard a contact.
• ACT—Average Completed Time. For contacts that were Handled or Discarded, this is the average timebetween capture by SocialMiner and the first time they were marked Handled or Discarded. This providesan indication of how of how much time it takes for this agent to complete work for a contact.
• Configuring the SQL Connection to the SocialMiner Reporting Database, on page 60
Cisco SocialMiner User Guide Release 11.6(2)59
Reporting

Configuring the SQL Connection to the SocialMiner ReportingDatabase
Connection to the SocialMiner Informix reporting database can be made through JDBC using the followingURL format:
jdbc:informix-sqli://<hostname>:<port>/ <databasename>:INFORMIXSERVER=<informixserver>;user=<informixuser>; password=<informixpassword>;
• The reporting database <port> is 1526.• The <databasename> is "mmca_data".• The <informixserver> name is based on the hostname of the server with _mmca append to the end ofthe hostname. Also, replace any dashes ("-") in the hostname with underscores ("_").
• The content of INFORMIXSERVER is the instance name. It must be lowercase.• The database host can be “socialminer” (all lowercase) and the instances must also be all lowercase.
The UTF-8 character set must be used for CUIC to connect.Note
For example, if your server's hostname is my-server.mycompany.com, then the INFORMIXSERVER nameis my_server_mmca. The complete JDBC URL is:
jdbc:informix-sqli://my-server.mycompany.com:1526/mmca_data:INFORMIXSERVER=my_server_mmca;user=reportinguser;password=<informixpassword>;
When authenticating, the informix username is always “reportinguser” and the informix password is thepassword you created in the Administration panel.
Cisco SocialMiner User Guide Release 11.6(2)60
ReportingConfiguring the SQL Connection to the SocialMiner Reporting Database
C H A P T E R 6Design Guidance
This section contains information intended to help plan for SocialMiner installation and deployment.
• Advanced UI Options , on page 61• Deployment Models , on page 61• Hardware and Software Specifications , on page 62• Ports , on page 62• Provisioning , on page 64• Provisioning Considerations for SocialMiner Chat, on page 65• SocialMiner User Accounts and Security , on page 66• VMware Open Virtual Format (OVF) , on page 66• Developer Information, on page 66
Advanced UI OptionsThe SocialMiner user interfaces are designed to be embedded in other web application user interfaces.
If your web site or application doesn't support OpenSocial, then add SocialMiner to a web page by using aniFrame (for example). With this technique you can make a frame sized to show one of the SocialMiner webpages (like the campaign results panel).
Deployment ModelsSocialMiner has a single-server, all-in-one, small or large deployment model. You cannot use a load-balancing,split data-center deployment. There is no replication. The solution is not redundant. The best availabilitysolution for SocialMiner is to back it up at a second location using a scheduled backup. In the event of a siteloss, you then restore into a new VM.
The server may be deployed inside or outside the corporate firewall in "Intranet" and "Internet" deploymentmodels.
• The Intranet deployment model provides the additional security of corporate network firewalls to reducethe risk of an external party accessing the system. This deployment model is required if SocialMinermust access internal sites, such as an internal forum site. The disadvantage of the Intranet deploymentmodel is that the SocialMiner system cannot be accessed by partners lacking VPN access. It is commonfor some public relations functions to be externally managed by an agency and offering easy access tothe SocialMiner system is very useful. Also, the Intranet deployment model does not allow rendering of
Cisco SocialMiner User Guide Release 11.6(2)61
SocialMiner OpenSocial Gadgets in public Internet containers such as iGoogle. The Intranet deploymentmodel complicates proxy configuration, however it simplifies directory integration.
• The Internet deployment model puts SocialMiner outside of a corporate firewall. This deployment modelrelies on the built-in security capabilities of the SocialMiner appliance. This may be acceptable from asecurity perspective depending on system use and corporate policies. For example, in some applicationsthe SocialMiner system handles 100 percent public postings and there is no disclosure risk associatedwith a compromised SocialMiner system. The Internet deployment model may complicate directoryintegration.
SocialMiner can be deployed where some users access the server through a firewall or proxy. For the customerchat interface, the SocialMiner server can be deployed behind a proxy server or firewall to prevent it frombeing abused or for limiting access by those outside the firewall.
Hardware and Software SpecificationsCisco supports SocialMiner deployment on any hardware provided that SocialMiner is installed with the Ciscoprovided VMWare OVF.
For the complete list of possible server options, see https://www.cisco.com/c/dam/en/us/td/docs/voice_ip_comm/uc_system/virtualization/virtualization-cisco-socialminer.html..
PortsThe following ports are used by SocialMiner. Your firewall configuration may need to be modified to openthese ports for SocialMiner.
CommentsDirectionUsed forPort
SocialMiner communicates with the configured emailserver (that can be in the corporate intranet or on theinternet) to send email notifications.
Outward. FromSocialMiner tothe configuredemail server.
Emailnotifications
Port 25
Used for unsecure (HTTP) traffic:
• From the SocialMiner user interface (browser)or APIs to the SocialMiner server.
• From the SocialMiner server to the internet.SocialMiner communicates outward to theinternet to fetch social contact information overHTTP.
• From the internet or corporate website to theSocialMiner server. SocialMiner receivesincoming chat and callback requests from theinternet or corporate website over HTTP.
BidirectionalHTTPPort 80
Cisco SocialMiner User Guide Release 11.6(2)62
Design GuidanceHardware and Software Specifications
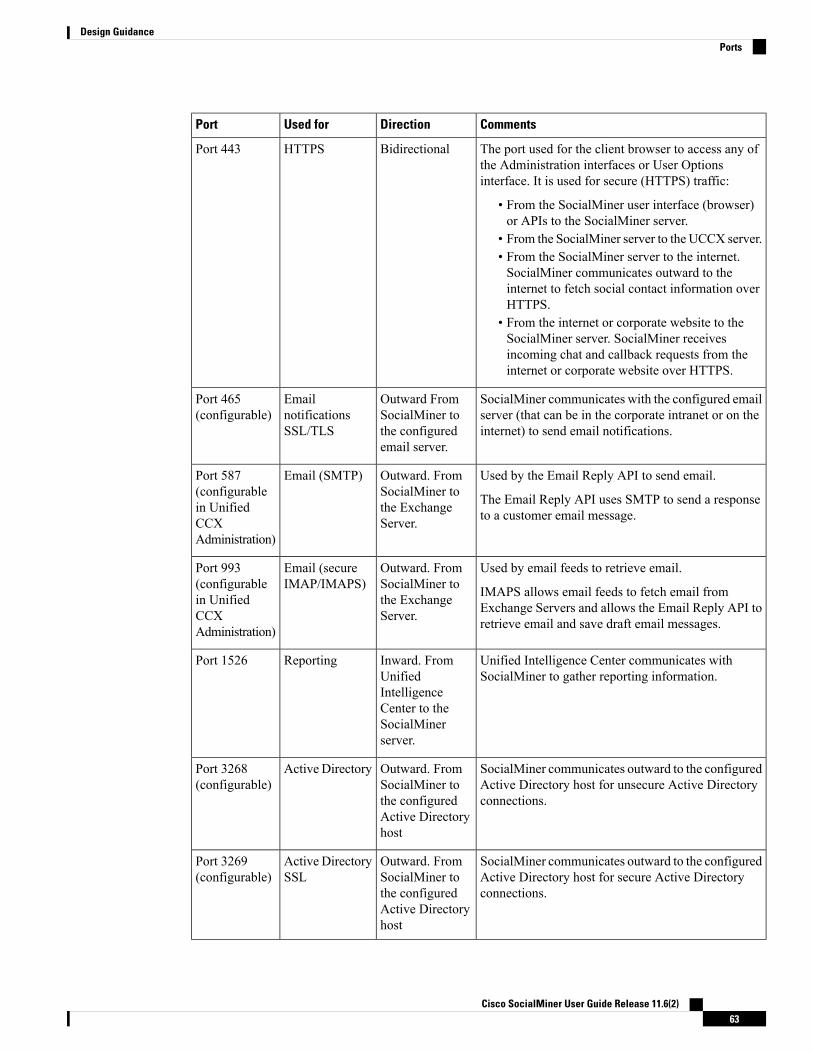
CommentsDirectionUsed forPort
The port used for the client browser to access any ofthe Administration interfaces or User Optionsinterface. It is used for secure (HTTPS) traffic:
• From the SocialMiner user interface (browser)or APIs to the SocialMiner server.
• From the SocialMiner server to the UCCX server.• From the SocialMiner server to the internet.SocialMiner communicates outward to theinternet to fetch social contact information overHTTPS.
• From the internet or corporate website to theSocialMiner server. SocialMiner receivesincoming chat and callback requests from theinternet or corporate website over HTTPS.
BidirectionalHTTPSPort 443
SocialMiner communicates with the configured emailserver (that can be in the corporate intranet or on theinternet) to send email notifications.
Outward FromSocialMiner tothe configuredemail server.
EmailnotificationsSSL/TLS
Port 465(configurable)
Used by the Email Reply API to send email.
The Email Reply API uses SMTP to send a responseto a customer email message.
Outward. FromSocialMiner tothe ExchangeServer.
Email (SMTP)Port 587(configurablein UnifiedCCXAdministration)
Used by email feeds to retrieve email.
IMAPS allows email feeds to fetch email fromExchange Servers and allows the Email Reply API toretrieve email and save draft email messages.
Outward. FromSocialMiner tothe ExchangeServer.
Email (secureIMAP/IMAPS)
Port 993(configurablein UnifiedCCXAdministration)
Unified Intelligence Center communicates withSocialMiner to gather reporting information.
Inward. FromUnifiedIntelligenceCenter to theSocialMinerserver.
ReportingPort 1526
SocialMiner communicates outward to the configuredActive Directory host for unsecure Active Directoryconnections.
Outward. FromSocialMiner tothe configuredActive Directoryhost
Active DirectoryPort 3268(configurable)
SocialMiner communicates outward to the configuredActive Directory host for secure Active Directoryconnections.
Outward. FromSocialMiner tothe configuredActive Directoryhost
Active DirectorySSL
Port 3269(configurable)
Cisco SocialMiner User Guide Release 11.6(2)63
Design GuidancePorts
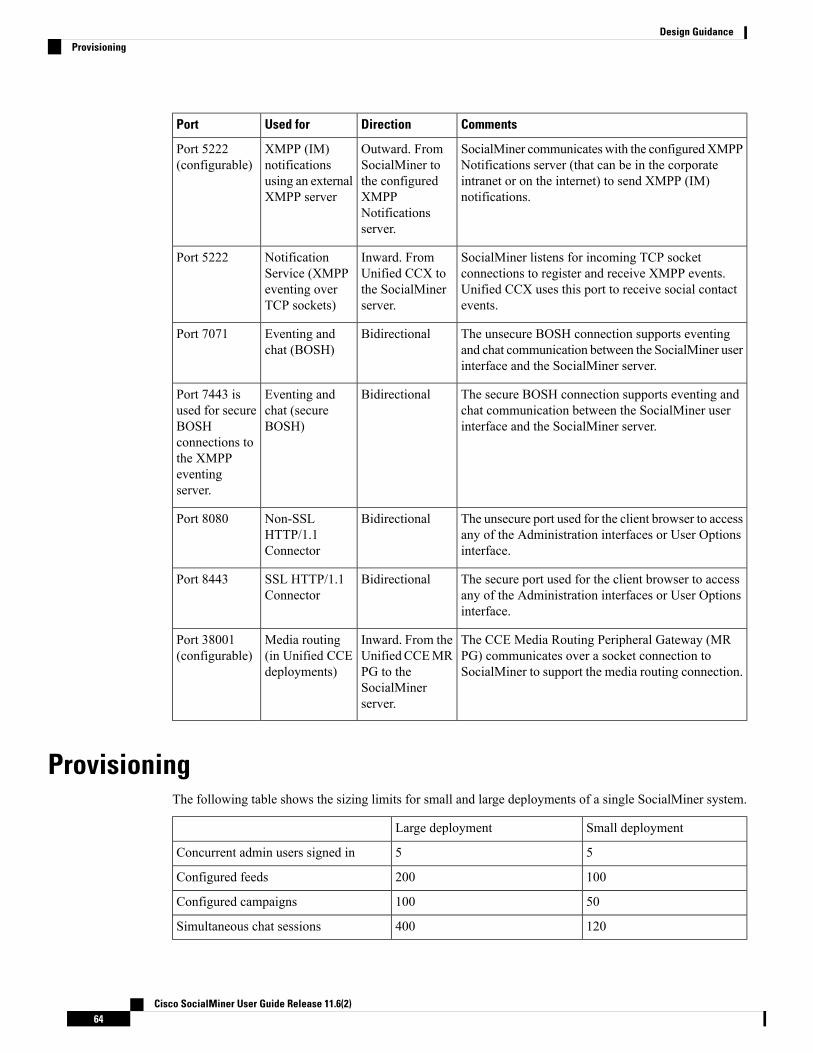
CommentsDirectionUsed forPort
SocialMiner communicateswith the configuredXMPPNotifications server (that can be in the corporateintranet or on the internet) to send XMPP (IM)notifications.
Outward. FromSocialMiner tothe configuredXMPPNotificationsserver.
XMPP (IM)notificationsusing an externalXMPP server
Port 5222(configurable)
SocialMiner listens for incoming TCP socketconnections to register and receive XMPP events.Unified CCX uses this port to receive social contactevents.
Inward. FromUnified CCX tothe SocialMinerserver.
NotificationService (XMPPeventing overTCP sockets)
Port 5222
The unsecure BOSH connection supports eventingand chat communication between the SocialMiner userinterface and the SocialMiner server.
BidirectionalEventing andchat (BOSH)
Port 7071
The secure BOSH connection supports eventing andchat communication between the SocialMiner userinterface and the SocialMiner server.
BidirectionalEventing andchat (secureBOSH)
Port 7443 isused for secureBOSHconnections tothe XMPPeventingserver.
The unsecure port used for the client browser to accessany of the Administration interfaces or User Optionsinterface.
BidirectionalNon-SSLHTTP/1.1Connector
Port 8080
The secure port used for the client browser to accessany of the Administration interfaces or User Optionsinterface.
BidirectionalSSL HTTP/1.1Connector
Port 8443
The CCE Media Routing Peripheral Gateway (MRPG) communicates over a socket connection toSocialMiner to support the media routing connection.
Inward. From theUnifiedCCEMRPG to theSocialMinerserver.
Media routing(in Unified CCEdeployments)
Port 38001(configurable)
ProvisioningThe following table shows the sizing limits for small and large deployments of a single SocialMiner system.
Small deploymentLarge deployment
55Concurrent admin users signed in
100200Configured feeds
50100Configured campaigns
120400Simultaneous chat sessions
Cisco SocialMiner User Guide Release 11.6(2)64
Design GuidanceProvisioning
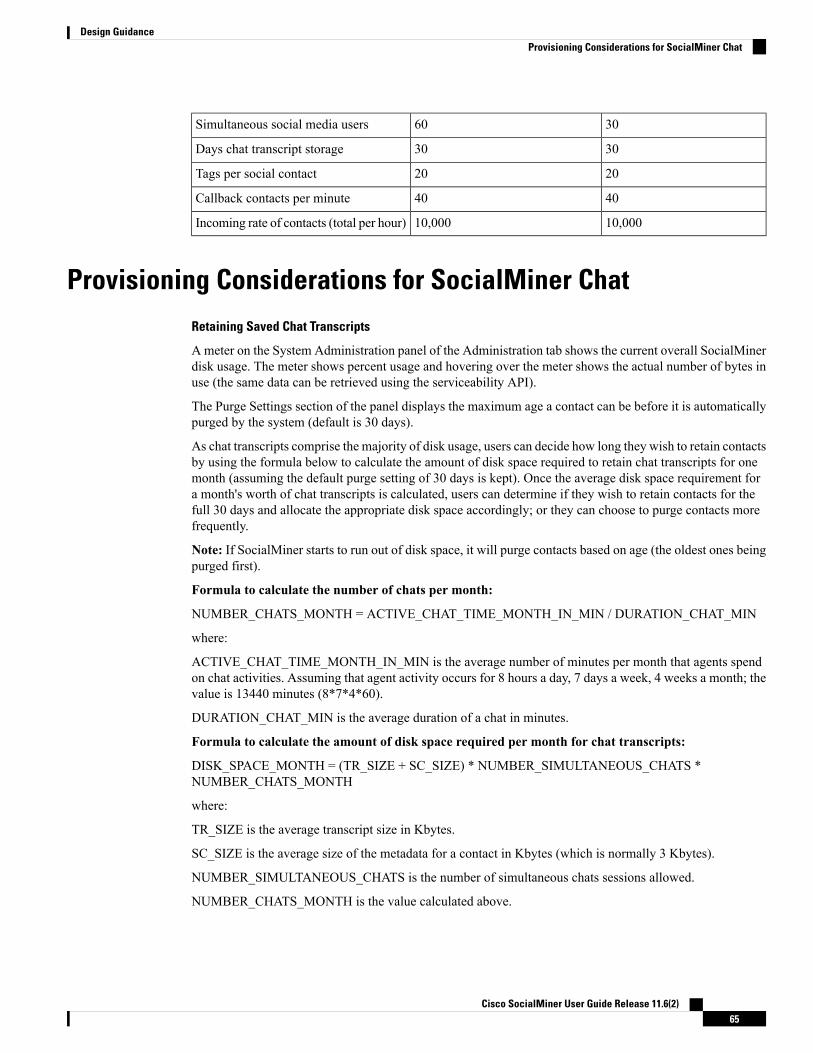
3060Simultaneous social media users
3030Days chat transcript storage
2020Tags per social contact
4040Callback contacts per minute
10,00010,000Incoming rate of contacts (total per hour)
Provisioning Considerations for SocialMiner ChatRetaining Saved Chat Transcripts
Ameter on the System Administration panel of the Administration tab shows the current overall SocialMinerdisk usage. The meter shows percent usage and hovering over the meter shows the actual number of bytes inuse (the same data can be retrieved using the serviceability API).
The Purge Settings section of the panel displays the maximum age a contact can be before it is automaticallypurged by the system (default is 30 days).
As chat transcripts comprise the majority of disk usage, users can decide how long they wish to retain contactsby using the formula below to calculate the amount of disk space required to retain chat transcripts for onemonth (assuming the default purge setting of 30 days is kept). Once the average disk space requirement fora month's worth of chat transcripts is calculated, users can determine if they wish to retain contacts for thefull 30 days and allocate the appropriate disk space accordingly; or they can choose to purge contacts morefrequently.
Note: If SocialMiner starts to run out of disk space, it will purge contacts based on age (the oldest ones beingpurged first).
Formula to calculate the number of chats per month:
NUMBER_CHATS_MONTH = ACTIVE_CHAT_TIME_MONTH_IN_MIN / DURATION_CHAT_MIN
where:
ACTIVE_CHAT_TIME_MONTH_IN_MIN is the average number of minutes per month that agents spendon chat activities. Assuming that agent activity occurs for 8 hours a day, 7 days a week, 4 weeks a month; thevalue is 13440 minutes (8*7*4*60).
DURATION_CHAT_MIN is the average duration of a chat in minutes.
Formula to calculate the amount of disk space required per month for chat transcripts:
DISK_SPACE_MONTH = (TR_SIZE + SC_SIZE) * NUMBER_SIMULTANEOUS_CHATS *NUMBER_CHATS_MONTH
where:
TR_SIZE is the average transcript size in Kbytes.
SC_SIZE is the average size of the metadata for a contact in Kbytes (which is normally 3 Kbytes).
NUMBER_SIMULTANEOUS_CHATS is the number of simultaneous chats sessions allowed.
NUMBER_CHATS_MONTH is the value calculated above.
Cisco SocialMiner User Guide Release 11.6(2)65
Design GuidanceProvisioning Considerations for SocialMiner Chat
Maximum Network Latency for Chat
The maximum network latency permitted for chat is 250 ms.
Network Bandwidth for Chat
Allocate network bandwidth required for chat based on this formula:
CHAT_NETWORK_BANDWIDTH (in Kbps) = CHAT_SESSIONS_SENDING_MSG_PER_SECOND *AVG_MSG_SIZE
For example, If all 400 sessions are active and 10% of chat sessions are sending messages every second, then400 * 10/100 = 40 chat sessions are sending message each second.
If the average message size is 1 Kb, then the chat network bandwidth is 40 Kbps.
SocialMiner User Accounts and SecuritySocialMiner minimizes the storage of usernames and passwords to reduce the security risk of a compromisedsystem. There is an administration account for the system setup, but all SocialMiner user access is controlledthrough Active Directory (AD) authentication. There are no SocialMiner user passwords stored on theSocialMiner System.
Users do not need to be manually set up on SocialMiner to access the system. Any user that is authenticatedby the Active Directory setup can use the system. If limits on who can use system are required, set up an ADgroup and configure SocialMiner to only allow access for that group.
AD authenticated users have access to all functions on the system, although panels access could be blockedby blocking certain URLs.
VMware Open Virtual Format (OVF)The SocialMiner system supports one standard OVF Appliance. SocialMiner can only be deployed on serversusing VMware ESXi.
See Virtualization for Cisco SocialMiner for more information.
Developer InformationFor developer information, including the SocialMiner API documentation and a discussion forum, see CiscoDevNet at https://developer.cisco.com/site/socialminer/overview/. Access to Cisco DevNet requires Ciscoaccount.
You can find training labs at http://docwiki.cisco.com/wiki/SocialMiner_Labs.
Cisco SocialMiner User Guide Release 11.6(2)66
Design GuidanceSocialMiner User Accounts and Security