Catenary Vaulting on Mfangano Island, Kenya
26
Catenary Vaulting on Mfangano Island, Kenya 2013 RAMSA Travel Fellowship Report mfanganovaults.blogspot.com/ Jonathan Dessi-Olive Master of Architecture, 2014 University of Pennsylvania School of Design
Transcript of Catenary Vaulting on Mfangano Island, Kenya
Catenar y Vaul t ing on Mfangano I s land, Kenya2013 RAMSA Travel Fellowship Report
mfanganovaults.blogspot.com/
Jonathan Dessi-OliveMaster of Architecture, 2014
University of Pennsylvania School of Design
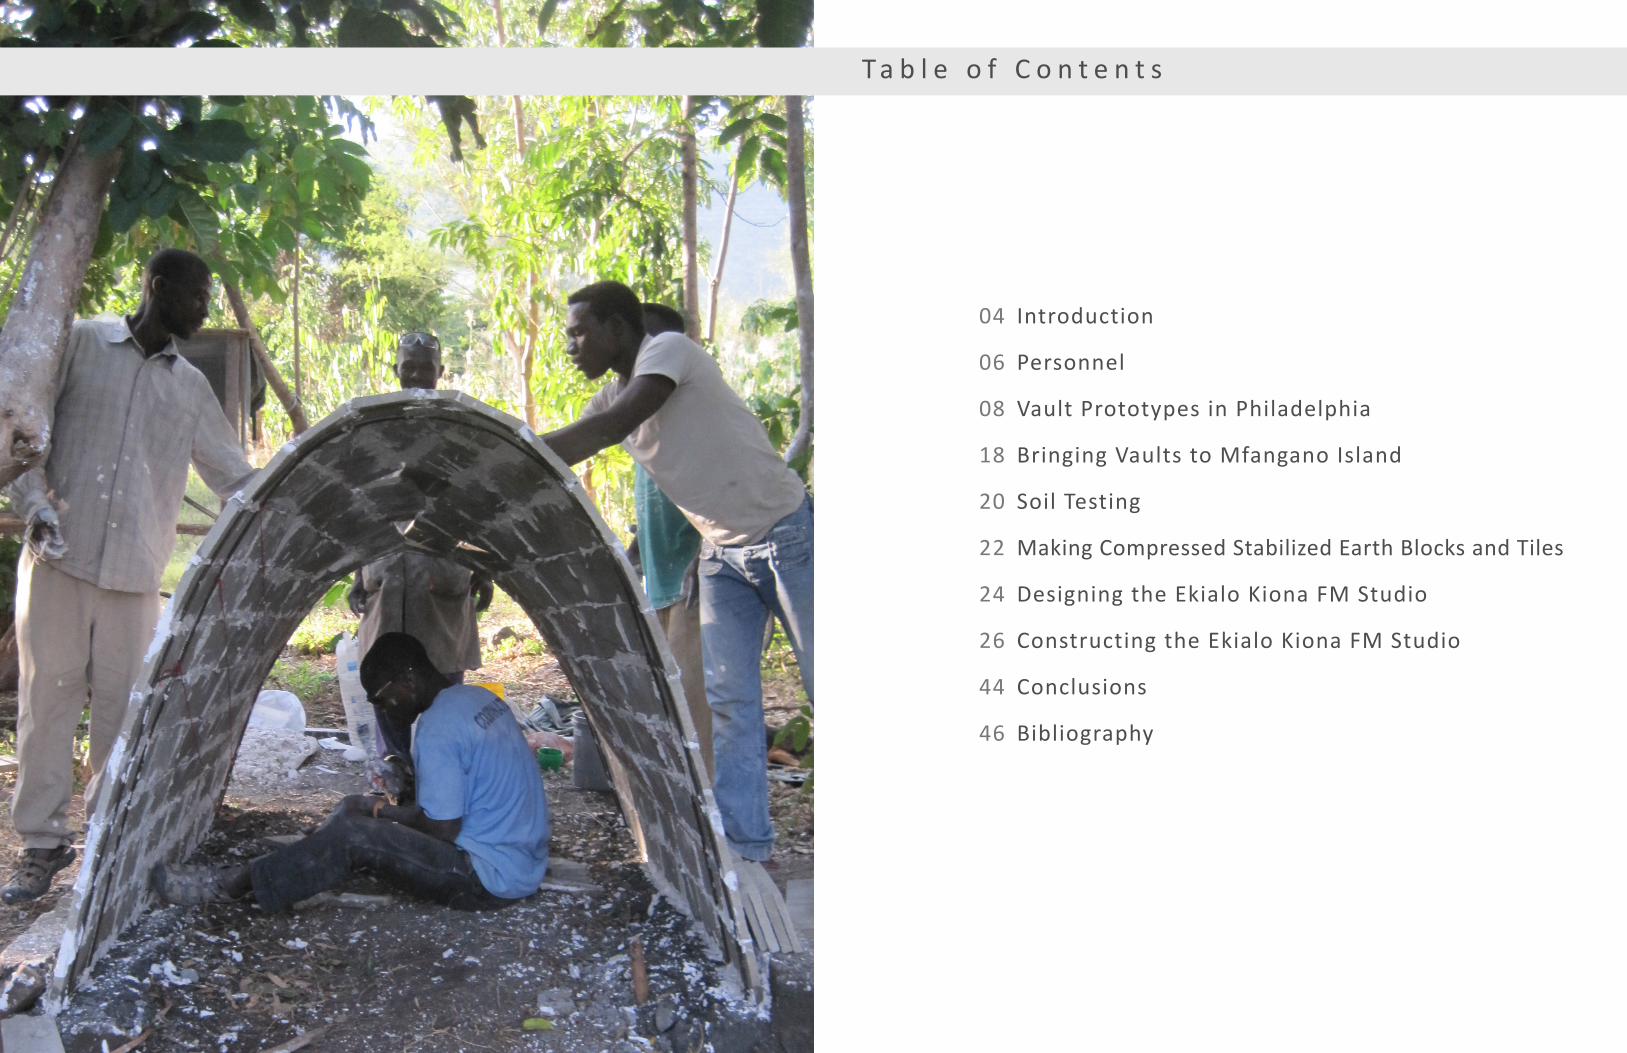
T a b l e o f C o n t e n t s
Vault Prototypes in Philadelphia
Personnel
Introduction
08
06
04
18
24
26
44
20
22
46
Bringing Vaults to Mfangano Island
Designing the Ekialo Kiona FM Studio
Constructing the Ekialo Kiona FM Studio
Conclusions
Soil Testing
Making Compressed Stabilized Earth Blocks and Tiles
Bibliography

I n t r o d u c t i o n 0504
This project began as an investigation of t i le vaulting , a revived construction method, and its potential to be favorable when appl ied in developing countries.
The culmination of the research was a collaborative construction of a small structure on Mfangano Is land, Kenya by PennDesign students and a team of local craftsmen. Upon completion the bui lding wil l stand as Africa’s f irst hybrid wind and solar-powered radio studio.
I became interested in thin vault and shell structures through the work of Raphael Guastavino from the late 19th and early 20th century in the United States and Professor John Ochsendorf (MIT) who was recently involved with projects in South Africa and Ethiopia. Their work employs the tile (Catalan) vaulting method to build impressive vaulted spaces and structures that are formally flexible and materially economical.
Guastavino is responsible for bringing the tile vaulting technique to the United States from Spain in the 1880’s and constructing nearly one-thousand buildings using a modernized version of the method. He used a one-inch thick fired-clay tile in multiple layers. The first layer followed the tradition of using fast-setting gypsum mortar and the subsequent layers used portland cement mortar - which was becoming readily available at that time, especially in the United States.
Ochsendorf, who is one the world’s leading experts on Guastavino vaulting, made a particularly interesting adaptation to the method in the early 2000’s. His projects used a compressed stabilized soil tile produced on site. This made the technique materially and economically more viable in the context of the developing world.
Thanks to generous financial support from the RAMSA Travel Fellowship as well as a research and a travel grant from the University of Pennsylvania, I began to put together a comprehensive project, inspired by John Ochsendorf ’s work, that aimed at building tile vaults on a remote island in Lake Victoria with a team of local craftsmen.

P e r s o n n e l 0706
P e n n D e s i g n R e s e a r c h Te a m
A d v i s o r s
Jonathan Dess i -Ol iveM. Arch, 2014
L indsay FalckLecturer, Univers i ty of Pennsylvania
Fernando VegasLecturer, Univers i ty of PennsylvaniaProfessor of Architecture, Polytechnic Univers i ty of Valencia
Camil la Mi letoLecturer, Univers i ty of PennsylvaniaProfessor of Architecture, Polytechnic Univers i ty of Valencia
Kel ly BergerM. Arch, 2014
Kordae HenryM. Arch/MLA, 2015
Er ik LeachM. Arch, 2015
08
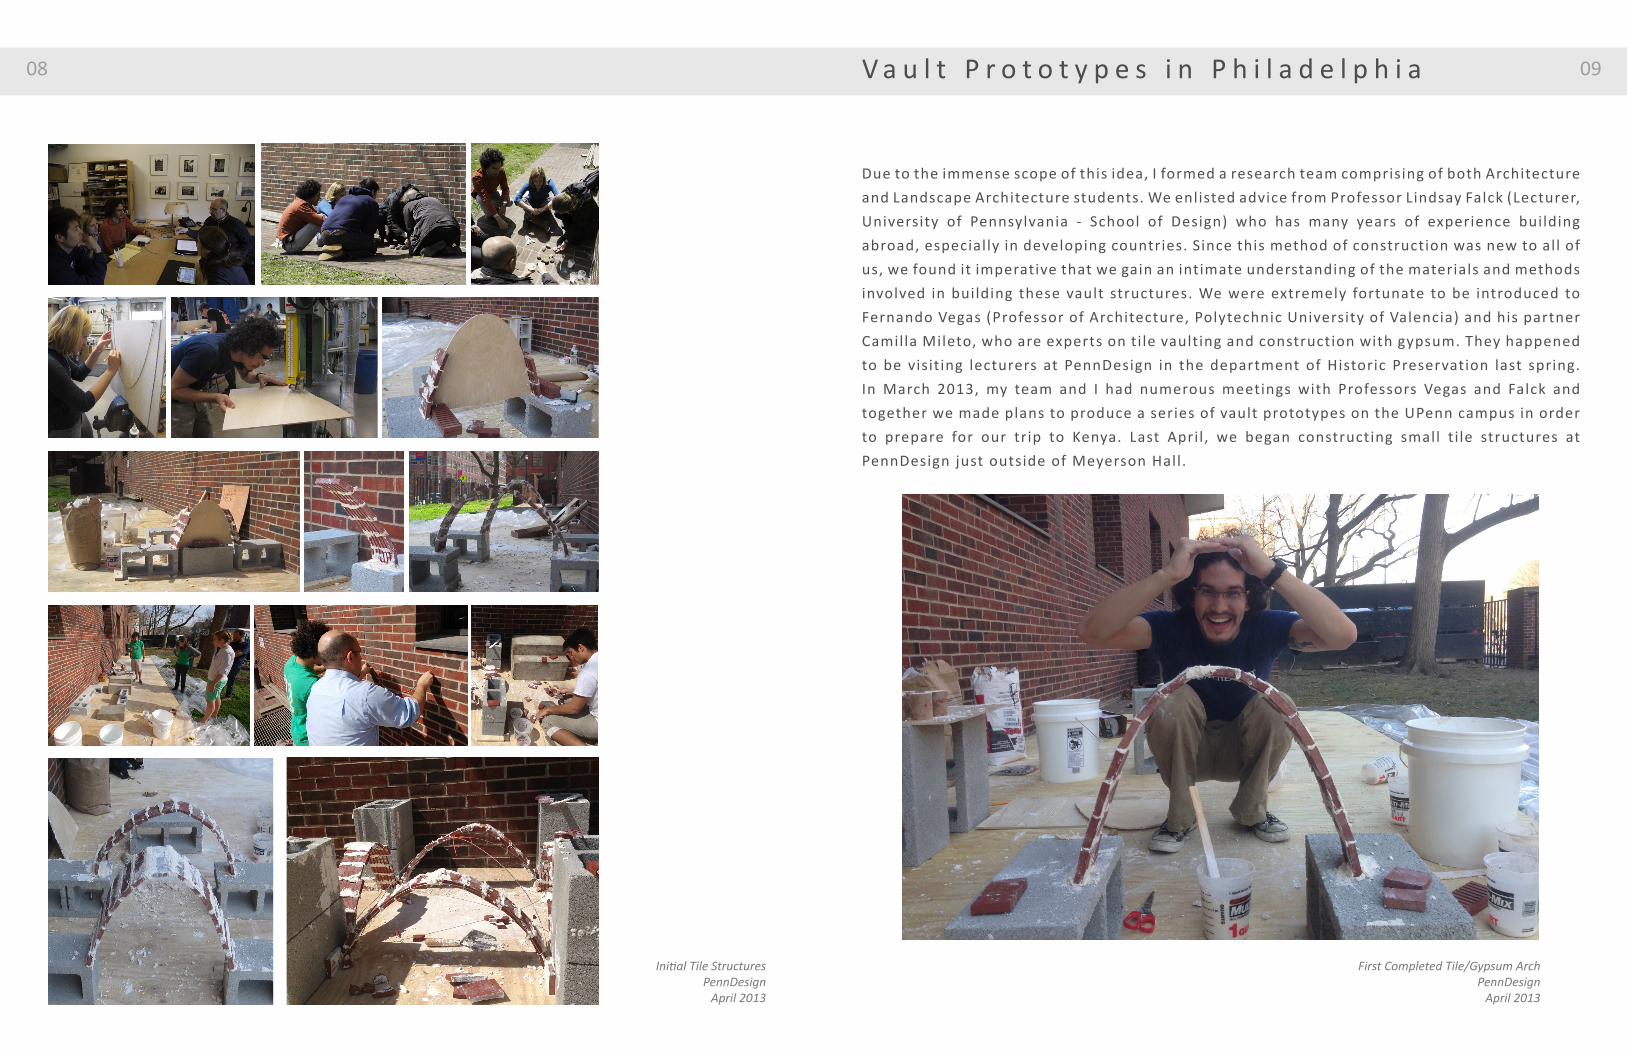
Initial Tile StructuresPennDesign
April 2013
V a u l t P r o t o t y p e s i n P h i l a d e l p h i a 09
Due to the immense scope of this idea, I formed a research team comprising of both Architecture and Landscape Architecture students. We enlisted advice from Professor Lindsay Falck (Lecturer, University of Pennsylvania - School of Design) who has many years of experience building abroad, especially in developing countries. Since this method of construction was new to all of us, we found it imperative that we gain an intimate understanding of the materials and methods involved in building these vault structures. We were extremely fortunate to be introduced to Fernando Vegas (Professor of Architecture, Polytechnic University of Valencia) and his partner Camilla Mileto, who are experts on ti le vaulting and construction with gypsum. They happened to be visiting lecturers at PennDesign in the department of Historic Preservation last spring. In March 2013, my team and I had numerous meetings with Professors Vegas and Falck and together we made plans to produce a series of vault prototypes on the UPenn campus in order to prepare for our trip to Kenya. Last April , we began constructing small t i le structures at PennDesign just outside of Meyerson Hall.
First Completed Tile/Gypsum ArchPennDesign
April 2013

10 S m a l l G r o i n - V a u l t 11
The f irst complete structure we bui lt was a Groin Vault. We set up the vault with the help of Fernando Vegas and Camil la Mileto. We learned a major lesson that f irst day: no matter the s ize of the structure one intends to bui ld, the planning and preparation to begin t i l ing is both diff icult and t ime consuming. Even for such a small and simple structure, there are many factors to consider: configuration of the foundations, depth and curvature of the former arches, and the amount of formwork/guidework that we would provide for ourselves.
This vault was extremely important in developing our understanding the intr icacies of the construction process: using gypsum mortar to rapidly construct the vault in canti lever and staggering the joints of the t i les with the second layer using cement mortar instead of gypsum. We developed our technique working with the materials and became more accurate with our placement of t i les. We also real ized that bui lding such a small vault was more diff icult than bui lding one of a larger s ize because the curves were very t ight over a short distance meaning every t i le had to be cut down.

12 S a d d l e B a r r e l - V a u l t 13
The success of the groin vault prompted a second prototype. This time we wanted to explore how the ruled surface of a barrel vault could be shifted in order to create geometrical complexity. The saddle vault was a way for us to gain an understanding of this type of geometry and continue developing our skills with the construction technique.
During the first attempt building this vault, we faced the issue of construction sequence. We encountered the real forces involved when building vault structures. We built up each side of the vault like walls, but eventually they became too heavy and collapsed. As a consequence, we learned that the end arches needed to be completed much sooner before infilling. The weight was too great to remain in cantilever.
For the second attempt, the end arches were completed much sooner. This made it possible to infill with much more confidence and most importantly, stability. I completed the entire first layer of the vault (mixing plaster myself) in just over a day. The second layer was a much more collaborative effort that tested different coursing techniques.

14 S t r a i g h t B a r r e l - V a u l t 15
The last prototype we wanted to build before leaving for Kenya was a much larger-scale vault. This was a serious test, applying what we learned building the first two prototypes.
Fernando Vegas and Camilla Mileto continually stressed the importance of having a fixed foundation. Any small settlement or vibration during construction (especially using gypsum) risks catastrophic failure. Safety during construction was a major concern, thus with the help of Lindsay Falck, we made sure we took the necessary steps to make a very heavy foundation for our vault. We used:
(4) 55 gallon steel barrels (55) bags of ready-mix concrete (2) 6 x 4 x 3/8 steel angle (2) 4 x 3-1/2 x 5/16 steel angle (8) 18” galvanized steel bolts (8) 1-3/4” class 8 steel bolts (2) 3/8” rebar
Construction of this foundation took one full day of work - literally until dark. All four team members were present and we were very fortunate to receive help throughout the day from Lindsay Falck, and from many of our colleagues at PennDesign who volunteered their time.
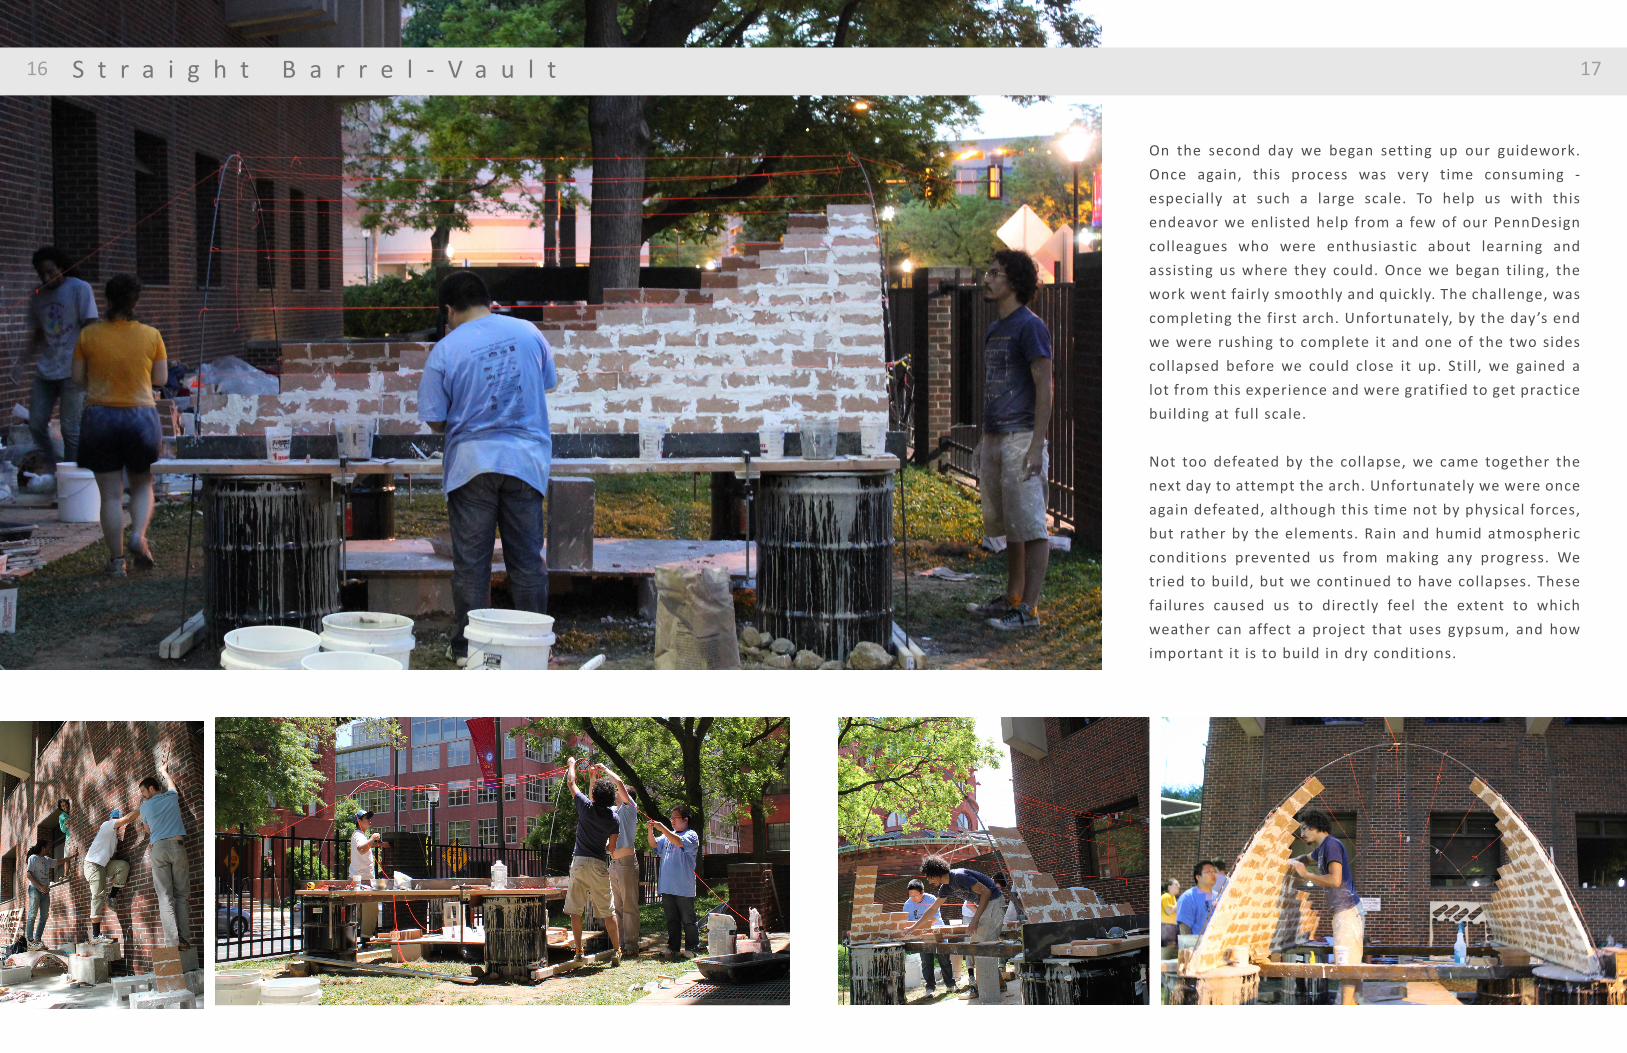
16 S t r a i g h t B a r r e l - V a u l t 17
On the second day we began setting up our guidework. Once again, this process was very time consuming - especially at such a large scale. To help us with this endeavor we enlisted help from a few of our PennDesign colleagues who were enthusiastic about learning and assisting us where they could. Once we began tiling, the work went fairly smoothly and quickly. The challenge, was completing the first arch. Unfortunately, by the day’s end we were rushing to complete it and one of the two sides collapsed before we could close it up. Still, we gained a lot from this experience and were gratified to get practice building at full scale.
Not too defeated by the collapse, we came together the next day to attempt the arch. Unfortunately we were once again defeated, although this time not by physical forces, but rather by the elements. Rain and humid atmospheric conditions prevented us from making any progress. We tried to build, but we continued to have collapses. These failures caused us to directly feel the extent to which weather can affect a project that uses gypsum, and how important it is to build in dry conditions.

18
Lake Victoria Mfangano Island Mbita Luanda
Lake VictoriaKenya
Ekialo Kiona
Flight Path
2Hr Drive
1Hr Ferry
2.5 Hr Canoe
Kisumu KisumuNairobi
In the beginning of June, my team and I traveled to Kenya with the intent of bringing the knowledge we acquired during our prototyping phase in Philadelphia. After an exhausting one-day journey consisting of a plane ride, a drive on difficult roads and multiple boats we arrived on Mfangano Island via Nairobi and Kisumu. Our stay on the island lasted nearly two full months.
The scope of the building project was developed through a partnership with the American-based NGO, Organic Health Response. I became acquainted with this NGO in the summer of 2012, when I was involved in a different project on the island building an Aquaponics farm. Through this experience, I formed a close relationship with not only the organization, but many of the people living on Mfangano - notably the extremely talented members of the EK Sustainable Design Guild.
For this project, we planned to collaboratively design and construct a small radio studio for OHR’s wind-powered community radio broadcast program, EKFM, which had been on-air for over eight months. Radio operations were being conducted out of OHR’s Mfangano headquarters, the Ekialo Kiona Community Center. The objective, was to provide EKFM its own building within the compound of the community center. The new radio studio not only intended to be a demonstration of the tile vaulting method being adapted through local practices, but also serve and empower the people of Mfangano with new skills and access to radio broadcast.
The RAMSA Travelling Fellowship entirely funded my travel to Kenya as well as all living expenses for the student research team, daily meals for the work crew throughout the two month construction period, building tools and materials, and partially contributed to the wages for the EK Guild.
19B r i n g i n g V a u l t s To M f a n g a n o I s l a n d
20
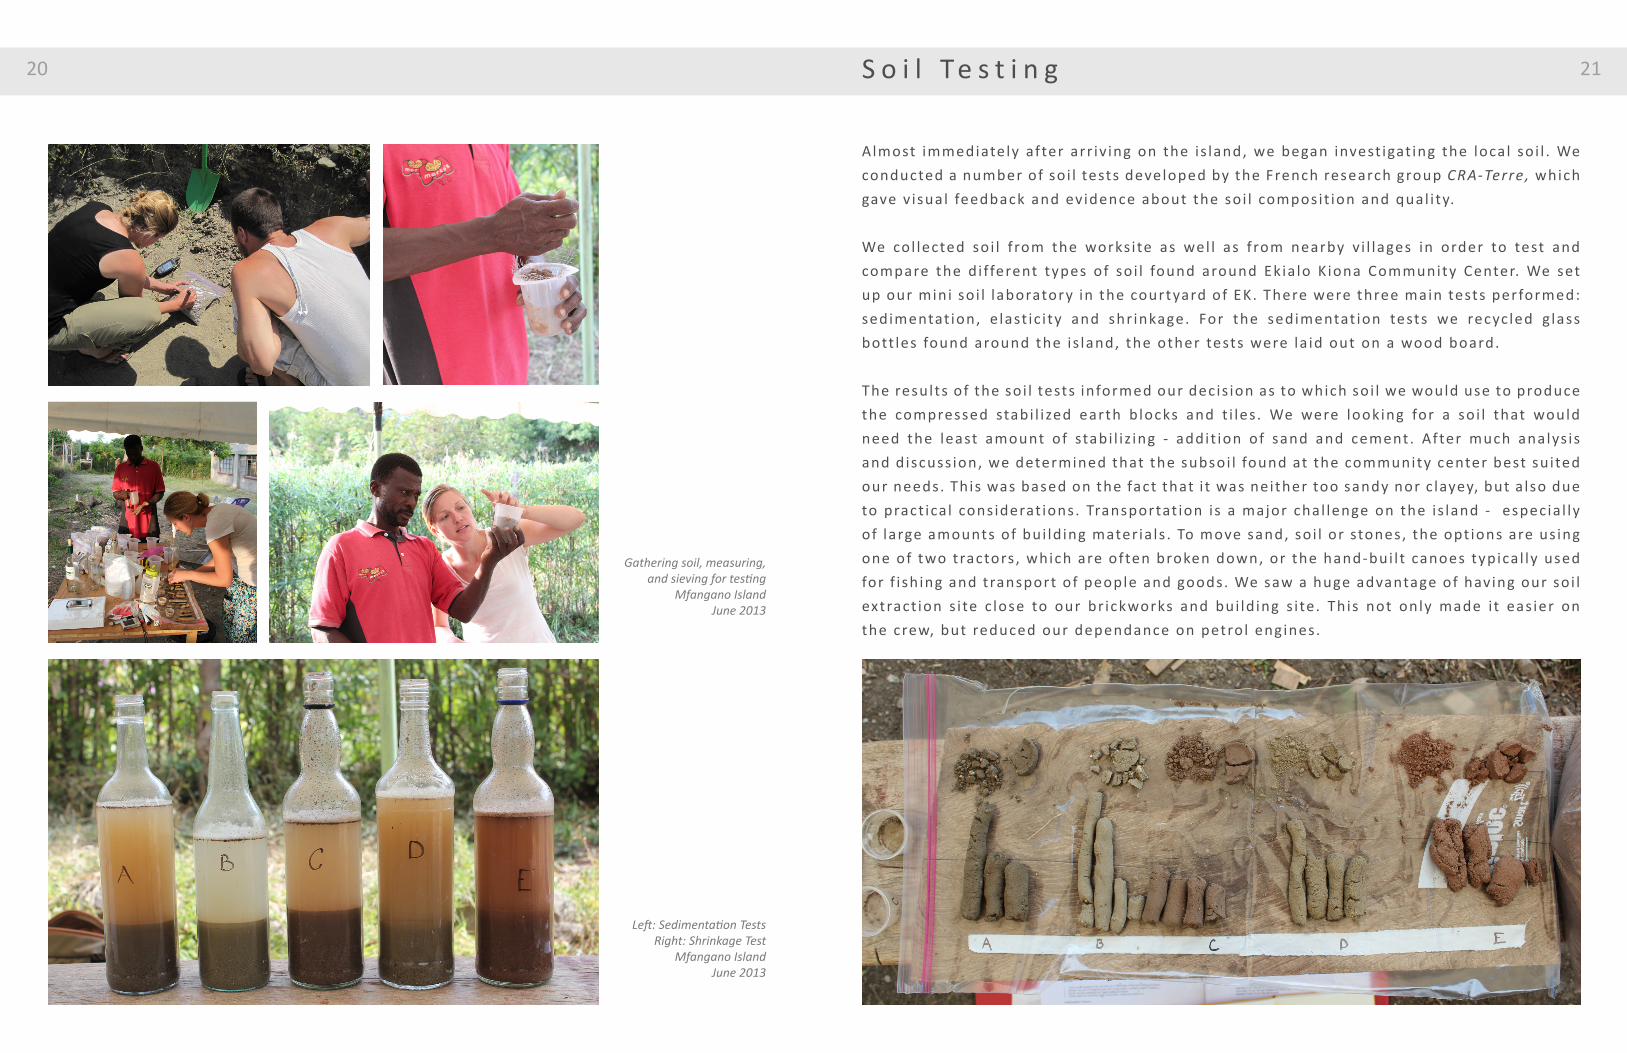
Left: Sedimentation TestsRight: Shrinkage Test
Mfangano IslandJune 2013
Gathering soil, measuring, and sieving for testing
Mfangano IslandJune 2013
21S o i l Te s t i n g
Almost immediately after arr iv ing on the is land, we began invest igat ing the local so i l . We conducted a number of so i l tests developed by the French research group CRA-Terre, which gave v isual feedback and evidence about the soi l composit ion and qual i ty.
We col lected soi l f rom the works i te as wel l as f rom nearby v i l lages in order to test and compare the d i fferent types of so i l found around Ekia lo K iona Community Center. We set up our mini so i l laboratory in the courtyard of EK. There were three main tests performed: sedimentat ion, e last ic i ty and shr inkage. For the sedimentat ion tests we recyc led g lass bott les found around the is land, the other tests were la id out on a wood board.
The results of the soi l tests informed our decis ion as to which soi l we would use to produce the compressed stabi l i zed earth b locks and t i les . We were looking for a soi l that would need the least amount of stabi l i z ing - addit ion of sand and cement. After much analys is and discuss ion, we determined that the subsoi l found at the community center best su ited our needs. This was based on the fact that i t was neither too sandy nor c layey, but a lso due to pract ica l cons iderat ions. Transportat ion is a major chal lenge on the is land - especia l ly of large amounts of bui ld ing mater ia ls . To move sand, so i l or stones, the opt ions are us ing one of two tractors , which are often broken down, or the hand-bui l t canoes typica l ly used for f i sh ing and transport of people and goods. We saw a huge advantage of having our soi l extract ion s i te c lose to our br ickworks and bui ld ing s i te . This not only made i t eas ier on the crew, but reduced our dependance on petrol engines.

22
Our Makiga Block PressMfangano Island
June 2013
Ekialo Kiona CenterBrickworks in Operation
Mfangano IslandJune/July 2013
23Making Compressed Stabilized Earth Blocks and Tiles
Following the soil tests, we began producing many sample blocks and tiles using different ratios of soil, sand, and cement. We performed quality tests to determine the relative compressive strength and resistance to abrasion of these masonry units. The results of these tests determined not only the correct ratio we needed to build the radio studio, but also served as evidence to a very skeptical local community that we could in fact produce strong masonry units from the local soil.
We settled on blocks that were 10% cement with no additional sand. This meant that with one 50kg bag of cement and six wheelbarrows of soil, we could make somewhere around 70 blocks. In one day we could make about 140 blocks, with a team of 5. For the tiles, we made a wood “blank” that helped us produce one-inch thick units. We settled on 12% cement and 5% sand. One bag of cement made around 230 tiles which typically could be produced in one day.
Curing occured in two stages: wet curing, which involved “watering” the units over seven days while keeping them covered with plastic tarps and dry curing, where the units were allowed to dry for 3 days in a shaded area. Over the entire build, our brickworks was in operation for almost 6 full weeks.
24
Reception
Office
Broadcasting8ft x 12 ft
12 ft x 12 ft
9 ft x 12 ft
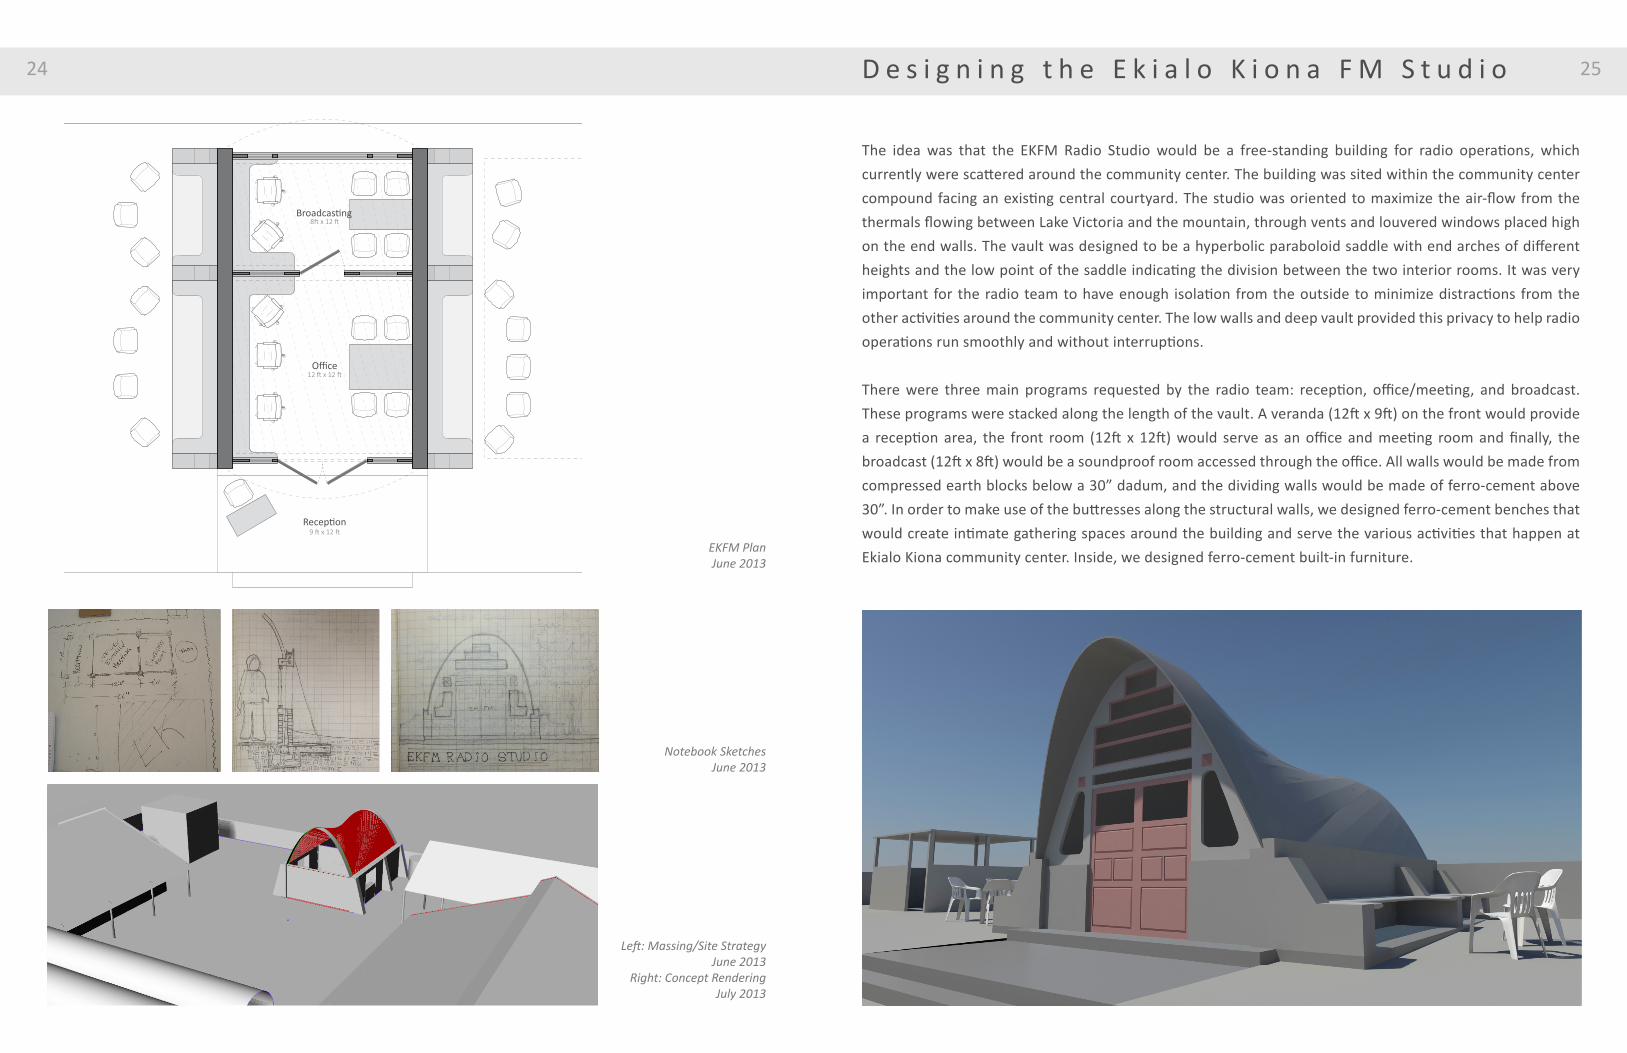
EKFM PlanJune 2013
Notebook SketchesJune 2013
Left: Massing/Site Strategy June 2013
Right: Concept RenderingJuly 2013
25D e s i g n i n g t h e E k i a l o K i o n a F M S t u d i o
The idea was that the EKFM Radio Studio would be a free-standing building for radio operations, which currently were scattered around the community center. The building was sited within the community center compound facing an existing central courtyard. The studio was oriented to maximize the air-flow from the thermals flowing between Lake Victoria and the mountain, through vents and louvered windows placed high on the end walls. The vault was designed to be a hyperbolic paraboloid saddle with end arches of different heights and the low point of the saddle indicating the division between the two interior rooms. It was very important for the radio team to have enough isolation from the outside to minimize distractions from the other activities around the community center. The low walls and deep vault provided this privacy to help radio operations run smoothly and without interruptions.
There were three main programs requested by the radio team: reception, office/meeting, and broadcast. These programs were stacked along the length of the vault. A veranda (12ft x 9ft) on the front would provide a reception area, the front room (12ft x 12ft) would serve as an office and meeting room and finally, the broadcast (12ft x 8ft) would be a soundproof room accessed through the office. All walls would be made from compressed earth blocks below a 30” dadum, and the dividing walls would be made of ferro-cement above 30”. In order to make use of the buttresses along the structural walls, we designed ferro-cement benches that would create intimate gathering spaces around the building and serve the various activities that happen at Ekialo Kiona community center. Inside, we designed ferro-cement built-in furniture.

EKFM Radio Studio (in process)Mfangano Island, Kenya
Constructed Summer 2013
26 27C o n s t r u c t i n g t h e E k i a l o K i o n a F M S t u d i o
We broke ground on the morning of June 13th, 2013. We gave ourselves a little over six-weeks to complete enough of the construction so the EK Guild could finish the building in our absence.
Testing the potential of tile vaulting as a favorable method of construction in developing areas like Mfangano Island was our goal for the EKFM Radio Studio. If successful, it would be a demonstration of the centuries-old building method adapted through local practices. We were attempting a comprehensive technology transfer aimed at empowering the EK Sustainable Design Guild with new skills. These skills included: earth construction through the fabrication of compressed stabilized soil blocks and tiles, understanding basic principles of catenary arches, setting up guidework for a doubly-curved vault, and the tile vaulting method. When complete, the building would be equipped with solar power to be Africa’s first hybrid wind and solar-powered radio studio.
Naturally, this ambitious endeavor was met with numerous challenges both in terms of the construction process itself, but also the reaction of the local community. We faced a lot of skepticism about earth construction and the tile vaulting technique. Locals were telling us the soil was very poor and would not hold up. Many were also concerned about the cost of building tile vaults compared to the extreme economy of the structures already being built out of wood, mud and corrugated metal. We met these skepticisms by providing the local craftsmen an opportunity to learn through testing and prototyping. We also kept our worksite relatively open - inviting all community members to watch and ask questions, or volunteer if they wanted to.

28 S o i l - T i l e S a d d l e B a r r e l - V a u l t 29
We knew it was critical to build a vault prototype with the Guild before building the full scale structure. Therefore the whole team met on a Saturday for a one-day training session. The goal was to build a scaled version of the vault we designed for the EKFM Studio. Using about 200 of our sample tiles, we wanted this training session to help the local team of craftsmen gain experience working with these materials and build confidence with the technique.
Prior to the training we poured footings. We started by explaining ruled surfaces and how to setup the guidework for the vault using welded rebar centering and strings. We had a quick demonstration of mixing gypsum mortar, buttering the tiles, and placing them on the structure. Shortly after, the Guild members were building the vault on their own. As progress was made, we ensured that they were understanding the importance of construction sequence and continually completing arches to stabilize the structure. By the end of the day, we finished the prototype, which was 8ft long and 5ft wide with end arches 3-1/2 ft and 5ft high. It was the largest successful prototype we built to date.

30 F o o t i n g s , F o u n d a t i o n s , a n d S l a b 31
Our advisor Fernando Vegas continually stressed the importance of providing a very solid and fixed foundation. We did not want to take any chances on the island so we planned for a very heavy floor. The whole process, up to the day we poured the slab, took three full weeks and was done entirely without machinery - only hand tools.
We began by digging trenches for the ring beams. The trenches were extended on the outside of each structural wall to provide kicks and three buttresses on each side. The ring beams were made of Y8 and Y10 “twisted bar ”. The steel was hand cut, bent and bound together. Once they were assembled, the ring beams were lowered onto a 2 inch screed of concrete and poured to create a beam that was approximately 10”x10”. Once the beams were sufficiently cured, we dug out the rooms down to the subsoil and refi l led them using the hundreds of large stones that were dug out of the ground on site. These stones were then recovered with additional subsoil and compacted by hand. The slab was poured in one day, using 22 - 50kg bags of cement and rough stones, mixed, spread and floated entirely by hand.
32 C o m p r e s s e d S t a b i l i z e d E a r t h B l o c k W a l l s 33
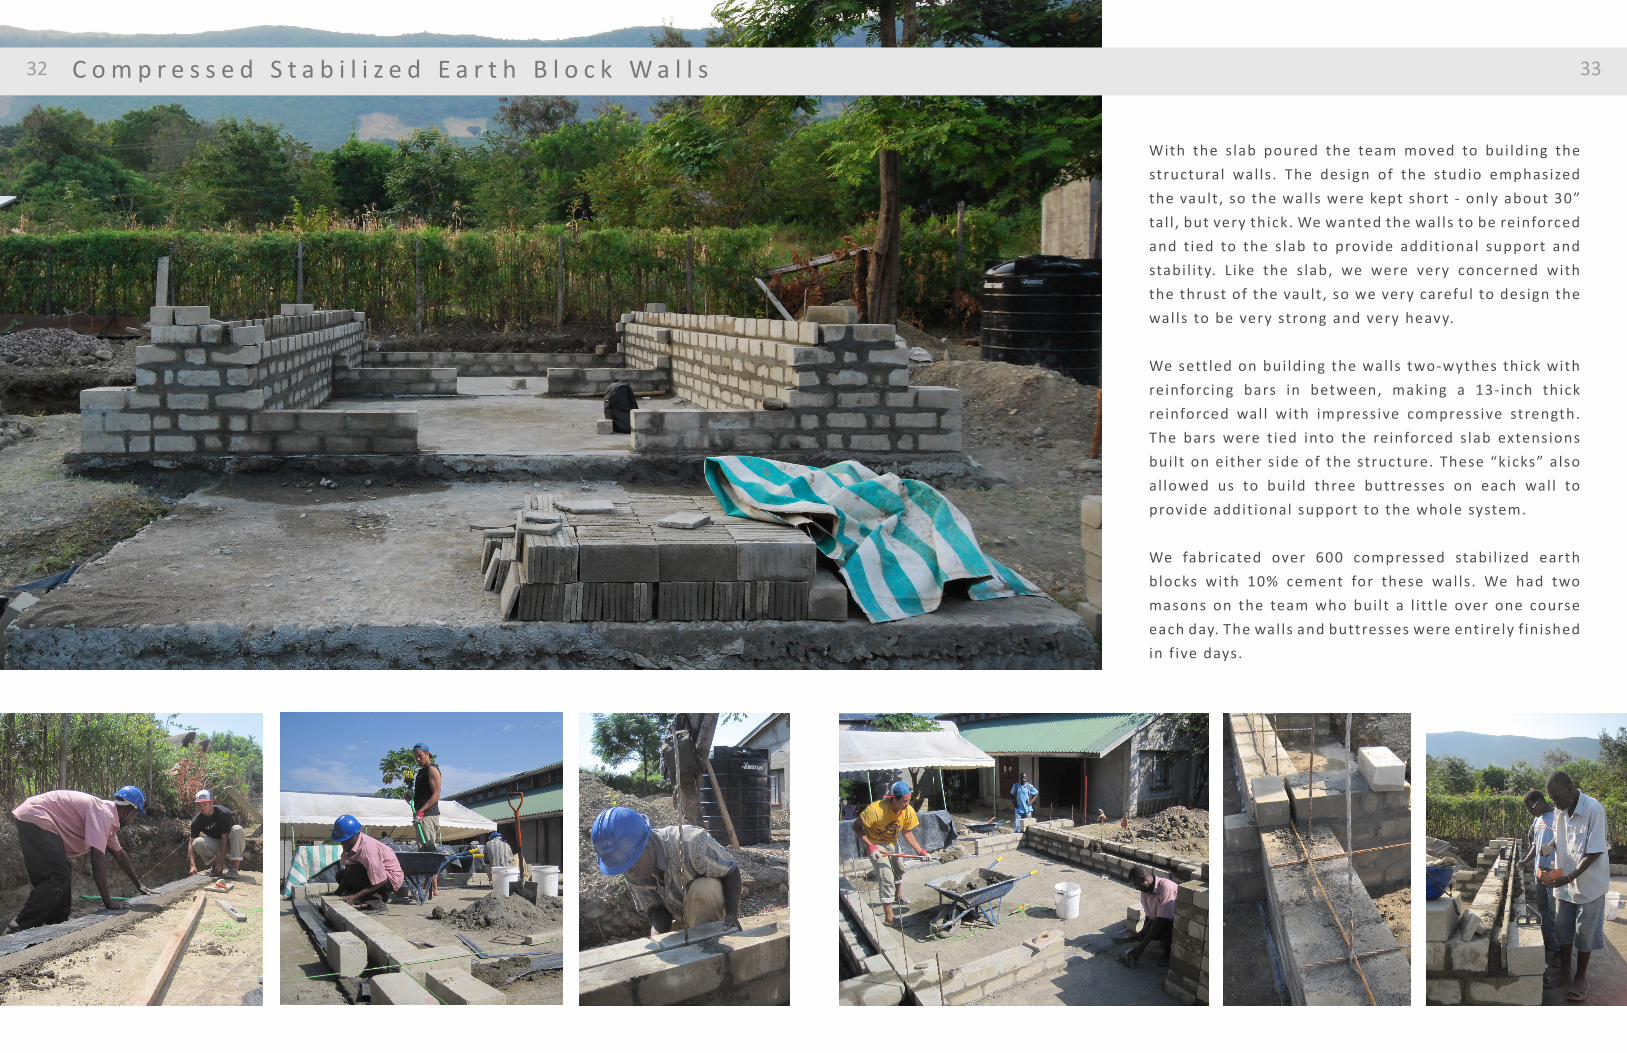
With the s lab poured the team moved to bui lding the structural wal ls . The design of the studio emphasized the vault , so the wal ls were kept short - only about 30” tal l , but very thick. We wanted the wal ls to be reinforced and t ied to the s lab to provide addit ional support and stabi l i ty. L ike the s lab, we were very concerned with the thrust of the vault , so we very careful to design the wal ls to be very strong and very heavy.
We sett led on bui lding the wal ls two-wythes thick with reinforcing bars in between, making a 13-inch thick reinforced wal l with impressive compressive strength. The bars were t ied into the reinforced slab extensions bui lt on either s ide of the structure. These “kicks” also al lowed us to bui ld three buttresses on each wal l to provide addit ional support to the whole system.
We fabricated over 600 compressed stabi l ized earth blocks with 10% cement for these wal ls . We had two masons on the team who bui lt a l i tt le over one course each day. The wal ls and buttresses were entirely f inished in f ive days.
34 V a u l t G u i d e w o r k 35
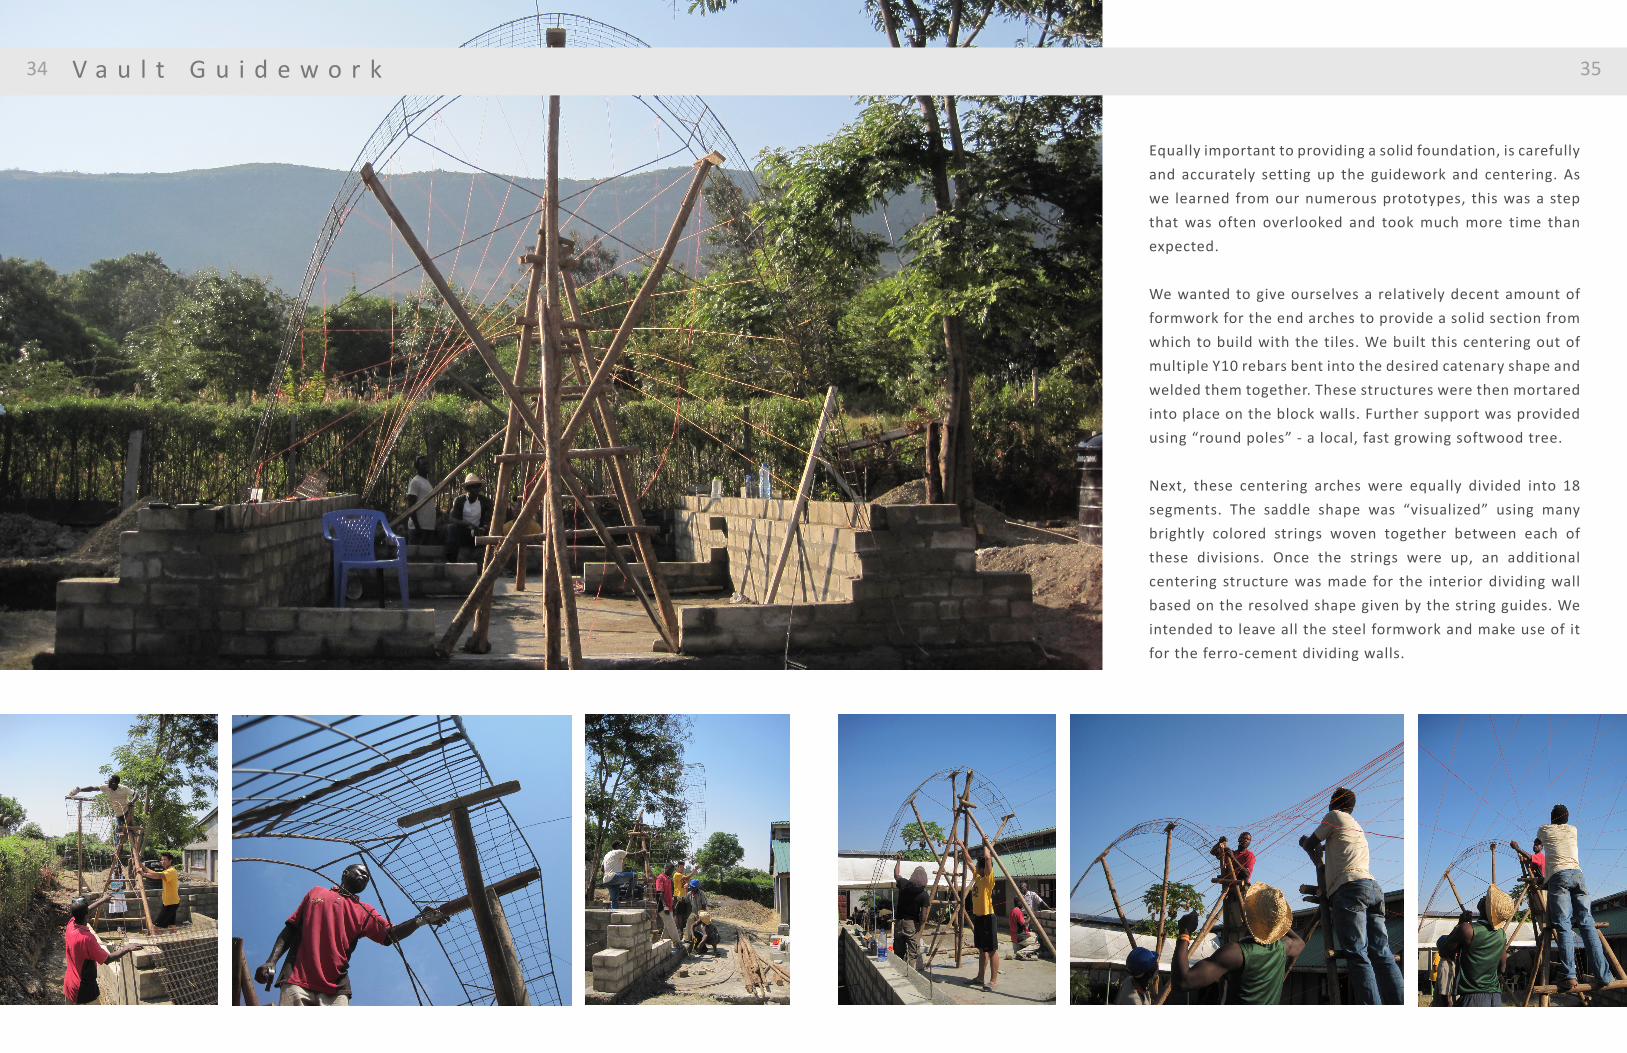
Equally important to providing a solid foundation, is carefully and accurately setting up the guidework and centering. As we learned from our numerous prototypes, this was a step that was often overlooked and took much more time than expected.
We wanted to give ourselves a relatively decent amount of formwork for the end arches to provide a solid section from which to build with the tiles. We built this centering out of multiple Y10 rebars bent into the desired catenary shape and welded them together. These structures were then mortared into place on the block walls. Further support was provided using “round poles” - a local, fast growing softwood tree.
Next, these centering arches were equally divided into 18 segments. The saddle shape was “visualized” using many brightly colored strings woven together between each of these divisions. Once the strings were up, an additional centering structure was made for the interior dividing wall based on the resolved shape given by the string guides. We intended to leave all the steel formwork and make use of it for the ferro-cement dividing walls.

36 T i l e V a u l t i n g 37
With the walls up and guidework in place, the team was ready to begin tiling. Our brickworks had been working tirelessly making over 200 tiles a day for over a week to ensure we would have enough for the build.
We split the crew into two teams to begin tiling on each end arch. By the end of the first day, we completed 3 arches, one over each steel centering structure. Our plan was to work off these stable arches with the first layer of tiles and build the second layer over these completed arches as progress was made. On the third day of tiling however, we began experiencing catastrophic failures and eventually had to take down the whole tile structure.
After much deliberation we determined that there were a number of factors that led to these collapses: lack of experience of the tilers, strength of the tiles versus the strength of the plaster, and the overall size of the vault, among others. Although we had our own academic and research-based goals in mind for the project, the truth was we were on Mfangano Island to construct a building for the very successful community-based radio station, and had to shift gears in order to deliver a completed building.

38 F e r r o - C e m e n t P r e p 39
It was our responsibility to provide the community of Mfangano Island with a building they could build safely and use once complete. As a “Plan B” to this project, we knew ferro-cement was a viable alternative to tile vaulting since the technique was already being practiced on the island for few years. Thus, the decision was made to continue pursuing the same geometry and design for the roof using ferro-cement.
In order to make the switch from tiles to ferro we had to purchase some additional rebar as well as welders mesh, chicken mesh and more round poles for support and formwork.
Setup for ferro began by running rebars along the string lines to create the ruled surface and anchoring the steel arches we used as centering to the steel reinforcing in the wall. Next, we laid and bound welder’s mesh (structural) over rebars and provided additional support with round poles so workers could climb on top of the structure. Finally, the chicken mesh was laid and bound over the top of the welders mesh. In only three days, the whole roof was made out of rebar, two different steel meshes, and was ready for the next step.
40 F e r r o - C e m e n t 41
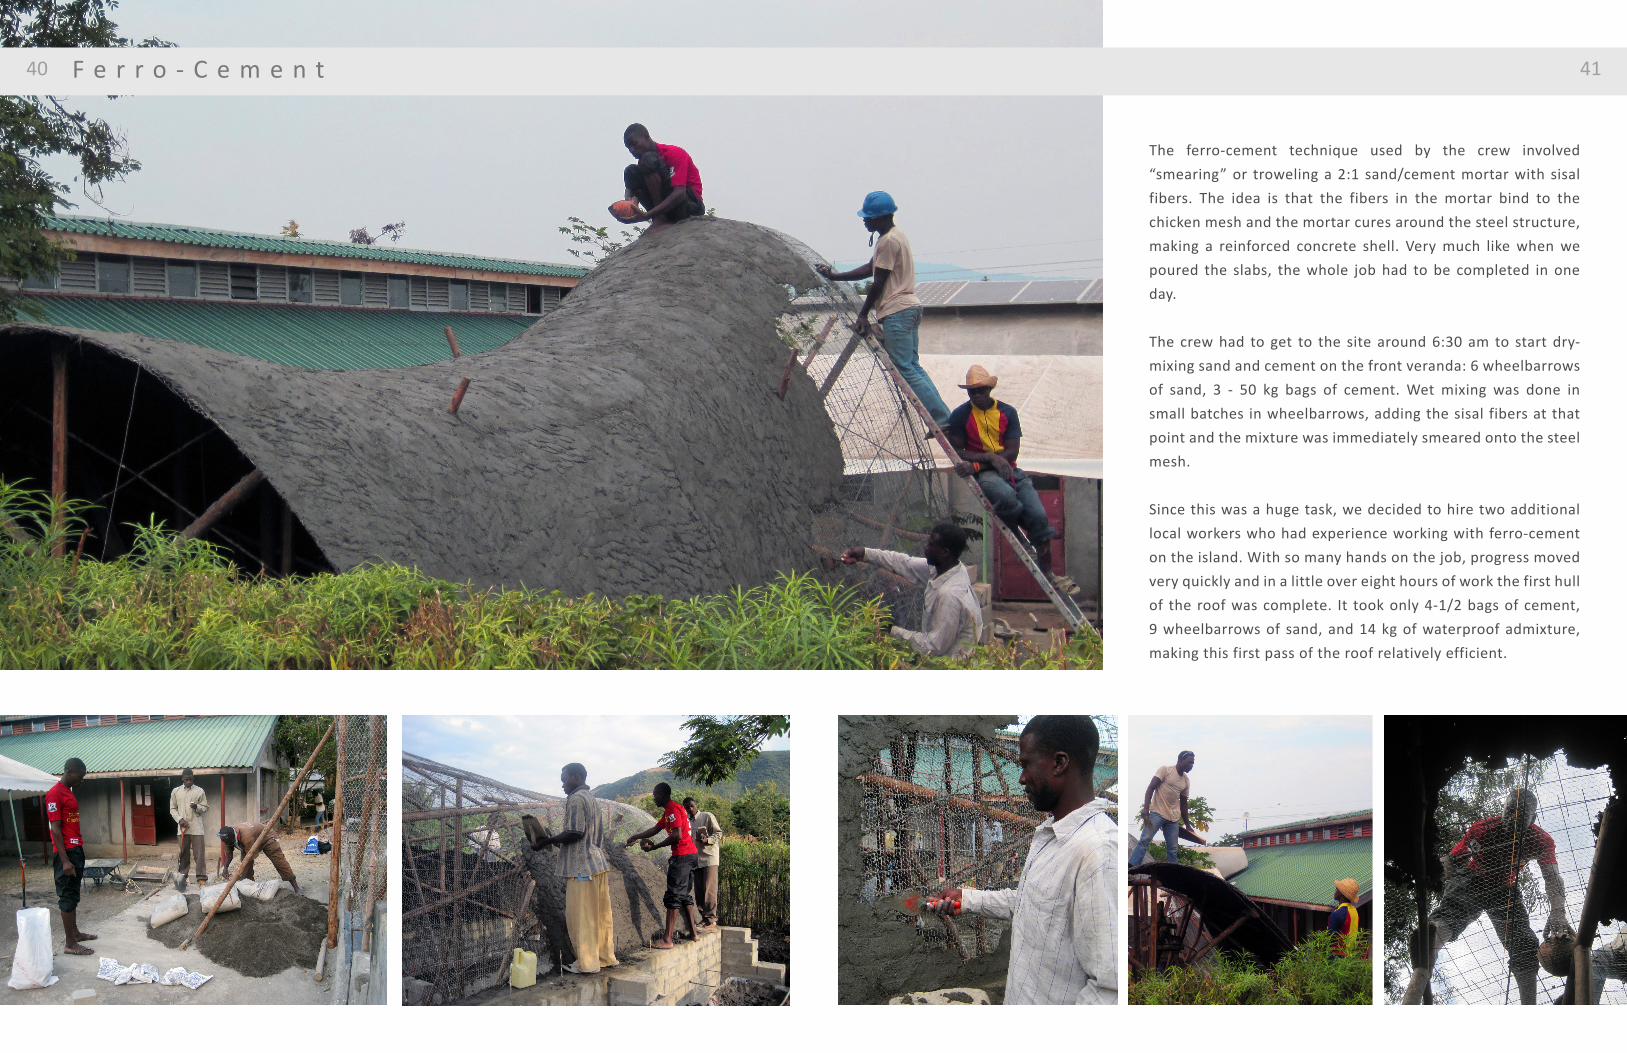
The ferro-cement technique used by the crew involved “smearing” or troweling a 2:1 sand/cement mortar with sisal fibers. The idea is that the fibers in the mortar bind to the chicken mesh and the mortar cures around the steel structure, making a reinforced concrete shell. Very much like when we poured the slabs, the whole job had to be completed in one day.
The crew had to get to the site around 6:30 am to start dry- mixing sand and cement on the front veranda: 6 wheelbarrows of sand, 3 - 50 kg bags of cement. Wet mixing was done in small batches in wheelbarrows, adding the sisal fibers at that point and the mixture was immediately smeared onto the steel mesh.
Since this was a huge task, we decided to hire two additional local workers who had experience working with ferro-cement on the island. With so many hands on the job, progress moved very quickly and in a little over eight hours of work the first hull of the roof was complete. It took only 4-1/2 bags of cement, 9 wheelbarrows of sand, and 14 kg of waterproof admixture, making this first pass of the roof relatively efficient.

42 F i n i s h e s 43
Just two days after completing the first hull of the roof, the student team had to leave the island and return home. Nevertheless, progress continued after we left. The work was all fairly straightforward finishing work for the Guild. They focused on non-structural ferro-cement dividing walls, doors, windows, gutters and other interior and exterior finishings including built-in furniture.
Additional layers of cement mortar were “plastered” or thrown both on the interior and exterior of the structure making the vault complete. This included the “nirro” coat where they essentially painted the surface of the vault with a water and cement slurry, which left a smooth and very hard surface. The thickness of the vault was kept under 3 inches.
With the funds they had left, the Guild managed to complete all of the dividing walls and window frames. The built-in desks on the interior and the built-in benches on the exterior have also been completed. All that remains to be built are doors and windows (glass louvers), the gutters and to run power from the solar array on the roof of EK Center to the new radio studio. The remaining funds from this fellowship will make the rest of this work possible.
44
I first traveled to Mfangano Island in the summer 2012 to help build an Aquaponic farm for the Ekialo Kiona community farm. This unique experience left a lasting impact on me. I not only learned many hands-on construction skills, but also gained a better understanding of informal design and the high skill that is present even in small communities of developing countries. Throughout the course of my stay that summer, I began to see the potential for future design projects that could be carried out in partnership with the craftsmen of the Ekialo Kiona Sustainable Design Guild.
This project was born out of a desire to travel back to the island, reconnect with the community on Mfangano and the craftsmen of the EK Guild, work directly with them, and give them a chance to work to expand their skill sets and support their families. As the idea matured into a project, it began to take on two distinct characters: a scholarly research project with personal interests and goals and a public interest design/build project. Managing these two over the course of my stay on the island this year proved very challenging because I continually needed to adjust between my own agenda and the local needs and practices.
Throughout the entirety of this project, a number questions emerged about our intent to bring over new building technologies to Mfangano Island and the impact it would have on the local community. When we arrived in Kenya, the project had a clear agenda of the ideas and skills we wanted to share with the Guild. We also had an assumption about the structure we were going to build: a small but usable prototype building (10ft x 10ft) that would be a demonstration of these ideas and skills adapted in the context of the island. When we entered schematic design with the EK Radio staff, the building more than tripled in size to accommodate the needs of radio operations. Although this was a concern both in terms of our ability to complete the structure and our overall budget, we pushed forward. Luckily, progress was very smooth right up until the point of working on the big tile vault. The failures experienced at this point of the process proved to be a critical moment where I was forced to make a major adjustment in my attitude toward the project and the course of action I was envisioning. At this point, reality set in about the responsibility my team and I had to complete the studio building independent of the method of construction or our initial intentions. Although it was disappointing to see the tiles fail at full scale, we had to measure our success and accept our failure.
The truth is, we succeeded in every other aspect of the project we intended to carry out. In fact, with the success of the tile vault prototype, the introduction of tile vaulting was also not a complete failure since the Guild members still received a taste for the method and had the opportunity to build a structure that to this day is still standing. This is proof that in some way, and with some adjustments, the method is possible on the island. The Guild members were genuinely excited about this potential and wanted to keep trying. It was also important on our end to make in clear that the failure was a part of the learning process and part of adapting the construction method for Mfangano.
45
We explained that their willingness to make the attempt and their efforts to work outside of their norms was immensely important and was a significant contribution to design and construction research. Not only did this motivate them to move past feelings of defeat, but it empowered them. Once they were able to step back and see all they accomplished, the Guild was rejuvenated and eager to finish the building using a different method than we had planned.
The EKFM studio was successful because it was built out of a continuous adjustment between our agenda and the Guild’s local practices. Other than the construction method of the roof, the design of the building, including the exact shape of the vault, remained the same. The result may even be better since we combined the local innovations in ferro-cement made by the Guild with our intent to build a double-curved catenary vault on compressed earth block structure. It is a demonstration of how contemporary design practice can operate through an informal design process to produce built work that is socially, culturally and ecologically sustainable.
Personally, this project continually revealed important realities about the discipline and practice of architecture. I learned to manage a project in an extremely difficult setting where tools, materials, resources, and skills cannot be taken for granted. I had a team of three university colleagues, a field consultant, four local craftsmen and three local laborers relying on me to resolve any issue along the way. I had to make executive decisions about construction details, methods, schedules, personnel and budgets. Additionally, I encountered the conflict between my personal interest as a designer versus the responsibility to see the project through completion no matter the difficulties or setbacks along the way.
I am extremely grateful for this opportunity that would not have been possible without the RAMSA Travel Fellowship. This experience will forever shape how I think about the field of architecture and the role the architect plays in a building project. I am more excited than ever to be pursuing this field as a career. The work and research I have conducted for this project has turned into a passion: one that I am continuing to pursue as a thesis during my final year at PennDesign, and will most certainly continue beyond my degree.
Thank you to Robert Stern and everyone at RAMSA for believing in me and supporting me through this experience.
-Jonathan Dessi-Olive
C o n c l u s i o n s

Durkee, A.N. “Hassan Fathy in New Mexico” in Via 7: The Building of Architecture, Behrens P. and Fisher A. (eds.) MIT Press. 1984.
Hamid, A. Hassan Fathy and Continuity in Islamic Architecture: the birth of a new modern. New York: The American University in Cairo Press. 2010.
Block P., DeJong M., Davis L. and Ochsendorf J. “Tile vaulted systems for low-cost construction in Africa.” Journal of the African Technology Development Forum (ATDF). Vol. 7. Nr. 1-2. 2010. pp. 4-13.This research article presents the SUDU project completed by Philippe Block, John Ochsendorf and others. It establishes the project in Ethiopia in the context of Guastavino’s methods and comments on bringing the tile vaulting method to a new place undergoing development.
Davis L., Rippmann M., Pawlofsky T. and Block P. “Innovative Funicular Tile Vaulting: A prototype in Switzerland.” The Structural Engineer. Vol. 90, Nr. 11. 2012. pp. 46-56.
This research article discusses the design and construction of tile vaulting prototype that was designed using digital design and analysis tools.
Davis L. and Block P. “Earthen Masonry Vaulting: Technologies and Transfer.” Building Ethiopia: Sustainability and Innovation in Architecture and Design, Cherenet, Z. and Sewnet, H. (eds.), Shama Books, Addis Ababa. 2012.This research article goes in depth on the processes of soil testing, prototyping and construction of the SUDU project.
Guastavino, R. Essay On the Theory and History of Cohesive Construction: Applied Especially to the Timbrel Vault 2nd Ed (reprint) Boston: Ticknor and Company. 1893.
Primary Resource. This is was originally a transcript of a lecture given by Guastavino that explains in depth his philosophy behind using the tile vaulting method at that time.
Mau, B. Massive Change. New York: Phaidon Press Inc. 2004.
This book offers some contemporary ideas about the use of materials.
Houben, H. and Guillaud, H. Earth Construction: A Comprehensive guide. Marseille: Editions Parentheses. 1989.
This textbook served as the basis of knowledge on earth construction for the EKFM studio project.
46
Organic Health Response < http://organichealthresponse.org/ >
Pedreschi, R., Theodossopoulos, D. “The Double Curvature Vaults of Eladio Dieste” Structures & Buildings 160. February 2007 Issue SB1. Pages 3–11
This article investigates some of the structural and geometrical aspects of Dieste’s work.
Pedreschi, R. Eladio Dieste: The Engineer’s Contribution to Contemporary Architecture. London: Thomas Telford Publishing. 2000.
This this book is a fairly complete and in depth piece about Eladio Dieste and his work using tile vaulting for massive projects.
Ochsendorf J. Guastavino Vaulting: the art of structural tile. New York: Princeton Architectural Press, 2010.
This is a comprehensive book about the career and works of Raphael Guastavino.
Muñoz, J. “Laying out Tile Vaults with Local Positioning Systems”
This article was used in the early phases of research. It helped solidify my interest in pursuing research on tile vaulting by exposing new ways of approaching the construction of vaults.
Moussavi, F. The Function of Form. Cambridge: Harvard GSD. 2009.
This book presents a contemporary take on form and affect. It has an extensive catalogue of many types of forms and their relative affects.
This book goes in depth about the work of Felix Candela. It includes a biographical section as well as presents case studies of a select few of his projects.
Moreyra Garlock, M.E., Billington, D. Felix Candela: Engineer, Builder, Structural Artist. New Haven: Yale University Press. 2008.
Nordenson, G. (ed) Seven Structural Engineers: The Felix Candela Lectures. New York: Museum of Modern Art. 2008.
This collection of articles has a number of relavant articles about thin vaults and shells that will be used for the case studies.
B i b l i o g r a p h y 47
Pedreschi, R. “The Structural Behaviour and Design of Free-Standing Barrel Vaults of Eladio Dieste”
This article investigates some of the structural and geometrical aspects of Dieste’s work.
Steele J. Hassan Fathy in Architectural Monographs 13. New York: St. Martin’s Press. 1988.
Rigassi, V. Compressed Earth Blocks: Manual of Production. CRA-Terre EAG. 1985.
This book is an extension to the other CRA-Terre manual of earth construction. Provides more in depth explanations of the specific processes of production of compressed earth blocks.
Ramage M., Ochsendorf J., Rich P., Bellamy J. and Block P. “Design and construction of the Mapungubwe National Park Interpretive Centre, South Africa.” Journal of the African Technology Development Forum (ATDF).Vol. 7. Nr. 1-2. 2010. pp. 14-23.
This research article is about the background and construction process of Ochsendorf ’s project in South Africa, and comments on bringing the technique to a new place.
Ramage M., Ochsendorf J., and Rich P. “New African vaults built with soil-cement tiles” in Proceedings of the International Association for Shell Spatial Structures Symposium 2009, Valencia.
This research article is about the design, analysis and construction processes of Ochsendorf ’s project in South Africa.
Ramage M., “Building a Catalan Vault”. 4.444 The Construction of Building Spring 2004. MIT
This short article explains the process of building a tile vault prototype step - by - step.
48 49
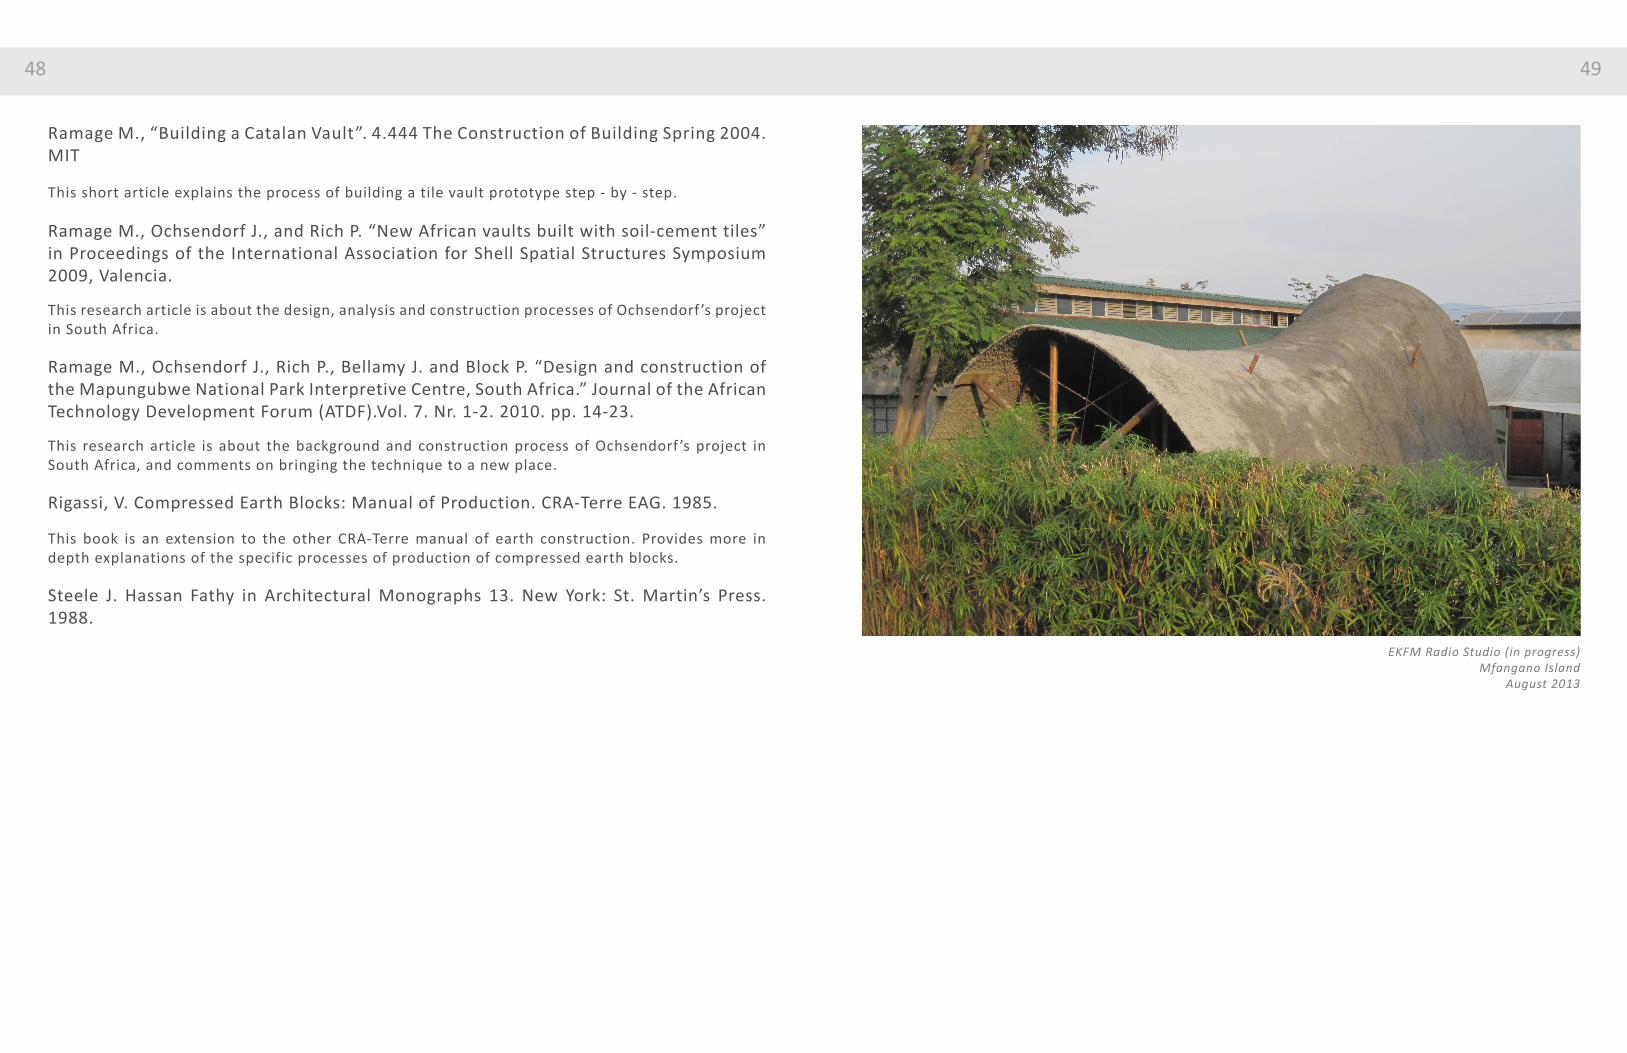
EKFM Radio Studio (in progress) Mfangano Island
August 2013