Cabling : e-series - Product Documentation
24
Cabling e-series NetApp April 11, 2022 This PDF was generated from https://docs.netapp.com/us-en/e-series/install-hw-cabling/index.html on April 11, 2022. Always check docs.netapp.com for the latest.
-
Upload
khangminh22 -
Category
Documents
-
view
3 -
download
0
Transcript of Cabling : e-series - Product Documentation

Cablinge-seriesNetAppApril 11, 2022
This PDF was generated from https://docs.netapp.com/us-en/e-series/install-hw-cabling/index.html onApril 11, 2022. Always check docs.netapp.com for the latest.

Table of Contents
Cabling . . . . . . . . . . . . . . . . . . . . . . . . . . . . . . . . . . . . . . . . . . . . . . . . . . . . . . . . . . . . . . . . . . . . . . . . . . . . . . . . . 1
Cabling overview . . . . . . . . . . . . . . . . . . . . . . . . . . . . . . . . . . . . . . . . . . . . . . . . . . . . . . . . . . . . . . . . . . . . . . . 1
Requirements. . . . . . . . . . . . . . . . . . . . . . . . . . . . . . . . . . . . . . . . . . . . . . . . . . . . . . . . . . . . . . . . . . . . . . . . . . 1
Host cabling . . . . . . . . . . . . . . . . . . . . . . . . . . . . . . . . . . . . . . . . . . . . . . . . . . . . . . . . . . . . . . . . . . . . . . . . . . . 2
Drive shelf cabling . . . . . . . . . . . . . . . . . . . . . . . . . . . . . . . . . . . . . . . . . . . . . . . . . . . . . . . . . . . . . . . . . . . . . . 3
Power cabling. . . . . . . . . . . . . . . . . . . . . . . . . . . . . . . . . . . . . . . . . . . . . . . . . . . . . . . . . . . . . . . . . . . . . . . . . . 9
Hot adding a drive shelf . . . . . . . . . . . . . . . . . . . . . . . . . . . . . . . . . . . . . . . . . . . . . . . . . . . . . . . . . . . . . . . . . . 9
Ethernet cabling for a management station . . . . . . . . . . . . . . . . . . . . . . . . . . . . . . . . . . . . . . . . . . . . . . . . . . 20

Cabling
Cabling overview
You can cable a host directly to a controller or use switches to connect a host to a
controller.
If your storage system includes one or more drive shelves, you must cable them to your controller shelf. You
can add a new drive shelf while power is still applied to other components of the storage system. In addition,
you can connect your storage system to a network for out-of-band management.
The cabling information is intended for a hardware installer or system administrator who is installing or
expanding a storage system. It is assumed that you have installed the storage system as described in the
Installation and Setup Instructions for your hardware.
Applicable hardware model
Cabling information applies to the following hardware models.
Controller Shelf Drive Shelf
EF600 Not applicable.
E5724, EF570, E2812, E2824, EF280 DE212C, DE224C
E2860, E5760 DE460C
Additional cabling information
If you are cabling for the following configuration, see Adding IOM Drive Shelves to an Existing E27XX, E56XX,
or EF560 Controller Shelf.
Controller Shelf Drive Shelf
E2712, E2724, E5612, E5624, EF560 DE212C, DE224C
E2760, E5660 DE460C
For information about other cabling options, see the E-Series Hardware Cabling Guide for older systems.
For information about cabling to support mirroring features, see the Synchronous and Asynchronous Mirroring
Feature Descriptions and Deployment Guide.
Requirements
In addition to controller shelves and drive shelves, you might need some or all of the
following components when cabling your storage system:
1

• Cables: SAS, Fibre Channel (FC), Ethernet, InfiniBand
• Small form-factor pluggable (SFP) or Quad SFP (QSFP) transceivers
• Switches
• Host bus adapters (HBAs)
• Host channel adapters (HCAs)
• Network interface cards (NICs)
Host cabling
You can cable a host directly to a controller (direct-attached topology) or use switches
(switch topology) to connect a host to a controller.
Cabling for a direct-attached topology
A direct-attached topology connects host adapters directly to controllers in your storage system.
The following figure shows an example connection. To help ensure maximum performance, use all available
host adapter ports.
Figure 1. Two hosts and two controllers
(1) Connect each host adapter port directly to the host ports on the controllers.
Cabling for a switch topology
A switch topology uses switches to connect hosts to the controllers in your storage system. The switch must
support the connection type used between the host and the controller.
The following figure shows an example connection. For switches that provide provisioning capability, you
should isolate each initiator and target pair.
2

Figure 2. Two hosts and two switches
(1) Connect each host adapter directly to the switch.
(2) Connect each switch directly to the host ports on the controllers. To help ensure maximum performance,
use all available host adapter ports.
Drive shelf cabling
You must connect each controller in the controller shelf to an I/O module (IOM) in a drive
shelf.
This procedure applies to IOM12 and IOM12B drive shelves.
This procedure is for like-for-like shelf IOM hot-swaps or replacements. This means you can
only replace an IOM12 module with another IOM12 module or replace an IOM12B module with
another IOM12B module. (Your shelf can have two IOM12 modules or have two IOM12B
modules.)
If you are cabling an older controller shelf to a DE212C, DE224C, or DE460, see Adding IOM Drive Shelves to
an Existing E27XX, E56XX, or EF560 Controller Shelf.
Cabling E2800 and E5700
The following information applies to cabling an E2800, E2800B, EF280, E5700, EF5700B, or EF570 controller
shelf to a DE212C, DE224C, or DE460 drive shelf.
Cabling a 12-drive or 24-drive shelf
You can cable your controller shelf to one or more 12-drive or 24-drive shelves.
The following image shows a representation of the controller shelf and the drive shelves. To locate the ports on
3

your model, see Hardware Universe.
A controller shelf and 12-drive or 24-drive shelves
Cabling a 60-drive shelf
You can cable your controller shelf to one or more 60-drive shelves.
The following image shows a representation of the controller shelf and the drive shelves. To locate the ports on
your model, see Hardware Universe.
A controller shelf and 60-drive shelves
4

Cabling EF300
The following information applies to cabling an EF300 controller shelf to a DE212C, DE224C, or DE460 drive
shelf.
Before you begin
Before cabling the EF300, make sure the firmware is updated to the latest version. To update the firmware,
5

follow the instructions in Upgrading SANtricity OS.
Cabling a 12-drive or 24-drive shelf
You can cable your controller shelf to one or more 12-drive or 24-drive shelves.
The following image shows a representation of the controller shelf and the drive shelves. To locate the ports on
your model, see Hardware Universe.
A controller shelf and 12-drive or 24-drive shelves
6

Cabling a 60-drive shelf
You can cable your controller shelf to one or more 60-drive shelves.
The following image shows a representation of the controller shelf and the drive shelves. To locate the ports on
your model, see Hardware Universe.
A controller shelf and 60-drive shelves
7

8
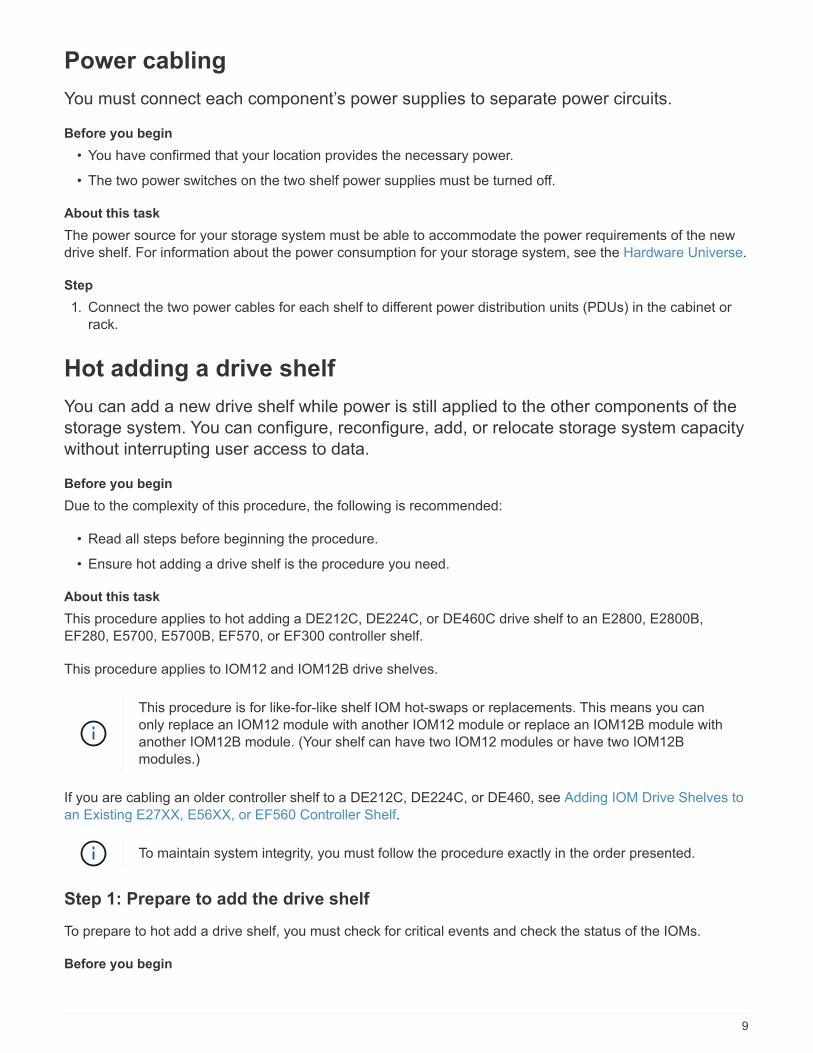
Power cabling
You must connect each component’s power supplies to separate power circuits.
Before you begin
• You have confirmed that your location provides the necessary power.
• The two power switches on the two shelf power supplies must be turned off.
About this task
The power source for your storage system must be able to accommodate the power requirements of the new
drive shelf. For information about the power consumption for your storage system, see the Hardware Universe.
Step
1. Connect the two power cables for each shelf to different power distribution units (PDUs) in the cabinet or
rack.
Hot adding a drive shelf
You can add a new drive shelf while power is still applied to the other components of the
storage system. You can configure, reconfigure, add, or relocate storage system capacity
without interrupting user access to data.
Before you begin
Due to the complexity of this procedure, the following is recommended:
• Read all steps before beginning the procedure.
• Ensure hot adding a drive shelf is the procedure you need.
About this task
This procedure applies to hot adding a DE212C, DE224C, or DE460C drive shelf to an E2800, E2800B,
EF280, E5700, E5700B, EF570, or EF300 controller shelf.
This procedure applies to IOM12 and IOM12B drive shelves.
This procedure is for like-for-like shelf IOM hot-swaps or replacements. This means you can
only replace an IOM12 module with another IOM12 module or replace an IOM12B module with
another IOM12B module. (Your shelf can have two IOM12 modules or have two IOM12B
modules.)
If you are cabling an older controller shelf to a DE212C, DE224C, or DE460, see Adding IOM Drive Shelves to
an Existing E27XX, E56XX, or EF560 Controller Shelf.
To maintain system integrity, you must follow the procedure exactly in the order presented.
Step 1: Prepare to add the drive shelf
To prepare to hot add a drive shelf, you must check for critical events and check the status of the IOMs.
Before you begin
9

• The power source for your storage system must be able to accommodate the power requirements of the
new drive shelf. For the power specification for your drive shelf, see the Hardware Universe.
• The cabling pattern for the existing storage system must match one of the applicable schemes shown in
this procedure.
Steps
1. In SANtricity System Manager, select Support > Support Center > Diagnostics.
2. Select Collect Support Data.
The Collect Support Data dialog box appears.
3. Click Collect.
The file is saved in the Downloads folder for your browser with the name support-data.7z. The data is not
automatically sent to technical support.
4. Select Support > Event Log.
The Event Log page displays the event data.
5. Select the heading of the Priority column to sort critical events to the top of the list.
6. Review the system critical events for events that have occurred in the last two to three weeks, and verify
that any recent critical events have been resolved or otherwise addressed.
If unresolved critical events have occurred within the previous two to three weeks, stop the
procedure and contact technical support. Continue the procedure only when the issue is
resolved.
7. Select Hardware.
8. Select the IOMs (ESMs) icon.
The Shelf Component Settings dialog box appears with the IOMs (ESMs) tab selected.
9. Make sure that the status shown for each IOM/ESM is Optimal.
10. Click Show more settings.
11. Confirm that the following conditions exist:
◦ The number of ESMs/IOMs detected matches the number of ESMs/IOMs installed in the system and
that for each drive shelf.
◦ Both of the ESMs/IOMs show that communication is OK.
◦ The data rate is 12Gb/s for DE212C, DE224C, and DE460C drive shelves or 6 Gb/s for other drive
trays.
Step 2: Install the drive shelf and apply power
You install a new drive shelf or a previously installed drive shelf, turn on the power, and check for any LEDs
that require attention.
Steps
10

1. If you are installing a drive shelf that has previously been installed in a storage system, remove the drives.
The drives must be installed one at a time later in this procedure.
If the installation history of the drive shelf that you are installing is unknown, you should assume that it has
been previously installed in a storage system.
2. Install the drive shelf in the rack that holds the storage system components.
See the installation instructions for your model for the full procedure for physical installation
and power cabling. The installation instructions for your model includes notes and warnings
that you must take into account to safely install a drive shelf.
3. Power on the new drive shelf, and confirm that no amber attention LEDs are illuminated on the drive shelf.
If possible, resolve any fault conditions before you continue with this procedure.
Step 3: Cable your system
Select one of the following options, depending on whether you are cabling an E2800 and E5700 storage
system or an EF300 storage system.
• Option 1: Connect the drive shelf for E2800 and E5700
• Option 2: Connect the drive shelf for EF300
If you are cabling an older controller shelf to a DE212C, DE224C, or DE460, see Adding IOM Drive Shelves to
an Existing E27XX, E56XX, or EF560 Controller Shelf.
Option 1: Connect the drive shelf for E2800 and E5700
You connect the drive shelf to controller A, confirm IOM status, and then connect the drive shelf to controller B.
Steps
1. Connect the drive shelf to controller A.
The following figure shows an example connection between an additional drive shelf and controller A. To
locate the ports on your model, see the Hardware Universe.
11

12

2. In SANtricity System Manager, click Hardware.
At this point in the procedure, you have only one active path to the controller shelf.
3. Scroll down, as necessary, to see all the drive shelves in the new storage system. If the new drive shelf is
not displayed, resolve the connection issue.
4. Select the ESMs/IOMs icon for the new drive shelf.
The Shelf Component Settings dialog box appears.
5. Select the ESMs/IOMs tab in the Shelf Component Settings dialog box.
6. Select Show more options, and verify the following:
◦ IOM/ESM A is listed.
◦ Current data rate is 12 Gbps for a SAS-3 drive shelf.
◦ Card communications is OK.
7. Disconnect all expansion cables from controller B.
8. Connect the drive shelf to controller B.
The following figure shows an example connection between an additional drive shelf and controller B. To
locate the ports on your model, see the Hardware Universe.
13

9. If it is not already selected, select the ESMs/IOMs tab in the Shelf Component Settings dialog box, and
then select Show more options. Verify that Card communications is YES.
Optimal status indicates that the loss of redundancy error associated with the new drive
shelf has been resolved and the storage system is stabilized.
Option 2: Connect the drive shelf for EF300
You connect the drive shelf to controller A, confirm IOM status, and then connect the drive shelf to controller B.
Before you begin
• You have updated your firmware to the latest version. To update your firmware, follow the instructions in
the Upgrading SANtricity OS.
Steps
1. Disconnect both of the A-side controller cables from IOM12 ports one and two from previous last shelf in
the stack and then connect them to the new shelf IOM12 ports one and two.
14

2. Connect the cables to A-side IOM12 ports three and four from the new shelf to previous last shelf IOM12
ports one and two.
The following figure shows an example connection for A side between an additional drive shelf and the
previous last shelf. To locate the ports on your model, see the Hardware Universe.
15

16

3. In SANtricity System Manager, click Hardware.
At this point in the procedure, you have only one active path to the controller shelf.
4. Scroll down, as necessary, to see all the drive shelves in the new storage system. If the new drive shelf is
not displayed, resolve the connection issue.
5. Select the ESMs/IOMs icon for the new drive shelf.
17

The Shelf Component Settings dialog box appears.
6. Select the ESMs/IOMs tab in the Shelf Component Settings dialog box.
7. Select Show more options, and verify the following:
◦ IOM/ESM A is listed.
◦ Current data rate is 12 Gbps for a SAS-3 drive shelf.
◦ Card communications is OK.
8. Disconnect both the B-side controller cables from IOM12 ports one and two from the previous last shelf in
the stack then connect them to the new shelf IOM12 ports one and two.
9. Connect the cables to B-side IOM12 ports three and four from the new shelf to the previous last shelf
IOM12 ports one and two.
The following figure shows an example connection for B side between an additional drive shelf and the
previous last shelf. To locate the ports on your model, see the Hardware Universe.
18

10. If it is not already selected, select the ESMs/IOMs tab in the Shelf Component Settings dialog box, and
then select Show more options. Verify that Card communications is YES.
Optimal status indicates that the loss of redundancy error associated with the new drive
shelf has been resolved and the storage system is stabilized.
19
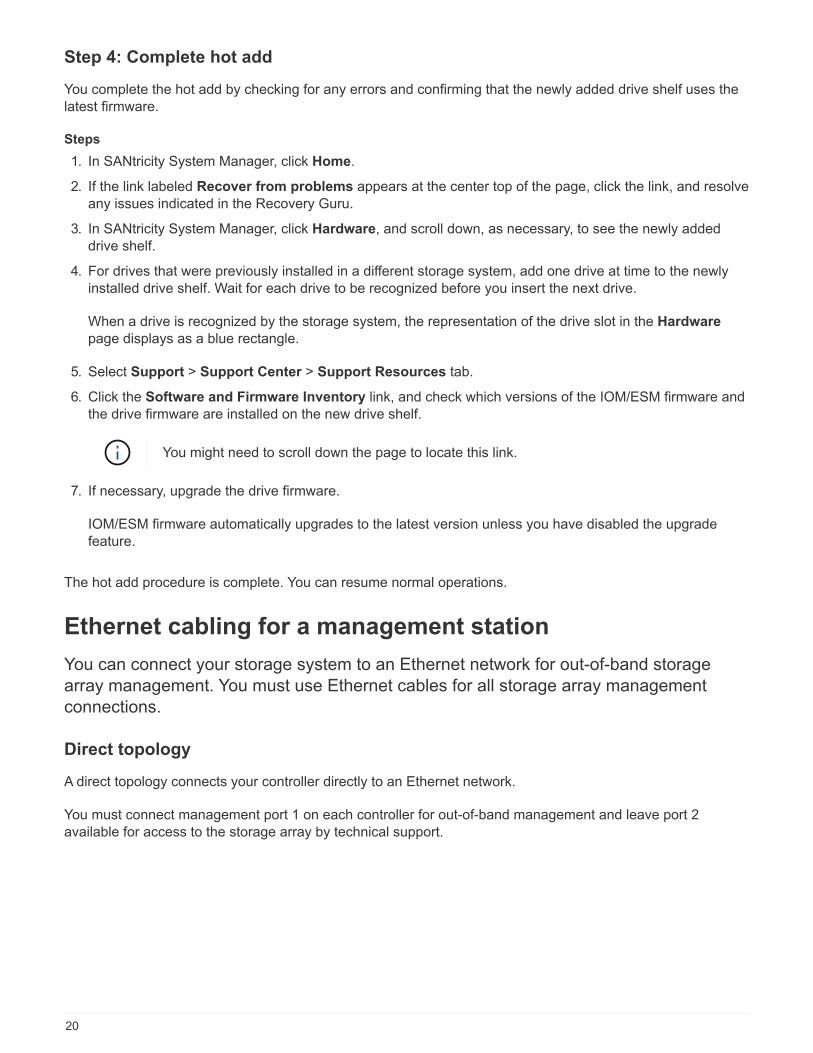
Step 4: Complete hot add
You complete the hot add by checking for any errors and confirming that the newly added drive shelf uses the
latest firmware.
Steps
1. In SANtricity System Manager, click Home.
2. If the link labeled Recover from problems appears at the center top of the page, click the link, and resolve
any issues indicated in the Recovery Guru.
3. In SANtricity System Manager, click Hardware, and scroll down, as necessary, to see the newly added
drive shelf.
4. For drives that were previously installed in a different storage system, add one drive at time to the newly
installed drive shelf. Wait for each drive to be recognized before you insert the next drive.
When a drive is recognized by the storage system, the representation of the drive slot in the Hardware
page displays as a blue rectangle.
5. Select Support > Support Center > Support Resources tab.
6. Click the Software and Firmware Inventory link, and check which versions of the IOM/ESM firmware and
the drive firmware are installed on the new drive shelf.
You might need to scroll down the page to locate this link.
7. If necessary, upgrade the drive firmware.
IOM/ESM firmware automatically upgrades to the latest version unless you have disabled the upgrade
feature.
The hot add procedure is complete. You can resume normal operations.
Ethernet cabling for a management station
You can connect your storage system to an Ethernet network for out-of-band storage
array management. You must use Ethernet cables for all storage array management
connections.
Direct topology
A direct topology connects your controller directly to an Ethernet network.
You must connect management port 1 on each controller for out-of-band management and leave port 2
available for access to the storage array by technical support.
20

Figure 3. Direct storage management connections
Fabric topology
A fabric topology uses a switch to connect your controller to an Ethernet network.
You must connect management port 1 on each controller for out-of-band management and leave port 2
available for access to the storage array by technical support.
Figure 4. Fabric storage management connections
21

Copyright Information
Copyright © 2022 NetApp, Inc. All rights reserved. Printed in the U.S. No part of this document covered by
copyright may be reproduced in any form or by any means-graphic, electronic, or mechanical, including
photocopying, recording, taping, or storage in an electronic retrieval system- without prior written permission of
the copyright owner.
Software derived from copyrighted NetApp material is subject to the following license and disclaimer:
THIS SOFTWARE IS PROVIDED BY NETAPP “AS IS” AND WITHOUT ANY EXPRESS OR IMPLIED
WARRANTIES, INCLUDING, BUT NOT LIMITED TO, THE IMPLIED WARRANTIES OF MERCHANTABILITY
AND FITNESS FOR A PARTICULAR PURPOSE, WHICH ARE HEREBY DISCLAIMED. IN NO EVENT SHALL
NETAPP BE LIABLE FOR ANY DIRECT, INDIRECT, INCIDENTAL, SPECIAL, EXEMPLARY, OR
CONSEQUENTIAL DAMAGES (INCLUDING, BUT NOT LIMITED TO, PROCUREMENT OF SUBSTITUTE
GOODS OR SERVICES; LOSS OF USE, DATA, OR PROFITS; OR BUSINESS INTERRUPTION) HOWEVER
CAUSED AND ON ANY THEORY OF LIABILITY, WHETHER IN CONTRACT, STRICT LIABILITY, OR TORT
(INCLUDING NEGLIGENCE OR OTHERWISE) ARISING IN ANY WAY OUT OF THE USE OF THIS
SOFTWARE, EVEN IF ADVISED OF THE POSSIBILITY OF SUCH DAMAGE.
NetApp reserves the right to change any products described herein at any time, and without notice. NetApp
assumes no responsibility or liability arising from the use of products described herein, except as expressly
agreed to in writing by NetApp. The use or purchase of this product does not convey a license under any
patent rights, trademark rights, or any other intellectual property rights of NetApp.
The product described in this manual may be protected by one or more U.S. patents, foreign patents, or
pending applications.
RESTRICTED RIGHTS LEGEND: Use, duplication, or disclosure by the government is subject to restrictions
as set forth in subparagraph (c)(1)(ii) of the Rights in Technical Data and Computer Software clause at DFARS
252.277-7103 (October 1988) and FAR 52-227-19 (June 1987).
Trademark Information
NETAPP, the NETAPP logo, and the marks listed at http://www.netapp.com/TM are trademarks of NetApp, Inc.
Other company and product names may be trademarks of their respective owners.
22