CA Top Secret for z/OS User Guide
612
User Guide r15 CA Top Secret® for z/OS Ninth Edition
-
Upload
khangminh22 -
Category
Documents
-
view
0 -
download
0
Transcript of CA Top Secret for z/OS User Guide
User Guide r15
CA Top Secret® for z/OS
Ninth Edition
This Documentation, which includes embedded help systems and electronically distributed materials (hereinafter referred to as the “Documentation”), is for your informational purposes only and is subject to change or withdrawal by CA at any time. This Documentation is proprietary information of CA and may not be copied, transferred, reproduced, disclosed, modified or duplicated, in whole or in part, without the prior written consent of CA.
If you are a licensed user of the software product(s) addressed in the Documentation, you may print or otherwise make available a reasonable number of copies of the Documentation for internal use by you and your employees in connection with that software, provided that all CA copyright notices and legends are affixed to each reproduced copy.
The right to print or otherwise make available copies of the Documentation is limited to the period during which the applicable license for such software remains in full force and effect. Should the license terminate for any reason, it is your responsibility to certify in writing to CA that all copies and partial copies of the Documentation have been returned to CA or destroyed.
TO THE EXTENT PERMITTED BY APPLICABLE LAW, CA PROVIDES THIS DOCUMENTATION “AS IS” WITHOUT WARRANTY OF ANY KIND, INCLUDING WITHOUT LIMITATION, ANY IMPLIED WARRANTIES OF MERCHANTABILITY, FITNESS FOR A PARTICULAR PURPOSE, OR NONINFRINGEMENT. IN NO EVENT WILL CA BE LIABLE TO YOU OR ANY THIRD PARTY FOR ANY LOSS OR DAMAGE, DIRECT OR INDIRECT, FROM THE USE OF THIS DOCUMENTATION, INCLUDING WITHOUT LIMITATION, LOST PROFITS, LOST INVESTMENT, BUSINESS INTERRUPTION, GOODWILL, OR LOST DATA, EVEN IF CA IS EXPRESSLY ADVISED IN ADVANCE OF THE POSSIBILITY OF SUCH LOSS OR DAMAGE.
The use of any software product referenced in the Documentation is governed by the applicable license agreement and such license agreement is not modified in any way by the terms of this notice.
The manufacturer of this Documentation is CA.
Provided with “Restricted Rights.” Use, duplication or disclosure by the United States Government is subject to the restrictions set forth in FAR Sections 12.212, 52.227-14, and 52.227-19(c)(1) - (2) and DFARS Section 252.227-7014(b)(3), as applicable, or their successors.
Copyright © 2014 CA. All rights reserved. All trademarks, trade names, service marks, and logos referenced herein belong to their respective companies.
CA Technologies Product References
This documentation set references the following CA products:
■ CA ACF2™ for z/OS (CA ACF2)
■ CA Common Services for z/OS (CA Common Services)
■ CA Distributed Security Integration Server for z/OS (CA DSI Server)
■ CA LDAP Server for z/OS (CA LDAP Server)
■ CA Top Secret® for z/OS (CA Top Secret)
Contact CA Technologies
Contact CA Support
For your convenience, CA Technologies provides one site where you can access the information that you need for your Home Office, Small Business, and Enterprise CA Technologies products. At http://ca.com/support, you can access the following resources:
■ Online and telephone contact information for technical assistance and customer services
■ Information about user communities and forums
■ Product and documentation downloads
■ CA Support policies and guidelines
■ Other helpful resources appropriate for your product
Providing Feedback About Product Documentation
If you have comments or questions about CA Technologies product documentation, you can send a message to [email protected].
To provide feedback about CA Technologies product documentation, complete our short customer survey which is available on the CA Support website at http://ca.com/docs.
Documentation Changes
The following documentation updates have been made since the last release of this documentation:
■ JES Startup Considerations (see page 51)—Updated section to describe changes to the way the product handles JES shutdown and startup.
■ CPF Journal Files (see page 396)—Updated section to describe changes to the way the product handles JES shutdown and startup.
■ Enable LDS Journaling to Record LDAP Requests (see page 527)—Defined the specific step of omitting the LDSJRNL DD statement from your CA Top Secret started task JCL before starting the LDS journal processing. This setup allows CA Top Secret to dynamically allocate the journal file to SYSOUT after JES becomes active.
The following changes were made in the previous release of this documentation:
■ Suspend ACIDs Automatically Based On Inactivity Thresholds (see page 91)—Modified the maximum value for the number of days after which the product prohibits signon for an unused ACID that is connected to an expired password.
■ Restricted Administrative Authorities (see page 120)—Described a CASECAUT exception where resource permissions allow an administrator to bypass NEWPW restrictions and expiration interval restrictions enforced by the PWADMIN(YES) control option.
■ Required CASECAUT Authorizations for Changing Password Fields (see page 121)—Added CASECAUT entity names for changing PWADMIN(YES) fields.
■ Change a User Password (see page 132)—Removed erroneous password restrictions; added information about how an administrator may assign passwords.
■ Change Your Own Password (see page 133)—Added content stating that the new password is subject to the restrictions specified in the NEWPW control option; clarified that you need to include the MULTIPW and FACILITY options if the ACID has multiple passwords assigned by facility.
■ Enforce Restrictions on Administrator Password Changes (see page 133)—Added this section that describes how to enforce the NEWPW restrictions for these password changes.
■ CICSPROD (see page 434)—Added CESL, CISP, CIS1, CJSL, CRST, and CPCT to the bypass list information.
■ CICSTEST (see page 435)—Added CESL, CISP, CIS1, CJSL, CRST, and CPCT to the bypass list information.
The following changes were made in the previous release of this documentation:
■ Facilities (see page 35)—Added MPC1, OPENMVS, and UNICNTR to the list of facilities for which CA Top Secret provides security.
■ Attributes for Activating or Deactivating Generic Prefixing (see page 162)—Clarified that you must use the TSS REPLACE(RDT) command if you want change the GENERIC attribute; corrected syntax for adding the NONGENERIC attribute to a resource class.
■ Define a CPF Node in the NDT Record (see page 379)—Updated the topic with information about CPFAUTOUID and CPFAUTOGID.
The following changes were made in the previous release of this documentation:
■ Create a User ACID (see page 69)—Corrected command syntax and example syntax, and expanded the description of the password variable.
■ Model an ACID with the MODEL Command (see page 73)—Added ASUSPEND/VSUSPEND/PSUSPEND to the list of fields that are not modeled.
■ System Predefined Resources (see page 336)—Clarified the restriction regarding changing resource classes to MASK or NOMASK; clarified that you can make changes only to the EXIT, DEFPROT, MERGE, and ALLMERGE attributes.
■ Change Non-Maskable Resources to Support Masking (see page 345)—Added this topic, which applies to certain predefined resource classes.
■ Generate a Random Password (see page 426)—Added this procedure, which helps improve security by eliminating the need to maintain a list of static passwords.

Contents 7
Contents
Chapter 1: Introduction 25
How CA Top Secret Works.......................................................................................................................................... 25
ACIDs .......................................................................................................................................................................... 25
ACID Structure ..................................................................................................................................................... 25
Functional ACIDs ................................................................................................................................................. 26
Organizational ACIDs ........................................................................................................................................... 27
ACID Validation ................................................................................................................................................... 28
The Security Administrator ........................................................................................................................................ 28
Types of Administrators ...................................................................................................................................... 29
Auditors ............................................................................................................................................................... 30
Scope ................................................................................................................................................................... 30
Authority ............................................................................................................................................................. 32
Facilities ...................................................................................................................................................................... 35
Facility Access Authorization ............................................................................................................................... 36
Resource Protection ................................................................................................................................................... 36
Ownership and Authorization ............................................................................................................................. 37
Security Validation Algorithm ............................................................................................................................. 37
Relationship Between Data Sets and Volumes ................................................................................................... 37
Fields .......................................................................................................................................................................... 37
Security Record Segments and Fields ................................................................................................................. 38
Assigning Values for Defined Fields .................................................................................................................... 38
Command Functions .................................................................................................................................................. 38
Command Syntax ................................................................................................................................................ 39
Entry Methods .................................................................................................................................................... 40
CA Top Secret Components ........................................................................................................................................ 41
Common Components ............................................................................................................................................... 42
CA Top Secret Files ..................................................................................................................................................... 42
Special Security Records ............................................................................................................................................. 45
Chapter 2: Post-Installation Configuration Considerations 47
STC Security Bypass .................................................................................................................................................... 48
Multi-CPU Environments ............................................................................................................................................ 49
Sysplex Coupling Facility ............................................................................................................................................ 49
CFRM Policy ......................................................................................................................................................... 50
SMF............................................................................................................................................................................. 50
JES2............................................................................................................................................................................. 51
8 User Guide
JES Startup Considerations .................................................................................................................................. 51
TSO Online Job Submission ........................................................................................................................................ 52
OpenEdition z/OS Support ......................................................................................................................................... 52
Allocate a VSAM File .................................................................................................................................................. 52
Chapter 3: Implementing CA Top Secret 53
Security Modes ........................................................................................................................................................... 54
Phased Implementation ............................................................................................................................................. 55
Concurrent Security Modes ................................................................................................................................ 56
FAIL Mode Migration .................................................................................................................................................. 56
Transaction Level Security .......................................................................................................................................... 57
Resource Level Security .............................................................................................................................................. 58
Activity Logging .......................................................................................................................................................... 58
Activity and Violation Reports ............................................................................................................................. 58
User Messages and Violations Suppression ............................................................................................................... 60
Chapter 4: Violations, Logging, Reporting, and Auditing 61
Audit/Tracking File ..................................................................................................................................................... 61
Violations and Logging ............................................................................................................................................... 62
Violation Limits.................................................................................................................................................... 63
Security Event Logging ............................................................................................................................................... 64
Security Reports ......................................................................................................................................................... 66
Auditing ...................................................................................................................................................................... 67
Auditing Users and Resources .................................................................................................................................... 68
Chapter 5: Creating and Setting Up Users 69
Create a User ACID ..................................................................................................................................................... 69
Review User Information .................................................................................................................................... 71
Zone, Division, and Department ACIDs ...................................................................................................................... 72
Model ACIDs ............................................................................................................................................................... 73
Model an ACID with the MODEL Command........................................................................................................ 73
Model an ACID with the CREATE Command ....................................................................................................... 77
Omitting Characteristics ...................................................................................................................................... 78
Profile ACIDs ............................................................................................................................................................... 79
Attach a Profile to an ACID .................................................................................................................................. 80
Attach a Temporary Profile ................................................................................................................................. 81
List an Expiration Date for a Profile .................................................................................................................... 81
Profile Order........................................................................................................................................................ 81
Global Profiles ..................................................................................................................................................... 82
Assign a Profile Outside Your Scope.................................................................................................................... 82
Contents 9
Group ACIDs ............................................................................................................................................................... 83
Attach a Group to an ACID .................................................................................................................................. 84
Determine a Group's Expiration Date ................................................................................................................. 84
How to Increase ACID Size ......................................................................................................................................... 84
Define a VSAM Cluster in the Catalog ................................................................................................................. 85
Allocate a New Security File with a New ACID Size ............................................................................................. 86
Copy the Backup Security File to the New Security File ...................................................................................... 88
Delete an ACID ........................................................................................................................................................... 90
ACID Expiration Date .................................................................................................................................................. 90
Reactivate an Expired ACID ................................................................................................................................. 91
Change an Expiration Date .................................................................................................................................. 91
Suspend ACIDs Automatically Based On Inactivity Thresholds .................................................................................. 91
Reactivate an ACID .............................................................................................................................................. 93
Set Limited Duration Suspensions ....................................................................................................................... 93
Promote or Demote an ACID ...................................................................................................................................... 94
Compare the Security Records of ACIDs .................................................................................................................... 94
Chapter 6: Creating Security Administrators 97
Control ACIDs ............................................................................................................................................................. 98
The Auditor .............................................................................................................................................................. 100
Administrative Authority .......................................................................................................................................... 101
ACID Authorities ................................................................................................................................................ 103
DATA Authorities ............................................................................................................................................... 104
FACILITY Authorities .......................................................................................................................................... 106
MISC1 Authorities ............................................................................................................................................. 106
MISC2 Authorities ............................................................................................................................................. 108
MISC3 Authorities ............................................................................................................................................. 110
MISC4 Authorities ............................................................................................................................................. 110
MISC5 Authorities ............................................................................................................................................. 112
MISC7 Authorities ............................................................................................................................................. 112
MISC8 Authorities ............................................................................................................................................. 113
MISC9 Authorities ............................................................................................................................................. 115
RESOURCE Authorities ...................................................................................................................................... 117
RSTDACC Authority ........................................................................................................................................... 118
SCOPE Authority ................................................................................................................................................ 119
Remove Administrative Authorities ......................................................................................................................... 119
Restricted Administrative Authorities ...................................................................................................................... 120
Required CASECAUT Authorizations for Changing Password Fields ................................................................. 121
Required CASECAUT Authorizations for Issuing Digital Certificate and Keyring Commands ............................ 123

10 User Guide
Chapter 7: Passwords 125
Passwords and Password Phrases ............................................................................................................................ 125
Password Defaults ............................................................................................................................................. 126
Password Phrase Defaults ................................................................................................................................. 127
Password Content .................................................................................................................................................... 127
The Restricted Password List ............................................................................................................................ 128
Special Characters in Passwords ....................................................................................................................... 129
Mixed Case Passwords ...................................................................................................................................... 130
Case in Passwords ............................................................................................................................................. 130
Define a Password for a New User ........................................................................................................................... 131
Define a Password Phrase for a New User ............................................................................................................... 132
Change a User Password .......................................................................................................................................... 132
Change Your Own Password .................................................................................................................................... 133
Enforce Restrictions on Administrator Password Changes ...................................................................................... 133
Set a Password Expiration Interval ........................................................................................................................... 134
Non Expiring Password ............................................................................................................................................. 134
Non Expiring Password Phrase ................................................................................................................................. 135
Password Violation Threshold .................................................................................................................................. 135
Suspended ACID Reinstatement ....................................................................................................................... 136
Password Reverification ........................................................................................................................................... 136
Password Masks ....................................................................................................................................................... 137
Password Mask Design ...................................................................................................................................... 138
Password History ...................................................................................................................................................... 138
Random Password Generation ................................................................................................................................. 139
User Requested Generation .............................................................................................................................. 140
Automatic Password Generation ............................................................................................................................. 140
ACIDs Without a Password ....................................................................................................................................... 141
Passwords that do not Expire ................................................................................................................................... 141
Forced Password Validation ..................................................................................................................................... 142
Forced Passwords ..................................................................................................................................................... 142
Chapter 8: Viewing Your Security Environment 143
Status Information ................................................................................................................................................... 143
ACID and Record Information ........................................................................................................................... 144
Viewing Authority ............................................................................................................................................. 145
Access Authorization Information ..................................................................................................................... 146
Resource Ownership ......................................................................................................................................... 147
Individual ACID Security Information ................................................................................................................ 147
Global Security Environment Information ........................................................................................................ 148

Contents 11
Chapter 9: Modifying Your Security Environment 149
Control Options ........................................................................................................................................................ 149
Restricted Control Options ................................................................................................................................ 150
Control Options and the Parameter File ........................................................................................................... 150
Control Options and the PARM Field ................................................................................................................ 151
Control Options and the O/S START Command ................................................................................................ 151
Changing Control Options With the O/S MODIFY Command............................................................................ 152
Control Options and the TSS MODIFY Command.............................................................................................. 152
Security Environment Refresh .......................................................................................................................... 153
Chapter 10: Setting up Resource Definitions and Ownership 155
How Resources are Secured ..................................................................................................................................... 155
Default Resource Protection .................................................................................................................................... 155
RDT Contents .................................................................................................................................................... 156
Permission Records ........................................................................................................................................... 156
Implementing Default Protection ............................................................................................................................ 156
Default Data Set Protection .............................................................................................................................. 156
Resource Ownership ................................................................................................................................................ 157
Resource Owner Selection ................................................................................................................................ 158
Generic Prefixing ............................................................................................................................................... 160
Masking ............................................................................................................................................................. 164
CPU Ownership ................................................................................................................................................. 173
Resource Owner Location ................................................................................................................................. 174
Transfer Resource Ownership ........................................................................................................................... 174
Former Owner Access Removal ........................................................................................................................ 175
Ownership Removal .......................................................................................................................................... 175
Resource Class Translation ....................................................................................................................................... 176
Chapter 11: Controlling Access 177
Introduction ............................................................................................................................................................. 177
Resource Access Permission .................................................................................................................................... 178
Generic Prefixing with PERMIT ......................................................................................................................... 179
Default Protection ............................................................................................................................................. 179
Individual Permission Removal ......................................................................................................................... 180
Access Restriction by Facility .................................................................................................................................... 181
Access Restriction by Program Path ......................................................................................................................... 182
Access Restriction by Access Level ........................................................................................................................... 183
Additional Access Levels ................................................................................................................................... 184
Access Control at the Record and Field Level ................................................................................................... 184
Unique Access Levels for Dynamically Defined Resources ............................................................................... 185

12 User Guide
Access Level Placement .................................................................................................................................... 185
Combining User Defined and Standard Levels .................................................................................................. 186
Access Restriction by SMFID .................................................................................................................................... 187
CPU Access Restriction ............................................................................................................................................. 187
Terminal Access Restriction ..................................................................................................................................... 188
Add Resources to the ALL Record ............................................................................................................................ 189
Source of Origin Access Restriction .......................................................................................................................... 190
Access Restriction with the ACTION Keyword .......................................................................................................... 191
Globally Accessible Resources .................................................................................................................................. 192
Global Authorization Override .......................................................................................................................... 193
Multiple Access Authorizations ................................................................................................................................ 194
Multiple Authorization Revoke ......................................................................................................................... 195
Access Denial ............................................................................................................................................................ 195
Limited Access ACIDs ................................................................................................................................................ 196
Restrict Signons to Specific Devices ......................................................................................................................... 196
Time of Use Monitoring ........................................................................................................................................... 197
GROUP Entry Monitoring ......................................................................................................................................... 199
Network Entry Monitoring ....................................................................................................................................... 199
Multiple Node Users ......................................................................................................................................... 200
PassTicket Generation ....................................................................................................................................... 200
PassTicket Definition ......................................................................................................................................... 201
Optional System Entry Restrictions .......................................................................................................................... 202
Chapter 12: Protecting Resources 205
Resource Classes ...................................................................................................................................................... 206
Permission Restrictions ..................................................................................................................................... 206
Volume Protection ................................................................................................................................................... 207
Volume Access Levels........................................................................................................................................ 208
Default Volume Protection ............................................................................................................................... 209
Generic Prefixing ............................................................................................................................................... 209
Access Authorization ......................................................................................................................................... 210
Program Pathing with Volumes ........................................................................................................................ 210
Access to all Volumes ........................................................................................................................................ 210
Volume Level Security Bypass ........................................................................................................................... 211
Bypass Volume Level Security with NOVOLCHK ................................................................................................ 211
Volume Only Level Security............................................................................................................................... 211
VTOC Index Protection ...................................................................................................................................... 212
Volume Management Packages ........................................................................................................................ 212
Data Set Protection .................................................................................................................................................. 215
Data Set Ownership Removal ........................................................................................................................... 216
Automatic Data Set Protection ......................................................................................................................... 217
Contents 13
Extend Default Protection ................................................................................................................................. 218
Generic Prefixing ............................................................................................................................................... 218
Data Set Masking .............................................................................................................................................. 219
Data Set Access Authorization .......................................................................................................................... 219
Data Set Level Security Bypass .......................................................................................................................... 225
Forced Data Set Password Check ...................................................................................................................... 225
Secure Catalogs ................................................................................................................................................. 226
The TSSPROT Utility ........................................................................................................................................... 229
Tape Volume Protection .......................................................................................................................................... 230
Tape Management Packages ............................................................................................................................ 230
Bypass Label Processing Security ...................................................................................................................... 231
Protect Tapes From Destructive Updating ........................................................................................................ 231
Data Set and Volume Level Security......................................................................................................................... 232
PDS Member Protection ........................................................................................................................................... 232
PDS Member Level Protection .......................................................................................................................... 233
Member Level Protection Exemption ............................................................................................................... 234
Implicit Access to the PDS Directory ................................................................................................................. 234
Explicit Access of a PDS Directory ..................................................................................................................... 235
Accidental PDS Corruption Prevention ............................................................................................................. 235
FETCH/EXECUTE Access of PDS Members ......................................................................................................... 236
PDS ALIAS Names .............................................................................................................................................. 236
Secure Related Diagnostic Programs ................................................................................................................ 236
PDS and PDSE Member Level Protection Usage Notes ..................................................................................... 237
Console Protection ................................................................................................................................................... 238
Default Attributes for the Console Facility ........................................................................................................ 239
MCS Console Facility Support ........................................................................................................................... 242
Terminal Protection ................................................................................................................................................. 244
Remove Ownership ........................................................................................................................................... 244
Generic Prefixing ............................................................................................................................................... 245
Program Protection .................................................................................................................................................. 247
Removing Ownership ........................................................................................................................................ 247
Default Protection ............................................................................................................................................. 247
Generic Prefixing ............................................................................................................................................... 248
Program Access Authorization .......................................................................................................................... 248
TSO SPF Panel Protection ......................................................................................................................................... 249
Application Protection ............................................................................................................................................. 249
Remove Application Ownership ........................................................................................................................ 250
Generic Prefixing for Applications ..................................................................................................................... 250
Application Access Authorization...................................................................................................................... 250
Record Level Protection (RLP) .................................................................................................................................. 251
RLP Implementation .......................................................................................................................................... 252
Permit Access to the Defined Records .............................................................................................................. 253
14 User Guide
Enable RLP Protection ....................................................................................................................................... 253
Installation Defined Resource Protection ................................................................................................................ 254
Reserved Parameters ........................................................................................................................................ 255
Using Generic Prefixing ..................................................................................................................................... 255
Authorize Access ............................................................................................................................................... 256
Online Transaction Protection ................................................................................................................................. 258
Implementing OTRAN Security ......................................................................................................................... 259
LCF Security .............................................................................................................................................................. 262
Set Up LCF Security ........................................................................................................................................... 263
Screen Level Protection (SLP) ................................................................................................................................... 267
Gather SLP Information ..................................................................................................................................... 268
Enter SDT Definitions ........................................................................................................................................ 269
Permit Access to the Defined Maps .................................................................................................................. 269
Enable SLP Protection ....................................................................................................................................... 270
JES Resource Protection ........................................................................................................................................... 270
The JES2 CA Top Secret Connection .................................................................................................................. 270
Establish JES Ownership .................................................................................................................................... 271
Remove Ownership of JES ................................................................................................................................. 271
Access to JES in FAIL Mode ............................................................................................................................... 272
Job Submission Restriction................................................................................................................................ 272
JES Masking ....................................................................................................................................................... 273
JES Access Levels ............................................................................................................................................... 273
Alternate ACID Job Control ............................................................................................................................... 273
SYSOUT Validation ............................................................................................................................................ 274
Node Protection ....................................................................................................................................................... 276
Generic Prefixing for Nodes .............................................................................................................................. 276
Masking Nodes .................................................................................................................................................. 276
Node Access Levels ........................................................................................................................................... 277
Network Job Entry (NJE) Job Validation ............................................................................................................ 277
Userid Owner Identification .............................................................................................................................. 278
Access Level Checking ....................................................................................................................................... 279
ACIDs with Limited Access ................................................................................................................................ 280
Alternate Way to Implement Nodes ................................................................................................................. 280
Operator Commands Restriction ............................................................................................................................. 281
Operator Command Masking ............................................................................................................................ 281
Operator Command Access Levels .................................................................................................................... 281
Specific Device Output Restrictions ......................................................................................................................... 282
Output Device Masking ..................................................................................................................................... 282
Output Device Access Levels ............................................................................................................................. 282
Spool Data Sets Protection ....................................................................................................................................... 283
Spool Data Set Masking..................................................................................................................................... 283
Output Viewing Permission ............................................................................................................................... 283
Contents 15
READ Access to User Spool Data Sets ............................................................................................................... 284
Spool Data Sets Access Levels ........................................................................................................................... 284
SDSF Resource Protection ........................................................................................................................................ 285
SDSF in FAIL Mode............................................................................................................................................. 286
SDSF Object Protection Through SAF ................................................................................................................ 287
SDSF Resource Class Protection ........................................................................................................................ 288
JESJOBS Resource Class Protection ................................................................................................................... 289
JESSPOOL Resource Class Protection ................................................................................................................ 290
OPERCMDS Resource Class Protection ............................................................................................................. 291
WRITER Resource Class Protection ................................................................................................................... 291
SDSF Resource Protection ................................................................................................................................. 291
SDSF Masking .................................................................................................................................................... 292
$SDSF Resource Class Definition ....................................................................................................................... 293
Message Queue Manager Protection ...................................................................................................................... 294
MQM Resource Classes ..................................................................................................................................... 295
MQM Started Task ACID ................................................................................................................................... 296
MQM Facility Definition .................................................................................................................................... 296
MQM Switch Profiles ........................................................................................................................................ 296
Level of MQM Security ...................................................................................................................................... 297
Access Profiles ................................................................................................................................................... 298
CICS MQSERIES Security .................................................................................................................................... 299
DB2 Resource Protection ......................................................................................................................................... 300
DB2 Resource Ownership .................................................................................................................................. 301
DB2 Resource Ownership Removal ................................................................................................................... 301
IBM DCE, SystemView, Netview, and OPTIME Protection ....................................................................................... 302
SystemView Segment Protection ...................................................................................................................... 303
NETVIEW Segment Protection .......................................................................................................................... 304
The OPTIME Field .............................................................................................................................................. 304
Delegated Resources ................................................................................................................................................ 305
Display Delegated Resources ............................................................................................................................ 305
SMS Data Fields ........................................................................................................................................................ 306
Add and Remove an SMS Application Identifier (SMSAPPL) ............................................................................. 306
Add and Remove an SMS Data Class (SMSDATA) ............................................................................................. 307
Add and Remove an SMS Management Class (SMSMGMT) ............................................................................. 307
Add and Remove an SMS Storage Class (SMSSTOR) ......................................................................................... 308
Resource Checking Bypass ....................................................................................................................................... 309
Chapter 13: Maintaining Special Security Records 311
The ALL Record ......................................................................................................................................................... 311
Authority for the ALL Record ............................................................................................................................ 311
Define Data to the ALL Record .......................................................................................................................... 312
16 User Guide
List the ALL Record ............................................................................................................................................ 312
APPCLU Record ......................................................................................................................................................... 312
Authority for APPCLU ........................................................................................................................................ 312
Define Data to the APPCLU Record ................................................................................................................... 313
Change Data in the APPCLU Record .................................................................................................................. 315
Remove Data From the APPCLU Record ........................................................................................................... 315
List the APPCLU Record ..................................................................................................................................... 316
AUDIT Record ........................................................................................................................................................... 316
Authority for the AUDIT record ......................................................................................................................... 316
Define Data to the AUDIT Record ..................................................................................................................... 316
Remove Data From the AUDIT Record .............................................................................................................. 317
List the AUDIT Record ....................................................................................................................................... 317
Data Lookaside Facility (DLF) Record ....................................................................................................................... 317
Authority for the DLF Record ............................................................................................................................ 317
Define Data to the DLF Record .......................................................................................................................... 318
Remove Data From the DLF Record .................................................................................................................. 318
List the DLF Record ............................................................................................................................................ 319
FDT Record ............................................................................................................................................................... 319
Authority for the FDT Record ............................................................................................................................ 319
FDT Record Data ............................................................................................................................................... 319
Modify Values in the FDT Record ...................................................................................................................... 322
Remove Data from the FDT Record .................................................................................................................. 323
List the Entire FDT ............................................................................................................................................. 323
List by FDTNAME ............................................................................................................................................... 323
List by FDTNAME PREFIX ................................................................................................................................... 324
List by FDTCODE ................................................................................................................................................ 324
List by FDT Segment .......................................................................................................................................... 324
List the FDT Display Name ................................................................................................................................. 325
MLS Record .............................................................................................................................................................. 325
Authority for the MLS Record ........................................................................................................................... 325
Maintaining the MLS Record ............................................................................................................................. 325
Node Descriptor Table (NDT) Record ....................................................................................................................... 326
Authority for the NDT Record ........................................................................................................................... 326
Define PSTKAPPL Data to the NDT .................................................................................................................... 326
PSTKAPPL Processing ........................................................................................................................................ 327
Define LDAP Nodes as NDT Node Elements ...................................................................................................... 328
Define LDS Global Options as NDT LDSYSID Elements ...................................................................................... 333
Define Linux Nodes as NDT Node Elements ...................................................................................................... 334
Change Values in the NDT ................................................................................................................................. 334
Remove Data From the NDT ............................................................................................................................. 335
List the NDT ....................................................................................................................................................... 335
RDT Record ............................................................................................................................................................... 336

Contents 17
Authority for the RDT ........................................................................................................................................ 336
System Predefined Resources ........................................................................................................................... 336
User Defined Resource Classes ......................................................................................................................... 337
Prefixed Resource Class (PIE) ............................................................................................................................ 337
General Resource Class (RIE) ............................................................................................................................. 337
Define a Resource to the RDT ........................................................................................................................... 338
Change Values in the RDT ................................................................................................................................. 342
PIE Resource Masking ....................................................................................................................................... 343
Remove a Resource from the RDT .................................................................................................................... 345
Change Non-Maskable Resources to Support Masking .................................................................................... 345
List the Entire RDT Record ................................................................................................................................ 346
List by PREFIX .................................................................................................................................................... 346
List by Resource Class ....................................................................................................................................... 347
List by Resource Code ....................................................................................................................................... 347
SDT Record ............................................................................................................................................................... 348
Authority for the SDT Record ............................................................................................................................ 348
Define CALENDAR Records to the SDT .............................................................................................................. 349
Define EIMPROF Records to the SDT ................................................................................................................ 351
Define KERBLINK Records to the SDT ................................................................................................................ 353
Define KEYSMSTR Records to the SDT .............................................................................................................. 354
Define MAP Records to the SDT ........................................................................................................................ 355
Define MASK Records to the SDT ...................................................................................................................... 357
Define REALM Records to the SDT .................................................................................................................... 358
Define RLP Record to SDT ................................................................................................................................. 361
Define SELECT Record to SDT ............................................................................................................................ 362
Define TIME Record to SDT ............................................................................................................................... 363
Replace SDT Data Elements .............................................................................................................................. 364
Remove Fields From SDT Records ..................................................................................................................... 365
Delete Record Elements From the SDT ............................................................................................................. 366
List SDT Record Elements .................................................................................................................................. 367
Started Task Command (STC) Record ....................................................................................................................... 369
Authority for STC ............................................................................................................................................... 369
Define a Started Task to the STC Record ........................................................................................................... 370
Remove a Procedure Name .............................................................................................................................. 372
Remove the STCACT Attribute .......................................................................................................................... 372
List the STC Record ............................................................................................................................................ 373
Chapter 14: Command Propagation Facility 375
About CPF ................................................................................................................................................................. 376
Synchronizing Information Across Nodes ......................................................................................................... 376
Controlling Access From Remote Nodes ........................................................................................................... 377
18 User Guide
SYSPLEX XES and XCF Security ........................................................................................................................... 377
CPF Features ............................................................................................................................................................. 378
CPF Architecture ....................................................................................................................................................... 378
Implicit and Explicit Targeting ........................................................................................................................... 379
Synchronous and Asynchronous Processing ..................................................................................................... 379
Define a CPF Node in the NDT Record .............................................................................................................. 379
CPF (ON) and CPF (OFF)..................................................................................................................................... 385
CPF in a SYSPLEX Environment .......................................................................................................................... 385
Administrative Authority ................................................................................................................................... 386
O/S START TSS Commands ....................................................................................................................................... 386
O/S STOP Command ................................................................................................................................................. 387
CPF Related Control Options .................................................................................................................................... 388
CPF Related MODIFY Commands ............................................................................................................................. 390
Command Keywords Used With CPF ........................................................................................................................ 391
DEFNODES With a TSS Command ..................................................................................................................... 392
Administer an ACID's DEFNODES ...................................................................................................................... 393
What Happens When a Command is Issued ..................................................................................................... 394
CPF Recovery File ..................................................................................................................................................... 395
Remove Pending Commands ............................................................................................................................ 396
CPF Journal Files ....................................................................................................................................................... 396
CPF Statistics ............................................................................................................................................................ 398
Recovery and Accountability .................................................................................................................................... 398
TSS Command Execution ................................................................................................................................... 398
Security Files Among Networked Machines ...................................................................................................... 399
System Entry Validation and Password Propagation ........................................................................................ 399
Installation Exit .................................................................................................................................................. 399
TSSCPR Utility .................................................................................................................................................... 400
Define a Node ........................................................................................................................................................... 401
CPF Gateway Support ............................................................................................................................................... 402
Chapter 15: Extending Security With the Application Interface 405
Introduction to the API ............................................................................................................................................. 405
Application Interface Components .......................................................................................................................... 406
Application Program Code Logic ....................................................................................................................... 406
Request Record Field Characteristics ................................................................................................................ 407
CA Top Secret Return Data Fields ..................................................................................................................... 409
ACID Hierarchy Return Fields ............................................................................................................................ 409
Application Interface Checks .................................................................................................................................... 411
General Resource Checking .............................................................................................................................. 412
Data Set and Volume Checking ......................................................................................................................... 413
Transaction/Command Checking ...................................................................................................................... 414
Contents 19
Facility Checking ................................................................................................................................................ 415
Facility List Checking ......................................................................................................................................... 415
Resource List Checking ...................................................................................................................................... 416
Log User Information ........................................................................................................................................ 417
Dynamic Update Facility ................................................................................................................................... 418
Field Extract and Update Facility ....................................................................................................................... 419
ACID Retrieval ................................................................................................................................................... 421
Other Checks for the ACID ................................................................................................................................ 421
Programming Examples............................................................................................................................................ 422
Assembler.......................................................................................................................................................... 423
PL/I .................................................................................................................................................................... 424
COBOL ............................................................................................................................................................... 425
Generate a Random Password ................................................................................................................................. 426
Chapter 16: Protecting Facilities 427
About Facilities ......................................................................................................................................................... 428
Facility Matrix Table Administration ........................................................................................................................ 428
Display Facility Information............................................................................................................................... 429
Add a New Facility ............................................................................................................................................. 429
Change a Facility’s Definition ............................................................................................................................ 431
Change a Facility’s Name .................................................................................................................................. 432
Default Values for Predefined Facilities ............................................................................................................ 433
Securing TSO ............................................................................................................................................................ 440
Signon Security and Authorization Restrictions ................................................................................................ 441
Terminal Security .............................................................................................................................................. 441
Program Security ............................................................................................................................................... 441
Command Security ............................................................................................................................................ 441
Security Administration..................................................................................................................................... 442
Data Set Access Validation ................................................................................................................................ 442
Securing CICS ............................................................................................................................................................ 442
Signon Security and Authorization Restrictions ................................................................................................ 442
Terminal Security .............................................................................................................................................. 443
Program Security ............................................................................................................................................... 443
Job Submission Validation ................................................................................................................................. 443
Security Administration..................................................................................................................................... 443
Security Key ....................................................................................................................................................... 443
Multiple Signons................................................................................................................................................ 444
Securing CA IDMS ..................................................................................................................................................... 444
Security Under r15 ............................................................................................................................................ 444
Signon Security and Authorization Restrictions ................................................................................................ 444
Transaction Security .......................................................................................................................................... 445
20 User Guide
Program and Subschema Security .................................................................................................................... 445
Area Security ..................................................................................................................................................... 445
Terminal Security .............................................................................................................................................. 445
Security Administration..................................................................................................................................... 445
Securing CA Roscoe IE .............................................................................................................................................. 446
Signon Security and Authorization Restrictions ................................................................................................ 446
Terminal Security .............................................................................................................................................. 446
Command and Monitor Security ....................................................................................................................... 446
ZAP, UTILITY, IMPORT, EXPORT Security ........................................................................................................... 447
Job Submission Validation ................................................................................................................................. 447
Security Administration..................................................................................................................................... 447
Securing IMS ............................................................................................................................................................. 447
Signon Security and Authorization Restrictions ................................................................................................ 448
Terminal Security .............................................................................................................................................. 448
Job Submission Validation ................................................................................................................................. 448
Security Administration..................................................................................................................................... 448
Multiple Sign Ons .............................................................................................................................................. 449
Securing BATCH Jobs ................................................................................................................................................ 449
Signon Security and Authorization Restrictions ................................................................................................ 449
Password Validation .......................................................................................................................................... 450
Card and Remote Reader Security .................................................................................................................... 450
Job Submission Validation ................................................................................................................................. 451
Job Scheduling Security ..................................................................................................................................... 451
Securing Started Tasks (STC) .................................................................................................................................... 451
Operator Accountability .................................................................................................................................... 451
ACID Association ............................................................................................................................................... 452
Password Security ............................................................................................................................................. 452
Bypass Security Checking .................................................................................................................................. 452
Securing z/VM .......................................................................................................................................................... 453
Activate and Deactivate the z/VM Facility ........................................................................................................ 453
Sharing Security Files Between z/VM, z/VSE, and z/OS .................................................................................... 454
Extended Platform Security ...................................................................................................................................... 454
Security for Other Products ...................................................................................................................................... 455
Chapter 17: Extending Security With the z/OS Security Interface 457
About the z/OS Standard Interface .......................................................................................................................... 457
Supported SU32 Forms ..................................................................................................................................... 458
The RACROUTE REQUEST=VERIFY Call ..................................................................................................................... 459
ACEE= Parameter Requirements ....................................................................................................................... 460
The RACROUTE REQUEST=AUTH Call ....................................................................................................................... 461
Resource Classes Classification ......................................................................................................................... 461

Contents 21
The RACROUTE REQUEST=FASTAUTH Call ............................................................................................................... 463
Class Name Format ........................................................................................................................................... 464
Character String Class Name ............................................................................................................................. 464
Performance Shortcuts ..................................................................................................................................... 467
Return Codes ..................................................................................................................................................... 467
The RACROUTE REQUEST=EXTRACT Call .................................................................................................................. 469
Password Encryption ......................................................................................................................................... 470
Obtaining Feedback .......................................................................................................................................... 471
Information Feedback ....................................................................................................................................... 472
Multiple User Address Space ................................................................................................................................... 474
The Address Space Environment ...................................................................................................................... 475
Standard Macro Instructions............................................................................................................................. 476
Examples: multiuser facilities ............................................................................................................................ 477
Data Areas Used by Sample Programs .............................................................................................................. 480
Dynamic Extract/Update Facility .............................................................................................................................. 481
Error Return Codes ............................................................................................................................................ 483
DUF Tips ............................................................................................................................................................ 483
Resource Name List Service Support ........................................................................................................................ 484
Invoking Support ............................................................................................................................................... 484
Returned Format ............................................................................................................................................... 485
Return Codes ..................................................................................................................................................... 486
Chapter 18: Extending Security With Site Security Exits 487
Customization Ideas ................................................................................................................................................. 487
TSSINSTX Characteristics .......................................................................................................................................... 488
Mechanics ................................................................................................................................................................ 489
Common Exit Parameters......................................................................................................................................... 489
Installation Exit Activation........................................................................................................................................ 491
CA Top Secret Exit/User Entry Points ....................................................................................................................... 491
ACTION - Permit Action (Exit) ............................................................................................................................ 492
CHANGE - Security File Change ......................................................................................................................... 493
COMMAND - Command Use Validation ............................................................................................................ 496
CPF - Command Being Sent to Remote TSS ...................................................................................................... 499
DATASET - Dataset Access Validation ............................................................................................................... 500
DSNPOST - Dataset Post Validation................................................................................................................... 501
IO - Voice or Digital Image Request .................................................................................................................. 501
MESSAGE - Message Editing ............................................................................................................................. 502
MSGXMEM - Message Editing Cross Memory Mode ........................................................................................ 503
PASSPHRASE - Password Phrase Change Entry ................................................................................................. 503
PASSWORD - Password Change Entry ............................................................................................................... 504
POSTINIT - Job/Session Post Initiation .............................................................................................................. 505
22 User Guide
PREINIT - Job/Session Pre-initiation .................................................................................................................. 507
RESOURCE - Resource Access Validation .......................................................................................................... 510
RESPOST - Resource Post Validation ................................................................................................................. 511
RESPOSTX - Resource Post Validation Cross Memory Mode ............................................................................ 512
RESXMEM - Resource Validation Cross Memory Mode .................................................................................... 513
SESSEND - Session (User) Termination .............................................................................................................. 515
SITE - Racheck Class=Instexit ............................................................................................................................. 516
SUBMIT - Internal Reader Submission .............................................................................................................. 516
TERM - Job (Address Space) Termination ......................................................................................................... 517
UNDEFIND - Undefined Acid Entry .................................................................................................................... 518
VIOLATN - Violation Detected ........................................................................................................................... 520
VIOXMEM - Violation Detected - Cross Memory Module ................................................................................. 521
VOLPOST - Volume Post Validation ................................................................................................................... 522
VOLUME - Volume Access Validation ................................................................................................................ 523
Chapter 19: LDAP Directory Services (LDS) 525
How LDS Works ........................................................................................................................................................ 525
Commands Valid for LDS .......................................................................................................................................... 526
Implement LDS ......................................................................................................................................................... 526
Records and Options Summary ................................................................................................................................ 527
TSSLDS Server Subtask ............................................................................................................................................. 527
Enable LDS Journaling to Record LDAP Requests .............................................................................................. 527
LDS Recovery File .............................................................................................................................................. 528
Create NDT LDSYSID Options Record ................................................................................................................ 530
SSL Definitions ................................................................................................................................................... 531
NDT LDAPNODE Records .......................................................................................................................................... 533
LDAPNODE with a Shared Security File ............................................................................................................. 535
LDAP Nodes with Multiple URLs ....................................................................................................................... 536
LDAP Nodes with Passwords ............................................................................................................................. 537
LDS ACID Field .......................................................................................................................................................... 538
LDAPDEST ACID Field ................................................................................................................................................ 539
LIST LDS Definitions .................................................................................................................................................. 539
Start and Stop LDS .................................................................................................................................................... 539
Control an LDAP Node .............................................................................................................................................. 540
Chapter 20: Start up and Shutdown 541
O/S START TSS Commands ....................................................................................................................................... 541
O/S STOP Command ................................................................................................................................................. 541
DOWN Options .................................................................................................................................................. 542
O/S CANCEL Command ............................................................................................................................................ 542

Contents 23
Startup ...................................................................................................................................................................... 542
CA Top Secret Activation .......................................................................................................................................... 542
Temporary Shutdown............................................................................................................................................... 543
End-of-Day Shutdown .............................................................................................................................................. 544
Restart After IPL ....................................................................................................................................................... 544
Reinitialization After Temporary Shutdown ............................................................................................................. 545
Restart After Temporary Shutdown ......................................................................................................................... 545
Restart After End-of-Day Shutdown ......................................................................................................................... 546
Chapter 21: Backup and Restore 547
How to Implement a Security File Backup and Recovery Plan ................................................................................. 547
Create a Backup Security File on DASD ............................................................................................................. 548
Create the Recovery File ................................................................................................................................... 550
Enable Automatic Backup for the Security File ................................................................................................. 551
How to Create a Mirror Copy of Your Security File .................................................................................................. 552
Define the Mirror Security File (BDAM and VSAM Components) ..................................................................... 553
Activate Mirroring ............................................................................................................................................. 555
How to Run the Product with a Mirror File as Primary Security File ........................................................................ 555
Create a Started Task for the Mirror File .......................................................................................................... 556
Start the Product with the Mirror as the Primary Security File ........................................................................ 557
TSSBCKUP Procedure ............................................................................................................................................... 558
Manual Backup of the Security File .......................................................................................................................... 558
Recovery File Backup ................................................................................................................................................ 559
Audit/Tracking File(s) Backup ................................................................................................................................... 559
Restore ..................................................................................................................................................................... 560
Recovery ................................................................................................................................................................... 561
How to Recover from a Security File Failure ..................................................................................................... 562
Manual Recovery .............................................................................................................................................. 574
Security File Serialization ......................................................................................................................................... 575
Chapter 22: Invoked Sub-functions 577
Controlling Applications that Invoke R_auditx ......................................................................................................... 577
Controlling Applications that Invoke R_dcekey........................................................................................................ 578
Controlling Applications that Invoke R_Getinfo ....................................................................................................... 579
Controlling Applications that Invoke R_ticketserv / R_GenSec ................................................................................ 579
Hardening a Cache ................................................................................................................................................... 581
Program Signing and Verification ............................................................................................................................. 581
Program Signing ................................................................................................................................................ 582
Program Verification ......................................................................................................................................... 583
Defining Programs for Verification.................................................................................................................... 583
24 User Guide
Verify a Signed Program .................................................................................................................................... 584
Manage the SIGVER Record .............................................................................................................................. 585
Authorize and Assign a Keyring for Program Signing ........................................................................................ 586
Authorize and Assign a Keyring for Signature Verification ............................................................................... 587
Appendix A: Prefixed Resources 589
Resources Supporting Masking Characters .............................................................................................................. 589
Appendix B: Predefined Resources 591
Predefined Resource Classes for z/OS ...................................................................................................................... 591
Predefined Resource Classes for z/VM .................................................................................................................... 596
Appendix C: Using the R_cacheserv Callable Service 597
Appendix D: Enterprise Identity Mapping 599
Enterprise Identity Mapping .................................................................................................................................... 599
Default Names .......................................................................................................................................................... 600
EIM Fields ................................................................................................................................................................. 600
PROXY Fields ............................................................................................................................................................. 601
Default EIM Record .................................................................................................................................................. 601
Default Proxy Record................................................................................................................................................ 602
Index 603
Chapter 1: Introduction 25
Chapter 1: Introduction
This section contains the following topics:
How CA Top Secret Works (see page 25) ACIDs (see page 25) The Security Administrator (see page 28) Facilities (see page 35) Resource Protection (see page 36) Fields (see page 37) Command Functions (see page 38) CA Top Secret Components (see page 41) Common Components (see page 42) CA Top Secret Files (see page 42) Special Security Records (see page 45)
How CA Top Secret Works
CA Top Secret controls how, when, and which resources a user can access. CA Top Secret requires that you have a valid accessor ID (ACID) and password before entering the system.
ACIDs
You can restrict an ACID's access to:
■ A particular terminal or CPU
■ Access only on particular days of the week or during certain hours
■ Access through a particular facility, such as TSO or CICS
ACID Structure
An ACID can be up to eight alphanumeric characters long, which normally corresponds with the user's system user ID. You can use the same ACID for all facilities or use a different ACID for each facility (such as TSO, CICS, and z/VM).
CA Top Secret recognizes several different types of ACIDs, ranging from a user to an entire zone. These types comprise the basic hierarchical structure of your CA Top Secret database. Each ACID type is then associated with a set of resource access authorizations.
ACIDs
26 User Guide
Functional ACIDs
Functional ACIDs let you perform specific tasks and “report to” organizational ACIDs. The functional ACIDs available are:
User ACIDs
The user is a person. Individuals are associated with user ACIDs or control ACIDs. A user ACID designates a specific employee in a department but can refer to any ACID type (functional or organizational).
Every user ACID must be associated with a single department ACID.
Profile ACIDs
When a group of users needs to use a set of identical resources in the same way (the users perform similar or related job functions), define this set of access authorizations once and then associate the entire set with each of the users in the group. In CA Top Secret, this set of common resource access characteristics is termed a profile. Every profile is assigned a unique profile ACID.
Once you define a profile, you can associate it with any number of users (at the same or different levels in the hierarchy), thereby eliminating the need to define each resource access authorization separately for every user.
Every profile ACID must be associated with, and defined to, a single department ACID.
Group ACIDs
CA Top Secret supports the concept of groups in the IBM Open environment. A group is similar to a profile in that it is a collection of users who can share access authorities for protected resources. IBM USS recognizes groups but not profiles.
ACIDs
Chapter 1: Introduction 27
Organizational ACIDs
Organizational ACIDs let you construct the upper levels of your security hierarchy. Organizational ACIDs report to other organizational ACIDs. Organizational ACIDs never report to functional ACIDs. The organizational ACIDs available are:
Department ACIDs
Users typically work for a particular department. CA Top Secret recognizes this logical separation by requiring each user ACID to be associated with one department ACID. Every department is assigned a unique Department ACID. You can assign resources to a department, which is the location that we recommend.
A Department ACID cannot be directly attached to a Zone ACID. You must attach this ACID to a Division ACID that is attached to a Zone ACID.
Division ACIDs (Optional)
CA Top Secret lets you define multiple divisions within your corporate security structure. Each division is composed of one or more departments. Every division is assigned a unique division ACID. You can assign resources to a division.
A division can have one or more VCA administrative ACIDs assigned to administer various authorities for other ACIDs assigned to the division.
Zone ACIDs (Optional)
Use a zone to group two or more divisions. Every zone is assigned a unique zone ACID. Resources can be assigned to a zone. A Department ACID cannot be directly attached to a Zone, but it can be attached to a Division ACID attached to a Zone ACID. A zone can have one or more ZCA administrative ACIDs assigned to administer various authorities for other ACIDs assigned to the zone.
You can assign resources to zones, but we do not recommended it.
Control ACIDs
Control ACIDs define security administrators that are associated with various structural levels within the CA Top Secret database. A control ACID can be a regular user of system facilities. A control ACID can issue subsystem commands and perform other functions-such as access data sets and submit jobs.
Initially, CA Top Secret knows of only one control ACID—the MSCA ACID—for the security administrator. You define this ACID to CA Top Secret during installation. You create other control ACIDs later. Each type of control ACID performs administrative tasks for the structural level it is associated with. To enable the control ACID to perform these tasks, each one is assigned a scope of authority and administrative authorities within that scope.
The Security Administrator
28 User Guide
ACID Validation
CA Top Secret validates ACIDs in different ways to protect against unauthorized use. First, CA Top Secret checks the security file to determine whether a designated ACID is defined by seeing if a security record exists for it. Second, if the ACID is undefined, CA Top Secret responds based on the initial control option settings for the security mode and various system options.
The Security Administrator
The security administrator:
■ Is the focal point of security for your site
■ Is responsible for implementing and maintaining system security
■ Defines users, resources, access levels, and facilities
■ Controls the security environment by using control options and TSS commands
■ Monitors resource access violations with the auditing, tracking, and reporting options
■ Must understand how CA Top Secret works and how best to implement security for your system
■ Acts as the liaison between CA Top Secret and the users who need to access the facilities and resources it secures
The security administrator's role is determined by:
■ The scope of authority (the entire installation or a single department within that installation)
■ The designated administrative authorities (create ACIDs, run reports, change control options)
■ The security needs of the site
For example, you might design one security administrator whose sole purpose is to create and maintain ACIDs, and another security administrator who is responsible for maintaining resources and the Resource Descriptor Table (RDT). Or you might create a “backup MSCA” by assigning full authority to one SCA. Each security administrator must first possess the appropriate administrative authority.
The Security Administrator
Chapter 1: Introduction 29
Types of Administrators
The CA Top Secret administrative hierarchy has seven levels. The first six levels represent ACIDs whose primary function is to control security administration.
Note: All control ACIDs, including the MSCA, go through CA Top Secret password checking, even in DORMANT mode.
Master Security Control ACID (MSCA)
Referred to as the Master Central Security Administrator. There can be only a single MSCA.
The MSCA's ACID is pre-defined; it exists as soon as the Security File is created through TSSMAINT. The MSCAs ACID cannot be deleted, although it can be renamed.
An MSCA has unlimited scope. Only an MSCA has implicit unlimited administrative authority. Only the MSCA can create SCAs.
The MSCA can log on or initiate with only password checking in force; no expiration, facility, source, or terminal checking is performed by CA Top Secret.
Central Security Control ACID (SCA)
Referred to as the Central Security Administrator. An SCA is not associated with any specific zone division or department but has unlimited scope. Most sites define only a few SCAs. We recommend that you create one “secondary” central security administrator, as a backup to the MSCA. An SCA, with this authority, can do almost everything except define another SCA or change the administrative authority of an existing ACID.
Limit Central Security Control ACID (LSCA)
An LSCA is not associated with any specific zone, division, or department. It has the same capabilities as an SCA but rules of scope checking apply.
Zonal Control ACID (ZCA)
Only a central security administrator can establish zonal administrators. Each ZCA is associated with a particular zone. A ZCA can perform the following activities: administrative tasks for the divisions, departments, users, and profiles linked to this zone. A zone may have several ZCAs, or under a centralized administrative system, no ZCAs. In the latter case, a central security administrator must perform the administrative requirements for this zone.
Divisional Control ACID (VCA)
A central security administrator can establish divisional administrators. Each VCA is associated with a particular division. A VCA can perform administrative tasks for the departments, users, and profiles linked to this division.
A division may have several VCAs, or under a centralized administrative system, no VCAs. In the latter case, central security administrator or ZCA must perform the administrative requirements for this division.
The Security Administrator
30 User Guide
Departmental Control ACID (DCA)
Departmental administrators can be established by a central security administrator or a VCA for a department that is linked to that VCA's division. The responsibilities that can be performed by a DCA include administrative tasks for the users and profiles that belong to this department.
A department may have several DCAs or no DCAs. In the latter case the administrative requirements for this department have to be performed by either a central security administrator or the appropriate ZCA or VCA.
USER
Any administrator with ACID(CREATE) administrative authority can establish users. While you can assign a user most types of administrative authority, the user's scope is always limited to itself. In general, we advise you to allow a user minimal administrative authority, leaving administrative functions with control ACIDs.
While you can give users administrative authority (limited to themselves), their primary function is to perform work. Control ACIDs can perform work, but this function should be secondary.
Auditors
As with any other type of administrator, an auditor's scope is a function of the TYPE that was designated at ACID creation, for example, TYPE(VCA). A central auditor is defined as an SCA; a divisional auditor is defined as a VCA.
Scope
For your security hierarchy, the security administrator is responsible for the scope of authority. CA Top Secret provides several different levels of control ACID scope. Each level corresponds to a level in your corporate structure.
For example, a division control ACID (VCA) is responsible for administering security for all the ACIDs within a particular division (including ACIDs assigned to departments associated with that division).
The following table shows an example of how an organization could define its security administrators to CA Top Secret, and the scope that results:
Title Scope Example
MSCA Entire installation The master SCA (MSCA) can create all CA Top Secret administrators, including SCAs, LSCAs, ZCAs, DCAs, VCAs, and auditors.

The Security Administrator
Chapter 1: Introduction 31
SCA Entire installation An SCA's scope of authority depends on the administrative authorities that they were granted. An SCA can create ZCAs, DCAs, VCAs, Profile, and User ACIDs, but not other SCAs.
LSCA A zone and/or another LSCA
An LSCA can have all the authority of an SCA, but unlike the SCA, the LSCA must have a scope of authority assigned to it. This scope of authority can be one or more LSCAs and/or zones.
ZCA A zone A zone security administrator can:
■ Permit access to resources owned by his zone, all connected divisions, departments and users within that zone.
■ Define profiles and perform maintenance for ACIDs that are within his scope.
■ Create ACIDs in his zone.
■ Permit ACIDs in other zones to access his zone's resources, but cannot perform maintenance for ACIDs in other zones.
VCA A division A divisional security administrator can:
■ Permit access to resources owned by his division, all departments and users within that division, and can define profiles and perform maintenance for ACIDs that are within his scope.
■ Create ACIDs in his division.
■ Permit ACIDs in other divisions to access his division's resources, but cannot perform maintenance for ACIDs in other divisions.
DCA A department Department administrators have the same scope over a department that a VCA has over a division. DCAs can also create ACIDs in their department.
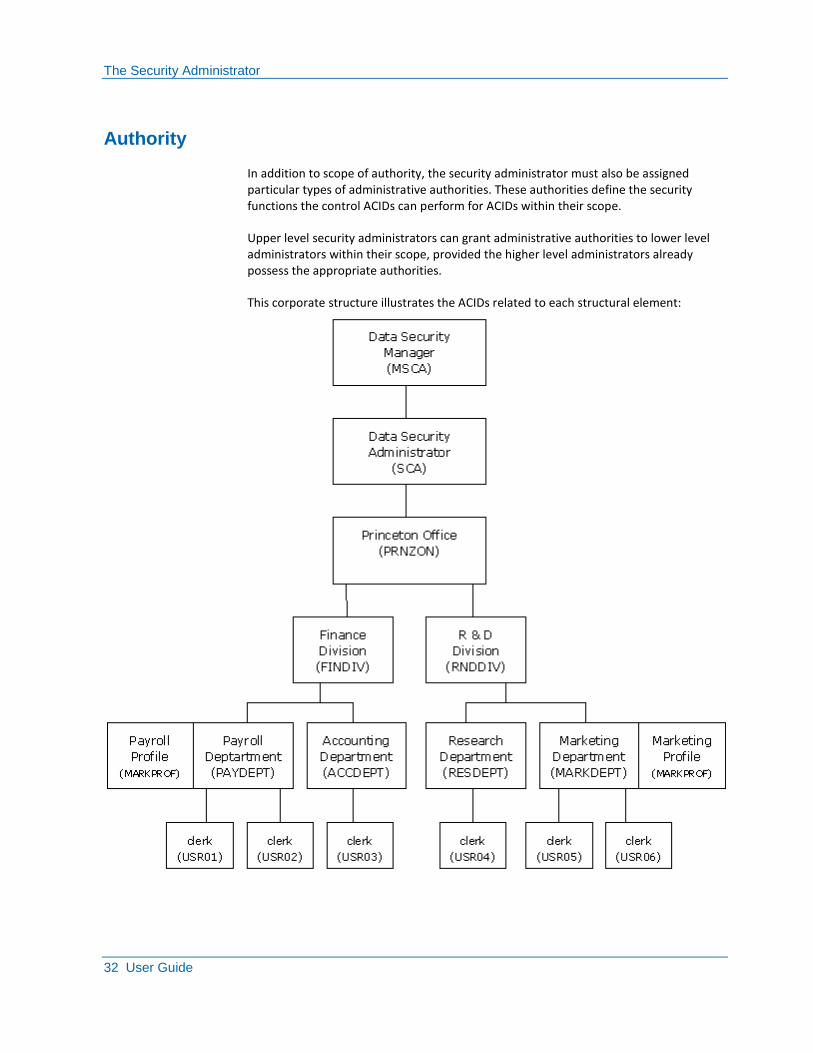
The Security Administrator
32 User Guide
Authority
In addition to scope of authority, the security administrator must also be assigned particular types of administrative authorities. These authorities define the security functions the control ACIDs can perform for ACIDs within their scope.
Upper level security administrators can grant administrative authorities to lower level administrators within their scope, provided the higher level administrators already possess the appropriate authorities.
This corporate structure illustrates the ACIDs related to each structural element:

The Security Administrator
Chapter 1: Introduction 33
The following table describes how CA Top Secret ACIDs correspond to elements within the corporate structure shown in the corporate structure.
Corporate Element Corresponding ACID
Data Security Manager/Chief MSCA is a control ACID
Data security administrator SCA is a control ACID
Princeton Office PRNZON is a zone ACID
Finance Division
R & D Division
xxxDIV are division ACIDs
Payroll Department
Accounting Department
Research Department
Marketing Department
xxxDEPT are department ACIDs
Payroll functions
Accounts Receivable functions
Accounts Payable functions
xxxPROF are profile ACIDs
Clerks USRxx are user ACIDs
The Security Administrator
34 User Guide
Types of Administrative Authorities
An ACID's authority determines what can be done with the administration of ACIDs, resources, facilities, and the display of security database information. The administrative authorities are:
■ ACID
■ DATA
■ RESOURCE
■ FACILITY
■ MISC1
■ MISC2
■ MISC3
■ MISC4
■ MISC5
■ MISC7
■ MISC8
■ MISC9
■ SCOPE
Each type of authority approximately corresponds to a different set of security environment control and maintenance functions (for example, ACID maintenance or resource maintenance).
A group of operands is associated with each type of authority. Each operand designates a specific functional authority. For example, ACID(CREATE) authority lets the control ACID create and delete ACIDs within their scope, while RESOURCE(INFO) lets the control ACID perform certain inquiries for any resource within their scope.
You cannot assign administrative authorities to a division, department, or profile ACID.
Global Authorities
To give every ACID the ability to perform specified administrative functions, the administrator can assign the administrative authority to the ALL record. For example, assigning MISC1(LTIME) to the ALL record gives all ACIDs the authority to set their own terminal lock time interval. The ALL record can also contain resources access levels.
Only administrators with MISC9(GLOBAL) authority can assign administrative authorities to the ALL Record.
Facilities
Chapter 1: Introduction 35
Facilities
A facility is a way of grouping options associated with a particular service to which users sign on. To sign on to a service, a user must have access to the facility. Only the MSCA can access any facility by default. Everyone else must be authorized to access one or more facilities.
CA Top Secret comes with facilities already defined in the Facilities Matrix Table. CA Top Secret provides security for many facilities, including the following facilities:
■ VM
■ CICS
■ CA Roscoe
■ IMS
■ CA IDMS
■ BATCH
■ TSO
■ STC
■ MPC1
■ OPENMVS
■ UNICNTR
More information:
Protecting Facilities (see page 427)
Resource Protection
36 User Guide
Facility Access Authorization
To assign authority to access a particular facility, use the FACILITY keyword with the CREATE or ADD command function.
The algorithm determining FACILITY access searches for a rule allowing access in the sequence:
■ The USER record
■ PROFILEs
■ The ALL record
If a FACILITY rule is found that denies access, CA Top Secret continues searching subsequent rules. If no later rule allows access, a FACILITY authorization failure occurs. This action is true regardless of the reason for the failure (for example, TOD, SYSID, or CALENDAR).
For information on the facilities specified with the FACILITY parameter, see the Control Options Guide. For a list of facilities that you can use for your site, check your Facility Matrix Table.
Examples: authorize access
This example authorizes USER01 to access the TSO facility:
TSS ADDTO(USER01) FACILITY(TSO)
This example gives USER01 access to all facilities:
TSS ADDTO(USER01) FACILITY(ALL)
Resource Protection
A resource is any component of the computing or operating system required by a task. CA Top Secret protects default and site-defined resources.
To protect computer resources, CA Top Secret must know that they exist.
The types of resources (such as data sets, volumes, terminals, and minidisks) that CA Top Secret protects appear in the Resource Descriptor Table (RDT). Many resource types are automatically defined to the RDT at installation. Additional resource types (including site-defined resources) can be added.

Fields
Chapter 1: Introduction 37
Ownership and Authorization
Securing resources is a two-step process. Once the resource type or class, is defined in the RDT, then each resource must be:
■ Owned by an individual or department ACID
■ Permitted to additional ACIDs (if necessary)
Ownership of a resource automatically implies full access to that resource. For other ACIDs to have access to that resource, they must be authorized or permitted to use it.
Security Validation Algorithm
Once you have defined all resources to CA Top Secret and have specified their access levels, any future request to access those resources is processed through the CA Top Secret validation algorithm to determine whether an ACID has the appropriate authorizations to access a particular resource.
Relationship Between Data Sets and Volumes
When an ACID requests access to a particular DASD data set, CA Top Secret must potentially evaluate both the pertinent volume and data set authorizations, depending on the bypass options or authorization associated with that ACID.
In the event that CA Top Secret must check both volume and data set level access, CA Top Secret always performs volume level first. In some cases, a request to access a data set is granted or failed strictly on the basis of the ACID's volume access authorizations.
Fields
A field resides in the data area of the ACID's security record that holds information system and security level applications use.

Command Functions
38 User Guide
Security Record Segments and Fields
Each security record is broken down by segments as defined in IBM's External Security Interface (RACROUTE) Guide.
Fields and segments of the ACID record are defined in the Field Descriptor Table (FDT) reserved record of the security file. Some fields and segments are pre-defined by CA Top Secret at installation. You can add additional fields and segments.
Manipulation of the FDT requires special administrative authority.
Assigning Values for Defined Fields
After you define fields and segments to the FDT, the field name becomes a keyword in CA Top Secret. Use standard CA Top Secret commands to assign, replace, and remove values. Anyone with administrative authority over the ACID can modify fields in an ACID security record.
Command Functions
Command functions are the primary tool of the security administrator. A command function lets you define ACIDs, assign attributes, and determine resource access.
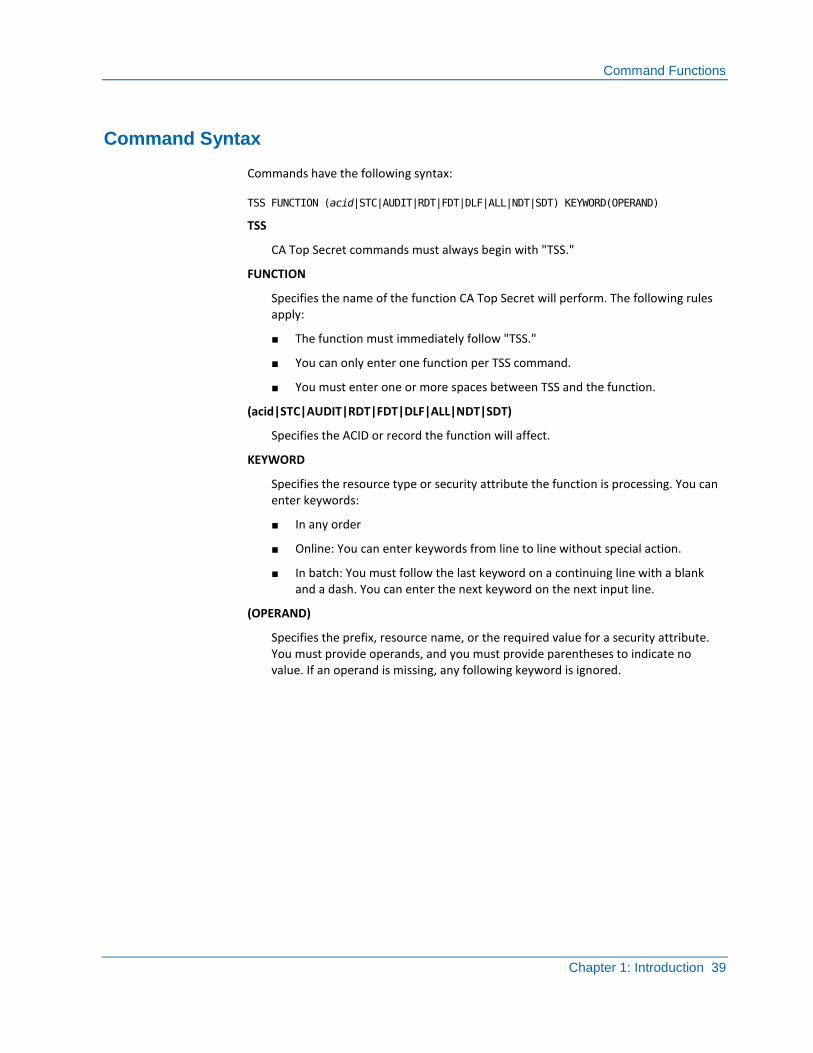
Command Functions
Chapter 1: Introduction 39
Command Syntax
Commands have the following syntax:
TSS FUNCTION (acid|STC|AUDIT|RDT|FDT|DLF|ALL|NDT|SDT) KEYWORD(OPERAND)
TSS
CA Top Secret commands must always begin with "TSS."
FUNCTION
Specifies the name of the function CA Top Secret will perform. The following rules apply:
■ The function must immediately follow "TSS."
■ You can only enter one function per TSS command.
■ You must enter one or more spaces between TSS and the function.
(acid|STC|AUDIT|RDT|FDT|DLF|ALL|NDT|SDT)
Specifies the ACID or record the function will affect.
KEYWORD
Specifies the resource type or security attribute the function is processing. You can enter keywords:
■ In any order
■ Online: You can enter keywords from line to line without special action.
■ In batch: You must follow the last keyword on a continuing line with a blank and a dash. You can enter the next keyword on the next input line.
(OPERAND)
Specifies the prefix, resource name, or the required value for a security attribute. You must provide operands, and you must provide parentheses to indicate no value. If an operand is missing, any following keyword is ignored.
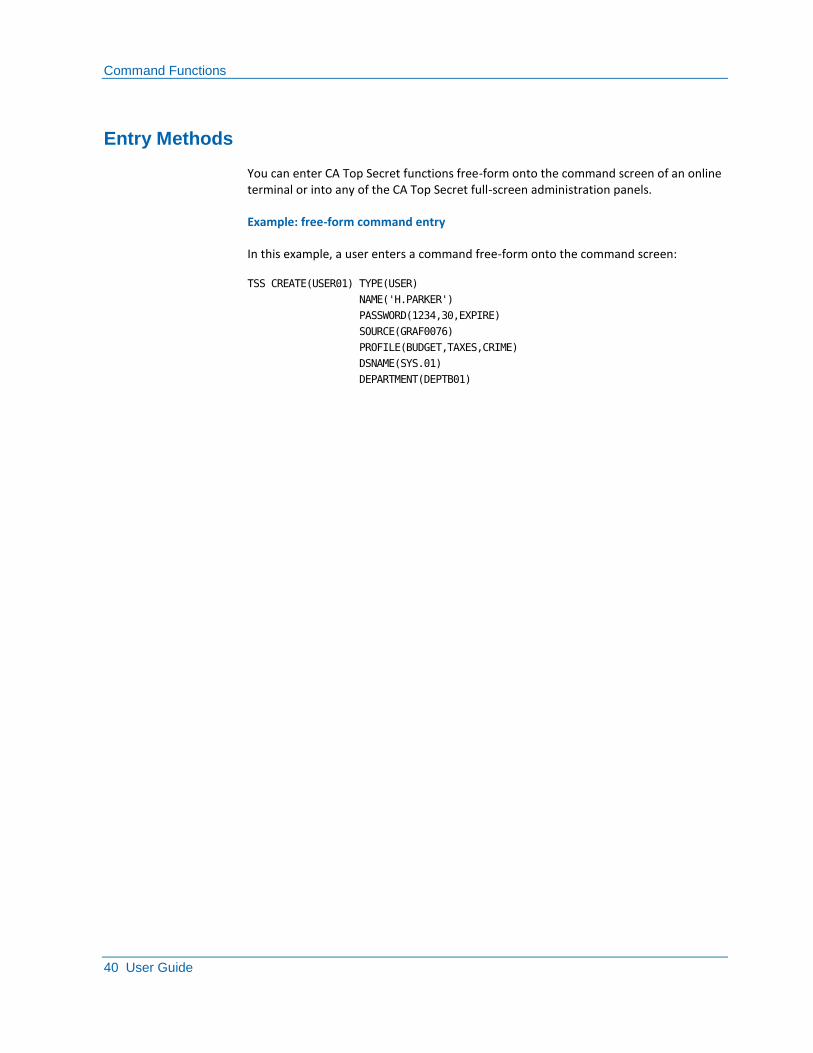
Command Functions
40 User Guide
Entry Methods
You can enter CA Top Secret functions free-form onto the command screen of an online terminal or into any of the CA Top Secret full-screen administration panels.
Example: free-form command entry
In this example, a user enters a command free-form onto the command screen:
TSS CREATE(USER01) TYPE(USER)
NAME('H.PARKER')
PASSWORD(1234,30,EXPIRE)
SOURCE(GRAF0076)
PROFILE(BUDGET,TAXES,CRIME)
DSNAME(SYS.01)
DEPARTMENT(DEPTB01)
CA Top Secret Components
Chapter 1: Introduction 41
CA Top Secret Components
Within CA Top Secret, distributed security can include:
Command Propagation Facility (CPF)
Routes security administration to all or selected nodes synchronously or asynchronously, resulting in single-point administration. Changes made to ACIDs, passwords, or access levels can be propagated to all nodes to which the user is defined. For example, USER01 is defined to two nodes, with NODE A as the local node and NODE B as the remote node. If the user changes the password on NODE A, CPF automatically propagates the change to NODE B. Through the use of command function keywords, you can specify which node receives these commands and how the local node processes them.
SYSPLEX XES and XCF (z/OS only)
Protects systems running in a sysplex environment:
XES
Shares security file records throughout the sysplex for all of CA Top Secret.
XCF
Allows CA Top Secret information to be communicated between systems. XCF is a message router.
CA Top Secret for DB2 (z/OS only)
Protects several DB2 resources and replaces GRANT/REVOKE processing. PERMIT commands are written in place of GRANT commands and a conversion utility provides a transition. A catalog synchronization utility brings DB2 catalog entries up-to-date with CA Top Secret for DB2 authorizations.
APPC
Can control access to z/OS from other systems. For example, you can limit which LUs to use for conversation processing, what type of security data the inbound transaction program must provide, and which users are authorized to execute the transaction program.
CA Top Secret WorkStation (z/OS only)
Provides:
■ A GUI for single-point administration of all CA Top Secret z/OS systems
■ Centralized monitoring and reporting of security events
Common Components
42 User Guide
Common Components
CA Top Secret uses the following CA components to coordinate multi-system security:
Event Notification Facility (ENF) (z/OS only)
An operating system interface component CA Top Secret uses to obtain data from z/OS. CAIENF provides the VTAM facilities to transmit and receive TSS commands when using the Command Propagation Facility.
Standard Security Facility (SSF)
A facility that provides an application interface for CA and non-CA products to obtain and use CA Top Secret information.
Common Communications Interface (CCI)
An interface that enables CA Top Secret secured nodes to communicate with one another.
CA Top Secret Files
CA Top Secret uses the following files.
Important! GRS and MIM are facilities that control resource serialization. CA Top Secret uses its own queuing and locking mechanism (and does not issue hardware reserves). Therefore, CA Top Secret files should be in GRS exclusion tables, and QNAMES are not necessary for MIM.
Security File
Provides an encrypted security database of security records that contain all user and resource permissions and restrictions. When a user initiates a job or signs on to an online facility in a z/OS environment, CA Top Secret obtains the user's security record from the BDAM security file and places it in the user's address space for the duration of the session.
The security file allows all CA Top Secret security information to be stored in a single shared database for all CPUs. Within the security file, each user is associated with a unique security record that lets CA Top Secret associate access authorizations with users.
■ Within an MVS environment, when a user initiates a job or signs on to an online facility, CA Top Secret obtains the user's security record from the security file and places it in the user's address space for the life of the session. CA Top Secret checks all access validation against the user's security record.
■ Within a VM environment, when a user logs onto a virtual machine, the CA Top Secret server machine retrieves the security record for that user from the security file. The user's security record remains in the server machine's storage for the life of the session.

CA Top Secret Files
Chapter 1: Introduction 43
VSAM File
Stores digital certificates, keyring records, Kerberos records, Data Classification records, SIGVER records, and IDMAP records.
Mirror Security File
Stores an identical copy of all data that is stored on the BDAM security file.
Mirror VSAM File
Stores an identical copy of all data that is stored on the VSAM security file.
Parameter File
Stores and defines control options at initialization and sets up the product operating environment.
Audit/Tracking File
Records security-related events and can be shared among CPUs. Events include violations, job and session initiation, and resource access. You can designate an optional, alternate Audit/Tracking file to increase the amount of information that can be stored before the file fills and begins to wrap.
Backup File
(If the BACKUP control option is active) Stores the automatic daily backup of the security file to ensure complete integrity of the security environment. The backup file is an exact copy of the security file as it existed at the time of the last backup. If the device containing the security file becomes unavailable, you can use the backup.
Recovery File
Stores recent administrative commands, the extent of which depends on the size of the allocated file. The backup security file, along with the application of select recovery file commands, can completely restore a damaged security file. This is a wraparound file.
CA Top Secret Files
44 User Guide
$$$LOG$$ File
Contains status messages and information about control option modifications. A DD statement for this file should not be included in the product started task JCL. If CA Top Secret is started under JES, the product dynamically allocates a SYSOUT file with a ddname of $$$LOG$$. If CA Top Secret is started with SUB=MSTR while JES is not active, no $$$LOG$$ file can be allocated. In this case, the $$$LOG$$ file is dynamically allocated when JES becomes active.
Note: If the $$$LOG$$ DD statement is included in the product started task JCL, dynamic allocation is not possible. In that case, there is no $$$LOG$$ file when TSS starts with SUB=MSTR.
Specifically, the file contains the following data:
■ All modifications to the default control options originating from:
– CA Top Secret parameter file
– Modifications made to the CA Top Secret address space through the operator console
– Online TSS command modifications by an administrator
■ Status messages for the CA Top Secret task regarding:
– Security file capacity and backup
– Audit/Tracking file capacity and backup
– I/O errors in product files during task execution
Command Propagation Files
Consists of two types of files that are associated with the command propagation facility (CPF). These files must be dedicated to a single CPU.
CPF Recovery File
Saves transmitted commands until a response to those commands has been received from remote nodes.
CPF Journal Files
Consists of the following journals for each CPF node to provide a historical record of command traffic to and from the node:
■ RECVCMDS is a receive journal that, for each node, contains commands from all other nodes and responses to all other nodes.
■ node_name is a send journal that can exist for each connected node to record commands that are sent to that node and responses from that node.
Special Security Records
Chapter 1: Introduction 45
Special Security Records
CA Top Secret has reserved or special ACIDs that are pre-defined and maintain resource and attribute information. These include:
ALL Record
Identifies resources that are globally accessible to all signed on users.
APPCLU Record
Stores the names and security requirements of the logical units (LUs) involved in APPC conversations.
Audit Record
Stores the resource names that are to be audited.
Data Lookaside Table (DLF)
Controls the loading of selected data sets into ESA hyperspace by selected jobs. With the proper authority and keywords, CA Top Secret can identify and control those data sets and jobs valid for DLF.
Delegate Record
Contains delegate resource definitions. Each definition specifies a resource class and entity name used in nested ACEE processing.
Facility Matrix Table
Contains all the facilities defined to CA Top Secret. Each entry contains information about the specific attributes associated with a particular facility (like VM, TSO, and so on), and can be viewed and modified with the FACILITY control option.
Field Descriptor Table (FDT)
Defines fields (classes) that can be attached to ACIDs within the Security File. Each field description contains a field name, field code, and field attributes.
MLS Delegate
Contains SECLABEL, CATEGORY, and SECLEVEL records, which are the hierarchical elements of multi-level security.
Node Descriptor Table (NDT)
Contains all CPF, LDAP, LINUX, and PassTicket application and session key-related node information. The NDT is a global record similar to the Resource Descriptor and Field Descriptor Tables.
Resource Descriptor Table (RDT)
Contains pre-defined resource classes. Each resource class is identified by a unique keyword and has certain attributes associated with it.
Special Security Records
46 User Guide
Started Task Table (STC)
Stores all started task procedure names and the ACIDs associated with them. CA Top Secret offers security protection for all required STC definitions or only for STCs that reference sensitive data or affect system integrity.
Static Data Table (SDT)
Contains record elements that you can use to control which users have access to certain resources.
Chapter 2: Post-Installation Configuration Considerations 47
Chapter 2: Post-Installation Configuration Considerations
This section contains the following topics:
STC Security Bypass (see page 48) Multi-CPU Environments (see page 49) Sysplex Coupling Facility (see page 49) SMF (see page 50) JES2 (see page 51) TSO Online Job Submission (see page 52) OpenEdition z/OS Support (see page 52) Allocate a VSAM File (see page 52)

STC Security Bypass
48 User Guide
STC Security Bypass
After installation, all STCs bypass security. The following STC definitions are required:
INIT
If the default STC ACID is BYPASS, then no additional definitions are required. Any valid STC ACID can be used with INIT, so that the starting batch initiator will not log as initiating BYPASS:
TSS ADDTO(STC) PROCNAME(INIT)
ACID(BYPASS)
If the default is FAIL, then an explicit definition must be given for INIT, either as BYPASS or by using an ACID that has a facility (STC).
TSS ADDTO(STC) PROCNAME(INIT)
ACID(STCACID)
JES2 or JES3
The recommended approach is to explicitly define an ACID for JES (using whatever name is desired) and adding it to the STC record. BYPASS should not be used with JES unless there are no installation-provided JES exits that invoke CA Top Secret and the installation is not using JES(VERIFY). In all cases, it is best to create an ACID for JES.
For example:
TSS CREATE(JES) NAME('JES ACID')
PASSWORD(NOPW,0)
DEPARTMENT(STCDEPT)
FACILITY(STC)
TSS ADDTO(STC) PROCNAME(JES2)
ACID(JES)
LLA, VLF, CATALOG, and other System Address Spaces
If the default STC ACID is BYPASS, then no additional definitions are required. Any valid STC ACID can be used with LLA so that the restarting LLA will not log as initiating BYPASS. See the previous INIT explanation for examples.
Note: When restarting LLA from an undefined terminal or ACID, two messages are received:
TSS7220E: 101 J=lla A=*missing
and
CSV244I CSV READ ACCESS DENIED
To correct this error, you must either PERMIT SYS1.PARMLIB to the ALL Record, or give access to the data set name for the ID starting the LLA.
TSS, TSSB, TSSBKUP, TSSRVCR1, TSSRESTN, SMSRESTR, and SMSRESTN
Multi-CPU Environments
Chapter 2: Post-Installation Configuration Considerations 49
BYPASS should be assigned either by the STC default (if the STC default is BYPASS) or by an explicit definition. Care must be taken to properly define these STCs.
Multi-CPU Environments
In a multiple CPU environment:
■ Place the following CA Top Secret files on a shared DASD volume:
– Security file
– Audit/tracking file
– Recovery file
■ If sharing a security file between multiple CPUs, specify the control option SHRFILE(YES) on each CPU.
■ Back up the security file from one CPU only. Omit the BACKUP DD statement or code the BACKUP(OFF) control option on all systems but one.
■ If “secured” data sets reside on shared DASD volumes and CA Top Secret is being used through one CPU only (usually during transition), system 913 abends may occur. Use program TSSPROT to remove the protection bits from the affected data sets. TSS Control Option ADSP should be set as ADSP(NO) to prevent future data sets from being marked as protected.
Sysplex Coupling Facility
CA Top Secret uses the definitions in the Coupling Facility Resource Management (CFRM) policy to manage coupling facility storage. The CFRM policy resides in a CFRM couple data set created with the IBM IXCL1DSU format utility program.
If the coupling facility supports structure duplexing, the CFRM couple data set should be formatted with the ITEM NAME(SMDUPLEX) NUMBER(1) statement.
To create the administrative CFRM policies, use the IBM utility program IXCMIAPU. To activate, change, or rebuild the CFRM policy use the z/OS operator command SETXCF.
SMF
50 User Guide
CFRM Policy
To set up the CFRM policy, you must know which subsystems and applications in the installation will use the coupling facility and the structure requirements of each.
Use the IBM utility program IXCMIAPU to define the CFRM policy to:
■ Identify each coupling facility and each structure.
■ Specify the size of each structure. The structure size will initially be allocated at the INITSIZE you specify. The maximum size of the structure is defined by SIZE. Use the TSSFAR utility to run a TSSFAR SFSTATS report, which will recommend the XES structure size. You can use this to help determine the structure size you want to specify in the CFRM policy. Other considerations are discussed in the IBM guide MVS Setting Up a Sysplex.
■ Specify the preference list (PRELIST), which is an ordered list of coupling facility names in which the structure can be allocated.
■ Specify an exclusion list of structures that are not to be allocated in the same coupling facility as the structure.
■ Specify DUPLEX(ALLOWED/ENABLED) if the structure is going to be duplexed.
Every application specifies the required structure types, as well as the name and size of the structure or structures it uses. CA Top Secret uses the SYSPLEX control option to provide this information.
SMF
If requested in the LOG control option, CA Top Secret will log security-related activity and incidents to SMF using record type 80.
The normal logging of CA Top Secret to the SMF file does not significantly affect the size of the SMF file, the amount of traffic SMF receives, or the frequency of dump. There are two situations that may warrant changes to either the SMF data set size or procedures:
■ When CA Top Secret is in WARN mode
■ The Central Security Administrator requests logging of all activity
Generally, SMF logging is discouraged in favor of the CA Top Secret audit/tracking file.
The SMF record number 231 is used for the SAF Trace Report and OMVS logging. If the ACID is being audited, the type 80 records are used. For information, see the Report and Tracking Guide.
JES2
Chapter 2: Post-Installation Configuration Considerations 51
JES2
Because CA Top Secret does not make any modifications to JES2 (or its control blocks), it makes certain assumptions about the offset of the JCT control block fields:
■ JCTINDEV (input device)
■ JCTROUTE (NJE input device)
■ JCTNJHDR (NJE header)
JCT offsets are determined automatically based on the JES level detected at CA Top Secret initialization. If your installation has made modifications to the JES2 JCT control block which shift the original offsets, the following procedure allows CA Top Secret to correctly locate the source of a batch job:
■ Verify the version of primary JES2 running at your installation
■ Verify the offsets of the affected JCT fields
■ Use the CA Top Secret JCT control option to make adjustments
JES Startup Considerations
The following considerations apply to JES startup:
■ You can start the CA Top Secret address space before JES starts. You should not provide a $$$LOG$$ SYSOUT DD statement in the JCL. Thus, when JES becomes active, CA Top Secret dynamically allocates and begins using a $$$LOG$$ SYSOUT data set.
Note: You cannot see the $$$LOG$$ spool file until JES is started.
■ For CPF nodes that are defined in the Node Descriptor Table (NDT), CA Top Secret performs the following activities if CA Top Secret starts before JES:
– While JES is inactive, CA Top Secret ignores journal files that are associated with the node.
– After JES is activated, CA Top Secret dynamically allocates and opens SYSOUT journal files for each node (if no SYSOUT DD statements exist in the JCL) and allocates and opens the incoming RECVCMDS journal file.
Note: CPF nodes that are defined through the parameter file are not eligible for SYSOUT spool allocation when JES has started after CA Top Secret.
■ After JES becomes active, CA Top Secret dynamically allocates SYSOUT files for LDS journal and trace data sets. CA Top Secret allocates these data sets only if no DD statements exist in the JCL.
If JES is terminated before CA Top Secret, CA Top Secret closes any opened SYSOUT data sets. CPF continues to send and receive commands, but no activity is logged to SYSOUT journal files. LDS continues to process outbound commands and commit them to the LDS recovery file. When JES restarts, these commands are propagated.
TSO Online Job Submission
52 User Guide
TSO Online Job Submission
CA Top Secret automatically inserts USER and PASSWORD information after TSO exits have been invoked. CA Top Secret does not interfere with or require any changes to job submission exits currently in use.
OpenEdition z/OS Support
CA Top Secret supports the OpenEdition z/OS Shell Setup Utility. BPXWIRAC contains a REXX exec that invokes the Shell Setup Utility.
To set up OpenEdition support
1. Copy the CAI.CAKOCLS0 member BPXWIRAC REXX exec to your REXX or CLIST library.
2. Concatenate the REXX to the SYSPROC DD or SYSEXEC DD statement in your TSO signon procedure.
Allocate a VSAM File
You can define a VSAM file to store digital certificates, keyrings, Kerberos records, SDT records, Data Classification records, SIGVER records, and IDMAP records. The VSAM data set increases the number of records that can be stored by converting the records to VSAM.
Follow these steps:
1. Edit CAI.CAKOJCL0 member VSAMDEF3 to remove STEP2 (if the security file is not shared), and then execute VSAMDEF3.
2. Run the TSSMAINT utility job (with a VSAMFILE DD statement that points to the defined VSAM base cluster file).
CA Top Secret allocates the VSAM file.
Chapter 3: Implementing CA Top Secret 53
Chapter 3: Implementing CA Top Secret
This section contains the following topics:
Security Modes (see page 54) Phased Implementation (see page 55) FAIL Mode Migration (see page 56) Transaction Level Security (see page 57) Resource Level Security (see page 58) Activity Logging (see page 58) User Messages and Violations Suppression (see page 60)
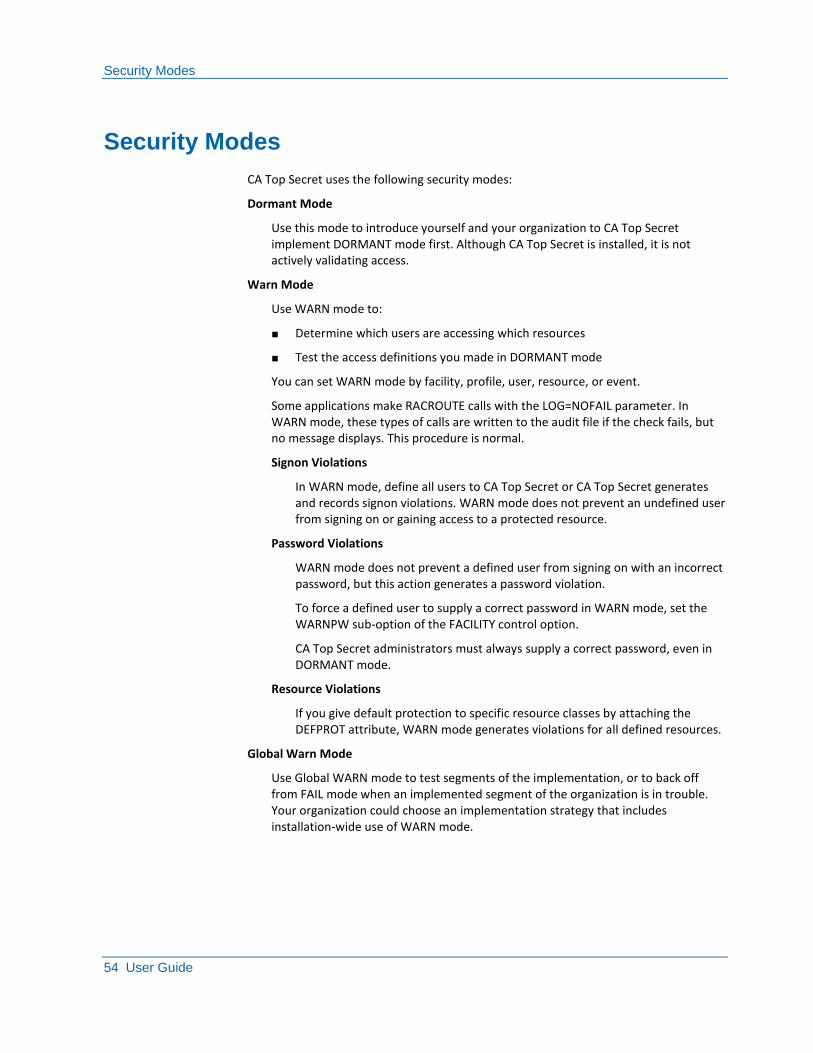
Security Modes
54 User Guide
Security Modes
CA Top Secret uses the following security modes:
Dormant Mode
Use this mode to introduce yourself and your organization to CA Top Secret implement DORMANT mode first. Although CA Top Secret is installed, it is not actively validating access.
Warn Mode
Use WARN mode to:
■ Determine which users are accessing which resources
■ Test the access definitions you made in DORMANT mode
You can set WARN mode by facility, profile, user, resource, or event.
Some applications make RACROUTE calls with the LOG=NOFAIL parameter. In WARN mode, these types of calls are written to the audit file if the check fails, but no message displays. This procedure is normal.
Signon Violations
In WARN mode, define all users to CA Top Secret or CA Top Secret generates and records signon violations. WARN mode does not prevent an undefined user from signing on or gaining access to a protected resource.
Password Violations
WARN mode does not prevent a defined user from signing on with an incorrect password, but this action generates a password violation.
To force a defined user to supply a correct password in WARN mode, set the WARNPW sub-option of the FACILITY control option.
CA Top Secret administrators must always supply a correct password, even in DORMANT mode.
Resource Violations
If you give default protection to specific resource classes by attaching the DEFPROT attribute, WARN mode generates violations for all defined resources.
Global Warn Mode
Use Global WARN mode to test segments of the implementation, or to back off from FAIL mode when an implemented segment of the organization is in trouble. Your organization could choose an implementation strategy that includes installation-wide use of WARN mode.
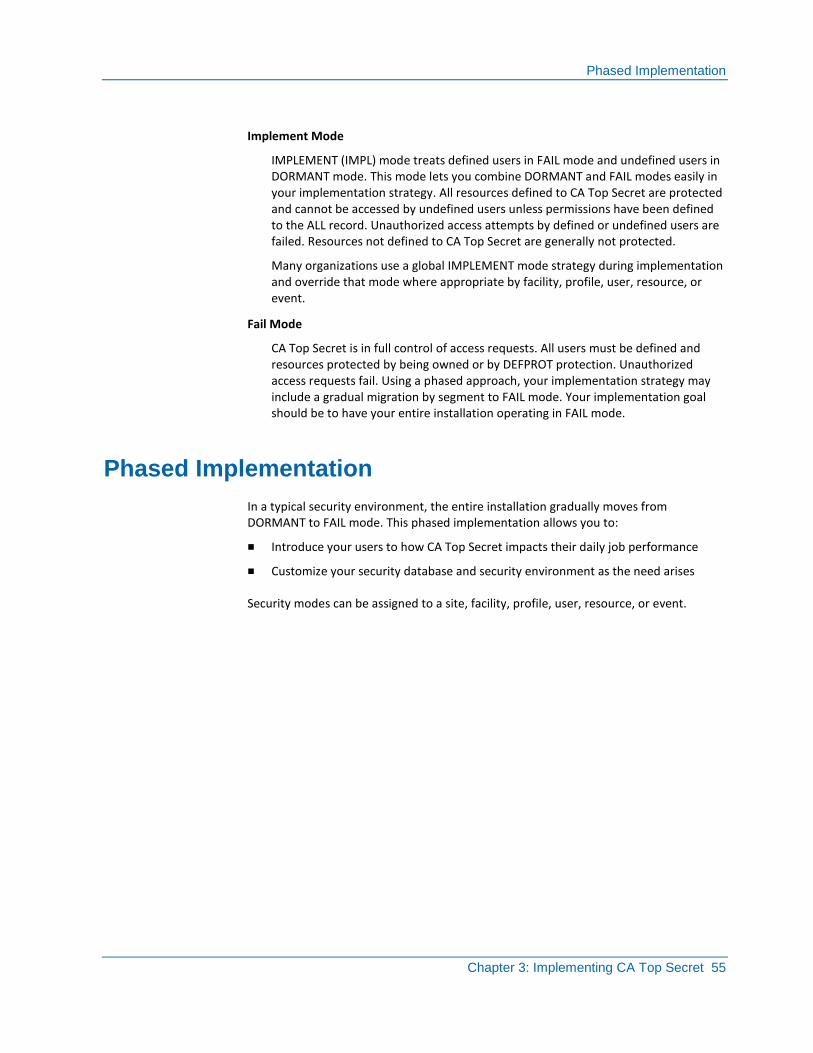
Phased Implementation
Chapter 3: Implementing CA Top Secret 55
Implement Mode
IMPLEMENT (IMPL) mode treats defined users in FAIL mode and undefined users in DORMANT mode. This mode lets you combine DORMANT and FAIL modes easily in your implementation strategy. All resources defined to CA Top Secret are protected and cannot be accessed by undefined users unless permissions have been defined to the ALL record. Unauthorized access attempts by defined or undefined users are failed. Resources not defined to CA Top Secret are generally not protected.
Many organizations use a global IMPLEMENT mode strategy during implementation and override that mode where appropriate by facility, profile, user, resource, or event.
Fail Mode
CA Top Secret is in full control of access requests. All users must be defined and resources protected by being owned or by DEFPROT protection. Unauthorized access requests fail. Using a phased approach, your implementation strategy may include a gradual migration by segment to FAIL mode. Your implementation goal should be to have your entire installation operating in FAIL mode.
Phased Implementation
In a typical security environment, the entire installation gradually moves from DORMANT to FAIL mode. This phased implementation allows you to:
■ Introduce your users to how CA Top Secret impacts their daily job performance
■ Customize your security database and security environment as the need arises
Security modes can be assigned to a site, facility, profile, user, resource, or event.
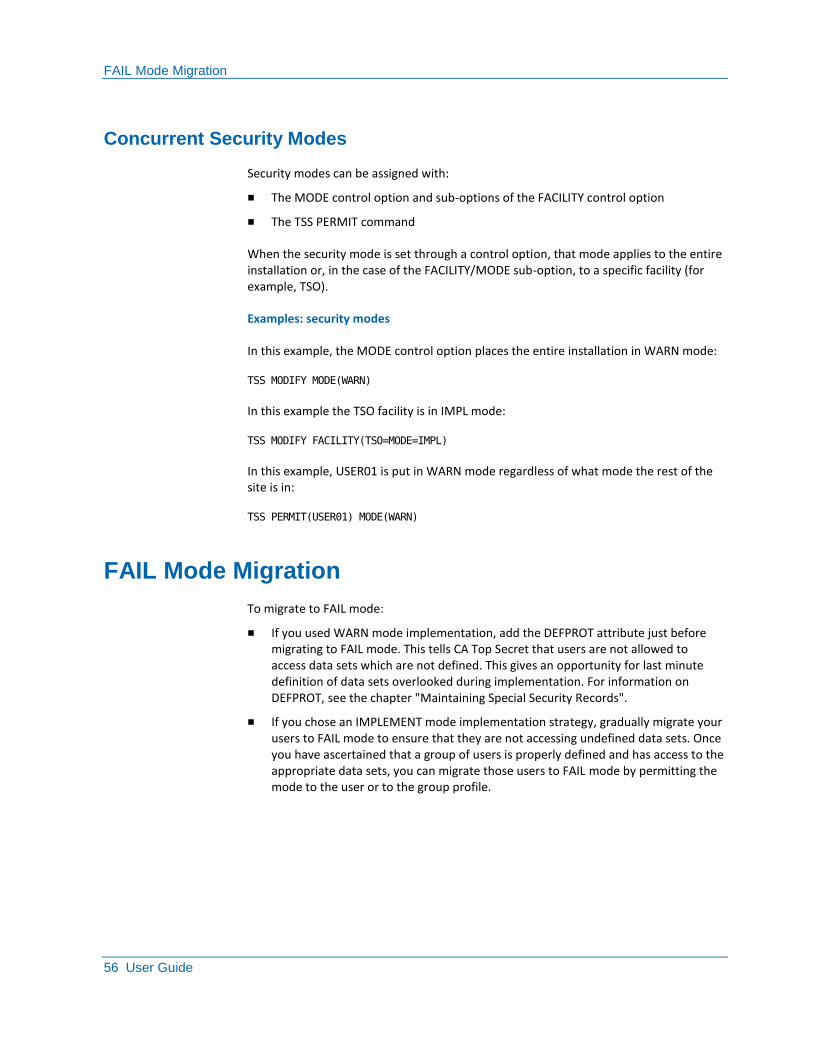
FAIL Mode Migration
56 User Guide
Concurrent Security Modes
Security modes can be assigned with:
■ The MODE control option and sub-options of the FACILITY control option
■ The TSS PERMIT command
When the security mode is set through a control option, that mode applies to the entire installation or, in the case of the FACILITY/MODE sub-option, to a specific facility (for example, TSO).
Examples: security modes
In this example, the MODE control option places the entire installation in WARN mode:
TSS MODIFY MODE(WARN)
In this example the TSO facility is in IMPL mode:
TSS MODIFY FACILITY(TSO=MODE=IMPL)
In this example, USER01 is put in WARN mode regardless of what mode the rest of the site is in:
TSS PERMIT(USER01) MODE(WARN)
FAIL Mode Migration
To migrate to FAIL mode:
■ If you used WARN mode implementation, add the DEFPROT attribute just before migrating to FAIL mode. This tells CA Top Secret that users are not allowed to access data sets which are not defined. This gives an opportunity for last minute definition of data sets overlooked during implementation. For information on DEFPROT, see the chapter "Maintaining Special Security Records".
■ If you chose an IMPLEMENT mode implementation strategy, gradually migrate your users to FAIL mode to ensure that they are not accessing undefined data sets. Once you have ascertained that a group of users is properly defined and has access to the appropriate data sets, you can migrate those users to FAIL mode by permitting the mode to the user or to the group profile.
Transaction Level Security
Chapter 3: Implementing CA Top Secret 57
Transaction Level Security
Transaction level security is effective for end-users only. A programmer can design an application to link to the program behind the transaction and get into the protected application by bypassing the transaction level security. If the files available within the facility are not protected a programmer can modify the program to access the files available behind the transaction level security. Proper program change controls limit these types of exposures.
If you choose to implement transaction level security with LCF, consider the following:
■ Transactions (or task codes for CA-IDMS) are the most obvious element of the application. Determine which users require which transactions and define those requirements to CA Top Secret.
■ Transactions using LCF are not resources that can be owned. Therefore:
– You cannot use the TSS WHOHAS command to determine who has access to the transactions.
– Transactions do not fall under the control of administrative scope. As a result, you cannot effectively decentralize their administration. An CA Top Secret administrator at any level can or cannot administer all transactions.
If you choose to secure transactions through OTRAN, consider the following:
■ Transaction ownership is global. Once a transaction is owned it must be administered across all facilities.
■ OTRANs are general resources and TSS WHOHAS can be used to help administer them.
Resource Level Security
58 User Guide
Resource Level Security
The following considerations apply to resource level security:
■ It is more difficult and time-consuming to determine the resource access requirements for a given application. It is often necessary to involve the applications development group to design effective resource level security.
■ CICS, IMS, and CA-IDMS resources are not owned, therefore:
– The TSS WHOOWNS and TSS WHOHAS commands can be used to determine who is responsible for, and who has access to, these resources.
– Administrative scope applies and administration of resources can be effectively decentralized.
■ Resource level security is the most secure level of security, because it prevents programmers from linking into protected programs or accessing protected files within these facilities.
You may find it appropriate to plan an implementation strategy that combines both forms of security. Many organizations initially address transaction level security, and as time permits gradually implement resource level security. Since these facilities allow gradual implementation of resources, even in FAIL mode, this may be the most effective approach for the implementation of CICS, IMS, and CA-IDMS security for your installation.
Activity Logging
You must select the activity to log. This can be done globally or by facility. Violation activity is always logged as long as you have specified the SMF sub-option of the LOG control option or have included the Audit/Tracking File in the CA Top Secret startup procedure.
Activity and Violation Reports
An easy way to monitor violations, or any selected activity, is to develop and produce reports on a regular basis. TSSUTIL, the CA Top Secret report generator, produces violation and/or activity reports based on customized selection criteria. For information, see the Report and Tracking Guide.
Any other report generator or program can be used to produce customized reports based on violations or activity. The format logged is an SMF type-80 format. For information, see member TSSINSTX (Installation Exit Skeleton Model) in the SMF80 DSECT.
Activity Logging
Chapter 3: Implementing CA Top Secret 59
Report Generation
When generating reports segment the information you are monitoring. If you segment the critical selection criteria from the non-critical you can focus on critical information. Consider the following sample breakdown of daily reports:
■ Report A contains violation information for systems resources
■ Report B contains violation information for payroll and accounts payable resources
■ Report C contains violation information for all other resources
■ Report D contains initiation information for dial-up terminals
■ Report E contains audited activity for critical production files
■ Report F contains audited activity for SUPERZAP and its aliases
■ Report G contains audited activity for all security administrators
■ Report H contains violation or audited information for super ACIDs
While the needs of each organization differ, when reporting is segmented it is easier for the security administrator to review critical violations and activity because the critical information is structured so that it stands out from the less critical information.
Ad-Hoc Reporting
You can produce ad-hoc reports that address special situations. For example, if you suspect that one of your users has suspicious access patterns, audit the user and produce a one-time report of his activity.
Route Code 9 Consoles
CA Top Secret lets you specify that CA Top Secret violation and initiation messages are sent to any operator console defined for route code 9. This allows the operations staff to monitor violations when activity is not monitored by security administrators. The operators have the option of notifying the appropriate authorities when a user appears to be generating violations.
To use a remote route code 9 console as your security console for use by the security administration staff, define the console so that commands cannot be entered from the remote location. This avoids the exposure to the machine room operations area from remotely entered console commands.
This is done through the LOG options.

User Messages and Violations Suppression
60 User Guide
TSSTRACK
TSSTRACK provides the security console function at any TSO or CICS terminal, if the terminal is used by an authorized CA Top Secret administrator.
For information about TSSTRACK, see the Report and Tracking Guide.
User Messages and Violations Suppression
CA Top Secret provides options to suppress messages and violations. You can suppress:
■ Sending messages to users in WARN mode by not specifying the MSG sub-option of the LOG control options.
■ Sending selected messages to users through the MSG control option.
■ Selected violations issued to users, but not the logging of violations, by changing characteristics of detailed violation reason codes through the DRC control option.
Suppressing messages may be an acceptable implementation strategy, particularly during the testing stages. Avoid message or violation suppression if possible. User messages and violations are often an important debugging tool to resolve user problems. If you suppress messages, choose the messages or violations you are going to suppress and communicate to any person who handles security problems that users may not be receiving the selected messages or violations.
Chapter 4: Violations, Logging, Reporting, and Auditing 61
Chapter 4: Violations, Logging, Reporting, and Auditing
This section contains the following topics:
Audit/Tracking File (see page 61) Violations and Logging (see page 62) Security Event Logging (see page 64) Security Reports (see page 66) Auditing (see page 67) Auditing Users and Resources (see page 68)
Audit/Tracking File
By default, CA Top Secret logs all violations to SMF. The Audit/Tracking file is also available for logging violations and audited events. The Audit/Tracking file lets you:
■ Eliminate SMF logging for violations and activity, which reduces SMF overhead.
■ Configure so that logging to the Audit/Tracking file cannot be suppressed. This configuration eliminates a potential security exposure.
■ Generate reports for up-to-the-minute information.
■ Extract security events that are logged to produce reports using the TSSUTIL batch utility.
You can only use the TSSTRACK online tracking capability if you are logging to the Audit/Tracking file. You can use the TSSUTIL to routinely archive audit tracking information.
CA Top Secret allows the online, real-time display of selected security activity on TSO and CICS terminals with the TSSTRACK utility.
TSSAUDIT permits auditors to monitor changes to the security file and sensitive z/OS facilities and data areas.
Violations and Logging
62 User Guide
Violations and Logging
The LOG control option is the primary mechanism that controls the reporting of system activity and violations for all facilities. You can also use the LOG sub-option of the FACILITY control option to control individual facilities.
Among the options you can select to track security breaches are:
■ A violation generates a descriptive message sent to the security console, the user's online terminal, or both.
■ Job/session initiations and terminations, resource accesses, security violations, or any combination of these events are logged for all or selected facilities.
■ A record of selected types of events are logged to SMF, the Audit/Tracking file, or both. The Audit/Tracking File can be shared across CPUs, providing a single reference source for security events.
When you use ACTION(AUDIT) with the PERMIT command function, it audits all accesses to the specified resource regardless of the mode or logging options of the user.
In FAIL mode, messages are issued regardless of the LOG control option specifications.
The logging of activity is transparent to the user.
Example: violation messages
This example logs violation messages to SMF or to the Audit/Tracking file but does not notify the user:
TSS MODIFY LOG(MSG)
Violations and Logging
Chapter 4: Violations, Logging, Reporting, and Auditing 63
Violation Limits
You can set limits as to how many violations users can accumulate per session and define an automatic action through the VTHRESH control option. The cancellation and suspension is automatic only for TSO, BATCH, and STC. For other online users, CA Top Secret prevents further access of any kind by locking out the terminal. This forces the user to sign off.
Access due to bypassing is always logged.
To set a violation limit, enter the command:
TSS MODIFY(VTHRESH(nn,SUS))
nn
Sets the maximum number of resource access violations that a user may accumulate during an online session or job execution. This operand must be specified when changing any of the action operands. 0 signifies that no violation threshold processing is performed.
Range: 0 to 254

Security Event Logging
64 User Guide
Security Event Logging
CA Top Secret provides the following batch utility programs to help monitor and control system security, log system activity, and perform disaster recovery:
TSSAUDIT
Run this batch utility to monitor changes to the security file and sensitive facilities and data areas. You can use it to list:
■ ACIDs that possess administrative or special privileges (such as AUDIT, CONSOLE) or any of the security bypass attributes.
■ The changes made to the security file. TSSAUDIT generates this information for a given date or time span by examining the recovery file. All changes made by a particular ACID can also be requested. The ACID must fall within the scope of the administrator running TSSAUDIT.
■ Information about modules in APF-authorized libraries.
■ Information about site-written (non-IBM) SVCs, the Program Properties Table (PPT), and the Terminal Monitor Program's (TMP) authorized program lists.
The last two capabilities are especially useful for pinpointing security weaknesses.
TSSCPR
Run this utility run against the CPF recovery file to produce a flat file record. This record can then be filtered through the TSSREPORT3 EARL report option or through another report writer to depict the contents of the CPF recovery file.
TSSOERPT (z/OS only)
Run this batch utility program to process security-related activity recorded in SMF data sets and the CA Top Secret Audit/Tracking file. To monitor user activity in an OpenEdition MVS environment, CA Top Secret logs security events under OpenEdition MVS to SMF using the standard CA Top Secret SMF record. Log records are written for any security event that denies the ACID access to an OpenEdition MVS facility. These records can assist you in determining the UID and GID of the ACID involved in the attempted access.
TSSPROT (z/OS only)
Run this utility to determine which of these data sets have and do not have their security bit indicators turned on. The TSSPROT utility pertains to VSAM and non-VSAM data sets in an SU32 environment. You can also use TSSPROT to turn security bits on or off for specific data sets or all data set located on accessible volumes. In a z/OS Alwayscall environment, TSSPROT has no effect.
Only the MSCA or an SCA can use this utility.
TSSRECVR

Security Event Logging
Chapter 4: Violations, Logging, Reporting, and Auditing 65
Run this utility to aid recovery from loss or corruption of the security file. During normal system operation, CA Top Secret maintains a record of all changes to the security file in the recovery file, which is a perpetual file. Changes are recorded to the file in a wraparound format. Therefore, this file must be large enough to accommodate all changes that occur between security file backups.
TSSRPTST (z/OS only)
Run this batch utility program to process and display the output the SAF SECTRACE command sends to SMF. To run the TSSRPTST report, you must have already run the SAF SECTRACE operator command and set the output destination to SMF. With few exceptions, CA Top Secret processes all z/OS SAF security requests by default. The SAF Trace report displays the monitored RACROUTE parameter list passed by requests for SAF services. This report also displays additional information, such as job name, user ID, and the program issuing the SAF call.
TSSTRACK (z/OS only)
Run this utililty to monitor security-related events from an online terminal in a real-time manner. This functionality lets the security administrator monitor suspicious activity "as it happens." Furthermore, TSSTRACK enables all CPUs on a single security audit file to be monitored from a single terminal. TSSTRACK can go back to a specified date to focus on a selected facility or on violations only.
The events that security administrators can monitor using TSSTRACK are limited by their administrative scope. All the information that TSSTRACK displays is obtained from the CA Top Secret Audit/Tracking file; only information logged to this file can be monitored.
You can use TSSTRACK from both 3270 and non-3270 terminals. Its standard version can run from CICS and TSO; however, you can customize it to run under other z/OS online facilities.
For information on logging options, see the Report and Tracking Guide.
Security Reports
66 User Guide
Security Reports
CA Top Secret provides the following batch utilities to translate resource access attempts and security events into reports:
TSSCHART
TSSCHART is a batch utility that provides an overview of your security database architecture by generating block charts of ACIDs/owned-resource relationships. This functionality lets you examine your security hierarchy "at-a-glance" and can be helpful during your initial CA Top Secret implementation process. Scope restrictions are honored so that if a properly authorized DCA uses the TSSCHART utility, the block chart the DCA receives only illustrates the ACIDs and resource relationships within the DCA's department. To view the installation as a whole, the MSCA or a properly authorized SCA must run the utility.
TSSUTIL
TSSUTIL is a flexible report generator/extract utility that provides batch reports of any security-related events logged to the Audit/Tracking File and/or SMF. You can produce precisely focused reports to monitor all kinds of security events. Selection criteria for TSSUTIL includes:
■ ACIDs
■ Jobs
■ Specific resources
■ Resource types
■ Facilities
■ Zones
■ Divisions
■ Departments
■ Dates
■ Types of access
■ CPUs
■ Violations
■ Audited incidents
TSSCFILE
■ TSSCFILE is a batch utility that produces a fixed-format output file whose records parallel the TSS LIST command output. You can then use this file with a site or vendor extract tool to write customized reports based on the configuration and content of your security database. As with the other batch reporting options, scope and administrative authority limitations are honored.
TSSREPORT and TSSREPORT2
Auditing
Chapter 4: Violations, Logging, Reporting, and Auditing 67
Under CA Top Secret for z/OS, TSSREPORT and TSSREPORT2 use the output of TSSCFILE and TSSUTIL, respectively, to produce pre-formatted CA Earl reports. You can choose from several different report layouts, and depending on your current needs and familiarity with CA Earl, you can design additional layouts.
TSSRPTST (z/OS only)
The SAF Trace Report lets you display the monitored RACROUTE parameter list passed by requests for SAF services. This report also displays additional environmental information, such as job name, user ID, and the program issuing the SAF call.
The TSSRPTST report formats and displays the output the SAF SECTRACE command sends to SMF. To run the TSSRPTST report, you must have already run the SAF SECTRACE operator command and set the output destination to SMF. With few exceptions, CA Top Secret processes all z/OS SAF security requests by default.
For information about these reports, see the Report and Tracking Guide.
Auditing
The TSSAUDIT utility lets auditors monitor changes to the Security File, sensitive facilities, and data areas.
CA Top Secret does not distinguish between an auditor and a CA Top Secret administrator. The auditor controls the functional responsibilities assigned to an employee. The types of CA Top Secret administrative authorities associated with the ACID reflect these functional responsibilities. The TSS ADMIN command function assigns administrative authorities, including audit-type authorities.
The ACIDs and resources must be included within the auditor's scope of authority, which is determined by the ACID type assigned when the auditor was defined to CA Top Secret. The scope can range from the entire installation (SCA) to just a user (USER).
Example: auditing ACID
This example gives an ACID the authority to audit certain resources and ACIDs and to use TSSUTIL, TSSAUDIT, and TSSTRACK to track both types of information:
TSS ADMIN(auditor's acid) RESOURCE(AUDIT,REPORT)
ACID(AUDIT,REPORT)

Auditing Users and Resources
68 User Guide
Auditing Users and Resources
A CA Top Secret auditor has the authority to audit:
Users
The auditor attaches the AUDIT attribute to the user's ACID.
Resources
The auditor updates the AUDIT record with the resource or resource prefix (up to 64 characters) and optional access levels to be audited.
A Specific Permission
The auditor includes the ACTION(AUDIT) keyword on the PERMIT command function.
The auditor can audit critical resources on a permanent basis and produce reports or monitor audit results online, as well as spot-check user activity by periodically auditing key personnel.
Auditors can coordinate their audit activity with the security administrator. The security administrator is doing concurrent audits to monitor effectiveness of the security implementation.
To avoid generating large numbers of unnecessary audit records, select audit criteria and revise this criteria as audit requirements change.
Chapter 5: Creating and Setting Up Users 69
Chapter 5: Creating and Setting Up Users
This section contains the following topics:
Create a User ACID (see page 69) Zone, Division, and Department ACIDs (see page 72) Model ACIDs (see page 73) Profile ACIDs (see page 79) Group ACIDs (see page 83) How to Increase ACID Size (see page 84) Delete an ACID (see page 90) ACID Expiration Date (see page 90) Suspend ACIDs Automatically Based On Inactivity Thresholds (see page 91) Promote or Demote an ACID (see page 94) Compare the Security Records of ACIDs (see page 94)
Create a User ACID
A user ACID is a functional ACID that lets you perform tasks and communicate with organizational ACIDs. The user is a person. A user ACID designates a specific employee in a department but can refer to any ACID type (functional or organizational).
Every user ACID must be associated with a single department ACID. Any administrator with ACID(CREATE) authority can establish users.
Create a User ACID
70 User Guide
To create a user ACID, enter the following command:
TSS CREATE(acid) NAME(acid_name)
TYPE(USER)
PASSWORD(password,nnn,EXP)
DEPARTMENT(department)
Note: If you do not specify TYPE, the product uses a default of TYPE(USER).
acid
Specifies the ID of the user ACID.
Valid values: Alphabetical characters (A-Z), numeric characters (0-9), and national characters ($ # @ % & = ?)
Invalid values: Scandinavian vowels (hex codes CO, DO, and 6A) and the following CA Top Secret table names:
■ ALL
■ APPCLU
■ AUDIT
■ CERTAUTH
■ CERTSITE
■ DELEGATE
■ DLF
■ FDT
■ MLS
■ MULTIID
■ NDT
■ RDT
■ SDT
■ STC
Length: Up to 8 characters
acid_name
Specifies the user name. If the name contains embedded blanks (for example, General User), surround the name with single quotation marks.
Length: Up to 32 characters
Create a User ACID
Chapter 5: Creating and Setting Up Users 71
password
Specifies the password of the user.
nnn
Specifies the number of days before password expiration occurs.
Range: 0 to 255
EXP
Specifies that the password expires when the user first logs on, at which point the user is prompted to create a password.
Length: Up to 8 characters
department
Specifies the department to which the user belongs.
Example: Create a User ACID
This example defines a new TSO user who is attached to the PAYDEPT department. The password INITIAL expires as soon as the user logs on, and any new password lasts for seven days. The CA Top Secret administrator must possess ACID(CREATE) authority and a scope that encompasses PAYDEPT.
TSS CREATE(USER02) NAME(‗ANDY POE‘)
TYPE(USER)
DEPARTMENT(PAYDEPT)
PASSWORD(INITIAL,7,EXP)
FACILITY(TSO)
Review User Information
You can allow users to obtain basic information about themselves (except for password, profile, and session information). Leave administrative functions to Control ACIDs.
To allow a user to display basic security record information, enter the command:
TSS ADMIN(username) DATA(BASIC)
Zone, Division, and Department ACIDs
72 User Guide
Zone, Division, and Department ACIDs
Use the TYPE parameter to create organizational ACIDs. Password is invalid with organizational ACIDs.
To create a zone, division, or zone ACID, enter the command:
TSS CREATE(acid) TYPE(DEPARTMENT|DIVISION|ZONE)
NAME(‗name‘)
[ZONE(zonename)|[DIVISION(divisionname)]
TYPE
Identifies whether you are creating a department, division, or zone ACID.
NAME
The name must be surrounded by single quotes if embedded with blanks.
Size: Up to 32 characters.
Valid values: Letters, numbers, and special characters
ZONE
Specifies the zone a division ACID belongs to.
DIVISION
Specifies the division a department ACID belongs to.
Examples: create a organizational ACID
This example creates a zone ACID called Parts Zone:
TSS CREATE(PARTZON) TYPE(ZONE)
NAME(‗PARTS ZONE‘)
This example creates the Accounting Division in the Parts Zone:
TSS CREATE(ACCTDIV) TYPE(DIVISION)
NAME(‗ACCT DIV‘)
ZONE(PARTZON)
This example creates the Personnel Applications Department linked to the Accounting Division:
TSS CREATE(ACCTDEPT) TYPE(DEPARTMENT)
NAME(‗PERSONNEL APPL‘)
DIVISION(ACCT01)
Model ACIDs
Chapter 5: Creating and Setting Up Users 73
Model ACIDs
You can use a model or template ACID to create a large number of new ACIDs. This saves time when creating a new ACID that is similar to an ACID that already exists. You can use two commands to model ACIDS:
■ MODEL
■ CREATE USING
The MODEL command generates a list of TSS commands that represent the ACID being modeled. The new ACID is not created until the TSS commands generated by the MODEL command are issued. The MODEL command copies not only the model ACID’s basic information, but also most of the ACID’s resource permissions and administrative resources.
The CREATE USING command automatically generates the new ACID. This command copies only the basic information of the ACID being modeled.
Model an ACID with the MODEL Command
Use the MODEL command function to generate the TSS commands to create an acid of the same type (using an existing acid as a model). The MODEL command generates a list of TSS commands, which you can review and edit as necessary. Executing the commands creates the acid specified in the ACID keyword.
Note: If you use the MODEL command, and the DIAGSYM option in DFSORT is YES, you must have a SYSOUT DD in the CA Top Secret started task.
The generated commands represent most of the information available from a TSS LIST(modelacid) DATA(ALL) command. All attributes and data set and resource permissions are modeled by commands. Fields that are not modeled include:
■ Passwords or passphrases
■ Digital certificate and keyring segments:
■ Create/Modify date time
■ Last used info
■ ACID List entries
■ ADMINBY

Model ACIDs
74 User Guide
■ ASUSPEND/VSUSPEND/PSUSPEND
■ Data Set Ownership information
■ Resource Ownership information
The INTO keyword specifies the data set where the TSS commands are written. You must specify this keyword to write commands to a PDS data set. You can view or edit the generated TSS commands.
If the INTO keyword is not specified, the TSS commands that are produced by the MODEL command are displayed to the user who issued the command.
The administrator executing the command must have:
■ Admin authority for DATA(all)
■ Scope over the acid being modeled
When the MODEL command is executed, the first record in the output is a comment containing the following information:
■ The command
■ The user acid being modeled
■ The date and time of the model
■ Identification of the TSS administrator who issued the command
■ Identification of the system on which the command was executed
■ Identification of the user acid used as a model
An example comment is as follows:
/*MODEL ACID NEWCAS STORED 02/18/10-10.45.51 BY MASTER1 ON XE15 USING CASSIE
This keyword has the following format:
TSS MODEL USING(modelacid) ACID(newacid)
TSS MODEL USING(modelacid) ACID(newacid) [INTO(datasetname[(membername)])]
modelacid
Specifies the acid to use as a model. All resources and permissions from this acid are copied to the new acid.
newacid
Specifies the name of the acid that will be modeled after the acid specified in the USING keyword. The name can be a new acid name or an existing acid name. If you specify an existing acid name and want to use TSS commands produced by the MODEL commands without changing them, delete the existing ACID before executing the TSS commands.

Model ACIDs
Chapter 5: Creating and Setting Up Users 75
datasetname[(membername)]
(Optional) Specifies the name and optionally a member name of the PDS data set where the model output commands are stored. If the keyword INTO is not specified, the TSS commands produced by the MODEL command are displayed to the user who issued the MODEL command.
Default for membername: Value specified in the ACID keyword. However, if the first character of the ACID value is a number, you must supply a member name that does not start with a number.
Examples: MODEL function
■ This example generates TSS model command output for the new acid NewRac using existing acid Rachael. The specified command generates the output in a user-specified member in a MVS PDS data set named KOTPA01.RACHAEL.MODEL (member name Rachaelk).
TSS MODEL USING(Rachael) ACID(NewRac) INTO(kotpa01.rachael.model(Rachaelk))
■ This example generates the model command output for the new acid NewRac using existing acid Rachel in the MVS PDS data set named KOTPA01.RACHAEL.MODEL (without a member name). The member is set to the acid name in the ACID keyword NewRac.
TSS MODEL USING(Rachael) ACID(NewRac) INTO(kotpa01.rachael.model)
■ In this example, the INTO keyword is omitted, and the command output appears on screen of the user (or appears as batch output if the command is executed from batch):
TSS MODEL USING(cassie) ACID(newcas)
Command output:
/*MODEL ACID NEWCAS STORED 02/18/10-14.41.53 BY MASTER1 ON XE15 USING CASSIE
/*Please edit any CREATE commands by adding a PASSWORD keyword to the command
TSS CRE(NEWCAS) NAME('CASSIE E. KOT') TYPE(USER) DEPT(SYSDEPT)
TSS ADD(NEWCAS) GROUP(OMVSGRP)
TSS ADMIN(NEWCAS) MISC4(CERTAUTH CERTUSER CERTGEN CERTEXPO CERTCHEK)
TSS ADD(NEWCAS) FAC(CICSPROD)
TSS ADD(NEWCAS) FAC(TSO)
TSS ADD(NEWCAS) KERBNAME(CASSIE1PRINCIPAL)
TSS ADD(NEWCAS) MAXTKTLF(0000086400)
TSS ADD(NEWCAS) HOME(/U)
TSS ADD(NEWCAS) DFLTGRP(OMVSGRP)
TSS0300I MODEL FUNCTION SUCCESSFUL
Model ACIDs
76 User Guide
Fields That Are Not Copied During User Modeling
During the user modeling process, CA Top Secret copies most of the modeled user’s security record information; however, the following fields are not copied during the process:
■ Field values not displayed by a TSS LIST command
■ Passwords or passphrases
■ Digital certificate and keyring segments:
– Certificate name, certificate start date, certificate until date, certificate ID, certificate subject DN
– Certificate keyring, certificate serial number, certificate issuer IDN, certificate issuer SDN, certificate NB date
– Certificate NA date, certificate key size, certificate key type, certificate label, certificate trust status
– Certificate URI, certificate IP address, certificate key usage
■ Create/Modify date
■ Create/Modify time
■ Last used info
■ ACID List entries
■ ADMINBY
■ Facility ADMINBY
■ Segment start
■ FCT ownership
■ Ownership dsn
■ Ownership vol
■ Ownership vm
■ Ownership resource
■ Ownership pie resource
■ Ownership resource class
■ Ownership on WHOHAS
Model ACIDs
Chapter 5: Creating and Setting Up Users 77
Model an ACID with the CREATE Command
Use the CREATE command to model ACIDS. All basic information is copied from the model ACID, including the name and password. The security administrator can also change, add, or omit any basic information from the model.
Basic information includes:
■ The name associated with the ACID
■ The ACID type
■ Facilities permitted access
■ Associated profiles
Any existing ACID can be used as the model. All ACID types can be created.
All rules of scope and administrative authority are supported.
If the model ACID is outside the scope of the security administrator and/or the model ACID has an information field that requires ADMIN authority the security administrator does not have, the model ACID cannot be used to create the new ACID. For example, a security administrator needs MISC1(INSTDATA) authority to copy INSTDATA information from the model ACID to the new ACID.
To create an ACID from a model, enter the command:
TSS CREATE(newacid) USING(modelacid)
[NAME('new name')]
[PASSWORD(newpassword,nn,EXP)]
[INSTDATA(new date)]
newacid
The name of the new ACID.
modelacid
The ACID used as a model.

Model ACIDs
78 User Guide
Examples: create an ACID from a model
This example creates a new ACID called USER03, using the ACID USER02 as the model:
TSS CREATE(USER03) USING(USER02)
This example gives USER03 a name and password different from the model:
TSS CREATE(USER03) USING(USER02)
NAME(‗JOHN SMITH‘)
PASSWORD(WELL,7,EXP)
This example changes the name and password of USER03, and the contents of the INSTDATA field:
TSS CREATE(USER03) USING(USER02)
NAME(‗JOHN SMITH‘)
PASSWORD(WELL,7,EXP)
INSTDATA(‗MARCH 85‘)
This example does not include any INSTDATA information from the USER02 model ACID:
TSS CREATE(USER03) USING(USER02)
NAME(‗JOHN SMITH‘)
PASSWORD(WELL,7,EXP)
INSTDATA( )
Omitting Characteristics
Omitting certain items can be used for all information except attributes because they have no values to nullify within the parentheses. To remove an attribute, such as NODSNCHK, use the REMOVE function after creating the ACID.

Profile ACIDs
Chapter 5: Creating and Setting Up Users 79
Profile ACIDs
A profile is an ACID containing resource permissions that allows users who can share access authorizations for protected resources to be grouped. Profiles minimize the use of access authorizations made directly to users. Use of profiles avoids redundant authorizations and makes administration easier.
When creating and using profiles:
■ You can attach a maximum of 254 profiles to one user
■ You cannot assign a password to a profile
■ You cannot attach a profile to another profile
■ A profile must be defined under an department
■ To attach a profile to a user, both the ACID and the profile must be within your scope of authority
■ Profiles can be made globally administrable with the GAP attribute
■ The SUSPEND attribute is not valid on a profile or group type acid
■ Profiles should not own resources
■ Users can be assigned to a profile permanently or temporarily
■ You can administer profiles outside of your scope if you have been given the proper authority
To define a new profile ACID
1. Enter the command:
TSS CREATE(acidname) TYPE(PROFILE)
NAME(profilename)
DEPARTMENT(deptname)
TYPE
Specifies PROFILE as the ACID type.
NAME
Specifies the name of the profile.
DEPARTMENT
Specifies the department the profile belongs to. This keyword is required if the control ACID issuing the command is an SCA, LSCA, or ZCA, but not a DCA. TYPE(USER) and TYPE(PROFILE) ACIDs must be created in a department.
The profile ACID is defined.
Profile ACIDs
80 User Guide
2. Enter the command:
TSS PERMIT(acidname) DSNAME(dataset)
ACCESS(UPDATE)
TIME(hh,hh)
DSNAME
Specifies the data sets permissions are granted to.
ACCESS
Specifies the type of permission being granted.
TIME
Specifies the time range for the permission to be granted.
The profile permissions are specified.
Example: define an ACID profile
This example creates the new Payroll Department profile linked to that department and then grants profile APPPRO1 update access to all data sets beginning with ABC as the high level qualifier from 8 a.m. to 7:59 p.m.
TSS CREATE(APPPRO1) TYPE(PROFILE)
NAME(‗PAYROLL DEPT PROF‘)
DEPARTMENT(PAYROL)
TSS PERMIT(APPPRO1) DSNAME(ABC.)
ACCESS(UPDATE)
TIME(08,20)
Attach a Profile to an ACID
To attach a profile to an ACID:
■ You must possess ACID(MAINTAIN) authority
■ Both the profile and the ACID must lie within your scope (unless it is a globally administrable profile)
To attach a profile to an ACID, enter the command:
TSS ADDTO(acidname) PROFILE(profileacid)
Profile ACIDs
Chapter 5: Creating and Setting Up Users 81
Attach a Temporary Profile
Use the FOR or UNTIL parameters to add a profile ACID on a temporary basis.
To connect a profile ACID to a user ACID for set period, enter the command:
TSS ADDTO(acidname) PROFILE(profileacid)
FOR(nnn)
nnn
The number of days the ACID is attached for.
List an Expiration Date for a Profile
To determine the expiration date for a temporary profile, enter the command:
TSS LIST(acidname) DATA(EXPIRE)
Profile Order
The order of profiles directly affects resource checking of the permissions granted. Existing profiles cannot be reordered.
To add an existing profile and make it the first one in the search order, use the FIRST keyword.
To put the new profile somewhere other than at the end, use the BEFORE and AFTER keywords.
Examples: profile order
This example adds PROF5 after PROF1 in the search order:
TSS ADDTO(USER04) PROFILE(PROF5)
AFTER(PROF1)
This example adds an existing profile, PROF4, to USER04 and makes it the first in the search order:
TSS ADDTO(USER04) PROFILE(PROF4)
FIRST
Profile ACIDs
82 User Guide
Global Profiles
A profile available to all administrators is called a globally administrable profile (GAP). Only a security administrator, with the same scope of authority as the security administrator who created the profile, can assign the GAP attribute. A profile allows any CA Top Secret administrator to attach it to any user within his administrative scope.
To create a globally administrable profile, enter the command:
TSS ADDTO(profilename) GAP
To remove the globally administrable profile from a profile, enter the command:
TSS REMOVE(profilename) GAP
Assign a Profile Outside Your Scope
To assign an ACID scope over a profile, use the ADMIN command function. Administration of profiles cannot be given to ACIDs with the type of USER.
Example: assign a profile outside your scope
This example:
■ Assumes that DCA2 administers DEPT2 and that PROF1 resides in DEPT1
■ Gives DCA2 administrative authority over PROF1
TSS ADMIN(DCA2) SCOPE(PROF1)

Group ACIDs
Chapter 5: Creating and Setting Up Users 83
Group ACIDs
A group is a collection of users. A group is similar to a profile, however a group is recognized by IBM OpenEdition MVS and a profile is not. To use IBM Open Edition MVS a user ACID must be associated with at least one group that has an assigned GID. The group can be attached directly to a user or the system default can be assigned using the OMVSGRP control option.
When you create and use groups:
■ You can attach a maximum of 254 groups and profiles to one user
■ You cannot assign a password to a group
■ You cannot attach a group to another group
■ A group must be attached to a department and a user
■ To attach a group to a user, both the ACID and the group must be within your scope of authority
■ Groups cannot own resources
■ Users can be assigned to a group permanently or temporarily
■ A group ACID can have DFP and GID information attached to it
To define a new group, enter the command:
TSS CREATE(acidname) TYPE(GROUP)
NAME(‗group name‘)
[DEPARTMENT(name)]
TYPE
Specifies GROUP as the type of ACID you want to create.
NAME
Specifies the name of the group.
DEPARTMENT
Indicates the department group belongs to. This keyword is required if the Control ACID issuing the command is an SCA, LSCA, or ZCA, but not a DCA.

How to Increase ACID Size
84 User Guide
Attach a Group to an ACID
To attach a group to an ACID:
■ You must possess ACID(MAINTAIN) authority
■ Both the group and the ACID must lie within your scope
Authorizations granted to the group are added to the user.
To attach a group to an ACID, enter the command:
TSS ADDTO(username) GROUP(groupname)
Example: attaching a temporary group
This example connects the group ACID to the specified user ACID for the next ten days. After that time the group is removed from the ACID:
TSS ADDTO(USER01) GROUP(APPGRO01)
FOR(10)
Determine a Group's Expiration Date
To determine a GROUP's expiration date, enter the command:
TSS LIST(acidname) DATA(EXPIRE)
How to Increase ACID Size
Accessor IDs (ACIDs) constitute the basic hierarchical structure of your database. Based on your security policy implementation and required level of protection, ACID records can reach the maximum size. As a result, administrators cannot add attributes and properties to the records, which can impede productivity and response times.
You can increase the maximum size of organizational ACIDs (which let you construct the upper levels of your security hierarchy) or increase the maximum size of all ACIDs. Increasing the size limit avoids the need to redesign the security implementation.

How to Increase ACID Size
Chapter 5: Creating and Setting Up Users 85
The following illustration shows how a security administrator increases ACID size.
Perform the following tasks to increase ACID size:
1. Define a VSAM cluster in the catalog (see page 85).
2. Allocate a security file with a new ACID size (see page 86).
3. Copy the backup security file to the new security file (see page 88).
Define a VSAM Cluster in the Catalog
The VSAM data set increases the number of records that can be stored by converting the records to VSAM. Before creating the VSAM file, you must define the VSAM cluster that the file that will occupy.
Follow these steps:
1. Edit the sample JCL in VSAMDEF3 to specify the data set name and volume to be allocated.
Important! Do not run STEP 2 if the security file is not shared.
2. Run VSAMDEF3.
The VSAM base cluster file is defined in the catalog. If the security file is shared, the alternate index file and path file are defined.
How to Increase ACID Size
86 User Guide
Allocate a New Security File with a New ACID Size
Allocate a new security file with a new ACID size by increasing the maximum size of ACIDs.
Note: This change can be implemented one security file at a time, does not affect the size of the security file, and does not affect system performance.
Follow these steps:
1. Determine the required number of blocks for creating the security file:
a. Edit TSSMAIND and the SECPARMS portion of TSSMAINS to conform to your site's standards, including the following edits.
The TSSMAIND and TSSMAINS members are in the CAKOJCL0 data set. CAKOJCL0 is available in the yourHLQ.SAMPJCL data set that was installed during product installation (where yourHLQ specifies the data set prefix for the site).
– Specify the name of the dummy run in the SECDUMMY member referenced in TSSMAIND.
A dummy run lets you calculate required blocks without allocating the real security file.
– Set the ID=DUMMY parameter to consist of a maximum of eight characters.
b. Execute a dummy run with the JCL in TSSMAIND.
The number of blocks required is returned.
Note: Running TSSMAIND causes an SD37 ABEND or U1520. This result is normal.
2. Create the security file:
a. Edit the CAKOJCL0 member TSSMAINS.
The CAKOJCL0 data set is available in the yourHLQ.SAMPJCL data set that was installed during product installation (where yourHLQ specifies the data set prefix for the site).
– Set the SPACE parameter on the SECFILE DD statement as recommended in the TSSMAIND output.
The default in the JCL is to use block allocation (rather than cylinders). To use blocks, set the BLKSIZE and BLOCKS parameters properly on the PROC statement. To use cylinders, follow the instructions in the TSSMAINS comments.
– Set VOLSER JCL to the DASD volume serial identifier for your security file.
How to Increase ACID Size
Chapter 5: Creating and Setting Up Users 87
– Set SECPRIM ID=PRIMARY to identify the name of your security file.
ID supports a maximum of eight characters. The specified characters are placed in the primary security file and distinguish the primary security file from the backup file. We recommend ID=PRIMARY for the primary file and ID=BACKUP for the backup file.
– Set the VSAMFILE DD statement to refer to the VSAM data set that you created when you defined a VSAM cluster in the catalog (see page 85).
– Set the VSAMAIX DD statement in STEP 2 to refer to the alternate index VSAM data set (if the security file is shared), or remove STEP 2 (if the security file is not shared).
After the VSAM file is created, to copy information from an existing security file, run the TSSXTEND utility. You can copy information from a BDAM-only security file or a security file that uses BDAM and VSAM files.
b. Specify a MAXACIDSIZE entry (for increasing all ACID size), ORGACIDSIZE entry (for increasing organization ACID size), or both in the TSSMAINS utility job as follows:
MAXACIDSIZE=nnnn
nnn
Specifies a value between 256 and 512 that lets all ACIDs reach a size of more than 256 KB. ACIDs that reach the original limit will adopt the new maximum size.
ORGACIDSIZE=nnnn
nnnn
Specifies a value between 513 and 1024 that lets organizational ACIDs (DEPT, DIV, and ZONE) reach a size of more than 512 KB. ACIDs that reach the original limit will adopt the new maximum size.
Important! Use this parameter only if you must support an department organizational ACID size that is greater than the MAXACIDSIZE value. CA Top Secret ignores any ORGACIDSIZE value that is less than the MAXACIDSIZE value.
c. Run the TSSMAINS job.
The product allocates the file.
Note: If you are using more than one CPU, you can place the security file on a shared DASD volume that is accessible to all systems. In this situation, you specify the control option SHRFILE(YES) on each CPU.

How to Increase ACID Size
88 User Guide
3. Edit the CAKOJCL0 member TSSMAINB:
Important! The SECPARMS contents must remain unchanged from the values used in TSSMAINS. If the backup file has different attributes than the primary file, the product might not be able to copy the primary file into the backup file during a backup process.
■ Set parameters BLOCKS and CYLS to be identical to the CYLS and BLOCKS parameters that TSSMAINS uses to create the security file.
■ Assign a BLKSIZE value that is identical to the BLKSIZE value of the primary security file.
■ (Optional) Edit the ID parameter in the SECBACK member reference (default of ID=BACKUP).
ID can contain up to eight characters. The value should clearly indicate that this file is the backup security file.
4. Execute the JCL in CAKOJCL0 member VSAMDEF6 to invoke IDCAMS to create a separate backup VSAM file.
Note: Specify the backup VSAM file on the VSAMFILE DD statement.
The product creates a separate backup VSAM file.
5. Run TSSMAINB to allocate the backup security file.
You now have a new security file with a new ACID size.
Copy the Backup Security File to the New Security File
After allocating a security file that provides a new ACID size limit, copy the old backup security file to the new security file.
To perform this task, you must be a Master Security Control ACID (MSCA) or a user with one of the following authorizations:
■ USE access to the TSSUTILITY.TSSXTEND entity in the CASECAUT resource class for any function except ZAP.
■ UPDATE access to the TSSUTILITY.TSSXTEND entity in the CASECAUT resource class for using the ZAP function.
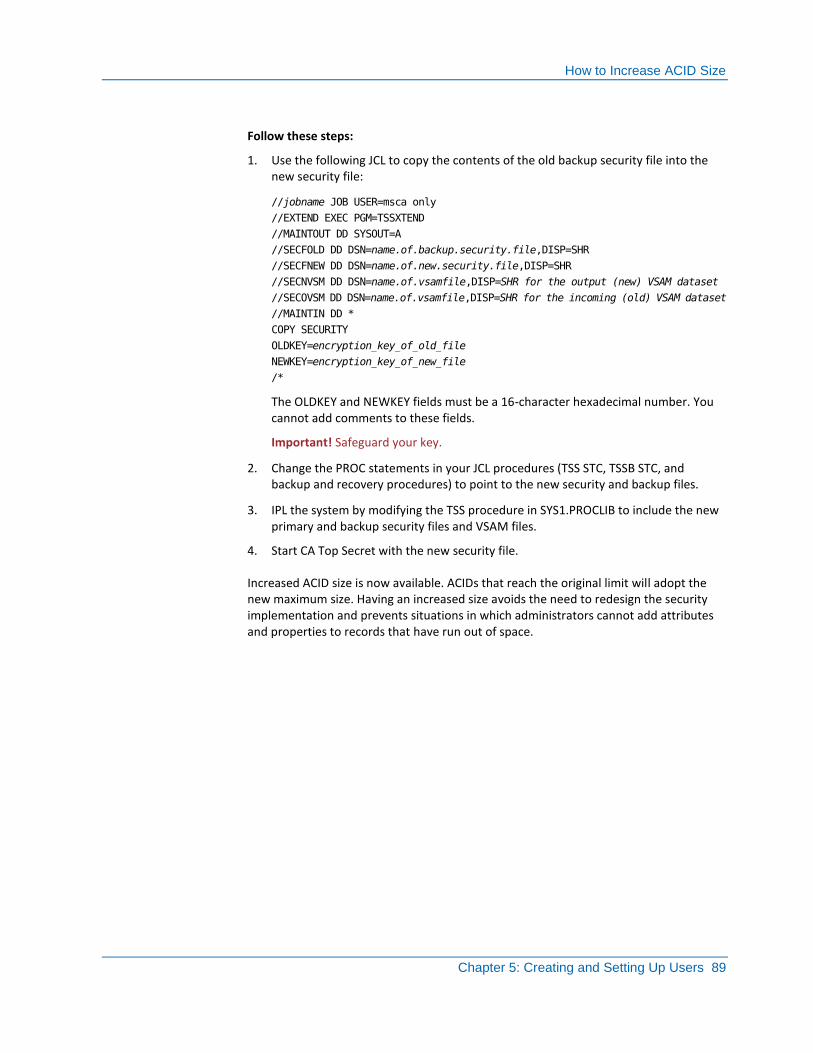
How to Increase ACID Size
Chapter 5: Creating and Setting Up Users 89
Follow these steps:
1. Use the following JCL to copy the contents of the old backup security file into the new security file:
//jobname JOB USER=msca only
//EXTEND EXEC PGM=TSSXTEND
//MAINTOUT DD SYSOUT=A
//SECFOLD DD DSN=name.of.backup.security.file,DISP=SHR
//SECFNEW DD DSN=name.of.new.security.file,DISP=SHR
//SECNVSM DD DSN=name.of.vsamfile,DISP=SHR for the output (new) VSAM dataset
//SECOVSM DD DSN=name.of.vsamfile,DISP=SHR for the incoming (old) VSAM dataset
//MAINTIN DD *
COPY SECURITY
OLDKEY=encryption_key_of_old_file
NEWKEY=encryption_key_of_new_file
/*
The OLDKEY and NEWKEY fields must be a 16-character hexadecimal number. You cannot add comments to these fields.
Important! Safeguard your key.
2. Change the PROC statements in your JCL procedures (TSS STC, TSSB STC, and backup and recovery procedures) to point to the new security and backup files.
3. IPL the system by modifying the TSS procedure in SYS1.PROCLIB to include the new primary and backup security files and VSAM files.
4. Start CA Top Secret with the new security file.
Increased ACID size is now available. ACIDs that reach the original limit will adopt the new maximum size. Having an increased size avoids the need to redesign the security implementation and prevents situations in which administrators cannot add attributes and properties to records that have run out of space.
Delete an ACID
90 User Guide
Delete an ACID
Use the DELETE command function to:
■ Purge a designated ACID from the security file
■ Revoke all authorizations granted to the ACID
■ Free any resources owned by the ACID
You cannot delete an ACID:
■ That still owns resources permitted to other users
■ Still permitted to other ACIDs (job submit authority)
■ If it is a divisional, departmental, or profile ACID that has other ACIDs linked to it
Important! The ALL, AUDIT, DLF, FDT, NDT, RDT, SDT, and STC Records and the MSCA’s ACID can never be deleted.
To delete an ACID, enter the command:
TSS DELETE(acidname)
ACID Expiration Date
You can specify that ACIDs expire after a set period or on a set date.
To set an expiration period for an ACID, enter the command:
TSS ADDTO(acidname) FOR(nnn)
nnn
Specifies how many days the ACID is valid, starting with the day the FOR parameter is entered.
Range: 1 to 255
Use the FOR and UNTIL keywords with the PERMIT function to specify a time limit on authorized access to the designated resource(s).
To set an expiration date for an ACID, enter the command:
TSS ADDTO(acidname) UNTIL(mm/dd/yy)
mm/dd/yy
The date the designated ACID automatically expires.
Suspend ACIDs Automatically Based On Inactivity Thresholds
Chapter 5: Creating and Setting Up Users 91
Reactivate an Expired ACID
You can reactivate an expired ACID with either the FOR, UNTIL, or EXPIRE keywords.
To reactivate an expired acid, use any of the following commands:
TSS REMOVE(acidname) FOR(0)
TSS ADDTO(acidname) FOR(0)
TSS REMOVE(acidname) UNTIL
TSS ADDTO(acidname) UNTIL
TSS REMOVE(acidname) EXPIRE
Change an Expiration Date
To change an expiration date to a new date, enter the command:
TSS REPLACE(acidname) UNTIL(mm/dd/yy)
To extend or decrease an expiration interval, enter the command:
TSS REPLACE(acidname) FOR(nnn)
To remove an expiration date, enter the command:
TSS REMOVE(acidname) EXPIRE
Suspend ACIDs Automatically Based On Inactivity Thresholds
You can suspend ACIDs that have not been used for a long time. Inactivity is measured from the day that an ACID’s password expired. If CA Top Secret does not detect any activity for an ACID before the threshold is reached, the ACID is suspended. Changing the password is considered activity.
To determine when to suspend ACIDs based on inactivity, enter the following command:
TSS MODIFY INACTIVE((0|nnn) [,LASTUSED])
0
Deactivates the INACTIVE option. This value is the default value.
Suspend ACIDs Automatically Based On Inactivity Thresholds
92 User Guide
nnn
Specifies a number of days, after which the product prohibits signon for an unused ACID that is connected to an expired password. For example, specifying 5 means that five days after the ACID's password expires, CA Top Secret suspends the ACID if no activity is detected for the ACID. Suspending the ACID denies system access to any user or job that uses this ACID.
Important! This suspension process does not apply to users with an administratively expired password. For example, an administrator can create a user with PASSWORD(password_text,,EXP). If the user never logged on to the system, the user would not be suspended during the first logon, regardless of the INACTIVE interval.
Range: 1 to 999
We recommend specifying a value between 14 and 30. When the value is too large, older unused identities that are still technically active might be at risk for unauthorized use (without administrator intervention). When the value is too small, ACIDs could be suspended unnecessarily (for example, when a regular employee returns from a scheduled vacation).
LASTUSED
Specifies to suspend the ACID if both of the following values are greater than the nnn setting:
■ Number of days between the last date that an ACID was used and today's date
■ Number of days between the last date that the ACID's password was changed and today's date
With this specification in place, CA Top Secret also suspends an ACID that has never signed on for a number of days exceeding the nnn setting. For example, if you create ACID BOB on July 5, and INACTIVE(30,LASTUSED) is set, BOB must sign on between July 5 and August 4; otherwise, CA Top Secret suspends the ACID.
Note: If you specify LASTUSED, the nnn value must be greater than or equal to the password expiration (PWEXP) and password phase expiration (PPEXP) values.
Suspend ACIDs Automatically Based On Inactivity Thresholds
Chapter 5: Creating and Setting Up Users 93
Reactivate an ACID
To reactivate a suspended ACID, remove the SUSPEND attribute from the user and replace the expired password.
To reactivate a suspended ACID
1. Enter the command:
TSS REMOVE(acidname) SUSPEND
The suspension is removed.
2. Enter the command:
TSS ADDTO(acidname) PASSWORD(password,nnn,EXP)
The password is replaced.
Set Limited Duration Suspensions
You can temporary deactivate an ACID for a limited period, for example during vacations.
To suspend an ACID for a limited period, enter the command:
TSS ADDTO(acidname) SUSPEND
UNTIL(mm/dd/yy)
Promote or Demote an ACID
94 User Guide
Promote or Demote an ACID
ACIDs can be:
■ Moved from one department, division, or zone to another
■ Changed from a user, ZCA, DCA, and/or VCA into an SCA
Promoting or demoting an ACID does not change the administrative authority, it changes the scope of administration.
The following considerations apply when performing a MOVE:
■ Only the MSCA can move a USER to an SCA or LSCA
■ Only the MSCA can move an LSCA, SCA, or ZONE
■ Only the MSCA, SCA or ZCA (within scope) can move a DIVISION or VCA
■ Only the MSCA, SCA, ZCA, or VCA (within scope) can move a DEPARTMENT or DCA
■ Only the MSCA, SCA, ZCA, or DCA (within scope) can move a USER or PROFILE
Examples: promote and demote ACIDs
This example leaves a user in the same department but promotes him to a DCA from a user ACID:
TSS MOVE(USER04) TYPE(DCA)
This example moves the DCA DCA01 from PERDEPT department into the PAYDEPT as a USER:
TSS MOVE(DCA01) DEPARTMENT(PAYDEPT)
TYPE(USER)
This example moves the SCA SCA01 to the FINDEPT department as a user ACID:
TSS MOVE(SCA01) DEPARTMENT(FINDEPT)
TYPE(USER)
Compare the Security Records of ACIDs
Security records contain all user and resource permissions and restrictions. These records can also contain the ACID holder name, the ACID type, and information about when the ACID was created, last modified, and last used.
Compare the Security Records of ACIDs
Chapter 5: Creating and Setting Up Users 95
You can use the COMPARE command function (and the associated USING keyword) to compare security records between two ACIDs.
Note: Administrators must have explicit authority to list a TSS data type of ACIDS. This authority is obtained through the DATA keyword of the ADMIN command function. The comparison does not include special security records (for example, the ALL Record, the FDT record, or the STC record); does not include digital certificate information; and does not let you compare creation dates, administrative changes dates, and last used dates.
To compare the security records of ACIDs, issue the following command:
TSS COMPARE(acid1) USING(acid2)
acid1
Specifies the first ACID to compare.
acid2
Specifies the second ACID to compare.
CA Top Secret initiates the comparison.
Example: Compare the Security Records of ACIDs Rachel01 and Rachel02
This example compares the security records of ACIDs rachel01 and rachel02:
TSS COMPARE(rachel01) USING(rachel02)


Chapter 6: Creating Security Administrators 97
Chapter 6: Creating Security Administrators
This section contains the following topics:
Control ACIDs (see page 98) The Auditor (see page 100) Administrative Authority (see page 101) Remove Administrative Authorities (see page 119) Restricted Administrative Authorities (see page 120)
Control ACIDs
98 User Guide
Control ACIDs
All Control ACIDs, including the MSCA, go through password checking, even in DORMANT mode.
To create a control ACID, enter the command:
TSS CREATE(acidname) TYPE(DCA|VCA|ZCA|LSCA)
NAME('name')
PASSWORD(password,nnn,EXP)
[ZONE|DIVISION|DEPT(name)]
TYPE
Identifies the ACID as a DCA, VCA, ZCA, LSCA, or SCA.
NAME
The name of the control ACID. Surround with single quotes if embedded with blanks.
Range: Up to 32 characters.
Valid values: Letters, numbers, and special characters
PASSWORD
Specifies the ACIDs password.
Range: Up to 8 characters.
ZONE|DIVISION|DEPT
Specifies the range of ACIDs which a control ACID is allowed to manipulate, and the range of operations allowed to manipulate these ACIDs. SCOPE is normally defined by the hierarchy ACID to which the control ACID is defined.
Examples: adding a control ACID
In this example, the DEVVCA control ACID is associated with DIVISION(DEV). All ACIDs defined within or below DIVISION(DEV) are within the scope of this VCA. ZCA, VCA and DCA ACIDs are always associated with a hierarchy ACID.
TSS CREATE(DEVVCA) TYPE(VCA)
NAME(‗DEVELOPMENT VCA‘)
DIVISION(DEV)
PASSWORD(VEFOK,7)
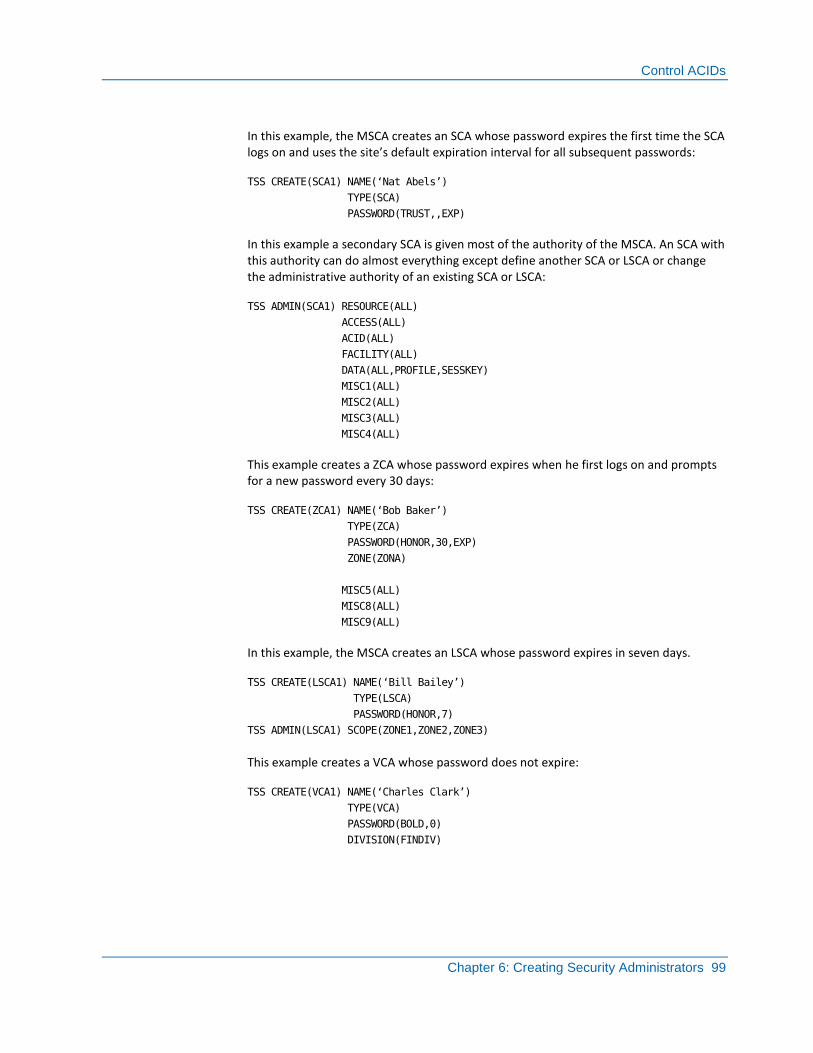
Control ACIDs
Chapter 6: Creating Security Administrators 99
In this example, the MSCA creates an SCA whose password expires the first time the SCA logs on and uses the site’s default expiration interval for all subsequent passwords:
TSS CREATE(SCA1) NAME(‗Nat Abels‘)
TYPE(SCA)
PASSWORD(TRUST,,EXP)
In this example a secondary SCA is given most of the authority of the MSCA. An SCA with this authority can do almost everything except define another SCA or LSCA or change the administrative authority of an existing SCA or LSCA:
TSS ADMIN(SCA1) RESOURCE(ALL)
ACCESS(ALL)
ACID(ALL)
FACILITY(ALL)
DATA(ALL,PROFILE,SESSKEY)
MISC1(ALL)
MISC2(ALL)
MISC3(ALL)
MISC4(ALL)
This example creates a ZCA whose password expires when he first logs on and prompts for a new password every 30 days:
TSS CREATE(ZCA1) NAME(‗Bob Baker‘)
TYPE(ZCA)
PASSWORD(HONOR,30,EXP)
ZONE(ZONA)
MISC5(ALL)
MISC8(ALL)
MISC9(ALL)
In this example, the MSCA creates an LSCA whose password expires in seven days.
TSS CREATE(LSCA1) NAME(‗Bill Bailey‘)
TYPE(LSCA)
PASSWORD(HONOR,7)
TSS ADMIN(LSCA1) SCOPE(ZONE1,ZONE2,ZONE3)
This example creates a VCA whose password does not expire:
TSS CREATE(VCA1) NAME(‗Charles Clark‘)
TYPE(VCA)
PASSWORD(BOLD,0)
DIVISION(FINDIV)
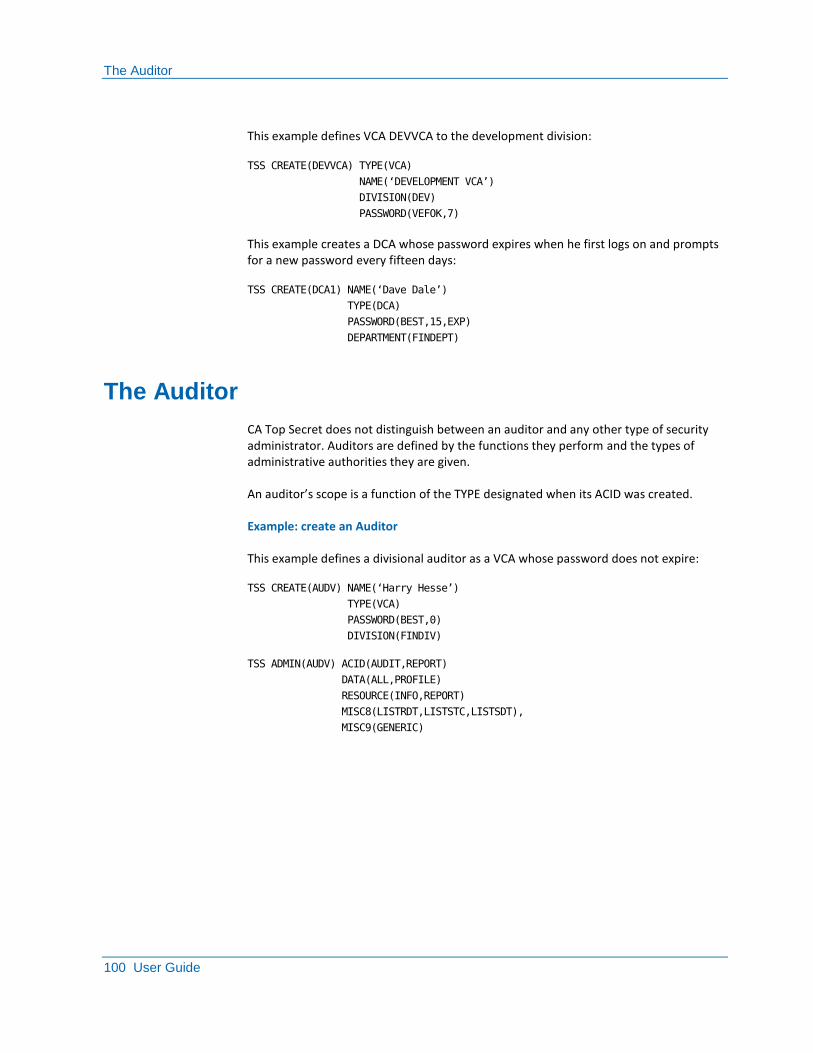
The Auditor
100 User Guide
This example defines VCA DEVVCA to the development division:
TSS CREATE(DEVVCA) TYPE(VCA)
NAME(‗DEVELOPMENT VCA‘)
DIVISION(DEV)
PASSWORD(VEFOK,7)
This example creates a DCA whose password expires when he first logs on and prompts for a new password every fifteen days:
TSS CREATE(DCA1) NAME(‗Dave Dale‘)
TYPE(DCA)
PASSWORD(BEST,15,EXP)
DEPARTMENT(FINDEPT)
The Auditor
CA Top Secret does not distinguish between an auditor and any other type of security administrator. Auditors are defined by the functions they perform and the types of administrative authorities they are given.
An auditor’s scope is a function of the TYPE designated when its ACID was created.
Example: create an Auditor
This example defines a divisional auditor as a VCA whose password does not expire:
TSS CREATE(AUDV) NAME(‗Harry Hesse‘)
TYPE(VCA)
PASSWORD(BEST,0)
DIVISION(FINDIV)
TSS ADMIN(AUDV) ACID(AUDIT,REPORT)
DATA(ALL,PROFILE)
RESOURCE(INFO,REPORT)
MISC8(LISTRDT,LISTSTC,LISTSDT),
MISC9(GENERIC)
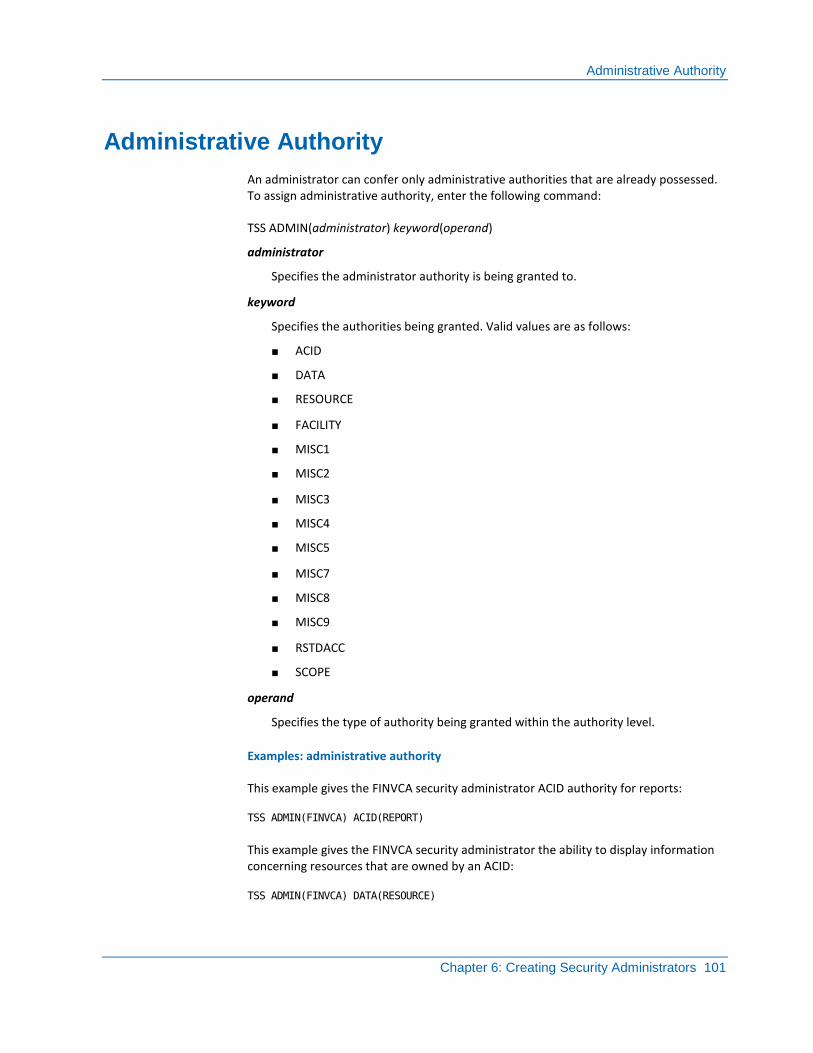
Administrative Authority
Chapter 6: Creating Security Administrators 101
Administrative Authority
An administrator can confer only administrative authorities that are already possessed. To assign administrative authority, enter the following command:
TSS ADMIN(administrator) keyword(operand)
administrator
Specifies the administrator authority is being granted to.
keyword
Specifies the authorities being granted. Valid values are as follows:
■ ACID
■ DATA
■ RESOURCE
■ FACILITY
■ MISC1
■ MISC2
■ MISC3
■ MISC4
■ MISC5
■ MISC7
■ MISC8
■ MISC9
■ RSTDACC
■ SCOPE
operand
Specifies the type of authority being granted within the authority level.
Examples: administrative authority
This example gives the FINVCA security administrator ACID authority for reports:
TSS ADMIN(FINVCA) ACID(REPORT)
This example gives the FINVCA security administrator the ability to display information concerning resources that are owned by an ACID:
TSS ADMIN(FINVCA) DATA(RESOURCE)
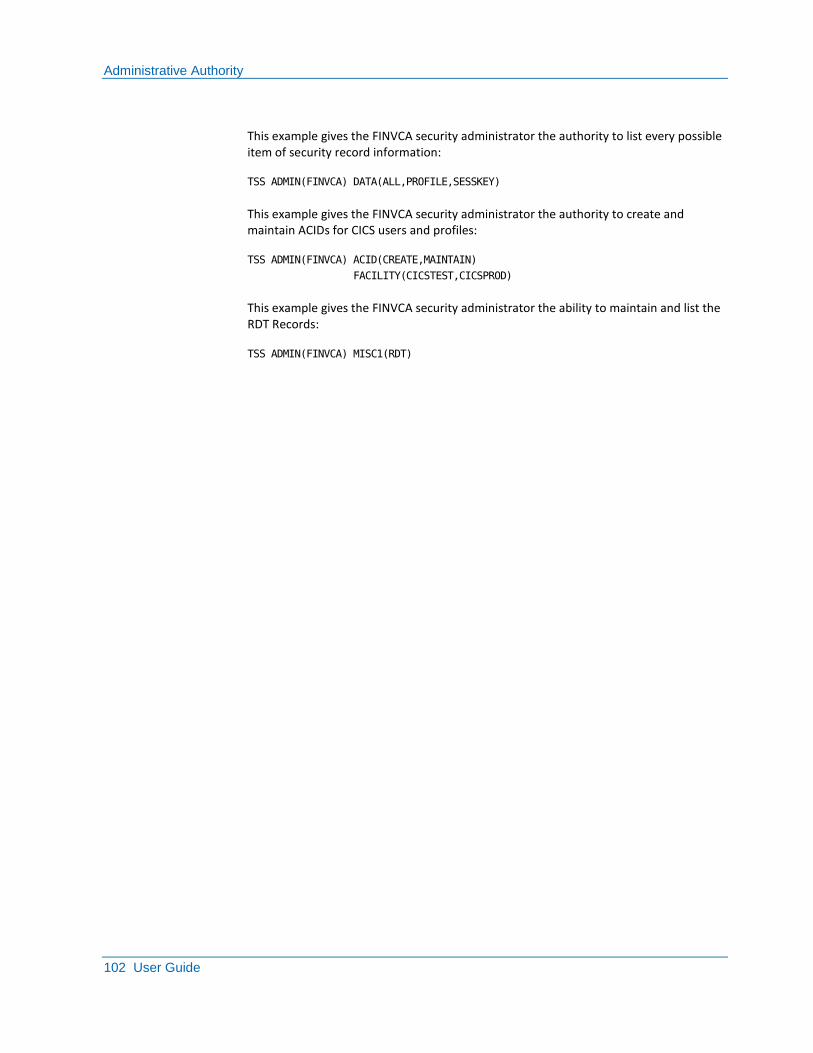
Administrative Authority
102 User Guide
This example gives the FINVCA security administrator the authority to list every possible item of security record information:
TSS ADMIN(FINVCA) DATA(ALL,PROFILE,SESSKEY)
This example gives the FINVCA security administrator the authority to create and maintain ACIDs for CICS users and profiles:
TSS ADMIN(FINVCA) ACID(CREATE,MAINTAIN)
FACILITY(CICSTEST,CICSPROD)
This example gives the FINVCA security administrator the ability to maintain and list the RDT Records:
TSS ADMIN(FINVCA) MISC1(RDT)
Administrative Authority
Chapter 6: Creating Security Administrators 103
ACID Authorities
The ACID keyword indicates what functions security administrators can perform on the ACIDs within their scope.
The following operands are used with the ACID keyword:
ALL
Authorizes the security administrator to perform all of the authorities listed below. The ALL operand is also used with the other keywords for administrative authority, and should not be confused with the ALL Record.
AUDIT
Authorizes the security administrator to ADD or REMOVE the AUDIT attribute. (Used to monitor what an ACID does).
CREATE
Authorizes the security administrator to create and delete ACIDs.
DEFNODES
Authorizes the security administrator to designate an ACID's default command routing nodes for the Command Propagation Facility.
INFO
Authorizes the security administrator to use the TSS WHOHAS function.
MAINTAIN
Authorizes the security administrator to maintain information for currently existing ACIDs.
REPORT
Authorizes the security administrator to use the BATCH reporting utilities.
XAUT
Authorizes the security administrator to permit one ACID to use another ACID for job submission
Administrative Authority
104 User Guide
DATA Authorities
The DATA keyword designates which portions of a Security Record security administrators can display when they issue a TSS LIST command function.
The following operands are used with the DATA keyword:
ACIDS
Lists all ACIDs connected to the ACID entered in the LIST function. This keyword applies to lists of division, department and profile ACIDs.
ADMIN
Lists information about the ACID’s administrative authorities.
ALL
Lists all information pertaining to an ACID except for password, profile, and session key.
BASIC
Lists general ACID information, such as name, type, and facility.
CICS
Lists the values for CICS operator fields: OIDCARD, OPCLASS, OPIDENT, OPPRTY, SCTYKEY.
INSTDATA
Lists the installation data for an ACID.
LCF
Displays the commands and transactions that an ACID is confined to (via TRANSACTIONS/COMMAND) or restricted from (via XTRANS/XCOMMAND).
NAMES
Lists an ACID name, and the associated owner’s name.
PASSWORD
Lists the ACID’s password information (expiration date and interval).
PROFILE
Lists the profile(s) attached to the ACID.
RESOURCE
Lists information about resources owned by an ACID.
SESSKEY
Lists the session key used to verify that one LU is authorized to link to another LU for the purposes of APPC conversation processing.
SMS
Administrative Authority
Chapter 6: Creating Security Administrators 105
Lists information about a default SMS data class.
SOURCE
Lists information about the ACID’s input device restrictions.
TSO
List TSO UADS data fields for an ACID.
WORKATTR
Lists the SYSOUT delivery and accounting information associated with the ACID.
XAUTH
Lists resources permitted by an ACID within his scope, including information about what access levels are allowed and which ACID owns the resource.
To give an administrator all DATA administrative authorities, specify the options:
■ ALL
■ PASSWORD
■ SESSKEY—Due to the sensitive nature of passwords and SESSKEY information.
■ PROFILE—Since the profiles connected to an ACID may not necessarily fall under the scope of the security administrator.
Example: assign data authority
This example gives the FINVCA security administrator the ability to display information concerning resources owned by an ACID.
TSS ADMIN(FINVCA) DATA(RESOURCE)
This example gives the FINVCA security administrator the authority to list every possible item of security record information:
TSS ADMIN(FINVCA) DATA(ALL,PROFILE,SESSKEY)
Administrative Authority
106 User Guide
FACILITY Authorities
The FACILITY keyword determines the facilities the security administrator has authority for. The FACILITY keyword is used with the other administrative authorities. CA Top Secret does not check a security administrator’s FACILITY authorization when he issues a TSS PERMIT allowing an ACID to access a resource only from a particular facility.
Example: grant facility authority
This example gives the FINSCA security administrator the authority to all facilities:
TSS ADMIN(FINSCA) FACILITY(ALL)
This example gives the FINVCA security administrator the authority to create and maintain ACIDs for CICS users and profiles:
TSS ADMIN(FINVCA) ACID(CREATE,MAINTAIN)
FACILITY(CICSTEST,CICSPROD)
This example gives USER01 access to the CICS facilities:
TSS ADDTO(USER01) FACILITY(CICSTEST,CICSPROD)
MISC1 Authorities
MISC1 sets authorities that generally pertain to ACID access restrictions such as LTIME, suspensions, and RDT maintenance.
Example: MISC1 authority
This example gives the FINVCA security administrator the ability to maintain and list the RDT Records:
TSS ADMIN(FINVCA) MISC1(RDT)
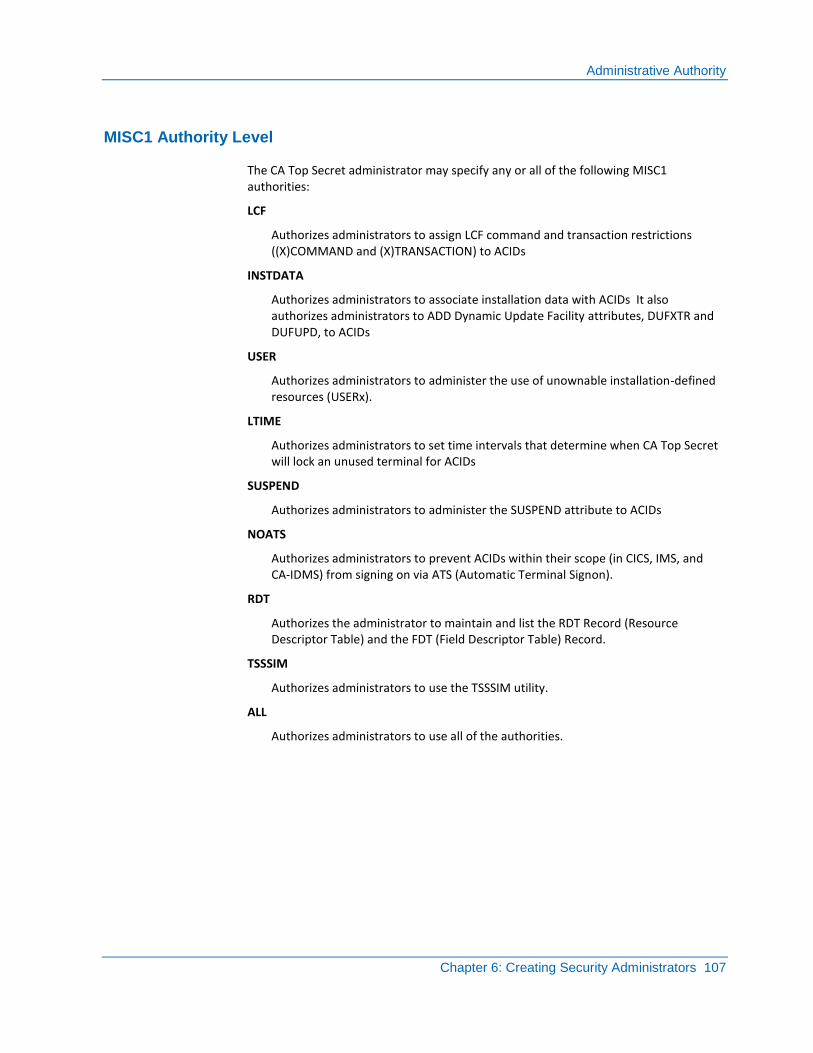
Administrative Authority
Chapter 6: Creating Security Administrators 107
MISC1 Authority Level
The CA Top Secret administrator may specify any or all of the following MISC1 authorities:
LCF
Authorizes administrators to assign LCF command and transaction restrictions ((X)COMMAND and (X)TRANSACTION) to ACIDs
INSTDATA
Authorizes administrators to associate installation data with ACIDs It also authorizes administrators to ADD Dynamic Update Facility attributes, DUFXTR and DUFUPD, to ACIDs
USER
Authorizes administrators to administer the use of unownable installation-defined resources (USERx).
LTIME
Authorizes administrators to set time intervals that determine when CA Top Secret will lock an unused terminal for ACIDs
SUSPEND
Authorizes administrators to administer the SUSPEND attribute to ACIDs
NOATS
Authorizes administrators to prevent ACIDs within their scope (in CICS, IMS, and CA-IDMS) from signing on via ATS (Automatic Terminal Signon).
RDT
Authorizes the administrator to maintain and list the RDT Record (Resource Descriptor Table) and the FDT (Field Descriptor Table) Record.
TSSSIM
Authorizes administrators to use the TSSSIM utility.
ALL
Authorizes administrators to use all of the authorities.
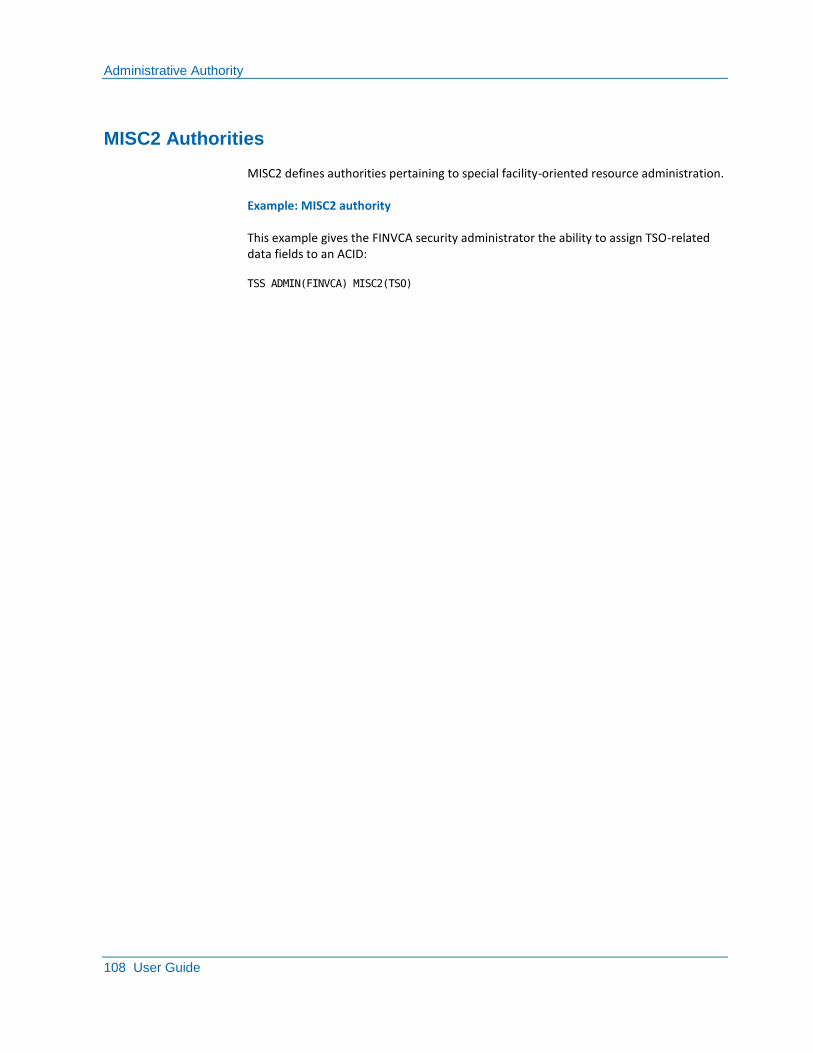
Administrative Authority
108 User Guide
MISC2 Authorities
MISC2 defines authorities pertaining to special facility-oriented resource administration.
Example: MISC2 authority
This example gives the FINVCA security administrator the ability to assign TSO-related data fields to an ACID:
TSS ADMIN(FINVCA) MISC2(TSO)
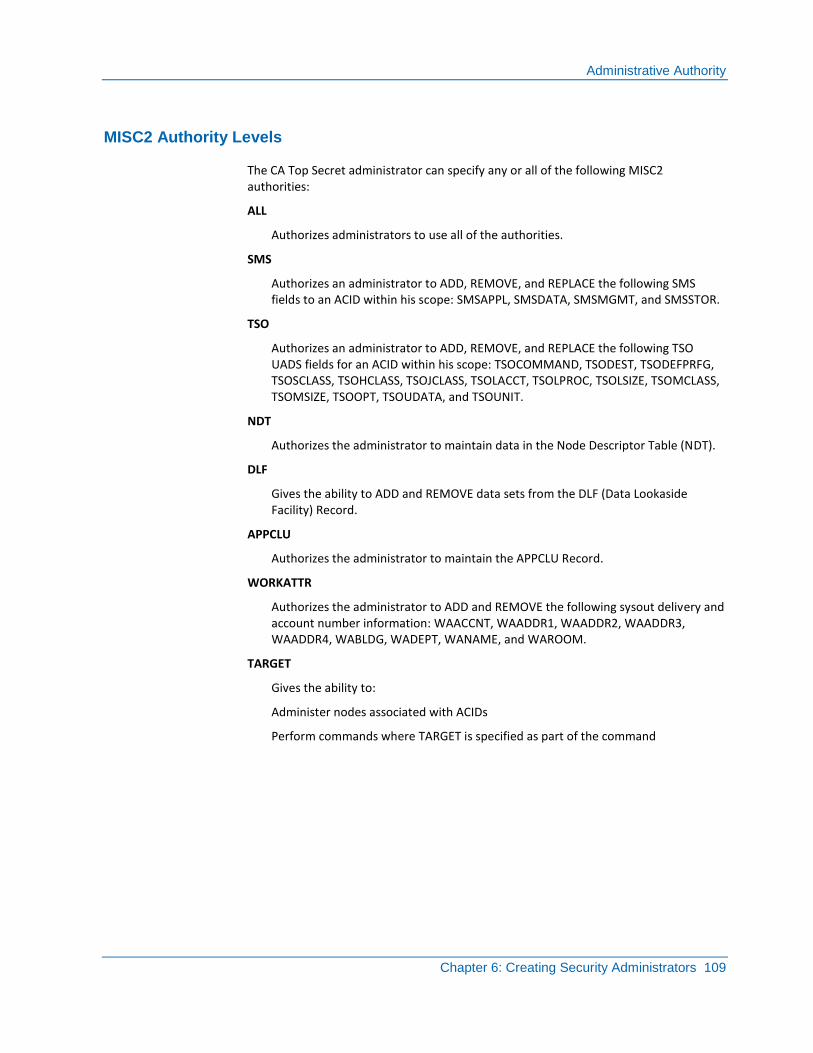
Administrative Authority
Chapter 6: Creating Security Administrators 109
MISC2 Authority Levels
The CA Top Secret administrator can specify any or all of the following MISC2 authorities:
ALL
Authorizes administrators to use all of the authorities.
SMS
Authorizes an administrator to ADD, REMOVE, and REPLACE the following SMS fields to an ACID within his scope: SMSAPPL, SMSDATA, SMSMGMT, and SMSSTOR.
TSO
Authorizes an administrator to ADD, REMOVE, and REPLACE the following TSO UADS fields for an ACID within his scope: TSOCOMMAND, TSODEST, TSODEFPRFG, TSOSCLASS, TSOHCLASS, TSOJCLASS, TSOLACCT, TSOLPROC, TSOLSIZE, TSOMCLASS, TSOMSIZE, TSOOPT, TSOUDATA, and TSOUNIT.
NDT
Authorizes the administrator to maintain data in the Node Descriptor Table (NDT).
DLF
Gives the ability to ADD and REMOVE data sets from the DLF (Data Lookaside Facility) Record.
APPCLU
Authorizes the administrator to maintain the APPCLU Record.
WORKATTR
Authorizes the administrator to ADD and REMOVE the following sysout delivery and account number information: WAACCNT, WAADDR1, WAADDR2, WAADDR3, WAADDR4, WABLDG, WADEPT, WANAME, and WAROOM.
TARGET
Gives the ability to:
Administer nodes associated with ACIDs
Perform commands where TARGET is specified as part of the command
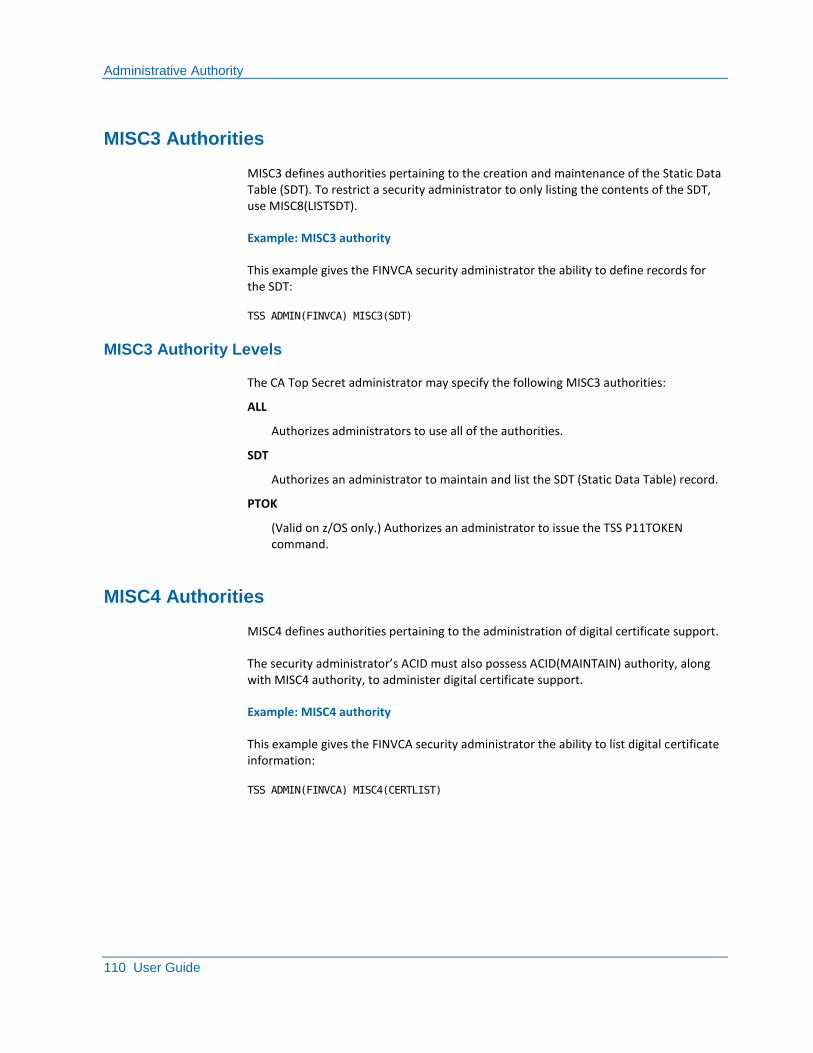
Administrative Authority
110 User Guide
MISC3 Authorities
MISC3 defines authorities pertaining to the creation and maintenance of the Static Data Table (SDT). To restrict a security administrator to only listing the contents of the SDT, use MISC8(LISTSDT).
Example: MISC3 authority
This example gives the FINVCA security administrator the ability to define records for the SDT:
TSS ADMIN(FINVCA) MISC3(SDT)
MISC3 Authority Levels
The CA Top Secret administrator may specify the following MISC3 authorities:
ALL
Authorizes administrators to use all of the authorities.
SDT
Authorizes an administrator to maintain and list the SDT (Static Data Table) record.
PTOK
(Valid on z/OS only.) Authorizes an administrator to issue the TSS P11TOKEN command.
MISC4 Authorities
MISC4 defines authorities pertaining to the administration of digital certificate support.
The security administrator’s ACID must also possess ACID(MAINTAIN) authority, along with MISC4 authority, to administer digital certificate support.
Example: MISC4 authority
This example gives the FINVCA security administrator the ability to list digital certificate information:
TSS ADMIN(FINVCA) MISC4(CERTLIST)
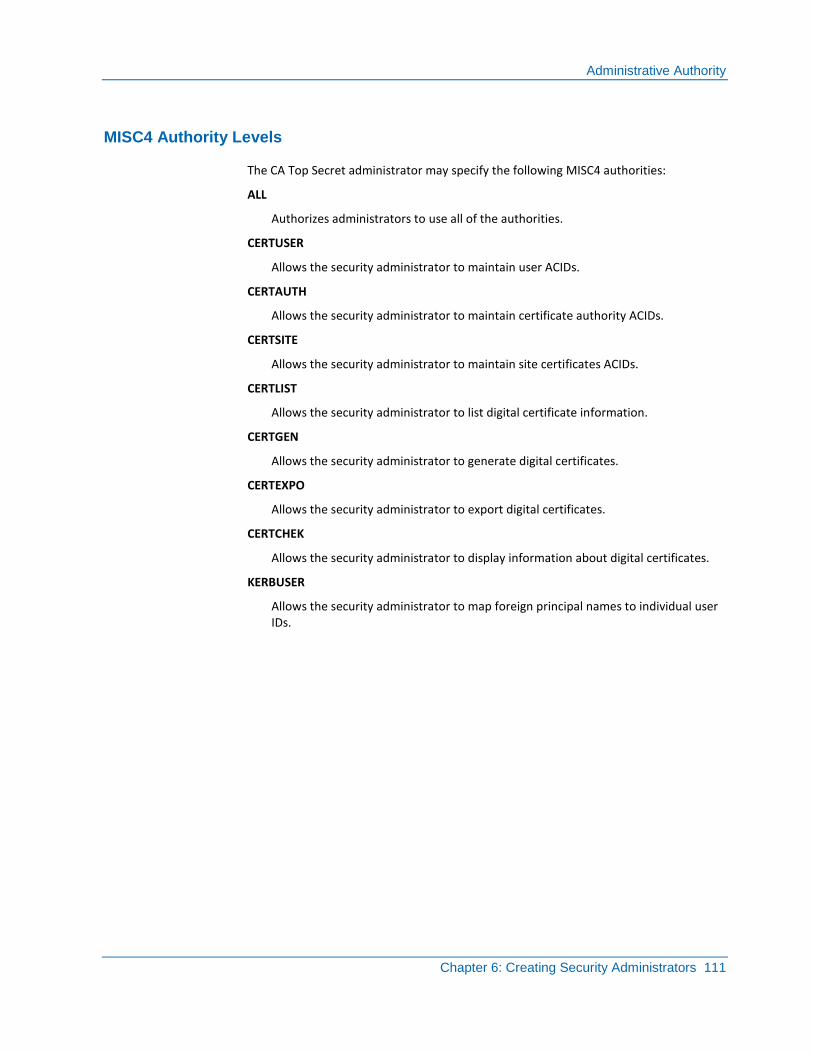
Administrative Authority
Chapter 6: Creating Security Administrators 111
MISC4 Authority Levels
The CA Top Secret administrator may specify the following MISC4 authorities:
ALL
Authorizes administrators to use all of the authorities.
CERTUSER
Allows the security administrator to maintain user ACIDs.
CERTAUTH
Allows the security administrator to maintain certificate authority ACIDs.
CERTSITE
Allows the security administrator to maintain site certificates ACIDs.
CERTLIST
Allows the security administrator to list digital certificate information.
CERTGEN
Allows the security administrator to generate digital certificates.
CERTEXPO
Allows the security administrator to export digital certificates.
CERTCHEK
Allows the security administrator to display information about digital certificates.
KERBUSER
Allows the security administrator to map foreign principal names to individual user IDs.
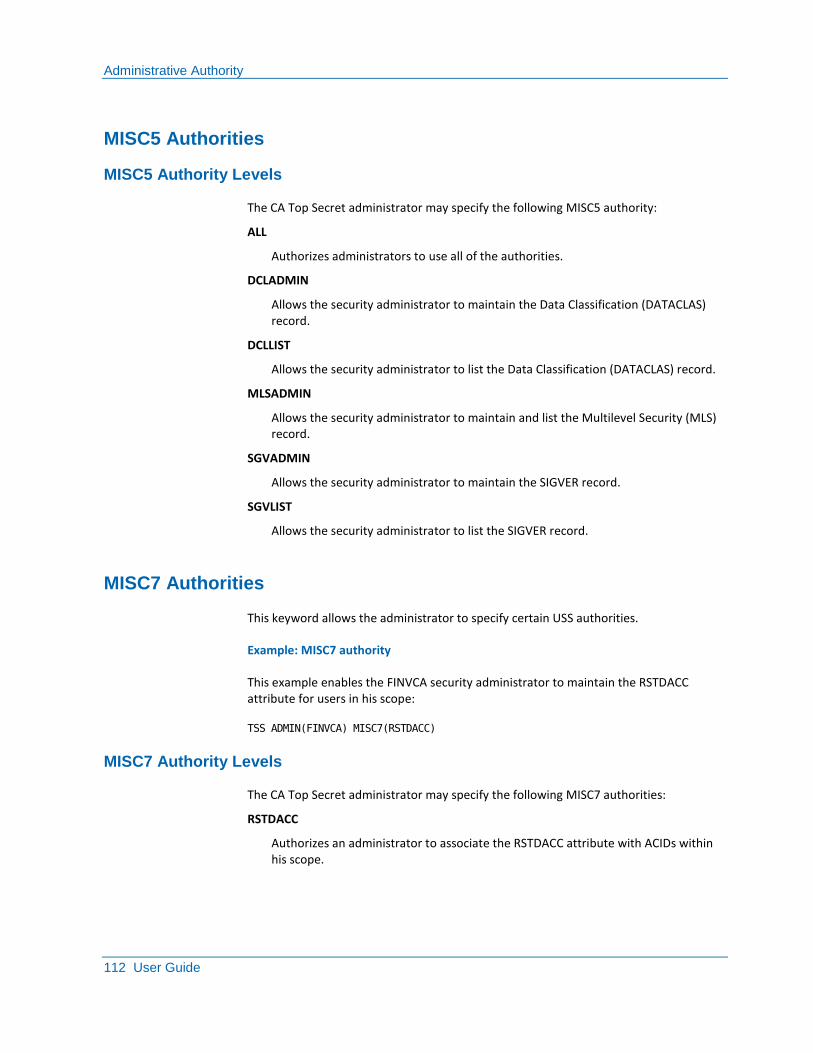
Administrative Authority
112 User Guide
MISC5 Authorities
MISC5 Authority Levels
The CA Top Secret administrator may specify the following MISC5 authority:
ALL
Authorizes administrators to use all of the authorities.
DCLADMIN
Allows the security administrator to maintain the Data Classification (DATACLAS) record.
DCLLIST
Allows the security administrator to list the Data Classification (DATACLAS) record.
MLSADMIN
Allows the security administrator to maintain and list the Multilevel Security (MLS) record.
SGVADMIN
Allows the security administrator to maintain the SIGVER record.
SGVLIST
Allows the security administrator to list the SIGVER record.
MISC7 Authorities
This keyword allows the administrator to specify certain USS authorities.
Example: MISC7 authority
This example enables the FINVCA security administrator to maintain the RSTDACC attribute for users in his scope:
TSS ADMIN(FINVCA) MISC7(RSTDACC)
MISC7 Authority Levels
The CA Top Secret administrator may specify the following MISC7 authorities:
RSTDACC
Authorizes an administrator to associate the RSTDACC attribute with ACIDs within his scope.
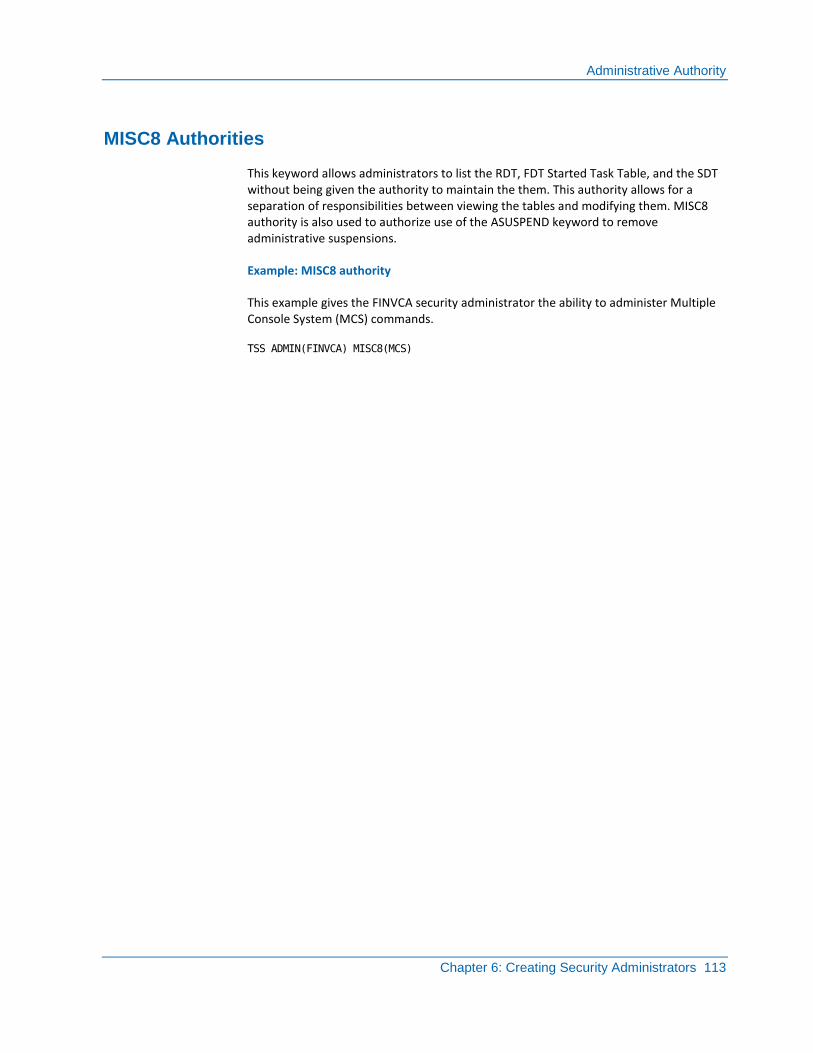
Administrative Authority
Chapter 6: Creating Security Administrators 113
MISC8 Authorities
This keyword allows administrators to list the RDT, FDT Started Task Table, and the SDT without being given the authority to maintain the them. This authority allows for a separation of responsibilities between viewing the tables and modifying them. MISC8 authority is also used to authorize use of the ASUSPEND keyword to remove administrative suspensions.
Example: MISC8 authority
This example gives the FINVCA security administrator the ability to administer Multiple Console System (MCS) commands.
TSS ADMIN(FINVCA) MISC8(MCS)

Administrative Authority
114 User Guide
MISC8 Authority Levels
The CA Top Secret administrator may specify any or all of the following MISC8 authorities:
LISTRDT
Authorizes an administrator to list the RDT and FDT Records but not to change them. MISC1(RDT) authority is required to maintain the RDT and FDT Records.
LISTSTC
Authorizes the administrator to list the contents of the Started Task Table but not to change it. MISC9(STC) authority is required to define started tasks to the Started Task Table.
LISTAPLU
Authorizes the administrator to list the contents of the APPCLU Record but not to change it. MISC2(APPCLU) authority is required to maintain the APPCLU record.
LISTSDT
Authorizes the administrator to list the contents of the Static Data Table (SDT) but not to change it. MISC3(SDT) authority is required to maintain the SDT records.
MCS
Authorizes the administrator to issue the Multiple Console Support (MCS) commands for ACIDs.
NOMVSDF
Allows the security administrator to provide an acid attribute (NOOMVSDF) which will prevent a user that does not have a UID/GID from inheriting the OMVS default user and group.
PWMAINT
Authorizes the administrator to do password maintenance on acids with their scope. This will allow the use of the PASSWORD keyword on any command, or the SUSPEND keyword on the REMOVE command, without specifying ACID(MAINTAIN) or MISC1(SUSPEND).
REMASUSP
Authorizes the administrator to issue the TSS REMOVE(acid) ASUSPEND command for ACIDs. In addition to MISC8(REMASUSP), the administrator must also have MISC1(SUSPEND) or MISC8(PWMAINT) authority to remove the ASUSPEND attribute.
ALL
Authorizes the administrator to use all of the authorities.
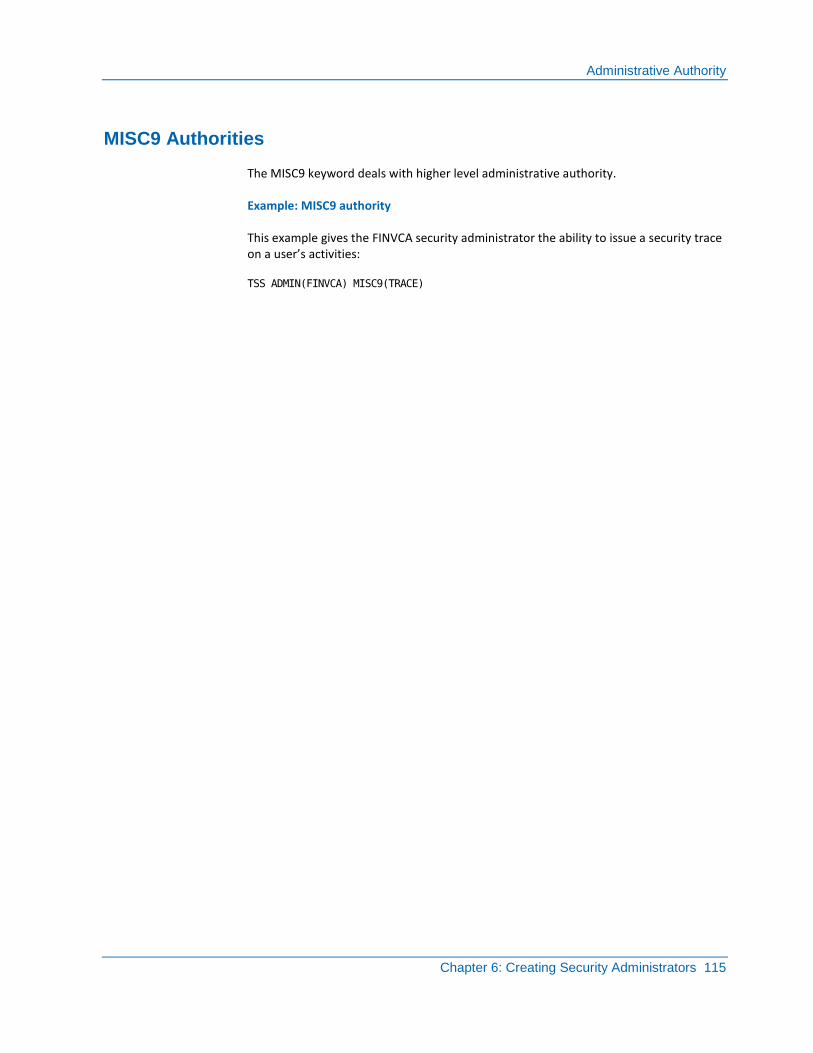
Administrative Authority
Chapter 6: Creating Security Administrators 115
MISC9 Authorities
The MISC9 keyword deals with higher level administrative authority.
Example: MISC9 authority
This example gives the FINVCA security administrator the ability to issue a security trace on a user’s activities:
TSS ADMIN(FINVCA) MISC9(TRACE)
Administrative Authority
116 User Guide
MISC9 Authority Levels
The CA Top Secret administrator may specify any or all of the following MISC9 authorities:
BYPASS
Authorizes an administrator to associate the following bypass attributes with ACIDs within his scope: NODSNCHK, NOVOLCHK, NORESCHK, NOVMDCHK, NOLCFCHK, and NOSUBCHK.
TRACE
Authorizes the administrator to associate the TRACE attribute with ACIDs within his scope.
CONSOLE
Authorizes the administrator to administer the CONSOLE attribute.
MASTFAC
Authorizes the administrator to associate a region control ACID with a multiuser address space facility.
MODE
Authorizes the administrator to associate any CA Top Secret owned security mode with an ACID. Only MSCA and SCA type acids can use the MODE keyword in a TSS PERMIT(acid) command.
STC
Authorizes the MSCA/SCA to define a started task to the CA Top Secret Started Task Table, and authorizes the administrator to list the contents of the Started Task Table.
GLOBAL
Authorizes the administrator to use LCF and administrative authorities for all users via the ALL record.
GENERIC
Authorizes the administrator to use the WHOOWNS function to obtain a list of all resources owned within his administrative scope. RESOURCE(INFO) authority only allows an ACID to obtain data on specific resources.
ALL
Authorizes the administrator to use all of the authorities.
Administrative Authority
Chapter 6: Creating Security Administrators 117
RESOURCE Authorities
The RESOURCE keyword designates what type of maintenance a security administrator can perform on resources.
The operands that can be specified with the RESOURCE keyword are:
ALL
Allows the security administrator to perform all of the authorities listed below.
AUDIT
Allows the security administrator to ADD or REMOVE resources from the AUDIT record.
INFO
Allows the security administrator to issue TSS WHOHAS and TSS WHOOWNS for resources.
OWN
Allows the security administrator to define, move, and remove resource ownership.
REPORT
Allows the security administrator to use CA Top Secret BATCH reporting utilities for resources.
XAUTH
Allows the security administrator to PERMIT or REVOKE resource access. The access levels must also be specified.
Examples: RESOURCE attributes
This example gives the FINVCA security administrator the ability to use BATCH reporting utilities for resources.
TSS ADMIN(FINVCA) RESOURCE(REPORT)
This example allows FINVCA to PERMIT an access level of READ or FETCH for the ACIDs within his scope:
TSS ADMIN(FINVCA) RESOURCE(XAUTH)
ACCESS(READ,FETCH)
RESOURCE(XAUTH) is not a typical administrative authority, since it allows the administrator to assign or revoke access authorizations to any ACID (provided the resource involved is within his scope).
Administrative Authority
118 User Guide
Resource Access Level
When specifying RESOURCE specify an ACCESS level, if one applies. Otherwise the default is READ.
Example: specify a resource access level
This example gives a resource create and update access levels:
TSS ADMIN(RESVCA) RESOURCE(OWN)
ACCESS(CREATE,UPDATE)
Authority for One Resource Class
The RESOURCE keyword applies to all resources.
Example: administrative authority for a specific resource
This example substitutes the resource class name:
TSS ADMIN(RESVCA) PROGRAM(INFO)
Resource Outside Scope
The ACTION(ADMIN) keyword gives the security administrator the ability to allow ACIDs within his scope the authority to administer resources not within the permitted ACID’s scope.
Example: administer out of scope resource
In this example, if the data sets with the high level index SYS1 are not within the SCOPE of ACID USER05, the security administrator issues the TSS PERMIT command function with ACTION(ADMIN) to allow USER05 to administer the data sets:
TSS PERMIT(USER05) DSNAME(SYS1.)
ACTION(ADMIN)
RSTDACC Authority
Use RSTDACC authority to allow the security administrator to administer the RSTDACC attribute for ACIDs within his scope.

Remove Administrative Authorities
Chapter 6: Creating Security Administrators 119
SCOPE Authority
SCOPE authority is used by the MSCA to determine the administrative scope of an LSCA (the only Control ACID type with variable scope). That scope can include Zones and even other LSCAs.
SCOPE authority does not apply to any other Control ACID and cannot be defined by any Control ACID other than the MSCA.
Example: scope authority
This example designates LSCA01 administrative scope of LSCA02, LSCA03, and ZONE1:
TSS ADMIN(LSCA01) SCOPE(LSCA02,LSCA03,ZONE1)
LSCA01 now has scope over ZONE1, LSCA02, and LSCA03, and over everything within the scope of LSCA02 and LSCA03.
Remove Administrative Authorities
The DEADMIN function removes administrative authorities. All formats, rules, and restrictions that apply to the ADMIN function are also applicable to the DEADMIN function.
To remove administrative authority, enter the command:
TSS DEADMIN(acid) keyword(operand)
Keyword
Specifies the level of administrative authority.
Operand
Specifies the type of authority within that level.
Example: remove administrative authorities
This example removes the authority from the FINVCA Control ACID to display BASIC information–such as name, ACID type, access authorizations, system entry restrictions–for the ACIDs within his scope:
TSS DEADMIN(FINVCA) DATA(BASIC)
Restricted Administrative Authorities
120 User Guide
Restricted Administrative Authorities
The CASECAUT resource class enables users with no administrative authorities to change certain password-related fields and issue digital certificate, keyring, and token commands for users within their scope.
CASECAUT authorities supplement existing administrative authorities, with the following exceptions:
■ When setting a NOPW value using CREATE, ADDTO, or REPLACE, administrators must have UPDATE access to entity TSSCMD.USER.cmd.NOPW in the CASECAUT resource class (where cmd is the command being issued). This authority is required even if the administrator already has ACID(CREATE) or ACID(MAINTAIN) authority.
■ To set a new password for the MSCA (using ADDTO or REPLACE), an SCA must have UPDATE access to entity TSSCMD.USER.cmd.MSCAPW in the CASECAUT resource class, where cmd is the command being issued. This authority is required even if the administrator already has ACID(MAINTAIN) or MISC8(PWMAINT) authority.
■ When the PWADMIN(NO) control option is set, an administrative user with ACID(MAINTAIN) and MISC8(PASSWORD) is not subject to NEWPW restrictions on password assignment and may assign any value to a user expiration interval in a command PASSWORD specification.

Restricted Administrative Authorities
Chapter 6: Creating Security Administrators 121
■ When the PWADMIN(YES) control option is set, an administrative password change command is subject to NEWPW control option restrictions (including password history checking for identical passwords) and password interval change restrictions. The restrictions apply to all users except the MSCA. To allow an administrator to bypass NEWPW and expiration interval restrictions that are enforced by PWADMIN(YES), you can permit CASECAUT resource permissions to the administrator as follows:
■ TSSCMD.USER.cmd.PWADMIN.NO bypasses all NEWPW restrictions, bypasses password history checking, and allows password interval changes.
If a password does not conform to NEWPW rules or a password interval change occurs, the exception is logged to the Audit/Tracking file. The log record is formatted with class ‘O’ (TSS command) and identifies the user with the nonconforming password. To generate an AUDIT record with other PWADMIN resources, specify ACTION(AUDIT) on the permit.
■ TSSCMD.USER.cmd.PWADMIN.EXP bypasses NEWPW restrictions and password history checking only when EXP is specified in the PASSWORD field. Password interval change restrictions still apply.
■ TSSCMD.USER.cmd.PWADMIN.HISTBYP bypasses checking for an exact password history match only when EXP is specified in the PASSWORD field. All other NEWPW restrictions still apply, and password interval changes are restricted.
■ TSSCMD.USER.cmd.PWADMIN.TS bypasses the NEWPW(TS) option that prevents the new password from being too similar to the current password.
■ TSSCMD.USER.cmd.PWADMIN.INT allows a new password interval when the user’s current interval and the new interval are not 0.
■ TSSCMD.USER.cmd.PWADMIN.ZEROINT allows a new password interval regardless of value.
RACROUTE checks for authorization in the CASECAUT class are issued in addition to (not instead of) the existing ADMIN authority checking. The appropriate CASECAUT RACROUTE access check is issued only when the existing ADMIN authority check fails. The NORESCHK attribute is not honored for the CASECAUT resource class.
Required CASECAUT Authorizations for Changing Password Fields
If given proper access to the entity TSSCMD.USER.cmd field in the CASECAUT resource class, users with no administrative authorities can change certain password-related fields for users within their scope. Access to this entity is granted by an administrator (using a PERMIT command).
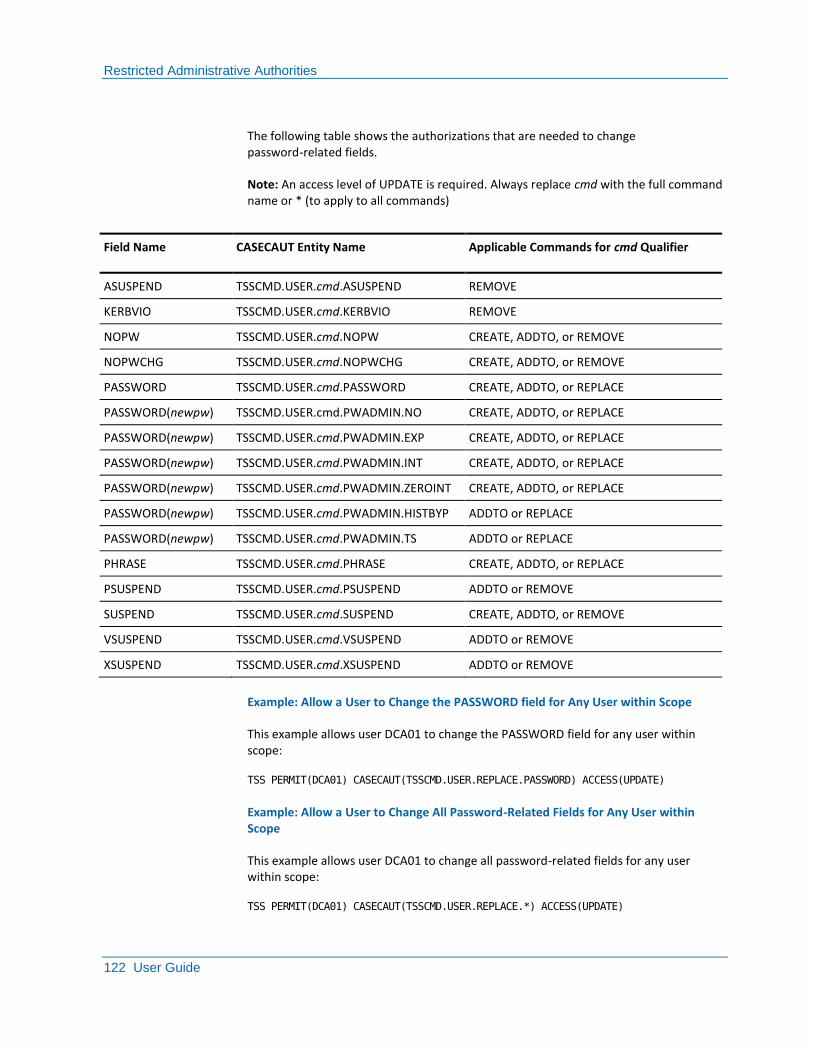
Restricted Administrative Authorities
122 User Guide
The following table shows the authorizations that are needed to change password-related fields.
Note: An access level of UPDATE is required. Always replace cmd with the full command name or * (to apply to all commands)
Field Name CASECAUT Entity Name Applicable Commands for cmd Qualifier
ASUSPEND TSSCMD.USER.cmd.ASUSPEND REMOVE
KERBVIO TSSCMD.USER.cmd.KERBVIO REMOVE
NOPW TSSCMD.USER.cmd.NOPW CREATE, ADDTO, or REMOVE
NOPWCHG TSSCMD.USER.cmd.NOPWCHG CREATE, ADDTO, or REMOVE
PASSWORD TSSCMD.USER.cmd.PASSWORD CREATE, ADDTO, or REPLACE
PASSWORD(newpw) TSSCMD.USER.cmd.PWADMIN.NO CREATE, ADDTO, or REPLACE
PASSWORD(newpw) TSSCMD.USER.cmd.PWADMIN.EXP CREATE, ADDTO, or REPLACE
PASSWORD(newpw) TSSCMD.USER.cmd.PWADMIN.INT CREATE, ADDTO, or REPLACE
PASSWORD(newpw) TSSCMD.USER.cmd.PWADMIN.ZEROINT CREATE, ADDTO, or REPLACE
PASSWORD(newpw) TSSCMD.USER.cmd.PWADMIN.HISTBYP ADDTO or REPLACE
PASSWORD(newpw) TSSCMD.USER.cmd.PWADMIN.TS ADDTO or REPLACE
PHRASE TSSCMD.USER.cmd.PHRASE CREATE, ADDTO, or REPLACE
PSUSPEND TSSCMD.USER.cmd.PSUSPEND ADDTO or REMOVE
SUSPEND TSSCMD.USER.cmd.SUSPEND CREATE, ADDTO, or REMOVE
VSUSPEND TSSCMD.USER.cmd.VSUSPEND ADDTO or REMOVE
XSUSPEND TSSCMD.USER.cmd.XSUSPEND ADDTO or REMOVE
Example: Allow a User to Change the PASSWORD field for Any User within Scope
This example allows user DCA01 to change the PASSWORD field for any user within scope:
TSS PERMIT(DCA01) CASECAUT(TSSCMD.USER.REPLACE.PASSWORD) ACCESS(UPDATE)
Example: Allow a User to Change All Password-Related Fields for Any User within Scope
This example allows user DCA01 to change all password-related fields for any user within scope:
TSS PERMIT(DCA01) CASECAUT(TSSCMD.USER.REPLACE.*) ACCESS(UPDATE)
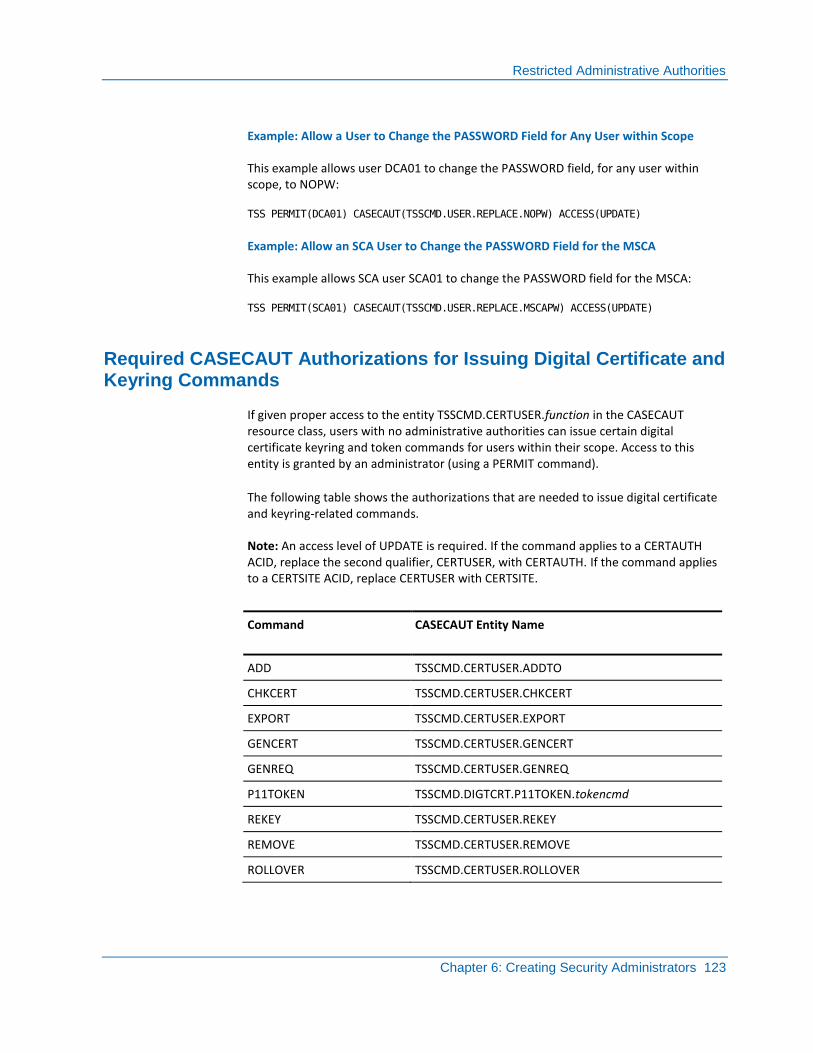
Restricted Administrative Authorities
Chapter 6: Creating Security Administrators 123
Example: Allow a User to Change the PASSWORD Field for Any User within Scope
This example allows user DCA01 to change the PASSWORD field, for any user within scope, to NOPW:
TSS PERMIT(DCA01) CASECAUT(TSSCMD.USER.REPLACE.NOPW) ACCESS(UPDATE)
Example: Allow an SCA User to Change the PASSWORD Field for the MSCA
This example allows SCA user SCA01 to change the PASSWORD field for the MSCA:
TSS PERMIT(SCA01) CASECAUT(TSSCMD.USER.REPLACE.MSCAPW) ACCESS(UPDATE)
Required CASECAUT Authorizations for Issuing Digital Certificate and Keyring Commands
If given proper access to the entity TSSCMD.CERTUSER.function in the CASECAUT resource class, users with no administrative authorities can issue certain digital certificate keyring and token commands for users within their scope. Access to this entity is granted by an administrator (using a PERMIT command).
The following table shows the authorizations that are needed to issue digital certificate and keyring-related commands.
Note: An access level of UPDATE is required. If the command applies to a CERTAUTH ACID, replace the second qualifier, CERTUSER, with CERTAUTH. If the command applies to a CERTSITE ACID, replace CERTUSER with CERTSITE.
Command CASECAUT Entity Name
ADD TSSCMD.CERTUSER.ADDTO
CHKCERT TSSCMD.CERTUSER.CHKCERT
EXPORT TSSCMD.CERTUSER.EXPORT
GENCERT TSSCMD.CERTUSER.GENCERT
GENREQ TSSCMD.CERTUSER.GENREQ
P11TOKEN TSSCMD.DIGTCRT.P11TOKEN.tokencmd
REKEY TSSCMD.CERTUSER.REKEY
REMOVE TSSCMD.CERTUSER.REMOVE
ROLLOVER TSSCMD.CERTUSER.ROLLOVER
Restricted Administrative Authorities
124 User Guide
Example: Allow a User to Add a Digital Certificate to Any User within Scope
This example allows user DCA01 to add a digital certificate to any user within scope:
TSS PERMIT(DCA01) CASECAUT(TSSCMD.CERTUSER.ADDTO) ACCESS(UPDATE)
Example: Allow a User to Add a Digital Certificate to the CERTSITE ACID
This example allows user DCA01 to add a digital certificate to the CERTSITE ACID:
TSS PERMIT(DCA01) CASECAUT(TSSCMD.CERTSITE.ADDTO) ACCESS(UPDATE)
Example: Allow a User to Generate a Digital Certificate for Any User within Scope
This example allows user DCA01 to generate a digital certificate for any user within scope:
TSS PERMIT(DCA01) CASECAUT(TSSCMD.CERTUSER.GENCERT) ACCESS(UPDATE)
Example: Allow a User to Add a P11TOKEN
This example allows user DCA01 to add a P11TOKEN:
TSS PERMIT(DCA01) CASECAUT(TSSCMD.DIGTCERT.P11TOKEN.ADDTO) ACCESS(UPDATE)
Chapter 7: Passwords 125
Chapter 7: Passwords
This section contains the following topics:
Passwords and Password Phrases (see page 125) Password Content (see page 127) Define a Password for a New User (see page 131) Define a Password Phrase for a New User (see page 132) Change a User Password (see page 132) Change Your Own Password (see page 133) Enforce Restrictions on Administrator Password Changes (see page 133) Set a Password Expiration Interval (see page 134) Non Expiring Password (see page 134) Non Expiring Password Phrase (see page 135) Password Violation Threshold (see page 135) Password Reverification (see page 136) Password Masks (see page 137) Password History (see page 138) Random Password Generation (see page 139) Automatic Password Generation (see page 140) ACIDs Without a Password (see page 141) Passwords that do not Expire (see page 141) Forced Password Validation (see page 142) Forced Passwords (see page 142)
Passwords and Password Phrases
CA Top Secret requires password protection for all ACIDs by default. In addition to a password, an ACID can have an optional password phrase. If an application supports password phrases, you can use the phrase instead of a password.
Passwords have a maximum length of eight characters. A password phrase can be from 9 to 100 characters and can include mixed-case letters, numbers, and special characters (including blanks). The same user ID can have a password for applications that accept only passwords and a password phrase for other applications.

Passwords and Password Phrases
126 User Guide
The security administrator can specify the following settings:
■ Password and password phrase settings, including:
■ Minimum length (which must be at least nine characters for password phrases)
■ Permitted and required content (for example, requiring at least one alphabetic character in a new password or requiring a minimum number of numeric characters in a password phrase)
■ Expiration interval
■ Whether passwords are for all facilities or individual facilities
■ Whether the product prompts users for new password and password phrase verification
■ Whether the product uses Triple-DES3 encryption or the Advanced Encryption Standard (AES) to encrypt passwords and password phrases.
Important! The AES encryption option is not backward compatible with releases prior to CA Top Secret r14.
Password Defaults
Set password requirements with the NEWPW control option. The defaults are:
■ The password must be at least four characters long.
■ The password must contain at least one alphabetical and one numeric character.
■ The password can be up to eight characters long.
■ The password cannot match any of the entries in the restricted password list.
■ The password cannot match the user ID or the first four characters of any word in the associated NAME field.
■ CA Top Secret issues warning messages three days before the password expires.
■ The password cannot be too similar to the previous password.
■ Users cannot change a password more often than once each day (except for security administrators and random password users).
■ Passwords can contain:
– Alphabetic uppercase characters (A-Z)
– Numeric digits (0-9)
– National characters ($#@)
For additional information, see the Control Options Guide.
Password Content
Chapter 7: Passwords 127
Password Phrase Defaults
Set password phrase defaults with the PSWDPHRASE, NPPTHRESH, PPEXP, PPHIST, and NEWPHRASE control options. The defaults are:
■ The password phrase:
■ Must be at least nine characters long.
■ Can be up to 100 characters long.
■ Expires after 30 days.
■ Cannot be the same as the previous three password phrases.
■ CA Top Secret issues warning messages three days before the password phrase expires.
■ Users cannot change a phrase more often than once each day (except for security administrators).
For information, see the Control Options Guide.
Password Content
An administrator can force users to create new passwords:
■ With at least one alphabetical character
■ With at least one numeric digit
■ With numeric digits only
■ With at least one special character
■ With an interior national character
■ Which exclude specific characters
■ With no vowels
■ Which conform to a mask
■ With no sequentially repeated characters
■ In mixed case
■ Not in a restricted password list
■ Which do not contain user’s ACID or name

Password Content
128 User Guide
The Restricted Password List
The restricted password list prevents the use of obvious passwords. For example, using the word NEW you could not specify the word NEW or any word that begins with NEW (like NEWton) as a password. However, you could specify any word that contains the word NEW (like renew).
The provided restricted password list is:
APPL, APR, ASDF, AUG, BASIC, CADAM, DEC, DEMO, FEB, FOCUS, GAME, IBM, JAN, JUL, JUN, LOG, MAR, MAY, NET, NEW, NOV, OCT, PASS, ROS, SEP, SIGN, SYS, TEST, TSO, VALID, VTAM, XXX, and 1234.
To use the restricted password list, enter the command:
TSS MODIFY NEWPW(RS)
Change the Restricted Password List
If you have CONSOLE authority, use the RPW control option to temporarily add or remove one or more entries from the list. You can have up to 511entries in the list. The list remains changed until CA Top Secret is recycled.
To display the current contents of the list, enter the command:
TSS MODIFY(RPW(LIST))
To change the contents of the restricted password list, enter the command:
TSS MODIFY(RPW(ADD|REMOVE,word1,word2,...wordn)
Examples: restricted password list
This example adds the prefixes PRES and CIA to the list. Users currently using PRES or CIA as their password or the prefix of their password can still use it to sign on:
TSS MODIFY(RPW(ADD,PRES,CIA))
This example deletes PRES from the list:
TSS MODIFY(RPW(REMOVE,PRES))
Password Content
Chapter 7: Passwords 129
Special Characters in Passwords
Special characters are defined in the PASSCHAR list. The special characters that can be defined for a password are:
■ Ampersand &
■ Asterisk *
■ At @
■ Carat ^
■ Colon :
■ Dollar $
■ Equal sign =
■ Exclamation mark !
■ Hyphen -
■ Percentage sign %
■ Period .
■ Pound (hash) #
■ Question mark ?
■ Underscore _
■ Vertical line |
These can be defined in character or hexadecimal format.
Important! Evaluate all potential logon applications that support the selection of a new password (for example, TSO and CICS) to insure that they support special characters in the password and new password fields. Applications that edit the password and new password field data prior to invoking the logon request may not support special characters. This may prevent users whose passwords contain special characters from logging on to the application.
To specify that new passwords must have at least one special character, enter the command:
TSS MODIFY NEWPW(SC)
Examples: special characters
This example uses character format to set the special password characters to *, &, and %:
TSS MODIFY PASSCHAR(*,&,%)
This example uses hexadecimal format to set the special characters to &, _, and %.
Password Content
130 User Guide
TSS MODIFY PASSCHAR(50,60,6C)
Mixed Case Passwords
To allow mixed case passwords update the security file with the new password structure.
To use mixed case passwords
1. Run TSSMAINT.
A new security file is defined.
2. Run TSSXTEND using the NEWPWBLOCK keyword.
Mixed case support is enabled.
3. Set the NEWPW option in the parameter file.
The mixed case option is set.
For information about TSSMAINT, TSSXTEND, and the parameter file, see the Installation Guide.
Case in Passwords
To force new passwords to have upper or lower case characters set.the NEWPW(MC) mixed case feature.
Examples: forcing character case in new passwords
This example forces new passwords to have at least one lower case character:
TSS MODIFY NEWPW(LC)
This example forces new passwords to have at least one uppercase character:
TSS MODIFY NEWPW(UC)
Define a Password for a New User
Chapter 7: Passwords 131
Define a Password for a New User
To define a password for a new user, enter the command:
TSS CREATE(acid) NAME(‗USER NAME‘)
PASSWORD(password,nnn,EXP)
password
The new password.
nnn
The number of days before the password expires.
Range: 0 to 255
EXP
Forces the password to expire the first time it is used.
Example: define a password for a new user
This example creates a new user where:
■ The password is TINKER
■ The missing second sub-option specifies the site’s default expiration interval for all subsequent passwords
■ The EXP sub-option indicates that TINKER will expire the first time it is used
TSS CREATE(USER01) NAME(‗GEORGE SMILEY‘)
DEPARTMENT(PAYROLL)
FACILITY(TSO)
PASSWORD(TINKER,,EXP)
Define a Password Phrase for a New User
132 User Guide
Define a Password Phrase for a New User
To define a password phrase for a new user, enter the command:
TSS CREATE(acid) NAME(‗USER NAME‘)
PHRASE(password phrase,nnn,EXP)
password phrase
The new password phrase.
Range: 9 to 100 characters.
nnn
The number of days before the password phrase expires.
Range: 0 to 255
EXP
Forces the password phrase to expire the first time it is used.
Change a User Password
Users may change their own password by issuing the following command:
TSS REPLACE(user) PASSWORD(password)
user
Specifies the user to which the new password is assigned.
password
Specifies the new password.
An administrator may assign passwords with the CREATE, ADD, or REPLACE command. Administrators may use the full power of the PASSWORD keyword.
TSS REPLACE(user) PASSWORD(password[,[expiration_interval][,EXP]])
password
Specifies the new password.
expiration_interval
Specifies the number of days before the password will expire. If you do not specify an interval value, the product substitutes the PWEXP control option value.
Range: 0-255
EXP
Specifies that the password is expired, to be immediately replaced by the user at the next signon.
Change Your Own Password
Chapter 7: Passwords 133
Change Your Own Password
Non-administrative ACIDs can use the REPLACE command to change their own passwords. The new password is subject to restrictions that are specified in the NEWPW control option.
If the ACID has multiple passwords assigned by facility, include the MULTIPW and FACILITY options to identify the password to change. If the options are not included, the change applies to the default facility *ALL*.
To replace your own password, enter the following command:
TSS REPLACE(acid) PASSWORD(new_password)
[MULTIPW FACILITY(facility)]
facility
Specifies the specific facility to which the password applies.
Enforce Restrictions on Administrator Password Changes
By default, an administrator can change the password of a user (or other administrator) to any value. To enforce the NEWPW control option restrictions and password interval restrictions for these password changes, enable the PWADMIN control option:
TSS MODIFY(PWADMIN(YES))
The following exceptions exist:
■ The MINDAYS, RN, and NU options are never enforced on an administrator password change.
■ The MSCA ACID is not subject to NEWPW restrictions.
■ When permitted to CASECAUT resources, an administrator can override PWADMIN(YES) restrictions.
Note: For details about using CASECAUT to provide restricted administrative authorities, see the CA Top Secret User Guide.
Set a Password Expiration Interval
134 User Guide
Set a Password Expiration Interval
The password expiration interval is specified in the second sub-option.
To set a password expiration interval, enter the command:
TSS REPLACE(USER01) PASSWORD(password,nnn,EXP)
password
The new password.
nnn
The number of days before the password expires.
Range: 1 to 255
EXP
Forces the password to expire the first time it is used.
Non Expiring Password
To create an ACID with a password that does not expire, specify 0 for the expiration interval.
Example: Non expiring password
This example creates a password that does not expire.
TSS CREATE(USER01) NAME( CICSPRD1 )
DEPARTMENT(PAYROLL)
FACILITY(BATCH,STC)
PASSWORD(TINKER,0)
Non Expiring Password Phrase
Chapter 7: Passwords 135
Non Expiring Password Phrase
If the ACID you are creating needs a password phrase that does not expire, specify 0 for the expiration interval.
Example: non expiring password phrase
This example creates a password phrase that does not expire:
TSS CREATE(USER01) NAME( CICSPRD1 )
DEPARTMENT(PAYROLL)
FACILITY(BATCH,STC)
PASSWORD(TINKER,0)
PHRASE(password phrase,0)
Password Violation Threshold
The violation threshold is the maximum number of consecutive times a wrong password can be entered before the ACID is suspended. There is a single violation threshold for both passwords and password phrases. The password violation threshold does not apply when attempting to assign a new password or password phrase and the user fails to match the password selection rules.
To set the password violation threshold, enter the command:
TSS MODIFY(PTHRESH(nnn))
nnn
The number of consecutive incorrect password or password phrase entries before the ACID is suspended.
Range: 1 to 255
Default: 3
Password Reverification
136 User Guide
Suspended ACID Reinstatement
You can reinstate an ACID suspended because the password violation threshold was exceeded.
To reinstate a suspended ACID
1. Enter the command:
TSS REPLACE(user-acid) PASSWORD(new-password | newpass,,EXP)
The user’s current password is replaced.
2. Enter the command:
TSS REMOVE(user-acid) SUSPEND
The suspension is removed.
Password Reverification
Whenever a user changes their password CA Top Secret prompts for a reentry. If the password is entered incorrectly, the user is given a specified number of times to enter it correctly. When the specified threshold is reached, the user is signed off and must complete the entire logon sequence to enter the system.
Password re-verification is available for TSO and CICS facilities and LCF and OTRAN resources only.
To activate password re-verification, enter the command:
TSS MODIFY('NPWRTHRESH(nn)')
nn
Specifies the maximum number of retry attempts.
Range: 1 to 99
Default: 2
Password Masks
Chapter 7: Passwords 137
Password Masks
A mask controls the placement of consonants, vowels, numbers, and special characters within a password. The mask is enforced system-wide for all users except the MSCA, and applies to all new passwords, including those that are randomly generated.
To define a mask, enter the command:
TSS MODIFY NEWPW(MASK=********)
********
The character type you can use in this position of the mask. Valid values are:
■ a—Any letter
■ c—Consonant
■ v—Vowel
■ n—Number
■ x—Non-vowel
■ ?—Any character
Example: define a password character mask
This example specifies that all new passwords must have:
■ A consonant as the first character
■ A vowel as the second character
■ A consonant as the third character
■ Any letter, number or special symbol for positions four, five, and six
■ A number for the eight character
TSS MODIFY NEWPW(MASK=cvc???n)
The password MAT2B@3 would correspond to this mask.

Password History
138 User Guide
Password Mask Design
Design your mask so that passwords are recognizable, easy to remember, and pronounceable.
Coordinate the composition of your mask with the NEWPW sub-options. For example, specifying MASK=vnvn could generate the password A5I6. In this case, the mask would override the NV and NM sub-options of the NEWPW control option if they were specified.
Example: mask design
This example allows passwords CATOX, ZULUK, and BESEY to be specified or randomly generated, but does not allow H2NO3 or 6#AK@.
TSS MODIFY NEWPW(MASK=CVCVC)
Password History
Password history prevents users from reusing a specified number of previous passwords. For example, if you maintain a history of three, a new password must be different from the last three used.
To maintain password history, set the PWHIST control option:
■ Dynamically from within CA Top Secret
■ Directly in the parameter file
To set password history dynamically, enter the command:
TSS MODIFY(PWHIST(nn))
nn
The number of previous passwords remembered.
Range: 1 to 64
Default: 3
Random Password Generation
Chapter 7: Passwords 139
Random Password Generation
CA Top Secret can generate random passwords according to a specified password mask.
Random password generation:
■ Is the only method to change a password if a user has the NOPWCHG attribute or if the NU sub-option of the NEWPW control option is specified.
■ Allows a user to change their password multiple times within one day.
■ Is controlled by the FACILITY control option RNDPW sub-option. CA Top Secret specifies RNDPW by default for the TSO, IMS, CA-IDMS, CA-Roscoe, and CICS facilities.
Before the random password generation option is used, specify:
■ A password mask
■ The minimum days using the MINDAYS= sub-option of the NEWPW control option
To automatically generate a password after the current one expires set the RN sub-option of the NEWPW control option.
Example: random password generation
This example specifies the RNDPW, RN, MASK, and MINDAYS sub-options using the FACILITY and NEWPW control options.
TSS MODIFY FACILITY(fac=RNDPW))
TSS MODIFY NEWPW(RN,MASK=cvcv,MINDAYS=5)
Automatic Password Generation
140 User Guide
User Requested Generation
Users can request that a new password be randomly generated at any time.
To randomly generate a new password
1. Enter 'random' as the new password.
The following messages are displayed:
TSS7030I Password Changed
TSS7020I Random Password About to be Displayed. Hit Enter to Continue.
2. Press Enter.
The following messages are displayed:
TSS7021I Your New Password is VANA27
TSS7022I Memorize Password & Hit Enter Key - DO ***NOT*** RECORD
3. Memorize the generated password. Without this password the user cannot sign on again.
4. Press Enter.
The following messages are displayed:
TSS7000I acidname Last-Used mm/dd/yy hh:mm System=xxxx Facility=xxxxxxxx
TSS7001I Count=xxxxx Mode=xxxx Locktime=xxxxx Name=xxxxxxxxxxxxxxxxxxxxx
Automatic Password Generation
If NEWPW(RN) is specified, a new password is generated for users the first time they sign on after their password has expired. If this feature is active, the user can manually change the password at any time.
To allow passwords to be randomly generated only:
■ The facility must have RNDPW specified
■ The user’s ACID must have the NOPWCHG attribute
■ The NEWPW control option must have the RN sub-option specified
ACIDs Without a Password
Chapter 7: Passwords 141
ACIDs Without a Password
A region ACID or an ACID that automatically signs onto a terminal may not require a password. CA recommends not to have many ACIDs without a password.
To create an ACID without a password, specify the NOPW sub-option and 0 for the expiration interval.
Example: ACIDs without a password
This example creates an ACID with no password:
TSS CREATE(USER01) NAME(‗TERMINAL01‘)
DEPARTMENT(PAYROLL)
FACILITY(TSO)
PASSWORD(NOPW,0)
Passwords that do not Expire
To create an ACID with a password that does not expire, specify 0 for the expiration interval.
Example: non expiring password
This example assigns the password TINKER that does not expire
TSS CREATE(USER01) NAME(‗CICSPRD1‘)
DEPARTMENT(PAYROLL)
FACILITY(BATCH,STC)
PASSWORD(TINKER,0)
Forced Password Validation
142 User Guide
Forced Password Validation
CA Top Secret offers designated facilities the option of failing invalid passwords when operating in DORMANT or WARN mode. This option keeps a job from processing if a user omitted their password or supplied an incorrect one. Use the defaults for this option to force password validation in all modes for all online facilities.
To implement forced password validation:
■ In DORMANT mode, use the DORMPW sub-option of the FACILITY control option
■ In WARN mode, use the WARNPW sub-option of the FACILITY control option
All Control ACIDs and TSO users for which CA Top Secret maintains UADS information must always use their CA Top Secret passwords in all modes when signing on to TSO.
Examples: force password validation
These examples turn forced password validation for the BATCH facility:
TSS MODIFY FACILITY(BATCH=DORMPW)
TSS MODIFY FACILITY(BATCH=WARNPW)
Forced Passwords
You can stop users from changing their passwords. New passwords are selected only by an authorized security administrator or by the automatic random password facility. To prohibit:
■ Specific users or profiles from selecting new passwords, use the NOPWCHG keyword
■ All users from selecting new passwords, use NEWPW control option NU sub-option
Example: keep a user from changing their password
This example prevents USER01 from changing his password:
TSS ADDTO(USER01) NOPWCHG
Chapter 8: Viewing Your Security Environment 143
Chapter 8: Viewing Your Security Environment
This section contains the following topics:
Status Information (see page 143)
Status Information
CA Top Secret provides online status information on the security environment and the ACIDs and resources within that environment. The informational TSS commands are:
TSS LIST
Displays information on individual or reserved ACIDs (such as the RDT).
TSS WHOHAS
Displays information on a resource, field name(FDT), facility, attribute or administrative authority, depending on which is specified.
TSS WHOOWNS
Displays information on whether a resource is defined to CA Top Secret and who is the owner.
TSS WHOAMI
Displays information on the security environment for the ACID currently signed on to the terminal.
TSS MODIFY(STATUS)
Displays information on the global security environment and control options-such as the default MODE-currently in effect.
Status Information
144 User Guide
ACID and Record Information
Use the TSS LIST command to display information contained on individual ACIDs, the ALL Record, the RDT Record, the FDT Record, the DLF Record, the NDT Record, the APPCLU Record, or the Audit Record. The information listed depends on:
■ The scope of the ACID issuing command
■ The administrative authorities the ACID possesses
For example, to list information on the:
■ Security Record, you need DATA (options) authority
■ ALL Record, you need MISC9(GLOBAL) authority
■ Audit Record, you need RESOURCE(AUDIT) authority
Only the MSCA or an authorized security administrator can display installation-wide information with TSS LIST. The administrative authorities needed are:
TSS ADMIN(ALL) DATA(ALL,PROFILE,SESSKEY)
Examples: list resource and ACID information
This example lists the resources being audited in your scope of authority:
TSS LIST(AUDIT)
This example lists the ACIDs and associated names in a department within your scope of authority:
TSS LIST(ACIDS) DATA(NAMES)
DEPARTMENT(DEPT01)
This example lists all of the ACIDs that begin with a specific prefix 'USER':
TSS LIST(ACIDS) ACIDPRFX(USER)
DATA(BASIC)
Status Information
Chapter 8: Viewing Your Security Environment 145
Viewing Authority
The administrator can grant ACIDs the authority to list the following information stored in their security record:
■ The ACID holder’s name
■ The ACID type
■ The size of the Security Record
■ Facilities the ACID can access
■ When the ACID was created, last modified, and last used
■ What resources are permitted to the ACID
■ The administrative authorities granted
The user cannot display their password, profile, or session key information.
To grant every ACID the authority to list security record information, enter the command:
TSS ADMIN(ALL) DATA(ALL)
Status Information
146 User Guide
Access Authorization Information
The information provided by the TSS WHOHAS command function depends on the operand supplied:
Resource
Displays information about the resource’s owner and the ACIDs authorized to access it. This function requires RESOURCE(INFO) authority.
ACID
Displays a list of additional ACIDs authorized to submit jobs for that ACID. This function requires ACID(INFO) authority.
A facility, attribute, or data field
Displays a list of all ACIDs that have the specified facility, attribute or data field. Facility requires ADMIN authority FACILITY(xxxx). Fieldname requires no special ADMIN authority.
Administrative authority information is obtained with the AUTHADM keyword and specifying any of the administrative authorities specified with the TSS ADMIN command. This function requires no special authority.
Examples: display ACID, resource, authority, and ownership information
This example determines the owner and all of the ACIDs authorized to use the SYS1 dataset:
TSS WHOHAS DSNAME(SYS1.)
This example determines all of the ACIDs authorized to use the CICSPROD facility:
TSS WHOHAS FACILITY(CICSPROD)
This example queries which users have the NODSNCHK attribute and simultaneously have default TSO logon procedure PROC399:
TSS WHOHAS NODSNCHK
TSOLPROC(PROC999)
This example lists users with administrative authority:
TSS WHOHAS AUTHADM
This example determines who has MISC1(SUSPEND) authority:
TSS WHOHAS AUTHADM
MISC1(SUSPEND)
This example determines the owner and all of the ACIDs authorized to submit jobs for the ACID DB2SCA1:
Status Information
Chapter 8: Viewing Your Security Environment 147
TSS WHOHAS ACID(DB2US12)
Resource Ownership
Use the TSS WHOOWNS command function to:
■ Determine if a resource is defined to CA Top Secret and who the owner is
■ Display in alphabetical order all resources that generically match the designated resource
The TSS WHOOWNS command is limited by the scope of the administrator issuing the command and requires RESOURCE(INFO) authority.
To display all the owned resources for a particular resource class, use an asterisk (*) as the operand.
Example: determine owned transactions
This example determines all the owned transactions within your scope:
TSS WHOOWNS OTRAN(*)
Individual ACID Security Information
The TSS WHOAMI command can be used by any user. TSS WHOAMI displays the ACID, ACID type, terminal ID, facility currently logged on to, and associated logging options for the ACID currently signed on to the terminal.
Status Information
148 User Guide
Global Security Environment Information
Use the TSS MODIFY(STATUS) command to display the global security environment and control options such as the default security MODE, default LOG, and PASSWORD options currently in effect. This command can be entered by any ACID with CONSOLE attribute.
To display security environment information, enter the command:
TSS MODIFY (STATUS([BASE,VERSION,FACMODE,PASSWORD,JES,CPF]))
BASE
Displays the base system and miscellaneous control options.
CPF
Displays CPF-related control options.
FACMODE
Displays facility modes.
JES
Displays JES-related control options.
LDS
Displays the LDAP nodes and the LDS control options.
LINUX
Displays the status of linux nodes.
MLS
Displays the status of the MLS control options.
PASSWORD
Displays password-related control options.
PHRASE
Displays the password phrase related control options.
STAG
Displays the statistics control options.
SYSPLEX
Displays the status of the coupling facility.
VERSION
Displays the system version in the output.
Chapter 9: Modifying Your Security Environment 149
Chapter 9: Modifying Your Security Environment
This section contains the following topics:
Control Options (see page 149)
Control Options
CA Top Secret control options define the processing environment CA Top Secret operates under. Use control options to:
■ Control how CA Top Secret normally operates and how it operates under specific MODEs and circumstances
■ Indicate which features, facilities, and products are on the operating system
■ Control how CA Top Secret handles individual facilities
■ Specify password selection rules and violation thresholds
■ Set suspension thresholds for users
■ Issue commands that force CA Top Secret to reset after shutdown or reinitialize after installing CA Top Secret maintenance
All control options have default values. The default values of the FACILITY control option vary by facility. In general, these default values are consistent with a FAIL MODE security environment.
CA Top Secret protects security-sensitive control options against unauthorized entry and change. Only the MSCA or an authorized SCA can select and change all control options.
Changes to control options made through console commands (such as START and MODIFY) are temporary and end when CA Top Secret is brought down. To effect a control option change that spans shutdowns, add the entry to the parameter file or the PARM field of the CA Top Secret started task.
Control Options
150 User Guide
Restricted Control Options
CA Top Secret restricts any control option that changes the security environment. Only control options that request status displays are not restricted.
When you specify a control option or change it at the console, the following actions occur:
■ If an ACID with the CONSOLE attribute is logged on to the console, the request is executed.
■ If an ACID without the CONSOLE attribute is logged on to the console, CA Top Secret prompts you for the necessary authorization. The request does not take effect unless you enter one of the following:
– An ACID that possesses the CONSOLE attribute followed by that ACID's password in the format ACID/password.
– The MSCA's previous password.
Whenever you change a control option, CA Top Secret automatically maintains an audit trail, including the ACID that changed the control option.
If you change a restricted control option using the TSS MODIFY command function, the administrator must possess the CONSOLE attribute.
Control Options and the Parameter File
When CA Top Secret starts up, it references the parameter file and the PARM field of the started task procedure EXEC statement for overrides to the control option defaults.
Changes to the parameter file:
■ Are permanent
■ Are useful when many control options default values are being changed
■ Cannot be audited by CA Top Secret
If the parameter file conflicts with the PARM field, the PARM field prevails.
If you are starting CA Top Secret as a subtask, code SUB=MSTR on the startup command.
Control Options
Chapter 9: Modifying Your Security Environment 151
Control Options and the PARM Field
Whenever the CA Top Secret started task procedure executes, this method overrides control option defaults or parameter file specifications.
z/OS limits the size of the PARM= field to 100 characters, use the parameter file to specify an initial set of control options during the installation of CA Top Secret. The limit for a single line in the parameter file is 80.
Example: change BACKUP control option
In this example the EXEC statement is coded to change the value of the BACKUP control option:
TSS EXEC PROGRAM=TSSMNGR4,DPRTY=(15,14),TIME=1440,
REGION=500K,PARM=‗BACKUP(0500)‘
Control Options and the O/S START Command
When the CA Top Secret started task begins, the START command overrides the control option defaults and the values specified through the parameter file or the PARM field.
The format of the O/S START command is:
S TSS,,,option,option,...
Example: set backup time
This example sets the automatic daily backup of the security file to 5 a.m.
S TSS,,,BACKUP(0500)
Control Options
152 User Guide
Changing Control Options With the O/S MODIFY Command
This method of changing control options:
■ Can be used at any time when CA Top Secret is running
■ Overrides control option values specified through the parameter file, the PARM field, and the O/S START command
This command has the following format:
F TSS,option,option,...
Example: establish WARN MODE
This example establishes WARN MODE as the global security environment and sets up an automatic backup of the Security File at 5 a.m.
F TSS,MODE(WARN),BACKUP(0500)
Control Options and the TSS MODIFY Command
This method of changing control options:
■ Can be used at any time while CA Top Secret is running
■ Overrides control option values specified through any other method
■ Is temporary and ends when CA Top Secret is brought down
This command has the following format:
TSS MODIFY(option,option,...)
Example: change security file backup time
In this example, the command instructs CA Top Secret to perform a daily backup of the Security File at 5 a.m.
TSS MODIFY(BACKUP(0500))

Control Options
Chapter 9: Modifying Your Security Environment 153
Security Environment Refresh
Use the REFRESH command for administrative security changes to take effect without having to log off or restart your system. This is useful in multi-user address spaces like CICS or IMS where an ACID may have multiple instances of signed-on users.
Examples: refreshing security environment
This example refresh your own security environment:
TSS REFRESH
This example refreshes all occurrences of an ACID in the address space where the command is issued:
TSS REFRESH(acid)
This example refreshes all occurrences of an ACID in the address space of a specific job:
TSS REFRESH(acid) JOBNAME(job)
This example refreshes all occurrences of an ACID in all address spaces:
TSS REFRESH(acid) JOBNAME(*)

Chapter 10: Setting up Resource Definitions and Ownership 155
Chapter 10: Setting up Resource Definitions and Ownership
This section contains the following topics:
How Resources are Secured (see page 155) Default Resource Protection (see page 155) Implementing Default Protection (see page 156) Resource Ownership (see page 157) Resource Class Translation (see page 176)
How Resources are Secured
You can restrict a user’s access to a resource by day, time, facility, program, or access level. Resource protection can also be extended on a default or global basis.
To secure resources:
■ Define the resources to CA Top Secret by:
– Verifying that the resource class is defined to the RDT
– Assigning ownership of the resource to an ACID
■ Permit access using the TSS PERMIT command function
Requests to access a secured resource are filtered through the Security Validation Algorithm. Access depends on what PERMITs the ACID has, how explicit those PERMITs are, and where they are stored (in the user, profile, or ALL Record). The Security Validation Algorithm uses all of this information to determine “best fit” between what resources the user is allowed to access and what resources the user is requesting to access.
Default Resource Protection
The RDT contains pre-defined resource classes. Each resource class is identified by a unique keyword, and has certain attributes associated with it.
CA Top Secret will not protect a resource it does not know about. To extend default protection to all resources pre-defined in the RDT, assign the DEFPROT attribute to the specific resource class. Each resource in the class has security protection even if it is not defined to CA Top Secret. A security violation occurs if a request is made to access the resource. (In FAIL MODE default protection exists for data sets and volumes only.)
Implementing Default Protection
156 User Guide
RDT Contents
To display information about a specific resource class, enter the command:
TSS LIST(RDT) RESCLASS(resource-class-name)
Permission Records
Use the ADMINBY control option to record any authorized resource permissions or facilities added to a user. When enabled, the following information is recorded:
■ The name of the administrator
■ The SMFID of the system the command was issued on
■ The date and time the command was issued
Implementing Default Protection
Many resources do not require full default protection (for example, if you do not want a security violation to occur when you access a particular resource). You can dynamically define resources to the RDT and give them default protection.
To set up full default protection for specific predefined resources in the RDT record, attach the DEFPROT attribute to the resources with the TSS REPLACE(RDT) command function.
Example: default protection
This example automatically protects CICS journal control tables (JCT):
TSS REPLACE(RDT) RESCLASS(JCT)
ATTR(DEFPROT)
Default Data Set Protection
To protect all data sets in WARN and IMPLEMENT modes, use the TSS REPLACE(RDT) command function to attach the DEFPROT attribute to the DATASET resource class. For information, see the chapter “Maintaining Special Security Records.”
Resource Ownership
Chapter 10: Setting up Resource Definitions and Ownership 157
Resource Ownership
Most resources must be owned before their use can be authorized. (Commands are protected through the Limited Command Facility and USERx class resources.)
After the resource class is defined to the RDT, determine which ACIDs have ownership of the individual resources within that class. Assigning ownership lets you individualize access restrictions for particular resources within the resource class.
Resource ownership implies that the owning ACID has an access level of ALL. Since it may not be desirable to grant unlimited access to individual users or profiles, assign resource ownership to a Department or Division ACID using the ADDTO command function. Then, full or restricted resource access can be authorized for other, non-owning ACIDs using the PERMIT command function.
Assigning resource ownership can have either of the following results:
■ If Resource is new (undefined), the ADDTO command defines the resource by assigning ownership to the ACID specified in the command function
■ If Resource is owned by another ACID, the ADDTO command transfers ownership to the ACID specified in the command function and automatically permits the previous owner full access to the resource
Resource Ownership
158 User Guide
Resource Owner Selection
Zone, division, department, profile, and user ACIDs can own resources. Only users and profiles can be granted access to resources.
For simpler and effective security administration, resources should typically:
■ Be owned by the appropriate department, division, or zone ACID
■ Have access permission granted to user and profile ACIDs on an as-needed basis
Note: Allow users to own all files matching their unique high-level qualifier.
By default, ownership of a resource automatically gives full (ALL) access of that resource to the owner. An exception is when a masked resource is owned at a user level. In this situation, the owner does not have access to the resource and cannot be permitted access to it. All masked resources should be owned at a department, or higher, level.
If ownership is granted to a user ACID, that user automatically has complete access to the resources.
Ownership of a resource by a department ACID:
■ Is done for safekeeping, the department ACID cannot access the resource.
■ Does not imply automatic access to that resource for all users in that department. Each user in that department has to be explicitly authorized to access that resource.
If a department has ownership of many resources permitted many times (over 500), create several dummy departments and split up the ownership. This improves processing efficiency by balancing distribution on the security file.
Example: ACID resource ownership
In this example, USER01 has ownership of the PAYROLL.UPDTE data set and ALL access to the PAYROLL.UPDTE data set.
TSS ADDTO(USER01) DSNAME(PAYROLL.UPDTE)
This access cannot be overridden with the commands:
TSS PERMIT ..... ACTION(DENY)
TSS PERMIT ..... ACCESS(NONE)
Ownership by a profile implies total access to the resource for every user attached to that profile. It is recommended that profiles never own anything.

Resource Ownership
Chapter 10: Setting up Resource Definitions and Ownership 159
Example: department ownership
This example designates the Financial Department (FINDEPT) as the owner of the INVEST.RES data set. If USER02 belongs to that department he would still have to be authorized (via the TSS PERMIT command ) to access the INVEST.RES data set. Therefore, USER02 can be given UPDATE access or even be restricted to READ only access to this data set. The same concept applies to resource ownership by Division and Zone ACIDs.
TSS ADDTO(FINDEPT) DSNAME(INVEST.RES)
Resource Ownership
160 User Guide
Generic Prefixing
Use generic prefixing to reduce the task of assigning ownership for each resource, masking, and profile ACID.
Resources can be defined to CA Top Secret by their full name or through a generic prefix. A generic prefix is a high-order sub-string of the full resource name. If your site has implemented and enforced sound resource naming conventions, you can use generic prefixing extensively to specify resources. Generic prefixing allows a group of resources with similar names in the same resource class to be defined to CA Top Secret simultaneously.
Generic prefixing can be used with any resource class. CA Top Secret allows identical generic prefixes if they are used with different resource types. For example, PROGRAM(PAYROLL) and APPLICATION(PAYROLL) do not conflict.
The minimum generic prefix length is one character—except data sets and volumes which are two characters. The maximum length is eight characters—except data sets which is 26.
Example: generic prefixing
In this example, the IEHPROGM, IEHINIT, and IEHLIST programs in the PROGRAM resource class are grouped under the generic prefix IEH.
Instead of entering:
TSS ADDTO(SYSDEPT) PROGRAM(IEHPROGM)
TSS ADDTO(SYSDEPT) PROGRAM(IEHINIT)
TSS ADDTO(SYSDEPT) PROGRAM(IEHLIST)
Enter:
TSS ADDTO(SYSDEPT) PROGRAM(IEH)
You can then permit access to all of the resources starting with IEH by entering:
TSS PERMIT(USER02) PROGRAM(IEH)
USER02 is now permitted to access programs IEHPROGM, IEHINIT, IEHLIST.
Examples: specify a generic prefix
This example assigns ownership of any program that begins with the prefix IEH to the ACID DEPT01.
TSS ADDTO(DEPT01) PROGRAM(IEH)
Resource Ownership
Chapter 10: Setting up Resource Definitions and Ownership 161
This example prefixes all data sets used by the Publications Department to TECHPUBS.
TSS ADDTO(PUBDEPT) DSNAME(TECHPUBS)
This example permits a user to access any data set prefixed by TECHPUBS:
TSS PERMIT(USER01) DSNAME(TECHPUBS) ACCESS(ALL)
This method eliminates the need for separate PERMIT commands to access the data sets: ‘TECHPUBS.PROD.SCEDS’ and ‘TECHPUBS.GRAPHICS.SCEDS’.
For further refinement, a prefix can span several data set name index levels. For example, to reduce the number of data sets a user can access, instead of specifying DSNAME(TECHPUBS), specify DSNAME(TECHPUBS.PR).
Undercutting
Undercutting is establishing ownership with a generic prefix generically higher (more inclusive) than an existing prefix. For example, the prefix IMS is more inclusive than the prefix IMSTEST. If the undercut is valid, CA Top Secret automatically transfers ownership of the specified resources to the new owner.
When using undercutting:
■ Do not to undercut a prefix that is already owned
■ All prefixes must be owned within the scope of the administrator specifying the undercut.
■ You cannot use a generic prefix to establish ownership that is generically lower (less inclusive) than an existing prefix (for example, the prefix IMSTEST cannot be used to undercut the prefix IMS).
Undercutting restrictions do not apply when the subsequent prefix is used to specify resource authorization rather than resource ownership.
Example: undercutting
This example shows two valid entries:
TSS ADDTO(DEPT01) DSNAME(IMS)
TSS PERMIT(USER02) DSNAME(IMSTEST)
Resource Ownership
162 User Guide
Attributes for Activating or Deactivating Generic Prefixing
The following attributes control whether a resource class supports generic prefixing:
GENERIC
Activates prefixing.
NONGENERIC
Deactivates prefixing and treats a general resource as a fully qualified name. The NONGENERIC attribute supports long and short resource classes.
Note: For a list of resources that cannot be used with the NONGENERIC attribute, see the “Prefixed Resources” appendix.
The NONGENERIC attribute applies to the following resources by default:
■ IUCV
■ VMCF
■ VMDIAL
■ VMMACH
■ VMRDR
Important! These attributes affect only permissions. The attributes do not affect the way resource ownership is designated or how the CICS Bypass List is processed.
To change the GENERIC attribute, you must use the TSS REPLACE(RDT) command.
To add the NONGENERIC attribute to a resource class, enter the following command:
TSS REPLACE(RDT) RESCLASS(class)
ATTR(NONGENERIC)
Example: Override the GENERIC Attribute
In this example, the TSOPROC resource class in the RDT has the GENERIC attribute. This example permits access only to a single TSOPROC named PROC397:
TSS ADD(DEPT01) TSOPROC(PROC397)
TSS ADD(USER01) TSOPROC(‗PROC397 ‗)
The non-generic TSOPROC resource is enclosed in apostrophes with a trailing space. Resources that are permitted as non-generic must be revoked the same way:
TSS REV(USER01) TSOPROC(‗PROC397 ‗)
Resource Ownership
Chapter 10: Setting up Resource Definitions and Ownership 163
Example: Override the NONGENERIC Attribute
In this example, the PROGRAM resource class in the RDT has the NONGENERIC attribute. To permit programs IEHPROGM, IEHINIT, and IEHLIST to one ACID, enter the following commands:
TSS ADDTO(USER01) PROGRAM(IEH)
TSS PERMIT(USER01) PROGRAM(IEH(G))
The G indicates that IEH is a generic prefix and not a fully qualified resource name.
How to Change the Generic Prefixing Setting for Existing Permissions
When you change the resource class between GENERIC to NONGENERIC, the previous security permissions are retained for all existing definitions. Previous permissions list differently to reflect that they contain the GENERIC or NONGENERIC attribute.
To change existing permits to the new GENERIC/NONGENERIC organization:
■ Use the TSS WHOHAS command to determine existing permissions in TSSCFILE.
■ Revoke existing permissions.
■ Alter the GENERIC/NONGENERIC attribute in the RDT.
■ Re-permit prior permissions.
GENERIC Attribute Removal
To remove the GENERIC attribute from an RDT RESCLASS, the RDT NONGENERIC attribute must replace the current GENERIC attribute.
After altering the RDT, existing permissions retain the GENERIC/NONGENERIC attribute under which they were initially permitted. To change existing permits to the new GENERIC/NONGENERIC organization:
■ Issue TSS WHOHAS through TSSCFILE to determine existing permissions
■ Revoke existing permissions
■ Alter the GENERIC/NONGENERIC attribute in the RDT
■ Re-permit prior permissions
To remove the GENERIC attribute, enter the command:
TSS REPLACE(RDT) RESCLASS(TSOPROC)
ATTR(NONGENERIC)
Resource Ownership
164 User Guide
NONGENERIC Attribute Removal
To remove the NONGENERIC attribute, use the REPLACE(RDT) command function.
If you replace the GENERIC/NOGENERIC attribute for RESCLASS, existing permissions retain the GENERIC/NOGENERIC attribute. Only future permissions are affected by the RDT update.
Example: remove the NONGENERIC attribute
This example removes the NONGENERIC attribute by replacing it with the GENERIC attribute.
TSS REPLACE(RDT) RESCLASS(PROGRAM)
ATTR(GENERIC)
Masking
Masking is used to group sets of resources whose names share similar characteristics. Masking is not restricted to prefixes. Similar characters can occur in the beginning, middle, or end of the resource name, with characters in between. Special characters are specified to represent variations between resource names.
A masked resource name is treated by CA Top Secret like a generic prefix. Any data set that begins with a pattern indicated by a mask is considered a match for it by the security validation algorithm, and the associated access authorizations are honored.
To determine if a resource supports masking
1. Enter the command:
TSS LIST(RDT)
2. Check the RDT for the MASK or NOMASK attribute.
Resource Ownership
Chapter 10: Setting up Resource Definitions and Ownership 165
Floating Pattern Masks
A floating pattern mask uses the hyphen (-) to represent a variable number of characters (including no characters). Resource names containing hyphens cannot be owned. They must match the ownership of resources defined by other characters and masks.
The hyphen:
■ Cannot be used in the same resource name with other masking characters
■ Can only be used in the interior of a resource name
■ Can only occur at position three or later
The following resource masks are invalid:
Resource Mask
Reason why invalid
- The hyphen cannot be used at the beginning or end of a resource name.
**-* The hyphen cannot be used in combination with any other masking character.
a-bc The hyphen cannot be used before position three of a resource mask.
A floating character mask can represent resource names with multiple qualifiers or indexes (cross-node resource names). These examples show how the hyphen mask can be used to cross partial and complete nodes of resource qualification:
Resource Mask Matches Does Not Match
ACCT-VEND ACCTPAY.VENDOR
ACCTVEND
ACC.VEND
AP.ACC.VEND
PAYROLL.-.XMPT [email protected]
PAYROLL.Y2K.XMPT.BKUP
PAYROLL.XMPT
The explicit periods on either side of the mask in the second example prevent the collapse of the hyphen into a null-string, and prevents the inclusion of more than one initial qualifier.
Resource Ownership
166 User Guide
Variable Character Substitution
Variable character substitution uses the asterisk (*) to represent a zero to eight character qualifier, optionally followed by a period(.). Resource masks containing asterisks can be owned.
If the first character of a mask is fixed, the second character cannot be an asterisk (for example, X*M100 is invalid, but ** is valid).
The following rules apply to masking:
■ For resource classes that support masking, an ADD command must specify a minimum of two characters
■ An ADD command that contains a masking character must start with a masking character
■ A resource name that starts with a non-masking character cannot contain a masking character in the second position
The ownership of the masked resource consisting of multiple asterisks does not supply default protection to all resource names in the class. Protection is supplied by replacing the RDT entry for the resource class with ATTR(DEFPROT). For information, see the chapter “Maintaining Special Security Records”.
Ownership of resources is a pseudo ownership. This enables the administrator to permit global access to resources owned through other ownerships. Minimize the length of “total wild-card” permissions so that the security algorithm will rank such maskings by “number of characters matched” as low as possible. For instance:
TSS PERMIT(user) DSN(%.)
ACC(ALL)
TSS PERMIT(user) DSN(*****)
ACC(READ)
The first permission ranks the data sets beginning with the user’s ACID as a higher match for the second permission (five characters) than the first (two characters)
Only READ access would be granted to such a data set.
Example: character substitution ranking
In this example, CA Top Secret ranks the first permission as taking precedence:
TSS PERMIT(user) DSN(%.) ACC(ALL)
TSS PERMIT(user) DSN(**) ACC(READ)
Examples: variable character substitution
Resource Ownership
Chapter 10: Setting up Resource Definitions and Ownership 167
Consider the following examples:
Resource Mask Matches Does Not Match
ACCT*M.DATA ACCT.PAYM.DATA ACCTPAYD.DATA
*LAB LAB NW.JERSEY.LAB
SAL*M.MARCH. SALPAYM.MARCH
SALM.MARCH
SAL.C.M.MARCH
SALPAYD.MARCH
SAL.MARCH
SAL.EXEMPTS.J.MARCH
In the first mask, the asterisk matches the 4-character string .PAY with exact matches on the fixed characters in the mask. The non-matching suffix D.DATA does not match the mask’s fixed characters “M.DATA”.
In the second mask, the initial asterisk matches zero characters at the start of “LAB”. There are too many (10 + period) characters in “NEW.JERSEY.LAB” to be represented by a single asterisk.
Index Substitution
The index mask is an extension of the variable mask. You can specify where index levels appear in a resource name. Index substitution masking uses (*.) to tell CA Top Secret to ignore an index (node) level. The masking characters:
■ Can be strung together to represent multiple index levels, for example, (*.*.)
■ At the beginning of the resource name represent a one to eight character index
Each asterisk appearing within the name can represent from zero to eight characters.
Examples: index substitution
This example specifies that .BALL must be prefixed by one to eight characters:
*.BALL
Matches:
BASKET.BALL
Does not match:
BALL.GAME
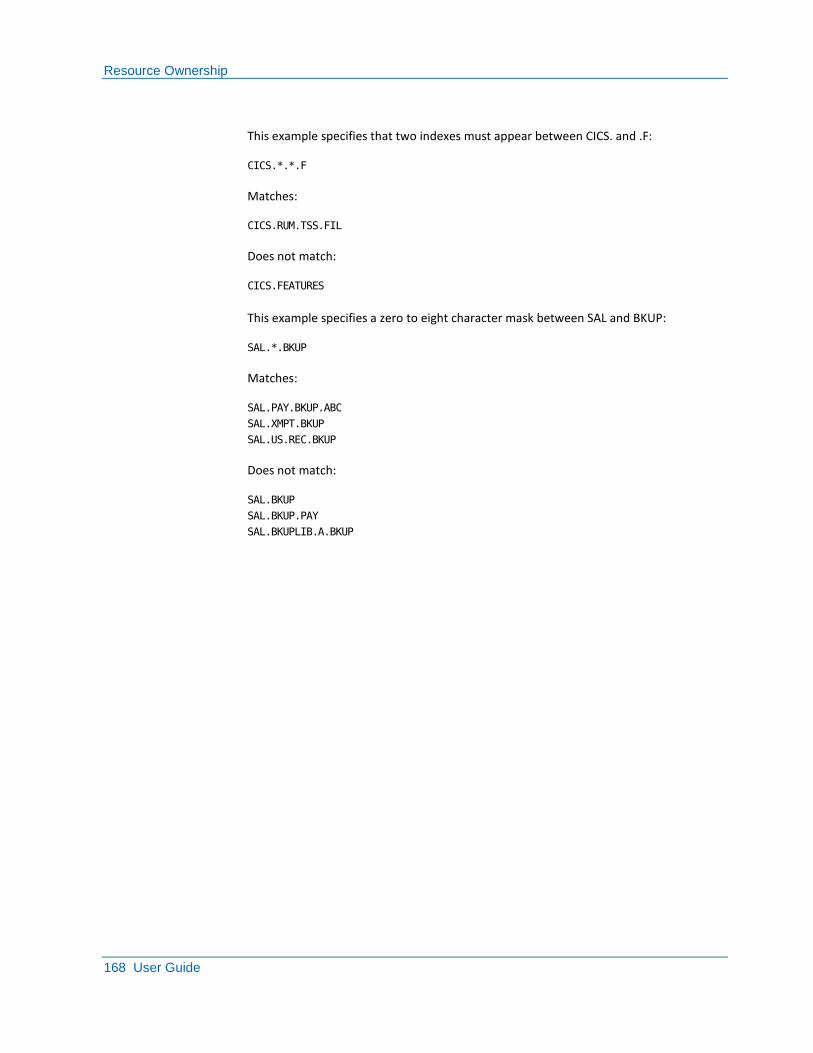
Resource Ownership
168 User Guide
This example specifies that two indexes must appear between CICS. and .F:
CICS.*.*.F
Matches:
CICS.RUM.TSS.FIL
Does not match:
CICS.FEATURES
This example specifies a zero to eight character mask between SAL and BKUP:
SAL.*.BKUP
Matches:
SAL.PAY.BKUP.ABC
SAL.XMPT.BKUP
SAL.US.REC.BKUP
Does not match:
SAL.BKUP
SAL.BKUP.PAY
SAL.BKUPLIB.A.BKUP
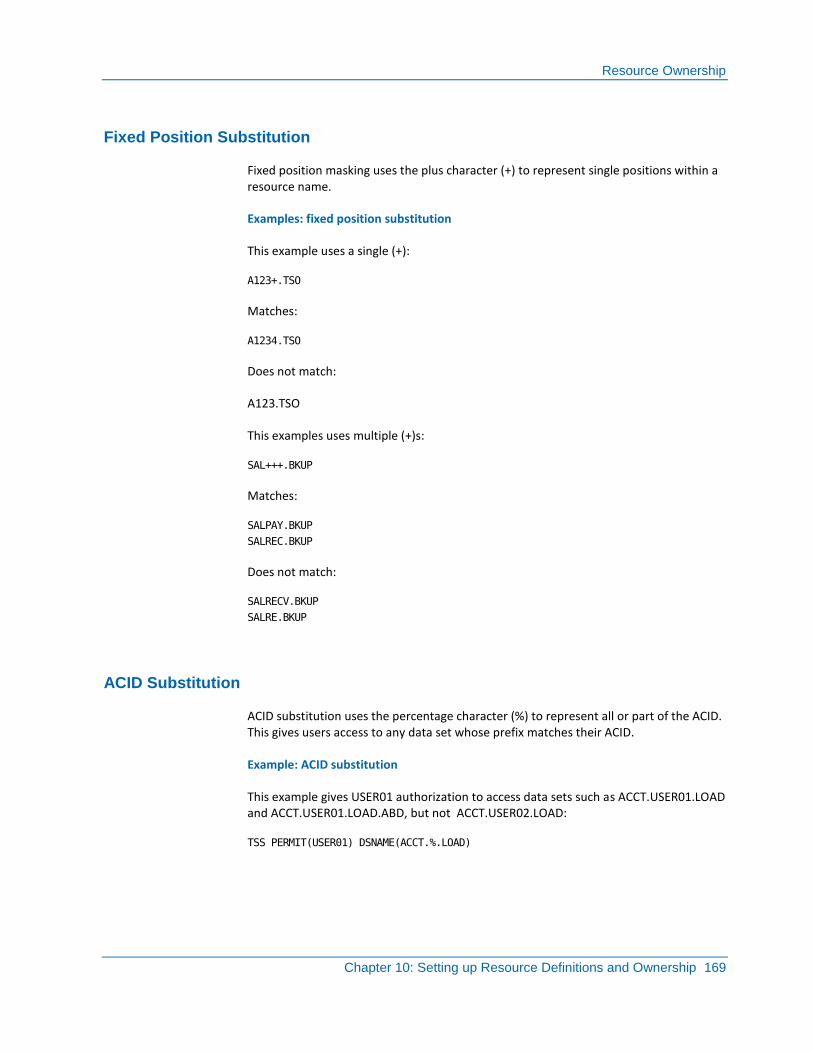
Resource Ownership
Chapter 10: Setting up Resource Definitions and Ownership 169
Fixed Position Substitution
Fixed position masking uses the plus character (+) to represent single positions within a resource name.
Examples: fixed position substitution
This example uses a single (+):
A123+.TSO
Matches:
A1234.TSO
Does not match:
A123.TSO
This examples uses multiple (+)s:
SAL+++.BKUP
Matches:
SALPAY.BKUP
SALREC.BKUP
Does not match:
SALRECV.BKUP
SALRE.BKUP
ACID Substitution
ACID substitution uses the percentage character (%) to represent all or part of the ACID. This gives users access to any data set whose prefix matches their ACID.
Example: ACID substitution
This example gives USER01 authorization to access data sets such as ACCT.USER01.LOAD and ACCT.USER01.LOAD.ABD, but not ACCT.USER02.LOAD:
TSS PERMIT(USER01) DSNAME(ACCT.%.LOAD)
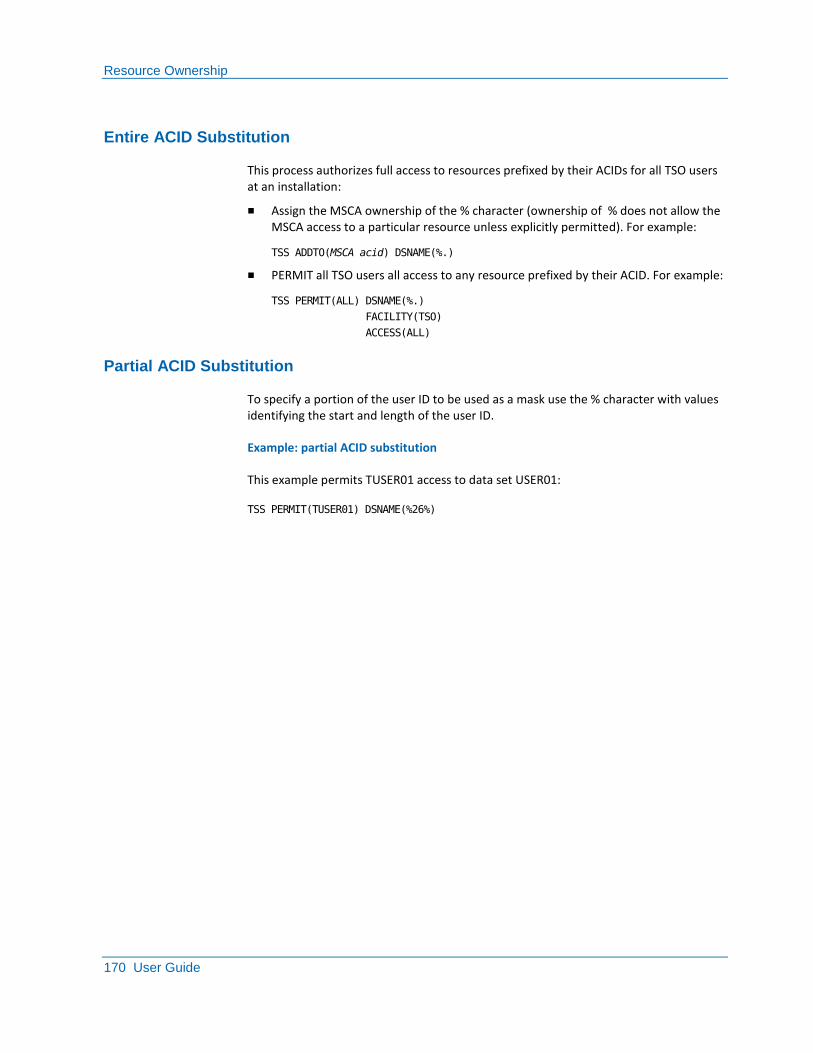
Resource Ownership
170 User Guide
Entire ACID Substitution
This process authorizes full access to resources prefixed by their ACIDs for all TSO users at an installation:
■ Assign the MSCA ownership of the % character (ownership of % does not allow the MSCA access to a particular resource unless explicitly permitted). For example:
TSS ADDTO(MSCA acid) DSNAME(%.)
■ PERMIT all TSO users all access to any resource prefixed by their ACID. For example:
TSS PERMIT(ALL) DSNAME(%.)
FACILITY(TSO)
ACCESS(ALL)
Partial ACID Substitution
To specify a portion of the user ID to be used as a mask use the % character with values identifying the start and length of the user ID.
Example: partial ACID substitution
This example permits TUSER01 access to data set USER01:
TSS PERMIT(TUSER01) DSNAME(%26%)
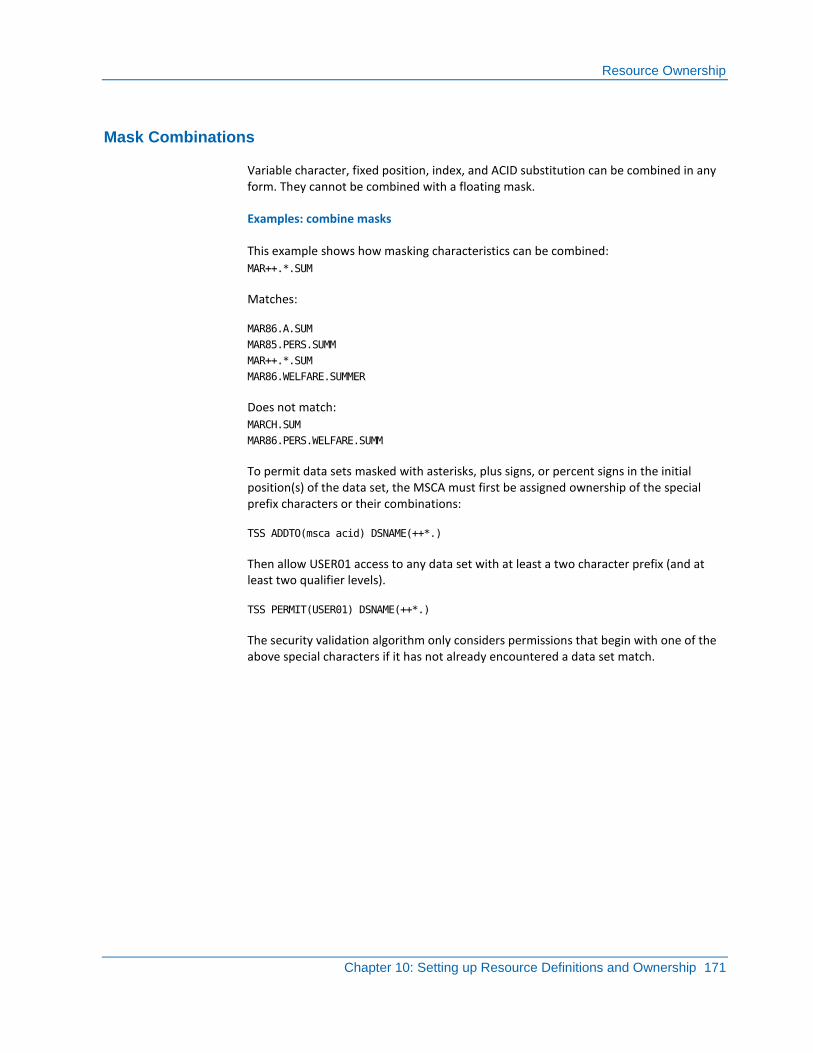
Resource Ownership
Chapter 10: Setting up Resource Definitions and Ownership 171
Mask Combinations
Variable character, fixed position, index, and ACID substitution can be combined in any form. They cannot be combined with a floating mask.
Examples: combine masks
This example shows how masking characteristics can be combined:
MAR++.*.SUM
Matches:
MAR86.A.SUM
MAR85.PERS.SUMM
MAR++.*.SUM
MAR86.WELFARE.SUMMER
Does not match:
MARCH.SUM
MAR86.PERS.WELFARE.SUMM
To permit data sets masked with asterisks, plus signs, or percent signs in the initial position(s) of the data set, the MSCA must first be assigned ownership of the special prefix characters or their combinations:
TSS ADDTO(msca acid) DSNAME(++*.)
Then allow USER01 access to any data set with at least a two character prefix (and at least two qualifier levels).
TSS PERMIT(USER01) DSNAME(++*.)
The security validation algorithm only considers permissions that begin with one of the above special characters if it has not already encountered a data set match.
Resource Ownership
172 User Guide
The *ALL* Resource Name
An administrator can PERMIT a user access to all protected resources within a class using a single command. For prefixed resources masking characters serve this function. For general resources, the special resource name *ALL* is used.
An administrator can PERMIT access to all owned resources within a NOMASK resource class by using the special resource name:
*ALL*
For resource classes with the MASK attribute, a similar PERMIT can be managed with the resource name:
*****
A permission using *ALL* only grants access to protected resources. Using ADD is a formality and has no effect on resources not already protected. PERMIT allows the administrator to allow access to all owned resources of a RESCLASS.
When DEFPROT is applied all resources are implicitly protected without the necessity of formal ownership. To grant access under DEFPROT the administrator must still own and permit the resources (which may include *ALL*).
Example: using *ALL*
This example gives USERA permission to all CICS transactions by assigning ownership of the special resource name *ALL* to the MSCA then issuing the PERMIT for USERA:
TSS ADDTO(MSCA) OTRAN(*ALL*)
TSS PERMIT(USERA) OTRAN(*ALL*)
FACILITY(CICSPROD)
This PERMIT allows USERA to access all transactions without having specific permissions for each one.
The ADDTO command does not protect all transactions; it only allows permission of the special name.
Resource Ownership
Chapter 10: Setting up Resource Definitions and Ownership 173
CPU Ownership
Once owned, a CPU cannot be accessed unless explicit authorization is granted. The CPU parameter is how CPU ownership and authorizations are specified. CPUs should be identified by the SMF ID of their system.
The SMF ID of a CPU is in SYS1.PARMLIB member SMFPRMxx.
Examples: assign ownership
This example assigns ownership to DEPT01 of the CPU resource SYSA:
TSS ADDTO(DEPT01) CPU(SYSA)
The example uses the TERMINAL parameter to establish ownership of a terminal:
TSS ADDTO(DEPT01) TERMINAL(K18L3064)
This example uses the VOLUME parameter to establishes ownership of a volume:
TSS ADDTO(DEPT01) VOLUME(WORK01)
This example uses the DSNAME parameter to establish ownership of a data set:
TSS ADDTO(DEPT01) DSNAME(PROD.SMP.CNTL)
This example gives USER01 ownership of jobs submitted from ALPHA2.USERJ:
TSS ADDTO(USER01) NODES(ALPHA.USERJ*)
Resource Ownership
174 User Guide
Resource Owner Location
To determine the owner of a resource, enter the command:
TSS WHOOWNS resource
All resources within the scope of the administrator who issued the command that generically match the designated resource type are displayed in alphabetical order.
To list all owned resources of a particular resource type within the scope of the administrator, enter the command:
TSS WHOOWNS resource(*)
Example: locate owned programs
This example determines all the owned programs within your scope:
TSS WHOOWNS PROGRAM(*)
Transfer Resource Ownership
To transfer ownership of a resource or set of resources from one ACID to another. The UNDERCUT keyword is required because the security administrator is aware that the resource is already owned. Since CA Top Secret automatically transfers ownership of the specified resources from the former owner to the new owner, only the new owner is identified in the command.
Whenever ownership is transferred, CA Top Secret automatically gives full access authorization to the former owner (provided the former owner was a User or Profile ACID, and not a Zone, Division, or Department ACID).
Both the new and former owners must fall within the scope of the administrator.
Example: transfer ownership
This example transfers ownership of terminal TSON0001 from USER01 to USER02:
TSS ADDTO(USER02) TERMINAL(TSON0001)
UNDERCUT
This example transfers ownership of all IMSTEST programs from USER01 to USER02:
TSS ADDTO(USER02) PROGRAM(IMS)
UNDERCUT
The following command is now implied:
TSS PERMIT(USER01) PROGRAM(IMSTEST)
Resource Ownership
Chapter 10: Setting up Resource Definitions and Ownership 175
Former Owner Access Removal
Use the NOPERMIT keyword to remove access from the former owner.
Example: remove access
This example removes access from the former owner of the terminal TSON0001:
TSS ADDTO(USER02) TERMINAL(TSON0001)
UNDERCUT
NOPERMIT
Ownership Removal
To remove ownership, use the REMOVE command function.
Example: remove ownership
This example removes job ownership from USER01:
TSS REMOVE(USER01) NODES(ALPHA.USERJ)
Resource Class Translation
176 User Guide
Resource Class Translation
Use resource translation to align resource ownership, permission, and reporting with the business use of a given facility. Resource class translation allows you to translate:
■ A source resource class into a target resource class during the resource security validation process
■ A single source resource class into multiple target resource classes depending on the facility definitions
Important! Defining new resource classes to the RDT and translating security validations to that class does not imply that all resources within the original class are protected within the new class. Insure that all resources that require protection are defined as owned and permitted for any classes defined as targets of resource class translation. Consider assigning the default protection attribute to any user defined resource classes used as targets for translation.
Example: resource class translation
In this example, a system running with multiple CICS regions is active at the same time and each CICS region represented by a unique facility within the matrix. No matter which CICS initiates a transaction the OTRAN resource class is assigned to the security validation process. The definition of resource ownership and the reporting and tracking of resource access and violations occurs within a single resource class. Defining resource class translation criteria in each CICS facility the OTRAN class translates into multiple classes for security validation purposes.
TSS MODIFY FACILITY(CICS1=RXLTADD(OTRAN:TRAN1))
TSS MODIFY FACILITY(CICS2=RXLTADD(OTRAN:TRAN2))
TSS MODIFY FACILITY(CICS3=RXLTADD(OTRAN:TRAN3))
When a user enters a transaction in CICS1, the OTRAN resource class is translated to TRAN1, and the security validation process checks for ownership and permission of the resource name within the resource class of TRAN1. Violation and access audit reporting includes both the original resource class and the actual resource class within the report entry if a translation is performed.
Chapter 11: Controlling Access 177
Chapter 11: Controlling Access
This section contains the following topics:
Introduction (see page 177) Resource Access Permission (see page 178) Access Restriction by Facility (see page 181) Access Restriction by Program Path (see page 182) Access Restriction by Access Level (see page 183) Access Restriction by SMFID (see page 187) CPU Access Restriction (see page 187) Terminal Access Restriction (see page 188) Add Resources to the ALL Record (see page 189) Source of Origin Access Restriction (see page 190) Access Restriction with the ACTION Keyword (see page 191) Globally Accessible Resources (see page 192) Multiple Access Authorizations (see page 194) Access Denial (see page 195) Limited Access ACIDs (see page 196) Restrict Signons to Specific Devices (see page 196) Time of Use Monitoring (see page 197) GROUP Entry Monitoring (see page 199) Network Entry Monitoring (see page 199) Optional System Entry Restrictions (see page 202)
Introduction
An ACID’s authorization to access a resource is determined by the PERMITs in:
■ The users record
■ The profile records attached to the users ACID
■ The ALL record (which lists globally accessible resources)
Resource Access Permission
178 User Guide
Resource Access Permission
The permit access to a resource, enter the command:
TSS PERMIT(acid) RESOURCE(name)
acid
Specifies the ACID being granted access.
RESOURCE
Specifies the resource class.
name
Specifies the name of the individual resource.
Example: grant access to a resource
In this example, the ACID is USER01, the resource class is TERMINAL, and the individual resource name is PD000001:
TSS PERMIT(USER01) TERMINAL(PD000001)
Example: authorize access to users
This example allows USER01 read-only access to data set MAG.NET.FIELD through the TSO facility. Access is allowed only from 8 a.m. through 6 p.m. for a period of thirty days starting from the date this command is issued:
TSS PERMIT(USER01) DSNAME(‗MAG.NET.FIELD‘)
FACILITY(TSO)
ACCESS(READ)
TIME(08,18)
FOR(30)
USER01 requires the ability to access TSO through a previous CREATE/ADDTO FACILITY(TSO) command for this example to be valid. If no facility restriction had been specified in the command above, USER01 would have been able to access MAG.NET.FIELD through any facility he can normally access.
Resource Access Permission
Chapter 11: Controlling Access 179
Generic Prefixing with PERMIT
Adding the appropriate keywords to the PERMIT command function restricts what resources the ACID can access and how they can be accessed.
Example: generic prefixing
This example permits USER02 to access all programs beginning with the IEH prefix:
TSS PERMIT(USER02) PROGRAM(IEH)
Default Protection
Any resource in the RDT that is not normally protected by default in any mode can be given default protection with the DEFPROT attribute.
Example: provide default protection
This example provides default protection for data sets in IMPLEMENT mode:
TSS REPLACE(RDT) RESCLASS(DATASET)
ATTR(DEFPROT)

Resource Access Permission
180 User Guide
Individual Permission Removal
To remove a specific permission:
■ List the user’s or profiles’ XAUTH data
■ Issue a revoke exactly as it is listed
Do not use the FOR keyword with the REVOKE command.
Examples: revoke permission
In this example, the output of the TSS LIST command is:
XA DATASET = SYS1.PROCLIB
ACCESS = READ
PRIVPGM = IEBCOPY
To revoke the authorization, enter the command:
TSS REVOKE(user) DSNAME(SYS1.PROCLIB)
ACCESS(READ)
PRIVPGM(IEBCOPY)
Even if there were other permissions with different access levels or other criteria, only this permission would be revoked. If you code the REVOKE with only the resource and no other parameters all matches of the resource is revoked.
Access Restriction by Facility
Chapter 11: Controlling Access 181
Access Restriction by Facility
Use the FACILITY keyword to restrict a user to accessing a specific resource through a designated facility only.
Facility sub-options override global control options of the same name.
To restrict access to a specific resource through a designated facility, enter the command:
TSS PERMIT(acid) RESOURCE(name)
FACILITY(facility)
name
The name of the specific resource access is being restricted to. Use the full identifier or a generic prefix.
facility
Specifies the facility used to access the resource.
Example: restrict access by facility
This example restricts USER01 to access program SCH007P through the BATCH or STC facilities only:
TSS PERMIT(USER01) PROGRAM(SCH007P)
FACILITY(BATCH,STC)
USER01 must be allowed to have access to these facilities:
TSS ADDTO(USER01) FACILITY(BATCH,STC)
Access Restriction by Program Path
182 User Guide
Access Restriction by Program Path
Program path access authorization allows access to resources or functions through specific programs only, called privileged programs. If a program other than a privileged one is used, the request causes a security violation.
Use program pathing to:
■ Control access to data sets and volumes
■ Ensure that a CICS resource is accessed through a specific application program only
■ Provide additional security for job submission and scheduling activity
Examples: restrict access by program path
This example allows PROD01 to submit jobs that run under the ACID PAY10M, but only through program SCH007P, a job scheduling program:
TSS PERMIT(PROD01) ACID(PAY10M)
PRIVPGM(SCH007P)
For program pathing to function, the issuer of the FRACHECK macro must pass the PRIVPGM name and the program must be in the linklist if LIB= is not specified.
This example specifies the additional restriction that this ACID can only be submitted through a started task:
TSS PERMIT(PROD01) ACID(PAY10M)
PRIVPGM(SCH007P)
FACILITY(STC)
This example requires that PROD01 be allowed to access the STC facility through a CREATE/ADDTO FACILITY(STC) entry, as well as be authorized to access SCH007P through a TSS PERMIT PROGRAM(SCH007P) entry.
By using the PRIVPGM keyword with the LIBRARY and FACILITY keywords, you can design an ACID’s access authorization so that ACID can only access a resource through a specific program, that must be loaded from a specific library, which is only accessed through a specific facility.
In this example USER02 must load the PAYUPDAT program from the PAYROLL.PRODLIB library, through BATCH to access the PAYROLL.MASTER data set:
TSS PERMIT(USER02) DSNAME(PAYROLL.MASTER)
PRIVPGM(PAYUPDAT)
LIBRARY(‗PAYROLL.PRODLIB‘)
FACILITY(BATCH)
ACCESS(UPDATE)
Access Restriction by Access Level
Chapter 11: Controlling Access 183
Access Restriction by Access Level
Use the ACCESS keyword to control the types and level of access to many resource classes such as:
■ Data sets
■ Volumes
■ CICS, CA-IDMS, and IMS resources
■ User-defined resources (UR1 and UR2)
Common access levels are:
■ READ (the default for data sets)
■ WRITE
■ UPDATE
■ CREATE
■ NOCREATE
■ SCRATCH
■ ALL
■ NONE
Ownership automatically confers total access to the resource to the owner unless Record Level Protection (RLP) is implemented.
Example: restrict access by access level
This example authorizes USER01 to update all data sets with AP as their highest-level qualifier:
TSS PERMIT(USER01) DSNAME(AP.)
ACCESS(UPDATE)

Access Restriction by Access Level
184 User Guide
Additional Access Levels
For resources such as CICS and IMS databases, CA Top Secret recognizes access level keywords that correspond to the actual system terminology (such as BROWSE, REPLACE, PURGE, and FEOV):
CONTROL
For VSAM data sets, CONTROL allows control-interval processing.
For VOLUME resources, when CONTROL and CREATE are both present, the combination allows the creation of data sets regardless of the applicable data set authorizations.
FETCH
Enables access to a program library (load library) for the purposes of executing programs.
The FETCH-only access level option enables the owner of a program library to allow others access to it for the execution of programs while preventing any other type of access. Thus, FETCH-only protection prevents the authorized user from reading the data set or copying a program for his own use (and, perhaps, modifying it to bypass special checking). Programs from FETCH-protected libraries can only be executed, called from TSO, or invoked through other standard system invocations. All FETCH requests in z/OS are translated as READ requests.
BLP
Allows a user to access a tape, bypassing the information kept in the label of that physical tape. BLP access is generally granted together with READ or UPDATE so that you are able to bypass label checking as well as read or write records to the tape.
To see the access levels of a resource, list the RDT entry for the resource.
Access Control at the Record and Field Level
Use the RLP to control which records within a data set and which fields within a record a user has access to.
To implement RLP:
■ Define the records and fields to protect to the SDT
■ Control access with the TSS PERMIT command with the appropriate access level specified
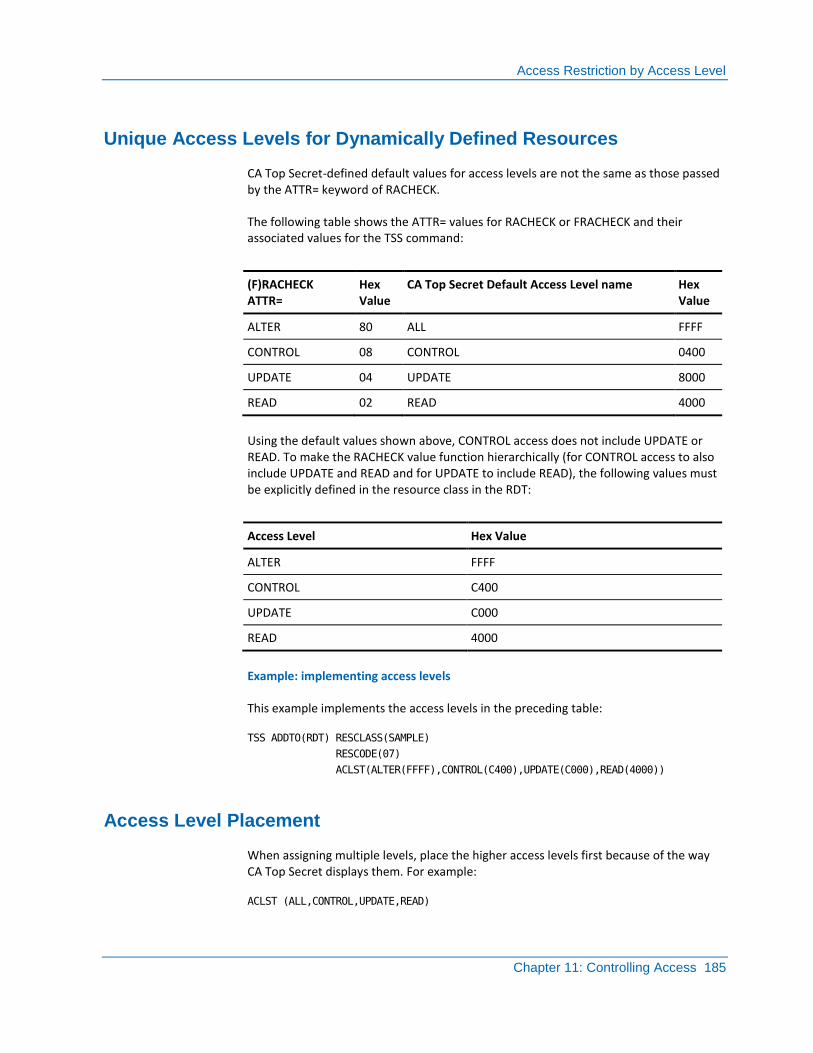
Access Restriction by Access Level
Chapter 11: Controlling Access 185
Unique Access Levels for Dynamically Defined Resources
CA Top Secret-defined default values for access levels are not the same as those passed by the ATTR= keyword of RACHECK.
The following table shows the ATTR= values for RACHECK or FRACHECK and their associated values for the TSS command:
(F)RACHECK ATTR=
Hex Value
CA Top Secret Default Access Level name Hex Value
ALTER 80 ALL FFFF
CONTROL 08 CONTROL 0400
UPDATE 04 UPDATE 8000
READ 02 READ 4000
Using the default values shown above, CONTROL access does not include UPDATE or READ. To make the RACHECK value function hierarchically (for CONTROL access to also include UPDATE and READ and for UPDATE to include READ), the following values must be explicitly defined in the resource class in the RDT:
Access Level Hex Value
ALTER FFFF
CONTROL C400
UPDATE C000
READ 4000
Example: implementing access levels
This example implements the access levels in the preceding table:
TSS ADDTO(RDT) RESCLASS(SAMPLE)
RESCODE(07)
ACLST(ALTER(FFFF),CONTROL(C400),UPDATE(C000),READ(4000))
Access Level Placement
When assigning multiple levels, place the higher access levels first because of the way CA Top Secret displays them. For example:
ACLST (ALL,CONTROL,UPDATE,READ)

Access Restriction by Access Level
186 User Guide
Combining User Defined and Standard Levels
You can combine user defined and access level access levels.
Examples: combine access levels
This example combines user-defined and standard access levels:
ACLST (ALTER(FFFF),ALL,CONTROL,EDIT(8000),UPDATE,
VIEW(4000),READ,MOVE(0004)
This example assigns unique access levels in which the list is non-exclusive. The DEFINE access level in this example allows all access levels that follow it—VIEW, EDIT, and MOVE. MOVE does not imply DEFINE, VIEW, or EDIT.
TSS ADDTO(RDT) RESCLASS(MENU)
RESCODE(05)
ACLST(DEFINE(FFFF),EDIT(8000),VIEW(4000),MOVE(0400))
This example has an assigned unique access levels to a main menu in the installation-written menu definition facility and you want to define new resource classes and access levels that are meaningful to your site.
The following table shows the site-written access levels used to equal access levels passed by the ATTR= keyword of RACHECK.
Site Written Access Levels ATTR=
VIEW READ
EDIT UPDATE
DEFINE CREATE/DELETE ALL or ALTER
MOVE CONTROL
Access Restriction by SMFID
Chapter 11: Controlling Access 187
Access Restriction by SMFID
Use the SYSID keyword to specify the systems a resource or facility can be accessed from. You can specify up to five SYSIDs on a command.
Example: restrict access by SMFID
This example allows user03 to use the TSO facility on the system that has an SMFID of TSO1 only:
TSS ADDTO(USER03) FACILITY(TSO)
SYSID(TSO1)
The ADDTO will match only if the access is done on the specified system.
CPU Access Restriction
The CPU keyword is used to establish access authorizations for CPUs. Authorization to access the CPU can be qualified with specific limitations (such as through a particular facility, on certain days, or during certain times).
Example: limit access by CPU
This example designates a batch-only machine accessible to the day shift:
TSS PERMIT(DAYPROF) CPU(SYSA)
FACILITY(BATCH)
TIME(08,17)

Terminal Access Restriction
188 User Guide
Terminal Access Restriction
You can protect terminal devices using:
■ The TERMINAL keyword
■ The SOURCE keyword
The TERMINAL keyword establishes access authorizations for terminals and readers. Once defined to CA Top Secret, access to terminals can be specifically restricted.
Examples: limit terminal access
This example authorizes USER01 to use New York terminals in the morning:
TSS PERMIT(USER01) TERMINAL(NYC)
TIMES(07,12)
This example permits all users connected to the PAYROLL profile (PAYPROF1) access to a local terminal (address K61L1234) in the Personnel Office from 7:00 a.m. to 11:00 a.m.:
TSS PERMIT(PAYPROF1) TERMINAL(K61L1234)
TIMES(07,11)
Add Resources to the ALL Record
Chapter 11: Controlling Access 189
Add Resources to the ALL Record
When adding resources to the ALL record:
■ The resource being defined must be owned
■ The PERMIT(ALL) command function applies to both defined and undefined users
■ You can still specify normally available access restrictions, such as TIME and FACILITY
Examples: add a resource
This example makes the SYS1.BRODCAST data set available to all users from the TSO facility at the UPDATE access level:
TSS PERMIT(ALL) DSNAME(‗SYS1.BRODCAST‘)
ACCESS(UPDATE)
FACILITY(TSO)
This example makes storage and work volumes globally accessible:
TSS PERMIT(ALL) VOLUME(volume-list)
ACCESS(CREATE)
This example allows all users—both undefined and defined—to access terminals with the PD01 and PD02 prefixes:
TSS PERMIT(ALL) TERMINAL(PD01,PD02)
Source of Origin Access Restriction
190 User Guide
Source of Origin Access Restriction
Designated jobs and online users (or profiles) can be restricted to enter the system from designated terminals and readers. This is source of origin security. Adding SOURCE to a profile affects all users attached to that profile.
To restrict a user to a specified terminal, enter the command:
TSS ADDTO(acid) SOURCE(terminalID)
Examples: grant access by source of origin
This example restricts USER01 to signing on from terminal C5NY002 only:
TSS ADDTO(USER01) SOURCE(C5NY002)
Terminal C5NY002 does not have to be defined to CA Top Secret to be a source. However, if the specified terminal is a protected resource, be sure the user is permitted to access it:
TSS PERMIT(USER01) TERMINAL(C5NY002)
A source of origin restriction overrides TERMINAL authorization. If USER01 has a source restriction of C5NY002 and USER01 is permitted to access terminal C5NY007 as shown above, an attempt by USER01 to sign on from C5NY007 results in a security violation.
Access Restriction with the ACTION Keyword
Chapter 11: Controlling Access 191
Access Restriction with the ACTION Keyword
Not all resource classes can be restricted by access level or path. CA Top Secret provides another layer of security using the ACTION keyword. The operand specified with the ACTION keyword tells CA Top Secret how to respond to an access request.
ACTION operands include:
ADMIN
Allows a security administrator to administer resources that are not owned within his scope of authority. If an access level is not specified, CA Top Secret permits the default access level for that resource class.
AUDIT
Creates an audit trail when the resource is accessed, regardless of the mode or logging options of the user.
DENY
Denies the ACID access to the specified resource. The mode that applies to the user is still honored.
ACTION(DENY)
Does not apply to resources where access levels are specified; instead, use ACCESS(NONE).
EXIT
Invokes the CA Top Secret Installation Exit for all accesses to the specified resource granted by this permission.
FAIL
Treats any access attempt as if the user were in FAIL mode. In other words, CA Top Secret fails any unauthorized access attempt regardless of the security mode the facility or user is in.
NODSN
Tells CA Top Secret to only check volume authorizations for access requests to data sets on this particular volume.
NOTIFY
Issues a TSS7299W message to the security console on any access to the specified resource granted by this permission.
Globally Accessible Resources
192 User Guide
PASSWORD
Adds additional password protection before granting access to a data set. Specifically, returns control to z/OS program checking for all DASD data sets after CA Top Secret verification has authorized access to this data set.
Note: Any data set checks that occur as a result of allocating an SMS-managed data set is not prompted for a data set password.
REVERIFY
For OTRAN resources, initiates password reverification.
VMPRIV
Grants the accessor the privileged form of CP commands and DIAGNOSE instructions.
Example: restrict access
This example tells CA Top Secret to notify the security console when USER03 accesses the PD000001 terminal:
TSS PERMIT(USER03) TERMINAL(PD000001)
ACTION(NOTIFY)
Globally Accessible Resources
To make a resource available to all users, add the resource to the ALL Record. All the standard access restrictions can be specified for globally accessible resources.
Global authorizations do not update everyone’s security records. They are maintained in common system memory (CSA), as well as on the ALL record in the security file.
A change made to the ALL record is effective immediately on the CPU from which the administrator makes the change. On other connected CPUs, the ALL record is not updated in CSA until a request is made to the Security File (for example, when a job or session initiates), then all of the connected CPUs are automatically synchronized as the new user or job initiates, or when any TSS command is executed.
The following table lists the resources commonly made globally accessible and the access restrictions usually assigned.
Resource Common Access Restrictions
SMF data sets ACCESS(READ)
TSO Broadcast data set ACCESS(UPDATE) FACILITY(TSO)
Globally Accessible Resources
Chapter 11: Controlling Access 193
Resource Common Access Restrictions
PRIVPGM(IEJEES73,LISTBC,LISTB,SEND)
TSO Help data set ACCESS(READ) FACILITY(TSO) PRIVPGM(H,HELP)
procedure libraries ACCESS(READ)
SPF profile ACCESS(UPDATE) PRIVPGM(ISPTASK)
compiler libraries ACCESS(READ)
production control libraries
ACCESS(READ) PRIVPGM(PGMA,PGMB)
system catalog data set ACCESS(UPDATE)
Global Authorization Override
A specific access authorization in a user or profile record overrides a global authorization in the ALL record.
Example: override global authorizations
This example shows that the specific access authorization for OPER01, overrides the global authorization from the ALL Record (which provides only default READ access):
TSS PERMIT(OPER01) DSNAME(‗SYS1.BRODCAST‘)
ACCESS(ALL)
TSS PERMIT(ALL) DSNAME(‗SYS1.BRODCAST‘)
Multiple Access Authorizations
194 User Guide
Multiple Access Authorizations
Use multiple authorizations to tailor elements in an overall security structure. For example, allow a large group of users to read a family of data sets and a few users in the group to update the data sets.
For each resource access request, CA Top Secret conducts a security validation search to determine whether the access request should be granted.
When there are multiple access authorizations, CA Top Secret treats separate PERMIT entries designating the same ACID and resource as discrete permissions rather than consolidating them into one combined permission.
The historical order in which multiple authorizations were made can determine which CA Top Secret error message is issued.
Examples: establish authorizations
This example requires both conditions to be satisfied (to use the NYC terminals, you must log on Monday through Friday during business hours only).
TSS PERMIT(ALL) TERMINAL(NYC)
TIMES(08,17)
DAYS(WEEKDAYS)
This example allows logon during business hours:
TSS PERMIT(ALL) TERMINAL(NYC)
TIMES(08,17)
This example requires logon during the week:
TSS PERMIT(ALL) TERMINAL(NYC)
DAYS(WEEKDAYS)
Access Denial
Chapter 11: Controlling Access 195
Multiple Authorization Revoke
Multiple authorizations can be revoked using a single TSS REVOKE function.
Example: revoke authorization
In this example, the REVOKE command revokes both of the previous PERMIT commands:
TSS PERMIT(USER01) DSNAME(ABC)
ACCESS(READ)
DAYS(MON)
TSS PERMIT(USER01) DSNAME(ABC)
ACCESS(CRE)
DAYS(TUES)
TSS REVOKE(USER01) DSNAME(ABC)
Access Denial
To deny an ACID access to a resource, use the:
■ ACTION(DENY) keyword with resources that do not support access levels (like a program, terminal, or CPU)
■ ACCESS(NONE) keyword with resources that support access levels
Examples: deny access to a resource
USER01 is connected to PROF01. This example removes authorization for USER01 to terminals PD000001 and PD000002:
TSS PERMIT(USER01) TERMINAL(PD000001,PD000002)
ACTION(DENY)
This example ensures that this request is automatically failed regardless of the MODE setting:
TSS PERMIT(USER01) TERMINAL(PD000001,PD000002)
ACTION(DENY,FAIL)
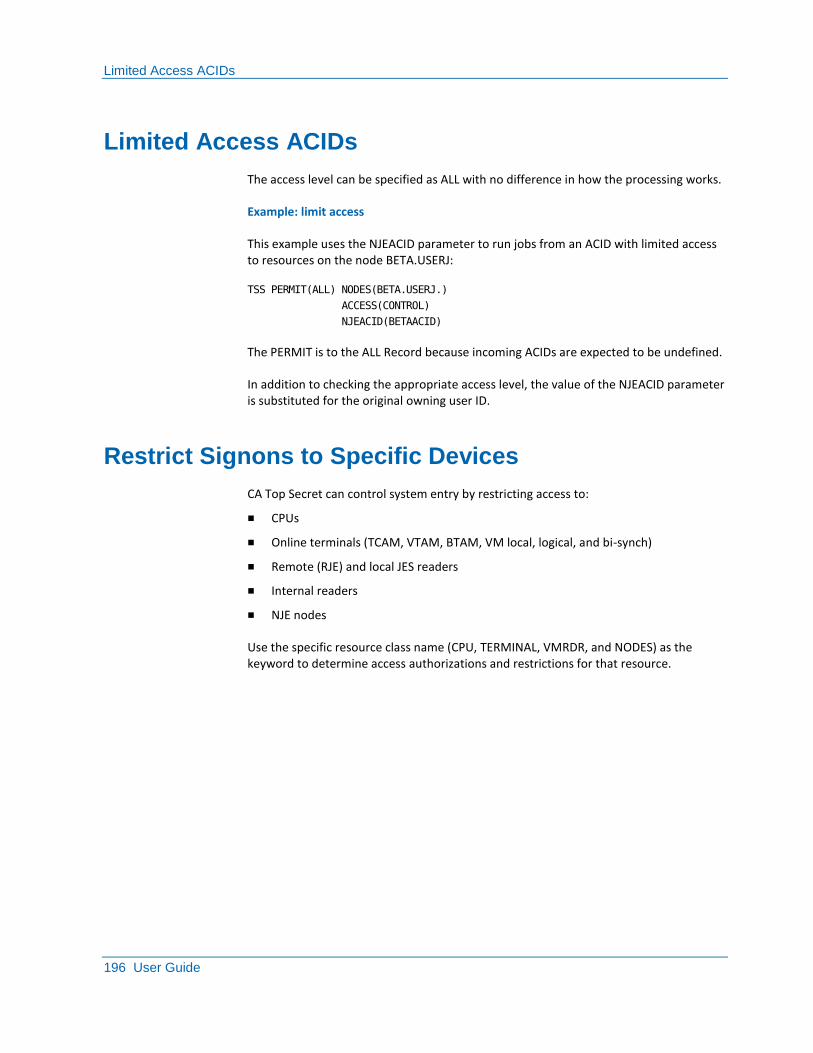
Limited Access ACIDs
196 User Guide
Limited Access ACIDs
The access level can be specified as ALL with no difference in how the processing works.
Example: limit access
This example uses the NJEACID parameter to run jobs from an ACID with limited access to resources on the node BETA.USERJ:
TSS PERMIT(ALL) NODES(BETA.USERJ.)
ACCESS(CONTROL)
NJEACID(BETAACID)
The PERMIT is to the ALL Record because incoming ACIDs are expected to be undefined.
In addition to checking the appropriate access level, the value of the NJEACID parameter is substituted for the original owning user ID.
Restrict Signons to Specific Devices
CA Top Secret can control system entry by restricting access to:
■ CPUs
■ Online terminals (TCAM, VTAM, BTAM, VM local, logical, and bi-synch)
■ Remote (RJE) and local JES readers
■ Internal readers
■ NJE nodes
Use the specific resource class name (CPU, TERMINAL, VMRDR, and NODES) as the keyword to determine access authorizations and restrictions for that resource.
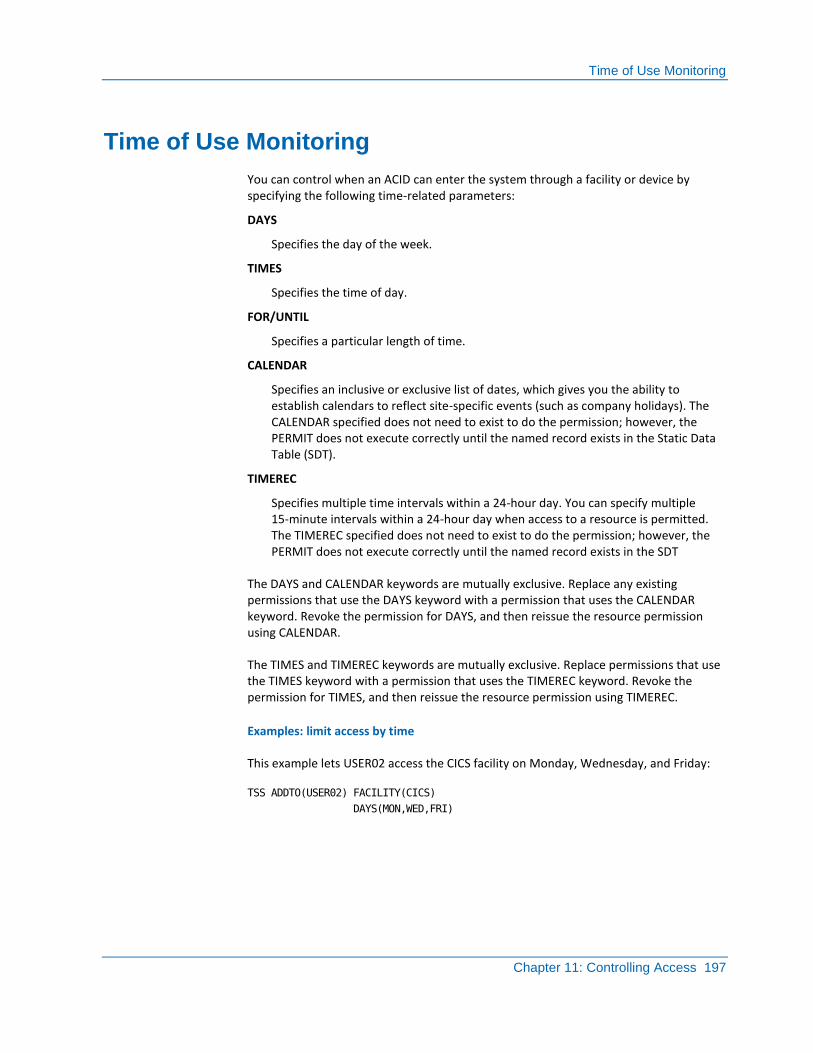
Time of Use Monitoring
Chapter 11: Controlling Access 197
Time of Use Monitoring
You can control when an ACID can enter the system through a facility or device by specifying the following time-related parameters:
DAYS
Specifies the day of the week.
TIMES
Specifies the time of day.
FOR/UNTIL
Specifies a particular length of time.
CALENDAR
Specifies an inclusive or exclusive list of dates, which gives you the ability to establish calendars to reflect site-specific events (such as company holidays). The CALENDAR specified does not need to exist to do the permission; however, the PERMIT does not execute correctly until the named record exists in the Static Data Table (SDT).
TIMEREC
Specifies multiple time intervals within a 24-hour day. You can specify multiple 15-minute intervals within a 24-hour day when access to a resource is permitted. The TIMEREC specified does not need to exist to do the permission; however, the PERMIT does not execute correctly until the named record exists in the SDT
The DAYS and CALENDAR keywords are mutually exclusive. Replace any existing permissions that use the DAYS keyword with a permission that uses the CALENDAR keyword. Revoke the permission for DAYS, and then reissue the resource permission using CALENDAR.
The TIMES and TIMEREC keywords are mutually exclusive. Replace permissions that use the TIMES keyword with a permission that uses the TIMEREC keyword. Revoke the permission for TIMES, and then reissue the resource permission using TIMEREC.
Examples: limit access by time
This example lets USER02 access the CICS facility on Monday, Wednesday, and Friday:
TSS ADDTO(USER02) FACILITY(CICS)
DAYS(MON,WED,FRI)
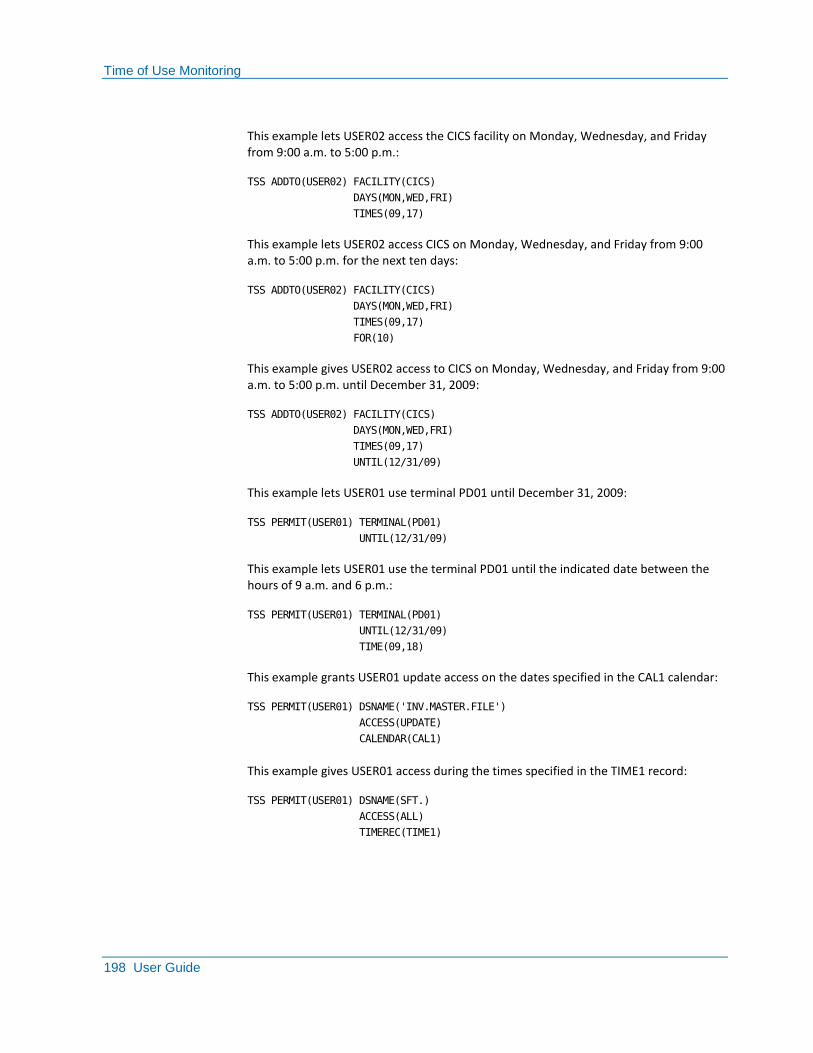
Time of Use Monitoring
198 User Guide
This example lets USER02 access the CICS facility on Monday, Wednesday, and Friday from 9:00 a.m. to 5:00 p.m.:
TSS ADDTO(USER02) FACILITY(CICS)
DAYS(MON,WED,FRI)
TIMES(09,17)
This example lets USER02 access CICS on Monday, Wednesday, and Friday from 9:00 a.m. to 5:00 p.m. for the next ten days:
TSS ADDTO(USER02) FACILITY(CICS)
DAYS(MON,WED,FRI)
TIMES(09,17)
FOR(10)
This example gives USER02 access to CICS on Monday, Wednesday, and Friday from 9:00 a.m. to 5:00 p.m. until December 31, 2009:
TSS ADDTO(USER02) FACILITY(CICS)
DAYS(MON,WED,FRI)
TIMES(09,17)
UNTIL(12/31/09)
This example lets USER01 use terminal PD01 until December 31, 2009:
TSS PERMIT(USER01) TERMINAL(PD01)
UNTIL(12/31/09)
This example lets USER01 use the terminal PD01 until the indicated date between the hours of 9 a.m. and 6 p.m.:
TSS PERMIT(USER01) TERMINAL(PD01)
UNTIL(12/31/09)
TIME(09,18)
This example grants USER01 update access on the dates specified in the CAL1 calendar:
TSS PERMIT(USER01) DSNAME('INV.MASTER.FILE')
ACCESS(UPDATE)
CALENDAR(CAL1)
This example gives USER01 access during the times specified in the TIME1 record:
TSS PERMIT(USER01) DSNAME(SFT.)
ACCESS(ALL)
TIMEREC(TIME1)
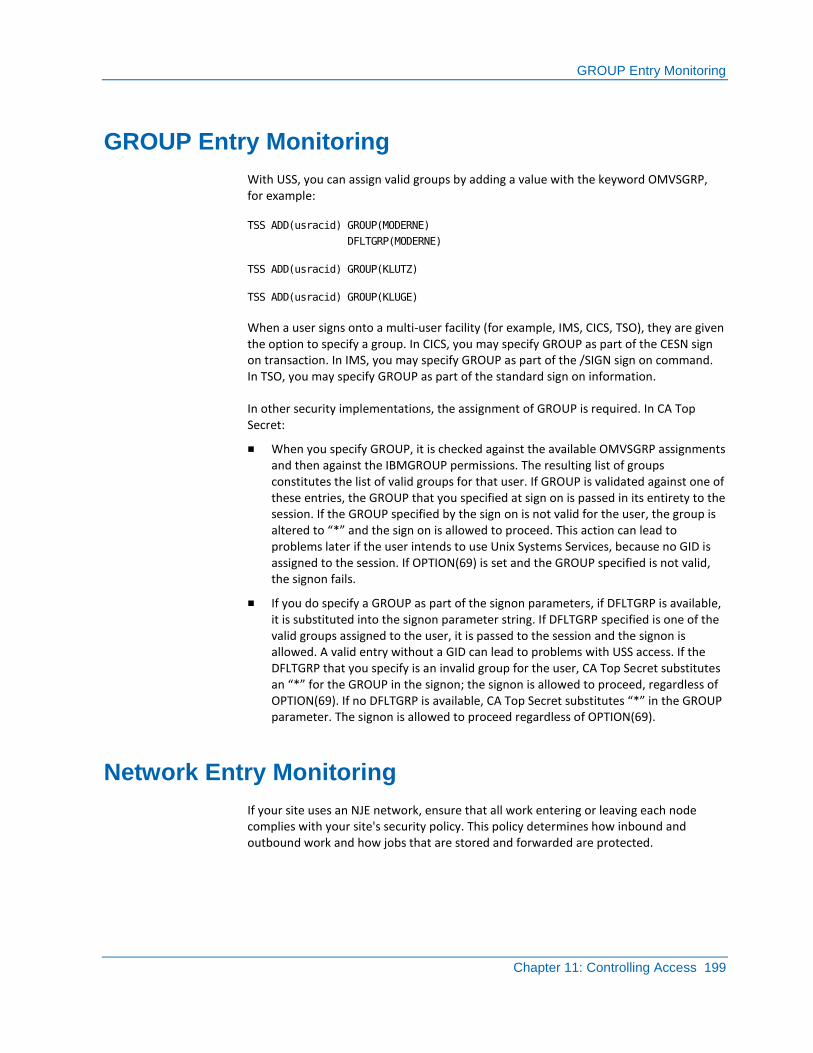
GROUP Entry Monitoring
Chapter 11: Controlling Access 199
GROUP Entry Monitoring
With USS, you can assign valid groups by adding a value with the keyword OMVSGRP, for example:
TSS ADD(usracid) GROUP(MODERNE)
DFLTGRP(MODERNE)
TSS ADD(usracid) GROUP(KLUTZ)
TSS ADD(usracid) GROUP(KLUGE)
When a user signs onto a multi-user facility (for example, IMS, CICS, TSO), they are given the option to specify a group. In CICS, you may specify GROUP as part of the CESN sign on transaction. In IMS, you may specify GROUP as part of the /SIGN sign on command. In TSO, you may specify GROUP as part of the standard sign on information.
In other security implementations, the assignment of GROUP is required. In CA Top Secret:
■ When you specify GROUP, it is checked against the available OMVSGRP assignments and then against the IBMGROUP permissions. The resulting list of groups constitutes the list of valid groups for that user. If GROUP is validated against one of these entries, the GROUP that you specified at sign on is passed in its entirety to the session. If the GROUP specified by the sign on is not valid for the user, the group is altered to “*” and the sign on is allowed to proceed. This action can lead to problems later if the user intends to use Unix Systems Services, because no GID is assigned to the session. If OPTION(69) is set and the GROUP specified is not valid, the signon fails.
■ If you do specify a GROUP as part of the signon parameters, if DFLTGRP is available, it is substituted into the signon parameter string. If DFLTGRP specified is one of the valid groups assigned to the user, it is passed to the session and the signon is allowed. A valid entry without a GID can lead to problems with USS access. If the DFLTGRP that you specify is an invalid group for the user, CA Top Secret substitutes an “*” for the GROUP in the signon; the signon is allowed to proceed, regardless of OPTION(69). If no DFLTGRP is available, CA Top Secret substitutes “*” in the GROUP parameter. The signon is allowed to proceed regardless of OPTION(69).
Network Entry Monitoring
If your site uses an NJE network, ensure that all work entering or leaving each node complies with your site's security policy. This policy determines how inbound and outbound work and how jobs that are stored and forwarded are protected.

Network Entry Monitoring
200 User Guide
Multiple Node Users
Only users defined to the target node can initiate jobs on that node. To define users to multiple nodes, you must adhere to the following requirements:
■ If CA Top Secret is not running on all nodes, explicitly define the user to all nodes the user needs to access. This method entails much administrative work, since anytime the user's security information changes, you must update it manually on each system.
■ If CA Top Secret is running on all nodes and each node has its own security file, use the Command Propagation Facility (CPF) to propagate security information for a user across all nodes while only entering it once.
■ If CA Top Secret is running on all nodes that share the same security file, then each user is implicitly defined to every other node in the system.
PassTicket Generation
To generate a PassTicket, use the PassTicket generator algorithm. This algorithm requires:
■ The user's ACID
■ The time of day
■ A session key
Two ways exist to generate a PassTicket using this algorithm:
■ Use the RCVTPTGN-callable service to generate the PassTicket on the host if you are running on z/OS.
■ Create a program that incorporates the algorithm for any function that generates a PassTicket. This method allows the PassTicket to be generated on a network.
Network Entry Monitoring
Chapter 11: Controlling Access 201
PassTicket Definition
The NDT contains all PassTicket application and session key-related node information. The NDT is a global record similar to the Resource Descriptor and Field Definition Tables.
To define PassTickets to CA Top Secret:
■ Identify each application that can accept a PassTicket and assign that application a unique password called a session key.
■ Add this information to the NDT using the PSTKAPPL and SESSKEY keywords. You must supply both keywords.
To define a PassTicket, enter the command:
TSS ADDTO(NDT) PSTKAPPL(ApplID)
SESSKEY(cccccccccccccccc)
SIGNMULTI
PSTKAPPL
Defines the application ID. Depending on the application, the secured sign on function uses a specific method to determine the application ID:
■ For CICS, IMS, or APPC applications, the application ID is defined using the standard naming conventions used to define these applications in a VTAM APPL statement.
■ For TSO, the application ID is defined by prefacing the SMF identifier of the system with the characters "TSO". For example, TSOXE05 is the application ID for TSO on machine MVXE05. The SMF system ID resides in the SMFPRMxx member of SYS1.PARMLIB.
■ For z/OS batch jobs that include TSS passwords in the JCL, replace the password with a PassTicket. The application ID for batch jobs is defined by prefacing the SMF identifier of the system with the characters "MVS". For example, MVSXE05 is the application ID for all batch jobs on machine MVXE05.
SESSKEY
Defines an encryption key for the application in the format of 16 hexadecimal digits.
Length: 8 bytes
SIGNMULTI
(Optional) The equivalent of RACF operand APPLDATA('NO REPLAY PROTECTION'). SIGNMULTI allows the same PassTicket to be used multiple times.
Optional System Entry Restrictions
202 User Guide
Example: define a PassTicket
This example creates a PassTicket for TSO that consists of the literal 'TSO' and a four-character SMFID. The SMFID is SYSA; therefore, the PassTicket for that system is TSOSYSA. The session key is 296LFD.
TSS ADDTO(NDT) PSTKAPPL(TSOSYSA)
SESSKEY(296LFD)
SIGNMULTI
Optional System Entry Restrictions
CA Top Secret employs the following optional system entry restrictions:
Facility Authorization
CA Top Secret protects access to system facilities—such as, VM, CICS, TSO, and BATCH—by requiring that the user be authorized to use the facility. Only the MSCA can access any facility by default. All other users must be explicitly authorized to use a facility or any number of facilities through a TSS CREATE or ADDTO function. You can also prevent an ACID from performing multiple simultaneous signons.
Access Authorization
CA Top Secret can control system entry by restricting access to terminals, readers, and CPUs. You can define and restrict the following device types to CA Top Secret:
■ Online terminals (TCAM, VTAM, BTAM, VM local, logical, and bi-synch)
■ Remote (RJE) and local JES readers
■ Internal readers
■ NJE nodes
The specific resource class name—such as VMRDR, TERMINAL or CPU—is the keyword to determine access authorizations and restrictions. The actual resource can be indicated by its full identifier or a Generic Prefix. For example, in the “Introduction” chapter, you learned that adding TERM(PD01,PD02) to the TSS PERMIT or TSS ADD statement restricts an ACID to using only those terminals whose prefix is PD01 or PD02.
Batch Job Validation
A batch job must be associated with an ACID so that CA Top Secret can determine which facilities and resources it can access and how they can be accessed. To CA Top Secret, a batch job's ACID is simply another ACID with an associated Security Record and a set of specific access authorizations. All the system entry restriction options can be specified for a User ACID, including facility, source of origin, and CPU restrictions.
Optional System Entry Restrictions
Chapter 11: Controlling Access 203
Validation
For jobs submitted through the following entities:
■ TSO
■ CICS
■ IMS
■ CA Roscoe
■ another online facility that utilizes the JES internal reader (even batch jobs or started tasks submitting other batch jobs)
■ through a VM Batch environment such as CA Jobwatch™
CA Top Secret provides an additional layer of security control beyond the basic batch job validation. The focus of this security layer is whether the submitter has the authority to submit the job. That is, CA Top Secret checks whether the ACID of the submitter is authorized to submit using the ACID associated with this job. If they are not authorized, the job is flushed at submission time before the job is initiated. For more information on the VM Batch environment, see your CA Jobwatch documentation.
By default, defined users are only allowed to submit jobs for execution under their own ACID. Explicit authority is required to allow a user to execute jobs using other ACIDs.
Terminal Locking
The terminal locking option protects unattended terminals against unauthorized access. Terminal locking prevents use of the terminal until it is logged off or unlocked. Terminal locking can be triggered automatically by CA Top Secret or through a user-initiated command.
Automatic Locking
CA Top Secret automatically locks a terminal that has been inactive for a pre-established duration. Automatic locking thresholds can be established at both the user and facility level. Locking is available for most online facilities including VM, TSO, CICS, IMS, and CA Roscoe.
In VM, you can optionally set the facility to disconnect or log off the user instead of locking the terminal.
Console Protection for MVS
CA Top Secret provides several protection options designed to prevent operators or other personnel from executing sensitive started tasks or changing security control options without proper identification and password authentication. The options you choose to implement depend upon your particular environment and the degree of security exposure involved.

Optional System Entry Restrictions
204 User Guide
STC Protection for MVS
There is no need to secure all started tasks, and, by default, CA Top Secret allows STCs to bypass security. When deciding on your approach to STC security, consider the impact on your systems and operations staff. Among the options CA Top Secret provides to protect started tasks are:
■ A specific STC procedure can be assigned a unique ACID and, optionally, a password.
■ Undefined STCs can be handled in one of the following ways:
– Assign a default ACID
– Allow them to run with security bypass
– Fail them
■ The operator can be prompted for both the ACID under which this STC executes and that ACID's associated password.
■ Operators can be forced to identify themselves prior to initiating an STC.
Special Authentication Devices
CA Top Secret supports certain types of special authentication devices as supplements to standard security processing.
Operator ID Cards
CA Top Secret supports the physical identification of users through Operator Identification Cards. You can use this feature to supplement password security. It is available for VM, TSO, and CICS through IBM 3270-compatible terminals.
Voice and Image Verification
CA Top Secret can support security devices that require user voice or image identification. This feature requires CA Top Secret customization to be implemented.
Chapter 12: Protecting Resources 205
Chapter 12: Protecting Resources
This section contains the following topics:
Resource Classes (see page 206) Volume Protection (see page 207) Data Set Protection (see page 215) Tape Volume Protection (see page 230) Data Set and Volume Level Security (see page 232) PDS Member Protection (see page 232) Console Protection (see page 238) Terminal Protection (see page 244) Program Protection (see page 247) TSO SPF Panel Protection (see page 249) Application Protection (see page 249) Record Level Protection (RLP) (see page 251) Installation Defined Resource Protection (see page 254) Online Transaction Protection (see page 258) LCF Security (see page 262) Screen Level Protection (SLP) (see page 267) JES Resource Protection (see page 270) Node Protection (see page 276) Operator Commands Restriction (see page 281) Specific Device Output Restrictions (see page 282) Spool Data Sets Protection (see page 283) SDSF Resource Protection (see page 285) Message Queue Manager Protection (see page 294) DB2 Resource Protection (see page 300) IBM DCE, SystemView, Netview, and OPTIME Protection (see page 302) Delegated Resources (see page 305) SMS Data Fields (see page 306) Resource Checking Bypass (see page 309)
Resource Classes
206 User Guide
Resource Classes
The objects that CA Top Secret protects are called resources. Each resource in CA Top Secret is an instance of a Resource Class (RESCLASS) defined in the RDT. Some resource classes can be used in multiple facilities. Other resource classes are specifically defined for individual environments. Resources are used throughout the system to protect the objects and services provided by jobs, tasks, and sessions in multi-user environments.
Most resource classes are defined as GENERIC, which allows all resources with the same prefix to be protected by the same command. A NONGENERIC definition requires complete specification of each resource by individual commands.
Resource classes defined as DEFPROT automatically protect all resources in the class, regardless of whether an explicit command has been issued to establish ownership.
Permission Restrictions
You can restrict permission under the control of the RDT definition:
ACTION
Indicates unusual actions or modes associated with the permission.
ACCESS
Restricts the access levels which are permitted.
LIB
Restricts the program from which the permission is initially executed to a specific data set.
PRIVPGM
Restricts the program from which the permission is initially executed to a specific program.
You can also restrict permission restricted by:
■ FACILITY
■ DAYS/CALENDAR
■ TIMES/TIMEREC
■ SYSID
■ SELECT

Volume Protection
Chapter 12: Protecting Resources 207
Volume Protection
When a volume is protected, an access request to the volume or to any data set on the volume needs access to the volume. You can bypass volume level security checking entirely and depend upon data set level security checking.
Both DASD and tape volumes must be owned before being authorized.
To establish ownership of a volume, enter the command:
TSS CREATE|ADDTO(acid) VOLUME(name)
Example: add ownership
This example protects the volume whose VOL=SER is T64803 by assigning ownership of the volume to DEPT01:
TSS ADDTO(DEPT01) VOLUME(T64803)
Volume Protection
208 User Guide
Volume Access Levels
The access levels that can be specified for volumes are:
ALL
All data residing on a volume can be accessed in any way.
BLP
Tape volume can be used with Bypass Label Processing.
CONTROL
If included with CREATE access, the user can create any data set residing on a volume-regardless of applicable data set access authorization.
CREATE
Data sets can be created on this volume if the data set access level permits it.
NOCREATE
All data sets residing on a volume can be accessed according to their data set access level. However, no new data sets can be created on this volume, regardless of the user's data set authority.
NONE
Data residing on a volume cannot be used in any way.
READ
(Default) All data sets residing on a volume can be read (opened for input). This access level is needed to perform a backup of the volume.
SCRATCH
Any data sets residing on a volume can be scratched.
UPDATE
All data sets residing on a volume can be simultaneously opened for both read and write access; implies READ volume authorization. This access level is needed to perform a restore of the volume.
WRITE
Volume can only be opened for output.
Volumes should rarely be permitted for more than CREATE access to individual users, since the volume authorization generally overrides the data set authorization. The more powerful access levels should be reserved for DASD management functions.
Volume Protection
Chapter 12: Protecting Resources 209
Example: assign access level
This example authorizes USER01 to update any data set on any volume whose VOLSER begins with T64:
TSS PERMIT(USER01) VOLUME(T64(G))
ACCESS(UPDATE)
If a user possesses no specific volume authorization, he cannot create data sets on that volume regardless of his data set authorization.
Default Volume Protection
Default protection extends security protection to a volume even if the volume is not defined to CA Top Secret. A security violation occurs if a request is made to access any unowned volume. If this type of request occurs in FAIL mode, the request is denied.
To extend default protection for volumes, enter the command:
TSS REPLACE(RDT) RESCLASS(VOLUME)
ATTR(DEFPROT)
Generic Prefixing
The VOLUME resource is installed with the NONGENERIC attribute. Volume ownership can be designated with generic prefixes. Once a prefix is owned, any volume beginning with that prefix is protected and must be permitted to other ACIDs.
The maximum length allowed for a volume resource identifier is six characters for a specific volume and five characters for a generic prefix. The minimum length allowed for the generic prefix is two characters.
When using generic prefixing, append a G to the prefix to indicate that a generic prefix is supplied.
Example: generic prefixing
This example protects all volumes with T64 as the first three characters of their VOL=SER:
TSS ADDTO(DEPT01) VOLUME(T64(G))
Volume Protection
210 User Guide
Access Authorization
Volume level access allows a user to access any data set on the volume, provided he has the authorized level.
Example: authorizing access
This example allows USER01 to access volume T64803 from Monday through Friday to create data sets:
TSS PERMIT(USER01) VOLUME(T64803)
DAYS(WEEKDAYS)
ACCESS(CREATE)
Program Pathing with Volumes
Program pathing restricts volume access to designated programs. Program pathing is useful for enforcing security protection when a volume management package is used. Extensive access to volumes can be allowed, but only through the appropriate volume management programs.
Example: assign an access path
This example gives the ACID VOLMGR access to all volumes at an access level of ALL, but only through the program VMGRP01 which must have been loaded from the library PROD.DLIB:
TSS PERMIT(VOLMGR) VOLUME(*ALL*)
ACCESS(ALL)
PRIVPGM(VMGRP01)
Access to all Volumes
To allow users access to all volumes:
■ Assign ownership of the identifier to the MSCA
■ Use the resource identifier *ALL*(G)
Example: access all volumes
This example allows USER01 to read any volume:
TSS ADDTO(MSCA) VOLUME(*ALL*(G))
TSS PERMIT(USER01) VOLUME(*ALL*(G))
Volume Protection
Chapter 12: Protecting Resources 211
Volume Level Security Bypass
When volume level security is bypassed, the CA Top Secret response to a request to access a data set is based solely on the applicable data set authorization.
To bypass volume level security
1. Enter the command:
TSS ADDTO(MSCA) VOLUME(*ALL*(G))
Ownership is assigned to the MSCA.
2. Enter the command:
TSS PERMIT(acid) VOLUME(*ALL*(G))
ACCESS(CREATE)
Permission is authorized.
Bypass Volume Level Security with NOVOLCHK
NOVOLCHK cannot be traced with TSS WHOHAS. Its use should be restricted to:
■ Volume management packages, that must access many volumes
■ Online regions which dynamically allocate data sets such as CA-Roscoe or CA-IDMS.
To allow unrestricted access to an entire volume, enter the command:
TSS ADDTO(SUPRACID) NOVOLCHK
Volume Only Level Security
To bypass data set level security checking attach the keyword ACTION(NODSN) to a PERMIT for a volume. When this keyword is specified, CA Top Secret considers only the pertinent volume authorizations when determining whether to grant an access request.
Example: volume level security
This example allows USER01 to scratch any data set on volume T50000:
TSS PERMIT(USER01) VOLUME(T50000)
ACTION(NODSN)
ACCESS(SCRATCH)
The ACTION parameter operates at the level of a specific access event. An access request made by a designated ACID for a designated resource.
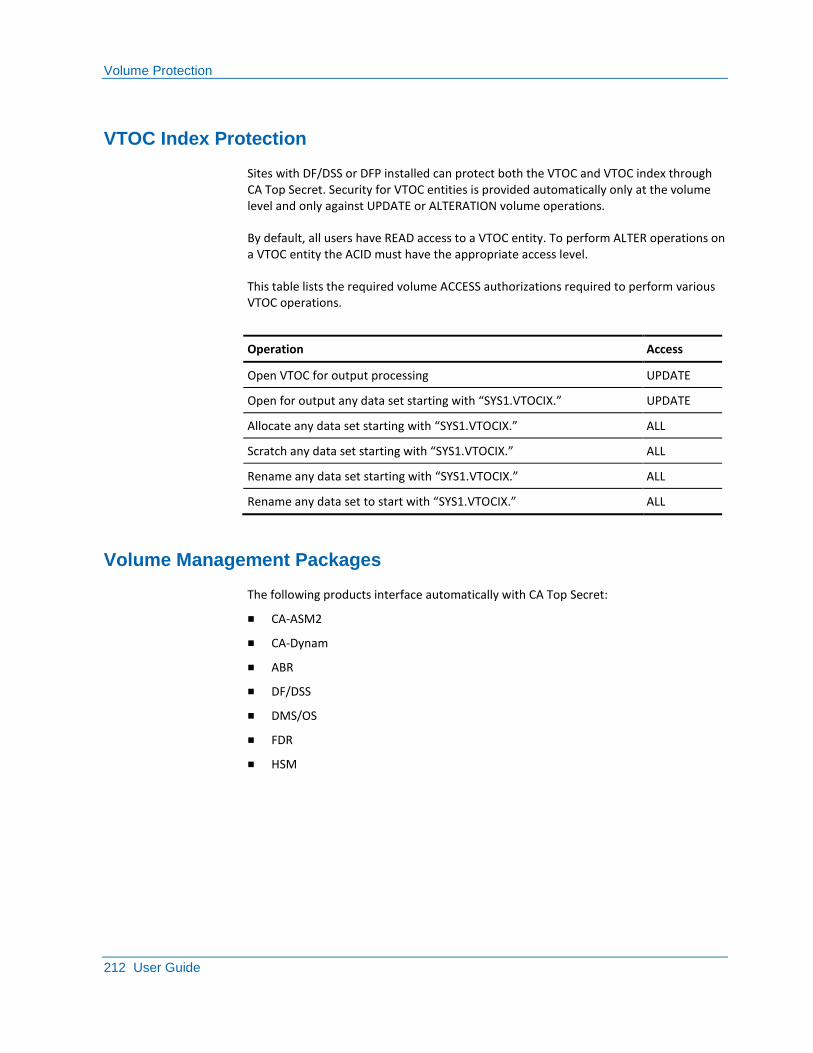
Volume Protection
212 User Guide
VTOC Index Protection
Sites with DF/DSS or DFP installed can protect both the VTOC and VTOC index through CA Top Secret. Security for VTOC entities is provided automatically only at the volume level and only against UPDATE or ALTERATION volume operations.
By default, all users have READ access to a VTOC entity. To perform ALTER operations on a VTOC entity the ACID must have the appropriate access level.
This table lists the required volume ACCESS authorizations required to perform various VTOC operations.
Operation Access
Open VTOC for output processing UPDATE
Open for output any data set starting with “SYS1.VTOCIX.” UPDATE
Allocate any data set starting with “SYS1.VTOCIX.” ALL
Scratch any data set starting with “SYS1.VTOCIX.” ALL
Rename any data set starting with “SYS1.VTOCIX.” ALL
Rename any data set to start with “SYS1.VTOCIX.” ALL
Volume Management Packages
The following products interface automatically with CA Top Secret:
■ CA-ASM2
■ CA-Dynam
■ ABR
■ DF/DSS
■ DMS/OS
■ FDR
■ HSM
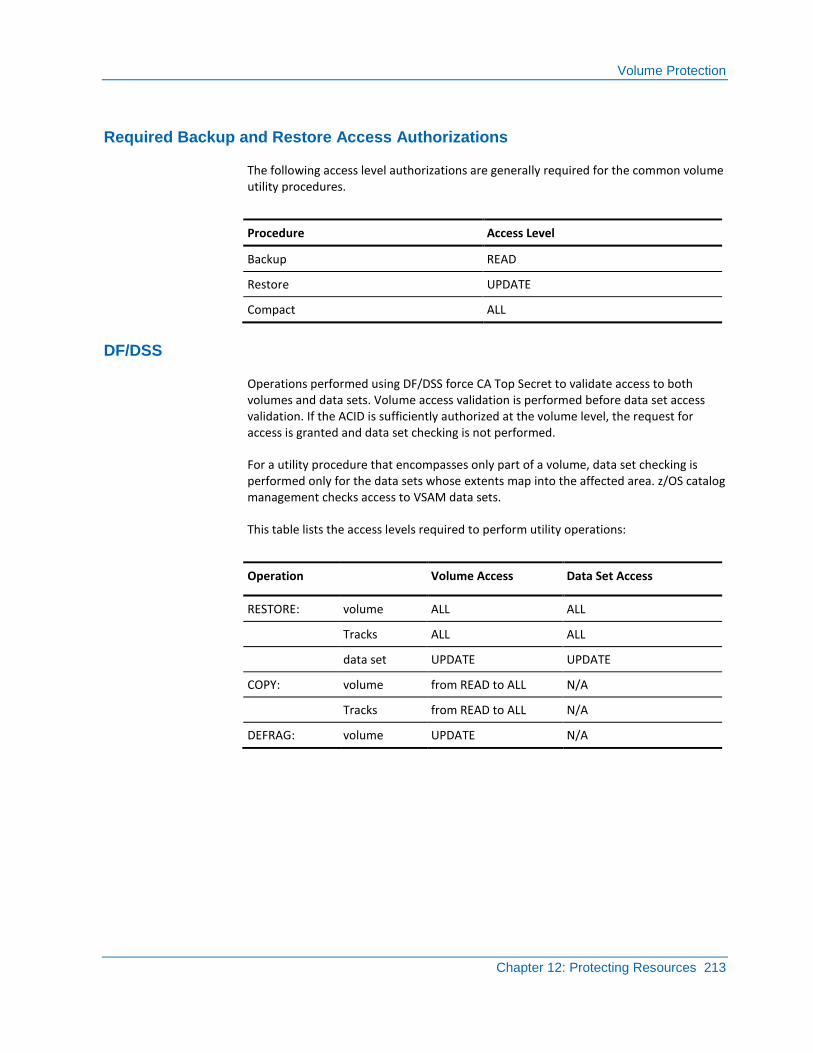
Volume Protection
Chapter 12: Protecting Resources 213
Required Backup and Restore Access Authorizations
The following access level authorizations are generally required for the common volume utility procedures.
Procedure Access Level
Backup READ
Restore UPDATE
Compact ALL
DF/DSS
Operations performed using DF/DSS force CA Top Secret to validate access to both volumes and data sets. Volume access validation is performed before data set access validation. If the ACID is sufficiently authorized at the volume level, the request for access is granted and data set checking is not performed.
For a utility procedure that encompasses only part of a volume, data set checking is performed only for the data sets whose extents map into the affected area. z/OS catalog management checks access to VSAM data sets.
This table lists the access levels required to perform utility operations:
Operation
Volume Access Data Set Access
RESTORE: volume ALL ALL
Tracks ALL ALL
data set UPDATE UPDATE
COPY: volume from READ to ALL N/A
Tracks from READ to ALL N/A
DEFRAG: volume UPDATE N/A
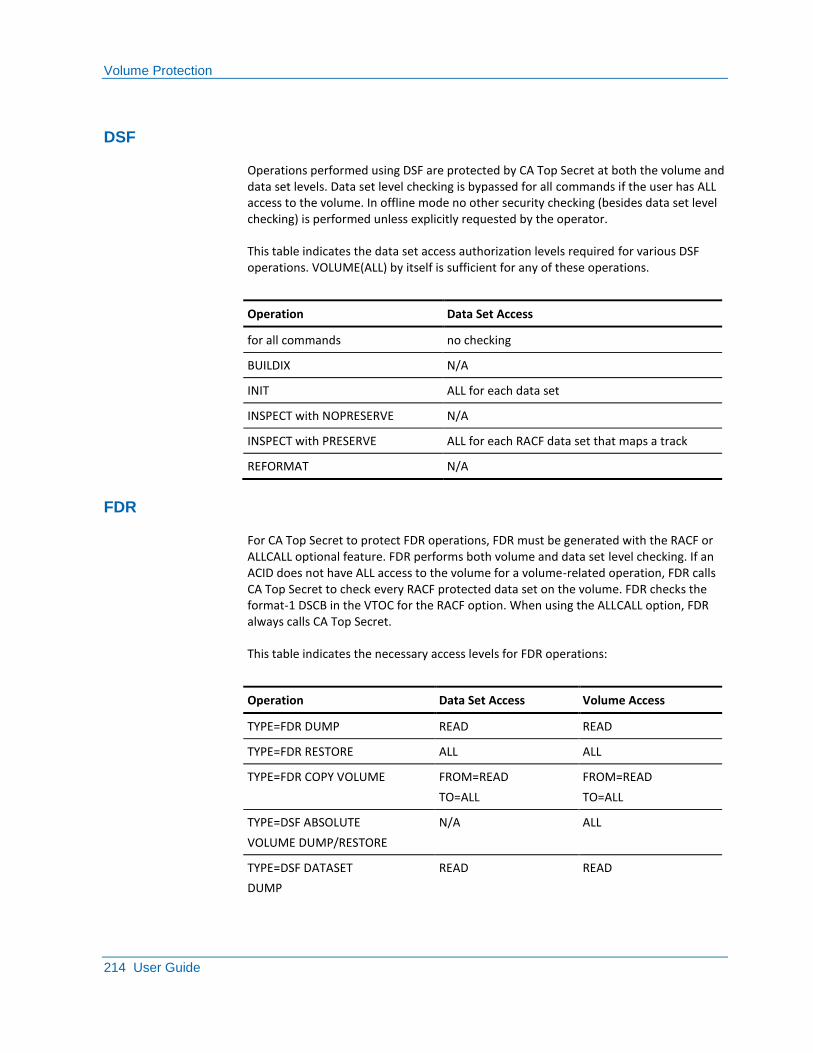
Volume Protection
214 User Guide
DSF
Operations performed using DSF are protected by CA Top Secret at both the volume and data set levels. Data set level checking is bypassed for all commands if the user has ALL access to the volume. In offline mode no other security checking (besides data set level checking) is performed unless explicitly requested by the operator.
This table indicates the data set access authorization levels required for various DSF operations. VOLUME(ALL) by itself is sufficient for any of these operations.
Operation Data Set Access
for all commands no checking
BUILDIX N/A
INIT ALL for each data set
INSPECT with NOPRESERVE N/A
INSPECT with PRESERVE ALL for each RACF data set that maps a track
REFORMAT N/A
FDR
For CA Top Secret to protect FDR operations, FDR must be generated with the RACF or ALLCALL optional feature. FDR performs both volume and data set level checking. If an ACID does not have ALL access to the volume for a volume-related operation, FDR calls CA Top Secret to check every RACF protected data set on the volume. FDR checks the format-1 DSCB in the VTOC for the RACF option. When using the ALLCALL option, FDR always calls CA Top Secret.
This table indicates the necessary access levels for FDR operations:
Operation Data Set Access Volume Access
TYPE=FDR DUMP READ READ
TYPE=FDR RESTORE ALL ALL
TYPE=FDR COPY VOLUME FROM=READ
TO=ALL
FROM=READ
TO=ALL
TYPE=DSF ABSOLUTE
VOLUME DUMP/RESTORE
N/A ALL
TYPE=DSF DATASET
DUMP
READ READ
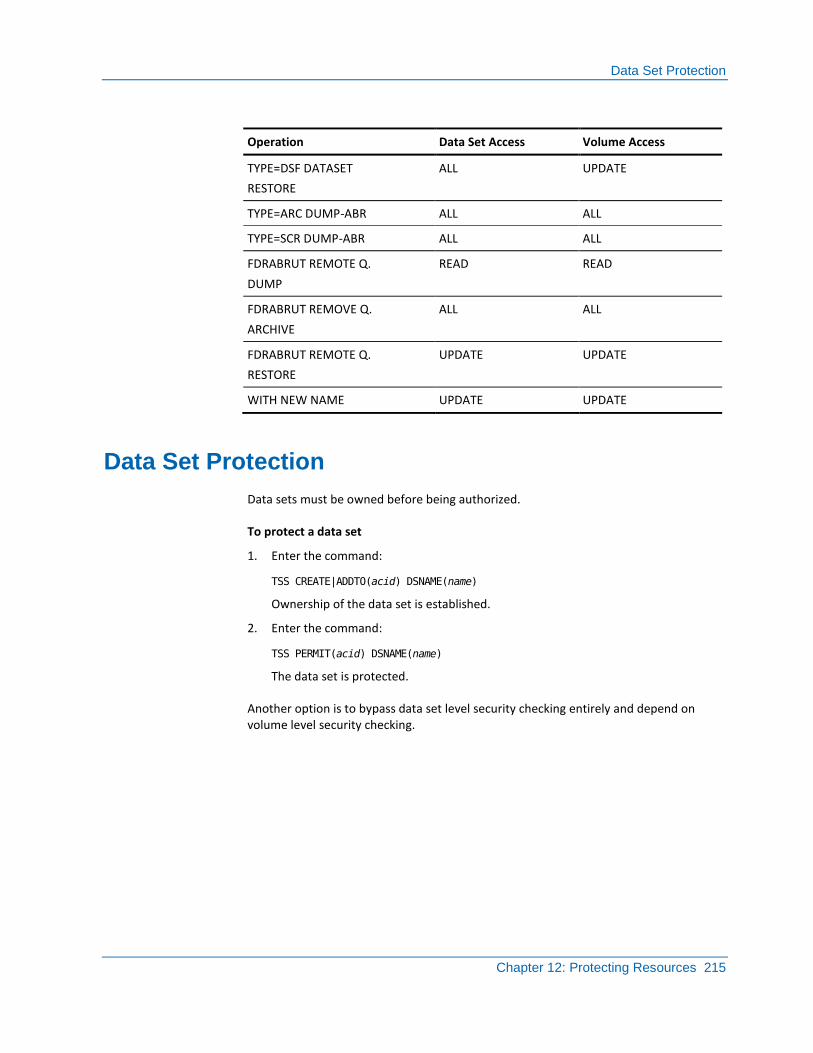
Data Set Protection
Chapter 12: Protecting Resources 215
Operation Data Set Access Volume Access
TYPE=DSF DATASET
RESTORE
ALL UPDATE
TYPE=ARC DUMP-ABR ALL ALL
TYPE=SCR DUMP-ABR ALL ALL
FDRABRUT REMOTE Q.
DUMP
READ READ
FDRABRUT REMOVE Q.
ARCHIVE
ALL ALL
FDRABRUT REMOTE Q.
RESTORE
UPDATE UPDATE
WITH NEW NAME UPDATE UPDATE
Data Set Protection
Data sets must be owned before being authorized.
To protect a data set
1. Enter the command:
TSS CREATE|ADDTO(acid) DSNAME(name)
Ownership of the data set is established.
2. Enter the command:
TSS PERMIT(acid) DSNAME(name)
The data set is protected.
Another option is to bypass data set level security checking entirely and depend on volume level security checking.
Data Set Protection
216 User Guide
Data Set Ownership Removal
To remove ownership of a data set
■ Revoke all permissions for the resource. Do not specify an access level or the command will fail.
■ Remove ownership of the data set
Example: remove ownership
This example revokes permission and then removes ownership of a dataset.
TSS REVOKE(USER01) DSNAME(PAYROLL.)
TSS REMOVE(DEPT01) DSNAME(PAYROLL.)
Data Set Protection
Chapter 12: Protecting Resources 217
Automatic Data Set Protection
Use the ADSP control option to automatically set the security bit for newly created data sets in a non-Alwayscall environment. A data set with the security bit set on can only be accessed when a security product is installed.
The values you can assign to the ADSP control option are:
ADSP(YES)
(Default) Turns on the security bit for all data sets that are created by a defined user. This option takes effect in all modes except DORMANT.
ADSP(ALL)
Turns on the security bit for all data sets created by all users in all modes.
ADSP(NO)
Tells CA Top Secret not to turn on the security bits for newly created data sets. SAF environments where no pre-ICF VSAM catalogs are present should use ADSP(NO).
You can use the NOADSP attribute to override the ADSP control option for individual users.
In a non-Alwayscall environment it is generally best to set ADSP(ALL) to prevent undefined users from being able to create data sets anywhere and then access them without security checking.
Example: automatic data set protection
This example tells CA Top Secret that any new data set owned by SYSPAGE will not automatically have its security bit turned on regardless of how the ADSP control option is set.
TSS ADDTO(SYSPAGE) NOADSP
Data Set Protection
218 User Guide
Extend Default Protection
CA Top Secret provides default protection of data sets in FAIL mode. Default protection extends security protection to a data set even if it has not yet been defined to CA Top Secret. A security violation occurs if a request is made to access any unowned data set.
Example: extend default protection
This example extends default protection to data sets in IMPLEMENT and WARN modes by attaching the DEFPROT attribute to the resource class named DATASET:
TSS REPLACE(RDT) RESCLASS(DATASET)
ATTR(DEFPROT)
When accessing any CA Top Secret files (for example the security file, backup security file, ATF file, ATF2 file, and recovery file) MODE is forced to FAIL and an AUDIT event is forced.
Recommendations
In IMPLEMENT mode give data sets default protection. This preserves the concept of using IMPLEMENT mode to bring an installation under the CA Top Secret umbrella in controlled phases.
In a non-Alwayscall environment set ADSP(ALL) to prevent undefined users from creating data sets anywhere and then access them without security checking.
Generic Prefixing
Data set ownership is typically designated by installation default using generic prefixes. Once a prefix is owned, any data set beginning with that prefix is protected and must be permitted to other ACIDs.
Example: generic prefixing
This example gives ownership of system data sets that begin with the prefixes SYS or IPO to the ACID SYSGROUP:
TSS ADDTO(SYSGROUP) DSNAME(SYS,IPO)
Data Set Protection
Chapter 12: Protecting Resources 219
Data Set Masking
Masking can group data sets whose names share similar characteristics. These shared patterns can then be used as the operands of the DSNAME parameter in TSS entries.
A masked data set name is treated by CA Top Secret like a generic prefix. Any data set that begins with a mask is considered a match by the security validation algorithm, and the associated access authorizations are honored. You can add a resource name containing a mask only if the name begins with a masking character.
Masking characters cannot be used within the owned portion of the DSNAME. For example, if TSS ADDTO(dept01) DSNAME(abc.xyz) is issued to establish ownership for data set abc.xyz, then TSS PERMIT(acid) DSNAME(abc.x*) is not valid.
Examples: data set masking
This example masks data sets with bc and yz:
TSS ADDTO(dept01) DSNAME(+bc.+yz)
Data Set Access Authorization
You can allow designated users to access data sets in an unlimited or a restricted manner. To specify a particular data set, place single quotes around the full data set name.
Examples: data set access authorization
This example allows USER01 to read data sets beginning with the qualifier PAYROLL. through the Batch facility:
TSS PERMIT(USER01) DSNAME(PAYROLL.)
ACCESS(READ)
FACILITY(BATCH)
This example authorizes USER01 to have complete access to the data set TNT.LIB.CNTL.BOOM.
TSS PERMIT(USER01) DSNAME('TNT.LIB.CNTL.BOOM')
ACCESS(ALL)
Data Set Protection
220 User Guide
Data Set Access Levels
Access levels are assigned using the ACCESS parameter. The access levels that can be specified for data sets (VSAM and non-VSAM) are:
ALL
Data set can be accessed in any way.
CONTROL
VSAM data set can be used for control interval update processing (for example, for an IDCAMS VERIFY function). VSAM data set that had a control password can be used.
CREATE
Data set can be created.
FETCH
Programs from the data set (library) can only be executed, not read.
NONE
Data set cannot be used in any way.
UPDATE
Data set can be updated; READ and WRITE access is implied. This access level is needed to perform a restore of the data set.
READ
(Default) Data sets can be read (opened for input). READ implies FETCH. This access level is needed to perform a backup of the data set.
SCRATCH
Data set can be scratched.
WRITE
Data can only be written into the data set (opened for output).
If the CA Top Secret validation algorithm detects two data set name permissions of equal length, it selects the first permission with a PERMIT access level of NONE (if such a permission exists). Otherwise, the first PERMIT with any access level is selected.
Example: assign an access level
This example authorizes USER01 to update any data set that matches the masked prefix SAL*M.
TSS PERMIT(USER01) DSNAME(SAL*M)
ACCESS(UPDATE)
Data Set Protection
Chapter 12: Protecting Resources 221
Required Access Levels
A user must have the following minimum access levels to rename a data set:
■ READ and SCRATCH for the old data set name
■ WRITE and CREATE for the new data set name
To access VSAM data sets the access level required corresponds to the previous password level for the catalog:
■ READ access when READ password was used
■ UPDATE access when UPDATE password was used
■ ALL access when MASTER password was used
To create a data set, the ACID must meet one of these conditions:
■ Own the volume.
■ Possess CREATE (or ALL) access at both the volume and data set level.
CA Top Secret cannot prevent undefined users from creating data sets in a z/OS environment that is non-Alwayscall except in FAIL mode. z/OS does not recognize CA Top Secret modes and z/OS controls new data set creation for defined users only.
■ Possess CREATE and CONTROL at the volume level.
Data Set Protection
222 User Guide
Program Pathing
Program pathing restricts access to sensitive data to designated programs. Program pathing:
■ Restricts production control personnel from accessing inappropriate data without keeping them from performing their regular functions.
■ Blocks unwanted exposure introduced by CA-Panvalet. For example, always opening programs for UPDATE access even if only READ access is needed. Using program pathing, you can force access to the data set through a program that only has the ability to read it.
Example: program pathing
This example authorizes USER01 to read data sets whose highest level qualifiers are SALPAY.MASTER, but only through program APUPDATE when running in the Batch facility:
TSS PERMIT(USER01) DSNAME(SALPAY.MASTER)
PRIVPGM(APUPDATE)
FACILITY(BATCH)
If APUPDATE is protected, the following PERMIT is required:
TSS PERMIT(USER01) PROGRAM(APUPDATE)
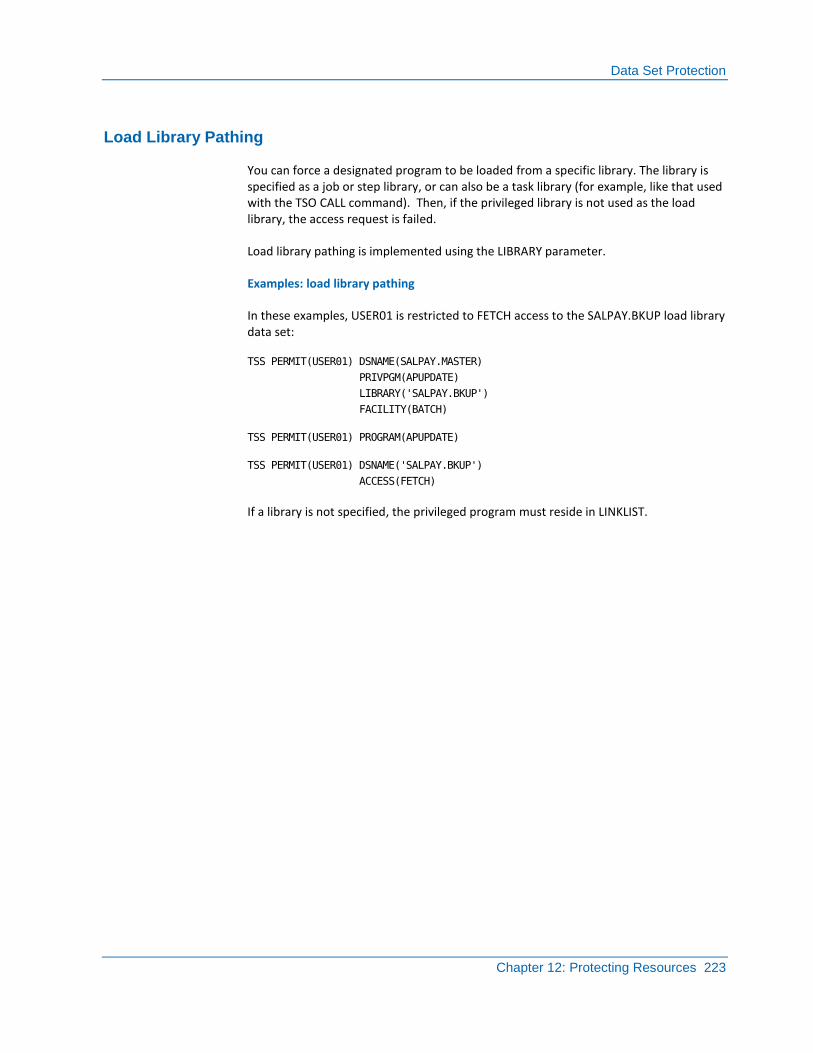
Data Set Protection
Chapter 12: Protecting Resources 223
Load Library Pathing
You can force a designated program to be loaded from a specific library. The library is specified as a job or step library, or can also be a task library (for example, like that used with the TSO CALL command). Then, if the privileged library is not used as the load library, the access request is failed.
Load library pathing is implemented using the LIBRARY parameter.
Examples: load library pathing
In these examples, USER01 is restricted to FETCH access to the SALPAY.BKUP load library data set:
TSS PERMIT(USER01) DSNAME(SALPAY.MASTER)
PRIVPGM(APUPDATE)
LIBRARY('SALPAY.BKUP')
FACILITY(BATCH)
TSS PERMIT(USER01) PROGRAM(APUPDATE)
TSS PERMIT(USER01) DSNAME('SALPAY.BKUP')
ACCESS(FETCH)
If a library is not specified, the privileged program must reside in LINKLIST.
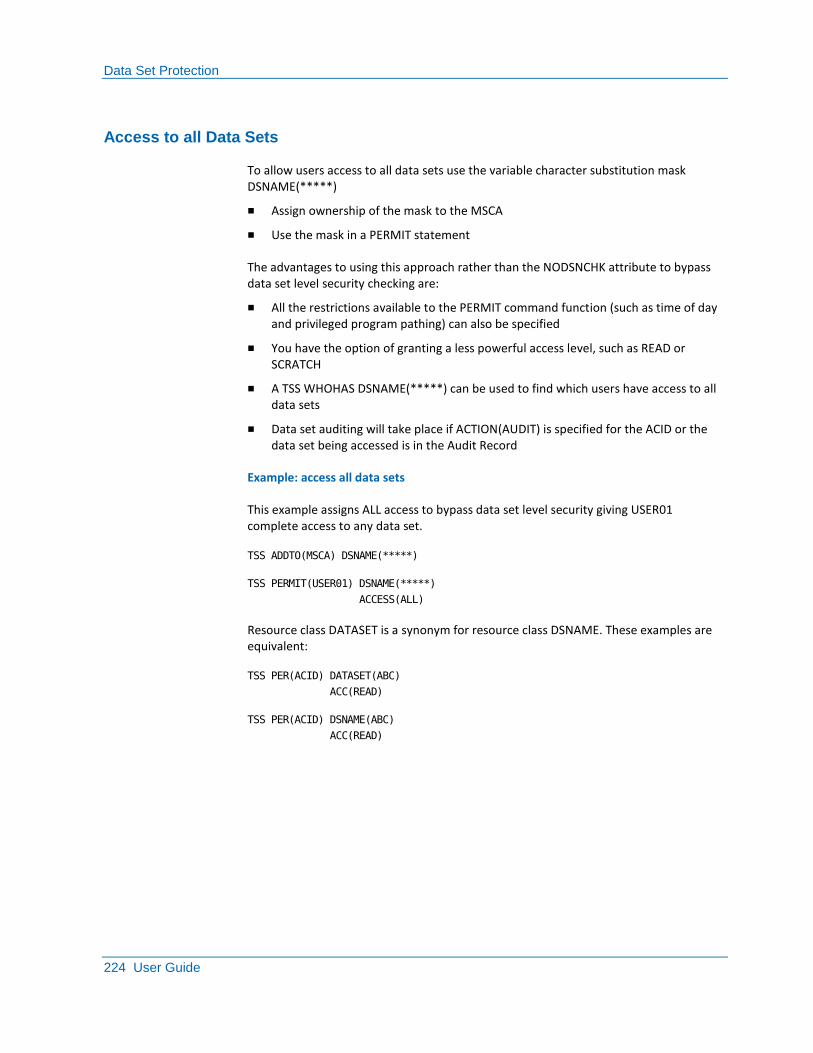
Data Set Protection
224 User Guide
Access to all Data Sets
To allow users access to all data sets use the variable character substitution mask DSNAME(*****)
■ Assign ownership of the mask to the MSCA
■ Use the mask in a PERMIT statement
The advantages to using this approach rather than the NODSNCHK attribute to bypass data set level security checking are:
■ All the restrictions available to the PERMIT command function (such as time of day and privileged program pathing) can also be specified
■ You have the option of granting a less powerful access level, such as READ or SCRATCH
■ A TSS WHOHAS DSNAME(*****) can be used to find which users have access to all data sets
■ Data set auditing will take place if ACTION(AUDIT) is specified for the ACID or the data set being accessed is in the Audit Record
Example: access all data sets
This example assigns ALL access to bypass data set level security giving USER01 complete access to any data set.
TSS ADDTO(MSCA) DSNAME(*****)
TSS PERMIT(USER01) DSNAME(*****)
ACCESS(ALL)
Resource class DATASET is a synonym for resource class DSNAME. These examples are equivalent:
TSS PER(ACID) DATASET(ABC)
ACC(READ)
TSS PER(ACID) DSNAME(ABC)
ACC(READ)
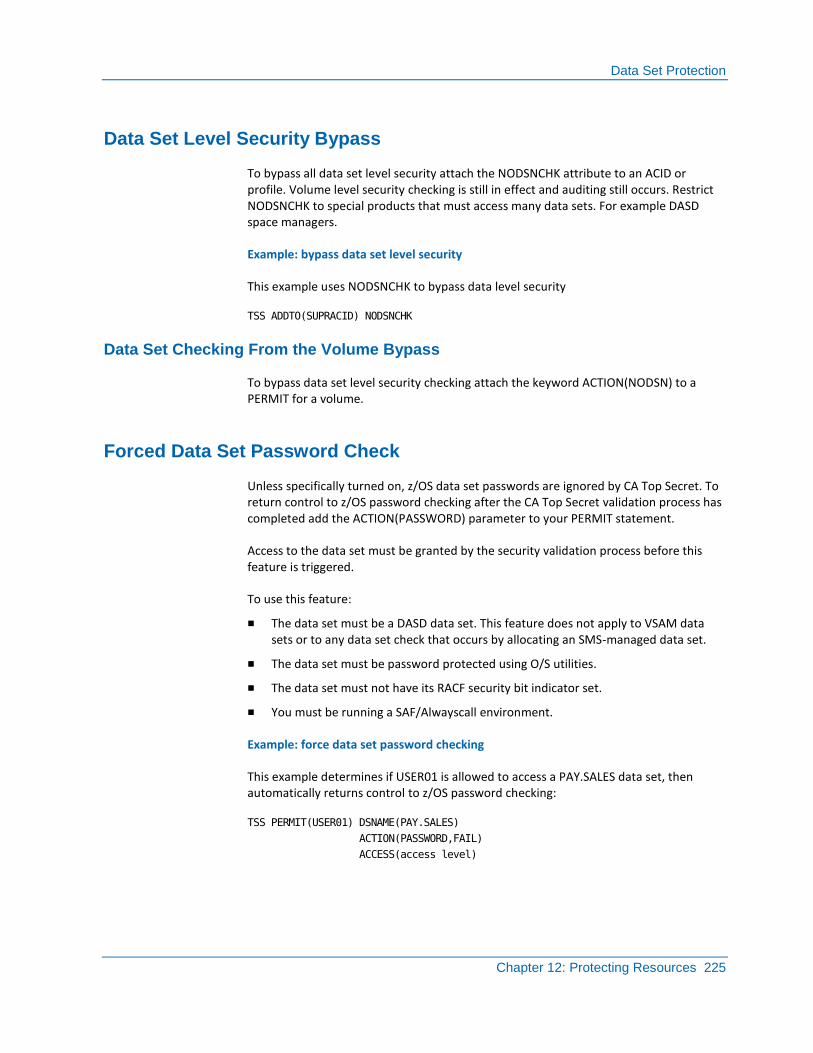
Data Set Protection
Chapter 12: Protecting Resources 225
Data Set Level Security Bypass
To bypass all data set level security attach the NODSNCHK attribute to an ACID or profile. Volume level security checking is still in effect and auditing still occurs. Restrict NODSNCHK to special products that must access many data sets. For example DASD space managers.
Example: bypass data set level security
This example uses NODSNCHK to bypass data level security
TSS ADDTO(SUPRACID) NODSNCHK
Data Set Checking From the Volume Bypass
To bypass data set level security checking attach the keyword ACTION(NODSN) to a PERMIT for a volume.
Forced Data Set Password Check
Unless specifically turned on, z/OS data set passwords are ignored by CA Top Secret. To return control to z/OS password checking after the CA Top Secret validation process has completed add the ACTION(PASSWORD) parameter to your PERMIT statement.
Access to the data set must be granted by the security validation process before this feature is triggered.
To use this feature:
■ The data set must be a DASD data set. This feature does not apply to VSAM data sets or to any data set check that occurs by allocating an SMS-managed data set.
■ The data set must be password protected using O/S utilities.
■ The data set must not have its RACF security bit indicator set.
■ You must be running a SAF/Alwayscall environment.
Example: force data set password checking
This example determines if USER01 is allowed to access a PAY.SALES data set, then automatically returns control to z/OS password checking:
TSS PERMIT(USER01) DSNAME(PAY.SALES)
ACTION(PASSWORD,FAIL)
ACCESS(access level)
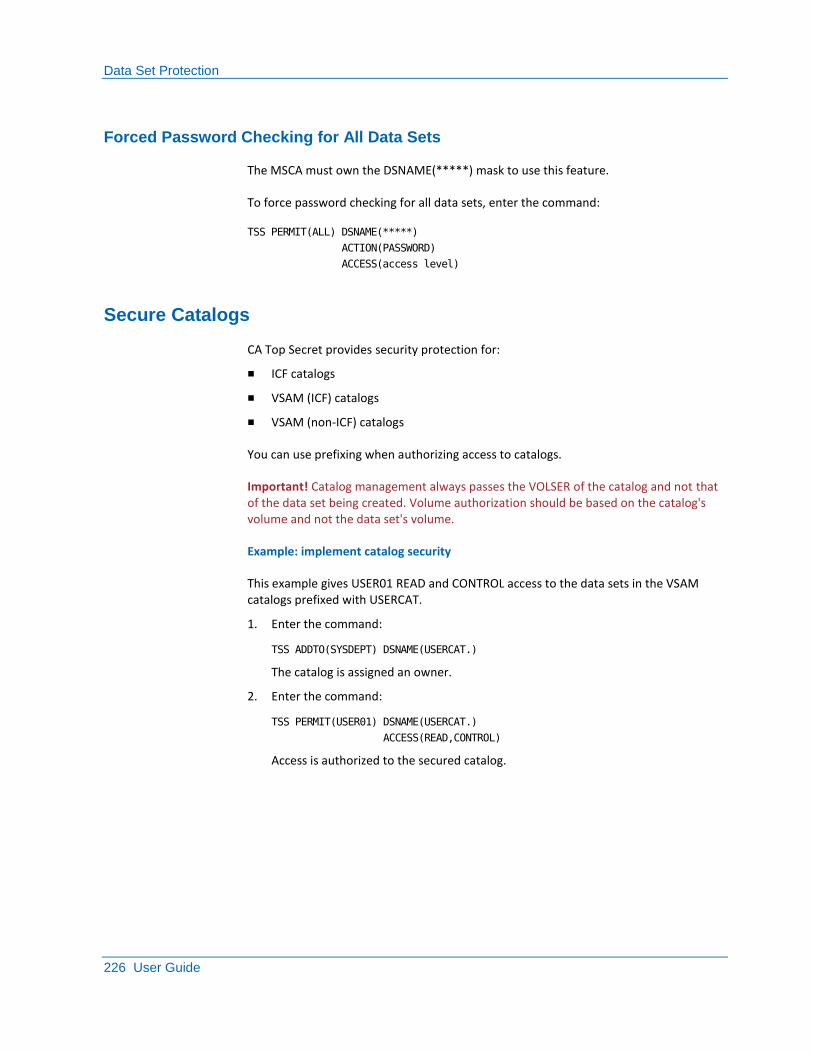
Data Set Protection
226 User Guide
Forced Password Checking for All Data Sets
The MSCA must own the DSNAME(*****) mask to use this feature.
To force password checking for all data sets, enter the command:
TSS PERMIT(ALL) DSNAME(*****)
ACTION(PASSWORD)
ACCESS(access level)
Secure Catalogs
CA Top Secret provides security protection for:
■ ICF catalogs
■ VSAM (ICF) catalogs
■ VSAM (non-ICF) catalogs
You can use prefixing when authorizing access to catalogs.
Important! Catalog management always passes the VOLSER of the catalog and not that of the data set being created. Volume authorization should be based on the catalog's volume and not the data set's volume.
Example: implement catalog security
This example gives USER01 READ and CONTROL access to the data sets in the VSAM catalogs prefixed with USERCAT.
1. Enter the command:
TSS ADDTO(SYSDEPT) DSNAME(USERCAT.)
The catalog is assigned an owner.
2. Enter the command:
TSS PERMIT(USER01) DSNAME(USERCAT.)
ACCESS(READ,CONTROL)
Access is authorized to the secured catalog.
Data Set Protection
Chapter 12: Protecting Resources 227
Assign Catalog Management Access Levels
Catalog management processing first calls CA Top Secret to validate access to the catalog itself. If the user has sufficient catalog access authority to perform the requested operation the specific authorization for the data set examined.
It is recommended that UPDATE access is only permitted to those user catalogs that the specific user will use. ALL access to those catalogs should be restricted to ACIDs who need to create or delete catalogs.
ALL access to a catalog may cause the operating system catalog management routines to bypass dataset checking. It should only be allowed on a very restricted basis.
To create a new entry, the user must have:
■ UPDATE access to the user catalog
■ READ access to the master catalog
■ CREATE access to the catalog volume
To delete a non-VSAM entry, the user must have:
■ READ access to the master catalog
■ UPDATE access to the user catalog
■ SCRATCH or ALL access to the data set
■ SCRATCH access to the volume
For information on the required access levels for access method services functions, see the IBM manual Access Method Services for the Integrated Catalog Facility.
ICF Catalogs
ICF catalogs and the data sets within them are protected when they are defined to CA Top Secret. Because ICF uses z/OS Alwayscall logic, it is not necessary to run the TSSPROT utility against these catalogs. Once the catalog is defined to CA Top Secret, password protection in all modes is not enforced. All security checking is done through CA Top Secret.
Data Set Protection
228 User Guide
Forced Catalog Password Protection
You can protect passwords on a data set, data set prefix or mask in WARN and IMPLEMENT mode.
Example: force catalog password protection
This example forces catalog password protection and CA Top Secret protection to be used for the ACID specified:
TSS PERMIT(acid) DSNAME(ICF.)
ACCESS(UPDATE)
ACTION(FAIL,PASSWORD)
Secure VSAM (Non-ICF) Catalogs
To protect VSAM catalogs in a z/OS non-Alwayscall environment:
■ Set the security bit for the catalog.
■ Define the catalog to CA Top Secret.
All VSAM catalogs are defined to CA Top Secret using their actual data set names; prefixes can also be used.
■ Protect the VSAM catalogs by running the TSSPROT utility.
Data Set Protection
Chapter 12: Protecting Resources 229
The TSSPROT Utility
The TSSPROT utility is used to secure z/OS and data sets only in an SU-32 (non-SAF) environment. A secured data set is one that has a RACF security indicator turned on. Both VSAM and non-VSAM data sets can be processed. Only the MSCA can use this utility.
To get VSAM protection, the catalog must be protected using TSSPROT. z/OS does not recognize individual data set protection if the associated catalog is not secured.
For information on the JCL for executing TSSPROT and the verbs and options used to construct the control statement, see the Report and Tracking Guide.
If your system operates under an z/OS Alwayscall environment, you do not need to use the TSSPROT utility.
Examples: TSSPROT
This example secures all non-VSAM data sets starting with the prefix PAY on all PRODxx volumes:
PROTECT D(PAY) VOLUME(PROD) UNIT(3380)
This example secures a VSAM user catalog:
PROTECT DSNAME(PROD.VSAMCATA) CATAPE(PROD.VSAMCATA)
This example secures all VSAM data sets cataloged in a user catalog:
PROTECT CATAPE(PROD.VSAMCATA)
This example protects all DASD data sets on all online DASD volumes, including password-protected data sets (in FAIL mode):
P PASSWORD(PROTECT)
This example simulates protection of all accessible non-VSAM DASD data sets:
PROTECT SIM

Tape Volume Protection
230 User Guide
Tape Volume Protection
The type of tape volume protection that CA Top Secret provides is specified through the TAPE control option and is dependent on the tape management system in use.
The TAPE control option settings are:
TAPE(OFF)
z/OS will not invoke CA Top Secret to validate a tape access request. This setting is appropriate when an external tape management package, such as TMS or TLMS, is in place.
TAPE(DEF)
CA Top Secret validates access requests for defined tape volumes only.
TAPE(DSN)
CA Top Secret validates tape data set access requests based on the full data set name specified in the DSN= parameter of the JCL. (z/OS limits the length of a data set name on a tape label to its last 17 characters.) With this option, tape security functions at the data set rather than the volume level.
Tape Management Packages
Any tape management package that issues SAF calls supports CA Top Secret at the tape volume and/or tape data set level. When used with tape management packages, CA Top Secret can manage scratch tapes, synchronize tape inventories, and remove and assign tape ownership.
CA Top Secret interfaces with most vendor tape management packages. If your installation is using BrightStor CA-DYNAM/TLMS, CA-Tape, or BrightStor CA-1, CA Top Secret can provide full tape data set security.
Because of the limitations on tape data set security in the absence of a tape management package, use CA Top Secret to protect tapes at the volume level.
To activate the CA Top Secret interface to the CA-Tape system, specify CA-Tape as one of the operands for the PRODUCT control option.
Tape Volume Protection
Chapter 12: Protecting Resources 231
Bypass Label Processing Security
A central security administrator can authorize designated ACIDs to run jobs that use bypass label processing (BLP). Special initiators do not have to be set up to run BLP jobs. An ACID is not allowed to use BLP processing unless explicitly authorized.
Authorization to use BLP can be given for a specific volume, a generically defined group of volumes, or all tape volumes. Authority can be for update-level access or restricted to read-only access.
To assign BLP authority, enter the command:
TSS PERMIT(acid) VOLUME(volser)
ACCESS(BLP,READ|UPDATE)
Volume permits with ACCESS(BLP,READ|UPDATE) are only used for tape volume access.
Example: securing bypass label processing
This example gives USER01 BLP processing authority to update any tape volume:
TSS PERMIT(USER01) VOLUME(*ALL*(G))
ACCESS(BLP,UPDATE)
Protect Tapes From Destructive Updating
CA Top Secret responds to security calls by DFP regarding the requested access of the tapes. The operator must remove the write ring from a tape when these conditions occur together:
■ The tape is opened for input processing
■ The ACID under which the job is running does not possess UPDATE access to the tape
■ The tape device is not a 3490 or a 3480 with the IDRC feature
To implement this capability set the TAPE control option to DSNAME or DEF, as appropriate to your environment.
Data Set and Volume Level Security
232 User Guide
Data Set and Volume Level Security
To determine whether access to a particular DASD data set should be allowed, CA Top Secret evaluates both the pertinent volume and data set access authorizations.
For tape volumes, generally volume or data set level security is in effect depending on the absence or presence of a tape management package.
CA Top Secret always performs volume level checking first. In some instances a request to access a data set is evaluated strictly on the basis of the volume access authorizations located by the volume level check.
For example, if the user is authorized for any volume level access other than CREATE and the request does not exceed this access level, CA Top Secret allows access to the volume and the data set without checking for DSNAME authorizations. If the ACID owns the volume access is allowed without any data set validation.
If the ACID has no relevant VOLUME authorization, CA Top Secret immediately switches to data set (DSN) validation checking (unless this is a data set creation request, in which case the request is automatically failed).
PDS Member Protection
PDS member level protection allows PDS data sets to be secured or audited at the member level.
With PDS member level protection, PDS member-names become a general resource securable at the READ or UPDATE level. A control option identifies which data sets require PDS member level protection. Once enabled, access to every PDS member is secured regardless of the access method or program type.
PDS member level protection does not replace normal data set security. A user with read access to a PDS can be restricted to reading only selected members. A user with update access to a PDS can be restricted to specific members that can be read and or specific members that can be updated.
PDS Member Protection
Chapter 12: Protecting Resources 233
PDS Member Level Protection
The PDSPROT control option statement activates PDS member level protection and identifies the PDS data sets to be protected at the member level. A PDSPROT control option statement identifies a PDS to be protected, optionally its volume serial, and names the resource class to be used for member level access checks.
The same resource class may be named on multiple PDSPROT control option statements allowing several PDS data sets to share a common set of member level rights. Five resource classes named PDSMEM1 through PDSMEM5 are predefined in the TSS Resource Definition Table (*RDT*) for this use. For example:
PDSPROT(ADD,DSN(SYS1.PARMLIB,VOL(yyyyyy),CLASS(PDSMEM1))
PDSPROT(ADD,DSN(SYS1.PARMLIB),CLASS(PDSMEM2))
PDSPROT(ON)
TSS ADDTO and PERMIT commands setup and administer security over PDS members. TSS PERMIT commands are used to grant access to PDS members. A PERMIT may grant READ or UPDATE authority and a PRIVPGM restriction may be included.
If PDSPROT is being used with CA PDSMAN, set FASTSTOW=N in the CA-PDSMAN startup parms. This setting allows other products to share STOW processing.
Example: PDS member level protection
This example establishes member level security to allow user1 to read member IEASYS00 of SYS1.PARMLIB and user2 to update this member using ISPF Edit:
TSS ADDTO(anydept) PDSMEM1(IEA)
TSS PERMIT(user1) PDSMEM1(IEASYS00)
ACCESS(READ)
TSS PERMIT(user2) PDSMEM1(IEASYS00)
ACCESS(UPDATE)
PRIVPGM(ISREDIT)
PDS Member Protection
234 User Guide
Member Level Protection Exemption
To exempt a particular user or program from member level checks set up a single PERMIT allowing ALL access to a special PDS member named <BYPASS>. Then, whenever a PDS secured at the member level is opened, CA Top Secret issues a resource check to learn if the current user or program has ALL access to the special <BYPASS> member name. If it does the user or program is exempt from all further member level protection. To take effect, the program accessing the <BYPASS> PDS must be loaded from an authorized library.
Example: exempt member level protection
This example exempts user1 from member level protection when executing the GIMSMP program only:
TSS PERMIT(user1) PDSMEM1(<BYPASS>)
ACCESS(ALL)
PRIVPGM(GIMSMP)
Implicit Access to the PDS Directory
A PDS directory exists at the physical beginning of every PDS data set. The directory tracks the name and address of every PDS member. Even though member level-protection is active, CA Top Secret implicitly allows read access to the entire directory. For instance, when listing a member directory with ISPF or IEHLIST, a user sees the names of members the user is not allowed to access. Violations occur when explicit READ or WRITE access occurs on the protected member.
The following commands protect members at different access levels:
TSS ADD(dept) PDSMEM1(MEM)
TSS PER(testuser) PDSMEM1(MEM1) ACC(READ)
TSS PER(testuser) PDSMEM1(MEM2) ACC(UPDATE)
When the PDS directory is displayed, the protected members are displayed. For example:
Name Prompt Size
. MEM1
. MEM2
. MEM3
. MEM4
If ACID(testuser) attempts to READ members MEM3 or MEM4 (in any data set associated through PDSPROT with the class PDSMEM1), he is rejected. ACID(testuser) is able to select MEM1 and MEM2, but is prevented from saving changes in MEM1. In this example resource class PDSMEM1 is associated with data set SYS1.PARMLIB.
PDS Member Protection
Chapter 12: Protecting Resources 235
Explicit Access of a PDS Directory
Implicit access to the PDS directory occurs whenever a PDS member is updated, saved, deleted, or renamed with high-level access methods. The directory is not explicitly updated by the calling program. It is implicitly updated by the operating system. Such access does not require explicit permission to the directory.
Programs which perform more sophisticated low-level block updates to the PDS may never explicitly address the directory, or perform directory access for an individual protected member (for example, using EXCP or BSAM access methods).
Examples: PDS directory access
This example directs CA Top Secret to prevent low-level writing to the directory blocks by protecting the “pseudo-member” <DIR>:
TSS ADD(dept) PDSMEM1(<DIR>)
This prevents users from performing a compress, for instance using the IEBCOPY utility. Such protection does not prevent implicit update of the directory during the rewrite of an individual member. This protection is only invoked during low-level block functions. To allow directory access you can permit access to <DIR>.
This example permits testuser to compress SYS1.PARMLIB:
TSS PERMIT(testuser) PDSMEM(<DIR>)
ACCESS(ALL)
Accidental PDS Corruption Prevention
A user may forget to specify a member name when allocating an existing PDS for output. This destroys the PDS directory. For example:
//OUTPUT DD DSN=IMPORTANT.PDS(NEWMEM1),DISP=SHR <- Desired this...
//OUTPUT DD DSN=IMPORTANT.PDS,DISP=SHR <- but coded this
This exposure is resolved using PDS member level protection. This accident generates a PDS member level security check for the special <DIR> resource. Only a small number of programs have authority to perform an explicit PDS directory update like this. Since no PERMIT exists the accidental access is stopped.
PDS Member Protection
236 User Guide
FETCH/EXECUTE Access of PDS Members
PDS member level protection does not secure the execute or fetch access of PDS members from PDS load libraries. Access is secured by the existing PROGRAM resource class. PDS member level protection may be useful for PDS load libraries as it restricts the ability of any user to copy, scratch, update, linkedit, or rename load library members.
PDS ALIAS Names
PDS member level protection addresses ALIAS name concerns. To:
■ Create an ALIAS the user must have update access the ALIAS name being created and the root member name to which the ALIAS is attached
■ Delete an ALIAS the user must have update access for the ALIAS name
■ Read a PDS member the user must have read access for the root member name
These features ensure that secured PDS member access is not compromised by a user creating an accessible ALIAS name and ensures that unauthorized ALIAS names are not created.
Secure Related Diagnostic Programs
Three PDS member level protection utility programs are provided whose execution should be secured by CAPDSSEC resources within the IBMFAC resource class.
Example: secure diagnostic programs
This example defines security ownership for the PDS member level protection utility programs resources and permits their use by “USER1” alone:
TSS ADDTO(anydept) IBMFAC(CAPDSSEC)
TSS PERMIT(USER1) IBMFAC(CAPDSSEC.TERM)
TSS PERMIT(USER1) IBMFAC(CAPDSSEC.STATUS)
TSS PERMIT(USER1) IBMFAC(CAPDSSEC.TRACE)
PDS Member Protection
Chapter 12: Protecting Resources 237
PDS and PDSE Member Level Protection Usage Notes
When using PDS member level protection:
■ SYS1.IMAGELIB is unique among data sets in that it is processed via the IMGLIB macro (SVC 105), and is not OPENed. Because it is not OPENed, the information in the DCB and DEB is unreliable, and there is no TIOT or JFCB from which to extract information. Therefore, SYS1.IMAGELIB cannot be protected at the member level.
■ PDS member level protection requires MVS/ESA 4.3.0 or above.
■ All forms of PDS access are secured including QSAM, BSAM, BPAM and EXCP.
■ Member level protection is enabled only for the PDS data sets that are listed via a PDSPROT control option statement. No additional overhead is incurred for other data set types, for non-listed PDS data sets, or for users with <BYPASS> authority.
■ PDS member level PERMITs may grant READ or UPDATE access.
■ Permission to the special <DIR> pseudo-member should be granted at the UPDATE or ALL access level. Permission may be denied with the NONE access level.
■ Permission granted at any other access level has no effect. Permission to the special <BYPASS> pseudo-member should be granted only at the ALL access level. Permission may be denied with the NONE access level. Permission granted at any other access level has no effect.
■ Administrative functionality for PDSE data sets is the same as PDS data sets.
■ Program fetch for execution is exempt from PDS member level protection since this access is already securable through the existing PROGRAM resource class.
■ If VLF caching is used for TSO CLIST libraries, PDS member level protection is bypassed for cache-resident CLISTs when executed under TSO.
■ PDS member level protection compliments rather than replaces data set security. To read a PDS member, a user requires both a data set PERMIT allowing access to the data set and a resource PERMIT allowing access to the member.
■ Note that any user with ALL authority over a PDS data set can circumvent PDS member level protection by their inherent ability to rename or delete the entire PDS data set.
■ Whenever a PDS member is read using an ALIAS name, the true member name is used in all member level validations.
■ Renaming a PDS member requires update authority for the old and new member name.
Console Protection
238 User Guide
■ For speed, a program may issue read multiple PDS members in a single I/O operation when reading or backing-up a PDS data set. With PDS member level protection active, such operations will correctly generate a resource check for every PDS member accessed. The OEM PDS command for TSO is a common example. When using this TSO command in full-track mode, member level checks may occur for more than one obvious member name. This is normal in this mode. Use the CONTROL MULTIPLE and CONTROL SINGLE sub-commands of this command to easily enable or disable this mode as desired.
■ The DASD restore of an entire PDS data set from a backup or archive will not typically generate PDS member level protection checks for members within the PDS data set being restored. Likewise, an IEHMOVE of an entire PDS will generate PDS member level protection checks for the input PDS data set. However, no member level protection checks will occur for the output data sets until the move completes. In both of these cases, no member level protection occurs because the new data set being created by the restore or move is not recognized as a PDS data set until the file building process is complete.
■ When first activated following an IPL, PDS member level protection creates a SCOPE=COMMON OS/390 dataspace to assist processing. The addition of this dataspace may require an adjustment of the MAXCAD=nnn setting within the IEASYSxx member of PARMLIB.
Console Protection
Every console command goes through console facility security checking. The console facility lets you define individual consoles to CA Top Secret and customize user access to commands issued from the console.
For example, you could allow one user to issue any z/OS command from the console while restricting another user to a particular command or subset of commands. To issue protected console commands the operator must complete the signon process.
The console facility is delivered in WARN mode. Stay in WARN until you have verified that all users who need to issue console commands can do so without receiving error messages.
Console Protection
Chapter 12: Protecting Resources 239
Default Attributes for the Console Facility
The console facility default control options stored in the Facility Matrix Table are:
TSS MODIFY(FACILITY(CONSOLE))
TSS9550I FACILITY DISPLAY FOR CONSOLE
TSS9551I INITPGM=*** id=CN TYPE=02
TSS9552I ATTRIBUTES=IN-USE,ACTIVE,NOSHRPRF,NOASUBM,MULTIUSER,NOXDEF
TSS9552I ATTRIBUTES=LUMSG,STMSG,SIGN(M),INSTDATA,NORNDPW,AUTHINIT
TSS9552I ATTRIBUTES=NOPROMPT,NOAUDIT,RES,WARNPW,NOTSOC,LCFCMD
TSS9552I ATTRIBUTES=MSGLC,NOTRACE,EODINIT,DORMPW,NONPWR,
TSS9553I MODE=FAIL DOWN=BYPASS LOGGING=ACCESS,INIT,SMF,MSG,SEC9
TSS9554I UIDACID=8 LOCKTIME=000 DEFACID=*NONE* KEY=8
TSS9566I MAXUSER=03000 PRFT=003
The EODINIT attribute specifies that a RACINIT can be performed on the Console facility after an CA Top Secret ZEOD is issued. Without EODINIT, if the console has not been logged on prior to end-of-day shutdown, sign on fails and no commands are processed.
Console Protection
240 User Guide
Define Consoles to CA Top Secret
To define your consoles to CA Top Secret
1. Specify DEFAULTS LOGON(AUTO) in SYS1.PARMLIB (in the member CONSOLExx).
2. Create a specific Department and Profile for the consoles. Assign the FACILITY(CONSOLE) attribute to the profile. For example:
TSS CREATE(CONSDEPT) NAME('Console Dept')
TYPE(DEPARTMENT)
TSS CREATE(CONSPROF) NAME('Console Prof')
TYPE(PROFILE)
FACILITY(CONSOLE)
DEPARTMENT(CONSDEPT)
This consolidates all consoles and console permits and attributes in one place.
3. Create an ACID for each console. Each ACID should have a type of USER and be assigned to the Console facility.
4. Assign the ACIDs to the Console department and profile created in Step 2.
5. To ease administration tasks, specify a non-expiring password for the console ACIDs. Consider adding the NORESCHK bypass attribute if the ACID is using JES resources.
This example assigns the console's ACID name as the console number, the CONSDEPT department, the CONSPROF profile, a password that does not expire, and access limited to the Console facility:
TSS CREATE(01) NAME('Console 01')
TYPE(USER)
DEPARTMENT(CONSDEPT)
PROFILE(CONSPROF)
PASSWORD(SHSH,0)
FACILITY(CONSOLE)
[NORESCHK]
You can name each console in the CONSOLxx member in SYS1.PARMLIB. In that case you would use the given name as the ACID.
6. Allow the Console department and profile access to the appropriate resources by adding z/OS, JES2, and JES3 to the Console Department and permitting them to the Console Profile by using the OPERCMDS resource class keyword. For example:
TSS ADDTO(CONSDEPT) OPERCMDS(MVS.,JES2.,JES3.)
TSS PERMIT(CONSPROF) OPERCMDS(MVS.,JES2.,JES3.)
ACCESS(ALL)
Console Protection
Chapter 12: Protecting Resources 241
7. ADD z/OS, JES2, and JES3 to the ALL Record using the OPERCMDS keyword. For example:
TSS PERMIT(ALL) OPERCMDS(MVS.,JES2.,JES3.)
ACCESS(ALL)
You can permit only certain console commands to certain users. For information, see the IBM System Commands Manual for ESA 3.1.3 and above.
Console Protection
242 User Guide
MCS Console Facility Support
CA Top Secret supports the TSO/E Extended MCS Console Facility. The Multiple Console System (MCS) lets you define multiple consoles, enter console commands, and receive console messages from various terminals which are defined as remote consoles. Security administrators must have MISC8 authority to issue the MCS commands. CA Top Secret supports the MCS fields:
MCSALTG
Assign an alternate group
MCSAUTH
Authorize command usage
MCSAUTO
Assign an AUTO keyword
MCSCMDS
Specify system to receive commands
MCSDOM
Assign Delete Operator Messages (DOM) to a console
MCSKEY
Assign a Key to a console
MCSLEVL
Specify level of messages for a console to receive
MCSLOGC
Log commands to the log file
MCSMFRM
Specify display format for messages
MCSMGID
Assign a migration ID to a console
MCSMON
Specify how events are monitored
MCSROUT
Specify routing codes
MCSSTOR
Define storage for message queuing
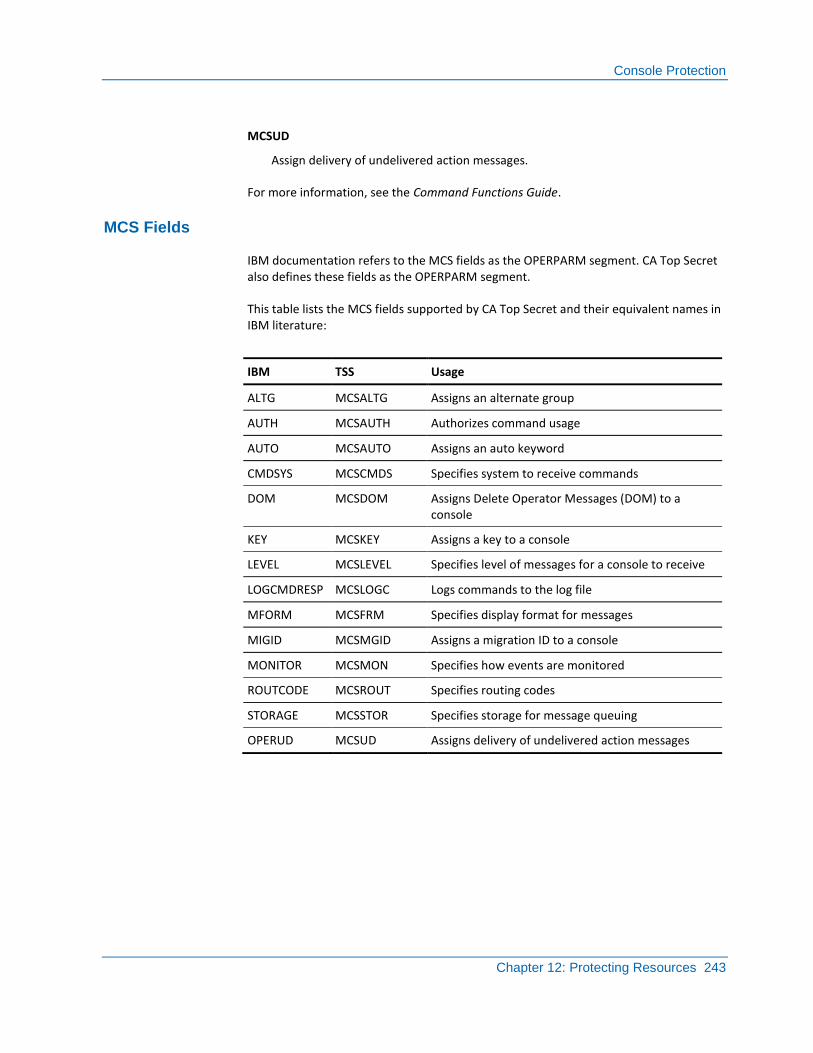
Console Protection
Chapter 12: Protecting Resources 243
MCSUD
Assign delivery of undelivered action messages.
For more information, see the Command Functions Guide.
MCS Fields
IBM documentation refers to the MCS fields as the OPERPARM segment. CA Top Secret also defines these fields as the OPERPARM segment.
This table lists the MCS fields supported by CA Top Secret and their equivalent names in IBM literature:
IBM TSS Usage
ALTG MCSALTG Assigns an alternate group
AUTH MCSAUTH Authorizes command usage
AUTO MCSAUTO Assigns an auto keyword
CMDSYS MCSCMDS Specifies system to receive commands
DOM MCSDOM Assigns Delete Operator Messages (DOM) to a console
KEY MCSKEY Assigns a key to a console
LEVEL MCSLEVEL Specifies level of messages for a console to receive
LOGCMDRESP MCSLOGC Logs commands to the log file
MFORM MCSFRM Specifies display format for messages
MIGID MCSMGID Assigns a migration ID to a console
MONITOR MCSMON Specifies how events are monitored
ROUTCODE MCSROUT Specifies routing codes
STORAGE MCSSTOR Specifies storage for message queuing
OPERUD MCSUD Assigns delivery of undelivered action messages
Terminal Protection
244 User Guide
Terminal Protection
The following terminal and reader device types can be defined to CA Top Secret:
■ Online terminals (TCAM, VTAM, and BTAM)
■ Remote (RJE) and local JES readers
■ Internal readers
■ NJE nodes
You can:
■ Protect against unauthorized use of a protected terminal. This is useful with readers and RJE stations that do not require signons where password security may not be feasible. Access to this device can be controlled. This includes restricting which jobs are valid for execution from this device through TSS ADDTO ACID entries.
■ Force user initiation only from an authorized source terminal. This protection can channel sensitive activities through authorized pathways.
Terminals must be owned before being authorized. To establish ownership, use a TSS CREATE/ADDTO TERMINAL entry then a TSS PERMIT TERMINAL entry to specify authorizations.
Example: protect terminals
This example protects all terminals whose names begin with K18L by assigning ownership of them to DEPT01:
TSS ADDTO(DEPT01) TERMINAL(K18L)
Remove Ownership
CA Top Secret will not remove ownership unless all permissions are revoked.
To remove ownership of a terminal
1. Revoke all permissions for the resource. For example:
TSS REVOKE(USER01) TERMINAL(K18L1125)
2. Remove the ownership of the terminal. For example:
TSS REMOVE(DEPT01P) TERMINAL(K18L1125)
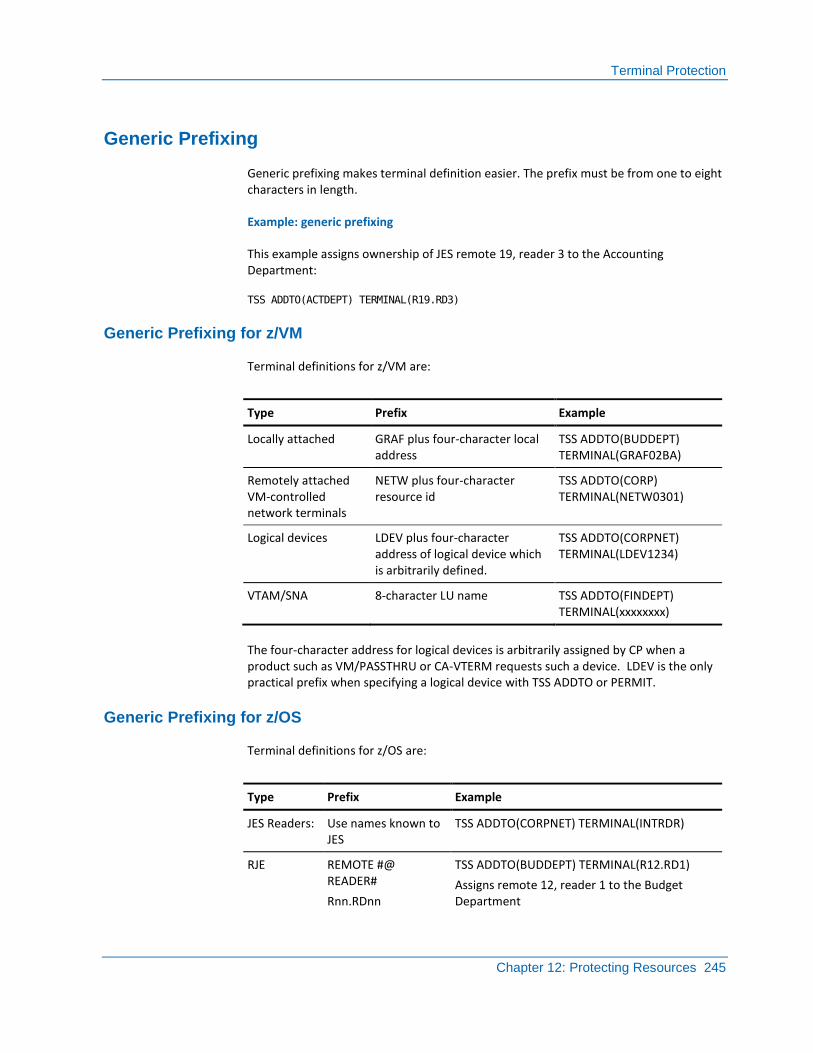
Terminal Protection
Chapter 12: Protecting Resources 245
Generic Prefixing
Generic prefixing makes terminal definition easier. The prefix must be from one to eight characters in length.
Example: generic prefixing
This example assigns ownership of JES remote 19, reader 3 to the Accounting Department:
TSS ADDTO(ACTDEPT) TERMINAL(R19.RD3)
Generic Prefixing for z/VM
Terminal definitions for z/VM are:
Type Prefix Example
Locally attached GRAF plus four-character local address
TSS ADDTO(BUDDEPT) TERMINAL(GRAF02BA)
Remotely attached VM-controlled network terminals
NETW plus four-character resource id
TSS ADDTO(CORP) TERMINAL(NETW0301)
Logical devices LDEV plus four-character address of logical device which is arbitrarily defined.
TSS ADDTO(CORPNET) TERMINAL(LDEV1234)
VTAM/SNA 8-character LU name TSS ADDTO(FINDEPT) TERMINAL(xxxxxxxx)
The four-character address for logical devices is arbitrarily assigned by CP when a product such as VM/PASSTHRU or CA-VTERM requests such a device. LDEV is the only practical prefix when specifying a logical device with TSS ADDTO or PERMIT.
Generic Prefixing for z/OS
Terminal definitions for z/OS are:
Type Prefix Example
JES Readers: Use names known to JES
TSS ADDTO(CORPNET) TERMINAL(INTRDR)
RJE REMOTE #@ READER#
Rnn.RDnn
TSS ADDTO(BUDDEPT) TERMINAL(R12.RD1)
Assigns remote 12, reader 1 to the Budget Department
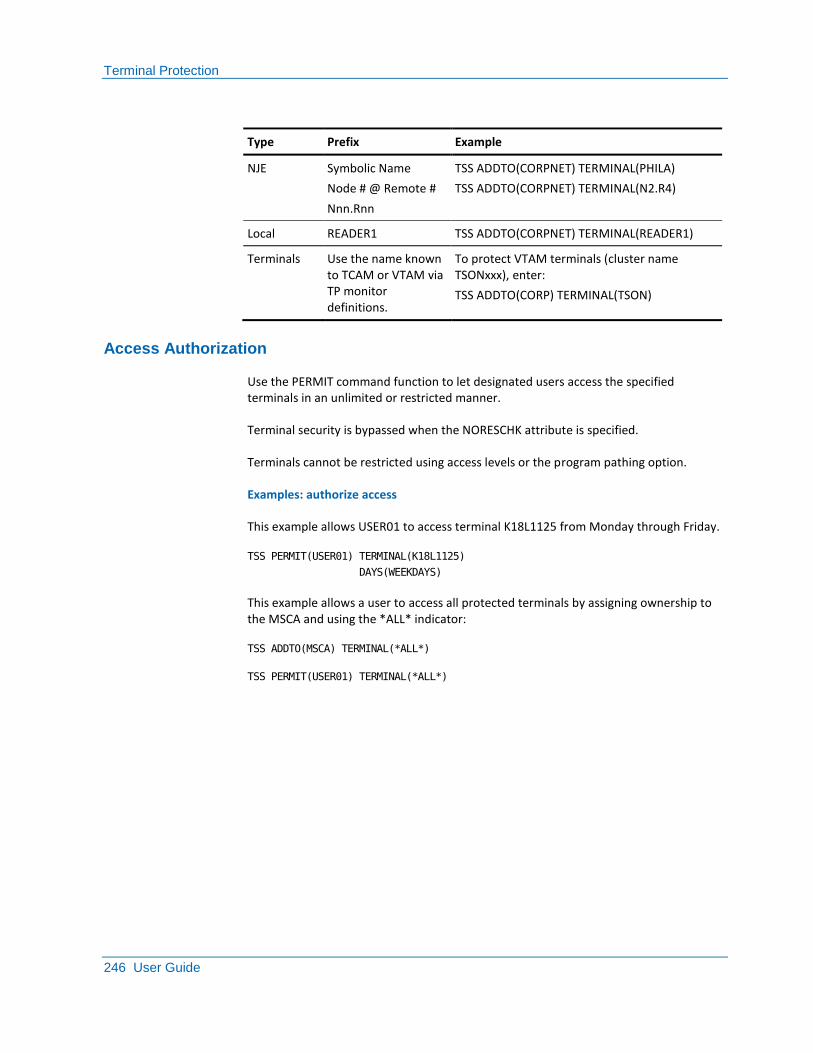
Terminal Protection
246 User Guide
Type Prefix Example
NJE Symbolic Name
Node # @ Remote #
Nnn.Rnn
TSS ADDTO(CORPNET) TERMINAL(PHILA)
TSS ADDTO(CORPNET) TERMINAL(N2.R4)
Local READER1 TSS ADDTO(CORPNET) TERMINAL(READER1)
Terminals Use the name known to TCAM or VTAM via TP monitor definitions.
To protect VTAM terminals (cluster name TSONxxx), enter:
TSS ADDTO(CORP) TERMINAL(TSON)
Access Authorization
Use the PERMIT command function to let designated users access the specified terminals in an unlimited or restricted manner.
Terminal security is bypassed when the NORESCHK attribute is specified.
Terminals cannot be restricted using access levels or the program pathing option.
Examples: authorize access
This example allows USER01 to access terminal K18L1125 from Monday through Friday.
TSS PERMIT(USER01) TERMINAL(K18L1125)
DAYS(WEEKDAYS)
This example allows a user to access all protected terminals by assigning ownership to the MSCA and using the *ALL* indicator:
TSS ADDTO(MSCA) TERMINAL(*ALL*)
TSS PERMIT(USER01) TERMINAL(*ALL*)
Program Protection
Chapter 12: Protecting Resources 247
Program Protection
Any owned program is protected. Undefined programs are not protected unless the DEFPROT attribute is added to the PROG resource class in the RDT. TSO commands are protected with the PROG keyword if the command is defined in terms of the program it causes to be executed.
Programs must be owned before being authorized.
Example: protect programs
This example protects the program IEHINITT by assigning ownership of it to DEPT01:
TSS ADDTO(DEPT01) PROGRAM(IEHINITT)
Removing Ownership
CA Top Secret will not remove ownership unless all permissions are revoked.
To remove ownership of a program
1. Revoke all permissions for the resource. For example:
TSS REVOKE(USER01) PROGRAM(IEHINITT)
2. Remove the ownership of the program. For example:
TSS REMOVE(DEPT01P) PROGRAM(IEHINITT)
Default Protection
Default protection gives security protection to programs not defined to CA Top Secret. A security violation occurs if a request is made to access an unowned program.
To give default protection to programs, attach the DEFPROT attribute to the PROGRAM resource class.
Example: assign default protection
This example assigns default protection:
TSS REPLACE(RDT) RESCLASS(PROGRAM)
ATTR(DEFPROT)
Program Protection
248 User Guide
Generic Prefixing
Program ownership can be designated with generic prefixes. Any program beginning with a prefix is protected and must be permitted to other ACIDs. A generic prefix must be from one to eight characters in length.
Example: generic prefixing
This example assigns ownership of all sensitive IBM utilities to the Systems Department:
TSS ADDTO(SYSDEPT) PROGRAM(IEH)
Program Access Authorization
Use the TSS PERMIT command function to allow designated users to access the indicated programs in an unlimited or a restricted manner.
Examples: authorize access
This example allows USER01 to use the IEHINITT utility from 7:00 a.m. to noon:
TSS PERMIT(USER01) PROGRAM(IEHINITT)
TIMES(07,12)
This example gives everyone the ability to use IEHINITT in the morning:
TSS PERMIT(ALL) PROGRAM(IEHINITT)
TIMES(07,12)
Assign a Program Path
Program pathing users who access a resource through a privileged program must be given authorization through a TSS PERMIT PROG entry before the PRIVPGM attribute can be used. For example:
TSS PERMIT(USER01) PROGRAM(APUPDATE)
Program pathing is then implemented with the PRIVPGM parameter.
Example: assign a program path
This example authorizes USER01 to read data sets whose highest level qualifiers are SALPAY.MASTER, but only through program APUPDATE when running in the Batch facility:
TSS PERMIT(USER01) DSNAME(SALPAY.MASTER)
PRIVPGM(APUPDATE)
FACILITY(BATCH)
TSO SPF Panel Protection
Chapter 12: Protecting Resources 249
Access to all Programs
To allow users access to all programs, assign ownership to the MSCA then use the resource identifier *ALL*.
Example: access all programs
This example allows USER01 to use any protected program:
TSS ADDTO(MSCA) PROGRAM(*ALL*)
TSS PERMIT(USER01) PROGRAM(*ALL*)
TSO SPF Panel Protection
CA Top Secret recognizes TSO SPF menus by the name of the controlling program. SPF menus should be identified in the form SPFx, where x is the menu ID.
For example, PROGRAM(SPF3) protects against the use of any SPF utility function, while SPF37 protects the VTOC sub-option.
This feature assumes standard program/panel match ups. It will not work if the SPF panel numbers for various functions have been changed. In this case, use PROGRAM protection.
Application Protection
Use the APPL keyword to protected online applications that interface with CA Top Secret through the z/OS System Authorization Facility (SAF). You can use this keyword to identify the application name of the LU to which a conversation request can be sent to secure APPC conversations.
Applications must first be owned before being authorized. Use a TSS CREATE/ADDTO APPLICATION entry then use a TSS PERMIT APPLICATION entry to specify authorizations.
Example: protect an application
This example adds the PAYP application to DEPT01:
TSS ADDTO(DEPT01) APPLICATION(PAYP)
The APPLICATION keyword identifies this resource class in the RDT.
For the IMS batch message processing regions (BMP) and message processing regions (MPP), use its Application Group Name (AGN) as the APPLICATION keyword's operand.
Application Protection
250 User Guide
Remove Application Ownership
CA Top Secret will not remove ownership unless all permissions are revoked.
To remove ownership of an application
1. Revoke all permissions for the resource. For example:
TSS REVOKE(USER01) APPLICATION(PAYP)
2. Remove the ownership of the application. For example:
TSS REMOVE(DEPT01P) APPLICATION(PAYP)
Generic Prefixing for Applications
Application ownership can be designated using generic prefixes. Once a prefix is owned, any application beginning with that prefix is protected and must be permitted to other ACIDs.
Example: generic prefixing
This example gives ownership of applications that begin with the prefix PAY to the ACID PAYDEPT:
TSS ADDTO(PAYDEPT) APPLICATION(PAY)
Application Access Authorization
Applications cannot be restricted using access levels or the program pathing option. Use the TSS PERMIT command function to let designated users access the indicated applications in an unlimited or a restricted manner.
Example: authorize access
This example allows USER01 to use the application PAYP through the batch facility:
TSS PERMIT(USER01) APPLICATION(PAYP)
FACILITY(BATCH)
Record Level Protection (RLP)
Chapter 12: Protecting Resources 251
Record Level Protection (RLP)
RLP gives you detailed control over which users have access to what data by defining the records to protect the SDT reserved ACID record and then permitting access with the TSS PERMIT command.
Before implementing RLP, ensure that the SDT is initialized with the SDTBLOCKS parameter of TSSMAINT.
Using RLP, you can give users access to:
■ A set of records within a file
■ A set of fields within a record
The SDT record elements used to implement RLP are:
RECORD
Defines the record using its FCT name, and specifies the record's layout (field name, data type, field positions, length). The field(s) defined are then referenced in the SELECT record.
SELECT
Defines the logic, using Boolean expressions, that specifies who gets access to a record based on the contents of one or more fields.
MASKREC
(Optional) Defines which fields within a record cannot be access.
Record Level Protection (RLP)
252 User Guide
RLP Implementation
To help implement RLP smoothly:
■ Determine which of your applications would benefit from RLP.
■ Gather information about the application FCT name, field names, positions, data types, length of field, and selection criteria).
■ Become familiar with the application.
■ Plan the details needed to implement RLP for this application. For example, you may decide on selection criteria that limit the user to viewing only the records within their departmental scope.
■ Determine who is the administrator for implementing RLP and give them MISC3(SDT) authority.
The process to enter the definitions is:
■ Define the RECORD definitions to the SDT with information such as:
– The name of the record (FCT name)
– The fields of the record
– The format of the data in the fields
– The sizes are the fields
For example:
TSS ADDTO(SDT) RECORD(pfile)
RECDATA(dept,char,10,4)
If you are protecting multiple fields within one record, do a separate ADDTO for each field you want to protect. You can protect up to ten fields in one record.
■ Define the SELECT expressions to the SDT used on the PERMIT command.
■ Define the layout of the record:
– The field of the record you want CA Top Secret to validate
– The type of comparison made
– The field being compared to
For example:
TSS ADDTO(SDT) SELECT(dp1000)
SELDATA('If dept GE ―1000‖ AND dept LE ―1099‖)
■ Define any MASK records to the SDT. MASK records are optional, and identify which fields within a record cannot be accessed. For example:
TSS ADDTO(SDT) MASKREC(MDEPT)
MASKDATA(pay,char,30,4,$$$$)
Record Level Protection (RLP)
Chapter 12: Protecting Resources 253
■ Listing the SDT records you just created to check your work. For example:
TSS LIST(SDT) RECORD(ALL)
■ Use TSS REPLACE(SDT) to correct any errors.
■ Refresh the SDT in-core tables using:
TSS MODIFY(SDTTABLE)
Permit Access to the Defined Records
To permit access to the defined records:
■ Revoke any existing PERMITs that a user may have for the FCTs.
■ Re-PERMIT the FCTs using the SELECT and/or MASKREC clauses
Example: permit access
This example permits access to the defined record:
TSS PERMIT(jane) FCT(pfile)
ACCESS(READ)
SELECT(dp1000)
MASKREC(mdept)
Enable RLP Protection
Enable RLP for the facility for the definitions and permissions to take effect.
Example: enable RLP protection
This example enables RLP in the CICS region:
TSS MODIFY FACILITY(cicsprod=RLP=YES)
Installation Defined Resource Protection
254 User Guide
Installation Defined Resource Protection
Installation defined resources do not usually trigger the z/OS Standard Security Interface to issue a security call. Typical installation-defined resources include:
■ Account codes
■ Job classes
■ Database fields and contents
■ PDS members
A resource can be ownable or unownable. If:
■ It is useful to be able to put specific restrictions on the use of this resource type using the PERMIT function, make it an ownable resource
■ Administrative scope and hierarchy are pertinent to who should be able to authorize access, make it ownable
■ Neither of these considerations apply make the resource unownable
Installation defined resources must be owned before being authorized. Use a TSS CREATE/ADDTO statement to establish ownership then use a TSS PERMIT statement to specify authorizations.
FIELDs are not automatically protected by CA Top Secret after they are owned. An application program must perform the security check by calling CA Top Secret using FRACHECK or the application high-level language interface.
Example: assign ownership to a resource
This example assigns ownership of an ABSTRACT, FIELD, and UR2 resource:
TSS ADDTO(CORPORAT) ABSTRACT(AC1)
TSS ADDTO(DEPTC) FIELD(A100,A200,A300)
TSS ADDTO(CORPORAT) UR2(ACCT7889,ACCT4567)
Installation Defined Resource Protection
Chapter 12: Protecting Resources 255
Reserved Parameters
The reserved parameters in the RDT used to see installation-defined resources are:
ABSTRACT
Used with additional site-written code to extend security to other “system” type resources, such as job execution classes.
FIELD
Used to define database fields and to validate access to these fields by user program or transactions.
UR1, UR2
Used to designate owned, non-system, site-defined resources, such as particular account codes. They are implemented and function in the same manner as ABSTRACT and FIELD.
USERx
Used to designate unowned types of resources.
Using Generic Prefixing
Ownership for any installation-defined resource can be designated using generic prefixes. Once a prefix is owned, any installation-defined resource beginning with that prefix is protected and must be permitted to other ACIDs.
Example: assign ownership with generic prefixing
This example gives ownership of fields beginning with the prefix A100 to the ACID DEPTC:
TSS ADDTO(DEPTC) FIELD(A100)
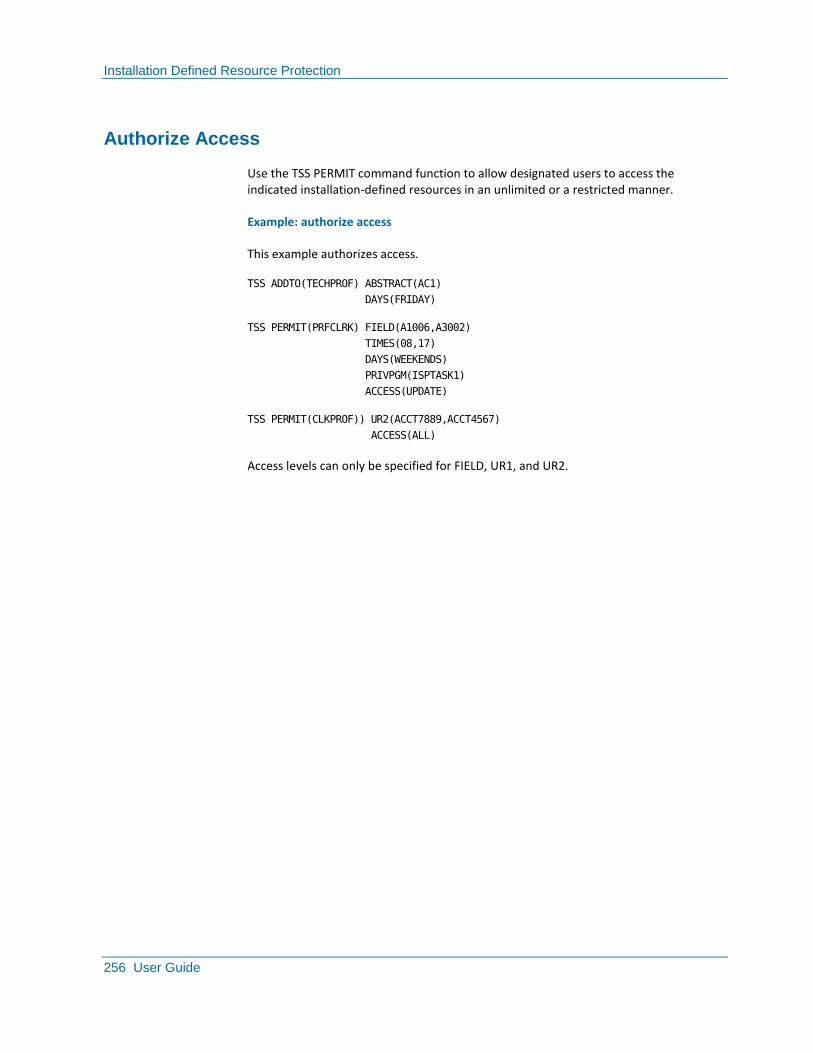
Installation Defined Resource Protection
256 User Guide
Authorize Access
Use the TSS PERMIT command function to allow designated users to access the indicated installation-defined resources in an unlimited or a restricted manner.
Example: authorize access
This example authorizes access.
TSS ADDTO(TECHPROF) ABSTRACT(AC1)
DAYS(FRIDAY)
TSS PERMIT(PRFCLRK) FIELD(A1006,A3002)
TIMES(08,17)
DAYS(WEEKENDS)
PRIVPGM(ISPTASK1)
ACCESS(UPDATE)
TSS PERMIT(CLKPROF)) UR2(ACCT7889,ACCT4567)
ACCESS(ALL)
Access levels can only be specified for FIELD, UR1, and UR2.
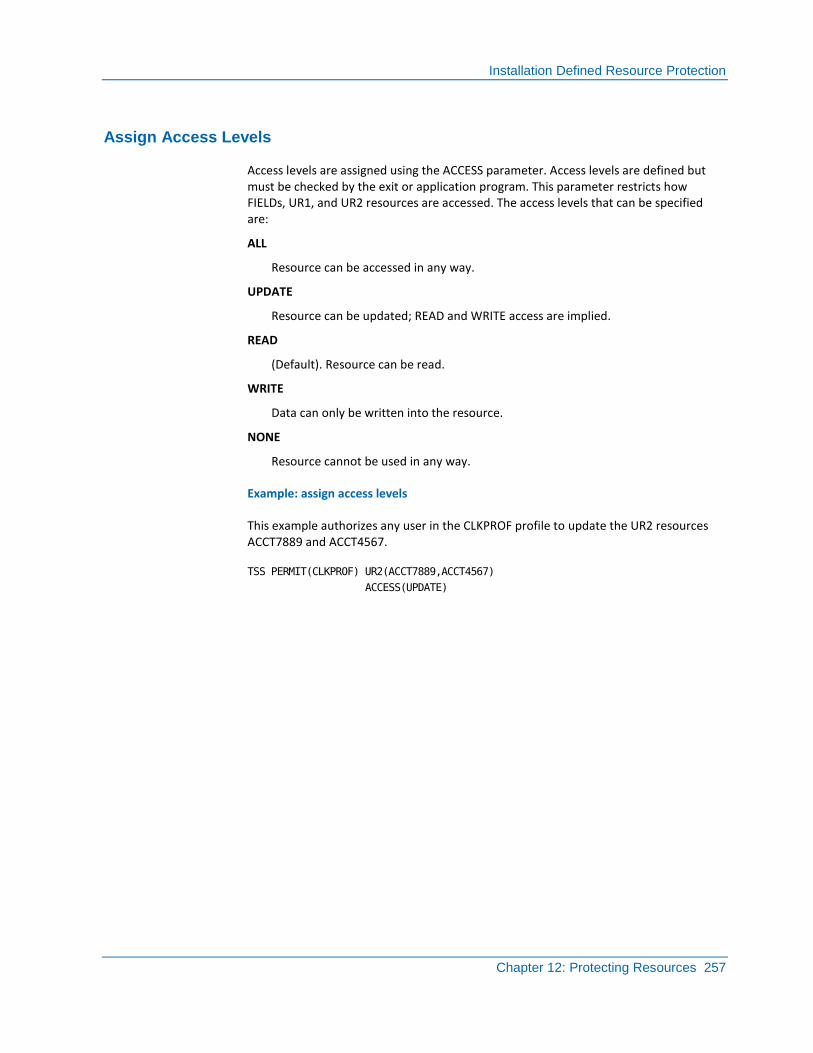
Installation Defined Resource Protection
Chapter 12: Protecting Resources 257
Assign Access Levels
Access levels are assigned using the ACCESS parameter. Access levels are defined but must be checked by the exit or application program. This parameter restricts how FIELDs, UR1, and UR2 resources are accessed. The access levels that can be specified are:
ALL
Resource can be accessed in any way.
UPDATE
Resource can be updated; READ and WRITE access are implied.
READ
(Default). Resource can be read.
WRITE
Data can only be written into the resource.
NONE
Resource cannot be used in any way.
Example: assign access levels
This example authorizes any user in the CLKPROF profile to update the UR2 resources ACCT7889 and ACCT4567.
TSS PERMIT(CLKPROF) UR2(ACCT7889,ACCT4567)
ACCESS(UPDATE)

Online Transaction Protection
258 User Guide
Assign a Program Path
If you are using program pathing and a user accesses a resource through an owned privileged program, grant access to the owned program.
Examples: assign a program path
This example permits the program IMSPZAP.
TSS PERMIT(PRFCLRK) PROGRAM(IMSPZAP)
This example allows any user attached to the PRFCLRK profile to update the specified fields from 8:00 a.m. until 5:59 p.m. on Monday through Friday, but only through the program ISPTASK1.
TSS PERMIT(PRFCLRK) FIELD(A1006,A3002)
TIMES(08,17)
DAYS(WEEKENDS)
PRIVPGM(IMSPZAP)
ACCESS(UPDATE)
Online Transaction Protection
CA Top Secret secures online transactions:
■ Through OTRAN (resource) security.
The OTRAN resource class allows transactions-which are ordinarily considered unowned-to be administered as owned resources. Security can be administered on a decentralized, application-by-application basis, and access to each transaction can be tailored with the same flexible restriction options available for other resources.
■ By the Limited Command Facility (LCF).
Through LCF, you can assign authorizations and restrictions to transactions on a user-by-user basis without impacting other users. Transactions controlled with LCF are not owned. If factors such as administrative scope and resource auditing capabilities are considered highly important for your security environment this may not be the best approach.
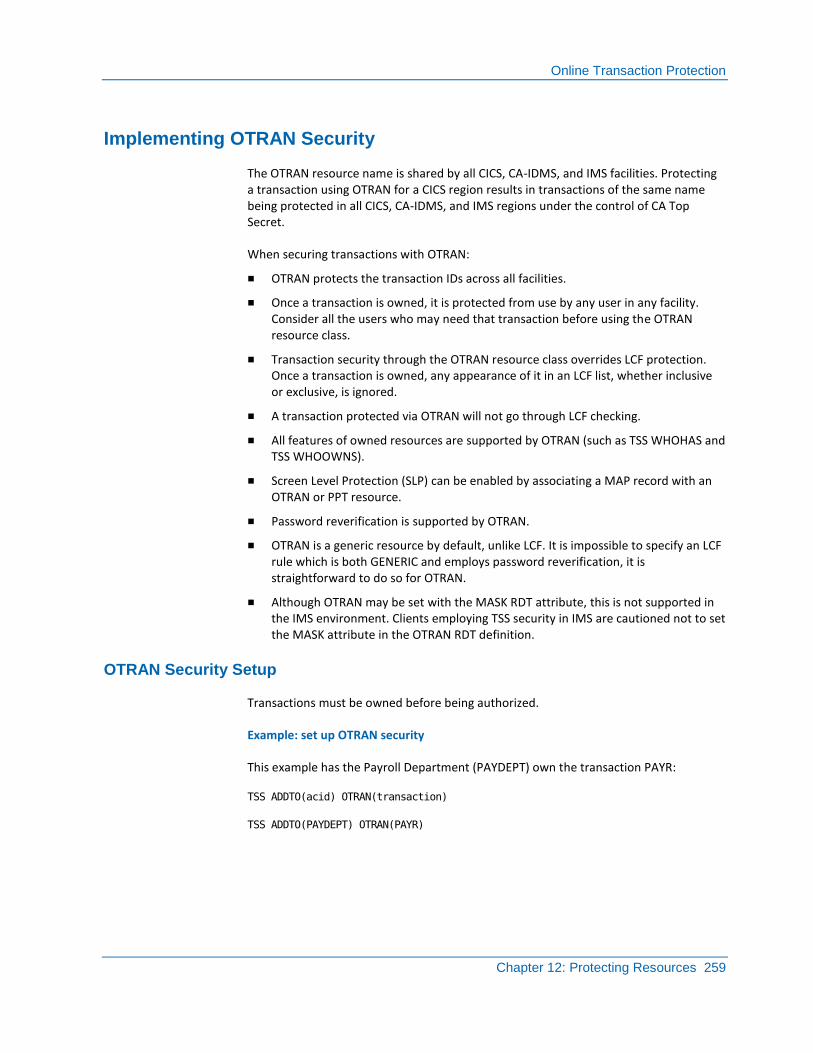
Online Transaction Protection
Chapter 12: Protecting Resources 259
Implementing OTRAN Security
The OTRAN resource name is shared by all CICS, CA-IDMS, and IMS facilities. Protecting a transaction using OTRAN for a CICS region results in transactions of the same name being protected in all CICS, CA-IDMS, and IMS regions under the control of CA Top Secret.
When securing transactions with OTRAN:
■ OTRAN protects the transaction IDs across all facilities.
■ Once a transaction is owned, it is protected from use by any user in any facility. Consider all the users who may need that transaction before using the OTRAN resource class.
■ Transaction security through the OTRAN resource class overrides LCF protection. Once a transaction is owned, any appearance of it in an LCF list, whether inclusive or exclusive, is ignored.
■ A transaction protected via OTRAN will not go through LCF checking.
■ All features of owned resources are supported by OTRAN (such as TSS WHOHAS and TSS WHOOWNS).
■ Screen Level Protection (SLP) can be enabled by associating a MAP record with an OTRAN or PPT resource.
■ Password reverification is supported by OTRAN.
■ OTRAN is a generic resource by default, unlike LCF. It is impossible to specify an LCF rule which is both GENERIC and employs password reverification, it is straightforward to do so for OTRAN.
■ Although OTRAN may be set with the MASK RDT attribute, this is not supported in the IMS environment. Clients employing TSS security in IMS are cautioned not to set the MASK attribute in the OTRAN RDT definition.
OTRAN Security Setup
Transactions must be owned before being authorized.
Example: set up OTRAN security
This example has the Payroll Department (PAYDEPT) own the transaction PAYR:
TSS ADDTO(acid) OTRAN(transaction)
TSS ADDTO(PAYDEPT) OTRAN(PAYR)

Online Transaction Protection
260 User Guide
OTRAN Ownership Removal
CA Top Secret will not remove ownership unless all permissions are revoked.
To remove ownership of a transaction
1. Revoke all permissions for the resource. For example:
TSS REVOKE(PAYPROG) OTRAN(PAYR)
2. Remove the ownership of the transaction. For example:
TSS REMOVE(PAYDEPT) OTRAN(PAYR)
OTRAN Generic Prefixing
OTRAN resources can be designated using generic prefixes. Once a prefix is owned, any transaction beginning with that prefix is protected and must be permitted to other ACIDs.
Example: generic prefixing with OTRAN
This example gives ownership of transactions that begin with the prefix PAY to the ACID PAYDEPT:
TSS ADDTO(PAYDEPT) OTRAN(PAY)
Authorize OTRAN Access
Use the PERMIT command function to allow designated users to use the specified transactions in an unlimited or restricted manner.
Example: authorize OTRAN access
This example allows a user whose ACID is PAYPROG to access the transaction PAYR:
TSS PERMIT(PAYPROG) OTRAN(PAYR)
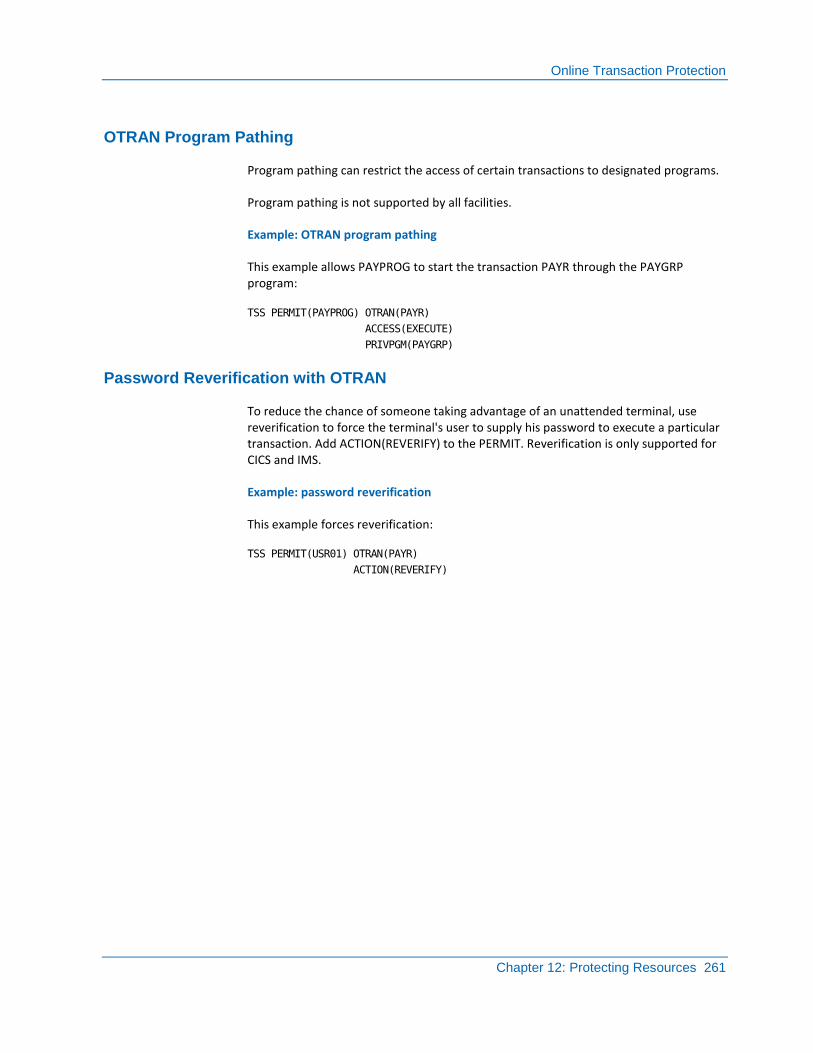
Online Transaction Protection
Chapter 12: Protecting Resources 261
OTRAN Program Pathing
Program pathing can restrict the access of certain transactions to designated programs.
Program pathing is not supported by all facilities.
Example: OTRAN program pathing
This example allows PAYPROG to start the transaction PAYR through the PAYGRP program:
TSS PERMIT(PAYPROG) OTRAN(PAYR)
ACCESS(EXECUTE)
PRIVPGM(PAYGRP)
Password Reverification with OTRAN
To reduce the chance of someone taking advantage of an unattended terminal, use reverification to force the terminal's user to supply his password to execute a particular transaction. Add ACTION(REVERIFY) to the PERMIT. Reverification is only supported for CICS and IMS.
Example: password reverification
This example forces reverification:
TSS PERMIT(USR01) OTRAN(PAYR)
ACTION(REVERIFY)
LCF Security
262 User Guide
LCF Security
Resources protected by LCF are known as unownable resources. LCF resources are added to individual ACIDs to provide access. They are not permitted. LCF security allows the security administrator to limit:
■ Commands available to a TSO user.
■ Monitor commands available to CA-Roscoe, ACEP, WYLBUR, and other online multi-user applications.
■ CICS, IMS, and CA-IDMS transactions.
■ Programs a batch job can execute.
■ ISPF/SPF panel options available to a user.
When securing transactions with LCF:
■ LCF transaction security is easy to implement and is the most common method of implementing security.
■ Implementation can be performed for one user without impacting others.
■ LCF lets you protect transactions without interfering with other facilities. (You can set up LCF security on your test system without affecting your production system.) Use of facility entries USER77 through USER221 for LCF is not recommended. Even after renaming, LCF processing considers these facilities to be identical.
■ LCF level security should not be combined with OTRAN (resource) security. If a transaction is secured by both LCF and OTRAN, OTRAN overrides LCF.
■ Password reverification can be used for transactions that are protected through LCF.
■ The XDEF and NOXDEF FACILITY suboptions are used for LCF to provide default protection.
■ The LCFTRAN and LCFCMD FACILITY suboptions are used to tailor the text for CA Top Secret LCF messages.
■ The TSS WHOHAS command is not valid with LCF security. (It is available for OTRAN.)
It is recommended that within a single facility inclusive or exclusive LCF be used to secure sensitive transactions (not a combination of both).
LCF Security
Chapter 12: Protecting Resources 263
Set Up LCF Security
Transactions protected through LCF must be defined by facility. Divide transactions by function or subset and as a group within profiles. This way transactions are defined only once per group, instead of once per user. You can then limit access to the transaction with an inclusive list that specifies which transactions the user is allowed to use, or an exclusive list that specifies which transactions the user is not allowed to use.
Limiting Access With Inclusive Lists
The inclusive approach restricts an ACID to using only specifically authorized transactions for a particular facility. An inclusive list is indicated by the CMD or TRANS keyword. (These keywords are interchangeable.)
Use of user definable facility entries USER77 through USER221 are not recommended for LCF. LCF processing considers the use of these facilities identical, even after the facility entries have been renamed.
When specifying an inclusive list, use the syntax:
TSS ADDTO(acid) TRANSACTIONS(facility,(trans,trans...))
Example: limit access
This example restricts the users connected to the PROF01 profile to using only the DDYA, DDYU, and DDYY transactions under the CICSPROD facility:
TSS ADDTO(PROF01) TRANSACTIONS(CICSPROD,(DDYA,DDYU,DDYY))
Limiting Access With Exclusive Lists
The exclusive approach allows an ACID to use all transactions except a specific list of restricted transactions for a particular facility. An exclusive list is indicated by the XCOMMAND or XTRANSACTIONS keyword. (These keywords are interchangeable.) For purposes of LCF protection, facility entities USER77 through USER221 are not considered unique.
When specifying an exclusive list, use the syntax:.
TSS ADDTO(acid) XCOMMAND(facility,(trans,trans...))
Example: limiting access
This example allows USER01 to use all of the TSO transactions except the SPF EDIT (SPF2) panel:
TSS ADDTO(USER01) XCOMMAND(TSO,(SPF2))

LCF Security
264 User Guide
The LCF Decision Process
When CA Top Secret is validating an ACID's request to access a command, the following decision-making process is used:
■ CA Top Secret searches the user's Security Records in the following order:
– The ACID's Security Record
– Any PROFILE(s) associated with the ACID (in the order shown by a TSS LIST command function)
– The ALL Record
■ The search continues through all records (user, profile, ALL) and ends when an exact match or prefix is found, or when all records are searched. If CA Top Secret does not find an exact or closest match to a transaction and only an inclusive list is encountered during the search of the user's applicable records, the transaction must be outside the user's authorized list and the transaction is rejected.
■ If CA Top Secret does not find an exact or closest match and only an exclusive list is encountered during the search of the user's applicable records, the transaction must be outside the user's unauthorized (exempt) list and the transaction is accepted.
If Both Inclusive and Exclusive LCF Are Used
Using both inclusive and exclusive LCF lists within a single facility is not recommended. A mixture of LCF-types is difficult to maintain.
If you use both inclusive and exclusive lists, make sure your definitions do not contradict each other. For example:
TSS ADDTO(CCC) TRANSACTIONS(CICSA,(ABCT))
TSS ADDTO(CCC) XTRANSACTIONS(CICSA,(ABCT))
CA Top Secret uses the following decision-making process if the list types are mixed:
■ The order in which an ACID's security records are checked is the same as the order listed previously.
■ Inclusive LCFs are checked first; if a match is found, the request is allowed.
■ If the transaction is not found on an inclusive LCF, the exclusive LCF is checked. If the transaction is found on the exclusive LCF, the request is failed.
Within each level of the ACID's Security Records, inclusive then exclusive checking is performed before the next record level, (for example Profile) is reached.
After all levels of checking have been completed, and if both exclusive and inclusive LCF were executed during the security record search, then inclusive LCF logic takes precedence and the record is rejected.
LCF Security
Chapter 12: Protecting Resources 265
Providing Default Protection
You can provide default protection for transactions by using the XDEF and NOXDEF sub-options of the FACILITY control option.
■ The NOXDEF sub-option is set by default to allow all users to execute any transaction until access controls have been established by an inclusive or exclusive list for the user
■ The XDEF sub-option indicates that users must have some kind of transaction list-inclusive (TRANS or CMD) or exclusive (XTRANS or XCMD)-before the user can execute any LCF transaction
In FAIL mode, a transaction cannot be executed by a user unless that user is defined to CA Top Secret.
Example: default protection
This example specifies the XDEF option for the CICSPROD facility:
TSS MODIFY(FACILITY(CICSPROD=XDEF))
Bypassing LCF Security
To specify that a particular user or profile is to bypass all LCF security, attach the NOLCFCHK bypass attribute to its ACID. NOLCFCHK use should be carefully restricted.
This attribute is sometimes used with CICS or IMS region ACIDs to avoid the administrative overhead of granting region permission for every transaction taking place.
Example: bypass LCF security
This example allows the ACID SUPRACID to bypass all LCF security checking:
TSS ADDTO(SUPRACID) NOLCFCHK
LCF Security
266 User Guide
Using Generic Prefixing
You can use generic prefixes when specifying transactions within an inclusive or an exclusive list. A generic LCF rule is invalid for password reverification.
When using generic prefixing, append a G to the prefix to indicate that a generic prefix is being supplied.
Example: generic prefixing
This example restricts the ACID PDGRLP from using all batch programs that begin with the characters IEH:
TSS ADDTO(PDGRLP) XTRANSACTIONS(BAT,(IEH(G))
Using Reverification
To reduce the chance of someone taking advantage of an unattended terminal, use reverification to force the terminal's user to supply his password to execute a particular transaction. Append a V to the transaction.
Note the following:
■ Reverification is only supported for CICS and IMS
■ An LCF rule which specifies password reverification may not be specified as a generic prefix
Example: reverification
This example forces reverification:
TSS ADDTO(USR01) TRANSACTIONS(CICSPROD,(PAY9(V)))
Accessing All Transactions
You can use an exclusive LCF list to permit access to all transactions in a facility that, by default, protects all transactions. To allow access to all transactions within a facility, specify an exclusive LCF list for a transaction that does not exist.
Example: access all transactions
This example specifies an exclusive LCF list for the CICS facility, listing NULL as the restricted transaction:
TSS ADDTO(USER01) XTRANSACTIONS(CICSPROD,(NULL))
Because NULL does not exist, USER01 is allowed access to all CICS transactions.
Screen Level Protection (SLP)
Chapter 12: Protecting Resources 267
Screen Level Protection (SLP)
SLP provides detailed control over the range of values which can be entered in individual fields or in combinations of fields by application end-users.
SLP is implemented through additional operands MAPREC and SELECT with OTRAN or PPT resources in CICS. SLP should only be used with applications that use only one screen format.
The MAPREC and SELECT keywords reference map field definitions and selection logic which you define in the CA Top Secret Static Data Table. To implement these definitions assure that a sufficient number of SDTBLOCKS are allocated in the security file using the TSSMAINT utility. If a new security file needs to be formatted with additional SDTBLOCKS copy your current security file using TSSXTEND into the larger allocation.
SLP may be supplemented by Record Level Protection. Before you can implement SLP initialize the SDT using the TSSMAINT SDTBLOCKS parameter.
The SDT record elements used to implement SLP are:
MAPREC
Defines the layout of a CICS map, including field name, row, column, and length.
SELECT
Defines the logic, using Boolean expressions, that specifies who can view and/or change the screen's fields.
Screen Level Protection (SLP)
268 User Guide
Gather SLP Information
Gathering this information helps the implementation run smoothly:
■ Determine which of your applications would benefit from SLP. Become familiar with the SDT MAPREC and SELECT functions to see the capabilities of CA Top Secret to define fields on your screen, and to select combinations of range values for those fields to allow proper access. Consider the following when making your decision:
– SLP can be implemented without program changes.
– SLP can be altered as the application changes.
– SLP can prevent individual users or groups of users from entering ranges of data in screen fields which you define.
– SLP must be altered whenever the application screen format changes.
– SLP does not prevent an application from displaying data before input takes place. In particular, when a transaction is initiated from a CICS EXEC START command, with input data from the CICS communication area or from CICS temporary storage, SLP provides no protection from unauthorized data being presented to the application end-user.
– SLP does not alter the field attributes to make a screen field invisible or inaccessible.
■ Gather information about the application (like field names, data types, length of field, and selection criteria).
■ Become familiar with the application.
■ Plan the details needed to implement SLP for this application. For example, you may decide on selection criteria that limit who can view salary information.
■ Determine who is the administrator for implementing SLP and give them MISC3(SDT) authority.

Screen Level Protection (SLP)
Chapter 12: Protecting Resources 269
Enter SDT Definitions
All definitions are entered using the TSS ADDTO(SDT) command.
To enter SDT definitions
1. Define the MAPREC definitions to the SDT. For example:
TSS ADDTO(SDT) MAPREC(MSDEPT)
MAPDATA(MDEPT,10,8,4)
2. (Optional) If you are protecting multiple field maps within one screen, do a separate ADD for each field you want to protect.
3. Define the SELECT expressions to the SDT you are using on the PERMIT command. For example:
TSS ADDTO(SDT) SELECT(DP1000)
SELDATA('IF dept EQ ―― OR dept GE ―1000‖ AND dept LE ―1099‖)
4. Check if the field is null so that Screen Level Protection will allow the transaction to continue, if it finds no data (null) within the terminal screen.
5. Enter the command:
TSS LIST(SDT) RECORD(ALL)
All the records are listed.
6. Check the list for the SDT records you just created.
7. (Optional) Correct any errors with the command:
TSS REPLACE(SDT)
8. Enter the command:
TSS MODIFY(SDTTABLE)
The SDT in-core tables are refreshed.
Permit Access to the Defined Maps
You can permit access to defined maps.
To permit access to the defined maps
1. Revoke any existing PERMITs that a user may have for this OTRAN or PPT resource.
2. Re-PERMIT the resources using the SELECT and MAPREC clauses. For example:
TSS PERMIT(jane) OTRAN(PAYR)
ACCESS(ALL)
SELECT(dp1000)
MAPREC(ENG1)
JES Resource Protection
270 User Guide
Enable SLP Protection
Enable SLP for the facility.
Example: Enable SLP protection
This example enables SLP in the CICS region:
TSS MODIFY FACILITY(cicsprod=SLP=YES)
JES Resource Protection
When setting up JES security, your security policy should have addressed questions such as:
■ What JES resources need protected?
■ Is it important to protect SYSIN and SYSOUT?
■ Which remote workstations should have access?
■ Should other nodes be able to submit jobs?
■ To which nodes should my system be able to send data?
■ Should the commands an operator can issue be limited?
These questions help you pinpoint which JES resources it is important to control access to at your site. You can use CA Top Secret to control access to these JES resources:
■ Input (nodes, RJE, readers, internal readers)
■ Output devices (nodes, printers, RJE)
■ Spool data sets (SYSIN, SYSOUT)
■ Operator commands
The JES2 CA Top Secret Connection
At various points during processing, JES2 passes information to SAF. When SAF receives the request:
■ SAF determines if CA Top Secret is active
■ If CA Top Secret is active, SAF passes the request to it and JES2 enforces any security decisions SAF returns
■ If CA Top Secret is not active, SAF returns to JES2 and JES2 security processing controls the resource
JES Resource Protection
Chapter 12: Protecting Resources 271
Establish JES Ownership
JES resources must be owned before being authorized.
Example: establish JES ownership
This example establishes ownership:
TSS ADDTO(USER01) JESSPOOL(USG203ME)
TSS PERMIT(ALL) JESSPOOL(USG203ME.%)
Remove Ownership of JES
CA Top Secret will not remove ownership unless all permissions are revoked.
To remove ownership of any JES resource
1. Revoke all permissions for the resource. For example:
TSS REVOKE(ALL) JESSPOOL(USG203ME.%)
You cannot specify an access level or the command will fail.
2. Remove the ownership of the JES resource. For example:
TSS REMOVE(USER01) JESSPOOL(USG203ME)
JES Resource Protection
272 User Guide
Access to JES in FAIL Mode
When the CA Top Secret address space is down, you cannot determine if the JESSPOOL and OPERCMDS resources are owned. If the system is in FAIL mode and the CA Top Secret address space is down, access to these resources are denied.
If your site is running strictly in FAIL mode, these commands allow access to these resources when CA Top Secret is not running:
TSS ADDTO(deptacid) JESJOBS(SUBMIT.,CANCEL.)
TSS ADDTO(deptacid) JESSPOOL(nodename)
TSS ADDTO(deptacid) OPERCMDS(MVS.,JES2.,JES3.)
TSS PERMIT(ALL) JESJOBS(SUBMIT.,CANCEL.)
ACCESS(ALL)
ACTION(PASSWORD)
TSS PERMIT(ALL) JESSPOOL(nodename.)
ACCESS(ALL)
ACTION(PASSWORD)
TSS PERMIT(ALL) OPERCMDS(MVS.,JES2.,JES3.)
ACCESS(ALL)
ACTION(PASSWORD)
Job Submission Restriction
TSS PERMIT allows designated users to access the indicated jobs in an unlimited or a restricted manner. Restrictions are indicated with the PERMIT parameter.
To restrict job submission
1. Establish ownership of the job using TSS CREATE/ADDTO. For example:
TSS ADDTO(DEPT01) JESJOBS(SUBMIT.MYNODE.JOB01)
2. Authorize access to the job. For example:
TSS PERMIT(USER01) JESJOBS(SUBMIT.MYNODE.MYJOB.MYACID)

JES Resource Protection
Chapter 12: Protecting Resources 273
JES Masking
Masking can be used to group jobs whose names share similar characteristics. These shared patterns can then be used as the operands of the JESJOBS parameter in TSS entries.
A masked job name is treated by CA Top Secret like a generic prefix. Any job that begins with a mask is considered a match by the security validation algorithm, and the associated access authorizations are honored.
JES Access Levels
The access levels that can be specified for jobs are:
ALL
Job can be accessed in any way.
UPDATE
Job can be updated; READ and WRITE access is implied.
READ
(Default) Job can be read.
WRITE
Job can only be written.
CONTROL
Job can be requeued.
NONE
Job cannot be used in any way.
Alternate ACID Job Control
You can give an ACID control of another ACID's job during job submission.
Example: alternate ACID control
This example gives the USER01 control of all jobs belonging to USER02:
TSS PERMIT(USER01) JESJOBS(SUBMIT.MYNODE.*.USER02)
JES Resource Protection
274 User Guide
SYSOUT Validation
To process nodes for SYSOUT
■ Identify the owning userid.
When a node receives a job via NJE, the owning userid is identified first.
If the userid is undefined on the receiving node, the *ALL* record is used to perform the checking.
If the submitting node for the output is the same as the NODES control option the submitting userid is assigned as owner of the output.
After the owner is identified, CA Top Secret generates the resource:
nodes.USERS.user
nodes
The name of the node where the SYSOUT was created.
USERS
Indicates that the SYSOUT is controlled by the owning userid.
User
The user that created the job.
If the submitting userid cannot be assigned as the owner, a second check is made against the submitting user for this resource:
snode.USERS.suser
snode
The submitting node.
USERS
Indicates that the SYSOUT is controlled by the owning userid.
Suser
The submitting user.
During the second check:
■ If the highest access level allowed is CONTROL or higher and NJEACID was specified on the PERMIT, that translated userid is used as the owner of the output.
To assign ACID NODEA to all output received (via NJE) from node NODEA, enter:
TSS PERMIT(ALL) NODES(NODEA.USERS.) ACCESS(CONTROL) NJEACID(NODEA)
■ If NJEACID is not specified or has a value of &SUSER., the submitting ACID is assigned as the owner without translation.
JES Resource Protection
Chapter 12: Protecting Resources 275
To assign the submitting ACID as the owner of the output of any job originally submitted from this node, and the NJEUSR control option for all other output received, enter:
TSS PERMIT(ALL) NODES(*.USERS.) ACCESS(READ) NJEACID(&SUSER).
To assign the submitting ACID as the owner of the output of any job, no matter what node it was submitted from, enter:
TSS PERMIT(ALL) NODES(*.USERS.) ACCESS(CONTROL) NJEACID(&SUSER).
■ If the result of the check indicates any lower access level, including NONE, the NJEUSR control option ACID is assigned as the owner of the output.
To assign the NJEUSR control option ACID to all output received (via NJE) from node NODEA, enter:
TSS PERMIT(ALL) NODES(NODEA.USERS.) ACCESS(READ)
■ A check is performed to determine the highest access level the generated resource is allowed. If that access level is:
NONE
The output is purged.
READ
If NJEACID specifies &USER., the submitting node and user is checked. Otherwise, the ACID specified in the NJEUSR control option is used.
UPDATE
If a validated security token exists for the submitting user creating the output, the NJEACID value (or the creating userid if NJEACID was not used) is assigned to the output. Otherwise, READ access is used.
CONTROL or higher
Whether a validated token is available, the NJEACID value or the creating userid is assigned to the output.
In all cases where the access level is greater than ACCESS(NONE), a value of NJEACID(&SUSER). is treated as a special case.
Node Protection
276 User Guide
Node Protection
A node is a point in a network defined by a symbolic name.
To protect a node
1. Establish ownership using TSS CREATE/ADDTO. For example:
TSS ADDTO(DEPT01) NODES(ALPHA.USERJ*)
2. Authorize access to the job using TSS PERMIT. For example:
TSS PERMIT(ALL) NODES(ALPHA.USERJ.)
ACCESS(NONE)
Example: protect a node
This example assigns the submitting ACID as the owner of the output of any job originally submitted from this node, and the ACID specified on the NJEUSR control option for all other output received.
TSS PERMIT(ALL) NODES(*.USERS.)
ACCESS(READ)
NJEACID(&SUSER)
Generic Prefixing for Nodes
Generic prefixing lets you group a set of similar nodes together and define them with one prefix. Once a prefix is owned, any node beginning with that prefix is protected and must be permitted to other ACIDs.
Example: protect a node using generic prefixing
This example gives ownership of nodes beginning with the prefix ALPHA to the ACID SYSGROUP.
TSS ADDTO(SYSGROUP) NODES(ALPHA)
Masking Nodes
Masking can be used to group nodes whose names share similar characteristics. These shared patterns can then be used as the operands of the NODES parameter in TSS PERMIT entries.
A masked node is treated by CA Top Secret like a generic prefix. Any node that begins with a mask is considered a match by the security validation algorithm, and the associated access authorizations are honored.
Node Protection
Chapter 12: Protecting Resources 277
Node Access Levels
The access levels that can be specified for nodes are:
ALL
(Default) Accept all jobs.
UPDATE
If a validated security token exists for the submitting user, that userid can be propagated. If the submitting user is not the same as the owner, a successful ACID cross-authorization check can be used to eliminate the need for further verification. In all other cases, normal verification is used.
READ
The job goes through normal verification, including password checking if appropriate.
CONTROL
Accept the job as valid without further verification of the user.
For example, if any job submitted from node BETA is to run without any password checking, enter:
TSS PERMIT(ALL) NODES(BETA.USERJ)
ACCESS(CONTROL)
NONE
Job is failed.
Network Job Entry (NJE) Job Validation
Nodes processing is used to control the execution of incoming NJE jobs and to assign a userid as the owner of the job on the target node (if necessary). Control is obtained through the NODES resource class.
Node Protection
278 User Guide
Userid Owner Identification
When a node receives a job from NJE:
■ The owning userid is always identified first.
■ The identified owner is usually the submitting userid.
■ If USER= is coded on the job card, that userid is used instead
■ If the owning userid is undefined on the receiving node the ALL Record is used in the checking process.
■ If the submitting node is the same as the value specified in the JESNODE control option, the job is treated as a local job and no nodes processing takes place.
After the owner is identified, CA Top Secret generates the following resource:
nodename.USERJ.userid
nodename
The name of the submitting node.
USERJ
Indicates that the job is controlled by the submitting userid.
Userid
The identified owner of the job.

Node Protection
Chapter 12: Protecting Resources 279
Access Level Checking
Once the userid is identified the highest access level allowed of the generated resource is determined. If that access level is:
NONE
The job is failed.
READ
The job goes through normal verification, including password checking (if appropriate).
UPDATE
If a validated security token exists for the submitting user, that userid can be propagated. If the submitting user is not the same as the owner, a successful ACID cross-authorization check may be used to eliminate the need for further verification. In all other cases, normal verification is used.
CONTROL or higher
Accept the job as valid without further verification of the user.
Examples: determine access levels
In this example, node ALPHA is not allowed to execute jobs on node ALPHA.USERJ:
TSS PERMIT(ALL) NODES(ALPHA.USERJ.)
ACCESS(NONE)
In this example, userid X123 is allowed to execute jobs on node ALPHA.USERJ, by creating a validated security token:
TSS PERMIT(ALL) NODES(ALPHA.USERJ.X123)
ACCESS(UPDATE)
In this example, any job submitted from node BETA can run without any password checking:
TSS PERMIT(ALL) NODES(BETA.USERJ)
ACCESS(CONTROL)
In this command, the access level can be specified as ALL with no difference in how the processing works.

Node Protection
280 User Guide
ACIDs with Limited Access
To run jobs from an ACID having limited access to resources on the node BETA.USERJ, use the NJEACID parameter.
Example: limit access ACID
In this example, in addition to checking the appropriate access level, the value of the NJEACID parameter is substituted for the original owning userid:
TSS PERMIT(ALL) NODES(BETA.USERJ.)
ACCESS(CONTROL)
NJEACID(BETAACID)
In this command, the access level can be specified as ALL with no difference in how the processing works.
Identical ACIDs
If ACID CA7 is in use on the local node and another user on NODE2 is also named CA7, CA Top Secret translates the ACID of the incoming job.
The user must be validated on the sending system for the job to be accepted.
Example: identical ACIDs
This example translates the userid for the incoming job to a userid CA7NODE2:
TSS PERMIT(CA7) NODES(NODE2.USERJ.CA7)
NJEACID(CA7NODE2)
ACCESS(UPDATE)
Alternate Way to Implement Nodes
There is an alternate method of implementing nodes.
Example: alternate node implementation
This example suppose that users defined to the profile TECHSUP have access to sensitive resources. This entry prevents ACIDs from being used on NJE jobs or, alternatively, allows the jobs to run under a default user called DEFUSER with a lower access level:
TSS PERMIT(TECHSUP) NODES(*.USERJ.)
ACCESS(NONE)
TSS PERMIT(TECHSUP) NODES(*.USERJ.)
ACCESS(CONTROL)
NJEACID(DEFUSER)
Operator Commands Restriction
Chapter 12: Protecting Resources 281
Operator Commands Restriction
Designated users can access the indicated operator commands in an unlimited or a restricted manner.
To restrict the use of operator commands
1. Establish ownership. For example:
TSS ADDTO(DEPT01) OPERCMDS(JES.CANCEL)
2. Authorize access to the operator command. For example:
TSS PERMIT(USER01) OPERCMDS(JES.CANCEL)
Example: restrict operator commands
This example issues D A, L from the console:
TSS PERMIT(USER01) OPERCMDS(MVS.DISPLAY.ACTIVE)
Operator Command Masking
Masking can be used to group operator commands whose names share similar characteristics. These shared patterns can then be used as the operands of the OPERCMDS parameter in TSS entries.
A masked operator command is treated by CA Top Secret like a generic prefix. Any operator command that begins with a mask is considered a match by the security validation algorithm, and the associated access authorizations are honored.
Operator Command Access Levels
The access levels that can be specified for operator commands are:
■ ALL
■ UPDATE
■ READ (Default)
■ CONTROL
■ NONE
Specific Device Output Restrictions
282 User Guide
Specific Device Output Restrictions
You can allow designated users to access the indicated output device in an unlimited or a restricted manner.
To restrict output to specific devices
1. Establish ownership using TSS CREATE/ADDTO.
This example gives USER01 routing control to all printers at a specific node:
TSS ADDTO(USER01) WRITER(NODE01.LOCAL.PRT6)
2. Authorize a user to control the output printing at a specific printer using TSS PERMIT. For example:
TSS PERMIT(USER02) WRITER(NODE01.LOCAL.PRT6)
Example: restrict output to specific devices
This example allows USER01 to route jobs to the SITE2 node.
TSS PERMIT(USER01) WRITER(JES3.NJE.SITE2)
Output Device Masking
Masking can be used to group output devices whose names share similar characteristics. These shared patterns can then be used as the operands of the WRITER parameter in TSS PERMIT entries.
Masked output devices are treated by CA Top Secret like a generic prefix. Any output device that begins with a mask is considered a match by the security validation algorithm, and the associated access authorizations are honored.
Output Device Access Levels
The output device access levels that can be specified are:
■ ALL
■ UPDATE
■ READ (Default)
■ CONTROL
■ NONE
Spool Data Sets Protection
Chapter 12: Protecting Resources 283
Spool Data Sets Protection
You can allow designated users to access the indicated spool data sets in an unlimited or a restricted manner.
Example: protect a spool data set
This example establishes ownership and authorizes access to the spool data set:
TSS ADDTO(DEPT01) JESSPOOL(USG203ME)
TSS PERMIT(USER01) JESSPOOL(MYNODE.USER01.JOB1.STC001.D01)
Spool Data Set Masking
Masking can be used for spool data sets. For example:
■ Allowing a user to view output that belongs to him
■ Giving users READ access to the spool data sets they own
Output Viewing Permission
You can give a user the authority to view output that belongs to him regardless of the originating node.
Example: view output
In this example, the first mask, *, can be any node. The second mask, %, indicates that the userid of the signed-on user must match the userid of any job being accessed:
TSS PERMIT(ALL) JESSPOOL(*.%)
ACCESS(ALL)
Spool Data Sets Protection
284 User Guide
READ Access to User Spool Data Sets
You can give users READ access from a particular node to JES spool data sets that they own.
A masked spool data set is treated by CA Top Secret like a generic prefix. Any spool data set that begins with a mask is considered a match by the security validation algorithm, and the associated access authorizations are honored.
Example: access spool data sets
In this example, USG203ME is the node users can access, while % indicates that the userids must match.
TSS PERMIT(ALL) JESSPOOL(USG203ME.%)
Spool Data Sets Access Levels
The access levels that can be specified for spool data sets are:
ALL
Data set can be accessed in any way.
UPDATE
Data set can be updated; READ and WRITE access is implied.
READ
(Default) Data sets can be read.
CONTROL
Data can be requeued.
NONE
Data set cannot be used in any way.

SDSF Resource Protection
Chapter 12: Protecting Resources 285
SDSF Resource Protection
The Spool Display and Search Facility (SDSF) interfaces with the z/OS spool to analyze and control the operation of a z/OS JES2 based system. SDSF provides:
■ Online display of the z/OS system log
■ Formatted information display about jobs, started tasks, printers, initiators, and TSO users
■ Online display of any SYSOUT data set prior to printout
■ Online display of SYSIN data sets of jobs executing or waiting to execute
■ Ability to issue z/OS and JES2 system commands from any terminal
SDSF Resource Protection
286 User Guide
SDSF in FAIL Mode
If the system is in FAIL mode and the CA Top Secret address space is down, access to resources is denied.
To allow access to the SDSF resource, enter the commands:
TSS ADDTO(deptacid) SDSF(ISFCMD.,ISFATTR.,ISFINIT.)
TSS PERMIT(ALL) SDSF(ISFCMD.,ISFATTR.,ISFINIT.)
ACCESS(ALL)
ACTION(PASSWORD)
SDSF SAF-based security uses the SDSF resource to determine if a user can view JES2 objects, JOBS, SYSIN, SYSOUT, and output GROUPS. Use the REVOKE and PERMIT commands on these resources . The PERMIT function must contain ACTION(PASSWORD).
For example:
TSS REVOKE(ALL) JESJOBS(SUBMIT.,CANCEL.)
TSS REVOKE(ALL) JESSPOOL(nodename)
TSS REVOKE(ALL) OPERCMDS(MVS.,JES2.,JES3.)
TSS REVOKE(ALL) SDSF(ISFCMD.,ISFATTR.,ISFINIT.)
TSS PERMIT(ALL) JESJOBS(SUBMIT.,CANCEL.)
ACCESS(ALL)
ACTION(PASSWORD)
TSS PERMIT(ALL) JESPOOL(nodename)
ACCESS(ALL)
ACTION(PASSWORD)
TSS PERMIT(ALL) OPERCMDS(MVS.,JES2.,JES3.)
ACCESS(ALL)
ACTION(PASSWORD)
TSS PERMIT(ALL) SDSF(ISFCMD.,ISFATTR.,ISFINIT.)
ACCESS(ALL)
ACTION(PASSWORD)
The PERMIT forces a return code of 4, which is returned to SDSF when access to SYSOUT is checked, making SDSF honor ISFPARMS or the SDSF user exit. This enforces SDSF security checking.
SDSF Resource Protection
Chapter 12: Protecting Resources 287
SDSF Object Protection Through SAF
You can use CA Top Secret to protect SDSF objects through the SAF interface. You can protect the following SDSF objects:
■ SDSF panels and commands
■ z/OS and JES2 commands
■ Fields that can be over typed
■ ACTION characters
■ Initiators
■ Destinations
■ Printers
SDSF Resource Protection
288 User Guide
SDSF Resource Class Protection
This resource class protects SDSF commands, panels, fields that can be over typed, and ACTION characters.
To protect commands, enter the command:
TSS ADDTO(deptacid) SDSF(ISFOPER.SYSTEM)
To limit the SDSF panel options that an ACID can use by assign ownership of them with the ADDTO function and the SDSF keyword.
This example protects the options and SDSF panel:
■ LOG - Display the system log
■ DA - Display active users of the system
■ I - Display jobs in the JES2 input queue
■ O - Display jobs in the JES 2 output queue
■ H - Display jobs in the JES2 held output queue
■ ST - Display status of jobs in the JES2 queues
■ PR - Display JES2 printers on this system
■ INIT - Display JES2 initiators on this system
Use these ADDTO functions to protect the options on the panel:
For LOG
TSS ADDTO(deptacid) SDSF(ISFCMD.ODSP.SYSLOG.JES2)
For DA
TSS ADDTO(deptacid) SDSF(ISFCMD.DSP.ACTIVE.JES2)
For I
TSS ADDTO(deptacid) SDSF(ISFCMD.DSP.INPUT.JES2)
For O
TSS ADDTO(deptacid) SDSF(ISFCMD.DSP.OUTPUT.JES2)
For H
TSS ADDTO(deptacid) SDSF(ISFCMD.DSP.HELD.JES2)
For ST
TSS ADDTO(deptacid) SDSF(ISFCMD.DSP.STATUS.JES2)
For PR
TSS ADDTO(deptacid) SDSF(ISFCMD.ODSP.PRINTER.JES2)
SDSF Resource Protection
Chapter 12: Protecting Resources 289
For INIT
TSS ADDTO(deptacid) SDSF(ISFCMD.ODSP.INITIATOR.JES2)
When the options are owned use PERMIT to authorize their use.
JESJOBS Resource Class Protection
This resource class secures the submission and cancellation of jobs.
Examples: protect JESJOBS
This example controls job submission:
TSS ADDTO(acid) JESJOBS(SUBMIT.nodename.jobname.userid)
This example controls job cancellation:
TSS ADDTO(acid) JESJOBS(CANCEL.nodename.userid.jobname)
SDSF Resource Protection
290 User Guide
JESSPOOL Resource Class Protection
This resource class secures JES objects.
You can also specify one of the following access levels for JESSPOOL:
■ NONE
■ READ
■ UPDATE
■ CONTROL
■ ALL
To specify this resource class, enter the command:
TSS ADDTO(acid) JESSPOOL(localnodeid.userid.jobname.jobid.dsnumber.name)
Localnodeid
The name of the node where the object resides.
Userid
The userid associated with the object.
Jobname
The name field of the JOB command function.
Dsnumber
The JES-assigned spool data set number.
Name
The name from the DSN= parameter.
Use JES tokens in addition to the SDSF resource to secure spool data sets.
Example: secure JES objects
This example secures output belonging to USER01 that USER02 needs to view:
TSS ADDTO(deptacid) JESSPOOL(nodename.USER01)
TSS PERMIT(USER02) JESSPOOL(nodename.USER01.jobid)
SDSF Resource Protection
Chapter 12: Protecting Resources 291
OPERCMDS Resource Class Protection
The OPERCMDS resource class protects JES and operator commands.
To protect JES and operator commands, enter the commands:
$C TSS ADDTO(acid) OPERCMDS(jesx.CANCEL)
$P TSS ADDTO(acid) OPERCMDS(jesx.STOP)
$D TSS ADDTO(acid) OPERCMDS(jesx.DISPLAY)
$T TSS ADDTO(acid) OPERCMDS(jesx.MODIFY)
S TSS ADDTO(acid) OPERCMDS(MVS.START)
D TSS ADDTO(acid) OPERCMDS(MVS.DISPLAY)
WRITER Resource Class Protection
This resource class protects output devices.
Examples: protect devices:
This example protects local devices:
TSS ADDTO(acid) WRITER(jesname.LOCAL.devicename)
This example protects RJE devices:
TSS ADDTO(acid) WRITER(jesname.RJE.devicename)
This example protects NJE Nodes:
TSS ADDTO(acid) WRITER(jesname.NJE.nodename)
SDSF Resource Protection
To implement resource classes to protecting SDSF resources use the following process:
■ Create a department ACID called SDSFDEPT.
■ Assign ownership of all of the SDSF resources (SDSF, JESJOBS, JESSPOOL, WRITER, and OPERCMDS) to the SDSFDEPT ACID.
■ Determine who uses SDSF and how they use it.
■ Create profiles based on the information gathered. Have profiles representing three types of user groups: systems programmers, operators, and end-users.
■ Attach the profiles to the appropriate users.
SDSF Resource Protection
292 User Guide
SDSF Masking
Masking can be used to group SDSF objects whose names share similar characteristics. These shared patterns can then be used as the operands in TSS ADDTO and PERMIT command functions.
Masking is not available for the WRITER resource class.
SDSF Resource Protection
Chapter 12: Protecting Resources 293
$SDSF Resource Class Definition
To protect SDSF resources define $SDSF to the RDT as a new resource. For example:
TSS ADDTO(RDT) RESCLASS($SDSF)
RESCODE(XX)
ACLST(VIEW(0800),CANCEL(0400),REQUEUE(0200),PRTCTL(8000))
Use $SDSF only if you are using the CA Top Secret exit.
These levels allow the user to perform SDSF functions and are required to define the SDSF resource:
VIEW
Displays the output from hold or output queues.
CANCEL
Stops jobs currently running or building output, and scratches any input/output jobs waiting in the queue.
REQUEUE
Modifies output classes and destinations.
PRTCTL
Controls all action characters and operator commands which can be entered through $SDSF and that are not covered by the above access levels.
Assign ownership of the $SDSF resource (usually to a department or division ACID).
For example:
TSS ADDTO(PRODDEPT) $SDSF(acid)
acid
The ACID in the USER= parameter on the job card, the started task ACID, or the TSO userid.
Authorize permissions with TSS PERMIT.
For example:
TSS PERMIT(acid) $SDSF(acid)
ACCESS(access level)
Message Queue Manager Protection
294 User Guide
$SDSF Default Protection
In FAIL mode, once the $SDSF resource is defined to the CA Top Secret RDT it is protected by default and its use must be authorized with a PERMIT function.
In WARN and IMPLEMENT modes protection is not automatic.
To protect the $SDSF resource, attach the DEFPROT:
TSS REPLACE(RDT) RESCLASS($SDSF)
ATTR(DEFPROT)
Message Queue Manager Protection
The IBM Message Queue Manager (MQSERIES or MQM) is an APPC-based application. MQM performs SAF RACROUTE calls that can have an impact on your system security.
Message Queue Manager Protection
Chapter 12: Protecting Resources 295
MQM Resource Classes
CA Top Secret has six MQSERIES (MQM) resource classes defined to the RDT.
To activate the MQSERIES resource classes
1. Enter the commands:
TSS ADDTO(anydept) MQADMIN(csq1.)
TSS ADDTO(anydept) MQQUEUE(csq1.)
TSS ADDTO(anydept) MQCONN(csq1.)
TSS ADDTO(anydept) MQCMDS(csq1.)
TSS ADDTO(anydept) MQPROC(csq1.)
TSS ADDTO(anydept) MQNLIST(csq1.)
Note the following:
■ Replace csq1 with the name of each MQSERIES subsystem name.
■ The MQSERIES default subsystem name is CSQ1.
■ All MQSERIES resources must be owned in CA Top Secret via TSS ADDTO commands as shown above. Failure to add/own all MQSERIES resources results in MQSERIES denying access to resources for no obvious reason. Having all MQSERIES resources owned means that PERMITs must be setup before users can access MQSERIES. These PERMITs are discussed next.
2. Enter the command:
TSS PER(acid) MQADMIN(csql.)
ACCESS(UPDATE)
The resource classes are authorized.
MQM Ownership Removal
To remove ownership of an MQSERIES (MQM) resource
1. Revoke all permissions for the resource. For example:
TSS REV(acid) MQADMIN(csql.)
You cannot specify an access level or the command will fail.
2. Remove the ownership of the MQSERIES (MQM) resource. For example:
TSS REMOVE(anydept) MQADMIN(csql.)
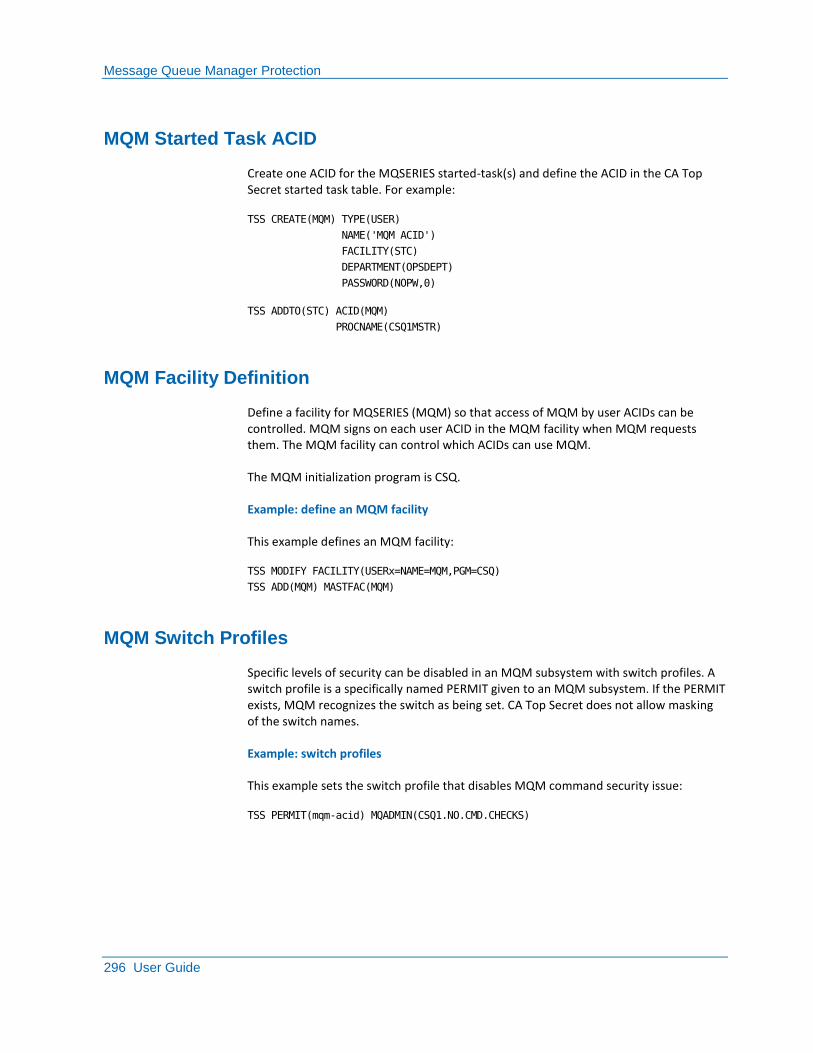
Message Queue Manager Protection
296 User Guide
MQM Started Task ACID
Create one ACID for the MQSERIES started-task(s) and define the ACID in the CA Top Secret started task table. For example:
TSS CREATE(MQM) TYPE(USER)
NAME('MQM ACID')
FACILITY(STC)
DEPARTMENT(OPSDEPT)
PASSWORD(NOPW,0)
TSS ADDTO(STC) ACID(MQM)
PROCNAME(CSQ1MSTR)
MQM Facility Definition
Define a facility for MQSERIES (MQM) so that access of MQM by user ACIDs can be controlled. MQM signs on each user ACID in the MQM facility when MQM requests them. The MQM facility can control which ACIDs can use MQM.
The MQM initialization program is CSQ.
Example: define an MQM facility
This example defines an MQM facility:
TSS MODIFY FACILITY(USERx=NAME=MQM,PGM=CSQ)
TSS ADD(MQM) MASTFAC(MQM)
MQM Switch Profiles
Specific levels of security can be disabled in an MQM subsystem with switch profiles. A switch profile is a specifically named PERMIT given to an MQM subsystem. If the PERMIT exists, MQM recognizes the switch as being set. CA Top Secret does not allow masking of the switch names.
Example: switch profiles
This example sets the switch profile that disables MQM command security issue:
TSS PERMIT(mqm-acid) MQADMIN(CSQ1.NO.CMD.CHECKS)
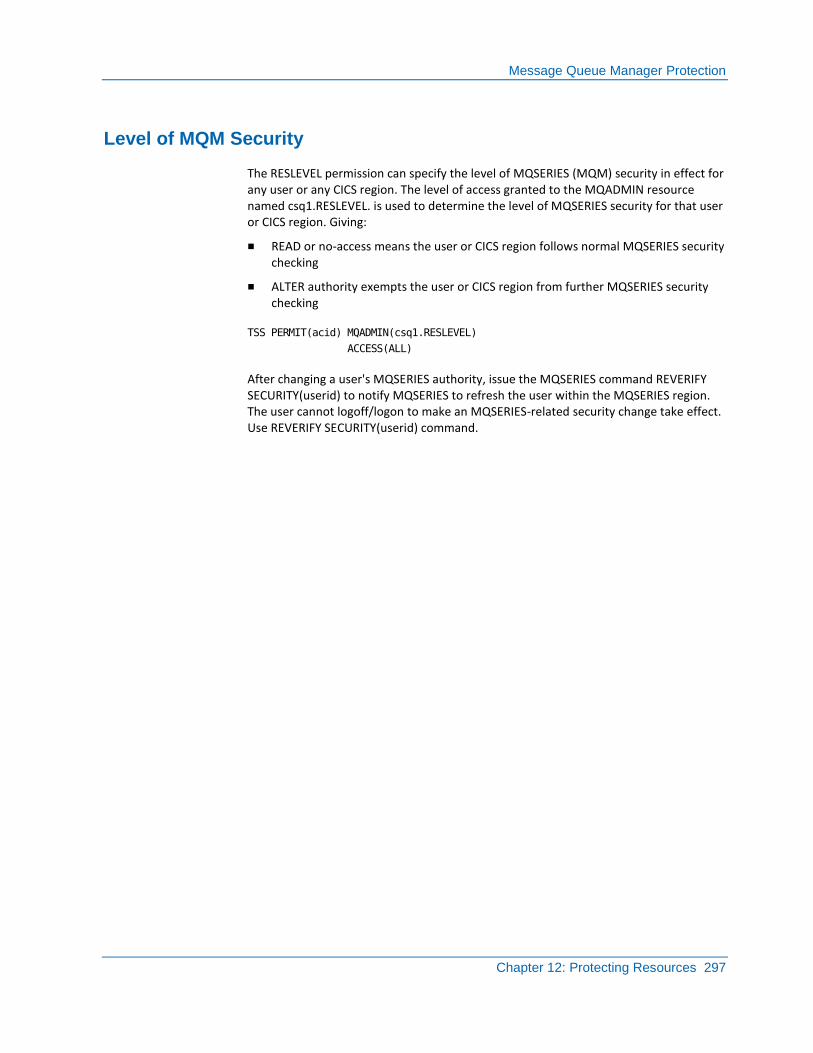
Message Queue Manager Protection
Chapter 12: Protecting Resources 297
Level of MQM Security
The RESLEVEL permission can specify the level of MQSERIES (MQM) security in effect for any user or any CICS region. The level of access granted to the MQADMIN resource named csq1.RESLEVEL. is used to determine the level of MQSERIES security for that user or CICS region. Giving:
■ READ or no-access means the user or CICS region follows normal MQSERIES security checking
■ ALTER authority exempts the user or CICS region from further MQSERIES security checking
TSS PERMIT(acid) MQADMIN(csq1.RESLEVEL)
ACCESS(ALL)
After changing a user's MQSERIES authority, issue the MQSERIES command REVERIFY SECURITY(userid) to notify MQSERIES to refresh the user within the MQSERIES region. The user cannot logoff/logon to make an MQSERIES-related security change take effect. Use REVERIFY SECURITY(userid) command.
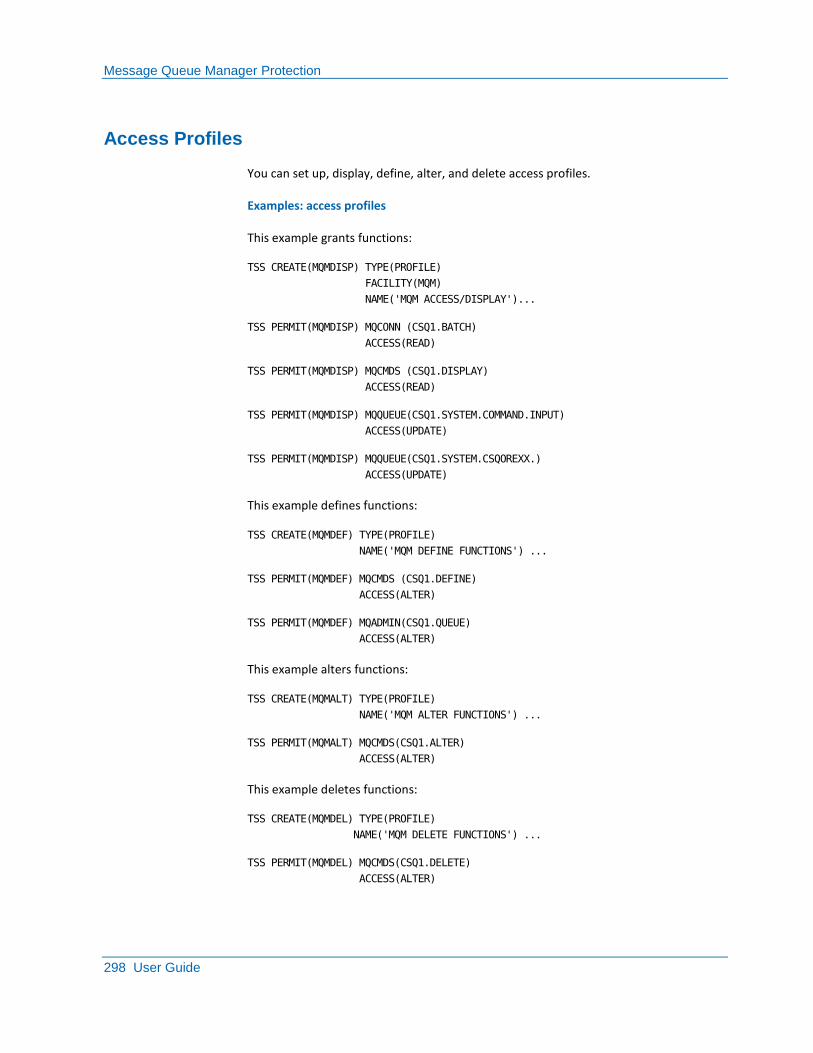
Message Queue Manager Protection
298 User Guide
Access Profiles
You can set up, display, define, alter, and delete access profiles.
Examples: access profiles
This example grants functions:
TSS CREATE(MQMDISP) TYPE(PROFILE)
FACILITY(MQM)
NAME('MQM ACCESS/DISPLAY')...
TSS PERMIT(MQMDISP) MQCONN (CSQ1.BATCH)
ACCESS(READ)
TSS PERMIT(MQMDISP) MQCMDS (CSQ1.DISPLAY)
ACCESS(READ)
TSS PERMIT(MQMDISP) MQQUEUE(CSQ1.SYSTEM.COMMAND.INPUT)
ACCESS(UPDATE)
TSS PERMIT(MQMDISP) MQQUEUE(CSQ1.SYSTEM.CSQOREXX.)
ACCESS(UPDATE)
This example defines functions:
TSS CREATE(MQMDEF) TYPE(PROFILE)
NAME('MQM DEFINE FUNCTIONS') ...
TSS PERMIT(MQMDEF) MQCMDS (CSQ1.DEFINE)
ACCESS(ALTER)
TSS PERMIT(MQMDEF) MQADMIN(CSQ1.QUEUE)
ACCESS(ALTER)
This example alters functions:
TSS CREATE(MQMALT) TYPE(PROFILE)
NAME('MQM ALTER FUNCTIONS') ...
TSS PERMIT(MQMALT) MQCMDS(CSQ1.ALTER)
ACCESS(ALTER)
This example deletes functions:
TSS CREATE(MQMDEL) TYPE(PROFILE)
NAME('MQM DELETE FUNCTIONS') ...
TSS PERMIT(MQMDEL) MQCMDS(CSQ1.DELETE)
ACCESS(ALTER)
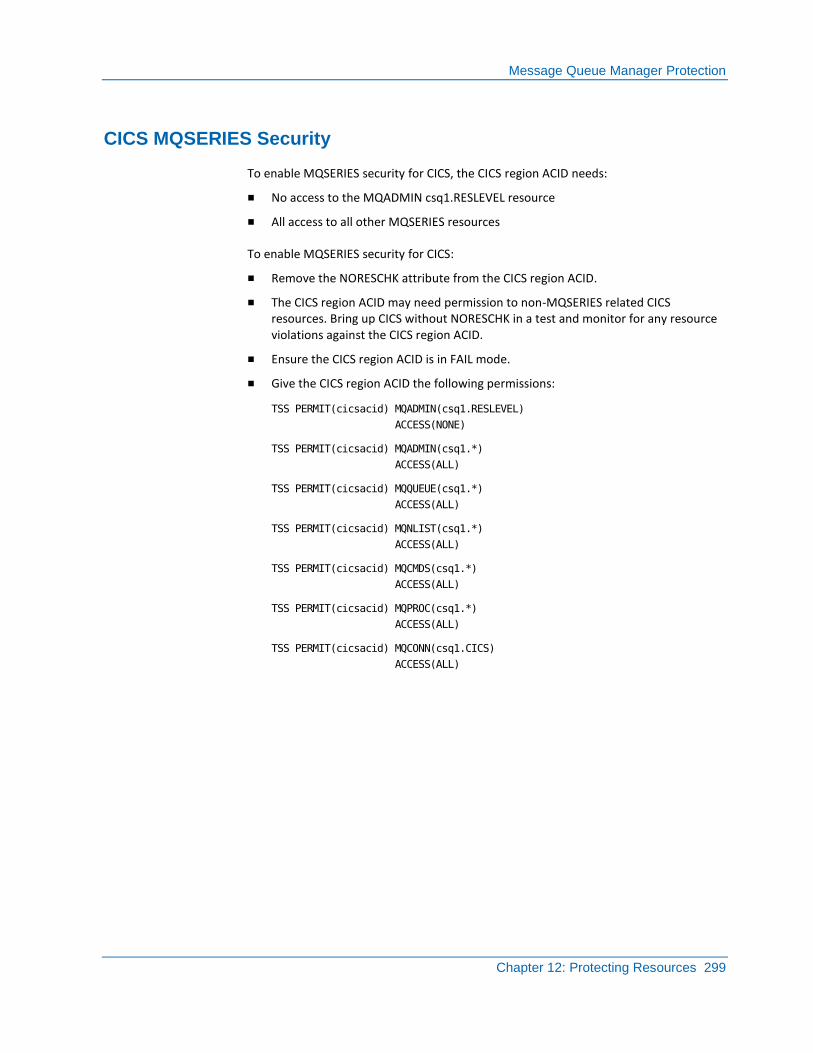
Message Queue Manager Protection
Chapter 12: Protecting Resources 299
CICS MQSERIES Security
To enable MQSERIES security for CICS, the CICS region ACID needs:
■ No access to the MQADMIN csq1.RESLEVEL resource
■ All access to all other MQSERIES resources
To enable MQSERIES security for CICS:
■ Remove the NORESCHK attribute from the CICS region ACID.
■ The CICS region ACID may need permission to non-MQSERIES related CICS resources. Bring up CICS without NORESCHK in a test and monitor for any resource violations against the CICS region ACID.
■ Ensure the CICS region ACID is in FAIL mode.
■ Give the CICS region ACID the following permissions:
TSS PERMIT(cicsacid) MQADMIN(csq1.RESLEVEL)
ACCESS(NONE)
TSS PERMIT(cicsacid) MQADMIN(csq1.*)
ACCESS(ALL)
TSS PERMIT(cicsacid) MQQUEUE(csq1.*)
ACCESS(ALL)
TSS PERMIT(cicsacid) MQNLIST(csq1.*)
ACCESS(ALL)
TSS PERMIT(cicsacid) MQCMDS(csq1.*)
ACCESS(ALL)
TSS PERMIT(cicsacid) MQPROC(csq1.*)
ACCESS(ALL)
TSS PERMIT(cicsacid) MQCONN(csq1.CICS)
ACCESS(ALL)
DB2 Resource Protection
300 User Guide
DB2 Resource Protection
All the DB2 resources have full scope checking and administrative authority support. This eliminates the need for secondary authorization IDs and the cascading revoke problems. The benefits of CA Top Secret for DB2 are:
■ The DB2 resources are easily administered with the same TSS command or the administration panels used in CA Top Secret.
■ In CA Top Secret for DB2, the concept of ownership through the creation of an object is eliminated. Instead, all of the DB2-related resources are preferably owned by a department and their use is authorized to users with appropriate privileges.
■ With CA Top Secret for DB2 you do not need secondary authorization IDs. In fact, they can obscure the lines of individual accountability.
■ The elimination of the cascading REVOKE effect makes secondary authorization IDs somewhat unnecessary. Due to this elimination, it is easier for CA Top Secret administrators to control and manage these DB2-related resources and authorities.
■ Support and security exist for all categories of DB2 privileges and authorities. Because the SYSADM authority has complete control over most DB2 resources, you should carefully limit and monitor its use just as you would an MSCA.
■ There are discrete checks with unique class names identifying the type of function secured.
■ Specific class names permit matching of relationships with existing DB2 controls.
■ Access levels are supported as applicable to each function.
■ All auditing and violation activity within DB2 is recorded to SMF and/or the Audit/Tracking File. All current facilities for reporting, including the online TSSTRACK reporting utility, are supported.
■ The Catalog Synchronization Utility provides the ability to bring DB2 catalog entries up-to-date with CA Top Secret for DB2.
The DB2 resources include:
DB2BUFF DB2PLAN DB2SYS
DB2COLL DB2TABLE DB2TABSP
DB2PKG DB2BASE DB2STOGP
DB2 Resource Protection
Chapter 12: Protecting Resources 301
DB2 Resource Ownership
To establish ownership, use TSS CREATE/ADDTO.
Example: establish DB2 resource ownership
This example adds and permits a DB2 resource:
TSS ADDTO(ENGDEPT) DB2PLAN(SR19052P)
TSS PERMIT(USRMIKE) DB2PLAN(SR19052P)
ACCESS(BIND)
DB2 Resource Ownership Removal
To remove ownership of a DB2 resource
1. Revoke all permissions for the resource. You cannot specify an access level.
2. Remove the ownership of the DB2 resource.
Example: remove DB2 resource ownership
This example removes ownership of a DB2 resource:
TSS REVOKE(USRMIKE) DB2PLAN(SR19052P)
TSS REMOVE(ENGDEPT) DB2PLAN(SR19052P)
IBM DCE, SystemView, Netview, and OPTIME Protection
302 User Guide
IBM DCE, SystemView, Netview, and OPTIME Protection
A mainframe can participate in a DCE environment using OpenEdition/DCE support. DCE programs and data can reside on the mainframe under OpenEdition.
A DCE segment of an ACID allows the fields:
■ UUID
■ DCENAME
■ HOMECELL
■ HOMEUUID
■ DCEFLAGS
■ DCEKEY
Examples: protect DCE
This example protects the DCE:
TSS ADDTO(acid) DCENAME(jordanm)
DCEFLAGS(AUTOLOGIN)
UUID(00000075-71db-21cf-b500-08005a470ba1)
HOMEUUID(abbc323c-5ce2-11cf-a61e-08005a470ba1)
HOMECELL(/.../cis_test1.cis.dog.com)
In this example, the ACID lists a DCE segment:
TSS LIST(acid) SEGMENT(DCE)
IBM DCE, SystemView, Netview, and OPTIME Protection
Chapter 12: Protecting Resources 303
SystemView Segment Protection
The SYSMVIEW resource class protects SystemView segments. The keywords allowed with this segment when permitting it to an ACID are:
■ APPLDATA
■ SCRIPTNAME
■ SCRIPTPARM
Example: protect SystemView
This example permits an ACID to this segment:
TSS PERMIT(jordan) SYSMVIEW(A01ITSO.SYSTEMA)
APPLDATA(ptkt1)
SCRIPTName(tsoscript)
SCRIPTParm(tsoparm)

IBM DCE, SystemView, Netview, and OPTIME Protection
304 User Guide
NETVIEW Segment Protection
CA Top Secret protects NETVIEW segments. The fields associated with this segment are:
■ NETVCONS
■ NETVCTL
■ NETVIC
■ NETVDMNS
■ NETVMSGR
■ NETVNGMF
■ NETVOPCL
There are three new resource classes: RODMMGR, NETSPAN and NETCMDS.
CA Top Secret naming of the NETVIEW fields varies from the IBM NETVIEW documentation.
The NETVIEW fields have the following format:
TSS ADDTO(acid) NETVCONS(consname)
NETIC(initial.command)
NETVCTL(SPECIFIC|GLOBAL|GENERAL )
NETVDMNS(domain1,domain2,...,domain-n)
NETVOPCL(n1,n2,...,n99) &lb.n can range from 1 to 2040&rb.
NETVMSGR( YES | NO )
NETVNGMG( YES | NO )
Example: protect NETVIEW
This example illustrates an ACID list NETVIEW segment:
TSS LIST(acid) SEGMENT(NETVIEW)
The OPTIME Field
In CICS the OPTIME field matches the TIMEOUT field described in IBM CICS documentation.
This field has the following format:
TSS ADDTO(acid) OPTIME(hhmm)
OPTIME controls the period of time allowed before CICS considers a terminal user to be “time-out”. The action taken by CICS depends on a CICS parameter SIGNOFF specified in the typeterm definition.
Delegated Resources
Chapter 12: Protecting Resources 305
Delegated Resources
The DELEGATE record defines one or more resources as delegated. Any resource class available for SAF FASTAUTH processing can have resources designated as delegated.
Only create delegated resources if an application explicitly requires it. CA Top Secret resource validation is affected by the resources you define in this record.
Important! Improper creation of delegated resources can adversely affect some applications.
This command has the following format:
TSS ADD (DELEGATE)
RTYPE(resource-type)
RNAME(resource-name | resource-mask)
RTYPE(resource-type)
Specifies the three-character type code of the resource. This field is required and cannot be masked. The three-character resource type is used to uppercase the resource name at ADD/REPLACE time when its associated eight character resource class in the RDT is not mixed-case.
RNAME(resource-name | resource-mask)
Specifies the 1 to 256-byte name of the delegated generalized resource or the 1 to 252-byte name of the delegated DB2 resource.
Example: create a delegate record
This example inserts a delegate record designated as a resource in the FACILITY class called IRR:
TSS ADD(DELEGATE) IBMFAC(IRR.)
You must have RESOURCE(OWN) authority to execute this command.
Display Delegated Resources
The LIST DELEGATE command displays the CA Top Secret resources defined to the system in delegate records. You must have DATA(NAMES) authority to execute this command.
To display delegate records, enter the command:
TSS LIST(DELEGATE)
SMS Data Fields
306 User Guide
SMS Data Fields
The SMS data fields provide a range of data and space management functions. SMS improves storage space use, controls external storage centrally, and lets you manage storage growth.
CA Top Secret protects the SMS data fields:
■ SMSAPPL
■ SMSDATA
■ SMSMGMT
■ SMSSTOR
Add and Remove an SMS Application Identifier (SMSAPPL)
Use the ADDTO and REMOVE commands to add and remove an SMSAPPL. SMSAPPL adds an up to eight-character SMS application-name to an ACID, and allows one application-name per command that can be a number, letter, or a special character.
To add or remove a default SMS application identifier, enter the command:
TSS [ADDTO|REMOVE](acid) SMSAPPL(application-name)
Examples: add and remove an SMSAPPL
This example gives JVAVCA a default application identifier of PAYROLL:
TSS ADDTO(JVAVCA) SMSAPPL(PAYROLL)
If the value for ACSDEFAULTS is YES in the SMS ACS routine, the application information is extracted from CA Top Secret. If you do not use the input variables to ACS routines saved in CA Top Secret, set this option to NO. This saves additional calls to CA Top Secret during allocation processing.
This example removes default application identifier of PAYROLL from JVAVCA:
TSS REMOVE(JVAVCA) SMSAPPL(PAYROLL)
SMS Data Fields
Chapter 12: Protecting Resources 307
Add and Remove an SMS Data Class (SMSDATA)
SMSDATA adds an up to eight-character SMS data-class-name to an ACID, and allows one data-class-name per command that can be a number, letter, or a special character.
To add or remove a default SMS data class, enter the command:
TSS [ADDTO|REMOVE](acid) SMSDATA(data-class-name)
Examples: add and remove an SMSDATA
This example gives JVAVCA a default data class of ALLDATA :
TSS ADDTO(JVAVCA) SMSDATA(ALLDATA)
If the value for ACSDEFAULTS is YES in the SMS ACS routine, the application information is extracted from CA Top Secret. If you do not use the input variables to ACS routines saved in CA Top Secret, set this option to NO. This saves additional calls to CA Top Secret during allocation processing.
This example removes a default data class ALLDATA from JVAVCA:
TSS REMOVE(JVAVCA) SMSDATA(ALLDATA)
Add and Remove an SMS Management Class (SMSMGMT)
SMSMGMT adds an up to eight-character SMS management-class-name to an ACID, and allows one management-class-name per command that can be a number, letter, or a special character.
To add or remove a default SMS management class, enter the command:
TSS [ADDTO|REMOVE](acid) SMSMGMT(management-class-name)
Examples: add and remove an SMSMGMT
This example gives JVAVCA a default management class of SYSTCLAS:
TSS ADDTO(JVAVCA) SMSMGMT(SYSTCLAS)
If the value for ACSDEFAULTS is YES in the SMS ACS routine, the application information is extracted from CA Top Secret. If you do not use the input variables to ACS routines saved in CA Top Secret, set this option to NO. This saves additional calls to CA Top Secret during allocation processing.
This example removes a default management class of SYSTCLAS from JVAVCA:
TSS REMOVE(JVAVCA) SMSMAMT(SYSTCLAS)
SMS Data Fields
308 User Guide
Add and Remove an SMS Storage Class (SMSSTOR)
SMSSTOR adds an up to eight-character SMS storage-class-name to an ACID, and allows one storage-class-name per command that can be a number, letter, or a special character.
To add or remove an default SMS storage class, enter the command:
TSS [ADDTO|REMOVE](acid) SMSSTOR(storage-class-name)
Examples: add and remove an SMSSTOR
This example gives JVAVCA a default storage class of SYSSTOR:
TSS ADDTO(JVAVCA) SMSSTOR(SYSSTOR)
If the value for ACSDEFAULTS is YES in the SMS ACS routine, the application information is extracted from CA Top Secret. If you do not use the input variables to ACS routines saved in CA Top Secret, set this option to NO. This saves additional calls to CA Top Secret during allocation processing.
This example removes a default management class of SYSSTOR from JVAVCA:
TSS REMOVE(JVAVCA) SMSSTOR(SYSSTOR)
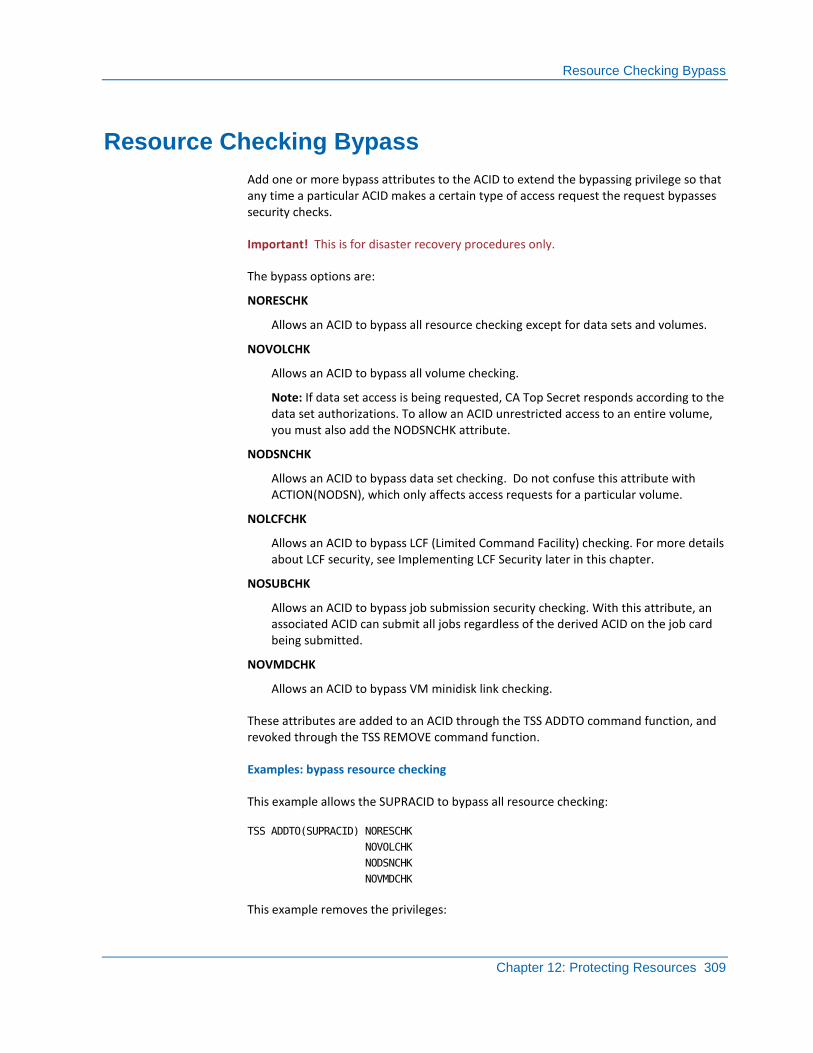
Resource Checking Bypass
Chapter 12: Protecting Resources 309
Resource Checking Bypass
Add one or more bypass attributes to the ACID to extend the bypassing privilege so that any time a particular ACID makes a certain type of access request the request bypasses security checks.
Important! This is for disaster recovery procedures only.
The bypass options are:
NORESCHK
Allows an ACID to bypass all resource checking except for data sets and volumes.
NOVOLCHK
Allows an ACID to bypass all volume checking.
Note: If data set access is being requested, CA Top Secret responds according to the data set authorizations. To allow an ACID unrestricted access to an entire volume, you must also add the NODSNCHK attribute.
NODSNCHK
Allows an ACID to bypass data set checking. Do not confuse this attribute with ACTION(NODSN), which only affects access requests for a particular volume.
NOLCFCHK
Allows an ACID to bypass LCF (Limited Command Facility) checking. For more details about LCF security, see Implementing LCF Security later in this chapter.
NOSUBCHK
Allows an ACID to bypass job submission security checking. With this attribute, an associated ACID can submit all jobs regardless of the derived ACID on the job card being submitted.
NOVMDCHK
Allows an ACID to bypass VM minidisk link checking.
These attributes are added to an ACID through the TSS ADDTO command function, and revoked through the TSS REMOVE command function.
Examples: bypass resource checking
This example allows the SUPRACID to bypass all resource checking:
TSS ADDTO(SUPRACID) NORESCHK
NOVOLCHK
NODSNCHK
NOVMDCHK
This example removes the privileges:
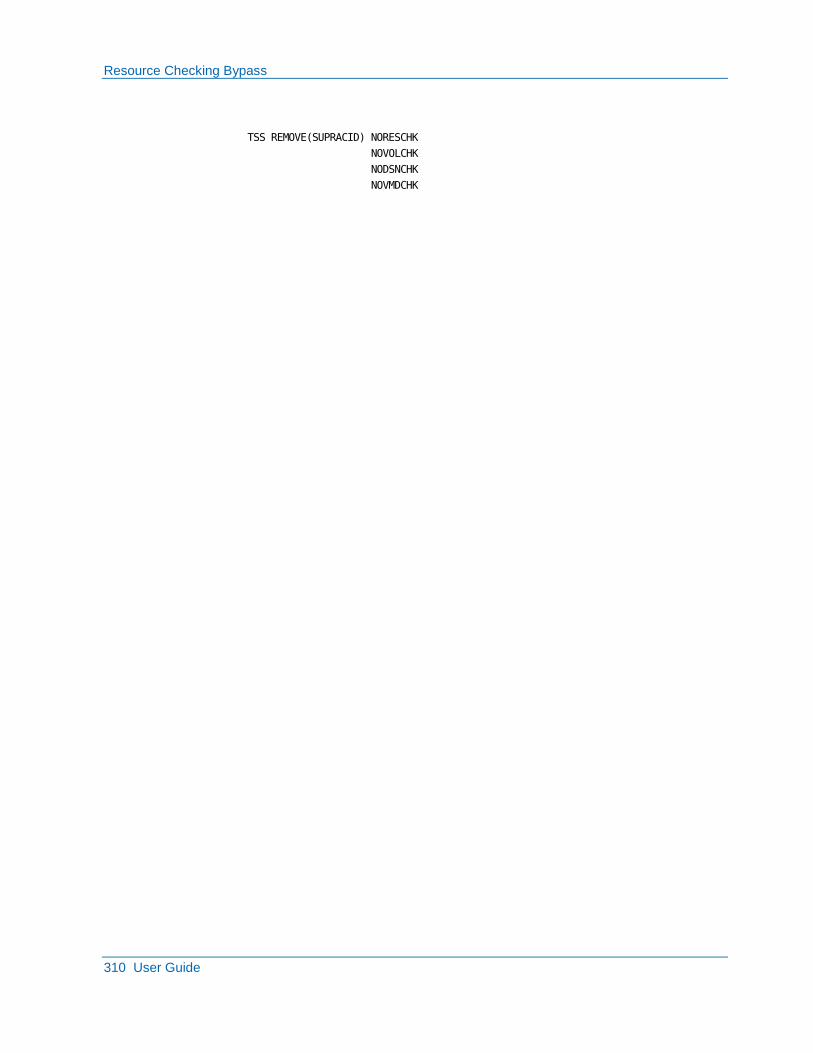
Resource Checking Bypass
310 User Guide
TSS REMOVE(SUPRACID) NORESCHK
NOVOLCHK
NODSNCHK
NOVMDCHK

Chapter 13: Maintaining Special Security Records 311
Chapter 13: Maintaining Special Security Records
This section contains the following topics:
The ALL Record (see page 311) APPCLU Record (see page 312) AUDIT Record (see page 316) Data Lookaside Facility (DLF) Record (see page 317) FDT Record (see page 319) MLS Record (see page 325) Node Descriptor Table (NDT) Record (see page 326) RDT Record (see page 336) SDT Record (see page 348) Started Task Command (STC) Record (see page 369)
The ALL Record
The ALL Record is a reserved ACID that identifies resources globally accessible to all users. The ALL reserved ACID is only used with the TSS ADDTO or REMOVE command function for the OPERCMDS, COMMAND, FACILITY, XCOMMAND, and USER keywords.
Authority for the ALL Record
You must have MISC9(GLOBAL) authority to administer the ALL Record.

APPCLU Record
312 User Guide
Define Data to the ALL Record
To give all users access to a resource, enter the command:
TSS PERMIT(ALL) resclass(resname|p-fix)
ACCESS(accesslevel)
Examples: ALL record definitions
This example permits the data set UNSOLD.MASTER.FILE to the ALL Record with ALL access:
TSS PERMIT(ALL) DSNAME(‗UNSOLD.MASTER.FILE‘) ACCESS(ALL)
This example permits all users to access the TSO facility between the hours of 9:00 a.m. and 5:59 p.m:
TSS ADDTO(ALL) FACILITY(TSO) TIME (09,17)
This example permits z/OS commands issued from a system console to the ALL Record:
TSS ADDTO(ALL) OPERCMDS(MVS.)
List the ALL Record
To list the ALL record, enter the command:
TSS LIST(ALL)
Example: listing the ALL record
This example lists the ALL Record:
TSS LIST(ALL) DATA(ALL)
APPCLU Record
The APPCLU Record is a reserved or special ACID that identifies which logical units (LUs) can establish a link for processing APPC transactions and conversations.
Authority for APPCLU
You must have MISC2(APPCLU) authority to add specific LINKIDs within the APPCLU Record.
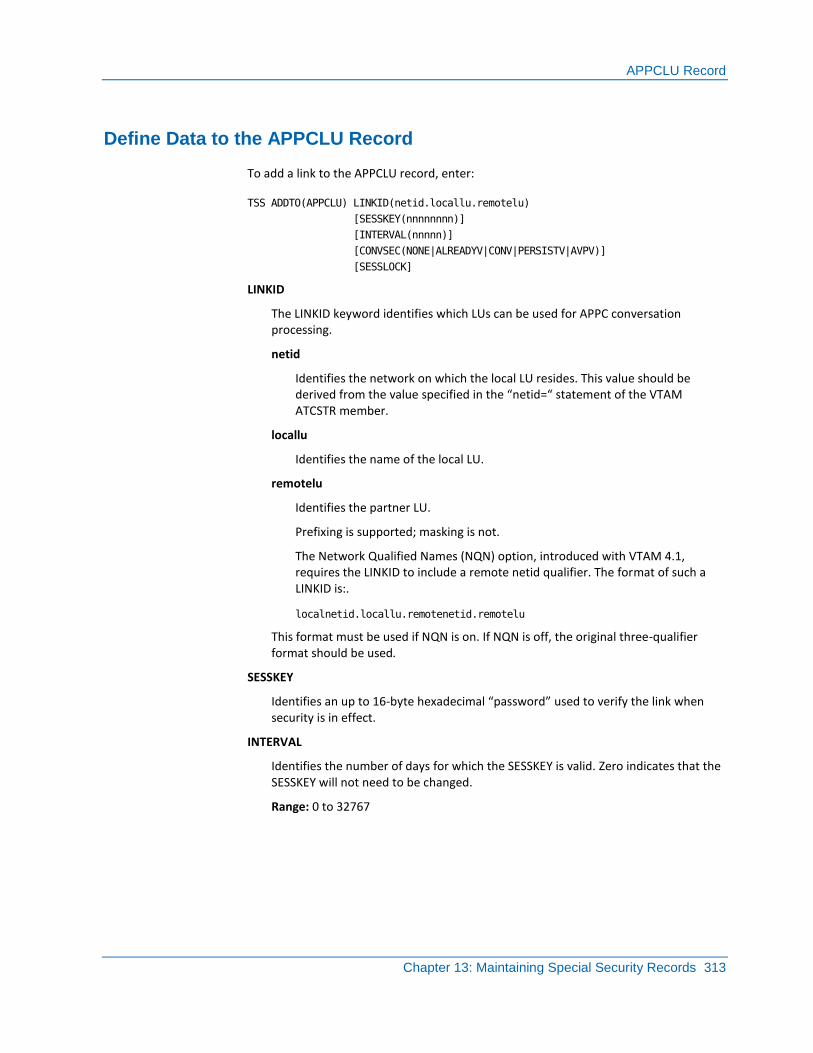
APPCLU Record
Chapter 13: Maintaining Special Security Records 313
Define Data to the APPCLU Record
To add a link to the APPCLU record, enter:
TSS ADDTO(APPCLU) LINKID(netid.locallu.remotelu)
[SESSKEY(nnnnnnnn)]
[INTERVAL(nnnnn)]
[CONVSEC(NONE|ALREADYV|CONV|PERSISTV|AVPV)]
[SESSLOCK]
LINKID
The LINKID keyword identifies which LUs can be used for APPC conversation processing.
netid
Identifies the network on which the local LU resides. This value should be derived from the value specified in the “netid=“ statement of the VTAM ATCSTR member.
locallu
Identifies the name of the local LU.
remotelu
Identifies the partner LU.
Prefixing is supported; masking is not.
The Network Qualified Names (NQN) option, introduced with VTAM 4.1, requires the LINKID to include a remote netid qualifier. The format of such a LINKID is:.
localnetid.locallu.remotenetid.remotelu
This format must be used if NQN is on. If NQN is off, the original three-qualifier format should be used.
SESSKEY
Identifies an up to 16-byte hexadecimal “password” used to verify the link when security is in effect.
INTERVAL
Identifies the number of days for which the SESSKEY is valid. Zero indicates that the SESSKEY will not need to be changed.
Range: 0 to 32767
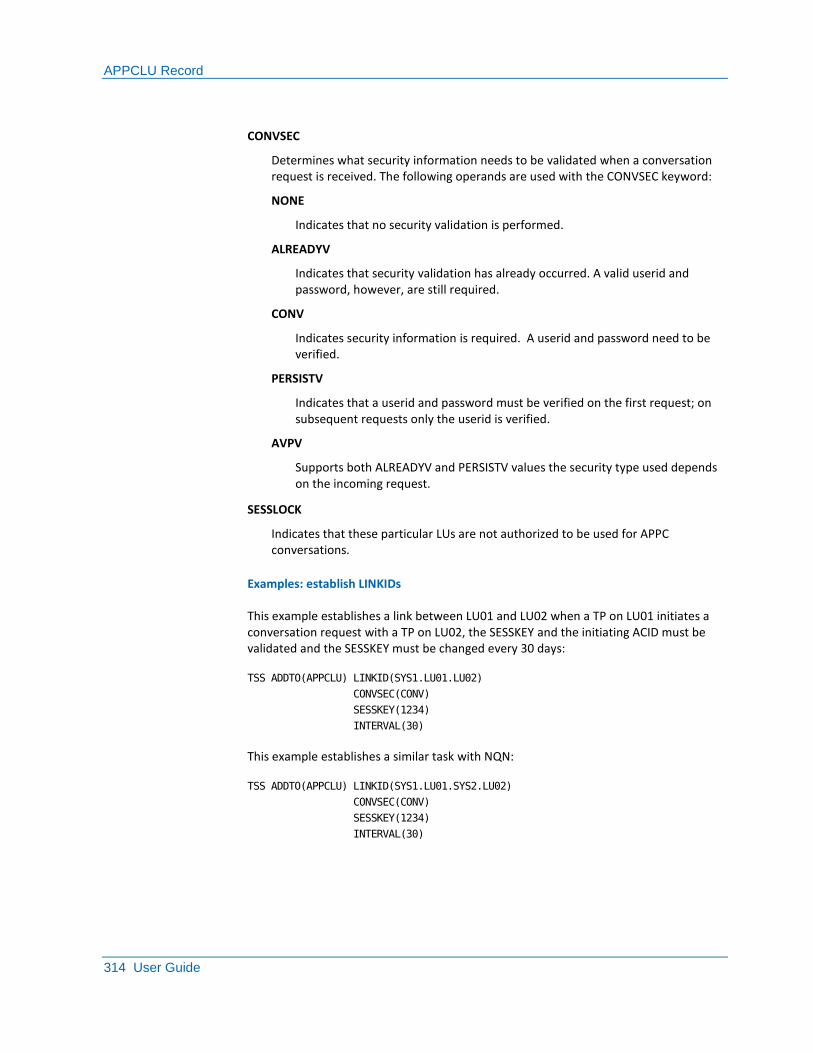
APPCLU Record
314 User Guide
CONVSEC
Determines what security information needs to be validated when a conversation request is received. The following operands are used with the CONVSEC keyword:
NONE
Indicates that no security validation is performed.
ALREADYV
Indicates that security validation has already occurred. A valid userid and password, however, are still required.
CONV
Indicates security information is required. A userid and password need to be verified.
PERSISTV
Indicates that a userid and password must be verified on the first request; on subsequent requests only the userid is verified.
AVPV
Supports both ALREADYV and PERSISTV values the security type used depends on the incoming request.
SESSLOCK
Indicates that these particular LUs are not authorized to be used for APPC conversations.
Examples: establish LINKIDs
This example establishes a link between LU01 and LU02 when a TP on LU01 initiates a conversation request with a TP on LU02, the SESSKEY and the initiating ACID must be validated and the SESSKEY must be changed every 30 days:
TSS ADDTO(APPCLU) LINKID(SYS1.LU01.LU02)
CONVSEC(CONV)
SESSKEY(1234)
INTERVAL(30)
This example establishes a similar task with NQN:
TSS ADDTO(APPCLU) LINKID(SYS1.LU01.SYS2.LU02)
CONVSEC(CONV)
SESSKEY(1234)
INTERVAL(30)
APPCLU Record
Chapter 13: Maintaining Special Security Records 315
Change Data in the APPCLU Record
Use the REPLACE command to change APPCLU record data. You can use all of the keywords associated with LINKID to change data in the APPCLU Record.
To remove a field from the APPCLU Record, specify the keyword followed by parentheses.
To change or remove data in the APPCLU Record, enter the command:
TSS REPLACE(APPCLU) LINKID(netid.locallu.remotelu)
[SESSKEY(nnnnnnnn)]
[INTERVAL(nnnnn)]
[CONVSEC(NONE|ALREADYV|CONV|PERSISTV|AVPV)]
[SESSLOCK]
Examples: change the APPCLU record
This example changes the SESSKEY interval to every 15 days for the link between LU01 and LU02:
TSS REPLACE(APPCLU) LINKID(SYS1.LU01.LU02)
SESSKEY(1234)
INTERVAL(15)
This example removes the conversation request keyword from the link between LU01 and LU02:
TSS REPLACE(APPCLU) LINKID(SYS1.LU01.LU02)
CONVSEC()
Remove Data From the APPCLU Record
To remove a link, enter the command:
TSS REMOVE(APPCLU) LINKID(netid.localu.remotelu)
Example: remove a link
This example removes the link between LU01 and LU02:
TSS REMOVE(APPCLU) LINKID(SYS1.LU01.LU02)
AUDIT Record
316 User Guide
List the APPCLU Record
To list the APPCLU record, enter the command:
TSS LIST(APPCLU)
AUDIT Record
The AUDIT Record is a reserved ACID used to add a specific resource for auditing purposes.
Authority for the AUDIT record
When using AUDIT as a reserved ACID name, you must have RESOURCE(AUDIT) authority.
Define Data to the AUDIT Record
Use the ADD command to add resources to the AUDIT record.
To add a resource to the AUDIT Record, enter the command:
TSS ADDTO(AUDIT) resource class(resource name)
[ACCESS(level1, level2, …)]
resource class
Identifies a resource class that is defined in the RDT.
Range: 1 to 8 characters
resource name
Identifies a resource or resource prefix that is to be audited.
levelx
Access level(s) to be audited.
Example: add a resource record
This example audits the data set UNSOLD.MASTER.FILE:
TSS ADDTO(AUDIT) DSNAME(‗UNSOLD.MASTER.FILE‘)
Data Lookaside Facility (DLF) Record
Chapter 13: Maintaining Special Security Records 317
Remove Data From the AUDIT Record
Use the REMOVE command to remove AUDIT record resources.
To remove a resource from the AUDIT Record, enter the command:
TSS REMOVE(AUDIT) resource(resourcename)
Example: remove a resource from the AUDIT record
This example removes the data set UNSOLD.MASTER.FILE from the AUDIT Record:
TSS REMOVE(AUDIT) DSNAME(‗UNSOLD.MASTER.FILE‘)
List the AUDIT Record
Use the LIST command to list the AUDIT record.
To list the entire AUDIT Record, enter the command:
TSS LIST(AUDIT)
To list a specific resource in the AUDIT Record, enter the command:
TSS LIST(AUDIT) resource(resclass)
Example: list an AUDIT record
This example lists all dataset resources in the AUDIT Record:
TSS LIST(AUDIT) RESCLASS(DATASET)
Data Lookaside Facility (DLF) Record
The Data Lookaside Facility (DLF) Record is a special ACID that controls the loading of selected data sets into ESA hyperspace by selected jobs.
Authority for the DLF Record
You must have MISC2(DLF) authority to administer the DLF Record.
Data Lookaside Facility (DLF) Record
318 User Guide
Define Data to the DLF Record
You can allow a specific data set to be brought into hyperspace that is accessed by one of the jobs in the JOBNAME list.
To define a data set to the DLF record, enter the command:
TSS ADDTO(DLF) DSNAME(data-set-name)
JOBNAME(job-name1,job-name2,...)
RETAIN
DSNAME
Identifies a prefix for a data-set-name brought into hyperspace.
Range: 2 to 26 characters
JOBNAME
Identifies an job-name that accesses a data set brought into hyperspace.
Range: Up to eight-characters
RETAIN
Leaves a data set in hyperspace when the job that brought it into hyperspace ends.
Example: defining DLF record data
This example adds data set CICS.MASTER.FILE to the DLF Record and allows it to be brought into hyperspace when it is accessed by JOB1, and to remain in hyperspace after the job ends:
TSS ADDTO(DLF) DSNAME(‗CICS.MASTER.FILE‘)
JOBNAME(JOB1)
RETAIN
Remove Data From the DLF Record
Use the REMOVE command to remove data from the DLF record.
To remove a data set from the DLF Record, enter the command:
TSS REMOVE(DLF) DSNAME(data-set-name)
Example: removing DLF record data
This example removes data set CICS.MASTER.FILE from the DLF:
TSS REMOVE(DLF) DSNAME(‗CICS.MASTER.FILE‘)
FDT Record
Chapter 13: Maintaining Special Security Records 319
List the DLF Record
Use the LIST command to list the DLF record.
To list the entire AUDIT Record, enter the command:
TSS LIST(DLF)
FDT Record
The FDT is a reserved ACID that contains predefined and user-defined ACID fields. Before adding a field to an ACID, it must be defined to the FDT.
Authority for the FDT Record
To manage the FDT, the administrator must have:
■ MISC1(RDT) authority to add to, remove from, and list the FDT Record itself
■ MISC8(LISTRDT) authority to limit authority to listing the FDT Record only
FDT Record Data
User defined fields can be used to define installation information (by user ACID) that can be manipulated or extracted by application programs via the application interface or with the RACROUTE EXTRACT macro.
Add these fields to ACIDs using the TSS commands. You can ADDTO, REMOVE, REPLACE, or LIST the defined data the same way you would with fields predefined by CA Top Secret.
You can add these fields to a profile ACID to create a role based profile that can be added to any user. The extract process searches and returns field data from the first connected profile if the field is not found in the user record of the ACID. Use the FIRST keyword when adding the new profile to an ACID to ensure it is the first profile/group found in the list.
Wide use of user-defined data can cause a situation where the original CA Top Secret information becomes a fraction of the total Security File—causing an unbalanced I/O as well as a misuse of storage and CPU. Re-examine the Security File size according to the amount of user data that the file is expected to hold.

FDT Record
320 User Guide
Define Data to the FDT Record
Use the ADDTO command to add new fields to the FDT.
To define a new field to the FDT, enter the command:
TSS ADDTO(FDT) FDTNAME(field-name)
FDTCODE(hex-code)
MAXLEN(nn)
DISPLAY(display-name)
[SEGMENT(segment-name)]
[ATTR(MIXED)][(NONDISP)][(NOXTRPRP)][(XTRPRP)]
FDTNAME
Adds user-defined field to the FDT Record when FDT is the target ACID name, and allows one field-name per command that can be a letter, number, or national characters (@, #, $).
Range: 1 to 8 characters
FDTCODE
Adds a user-defined hex-code to the FDT Record when FDT is the target name, and allows one hex-code per command.
Range: 01 to FF
SEGMENT
Assigns an field to a specific segment, and allows one segment-name per command that can be a letter, number, or special character. You cannot add user-defined fields to predefined segments. The following are predefined CA Top Secret segments:
ALL, BASE, CICS, DFP, DLFDATA, IMS, LANGUAGE, OPERPARM, TSO, WORKATTR, z/OS.
A new segment is defined by specifying a unique value when adding a new field. If the value specified for a segment already exists, a new field is added to that segment. If the segment name is not specified the field is added to the base segment.
Range: Up to eight-character.
MAXLEN
Defines the number of bytes that can be entered for the user-defined FDT entries, and allows one MAXLEN value per command. The total of all user-defined fields should not exceed 32,767 bytes.
FDT Record
Chapter 13: Maintaining Special Security Records 321
DISPLAY
Defines a display-name with its associated defined field and segment in the FDT Record, and allows one display-name per command that can be a letter, number, or special character. The display-name must be enclosed in single quotes if it contains blanks.
Range: 1 to 11 characters
ATTR
Specifies attributes in effect. One or more of the following operands may be specified with the ATTR keyword:
MIXED
Displays field in mixed case format. If you do not specify MIXED, the display defaults to uppercase.
NONDISP
The field is not displayed by an administrator using a TSS LIST function on the ACID. The data can be extracted and/or modified as normal using the Application Interface or the RACROUTE macro. If you do not specify NONDISP, the field displays.
NOXTRPRP
Prohibits successful extract/replace call results for the field from being sent to the recovery file and propagated to other systems. You can change this attribute via a “TSS REPLACE” command for user-defined fields in the FDT and pre-defined fields in the FDT where CA did not already include this attribute.
XTRPRP
Allows successful extract/replace call results for the field to be sent to the recovery file and propagated to other systems. This attribute does not display when you list the field. You can change this attribute via a “TSS REPLACE” command for user-defined fields in the FDT and pre-defined fields in the FDT where CA did not already include this attribute or NOXTRPRP.
FDT Record
322 User Guide
Example: define a new FDT field
This example creates an area code and home phone field called HPHONE that belong to a segment named HPHNATTR and a display called HPHNUM. The maximum length for the field is 12 bytes and has a hex-code of 01:
TSS ADDTO(FDT) FDTNAME(HPHONE)
FDTCODE(01)
SEGMENT(HPHNATTR)
MAXLEN(12)
DISPLAY(HPHNUM)
This example adds the contents of this area code and home phone field to its respective owner:
TSS ADDTO(USER01) HPHONE(‗908 780 5550‘)
Use single quotes when the field contains blanks.
Modify Values in the FDT Record
You can modify an existing user defined field to change its characteristics.
Use the replace command to change the FDT fields.
To change the characteristics of user-defined fields, enter the command:
TSS REPLACE(FDT) FDTNAME(field-name)
SEGMENT(segment-name)
MAXLEN(nn)
DISPLAY(display-name)
Example: modify existing fields
This example changes the maximum length for the HPHONE field from 12 to 14 bytes:
TSS REPLACE(FDT) FDTNAME(HPHONE) MAXLEN(14)
FDT Record
Chapter 13: Maintaining Special Security Records 323
Remove Data from the FDT Record
FDT fields are removed with the REMOVE command. Only the FDTNAME is required for removing a user-defined field.
To remove a user-defined field, enter the command:
TSS REMOVE(FDT) FDTNAME(field-name)
Example: remove an FDT field
This example removes the HPHONE field from the FDT:
TSS REMOVE(FDT) FDTNAME(HPHONE)
List the Entire FDT
The LIST command lists the entire FDT including both predefined and user-defined fields.
To list the entire FDT, enter the command:
TSS LIST(FDT)
List by FDTNAME
You can list specific fields in the FDT.
To list a specific field, enter the command:
TSS LIST(FDT) FDTNAME(field-name)
Example: listing a FDT field
This example lists the HPHONE field and its associated display and segment:
TSS LIST(FDT) FDTNAME(HPHONE)
FDT Record
324 User Guide
List by FDTNAME PREFIX
When the keyword PREFIX is specified all record matching is performed using the data entered as a partial key.
To list the FDTNAME prefix, enter the command:
TSS LIST(FDT) FDTNAME(cccccccc)PREFIX
cccccccc
1 to 8 characters.
Example: listing a FDT PREFIX
This example lists field names that start with 'HP':
TSS LIST(FDT) FDTNAME(HP) PREFIX
List by FDTCODE
To list a specific FDT code and associated fields, enter the command:
TSS LIST(FDT) FDTCODE(hex-code)
Example: listing by FDTCODE
This example lists the field with hex-code 01:
TSS LIST(FDT) FDTCODE(01)
List by FDT Segment
To list a specific segment-name and its associated fields, enter the command:
TSS LIST(FDT) SEGMENT(segment-name)
Example: list the FDT by segment
This example lists the segment HPHNATTR to which the home area code and phone number belong:
TSS LIST(FDT) SEGMENT(HPHNATTR)
MLS Record
Chapter 13: Maintaining Special Security Records 325
List the FDT Display Name
To list a specific display name and associated fields, enter the command:
TSS LIST(FDT) DISPLAY(display-name)
Example: list the FDT by display
This example lists the HPHNUM field to which the home area code and phone number belong:
TSS LIST(FDT) DISPLAY(HPHNUM)
MLS Record
The MLS record is a reserved ACID that contains Multi Level Security records. The MLS record:
■ Stores security categories (CATEGORY)
■ Stores security levels (SECLEVEL)
■ Stores security labels (SECLABEL)
■ Relates these purely multi-level security definitions to objects in the system such as data sets, UNIX files, directories, symbolic links, and IPC objects
Authority for the MLS Record
Because the powers are unlimited, the MLS administrator must be a highly trusted SCA or MSCA and have MISC5(MLS) authority.
Maintaining the MLS Record
For information on maintaining MLS records, see Multilevel Security Planning Guide.
Node Descriptor Table (NDT) Record
326 User Guide
Node Descriptor Table (NDT) Record
The NDT is a reserved ACID that contains:
■ PassTicket and Session Key data
■ LDAPNODE data
■ LDSYSID data
■ LINUXNODE data
■ CPFNODE data
Authority for the NDT Record
You must have MISC2(NDT) authority to maintain data in the NDT.
Define PSTKAPPL Data to the NDT
To assign a session key to an application, enter the command:
TSS ADDTO(NDT) PSTKAPPL(application)
SESSKEY(session-key)
PSTKAPPL
Identifies an application that is assigned a session key for PassTicket processing, and allows one application per command that can be a letter, number, or special character.
Range: Up to eight characters
SESSKEY
Specifies an hexadecimal “password” that is unique to each application defined by a PSTKAPPL keyword. You must supply a SESSKEY with PSTKAPPL.
Range: Up to 16 characters
Example: assign a session key
This example indicates that the session key for KA180987 is A1B2C3:
TSS ADDTO(NDT) PSTKAPPL(KAI80987)
SESSKEY(A1B2C3)
Node Descriptor Table (NDT) Record
Chapter 13: Maintaining Special Security Records 327
PSTKAPPL Processing
When working with PSTKAPPL:
■ The SESSKEY value can be replaced
■ The SESSKEY value cannot be removed
To remove the SIGNMULTI attribute, enter:
TSS REMOVE(NDT) PSTKAPPL(applname) SIGNMULTI
To change the PSTKAPPL:
■ Remove the entry from the NDT
■ Redefine with a new PSTKAPPL value
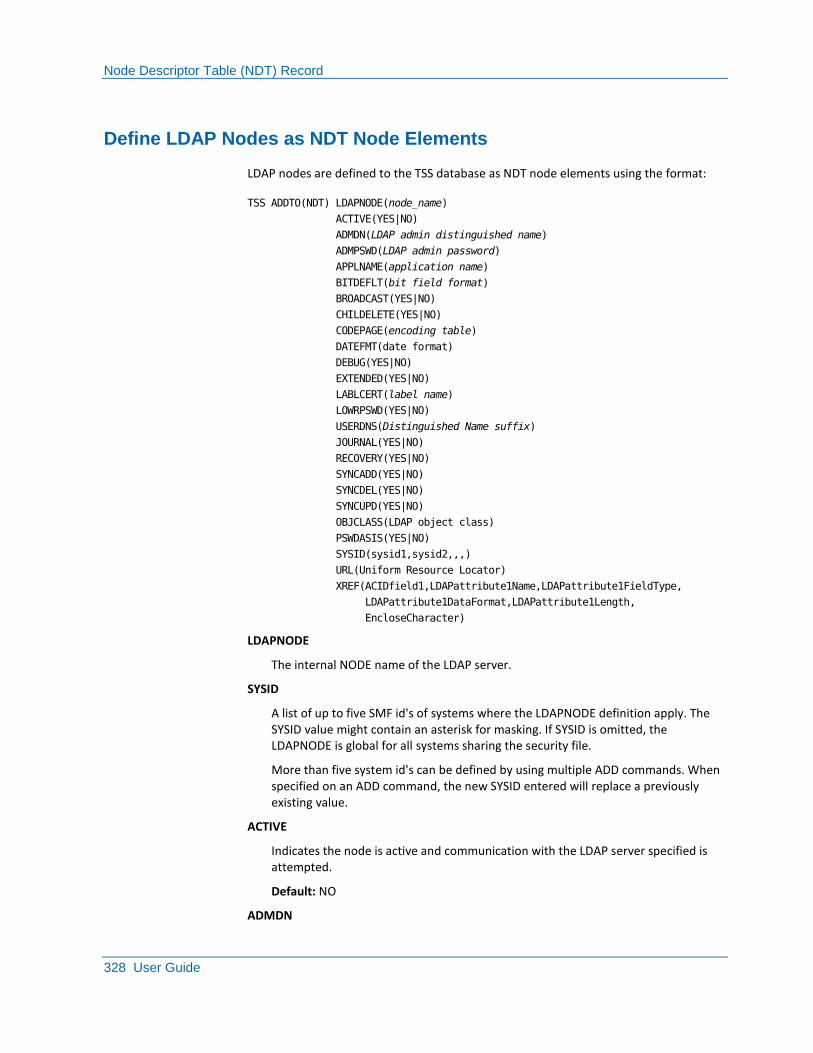
Node Descriptor Table (NDT) Record
328 User Guide
Define LDAP Nodes as NDT Node Elements
LDAP nodes are defined to the TSS database as NDT node elements using the format:
TSS ADDTO(NDT) LDAPNODE(node_name)
ACTIVE(YES|NO)
ADMDN(LDAP admin distinguished name)
ADMPSWD(LDAP admin password)
APPLNAME(application name)
BITDEFLT(bit field format)
BROADCAST(YES|NO)
CHILDELETE(YES|NO)
CODEPAGE(encoding table)
DATEFMT(date format)
DEBUG(YES|NO)
EXTENDED(YES|NO)
LABLCERT(label name)
LOWRPSWD(YES|NO)
USERDNS(Distinguished Name suffix)
JOURNAL(YES|NO)
RECOVERY(YES|NO)
SYNCADD(YES|NO)
SYNCDEL(YES|NO)
SYNCUPD(YES|NO)
OBJCLASS(LDAP object class)
PSWDASIS(YES|NO)
SYSID(sysid1,sysid2,,,)
URL(Uniform Resource Locator)
XREF(ACIDfield1,LDAPattribute1Name,LDAPattribute1FieldType,
LDAPattribute1DataFormat,LDAPattribute1Length,
EncloseCharacter)
LDAPNODE
The internal NODE name of the LDAP server.
SYSID
A list of up to five SMF id's of systems where the LDAPNODE definition apply. The SYSID value might contain an asterisk for masking. If SYSID is omitted, the LDAPNODE is global for all systems sharing the security file.
More than five system id's can be defined by using multiple ADD commands. When specified on an ADD command, the new SYSID entered will replace a previously existing value.
ACTIVE
Indicates the node is active and communication with the LDAP server specified is attempted.
Default: NO
ADMDN
Node Descriptor Table (NDT) Record
Chapter 13: Maintaining Special Security Records 329
Indicates the LDAP administrator distinguished name used for binding to the LDAP server and administering the LDAP request. If there exists any embedded spaces or commas within the ADMNDN, enclose the entire string in quotes.
ADMPSWD
Indicates the LDAP administrator password used in conjunction with the LDAP administrator ID for binding to the LDAP server.
APPLNAME
Specifies the application name of the NDT table data record that contains the TSS administrator's encryption key used for generating PassTickets. The TSS administrator's userid is used in conjunction with the PassTicket for binding to the LDAP server and administering the LDAP request.
BITDEFLT
Indicates the default field type and format that all bit fields are sent to the LDAP server. The default for this field is CHAR_YN. The list of available options for this field includes:
BINARY
Binary 1 or 0 when the bit is ON or OFF, respectively.
CHAR_01
'1' or '0' when the bit is ON or OFF, respectively.
CHAR_YN
'Y' or 'N' when the bit is ON or OFF, respectively.
CHAR_TF
'T' or 'F' when the bit is ON or OFF, respectively.
BINARY_REV
Binary 0 or 1 when the bit is ON or OFF, respectively.
CHAR_REV01
'0' or '1' when the bit is ON or OFF, respectively.
CHAR_REVYN
'N' or 'Y' when the bit is ON or OFF, respectively.
CHAR_REVTF
'F' or 'T' when the bit is ON or OFF, respectively.
BROADCAST
Indicates the node is a broadcast node. All commands and password changes are sent to this node regardless of the LDS attribute setting on the ACID record.
Default: NO
Node Descriptor Table (NDT) Record
330 User Guide
SYNCADD
Specifies that TSS ACID create processing is propagated to the LDAP server.
Default: NO
CHILDELETE
Indicates that children objects are deleted before deleting the base object.
CODEPAGE
Indicates a twenty byte character field to specify which character encoding table is used to translate characters as they are passed into the system. If no CODEPAGE is specified, ASCII ISO8859-1 is assumed.
DATEFMT
Indicates the default format that the date fields are sent to the LDAP server. The date format options available are the following:
■ (Default) MMDDYYYY
■ DDMMYYYY
■ YYYYMMDD
■ MMDDYY1
■ DDMMYY1
■ YYMMDD1
MM
A two digit month.
DD
A two digit day.
YYYY
A four digit year.
YY
A two-digit year.
1
Represents a '/' forward slash delimiter in the date field.
Year designations of 70-99 assume a date in the 20th century (1970-1999); year designations of 00-69 assume a date in the 21st century (2000-2069).
DEBUG
Indicates that node level tracing is enabled or disabled.
Node Descriptor Table (NDT) Record
Chapter 13: Maintaining Special Security Records 331
EXTENDED
Indicates that extended operations are used to enable SSL for the connection to the LDAP server.
LABLCERT
Defines the LABEL of the PERSONAL certificate used, if CLIENT authentication is required for the LDAP server defined by this LDAPNODE record.
USERDNS
Indicates the user distinguished name suffix that refers to the entry on the LDAP server where the changes are applied.
Maximum length: 255
Note: If there exists any embedded spaces or commas within the USERDNS, enclose the entire string in quotes.
JOURNAL
Specifies whether journaling of LDAP outbound traffic is enabled.
OBJCLASS
Specifies the LDAP object class used when an LDAP entry is created. The object class defines the attributes the LDAP directory entry might contain.
Default: TSSUSER.
SYNCDEL
Specifies that TSS ACID remove processing is propagated to the LDAP server.
Default: NO.
SYNCUPD
Specifies that TSS ACID add/rep processing is propagated to the LDAP server.
Default: NO
RECOVERY
Indicates that recovery processing is enabled for the node.
Default: YES
PSWDASIS
If the password field is specified in the XREF field, the PSWASIS option indicates if the password is propagated as it was entered during a signon password change. Any changes made to the password via the TSS command will always be propagated in upper case even if this option is YES. If this option is set to NO then signon password changes are sent in upper case.
Default: YES
Node Descriptor Table (NDT) Record
332 User Guide
PSWDLOWR
Specifies if the case sensitivity format of the user's password is propagated.
Default: NO
PSWDLOWR works in conjunction with the PSWDASIS function. When:
■ PSWDASIS(NO) and PSWDLOWR(YES) The password is sent in the lowercase.
■ PSWDASIS(YES) and PSWDLOWR(YES) PSWDASIS overrides PSWDLOWR and passwords are sent as is.
■ PSWDASIS(NO) and PSWDLOWR(NO) The password is sent in uppercase.
When a user changes a password during system entry validation, LDS automatically propagates the new password to the LDAP servers interested in the password field. The user receives no indication that LDS processing was involved. LDS must be active and the LDS option must be specified in the ACID.
URL
Specifies the Uniform Resource Locator (URL) used to identify the LDAP server. There is a maximum of three URL entries. The entries specify the primary followed by the backups.The syntax of the LDAP URL is:
ldap[s]:// [<host>[:CA Portal]]
ldap
Specifies a connection using the LDAP protocol.
ldaps
Specifies an SSL LDAP connection.
host
The name or IP address of the LDAP server host.
port
The port number of the LDAP server.
XREF
Specifies the names of the TSS ACID fields and the corresponding LDAP directory attribute fields synchronized to the LDAP directory.
Node Descriptor Table (NDT) Record
Chapter 13: Maintaining Special Security Records 333
Define LDS Global Options as NDT LDSYSID Elements
LDS global options are defined to the TSS database as NDT LDSYSID elements using the following syntax:
TSS ADDTO(NDT) LDSYSID(system smfid)
DEBUG(YES/NO)
RETRY(nnn)
TIMEOUT(nnn)
JOURNAL(YES|NO)
JOURNALDSN(dsname)
KEYRING(ring_name)
LDSYSID
The SMFID of the system where the LDS global options apply.
DEBUG
Indicates that global tracing of all LDAP nodes is enabled or disabled.
JOURNAL
Specifies whether journaling of all LDAP outbound traffic is enabled.
JOURNALDSN
Specifies the Dataset name of the file used for writing journal records when LDS journaling is enabled.
RETRY
Specifies the number of times the LDS server task will retry a failed send operation to the remote LDAP directory, before deactivating the LDAP node.
Default: 3
TIMEOUT
Specifies time interval in seconds at which the LDS server task will stop waiting for a response from the remote LDAP directory and schedule a retry attempt for the stalled send operation.
Default: 5
KEYRING
Specifies the name of the SSL keyring holding the digital certificates which are used by LDS for SSL authentication.
Node Descriptor Table (NDT) Record
334 User Guide
Define Linux Nodes as NDT Node Elements
Linux nodes are defined to the TSS database as NDT node elements using the following syntax:
TSS ADDTO(NDT) LINUXNODE(node_name)
[IPADDR(ip_address)
FACILITY(facility_name)
ACTIVE(YES|NO)]
LINUXNODE
Linux system name.
Maximum length: 246 characters
IPADDR
IP address for the Linux system.
FACILITY
Facility name to use of the system entry validation.
ACTIVE
Indicates whether the node is active and whether system validation is performed.
Default: NO
Change Values in the NDT
To replace an application, enter the command:
TSS REPLACE(NDT) PSTKAPPL(application)
Example: change an NDT value
This example replaces application KA180987 with application KA180999:
TSS REPLACE(NDT) PSTKAPPL(KA180999)
Node Descriptor Table (NDT) Record
Chapter 13: Maintaining Special Security Records 335
Remove Data From the NDT
To remove an application and its accompanying session key from the NDT, enter the command
TSS REMOVE(NDT) PSTKAPPL(application)
Example: remove NDT data
This example removes the application KA180987 and its associated session key:
TSS REMOVE(NDT) PSTKAPPL(KAI80987)
List the NDT
There are different ways you can list the NDT Record.
To list associated applications only, enter:
TSS LIST(NDT)
In the remaining examples, DATA specifies the particular data type that is listed.
To list subtype records but not session keys, enter:
TSS LIST(NDT) DATA(ALL)
To list session keys and associated applications, enter:
TSS LIST(NDT) DATA(SESSKEY)
To list only the basic ACID information (such as name sizes and dates), enter:
TSS LIST(NDT) DATA(NONE)
To list all records for the given node type (such as LDAP, LINUX, CPF), enter:
TSS LIST(NDT) DATA(LDAP|LINUX|CPF)
To display all or a specific LDAPNODE definition, enter:
TSS LIST(NDT) LDAPNODE(ALL|testnode)
RDT Record
336 User Guide
RDT Record
The RDT is a reserved ACID that contains:
■ Predefined resources classes, such as VOLUME, DATASET, and TERMINAL
■ User-defined resource classes
There are 126 RESCODEs available for user defined resource classes that can be defined in the RDT. If you add a RESCLASS without a RESCODE, CA Top Secret searches for the next available user RESCODE and adds it automatically.
Authority for the RDT
To manage the RDT, the administrator must have:
■ MISC1(RDT) authority to specify attributes, access levels, default access level as well as listing the RDT Record
■ MISC8(LISTRDT) authority to limit RDT administrative functions to listing the RDT Record
System Predefined Resources
CA Top Secret reserved resource classes use a mixture of general and prefixed resource classes. RESCODEs are in the 040 to 0FF hexadecimal range and 140 to 1FF hexadecimal range.
The product enforces the following restrictions regarding ATTR attributes in the RESCLASS definition:
■ The MASK attribute cannot be altered. For predefined resource classes with RESCODEs 040 to 0FF, a class that was originally defined as NOMASK can be changed to MASK (see page 345). However, a class that was defined as MASK cannot be changed to NOMASK.
■ You can make changes only to the EXIT, DEFPROT, MERGE, and ALLMERGE attributes.
■ Resource names can be up to 8 characters in an ADDTO command for RIE resource ownerships. This value cannot be altered for predefined resource classes.
■ Resource names can be up to 26 characters in an ADDTO command for PIE resource ownerships. This value cannot be altered for predefined resource classes.

RDT Record
Chapter 13: Maintaining Special Security Records 337
User Defined Resource Classes
You may need to define non-CA Top Secret resource classes in the following situations:
■ IBM products that requirement a non-fixed or installation-defined resource class name.
■ OEM software packages that have unique resource class names not defined by CA Top Secret.
■ Installation-written security with its own resource classes, and any other customized site applications with resources and security of its own. For example, a site-written application may require the definition of a resource class of $PROC to provide JCL procedure security as checked by an installation-written JES exit.
Installation-written security may require separate naming conventions and access levels.
Prefixed Resource Class (PIE)
Internally, a Prefixed Resource class is called a PIE resource. A Prefixed Resource class has the characteristics:
■ Permission always allows masking characters
■ Permission resource name length is normally up to 44 characters unless modified by MAXLEN
■ Ownership resource name length is normally up to 26 characters, unless MAXLEN is smaller
General Resource Class (RIE)
Internally a General Resource class is known as a RIE resource. A General Resource class has the characteristics:
■ Permission allows masking characters only if the resource class is defined with ATTR(MASK)
■ Permission resource name length is normally up to eight characters unless modified by MAXLEN
■ Ownership resource name length is normally up to eight characters unless MAXLEN is smaller
RDT Record
338 User Guide
Define a Resource to the RDT
To define a new resource class to the RDT, enter the command:
TSS ADDTO(RDT) RESCLASS(resource-class-name)
RESCODE(hex-code)
MAXLEN(maxpermit)
[ATTR(attribute-list)]
[ACLST(access-level-list)]
[DEFACC(default-access-level)]
RESCLASS
Defines a resource-class-name. You can only specify one resource-class-name per command. The name can contain letters, numbers, or national characters (@, #, $). The TSS command, logging, and the security interface honor this name. The beginning characters of a new RESCLASS name cannot match the beginning characters of an existing RESCLASS name. For example, VOLUME is an existing predefined RESCLASS name; therefore, it is not possible to create a new RESCLASS name called VOL.
Range: Up to eight characters
Tip: To avoid any possibility of a user-defined resource conflicting with any future CA Top Secret predefined resource class, it is recommended that the user-defined resource class have a national character (@,#,$) or number (0-9) in one of the first four characters of the name.
RESCODE
(Optional) Used internally by CA Top Secret to abbreviate the resource class in the user’s security record and audit information.
If you enter a RESCODE, select from the following hexadecimal values:
■ 001 to 03F (RIE)
■ 101 to 13F (PIE)
If not specified, RESCODE defaults to the first available unused user-definable value, RIE or PIE.
To define a RIE or PIE resource specifically because of its MAXOWN value, you must specify an appropriate RESCODE value.
MAXLEN
Defines the maximum length name in a PERMIT command allowed for this RESCLASS; sets the attribute MAXPERMIT displayed by the LIST(RDT) command; inconsistent with ATTR(SHORT)/(LONG) .
Optional parameters that can be used when defining a resource to the RDT Record or when modifying an existing resource are.
Range: 1 to 255
RDT Record
Chapter 13: Maintaining Special Security Records 339
ATTR
Defines one or more of the following operands:
■ EXIT—Calls the installation exit for this resource class.
■ NOEXIT—Deactivates the installation exit.
■ DEFPROT—Protects this resource class by default.
■ NODEFPROT—Deactivates default protection.
■ GENERIC—Supports generic prefixing for this resource class.
■ NONGENERIC—Deactivates generic prefixing and treats the resource names as fully qualified names.
■ PRIVPGM—Supports privileged program for this resource class.
■ NOPRIVPGM—Deactivates privileged program support.
■ LIBRARY—PIE only. Supports LIBRARY with PRIVPGM for this resource class.
■ NOLIB—PIE only. Deactivates support for a library with privileged program.
■ LONG—Equivalent to MAXLEN(44): indicates that the maximum length resource name for PERMIT with this RESCLASS is 44.
■ SHORT—(default) Equivalent to MAXLEN(8): indicates that the maximum length resource name for PERMIT with this RESCLASS is 8.
■ MERGE—Overrides the AUTH control option and uses the MERGE algorithm to determine the processing record for security validation of this RESCLASS. For a description of the algorithm, see the chapter “The Resource Access Security Validation Algorithm.”
■ NOMERGE—Removes the MERGE attribute from the resource.
■ ALLMERGE—Overrides the AUTH control option and uses the MERGE algorithm to determine the processing record for security validation of this RESCLASS. For a description of the algorithm, see the chapter “The Resource Access Security Validation Algorithm.”
■ NOALLMERGE—Removes the ALLMERGE attribute from the resource.
■ VMUSER—Supports VMUSER for this resource class.
■ NOVMUSER—Deactivates VMUSER support.
■ MASK—RIE only. Supports masking for this resource class.
■ NOMASK—RIE only. Deactivates masking for this resource class.
For PRIVPGM, LIBRARY, and VMUSER the security driver must also support these features. For a user-defined resource, the software that generates the security calls must supply additional parameters in order to satisfy PRIVPGM, LIBRARY, and VMUSER restrictions.
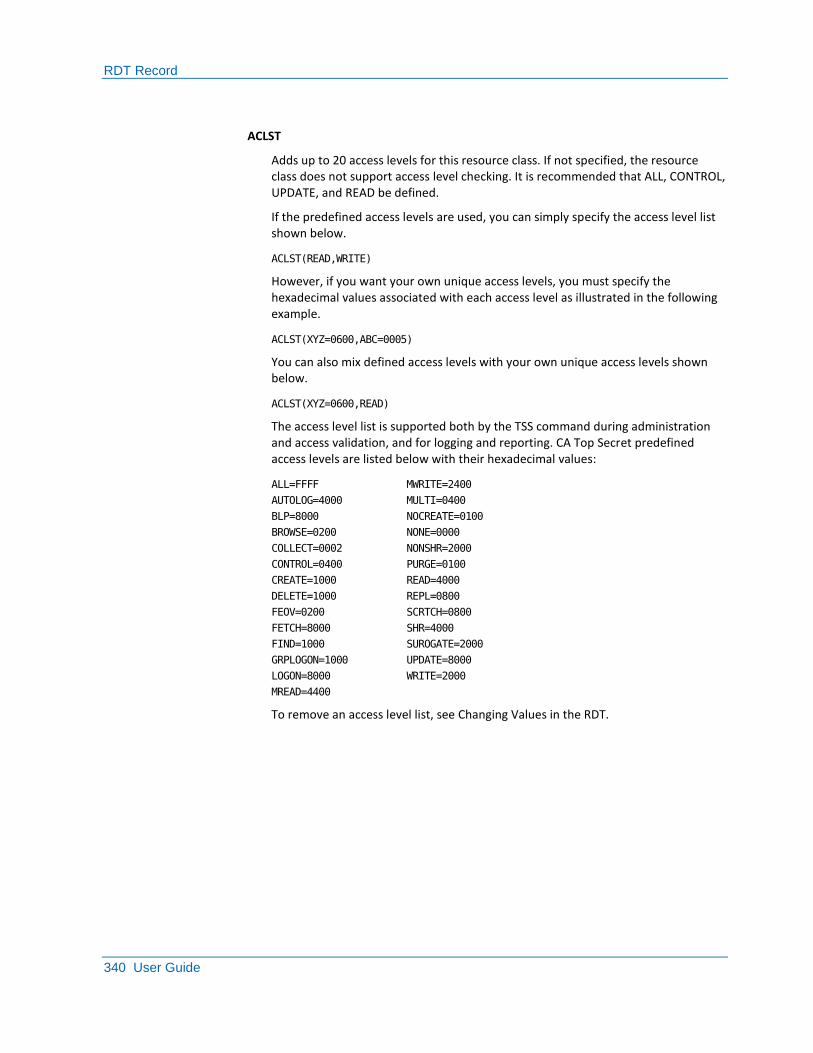
RDT Record
340 User Guide
ACLST
Adds up to 20 access levels for this resource class. If not specified, the resource class does not support access level checking. It is recommended that ALL, CONTROL, UPDATE, and READ be defined.
If the predefined access levels are used, you can simply specify the access level list shown below.
ACLST(READ,WRITE)
However, if you want your own unique access levels, you must specify the hexadecimal values associated with each access level as illustrated in the following example.
ACLST(XYZ=0600,ABC=0005)
You can also mix defined access levels with your own unique access levels shown below.
ACLST(XYZ=0600,READ)
The access level list is supported both by the TSS command during administration and access validation, and for logging and reporting. CA Top Secret predefined access levels are listed below with their hexadecimal values:
ALL=FFFF MWRITE=2400
AUTOLOG=4000 MULTI=0400
BLP=8000 NOCREATE=0100
BROWSE=0200 NONE=0000
COLLECT=0002 NONSHR=2000
CONTROL=0400 PURGE=0100
CREATE=1000 READ=4000
DELETE=1000 REPL=0800
FEOV=0200 SCRTCH=0800
FETCH=8000 SHR=4000
FIND=1000 SUROGATE=2000
GRPLOGON=1000 UPDATE=8000
LOGON=8000 WRITE=2000
MREAD=4400
To remove an access level list, see Changing Values in the RDT.
RDT Record
Chapter 13: Maintaining Special Security Records 341
DEFACC
Sets the default access level CA Top Secret assigns on a TSS PERMIT. If not specified, the default access is NONE. The predefined CA Top Secret access levels with their respective hexadecimal values are listed above.
The access level specified by DEFACC must match the applicable access levels indicated by the ACLST entries for that resource. If they do not match; if no ACLST was specified, you will receive a TSS0282E error message.
When creating a user-defined resource class, remember the following rule: If the access level is not one that is known to CA Top Secret, you must specify the hexadecimal value in the DEFACC as well as the ACLST field shown below.
TSS ADDTO(RDT) RESCLASS($NEWRES)
RESCODE(04)
ACLST(ALLOW=4000)
DEFACC(ALLOW=4000)
Examples: define resources to the RDT
This example adds a new resource class to the RDT Record with READ and WRITE access levels:
TSS ADDTO(RDT) RESCLASS($PAY)
RESCODE(12)
ACLST(WRITE,READ)
This example gives administrative authority for ownership and grants users access to a new resource class $PAY:
TSS ADMIN(ADM01) $PAY(OWN,XAUTH)
ACCESS(READ,WRITE)
This example adds this new resource class name $PAY to a department that is within your scope:
TSS ADDTO(DEPT01) $PAY(401K)
401K is a resource name that is now accessed by the resource class $PAY.
This example permits this resource to USER01 with READ access:
TSS PERMIT(USER01) $PAY(401K)
ACCESS(READ)
RDT Record
342 User Guide
Change Values in the RDT
You can modify an existing resource class to change its attributes. For example, you can add default protection by assigning the DEFPROT attribute to the resource classes entry in the RDT.
To change the values of previously defined resource classes, enter the command:
TSS REPLACE(RDT) RESCLASS(resource-class-name)
ATTR(attribute-list)
ACLST(access-level-list)
DEFACC(default-access-level)
Examples: change RDT values
This example removes default protection from the resource class #PRODUCT:
TSS REPLACE(RDT) RESCLASS(#PRODUCT)
ATTR(NODEFPROT)
This example adds #PRODUCT to the RDT Record and gives it default protection:
TSS ADDTO(RDT) RESCLASS(#PRODUCT)
RESCODE(10)
ATTR(DEFPROT)
This example removes an existing READ access and replaces it with UPDATE access:
TSS REPLACE(RDT) RESCLASS(#PRODUCT)
ACLST(UPDATE)
This example keeps the READ access level and adds the UPDATE level:
TSS REPLACE(RDT) RESCLASS(#PRODUCT)
ACLST(READ,UPDATE)
This example removes an access level entirely from the access-level-list:
TSS REPLACE(RDT) RESCLASS(#PRODUCT)
ACLST()
This example removes the existing READ access and replaces it with NONE.
TSS REPLACE(RDT) RESCLASS(#PRODUCT)
DEFACC(NONE)
RDT Record
Chapter 13: Maintaining Special Security Records 343
PIE Resource Masking
New PIE user-defined resource classes are automatically MASK. They cannot be NOMASK.
To change existing non-maskable resources to support masking, enter the command:
TSS REPLACE(RDT) RESCLASS(resclass)
ATTR(MASK)
This command converts the resource to support masking, although the maximum number will remain eight.
Resources Longer than Eight Characters
If you have an existing resource that you want to own which is longer than eight characters:
■ Revoke and remove all users of that resource class
■ Remove the resclass from the RDT
■ Re-create the resource class
■ Create user-defined resources to support ownership longer than eight characters. For example:
TSS ADDTO(RDT) RESCLASS(resclass) ATTR(MASK)
■ List the resource class to show several new features such as: a MASKABLE or NOMASK resource, a MAXOWN(nn) attribute displaying the maximum value for an ownable resource, and a MAXPERMIT(nnn) attribute displaying the maximum value for a permitted resource.
■ Define lengths up to 255 characters with the MAXLEN(nnn) keyword. ATTR(LONG) implies MAXLEN(44). ATTR(SHORT) implies MAXLEN(8).
RDT Record
344 User Guide
Resource Masking Implications
Before altering an existing resource class from NOMASK to MASK (or the reverse):
■ Revoke all permissions for the resource class
■ Remove all existing ownerships
Although the LIST command displays MASK and NOMASK resources as if the names were identical, the resource names of MASKABLE resources are stored differently from NONMASKABLE resources.
Once you have altered a resource class from NOMASK to MASK, ownerships and permissions entered under the NOMASK regime continue to be honored, but these resources cannot be altered through administration commands. Permissions that contain mask characters but which were entered under a NOMASK regime are not interpreted as masked permissions. You cannot enter what appear to be maskable permissions until the resource class was actually altered to ATTR(MASK). Such resource are flagged by the LIST statement with the following to signify that it will not be treated as a mask:
ATTRIB=NONMASK
Mixing MASK and NOMASK
There are many anomalies associated with maintaining a mixture of MASK and NOMASK ownerships and permissions. For example:
■ Ownerships entered under the old regime will not be found by TSS WHOOWNS or TSS WHOHAS under the new regime
■ Administration of resources defined under the previous regime may not be found by administration commands to REVOKE, REMOVE or to PERMIT or ADD
If you have a mixture of MASK and NOMASK resources:
■ You can administer old regime resources reliably only by modifying the RESCLASS back to the old MASK/NOMASK attribute
■ New regime resources cannot be administered until the RESCLASS is set back to its new regime value
RDT Record
Chapter 13: Maintaining Special Security Records 345
Remove a Resource from the RDT
Removing a resource class from the RDT requires that all owned resources belonging to that particular resource class were previously removed.
To remove a user-defined resource class definition, enter the command:
TSS REMOVE(RDT) RESCLASS(resource-class-name)
Example: remove a resource from the RDT
This example removes #PRODUCT from the RDT:
TSS REMOVE(RDT) RESCLASS(#PRODUCT)
Change Non-Maskable Resources to Support Masking
For predefined resource classes with RESCODEs 040 to 0FF, a class that was originally defined as NOMASK can be changed to MASK. Masking provides the ability to group sets of resources whose names share similar characteristics.
Note: A class that is defined as MASK cannot be changed to NOMASK.
Follow these steps:
1. Identify ownership for the resource class:
a. Issue the following command to see all ownerships:
TSS WHOOWNS resclass(*)
resclass
Specifies the name of the resource class.
The product displays output that shows ownership information about these resources.
b. Issue the following command for each 'xxxx' that shows up in the WHOOWNS output:
TSS WHOHAS resclass(xxxx)
The product displays output information regarding who has access to these resources.
2. Review the output, then issue TSS REVOKE command information to revoke all permits for the resource class.
3. Issue TSS REMOVE command information to remove all ownerships in the resource class.
The product removes ownerships as instructed.
RDT Record
346 User Guide
4. Change the resource class from NOMASK to MASK.
The resource class now supports masking.
5. Issue TSS ADDTO command information to reassign all ownerships that you removed.
The product reassigns ownerships as instructed.
6. Issue TSS PERMIT command information to redo all the permits that you revoked.
The product restores permits as instructed.
More information:
Masking (see page 164) Resource Masking Implications (see page 344)
List the Entire RDT Record
Use the LIST command to list the entire RDT record.
To list the RDT record, enter the command:
TSS LIST(RDT)
List by PREFIX
When the keyword PREFIX is specified all record matching is performed using the data entered as a partial key.
To list the RDT table using the prefix option, enter the command:
TSS LIST(RDT) RESCLASS(xxxxxxxx)
PREFIX
Example: list a prefix
This example lists all RDT entries that have a RESCLASS that starts with TSO:
TSS LIST(RDT) RESCLASS(TSO) PREFIX

RDT Record
Chapter 13: Maintaining Special Security Records 347
List by Resource Class
To list a resource class, enter the command:
TSS LIST(RDT) RESCLASS(resource-class-name)
Example: list a resource class
This example lists data relating to the #PRODUCT resource class:
TSS LIST(RDT) RESCLASS(#PRODUCT)
List by Resource Code
To list a specific resource code, enter the command:
TSS LIST(RDT) RESCODE(xxx)
Example: test for an unused RESCODE
This example determines if a RESCODE is already used:
TSS LIST(RDT) RESCODE(123)
SDT Record
348 User Guide
SDT Record
The SDT record is a reserved ACID for internal, non-volatile data. The SDT stores:
CALENDAR records
Controls access to calendars
EIM PROFILE records (EIMPROF)
Specifies information used by EIM to connect to an EIM domain
KERBLINK records
Define and map foreign principal names to CA Top Secret user Ids.
KEYSMSTR records
Specifies encryption keys.
MAP records (MAPREC)
Controls access to the MAP record associated with an OTRAN or PPT resource. MAP records support Screen Level Protection (SLP).
MASK records (MASKREC)
Controls access to a MASK record associated with the FCT.
RLP records (RECORD)
Provides Record Level Protection for the FCT.
SELECT records
Controls access to a SELECT record associated with an FCT PPT, or OTRAN resource.
TIME records (TIMEREC)
Controls access to the TIME record associated with any resource.
These unique user-defined record IDs are added to the SDT using TSS ADDTO(SDT). When CA Top Secret is initialized, the record elements currently defined are loaded into memory. They are then used as part of the security enforcement based on the appropriate authorizations.
Authority for the SDT Record
To manage the SDT, you must have:
■ MISC3(SDT) for full authority
■ MISC8(LISTSDT) to limit authority to list the SDT Record only
SDT Record
Chapter 13: Maintaining Special Security Records 349
Define CALENDAR Records to the SDT
Use the ADDTO command to add a calendar record.
To define a new CALENDAR record to the SDT, enter the command:
TSS ADDTO(SDT) CALENDAR(cal-name)
DESCRIPT(descript-name)
YEAR(yyyy)
DAYS(days,...)
EXCLUDE(mm/dd,mm/dd,...)
INCLUDE(mm/dd,mm/dd,...)
CALENDAR
Specifies an eight-character, user-defined calendar ID that must be unique for each calendar. It can contain letters, numbers, and special characters.
DESCRIPT
Designates an optional 32-character, user-description field that is used as a logical name for this record. If the description field contains blanks, you must enclose it in single quotes.
YEAR
Specifies the year in which this calendar record is active; optional. If not specified, the current year is used (the default). A defined calendar expires at the end of the year (12/31/xx). To keep the calendar active, you must redefine it specifying the new year for yyyy. If the new calendar is not defined by January 1, then the permission will no longer be valid and the expected access will no longer exist.
DAYS
Indicates which days of the week to include in the calendar. Valid entries are: SUNDAY, MONDAY, TUESDAY, WEDNESDAY, THURSDAY, FRIDAY, SATURDAY, WEEKDAYS, and WEEKENDS. When defining a calendar, it is important to remember that all days to be included in the calendar must be explicitly specified.
EXCLUDE
Lists specific dates that are to be excluded from the calendar. These dates are in addition to the days specified on the DAYS keyword. EXCLUDE has no effect unless DAYS or INCLUDE match the dates excluded.
INCLUDE
Lists specific dates that are to be included in the calendar. These dates are in addition to the days specified on the DAYS keyword.
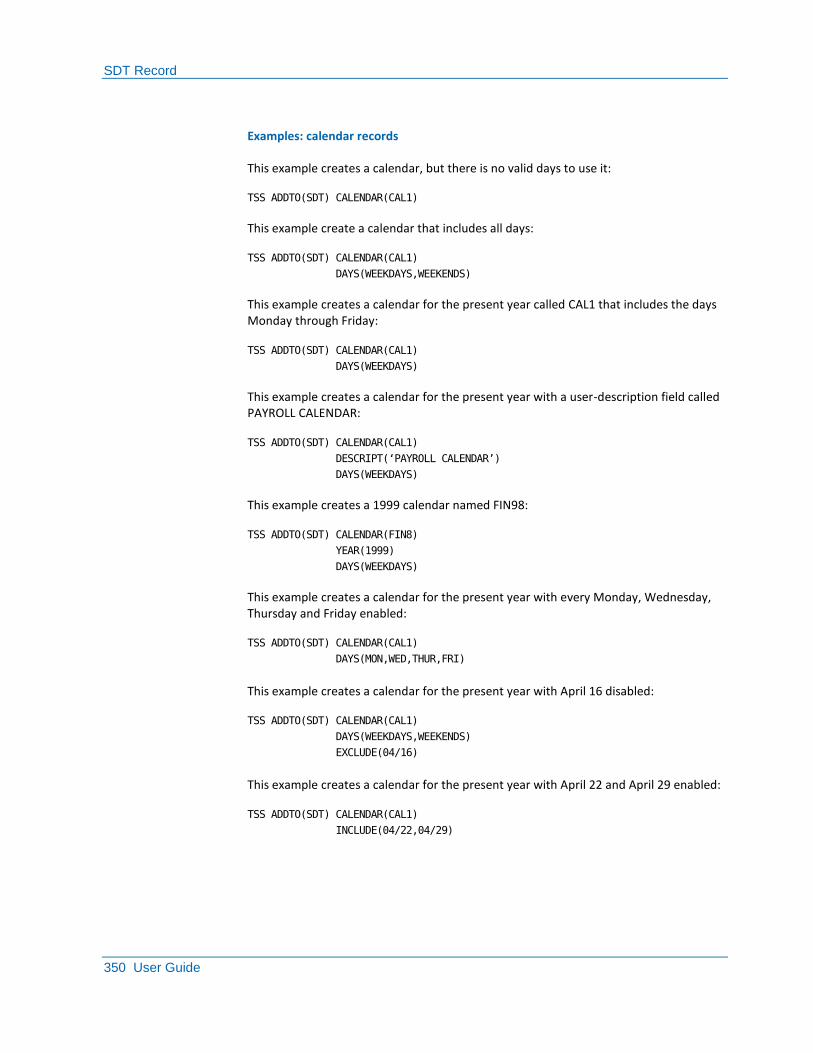
SDT Record
350 User Guide
Examples: calendar records
This example creates a calendar, but there is no valid days to use it:
TSS ADDTO(SDT) CALENDAR(CAL1)
This example create a calendar that includes all days:
TSS ADDTO(SDT) CALENDAR(CAL1)
DAYS(WEEKDAYS,WEEKENDS)
This example creates a calendar for the present year called CAL1 that includes the days Monday through Friday:
TSS ADDTO(SDT) CALENDAR(CAL1)
DAYS(WEEKDAYS)
This example creates a calendar for the present year with a user-description field called PAYROLL CALENDAR:
TSS ADDTO(SDT) CALENDAR(CAL1)
DESCRIPT(‗PAYROLL CALENDAR‘)
DAYS(WEEKDAYS)
This example creates a 1999 calendar named FIN98:
TSS ADDTO(SDT) CALENDAR(FIN8)
YEAR(1999)
DAYS(WEEKDAYS)
This example creates a calendar for the present year with every Monday, Wednesday, Thursday and Friday enabled:
TSS ADDTO(SDT) CALENDAR(CAL1)
DAYS(MON,WED,THUR,FRI)
This example creates a calendar for the present year with April 16 disabled:
TSS ADDTO(SDT) CALENDAR(CAL1)
DAYS(WEEKDAYS,WEEKENDS)
EXCLUDE(04/16)
This example creates a calendar for the present year with April 22 and April 29 enabled:
TSS ADDTO(SDT) CALENDAR(CAL1)
INCLUDE(04/22,04/29)
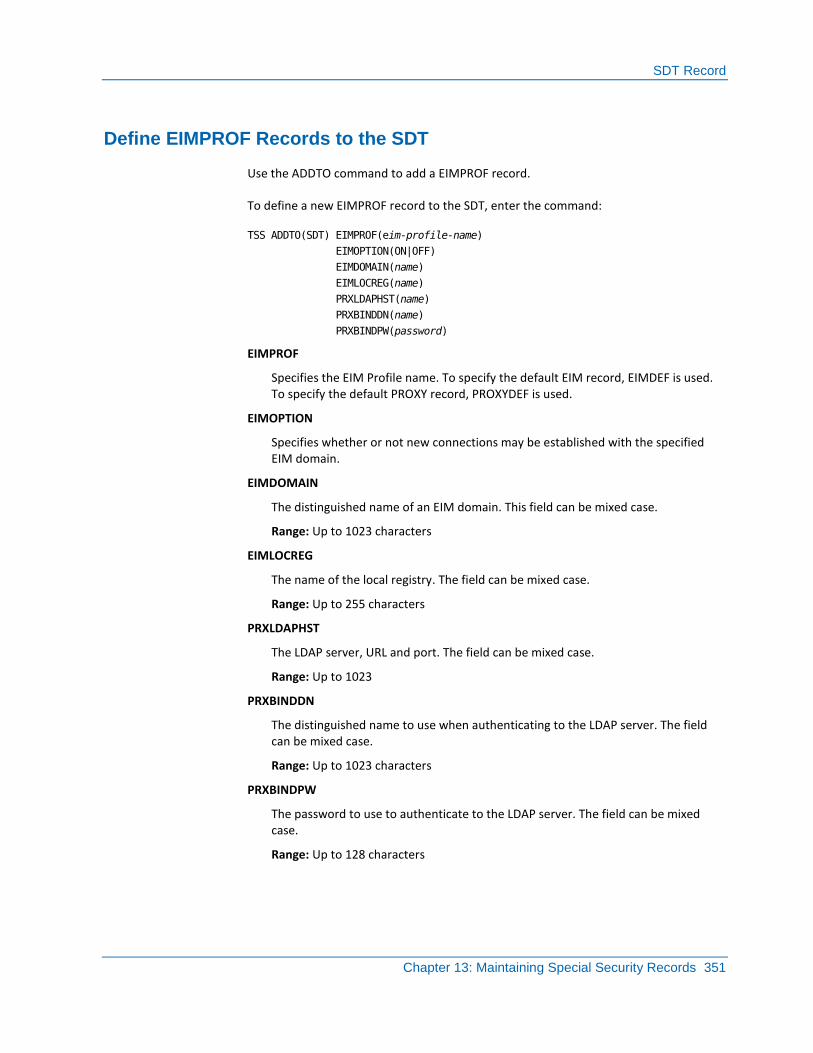
SDT Record
Chapter 13: Maintaining Special Security Records 351
Define EIMPROF Records to the SDT
Use the ADDTO command to add a EIMPROF record.
To define a new EIMPROF record to the SDT, enter the command:
TSS ADDTO(SDT) EIMPROF(eim-profile-name)
EIMOPTION(ON|OFF)
EIMDOMAIN(name)
EIMLOCREG(name)
PRXLDAPHST(name)
PRXBINDDN(name)
PRXBINDPW(password)
EIMPROF
Specifies the EIM Profile name. To specify the default EIM record, EIMDEF is used. To specify the default PROXY record, PROXYDEF is used.
EIMOPTION
Specifies whether or not new connections may be established with the specified EIM domain.
EIMDOMAIN
The distinguished name of an EIM domain. This field can be mixed case.
Range: Up to 1023 characters
EIMLOCREG
The name of the local registry. The field can be mixed case.
Range: Up to 255 characters
PRXLDAPHST
The LDAP server, URL and port. The field can be mixed case.
Range: Up to 1023
PRXBINDDN
The distinguished name to use when authenticating to the LDAP server. The field can be mixed case.
Range: Up to 1023 characters
PRXBINDPW
The password to use to authenticate to the LDAP server. The field can be mixed case.
Range: Up to 128 characters
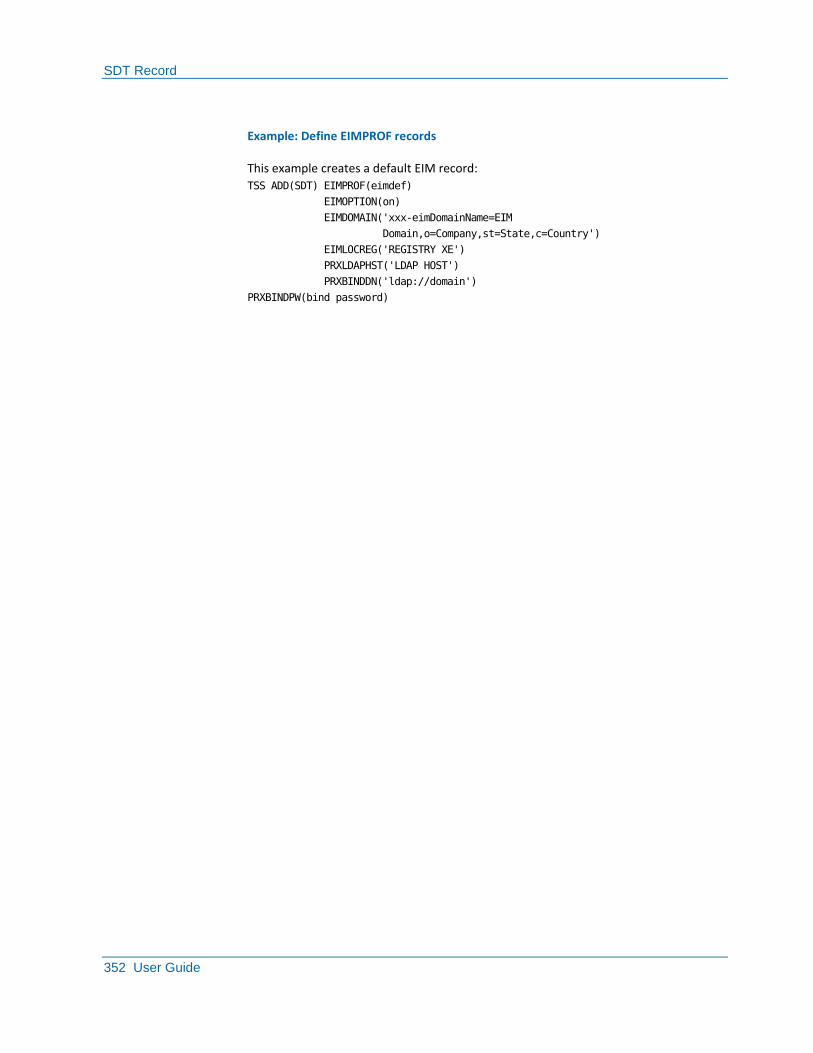
SDT Record
352 User Guide
Example: Define EIMPROF records
This example creates a default EIM record:
TSS ADD(SDT) EIMPROF(eimdef)
EIMOPTION(on)
EIMDOMAIN('xxx-eimDomainName=EIM
Domain,o=Company,st=State,c=Country')
EIMLOCREG('REGISTRY XE')
PRXLDAPHST('LDAP HOST')
PRXBINDDN('ldap://domain')
PRXBINDPW(bind password)

SDT Record
Chapter 13: Maintaining Special Security Records 353
Define KERBLINK Records to the SDT
Use the ADDTO command to add a KERBLINK record.
To define a new KERBLINK record to the SDT, enter the command:
TSS ADDTO(SDT) KERBLINK(link_name)
LINKNAME(fully—qualified—name)
KERBUSER(local_acid)
KERBLINK
Identifies the record. Must be a unique name within the KERBLINK SDT record type.
Range: 1 to 8 characters
LINKNAME
A string which specifies the URL of the foreign realm in which the foreign principal user is defined. The KERBNAME under which the associated (foreign) ACID is defined. The format of this string is:
/.../foreign_realm_URL/foreign_principal_KERBNAME
Note: If the foreign_principal_KERBNAME is not supplied, the definition refers to all Kerberos principal users defined in that specific foreign realm.
KERBUSER
The ACID in the local system to which requested activities is assigned in the local system.
Example: Define KERBLINK records
This example maps USER01 and USER02 foreign principal names to their individual user IDs on the local z/OS system:
TSS ADDTO(SDT) KERBLINK(KERBLK1)
LINKNAME('KERB.CA.COM/USER01')
KERBUSER(PAUL01)
TSS ADDTO(SDT) KERBLINK(KERBLK2)
LINKNAME('KERB.CA.COM/USER02')
KERBUSER(NADIA01)

SDT Record
354 User Guide
Define KEYSMSTR Records to the SDT
Use the ADDTO command to add a KEYSMSTR record.
Note: Only the MSCA can specify the KEYSMSTR keyword.
To define a new KEYSMSTR record to the SDT, enter the command:
TSS ADD(SDT) KEYSMSTR(LDAP.BINDPW.KEY)
DCENCRY(CCCCCCCCCCCCCCCC)
KEYMASK|KEYENCRY]
DCENCRY
A 16-character hexadecimal encryption key value.
KEYMASK
(Default) indicates that the DCENCRY key is used to mask the user's DCE password when it is stored in the DCEKEY field of the user's acid record.
KEYENCRY
Indicates that the DCENCRY key is used to encrypt the user's DCE password when it is stored in the user's acid record.
Example: Define KEYSMSTR records
This example define the string C1C2C3C4C5C6C7C8 as the encryption key value for the LDAP PROXY BINDPW key:
TSS ADD(SDT) KEYSMSTR(LDAP.BINDPW.KEY)
DCENCRY(C1C2C3C4C5C6C7C8)
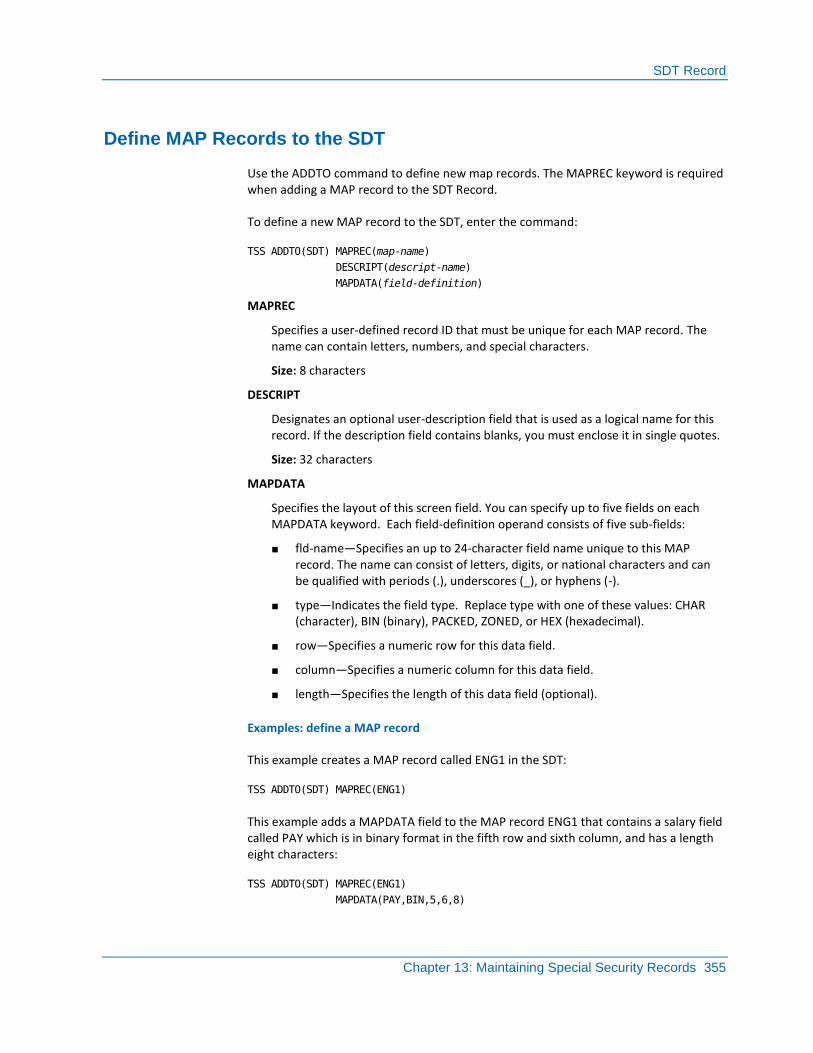
SDT Record
Chapter 13: Maintaining Special Security Records 355
Define MAP Records to the SDT
Use the ADDTO command to define new map records. The MAPREC keyword is required when adding a MAP record to the SDT Record.
To define a new MAP record to the SDT, enter the command:
TSS ADDTO(SDT) MAPREC(map-name)
DESCRIPT(descript-name)
MAPDATA(field-definition)
MAPREC
Specifies a user-defined record ID that must be unique for each MAP record. The name can contain letters, numbers, and special characters.
Size: 8 characters
DESCRIPT
Designates an optional user-description field that is used as a logical name for this record. If the description field contains blanks, you must enclose it in single quotes.
Size: 32 characters
MAPDATA
Specifies the layout of this screen field. You can specify up to five fields on each MAPDATA keyword. Each field-definition operand consists of five sub-fields:
■ fld-name—Specifies an up to 24-character field name unique to this MAP record. The name can consist of letters, digits, or national characters and can be qualified with periods (.), underscores (_), or hyphens (-).
■ type—Indicates the field type. Replace type with one of these values: CHAR (character), BIN (binary), PACKED, ZONED, or HEX (hexadecimal).
■ row—Specifies a numeric row for this data field.
■ column—Specifies a numeric column for this data field.
■ length—Specifies the length of this data field (optional).
Examples: define a MAP record
This example creates a MAP record called ENG1 in the SDT:
TSS ADDTO(SDT) MAPREC(ENG1)
This example adds a MAPDATA field to the MAP record ENG1 that contains a salary field called PAY which is in binary format in the fifth row and sixth column, and has a length eight characters:
TSS ADDTO(SDT) MAPREC(ENG1)
MAPDATA(PAY,BIN,5,6,8)
SDT Record
356 User Guide
Calculate a Value for Column
If the screen image was built by CICS BMS(DFHBMS), use the value specified in the DFHMDF POS field and add 1 to the column value.
For example:
PANA DFHMDF POS=(3,24),LENGTH=5
The format of the TSS command is:
TSS ADDTO(SDT) MAPREC(PANA)
MAPDATA(code,CHAR,3,25,5)
If you did not use BMS to build the screen image or you do not have access to the CICS BMS MAP source, you can calculate the column by physically counting (from 1) the offset to the field column on the screen.
SDT Record
Chapter 13: Maintaining Special Security Records 357
Define MASK Records to the SDT
The MASKREC keyword is required when adding a MASK record to the SDT Record.
To define a new MASK record to the SDT, enter the command:
TSS ADDTO(SDT) MASKREC(mask-name)
DESCRIPT(descript-name)
MASKDATA(field-definition)
MASKREC
Specifies a user-defined record ID that must be unique for each MASK record. Valid names can contain alphabetic, numeric, national characters and Scandinavian vowels (hex codes, CO, DO, and 6A).
Size: 8 characters
DESCRIPT
Designates an optional user-description field that is used as a logical name for this record. If the description field contains blanks, enclose it in single quotes.
Size: 32 character
MASKDATA
Contains the layout of the field to be masked. You can specify up to five fields on each MASKDATA keyword. Each field-definition operand consists of five sub-fields:
■ fld-name—Specifies an up to 24-character field name unique to this MASK record. The name can consist of letters, digits, or national characters and can be qualified with periods (.), underscores (_), or hyphens (-).
■ type—Indicates the field type. Replace type with one of these values: CHAR (character), BIN (binary), PACKED, ZONED, HEX(hexadecimal).
■ offset—Indicates an up to five-digit offset value.
■ length—Indicates an up to 44-decimal value for length.
■ mask—Indicates an up to 44-character mask value. This value can contain letters, numbers, and special characters; however, the value must match the field type. The value specified for mask will appear in place of the actual value.
Example: define a DST MASK record
This example adds a MASKDATA field to the MASK record CRYPT1 that contains a salary field in character format called ADDR, masked with an asterisk (*), having an offset value of 50 and a length of 20 characters:
TSS ADDTO(SDT) MASKREC(CRYPT1)
MASKDATA(ADDR,CHAR,50,20,**)
SDT Record
358 User Guide
Define REALM Records to the SDT
The REALM keyword is required when adding a REALM record to the SDT Record.
When used with local realm, this keyword has the following format:
TSS ADDTO(SDT) REALM(KERBDFLT)
REALMNAME('kerberos-realm-name')
MINTKTLF(min-ticket-life)
MAXTKTLF(max-ticket-life)
DEFTKTLF(default-ticket-life)
KERBPASS(kerberos-password)
CHKADDRS
When used with the foreign realm, this keyword has the following format:
TSS ADDTO(SDT) REALM(realm-label)
REALMNAME('fully-qualified-name')
KERBPASS(PASSWORD)
REALM
Specifies the identity of the SDT REALM record for foreign realms. The name must be unique and contain alphanumeric characters. KERBDFLT is reserved for the local realm. Any REALM name not equal to KERBDFLT is assumed to be a foreign realm. Specifies the identity of the SDT REALM record for foreign realms.
Range: Up to 8
REALMNAME
Specifies the fully qualified name of the foreign realm. Can be any character except the (X'61') character. Do not use any of the EBCDIC variant characters to avoid problems with different code pages. Use the single quotes if:
■ Parentheses, commas, blanks, or semicolons are entered as part of the name, the character string must be enclosed in single quotes.
■ Because, a single quote is part of the name, the entire character string is enclosed in single quotes. Use two single quotes together to represent each single quote in the string.
■ The first character of the name is a single quote. Enter the string within single quotes, with two single quotes entered for the single quote.
Regardless of the case used, CA Top Secret rolls the name to uppercase. However, changing the name to uppercase does not ensure that a valid REALMNAME has been specified.
Range: Up to 240 characters
SDT Record
Chapter 13: Maintaining Special Security Records 359
MINTKTLF
The minimum ticket life in seconds. This keyword is only applicable when defining the KERBDFLT realm record (not foreign realms). If MINTKTLF is specified, then DEFTKTLF and MAXTKTLF must be specified.
Range: 1 - 2147483647
MAXTKTLF
The maximum ticket life in seconds. This keyword is only applicable when defining the KERBDFLT realm record (not foreign realms). If MAXTKTLF is specified, then DEFTKTLF and MINTKTLF must be specified.
Range: 1 to 2147483647
DEFTKTLF
The default ticket life in seconds. This keyword is only applicable when defining the KERBDFLT realm record (not foreign realms). If DEFTKTLF is specified, then MINTKTLF and MAXTKTLF must also be specified.
Range: 1 to 2147483647
Default: 300 (5 minutes)
KERBPASS
Specifies the value of the Kerberos password in the realm. You can use any character, but do not use any of the variant characters to avoid problems with different code pages. Use the single quotes, or not, depending on the following:
■ If parentheses, commas, blanks, or semicolons are entered as part of the name, the character string must be enclosed in single quotes.
■ Because a single quote is part of the name, the entire character string is enclosed in single quotes. Use two single quotes together to represent each single quote with the string.
■ If the first character of the name is a single quote, enter the string within single quotes. Use two single quotes for a single quote.
Limits: Maximum length is 8 characters. Both both uppercase and lowercase characters are accepted and maintained in the case entered.
CHKADDRS
Enables address checking in tickets for the Kerberos server running on z/OS 1.13 and higher. This field can be enabled for the local realm only.
Default: NO CHKADDRS
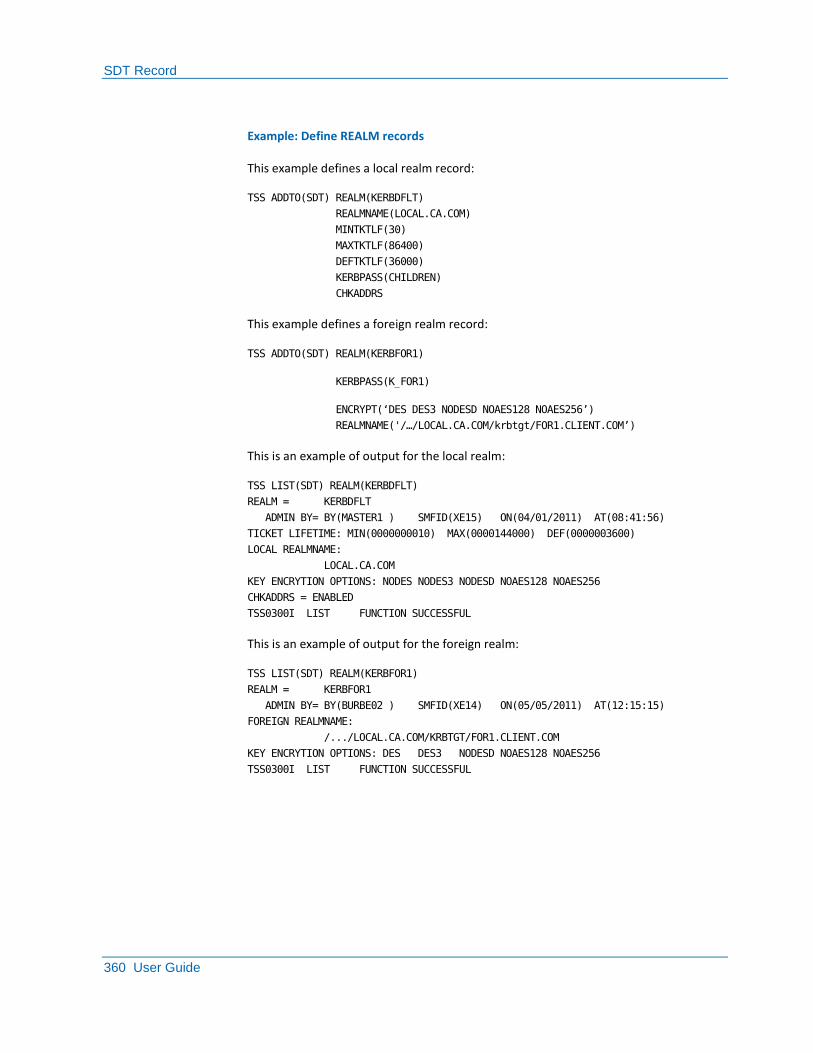
SDT Record
360 User Guide
Example: Define REALM records
This example defines a local realm record:
TSS ADDTO(SDT) REALM(KERBDFLT)
REALMNAME(LOCAL.CA.COM)
MINTKTLF(30)
MAXTKTLF(86400)
DEFTKTLF(36000)
KERBPASS(CHILDREN)
CHKADDRS
This example defines a foreign realm record:
TSS ADDTO(SDT) REALM(KERBFOR1)
KERBPASS(K_FOR1)
ENCRYPT(‗DES DES3 NODESD NOAES128 NOAES256‘)
REALMNAME('/…/LOCAL.CA.COM/krbtgt/FOR1.CLIENT.COM‘)
This is an example of output for the local realm:
TSS LIST(SDT) REALM(KERBDFLT)
REALM = KERBDFLT
ADMIN BY= BY(MASTER1 ) SMFID(XE15) ON(04/01/2011) AT(08:41:56)
TICKET LIFETIME: MIN(0000000010) MAX(0000144000) DEF(0000003600)
LOCAL REALMNAME:
LOCAL.CA.COM
KEY ENCRYTION OPTIONS: NODES NODES3 NODESD NOAES128 NOAES256
CHKADDRS = ENABLED
TSS0300I LIST FUNCTION SUCCESSFUL
This is an example of output for the foreign realm:
TSS LIST(SDT) REALM(KERBFOR1)
REALM = KERBFOR1
ADMIN BY= BY(BURBE02 ) SMFID(XE14) ON(05/05/2011) AT(12:15:15)
FOREIGN REALMNAME:
/.../LOCAL.CA.COM/KRBTGT/FOR1.CLIENT.COM
KEY ENCRYTION OPTIONS: DES DES3 NODESD NOAES128 NOAES256
TSS0300I LIST FUNCTION SUCCESSFUL
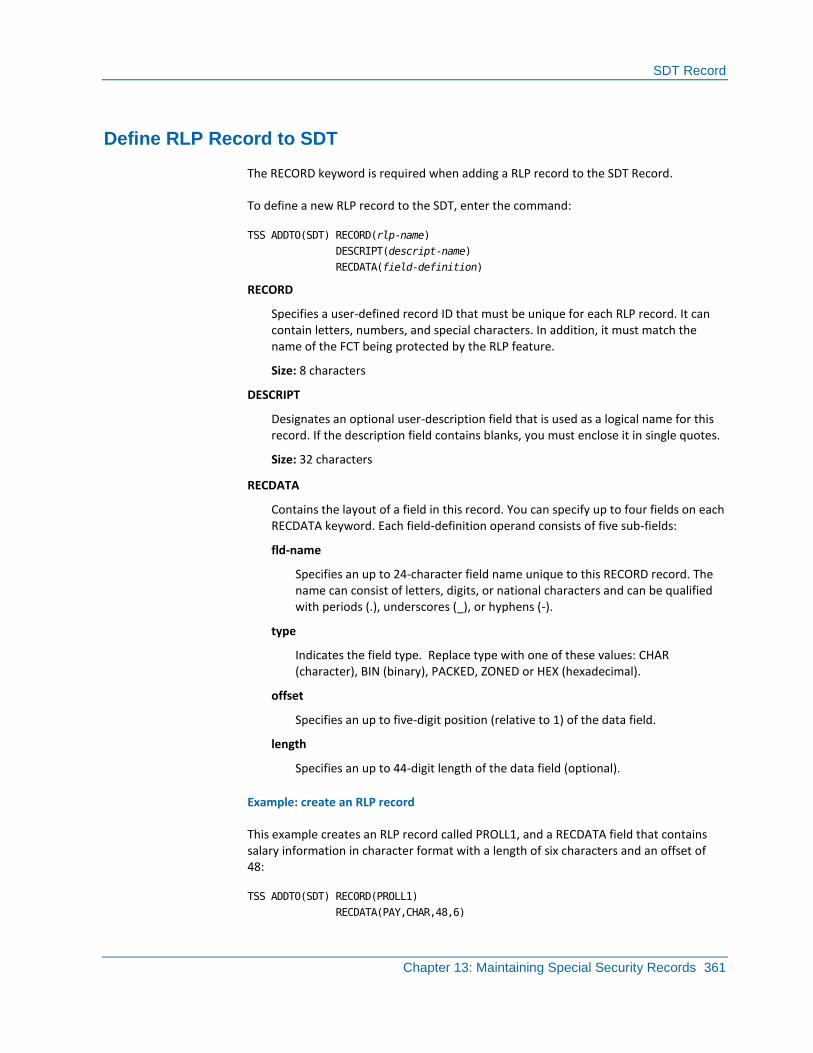
SDT Record
Chapter 13: Maintaining Special Security Records 361
Define RLP Record to SDT
The RECORD keyword is required when adding a RLP record to the SDT Record.
To define a new RLP record to the SDT, enter the command:
TSS ADDTO(SDT) RECORD(rlp-name)
DESCRIPT(descript-name)
RECDATA(field-definition)
RECORD
Specifies a user-defined record ID that must be unique for each RLP record. It can contain letters, numbers, and special characters. In addition, it must match the name of the FCT being protected by the RLP feature.
Size: 8 characters
DESCRIPT
Designates an optional user-description field that is used as a logical name for this record. If the description field contains blanks, you must enclose it in single quotes.
Size: 32 characters
RECDATA
Contains the layout of a field in this record. You can specify up to four fields on each RECDATA keyword. Each field-definition operand consists of five sub-fields:
fld-name
Specifies an up to 24-character field name unique to this RECORD record. The name can consist of letters, digits, or national characters and can be qualified with periods (.), underscores (_), or hyphens (-).
type
Indicates the field type. Replace type with one of these values: CHAR (character), BIN (binary), PACKED, ZONED or HEX (hexadecimal).
offset
Specifies an up to five-digit position (relative to 1) of the data field.
length
Specifies an up to 44-digit length of the data field (optional).
Example: create an RLP record
This example creates an RLP record called PROLL1, and a RECDATA field that contains salary information in character format with a length of six characters and an offset of 48:
TSS ADDTO(SDT) RECORD(PROLL1)
RECDATA(PAY,CHAR,48,6)
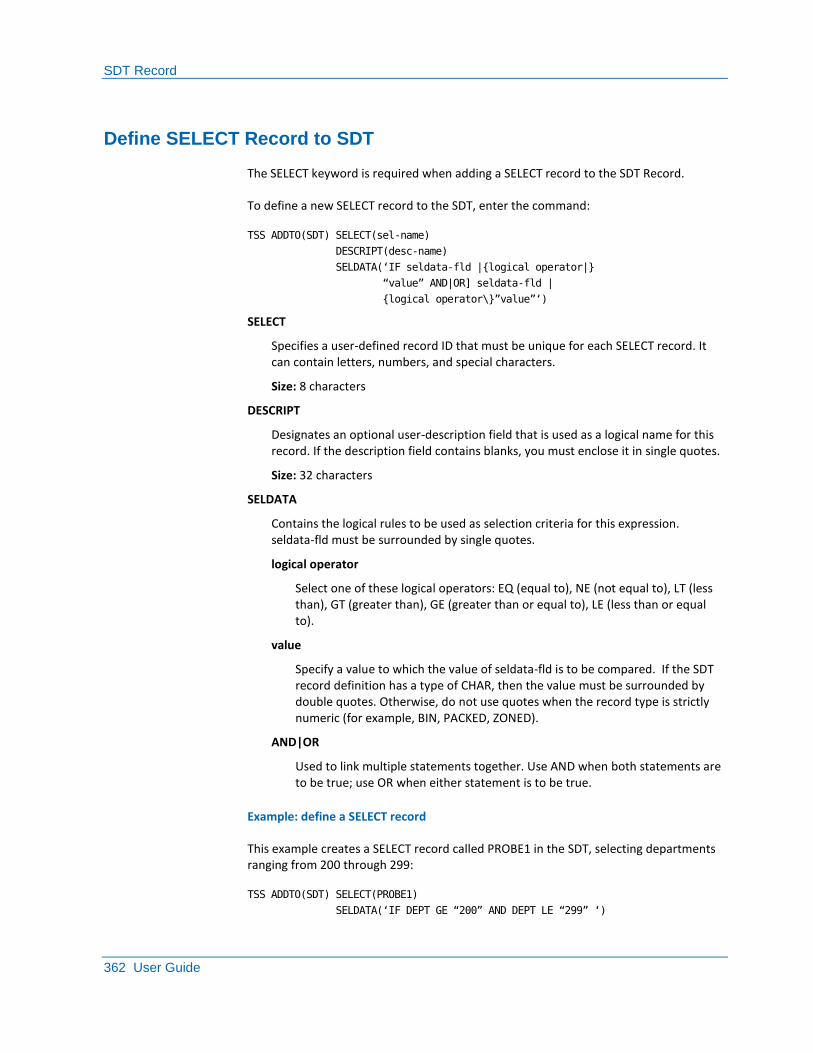
SDT Record
362 User Guide
Define SELECT Record to SDT
The SELECT keyword is required when adding a SELECT record to the SDT Record.
To define a new SELECT record to the SDT, enter the command:
TSS ADDTO(SDT) SELECT(sel-name)
DESCRIPT(desc-name)
SELDATA(‗IF seldata-fld |{logical operator|}
―value‖ AND|OR] seldata-fld |
{logical operator\}‖value‖‗)
SELECT
Specifies a user-defined record ID that must be unique for each SELECT record. It can contain letters, numbers, and special characters.
Size: 8 characters
DESCRIPT
Designates an optional user-description field that is used as a logical name for this record. If the description field contains blanks, you must enclose it in single quotes.
Size: 32 characters
SELDATA
Contains the logical rules to be used as selection criteria for this expression. seldata-fld must be surrounded by single quotes.
logical operator
Select one of these logical operators: EQ (equal to), NE (not equal to), LT (less than), GT (greater than), GE (greater than or equal to), LE (less than or equal to).
value
Specify a value to which the value of seldata-fld is to be compared. If the SDT record definition has a type of CHAR, then the value must be surrounded by double quotes. Otherwise, do not use quotes when the record type is strictly numeric (for example, BIN, PACKED, ZONED).
AND|OR
Used to link multiple statements together. Use AND when both statements are to be true; use OR when either statement is to be true.
Example: define a SELECT record
This example creates a SELECT record called PROBE1 in the SDT, selecting departments ranging from 200 through 299:
TSS ADDTO(SDT) SELECT(PROBE1)
SELDATA(‗IF DEPT GE ―200‖ AND DEPT LE ―299‖ ‗)
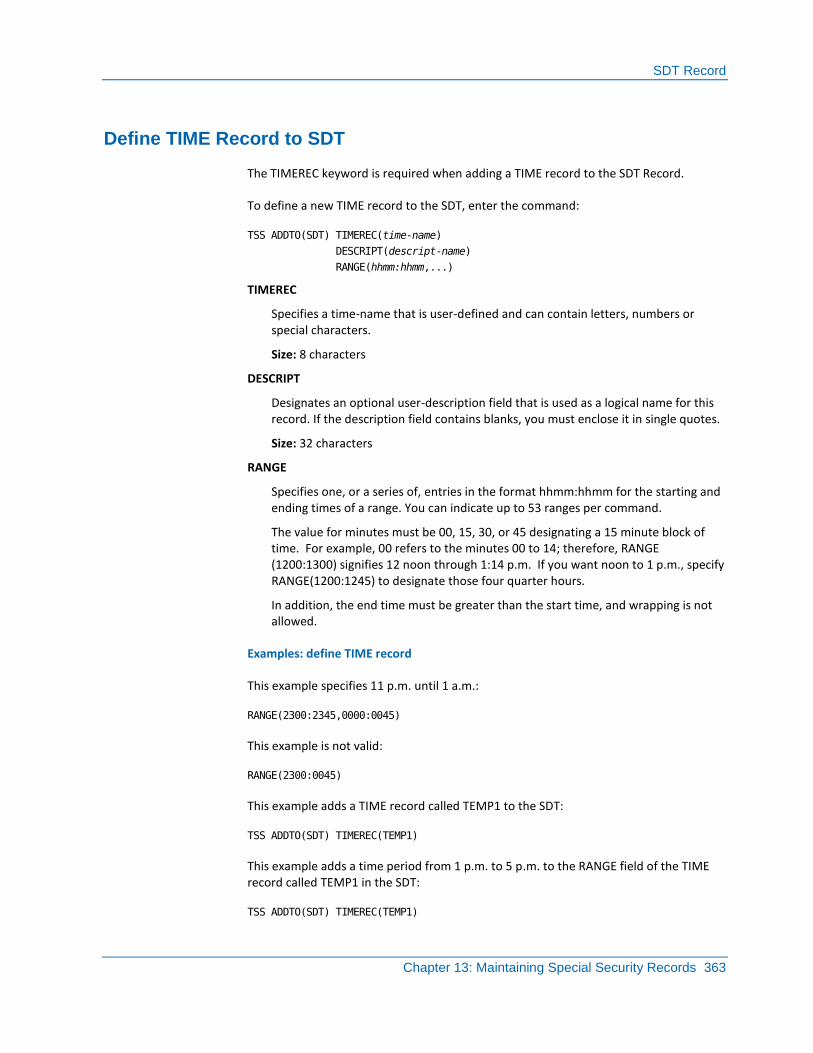
SDT Record
Chapter 13: Maintaining Special Security Records 363
Define TIME Record to SDT
The TIMEREC keyword is required when adding a TIME record to the SDT Record.
To define a new TIME record to the SDT, enter the command:
TSS ADDTO(SDT) TIMEREC(time-name)
DESCRIPT(descript-name)
RANGE(hhmm:hhmm,...)
TIMEREC
Specifies a time-name that is user-defined and can contain letters, numbers or special characters.
Size: 8 characters
DESCRIPT
Designates an optional user-description field that is used as a logical name for this record. If the description field contains blanks, you must enclose it in single quotes.
Size: 32 characters
RANGE
Specifies one, or a series of, entries in the format hhmm:hhmm for the starting and ending times of a range. You can indicate up to 53 ranges per command.
The value for minutes must be 00, 15, 30, or 45 designating a 15 minute block of time. For example, 00 refers to the minutes 00 to 14; therefore, RANGE (1200:1300) signifies 12 noon through 1:14 p.m. If you want noon to 1 p.m., specify RANGE(1200:1245) to designate those four quarter hours.
In addition, the end time must be greater than the start time, and wrapping is not allowed.
Examples: define TIME record
This example specifies 11 p.m. until 1 a.m.:
RANGE(2300:2345,0000:0045)
This example is not valid:
RANGE(2300:0045)
This example adds a TIME record called TEMP1 to the SDT:
TSS ADDTO(SDT) TIMEREC(TEMP1)
This example adds a time period from 1 p.m. to 5 p.m. to the RANGE field of the TIME record called TEMP1 in the SDT:
TSS ADDTO(SDT) TIMEREC(TEMP1)
SDT Record
364 User Guide
RANGE(1300:1645)
Replace SDT Data Elements
You can replace any record elements you defined to the SDT with TSS REPLACE(SDT). The same keywords used to define each record element on the TSS ADDTO(SDT) command are used to replace the values.
Examples: replace SDT data elements
This example replaces an existing CALENDAR record with new dates:
TSS REPLACE(SDT) CALENDAR(cal-name)
YEAR(yyyy) DAYS(days,...)
EXCLUDE(mm/dd,mm/dd,...)
INCLUDE(mm/dd,mm/dd,...)
This example replaces an existing MAP definition with a single new field:
TSS REPLACE(SDT) MAPREC(map-name)
MAPDATA(field-definition)
This example replaces an existing MASK definition with a single new field:
TSS REPLACE(SDT) MASKREC(mask-name)
MASKDATA(field-definition)
This example replaces an existing RLP RECORD definition with a single new field:
TSS REPLACE(SDT) RECORD(rlp-name)
RECDATA(field-definition)
This example replaces an existing SELECT record with a new field:
TSS REPLACE SELECT(sel-name)
SELDATA(‗IF seldata-fld \{logical operator\} ―value‖
[AND|OR] seldata-fld \{logical operator\}‖value‖‗)
This example replaces an existing TIME definition with a single new range:
TSS REPLACE(SDT) TIMEREC(time-name)
RANGE(hhmm,hhmm,...)
Any keywords, such as DESCRIPTION, that are not part of the Replace, are removed.
SDT Record
Chapter 13: Maintaining Special Security Records 365
Remove Fields From SDT Records
You can remove fields in any of the record elements you defined to the SDT with TSS REMOVE(SDT).
Remove Dates From CALENDAR Records
You can use the REMOVE command to LIST remove only specified dates from an existing CALENDAR record.
To remove specific dates, enter the command:
TSS REMOVE(SDT) CALENDAR(cal-name)
YEAR(yyyy) \{DAYS(days,...)
EXCLUDE(mm/dd,mm/dd,...)
INCLUDE(mm/dd,mm/dd,...)\}
Remove Fields From MAP Records
You can use the REMOVE command to remove up to five fields from an existing MAP record.
To remove fields from an existing MAP record, enter the command:
TSS REMOVE(SDT) MAPREC(map-name)
SDTFNAME(mapdata-fld1[,...mapdata-fld5])
Remove Fields From MASK Records
You can use the REMOVE command to remove up to five fields from an existing MASK record.
To remove fields from an existing MASK record, enter the command:
TSS REMOVE(SDT) MASKREC(mask-name)
SDTFNAME(maskdata-fld1[,...maskdata-fld5])
Remove Fields From RLP Records
You can remove up to five fields from an existing RLP record.
To remove fields from an existing RLP record, enter the command:
TSS REMOVE(SDT) RECORD(rlp-name)
SDTFNAME(recdata-fld1[,...recdata-fld5])

SDT Record
366 User Guide
Remove Fields From SELECT Records
You can remove up to five fields from an existing SELECT record.
To remove fields from an existing SELECT record, enter the command:
TSS REMOVE(SDT) SELECT(sel-name)
SDTFNAME(seldata-fld1[,...seldata-fld5])
Remove Times From TIME Records
You can use the REMOVE command to remove only specified times from an existing TIME record.
To remove times from an existing TIME record, enter the command:
TSS REMOVE(SDT) TIMEREC(time-name)
RANGE(hhmm:hhmm[,...hhmm:hhmm])
Delete Record Elements From the SDT
You can delete any record element you defined to the SDT with TSS DELETE(SDT).
Examples: delete a CALENDAR record
This example deletes a specified CALENDAR record for a year other than the current year from the SDT:
TSS DELETE(SDT) CALENDAR(cal-name)
YEAR(yyyy)
This example deletes a specified MAP record:
TSS DELETE(SDT) MAPREC(map-name)
This example deletes a mask record:
TSS DELETE(SDT) MASKREC(mask-name)
This example deletes a RLP record
TSS DELETE(SDT) RECORD(rlp-name)
SDT Record
Chapter 13: Maintaining Special Security Records 367
List SDT Record Elements
To list SDT data, you must specify the record-type you wish to list. All record types can be listed including the record types that are automatically added to the SDT.
Examples: list SDT record elements
This example lists all or only a specified CALENDAR record from the SDT:
TSS LIST(SDT) CALENDAR(ALL|cal-name)
This example lists all or only a specified MAP record from the SDT:
TSS LIST(SDT) MAPREC(ALL|map-name)
This example lists all or only a specified MASK record from the SDT:
TSS LIST(SDT) MASKREC(ALL|mask-name)
This example lists all or only a specified RLP from the SDT:
TSS LIST(SDT) RECORD(ALL|rlp-name)
This example lists all or only a specified SELECT from the SDT:
TSS LIST(SDT) SELECT(ALL|sel-name)
This example lists all or only a specified TIME record from the SDT:
TSS LIST(SDT) TIMEREC(ALL|time-name)
SDT Record
368 User Guide
List SDT with PREFIX
When the keyword PREFIX is specified all record matching is performed using the data entered as a partial key. For example:
TSS LIST(SDT) CALENDAR(WEEK) PREFIX
CALENDAR entries that would satisfy this list command are: WEEKEND, WEEKDAYS, etc.
Examples: List SDT record elements with PREFIX
This example lists the SDT table using the prefix option:
TSS LIST(SDT) CALENDAR(xxxxxxxx) PREFIX
TSS LIST(SDT) CALENDAR(xxxxxxxx) YEAR(yyyy) PREFIX
TSS LIST(SDT) MAPREC(xxxxxxxx) PREFIX
TSS LIST(SDT) MASKREC(xxxxxxxx) PREFIX
TSS LIST(SDT) RECORD(xxxxxxxx) PREFIX
TSS LIST(SDT) SELECT(xxxxxxxx) PREFIX
TSS LIST(SDT) TIMEREC(xxxxxxxx) PREFIX
xxxxxxxx
1 to 8 characters
yyyy
Must be 4 numeric characters
LIST in a Shared Environment
In a shared security file environment, all modifications to any SDT record type and data field made in the local system are immediately available to the TSS LIST command if entered from the same local system.
If the SDT modifications are made on a local system and the TSS LIST is attempted from a remote system, it is possible that some SDT records will not reflect the current changes as they are listed from internal tables not updated with the current data. The SDT record types and data fields that may experience this effect include:
■ CERTMAP Certificate name filter
■ CRITERIA Certificate filter criteria
■ CRITMAP Certificate filter ACID to user
Started Task Command (STC) Record
Chapter 13: Maintaining Special Security Records 369
■ DIGICERT Digital certificates
■ KERBLINK Kerberos foreign principals
■ KERBSEGM Kerberos principal user
■ KEYRING Certificate keyring
■ LINUXNAM Linux user name
■ REALM Kerberos local / foreign realms
For immediate access to the current TSS LIST record data for any of the included SDT record types on a remote system, enter the TSS MODIFY SYNCH command to refresh the required tables with current data from the security file.
Started Task Command (STC) Record
The Started Task Command (STC) Record is a reserved or special ACID that defines a z/OS started task command to CA Top Secret.
Authority for STC
You must have MISC9(STC) authority to define started tasks for ACIDs within your scope.
Started Task Command (STC) Record
370 User Guide
Define a Started Task to the STC Record
To define a z/OS STC to CA Top Secret and audit its activity, enter the command:
TSS ADDTO(STC) PROCNAME(stcname)
ACID(regionacid|action)
[STCACT]
PROCNAME
Indicates the procedure name invoked by an operator O/S START command and identifies the entry in the STC special record which is to be added.
A procedure name is a member of a PROCxx concatenation defined to JES, and conforms to normal naming restrictions for member names.
CA Top Secret accepts:
■ The exact procedure name
■ A generic procedure name, with a trailing asterisk (*) to indicate that the stcname is a prefix
■ DEFAULT to indicate a procedure name which has not otherwise been defined to the STC record
ACID
The ACID that CA Top Secret assigns the started task option.
regionacid
Pre-existing ACID that CA Top Secret assigns the started task with designated PROCNAME. If the ACID is defined with a significant password (other than NOPW), the system console prompts for the PASSWORD associated with "acid." If the ACID is deleted, if the stcname procedure is started and assigned to this now invalid ACID. An error is issued by the delete but the command is allowed to continue.
Range: 1 to 8 characters
action
If no ACID was created for the STC, choose one of the following actions:
■ BYPASS—Security checking for the stcname is bypassed. This is not recommended for complex tasks like CICS, where BYPASS security can cause security failure and unpredictable outcomes during initialization and transaction execution.
■ FAIL—The stcname initiation fails.
■ PROMPT—The console operator is prompted for an ACID and password to be assigned for this instance of the started task of this stcname.
STCACT
Started Task Command (STC) Record
Chapter 13: Maintaining Special Security Records 371
(Optional) When START is entered at the console, TSS7152A prompts for the ACID and PASSWORD of the operator who entered the command. TSS7152A provides accountability for the operator who starts the task. The ACID supplied for accountability cannot have password NOPW. The accountability acid and password supplied in the response to TSS7152A is separate from the password of the ACID in the STC definition. This generates a separate TSS7150A message, which protects started task execution.
STC ACID passwords are only prompted in IMPL or FAIL modes.
Examples: started tasks and the STC record
This example associates a started task for disk copy that is audited:
TSS ADDTO(STC) PROCNAME(DISKCOPY)
STCACT ACID(OP187)
This example associates a started task for a dump processing with an ACID (use the CREATE function to define ACID OP187):
TSS ADDTO(STC) PROCNAME(PRDMP)
ACID(OP187)
This example associates undefined STCs with a default ACID (use the CREATE function to define ACID 12347):
TSS ADDTO(STC) PROCNAME(DEFAULT)
ACID(12347)
This example FAILs all undefined STCs:
TSS ADDTO(STC) PROCNAME(DEFAULT)
ACID(FAIL)
This example allows undefined STCs to BYPASS security:
TSS ADDTO(STC) PROCNAME(DEFAULT)
ACID(BYPASS)
This example forces an operator to supply an ACID and password for all undefined STCs:
TSS ADDTO(STC) PROCNAME(DEFAULT)
ACID(PROMPT)
Started Task Command (STC) Record
372 User Guide
Remove a Procedure Name
Use the REMOVE command to remove a procedure name from the STC Record.
To remove a procedure name (stc-name), enter the command:
TSS REMOVE(STC) PROCNAME{(stcname)}
{(DEFAULT)}
Example: remove a procedure name
This example removes a started task for dump processing:
TSS REMOVE(STC) PROCNAME(PRDMP)
Remove the STCACT Attribute
To remove an STCACT attribute from the STC Record:
■ Remove the entire STC definition
■ Define the STC without the attribute
Example: remove the STCACT attribute
This example removes the STCACT attribute from the disk copy STC:
TSS REMOVE(STC) PROCNAME(DISKCOPY)
TSS ADDTO(STC) PROCNAME(DISKCOPY)
ACID(OPS99)

Started Task Command (STC) Record
Chapter 13: Maintaining Special Security Records 373
List the STC Record
Use the LIST command to list the STC record.
To list the entire STC Record, enter the command:
TSS LIST(STC)
When the keyword PREFIX is specified all record matching is performed using the data entered as a partial key.
Examples: using PREFIX
This example lists the PROCNAMES ASSEM, ASSEMBLY, ASSEMBLR, and ASSEMX.
TSS LIST(STC) PROCNAME(ASSEM)PREFIX
This example lists the STC table using the prefix option:
TSS LIST(STC) PROCNAME(xxxxxxxx)PREFIX
TSS LIST(STC) ACID(xxxxxxxx)PREFIX
TSS LIST(STC) PROCNAME(xxxxxxxx)ACID(xxxxxxxx)PREFIX
xxxxxxxx
1 to 8 characters.

Chapter 14: Command Propagation Facility 375
Chapter 14: Command Propagation Facility
This section contains the following topics:
About CPF (see page 376) CPF Features (see page 378) CPF Architecture (see page 378) O/S START TSS Commands (see page 386) O/S STOP Command (see page 387) CPF Related Control Options (see page 388) CPF Related MODIFY Commands (see page 390) Command Keywords Used With CPF (see page 391) CPF Recovery File (see page 395) CPF Journal Files (see page 396) CPF Statistics (see page 398) Recovery and Accountability (see page 398) Define a Node (see page 401) CPF Gateway Support (see page 402)
About CPF
376 User Guide
About CPF
CPF distributed security processing lets you administer security across multiple VTAM nodes, and between CA Top Secret and CA Common Services for z/OS platforms.
For example, with the appropriate authorization, a security administrator on one node can make modifications to the security file on another node. The CPF allows centralized control of the whole network or a smaller portion of that network.
The CPF provides the security environment with:
■ Routing of security administration to all or selected nodes within the z/OS or z/VM security network—including CA Common Services.
■ Optional synchronous or asynchronous remote command execution. (Synchronous waits for the command response to return from the remote node before continuing, asynchronous does not wait for a response before resuming processing.)
■ TSS command execution with most CA Top Secret commands.
■ Automatic update of passwords on all connected systems if changed by the user at logon.
■ Propagation of user-initiated suspensions for exceeding password and violation threshold limits.
■ Optional Journal Files (SYSOUT, tape, or disk) to log commands transmitted to, and responses received from, remote nodes.
■ Optional collection of asynchronous commands in a recovery file so that they can be retransmitted in case of network outage.
■ Support CCI generic SYSPLEX node ID.
Synchronizing Information Across Nodes
CPF lets you automatically synchronize security administration on multiple nodes through the propagation of TSS commands, as well as user-initiated changes—such as suspension and password changes.
Security administration propagation can be:
■ Implicit—The CPF control options set system-wide propagation rules
■ Explicit—The CPF command keywords set propagation rules on a command-by-command basis
About CPF
Chapter 14: Command Propagation Facility 377
Controlling Access From Remote Nodes
When CPF transmits a command to a remote destination:
■ It records the command image on the journal file for that node and associates an ID with that command.
■ When a response is received from the remote node, CPF journals the response and the ID number so that the response can be matched to the command that prompted it.
■ When the response is sent back, it is journalized with the ID and remote destination name.
By examining the appropriate journal file, an auditor can see exactly what came in, what went out, and the results of the action taken.
With support for CCI SYSPLEX generic resource name, multiple TSS systems within a SYSPLEX sharing the same security file, can be defined to remote TSS systems outside the SYSPLEX as a single CPF node.
Non-SYSPLEX systems only define one node using the CCI generic SYSPLEX name and commands are transmitted into the SYSPLEX using the generic name as the target node. CCI then forwards the commands to the first available TSS system within the SYSPLEX. If a TSS system within the SYSPLEX becomes unavailable, CCI automatically routes incoming CPF traffic to another available TSS system within the SYSPLEX.
SYSPLEX XES and XCF Security
The coupling facility is a feature of MVS/ESA that allows systems in a sysplex environment to communicate and share data with each other. Security in a sysplex environment is based on:
■ The communication function or Cross System Coupling Facility (XCF) that provides a way for each system in the sysplex to send messages or signals to all other systems.
■ The data sharing function or Cross System Extended Services (XES) that provides the ability for systems in the sysplex to share common data that would normally be obtained from a database. This function saves system resources by reducing I/O to the database.
CA Top Secret supports the use of both of these functions for all CA Top Secret protected systems running in a sysplex environment. This support allows multiple systems to share one security file.
CPF Features
378 User Guide
CPF Features
The CPF lets sites administer multiple Security Files across VTAM-networked systems by propagating TSS commands and user-initiated changes to all or selected nodes within that network.
The CPF provides the security environment with:
■ Routing of security administration to all or selected nodes within the z/OS security network
■ Optional synchronous or asynchronous remote command execution
■ TSS command execution with most CA Top Secret commands— except MODIFY, LOCK, UNLOCK, HELP, and WHOAMI
■ Automatic update of passwords on all connected systems if changed by the user during logon
■ Propagation of user-initiated suspensions for exceeding password and violation limits
■ Optional Journal Files (SYSOUT, tape, or disk) to log commands transmitted to, and responses received from, remote nodes
■ Collecting asynchronous commands in an optional Recovery File so that they can be retransmitted in case of network outage
■ Support CCI generic SYSPLEX node id
■ To perform distributed security processing, CA Top Secret relies on the Common Services for z/OS components CAIENF and CAICCI
CPF Architecture
Security files that are identical can be defined to a remote site. Security files that are not identical make maintaining user information difficult. Consider using automatic propagation based on default nodes (DEFNODES) for ACIDs.
CPF Architecture
Chapter 14: Command Propagation Facility 379
Implicit and Explicit Targeting
Security administration propagation can be:
■ Implicit—Use the CPF control options to set system-wide propagation rules.
■ Explicit—Use the CPF command keywords to set propagation rules on a command-by-command basis.
The designated CPF control option values specified in each Parameter File determine the implicit target nodes used when a command is issued from that particular node. For example, if the CPF control options for NODEA identify implicit target nodes of NODEB, NODEC, and NODED, whenever a command is issued from NODEA that command is automatically sent to NODEB, NODEC, and NODED.
You can use the CPF command keywords to override the targets designated by the control options. For example, even though the control options for NODEA identify implicit targets of NODEB, NODEC, and NODED, you can use the TARGET keyword to indicate that a particular command should only be propagated to NODEB.
Synchronous and Asynchronous Processing
You can indicate that a command is processed:
Synchronous
Allows TSS commands to execute simultaneously throughout the network. CA Top Secret waits for the command response to return from the remote node before continuing.
Asynchronous
Allows TSS commands to execute on a selective basis throughout the network. CA Top Secret does not wait for a response from each node to resume processing. All commands transmitted through asynchronous processing are retained in a CPF Recovery File.
These options are independent and can be used separately or together. The synchronous or asynchronous processing of commands and the specific targeted nodes are initially determined by control option settings. These values can be changed with TSS command keywords.
Define a CPF Node in the NDT Record
You can define CPF nodes in the NDT record in the CA Top Secret security file. CPF nodes are grouped on the NDT record by system ID to allow multiple CA Top Secret systems to use separate CPF node definitions. The system ID entry contains the global system defaults for CPF processing.
CPF Architecture
380 User Guide
CA Top Secret supports defining CPF nodes by using the CPFNODES control option. After a CPF node is defined to the NDT record, a control option definition for the same node name is ignored. When a node is defined by using the parmlib CPFNODE method, the word STATIC appears during the issuance of a TSS MODI STATUS(CPF) command.
Note: CPF node definitions can be created or modified in the NDT record at any time after CA Top Secret starts. The START and REFRESH commands activate newly defined CPF nodes or apply new processing options to existing active CPF nodes. When refreshing an individual node, CPF processing for other nodes is not interrupted.
When the NDT has a CPFSYSID entry for the local system, the following parmfile control options are ignored:
■ CPFTARGET
■ CPFWAIT
■ CPFRCVUND
■ RECVCMDS
■ CPFLISTMULT
■ CPFAUTOUID
■ CPFAUTOGID
Follow these steps:
1. Administer the system ID definition:
TSS ADD(NDT) CPFSYSID(system_id)
CPFTARGET(*|LOCAL|AUTO)
CPFWAIT(YES|NO)
CPFRCVUND(YES|NO)
CPFLISTMULT(YES|NO)
CPFAUTOUID(YES|NO)
CPFAUTOGID(YES|NO)
RECVCMDS(YES|NO)
RECVDSN(dsname)
CPF Architecture
Chapter 14: Command Propagation Facility 381
CPFSYSID(system_id)
Specifies the system name where global options are applicable.
CPFTARGET(*|LOCAL|AUTO)
Specifies the default value for the TARGET keyword of the TSS command. This keyword specifies which nodes receive commands.
*
Propagates commands to all nodes defined as send-only or send/receive in the CPFNODES control option.
LOCAL
Propagates commands to a particular local node.
AUTO
Propagates a command to nodes identified by the ACID's DEFNODES (if a target node is not explicitly identified on a command).
Default: LOCAL
CPFWAIT(YES|NO)
Specifies the default value for the WAIT keyword of the TSS command:
YES
Processes commands on a synchronous basis (which requires users to wait for the commands to complete on specified nodes before the local command completes).
NO
Processes commands on an asynchronous basis (which does not require a response from each node to resume processing).
Note: The CPFWAIT control option can be overridden by the WAIT value on an individual TSS command.
Default: NO
CPFRCVUND(YES|NO)
Specifies whether the local node can receive commands from undefined nodes.
Default: NO
CPF Architecture
382 User Guide
CPFLISTMULT(YES|NO)
Specifies whether CPF allows routing of LIST(ACIDS) and WHOHAS FACILITY commands to more than a single node.
Default: NO
CPFAUTOUID(YES|NO)
Specifies whether CPF transmits a TSS command with an assigned UID value (instead of the ? value).
Default: NO
CPFAUTOGID(YES|NO)
Specifies whether CPF transmits a TSS command with an assigned GID value (instead of the ? value).
Default: NO
RECVCMDS(YES|NO)
Specifies whether activity for propagated commands that are received from remote nodes is logged to a SYSOUT file.
Default: YES
RECVDSN(dsname)
Specifies a data set that is used to hold log data when RECVCMDS(YES) is in effect.
2. Administer the node definition:
TSS ADD(NDT) CPFNODE(node_name)
CPFSYSID(system_id)
ACTIVE(YES|NO)
RECEIVE(ALL|NONE)
SEND(ALL|CMD|PWD|NONE)
GATEWAY(YES|NO)
BROADCAST(YES|NO)
JOURNAL(YES|NO)
JOURNALDSN(dsname)
CPFNODE(node_name)
Specifies a one-to-eight character CPF node name.
CPF Architecture
Chapter 14: Command Propagation Facility 383
CPFSYSID(system_id)
Specifies the system name where this node definition is applicable. If you do not specify a name, the CPF node definition is used on all systems that share the security file.
ACTIVE(YES|NO)
Specifies whether the node is available to send or receive commands and passwords.
Default: YES
RECEIVE(ALL|NONE)
Specifies whether the local node can receive commands from the remote node.
Default: ALL
SEND(ALL|CMD|PWD|NONE)
Specifies whether the local node can send all commands to the node specified by CPFNODE. CMD indicates that only administrative command changes are sent to that node. PWD indicates that only password changes and suspensions are sent to that node.
Default: ALL
GATEWAY(YES|NO)
Specifies whether the node can act as a CPF gateway or CPF server for another node.
Default: NO
BROADCAST(YES|NO)
Specifies whether the node is valid to receive password and command changes that are sent to all nodes through TARGET(*) or the CPFTARGET(*) control option. If NO is specified, changes are sent only when DEFNODES are associated with the ACID or a node name is specified with the TARGET keyword.
Default: YES
CPF Architecture
384 User Guide
JOURNAL(YES|NO)
Specifies whether CPF node activity is logged to a SYSOUT file. If SEND(NONE) is in effect, nothing is written to the journal. If you modify the SEND attribute to any value other than NONE (and refresh the node), the journal is opened.
Default: YES
JOURNALDSN(dsname)
Specifies a data set to use as a logging file when JOURNAL(YES) is in effect.
3. Activate the newly defined CPF node:
S TSS
Your definition is complete.
Example: Define a CPF Node
This example sets up the NDT CPFNODE definitions for system SYS1 to allow the following activities:
■ Sending CPF commands and passwords to remote system SYS2
■ Receiving CPF commands and passwords from SYS2
TSS ADD(NDT) CPFSYSID(SYS1)
RECVCMDS(YES)
CPFTARGET(LOCAL)
TSS ADD(NDT) CPFSYSID(SYS1)
CPFNODE(SYS2)
JOURNAL(YES)
RECEIVE(ALL)
SEND(ALL)
Example: Define a New System
This example defines a new system:
TSS ADD(NDT) CPFSYSID(SYSA)
Example: Define a Node
This example defines a node:
TSS ADD(NDT) CPFSYSID(SYSA) CPFNODE(NODE1)
Example: Remove a Node Definition
This example removes a node definition:
TSS REMOVE(NDT) CPFNODE(nnnnnnnn) CPFSYSID(ssssssss)
CPF Architecture
Chapter 14: Command Propagation Facility 385
Example: List the CPF Node Definitions
This example lists the CPF node definitions:
TSS LIST(NDT) CPFNODE(nnnnnnnn) CPFSYSID(ssssssss)
Example: List All Nodes for All Systems
This example lists all nodes for all systems:
TSS LIST(NDT) CPFSYSID(*)
CPF (ON) and CPF (OFF)
If all CPF related control options are migrated from the control options parameter file to the NDT, control option CPF(ON) or CPF(OFF) is required in the parameters file for CPF to initialize using the NDT based definition. If neither is specified, CPF will not initialize and cannot be activated unless CA Top Secret is recycled. CPF(ON) activates CPF as soon as CA Top Secret is started up. CPF(OFF) starts CA Top Secret with CPF inactive. CPF is activated with TSS MODIFY(CPF(ON)).
Adding a new CPF node to an active CA Top Secret system requires adding a NODE definition to CAICCI.
CPF in a SYSPLEX Environment
CAICCI allow you to define two or more CAICCI sysids as parts of a sysplex. CA Top Secret systems residing on these hosts can be collectively targeted by their common SYSPLEXID to allow CAICCI to distribute the workload.
When setting up the CPF node definitions on CA Top Secret systems outside the CAICCI sysplex, only a single CPFNODE definition using the generic CAICCI SYSPLEXID is required. Commands are transmitted into the SYSPLEX using the generic name as the target node. CAICCI forwards the commands to any available CA Top Secret system within the SYSPLEX.

O/S START TSS Commands
386 User Guide
Administrative Authority
Security Administrator authority and scope are verified at the sending and target nodes before a command is applied to the targeted security files. To enter TSS commands with a targeted destination, you need MISC2(TARGET) authority.
The CPF allows the security administrator to view the contents of security files in remote nodes. This is secure since scope is verified at both locations and the data is encrypted between nodes.
Propagated administration commands execute on the remote system using the authority and scope of the user as defined on the remote system, and not from the originating system. For example, if a user who is defined as an SCA on one system propagates a TSS command to a system where that user is defined only as a USER, then the command is limited to the USER authority.
User initiated (versus administrator initiated) password changes propagated through CPF cause the user's password to change at each node where the change is sent, provided that the user's existing passwords are the same. The password will not change at nodes where the existing passwords are not identical or are not synchronized. This prevents one user from changing the password of an identically named ACID on another node used by another person.
O/S START TSS Commands
The O/S START command is used in this format to initiate the CA Top Secret started task:
S TSS
The O/S START command is also used to specify the CA Top Secret control options.
If you are starting CA Top Secret as a subtask, code SUB=MSTR on the startup command.
Options specified by the O/S START command are overridden by both the O/S MODIFY and TSS MODIFY commands.
O/S STOP Command
Chapter 14: Command Propagation Facility 387
O/S STOP Command
To terminate the CA Top Secret started task procedure use the O/S STOP command:
P TSS
Stopping CA Top Secret in this manner is the recommended method for normal or temporary shutdown.
Terminating the CA Top Secret started task does not terminate the security interface. The security interface is always active, and validates requests already active in the system. Shutting down the CA Top Secret started task deactivates security file inputs and outputs, console communications to the operator, and use of the TSS command.
CPF Related Control Options
388 User Guide
CPF Related Control Options
CA Top Secret supplies control options that govern the use of CPF and enable distributed security to be maintained efficiently. At least one CPF-related control options must be entered at CA Top Secret startup to use the CPF.
Once you have designated control options, your TSS commands automatically propagate to the default nodes.
The control options that tailor the CPF environment are:
CPF(ON|OFF|KILL|REFRESH)
Indicates whether CPF should be activated at CA Top Secret startup and lets you temporarily terminate the CPF subtask without bringing down all of CA Top Secret.
■ ON—TSS commands are transmitted by this node or received from other nodes.
■ If CPF(ON) has been specified, but CCI is not available or not fully initialized, CPF status is displayed as CPF(INIT). While CPF is in this status, commands are not propagated via CPF and are not logged to the CPF Recovery File. Once CCI completes its initialization, CPF status will display as CPF(ON), and command propagation and logging will take place.
■ OFF—No TSS commands can be transmitted.
■ KILL—Issued with a TSS MODIFY command to temporarily terminate the CPF subtask and automatically take a dump. The subtask can then be reattached by specifying TSS MODIFY(CPF(ON)).
■ REFRESH—Issued with a TSS MODIFY command to terminate and immediately restart the CPF subtask, while rebuilding the in-core node table based on current NDT CPFNODE definitions. Any commands queued in storage is released and the queues are rebuilt from the recovery file. When CPF is restarted, the new attributes of each node will only apply to new CPF messages queued after the refresh has completed. Commands and password changes already on the recovery file prior to the refresh is sent to the target nodes regardless of current node attributes.
CPFNODES(node1,node2A(S)|(R)|(C)|(P)|(GW)|(NB)|,...)
Identifies the remote CA Top Secret nodes from and/or to which CPF can propagate commands.
■ (S)—Indicates that the local node can only send commands to the designated remote node.
■ (R)—Indicates that the local node can only receive commands from the designated remote node.
■ (C)—Specifies that only administrative command changes and DUF updates are sent to a node.
■ (P)—Specifies that only password changes and suspensions are sent to a node.
CPF Related Control Options
Chapter 14: Command Propagation Facility 389
■ (GW)—Allows a CPF node to act as a CPF gateway or CPF server for another CPF node.
■ (NB)—Indicates that the node is a no-broadcast node; used when CPFTARGET(LOCAL) is the default.
User-initiated changes (such as updated passwords or suspension due to access violations) or duf updates are propagated to those nodes identified by the CPFNODES control option.
CPFRCVUND(YES|NO)
Indicates whether the local node will receive commands issued from a remote node that hasn't been defined to the CPFNODES list. Default: NO.
CPFWAIT(YES|NO)
Sets a default value for the TSS command WAIT keyword.
■ If CPFWAIT is omitted, CA Top Secret chooses a default of YES. This means that commands are processed on a synchronous basis, requiring the user to wait for the commands to complete on all specified nodes before the local command completes.
■ If NO is selected, processing occurs asynchronously.
Regardless of whether you select YES or NO, the CPFWAIT control option can be overridden by the WAIT value on the individual TSS command.
CPFTARGET(AUTO|*|LOCAL)
Sets a default value for the TSS command TARGET keyword.
The security administrator can select one of three options.
■ AUTO—Indicates that, if a target node is not explicitly identified on a command, that command will automatically propagate to those nodes identified by the ACID's DEFNODES.
■ asterisk (*)—Indicates all nodes defined as send-only or send/receive in the CPFNODES control option. Nodes defined as receive-only are not included.
■ LOCAL—Indicates a particular local node.
CPF Related MODIFY Commands
390 User Guide
CPF Related MODIFY Commands
The CPF related MODIFY commands are:
CPFNODE(nodename=STOP)
This command stops all new activity for the node and the node will show up with status of STOPPED. Commands currently queued up for transmission are processed but no new commands will get queued.
CPFNODE(nodename=START)
This command activates a previously stopped node, or install and activate a new NDT defined node.
CPFNODE(nodename=REFRESH)
This command modifies the node attributes based on current NDT definitions. New attributes will only affect commands and password changes not yet queued to the node. Recovery file records and in-core queue entries will still be processed based on the attributes in effect prior to the refresh.
Activating a new NDT defined node using the START or REFRESH commands, also requires adding a NODE definition to CAICCI.
Command Keywords Used With CPF
Chapter 14: Command Propagation Facility 391
Command Keywords Used With CPF
The TSS command functions that can be used with CPF are authorization commands such as ADDTO, PERMIT, REMOVE, and CREATE as well as, WHOHAS, LIST, and WHOOWNS.
The CPF keywords that can be used with these functions are:
TARGET(node1,node2...)
Identifies each node to which a command can be propagated.
TARGET(*)
Transmits the command to the local node and to all nodes defined in the CPFNODES control option.
TARGET(=)
Restricts command execution to the local node only. The TARGET(=) keyword overrides the CPFTARGET(LOCAL) control option.
TARGET(n...n*)
Transmits all commands to nodes whose names begin with the indicated string. The string can range from one to seven characters.
TARGET(SELECT)
Propagates commands to all DEFNODES for a user, including nodes marked as no-broadcast nodes.
DEFNODES(node1,node2,...)
Defines default remote nodes for use in the event that a security administrator does not specify a TARGET keyword on a command. DEFNODES only applies if the CPFTARGET control option has been set to AUTO.
WAIT(Yes|No)
Sets the processing mode for the command being issued. WAIT(YES) selects synchronous processing. WAIT(NO) selects asynchronous processing. The WAIT keyword overrides the CPFWAIT control option setting.
Examples: CPF command keywords
This example displays the users on CPU1, CPU2, and the local node that have access to payroll data:
TSS WHOHAS DSNAME(PAYROLL.)
TARGET(CPU1,CPU2,=)
WAIT(Y)
This example grants ownership of the SYS1 data set prefix to DEPT01 on all remote R-prefixed nodes identified by the CPFNODES control option:
Command Keywords Used With CPF
392 User Guide
TSS ADDTO(DEPT01) DSNAME(SYS1.)
TARGET(R*)
WAIT(Y)
This example designates the ALT, BOS, and CIN nodes as the default routing nodes for USER01:
TSS ADDTO(USER01) DEFNODES(ALT, BOS, CIN)
DEFNODES With a TSS Command
Although asterisk (*) and LOCAL are the more commonly used values with CPFTARGET, when using DEFNODES with a TSS command, AUTO is required.
DEFNODES only applies:
■ If CPFTARGET is set to AUTO
■ If no TARGET keyword is specified on the command
If these two conditions are met, CA Top Secret automatically retrieves the DEFNODES normally associated with the targeted ACID. The only time the DEFNODES keyword is supplied in a command is when the ACID's DEFNODES are being designated (on the initial TSS CREATE or later through a TSS ADDTO) or updated. DEFNODES administration is discussed in the next section.
If CPFTARGET is set to AUTO and no DEFNODES are specified, routing is done to all the nodes with send abilities only when a user changes his own password or is suspended because of an invalid password or because he has been inactive for too long.
If the command issued is an ADD/REMOVE, ADMIN/DEADMIN, DELETE, MOVE, PERMIT/REVOKE, RENAME, or REPLACE, the destination nodes are taken from the DEFNODES of the targeted ACID.

Command Keywords Used With CPF
Chapter 14: Command Propagation Facility 393
Administer an ACID's DEFNODES
DEFNODES can be assigned to an ACID:
■ Using TSS CREATE. Specify the DEFNODES keyword.
■ Using TSS CREATE with a model ACID. The ACID must have DEFNODES to be transferred to the new ACID.
■ Using TSS ADDTO with an existing ACID.
If TSS CREATE is issued without indicating the DEFNODES keyword, or by using a model ACID that does not have DEFNODES, no DEFNODES are supplied.
Use TSS REMOVE is used to delete one or more entries.
Use TSS REPLACE to delete an ACID's existing DEFNODES definitions in their entirety and replace them with a completely new list.
A maximum of five DEFNODES can be added, removed, or replaced in a single TSS command.
Examples: DEFNODE administration
This example creates an ACID of USER01 for John Smith and designates NODEA, NODEB, and NODEC as his DEFNODES:
TSS CREATE(USER01) NAME('John Smith')
TYPE(USER)
PASSWORD(shsh,30,exp)
DEFNODES(NODEA,NODEB,NODEC)
This example uses the ACID created in the previous example as the basis for Sam Jone's ACID, USER02. Since USER01 has DEFNODES, these same DEFNODES are being transferred to USER02:
TSS CREATE(USER02) USING(USER01)
Name('Sam Jones')
This example indicates that ACID01 now has DEFNODES of NODEB and NODEC:
TSS ADDTO(ACID01) DEFNODES(NODEB,NODEC)
This example removes NODEB from USER02's DEFNODES list while leaving NODEA and NODEC:
TSS REMOVE(USER02) DEFNODES(NODEB)
Command Keywords Used With CPF
394 User Guide
This example completely removes the current DEFNODES from USER02 and replaces them with NODEF, NODEG, and NODEH:
TSS REPLACE(USER02) DEFNODE(NODEF,NODEG,NODEH)
What Happens When a Command is Issued
To get a better understanding of how the CPF control options and CPF command keywords work together, consider the consequences of the following sample commands.
Examples: CPF commands and options:
In this example, since no TARGET is specified, CA Top Secret looks to the CPFTARGET control option setting to determine the designated default routing procedure:
■ If CPFTARGET is set to AUTO, the command will propagate to those nodes identified by the ACID's DEFNODES.
■ If CPFTARGET is set to LOCAL, the command will only execute on the local node.
■ If CPFTARGET is set to *, the command will propagate to all nodes identified by the CPFNODES control option, except for nodes identified as no-broadcast nodes.
■ If CPFTARGET hasn't been activated, the command will only execute on the local node.
TSS ADDTO(USER01) DSNAME(ABC123)
In this example, USER01 is being granted ownership of the ABC123 data set. Since a TARGET of * was specified, this command is propagated to all nodes identified by the CPFNODES control option.
TSS ADDTO(USER01) DSNAME(ABC123)
TARGET(*)
In this example the same command will only be executed on the local node (as specified by the =).
TSS ADDTO(USER01) DSNAME(ABC123)
TARGET(=)
In this example the command is propagated to NODEA and NODEB regardless of the values specified by the CFPNODES or CPFTARGET control options and any DEFNODES USER01 may have. An explicit TARGET will override the defaults.
TSS ADDTO(USER01) DSNAME(ABC123)
TARGET(NODEA,NODEB)
CPF Recovery File
Chapter 14: Command Propagation Facility 395
In this example the command is propagated to all broadcast nodes and any no-broadcast nodes that are identified as DEFNODES for USER01.
TSS ADDTO(USER01) DSNAME(ABC123)
TARGET(*,SELECT)
CPF Recovery File
The CPF Recovery File is a BDAM disk file that saves transmitted commands until a response is received from a remote machine. Only commands selecting or defaulting to WAIT(NO) are saved for re-transmission. Commands targeted only for the local machine are not saved.
When a TSS command with WAIT(NO) is entered CPF saves a command image on the CPF Recovery File before transmitting it over the link. When a response from the remote is returned CPF deletes the command from the file. If the response is not received CPF scans the Recovery File at the resumption of service and select all commands not responded and retransmits them. When a response is received, the command(s) are deleted from the file.
CPF scans the CPF recovery file:
■ At CA Top Secret initialization
■ When contact with a remote machine is reestablished after having been lost
Before you can use the Recovery File, it must be formatted through TSSMAINT. A DD statement must be inserted into the CA Top Secret jobstream to define the CPF Recovery File. For example:
//CPFFILE DD DSN=SYS2.TSS50.CPF.RECOVERY,DISP=OLD
Important! CPF Recovery File cannot be shared across multiple systems.
If the CPF Recovery File is not defined, command routing through CPF can still occur but there is no re-transmission of unresponded commands.
If the CPF Recovery File is full a message is written to the job CA Top Secret LOG and console each time CPF wants to write a message to the file but cannot. The CPF operation continues but, in case of failure, the unwritten command cannot be recovered.
CPF Journal Files
396 User Guide
Remove Pending Commands
You can remove pending commands from the CPF Recovery File by date and by node. This is useful to selectively remove commands (for example, when testing systems that are only occasionally active).
Examples: remove pending CPF commands
This example removes all records for the specified node:
TSS REMOVE(*CPFRECV) CPFNODE(xxxxx,yyyyy)
This example removes all records up to, and including, the specified date:
TSS REMOVE(*CPFRECV) UNTIL(mm/dd/yy)
CPF Journal Files
CPF uses journal files to provide a historical record of the command traffic to and from CA Top Secret. An individual journal file is usually a JES spool data set—a SYSOUT data set that can be printed offline or viewed.
When CA Top Secret is started as a subsystem, SYSOUT is unavailable if CPF is activated before JES is initialized. The product ignores any CA Top Secret file that is allocated to SYSOUT when CA Top Secret is started as a subsystem while JES is not active.
After JES is activated, the product dynamically allocates CPF journal files (if no SYSOUT DD statements exist in the JCL). If JES is terminated before CA Top Secret, the product closes the SYSOUT journal files. CPF continues to send and receive commands, but no activity is logged to SYSOUT journal files.
If CA Top Secret is started as a subsystem and you want to use CPF journaling when JES is not active, you must redirect CPF journal files to a data set file type other than SYSOUT. This file should be a sequential data set with the following DCB attributes:
■ LRECL=133
■ RECFM=F(B)
■ BLKSIZE=2660 (or any multiple of 133)
CPF uses one journal file for each remote node defined to it through the CPFNODES control option, plus one journal file for all incoming traffic. The node-specific journal files have a DDname equal to the node name, and the DDname for incoming traffic is RECVCMDS. We recommend that these DDnames not be defined in the CA Top Secret JCL stream. If a given DDname is missing, CPF dynamically allocates the journal file. If dynamic allocation fails, CPF continues the operation but does not perform the journaling for the associated node.
CPF Journal Files
Chapter 14: Command Propagation Facility 397
CPF does not require predefined DD statements for the Journal data sets in the CA Top Secret JCL stream. If actual sequential journal data sets are chosen, they must be cataloged prior to activating CPF.
When transmitting a command to a remote destination, CPF records the command image on the Journal File for that node and associates an ID number with that command. When a response is received from the remote node, CPF journals the response and the ID number so that the response can be matched to the command that prompted it. When a command is received from a remote machine, CPF journals the command, the ID number, and the node name that sent the command. When the response is sent back, it is journaled with the ID and remote destination name.
By examining the appropriate Journal File, an auditor can see what came in, can see what went out, and can see the results of the action taken. The CPF Journal Files log commands regardless of whether WAIT(YES) or WAIT(NO) was specified.
The Journal Files can be used for debugging purposes.
Examples: CPF journal files
This example sets up the NDT definitions to dynamically allocate SYSOUT journal data sets for inbound and outbound commands. CPF will dynamically allocate a SYSOUT data set with DDname RECVCMDS and another one with DDname SYS2:
TSS ADD(NDT) CPFSYSID(SYS1)
RECVCMDS(YES)
TSS ADD(NDT) CPFSYSID(SYS1)
CPFNODE(SYS2)
JOURNAL(YES)
This example shows sets up the NDT definitions for dynamically allocating sequential journal data sets for inbound and outbound commands. CPF will dynamically allocate a sequential data set with DSN=”cpf.recv.dsn” for inbound commands, and sequential data set with DSN=”sys2.cpf.journal” for outbound commands targeted:
TSS ADD(NDT) CPFSYSID(SYS1)
RECVCMDS(YES)
RECVDSN(cpf.recv.dsn)
TSS ADD(NDT) CPFSYSID(SYS1)
CPFNODE(SYS2)
JOURNAL(YES)
JOURNALDSN(sys2.cpf.journal)
CPF Statistics
398 User Guide
CPF Statistics
CPF related event statistics are collected for the number of:
■ Inbound command requests for a particular node
■ Inbound password requests for a particular node
■ Outbound command requests for a particular node
■ Outbound password requests for a particular node
■ Returned outbound requests for a particular node
Note: CPF Statistics are only displayed if CPF is active and the STATG control option is set to ON.
To display CPF related event statistics, enter the command:
TSS MODIFY(STATS)
Recovery and Accountability
The TSSRECVR utility provides security file recovery processing.
When you run TSSRECVR the TARGET is always local no matter what the original TARGET destination.
TSS Command Execution
Anyone with MISC2(TARGET) authority can enter a TSS command with a targeted destination. The command is executed at the remote machine under the authority the issuing ACID has on the remote node.
For example, ACID(HARRY) is defined as an SCA on his local machine, but on REMOTEB ACID(HARRY) is only a USER. Any command HARRY sends to REMOTEB is executed with his authority on REMOTEB—as a user.
If the security administrator issuing the command does not exist on the remote node you will receive the message:
TSS0324E ADMINISTRATOR'S ACID DOES NOT EXIST ON TARGET NODE
Recovery and Accountability
Chapter 14: Command Propagation Facility 399
Security Files Among Networked Machines
Each command routed by CPF is executed at the remote machine as though it originated there.
Commands that work at one remote may fail at another. Commands executed at a remote node may not have their intended effect.
For example, if the MSCA gave ownership of DSNAME(SYS1) to ACID(HARRY) at his local node (where he is designated as an SCA) that command, if routed to REMOTEB through CPF, can give the same ownership to USER(HARRY).
System Entry Validation and Password Propagation
When a user is required to update his password as part of system entry validation, CA Top Secret notifies all other CPF connected nodes of the change. If a matching ACID is found on a remote node, CA Top Secret first compares the password of the "remote" ACID with the old password of the "local" ACID to verify that they are not two different ACIDs with the same ACID name. If the passwords match, the password on the remote node is updated.
For example, USER01 signs on to TSO on Node A. His current password of "remember" has expired and he changes it to "always". Through CPF, that change is sent to Node B, a remote node. When CPF finds a USER01 in the Security File of Node B, it asks "Is the current password ‘remember’?".
■ If the answer is yes, the password of USER01 on Node B is also updated
■ If the answer is no, CPF assumes that the USER01 on Node B is not the same person as the USER01 on Node A and leaves the Node B password unchanged
When CPF detects that the passwords do not match, the following message is sent to the CPF spool data set on the remote node:
TSS0422E PASSWORD VERIFICATION FAILED ON REMOTE NODE
Installation Exit
The installation exit routine can be called for CPF transmission on both the sending and receiving side, and may block the command at either point. The exit can also make some changes to the command text.
Recovery and Accountability
400 User Guide
TSSCPR Utility
The TSSCPR utility is run against the CPF recovery file to produce a flat file record. This file can then be filtered through the TSSREPORT3 EARL report option or through another report writer to depict the contents of the CPF recovery file.
For more information, see the Report and Tracking Guide.
Define a Node
Chapter 14: Command Propagation Facility 401
Define a Node
A CA Common Services node can be defined to CPF to allow user password changes and user suspension activity to be synchronized between both the CA Top Secret and CA Common Services. CA Common Services will only process inbound TSS commands that relate to a user password change, user suspension, or user unsuspension. CA Common Services only generates outbound TSS commands concerning a change in the user's password or any suspension activity that occurs on the CA Common Services node.
To define a CA Common Services node:
■ Define a remote CA Common Services node to CCI.
The remote CA Common Services node should be defined using TCP/IP conventions, not the VTAM conventions used to define remote CA Top Secret mainframe nodes.
This example shows the CCI statements that define node UNI1 to CCI on node OS/3901:
SYSID(OS/3901) /* existing cci sysid */
PROTOCOL(TCPIPGW,1721,1,OS/3901) /* local cci tcpip port */
NODE(TCPIPGW,141.99.2.3:1721,1,UNI1) /* remote ip:port, name */
CONNECT(UNI1) /* remote connect */
■ Define the CA Common Services node to the CPF network.
When defining a CA Common Services node to an existing CPF network, only one mainframe needs to define and maintain the CPF connection. This mainframe should specify the GW (gateway) operand on its TSS CPFNODE statement to indicate that this single mainframe is a gateway for the CA Common Services node into the existing CPF network.
■ Activate the CA Common Services.
CPF communicates with the User Profile Synchronization (UPS) feature of CA Common Services. In general, the following CA Common Services must be activated by selecting YES on the Preference menu on the CA Common Services-Settings pulldown menu.
CCI REMOTE SERVER = YES
UPS = YES
CPF = YES
■ Tailor the CCIRMTD.RC configuration file.
The CCI Remote Server requires you to tailor the CCIRMTD.RC configuration file. This file specifies the TCP/IP port that CCI will use. The port number chosen must match the one specified on the mainframe CCI NODE() statement (see Step 1).
■ Tailor the CA Common Services Option settings.
The CA Common Services Configuration-Settings pulldown menu Options tab is used to list and change CA Common Services option settings. Review and tailor the option choices related to the UPS.
CPF Gateway Support
402 User Guide
For more information, see the CA Common Services for z/OS documentation.
CPF Gateway Support
CPF gateway support is an option that allows a CPF node to connect to a CPF network via a single connection point. Using this option, one CPF node acts as a "CPF gateway" through which another node can gain access to the entire CPF network. When used, the named CPF node must be connected to the CPF network only via this one definition and connection point.
Whenever a command is received from a remote system, CPF determines if the command was received from, or must be forwarded to, any CPF gateway node(s). Commands from a gateway node are then re-propagated to other CPF nodes as though they had originated locally. Commands from non-gateway nodes are re-propagated to gateway nodes.
A gateway connection is specified when a TSS CPFNODES() control option statement includes the GW option.
The CPFNODES control option and connection method must be used when a CA Common Services node is added to a CPF network containing more than one mainframe. A CA Common Services node must be connected only to one CA Top Secret mainframe within a CPF network, and that mainframe must specify the GW option on the CPFNODES() statement used to define the CA Common Services node.
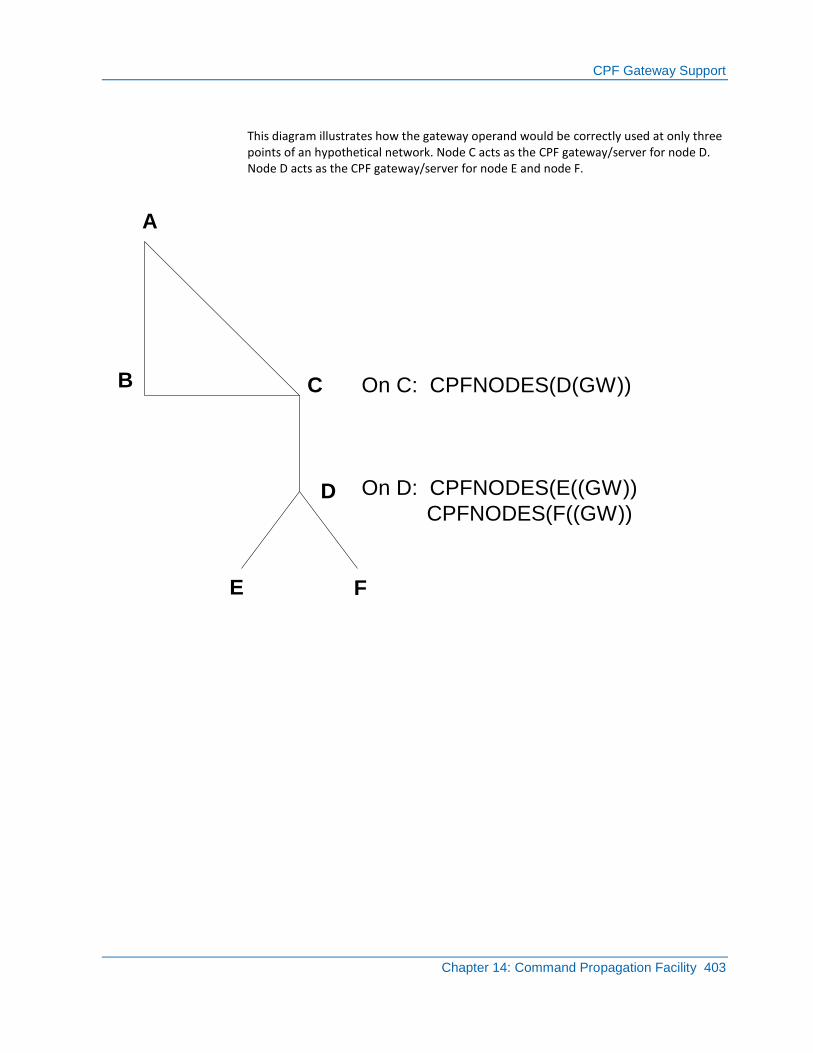
CPF Gateway Support
Chapter 14: Command Propagation Facility 403
This diagram illustrates how the gateway operand would be correctly used at only three points of an hypothetical network. Node C acts as the CPF gateway/server for node D. Node D acts as the CPF gateway/server for node E and node F.
A
B C
D
E F
On C: CPFNODES(D(GW))
On D: CPFNODES(E((GW))
CPFNODES(F((GW))

Chapter 15: Extending Security With the Application Interface 405
Chapter 15: Extending Security With the Application Interface
This section contains the following topics:
Introduction to the API (see page 405) Application Interface Components (see page 406) Application Interface Checks (see page 411) Programming Examples (see page 422) Generate a Random Password (see page 426)
Introduction to the API
The CA Top Secret Application Interface lets a programmer link an application program to CA Top Secret services. The Application Interface can be used to:
■ Perform security checks for resources, such as database fields and user resources
■ Perform security checks on application program menu options, CICS application panels, and so on
■ Consolidate additional security and integrity requirements (for example, application level security requirements)
■ Retrieve or update user-oriented information maintained on the Security Record's installation data area
■ Log site-oriented data to the Audit/Tracking File
■ Retrieve a user's ACID and status
■ Retrieve a user's list of accessible general resources
The CA Top Secret Application Interface can be invoked by macro or command level programs written in COBOL, PL/1, or Assembler. This interface relieves the programmer from the task of locating the user's Security Record and interfacing directly with CA Top Secret through the z/OS Security Interface.
The Application Interface cannot be used to retrieve distributed information from non-local security files that are using CPF.
Application Interface Components
406 User Guide
Application Interface Components
To use the Application Interface, the following components are required:
TSSAI
An application interface program distributed and residing in the CA Top Secret load library. TSSAI does NOT check the CICS facility bypass lists.
Request Parameter List
CA provides mapping through the Request Parameter List. In AAKOSRC0, support for each of the languages are in the following members:
■ TSSCPLA—Assembler
■ TSSCPLC—COBOL
■ TSSCPLP—PL/I
The application program passes a parameter list to the program TSSAI through an appropriate Dynamic Call Mechanism in the language being used.
To use the CA Top Secret Application Interface, define a parameter list declaring all of the Request Record fields. The Request Record contains:
■ Request Fields, filled in by the application program
■ Return Fields, filled in by CA Top Secret
The application program defines a parameter list declaring all the Request fields. Depending on the type of checking that is to be performed, all or some of the fields are required.
Application Program Code Logic
To invoke the Application Interface, the program code (written in COBOL, PL/1, or Assembler) must follow the logic outlined below.
■ Build the parameter list to be passed. All fields not supplied for your request should be initialized to binary zeros—except for TSSRNAME, which should be filled with blanks.
■ Invoke the CA Top Secret Application Interface to process the request.
The CA Top Secret Application Interface can be invoked by issuing a LINK (or a dynamic call).
■ Perform processing based on the returned data.
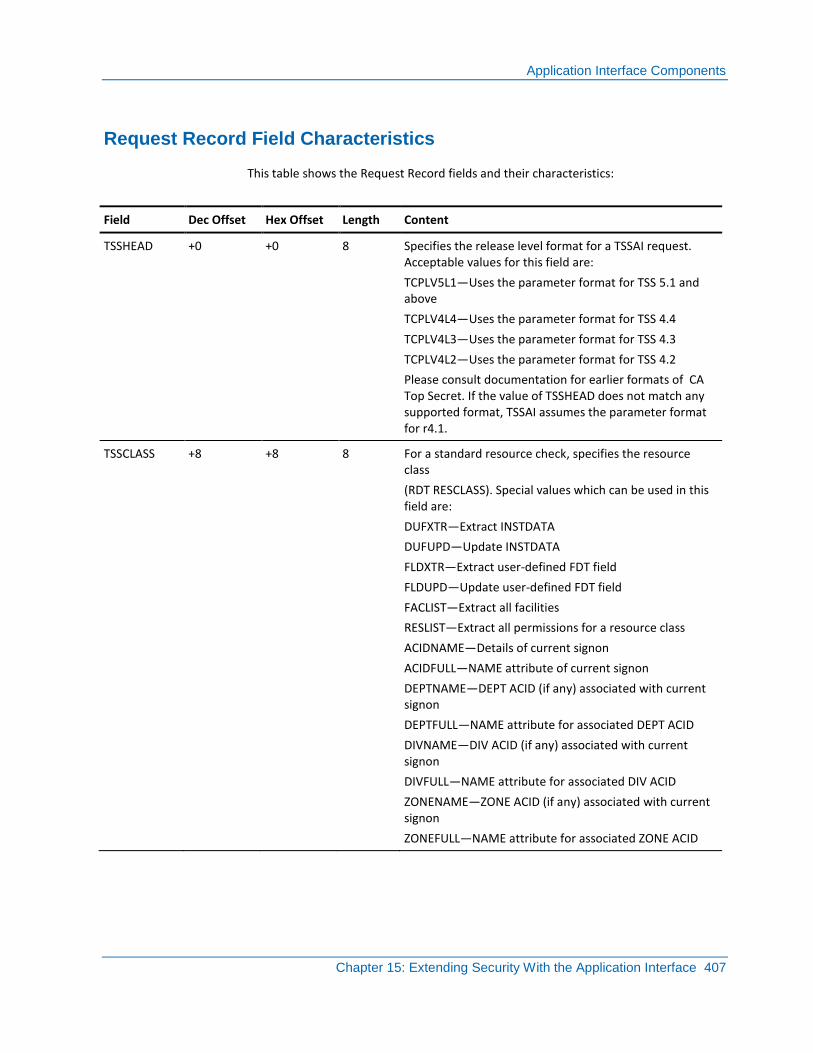
Application Interface Components
Chapter 15: Extending Security With the Application Interface 407
Request Record Field Characteristics
This table shows the Request Record fields and their characteristics:
Field Dec Offset Hex Offset Length Content
TSSHEAD +0 +0 8 Specifies the release level format for a TSSAI request. Acceptable values for this field are:
TCPLV5L1—Uses the parameter format for TSS 5.1 and above
TCPLV4L4—Uses the parameter format for TSS 4.4
TCPLV4L3—Uses the parameter format for TSS 4.3
TCPLV4L2—Uses the parameter format for TSS 4.2
Please consult documentation for earlier formats of CA Top Secret. If the value of TSSHEAD does not match any supported format, TSSAI assumes the parameter format for r4.1.
TSSCLASS +8 +8 8 For a standard resource check, specifies the resource class
(RDT RESCLASS). Special values which can be used in this field are:
DUFXTR—Extract INSTDATA
DUFUPD—Update INSTDATA
FLDXTR—Extract user-defined FDT field
FLDUPD—Update user-defined FDT field
FACLIST—Extract all facilities
RESLIST—Extract all permissions for a resource class
ACIDNAME—Details of current signon
ACIDFULL—NAME attribute of current signon
DEPTNAME—DEPT ACID (if any) associated with current signon
DEPTFULL—NAME attribute for associated DEPT ACID
DIVNAME—DIV ACID (if any) associated with current signon
DIVFULL—NAME attribute for associated DIV ACID
ZONENAME—ZONE ACID (if any) associated with current signon
ZONEFULL—NAME attribute for associated ZONE ACID

Application Interface Components
408 User Guide
Field Dec Offset Hex Offset Length Content
TSSRNAME +16 +10 44 For a standard resource check, specifies the name of the resource within TSSCLASS. For special values of TSSCLASS TSSRNAME will represent:
DUFXTR/DUFUPD—an ACID other than the current signed on acid to be extracted or updated
FLDUPD | FLDXTR—the FDT FDTNAME of the field to be extracted or updated
FACLIST—(unused)
RESLIST—the RDT RESCLASS for which permissions are to be listed
TSSPPGM +60 +3C 8 For a standard resource check, specifies a program name through which the resource is being accessed. Of the special values of TSSCLASS, only FLDXTR and FLDUPD make use of this field:
FLDUPD|FLDXTR—the FDT SEGMENT associated with this FDTNAME
TSSACC +68 +44 8 For a standard resource class whose RDT definition includes explicit access levels, this field must correspond to one of the defined access levels (left justified and space filled); however, if specified with hex-zeroes, the RDT DEFACC value will be substituted.
This field is ignored for resources whose associated RDT entry has no defined access levels. It is ignored by all special values of TSSCLASS.
TSSCACEE +84 +54 4 For all values of TSSCLASS except DUFXTR and DUFUPD, this field represents the address of an ACEE for whom the resource or special check is being performed. (This address would have to be supplied programmatically using an appropriate RACROUTE REQUEST=VERIFY macro.) In order for such requests to be valid, the current signed on user would have to be cross-authorized to the requested ACID.
By convention, if TSSCACEE is all blank (x'40'), the check to be requested will be presumed for the current signed on ACID.
In CICS, TSSCAI will only honor TSSCACEE when OPTIONS(64) has been selected at TSS initialization. In IDMS, TSSMAI will never honor TSSCACEE.
TSSVOL +88 +58 6 VOLSER used for data set requests only
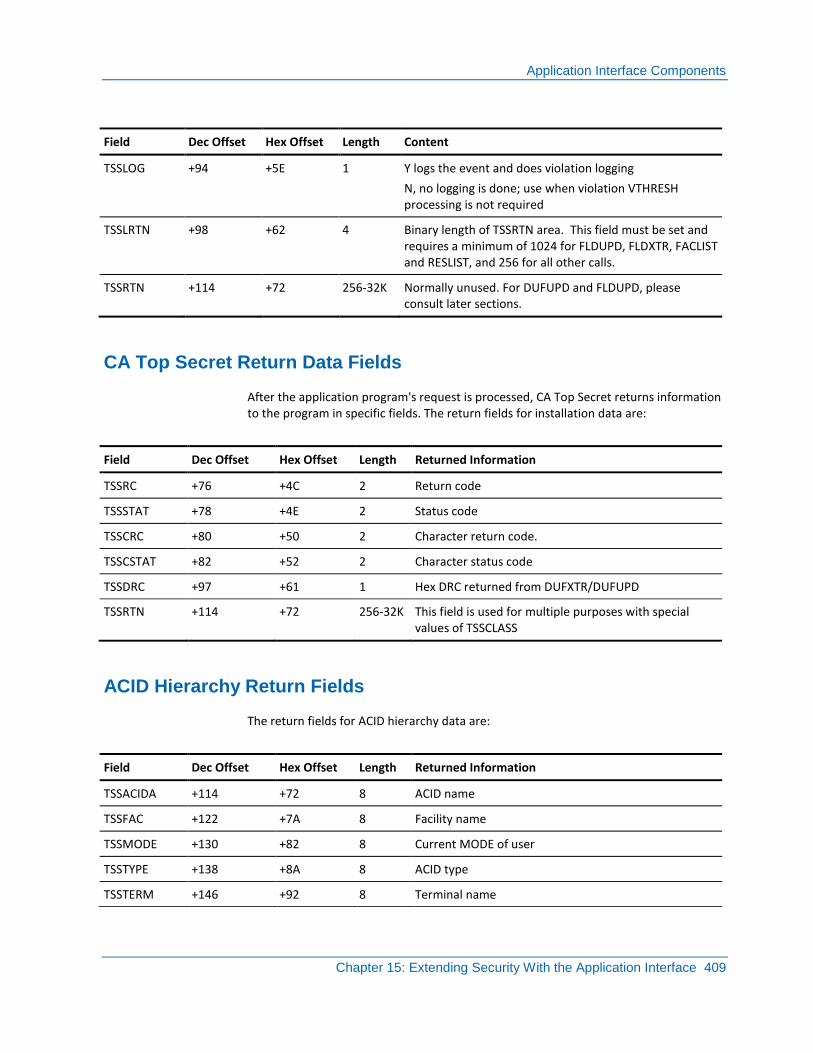
Application Interface Components
Chapter 15: Extending Security With the Application Interface 409
Field Dec Offset Hex Offset Length Content
TSSLOG +94 +5E 1 Y logs the event and does violation logging
N, no logging is done; use when violation VTHRESH processing is not required
TSSLRTN +98 +62 4 Binary length of TSSRTN area. This field must be set and requires a minimum of 1024 for FLDUPD, FLDXTR, FACLIST and RESLIST, and 256 for all other calls.
TSSRTN +114 +72 256-32K Normally unused. For DUFUPD and FLDUPD, please consult later sections.
CA Top Secret Return Data Fields
After the application program's request is processed, CA Top Secret returns information to the program in specific fields. The return fields for installation data are:
Field Dec Offset Hex Offset Length Returned Information
TSSRC +76 +4C 2 Return code
TSSSTAT +78 +4E 2 Status code
TSSCRC +80 +50 2 Character return code.
TSSCSTAT +82 +52 2 Character status code
TSSDRC +97 +61 1 Hex DRC returned from DUFXTR/DUFUPD
TSSRTN +114 +72 256-32K This field is used for multiple purposes with special values of TSSCLASS
ACID Hierarchy Return Fields
The return fields for ACID hierarchy data are:
Field Dec Offset Hex Offset Length Returned Information
TSSACIDA +114 +72 8 ACID name
TSSFAC +122 +7A 8 Facility name
TSSMODE +130 +82 8 Current MODE of user
TSSTYPE +138 +8A 8 ACID type
TSSTERM +146 +92 8 Terminal name
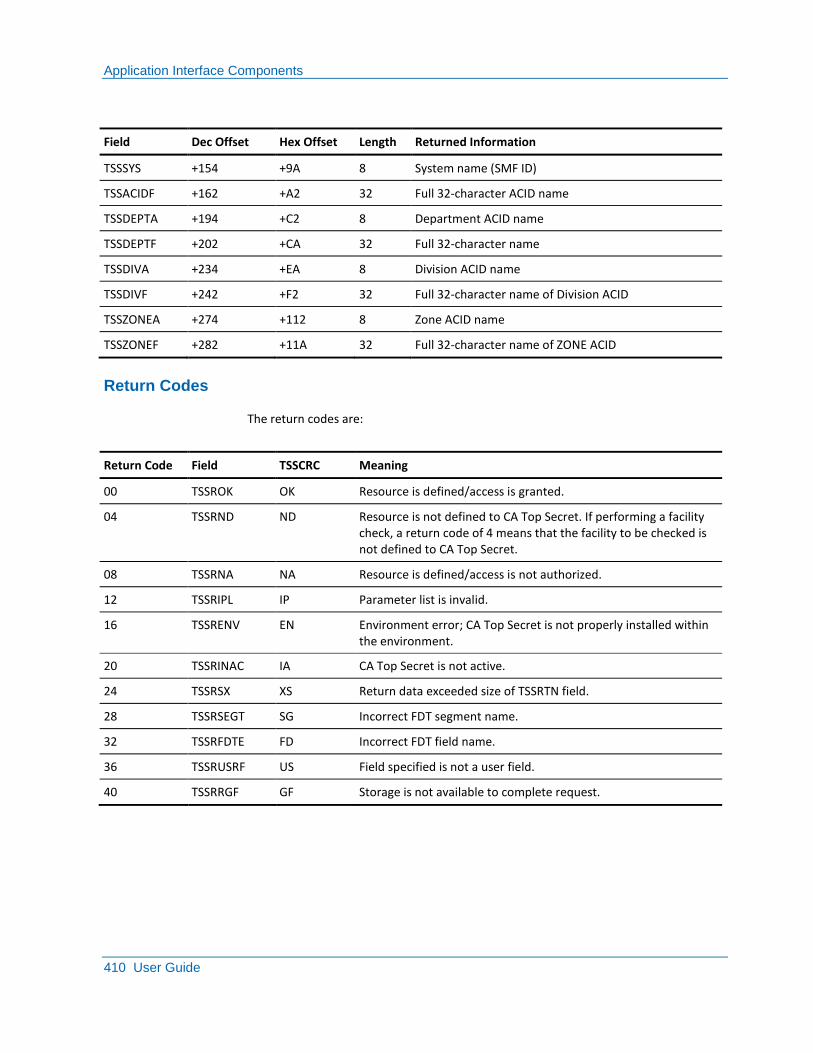
Application Interface Components
410 User Guide
Field Dec Offset Hex Offset Length Returned Information
TSSSYS +154 +9A 8 System name (SMF ID)
TSSACIDF +162 +A2 32 Full 32-character ACID name
TSSDEPTA +194 +C2 8 Department ACID name
TSSDEPTF +202 +CA 32 Full 32-character name
TSSDIVA +234 +EA 8 Division ACID name
TSSDIVF +242 +F2 32 Full 32-character name of Division ACID
TSSZONEA +274 +112 8 Zone ACID name
TSSZONEF +282 +11A 32 Full 32-character name of ZONE ACID
Return Codes
The return codes are:
Return Code Field TSSCRC Meaning
00 TSSROK OK Resource is defined/access is granted.
04 TSSRND ND Resource is not defined to CA Top Secret. If performing a facility check, a return code of 4 means that the facility to be checked is not defined to CA Top Secret.
08 TSSRNA NA Resource is defined/access is not authorized.
12 TSSRIPL IP Parameter list is invalid.
16 TSSRENV EN Environment error; CA Top Secret is not properly installed within the environment.
20 TSSRINAC IA CA Top Secret is not active.
24 TSSRSX XS Return data exceeded size of TSSRTN field.
28 TSSRSEGT SG Incorrect FDT segment name.
32 TSSRFDTE FD Incorrect FDT field name.
36 TSSRUSRF US Field specified is not a user field.
40 TSSRRGF GF Storage is not available to complete request.
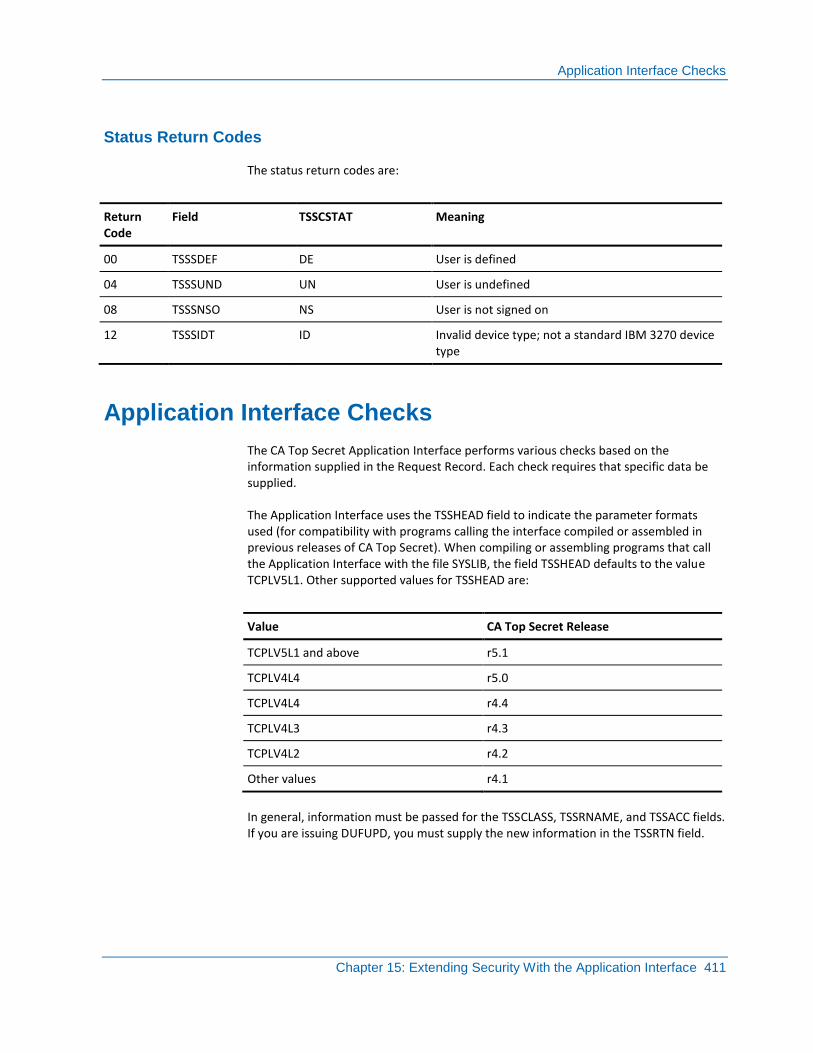
Application Interface Checks
Chapter 15: Extending Security With the Application Interface 411
Status Return Codes
The status return codes are:
Return Code
Field TSSCSTAT Meaning
00 TSSSDEF DE User is defined
04 TSSSUND UN User is undefined
08 TSSSNSO NS User is not signed on
12 TSSSIDT ID Invalid device type; not a standard IBM 3270 device type
Application Interface Checks
The CA Top Secret Application Interface performs various checks based on the information supplied in the Request Record. Each check requires that specific data be supplied.
The Application Interface uses the TSSHEAD field to indicate the parameter formats used (for compatibility with programs calling the interface compiled or assembled in previous releases of CA Top Secret). When compiling or assembling programs that call the Application Interface with the file SYSLIB, the field TSSHEAD defaults to the value TCPLV5L1. Other supported values for TSSHEAD are:
Value CA Top Secret Release
TCPLV5L1 and above r5.1
TCPLV4L4 r5.0
TCPLV4L4 r4.4
TCPLV4L3 r4.3
TCPLV4L2 r4.2
Other values r4.1
In general, information must be passed for the TSSCLASS, TSSRNAME, and TSSACC fields. If you are issuing DUFUPD, you must supply the new information in the TSSRTN field.

Application Interface Checks
412 User Guide
General Resource Checking
The interface allows an application program to check resources. To perform a resource check for resources other than data sets or volumes, the following Request Record fields must be supplied by the application program:
TSSHEAD
See Request Record Data Fields for details.
TSSCLASS
For a standard resource check, specifies the resource class (RDT RESCLASS).
TSSRNAME
For a standard resource check, specifies the name of the resource within TSSCLASS.
TSSPPGM
For a standard resource check, specifies a program name through which the resource is being accessed.
TSSACC
For a standard resource class whose RDT definition includes explicit access levels, this field must correspond to one of the defined access levels (left justified and space filled); however, if specified with hex-zeroes, the RDT DEFACC value will be substituted. This field is ignored for resources whose associated RDT has no defined access levels.
TSSCACEE
For all general resources, this field represents the address of an ACEE for whom the resource or special check is being performed. (This address would have to be supplied programmatically using an appropriate RACROUTE REQUEST=VERIFY macro.) In order for such requests to be valid, the current signed on user would have to be cross-authorized to the requested ACID. By convention, if TSSCACEE is all blank (x'40'), the check to be requested will be presumed for the current signed on ACID.
In CICS, TSSCAI will only honor TSSCACEE when OPTIONS(64) has been selected at TSS initialization. In IDMS, TSSMAI will never honor TSSCACEE.
TSSLOG
If violation logging is required, code Y. If any other value is entered, no logging will occur.
CA Top Secret supplies a Return Code in the TSSRC field and a Character Return Code in the TSSCRC field to the application program.
Application Interface Checks
Chapter 15: Extending Security With the Application Interface 413
Data Set and Volume Checking
The interface allows an application program to perform security checks for data set names on DASD or TAPE volumes, or to determine user access to DASD or TAPE volumes without regard to specific data set names. For DATASET checking, the following fields should be supplied:
■ TSSHEAD
■ TSSRCLASS=DATASET
■ TSSRNAME=fully qualified data set name (no quotes)
■ TSSVOL=volser associated with the data set
■ TSSACC=access level required for the request
■ TSSPPGM=(optional) program through which the data set is accessed
■ TSSLOG=(optional) logging indicator
TSSACC Field Specifications
The specifications for the TSSACC field are:
■ For DATASET, DASDVOL, and TAPEVOL, use the levels defined by IBM for RACHECK. These levels are: ALTER, CONTROL, UPDATE, and READ.
■ DATASET checking for extended access levels is performed using the DATASETX RESCLASS. Available TSSACC values for this resource class include: SCRATCH, CREATE, WRITE, READ FETCH, INQUIRE, SET, ALL.
■ Volume checking for DASD volumes with extended access levels is performed using the DASDVOLX RESCLASS. Available TSSACC values for this resource class include: NOCREATE, CONTROL, SCRATCH, CREATE, WRITE, READ, INQUIRE, SET, ALL.
■ Volume checking for tape volumes with extended access levels is performed using the TAPEVOLX RESCLASS. Available TSSACC values for this resource class include: NOCREATE, CONTROL, SCRATCH, CREATE, WRITE, READ, BLP, ALL.
■ Special resource classes DATASETT, DASDVOLT, AND TAPVOLT are used to check if any permission is present regardless of access level, respectively for data set access, DASD volume access, and tape volume access. TSSRC=0 if a permission is present, TSSRC=8 if the resource is owned but no permission is present, TSSRC=4 if the resource is not owned.
■ The Parameter list DSECT can be found as #TSSCPL on the Optional Materials File.
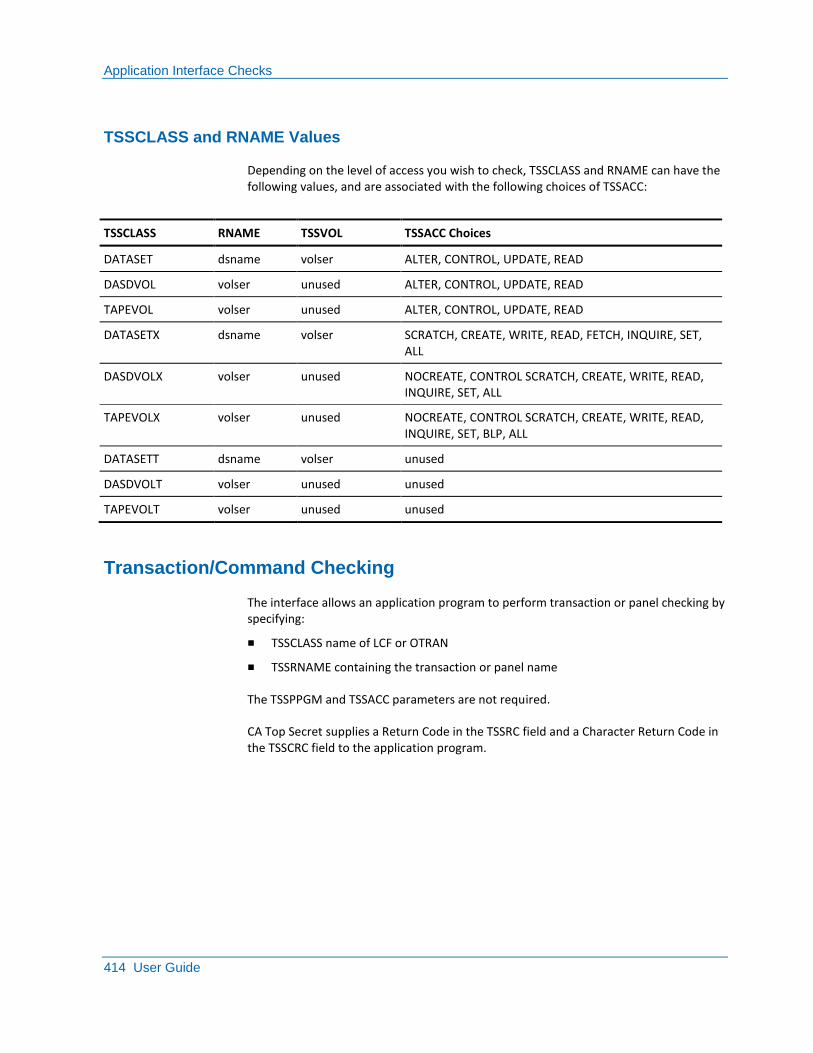
Application Interface Checks
414 User Guide
TSSCLASS and RNAME Values
Depending on the level of access you wish to check, TSSCLASS and RNAME can have the following values, and are associated with the following choices of TSSACC:
TSSCLASS RNAME TSSVOL TSSACC Choices
DATASET dsname volser ALTER, CONTROL, UPDATE, READ
DASDVOL volser unused ALTER, CONTROL, UPDATE, READ
TAPEVOL volser unused ALTER, CONTROL, UPDATE, READ
DATASETX dsname volser SCRATCH, CREATE, WRITE, READ, FETCH, INQUIRE, SET, ALL
DASDVOLX volser unused NOCREATE, CONTROL SCRATCH, CREATE, WRITE, READ, INQUIRE, SET, ALL
TAPEVOLX volser unused NOCREATE, CONTROL SCRATCH, CREATE, WRITE, READ, INQUIRE, SET, BLP, ALL
DATASETT dsname volser unused
DASDVOLT volser unused unused
TAPEVOLT volser unused unused
Transaction/Command Checking
The interface allows an application program to perform transaction or panel checking by specifying:
■ TSSCLASS name of LCF or OTRAN
■ TSSRNAME containing the transaction or panel name
The TSSPPGM and TSSACC parameters are not required.
CA Top Secret supplies a Return Code in the TSSRC field and a Character Return Code in the TSSCRC field to the application program.
Application Interface Checks
Chapter 15: Extending Security With the Application Interface 415
Facility Checking
The interface allows an application program to determine if a user is authorized to sign on to a certain facility. For facility checking, the program must supply:
■ TSSCLASS name of FACILITY
■ TSSRNAME containing the name of the facility to be checked
TSSCACEE must contain a pointer to the user's ACEE if the check is being done for another ACID.
This function provides information on the current user if TSSCACEE is not coded.
CA Top Secret supplies the application program with a Return Code in the TSSRC field and a Character Return Code in the TSSCRC field.
If the Return Code is equal to 4, the facility name supplied by the application program in the TSSRNAME field is not defined.
Facility List Checking
The interface allows an application program to obtain a list of all the facilities that a user is authorized to access. The application program must specify FACLIST in the TSSCLASS Request Record field. No other fields are required.
CA Top Secret supplies the application program with a list of all facilities that the user is authorized to access. Each facility name is eight characters long, padded with blanks. The facility list is returned in the TSSRTN field of the Return Record. The information pertains only to the signed-on user.
When using the TCPLV5L1 format of the parameter list, FACLIST requires TSSLRTN to be set to a value of 1024 or greater. When using the TCPLV4L4 format, TSSLRTN must be set to 1024. FACLIST should not be used with lower level formats.
Application Interface Checks
416 User Guide
Resource List Checking
The RESLIST function of TSSAI generates a list of resources that are added or permitted to the requesting user within a specified resource class. The RESLIST function for a resource can be protected because RESLIST is defined by CA Top Secret to the RDT.
To establish protection for the RESLIST function on the named resource, enter:
TSS ADDTO(owner) RESLIST(resource)
Alternatively, all RESLIST resource access can be protected by adding the DEFPROT attribute to the RESLIST resource.
To permit or deny RESLIST, enter:
TSS PERMIT(user) RESLIST(resource)
TSS PERMIT(user) RESLIST(resource) ACTION(DENY,FAIL)
To invoke the RESLIST function through the application interface, the field TSSCLASS of the parameter TSSCPL must be set to the value RESLIST, and the name of the resource must be placed in the field TSSRNAME.
Normally, the request is performed for the ACID assigned to the calling program. However, the user may provide an ACEE pointer for a specified user by moving the pointer value to TSSCACEE prior to the TSSAI call.
The length for TSSRTN returned by RESLIST is 1024, although you can specify an area as large as 32K. To supply a larger value, indicate a new format for the Application Interface parameter by using the TSSHEAD value TCPLV5L1.
To accommodate the RESLIST data, you can:
■ Specify the traditional 256 or 1024 byte area for the RESLIST data, or
■ Supply the length of TSSRTN in the field TSSLRTN.
If the user-supplied pre-allocated area is not large enough to hold the RESLIST returned data, the interface returns as much data as will fit and post a return code of 24.
Application Interface Checks
Chapter 15: Extending Security With the Application Interface 417
The length of TSSCPL is stored in TSSPLEN2, similar to the length used by the FACLIST function. TSSRTN is formatted in the TSSCPLA Assembler copybook in the AAKOSRC0 installation file. RESLIST formats the TSSRTN structure into the following:
TSSRFLDS
Four-byte count of the number of entries returned
TSSRDATA
List structure. The entries of the TSSRDATA list structure are mapped as follows:
■ TSSRLLEN—Two-byte resource name length
■ TSSRLGEN—One-byte indicator showing: GENERIC resource name
■ TSSRLRES—Up to 255-character resource name whose actual length is contained in TSSRLLEN
The TSSRLENT Assembler DSECT has been provided in the TSSCPLA copybook for programming convenience in mapping these entries.
TSSRTN has been formatted for the COBOL programmer in TSSCPLC, and for the PL/I programmer in TSSCPLP. See the comments in the copybooks for programming suggestions in higher-level languages.
TSSRC can return all of the values previously documented in this chapter. However, the RESLIST call can also return the special value 24 (TSSCRC='XS') which means the return area is too small to hold list.
Log User Information
The interface allows an application program to log up to 40 bytes of user-supplied data. The data is logged to the Audit/Tracking File and/or SMF based on the installation-defined logging options.
To log information, the application program must supply the following information to the interface:
■ Specify a TSSCLASS name of LOG.
■ The information to be logged must be supplied in the first 40 bytes of the TSSRTN request field.
TSSCACEE must contain a pointer to the user’s ACEE if the check is being done for another ACID.
Application Interface Checks
418 User Guide
Dynamic Update Facility
The Application Interface can extract and/or update user-dependent data such as counts, balances, totals, and CPU usage. CA Top Secret stores this data in the installation data area, as created by the TSS CREATE, TSS ADDTO, or TSS REPLACE command functions. To use the TSSAI functions DUFUPD and DUFXTR, an ACID must have the TSS attributes, DUFUPD and DUFXTR, respectively.
The installation data, INSTDATA, is maintained in the user’s Security Record on the Security File. The installation data can be updated or extracted for any ACID on the Security File. TSSAI cannot be used to REMOVE an ACID’s INSTDATA by placing spaces or hex-zeros in the TSSRTN field. You must use the TSS REMOVE command to eliminate INSTDATA.
Although INSTDATA may be added to a profile record, its use is limited. INSTDATA on a profile is only available when using DUFXTR for the current user. When specifying DUFUPD or DUFXTR for another user, the INSTDATA must be on the user’s record, not in a profile.
Extract Installation Data
An ACID’s installation data can be extracted using the Application Interface DUFXTR function. DUFXTR does not read the user’s security Interface DUFXTR function. DUFXTR does not read the user’s security record for this information, but takes its data from an in-core copy.
To extract the installation data for a user, the application program must supply the following information to the interface:
■ Specify a TSSCLASS name of DUFXTR
■ Specify TSSRNAME
TSSRC TSSCRC TSSRTN Comments
0 OK INSTDATA 256 characters
4 ND SPACES Active user is undefined or is authorized but no INSTDATA is available
8 NA SPACES Active user is not authorized
CA Top Secret returns the installation data to the application program in the TSSRTN field.
CA Top Secret returns the DRC for an DUFUPD/DUFXTR violations in field TSSDRC at offset X'61' of TSSCPL.
Application Interface Checks
Chapter 15: Extending Security With the Application Interface 419
Specify the TSSRNAME
When extracting or updating the installation data for the active user or another user, follow these directions:
■ If updating the installation data for an ACID other than the current ACID, place the ACID name in the TSSRNAME field, left justified
■ If updating the current ACID, you may place spaces (x'40') in the TSSRNAME field; optionally, the current ACID name can be placed in TSSRNAME
■ If a userid is passed in TSSRNAME instead of blanks, then an I/O to the security file will occur
To extract/update data from another user, the current ACID must be cross-authorized for that ACID.
Update Installation Data
An ACID’s installation data can be updated using the Application Interface DUFUPD function. The ACID’s security record is not modified immediately with this function. DUFUPD only updates the security record when the ACID signs off or when the ACID is refreshed. DUFUPD cannot update the length of the installation data, or add installation data when it did not already exist. To use the DUFUPD function, the current user must have the DUFUPD attribute.
To update the installation data for a user, the application program must supply the following information to the interface:
■ Specify a TSSCLASS name of DUFUPD
■ Specify TSSRNAME
■ Place the updated installation data in the TSSRTN field
CA Top Secret updates the installation data by replacing the old data with the supplied data.
Field Extract and Update Facility
The Application Interface can extract and/or update fields attached to an ACID. All user-defined fields can be extracted and/or updated, as well as many of the fields in the FDT.
Predefined fields (like TSO and CICS) are not valid for TSSAI processing.
To extract field data, the User ACID must have the DUFXTR attribute; the DUFUPD attribute is required to update field data.
Application Interface Checks
420 User Guide
Extract Field Data
To extract the data for a specific field:
■ Specify TSSHEAD of TCPLV5L1.
■ Specify a TSSCLASS name of FLDXTR.
■ Specify the segment name in TSSPPGM.
■ Specify the field name in the TSSRNAME field.
■ The TSSLRTN field should be set to a value of at least the length of the FDT field to be extracted.
CA Top Secret returns a word containing the length of the field followed by the field data in the TSSRTN field. Data extracted with FLDXTR is taken from the ACEE at the time it was initialized. If FLDUPD has taken place after initialization, FLDXTR will not reflect these changes.
Update the Field Data
To update the data of a specific field:
■ Specify TSSHEAD of TCPLV5L1.
■ Specify a TSSCLASS name of FLDXTR.
■ Specify the segment name in TSSPPGM.
■ Specify the field name in the TSSRNAME field.
■ Specify a four-byte word to contain the length of the field, and then specify the data to be stored in the TSSRTN field. (The four-byte length goes in front of the data.)
■ The TSSLRTN field should be set to a value of at least the length of the FDT field to be extracted.
CA Top Secret updates the field data by replacing the old data with the supplied data. Data extracted with FLDXTR is taken from the ACEE at the time it was initialized. If FLDUPD has taken place after initialization, FLDXTR will not reflect these changes.

Application Interface Checks
Chapter 15: Extending Security With the Application Interface 421
ACID Retrieval
The interface allows an application program to retrieve the eight-character ACID of the signed-on user, as well as other information. Use the following information to retrieve the indicated data.
■ The application program must supply a TSSCLASS name of ACIDNAME
■ No other fields are required
The Application Interface returns:
TSSACIDA
The eight-character ACID of the current user.
TSSMODE
The eight-character MODE name of the signed on ACID.
TSSFAC
The eight-character name of the facility that the user is currently signed on to.
TSSTYPE
The type of user ACID (USER, DCA, VCA, or SCA).
TSSTERM
The name of the terminal the user is signed on to.
TSSSYS
The System ID (SMF ID) of the system the user is signed on to. The SMF ID returns left justified and padded with blanks.
Other Checks for the ACID
The Application Interface can also perform the following checks for the signed-on user by specifying special keywords in the TSSCLASS field:
TSSCACEE must contain a pointer to the user’s ACEE if the check is being done for another ACID.
TSSCLASS Return Field Returned Data Description
ACIDFULL TSSACIDF Full 32 character ACID’s name
DEPTNAME TSSDEPTA 8 character name of the ACID’s department
DEPTFULL TSSDEPTF Full 32 character ACID’s department name
DIVNAME TSSDIVA 8 character name of the ACID’s division
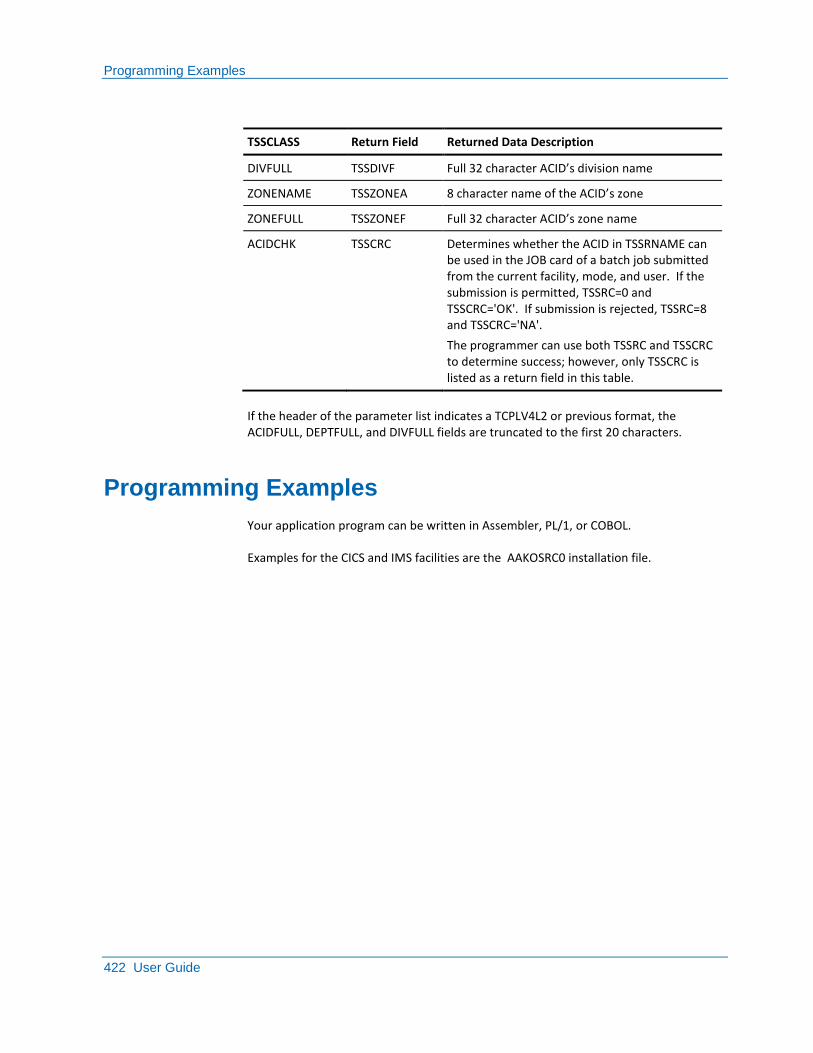
Programming Examples
422 User Guide
TSSCLASS Return Field Returned Data Description
DIVFULL TSSDIVF Full 32 character ACID’s division name
ZONENAME TSSZONEA 8 character name of the ACID’s zone
ZONEFULL TSSZONEF Full 32 character ACID’s zone name
ACIDCHK TSSCRC Determines whether the ACID in TSSRNAME can be used in the JOB card of a batch job submitted from the current facility, mode, and user. If the submission is permitted, TSSRC=0 and TSSCRC='OK'. If submission is rejected, TSSRC=8 and TSSCRC='NA'.
The programmer can use both TSSRC and TSSCRC to determine success; however, only TSSCRC is listed as a return field in this table.
If the header of the parameter list indicates a TCPLV4L2 or previous format, the ACIDFULL, DEPTFULL, and DIVFULL fields are truncated to the first 20 characters.
Programming Examples
Your application program can be written in Assembler, PL/1, or COBOL.
Examples for the CICS and IMS facilities are the AAKOSRC0 installation file.

Programming Examples
Chapter 15: Extending Security With the Application Interface 423
Assembler
In Assembler, use the LOAD MACRO to load TSSAI. Then, BRANCH and LINK to the routine. At the close of processing, issue the DELETE MACRO to delete the module.
An alternate approach is to use the LINK MACRO.
The AAKOSRC0 file contains examples of assembler code that illustrate both techniques for BATCH, STC, and TSO facilities. Member EXAIBA1 shows the use of LOAD. Member EXAIBA2 shows the use of LINK.
USING TSSCPL,R2
LA R2,TSSCPL
MVI TSSLOG, 'Y' VIOLATION LOGGING REQUESTED
MVC TSSHEAD,=CL8'TCPLV5L1'
MVC TSSCLASS,=CL8'RESLIST' REQUEST INSTALLATION DATA
MVC TSSRNAME,=CL8'DSNAME'
MVC TSSLRTN,=F'2048'
LA R1,TSSCPL R1 —> PARAMETER LIST
ST R1,ATSSCPL
LA R1,ATSSCPL
LINK EP=TSSAI LINK TO APPLICATION INTERFACE
LTR R15,R15 Q RETURN CODE OK
BNZ NOTOK A NOT OK GO DO YOUR ERROR
OK DS OH DO WHAT YOU LIKE
.
.
.
ATSSCPL DS A ADDRESS OF PARAMETER LIST
COPY TSSCPLA
#TSSCPL RTLN=2048
. INTERFACE PARM LIST
.
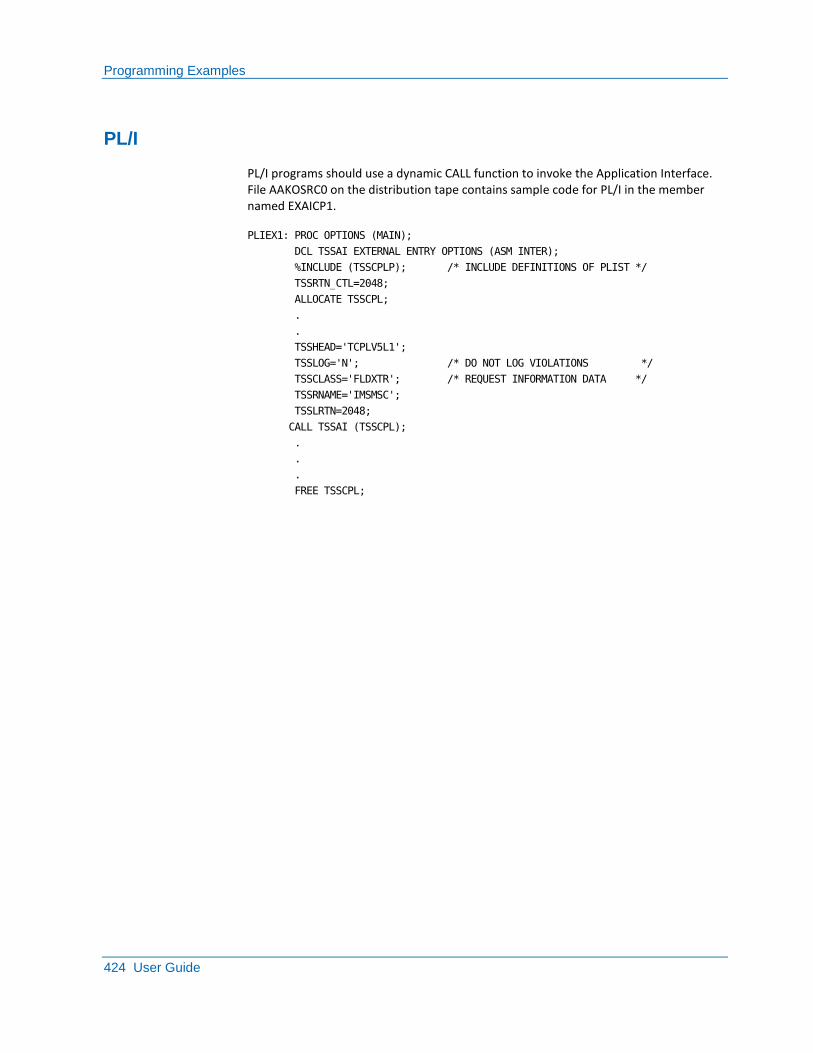
Programming Examples
424 User Guide
PL/I
PL/I programs should use a dynamic CALL function to invoke the Application Interface. File AAKOSRC0 on the distribution tape contains sample code for PL/I in the member named EXAICP1.
PLIEX1: PROC OPTIONS (MAIN);
DCL TSSAI EXTERNAL ENTRY OPTIONS (ASM INTER);
%INCLUDE (TSSCPLP); /* INCLUDE DEFINITIONS OF PLIST */
TSSRTN_CTL=2048;
ALLOCATE TSSCPL;
.
.
TSSHEAD='TCPLV5L1';
TSSLOG='N'; /* DO NOT LOG VIOLATIONS */
TSSCLASS='FLDXTR'; /* REQUEST INFORMATION DATA */
TSSRNAME='IMSMSC';
TSSLRTN=2048;
CALL TSSAI (TSSCPL);
.
.
.
FREE TSSCPL;

Programming Examples
Chapter 15: Extending Security With the Application Interface 425
COBOL
COBOL programs should use a dynamic CALL function to invoke the Application Interface and a CANCEL function to delete the requested module. File AAKOSRC0 on the distribution tape contains COBOL coding examples that use a dynamic call to invoke the Application Interface in the EXAICC1 member.
000010 IDENTIFICATION DIVISION.
.
001000 DATA DIVISION.
.
001010******************************************************************
001020* *
001030* ENSURE TSSCPL IS IN THE COBOL COPY LIBRARY OR COPY YOUR OWN *
001040* VERSION INLINE INTO PROGRAM, USE OF COPY LIBRARY IS *
001050* RECOMMENDED SO THAT CHANGES WILL ONLY REQUIRE RECOMPILE
001060* AND NOT RECODING OF SOURCE *
001070******************************************************************
001080 01 TSSCPL COPY TSSCPLC REPLACING ==:RTLN:==BY==256==.
001090 77 TSSAI PICTURE X(8).
.
002000 PROCEDURE DIVISION.
.
010010******************************************************************
010020* *
010030* CALL CA Top Secret APPLICATION INTERFACE TO EXTRACT *
010040* INSTALLATION DATA FROM USER'S SECURITY RECORD *
010050* VIOLATION LOGGING IS REQUESTED *
010060******************************************************************
010070 MOVE 'TCPLV5L1' to TSSHEAD
010080 MOVE 'Y' to TSSLOG
010090 MOVE 'DUFXTR' to TSSCLASS.
010100 MOVE 'TSSAI' to TSSAI.
010110 CALL TSSAI USING TSSCPL.
010120 IF NOT TSSROK GO TO 100-CHECK-TOP-RETURN
010130 MOVE TSSRTN TO USER-AREA-FOR-INST-DATA.
.
020010******************************************************************
020020* *
020030* CANCEL CA Top Secret APPLICATION INTERFACE DO THIS WHEN THE *
020040* CA Top Secret INTERFACE IS NO LONGER REQURIED BY PROGRAM AND *
020050* THUS FREE UP THE STORAGE IT OCCUPIES IF NOT IN COMMON STORE *
020060* *
020070******************************************************************
020090 MOVE 'TSSAI' to TSSAI.
020100 CANCEL TSSAI.
Generate a Random Password
426 User Guide
Generate a Random Password
You can generate a random password. This capability improves security by eliminating the need to maintain a list of static passwords. For example, every month you can randomly generate a new password that is unlike any previous password.
Follow these steps:
1. Issue a LINK (or a dynamic call) to invoke the CA Top Secret Application Interface.
The CA Top Secret Application Interface launches.
2. Define and submit a parameter list with the following Request Record specifications:
■ For TSSHEAD, specify TCPLV5L1.
■ For TSSCLASS, specify RANDOM.
■ For TSSRNAME, specify the userid for which to generate a random password.
■ For TSSPSWDO, specify the current password of the userid.
When you submit the list, the following message appears, beginning at label TSSRTN:
NEW PASSWORD IS (XXXXXXXX)
XXXXXXXX
Identifies the new password. The new password is always left-justified and padded to eight characters with blanks.
Chapter 16: Protecting Facilities 427
Chapter 16: Protecting Facilities
This section contains the following topics:
About Facilities (see page 428) Facility Matrix Table Administration (see page 428) Securing TSO (see page 440) Securing CICS (see page 442) Securing CA IDMS (see page 444) Securing CA Roscoe IE (see page 446) Securing IMS (see page 447) Securing BATCH Jobs (see page 449) Securing Started Tasks (STC) (see page 451) Securing z/VM (see page 453) Extended Platform Security (see page 454) Security for Other Products (see page 455)

About Facilities
428 User Guide
About Facilities
Some services, such as BATCH, STC, and CONSOLE, are automatically associated with the appropriate facility through the use of the SESSION type. You can provide this type:
■ As a parameter on the signon request
■ From the appropriate field in the input token provided by the TOKNIN= parameter
Other services such as CICS, CA IDMS, and IMS are associated:
■ Explicitly—By assigning a MASTFAC parameter to the ACID executing the batch job or STC that created the service.
■ Implicitly—CA Top Secret looks at the program in control and matches it with the program name specified in the facility. If there is not a match for the INITPGM or no MASTFAC was assigned, a facility of STC is assigned if the particular service was started as a started task. If the service was started as a batch job, the facility of BATCH is assigned.
Facilities can also be:
■ Single user address space (like TSO and BATCH). Each signed on user gets their own address space.
■ Multiple user address space (for example, CICS and IMS). Using CICS as an example, each user that signs on to a CICS region is given part of the region's block of space. When a user requests access, standard CICS only identifies to z/OS the Security Record for the region involved, not the specific user's Security Record. This procedure is typical of multiple user address space systems.
A list of CA Top Secret predefined facilities and their attributes resides in the Facilities Matrix Table. These attributes are called the facility's definition.
Facility Matrix Table Administration
The Facility Matrix Table in the Parameter File contains predefined facilities and templates you can customize to create additional facilities. Each entry contains facility-specific information which controls how the facility functions. To change facility-specific information:
■ Permanently, use the FACILITY control option
■ Temporarily, use the TSS MODIFY command

Facility Matrix Table Administration
Chapter 16: Protecting Facilities 429
Display Facility Information
The facility definitions are contained in the Facility Matrix Table.
To display all the facilities currently in use at your site, enter the command:
TSS MODIFY(FACILITY(ALL))
To display a specific facility’s definition, enter the command:
TSS MODIFY(FACILITY(facility))
Example: TSO facility information
This example shows the default values for the TSO Facility Matrix Table entry. The first line identifies TSO to CA Top Secret. The remaining lines specify which FACILITY operands pertain to the TSO facility within the CA Top Secret environment:
INITPGM=IKJEFLC id=T TYPE=03
ATTRIBUTES=IN-USE,ACTIVE,SHRPRF,NOASUBM,ABEND,SUAS,NOXDEF
ATTRIBUTES=LUMSG,STMSG,SIGN(M),INSTDATA,RNDPW,AUTHINIT
ATTRIBUTES=NOPROMPT,NOAUDIT,RES,WARNPW,TSOC,LCFCMD
ATTRIBUTES=MAGLC,NOTRACE,NOEODINIT,IJU,NODORMPW,NONPWR,
MODE=FAIL DOWN=GLOBAL LOGGING=ACCESS,INIT,MSG,SEC9
UIDACID=8 LOCKTIME=000 DEFACID=*NONE* KEY=8
Add a New Facility
There are 221 dummy facility entries available for site-defined facilities such as test regions for CICS or IMS. Each dummy facility has the name USERnnn.
This table shows how each facility has an accompanying field ID of two characters:
Facilities ID Field
USER0 – USER99 0 through 99
USER100 - USER109 A0 through A9
USER110 - USER119 B0 through B9
USER120 - USER129 C0 through C9
USER130 - USER139 D0 through D9
USER140 - USER149 E0 through E9
USER150 - USER159 F0 through F9
USER160 - USER169 G0 through G9
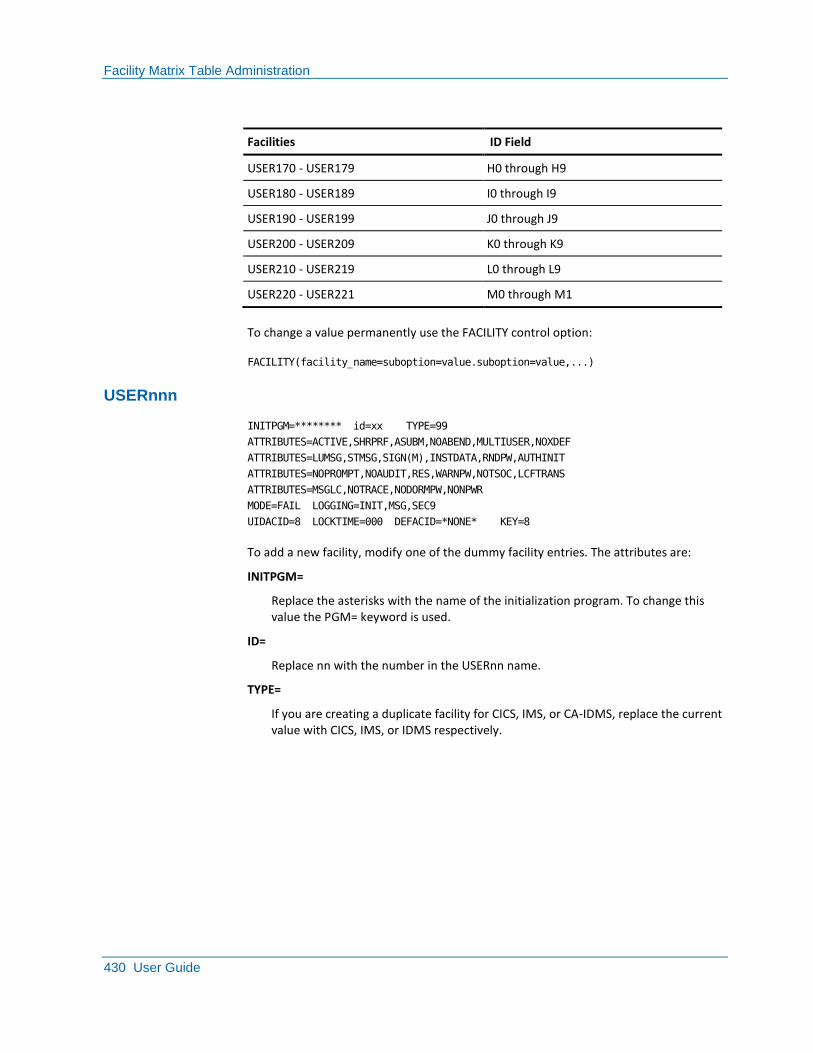
Facility Matrix Table Administration
430 User Guide
Facilities ID Field
USER170 - USER179 H0 through H9
USER180 - USER189 I0 through I9
USER190 - USER199 J0 through J9
USER200 - USER209 K0 through K9
USER210 - USER219 L0 through L9
USER220 - USER221 M0 through M1
To change a value permanently use the FACILITY control option:
FACILITY(facility_name=suboption=value.suboption=value,...)
USERnnn
INITPGM=******** id=xx TYPE=99
ATTRIBUTES=ACTIVE,SHRPRF,ASUBM,NOABEND,MULTIUSER,NOXDEF
ATTRIBUTES=LUMSG,STMSG,SIGN(M),INSTDATA,RNDPW,AUTHINIT
ATTRIBUTES=NOPROMPT,NOAUDIT,RES,WARNPW,NOTSOC,LCFTRANS
ATTRIBUTES=MSGLC,NOTRACE,NODORMPW,NONPWR
MODE=FAIL LOGGING=INIT,MSG,SEC9
UIDACID=8 LOCKTIME=000 DEFACID=*NONE* KEY=8
To add a new facility, modify one of the dummy facility entries. The attributes are:
INITPGM=
Replace the asterisks with the name of the initialization program. To change this value the PGM= keyword is used.
ID=
Replace nn with the number in the USERnn name.
TYPE=
If you are creating a duplicate facility for CICS, IMS, or CA-IDMS, replace the current value with CICS, IMS, or IDMS respectively.
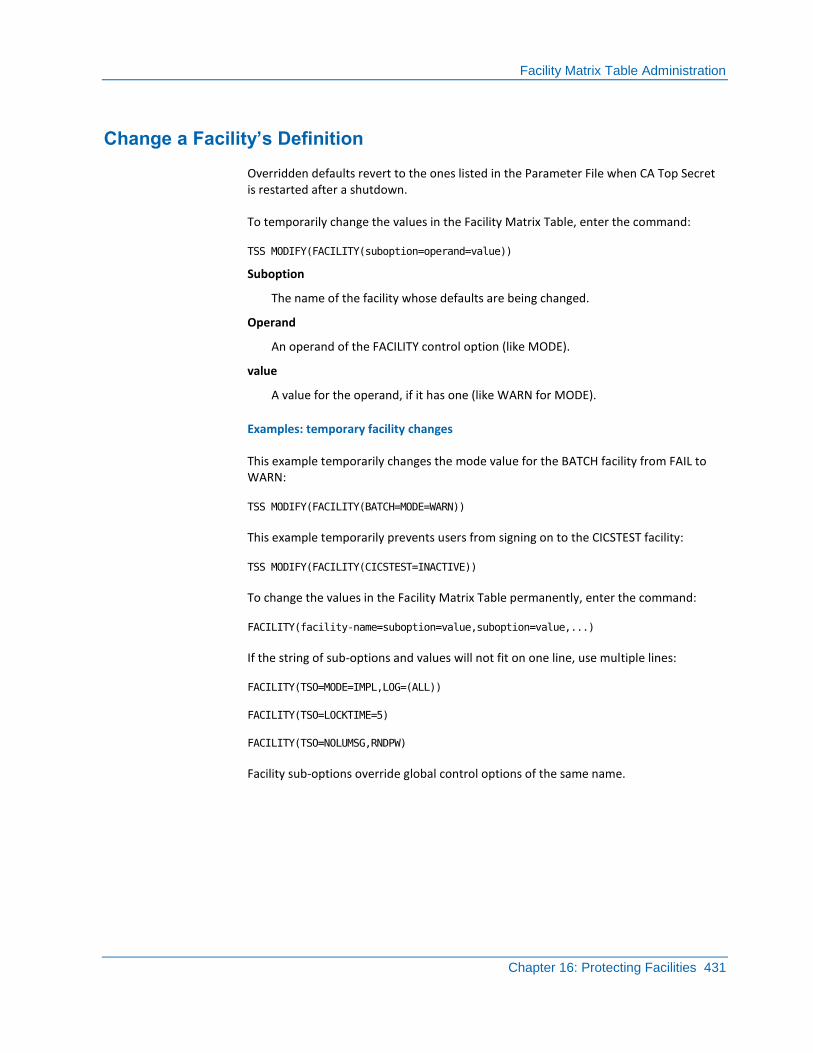
Facility Matrix Table Administration
Chapter 16: Protecting Facilities 431
Change a Facility’s Definition
Overridden defaults revert to the ones listed in the Parameter File when CA Top Secret is restarted after a shutdown.
To temporarily change the values in the Facility Matrix Table, enter the command:
TSS MODIFY(FACILITY(suboption=operand=value))
Suboption
The name of the facility whose defaults are being changed.
Operand
An operand of the FACILITY control option (like MODE).
value
A value for the operand, if it has one (like WARN for MODE).
Examples: temporary facility changes
This example temporarily changes the mode value for the BATCH facility from FAIL to WARN:
TSS MODIFY(FACILITY(BATCH=MODE=WARN))
This example temporarily prevents users from signing on to the CICSTEST facility:
TSS MODIFY(FACILITY(CICSTEST=INACTIVE))
To change the values in the Facility Matrix Table permanently, enter the command:
FACILITY(facility-name=suboption=value,suboption=value,...)
If the string of sub-options and values will not fit on one line, use multiple lines:
FACILITY(TSO=MODE=IMPL,LOG=(ALL))
FACILITY(TSO=LOCKTIME=5)
FACILITY(TSO=NOLUMSG,RNDPW)
Facility sub-options override global control options of the same name.
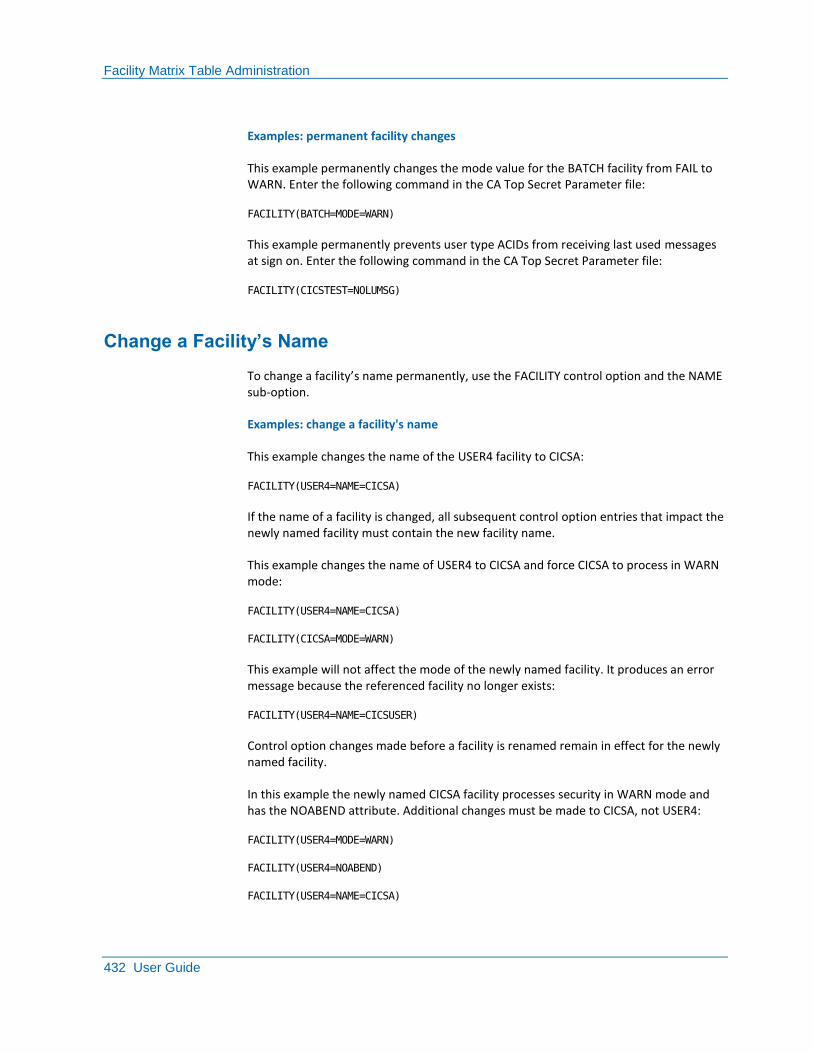
Facility Matrix Table Administration
432 User Guide
Examples: permanent facility changes
This example permanently changes the mode value for the BATCH facility from FAIL to WARN. Enter the following command in the CA Top Secret Parameter file:
FACILITY(BATCH=MODE=WARN)
This example permanently prevents user type ACIDs from receiving last used messages at sign on. Enter the following command in the CA Top Secret Parameter file:
FACILITY(CICSTEST=NOLUMSG)
Change a Facility’s Name
To change a facility’s name permanently, use the FACILITY control option and the NAME sub-option.
Examples: change a facility's name
This example changes the name of the USER4 facility to CICSA:
FACILITY(USER4=NAME=CICSA)
If the name of a facility is changed, all subsequent control option entries that impact the newly named facility must contain the new facility name.
This example changes the name of USER4 to CICSA and force CICSA to process in WARN mode:
FACILITY(USER4=NAME=CICSA)
FACILITY(CICSA=MODE=WARN)
This example will not affect the mode of the newly named facility. It produces an error message because the referenced facility no longer exists:
FACILITY(USER4=NAME=CICSUSER)
Control option changes made before a facility is renamed remain in effect for the newly named facility.
In this example the newly named CICSA facility processes security in WARN mode and has the NOABEND attribute. Additional changes must be made to CICSA, not USER4:
FACILITY(USER4=MODE=WARN)
FACILITY(USER4=NOABEND)
FACILITY(USER4=NAME=CICSA)
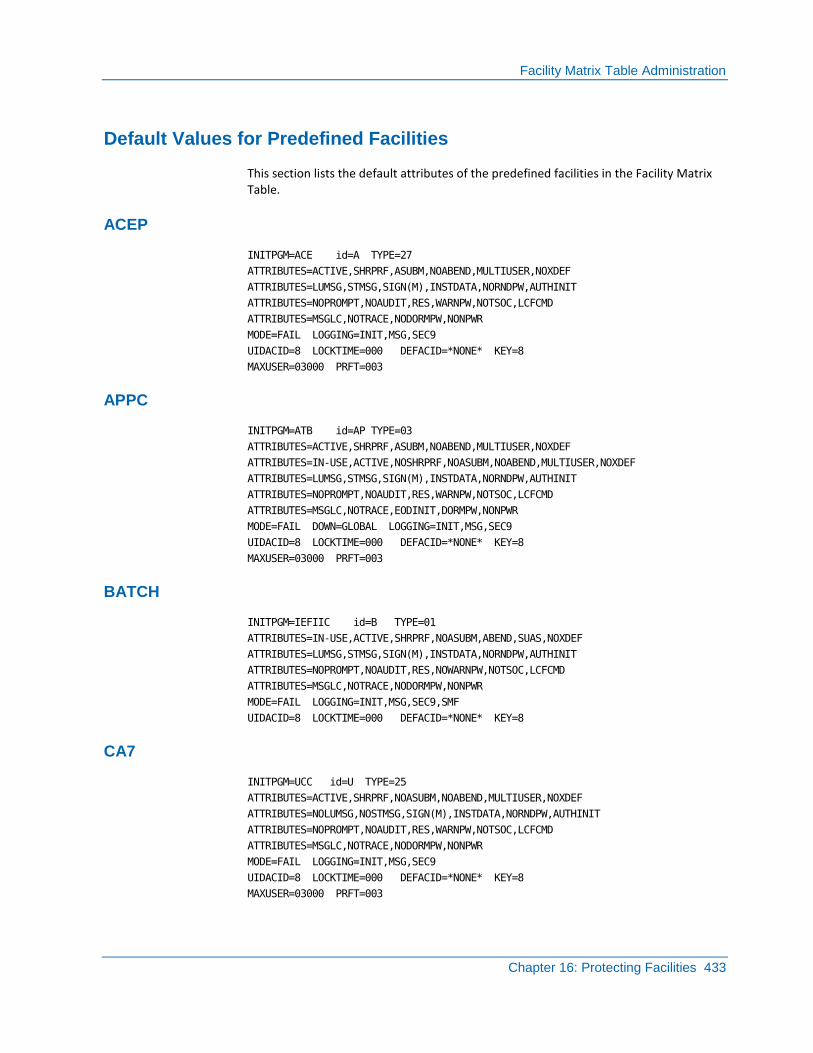
Facility Matrix Table Administration
Chapter 16: Protecting Facilities 433
Default Values for Predefined Facilities
This section lists the default attributes of the predefined facilities in the Facility Matrix Table.
ACEP
INITPGM=ACE id=A TYPE=27
ATTRIBUTES=ACTIVE,SHRPRF,ASUBM,NOABEND,MULTIUSER,NOXDEF
ATTRIBUTES=LUMSG,STMSG,SIGN(M),INSTDATA,NORNDPW,AUTHINIT
ATTRIBUTES=NOPROMPT,NOAUDIT,RES,WARNPW,NOTSOC,LCFCMD
ATTRIBUTES=MSGLC,NOTRACE,NODORMPW,NONPWR
MODE=FAIL LOGGING=INIT,MSG,SEC9
UIDACID=8 LOCKTIME=000 DEFACID=*NONE* KEY=8
MAXUSER=03000 PRFT=003
APPC
INITPGM=ATB id=AP TYPE=03
ATTRIBUTES=ACTIVE,SHRPRF,ASUBM,NOABEND,MULTIUSER,NOXDEF
ATTRIBUTES=IN-USE,ACTIVE,NOSHRPRF,NOASUBM,NOABEND,MULTIUSER,NOXDEF
ATTRIBUTES=LUMSG,STMSG,SIGN(M),INSTDATA,NORNDPW,AUTHINIT
ATTRIBUTES=NOPROMPT,NOAUDIT,RES,WARNPW,NOTSOC,LCFCMD
ATTRIBUTES=MSGLC,NOTRACE,EODINIT,DORMPW,NONPWR
MODE=FAIL DOWN=GLOBAL LOGGING=INIT,MSG,SEC9
UIDACID=8 LOCKTIME=000 DEFACID=*NONE* KEY=8
MAXUSER=03000 PRFT=003
BATCH
INITPGM=IEFIIC id=B TYPE=01
ATTRIBUTES=IN-USE,ACTIVE,SHRPRF,NOASUBM,ABEND,SUAS,NOXDEF
ATTRIBUTES=LUMSG,STMSG,SIGN(M),INSTDATA,NORNDPW,AUTHINIT
ATTRIBUTES=NOPROMPT,NOAUDIT,RES,NOWARNPW,NOTSOC,LCFCMD
ATTRIBUTES=MSGLC,NOTRACE,NODORMPW,NONPWR
MODE=FAIL LOGGING=INIT,MSG,SEC9,SMF
UIDACID=8 LOCKTIME=000 DEFACID=*NONE* KEY=8
CA7
INITPGM=UCC id=U TYPE=25
ATTRIBUTES=ACTIVE,SHRPRF,NOASUBM,NOABEND,MULTIUSER,NOXDEF
ATTRIBUTES=NOLUMSG,NOSTMSG,SIGN(M),INSTDATA,NORNDPW,AUTHINIT
ATTRIBUTES=NOPROMPT,NOAUDIT,RES,WARNPW,NOTSOC,LCFCMD
ATTRIBUTES=MSGLC,NOTRACE,NODORMPW,NONPWR
MODE=FAIL LOGGING=INIT,MSG,SEC9
UIDACID=8 LOCKTIME=000 DEFACID=*NONE* KEY=8
MAXUSER=03000 PRFT=003
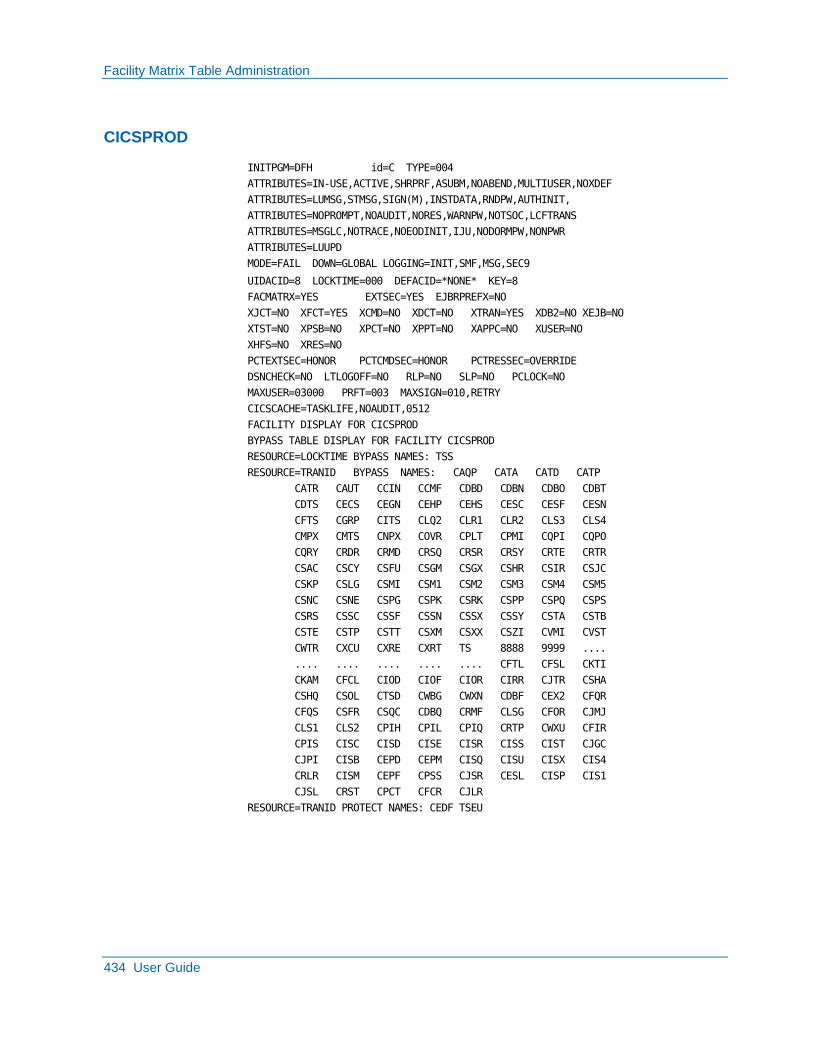
Facility Matrix Table Administration
434 User Guide
CICSPROD
INITPGM=DFH id=C TYPE=004
ATTRIBUTES=IN-USE,ACTIVE,SHRPRF,ASUBM,NOABEND,MULTIUSER,NOXDEF
ATTRIBUTES=LUMSG,STMSG,SIGN(M),INSTDATA,RNDPW,AUTHINIT,
ATTRIBUTES=NOPROMPT,NOAUDIT,NORES,WARNPW,NOTSOC,LCFTRANS
ATTRIBUTES=MSGLC,NOTRACE,NOEODINIT,IJU,NODORMPW,NONPWR
ATTRIBUTES=LUUPD
MODE=FAIL DOWN=GLOBAL LOGGING=INIT,SMF,MSG,SEC9
UIDACID=8 LOCKTIME=000 DEFACID=*NONE* KEY=8
FACMATRX=YES EXTSEC=YES EJBRPREFX=NO
XJCT=NO XFCT=YES XCMD=NO XDCT=NO XTRAN=YES XDB2=NO XEJB=NO
XTST=NO XPSB=NO XPCT=NO XPPT=NO XAPPC=NO XUSER=NO
XHFS=NO XRES=NO
PCTEXTSEC=HONOR PCTCMDSEC=HONOR PCTRESSEC=OVERRIDE
DSNCHECK=NO LTLOGOFF=NO RLP=NO SLP=NO PCLOCK=NO
MAXUSER=03000 PRFT=003 MAXSIGN=010,RETRY
CICSCACHE=TASKLIFE,NOAUDIT,0512
FACILITY DISPLAY FOR CICSPROD
BYPASS TABLE DISPLAY FOR FACILITY CICSPROD
RESOURCE=LOCKTIME BYPASS NAMES: TSS
RESOURCE=TRANID BYPASS NAMES: CAQP CATA CATD CATP
CATR CAUT CCIN CCMF CDBD CDBN CDBO CDBT
CDTS CECS CEGN CEHP CEHS CESC CESF CESN
CFTS CGRP CITS CLQ2 CLR1 CLR2 CLS3 CLS4
CMPX CMTS CNPX COVR CPLT CPMI CQPI CQPO
CQRY CRDR CRMD CRSQ CRSR CRSY CRTE CRTR
CSAC CSCY CSFU CSGM CSGX CSHR CSIR CSJC
CSKP CSLG CSMI CSM1 CSM2 CSM3 CSM4 CSM5
CSNC CSNE CSPG CSPK CSRK CSPP CSPQ CSPS
CSRS CSSC CSSF CSSN CSSX CSSY CSTA CSTB
CSTE CSTP CSTT CSXM CSXX CSZI CVMI CVST
CWTR CXCU CXRE CXRT TS 8888 9999 ....
.... .... .... .... .... CFTL CFSL CKTI
CKAM CFCL CIOD CIOF CIOR CIRR CJTR CSHA
CSHQ CSOL CTSD CWBG CWXN CDBF CEX2 CFQR
CFQS CSFR CSQC CDBQ CRMF CLSG CFOR CJMJ
CLS1 CLS2 CPIH CPIL CPIQ CRTP CWXU CFIR
CPIS CISC CISD CISE CISR CISS CIST CJGC
CJPI CISB CEPD CEPM CISQ CISU CISX CIS4
CRLR CISM CEPF CPSS CJSR CESL CISP CIS1
CJSL CRST CPCT CFCR CJLR
RESOURCE=TRANID PROTECT NAMES: CEDF TSEU

Facility Matrix Table Administration
Chapter 16: Protecting Facilities 435
CICSTEST
INITPGM=DFH id=k TYPE=004
ATTRIBUTES=IN-USE,ACTIVE,SHRPRF,ASUBM,NOABEND,MULTIUSER,NOXDEF
ATTRIBUTES=LUMSG,STMSG,SIGN(M),INSTDATA,RNDPW,AUTHINIT,
ATTRIBUTES=NOPROMPT,NOAUDIT,NORES,WARNPW,NOTSOC,LCFTRANS
ATTRIBUTES=MSGLC,NOTRACE,NOEODINIT,IJU,NODORMPW,NONPWR
ATTRIBUTES=LUUPD
MODE=FAIL DOWN=GLOBAL LOGGING=INIT,SMF,MSG,SEC9
UIDACID=8 LOCKTIME=000 DEFACID=*NONE* KEY=8
FACMATRX=YES EXTSEC=YES EJBRPREFX=NO
XJCT=NO XFCT=YES XCMD=NO XDCT=NO XTRAN=YES XDB2=NO XEJB=NO
XTST=NO XPSB=NO XPCT=NO XPPT=NO XAPPC=NO XUSER=NO
XHFS=NO XRES=NO
PCTEXTSEC=HONOR PCTCMDSEC=HONOR PCTRESSEC=OVERRIDE
DSNCHECK=NO LTLOGOFF=NO RLP=NO SLP=NO PCLOCK=NO
MAXUSER=03000 PRFT=003 MAXSIGN=010,RETRY
CICSCACHE=TASKLIFE,NOAUDIT,0512
FACILITY DISPLAY FOR CICSTEST
BYPASS TABLE DISPLAY FOR FACILITY CICSTEST
RESOURCE=LOCKTIME BYPASS NAMES: TSS
RESOURCE=TRANID BYPASS NAMES: CAQP CATA CATD CATP
CATR CAUT CCIN CCMF CDBD CDBN CDBO CDBT
CDTS CECS CEGN CEHP CEHS CESC CESF CESN
CFTS CGRP CITS CLQ2 CLR1 CLR2 CLS3 CLS4
CMPX CMTS CNPX COVR CPLT CPMI CQPI CQPO
CQRY CRDR CRMD CRSQ CRSR CRSY CRTE CRTR
CSAC CSCY CSFU CSGM CSGX CSHR CSIR CSJC
CSKP CSLG CSMI CSM1 CSM2 CSM3 CSM4 CSM5
CSNC CSNE CSPG CSPK CSRK CSPP CSPQ CSPS
CSRS CSSC CSSF CSSN CSSX CSSY CSTA CSTB
CSTE CSTP CSTT CSXM CSXX CSZI CVMI CVST
CWTR CXCU CXRE CXRT TS 8888 9999 ....
.... .... .... .... .... CFTL CFSL CKTI
CKAM CFCL CIOD CIOF CIOR CIRR CJTR CSHA
CSHQ CSOL CTSD CWBG CWXN CDBF CEX2 CFQR
CFQS CSFR CSQC CDBQ CRMF CLSG CFOR CJMJ
CLS1 CLS2 CPIH CPIL CPIQ CRTP CWXU CFIR
CPIS CISC CISD CISE CISR CISS CIST CJGC
CJPI CISB CEPD CEPM CISQ CISU CISX CIS4
CRLR CISM CEPF CPSS CJSR CESL CISP CIS1
CJSL CRST CPCT CFCR CJLR
RESOURCE=TRANID PROTECT NAMES: CEDF TSEU
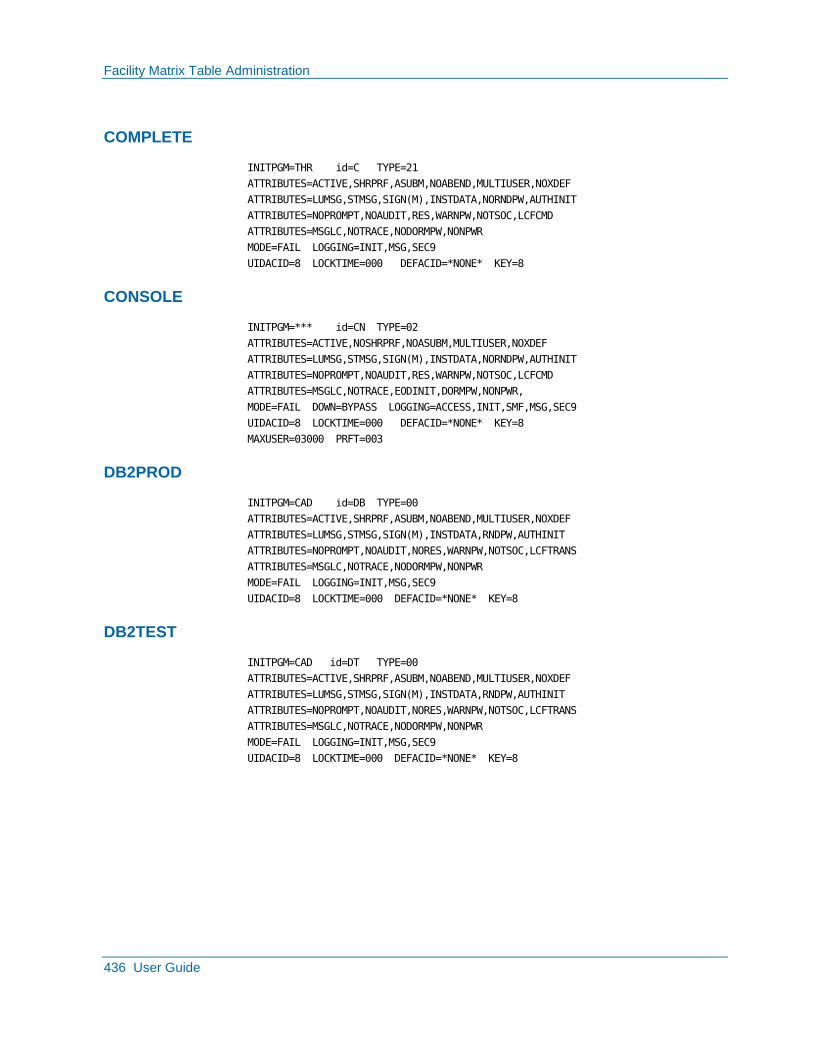
Facility Matrix Table Administration
436 User Guide
COMPLETE
INITPGM=THR id=C TYPE=21
ATTRIBUTES=ACTIVE,SHRPRF,ASUBM,NOABEND,MULTIUSER,NOXDEF
ATTRIBUTES=LUMSG,STMSG,SIGN(M),INSTDATA,NORNDPW,AUTHINIT
ATTRIBUTES=NOPROMPT,NOAUDIT,RES,WARNPW,NOTSOC,LCFCMD
ATTRIBUTES=MSGLC,NOTRACE,NODORMPW,NONPWR
MODE=FAIL LOGGING=INIT,MSG,SEC9
UIDACID=8 LOCKTIME=000 DEFACID=*NONE* KEY=8
CONSOLE
INITPGM=*** id=CN TYPE=02
ATTRIBUTES=ACTIVE,NOSHRPRF,NOASUBM,MULTIUSER,NOXDEF
ATTRIBUTES=LUMSG,STMSG,SIGN(M),INSTDATA,NORNDPW,AUTHINIT
ATTRIBUTES=NOPROMPT,NOAUDIT,RES,WARNPW,NOTSOC,LCFCMD
ATTRIBUTES=MSGLC,NOTRACE,EODINIT,DORMPW,NONPWR,
MODE=FAIL DOWN=BYPASS LOGGING=ACCESS,INIT,SMF,MSG,SEC9
UIDACID=8 LOCKTIME=000 DEFACID=*NONE* KEY=8
MAXUSER=03000 PRFT=003
DB2PROD
INITPGM=CAD id=DB TYPE=00
ATTRIBUTES=ACTIVE,SHRPRF,ASUBM,NOABEND,MULTIUSER,NOXDEF
ATTRIBUTES=LUMSG,STMSG,SIGN(M),INSTDATA,RNDPW,AUTHINIT
ATTRIBUTES=NOPROMPT,NOAUDIT,NORES,WARNPW,NOTSOC,LCFTRANS
ATTRIBUTES=MSGLC,NOTRACE,NODORMPW,NONPWR
MODE=FAIL LOGGING=INIT,MSG,SEC9
UIDACID=8 LOCKTIME=000 DEFACID=*NONE* KEY=8
DB2TEST
INITPGM=CAD id=DT TYPE=00
ATTRIBUTES=ACTIVE,SHRPRF,ASUBM,NOABEND,MULTIUSER,NOXDEF
ATTRIBUTES=LUMSG,STMSG,SIGN(M),INSTDATA,RNDPW,AUTHINIT
ATTRIBUTES=NOPROMPT,NOAUDIT,NORES,WARNPW,NOTSOC,LCFTRANS
ATTRIBUTES=MSGLC,NOTRACE,NODORMPW,NONPWR
MODE=FAIL LOGGING=INIT,MSG,SEC9
UIDACID=8 LOCKTIME=000 DEFACID=*NONE* KEY=8
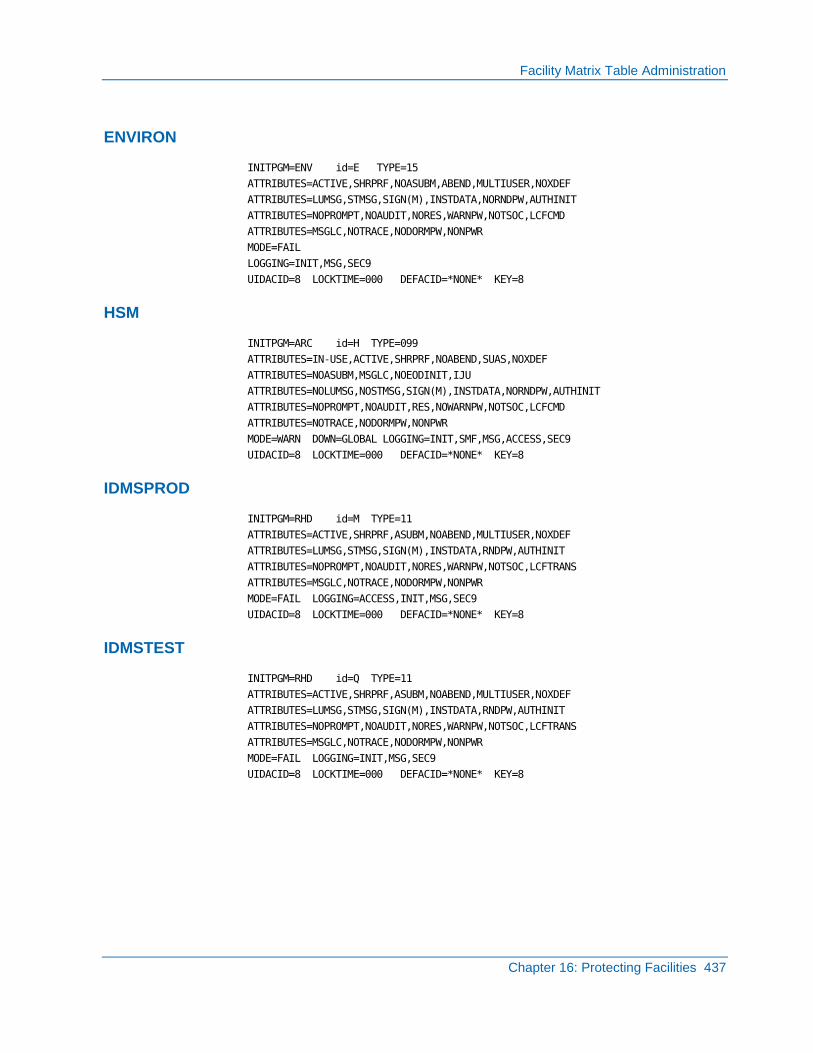
Facility Matrix Table Administration
Chapter 16: Protecting Facilities 437
ENVIRON
INITPGM=ENV id=E TYPE=15
ATTRIBUTES=ACTIVE,SHRPRF,NOASUBM,ABEND,MULTIUSER,NOXDEF
ATTRIBUTES=LUMSG,STMSG,SIGN(M),INSTDATA,NORNDPW,AUTHINIT
ATTRIBUTES=NOPROMPT,NOAUDIT,NORES,WARNPW,NOTSOC,LCFCMD
ATTRIBUTES=MSGLC,NOTRACE,NODORMPW,NONPWR
MODE=FAIL
LOGGING=INIT,MSG,SEC9
UIDACID=8 LOCKTIME=000 DEFACID=*NONE* KEY=8
HSM
INITPGM=ARC id=H TYPE=099
ATTRIBUTES=IN-USE,ACTIVE,SHRPRF,NOABEND,SUAS,NOXDEF
ATTRIBUTES=NOASUBM,MSGLC,NOEODINIT,IJU
ATTRIBUTES=NOLUMSG,NOSTMSG,SIGN(M),INSTDATA,NORNDPW,AUTHINIT
ATTRIBUTES=NOPROMPT,NOAUDIT,RES,NOWARNPW,NOTSOC,LCFCMD
ATTRIBUTES=NOTRACE,NODORMPW,NONPWR
MODE=WARN DOWN=GLOBAL LOGGING=INIT,SMF,MSG,ACCESS,SEC9
UIDACID=8 LOCKTIME=000 DEFACID=*NONE* KEY=8
IDMSPROD
INITPGM=RHD id=M TYPE=11
ATTRIBUTES=ACTIVE,SHRPRF,ASUBM,NOABEND,MULTIUSER,NOXDEF
ATTRIBUTES=LUMSG,STMSG,SIGN(M),INSTDATA,RNDPW,AUTHINIT
ATTRIBUTES=NOPROMPT,NOAUDIT,NORES,WARNPW,NOTSOC,LCFTRANS
ATTRIBUTES=MSGLC,NOTRACE,NODORMPW,NONPWR
MODE=FAIL LOGGING=ACCESS,INIT,MSG,SEC9
UIDACID=8 LOCKTIME=000 DEFACID=*NONE* KEY=8
IDMSTEST
INITPGM=RHD id=Q TYPE=11
ATTRIBUTES=ACTIVE,SHRPRF,ASUBM,NOABEND,MULTIUSER,NOXDEF
ATTRIBUTES=LUMSG,STMSG,SIGN(M),INSTDATA,RNDPW,AUTHINIT
ATTRIBUTES=NOPROMPT,NOAUDIT,NORES,WARNPW,NOTSOC,LCFTRANS
ATTRIBUTES=MSGLC,NOTRACE,NODORMPW,NONPWR
MODE=FAIL LOGGING=INIT,MSG,SEC9
UIDACID=8 LOCKTIME=000 DEFACID=*NONE* KEY=8

Facility Matrix Table Administration
438 User Guide
IMSPROD
INITPGM=DFS id=I TYPE=05
ATTRIBUTES=ACTIVE,SHRPRF,ASUBM,NOABEND,MULTIUSER,NOXDEF
ATTRIBUTES=LUMSG,STMSG,SIGN(M),INSTDATA,RNDPW,AUTHINIT
ATTRIBUTES=NOPROMPT,NOAUDIT,NORES,WARNPW,NOTSOC,LCFTRANS
ATTRIBUTES=MSGLC,NOTRACE,NODORMPW,NONPWR
MODE=FAIL LOGGING=INIT,MSG,SEC9
UIDACID=8 LOCKTIME=000 DEFACID=*NONE* KEY=8
IMSTEST
INITPGM=DFS id=X TYPE=05
ATTRIBUTES=ACTIVE,SHRPRF,ASUBM,NOABEND,MULTIUSER,NOXDEF
ATTRIBUTES=LUMSG,STMSG,SIGN(M),INSTDATA,RNDPW,AUTHINIT
ATTRIBUTES=NOPROMPT,NOAUDIT,NORES,WARNPW,NOTSOC,LCFTRANS
ATTRIBUTES=MSGLC,NOTRACE,NODORMPW,NONPWR
MODE=FAIL LOGGING=INIT,MSG,SEC9
UIDACID=8 LOCKTIME=000 DEFACID=*NONE* KEY=8
INTERACT
INITPGM=MEN id=I TYPE=14
ATTRIBUTES=ACTIVE,SHRPRF,ASUBM,NOABEND,MULTIUSER,NOXDEF
ATTRIBUTES=LUMSG,STMSG,SIGN(M),INSTDATA,NORNDPW,AUTHINIT
ATTRIBUTES=NOPROMPT,NOAUDIT,RES,WARNPW,NOTSOC,LCFCMD
ATTRIBUTES=MSGLC,NOTRACE,NODORMPW,NONPWR
MODE=FAIL LOGGING=INIT,MSG,SEC9
UIDACID=8 LOCKTIME=000 DEFACID=*NONE* KEY=5
JES
INITPGM=HAS id=J TYPE=12
ATTRIBUTES=ACTIVE,NOSHRPRF,NOASUBM,NOABEND,MULTIUSER,NOXDEF
ATTRIBUTES=LUMSG,STMSG,SIGN(M),INSTDATA,NORNDPW,AUTHINIT
ATTRIBUTES=NOPROMPT,NOAUDIT,RES,WARNPW,NOTSOC,LCFCMD
ATTRIBUTES=MSGLC,NOTRACE,DORMPW,NONPWR
MODE=FAIL LOGGING=INIT,MSG,SEC9
UIDACID=8 LOCKTIME=000 DEFACID=*NONE* KEY=8
NCCF
INITPGM=DSI id=N TYPE=06
ATTRIBUTES=ACTIVE,SHRPRF,ASUBM,ABEND,MULTIUSER,NOXDEF
ATTRIBUTES=LUMSG,STMSG,SIGN(M),INSTDATA,NORNDPW,NOAUTHINIT
ATTRIBUTES=NOPROMPT,NOAUDIT,RES,WARNPW,NOTSOC,LCFCMD
ATTRIBUTES=MSGLC,NOTRACE,NODORMPW,NONPWR,NOEODINIT,IJU
MAXUSER=03000, PRFT=003 LOGGING=INIT,MSG DOWN=GLOBAL
UIDACID=8 LOCKTIME=000 DEFACID=*NONE* KEY=8
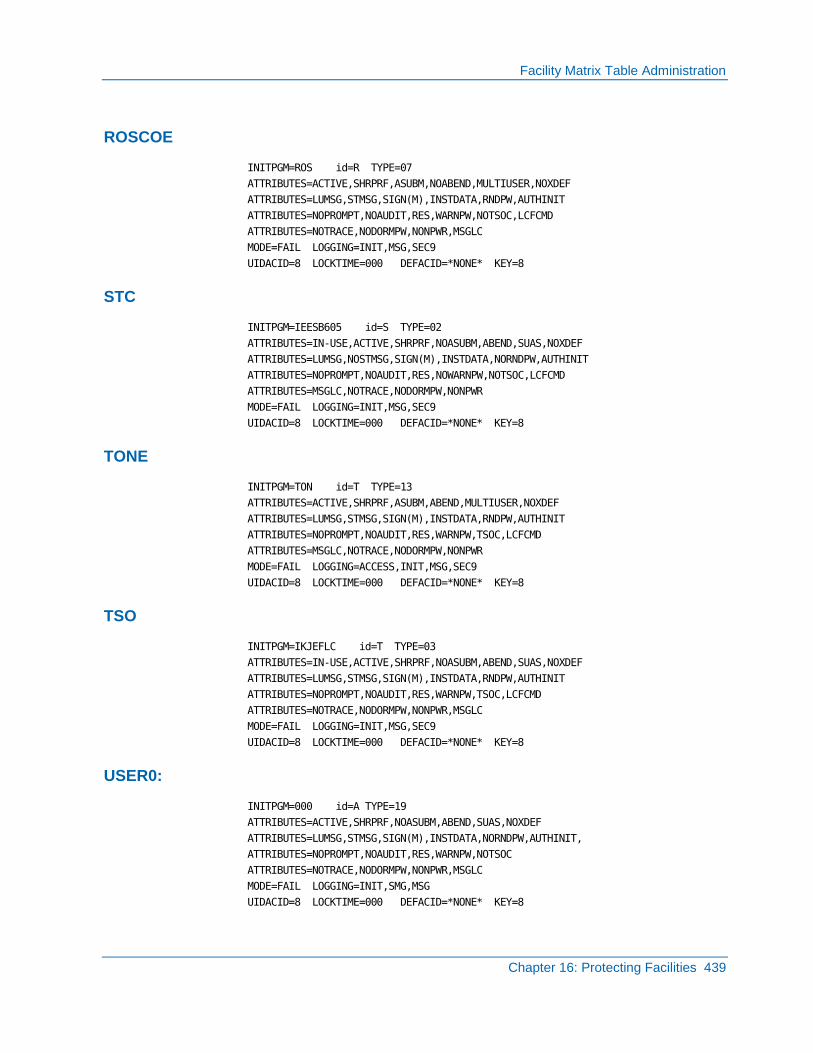
Facility Matrix Table Administration
Chapter 16: Protecting Facilities 439
ROSCOE
INITPGM=ROS id=R TYPE=07
ATTRIBUTES=ACTIVE,SHRPRF,ASUBM,NOABEND,MULTIUSER,NOXDEF
ATTRIBUTES=LUMSG,STMSG,SIGN(M),INSTDATA,RNDPW,AUTHINIT
ATTRIBUTES=NOPROMPT,NOAUDIT,RES,WARNPW,NOTSOC,LCFCMD
ATTRIBUTES=NOTRACE,NODORMPW,NONPWR,MSGLC
MODE=FAIL LOGGING=INIT,MSG,SEC9
UIDACID=8 LOCKTIME=000 DEFACID=*NONE* KEY=8
STC
INITPGM=IEESB605 id=S TYPE=02
ATTRIBUTES=IN-USE,ACTIVE,SHRPRF,NOASUBM,ABEND,SUAS,NOXDEF
ATTRIBUTES=LUMSG,NOSTMSG,SIGN(M),INSTDATA,NORNDPW,AUTHINIT
ATTRIBUTES=NOPROMPT,NOAUDIT,RES,NOWARNPW,NOTSOC,LCFCMD
ATTRIBUTES=MSGLC,NOTRACE,NODORMPW,NONPWR
MODE=FAIL LOGGING=INIT,MSG,SEC9
UIDACID=8 LOCKTIME=000 DEFACID=*NONE* KEY=8
TONE
INITPGM=TON id=T TYPE=13
ATTRIBUTES=ACTIVE,SHRPRF,ASUBM,ABEND,MULTIUSER,NOXDEF
ATTRIBUTES=LUMSG,STMSG,SIGN(M),INSTDATA,RNDPW,AUTHINIT
ATTRIBUTES=NOPROMPT,NOAUDIT,RES,WARNPW,TSOC,LCFCMD
ATTRIBUTES=MSGLC,NOTRACE,NODORMPW,NONPWR
MODE=FAIL LOGGING=ACCESS,INIT,MSG,SEC9
UIDACID=8 LOCKTIME=000 DEFACID=*NONE* KEY=8
TSO
INITPGM=IKJEFLC id=T TYPE=03
ATTRIBUTES=IN-USE,ACTIVE,SHRPRF,NOASUBM,ABEND,SUAS,NOXDEF
ATTRIBUTES=LUMSG,STMSG,SIGN(M),INSTDATA,RNDPW,AUTHINIT
ATTRIBUTES=NOPROMPT,NOAUDIT,RES,WARNPW,TSOC,LCFCMD
ATTRIBUTES=NOTRACE,NODORMPW,NONPWR,MSGLC
MODE=FAIL LOGGING=INIT,MSG,SEC9
UIDACID=8 LOCKTIME=000 DEFACID=*NONE* KEY=8
USER0:
INITPGM=000 id=A TYPE=19
ATTRIBUTES=ACTIVE,SHRPRF,NOASUBM,ABEND,SUAS,NOXDEF
ATTRIBUTES=LUMSG,STMSG,SIGN(M),INSTDATA,NORNDPW,AUTHINIT,
ATTRIBUTES=NOPROMPT,NOAUDIT,RES,WARNPW,NOTSOC
ATTRIBUTES=NOTRACE,NODORMPW,NONPWR,MSGLC
MODE=FAIL LOGGING=INIT,SMG,MSG
UIDACID=8 LOCKTIME=000 DEFACID=*NONE* KEY=8
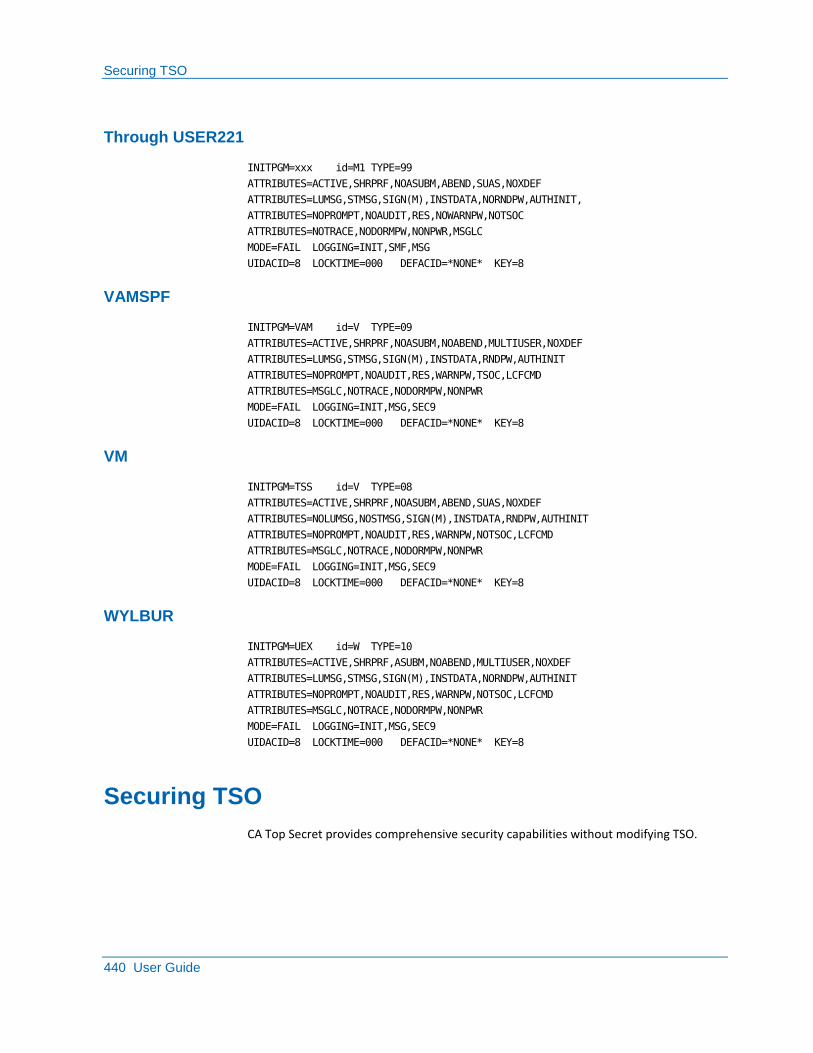
Securing TSO
440 User Guide
Through USER221
INITPGM=xxx id=M1 TYPE=99
ATTRIBUTES=ACTIVE,SHRPRF,NOASUBM,ABEND,SUAS,NOXDEF
ATTRIBUTES=LUMSG,STMSG,SIGN(M),INSTDATA,NORNDPW,AUTHINIT,
ATTRIBUTES=NOPROMPT,NOAUDIT,RES,NOWARNPW,NOTSOC
ATTRIBUTES=NOTRACE,NODORMPW,NONPWR,MSGLC
MODE=FAIL LOGGING=INIT,SMF,MSG
UIDACID=8 LOCKTIME=000 DEFACID=*NONE* KEY=8
VAMSPF
INITPGM=VAM id=V TYPE=09
ATTRIBUTES=ACTIVE,SHRPRF,NOASUBM,NOABEND,MULTIUSER,NOXDEF
ATTRIBUTES=LUMSG,STMSG,SIGN(M),INSTDATA,RNDPW,AUTHINIT
ATTRIBUTES=NOPROMPT,NOAUDIT,RES,WARNPW,TSOC,LCFCMD
ATTRIBUTES=MSGLC,NOTRACE,NODORMPW,NONPWR
MODE=FAIL LOGGING=INIT,MSG,SEC9
UIDACID=8 LOCKTIME=000 DEFACID=*NONE* KEY=8
VM
INITPGM=TSS id=V TYPE=08
ATTRIBUTES=ACTIVE,SHRPRF,NOASUBM,ABEND,SUAS,NOXDEF
ATTRIBUTES=NOLUMSG,NOSTMSG,SIGN(M),INSTDATA,RNDPW,AUTHINIT
ATTRIBUTES=NOPROMPT,NOAUDIT,RES,WARNPW,NOTSOC,LCFCMD
ATTRIBUTES=MSGLC,NOTRACE,NODORMPW,NONPWR
MODE=FAIL LOGGING=INIT,MSG,SEC9
UIDACID=8 LOCKTIME=000 DEFACID=*NONE* KEY=8
WYLBUR
INITPGM=UEX id=W TYPE=10
ATTRIBUTES=ACTIVE,SHRPRF,ASUBM,NOABEND,MULTIUSER,NOXDEF
ATTRIBUTES=LUMSG,STMSG,SIGN(M),INSTDATA,NORNDPW,AUTHINIT
ATTRIBUTES=NOPROMPT,NOAUDIT,RES,WARNPW,NOTSOC,LCFCMD
ATTRIBUTES=MSGLC,NOTRACE,NODORMPW,NONPWR
MODE=FAIL LOGGING=INIT,MSG,SEC9
UIDACID=8 LOCKTIME=000 DEFACID=*NONE* KEY=8
Securing TSO
CA Top Secret provides comprehensive security capabilities without modifying TSO.
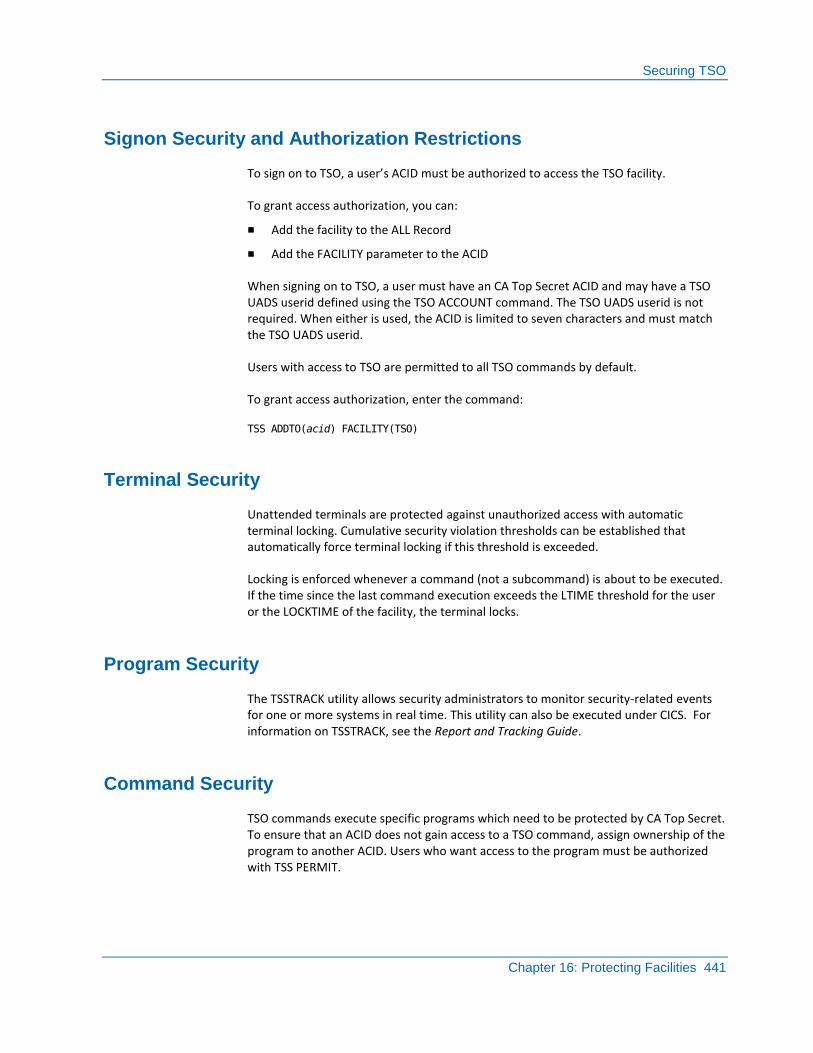
Securing TSO
Chapter 16: Protecting Facilities 441
Signon Security and Authorization Restrictions
To sign on to TSO, a user’s ACID must be authorized to access the TSO facility.
To grant access authorization, you can:
■ Add the facility to the ALL Record
■ Add the FACILITY parameter to the ACID
When signing on to TSO, a user must have an CA Top Secret ACID and may have a TSO UADS userid defined using the TSO ACCOUNT command. The TSO UADS userid is not required. When either is used, the ACID is limited to seven characters and must match the TSO UADS userid.
Users with access to TSO are permitted to all TSO commands by default.
To grant access authorization, enter the command:
TSS ADDTO(acid) FACILITY(TSO)
Terminal Security
Unattended terminals are protected against unauthorized access with automatic terminal locking. Cumulative security violation thresholds can be established that automatically force terminal locking if this threshold is exceeded.
Locking is enforced whenever a command (not a subcommand) is about to be executed. If the time since the last command execution exceeds the LTIME threshold for the user or the LOCKTIME of the facility, the terminal locks.
Program Security
The TSSTRACK utility allows security administrators to monitor security-related events for one or more systems in real time. This utility can also be executed under CICS. For information on TSSTRACK, see the Report and Tracking Guide.
Command Security
TSO commands execute specific programs which need to be protected by CA Top Secret. To ensure that an ACID does not gain access to a TSO command, assign ownership of the program to another ACID. Users who want access to the program must be authorized with TSS PERMIT.
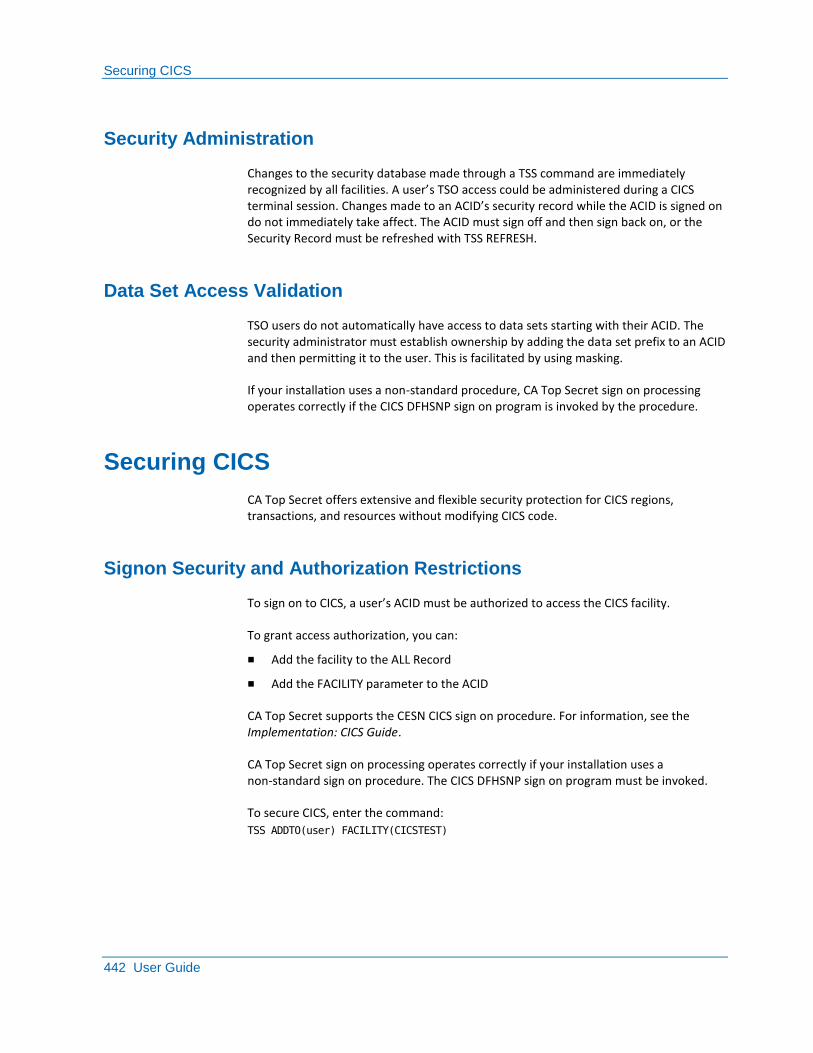
Securing CICS
442 User Guide
Security Administration
Changes to the security database made through a TSS command are immediately recognized by all facilities. A user’s TSO access could be administered during a CICS terminal session. Changes made to an ACID’s security record while the ACID is signed on do not immediately take affect. The ACID must sign off and then sign back on, or the Security Record must be refreshed with TSS REFRESH.
Data Set Access Validation
TSO users do not automatically have access to data sets starting with their ACID. The security administrator must establish ownership by adding the data set prefix to an ACID and then permitting it to the user. This is facilitated by using masking.
If your installation uses a non-standard procedure, CA Top Secret sign on processing operates correctly if the CICS DFHSNP sign on program is invoked by the procedure.
Securing CICS
CA Top Secret offers extensive and flexible security protection for CICS regions, transactions, and resources without modifying CICS code.
Signon Security and Authorization Restrictions
To sign on to CICS, a user’s ACID must be authorized to access the CICS facility.
To grant access authorization, you can:
■ Add the facility to the ALL Record
■ Add the FACILITY parameter to the ACID
CA Top Secret supports the CESN CICS sign on procedure. For information, see the Implementation: CICS Guide.
CA Top Secret sign on processing operates correctly if your installation uses a non-standard sign on procedure. The CICS DFHSNP sign on program must be invoked.
To secure CICS, enter the command:
TSS ADDTO(user) FACILITY(CICSTEST)
Securing CICS
Chapter 16: Protecting Facilities 443
Terminal Security
CA Top Secret can be used to:
■ Restrict terminal use to authorized users only
■ Restrict users to signing on only from specific terminals
■ Restrict users to particular CICS regions
■ Prevent a user from signing on to the same region from multiple terminals
■ Protect unattended terminals with automatic terminal locking
■ Establish cumulative security violation thresholds that force terminal locking if a threshold is exceeded
Program Security
The TSSTRACK utility that allows security administrators to monitor security-related events for one or more systems in real time. For information, see the Report and Tracking Guide.
Job Submission Validation
Online jobs submitted under CICS are treated by CA Top Secret as if they were submitted under TSO.
Security Administration
Security administrators can use the TSS command under CICS to perform all security administration.
Changes to the security database made through a TSS command are immediately recognized by all facilities. A user’s TSO access could be administered during a CICS terminal session. Any changes made to an ACID’s security record while that ACID is signed on do not immediately take affect. The ACID must sign off and on for the changes to be registered, or the Security Record must be refreshed with TSS REFRESH.
Security Key
A user’s CICS security key can be specified using the SCTYKEY keyword on TSS CREATE or ADDTO. Up to 64 security keys can be specified. Security keys are available in all modes.
Securing CA IDMS
444 User Guide
Multiple Signons
CA Top Secret for CICS supports multiple concurrent signons by an ACID. This is a site-selectable option.
Use the SIGN(M) control option to allow simultaneous logons for the same ACID. Use the SIGN(S) control option to disallow simultaneous logons for the same ACID for each CICS region running under a specified facility.
Securing CA IDMS
CA Top Secret provides security capabilities that work with CA-IDMS security to extend resource control within the CA-IDMS environment.
Security Under r15
The CA Top Secret CA IDMS Interface for r15 is invoked automatically using the CA Common Services for z/OS CAISSF component when external security is specified for the CA IDMS Signon Resource Type Table (SRTT). CA Top Secret provides security for all CA IDMS resources that are coded in the SRTT.
For information about security for CA IDMS, see the Implementation: Other Interfaces Guide and the CA IDMS Security Administrator’s Guide.
Signon Security and Authorization Restrictions
To sign on to CA IDMS a user’s ACID must be authorized to access the CA IDMS facility.
To grant access authorization you can:
■ Add the facility to the ALL Record
■ Add the FACILITY parameter to the ACID
All users must be defined to CA IDMS in the Data Dictionary. If a user is defined in the Data Dictionary as having a password, the user is prompted twice for a password when he attempts to sign on; once by CA IDMS for the password in the data dictionary and once by CA Top Secret for the CA Top Secret password.
Define users in the Data Dictionary as not having a password. This allows CA Top Secret to perform all password checking.
To secure CA IDMS, enter the command:
TSS ADDTO(user) FACILITY(IDMSTEST)
Securing CA IDMS
Chapter 16: Protecting Facilities 445
Transaction Security
CA Top Secret secures CA IDMS transactions:
■ By protecting them at the resource level as owned resources using the OTRAN resource class
■ On a user-by-facility basis through the Limited Command Facility (LCF)
For information on LCF and OTRAN, see the Implementation: Other Interfaces Guide.
Program and Subschema Security
Ownership of a program or a subschema immediately protects the resource across all facilities and regions. Access to the program and subschema are granted with TSS PERMIT and limited to specific regions through the FACILITY keyword as part of the program and subschema permission.
Area Security
Area security is provided for both logical and physical databases. Ownership of an area protects the resource across all defined CA-IDMS regions. Access is granted with TSS PERMIT. Use of the area can be limited to specific regions through the FACILITY keyword as part of the area definitions.
Terminal Security
Terminals are owned resources. Ownership of a terminal protects it across all defined facilities. Access can be limited to only specific facilities through the FACILITY keyword as part of the terminal definition.
Security Administration
Security administrators can use the TSS command under CA IDMS to perform all security administration.
Changes to the security database made through a TSS command are immediately recognized by all facilities. User access can be administered during a CA IDMS terminal session.
Securing CA Roscoe IE
446 User Guide
Securing CA Roscoe IE
No modifications of CA Roscoe IE code are required to implement CA Top Secret support. Support is provided through CA Roscoe IE security exits.
Signon Security and Authorization Restrictions
To sign on to CA Roscoe IE, a user’s ACID must be authorized to access the CA Roscoe IE facility.
In addition to being defined to CA Top Secret, users must be defined in the CA Roscoe User Profiles Dataset. Users then sign on to CA Roscoe IE using their ACID and password.
If the CA Roscoe IE key has “.” embedded in it (for example, “RCA.USER5”) CA Top Secret uses the characters after the period as the user’s ACID—for example, USER5.
To grant access authorization you can:
■ Add the facility to the ALL Record
■ Add the FACILITY parameter to the ACID
To secure CA Roscoe IE, enter the command:
TSS ADDTO(user) FACILITY(ROSCOE)
Terminal Security
CA Top Secret can restrict the use of terminals to authorized users only. In addition, you can prevent a user from signing on from multiple terminals.
By installing a command exit, unattended terminals can be protected against unauthorized access by using automatic terminal locking. Cumulative security violation thresholds can be established that force terminal locking if this threshold is exceeded.
Command and Monitor Security
Security for both commands and monitors is provided through the CA Top Secret Limited Command Facility (LCF). With LCF each user can have an inclusive list (which specifies a list of commands and monitors he is allowed to use) or an exclusive list (which specifies a list of commands and monitors he is not allowed to use).
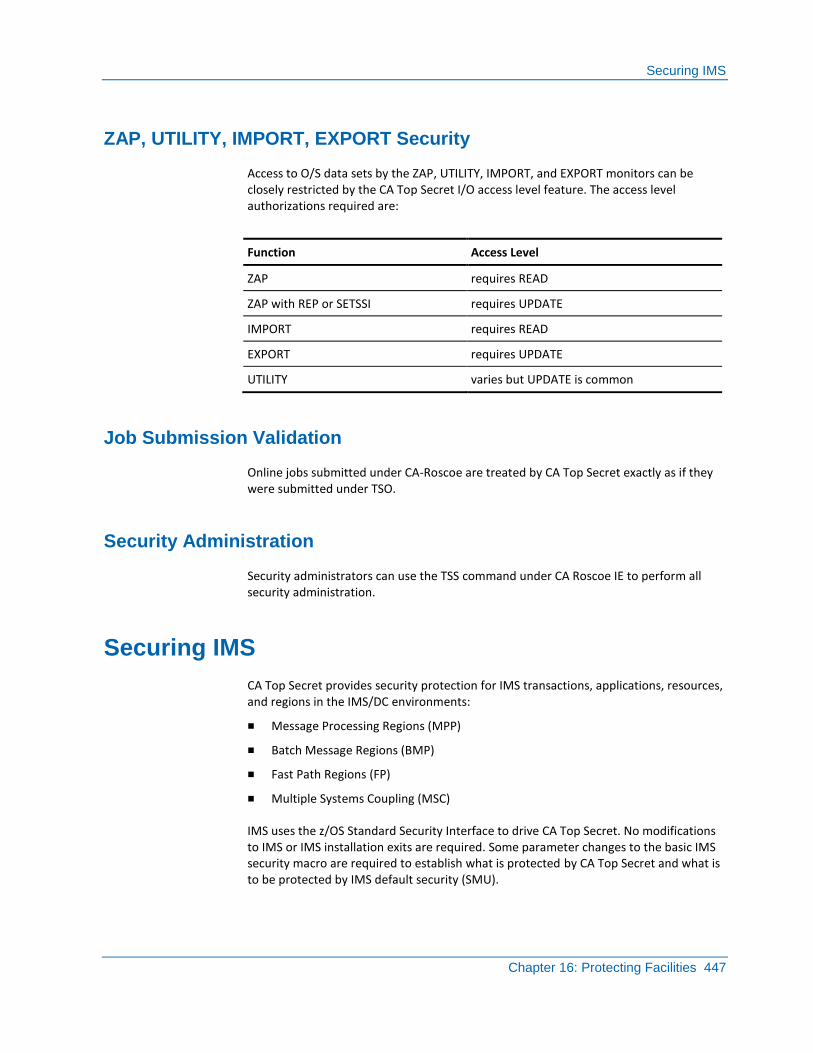
Securing IMS
Chapter 16: Protecting Facilities 447
ZAP, UTILITY, IMPORT, EXPORT Security
Access to O/S data sets by the ZAP, UTILITY, IMPORT, and EXPORT monitors can be closely restricted by the CA Top Secret I/O access level feature. The access level authorizations required are:
Function Access Level
ZAP requires READ
ZAP with REP or SETSSI requires UPDATE
IMPORT requires READ
EXPORT requires UPDATE
UTILITY varies but UPDATE is common
Job Submission Validation
Online jobs submitted under CA-Roscoe are treated by CA Top Secret exactly as if they were submitted under TSO.
Security Administration
Security administrators can use the TSS command under CA Roscoe IE to perform all security administration.
Securing IMS
CA Top Secret provides security protection for IMS transactions, applications, resources, and regions in the IMS/DC environments:
■ Message Processing Regions (MPP)
■ Batch Message Regions (BMP)
■ Fast Path Regions (FP)
■ Multiple Systems Coupling (MSC)
IMS uses the z/OS Standard Security Interface to drive CA Top Secret. No modifications to IMS or IMS installation exits are required. Some parameter changes to the basic IMS security macro are required to establish what is protected by CA Top Secret and what is to be protected by IMS default security (SMU).

Securing IMS
448 User Guide
Signon Security and Authorization Restrictions
To sign on to IMS, a user’s ACID must be authorized to access the IMS facility.
To grant access authorization you can:
■ Add the facility to the ALL Record
■ Add the FACILITY parameter to the ACID
Most users have to explicitly sign on to IMS using the IMS SIGN command. CA Top Secret then checks that the user is authorized to access IMS.
Users can be restricted from signing on to more than one terminal at a time.
To secure IMS, enter the command:
TSS ADDTO(USER) FACILITY(IMSTEST)
Terminal Security
CA Top Secret can:
■ Restrict terminal use to only authorized users
■ Restrict users to sign on only from specific terminal/readers
■ Restrict users to accessing only particular regions from certain terminals
■ Prevent a user from signing on to the same region from multiple terminals
■ Protect unattended terminals against unauthorized access with automatic terminal locking
■ Establish cumulative security violation thresholds
Job Submission Validation
Online jobs submitted under IMS are treated the same as for any other online facility.
Security Administration
Security administrators can use the TSS command under IMS to perform all security administration.
Changes to the security database made through a TSS command are immediately recognized by all facilities. CA Roscoe IE can be administered through an IMS session.
Securing BATCH Jobs
Chapter 16: Protecting Facilities 449
Multiple Sign Ons
Multiple concurrent sign ons is a site-selectable option.
Securing BATCH Jobs
You can use CA Top Secret to provide security protection for the BATCH facility.
Signon Security and Authorization Restrictions
CA Top Secret views BATCH as a facility that must be protected and authorized for use. To provide protection, each batch job must be associated with an ACID and password.
To grant access authorization you can:
■ Add the facility to the ALL Record
■ Add the FACILITY parameter to the ACID
To secure the BATCH facility, enter the command:
TSS ADDTO(USER) FACILITY(BATCH)

Securing BATCH Jobs
450 User Guide
ACID Derivation
CA Top Secret treats a batch job like an ACID. It has an associated user record with a set of specific access authorization. CA Top Secret derives an ACID for batch jobs submitted through an online facility based on the SUBACID control option. The value used most often derives the ACID from the user ACID signed on to the online facility. This allows the batch job to run with the same ACID as the ACID of the online user.
Another way to derive an ACID and minimize required JCL revisions at the same time is to use the JOBACID control option. This derives an ACID from information on the existing JOB statement. If you want:
■ Each job to have a unique ACID, set the JOBACID control option to derive the ACID from the jobname or programmer name on the JOB statement.
■ Each job to have a group ACID, set JOBACID to derive the ACID from the accounting field or the USER= field on the JOB statement.
This method also allows online user to submit batch jobs that will run under an ACID other than the ACID of the online user— called a secondary ACID. The user can code the secondary ACID in the USER= field on the JOB statement. If the online user is permitted to the secondary ACID, the user will not have to know the password for the secondary ACID. This password is supplied in a non-viewable field by CA Top Secret
■ To control access based on the source of the job, set JOBACID to derive an ACID from the reader name.
The derived ACID must be a valid ACID. If it is not, the default ACID specified using the DEFACID suboption of the FACILITY control option is applied to the job.
Password Validation
In IMPLEMENT and FAIL mode, a user must supply a valid password. In WARN and DORMANT mode, you can use the FACILITY control option to force the user to supply a valid password. For information, see the Implementation: Other Interfaces Guide.
Card and Remote Reader Security
Jobs submitted from a physical reader must have the submitter’s password manually coded in the PASSWORD= parameter on the JOB statement—unless the associated ACID does not require a password.
Securing Started Tasks (STC)
Chapter 16: Protecting Facilities 451
Job Submission Validation
By default, CA Top Secret allows a defined user to submit batch jobs for which the ACID is specifically authorized. Explicit authority is required to permit a user to submit jobs identified by other ACIDs. The required authority needed to submit these jobs is granted using the ACID keyword of TSS PERMIT.
Job Scheduling Security
Production job scheduling systems (such as CA Scheduler JM) can have authority to submit any job as required. This authority can be:
■ Limited to a specified list of jobs
■ Restricted by facility
■ Restricted by privileged program
Securing Started Tasks (STC)
CA Top Secret offers security protection for all required Started Tasks (STC) definitions and STCs that reference sensitive data or affect system integrity. In addition, you have the option to protect whatever is appropriate at your particular installation. There is no need to secure all started tasks so, by default, CA Top Secret allows STCs to bypass security.
For information, see the Implementation: Other Interfaces Guide.
Operator Accountability
Data processing personnel continuously have access to the O/S consoles and started tasks. Many STCs can be executed without any record to indicate who entered the started task. With the proper authority, CA Top Secret allows a security administrator to force the operator executing the STC to provide identification.
By using the ADDTO(STC) function, the security administrator can attach an STCACT attribute to the STC definition, forcing the operator to enter his user ACID and password. If the ACID or password entered is invalid, the STC will not execute.
Securing Started Tasks (STC)
452 User Guide
ACID Association
An STC can be associated with a specific ACID with TSS ADDTO.
Example: ACID association
This example associated an STC with a specific ACID:
TSS ADDTO(STC) PROCNAME(stc-name)
ACID(acid-name)
Password Security
You can define an STC that prompts for an ACID with an assigned password. (Specifying a password is required only for critical STCs.) If the ACID assigned to the STC is defined with a password, then a second prompt is issued for the password. This provides additional protection by forcing the operator to supply the correct ACID information for the STC before it is allowed to execute.
Bypass Security Checking
To define a specific STC that bypasses CA Top Secret checking, use TSS ADDTO and specify the BYPASS keyword in the acidname field. This allows the started task to execute without security checking.

Securing z/VM
Chapter 16: Protecting Facilities 453
Securing z/VM
Virtual machines running CA Top Secret are under the z/VM facility. CA Top Secret controls access to the z/VM facility by requiring that the user be authorized to use the virtual machine. By default, only the MSCA is authorized to use z/VM when CA Top Secret is first installed. Everyone else must be explicitly authorized to use the z/VM facility through a TSS CREATE or TSS ADDTO.
To segregate your z/VM CPUs into different facilities, use the FACILITY control option to rename one of the USERnn entries in the Facility Matrix Table.
Use the VMFAC control option to associate your CA Top Secret facility to the DMKSYSID of the CPU.
Examples: secure z/VM
This example designates the USER1 entry as VMTEST:
FACILITY(USER1=NAME=VMTEST)
This example sets the mode for this facility to WARN:
FACILITY(VMTEST=MODE=WARN)
In this example, SYSTEMC identifies the SYSID for DMKSYSID:
VMFAC(SYSTEMC=VMTEST)
Activate and Deactivate the z/VM Facility
Security administrators with the proper authority can activate or deactivate the z/VM facility by using TSS MODIFY(temporarily) or the FACILITY control option (permanently).
To activate the facility, use the ACTIVE sub-option of FACILITY.
To deactivate the facility, specify the INACT (inactive) sub-option.
Examples: z/VM activation
This example activates z/VM:
TSS MODIFY FACILITY(VMTEST=ACTIVE)
This example allows users to sign on to the VMTEST facility:
TSS MODIFY FACILITY(VMTEST=INACT)
Extended Platform Security
454 User Guide
Sharing Security Files Between z/VM, z/VSE, and z/OS
Due to VSAM file requirement for r15, z/OS can no longer share secfiles with z/VM or z/VSE.
Extended Platform Security
CA Top Secret also extends security beyond internal z/OS to the native environments of DB2, and the PC workstation.
■ CA Top Secret for DB2 protects seven DB2 resources and replaces cumbersome GRANT/REVOKE processing and cascade effect with proven, simple-to-use, CA Top Secret concepts. PERMITs are written in place of GRANTs, and a conversion utility provides a smooth, easy transition.
■ CA Top Secret WorkStation combines a fast and easy-to-use Windows-based GUI for single-point administration of all CA Top Secret z/OS systems with centralized monitoring and reporting of security events throughout a heterogeneous, multivendor environment.
■ CA Top Secret for z/OS also offers a number of security options for sites using MVS/ESA APPC conversation processing. The options you choose to use will depend on the nature of the resources being tapped and on the degree of security existing on each conversing system. For example, the security administrator can limit which LUs can be used for conversation processing, what type of security data the inbound transaction program must provide, and which users are authorized to execute that transaction program.
Security for Other Products
Chapter 16: Protecting Facilities 455
Security for Other Products
CA Top Secret provides standard security support for systems, such as:
■ TONE
■ VAM/SPF
■ ACEP
■ COM-PLETE
■ FDR
Other products that inherently recognize and support CA Top Secret include:
■ CA 1®
■ CA 7®
■ CA 11™
■ CA Dispatch™
■ CA ASM2®
■ CA Opera™
■ CA TLMS®
■ CA Scheduler®
■ CA-Jobwatch™
■ CA-Director
■ CA VMAN™

Chapter 17: Extending Security With the z/OS Security Interface 457
Chapter 17: Extending Security With the z/OS Security Interface
This section contains the following topics:
About the z/OS Standard Interface (see page 457) The RACROUTE REQUEST=VERIFY Call (see page 459) The RACROUTE REQUEST=AUTH Call (see page 461) The RACROUTE REQUEST=FASTAUTH Call (see page 463) The RACROUTE REQUEST=EXTRACT Call (see page 469) Multiple User Address Space (see page 474) Dynamic Extract/Update Facility (see page 481) Resource Name List Service Support (see page 484)
About the z/OS Standard Interface
The z/OS Standard Security Interface:
■ Drives access authorization checking for CA Top Secret
■ Can perform specialized security checking with CA Top Secret
Although the original SSI macros are supported, CA recommends that all security checks are performed with the z/OS SAF interface. Use the RACROUTE macro to interface with CA Top Secret.
The examples in this section reference only the z/OS SAF interface macros, but equivalent functionality is obtained using the z/OS Standard Security Interface versions. Use the standard IBM security macros to:
■ Validate access to all standard resources recognized by CA Top Secret
■ Validate access to an installation-defined resource (for example, CPUs)
■ Provide security support for your tape management system
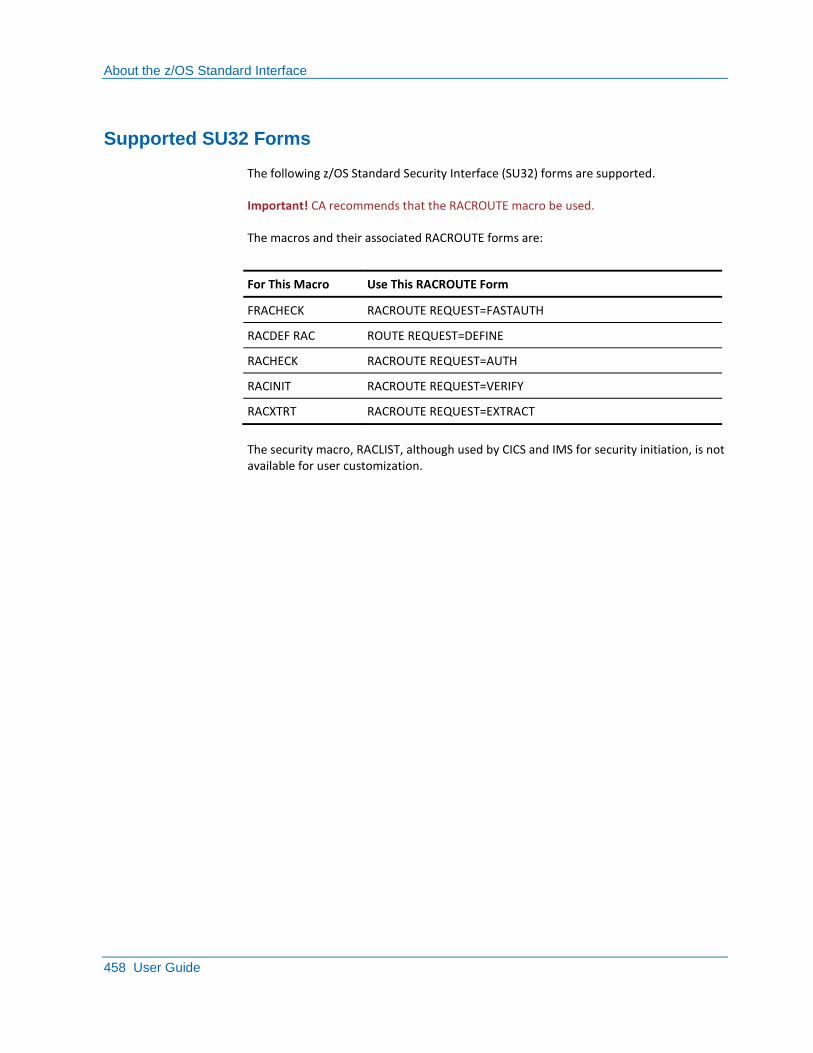
About the z/OS Standard Interface
458 User Guide
Supported SU32 Forms
The following z/OS Standard Security Interface (SU32) forms are supported.
Important! CA recommends that the RACROUTE macro be used.
The macros and their associated RACROUTE forms are:
For This Macro Use This RACROUTE Form
FRACHECK RACROUTE REQUEST=FASTAUTH
RACDEF RAC ROUTE REQUEST=DEFINE
RACHECK RACROUTE REQUEST=AUTH
RACINIT RACROUTE REQUEST=VERIFY
RACXTRT RACROUTE REQUEST=EXTRACT
The security macro, RACLIST, although used by CICS and IMS for security initiation, is not available for user customization.
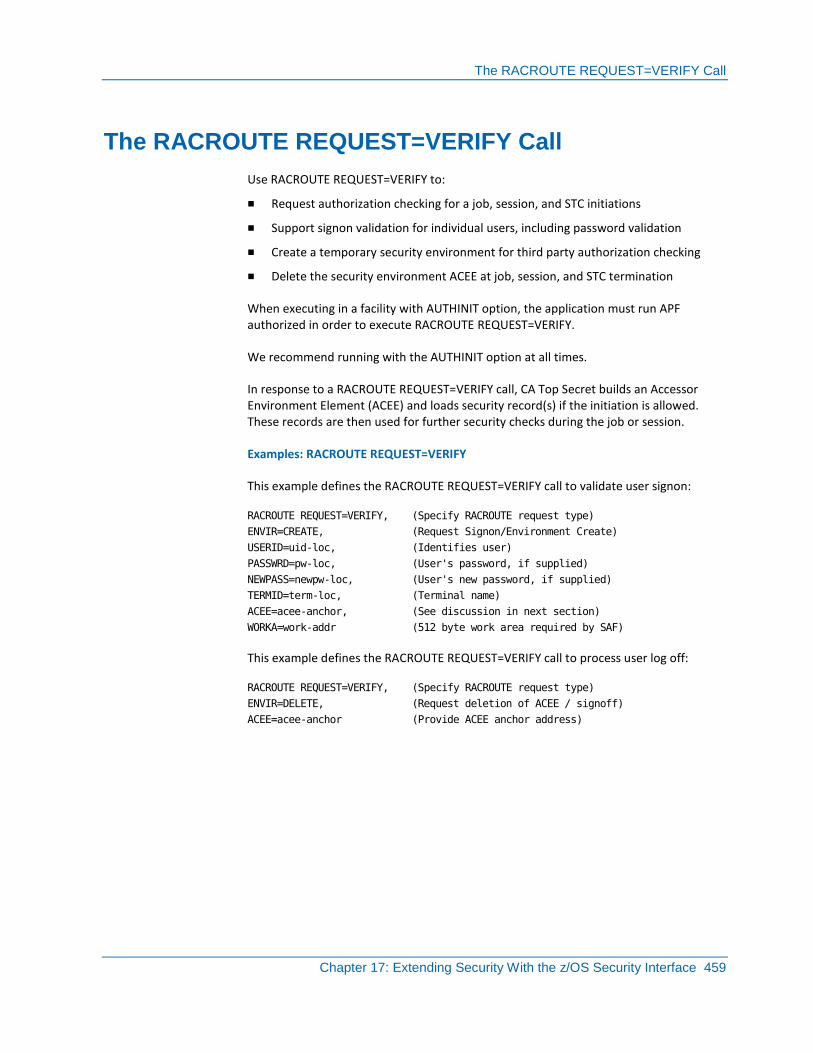
The RACROUTE REQUEST=VERIFY Call
Chapter 17: Extending Security With the z/OS Security Interface 459
The RACROUTE REQUEST=VERIFY Call
Use RACROUTE REQUEST=VERIFY to:
■ Request authorization checking for a job, session, and STC initiations
■ Support signon validation for individual users, including password validation
■ Create a temporary security environment for third party authorization checking
■ Delete the security environment ACEE at job, session, and STC termination
When executing in a facility with AUTHINIT option, the application must run APF authorized in order to execute RACROUTE REQUEST=VERIFY.
We recommend running with the AUTHINIT option at all times.
In response to a RACROUTE REQUEST=VERIFY call, CA Top Secret builds an Accessor Environment Element (ACEE) and loads security record(s) if the initiation is allowed. These records are then used for further security checks during the job or session.
Examples: RACROUTE REQUEST=VERIFY
This example defines the RACROUTE REQUEST=VERIFY call to validate user signon:
RACROUTE REQUEST=VERIFY, (Specify RACROUTE request type)
ENVIR=CREATE, (Request Signon/Environment Create)
USERID=uid-loc, (Identifies user)
PASSWRD=pw-loc, (User's password, if supplied)
NEWPASS=newpw-loc, (User's new password, if supplied)
TERMID=term-loc, (Terminal name)
ACEE=acee-anchor, (See discussion in next section)
WORKA=work-addr (512 byte work area required by SAF)
This example defines the RACROUTE REQUEST=VERIFY call to process user log off:
RACROUTE REQUEST=VERIFY, (Specify RACROUTE request type)
ENVIR=DELETE, (Request deletion of ACEE / signoff)
ACEE=acee-anchor (Provide ACEE anchor address)
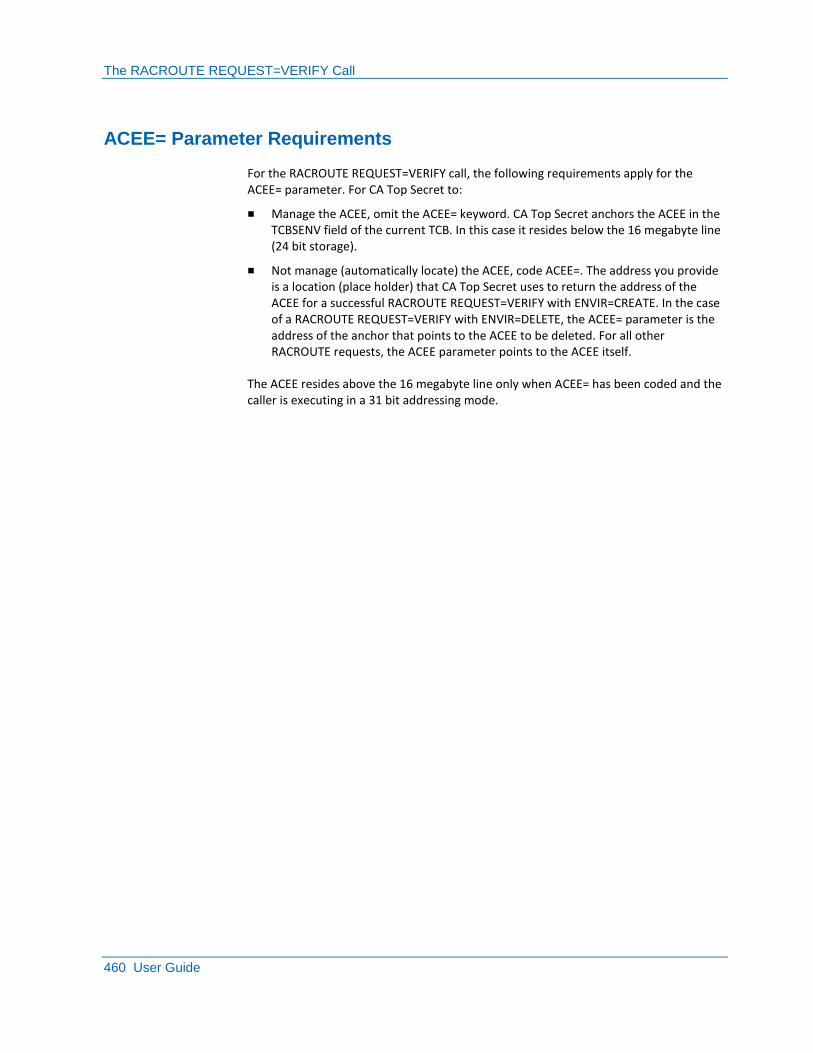
The RACROUTE REQUEST=VERIFY Call
460 User Guide
ACEE= Parameter Requirements
For the RACROUTE REQUEST=VERIFY call, the following requirements apply for the ACEE= parameter. For CA Top Secret to:
■ Manage the ACEE, omit the ACEE= keyword. CA Top Secret anchors the ACEE in the TCBSENV field of the current TCB. In this case it resides below the 16 megabyte line (24 bit storage).
■ Not manage (automatically locate) the ACEE, code ACEE=. The address you provide is a location (place holder) that CA Top Secret uses to return the address of the ACEE for a successful RACROUTE REQUEST=VERIFY with ENVIR=CREATE. In the case of a RACROUTE REQUEST=VERIFY with ENVIR=DELETE, the ACEE= parameter is the address of the anchor that points to the ACEE to be deleted. For all other RACROUTE requests, the ACEE parameter points to the ACEE itself.
The ACEE resides above the 16 megabyte line only when ACEE= has been coded and the caller is executing in a 31 bit addressing mode.

The RACROUTE REQUEST=AUTH Call
Chapter 17: Extending Security With the z/OS Security Interface 461
The RACROUTE REQUEST=AUTH Call
The RACROUTE REQUEST=AUTH call:
■ Requests authorization for use of a specified resource at a specific access level
■ Is primarily used for data set and volume authorizations
■ Can be used for any resource class available using RACROUTE REQUEST=FASTAUTH
Examples: RACROUTE REQUEST=AUTH
This example defines the RACROUTE REQUEST=AUTH call to validate data set access:
RACROUTE REQUEST=AUTH,
CLASS='DATASET',
ENTITY=DSNAME,
ATTR=attr-name, (read/update/alter)
WORKA=WORKAREA
DSNAME DC CL44'SAMPLE.DATA.SET.NAME'
WORKAREA DS XL512
This example defines the RACROUTE REQUEST=AUTH call to log data to the SMF or Audit/Tracking File:
RACROUTE REQUEST=AUTH,
CLASS=CLASSNML,
ENTITY=EVENT3, (log data area)
WORKA=RWORK
CLASSNML DC AL1(L'CLASSNM)
CLASSNM DC C'USERLOG'
EVENT3 DC AL1(21),CL21'EVENT 3 HAS COMPLETED'
RWORK DS XL512
Resource Classes Classification
Resources are classified by Class Names. This table lists valid Class Names, their functions, and required data.
Class Name Function Entity
ABSTRACT Validate access to user resource 8 character user resource name
CHGPROP Cross-CPU change propagation Recovery record buffer
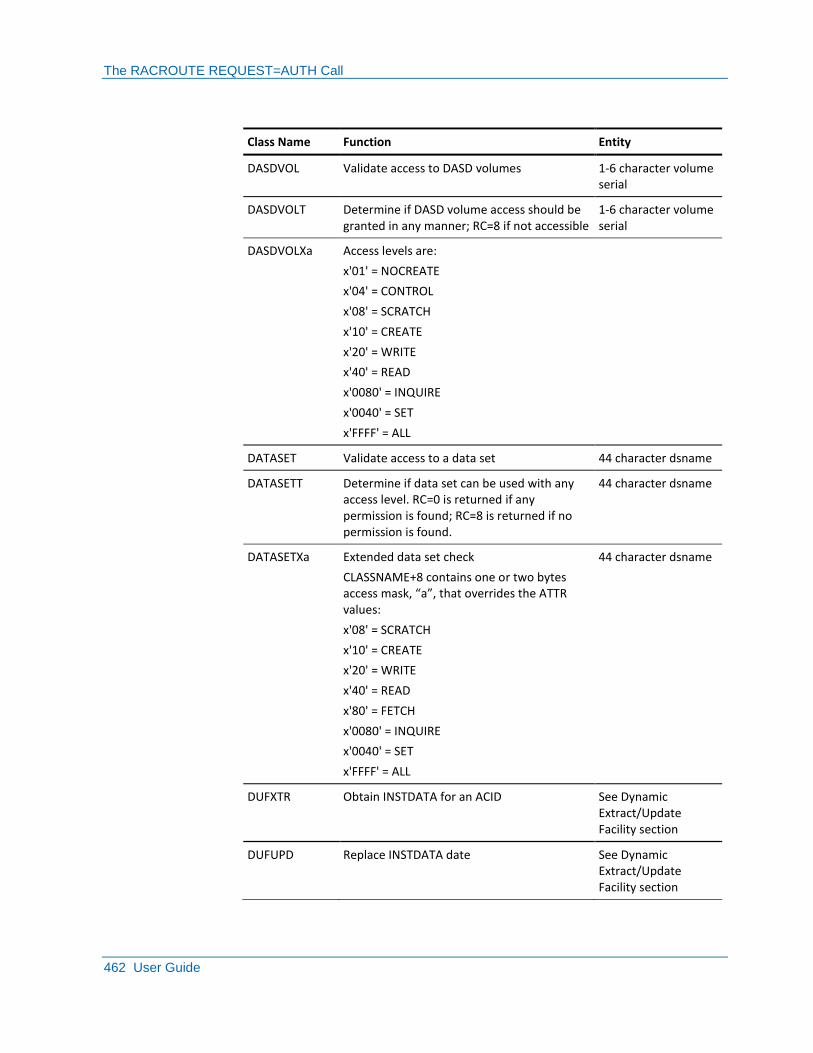
The RACROUTE REQUEST=AUTH Call
462 User Guide
Class Name Function Entity
DASDVOL Validate access to DASD volumes 1-6 character volume serial
DASDVOLT Determine if DASD volume access should be granted in any manner; RC=8 if not accessible
1-6 character volume serial
DASDVOLXa Access levels are:
x'01' = NOCREATE
x'04' = CONTROL
x'08' = SCRATCH
x'10' = CREATE
x'20' = WRITE
x'40' = READ
x'0080' = INQUIRE
x'0040' = SET
x'FFFF' = ALL
DATASET Validate access to a data set 44 character dsname
DATASETT Determine if data set can be used with any access level. RC=0 is returned if any permission is found; RC=8 is returned if no permission is found.
44 character dsname
DATASETXa Extended data set check
CLASSNAME+8 contains one or two bytes access mask, “a”, that overrides the ATTR values:
x'08' = SCRATCH
x'10' = CREATE
x'20' = WRITE
x'40' = READ
x'80' = FETCH
x'0080' = INQUIRE
x'0040' = SET
x'FFFF' = ALL
44 character dsname
DUFXTR Obtain INSTDATA for an ACID See Dynamic Extract/Update Facility section
DUFUPD Replace INSTDATA date See Dynamic Extract/Update Facility section
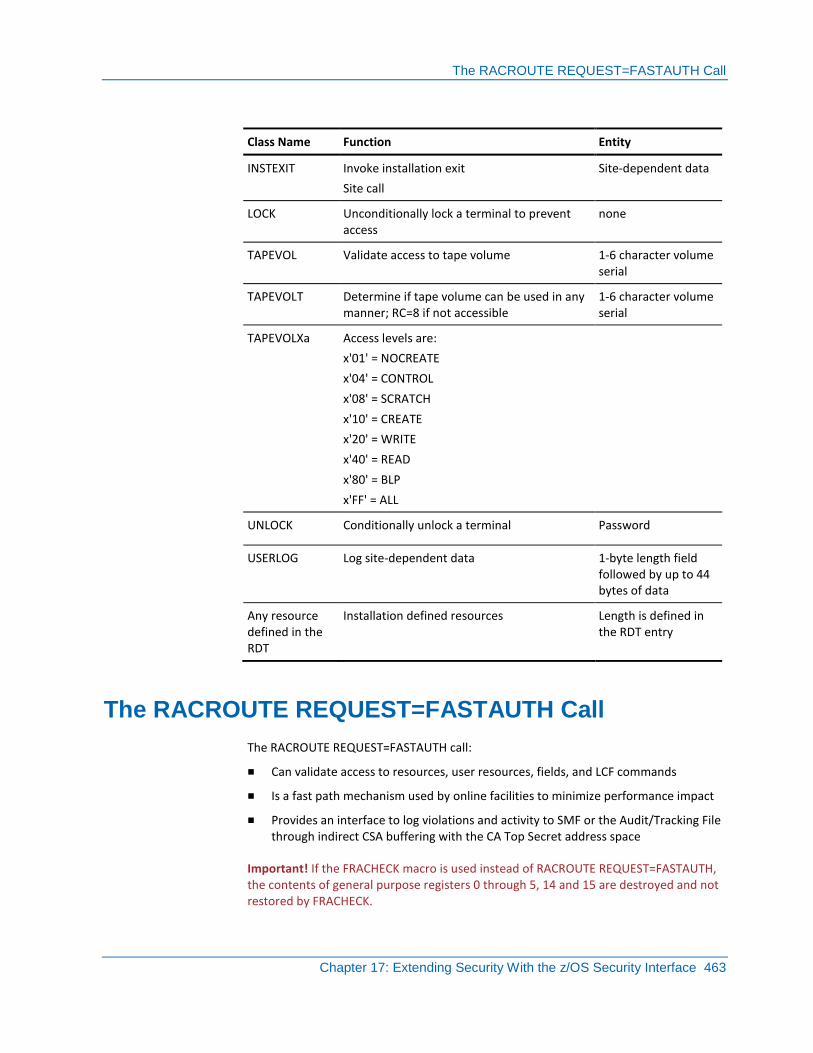
The RACROUTE REQUEST=FASTAUTH Call
Chapter 17: Extending Security With the z/OS Security Interface 463
Class Name Function Entity
INSTEXIT Invoke installation exit
Site call
Site-dependent data
LOCK Unconditionally lock a terminal to prevent access
none
TAPEVOL Validate access to tape volume 1-6 character volume serial
TAPEVOLT Determine if tape volume can be used in any manner; RC=8 if not accessible
1-6 character volume serial
TAPEVOLXa Access levels are:
x'01' = NOCREATE
x'04' = CONTROL
x'08' = SCRATCH
x'10' = CREATE
x'20' = WRITE
x'40' = READ
x'80' = BLP
x'FF' = ALL
UNLOCK Conditionally unlock a terminal Password
USERLOG Log site-dependent data 1-byte length field followed by up to 44 bytes of data
Any resource defined in the RDT
Installation defined resources Length is defined in the RDT entry
The RACROUTE REQUEST=FASTAUTH Call
The RACROUTE REQUEST=FASTAUTH call:
■ Can validate access to resources, user resources, fields, and LCF commands
■ Is a fast path mechanism used by online facilities to minimize performance impact
■ Provides an interface to log violations and activity to SMF or the Audit/Tracking File through indirect CSA buffering with the CA Top Secret address space
Important! If the FRACHECK macro is used instead of RACROUTE REQUEST=FASTAUTH, the contents of general purpose registers 0 through 5, 14 and 15 are destroyed and not restored by FRACHECK.
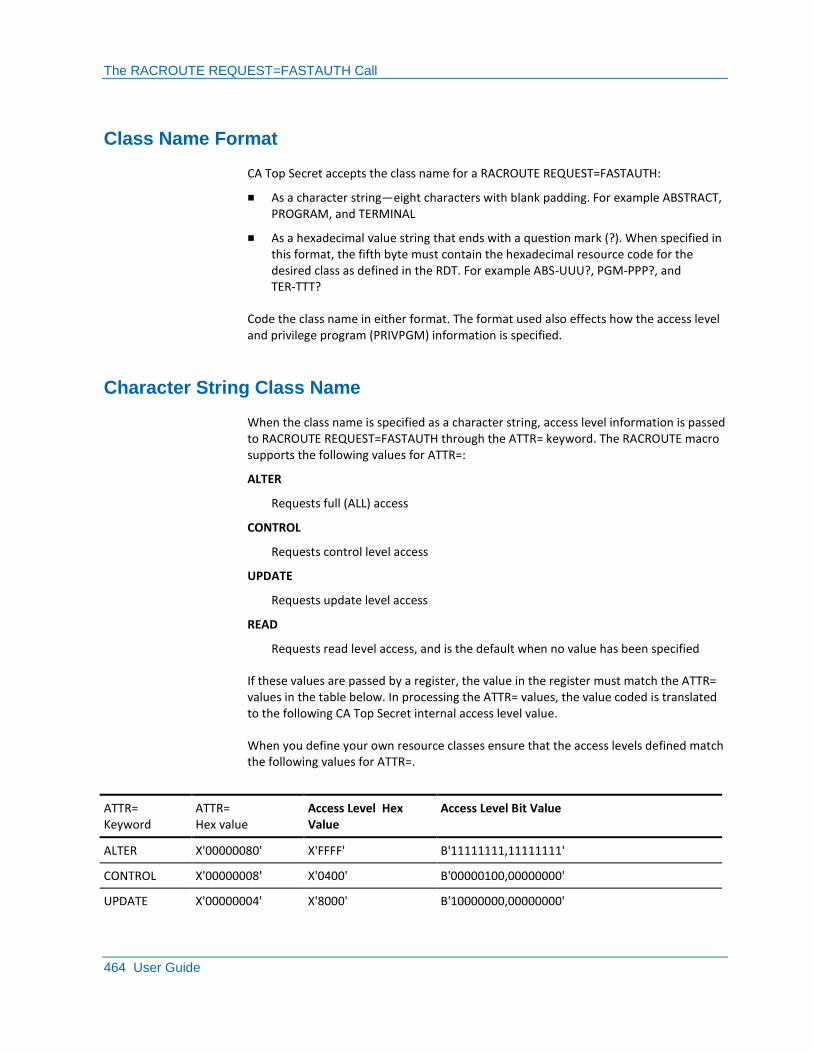
The RACROUTE REQUEST=FASTAUTH Call
464 User Guide
Class Name Format
CA Top Secret accepts the class name for a RACROUTE REQUEST=FASTAUTH:
■ As a character string—eight characters with blank padding. For example ABSTRACT, PROGRAM, and TERMINAL
■ As a hexadecimal value string that ends with a question mark (?). When specified in this format, the fifth byte must contain the hexadecimal resource code for the desired class as defined in the RDT. For example ABS-UUU?, PGM-PPP?, and TER-TTT?
Code the class name in either format. The format used also effects how the access level and privilege program (PRIVPGM) information is specified.
Character String Class Name
When the class name is specified as a character string, access level information is passed to RACROUTE REQUEST=FASTAUTH through the ATTR= keyword. The RACROUTE macro supports the following values for ATTR=:
ALTER
Requests full (ALL) access
CONTROL
Requests control level access
UPDATE
Requests update level access
READ
Requests read level access, and is the default when no value has been specified
If these values are passed by a register, the value in the register must match the ATTR= values in the table below. In processing the ATTR= values, the value coded is translated to the following CA Top Secret internal access level value.
When you define your own resource classes ensure that the access levels defined match the following values for ATTR=.
ATTR= Keyword
ATTR= Hex value
Access Level Hex Value
Access Level Bit Value
ALTER X'00000080' X'FFFF' B'11111111,11111111'
CONTROL X'00000008' X'0400' B'00000100,00000000'
UPDATE X'00000004' X'8000' B'10000000,00000000'
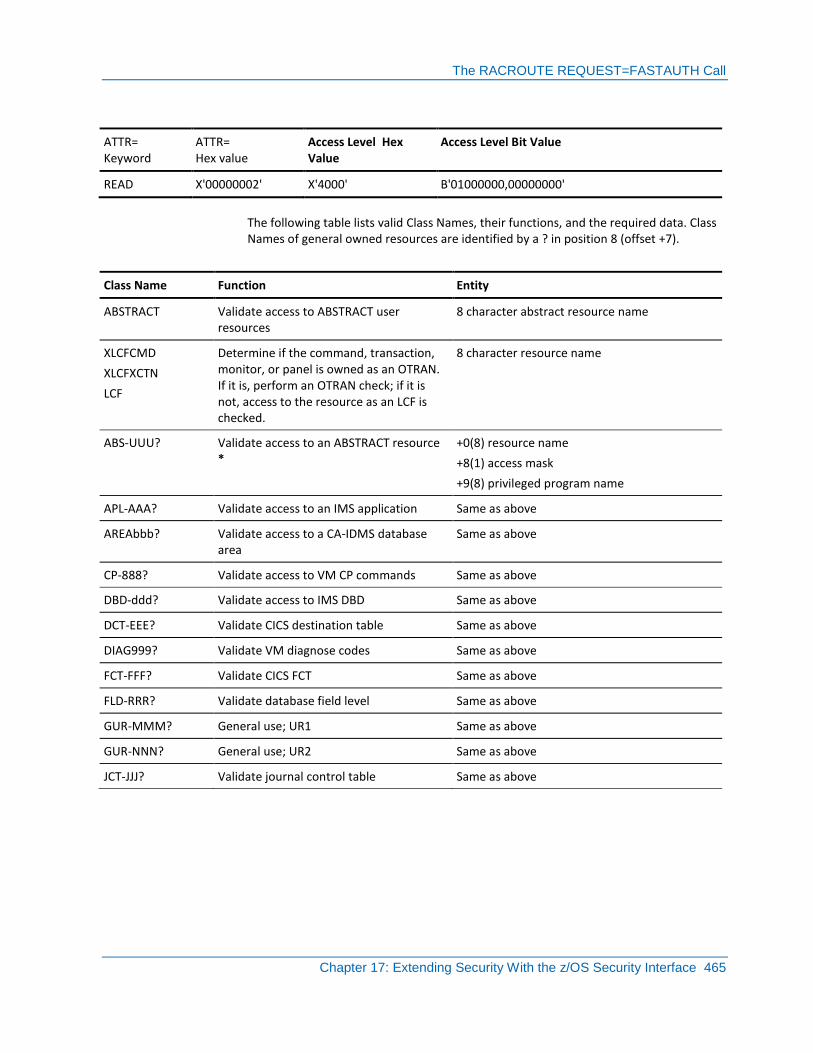
The RACROUTE REQUEST=FASTAUTH Call
Chapter 17: Extending Security With the z/OS Security Interface 465
ATTR= Keyword
ATTR= Hex value
Access Level Hex Value
Access Level Bit Value
READ X'00000002' X'4000' B'01000000,00000000'
The following table lists valid Class Names, their functions, and the required data. Class Names of general owned resources are identified by a ? in position 8 (offset +7).
Class Name Function Entity
ABSTRACT Validate access to ABSTRACT user resources
8 character abstract resource name
XLCFCMD
XLCFXCTN
LCF
Determine if the command, transaction, monitor, or panel is owned as an OTRAN. If it is, perform an OTRAN check; if it is not, access to the resource as an LCF is checked.
8 character resource name
ABS-UUU? Validate access to an ABSTRACT resource *
+0(8) resource name
+8(1) access mask
+9(8) privileged program name
APL-AAA? Validate access to an IMS application Same as above
AREAbbb? Validate access to a CA-IDMS database area
Same as above
CP-888? Validate access to VM CP commands Same as above
DBD-ddd? Validate access to IMS DBD Same as above
DCT-EEE? Validate CICS destination table Same as above
DIAG999? Validate VM diagnose codes Same as above
FCT-FFF? Validate CICS FCT Same as above
FLD-RRR? Validate database field level Same as above
GUR-MMM? General use; UR1 Same as above
GUR-NNN? General use; UR2 Same as above
JCT-JJJ? Validate journal control table Same as above
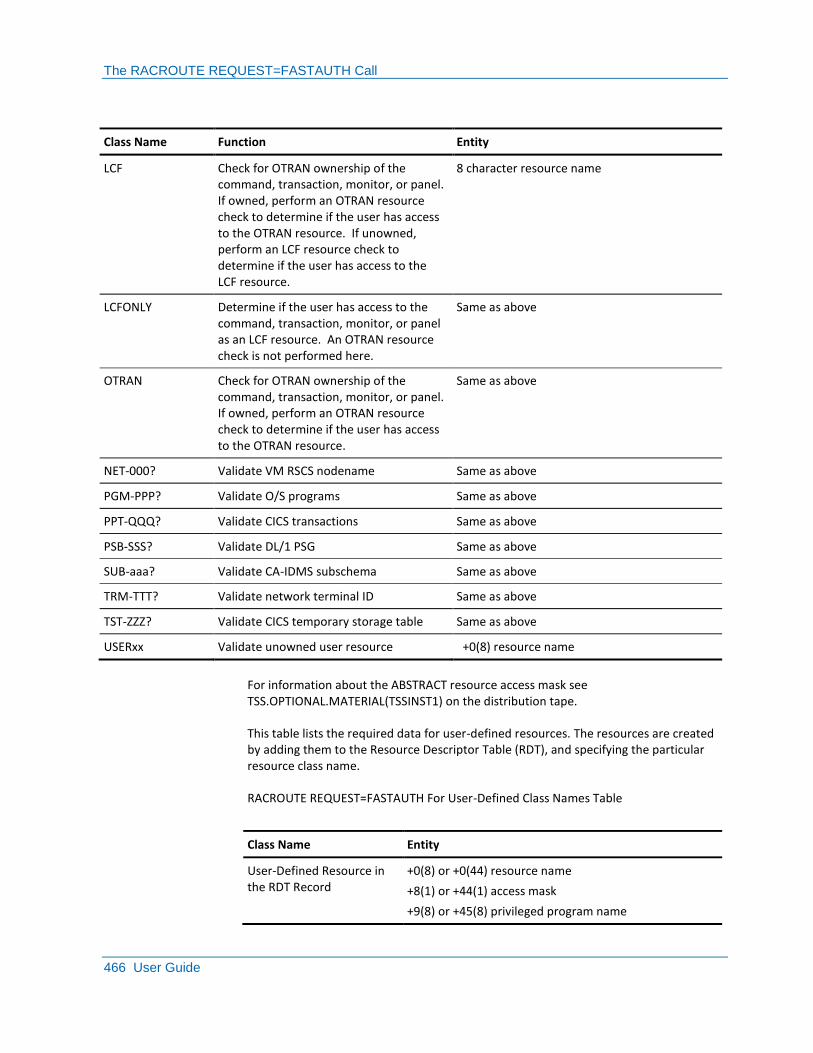
The RACROUTE REQUEST=FASTAUTH Call
466 User Guide
Class Name Function Entity
LCF Check for OTRAN ownership of the command, transaction, monitor, or panel. If owned, perform an OTRAN resource check to determine if the user has access to the OTRAN resource. If unowned, perform an LCF resource check to determine if the user has access to the LCF resource.
8 character resource name
LCFONLY Determine if the user has access to the command, transaction, monitor, or panel as an LCF resource. An OTRAN resource check is not performed here.
Same as above
OTRAN Check for OTRAN ownership of the command, transaction, monitor, or panel. If owned, perform an OTRAN resource check to determine if the user has access to the OTRAN resource.
Same as above
NET-000? Validate VM RSCS nodename Same as above
PGM-PPP? Validate O/S programs Same as above
PPT-QQQ? Validate CICS transactions Same as above
PSB-SSS? Validate DL/1 PSG Same as above
SUB-aaa? Validate CA-IDMS subschema Same as above
TRM-TTT? Validate network terminal ID Same as above
TST-ZZZ? Validate CICS temporary storage table Same as above
USERxx Validate unowned user resource +0(8) resource name
For information about the ABSTRACT resource access mask see TSS.OPTIONAL.MATERIAL(TSSINST1) on the distribution tape.
This table lists the required data for user-defined resources. The resources are created by adding them to the Resource Descriptor Table (RDT), and specifying the particular resource class name.
RACROUTE REQUEST=FASTAUTH For User-Defined Class Names Table
Class Name Entity
User-Defined Resource in the RDT Record
+0(8) or +0(44) resource name
+8(1) or +44(1) access mask
+9(8) or +45(8) privileged program name
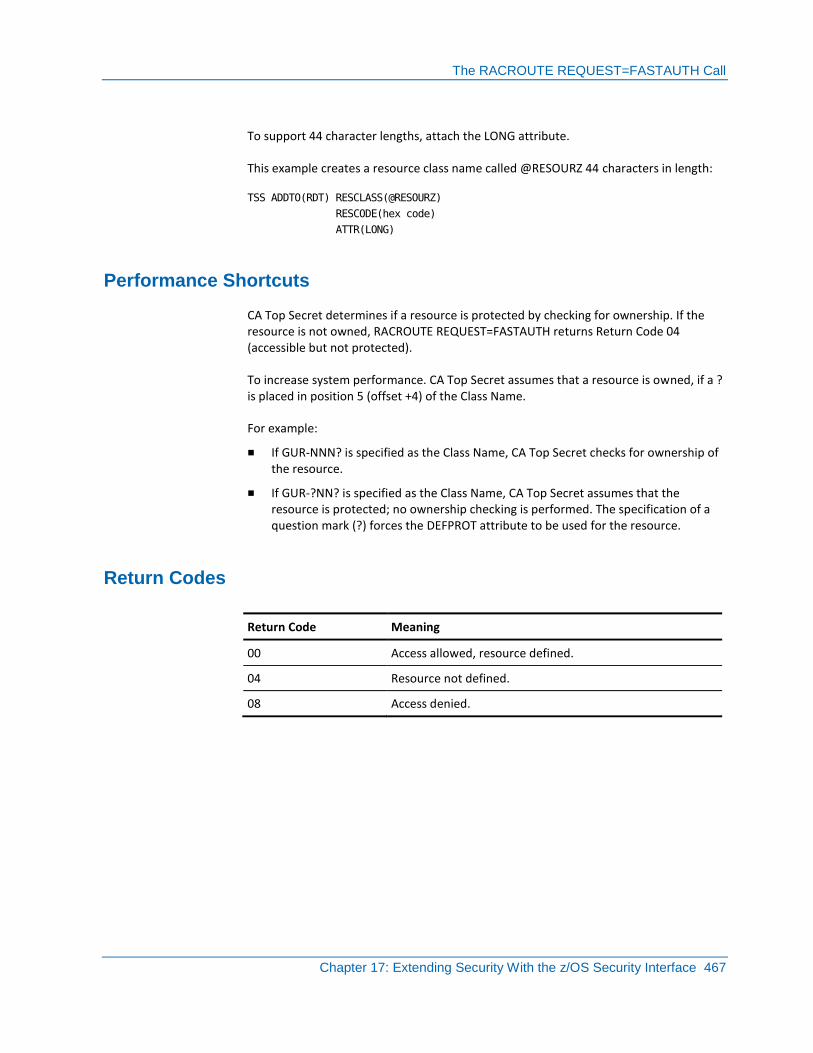
The RACROUTE REQUEST=FASTAUTH Call
Chapter 17: Extending Security With the z/OS Security Interface 467
To support 44 character lengths, attach the LONG attribute.
This example creates a resource class name called @RESOURZ 44 characters in length:
TSS ADDTO(RDT) RESCLASS(@RESOURZ)
RESCODE(hex code)
ATTR(LONG)
Performance Shortcuts
CA Top Secret determines if a resource is protected by checking for ownership. If the resource is not owned, RACROUTE REQUEST=FASTAUTH returns Return Code 04 (accessible but not protected).
To increase system performance. CA Top Secret assumes that a resource is owned, if a ? is placed in position 5 (offset +4) of the Class Name.
For example:
■ If GUR-NNN? is specified as the Class Name, CA Top Secret checks for ownership of the resource.
■ If GUR-?NN? is specified as the Class Name, CA Top Secret assumes that the resource is protected; no ownership checking is performed. The specification of a question mark (?) forces the DEFPROT attribute to be used for the resource.
Return Codes
Return Code Meaning
00 Access allowed, resource defined.
04 Resource not defined.
08 Access denied.
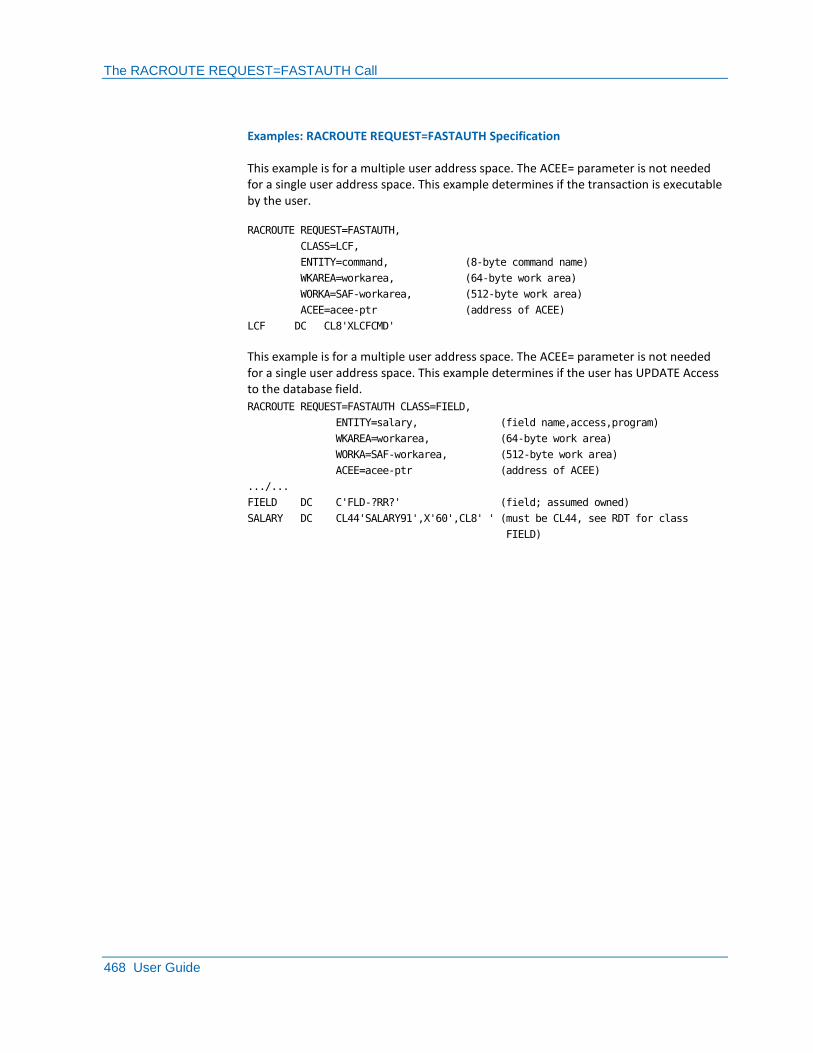
The RACROUTE REQUEST=FASTAUTH Call
468 User Guide
Examples: RACROUTE REQUEST=FASTAUTH Specification
This example is for a multiple user address space. The ACEE= parameter is not needed for a single user address space. This example determines if the transaction is executable by the user.
RACROUTE REQUEST=FASTAUTH,
CLASS=LCF,
ENTITY=command, (8-byte command name)
WKAREA=workarea, (64-byte work area)
WORKA=SAF-workarea, (512-byte work area)
ACEE=acee-ptr (address of ACEE)
LCF DC CL8'XLCFCMD'
This example is for a multiple user address space. The ACEE= parameter is not needed for a single user address space. This example determines if the user has UPDATE Access to the database field.
RACROUTE REQUEST=FASTAUTH CLASS=FIELD,
ENTITY=salary, (field name,access,program)
WKAREA=workarea, (64-byte work area)
WORKA=SAF-workarea, (512-byte work area)
ACEE=acee-ptr (address of ACEE)
.../...
FIELD DC C'FLD-?RR?' (field; assumed owned)
SALARY DC CL44'SALARY91',X'60',CL8' ' (must be CL44, see RDT for class
FIELD)
The RACROUTE REQUEST=EXTRACT Call
Chapter 17: Extending Security With the z/OS Security Interface 469
The RACROUTE REQUEST=EXTRACT Call
The RACROUTE REQUEST=EXTRACT call:
■ Extracts user information from the security file
■ Encrypts data using a hashing technique or the DES algorithm
■ Creates encrypted passwords that can be specified as input to RACROUTE REQUEST=VERIFY (ENVIR=CREATE)
To return an encrypted password for any user whose submitting ACID has the authority to submit jobs on behalf of another user’s ACID, enter the command:
TSS PERMIT(USER) ACID(OTHER)
CA Top Secret supports a form of extract that returns a feedback area when used in WARN mode if the FIELDS parameter is coded as follows:
F'1',C'PASSWORD',C'TSS '
This extract indicates whether a user is also authorized to submit a job using another user's ACID.
To issue a RACROUTE REQUEST=EXTRACT call, the caller must be executing authorized—APF, system key (keys 0 through 7), or supervisor state.
Upon return from a RACROUTE REQUEST=EXTRACT call with the TYPE=EXTRACT parameter, general purpose register 1 points to a response area. It is your responsibility to free this storage area. The storage is obtained in the subpool specified on the macro invocation, with the default subpool being 229. The storage key obtained depends on the subpool.
The extract request searches the user record of the selected ACID for any fields to be extracted. If a field is not found in the user record, the search continues with the first connected profile in the ACID’s list. This allows you to assign security related fields to a role based profile that can be added to any user.
The RACROUTE REQUEST=EXTRACT Call
470 User Guide
Password Encryption
RACROUTE REQUEST=EXTRACT is used by the IBM's BDT to obtain an encrypted password from a RACF file and pass it over the network to another RACF site where the same user's password exists on the other site's Security File. CA supports this function if the two remote sites have CA Top Secret and the same encryption key applied using the TSSKEY00 utility.
Using the encrypt function of RACROUTE REQUEST=EXTRACT, password re-authentication is possible. If a password for a user is encrypted using the DES function of RACROUTE REQUEST=EXTRACT, it is encrypted to the same value as would be returned from the RACROUTE REQUEST=EXTRACT extract function.
Consider the following VTAM application example:
■ The user has signed on.
■ At some point in processing re-authentication is required, and the application prompts the user for the password.
■ The password entered by the user is encrypted using:
RACROUTE REQUEST=EXTRACT,TYPE=ENCRYPT
The DES function encrypts the user's password; assume this is placed in PASSA.
■ The application then issues which returns the signed-on user's password encrypted; assume this is placed in PASSB:
RACROUTE REQUEST=EXTRACT,TYPE=EXTRACT
■ PASSA and PASSB are then compared. If they are the same, then the user is authenticated. (Note that the clear text password is not returned by RACROUTE REQUEST=EXTRACT.)

The RACROUTE REQUEST=EXTRACT Call
Chapter 17: Extending Security With the z/OS Security Interface 471
Obtaining Feedback
To obtain feedback from RACXTRT, enter:
RACROUTE REQUEST=EXTRACT,
TYPE=EXTRACT,
SUBPOOL=1,
FIELDS=XFIELDS,
WORKA=RACWK,
ENTITY=XUSER
XFIELDS DC F'1',C'PASSWORD',C'TSS '
XUSER DC CL8'USERID'
SUBPOOL=1 obtains storage for response in the user's TCB key. It is your responsibility to free the response area.
For FAIL and IMPLEMENT modes, the return code is 8 if the user is not authorized, and a value of 9D appears in Register 0. The ACID is not authorized by CA Top Secret to extract passwords or to submit jobs on behalf of other users.
In WARN mode, since the value for both Register 15 and Register 0 is 0, the only way to determine if the ACID is authorized to extract passwords and submit jobs on behalf of other ACIDs is through the feedback area. This area follows the encrypted password field mapped by #FEEDBCK in Optional Materials, and #RXTRESP maps the response area.

The RACROUTE REQUEST=EXTRACT Call
472 User Guide
Information Feedback
The INSTLN operand of any security macro can obtain information feedback. Feedback consists of return codes, access masks, and message text. It allows a caller to make informative decisions about access attempts and the security environment. The field is a minimum of 16 bytes, a maximum of 255 bytes.
INSTLN must address a data area that is modifiable using the caller's protect key. The format of the feedback area is:
+0 (4) FEEDBACK ID
Characters TSSF indicate CA Top Secret user feedback.
+4 (1) LENGTH
Indicates the size of the feedback area.
Range: 16 to 255
+5 (1) RETURN CODE
The actual return code; the code that would have been returned to register 15 if the event was processed in FAIL or IMPLEMENT mode. The code is always returned to the feedback area, even if you are running in WARN or DORMANT mode.
+6 (1) VIOLATION CODE
The detail error reason code, 1 to 255, that reflects the type of violation.
+7 (1) REQUESTED ACCESS
Indicates the type of requested access.
+8 (1) ALLOWED ACCESS
Indicates the type of access that was granted.
+9 (1) FLAG BYTE
Used both by the caller, to control processing, and by CA Top Secret, to feed information back.
The caller can set the NOLOG x'10' bit to prohibit CA Top Secret from automatically logging the request.
CA Top Secret sets the terminate user bit, x'08', when the user's violation count has exceeded the VTHRESH threshold. This informs the caller to cancel the session.
The flag byte should be cleared to hexadecimal zeros and set prior to each call because CA Top Secret will set the flags during each call. If the flag byte is not reset, incorrect results may occur. The flags and their meanings are:
B'10000000'
User ACID is undefined
B'01000000'
Default ACID used
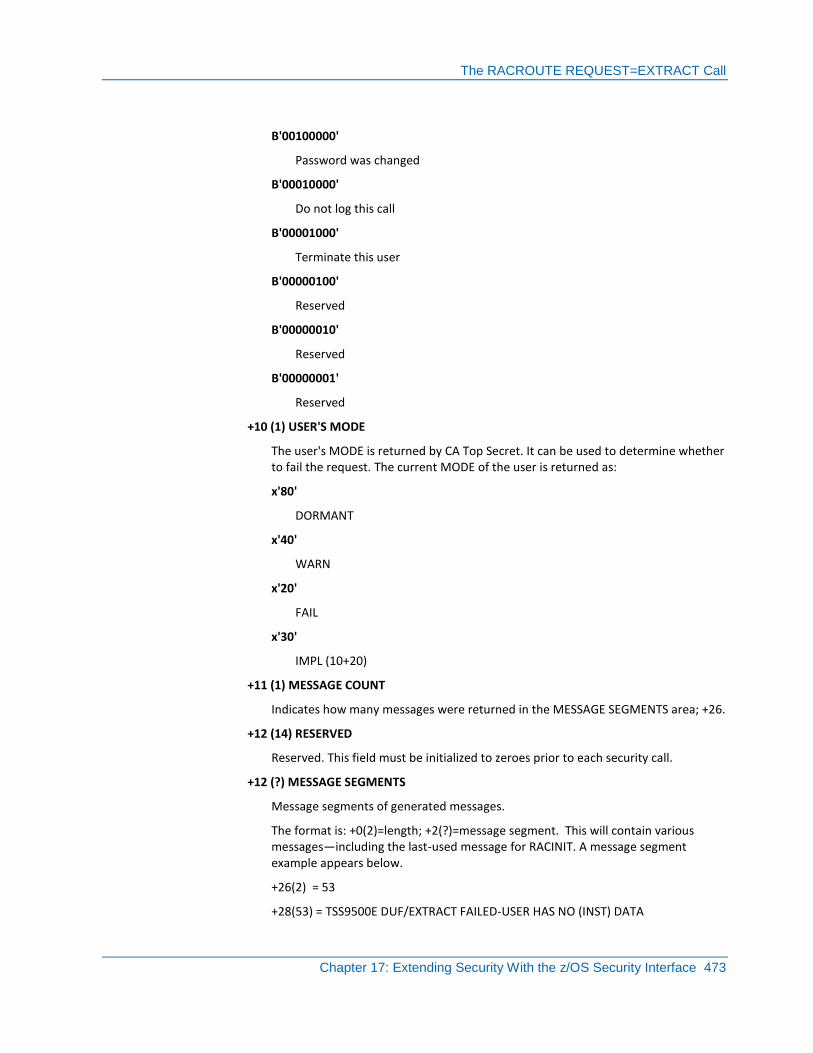
The RACROUTE REQUEST=EXTRACT Call
Chapter 17: Extending Security With the z/OS Security Interface 473
B'00100000'
Password was changed
B'00010000'
Do not log this call
B'00001000'
Terminate this user
B'00000100'
Reserved
B'00000010'
Reserved
B'00000001'
Reserved
+10 (1) USER'S MODE
The user's MODE is returned by CA Top Secret. It can be used to determine whether to fail the request. The current MODE of the user is returned as:
x'80'
DORMANT
x'40'
WARN
x'20'
FAIL
x'30'
IMPL (10+20)
+11 (1) MESSAGE COUNT
Indicates how many messages were returned in the MESSAGE SEGMENTS area; +26.
+12 (14) RESERVED
Reserved. This field must be initialized to zeroes prior to each security call.
+12 (?) MESSAGE SEGMENTS
Message segments of generated messages.
The format is: +0(2)=length; +2(?)=message segment. This will contain various messages—including the last-used message for RACINIT. A message segment example appears below.
+26(2) = 53
+28(53) = TSS9500E DUF/EXTRACT FAILED-USER HAS NO (INST) DATA

Multiple User Address Space
474 User Guide
+81(2) = 42
+83(44) = TSS9506E PROBABLE SITE INTERFACING ERROR 030
All lengths and offsets are in decimal, not hexadecimal, format.
Message text is only returned if the feedback area size will hold the text. RACROUTE REQUEST=FASTAUTH supports a feedback area of 256 bytes in length.
Register 15 Return Codes
The return codes set in register 15 versus the feedback return codes are:
R15 FDBRC FDBDRC Meaning
0 0 0 Access was allowed
4 4 0 Resource not defined; DORMANT mode
5 4 ^0 CLASSname not defined; DRC(NOVIOL)
4 >4 ^0 WARN mode
>4 >4 ^0 Fail access
For most applications, testing the register 15 code is sufficient. A return code of 0 allows the request, a return code of 4 defers to whatever native security is available, and a return code greater than 4 fails the request.
Certain fields are set in the 16 word work area provided for RACROUTE REQUEST=FASTAUTH and FRACHECK:
■ Word 12 = 0 No audit
■ Word 12 = 4 User/resource/facility is audited
Word 13 = Same as register 15 return code
Multiple User Address Space
The ACEE parameter must be passed when customized security checks are written for use in multiple user address space systems such as CICS, IMS, CA Roscoe IE, and CA IDMS.

Multiple User Address Space
Chapter 17: Extending Security With the z/OS Security Interface 475
The Address Space Environment
CA Top Secret maintains a security environment in every active address space. The environment is created at job/session initiation through a call to CA Top Secret. z/OS automatically invokes initiation security for BATCH, TSO, Started Task, IMS, CICS, and NCCF facilities. Any installation facility can use the same approach in creating the security environment.
The environment consists of control blocks initialized and maintained solely by CA Top Secret. The major control block is the Accessor Environment Element (ACEE) recognized by z/OS as a standard security control block. Associate individual users within the local facility with their unique ACEEs.
The information stored in the ACEE is used to validate resource access within the address space for an active user. In single user facilities, the system invokes security to build and maintain a single Master ACEE. This is also true of multi-user facilities, so a Master ACEE will always exist.
For CA Top Secret, the Master ACEE is associated with the ACID for the BATCH job or STC that is the facility. The facility is responsible for invoking CA Top Secret (by issuing RACROUTE REQUEST=VERIFY) to build ACEEs for individual users as they sign on.
Each ACEE reflects the security-related information for the user's ACID. When resource validation takes place in any address space, CA Top Secret uses the information associated with the Master ACEE or the user ACEE to validate access to the resource. In most cases, the security driver that invokes CA Top Secret is z/OS. However, other forms of resource checking must be initiated by the installation facility.
CA Top Secret must have an ACEE to do validation. When an ACEE is not passed to CA Top Secret on a given request, CA Top Secret attempts to locate the ACEE on its own. CA Top Secret checks the TCBSENV field of the current TCB for the address of the current ACEE:
■ If TCBSENV points to an ACEE, that ACEE is used.
■ When TCBSENV is zero, CA Top Secret uses the ACEE anchored in ASXBSENV in the ASXB of the current address space, which is the Master ACEE.
When an address space contains multiple users (a multiple user address space), if there is no task-per-user relationship (each TCB anchors its own ACEE), the ACEE most often used is the Master ACEE and not the individual user's ACEE. In this case, the installation code should always provide ACEE= on all resource calls to perform security validation for each user.
When a subtask is created by z/OS through the ATTACH macro, the TCBSENV field of the mother task is not propagated to the daughter task. If it is necessary for the daughter task to retain the same ACEE (or ACID information), the mother task must fill in the daughter task's TCBSENV field.
Multiple User Address Space
476 User Guide
As an example of a no task-per-user environment, an installation-written facility has its own control block that reflects individual user information. In this example, the installation control block is called the USER C/B.
The USER C/B must contain the address of the ACEE for the user. This address is passed to security for all future security checks. All facilities, whether they are z/OS drivers or installation code, interface with CA Top Secret through the following standard z/OS macro instructions.
Standard Macro Instructions
To perform signon security and build the ACEE, enter:
RACROUTE REQUEST=VERIFY,ENVIR=CREATE
To perform signoff cleanup and free the ACEE, enter:
RACROUTE REQUEST=VERIFY,ENVIR=DELETE
To perform data set, volume, terminal, abstract, and application checking, enter:
RACROUTE REQUEST=AUTH
To perform LCF checking for transactions and commands, enter:
RACROUTE REQUEST=FASTAUTH
The ACEE keyword for these macros is the key to multi-user security validation. It passes the address of the ACEE associated with the user prior to performing the requested operation. If the ACEE is not passed, z/OS uses the Master ACEE to validate the request. This does not perform security validation for the user. Security validation must be performed prior to allowing the following operations to take place:
■ Opening a data set
■ Creating, scratching, or renaming a data set
■ Executing a transaction or command
■ Submitting a jobstream.
Important! CA will not distribute source macro listings of CA Top Secret control blocks.
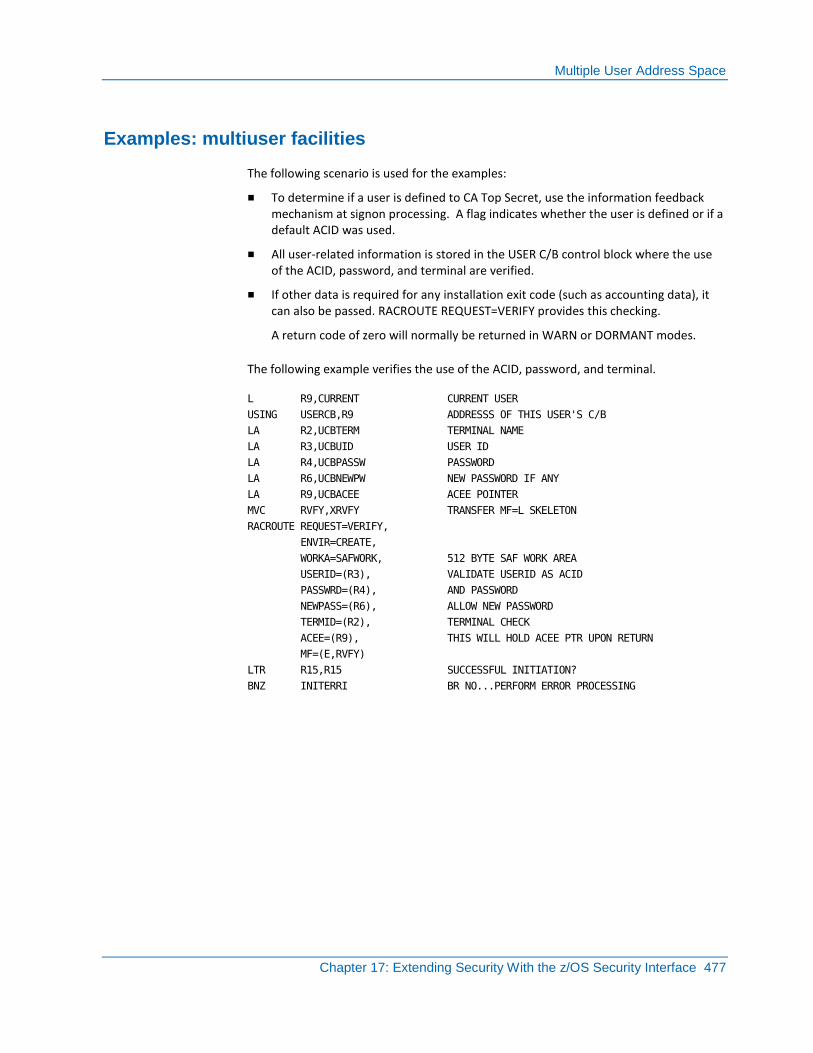
Multiple User Address Space
Chapter 17: Extending Security With the z/OS Security Interface 477
Examples: multiuser facilities
The following scenario is used for the examples:
■ To determine if a user is defined to CA Top Secret, use the information feedback mechanism at signon processing. A flag indicates whether the user is defined or if a default ACID was used.
■ All user-related information is stored in the USER C/B control block where the use of the ACID, password, and terminal are verified.
■ If other data is required for any installation exit code (such as accounting data), it can also be passed. RACROUTE REQUEST=VERIFY provides this checking.
A return code of zero will normally be returned in WARN or DORMANT modes.
The following example verifies the use of the ACID, password, and terminal.
L R9,CURRENT CURRENT USER
USING USERCB,R9 ADDRESSS OF THIS USER'S C/B
LA R2,UCBTERM TERMINAL NAME
LA R3,UCBUID USER ID
LA R4,UCBPASSW PASSWORD
LA R6,UCBNEWPW NEW PASSWORD IF ANY
LA R9,UCBACEE ACEE POINTER
MVC RVFY,XRVFY TRANSFER MF=L SKELETON
RACROUTE REQUEST=VERIFY,
ENVIR=CREATE,
WORKA=SAFWORK, 512 BYTE SAF WORK AREA
USERID=(R3), VALIDATE USERID AS ACID
PASSWRD=(R4), AND PASSWORD
NEWPASS=(R6), ALLOW NEW PASSWORD
TERMID=(R2), TERMINAL CHECK
ACEE=(R9), THIS WILL HOLD ACEE PTR UPON RETURN
MF=(E,RVFY)
LTR R15,R15 SUCCESSFUL INITIATION?
BNZ INITERRI BR NO...PERFORM ERROR PROCESSING
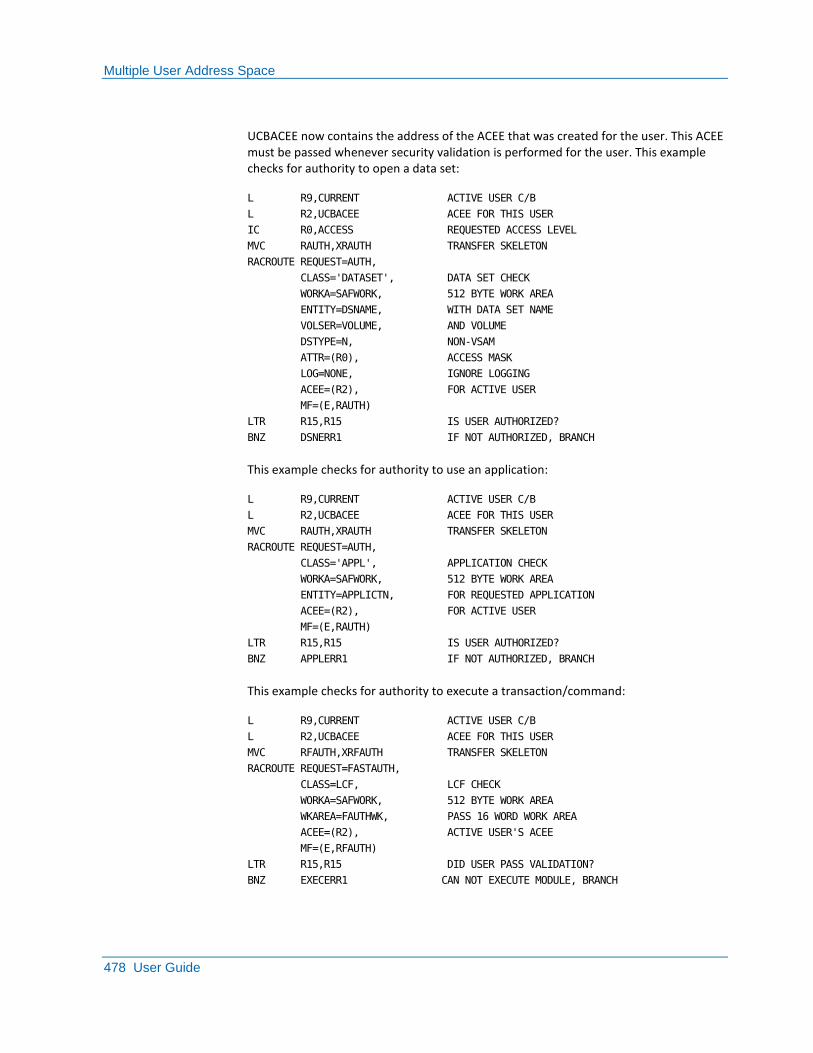
Multiple User Address Space
478 User Guide
UCBACEE now contains the address of the ACEE that was created for the user. This ACEE must be passed whenever security validation is performed for the user. This example checks for authority to open a data set:
L R9,CURRENT ACTIVE USER C/B
L R2,UCBACEE ACEE FOR THIS USER
IC R0,ACCESS REQUESTED ACCESS LEVEL
MVC RAUTH,XRAUTH TRANSFER SKELETON
RACROUTE REQUEST=AUTH,
CLASS='DATASET', DATA SET CHECK
WORKA=SAFWORK, 512 BYTE WORK AREA
ENTITY=DSNAME, WITH DATA SET NAME
VOLSER=VOLUME, AND VOLUME
DSTYPE=N, NON-VSAM
ATTR=(R0), ACCESS MASK
LOG=NONE, IGNORE LOGGING
ACEE=(R2), FOR ACTIVE USER
MF=(E,RAUTH)
LTR R15,R15 IS USER AUTHORIZED?
BNZ DSNERR1 IF NOT AUTHORIZED, BRANCH
This example checks for authority to use an application:
L R9,CURRENT ACTIVE USER C/B
L R2,UCBACEE ACEE FOR THIS USER
MVC RAUTH,XRAUTH TRANSFER SKELETON
RACROUTE REQUEST=AUTH,
CLASS='APPL', APPLICATION CHECK
WORKA=SAFWORK, 512 BYTE WORK AREA
ENTITY=APPLICTN, FOR REQUESTED APPLICATION
ACEE=(R2), FOR ACTIVE USER
MF=(E,RAUTH)
LTR R15,R15 IS USER AUTHORIZED?
BNZ APPLERR1 IF NOT AUTHORIZED, BRANCH
This example checks for authority to execute a transaction/command:
L R9,CURRENT ACTIVE USER C/B
L R2,UCBACEE ACEE FOR THIS USER
MVC RFAUTH,XRFAUTH TRANSFER SKELETON
RACROUTE REQUEST=FASTAUTH,
CLASS=LCF, LCF CHECK
WORKA=SAFWORK, 512 BYTE WORK AREA
WKAREA=FAUTHWK, PASS 16 WORD WORK AREA
ACEE=(R2), ACTIVE USER'S ACEE
MF=(E,RFAUTH)
LTR R15,R15 DID USER PASS VALIDATION?
BNZ EXECERR1 CAN NOT EXECUTE MODULE, BRANCH
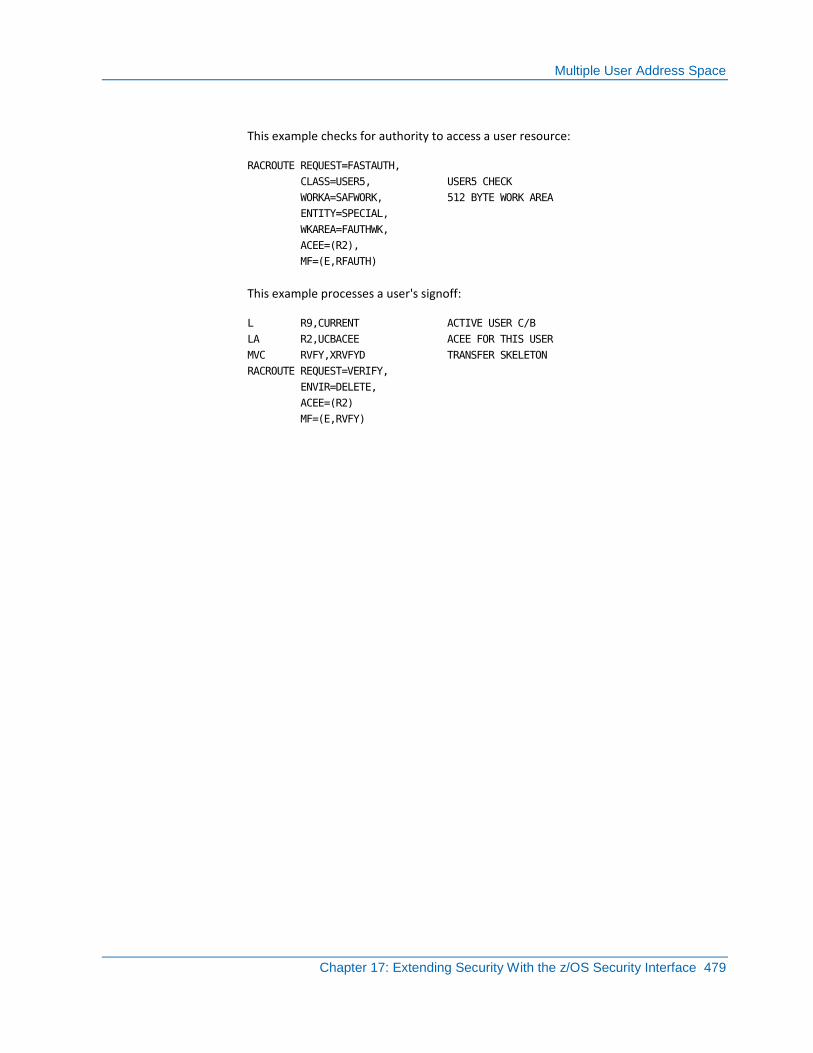
Multiple User Address Space
Chapter 17: Extending Security With the z/OS Security Interface 479
This example checks for authority to access a user resource:
RACROUTE REQUEST=FASTAUTH,
CLASS=USER5, USER5 CHECK
WORKA=SAFWORK, 512 BYTE WORK AREA
ENTITY=SPECIAL,
WKAREA=FAUTHWK,
ACEE=(R2),
MF=(E,RFAUTH)
This example processes a user's signoff:
L R9,CURRENT ACTIVE USER C/B
LA R2,UCBACEE ACEE FOR THIS USER
MVC RVFY,XRVFYD TRANSFER SKELETON
RACROUTE REQUEST=VERIFY,
ENVIR=DELETE,
ACEE=(R2)
MF=(E,RVFY)

Multiple User Address Space
480 User Guide
Data Areas Used by Sample Programs
USER5 DC CL8'USER5' Class name for FASTAUTH
* special contains user resource 10000, update access level, program:
SPECIAL DC CL8'10000',X'60',CL8'CUTRPGM'
LCF DC CL8'XLCF'
XRVFY RACROUTE REQUEST=VERIFY,ENVIR=CREATE,MF=L
XRVFYD RACROUTE REQUEST=VERIFY,ENVIR=DELETE,MF=L
XRAUTH RACROUTE REQUEST=AUTH,MF=L
XRFAUTH RACROUTE REQUEST=FASTAUTH,MF=L
USERCB DSECT USER CONTROL BLOCK MAPPING
UCBUID DS XL1,CL8 USER LENGTH AND USERID
UCBPASSW DS XL1,CL8 PASSWORD LENGTH AND PASSWORD
UCBNEWPW DS XL1,CL8 NEW PASSWORD LENGTH AND PASSWORD
UCBTERM DS CL8 TERMINAL USER IS USING
UCBACEE DS A POINTER TO USER'S ACEE
WORKAREA DSECT
CURRENT DS A ADDRESS OF ACTIVE USER C/B
FAUTHWK DS 16F WORKAREA FOR FASTAUTH
SAFWORK DS XL512 SAF WORK AREA
RVFY DS 0XL256 RACROUTE PARMLIST FOR EXECUTION
RAUTH DS 0XL256 ―― ―― ―― ―― ―― ―― ―― ―― ―― ――
RFAUTH DS XL256 ―― ―― ―― ―― ―― ―― ―― ―― ―― ――
XACTNNAM DS CL8 NAME OF MODULE TO BE EXECUTED
APPLCTN DS CL8 NAME OF APPLICATION TO BE ACCESSED
DSNAME DS CL44 NAME OF DATA SET TO BE ACCESSED
ACCESS DS X ACCESS LEVEL FOR DATA SET OPEN
VOLUME DS CL6 VOLUME FOR DATA SET

Dynamic Extract/Update Facility
Chapter 17: Extending Security With the z/OS Security Interface 481
Dynamic Extract/Update Facility
Use the Dynamic Extract/Update Facility (DUF) to extract and update INSTALLATION data area user-dependent data such as counts, statistics, totals, and CPU usage.
The installation data (INSTDATA) is maintained in the user’s security record. Installation data for any ACID can be maintained using DUF:
■ The current ACID as defined by an ACEE
■ Any ACID on the Security File.
Use the RACROUTE REQUEST=AUTH call to extract, maintain, and update the installation data. The program name must be defined by the DUFPGM control option or the caller of these functions must be authorized through the TSS ADDTO parameters DUFXTR and/or DUFUPD.
An example of INSTDATA is:
INSTDATA(‗ID=Q477,CPU=00104,CODE=A,BAL=$00366.00')
The Class Names and their functions are listed in the following table.
Class Name
Function Entity
DUFXTR Extract the INSTDATA for an ACID.
If the ACID name is left blank, the INSTDATA of the active user is extracted.
If the ACID name is supplied, the INSTDATA for the supplied ACID is extracted.
+0(8) ACID name or blanks
+8(255) INSTDATA buffer
DUFUPD Replaces an ACID’s INSTDATA.
If the ACID name is left blank, the INSTDATA of the active user is replaced.
If the ACID name is supplied, the INSTDATA for the supplied ACID is replaced.
DUF updates are propagated to all CPF-defined nodes.
+0(8) ACID name or blanks
+8(255) INSTDATA buffer
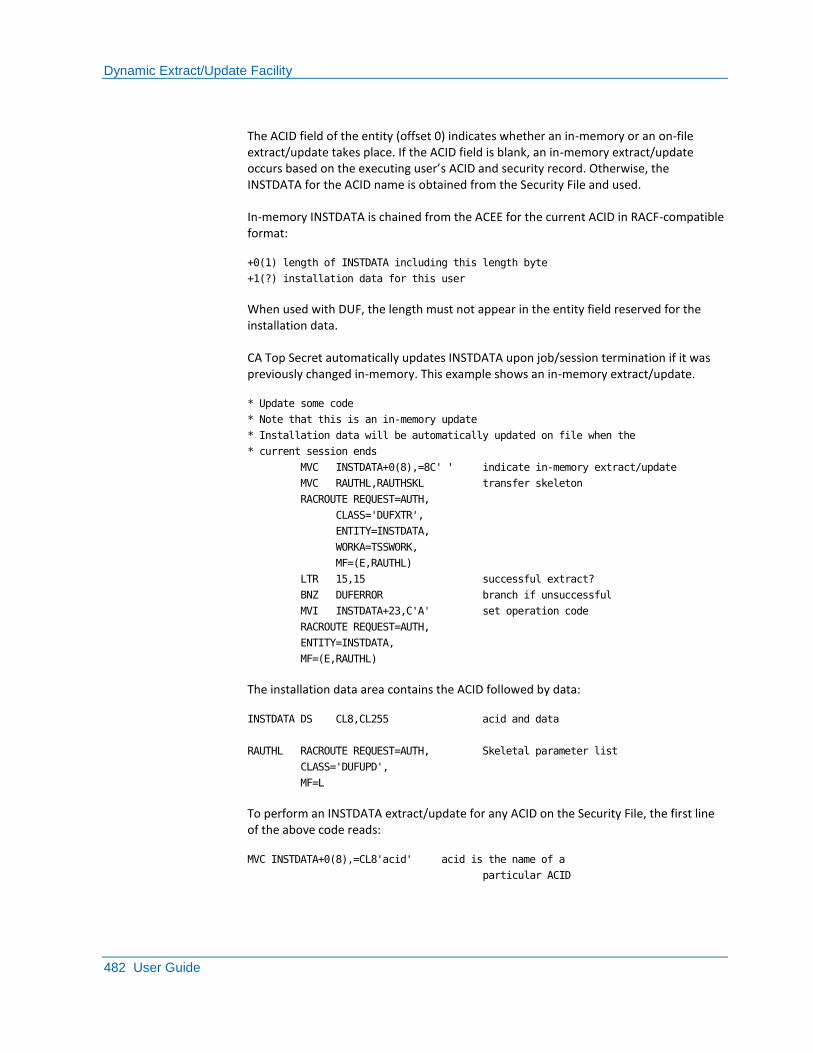
Dynamic Extract/Update Facility
482 User Guide
The ACID field of the entity (offset 0) indicates whether an in-memory or an on-file extract/update takes place. If the ACID field is blank, an in-memory extract/update occurs based on the executing user’s ACID and security record. Otherwise, the INSTDATA for the ACID name is obtained from the Security File and used.
In-memory INSTDATA is chained from the ACEE for the current ACID in RACF-compatible format:
+0(1) length of INSTDATA including this length byte
+1(?) installation data for this user
When used with DUF, the length must not appear in the entity field reserved for the installation data.
CA Top Secret automatically updates INSTDATA upon job/session termination if it was previously changed in-memory. This example shows an in-memory extract/update.
* Update some code
* Note that this is an in-memory update
* Installation data will be automatically updated on file when the
* current session ends
MVC INSTDATA+0(8),=8C' ' indicate in-memory extract/update
MVC RAUTHL,RAUTHSKL transfer skeleton
RACROUTE REQUEST=AUTH,
CLASS='DUFXTR',
ENTITY=INSTDATA,
WORKA=TSSWORK,
MF=(E,RAUTHL)
LTR 15,15 successful extract?
BNZ DUFERROR branch if unsuccessful
MVI INSTDATA+23,C'A' set operation code
RACROUTE REQUEST=AUTH,
ENTITY=INSTDATA,
MF=(E,RAUTHL)
The installation data area contains the ACID followed by data:
INSTDATA DS CL8,CL255 acid and data
RAUTHL RACROUTE REQUEST=AUTH, Skeletal parameter list
CLASS='DUFUPD',
MF=L
To perform an INSTDATA extract/update for any ACID on the Security File, the first line of the above code reads:
MVC INSTDATA+0(8),=CL8'acid' acid is the name of a
particular ACID
Dynamic Extract/Update Facility
Chapter 17: Extending Security With the z/OS Security Interface 483
Error Return Codes
If feedback is used, possible detail error return codes are:
x'1E'
Invalid parameter
x'1F'
No DUFXTR/DUFUPD authority
x'46'
ACID undefined
x'4E'
ACID has no INSTDATA
DUF Tips
When using DUF:
■ Do not try to reduce or extend the size of the INSTDATA. To change the size of INSTDATA use TSS REPLACE or TSS ADD INSTDATA.
■ To enable the TSS command to display meaningful information, maintain EBCDIC information only.
■ Keep counters in unpacked numeric format.
■ Use fixed format fields or user free-format with identifiers.
■ Use your installation exit (TSS command call) to enforce INSTDATA standards. When updating, the entire INSTDATA field must be replaced.
Resource Name List Service Support
484 User Guide
Resource Name List Service Support
The CA Top Secret TSSRSVC1 module provides Resource Name List support. This support allows authorized programs to call CA Top Secret to retrieve the names of resources within a class that a given ACID can access at READ level or higher.
TSSRSVC1 searches the RDT for the class name. If the class is found, TSSRSVC1 checks all permissions and determines if the specified ACID is authorized to access the resource at READ level or higher. When TSSRSVC1 finds a match, it places the resource name into the input work area. CA Top Secret supports any general resource or PIE resource (resource classes that support masking) in the RDT.
CA Top Secret searches the USER, PROFILE, and ALL records, but may stop if the size of the output list exceeds the work area.
CA Top Secret loads the address of TSSRSVC1 into RCVTPNL0 during initialization. The caller of the module must use the address in RCVTPNL0 in the RCVT. The RCVT is mapped by the IBM ICHPRCVT macro.
Note the following:
■ Your program is responsible for obtaining and releasing the storage that TSSRSVC1 uses to store the Resource Name List
■ Callers of TSSRSVC1 must be running in key 0, task mode, with no locks held
Invoking Support
When you invoke TSSRSVC1 support, your program must use the CALL command to pass the parameters:
Classname
A name from which CA Top Secret derives the resource names to which the ACID has authorization.
Length: 8 characters
Work Area Length
A full word that contains the length of the area in which TSSRSVC1 is going to build the Resource Name List.
Work Area
A full word pointer that contains the address of the workarea where TSSRSVC1 is going to build the Resource Name List.
ACEE Pointer
A full word pointer that contains the address of the ACEE for the ACID for whom resource authorization is being determined.
Resource Name List Service Support
Chapter 17: Extending Security With the z/OS Security Interface 485
Returned Format
A fixed (31) count field that precedes the Resource Name List contains the total count of resource names returned by TSSRSVC1. The format of the list when it is placed in the work area is:
Name Length
The two byte length of the resource name.
Flags
A one byte flag field (only the first bit is used). The first bit of the flag field byte is on if the resource is a generic resource.
Resource Name
A variable length resource name.
Resource Name List Service Support
486 User Guide
Return Codes
TSSRSVC1 returns 0 to indicate a successful search.
The following return codes are returned in register 15:
00
The Resource Name List function completed successfully.
04
No resources found for which the ACID had at least READ access.
08
No resource entries found for that class; indicates that no resources existed for the input class.
0C
The work area was not large enough to hold all the resource names.
14
Resource Name List parameter error.
The following reason codes are returned in register 0:
04
No ACEE available.
08
Work Area too small to contain a single resource.
10
Input Class name not valid.
Chapter 18: Extending Security With Site Security Exits 487
Chapter 18: Extending Security With Site Security Exits
This section contains the following topics:
Customization Ideas (see page 487) TSSINSTX Characteristics (see page 488) Mechanics (see page 489) Common Exit Parameters (see page 489) Installation Exit Activation (see page 491) CA Top Secret Exit/User Entry Points (see page 491)
Customization Ideas
CA Top Secret lets you create security checks which bypass, replace, or enhance normal security validation with TSSINSTX. You can use TSSINSTX to:
■ Provide additional job card parameter validations:
– JES2 Initiator class authorizations
– Job priority authorizations
– Account number information
■ Limit TSO usage by department.
■ Maintain CA-Roscoe usage statistics based on the time-of-day session-Roscoe/ * * signoff.
■ Verify voice/image for online session signon.
■ Provide implicit data set prefix security for DASD management archiving data sets.
■ Use “pseudo data set names” to provide other resources with the flexibility of data set name security. This is useful in controlling access to members in a library management package (for example, CA-Panvalet, CA-Librarian, or CA-Endeavor).
■ Eliminate the logging of BYPASS events as desired by the installation to reduce ATF logging.
Sample code for these uses is in the AAKOSRC0 member TSSINST1.
TSSINSTX Characteristics
488 User Guide
TSSINSTX Characteristics
TSSINSTX is a single load module with a single entry point. There are 26 different processing routines which are entered based upon the function code passed on entry. The load module must reside in a LINKLST library and must be named TSSINSTX. The link-edit must specify AMODE(31),RMODE(ANY).
To link edit the sample exit provided in the AAKOSRC0 file as member TSSINST1, the SYSLIB concatenation should include the following data sets:
SYS1.MACLIB
z/OS target macro library.
SYS1.HASPSRC
JES2 distribution macro library.
SYS1.AMODGEN
z/OS distribution macro library.
cai.AAKOSRC0
CA Top Secret for z/OS optional materials file.
With the exception of the COMMAND exit, TSSINSTX normally runs in the user address space under the security SVC. In the case of the COMMAND exit, TSSINSTX runs in the CA Top Secret address space. The exit is entered in supervisor state, key 0. The exit can issue any SVC and perform I/O unless otherwise noted in the list above.
TSSINSTX is protected by an error recovery routine (in most cases). In the event of an abend, an SVC dump is taken and the exit is disabled with a message issued to the security and master consoles. Any variations to this rule are noted in the list above.
CA Top Secret loads the installation exit (TSSINSTX) as specified on the module's linkedit attributes. The installation exit should be linked as RMODE(ANY), so that it is loaded above the line. Because most parameters passed to the exit now exist above the line, RACROUTE calls must be issued for all security checks. TSSINST1, supplied in CAI.AAKOSRC0, contains examples of proper coding of RACROUTE requests.
Because the exit can issue any SVC and perform I/O, different exits are called when in cross memory mode. A FASTAUTH call that would ordinarily call the RESOURCE, RESOURCE POST VALIDATION, MESSAGE, or VIOLATION exit points instead calls CROSS MEMORY versions of these exits if the FASTAUTH is issued in cross memory mode. These exit points may not issue SVC's or perform I/O.
If a validation is processed for a facility with resource translation, the translation of resource classes occurs before an exit point is invoked. The values communicated to TSSINSTX for TXA#RTYP and TXARTYP2 correspond to the translated resource type.
Mechanics
Chapter 18: Extending Security With Site Security Exits 489
Mechanics
TSSINSTX is supplied in the AAKOSRC0 file member TSSINSTX. An activation matrix at the beginning of the TSSINSTX module defines which exit points are invoked. The matrix contains a one byte flag for each function (point of user entry). If the flag byte is non-zero, CA Top Secret calls the installation exit point for the function.
It is the responsibility of the site programmer to place the customized installation code in the appropriate exit routine within TSSINSTX.
Common Exit Parameters
This list contains common parameters passed to all exit points. Some parameter fields may not be valid at some exit points. For example, the TXA#DRC parameter field will not contain valid information for the PREINIT exit point since the security processing has not completed.
TXA#ACID
@ ACID that initiated the security event.
TXA#ACEE
@ ACEE for the ACID that initiated the security event.
TXA#DRC
@ Detailed Reason Code for this security event.
TXA#FACM
@ Facility matrix table entry for the facility under which the ACID signed on. The facility matrix table entry is mapped by the #FACMATX macro definition supplied in the CAI.OPMAT file on the product installation tape.
TXA#FEED
@ Feedback area address, if present.
TXA#FLAG
@ Flag for communication with TSSINSTX.
TXA#INSD
@ ACID installation data area (INSTDATA). The area contains a length byte and a zero separator followed by the actual data (up to 256 bytes). This field cannot be updated for TSSINSTX. Any actual change to an ACID's installation data would be accomplished through the use of the CA Top Secret Application Interface, or TSS administrative commands.
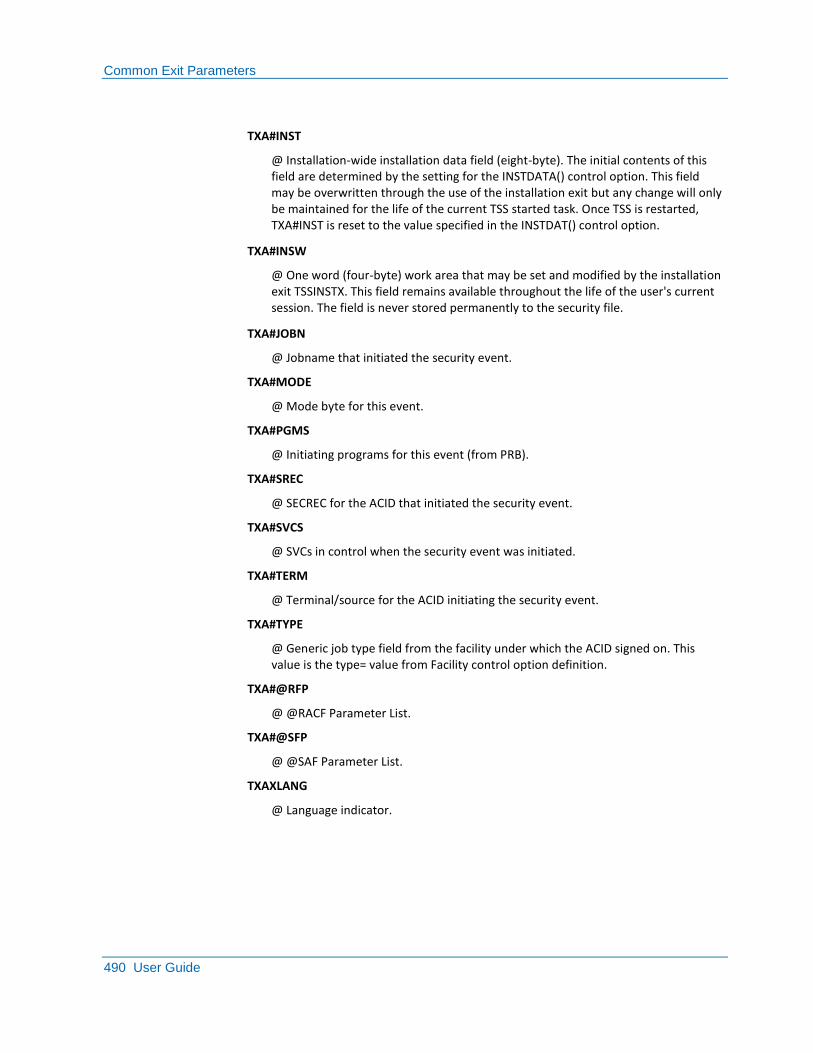
Common Exit Parameters
490 User Guide
TXA#INST
@ Installation-wide installation data field (eight-byte). The initial contents of this field are determined by the setting for the INSTDATA() control option. This field may be overwritten through the use of the installation exit but any change will only be maintained for the life of the current TSS started task. Once TSS is restarted, TXA#INST is reset to the value specified in the INSTDAT() control option.
TXA#INSW
@ One word (four-byte) work area that may be set and modified by the installation exit TSSINSTX. This field remains available throughout the life of the user's current session. The field is never stored permanently to the security file.
TXA#JOBN
@ Jobname that initiated the security event.
TXA#MODE
@ Mode byte for this event.
TXA#PGMS
@ Initiating programs for this event (from PRB).
TXA#SREC
@ SECREC for the ACID that initiated the security event.
TXA#SVCS
@ SVCs in control when the security event was initiated.
TXA#TERM
@ Terminal/source for the ACID initiating the security event.
TXA#TYPE
@ Generic job type field from the facility under which the ACID signed on. This value is the type= value from Facility control option definition.
TXA#@RFP
@ @RACF Parameter List.
TXA#@SFP
@ @SAF Parameter List.
TXAXLANG
@ Language indicator.
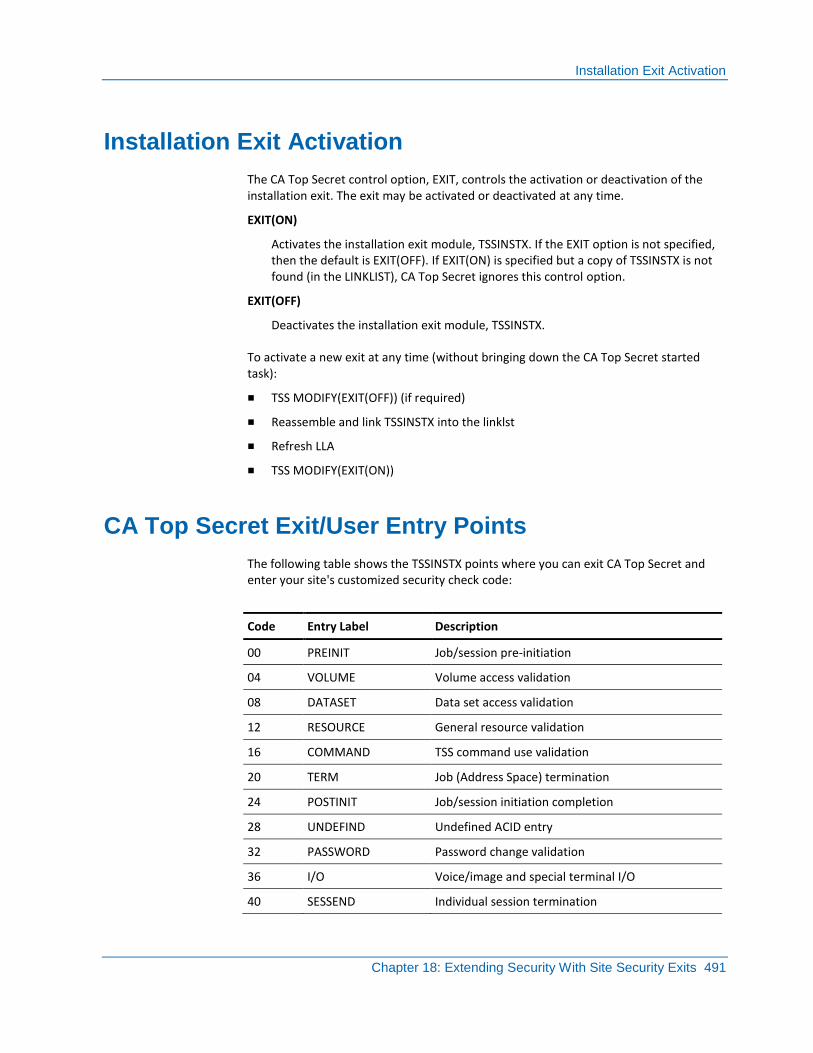
Installation Exit Activation
Chapter 18: Extending Security With Site Security Exits 491
Installation Exit Activation
The CA Top Secret control option, EXIT, controls the activation or deactivation of the installation exit. The exit may be activated or deactivated at any time.
EXIT(ON)
Activates the installation exit module, TSSINSTX. If the EXIT option is not specified, then the default is EXIT(OFF). If EXIT(ON) is specified but a copy of TSSINSTX is not found (in the LINKLIST), CA Top Secret ignores this control option.
EXIT(OFF)
Deactivates the installation exit module, TSSINSTX.
To activate a new exit at any time (without bringing down the CA Top Secret started task):
■ TSS MODIFY(EXIT(OFF)) (if required)
■ Reassemble and link TSSINSTX into the linklst
■ Refresh LLA
■ TSS MODIFY(EXIT(ON))
CA Top Secret Exit/User Entry Points
The following table shows the TSSINSTX points where you can exit CA Top Secret and enter your site's customized security check code:
Code Entry Label Description
00 PREINIT Job/session pre-initiation
04 VOLUME Volume access validation
08 DATASET Data set access validation
12 RESOURCE General resource validation
16 COMMAND TSS command use validation
20 TERM Job (Address Space) termination
24 POSTINIT Job/session initiation completion
28 UNDEFIND Undefined ACID entry
32 PASSWORD Password change validation
36 I/O Voice/image and special terminal I/O
40 SESSEND Individual session termination

CA Top Secret Exit/User Entry Points
492 User Guide
Code Entry Label Description
44 SUBMIT INTRDR job submission
48 CHANGE Security File change
52 ACTION Permit action exit
56 MESSAGE CA Top Secret message editing
64 VIOLATN/LOGGING Violations and all audited events
68 SITE VIA RACHECK
72 CPF Command propagation exit
76 RESOURCE XMEM Resource validation - cross memory
80 MESSAGE XMEM Message editing - cross memory
84 VIOLATION XMEM Violation notification - cross memory
88 RESOURCE POST Resource post validation
92 RESOURCE POST XMEM
Resource post validation - cross memory
96 DATASET POST Dataset post validation
100 VOLUME POST Volume post validation
104 PASSPHRASE Password phrase change validation
Although the text of the CA Top Secret messages can be changed, the numbers cannot be edited.
ACTION - Permit Action (Exit)
Receives control for all security events against DATASETS, VOLUMES, and masked prefixed resources that match on a PERMIT with ACTION(EXIT).
Parameters
TXA#XE@
Internally formatted resource permission.
Output
NONE
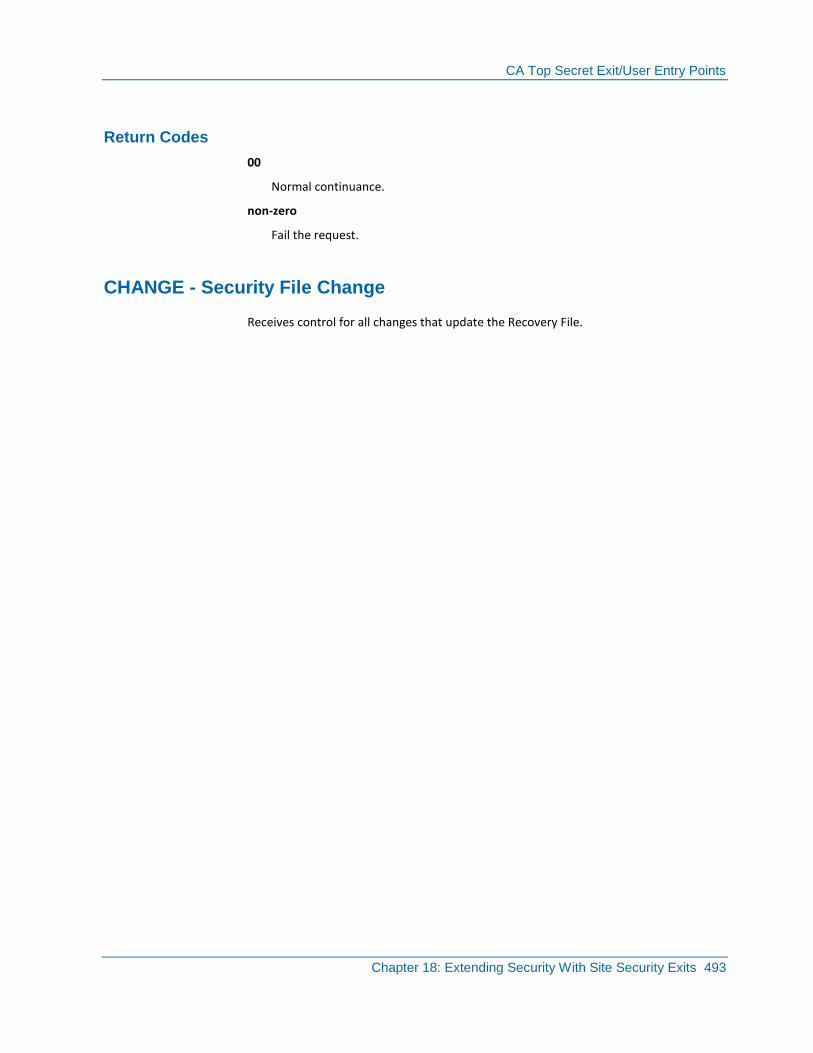
CA Top Secret Exit/User Entry Points
Chapter 18: Extending Security With Site Security Exits 493
Return Codes
00
Normal continuance.
non-zero
Fail the request.
CHANGE - Security File Change
Receives control for all changes that update the Recovery File.
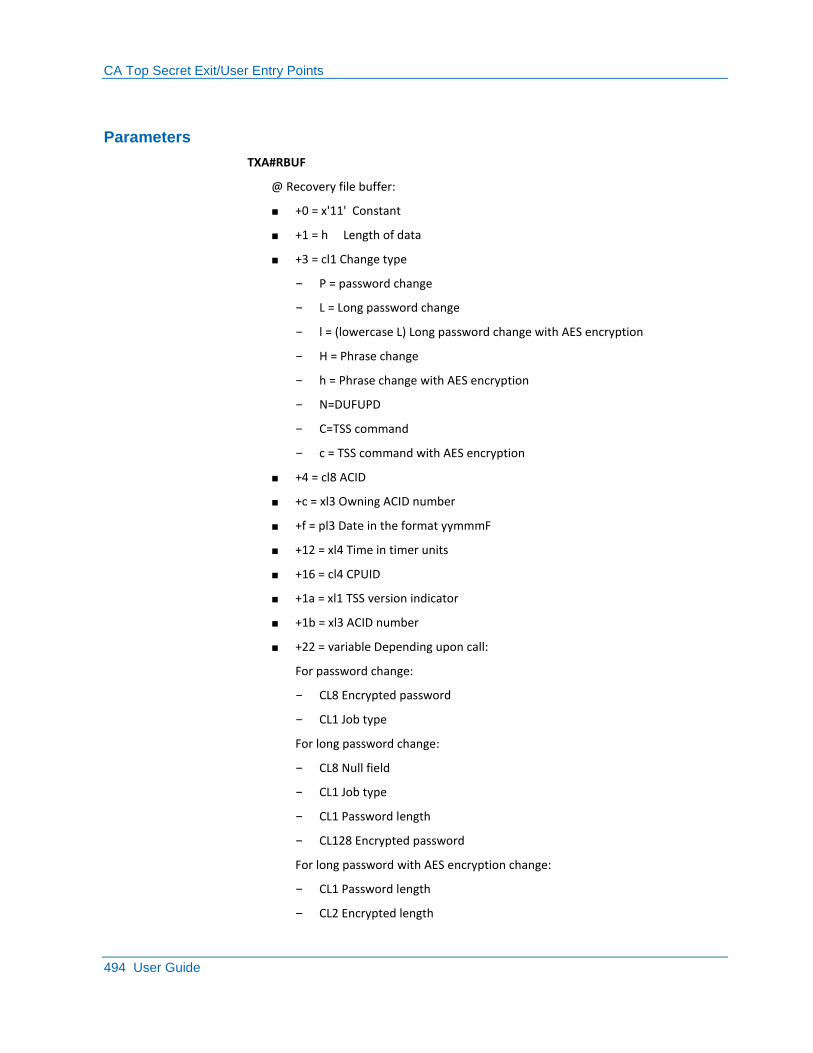
CA Top Secret Exit/User Entry Points
494 User Guide
Parameters
TXA#RBUF
@ Recovery file buffer:
■ +0 = x'11' Constant
■ +1 = h Length of data
■ +3 = cl1 Change type
– P = password change
– L = Long password change
– l = (lowercase L) Long password change with AES encryption
– H = Phrase change
– h = Phrase change with AES encryption
– N=DUFUPD
– C=TSS command
– c = TSS command with AES encryption
■ +4 = cl8 ACID
■ +c = xl3 Owning ACID number
■ +f = pl3 Date in the format yymmmF
■ +12 = xl4 Time in timer units
■ +16 = cl4 CPUID
■ +1a = xl1 TSS version indicator
■ +1b = xl3 ACID number
■ +22 = variable Depending upon call:
For password change:
– CL8 Encrypted password
– CL1 Job type
For long password change:
– CL8 Null field
– CL1 Job type
– CL1 Password length
– CL128 Encrypted password
For long password with AES encryption change:
– CL1 Password length
– CL2 Encrypted length

CA Top Secret Exit/User Entry Points
Chapter 18: Extending Security With Site Security Exits 495
– CL16 Encryption key
– CL128 Encrypted password
For Phrase change:
– CL2 Phrase length
– CL8 Encryption key
– CL128 Encrypted phrase
For Phrase with AES encryption change:
– CL1 Phrase length
– CL2 Encrypted length
– CL16 Encryption key
– CL128 Encrypted phrase
For DUFUPD change:
– CL2 Length of installation data
– CL255 Installation data
For TSS command change (C or c):
– CLxxx Command text
XA#CPL
@ Change parameter list:
■ +0 = cl1 p=password change, u=DUFUPD, c=TSS command
■ +F = cl8 ACID
■ +17 = cl8 Owning ACID
Output
NONE
CA Top Secret Exit/User Entry Points
496 User Guide
Return Codes
Not checked.
This exit point receives control on:
■ Password change
■ DUFUPD
■ TSS command Security File change
When entered for an CA Top Secret command processor change, this exit point is protected by the CA Top Secret Command Processor ESTAE routine. Abends are recovered, but the exit is not disabled.
COMMAND - Command Use Validation
Receives control on each TSS command.
Parameters
TXACCACI
@ Caller's ACID.
TXACTYPE
@ Caller's TYPE.
TXACMRTN
@ Message routine called by passing WTO style buffer to the routine.
TXACCBUF
@ Command buffer.
CA Top Secret Exit/User Entry Points
Chapter 18: Extending Security With Site Security Exits 497
TXACFUNC
@ TSS command function:
■ 01 = CREATE
■ 02 = DELETE
■ 03 = ADDTO
■ 04 = REPLACE
■ 05 = RENAME
■ 06 = REMOVE
■ 07 = PERMIT
■ 08 = REVOKE
■ 09 = WHOOWNS
■ 0A = WHOHAS
■ 0B = LIST
■ 0C = HELP
■ 0D = LOCK
■ 0E = UNLOCK
■ 0F = WHOAMI
■ 10 = MODIFY
■ 11 = ADMIN
■ 12 = DEADMIN
■ 13 = MOVE
TXACACID
@ ACID specified on the TSS command
CA Top Secret Exit/User Entry Points
498 User Guide
TXACPROF
@ Profile table which contains the PROFILEs specified on the TSS command
TXACACIL
@ Permitted ACIDs table which contains the ACIDs specified on the TSS command
TXACPASS
@ Password data specified on the TSS command
TXACOPID
@ CICS OPIDENT specified on the TSS command
TXACINST
@ Installation data specified on the TSS command
TXACAUD
@ Audit flag specified on the TSS command
TXACTGTS
@ Target list or sender name specified on the TSS command
TXACRLST
@ Resource list which contains the resources specified on the TSS command. List of full words each pointing to a resource table. Use full word ‘0’ for delimiter.
TXACPHRA
@ Password phrase as 256 character areas on the command. Applicable for z/OS 1.8 and above only.
+0 = 1 byte length (0 implies no password phrase)
+1 = password phrase data
Output
NONE
CA Top Secret Exit/User Entry Points
Chapter 18: Extending Security With Site Security Exits 499
Return Codes
00
Normal continuance.
Non-zero
FAIL command.
The common exit parameters are not passed to COMMAND.
This exit point is not protected by the same ESTAE routine that protects most other entry points, and is not disabled automatically when an abend occurs.
CPF - Command Being Sent to Remote TSS
Allows the user to examine CPF propagation requests and change the target machines.
Parameters
TXACTGTS
@ CPF target data.
TXACCACI
@ Issuing ACID.
TXACTYPE
@ Issuing ACID's type.
TXACCBUF
@ Raw command buffer.
TXACFUNC
@ Command function.
Output
May alter CPF target names or eliminate targets by altering $$CTFLG1 and $$CTUSE
Return Codes
00
Normal continuance.
04
Reject the entire command.
CA Top Secret Exit/User Entry Points
500 User Guide
DATASET - Dataset Access Validation
Receives control on all data set checks allowing additional user validation.
Parameters
TXA#DSN
@ DATASET NAME (44 bytes, blank padded).
TXA#VOL
@ VOLSER (six bytes, blank padded).
TXA#ACC
@ Requested access level (two bytes).
TXA#RTYP
@ Resource type (rescode from RDT).
Output
TXA#DSN
May be changed.
TXA#VOL
May be changed.
TXA#ACC
May be changed.
$TXADAUD
Flag indicating that a user or session job should be audited. This flag is part of TXAVIND and must have an OR function applied with TXAVIND to be set.
Return Codes
00
Normal continuance.
04
Fail request.
08
Continue without further checking.
12
Checking takes place as usual, except that the mode will be treated as WARN for this call only. ACTION(FAIL) will be ignored if it is found on the best matching permit, and the call will be processed exactly as if the mode were WARN.
CA Top Secret Exit/User Entry Points
Chapter 18: Extending Security With Site Security Exits 501
DSNPOST - Dataset Post Validation
Receives control on all data set checks allowing additional user validation.
Parameters
TXA#DSN
@ DATASET NAME (44 bytes, blank padded).
TXA#VOL
@ VOLSER (six bytes, blank padded).
TXA#ACC
@ Requested access level (two bytes).
TXA#RTYP
@ Resource type (rescode from RDT).
Output
$TXADAUD
Flag indicating that a user or session job should be audited. This flag is part of TXADIND and must have an OR function applied with TXADIND to be set.
Return Codes
00
Normal continuance.
04
Fail request.
08
Continue without further checking.
IO - Voice or Digital Image Request
Receives control on security initiation requests to allow the processing of special device considerations.
CA Top Secret Exit/User Entry Points
502 User Guide
Parameters
TXAIPKL
@ PHYSKEY length.
TXAIPKY
@ PHYSKEY data.
TXAIVBFR
@ Voice buffer (filled by exit code).
Output
If voice verification is in use, then the voice buffer must be filled. If voice verification is returned, then the voice buffer must match the user's Security Record.
Return Codes
00
Normal continuance.
04
Fail request.
14
Skip password check.
MESSAGE - Message Editing
Receives control for security messages. This allows the user to edit the text.
Parameters
TXA#MBUF
@ Message buffer in WTO format.
Output
TXA#MBUF
May alter message text.
Return Codes
None
CA Top Secret Exit/User Entry Points
Chapter 18: Extending Security With Site Security Exits 503
MSGXMEM - Message Editing Cross Memory Mode
Receives control for cross memory security messages. This allows the user to edit the text.
Parameters
TXA#MBUF
@ Message buffer in WTO format.
Output
TXA#MBUF
May alter message text.
Return Codes
None
PASSPHRASE - Password Phrase Change Entry
Receives control of security requests for which a password phrase change has been requested.This exit can fail a passphrase change request that passed NEWPHRASE controls. Use the PREINIT exit to modify the new passphrase prior to NEWPHRASE processing.
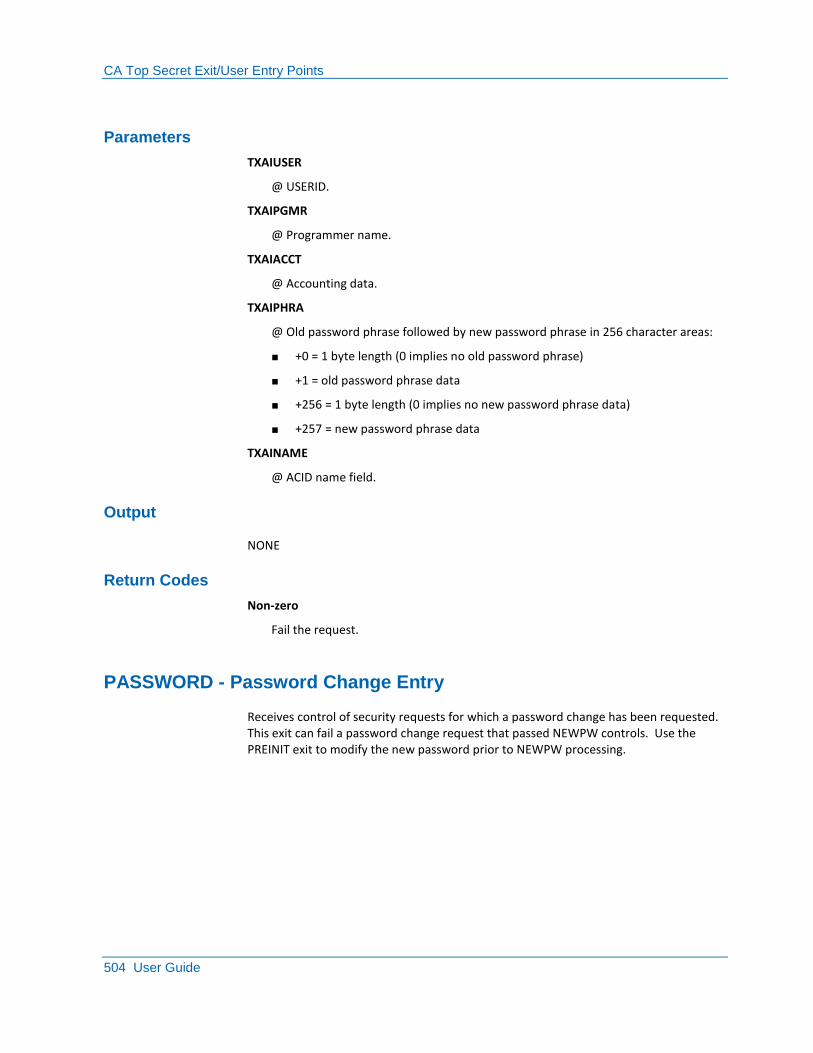
CA Top Secret Exit/User Entry Points
504 User Guide
Parameters
TXAIUSER
@ USERID.
TXAIPGMR
@ Programmer name.
TXAIACCT
@ Accounting data.
TXAIPHRA
@ Old password phrase followed by new password phrase in 256 character areas:
■ +0 = 1 byte length (0 implies no old password phrase)
■ +1 = old password phrase data
■ +256 = 1 byte length (0 implies no new password phrase data)
■ +257 = new password phrase data
TXAINAME
@ ACID name field.
Output
NONE
Return Codes
Non-zero
Fail the request.
PASSWORD - Password Change Entry
Receives control of security requests for which a password change has been requested. This exit can fail a password change request that passed NEWPW controls. Use the PREINIT exit to modify the new password prior to NEWPW processing.
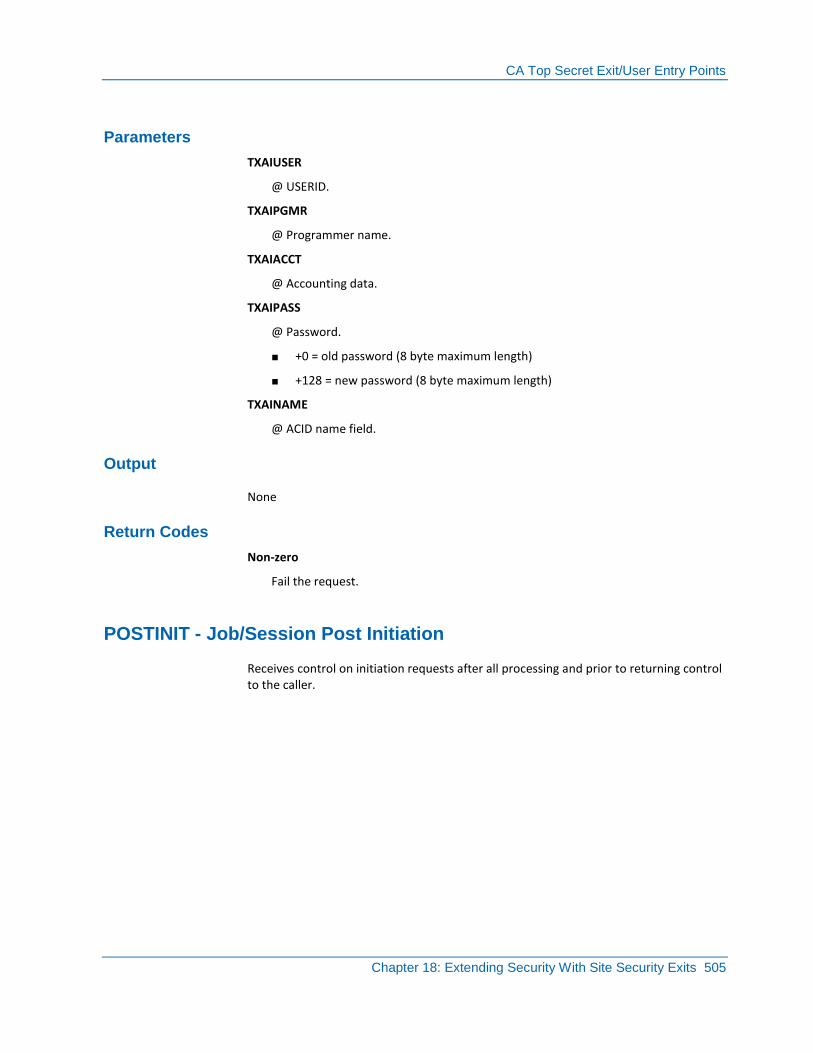
CA Top Secret Exit/User Entry Points
Chapter 18: Extending Security With Site Security Exits 505
Parameters
TXAIUSER
@ USERID.
TXAIPGMR
@ Programmer name.
TXAIACCT
@ Accounting data.
TXAIPASS
@ Password.
■ +0 = old password (8 byte maximum length)
■ +128 = new password (8 byte maximum length)
TXAINAME
@ ACID name field.
Output
None
Return Codes
Non-zero
Fail the request.
POSTINIT - Job/Session Post Initiation
Receives control on initiation requests after all processing and prior to returning control to the caller.
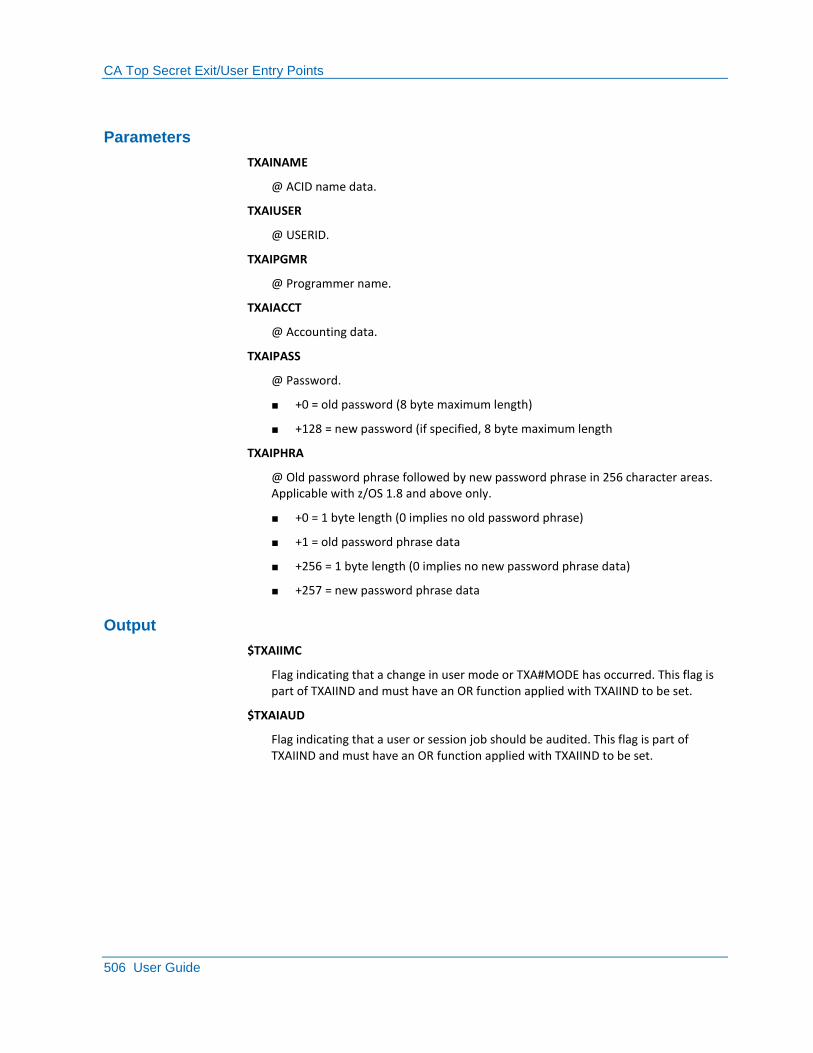
CA Top Secret Exit/User Entry Points
506 User Guide
Parameters
TXAINAME
@ ACID name data.
TXAIUSER
@ USERID.
TXAIPGMR
@ Programmer name.
TXAIACCT
@ Accounting data.
TXAIPASS
@ Password.
■ +0 = old password (8 byte maximum length)
■ +128 = new password (if specified, 8 byte maximum length
TXAIPHRA
@ Old password phrase followed by new password phrase in 256 character areas. Applicable with z/OS 1.8 and above only.
■ +0 = 1 byte length (0 implies no old password phrase)
■ +1 = old password phrase data
■ +256 = 1 byte length (0 implies no new password phrase data)
■ +257 = new password phrase data
Output
$TXAIIMC
Flag indicating that a change in user mode or TXA#MODE has occurred. This flag is part of TXAIIND and must have an OR function applied with TXAIIND to be set.
$TXAIAUD
Flag indicating that a user or session job should be audited. This flag is part of TXAIIND and must have an OR function applied with TXAIIND to be set.

CA Top Secret Exit/User Entry Points
Chapter 18: Extending Security With Site Security Exits 507
Return Codes
00
Normal continuance.
04
Fail request.
08
Continue without further checking.
PREINIT - Job/Session Pre-initiation
Receives control on all initiation requests after the initial parameter list validation, but prior to processing.
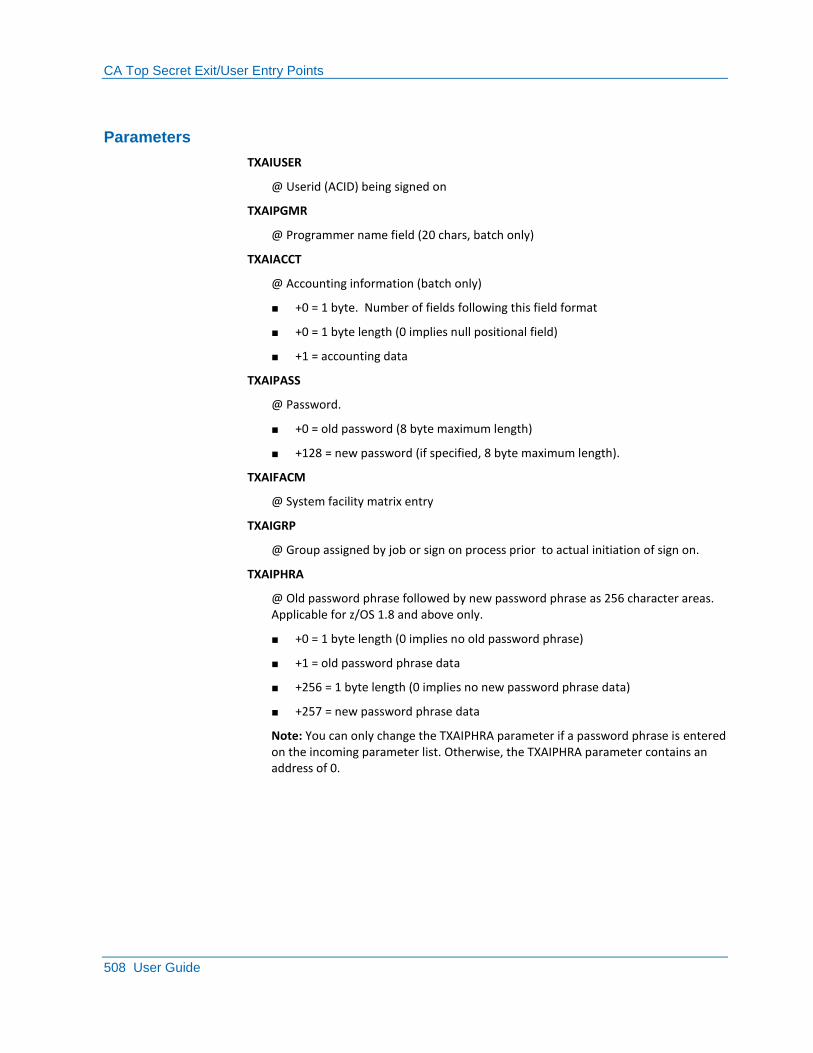
CA Top Secret Exit/User Entry Points
508 User Guide
Parameters
TXAIUSER
@ Userid (ACID) being signed on
TXAIPGMR
@ Programmer name field (20 chars, batch only)
TXAIACCT
@ Accounting information (batch only)
■ +0 = 1 byte. Number of fields following this field format
■ +0 = 1 byte length (0 implies null positional field)
■ +1 = accounting data
TXAIPASS
@ Password.
■ +0 = old password (8 byte maximum length)
■ +128 = new password (if specified, 8 byte maximum length).
TXAIFACM
@ System facility matrix entry
TXAIGRP
@ Group assigned by job or sign on process prior to actual initiation of sign on.
TXAIPHRA
@ Old password phrase followed by new password phrase as 256 character areas. Applicable for z/OS 1.8 and above only.
■ +0 = 1 byte length (0 implies no old password phrase)
■ +1 = old password phrase data
■ +256 = 1 byte length (0 implies no new password phrase data)
■ +257 = new password phrase data
Note: You can only change the TXAIPHRA parameter if a password phrase is entered on the incoming parameter list. Otherwise, the TXAIPHRA parameter contains an address of 0.
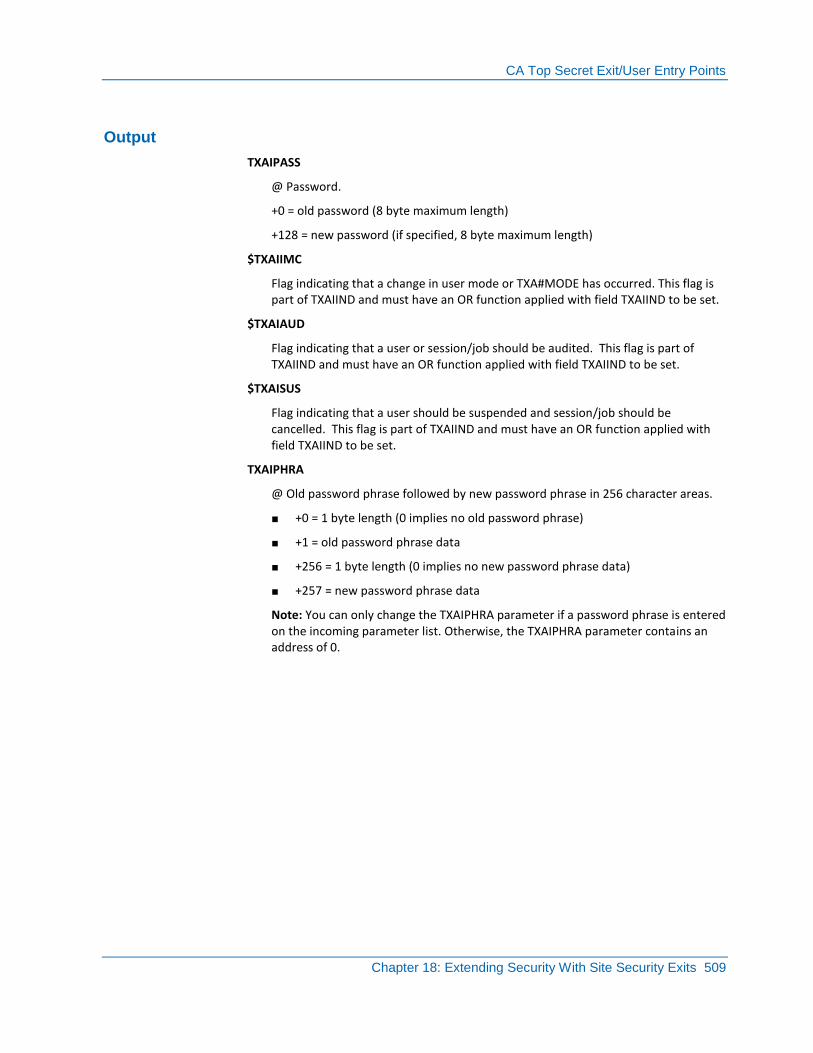
CA Top Secret Exit/User Entry Points
Chapter 18: Extending Security With Site Security Exits 509
Output
TXAIPASS
@ Password.
+0 = old password (8 byte maximum length)
+128 = new password (if specified, 8 byte maximum length)
$TXAIIMC
Flag indicating that a change in user mode or TXA#MODE has occurred. This flag is part of TXAIIND and must have an OR function applied with field TXAIIND to be set.
$TXAIAUD
Flag indicating that a user or session/job should be audited. This flag is part of TXAIIND and must have an OR function applied with field TXAIIND to be set.
$TXAISUS
Flag indicating that a user should be suspended and session/job should be cancelled. This flag is part of TXAIIND and must have an OR function applied with field TXAIIND to be set.
TXAIPHRA
@ Old password phrase followed by new password phrase in 256 character areas.
■ +0 = 1 byte length (0 implies no old password phrase)
■ +1 = old password phrase data
■ +256 = 1 byte length (0 implies no new password phrase data)
■ +257 = new password phrase data
Note: You can only change the TXAIPHRA parameter if a password phrase is entered on the incoming parameter list. Otherwise, the TXAIPHRA parameter contains an address of 0.
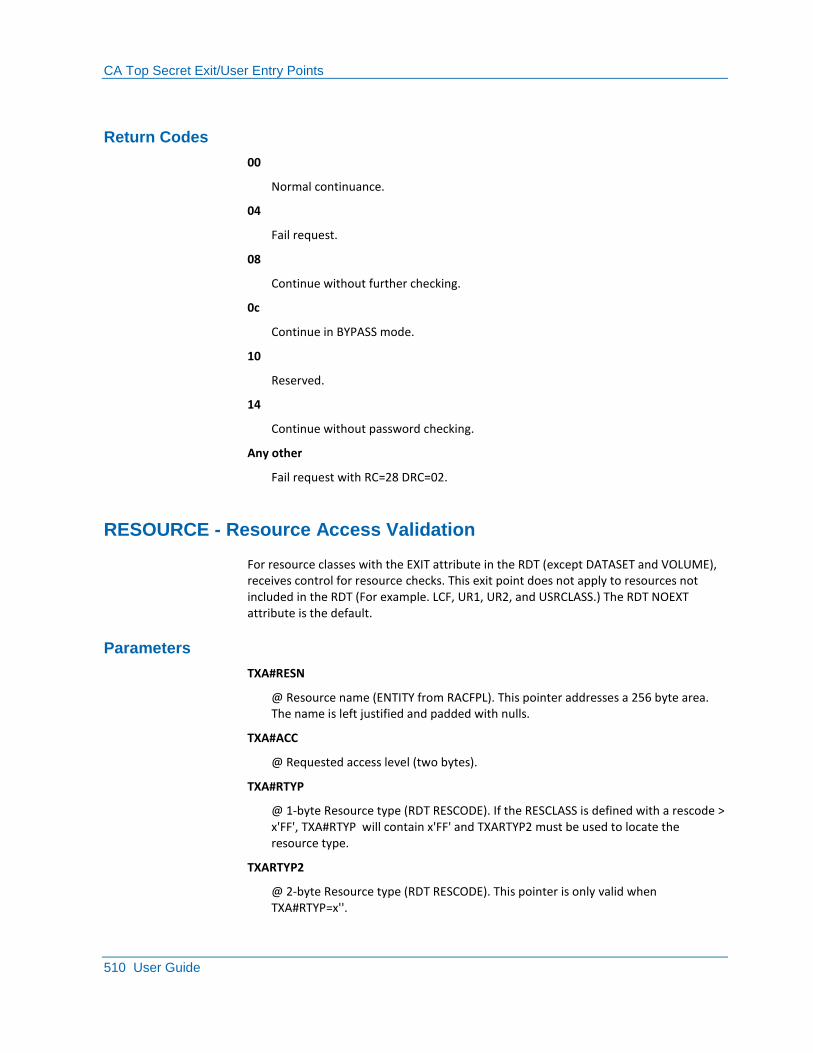
CA Top Secret Exit/User Entry Points
510 User Guide
Return Codes
00
Normal continuance.
04
Fail request.
08
Continue without further checking.
0c
Continue in BYPASS mode.
10
Reserved.
14
Continue without password checking.
Any other
Fail request with RC=28 DRC=02.
RESOURCE - Resource Access Validation
For resource classes with the EXIT attribute in the RDT (except DATASET and VOLUME), receives control for resource checks. This exit point does not apply to resources not included in the RDT (For example. LCF, UR1, UR2, and USRCLASS.) The RDT NOEXT attribute is the default.
Parameters
TXA#RESN
@ Resource name (ENTITY from RACFPL). This pointer addresses a 256 byte area. The name is left justified and padded with nulls.
TXA#ACC
@ Requested access level (two bytes).
TXA#RTYP
@ 1-byte Resource type (RDT RESCODE). If the RESCLASS is defined with a rescode > x'FF', TXA#RTYP will contain x'FF' and TXARTYP2 must be used to locate the resource type.
TXARTYP2
@ 2-byte Resource type (RDT RESCODE). This pointer is only valid when TXA#RTYP=x''.

CA Top Secret Exit/User Entry Points
Chapter 18: Extending Security With Site Security Exits 511
Output
TXA#RESN
May be changed.
TXA#RTYP
May be changed if rescode < x'FF'.
TXARTYP2
May be changed for any rescode and must be used instead of TXA#RTYP when the rescode > x'FF'.
TXA#ACC
May be changed
$TXARAUD
Flag indicating that a user or session job should be audited. This flag is part of TXARIND and must have an OR function applied with TXARIND to be set.
Return Codes
00
Normal continuance.
04
Fail request.
08
Continue without further checking.
12
Checking takes place as usual, except that the mode will be treated as WARN for this call only. ACTION(FAIL) will be ignored if it is found on the best matching permit, and the call will be processed exactly as if the mode were WARN.
RESPOST - Resource Post Validation
For resource classes with the EXIT attribute in the RDT (except DATASET and VOLUME) receives control for resource checks. This exit point does not apply to resources not included in the RDT. (For example, LCF, UR1, UR2, and USRCLASS.) The RDT NOEXT attribute is the default.
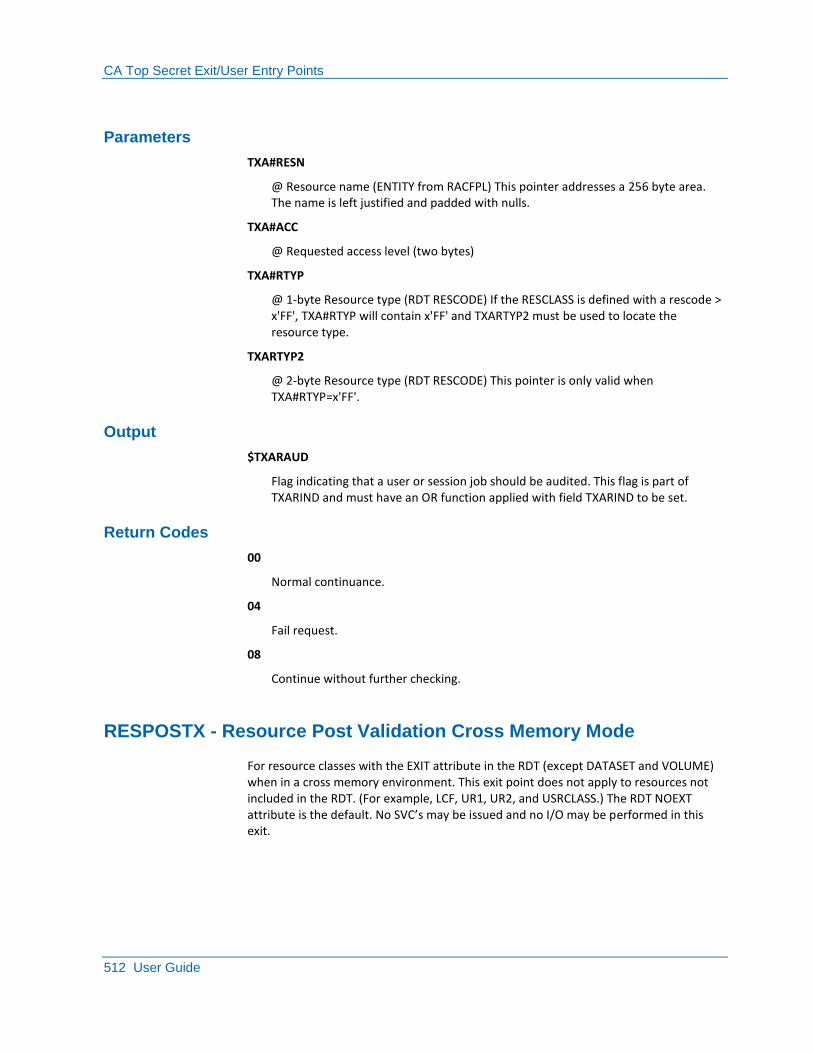
CA Top Secret Exit/User Entry Points
512 User Guide
Parameters
TXA#RESN
@ Resource name (ENTITY from RACFPL) This pointer addresses a 256 byte area. The name is left justified and padded with nulls.
TXA#ACC
@ Requested access level (two bytes)
TXA#RTYP
@ 1-byte Resource type (RDT RESCODE) If the RESCLASS is defined with a rescode > x'FF', TXA#RTYP will contain x'FF' and TXARTYP2 must be used to locate the resource type.
TXARTYP2
@ 2-byte Resource type (RDT RESCODE) This pointer is only valid when TXA#RTYP=x'FF'.
Output
$TXARAUD
Flag indicating that a user or session job should be audited. This flag is part of TXARIND and must have an OR function applied with field TXARIND to be set.
Return Codes
00
Normal continuance.
04
Fail request.
08
Continue without further checking.
RESPOSTX - Resource Post Validation Cross Memory Mode
For resource classes with the EXIT attribute in the RDT (except DATASET and VOLUME) when in a cross memory environment. This exit point does not apply to resources not included in the RDT. (For example, LCF, UR1, UR2, and USRCLASS.) The RDT NOEXT attribute is the default. No SVC’s may be issued and no I/O may be performed in this exit.
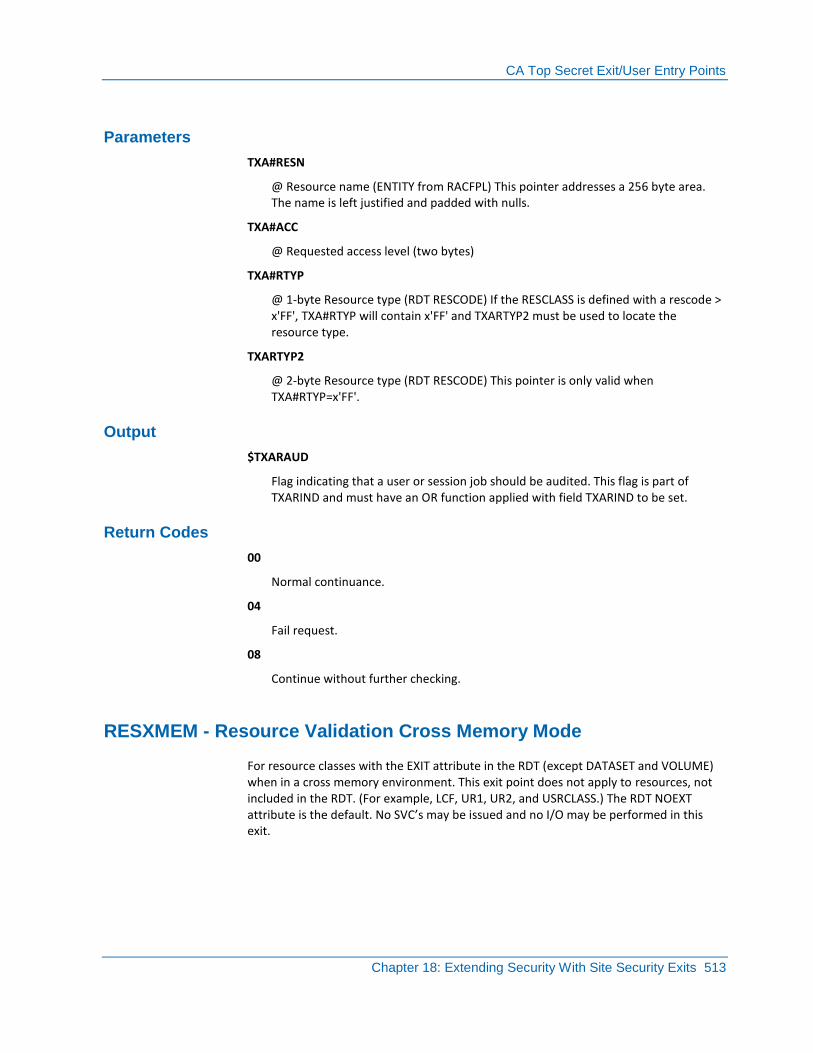
CA Top Secret Exit/User Entry Points
Chapter 18: Extending Security With Site Security Exits 513
Parameters
TXA#RESN
@ Resource name (ENTITY from RACFPL) This pointer addresses a 256 byte area. The name is left justified and padded with nulls.
TXA#ACC
@ Requested access level (two bytes)
TXA#RTYP
@ 1-byte Resource type (RDT RESCODE) If the RESCLASS is defined with a rescode > x'FF', TXA#RTYP will contain x'FF' and TXARTYP2 must be used to locate the resource type.
TXARTYP2
@ 2-byte Resource type (RDT RESCODE) This pointer is only valid when TXA#RTYP=x'FF'.
Output
$TXARAUD
Flag indicating that a user or session job should be audited. This flag is part of TXARIND and must have an OR function applied with field TXARIND to be set.
Return Codes
00
Normal continuance.
04
Fail request.
08
Continue without further checking.
RESXMEM - Resource Validation Cross Memory Mode
For resource classes with the EXIT attribute in the RDT (except DATASET and VOLUME) when in a cross memory environment. This exit point does not apply to resources, not included in the RDT. (For example, LCF, UR1, UR2, and USRCLASS.) The RDT NOEXT attribute is the default. No SVC’s may be issued and no I/O may be performed in this exit.
CA Top Secret Exit/User Entry Points
514 User Guide
Parameters
TXA#RESN
@ Resource name (ENTITY from RACFPL) This pointer addresses a 256 byte area. The name is left justified and padded with nulls.
TXA#ACC
@ Requested access level (two bytes).
TXA#RTYP
@ 1-byte Resource type (RDT RESCODE). If the RESCLASS is defined with a rescode > x'FF', TXA#RTYP will contain x'FF' and TXARTYP2 must be used to locate the resource type.
TXARTYP2
@ 2-byte Resource type (RDT RESCODE). This pointer is only valid when TXA#RTYP=x'FF'.
Output
TXA#RESN
May be changed.
TXA#RTYP
May be changed if rescode < x'FF'.
TXARTYP2
May be changed for any rescode and must be used instead of TXA#RTYP when the rescode > x'FF'.
TXA#ACC
May be changed.
$TXARAUD
Flag indicating that a user or session/job should be audited. This flag is part of TXARIND and must have an OR function applied with TXARIND to be set.

CA Top Secret Exit/User Entry Points
Chapter 18: Extending Security With Site Security Exits 515
Return Codes
00
Normal continuance.
04
Fail request.
08
Continue without further checking.
12
Checking takes place as usual, except that the mode will be treated as WARN for this call only. ACTION(FAIL) will be ignored if it is found on the best matching permit, and the call will be processed exactly as if the mode were WARN.
SESSEND - Session (User) Termination
Receives control of individual user termination requests from multi-user address spaces.
Parameters
TXAIUSER
@ USERID.
TXAIPGMR
@ Programmer name.
TXAIACCT
@ Accounting data.
TXAIPASS
@ Password.
TXAINAME
@ ACID name field.
TXAIPHRA
@ Old password phrase followed by new password phrase in 256 character areas:
■ +0 = 1 byte length (0 implies no old password phrase)
■ +1 = old password phrase data
■ +256 = 1 byte length (0 implies no new password phrase data)
■ +257 = new password phrase data
CA Top Secret Exit/User Entry Points
516 User Guide
Output
$TXAIIMC
Flag indicating that a change in user mode or TXA#MODE has occurred. This flag is part of TXAIIND and must have an OR function applied with
TXAIIND to be set.
$TXAIAUD
Flag indicating that a user or session/job should be audited. This flag is part of TXAIIND and must have an OR function applied with TXAIIND to be set.
Return Codes
Not checked.
SITE - Racheck Class=Instexit
Site exit point, through RACROUTE REQUEST=AUTH,CLASS=INSTEXIT, that allows for user processing.
Parameters
TXA#DATA
@ ENTITY= from RACROUTE.
Output
None
Return Codes
00
Normal continuance.
SUBMIT - Internal Reader Submission
Receives control when the job is submitted through the internal reader.
CA Top Secret Exit/User Entry Points
Chapter 18: Extending Security With Site Security Exits 517
Parameters
TXASSJOB
@ Submitted job name.
TXASSACT
@ Submitted accounting data.
TXASSPGN
@ Submitted programmer name field.
TXASSACD
@ Submitted ACID.
TXASAFLG
@ Submit flag byte:
■ 80 = USER= found on job statement
■ 40 = ACID derived from (J,x)
■ 20 = ACID propagated
■ 10 = PASSWORD= found on job statement
■ 08 = NOSUBCHK caller
Output
None
Return Codes
00
Normal continuance.
08
Submit without further checking.
Any other
Fail the Submit.
TERM - Job (Address Space) Termination
Receives control on termination requests that resulted from an out-of-address space termination.
CA Top Secret Exit/User Entry Points
518 User Guide
Parameters
None
Output
None
Return Codes
00
Normal continuance.
04
Fail request.
08
Continue without further checking.
UNDEFIND - Undefined Acid Entry
Receives control after PREINIT processing and the initiation request determines that the original or assigned ACID is not defined to CA Top Secret.
When signon occurs in:
■ FACILITY TYPE=CICS the UNDEFIND exit point is ignored, invoke default ACID processing through OPTION(20) and the facility DEFACID
■ FACILITY TYPE=IMS the UNDEFIND exit point is ignored, invoke default ACID processing through IMS(IMSATSDF) and the facility DEFACID
Some reasons a valid ACID is assigned to security initialization are:
■ Automatic terminal signon (ATS)
■ FACILITY control option DEFACID
■ JOBACID control option
■ SUBACID control option
After all automatic assignments have failed, this exit point allows a new ACID to be assigned (for example to log the failure). The ACID assigned should have low power.
CA Top Secret Exit/User Entry Points
Chapter 18: Extending Security With Site Security Exits 519
Parameters
TXAIUSER
@ Input ACID.
TXAIPASS
@ Password.
+0 = old password (8 byte maximum length)
+128 = new password (if specified, 8 byte maximum length)
TXAIPGMR
@ Programmer name (address can be zero, in which case no data).
TXAIACCT
@ Accounting data (address can be zero, in which case no data).
■ +0 = 1 byte accounting field count (0 implies null positional field)
■ +1 = 1 or more accounting data structures (if field count not zero)
■ +0 = 1 byte length field
■ +1 = accounting data field data
TXAITERM
@ Terminal id or reader name.
TXAIJOBN
@ JOB name.
TXA#FEED
@ TSS Feedback Area.
TXAIPHRA
@ Old password phrase followed by new password phrase in 256 character areas.
■ +0 = 1 byte length (0 implies no old password phrase)
■ +1 = old password phrase data
■ +256 = 1 byte length (0 implies no new password phrase data)
■ +257 = new password phrase data
Note: You can only change the TXAIPHRA parameter if a password phrase is entered on the incoming parameter list. Otherwise, the TXAIPHRA parameter contains an address of 0.
CA Top Secret Exit/User Entry Points
520 User Guide
Output
TXA#ACID
@ New assigned ACID (this is different from input).
TXAIPASS
@ Password.
■ +0 = old password (8 byte maximum length)
■ +128 = new password (if specified, 8 byte maximum length)
TXAIJOBN
@ Original/altered JOB name.
TXAITERM
@ Original/altered reader or terminal ID.
TXAIPHRA
@ Old password phrase followed by new password phrase in 256 character areas.
■ +0 = 1 byte length (0 implies no old password phrase)
■ +1 = old password phrase data
■ +256 = 1 byte length (0 implies no new password phrase data)
■ +257 = new password phrase data
Note: You can only change the TXAIPHRA parameter if a password phrase is entered on the incoming parameter list. Otherwise, the TXAIPHRA parameter contains an address of 0.
Return Codes
00
Security initialization will be rejected as normal for undefined ACID. (Changes to parameters are ignored.)
10
Retry with altered parameters (must include TXA#ACID)
VIOLATN - Violation Detected
Receives control for all logged security events. This allows the user to alter normal logging functions.
CA Top Secret Exit/User Entry Points
Chapter 18: Extending Security With Site Security Exits 521
Parameters
TXA#FLOG
@FLOG buffer.
TXA#DRCE
@ Detailed reason code element.
TXA#3
@Audit flag:
■ 80 Bypass
■ 20 DSN/VOL/RESOURCE exit allowed access
■ 10 Bypass DSN check(NODSNCHK)
■ 04 TEMP DSN and TEMPDSN(NO) set
These flags are not mutually exclusive. Any combination of flags may be set.
Output
None
Return Codes
00
Normal continuance.
04
Do not log this call.
VIOXMEM - Violation Detected - Cross Memory Module
Receives control for all cross memory logged security events. This allows the user to alter normal logging functions.

CA Top Secret Exit/User Entry Points
522 User Guide
Parameters
TXA#FLOG
@FLOG buffer.
TXA#DRCE
@ Detailed reason code element.
TXA#3
@Audit flag:
■ 80 Bypass
■ 20 DSN/VOL/RESOURCE exit allowed access
■ 10 Bypass DSN check(NODSNCHK)
■ 04 TEMP DSN and TEMPDSN(NO) set
These flags are not mutually exclusive. Any combination of flags may be set.
Output
None
Return Codes
00
Normal continuance.
04
Do not log this call.
VOLPOST - Volume Post Validation
Receives control on all volume checks allowing additional user validation.
CA Top Secret Exit/User Entry Points
Chapter 18: Extending Security With Site Security Exits 523
Parameters
TXA#VOL
@ VOLSER (six bytes, blank padded).
TXA#DSN
@ DATASET NAME (44 bytes, blank padded).
TXA#ACC
@ Requested access level (2 bytes).
TXA#RTYP
@ Resource type (rescode from RDT).
Output
$TXAVAUD
Flag indicating that a user or session job should be audited. This flag is part of TXAVIND and must have an OR function applied with TXAVIND to be set.
Return Codes
00
Normal continuance.
04
Fail request.
08
Continue without further checking.
VOLUME - Volume Access Validation
Receives control on all volume checks allowing additional user validation.
CA Top Secret Exit/User Entry Points
524 User Guide
Parameters
TXA#VOL
@ VOLSER (six bytes, blank padded)
TXA#DSN
@ DATASET NAME (44 bytes, blank padded)
TXA#ACC
@ Requested access level (2 bytes)
TXA#RTYP
@ Resource type (rescode from RDT)
Output
TXA#VOL
May be changed.
TXA#DSN
May be changed.
TXA#ACC
May be changed.
$TXAVAUD
Flag indicating that a user or session job should be audited. This flag is part of TXAVIND and must have an OR function applied with TXAVIND to be set.
Return Codes
00
Normal continuance.
04
Fail request.
08
Continue without further checking.
12
Checking takes place as usual, except that the mode will be treated as WARN for this call only. ACTION(FAIL) will be ignored if it is found on the best matching permit, and the call will be processed exactly as if the mode were WARN.
Chapter 19: LDAP Directory Services (LDS) 525
Chapter 19: LDAP Directory Services (LDS)
This section contains the following topics:
How LDS Works (see page 525) Commands Valid for LDS (see page 526) Implement LDS (see page 526) Records and Options Summary (see page 527) TSSLDS Server Subtask (see page 527) NDT LDAPNODE Records (see page 533) LDS ACID Field (see page 538) LDAPDEST ACID Field (see page 539) LIST LDS Definitions (see page 539) Start and Stop LDS (see page 539) Control an LDAP Node (see page 540)
How LDS Works
An LDAP directory:
■ Provides directory information in a central location
■ Can be used as a network-accessible database to organize and index network security information
The LDAP Directory Services (LDS) option allows security information to be directly accessible through LDAP compliant directory enabled applications.
Use LDS to provide:
■ Centralized control of security information
■ Enhanced flexibility by supporting all network operating systems
■ Consistency across the enterprise
CA Top Secret acts as an application client that uses an LDAP Application Program Interface (API) to format and communicate a request to the LDAP server. The CA Top Secret interface establishes a connection and communicates to the LDAP server through TCP/IP. Servers enabled with Secure Sockets Layer (SSL) technology protect unauthorized parties from viewing sensitive information during a secure session.
LDS runs in the CA Top Secret address space and requires additional CPU cycles to process the data. For example, 1,000 commands for security changes to 5 nodes results in 5,000 commands.
Commands Valid for LDS
526 User Guide
Commands Valid for LDS
Administrative commands that create, modify, and delete ACIDs are valid for LDS. This includes CREATE, ADD, REPLACE, and DELETE of ACID records as well as password changes during system validation. The PERMIT and REVOKE commands are not valid for LDS and are not transmitted to LDAP servers.
Important! Use SSL if you are using LDS to propagate highly sensitive information.
Implement LDS
To implementing the CA Top Secret LDS component:
■ Create the LDS Journal file
■ Create the LDS Recovery file
■ Create the NDT LDAPNODE records
■ Create NDT LDSYSID options record
■ Set up SSL definitions
■ Define XREF field mapping for NDT LDAPNODE records
■ Add LDS attribute to valid ACID records
■ Add LDAPDEST list to valid ACID records
■ List LDS definitions to validate setup
■ Modify LDS Control Option to start LDS processing
Records and Options Summary
Chapter 19: LDAP Directory Services (LDS) 527
Records and Options Summary
The record fields are:
NDT
This record ID contains LDAP server information and field mapping and LDS global options.
Control Options
This record ID defines global options available. The LDS parameter indicates that the LDS interface can be used.
LDAPNODE XREF
This record ID allows unique mapping of LDAP attributes to CA Top Secret ACID fields for each LDAP server.
NDT defined global options override static global options, which are specified in the startup control options file.
TSSLDS Server Subtask
The TSSLDS server subtask is started by CA Top Secret when the LDS Control Option is enabled. The server subtask communicates with all remote LDAP directories defined to the local system.
TSSLDS executes as a subtask, within the CA Top Secret address space.
To enable LDS journaling, include the LDSJRNL DD statement in the CA Top Secret procedure.
To enable LDS recovery capabilities, include the LDSRCVR DD statement in the CA Top Secret procedure.
Enable LDS Journaling to Record LDAP Requests
LDS uses a journal file to provide a historical record of outbound LDAP requests to LDAP servers. All requests and corresponding messages are journaled. When transmitting a request to an LDAP server, LDS records the image in the LDSJRNL file. Before each request or message is written, a header provides the following details:
■ A time-date stamp
■ An LDAP record id
■ The affected CA Top Secret userid
TSSLDS Server Subtask
528 User Guide
Before starting the LDS journal processing, you must ensure that the LDSJRNL DD statement is omitted from your CA Top Secret started task JCL. This setup allows CA Top Secret to dynamically allocate the journal file to SYSOUT after JES becomes active.
Note: If the DD statement is present in the started task JCL, the journal file will not be available if CA Top Secret is started before JES is active.
More information:
Create NDT LDSYSID Options Record (see page 530)
LDS Recovery File
LDS uses the recovery file to provide recovery capabilities to outbound LDS transmit ions.
All outbound commands:
■ To active LDAP servers are written to the recovery file before attempting to send them . A command image is written for each server eligible to receive the command. Once a command successfully reaches a target server, the command image is removed from the recovery file
■ To inactive LDAP nodes are also written to the recovery file. When a node becomes active and a connection is established to the remote LDAP server, all queued commands are read from the recovery file, and transmitted to the remote server.
Remove recovery file records manually from the recovery file with a TSS REM(*LDSRECV) command.
The LDS recovery file is defined in the CA Top Secret procedure using the LDSRCVR DD statement. The recovery file must be created and initialized prior to starting the LDS recovery processing.
To create the LDS recovery file, use the INITLDSR job in the SAMPJCL library. This JCL has BLKSZ=8196, you can change the BLKSZ value to any multiple of 1024.
Important! LDS Recovery File cannot be shared across multiple systems.
If the LDS Recovery File is not defined or the file fails to open, command routing through LDS can still occur but there is no retransmission of unresponded commands.
If the LDS Recovery File becomes temporarily filled, a message is written to the job CA Top Secret LOG and console each time LDS wants to write a message to the file but cannot. The LDS operation continues but, in case of failure, the unwritten command cannot be recovered.
TSSLDS Server Subtask
Chapter 19: LDAP Directory Services (LDS) 529
Remove Pending Commands
You can remove pending commands from the LDS Recovery File by date and by node.
Examples: remove pending command
This example removes all records for the specified node:
TSS REMOVE(*LDSRECV) NODELIST(ldapnode1,ldapnode2)
This example removes all records up to, and including, the specified date:
TSS REMOVE(*LDSRECV) UNTIL(mm/dd/yy)
TSSLDS Server Subtask
530 User Guide
Create NDT LDSYSID Options Record
The NDT LDSYSID record can define LDS global options for systems sharing the security file. If a system starts up and no LDSYSID record exist in the NDT for that system, LDS global options are retrieved from the startup control options file.
The LDSYSID record is used to define the LDS global options:
■ Timeout interval
■ Retry count
■ Trace status
■ Journaling enablement
■ Journal data set name
■ SSL keyring name
The supported keywords for an NDT LDSYSID record are.
■ LDSYSID(system smfid) required
■ DEBUG(YES|NO)
■ RETRY(count) Default: 003
■ TIMEOUT(interval) Default: 005
■ JOURNAL(YES|NO)
■ JOURNALDSN(dsname) Default: null
■ KEYRING(ring_name) Default: null
If Journaling is enabled, the file specified via JOURNALDSN is dynamically allocated only if no LDSJRNL DD statement exists in the TSS startup JCL.
Example: create an LDSYSID options record
This example creates an LDSYSID options record for system ID= SYS1:
TSS ADD(ndt) LDSYSID(SYS1)
TIMEOUT(10)
RETRY(010)
DEBUG(NO )
JOURNAL(YES)
TSSLDS Server Subtask
Chapter 19: LDAP Directory Services (LDS) 531
SSL Definitions
If remote LDAP servers require SSL authentication of server and client identities, use digital certificates when establishing the connection between the CA Top Secret LDS component and the remote LDAP servers.
All digital certificates used for LDS authentication are grouped in a KEYRING attached to the TSSLDS ACID.
The keyring name is defined in the NDT/LDSYSID options record. The keyring should group:
■ All CERTAUTH certificates needed for SERVER authentication
■ All PERSONAL certificates needed for CLIENT authentication
If CLIENT authentication is required for an LDAP server, the NDT/LDAPNODE record should include the LABLCERT keyword, which defines the LABEL of the PERSONAL certificate.
Examples: set up SSL
This example creates the LDS special ACID:
TSS CREATE(TSSLDS) TYPE(USER)
NAME('LDS STC ACID')
PASS(password,0)
DEPT(OMVSDEPT)
FACILITY(STC)
GROUP(OMVSGRP)
TSS ADD(TSSLDS) DFLTGRP(OMVSGRP)
This example defines the KEYRING name:
TSS ADD(tsslds) KEYRING(ring0001)
This example defines the CERTAUTH certificate if not previously defined:
TSS ADD(tsslds) DIGICERT(certaut1)
DCDSN(user.cert.lds)
TRUST
This example adds the CERTAUTH certificate to the KEYRING:
TSS ADD(tsslds) KEYRING(ring0001)
RINGDATA(tsslds,certaut1)
USAGE(certauth)
This example generates a PERSONAL certificate:
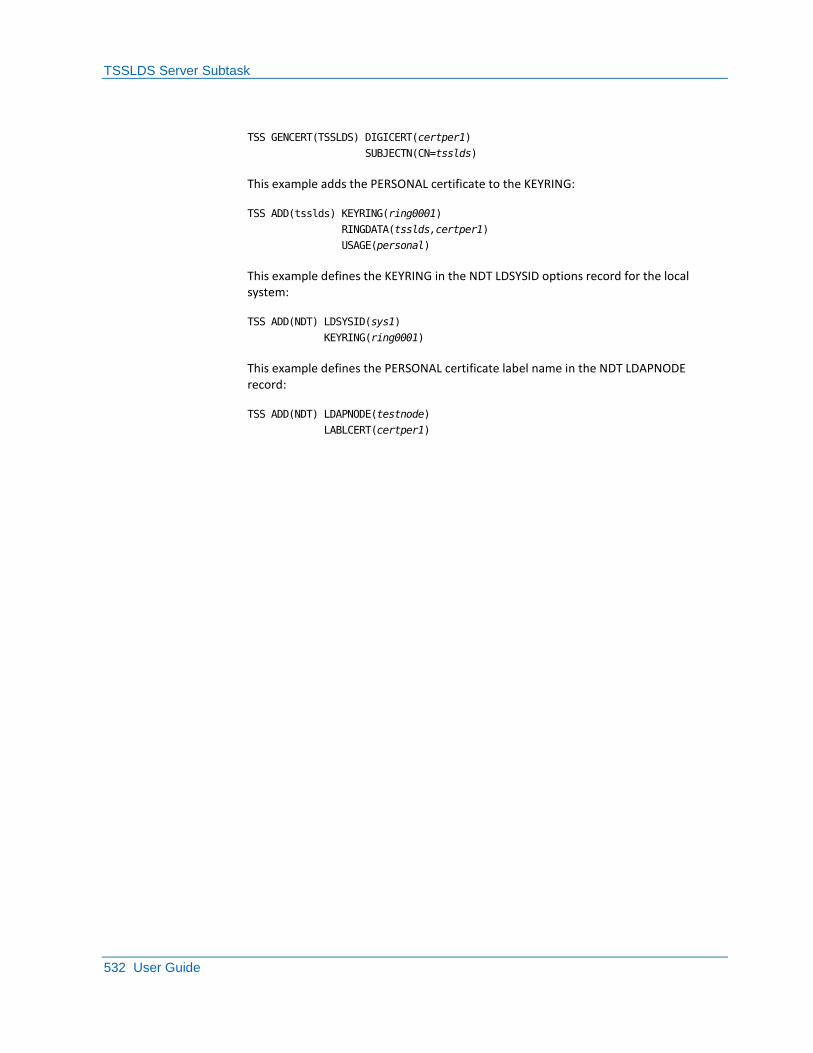
TSSLDS Server Subtask
532 User Guide
TSS GENCERT(TSSLDS) DIGICERT(certper1)
SUBJECTN(CN=tsslds)
This example adds the PERSONAL certificate to the KEYRING:
TSS ADD(tsslds) KEYRING(ring0001)
RINGDATA(tsslds,certper1)
USAGE(personal)
This example defines the KEYRING in the NDT LDSYSID options record for the local system:
TSS ADD(NDT) LDSYSID(sys1)
KEYRING(ring0001)
This example defines the PERSONAL certificate label name in the NDT LDAPNODE record:
TSS ADD(NDT) LDAPNODE(testnode)
LABLCERT(certper1)
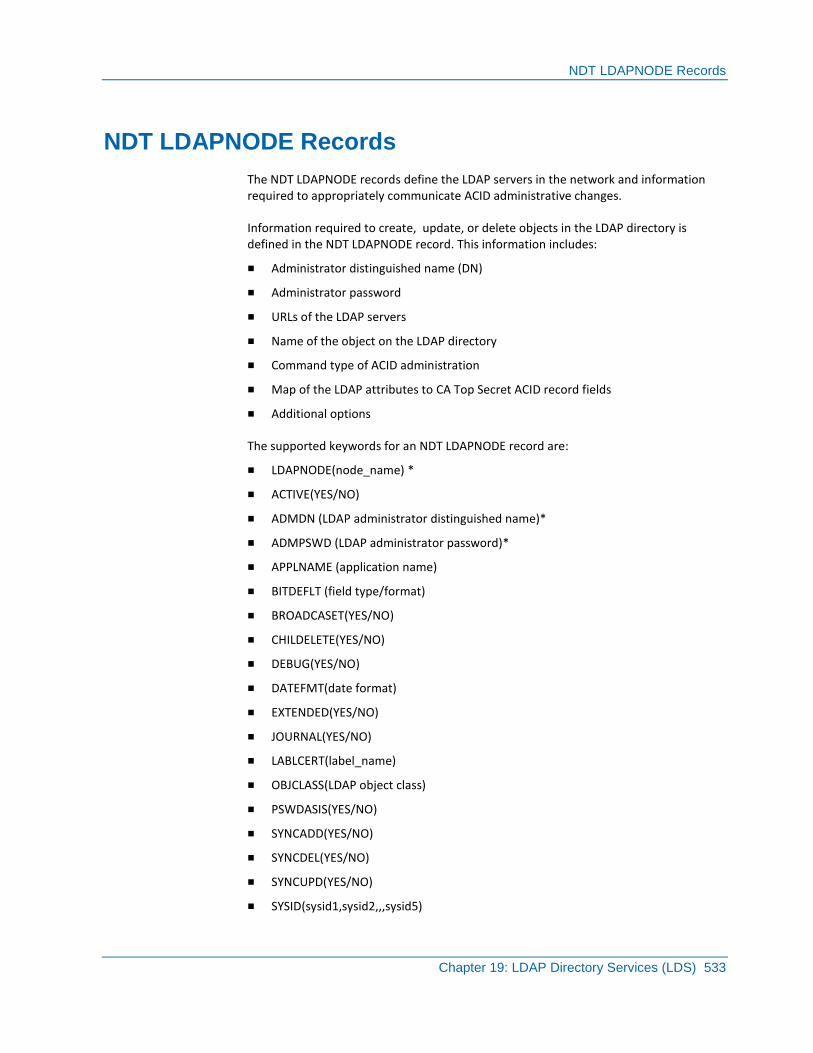
NDT LDAPNODE Records
Chapter 19: LDAP Directory Services (LDS) 533
NDT LDAPNODE Records
The NDT LDAPNODE records define the LDAP servers in the network and information required to appropriately communicate ACID administrative changes.
Information required to create, update, or delete objects in the LDAP directory is defined in the NDT LDAPNODE record. This information includes:
■ Administrator distinguished name (DN)
■ Administrator password
■ URLs of the LDAP servers
■ Name of the object on the LDAP directory
■ Command type of ACID administration
■ Map of the LDAP attributes to CA Top Secret ACID record fields
■ Additional options
The supported keywords for an NDT LDAPNODE record are:
■ LDAPNODE(node_name) *
■ ACTIVE(YES/NO)
■ ADMDN (LDAP administrator distinguished name)*
■ ADMPSWD (LDAP administrator password)*
■ APPLNAME (application name)
■ BITDEFLT (field type/format)
■ BROADCASET(YES/NO)
■ CHILDELETE(YES/NO)
■ DEBUG(YES/NO)
■ DATEFMT(date format)
■ EXTENDED(YES/NO)
■ JOURNAL(YES/NO)
■ LABLCERT(label_name)
■ OBJCLASS(LDAP object class)
■ PSWDASIS(YES/NO)
■ SYNCADD(YES/NO)
■ SYNCDEL(YES/NO)
■ SYNCUPD(YES/NO)
■ SYSID(sysid1,sysid2,,,sysid5)
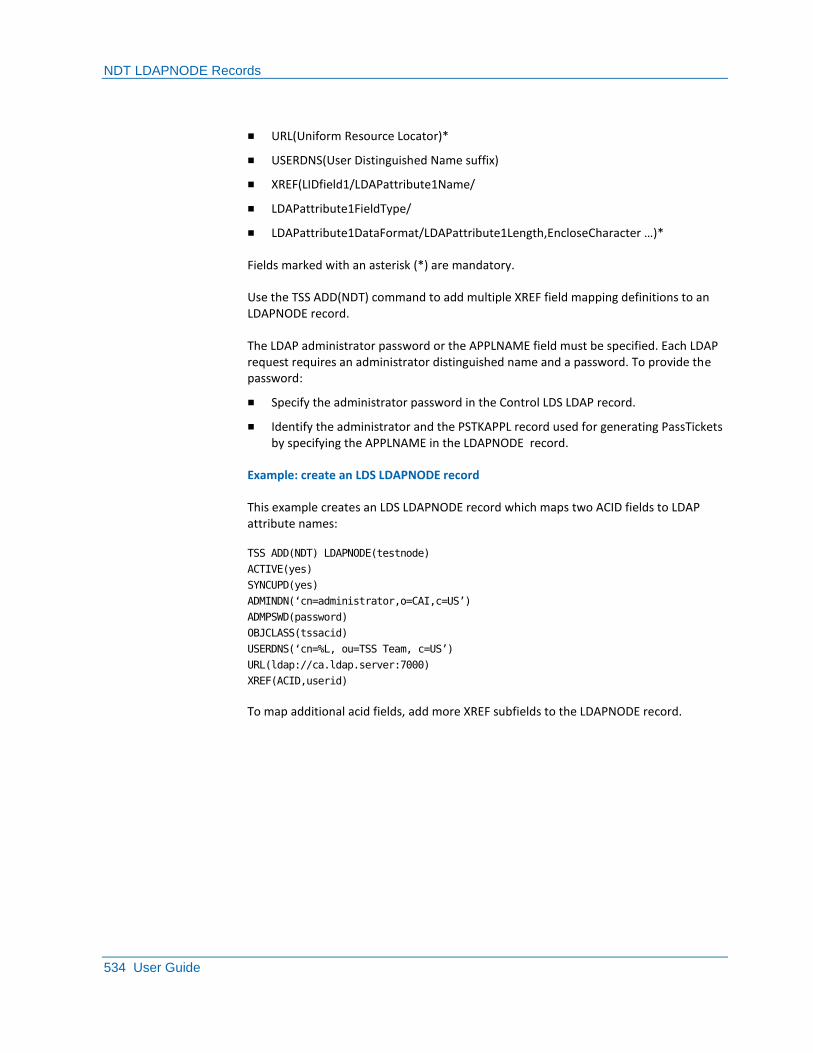
NDT LDAPNODE Records
534 User Guide
■ URL(Uniform Resource Locator)*
■ USERDNS(User Distinguished Name suffix)
■ XREF(LIDfield1/LDAPattribute1Name/
■ LDAPattribute1FieldType/
■ LDAPattribute1DataFormat/LDAPattribute1Length,EncloseCharacter …)*
Fields marked with an asterisk (*) are mandatory.
Use the TSS ADD(NDT) command to add multiple XREF field mapping definitions to an LDAPNODE record.
The LDAP administrator password or the APPLNAME field must be specified. Each LDAP request requires an administrator distinguished name and a password. To provide the password:
■ Specify the administrator password in the Control LDS LDAP record.
■ Identify the administrator and the PSTKAPPL record used for generating PassTickets by specifying the APPLNAME in the LDAPNODE record.
Example: create an LDS LDAPNODE record
This example creates an LDS LDAPNODE record which maps two ACID fields to LDAP attribute names:
TSS ADD(NDT) LDAPNODE(testnode)
ACTIVE(yes)
SYNCUPD(yes)
ADMINDN(‗cn=administrator,o=CAI,c=US‘)
ADMPSWD(password)
OBJCLASS(tssacid)
USERDNS(‗cn=%L, ou=TSS Team, c=US‘)
URL(ldap://ca.ldap.server:7000)
XREF(ACID,userid)
To map additional acid fields, add more XREF subfields to the LDAPNODE record.
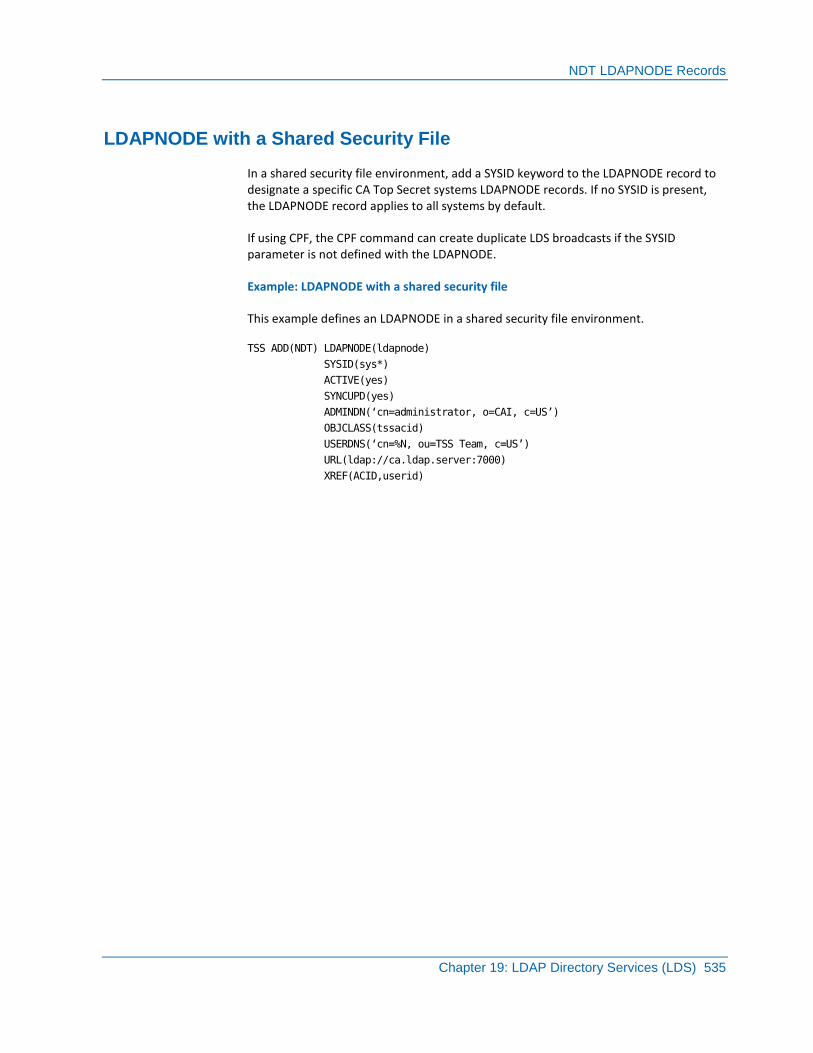
NDT LDAPNODE Records
Chapter 19: LDAP Directory Services (LDS) 535
LDAPNODE with a Shared Security File
In a shared security file environment, add a SYSID keyword to the LDAPNODE record to designate a specific CA Top Secret systems LDAPNODE records. If no SYSID is present, the LDAPNODE record applies to all systems by default.
If using CPF, the CPF command can create duplicate LDS broadcasts if the SYSID parameter is not defined with the LDAPNODE.
Example: LDAPNODE with a shared security file
This example defines an LDAPNODE in a shared security file environment.
TSS ADD(NDT) LDAPNODE(ldapnode)
SYSID(sys*)
ACTIVE(yes)
SYNCUPD(yes)
ADMINDN(‗cn=administrator, o=CAI, c=US‘)
OBJCLASS(tssacid)
USERDNS(‗cn=%N, ou=TSS Team, c=US‘)
URL(ldap://ca.ldap.server:7000)
XREF(ACID,userid)
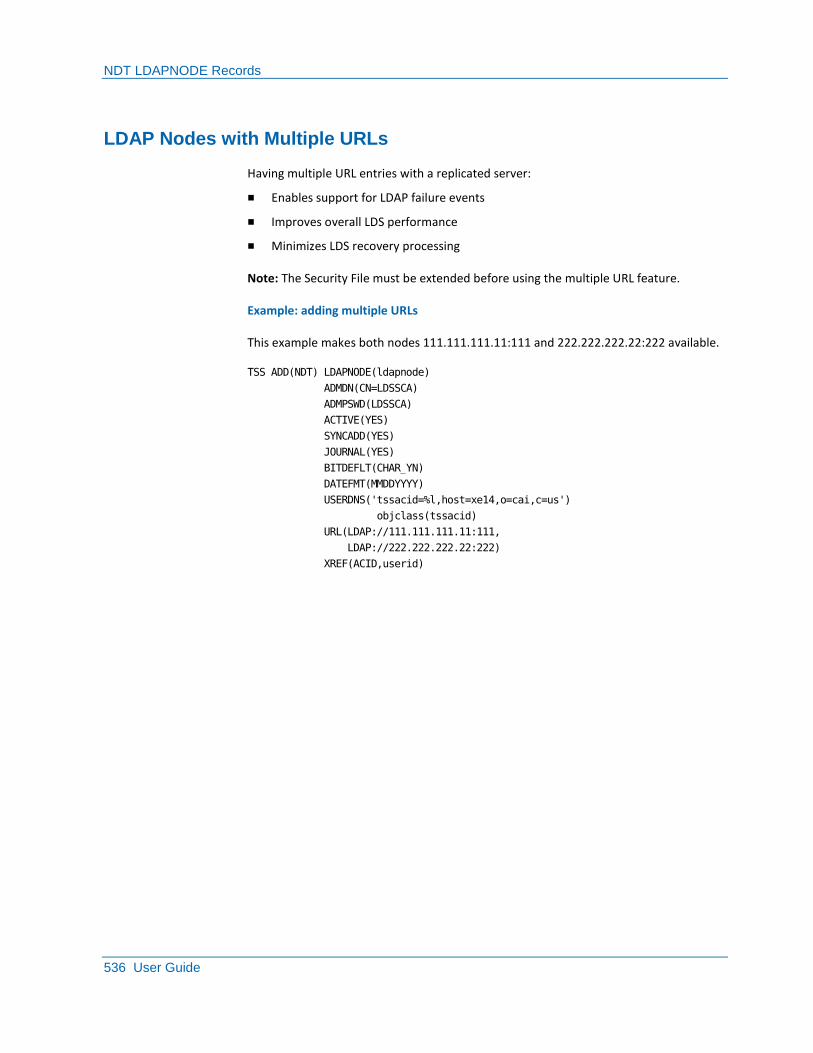
NDT LDAPNODE Records
536 User Guide
LDAP Nodes with Multiple URLs
Having multiple URL entries with a replicated server:
■ Enables support for LDAP failure events
■ Improves overall LDS performance
■ Minimizes LDS recovery processing
Note: The Security File must be extended before using the multiple URL feature.
Example: adding multiple URLs
This example makes both nodes 111.111.111.11:111 and 222.222.222.22:222 available.
TSS ADD(NDT) LDAPNODE(ldapnode)
ADMDN(CN=LDSSCA)
ADMPSWD(LDSSCA)
ACTIVE(YES)
SYNCADD(YES)
JOURNAL(YES)
BITDEFLT(CHAR_YN)
DATEFMT(MMDDYYYY)
USERDNS('tssacid=%l,host=xe14,o=cai,c=us')
objclass(tssacid)
URL(LDAP://111.111.111.11:111,
LDAP://222.222.222.22:222)
XREF(ACID,userid)
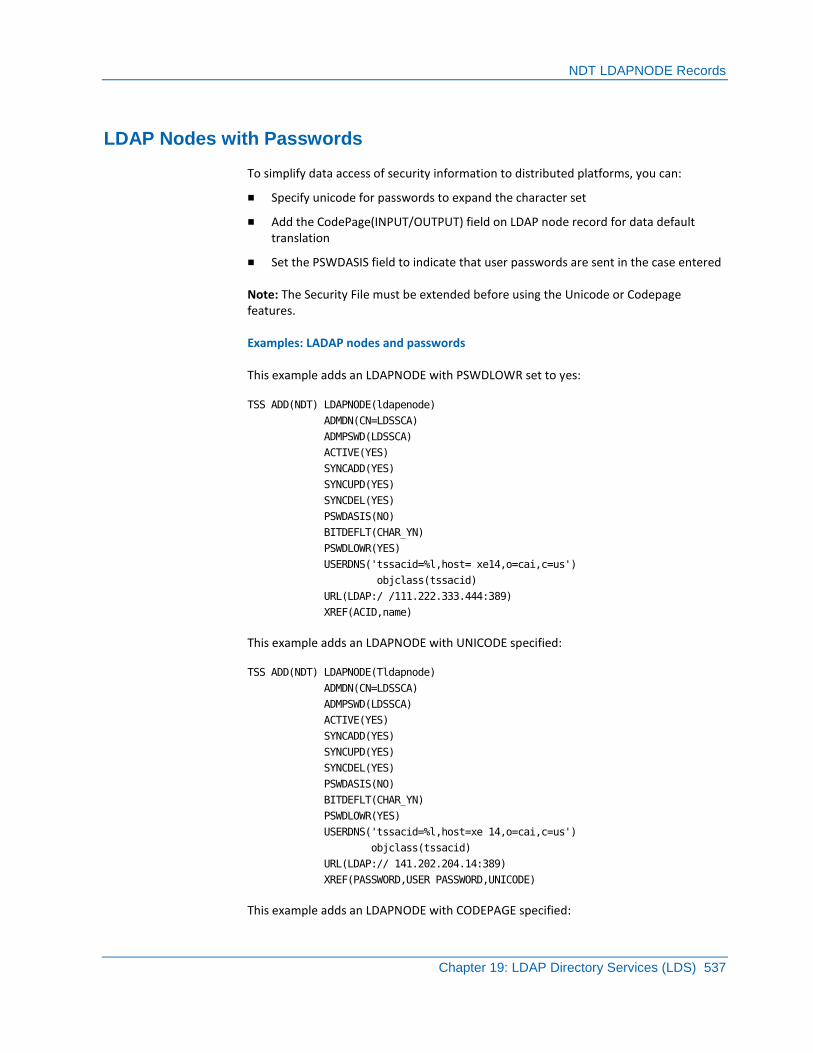
NDT LDAPNODE Records
Chapter 19: LDAP Directory Services (LDS) 537
LDAP Nodes with Passwords
To simplify data access of security information to distributed platforms, you can:
■ Specify unicode for passwords to expand the character set
■ Add the CodePage(INPUT/OUTPUT) field on LDAP node record for data default translation
■ Set the PSWDASIS field to indicate that user passwords are sent in the case entered
Note: The Security File must be extended before using the Unicode or Codepage features.
Examples: LADAP nodes and passwords
This example adds an LDAPNODE with PSWDLOWR set to yes:
TSS ADD(NDT) LDAPNODE(ldapenode)
ADMDN(CN=LDSSCA)
ADMPSWD(LDSSCA)
ACTIVE(YES)
SYNCADD(YES)
SYNCUPD(YES)
SYNCDEL(YES)
PSWDASIS(NO)
BITDEFLT(CHAR_YN)
PSWDLOWR(YES)
USERDNS('tssacid=%l,host= xe14,o=cai,c=us')
objclass(tssacid)
URL(LDAP:/ /111.222.333.444:389)
XREF(ACID,name)
This example adds an LDAPNODE with UNICODE specified:
TSS ADD(NDT) LDAPNODE(Tldapnode)
ADMDN(CN=LDSSCA)
ADMPSWD(LDSSCA)
ACTIVE(YES)
SYNCADD(YES)
SYNCUPD(YES)
SYNCDEL(YES)
PSWDASIS(NO)
BITDEFLT(CHAR_YN)
PSWDLOWR(YES)
USERDNS('tssacid=%l,host=xe 14,o=cai,c=us')
objclass(tssacid)
URL(LDAP:// 141.202.204.14:389)
XREF(PASSWORD,USER PASSWORD,UNICODE)
This example adds an LDAPNODE with CODEPAGE specified:
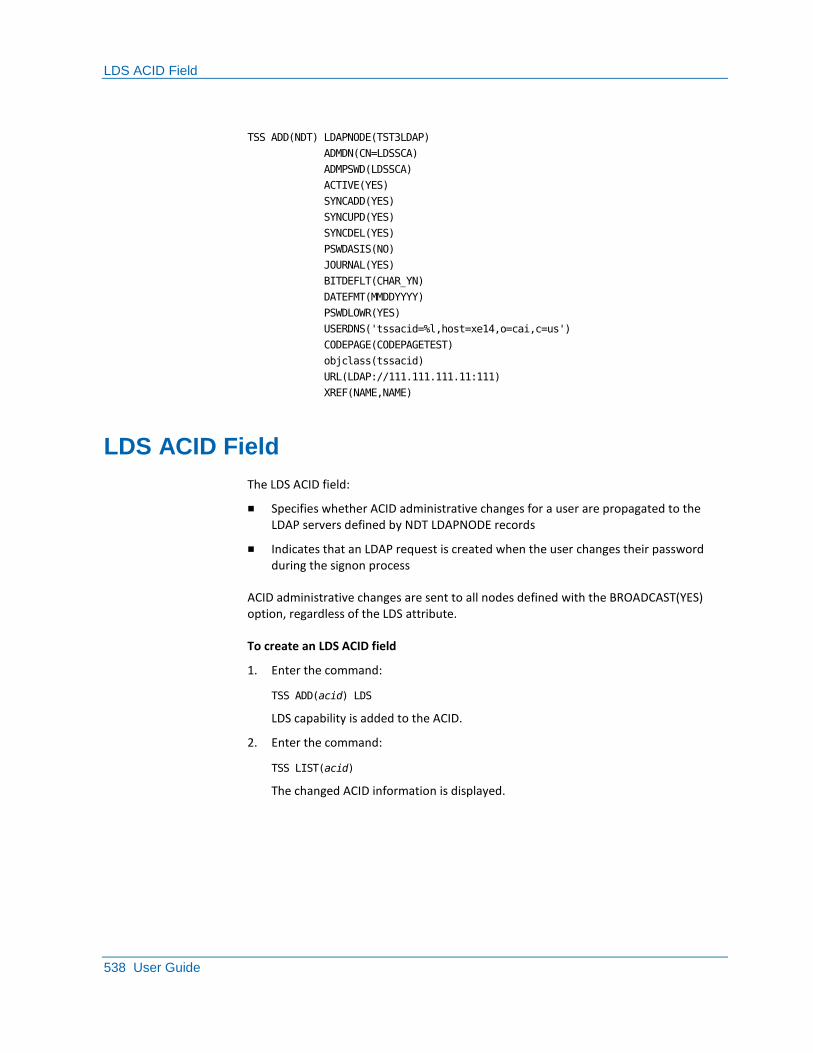
LDS ACID Field
538 User Guide
TSS ADD(NDT) LDAPNODE(TST3LDAP)
ADMDN(CN=LDSSCA)
ADMPSWD(LDSSCA)
ACTIVE(YES)
SYNCADD(YES)
SYNCUPD(YES)
SYNCDEL(YES)
PSWDASIS(NO)
JOURNAL(YES)
BITDEFLT(CHAR_YN)
DATEFMT(MMDDYYYY)
PSWDLOWR(YES)
USERDNS('tssacid=%l,host=xe14,o=cai,c=us')
CODEPAGE(CODEPAGETEST)
objclass(tssacid)
URL(LDAP://111.111.111.11:111)
XREF(NAME,NAME)
LDS ACID Field
The LDS ACID field:
■ Specifies whether ACID administrative changes for a user are propagated to the LDAP servers defined by NDT LDAPNODE records
■ Indicates that an LDAP request is created when the user changes their password during the signon process
ACID administrative changes are sent to all nodes defined with the BROADCAST(YES) option, regardless of the LDS attribute.
To create an LDS ACID field
1. Enter the command:
TSS ADD(acid) LDS
LDS capability is added to the ACID.
2. Enter the command:
TSS LIST(acid)
The changed ACID information is displayed.
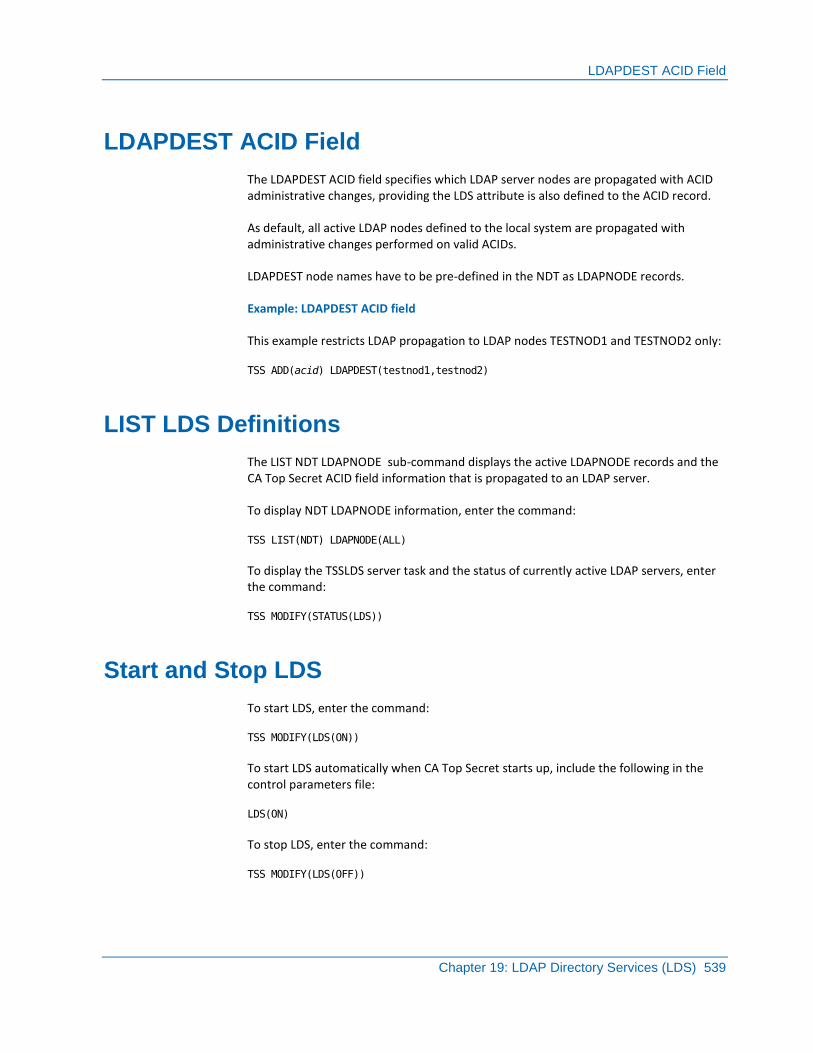
LDAPDEST ACID Field
Chapter 19: LDAP Directory Services (LDS) 539
LDAPDEST ACID Field
The LDAPDEST ACID field specifies which LDAP server nodes are propagated with ACID administrative changes, providing the LDS attribute is also defined to the ACID record.
As default, all active LDAP nodes defined to the local system are propagated with administrative changes performed on valid ACIDs.
LDAPDEST node names have to be pre-defined in the NDT as LDAPNODE records.
Example: LDAPDEST ACID field
This example restricts LDAP propagation to LDAP nodes TESTNOD1 and TESTNOD2 only:
TSS ADD(acid) LDAPDEST(testnod1,testnod2)
LIST LDS Definitions
The LIST NDT LDAPNODE sub-command displays the active LDAPNODE records and the CA Top Secret ACID field information that is propagated to an LDAP server.
To display NDT LDAPNODE information, enter the command:
TSS LIST(NDT) LDAPNODE(ALL)
To display the TSSLDS server task and the status of currently active LDAP servers, enter the command:
TSS MODIFY(STATUS(LDS))
Start and Stop LDS
To start LDS, enter the command:
TSS MODIFY(LDS(ON))
To start LDS automatically when CA Top Secret starts up, include the following in the control parameters file:
LDS(ON)
To stop LDS, enter the command:
TSS MODIFY(LDS(OFF))
Control an LDAP Node
540 User Guide
Control an LDAP Node
To activate an inactive LDAP node, enter the command:
TSS MODIFY LDAPNODE(nodename,ACTIVE(YES))
To deactivate a currently active LDAP node, enter the command:
TSS MODIFY LDAPNODE(nodename,ACTIVE(NO))
To enable global LDAP tracing, enter the command:
TSS MODIFY LDAPNODE(nodename,TRACE(ON))
To disable the node level trace, enter the command:
TSS MODIFY LDAPNODE(nodename,TRACE(OFF))
Chapter 20: Start up and Shutdown 541
Chapter 20: Start up and Shutdown
This section contains the following topics:
O/S START TSS Commands (see page 541) O/S STOP Command (see page 541) O/S CANCEL Command (see page 542) Startup (see page 542) CA Top Secret Activation (see page 542) Temporary Shutdown (see page 543) End-of-Day Shutdown (see page 544) Restart After IPL (see page 544) Reinitialization After Temporary Shutdown (see page 545) Restart After Temporary Shutdown (see page 545) Restart After End-of-Day Shutdown (see page 546)
O/S START TSS Commands
The O/S START command is used in this format to initiate the CA Top Secret started task:
S TSS
The O/S START command is also used to specify the CA Top Secret control options.
If you are starting CA Top Secret as a subtask, code SUB=MSTR on the startup command.
Options specified by the O/S START command are overridden by both the O/S MODIFY and TSS MODIFY commands.
O/S STOP Command
To terminate the CA Top Secret started task procedure use the O/S STOP command:
P TSS
Stopping CA Top Secret in this manner is the recommended method for normal or temporary shutdown.
Terminating the CA Top Secret started task does not terminate the security interface. The security interface is always active, and validates requests already active in the system. Shutting down the CA Top Secret started task deactivates security file inputs and outputs, console communications to the operator, and use of the TSS command.
O/S CANCEL Command
542 User Guide
DOWN Options
Once the CA Top Secret address space is deactivated, the DOWN options take effect in all modes except the DORMANT mode.
If an end-of-day shutdown is necessary to complete an orderly CPU termination, CA Top Secret will not prompt the operator for authorization.
O/S CANCEL Command
The O/S CANCEL command is issued to immediately terminate the CA Top Secret started task procedure. CANCEL should be used only in emergency situations. It is not the recommended method for normal or temporary shutdown; use the O/S STOP command.
Terminating the CA Top Secret started task via the O/S CANCEL command is not possible unless the CANCEL control option is set.
Startup
CA Top Secret should start up automatically during the IPL process after JES initialization (this should be the case no matter which IPL parameters are used to bring up your system) or it can be started as a subsystem. CA Top Secret should be the first started task to execute during a system IPL and the last address space to be brought down at the end of the day.
During startup, CA Top Secret may issue z/OS commands after security has been initialized into z/OS. This ensures that security is always present after JES initialization.
CA Top Secret Activation
There are two methods of activating CA Top Secret:
■ Automatically through the use of the Automatic Commands File.
CA Top Secret is automatically activated after IPL, if the START TSS procedure has been placed in member COMMND00 of SYS1.PARMLIB (during installation).
■ At the console, using the O/S START TSS command.
If CA Top Secret is stopped temporarily or shutdown, or if the START TSS procedure is not placed in COMMND00, activate CA Top Secret using the command:
START TSS
Temporary Shutdown
Chapter 20: Start up and Shutdown 543
Temporary Shutdown
A temporary or normal shutdown is the recommended method of deactivating the CA Top Secret address space.
In a JES3 environment, when CA Top Secret is stopped, a problem may arise restarting CA Top Secret if several batch jobs are submitted while it is down. Shown below are two JES3 commands. Issue the first JES3 command when CA Top Secret is stopped and issue the second JES3 command when CA Top Secret is restarted again.
*F X D=INTRDR HOLD
*F X D=INTRDR RELEASE
To temporarily shutdown the CA Top Secret address space
1. Enter:
P TSS
CA Top Secret displays the messages:
TSS9072I ** SELECT TYPE OF SHUTDOWN ** <I> TO IGNORE
TSS9072I <Z> END OF DAY; RE-IPL WILL BE REQUIRED
TSS9072A <T> TEMPORARY; MAY IMPACT THROUGHPUT
2. For a normal or temporary shutdown, enter:
T
End-of-Day Shutdown
544 User Guide
End-of-Day Shutdown
Important! An end-of-day shutdown deactivates the CA Top Secret address space and requires an IPL.
End-of-day shutdown prohibits new initiations in all modes other than DORMANT. New users will not be able to sign on to any facility and new batch jobs will not execute.
Provided the operator has the authority, an end-of-day shutdown can be reset using the RESETEOD control option. This control option allows CA Top Secret to be restarted without an IPL after it has been brought down (accidentally) for end-of-day shutdown.
To shutdown the CA Top Secret address space:
1. Enter:
P TSS
CA Top Secret displays the messages:
TSS9072I ** SELECT TYPE OF SHUTDOWN ** <I> TO IGNORE
TSS9072I <Z> END OF DAY; RE-IPL WILL BE REQUIRED
TSS9072A <T> TEMPORARY; MAY IMPACT THROUGHPUT
2. For an end-of-day shutdown,enter:
Z
Restart After IPL
If CA Top Secret has been installed according to the recommended method, the START TSS command is in the PARMLIB member, COMMND00, and no operator intervention is required. The CA Top Secret started task to executes automatically.

Reinitialization After Temporary Shutdown
Chapter 20: Start up and Shutdown 545
Reinitialization After Temporary Shutdown
To reinitialize, restart CA Top Secret using the START TSS command with the REINIT control option. CA recommends that REINIT be used only after a new version of CA Top Secret has been installed or when instructed as part of maintenance. REINIT is not required for initial installation or at IPL time.
All or part of CA Top Secret can be reinitialized using this option. REINIT cannot be entered as an O/S Modify command.
The format is:
S TSS,,,REINIT[(K|E|M|1|2)]
REINIT
Reinitializes everything
K
Reloads module TSSKERNL
E
Reloads module TSSEXEC
1
Reloads module TSSOS/3901
2
Reloads module TSSOS/3902
M
Reloads modules TSS, TSSIMS, TSSRESPW
Restart After Temporary Shutdown
The START TSS procedure is initiated through the O/S Start TSS command in the format:
S TSS,,,(option,option,...)
Restart After End-of-Day Shutdown
546 User Guide
Restart After End-of-Day Shutdown
To perform this function you must first have CONSOLE authority and the appropriate userid and password.
To restart CA Top Secret after end-of-day shutdown
1. Start CA Top Secret using the same procedure name under which it had previously been executing. For example:
S TSS
2. Modify CA Top Secret using the O/S MODIFY command with the RESETEOD control option:
F TSS,RESETEOD
Shutdown CA Top Secret with a temporary shutdown and restart.
Chapter 21: Backup and Restore 547
Chapter 21: Backup and Restore
This section contains the following topics:
How to Implement a Security File Backup and Recovery Plan (see page 547) How to Create a Mirror Copy of Your Security File (see page 552) How to Run the Product with a Mirror File as Primary Security File (see page 555) TSSBCKUP Procedure (see page 558) Manual Backup of the Security File (see page 558) Recovery File Backup (see page 559) Audit/Tracking File(s) Backup (see page 559) Restore (see page 560) Recovery (see page 561) Security File Serialization (see page 575)
How to Implement a Security File Backup and Recovery Plan
The security file contains all security-related information about users, profiles, departments, divisions, zones, and resources. You need to protect your site from loss of data that could occur if your primary security file is damaged, corrupted, or lost. This scenario shows how a security administrator implements a security file backup and recovery plan.
Security file corruption can occur because of physical damage, intrusion, or an invalid command. Performing regular security file backups ensures that you can recover data. Recovery consists of reconstructing the security file with all changes that occurred since the last backup. You apply these changes from a recovery file to the backup security file.
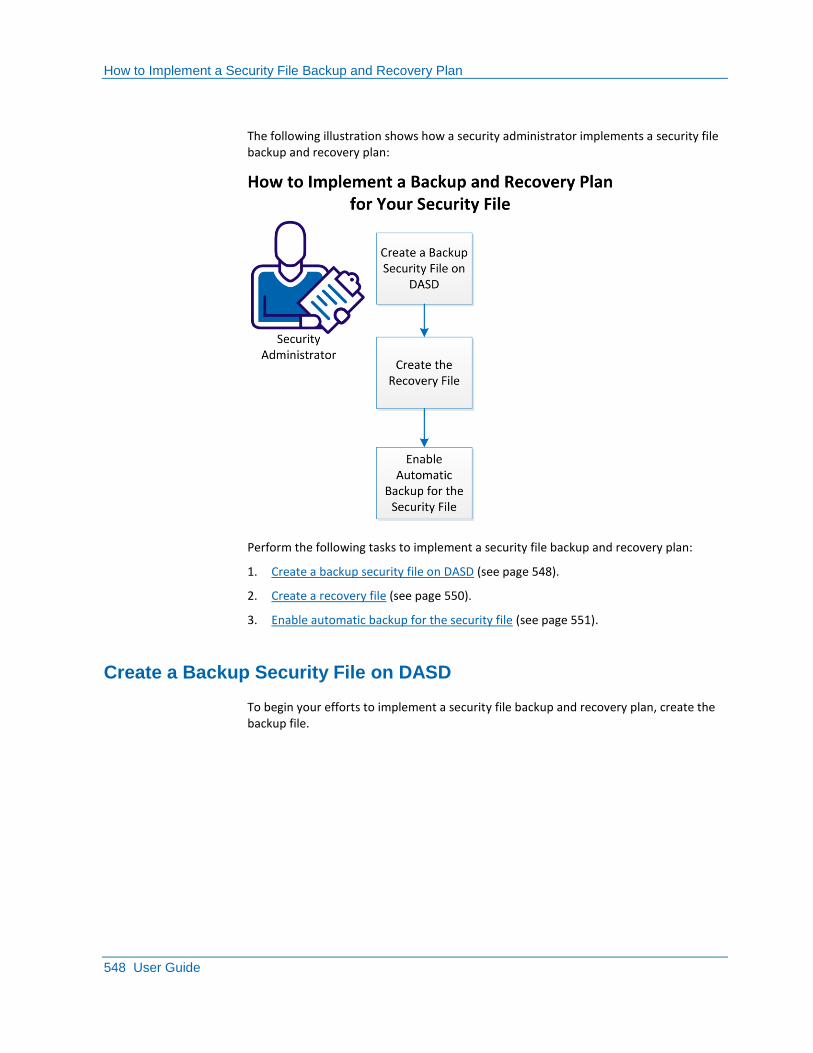
How to Implement a Security File Backup and Recovery Plan
548 User Guide
The following illustration shows how a security administrator implements a security file backup and recovery plan:
Perform the following tasks to implement a security file backup and recovery plan:
1. Create a backup security file on DASD (see page 548).
2. Create a recovery file (see page 550).
3. Enable automatic backup for the security file (see page 551).
Create a Backup Security File on DASD
To begin your efforts to implement a security file backup and recovery plan, create the backup file.
How to Implement a Security File Backup and Recovery Plan
Chapter 21: Backup and Restore 549
We recommend that you place the backup file on a DASD that is not the same volume, unit, and channel path as the security file. When you use this method, the backup security file remains available if a failure occurs on the security file volume.
Important! When a security file is shared by multiple CPUs, only one system should be configured for BACKUP. That is, your backup file should not be shared between CPUs.
Follow these steps:
1. Edit the CAKOJCL0 member TSSMAINB.
The CAKOJCL0 data set is available in the yourHLQ.SAMPJCL data set that was installed during product installation (where yourHLQ specifies the data set prefix for the site).
■ Ensure that the CYLS and BLOCKS parameters are identical to the CYLS and BLOCKS parameters that TSSMAINS uses to create the security file.
■ Ensure that the backup security file is the same BLKSIZE as the primary security file.
■ Leave the SECPARMS contents unchanged from the values used in TSSMAINS.
■ (Optional) Edit the ID parameter in the SECBACK member (if you want a different ID for the file).
Your entry can contain up to eight characters. The default is ID=BACKUP.
Important! If you change this value, your value must clearly indicate that this file is the backup security file.
■ For the VSAM file, use IDCAMS to create a separate backup VSAM file. Sample JCL is provided in CAKOJCL0 member VSAMDEF6. Specify the backup VSAM file on the VSAMFILE DD statement.
The member is updated.
2. Run TSSMAINB.
CA Top Secret allocates the backup security file.
3. Run VSAMDEF6.
CA Top Secret allocates the backup VSAM file.
4. Add the following JCL statement to TSS started task procedure:
//BACKUP DD DISP=SHR,DSN=backup_file
//VSAMBKUP DD DISP=SHR,DSN=backup_VSAM_file
backup_file
Specifies the name of the backup security file.
backup_VSAM_file
Specifies the name of the backup VSAM file.

How to Implement a Security File Backup and Recovery Plan
550 User Guide
Create the Recovery File
The recovery file contains an encrypted record of all changes made to the security file. If the security file becomes damaged or unusable, use the recovery file to help recreate the security file.
The recovery file stores recent administrative commands. The size of the allocated file determines the number of commands that can be stored.
Note: We recommend allocating a file that can store a minimum of 30 days worth of data.
The recovery file is a wraparound file. When the file is full, recording continues at the beginning of the file, overwriting existing data. By default, the recovery file can hold approximately 2,000 changes before a wraparound occurs. The recovery file does not support DFSMS Extended Sequential data sets (multi-volume data sets).
We recommend placing the recovery file on a volume that other systems do not use heavily and that is not subject to extensive I/O.
Important! Do not allocate the recovery file on the same volume as the security file (in case of loss due to hardware malfunction).
Follow these steps:
1. Edit the utility job in member TSSMAINR of data set CAKOJCL0 to conform to your site standards:
a. Edit the recovery file parameters, starting in column 1:
CREATE RECOVERY
Requests recovery file initialization.
BLOCKS=????
Specifies the number of blocks to use for the recovery file. A large recovery file delays initialization of the CA Top Secret address space every time it is started. The size of the recovery file depends on the interval between security file backups. Make the file large enough to record two or three days of changes for every day in the security file backup period. For example, if the security file is backed up at the end of each day, the recovery file should be large enough to accommodate at least two days of changes.
Default: 250
Minimum: 250
Maximum: N/A
How to Implement a Security File Backup and Recovery Plan
Chapter 21: Backup and Restore 551
b. Replace lowercase type in the JCL with the appropriate parameters for your site.
Note: The file block size should provide efficient utilization of the track capacity for the device on which the file resides. An exact value is not necessary because TSSMAINT rounds the block size down to a multiple of its logical record length. The actual block size may be less than specified on the JCL, but it should be approximate.
2. Submit the job.
CA Top Secret creates the recovery file.
3. Add the following JCL statement to TSS started task procedure:
//RECFILE DD DISP=SHR,DSN=recovery_file
recovery_file
Specifies the name of the recovery file.
You have successfully created the recovery file.
Enable Automatic Backup for the Security File
You can automatically back up the security file to DASD. In addition to a recovery file, a daily backup of the security file protects you from data loss.
You can manually back up the security file by issuing the command F TSS,BACKUP. However, we recommend that you use automatic backup. An automated process ensures that backup occurs consistently.
Even with automatic backup in effect, you might need to use TSSBCKUP to copy the backup security file to tape. If your site has only one copy of the backup security file, run TSSBCKUP prior to using the TSSRECVR utility. This method prevents loss of data in the case of hardware malfunction and provides a reserve copy of the backup security file on tape.
Follow these steps:

How to Create a Mirror Copy of Your Security File
552 User Guide
1. Schedule an automatic backup by performing one of the following actions:
■ Include the following specification in the PARMFILE DD statement of the CA Top Secret started task procedure (permanent):
BACKUP (hhmm)
■ Issue the following command (temporary during the active product session)
TSS MODIFY BACKUP (hhmm)
hhmm
Backs up the security file at the specified time (if the BACKUP DD statement is in the CA Top Secret STC procedure). We recommend including this command specification in the PARMFILE DD statement of the TSS started task procedure.
Default: 0100 (1:00 a.m.)
The product will back up the security file at the specified time.
2. Issue the following command to confirm that the RECOVER(ON) control option setting is in effect:
TSS MODI STATUS
Active recovery file status information indicates that the RECOVER option is ON, which activates the recovery file and records security database changes in the recovery file. Absence of the status information indicates that the option is OFF, in which case you can activate the option.
If the RECOVER control option is omitted at CA Top Secret startup, RECOVER(ON) is in effect if the RECFILE DD statement is in the CA Top Secret started task JCL.
Your automatic backup is configured. You have now implemented a backup and recovery plan to protect your site from data loss. If you experience a security file failure, you can restore the security file.
How to Create a Mirror Copy of Your Security File
The security file contains all security-related information about users, profiles, departments, divisions, zones, and resources. You need to protect your site from loss of data that could occur if your primary security file is damaged, corrupted, or lost. Additionally, you need increased availability of the security file to allow frequent user access. To address these needs, this scenario shows how a security administrator creates a mirror copy of the security file.
The security file is locked anytime a backup is initiated. Users attempting to sign on or perform other security validation checks during a lock can encounter delays, failures, or timeouts. Having a mirror file available allows greater flexibility for when to schedule backup processing (for example, less frequently). Additionally, the mirror file is an exact duplicate of the primary security file and provides up-to-the-minute data in the event of a sudden problem with the primary file.

How to Create a Mirror Copy of Your Security File
Chapter 21: Backup and Restore 553
The following illustration shows how a security administrator creates a mirror copy of the security file:
Perform the following tasks to create a mirror copy of your security file:
1. Define the mirror security file (BDAM and VSAM components) (see page 553).
2. Activate mirroring (see page 555).
Define the Mirror Security File (BDAM and VSAM Components)
If you are not sharing the security file on multiple systems, you can maintain a mirror copy of the security file and VSAM file (to use them as backups in a recovery situation). To have these copies available for use, define a mirror security file (including the BDAM and VSAM components).
Important! Mirror files are supported only on systems that do not share the security file (SHRFILE(NO) control option setting). In this environment, the VSAM file should not be defined with an alternate index. If your current VSAM file is defined with an alternate index, copy the file to a VSAM file without an alternate index before performing this procedure.
Follow these steps:
1. Use the IDCAMS utility to allocate the VSAM mirror file.
The product provides a VSAMDEFM model in CAI.CAKOJCL0.
2. Edit the sample JCL in CAKOJCL0 member TSSMAINM to meet your site's needs.
How to Create a Mirror Copy of Your Security File
554 User Guide
3. Run the TSSMAINT utility job to allocate a mirror security file (ensuring that your VSAMFILE DD statement points to the defined VSAM mirror file).
Note: TSSMAINT resides in the CA Top Secret CAKOJCL0 data set.
CA Top Secret allocates the mirror security file.
4. Edit the product started task procedure in SYS1.PROCLIB.
Note: You can use the model that is provided in CAI.CAKOJCL0(TSS).
a. Specify the BDAM file name on the SECMIRR DD statement.
b. Specify the VSAM file name on the VSAMIRR DD statement.
The following requirements apply to the BDAM and VSAM components:
■ These files must not be on the same volume of the primary security file. We recommend placing the files on separate channels and separate strings. This way, any physical failure of these devices leaves the other set of files available when the product is restarted.
■ The BDAM mirror data set block size must match the block size of the primary security file (SECFILE) data set.
■ The VSAM mirror data set must have a maximum record size that matches or exceeds the size of the primary VSAM data set.
■ The space allocation and record count for the mirror BDAM data set must match the allocation of the primary BDAM data set.
■ The space allocation and record count for the mirror VSAM data set must match the allocation of the primary VSAM data set.
Your new file is now in place. When you activate mirroring, you can begin using the mirror security file.
How to Run the Product with a Mirror File as Primary Security File
Chapter 21: Backup and Restore 555
Activate Mirroring
Activating the MIRROR control option lets you start maintaining a mirror copy of the security file. This exact duplicate will capture the same information as the primary security file as updates are made throughout the day.
Important! Even if you use mirroring, you should still perform regular backups. If you do not want to manually back up at specific times (through the TSS BACKUP command), we recommend, at a minimum, backing up weekly. The backup should include the DASD containing the active security file and the mirror file.
Follow these steps:
1. Include the following control option specification in the CA Top Secret parameter file:
MIRROR(ON)
Note: The MIRROR option is supported only with a non-shared security file.
The option takes effect at the next product startup.
2. Ensure that that the SHRFILE(NO) control option specification is in place.
3. Restart the product:
a. Shut down the product:
P TSS
b. Start the product:
START TSS
Mirroring is now active, and an exact duplicate of the security file now exists.
Note: When started for the first time with a new mirror file, CA Top Secret synchronizes the mirror file and primary security file.
With mirroring in place, you can implement a security file backup and recovery plan that backs up less often (to allow greater security file availability for user access).
How to Run the Product with a Mirror File as Primary Security File
The security file contains all security-related information about users, profiles, departments, divisions, zones, and resources. In this scenario, you have created a mirror copy of your primary security file but subsequently encountered a problem with the primary file. This scenario shows how a security administrator switches to the mirror security file and runs the product with the mirror file as the primary file.
Note: Switching to the mirror security file does not require an IPL.
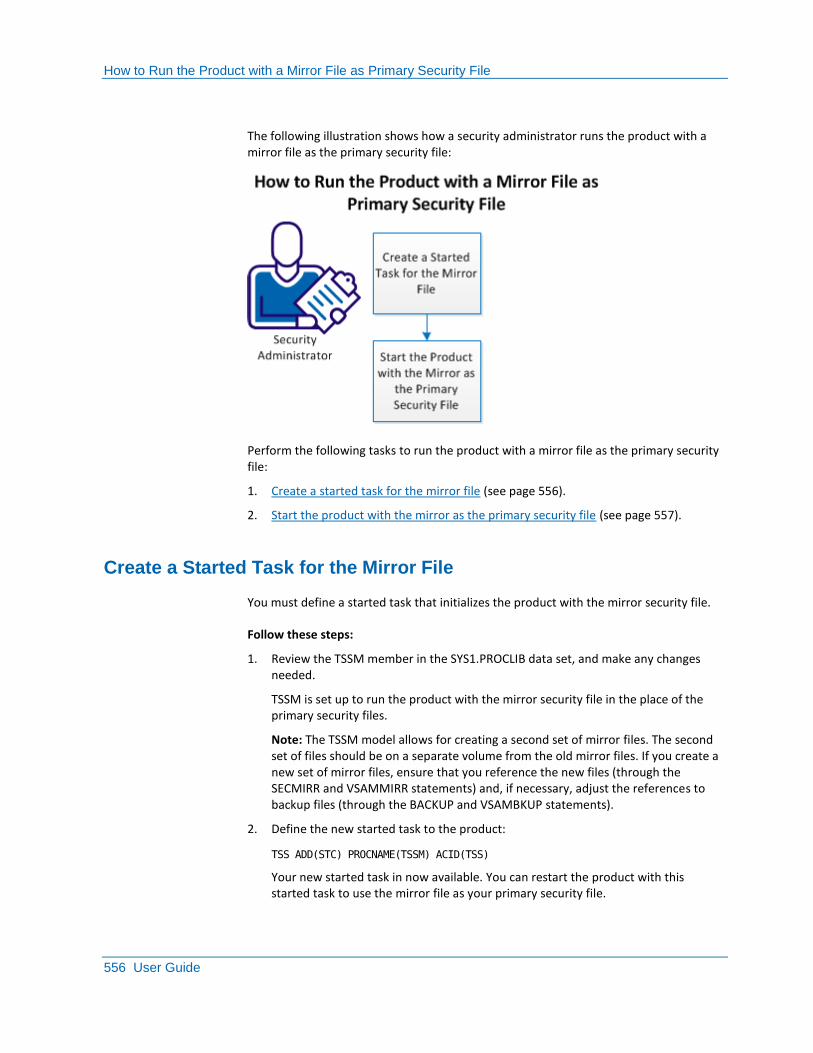
How to Run the Product with a Mirror File as Primary Security File
556 User Guide
The following illustration shows how a security administrator runs the product with a mirror file as the primary security file:
Perform the following tasks to run the product with a mirror file as the primary security file:
1. Create a started task for the mirror file (see page 556).
2. Start the product with the mirror as the primary security file (see page 557).
Create a Started Task for the Mirror File
You must define a started task that initializes the product with the mirror security file.
Follow these steps:
1. Review the TSSM member in the SYS1.PROCLIB data set, and make any changes needed.
TSSM is set up to run the product with the mirror security file in the place of the primary security files.
Note: The TSSM model allows for creating a second set of mirror files. The second set of files should be on a separate volume from the old mirror files. If you create a new set of mirror files, ensure that you reference the new files (through the SECMIRR and VSAMMIRR statements) and, if necessary, adjust the references to backup files (through the BACKUP and VSAMBKUP statements).
2. Define the new started task to the product:
TSS ADD(STC) PROCNAME(TSSM) ACID(TSS)
Your new started task in now available. You can restart the product with this started task to use the mirror file as your primary security file.
How to Run the Product with a Mirror File as Primary Security File
Chapter 21: Backup and Restore 557
Start the Product with the Mirror as the Primary Security File
After creating a started task for using the mirrors file as your primary file, you must restart the product to initialize with the mirror.
Follow these steps:
1. Restart the product:
a. Stop the product:
STOP TSS
b. Start the product:
START STC_name,,,REINIT
STC_name
Specifies the name of the started task you created.
Example: START TSSM,,,REINIT
The restarted product now uses the new started task procedure.
2. Force a backup:
F TSS,BACKUP
You have successfully restarted the product with the mirror as the primary security file.
TSSBCKUP Procedure
558 User Guide
TSSBCKUP Procedure
TSSBCKUP can be used to back up the:
■ Security file (optional if CA Top Secret automatic backup is in effect)
■ Recovery file
■ Audit/Tracking file
The Audit/Tracking File can be backed up in its entirety or it can be archived daily, weekly, or monthly using the TSSARCHI JCL.
The TSSBCKUP procedure allows manual backup of a DASD file to tape. It uses the IBM utility IEHMOVE to copy the files.
The CA Top Secret security administrator or systems programmer edits the JCL at installation.
TSSBCKUP can be run as a started task or batch job. For backing up files at regular intervals run TSSBCKUP as a batch job through a Job Schedular. To copy files on a less regular basis, initiate TSSBCKUP as a started task.
Member SMSBCKUP uses the DFDSS utility and is provided for use in an SMS environment.
Manual Backup of the Security File
Even with the CA Top Secret automatic backup feature in effect, it may be necessary to use TSSBCKUP to copy the backup security file to tape. If your site has only one copy of the backup security file, run TSSBCKUP prior to using the TSSRECVR utility. This prevents loss of data in the case of hardware malfunction and provides a reserve copy of the backup security file on tape.
TSSBCKUP should be set up to back up the security file by default. If it is necessary to back up any of the other CA Top Secret files specify the correct file when executing the task.
Example: Manual security file backup
This example execute TSSBCKUP for the security file:
S TSSBCKUP
Recovery File Backup
Chapter 21: Backup and Restore 559
Recovery File Backup
The recovery file records changes made to the security file. When the file is full recording continues at the beginning of the file overlaying existing data.
Recorded changes are written to the security file by running the TSSRECVR utility.
CA recommends that the recovery file be allocated on a different volume than the security file to ensure that if a hardware malfunction occurs recovery using an alternative device or path is possible.
The size of the recovery file is dependent on the interval between security file backups. The file should be made large enough to record two or three days worth of changes for every day in the security backup interval. For example, if the security file is backed up at the end of each day, the recovery file should be large enough to accommodate at least two days worth of changes.
There is no need to backup the recovery file.It is possible to backup to tape using the TSSBCKUP procedure.
Because the TSSBCKUP JCL is set up to point to the security file by default, to backup the recovery file specify a different file name.
Example: Recovery file backup
This example backs up the recovery file:
S TSSBCKUP,'RECFILE'
Audit/Tracking File(s) Backup
The Audit/Tracking Files record security incidents. Violations and audited events are held in this wraparound file. Incidents can be generated by report or displayed online as the events occur.
It is not necessary to backup the Audit/Tracking Files. To do so use the TSSBCKUP procedure.
Example: Audit file backup
This example backs up the Audit/Tracking Files:
S TSSBCKUP,'AUDIT'
Restore
560 User Guide
Restore
Although CA Top Secret files can be backed up, only the security and recovery files can be restored without affecting CA Top Secret's performance. Three JCL procedures are placed in your PROCLIB during installation to restore these files. The JCL procedures restore from tape to DASD.
TSSRESTN
This procedure is used with the security file only. It creates a new security file from a backup copy. If the primary security file is lost or damaged, TSSRESTN allocates space on DASD and then restores the security file in the newly allocated space using IEHMOVE.
To create a new security file with the most current changes, enter:
S TSSRESTN
SMSRESTR
Use this procedure to restore the security file or the recovery file. TSSRESTR restores the backup security or recovery file from tape to DASD over the existing file.
Set up the TSSRESTR JCL to restore the security file. To restore the recovery file, specify the file when executing the task.
To restore the security file, enter:
START TSSRESTR
To restore the recovery file, enter:
S TSSRESTR,LL='RECFILE'
SMSRESTN
This procedure is used with the security file only. It creates a new security file from a backup copy. If the primary security file is lost or damaged, SMSRESTN allocates space on DASD and then restores the security file in the newly allocated space using the ADRDSSU utility.
To create a new security file with the most current changes, enter:
S SMSRESTN
Recovery
Chapter 21: Backup and Restore 561
Recovery
CA Top Secret provides recovery processing services for the security file through the TSSRECVR utility. (No other files can be recovered using this utility.)
The Recovery and Audit/Tracking Files cannot be recovered using CA Top Secret. To restore the recovery file use TSSRESTR. To archive the Audit/Tracking File see the TSSARCHI procedure.
TSSRECVR uses the records kept in the Recovery File to recover all changes made to the Security File. For TSSRECVR to be effective, the recovery control option, RECOVER(ON) must have been in effect. RECOVER(ON) is specified at installation time or by an operator O/S MODIFY or TSS MODIFY command.
The TSSRECVR utility requires the setup of the sample JCL TSSRCVR1 and TSSRCVR2 procedures placed in your PROCLIB during installation:
TSSRCVR1
Retrieves changes from the recovery file which occurred after the time and date specified in the EXEC PARM.
The recovery file changes are then copied into a temporary TSS command file. This procedure prevents duplicate updates.
TSSRCVR2
TSSRCVR2 reads the temporary TSS command file (created when you ran TSSRCVR1), retrieves those changes, and applies them to the active Security File, most likely the Backup Security File. (The Backup Security File after following the recovery procedures has become the primary security file. TSSRCVR2 cannot apply changes to a security file other than the currently active security file.)
You will need the CA Top Secret started task procedure, member name TSSB, as part of the recovery procedures. Member TSSB is a backup TSS STC procedure which points to the backup security file and does not use CA Top Secret automatic backup. TSSB STC is created during CA Top Secret installation.
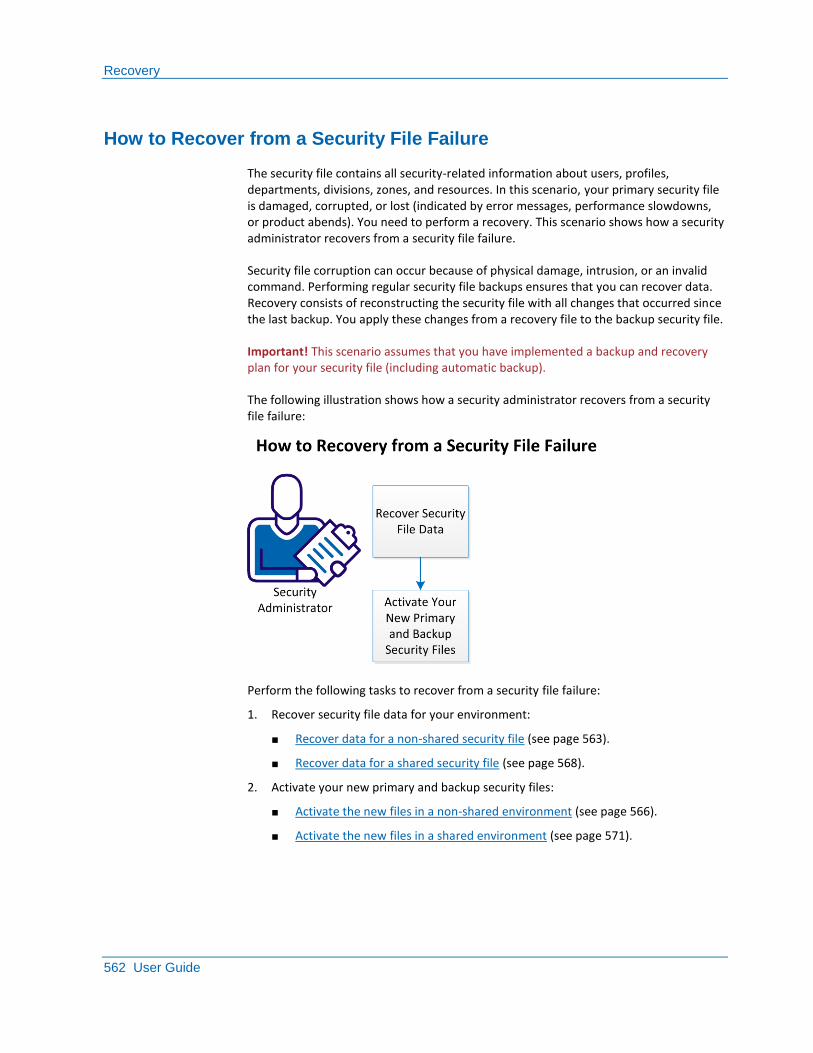
Recovery
562 User Guide
How to Recover from a Security File Failure
The security file contains all security-related information about users, profiles, departments, divisions, zones, and resources. In this scenario, your primary security file is damaged, corrupted, or lost (indicated by error messages, performance slowdowns, or product abends). You need to perform a recovery. This scenario shows how a security administrator recovers from a security file failure.
Security file corruption can occur because of physical damage, intrusion, or an invalid command. Performing regular security file backups ensures that you can recover data. Recovery consists of reconstructing the security file with all changes that occurred since the last backup. You apply these changes from a recovery file to the backup security file.
Important! This scenario assumes that you have implemented a backup and recovery plan for your security file (including automatic backup).
The following illustration shows how a security administrator recovers from a security file failure:
Perform the following tasks to recover from a security file failure:
1. Recover security file data for your environment:
■ Recover data for a non-shared security file (see page 563).
■ Recover data for a shared security file (see page 568).
2. Activate your new primary and backup security files:
■ Activate the new files in a non-shared environment (see page 566).
■ Activate the new files in a shared environment (see page 571).
Recovery
Chapter 21: Backup and Restore 563
Recover Data for a Non-Shared Security File (SHRFILE=NO)
Security file recovery occurs in two phases:
■ TSSRECVR generates TSS commands from the recovery file.
■ The batch Terminal Monitor Program executes the TSS commands and applies them to the backup security file.
Important! If the security file is compromised and the CA Top Secret address space stays up, ensure that your backup started task JCL is current prior to shutting down the address space.
Summary of steps:
1. Back up the damaged security file and VSAM file.
2. Run VSAMDEF7.
3. Edit and start TSSB.
4. Execute the recovery procedure.
Important! This procedure assumes you have implemented automatic backup (control option BACKUP) with command recovery (control option RECOVER(ON)). Additionally, this procedure is for environments that use a non-shared security file (SHRFILE=NO); a separate procedure exists to recover data for a shared security file (see page 568).
The goal of this recovery scenario is to forward recover security files, ending up with the same data set names, which enables you to recover without changing the live TSS started task.
Follow these steps:
1. Back up the damaged security file and VSAM file (using DFSMS, FDR, or similar software).
The backup information might be needed by CA Support to determine what occurred that led to security file problems.
2. Run CAIJCL member VSAMDEF7 (using the VSAM backup file as input) to create a new VSAM file.
When running VSAMDEF7, steps 4 and 5 are skipped because we do not use AIX or PATH in a non-shared environment.
3. Edit the TSSB backup started task procedure, then restart the product with TSSB:
a. Edit TSSB so that it has the following characteristics:
■ The SECFILE DD statement points to the backup security file of the security file that failed.

Recovery
564 User Guide
Important! If you are using your only copy of the backup security file and suspect that a command function update damaged the security file, make a copy of the backup security file by running the TSSBCKUP or SMSBCKUP procedure JCL.
■ The VSAMFILE DD statement points to the VSAM file created by VSAMDEF7.
■ Automatic backup is turned OFF (no BACKUP or VSAMBKUP DD statements).
Example of TSSB Started Task Procedure
//TSSB PROC PARMS='SYS1.PARMLIB',
// HL='CAI.TSSC0',
// PRINT='*'
//*
//*
//* CA Top Secret SECURITY (TSS) STARTED TASK FOR USE
//* DURING RECOVERY PROCEDURE ONLY
//*
//*
//TSSB EXEC PGM=TSSMNGR4,DPRTY=(15,14),
// TIME=1440,REGION=500K
//SECFILE DD DISP=SHR,DSN=&HL..BACKUP
//VSAMFILE DD DISP=SHR,DSN=&HL..VSAMCOPY – VSAMDEF7
//RECFILE DD DISP=SHR,DSN=&HL..RECFILE
//AUDIT DD DISP=SHR,DSN=&HL..AUDIT
//PARMFILE DD DISP=SHR,FREE=CLOSE,DSN=&PARMS(TSSPARM0)
b. Stop CA Top Secret:
P TSS
c. Start the product with TSSB:
S TSSB
Running TSSB ensures that your security environment is no more than 24 hours out of date. This should let most operations continue normally without an outage while you continue the recovery process.
4. Execute the recovery procedure:
a. Turn off recovery (to avoid duplication of TSS command functions on the recovery file resulting from the recovery process):
F TSS,RECOVER(OFF)
b. Retrieve recovery file changes:
START TSSRCVR1,DTE=DATE(yyddd)[,TME=TIME(hhmm)]
hhmm
Specifies the hour and minute for selecting recovery records. This value should be the time of the last security file backup.
Recovery
Chapter 21: Backup and Restore 565
yyddd
Specifies the earliest date for selecting recovery records.
TSSRCVR1 retrieves the changes.
A TSS command can contain the keyword TARGET. When placed in the recovery file on the system where it was entered, the TARGET keyword is commented out and replaced with TARGET(=). This change prevents duplicate permits on remote nodes when recovery is done on one system.
Example: Replacing the TARGET Keyword
In this example, you specify the following command:
TSS TARGET(=,NODE2) PERMIT(USER1) DSNAME(ABC.) ACCESS(READ)
In the TSSRCVR1 output, the command appears as follows:
TSS TARGET(=) PERMIT(USER1) DSN(ABC.) ACCESS(READ)
c. Add the TSSRCVR2 procedure to the product started task table:
TSS ADDTO(STC) PROCNAME(TSSRCVR2) ACID(msca) STCACT
To ensure that commands do not fail due to insufficient authority, TSSRCVR2 runs under Master Security Control ACID (MSCA) authority. The optional STCACT keyword prompts the operator console for a user ID and password when the procedure is started. The ID is written to the audit file.
d. Start TSSRCVR2:
S TSSRCVR2
The changes that TSSRCVR1 collected are applied to the backup security file. You have recovered data.
Recovery
566 User Guide
Activate Your New Primary and Backup Security Files (Non-Shared Environment)
After you recover security file data, activate your new primary and backup security files.
Summary of steps:
1. Run TSSMAINS to re-create security files.
2. Create and start temporary started task TSSN.
3. Force an immediate backup.
4. Restart CA Top Secret.
5. Verify that a RECOVER control option setting of ON is in effect.
Important! This procedure is for environments that use a non-shared security file (SHRFILE=NO). Separate instructions are available to activate the files in an environment that uses a shared security file (see page 571).
Follow these steps:
1. Initialize a new security file.
Note: The new security file and backup file must be on different volumes. The new primary security file must have the same parameter values as the original security file. The ID parameter should be set to ID=PRIMARY.
a. Rename and save the corrupted security file elsewhere before deleting it.
b. Run job VSAMDEF3 to allocate a new primary VSAM file.
Note: Skip step 2.
c. Run the TSSMAINS utility to create the security file for your system.
Your new security file is initialized.
2. Create started task TSSN:
a. Model TSSN after the TSSB started task procedure, in which the SECFILE DD statement points to the backup security file and the BACKUP DD statement points to the primary security file. You can use the following JCL as a model:
//TSS PROC PARMS='SYS1.PARMLIB',
// HL='CAI.TSSC0',
// PRINT='*'
//*
//*
//* CA Top Secret SECURITY (TSS) STARTED TASK FOR USE
//* DURING RECOVERY PROCEDURE ONLY
//*
//*
//TSSB EXEC PGM=TSSMNGR4,DPRTY=(15,14),
// TIME=1440,REGION=500K
//SECFILE DD DISP=SHR,DSN=&HL..BACKUP
Recovery
Chapter 21: Backup and Restore 567
//BACKUP DD DISP=SHR,DSN=&HL..SECFILE
//VSAMFILE DD DISP=SHR,DSN=&HL..VSAMCOPY (VSAMDEF7)
//VSAMBKUP DD DISP=SHR,DSN=&HL..VSAMFILE (VSAMDEF3)
//RECFILE DD DISP=SHR,DSN=&HL..RECFILE
//AUDIT DD DISP=SHR,DSN=&HL..AUDIT
//PARMFILE DD DISP=SHR,FREE=CLOSE,DSN=&PARMS(TSSPARM0).
//AUTOCMDS DD DISP=SHR,FREE=CLOSE,DSN=&PARMS(TSSAUTO0).
//SYSUDUMP DD SYSOUT=&PRINT.
//PEND
b. Save your new started task as a new member in the SYS1.PROCLIB data set (for example, SYS1.PROCLIB(TSSN).
3. Restart the product with the TSSN temporary started task procedure:
a. Stop the product:
P TSS
b. Start the product:
S TSSN, , ,REINIT
The restarted product now uses the newly created procedure.
4. Force an immediate backup:
F TSS,BACKUP
5. Restart the product again with the normal started task:
a. Stop the product:
STOP TSS
b. Start the product by using the TSS started task:
S TSS
The primary security file is recovered, with the original security file and VSAM names.
6. Issue the following command to confirm that a RECOVER control option setting of ON is in effect:
TSS MODI STATUS
Active recovery file status information indicates that the RECOVER option is ON. Absence of the status information indicates that the option is OFF, in which case you can activate the option.
You have successfully recovered from the security file failure.

Recovery
568 User Guide
Recover Data for a Shared Security File (SHRFILE=YES)
Security file recovery occurs in two phases:
■ TSSRECVR generates TSS commands from the recovery file.
■ The batch Terminal Monitor Program executes the TSS commands and applies them to the backup security file.
Important! If the security file is compromised and the CA Top Secret address space stays up, ensure that your backup started task JCL is current prior to shutting down the address space.
Summary of steps:
1. Back up the security file and VSAM file.
2. Run VSAMDEF7.
3. Edit and start TSSB.
4. Execute the recovery procedure.
Important! This procedure assumes you have implemented automatic backup (control option BACKUP) with command recovery (control option RECOVER(ON)). Additionally, this procedure is for environments that use a shared security file (SHRFILE=YES). A separate procedure exists to recover data for a non-shared security file (see page 563).
The goal of this recovery scenario is to forward recover security files, ending up with the same data set names, enabling you to recover without changing the live TSS started task.
Follow these steps:
1. Back up the damaged security file and VSAM file (using DFSMS, FDR, or similar software).
This information might be need by CA Support later to determine what problems occurred that caused the security file failure.
2. Run CAIJCL member VSAMDEF7 (using the VSAM backup file as input) to create new VSAM, PATH, and AIX files.
3. Edit the TSSB backup started task procedure and restart the product with TSSB:
a. Edit TSSB so that it has the following characteristics:
■ The SECFILE DD statement points to the backup security file for the security file that failed.
Important! If you are using your only copy of the backup security file and suspect that a command function update damaged the security file, make a copy of the backup security file by running the TSSBCKUP or SMSBCKUP procedure JCL.
Recovery
Chapter 21: Backup and Restore 569
■ The VSAMFILE DD statement points to the VSAMCOPY file created by VSAMDEF7.
■ The VSMPATH DD statement points to the PATHCOPY file created by VSAMDEF7.
■ The VSAMAIX DD statement points to the AIXCOPY file created by VSAMDEF7.
■ Automatic backup is turned OFF (no BACKUP or VSAMBKUP DD statements).
Example of TSSB Started Task Procedure
//TSSB PROC PARMS='SYS1.PARMLIB',
// HL='CAI.TSSC0',
// PRINT='*'
//*
//*
//* CA Top Secret SECURITY (TSS) STARTED TASK FOR USE
//* DURING RECOVERY PROCEDURE ONLY
//*
//*
//TSSB EXEC PGM=TSSMNGR4,DPRTY=(15,14),
// TIME=1440,REGION=500K
//SECFILE DD DISP=SHR,DSN=&HL..BACKUP
//VSAMFILE DD DISP=SHR,DSN=&HL..VSAMCOPY
//VSAMAIX DD DISP=SHR,DSN=&HL..AIXCOPY
//VSMPATH DD DISP=SHR,DSN=&HL..PATHCOPY
//RECFILE DD DISP=SHR,DSN=&HL..RECFILE
//AUDIT DD DISP=SHR,DSN=&HL..AUDIT
//PARMFILE DD DISP=SHR,FREE=CLOSE,DSN=&PARMS(TSSPARM0)
b. Stop the product on all shared systems:
P TSS
c. Start the TSSB started task procedure on only one system:
S TSSB
Running TSSB ensures that you have a security file that is no more than 24 hours out of date. This should let most operations continue normally without an outage while you continue the recovery process.
4. Execute the recovery procedure:
a. Turn off recovery (to avoid duplication of TSS command functions on the recovery file resulting from the recovery process):
F TSS,RECOVER(OFF)
b. Retrieve recovery file changes:
S TSSRCVR1,DTE=DATE(yyddd)[,TME=TIME(hhmm)]
hhmm
Recovery
570 User Guide
Specifies the hour and minute for selecting recovery records. This value should be the time of the last security file backup.
yyddd
Specifies the earliest date for selecting recovery records.
TSSRCVR1 retrieves the changes.
A TSS command can contain the keyword TARGET. When placed in the recovery file on the system where it was entered, the TARGET keyword is commented out and replaced with TARGET(=). This change prevents duplicate permits on remote nodes when recovery is done on one system.
Example: Replacing the TARGET Keyword
In this example, you specify the following command:
TSS TARGET(=,NODE2) PERMIT(USER1) DSNAME(ABC.) ACCESS(READ)
In the output of TSSRCVR1, the command appears as follows:
TSS TARGET(=) PERMIT(USER1) DSN(ABC.) ACCESS(READ)
c. Add the TSSRCVR2 procedure to the product started task table:
TSS ADDTO(STC) PROCNAME(TSSRCVR2) ACID(msca) STCACT
To ensure that commands do not fail due to insufficient authority, TSSRCVR2 runs under Master Security Control ACID (MSCA) authority. The optional STCACT keyword prompts the operator console for a user ID and password when the procedure is started. The ID is written to the audit file.
d. Start TSSRCVR2:
S TSSRCVR2
The changes that TSSRCVR1 collected are applied to the backup security file. You have recovered data.
Recovery
Chapter 21: Backup and Restore 571
Activate Your New Primary and Backup Security Files (Shared Environment)
After you recover security file data, activate your new primary and backup security files.
Summary of steps:
1. Run TSSMAINS to re-create the security file.
2. Create and start temporary started task TSSN.
3. Force an immediate backup.
4. Recycle CA Top Secret on a single system.
5. Verify that a RECOVER control option setting of ON is in effect.
6. Restart CA Top Secret on all shared systems.
Important! This procedure is for environments that use a shared security file (SHRFILE=YES). Separate instructions are available to activate the files in an environment that uses a non-shared security file (see page 566).
Follow these steps:
1. Initialize a new security file.
Note: The new primary security file must have the same parameter values as the original security file. The ID parameter should be set to ID=PRIMARY.
a. Rename and save the corrupted security file and VSAM file elsewhere before deleting them.
b. Run VSAMDEF7 (to create a new primary VSAM file), ensuring the following setup:
■ As input, use the VSAM files that were created when you ran VSAMDEF7 when recovering security file data (see page 568).
■ Under step 3 in the VSAMDEF7 JCL, change the DD1 and DD2 DD statements to match the following specifications:
//DD1 DD DISP=SHR,DSN=IDSXV$P.PO.TSSHO43.VSAMCOPY
//DD2 DD DISP=SHR,DSN=IDSXV$P.PO.TSSHO43.VSAMFILE
c. Run VSAMDEF6 to create a throwaway VSAM file.
d. Run the TSSMAINS utility to create the security file for your system.
Note: We are using a throwaway VSAM file when we run TSSMAINS. We do this activity to satisfy a requirement in TSSMAINS so that we can continue to create a BDAM file.
Example of TSSMAINS
//TSSMAINS EXEC PGM=TSSMAINT
//MAINTOUT DD SYSOUT=*
//SECFILE DD DSN=Original SECFILE NAME ,
// SPACE=(XXXX,(XXXX),RLSE,CONTIG),
Recovery
572 User Guide
// UNIT=3390,DISP=(,CATLG,DELETE),VOL=SER=XXXXXX,
// DCB=(KEYLEN=17,BLKSIZE=27648)
//VSAMFILE DD DISP=SHR,DSN=VSAM file from VSAMDEF6
//MAINTIN DD *
CREATE SECURITY
ACCESSORS=40000
VOLUMES=3000
BLOCKSIZE=27648
MAXACIDSIZE=512
RESBLOCKS=50
SCA=XXXXXXXX/ZZZZZZZZ
ID=PRIMARY
INITVSAM=DIGICERT
/*
2. Create a started task (TSSN):
a. Model TSSN after the TSS started task, in which the SECFILE DD statement points to the backup security file and the BACKUP DD statement points to the primary security file.
Note: The VSAM files that you reference in TSSN should be the files that were created when you ran VSAMDEF7 earlier in this procedure.
You can use the following JCL as an example to create TSSN:
//TSS PROC PARMS='SYS1.PARMLIB',
// HL='CAI.TSSC0',
// PRINT='*'
//*
//*
//* CA Top Secret SECURITY (TSS) STARTED TASK FOR USE
//* DURING RECOVERY PROCEDURE ONLY
//*
//*
//TSSB EXEC PGM=TSSMNGR4,DPRTY=(15,14),
// TIME=1440,REGION=500K
//SECFILE DD DISP=SHR,DSN=&HL..BACKUP
//BACKUP DD DISP=SHR,DSN=&HL..SECFILE
//VSAMFILE DD DISP=SHR,DSN=&HL..VSAMFILE
//VSAMAIX DD DISP=SHR,DSN=&HL..VSAMAIX
//VSAMPATH DD DISP=SHR,DSN=&HL..VSAMPATH
//VSAMBKUP DD DISP=SHR,DSN=&HL..VSAMBKUP
//RECFILE DD DISP=SHR,DSN=&HL..RECFILE
//AUDIT DD DISP=SHR,DSN=&HL..AUDIT
//PARMFILE DD DISP=SHR,FREE=CLOSE,DSN=&PARMS(TSSPARM0).
//AUTOCMDS DD DISP=SHR,FREE=CLOSE,DSN=&PARMS(TSSAUTO0).
//SYSUDUMP DD SYSOUT=&PRINT.
//PEND
b. Save your new started task as a member in the SYS1.PROCLIB data set (for example, SYS1.PROCLIB(TSSN).

Recovery
Chapter 21: Backup and Restore 573
3. Restart the product with the TSSN temporary started task:
a. Stop the product:
P TSS
b. Start the product:
S TSSN,,,REINIT
The restarted product now uses the newly created procedure.
4. Force an immediate backup:
F TSS,BACKUP
5. Restart the product again on a single system with the standard TSS started task:
a. Stop the product:
P TSS
b. Start the product by using your standard TSS started task:
S TSS
The primary security file is recovered, with the original security file and VSAM names.
6. Issue the following command to confirm that a RECOVER control option setting of ON is in effect:
TSS MODI STATUS
Active recovery file status information indicates that the RECOVER option is ON. Absence of the status information indicates that the option is OFF, in which case you can activate the option.
7. Restart CA Top Secret on all shared systems.
You have successfully recovered from the security file failure.
Recovery
574 User Guide
Manual Recovery
If the Security File is lost or damaged and your site is not using the automatic backup feature follow this procedure.
To manually recover the security file
1. Enter:
STOP TSS
CA Top Secret stops.
2. Manually restore the backup copy of the security file with the JCL procedure:
TSSRESTN
Allocates new space on DASD and restores a file from tape to the newly allocated DASD space.
3. Enter:
START TSS
CA Top Secret restarts.
4. Enter the O/S MODIFY command:
F TSS,RECOVER(OFF)
The RECOVER control option is turned OFF to avoid duplication of TSS commands.
5. The TSSRCVR1 JCL reads the security file time stamp and retrieves changes from the recovery file after that time. This prevents duplicate updates. If it is necessary to override the time stamp, add the TIME and DATE in the EXEC PARM field before executing TSSRCVR1. To execute TSSRCVR1, enter:
START TSSRCVR1
6. Enter:
START TSSRCVR2
The changes are applied to the security file. Your security file is recovered.
Security File Serialization
Chapter 21: Backup and Restore 575
Security File Serialization
When a system is attempting to acquire the security file lock, and detects that the lock is held, CA Top Secret retries to acquire the lock for several minutes. If the lock is still not obtained, CA Top Secret issues the TSS9123 message which prompts for a reply of WAIT or RESET. The correct reply to the TSS9123 message is WAIT. This indicates that CA Top Secret will wait for the holder to release the lock.
The only situations in which replying RESET would be appropriate are:
■ Having multiple systems sharing the security file and all of them having the TSS9123 prompt outstanding. The correct action is to respond RESET to the first system, and WAIT on all remaining systems.
■ If the system identified in the TSS9123 message took a hardware failure and is non-operational.
Replying RESET any other time directs one system to ignore whatever the other system is doing to the security file. This introduces the potential of damaging your security file.

Chapter 22: Invoked Sub-functions 577
Chapter 22: Invoked Sub-functions
This section contains the following topics:
Controlling Applications that Invoke R_auditx (see page 577) Controlling Applications that Invoke R_dcekey (see page 578) Controlling Applications that Invoke R_Getinfo (see page 579) Controlling Applications that Invoke R_ticketserv / R_GenSec (see page 579) Hardening a Cache (see page 581) Program Signing and Verification (see page 581)
Controlling Applications that Invoke R_auditx
Authorized components can invoke the R_auditx callable service to log events to:
■ SMF
■ The audit tracking file
Applications that do not run in system key or in supervisor state require READ access to the IRR.RAUDITX resource in the IBMFAC class.
To establish read access
1. Enter the command:
TSS ADD(tssdept) IBMFAC(IRR)
The IBMFAC is owned.
2. Enter the command:
TSS PER(tsscomp1) IBMFAC(IRR.RAUDITX)
ACCESS(READ)
A permit is added to the component.
Controlling Applications that Invoke R_dcekey
578 User Guide
Controlling Applications that Invoke R_dcekey
Authorized components can invoke the R_dcekey callable service to:
■ Set a DCE password
■ Retrieve a DCE password
■ Retrieve an LDAP bind password
Applications that do not run in system key or in supervisor state require READ access to the BPX.SERVER or IRR.RDCEKEY resource in the IBMFAC class.
To establish read access to R_dcekey
1. Enter the commands:
TSS ADD(tssdept) IBMFAC(IRR)
TSS ADD(tssdept) IBMFAC(BPX)
The IBMFAC is owned.
2. Enter the commands:
TSS PER(tsscomp1) IBMFAC(BPX.SERVER)
ACCESS(READ)
TSS PER(tsscomp1) IBMFAC(IRR.RDCEKEY)
ACCESS(READ)
The permit is added to the component.
Controlling Applications that Invoke R_Getinfo
Chapter 22: Invoked Sub-functions 579
Controlling Applications that Invoke R_Getinfo
Authorized servers can invoke the R_Getinfo callable service to retrieve a subset of security server information.
Applications that do not run in system key or in supervisor state require READ access to the BPX.SERVER resource in the IBMFAC class. If Function_code 1 is specified, callers with read access to the IRR.RGETINFO.EIM resource in the IBMFAC class can use R_Getinfo.
To establish read access to R_Getinfo
1. Enter the commands:
TSS ADD(tssdept) IBMFAC(IRR)
TSS ADD(tssdept) IBMFAC(BPX)
The IBMFAC is owned.
2. Enter the commands:
TSS PER(tsscomp1) IBMFAC(BPX.SERVER)
ACCESS(READ)
TSS PER(tsscomp1) IBMFAC(IRR.RGETINFO.EIM)
ACCESS(READ)
A permit is added to the server.
Controlling Applications that Invoke R_ticketserv / R_GenSec
Both authorized and unauthorized applications can invoke the PassTicket subfunction of the R_ticketserv or R_GenSec callable service to generate or evaluate a PassTicket.
Use of the R_ticketserv or R_GenSec callable service is authorized by resources in the PTKTDATA class. These resources are based on the application ID and target userid in the PassTicket function.
The following table describes the access required.
Operation Resource Name Access Required
Generate PassTicket
IRRPTAUTH.application.target-userid UPDATE
Evaluate PassTicket
IRRPTAUTH.application.target-userid READ

Controlling Applications that Invoke R_ticketserv / R_GenSec
580 User Guide
If the PTKTDATA class is not active or the resource rules are not defined, any PassTicket request made through the callable services fails.
All callers regardless of the PSW key or state must pass the authorization check.
To establish authority
1. Enter the command:
TSS ADD(RDT) RESCLASS(PTKTDATA)
ACLST(ALL,READ,UPDATE)
MAXLEN(37)
The PTKTDATA resource is added to the RDT.
2. Enter the command:
TSS ADD(tssdept) PTKTDATA(IRRPTAUT)
IRRPTAUT is owned.
3. Enter the command:
TSS PER(tsscomp1) PTKTDATA(IRRPTAUTH.aaaaaaaa.uuuuuuuu)
ACCESS(READ,UPDATE)
aaaaaaaa
Specifies the application.
uuuuuuuu
Specifies the user.
A permit is added to the component.
the RACF command to establish a profile is :
RDEFINE PTKTDATA profile-name SSIGNON(KEYMASKED(blah)) UACC(NONE)
The CA Top Secret equivalent of this command is:
TSS ADD(NDT) PSTKAPPL(applid) SESSKEY(xxxx) SIGNMULTI

Hardening a Cache
Chapter 22: Invoked Sub-functions 581
Hardening a Cache
For information about invoking the R_cacheserv callable service, see the IBM manual z/OS Security Server RACF Callable Services.
The R_cacheserv Callable Service can optionally store caches on a file. When caches are stored on a file, it is called hardening.
To harden a cache
1. Add the following DD statement to the CA Top Secret procedure JCL:
//RCACHE DD DSN=rcache.vsam.file.name, DISP=OLD
file.name
Specifies the file name used in the INITCSRV job.
2. Insert RCACHE and RCQNAME control options to specify hardening and to define the cache names that are to be hardened.
For information about the RCACHE and RCQNAME control options, see the Control Options Guide.
Program Signing and Verification
CA Top Secret supports program signing and the verification of programs. You can dictate that certain programs must have valid digital signatures prior to their loading in the system. You can also set up the records required to allow users to sign programs using the z/OS Binder.
Program Signing and Verification
582 User Guide
Program Signing
A user can indicate that a signature is required by using the SIGN binder option when the program object is created. The binder only generates signatures for program objects stored in a PDSE.
To sign a program, the user must have access to a key ring and the certificate objects stored in the key ring. The key ring used during signing must contain a code-signing certificate and its private key and each certificate authority (CA) certificate in the certificate chain of the code-signing certificate. Note the following certificate restrictions within this key ring:
■ There can be more than ten certificates in the certificate chain of the code-signing certificate.
■ The key ring may not be a PKCS #11 token.
■ The code signing certificate and each certificate in the chain must be signed using either the sha256WithRSAEncryption or sha1WithRSAEncryption signature algorithms.
■ The code-signing certificate must have the no KeyUsage extension or a KeyUsage extension with at least the digitalSignature and nonRepudiation values set.
■ The CA certificates in the code-signing certificate chain must have certificate-signing capabilities. They must have both of the following – either the certificate has no BasicConstraints extension, or the certificate must have BasicConstrains extension with the CA indicator enabled plus the certificate either has no KeyUsage extension or the keyUsage exitension is present and at least the keyCertSign value is enabled
When the binder attempts to sign a program, it obtains the code-signing key ring by issuing a RACROUTE EXTRACT for a profile in the following format. It extracts each profile until it finds a profile:
■ IRR.PROGRAM.SIGNING.group.user
■ IRR.PROGRAM.SIGNING.user
■ IRR.PROGRAM.SIGNING.group
■ IRR.PROGRAM.SIGNING
In CA Top Secret, the user performing the program signing must have a PERMIT to the profiles in the ACID record, in an attached profile, or using the ALL record. The USERID and KEYRING, which are used for the program signing, are obtained from the APPLDATA field associated with the selected permit.
A user who requests that a program be signed using the binder must have access to the certificate objects in the selected key ring. The certificate objects are obtained using the R_datalib callable service. If you decide to assign the same key ring to all authorized signers, you can create resource rules in the RDATALIB class instead of the FACILITY class. The RDATALIB class rules let you grant access to a specific key ring. The FACILITY class resources grant access to any key ring.
Program Signing and Verification
Chapter 22: Invoked Sub-functions 583
Program Verification
The program verification process uses a single key ring for all programs being verified. This key ring must contain a root CA certificate for each of your trusted program signer certificates. This key ring also has some restrictions on the key ring and the certificates within this key ring:
■ You must add the TRUST status to the IBM code signing CA certificate supplied with CA TSS.
■ The key ring may not be a PKCS #11 token.
■ Each root CA certificate must be signed using either the sha256WithRSAEncryption or sha1WithRSAEncryption signature algorithms.
■ Each root CA certificates must have certificate-signing capabilities. They must have the following:
– The certificate has no BasicConstraints extension or the certificate must have BasicConstrains extension with the CA indicator enabled plus the certificate either has no KeyUsage extension or the keyUsage exitension is present and at least the keyCertSign value is enabled.
When the program is loaded, the z/OS Loader obtains the signature verification key ring by issuing a RACROUTE EXTRACT for the IRR.PROGRAM.SIGNATURE.VERIFICATION profile.
The USERID and KEYRING used for the verification process are obtained from the APPLDATA field associated with a PERMIT to the IRR.PROGRAM.SIGNATURE.VERIFICATION profile.
Defining Programs for Verification
SIGVER records specify which programs require a valid digital signature. The SIGVER records can indicate if the load should fail if the program does not contain a valid signature or if an audit record should be cut. SIGVER records can also determine if signed programs are currently executing in your system.
Program Signing and Verification
584 User Guide
Verify a Signed Program
SIGVER records let you specify which programs require a valid digital signature. The SIGVER records can indicate if the load should fail if the program does not contain a valid signature or if an audit record should be cut. SIGVER records can also determine if signed programs are currently executing in your system.
To verify a signed program
1. Create the signature verification key ring by entering the following command:
Note: You only perform this step once because all signature verification requests use the same key ring.
TSS ADD(USER01) KEYRING(SIGVER) LABLRING('Pgm_Signature_Ver')
Note: All users loading signed programs must be able to access the certificates on this key ring. The key ring is accessed using the R_Datalib callable service. You may want to provide access using the RDATALIB class instead of the FACILITY class. The RDATALIB class rules let you grant access to a specific key ring. The FACILITY class resources grant access to any key ring. For more information, see z/OS Security Service RACF Callable Services.
The signature is created.
Note: Skip the following step if you generated the CA certificate.
2. Add the root CA certificate to CA TSS as a trusted CA by entering the following command:
TSS ADD(CERTAUTH) DIGICERT(PSVCA) DCDSN(VENDOR.CA.CERT.DSN) labei(Vendor Code
Signing CA) TRUST
The root CA certificate is added to CA TSS.
3. Add the root CA certificate to the signature verification key ring (this is the key ring created earlier) by entering the following command:
TSS ADD(USER01) KEYRING(SIGVER) RINGDATA(CERTAUTH,PSVCA)
The root CA certificate is added to the key ring.
4. Create the SIGVER record to indicate a signature is required by entering the following command:
TSS ADD(SIGVER) PROGRAM(iefbr14) SIGREQ(YES) FAILLOAD(ANYBAD) SIGAUDIT(FAIL)
The SIGVER record is created.
Program Signing and Verification
Chapter 22: Invoked Sub-functions 585
Manage the SIGVER Record
Use this procedure to add a program to the SIGVER record. The SIGVER record is a VSAM record type.
All keywords are optional except the program name. LOADLIB is optional, but it is part of the VSAM record key; therefore if it is specified on an ADD, you must also specify it on a REMOVE and REPLACE.
To add a program to the SIGVER record, issue the following command:
TSS ADD(SIGVER) PROGRAM(prog_name)
[LOADLIB(dsname[,volser])]
[SIGREQ(YES|NO)]
[FAILLOAD(ANYBAD | BADSIGONLY | NEVER )]
[SIGAUDIT(ALL | FAIL| NONE )]
prog_name
Identifies the program name.
dsname
Identifies the data set where the program is stored.
volser
Identifies the volume serial number.
For detailed information regarding keywords, see the Command Functions Guide.
Examples: Managing the SIGVER Record
To replace a program in the SIGVER record, use the following command:
TSS REPLACE(SIGVER) PROGRAM(prog_name){any valid keyword}
To remove a program from the SIGVER record, use the following command:
TSS REMOVE(SIGVER) PROGRAM(prog_name)
[LOADLIB(dsname[,volser])]
To list program details for the SIGVER record, use the following command:
TSS LIST(SIGVER) PROGRAM(*|prog_name)
[LOADLIB(dsname[,volser])]

Program Signing and Verification
586 User Guide
Authorize and Assign a Keyring for Program Signing
For the signing process, a user must be authorized for the IRR.PROGRAM.SIGNING profile in the IBMFAC resource class. Assign the algorithm and key ring name using the APPLDATA keyword on the PERMIT command.
Note: You can allow different key rings for different departments and users.
The entity name in the PERMIT may be suffixed by a group name, a user ID, or both. The PERMIT may be associated with a user ACID or the *ALL record.
To authorize and assign a keyring, issue the following command:
TSS PERMIT(tssuser) IBMFAC(IRR.PROGRAM.SIGNING[group[.user])
APPLDATA('[SHA256] userid/keyring_name')
group
Specifies the group name.
user
Specifies the user name.
SHA256
Specifies the digest algorithm. SHA256 is the only supported algorithm.
userid
Specifies the user ID.
keyring_name
Specifies the eight-byte keyring name.
The keyring is assigned and authorized.
If an algorithm name is included within the APPLDATA string, include a single blank before the USERID name.
The APPLDATA value is extracted by searching for a best match PERMIT in the following order:
■ IRR.PROGRAM.SIGNING.group.user
■ IRR.PROGRAM.SIGNING.user
■ IRR.PROGRAM.SIGNING.group
■ IRR.PROGRAM.SIGNING
Program Signing and Verification
Chapter 22: Invoked Sub-functions 587
Examples: Program Signing
Authorize a user within a group to use the Pgm_Sign_Ver keyring associated with USER99 and specify the SHA256 algorithm:
TSS PERMIT(USER01) IBMFAC(IRR.PROGRAM.SIGNING.OMVSGRP.USER01)
APPLDATA('SHA256 USER99/Pgm_Sign_Ver')
Authorize any user within a group to use the Pgm_Sign_Ver keyring associated with USER99 and specify the SHA256 algorithm:
TSS PERMIT(USER01) IBMFAC(IRR.PROGRAM.SIGNING.OMVSGRP)
APPLDATA('SHA256 USER99/Pgm_Sign_Ver')
Authorize and Assign a Keyring for Signature Verification
For the verification process, a user must have authority for the IRR.PROGRAM.SIGNATURE.VERIFICATION profile in the IBMFAC resource class.
The verification process uses a single keyring, which needs all of the CA certificates attached to it. Use the APPLDATA keyword on the PERMIT command to assign the keyring. This PERMIT can be associated with the *ALL record.
To authorize and assign a keyring, issue the following command:
TSS PERMIT(ALL)
IBMFAC(IRR.PROGRAM.SIGNATURE.VERIFICATION)
APPLDATA('[SHA256] userid/keyring_name')
userid
Specifies the user ID.
keyring_name
Specifies the eight-byte keyring name.
The keyring is assigned and authorized.
Examples: Signature Verification
Authorize all users to use the Pgm_Sign_Ver keyring associated with USER99 and specify the SHA256 algorithm:
TSS PER(ALL) IBMFAC(IRR.PROGRAM.SIGNATURE.VERIFICATION)
APPLDATA('SHA256 USER99/Pgm_Sign_Ver')

Appendix A: Prefixed Resources 589
Appendix A: Prefixed Resources
CA Top Secret manages general and prefixed resources.
Resources Supporting Masking Characters
Prefixed resources that support masking characters are:
■ APPCID
■ APPCLU
■ APPCSI
■ APPCTP
■ DB2BASE
■ DB2COLL
■ DB2PKG
■ DLFCLASS
■ DSNAME
■ DTADMIN
■ DTSYSTEM
■ DTTABLE
■ DTUTIL
■ JESJOBS
■ JESSPOOL
■ MQADMIN
■ MQCMDS
■ MQCONN
■ MQNLIST
■ MQPROC
■ MQQUEUE
■ NODES
■ OPERCMDS
■ PANAPT
■ SDSF
Resources Supporting Masking Characters
590 User Guide
■ VMMDISK
■ VSESLIB
■ VSEMEMBR
■ WRITER
Prefixed resources have an attribute of MASK when the RESCLASS is displayed using the TSS LIST(RDT) RESCLASS(resource class) command.
Appendix B: Predefined Resources 591
Appendix B: Predefined Resources
This section contains the following topics:
Predefined Resource Classes for z/OS (see page 591) Predefined Resource Classes for z/VM (see page 596)
Predefined Resource Classes for z/OS
The predefined resource classes for z/OS are:
Type Resource Class Keyword
APPC transaction programs and profiles APPCTP
APPC side information files APPCSI
APPC logical units APPCPORT
APPC logical units APPCLU
ACID cross authorization ALT-ACID
CA-VMAN CAADMIN
CA-Librarian® CACCFDSN
Sysview CAGSVX
CA-Librarian CALIBMEM
CA-DISPATCH™ reports CAREPORT
CA-TAPE CATAPE
CA-VMAN CAVAPPL
SOMOBJECTS CBIND
VM system CP commands CPCMD
ICSF Keys CSFKEYS
ICSF Services CSFSERV
CICS DB2 CTSDB2
Data set DATASET
Discontiguous Saved Segments / Named Saved Systems
DCSS
CA-Datacom DCTABLE
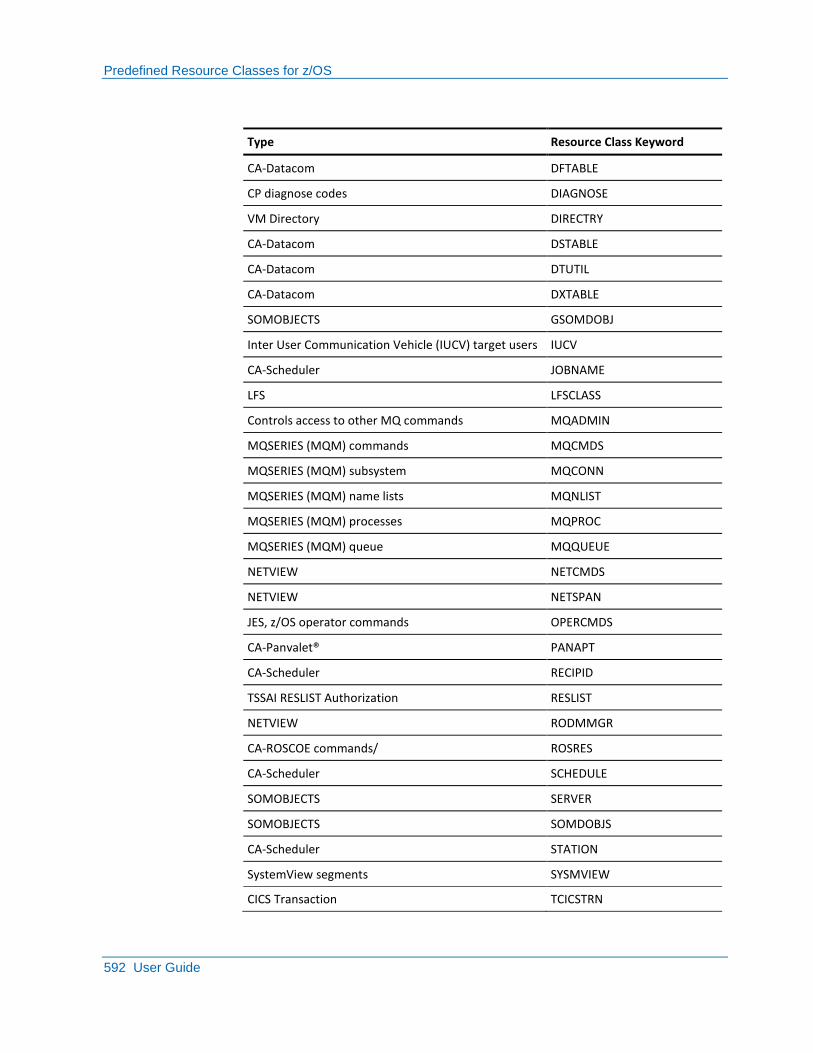
Predefined Resource Classes for z/OS
592 User Guide
Type Resource Class Keyword
CA-Datacom DFTABLE
CP diagnose codes DIAGNOSE
VM Directory DIRECTRY
CA-Datacom DSTABLE
CA-Datacom DTUTIL
CA-Datacom DXTABLE
SOMOBJECTS GSOMDOBJ
Inter User Communication Vehicle (IUCV) target users IUCV
CA-Scheduler JOBNAME
LFS LFSCLASS
Controls access to other MQ commands MQADMIN
MQSERIES (MQM) commands MQCMDS
MQSERIES (MQM) subsystem MQCONN
MQSERIES (MQM) name lists MQNLIST
MQSERIES (MQM) processes MQPROC
MQSERIES (MQM) queue MQQUEUE
NETVIEW NETCMDS
NETVIEW NETSPAN
JES, z/OS operator commands OPERCMDS
CA-Panvalet® PANAPT
CA-Scheduler RECIPID
TSSAI RESLIST Authorization RESLIST
NETVIEW RODMMGR
CA-ROSCOE commands/ ROSRES
CA-Scheduler SCHEDULE
SOMOBJECTS SERVER
SOMOBJECTS SOMDOBJS
CA-Scheduler STATION
SystemView segments SYSMVIEW
CICS Transaction TCICSTRN
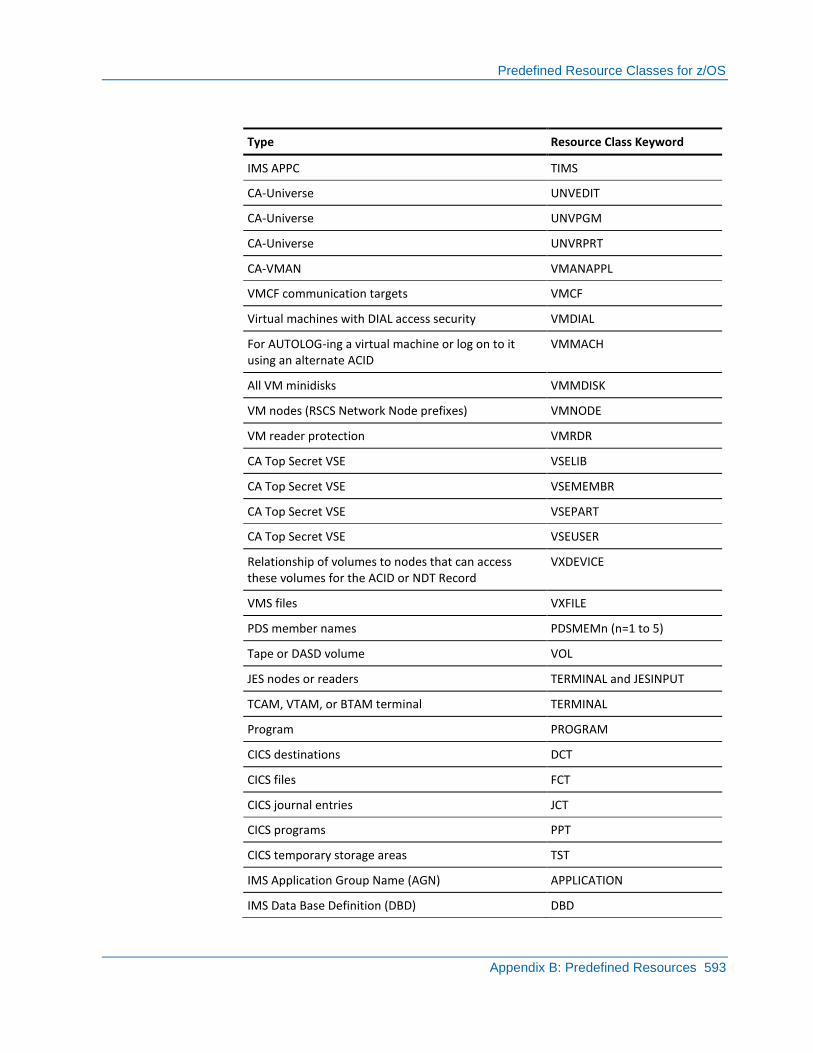
Predefined Resource Classes for z/OS
Appendix B: Predefined Resources 593
Type Resource Class Keyword
IMS APPC TIMS
CA-Universe UNVEDIT
CA-Universe UNVPGM
CA-Universe UNVRPRT
CA-VMAN VMANAPPL
VMCF communication targets VMCF
Virtual machines with DIAL access security VMDIAL
For AUTOLOG-ing a virtual machine or log on to it using an alternate ACID
VMMACH
All VM minidisks VMMDISK
VM nodes (RSCS Network Node prefixes) VMNODE
VM reader protection VMRDR
CA Top Secret VSE VSELIB
CA Top Secret VSE VSEMEMBR
CA Top Secret VSE VSEPART
CA Top Secret VSE VSEUSER
Relationship of volumes to nodes that can access these volumes for the ACID or NDT Record
VXDEVICE
VMS files VXFILE
PDS member names PDSMEMn (n=1 to 5)
Tape or DASD volume VOL
JES nodes or readers TERMINAL and JESINPUT
TCAM, VTAM, or BTAM terminal TERMINAL
Program PROGRAM
CICS destinations DCT
CICS files FCT
CICS journal entries JCT
CICS programs PPT
CICS temporary storage areas TST
IMS Application Group Name (AGN) APPLICATION
IMS Data Base Definition (DBD) DBD
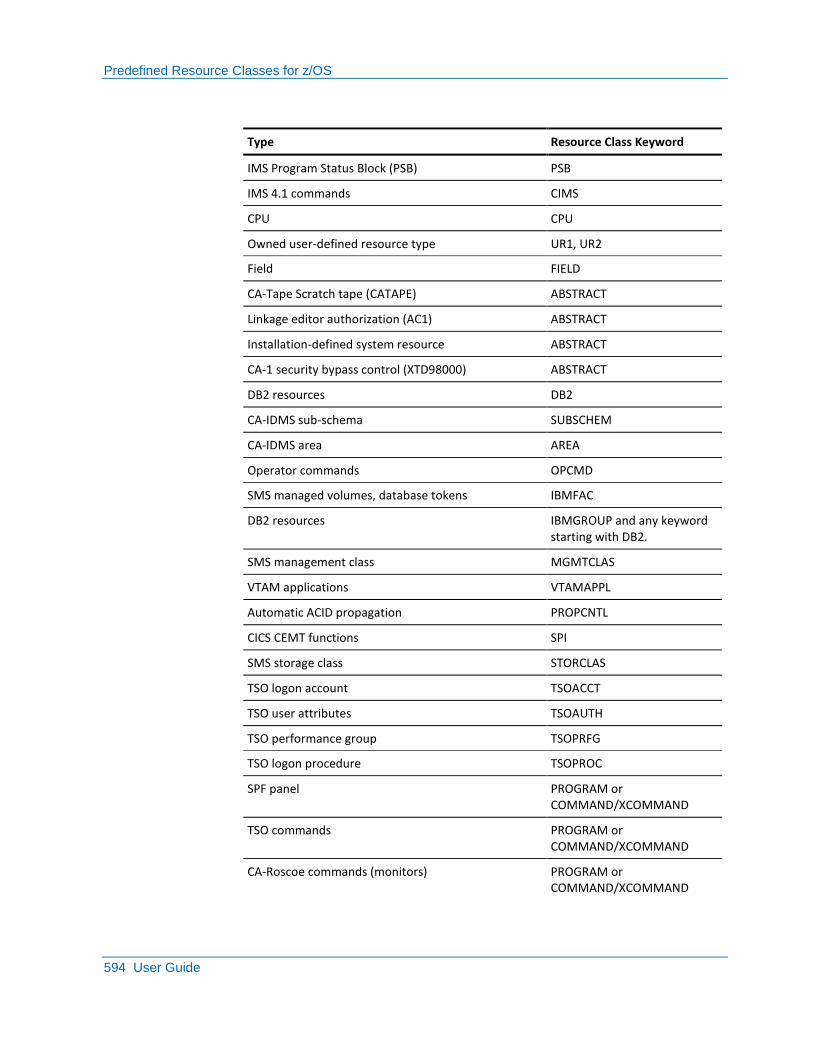
Predefined Resource Classes for z/OS
594 User Guide
Type Resource Class Keyword
IMS Program Status Block (PSB) PSB
IMS 4.1 commands CIMS
CPU CPU
Owned user-defined resource type UR1, UR2
Field FIELD
CA-Tape Scratch tape (CATAPE) ABSTRACT
Linkage editor authorization (AC1) ABSTRACT
Installation-defined system resource ABSTRACT
CA-1 security bypass control (XTD98000) ABSTRACT
DB2 resources DB2
CA-IDMS sub-schema SUBSCHEM
CA-IDMS area AREA
Operator commands OPCMD
SMS managed volumes, database tokens IBMFAC
DB2 resources IBMGROUP and any keyword starting with DB2.
SMS management class MGMTCLAS
VTAM applications VTAMAPPL
Automatic ACID propagation PROPCNTL
CICS CEMT functions SPI
SMS storage class STORCLAS
TSO logon account TSOACCT
TSO user attributes TSOAUTH
TSO performance group TSOPRFG
TSO logon procedure TSOPROC
SPF panel PROGRAM or COMMAND/XCOMMAND
TSO commands PROGRAM or COMMAND/XCOMMAND
CA-Roscoe commands (monitors) PROGRAM or COMMAND/XCOMMAND
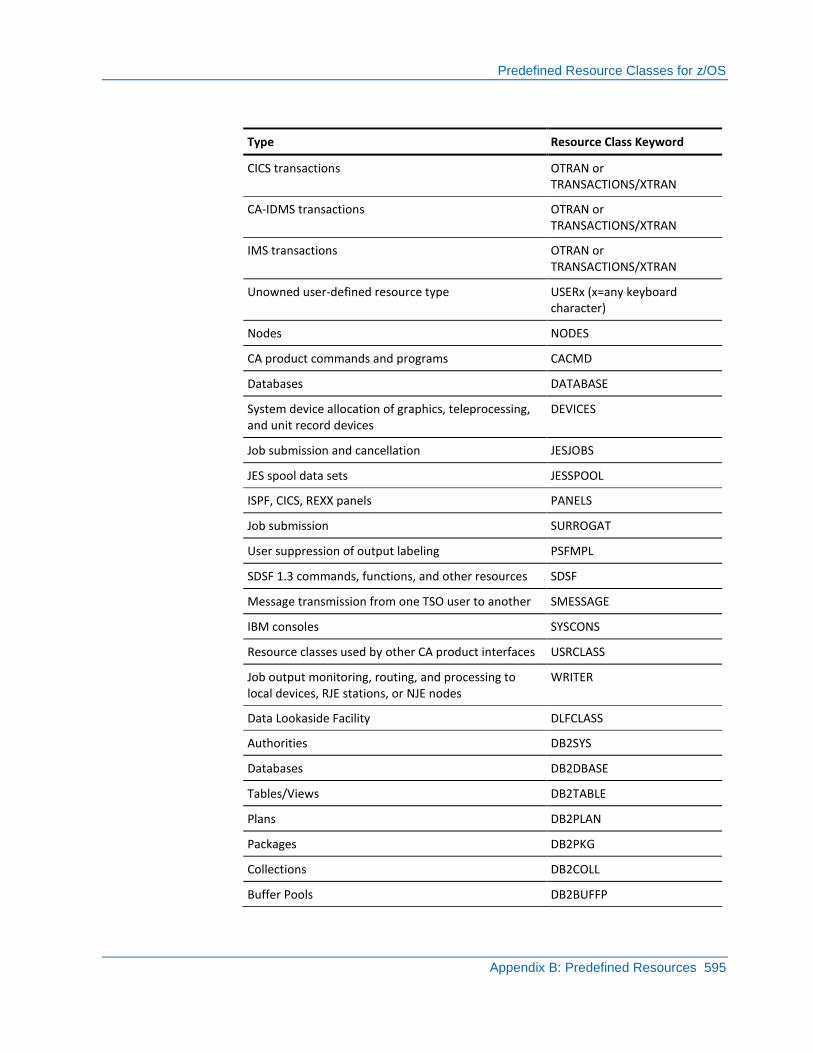
Predefined Resource Classes for z/OS
Appendix B: Predefined Resources 595
Type Resource Class Keyword
CICS transactions OTRAN or TRANSACTIONS/XTRAN
CA-IDMS transactions OTRAN or TRANSACTIONS/XTRAN
IMS transactions OTRAN or TRANSACTIONS/XTRAN
Unowned user-defined resource type USERx (x=any keyboard character)
Nodes NODES
CA product commands and programs CACMD
Databases DATABASE
System device allocation of graphics, teleprocessing, and unit record devices
DEVICES
Job submission and cancellation JESJOBS
JES spool data sets JESSPOOL
ISPF, CICS, REXX panels PANELS
Job submission SURROGAT
User suppression of output labeling PSFMPL
SDSF 1.3 commands, functions, and other resources SDSF
Message transmission from one TSO user to another SMESSAGE
IBM consoles SYSCONS
Resource classes used by other CA product interfaces USRCLASS
Job output monitoring, routing, and processing to local devices, RJE stations, or NJE nodes
WRITER
Data Lookaside Facility DLFCLASS
Authorities DB2SYS
Databases DB2DBASE
Tables/Views DB2TABLE
Plans DB2PLAN
Packages DB2PKG
Collections DB2COLL
Buffer Pools DB2BUFFP
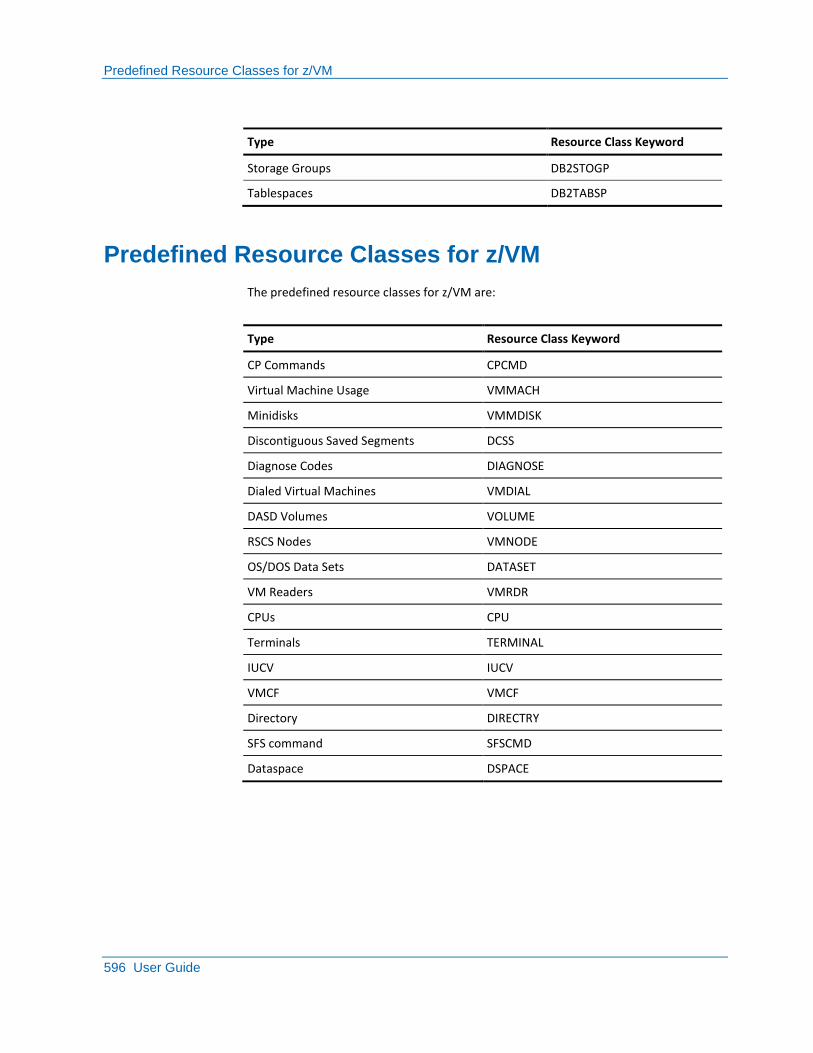
Predefined Resource Classes for z/VM
596 User Guide
Type Resource Class Keyword
Storage Groups DB2STOGP
Tablespaces DB2TABSP
Predefined Resource Classes for z/VM
The predefined resource classes for z/VM are:
Type Resource Class Keyword
CP Commands CPCMD
Virtual Machine Usage VMMACH
Minidisks VMMDISK
Discontiguous Saved Segments DCSS
Diagnose Codes DIAGNOSE
Dialed Virtual Machines VMDIAL
DASD Volumes VOLUME
RSCS Nodes VMNODE
OS/DOS Data Sets DATASET
VM Readers VMRDR
CPUs CPU
Terminals TERMINAL
IUCV IUCV
VMCF VMCF
Directory DIRECTRY
SFS command SFSCMD
Dataspace DSPACE
Appendix C: Using the R_cacheserv Callable Service 597
Appendix C: Using the R_cacheserv Callable Service
The R_cacheserv Callable Service provides support for SAF Callable Service R_cacheserv functions:
■ Harden
■ Restore
■ Version fetch
■ Delete
This appendix describes how to use the R_cacheserv Callable Service. For information about invoking the R_cacheserv callable service, see the IBM manual z/OS Security Server RACF Callable Services.
The R_cacheserv Callable Service optionally stores caches on a file. When caches are stored on a file, it is called hardening.
To harden a cache
1. Add the following DD statement to the CA Top Secret procedure JCL:
//RCACHE DD DSN=rcache.vsam.file.name, DISP=OLD
file.name
The filename used in the INITCSRV job
2. Insert RCACHE and RCQNAME control options to specify hardening and to define the cache names that are to be hardened.

Appendix D: Enterprise Identity Mapping 599
Appendix D: Enterprise Identity Mapping
This section contains the following topics:
Enterprise Identity Mapping (see page 599) Default Names (see page 600) EIM Fields (see page 600) PROXY Fields (see page 601) Default EIM Record (see page 601) Default Proxy Record (see page 602)
Enterprise Identity Mapping
Enterprise Identity Mapping (EIM) creates a unique identity for an individual or resource and relates that identity to all other representations of the given entity (individual or resource) within the organization.
EIM provides a means to manage multiple user registries on multiple platforms by storing information about the relationships between user or resource identities and allowing EIM-enabled applications to map from one identity to another.
An EIM environment includes at least one domain controller, EIM domain, and EIM clients. The domain controller is a LDAP server, which is used to manage and control data stored in an EIM domain, such as EIM identifiers and registry definitions.
For information on EIM, see IBM’s z/OS Security Server Enterprise Identity Mapping (EIM) Guide and Reference, SA22-7875-00.
The user ACID contains the name of the EIM profile. Default EIM and PROXY information is needed for IRR.EIM.DEFAULTS. Default PROXY information is needed for IRR.PROXY.DEFAULTS.

Default Names
600 User Guide
Default Names
CA Top Secret provides a default name for EIM and PROXY information. If information is not provided in the EIM and PROXY profiles, CA Top Secret looks to the EIMDEF record and then the PROXYDEF record to retrieve default information. Both records contain the fields:
■ BINDDN(PRXBINDDN)
■ BINDPW(PRXBINDPW)
■ ENABLE|DISABLE(EIMOPTION)
■ DOMAINDN(EIMDOMAIN)
■ KERBREG, X509REG
■ LDAPHOST(PRXLDAPHST)
■ LOCALREG(EIMLOCREG)
EIM Fields ENABLE|DISABLE (EIMOPTION)
Specifies whether or not new connections may be established with the specified EIM domain.
DOMAINDN (EIMDOMAIN)
The distinguished name of an EIM domain
Length: Up to 1023 characters
LOCALREG (EIMLOCREG)
The name of the local registry
Length: Up to 255 characters
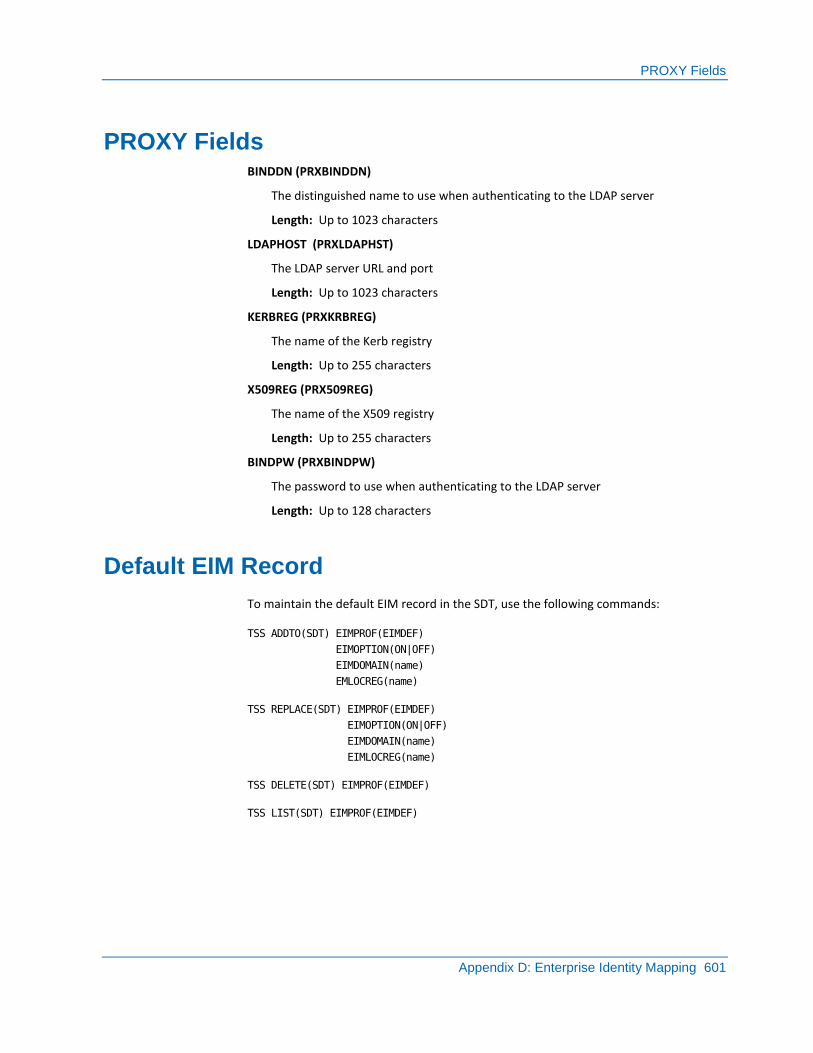
PROXY Fields
Appendix D: Enterprise Identity Mapping 601
PROXY Fields BINDDN (PRXBINDDN)
The distinguished name to use when authenticating to the LDAP server
Length: Up to 1023 characters
LDAPHOST (PRXLDAPHST)
The LDAP server URL and port
Length: Up to 1023 characters
KERBREG (PRXKRBREG)
The name of the Kerb registry
Length: Up to 255 characters
X509REG (PRX509REG)
The name of the X509 registry
Length: Up to 255 characters
BINDPW (PRXBINDPW)
The password to use when authenticating to the LDAP server
Length: Up to 128 characters
Default EIM Record
To maintain the default EIM record in the SDT, use the following commands:
TSS ADDTO(SDT) EIMPROF(EIMDEF)
EIMOPTION(ON|OFF)
EIMDOMAIN(name)
EMLOCREG(name)
TSS REPLACE(SDT) EIMPROF(EIMDEF)
EIMOPTION(ON|OFF)
EIMDOMAIN(name)
EIMLOCREG(name)
TSS DELETE(SDT) EIMPROF(EIMDEF)
TSS LIST(SDT) EIMPROF(EIMDEF)
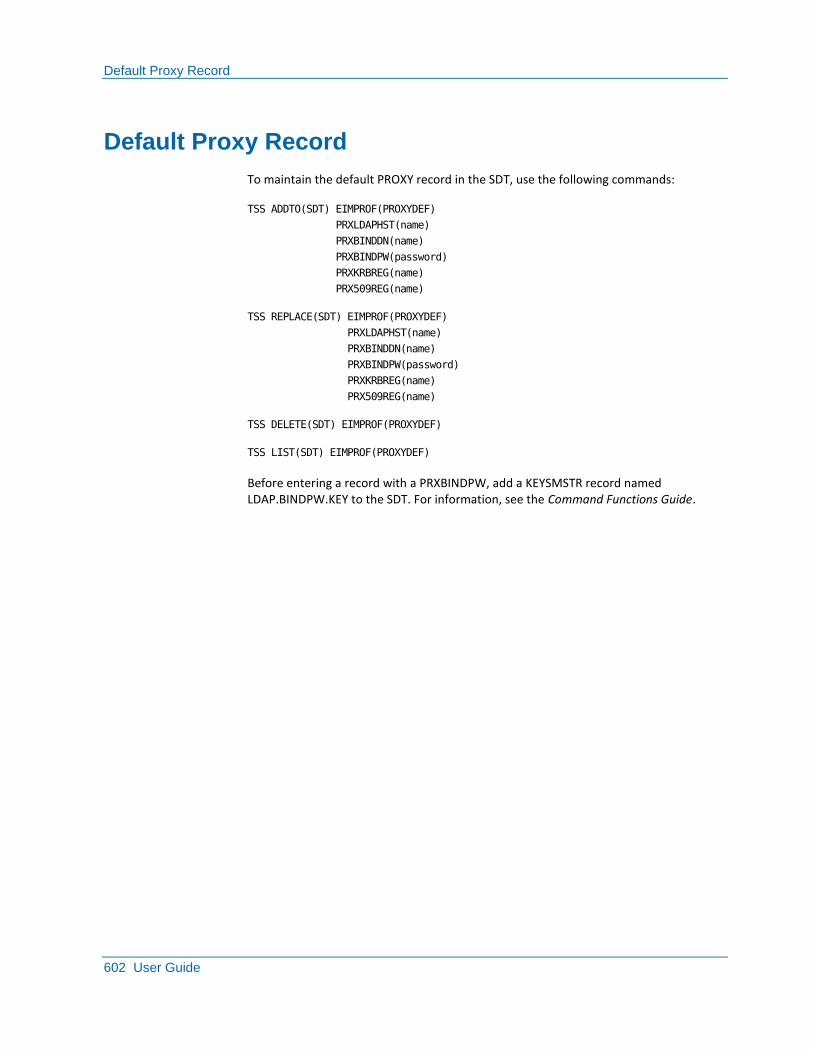
Default Proxy Record
602 User Guide
Default Proxy Record
To maintain the default PROXY record in the SDT, use the following commands:
TSS ADDTO(SDT) EIMPROF(PROXYDEF)
PRXLDAPHST(name)
PRXBINDDN(name)
PRXBINDPW(password)
PRXKRBREG(name)
PRX509REG(name)
TSS REPLACE(SDT) EIMPROF(PROXYDEF)
PRXLDAPHST(name)
PRXBINDDN(name)
PRXBINDPW(password)
PRXKRBREG(name)
PRX509REG(name)
TSS DELETE(SDT) EIMPROF(PROXYDEF)
TSS LIST(SDT) EIMPROF(PROXYDEF)
Before entering a record with a PRXBINDPW, add a KEYSMSTR record named LDAP.BINDPW.KEY to the SDT. For information, see the Command Functions Guide.
Index 603
Index
$
$SDSF Default Protection • 294 $SDSF Resource Class Definition • 293
A
About CPF • 376 About Facilities • 428 About the z/OS Standard Interface • 457 Access Authorization • 210, 246 Access Authorization Information • 146 Access Control at the Record and Field Level • 184 Access Denial • 195 Access Level Checking • 279 Access Level Placement • 185 Access Profiles • 298 Access Restriction by Access Level • 183 Access Restriction by Facility • 181 Access Restriction by Program Path • 182 Access Restriction by SMFID • 187 Access Restriction with the ACTION Keyword • 191 Access to all Data Sets • 224 Access to all Programs • 249 Access to all Volumes • 210 Access to JES in FAIL Mode • 272 Accessing All Transactions • 266 Accidental PDS Corruption Prevention • 235 ACEE= Parameter Requirements • 460 ACEP • 433 ACID and Record Information • 144 ACID Association • 452 ACID Authorities • 103 ACID Derivation • 450 ACID Expiration Date • 90 ACID Hierarchy Return Fields • 409 ACID Retrieval • 421 ACID Structure • 25 ACID Substitution • 169 ACID Validation • 28 ACIDs • 25 ACIDs with Limited Access • 280 ACIDs Without a Password • 141 ACTION - Permit Action (Exit) • 492 Activate and Deactivate the z/VM Facility • 453 Activate Mirroring • 553, 555
Activate Your New Primary and Backup Security Files (Non-Shared Environment) • 562, 566, 571
Activate Your New Primary and Backup Security Files (Shared Environment) • 562, 566, 571
Activity and Violation Reports • 58 Activity Logging • 58 Add a New Facility • 429 Add and Remove an SMS Application Identifier
(SMSAPPL) • 306 Add and Remove an SMS Data Class (SMSDATA) •
307 Add and Remove an SMS Management Class
(SMSMGMT) • 307 Add and Remove an SMS Storage Class (SMSSTOR) •
308 Add Resources to the ALL Record • 189 Additional Access Levels • 184 Ad-Hoc Reporting • 59 Administer an ACID's DEFNODES • 393 Administrative Authority • 101, 386 Allocate a New Security File with a New ACID Size •
85, 86 Allocate a VSAM File • 52 Alternate ACID Job Control • 273 Alternate Way to Implement Nodes • 280 APPC • 433 APPCLU Record • 312 Application Access Authorization • 250 Application Interface Checks • 411 Application Interface Components • 406 Application Program Code Logic • 406 Application Protection • 249 Area Security • 445 Assembler • 423 Assign a Profile Outside Your Scope • 82 Assign a Program Path • 248, 258 Assign Access Levels • 257 Assign Catalog Management Access Levels • 227 Assigning Values for Defined Fields • 38 Attach a Group to an ACID • 84 Attach a Profile to an ACID • 80 Attach a Temporary Profile • 81 Attributes for Activating or Deactivating Generic
Prefixing • 5, 162 AUDIT Record • 316
604 User Guide
Audit/Tracking File • 61 Audit/Tracking File(s) Backup • 559 Auditing • 67 Auditing Users and Resources • 68 Auditors • 30 Authority • 32 Authority for APPCLU • 312 Authority for One Resource Class • 118 Authority for STC • 369 Authority for the ALL Record • 311 Authority for the AUDIT record • 316 Authority for the DLF Record • 317 Authority for the FDT Record • 319 Authority for the MLS Record • 325 Authority for the NDT Record • 326 Authority for the RDT • 336 Authority for the SDT Record • 348 Authorize Access • 256 Authorize and Assign a Keyring for Program Signing •
586 Authorize and Assign a Keyring for Signature
Verification • 587 Authorize OTRAN Access • 260 Automatic Data Set Protection • 217 Automatic Password Generation • 140
B
Backup and Restore • 547 BATCH • 433 Bypass Label Processing Security • 231 Bypass Security Checking • 452 Bypass Volume Level Security with NOVOLCHK • 211 Bypassing LCF Security • 265
C
CA Technologies Product References • 3 CA Top Secret Activation • 542 CA Top Secret Components • 41 CA Top Secret Exit/User Entry Points • 491 CA Top Secret Files • 42 CA Top Secret Return Data Fields • 409 CA7 • 433 Calculate a Value for Column • 356 Card and Remote Reader Security • 450 Case in Passwords • 130 CFRM Policy • 50 CHANGE - Security File Change • 493 Change a Facility’s Definition • 431
Change a Facility’s Name • 432 Change a User Password • 4, 132 Change an Expiration Date • 91 Change Data in the APPCLU Record • 315 Change Non-Maskable Resources to Support
Masking • 5, 336, 345 Change the Restricted Password List • 128 Change Values in the NDT • 334 Change Values in the RDT • 342 Change Your Own Password • 4, 133 Changing Control Options With the O/S MODIFY
Command • 152 Character String Class Name • 464 CICS MQSERIES Security • 299 CICSPROD • 4, 434 CICSTEST • 4, 435 Class Name Format • 464 COBOL • 425 Combining User Defined and Standard Levels • 186 COMMAND - Command Use Validation • 496 Command and Monitor Security • 446 Command Functions • 38 Command Keywords Used With CPF • 391 Command Propagation Facility • 375 Command Security • 441 Command Syntax • 39 Commands Valid for LDS • 526 Common Components • 42 Common Exit Parameters • 489 Compare the Security Records of ACIDs • 94 COMPLETE • 436 Concurrent Security Modes • 56 CONSOLE • 436 Console Protection • 238 Contact CA Technologies • 3 Control ACIDs • 98 Control an LDAP Node • 540 Control Options • 149 Control Options and the O/S START Command • 151 Control Options and the Parameter File • 150 Control Options and the PARM Field • 151 Control Options and the TSS MODIFY Command •
152 Controlling Access • 177 Controlling Access From Remote Nodes • 377 Controlling Applications that Invoke R_auditx • 577 Controlling Applications that Invoke R_dcekey • 578 Controlling Applications that Invoke R_Getinfo • 579

Index 605
Controlling Applications that Invoke R_ticketserv / R_GenSec • 579
Copy the Backup Security File to the New Security File • 85, 88
CPF - Command Being Sent to Remote TSS • 499 CPF (ON) and CPF (OFF) • 385 CPF Architecture • 378 CPF Features • 378 CPF Gateway Support • 402 CPF in a SYSPLEX Environment • 385 CPF Journal Files • 4, 396 CPF Recovery File • 395 CPF Related Control Options • 388 CPF Related MODIFY Commands • 390 CPF Statistics • 398 CPU Access Restriction • 187 CPU Ownership • 173 Create a Backup Security File on DASD • 548 Create a Started Task for the Mirror File • 556 Create a User ACID • 5, 69 Create NDT LDSYSID Options Record • 530 Create the Recovery File • 548, 550 Creating and Setting Up Users • 69 Creating Security Administrators • 97 Customization Ideas • 487
D
Data Areas Used by Sample Programs • 480 DATA Authorities • 104 Data Lookaside Facility (DLF) Record • 317 Data Set Access Authorization • 219 Data Set Access Levels • 220 Data Set Access Validation • 442 Data Set and Volume Checking • 413 Data Set and Volume Level Security • 232 Data Set Checking From the Volume Bypass • 225 Data Set Level Security Bypass • 225 Data Set Masking • 219 Data Set Ownership Removal • 216 Data Set Protection • 215 DATASET - Dataset Access Validation • 500 DB2 Resource Ownership • 301 DB2 Resource Ownership Removal • 301 DB2 Resource Protection • 300 DB2PROD • 436 DB2TEST • 436 Default Attributes for the Console Facility • 239 Default Data Set Protection • 156
Default EIM Record • 601 Default Names • 600 Default Protection • 179, 247 Default Proxy Record • 602 Default Resource Protection • 155 Default Values for Predefined Facilities • 433 Default Volume Protection • 209 Define a CPF Node in the NDT Record • 5, 379 Define a Node • 401 Define a Password for a New User • 131 Define a Password Phrase for a New User • 132 Define a Resource to the RDT • 338 Define a Started Task to the STC Record • 370 Define a VSAM Cluster in the Catalog • 85, 87 Define CALENDAR Records to the SDT • 349 Define Consoles to CA Top Secret • 240 Define Data to the ALL Record • 312 Define Data to the APPCLU Record • 313 Define Data to the AUDIT Record • 316 Define Data to the DLF Record • 318 Define Data to the FDT Record • 320 Define EIMPROF Records to the SDT • 351 Define KERBLINK Records to the SDT • 353 Define KEYSMSTR Records to the SDT • 354 Define LDAP Nodes as NDT Node Elements • 328 Define LDS Global Options as NDT LDSYSID Elements
• 333 Define Linux Nodes as NDT Node Elements • 334 Define MAP Records to the SDT • 355 Define MASK Records to the SDT • 357 Define PSTKAPPL Data to the NDT • 326 Define REALM Records to the SDT • 358 Define RLP Record to SDT • 361 Define SELECT Record to SDT • 362 Define the Mirror Security File (BDAM and VSAM
Components) • 553 Define TIME Record to SDT • 363 Defining Programs for Verification • 583 DEFNODES With a TSS Command • 392 Delegated Resources • 305 Delete an ACID • 90 Delete Record Elements From the SDT • 366 Determine a Group's Expiration Date • 84 DF/DSS • 213 Display Delegated Resources • 305 Display Facility Information • 429 Documentation Changes • 4 DOWN Options • 542 DSF • 214
606 User Guide
DSNPOST - Dataset Post Validation • 501 DUF Tips • 483 Dynamic Extract/Update Facility • 481 Dynamic Update Facility • 418
E
EIM Fields • 600 Enable Automatic Backup for the Security File • 548,
551 Enable LDS Journaling to Record LDAP Requests • 4,
527 Enable RLP Protection • 253 Enable SLP Protection • 270 End-of-Day Shutdown • 544 Enforce Restrictions on Administrator Password
Changes • 4, 133 Enter SDT Definitions • 269 Enterprise Identity Mapping • 599 Entire ACID Substitution • 170 Entry Methods • 40 ENVIRON • 437 Error Return Codes • 483 Establish JES Ownership • 271 Examples
Managing the SIGVER Record • 585 multiuser facilities • 477 Program Signing • 587 Signature Verification • 587
Explicit Access of a PDS Directory • 235 Extend Default Protection • 218 Extended Platform Security • 454 Extending Security With Site Security Exits • 487 Extending Security With the Application Interface •
405 Extending Security With the z/OS Security Interface •
457 Extract Field Data • 420 Extract Installation Data • 418
F
Facilities • 4, 35 Facility Access Authorization • 36 FACILITY Authorities • 106 Facility Checking • 415 Facility List Checking • 415 Facility Matrix Table Administration • 428 FAIL Mode Migration • 56 FDR • 214
FDT Record • 319 FDT Record Data • 319 FETCH/EXECUTE Access of PDS Members • 236 Field Extract and Update Facility • 419 Fields • 37 Fields That Are Not Copied During User Modeling •
76 Fixed Position Substitution • 169 Floating Pattern Masks • 165 Forced Catalog Password Protection • 228 Forced Data Set Password Check • 225 Forced Password Checking for All Data Sets • 226 Forced Password Validation • 142 Forced Passwords • 142 Former Owner Access Removal • 175 Functional ACIDs • 26
G
Gather SLP Information • 268 General Resource Checking • 412 General Resource Class (RIE) • 337 Generate a Random Password • 5, 426 GENERIC Attribute Removal • 163 Generic Prefixing • 160, 209, 218, 245, 248 Generic Prefixing for Applications • 250 Generic Prefixing for Nodes • 276 Generic Prefixing for z/OS • 245 Generic Prefixing for z/VM • 245 Generic Prefixing with PERMIT • 179 Global Authorities • 34 Global Authorization Override • 193 Global Profiles • 82 Global Security Environment Information • 148 Globally Accessible Resources • 192 Group ACIDs • 83 GROUP Entry Monitoring • 199
H
Hardening a Cache • 581 How CA Top Secret Works • 25 How LDS Works • 525 How Resources are Secured • 155 How to Change the Generic Prefixing Setting for
Existing Permissions • 163 How to Create a Mirror Copy of Your Security File •
552 How to Implement a Security File Backup and
Recovery Plan • 547
Index 607
How to Increase ACID Size • 84 How to Recover from a Security File Failure • 562 How to Run the Product with a Mirror File as Primary
Security File • 555 HSM • 437
I
IBM DCE, SystemView, Netview, and OPTIME Protection • 302
ICF Catalogs • 227 Identical ACIDs • 280 IDMSPROD • 437 IDMSTEST • 437 If Both Inclusive and Exclusive LCF Are Used • 264 Implement LDS • 526 Implementing CA Top Secret • 53 Implementing Default Protection • 156 Implementing OTRAN Security • 259 Implicit Access to the PDS Directory • 234 Implicit and Explicit Targeting • 379 IMSPROD • 438 IMSTEST • 438 Index Substitution • 167 Individual ACID Security Information • 147 Individual Permission Removal • 180 Information Feedback • 472 Installation Defined Resource Protection • 254 Installation Exit • 399 Installation Exit Activation • 491 INTERACT • 438 Introduction • 25, 177 Introduction to the API • 405 Invoked Sub-functions • 577 Invoking Support • 484 IO - Voice or Digital Image Request • 501
J
JES • 438 JES Access Levels • 273 JES Masking • 273 JES Resource Protection • 270 JES Startup Considerations • 4, 51 JES2 • 51 JESJOBS Resource Class Protection • 289 JESSPOOL Resource Class Protection • 290 Job Scheduling Security • 451 Job Submission Restriction • 272 Job Submission Validation • 443, 447, 448, 451
L
LCF Security • 262 LDAP Directory Services (LDS) • 525 LDAP Nodes with Multiple URLs • 536 LDAP Nodes with Passwords • 537 LDAPDEST ACID Field • 539 LDAPNODE with a Shared Security File • 535 LDS ACID Field • 538 LDS Recovery File • 528 Level of MQM Security • 297 Limited Access ACIDs • 196 Limiting Access With Exclusive Lists • 263 Limiting Access With Inclusive Lists • 263 List an Expiration Date for a Profile • 81 List by FDT Segment • 324 List by FDTCODE • 324 List by FDTNAME • 323 List by FDTNAME PREFIX • 324 List by PREFIX • 346 List by Resource Class • 347 List by Resource Code • 347 LIST in a Shared Environment • 368 LIST LDS Definitions • 539 List SDT Record Elements • 367 List SDT with PREFIX • 368 List the ALL Record • 312 List the APPCLU Record • 316 List the AUDIT Record • 317 List the DLF Record • 319 List the Entire FDT • 323 List the Entire RDT Record • 346 List the FDT Display Name • 325 List the NDT • 335 List the STC Record • 373 Load Library Pathing • 223 Log User Information • 417
M
Maintaining Special Security Records • 311 Maintaining the MLS Record • 325 Manage the SIGVER Record • 585 Manual Backup of the Security File • 558 Manual Recovery • 574 Mask Combinations • 171 Masking • 164 Masking Nodes • 276 MCS Console Facility Support • 242 MCS Fields • 243
608 User Guide
Mechanics • 489 Member Level Protection Exemption • 234 MESSAGE - Message Editing • 502 Message Queue Manager Protection • 294 MISC1 Authorities • 106 MISC1 Authority Level • 107 MISC2 Authorities • 108 MISC2 Authority Levels • 109 MISC3 Authorities • 110 MISC3 Authority Levels • 110 MISC4 Authorities • 110 MISC4 Authority Levels • 111 MISC5 Authorities • 112 MISC5 Authority Levels • 112 MISC7 Authorities • 112 MISC7 Authority Levels • 112 MISC8 Authorities • 113 MISC8 Authority Levels • 114 MISC9 Authorities • 115 MISC9 Authority Levels • 116 Mixed Case Passwords • 130 Mixing MASK and NOMASK • 344 MLS Record • 325 Model ACIDs • 73 Model an ACID with the CREATE Command • 77 Model an ACID with the MODEL Command • 5, 73 Modify Values in the FDT Record • 322 Modifying Your Security Environment • 149 MQM Facility Definition • 296 MQM Ownership Removal • 295 MQM Resource Classes • 295 MQM Started Task ACID • 296 MQM Switch Profiles • 296 MSGXMEM - Message Editing Cross Memory Mode •
503 Multi-CPU Environments • 49 Multiple Access Authorizations • 194 Multiple Authorization Revoke • 195 Multiple Node Users • 200 Multiple Sign Ons • 449 Multiple Signons • 444 Multiple User Address Space • 474
N
NCCF • 438 NDT LDAPNODE Records • 533 NETVIEW Segment Protection • 304 Network Entry Monitoring • 199
Network Job Entry (NJE) Job Validation • 277 Node Access Levels • 277 Node Descriptor Table (NDT) Record • 326 Node Protection • 276 Non Expiring Password • 134 Non Expiring Password Phrase • 135 NONGENERIC Attribute Removal • 164
O
O/S CANCEL Command • 542 O/S START TSS Commands • 386, 541 O/S STOP Command • 387, 541 Obtaining Feedback • 471 Omitting Characteristics • 78 Online Transaction Protection • 258 OpenEdition z/OS Support • 52 Operator Accountability • 451 Operator Command Access Levels • 281 Operator Command Masking • 281 Operator Commands Restriction • 281 OPERCMDS Resource Class Protection • 291 Optional System Entry Restrictions • 202 Organizational ACIDs • 27 Other Checks for the ACID • 421 OTRAN Generic Prefixing • 260 OTRAN Ownership Removal • 260 OTRAN Program Pathing • 261 OTRAN Security Setup • 259 Output • 492, 495, 498, 499, 500, 501, 502, 503,
504, 505, 506, 509, 511, 512, 513, 514, 516, 517, 518, 520, 521, 522, 523, 524
Output Device Access Levels • 282 Output Device Masking • 282 Output Viewing Permission • 283 Ownership and Authorization • 37 Ownership Removal • 175
P
Parameters • 492, 494, 496, 499, 500, 501, 502, 503, 504, 505, 506, 508, 510, 512, 513, 514, 515, 516, 517, 518, 519, 521, 522, 523, 524
Partial ACID Substitution • 170 PASSPHRASE - Password Phrase Change Entry • 503 PassTicket Definition • 201 PassTicket Generation • 200 PASSWORD - Password Change Entry • 504 Password Content • 127 Password Defaults • 126
Index 609
Password Encryption • 470 Password History • 138 Password Mask Design • 138 Password Masks • 137 Password Phrase Defaults • 127 Password Reverification • 136 Password Reverification with OTRAN • 261 Password Security • 452 Password Validation • 450 Password Violation Threshold • 135 Passwords • 125 Passwords and Password Phrases • 125 Passwords that do not Expire • 141 PDS ALIAS Names • 236 PDS and PDSE Member Level Protection Usage Notes
• 237 PDS Member Level Protection • 233 PDS Member Protection • 232 Performance Shortcuts • 467 Permission Records • 156 Permission Restrictions • 206 Permit Access to the Defined Maps • 269 Permit Access to the Defined Records • 253 Phased Implementation • 55 PIE Resource Masking • 343 PL/I • 424 POSTINIT - Job/Session Post Initiation • 505 Post-Installation Configuration Considerations • 47 Predefined Resource Classes for z/OS • 591 Predefined Resource Classes for z/VM • 596 Predefined Resources • 591 Prefixed Resource Class (PIE) • 337 Prefixed Resources • 589 PREINIT - Job/Session Pre-initiation • 507 Profile ACIDs • 79 Profile Order • 81 Program Access Authorization • 248 Program and Subschema Security • 445 Program Pathing • 222 Program Pathing with Volumes • 210 Program Protection • 247 Program Security • 441, 443 Program Signing • 582 Program Signing and Verification • 581 Program Verification • 583 Programming Examples • 422 Promote or Demote an ACID • 94 Protect Tapes From Destructive Updating • 231 Protecting Facilities • 427
Protecting Resources • 205 Providing Default Protection • 265 PROXY Fields • 601 PSTKAPPL Processing • 327
R
Random Password Generation • 139 RDT Contents • 156 RDT Record • 336 Reactivate an ACID • 93 Reactivate an Expired ACID • 91 READ Access to User Spool Data Sets • 284 Recommendations • 218 Record Level Protection (RLP) • 251 Records and Options Summary • 527 Recover Data for a Non-Shared Security File
(SHRFILE=NO) • 562, 563, 568 Recover Data for a Shared Security File
(SHRFILE=YES) • 562, 563, 568, 571 Recovery • 561 Recovery and Accountability • 398 Recovery File Backup • 559 Register 15 Return Codes • 474 Reinitialization After Temporary Shutdown • 545 Relationship Between Data Sets and Volumes • 37 Remove a Procedure Name • 372 Remove a Resource from the RDT • 345 Remove Administrative Authorities • 119 Remove Application Ownership • 250 Remove Data From the APPCLU Record • 315 Remove Data From the AUDIT Record • 317 Remove Data From the DLF Record • 318 Remove Data from the FDT Record • 323 Remove Data From the NDT • 335 Remove Dates From CALENDAR Records • 365 Remove Fields From MAP Records • 365 Remove Fields From MASK Records • 365 Remove Fields From RLP Records • 365 Remove Fields From SDT Records • 365 Remove Fields From SELECT Records • 366 Remove Ownership • 244 Remove Ownership of JES • 271 Remove Pending Commands • 396, 529 Remove the STCACT Attribute • 372 Remove Times From TIME Records • 366 Removing Ownership • 247 Replace SDT Data Elements • 364 Report Generation • 59
610 User Guide
Request Record Field Characteristics • 407 Required Access Levels • 221 Required Backup and Restore Access Authorizations
• 213 Required CASECAUT Authorizations for Changing
Password Fields • 4, 121 Required CASECAUT Authorizations for Issuing
Digital Certificate and Keyring Commands • 123 Reserved Parameters • 255 RESOURCE - Resource Access Validation • 510 Resource Access Level • 118 Resource Access Permission • 178 RESOURCE Authorities • 117 Resource Checking Bypass • 309 Resource Class Translation • 176 Resource Classes • 206 Resource Classes Classification • 461 Resource Level Security • 58 Resource List Checking • 416 Resource Masking Implications • 344 Resource Name List Service Support • 484 Resource Outside Scope • 118 Resource Owner Location • 174 Resource Owner Selection • 158 Resource Ownership • 147, 157 Resource Protection • 36 Resources Longer than Eight Characters • 343 Resources Supporting Masking Characters • 589 RESPOST - Resource Post Validation • 511 RESPOSTX - Resource Post Validation Cross Memory
Mode • 512 Restart After End-of-Day Shutdown • 546 Restart After IPL • 544 Restart After Temporary Shutdown • 545 Restore • 560 Restrict Signons to Specific Devices • 196 Restricted Administrative Authorities • 4, 120 Restricted Control Options • 150 RESXMEM - Resource Validation Cross Memory
Mode • 513 Return Codes • 410, 467, 486, 493, 496, 499, 500,
501, 502, 503, 504, 505, 507, 510, 511, 512, 513, 515, 516, 517, 518, 520, 521, 522, 523, 524
Returned Format • 485 Review User Information • 71 RLP Implementation • 252 ROSCOE • 439 Route Code 9 Consoles • 59 RSTDACC Authority • 118
S
Scope • 30 SCOPE Authority • 119 Screen Level Protection (SLP) • 267 SDSF in FAIL Mode • 286 SDSF Masking • 292 SDSF Object Protection Through SAF • 287 SDSF Resource Class Protection • 288 SDSF Resource Protection • 285, 291 SDT Record • 348 Secure Catalogs • 226 Secure Related Diagnostic Programs • 236 Secure VSAM (Non-ICF) Catalogs • 228 Securing BATCH Jobs • 449 Securing CA IDMS • 444 Securing CA Roscoe IE • 446 Securing CICS • 442 Securing IMS • 447 Securing Started Tasks (STC) • 451 Securing TSO • 440 Securing z/VM • 453 Security Administration • 442, 443, 445, 447, 448 Security Environment Refresh • 153 Security Event Logging • 64 Security File Serialization • 575 Security Files Among Networked Machines • 399 Security for Other Products • 455 Security Key • 443 Security Modes • 54 Security Record Segments and Fields • 38 Security Reports • 66 Security Under r15 • 444 Security Validation Algorithm • 37 SESSEND - Session (User) Termination • 515 Set a Password Expiration Interval • 134 Set Limited Duration Suspensions • 93 Set Up LCF Security • 263 Setting up Resource Definitions and Ownership •
155 Sharing Security Files Between z/VM, z/VSE, and
z/OS • 454 Signon Security and Authorization Restrictions • 441,
442, 444, 446, 448, 449 SITE - Racheck Class=Instexit • 516 SMF • 50 SMS Data Fields • 306 Source of Origin Access Restriction • 190 Special Characters in Passwords • 129
Index 611
Special Security Records • 45 Specific Device Output Restrictions • 282 Specify the TSSRNAME • 419 Spool Data Set Masking • 283 Spool Data Sets Access Levels • 284 Spool Data Sets Protection • 283 SSL Definitions • 531 Standard Macro Instructions • 476 Start and Stop LDS • 539 Start the Product with the Mirror as the Primary
Security File • 556, 557 Start up and Shutdown • 541 Started Task Command (STC) Record • 369 Startup • 542 Status Information • 143 Status Return Codes • 411 STC • 439 STC Security Bypass • 48 SUBMIT - Internal Reader Submission • 516 Supported SU32 Forms • 458 Suspend ACIDs Automatically Based On Inactivity
Thresholds • 4, 91 Suspended ACID Reinstatement • 136 Synchronizing Information Across Nodes • 376 Synchronous and Asynchronous Processing • 379 SYSOUT Validation • 274 Sysplex Coupling Facility • 49 SYSPLEX XES and XCF Security • 377 System Entry Validation and Password Propagation •
399 System Predefined Resources • 5, 336 SystemView Segment Protection • 303
T
Tape Management Packages • 230 Tape Volume Protection • 230 Temporary Shutdown • 543 TERM - Job (Address Space) Termination • 517 Terminal Access Restriction • 188 Terminal Protection • 244 Terminal Security • 441, 443, 445, 446, 448 The *ALL* Resource Name • 172 The Address Space Environment • 475 The ALL Record • 311 The Auditor • 100 The JES2 CA Top Secret Connection • 270 The LCF Decision Process • 264 The OPTIME Field • 304
The RACROUTE REQUEST=AUTH Call • 461 The RACROUTE REQUEST=EXTRACT Call • 469 The RACROUTE REQUEST=FASTAUTH Call • 463 The RACROUTE REQUEST=VERIFY Call • 459 The Restricted Password List • 128 The Security Administrator • 28 The TSSPROT Utility • 229 Through USER221 • 440 Time of Use Monitoring • 197 TONE • 439 Transaction Level Security • 57 Transaction Security • 445 Transaction/Command Checking • 414 Transfer Resource Ownership • 174 TSO • 439 TSO Online Job Submission • 52 TSO SPF Panel Protection • 249 TSS Command Execution • 398 TSSACC Field Specifications • 413 TSSBCKUP Procedure • 558 TSSCLASS and RNAME Values • 414 TSSCPR Utility • 400 TSSINSTX Characteristics • 488 TSSLDS Server Subtask • 527 TSSTRACK • 60 Types of Administrative Authorities • 34 Types of Administrators • 29
U
UNDEFIND - Undefined Acid Entry • 518 Undercutting • 161 Unique Access Levels for Dynamically Defined
Resources • 185 Update Installation Data • 419 Update the Field Data • 420 User Defined Resource Classes • 337 User Messages and Violations Suppression • 60 User Requested Generation • 140 USER0: • 439 Userid Owner Identification • 278 USERnnn • 430 Using Generic Prefixing • 255, 266 Using Reverification • 266 Using the R_cacheserv Callable Service • 597
V
VAMSPF • 440 Variable Character Substitution • 166
612 User Guide
Verify a Signed Program • 584 Viewing Authority • 145 Viewing Your Security Environment • 143 Violation Limits • 63 Violations and Logging • 62 Violations, Logging, Reporting, and Auditing • 61 VIOLATN - Violation Detected • 520 VIOXMEM - Violation Detected - Cross Memory
Module • 521 VM • 440 VOLPOST - Volume Post Validation • 522 VOLUME - Volume Access Validation • 523 Volume Access Levels • 208 Volume Level Security Bypass • 211 Volume Management Packages • 212 Volume Only Level Security • 211 Volume Protection • 207 VTOC Index Protection • 212
W
What Happens When a Command is Issued • 394 WRITER Resource Class Protection • 291 WYLBUR • 440
Z
ZAP, UTILITY, IMPORT, EXPORT Security • 447 Zone, Division, and Department ACIDs • 72