
BSCW 5.1 Manual
265
BSCW 5.1 Manual August 2017
-
Upload
khangminh22 -
Category
Documents
-
view
1 -
download
0
Transcript of BSCW 5.1 Manual

BSCW 5.1
Manual
August 2017

BSCW – Basic Support for Cooperative Work, Version 5.1
http://www.bscw.de/
BSCW is © 1995-2017 Fraunhofer FIT and OrbiTeam Software GmbH & Co. KG
Distributed by OrbiTeam Software GmbH & Co. KG in cooperation with Fraunhofer FIT – Institute for Applied Information Technology
OrbiTeam Software GmbH & Co. KG Endenicher Allee 35 53121 Bonn Germany http://www.orbiteam.de Email: [email protected]
Text and figures presented in this manual have been prepared with high diligence. However, the authors cannot guarantee for the correctness. Therefore the publisher and the authors do not offer any warranties or representations, nor do they accept any liabilities with respect to the application description.
All rights reserved. © 2017 OrbiTeam Software GmbH & Co. KG.

Contents iii
Contents
1 Overview 1
1.1 Benefits of using BSCW 1
1.2 Prerequisites for using BSCW 1 1.3 Additional information about BSCW 2
1.4 BSCW at a glance 2 1.4.1 The folder page 2
1.4.2 Shared objects in a workspace 3 1.4.3 The personal objects 5
1.4.4 Actions on the current folder or workspace 6 1.4.5 Actions on selected objects 7
1.4.6 Actions on a particular object 7 1.5 Operating your own BSCW server 8
1.6 What’s new in version 5.1? 9
2 Getting Started 11
2.1 Registering as a BSCW user 11 2.1.1 Registering as a new user 11
2.1.2 Changing your password 12 2.1.3 Forgot your password? 12
2.1.4 Registering an additional e-mail address 13 2.1.5 Destroying one’s own user account 13
2.2 Logging into your BSCW workspaces 14 2.2.1 Starting a BSCW session 14
2.2.2 First time login 14 2.2.3 Closing a BSCW session 15
2.2.4 Parallel BSCW sessions 16 2.2.5 Alternative methods of authentication 16
2.3 Choosing the user interface language 17 2.4 Your personal profile 17
2.5 Configuring your Web browser 19
3 Basic Concepts and Functions 21
3.1 The Web-based user interface 21 3.1.1 Header 22
3.1.2 List of entries 25 3.2 Shareable objects 28
3.2.1 Document 28 3.2.2 Document under version control 29
3.2.3 Note 29 3.2.4 URL 30
3.2.5 Folder 30 3.2.6 Portal 30
3.2.7 Contact list 30

iv Contents
3.2.8 Discussion forum 31
3.2.9 Blog 31 3.2.10 E-Mail message 31
3.2.11 Search folder 31 3.2.12 RSS feed 31
3.2.13 Template folder 32 3.2.14 Website folder 32
3.2.15 Calendar 32 3.2.16 Appointment scheduling 32
3.2.17 Poll and voting 32 3.2.18 Community 33
3.2.19 Project and phase 33 3.2.20 Task 33
3.2.21 Flow folder 33 3.3 Actions 33
3.3.1 Creating and changing objects 34 3.3.2 Uploading and changing documents 35
3.3.3 Inviting members 37 3.3.4 Actions on objects in a folder 38
3.4 Personal objects 43 3.4.1 Personal portal 44
3.4.2 Bookmarks 47 3.4.3 Personal templates 47
3.4.4 Clipboard 48 3.4.5 Trash 50
3.5 Public space 50 3.5.1 Allowing anonymous access 51
3.5.2 Accessing folders anonymously 51 3.5.3 Public entry page for anonymous access 52
3.6 Events 54 3.6.1 Displaying event information 54
3.6.2 Event types 55 3.6.3 Catching up on recent events 55
3.6.4 Subscribing to event services 55 3.7 Search 58
3.7.1 The search form 59 3.7.2 Special actions in search folders 63
3.8 Customizing the user interface 64 3.8.1 Style sheets 64
3.8.2 Levels of proficiency 64 3.8.3 User preferences 65
3.8.4 Views on folders 68 3.8.5 Banners 71
3.9 Metadata and info page 72 3.9.1 Metadata profiles 72
3.9.2 Tags 76 3.9.3 The info page 77
4 Workspaces, Access Rights and Roles 79
4.1 Creating and managing shared workspaces 79
4.1.1 Creating shared workspaces: Inviting other users 79

Contents v
4.1.2 Becoming a member: Being invited to a workspace 81
4.1.3 Members’ page 82 4.1.4 Moving shared workspaces 85
4.2 Access rights and roles 86 4.2.1 The BSCW role concept 86
4.2.2 Information about current access rights 88 4.2.3 Assignment of roles 89
4.2.4 Defining and re-defining roles 90 4.2.5 Ownership and ownership transfer 91
5 Address Book and Contacts 95
5.1 Contact lists 95
5.1.1 Creating contacts 95 5.1.2 User contacts and original contacts 96
5.1.3 Changing contacts 97 5.1.4 Sorting and filtering contacts 97
5.1.5 Importing and exporting contacts 97 5.1.6 Contacting contacts 98
5.2 Address book 99 5.2.1 Creating entries in your address book 99
5.2.2 Changing address book entries 100 5.2.3 Structuring the address book 100
5.2.4 Using the address book 101 5.3 Sending messages and BSCW objects 101
5.3.1 Sending messages 101 5.3.2 Sending BSCW objects 102
6 Discussion Forums, Blogs and Feeds 105
6.1 Discussion forums and notes 105
6.1.1 Creating a discussion forum 105 6.1.2 Adding a note 106
6.1.3 Replying to notes 106 6.1.4 Adding attachments to a note 107
6.1.5 Browsing a discussion forum 107 6.1.6 Moving and deleting notes 107
6.1.7 Annotating objects 108 6.2 Blogs 108
6.2.1 Creating and changing blogs 109 6.2.2 Using blogs 111
6.3 RSS feeds 111
7 Alternative User Interfaces 113
7.1 Desktop Widgets 113 7.1.1 Installation of the desktop widgets 113
7.1.2 Using desktop widgets 114 7.2 Mobile Device Interface 118
7.2.1 Mobile access 119 7.2.2 Mobile login to BSCW 119
7.2.3 Mobile portal 120 7.2.4 User interface of the mobile portal 121

vi Contents
7.2.5 Domains and functions of the mobile portal 122
7.3 Simplified User Interface 126 7.3.1 Folder view (simplified user interface) 126
7.3.2 Managing folders and documents (simplified user interface) 128 7.3.3 Other actions of the simplified user interface 128
7.3.4 Search (simplified user interface) 129
8 Document and Content Management 131
8.1 Direct editing of documents 131 8.1.1 Creating and editing text documents 132
8.1.2 Creating and editing HTML documents 132 8.1.3 Editing MS Office files 133
8.1.4 Editing documents using external editors 134 8.2 Document functions 135
8.2.1 Resubmitting documents 135 8.2.2 Locking documents 136
8.2.3 Freezing documents and folders 136 8.3 Documents under version control 137
8.3.1 Imposing version control 137 8.3.2 Creating a new version 137
8.3.3 Editing version information 138 8.3.4 Branching versions 139
8.3.5 Managing versions 140 8.3.6 Automatic versioning 140
8.4 Templates and template folders 142 8.4.1 Creating template folders 142
8.4.2 Copying from templates 143 8.5 URLs for objects in workspaces 143
8.5.1 BSCW’s internal address format 144 8.5.2 Folder path URLs 144
8.6 Website folders 145 8.6.1 Creating website folders 146
8.6.2 Creating and editing the contents of website folders 147 8.6.3 Editing the appearance of website folders 149
8.6.4 Using BSCW elements 151 8.6.5 Using text elements 163
8.6.6 Exporting and publishing website folders 164 8.6.7 Integration of an external wiki engine 164
9 Traceability and Social Cooperation 165
9.1 Online status display 165
9.2 Microblogging 167 9.2.1 Displaying microblogs 167
9.2.2 Creating and deleting microblog messages 168 9.2.3 Actions on microblog messages 169
9.2.4 Searching for microblog messages 170 9.2.5 Notification of new microblog messages 170
9.2.6 Personal microblogs 171 9.2.7 Microblogs as widgets and at the mobile interface 171
9.3 Event monitoring using RSS feeds 172 9.3.1 BSCW RSS event feeds 173

Contents vii
9.3.2 Using BSCW RSS event feeds 173
10 Calendars, Appointment Scheduling and Polls 175
10.1 Calendars 175
10.1.1 Creating an appointment 176 10.1.2 Changing an appointment 177
10.1.3 Deleting an appointment 178 10.1.4 Using different views 178
10.1.5 Calendar actions 180 10.1.6 Calendar options 181
10.2 Appointment scheduling 182 10.2.1 Creating and changing appointment schedulings 182
10.2.2 Voting on the suggested dates 184 10.2.3 Suggesting other persons for participation 185
10.2.4 Fixing a final date 186 10.2.5 Resetting appointment schedulings 186
10.3 Polls and votings 187 10.3.1 Creating polls 188
10.3.2 Creating votings 189 10.3.3 Changing polls and votings 190
10.3.4 Viewing polls and votings as a timeline 191 10.3.5 Responding to polls and votings 191
10.3.6 Resetting polls and votings 192 10.3.7 Viewing and exporting results of a poll or voting 192
11 Communities 193
11.1 Becoming a community member 194
11.2 Creating a community 194 11.3 Managing a community 196
11.4 Communities as shared mailing lists 198 11.5 Hierarchical organization of communities 198
11.6 Inviting communities to member groups and vice versa 200
12 Workflow Management 201
12.1 Tasks and projects 201 12.1.1 Creating and changing projects and phases 202
12.1.2 Creating and changing tasks 205 12.1.3 Task view 210
12.1.4 Starting tasks 211 12.1.5 Personal task list 212
12.1.6 Progress of a task and progress aggregation 213 12.1.7 Processing tasks 214
12.1.8 Handling exceptional task situations 216 12.1.9 Structuring tasks into workflows 219
12.1.10 Viewing tasks and projects as a timeline 224 12.2 Flow folders 225
12.2.1 Creating and changing flow folders 226 12.2.2 Starting and forwarding flow folders 227
12.2.3 Status and history of flow folders 228 12.3 Document review 228

viii Contents
12.3.1 Putting documents under review 229
12.3.2 Having documents reviewed 231
13 Import/Export 233
13.1 Archiving and transferring objects 233 13.2 Converting documents 235
13.3 Exporting in PDF 236 13.4 Exporting folders and documents via FTP 237
13.5 BSCW upload helpers 237 13.5.1 Drag & drop uploader 237
13.5.2 Document uploader 238 13.6 Upload per e-mail 239
13.7 Briefcase 240 13.7.1 Briefcase requirements 241
13.7.2 Working with the briefcase 241 13.8 Outlook synchronization 243
13.8.1 System requirements for Outlook synchronization 244 13.8.2 Using Outlook synchronization 244
13.9 WebDAV 247
Index 251

Overview 1
1 Overview
1.1 Benefits of using BSCW BSCW supports asynchronous and synchronous cooperation with your partners over the Inter-
net, in your Intranet or in a network with your business partners (Extranet).
For asynchronous (non-simultaneous) cooperation, BSCW offers shared workspaces that
groups of people can use to store, manage, jointly edit and share information (documents, notes,
URLs, tasks etc.).
The essential advantages:
o With a BSCW workspace, you may share information within a workgroup – indepen-
dent of the specific computer systems that the members use.
o You do not need to install any software before using BSCW. You only need a standard
Web browser.
o You access BSCW workspaces, browse folders and download documents to your local
system just like ‘normal’ Web pages.
o BSCW keeps you informed of all relevant events in a shared workspace.
o You can upload documents to a shared workspace or create notes, URLs, tasks etc. using
any standard Web browser.
For synchronous (simultaneous) cooperation, BSCW provides tools for
o planning and organizing meetings,
o ad-hoc communication with partners, who are currently logged into a shared workspace
and therefore are likely to be working on a common task.
1.2 Prerequisites for using BSCW Requirements for using BSCW are minimal:
o To register as a user of a BSCW server, you must have a personal e-mail address.
o To access shared workspaces and to download documents to your local computer, you
need a modern Web browser with JavaScript and cookies activated. You can choose
from, e.g., the current versions of Google’s Chrome, Mozilla Firefox, Microsoft Internet
Explorer, and Edge, Opera and Apple’s Safari (you find the minimum requirements for
browser versions in 2.5 “Configuring your Web browser” on page 19).
o The standard way to upload documents to a BSCW workspace is to use the built-in file
upload function of current Web browsers. In case of problems you may have to use one
of BSCW’s upload helpers (see 13.5 “BSCW upload helpers” on page 237).

2 Overview
1.3 Additional information about BSCW For additional information on BSCW visit the BSCW home page (http://www.bscw.de/). Here
you can find news about BSCW, a list of reference installations and projects as well as further
information about possible application areas and about questions of licensing BSCW. Under
the heading ‘Support’ you find a list of frequently asked questions with our answers. You will
also learn how you can try out BSCW on a demo server.
1.4 BSCW at a glance This section can only touch upon a small subset of BSCW functions. It is intended to give you
a first impression of what a BSCW workspace looks like.
Please bear in mind that the objects we describe and also the actions we discuss in the following
example of a workspace may not be available to you in some of your workspaces. This may be
due to, e.g.,
o the configuration of the BSCW server you use,
o the level of proficiency with BSCW that you have chosen for yourself. By default, new
users are assigned to the Expert level, allowing all sorts of objects and actions. You may
have changed, however, your level of proficiency to a lower level (as described in 3.8.2
“Levels of proficiency” on page 64). At these lower levels, e.g. Beginner, you will be
offered fewer actions and objects at the interface than are shown below.
1.4.1 The folder page
The basic concept of BSCW is the workspace, which is – adopting Macintosh or Windows
terminology – a folder
o for a specific group of registered users, represented by the group icon , who can
o read, edit, add, move and delete objects in this shared folder.
As a registered user of a BSCW server you may be a member in an arbitrary number of work-
spaces. You may create folders or other objects and share them as required by the tasks at hand.
In its Web-based user interface, BSCW presents the contents of a folder or workspace as the
central part of a page – preceded by a header containing pop-up menus, buttons and action
shortcuts.
Figure 1 shows a folder page with examples of the objects that you can create and share in
BSCW. Please note that different icons are used to represent the different types of objects. In
3.1 “The Web-based user interface” on page 21, the structure of the folder page is explained in
detail.

Overview 3
Figure 1: Example folder page
1.4.2 Shared objects in a workspace
Several classes of objects may be created and shared in a BSCW workspace:
o Document
o Document under version control
o Note
o URL
o Folder
o Search folder
o Calendar
o Discussion forum
o Blog
o E-Mail message
o Template folder
o Website folder
o Project / Phase
o Flow folder
o Task
o Poll / Voting / Appointment scheduling
o Contact list

4 Overview
Figure 1 shows instances of many of these object types. Each object is represented by an entry
showing the object name, a pop-up action menu button, some icons and additional data, as
shown in the following figure.
Figure 2: Representation of an object
Click the icon on the left to display the object’s info page. The following check box may be
“ticked” to select the object for some action.
The icon immediately left of the object name denotes the object type. If the object is a docu-
ment, the icon represents its file type. If it is a note, the icon may represent a pragmatic aspect
picked by the author of the note. BSCW’s object types are discussed in greater detail in 3.2
“Shareable objects” on page 28.
The name of an object is the most prominent part of an object entry. Since BSCW is designed
to make sharing of information easier, it is very important to use descriptive object names which
will be understood by the other members of the workspace. The names of documents and folders
underlie restrictions concerning the use of special characters; you are notified of violations.
To the right of the object name, there is
o a pop-up menu button showing the actions applicable to the object. Please note that
different actions are possible for different types of objects. Figure 6 shows a few of the
action menu entries permitted for an object.
The action menu may also be invoked by a right mouse click anywhere on the object
entry (pressing the Ctrl key along with the right mouse click produces the original
browser menu, e.g. for “Save target as…”).
Putting the cursor over the action menu icon displays often-used actions (Change Pro-
perties, Cut, Copy, Delete) as a horizontal iconized action menu.
BSCW displays additional information about the object depending on object type and the
selected viewing preferences:
o the size of the object:
o in case of a folder, the number of objects it contains,
o in case of a document or e-mail message, the size in bytes, kilobytes or megabytes;
o zero, one or more of the following icons:
indicates that a folder is shared,
indicates that someone has set a lock for this object,
indicates that a note has been added to the object,
indicates how the document has been rated by one or more group members;
o the name of its creator and owner;
o date and time of the most recent modification;
o zero, one or more icons indicating that some of the following events have occurred:
indicates a new object,
indicates changes of the object,

Overview 5
indicates that someone has read the object,
indicates recent modifications in a sub-object;
Please note that nearly all the icons in an object entry are clickable, i.e. you get more informa-
tion on a group, a lock, a note, a rating etc. by clicking it.
1.4.3 The personal objects
In the upper right-hand corner of the user interface you find a row of icons that give direct
access to your personal objects. These icons of the instant access bar are available in each of
your folders or workspaces.
Your personal portal for BSCW can show the contents of important workspaces, an
overview of recent BSCW events, current appointments from your BSCW calendar or your
BSCW microblog messages. Your portal is configured by yourself.
Your personal workspace or home folder is the folder that may only be accessed by
yourself and contains all your folders and all workspaces where you are a member. If you click
on the home folder icon in one of your other private objects, you return to the private folder or
shared workspace that you visited last. Another click on the home folder icon brings you to the
home folder itself.
The listing of your community workspaces contains all such workspaces with commu-
nities where you are a member. Communities allow workspace access for large groups of users
equipped with equal access rights, keeping performance independent of community size; they
also offer self-organized platforms for users with similar interests. The community workspaces
are also contained in your home folder.
The clipboard serves as an intermediate store when cutting and copying.
The trash helps to prevent unauthorized or unintentional deletion of objects. In BSCW,
an object can be irrevocably destroyed only from its owner’s trash.
The address book is used to invite new members to your workspaces and to manage
contacts.
The calendar helps you manage your appointments.
The task list contains tasks you are to carry out (includes proper tasks, flow folders and
documents to be released; also see 12 “Workflow Management” on page 201).
The bookmarks contain your collected bookmarks and offer quick access to the objects
referred to by the bookmarks.
The personal templates and contain templates for often-used objects and metadata pro-
files that you have defined in addition to the standards supplied by the system.

6 Overview
The briefcase is used to synchronize BSCW documents with their counterparts on a local
computer.
1.4.4 Actions on the current folder or workspace
Objects are created by performing actions on the current folder. The pop-up menus, that trigger
these actions, are located in the top section of the folder page. Below the pop-up menus you
find the action shortcut bar for the most frequent of these actions.
Figure 3: Top menu bar and action shortcut bar
New objects are added by selecting one of the file menu entries from the top menu or by se-
lecting the respective action shortcut:
• Select File New Document to upload a file from your local computer system to the
current BSCW folder or workspace.
The popular Web browsers provide the functionality required for file upload. If you
have to upload large documents or a great number of documents regularly, you should
consider using one of the BSCW upload helpers available (for details see 13.5 “BSCW
upload helpers” on page 245).
• Select File New and an object type from the list offered (Workspace, Folder, URL,
Discussion Forum, Poll, Task, Search Folder etc.) to create an object of the specified
type directly on the BSCW server.
Figure 4: How to create a document
Existing objects are moved around your workspaces using your clipboard:

Overview 7
• Select Edit Paste to add objects to the current folder that were transferred to your
clipboard by the most recent Copy or Cut action. The clipboard objects may also have
been created via an archive, extract or convert action.
1.4.5 Actions on selected objects
Directly above the list of objects in a folder page you find the multi-selection toolbar. This
toolbar lists icons of actions which can be applied to several selected objects. The names of the
actions are shown as tooltips when you move the cursor over the action icons.
Figure 5: Multi-selection toolbar
Objects are selected by ticking their check boxes. and are shortcuts for selecting or de-
selecting all objects within a folder. You may, e.g., transfer the selected objects
• to your clipboard via (or Edit Cut ), or
• to your trash via (or Edit Delete ).
Objects transferred from a workspace to your clipboard or trash are no longer visible to the
other members of the workspace.
Some actions, e.g. rate , may only be applied to objects of specific types. A detailed intro-
duction to BSCW actions is given in 3.3 “Actions” on page 33.
1.4.6 Actions on a particular object
In the middle of each object entry in the folder page you find an action button for operations
to be applied to that particular object, as shown in Figure 6.
Figure 6: The action menu for a calendar

8 Overview
The action menu may also be invoked by a right mouse click anywhere on an object entry
(pressing the Ctrl key along with the right mouse click produces the original browser menu, e.g.
for “Save target as…”).
Putting the cursor over the action menu icon displays often-used actions (Change Properties,
Cut, Copy, Delete) as a horizontal iconized action menu.
The configuration of the action menu depends on the object type: different actions are available,
e.g., for a URL, a folder or a document.
BSCW will not display action menu entries for actions that you may not perform on a specific
object. This may be due to the fact that the object type doesn’t allow this action in general or
that your role with respect to the object doesn’t let you perform the action. Roles are the basis
for access right management in BSCW. You may invite new workspace members assigning
roles to them, e.g. ‘teacher’ or ‘student’, if these roles have been defined beforehand. Roles
define access profiles and can be attached to any object in BSCW. A set of predefined roles
serves as a starting point: Manager, Member, Associate member (cannot invite other members)
and Restricted member (read-only access) are default roles – define your own roles at will. Role
assignments are inherited via the folder hierarchy and can be modified any time (see 4.2
“Access rights and roles” on page 86).
1.5 Operating your own BSCW server You may operate your own BSCW server as an extension of a suitable Web server running on
a Unix, Linux, or Windows Server platform.
The BSCW server software is distributed by OrbiTeam Software GmbH & Co. KG, Bonn,
Germany, under licence from the Fraunhofer Institute for Applied Information Technology
(FIT).
You may download the BSCW server software (http://www.bscw.de/english/download.html)
and use it free of charge for a 90 day evaluation period. Starting with the 91st day, usage of
your own BSCW server requires a licence. The distribution of BSCW licences is handled by
OrbiTeam Software GmbH & Co. KG.
Schools and universities may apply for royalty free licences for educational purposes. Other
licensees have to pay a licence fee for use of BSCW beyond the evaluation period. Please
contact [email protected] if you need further information regarding the licensing procedure.
Acknowledgements
BSCW provides support for HTML editing based on the CKEditor (http://ckeditor.com/
Copyright © 2003-2011 Frederico Knabben) which is integrated with the BSCW software. The
CKEditor is licensed under the GNU Lesser General Public Licence (see
http://www.opensource.org/licenses/lgpl-license.php).
The JavaScript calendar integrated into BSCW is based on the DHTML Calendar 1.0
(http://www.dynarch.com/projects/calendar Copyright © 2002-2005 Mihai Bazon,
http://www.bazon.net/mishoo) and distributed under the GNU Lesser General Public License
(http://www.gnu.org/licenses/lgpl.html).
The mobile user interface is based on the jQuery Mobile Framework (licensed under the terms
of the MIT License, see http://jquerymobile.com/). The mobile user interface also includes the
datepicker plugin (https://github.com/jtsage/jquery-mobile-datebox Copyright © JTSage)
licensed under CC 3.0 Attribution license.

Overview 9
The BSCW desktop widgets are based on Adobe AIR and include the Adobe AIR SDK source
files and sample code, Copyright © Adobe Systems Inc., licensed under the Adobe AIR SDK
License Agreement (http://www.adobe.com/special/products/air/tools/sdk/eula/).
Direct editing of BSCW documents with local editors and applications is based on the Zope
External Editor Client (Copyright © 2008 Thierry Benita, Jean-Nicolas Bes, atReal, Casey
Duncan and Zope Corporation, http://www.zope.org/), which is not part of the BSCW software,
but has to be installed by the user. The Zope client is licensed under the Zope Public License
(ZPL).
For a quicker document search, BSCW supports the optional integration of the indexing service
PyLucene (http://lucene.apache.org/pylucene/). PyLucene is provided by the Apache Software
Foundation under the Apache License.
For the visualization of time related objects in a Gantt chart like manner, BSCW integrates the
Timeline component of the SIMILE widgets developed at the Massachusetts Institute of Tech-
nology (http://www.simile-widgets.org/timeline/). Timeline is open source software and is
licensed under the BSD licence.
For collaborative editing of Web pages, BSCW offers to integrate the MoinMoin wiki engine
(see http://moinmo.in/), which is licensed under GNU General Public Licence.
Further, BSCW includes software developed by the Apache Software Foundation
(http://www.apache.org/).
1.6 What’s new in version 5.1? Revision of the BSCW search
The BSCW search function has been completely revised and simplified. There is now
only one single, much more comfortable search form, where you easily can enter com-
plex queries. Queries to the Google search engine are no longer supported (see 3.7
“Search” on page 58).
Content view of folders and document preview .
The standard details view on folders has been extended by a new content view which
may be activated alternatively. The content view offers more information on the content
of an object entry, e.g., for documents a preview and abstract if available, for contacts
and user objects a photograph if available and for folders the names of the objects
contained. Also, BSCW can display a preview of documents, which you may have en-
larged at will – just position your cursor over the object type icon of a document (see
3.8.4 “Views on folders” on page 68).
User-defined metadata
Metadata attributes of an object are summarized in a metadata profile. Metadata attri-
butes have a name and a data type (such as text or date) and can be structured into groups
within a profile. For most of the existing object types in BSCW (such as Folder or
Document) there are predefined system profiles. You may create your own metadata
profiles on the basis of the given system profiles and store these profiles for further use
in template folders (see 3.9.1 “Metadata profiles” on page 72).
Simplified User Interface
The new simplified user interface allows easy access to the most basic features of
BSCW and is offered to users who only sporadically log into BSCW. The simplified
user interface is restricted to essential functions like navigation, creation and deletion

10 Overview
of documents and folders as well as searching (see 7.3 “Simplified User Interface” on
page 126).
Microblogging
The new microblogging component in BSCW supports the exchange of short text
messages, which are displayed in chronological order. In BSCW, also events are in-
cluded into microblogging. Microblogs may be focused on single users, members of a
workspace or the whole social network, i.e. the users with whom one is in contact via
shared workspaces (see 9.2 “Microblogging” on page 167).
Document review
Document review is to be used in the production of documents that have to meet a cer-
tain quality standard. After editing a document is reviewed by one or more persons re-
sponsible and is eventually released or rejected. In BSCW, document review can be
defined for single documents or entire folders by specifying the different review steps
and the persons responsible. (see 12.3 “Document review” on page 228).
Further changes and enhancements
The navigational action shortcut that lets you browse your workspaces is now
always accessible since it remains on the same spot of the browser window, even if the
window is scrolled (see 3.1 “The Web-based user interface” on page 21).
The online status has been extended in such a way that users may indicate in their online
status that they do not want to be disturbed (see 9.1 “Online status display” on page
165).
Some BSCW functions have been dropped: The Document Generator (because it is
superseded by the improved website folders), the event monitor (because similar
functionality is offered by the event widgets in portals and on the desktop) and the
BSCW desktop client (because many other convenient options exist for uploading
documents) (see 13.5 “BSCW upload helpers” on page 237). The user interface without
JavaScript doesn’t meet modern user interface requirements and is therefore no longer
offered, i.e. usage of BSCW requires the activation of JavaScript in your browser (also
see 3.8.1 “Style sheets” on page 64). In addition, the optional extensions for the
visualization of document events and of the relations between workspaces and users
(workspace maps) have been omitted for technical reasons.

Getting Started 11
2 Getting Started
The sections of this chapter describe in detail what to do before you start to use BSCW. Some
of these actions are essential, and others will make it easier for you to use BSCW – you should
read them all before using the system.
2.1 Registering as a BSCW user Before starting to use BSCW, you have to be registered as a user of your BSCW server. After
a simple authentication procedure you are ‘known’ to the BSCW server as a registered user.
Basically, you are identified by a combination of your
o user name,
o password and
o e-mail address.
Using your user name and password, you can access your folders and workspaces from any
computer with Internet access and a suitable Web browser.
2.1.1 Registering as a new user
The configuration of a BSCW server determines whether and how one can register as a user.
There are the following possibilities:
o Self-registration is allowed for everyone.
o Self-registration is not allowed, but all or certain users may invite other persons to
register via their e-mail address.
o Self-registration is not allowed, only the BSCW administrator can set up new users.
When registering yourself you proceed as follows.
• Open the home page of your BSCW server (e.g. http://your-bscw-server/pub/) and click
[Register] in order to register with your e-mail address and eventually some more
personal information required (name, organization, telephone number).
• BSCW sends an e-mail message to the address given. This message contains a special
URL which you have to open in your Web browser.
• Opening this URL brings up a form where you fill in your user name and password. For
security reasons you may open the URL only once.
• After having submitted the registration form you can log in to your BSCW server using
the user name and password chosen.

12 Getting Started
When you are invited to a workspace of a BSCW server by a user who is already a registered
user of this BSCW server, you will receive an e-mail message from this BSCW server and you
proceed as above starting with step 2.
When you are registered by the BSCW administrator you will receive your user name and
password from the administrator. You can change the password, but you cannot change your
user name.
Choosing your user name
Your user name serves as your public identity for the BSCW server. We recommend that you
use your last name, possibly combined with your first name, as your user name.
Note: By default, BSCW does not distinguish between upper and lower-case letters in user
names.
The BSCW server requires user names to be unique. If your user name is already used by
someone else on the server, BSCW will report an error in the registration procedure. In this
case, you have to modify your user name, e.g., by adding your first name or a number.
Note: For security reasons, you cannot change your user name.
Setting your password
In order to protect your information stored on the BSCW server, choose a sufficiently secure
password and change it regularly. For security reasons concerning your local computer system,
you should not use the same password for BSCW as for your local computer.
After submission of the registration form, BSCW is ready for your first login using the user
name and password chosen.
2.1.2 Changing your password
You can change your password whenever you want.
• Select Options Change Password in order to enter your new password.
• Fill in the ‘Change Password’ form and click [OK]. Now you are asked to authenticate
with the new password.
2.1.3 Forgot your password?
If you have forgotten your password, you cannot access your BSCW workspaces any more –
and, of course, you cannot change your password as described above.
For exactly this case of emergency, BSCW provides a specific procedure to assign a new
password without having to provide the old one:
• Open the registration page of your BSCW server (on FIT’s public BSCW server this is
https://public.bscw.de/pub) and click the link “Forgot password?” in order to register a
new password. Also, the normal login form has this link.
• In the following action form, enter one of the e-mail addresses which BSCW has already
associated with your user name (e.g. your primary e-mail address) and confirm with
[OK].
• BSCW will then send a message to the e-mail address given, which contains the URL
of a form that allows you to set a new password for yourself.

Getting Started 13
2.1.4 Registering an additional e-mail address
If you have several e-mail addresses, which you use in different contexts, e.g. for business and
private contacts, it may sometimes happen that you are asked via e-mail to register again on
your BSCW server, because someone has invited you to a workspace. This is the case when
some other user invites you to a workspace using one of your e-mail addresses different from
the one under which you are registered on your BSCW server.
In this case, you have two alternatives: you may register under a new user name which you
want to use in conjunction with this e-mail address, or you may register this e-mail address as
an additional e-mail address of your existing user account. In the latter case, your BSCW server
will be able to associate your different e-mail addresses with your user name when you are
invited using one of your registered e-mail addresses.
When you receive such a registration message, repeat the registration procedure. If you want to
register the new e-mail address under your existing user name as an additional address, specify
the same user name and password under which you are already registered. BSCW will send the
URL of a form to your additional e-mail address. In this form you may confirm that you indeed
want to register this e-mail address for your user name.
You may also register additional e-mail addresses under your user name, without having re-
ceived an invitation.
• Select Options Profile Change and enter an additional e-mail address into the field
‘Add e-mail address’ of the ‘Personal Data’ section of the action form.
Subsequently, you have to undergo the same shortened registration procedure as described
above in order to ensure that the association of your user name with the new e-mail address is
indeed valid. You may repeat this process for further e-mail addresses.
The registration of further e-mail addresses makes sense if you expect to be invited to BSCW
workspaces under these addresses or if you want to upload documents via e-mail from these
addresses. In these cases, BSCW will be able to correctly associate your user name with any of
these addresses.
Regardless of the registration of secondary e-mail addresses, BSCW will always use your
primary e-mail address to send e-mail messages to you, e.g. your periodic e-mail report on
workspace activity. This e-mail address is also shown on your user info page.
If you have registered several e-mail addresses, you may change your primary e-mail address
• by choosing Options Profile Change and selecting the address desired from the drop-
down list ‘Primary e-mail address’ in the ‘Personal Data’ section of the action form.
All your e-mail addresses registered are also shown when you select Options Profile Show .
Scroll down to the field ‘E-Mail addresses attached in the section ‘Administrator details’. Other
users see only your primary e-mail address when looking at your user info page.
2.1.5 Destroying one’s own user account
With some BSCW servers that allow self-registration you may be able to also destroy your own
user account when you no longer want to use this BSCW server. By default, this feature is not
enabled. Note that this action is irreversible and also destroys all data on the server that only
you yourself have access to.
• Select Options Destroy Account in the top menu bar.
• Enter your password to confirm destroying your user account and hit [OK].

14 Getting Started
Note: This action has to be enabled by your BSCW administrator. By default, it is not enabled.
2.2 Logging into your BSCW workspaces As a registered user, you have to log in to your BSCW server and identify yourself at the be-
ginning of each session.
2.2.1 Starting a BSCW session
You start a session on a BSCW server
• by opening the URL http://your-bscw-server/bscw/bscw.cgi/, or
• by directly accessing an object in one of your folders or workspaces, using a URL, e.g.,
from your list of bookmarks or favourites.
Note: With recent installations, the address of your BSCW server is by default
http://your-bscw-server/sec/bscw.cgi/. Your BSCW administrator may, however, have chosen
an altogether different scheme.
For login and identification, you have to submit your user name and password. You may also
log in using your e-mail address instead of your user name. Your BSCW server may also offer
alternative ways of logging in (see 2.2.5 “Alternative methods of authentication” on page 16).
If you are directly accessing an object in a workspace by specifying its URL, BSCW will
immediately take you to the contents of this object. For instance, if somebody sends you the
URL of a folder, you will see this folder page immediately on logging in (provided you have
the necessary access rights). Otherwise, you will be shown your personal portal by default.
After a longer period of inactivity, your BSCW session expires and you are requested to au-
thenticate again.
2.2.2 First time login
When you log in to BSCW for the very first time, your personal portal contains a lot of widgets
(e.g. your home folder, address book, personal calendar, microblog), but these widgets may
show very few or no entries at all. In case you have been invited to a workspace, you have at
least one concrete example how collaboration in BSCW looks like. But if not, your home folder
(“Workspaces of your-user-name”) is empty and you might ask yourself how to start working
with BSCW.
The simplest way of starting is to create a workspace of your own that you share with other
users:
• Select File New Workspace from the top menu or click on the in the action
shortcut bar. In the section ‘General’ you enter name and optionally tags and a
description of the new workspace. The names of documents and folders underlie
restrictions concerning the use of special characters; you are notified of violations. Tags
are freely chosen keywords under which you or other users may find the workspace.
• In the section ‘General’ you can further choose a template for the subfolder structure of
the new workspace. Such templates may be available for your BSCW server. For a first
time, you may leave it at ‘no template’.

Getting Started 15
Finally, you may have certain shared objects automatically generated for the new
workspace: a workspace portal, a group calendar, a contact list, a folder for upload per
e-mail, a template folder and a workspace-specific trash. Make your choice by checking
or unchecking the respective check-boxes.
Note: The workspace-specific trash receives all objects deleted by the members of the
workspace. Only the workspace manager and the creator can undelete or finally destroy
objects in the workspace trash. The trash itself cannot be deleted after creation.
• Go to the ‘Members’ section of the action form and select the future members of your
workspace:
• Select the ‘Enter e-mail addresses or user names’ option of the drop-down menu,
enter e-mail addresses of people already registered on your BSCW server (you
probably won’t know their precise BSCW user names) or of people you want to
invite to register with your BSCW server (if you are authorized to invite new users
or your server allows self-registration) and hit [Add].
• Alternatively, choose the option ‘Search for BSCW users’ and enter a search string
which is meant to be part of a user name. Select any candidates from the search
results and hit [Add] again. You can combine both methods of specifying members.
• Select the desired role, e.g. ‘Member’, for the members of your workspace and enter
an optional invitation text that will be added to invitation e-mails to be sent to
members that you have invited to register.
• The sections ‘Document Review’ and ‘Automatic Versioning’ are about defining a re-
view process and automatic versioning for the documents of the new workspace. Forget
about these sections for the time being, you can come back to these subjects later.
• Hit [OK] to create the new workspace.
Open the new workspace, load up some documents you want to share with the members of the
new workspace, create a new discussion forum within the workspace or call a meeting in the
workspace’s calendar.
For a more in-depth discussion of shared workspaces see 4.1 “Creating and managing shared
workspaces” on page 79.
Note: Don’t confuse workspaces and communities. When starting work with BSCW, you will
most probably want to create a workspace and not a community. Communities are meant to
accommodate very large groups of users with shared interests and have their specific limitations
as far as access rights are concerned.
2.2.3 Closing a BSCW session
In order to close a BSCW session,
• select File Logout in the top menu. Alternatively, press at the upper
right-hand corner of the BSCW interface.
• Before actually closing down your session, BSCW deletes any private data that might
have been stored in your browser. Such data are, e.g. backup copies of the integrated
HTML editor or locally cached microblogging messages. Subsequently you are present-
ed with the publicly accessible welcome page of your BSCW server.

16 Getting Started
Note: Should an error occur during the removal of private data, you are notified and
have to delete these data from the local storage of your browser yourself. For Windows
browsers use the key combination Ctrl-Shift-Del to invoke a dialog for deleting the
browsing history, check the website data option (with Firefox check the cookies option)
and proceed to delete these data. In Safari you select Safari > Reset Safari, check ‘Delete
all website data’ and hit [Reset].
• With some browsers, you are asked to authenticate again before you can log out. In this
case, you must authenticate with an empty password to actually close the BSCW session.
Cancelling the authentication at this point does not close your session with BSCW.
For some Web browsers the explicit logout cannot be provided. In this case, you have to close
a BSCW session by terminating the Web browser program on your local computer. Until logout
or termination of the browser the access rights remain in effect that were granted to you under
your user name.
Note: If you share your computer with other people (e.g., in a public Internet cafe), do not forget
to close your BSCW session after you have finished working with BSCW.
2.2.4 Parallel BSCW sessions
You may have accounts on several BSCW servers, e.g. on a public BSCW server and on a
server at your organization. You may also have several different user names on the same server.
At any point in time, your Web browser can represent only one user name on any given BSCW
server. Parallel sessions with different user names on one BSCW server are not possible.
Most Web browsers, however, will allow you to have active sessions on several different
BSCW servers simultaneously under the same user name and password.
Note: A transfer of BSCW objects between different servers, on which you have active sessions
in parallel, is possible only via your local computer as a physical relay station. Your clipboards
on the different servers are not interconnected although their icons look identical.
2.2.5 Alternative methods of authentication
The default method of authentication for BSCW servers is the standard ‘basic authentication’
scheme of most Web browsers using user name and password. This method of authentication
is comparatively insecure: when BSCW server traffic is intercepted, user name and password
may be revealed to third parties.
The situation can be improved by encrypting the BSCW server traffic. Indeed, your BSCW
server may be operated using HTTPS (a combination of HTTP and a cryptographic transport
protocol) for communication between your browser and the BSCW server. Ask your adminis-
trator about this possibility if not already in operation (in this case your BSCW server address
starts with https:// instead of with http://).
Your BSCW server may also be configured to allow for other methods of authentication, most
notably methods that can be used across a variety of Web services without the necessity to
memorize different user names and passwords for each service or even to authenticate again
and again when switching services (so-called). Alternative methods of authentication available
for your BSCW server are offered to you on the same page that is shown when logging into
BSCW.
An example of a single sign-on process is OpenID where authentication is done via specific
identification services (known as OpenID providers) where you maintain an OpenID identity.

Getting Started 17
Whenever you see the OpenID icon on the login page, you may log into your BSCW server
entering the URL of your OpenID provider.
• Enter the URL of your OpenID provider into the respective field of the BSCW login
page. You may obtain an OpenID identity from one of the many OpenID providers.
E.g., users with a Google account may log into BSCW using the following URL
https://www.google.com/accounts/o8/id.
• You will then be prompted by your OpenID provider to authenticate yourself. After-
wards you are logged into BSCW.
The main advantage of this method is that you now do not have to authenticate again with other
OpenID-enabled websites. More details are to be found at http://openid.net/.
2.3 Choosing the user interface language The BSCW user interface language is a personal, user-defined option. It only affects your view
of the information presented. When you are registered as a new user, BSCW automatically takes
your preferred Web browser language as your user interface language. You may select a
different language
• by choosing Options Preferences in the top menu and pick your favourite language
from the ‘Language (BSCW)’ menu in the ‘General’ tab of the action form.
When you choose English as your user interface language, the online help will also be in
English; the same goes for German. All other user interface languages, however, do not have
their own online help and use the English version instead.
2.4 Your personal profile In BSCW, you have a personal profile consisting of useful information about yourself including
full name, organization, address, telephone numbers, a photograph, links to additional infor-
mation on the Web, e.g. to a personal home page and the website of your organization as well
as your contact details in social networks and instant messaging services making it easier for
other users to get in touch with you.
The information that you enter into your personal profile is presented in your personal info
page, which other users may look up, e.g. to make sure that the person they are about to invite
to their workspace under your user name is actually the person they mean.
In order to enter or update information in your personal profile,
• select Options Profile Change .
You may check the appearance of your current personal info page by
• selecting Options Profile Show .
The ‘Change Personal Profile’ form where you enter or update your personal profile has a
number of sections grouping the information contained in the personal profile:
o Personal Data
o Communication
o Time Zone
o Picture

18 Getting Started
Personal data
Personal data about yourself comprise your full name, organization, phone numbers, home
page, postal address and e-mail address. The full name and organization given in your personal
profile will also be used in address book entries and members’ pages to represent a user as user
entry. Such an entry will read, e.g.,
jhdoe (John H. Doe, Acme Corp.)
when full name and organization are given, while the same user without a full name in his
personal profile would be represented as
jhdoe <[email protected]>
You may add tags and a description to your personal data, which are shown as part of the de-
scription of your entry on members’ pages.
The ‘Primary e-mail address’ field is set to the e-mail address that BSCW uses for sending
messages to you, e.g. the periodic e-mail reports on workspace activity. By default, this is the
e-mail address under which you have registered with the BSCW server. If your e-mail address
has changed or if you use additional e-mail addresses, please enter the new address or the
additional addresses into the ‘Add e-mail address’ field. For each of the secondary addresses
you will have to go through a registration process similar to your initial registration.
When you have registered additional e-mail addresses, you may choose one of them as your
primary e-mail address via selection in the respective field. Please note that the server configu-
ration may not allow every user to enter additional addresses and may confine admissible ad-
dresses to certain e-mail domains.
Communication
Here, you may enter information enabling other users to get in touch with you in social networks
or via instant messaging services. To add a social network or instant messaging service to your
personal profile,
• select an entry from the drop-down list offered and press the [+ Add] button.
• With social networks, give the URL under which you may be reached in the particular
network. Possibly augment the description of the network.
• With instant messaging services, specify user number or user identification. Instant
messaging services allow real-time communication between two or more users, utilizing
plain text messages, voice or even video telephony. Click the buttons to learn more
about services that you do not know yet.
• In order to remove a social network or instant messaging service from your personal
profile, click its button.
The contact data entered will be shown under ‘Contact details’ on your user info page and are
to be used by other users wanting to get in contact with you.
Time Zone
Here you may select your local time zone, i.e. the time zone where you are currently located.
All temporal information presented at the BSCW interface, e.g. the time of events, is adjusted
to this personal setting. The default value for the time zone is the time zone of your BSCW
server.
If you choose ‘no time zone selected’ as your time zone, you may specify your local time zone
in the ‘Hour’ and ‘Minute’ fields (value in the latter field should be 0 or 30, otherwise it is

Getting Started 19
rounded to one of these values). With other time zone selections, any input in these fields is
ignored.
You may also choose your preferred date format, which is then again used for the display of all
dates at your BSCW user interface.
Picture
This section shows a picture of yourself that is shown on your personal info page or along with
your messages in microblogs. If such a picture does not yet exist, you may add one to your
personal profile.
• Choose ‘Upload picture from external website’ and enter a URL into the ‘Picture URL’
field that points to such an image on the Web,
or
• choose ‘Upload picture from my computer’. Use the [Browse...] button of the ‘Local
file’ field to select the picture. The uploaded picture file is stored in the system and the
access rights are set in such a way that all registered users may look at this picture.
In the same way you can replace an existing picture of yourself. You may also delete such a
picture using the button [Delete picture] below the picture.
2.5 Configuring your Web browser Before using the BSCW server, please check the version and configuration of your Web
browser.
• The use of BSCW requires a current version of one of the popular browsers. BSCW
works best with one of the following browser versions:
o Chrome 17+,
o Edge
o Firefox 24+,
o Internet Explorer 9+,
o Opera 15+.
o Safari 6+,
• The browser should always contact the BSCW server before using pages from its cache.
This should work fine with current versions of most browsers. If you have doubts in this
respect (changes you made are not shown in BSCW pages), you should check your
browser configuration. In Microsoft Internet Explorer, e.g., choose “Tools > Internet
Options > General > Browsing History [Settings] > Temporary Internet Files > Every
time I visit the webpage”. The exact procedure to set this option depends on your
browser and browser version.
• Make sure that the clock on your computer is set correctly. Otherwise synchronization
between the BSCW server and pages in your local cache will not work correctly.
• BSCW makes use of JavaScript, Dojo and cookies. In order to have BSCW function
properly, your Web browser has to be configured so that JavaScript is activated and
cookies are accepted. BSCW cookies are used exclusively for authentication purposes
and are valid for a BSCW session.
Most modern browsers like the ones listed above support Dojo. If your browser does

20 Getting Started
not support Dojo, you will be warned and BSCW switches into a non-Dojo mode. In
this case, some BSCW features will not work (e.g. the graphical navigator or the new
search form), or will work differently (e.g. text fields and selection lists instead of more
comfortable widgets).
• When using Internet Explorer you should disable “friendly HTTP error messages”
(disable option “Tools > Internet Options > Advanced > Browsing > Show friendly
HTTP error messages”). Otherwise Internet Explorer might suppress important error
messages.
The following BSCW extensions are implemented as Java applets:
o Document uploader and drag & drop uploader – upload helpers for convenient file up-
load,
o Briefcase – a tool that synchronizes BSCW objects with your local file system,
o Outlook synchronization – a tool that synchronizes BSCW contact lists and calendars
with your local Outlook data.
If you want to install and use any of these extensions, your Web browser must be configured to
run Java applets which are installed locally. How these options are set in your browser, varies
between platforms and browsers. Please consult your Web browser’s manual for more
information.
As long as the documents that you download from your workspaces can be displayed by your
Web browser (with the help of any plug-ins you may have installed), you do not need to change
your browser’s configuration in order to use BSCW.
If, however, you want to exchange documents in proprietary formats (e.g. WordPerfect, Excel,
Photoshop, etc.) with other members of your workspaces, you should tailor the configuration
of your browser as follows. All files that BSCW sends to your browser carry an explicit file
type. Instruct your browser to link the file types relevant to you to a certain action, e.g., by
starting a program that opens and displays the file just transferred. How you proceed to this
effect varies between platforms and browsers. Please consult your browser’s manual for more
information.
If you do not configure your Web browser in the way indicated, the download of files, that
cannot be handled, will produce a prompt asking you which program to use. More recent
browser versions will usually allow you to establish a link between the file type of the present
file and the program to be used ‘on the fly’. This link will then be applied to the next file with
the same file type.

Basic Concepts and Functions 21
3 Basic Concepts and Functions
This chapter describes the basic concepts and functions of BSCW, that will help you start
cooperating with other users in shared workspaces.
Some details that we describe below may not be available to you in some of your workspaces
or may work differently. This may be due to one or more of the following reasons:
• The role you are assigned to (possibly resulting in reduced access rights).
• The level of proficiency with BSCW that you have chosen for yourself. By default, new
users are assigned to the Expert level, allowing all sorts of objects and actions. You may
have changed, however, your level of proficiency to a lower level (as described in 3.8.2
“Levels of proficiency” on page 64). At these lower levels, e.g. Beginner, you will be
offered fewer actions and objects at the interface than are shown below.
• The configuration of your BSCW server that may not allow certain functions.
3.1 The Web-based user interface BSCW manages two basic types of objects:
o Objects that do not contain other objects:
o document
o note
o widget (of a portal)
o URL
o appointment
o blog entry
o poll
o contact
o user
o Objects that may contain other objects:
o folder
o search folder
o portal
o calendar

22 Basic Concepts and Functions
o discussion forum
o blog
o e-mail message
o template folder
o website folder
o project
o phase (of a project)
o task
o flow folder
o contact list
o member group (of a workspace)
o community
o address book
o clipboard
o trash
In its Web-based user interface, BSCW displays the contents of container objects in pages that
share a common basic structure and functionality. The page of a folder may be taken as a model
of these pages.
The HTML pages of folders, discussion forums or personal objects like the address book, the
clipboard, etc. all have a two-part structure consisting of
o a header and
o a list of entries (the body).
The following sections describe the general structure and functionality of such pages using the
folder page as an example. Note that the contents of portals and calendars are displayed dif-
ferently.
The folder pages will automatically adapt to the width you choose for the browser window, so
that essential functions are still accessible with a narrow browser window.
3.1.1 Header
Figure 7 shows the elements of the header section of a folder page.

Basic Concepts and Functions 23
Figure 7: Header elements
The header section of a folder page – like the header section of a calendar page, of an address
book page, etc. – has the following elements.
The top menu bar
contains the menus for creating and manipulating objects within the folder (or calendar,
discussion forum, etc.). Details are given in 3.3 “Actions” on page 33.
The logout button
closes your BSCW session.
The action shortcut bar
consists of frequently used actions like creating objects, e.g., documents, subfolders or
discussion forums, initiating a search or getting more information about the current
folder.
The first action shortcut lets you browse your workspaces; clicking on the icon
opens a window representing your complete workspace hierarchy. This icon is always
accessible since it remains on the same spot of the browser window, even if the window
is scrolled. For a quick access to a certain workspace, browse your workspaces and click
on the workspace to open it in BSCW.
The instant access bar
gives access to personal objects like your home folder, clipboard, trash, address book
and calendar. The instant access bar may disappear if the browser window gets too
narrow for its display.

24 Basic Concepts and Functions
The navigation bar
specifies the location of the current object in your folder hierarchy as a path from your
home folder to this very object: Workspaces of your-user-name / active workspaces.
The names in the directory path are links to the respective folder pages.
A search field is integrated into the navigation bar that lets you directly search your
workspaces (“quick search”). Type your search terms into the search field and hit .
The results will be presented in a temporary search folder with the location of the objects
found in their description. In order to return to your previous workspace, hit in the
instant access bar.
The standard search (“all”) will look for all objects in the current folder where the search
terms appear in the name, the content, the description or the tags. You may also select
a different type of search from the drop-down menu appearing when you point to the
triangle preceding the search field: name, tags or documents. A name search looks
for all objects in the current folder where the search terms appear in the name, a tag
search looks for all objects where the search terms appear in the tags, and a document
search looks for all documents that contain the search terms.
Further details on searching in BSCW are given in 3.7 “Search” on page 58.
The banner
is empty by default; a banner consisting of text and graphics may be inserted individu-
ally for each folder, if so desired (see 3.8.5 “Banners” on page 71).
The multi-selection toolbar
offers buttons for
• selecting or de-selecting all entries in the current page;
• enabling or disabling the display of subfolders, when the option View Fold-
out is active;
• applying the actions listed to the objects selected (check-marked),
• toggling between details and content view and
• filtering the object entries to be shown.

Basic Concepts and Functions 25
The context menu
(an action button at the lower right-hand corner of the header section of the folder
page) offers all actions that are applicable to the current folder. The context menu may
also be invoked by a right mouse click anywhere on the title part of the folder listing
(pressing the Ctrl key along with the right mouse click produces the original browser
menu, e.g. for “Save target as…”).
Putting the cursor over the context menu icon displays often-used actions (Change
Properties, Cut, Copy) as a horizontal iconized context menu.
3.1.2 List of entries
The body of a folder page, search result page, etc. consists of a list of entries, each representing
an object contained in the folder, search folder etc. A folder page is by default displayed in the
details view where an object entry normally consists of the following elements:
o Information icon
o Check box for selecting the object
o Object type icon
o Name of the object
o Action menu button giving access to actions that may be performed on the object
represented by the entry. Putting the cursor over the action menu icon displays often-
used actions (Change Properties, Cut, Copy, Delete) as a horizontal iconized action
menu.
o Size of an entry is indicated in bytes, in case of a folder in number of objects contained.
o This may be followed by icons leading to additional information, e.g., in a folder page
a members’ icon will take you to the members’ page of this folder.
Note, that you can actually configure the information displayed along with an entry
via View Columns in the top menu.
Besides the details view described above, there is also a content view available. An object entry
in the content view has the following elements:
o Check box for selecting the object

26 Basic Concepts and Functions
o Object icon: With documents, the object icon is a miniaturized preview, with contacts
and users it is a picture, if available, and otherwise it is the object type icon.
o Info-box consisting of a header line with name, action menu, and if applicable, members
icon, rating etc. and a domain with further details like size, document type, creator,
creation date.
o Abstract of the object content (with folders, e.g., the names of the objects contained)
o Description
o Author and date of the last modification
You activate the content view by selecting View Content in the top menu (see 3.8.4 “Views on
folders” on page 68).
Please note that entries in portal and calendar pages look and work a bit differently than
described here for folder entries.
3.1.2.1 Opening documents and document preview
In order to display the contents of a document in a folder listing
• click the name of the respective object entry or
• use Open in its action menu.
The way documents are opened is dependent on your personal preferences (see below) as well
as on browser, operating system, plug-ins installed and browser configuration. So you can, e.g.,
specify whether PDF documents should be opened in the browser (using a so-called PDF plug-
in) or directly in the Adobe PDF reader.
If you want to open a document that your Web browser cannot displayed, you can download
the corresponding file and open it on your local system using an appropriate application.
Position your cursor over the object type icon of a document to display a miniaturized preview
of the document, which you may additionally have enlarged (see Figure 8 for an example). For
documents without a preview, a tooltip with the document type is shown. Text, HTML and PDF
documents all have previews, with other document types it depends on whether your BSCW
administrator has installed the respective PDF converters.

Basic Concepts and Functions 27
Figure 8: Document preview in details view
If you have activated the presentation option “Open documents in preview” in your personal
preferences, you get a full image preview when you open a document. This is also the case
when you click on the miniature preview of the document.
The full image preview features a header with buttons to [Download], [Print], [Edit] the docu-
ment (if at all possible) and to [Go back] to the folder listing. Additionally, you may use the
arrows at the left and right edge of the header to leaf through all documents of the current folder,
for which a preview exists.
In the content view of a folder, click on the object symbol of a document (a miniature preview)
to have the full image preview displayed.
3.1.2.2 Sorting entries and displaying the complete folder contents
BSCW can display the entries of a folder listing ordered according to different sorting criteria.
Select View Sort to redisplay the page with the entries sorted by the criterion desired:
• by Name ,
• by Type ,
• by Last Modified (date of last modification)
and by some other criteria applicable.
In the details view, you may also sort the entries by clicking a column header of the entry list,
e.g. ‘Name’ or ‘Last modified’.
You may display the complete contents of a folder by
• selecting File Contents in the top menu of the folder.
This will bring up a compact list of the objects contained in the folder as clickable items.
Subfolders in this list may be fold out to have their contents displayed. Hitting the [Show all]
button at the top of the list displays the contents of all subfolders, sub-subfolders etc as an
indented list.

28 Basic Concepts and Functions
Click on a folder name in the navigation bar or the contents list to return to the normal folder
view.
3.2 Shareable objects BSCW provides several types of objects that you may create, manage and share in a workspace
(see 3.3.3 “Inviting members” on page 37 on how to share a workspace).
Document (here a PDF file)
Document under version control [1.2] (here an HTML file)
Note
URL (Link)
Folder
Portal
Contact list
Discussion forum
Blog
E-Mail message
Search folder
RSS feed
RSS article
Template folder
Website folder
Calendar
Poll
Voting
Appointment scheduling
Project
Phase
Task
Flow folder
When objects of the above types are listed as entries of a folder page, the icon left of the object
name indicates the type of the object – for a document, this icon identifies its file type.
3.2.1 Document
Any file uploaded from your local system is represented in BSCW as a document. A document
may contain text, spreadsheets, graphics, print files, pictures, sound, video, etc., typically stored

Basic Concepts and Functions 29
in various proprietary file formats. Each document in BSCW is associated with an according
file type when it is uploaded. This file type is represented by a specific icon in front of the
document name (or by the icon for a file type that does not have an individual icon on your
BSCW server). On the Internet, these file types are identified by so-called MIME types. The
info page of a document shows this more technical looking MIME type.
BSCW provides specific functions for two kinds of documents.
Plain text and HTML documents:
Documents of file type ‘Plain Text’ or ‘HTML Document’ (MIME types text/plain
or text/HTML) may be created and edited directly on the BSCW server
(actions File New Text Document , File New HTML Document and Edit ; see 8.1
“Direct editing of documents” on page 131).
Zip and Tar archives:
BSCW can create Zip and Tar archives from objects in a folder (including personal
objects like your home folder, clipboard and trash). Such archives are again BSCW
documents (of file type ‘Archive (Zip/Winzip)’ or ‘Archive (Tar)’). BSCW can also
extract the files from Zip or Tar archives that you have uploaded from your local system;
the files are put into your clipboard as BSCW documents and folders (actions
Archive and Extract ; see 13.1 “Archiving and transferring objects” on page 233).
Depending on the file type of a document and on the configuration of your Web browser, several
things may happen when you click on the document name in a folder page:
o the Web browser may interpret the underlying file and display it;
o a program on your local computer may be started to display the file;
o a dialog box may come up that lets you store the document as a local file;
o the Web browser may offer a set of options for handling the document.
For several types of documents, BSCW offers a preview (see 3.1.2.1 “Opening documents and
document preview” on page 26).
3.2.2 Document under version control
Version control is a powerful tool that helps you avoid erroneously modifying or deleting a
document which is, e.g., authored by a number of people and is undergoing a number of revi-
sions. Version control also guarantees that only the most recent version is used when the docu-
ment is read or copied.
3.2.3 Note
A note is typically a short message that you create directly in BSCW. Notes are a convenient
tool to:
o inform the workspace members on a subject,
o start and organize a discussion about a problem,
o ask all members about their view on a topic.
Within a discussion forum, you may create new notes on their own or as a Reply to other
notes, thereby contributing to discussion threads. Outside discussion forums, a note can exist
as an entry in your clipboard or trash when you have cut, copied or deleted the note.

30 Basic Concepts and Functions
3.2.4 URL
Similar to an entry in a list of bookmarks, URL objects provide direct access to an object that
is not contained in the current folder, but is located somewhere on the Web, on an FTP or News
server etc. A URL object may also be used to access a BSCW object in another folder or
workspace on the same BSCW server (see 8.5 “URLs for objects in workspaces” on page 143).
You create an URL object by
• selecting File New URL in the top menu bar.
• In the ‘General’ section of the action form, you enter the address under ‘URL’ (e.g.
http://www.bscw.de/files/help-5.1/english/). You can specify whether the URL link is
to be stored or the document that the URL address refers to is to be uploaded. The latter
will create a local copy that can be accessed even if the original document has become
unavailable, e.g. because the document has been moved or the server has been shut
down.
You may also enter a name for the URL (by default, its name is the last part of the
address) and optional tags and description. Finally, you may rate the URL. Uploading
and rating can also be done later; see the URL actions below.
• Hit [OK] to create the new URL.
URL objects may also be copied from a BSCW RSS feed: Copy some RSS articles to your
clipboard and then paste them into a folder.
The special action menu entries for URL objects are:
Information Verify checks the availability of a URL.
Fetch stores the contents of the document or object referred to by a URL in your workspace
(in addition to the URL object).
Change Rate lets you rate the quality of the document or object referred to by a URL on a
five point scale.
3.2.5 Folder
Folders are the basic instrument to organize and manage the objects that you upload to, or create
in, BSCW. A folder may contain all types of objects including other folders, discussion forums
or a calendar.
• Click the folder icon or the name of the folder to display the contents of the folder in
the current folder page.
3.2.6 Portal
The portal of a folder offers a quick overview of contents and events in a folder. The portal
consists of widgets that can show folder contents, events and appointments of your BSCW
calendar; other widgets may be used for searching, navigation and microblogging. Portals are
configured by the members of the portal themselves. Folder portals work like your personal
portal to BSCW.
3.2.7 Contact list
Contact lists are specialized folders for maintaining contact information about relevant people.
Contact lists may be created in arbitrary folders so that you are able to maintain contact

Basic Concepts and Functions 31
information in the context of a certain workspace – also about persons are not members of this
workspace or users of your BSCW server.
3.2.8 Discussion forum
A discussion forum consists of notes – basically short pieces of text “pinned to a bulletin board”
for all members of a workspace to read and react on. Reactions to notes in the form of
comments, questions or counterarguments create discussions threads within a discussion forum.
Discussion forums may be objects on their own within a folder, but may also be used in order
to annotate documents and URL objects.
3.2.9 Blog
A blog (short for Web log) consists of a sequence of entries, which are displayed in reverse
chronological order, i.e. the latest entry is shown first. The blog entries themselves are HTML
documents, usually rather short pieces of text which may also contain pictures and links to other
documents. Blogs differ in who may read the entries and who may add new entries. By default,
everyone who can read an entry may also add a comment.
Blogs are displayed in a specific layout that may also be customized. Blogs may be displayed
as such or may be embedded in a normal BSCW page or a user-defined Web page. In addition,
blogs can be displayed as RSS feeds; you can subscribe to such blog feeds to be informed about
new blog entries.
3.2.10 E-Mail message
You may send e-mail messages directly to a BSCW folder if the folder permits this. Such e-mail
messages may contain arbitrary attachments and are stored in BSCW as e-mail message objects
according to the Internet standard RFC 822.
By adding the e-mail address of a BSCW folder to a project distribution list, you may, e.g.,
create a complete e-mail archive of the project. Project members need no longer store all im-
portant e-mail messages within their own e-mail systems.
Sending documents to a folder as attachments of an e-mail message is a convenient alternative
to uploading these documents using the Web-based interface.
3.2.11 Search folder
Search folders contain the results of a search as a list of links to BSCW objects. The contents
of a search folder may be edited as a whole by repeating the search process with the identical
query to update the search results, or with a modified query to, e.g., narrow down the search.
3.2.12 RSS feed
RSS feeds provide abstracts of frequently updated material (e.g. news, blogs) on the Web in a
standardized format. In BSCW, RSS feed objects are special folders that store the latest ab-
stracts of an RSS feed as RSS articles. The selection may be updated by a Redo Search
action. Individual RSS articles may be copied from a RSS feed folder and pasted to another
place as URL objects that contain the abstract in their description and a link to the original
article.

32 Basic Concepts and Functions
3.2.13 Template folder
Template folders are special folders containing templates which may be copied to other folders.
Templates can be arbitrary BSCW objects, e.g. documents of any kind, polls, flow folders, tasks
and even folders including their entire contents. Typical examples of templates are letter or
spreadsheet templates with elaborate layout and formats plus complex formulas in the case of
spreadsheets, which have to be filled with specific contents after copying.
In addition to user-defined template folders containing templates for the use of an individual or
a workspace group, there are also system-wide template folders accessible to all registered users
of the BSCW server, which are managed by the system administrator.
3.2.14 Website folder
Website folders provide a convenient way to create and manage a miniature website inside
BSCW. Apart from the HTML documents (“pages”) making up the contents of the website, a
website folder has three special documents: the home page that is shown when you click on a
website folder’s icon or name, the layout page that serves as the standard framework for all
other HTML documents of the website folder, thus ensuring a consistent layout of all pages in
a website folder, and finally the style definition, a style sheet that defines e.g. the colours and
fonts of the HTML elements used in the pages of the website folder.
Additionally, website folders have a built-in element system with a wiki-like [element …]
syntax, allowing you to include BSCW system features into the pages of a website folder, e.g.
a page’s last modification date, links for editing the page, a display of the page history or even
entire action menus.
3.2.15 Calendar
The calendar provides different views (year, month, week, day) conforming to the usual “look-
and-feel” of calendars. Users may enter appointments directly into the calendar. In addition to
the personal calendar of each user, group calendars may be created within arbitrary workspaces
and may then be used as a joint calendar for the members of the workspace and other users (this
is not possible in your home folder).
The calendar functions support you in planning, preparing and documenting an appointment for
a group of invited participants. The selection of participants is not limited to the members of
the workspace in which you create the appointment.
3.2.16 Appointment scheduling
An appointment scheduling helps in finding an agreeable date for a group appointment. The
organizer of a group appointment creates an appointment scheduling specifying possible dates
and participants of the appointment. Participants may be BSCW users as well as other persons.
The participants are notified via e-mail and may vote on the dates proposed. The organizer
determines the final date of the appointment depending on the outcome of the voting and all
participants are notified.
3.2.17 Poll and voting
A poll consists of a number of questions, each offering a list of answers. A poll is open for
voting either to the member group of a workspace, in which it was created, or to the general
public. Voting is limited to the voting period of the poll. Poll results may be viewed in graphical
form during and after the voting period; results may also be exported for further processing.

Basic Concepts and Functions 33
A voting differs from a poll only in two respects: (a) votes are personal and not anonymous, i.e.
each participant can see how the others have voted, and (b) the participants of a voting may be
arbitrary persons identified by their user name or e-mail address, i.e. participants are not re-
stricted to the member group of the workspace that contains the voting.
3.2.18 Community
Communities allow workspace access for large groups of users equipped with equal access
rights keeping performance independent of community size; they also offer self-organized plat-
forms for users with similar interests.
3.2.19 Project and phase
Projects and phases support project management through time planning and progress control.
Both types of objects are implemented in BSCW as special folders, which may contain further
documents and discussion forums. A project is meant to stand for an undertaking with a limited
time frame and a defined goal. The time frame of a project may be given by start date and
completion date. Projects may be further split up in phases.
A phase is a self-contained part of a project and may be further divided into separate tasks. A
phase is always part of a project and its time frame, i.e. start date and completion date, is re-
stricted by the time frame of the superordinate project. The time frames of the phases of a pro-
ject may overlap.
3.2.20 Task
A task stands for an activity to be done. A task has one or more persons responsible for carrying
out the task or supervising its execution. Usually tasks are part of a superior process (phase or
project), but may also exist on their own. A task may be carried out by the provision of results.
Tasks may have an estimated duration and a deadline. Each user has a personal task list that
contains all tasks that a user has to do.
Tasks may be split up into subtasks. The subtasks of a task may be combined to form a work-
flow so that one task depends on the results of other tasks. Workflows may be changed at run-
time by adding more tasks, deleting others or assigning existing tasks to other users for
execution. Workflows may be copied for reuse.
3.2.21 Flow folder
Flow folders are like ordinary folders in that they contain a number of other objects such as
documents and notes. In addition, they have an associated list of tasks that need to be carried
out with the material contained in the folder. A flow folder is forwarded to the users responsible
for the execution of the individual tasks in the order given in the flow folder.
The tasks of a flow folder consist of a name, an informal description and a responsible; they are
not objects on their own, but part of their flow folder, and are not to be confused with the proper
tasks described above.
3.3 Actions In BSCW, an action may be triggered by selecting a menu entry or clicking a button, link or
icon, each representing the action. In the Web-based user interface these action triggers may
take the following forms:

34 Basic Concepts and Functions
Menus:
Top menu bar, e.g. File New Document
Context menu and action menus, e.g. Change Properties
Buttons:
Action shortcut bar
gives access to frequently used actions.
Instant access bar
Example: opens your clipboard.
Navigation bar
Example: ‘:your-user-name’ opens your home folder.
Multi-selection toolbar, e.g. (cut) or (delete)
Links or icons in the entries of a folder listing
Example: shows the member group of a workspace.
With the obvious exception of the action shortcut bar, the actions triggered by buttons are
simple navigation actions: they open and display a new page showing another folder, a
document, the members of a folder, a user info page, etc.
For the rest of this section, we focus on the actions triggered via menus, which need a bit more
of an explanation.
Keep in mind that the actions made available to you in the diverse menus also depend on
o the level of proficiency you have set in your preferences and
o the role (i.e. access rights) you have with respect to a folder and to the objects it contains.
3.3.1 Creating and changing objects
In the layout of the folder page, the menu entries that create objects of different types are located
in four places:
• In the top menu bar, you may create objects in the current folder by selecting the object
type entry from the File New menu, e.g. File New Folder creates a new subfolder of
the current folder. The action form has three sections:
• In the ‘General’ section, you enter the name and optional tags and description.
Note: Starting with BSCW version 5.1, folder and document names may only use a
restricted character set in order to ensure a better compatibility with the naming con-
ventions of the different operating systems (e.g. when downloading a BSCW archive).
When creating a new folder, you will be notified of an invalid name (e.g. containing one
of the following characters \ * : ? / < > | "). In this case you have to correct the name
before you can create the folder.
Invalid names of existing folders or documents from an older BSCW version are only
changed when you duplicate folders or documents (e.g. by copying) or when your
BSCW administrator arranges for all invalid names to be made valid.

Basic Concepts and Functions 35
• If you are manager of the current workspace, you will see two additional sections of
the action form. In the ‘Document Review’ section, you can define a review process
for the documents of the folder to be created (details in 12.3 “Document review” on
page 228). In the ‘Auto Versioning’ section, you specify whether documents in the
new folder are to be automatically put under version control (details in 8.3.6 “Auto-
matic versioning” on page 140).
• Finally hit [OK] to create the new folder.
• The action shortcut bar allows for creating frequently used objects in the current folder,
e.g. clicking on also creates a new subfolder in the current folder with exactly the
same action form as above.
• The context menu allows for creating new objects in the current folder by selecting the
object type from the New menu, e.g. New Discussion Forum creates a new dis-
cussion forum in the current folder.
• The action menus of folder entries (or entries of other container objects like discussion
forums, website folders or projects) also offer a New menu for creating new objects;
e.g. New Poll in the action menu of a subfolder creates a new poll in this subfolder.
All actions for the creation of a new object will bring up a form in which to enter the information
that BSCW needs to create the new object. The form depends on the object type selected. For
the different object types see 3.2 “Shareable objects” on page 28.
You can change the properties of an object after creation by
• selecting Change Properties in the action menu of the object.
The action form for changing the properties of an object is the same as the form for creating an
object and depends on the object type. With a folder, e.g., the action form has the three sections
‘General’, ‘Document Review’ and ‘Auto Versioning’, in which you my change the name, tags
and description of the folder and its settings concerning document review and automatic ver-
sioning of documents contained in the folder (the latter only if you are manager).
Some objects may only be created within specific other objects, e.g. notes may only be created
within discussion forums, phases may only be created within projects. Creation of communities
via the File menu is only possible in your home folder.
Note: You may create shared workspaces in your home folder via File New Workspace , which
is a shortcut for first creating a private folder and then inviting other users as members (see
3.3.3 “Inviting members” on page 37). This menu entry is available only in home folders and
is meant to avoid a confusion of workspaces and communities for new BSCW users.
3.3.2 Uploading and changing documents
BSCW lets you upload a local file to a folder as a document on the BSCW server. Popular
browsers feature a file uploading function (e.g. Chrome, Edge, Firefox, Internet Explorer, Opera
and Safari), so you need no additional software to upload documents.
If you have to upload large documents or a great number of documents regularly, you should
consider using one of the BSCW upload helpers available (for details see 13.5 “BSCW upload
helpers” on page 237).
For uploading documents via your browser,
• select File New Document in the top menu.
You can change all the information about a document by

36 Basic Concepts and Functions
• selecting Change Properties in the action menu of the document.
Both actions essentially use the same action form consisting of four sections:
o General: Specification of local file for upload (omitted when changing properties),
name, tags and description.
o Document Review (managers only): Definition of a review process for the document
that differs from the process valid for the documents of the current folder (see 12.3
“Document review” on page 228).
o Automatic Versioning (managers only): Definition of versioning options for the docu-
ment that differ from the options valid for the documents of the current folder (see 8.3.6
“Automatic versioning” on page 140).
o Attributes: Specification of metadata attributes for the document.
General
• In the ‘General’ section, select a file for uploading from your local file system using the
[Browse…] button in the ‘Local file’ field. The name of the file selected is automatically
copied into the field. The name will be used by BSCW as the document name unless
you enter a different name in the ‘Name’ field. Choose a telling document name, so the
other members of the workspace will know what the document is about.
The file extension used to indicate the file type on some platforms should be kept in the
document name, because it facilitates the recognition of the file type when the document
is downloaded again by other members of the workspace: the BSCW document name
is the default local file name!
Note: Starting with BSCW version 5.1, document and folder names may only use a
restricted character set in order to ensure a better compatibility with the naming con-
ventions of the different operating systems (e.g. when downloading a BSCW archive).
When creating a new folder, you will be notified of an invalid name (e.g. containing one
of the following characters \ * : ? / < > | "). In this case you have to correct the name
before you can create the folder.
Invalid names of existing documents or folders from an older BSCW version are only
changed when you duplicate folders or documents (e.g. by copying) or when your
BSCW administrator arranges for all invalid names to be made valid.
• You may enter freely chosen keywords in the ‘Tags’ field to characterize the new
documents. These tags may be used in searches. Several tags are separated by blanks.
There is no distinction between upper and lower case in tags.
• In the ‘Description’ field you may enter a description of the document’s contents or
instructions for its use.
• You may provide an assessment of the document’s quality by selecting one of the ratings
offered. You may also rate the document later or change your rating using
Change Rate . BSCW shows all ratings in the document’s info page; the median of
all ratings is shown as an icon in the ‘Rating’ column of the document entry (with only
two ratings, the average rating is taken).
• The correct file type of the document is normally recognized by Web browsers and
automatically assigned (default setting). You can also specify the file type yourself by
selecting a file type from the menu offered. Should the correct file type not be offered,
you can enter the according MIME type (standardized designation of file types on the
Internet) manually. The info page of a document shows its MIME type.

Basic Concepts and Functions 37
Similarly, a possible encoding applied to the file is detected correctly in most cases.
Occasionally you may need to specify the encoding in the respective field. You may
change file type and encoding later on, using Change Properties in the action menu
of the document.
Attributes
• In the section ‘Attributes’ you may specify metadata attributes for the new document.
These attributes may also be used in searches. The default attributes are arranged in two
groups. The first group contains category and priority; these attributes are indicated in
folder listings in which the document appears, when the respective columns are
activated via View Columns in the top menu. The second group of attributes is used for
document classification according to the Dublin Core standard (see 3.9.1 “Metadata
profiles” on page 72); with these attributes you may add further values by clicking on
the add icon .
Later on, you may also define your own attributes, which are summarized in a new or
changed metadata profile and assigned to the document (for details see 3.9.1 “Metadata
profiles” on page 72).
• Hit [OK] to finally upload the new document or to commit the changes you made.
Attention: If you upload a document to a folder, that already contains a document with the same
name and the same file type, the existing document is replaced by the uploaded document. To
prevent overwriting of a document
• select Access Set Lock in the action menu of the document to set a (removable) lock.
If a document is under version control it cannot be overwritten by uploading a document with
the same name and file type; instead, a new version of the document is created.
Note: When you upload documents to a shared workspace that you do not own, the uploaded
documents will belong to the owner of the workspace and not to you, the creator. The disk space
used by these documents is added to the disk quota of the workspace owner. When disk space
control (‘quota system’) has been activated for your BSCW server, the upload of large do-
cuments by members of a workspace may lead to problems for the owner (violation of the disk
space limit). Because workspace owners are in general also workspace managers, they can of
course destroy large documents, should problems arise. If disk space control is activated for
your BSCW server, select File Info in the top menu of your home folder to inspect the disk
space used by all objects that you own.
3.3.3 Inviting members
You turn a private folder into a shared workspace by inviting other users as ‘members’ – you
yourself are the first member and owner of the workspace.
• Select File Access Invite Member in the top menu bar to trigger this action.
For action details see 4.1.1 “Creating shared workspaces” on page 79. By inviting additional
members to a shared workspace, you enlarge the group of people who may access the work-
space and the objects it contains. Before you turn a private folder into a shared workspace,
please read 4.1 “Creating and managing shared workspaces” on page 79; section 4.2 “Access
rights and roles” on page 86 explains how to modify the access rights of the members in a
shared workspace.

38 Basic Concepts and Functions
A private folder, a shared workspace or a folder or discussion forum within a workspace become
a public workspace by selecting File Access Public Access (by default only allowed for man-
agers). This feature may have been disabled altogether by your BSCW administrator for secu-
rity reasons.
You may specify which actions are possible for anonymous access in a public workspace. This
gives you extended access control. As a default, every user is authorized to read all documents
in a public folder. All published objects are listed in the public space of the BSCW server. This
public space, which is a community folder named ‘public’, may be accessed by select-
ing GoTo Public Space in the top menu or by clicking the community icon in the instant access
bar .
The actions described above are also offered in the action menus of folder or discussion forum
entries ( Access Invite Member and Access Public Access ).
If you plan to invite a large number of users to a workspace, consider adding a community to
the workspace. Communities can accommodate large numbers of members and offer access to
the community workspace without loss of performance.
3.3.4 Actions on objects in a folder
Actions on objects in a folder may be invoked in different ways. BSCW differs between:
• application of the action to several objects in parallel via
• selecting the objects by activating the check boxes on the left-hand side of the object
entries, and via
• selecting the action from the multi-selection toolbar;
• application of the action to one specific object via selecting an action entry from the
object’s action menu .
The actions of the multi-selection toolbar are generally also offered in the individual action
menus of the object entries. Some actions are also offered in the top menu bar: under File for
the current folder and under Edit for the current selection of object entries.
3.3.4.1 Multi-selection toolbar: Actions on selected objects
When an action is to be applied to several objects in parallel, you have to first select the objects.
You can do this by:
• activating the respective check boxes on the left-hand side of the object entries;
• selecting all entries in the folder page by clicking in the multi-selection toolbar. The
latter may also be done by selecting Edit Select all in the top menu bar.
When selecting objects for a simultaneous action, you may also de-select all objects so far
selected by
• clicking in the multi-selection toolbar. This may also be done by
selecting Edit Unselect all in the top menu bar.
After having selected the objects that the action is to be applied to, you have to click the ap-
propriate icon in the multi-selection toolbar to trigger the action. The names of the actions are
shown as tooltips when you move the cursor over the action icons. You find these actions also
as options in the Edit menu of the top menu bar: thus you may select, e.g., (catch up) or
Edit Catch up .

Basic Concepts and Functions 39
If you have selected objects for an action that cannot be performed on all of these objects,
BSCW will perform the action only on those objects selected where the action is ‘legitimate’.
If there is no object in the folder for which an action would be legitimate, the corresponding
action icon will not be shown in the multi-selection toolbar.
In the following, we describe what the actions of the multi-selection toolbar will do.
Catch up – indicates to BSCW that you have taken note of the current events (i.e. pre-
vious actions on the objects selected) and that you do not want to be reminded of them
any longer. The event icons in the entries selected are removed.
Note: Catch up is applied recursively to the complete contents of a folder and its sub-
folders. As a shortcut, catch up affects all objects in a folder when no objects are se-
lected. Thus, the effect is identical to selecting File Catch up in the top menu.
Send E-Mail – lets you send the objects selected and their complete contents by e-mail
(as attachments). You may also send links to the objects via e-mail. Selection of the
send action brings up a form for distribution via e-mail. The recipients may be selected
from your address book; their e-mail addresses may also be entered directly into the
form.
Cut – transfers the objects selected to your clipboard.
Cut – transfers the objects selected to your clipboard.
Move – transfers the objects selected to a destination that you select from the folder tree
of your workspaces.
Copy – puts copies of the objects selected into your clipboard.
Paste – transfers the objects of the current selection in your clipboard to the folder
selected. If nothing is selected, the current selection in your clipboard is transferred to
the current folder. Note, that you may select only one folder to which the objects of the
clipboard are to be transferred.
Delete – transfers the objects selected to your trash.
Undelete – returns the objects selected in your trash to the locations from which they
were deleted, i.e. moved to the trash.
Archive – generates a Zip or Tar archive of the objects selected. Archiving is particularly
useful if you want to download a large number of documents.
Rate – lets you rate the quality of the documents selected or of the objects referred to
by the URLs selected.
to Address Book – puts links to objects selected in a members’ page into your address
book (if not already present).
to Community – creates a community with the objects selected in a members’ page as
members.
to Case – puts links to the folders selected into your briefcase for synchronization with
your local computer.
to Portal – generates widgets in your personal portal that correspond to the objects se-
lected. In the case of folders or discussion forums, e.g., the widgets show the contents
of the folders or discussion forums selected.

40 Basic Concepts and Functions
vCard Export –stores the user objects selected in a members’ page or your address book
as a vCard file (*.vcf) on your local computer for import of the contact information
contained into local applications like Microsoft Outlook.
3.3.4.2 Action menu: Actions on a single object
Actions on a single object are invoked by selecting the action’s entry in the object’s action menu
. Note that the action menu may also be invoked by a right mouse click anywhere on the
object entry (pressing the Ctrl key along with the right mouse click produces the original
browser menu, e.g. for “Save target as…”). Putting the cursor over the action menu icon dis-
plays often-used actions (Change Properties, Cut, Copy, Delete) as a horizontal iconized action
menu.
Some of the entries in the action menu are specific for a particular type of object, e.g., the
actions offered for a folder and a document are different.
Depending on what level of proficiency you have chosen for yourself, you may see fewer than
the complete set of possible action menu entries for a given type of object. Furthermore, BSCW
does not show action menu entries that you cannot use, because you do not have the necessary
access rights for a specific object or a complete folder or workspace.
Below we list most of the actions offered in action menus in the order in which they appear in
an action menu.
o General
o Change
o New
o Access
o Attach
o Send to
o Link
o Move
General
Open opens and displays the object (folder, document, calendar etc.).
Contents shows an indented list, holding not only the objects directly contained in the folder,
but also the contents of subfolders, sub-subfolders, etc.
Information
Info shows the info page of the object.
History shows all change events that took place since the creation of the object.
Catch up indicates that you have taken note of recent events which happened to the
object. The corresponding event icons are removed.
Notifications lets you configure the events concerning the given object that you want to
be notified of by, e.g., icons or the daily workspace activity report.
Resubmit lets you specify one or more dates when you want to receive an e-mail
reminder to attend to a document again.
Export Events produces the events of the given object as a comma separated file for
further processing, e.g. with a suitable spreadsheet program.

Basic Concepts and Functions 41
Change: This submenu summarizes all actions concerning changes of the given object.
Different types of objects allow different change actions.
Properties lets you change all properties of the given object. This includes all specifica-
tions that you made while creating the object: name, description, tags, rating and
attributes. As manager, you can also change the automatic versioning and document
review settings for folders and documents.
Edit lets you edit text documents and notes (plain text and HTML) directly on the
BSCW server. Under certain conditions, Microsoft Office files can also be edited this
way.
Replace uploads a file from your local computer system that replaces the current docu-
ment. The replaced document is overwritten and no longer accessible.
Version Control imposes version control on a document. You may enter a description of
the base version, initial version number and state. For documents already under version
control, the change menu offers further actions like Revise , Manage Versions which are
treated in 8.3 “Documents under version control” on page 137.
Rate allows you to rate the quality of a document or an object referred to by an URL
on a 5-point scale. A rating will replace your previous rating, if any. All ratings by the
members of the workspace are displayed in the info page of the object. The median
rating is displayed in iconized form in the ‘Rating’ column of the object’s entry.
Edit Copy generates a copy of a text or HTML document and lets you then edit the copy.
New : This submenu exists only with container objects, i.e. objects which may contain other
objects (folders, discussion forums etc.). It summarizes all actions which generate new objects
within the given container object. Which objects may be generated depends on the type of the
given container object.
Access : This submenu summarizes all actions which govern the access to the given object,
i.e. who can do what with the given object.
Invite Member lets you invite a new member to a workspace or discussion forum.
Public Access turns the folder or discussion forum into a public workspace. For en-
hanced control, you may specify the permitted actions (i.e. add document, folder, dis-
cussion, note, URL) for anonymous access. For security reasons, the default is read-
only access.
Upload per E-Mail opens the given workspace for uploading documents per e-mail.
Set Lock locks the given document to avoid inadvertent modification or deletion of the
document. You should enter the reason for setting the lock. This text is displayed when
the icon in the ‘Share’ is clicked; at this occasion, you may unlock the document
again; other members may also ‘steal’ the lock from you.
Freeze protects the given document from changes by other members of the workspace.
Frozen documents can only be read by others.By default, freezing is only possible for
managers and creators.
Add Role lets you define a new role based on standard templates or action classes.
Edit Role lets you change the access rights of an existing role, given that you have the
permission to do so.
Assign Role allows you tox assign a new role and thus new access rights to another
member, if you have the necessary permission.

42 Basic Concepts and Functions
Attach : The actions of this submenu let you add other objects to the given object as attach-
ments. So you may attach a note to a document or URL and attach a document or URL to a
note. The attached note is generated when attached, the attached document is uploaded.
Send to : This submenu summarizes all actions which transform the given object into another
format or export it otherwise. The actions possible depend on the type of the object. Examples
are the archiving of folders, the converting of documents or the preparation for printing folder
listings or contact lists in PDF format.
Link : This submenu summarizes all actions that generate a link to the given object and put
it into some other object. Links serve the purpose of having entries in different places of your
folder hierarchy that all refer to the same object without the necessity to copy the object. De-
stroying a link does not destroy the object as long as there are other links, i.e. entries referring
to the object.
to Clipboard creates a link to the current object in your clipboard, from where you may
paste it to another folder (only for managers).
as Bookmark creates a link to the current object in your bookmarks.
Show Internet Address shows the Internet address of the current object, which then may
be copied to the clipboard of your local computer, e.g., to be included in an e-mail. The
respective QR code is also displayed and can be photographed from the screen. If the
Flash plugin of Adobe Systems is installed in your browser, you can copy the address
shown to the clipboard of your computer using the button [Copy URL to clipboard].
Copy Internet Address copies the Internet address of the current object to the clipboard of
your local computer if the Flash plugin of Adobe Systems is installed in your browser.
to Portal generates a widget in your personal portal that corresponds to the current
object. In the case of a folder or discussion forum, e.g., the widget shows the contents
of the folder or discussion forum.
to Case creates a link to the current object, in this case a folder, in your briefcase for
data synchronization with your local computer.
Move
Cut transfers the object to your clipboard.
Move transfers the object to a destination that you select from the folder tree of your work-
spaces.
Copy transfers a copy of the object to your clipboard.
Note: To copy a folder means to recursively copy all objects contained in it, including all sub-
folders, sub-subfolders, etc. In some cases, a link to clipboard or cut action serves the same
purpose, but may save a lot of storage space.
Paste transfers the current selection of objects from the clipboard to the object, in this case
a folder, discussion forum or other container object.
Delete transfers the object to your trash.

Basic Concepts and Functions 43
3.4 Personal objects In BSCW, every user has direct access to a number of personal objects, the icons of which are
shown in the instant access bar in the upper right-hand corner of the Web-based user interface.
The instant access bar is present in each of your folder pages.
The personal objects cannot be shared with other users of your BSCW server.
Personal portal
Home folder
Communities
Clipboard
Trash
Address book
Calendar
Task list
Bookmarks
Personal templates
Briefcase
Your personal portal for BSCW can show the contents of important workspaces, an over-
view of recent BSCW events, current appointments from your BSCW calendar or your BSCW
microblog messages. Your portal is configured by yourself.
Your home folder is your personal workspace, which may only be accessed by yourself
and which contains all folders that you have created and all workspaces where you have been
invited as a member. When you click your home folder icon from within other personal objects,
you return to the workspace that you viewed last; clicking again on the home folder icon brings
you indeed to your home folder.
The listing of your community workspaces contains all such workspaces with commu-
nities where you are a member. Communities allow workspace access for large groups of users
equipped with equal access rights keeping performance independent of community size; they
also offer self-organized platforms for users with similar interests.
The address book is mainly used to invite new members to your workspaces.

44 Basic Concepts and Functions
The calendar helps you manage your appointments. In addition to this personal calendar,
BSCW offers group calendars to support cooperation in arbitrary workspaces. These group
calendars are stored in the respective workspaces.
This personal data area contains the tasks that you are to carry out (includes proper tasks,
tasks in flow folders and documents to be released). The icon changes its appearance if there
are tasks for you to carry out.
Bookmarks offer quick access to important objects. This personal data area contains
those bookmarks that you have collected.
The personal templates contain templates for often-used objects (e.g. documents, folder
structures) that you have defined for copying from, and metadata profiles that you have defined
in addition to the predefined system profiles.
The briefcase contains documents you want to have synchronized with their counterparts
on your local computer.
Personal portal, bookmarks, personal templates, clipboard and trash are described in more detail
in the following subsections.
3.4.1 Personal portal
Your personal portal for BSCW can show the contents of important workspaces, an overview
of recent BSCW events, current appointments from your BSCW calendar or your BSCW micro-
blog messages.
Your portal is preconfigured by the system and is then managed by yourself. It is meant to be a
personalized starting page for a quick and direct access to important information on your BSCW
server.
You access your personal portal
• by clicking on in the instant access bar (if you don’t have this icon in the instant
access bar, activate it with Options Preferences in the section ‘Presentation’) or
via GoTo Portal in the top menu bar.
3.4.1.1 Creating the personal portal
Your personal portal is preconfigured by the system and already contains windows for search-
ing, navigation, and the display of events, appointments and contacts in the form of so-called
widgets. You add further widgets to your personal portal as follows.
• Select File New Widget to create a new widget.
• The action form ‘New Widget’ offers an icon bar from which to select the type of the
new widget. When you move the cursor over a widget icon, the function of the widget
will be shown as tooltip. Examples are the display of BSCW contents like folders,
events, appointments, tasks, bookmarks, contacts or microblogging.
• Enter a name for the new widget. By default, the widget type is taken as name. You can
also enter tags for the new widget.

Basic Concepts and Functions 45
• The widgets you create this way all focus on your personal domains in BSCW: widgets
of type navigator, folder and contents show your home folder, widgets of type calendar,
tasks, bookmarks and address book show your personal calendar, task list, bookmark
folder and address book, respectively. A widget of type events lists current events
concerning all your workspaces. These default specifications of the so-called context of
the widget may be changed later. How to directly create widgets that show e.g. the
contents of a specific folder or group calendar is described below.
• Hit [OK] to create the new widget.
The new widget will be inserted into your personal portal at a free place.
You may also create widgets by
• selecting Link to Portal in the action menu of an entry in a normal folder listing.
Linking a folder entry to your portal creates a folder widget showing the contents of the
respective folder, which is also the case for a template folder or contact list. In the case
of a group calendar a calendar widget is created showing the appointments of the
respective group calendar. For discussion forums, blogs and RSS feeds, a contents
widget is created focusing on the respective object. For all other kinds of objects an info
widget is created that shows important information about the respective object.
• You create several widgets at a time by linking several objects to your portal: select the
objects by checking their check boxes and click in the multi-selection toolbar.
Continue to create new widgets until you have all important information displayed in your
personal portal.
3.4.1.2 Changing the personal portal
You can change your personal portal by
o rearranging the positions of the widgets,
o adding new widgets, deleting existing widgets and
o changing the specifications of individual widgets.
The position of a widget is changed via drag and drop.
• Click on the title bar of the widget and move the widget to a new position with the
mouse key pressed. This way you can arrange the widgets of your personal portal ac-
cording to your preferences.
You can delete widgets of your personal portal by
• clicking on in the title bar of the widget.
You may change a widget as follows.
• Click on in the title bar of the widget.
• In the section ‘General’ of the action form ‘Change Widget’ you may change name tags
and description of the widget. The title of a widget as shown in the title bar of the widget
consists of the name followed by the context in parentheses (exceptions: clock and
welcome widgets). An optional description of a widget is only shown in the details view
of the personal portal.
• In the section ‘Preferences’ you can change the default specifications made when the
widget was created. In the Data box, you may determine the context of the widget. The
context of a BSCW widget is the object on which the widget is focused, e.g. the folder

46 Basic Concepts and Functions
whose content is shown in a folder widget. Use the button to select the context
object. In the View box, you can change widget display parameters which depend on the
widget type: enter the number of entries shown or select a filter or sorting criterion.
3.4.1.3 Details view of the personal portal
You can switch to a compact view of the widgets of your personal portal by
• selecting View Details in the top menu of the portal page. In contents view, the widgets
of your personal portal are displayed like in an ordinary folder page.
• You may change individual widgets using Change Properties . You may also insert
new widgets and delete existing one in the details view of the portal.
• You return to the normal portal view by selecting View Portal in the top menu.
3.4.1.4 Using the personal portal
You can choose to start all your BSCW sessions with your personal portal by selecting the
respective option in your personal preferences ( Options Preferences ) under ‘Portal’. There you
can also change the default value of the maximum number of visible entries in list-like widgets
(folders, events, news).
The widgets of your personal portal have three buttons in their title bar ( , , ) to mini-
mize or maximize the widget, to change the widget and to delete the widget. List-like widgets
having more entries than the current maximum offer two buttons [next] and [previous] at the
bottom to move up and down in the list.
Further information concerning a widget entry is shown as tooltips when the cursor is positioned
over the entry. By clicking , the information may also be shown in the widget itself.
Many widgets offer their entries as clickable links. The contents of an entry, e.g. a BSCW folder
or an RSS news item, are shown in a separate browser tab or window.
Every time you open the portal, its contents are updated, i.e. folder widgets show the current
contents, events widgets show the latest events, etc. The clock widget is permanently updated.
You may also update your portal using in the action shortcut bar.
The widgets of the personal portal work very much like the desktop widgets; see 7.1.2.3 “Func-
tionality of desktop widgets” on page 116 for a more detailed description.
3.4.1.5 Folder portals
In the same way that you use the personal portal for a quick overview of important contents of,
and recent events in, your personal workspace, i.e. your home folder, you may also make use
of portals for arbitrary folders.
You create a portal for the current folder by
• selecting File New Portal in the top menu.
The newly created folder portal contains several widgets relating to the current folder: a folder,
event, navigator, search, calendar, microblog and info widget. You may populate the folder
portal with more widgets of your choice, delete some of the default widgets or rearrange the
widgets as described above for your personal portal.
You may only have one portal per folder.

Basic Concepts and Functions 47
3.4.2 Bookmarks
Bookmarks in BSCW are links to Web pages or BSCW objects that are of personal interest to
you. With your bookmark folder you have a personal object where you may collect bookmarks
similar to the bookmarking feature of Web browsers.
• Click in the instant access bar or
• select GoTo Bookmarks in the top menu to open your bookmark folder. You may now
add new bookmarks using File New URL .
In other folders, you may use Link as Bookmark to add links to BSCW objects to your book-
mark folder.
Within the bookmark folder, you may create subfolders via File New Folder as you would
create an ordinary folder. This way you can add structure to your bookmark collection. Note
that bookmarks can only exist in your bookmark folder. Bookmarks and bookmark subfolders
may be moved around in your bookmark folder but not to other folders.
BSCW bookmarks may be exported in the so-called Netscape bookmark format and then
imported into browsers that support this format (e.g. Chrome, Firefox, Internet Explorer, Opera
and Safari).
• Select File Send to Archive in the top menu of your bookmark folder to archive all
your bookmarks in Netscape format. Download this archive to your local computer,
unpack the HTML file with your bookmarks and import the bookmarks to your browser.
• You may carry out this operation also for part of your bookmarks by selecting the re-
spective bookmark subfolders and clicking in the multi-selection toolbar.
This export feature is helpful for users who have to use different computers frequently: when-
ever they access a new computer, they may first download and install their BSCW bookmarks
on this computer, thus always having access to their personal BSCW bookmarks.
3.4.3 Personal templates
Your personal templates are the place to store user-defined templates and metadata profiles for
your personal use. These objects are available to you when you create copies of templates
using New from Template and when you assign a new metadata profile to an object using
Change Metadata Profile .
Templates are used as masters for frequently used types of documents (letters, reports, forms),
usually including elaborate layout and formatting information or complex formulas in the case
of spreadsheets. In BSCW, you can declare arbitrary objects as templates: polls, flow folders
and tasks or even folders including their entire contents.
Metadata profiles summarize metadata attributes of a given BSCW object type. In addition to
the predefined system profiles you may define your own metadata profiles which you may store
in your personal templates.
• Click on in the instant access bar or
• choose GoTo Templates in the top menu in order to open your personal templates.
You can create new templates and metadata profiles in your personal templates.
• Select File New …… to create an object that is to serve as template. Then you need
to edit this object (e.g. document, folder, poll) so that it can serve as a template.

48 Basic Concepts and Functions
• Select File New Metadata Profile …… Profile to create a metadata profile for a certain
object type.
You may also cut or copy existing templates and metadata profiles and paste them to your
personal template folder.
3.4.4 Clipboard
You may move objects – or their copies – from one folder to another folder. For this purpose
you use your clipboard as follows.
• Click the check boxes of the objects you want to move or copy.
• Click Edit Cut from your top menu bar to transfer the objects to your clipboard, or use
from the multi-selection toolbar.
• Use Edit Copy or from the multi-selection toolbar to transfer copies of the objects
selected to your clipboard.
There is a visual feedback from your clipboard: it is no longer empty.
• Open the folder to which the objects are to be moved.
• Click Edit Paste to insert the objects into this folder.
Note: To copy a folder means to recursively copy all objects that it contains, including folders
and subfolders along with their contents. This could use up much storage space.
If you don’t need a real copy of the folder, but only need to access the folder from the ‘old’ as
well as from the ‘new’ location, then you have another possibility, that uses up much less disk
space.
• Consider creating a link to this folder in your clipboard via Link to Clipboard (by
default, only possible for managers of the folder). A link to an object works like any
other folder entry referring to the object. Links serve the purpose of having entries in
different places of your folder hierarchy that all refer to the same object without the
necessity to copy the object. Destroying a link does not destroy the object as long as
there are other links, i.e. entries referring to the object. The link may be inserted any-
where in your folder hierarchy.
If you only want to access the folder from your bookmarks
• create a bookmark for this folder via Link as Bookmark that allows direct access to
the folder.
Note: You can also move objects without using the clipboard via Edit Move or from the
multi-selection toolbar. For single objects use Move in the action menu.
Full functionality of the clipboard
After a cut, copy or link to clipboard operation you may delay the paste operation. In this case,
the clipboard holds all objects that have been cut, copied or linked to it and have not yet been
pasted to a new location or deleted to the trash. Your clipboard ‘remembers’ the set of objects
that were added by the latest cut, copy or link as the current selection. In the list of objects in
the clipboard, the marked check boxes indicate the current selection. You can change the current
selection manually by checking and unchecking entries in the clipboard and executing a cut

Basic Concepts and Functions 49
action ( ), while you still are in the clipboard. All objects of the current selection will be
transferred to the folder where you next choose Edit Paste .
You may also organize your clipboard as a folder hierarchy and even transfer the current se-
lection to another folder within your clipboard. This is useful for collecting objects from dif-
ferent locations in a folder inside your clipboard in order to, e.g., archive them later (see 13.1
“Archiving and transferring objects” on page 233).
Who owns cut, copied and pasted objects?
Ownership becomes important when disk space control (‘quota system’) has been activated for
your BSCW server, because all objects that you own are added to your disk space usage, and
this may eventually lead to a violation of your disk space limit. Moving, copying and generating
links to objects may change the ownership.
When you create an object, the object is owned by the owner of the folder in which the object
was created (and not by you, its creator, should you not also be the owner of the folder!). One
could say that, by default, ownership is inherited along the folder hierarchy. When you are
invited to a workspace, however, the workspace entry appears in your home folder, of which
you are the owner – but you are not the owner of the workspace. This workspace entry overrides
ownership inheritance and sets a new owner. In the following discussion, we concentrate on
these two standard cases: a document that you have created within a possibly shared folder, and
a shared workspace to which you have been invited.
When you cut the document, it is transferred to your clipboard, and you become its owner; all
other members of the folder from where you have cut the document lose access to the document.
The document may be said to inherit ownership and membership from your clipboard. When
you paste the document, the owner of the folder or workspace to which the document was pasted
becomes also the owner of the document, in accordance with the default inheritance of
ownership.
When you cut the shared workspace, it is also transferred to your clipboard, but ownership and
membership remain untouched. The workspace entry does not inherit ownership from your
clipboard as it didn’t from your home folder. If you then paste the workspace to one of your
private folders, again ownership and membership remain untouched. If you paste the workspace
to somewhere inside another workspace, the members of this workspace also become members
of the pasted workspace, but ownership of the pasted workspace is unchanged (also see 4.1.4.2
“Embedding a workspace into another workspace” on page 85).
Copying document and workspace alike creates copies in your clipboard, of which you are the
only member and owner, so to speak ‘private’ copies. Pasting these private copies to a folder
transfers ownership to the owner of this folder.
When you create a link to an object in your clipboard, you create an entry in your clipboard that
refers to the object and that inherits ownership from your clipboard. You are added to the
owners of the object. Linking is only possible if you are a manager of the object; for our two
standard cases you would in general only be able to create a link to the document if you are the
manager of the containing folder. Pasting the link removes you as owner and adds the owner of
the folder or workspace to which the link is pasted. Note that several owners of an object share
the disk space used up by the object: with two owners of a 500 kB document, e.g., only 250 kB
are added to the disk quota of each owner.
For a further discussion also see 4.2.5 “Ownership and ownership transfer” on page 91.

50 Basic Concepts and Functions
3.4.5 Trash
The trash contains all objects that you have deleted from your folders using Delete in the
action menu of an object or using in the multi-selection toolbar for a set of objects that you
have selected beforehand. The trash icon is displayed in the instant access bar of a folder page.
Its form indicates whether or not there are objects in the trash.
• Click the trash icon to inspect the contents of your trash. Alternatively, select
GoTo Trash in the top menu. Trash contents are displayed like any other folder page.
Two actions for objects in the trash are additionally offered in the multi-selection toolbar (and
also in the action menus of the object entries):
Undelete – returns the objects selected to the locations from which they were deleted,
i.e. moved to the trash – if these locations are still available. If not, you may simply cut
the objects and paste them to a folder of your choice.
Destroy – deletes the objects selected from your trash. You thereby lose access to these
objects via the entries destroyed (you may have still access to these objects via other
entries, e.g., created by a Link to Clipboard action). If you are going to destroy a
shared workspace, where you are the only owner, and would lose access to the work-
space completely, the workspace would be lost also for the other members. In this case,
you will be warned before such a workspace is destroyed. If you destroy a shared work-
space, that you do not own or that has other owners, you simply lose your membership,
i.e. you leave the workspace; the workspace itself remains intact for the remaining
members.
Special rules apply to deleting versions of documents under version control (see 8.3.5 “Manag-
ing versions” on page 140).
Who owns deleted and destroyed objects?
Ownership becomes important when disk space control (‘quota system’) has been activated for
your BSCW server, because all objects that you own are added to your disk space quota, and
this may eventually lead to a violation of your disk space limit. Deleting and destroying objects
may change the ownership.
When you delete an object, i.e. move it to your trash, the same rules apply with respect to
ownership and membership as if you would cut the object, i.e. move it to your clipboard. That
means for the standard cases of a document, which you have created in a folder which you do
not own, and a workspace, to which you have been invited, that you become the owner of the
deleted document in your trash, and that other members of the folder, if any, lose access to the
document, while deleting the workspace leaves ownership (and membership) untouched.
Destroying objects in the trash relieves you from ownership – given that you are an owner – if
you do not still have access to the objects destroyed via other links.
For a further discussion also see 4.2.5 “Ownership and ownership transfer” on page 91.
3.5 Public space The public space represents that part of a BSCW server which can be accessed by everyone
over the World-Wide Web without being a registered user of the server. Folders, discussion
forums and other objects may be made publicly available using File Access Public Access in
the top menu or Access Public Access in the action menu of the object. This action is by

Basic Concepts and Functions 51
default only allowed for managers. The access rights for anonymous users are determined when
an object is published. By default, anonymous users have read access only.
Note: For security reasons, the BSCW administrator may remove the public space from your
server. In this case, no objects may be made publicly available.
The public space is implemented as a community workspace named ‘public’. Its community is
the group of anonymous users, i.e. of all users accessing the public part of a BSCW server
anonymously. (For communities in general see 11 “Communities” on page 193.) The folder
‘public’ is contained in the listing of community workspaces of every registered user of your
BSCW server. You reach the public space, e.g., by clicking in the instant access bar.
3.5.1 Allowing anonymous access
BSCW facilitates publishing objects in the World-Wide Web. Folders, website folders, dis-
cussion forums, calendars, blogs, contact lists and other types of objects may be published by
allowing anonymous access from the Web (by default only managers may allow anonymous
access). Note that your BSCW administrator may have disabled this feature altogether for se-
curity reasons.
• Select Access Public Access in the action menu of the object you want to publish
(by default only possible for managers), check the ‘Public Access’ check box and hit
[OK].
• With some object types (e.g. folders and discussion forums) you may select actions
concerning the addition of new objects to the folder, which are to be permitted for
anonymous access. If you do not select any of these actions only read access is allowed
for anonymous access.
• In this case, you may also specify that the anonymous access should be moderated. In
the case of moderated access, an object created via anonymous access is not visible to
anonymous users until the object has been explicitly published by a member of the
folder via Access Publish .
By allowing public access for an object, the fictitious user anonymous becomes a member of
the object, indicated by the icon adjacent to the object name in the navigation bar.
You may revoke public access either
• by selecting Access Public Access in the action menu of the published object,
unchecking the ‘Public Access’ check box and hitting [OK], or
• by removing anonymous from the member list of the published object.
3.5.2 Accessing folders anonymously
All objects of a BSCW server that have been published by allowing anonymous access via
Access Public Access are listed in the public space of the server, which is a community
folder named ‘public’. You reach the public space as follows:
• Click in the instant access bar or
• select GoTo My Communities in the top menu. This presents the folder ‘Communities
of your-user-name’ containing all community workspaces with communities where you
are a member.

52 Basic Concepts and Functions
• Open the community workspace ‘public’, which contains all objects that have been pub-
lished on your BSCW server.
Alternatively you may also reach the public space as an anonymous user:
• Select GoTo Public Space in the top menu. This presents the folder ‘Communities of
anonymous’ containing the workspace ‘public’.
• Open the workspace ‘public’ to view all objects that have been published on your
BSCW server.
The latter way of accessing the public space lets you view the objects that have been made
publicly available as an anonymous user, without having to terminate your current BSCW
session under your own user name. This is especially useful when you moderate a workspace
with public access. You may then check very quickly how the public part of the workspace
looks like from the perspective of an anonymous user in the World-Wide Web.
If you want to create a link to a BSCW object, that allows anonymous access in a public Web
page, you should proceed as follows:
• Copy the object’s URL in BSCW (most Web browsers are able to copy the URL of a
link to the local clipboard).
• Modify the URL so that it by-passes the login procedure and accesses the object directly
by replacing .../bscw/... by .../pub/....
• Insert the modified URL, e.g., into your home page to allow direct access to the BSCW
object from your home page.
The modification of the URL is demonstrated in the following example. Let the internal address
of an object be:
http://your-bscw-server/bscw/bscw.cgi/d18147/some.doc
The bold part of this address must be replaced for anonymous access as shown below:
http://your-bscw-server/pub/bscw.cgi/d18147/some.doc
Replacing “bscw” by “pub” has the effect that the BSCW login procedure (which is normally
started when a user accesses the BSCW server) is by-passed. Access control, however, is not
by-passed: BSCW returns an error message if anonymous access is not allowed for the object
requested.
Note: With recent installations, the internal addresses of BSCW objects are by default
http://your-bscw-server/sec/bscw.cgi/...Your administrator, however, may have chosen a dif-
ferent scheme for the addresses. This also goes for the address component pub for the public
space. If in doubt ask your administrator.
3.5.3 Public entry page for anonymous access
BSCW folders allowing public access may be equipped with an additional entry page for ano-
nymous access. While the members of the folder may use the ‘normal’ BSCW user interface to
work on the folder, the anonymous user is presented with a specific entry page. This way, the
actual folder and is hidden from anonymous access and only selected material from the folder
is presented to anonymous users, who may not even be aware that they access a BSCW server.
The creation of public entry pages is intended for users who are familiar with the creation of
HTML pages.

Basic Concepts and Functions 53
Note that public entry pages must have been enabled by the BSCW system administrator by
setting
INDEX_PAGE_EXT='index*.html'
in the BSCW configuration file.
The public entry page is an HTML file named index.html, which is to be contained in the
published folder. The mechanism of index.html in a public BSCW folder is similar to the
presence of a file index.html in a website directory: access from the World-Wide Web pre-
sents the file index.html and not the contents of the directory or folder.
Here is how you create public entry pages in BSCW:
• Create a new file named index.html using File New HTML Document in the top menu
of the folder you intend to publish with a welcome page.
• Edit index.html to your needs. Relative links inside index.html may refer to objects
in your folder. You find a schematic example below in this section.
• Open the folder to public access via Access Public Access .
• Anonymous users may now access your folder using the public addressing scheme in
BSCW:
http://your-bscw-server/pub/bscw.cgi/folder-id
Using the URL
http://your-bscw-server/bscw/bscw.cgi/folder-id
will present the BSCW folder for non-anonymous users in its full functionality.
Example of a public entry page
The following schematic example shows how the HTML code of an entry page could look like.
This entry page presents links to two documents of the published folder embedded in some text
of your choice.
<!DOCTYPE html>
<html lang="en">
<head>
<meta charset="utf-8">
<title>Page Title</title>
</head>
<body>
<h1>A heading</h1>
<p>Some text</p>
<p><a href="./document1.txt">A link to document 1</a>
<p>Some text</p>
<p><a href="./subfolder/document2.txt">A link to document 2</a>
<p>Some text</p>
</body>
</html>
Other languages
All available languages other than English may also be used for public entry pages. E.g., if you
provide an additional file index-de.html in the published folder with a German translation of
the file index.html, anonymous users who have selected the German language interface for
their browser will be shown the German version of the welcome page.

54 Basic Concepts and Functions
3.6 Events An important aspect of cooperative work is that all members of a shared workspace are kept
informed about what happens in the workspace. To this end, BSCW records each action on an
object in the workspace as an event. Each member of a workspace will be informed about the
events inside the workspace.
BSCW provides several event services that support different levels of awareness about the
activities in shared workspaces. From this set of services, you may select the services most
suitable for your needs. Moreover, you may specify for which types of events you want to use
the services selected. The services include event icons in the Web interface, which indicate
recent changes on objects, periodic e-mail reports on workspace activity as well as direct
e-mails. You may even receive recent events via BSCW RSS feeds.
Posting activity in BSCW microblogs (see 9.2 “Microblogging” on page 167) is not treated as
an ordinary event; new messages may be, however, included in periodic e-mail reports and
direct e-mail notifications and there is also a specific event service: a display of new micro-
blogging messages at the top-level Web-based user interface.
In addition to these event services which are treated below, you may keep up with events in
your workspaces using event widgets in your personal or workspace portals (see 3.4.1 “Personal
portal” on page 44), the events desktop widget (see 7.1 “Desktop Widgets” on page 113) and
microblogs, which also can show events (see 9.2 “Microblogging” on page 167).
Note: Some of the above event services may not be available on your BSCW server because
they have not been activated by your BSCW administrator.
3.6.1 Displaying event information
BSCW has several ways to display information about events:
o Event icons in the entries of a folder page inform you at a glance that some action of a
specific event type was performed on this object recently. To the right of the object
name various event icons may be displayed: , , , and . Click an event
icon to obtain a list of the recent events of the type symbolized by the icon.
o A detailed history of all events is maintained for all objects, reaching as far back as your
BSCW administrator restores events. Choose Information History from an object’s
action menu to view its history.
o The periodic e-mail report on workspace activity lists all events and microblog mes-
sages of interest across all your workspaces that occurred the previous day or week.
o Direct e-mail informs about events or microblog messages immediately.
o The BSCW RSS event feeds provide recent events as RSS formatted news. Using these
RSS feeds, modern browsers (or other RSS aggregators) may poll BSCW for online
information on what is going on in your workspaces.
You may also export all events of a given object by selecting Information Export Events from
this object’s action menu. The events are exported in the form of a comma-separated .csv file,
e.g. for further processing with a spreadsheet program.
There is a specific way of displaying recent microblog messages in BSCW:
o The display of new microblog messages at the top-level interface. Clicking on the icon
left of the logout icon lists all new microblog messages since you last visited the
display.

Basic Concepts and Functions 55
3.6.2 Event types
In BSCW, the events related to an object are grouped into five event types. In the object entries
of a folder page, each type is represented by a specific event icon.
Create event: The object (document, folder, URL etc.) is new for you, you have not
seen it before. This event may be caused by yourself or another member of the
workspace.
Change event: The object has been somehow modified, e.g. renamed or edited. Adding
new versions to a document and modification of metadata also belong to this event type.
Move event: The object has been moved from one location to another. Move events are
generated when a document, folder, etc. is cut, pasted, deleted, undeleted, archived,
extracted or converted.
Events inside: There are recent change events for objects somewhere within this folder,
including its subfolders and the objects contained therein. This icon is only displayed
for folders. Events of this type are only represented as event icons and are not
transmitted by the other event services.
Read event: The object has been accessed without modification, e.g. has been read,
downloaded or copied. BSCW lists only the most recent read event per user.
As far as event icons are concerned, read events are propagated to higher-level folders
and are included in their event icons.
3.6.3 Catching up on recent events
Event icons indicate recent events. Recent are those events related to an object that occurred
after the last catch up action which affected this object.
• Invoke Information Catch up to indicate that you have taken note of the recent events
of the object.
This means that these events are no longer recent for you. Therefore, BSCW will no longer
present the respective event icons to you, though they are still presented to other members who
have not yet caught up with these events.
You may selectively catch up on events of a particular type:
• Click an object’s event icon to display a list of recent events of this type.
• In this page, click [Catch up].
All events actually shown in that list are no longer recent for you. An event, that happened
while your Web browser displayed the event list, has status ‘recent’, of course, and will be
indicated again by an event icon.
Note: When you have taken note of the different types of events for those objects in a folder
that interest you most, don’t forget to perform a File Catch up action for the rest of the events.
Otherwise, there will be an increasing number of event icons in your folder pages, and you will
quickly lose overview of what happened in your workspaces.
3.6.4 Subscribing to event services
BSCW allows you to specify in detail how you want to be informed about events in your work-
spaces. For the general case, the default notification options specify about which types of events

56 Basic Concepts and Functions
you are to be notified via the different event services. These default options may be overridden
on a per object basis.
Notification of new microblog messages may be included in the e-mail event services, and there
is also a specific microblog notification service. Both allow a detailed specification of what
types of microblog messages you want to be notified of.
3.6.4.1 Setting the default notification options
Depending on your BSCW installation, several event services are available that may be con-
figured individually.
o Event icons indicate recent events on the user interface level.
o The periodic e-mail report contains events or microblog messages that occurred in your
workspaces the previous day or the previous week.
o Direct e-mail notifies you immediately about relevant events or specific types of
microblog messages.
o The BSCW RSS event feeds provide recent events as RSS formatted news. Using these
RSS feeds, modern browsers (or other RSS aggregators) may poll BSCW for online
information on what is going on in your workspaces.
The availability of RSS event feeds and the e-mail event services depend on the configuration
of your BSCW server.
There is a specific way of displaying recent microblog messages in BSCW:
o The display of new microblog messages at the top-level interface. Clicking on the icon
left of the logout icon lists all new microblog messages since you last visited the
display.
To specify on what event types (read, create, move or change events) or microblog message
types you want to be notified of by which event services,
• choose Options Preferences from the top menu bar.
• The ‘Edit Preferences’ action form provides the section ‘Notifications’ with the sub-
sections ‘Active Event Services’, ‘Event Types Subscribed’ and ‘Microblog Messages’
where you may specify your default notification options. The subsection ‘Microblog
Messages’ will appear only if microblogging has been activated for your BSCW server.
• In the ‘Active Event Services’ subsection you may check those event services that you
want to use. For the periodic e-mail report you can choose between daily and weekly
reports and can also specify whether you want to be notified about events and microblog
messages that you yourself have generated or posted. Such events and messages are not
transmitted by the other event services listed.
• In the ‘Event Types Subscribed’ subsection you may specify for each active event ser-
vice the event types that this service is you to notify you of.
• In the ‘Microblog Messages’ subsection you may specify the message types that the
active event services (with the exception of the RSS event feeds) are to notify you of.
Note that the display of new messages is always active; the other services have to be
activated under ‘Active Event Services’.
The specific message types offered are:

Basic Concepts and Functions 57
o Personal messages: Messages that were directed to yourself in your personal micro-
blog and that are not accessible to other users.
o Replies to own messages: Messages that are a reply to one of your own messages.
o Messages mentioning own user name: Messages that explicitly mention your user
name with a preceding @.
o Other messages: all messages except the personal messages.
Your own messages are listed in the periodic e-mail report if you have checked this
option explicitly in the ‘Active Event Services’ subsection. Apart from that, your own
messages are only listed when they received a new reply or are a reply to a message
which in turn received a new reply. Note that the notification services always list com-
plete threads, i.e. a message along with all its replies.
The default notification options are valid for all objects in your workspaces unless you change
the notification options on the object level.
Note: The notification options for microblog messages are valid for all microblogs, there is no
possibility to change these options, e.g., for certain workspace microblogs.
You may change the default options at any time, e.g. to deactivate an entire event service or to
disable read events from being transmitted via the periodic e-mail report. While changes in the
default options with respect to event types do not affect individually set notification options,
deactivation of an event service is valid also for individual notification options. Thus, the de-
fault notification options provide a central location to enable or disable an entire event service.
If you do not want to overrule individual settings, just disable all event types for a given service
to disable the service for the general case, but still allow its use for certain objects with
individual notification options that use this event service.
Please note that some services may be disabled for your BSCW server. Consequently, these
services are not offered for default configuration.
Note: Enabling the direct e-mail notification service on a container object (folder, discussion
forum etc.) may result in numerous e-mail messages, which are generated and delivered to your
primary e-mail address.
3.6.4.2 Changing the notification options on the object level
You may also set individual notification options for a particular object. This way, you determine
on what types of events you want to be notified, that concern this very object and objects
possibly contained therein. To do so, invoke Information Notifications in the object’s action
menu. This presents the ‘Change Notifications’ form with sections for every event service that
you have activated in your default notification options.
For every service activated, you may select the event types that you want to be notified about
by the respective service. You have the choice of using the options inherited from the parent
folder or to define special options for the current object and its eventual contents via the check
boxes provided for the different event types. If no notification options have been changed in
parent folders, the options inherited are the default notification options. This is indicated by the
label ‘Use default options’ which replaces the label ‘Use inherited options’ in this case.
If the notification options for the current object have been changed (at least for one event ser-
vice, the radio button ‘Define special options’ has been selected), you can remove these changes
by clicking on [Reset]. This leads to using the notification options of the parent folder – which

58 Basic Concepts and Functions
may be the default notification options if no specific notification options have been set in any
superior folder.
Event services may only be activated or deactivated on a whole in the default notification
options. When you want to use an event service for the current object that has not been activated
in the default notification options, click on [Change default options] to do this. After having
changed the default notification options, e.g. by activating an additional event service, you
return to the ‘Change Notifications’ form to proceed setting the individual notification options
for the current object.
Warning: All changes made in the ‘Change Notifications’ form will be lost when clicking
[Change default options].
A setting of the notification options which deviates from the notification options inherited is
indicated by an icon in the entry of the object concerned. Click this icon to view or change
the notification options.
3.7 Search BSCW helps you to find objects (documents, folders, contacts etc.) in BSCW. The search
criteria may relate to object attributes (like name, description, tags or object type) and with
documents also to their content. Several search criteria may be combined. The search domain
may either be the current folder or workspace, all your workspaces including your home folder
or the entire BSCW system including also your clipboard, waste and calendar.
Starting a search
The standard way to initiate a search is via File Search in the top menu. This presents you
with the search form to precisely specify your query as explained below. The search results are
then presented as a folder listing in a temporary search folder.
There are also several other ways to initiate a search without having to fill in the search form:
o The search field offered in the navigation bar supports a quick search for objects based
on name or tags and for documents based on content.
o A quick search identical to that of the search field is also offered as desktop widget and
as search widget of the personal portal. Also, the mobile portal of BSCW supports the
quick search for BSCW objects.
o Clicking on the tag of an entry shown in a folder listing initiates a quick search for
objects in your entire BSCW having that same tag.
On a members’ page, in a contact list and in your personal address book, you can start a search
for specific users, that are registered on your BSCW server (for more details on the user search
see below).
Search results presented in a specific folder
Independent of the way you initiate a search, the search results are presented in a temporary
search folder. The description of each object found names the folder that contains the object.
Make sure that you have activated the option View Descriptions when viewing the search
results.
Search folders represent a specific BSCW object type with some actions of its own. You may
repeat the search with a modified query and store the search results permanently in BSCW by

Basic Concepts and Functions 59
making the temporary search folder a permanent search folder somewhere in your folder hier-
archy. Permanent search folders are useful when a particular search is to be repeated at a later
point in time (see 3.7.2 “Special actions in search folders” on page 63).
To return from a search folder to your workspaces hit .
3.7.1 The search form
The search form consists of a top row where you determine the domain of search and in its
lower part of a number of nested expressions represented as boxes, each grouping a number of
search criteria as rows.
A search expression may be of AND or OR type, i.e. an object satisfying the search expression
must fulfill either all its criteria (AND) or at least one (OR). A search criterion may be either a
basic criterion, e.g. requiring that the name of the objects to be found contains the string “bscw”,
or a search expression, hence the nesting of the expressions. A basic criterion can also be negat-
ed, e.g. requiring that the name of the objects to be found does not contain the string “bscw”.
The same goes for search expressions except the top level one.
Basic criteria may concern all object metadata as well as document content. More specifically,
basic criteria may concern
o general object attributes like name, description, tags or BSCW object type,
o content and specific attributes of documents like file type or Dublin Core attributes,
o events that have occurred with an object,
o specific attributes of certain object types like department and e-mail address of contacts
or tasks of a flow folder. Here you may also refer to user-defined metadata attributes.
An example given in Figure 9 is a query looking for all objects in your workspaces whose name
or tags contain the strings “introduction” and “bscw” and which were created by user “koch”
or user “ruland”.

60 Basic Concepts and Functions
Figure 9: BSCW search form
You start filling in the search form by selecting your domain of search from the drop-down
menu provided:
o the current folder,
o the current workspace, i.e. the ‘smallest’ workspace containing the current folder, which
is the workspace from which the current folder inherits its members (only offered in the
menu if different from the current folder),
o all your workspaces,
o the entire system including your clipboard, waste and calendar or
o The search domain where you have searched the last time (if different from the above).
This domain is characterized by an asterisk (*) appended to its name.
When you have never searched before, you start with an AND expression having ‘name’ as the
only search criterion. Once you have done a search, your last query is offered as starting point.
You edit a query by adding new search criteria or subordinate expressions to a search ex-
pression, by filling in values in search criteria, as well as by negating, deleting or moving search
criteria and expressions.
We start with describing the functions offered in the head line of a search expression – pro-
ceeding from left to right:
• The small triangular icon at the left-hand border of the head line lets you fold in and
out the search criteria and subordinate expressions of the search expression (not
available for the top expression). You achieve the same effect by clicking in the head
line somewhere beside the buttons and menus.

Basic Concepts and Functions 61
• The next icon allows for negating the entire search expression (except the top level
one). Clicking on this icon changes it to . Clicking on takes back the negation.
Basic search criteria may also be negated this way.
• The type of the search expression (AND or OR) may be toggled using the drop-down
menu right next to the indication of the logical type of the expression.
• The [Fill all] button enables you to fill in all text fields inside an expression with a
certain string. You may of course also fill in the text fields one by one.
• Using the drop-down menu you may add commonly used search criteria (like
name, description, tags or content) and new search expressions to the search expression.
As subordinate expressions you can choose from the empty search expression and two
predefined expressions that correspond to quick search ‘all’ and ‘documents’ of the
search field in the navigation bar. The quick search ‘documents’ is only offered when
an indexing service has been installed on your BSCW server.
• Using the drop-down menu [Search criteria] you may add search criteria to the search
expression that relate to attributes from a group of metadata profiles chosen from the
following profile menu. The profile sources available are:
• System profiles: The pre-configured metadata profiles for the diverse BSCW object
types.
• My profiles: Metadata profiles which are stored in your personal templates folder.
• Profiles of other users: Metadata profiles of other users with whom you cooperate.
You find details on metadata profiles in 3.9.1 “Metadata profiles” on page 72.
• The [Graph] button in the head line of the top-level expression presents the current query
in graphical from. This search graph representation is shown in a separate browser
window. Graphical displaying of search queries has to be activated by your BSCW
administrator.
If you are not using the [Fill in] function, you have to fill in the input fields of your search
criteria one by one. With text fields (name, description, tags, content etc.) you may enter
multiple search terms and also parts of search terms. Please also read the following note.
Note: Searching with textual search terms underlies the following rules (we use document
search by content as an example, but the rules are also valid for other cases like object search
by name).
If you enter a single term, all documents will be found whose content contains this term as word
or part of a word. If you enter several terms separated by blanks, all documents will be found
whose content contains all terms entered as words or part of words. The order does not matter.
If documents are to be found containing a certain phrase possibly with blanks, you have to
enclose this phrase in double quotes.
Non-alphanumeric characters are treated as they are by default. If, however, an indexing service
is installed on your BSCW server, these characters are treated as they are in phrases, but as
separators in simple terms (with the exception of . and :).
There are no wildcard characters to be used in search strings.
Upper and lower-case characters are not distinguished in search strings including phrases.
You can delete and move the expressions and criteria of your query as follows.
• You remove a criterion or expression by clicking on the icon at the right-hand side
of a criterion or expression. For the top-level expression of your query this operation

62 Basic Concepts and Functions
means that all expressions and criteria contained are removed, resulting in an empty
query. Note that this operation cannot be undone.
• You rearrange criteria and expressions by dragging them around using the icon left
of . This way you may move, e.g., a criterion or expression inside another expression
or move a criterion from inside an expression to a level higher up.
If you are done with the editing of your query,
• hit [OK] to start the search. You will be shown the search results in a temporary search
folder.
Please note that content-based search for documents (full text search) is only possible for plain
text and HTML documents (MIME types text/plain and text/html) if no indexing service
has been installed on your BSCW server. This is indicated by the fact that no quick search for
documents is offered as search expression in the drop-down menu. Contact your BSCW
administrator.
Special features of the user search
Searching for users is only possible on a members’ page, in a contact list and in your personal
address book.
• Select File Search in the top menu.
• In the search form, choose your search domain:
o the members of the current workspace
o the users in the current contact list,
o the members of all your workspaces,
o the entire BSCW system or
o your personal address book.
Searching the entire system can be helpful when you want to invite someone into a
workspace whose name or e-mail address you do not know precisely, but who most
probably is registered on your BSCW server.
• Choose the search criteria for your user search. Use the drop-down menu for
often-used user-specific attributes or the drop-down menu [Search criteria] that
contains attributes from the system profile Contact, i.e. attributes that users may fill
into their personal profiles using Options Profile Change .
• Using the you may add search criteria from the system profile Contact, i.e. attributes
Note that with most users the only information available is ‘name’ and ‘e-mail address’ since
filling in personal details is optional.
Besides the normal search you may also do a quick search for users using the search field in the
navigation bar. In this case the search domain is the members’ page, the contact list or the
address book where the user search was started.
• Select the kind of search from the drop-down menu in front of the search field: all
or e-mail.
• The default search (“all”) looks for all users on the members’ page with the search terms
occurring in user name, given name, middle names, surname, organization or e-mail
address. An e-mail search finds all users with e-mail addresses containing the search
terms.

Basic Concepts and Functions 63
3.7.2 Special actions in search folders
Search folders show the query and the search domain directly above the listing of search results.
The query, which in general may be very complex, is shown in an abbreviated form, indicating
only its type (AND or OR) and the search criteria involved.
With simple queries that only use one search string (possibly in several search expressions),
you may modify this search string and start a search without having to tend to the search form.
• Enter your modified search string in the search field provided in the search folder header
and click [Search again].
In a search folder, the following additional actions are offered in the File menu.
• Select File Edit Query to repeat your search with a modified query.
• Select File Redo Search to repeat your search with an unmodified query.
• Select File Save as to store temporary search results in a permanent search folder.
Optionally enter name, description and tags for the permanent search folder, if the name
is to be different from the default name. Determine the place in your folder hierarchy
where to store the search folder using the navigation window. Per default, the search
folder will be stored in the current folder. Should your browser not support Dojo (also
see 3.8.1 “Style sheets” on page 64), the search folder will appear in your clipboard,
from where you may paste it to a suitable folder.
All these actions are also available as iconized buttons in the action shortcut bar, if so configured
in your personal preferences.
Ignoring search results
You may exclude certain non-interesting results from display in the search results list.
• Choose Ignore in the action menu of a search result.
Such a result will not be shown in the search folder listing, even if the search is repeated or the
search query edited. If search results are ignored, ‘Result List’ is displayed at the right-hand
end of the multi-action toolbar.
The search results ignored are summarized in the ‘Ignore List’, which is displayed
via View Filter Ignore List . In this view, you may also revoke ignoring a search result by a
repeated Ignore in the action menu. Via View Filter Result List you return to the list of
search results. Switching between ignore and result list may also be done using the drop-down
menu that is shown when you click on either ‘Ignore List’ or ‘Result List’ at the right-hand end
of the multi-action toolbar.
Ignoring search results is not a personal preference, ignoring is valid for all members of the
search folder.
Filtering search results
If your BSCW server does not employ an indexing service for searching, you can filter search
results, e.g. by object type and file type, via View Filter as in normal folders. Ignoring search
results has no effect when you filter according to other criteria. For performance reasons, there
is no possibility of filtering search results, if your BSCW server makes use of an indexing
service for searching.

64 Basic Concepts and Functions
3.8 Customizing the user interface The user interface of BSCW may be customized in many different ways concerning presenta-
tion as well as functionality. For a number of system functions, you may adapt BSCW to spec-
ific requirements of the tasks at hand, your personal work style and your proficiency in using
BSCW.
BSCW automatically adapts to your browser’s capabilities with regard to the processing of
Dojo and style sheets.
You adapt BSCW by setting your personal preferences and choosing your viewing options.
Also, you may choose to use additional features for file upload or select a specific user interface
language.
3.8.1 Style sheets
The BSCW user interface makes use of style sheets and JavaScript. Starting with version 5
BSCW additionally makes extensive use of Dojo. This is done in particular for page layout and
the generation of pop-up menus and navigation windows.
o If your browser can handle Dojo as most modern browsers do (see the list in 2.5
“Configuring your Web browser” on page 19), BSCW will automatically present the
Dojo-enhanced interface. Otherwise some BSCW functions will not work or will work
differently. We will indicate these situations.
o Please do not disable JavaScript in your browser: your interface will no longer be
functional.
o Please do not disable style sheets in your browser: your interface will lose important
layout and style information. It will continue to be fully operational, but might look
‘awkward’. Security concerns with regard to the use of style sheets are not justified.
3.8.2 Levels of proficiency
BSCW has different levels of proficiency of a user that correspond to user interfaces of growing
functionality and complexity. The standard installation of a BSCW server has the following
levels:
o Beginner
o Advanced
o Expert
As a new user of BSCW you start by default at the Expert level (if your system administrator
has not configured your server otherwise). If you want to get accustomed to the functions and
object types of BSCW in a step-by-step fashion, you can change into a lower level of
proficiency and later return to the Expert level. It is always possible to switch to another level
of proficiency.
• Choose Options Preferences from the top menu bar.
• Select your preferred level of proficiency (Beginner, Advanced or Expert) in the ‘Ge-
neral’ section of the action form.
Depending on the server configuration, the number of levels may vary; they may be labelled
differently and may group functions differently.

Basic Concepts and Functions 65
If your user level does not offer all actions available in an action menu, you may choose the
option more… to switch to a higher level.
3.8.3 User preferences
BSCW lets you set a number of parameters called user preferences that govern the appearance
and functionality of your BSCW user interface. The setting of these parameters is your personal
choice: a shared workspace does not necessarily look the same for all members.
Attention: Preferences are set for a specific server. If you want to work with several servers in
the same way, you have to set identical preferences on all servers.
In order to check or update your user preferences,
• click Options Preferences in the top menu bar.
The ‘Edit Preferences’ form has a number of sections grouping the information making up your
user preferences:
o General
o Presentation
o Portal
o Microblog
o Calendar / Task List
o Notifications
General
Subsection ‘Basic Preferences’:
Language: Select your user interface language from the drop-down menu offered.
Level of proficiency: Choose a user level for yourself which corresponds to your proficiency in
using BSCW (also see previous section).
E-Mail: Specify the format of e-mail messages you receive from BSCW (most prominently the
periodic e-mail reports on workspace activity) and whether you want to receive a copy of all
e-mail messages you send via BSCW (“blind carbon copy”).
Subsection ‘File Handling’:
File upload: Check the respective box if you intend to use the drag & drop uploader.
External editors: Select those document types from the list for which you want to activate direct
editing with local (for BSCW external) editors. You may then edit documents of these types
directly on the BSCW server, i.e. without the usual download-edit-upload cycle. By choosing
the action Change Edit the local editor corresponding to the document type (e.g. MS Word)
is started directly from within the Web browser.
Note that direct editing needs the prior installation of a helper application. Details on the instal-
lation and direct editing in general are given in 8.1.4 “Editing documents using external editors”
on page 134.
Synchronization via briefcase: These options concern the synchronization of BSCW documents
with their counterparts on your local computer via the briefcase, a personal object (like the trash
or clipboard); see 13.7 “Briefcase” on page 240.

66 Basic Concepts and Functions
In ‘Local briefcase folder’, enter the (changed) location of the local briefcase as a path in the
local file system.
Note: When you change the location of the local briefcase folder, the old briefcase folder will
not be taken into account when the next synchronization takes place, and documents changed
in the old briefcase will not be transferred to the BSCW server. To prevent any loss of data you
should change the path to the local briefcase folder only after a successful synchronization. You
may want to delete the old briefcase folder from your local computer. During the next
synchronization, the new local briefcase folder will be created.
Check the option ‘Transfer document versions into local briefcase’ to also have the versions of
versioned BSCW documents transferred to your local briefcase folder. If this option is not acti-
vated, only the current version of a versioned BSCW document is transferred to the local brief-
case folder during synchronization.
Check the option ‘Expand local document names by default extension’ to have document names
expanded by standard file extensions when transferred to the local briefcase folder. A BSCW
document docname of file type ‘Adobe PDF’, e.g., will be transferred to the local briefcase as
docname.pdf.
Subsection ‘Privacy’:
Presence: Uncheck the option offered when your presence in BSCW and the date of your last
login is not to be shown to other users.
Presentation
Subsection ‘Basic Preferences’:
Display theme: Select ‘Black & White’ for a less colourful BSCW interface or ‘BSCW
(Orange)’ to switch back to the standard.
Maximal number of visible entries in folder listings: Use this option to limit the number of
entries shown in a folder listing. If the number of entries in a folder listing exceeds the maxi-
mum you specify here, the listing is split up into several pages and you have to leaf through the
listing instead of scrolling. Buttons leading to the next or previous page are provided at the top
and bottom of the entry list.
Set font size by browser: Check this option if you want to control the font size in the BSCW
user interface via your browser settings. If this option is not checked, browser settings
concerning the font size are ignored and BSCW controls the font size of its interface.
Remember each folder’s view options: Check this option if you want to individually store the
viewing options of each folder. If this option is not checked, viewing options set for one folder
are valid for each and every other folder. For details see 3.8.4 “Views on folders” on page 68,
especially the subsection on the scope of viewing option.
Open documents in preview: Activating this option changes BSCW’s way to open documents.
Text, HTML and PDF documents are displayed in a BSCW page with buttons for downloading,
printing and editing, if at all possible. Other types of documents (e.g. Powerpoint presentations)
may also be presented this way, if the respective PDF converters are installed on your BSCW
server.
When this option is not active, text, HTML and PDF documents are opened directly in the
browser, other documents are opened in the respective local applications or are offered for
download.
Use internal PDF viewer for preview: If you have opted for opening text, HTML and PDF
documents in BSCW preview (see preceding option), activating this option avoids preview

Basic Concepts and Functions 67
problems that could arise from your browser settings, which could e.g. require that such docu-
ments are to be offered for download.
Use pop-up dialogs: Check this option when you prefer to have action forms presented as pop-
up windows in a tabbed format. If this option is not checked, action forms will be presented
standard forms with sections that may be folded and unfolded for better overview.
Optimize date input for pointer device (mouse): Check this option if you prefer to enter dates
using selection lists and your mouse instead of typing them directly using your keyboard.
Subsection ‘Icons in instant access bar’: Check the icons you want to have presented in the
instant access bar.
Subsection ‘Icons in action shortcut bar’: Check the icons you want to have presented in the
action shortcut bar.
Portal
Show portal at login: Check this option when you want BSCW to come up with your personal
portal when you start a BSCW session.
Number of entries in widgets: Specify the default maximum number of entries to be shown at a
time in widgets that are organized as a list of entries, like workspaces, events, news etc. Widgets
are the rectangular windows that make up your personal portal.
Microblog
My network: Define the range of addressees for posting microblog messages inside a private
area, e.g. inside your home folder. This can be either your social network, i.e. all users with
whom you share a workspace or community, either directly or indirectly, or the members of a
shared workspace.
Since your social network may become very large, you should consider restricting top-level
microblogging to the more manageable member group of a workspace.
Note: Your BSCW administrator may have disabled the possibility of posting microblog mes-
sages to your entire social network; in this case you have to choose a member group as your
microblogging network.
Calendar / Task List
Time scale, Week start, Workdays: Specify on what time scale appointments are to be presented
in day and week view, the first day of the week and what counts as workdays for you. The latter
settings govern the arrangement of your calendar views.
Generally add all tasks that you create to your task list: Your task list (accessible via GoTo
Tasks ) contains all tasks that you are to carry out. If you want to monitor also tasks that you
create, i.e. request of other people, via your task list, check this option.
For appointments, you may specify whether
• appointments that you create in a group calendar are automatically copied into your
personal calendar (also if you do not participate!),
• appointments from whose participant list you are removed are automatically deleted
from your personal calendar,
• your participation in appointments that you delete from your personal calendar is auto-
matically declined, and whether

68 Basic Concepts and Functions
• appointments are to be shown in a new browser window.
Notifications
BSCW provides several event services that notify about new events and new microblog
messages in BSCW. The different event services use different ways of delivery for the noti-
fications. For the event services that you have activated, you may subscribe to the notification
about different event types (read events, create events etc.) and different microblog message
types. For details see 3.6.4.1 “Setting the default notification options” on page 56.
Subsection ‘Active Event Services’:
Here, you may select the event services most suitable for your needs by checking the respective
options.
Subsection ‘Event Types Subscribed’:
Here, you may subscribe to being notified about the different event types for the active event
services. By folding out the menus of the different services you are presented with the different
event types. You may also check a complete event service that will then notify you about events
of all types.
Subsection ‘Microblog Messages’:
Here, you may subscribe to being notified about the different microblog message types for the
active event services. By folding out the menus of the different services you are presented with
the different message types. You may also check a complete event service that will then notify
you about events of all types. This subsection appears only if microblogging has been activated
for your BSCW server.
3.8.4 Views on folders
You are able to customize the way your folders and other container objects (discussion forums,
calendars etc.) are displayed at the BSCW user interface. The options are offered in
the View menu in the top menu bar and differ slightly for different kinds of container objects
(number of columns available, or special functions like the display of note contents in discus-
sion forums).
For folders and discussion forums you can first of all choose between the details view, which
is provided by default, and the content view.
• Select View Content to activate the content view. Select View Details to return to the
details view.
The details view offers more object details per entry, the content view gives more information
pertaining to the content of an object, dropping some other object details at the same time.
Details view on folders
In the details view, an entry starts by default with the information icon, a check box and an icon
representing the object’s type. Next come the name of the object, the action menu button and
the size of the object. Further object attributes in the details view are, e.g., rating, creator, owner,
date of last modification or icons referring to additional information like the members’ icon
that will take you to the members of the group with whom you share the object represented.
You can configure the details view with the View options in the top menu as follows.
• Choose View Foldout to enable or disable the display of subfolders. If the foldout
option is active, two additional buttons in the multi-selection toolbar allow showing

Basic Concepts and Functions 69
or hiding the contents of the subfolders selected (if no subfolders are selected, the con-
tents of all subfolders are shown or hidden). If showing the contents of subfolders would
exceed the maximal number of visible entries in folder listings set in your personal
preferences, the subfolders contents are only hinted at and not shown completely.
• Choose View Compact to reduce descriptions to one short line; the complete descrip-
tion (including attributes and tags) is shown as a tooltip when you move your mouse
over the shortened description. The icons and indicate that a description is longer
than can be shown in the compact view.
• Choose View Descriptions to show or hide the descriptions of folder entries altogether.
• Choose View Columns to select which attributes of an entry are to be displayed in the
columns of the folder view. The columns offered depend on the type of the current
container: there are fewer columns in a member list than in the task list.
• Choose View Sort by ... to sort the entries of a folder. The sorting criteria available
are a subset of the entry attributes. The current sorting criterion is indicated by a small
upward or downward pointing triangle ( ) in front of the criterion in the drop-down
menu. By clicking on this icon you can invert the sorting order.
The current sorting criterion is also indicated by a small black triangle ( ) near the
respective column heading – when the column is shown at all. By clicking on a column
heading which is underlined – meaning that the column attribute is a valid sorting cri-
terion – you may directly sort the entries of a folder. Clicking on the column heading
corresponding to the current sorting criterion inverts the sorting order.
• Choose View Filter to display only objects of a certain type or documents of a certain
Date type. You may also filter for certain values of category, priority or status (of tasks,
projects etc.). Filtering for ‘Responsible’ shows all objects (tasks, documents under
review, flow folders) for which you are currently responsible in the sense that you have
to carry out an action with such objects (value ‘yes’), for which you are not or not yet
responsible (value ‘no’ or ‘not now’) or which can have no attribute ‘Responsible’
(value ‘undefined’). Using ‘Responsibility’ you may filter, e.g. in your personal task
list, for the kind of role (contractor, requestor, responsible) in which you are responsible
for certain objects. Responsibility filtering for a value of ‘none’ shows all objects for
which you are currently not responsible (but could be made responsible for in principle).
The currently applied filter is indicated at the right-hand end of the multi-selection
toolbar. Select ‘No Filter’ to have all objects and documents displayed in the folder
listing.
You may change several viewing options at a time by selecting View Customize . The action
form has two sections: in the ‘General’ section you may activate or deactivate applicable
options (like Foldout, Compact or Descriptions), while in the ‘Columns’ section you may set
the columns to display in the folder listing.
Content view on folders
You activate the contents view by
• selecting View Content in the top menu.
o Check box for selecting the object
o Object icon: With documents, the object icon is a miniaturized preview, with contacts
and users it is a picture, if available, and otherwise it is the object type icon.
o Info box.

70 Basic Concepts and Functions
o Abstract
o Description
o Author and date of the last modification
An object entry in the content view starts with the check box followed by a larger object icon.
With documents, the object icon of documents is a miniaturized preview, with contacts and
users it is a photograph, if available, and otherwise it is the object type icon. The object icon is
followed by an info box consisting of a header line with name, action menu, and if applicable,
members icon, rating etc. and a domain with further details like size, document type, creator,
creation date. Next, an abstract of the object content (with folders, e.g., the names of the objects
contained) and the description are given as well as the author and date of the last modification.
You can configure the content view with the View options in the top menu in a similar way as
you configure the details view. The options Foldout , Descriptions and Columns , however, are
not offered and the number of sort criteria is restricted.
Special options with discussion forums and calendars
With some container objects, you have additional options in the View menu, e.g. you may
enable the display of note contents in discussion forums, or you may select among many
viewing options for the display of calendars.
Scope of viewing options
You have the choice of having the viewing options set and stored individually for each folder
and container object or of having the viewing options of one folder or container applied to all
other folders and containers of the same or similar type as well. This option is set in your per-
sonal preferences:
• Click Options Preferences in the top menu bar and go to the ‘Presentation’ section of
the action form.
• Check the option Remember each folder’s view options if each folder is to be individu-
ally treated with regard to viewing options; otherwise, the viewing options set for one
folder or container also count for each and every other folder of the same or similar
type.
If the Remember option is active, you are still able to transfer viewing options to other folders
or containers.
• Choose View Apply to All Similar to set the viewing options of the current folder or con-
tainer also for all other folders or containers of the same or similar type. By applying
the viewing option of a folder to all similar containers, you transfer the viewing options
to all other folders, website folders, template folders, flow folders, community folders
as well as to personal objects like the clipboard and the briefcase, and vice versa. Using
this action, viewing options are transferred from one calendar to all other calendars and
from one discussion forum to all other discussion forums. Also, member lists and the
address book are treated as similar.
When you have changed the viewing options of the current folder, you may still revert to the
viewing options transferred to the current folder via Apply to All Similar by
• choosing View Reset .
If the Remember option is inactive, viewing options are set for all folders and containers of the
same and similar type alike. You may exclude certain folders or containers from taking over
the viewing options from peer containers by

Basic Concepts and Functions 71
• checking View Individual for a particular folder or container. You may then set the
viewing options for this folder or container different from the viewing options from
other containers of the same or similar type. The viewing options for individual folders
or containers are protected from being overridden by the settings of other folder or
containers.
When the Individual option of a folder or container is deactivated, the viewing options are reset
to the viewing options of the non-individualized folders or containers of the same type.
If you want to apply the viewing options of an individualized folder to other folders and con-
tainers of similar type,
• choose View Apply to All Similar . Other individual folders will remain untouched by this
action.
3.8.5 Banners
Every folder page has a header consisting of several lines. By default, the space below the
navigation bar is empty, as shown in Figure 10.
Figure 10: Header section of a folder page without banner
You may insert a banner into this space. Set your proficiency level to ‘Expert’.
• Choose File Change Banner .
• In the ‘Change Banner’ form, specify the banner as HTML text (with links to pictures
etc.). With most current Web browsers (e.g. Chrome, Edge, Firefox, Internet Explorer,
Opera and Safari) you enter and edit the banner using an HTML editor that has been
integrated into BSCW (also see 8.1.2 “Creating and editing HTML documents” on page
132).
With a banner, the header of a workspace and the folders contained might look like shown in
the following figure.

72 Basic Concepts and Functions
Figure 11: Header section of a folder with banner
The banner is ‘inherited’ by subfolders unless you define a new banner there or
• choose Change Banner , clear the banner and confirm with [OK]. Now the banner is
empty again.
3.9 Metadata and info page The metadata in BSCW serve to closer describe objects and to retrieve objects using the BSCW
search. The metadata associated with an object are displayed on its info page.
BSCW objects have a set of metadata attributes that is either set by the user (e.g. name and
description) or by the system (e.g. creation date or name of creator). Further there are metadata
attributes, which for a particular type of object are grouped together in a metadata profile. In
addition to the predefined system profiles for the existing BSCW object types, users can create
their own metadata profiles that are stored along with templates in template folders.
Another approach to describing and classifying objects is tagging. Here, users describe objects
by freely chosen keywords, the so-called tags. A lot of object types in BSCW may be tagged,
including folders, documents and users.
Both named attributes and tags may be used in BSCW searches.
The info page of an object brings together all the descriptive information that BSCW maintains
about the object. This includes named attributes as well as tags.
3.9.1 Metadata profiles
The metadata attributes, which may be specified for an object, are summarized in a metadata
profile – with the exception of name, description and tags. Metadata attributes have a name and
a data type (such as line of text or date) and can be structured into groups within a profile. For
most of the existing object types in BSCW there are predefined system profiles. Examples are
the following metadata profiles.
o Documents have the general attributes priority and category and the attributes of the
Dublin Core Metadata Element Set (such as title, author, language etc.).
o Contacts essentially consist of metadata attributes concerning name, address, phone
numbers, affiliation etc.
o Tasks have by default the attributes customer, contact, location, URL, priority and
category.

Basic Concepts and Functions 73
The system profiles of certain object types may be empty, e.g. the system profiles of folders
and URLs. Number and type of system profiles depend on the configuration of your BSCW
server. You may create your own metadata profiles on the basis of the given system profiles
and store these profiles for further use in your personal folder ‘Personal Templates of your-
user-name’. It is also possible to define metadata profiles for a certain workspace and to store
them in a template folder of that workspace. Thus, the profiles are available for all members of
this workspace.
3.9.1.1 Using metadata attributes
When creating an object you may assign values to the metadata attributes of the object. The
‘Attributes’ section of the action form provides the respective fields where you may insert
values for the metadata attributes of the object. If there is no ‘Attributes’ section, the type of
the object created has an empty metadata profile or none at all.
You can assign values to the metadata attributes of an object or change existing values also
after the object has been created.
• Select Change Properties in the action menu of the object concerned and go to the
‘Attributes’ section of the action form. There you may insert, change or delete metadata.
An eventual grouping of attributes is indicated by enclosing the group in a separate box
with an optional group name.
• Some attributes allow specifying multiple values by clicking next to the input field.
You may delete values by clicking next to the value field.
• By clicking on [Reset properties] you may delete all values shown in the ‘Attributes’
section.
All attributes with values are shown below the description of an object in the folder listing. If
the view options are set so that no descriptions are shown or are only shown in compact form,
attributes will appear as tooltips of either the icon or the one-line description, respectively.
Also, all attributes are shown on the info page of an object.
The info page of an object shows the attributes that have a value, also indicating the name of
the underlying metadata profile and, where appropriate, the names of attribute groups (e.g.
“Dublin Core”).
When copying objects, eventual metadata attributes are also copied.
When searching for objects in BSCW, you may use all metadata attributes (see 3.7.1 “The
search form” on page 59). The search form offers to make use of metadata attributes in search
criteria.
In website folders, you can display the metadata attributes of single objects as well as object
tables with selected metadata attributes. You can also filter content listings of website folders
making use of the values of certain metadata attributes (see 8.6.5 “Using text elements” on page
163 and 8.6.4 “Using BSCW elements” on page 151). For these operations, you need to know
the so-called key of a metadata attribute, which is not given on the info page of a metadata
profile. An example is the key bscw:keywords denoting the metadata attribute ‘Tags’.
You can obtain a complete list of the metadata keys of a metadata profile including the user-
defined attributes by
• selecting Specification in the action menu of a metadata profile. This will list all keys
of the attributes in the profile as a text file, one key per line.

74 Basic Concepts and Functions
3.9.1.2 Defining new metadata profiles
You may extend the set of predefined system profiles and define your own metadata profiles to
suit your needs. A user-defined metadata profile is always associated to a certain BSCW object
type (e.g. folder, document, contact). When defining a metadata profile, you start from the sys-
tem profile of the respective object type and then add your own attributes or entire groups of
attributes or cancel existing attributes in any possible way.
If you create your own metadata profile of a container object (folder, contact list or similar),
you can not only define the attributes of the container object, but also set the metadata profiles
of objects contained. For example, you can define a metadata profile “Club” that is based on
the contact list and has additional attributes such as address and club number, and specify that
the contacts contained should have the metadata profile “Club member”, in which you delete
certain unnecessary contact attributes and define additional attributes that concern membership
such as member number or membership fee.
You can create a new metadata profile in two ways. You create a new metadata profile explicitly
• by selecting File New Metadata Profile in the top menu of your personal templates or
any other template folder and determining the object type desired from the sub menu,
e.g. Document Profile .
Metadata profiles from your personal templates are available to you everywhere, metadata pro-
files from a templates folder in a workspace are available to you (and the other members of the
workspace) only in this particular workspace.
You create a new metadata profile ad hoc while assigning a metadata profile to an object, when
you find that the available profiles are not sufficient for your purpose.
• Select Change Metadata Profile in the action menu of an object. If the profiles offered
for selection in the action form ‘Metadata Profile’ are not sufficient, click on [Add
metadata profile] to create a new metadata profile for the object type of the current
object.
The metadata profiles created in this ad hoc fashion are stored in your personal templates and
are available for assignment afterwards.
The subsequent interaction for specifying the new metadata profile is identical in both cases.
• The action form ‘Add Metadata Profile’ shows the system profile of the object type
chosen or of the object type of the current object, respectively, which you now may edit
as described in the following. Note that a system profile like that of a folder may be
empty.
• First, enter a name for the new metadata profile and possibly a description that explains
the purpose of the new profile.
• In the section “Attributes and groups” of the action form, you add single metadata attri-
butes or entire groups of attributes to your metadata profile using the drop-down menu
[Add]. Here you can choose from attributes and attribute groups coming from existing
metadata profiles.
Groups of attributes that have been added may subsequently be edited. You may also
add an empty group to your profile (select ‘Emtpy Group’ from the [Add] menu) that is
to be filled with attributes of your choice. Don’t forget to give a name to your new
attribute group. Groups are to structure a profile and may also be nested.
By choosing ‘New Attribute’ you specify your own attribute along with name and data
type; check whether the attribute may have multiple values.

Basic Concepts and Functions 75
• You delete an attribute or attribute group by clicking on the icon on the right side of
the attribute or group box.
• You may reorder attributes and groups by dragging the attribute or group to the position
desired using the icon. This way you can also move an attribute or group inside
another group, or from inside a group to the top level.
• If you specify a new metadata profile for a container object type (folder, contact list or
similar), the action form has an additional section “Default profile of new objects”,
where you can specify metadata profiles for objects that will be created in the container,
if those profiles are to differ from the predefined system profiles.
• Select an object type from the [Add] menu for which you plan to specify a user-
defined metadata profile.
• In the appearing assignment line of the action form you may now choose a metadata
profile for this object type. This profile will be assigned to all objects of the object
type that will be created within the container.
These profile assignments may be deleted or reordered exactly as in the section “Attri-
butes and groups” using the same icons. You may also specify these assignments of
object contained to metadata profiles later on when you change the metadata profile
itself (see below).
• Click [OK] to store the new metadata profile in your personal templates or in a template
folder.
• If you have defined the new metadata profile ad hoc, you return to the action form
‘Metadata Profile’ and the name of the new metadata profile will appear as choice in
the drop-down menu [Choose]. Click [OK] to assign this profile to the current object.
3.9.1.3 Assigning metadata profiles
An object may be assigned an existing user-defined metadata profile
• by choosing Change Metadata Profile in the action menu of this object. Choose the
metadata profile from the [Choose] drop-down menu and click [OK]. Apart from the
predefined system profile, all user-defined profiles for the object type of the current
object will be offered, that are contained in your personal templates or in a template
folder of the current workspace. If no other profile than the system profile is offered,
then there no other metadata profiles available for the current object type.
• If the current object contains other objects, you have three options to also specify the
metadata profiles of the objects contained. You can determine that these metadata pro-
files remain unchanged, that they are adjusted according to the assignment of metadata
profiles to newly created objects in the container, or that they are all set to the approp-
riate system profiles.
When you assign a new metadata profile to an object that already has attributes with values of
the old metadata profile, these attributes will be listed along with their values at the end of the
new profile.
You may also include metadata profiles when you create templates: Assign a suitable user-
defined metadata profile to a newly created template. This way you may e.g. define the metadata
profile of a contact list template such that the contacts contained in this list all have a certain
contact metadata profile.

76 Basic Concepts and Functions
3.9.1.4 Changing and sharing metadata profiles
You may change the metadata profiles that you have created. Changing metadata profiles that
have been defined by other users is, however, possible only for the manager of the template
folder containing the metadata profile in question.
You can change a metadata profile in your personal templates or some template folder explicitly
• by choosing Change Properties in the action menu of this metadata profile,
and you can change a metadata profile of an object ad hoc
• by choosing Change Metadata Profile in the action menu of this object and clicking
on [Change metadata profile]. If this button is not offered, you do not have the access
rights to change the profile of the current object.
The interaction for changing a metadata profile in the ‘Change Metadata Profile’ action form
is exactly the same as for defining a new metadata profile, which essentially consists of
changing a system profile.
• Click [OK] to store the changed metadata profile, which is now valid for all objects with
this profile.
If you delete an attribute when changing a metadata profile and this attribute has already a value
for some objects, this attribute appears along with its value at the end of the profile after the
other attributes of the profile. If deleted attributes have no value anymore, they disappear
completely.
If you delete a metadata profile, it is still maintained as long as there are objects with this meta-
data profile.
You may invite other users to a metadata profile in order to promote sharing profiles across the
borders of shared workspaces. Such a profile appears at top level in the personal templates of
the users invited and may be used by these users when assigning metadata profiles.
3.9.1.5 Exporting metadata attributes
You may store and export the metadata attributes of documents, notes, contacts, tasks and flow
folders contained in a folder in form of a comma-separated .csv file. Subfolders will also be
searched recursively. Apart from the metadata, access path and BSCW object id will be stored
for each object in the file.
• Choose File Send to Metadata in the top menu of the folder.
• The action form ‘Export Metadata’ lets you select the attributes to export: check a com-
plete metadata profiles or unfold a profile and select single attributes for export. With
user-defined metadata profiles, only the new attributes are offered for export.
• You may further choose to directly download the metadata file or have it stored in your
clipboard or the folder itself.
This way, you may process metadata, e.g., with a spreadsheet program. You may invoke the
action also via Send to Metadata in the action menu of a folder.
3.9.2 Tags
Tags are freely chosen keywords that are used to describe and classify most BSCW objects
including folders, documents, URLs, notes, RSS feeds, communities and even users. Tags are
used for finding objects and detecting relationships.

Basic Concepts and Functions 77
Tags may be assigned to new objects during creation by filling in the ‘Tags’ field of the action
form. Objects may have any number of tags. Just enter your tags as words separated by blanks.
Note that with tags there is no distinction between upper and lower case.
You can assign new tags to existing objects, add more tags or change existing tags by
• selecting Change Properties from the action menu of the object and change the tags
in the ‘General’ section’.
Tags – like named attributes – are shown below the description of an object; they appear as
tooltips when viewing options are set that no descriptions or only compact descriptions are
shown.
Tags shown in a folder listing may be clicked on to initiate a search for objects with the same
tag in your entire BSCW system.
Apart from this possibility of initiating a tag search, tags may also be used in regular BSCW
searches.
Tags play an even more prominent role within blogs: the tags used for the blog entries are
shown according to relative frequency. Display of blog entries may be restricted to blog entries
labeled with a certain tag (for details see 6.2 “Blogs” on page 108).
3.9.3 The info page
BSCW generates and maintains a lot of descriptive information on its objects (folders,
discussion forums, documents, users, groups etc.). Some of the items may be edited by a user
who has the necessary access rights, others are automatically generated and updated by BSCW.
While a few items, e.g. type and name of an object or the user name of its owner, are displayed
in various contexts in the Web-based user interface, it is the info page of an object that brings
together all the information that BSCW maintains about the object.
• Select Information General or click the icon to the left of an object’s type icon to
display the info page of the object (see Figure 12 for an example).

78 Basic Concepts and Functions
Figure 12: Info page with metadata attributes
The info page supplies some technical information about an object, shows tags and all attributes
with values assigned, if any, and lists the current access rights, i.e. which users in what role
may carry out which actions on the object. The other contents of the info page may vary
depending on the object type, e.g.:
o Document under version control: The info page additionally shows the version history
as a table. By clicking the version number, you may download a specific version to your
local system.
o Contact: The info page shows all the information entered describing the contact. The
information corresponds to the data a user can enter into his personal profile under
‘Personal Data’.
o User: Besides user name and e-mail address, the info page contains all the information
that was entered into the personal profile of the user like a telephone number or a pho-
tograph. Under ‘Folders in common’ you may have listed all workspaces that you
currently have in common with the user shown. The user info page also contains contact
details on how to reach a user via messaging services or social networks when such
details were entered into the personal profile.
o Task: The info page shows requestors, contractors, status and time frame.

Workspaces, Access Rights and Roles 79
4 Workspaces, Access Rights and Roles
4.1 Creating and managing shared workspaces A shared workspace is a folder that can be accessed by other people beyond its manager or
owner, typically by a group of registered users, its members. In the default configuration – that
you may adapt to your needs – every member of a workspace
o has access to all the objects of the workspace,
o immediately realizes the effects of any action another member performs on an object in
the workspace and
o may perform most actions on the workspace and its objects (for restrictions see 4.2
“Access rights and roles” on page 86).
A folder indicates its special status as a shared workspace by the icon adjacent to its name
in the navigation bar, which is also shown in the ‘Share’ column of the folder entry. Click this
icon to display the members’ page of this workspace. There you can also manage workspace
membership.
The rules described here for folders are essentially also true for other BSCW ‘container objects’
that are derived from the folder class: discussion forums, group calendars, projects, tasks – see
the respective sections for details that may deviate from the general rules outlined below.
4.1.1 Creating shared workspaces: Inviting other users
You create a shared work space by inviting other users as members to one of your private
folders. This way, you may turn any private folder into a shared workspace. By inviting other
users to share the folder with you grant them access rights to this folder and to all of its contents.
• Choose File Access Invite Member from the top menu bar of the folder to bring up the
‘Invite Member’ form. This action may also be invoked using Access Invite
member in the action menu of a private folder.
• Select persons to be invited and transfer them to the ‘Selected users’ field using the
button. You have several possibilities for selection, which you may also combine:
• Enter user names or e-mail addresses directly.
• Choose contacts or contact lists from your address book.
You may choose only from contacts that are associated with a user or a permissible
e-mail address, i.e. an e-mail address that may be used for self-registration at your
BSCW server. Likewise, you are only offered contact lists for invitations that con-
tain at least one such contact. When you transfer a contact list to the field ‘Selected

80 Workspaces, Access Rights and Roles
users’, all users and permissible e-mail addresses of the contact list are invited to the
shared workspace. Other contacts are not taken into account.
• Search for BSCW users and choose new members from the search result.
• Search for BSCW groups and choose member groups as new members from the
search result.
Only those member groups can be found which have been declared as available for
invitation beforehand (see 4.1.3.2 “Member groups” on page 84). The member
groups become new members of the workspace as a whole.
Member groups may contain a community as member or even may allow public
access, the latter being indicated by a ‘Guest User’ in the member group name. In-
viting such member groups opens your workspace for the members of the commu-
nity or even the general public.
• Choose from contact lists shown at the end of the drop-down list.
These contact lists come from your address book. If you select such a contact list,
all user contacts and contacts with a permissible e-mail address are listed for you to
choose from. If you are sure that you want to invite the entire contact list, choose it
as a whole from your address book (see above).
You may also remove entries from the ‘Selected users’ field using the button.
If you would like to see who is already member of the workspace at this point,
• select the option ‘Choose from workspace members’. Using this option, you can
also invite existing members of the workspace in an additional role.
Note: If an LDAP directory has been installed on your BSCW server, the ‘Invite Mem-
ber’ form lets you also search this LDAP directory for users that you want to invite. Ask
your system administrator.
• Enter a personal invitation message into the ‘Invitation text’ field. This personal mes-
sage will be added to the automated invitation message that is sent to all persons who
are not yet registered users of your BSCW server.
Tick the respective check box above the invitation text if you want to have an invitation
message also sent to the registered users whom you invite.
• Specify the role which the new members are going to play in the workspace in ‘Invite
new members as’. The role determines what actions the new members may perform
within the workspace. The default role for new members is ‘Member’ (see 4.2.1 “Mem-
bers’ page” on page 82 for a description of standard roles). If you want to invite mem-
bers in different roles, you have to repeat the invite action.
• Specify in what ‘Invitation language’ the automated part of an invitation message
should be sent to users not yet registered.
• Click [OK] to grant workspace access to the new members and to send off the invitation
messages.
If you have selected or entered e-mail addresses that BSCW has not yet associated with regis-
tered users, BSCW will automatically send an e-mail message to these addresses. This message,
sent on behalf of you, is an invitation to register as a user of your BSCW server. The message
will be sent in the language that you have selected, and your personal invitation that you have
entered under ‘Invitation text’ will be appended to the standard text.

Workspaces, Access Rights and Roles 81
Note: The language that you select in this form for the invitational message will initially be
used by BSCW as user interface language for these newly registered users if their browsers do
not provide language information.
In your home folder, you may create shared workspaces in one go: instead of first creating a
private folder and then inviting other users as members, you
• select File New Workspace from the top menu. In the ‘Members’ section, the action
form lets you specify the members of the new workspace. In the ‘General’ section you
may also choose to have a workspace portal, a group calendar, a contact list and a
template folder created along with the new workspace.
As the creator of the workspace, you automatically become the ‘Manager’ of the workspace, a
role that includes more access rights than the simple ‘Member’ (see 4.2.1 “The BSCW role
concept” on page 86 for a description of standard roles).
4.1.2 Becoming a member: Being invited to a workspace
You become a member of a workspace only by being invited by its manager or by another
member who is entitled to invite new members.
If you, as a registered user of a BSCW server, are invited to a workspace you will realize this
fact by the appearance of the new workspace in your home folder with the icon attached.
Additionally, new members are informed by an invitational e-mail message if the respective
option has been activated in the ‘Invite member’ form.
Your periodic e-mail report on workspace activity will also notify you of any new workspaces
that you have been invited to on the day before.
Your home folder is the default position that BSCW uses to place a new shared workspace. You
may Cut the workspace and Paste it anywhere into your private folder hierarchy. This
transfer of the workspace is not visible to the other members, while any transfer of objects
inside the workspace is, of course. If you move a new shared workspace into an existing shared
workspace, it becomes part of this workspace and the members of the higher-level workspace
(its member group) are automatically added to the members of the new workspace (also see
4.1.4.2 “Embedding a workspace into another workspace” on page 85).
If you are invited to a workspace and are not yet a registered user, you will get an invitation
message along with a request to register. After registration, the workspace to which you have
been invited appears in your home folder.
BSCW does not provide a specific function to decline the invitation to a workspace. You can
terminate your membership in two ways:
• You remove yourself from the member group of the workspace by
• clicking the group icon adjacent to the name of the workspace in order to have
its members’ page displayed, and
• choosing Access Remove in the action menu of your personal entry.
• You destroy the workspace, i.e. delete it from your home folder and destroy it in your
trash. Only deleting the workspace is not sufficient: even if the workspace is in your
trash, you will still be its member.
In order to gain access to the workspace again, you have to ask another member to re-invite
you. It is not possible to invite oneself to other people’s workspaces.

82 Workspaces, Access Rights and Roles
4.1.3 Members’ page
The members’ page of a workspace provides a list of the members of the workspace.
• Click the icon next to the workspace name to display the members’ page of the
workspace. The icons and indicate that the workspace has a community as mem-
ber or is allowing public access.
The members’ page lists the users of your BSCW server who are currently members of the
workspace. In general, you may also have e-mail addresses, member groups and communities
as members of a workspace.
o Persons with pending membership are listed with their e-mail address. A membership
is pending if a person has been invited but has not yet registered as a user of the BSCW
server. This person cannot use the shared workspace until the registration is completed.
A person whose membership is pending can be reminded to register:
• Click Access Re-invite to send another invitation to this e-mail address.
o Persons who are registered users of the BSCW server are listed as
o user-name (full-name[, organization]) or
o user-name <e-mail-address>.
Entries of the latter form indicate that no further personal information has been made
available.
• Click on a user name to have the associated user pop-up displayed. Here you find
the user’s organization, e-mail address and phone number (if present in the personal
profile) and also the online status of the user (small coloured dot in front of the user
name). Using the buttons [Details], [Microblog] and [E-Mail] you can invoke the
info page or the personal microblog of the user as well as a form for sending an
e-mail message to this user.
The personal info page of a user contains most of the information entered by this
workspace member using Options Profile Change . Under ‘Folders in common’
you may have listed all workspaces that you currently have in common with the
member shown. The form section ‘Contact details’ shows the information that the
member has entered in the ‘Communication’ section of the personal profile. You
may contact the member directly by clicking one of the buttons offered. By clicking
[More Information] you can learn more about the respective communication service.
o All current members of a workspace form the member group ‘Members of workspace-
name’. Member groups may be invited to a workspace as a whole (see above) or may
become members implicitly, when a workspace is embedded into another (see 4.1.4.2
“Embedding a workspace into another workspace” on page 85). Groups are listed on
the members’ page as ‘Members of workspace-name’ with the icon . Group members
are represented by their groups and are not visible as individual members on the mem-
bers’ page.
• Click the name of a member group to bring up the members’ page of this group.
This is possible only if you are a member of this member group yourself.
Note that member groups of workspaces with a community (not to be confused with the
community itself) are indicated by the icon . In this case, the name is ‘Members &
Community of workspace-name’. Member groups allowing public access are indicated
by the icon . In this case, the name is ‘Members & Guest User of workspace-name’.

Workspaces, Access Rights and Roles 83
o Communities in BSCW allow workspace access for large groups of users equipped with
equal access rights keeping performance independent of community size. A workspace
can have at most one community as member, shown as in the members’ page.
A community is listed as ‘Community of community-workspace-name’ where the com-
munity workspace is the workspace to which the community belongs – in this case the
workspace whose members’ page you just have opened. Community members are
represented by their community and are not visible as individual members. By default,
only managers of a community have access to its members’ page.
You may store entries on a members’ page as vCard files (*.vcf) on your local computer. Such
vCard files contain the contact information of users and may be imported into local applications
like Microsoft Outlook.
• Select File Send to vCard in the top menu, in the multi-selection toolbar or Send
to vCard in the action menu to store the entire members’ page, selected entries or a
single entry, respectively, as a vCard file (*.vcf) on your local computer.
The members of a workspace listed in the members’ page form the member group ‘Members
of workspace-name’. Vice versa, every member group is associated to a shared workspace, i.e.
there is no workspace without its member group and no member group without its workspace.
Note: Like any other BSCW object, a member group has a history that contains the events of
adding or removing members. You may refer to this history for information about former mem-
bers of the workspace. Choose Information History to display the entire history of your work-
space group.
The menu bars of the members’ page offer all the functionality you need for membership ad-
ministration, which is treated in the next section.
What else you should know about member groups, you will find in the respective section.
4.1.3.1 Membership administration
The members’ page of a workspace lets you manage workspace membership. You can
o remove existing members,
o re-invite pending members and
o invite new members.
All these actions are by default available not only for managers, but also for normal members
of a workspace.
You remove existing members from the workspace as follows.
• Select the entries of members you want to remove and choose from the multi-
selection toolbar to remove all members selected from this workspace, or
• choose Access Remove from a member’s action menu to remove a single member
from this workspace.
As a side-effect, the members selected are also removed from any workspace to which they had
access by way of being members of this workspace. All other workspaces, your address book
and the address books of other registered users that may include the user names selected are not
affected by this action.
You re-invite a pending member – indicated by an e-mail address entry – with an additional
invitation by

84 Workspaces, Access Rights and Roles
• clicking Access Re-invite in the entry’s action menu.
The members’ page of a workspace lets you also invite additional members to this workspace:
• Choose File Access Invite Member from the top menu bar to bring up the ‘Invite Mem-
ber’ form that lets you specify additional members who are to be granted access to this
workspace.
• Continue as explained in 4.1.1 “Creating shared workspaces” on page 79. As an ordi-
nary member, you may invite further members only in the roles of Member and Re-
stricted Member. Only managers may invite other users as Manager.
4.1.3.2 Member groups
Member groups are a useful tool for the administration of workspace membership and for the
management of access rights. In particular, a member group lets you store and update the as-
signment of persons to a role – and to the access rights associated with the role – in a single
place. This information may be made available to the users of your BSCW server by showing
the group as candidate for invitation to shared workspaces. The group may then be invited to
arbitrary workspaces as a whole. Changes in group membership and role assignment are auto-
matically updated in all places where the group appears as a whole.
• Create workspaces for smaller groups of users whom you want to treat as groups on
their own because of their function or the tasks they work on.
• Select File Access Show Group in the top menu of such a workspace or its members’
page in order to make the group as a whole available for invitation to workspaces for all
users of your BSCW server. The name of the group is ‘Members of workspace name’.
Hit [OK].
Note: This action is by default only allowed for managers of a workspace.
• You (and other users) may now invite such an entire member group as a member to
other workspaces. In the ‘Invite Member’ action form, choose ‘Search for BSCW
groups’, enter a search term and transfer one or more of the groups found to the field
‘Selected users’. The group or groups will become members of the shared workspace.
If you want to revoke the availability of a member group for invitation,
• select File Access Hide Group in the top menu of such a workspace or its members’
page.
Note: For member groups of community workspaces, i.e. of workspaces with a community as
member, the availability for invitation to other workspaces is determined by the community’s
admission policy. For a hidden community, the member group of the respective workspace is
not available for invitation, for closed and open communities, which are visible for other users
anyhow, it is. Consequently, the actions Show Group and Hide Group are not possible for such
member groups.
When you invite the member group of a workspace X to a workspace Y, ‘Members of X’ be-
come a member of ‘Members of Y’, i.e. ‘Members of X’ are contained in ‘Members of Y’. This
relation between the member groups implies the inverse relation between the workspaces
involved: workspace Y is automatically made part of workspace X, i.e. is contained in work-
space X (see 4.1.4.2 “Embedding a workspace into another workspace” on page 85 where work-
spaces are embedded in one another with analogous consequences for the member groups).

Workspaces, Access Rights and Roles 85
Note: All members of an invited group hold the role in which they were invited as a group –
only restricted members become anonymous members. Should members hold several roles due
to such a group invitation, they have all rights associated to the different roles.
You can use this mechanism to map a hierarchical organization onto BSCW workspaces and
their member groups. Create workspaces for all organizational units, invite the users belonging
to the lowest level units to the respective workspaces and add the member groups of these
workspaces to your address book. Next, invite the member groups of the lowest level units to
the workspaces one level higher to which they belong (plus some managers and staff). Working
your way upwards in the organizational hierarchy, you create a corresponding hierarchy of
member groups and workspaces.
Note: If you plan to create large member groups where the vast majority of members has the
same role, for performance reasons, you should consider using communities.
4.1.4 Moving shared workspaces
4.1.4.1 Positioning a workspace in your folder hierarchy
There is a default position that BSCW uses to place a shared workspace which has not yet been
assigned a position manually: the top level in your home folder. BSCW places a workspace, to
which you have just been invited as a new member, in the top level of your home folder –
irrespective of the positions that this workspace has in the individual folder hierarchies of the
other members.
If, e.g., a folder B, which is contained in a workspace A, is turned into a shared workspace of
its own by inviting additional members to B, the position of workspace B in the original work-
space A remains unaffected for the members of workspace A. For the new members, workspace
B appears in the top level of their home folders.
You may Cut a shared workspace and Paste it anywhere in your private folder hierarchy.
This transfer of the workspace is not visible to the other members, while any transfer of objects
inside the workspace is, of course.
Moving a shared workspace into another shared workspace has consequences for workspace
membership in both workspaces which is treated in the next section.
4.1.4.2 Embedding a workspace into another workspace
You may create further shared workspaces inside an existing shared workspace by inviting new
members to subfolders of the existing workspace. Use
• Access Invite Member from a subfolder entry’s action menu, or the respective File
menu option in the subfolder’s top menu.
You thereby embed the new workspaces into the existing workspace.
You may also embed a workspace in another by transferring a workspace to another via cut and
paste. The members of the higher-level workspace (its member group) are automatically added
to the members of the embedded workspace. Should the embedded workspace have been cut
from another workspace, the member group of this workspace is removed from the members
of the embedded workspace. Embedding a workspace into another automatically changes the
membership of the workspace that you transfer. Remember to check whether these automatic
changes conform to your intentions and correct membership and access rights if necessary.

86 Workspaces, Access Rights and Roles
4.2 Access rights and roles The members of a shared workspace jointly work on the workspace itself and the objects con-
tained in it, e.g. by changing the name of the workspace or uploading documents to the work-
space. The access rights in the workspace define which actions a certain member may carry out.
Access rights are assigned to members via roles (Manager, Member, Restricted member etc.),
which the members receive when they are invited to the workspace. For instance, ordinary
members are allowed by default to invite new members and remove existing members, restrict-
ed members are not allowed to do this; restricted members only have reading access to the
objects of a workspace, ordinary members may change existing objects and create new ones.
A manager of a workspace may change the default access rights by excluding actions from a
certain role or by allowing further actions. This way one could determine, e.g., that ordinary
members cannot invite new members or that restricted members may upload documents.
The access rights defined for a workspace by its roles are inherited by all objects contained in
the workspace including all subfolders and the objects contained therein. The access rights may,
however, also be changed for certain objects. A manager may, e.g., change the Member role for
a certain subfolder in such a way, that ordinary members only have read access for this
subfolder. This arrangement is then valid for all objects contained in the particular subfolder.
Note: A major motivation for limiting access rights is to prevent documents from being over-
written or deleted inadvertently. BSCW offers other ways to avoid this which do not involve
the modification of access rights:
• Lock the document temporarily via Access Set Lock .
• Freeze the document via Access Freeze .
• Establish version control for the document via Access Version Control .
Access right management is by default reserved for the managers of a workspace (but even this
could be changed by editing the access rights!). One should change access rights only sparingly
and make eventual changes known inside the workspace in order to avoid unnecessary
irritations (“Why I’m not allowed to carry out this action here, which is possible in all other
workspaces?”).
In the following, we will explain the BSCW role concept and show, how
o to get informed about the current role assignment in a workspace and the access rights
going along with it,
o to assign roles,
o to edit roles and also
o to define new roles.
At the end of the section we describe the owner role in some detail. The owner role determines
which user is responsible for the disk space used by a BSCW object.
4.2.1 The BSCW role concept
BSCW manages access rights via the role or roles that a user holds. Roles are sets of actions
that are allowed for the holder of a role. Access control via roles is very simple: Users may
carry out a certain action on a given object if and only if their role with respect to the object
includes that action. Only permitted actions are offered in the menus.

Workspaces, Access Rights and Roles 87
When users hold multiple roles, they may carry out an action if the action is allowed for one of
their roles. Users may consequently carry out actions contained in the union of actions resulting
from their roles.
Standard roles
As examples of BSCW roles we give a description of the predefined standard roles that are
offered when inviting new members to a workspace.
o Member
o read, copy, cut and delete the objects of a workspace
o have the info page displayed
o create new objects, e.g. upload documents, change objects (name, description etc.)
and edit objects
o search for objects, introduce version control for documents
o invite new members and remove existing ones
o Manager
o everything a Member can do
o change the access rights in a workspace: assign roles, edit roles, define new roles,
allow public access
o Restricted member has read access only, can read and copy objects and have the info
page displayed.
o Associate member has access rights similar to a Member, but cannot invite new mem-
bers and remove existing ones.
Inheritance of access rights: the scope of a role
To avoid explicit role assignment whenever a new object is created, role definitions and as-
signments are inherited along the folder hierarchy. When a user, e.g., creates a subfolder, this
subfolder inherits the member group of the parent folder including all role assignments.
The scope of a role is the object for which a user holds that role and everything inside the object,
unless and until the user is re-assigned another role.
Note: Though this principle is also true for personal containers like the user’s home folder,
clipboard or trash, the user’s default role in these special containers is not inherited to shared
folders which are contained therein.
An example
You are by default the Manager of your home folder and of all objects and all subfolders
therein. The default role Manager is inherited to your home folder’s scope.
We now assume that you are invited to a shared folder called ‘Project Documentation’. The
Manager of this workspace invites you in the role Restricted member in order to assign only
restricted access rights to you, e.g. only read access. You now hold the role Restricted member
for the entire ‘Project Documentation’ folder and its contents.
On the other hand, the shared folder ‘Project Documentation’ appears at the top level of your
home folder where you are Manager. What roles will you play in ‘Project Documentation’? If
the role Manager were inherited from your home folder to ‘Project Documentation’, you would
be both Manager and Restricted member. This would be technically feasible, but most likely

88 Workspaces, Access Rights and Roles
not what your host intended. Therefore, the personal containers like the home folder, clipboard
and trash inherit their role assignments only to private folders, but not to shared folders. Shared
folders inherit role definitions and assignments only from other shared folders.
Extended access rights for the BSCW administrator
BSCW administrators may always assign and redefine roles (actions Access Assign Role
and Access Edit Role ) on all folders, independent of their membership. Besides, they may
open all folders and may execute Information General for all objects.
Because of the extensive rights that a BSCW administrator has (and must have), the property
of being an administrator is not a role in the sense of the BSCW role concept and consequently
cannot be manipulated via the BSCW user interface.
4.2.2 Information about current access rights
For each object, the access rights table on the object’s info page shows the current access rights.
• Select Information General or click the icon to the left of the object’s type icon to
display its info page.
The ‘Access rights’ table has a row for each predefined role and each user-defined role (if any)
for the folder. The table shows for each role which users have been assigned to the respective
role and which actions are permitted for this role (and thereby also for the holders of the
respective role).
If a role has been changed for this object, the additional actions are underlined and the no longer
permitted actions are struck through. If you cannot detect any underlined or struck through
actions, the role definition corresponds to the predefined default.
Underlining or striking through of role members in the table indicates that the users concerned
have been assigned to an additional role (underlined) or have lost a role they held when invited
to the workspace. Also see next section about explicit role assignment.
You can also have an overview of the access rights for workspaces and all folders contained
therein in the form of table.
• Select File Access Rights in the top menu of the workspace or select Information
Access Rights in the action menu of the workspace in a folder listing.
The table lists the roles, the role members and the action groups allowed for the workspace
itself and all its subfolders. The actions belonging to an action group are displayed in the tooltip
of the action group. Position your cursor over the name of an action group to have the tooltip
shown.
If an action group is struck through, certain actions of the group are not allowed for the cor-
responding role. The tooltip shows which actions are concerned. If the action group is given in
bold and struck through, the whole group is not allowed for the corresponding role. Underlining
of an action group indicates that this group is not part of the standard scope of the role, but that
some actions of this group are allowed for the role concerned. The tooltip shows the actions
(underlined) which are allowed for the role. When the action group is given in bold and under-
lined, all actions of the group are allowed.
With self-defined roles which are initially empty and allow no actions. All action groups
allowed are underlined.

Workspaces, Access Rights and Roles 89
Note: The action groups Change ext. and Share ext. of the role Creator do not have the standard
scope, but are restricted with regard to the actions allowed. This is not specifically indicated,
but visible from the respective tooltips.
Underlining and striking through of role members has the same meaning as in the access rights
table of the info page (see above).
The access rights table indicates the hierarchical folder structure by indentation. Apart from the
subfolders contained, the table also lists all objects for which the access rights have been
changed individually.
An access rights table may also be displayed for other container objects like website folders,
flow folders or tasks.
You can export an access rights table as PDF file and have it printed on your local computer.
Use the button in the upper right-hand corner of the table.
4.2.3 Assignment of roles
Role assignments may be done in two different ways:
• when inviting users to the member group of a workspace or other container object;
• by explicitly using Access Assign Role .
Role assignment during invitation
When inviting users to a workspace, the roles which may be assigned are indicated by the
selection list of the field ‘Invite new members as’ in the ‘Invite Member’ form. This includes
normal roles like Manager or Member, and restricted roles like Restricted member, but not
system defined roles like, e.g., Owner or Creator. Workspace managers may invite users in all
roles valid for a particular workspace, simple members, however, may do so only in roles on
the same ‘level’ or below, e.g. as members or restricted members, but not as managers.
Since not only single users, but also entire member groups may be invited to a workspace, it is
possible to assign a role to a group when inviting this group. The role is assigned to every
member of the group. This may lead to multiple roles for a user, e.g., when you invite two
groups of users in different roles, which both contain the same user.
Role assignment using ‘Assign Role’
Using the action Access Assign Role , you may grant (or deny) particular access rights to
specific members of an object by re-assigning the roles assigned during invitation or inherited
from parent workspaces.
The ‘Assign Role’ form presents you with a list of all members along with their roles. By click-
ing the respective control boxes, you may change the role assignments (or leave them as is).
Assignments of system-defined roles like Owner or Creator may not be changed here. By
clicking [Reset Role Assignments], you may reset all individual role assignments done for this
particular workspace (if any).
By default, the Assign Role action is reserved for the managers of a workspace.
If the object, for which the role assignment is done, is contained in more than one folder you
are first presented with a different form, where you may choose for each containing folder
whether to inherit all role assignments from this folder (including ownership) or to assign a
specific role to all members of this folder. The latter may again lead to multiple roles for a

90 Workspaces, Access Rights and Roles
specific user. Click [Add Specific Role Assignments] to proceed to the form for individual role
assignment for the different members.
Note: You may use the Access Assign Role action for sharing or transferring ownership of
a given object, if this object is contained in more than one folder. Choose to inherit role assign-
ments and ownership from a containing folder to have the owners of the containing folders also
become owners of the object. You may give up workspace ownership altogether by switching
off the role inheritance from the specific containing folder where you are an owner (and hence
have become the owner of the object under consideration).
Ownership becomes important when disk space control has been activated for your BSCW ser-
ver, because all objects that you own are added to your disk space quota, and this may eventually
lead to a violation of your disk space limit. Shared ownership of resources that use up much
disk space might be a fair solution because disk space usage is also shared between the owners.
4.2.4 Defining and re-defining roles
Some roles in BSCW are already predefined by the system, e.g. Manager, Member or Restricted
member. These roles may be applied to all BSCW objects and thus may be assigned anywhere.
In addition, you may define new roles if you need them for a specific application. Examples
would be Teacher, Student or Guest. You proceed as follows:
• Choose Access Add Role in the action menu of the object, for which you want to
define the new role. If this object is a folder the new role is also valid for all objects
contained in the folder.
• Enter the name of the new role in the ‘Add Role’ form. To define the access rights of
the new role you have two possibilities:
• You may use another role as template: choose a role template and select the check box
next to it. You may then proceed to adapt the template to your needs using [Edit role...].
• You may also define the new role’s access rights from scratch. To do so, de-activate the
use of a role template and select the action classes which the future role holders shall be
authorized to. All BSCW actions underlying access control are classified into action
classes. Below we give some typical examples of actions for the classes listed:
Get: Open, Copy
Get ext.: More Information
Add: Upload Document, Add Note, Add URL
Add ext.: Add Folder, Add Discussion Forum
Change: Change Properties, Lock, Start Version Control
Change ext.: Delete, Destroy Versions
Share: Invite Member, Remove Member
Share ext.: Add Role, Edit Role, Upload per E-Mail
Edit: Cut, Edit Note
Blog: Add Blog Entry, Change Blog
Choose [Edit role...] to view all action classes in detail – the ones that you have selected
and also the ones that you don’t have selected.
• Confirm with [OK] if you are satisfied with the action groups that you have selected for
your new role, or click [Edit Role ...] to carry out the necessary modifications of the
new role on the level of single actions (see Edit Role further below).
User-defined roles are restricted to the scope of the respective object and may only be used
within this scope.

Workspaces, Access Rights and Roles 91
Predefined as well as user-defined roles are called normal roles since they may be assigned
without restrictions within their respective scope. Besides, there are also special roles that may
only be assigned to users with restrictions or that are inherited in a special way. Only system
administrators may define (or remove) special roles. Examples for special roles are Owner and
Creator.
All roles (normal roles as well as special roles) may be redefined.
• Choose Access Edit Role in the action menu of the object for which you want to
change role definitions.
• Select the role that you want to change and confirm with [OK]. At this point, you may
also reset all role changes carried out for this object so far by clicking [Reset All Roles].
• In the subsequent form, you select all actions that should be allowed for the changed
role and confirm with [OK]. In case the edited role is a user-defined role, you may delete
the role definition altogether by clicking [Remove Role].
Note: If the action ‘Cut’ is allowed for a role, then this goes also for the action ‘Delete’ even if
the respective check box has not been checked. The reason for this rule is that an object that
has been cut may be deleted from the clipboard without any further restrictions, i.e. one could
say that the action ‘Cut’ includes the action ‘Delete’.
The changed role definitions are valid within the scope of the object where they have been
changed, but not outside! This means that there may be different roles with the same name, but
different scopes, i.e. Members in two different workspaces may have quite different access
rights.
4.2.5 Ownership and ownership transfer
The owner role is a system role, i.e. computed by BSCW and not arbitrarily set by users. Every
object has one or more owners, who share responsibility for the disk space used by the object
owned – important when disk space control (‘quota system’) has been activated for your server.
Ownership and transfer of ownership in BSCW (and transfer of roles in general) is best ex-
plained by taking a closer look at the entries in folder listings that act as links to BSCW objects.
An object is accessed via its entries where one object may have a multitude of entries. An
example: If you click on an entry of an HTML document in one of your shared workspaces, the
document is shown to you. If another member of the same workspace clicks on her entry of the
same document, she is also shown the document. So, both of you have (at least) read access to
the HTML document by means of your entries in the shared workspace referring to the same
object.
If you cut, delete or paste an object you actually do not cut, delete or paste the object, but you
move an entry referring to the object into your clipboard, into your trash or from your clipboard
to some other container object. Moving objects in BSCW means moving the entries, not the
objects themselves.
How are entries created? If you create an object, entries to this object are created for all mem-
bers of the container object in which you create the object. Other actions also create additional
entries of an object, e.g., Link to Clipboard creates an entry referring to the object in your
clipboard, and inviting new members to a workspace creates entries to the workspace and its
contents in the home folder of the newly invited members.
Entries come in two flavours with respect to ownership, membership and transfer of roles:

92 Workspaces, Access Rights and Roles
o Entry transfers roles: This is typically the case when an object along with its entries is
created in a folder. In this case, the object inherits the members and their roles (including
the owner role) from the folder in which the object was created.
o Entry sets roles: This is typically the case when a user A is invited to a folder in the role
‘xyz’. In this case, an entry in the home folder of user A is created that refers to the
folder and sets role ‘xyz’ for user A. The owners of the folder remain unchanged, only
user A joins in role ‘xyz’.
Given the necessary access rights – by default those of a manager – you may change the char-
acter of entries with respect to transferring roles or setting roles. Invoke Access Assign
Role to display a form that either lets you only define specific role assignments for the members
of the object (in this case, the object has only one entry, which has to be a role transferring
entry), or that lets you also specify for each entry of the object whether it is to transfer roles
from the containing folder or whether it sets a specific role for the members of the containing
folder. Depending on your choice, the entries become role transferring entries or role setting
entries. There must at least be one entry left which transfers the owner role from the folder
above (the owner role cannot be set!). The specific role assignments for the users listed override
the role assignments derived from role transfer or role setting (see 4.2.3 “Assignment of roles”
on page 89).
The two kinds of entries are not easily distinguished at the user interface. The icon signaling
that the respective object is contained in at least two folders with different groups is a good
guideline: Entries with a icon, where the owner differs from the owner of the containing
folder, are good candidates for role setting entries, whereas entries with no icon are good
candidates for role transferring entries. To be sure about the character of an entry, you have to
use Access Assign Role .
When entries are moved (cut, pasted, deleted), they do not change their character with respect
to transferring or setting roles. When you move a role setting entry to your clipboard, it still
remains a role setting entry, and you keep your role(s) that you had beforehand.
The members and their roles with respect to an object result as a sum of what is transferred or
set by the individual entries referring to the object, eventually overridden by specific role as-
signments via Access Assign Role . When an object is no longer referred to by an entry, i.e.
when all entries have been destroyed, the object will eventually be removed from the system
(see ‘Destroy’ below).
After the discussion of the general principles, let us now see how ownership and membership
of an object is affected by cutting, pasting, deleting and destroying the entries referring to it.
o Cut: Cutting an entry from a folder F moves the entry to your clipboard. If the entry
transfers roles it will now transfer roles and members from your clipboard instead of
from folder F. This will give you the role of owner and manager. If the entry sets roles
your role will remain the same as in folder F. The other members of folder F, if any,
will lose access to the object referred to by the entry via this entry. Membership and
ownership based on other entries referring to the same object in other folders remain as
is.
o Paste: Pasting a role transferring entry from your clipboard to a folder G lets the entry
now transfer members and roles from folder G instead of from your clipboard. Conse-
quently, all members, managers and owners of G will also become members, managers
and owners of the object referred to by the entry. You will lose your owner/manager
role if you are not also owner/manager of G. Pasting a role setting entry from your
clipboard to a folder G leaves you in your role that you had in your clipboard. Other

Workspaces, Access Rights and Roles 93
members of folder G, if any, get access to the object referred to by the entry in the role
that is set in the entry – eventually overridden by specific role assignments of the object
– with the exception of restricted or anonymous members of G, which become
anonymous members of the object to ensure minimal access. Ownership which is based
on other role transferring entries remains as is.
o Delete: works like cut, only entries are moved to your trash and not to your clipboard.
o Undelete: works like paste, only entries are moved back to their original location.
o Destroy: removes entries from your trash. If you destroy a role setting entry you lose
access to the object referred to by the entry via this entry; if the entry was your only
access to the object, you are removed as member of the object. If you destroy a role
transferring entry – you are owner and manager of the object because you are owner
and manager of your trash! – you lose your owner and manager role transferred via this
entry; if the entry was your only access to the object, you are removed as member and
owner of the object. The disk space used by the object is no longer accounted to your
disk quota, if disk space control is activated for your BSCW server. A problem arises
when the role transferring entry to be destroyed is the last such entry referring to the
object, and there are other role setting entries left that still refer to this object. If the
entry would be simply removed, the object would have no owner left; you would think
you had destroyed your ‘own’ object while other members still have access. To avoid
such a situation, the other role setting entries referring to the object are removed as well.
Since the other members of the object lose access to the object, you are warned by
BSCW before you destroy the last role transferring entry referring to an object that still
has other members. If you go ahead, the object has no more entries referring to it and
will eventually be removed from the system.


Address Book and Contacts 95
5 Address Book and Contacts
The personal address book supports you in managing the contact data of arbitrary persons that
are of interest to you. This includes users of your BSCW server as well as persons who are not
(yet) users of your BSCW server. The contact data of a person are stored in a contact object.
For a better overview, you may group the contacts of your address book in contact lists. The
entries of your address book are available when inviting members to a workspace, participants
to an appointment or an appointment scheduling.
Contact lists are special folders that contain only contacts. Contact lists may also be created in
arbitrary workspaces, in order to have relevant contact data available in the context of a work-
space. Before such contacts may be used, e.g. for inviting new members to a workspace, they
have to be copied, however, into the personal address book.
E-Mail addresses and mobile phone numbers stored in contacts may be used to send e-mail
messages, SMS or BSCW objects to contact persons. This requires an according configuration
of your BSCW server.
5.1 Contact lists Contact lists are special folders for maintaining contact information about people relevant to
you. The contact data of a person are stored in a contact object. Contact lists contain only such
contact objects. Contact lists may be created in arbitrary folders so that you are able to maintain
contact information in the context of a certain workspace – also about persons who are not
members of this workspace or not even users of your BSCW server. The representation of a
contact list is very similar to that of a members’ page.
You create a new empty contact list as follows.
• Select File New Contact List in the top menu and enter name and optional tags and
description of the contact list.
You change name, tags and description of a contact list as follows.
• Select Change Properties in the action menu of the contact list and enter your
changes.
5.1.1 Creating contacts
For creating contacts in a contact list
• open the contact list and select File New Contact . Enter the contact information in the
‘Add Contact’ form.
All contact details may be changed using Change Properties in the action menu of
a contact later on.

96 Address Book and Contacts
• You may assign the new contact to one or several categories, by which contacts may be
sorted and filtered. Using Options Contact List in the top menu you may define your
own contact categories.
• Instead of entering contact information manually you may also [Choose users]. This
button opens a new action form ‘Add Entries’. Here you may enter user names or e-mail
addresses or choose users from the result of a BSCW user search or search in an LDAP
directory and transfer them to the field ‘Selected users’. Clicking [OK] will create new
contacts corresponding to the personal profiles of the users selected. Such contacts are
called original contacts.
5.1.2 User contacts and original contacts
If a contact that you create has an e-mail address which also belongs to a user, the contact is
automatically associated to this user and the contact is called a user contact. The same goes for
e-mail addresses which have received an invitation for registration (so called ‘pending e-mail
addresses’). In such a case, the user name or the pending e-mail address is added to the name
of the contact in parentheses. The type of the contact, which is shown in the ‘Status’ column,
changes from ‘Contact’ to ‘User’ or ‘Pending E-Mail Address’.
The type of a contact is also indicated by its icon:
normal contact
contact associated to a user
contact associated to a pending e-mail address
Note: If a contact has several e-mail addresses, it will be associated to a user only if this is the
only user that has corresponding e-mail addresses.
Contacts created by the [Choose users] action are not only associated to a user or pending e-mail
address, but also show the original attributes which the respective users have entered in the
‘Personal Data’ section of their personal profiles. Such contacts are called original contacts,
have the type ‘User’ or ‘Pending E-Mail Address’.
Original user contacts can be distinguished by their icons from other contacts of the same type.
original user contact
original contact of a pending e-mail address
Original user contacts are specific in that they always show the same attributes that the respec-
tive users have set in their personal profiles, i.e. the attributes of an original contact are
automatically updated.
The original contact of a pending e-mail address is automatically converted to an original user
contact as soon as the corresponding user registers.
Original contacts usually have a member group of restricted members to be detected by the
group icon in the ‘Share’ column. This is the group of those users who also have this contact
in their address book or some contact list.
For completeness sake, we would like to mention that user contacts may also show other icons
depending on the state of their corresponding user accounts: e.g. ‘Bounced E-Mail Address’
(user whose e-mail address has become invalid) , ‘Locked User’ (user whose user account has
been locked by the administrator) or ‘Expired User’ (user whose temporally limited account
has expired).

Address Book and Contacts 97
5.1.3 Changing contacts
All contact details may be changed
• using Change Properties in the action menu of a contact.
Changing a user contact, i.e. a contact that is associated to a user, differs in some respects from
changing a normal contact:
• Below the fields of the action form ‘Change Contact’ you see the entries appearing in
green which were made by the user himself in his personal profile, if the entries differ
from the entries of the contact. The user name is added in parentheses.
• Click [Merge with original] to take over the user values for one or more fields.
• Click [Replace by original] to take over all values from the associated user. The user
contact is changed to an original user contact and all contact details are automatically
updated whenever the user concerned changes his or her personal profile.
• Click [Edit] in order to continue with the usual editing of the contact.
• End the editing by clicking [OK]
Note: Even if user data are taken over into a contact using [Merge with original], as described
above, these fields will not automatically updated when this user changes the personal profile.
When you change an original user contact, the contact is converted to a normal contact and
contact details will no longer be automatically kept in accordance with the personal profile of
the user. You are warned about this fact by a message in the action form ‘Change Contact
(copy)’.
5.1.4 Sorting and filtering contacts
Contacts may be sorted and filtered
• using View Sort and View Filter in the top menu. Besides category, contacts may also
be filtered by the organization assigned.
You can also define your own contact categories in addition to the predefined categories
‘Business’ or ‘Private’.
• Select Options Contact List in the top menu of a contact list. In the subsequent form you
may [Add] your own categories and [Remove] existing user-defined categories.
5.1.5 Importing and exporting contacts
Contacts of a contact list may be imported from local applications like Microsoft Outlook in
the vCard format.
• Select File Import (vCard) and upload a vCard file (*.vcf) from your local computer.
BSCW infers the character set of the file automatically from your browser information.
You may override the suggested character set by selecting a different one.
• Alternatively, you can upload one or more vCard files into a contact list using the drag
& drop uploader.
Contacts and contact lists may also be exported using the ‘vCard’ format.
• In order to export a single contact as a vCard file, select Send to vCard in the action
menu of the contact and store the file on your local computer.

98 Address Book and Contacts
• You can export several contacts at a time as a vCard file by checking the contact entries
in the contact list and then clicking in the multi-selection toolbar.
• You can export an entire contact list as a vCard file using File Send to vCard in the
top menu.
The export of address information contained in user entries of your address book or arbitrary
members’ pages is also possible in vCard format using the same actions.
Note: The import of Microsoft Outlook contacts is only possible if they have first been stored
in Outlook as a vCard file (*.vcf).
If you are working on a Windows platform locally, you can synchronize your BSCW contact
lists with contact folders in MS Outlook. See 13.8 “Outlook synchronization” on page 243 for
details.
Contacts and contact lists may also be copied into your address book. Contacts and contact lists
of your address book may also be used when inviting new members to a workspace.
• Select File to Address Book in the top menu of a contact list, to copy the whole list into
your address book.
• In order to copy single contacts, check the boxes of the contacts to be copied and click
on in the multi-selection toolbar.
5.1.6 Contacting contacts
You may send an e-mail message to a contact having an e-mail address by
• selecting Send to E-Mail in the action menu of the contact. Details are to be found
in 5.3.1 “Sending messages” on page 101.
Depending on the configuration of your BSCW server, you may send an SMS to a contact with
a mobile phone number
• by selecting Send SMS in the action menu of the contact.
Given a user contact, i.e. a contact which is associated to a user, also indicated by its icon ,
you could try to get in touch with the corresponding user over social networks or instant mes-
saging services. This is, of course, only possible if the user has entered according links in the
‘communication’ section of the personal profile.
• Click on the user contact, to have the user pop-up displayed.
• Click on the [E-Mail] button, to send an e-mail message to the user.
• Use the [Details] button to get to the user info page. The section ‘Contact details’ in the
personal info page lists the contact facilities that the particular user offers. If the section
is missing, the user has not entered any links to social networks or instant messaging
systems in the personal profile.
• Click on the icon of a social network, to get to the user’s page in the particular network.
Click on the icon of an instant messaging system, to get in touch with the user via the
respective instant messaging system.

Address Book and Contacts 99
5.2 Address book Your address book is a personal object accessible only by yourself. It helps you to manage the
contact data of arbitrary persons that are of interest to you. This includes users of your BSCW
server as well as persons who are not (yet) users of your BSCW server. The contact data of a
person are stored in a contact object. For a better overview, you may group the contacts of your
address book in contact lists. The entries of your address book, single contacts and entire contact
lists, are available when inviting members to a workspace, participants to an appointment or an
appointment scheduling.
The contents of your address book are displayed in a page that corresponds to the representation
of a contact list. Most actions for contacts in contact lists are also possible for the contacts in
your address book. Entries in the address book may be sorted by name and type. When sorted
by type, the entries appear in the following order: communities, member groups, e-mail ad-
dresses and finally user names.
• Open your address book by clicking on the icon in your instant access bar or
select GoTo Address Book in the top menu.
5.2.1 Creating entries in your address book
New entries in your address book come from two sources: (a) BSCW automatically adds all
users and e-mail addresses, which you invite to one of your workspaces, to your address book;
(b) you may add entries to your address book manually.
You may add new entries to your address book as you would add them to a contact list:
• Open your address book by clicking on the icon in your instant access bar or
select GoTo Address Book in the top menu.
• Choose File New Contact from the top menu bar and fill in the action form.
• Click [OK] to create new entries in your address book.
Instead of creating address book entries manually, you may also copy users from members’
pages and contacts from contact lists into your address book.
• On a members’ page or contact list, check those entries to be inserted into your address
book and select in the multi-selection toolbar, or
• select to Address Book from the action menu of single entries. If this action is not
offered in the action menu, the contact may already be part of your address book.
Contacts that you copy from a members’ page are original contacts.
You may also import contacts from local applications like Outlook in vCard format into your
address book by invoking File Import (vCard) . This works exactly as for contact lists (see 5.1.5
“Importing and exporting contacts” on page 97). You may also export single contacts, contact
lists of your address book or even the entire address book in vCard format using Send to
vCard in the action menu or File Send to vCard in the top menu for usage on your local
computer.
Note: Starting with this BSCW version, member groups cannot be transferred to personal
address books anymore to be used for invitation to workspaces. Instead, member groups may
be made available for invitation to workspaces in general and are found by a global search when
inviting members to a workspace.

100 Address Book and Contacts
5.2.2 Changing address book entries
With the exception of original contacts (icon ) you may change the contacts of your address
book anytime
• by selecting Change Properties in the action menu of a contact.
When editing a user contact, i.e. a contact associated to a user, you are able to compare your
contact data with the data of the user’s personal profile:
• Below the fields of the action form ‘Change Contact’, the original entries of the user’s
personal profile are indicated in green, if deviating from your contact data. The user
name is added in parentheses.
• Click [Merge with original] to take over one or more fields from the associated user’s
personal profile.
• Click [Edit] to continue with the usual editing of the contact.
• If you would like to convert the user contact into an original contact in order to have the
current user data available in this contact at any time, click [Replace by original].
Note: Even if you have taken over user data into one of your contacts with [Merge with original]
as described above, these data are not updated automatically as is the case with original con-
tacts.
You cannot really change an original contact because you would thereby change the personal
profile of this user. You may, however, copy an original contact into an ordinary user contact
and edit it afterwards.
• Select Change Properties in the action menu of an original contact.
• The action form ‘Change Contact (copy)’ warns you that you are going to create a copy
of the original contact and thereby will lose the automatic update of the user data.
• Select [Cancel] to keep the original contact or edit the copy and replace the original
contact with your copy by clicking [OK].
You may change your own original contact, which you possibly have created using [Choose
users] in your address book, without any restrictions. This has the same effect as if you would
change the ‘Personal Data’ section of your personal profile using Options Profile Change .
Entries in your address book can only be deleted manually; BSCW will not automatically re-
move an entry that it has added automatically.
• Select the entries to be removed in your address book page and choose from the
multi-selection toolbar. Single entries may be removed via Access Remove in the
action menu.
If you destroy your own original contact in the trash, you will remove it also from all other
address books and contact lists. You receive a warning before you confirm the destruction.
Apart from that removing or destroying a contact does not affect any other address book or the
member status of users referred to by the entries removed. It only concerns your personal
address book.
5.2.3 Structuring the address book
In order to structure your address book in different domains, you may create contact lists inside
your address book.

Address Book and Contacts 101
• Select File New Contact List from the top menu and enter name and optional
description. Both may be changed later on.
In such a contact list of your address book, you can create new contacts as described for your
address book, or transfer contacts from your address book via cut/copy and paste.
Contact lists of workspaces may be transferred to your address book as a whole using the
action File to Address Book in the top menu of the contact list.
Contact lists of your address book may be used when inviting new members to workspaces –
either by inviting all or only certain contacts of the list (for details see 4.1.1 “Creating shared
workspaces: Inviting other users” on page 79). In order to appear in the invitation action form,
such contact lists must at least contain a contact that is associated with a user or pending e-mail
address or contains an e-mail address admitted for self-registration on your BSCW server.
5.2.4 Using the address book
Your address book helps you when selecting persons for invitation to workspaces, appointments
and votings: the diverse action forms offer the option ‘Select from my address book’ for this
purpose.
You can sort the contacts of your address book according to various criteria using View Sort .
When sorting by type, the contact lists precede the contacts in the order: general contacts, user
contacts and pending e-mail contacts. The contacts of your address book may be filtered accord-
ing to category and organization using View Filter (also see 3.8.4 “Views on folders” on page
68).
You may contact persons represented by the contacts of your address book, when e-mail ad-
dresses, mobile phone numbers or other contact data are given. This works as in normal contact
lists and is described in 5.1.6 “Contacting contacts” on page 98.
5.3 Sending messages and BSCW objects If a contact has an e-mail address, you can send e-mail messages to such contacts in your ad-
dress book or in an arbitrary contact list. This also holds for the member entries on a members’
page of a workspace.
If your BSCW server is configured for sending e-mail messages, you may also send BSCW
objects via e-mail. When doing this, you may select the receivers from your address book or
from the members’ page of a workspace.
5.3.1 Sending messages
You may send e-mail messages to contacts of your address book or of a contact list, provided
these contacts have an e-mail address.
• Open your address book (e.g. using GoTo Address Book ) or a contact list and check
those contacts which you want to send an e-mail message to. If you want to send a
message to all contacts of a contact list, simply select Edit Select all .
• Select (Send E-Mail) in the multi-selection toolbar, to send the message. The ‘Send
E-Mail’ form already shows the e-mail addresses of the contacts selected in the ‘To:’
field. You may enter further e-mail addresses either manually or by selection from your
address book that is shown when you click on one of the [To:], [Cc:] or [Bcc:] buttons.
Enter subject and body of your message and confirm with [OK] to send the message.

102 Address Book and Contacts
Depending on the configuration of your BSCW server, you may send an SMS to a contact with
a mobile phone number
• by selecting Send SMS in the action menu of the contact.
BSCW helps you to send an e-mail message to an ad-hoc selection of the members of a work-
space (in this case, you are sure to have the e-mail addresses):
• Click the icon next to the name of the workspace to display its members’ page.
• Click Edit Select all and/or the individual check boxes to select the members to be
included in your ad-hoc mailing list.
• Click (Send E-Mail) in the multi-selection toolbar to send a message as it is described
for contacts above.
5.3.2 Sending BSCW objects
You may send BSCW objects and their complete contents to the members of a workspace and
other people as well. You may use contact information contained in your address book, when
sending BSCW objects.
The BSCW objects are sent as attachments of an e-mail. When you send the objects via e-mail
you may also send links to the objects instead of sending the objects themselves in an attach-
ment. Think of this possibility especially when sending large documents.
• Click the individual check boxes to select the objects that you want to send and click
(Send E-Mail) in the multi-selection toolbar.
• In the ‘Send E-Mail’ form you may specify recipients, subject and body of your mes-
sage; the objects that are sent as attachments are listed below.
• Use the [Add members] button to add all members of your current workspace to the
‘To:’ field. Use [Remove members] to remove them again. You may make use of
contacts with e-mail addresses from your BSCW address book by clicking the [To:],
[Cc:] and [Bcc:] buttons.
• Under ‘Send as link or as attachment’ you may choose how you want to send the objects
selected.
• Use the option ‘Send as attachment to all recipients’ if you wish to attach the objects
to your e-mail message. Avoid this option if your documents are large or if you want
to keep track of who actually will read the documents.
• Use one of the two ‘Send as link ...’ options if you wish to avoid e-mail attachments.
If you send links also to non-members of the workspace, these non-members will
have read access to the objects. Read access is enabled by way of a token and is
restricted to the time span indicated. You may block access to an object sent before
the time span has elapsed: Open the info page of the object, which lists under
‘Access rights’ the read access right via token. The action [Delete token] in the right-
hand column of the access right table revokes the access via token for non-members.
The option ‘Send as link to workspace members only’ ensures that no one but work-
space members with the right to read will be able to access your objects: non-
authorized recipients will be removed from the recipients’ lists and will not be sent
an e-mail at all (in this case, a warning will appear before the message is actually
sent).

Address Book and Contacts 103
Note: The action (Send E-Mail) is only available when your BSCW server has been con-
figured for e-mail distribution by your BSCW administrator.


Discussion Forums, Blogs and Feeds 105
6 Discussion Forums, Blogs and Feeds
6.1 Discussion forums and notes Discussion forums are either objects on their own within a folder or are attached to BSCW
objects as annotations. A discussion forum consists of notes – basically short pieces of text
“pinned to a bulletin board” for all members of a workspace to read and react on. One specific
type of reaction is to write another note that refers (‘replies’) to an earlier one, as
o answer to a question;
o counter-argument to an argument;
o additional piece of information to a topic.
The author of a note that replies to another note extends and refines a network of notes – inside
a discussion forum or even across the boundaries of discussion forums. This network of notes
linked by replies remains intact when a note is transferred to a different discussion forum, to
your clipboard or even to your trash.
A discussion forum may contain notes, which do not refer to one another, and may also contain
several “threads” of notes replying to notes replying to notes, etc.
The discussion forum page shows an entry for each note of the discussion forum. The entries
of notes that belong to a particular thread may be grouped together:
• Select View Sort by Thread in the top menu.
Notes may contribute different types of content to a discussion forum, possibly reflecting the
author’s attitude. BSCW lets you characterize your contribution by certain types, which are
displayed as icons along with the note. FIT Fraunhofer’s public BSCW server offers the fol-
lowing types:
(neutral) Note
Pro = approval
Con = disapproval
Angry = strong disapproval
Important! = significant contribution
Idea = sudden inspiration
6.1.1 Creating a discussion forum
In order to create a discussion forum along with a first note, proceed as follows.

106 Discussion Forums, Blogs and Feeds
• Select File New Discussion Forum in the top menu to bring up the ‘Add Discussion
Forum’ form.
• Enter the name of the new discussion forum; if no name is given the text in the ‘Subject’
field will be used instead.
• Choose the type most appropriate for the contents of the note you are about to create
(for the diverse types see above).
• Enter the gist of your note in the ‘Subject’ field.
• Enter optional tags for your discussion forum.
• Enter the text of your note into the window of the HTML editor below ‘Message’. If
you click on [Cancel and edit source], you lose all your input so far and can enter the
message as text message instead of in HTML.
A discussion forum is always generated along with a first note, but may well exist without
notes: you may remove all notes from a discussion forum using Cut or Delete and add new
notes later. This could make sense when you install a workspace for a group and want to fix a
place and name for a discussion forum beforehand.
You may change name, tags and description of the discussion forum using File Change Pro-
perties in the top menu of the discussion forum.
6.1.2 Adding a note
You may add a note to a discussion forum as a reply to an existing note – this is treated below
– and as a note on its own, that is not referring to any other note.
• Select File New Note inside a discussion forum or
• select New Note in the action menu of a discussion forum to bring up the ‘Add Note’
form.
• Choose the type most appropriate for the contents of the note that you are about to create
(for the diverse types see above).
• Enter the gist of your note in the ‘Subject’ field.
• Enter optional tags for your note.
• Enter the text of your note into the window of the HTML editor below ‘Message’. If
you click on [Cancel and edit source], you lose all your input so far and can enter the
message as text message instead of in HTML.
As its author, you may modify a note even after replies have been made:
• Select Change Properties to bring up the ‘Edit Note’ form that lets you change type,
subject, tags and message of the note.
6.1.3 Replying to notes
The Reply action lets you reply to existing notes of a discussion forum and thereby define
links from existing notes to a new note that you plan to add to a discussion forum.
• Select Reply from the action menu of the note that you want to reply to in order to
bring up the ‘Reply’ form.
• Continue as with adding notes described above.

Discussion Forums, Blogs and Feeds 107
6.1.4 Adding attachments to a note
You may attach arbitrary documents and URLs to a note:
• Select Attach Document or Attach URL in the action menu of a note to attach a
document or URL to a note.
• Proceed as if you were adding a document or URL to a folder.
• To attach a document or URL to a note in the single note view, i.e. the view that is
presented when you click on a note, use File New Document or File New URL .
The presence of attachments is indicated by an icon near the note – always in the single note
view and, when the option View Columns Attachments is activated, also in the discussion
forum view. Click on this icon to access the attachments’ folder. There you may add more
attachments using File New Document or File New URL and may also Delete , Cut
and Copy attachments.
Exactly as with notes, attachments may also be added to appointments.
6.1.5 Browsing a discussion forum
BSCW provides different ways to display the contents of notes and to browse a discussion
forum. In the discussion overview, all notes are displayed in a box along with subject and author.
You may customize the display of the discussion overview by selecting your viewing options.
• Enable or disable the display of note contents in the discussion overview by selecting
or de-selecting View Note contents . When the display of note contents is enabled, all
notes have an individual foldout button ( or ) that allows to show or hide the contents
of a note. In addition, these two foldout buttons also appear in the multi-selection toolbar
to show or hide the contents of selected notes. If no notes are selected, these buttons
will take effect on all notes.
• Select the note attributes you want to have displayed in the discussion overview
via View Columns .
• Sort the notes by type, date, author, subject or thread by selecting the respective entry
in View Sort by ... . The default sorting criterion is by thread: in this case, all notes
belonging to a thread are grouped into one note box.
• By activating the option View Foldout you get an additional button ( or ) in the
upper right-hand corner of a note that lets you switch from full to minimal display of a
note and back again.
Click on a note to switch to the single note view where the note contents and links to other
notes, if any, are displayed. Use these links to browse the discussion forum, which may event-
ually lead to other discussion forums, e.g. when a note is a reply to a note from another discus-
sion forum. The single note view also offers a navigation bar on top where you can browse the
notes of a discussion forum backwards and forwards using the arrow icons and , the notes
being sorted by the current sort criterion activated via View Sort in the top menu of the dis-
cussion forum view. Click on the name of the discussion forum in the header line of the single
note view to return to the discussion overview.
6.1.6 Moving and deleting notes
A note is an object that may be transferred or deleted like other types of objects – with a minor
exception: a note may be transferred only to a discussion forum, not to an ordinary folder.

108 Discussion Forums, Blogs and Feeds
• Select (check-mark) the notes within a discussion forum and then apply a (cut),
(copy) or (delete) action to the notes selected. You may also use the respective
actions from the action menu of single notes.
• Select Edit Paste in the top menu of a discussion forum to insert cut or copied notes
from your clipboard. Again, you may also use the respective action from the action
menu of a discussion forum.
6.1.7 Annotating objects
Notes may be used to annotate BSCW objects. Notes complement description and rating as
additional information.
• Select Attach Note in the action menu of an entry to bring up the ‘Attach Note’ form.
• Continue as with adding notes described above.
An object can have only one note attached to it as annotation. Such an annotation has the full
functionality of a ‘stand-alone’ discussion forum, i.e. it may have more notes, replies and dis-
cussion threads.
The presence of an annotation is indicated by the icon in the ‘Note’ column of a folder
listing. Click this icon to display the contents of the annotation. If the icon is not displayed in
your folder listing, the option View Columns Attachments is probably deactivated.
You remove the annotation of an object by completely deleting the contents of the respective
discussion forum.
Annotations stay with their objects when you cut or delete the respective objects. Annotations
are stripped, however, when you copy, archive or send annotated objects.
6.2 Blogs Blogs (short for Web logs) originally started as a kind of online diaries on the Web, i.e. one
person published his or her day-to-day entries for everyone to read on the Web. A blog in
BSCW consists of a sequence of entries, the entries usually being short to medium pieces of
text, and as HTML documents also allowing for the inclusion of pictures and links to other
material on the Web. Blog entries have a subject line and may also be tagged, i.e. characterized
by a number of freely chosen keywords. The entries of a blog are displayed in reverse chrono-
logical order, i.e. the latest entry is shown first.
Blogs differ in who may read the entries and who may add new entries: members of the work-
space containing the blog, registered users of the BSCW server or the general public. Note that
the blog itself is a kind of folder to whom you may invite additional users as members. The
right to add new entries may also be restricted to the creator of the blog. By default, everyone
who can read a blog entry may also add a comment.

Discussion Forums, Blogs and Feeds 109
Figure 13: Display of a blog embedded in BSCW
Blogs are presented in a specific layout that may also be customized by a user-defined style
sheet. Blogs may be displayed as such, but may also be embedded in a normal BSCW page or
a user-defined Web page. The figure above shows a blog embedded in BSCW. A blog page
contains a certain number of entries showing author, date, subject, tags and the beginning of
the entry text. The entries may also be displayed by tag, author or month of creation, i.e. only
entries are shown that have been tagged by a certain keyword, written by a certain author or
created in a certain month. The left-hand side of the blog display shows lists of the tags that
were used, of the authors that contributed to the blog, and the months when entries were created.
Tags, authors and dates are listed in proportion to relative frequency, e.g. the author with the
most contributions is printed in large font, whereas the author of just one entry is printed in
small font.
In addition, blogs can be displayed as RSS feeds, optionally integrating also the comments on
entries. You can subscribe to such blog feeds to stay informed about new blog entries. The RSS
feature requires a more recent Web browser version like the ones listed in 2.5 “Configuring
your Web browser” on page 19.
Blogs are only available on your BSCW server if the respective functionality has been activated
by your server administrator.
6.2.1 Creating and changing blogs
To create a blog in the current folder, you proceed as follows:
• Select File New Blog in the top menu. The ‘Add Blog’ action form has three sections.
• In section ‘General’, enter name and optional tags and description of the new blog.

110 Discussion Forums, Blogs and Feeds
• In section ‘Access’, specify who may read and write blog entries by clicking the respec-
tive radio buttons.
Note: If you allow registered users of your BSCW server or the general public to take
part in the new blog, do not forget to announce the blog along with its URL to the par-
ticipants you have in mind.
• In section ‘Layout’, select among the four possibilities of blog display:
o blog page only in box layout,
o blog page only in standard layout,
o blog page in standard layout embedded in a BSCW page including the navigation
bar,
o blog page in standard layout embedded in an external Web page, e.g., to add some
background information about the purpose of the blog or some motivation to con-
tribute to the blog. In the latter case, enter the URL of this external Web page.
Important: The external Web page must include the insertion point for the blog as the
pattern #blog#.
You may optionally specify the URL of a style sheet to override the default BSCW
styles for your blog. By inventing your own styles you may change the appearance of
the blog presentation, e.g. colours or fonts used. You will find the default BSCW styles
at
http://your-bscw-server/bscw_resources/styles/bscw/blog.css
• Decide whether to use pop-up dialogs within the blog and whether the entry comments
are to be integrated into the blog’s RSS feed by checking the respective check boxes.
• Select the number of entries that are to be displayed in a blog page.
Specify the number of characters that are to represent an entry in a blog page. The char-
acters are taken from the beginning of the entry text. If you enter 0, the whole entry text
is shown.
• Confirm with [OK] to create the blog, which is initially empty, i.e. contains no entries.
All the properties of the new blog which you have specified during creation may be changed
any time. To this end, select Change Properties in the action menu of the blog. The ‘Change
Blog’ form that is presented to you has exactly the same appearance as the ‘Add Blog’ form
above.
The access rights for the new blog, which you have specified above, determine who may read
blog entries and who may add new blog entries. These access rights are supplemented by default
access rights determining who may add comments to a blog entry, who may edit and delete
blog entries and who may change the blog.
o Everyone who can read blog entries may also add comments to an entry.
o The manager of a blog can delete entries as can the creator of an entry.
o The author of an entry may edit the entry, the author of a comment may edit the com-
ment.
o Only the creator of a blog may change the blog.
If you want to change these default access rights, e.g., to allow the manager of a blog to change
the blog or to forbid anonymous readers of an entry to add a comment, you have to edit the

Discussion Forums, Blogs and Feeds 111
respective roles by selecting Access Edit Role in the action menu of the blog. In our example
you would enable the action ‘Change Blog’ for the role Manager and you would disable the
action ‘Add Blog Comment’ for the role Anonymous member (see 4.2.4 “Defining and re-defin-
ing roles” on page 90 on editing roles).
If you have changed the access rights of a blog, none of the radio buttons governing the read
and write rights in the ‘Change Blog’ action form will be pre-selected, so that you do not inad-
vertently overwrite your custom access rights. If you, however, want to return to one of the
default access rights schemes, select the respective radio buttons before hitting [OK].
6.2.2 Using blogs
In order to view a blog and its entries, click on the blog’s name or icon in the folder listing
containing the blog or select Open in the blog’s action menu. An example is shown in Figure
13 above. You may add entries to a blog by clicking on the ‘Add entry’ action button in the
upper left-hand corner of the blog display.
The right-hand side of the blog display lists entries with date, subject, start of text, author,
number of readers, comments so far and tags, if any. Click on the subject to read the full entry
if not displayed completely and/or to add a comment. Given the according access rights, you
may edit or delete an entry by clicking on the respective buttons [Edit] and [Delete]. Note that
deleted entries are moved to the trash from where they may be undeleted again.
If the blog contains more entries than fit in one blog page, a row of navigation buttons at the
bottom of a blog page allows moving to a specific page or the next or previous page.
The left-hand side of the blog display shows lists of the available actions, of the tags that were
used, of the authors that contributed to the blog, and of the months when entries were created.
Tags, authors and dates are listed in proportion to relative frequency, e.g. the author with the
most contributions is printed in large font, whereas the author of just one entry is printed in
small font. You may limit the display to entries tagged by a certain keyword, written by a certain
author, or created in a certain month by clicking on a tag, author or month in these lists. In order
to return to a display of all entries, click on the ‘Show all entries’ action in the upper left-hand
corner.
By hitting the ‘RSS feed’ button in the lower left-hand corner of the blog display you get the
entire blog represented as RSS feed in chronological order. You are offered to subscribe to this
RSS feed in order to stay informed about activities in this blog.
6.3 RSS feeds RSS feeds provide abstracts of frequently updated material on the Web (e.g. news, blogs) in the
standardized RSS format. RSS is a Web content syndication format. The acronym ‘RSS’
underwent a number of meanings during its lifetime, but now is generally referring to ‘really
simple syndication’. RSS is a dialect of XML that was created in the late 1990s to allow lists
of information, known as ‘feeds’, to be published by content producers and subscribed to by
readers. The availability of an RSS feed usually is indicated in your browser by an RSS icon
. Clicking on the icon will present you with the abstracts of the RSS feed.
Very often, RSS feeds are provided by news agencies or newspapers. For examples of RSS
feeds, see
o http://www.nytimes.com/services/xml/rss/nyt/GlobalHome.xml (New York Times),
o http://news.yahoo.com/rss (Yahoo!) or

112 Discussion Forums, Blogs and Feeds
o http://feeds.reuters.com/reuters/businessNews (Reuters)
An RSS file is a simple structured list of news items, each consisting of a headline, an abstract
and a link to the full article, which are encoded in a way that they can be easily used by programs
called feed readers. These programs allow users to read articles or events from any number of
aggregated news sites at one time.
In BSCW, RSS feed objects are special folders that store the latest abstracts of an RSS feed as
RSS articles. You create an RSS feed object by
• selecting File New RSS feed in the top menu. In section ‘general’ of the action form,
fill in the URL of the RSS feed, its name and optional tags, description and rating. If
you leave the name field blank, the name is taken from the RSS feed.
• Hit [OK] to create the RSS feed object.
The newly created RSS feed object will already contain the latest abstracts of the RSS feed
chosen. Open the RSS feed to view the RSS articles of the feed. The articles themselves are
contained in the descriptions of the RSS articles. Clicking on an RSS article will show the full
original article: news, blog entry, video or whatever the feed is about.
If the RSS feed folder is empty, you probably have entered a URL that does not link to a proper
RSS feed. The maximal number of RSS articles in an RSS feed is part of your BSCW server
configuration. Ask your BSCW administrator.
You may copy individual RSS articles and paste them as URL objects to another place of your
folder hierarchy.
The selection of articles in an RSS feed may be updated by
• selecting Redo Search in the action menu of the RSS feed.
As far as viewing options are concerned, RSS feed objects constitute a type of its own: they do
not inherit viewing options from other folders nor do their viewing option settings influence
other folders.

Alternative User Interfaces 113
7 Alternative User Interfaces
7.1 Desktop Widgets Desktop widgets provide the same functions as the widgets of your personal portal (see 3.4.1
“Personal portal” on page 44). They do not, however, run inside a browser window, but on the
desktop of your PC. With a desktop widget you can, e.g., navigate in your BSCW folders or
keep informed about BSCW events without having to open your Web browser. For the display
of BSCW contents, e.g. a folder listing or document, the desktop widgets make use of the Web
browser and the standard user interface.
System requirements
Desktop widgets require the installation of Adobe AIR, Version 2.0 and up. You find the re-
quirements concerning storage capacity and operating system of your local computer under
http://www.adobe.com/products/air/tech-specs.html.
7.1.1 Installation of the desktop widgets
The BSCW desktop widgets are offered for installation at the Web-based BSCW user interface.
• Select GoTo Desktop Widgets in the top menu to get to the installation page with an
overview of the available desktop widgets.
• Navigator: Navigation within the folder hierarchy, access to folders and documents
via Web browser, upload of documents per drag & drop.
• Address Book: Overview of contacts, online status and contact data in the personal
address book.
• Calendar: Overview of current appointments in the personal calendar.
• Tasks: Overview of current tasks in the personal task list.
• Search: Simple BSCW search from the desktop.
• Events: Overview of the latest changes in your workspaces.
• Microblog: The microblog of your social network in BSCW.
• Click on [INSTALL NOW] to have a desktop widget installed on your PC.
A desktop widget is installed by downloading and installing the widget on your local computer.
You have to explicitly consent to the installation in various dialogs by clicking [Open], [Install],
[Next] or [Proceed], otherwise the installation is cancelled. Also, you must have administrator
rights on your local computer. The desktop widgets have been developed by OrbiTeam with
diligence and are signed by an OrbiTeam certificate.
For running the desktop widgets, you need the AIR runtime environment starting with version
2.0. The widget installation process checks whether this runtime environment is available on

114 Alternative User Interfaces
your computer. If not, the current version is being installed, which again requires your consent
in various dialogs. Only after the installation of Adobe AIR, the installation of the desktop
widget is continued. While the BSCW desktop widgets are compatible with Adobe AIR version
2.0 and up, it is recommended to always install the latest version.
After successful installation, the widget appears on your desktop and is ready for login, which
is described in the next section.
You may remove a desktop widget from your computer at any time by having it uninstalled.
On Windows, e.g., you uninstall via ‘Control Panel > Add/Remove Programs’. Uninstallation
may vary from system to system.
7.1.2 Using desktop widgets
7.1.2.1 Starting a desktop widget
After having installed a desktop widget, you may start it on your PC. This may vary from system
to system – normally you find so-called shortcuts on your desktop (small iconized re-
presentations of the widgets) on which you click in order to start the widget.
When starting a desktop widget the first time, you are asked to enter the BSCW URL as well as
your user name and password. The BSCW URL is the URL of your BSCW server and is shown
on the widget installation page which you invoke with GoTo Desktop Widgets in the top menu.
We recommend that you copy the URL from there. User name and password are your normal
BSCW user name and password that you use for logging in to BSCW. BSCW URL and user
name are stored for the next start of the widget. Optionally you may also have the password
stored. Passwords stored in your Web browser are not recognized by the widgets.
Note: If you start a running desktop widget a second time, you will not create a second widget,
but only refresh the window of the running widget.
Please note that login to a desktop widget is completely separated from your browser login to
BSCW. This means specifically that
o a login to a desktop widget does not imply a successful login to BSCW via Web brow-
ser, and that
o the display of BSCW content in the browser from within the desktop widget requires a
BSCW login via browser, if not already logged in.
Note: Login and storage of login data is done on a per widget basis. If you start a second widget
you have to login again.
7.1.2.2 User interface of desktop widgets
The user interface of the desktop widgets is structured following the same principle.
o The top line of the desktop widget window contains title and – in parentheses – context
of the widget. At the right-hand end of the top line are two buttons and for
refreshing and editing, respectively.
The context is the folder in focus of the widget. In case of the navigator this is the folder
up to which the folder hierarchy unfolds automatically, in case of the search widget this
is the folder in which the widget searches. With some widgets the context may be
changed, with some widgets, e.g. the address book, it is fixed.

Alternative User Interfaces 115
o Below the top line, the contents of the widget are shown – a scrollable folder hierarchy
or lists of events, appointments or tasks.
Figure 14: The Events desktop widget
Interacting with a desktop widget is very similar to interacting with a widget of the personal
portal or a group portal.
• Click to refresh the contents of the widget window.
Note: With some desktop widgets like the events and the address book the contents are
brought up to date in regular intervals. You may change the interval in the widget pre-
ferences.
• Click to edit the widget properties. You are offered three tabs for editing.
• Preferences: Here you can change the way the widget content is presented to you.
You can change, e.g., the context of the widget, the number of list entries to be
presented at a time, or a sorting or filtering criterion. The sorting criterion ‘your
preselection’ sorts the entries like the user does in the respective listing at the stan-
dard user interface. This way, sorting in the desktop widget may be synchronized
with sorting at the standard user interface.
Details are given below where the functionality of the widgets is described.
• My Account: This tab shows your user name and the BSCW server that you are
logged in to with the widget. You may enter a different user name in order to log in
to your BSCW server under a different user name. In the same way, you can enter a
different BSCW URL in order to log in to a different BSCW server. Further you
may change the options regarding the widget language, storage of your password
and automatic start of the widget.
• Updates: This tab shows which version of the widget you have installed and which
version is the latest version. When the BSCW server software is updated, it may
also be the case, that the desktop widgets are updated to a new version. If the update
version includes important changes, the widget is updated automatically when it is

116 Alternative User Interfaces
started. If this is not the case, you can consult the release notes in order to decide
whether to have the update version installed manually via [Update now] or not.
With the exception of the navigator widget, the content of a desktop widget is displayed as a
list of entries, i.e. a list of contacts, appointments, search results or events. If not all entries fit
into the widget window, you may leaf through the whole list using the [next] and [previous]
buttons. You get more information on an entry in the form of a tooltip when you position the
mouse over the entry. With search results, you may have this tooltip displayed below a search
result using the button. The calendar widget offers an additional monthly calendar to be
shown (and hidden again) using again the button.
The navigator widget shows the contents of its root folder as a folder hierarchy where you can
navigate by folding and unfolding the subfolders. If necessary, you may scroll the display with
scroll bars appearing at the right and lower side of the widget window.
In both the widget lists and the folder hierarchy of the navigator widget, a click on one of the
entries shown opens the respective page in a new tab of your Web browser. This page then
shows e.g. a BSCW folder, a document or an appointment. With events, a click opens the object
concerned. The display of BSCW contents from within a desktop widget requires that you are
logged in to your BSCW server with your Web browser.
Note for Windows: When you close the window of a desktop widget, the widget continues to
run in the background. Click on its tray icon in the task bar to restore the widget window. A
right-click on the tray icon shows the context menu of the widget where you may terminate the
widget.
7.1.2.3 Functionality of desktop widgets
In the following, we describe the functionality and the preference options of the different desk-
top widgets.
Navigator
The navigator widget supports quick and simple navigation to a certain folder or document by
folding and unfolding folders and other container objects of your folder hierarchy. Clicking on
a folder or document opens it in a new tab of your Web browser.
You can also upload documents to BSCW via ‘drag & drop’. Select a document or a group of
documents on your local computer, move them with mouse button down to the navigator widget
and drop them into one of the folders there by releasing the mouse button.
Preferences:
• Root folder: Origin of the folder hierarchy shown in the navigator widget.
• Context: Folder up to which the folder hierarchy is automatically unfolded when the
navigator widget is started.
Address book
The address book widget shows the contacts and contact lists contained in your personal address
book in BSCW. The tooltip of a contact entry shows a selection of the contact data, the tooltip
of a contact list shows the names of the contacts contained. To the right of a contact entry that
is associated to a registered user, the online status and the date of last login is shown. The online
status is shown as a coloured dot: green or grey, when the user has been active in BSCW during
the last 5 minutes or the last hour, respectively. An online status in red indicates that the last
user activity is older than an hour, the user is not logged into BSCW or that the contact cannot

Alternative User Interfaces 117
be associated to a user at all. In addition, there are the colour values of yellow and orange for
users who have logged into BSCW, but have set their online status to “busy” or “do not disturb”.
Instead of your address book, you may also view the contacts of an arbitrary contact list in the
address book widget.
Preferences:
• Context: Address book or contact list whose contacts are to be shown in the widget.
With you choose a contact list, with you return to your personal address book.
• Number of entries: Maximal number of entries shown at a time.
• Filter: Hiding of contacts where the associated user has not been active in the period of
time selected. Applying such a filter hides also all contact lists of your address book.
• Update interval: Time interval for automatic update of widget content.
• Sort: Criteria for sorting the address book entries. The criterion ‘your preselection’ sorts
the entries like they are currently sorted in your address book or contact list.
Calendar
The calendar widget lists the appointments of your personal calendar. The essential properties
of an appointment are shown as a tooltip. In the preferences, you may change the period of time
for which appointments are to be listed. You may sort the appointments and filter them by
status. Instead of your personal calendar you may also choose a group calendar for display in
the widget.
For better orientation, there is a monthly calendar where the current date is underlined and dates
with appointments are coloured in orange. This calendar may be folded and unfolded using .
When you select a certain date in the monthly calendar, all appointments in the widget list
which take place at that date are highlighted in grey.
Preferences:
• Context: Calendar whose appointments are to be shown in the widget. With you
choose a group calendar, with you return to your personal calendar.
• Number of entries: Maximal number of entries shown at a time.
• Filter: Hiding appointments according to attendance or status.
• Period: Period of time for which appointments are to be shown. ‘Seven days’ is the
period of seven days from today.
• Sort: Sorting appointments in ascending or descending order.
Tasks
The tasks widget lists the tasks of your personal task list along with status and deadline if given.
The tooltip of a task shows the essential properties of a task. You may sort and filter the tasks
according to various criteria, and may have only tasks shown whose deadline falls into a certain
period of time.
Preferences:
• Filter: Showing only tasks with a certain status.
• Period: Showing only tasks whose deadline falls into the period selected.
• Sort: Sorting the tasks by various criteria.

118 Alternative User Interfaces
Search
The search widget works similar to the search field in the navigation bar of the standard user
interface. Using the search widget, you may search from your desktop for BSCW objects whose
name, description, tags or content contains the text entered into the search field (option “all”).
You may restrict the search to objects where only the name or the tags contain the search string,
or to documents containing the search string. You can also limit the search to certain folders.
The tooltip of a search result, which shows its place in the folder hierarchy, may also be un-
folded below the search result as a clickable folder path using . By clicking one of the folders
here, you can also have the folders displayed that contain the search result.
Preferences:
• Context: Folder to be searched.
• Number of entries: Maximal number of entries shown at a time.
Events
The events widget offers an overview of the current events in your workspaces, i.e. of events
which have not been caught up by you yet. The events are shown in chronological order. The
tooltip of an event gives object, action, user and action date. Clicking on an event opens the
object concerned in your Web browser. You may [Catch up] with the events shown.
Preferences:
• Context: Folder whose events are to be shown.
• Number of entries: Maximal number of entries shown at a time.
• Filter: Hiding of events that were either caused by you or not caused by you.
• Update interval: Time interval for automatic update of widget content.
Microblog
The microblog widget shows the microblog of your social network (cf. 9.2.1 “Displaying
microblogs” on page 167) and works very much like the microblog console in the browser
interface of BSCW. The main restriction is that you cannot focus the microblog on a workspace
or user (cf. 9.2.7 “Microblogs as widgets and at the mobile interface” on page 171).
There are no preferences for the microblog widget.
7.2 Mobile Device Interface BSCW allows you to access BSCW also by use of mobile devices. Via a so-called mobile portal,
you may access, e.g., your address book, your calendar and your workspaces. The latest events
BSCW events are presented to you in a special view. Bookmarks provide easy access to
frequently used workspaces.
The current mobile access feature was developed for latest generation mobile devices. The use
of this feature requires an according mobile device like an Apple iPhone or an Android Smart-
phone.
Mobile access to your BSCW server requires the prior activation of the respective functionality
by your BSCW administrator. For questions concerning mobile network access and config-
uration of your mobile device, please consult your network operator or the manufacturer of the
mobile device.

Alternative User Interfaces 119
7.2.1 Mobile access
There are two ways to access the BSCW server from a mobile device:
o Access via a mobile Web browser
o Direct access via an app icon on the home screen of an Apple iPhone
Access via a mobile Web browser is similar to using a Web browser on your desk top. Open
the home page of the BSCW server in your mobile browser by entering the corresponding URL
– e.g. https://my.bscw.de/. You can also copy the BSCW server URL from your desktop
browser and send it via e-mail to yourself on the mobile device; you will then only have to copy
the URL from your mailbox to your mobile browser.
On Apple iPhones, you may add the mobile BSC interface as an app icon to the home screen,
so that you can access the mobile portal of your BSCW server directly via this icon. Open the
BSCW server URL in the mobile Web browser, click on the + icon in the browser status line
and select [Add to Home Screen].
7.2.2 Mobile login to BSCW
When your BSCW server is configured for mobile access, you may log in to the mobile BSCW
portal as follows.
• When logging in to BSCW, click the button [Mobile Access] which appears on both the
public home page of your BSCW server (e.g. https://my.bscw.de/pub/) and the ‘Login’
form (e.g. https://my.bscw.de/bscw/bscw.cgi/). Login requires user name and password
as usual.
Depending on your mobile device, the login page shown may vary (for an example, see Figure
15).
Figure 15: Mobile login to BSCW
Once you logged in to the mobile portal, you will be led to the mobile portal upon further logins.
If you want to return to the normal BSCW access,
• select [Desktop Access] when logging in the next time.

120 Alternative User Interfaces
7.2.3 Mobile portal
The mobile portal is your entry page for mobile access to your BSCW server. All domains
offered are accessible from this page. For simplified navigation and better orientation, you will
get back to the mobile portal from all domains offered. Use the button , which is provided in
the upper left-hand corner of all domain pages.
The mobile portal lets you choose among its different domains:
• Home: Access to your home folder and workspaces,
• Address Book: Access to your address book,
• Calendar: Access to your calendar,
• Task List: Access to your task list,
• Clipboard: Access to your clipboard,
• Trash: Access to your trash,
• Events: Overview of recent events,
• Bookmarks: Access to your bookmarks,
• My Communities: Access to your communities,
• Case: Access to your case (only possible if the respective functionality has been activat-
ed for your server; ask your BSCW administrator).
If microblogging has been activated for your server, there is an additional entry in your mobile
portal that replaces the “Events” entry.
• Microblog & Events: Access to the microblog of your social network that also includes
events.
Below the domains you find two search functions:
• Search: Direct search with input field on the portal page,
• Extended: Extended search for type, name, description, tags and content.
There are two more buttons on the bottom line of the mobile portal page:
• Edit Preferences: Configuration of the mobile portal view,
• Help: On-line help on usage of the mobile portal.

Alternative User Interfaces 121
Figure 16: Mobile portal
7.2.4 User interface of the mobile portal
The user interface of the mobile portal takes into account the limited size of mobile devices and
offers fewer details and actions than the standard user interface.
Listings
Folders and related container objects are represented as simple listings. If present, some ad-
ditional details like a description are indicated below an entry (configurable via [Edit Prefer-
ences] on the portal page). For each object, at least type icon and name are given. Navigation
in a folder hierarchy is done by selecting one of the subfolders presented. When opening a
folder, its contents are again represented as a list. You get one level higher up in the hierarchy
by clicking the button in the upper left-hand corner. The button takes you back to the
mobile portal.
Listings like that of a folder or an event history only show a certain number of entries (the
number is configurable via [Edit Preferences]). If a list contains more than the maximal number
of entries to be shown, you can work your way through the complete list by using the buttons
and in the lower navigation bar.
Details
In addition to the list view of folders, also the details of such objects are offered when you click
the button at the right-hand end of an entry. With objects that contain no other objects like
documents or contacts, also a click on the name of the entry opens the details page.
The details page is similar to the info page of the standard user interface. In addition to general
information it offers further details like specific attributes, members and event history (as far
as available). The respective tabs are placed at the bottom of the details page.
o General: General information like name, date of last modification or path to the object
plus actions on the objects (if any).
o Attributes: Object specific attributes like document metadata.
o Members/Participants: List of members with access to the folder or participants of an
appointment, respectively.
o History: Event history of the object.

122 Alternative User Interfaces
If you have sufficient access rights to change the object shown, you may use the different tabs
to change e.g. name, tags or description, to change specific attributes like document metadata
or to invite new members and remove existing ones.
Changes are made using [ Edit] at the right-hand end of the navigation bar on the details page.
You may switch tabs during editing. Editing has to be confirmed by clicking the [OK] button
in the upper right-hand corner. Editing may be aborted by clicking the button in the upper
left-hand corner.
Actions
In addition to editing object attributes and managing membership, further actions are offered at
the mobile user interface.
You may create new objects using the button at the right-hand end of the upper navigation
bar. Select an object from the list of object types that you may create. Further interaction works
similarly to the standard user interface.
All other actions are only offered on the details page via buttons in the upper part of the “Gen-
eral” tab. If more than two actions are possible, you get to the second and further actions by
clicking the [Actions] button. After clicking on an action button, the further interaction works
similarly to the standard user interface.
At the mobile user interface, you only have a limited number of actions at your disposal as
compared to the standard user interface. As detailed above, you may create new objects, but the
number of object types that may be created at the mobile user interface is restricted to folders,
documents, URLs, contact lists and discussion forums. You can change, cut, delete, copy and
paste existing objects, but you may, e.g., not change the access rights of an object at the mobile
user interface. You may add notes to most object types, if you have the respective access rights,
and you may create your personal BSCW bookmarks for most objects. Further actions possible
and the respective restrictions are detailed when describing the different domains of the mobile
portal below.
7.2.5 Domains and functions of the mobile portal
7.2.5.1 Mobile portal: Home folder and workspaces
Here you can access the contents of your workspaces. Folders and other container objects are
represented in a simple list view. Further details of the objects indicated are given in the details
page, where you also may edit the objects, e.g. change the description or attach a note.
Within folders, you may create new objects: folders, contact lists, calendars, URLs and discus-
sion forums. You create new objects in the list view of a folder as follows.
• Click on the button at the right-hand end of the upper navigation bar.
• Select the type of the object that you want to create. Further interaction works similarly
to the standard user interface.
The details page of single objects provides more actions. You may, e.g., delete objects from a
folder or move them to other folders via cut and paste.
On the details page of shared workspaces, you can manage membership in the “Members” tab.
• You invite new members using the [Add] button. Alternatively, you may also use [Invite
member] in the “General” tab.

Alternative User Interfaces 123
• In the action form ‘Invite member’ you may only enter one user name or e-mail address
into the upmost field. When choosing from your address book, you may select several
entries which are transferred to the respective field after closing the address book.
• When you invite new members to a subfolder of an existing workspace, you may choose
whether to invite the new members to the subfolder (to ‘Members of subfolder-name’)
or to the existing workspace (to ‘Members of workspace-name’). Choose the existing
workspace, if you want to extend the member group of the workspace and to grant the
new members access to the entire workspace in the role selected. If you choose the
subfolder, the new members will get access only to the subfolder of the workspace. This
works exactly as if you had carried out the action Access Invite Member for a sub-
folder at the standard user interface.
• You remove members from a workspace by clicking [ Edit] in the “Members” tab of
the workspace. Check the members you want to remove and click [Remove Member].
This works only in the workspace itself, not in eventual subfolders.
The entries of blogs and discussion forums are also shown as listings. You may view the con-
tents of entries, add a new entry or answer to entries in discussion forums.
Note: At the mobile user interface, you cannot format your entries to blogs or discussion forums
as you would at the standard user interface. So, if you edit existing entries, you may lose existing
formatting of the entries (like bold, italic etc.).
Figure 17: Document details
If you click on a document in a folder listing, the details of the document will be shown. Here
you find description, size, MIME type and information about the last modification. You may
edit the document metadata, send the document per e-mail (as link or as attachment) or down-
load the document via [Open].
Note: Viewing a document on the mobile device may necessitate further applications.
Creating new documents is possible if your mobile device supports uploading documents, e.g.
smart phones running Android version 2.2 and up usually support uploading pictures and textual
notes. For iPhones, this may be restricted to uploading pictures.

124 Alternative User Interfaces
7.2.5.2 Mobile portal: Address book
The address book lists all contacts which are contained in your personal BSCW address book.
You may add new contacts to the address book and all other contact lists
• by clicking the button in the upper right-hand corner of the list view. When you
choose ‘User’ as contact type, you may search for users and add original contacts of
users found (see 5.2.1 “Creating entries in your address book” on page 99) to your ad-
dress book or contact list.
You may also [ Edit] contacts on the details page.
If a contact has a telephone number, you may make a phone call to this number. Contact is also
possible via an e-mail address, if your device supports sending e-mails. Alternatively, you may
use the [E-Mail] action to send an e-mail message to the person listed via the BSCW server.
7.2.5.3 Mobile portal: Calendar
Your personal calendar shows your appointments as a listing. Here, you may create new ap-
pointments using the button in the upper right-hand corner. You may inspect the properties
of appointments by opening the details page. On the details page, you may also [ Edit] the
appointments and [Decline] and [Confirm] your participation when you are invited.
Group calendars of shared workspaces are treated the same way as your personal calendar at
the mobile user interface. The possible actions for appointments are the same.
7.2.5.4 Mobile portal: Task list
Your personal task list is presented as a listing. On the details page, you may e.g. start, complete,
cancel or finish tasks and forward flow folders.
Note: At the mobile user interface, you cannot create new tasks or edit the input or output fields
of existing tasks. You can, however, change the deadline via [ Edit]. The action [Open] shows
possible task attachments that are contained within the task.
7.2.5.5 Mobile portal: Clipboard and trash
The domains “Clipboard” and “Trash” offer access to your clipboard and trash which contain
objects that you have cut, copied or deleted. The actions available with respect to clipboard and
trash are the same as at the standard user interface: cut, copy, paste, delete, destroy and undelete.
Note: The actions Cut, Copy and Delete are provided on the details page of an object only if
you have accessed the details page from a folder listing. The actions are not available when you
have accessed the object directly, e.g. from the navigation bar or an object history.
7.2.5.6 Mobile portal: Events
The domain “Events” presents an overview of recent activities in your shared workspaces. The
most recent events (not yet caught up with) are listed in chronological order. You may [Catch
up] with the events shown using the respective button in the upper right-hand corner.
For each event, object, action and date of action are given. Clicking on the name of the object
brings you to the object’s details. The info button at the right-hand end of an event entry
takes you to the details page of the user who caused the event.
In addition, event messages are provided for all objects in form of an event history, which you
may access on the details page of an object under the “History” tab.

Alternative User Interfaces 125
7.2.5.7 Mobile portal: Bookmarks
Bookmarks may refer to BSCW objects as well as to Web pages. Every user has a personal
bookmark folder for the management of bookmarks in BSCW.
The bookmarks area of the mobile portal provides access to your bookmarks. This allows you
to easily access frequently used folders and documents in BSCW as well as regularly accessed
websites while being on the move. On the details page of an object you can also create new
bookmarks at the mobile user interface.
7.2.5.8 Mobile portal: My communities
Accessing your communities is very similar to accessing your workspaces, i.e. you are pre-
sented with a listing of your communities in which you can navigate, inspect details and
possibly change details.
7.2.5.9 Mobile portal: Case
Accessing your briefcase is very similar to accessing your workspaces, i.e. you are presented
with a listing of your briefcase folders in which you can navigate, inspect details and possibly
change details.
Note that you can delete folders from your briefcase using the action [Delete], but you cannot
add folders to your briefcase at the mobile user interface. Also, synchronization of the briefcase
contents is only possible at the standard user interface at your PC (also see 13.7.2 “Working
with the briefcase” on page 241).
7.2.5.10 Mobile portal: Microblog & Events
This domain of the mobile interface presents you with the microblog of your social network.
This microblog lists all messages that were posted by users with whom you share a workspace;
additionally, it lists all events caused by such users. The uppermost text field allows you to post
a message yourself. This domain replaces the “Events” domain of the mobile interface, when
microblogging has been activated for your BSCW server.
For details on BSCW microblogging see 9.2 “Microblogging” on page 167. For details on
microblogging at the mobile user interface see 9.2.7 “Microblogs as widgets and at the mobile
interface” on page 171.
7.2.5.11 Mobile portal: Search
Searching is available at the mobile portal in form of a simple direct search via [Search] with
search field in the portal and an extended search via [Extended] with a separate action form.
• [Search]: The direct search works like the standard user interface’s search field provided
of at the right-hand end of the navigation bar. This is a search which looks for BSCW
objects where the search string entered occurs in name, description, tags or content of
the object.
• [Extended]: Here you can restrict the search to objects of a given type, can enter
different strings into the search fields and can determine whether to look for objects
fulfilling all or at least one of your search criteria (‘and’ or ‘or’ conjunction).
The search results are shown as a listing.

126 Alternative User Interfaces
7.2.5.12 Mobile portal: Preferences
Using [Edit Preferences] in the lower left-hand corner of the mobile portal you can adapt the
representation within the mobile portal.
• With Limit entries to you can restrict the number of entries shown in a listing. Choose
a value that suits your mobile device.
• The option Show details in folder listings activates the display of certain details like a
description in folder listings. Deactivate this option if you prefer a compact representa-
tion.
• The option Visual effects activates special effects like, e.g., ‘wiping’ for next page or
fixed navigation bars when scrolling. This option is available for Apple devices only.
7.3 Simplified User Interface The simplified user interface provides a browser access to your BSCW server that is restricted
to essential functions. Using the simplified user interface you can
o browse your folder structure
o create new folders and documents
o delete and destroy existing folders and documents
o change object attributes,
o send links to documents and
o search your folders.
You can invoke the simplified user interface when logging into your BSCW server by clicking
the button [Simple Access]. If this button is missing, your BSCW administrator has not
activated the simplified user interface.
7.3.1 Folder view (simplified user interface)
The folder view of the simplified user interface consists of a header, a list of entries and a footer.
Figure 18 gives an example of the simplified user interface.

Alternative User Interfaces 127
Figure 18: The simplified user interface
The header section of the simplified user interface consists of
• two buttons [Workspaces] and [Trash] allowing to switch between the display of your
workspaces and your trash,
• the New menu for creating new folders and documents where possible, and
• the navigation bar with integrated search field below.
The navigation bar shows the path of the current folder as a sequence of clickable links. The
search field lets you search your workspaces. The last header line gives the name of the current
folder.
The list of entries represents the objects contained in the current folder, one object per entry.
An object entry has the following elements:
• Object type icon. Position your cursor over this icon to display name, description and
other user-defined attributes of the entry. If there are no description and other attributes,
the object type or the file type of documents is shown.
• Object name. Click on the name to open the object.
• Action menu button with the actions that may be applied to the object represented
by the entry.
• Object type.
• Object size, which is given in bytes, in case of a folder in number of objects contained.
• Date of last modification.
• User who last modified the object. Click on the user name to open the info page of this
user.
You can sort the list of entries by name, type, size, last modification and user of last modifi-
cation
• by clicking on the respective column heading. A repeated click on the column heading
inverts the sort order.

128 Alternative User Interfaces
The footer section of the folder view gives the total number of the objects contained in the
current folder and the numbers of the entries shown. A maximum of 10 entries can be shown at
a time. With big folders, you can browse the entries using the buttons [First], [Previous], [1],
[2], … [Next], [Last] on the right-hand side of the footer.
Note: Some BSCW objects like calendars, workspace portals or website folders have no sim-
plified representation. When you open such an object it will be shown in the normal
representation. Opening a simple folder will you bring back to the simplified user interface.
7.3.2 Managing folders and documents (simplified user interface)
To create a new folder, you
• select New Folder in the top line and enter name and optionally description and tags
of the new folder. Please note the restrictions concerning the use of special characters
in BSCW object names. Hit [OK] to create the folder.
To create a new document
• select New Document in the top line. In the action form, you select a file for upload
using the [Browse…] button in the field ‘Local file’. The name of the file is automatic-
ally entered into the field. This file name is also valid in BSCW, unless you enter a
different name into the ‘Name’ field. Please note the restrictions concerning the use of
special characters in BSCW object names.
• Optionally enter a description and tags for the new document and hit [OK].
You can also upload documents via ‘drag & drop’. Select a document or a group of documents
on your local computer, move them with mouse button down to the browser window of the
simplified user interface and drop them by releasing the mouse button. The documents will be
uploaded to the current folder. Please note that uploading via ‘drag & drop’ at the simplified
user interface is not available for older versions of the Internet Explorer.
You delete folders and documents using the action menu.
• Select Delete in the action menu of the object you want to delete.
The deleted objects are put into your trash. There you may finally destroy the objects or return
them to the locations from which they were deleted.
• Click [Trash] in the top line to display the contents of your trash.
• Select Undelete in the action menu of an object that you want to return to its original
location.
• Select Destroy in the action menu of an object that you want to have permanently
removed.
• Click [Workspaces] to return to your workspaces.
7.3.3 Other actions of the simplified user interface
Displaying and changing object attributes
To have a look at the attributes of an object
• select More Information in the action menu of an object.
You may also position the cursor over the object type icon at the beginning of an object entry
to have a tooltip displayed with name, description and other user-defined attributes.

Alternative User Interfaces 129
To change the attributes of an object,
• select Change Attributes in the action menu of an object.
• With folders you can change name, description and tags, documents have some more
attributes.
Sending links to documents
You can grant other persons access to a document by sending them a link to this document via
e-mail. Such a link allows access to the document for a limited span of time.
• Select Send as Link in the action menu of a document that you want make accessible
to other persons.
• In the action form, enter the e-mail addresses or BSCW user names of these persons,
add a subject and a personal message and hit [OK].
• The automatically generated part of the e-mail message contains the link to the docu-
ment along with the date until which the link is valid.
7.3.4 Search (simplified user interface)
You may search your workspaces using the search field in the navigation bar. This search field
operates like the corresponding search field at the general BSCW user interface and implements
a simple quick search for objects based on object names or tags and for documents based on
content.
• Select the kind of your search from the drop-down menu in front of the search field:
all, tags, documents, name.
• The default search (“all”) looks for all objects in the current folder with the search terms
occurring in name, content, description or tags. A search based on names finds all
objects in the current folder with names containing the search terms, a search based on
tags finds all objects whose tags contain the search terms, and a document search finds
all documents containing the search terms.
• Enter your search terms into the search field and hit the Return key. The search results
are shown in a temporary search folder. The description of a search result contains its
location in your folder hierarchy.
Click on [Workspaces] in the top line to return to your previous folder.


Document and Content Management 131
8 Document and Content Management
In BSCW, any file uploaded from your local computer system is represented as a document. A
document may contain text, spreadsheets, graphics, print files, pictures, sound, video, etc. and
is one of the most basic object types in BSCW. The upload of documents is described in 3.3.2
“Uploading and changing documents” on page 35.
BSCW supports the management of documents and their contents:
o Text and HTML documents may be directly generated and edited on the BSCW server.
Under certain conditions, also MS Office files and arbitrary documents may be directly
edited on the BSCW server.
o Documents may be ‘resubmitted’ to remind you of certain documents; documents may
be locked or frozen to save them from inadvertently being replaced or edited.
o Documents may be put under version control in order to keep track of changes when a
document is edited by several authors in a shared workspace.
o Documents may serve as templates kept in specific template folders from where they
may be copied to other places. Typical examples of templates are letter or spreadsheet
templates with elaborate layout and formats or complex formulas.
o Collections of interlinked documents (HTML documents, image, audio or video files)
may be created and managed using URLs for BSCW objects. You may share such doc-
ument collections with the other members of a workspace and even publish them for
anonymous access on the Web.
o HTML documents may be grouped into a website folder to be managed as a miniature
website in BSCW. Website folders have two special documents: the home page and the
layout page, the latter serving as the standard framework for all other HTML documents
of the website folder.
8.1 Direct editing of documents Editing of documents stored in BSCW is usually done by downloading the document, editing
the document on your local computer and uploading it afterwards. Under certain circumstances,
however, documents may be edited from the web-based user interface directly on your BSCW
server:
o text and HTML documents, using editors which are integrated into the Web browser;
o MS Office files, using WebDAV (only possible when you are using Internet Explorer
under Windows);

132 Document and Content Management
o arbitrary documents using a local helper application that supports direct editing with
external editors.
In addition, text and HTML documents may be directly created on the BSCW server.
8.1.1 Creating and editing text documents
You can create and edit text documents (MIME type text/plain) directly on the BSCW server
without restrictions. The text editor used is a simple text box where the contents of the document
are displayed and may be entered and edited.
To create a text document
• select File New Text Document in the top menu menu of the current folder.
• Enter name, optional tags and description of the new document. Enter the text of the
document into the text box offered.
• Hit [OK] to create the document.
To edit a text document directly on the BSCW server,
• select Change Edit in the action menu of the document. When you use the built-in
simple text editor, this action automatically locks the document, until you are finished
with editing.
• The contents of the text document are displayed in a text box where you may edit the
document freely.
• By hitting [OK], the edited document replaces the existing one or creates a new version
if the document is under version control.
During document creation (either via upload or directly on the server), the character set of the
document has been inferred from the creator’s browser information. You can also explicitly set
the character set via Change Properties . Uncheck the check box ‘Try to select the character
set for contents of a text file automatically’ and confirm with [OK]. You can then enter the
character set for the document in the action form.
In addition to plain text documents, direct editing is also possible for other types of text docu-
ments, e.g. for XML documents (MIME type text/xml). Because of the primitive nature of the
editing method, direct editing of text documents is only recommended for rather short docu-
ments.
8.1.2 Creating and editing HTML documents
You can create and edit HTML documents (MIME type text/html) directly on the BSCW
server. With most recent Web browsers, e.g. Chrome, Edge, Firefox, Internet Explorer, Opera
and Safari, an HTML editor is being used that has been integrated into BSCW. Should you use
a browser that does not work with the integrated editor, HTML documents are edited like
ordinary text documents.
To create an HTML document
• select File New HTML Document in the top menu of the current folder.
• Enter name, optional tags and description of the new document. Enter the contents of
the document into the window of the HTML editor.

Document and Content Management 133
• Hitting [OK] or invoking the editor ‘Save’ operation creates the new HTML document.
If you forgot to enter a name for the new document, it is stored under “Document of
<your user name>”.
• If you click on [Cancel and edit source] you lose your input so far and can enter the
HTML document in source text, i.e. with HTML tags.
To edit an HTML document directly on the server
• select Change Edit in the action menu of the document. When you use the built-in
HTML editor, this action automatically locks the document, until you are finished with
editing.
Note: The automatic locking generates no events of its own and doesn’t appear in the
history of the document.
• The contents of the HTML document are displayed in the window of the HTML editor
where you may edit the document freely.
• By hitting [OK], the edited document replaces the existing one or creates a new version
if the document is under version control.
• If you click on [Cancel and edit source] you lose your input so far and can edit the
HTML document as source text.
The editor features a backup-restore facility. The backup copies of all documents edited are
available until the end of the BSCW session, i.e. until logout. There is also one backup copy
for cancelled editor sessions.
• Click [Create backup now] in the editor’s upper toolbar to create a backup. Additionally,
a backup is automatically created every minute. The date of the last backup is shown at
the left-hand end of the toolbar.
• Click [Restore from backup] to restore the editor content from the last backup. You are
shown the last backup before actual restoration takes place.
During creation of the HTML document (either via upload or directly on the server), the char-
acter set of the document has been inferred from the creator’s browser information. You can
also explicitly set the character set via Change Properties . Uncheck the check box ‘Try to
select the character set for contents of a text file automatically’ and confirm with [OK]. You
can then enter the character set for the HTML document in the action form.
8.1.3 Editing MS Office files
Direct editing of MS Office files is based on functionality which has been provided by Micro-
soft in more recent versions of MS Windows and MS Office. The requirements are:
o Windows 7 and up;
o Internet Explorer 8.0 or up;
o Office 2010 or up;
o the BSCW document is a Word, Excel, PowerPoint, Project, or Visio file;
o the document name on the BSCW server has the correct extension, e.g., .doc for a Word
document.
Furthermore, your BSCW server must be configured so that
o WebDAV is enabled (see 13.9 “WebDAV” on page 247) and

134 Document and Content Management
o cookie authentication is not enabled.
If in doubt, ask your BSCW administrator.
If the requirements are met, you directly edit an MS Office document on the BSCW server as
follows.
• Select Change Edit in the action menu of the document.
• The action locks the document and opens the appropriate Office application where you
can edit the document.
Note: The automatic locking generates no events of its own and doesn’t appear in the
history of the document.
• Applying the “Save” operation in the Office application writes the file directly back to
the BSCW server, replacing the existing one, or creates a new version if the document
is under version control.
• Closing the document in the Office application unlocks the document.
Note: When direct editing with the helper application for external editors has been activated for
MS Office files (see next section), this mechanism has priority over the direct editing of MS
Office files described here.
8.1.4 Editing documents using external editors
Using a local helper application for external editors you can edit arbitrary documents directly
on the BSCW server. The helper application has to be installed on your local computer. For
direct editing of a document, the helper application is called from within the browser; the helper
application then starts the local editor suitable for the particular document type and writes the
results back to the BSCW server during and after editing. Depending on document type, you
may use as editor text processors like Microsoft Word or Open Office Writer, graphical editors
or spreadsheet programs.
If you want to employ this method of direct editing, you proceed as follows:
• Installation of the helper application for direct editing with external editors on your local
computer.
• Configuration of your personal preferences so that the helper application starts the
suitable local editor when you are directly editing documents of a certain type.
• Direct editing via Change Edit for document types configured accordingly.
Installation of the helper application for direct editing with external editors
BSCW supports as helper application the Zope External Editor Client which is also used within
the content management framework Zope (http://www.zope.org). The Zope client is available
for the Windows and Linux platforms. After download and installation, the Zope client is ready
to use; all usual document types are preconfigured.
• Download the Zope client for your platform from
http://old.plone.org/products/zope-externaleditor-client
• Install the Zope client on your local computer (on Windows e.g., start the downloaded
setup program and follow the instructions of the installation wizard).

Document and Content Management 135
If you use specific network connections (e.g. a proxy server), you may have to further configure
the Zope client. How to do this and links to more details on the Zope client are to be found on
the BSCW website under http://www.bscw.de/english/externaleditor.html.
Configuration of the external editors in your personal BSCW preferences
Select the document types that you want to directly edit in BSCW with local applications – the
external editors.
• Select Options Preferences in the top menu and go to the subsection ‘File Handling’ of
the section ‘General’ of the action form.
• Under External editors, select those document types for which you want to activate
direct editing with local (for BSCW external) editors via the Zope client, e.g. MS Office
files or OpenOffice files. If you select ‘plain text’ here, text documents are no longer
edited using the simple text editor integrated into BSCW, but using your local text editor
via the Zope client.
• Confirm with [OK].
Direct editing using the helper application
For direct editing of BSCW documents via the Zope client you proceed as follows.
• Select Change Edit in the action menu of a document for the type of which an ex-
ternal editor has been configured.
• Your browser will now ask you what to do with the working copy of the document:
open, store or cancel. Confirm opening with Zope External Editor. With some browsers
you may suppress this dialog in the future by checking or unchecking a corresponding
option.
• Now, the local editor corresponding to the document type is started with the current
document; the document itself is locked within BSCW.
• After editing, you store the document using the “Save” operation of the editor and close
the editor. You will then be asked by the Zope client to confirm the end of editing.
Afterwards, the original document is replaced by the edited document – with versioned
documents a new version is created – and the document is unlocked again.
8.2 Document functions
8.2.1 Resubmitting documents
You may have a document ‘resubmitted’ to you at certain dates, i.e. have a reminder e-mail
message sent to you by BSCW containing links to the document and the workspace that con-
tains it:
• Select Send to Resubmission in the action menu of the document. Enter the date of
the resubmission as well as subject and body of the reminder message. If the document
is part of a shared workspace, you may specify whether the message is to be sent only
to yourself or also to the other members of the workspace. Confirm with [OK].
• Next, you will be shown the existing dates for resubmission. Click [Add] to enter further
dates. By clicking the icons or in the ‘Action’ column, existing dates may be
deleted or changed. Click [Back] to return to the folder view.

136 Document and Content Management
8.2.2 Locking documents
You may set a temporary lock for a document to avoid conflicts when several authors concur-
rently edit the document. A locked document may only be read by other users, it cannot be
modified or replaced. Also, a new version cannot be generated.
• Select Access Set Lock in the action menu of the document and enter a lock note.
Confirm by clicking [OK].
As lock owner, you may change the lock note any time without unlocking the document: click
on the icon in the ‘Share’ column of the document entry. Using this very action, you may
also unlock the document again by hitting [Unlock]. Instead of clicking on the icon you may
also invoke this action via Access Show Lock .
If you want to modify a document that has been locked by another user in spite of the lock, you
may ‘steal’ the lock, sufficient access rights given.
• Click on the icon in the ‘Share’ column of the entry of the document locked, enter
your own lock note and confirm with [Steal lock].
Now you have locked the document for other users and may modify it yourself. The former
owner of the lock will be notified via e-mail. If you do not have sufficient access rights for
stealing the lock, only the lock note will be shown to you. Stealing (or viewing) the lock may
also be invoked by selecting Access Show Lock in the action menu of the document locked.
When you lock a document that you do not own, you become an additional owner of the
document.
8.2.3 Freezing documents and folders
By default, creators and managers of a document may freeze the document, thus saving it from
further modifications by other members of the workspace. A frozen document may only be
read, it cannot be modified any more. After unfreezing it may be edited again.
• In the folder listing, check the check boxes of the documents that you want to freeze.
• Select Edit Freeze in the top menu to receive a listing of the documents that are to be
frozen. Confirm by hitting [OK].
• If you want to freeze only one document, you may also select Access Freeze in the
action menu of the document.
Frozen documents are indicated by the icon in the ‘Share’ column of a folder listing.
If you want to unfreeze some documents again, use Edit Unfreeze in the top menu. You may
also choose Access Unfreeze from the action menu of a frozen document.
As creator or manager you can also freeze an entire folder, thus saving the complete contents
from modifications by other members of the folder.
• Select File Access Freeze in the top menu of the folder that you want to freeze.
• Alternatively, you can also select Access Freeze in the action menu of the folder.
Frozen folders are indicated by the icon in the navigation bar and the ‘Share’ column of the
folder entry in a listing.
If you want to unfreeze a frozen folder, use File Access Unfreeze in the top menu of the
folder. You may also select Access Unfreeze in the action menu of the folder.
Document and Content Management 137
8.3 Documents under version control When cooperating in a shared workspace, several authors may want to repeatedly edit and
revise common documents. Keeping track of the many changes by the various authors means
additional effort that can be avoided by putting such documents under version control.
The contents of a document under version control are not simply replaced when a document is
modified; instead, a new version is created as the current version. Earlier versions are main-
tained; their sequence is identified by increasing version numbers (e.g. 0.1, 0.2, 0.3, etc.). You
may access earlier versions of a document via the document’s info page or directly via a URL
with a version number (see below).
As the manager of a folder you may additionally impose automatic versioning on all documents
of the folder. Uploading of new documents and editing or replacing of existing documents will
automatically generate documents under version control.
8.3.1 Imposing version control
Establishing version control for a document may be thought of as creating a new object of the
type ‘Document under version control’ and using the existing document as the initial version.
• Select Change Version Control in the document’s action menu.
• Enter description, state and number of the original version into the ‘Start Version Con-
trol’ form.
Version control is indicated by a few changes in the document’s entry in the folder listing:
o A version number is inserted after the document name.
o Revise replaces Replace in the action menu of the document.
When a document is under version control, some BSCW actions only concern the current ver-
sion of the document:
• Clicking the document name or the icon downloads the current version.
• Actions such as Send to Converter or Send to Archive concern the current ver-
sion.
You may revoke version control for a document only by destroying all its versions (see 8.3.5
“Managing versions” on page 140).
Instead of imposing version control on single documents you may also put all documents of a
folder under version control. Details are to be found in 8.3.6 “Automatic versioning” on page
140.
8.3.2 Creating a new version
You may create a new version of a document under version control as you would Edit
or Replace ordinary documents.
If you edit a text or HTML document under version control directly on the server, a new version
is created automatically. Its version information should be completed in order to inform the
members of the workspace (see next section).
You explicitly create a new version of a document under version control as follows.
• Select Change Revise in the action menu of the document; this action replaces the
Change Replace action of ordinary documents.

138 Document and Content Management
• The ‘Revise’ form lets you upload a file as the new version. The form further offers
default values for the new version number and the version state. These values may be
modified, e.g., an out-of-sequence version number may indicate that the current version
is a significant change of the preceding version.
• Entering instructive information in the field ‘Changes made in version version-number’
will help the members of the workspace understand the version history and later on to
find a specific older version.
8.3.3 Editing version information
Version number, version state and change description may only be changed for the current
version of a document under version control – for earlier versions this information cannot be
edited any more.
In order to change some part of a document’s version information
• select Change Version Info to bring up the ‘Version Info’ form that lets you change
version information.
8.3.3.1 Version numbers
Versions are identified by unique version numbers. They consist of numbers separated by dots.
The numbers must be in the range [0, 32767].
BSCW has two kinds of version numbers:
o A main version number consists of a position for (more significant) version ‘jumps’
before the dot and a position for (less significant) version ‘steps’ after the dot. Examples
are 0.1, 3.11, 4.5 or 8.1.
o A branch version number is generated by appending a combination branch-num-
ber.step-number to the version number from which the branch starts. The branch
number identifies the branch, which starts from the particular version, and the step num-
ber identifies the version within the branch. Only the step number furthest to the right
may be changed in a branch version number. The version number 0.1.2.3, e.g., identifies
version 3 in branch 2 that starts from the main version 0.1. You may also generate
branch versions of branch versions! See 8.3.4 “Branching versions” on page 139 on how
to create a version branch.
When you generate a new version of a document, BSCW offers a default version number, where
the step number is incremented by 1. You may enter a higher step number. Entering a lower
step number for a main version number is only possible if you increase the jump number at the
same time, e.g., entering 1.0 instead of 0.12.
Note: You cannot change the version number of the current version if the current version is the
origin of a version branch. That happens, e.g., automatically when the current version is copied
by another user.
8.3.3.2 Version state
The state of a document version is meant to indicate its degree of maturity or the stage of a
respective work process. For example, a document might first be characterized as a ‘draft’.
After an inspection, the state might be set to ‘accepted’ and later to ‘published’.

Document and Content Management 139
The members of a workspace may agree on suitable version states for their work processes and
enter them into the ‘Version state’ field. As a preliminary default, BSCW provides a menu with
three version states:
o experimental,
o stable,
o released.
8.3.3.3 Change description
When a versioned document is shared, it is important that all members of the workspace are
able to track its version history, e.g. to find the earlier version that is just prior to a critical
modification. Thus, the author of a new version should make use of the ‘Changes made in
version...’ field of the ‘Revise’ or ‘Version Info’ form to describe the modifications that make
this version differ from the preceding one.
8.3.4 Branching versions
If a document is edited simultaneously by several authors, or if different variants are to be
managed in parallel, you may create two or more parallel version branches of the original
document, each having its own ‘current version’. A new version branch is again a document
under version control that starts out from an arbitrary version of the original document. You
may also create branches of branches.
• Select Change Branch from the action menu of a document under version control.
• In the version history of the ‘Branch’ form, select the version from which the new
branch is to originate by clicking its radio button in the ‘Id’ column. Enter a name for
the new version branch.
The first version of the new branch document is a copy of the root version of the original docu-
ment in the same folder. The state is also copied. The version number is formed by appending
next-branch-number.1. The latter may be changed using Change Version Info .
Note: Copying documents under version control means branching, i.e. a new version branch of
the document is automatically generated in the clipboard.
BSCW does not provide any specific support to ‘re-unite’ several version branches that have
been modified in parallel. Therefore, it is important to have telling change descriptions and to
agree beforehand on a document editing and versioning strategy in order to facilitate the process
of bringing the different branches together into a single consolidated document.
Note: When revising a branch version, you cannot store the new branch version as a main ver-
sion, i.e. you cannot increase a branch version number to a main version number.
An example: Let’s assume that you have generated a new branch 0.1.0.1 starting from version
0.1. You edit the underlying file of the branch version and store it as new branch versions,
increasing the branch version number to 0.1.0.2 and 0.1.0.3. When you now want to save a new
branch version as a main version, you cannot simply increase 0.1.0.3 to, say, 1.0 for reasons of
version security. Instead, you have to enter 0.1.0.4 as branch version number and revise the
main version by uploading the file underlying the 0.1.0.4 branch version as the new 1.0 main
version.

140 Document and Content Management
8.3.5 Managing versions
BSCW lets you access earlier versions of a document under version control by clicking the
version number in the document’s info page or by directly entering its URL.
• Select Information General in the action menu of the document requested.
• The info page of the document contains a section Version History and, for a document
with version branches, another section Related Branches. The tables show for each ver-
sion date of creation, author, state and change description.
• Click the version number of the version you want to read or download.
You may access an earlier version directly via its URL (for accessing BSCW objects via their
URL in general see 8.5 “URLs for objects in workspaces” on page 143). For documents under
version control, you append the version number to the normal URL for documents as shown in
the following example:
http://your-bscw-server/bscw/bscw.cgi/d12345/report.doc?version=0.6
Note: You cannot make any changes to older versions of a document under version control
unless you branch out from the version that you want to edit and modify the branch version.
If you not only want to get an overview of the different versions of a document, but also want
to compare or delete versions you do not need anymore,
• select Change Manage Versions . This brings up the version history giving date,
author, status and change notices, if any, of all versions of the document that may be
deleted. Note that technical reasons may forbid the destruction of a version, e.g., if there
are branches originating from that version.
• With text, HTML and other documents, which may be converted to text format, you
may compare versions before deleting them. Check any two versions and hit [Compare
Versions]. The comparison between the two versions will appear in the action form:
additions are underlined, omissions are crossed out.
Note: Documents may be converted to text format if your system administrator has in-
stalled a respective converter for the particular document type.
• Then check the versions that you want to destroy (make sure to uncheck all versions
that you do not intend to destroy) and hit [Destroy Versions]. Note that destroying
versions is irreversible.
When you destroy all versions of a document, you revoke version control, i.e. the document
becomes a normal document again.
8.3.6 Automatic versioning
As manager you may impose version control on complete folders and their subfolders, so that
all documents that are newly created and all existing documents that are edited or replaced are
automatically put under version control.
• Select File Change Properties in the top menu of the folder you want to put under
version control. The action is also available in the action menu of a folder entry.
• The section ‘Automatic Versioning’ of the action form – that is also present when a
folder is created – offers four options:

Document and Content Management 141
• The setting inherited from some superior folder or the BSCW server default setting,
when no superior folder has a setting different from the default. The default setting
is usually ‘no automatic versioning’, but may differ for your server; if in doubt ask
your BSCW administrator.
The rest of the options are explicit settings for the current folder:
• Automatic version control with an unlimited number of versions.
• Automatic version control up to specific number of versions; generating a version
exceeding the number specified will destroy the oldest version.
• No automatic version control, version control has to be imposed explicitly.
• The current setting is indicated by the option preselected. Make your choice and confirm
with [OK].
Automatic version control is inherited by all subfolders of a folder unless the subfolders have a
specific automatic version control setting of their own. Thus, you may put an entire subtree of
your folder hierarchy under version control with the possible exception of some folders for
which you explicitly specify no automatic version control.
You may also set automatic version control for single documents via Change Properties in
the action menu, e.g. to except certain documents from version control or to specify version
control with a limited number of versions. This is also offered when a document is created.
The automatic versioning option valid for a certain folder or document is shown on the info
page under Details (click on the left-hand side of the object entry). If there is no entry
‘Automatic Versioning’ in the Details section, then the BSCW server default setting applies to
this folder or document.
When you set automatic versioning for a folder (unlimited or limited number of versions) the
following will happen to the already existing documents and subfolders:
Documents not under version control: remain unchanged, i.e. as documents without ver-
sions. A subsequent Edit or Replace action will automatically turn such documents into
documents under version control with the original as first version and the edited or replaced
document as second version. You may of course also put such documents under version
control manually via Version Control .
Documents under version control: When automatic versioning is specified with an un-
limited number of versions, the documents remain unchanged. When automatic versioning
is specified with a limited number of versions, documents with a number of versions ex-
ceeding the maximal number specified will be put under version control with an unlimited
number of versions, so that no existing versions are accidentally destroyed. For other docu-
ments automatic version control applies as specified.
Documents under version control with an explicit automatic versioning setting: remain
unchanged and keep their specific setting.
Subfolders: Subfolders with an explicit automatic version control setting keep this setting,
all other subfolders inherit the setting from the current folder.
All documents that are newly created within the folder, e.g. via New Document or per drag
and drop uploading, will be put under version control as specified (with the new document as
first version). Note that documents that are inserted into the folder via Edit Paste will not
automatically be put under version control; only editing or replacing such documents will do
so as explained above. If you generate a new Branch from a document already under version
control (see 8.3.4 “Branching versions” on page 139), the branch document will be put under

142 Document and Content Management
the same version control that is valid for the folder. Note that versions from which a branch was
generated may not be destroyed. Such versions do not count for automatic versioning with a
limited number of versions.
If you revoke automatic versioning for a folder, i.e. choose the option ‘No automatic versioning’
or return to the BSCW server default when this comes up to no automatic versioning, the
documents contained in the folder (and its subfolders) will not be modified and no existing
versions will be lost. Documents and subfolders that had a specific automatic versioning setting
of their own will keep this setting. Other subfolders inherit the new setting, other documents
become normal documents – either under version control or not, but with no automatic
versioning setting.
Note: As explained above, revoking automatic versioning or restricting automatic versioning to
a smaller version limit will not destroy any versions whatsoever. If you want to remove versions
that you don’t need any more, you have to manually destroy them via Manage Versions . Should
that concern many folders and documents, ask your BSCW administrator to help you with an
automated script.
8.4 Templates and template folders Templates are used as masters for frequently used types of documents (letters, reports, forms),
usually including elaborate layout and formatting information or complex formulas in the case
of spreadsheets. In BSCW, you can declare arbitrary objects as templates: polls, flow folders
and tasks or even folders including their entire contents.
All templates must be put into your personal templates or into template folders, special folders
which contain only templates (and metadata profiles). Template folders can carry any name,
they are identified by a specific icon . Because otherwise template folders behave like
ordinary folders, they may also be shared with other users. This way, e.g., you may set up sets
of shared templates for use by your working team. In addition to user-defined template folders
containing templates for the use of an individual or a workspace group, there are also system-
wide template folders accessible to all registered users of the BSCW server, which are managed
by the system administrator.
8.4.1 Creating template folders
You create a new template folder in the current folder as you would create an ordinary folder:
• Select File New Template Folder in the top menu.
• In the section ‘General’ of the ‘Add Template Folder’ form, enter name and optional
tags and description of the new template folder. In the other sections of the action form
you may also define a document review or automatic versioning for the new folder.
• Confirm with [OK] to create the template folder, which is initially empty and has to be
filled with templates.
When you create a template in one of your template folders, consider adding a description of
the template, which could contain information about the purpose of the template and its use.
Such a template description is shown when the template is being copied.
Any object that you create in your personal templates – other than template folders or metadata
profiles – is considered a template!

Document and Content Management 143
BSCW has a specific search strategy when it looks for templates to offer for copying. You
should keep this strategy in mind when creating template folders. The templates that are being
offered for copying into the current folder come from template folders in the following places:
o Your personal templates and template folders therein – Your personal templates may
contain any number of templates and template folders containing further templates.
o Template folders in the current folder – There may be any number of template folders
in the current folder. Again, template folders in subfolders of the current folder are not
considered when making copies of templates in the current folder.
o Template folders in folders on the current path – BSCW will also consider template
folders which are contained in folders on the path upwards from the current folder to
your top-level folder (the current path is indicated in the navigation bar). Once again,
only template folders directly contained in folders on the current path are considered.
Consequently, if you place a template folder at the top level of a shared workspace, the
templates of this template folder may be used by all members of the workspace in all
subfolders and sub-subfolders of this workspace.
o System-wide template folders – Apart from personal template folders in your clipboard
or shared template folders available to members of shared workspaces, there are tem-
plate folders which are accessible to all registered users. System-wide template folders
are created and managed by your BSCW system administrator. Please turn to your
BSCW system administrator if you want to have more system-wide templates.
8.4.2 Copying from templates
You make a copy from a template as follows:
• Select File New from Template in the top menu.
• In the ‘Copy from Template’ form that is displayed next, select the template to copy
from. The description of the template selected is also shown, if any.
• Change the default name of the copy, if so desired, and optionally enter a description.
• Hit [OK] to create the copy from the template chosen.
The templates that are being offered, when you make a copy from a template, are determined
by BSCW’s search strategy with respect to template folders (see previous section).
8.5 URLs for objects in workspaces BSCW lets you create and manage sets of interlinked documents (HTML files, .gif or .jpeg
files, audio or video files, etc.). You may share them with the other members of a workspace
and even publish them for anonymous access on the Web (see 3.5.1 “Allowing anonymous
access” on page 51).
Links, i.e. URLs for objects in workspaces, may also be included in notes, in the description of
an object and in various other text fields.
o If you want to create a link to an object contained in another workspace on the same
server, make sure that the members of your workspace may access the object.
o If you want to create a link to an object on a different BSCW server, make sure that the
object has been made available for anonymous access.

144 Document and Content Management
To create a link, you need to specify the URL of the object on the BSCW server. This URL
may be specified in two different formats:
o in BSCW’s internal address format or
o as a path in a folder or directory tree,
each with its specific advantages:
BSCW’s internal numerical addresses are short, they do not change when objects are re-
named, moved to another folder, etc., and they may be used as entry points to a hyperlinked
structure from outside a BSCW server.
On the other hand, by using the familiar ‘relative’ directory path URLs, you keep a hyper-
linked structure portable, i.e. you could archive a collection of documents, take it to a dif-
ferent server, move it to an arbitrary place in the folder hierarchy and still have the links
intact and working.
8.5.1 BSCW’s internal address format
BSCW generates an internal address for every object. This address is shown in the ‘Address’,
‘Location’ or similar field of your Web browser while the browser displays the object. When
the browser displays a text/html document named article, the address field might show:
http://your-bscw-server/bscw/bscw.cgi/d3014/article.html
You may use this internal address in a link tag in any HTML document:
<A HREF="http://your-bscw-server/bscw/bscw.cgi/d3014/article.html">Article</A>
It may also be abbreviated as
<A HREF="/bscw/bscw.cgi/d3014/article.html">Article</A>
when both documents reside on the same server.
If you want to allow anonymous access to article.html, the address has to be modified to
<A HREF="http://your-bscw-server/pub/bscw.cgi/d3014/article.html">Article</A>
For details see 3.5.1 “Allowing anonymous access” on page 51.
8.5.2 Folder path URLs
BSCW can convert path names as they are shown in the navigation bar of the folder listing (the
‘Your Location:’ field) to the corresponding internal addresses. This allows you to use this
familiar address format to define links to objects in a BSCW workspace, in particular from other
objects in that workspace.
Take as an example a document article.html that contains a picture pic.gif and refers to a
second document doc2.html. The text of article.html might then contain the tags
<img src="pic.gif"> ... <a href="doc2.html">document 2</a>
If the three files article.html, pic.gif and doc2.html are contained in the same folder,
BSCW will convert the links correctly and will display the requested files.
Files in subfolders, in folders higher up the directory tree or in a different branch of the tree of
workspaces may be addressed in the same way, following standard UNIX notation. If, e.g., the
image file pic.gif is contained in the subfolder pictures, and the second document is contained

Document and Content Management 145
in the subfolder documents of the subfolder more, BSCW will correctly convert the following
links.
<img src="pictures/pic.gif">
...
<a href="more/documents/doc2.html">document 2</a>
Similarly, if the document doc2.html contains a link
<a href="../../article.html">previous document</a>
this link is again converted correctly, if article.html is contained in a folder two levels above
doc2.html.
8.6 Website folders Website folders provide a convenient way to create and manage a miniature website inside
BSCW. Apart from the HTML documents (“pages”) making up the contents of the website, a
website folder has up to five special documents:
o the home page that is shown when you click on a website folder’s icon or name in
a folder listing,
o the layout page that serves as the standard framework for all other HTML documents
of the website folder, thus ensuring a consistent layout of all pages in a website folder,
o the search results page that presents the results of a search in the website folder,
o the print page that represents a template for printing pages of the website folder, and
o the style definition, a style sheet that defines e.g. the colours and fonts of the HTML
elements used in the pages of the website folder.
The latter four documents, which are responsible for the appearance of the website folder, are
called resource documents of the website folder and are stored in a subfolder ‘Resources’.
When you create a website folder, the system provides predefined home pages, layout pages,
search results pages, print pages and style definition.
Website folders may still be opened like ordinary folders bypassing the display of the home
page (use Open in the action menu instead of Web View which shows the home page) and
exhibit the functionality of ordinary folders, i.e. may contain other material than HTML
documents and also subfolders, which may be website folders themselves or not.
Website folders have a built-in element system with a wiki-like [element …] syntax, allowing
you to include general BSCW system features as well as elements that were specifically
developed for website folders into your pages. Examples for system features are a page’s last
modification date, buttons for editing a page, last visited pages or even entire action menus.
Examples for specific elements are search result pages, sortable content listings, photo galleries
and a possibility to include comments on a page. Most of these features are to be found in the
demo folder which is offered when you create a new website folder.
Additionally, you may also define your own text elements to be used in other places of the
website folder. This way, you can define, e.g., the page title in every content page which is then
used in the layout page to display the title. Figure 19 shows a sample page of a website folder
exhibiting some of these features.

146 Document and Content Management
Figure 19: A sample page of a website folder
BSCW elements as well as links to other pages or existing images of the website folder may be
inserted into the pages of the website folder very easily using BSCW’s built-in HTML editor.
The editor offers five buttons for this purpose when HTML documents are edited within a
website folder.
Website folders may also be exported and published in form of a static copy. A static copy is
the result of an evaluation of the website folder, i.e. all text and BSCW elements are replaced
by their respective values and the pages are embedded in the layout page. BSCW elements that
cannot be used in an external environment, e.g. action links or action menus, are omitted during
this process. Subfolders are included in a static copy.
Website folders are only available on your BSCW server if the respective functionality has been
activated by your server administrator.
8.6.1 Creating website folders
To create a website folder in the current folder, you proceed as follows:
• Select File New Website Folder in the top menu.
• The ‘Add Website Folder’ form has the sections ‘General’, ‘Contents’, ‘Design’ and
‘Automatic Versioning’.
• General: Enter the name of the website folder, optional tags and a description. Further,
you may decide about the default view of the website folder (web view or standard
folder view) and whether to create a template folder. The template folder when created
will contain a template page “Empty” that serves as template for pages created using
New Page .
• Contents: Select the initial contents of the website folder. The default option “Basic”
provides an empty home page only. The rest of the options give an impression of the
capabilities of website folders and have of course to be adapted to your specific needs.
The “Demo” option is intended to give an impression of most of the features of website
folders. Regardless of what you choose, you may edit the home page and other pages
later on.
• Design: You are offered three layout options with two styles each. The “Tree” style is
suitable for hierarchically structured websites; the “Query” style is suitable for a flat set
of pages through which you navigate making use of author names, tags and categories.
The PC-oriented layouts may include the possibility to comment on pages or not. All in
all, you have got ten design options to choose from. Your choice here results in two

Document and Content Management 147
documents of your website folder, the layout page and the style definition. Both may be
edited later on.
• Automatic Versioning: Select the strategy of automatic versioning for your website
folder. The default is to store at most 10 versions of documents in the website folder in
order to be able to undo changes of website pages. In web view, the latest version of a
page is shown. In order to revert to an older version, you have to delete the more recent
versions.
• Hit [OK] to create the website folder according to the specifications made so far. All
properties of the website folder may be changed at a later point in time.
After having created a website folder, you may now start to create or upload the content pages
of your website folder (see next section). Your new website folder will contain at least a Home
Page (may be named differently) and a resource folder Resources with four resource docu-
ments: Layout (the layout page), Print (the printing template), Search (the search results page)
and Style (the style definition). Depending on the automatic versioning option chosen, these
documents will be documents under version control.
You may change name, tags, description and automatic versioning options of a website folder
using Change Properties in the action menu of the website folder like you would with ordi-
nary folders. How you change the appearance of a website folder using this action is explained
further below.
When you would like to structure your website folder like a tree, create subsidiary website
folders as subfolders.
• Select New Subsidiary Website Folder in the action menu of the website folder to
which you want to add a website subfolder.
• Enter name and optionally tags and description. Click [OK].
The new subsidiary website folder contains an empty home page carrying the name of the folder
as title. The other options (design, automatic versioning) are inherited from the containing web-
site folder. By default, subsidiary website folders are shown in web view as part of the website
folder’s contents, ordinary subfolders are not.
8.6.2 Creating and editing the contents of website folders
You can add new pages to your website folder as follows.
• Select New Page in the action menu of the website folder or File New Page in
the top menu of the website folder that you have opened using Open . “Empty” from
the template folder “Page Templates” will be used as template, if you had such a temp-
late folder created during creation of the website folder. If not, you can also create a
template folder with a page template “Empty” afterwards. You can edit this page accord-
ing to your needs. If there is no page “Empty” found in a template folder of your website
folder, the system template, an empty page with the name of the new page as title, is
used.
• Enter name and optionally tags and description of the new page.
• You can then edit the page with the built-in HTML editor.
You can also derive a new page from an existing page by copying and subsequent editing, thus
retaining the original style. In order to facilitate the creation of pages in a website folder, the
copy and edit operations are summarized in a single action.
• Select Change Edit Copy in the action menu of an HTML (or text) document.

148 Document and Content Management
• In the ‘Edit Copy’ form you may enter a name for the copy and an optional description.
• Hit [OK] to create the copy and launch the editor for editing the document copy.
When the website folder functionality is activated, the Edit Copy action is also available for all
HTML and text documents on the BSCW server.
You can edit existing pages of your website folder as follows.
• Select Change Edit in the action menu of the page in the normal folder view or
• click on the icon in the web view of the page.
BSCW’s built-in HTML editor will be used for creating new pages and editing existing ones.
The editor will display an additional toolbar when you are editing a page inside a website folder.
This toolbar offers five buttons to facilitate editing website folder pages:
• Insert BSCW Element – offers often-used BSCW elements. Selecting one of the ele-
ments offered inserts the respective code into the source code of the document at the
current cursor position. In order to shorten the menu, not all BSCW elements supported
are listed in this menu. For a complete list see the section after the next.
• Link to Existing Object – offers the names of objects contained in the current website
folder other than the current document. Selecting and confirming one of them inserts a
link to the object at the current cursor position. The active layout page is not offered in
this menu.
• Existing Image – offers images present in this folder for selection in order to facilitate
the insertion of images into the document. Images contained in the ‘Resources’ folder
also appear in this list.
• Folder actions – offers some often-used actions on the current website folder. Selecting
one of the action names inserts the respective code into the source code of the document
at the current cursor position. For a complete list of actions available see the section
after the next. under folderactions.
• Document actions – offers some often-used actions on the document being edited. Se-
lecting one of the action names inserts the respective code into the source code of the
document at the current cursor position. For a complete list of actions available see the
section after the next under documentactions.
Clicking the [Preview] button of BSCW’s built-in HTML editor will open a separate browser
window and show the current page in web view.
You may print the pages of a website folder using Print in the action menu of a page (ordi-
nary folder view) or by clicking on the icon (web view). The active print page of the website
folder will be used.
Changing document links to BSCW notation
The Change menu of a website folder offers an additional action:
• Choose Change Links Between Documents to transfer links to other BSCW documents
in the pages of your website folder from normal HTML notation to BSCW notation.
In contrast to ordinary HTML links, BSCW links are independent of the place where the docu-
ment is stored. So, if you create an ordinary link to a BSCW document in a page of the website
folder, and you move the BSCW document to another folder, the ordinary link will not work
any longer. If you have transferred your links to BSCW notation, however, the links will stay
working even if the BSCW documents linked to are moved around.

Document and Content Management 149
Note: If you use the editor menu “Insert BSCW Link” to insert links to BSCW documents, the
links will be in BSCW notation. The action Links Between Documents is mainly meant for trans-
ferring links in website folders created using former BSCW versions.
8.6.3 Editing the appearance of website folders
When you want to change the home page, layout page, print page, search results page or style
definition of a website folder, you have different possibilities to do so.
o Selection of a different predefined home page or other resource document.
o Creation and activation of your own home page or other resource document.
o Editing of the active home page or other resource document.
o Deactivation of the home page or other resource document.
Selecting predefined resource documents
You select a different predefined home page or other resource document as the active one for
your website folder as follows.
• Select Change Properties from the action menu of the website folder and go to the
section ‘Appearance’ of the action form.
• Choose the aspect of the appearance of the website folder that you want to change, e.g.
Layout Page, and select a new system default layout from the options offered below
‘Add Layout Page’. Proceed for the other types of resource documents and add the
resource documents selected to your website folder by hitting [OK]. These new pages
become the active home page, layout page etc. and determine the appearance of the
website folder.
• The old home page, layout page etc. are deactivated by this action, but not replaced.
This way they may be reactivated at a later point in time.
You can also add and activate a new predefined home page, layout page or style definition
• by selecting New Home Page , New Layout Page or New Style Definition in
the action menu of the website folder.
Creating and activating your own resource documents
You can also create the documents that determine the appearance yourself: upload them to your
website folder, copy and edit existing pages and style sheets, or move such documents from
other website folders to the current one. Resource documents like layout pages, print pages,
search results pages and style definitions should be placed into the Resources folder. You
activate such resource documents created by yourself as follows.
• Select Change Properties from the action menu of the website folder and go to the
section ‘Appearance’ of the action form.
• Choose an aspect of the appearance, e.g. Layout Page, and select one of your own pages
from the drop-down menu below ‘Select Layout Page’ as the new layout page. The
currently active page or style sheet is pre-selected in the menu. Proceed for other aspects
and finally activate the pages and style sheets selected by hitting [OK].
When you plan to create your own home pages or other resource documents, have a look at the
predefined pages provided by the system and make yourself familiar with the BSCW elements
used in these documents (see 8.6.4 “Using BSCW elements” on page 151). Layout pages and

150 Document and Content Management
print pages have to contain the special element [element content] exactly once. This is the
place where the other pages of the website folder, the content pages, are embedded into the
layout page and the page to be printed is embedded into the printing template. Further, you are
free to use all BSCW elements in layout and print pages. These elements, however, will be
evaluated against the embedded page, not against the layout or print page itself. If you have,
e.g., included a BSCW element to display the page’s size, the size of the embedded page will
be displayed, not the size of the layout page.
For creating your own style definitions, you have to be familiar with style sheets. In any case,
have a look at the predefined style definition that comes with a freshly created website folder.
Directly editing active resource documents
You can directly edit active home pages and other active resource documents in the folder
Resources. Also, in this case you should make yourself familiar with the predefined system
pages and the BSCW elements used therein.
• Select Change Edit in the action menu of the document concerned, edit the docu-
ment and confirm with [OK].
• You can also use Change Home Page , Change Layout Page or Change Style
Definition in the action menu of the website folder to directly edit the active home page,
layout page or style definition.
If you have activated automatic versioning for the website folder, these actions generate new
version of the documents edited. In this case, you can return to a former design by deleting
more recent versions of home page or other resource documents.
For details about editing HTML pages in website folders see the previous section.
Deactivating resource documents
You may use the action Change Properties to deactivate the home page and other resource
documents.
• In the section ‘Appearance’ select ‘No home page’, ‘No layout page’ etc. from the drop-
down menu below ‘Select Home Page’, ‘Select Layout Page’ etc. and confirm with
[OK].
Deactivating the home page (for reasons whatsoever) makes a website folder appear as an
ordinary folder.
Adapting style definitions in case of server upgrades
Should your BSCW server be upgraded, it may happen that your style definitions do not match
the new version of website folders. In this case, you get a very prominent error message advising
you to upgrade your style definitions too. Style definitions of website folders are not automatic-
ally adapted when your BSCW server is upgraded, since style definitions are documents that
may have been edited by you or other users.
If you use only predefined system style sheets, you have to only create (and thereby activate) a
new predefined style sheet for your website folder as described above. If you use your own
style sheets, you have two possibilities.
o You could incorporate your changes (e.g. a different colour scheme) into a new pre-
defined style sheet.
o You could edit your existing style definition to match the new website folder version.
To this end, you have to at least enter the current version number into the first line of

Document and Content Management 151
the style definition document, e.g. /*bscw-style-v2*/. Compare your style definition
with the current predefined style definition, from which your definition has been
derived, and carry out the necessary changes.
How to edit active style definitions has also been described above.
If you continue to use style definitions that do not match the current version of website folders,
various errors may occur: action menus are not displayed correctly, navigation in tree-like
website folders does no longer work properly and more recent BSCW elements do not work at
all. So, you should not ignore the respective error message.
8.6.4 Using BSCW elements
Website folders have a built-in element system with a wiki-like [element …] syntax, allowing
you to include BSCW elements into your pages, e.g. a page’s last modification date, links for
editing the page, a display of the page history or even entire action menus. BSCW elements
have a name and may also have parameters with values. An abstract example of the BSCW
element syntax,
[element name param1=True param2="A long text with spaces"]
represents the BSCW element name with two parameters, one named param1 with value True,
the other one named param2 with value "A long text with spaces". Note the double quotes,
which are only needed for values containing spaces. A concrete example of a BSCW element
is
[element documentactions action=edit text="Change me!"]
representing the action Edit to be applied to the current document. In the Web view of an HTML
document in a website folder, the BSCW elements are evaluated and the results are inserted
into the page. In the above example, a clickable link labelled Change me! would be inserted
into the document that would invoke the Edit action on the document itself.
Note: In the context of BSCW elements in website folders some actions have names that differ
from their usual names in BSCW. Examples are Revert Changes instead of Destroy Versions
and Add Subfolder instead of Add Subsidiary Website Folder.
Even though all BSCW elements are enclosed in square brackets, you can still use square
brackets in documents of a website folder as normal text. Only the string [element will be
recognized as the start of a website folder element. Errors in BSCW element specifications lead
to error messages inserted into the page while the rest of the page will still work as expected.
You may embed BSCW elements in arbitrary HTML text that is shown only if the evaluation
of the BSCW element results in a non-empty content. In the following example
[decoration] <HTML text> [element ..] <HTML text> [/decoration]
the text between [decoration] and [/decoration] will not be shown, if the result of the
BSCW element evaluation is empty.
In the following, the available BSCW elements are listed in alphabetical order. The ‘Static’
attribute tells you whether the particular element will be included in a static copy of the website
folder or not (see 8.6.6 “Exporting and publishing website folders” on page 164). You may
enter the BSCW elements directly into the source text of your website folder’s pages or use the
respective drop-down menu of BSCW’s built-in HTML editor.
o authors Inserts a list of authors of objects of the current website folder. Clicking on an
author name restricts the list of objects shown in the list generated by contents to the

152 Document and Content Management
objects generated by a specific author. Note that clicking on an author name has no
effect on hierarchical lists generated by tree.
Static: No
Parameters: None
Example: [element authors]
o back Inserts a link that leads from inside the website folder to the first parent folder that
is not a website folder.
Static: Yes
Parameters:
icon (optional)
Instead of a text, you may also label the link with an icon. Enter the URL of the
icon as value of the icon parameter. If both icon and text are given, the link is
labelled with the icon and the text is used as tooltip.
text (optional)
By default, the label of the back link is taken from the BSCW language files in
the current user language (in English that would be “Back”). You may enter an
alternative label using the text parameter.
Example: [element back text="Up and away"]
o categories Inserts a list of categories assigned to the objects of the current website
folder. Clicking on a category restricts the list of objects shown in a list generated by
contents to the objects with a specific category. Note that clicking on a category has no
effect on hierarchical lists generated by tree.
Static: No
Parameters: None
Example: [element categories]
o comments Lists the comments on the current page and by default offers an input field
for entering new comments, if the user has the right to enter new comments. Eventual
answers to comments are not shown.
Static: Yes
Parameters:
latestfirst (optional, default False)
The comments are sorted by date of creation. By default, the oldest comment
appears at the top of the list. Set the parameter to True. To have the list start
with the latest comment.
maxcomments (optional, default None, i.e. no restrictions)
The number of the comments shown is not restricted by default. Using the para-
meter maxcomments, you may limit the number of comments shown. If there
are more comments than can be shown because of the limit, a link will appear
that takes you to a discussion forum with all comments shown in the normal
BSCW view.
showform (optional, default True)
The input field for new comments is offered by default. You can prevent this by
setting the parameter to False.

Document and Content Management 153
Note: If the user does not have the right to enter comments, the input field will
not be offered regardless of the parameter value.
Example: [element comments latestfirst=True maxcomments=7]
o contents Inserts a list of all objects contained in the current website folder as clickable
links. In case of a full-text search the list will be replaced by the search results, if no
proper search result page has been defined using searchresults.
Static: Yes
Parameters:
emptymsg (optional, default True)
By default, the message “No results” will be shown if the contents list is empty
(e.g. because of filtering). Set the parameter to "" to suppress this message. If
you set the parameter to False, the element remains altogether empty. In this
case you may use [decoration] (see above).
indextopmost (optional, default True)
By default, the home page of a website folder comes first in the contents list,
independent of the sorting criterion. You can have the home page being inserted
into the contents list according to the current sorting criterion by setting the
indextopmost parameter to False.
metafilterdocs (optional, default None)
The metafilterdocs parameter allows you to hide all documents that do not
satisfy certain criteria regarding one of their metadata attributes. The parameter
value consists of a metadata attribute and a comma-separated list of possible
values. You may check for equality (=), inequality (!) and being part of (%). A
qualification of the operators with a preceding * causes the display of all
documents that do not have the metadata attribute in question. The examples
below demonstrate the use of this parameter. The metadata attributes are speci-
fied using their internal keys. A list of possible metadata attributes and their keys
is given after the examples below. By default, there is no filtering by metadata
attributes.
metafilterfolders (optional, default None)
Works like metafilterdocs, relates, however, to the display of folders in the
contents listing.
onlynames (optional, default "*")
Works like onlytypes, except that filtering is done on the basis of object names.
Specify a comma-separated list of allowed names, e.g. image??.jpg or *.html
(* stands for an arbitrary string, while ? stands for an arbitrary character). Again,
folders are not affected by the name filtering.
onlytypes (optional, default "text/html")
The onlytypes parameter allows you to hide all documents that do not have a
certain MIME type. Specify a comma-separated list of allowed types, e.g.
text/html for HTML documents. Specification of entire groups of MIME types
is also possible using the wildcard character * (e.g. text/*). Folders are not
affected by the type filtering. If you want to turn the filtering off, set the
parameter to "*". You may use onlynames together with onlytypes at a time. In
this case, only documents that pass both criteria will be displayed.
paging (optional, default True)
Determines whether the entries of the content listing are split into multiple pages
if necessary or not. The maximal number of entries per page corresponds to the
user setting “Maximum number of visible entries in folder listings”, which is

154 Document and Content Management
defined in the top menu under Options Preferences in the section
“Presentation”.
showextensions (optional, default False)
By default, file name extensions (like .html) are not shown in the contents list.
You can force showing file extensions by setting the showextensions parameter
to True.
showfolders (optional, default "webonly")
Determines which folders are shown in addition to the other objects and may
have one of the following three values:
o all All folders are shown.
o none No folders are shown.
o webonly Only website folders with an active home page are shown.
showhome (optional, default True)
By default, the home page is shown in the contents listing. You may deviate
from this procedure by setting the parameter to False.
showlayout, showstyle (optional, default False)
By default, the layout page and the style definition do not appear in the contents
list. You can force their appearance by setting the respective parameter to True.
showtemplatefolders (optional, default False)
By default, template folders are not shown in the contents list. You can force
their appearance by setting the showtemplatefolders parameter to True given
that these folders would be shown at all according to the showfolders setting.
showtitle (optional, default False)
Determines whether the name of the current folder is to be displayed above the
contents listing.
sort (optional, default "byName")
Determines how the contents listing is sorted and may have one of the following
values:
o byType Objects are sorted by object type.
o byName Objects are sorted by name.
o bySize Objects are sorted by size.
o byDate Objects are sorted by date of last modification.
o byRating Objects are sorted by rating.
You may also specify several sorting criteria as a comma-separated list. A -
preceding a sorting criterion inverts the sorting order. If sort is not specified,
sorting is by name.
uplink (optional, default False)
By default, the contents list contains a link to the parent website folder in all
subsidiary website folders, but not in the top-level folder. You can suppress this
link by setting the uplink parameter to False. You can also force the link to
appear in all website folders including the top-level one by setting the value to
True.
target (optional, default "")
Specifies in which browser window documents of a certain type, which are
contained in the contents listing, are to be opened. The value of the parameter
consists of a comma-separated list of specifications relating to the target window
and the MIME type of the document. The specification of a window alone relates
to all documents, the specification of [MIME type]:[window name] relates to
the documents of the MIME type given. For the use of the parameter also see
the examples given below. By default, all documents are opened in the current
browser window, thus replacing the contents listing.

Document and Content Management 155
topitems (optional, default "")
Specifies the objects of the current folder which are to be listed at the top
independent of the sorting chosen. The value of the parameter consists of a
comma-separated list of object names.
Examples: [element contents showlayout=True topitems="First,Second"]
Displays a contents list including the layout page. The objects First and Second
appear at the top of the list independent of the sorting chosen. [element contents onlynames="*.html"]
Displays a contents list hiding all non-folder objects with names not ending in
‘.html’. [element contents onlytypes="text/plain, text/html"]
Displays a contents list hiding all non-folder objects other than HTML and text
documents. [element contents metafilterdocs="bscw:keywords=cat,dog"]
Displays a contents list with only those documents containing the tags cat or
dog. [element contents metafilterdocs="bscw:keywords*=cat,dog"]
Like the previous example, only that documents without any tags are also
shown. [element contents metafilterfolders="bscw:keywords!cat,dog"]
Displays a contents list with only those folders not containing the tags cat or
dog. [element contents target="_blank"]
Causes all documents of the contents list to be opened in a new browser window. [element contents target="application/pdf:_blank"]
Causes all PDF documents of the contents list to be opened in a new browser
window. [element contents target="_blank, application/pdf:myWindow"]
Causes all PDF documents of the contents list to be opened in myWindow, all
other documents in a new window.
Selection of metadata keys
General metadata of BSCW objects
bscw:category (Category), bscw:description) (Description), bscw:keywords
(Tags), bscw:name (Name), bscw:priority (Priority)
Dublin Core attributes of documents
DC:author (Author), DC:coverage (Coverage), DC:created (Created on),
DC:format (Format (MIME type)), DC:language (Language), DC:publisher
(Publisher), DC:source (Source), DC:subject (Subject), DC:title (Title)
Metadata of users and contacts
bscw_contact:givenname (Given name), bscw_contact:mail (E-Mail address),
bscw_contact:org (Organization), bscw_contact:surname (Surname)
Document attributes used with document review
bscw_doc:approval_status (Status), bscw_doc:responsible (Responsible)
Metadata of flow folders
bscw_flowfolder:responsible (Responsible), bscw_flowfolder:task (Task)
For a complete list of metadata available, please contact your BSCW administrator.
You can obtain a list of the metadata keys of a given metadata profile selecting
Specification in the action menu of the metadata profile.
o contentsmetatable Inserts a table of selected metadata of all objects directly contained
in the current website folder into the current document. This contents table may be

156 Document and Content Management
sorted by the user with respect to the metadata shown. By default, the columns of the
table show name, tags and description of the objects directly contained. You may also
have other metadata attributes displayed. Metadata attributes are identified by their
keys. You can obtain a list of the metadata keys used in a metadata profile by selecting
Specification in the action menu of the metadata profile. For examples of metadata
keys also see contents above.
Static: Yes
Parameters:
columns (optional, default "bscw:name, bscw:keywords,
bscw:description")
By default, the contents table shows in its columns the name, tags and descrip-
tion of the objects directly contained. If you want to deviate from the default,
enter a comma-separated list of metadata keys as value for the columns para-
meter.
Moreover, the following parameters are available which have the same effect as in
contents, namely to exclude certain objects from the contents table.
metafilterdocs (optional, default None)
metafilterfolders (optional, default None)
onlynames (optional, default "*")
onlytypes (optional, default "text/html")
showfolders (optional, default "webonly")
showhome (optional default True)
showlayout (optional, default False)
showstyle (optional, default False)
showtemplatefolders (optional, default False)
Example: [element contentsmetatable]
Shows the documents and website folders directly contained in the current folder
as a table with name, tags and description columns.
o date Inserts the current date and/or time.
Static: Yes
Parameters:
format (optional)
If you don’t like the default date and time format (example: 2007-07-03 14:31)
and are familiar with Python programming, you can specify your own format.
Please refer to the Python reference manual under strftime.
Example: [element date format="%A, %B %d, %I:%M %p"]
Inserts the current date and time in a user-defined format, yielding Tuesday, July
03, 02:31 PM instead of the standard format above.
o documentactions Inserts a complete action menu for the current document or a direct
link to a specific action.
Static: No
Parameters:
action (optional)
If the parameter is omitted, a whole action menu will be inserted. Otherwise, a
direct link to the action specified will be created. See below for admissible val-
ues of the action parameter. If the action specified is not allowed for the current

Document and Content Management 157
user, the documentactions element will be replaced by the value of the for-
biddentext or forbiddenicon parameters or an empty string.
forbiddenicon (optional and only used if action is specified)
If the action specified is not allowed for the current user, the icon referred to by
the value of the parameter will be displayed instead of the action link.
forbiddentext (optional and only used if action is specified)
If the action specified is not allowed for the current user, the value of the para-
meter will be displayed instead of the action link. The forbiddentext parameter
defaults to an empty string.
icon (optional and only used if action is specified)
The link to the action specified will be labelled with an icon. The value of the
icon parameter is the URL that refers to the icon. The value may also be True in
which case the BSCW icon of the action is taken. If both icon and text are given,
the link is labelled with the icon and the text is used as tooltip.
onlyif (optional, default "")
Specifies a condition for the display of the action or action menu. If the condition
is not satisfied, the whole element remains empty. The value of the parameter is
a string of characters. The conditions that are currently available check whether
the current document is the home page (index) or which level of proficiency the
user has (beginner, advanced or expert: profile_ui_beginner, profile_ui_-
advanced, profile_ui_expert). The level of proficiency is set in the top menu
under Options Preferences in the section ‘General’. You may also use the
logical operator not in your conditions. See below for some examples.
text (optional and only used if action is specified)
The link to the action specified will be labelled with the value of the text
parameter. If the text and icon parameters are omitted, the link will be labelled
with the BSCW name of the action in the current user’s preferred language.
Remember that a text containing spaces must be enclosed in double quotes.
Examples: [element documentactions]
Inserts the action menu for the current document. [element documentactions action=get text="Source"]
Inserts a link for opening the current document with the link labelled “Source”.
This action will show the document’s source code, i.e. BSCW elements or text
elements are not evaluated and replaced. [element documentactions action=replace]
Inserts an action link for replacing the current document with the default link
label “Replace”. [element documentactions action=printweb icon=True onlyif="not
index"]
Inserts the default icon for printing the current document into the current
document if it is not the home page of the current website folder. [element documentactions action=edit icon=True
onlyif=profile_ui_expert]
Inserts the default icon for editing the current document into the current
document if the user has set the level of proficiency to “Expert”.
Possible actions:
attachnote (Attach Note), checkout (Lock), chtype (Change Type), copy (Copy), cut
(Cut), cutattachment (Cut Attachment), duplicate_edit (Edit Copy), edit (Edit),
editobject (Change Properties), export (Export), freeze (Freeze), get (Open), history
(Show History), info (More Information), link (Link to Clipboard), printweb (Print),
rate (Rate), replace (Replace), resubmit (Resubmit), revise (Revise).

158 Document and Content Management
o fileupload Inserts an interaction element for uploading images to the current folder.
There is to be at most one fileupload element per page.
The interaction element consists of three buttons [Select file(s) to upload…], [Upload],
[Cancel upload] and a preview domain showing the files intended for upload. The first
button initiates a standard file selection dialog, the second button causes the actual up-
loading and the third button cancels the upload process. You may also specify files for
uploading by dropping them over the [Upload] button. The files intended for uploading
are shown in the preview area below the buttons.
Note: Currently, the fileupload element is to be used for uploading image files only.
Static: No
Parameters: None
Example: [element fileupload]
o folderactions Works exactly like documentactions, but takes the current website folder
as the object of reference for the action menu or the action links.
Static: No
Parameters:
Same as for documentactions.
Examples: [element folderactions]
Inserts the action menu for the current website folder. [element folderactions action=get text="List all objects in BSCW
style"]
Inserts a link to open the current website folder with link label “List all objects
in BSCW style”, resulting in a normal folder listing. [element folderactions action=history]
Inserts a link to the folder’s history with the default link label “Show History”.
Possible actions:
addcal (Add Group Calendar), addctlist (Add Contact List), addmember (Invite
Member), addnotes (Add Discussion Forum),addpage (Add Page), addsubweb-
folder (Add Folder), addrole (Add Role), addSearch (Add Search Folder), addurl
(Add URL), chbanner (Change Banner), chrole (Assign Role), copy (Copy), cut
(Cut), editindex (Edit Home Page), editobject (Change Properties), editrole (Edit
Role), editstyle (Edit Style Definition), edittemplate (Edit Layout Page), export
(Export), get (Open), getweb (Show Web View), history (Show History), info (More
Information), link (Link to Clipboard), make (Static Copy) pubaccess (Public
Access), uploaddoc (Upload Document).
o gallery Displays the image files that are contained in the current folder in form of a
gallery with miniaturized previews. Image files are documents with a respective MIME
type (image/jpg, image/png etc.).
Static: Yes
Parameters:
emptymsg (optional, default True)
By default, the message “No results” is displayed if the current folder contains
no image files. If you set the parameter to "" this message will not appear. If
you set the parameter to False the whole element remains empty. In the latter
case you can use [decoration] (see above).

Document and Content Management 159
hover (optional, default False)
Set the parameter to True to have a gallery image over which the cursor is
positioned slightly enlarged.
lightbox (optional, default False)
Set the parameter to True to have a full-window preview displayed when you
click on a gallery image.
paging (optional, default False)
Works as with contents. Here you can additionally set the maximal number of
entries per page directly as the value of the parameter paging. This replaces the
user setting “Maximum number of visible entries in folder listings”.
size (optional, default value "small")
Controls the size of the gallery images displayed. Other possible values are
"medium" and "large".
sort (optional, default "byType, byName")
By default, the images are sorted by type and name. Other sorting orders are
defined via this parameter as with contents.
Example: [element gallery paging=10 sort="byName" lightbox=True]
o history Inserts a list of the documents that were visited last as a list of clickable links.
Static: No
Parameters:
divider (optional, default ", ")
By default, the links in the list are separated by a comma and a blank. Using the
divider parameter, you may enter an alternative separation string.
maxdocs (optional, default 5)
By default, at most five documents will be listed. With the maxdocs parameter
you may set a different maximum.
showextensions (optional, default False)
By default, file extensions (such as .html) are not shown in the history list. By
setting showextensions to True you may force showing file extensions.
Example: [element history divider=" | " maxdocs=7]
o lastmod Inserts the date and/or time of the current document’s last modification.
Static: Yes
Parameters:
format (optional)
You can specify your own date and time format as explained under date above.
Example: [element lastmod]
o lastmodby Inserts the name of the user who last modified the current document.
Static: Yes
Parameters: None
Example: [element lastmodby]
o location Inserts the path to the current document as clickable links.
Static: Yes
Parameters: None

160 Document and Content Management
Example: [element location]
o message Inserts a BSCW system message. These messages are displayed in the pre-
ferred language of the current user.
Static: Yes
Parameters:
name (required)
The name of the message to display. The available messages are contained in
the file
bscw-directory/messages/en/lg_msgconfig.py
on your BSCW server. Ask your BSCW system administrator for the precise
location of this file in your particular BSCW installation.
Example: [element message name=location]
Displays the message named ‘location’. In English, this yields “Your location”.
o metadata Inserts the metadata of the current object as a table arranged according to the
groups of the respective metadata profile and offers a button for changing the metadata.
In contrast to contentsmetatable, metadata is about one single object.
Static: Yes
Parameters: None
Example: [element metadata]
o search Inserts the input field for the full-text search within the website folder. The
search results appear on the search results page that you have defined for the current
website folder using searchresults. Without a specific search result page the search
results replace the contents list or tree that were generated using contents or tree. Using
search only makes sense if you use searchresults, contents or tree at the same time,
otherwise the search results will not be shown.
Static: No
Parameter: None
Parameters:
selectscope (optional, default False)
Specifies whether the search domain (entire website folder or current folder) can
be selected at the user interface.
scopeall (optional, default True)
Specifies whether the entire website folder is to be searched. Set the parameter
to False if you want to restrict the search to the current folder.
Example: [element search]
o searchresults Specifies the appearance of the search result page that shows the results
of a search in the current folder.
Static: No
Parameters:
The same as for contents with the following additions:
grouping (optional, default)
Allows the grouping of search results according to folders in which they are
contained. The default setting has the search results presented as a normal list

Document and Content Management 161
sorted by the sorting criteria of the sort parameter. If you set the parameter
grouping to True, the search results are presented in groups: each group contains
all hits that were found in a particular folder; the groups themselves are sorted
according to the path that leads to a specific folder; within the groups the search
results are sorted according to the criteria of the sort parameter. If you set the
parameter grouping to a number n>1, a maximum of n search results will be
shown per group.
paging (optional, default False)
Works basically as with contents, i.e. the search results are distributed to several
pages if necessary, if the parameter has not the value False. As with gallery you
can also set the maximal number of entries per page directly as the value of the
parameter paging. This replaces the user setting “Maximum number of visible
entries in folder listings”.
The way search results are distributed to different pages here also depends on
the value of the parameter grouping. If grouping has the default value False,
the search results are distributed to pages according to the value of the parameter
paging. If the parameter grouping has the value True, the parameter paging
specifies how many groups (not search results) are to appear on one page at
most. Also, when grouping has a value of n>1, paging specifies the maximal
number of groups that are to appear on a single page, only that now not all search
results of a group are shown, but at most only n.
showpath (optional, default False)
Specifies whether the path of the folder containing the search result is to be
displayed after the name of the search result.
Example: [element searchresults grouping=8 paging=4]
Specifies that search results are to be grouped according to the subfolders in
which they are contained, that a maximum of eight search results are to be
displayed per group and that a maximum of four groups are to be displayed per
page.
o size Inserts an object’s size.
Static: Yes
Parameters:
filename (optional)
By default, the current document’s size is used. You can specify a different ob-
ject by giving its name in the filename parameter.
unit (optional, default B)
The default unit is bytes (B). If your document is rather large, another unit may
be more appropriate. Valid units are B, KB, MB, and GB.
Example: [element size filename="files/dvd-image.iso" unit=GB]
Inserts the size of the object dvd-image.iso in subfolder files of the current
folder, measured in gigabytes.
o systembanner Inserts the system banner, by default the BSCW system banner.
Static: Yes
Parameters: None
Example: [element systembanner]

162 Document and Content Management
o tags Inserts a list of tags assigned to the objects of the current website folder. Clicking
on a tag restricts the list of objects shown in a list generated by contents to the objects
with a specific tag assigned. Note that clicking on a tag has no effect on hierarchical
lists generated by tree.
Static: No
Parameters: None
Example: [element tags]
o toc Displays a table of contents of the current document consisting of headings as click-
able links allowing navigation within the document.
Static: Yes
Parameters:
headingcount (optional, default 1)
Specifies the minimal number of headings in the table of contents. If the docu-
ment has fewer headings, no table of contents will be displayed at all. This
parameter is to enable the use of the element toc also in layout pages and at the
same time to prevent too meager tables of contents of embedded content pages.
highest (optional, default 5)
Defines the highest level of headings to be included in the table of contents. A
value of 3, e.g., lets headings <h1>, <h2> and <h3> appear in the table of
contents, but not headings <h4>, <h5> etc.
lowest (optional, default 1)
Defines the lowest level of headings to be included in the table of contents. A
value of 2, e.g., lets headings <h2>, <h3>, <h4> etc. appear in the table of
contents, but not <h1> headings.
title (optional, default None)
Using this parameter you can define your own title for the table of contents.
Example: [element toc headingcount=5 highest=3 title="Contents"]
Displays a table of contents consisting of at least five headings of level <h1>,
<h2> and <h3> and the preceding title Contents.
o tree Inserts a tree of clickable links showing the contents of the current website folder
from top level down to the current document. In case of a full-text search the tree will
be replaced by the search results when no proper search results page has been defined
using searchresults.
Static: Yes
Parameters:
Same as for contents with the exception of paging and an exception concerning a
default procedure:
showhome (optional, default procedure see below)
By default, the home page is shown for the top-level folder, but not for sub-
sidiary folders in the tree. You may deviate from this procedure by setting the
parameter to either True or False.
Examples: [element tree showlayout=True]
Displays a contents tree including layout pages.

Document and Content Management 163
[element tree onlynames=*.html]
Displays a contents tree hiding all non-folder objects with names not ending in
‘.html’.
8.6.5 Using text elements
Text elements are website folder elements which stand for a user-defined piece of text and
which may be defined in one page of a website folder and used in another. This way, you can
define, e.g., the page title individually in every content page which is then used in the layout
page to display the title in the top part of the page.
Text elements have a name and a value. This is how you define a text element:
[element set name="Text element name"]Value of text element[/element]
The definition is to be inserted somewhere into the source text of a page. Once defined, you can
use the text element by inserting
[element get name="Text element name"]
into the source text of a page. In the Web view of this page, the text element will be evaluated
to its value which replaces the text element.
Text elements defined in the layout page may be used in all content pages of the website folder,
e.g. as shorthand notations for often-used pieces of text possibly including complex formatting.
Text elements defined in a content page may only be used in this same content page and the
layout page. If you define text elements with the same name both in a content page and the
layout page, the definition in the content page will override the one in the layout page. Thus,
you can define default text elements in the layout page, which may or may not be overridden
in the content pages. Have a look at the sources of the demo layout and home pages to learn
more about the use of text elements.
There are some predefined text elements which you can use without prior definition:
o title: the BSCW name of the current object;
o description: the description of the current object taken from BSCW;
o author: the name of the user who created the current object;
o meta:bscw:keywords, meta:bscw:category: the tags and category assigned to the current
object; other metadata of the current object are also available this way, i.e. by appending
the so-called key of a metadata attribute to meta:. The keys of the attributes of a
metadata profile are obtained by
• selecting Specification in the action menu of the metadata profile (also cf. 3.9.1
“Metadata profiles” on page 72).
So
[element get name="title"]
inserts the name of the current page and
[element get name="meta:bscw:description"]
inserts the description of the current page. Further you may insert the description of the folder
containing the current page using
[element get name="foldermeta:bscw:description"]
and the description of the top most website folder containing the current page using
[element get name="topmostfoldermeta:bscw:description"]

164 Document and Content Management
It is also possible to make use of metadata at an unspecified point in the access path to page
shown. So
[element get name="searchmeta:bscw:description"]
inserts the metadata attribute bscw:description, i.e. the description, of the lowest object along
the access path to which bscw:description could have been assigned. If this object has no
description, we get an empty output.
8.6.6 Exporting and publishing website folders
You can create an evaluated copy of your website folder, i.e. a copy in which the BSCW and
text elements are evaluated and replaced and in which all content pages are embedded in the
layout page. Such a copy is called a “static” copy because all elements that determine the ap-
pearance of the website folder have been evaluated once and for all. Static copies are created in
your clipboard and may be pasted from there to an ordinary BSCW folder, exported to an
external Web server or sent by e-mail. You create a static copy of a website folder as follows:
• Select Static Copy in the action menu of the website folder.
• In the ‘Static Copy’ form you may choose to have all objects of the website folder copied
or only HTML documents and website subfolders with their HTML documents.
• Hit [OK] to start the copying. If there are BSCW elements in the pages of your website
folder that cannot be transferred to a static context, you will be informed in an extra
form.
A static copy of a website folder doesn’t look exactly the same way as when viewed directly in
BSCW. Critical BSCW elements that don’t translate into a static context (action links, menus
etc.) are omitted from a static copy; other elements might have a slightly different appearance.
8.6.7 Integration of an external wiki engine
Website folders may be used to generate a sort of wikis inside BSCW. In addition, an external
wiki engine, the MoinMoin software (details under http://moinmo.in/) may be integrated into
BSCW. Integration takes the form of assigning a MoinMoin wiki to a given workspace. The
existence of the wiki is indicated in the banner of the workspace, which in this case contains a
link to the wiki. Clicking on this link leads to the wiki. When you open the wiki from within
BSCW this way, you will be automatically authenticated in the wiki under your user name.
Integration of MoinMoin has to be done by your BSCW administrator for every single work-
space that is to be equipped with a MoinMoin wiki.

Traceability and Social Cooperation 165
9 Traceability and Social Cooperation
Within your social network in BSCW, i.e. the set of users with whom you share a workspace,
you may keep informed about the current user activity, you may trace this activity with the help
of the events having taken place and you may get in touch using informal communication in
the context of shared workspaces.
You can find out which users may be available online via
o the online status display indicating the “BSCW presence” of the members of a shared
workspace.
You can keep in touch with your co-workers in BSCW using
o the microblogging feature of BSCW supporting the exchange of short text messages
among the members of a shared workspace. Such a microblog also contains the events
of a workspace.
You can keep informed about the events in your workspaces in a more online fashion than
provided by daily reports, using
o the RSS feeds on BSCW events containing recent events in your workspaces in RSS
format (to be read using the RSS features of current browsers or specific RSS aggrega-
tors).
In addition, you may keep up with events in your workspaces using event widgets in your per-
sonal or workspace portals (see 3.4.1 “Personal portal” on page 44) or the events desktop widget
(see 7.1 “Desktop Widgets” on page 113).
9.1 Online status display The online status display indicates the “BSCW presence” of members of a shared workspace,
i.e. their online status with regard to their activity in BSCW. The online status display is shown
below the navigation bar of the shared workspace and is activated with Options Pre-
sence Show All or Options Presence Show Online . In the first case, all members are shown
with their online status; in the second case, only those members are shown that have recently
been active in BSCW.
You can deactivate the display of your presence in BSCW to other users under Options Pre-
ferences in the section ‘General’, subsection ‘Privacy’, of the action form. In this case your
contact status is permanently set to “not available”.

166 Traceability and Social Cooperation
Figure 20: Online status display
“BSCW presence” is measured by the time span between now and the last user activity in the
BSCW Web browser window. Window activation, mouse movements or key strokes in the
window count as activity in the sense of BSCW presence. The online status is signaled by
different colours of the status icon and a corresponding tooltip:
o green / available (< 5 min): the user has been active during the last five minutes;
o grey / inactive (< 60 min): the user has not been active during the last five minutes, but
within the last hour;
o red / unavailable: the user has not been active during the last hour or may be not even
logged in to BSCW.
The time spans given correspond to the default configuration of the online status display. Your
server may be configured differently. If in doubt, ask your BSCW administrator. If a user is
active, the online status display is updated automatically.
In addition, active users may indicate to other users via contact status that they are busy or do
not want to be disturbed. They even may hide their active status completely from other users.
• Click on the icon on the right margin of the contact status line. Choose from one
of the options offered: “busy”, “don’t disturb” or “unavailable”. With the former two
options you are given the opportunity to enter a note displayed to other users when they
point to your contact status icon.
The button to change the contact status takes on the colour of the status that you have
chosen. You may change your contact status this way at any time.
Consequently, there are two more values for the contact status:
o yellow / busy: the user is logged in, but is busy and wants to be contacted in urgent cases
only.
o orange / don’t disturb: the user is logged in, but does not want to be disturbed.
In order to contact a user, you can click on any user name listed in the online status display.
This will show the user pop-up.
• Click [E-Mail], to send an e-mail message to the user.
• Click [Details] to have the user info page shown offering all contact information that
this user has entered into the personal profile.
The chances to reach a user with one of the online tools listed under ‘Contact details’
are of course better, when this user has been recently active in BSCW. See 5.1.6 “Con-
tacting contacts” on page 98 for action details.
The online status display is turned off with Options Presence Hide .

Traceability and Social Cooperation 167
Note: The online status display will also be shown in your address book giving the online status
of all users contained in your address book. An online status display will not be shown in one
of your private folders including your home folder, even if activated.
9.2 Microblogging Microblogging in BSCW supports the exchange of short text messages. The messages are dis-
played in inverse chronological order as is usual in blogs. In BSCW, also events appear in
microblogs.
Microblogs in BSCW can be focused on certain groups of users: on a single user, on the mem-
bers of a shared workspace or on the social network of a user, i.e. all users with whom a user
cooperates via BSCW. The respective microblogs contain the messages that have been posted
by the users in focus, and the events that have been caused by these users.
Microblogging on your BSCW server has to be activated by your system administrator.
9.2.1 Displaying microblogs
In folder listings of BSCW, the availability of microblogging is indicated by a tab in the lower
right-hand corner of the browser window.
• Click on the tab to open the microblogging console.
The microblog entries are displayed in chronological order, the entries created last appear at the
top. The entries may be messages or BSCW events. The entries are displayed along with all
replies they may have received. The replies are shown indented below the entry to which they
relate. The date of the last reply determines the chronological position of the entry in the micro-
blog.
You can have a microblog displayed in two different sizes.
• Click on the icon at the right-hand border of the microblog tab to have a larger part
of the microblog shown. Click on in order to return to default size.
Microblogs in BSCW may list messages coming from two different groups of users:
o In your personal objects like your home folder, your private folders or your address
book, the microblog lists all messages and events that were posted to you or caused by
users of your social network, i.e. by users with whom you share a workspace or com-
munity.
o In other folders, the microblog can also list only messages (and events) of the members
of the current workspace, which have been posted for the members of this very
workspace. The current workspace is the workspace from which the current folder in-
herits its members.
Workspace microblogs list only those messages and events that have been created after
you yourself have become member of the respective workspace.
The headline of the unfolded microblog console is either ‘Social Network’ or the name of the
current workspace, telling you which type of microblog you are viewing.
With workspace microblogs, you can switch between the display of the workspace microblog
and the general microblog of your social network.
• When the workspace microblog is shown, the button [Only Workspace] appears in red.
Click this button to have the general microblog of your social network displayed. The

168 Traceability and Social Cooperation
button [Only Workspace] is now grayed out. Clicking the button again shows the
workspace microblog.
The display of events in a microblog may be controlled using the button [Show Events] in the
upper left-hand corner of the microblog console.
• Click on [Show Events] to have the events displayed in the microblog. The button will
appear in red. Clicking the button again hides the events from the microblog.
To leave the microblog,
• click the button in the microblog tab causing the microblog console to fold in.
9.2.2 Creating and deleting microblog messages
Creating microblog messages
You create new messages by typing your message into the text field at the top of the message
listing (you may have to scroll to the top to have the text field shown). The labeling of the text
field indicates whom you address with your message (“Share with …”).
• Enter your message into the text field and click on to post your message.
The group of users to whom you post your message by default depends on your current position
in BSCW.
o In your personal objects like your home folder, your private folders or your address
book you always post to your microblogging network. Your network is either your entire
social network or the member group of a workspace of your choice.
• Click on the button [View social network] below the text field for new messages to
have the members of your current social network displayed.
You define your microblogging network in your personal preferences.
• Select Options Preferences in the top menu and go to the ‘Microblog’ section of the
action form. Check either ‘Social network’ or select a workspace whose members
are to become your network. This setting can, of course, be changed later on.
Since the social network of a user may become very large, it is possible (and often
advisable) to restrict top-level posting to the more manageable member group of a
workspace. Note that even in this case you may still receive messages from users outside
your posting network.
Note: Your BSCW administrator may have disabled the possibility of posting microblog
messages to your entire social network; in this case you have to choose a member group
as your microblogging network.
o In other folders, you post by default to the members of the current workspace, i.e. the
workspace from which the current folder inherits its members.
When you display the general microblog “Social Network” instead of the workspace
microblog here (the button [Only Workspace] is grayed out), you can use the drop-down
menu to post a message to your microblogging network.
Posting to a single user in the personal microblog on the info page of the user is treated below.

Traceability and Social Cooperation 169
User names and hash tags in microblog messages
You can also use user names (e.g. @koch) or so-called hash tags (e.g. #bscw) in your messages
in order to address a certain user or to characterize your messages. Both appear as clickable
links. Clicking on a user name shows the user pop-up, clicking on a hash tag starts a search for
messages with that tag. You can have yourself notified of new microblog messages that mention
your user name explicitly with a preceding @ (see 9.2.5 “Notification of new microblog mes-
sages” on page 170).
Note: You can use the @<user name> mechanism only to address users of your social network,
i.e. users with whom you share a workspace or community. In other cases, the @ character is
removed and no clickable link is generated.
Deleting microblog messages
You can delete only messages that you have created (and not e.g. events that appear in a micro-
blog or messages of other users).
• Click the [Delete] button below the message that you want to delete and confirm with
[OK].
This will delete the content of the message, but not any replies. As long as there are any replies
left, the empty message will continue to exist. Also, if it is a reply to a message which still has
other, older replies, it will continue to exist. Otherwise, the message will altogether go away.
Note: Deleted messages may still occur with content in local microblog desktop widgets of
other users as long as their cache has not expired. Also, deleted messages may appear in full in
e-mail notifications (periodic reports, direct e-mail) that were sent before the deletion.
9.2.3 Actions on microblog messages
The entries of a microblog show
o in the top line, the name of the user who created the message or caused the event and if
applicable the workspace of the microblog for which the message was intended or the
folder where the event took place;
o underneath the content of the message or the type of the event and the name of the object
to which the event relates, and
o finally, the date of the message or event and two buttons ‘Like’ and ‘Reply’.
Names of users and BSCW objects in microblog entries are clickable links.
• Click on the name of a user to have the respective user pop-up displayed. Here you find
the user’s organization, e-mail address and phone number (if present in the personal
profile) and also the online status of the user (small coloured dot in front of the user
name). Using the buttons [Details], [Microblog] and [E-Mail] you can invoke the info
page or the personal microblog of the user as well as a form for sending an e-mail
message to this user.
• Click on a hash tag to start a search for messages with that tag.
• Click on the name of a workspace or other object to navigate to this object.
Using the buttons below a microblog entry you can react positively to an entry, reply to it or
recommend it to other users.

170 Traceability and Social Cooperation
• Click [Like] to express your positive reaction to a message or event. The button will
change to [Unlike] to offer you the possibility to withdraw your positive reaction. The
number and names of users who like a message or event is indicated below the entry.
• Click [Reply] to enter a comment on a message or event. Enter the comment into the
text field that appears below the entry and click to post your reply. If you change
your mind and don’t want to reply, click with an empty text field and the text field
will go away.
• Click [Reply] and enter only usernames with a preceding @ into the reply field to re-
commend the message to other users. Click to have the message sent via e-mail to
the users indicated; you appear as sender.
Note: You can recommend microblog messages only to users of your social network,
i.e. users with whom you share a workspace or community.
Replies are shown indented below the microblog message to which they relate. Replies to
replies, however, are not further indented, but are shown like normal replies.
Note: The chronological position of a message with replies is determined by the date of the last
reply, not by the date of the message.
9.2.4 Searching for microblog messages
You may search for messages in microblogs. The search involves all microblogs which are
accessible to you and looks for all messages and replies containing your search terms. A hit
consists of a complete thread, i.e. a message with all its replies. You cannot search for events.
• Enter your search terms into the microblog search field in the upper right-hand corner
and click or hit the return key to start the search. You may enter several search terms
separated by blanks and also parts of terms. You may also search for certain phrases by
enclosing them in double quotes.
• The messages found are shown in the result list. If this list remains empty, then no
messages or replies were found matching your query.
• Click [Exit Search] to return to the microblog.
9.2.5 Notification of new microblog messages
You are notified of new messages by a specific display symbolized by the icon left of
the logout icon in the header section of the Web-based user interface. Clicking on this icon lists
new microblog messages since you last visited the display. The number in the display icon
indicates the number of new messages. If the display icon is not shown, then there are no new
messages.
New messages are always shown along with their complete threads. The new messages are
highlighted in orange (as in normal microblogs). You may restrict the type of messages you are
to be notified about this way.
• Choose Options Preferences from the top menu bar.
• The ‘Edit Preferences’ action form provides the section ‘Notifications’ with the sub-
sections ‘Active Event Services’, ‘Event Types Subscribed’ and ‘Microblog Messages’.
Traceability and Social Cooperation 171
• In the ‘Microblog Messages’ subsection, you may specify under ‘Display of new mes-
sages’ the message types that you want to be notified of in this display. The types avail-
able are:
o Personal messages that were directed to yourself in your personal microblog and
that are not accessible to other users.
o Replies to one of your own messages.
o Messages that explicitly mention your user name with a preceding @.
o Other messages, i.e. all messages except the personal messages.
• Here, you may also specify about which types of new microblog messages you want to
be notified using the existing e-mail event services (periodic e-mail report or direct
e-mail), if you have activated these services.
Note, that your own new messages are only listed by the notification services when they have
received a new reply or are a reply to a message which in turn received a new reply. You may,
however, specify that the periodic e-mail report is to list your own messages in any case.
More details are to be found in 3.6.4.1 “Setting the default notification options” on page 56.
9.2.6 Personal microblogs
There is also a microblog on the info page of a user. This microblog lists only messages which
have been posted by this user or have been directed to this user personally and to which you
have access. Also, events caused by this user are shown in this microblog.
• Click on a user name in a microblog, on a members’ page, in a contact list or in the
address book. This will show the user pop-up. There you click on [Microblog] to display
the info page of the user with the personal microblog.
• In this personal microblog, you can communicate something to the respective user by
creating a personal message which is intended only for this very user and which may be
accessed only by yourself and this user.
9.2.7 Microblogs as widgets and at the mobile interface
In addition to the display of microblogs in the microblog console of the folder view you can
also have microblogs displayed as widgets on your personal portal or any workspace portal, as
desktop widgets on your local computer and also at the mobile device interface of BSCW.
Microblogs as portal widgets
You create a microblog widget
• by selecting File New Widget in the top menu of your personal portal or a workspace
portal. Choose ‘Microblog’ as the type of the new widget.
The context of the new microblog widget in your personal portal is by default your entire social
network, the context of the new microblog widget in a workspace portal is this very workspace.
That means that the new microblog widget in your personal portal shows by default the
microblog of your social network and that the new microblog widget in a workspace shows by
default the microblog of this workspace. The display of events is disabled at first.
You may change the context of a microblog widget

172 Traceability and Social Cooperation
• by clicking on in the title line of the widget and enter a new context in the ‘Prefer-
ences’ section of the ‘Change Widget’ action form. This way you may also have the
personal microblog of a user displayed in a portal widget.
For creating and changing widgets in a portal cf. also 3.4.1 “Personal portal” on page 44.
In other respects, the microblog portal widget works like the microblog console.
Microblogs as desktop widgets
For the installation of the microblog desktop widget
• select GoTo Desktop Widgets in the top menu. In the following overview of available
widgets choose ‘Microblog’. The further steps of installing and starting the microblog
desktop widget are given in 7.1 “Desktop Widgets” on page 113.
The following restrictions apply to the microblog desktop widget.
o The context of the microblog is always your entire social network, focusing the micro-
blog on a workspace is not possible.
o There is no user pop-up when you click a user name. Instead, the user info page is shown
in a new browser window along with the user’s personal microblog.
In other respects, the microblog desktop widget works like the microblog console.
Microblogs at the mobile device interface
The microblog at the mobile device interface is reached via the mobile portal.
• Click the “Microblog & Events” domain button of the mobile portal to have the micro-
blog of your social network displayed, which also includes the events in your social
network by default.
Details on the mobile device interface in general are to be found in 7.2 “Mobile Device Inter-
face” on page 118.
Some restrictions apply to the microblog at the mobile device interface.
o The context of the microblog is always your entire social network, focusing the micro-
blog on a workspace or user is not possible.
o The microblog shown always includes events. Excluding the display of events is not
possible.
o There is no notification of new microblog messages. The microblog is refreshed regu-
larly.
o There is no user pop-up when you click a user name. Instead, the user info page is shown
where you may also send an e-mail message to the user concerned. There is, however,
no way to access the user’s personal microblog.
In other respects, the microblog at the mobile device interface works like the microblog console.
9.3 Event monitoring using RSS feeds BSCW implements RSS feeds of all recent BSCW events which have happened in one of your
folders. Using such an RSS feed, current browser (or other RSS feed readers) may poll BSCW
for RSS formatted event items. The BSCW RSS event feeds are meant to provide online infor-
mation on what is going on in your workspaces. They are a supplement to your periodic e-mail
report or the event widgets. More details on RSS are found in 6.3 “RSS feeds” on page 111.
Traceability and Social Cooperation 173
Usage of BSCW RSS event feeds requires the activation of the respective functionality for your
BSCW server by the system administrator.
9.3.1 BSCW RSS event feeds
BSCW implements RSS feeds which modern browsers or other RSS feed readers may poll for
RSS formatted event items. BSCW’s RSS event feeds provide all recent BSCW events which
have happened in a certain folder (and its subfolders).
BSCW will not display documents or other data via RSS. A BSCW RSS event feed is merely
meant to provide online information on what is going on in one of your workspaces. It is a
supplement to the periodic e-mail report or the event widgets.
BSCW does not send the entire history of events via RSS event feeds. The event history is
restricted to a limited time span, e.g. six hours from the moment you are calling. The exact
duration of this period is part of the BSCW server configuration. Your browser or RSS feed
reader keeps track of what BSCW events you have already read or deleted and knows how to
properly display BSCW events.
9.3.2 Using BSCW RSS event feeds
For making use of BSCW RSS event feeds to keep track of what is going on in your BSCW
workspaces,
• BSCW RSS event feeds must be activated on your BSCW server. If in doubt, ask your
system administrator about configuration details.
• In addition, you have to activate the RSS event feed service in your personal notification
options, where you can also specify about which event types you want to be notified via
RSS.
Current versions of Web browsers like Chrome, Firefox, Internet Explorer, Opera and Safari
allow to directly import and read BSCW RSS event feeds. Check your browser’s help on how
to subscribe to BSCW event feeds. Alternatively, you can use one of the numerous RSS feed
readers that can be found in the Web.
When you use an RSS feed reader to read BSCW event feeds, it depends on the configuration
of your BSCW server whether you have to authenticate with your BSCW user name and pass-
word or not. If your preferred feed reader does not support authentication, ask your BSCW
administrator to eventually disable authentication for RSS event feeds.
BSCW RSS event feed addresses
To find out the address of the BSCW RSS event feed on the events in a certain folder, you
proceed as follows:
• Set your level of proficiency to Expert via Options Level if necessary; otherwise the
following action will not be available.
• Navigate to the folder the events of which you are interested in. If you are, e.g., inter-
ested in an RSS feed on incoming tasks, open your task list.
• Choose GoTo Events to render an RSS feed of all recent BSCW events which have
happened in the current folder. As a result, your browser displays RSS formatted output.
• Your browser’s URL field will now contain the address of the BSCW RSS event feed
concerning the events of the current folder. This address has to be copied into your

174 Traceability and Social Cooperation
preferred RSS feed reader; if you do not want to view the feed in your browser, see
below.
Adding a BSCW event feed to an RSS feed reader
• Start your preferred RSS feed reader, add a new RSS feed (sometimes called ‘news
channel’) and enter the address of a BSCW RSS event feed
http://your-bscw-server/bscw/bscw.cgi/folder-id?op=rss
into the new feed’s or channel’s location field. If you do not know the server address or
id of the folder whose events you are interested in, proceed as above and copy the correct
URL from the URL field of your browser.
• Give a proper name to the BSCW event feed and tell your feed reader how often it
should poll BSCW for new events.
Depending on the configuration of your BSCW server, your RSS feed reader may ask you for
authentication when it polls BSCW for new events. Please note that not all RSS feed readers
feature authentication; such feed readers may only be used for BSCW event feeds if authen-
tication for these feeds is disabled for your BSCW server.
Note: Not all RSS feed readers look alike or work alike, some even do not work very well at
all. So some feed readers may have difficulties in displaying BSCW RSS event feeds. Check
for latest updates from time to time or just try another feed reader.

Calendars, Appointment Scheduling and Polls 175
10 Calendars, Appointment Scheduling and Polls
10.1 Calendars Your personal BSCW calendar is a personal object like your clipboard, your trash or your
address book.
• Click in the instant access bar or
• select GoTo Calendar in the top menu to access your personal calendar.
Figure 21: Month view in a group calendar
In addition to your personal calendar, that is meant for the management of your personal ap-
pointments, there are also group calendars meant for the coordination of work in a specific
workspace by the members of a that workspace.
• Select File New Group Calendar in the top menu of a workspace to create a group
calendar for that workspace. Enter name and optional tags and description of the new
group calendar. Hit [OK] to create the new group calendar.
• For obvious reasons, you may create only one group calendar per workspace.
• Name, tags and description of the group calendar may be changed using Change
Properties in the action menu of the group calendar.

176 Calendars, Appointment Scheduling and Polls
What is said about the handling of calendars in the following sections works for personal cal-
endars as well as for group calendars.
10.1.1 Creating an appointment
You may enter appointments into a BSCW calendar to organize events of different types (pri-
vate dates, group meetings, telephone conferences). An appointment is described by at least a
date and a name. If the appointment concerns a group of people, you may specify its partici-
pants. Upon request, the participants are invited automatically, and their individual status (ac-
cepted, declined) is managed along with the status of the appointment itself. Besides name, date
and eventual participants, you may also define a series of recurrences of an appointment and
have reminders sent by e-mail.
• To create a new appointment inside a calendar, select File New Appointment in the top
menu, click in the action shortcut bar or click in the day entries of a week or
month view.
• The ‘Add Appointment’ action form has four sections where to enter different kinds of
information concerning the new appointment:
Appointment,
Participants,
Recurrence,
Reminders.
• ‘Appointment’: Enter name and optionally tags and description. Further you may
specify:
• Category, Priority: Select a category and the priority of the appointment. Appoint-
ments of different categories may be displayed in different colours (see 10.1.6
“Calendar options” on page 181).
• Date/Time: Enter date and time of the appointment. Optionally you may also specify
the end of the appointment and the time zone.
• Location: enter the physical location of the appointment (if applicable).
• Status: specifies the status of an appointment (tentative, confirmed, cancelled).
Choose ‘confirmed’ if the appointment will take place regardless of whether indi-
vidual participants decline their participation. The default status ‘automatic’ means
that the status is initially set to ‘tentative’ and then is changed automatically when
all participants have confirmed or declined.
• ‘Participants’: The participants of the appointment may be chosen as you would choose
users when inviting new members to a workspace: you can choose from your address
book, enter user names directly or conduct a search for users. Tick the respective check
box if you want to have the participants invited by an e-mail message. When inviting to
an appointment of a group calendar, you may of course also invite persons who are not
members of the group calendar’s workspace. If you plan to attend to an appointment
that you are about to create, don’t forget to invite yourself: you are not a participant by
default!
• ‘Recurrence’: Here you may specify a series of recurrences of the appointment you are
about to create. This is done via rules of various types (e.g. weekly, weekly on certain
weekdays or monthly on certain days of month) that may be selected from the ‘Rule

Calendars, Appointment Scheduling and Polls 177
type’ list box. By clicking on [Add recurrence] you get a rule field that you fill in ac-
cording to your needs. In the same manner you may add more rules that generate further
recurrences of your appointment. For monthly recurrences, there are certain short nota-
tions to denote, e.g., the third day of the month (3) or the second to last Sunday of the
month (-2 Su).
If you want to exclude some dates from the recurrences of the appointment you have to
generate exceptions: choose a rule, click on [Add exception] and specify the details in
the respective exception field. You may, of course, add several exceptions this way.
Note: The selection of a rule type alone, e.g. ‘Weekly’, does not yet add a recurrence to
your appointment; you have to click on the [Add recurrence] button.
• ‘Reminders’: Here you may specify a reminder e-mail message to be sent to yourself,
the participants of the appointment or the members of your workspace. Select the per-
sons the reminder is to be sent to from the ‘Reminder type’ list box. By clicking on
[Add], you get a reminder field that you fill in with the details of the reminder (when,
how often, to whom). You may also attach a personal note to the otherwise auto-
matically generated reminder message. You may specify several reminders to be sent at
different times to different numbers of people by repeatedly hitting [Add].
• Confirm with [OK] to create the appointment according to the specifications made so
far. All properties of the appointment may also be specified and changed at a later point
in time.
10.1.2 Changing an appointment
You may change all properties of an appointment if you are the creator or manager of the ap-
pointment:
• Select Change Properties to change the appointment. The action form has the same
sections as the action form for creating an appointment.
• In the section ‘Participants’, BSCW will help you to inform the participants about the
changes via e-mail. Further, you may let them again confirm or decline their participa-
tion.
When you change the date and/or time of an appointment with participants, you should set the
status to ‘tentative’ since it has to be decided again who will attend and who will not.
When you change properties of an appointment that belongs to a series of recurrent appoint-
ments, the changes only concern the individual appointment, the other appointments of the
series remain as they are.
If you want to change the attributes of an entire series of appointments (including the recurrence
rules), you proceed as follows:
• Select Change Properties Series in the action menu of an arbitrary appointment of
the series.
• Change any properties and confirm with [OK]. Note that your changes concern all
appointments of the series unless a property has been changed individually for a certain
appointment. Further, changes of date only concern the first appointment of the series,
changes of time concern all appointments of the series with the exception of appoint-
ments that were generated by recurrence rules of the type ‘On a Single Date’.

178 Calendars, Appointment Scheduling and Polls
10.1.3 Deleting an appointment
In order to delete an appointment from the day, week or month view of a calendar,
• select Delete in the action menu of the respective appointment.
If the appointment belongs to a series of recurring appointments, only the individual appoint-
ment is deleted. This also holds for the initial appointment of a series. When you want to delete
an entire series of recurring appointments,
• select Change Properties Series in the action menu of an arbitrary appointment of
the series and delete the recurrence rules. This deletes all recurrences of the initial
appointment. If you want to also delete the initial appointment, you have to do this
individually as described above.
In the calendar views (quarter, year) you cannot delete appointments.
An appointment that you have deleted from a calendar is transferred to your trash. When you
delete an appointment from your personal calendar, it may still be accessed by the other par-
ticipants. When you delete an appointment from a group calendar, the other members of the
respective workspace lose access, but the participants of the appointment will still have access
from their personal calendars. An appointment that you have inadvertently deleted may be
restored from your trash using Undelete .
When you delete an appointment to which you are invited, you thereby decline your partici-
pation (see the action Decline in 10.1.5 “Calendar actions” on page 180); undeleting the
appointment does not take back this action.
When you destroy an appointment in your trash, the same rules apply as for other objects (also
see 4.2.5 “Ownership and ownership transfer” on page 91). If you, e.g., destroy an appointment
where you are the only owner from a group calendar, and this appointment is also present in
your personal calendar, the appointment is still accessible in your personal calendar (also for
the participants) and you remain owner – you have only destroyed the appointment entry in the
group calendar. If the appointment had not been present in your personal calendar, however, it
would have gone for good.
10.1.4 Using different views
A calendar may be viewed in different formats. Most of the view formats are selected from
the View menu. As an alternative, the appointments of a calendar may also be viewed arranged
as a timeline (see below).
• Click on the View menu and choose the mode which is appropriate for your current
needs.
• Day shows all the appointments of a specific day.
• Week shows the whole week.
• Month shows the whole month.
• Quarter shows the whole quarter of the year.
• Year shows the whole year.
• Details show a list of all appointments in the calendar.
In the ‘Details’ view you can manage appointments like you are used to in normal folders, e.g.,
sort them by category or status. In the other views you may navigate using the or arrows.

Calendars, Appointment Scheduling and Polls 179
You may highlight weekends in the calendar views by activating the option View Highlight
Weekends . In the month and week view, you may also suppress the weekends altogether by
activating the option View Skip Weekends ; days of the weekend will then only be shown if they
contain appointments. Use the section ‘Task List and Calendar’ in the action form of
Options Preferences to specify which days of the week are to count as weekend for you. Here,
you may also specify your personal preferences for the first day of the week and the time scale
in day and week views.
By default, the duration of an appointment is indicated in the day and week view of a calendar.
You may have only the beginning of an appointment shown by deactivating the
option View Show Duration .
By activating the option View Shrink Columns , the days of the week containing no appointments
will get less room in the week and month view of a calendar; consequently, there will be more
room for the display of appointments on the other days of the week.
Activating the option View Categories in Colour in day, week or month view lets you distinguish
the different categories of appointments by the font colour of the appointment name. This option
is without effect when the display of category icons is activated via View Entries .
In year and quarter view, the background colour of new appointments is yellow and that of
changed appointments is orange. Using the option View Changes in Colour you may have the
same effect in day, week and month view – but only if the display of event icons has been
deactivated via View Entries .
You may control what sort of detailed appointment information is shown in the different cal-
endar views by activating or deactivating the options of View Entries . Because there is more
room, the day view offers more options than, e.g., the month or year view. After you have
activated the option Check Box in the day, week or month view, you may use the multi-selection
toolbar for actions on several appointments at a time.
Using View Filter , you may restrict the appointments shown in the calendar to those having a
certain status by selecting the respective filter option. When the filter option ‘Invited’ is active,
e.g., only appointments to which you have been invited as participant are shown.
You may activate or deactivate several viewing options at a time by selecting View Customize .
Scope of calendar viewing options
As with folders, you have the choice of having the viewing options set and stored individually
for each calendar (personal and group calendar) or of having the viewing options of one cal-
endar applied to all other calendars. This option is set in your personal preferences:
• Click Options Preferences in the top menu bar and go to the ‘Presentation’ section of
the action form.
• Check the option Remember each folder’s view options if each calendar’s viewing op-
tions are to be treated individually; otherwise, the viewing options set for one calendar
also count for each and every other calendar.
If the Remember option is active, you are still able to transfer viewing options to other folders
or containers.
• Choose View Apply to All Similar to set the viewing options of the current calendar also
for all other calendars.
When you have changed the viewing options of the current folder, you may still revert to the
viewing options transferred to the current folder via Apply to All Similar by

180 Calendars, Appointment Scheduling and Polls
• choosing View Reset .
If the Remember option is inactive, viewing options set for one calendar are also valid for all
other calendars. You may exclude certain calendars from taking over the viewing options by
• checking View Individual for a particular calendar. You may then set the viewing
options for this calendar different from the viewing options from other calendars. The
viewing options for individual calendars are protected from being overridden by the
settings of other calendars.
When the Individual option of a folder or container is deactivated, the viewing options are reset
to the viewing options of the non-individualized calendars.
If you want to apply the viewing options of an individualized calendar to other calendars,
• choose View Apply to All Similar . Other individual folders will remain untouched by this
action.
Viewing appointments as a timeline
You may view the appointments of a calendar also arranged as a timeline where each appoint-
ment is placed at the position corresponding to its start time. If an end time is given, the temporal
extension of the appointment is represented as a bar. The timeline view is shown in a separate
browser window.
• Select GoTo Timeline in the top menu of a calendar to generate a timeline view of the
appointments of the calendar.
• Further details are given in 12.1.10 “Viewing tasks and projects as a timeline” on page
224.
10.1.5 Calendar actions
The GoTo top menu of a calendar offers two additional actions Today and Date that move the
calendar view to the current date or to a date that you specify. Note that date specification
depends on the current calendar viewing options: when in month view, you may only select a
specific month.
If you are working on a Windows platform locally,
• you can synchronize all appointments of a BSCW calendar with the appointments in an
Outlook calendar using File Synchronize in the top menu (see 13.8 “Outlook synchroni-
zation” on page 243 for details).
Further you may export calendar data as PDF file for printing
• by selecting File Send to File (PDF) in the top menu. You may choose from monthly,
weekly and list view and set the period of time for which you want the calendar dat to
be printed.
The action menu of an appointment contains the actions you may use to handle your appoint-
ments. The following actions are specific actions for appointments.
• Send to iCal exports the appointment data in a format understood by other calendar
tools, e.g., Outlook and OpenOffice/LibreOffice. An according file is sent to your Web
browser for import of the appointment by such calendar tools. You may also export all
appointments of a calendar using File Send to iCal in the top menu.

Calendars, Appointment Scheduling and Polls 181
• Appointment data in the ‘iCalendar’ format (MIME type text/calendar, Windows file
extension *.ics) can also be imported to a BSCW calendar using File Import (iCalen-
dar) in the top menu. Alternatively, you can upload one or several .ics files via drag &
drop using the drag & drop uploader.
• Confirm confirms your participation in the appointment (action available when you
are invited as participant and have not yet confirmed).
• Decline declines your participation in the appointment (action available when you
are invited as participant and have not yet declined).
• Cancel Appointment cancels the complete appointment, i.e. the status is set to ‘can-
celled’, all participants are notified by e-mail about the cancellation and eventual re-
minders will no longer be sent. Cancellation of an appointment deletes the appointment
from the calendar where the action was carried out. By default, this action is only
possible for managers.
• Change Properties lets you edit the diverse properties of an appointment.
• Attach lets you attach a document, URL or note to an appointment. Attachments are
indicated in the day and month view by an icon if the according option has been
activated via View Entries Attachments . Click on this icon to access the attachments
folder. Document and URL attachments to appointments are handled like attachments
to notes. Note attachments are added to the attachments folder as stand-alone notes.
• Link to Calendar adds a link to an appointment of a group calendar to your personal
calendar.
The rest of the actions in the appointment action menu consists of generic actions showing the
same behaviour for appointments as they do for other objects.
10.1.6 Calendar options
In the section ‘Calendar / Task List’ of the Options Preferences action form you may adjust
several calendar settings concerning the arrangement of your calendars and the automatic trans-
fer and the automatic removal of appointments. You may specify
• the first day of the week,
• which days count as working days for you and
• the time scale for appointments in the day and week view.
Further you may specify, whether
• appointments that you create in a group calendar are automatically entered into your
personal calendar (also if you do not participate!),
• appointments from whose participant list you are removed are automatically deleted
from your personal calendar, and whether
• your participation in appointments that you delete from your personal calendar is auto-
matically declined.
Using Options This Calendar in the top menu of a group calendar you may specify, whether
appointments to which you are invited in this calendar are automatically entered into your
personal calendar.

182 Calendars, Appointment Scheduling and Polls
10.2 Appointment scheduling An appointment scheduling helps in finding an agreeable date for a group appointment. The
organizer of such a group appointment creates an appointment scheduling specifying possible
dates and participants of the appointment. Participants may be registered BSCW users as well
as other persons. The participants are notified via e-mail and may then vote on the dates propos-
ed as long as the voting period has not expired. Further participants may be suggested for the
appointment. The organizer determines the final date of the appointment, depending on the
outcome of the voting. All participants are notified about the final date, which may then be
transferred to a BSCW calendar or exported to other calendar systems.
Figure 22: Appointment scheduling
10.2.1 Creating and changing appointment schedulings
You create an appointment scheduling as follows:
• Select File New Appointment Scheduling in the top menu.
• In the ‘General’ section of the ‘New Appointment Scheduling’ action form you specify
the following details of the appointment scheduling.
• Name and optional heading, tags and description. The heading appears at the top of
the voting form. If missing, the name is taken as heading.
• Suggested dates: Select the dates for the appointment. Use the drop-down menus or
click on the calendar icon to activate the calendar tool. Time fields may be left open.
You may add a remark to your dates, e.g. on the place or duration of the proposed
appointment, which will also be shown to the participants. Use the [Add date] button
to add more dates if three are not enough.

Calendars, Appointment Scheduling and Polls 183
Note: As soon as someone has voted on the appointment scheduling, you cannot change
the dates any more, unless you reset the appointment scheduling. Resetting, however,
loses all participant votes so far.
• Time frame and reminder: Enter start and end of the voting period. Voting on the
suggested dates is only possible within the time frame given. Specify when you want
to be reminded of the end of the voting.
• Details of participation and notification: Specify whether you want to be notified
of each voting. You may also allow participants to suggest further participants.
Specify whether participants are allowed to vote on a date with “maybe” (in addition
to the simple yes-no alternative).
• In the section ‘Participants’ you specify the participants of the appointment and details
of their notification.
• Participants: Select the participants of the appointment (as you would select mem-
bers of a workspace). You may enter e-mail addresses of persons who are not reg-
istered users of your BSCW server; in the case of appointment scheduling, these
persons can take part without registering as BSCW users. When you create an ap-
pointment scheduling inside a shared workspace, the members of the workspace are
preselected as participants by default.
• E-Mail language: Choose the language of the invitation e-mail.
• You may add a personal message to the participants: Enter an optional message to
be added to the otherwise automatically generated invitation e-mail to be sent to all
participants.
• Hit [OK] to generate a preview of the voting form. Here, you have the possibility to
change any details of the appointment scheduling or to start the voting process im-
mediately: click on [Change appointment scheduling] or on [Start appointment sched-
uling now]. Click on [Go back] if you are satisfied with the preview and the voting is to
begin at the start date given.
• If you have started the appointment scheduling in the previous step and are a participant
yourself, you will be asked next to vote on the dates suggested, which is explained
below. At this point, you may also edit the participant list by clicking on [Edit
participants].
You as the organizer can change most details of the appointment scheduling. Once a participant
has voted, however, you cannot change the dates and the voting scheme (‘yes-no’ or ‘yes-no-
maybe’), unless you reset the appointment scheduling.
• Select Change Properties in the action menu of the appointment scheduling and
change name, description, voting period, notification details, or participants. Add an
optional message to be included in notification e-mails to participants of a running ap-
pointment scheduling.
• Hit [OK] for the changes to become valid. All participants of a running appointment
scheduling will be notified about the changes, new participants will be invited to vote
and participants you have removed from the list will be informed.
You may start an appointment scheduling which has not yet begun at any time.
• Select Open in the action menu of the appointment scheduling or click on its entry
in the folder listing. In the action form, click on [Start appointment scheduling now].

184 Calendars, Appointment Scheduling and Polls
If a participant suggests new participants and this has to be confirmed by you (depends on your
BSCW server configuration), you will receive an e-mail containing a link that takes you directly
to the action form for inviting the new (and possibly other) participants.
• The ‘Participants’ action form shows the present participants and allows to add new
participants and to remove existing participants.
• Add an optional message to be included to invitations of new participants and to e-mails
to participants removed. Click [OK] when you are done.
You as the organizer may send an e-mail message to the participants of a running appointment
scheduling.
• Select Send to Participants in the action menu of the appointment scheduling, enter
your message and hit [OK]. You may send the message to all participants, all particip-
ants having already voted or not voted yet, or select certain participants to receive your
message.
Note that not only the organizer, i.e. creator of an appointment scheduling, but also the manager
of a workspace that contains the appointment scheduling can change an appointment scheduling
or send messages to the participants.
The voting periods of appointment schedulings may also be viewed arranged as a timeline.
• Select GoTo Timeline in the top menu of a folder to generate a timeline view of all
appointment schedulings contained in the folder.
• Further details are given in 12.1.10 “Viewing tasks and projects as a timeline” on page
224.
10.2.2 Voting on the suggested dates
When the start time of an appointment scheduling actually has been reached (or the appointment
scheduling has been started manually as described above), all participants are notified via e-mail
and are invited to vote on the suggested dates. This e-mail message includes a personalized link
that allows you as a participant to access the appointment scheduling in order to vote, change a
vote or have a look at the voting results so far. Do not forward this link to other persons (they
could use this link only to participate under your name), but rather use the second link in the
e-mail (if present) to suggest other persons for participation in the appointment. If you are a
member of the workspace containing the appointment scheduling object you may simply open
the appointment scheduling to vote.
You vote on an appointment scheduling
• by clicking on the “To appointment scheduling” link in the invitation e-mail or by se-
lecting Open in the action menu of the appointment scheduling (the latter only if you
are a member of the workspace containing the appointment scheduling object).
• The ‘Appointment Scheduling’ action form presents the voting as a table: the suggested
dates are the columns, the participants and their votes are the rows. Vote on the dates
suggested by pressing the appropriate radio buttons and clicking [Vote]. If you have
voted already and want to change your opinion, click on the edit icon next to your
name.
• The optional comments and the degree of acceptance that a date has received so far are
shown as tooltips of the info icon of a date.

Calendars, Appointment Scheduling and Polls 185
• The ‘Current status’ line shows the accumulated status of the dates suggested for the
appointment:
o Green: All participants have voted with ‘yes’.
o Orange: No participant has voted with ‘no’, at least one participant has voted with
‘maybe’.
o Red: At least one participant has voted with ‘no’.
Your vote will be reflected immediately in the current status of a date: if you vote with
‘no’, e.g., the current status will switch to red.
• You may also suggest other participants by clicking the respective button, if this possi-
bility is foreseen for this appointment scheduling (see next section).
• Click on [Go back] to return to the folder listing.
You may change your vote or have a look at the other votes using the same link in the invitation
e-mail, so do not delete this e-mail. Voting on the appointment scheduling is possible as long
as the voting period has not expired or the organizer has not closed the voting earlier (about
which you will be notified via e-mail).
If you vote on an appointment scheduling as organizer, the current status of the appointment
scheduling is indicated in the ‘Final date’ line and you are offered to fix the final date by
selecting one of the dates (see below). You may also edit the participant list by clicking [Edit
participants] as explained above.
10.2.3 Suggesting other persons for participation
The organizer of an appointment scheduling may allow participants to suggest other particip-
ants. If this is the case, the invitation e-mail for an appointment scheduling also contains a link
for suggesting other persons for participating in the appointment, e.g. in case you yourself do
not want to participate.
You suggest other persons for participation in the appointment
• by clicking the “Suggest participants” link of the invitation e-mail or by opening the
appointment scheduling and clicking the [Suggest participants] button in the appoint-
ment scheduling action form. If you are a member of the workspace that contains the
appointment scheduling, you can also suggest new participants by selecting Suggest
Participants in the action menu of the appointment scheduling.
• In the ‘Suggest Participants’ action form you may select additional participants of the
appointment (as you would select members of a workspace). You may also enter e-mail
addresses of persons who are not registered users of your BSCW server; in the case of
appointment scheduling, these persons can take part without registering as BSCW users.
• Click [OK] to either have the new participants directly invited or have the organizer
informed about your suggestion who will then decide about inviting the persons you
have suggested.
Depending on the configuration of your BSCW server and the specification of the organizer of
the appointment, the new participants suggested by you are either directly invited or have to be
confirmed by the organizer. In the latter case, the organizer will receive an e-mail to that end.
The organizer can also
• select Revise Suggestions in the action menu of the appointment scheduling.

186 Calendars, Appointment Scheduling and Polls
• In the action form ‘Invite Suggested or New Participants’, the persons suggested for
participation are already entered under ‘Suggested persons’.
• Hit [OK] to confirm participation. At this point, you may also add further participants.
10.2.4 Fixing a final date
Organizers of an appointment scheduling can inform themselves about the current status of the
voting by opening the appointment scheduling (either by clicking on the appointment sched-
uling entry in the folder listing or by selecting Open in the action menu of the appointment
scheduling). Organizers may also have themselves reminded about the approaching end of the
voting period via e-mail. Such a reminder e-mail also contains a link leading to the appointment
scheduling.
The ‘Final date’ line of the appointment scheduling form shows the accumulated status of the
dates suggested for the appointment:
o Green: All participants have voted with ‘yes’.
o Orange: No participant has voted with ‘no’, at least one participant has voted with
‘maybe’.
o Red: At least one participant has voted with ‘no’.
As an organizer, you are offered two extra buttons in this line. These buttons allow fixing a
final date for the appointment or closing the voting without fixing a date, e.g. because it is
obvious that no date can be found which is agreeable for all participants.
• Select the final date by pressing the respective radio button and click on [Fix] to fix a
date as final thereby also closing the appointment scheduling to voting.
• In the ‘Close Appointment Scheduling’ form you may add a note to the otherwise auto-
mated e-mail announcing the final date to the participants. You can also transfer the
final date to your personal calendar or the group calendar of the workspace that contains
the appointment scheduling (if such a group calendar exists).
• Click on [Close without date] to close the appointment scheduling for voting without
fixing a date for the appointment. In the ‘Close Appointment Scheduling’ form you may
again add a note to the otherwise automated e-mail announcing the closing of the ap-
pointment scheduling to the participants.
All participants will be notified via e-mail about the final date of the appointment or the closing
of the appointment scheduling. If a final date has been fixed, this e-mail contains a link that
allows the participants to import the final date in iCal format into their BSCW or other
calendars.
Note that not only the organizer, i.e. creator of an appointment scheduling, but also the manager
of a workspace that contains the appointment scheduling can fix a final date for the appoint-
ment.
10.2.5 Resetting appointment schedulings
When you want to change the dates or the voting scheme (‘yes-no’ or ‘yes-no-maybe’) of an
appointment scheduling, after it has been voted on, you have to reset the appointment sched-
uling to do so. This, however, loses all votes so far.
• Choose Reset in the action menu of the appointment scheduling and acknowledge
the warning with [OK].
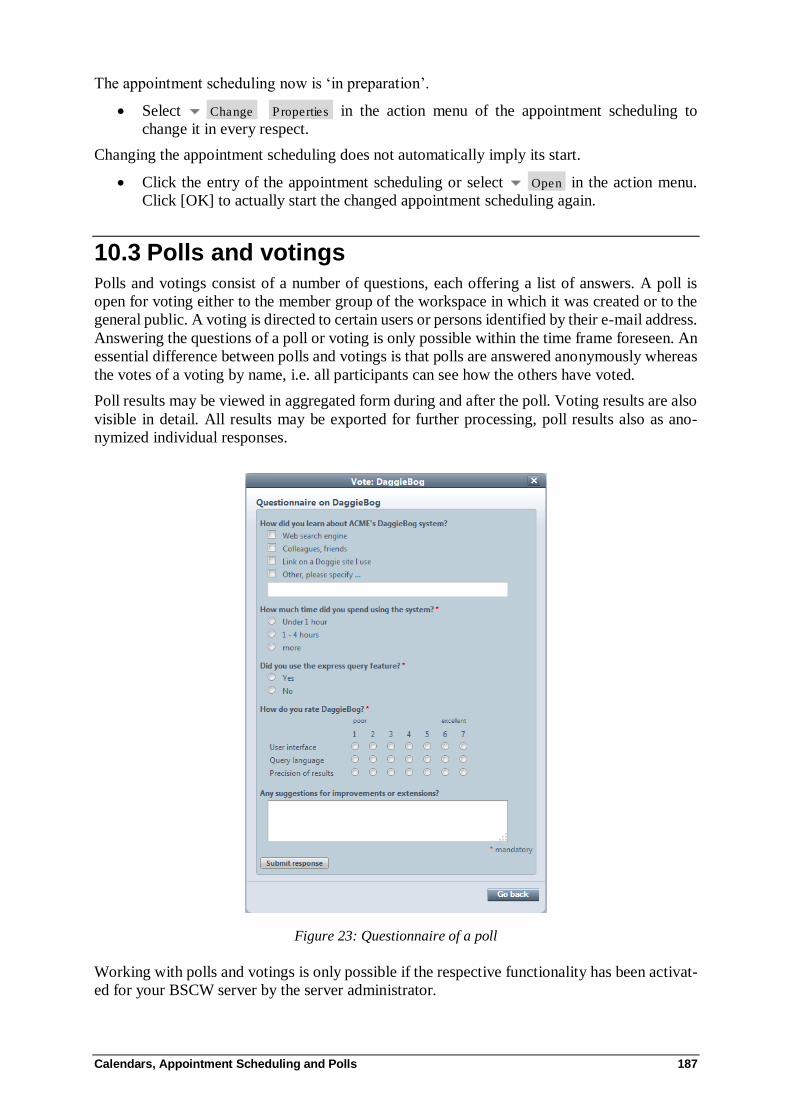
Calendars, Appointment Scheduling and Polls 187
The appointment scheduling now is ‘in preparation’.
• Select Change Properties in the action menu of the appointment scheduling to
change it in every respect.
Changing the appointment scheduling does not automatically imply its start.
• Click the entry of the appointment scheduling or select Open in the action menu.
Click [OK] to actually start the changed appointment scheduling again.
10.3 Polls and votings Polls and votings consist of a number of questions, each offering a list of answers. A poll is
open for voting either to the member group of the workspace in which it was created or to the
general public. A voting is directed to certain users or persons identified by their e-mail address.
Answering the questions of a poll or voting is only possible within the time frame foreseen. An
essential difference between polls and votings is that polls are answered anonymously whereas
the votes of a voting by name, i.e. all participants can see how the others have voted.
Poll results may be viewed in aggregated form during and after the poll. Voting results are also
visible in detail. All results may be exported for further processing, poll results also as ano-
nymized individual responses.
Figure 23: Questionnaire of a poll
Working with polls and votings is only possible if the respective functionality has been activat-
ed for your BSCW server by the server administrator.

188 Calendars, Appointment Scheduling and Polls
10.3.1 Creating polls
To create a new poll in the current folder you proceed as follows.
• Select File New Poll in the top menu. The action form ‘Add Poll’ has two sections
where you specify the new poll
• In the section ‘General’ you enter name, heading, optional tags and description of the
new poll. The heading is used when presenting the poll to participants, by default the
name of the poll is taken as heading.
Participation in the poll is only possible during the time frame of the poll start time and
end time of the voting period. Please note that checking boxes ‘from now’ or ‘forever’
will override any dates entered.
Under access you specify whether the poll is to be a public poll and whether and when
poll results are accessible to participants.
Public polls are not only directed to the members of the workspace containing the poll,
but to the general public. Check this option if the poll is to be anonymously accessible.
Note that anonymous voters must use the public link
http://your-bscw-server/pub/bscw.cgi/poll-id
where poll-id is the object id of the poll – to be found as the last number of the URL
shown in the address bar of your browser when you open the poll.
Several options govern the presentation of the poll:
• You may have the questions numbered, starting from number 1.
• You may specify a link (URL) to a style sheet to override the default BSCW styles
for your poll. By inventing your own styles you may change the appearance of the
poll presentation, e.g. colours or fonts used in the questionnaire. You will find the
default BSCW styles at
http://your-bscw-server/bscw_resources/static/styles/bscw/poll.css
Changing the default style sheet requires a certain experience with style sheets.
• Instead of presenting the poll in the default BSCW view, you may present the poll
embedded into a Web page of your choice, e.g. to add some background information
about the purpose of the poll or some motivation to participate in the poll.
You may specify the width of the questionnaire in which it is to appear in the exter-
nal page.
Important: The external Web page must include the insertion point for the poll as the
pattern #poll#. The external Web page is only used for presentation, not for participation
in the poll. Participants will continue to use the BSCW poll object to participate in the
poll or the link given above for public polls.
• In section ‘Questions’ you may enter the questions of your poll. Select a type of question
and click [Add] check. At present, you can select from seven types:
o Single Choice – choice of several answers from which the voter may select exactly
one.
o Multiple Choice – choice of several answers from which the voter may select one
or more.
o Yes/No – choice of predefined answers ‘Yes’ or ‘No’.
o Yes/No/Uncertain – choice of predefined answers ‘Yes’, ‘No’ or ‘Uncertain’.

Calendars, Appointment Scheduling and Polls 189
o Rating – choice of predefined ratings on a number of predefined subjects with a
variable range of possible ratings.
o Text – free text answer.
o Multiple Dates – choice of several dates for an appointment from up to eight
proposed dates. Participants may select one or more dates.
For single and multiple-choice questions you predefine answers, for rating questions
you predefine the subjects to be rated. Enter one answer or subject per line into the
‘Answers’ or ‘Subjects’ text fields. Check ‘Response is mandatory’ to force voters to
answer your question. You may allow for additional Other and Comment fields for some
types of questions, so that participants may answer the question other than with one of
your predefined answers and may add further comments to their answer. For rating
questions, you specify the range of rating values and their labels.
In addition to the actual questions you can add subtitles and explanations. Subtitles serve
the purpose to structure a larger questionnaire; explanations are to explain the meaning
of a question in more detail. You add subtitles and explanations as “questions” of the
respective type.
o Subtitle
o Explanation
Continue to enter new questions until your questionnaire is complete. Questions already
entered may be removed using . You may change the order of the questions by
moving the questions up and down using or .
• Confirm with [OK] to create the new poll.
10.3.2 Creating votings
In order to create a new voting in the current workspace, you proceed as follows.
• Select File New Voting in the top menu. The action form ‘Add Voting’ has three sec-
tions where you specify the new voting. The action form is to a large extent very similar
to the action form for creating new polls. The section ‘Participants’ is added for votings
and some options in section ‘General’ are different.
• The section ‘General’ is structured like the corresponding section for the creation of
polls with the following differences:
• Start and end of the voting period have to be specified by exact dates, there are no
never ending votings. The organizer of a voting, i.e. its creator, may choose to be
reminded of the approaching end of the voting period.
• There are no public votings. The participants of a voting are determined in section
‘Participants’.
• In section ‘Participants’ you enter the participants of the voting. The members of the
workspace in which you create the voting are preselected as participants. You may now
add further participants by entering their user names or e-mail addresses (as you would
invite members to a workspace). You may also remove participants already entered,
thereby excluding them from the voting.
Note that participants of a voting do not automatically become members of the contain-
ing workspace, but are invited via e-mail and access the voting by means of personalized

190 Calendars, Appointment Scheduling and Polls
links. You may also enter e-mail addresses of persons as participants who are not regis-
tered users of your BSCW server. Such persons can participate in the voting without
becoming registered users.
You can specify the language of the automatically generated invitation e-mail and add
an optional personal comment.
• In the section ‘Questions’ you enter the questions to be voted on in exact the same way
as you would do for a poll (see previous section).
• Confirm with [OK] to create the new voting.
10.3.3 Changing polls and votings
After you have created a poll or voting, you may change all your specifications – with two
exceptions:
o Questions may only be changed as long as there are no responses yet.
o The start time of a voting may not be changed after invitation e-mails have been sent.
In order to change a poll or voting
• select Change Properties in the action menu of the poll or voting. The action forms
‘Change Poll’ or ‘Change Voting’ let you change the poll or voting. The action forms
are structured exactly like the corresponding forms for creating polls or votings.
• If there are already responses to a poll or voting, you cannot change the questions any-
more and the section ‘Questions’ misses from the action form. With an ongoing voting,
changes of the start date are ignored. All other specifications, however, may be changed
freely, also with ongoing polls or votings. This way you have, e.g., the possibility to end
a poll that has been specified to run ‘forever’. If you change the end date of a voting,
you can add a personal note that is included in the notification of the participants.
• If you remove participants from an ongoing voting, you may add a personal comment
to the otherwise automated e-mail message to removed participants.
As an organizer, you may start a voting which has not yet begun at any time.
• Select Open in the action menu of the voting or click on its entry in the folder listing.
In the action form, click on [Start voting now].
In case you want to change the questions of an ongoing poll or voting that has already drawn
responses, you only have the possibility to reset the poll or voting and change the questions
afterwards. You lose, however, the responses already received. If you know beforehand that
you cannot finish the definition of all the questions of your poll or voting in one go during
creation, you should make sure that the poll or voting does not start until you are done with
your questions.
Polls and votings cannot be viewed before the poll or voting has started. If you want to have a
preview of your questionnaire before the poll or voting actually starts, create the poll or voting
in one of your private folders, enter ‘from now’ or the corresponding date as the start and view
the questionnaire by opening the poll or voting object.
• Select Open in the action menu of the poll or voting or click on the poll or voting
entry in the folder listing. This will show the questionnaire. Hit [Go back] when you
have finished viewing. You shouldn’t submit a response now.
When you are satisfied, you can enter the intended start time and transfer the poll via cut and
paste to the workspace where you want the poll to take place. Note that such a transfer of a

Calendars, Appointment Scheduling and Polls 191
voting will not automatically enter the members of the destination workspace as participants,
you have to do that yourself.
Note: While by default every member of a workspace may create new polls, only the creator of
a poll and the manager of the workspace containing the poll may edit the poll.
10.3.4 Viewing polls and votings as a timeline
You may view the voting periods of polls or votings arranged as a timeline. The voting periods
of all polls or votings contained in a folder are represented as bars on a time axis. The timeline
view is shown in a separate browser window.
• Select GoTo Timeline in the top menu of a folder to generate a timeline view of all
polls or votings contained in the folder.
• Further details are given in 12.1.10 “Viewing tasks and projects as a timeline” on page
224.
10.3.5 Responding to polls and votings
As the creator of a poll, you may want to announce the start of voting by including the link to
the poll in a Web page or by distributing it via e-mail, especially when it is a public poll. In this
case, you should publish the public link to the poll for anonymous voters, i.e.
http://your-bscw-server/pub/bscw.cgi/poll-id
For authenticated voters with access to the workspace containing the poll, you should advise
the use of the ‘authenticated’ access to the poll, i.e. the link
http://your-bscw-server/bscw/bscw.cgi/poll-id
where poll-id is the object id of the poll – to be found as the last number of the URL shown in
the address field of your browser when you open the poll. If in doubt, ask your BSCW ad-
ministrator about the correct links.
With a voting, start and change of the voting period are automatically announced to the partic-
ipants via e-mail, you need not to become active in this respect.
You as the organizer of a voting may send an e-mail message to the participants.
• Select Send to Participants in the action menu of the voting, enter your message and
hit [OK]. You may send the message to all participants, all participants having already
voted or not voted yet, or select certain participants to receive your message.
Note that not only the organizer, i.e. creator of a voting, but also the manager of a workspace
that contains the voting can send messages to the participants.
In order to respond to a poll, you either click on the link published as described above. When
you want to respond to a voting, you click on the link which you received via e-mail. If you
have access to the workspace of the poll or voting you
• choose Open in the action menu of the poll or voting or click on the respective entry
in the folder listing. This will show the questionnaire.
• Fill in the questionnaire and hit [Submit response] when you are finished. All questions
which are marked with an asterisk (*) as mandatory have to be answered, otherwise the
response will not be not accepted.
Answers to a poll will then be final and cannot be revised any more. With votings, you
can still change your mind (see below).

192 Calendars, Appointment Scheduling and Polls
• At last, the results so far received will be shown if the poll or voting is configured so
that participants may access the results.
Responding to a poll or voting is only possible if its time frame has started and not yet expired.
Each potential participant in a poll may only vote once. In case of a public poll this is achieved
by setting a browser cookie. Participants of a voting can change their mind:
• Open the voting and click [Change your mind] at the top of the questionnaire and vote
again.
10.3.6 Resetting polls and votings
You may reset an ongoing poll or voting at any time. After a reset, however, all votes so far
will be removed. All potential participants may respond again. To reset a poll or voting
• choose Reset in the action menu of the poll or voting. Read the warning and confirm
with [OK].
• The start of the poll or voting will be set at the time of reset.
• The participants of a voting will be informed of the reset via e-mail.
After a reset, you can change the questions of a poll or voting, but only as long as there are no
new responses. If you plan a thorough revision of your questions, you should move the new
start of the poll or voting further into the future.
10.3.7 Viewing and exporting results of a poll or voting
By default, the creator of a poll or voting and the manager of the workspace containing the poll
or voting may view the current results by
• choosing Show Responses from the action menu of the poll or voting. This will show
a graphical representation of the responses so far received.
If a poll or voting is configured accordingly, also the participants may view the poll results by
opening the poll or voting: by clicking on the entry in the folder listing, via the action menu or
by clicking on the link received via e-mail (voting) or otherwise published (public poll). If a
participant has already responded, this will show the poll results. If a participant has not yet
responded and is entitled to view the current results, opening the poll or voting will present the
questionnaire; clicking on [Show responses up to now...] at the end of the questionnaire will
present the results.
In addition to viewing the results in a graphical representation, you may also export them as a
comma-separated file in the .csv file format. This allows you to store the results for further
processing with an appropriate application, e.g. Microsoft Excel. The results of votings are
exported as single responses along with user name or e-mail address of the voter. The results
of polls may be exported as anonymized single responses or in aggregated form. Exporting
results is by default reserved for the creator and the managers of the workspace containing the
poll or voting.
• Choose Send to File (Responses) in the action menu of a poll or voting to export the
results as single responses in .csv format.
• Choose Send to File (Results) in the action menu of a poll to export the results in
aggregated form in .csv format.

Communities 193
11 Communities
Communities in BSCW allow workspace access for large groups of users equipped with equal
access rights keeping performance independent of community size; communities also offer self-
organized platforms for users with similar interests.
You would choose a community in BSCW for the following example cases.
o You plan to set up a platform for all hobby astronomers on your BSCW server: a work-
space which is announced to all users of your BSCW server, where every user may get
access to, and may read and upload relevant documents and links (“Astronomers’
Platform”).
o You would like to create a workspace for all 250 members of a department in your
organization into which you and some other managers insert documents, links or entire
subfolders that represent useful information (“Bulletin Board”).
o You manage a workspace that over the years has acquired a very large number of mem-
bers, and where server response time has become unsatisfactory even for simple
operations (“Crowded Workspace”).
A community is a group of users, its members. Every community is member of exactly one
workspace, the community workspace, also called the associated workspace of the community.
A workspace can have at most one community as member, i.e. there is a one-to-one correspon-
dence between a community and its associated workspace. The community members have
access to the community workspace in a single role, the community role (not to be confused
with the role community members have with respect to the community itself, which is Member
– redefined for communities with minimal rights). The managers of the community workspace
are also the managers of the community.
Note that workspace access via communities in a single role by a large number of community
members gives the performance advantage over shared workspace access by the same number
of members, where every member may have a different role with different access rights. Com-
munities are treated as a single user in many contexts, which simplifies the calculation of access
rights enormously.
Communities come in three flavours as far as their admission policy is concerned: open, closed
and hidden.
o Open communities are announced to all registered users of your BSCW server, and users
may become members of the community on their own by joining it.
o Closed communities are announced to all registered users of your BSCW server, but
users may not become members of the community on their own, they have to ask the
community manager(s) for admission.
o Hidden communities are not announced to the users of your BSCW server. A user can
only become a member of a hidden community by invitation of a community manager.

194 Communities
Open and closed communities may be invited to other communities, hidden communities may
not. The same goes for the member groups of community workspaces with respect to the invi-
tation to other workspaces.
11.1 Becoming a community member To find out about the non-hidden communities on your BSCW server,
• select GoTo Other Communities in the top menu, which presents a list of all those com-
munities where you are not a member. You can tell by its icon whether a community is
open ( ) or closed ( ).
You may now become a member of such a community by
• selecting Join Community in the action menu of an open community, which imme-
diately makes you a member, or by
• selecting Request Admission in the action menu of a closed community to ask the
community manager(s) for admission to the community. This leads to an e-mail form
where you may apply for community membership.
With hidden communities, you may only become member through explicit invitation by the
community manager(s).
After you have become a member, the community will disappear from the ‘Other Communities’
folder. The associated workspace will instead appear in your home folder and in the folder
‘Communities of your-user-name’ which contains the community workspaces of all
communities where you are a member. To access this folder
• select GoTo My Communities in the top menu.
• Alternatively, you can click in the instant access bar.
The folder ‘Communities of your-user-name’ additionally has the entry ‘public’, containing all
folders and discussion forums that have been made publicly available.
Leaving a community is only possible for community members in open communities: delete
the respective community workspace in the folder ‘Communities of your-user-name’. With
closed and hidden communities, you have to ask a community manager to remove you as a
member from the community. You cannot delete community workspaces of closed and hidden
communities from your communities’ listing yourself.
11.2 Creating a community You may create a new community in many different ways. We illustrate some of the possi-
bilities for our three example cases above. We begin with the “Astronomers’ Platform”. When
you start from scratch, you proceed as follows.
• Select File New Community in the top menu of your home folder; this is the only place
where you can create new communities this way. The ‘New Community’ action form
has several sections.
• In the ‘General’ section you enter the name of the new community (e.g. ‘Hobby Astro-
nomers’) and optionally tags and a description. The tags will also be displayed in the
‘Other Communities’ folder to other users. The associated community workspace will
be created along with the new community. This workspace, which is initially empty,

Communities 195
will appear in your home folder and you will be its owner and manager. It will carry the
same name, description and tags as the new community.
• Next you choose the ‘Admission policy’ for the new community: open, closed or hid-
den. You should only create a non-hidden community if you are really sure that your
community is also of interest to other users of your BSCW server. Non-hidden com-
munities will appear in the ‘Other Communities’ listing of each and every registered
user of your BSCW server. In our case, we choose the open community since we want
to attract users to join our community of hobby astronomers. The admission policy of a
community may be changed later on by a community manager. So, if you feel that
enough members have joined your community you might change its admission policy
to ‘closed’.
• Finally, you select the ‘Role of community members’, i.e. the community role in which
all community members access the community workspace. You should select a role that
is appropriate for the purpose of your community. E.g., if you want community mem-
bers only to be able to read the workspace contents you should select Restricted member,
if you want to allow community members to contribute to the workspace contents you
should select Associate member, which also includes change actions (the default
offered). Note that selection of the role Member allows community members to remove
other workspace members including the community itself which is usually not what you
want. In our case, we would select the default Associate member since we expect future
community members to contribute to the community workspace, but not to change
community workspace membership. The community role can be changed later on by a
community manager.
• In the section ‘Members’ you can select the initial members of the new community. If
you already know some hobby astronomers who are users of your BSCW server you
could create your community starting with these community members. You may use the
same mechanisms for selecting the new community members as if you were inviting
new members to a workspace – with the difference that you cannot invite member
groups of other workspaces (also see 11.5 “Hierarchical organization of communities”
on page 198 and 11.6 “Inviting communities to member groups and vice versa” on page
200). You yourself as creator and manager of the community are not automatically one
of its members. But you are a member of the new community workspace in the role of
manager.
• The section ‘Automatic Versioning’ concerns the automatic versioning policy of the
new community workspace.
The new community workspace ‘Hobby Astronomers’ will appear in your home folder, but is
not listed under ‘Communities of your-user-name’ as long as you are not a member.
You would normally proceed to generate a structure and contents for the workspace. After-
wards, you would wait for other users to join your community. You could also directly invite
more members to your community.
• Click the icon shown in the ‘Share’ column of the community workspace entry to
view the members of the community workspace. This icon generally indicates that a
workspace has a community as member.
• Select Access Invite Member in the action menu of the community.
Next, we consider our “Bulletin Board” example case. Let’s assume that the workspace repre-
senting the initial contents of the departmental bulletin board already exists with yourself as
manager and some other users as members that are also to provide input. You now add to this

196 Communities
workspace a community of all members of your department (by default, you have to be a man-
ager of the workspace to do this).
• Select Access Add Community in the action menu of the workspace.
• The new community that will become a member of the workspace will carry the same
name as the workspace.
• In the ‘Add Community’ form you choose the ‘Admission policy and visibility’ for the
new community: open, closed or hidden. In our case we choose the hidden community
because we don’t want to announce the community to other users and plan to invite the
members ourselves.
• You then select the ‘Role of community members’, i.e. the community role in which all
community members access the community workspace. In our case, we would select
Restricted member since we want to grant only read access to the community members.
• Finally, you invite the members of the new community, in our case the members of your
department. Consider using a ‘Search for BSCW users’ with the department name as
search criterion.
In our last example case “Crowded Workspace” you want to turn the many members of the
workspace into one community, which as a whole will then become a member of the workspace,
thus essentially improving server response time of operations on this workspace. By default,
you have to be a workspace manager to do this.
• Click the icon in the ‘Share’ column of the workspace entry to display its members’
page.
• Select the workspace members that are to become members of the community by ticking
the check boxes in front of the respective member entries. (It might be quicker to select
all members by clicking and then deselecting managers and owners.) Select Edit to
Community in the top menu or click in the multi-selection toolbar. Workspace owners
cannot be turned into community members this way.
• In the ‘Add Community’ form you proceed exactly as described above for adding a com-
munity to a workspace using Access Add Community . The default offered as
community role is the role that most members have with respect to the workspace. So,
in the standard case that all workspace members apart from the manager have the role
Member, access rights remain unchanged if this role is chosen as community role. Note
that access rights are changed for community members who had a workspace role
different from the community role. As admission policy, you would choose the hidden
community in our example case, because the reason for creating the community was not
to attract other users to this workspace, but to improve server response time.
11.3 Managing a community Communities are managed by the community managers, i.e. the managers of the associated
community workspace. The basic management functions include:
o inviting users to a community,
o changing the community role,
o changing the community admission policy,
o removing members from a community,

Communities 197
o removing the community as member from the community workspace, which also de-
stroys the community.
For accessing a community, you
• click the icon in the ‘Share’ column of the community workspace entry. This dis-
plays the members of the community workspace including the community.
As a community manager you may now invite other users to the community by
• selecting Access Invite Member in the action menu of the community.
If you want to turn members of the community workspace into members of the community,
• select these members by ticking the check boxes in front of the respective member en-
tries and click in the multi-selection toolbar or select Edit to Community in the top
menu. This action may change the access rights of the members concerned if their role
as workspace member is different from the community role. Note that workspace ow-
ners cannot be turned into community members this way; they have to be additionally
invited as community members.
The info page of a community does by default not show its members for reasons of performance
and privacy. Also, a community is per default not accessible to its members, i.e. community
members cannot open a community to view its list of members; this is reserved for the managers
of the community workspace. As a community manager you may remove this restriction by
editing the community member role to allow the ‘Open’ action (see 4.2.4 “Defining and re-
defining roles” on page 90).
You can change the admission policy of a community by
• selecting Change Properties in the action menu of the community.
The community role, i.e. the role in which the community members access the community
workspace, may be changed by
• selecting Access Assign Role in the action menu of the community or the community
workspace and inviting the community in a different role.
Note that communities cannot become owners of the associated community workspaces.
You may remove members from a community by
• first clicking on the community entry to have its members’ page displayed and
• then selecting the community members to be removed by ticking the check boxes in
front of their entries and clicking in the multi-selection toolbar.
You may remove the whole community as member from a workspace by
• selecting Access Remove in the action menu of the community. This action also
destroys the community. If the community has members, you are asked in the ‘Remove
Member’ form whether you prefer to remove all members from the community before
deletion or to move them to the member group of the associated community workspace,
i.e. make them members of this workspace in the community role.
Note that not only managers of the community workspace can remove the community from the
workspace member group, but also members of the community workspace in the role Member.

198 Communities
11.4 Communities as shared mailing lists Communities may also be used as shared e-mail distribution lists: By default, every community
member has the right to send e-mail messages to the whole community. Of course, also the
members of the associated community workspace may send e-mail messages to the community.
Note, that your BSCW server has to be configured for e-mail distribution by your administrator.
You send an e-mail message to a community as follows:
• Go to the members’ page of the community workspace by clicking on the icon
shown in the ‘Share’ column of the community workspace entry.
• Select Send to E-Mail in the action menu of the community ( ). This will present
the ‘Send E-Mail’ form with the community e-mail address already inserted into the
‘To:’ field. Alternatively, you may also select the community and use (Send E-Mail)
in the multi-selection toolbar.
When you plan to use a community as shared mailing list, the admission policy should be hid-
den or closed and the community role should not include the right to invite or remove members,
so that you can control community membership. As community role you should choose, e.g.,
Associate member, but not Member (includes right to destroy the whole community) or Man-
ager (includes right to manage community membership).
11.5 Hierarchical organization of communities Communities may be organized hierarchically by making communities members of other com-
munities. This way the organizational hierarchy of an enterprise can be mapped to BSCW
communities.
Members of a subcommunity may access the community workspace of a supercommunity. The
respective community workspaces are not necessarily related in any inclusion relations. This
situation is completely different from the seemingly similar relation between workspaces and
their member groups.
For demonstration purposes, take the case of the bulletin board for a large department which
we organized as a community workspace above. The associated community has as members all
employees of the department. When you as community manager would like to set up, e.g., also
bulletin boards for the subdepartments (let’s call them A, B, C), which are also to be imple-
mented as community workspaces, you could proceed as follows:
• Go to the members’ page of the department community by first clicking on the icon
shown in the ‘Share’ column of the community workspace entry to view the members
of the community workspace and then clicking on the community entry.
• Tick the check boxes of all user entries of the employees of subdepartment A and click
in the multi-selection toolbar to create the new community for subdepartment A.
• In the ‘New Community’ form that is presented next, you enter the name of the new
community (in our case ‘Bulletin Board of Subdepartment A’) and select the admission
policy (in our case Restricted member and Hidden Community) as well as the commu-
nity role. This also creates the associated community workspace that will appear in your
home directory with you as owner and manager. If you do not want to manage the
subdepartmental bulletin board yourself, invite someone of subdepartment A as
manager to the new community workspace.

Communities 199
• Repeat the above steps for subdepartments B and C. Now the members’ page of the
department bulletin board community will show no more user entries of employees of
the three subdepartments, but only the three entries of the subdepartment communities.
This way you have created three subcommunities of the original community. You could sub-
divide the new subcommunities further, proceeding exactly as described above. Note that the
members of the subcommunities may access the community workspace of a supercommunity
in the community role of the supercommunity, i.e. the community role of the supercommunity
determines how members of subcommunities and sub-subcommunities etc. may access the
community workspace of the supercommunity – regardless of the community roles in the sub-
communities.
Instead of building a hierarchical community organization by subdividing an existing commu-
nity, you can also proceed bottom up by uniting existing communities so that these communities
become subcommunities of the new community. Let’s assume that you have already created
three communities A, B, and C for the three subdepartments and now want to create a de-
partment community with exactly these three communities as members, so that all members of
the three existing communities may access the community workspace of the new department
community.
• Make sure that the admission policy of all three communities A, B and C is set to
‘closed’. Hidden communities cannot be invited to other communities.
• Create a new community in your home folder via File New Community in the top
menu. In the ‘General’ section of the action form, enter the name of the new community
(in our case ‘Bulletin Board of Department D’) and select the admission policy as well
as community role (in our case Hidden Community and Restricted member). This also
creates the associated community workspace that will appear in your home directory
with you as owner and manager.
• In the ‘Members’ section, choose ‘Search for BSCW groups’ and enter as query, e.g.
‘bulletin’, given that this string is contained in the name of the three existing depart-
mental bulletin board communities. Transfer the three communities found to the
‘Selected users’ field and hit [OK] to finally create the community.
• Set the admission policy of the three communities A, B and C back to ‘hidden’.
Alternatively, you could first create the department community D and then invite the three
communities A, B, and C as subcommunities via Access Invite Member in the action menu
of community D, or you could first create a workspace D and then add a community with the
three communities A, B and C as members. Either way, you would use the same mechanism of
searching for BSCW groups in the invitation form.
If you have access to a community because you are a member of a subcommunity, this com-
munity is also listed under ‘Communities of your-user-name’ in spite of the fact that you are
not a member.
Removing a community from the member group of its workspace destroys the community, but
not its eventual subcommunities. They are only removed as members of the community before
the community is destroyed. In the ‘Remove Member’ form you may, however, also choose the
option to move the community members including a subcommunity to the member group of
the community workspace, i.e. make them members of this workspace in the community role.
In the case of a subcommunity, you should note that you do not move the single members of
the subcommunity to the member group of the community workspace, but the member group
of the subcommunity workspace which includes at least its manager(s) and/or owner. This has

200 Communities
also the consequence that the community workspace becomes part of the subcommunity
workspace.
11.6 Inviting communities to member groups and vice versa
You cannot invite communities to member groups and you cannot invite member groups to
communities. Here and in the following, we use the term ‘community’ in the restricted sense
of meaning the group of community members and not the community workspace or the member
group of the community workspace, which also includes at least the manager and/or owner.
o If you could invite a community to a member group, the community would be a member
in two workspaces, which would violate the principle of a one-to-one relation between
a community and its associated community workspace.
Note: When searching for BSCW groups to be invited to the member group of a work-
space, only member groups will be found. The member groups found may also contain
member groups of community workspaces, i.e. member groups having a community as
member.
o If you could invite a member group to a community, the potentially different roles of
the members in the member group would not fit into the concept of the community as a
group of many members with the same role.
Note: When searching for BSCW groups to be invited to a community, only communi-
ties will be found.
If you want to allow a community A access to a workspace B, you have two possibilities.
• Create a (possibly empty) community for B and invite community A to community B.
• Invite the member group of the community workspace of A to the workspace B.
If you want to allow the member group of workspace B access to community workspace A, you
also have two possibilities.
• Invite the member group of B to the community workspace A.
• Convert the member group to a community B (as in our example “Crowded Work-
space”) and invite this community B to community A.
When you invite a member group A to a member group B, you also embed workspace B into
workspace A (see 4.1.4.2 “Embedding a workspace into another workspace” on page 85). When
you invite a community A to a community B, the respective community workspaces stay
independent of each other. The conditions of the case at hand determine which of the above
solutions is to be preferred.
Reminder: For inviting communities and member groups, always use the option ‘Search for
BSCW groups’ in the invitation form.

Workflow Management 201
12 Workflow Management
BSCW provides workflow management support in the following domains:
• Tasks and projects: Time planning in projects and project phases, execution and control
of structured tasks, definition of user-defined workflows.
• Flow folders: Representation of linear business processes as “wandering” folders.
• Document review: Review and release of documents in several steps.
Workflow management support needs to be activated for your BSCW server by the server
administrator in order to make use of the respective functionality.
12.1 Tasks and projects BSCW supports project management through time planning and progress management in
projects, phases and tasks. All three types of BSCW objects are specialized folders that may
also contain other material, discussion forums etc.
A project is meant to stand for an undertaking with a limited time frame and a defined goal.
The time frame of a project may be given by start date and completion date. Projects may be
further split up in phases. Projects themselves are always contained in normal folders.
A phase is a self-contained part of a project and may be further divided into separate tasks. A
phase is always part of a project and its time frame, i.e. start date and end date, is restricted by
the time frame of the containing project. The time frames of the phases of a project may overlap.
A task stands for an activity that has to be done. A task has one or more persons responsible for
carrying out the task or supervising its execution. Usually tasks are part of a superior process
(phase or project), but may also exist on their own. Task execution may lead to the provision
of results. Tasks may have an estimated duration and a deadline when the task is due.
Tasks may be split up into subtasks. The subtasks of a task may be combined to form a workflow
so that one task depends on the results of other tasks. Workflows may be changed at run-time
by adding more tasks, deleting others or assigning existing tasks to other users for execution.
Workflows may be copied for reuse.
Projects, phases and tasks have a value assigned that describes their progress: as scheduled,
critical, overdue or completed. The progress of a project is aggregated from the lower levels,
i.e. subtasks, tasks, phases, to the top level, the project, and is indicated in the folder overview.
The project management support of BSCW in projects, phases and tasks is described below
using as example a distributed software development process. The stages include the definition
of the project and its phases, the invitation of the project members and the cooperative task
execution. Users are informed about work progress and running activities by notification
functions of the system.

202 Workflow Management
12.1.1 Creating and changing projects and phases
12.1.1.1 Creating projects
On the basis of a project plan that specifies the phases of the project and their temporal con-
ditions, you can now start to create the project and its phases.
• Select File New Project in the top menu of the folder where you want to create the
project.
• The action form ‘Add Project’ has three sections. In section ‘General’ you enter name,
description as well as start date and completion date. You may also enter tags charac-
terizing the project. Apart from the name, all specifications are optional. If you don’t
enter temporal conditions, however, you receive no support of work progress control.
• In section ‘Phases’ you click on [Add phase] in order to create a project phase, again
with name, tags, description, start date and completion date. All specifications apart
from the name are optional, but the absence of temporal conditions also means that work
progress cannot be monitored.
You may add further project phases by clicking [Add phase] again. Also, after creation
of the project, you may still add, change and delete phases.
• In section ‘Attributes’ you may enter attributes for the project (by default category and
priority).
• Hit [OK] to create the project.
After you have created the project and its phases, you may now add the project team. You invite
all persons who are involved in the project in the role of Member using File Access Invite
Member in the top menu of the project. Thereafter all members of the project team may access
project documents and may create, carry out and coordinate tasks. You cannot invite further
members to the phases of a project, i.e. the members of the project phases are exactly the
members of the project.
As an example, Figure 24 shows the development project “Substitution of the commission
settlement system” for an insurance company. The project is divided into seven phases. Some
of the project phases follow one another strictly in time, some overlap.
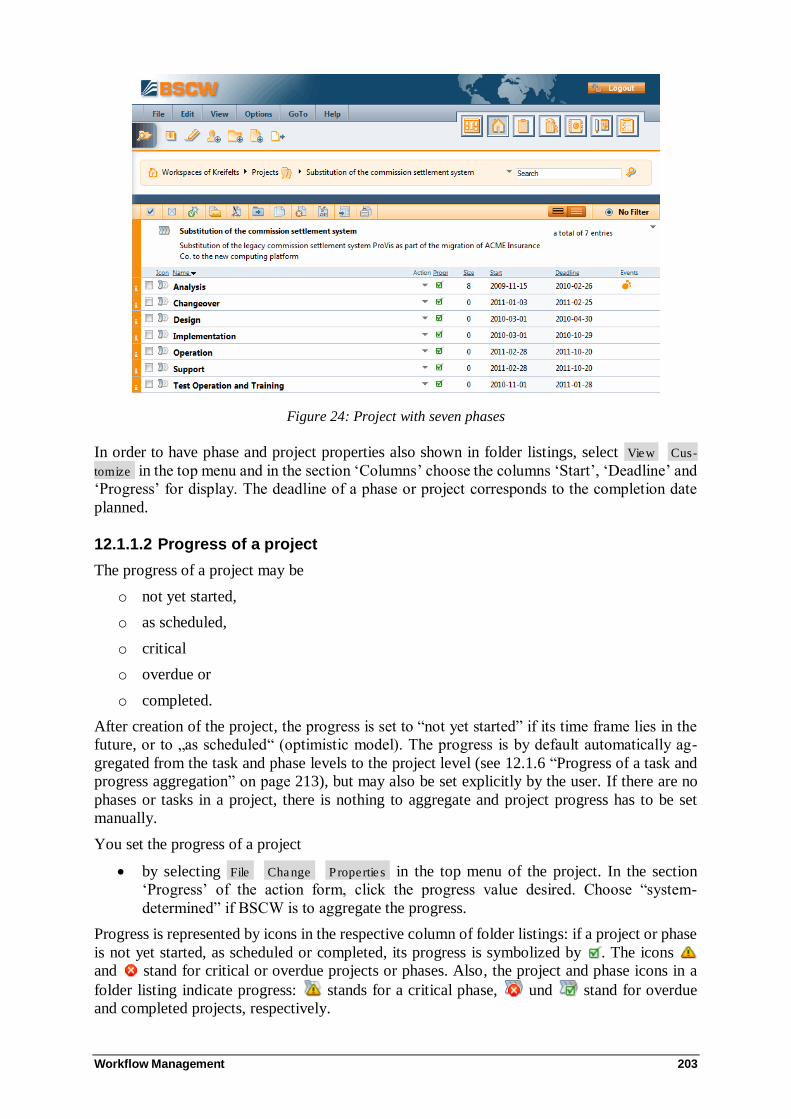
Workflow Management 203
Figure 24: Project with seven phases
In order to have phase and project properties also shown in folder listings, select View Cus-
tomize in the top menu and in the section ‘Columns’ choose the columns ‘Start’, ‘Deadline’ and
‘Progress’ for display. The deadline of a phase or project corresponds to the completion date
planned.
12.1.1.2 Progress of a project
The progress of a project may be
o not yet started,
o as scheduled,
o critical
o overdue or
o completed.
After creation of the project, the progress is set to “not yet started” if its time frame lies in the
future, or to „as scheduled“ (optimistic model). The progress is by default automatically ag-
gregated from the task and phase levels to the project level (see 12.1.6 “Progress of a task and
progress aggregation” on page 213), but may also be set explicitly by the user. If there are no
phases or tasks in a project, there is nothing to aggregate and project progress has to be set
manually.
You set the progress of a project
• by selecting File Change Properties in the top menu of the project. In the section
‘Progress’ of the action form, click the progress value desired. Choose “system-
determined” if BSCW is to aggregate the progress.
Progress is represented by icons in the respective column of folder listings: if a project or phase
is not yet started, as scheduled or completed, its progress is symbolized by . The icons
and stand for critical or overdue projects or phases. Also, the project and phase icons in a
folder listing indicate progress: stands for a critical phase, und stand for overdue
and completed projects, respectively.

204 Workflow Management
12.1.1.3 Creating phases
Should you need to extend a running project by an additional phase,
• select File New Phase in the top menu of the project which you want to add a new
phase to.
• In section ‘General’ of the action form ‘Add Phase’ you enter name, tags and description
of the new phase.
For start and completion dates, earliest and latest dates are indicated which restrict the
dates that may be entered. These dates follow from the start and completion dates of the
project to which the phase belongs.
• In section ‘Attributes’ you may assign attributes to the new phase (by default category
and priority).
Note that phases may only be created within projects and that projects cannot be created within
projects.
You may also create several phases in one step.
• Select File New Multiple Phases in the top menu of the project which you want to add
new phases to.
• In the action form ‘Phases’ click [Add phase] as many times as you want to create new
phases. For each phase, enter the necessary specifications. For the time frame of the new
phases, restrictions are indicated which follow from start and completion date of the
containing project.
When creating multiple phases in one step you cannot enter attributes. You may do so later
using Change Properties in the action menu of the phase.
12.1.1.4 Changing projects and phases
Should it become necessary to change the specifications of a project during runtime, you may
change its time frame, i.e. start and completion dates, as well as add new phases (see previous
section) and change or delete existing ones. You may also change name, attributes, and
progress.
In order to change a project,
• select File Change Properties in the top menu of the project. The action form has three
sections: ‘General’, where you may change name, tags, description and time frame of
the project; ‘Progress’, where you can change the progress of a project manually (see
above); ‘Attributes’, where you can change the attributes of a project.
• In the section ‘General’, the latest start date and the earliest completion date are indicat-
ed below the respective fields. These dates follow from the time frames of the phases of
the project. If there are no phases in the project or if the project phases have no user-
defined start or completion date, start and completion dates of possibly existing
subordinate tasks are taken into account: the earliest start of a subordinate task is taken
as latest project start and the latest completion date of a subordinate task is taken as the
earliest completion date of the project.
You delete phases of a project as you would delete other objects using Delete in the action
menu of a phase.
You can change name, tags, description, time frame, progression and attributes of a phase in
the same manner as with projects.

Workflow Management 205
• Select Change Properties in the action menu of the phase. The action form again has
three sections: ‘General’, where you may change name, tags, description and time frame
of the phase; ‘Progress’, where you can change the progress of a phase manually (see
above); ‘Attributes’, where you can change the attributes of a phase.
• In the section ‘General’, the latest start date and the earliest completion date are indi-
cated below the respective fields. The earliest start of a phase is the start of the contain-
ing project. If the start of the project has not been defined, the start of the phase has to
be before the latest start date, which follows from the earliest start of possibly existing
subordinate tasks. The earliest completion date of the phase follows from latest
completion date of possibly existing subordinate tasks. If a completion date has been
defined for the containing project, this date is also the latest completion date of the
phase.
12.1.2 Creating and changing tasks
12.1.2.1 Basic facts about tasks
Tasks represent assignments that you as requestor want to have carried out by one or more other
users, called contractors. The subject of the task is indicated by its name and description.
Additionally, tasks may be associated with one or more tags (keywords) that can be used for
context-based search (tag search) within the project. Further components of a task are
o duration and deadline,
o input and output data
o the way in which the responsibles (requestor and contractors) are informed about task
execution, and possibly
o subtasks.
The input and output data of a task are specified by you as requestor, before you start the task.
The input data are preconditions for the execution of a task and are provided by the requestor,
output data are the results of the task and are supplied by the contractors. Simple tasks may do
without input and output data. A task is also a folder containing any kind of attachments, which
may be added after task creation.
In our sample project, tasks serve the purpose of further breaking down the work within the
project phases. Apart from that, tasks, especially simple tasks, may also exist stand-alone with-
out a project context.
12.1.2.2 Creating a sample task
After having defined the project and its phases and after having invited the project team, we
can start with creating tasks. As project manager, you start with the phase “Analysis” of our
sample project “Substitution of the commission accounting system” and create the first task
“Expert interviews and workshops”. This task is to be jointly carried out by two members of
the project team. As input data for the task you add the list of the experts to be interviewed and
of the prospective participants of the workshops. The result of the task, i.e. its output data, is a
document that contains the minutes of all interviews and workshops.
In order to create this new task
• select File New Task in the top menu of the phase “Analysis” to which the new task
is to belong.

206 Workflow Management
• The action form ‘Add Task’ has several sections that we deal with in detail below. For
our example go to the section ‘General’ and enter as name of the new task “Expert
interviews”. For the duration you enter four weeks, the time that you guess is necessary
for the execution of the task. As deadline, you enter the date two weeks before the
completion date of the “Analysis” phase, since the preparation of the concluding sum-
mary depends on the outcome of the present task.
• In the section ‘Responsibles’ go to the subsection ‘Contractors’ and select those three
project members that you have foreseen for this task. Leave the requestor open for the
time being. You yourself will become requestor automatically when you start the task.
• In the section ‘Data’ go to the subsection ‘Input Data’ and enter a new data field of type
document with the name “Expert list”; leave the value open. Before you start the task,
however, you have to provide the input document. We come back to this point further
below. In the subsection ‘Output Data’ you specify another data field of type document
with the name “Minutes”, which represents the result of the task and has to be supplied
by the contractors. With both data fields check ‘Mandatory’ so that the task cannot be
started before you have provided the expert list and cannot be finished before the
contractors have supplied the interview minutes.
• After having entered these specifications, hit [OK] to finally create the task.
Click on the entry of the newly created task, to view your specifications in task view as shown
in Figure 25.
Figure 25: Newly created task in task view

Workflow Management 207
12.1.2.3 Creating tasks: the general case
Tasks may not only be created within phases of a project. Should a smaller project not be
divided into phases, tasks may be created also directly within the project. Tasks may also be
used outside of projects and phases, i.e. you may create tasks in arbitrary folders.
You create tasks using the action File New Task in the top menu of the project, phase or
folder where you want to create the task. The action form ‘Add Task’ has the sections
o General,
o Responsibles,
o Data,
o Notification and
o Attributes
where numerous specifications can be made concerning the new task. For simple personal tasks
entering a name in section ‘General’ will do, more complex tasks require further specifications,
of course. The new task is created by hitting [OK], all specifications may be changed before
the task is started.
General: Setting name, duration and deadline
In this section you enter general information, duration and deadline.
• Enter the name of the task, a description, tags, category and priority. Name and descrip-
tion should indicate what the task is about.
• The duration of a task is the expected time span between start of the task and its com-
pletion. The duration is used to compute the prospective completion date when the task
is actually started. This way it is possible to indicate a critical situation for the containing
phase and project when the task is started late – assuming that the duration is at least
required time to carry out the task. An earlier completion of the task is of course
possible.
When the prospective completion date is passed without the task being finished its pro-
gress is regarded as critical.
• As deadline, you enter the date when the task should be finished according to the time-
plan of phase or project.
When the deadline is passed without the task being finished its progress is regarded as
overdue.
• All specifications apart from the task name are optional. If you don’t enter a duration
and deadline, however, no automatic computation and aggregation of the progress of
the containing phase and project is possible.
Responsibles: Selecting requestors and contractors
In this section, there are two respective subsections where you can specify the requestors and
contractors of the task who are responsible for supervision and execution of the task.
• As contractors, you select users who are to carry out the task. When starting a task with
more than one contractor, all contractors remain responsible for the execution of the
task; every one of them may work on the task and finish it.

208 Workflow Management
You may postpone the selection of the contractors and assign the task later using the
action Task Assign in the action menu of the task. Note that a task without con-
tractors cannot be started.
You may also select users as contractors who are not members of the project, phase or
folder in which you create the task. In this case, however, the contractors have only
access to the task itself and its contents, but not to its context, i.e. the project, phase or
folder containing the task.
• As requestors, you select users that are to supervise the execution of the task. If you
enter more than one user here, the user who starts the task becomes the only requestor.
Again, you can postpone the selection of a requestor because all members that have
access to the task (including yourself as creator) may assign contractors and start the
task, thereby becoming requestor of the task automatically.
• Optionally you can determine that the new task is to be entered into the task lists of
requestors and contractors directly after creation, i.e. before it is actually started. This
way the users responsible for the task have immediate access to the task via their task
list. Especially when you have selected users as requestor who are not members of the
phase or project to which the task belongs, you should check this option. Otherwise
these users have no access to the task and consequently cannot start the task.
Data: Specifying input and output data
In this section, there are two subsections where you can specify the input and output data of the
new task. The input data are provided by the requestor and serve the purpose of transmitting
the data required for the execution of the task (e.g. text fields or entire documents) to the con-
tractors. The output data represent the result of the task and are to be supplied by the contractors
before they can declare the task as done.
Input and output data consist of data fields which have a data type, e.g. text, check box or
document.
Input and output data may also define dependencies within task structures, e.g. between several
tasks of a phase or project or between main task and subtasks. A task depends on another when
it gets its input data from this other task or when it has the condition as input data that another
tasks output is released. The dependent task may then only be started when the other task has
been finished. In the presence of already existing peer tasks, i.e. tasks of the same phase or
project where you are creating the new task, also the data of these tasks and conditions on these
tasks being finished may be offered as input or output data. For more details and examples see
12.1.9 “Structuring tasks into workflows” on page 219.
• In the subsection Input Data, you enter the input data fields. Under New input data,
select a data type and click [Add]. A line will appear containing fields for name and
value of the data field. Enter the name and check whether the data field is to be
mandatory or not, i.e. whether the task may not be started before the data field has a
value. You may enter the value now or later (e.g. using the action Change Proper-
ties or directly in the task view).
• Continue to enter further input data fields by clicking [Add] until you have entered all
the data fields required. By clicking you may delete data fields already entered. Use
the arrows and to change the order of the data fields in which they are to appear
in the task view. You may also reorder the data fields by dragging a data field by one of
the arrows to appear above or below another data field.
• When peer tasks are present, you have two additional possibilities to define input data.

Workflow Management 209
• Conditions for starting the task: Select one or more of the conditions offered. The
output of a peer task is released when this peer task has been finished. By selecting
such a condition as input data, you make the start of the task to be created depend
on the other task being finished.
• Data coming from main or peer tasks: Select one or more output data fields of peer
tasks as input data. Such a data field is shared between peer and present task and its
value is available for the present task when it has been released by the peer task.
You make the start of the present task depend on the peer tasks being finished.
You select an item in one of the lists by clicking on it. You deselect again by clicking
with the Ctrl key being pressed.
You find more details on shared data fields and conditions in 12.1.9.4 “Creating
subtasks” on page 221.
• In the subsection Output Data, you enter the output data fields. Under New output data,
proceed exactly as described for the input data fields above. You may also enter values
for these output data fields, e.g. as suggestions or notes for the contractors who are to
supply these values in the end. With output documents you could provide, e.g., a
template as value.
• When peer tasks are present, you have an additional possibility to define output data
fields. Under Data needed by main or peer tasks you can select one or more input data
fields of peer tasks as output data. Such a data field is shared between peer and present
task and its value is available for the peer task when it has been released by the present
task. You make the start of the peer tasks depend on the present task being finished.
Again, you select by clicking and deselect by clicking with the Ctrl key pressed. More
details on shared data fields in 12.1.9.4 “Creating subtasks” on page 221.
• With data fields of type document, two additional buttons appear after the value:
lets you browse your folder hierarchy and select a document as value for the data field,
undoes the selection and deletes the value of the data field again. If you intend to
fill the data field with a document that has still to be uploaded to BSCW, enter the value
later.
If you enter a value for an input or output document of a task, a link to the document is
added to the task and is shown in task view in section ‘Contents’. As soon as the task is
started, input documents are put under version control, in order to have a record of who
has done what with the task documents. The same goes for output documents; they are
put under version control when the task is finished for the first time and the contractor
thereby releases the output documents.
Notification: Notifying about task events
In this section, you can specify how requestors and contractors are to be notified about their
mutual actions and when you and other persons concerned are to be reminded of an approaching
deadline. Action notifications and reminders are sent by e-mail.
• Under E-Mail notification, unfold the actions about which the notifications are about.
Here you may then check or uncheck certain actions or all of them. Of course, the
requestor is notified about actions of the contractor and vice versa.
• Under Reminders you may let yourself, requestor, contractors or all members be re-
minded of the approaching task deadline. Select the recipient of the reminder and click
on [Add]. In the line that now appears you select how long in advance the reminder is

210 Workflow Management
to be sent. Using [Attach a personal note] you may add a personal note to the otherwise
automatically generated reminder. By repeated clicking on [Add] you may have
reminders sent at different point in time to the people concerned. By clicking you
can delete already generated reminders.
Attributes
In this section, you may set the task attributes (by default Customer, Contact, Location, URL).
The task attributes are configured for your BSCW server in the system profile ‘Task’. You may
define and use your own metadata profile for tasks (see 3.9.1 “Metadata profiles” on page 72).
12.1.2.4 Changing tasks
Before the task has been started you may change all task specifications by
• selecting Change Properties in the action menu of the task. The action form contains
all sections that we have described above where you may correct your specifications. If
you want to delete the deadline of a task you have to enter an empty date.
Once a task has been started, the task specifications that may be changed depend on the state of
the task (an overview of the states of a task is given in 12.1.8 “Handling exceptional task
situations” on page 216). In states where the task may be started again, all specifications may
be changed. In other states, some specifications may still be changed, e.g. in state requested
you as requestor may request additional results by entering further output data, but you may not
change the input data or the contractors. The action form ‘Change task’ offers all changes that
are possible in the current state of the task.
12.1.2.5 Copying tasks
You need not create tasks from scratch every time, you can also copy existing tasks. The
specifications concerning responsibles, data fields and duration are copied along with the task.
The status of the copied task is set to initial, the deadline is not copied. If you copy tasks being
processed, data field values or objections and the start date and expected end date (if any) are
removed as is the audit trail. Eventual attachments are copied from the original task.
12.1.3 Task view
If you click on a task object, it opens in task view. The task view shows the essential attributes
of a task in four sections, which you may fold in and out.
o Properties: contains the time frame, requestor and contractors as well as the context,
i.e. the phase, project or folder to which the task belongs.
When a task has not yet been started, duration and deadline are shown; when a task is
in execution, start and expected end date replace the duration. All temporal specifica-
tions are only shown, of course, if present.
o State: shows the current task state, e.g. initial for a task just created or requested for a
task just started. Unfold the state section to get an overview of the task states possible.
The current state is indicated in faded orange. States that may be reached by contractor
actions are shown in blue; states that may be reached by requestor actions are shown in
green.
By clicking on a state that corresponds to your task role, you may execute the respective
action

Workflow Management 211
o Data: contains the input and output data fields of the task. If the present state of the task
allows you as requestor or contractor to edit the input or output data fields, here you
may enter values for data fields or objections to data field values provided.
In state requested, e.g., you as contractor could enter all output data representing the
result of the task. Also, you could enter objections below the respective input data fields.
With data fields of type document, two buttons appear after the value: lets you
browse your folder hierarchy and select a document as value for the data field, un-
does the selection and deletes the value of the data field again.
Use [Save form] to protect data values and objections already entered against accidental
deletion, because these values are lost when you leave the task view without executing
a task action.
Data values and objections which have been saved are visible to all other users which
have the same task role. If in state requested, e.g., a contractor fills in an output field or
enters an objection to an input field and saves, all other contractors will see the data
values and objections when they open the task. The requestor, however, cannot see these
data values and objections until one of the contractors has released them via a task
action. In state requested, objections are released by [Object to task] and output data are
released by [Finish task]. Data values and objections that have been released cannot be
changed in the current state of the task (here: objected or finished) and are visible to all
parties concerned.
o Contents: contains all task documents, i.e. values of data fields of type document divid-
ed into input and output data, and all other attachments of the task that have been added
by either contractors, requestors or other members of the task.
The last part of the contents section is the audit trail, where all task actions (start, exe-
cution, objection etc.) are recorded automatically. The audit trail is organized as a
discussion forum. When a task action is carried out, the actor may add a personal com-
ment for the audit trail.
The different sections of the task view are only shown if they are not empty, i.e. the section
‘Data’ is not present when the task has no input or output data. Figure 25 shows the example of
a newly created task in task view.
Between the ‘Data’ and ‘Contents’ sections, the task view provides an area with buttons for the
task actions which you as contractor or requestor can execute in the present state of the task.
You find the same actions in the context menu of the task, e.g. Task Finish or
Task Object . Above the task action buttons in task view you may add a personal comment
to your task action for the audit trail.
12.1.4 Starting tasks
Before you can start a task, all necessary specifications must have been made. In particular, the
input data fields that have been marked as mandatory must have a value, otherwise you get an
error message when you try to start the task.
For input data fields of type document, you should first upload the documents that you intend
to assign as values to these input fields. You can upload the documents into the task (e.g. with
New Document in the action menu of the task) or to some other suitable place, e.g. the
project or phase to which the task belongs.
In order to assign values to input data fields,

212 Workflow Management
• select Change Properties in the action menu of the task and go to the ‘Data’ section.
You can also switch to task view by opening the task.
• Enter at least values for the data fields that have been marked as mandatory. For data
fields of type document, use the button to find the input document in your folder
hierarchy.
You should also make sure that you have assigned contractors to the task – otherwise you
remain the sole contractor and the task becomes a personal one, like an entry in a personal to-
do list. If you start a task in this state by mistake, you can nevertheless assign other contractors
afterwards (e.g. via Task Assign ).
You must not necessarily assign requestors before you start a task – you yourself will become
requestor automatically when you start a task without requestors. Anyway, you can forward the
task later to a different requestor.
After you have made all necessary preparations,
• you start the task via Task Request in the action menu of the task or by [Request
task] in task view.
• The task state switches from initial to requested and you become sole requestor. Should
there have been other users assigned as requestors, they lose this role.
• All input data are released by requesting the task: they become visible to all contractors
and cannot be changed in this task state neither by you as requestor nor by the con-
tractors. Documents as input data are put under version control when the task is started.
This way, changes to task documents are traceable and document versions can be
uniquely associated with task states, e.g. if an input document has to be changed by you
as requestor after objections by the contractors.
At this point in time at the latest, the task is entered into the personal task lists of the contractors.
Additionally, the task is entered into the personal task list of the requestor, if not already present.
12.1.5 Personal task list
Each BSCW user has a personal task list that contains all tasks that the user is supposed to carry
out as contractor or to supervise as requestor. The task list is accessed via GoTo Tasks or the
tasks icon in the instant access bar . Shouldn’t you find this icon in the instant access bar,
you can activate it via Options Preferences in the section ‘Presentation’.
When a user loses the contractor or requestor role, e.g., by deleting or forwarding a task, it
disappears from the user’s task list.
Tasks that do not appear in your task list, but which you have access to, because you are a
member of the task, may be added to your task list via to Task List , even if you are not
responsible for the task’s execution or supervision.
The task list also contains flow folders where the user is responsible for carrying out the current
task.
Sorting and filtering the tasks in the task list
The tasks in the task list may be sorted according to several task specific criteria.
• Select, e.g., View Sort Deadline in the top menu of your task list to sort the tasks by
deadline. Other criteria are start, status or context.

Workflow Management 213
Besides sorting you can also filter your tasks, i.e. only tasks are shown in the list that fulfill a
certain criterion.
• Select, e.g., View Filter Requestor in the top menu of the task list to have only tasks
shown where you are requestor or where there is no requestor assigned yet and you
could become requestor since you have access to the task.
• Other filtering criteria are:
o Contractor: all tasks are shown where you are contractor or where there is no con-
tractor assigned yet and you could become contractor since you have access to the
task.
o Responsible: all tasks are shown where you are to make the next move, i.e. where
you in your role as either requestor or contractor are to execute the next task action.
o Categories like delivery, order etc.
o Progress from as scheduled to completed.
o States from initial to completed.
You can also select filters by clicking on the current filter criterion shown at the right-hand side
of the multi-selection toolbar. By selecting “No filter” you have all tasks shown in the task list
again.
12.1.6 Progress of a task and progress aggregation
After creation of a task, its progress is set to as scheduled . As soon as a task is started, the
expected completion date is computed as start date plus expected duration. If this expected
completion date is later than the user-defined deadline, the progress of the task is set to critical
. When the deadline is passed, the progress is set to overdue .
Note: The task icons , and , which are used in folder listings, do not symbolize the
temporal progress of a task, but indicate specific details of its execution: stands for a task
that has been finished or completed, indicates a roll-back in task execution like e.g. an
objection to task results, and finally stands for a task that has been cancelled and has to be
restarted, if at all (also see 12.1.8 “Handling exceptional task situations” on page 216).
In order to be visible also on phase and project level, the progress of subordinate tasks is ag-
gregated from lower levels upward according to the project structure, if progress on phase and
project level has been set to system-determined (see 12.1.1.2 “Progress of a project” on page
203).
The following rules govern the aggregation of progress (also see Figure 26):
o If the progress of all subordinate tasks is as scheduled, critical or overdue, the progress
of the task, phase or project directly above in the project structure is also set to as
scheduled, critical or overdue, respectively.
o If the progress of the subordinate tasks is a mixture of as scheduled, critical and over-
due, the progress of the task, phase or project directly above in the project structure is
set to critical.
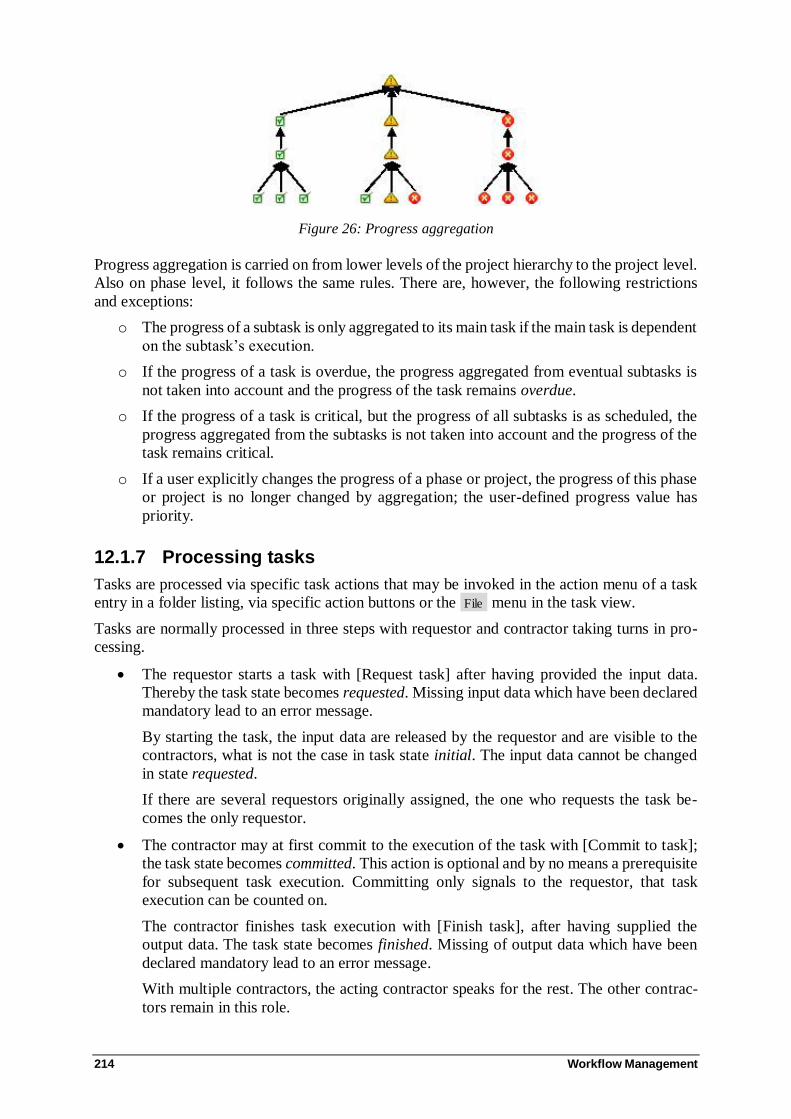
214 Workflow Management
Figure 26: Progress aggregation
Progress aggregation is carried on from lower levels of the project hierarchy to the project level.
Also on phase level, it follows the same rules. There are, however, the following restrictions
and exceptions:
o The progress of a subtask is only aggregated to its main task if the main task is dependent
on the subtask’s execution.
o If the progress of a task is overdue, the progress aggregated from eventual subtasks is
not taken into account and the progress of the task remains overdue.
o If the progress of a task is critical, but the progress of all subtasks is as scheduled, the
progress aggregated from the subtasks is not taken into account and the progress of the
task remains critical.
o If a user explicitly changes the progress of a phase or project, the progress of this phase
or project is no longer changed by aggregation; the user-defined progress value has
priority.
12.1.7 Processing tasks
Tasks are processed via specific task actions that may be invoked in the action menu of a task
entry in a folder listing, via specific action buttons or the File menu in the task view.
Tasks are normally processed in three steps with requestor and contractor taking turns in pro-
cessing.
• The requestor starts a task with [Request task] after having provided the input data.
Thereby the task state becomes requested. Missing input data which have been declared
mandatory lead to an error message.
By starting the task, the input data are released by the requestor and are visible to the
contractors, what is not the case in task state initial. The input data cannot be changed
in state requested.
If there are several requestors originally assigned, the one who requests the task be-
comes the only requestor.
• The contractor may at first commit to the execution of the task with [Commit to task];
the task state becomes committed. This action is optional and by no means a prerequisite
for subsequent task execution. Committing only signals to the requestor, that task
execution can be counted on.
The contractor finishes task execution with [Finish task], after having supplied the
output data. The task state becomes finished. Missing of output data which have been
declared mandatory lead to an error message.
With multiple contractors, the acting contractor speaks for the rest. The other contrac-
tors remain in this role.

Workflow Management 215
By finishing a task, the output data are released by the contractors and become visible
to the requestor, which is not the case in states requested and committed. The output
data cannot be changed in state finished.
• The requestor finally accepts the outcome of the task with [Accept task]. Processing of
the task ends and the task state becomes a final accepted.
When there are no contractors assigned starting a task makes the task a personal task of the user
who has started the task. Such personal tasks are of course not processed with requestor and
contractor taking turns, but may be carried out via [Complete task] by the sole responsible. This
action puts the task into state completed and is also possible when no contractor has access to
the task any longer.
Committing to and finishing tasks: an example
We return to our example task “Expert interviews” in the project “Substitution of the commis-
sion settlement system”. The task has meanwhile been started with the input document “Expert
list”. You are one of the contractors and open the task. After having checked the expert list
(there are four experts to be interviewed), you agree to carry out the task until the deadline
scheduled.
• You select Task Commit in the context menu of the task or click [Commit to task].
You don’t enter a remark for the audit trail.
• The action changes the task state to committed.
After you and the other contractors have actually interviewed the four experts, you put down
the results of your activities in the document “Interview minutes” and upload the document to
BSCW. You now can finish the task.
• You open the task “Expert interviews” and go to the section ‘Data’. Click on the
button beside the output data field ‘Minutes’ to open a navigator which lets you find
and select your document “Interview minutes”. Clicking on the document specifies it as
the value of the ‘Minutes’ data field.
• Above the task action buttons, enter a remark for the audit trail, if something unusual
happened during the interviews, e.g. exchange of an expert. Then click on [Finish task].
• The action releases the output document and it becomes visible and accessible for the
requestor. You cannot change the document at the moment. The task state becomes
finished.

216 Workflow Management
Figure 27: Task after execution
Figure 27 shows the example task after the task has been finished. As contractor, you may at
this stage only add further contractors, e.g. early information for later project phases ([Assign
task]), forward the task to other contractors, because you go on a holiday ([Forward task]) or
[Withdraw task results]. The latter action gives you and the other contractors the opportunity to
edit the output data again, in this case the interview minutes, and then finish the task a second
time (also see next section).
12.1.8 Handling exceptional task situations
During the processing of task, exceptional situations may arise that require a deviation of the
normal course of action. The respective actions are offered as [buttons] in task view and as
actions in the action and context menu of the task under Task . What is offered here in detail
depends on the role of the user as contractor or requestor, of course.
Task Object : Input data contain mistakes. In task view, contractors may enter their ob-
jections below the faulty input data fields and [Object to task]. Objections to input data
may also be entered and saved using [Save form] without actually object to the task.
Such preliminary objections are not visible to the requestor, as long as the action [Object
to task] has not been executed; they may be changed or deleted at will.
After the action, the objections are accessible to the requestor. After a correction of the
input data, the requestor may request the task again.

Workflow Management 217
Task Withdraw Request : Task needs to be re-specified. The requestor may [Withdraw task
request] in order to, e.g., specify additional input or output data or enter different values
for existing input data fields. After a correction, the task may be requested again.
Task Request Correction : Output data contain mistakes. In task view, the requestor may
enter objections below the faulty output data fields and [Request task correction]. Ob-
jections to output data may also be entered and saved using [Save form] without actually
requesting task corrections. Such preliminary objections are not visible to the con-
tractors, as long as the action [Request task correction] has not been executed; they may
be changed or deleted at will.
After the action, the objections are accessible to the contractor(s). After a correction of
the output data, a contractor may finish the task again.
Task Withdraw Results : Output data contain mistakes. A contractor may [Withdraw task
results] in order to correct the output data of the task. After a correction, the task may
be finished again.
Task Reject : Contractor is not able or willing to execute the task (not his or her duty, on
leave). A contractor may [Reject task] and the task state switches to rejected.
A rejected task may be changed by the requestor and started again. Possible changes
include the assignment of new contractors and the definition of new data fields.
Task Uncommit : Commitment to task execution needs to be revoked. A contractor may
undo the commitment via [Uncommit to task]. The contractor may then object to the
task, reject the task or finish it in spite of revoking the commitment. The requestor may
withdraw or cancel the task or decide to wait for task execution.
Task Cancel : Reason for task execution is no longer valid. The requestor may [Cancel
task]. A cancelled task is not processed further. The requestor may, however, reopen the
task, change it and start it again (or simply restart it at a later point in time).
Task Forward : Other users are more suited for task execution or supervision. Both con-
tractor and requestor may [Forward task] to other users. If one forwards a task, one can
nevertheless stay contractor or requestor by checking the respective box in the action
form.
There are two more actions by which tasks in a final state (accepted, cancelled or completed)
may be reused again.
Task Reopen : The requestor puts the task into a state where all task specifications may
be changed, in order to start the task again with the changed specifications (contractors,
input data, time frame)
Task Restart : The requestor simply restarts the task with the specifications given. Note
that eventual specifications of a deadline and input data values remain as is.
The requestor may add further contractors to a task or may remove existing ones by
Task Assign . This action is not possible in final states of a task and when the current
contractors are working on the task (states requested and committed). In some task states
(e.g. rejected) also contractors may invoke this action and can leave a task this way.
Apart from forwarding and assigning all of the above actions have no action form, i.e. the
actions are executed straight away, because they consist of a state transition of the underlying
task. The data necessary for the action (comments for the audit trail, objections, input and output
data) have to be entered in task view (and possibly saved via [Save form]) before the action is
218 Workflow Management
invoked. During the action, only the availability of the expected data is checked. Missing data
lead to an error message or a warning in form of a hint.
The state transitions of a task that are due to task actions are summarized in the following table.
Action State before action State after action
request initial, objected, withdrawn,
rejected, reopened
requested
commit requested committed
finish requested, committed finished
object requested objected
uncommit committed requested
withdraw results finished committed
reject requested rejected
accept finished accepted
request correction finished committed
cancel every state except accepted and
cancelled
cancelled
withdraw request requested, committed, finished withdrawn
restart accepted, cancelled requested
reopen accepted, cancelled reopened
If an exceptional situation arises during task processing, which deviates from the normal course
of action (request – commit/finish – accept), this is indicated by a specific task icon in a folder
listing or the personal task list. The different task icons have the following meaning:
represents a task that has not yet been started or is being worked on without having been
finished.
represents a task that has been finished. Also, the task states accepted and completed
(by the requestor) show this icon.
represents a task that has been rolled back by actions such as an objection, a withdrawal
of results or a request for correction. When the task returns to the normal course of
processing, e.g. by actions such as a renewed request after an objection or a renewed
finishing after a request for correction, the task is represented again by the icon for tasks
in processing or tasks done.
represents a task that has been cancelled. Such tasks may be started again, with or with-
out changed specifications (action reopen and restart).
In task view, the possible actions are offered as buttons. The actions offered depend on the task
state and the role of the user as contractor or requestor. With a task in state requested, e.g., as
contractor you could commit to, finish, object to, and reject the task, as requestor you could
withdraw the task request and cancel the task altogether; in both roles, you could forward the
task to other contractors or requestors.
If you unfold the section ‘State’ in task view, you will see the possible states of the task. The
current state is indicated in faded orange. States that may be reached by a contractor action are

Workflow Management 219
coloured blue, states that may be reached by a requestor action are coloured green. By clicking
on a target state, you may also invoke the respective action.
12.1.9 Structuring tasks into workflows
Tasks may contain subtasks. These subtasks may be predefined or created at runtime. The cre-
ation of subtasks may be continued through as many levels as desired. Work on a task may be
completely or partly distributed to its subtasks. The subtasks of a main task may be combined
to form a workflow. The same goes for the tasks of a project or phase. The tasks of a workflow
are connected using common data (a task needs, e.g., as input a document that is by another
task’s output) and conditions (a task may only be started, e.g., when another task has been
finished). Such a user-defined workflow may be changed at runtime and may be copied for
reuse.
The tasks of a workflow are automatically started by the system, if the necessary input data
have been released. Processing of tasks in a workflow is automatically interrupted, if this is no
longer the case. Subtasks are automatically cancelled when the main task is cancelled. Likewise,
the main task is automatically finished, if the output data of the main task have been released
by execution of the subtasks. In this way, the processing of workflows is supported by the
system.
When we described the definition of input and output data of new tasks (see 12.1.2.3 “Creating
tasks: the general case” on page 207), we have touched upon creating workflows within the
tasks of a phase or project. Here we will treat the subject in more detail, also covering the case
of workflows formed by the subtasks of a main task.
12.1.9.1 Creating multiple subtasks
There are two ways to create subtasks: (a) you can create several subtasks in one step and (b)
you can create subtasks one by one.
We start with the creation of subtasks in one step. This action serves the purpose of quickly
creating a set of simple subtasks, which initially have no input and output data. Also, other
specifications like description, e-mail notification on the task as well as tags and attributes have
to be entered later using Change Properties , especially if the subtasks created are to be
combined to form a workflow (see 12.1.9.3 “Linking subtasks to form workflows” on page
220).
The creation of multiple subtasks in one step is only possible if the main task is not being
processed, e.g. in states initial or reopened.
• Select File New Multiple Subtasks in the top menu of the task view of a task.
• In the action form, click on [Add subtask] and enter name, duration, deadline and con-
tractors of the new subtask. As contractors of the subtask you should choose users who
have access to the main task, e.g. contractors or members of the main task. Other users
could have difficulties with the execution of the subtask, since they have no access to
material possibly contained in the main task.
• Continue to create further subtasks using [Add subtask] and finally confirm with [OK].
The new subtasks appear in the section ‘Contents’ of the main task. If you do not specify input
data for the subtasks thus created, they will all be automatically started, when the main task is
started.

220 Workflow Management
12.1.9.2 Dividing a task into subtasks: an example
We return to our example task “Expert interviews” in the project “Substitution of the com-
mission settlement system”. You as the requestor of this task would like to distribute the
interviews to the project members foreseen as contractors according to their specific qualifica-
tion. You select File New Multiple Subtasks and define four subtasks “Interview Dr. Trevor”,
“Interview Mr. Howard” etc., that you assign to suitable project members as contractors. Dura-
tion and deadline are taken over from the main task.
After creation of the subtasks you start the “Expert interviews” task. This also starts all the
subtasks automatically. By dividing the task into subtasks, the contractors of “Expert
interviews” have an overview of who is responsible for the different interviews and whether
and when they were actually carried out. The minutes of the different interviews are uploaded
as documents to the main task and have yet to be integrated into the output document of the
main task.
The creation of subtasks as single tasks also includes the definition of input and output data.
When you specify the data fields of a subtask you always have the possibility to link the subtask
to other tasks via a suitable definition of the input and output data – thus forming a workflow.
Therefore we have postponed the creation of single tasks to the next section.
12.1.9.3 Linking subtasks to form workflows
You can link the subtasks of a main task (and also the tasks of project or phase) to form a
workflow by means of shared data or status conditions. Given two subtasks S1 and S2, you can
make the following specifications concerning their input and output data:
o For subtask S2, you specify as input data a document D, which belongs to the output
data of S1. Thus, S2 can only start, after S1 has been finished and document D has been
released. There is a delivery relation between the two subtasks: S1 delivers D to S2.
o Likewise, you could specify as output data of S1 the document D that belongs to the
input data of S2. The effect is the same; the difference in procedure depends on which
subtask is created first, S1 or S2.
You can also link subtasks to the main task by, e.g., taking over input data of the main task as
input data of a subtask or by declaring the output data of a subtask as part of the output data of
the main task. This way, work on the main task may be completely or partly distributed to
subtasks.
If you specify, e.g., an input data field of a subtask as an input data field of the main task, then
subtask and main task share this data field. Tasks that share a data field also share the value
when it is released. This has the consequence that the value of the data field is copied from main
task to subtask when value is released, in our example of an input field when the main task is
started. The value of the data field cannot be changed in the subtask independently of the main
task.
You can link subtasks not only via concrete data fields, but also via preconditions on the pro-
gress status of a subtask which is characterized by the release status of its input and output data:
o <input released>: The input data of a task are released by a task action, e.g. request, of
the requestor: the requestor declares the input data as valid and may not change them
now. The task is in state requested, committed, possibly already finished, but not, e.g.,
in state initial, request withdrawn or cancelled. As condition for the start of another task
<input of S1 released> has the effect that the other task can start whenever S1 changes
into a state where its input data are released.

Workflow Management 221
o <output released>: The output data of a task are released by a task action (finish or
complete) of the contractor: the contractor declares the output data as valid and may not
change them now. The task is in state finished, accepted or completed, but not, e.g., in
state requested or committed. As condition for the start of another task <output of S1
released> has the effect that the other task can start whenever S1 changes into a state
where its output data are released.
If you want to have a subtask S2 only started after the subtask S1 has been finished, select the
condition <output of S1 released> as input data of S2. If a main task should be only finished
when its subtask S2 has been finished, select the condition <output of S2 released> as output
data of the main task.
12.1.9.4 Creating subtasks
Subtasks may be predefined by the requestor of the main task when the main task is not being
worked on (e.g. in states initial or reopened); subtasks may also be created by the contractors
of the main task when the task is in processing. You create a subtask as a single task by
• selecting File New Task in the top menu of the task view of a task. You may also
invoke this action by selecting New Task in the action menu of a task entry in a
folder listing. The existing task becomes the main task of the subtask to be created.
• The action form for creation of a subtask equals in nearly all parts the action form for
the creation of tasks. Only the definition of input and output data offers a new possibi-
lity. In addition to data fields and conditions of peer tasks (of a phase or project) you
can now also enter conditions and data fields of the main task.
Input Data
• Conditions for starting of the task: Here you can select from conditions under which
the new subtask may be started – when the main task has been started or when a
peer subtask has been finished.
<input of main task released> means that the main task is in processing, hence in a
state where the input data may not be changed (e.g. requested).
<output of peer task released> means the peer task, i.e. another subtask of the same
main task, has been finished, hence in a state where the output data may not be
changed (e.g. finished).
• Data coming from main or peer tasks: Here you may select from data fields of the
main and peer tasks. By selecting such a data field you declare it as input field of
the new subtask. The new subtask can then only be started when the respective data
field has been released and the value of the data field, with a data field of type docu-
ment, e.g., the contents of the document, is available to the new task.
If you select input data of the main task, the new subtask can only start when the
main task has been started, too, and thus its input data have been released. If you
select output data of a peer task, the new subtask can only start when the peer task
has been finished and thus its output data have been released.
Note: When you want to deselect an already selected data field or condition, click on it
with the Ctrl key pressed.
• New input data: Here you may define own input data fields of the new subtask by
selecting a data type and clicking [Add].

222 Workflow Management
Output Data
• Data needed by main or peer tasks: Here you can select from data fields of the main
and peer tasks. By selecting such a data field, you declare it as output field of the
new subtask. When the new subtask has been finished, the data field is released. The
value of the data field, with a data field of type document, e.g., the contents of the
document, is then available for the contractors of the peer task or the requestor of
the main task, respectively.
• New output data: Here you may define own output fields of the new subtask by
selecting a data type and clicking [Add].
Continue to create new subtasks until you have finished the partition of the main task into sub-
tasks.
Note: When the main task is in processing, new subtasks are automatically started when all
input data are available. This is especially true for subtasks that take all input data from the
main task or that have no input data at all.
12.1.9.5 Dividing a task into two sequential subtasks: an example
We take as example the task “Requirements” from the analysis phase of our project “Substitu-
tion of the commission settlement system”. This task is to compile the functional requirements
for the new system and have them checked by the financial department.
First you create the task “Requirements” by selecting File New Task in the top menu of the
project phase “Analysis”. As contractors, you take two project members who are going to
compile the requirements document and a representative of the financial department who is
authorized to approve the requirements and whom you have invited to the project. As requestor
you enter yourself. As input data, you choose under Data coming from main or peer tasks the
output documents of the tasks “Expert interviews” and “Workshops”. As output data, you de-
fine under New output data a data field “Functional requirements definition” of type document
and a data field “requirements approved” of type check box.
Because of your specification of the input data, the task “Requirements” can only start after the
tasks “Expert interviews” and “Workshops” have been finished and the minutes of the expert
interviews and workshops have been released. If you do not want this ordering of task
execution, simply do not enter any input data for task “Requirements”. Its contractors may then
access the results of the other tasks in the current version as members of the project, and task
“Requirements” may be started independently of the other two.
Now you split the task “Requirements” in two subtasks, the compilation of the requirements
and their approval. You switch to task view and select File New Task in the top menu. As
name of the new subtask you enter “Requirements compilation”, as contractors you select the
two project members foreseen, as input data you select under Data coming from main or parent
tasks the input data of the main task “Requirements” (if any), and as output data you select
under Data needed by main or peer tasks the output document “Functional requirements defi-
nition” of the main task “Requirements”.
Again select File New Task in the top menu. Enter “Requirements approval” as name and
select the representative of the financial department as contractor. As input data, you select
under Data coming from main or peer tasks the output document “Functional requirements
definition” of the peer subtask “Requirements compilation” just created, as output data you
select under Data needed by main or peer tasks the check box “requirements approved” of the
main task.

Workflow Management 223
This way you have divided the task “Requirements” into two subtasks which executed one after
another do the job of the original task. The two subtasks appear in the ‘Contents’ section of the
task view under “Tasks…”. The delivery relations between the tasks are shown in the descript-
tion of the subtasks and in the ‘Properties’ section of the task view of the main task.
12.1.9.6 Changing subtasks and main tasks
Subtasks may be changed using Change Properties just like other tasks. What can be
changed depends on the state of the subtask. Note that subtasks of a main task in processing are
automatically started when all input data are available. In this state, not all changes are possible
and you have to withdraw the task request in order to be able to change the subtask. The action
form for changing subtasks is the same as for creating subtasks.
When changing main tasks, i.e. task that have already subtasks, three additional form fields
appear which relate to data coming from, or needed by, subtasks and conditions concerning
their execution.
Input Data
• Data needed by subtasks: Here you can select from input data fields of subtasks. By
selecting such a data field, you declare it as input field of the current main task. When
the main task is started, the data field is released and is then available for the contractors
of the subtask as input data.
Normally you would proceed top-down when linking data fields of main and subtasks,
i.e. you would first define the input data of the main task and then declare these input
data as input data of subtasks, if necessary. Here you have the possibility to do the same
thing bottom-up: declare subtask input data, which are not supplied by other subtasks,
as input data of the main task afterwards.
Output Data
• Conditions for finishing the task: Here you can determine that the current main task may
only be finished, when certain subtasks have been finished. Select one or more of the
conditions offered.
<output of subtask released> means that the subtask has been carried out, hence is in a
state where the output data cannot be changed (e.g. finished or accepted).
• Data coming from subtasks: Here you may select from output data fields of subtasks.
By selecting such a data field, you declare it as output field of the current main task.
When the subtask has been finished and the data field is released, it is available as output
data field of the main task. Here again you have the possibility to proceed bottom-up
when linking data fields of main and subtasks: declare output data of subtasks which
are not needed by other subtasks as output data of the main task.
If a given task is a subtask of a main task, has peer tasks as well as subtasks of its own, changing
input and output data can require a rather complex form: apart from defining new input and
output data, you can select from data and conditions concerning the main and peer tasks as well
as from data and conditions concerning the subtasks.
12.1.9.7 Processing workflows: what is different from single tasks?
The main differences between processing single tasks and a workflow of main task and subtasks
are the following:
o Tasks which have data fields in common with main task, peer tasks or subtasks, depend
on these data fields being released before they can be started or finished. A subtask may

224 Workflow Management
only be started when all its input data shared with other tasks are released; a main task
may only be finished when all its output data shared with subtasks have been released.
Starting or finishing conditions concerning the release of such data have the same effect.
o Actions on a main task or on subtasks of a workflow can trigger further actions on other
tasks of the workflow. The flow of work within a network of a main task and its subtasks
is supported
o by propagating values of shared data fields, whenever they are released, and auto-
matically advancing the workflow, e.g. by starting subtasks whose complete input
has been released by the start of the main task, or by finishing a main task whose
complete output data have been released by execution of subtasks.
o by withdrawing values of shared data fields, whenever their release has been taken
back, and by automatically rolling back the workflow, e.g. by requesting the correc-
tion of a subtask whose output was objected to as input field of a peer task.
Also, all subtasks are cancelled when the main task is cancelled, and all subtasks are
reopened when the main task is reopened.
o When computing the expected completion date of a main task, the expected duration of
its subtasks is taken into account, should this be longer than the duration originally
specified for the main task.
When a workflow consisting of main task and subtasks is copied, all tasks are treated as when
copying single tasks (requestors and eventual data field values and audit trails are removed,
status is set to initial); since data fields are copied, the connection between the tasks of the
workflow via shared data fields and release conditions stays intact.
Processing support of workflows: an example
As an example, we take the task “Requirements” of the analysis phase in our project “Substitu-
tion of the commission settlement system”. Above, we have split this task into two subtasks
“Requirements compilation” and “Requirements approval”. “Requirements compilation” takes
its input data from the main task “Requirements” and delivers its output document “Functional
requirements definition” to the main task and to the peer task “Requirements approval”.
“Requirements approval” delivers its output “requirements approved” (a check box) to the main
task as last part of the output data of this task.
When the task “Requirements” is started, also the subtask “Requirements compilation” is
started automatically and the contractors are notified. When this subtask is finished, the other
subtask “Requirements approval” is started automatically. After the approval has been finished,
all output data of the main task “Requirements” are released and the main task is finished
automatically, since we had the subtasks defined in such a way that they replace the main task.
Should exceptional situations arise, e.g. the representative of the financial department objects
to the functional requirements definition (action Task Object in subtask “Requirements ap-
proval”), the workflow is rolled back: the correction of the result of subtask “Requirements
compilation” is requested automatically, so that its contractors can react to the objection. After
“Requirements compilation” has been finished a second time, “Requirements approval” is
started again.
12.1.10 Viewing tasks and projects as a timeline
You may view projects, phases and tasks in a Gantt chart manner arranged as a timeline. This
feature allows a quick overview of the temporal relations of your tasks, phases and projects and

Workflow Management 225
their status. The visualization works likewise for other time-related objects like appointments,
polls, votings and appointment schedulings.
The timeline visualization is an optional feature and has to be activated for your BSCW server
by the server administrator.
You may create a timeline view for tasks, phases and projects contained in the current folder
(and its subfolders) in the following way.
• Select GoTo Timeline in the top menu of the current folder.
• In the action form, you may select the ‘Time interval’, i.e. the temporal unit, for your
timeline. Choose the monthly interval for a coarser representation and the weekly for a
more fine-grained. Check the type of objects to be shown in the timeline representation.
Besides projects, phases and tasks, you may have also shown other time-related types
of objects: appointments, polls, votings and appointment schedulings.
• Hit [OK] to create the timeline representation in a separate browser window.
The timeline window shows in its upper part all time-related objects of the types that you have
selected, which are contained in the current folder and its subfolders. Each object is represented
by its icon and name at a position in the timeline corresponding to its start time; if an end time
is given, the temporal extension of the object is indicated by a bar above the icon, which is
coloured according to the object status. The colour codes are explained in a caption at the
bottom of the timeline window.
You may click on an object name or icon to get additional information in a tooltip. Within the
tooltip you may click on the object name to open the object in the original browser tab. A
timeline visualization itself is read-only, i.e. you may not edit or delete any of the objects shown
in this view nor add new objects.
You may scroll the timeline either by using cursor arrows or by using the mouse: click on the
view, hold mouse button down and move left or right. The lower part of the timeline gives a
broader temporal context and may be used for quicker mouse scrolling. Here, objects are indi-
cated by a small vertical bar at their start time (only projects are also indicated by their name).
Close the timeline view by closing its browser window.
12.2 Flow folders Flow folders allow you to manage workflows where documents follow a certain work process
and are forwarded from one user to another for subsequent processing. Each flow folder has a
number of tasks which are to be carried out by the users responsible in the order specified. Flow
folders – like normal folders – may contain objects of all types, e.g. documents, other folders
or discussion forums.
A flow folder is processed by forwarding the folder (and thus all documents contained therein)
to the users responsible for the tasks of the flow folder, one after the other. Depending on the
nature of the process, the flow may branch at a certain step, thereby allowing the user re-
sponsible for the task at hand to choose where to forward the process to.
The users responsible for a current task have access to the flow folder via their personal task
lists. After forwarding, the flow folder disappears from the personal task list and is no longer
accessible, if users are not also members of the flow folder – apart from its specific function-
ality, a flow folder is also a workspace which may have several members.

226 Workflow Management
Independent of the current task under way, the members of the flow folder may view its status,
may change its contents as well as its tasks and may forward the flow folder, if the currently
responsible user doesn’t react.
12.2.1 Creating and changing flow folders
In order to create a new flow folder, you proceed as follows:
• Select File New Flow Folder from the top menu. The action form ‘Add Flow Folder’
has three sections ‘General’, ‘Tasks’ and ‘Automatic Versioning’.
• In section ‘General’ you enter the name and optional tags and description of the new
flow folder.
• In section ‘Tasks’ you enter the tasks of your flow folder.
• Click [Add new task] to create a new task. In the task form, you enter the name of
the task and an optional description.
Under Forward to you determine the next station in the flow of tasks. After
completion of a task, the flow folder is by default forwarded to the next task in the
list. Alternatively, you may enable forwarding the flow folder to another task or one
of several other tasks.
Finally, you select one or more users responsible for the task as you would invite
members to a workspace.
• Fold in the task form by clicking on the triangle in the upper left-hand corner of
the task form.
• Continue to add new tasks by clicking [Add new task].
• In the folded and compact representation, tasks are numbered. If you have chosen
to deviate from the standard processing order, task numbers after the task name
indicate to which task or to which one of several tasks the flow folder is forwarded.
• Use the arrows and to change the order of tasks and to delete tasks already
entered.
• You may change tasks by unfolding a task (click on ) and change all task infor-
mation in the task form: name, description, next station and responsibles.
• In section ‘Automatic Versioning’ you may impose version control on the new flow
folder and its subfolders, so that all documents that are newly created are automatically
put under version control.
• Hit [OK] to create a new flow folder.
After creation of the new flow folder, you can add any documents or other objects to the flow
folder that are important for the tasks defined.
As a member of the flow folder, you may change the flow folder any time. This concerns not
only the contents of the flow folder but also its tasks: you may add new tasks, delete existing
tasks, change the order of tasks or change the specification of existing tasks including the
responsible(s). Changing flow folders is also possible for users responsible for the current task.
• Select Change Properties in the action menu of the flow folder you want to change.
The action form for changing flow folders works exactly like the action form for
creating flow folders described above.
• In section ‘Tasks’, remember to unfold tasks (click on ) in order to change them.

Workflow Management 227
You can also copy flow folders along with their contents and tasks. The state of task execution
is not copied: the status of a copied flow folder is that of a newly defined flow folder before the
first task has been started. The contents of the flow folder, however, are copied in their current
state!
12.2.2 Starting and forwarding flow folders
Starting flow folders
After you have added the relevant material to the flow folder you can initiate the flow of tasks
by forwarding the flow folder to the users responsible for the first task, which is the topmost
task in the list of tasks of the flow folder.
• Select Forward in the action menu of the flow folder. In the action form you may
have two sets of people notified of the forwarding action:
o the manager of the flow folder and the other users responsible for the current task,
o the users of the next task to which the flow folder is forwarded.
When starting a flow folder, the first option concerns the manager (probably yourself)
and the other members of the flow folder who could have also initiated the flow folder
(in the present context, “current task” means starting the flow folder). The second option
concerns the users who are responsible for the first task of the flow folder.
You can add a personal comment to these otherwise automated e-mail messages.
• Confirm by hitting [OK].
This action is the kick-off for the processing of the flow folder and puts the flow folder into the
personal task list of the user(s) responsible for the first task.
Forwarding flow folders
After the flow folder has been started, the flow folder appears in the personal task lists of the
users who have been designated as responsible for the first task. These users may then carry out
their task, e.g. by editing the material of the flow folder or by adding new documents, and
forward the flow folder to its next station. The users responsible for the next task proceed with
carrying out their task and forward the flow folder further down the line. When there is no next
task, forwarding the flow folders ends flow folder processing.
You as a user responsible for a task of a flow folder, find the flow folder in your personal task
list. You may have been notified of the presence of the flow folder via e-mail. After having
carried out your task, you forward the flow folder to its next station as follows.
• Select Forward in the action menu of the flow folder.
• In the action form, you may choose to notify (a) the manager of the flow folder and
other persons responsible for the current task, and (b) the user(s) responsible for the
next task via e-mail of the forwarding. You may add a personal comment, e.g. describing
the result of your activity, to the otherwise automated e-mail notification.
• Under Forward to the next task and its responsible(s) are indicated. If there is more than
one task foreseen as next station in the flow, you may choose to which task the flow
folder is to be forwarded next.
When there is no next task, this is indicated by Complete this flow folder.

228 Workflow Management
By forwarding a flow folder, you declare the current task as completed. The flow folder is
removed from your personal task list as well as of the personal task lists of other users respons-
ible for this task. It will then appear in the personal task list of the user(s) responsible for the
next task. Before forwarding a flow folder, make sure that this task is indeed completed, that,
e.g., a document requested has been uploaded to the flow folder or that a document in the flow
folder has been edited according to the task description.
What you should know about processing flow folders:
o Deleting a flow folder from your personal task list removes you from the set of re-
sponsibles of the current task. You have no longer access to the flow folder.
o Forwarding a flow folder is not only possible for the user(s) responsible for the current
task, but also for the manager and the members of the flow folder. By doing this, the
current task is taken away from the user(s) responsible for the task and the flow folder
is forwarded in its present state to the user(s) responsible for the next task.
o When the last task has been completed, i.e. when there is no next task, the flow of the
flow folder is finished. A finished flow folder may be reused after an eventual update
of its contents or definition by forwarding it again to its first task.
12.2.3 Status and history of flow folders
The current task of a flow folder and the user(s) responsible for this task are shown along with
the description of the flow folder. If these attributes are missing, the flow folder has not yet
been started or its flow of tasks has finished. The info page of a flow folder also shows its tasks.
Here, you can recognize the current task by its responsible(s) shown in bold.
The flow history records all task transitions of a flow folder: who has forwarded the flow folder
when and with what comment. The flow history does not indicate the current task.
• Select Flow History in the action menu of a flow folder to view the flow history.
12.3 Document review Document review is useful in the production of documents that have to meet a certain quality
standard. When a draft document has undergone the necessary editing and is ready for release,
document review ensures the quality intended: the document is reviewed by one or more
persons responsible and is eventually released or rejected. In case of a rejection this process can
be repeated.
In BSCW, document review can be defined for single documents or entire folders by specifying
different review steps and the persons responsible. When the review process is defined for an
entire folder, it is valid for all documents contained in the folder and its subfolders.

Workflow Management 229
Figure 28: Document review (schematic view, two review steps)
After definition of the review process, the review of a document may be started by a member
of the folder where the document is located. The document is put under version control and is
locked for the duration of the review. The reviewers are notified by e-mail when it’s their turn
and can now accept or reject the document. The different steps of the review process are
executed one after another. When a document is accepted in the last review step, it is thus
released. When a document is rejected in any of the review steps, the review process is
terminated. The document may be edited again and may eventually undergo another review.
The initiator of the review process is also notified by e-mail of acceptance or rejection.
12.3.1 Putting documents under review
12.3.1.1 Specifying the review process
You can only put folders or single documents under review, if you are the manager of the
workspace where the folder or document is located.
You put an entire folder and thereby all documents contained therein under review, when you
want to define a standard review process which is to be run through for all documents of a
certain folder. In order to do this you proceed as follows.
• Select Change Properties in the action menu of the folder and go to the section
“Review” of the action form (if this section is missing you are probably not the manager
of the folder). You may also define the review process when creating the folder.
• You may now define your own review process (option ‘Define document review’). If
there is a review process defined for the parent folder you may choose to inherit this
process for the current folder (option ‘Inherit settings’).
• For defining your own process, select the respective option. Next, determine whether
reviewing is to be started automatically whenever a document is uploaded or pasted to
the current folder. An automatic start is indicated, if the folder is not to contain draft
documents, but only final versions of documents intended for release.
• Click on [Add review step].
• Enter an optional description of the review step.
• Determine whether a single reviewer is sufficient to accept a document or whether
all reviewers of a review step have to accept a document, so that it counts as ac-
cepted. Note, that for a rejection a single reviewer is always sufficient.
• Finally select the reviewers responsible for document review of in this step.

230 Workflow Management
Note: Reviewers don’t have to be members of the workspace to which a document be-
longs. They get separate access to documents to be reviewed.
The same user cannot be reviewer in different steps of the review process.
• Repeat the adding of review steps as often as necessary.
• Use the arrows and to change the order of steps and to delete steps already
entered.
• You may change steps by unfolding a step (click on ) and change all step information:
description, single reviewer sufficient or not and responsible reviewers.
• Hit [OK] to define the review process for the folder.
After you have defined the review process for the folder, you can start this review process for
all documents within the folder. The document review will start automatically for all documents
uploaded or pasted to this folder, if so specified in the review process definition. How the review
process proceeds in detail is described further below.
You can also define a review process for single documents, in order to e.g. define a review
process deviating from the standard procedure of a folder. You proceed in a similar way as with
folders.
• Select Change Properties in the action menu of the document and go to the section
“Review” of the action form (if this section is missing you are probably not the manager
of the document).
• Define the review process by selecting the option ‘Define document review’.
• Proceed in the definition of the review process by clicking [Add review step] as
described above for folders.
12.3.1.2 Changing the review process
As manager, you may change the review process of folders and documents any time, but not
for documents just being reviewed.
• Select Change Properties in the action menu of the folder or document and go to the
section “Review” of the action form (if this section is missing you are probably not the
manager of the document).
• You now have several options:
• By selecting ‘No document review’ you determine that the review process of the
parent folder is not taken over.
• By selecting ‘Inherit settings’ you take over the review process of the parent folder
and overwrite an eventual review process specifically defined for the current folder
or document.
• By selecting ‘Define document review’ you choose to define a new review process
or to change an existing one by changing, adding deleting or moving review steps.
• Hit [OK] to confirm the changed review process for the folder or document.
After you have changed the review process of a folder, the changed process is valid for all
documents and folders contained therein with the exception of those documents and subfolders
for which you had already defined an individual document review process. The review process
also remains unchanged for documents already under review when the folder review process is
changed – this holds also when such a document is reviewed again after a rejection.

Workflow Management 231
12.3.2 Having documents reviewed
You can recognize documents for which a review process has been defined by the Review
entry in the action menu. The info page of such a document or its parent folder shows the steps
and responsible reviewers of the associated review process. You can also activate the display
of the status or progress columns in the detail view of the folder using View Columns in the
top menu to detect documents for which a review process has been defined: these documents
will show ‘being edited’ and in these columns.
Every member of the folder where such a document is located may start the review process.
This will usually happen when editing of the document has been finished.
• Select Review Start Review in the action menu of the document. As a shortcut, you
can also click on the icon in the progress column.
• You can add a note to this action that will be appended to the document and that will be
visible for the reviewers.
• Hit [OK] to start the review process.
Now the document is put under version control if this has not already happened and cannot be
edited anymore for the duration of the review. The document appears in the task lists of the
reviewers for the first review step. These reviewers will also be notified by e-mail that a review
is due.
The start of the review process is indicated in the folder listing by a status value of ‘being
reviewed’ and the progress icon . Don’t forget to activate the columns ‘Status’ and ‘Pro-
gress’ using View Columns in the top menu.
After having started the review process, you have to wait for its outcome of which you will be
notified by e-mail. The info page of the document shows status and current review step. After
termination of the review, the status and progress columns will either show ‘released’ and
or ‘rejected’ and . If the document has been released or rejected, the version state will also
be set to ‘released’ or ‘rejected’, respectively.
During the review the document is locked and cannot be edited. As the initiator of the review
or the manager of the folder you may, however, cancel the review process anytime by
• selecting Review Cancel Review in the action menu of the document. You may
append a note to this action, too. The status and progress columns will show ‘cancelled’
and .
After cancellation (and termination) of the review process, the document can be edited again
and the review process may be started for another round
• by selecting Review Restart Review in the action menu of the document.
A review restart is also possible for documents that have already been released, e.g. in the case
that the quality standard of the review process have changed.
If you take part in the review process as a reviewer, you receive an e-mail notification with a
request for review. The documents to be reviewed appear in your task list, which may be viewed
using GoTo Task List in the top menu.
• Select Review Accept Document in the action menu of the document, when you are
satisfied with the document. As a shortcut, you can also click on the icon in the
progress column. Add an optional note to your action. Depending on the process defi-
nition, other reviewers may have to accept the document as well, before it can move on

232 Workflow Management
to the next review step. After the document has been successfully accepted of in the last
review step it has the status ‘released’.
• Select Review Reject Document in the action menu of the document, if you have
objections which you should also summarize in the action note for the editors of the
document. The document gets the status ‘rejected’, can be edited again and eventually
entered into the review process for another round.
• Select Review Delegate Review in the action menu of the document, if you don’t
want to review this particular document yourself. In the action form, you choose one or
more other users who are to review the document on your behalf. You can also add a
note to your action which is transmitted to the other users along with the e-mail request
for review. The delegation is valid for the review of this document, also when the review
is cancelled and restarted.
After you have accepted or rejected the document or have delegated the review, the document
disappears from your task list.

Import/Export 233
13 Import/Export
13.1 Archiving and transferring objects Creating an archive transforms copies of a set of objects (folders, documents, discussion forums
etc.) into one compact document, thus saving storage space and download time. Archives are
especially useful for downloading numerous or big files. You may also encode the resulting
archive document – usually with the aim of further reducing the size of an archive.
On the one hand, you may archive objects in BSCW in order to download the archive to your
local computer, extract the original files there or to send the whole archive per e-mail to some
other person. On the other hand, you may pack local files and folders into an archive (Zip or
Tar), upload the archive to a BSCW workspace and extract the original files and folders. You
may also archive entire BSCW workspaces in order to extract them on the same or some other
BSCW server at a later point in time.
You may optionally also have BSCW metadata archived along with the objects. The optional
archiving of metadata in form of an XML file supplies additional information on the objects
archived and may be evaluated automatically by other programs. When extracting an archive
with metadata on a BSCW server of version 5.0 or later, the objects are restored along with
their metadata.
You should take into account that not all types of objects may be archived and that not all
metadata – such as event history, attachments or ratings for example – may be archived. This
means that archiving and extraction without any loss of information is not possible. Details on
which object types and which metadata may be archived are to be found below in this section.
In order to archive a set of objects you proceed as follows.
• Select (check-mark) the entries of the objects that you want to include in the archive
file. Your clipboard may be helpful in bringing together objects from ‘distant’ locations
that you want to include in one archive file.
• Click in the multi-selection toolbar to bring up the ‘Archive’ form. It includes a list
of the archive types that your BSCW server can produce, and of the encoding methods
that may be applied to the archive file. The archive types and encoding methods offered
depend on the configuration of your BSCW server.
• Change the name of the archive if necessary.
• Click one of the ‘Storage’ options to specify what to do with the archive: download
only, add to clipboard or add to current folder.
• Under ‘Options’ you may activate additional features when creating the archive:
• Check the option ‘Create index file’ if BSCW is to create an index file of the entries
archived. The file index.html is a table of contents of the archive also containing
some metadata like the descriptions of the objects archived.

234 Import/Export
• Check the option ‘Create BSCW archive’ if BSCW is to create an additional file
(.bscw) containing further information on the objects archived (metadata). This
minimizes loss of information when the archive is extracted again on the same or
another BSCW server. Which metadata may be archived at all is explained below.
• Check the option ‘Include document versions’ to have all document versions ar-
chived. If you leave this option unchecked, only the latest version of versioned
documents will be archived.
• Check the option ‘Select character set for file names automatically’ to let BSCW
automatically select the character set for encoding of the file names in the archive.
If you uncheck this option the Unicode character set UTF-8 is selected, which on
some operating systems may cause problems when extracting the archive.
• Select the archive type which fits your local computer platform and eventually select
the encoding/compression to be applied.
• Start archiving by clicking [OK].
With smaller archives, the message ‘Archive created’ appears with a link to the archive
and a list of the objects that could not be archived. The types of objects that cannot be
archived are listed below. If the option ‘download only’ has been selected, the archive
created is offered for immediate download.
With bigger archives, the archiving process is executed in background. In this case, the
message ‘Archiving in progress’ appears and you will receive an e-mail message to your
primary address when archiving has been completed. This message contains a link to
the archive and a list of those objects that could not be archived.
If you have chosen the option ‘download only’ with bigger archives, the archive is
appended to the notification e-mail message or – with very large archives – is stored in
your clipboard; in the latter case the notification contains a link to the archive.
Note: In order to open archives downloaded to a local computer, the necessary extraction pro-
grams have to be installed and the Web browser has to be configured to start these programs
when archive files of the respective file types are encountered. When encoding is used, match-
ing decoding programs have to be installed and the Web browser has to be configured to start
these programs when encoded archive files of the respective file types are encountered.
In order to upload local files to a workspace via the archive mechanism you proceed as follows:
• Create an archive of the files you want to upload on your local computer (Zip or Tar
archives depending on your platform; also an e-mail message with documents attached
will work as an RFC822 archive if available on your BSCW server).
• Upload the archive document to one of your workspaces.
• Extract the original files by invoking Extract in the action menu of the archive do-
cument. This will create the original files as documents in your clipboard.
With smaller archives, a message ‘Archive extracted’ appears along with a list of the
objects extracted.
With bigger archives, you receive a message ‘Extraction in progress’ – extraction is
executed in the background. You will be informed by a further message when extraction
has been completed.
• Files extracted to your clipboard are ready to be pasted to some appropriate place in
your folder hierarchy.

Import/Export 235
Archivable and non-archivable types of objects
The following types of object may be archived:
o folders
o documents
o contact lists and contacts
o calendars and appointments
o blogs and discussion forums with notes
o website folders
o URL objects and RSS folders
Such objects are restituted from an archive in all essential aspects during extraction, if metadata
have been archived as well. With other object types, e.g. tasks or flow folders, many details are
lost when extracted from an archive.
The following types of objects cannot be archived:
o polls, votings and appointment schedulings
o workspace portals and their widgets
Archivable and non-archivable metadata
The following metadata may optionally be archived (option ‘BSCW archive’):
o name, description and further details of objects archived,
o creator and date of creation,
o BSCW specific data like object type and object number.
The following metadata are never archived and are not available after extraction of an archive
in BSCW:
o events and history (apart from creation and the extraction itself),
o members and access rights, i.e. workspaces are archived as ordinary folders,
o attachments and ratings,
o automatic versioning options concerning documents and folders,
o locks and versions of documents,
o participants, reminders, tags and user-defined attributes of appointments,
o start and end dates of projects, phases and tasks,
o responsibles, states and details of tasks and flow folders.
13.2 Converting documents Conversion helps you share documents when not all members of your workspace can use the
same programs. Conversion translates a document from one (typically application specific) file
format into another that you and your colleagues may be able to read and edit more easily than
the original format. The original document remains unchanged.
Note: Like conversion programs on your local computer system, the conversion routines in
BSCW typically cannot translate all features of specific file formats into other formats without

236 Import/Export
losing information. As far as possible, BSCW will advise you of changes or losses to be expec-
ted from a specific conversion.
Converted documents may also be encoded – usually with the aim of reducing the document
size, thus reducing the storage space requirements and the download time. When you use en-
coding, you need a matching decoding program on your local computer in order to make en-
coded documents readable again. Please make sure that all members of your workspace have
the necessary programs installed on their machines and have configured their Web browser to
start these programs when they encounter the file type of an encoded document.
In order to convert a document, you proceed as follows:
• Select Send to Converter from the action menu of the respective document in the
folder listing.
• The ‘Convert’ form shows a list of those formats into which BSCW can convert your
document. Arrows in this list indicate the path of conversion: if an arrow, e.g., points
from format A to format B, conversion to format B will be effected by first converting
a document to format A and from there to format B. The list also briefly indicates the
major types of potential information loss during conversion into the different formats.
• Enter the name of the converted document, select the destination format and/or the en-
coding to be applied and confirm your selection.
• BSCW will write the converted file into your clipboard, from where you may paste it to
the location requested, and then displays a form which lets you immediately download
the document and also summarizes the loss of information during conversion.
Note: Conversion programs are not part of the BSCW server software. They have to be installed
separately by the BSCW administrator. Thus, the selection of conversion programs available
on your BSCW server is determined by your administrator.
13.3 Exporting in PDF You may export listings of many container objects, i.e. objects that can contain other objects,
in PDF format for printing. Examples are folders and similar object types like website folders,
projects or flow folders; here, a listing of the entries is generated, which is similar to ordinary
folder listings. With discussion forums and blogs, the PDF listing also contains the contents of
the notes and blog entries. With contact lists you can specify which contact information is to
appear in the printed listing.
• Select File Send to File (PDF) from the top menu of the object whose listing you want
to export as a PDF document. If this menu entry is missing, you cannot generate a PDF
listing for this type of object.
• With some object types, you can make further specifications in the ‘PDF Export’ action
form. For folders you can choose, e.g., whether to include descriptions into the PDF
folder listing, for contact lists you can select the contact information that is to appear in
the print view of the contact list. For calendars, you can choose from different print
views (month, week, list) and can set the period of time, of which you want to have the
calendar data printed. Hit [OK] to generate the PDF document. Then you will be asked
whether to store the document on your computer or to open it with a suitable application.
• With object types like discussion forums or blogs, where no further specifications are
necessary, the PDF listing is opened in a form and you may print or store it from there.

Import/Export 237
13.4 Exporting folders and documents via FTP The ‘FTP Export’ action allows the transfer of a complete folder tree via FTP to an FTP server,
e.g., the folder tree of the pages of a website stored in BSCW. You proceed as follows:
• Select File Send to FTP Server from the top menu of the folder whose contents (do-
cuments, subfolders) you want to transfer. Empty subfolders will not be transferred.
• The ‘FTP Export’ form requires the following parameters:
o FTP host,
o FTP path on the FTP host,
o FTP user name,
o FTP password,
o the character set for file names on the FTP host (BSCW uses the Unicode character
set UTF-8 for object names).
The FTP parameters (except the password for security reasons) are saved and remain
available for future export operations.
You may also export a single document by selecting Send to FTP Server from the docu-
ment’s action menu. Selecting this action in the action menu of a folder entry has exactly the
same effect as described above.
Note: When repeating an export action to the same FTP server, by default only those documents
are transferred that have been changed since the most recent export operation. By checking the
respective option, you may also require that all documents are to be exported.
13.5 BSCW upload helpers As an alternative to the file upload function of your Web browser, there are two BSCW upload
helpers that you may use to upload documents to your workspaces: the drag & drop uploader
and the document uploader. The use of these uploaders is especially useful for the upload of
large documents or a great number of documents. Both upload helpers offer the following
functionality:
o upload of several files in one operation,
o drag & drop of files into the upload window,
o upload of folders as a compressed archive or as single files,
The document uploader allows for the specification of document type and description before
upload. The drag & drop uploader requires prior activation in your user preferences.
Note: The BSCW Desktop client, an upload helper of former BSCW versions, cannot be in-
voked from the normal user interface any longer. If you need to decrypt files that were encrypted
using the BSCW Desktop client, ask your BSCW administrator – the software is still available.
13.5.1 Drag & drop uploader
For some older browsers, the drag & drop uploader requires the Java runtime environment (Java
plug-in) version 7 and up (also known as Java 1.7). For the current versions of popular browsers
Java is no longer necessary.

238 Import/Export
If you intend to use the drag & drop uploader, you have to activate it first:
• Click Options Preferences in your top menu bar and mark the check box Use
drag&drop uploader for file upload in the ‘General’ section of the action form, sub-
section ‘File Handling’, and confirm with [OK].
After activation, a specific upload icon will be placed prominently in the header section of your
folder pages (see Figure 29). Just drop a file or group of files onto this icon for upload to the
current folder.
If the names of files uploaded do not conform to the restrictions with regard to the use of special
characters in BSCW document names, the names are automatically corrected.
Figure 29: BSCW header with drag & drop uploader installed
13.5.2 Document uploader
The document uploader is automatically started via GoTo Upload Documents in the top menu
when all prerequisites are met (Java-compliant browser and platform). Alternatively, you may
start the document uploader by clicking the icon in the action shortcut bar.
Figure 30: Document uploader

Import/Export 239
The document uploader opens in a new browser window and allows upload of multiple files
into the currently selected folder. Files may be added to the selection by ‘drag & drop’ or by
using the file selection dialog. You may change the name of each file, add a description or
change the file type. Click the icon to start the file upload process.
13.6 Upload per e-mail Sending plain text messages plus attached documents per e-mail to a BSCW folder is an alter-
native to the conventional BSCW upload via BSCW’s Web-based interface by invoking File
New Document .
Please note that the e-mail upload feature has to be explicitly enabled and configured by your
BSCW server administrator. For security reasons, the standard BSCW installation routines do
not enable e-mail upload.
In order to be able to upload text messages and documents to a folder per e-mail, you first have
to open the folder for this kind of upload:
• Select Access Upload per E-Mail in the action menu of the folder that you want to
open for e-mail upload. By default, this action is only available for managers of a folder.
• The form ‘Upload per E-Mail’ lets you specify who is permitted to send e-mail to the
folder:
o only members of the respective folder;
o only registered users of your BSCW server – even if they are not members of the
respective folder;
o everybody, i.e. the folder is open to receive e-mail from the general public.
You may also determine whether attachments are to be automatically extracted from
e-mails sent to the folder. In this case the attachments are separately stored in a subfolder
and you don’t need to extract the attachments manually using the action Extract as
described below.
Furthermore, you may have a message sent to the members of the folder containing the
e-mail address of the folder, normally of the form bscw+folderId@your-bscw-server or
bscw-folderId@your-bscw-server, depending on the e-mail system used for receiving
the messages. We recommend that you wait for this message to arrive before uploading
is started.
Folders open for e-mail upload are indicated by the icon.
To upload an e-mail message plus attachments to the folder opened for e-mail upload, you
proceed as follows:
• Compose an e-mail message, attach documents you want to upload and send the mes-
sage to the address of the folder. This action may of course also be carried out by all
persons that have permission to send e-mail to the folder.
• When the e-mail message has been successfully received in the folder, there will be a
new object of type e-mail message with the subject of the message as its name. If you
have activated the option for automatic extraction, the new object will be a subfolder
with the same name, which contains the message itself and all its attachment as docu-
ments. If the message had no subject, the object will be named ‘Message from user-
name’.

240 Import/Export
• In the former case, the new object is a document conforming to Internet standard
RFC822 containing the text of the e-mail message as well as its attachments (MIME
type message/rfc822).
• Click on the e-mail object to read the message itself and eventual attachments using
a local e-mail program, or
• select Extract in the action menu of the message in order to unpack the attach-
ments of the message. This works exactly as with archives. The message itself and
its attachments are put into a folder, which is named after the subject of the message.
You have several options concerning the place where this folder is to be stored: your
clipboard, from where you may paste it to suitable locations within your
workspaces, or the current folder.
• In the latter case, the new subfolder named after the subject of the message contains the
message itself and all its attachments. The message document is named again after the
subject of the message, the attachments bear the names of the original files. Addi-
tionally, message and attachment names are numbered.
BSCW identifies the sender of an e-mail message by its address. In case of an unknown e-mail
address or missing access rights, the message will be returned with a corresponding note. You
should add further e-mail addresses to your BSCW profile if you want to upload e-mail mes-
sages from several e-mail accounts (see 2.1.4 “Registering an additional e-mail address” on
page 13).
You may disable e-mail upload for a folder at any time:
• Select Access Upload per E-Mail in the action menu of a folder that you have opened
to e-mail upload, activate the option ‘disabled’ in the ‘Upload per E-Mail’ form and
confirm with [OK].
Attention: Think twice before you allow e-mail upload for non-members of a workspace. Al-
lowing all registered users to upload via e-mail may grant this right to thousands of users, most
of which you probably do not know. Granting the right to upload via e-mail to the general public
should be handled with extreme caution, since it opens a folder to junk mail and spamming.
13.7 Briefcase The briefcase is a personal object (like the trash or clipboard) which allows synchronization of
BSCW documents with their counterparts on your local computer. During synchronization, the
documents in your briefcase are compared with the documents on the local computer: more
recent documents on BSCW are transferred to the local computer and vice versa. To access
your briefcase,
• click in the instant access bar or
• select GoTo Case in the top menu.
The briefcase feature is particularly useful for synchronizing documents on your local computer
with the corresponding documents on your BSCW server after having worked offline. You may
copy entire BSCW workspaces to your computer and edit the documents contained in those
workspaces on your local computer, e.g., while travelling. Back home again, you may use the
synchronization feature to update the documents changed locally with the BSCW server (and
vice versa when other members have replaced documents in a workspace with updated ver-
sions).

Import/Export 241
Document synchronization using the briefcase is only available with a professional BSCW
license. OrbiTeam offers an upgrade from the royalty free educational license to the fully
featured professional license. For details, please contact [email protected]. Also, the brief-
case functionality has to be activated by your BSCW administrator.
13.7.1 Briefcase requirements
The briefcase uses a Java applet for the synchronization of local files with the BSCW server.
This applet is loaded into your browser and executed by the Java plug-in. Your browser must
support this plug-in, which is automatically installed when needed. The Java runtime environ-
ment (Java plug-in) version 7 or up (also known as Java 1.7) is used, which is supported by
current Web browsers.
Please note that the briefcase synchronization works only on MS Windows (7 and up).
13.7.2 Working with the briefcase
Briefcase actions are only available in the user levels Advanced and Expert. If necessary, choose
one of these user levels via Options Level to be able to use the briefcase.
In order to have a folder synchronized with your local computer, a link to this folder must be
put into the briefcase:
• Select Link to Case in the action menu of a folder or workspace in order to have this
folder or workspace synchronized with your local computer. The folder itself remains
unchanged at its original location. You cannot put single documents into the briefcase,
but only entire folders.
• You can also put several folders into the briefcase by first selecting these folders and
then clicking in the multi-selection toolbar.
To remove a folder from the briefcase and consequently exclude it from synchronization,
• open the briefcase, e.g. by selecting GoTo Case in the top menu and
• select Delete in the action menu of the folder concerned.
The BSCW briefcase has a local counterpart, the local briefcase folder on your local computer.
After successful synchronization, the local briefcase contains the same documents and folders
as the briefcase on the BSCW server. The location of this local briefcase folder and some other
options concerning synchronization are specified as follows:
• Select Options Preferences in the top menu bar.
• Go to the ‘File Handling’ subsection of the section ‘General’ of the action form.
• In the ‘Synchronization via briefcase’ box, enter the (changed) location of the Local
briefcase folder as a path in the local file system into the respective field.
• Check the option transfer document versions into case to also have the versions of ver-
sioned BSCW documents transferred to your local briefcase folder. The versions of a
document docname will be placed into a subfolder docname.versions of the local brief-
case folder. Note that by default only up to three of the latest versions of a document
are transferred. If you are not happy with this restriction, contact your system adminis-
trator. If this option is not activated, only the current version of a versioned BSCW
document is transferred to the local briefcase folder during synchronization.
• Check the option expand document names by default extension to have document names
expanded by standard file extensions when transferred to the local briefcase folder. A

242 Import/Export
BSCW document docname of file type ‘Adobe PDF’, e.g., will be transferred to the
local briefcase as docname.pdf.
You need not create the folder for the local briefcase; it will be created automatically during
the first synchronization.
Note: When you change the location of the local briefcase via Options Preferences as described
above, the old briefcase folder will not be taken into account when the next synchronization
takes place, and documents changed in the old briefcase will not be transferred to the BSCW
server. To prevent any loss of data you should change the path to the local briefcase folder only
after a successful synchronization. You may want to delete the old briefcase folder from your
local computer. During the next synchronization, the new local briefcase folder will be created.
In order to synchronize the contents of the briefcase with your local computer, you proceed as
follows:
• Open the briefcase, e.g. by selecting GoTo Case in the top menu.
• Select Synchronize in the context menu of your briefcase. Alternatively, you may
click the icon in the shortcut bar.
• A new window opens for carrying out the synchronization. The changes in the local
system and in BSCW are calculated and shown in a preview titled ‘Changes’; a progress
bar in the lower left-hand corner indicates the progress of the calculation process.
• You may now select the folders you want to synchronize. The column ‘Action’ shows
for each folder, whether changes are to be transferred from the local PC to BSCW (
) or the other way round ( ) or whether changes are to be transferred in both
directions ( ). A click on a particular folder shows the respective changes in detail
(in the ‘Info’ box at the bottom). Click on the action icon of a folder line, to restrict or
skip synchronization altogether ( ) for this folder using the respective drop-down
menu.
• Hit [OK] to start the synchronization process. Depending on the amount of data stored
in the briefcase and the number of changes in documents, the synchronization may take
some minutes. Please wait until the progress bar has reached 100%.
• When the synchronization has been completed, a list of the folders and documents which
have been transferred is shown. The following icons are used:
Information about an action carried out during synchronization.
Warning about an action carried out during synchronization.
An error occurred during synchronization.
A document has been transferred from the BSCW server to the local briefcase
folder.
A document has been transferred from the local briefcase to the BSCW server.
A synchronization conflict has been detected (a document may have been version-
ed in BSCW).
• You may then close the window by using the button provided.

Import/Export 243
During synchronization, documents may be transferred from the BSCW server to the local
briefcase folder and vice versa from the local computer to the BSCW server. The following has
to be taken into account:
o Only folders and documents are synchronized, other BSCW objects such as notes, cal-
endars or URLs are not.
o Documents and folders in the BSCW briefcase, which are not present in the local brief-
case yet, will be transferred to the local briefcase.
o Documents and folders created in the local briefcase are uploaded to the according
workspace in the BSCW briefcase during the next synchronization (subject to access
control).
o You must not create documents or folders at top level in the local briefcase, but only
within the already existing folders. New top-level folders must first be created in your
BSCW briefcase using Link to Case . Otherwise you will get an error during syn-
chronization.
o Documents and folders, which have been deleted within the BSCW system are deleted
from the local briefcase during synchronization (given they have not been edited lo-
cally). This also holds when documents or folders have been renamed within BSCW.
o Documents from the BSCW briefcase which are already available in the local briefcase,
but have not been changed there, are transferred to the local briefcase if they have been
changed on the BSCW server since the last synchronization.
o Documents from the local briefcase, which have been edited locally, are transferred to
the corresponding folder in the BSCW briefcase. An already existing document on the
BSCW server is processed as follows:
o The document will be replaced if it is not under version control and has not been
changed in BSCW.
o A new version will be created if the document is already under version control.
o If the document has been changed also in BSCW (conflict), a new document version
will be created. If necessary, the document is put under version control first; the
local document with its changes is uploaded to BSCW as the new version with an
according version comment. Such conflicts are also indicated in the result list.
To resolve a conflict, you must decide which document change has priority. If the change in
BSCW has priority, you should delete the last document version in BSCW (this is the one from
the local briefcase) and also delete the document from the local briefcase to prevent another
conflict. If the change on your local computer has priority, no action is necessary in BSCW (the
document changed locally corresponds to the current version on BSCW). To avoid conflicts
you should lock documents in your BSCW briefcase if you plan to edit them locally.
13.8 Outlook synchronization BSCW supports the synchronization of contacts and appointments with corresponding data in
Microsoft Outlook, i.e. BSCW users working on a Windows platform may synchronize their
BSCW contact lists and personal or group calendars with an Outlook client on their local com-
puters. This way the appointments of a BSCW group calendar can be downloaded to a local
computer, the local contact data of workspace members can be collected into a BSCW contact
list of the workspace, and contacts and appointments alike may be kept up-to-date in BSCW
and Outlook via periodical Outlook synchronizations.

244 Import/Export
Outlook synchronization works on the basis of single contact lists and calendars, each of which
are synchronized separately. To this end, a BSCW contact list or calendar is associated with a
contact folder or calendar in Outlook. In order to synchronize a contact list or calendar with its
counterpart on your local computer, select Synchronize in the action menu of the contact list
or calendar. Alternatively, you may also open the contact list or calendar and select in the
action shortcut bar.
During synchronization, the contacts or appointments in your contact list or calendar are
compared with the contacts and appointments in the corresponding Outlook folder on your local
computer and the following actions are carried out:
o Recently created contacts or appointments in BSCW are transferred to the local Outlook
folder and vice versa.
o Contacts or appointments deleted in BSCW are also deleted from the local Outlook
folder and vice versa.
o Modifications of contacts or appointments in BSCW since the last synchronization are
transferred to Outlook and vice versa.
o Conflicts, i.e. modifications of contacts or appointments and their counterparts in both
BSCW and Outlook since the last synchronization, must be resolved manually by giving
priority to either the BSCW or the Outlook modifications.
Please note that Outlook synchronization is only available with a professional BSCW license.
OrbiTeam offers an upgrade from the royalty free educational license to the fully featured
professional license. For details, please contact [email protected]. Also, Outlook synchro-
nization has to be activated by your BSCW server administrator.
13.8.1 System requirements for Outlook synchronization
First of all, note that Outlook synchronization works only on MS Windows (7 and up) with
Outlook (2010 and up).
The Outlook synchronization is implemented as a Java applet. This applet is loaded into your
browser and executed by a special Java plug-in. You need the Java runtime environment (Java
plug-in) version 7 or up (also known as Java 1.7), which is supported by all current browsers.
13.8.2 Using Outlook synchronization
The first step in using Outlook synchronization is to establish the association between a contact
list or calendar in BSCW and the corresponding contact folder or calendar in Outlook on your
local computer.
• Open the contact list or calendar which you want to synchronize with a local Outlook
folder.
• Select File Synchronize in the top menu or click on in the action shortcut bar to
start the synchronization applet.
• After start-up, the applet will show a separate window in which you may select an Out-
look folder to associate with the current contact list or calendar for synchronization
purposes. You may either select an existing Outlook folder or create a new empty one.
You create a new folder by first selecting an existing folder as parent folder, then en-
tering the name of the new folder and finally hitting [Create Folder].

Import/Export 245
Note: The Outlook synchronization has been designed to access the Outlook application
in a desktop environment; you cannot use it to access a MS Exchange Server. Con-
sequently, you need to select here a contact list or a calendar from a local Outlook
Personal Store (PST).
The folder selection window will only come up when there is no Outlook folder associated with
the current BSCW contact list or calendar. This is the case when Outlook synchronization is
first started for a contact list or calendar or when the associated Outlook folder is not accessible,
e.g. has been deleted meanwhile.
The association between a BSCW contact list or calendar and an Outlook folder is valid for the
lifetime of the associated objects, i.e. until the BSCW object or the Outlook folder is destroyed
(in Outlook: deleted from the Deleted Items folder).
Note: Although it is possible to associate two BSCW contact lists or calendars with the same
Outlook folder, we strongly discourage you to do this. Subsequent synchronization will lead to
two different BSCW contact lists or calendars with the same contents which might be disturbing
and may lead to unnecessary conflicts.
During the initial synchronization, contacts and appointments of the BSCW contact list or
calendar will be downloaded to the associated Outlook folder, while the contacts or appoint-
ments of the Outlook folder, if any, are uploaded to the corresponding BSCW object. The
corresponding actions are indicated in the main window of the synchronization applet (see the
figure below). As a result, the associated objects on both sides contain the same contacts or
appointments.
Figure 31: Main window of the Outlook synchronization applet
Important: You should consider the following points when synchronizing appointments:
o Set your personal time zone via Options Profile Change in the ‘Time Zone’ section. This
ensures that “floating” appointments, i.e. BSCW appointments with no time zone set (the
default), are transferred correctly to your associated Outlook calendar.
o Outlook supports less sophisticated recurrence rules for appointments than does BSCW.
Consequently, only BSCW appointments with one recurrence rule and no exception rules
can be transferred to Outlook during synchronization. There are further restrictions on the
recurrence rules that may be transferred to Outlook; you will be advised via according error

246 Import/Export
messages. To be on the safe side, have a look at the recurrence patterns that are possible in
Outlook.
o Modifications of individual appointments belonging to a whole series of recurring appoint-
ments cannot be transferred from one side to the other during synchronization.
Further kinds of actions may become necessary during the synchronizations following the
initial one: contacts or appointments may have been modified or deleted and more contacts or
appointments may have been added on one side or both. Consequently, contacts or appoint-
ments may need to be updated, deleted or created on one side or the other. The necessary syn-
chronization actions are listed in the main window of the synchronization applet as shown in
the figure above.
The synchronization actions are distinguished using specific icons.
A new contact or appointment has been created in Outlook; a corresponding object
is to be created in BSCW via transfer of the object from Outlook to BSCW.
An existing contact or appointment has been modified in Outlook; the correspond-
ing object in BSCW is to be updated via transfer of the object from Outlook to BSCW.
A new contact or appointment has been created in BSCW; a corresponding object
is to be created in Outlook via transfer of the object from BSCW to Outlook.
An existing contact or appointment has been modified in BSCW; the corresponding
object in Outlook is to be updated via transfer of the object from BSCW to Outlook.
An existing contact or appointment has been deleted in Outlook; the corresponding ob-
ject in BSCW is also to be deleted.
An existing contact or appointment has been deleted in BSCW; the corresponding object
in Outlook is also to be deleted. Note that concurrent deletion of two corresponding
contacts or appointments is not specifically indicated because no synchronizing action
is necessary in this situation.
An existing contact or appointment has been modified in both BSCW and Outlook;
the resulting conflict is to be resolved manually by giving priority to one of the modi-
fications.
An appointment cannot be transferred from one side to the other. The reason for the
transfer problem is displayed in the lower part of the applet window when the specific
item is clicked on. In most cases, transfer problems are caused by complex recurrence
rules of BSCW appointments or changes in individual appointments belonging to a
series of recurring appointments, both of which is not supported by the synchronization
process.
Transfer problems have to be handled manually outside the synchronization process, e.g. by
simplifying a complex BSCW recurrence rule or by undoing a modification of an individual
appointment belonging to a series of recurring appointments in Outlook.
The other situation that cannot be handled automatically during synchronization is the conflict.
Concurrent modifications of two corresponding contacts or appointments since the last
synchronization constitute a conflict. The nature of the modifications is not taken into account,
only the point in time when the modifications were carried out. Also, modification of an object
on the one side and deletion of the corresponding object on the other side is regarded as a
conflict. Consequently, conflicts may not be resolved by deleting the object concerned on one
side or the other. Also, undoing the modification on one side or the other will not work because
this would be regarded as an additional modification again. Conflicts may only be resolved by
giving priority to one of the modifications and having the object on the other side updated

Import/Export 247
accordingly. Of course, no one will force you to resolve a conflict or to remove a transfer
problem, you will only be remembered that there are problems, every time you do an Outlook
synchronization.
You have several possibilities to control the synchronization process:
• In the upper part of the applet window, you may select certain groups of synchronization
actions for display in the main list by checking or unchecking the respective check
boxes. Actions that are not displayed in the main list will not be executed during
synchronization. This way, e.g., you may forbid the deletion of contacts in your Outlook
folder.
• You may individually determine the synchronization action to be taken for the items in
the main list of the applet window. Clicking on the action icon of an item will display a
drop-down menu with the actions possible, from which you may select the action to be
executed for this item. This is particular useful for the manual resolution of conflicts or
the exemption of individual items from the synchronization by selecting the null action
for these items, which is symbolized by the icon.
• You may also set the synchronization action for a whole group of items that you have
selected manually in the main list by clicking on the items. After selection of the items,
a right-mouse click will display a pop-up menu with the actions possible for all items in
the group. This is particular useful for resolving a whole group of conflicts in the same
manner. Attention: If your selection of items is too heterogeneous, the null action (
) may be the only action permissible for all items in the selection.
After you have decided which objects to synchronize and how, you finally start the actual
synchronization by hitting the [OK] button in the synchronization applet window. The progress
bar in the lower part of the applet part will inform you about the progress of the synchronization
process.
Attention: If the synchronization process comes to an in-between halt, the reason may be that
you are asked in a separate pop-up dialog to allow the access to Outlook’s e-mail addresses by
the synchronization applet. This is a built-in security check against virus attacks. To continue
the synchronization process you have to allow the access for the applet. There is a freeware
program available that will do this automatically on your behalf.
(http://www.contextmagic.com/express-clickyes/)
13.9 WebDAV WebDAV stands for “Web-based Distributed Authoring and Versioning”. It is a set of exten-
sions to the HTTP protocol which allows users to collaboratively edit and manage files on
remote Web servers. Using WebDAV, it is possible to upload files to a server or to rename files
on the server.
BSCW supports the WebDAV protocol as a server so that you may use a WebDAV client, i.e.
a client application also supporting the WebDAV protocol, to navigate through your work-
spaces, open and edit documents, write them back to the server, transfer them from one work-
space to another etc. Please note that WebDAV support must be activated for your BSCW
server. If in doubt, ask your BSCW administrator.
The most relevant applications that support WebDAV include Microsoft’s Internet Explorer,
Windows Explorer and the Office package. In the following, we will concentrate on these ap-
plications (for other applications that also support WebDAV see www.webdav.org). They offer
the following advantages if you use them for accessing BSCW via WebDAV:

248 Import/Export
o Your BSCW workspaces are represented as Web folders in Internet Explorer and Win-
dows Explorer. You may browse your workspaces as is usual in Windows Explorer.
o You may copy, paste or delete the BSCW objects represented using ‘drag & drop’ or
right mouse clicks.
o You may open Microsoft Office documents directly within a Web folder – the corre-
sponding Office application is launched automatically. After having edited the docu-
ment, you may write the document back to the BSCW server by using ‘Save’ or ‘Save
As...’ There is no need for a local save and subsequent upload.
In order to connect to a BSCW server using WebDAV on Windows 7, you first have to enable
the WebClient service that is disabled by default. You check the status of this service as follows.
• In the start menu, select “Administrative Tools” and click “Management”; in the sub-
sequent window, double-click “Computer Management”.
• In the details pane, double-click “Services and Applications”.
• Double-click “Services”.
• Scroll down, right-click “WebClient”, and click “Properties”.
• In the “Startup type” list box, click “Automatic”.
• Click [Apply].
• In the “Service status” section, click [Start].
• Click [OK].
To actually connect to a BSCW server you then proceed as follows.
• Open the folder “Computer” (either by double-clicking the respective icon on your
desktop, from within Windows Explorer or from the start menu).
• Open the context menu by right-clicking an empty space of the folder window and select
“Add Network Location”.
• In the “Add Network Location Wizard” click [Next].
• Confirm the selection “custom network location” by clicking [Next].
• Enter the full URL of your BSCW server into the field “Internet or network address”
(e.g. https://your-bscw-server/bscw/bscw.cgi) and confirm by clicking [Next].
• Enter a name of the new network location (e.g. “BSCW server”) and click [Next].
• Confirm twice with [Next].
• Enter the URL of your BSCW server (e.g. http://your-bscw-server/bscw/bscw.cgi) and
confirm with [Next].
• You will then be prompted for your BSCW user name and password.
• Enter a name for the new network location (e.g. “my BSCW server”) and click [Next].
• Activate the option “Open this network location after clicking [Finish]” and click
[Finish].
If the new network location has been successfully created, it will appear in the Windows folder
“Computer” and allows access to your BSCW server. Your home folder (‘Workspaces of your-
user-name’) is accessible via the alias folder ‘home’. You may now browse your workspaces
using the Windows Explorer, and upload or download files (using copy and paste or drag &

Import/Export 249
drop). Violations of restrictions concerning the use of special characters in BSCW document
names are automatically corrected.
In case the method described above does not work (e.g. password dialog keeps popping up),
please consult the FAQ (frequently asked questions) on WebDAV at the BSCW website
(http://www.bscw.de) for hints on trouble-shooting.
The Microsoft implementation of WebDAV is not fully compliant with the WebDAV standard,
which leads to the following problems:
o Dialog boxes and error messages are sometimes misleading.
o Blanks and special characters in BSCW object names may not be represented correctly
in the Web folder view of Internet Explorer and Windows Explorer.
o The superior folder is shown in the current folder.
o Drag & drop within the same folder results in a copy operation.
Attention: In order to close the WebDAV connection to your BSCW server, it is not sufficient
to close the browser window or to remove the WebDAV folder – the network connection is still
active! Now, if other people want to set up WebDAV under their own user name, still your
private workspaces will open up in spite of the other person using the correct user name and
password. To avoid this, log off from Windows (“start > Shut Down... > Log off your-user-
name”) and log in again. This is needed, when other people have access your local system.


Index 251
Index
A
access 40
access rights 86
access rights table 88
action menu 7, 40
action shortcut bar 6, 22
actions
on a single object 7, 40
on selected objects 7, 38
add community 194
add entry (blog) 111
add role 90
additional e-mail address 13
address book 43, 99
changing entries 100
export of entries 99
filtering and sorting 101
import of entries 99
new entry 99
structuring 101
address of a BSCW object 143
admission policy 193
advanced level of proficiency 64
alias 13
annotation 108
anonymous access 51, 52
apply view to all similar 68
appointment 176
add 176
attach document or URL 180
cancel 180
change 177
confirm or decline 180
delete and destroy 178
export from calendar 180
import to calendar 180
synchronization with Outlook 245
appointment reminder 176
appointment scheduling 32, 182
change 182
create 182
fix date 186
reset 186
suggest others 185
vote 184
archive 233
assign (task) 216
assign role 89
attach 40
document or URL or note to appointment
180
document or URL to note 107
note to an object 108
attributes (metadata) 72
audit trail (task) 210
authentication
alternative methods 16
automatic versioning 140
availability of other users 165
awareness 56
B
banner 22, 71
beginner level of proficiency 64
blog 31, 108
change 109
create 109
blog comment 111
bookmarks in BSCW 43, 47
branch of a version 139
briefcase 43, 241
requirements 241
browser configuration 19, 64
BSCW element (website folder) 147, 151
BSCW event feed 173
BSCW home page 2
BSCW presence 165
BSCW RSS event feed 54, 172
BSCW server
operating your own 8
registration at 11
BSCW user interface 21
C
cache (Web browser settings) 19
calendar 32, 43, 175
actions 180
options 181
synchronization with Outlook 245
views 178
cancel (task) 216

252 Index
case 43, 241
catch up on events 55
change 40
change event 55
change password 12
changes inside event 55
check-mark an entry 38
choose user name 11
clipboard 48
close BSCW session 15
columns of a folder view 68
community 33, 193
compact view 68
compression 233
configuration of event notification 56
contact
change 97
create 95
export 97
filter 97
import 97
original 96, 99
sort 97
contact details 17
contact list 30, 95
synchronization with Outlook 245
contact users 98
content view 25, 68
contents of a folder 27
context menu 22
contractor 205
conversion of documents 235
copy 48
copy from template 143
create event 55
create multiple subtasks 219
create objects 34
current selection 38
customization 64
customize view 68
cut 48, 91
D
daily e-mail report 56
deadline (task) 205
default notification options 56
delete 50, 91
deregistration 13
description
show and hide 68
desktop widgets
install 113
usage 114
destroy 50, 91
destroy user account 13
details view 25, 68
mobile portal 121
direct editing of documents 131
direct e-mail notification 54, 56
discussion forum 29, 31, 105
add 105
change 105
disk space control 36, 91
document 28
archive 233
direct editing 131
extract from archive 233
freeze 136
FTP export 237
import 233
lock 36, 136
put under review 229
resubmission 135
synchronization with local computer 241
upload per e-mail 239
valid name 36
document conversion 235
document preview 26
document review 228
change 230
specify 229
start 231
document under version control 29, 137
document upload 6, 36, 116, 237
document uploader 238
drag & drop uploader 238
Dublin Core 72
E
edit copy 147
edit role 90
editing documents on BSCW server 131
e-mail alias 13
e-mail message 31
send 101
e-mail report (periodic) 54, 56
encoding 36, 233
entry of a blog 111
event icons 55, 56
event notification 172
event services 54, 56
event types 55

Index 253
events 54
catch up 55
expert level of proficiency 64
export
address book entries 99
appointments 180
contacts 97
events 54
in PDF 236
metadata attributes 76
poll results 192
user entries 82
via FTP 237
voting results 192
website folders 164
extract from archive 233
F
fetch URL 30
filtering
calendar 178
folder view 68
task list 212
final date (appointment scheduling) 186
flow folder 33, 225
add 226
change 226
copy 226
forward 227
history 228
start 227
status 228
folder 2
anonymous access 51, 52
create 34
freeze 136
FTP export 237
publish 51
upload per e-mail 239
valid name 34
folder page 2
folder portal 47
folder view
simplified 126
folder views 25, 68
foldout 68
forward (task) 216
forward flow folder 227
freeze
documents 136
folders 136
from template (copy) 143
G
group calendar 175
group history 82
groups as members of workspaces 84
H
header section of a folder page 22
hide group 84
history
of document versions 140
of events 54
of flow folders 228
home folder 5, 43
home page (website folder) 149
HTML document
create on BSCW server 132
edit 132
I
iCalendar format of appointments 180
ignore list 63
import
address book entries 99
appointments 180
contacts 97
document 233
folder 233
individual view 68
info page 77
info page of a user 17, 77, 82
input data (task) 205
instant access bar 5, 22
instant messaging 17
interface for mobile devices 118
Internet address
copy 40
show 40
invite member 38, 79, 83
J
join community 194
L
language of user interface 17, 65
layout page (website folder) 149
LDAP directory 79
level of proficiency 64
254 Index
linear business process 225
link 40, 48
links between documents (website folder)
147
list of contents of a folder 27
list view
mobile portal 121
live bookmarks 173
lock document 36, 136
log in to BSCW 14
first time 14
when password forgotten 12
log out 15
M
member
invite 79, 83
re-invite 83
remove 83
member group 82, 84, 200
members of a workspace 82
members’ page 82
membership administration 38, 83
metadata 72
metadata attributes
export 76
internal keys 73
use 73
metadata profile 72
assign 75
change 76
define 74
share 76
microblogging 167
as widgets 171
creating messages 168
deleting messages 168
display 167
liking messages 169
mobile interface 171
my network 168
notification of new messages 56, 170
personal microblog 171
replying to messages 169
searching for messages 170
social network 167
mobile access to BSCW 119
mobile devices 118
mobile login to BSCW 119
mobile portal 120
actions 121
address book 124
bookmarks 125
calendar 124
case 125
clipboard 124
communities 125
details view 121
domains and functions 122
events 124
home folder 122
list view 121
microblogging 125
preferences 126
search 125
task list 124
trash 124
user interface 121
workspaces 122
more info 77
move event 55
multiple subtasks 219
multi-selection toolbar 7, 22, 38
my communities 194
N
navigation bar 22
new in BSCW version 5.1 9
note 29, 105
add 106
delete 108
edit 106
move 108
reply to 106
note attachments 107
notification options
default setting 56
on object level 58
O
object (task) 216
object address 143
object in BSCW 3
object types 28
online status 165
open 26
OpenID 16
options
calendar 181
personal 17
preferences 65

Index 255
other communities 194
Outlook synchronization 244
Outlook synchronization requirements 245
output data (task) 205
owner 89, 91
ownership 48, 91
P
parallel BSCW sessions 16
password
change 12
initial setting 11
replace forgotten password 12
paste 48, 91
PDF export 236
pending membership 82
periodic e-mail report 54
personal portal 44
change 45
create 45
details view 46
use 46
personal profile 17
personal task list 43, 212
personal templates 43, 47
personal workspace 5, 43
phase (project) 33, 201
change 204
create 204
poll 32, 187
add 188
change 190
reset 192
respond 191
results 192
portal
change 45
details view 46
for folders 47
mobile 120
personal 44
use 46
preferences 65
presence in BSCW 165
preview (documents) 26
primary e-mail address 13, 17
processing tasks 214
proficiency level 64
profile (personal) 17
progress
project 203
task 213
progress aggregation 213
project 33, 201
change 204
create 202
public access 38, 51
public entry page 53
public space 38, 51, 52
publish folders 51
Q
query 58
edit 63
questionnaire 187
quota system 36, 48, 91
R
rate document or URL 40
rate URL 30
read event 55
recent events 55
recurring appointments 176
delete 178
redo search 63
register
additional e-mail address 13
as a BSCW user 11
registration 11
re-invite member 82, 83
reject (task) 216
relative links to BSCW objects 144
remove member 83
reopen (task) 216
replace 40
reply to a note 106
request admission (community) 194
request correction (task) 216
requestor 205
requirements for using BSCW 1
reset
appointment scheduling 186
poll 192
view 68
voting 192
restart
task 216
resubmission of documents 135
review (of documents) 228
revise document 137
role 86

256 Index
add 90
assign 89
edit 90
role concept 87
role inheritance 87, 91
RSS event feed 56, 172
RSS feed 31, 111
S
search 58
search field 22, 58
search folder 31, 58
save 63
search form 59
search query 58
select all 7, 22
select an entry 38
send
BSCW objects 102
e-mail message 101
SMS 98, 101
send to 40
set lock 36, 136
shared objects 2, 3
shared workspace 79
create 79
shortcuts 6
show contents of a folder 27
show group 84
show lock 136
simplified user interface 126
creating objects 128
deleting objects 128
folder view 126
object attributes 128
search 129
sending documents 128
SMS 98, 101
sort
entries of a folder 27, 68
notes by thread 105
start BSCW session 14
start flow folder 227
static copy 164
status of tasks 216
steal lock 136
style definition (website folder) 149
adapting to server upgrade 149
style sheets 64
subtask 219
change 223
create 221
link to workflow 220
sequence of 222
synchronize
appointments 244
contacts 244
documents 241
T
tag 77
tag search 58
Tar archive 28, 233
task 33, 201
accept 214
assign 216
cancel 216
change 210
commit 214
complete 214
copy 210
create 207
exception handling 216
finish 214
forward 216
object 216
of a flow folder 226
processing 214
reject 216
reopen 216
request 211
request correction 216
restart 216
start 211
state 216
structuring 219
uncommit 216
view 210
withdraw request 216
withdraw results 216
task list (personal) 43, 212
template 142
template folder 32, 142
terminate BSCW session 15
text document
create on BSCW server 132
edit 132
text element (website folder) 163
timeline 225
to address book 99
to community 194
top menu bar 6, 22

Index 257
trash 50
U
uncommit (task) 216
undelete 50
unfreeze
document 136
folder 136
unlock document 136
unselect all 7, 22
upload helpers 237
upload of documents 36, 237, 239
upload of multiple documents 237
upload per e-mail 239
URL
fetch 30
rate 30
verify 30
URL object 30
URL of a BSCW object 143
user account
destroy 13
user contact 96
user info page 17, 77, 82
user interface language 17, 65
user interface of BSCW 21
user level 64
user name 11
user profile 17, 82
user search 59
user-defined workflow 201, 219
V
valid document names 36
valid folder names 34
vCard format 82, 97, 99
verify URL 30
version
compare 140
destroy 140
manage 140
revise 137
version branch 139
version control of documents 137
revoke 140
version history 140
version info 138
version number 137, 138
version state 138
versioned document 29
views of a folder 68
visualization as timeline 225
voting
change 190
contact participants 191
create 189
reset 192
respond 191
results 192
W
Web info on BSCW 2
Web log 108
web view 145
WebDAV 248
website folder 32, 145
BSCW element 147, 151
change 149
create 146
export 164
home page 149
layout page 149
new page 147
style definition 149
text element 163
website management 145
weekly e-mail report 56
widget (portal)
change 45
create 45
withdraw request (task) 216
withdraw results (task) 216
workflow 201, 219
of subtasks 220
process 223
workspace 79
being invited 81
create 14, 34
embedding one into another 85
leave 81
move 85
Z
Zip archive 28, 233
Zope external editor helper application 134