Beginning Access 2003 VBA - mohamadbinabdullah
545
-
Upload
khangminh22 -
Category
Documents
-
view
6 -
download
0
Transcript of Beginning Access 2003 VBA - mohamadbinabdullah

P1: IML/FFX P2: IML/FFX QC: IML/FFX T1: IML
WY044-FM WY044-Gosnell WY044-Gosnell-v2.cls August 13, 2004 15:34
Beginning Access 2003 VBA
i

P1: IML/FFX P2: IML/FFX QC: IML/FFX T1: IML
WY044-FM WY044-Gosnell WY044-Gosnell-v2.cls August 13, 2004 15:34
ii

P1: IML/FFX P2: IML/FFX QC: IML/FFX T1: IML
WY044-FM WY044-Gosnell WY044-Gosnell-v2.cls August 13, 2004 15:34
Beginning Access 2003 VBA
Denise Gosnell
Wiley Publishing, Inc.
iii

P1: IML/FFX P2: IML/FFX QC: IML/FFX T1: IML
WY044-FM WY044-Gosnell WY044-Gosnell-v2.cls August 13, 2004 15:34
Beginning Access 2003 VBAPublished byWiley Publishing, Inc.10475 Crosspoint BoulevardIndianapolis, IN 46256www.wiley.com
Copyright c© 2004 by Wiley Publishing, Inc., Indianapolis, Indiana
Published simultaneously in Canada
Manufactured in the United States of America
10 9 8 7 6 5 4 3 2 1
No part of this publication may be reproduced, stored in a retrieval system or transmitted in any form or by any means,electronic, mechanical, photocopying, recording, scanning or otherwise, except as permitted under Sections 107 or 108of the 1976 United States Copyright Act, without either the prior written permission of the Publisher, or authorizationthrough payment of the appropriate per-copy fee to the Copyright Clearance Center, 222 Rosewood Drive, Danvers, MA01923, (978) 750-8400, fax (978) 646-8600. Requests to the Publisher for permission should be addressed to the LegalDepartment, Wiley Publishing, Inc., 10475 Crosspoint Blvd., Indianapolis, IN 46256, (317) 572-3447, fax (317) 572-4355,E-Mail: [email protected].
LIMIT OF LIABILITY/DISCLAIMER OF WARRANTY: THE PUBLISHER AND THE AUTHOR MAKE NO REPRE-SENTATIONS OR WARRANTIES WITH RESPECT TO THE ACCURACY OR COMPLETENESS OF THE CONTENTSOF THIS WORK AND SPECIFICALLY DISCLAIM ALL WARRANTIES, INCLUDING WITHOUT LIMITATION WAR-RANTIES OF FITNESS FOR A PARTICULAR PURPOSE. NO WARRANTY MAY BE CREATED OR EXTENDED BYSALES OR PROMOTIONAL MATERIALS. THE ADVICE AND STRATEGIES CONTAINED HEREIN MAY NOT BESUITABLE FOR EVERY SITUATION. THIS WORK IS SOLD WITH THE UNDERSTANDING THAT THE PUBLISHERIS NOT ENGAGED IN RENDERING LEGAL, ACCOUNTING, OR OTHER PROFESSIONAL SERVICES. IF PROFES-SIONAL ASSISTANCE IS REQUIRED, THE SERVICES OF A COMPETENT PROFESSIONAL PERSON SHOULD BESOUGHT. NEITHER THE PUBLISHER NOR THE AUTHOR SHALL BE LIABLE FOR DAMAGES ARISING HERE-FROM. THE FACT THAT AN ORGANIZATION OR WEBSITE IS REFERRED TO IN THIS WORK AS A CITATIONAND/OR A POTENTIAL SOURCE OF FURTHER INFORMATION DOES NOT MEAN THAT THE AUTHOR OR THEPUBLISHER ENDORSES THE INFORMATION THE ORGANIZATION OR WEBSITE MAY PROVIDE OR RECOM-MENDATIONS IT MAY MAKE. FURTHER, READERS SHOULD BE AWARE THAT INTERNET WEBSITES LISTEDIN THIS WORK MAY HAVE CHANGED OR DISAPPEARED BETWEEN WHEN THIS WORK WAS WRITTEN ANDWHEN IT IS READ.
For general information on our other products and services or to obtain technical support, please contact our CustomerCare Department within the U.S. at (800) 762-2974, outside the U.S. at (317) 572-3993 or fax (317) 572-4002.
Wiley also publishes its books in a variety of electronic formats. Some content that appears in print may not be availablein electronic books.
Library of Congress Cataloging-in-Publication DataGosnell, Denise.
Beginning Access 2003 VBA / Denise Gosnell.p. cm.
Includes index.ISBN 0-7645-5659-2
1. Microsoft Access. 2. Database management. 3. MicrosoftVisual Basic for applications. I. Title.
QA76.9.D3G68 2004005.75′65—dc22
2004015762
Trademarks: Wiley, the Wiley Publishing logo, Wrox, the Wrox logo, Programmer to Programmer and related tradedress are trademarks or registered trademarks of John Wiley & Sons, Inc. and/or its affiliates, in the United States andother countries, and may not be used without written permission. All other trademarks are the property of theirrespective owners. Wiley Publishing, Inc., is not associated with any product or vendor mentioned in this book.
iv
eISBN: 0-7645-79029

P1: IML/FFX P2: IML/FFX QC: IML/FFX T1: IML
WY044-FM WY044-Gosnell WY044-Gosnell-v2.cls August 13, 2004 15:34
About the Author
Denise Gosnell is a software attorney with Woodard, Emhardt, Moriarty, McNett & Henry LLP, aworldwide intellectual property law firm based in Indianapolis, Indiana. Denise has a uniquebackground in both technology and law, and presently uses her deep technical and legal expertise tocounsel hi-tech clients on intellectual property and technical matters.
Denise has ten years of experience creating software applications, ranging from standalone andclient-server to enterprise-wide applications. Denise has worked for leading software companies such asMicrosoft and EDS, and has earned a worldwide reputation for her technology expertise. She received aBachelor of Arts degree in Computer Science – Business (summa cum laude) from Anderson University,and a Doctor of Jurisprudence degree from Indiana University School of Law in Indianapolis.
Denise has co-authored five software development books to date: Visual Basic .NET and SQL Server 2000:Building An Effective Data Layer (Wrox Press), Beginning Visual Basic.NET Databases (Wrox Press),Professional .NET Framework (Wrox Press), Professional SQL Server 2000 (Wrox Press), and MSDE Bible (IDGBooks). Denise was a featured technology speaker at the Microsoft European Professional Developer’sConference in December 2001 and has on numerous occasions assisted Microsoft’s Training andCertification group in creating new exams for their MCSD and MCSE certifications. She herself holds theMCSD certification.
Denise can be reached at [email protected] or [email protected].
v

P1: IML/FFX P2: IML/FFX QC: IML/FFX T1: IML
WY044-FM WY044-Gosnell WY044-Gosnell-v2.cls August 13, 2004 15:34
CreditsExecutive EditorChris Webb
Editorial ManagerKathryn A. Malm
Senior Development EditorEmilie Herman
Production EditorGabrielle Nabi
Technical EditorWiley-Dreamtech India Pvt Ltd
Copy EditorMary Lagu
Vice President and Executive Group PublisherRichard Swadley
Vice President and Executive PublisherBob Ipsen
Vice President and PublisherJoseph B. Wikert
Executive Editorial DirectorMary Bednarek
Proofreading and IndexingTechBooks Production Services
vi

P1: IML/FFX P2: IML/FFX QC: IML/FFX T1: IML
WY044-FM WY044-Gosnell WY044-Gosnell-v2.cls August 13, 2004 15:34
This book is dedicated to Professor Chuck Koontz and the Computer Science department at AndersonUniversity. Thanks for introducing me to Visual Basic over ten years ago and for your support andencouragement! Although time and distance separates us, the assistance you provided me at thebeginning of my career is always remembered and appreciated.
I would like to offer a special thanks to Emilie Herman and Chris Webb and the other staff at Wiley whoplayed such a key role in making this book a reality. I could not have done this without you!
vii

P1: IML/FFX P2: IML/FFX QC: IML/FFX T1: IML
WY044-FM WY044-Gosnell WY044-Gosnell-v2.cls August 13, 2004 15:34
viii

P1: IML/FFX P2: IML/FFX QC: IML/FFX T1: IML
WY044-FM WY044-Gosnell WY044-Gosnell-v2.cls August 13, 2004 15:34
Contents
Introduction xv
Chapter 1: Introduction to Access 2003 VBA 1
What Is Access 2003 VBA? 1What’s New in Access 2003 VBA? 2Access 2003 VBA Programming 101 2
Requirements Gathering Phase 2Design Phase 3Development Phase 17Testing Phase 22Implementation Phase 23
Summary 24Exercises 25
Chapter 2: The Basics of Writing and Testing VBA Code 27
Creating Modules 27Standard Modules versus Class Modules 29Creating and Calling Procedures 33
Sub versus Function Procedure 33Upgrading Macros to Procedures 46
Using Variables and Constants to Store Values 47Types of Variables 47Declaring and Using Variables 49Constants 52Scope and Lifetime of Variables and Constants 52Naming Conventions 53
Controlling Program Flow 54Decision Making 54Loops 59
Documenting Your Code 62Error Debugging 62
Types of Errors 63Debugging Your Code 65

P1: IML/FFX P2: IML/FFX QC: IML/FFX T1: IML
WY044-FM WY044-Gosnell WY044-Gosnell-v2.cls August 13, 2004 15:34
Contents
Error Handling 69Default Error Messages 70Handling Errors with an On Error Statement 70The Err Object 72Using the Errors Collection 73Creating a Generic Error Handler 73
Summary 76Exercises 76
Chapter 3: Programming Applications Using Objects 77
Elements of an Object 77What Is a Property? 78What Is a Method? 80What Is an Event? 81
Viewing Objects Using the Object Browser 89Ways to Refer to Objects 90Using Access Collections and Objects 91
The Forms Collection and Form Object 92The Reports Collection and Report Object 94The CurrentProject Object 94The DoCmd Object 95The Screen Object 95The Printers Collection and Printer Object 96Other Objects 97
Summary 98Exercises 98
Chapter 4: Creating Your Own Objects 99
Using Class Modules to Create Your Own Objects 99Class Diagrams 100Creating Properties 103Creating Methods 109Creating Events 111Using the Class 112Advanced Techniques 118
Create Custom Properties for Existing Objects 121Using Existing Tag Property 121Using Public Variables 121Using Property Let, Property Get, and Property Set Routines 121
Create Custom Methods for Existing Objects 122Using Public Sub Procedures and Functions 122
x

P1: IML/FFX P2: IML/FFX QC: IML/FFX T1: IML
WY044-FM WY044-Gosnell WY044-Gosnell-v2.cls August 13, 2004 15:34
Contents
Summary 123Exercises 124
Chapter 5: Interacting with Data Using ADO and SQL 125
Introduction to Data Access 125Using ADODB to Work with Data 126
The ADO Object Model 126The Connection Object 126The Command Object 128The Recordset Object 128
Introduction to SQL 155Retrieving Data Using SQL Select Statements 155Inserting Data Using SQL Insert Statements 160Updating Data Using SQL Statements 160Deleting Data Using SQL Statements 161
Using ADOX to Manipulate Data Objects 172Creating a Table with ADOX 173Managing Security with ADOX 174
Summary 176Exercises 176
Chapter 6: Building Interactive Forms 177
Form Navigation and Flow 177Working with Controls 183
Combo Boxes versus List Boxes 184Tab Controls and Subforms 188
Building User Interaction 189The MsgBox Function 190Validating User Input 190
Adding Polish to Your Forms 191Summary 192Exercises 192
Chapter 7: Importing, Linking, and Exporting Using External Data Sources 193
Linking, Importing, and Exporting Overview 193Access and Other Databases 194Transferring Complete SQL Server Database 197Spreadsheets 197Text Files 198XML Files 201
xi

P1: IML/FFX P2: IML/FFX QC: IML/FFX T1: IML
WY044-FM WY044-Gosnell WY044-Gosnell-v2.cls August 13, 2004 15:34
Contents
E-mails and Outlook 202Other Ways to Export Data 204Using Data from Web Services 204Summary 210Exercises 210
Chapter 8: Creating Reports and Web-Enabled Output 211
Working with Reports from VBA 211Setting the Report Data Source 211Creating Reports Programmatically 213
Exporting Access Data to Web Formats 223Creating Static HTML Pages 223Creating ASP Pages 225Creating Data Access Pages 227
Summary 232Exercises 232
Chapter 9: Building SQL Server Applications with Access Projects 233
Access Projects—Using Access as a Front End to SQL server 233Setting Up SQL Server 234
SQL Server Versions 235Obtaining and Installing SQL Server Desktop Engine 236
Creating Access Projects (ADPs) 239Using an Existing SQL Server Database 239Using a New SQL Server Database 240
Working with SQL Server Objects from Access 243SQL Server Tables 243SQL Server Stored Procedures 246SQL Server Views 248SQL Server Functions 252
Migrating an Existing Access Database to an Access Project 254Changes to an Existing Database 254Using the Upsizing Wizard 255
Summary 261Exercises 264
Chapter 10: Advanced Access Programming 265
Using Dynamic Link Libraries (DLLs) 265Standard DLLs 265Using External DLLs 269
xii

P1: IML/FFX P2: IML/FFX QC: IML/FFX T1: IML
WY044-FM WY044-Gosnell WY044-Gosnell-v2.cls August 13, 2004 15:34
Contents
Automation 272Working with Automation Objects 272Controlling Microsoft Excel 273Controlling Microsoft Word 276Controlling Microsoft Outlook 279
ActiveX Controls 282Libraries 285Add-ins 289Transactions 289Summary 290Exercises 291
Chapter 11: Finishing the Application 293
Multi-User Considerations 293Record Locking and Update Conflicts 294Multi-User Architecture Considerations 296
Optimizing Your Applications 299Improving Actual Performance 300Improving Perceived Performance 302Running the Performance Analyzer 303
Securing Your Application 305Adding a Database Password 305Adding a Password for VBA Code 306Adding Users, Groups, and Permissions 306Encrypting a Database 307
Distributing Your Application 308Distributing the Application to Users with the Full Version of Access 308Distributing the Application with the Access Runtime 308Distributing an Execute-Only Application 309
Maintaining the Application 309Compacting and Repairing the Database 309Making Backup Copies of the Database 309
Summary 310Exercises 310
Chapter 12: Case Study 1: Project Tracker Application 311
Design Specifications 311Building the Database 317Building the User Interface 320Building the Class Modules for the Objects 330
xiii
P1: IML/FFX P2: IML/FFX QC: IML/FFX T1: IML
WY044-FM WY044-Gosnell WY044-Gosnell-v2.cls August 13, 2004 15:34
Contents
The Project Class 331The Contact Class 345
Building the Standard Modules 356Connecting the User Interface to the Code 382
The Projects Form 382The Contacts Form 411
Touring the Finished Project Tracker Application 422Summary 428
Chapter 13: Case Study 2: Customer Service Application 429
Design Specifications 429Building the Database and Database Objects 432Building the User Interface 443Building the Class Module for the Objects 448Building the Standard Modules 455Connecting the User Interface to the Code 467
The Customer Search Form 468The View/Manage Customer Accounts Form 473
Touring the Finished Customer Service Application 481Summary 487Appendix A: Exercise Answers 489
Index 495
xiv

P1: IML/FFX P2: IML/FFX QC: IML/FFX T1: IML
WY044-FM WY044-Gosnell WY044-Gosnell-v2.cls August 13, 2004 15:34
Introduction
Microsoft Access 2003 is a powerful database application that allows you to build standalone andclient-server database applications. Access applications are used in many enterprises for storinginventory and maintaining customer records, sales data, or nearly any other type of data that needstracking. Access has powerful wizards and tools that make it relatively easy for users to build a databaseapplication. However, such databases must often be expanded to include additional features notsupported by the simple design provided by the wizards. VBA is a powerful programming language thatcan be used in Access applications to expand the functionality in ways you never imagined. If you arehoping to take your current Access databases or future databases to a more robust level of functionality,then Beginning Access 2003 VBA is the book for you.
Who Should Read This BookThis book assumes you have created Access databases in the past that have tables, forms, and possiblymacros. You may have even written some VBA code in Access before, or you may have experience withVisual Basic or VBScript and want to learn how to write VBA code from within Access applications. Noprior experience with VBA is required. As long as you have the ability to create Access tables and formsand the desire to learn VBA, this book will have a lot to offer you.
It is very possible that you have realized limitations with your current Access applications and nowdesire to build more sophisticated solutions. For example, your current application may need additionalfeatures that must be programmed with VBA. Because your application has been a great success, it mayhave outgrown its current design and may need improvement to support more users or a client-serverenvironment. Or, you may want to begin creating your new database applications with expandedfunctionality. The tools and techniques covered in this book will teach you how to take your Accessapplications to the next level.
What This Book CoversAlthough Beginning Access 2003 VBA focuses on Access 2003, VBA has not changed a whole lot since theprior versions of Access. Even if you are using a prior version of Access, you can still gain a lot from thisbook. However, some examples will deal with features supported only in Access 2003.
This is the fifth edition of the book, and I was challenged with rewriting it from scratch to give the book afresh look. One issue I struggled with is whether to cover DAO in any detail. DAO is a data accessmethodology that is still supported in Access 2003, but ADO is the better and more recommended dataaccess methodology for use in client-server applications. It also provides enhanced functionality. Prioreditions of the book focused on DAO, but some also included examples of how to use ADO. BecauseDAO is becoming more and more outdated and you will probably want to design a multi-user,enterprise-wide solution now or at some migration point in the future, ADO is the better and moreflexible data access method. For these reasons, I decided to include only a brief explanation of DAO, and Ihave focused all of the data access examples throughout the book on ADO. If you are faced with

P1: IML/FFX P2: IML/FFX QC: IML/FFX T1: IML
WY044-FM WY044-Gosnell WY044-Gosnell-v2.cls August 13, 2004 15:34
Introduction
maintaining an existing application that uses DAO and you need further information, numerous booksare written on the topic, as well as extensive resources on the Internet.
As you read this book, you will learn:
❑ Basic programming life cycles and architecture concepts
❑ How VBA can be used for professional application development
❑ The basics of programming using VBA
❑ Basic object-oriented programming techniques using VBA
❑ How to use existing objects
❑ How to create custom objects
❑ How to use ActiveX Data Objects (ADO) to retrieve and update data
❑ How to retrieve data from external data sources
❑ How to create reports and Web content from the database
❑ How to integrate with Office applications
❑ How to build SQL Server solutions with Access projects
❑ How to fine-tune and distribute the application
How This Book Is StructuredI decided to structure the chapters with standalone examples that do not require you to follow thechapters in order. This structure will allow you to go straight to a chapter that interests you, or to skiparound among chapters as desired. Certainly, some chapters will not make as much sense unless youhave read the prior chapters or are already familiar with the topics covered therein. At least, you will notbe required to read the prior chapters that cover topics you already know just for the purpose of buildingparts of a solution that are prerequisites to the chapter you are really interested in.
Chapter 1 provides an overview of Access 2003 VBA and the programming life cycle, and it introducesthe Visual Basic Editor environment. Chapter 2 covers several important VBA programming concepts,such as how to create code procedures, how to control the flow of execution in your code, how to makedecisions in your code, how to handle errors, and how to debug your application.
Chapters 3 and 4 demystify object-oriented programming and teach you how to use existing objects andhow to create your own custom objects. Chapter 5 illustrates how to use ADO to retrieve and update datain databases and how to create and execute SQL statements using ADO. Chapter 6 covers numeroustechniques for building interactive forms, such as creating switchboard forms and choosing the rightcontrol for your form. Chapter 7 shows various ways to import, link, and export data to and from externaldata sources such as MDB files, SQL Server databases, XML files, Web services, and other data sources.
Chapter 8 shows how you can use VBA to create reports programmatically, as well as how to export datain your Access 2003 application to various Web formats, such as HTML, ASP, and data access pages.Chapter 9 illustrates how to create a new Access project as a front end to SQL Server for more robust
xvi

P1: IML/FFX P2: IML/FFX QC: IML/FFX T1: IML
WY044-FM WY044-Gosnell WY044-Gosnell-v2.cls August 13, 2004 15:34
Introduction
applications, and it also covers how to migrate an existing Access database to an Access project that usesSQL Server.
Chapter 10 covers advanced VBA topics including how to work with external DLLs and how to useautomation to control external programs such as Microsoft Word and Excel, as well as security,transactions, and multi-user considerations. Chapter 11 rounds out the prior chapters by covering somefinishing touches that you can apply to prepare your application for distribution.
Chapters 12 and 13 provide two comprehensive case studies that will give you hands-on experience inbuilding real-world solutions using the concepts covered in the book. Chapter 12 focuses on building astandalone project tracking application. The project tracking application allows a user to track projectsand related details, such as comments, contacts, and file attachments. A few examples of the userinterface for the project tracking application you will create in Chapter 12 are shown in Figures I.1 and I.2.
Figure I.1
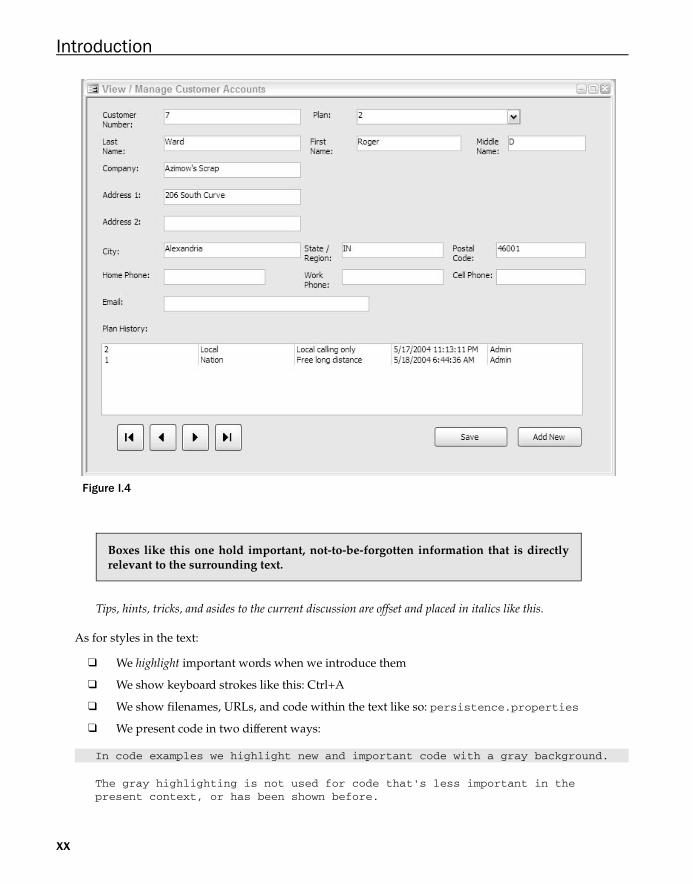
Chapter 13 focuses on building a client-server customer service application that uses SQL Server as thedatabase. The customer service application allows a customer service agent to locate a customer recordbased on search criteria and then view and modify the customer record details. A few examples of the
xvii

P1: IML/FFX P2: IML/FFX QC: IML/FFX T1: IML
WY044-FM WY044-Gosnell WY044-Gosnell-v2.cls August 13, 2004 15:34
Introduction
Figure I.2
user interface for this customer service application that you will create in Chapter 13 are shown inFigures I.3 and I.4.
At the end of each chapter, you will be provided with exercises to test your understanding of some of theimportant concepts covered. Solutions to the exercises at the end of each chapter are provided inAppendix A.
What You Need to Use This BookAt a minimum, you need Access 2003 in order to implement the examples provided throughout the book.One topic covered in Chapter 7 is how to retrieve data from Web services, which requires the Office WebServices toolkit. The Office Web Services toolkit is available for download from Microsoft’s Web site.Chapters 9 and 13 deal with examples based on SQL Server 2000 as the database, and thus a copy of SQLServer 2000 is needed to implement those examples. A free entry-level version of SQL Server 2000, calledMSDE 2000, is included with versions of Office 2003 that have Access 2003.
xviii

P1: IML/FFX P2: IML/FFX QC: IML/FFX T1: IML
WY044-FM WY044-Gosnell WY044-Gosnell-v2.cls August 13, 2004 15:34
Introduction
Figure I.3
ConventionsTo help you get the most from the text and keep track of what’s happening, I’ve used a number ofconventions throughout the book.
Try It OutThe Try It Out is an exercise you should work through, following the text in the book.
1. The exercise usually consists of a set of steps.
2. Each step has a number.
3. Follow the steps using your copy of the database.
How It WorksAfter each Try It Out, the code you’ve typed will be explained in detail.
xix
P1: IML/FFX P2: IML/FFX QC: IML/FFX T1: IML
WY044-FM WY044-Gosnell WY044-Gosnell-v2.cls August 13, 2004 15:34
Introduction
Figure I.4
Boxes like this one hold important, not-to-be-forgotten information that is directlyrelevant to the surrounding text.
Tips, hints, tricks, and asides to the current discussion are offset and placed in italics like this.
As for styles in the text:
❑ We highlight important words when we introduce them
❑ We show keyboard strokes like this: Ctrl+A
❑ We show filenames, URLs, and code within the text like so: persistence.properties
❑ We present code in two different ways:
In code examples we highlight new and important code with a gray background.
The gray highlighting is not used for code that's less important in thepresent context, or has been shown before.
xx

P1: IML/FFX P2: IML/FFX QC: IML/FFX T1: IML
WY044-FM WY044-Gosnell WY044-Gosnell-v2.cls August 13, 2004 15:34
Introduction
Source CodeAs you work through the examples in this book, you may choose either to type in all the code manuallyor to use the source code files that accompany the book. All the source code used in this book is availablefor download at http://www.wrox.com. When you are at the site, simply locate the book’s title (eitherby using the Search box or by using one of the title lists) and click the Download Code link on the book’sdetail page to obtain all the source code for the book.
Because many books have similar titles, you may find it easiest to search by ISBN; for this book the ISBN is0-7645-5659-2.
After you download the code, just decompress it with your favorite compression tool. Alternately, youcan go to the main Wrox code download page at http://www.wrox.com/dynamic/books/download.aspx to see the code available for this book and all other Wrox books.
ErrataWe make every effort to ensure that there are no errors in the text or in the code. However, no one isperfect, and mistakes do occur. If you find an error in one of our books, like a spelling mistake or faultypiece of code, we would be very grateful for your feedback. By sending in errata you may save anotherreader hours of frustration and, at the same time, you will be helping us provide even higher qualityinformation.
To find the errata page for this book, go to http://www.wrox.com and locate the title using the Searchbox or one of the title lists. Then, on the book details page, click the Book Errata link. On this page youcan view all errata that has been submitted for this book and posted by Wrox editors. A complete booklist, including links to each’s book’s errata, is also available at www.wrox.com/misc-pages/booklist.shtml.
If you don’t spot “your’’ error on the Book Errata page, go to www.wrox.com/contact/techsupport.shtml and complete the form there to send us the error you have found. We’ll check the information and,if appropriate, post a message to the book’s errata page and fix the problem in subsequent editions of thebook.
p2p.wrox.comFor author and peer discussion, join the P2P forums at p2p.wrox.com. The forums are a Web-basedsystem for you to post messages relating to Wrox books and related technologies and to interact withother readers and technology users. The forums offer a subscription feature, which will enable us toe-mail you topics of interest of your choosing when new posts are made to the forums. Wrox authors,editors, other industry experts, and your fellow readers are present on these forums.
At http://p2p.wrox.com you will find a number of different forums that will help you not only as youread this book, but also as you develop your own applications. To join the forums, just follow these steps:
1. Go to p2p.wrox.com and click the Register link.
2. Read the terms of use and click Agree.
xxi

P1: IML/FFX P2: IML/FFX QC: IML/FFX T1: IML
WY044-FM WY044-Gosnell WY044-Gosnell-v2.cls August 13, 2004 15:34
Introduction
3. Complete the required information to join as well as any optional information you wish toprovide and click Submit.
4. You will receive an e-mail with information describing how to verify your account and completethe joining process.
You can read messages in the forums without joining P2P, but in order to post your own messages, youmust join.
After you join, you can post new messages and respond to messages other users post. You can readmessages at any time on the Web. If you would like to have new messages from a particular forume-mailed to you, click the Subscribe to this Forum icon by the forum name in the forum listing.
For more information about how to use the Wrox P2P, be sure to read the P2P FAQs for answers toquestions about how the forum software works, as well as answers to many common questions specific toP2P and Wrox books. To read the FAQs, click the FAQ link on any P2P page.
xxii

P1: IML/FFX P2: IML/FFX QC: IML/FFX T1: IML
WY044-01 WY044-Gosnell WY044-Gosnell-v2.cls August 5, 2004 15:24
1Introduction to Access
2003 VBA
This chapter will provide an introduction to the world of Access 2003 VBA and programming ingeneral. More specifically, this chapter will cover:
❑ Introduction to Access 2003 VBA and new features
❑ Explanation of the stages in the Systems Development Life Cycle of software development
❑ Techniques for designing applications
❑ Writing and testing VBA code using the Visual Basic Editor
What Is Access 2003 VBA?VBA is an acronym that stands for Visual Basic for Applications. VBA is included as part of severalMicrosoft products, including Access, Word, and Excel. For example, Access 2003 VBA uses VBAversion 6.0, which is the same version of VBA used by Word 2003 VBA and Excel 2003 VBA. VBA isa programming language that can be used to add additional features to your applications. You areno doubt already aware that Access is a powerful database application that also enables you tocreate applications that include user interfaces. You can use VBA instead of or in addition to Accessmacros to provide advanced functionality to those Access applications. For example, you might usean AutoExec macro to control which form loads when the application begins, and then write thebusiness logic that controls how the application works using VBA.
VBA should not be confused with the Microsoft Visual Basic (VB) or Visual Basic .NET (VB.NET)programming products. VB and VB.NET have their own syntaxes of the Visual Basic programminglanguage. The VB syntax, the VB.NET syntax, and the VBA syntax are very similar, but they havesome differences. Unlike Access, the Visual Basic (VB) and Visual Basic .NET (VB.NET) products donot have a built-in database. The Visual Basic and Visual Basic .NET programming products aretypically used in building more complex enterprise applications that use Access, SQL Server, orOracle as the database. Access 2003 VBA is typically used to build small and simple Access databaseapplications designed for a few users. The experience you gain writing VBA code in Access or other

P1: IML/FFX P2: IML/FFX QC: IML/FFX T1: IML
WY044-01 WY044-Gosnell WY044-Gosnell-v2.cls August 5, 2004 15:24
Chapter 1
Microsoft Office application products will certainly be helpful if you ever decide to use the Microsoft VBor VB.NET programming products.
What’s New in Access 2003 VBA?Access 2003, in general, has not changed substantially from Access 2002, although some helpfulimprovements have certainly been made. Access 2003 provides navigation and user interfaceimprovements, the ability to create smart tags, as well as enhanced capabilities for working with XMLdata and interacting with applications such as Microsoft SharePoint or InfoPath. A new error-checkingfeature is included that flags common errors in forms and reports. Field properties for bound controls onforms and reports are now updated automatically. Access 2003 VBA has not changed much from Access2002 and is still based on VBA version 6.0.
Access 2003 VBA Programming 101Many people first enter the world of programming by creating simple Access applications that become asuccess and must be expanded. These programmers typically have little to no formal experience indesigning software applications and have taught themselves how to write basic Access applications. Theynow need to use VBA to extend those applications. You may very well fall into this category. The rest ofthis chapter will provide you with a basic overview of general programming concepts such as the phasesof the Systems Development Life Cycle and will explain how Access VBA fits into each of these phases.
All applications should be written according to a development methodology that provides guidelines fordeveloping the application. A commonly followed development methodology is a Systems DevelopmentLife Cycle (SDLC) that includes the following phases:
❑ Requirements gathering
❑ Designing
❑ Developing
❑ Testing
❑ Implementing
These phases are discussed in detail below.
Various other types of application development methodologies can be used in addition to, or instead of, theSystems Development Life Cycle as appropriate, such as Rapid Application Design (RAD) techniques,Extreme Programming techniques, and so on.
Requirements Gathering PhaseIn the requirements gathering phase, your goal is to identify the objectives for the new application. Thefinal output of the requirements gathering phase should be a document describing the purpose of andfeatures requested for the new application and any other helpful details you gathered during this phase.
2

P1: IML/FFX P2: IML/FFX QC: IML/FFX T1: IML
WY044-01 WY044-Gosnell WY044-Gosnell-v2.cls August 5, 2004 15:24
Introduction to Access 2003 VBA
You should determine the purpose of the application overall, who will use the application, from whatlocations the application will be accessed, and exactly what features the application should provide.Interview end users and other company employees as appropriate to determine what electronic or papersystems this application will replace. Ask them questions about the problems with the current systems soyou can better understand what will make your application successful. You should also find out from theend users what features they would like to see included in the application, which features they feel arecritical, and which are less so. Also obtain copies of any current documents or screens of currentapplications or processes that are being used. Reviewing the existing applications that your applicationwill replace is a very helpful strategy.
Interviewing end users is a critical part of developing a software application because if you expectsomeone to use your application you have to first find out what he is looking for. If your application doesnot meet some need he has, he has no incentive to use it. You should also know, however, that end usersoften ask for many more features than you can or should include in the application. You have to learnhow to prioritize the features and implement those that are required or helpful for meeting the needs ofmost users or that are required in order to comply with management orders.
For purposes of illustrating some concepts in the Systems Development Life Cycle, I use a hypotheticalexample. Suppose that you have the task of writing a Wrox Auto Sales Application that will be used bysales and other staff at the auto sales company. Applying these requirements gathering techniques, youhave determined that the application should allow the users to search inventory for available and soldcars, to view or edit details about a selected car, and to view or edit customer details. Currently thisprocess is being implemented solely on paper and needs to be automated in an Access application thatwill be used by a few end users. You have written down extensive details about what data elements needto be tracked, the features that are desired, and other details that you learned in this process. You areready to move into the design phase.
Design PhaseDuring the design phase, you analyze the requirements gathered in the prior phase and determine asystem design. The final output of the design phase should be a written document describing the featuresyour application will provide and, ideally, a prototype of each screen.
You can document your design for the hypothetical Wrox Auto Sales Application and any otherapplication in various ways, but having some type of documentation on paper before writing the first lineof code is very important. You will understand why momentarily.
Start the design phase by organizing the requirements into logical groupings and/or steps. They will helpyou determine the layout for screens and the code. Using the Wrox Auto Sales example, let’s look at someways you can use modeling to assist you with your design.
Model the Application DesignModeling is best defined as the process of documenting one or more parts of an application on paper (orwith an electronic tool). A variety of modeling techniques can be used to accomplish the end result:modeling the flow of activities through the system, modeling the way the code will be structured, andso on.
3

P1: IML/FFX P2: IML/FFX QC: IML/FFX T1: IML
WY044-01 WY044-Gosnell WY044-Gosnell-v2.cls August 5, 2004 15:24
Chapter 1
Regardless of the modeling techniques you decide to use, the objective is to come up with a completeroadmap for building the system before you write a single line of code. If you start coding a solutionwithout a roadmap, you will find that it becomes extremely difficult and inefficient to make majoradjustments. Think of it as a blueprint for building a house. You wouldn’t want to build a house withouta blueprint for how it is supposed to be structured. Suppose that you have someone build a house for youwithout a blueprint, and you check up on the progress a few weeks later. When you walk into the house,you notice that it has no basement. The first and second floors have been framed, yet there is no basement(and you wanted one). Think of how much work is involved in having all of the framing for the first andsecond floors torn down just so the basement can be put in. The rework involved, the cost, and the delaysare enormous.
This same concept applies to designing a computer application. If you plan up front how the applicationneeds to look and what it will do, you have a detailed road map. You probably won’t get deep into theprocess and discover some major unresolved issue. This is not to say that proper modeling will take awayall risk of later problems, because that is impossible. However, you will, at least, get the major frameworkof the system (such as whether the house needs a basement) defined, and you can worry about finishingthe very minor details (like paint colors) later. I hope you now see why documenting the system on paperbefore writing code is so important. Now I’ll take a look at some of the most commonly useddiagramming techniques—Use Case Diagrams and Activity Diagrams—and see how they can be used tohelp design your applications.
Use Case DiagramsUse Case Diagrams show the services provided by the system to its users. I like to think of it as the actionsa user can take in the system. For example, in the case of our Wrox Auto Sales hypothetical application,the auto sales staff will need some type of Search Inventory Screen to allow them to search the inventoryof cars. From that screen, they need to be able to run searches, clear the search results, open a selected cardetail record, open the car detail screen (empty), or open the customer screen (empty). Suppose each ofthese is an action the user can take on the Search Inventory Screen in our system. Thus, each of theseactions can map to an action in a Use Case Diagram.
First, let’s look at how such a Use Case Diagram would appear on our screen (Figure 1.1) and then youcan study in more detail how it is structured.
Notice how the Use Case Diagram in Figure 1.1 lists the separate actions the Wrox Auto Sales Staff cantake on the Search Inventory Screen in the system, as described previously. The stick figure representing aperson is called an Actor. The actor represents the Wrox Auto Sales Staff member who is using the system.Lines are drawn to each of the actions the actor can perform. No special requirement exists for how yougroup Use Cases. In other words, whether you group Use Cases together by screens, major functionality,logically related concepts, and so on is up to you. In the preceding example, I have structured the UseCases by a particular screen. This is the structure that I use most frequently, as it is typically easier tothink of activities you can perform in an application from the perspective of the particular screens onwhich they can be invoked.
Notice how each of the Use Cases is numbered beginning with the Requirement Number followed by theUse Case Number (for example, 1.2 for representing the second Use Case in Requirement One). This isanother technique that I myself follow because it makes numbering Use Cases much easier should youlater insert or delete one in a particular section. For example, if you add a new action that the user isallowed to perform on the Search Inventory Screen, you don’t have to renumber all the Use Cases for theentire system. You just add the next highest Use Case for that particular requirement (for example, thenew one would be UC 1.6 for the preceding example).
4

P1: IML/FFX P2: IML/FFX QC: IML/FFX T1: IML
WY044-01 WY044-Gosnell WY044-Gosnell-v2.cls August 5, 2004 15:24
Introduction to Access 2003 VBA
Wrox Auto Sales Staff
UC 1.1 - SearchCar Inventory
UC 1.4 -Open View/Manage Car Details Screen
(Empty)
UC 1.3 - Open View/ManageCar Details Screen For
Selected Car
UC 1.2 - ClearSearch Results
UC 1.5 - Open View/ManageCustomer Details Screen
(Empty)
*
*
***
*
*
Requirement 1 - Search Inventory ScreenUse Cases
Figure 1.1
This is the basic concept of the structure of Use Cases. So now, take a look at the Use Case diagram foranother screen in the system. Figure 1.2 shows the activities the user performs on some type ofView/Manage Car Details Screen.
These two sample Use Case Diagrams cover several of the actions that our hypothetical Wrox Auto SalesApplication will allow a user to take in the system. In Chapter 4, you will learn how the Use CaseDiagrams can help create Class Diagrams to represent how source code should be structured into custom
5

P1: IML/FFX P2: IML/FFX QC: IML/FFX T1: IML
WY044-01 WY044-Gosnell WY044-Gosnell-v2.cls August 5, 2004 15:24
Chapter 1
Wrox Auto Sales Staff
UC 2.1 - OpenExisting Car Detail Record
UC 2.4 - DeleteExisting Car Detail Record
UC 2.3 - Add NewCar Detail Record
UC 2.2 - UpdateExisting Car Detail Record
*
*
*
*
**
*
*
Requirement 2 - View/Manage Car Details ScreenUse Cases
Figure 1.2
objects that you will create. Now, look at creating Activity Diagrams to portray the flow of actions in thesystem.
Activity DiagramsActivity Diagrams are diagrams very similar to process Flow Diagrams, showing the flow from activity toactivity and action to action. They provide a detailed view of the way a user (an actor) can operate withinthe system. Here are some basic steps for creating an Activity Diagram:
1. Determine the scope you want your Activity Diagram to portray (that is, a single use case, aseries of use cases, a business process, a screen, and so on).
2. Add the Starting Point for the diagram.
6

P1: IML/FFX P2: IML/FFX QC: IML/FFX T1: IML
WY044-01 WY044-Gosnell WY044-Gosnell-v2.cls August 5, 2004 15:24
Introduction to Access 2003 VBA
3. Add the activities for each step users can take. This includes the initial step (opening the screen,and so on) plus any steps describing what they do next.
4. Add the Connectors from each activity to the next.
5. Label alternative paths appropriately so you can tell that the user can take one or more paths.These are called Decision Points.
6. Add any Parallel Activities, or activities that can happen simultaneously and must both finishbefore another action can be taken.
7. Add the Ending Points, which are the one or more points in the flow that the actions may end.
Activity Diagrams are helpful for many reasons, including aiding in structuring your code for the systemand aiding in the test cases for the functionality you must ensure the system provides.
You will now see how we can apply these concepts to creating an Activity Diagram for the SearchInventory Screen of the hypothetical Wrox Auto Sales application. Based on the requirements you havegathered and analyzed so far, you have enough information to describe the actions a user can take on thisscreen in plain English. First, the Search Inventory Screen opens. Next, the user can open theView/Manage Car Details Screen, open the View/Manage Customer Details Screen, or run a searchagainst inventory. If she opens the View/Manage Car Details Screen, the flow on this Search screen ends.If she opens the View/Manage Customer Details Screen, the flow on this screen also ends. However, theuser can also run a search, fill in the search criteria, click the Search button, and view the results. She canthen either clear the results, run the search again, or open the detail screen for a selected car. After shefinishes searching (or if she opens a car detail record), the flow on this screen ends. Figure 1.3 shows howthese steps can be depicted in an Activity Diagram:
Notice how the alternative paths the user can take are depicted using OR. Further notice how eachactivity is connected with an arrow. The starting and ending circles depict the points where the flow startsand the points where the flow can end. That’s really all there is to creating an Activity Diagram. Yousimply model the flow of the actions a user takes in the system electronically or on paper in the order theyhappen, indicating any alternative or parallel activities. I used Microsoft Visio to create these diagrams,but you can use various other tools or just diagrams written on paper. The tool you use is not important,just as long as you document the design in some fashion. Let’s look at an Activity Diagram for anotherscreen in our Wrox Auto Sales application.
Figure 1.4 demonstrates the actions a user can take in order on a View/Manage Car Details Screen. Noticehow the user can either open a car detail record or add a new car detail record when the screen firstopens. After a record is opened, it can be viewed, modified, or deleted.
Screen PrototypesAfter creating Use Case and Activity Diagrams (or other appropriate design diagrams), you should alsocreate screen prototypes that illustrate at a basic level how the user interface will look.
Turning now to the Wrox Auto Sales hypothetical, look at what the Search Inventory and Manage Carsscreen prototypes might look like. From the Use Case diagram for the Search Inventory screen (shown inFigure 1.1), you know there are five requirements:
❑ UC 1.1 Search Car Inventory
❑ UC 1.2 Clear Search Results
7

P1: IML/FFX P2: IML/FFX QC: IML/FFX T1: IML
WY044-01 WY044-Gosnell WY044-Gosnell-v2.cls August 5, 2004 15:24
Chapter 1
Open Search Inventory Screen
Fill In Search CriteriaOpen View/Manage Car Details Screen Open View/Manage Customer Details Screen
Run Search Against Inventory
View Search Results
Clear Search ResultsOpen View/Manage Details Screen For Selected Car
{OR} {OR}
{OR}
{OR}
Requirement 1 - Search Inventory ScreenActivity Diagram
Figure 1.3
❑ UC 1.3 Open View/Manage Car Details for Selected Car
❑ UC 1.4 Open View/Manage Car Details Screen (Empty)
❑ UC 1.5 Open View/Manage Customer Details Screen (Empty)
Use Cases can translate directly into menu options, buttons, and other controls on correspondingform(s).
8

P1: IML/FFX P2: IML/FFX QC: IML/FFX T1: IML
WY044-01 WY044-Gosnell WY044-Gosnell-v2.cls August 5, 2004 15:24
Introduction to Access 2003 VBA
Open View/Manage Car Details Screen
Add New Car Detail RecordOpen Car Detail Record (Automatically from Search Screen) Open Car Detail Record (By Vehicle ID Number)
{OR} {OR}
Requirement 2 - View/Manage Car Details ScreenActivity Diagram
Modify Car Detail Record
Save Changes To Database
Delete Car Detail Record
{OR}
View Car Detail Record Without Modifying It
{OR}
Figure 1.4
Figure 1.5 shows an example of how these Use Cases were mapped to user interface elements for theSearch Inventory screen. Notice how the Use Cases are satisfied: Search button (UC 1.1), Clear button(UC 1.2), Manage Cars Screen option in View menu (UC 1.3 and UC 1.4), and Manage Customers Screenoption in View menu (UC 1.5). Depending on whether a particular car is selected in the search results list,the Manage Cars Screen will open empty or containing data for the selected car. The other controls you
9

P1: IML/FFX P2: IML/FFX QC: IML/FFX T1: IML
WY044-01 WY044-Gosnell WY044-Gosnell-v2.cls August 5, 2004 15:24
Chapter 1
Figure 1.5
see in Figure 1.5 are the data elements that the user can specify to run a search. These data elementsinclude Vehicle ID Number, Year, Make, Color, Model, and Status. These data elements were originallydetermined in the requirements gathering phase.
The same concepts apply to creating the View/Manage Car Details screen prototype for the hypotheticalWrox Auto Sales application. Recall that the Use Case diagram in Figure 1.2 listed four requirements:UC 2.1—Open Existing Car Detail Record, UC 2.2—Updated Existing Car Detail Record, UC 2.3—AddNew Car Detail Record, and UC 2.4—Delete Existing Car Detail Record. Figure 1.6 shows how theserequirements can map to control buttons and other options on a screen. Notice how these Use Cases aresatisfied in Figure 1.6: the Lookup button (UC 2.1), the Save button (UC 2.2), the Add New button(UC 2.3), and the Delete button (UC 2.4). Again, the data elements are also listed, such as Vehicle IDNumber, Make, Model, and Year—all determined during the requirements gathering phase.
Determine Application ArchitectureDuring the design phase, you should have determined the architecture of your application. Let’s nowtake a brief look at what application architecture actually is. Application architecture refers to the way yousplit up an application into smaller pieces. Just about all applications, including Access 2003 VBA
10

P1: IML/FFX P2: IML/FFX QC: IML/FFX T1: IML
WY044-01 WY044-Gosnell WY044-Gosnell-v2.cls August 5, 2004 15:24
Introduction to Access 2003 VBA
Figure 1.6
applications, have the following elements:
❑ User Interface: the screens the user sees and interacts with
❑ Business Rules: the processing that takes place in response to the user’s action, such ascalculating some result, looking up information, and so on
❑ Database: a physical data store for certain information used by the application
The architecture is the manner in which you put all the pieces together to form an application. Often, thearchitecture of an application is referred to by the number of tiers it contains. In this context, tiers refers tothe number of machines that an application actually runs on. If any part of an application runs on aparticular machine, that machine is counted in the tiers. This concept will be described in much moredetail as you look at the different types of architecture: single-tier, two-tier, and three/n-tier.
Most of the examples in this book will be based on a single-tier standalone architecture for the sake ofsimplicity, although some two-tier client-server examples will also be covered.
11

P1: IML/FFX P2: IML/FFX QC: IML/FFX T1: IML
WY044-01 WY044-Gosnell WY044-Gosnell-v2.cls August 5, 2004 15:24
Chapter 1
Single-Tier (Standalone)Single-tier applications became common at the beginning of the PC era, but they have actually been aroundlonger than that if you consider mainframes. A single-tier application is one where the entire applicationis contained and runs on a single computer. This is also referred to as a standalone application. An exampleof a standalone application is, of course, a Microsoft Access application that has the user interface,business logic, and data all within the same file on one computer.
An application need not be completely contained in a single file to be considered standalone. Take, forinstance, a loan amortization program installed on your computer that has an .EXE file that runs andreads information from one or more files on your hard drive. The entire application runs on a singlecomputer even though more than one file is involved. This application is also a standalone application.Figure 1.7 illustrates a diagram of a typical standalone application.
Standalone Architecture
User Interface
Business Logic
Data
Entire applicationruns on a singlecomputer
Workstation
Figure 1.7
With a standalone application, everything is nicely self-contained. If you are the only person who will usethe application and data, a standalone architecture is fine. In the case of Access applications, you may alsoput the single Access file containing both the user interface and the database on the network to allowmultiple people to access the application. This also works fine in many situations and also qualifies as astandalone architecture. As the number of users for a standalone Access application grows, thestandalone architecture can become problematic because each user is accessing the same file on thenetwork for the user interface and database. Many of the Access 2003 VBA examples covered in this bookare based on a standalone architecture.
As applications grew and had to be shared more often, a client-server architecture was introduced tofacilitate sharing. You will see how the client-server architecture can help address some of the limitationsof the standalone architecture.
Two-Tier (Client-Server)Client-server applications (applications that span two-tiers: a client machine and a server machine) solvedthe problem introduced by standalone applications and allowed multiple people to share the same datamore easily. Client-server applications require a central server to hold the data store in a central location.The database server then processes requests for data from each of the client machines. Client-serverapplications first appeared in the early 1990s on the PC platform. A diagram of this architecture isdepicted in Figure 1.8.
12

P1: IML/FFX P2: IML/FFX QC: IML/FFX T1: IML
WY044-01 WY044-Gosnell WY044-Gosnell-v2.cls August 5, 2004 15:24
Introduction to Access 2003 VBA
Client-Server Architecture
Workstations
Application (UserInterface, Business Logic)
Database (andpossibly somebusiness logic)
Data
Server
Figure 1.8
In this architecture, the data store is abstracted from the client. The client machine makes a request fromthe server to add, insert, update, or view data and the server processes the request and returns the resultsto the client. A typical database server in such a scenario might be an Access, SQL Server, or Oracledatabase. In the case of an Access client-server application, the user interface may reside in one Accessfile, and the database may reside in a separate file or database application on a server, such as an Accessor SQL Server database. Creating client-server applications using Access or SQL Server databases will bediscussed in Chapters 7, 9, and 13.
In a client-server application, the main application is loaded on each client computer. The applicationincludes the user interface and probably most or all of the business logic elements. In other words, theapplication contains code to create the user interface, process the user actions, perform any validations orcalculations, and look up or modify data in the database. It is possible, however, to have some of thebusiness logic on the database server, such as in stored procedures that are described in Chapters 8 and12. For example, if you require a zip code to be five characters in length, you could put that logic in theinsert or update stored procedure to raise an error instead of the code on the client. The bottom line withbusiness logic in client-server applications is that it can be entirely on the client, entirely on the server, oryou can use a combination of the two.
The advantages of client-server applications are that you can share data across multiple computers moreeasily than before and also separate the user interface from the database. Each client always updates thecentral repository.
At some point, however, the central database server is limited in terms of how many users it can handle.This might mean that a database server must scale up to a bigger server or beef up the resources of theexisting server. To address some of these problems with growth and maintenance, the three-tier/n-tierarchitecture was introduced.
Three-Tier/N-TierThe three-tiered architecture, also called n-tier, solves the limitations imposed by the client-serverarchitecture and allows you to architect solutions that can grow easily as your needs grow. You cansimply add additional servers to handle the processing. Microsoft Access is not typically used to createthree-tier applications, although with some complex coding it can be used as part of a three-tier
13

P1: IML/FFX P2: IML/FFX QC: IML/FFX T1: IML
WY044-01 WY044-Gosnell WY044-Gosnell-v2.cls August 5, 2004 15:24
Chapter 1
application design. Access should not be used for three-tier applications because for such a large-scaleapplication, Access is not the best user interface or database to use. It contains serious limitations.
Even though you will not use Access to develop three-tier applications, it is still worthwhile tounderstand what a three-tier application includes. I discuss this because, at some point, you may need tomigrate your client-server Access application to a three-tier architecture.
So how does a three-tier architecture create incredible growth potential? The idea is that applicationelements are physically compiled as separate elements, and they run on different computers. Forexample, the user interface elements are separate from the middle-layer business logic, which is separatefrom the database layer. In this case, the application is running on three different computers: the client,the middle tier server, and the database server (hence the name three-tier). Figure 1.9 diagrams this:
3-Tier Architecture
Data
Presentation Layer(User Interface)
Database Layer(Stored Procedures,Data)
Middle Layer(Business Logic, DataAccess)
WorkstationsServer Server
Figure 1.9
The three-tier/n-tier architecture takes client-server to the next level by abstracting all the various layersof processing from both the client and the server. It takes some practice to do this correctly. In plainEnglish, what does this mean to you as a programmer? It means you break the application into isolatedpieces that call each other as appropriate. You no longer write a single program with intermixed code thatcreates the user interface, checks the business rules, performs calculations, and updates the database.
When these actions get split into separate functionalities, they can be thought of as separate source codeprojects. You create the part of the program that deals specifically with showing the graphical userinterface in its own project (such as an .EXE created using Visual Basic or Visual Basic.NET). You thencreate the business logic in its own project that will be compiled into a business logic component (such asa DLL created using Visual Basic or Visual Basic.NET). The business logic component will then be calledby the client project to perform any calculations, business rules checks, and so on. The brief summarybelow states this idea another way.
The Presentation Layer is responsible for:
❑ Displaying the user interface
❑ Processing user requests
❑ Sending user requests to the Middle (Business) Layer for processing
❑ Receiving results of the user requests from the Middle (Business) Layer
❑ Presenting the results of the requests to the user
14

P1: IML/FFX P2: IML/FFX QC: IML/FFX T1: IML
WY044-01 WY044-Gosnell WY044-Gosnell-v2.cls August 5, 2004 15:24
Introduction to Access 2003 VBA
The presentation layer can be a Web browser interface (thin client) or a traditional non-Web-based (richclient) user interface. Thin client refers to the fact that very little, if any, compiled code is installed on theclient for rendering the user interface. Rich client refers to the fact that a fair amount of compiled code isinstalled on the machine to make the interface richer to the user. Either way, thin or rich client, the userinterface elements are still separated from the other layers.
The Middle (Business) Layer is responsible for:
❑ Receiving requests from the Presentation Layer
❑ Performing any business logic checks or calculations
❑ Interacting with the database
❑ Returning the processed results to the Presentation Layer
The Data (database) Layer is responsible for:
❑ Storing the data
❑ Returning data upon request to the Middle Layer
❑ Modifying data upon request from the Middle Layer
This three-tier/n-tier architecture allows each processing layer to be built as a set of components(sometimes called objects) that can be called very efficiently from a large number of clients.
In addition to isolating the business logic from the presentation and database layers, it is also verycommon to further separate any call to the database into its own layer, as shown in the diagram inFigure 1.10.
Separation of Logic
Presentation Layer
Business Logic Data Access Data
Data Store
Data Store
Figure 1.10
Using this approach, the summary of the actions performed by each layer is modified as follows:
The Presentation Layer is responsible for:
❑ Displaying the user interface
❑ Processing user requests
15

P1: IML/FFX P2: IML/FFX QC: IML/FFX T1: IML
WY044-01 WY044-Gosnell WY044-Gosnell-v2.cls August 5, 2004 15:24
Chapter 1
❑ Sending user requests to the Business Logic Layer for processing
❑ Receiving results of the user requests from the Business Logic Layer
❑ Presenting the results of the requests to the user
The Business Logic Layer is responsible for:
❑ Receiving requests from the Presentation Layer
❑ Performing any business logic checks or calculations
❑ Returning the processed results to the Presentation Layer
The Data Access Layer is responsible for:
❑ Receiving requests from the Business Logic Layer
❑ Interacting with the Data (database) Layer
❑ Returning the processed results to the Business Logic Layer
The Data (database) Layer is responsible for:
❑ Storing the data
❑ Returning data upon request to the Data Access Layer
❑ Modifying data upon request from the Data Access Layer
Separating Code into Logical TiersAlthough the idea of separating your code into different tiers was just described in the context ofdesigning three-tier enterprise applications, be aware that you can write your Access 2003 VBAapplications in multiple logical tiers to make future migrations easier. I will show you why.
For example, if you isolate all code that will touch the database for an add, update, delete, or retrieval ofdata into its own separate component or module (totally separate from the business logic), it is mucheasier to change from one database platform to another. Suppose you decide to switch from Access toSQL Server as the database. With the database access code isolated in a single module, you only have tomodify the data access components and the database itself. You do not have to touch any of thepresentation (user interface) code or the business logic code. Imagine how much easier this is thanweeding through dozens of procedures non-related to database access to find what must be modified forthe new database platform.
Although you organize the application into separate modules or components, you may not actually runthem on separate servers. For example, you may have written a module (such as a VBA module) for all ofthe business logic and a separate module (such as a VBA module) for handling all data access calls to thedatabase. Although those modules are in separate logical tiers, they may run on the same server (thephysical tier). The beauty is that by structuring your Access code properly now, you prepare for futuregrowth if later you decide to migrate to different servers or implementations. Various chaptersthroughout this book will illustrate these preferred design techniques in detail to make your futuremodifications and migrations easier.
16

P1: IML/FFX P2: IML/FFX QC: IML/FFX T1: IML
WY044-01 WY044-Gosnell WY044-Gosnell-v2.cls August 5, 2004 15:24
Introduction to Access 2003 VBA
Now that I have covered how to document your application into a written specification and to determinethe appropriate architecture, let’s move on to the next phase of the SDLC.
Development PhaseAfter you have completed the design phase and have a written specification for how your applicationshould function and look, you enter the development phase. Here you begin using Access 2003 and Access2003 VBA to create your application according to the design specifications you just created. As you areprobably already aware, you use Forms in Access to create the user interface. You should use VBA tocreate the code for the business logic and data access logic. You should use a database such as Access orSQL Server to store the database tables and records.
Because this is a book about VBA, I show you how to write VBA code for the business logic and databaseaccess logic using the Visual Basic Editor. Let’s take a look at some simple examples in the Visual BasicEditor.
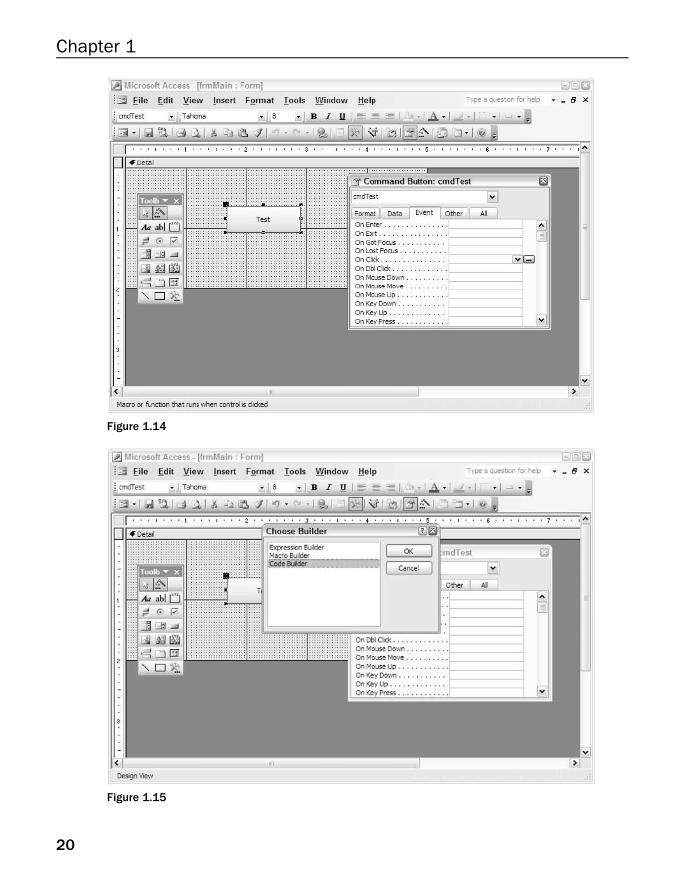
The Visual Basic EditorAs previously mentioned, VBA code is written in Access using the Visual Basic Editor. You can get to theVisual Basic Editor in various ways. One way is to select: Tools ➪ Macro ➪ Visual Basic Editor, as shownin Figure 1.11.
Figure 1.11
17

P1: IML/FFX P2: IML/FFX QC: IML/FFX T1: IML
WY044-01 WY044-Gosnell WY044-Gosnell-v2.cls August 5, 2004 15:24
Chapter 1
You can also select Alt+F11 to open the Visual Basic Editor. Yet another way to get to the Visual BasicEditor is to click Modules from the Objects list in Access, and then select the New option. This is shown inFigure 1.12.
Figure 1.12
Figure 1.13 shows an example of what the Visual Basic Editor looks like.
Notice that the Visual Basic Editor in Figure 1.13 contains a Code window on the right side, a Projectwindow on the upper-left side, and a Properties module on the bottom-left side. The way these windowsare arranged can be customized to suit your preferences. Additional windows can also be displayed byusing the View menu.
What you see in the Visual Basic Editor depends on how you got there and what objects are part of theAccess database already. The concept of Access objects will be described in detail in Chapter 3. For now,just think of forms, controls, modules, and examples of potential objects that may have VBA codeassociated with them. In the Project window of Figure 1.13, a new module called Module1 was justinserted. The cursor is flashing in the code window that is associated with Module1. When other objectsare present in the Project window, you can navigate through the hierarchy and use the Code window toadd or modify code that corresponds to the selected objects.
For example, suppose you have a form in your Access database called frmMain. You have added acommand button called cmdText to your frmMain. You can get to the Visual Basic Editor from within
18

P1: IML/FFX P2: IML/FFX QC: IML/FFX T1: IML
WY044-01 WY044-Gosnell WY044-Gosnell-v2.cls August 5, 2004 15:24
Introduction to Access 2003 VBA
Figure 1.13
frmMain by first selecting the cmdText control and then selecting an event, such as On_Click, asshown in Figure 1.14.
Next, click the button with the ellipses (. . . ) to open the screen shown in Figure 1.15.
On the Choose Builder screen shown in Figure 1.15, select the Code Builder option and then click OK.The Visual Basic Editor is then opened with a new empty procedure for the cmdTest_click event in theCode window, as shown in Figure 1.16.
Notice how you now see the frmMain Form in the Project window in the upper left-hand side of thescreen as well. Let’s look at a few examples of how you can add code to the Code window using thecmdTest_click event as an example. If you begin typing a command in the code window, such as themsgbox command, a tooltip appears (where available and appropriate) to provide you with details onthe syntax required for that command. An example of this is displayed in Figure 1.17.
Another helpful feature of the Visual Basic Editor helps you complete a particular command bydisplaying a list of available options. An example of this feature is shown in Figure 1.18.
Notice in Figure 1.18 how the docmd command has been entered followed by a period. The moment youtype the period, the available options for docmd are displayed. You can then select one of the availableoptions from the list. In the development phase, you use the Visual Basic Editor to write the code toimplement the business logic and database logic for your forms.
19
P1: IML/FFX P2: IML/FFX QC: IML/FFX T1: IML
WY044-01 WY044-Gosnell WY044-Gosnell-v2.cls August 5, 2004 15:24
Chapter 1
Figure 1.14
Figure 1.15
20

P1: IML/FFX P2: IML/FFX QC: IML/FFX T1: IML
WY044-01 WY044-Gosnell WY044-Gosnell-v2.cls August 5, 2004 15:24
Introduction to Access 2003 VBA
Figure 1.16
Figure 1.17
21

P1: IML/FFX P2: IML/FFX QC: IML/FFX T1: IML
WY044-01 WY044-Gosnell WY044-Gosnell-v2.cls August 5, 2004 15:24
Chapter 1
Figure 1.18
After you have developed all or part of your code, you enter the testing phase.
Testing PhaseIn the testing phase, you test the application to ensure it works. Testing is an iterative process. Forexample, unit testing should be performed as different parts of the application are completed. Also,system tests at the end should be completed to ensure that various parts of the system work correctlytogether. To test the code you create using the Visual Basic Editor, you can use various techniques, as Idescribe in the following sections.
Running and Debugging Code in the Visual Basic EditorThe Visual Basic Editor allows you to debug, compile, and run your VBA code. The steps involved inrunning and debugging your application are illustrated in detail in Chapter 2 in the Debugging section.However, to give you just a few examples of how the testing phase works, look at some of the types oftechniques you can use to test your code.
As shown in Figure 1.19, breakpoints can be added to particular lines of code so that execution stopswhen that line is reached. Breakpoints can be set at various places in your code so you can stop onselected lines of code to analyze various aspects of the application at that particular time.
22

P1: IML/FFX P2: IML/FFX QC: IML/FFX T1: IML
WY044-01 WY044-Gosnell WY044-Gosnell-v2.cls August 5, 2004 15:24
Introduction to Access 2003 VBA
Figure 1.19
Notice how in Figure 1.19 and Figure 1.20, the screen includes Immediate, Locals, and Watches windows.The Immediate window allows you to obtain information at a particular point in time, such as when abreakpoint is encountered. In the example in Figure 1.20, the current value of the txtTest variable wasretrieved using the Immediate window by typing ? txtTest in the window just after running the line ofcode that set the value of the variable. In the Locals window, you can see that all variables of the currentprocedure are displayed, which in this example is the txtTest variable. The Watches window iscurrently empty but allows you to establish rules for watching certain activities as they occur.
As mentioned previously, these testing techniques and several others will be covered in the DebuggingSection of Chapter 2. For now, just be aware that you write your VBA code in the Visual Basic Editoraccording to your design specifications. The Editor has various features that allow you to run, test, and fixyour VBA code for the application. You will be using the Visual Basic Editor throughout the entire book,so you will become very familiar with how it works.
Implementation PhaseAfter you complete the testing phase and have corrected your application, you enter the implementationphase. In this phase, you distribute the application to the end users. In Access, there are various ways todistribute your application, as I discuss in detail in Chapter 10.
23

P1: IML/FFX P2: IML/FFX QC: IML/FFX T1: IML
WY044-01 WY044-Gosnell WY044-Gosnell-v2.cls August 5, 2004 15:24
Chapter 1
Figure 1.20
After you implement the application, each of the phases discussed herein can be repeated as necessary,such as when new features are added.
SummaryAccess 2003 VBA is an example of a programming language that can be used to extend your Accessapplications. As part of developing Access and other applications, you should follow a developmentmethodology such as the Systems Development Life Cycle to facilitate the development process andreduce the amount of rework needed later.
The SDLC includes various phases, including the requirements gathering, design, development, testing,and implementation phases. In the requirements gathering phase, you determine the list of features thatthe application must include. In the design phase, you document the application on paper so you knowhow to code it. Some examples of how you can document your design include using Use Cases, ActivityDiagrams, and Screen Prototypes. As part of the design phase, you determine whether to use thestandalone or client-server application architecture. In the development phase, you use Access to createyour forms, and VBA from the Visual Basic Editor to create the business logic and data access code foryour forms. In the testing phase, you use the Visual Basic Editor to test and fix your application. In theimplementation phase, you prepare and distribute your application to end users.
24

P1: IML/FFX P2: IML/FFX QC: IML/FFX T1: IML
WY044-01 WY044-Gosnell WY044-Gosnell-v2.cls August 5, 2004 15:24
Introduction to Access 2003 VBA
With this chapter under your belt, you now move on to Chapter 2, where you learn the basics of writingand testing VBA code using the Visual Basic Editor.
Exercises1. What are the phases of the Systems Development Life Cycle (SDLC) and the purposes of each
phase?
2. What are some examples of the ways you can document your design in the design phase of theSDLC?
3. What is the difference between a standalone application and a client-server application?
4. What are the advantages of separating your code into logical tiers in your Access applications?
25

P1: IML/FFX P2: IML/FFX QC: IML/FFX T1: IML
WY044-01 WY044-Gosnell WY044-Gosnell-v2.cls August 5, 2004 15:24
26

P1: IML/FFX P2: IML/FFX QC: IML/FFX T1: IML
WY044-02 WY044-Gosnell WY044-Gosnell-v2.cls August 20, 2004 13:44
2The Basics of Writing and
Testing VBA Code
Chapter 1 introduced the Access VBA programming environment and some general softwaredevelopment concepts. At this point, you are ready to learn the basics of writing and testing codeusing VBA. This chapter will cover:
❑ Creating code modules
❑ Creating and calling procedures
❑ Using variables to store values
❑ Controlling the flow of programs
❑ Debugging and handling errors
This chapter will serve as a building block for the more advanced VBA concepts covered in laterchapters. The techniques covered in this chapter and in most of the remaining chapters are usedduring the development and testing phases of the Systems Development Life Cycle, as defined inChapter 1.
Creating ModulesModules are best described as containers for holding VBA code. Modules can contain declarationsand procedures. VBA code that is placed in one or more modules can be called from an Accessapplication to perform a specified task. I discuss this in greater detail throughout.
Figure 2.1 shows a sample module displayed in the Visual Basic Editor.
Note that the previous figure has four areas labeled. Each one will now be mentioned briefly.
1. Object navigation box—Use to select the object to work with.
2. Declarations/Procedure navigation box—Use to navigate to the general declarationssection or to a particular procedure.

P1: IML/FFX P2: IML/FFX QC: IML/FFX T1: IML
WY044-02 WY044-Gosnell WY044-Gosnell-v2.cls August 20, 2004 13:44
Chapter 2
Figure 2.1
3. Declarations—Contains the declarations for the module.
4. Procedures—Contains the sub procedures and functions for the module.
When you select the Declarations/Procedure navigation box, a list appears that displays the existingprocedures of the module, as shown in Figure 2.2.
Now that you have a basic idea of what a module is (container for code), let’s turn to the different typesof modules.
Figure 2.2
28

P1: IML/FFX P2: IML/FFX QC: IML/FFX T1: IML
WY044-02 WY044-Gosnell WY044-Gosnell-v2.cls August 20, 2004 13:44
The Basics of Writing and Testing VBA Code
Standard Modules versus Class ModulesThere are two types of modules: standard modules and class modules. Standard modules are modules thatcontain procedures that are not associated with any particular object. Class modules are modules that areassociated with a particular object. Class modules can be used either for form or report modules or forcustom objects. For example, form and report modules can contain code that corresponds to a particularform or report. An example of a form module is an event procedure, such as the click event for a controlon a form. Since Access 97, class modules can also be created independently of a form or report to create adefinition for a custom object. The current chapter will focus on standard modules and class modules thatare associated with a form or report. Custom objects are discussed in detail in Chapter 4.
In general, it is a good programming practice to write most or all of your businesslogic and data access for the application in procedures that are contained in standardmodules and keep the presentation logic in class modules associated with the formor report. This separation of code concept was briefly introduced in Chapter 1 in theArchitecture section.
One way to create a module is to select the Modules tab in the database window and click the Newbutton. Another way to create a module is to select Insert ➪ Module. Let’s now create a sample databasewith a form and a module that can be used for the examples throughout this chapter. This will alsoillustrate how to create a new module. I will continue with the discussion on modules and proceduresafter the database has been created.
Try It Out Create a Database to Use With Examples in the ChapterLet’s jump right in by creating the database that can be used with the examples in this chapter.
1. Create a new database. To do so, select File ➪ New ➪ Blank Database. Next, navigate to the pathwhere you want to save the database and specify Ch2CodeExamples.mdb as the File Name field.Click the Create button and the new database will be created.
Note that the default format for databases in Access is 2000, but if you do not need thecompatibility with Access 2000, you should change it to 2002–2003 format. You can change thisoption by selecting Tools ➪ Options, and on the Advanced Tab changing the Default File Formatoption from Access 2000 to Access 2002–2003.
2. Add a new form to your database. To do so, click Forms in the Objects list of the databasewindow and double-click the option Create Form in Design View. Alternatively, you can clickthe New button and select Design View from the list of options and then click the OK button.
3. Make sure the Toolbox containing the form controls is displayed. If it is not, select View ➪Toolbox.
4. Use the Toolbox to drag and drop two text boxes and one command button onto the form, asshown in Figure 2.3.
5. Select View ➪ Properties to display the Properties dialog box. Change the Name properties ofthe first text box, second text box, and command button to txtValue1, txtValue2, andcmdRun, respectively. If you select a particular control, such as the first text box, you can set itsproperties in the Properties dialog box. Figure 2.4 provides an example of how to change theName property of the selected control, which in this example is txtValue1.
29

P1: IML/FFX P2: IML/FFX QC: IML/FFX T1: IML
WY044-02 WY044-Gosnell WY044-Gosnell-v2.cls August 20, 2004 13:44
Chapter 2
Figure 2.3
Figure 2.4
30

P1: IML/FFX P2: IML/FFX QC: IML/FFX T1: IML
WY044-02 WY044-Gosnell WY044-Gosnell-v2.cls August 20, 2004 13:44
The Basics of Writing and Testing VBA Code
6. Change the Name property of the first text box label to lblValue1 and its Caption property toValue 1. Change the Name property of second text box label to lblValue2 and the Captionproperty to Value 2. Change the cmdRun Caption property to Run. After these changes havebeen made, the finished form should look like that shown in Figure 2.5.
Figure 2.5
7. Save the form. Select File ➪ Save or click X in the upper-right corner of the form itself. Whenprompted, specify the name for the form as frmTest. Close the form by clicking the X in theupper-right corner of the form itself, if you have not already done so.
8. Create a new module. Click Modules in the Objects list of the database window and select theNew button, as shown in Figure 2.6.
9. The Visual Basic Editor window appears. Use the Properties window of the Visual Basic Editor torename the module to modBusinessLogic, as shown in Figure 2.7. If the Properties Window isnot already displayed, you can select View ➪ Properties Window to display it.
Figure 2.7 contains an Option Explicit statement in the declarations section of the module. If themodule you just created does not have the Option Explicit statement, you should select Tools ➪Options ➪ Code Settings area and select the Require Variable Declaration option and then reinsert themodule. The Option Explicit statement then appears. This option requires variables to be definedbefore they can be used and promotes better coding habits.
How It WorksYou just created a new Access 2003 database, added a new form with three controls, and added a newmodule. No real code is written yet, so the database will not really do anything at this point. But you willbe writing code in the new database throughout the rest of this chapter to illustrate various codingconcepts.
31

P1: IML/FFX P2: IML/FFX QC: IML/FFX T1: IML
WY044-02 WY044-Gosnell WY044-Gosnell-v2.cls August 20, 2004 13:44
Chapter 2
Figure 2.6
Figure 2.7
32

P1: IML/FFX P2: IML/FFX QC: IML/FFX T1: IML
WY044-02 WY044-Gosnell WY044-Gosnell-v2.cls August 20, 2004 13:44
The Basics of Writing and Testing VBA Code
Creating and Calling ProceduresNow that you have a sample database, I return to a discussion of modules and procedures. You alreadysaw a procedure inside the sample module illustrations provided previously, but let’s now analyze whatthe procedures are and how they can be used.
Procedures are the building blocks of modules. Each module contains one or more sub procedures orfunctions, and each sub procedure or function contains one or more VBA code statements.
Sub versus Function ProcedureProcedures can either be sub procedures or function procedures. A sub procedure performs an action butdoes not return a particular result. A function performs an action and returns a particular result. I willprovide various examples to illustrate these differences. Sub procedures and functions can be called bothfrom within other procedures and functions and when an event associated with an object is triggered (forexample, button_click), as I describe in more detail in Chapter 3.
Create and Call a New Sub ProcedureThe syntax for declaring a new sub procedure without parameters is:
Sub ProcedureName'code for the procedureEnd Sub
The syntax for a new sub procedure that contains variables as parameters is:
Sub ProcedureName(Variables)'code for the procedureEnd Sub
Variables are containers for storing data. If a procedure must use the value stored in a particular variable,that variable can be passed as a parameter to the procedure. Let’s create a new procedure to see how thisworks.
Try It Out Creating the VerifyCreditAvail procedureNext, you will create a VerifyCreditAvail procedure that will compare two numbers to see if enoughcredit is available for the purchase.
1. Insert the following code in the modBusinessLogic module underneath the declarations section(underneath Option Explicit statement). See Figure 2.2 for an example if you are unsurewhere to put the code.
Sub VerifyCreditAvail(curTotalPrice As Currency, curAvailCredit As Currency)
'inform user if not enough credit for purchase
33

P1: IML/FFX P2: IML/FFX QC: IML/FFX T1: IML
WY044-02 WY044-Gosnell WY044-Gosnell-v2.cls August 20, 2004 13:44
Chapter 2
If curTotalPrice > curAvailCredit ThenMsgBox "You do not have enough credit available for this purchase."
End If
End Sub
2. Run the procedure from the Immediate Window. If the Immediate Window is not already open,select View ➪ Immediate Window. Type the command (shown in Figure 2.8) in the ImmediateWindow and then click Enter.
Figure 2.8
3. You should see a message box like the one shown in Figure 2.9.
Figure 2.9
How It WorksThe VerifyCreditAvail sub procedure accepts two variables as parameters, curTotalPrice andcurAvailCredit:
Sub VerifyCreditAvail(curTotalPrice As Currency, curAvailCredit As Currency)
The procedure contains an If statement that compares the value of curTotalPrice tocurAvailCredit to see if curTotalPrice is larger:
'inform user if not enough credit for purchaseIf curTotalPrice > curAvailCredit Then
MsgBox "You do not have enough credit available for this purchase."End If
From the Immediate Window, you call the VerifyCreditAvail sub procedure and pass it the values5.0 and 4.93. The value 5.0 represents curTotalPrice and the value 4.93 representscurAvailCredit. When the preceding If statement was evaluated, Access determined that 5.0 wasgreater than 4.93, and thus the message box indicating insufficient available credit was displayed.
34

P1: IML/FFX P2: IML/FFX QC: IML/FFX T1: IML
WY044-02 WY044-Gosnell WY044-Gosnell-v2.cls August 20, 2004 13:44
The Basics of Writing and Testing VBA Code
Call a Sub Procedure from Another ProcedureAfter a procedure has been created, it can be called from within another procedure if desired. Here’s asimple example to illustrate the syntax:
Sub FirstProcedure'This code calls a procedure called SecondProcedureSecondProcedure
End Sub
Now that you know the syntax for calling a procedure from within another procedure, you can writecode to call the VerifyCreditAvail procedure you created previously from another procedure.
Try It Out Calling VerifyCreditAvail from Another ProcedureYou can now create a new procedure, called FinalizeOrder, that will call the VerifyCreditAvailprocedure.
1. Add the following procedure, called FinalizeOrder, to the modBusinessLogic moduleunderneath VerifyCreditAvail:
Sub FinalizeOrder()
'declare variables for storing Price and Credit AvailDim curPrice As CurrencyDim curCreditAvail As Currency
'give variables values here for illustration purposescurPrice = 4.5curCreditAvail = 3.75
'call VerifyCreditAvail procedureVerifyCreditAvail curPrice, curCreditAvail
End Sub
2. Run the FinalizeOrder procedure from the Immediate Window as shown in Figure 2.10.
Figure 2.10
3. The same message box you received earlier is again displayed to indicate that available credit isnot sufficient.
35

P1: IML/FFX P2: IML/FFX QC: IML/FFX T1: IML
WY044-02 WY044-Gosnell WY044-Gosnell-v2.cls August 20, 2004 13:44
Chapter 2
How It WorksThe FinalizeOrder procedure uses two local variables: curPrice and curCreditAvail.
Sub FinalizeOrder()
'declare variables for storing Price and Credit AvailDim curPrice As CurrencyDim curCreditAvail As Currency
The variables are then assigned values for illustration purposes.
'give variables values here for illustration purposescurPrice = 4.5curCreditAvail = 3.75
Note that, in most cases, you would not hard-code the values in the procedure, but instead you wouldretrieve them from a database, another variable, or another source. After the variables were assignedvalues, you call the VerifyCreditAvail procedure, with those variables passed as parameters:
'call VerifyCreditAvail procedureVerifyCreditAvail curPrice, curCreditAvail
You then run the FinalizeOrder procedure from the Immediate Window to test it. TheFinalizeOrder procedure executes the code to declare the variables, assign the variable values, andcall the VerifyCreditAvail procedure. Because the value of 4.5 specified for curPrice was greaterthan the value specified for curCreditAvail, the VerifyCreditAvail procedure caused a messagebox to be displayed, as in the prior example.
Call a Sub Procedure from an EventIn addition to being called from another procedure, sub procedures can also be called from an event.Recall that earlier I discussed the two types of modules: standard modules and class modules. The codeexamples you have written so far were written in the standard module called modBusinessLogic. Youwill now write code in a class module associated with a particular form.
Creating a Procedure for an Object Using Code Builder
The first time you write code for a class module of a particular form or report, you must generate theempty procedure using the Code Builder. You may recall in Chapter 1 an example of creating a new eventprocedure for cmdTest_Click using the Code Builder. We’ll now revisit the Code Builder idea tofurther investigate how it works and to let you try it out for yourself. The concept of events and theirassociated objects is described in greater detail in Chapter 3.
Try It Out Create New Procedure for frmTest Using Code BuilderLet’s now create a new procedure for frmTest using the Code Builder.
1. Return to the database window and open frmTest in design view. To do so, select Forms fromthe Objects list, select frmTest, and then click the Design button.
36

P1: IML/FFX P2: IML/FFX QC: IML/FFX T1: IML
WY044-02 WY044-Gosnell WY044-Gosnell-v2.cls August 20, 2004 13:44
The Basics of Writing and Testing VBA Code
2. Select the cmdRun button on the form. You should see the Properties window. If theProperties window is not visible, select View ➪ Properties and select the cmdRun buttonagain.
3. Select the Event tab from the cmdRun Properties window. Click the On Click event from thelist, as shown in Figure 2.11.
Figure 2.11
4. Click the elipses (. . . ) button in the Event tab, and the screen in Figure 2.12 will appear.
Figure 2.12
5. Select the Code Builder option from the list, as shown in the previous figure, and click the OKbutton.
6. The Visual Basic Editor will now be displayed with the cursor flashing in a newly created emptyprocedure called cmdRun_Click (Figure 2.13).
37

P1: IML/FFX P2: IML/FFX QC: IML/FFX T1: IML
WY044-02 WY044-Gosnell WY044-Gosnell-v2.cls August 20, 2004 13:44
Chapter 2
Figure 2.13
7. Add the following code to the newly created procedure:
Private Sub cmdRun_Click()
'declare variables to store price and avail creditDim curPrice As CurrencyDim curCreditAvail As Currency
'assign variables to current values in text boxes on FormcurPrice = txtValue1curCreditAvail = txtValue2
'call VerifyCreditAvail procedureVerifyCreditAvail curPrice, curCreditAvail
End Sub
8. After adding the preceding code to the cmdRun_Click procedure, click the Save button in theVisual Basic Editor to make sure all code so far has been saved. It is a good idea to select the Saveoption periodically to ensure you do not lose any of your work.
9. Return to the frmTest form and open it in View mode to run it. To do so, click View from thetoolbar menu with the form open. Input a value of 2000 for Value 1 and 1500 for Value 2, asshown in Figure 2.14.
10. You should see the same message box that appeared before, indicating that not enough credit isavailable (Figure 2.15).
38

P1: IML/FFX P2: IML/FFX QC: IML/FFX T1: IML
WY044-02 WY044-Gosnell WY044-Gosnell-v2.cls August 20, 2004 13:44
The Basics of Writing and Testing VBA Code
Figure 2.14
Figure 2.15
How It WorksTo create the empty procedure, you used the Code Builder from the frmTest form. Because you selectedthe click Event on the Properties window for the cmdRun button and then chose the Code Builder option,Access automatically generated an empty event procedure called cmdRun_Click. This event procedurewill be called anytime the cmdRun button is clicked when the frmTest form is running.
When the code in cmdRun_Click runs, it first declares some local variables and assigns values to thelocal variables that the user specified in the text boxes. For example, the value of 2000 specified for thefirst text box is assigned to the curPrice variable. The value of 1500 for the second text box is assignedto the curCreditAvail variable.
'declare variables to store price and avail creditDim curPrice As CurrencyDim curCreditAvail As Currency
'assign variables to current values in text boxes on FormcurPrice = txtValue1curCreditAvail = txtValue2
39

P1: IML/FFX P2: IML/FFX QC: IML/FFX T1: IML
WY044-02 WY044-Gosnell WY044-Gosnell-v2.cls August 20, 2004 13:44
Chapter 2
The VerifyCreditAvail procedure is then called using the local variables as parameters.
'call VerifyCreditAvail procedureVerifyCreditAvail curPrice, curCreditAvail
When the VerifyCreditAvail procedure executed, it evaluated the available credit and displayed thesame error message you saw earlier because the value you input for curPrice was greater than thevalue for curCreditAvail.
Creating Additional Procedures for an Object Using the Code Window
After the first event procedure is created for a form or report, an associated form or report module isautomatically created. You can then create additional procedures for that particular form easily fromwithin the code window itself. For example, after you added the cmdRun_Click event, theForm_frmTest object appears in the Project window below. When you select Form_frmTest in theProject window and then the Object navigation drop-down list, all the objects associated with frmTestare displayed (Figure 2.16).
Figure 2.16
In the preceding example, txtValue1 is selected. This is the name of the first text box on the frmTest form.After you select the txtValue1 value from the Object navigation list, the values in the declarations/procedures navigation list are then updated to correspond with those available for the txtValue1.Figure 2.17 displays some of these available procedures that can be created for the txtValue1 text box.
When you select any of the procedures in the list, such as BeforeUpdate, a corresponding emptyprocedure will automatically be created with the cursor flashing, ready for you to input your code(Figure 2.18).
40

P1: IML/FFX P2: IML/FFX QC: IML/FFX T1: IML
WY044-02 WY044-Gosnell WY044-Gosnell-v2.cls August 20, 2004 13:44
The Basics of Writing and Testing VBA Code
Figure 2.17
Figure 2.18
Writing code for object events will be explored in detail in Chapter 3, but at this point you should justknow what a procedure is and that it can be called from various places, such as from an event or anotherprocedure.
Create and Call a New Function ProcedureSo far, all the examples you have reviewed have dealt with creating and calling sub procedures. Earlieryou learned that a function procedure is used to perform a particular action and also return a particularresult. Let’s look at that in more detail now.
41

P1: IML/FFX P2: IML/FFX QC: IML/FFX T1: IML
WY044-02 WY044-Gosnell WY044-Gosnell-v2.cls August 20, 2004 13:44
Chapter 2
The syntax for declaring a new function procedure without parameters is:
Function ProcedureName As DataType'code for the functionEnd Function
The syntax for a new sub procedure that contains variables as parameters is:
Function ProcedureName(Variables) As DataType'code for the procedureEnd Function
Note that in both the preceding cases, the Function keyword is used instead of the Sub keyword in twoplaces. Also note that a data type is required as part of the function declaration. The data type should bespecified to correspond to the type of the value you want the function to output.
Now you can create a new function to illustrate these procedures.
Try It Out Creating the CalculateSalesTax FunctionThe CalculateSalesTax function you create next accepts a price and a tax rate as parameters andcalculates the amount of tax.
1. In the modBusinessLogic standard module, add the following function, calledCalculateSalesTax, after the FinalizeOrder sub procedure.
Function CalculateSalesTax(curPrice As Currency, intTaxRate As Double)As Currency
'declare variable for storing calculated taxDim dblTaxAmt As Currency
'calculate amt of tax based on price and ratedblTaxAmt = curPrice * intTaxRate
'return the calculated amtCalculateSalesTax = dblTaxAmt
End Function
2. After the function has been added, the Visual Basic Editor window should look something likeFigure 2.19.
3. Run the new function from the Immediate Window using the syntax shown in Figure 2.20 andpress Enter. You can select View ➪ Immediate Window if it is not already displayed.
4. After you press Enter, the 0.25 value is displayed in the Immediate Window.
How It WorksThe CalculateSalesTax function has a declaration containing two variables as parameters. It usesCurrency as the return data type.
42

P1: IML/FFX P2: IML/FFX QC: IML/FFX T1: IML
WY044-02 WY044-Gosnell WY044-Gosnell-v2.cls August 20, 2004 13:44
The Basics of Writing and Testing VBA Code
Figure 2.19
Figure 2.20
Function CalculateSalesTax(curPrice As Currency, intTaxRate As Double)As Currency
A variable is declared to store the calculated tax value.
'declare variable for storing calculated taxDim dblTaxAmt As Currency
The amount of tax is calculated by multiplying the curPrice value by the intTaxRate value.
'calculate amt of tax based on price and ratedblTaxAmt = curPrice * intTaxRate
Because the procedure is a function procedure, a particular value should be returned. In this case, it isdesirable to return the amount of sales tax that was calculated. The name of the function is assigned to the
43

P1: IML/FFX P2: IML/FFX QC: IML/FFX T1: IML
WY044-02 WY044-Gosnell WY044-Gosnell-v2.cls August 20, 2004 13:44
Chapter 2
dblTaxAmt value. This, in effect, returns the dblTaxAmt value to the calling procedure for further useand processing.
'return the calculated amtCalculateSalesTax = dblTaxAmt
When the function procedure was tested using the Immediate Window, the preceding code was executedusing the values 5.0 and .05 you specified as the parameters. The value of 5.0 was assigned to thecurPrice variable, and the value of .05 was assigned to the intTaxRate variable. The result of 0.25was then displayed as the result.
Did you happen to notice that this time you had to use a question mark and put the parameters inparentheses? The prior examples did not use the question mark and parenthesis when calling subprocedures from the Immediate Window. As you just learned, the syntax differs slightly depending onwhether you want to call a sub procedure or function from the Immediate Window.
Call a Function from another ProcedureJust like sub procedures, functions can be called from other procedures. The procedures you follow arebasically the same as described in the prior example that illustrates calling a sub procedure from anothersub procedure. The main difference is that when you call a function from another function or subprocedure, you typically assign the return value of the function to a local variable and then use itappropriately. For example, to call the CalculateSalesTax function from within another function orsub procedure, you could use the following code:
Dim dblSalesTax As Double
'call the CalculateSalesTax function and assign the result to the local variabledblSalesTax = CalculateSalesTax(100,.06)
Calling a Function from an EventAgain, just as with sub procedures, you can call a function from a class module associated with a form orreport. The procedures are basically the same as described in the prior example that illustrates calling asub procedure from an event. A more detailed explanation of events can be found in Chapter 3.
Scope and Lifetime of Sub Procedures and FunctionsSub procedures and functions have a particular life cycle that determines how long they will live. Theyalso have characteristics that determine from where they can be called. This is referred to as scope. Howthe procedure is declared determines how long the procedure will live and from where the procedure canbe called.
First, let’s look at the procedure life cycle. Traditionally, a procedure executes and then everything itcontained—such as the values in the variables—are released from memory. In the circumstances whereyou must preserve all the values within a procedure after it finishes executing, you can declare theprocedure with the Static keyword.
Using the Static keyword in the declaration will basically keep the procedure in memory from the lasttime the procedure ran, including all associated values of the variables. As you may be aware, there areother ways to preserve particular values after a procedure ends. Examples include using public variablesor storing certain values in a database for later retrieval.
44
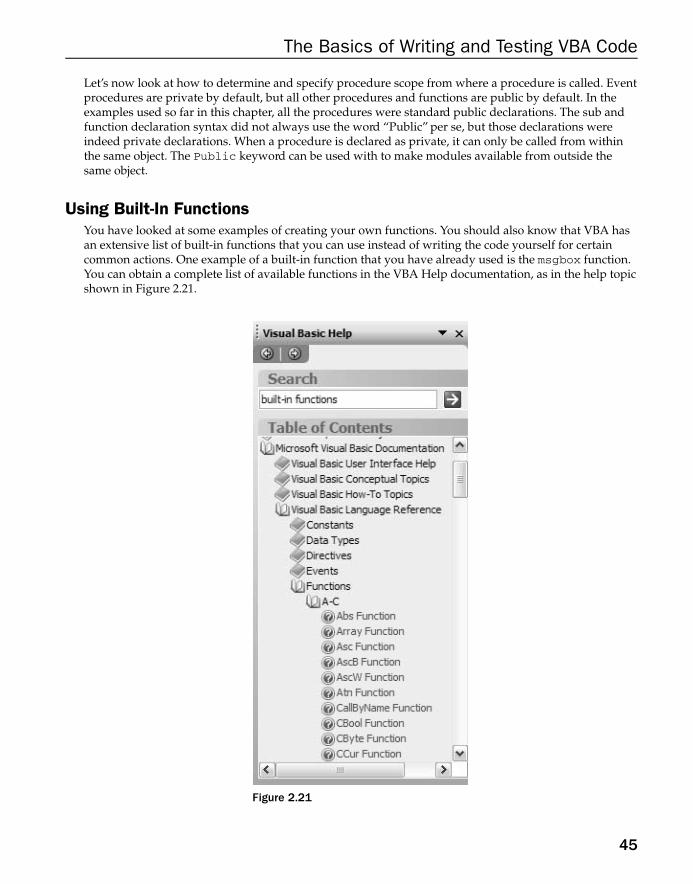
P1: IML/FFX P2: IML/FFX QC: IML/FFX T1: IML
WY044-02 WY044-Gosnell WY044-Gosnell-v2.cls August 20, 2004 13:44
The Basics of Writing and Testing VBA Code
Let’s now look at how to determine and specify procedure scope from where a procedure is called. Eventprocedures are private by default, but all other procedures and functions are public by default. In theexamples used so far in this chapter, all the procedures were standard public declarations. The sub andfunction declaration syntax did not always use the word “Public’’ per se, but those declarations wereindeed private declarations. When a procedure is declared as private, it can only be called from withinthe same object. The Public keyword can be used with to make modules available from outside thesame object.
Using Built-In FunctionsYou have looked at some examples of creating your own functions. You should also know that VBA hasan extensive list of built-in functions that you can use instead of writing the code yourself for certaincommon actions. One example of a built-in function that you have already used is the msgbox function.You can obtain a complete list of available functions in the VBA Help documentation, as in the help topicshown in Figure 2.21.
Figure 2.21
45

P1: IML/FFX P2: IML/FFX QC: IML/FFX T1: IML
WY044-02 WY044-Gosnell WY044-Gosnell-v2.cls August 20, 2004 13:44
Chapter 2
You can also view a list of available functions using the Expression Builder. Consult the VBA Helpdocumentation for how to access the Expression Builder.
Upgrading Macros to ProceduresNow that you are familiar with procedures and functions, it is worth mentioning that you can convertexisting macros to procedures. Procedures provide you with much greater functionality and flexibilitythan do macros. Thus, in most cases, you should start using procedures instead of macros. The AutoExecmacro is one example of a macro that you may continue to use to control which form loads when thedatabase opens.
Let’s take a quick look at how easy it is to convert an existing macro to a procedure. Suppose you have amacro called mcrOpenFrmTest, as shown in Figure 2.22.
Figure 2.22
The macro has one Action, an OpenForm action, to open the frmTest form. To convert this macro to aprocedure, select the macro in the database window and right-click so the pop-up menu that is shown inFigure 2.23 appears. Choose Save As from the pop-up menu.
A Save As dialog box is displayed, as shown in Figure 2.24.
On the Save As dialog, specify a name for the converted macro, and specify the option to save it as aModule. After you click OK, another dialog box appears that prompts you to indicate whether to includeerror handling code and comments. Choose both options. By clicking the Convert button, you convert themacro to a procedure and a message is displayed to confirm the conversion was successful. The VisualBasic Editor opens and shows that a new module was inserted. When you select the new module, you seethat the OpenForm Action was converted to a DoCmd.OpenForm statement.
That’s all it takes to convert macros to procedures. I wish everything were that easy.
46

P1: IML/FFX P2: IML/FFX QC: IML/FFX T1: IML
WY044-02 WY044-Gosnell WY044-Gosnell-v2.cls August 20, 2004 13:44
The Basics of Writing and Testing VBA Code
Figure 2.23
Figure 2.24
Using Variables and Constants to Store ValuesNow that you have a basic understanding of how to create procedures, turn your attention to learninghow to use variables and constants in those procedures. Variables and constants can be used to storevalues that are used by your Access program. You have already seen a few examples of using variables tostore values. I cover variables in a bit more detail because they are so important to writing VBA code.
Types of VariablesVarious types of variables can be declared and used in your procedures. The most common variables areprobably String, Integer, Long, Currency, and Date, although other variables are also commonly
47

P1: IML/FFX P2: IML/FFX QC: IML/FFX T1: IML
WY044-02 WY044-Gosnell WY044-Gosnell-v2.cls August 20, 2004 13:44
Chapter 2
Figure 2.25
used. The following table illustrates the various data types that are available in VBA and offers anexplanation of the type of value each can store.
Data Type What It Stores
Boolean True or False
Byte Positive integers from 0 to 255
Currency Positive and negative currency values with 4 decimal places
Date Date and Time from 1/1/0100 to 12/31/9999
Double 8-byte decimal values
Integer 2-byte integers from −32,768 to +32,768
Long 4-byte integers from −2 billion to +2 billion
Object Access object reference
Single 4-byte decimal values
48

P1: IML/FFX P2: IML/FFX QC: IML/FFX T1: IML
WY044-02 WY044-Gosnell WY044-Gosnell-v2.cls August 20, 2004 13:44
The Basics of Writing and Testing VBA Code
Data Type What It Stores
String (variable length) From 0 to 2 billion characters
String (fixed length) From 1 to 65,000 characters
User-Defined (with Type) Same as its associated data type
Variant (numbers) Numeric value up to range of Double
Variant (characters) From 0 to 2 billion characters
Note that the VBA data type does not correspond perfectly to the field data types listed in database tablesyou create in Access. The following table shows examples of how each VBA data type maps to aparticular Access field data type. This table is presented to help you evaluate which variable data types touse when reading and using values from particular fields in your Access databases.
Visual Basic Data Type Corresponding Access Field Data Type
Boolean Yes/No
Byte Number (Byte)
Currency Currency
Date Date/Time
Double Number (Double)
Integer Number (Integer)
Long Number (Long Integer) or AutoNumber (Long Integer)
Single Number (Single)
String Text or Memo
Declaring and Using VariablesThe previous examples briefly illustrated that variables can be declared using the Dim statement. Hereare some additional examples:
Dim strMessage As StringDim rsSales As Adodb.RecordsetDim intCounter As IntegerDim blnResponse As Boolean
After it is declared, a variable obtains its value (is assigned) by setting the variable equal to a value or toan expression that evaluates to a value. The expression can contain operators (such as =, >, or <), othervariables, constants, key words, formulas, and so on.
Further examples illustrating variable assignments are provided at the end of this chapter.
49

P1: IML/FFX P2: IML/FFX QC: IML/FFX T1: IML
WY044-02 WY044-Gosnell WY044-Gosnell-v2.cls August 20, 2004 13:44
Chapter 2
Declaring and Using ArraysArrays are indexed elements that have the same data type. Each array element has a unique indexnumber. Arrays can be static or dynamic. Static arrays have a fixed number of elements, whereasdynamic arrays have the option to grow in size. The lowest index of an array is 0 by default.
Here is an example of how to declare and use an array.
Sub DemoFixedArray()
'declare an array with 5 elementsDim arstrPictureFile(4) As String
'populate each array element with a valuearstrPictureFile(0) = "Christmas.jpg"arstrPictureFile(1) = "Thanksgiving.jpg"arstrPictureFile(2) = "WinterVacation.jpg"arstrPictureFile(3) = "SummerVacation.jpg"arstrPictureFile(4) = "Anniversary.jpg"
End Sub
The preceding array illustrates how to declare a fixed-size array. In some cases, you may not knowexactly how big the array needs to be. In such cases, you use a dynamic array. A dynamic array isdeclared without an upper bound index, as shown in the following example.
Sub DemoDynamicArray()
'declare an dynamic arrayDim arstrPictureFile() As String
'once you have determined how big the array needs to be'such as other code in between, then specify a size'for the arrayReDim arstrPictureFile(50) As String
'populate the first 5 array elements with a valuearstrPictureFile(0) = "Christmas.jpg"arstrPictureFile(1) = "Thanksgiving.jpg"arstrPictureFile(2) = "WinterVacation.jpg"arstrPictureFile(3) = "SummerVacation.jpg"arstrPictureFile(4) = "Anniversary.jpg"
End Sub
The ReDim statement is used to define the size of the array when it is known. Any values stored in thearray when the ReDim statement is used are lost because the array is reset. The Preserve statement canbe used in circumstances where you want to preserve the prior values in the array when using the ReDimstatement.
Declaring and Using User-Defined Data TypesUser-defined types allow you to create your own data types. User-defined types can contain various piecesof information of the same or varying data types. Here is an example:
50

P1: IML/FFX P2: IML/FFX QC: IML/FFX T1: IML
WY044-02 WY044-Gosnell WY044-Gosnell-v2.cls August 20, 2004 13:44
The Basics of Writing and Testing VBA Code
Public Type typTripInfostrTripLocation As StringdtTripStartDate As DatedtTripEndDate As DatestrPhotoPath As String
End Type
The preceding code can be placed in the General Declarations section of the module. Now, let’s look at asample procedure that uses the typTripInfo user-defined type.
Sub TestUserDefinedType()
'declare a variable as the user defined type typTripInfoDim typRecentTrip As typTripInfo
'assign values to the typRecentTrip user defined typetypRecentTrip.strTripLocation = "Italy"typRecentTrip.dtTripStartDate = "3-18-04"typRecentTrip.dtTripEndDate = "3-27-04"typRecentTrip.strPhotoPath = "c:\trips\Italy"
End Sub
In the preceding procedure, a local variable is declared as the custom data type typTripInfo. Then,values for each of the variables in the user-defined type are specified.
Declaring and Using Object VariablesObject variables are variables that reference objects, such as databases, recordsets, forms, or controls.Object variables allow you to create references with shorter names than the original object and topass objects as parameters to procedures.
Here is an example of how to declare and use a text box object variable from a form module.
Sub TestObjectVariable()
'declare an object variableDim txtPrice As TextBox
'point the object to the txtValue1 text boxSet txtPrice = Me.txtValue1
'set the text value of the text boxtxtPrice.Text = "2000"
End Sub
The preceding procedure declares a new variable as a text box object and then points the new variable tothe existing txtValue1 text box. A value of 2000 is then assigned to the new variable, which actually endsup physically setting the value in the original txtValue1 text box on the form to which you have pointedthe new variable.
51

P1: IML/FFX P2: IML/FFX QC: IML/FFX T1: IML
WY044-02 WY044-Gosnell WY044-Gosnell-v2.cls August 20, 2004 13:44
Chapter 2
ConstantsVBA allows you to create your own constants or use built-in constants.
Declaring and Using ConstantsA constant is a type of variable that maintains a constant value that does not change. Unlike traditionalvariables, constants are assigned values when you create them. Constants are declared with the Conststatement instead of the Dim statement. Here are some examples:
Const conWelcomeMessage as String = "Welcome to my first VBA application."Const conRate as Double = 5.5
Constants can help improve the readability of your code. For example, a line of code is much cleaner andmore understandable if it uses the constant conRate than if it is hard-coded with a value of 5.5:
dblTotalSales = conRate
Constants can also make your code easier to maintain. For example, because the constant is declared inone place, you do not have to search for every instance where the rate with a hard-coded value of 5.5 isused in the code. Instead, you simply use a constant to store the current rate and modify that one item ifthe rate later changes.
Using Built-in ConstantsVBA has numerous intrinsic constants that can be used in your code to save you from writing the codeyourself. For example, the msgbox function has various constants that can be used instead of theparticular integers. The constant vbOK represents a value of 1 and is used to test or indicate that an OKbutton was clicked. The constant vbCancel represents a value of 2 and is used to indicate or testwhether a Cancel button was clicked. Please refer to help documentation for more information on theconstants available.
Scope and Lifetime of Variables and ConstantsVariables and constants have a scope and life cycle and scope similar to procedures. With respect to lifecycle, the variables within sub and function procedures generally live while the procedure is executing.The Static keyword can be used when necessary to alter this traditional lifetime and preserve the valueof the variable after the last procedure that uses it finishes executing.
The scope of a variable determines from where the variable can be seen or used. A variable createdlocally within a procedure can be seen only by that procedure. A variable that is declared in the GeneralDeclarations section can be seen by all procedures in that particular module or by procedures in allmodules, depending on whether it is declared as public or private. If the variable is declared with thePublic keyword, all procedures in all modules can use and see it. If it is not, the variable is private andonly the procedures in the particular module where the declaration is located can see it.
Try It Out Declaring a Public VariableNext, you can declare a public variable to illustrate how to make variables visible from procedures in anymodule.
1. In the modBusinessLogic standard module, go to the General Declarations section (Figure 2.26).
52

P1: IML/FFX P2: IML/FFX QC: IML/FFX T1: IML
WY044-02 WY044-Gosnell WY044-Gosnell-v2.cls August 20, 2004 13:44
The Basics of Writing and Testing VBA Code
Figure 2.26
2. Add a public constant called strTest to the General Declarations section, as shown in theprevious figure.
How It WorksBy declaring the variable strTest as Public, it can be used and seen from procedures in any module now.
Naming ConventionsYou may have noticed that all the examples covered so far prefixed each variable and object declarationwith a two- or three-character prefix, such as the variable strTest in the prior figure. These prefixes arebeing used as a naming convention to provide a standardized way of naming objects and variables.Various types of naming conventions are in use today, and one may be just as good as the other.
Following some type of naming convention is a valuable practice. For example, if you name a variablewith a prefix that indicates its data type, you do not have to weed through lines and lines of code lookingfor the place it was declared to see what data type it stores.
The following table illustrates some naming conventions that I like to use for my variables. Otherconventions could also be used, as was mentioned previously.
Prefix Data Type Example
bln Boolean blnResult
byt Byte bytResponse
cur Currency curTotalSales
dt Date dtBirth
dbl Double dblGPA
int Integer intCount
lng Long lngTrackingNum
obj Object objControl
sng Single sngResult
Continued
53

P1: IML/FFX P2: IML/FFX QC: IML/FFX T1: IML
WY044-02 WY044-Gosnell WY044-Gosnell-v2.cls August 20, 2004 13:44
Chapter 2
Prefix Data Type Example
str String strMessage
typ User-Defined Type typExample
var Variant varOutput
The following table lists some naming conventions I like to use for objects. Some objects and variablesare not listed in these naming convention tables, but these are the most common to give you the generalidea.
Prefix Object Example
cls Class Module clsProject
frm Form frmMain
fsub SubForm fsubMainDetail
mcr Macro mcrAutoExec
mod Module modBusinessLogic
qry Query qryCalculateSales
rpt Report rptAnnualSales
rsub Subreport rsubAccountExecutives
tbl Table tblSales
Controlling Program FlowSo far, you have learned how to create one or more modules to contain your code as well as how to createprocedures within those modules. Now you will see how to write commands within procedures thatcontrol the flow of the program. The flow of a program can be controlled through decision-making,loops, and in other ways. We’ll start by looking at writing decision-making code.
Decision MakingVBA has various statements you can use to make decisions in your code and then take an appropriateaction depending on the result. The following gives you several decision-making examples to illustratethis concept.
If. . . ThenIf...Then statements can be used to make decisions and perform certain actions depending onwhether the conditions are met.
54

P1: IML/FFX P2: IML/FFX QC: IML/FFX T1: IML
WY044-02 WY044-Gosnell WY044-Gosnell-v2.cls August 20, 2004 13:44
The Basics of Writing and Testing VBA Code
The syntax for an If...Then statement is:
If CONDITION Then'code if the condition is metEnd If
The syntax for an If...Then...Else statement is:
If CONDITION Then'code if the condition is metElse'code if the condition is not metEnd If
The syntax for an If...Then...ElseIf statement is:
If CONDITION Then'code if the condition is metElseIf CONDITION Then'code if the ElseIf condition is metEnd If
ElseIf and Else can be used together as part of the same If...Then statement, or they can be usedseparately, as illustrated in the previous example. If...Then statements can also be nested within eachother, as shown in the following example.
If intCounter < 0 Then'reset intCounter to 0intCounter = 0
ElseIf intCounter > 0 and intCounter < 50 ThenIf intCounter = 50 ThenMsgbox "The maximum number of sessions has been reached."
ElseMsgbox "There are still sessions remaining."
End If
intCounter = intCounter + 1
End If
Try It Out Creating TestIfStatement ProcedureNow, it’s your turn to create a new procedure and makes uses of If...Then statements.
1. In the modBusinessLogic standard module, add the following TestIfStatement procedure:
Sub TestIfStatement()
'declare variable to store sales tax valueDim curSalesTax As Currency
55
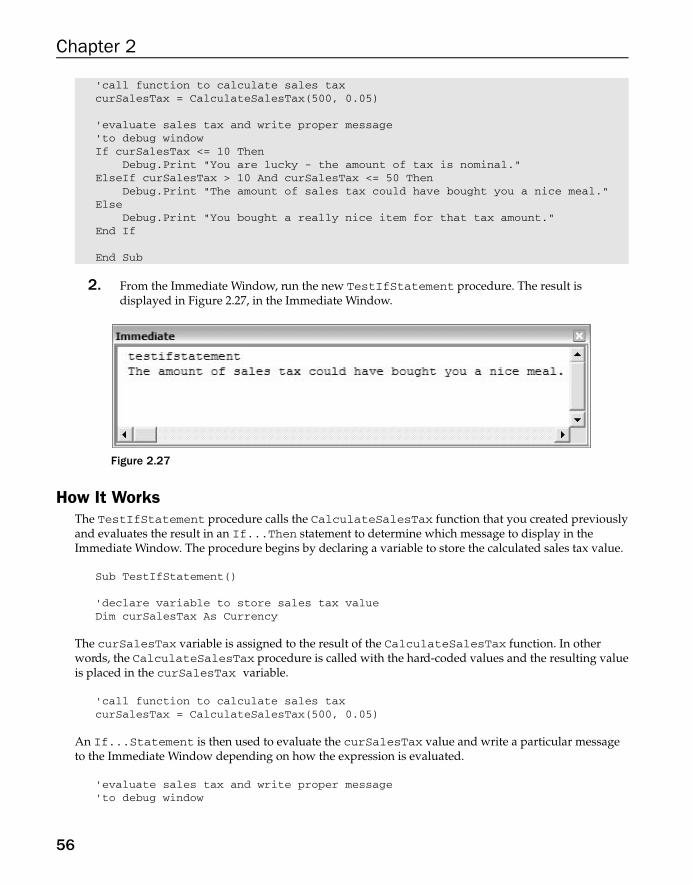
P1: IML/FFX P2: IML/FFX QC: IML/FFX T1: IML
WY044-02 WY044-Gosnell WY044-Gosnell-v2.cls August 20, 2004 13:44
Chapter 2
'call function to calculate sales taxcurSalesTax = CalculateSalesTax(500, 0.05)
'evaluate sales tax and write proper message'to debug windowIf curSalesTax <= 10 Then
Debug.Print "You are lucky - the amount of tax is nominal."ElseIf curSalesTax > 10 And curSalesTax <= 50 Then
Debug.Print "The amount of sales tax could have bought you a nice meal."Else
Debug.Print "You bought a really nice item for that tax amount."End If
End Sub
2. From the Immediate Window, run the new TestIfStatement procedure. The result isdisplayed in Figure 2.27, in the Immediate Window.
Figure 2.27
How It WorksThe TestIfStatement procedure calls the CalculateSalesTax function that you created previouslyand evaluates the result in an If...Then statement to determine which message to display in theImmediate Window. The procedure begins by declaring a variable to store the calculated sales tax value.
Sub TestIfStatement()
'declare variable to store sales tax valueDim curSalesTax As Currency
The curSalesTax variable is assigned to the result of the CalculateSalesTax function. In otherwords, the CalculateSalesTax procedure is called with the hard-coded values and the resulting valueis placed in the curSalesTax variable.
'call function to calculate sales taxcurSalesTax = CalculateSalesTax(500, 0.05)
An If...Statement is then used to evaluate the curSalesTax value and write a particular messageto the Immediate Window depending on how the expression is evaluated.
'evaluate sales tax and write proper message'to debug window
56

P1: IML/FFX P2: IML/FFX QC: IML/FFX T1: IML
WY044-02 WY044-Gosnell WY044-Gosnell-v2.cls August 20, 2004 13:44
The Basics of Writing and Testing VBA Code
If curSalesTax <= 10 ThenDebug.Print "You are lucky - the amount of tax is nominal."
ElseIf curSalesTax > 10 And curSalesTax <= 50 ThenDebug.Print "The amount of sales tax could have bought you a nice meal."
ElseDebug.Print "You bought a really nice item for that tax amount."
End IfEnd Sub
In the current example, because a value of 500 is specified for the sales amount parameter of theCalculateSalesTax function and .05 is specified for the tax rate parameter, the resulting tax amountis 25. Thus, when you run the procedure, the Immediate Window displays the corresponding message.
IIfThe IIF function can be used to return one of two possible values depending on whether the conditionbeing tested is true or false. The syntax for the IIF function is:
IIf(expr, truepart, falsepart)
Here is an example:
strResult = IIf(intWeight > 25, "Heavy", "Light")
If the intWeight value is greater than 25, then the IIF function will return the value "Heavy" andassign it to the strResult variable. Otherwise, the strResult variable will be assigned to the value"Light".
Conditional IfConditional If...Then statements enable you to selectively compile and execute certain blocks of code.Conditional If statements can be used in various scenarios, such as when you want certain blocks ofcode to execute during testing but not in the release version, or when you’re distributing your applicationin different regions and want certain code to apply in some regions but not others. The following is anexample of the general syntax.
#If conLanguage = "English" Then'The code specific to the English version of the software goes here.
#ElseIf conLanguage = "Spanish" Then'The code specific to the Spanish version of the software goes here.
#Else'The code specific to the remaining versions of the software goes here.
#End If
Select. . . CaseAnother way to implement decision making in your VBA code is to use a Select...Case statement.Select...Case statements can be used to easily evaluate the same variable multiple times and thentake a particular action depending on the evaluation.
57

P1: IML/FFX P2: IML/FFX QC: IML/FFX T1: IML
WY044-02 WY044-Gosnell WY044-Gosnell-v2.cls August 20, 2004 13:44
Chapter 2
The syntax for a Select...Case statement is:
Select Case VARIABLECase VALUE1'code to run if VARIABLE equals Value1
Case VALUE2'code to run if VARIABLE equals Value2
Case Else'code to run for remaining cases
End Select
Try It Out Create the TestCaseStatement ProcedureLet’s create a new procedure that makes use of a Select...Case statement to illustrate this in furtherdetail.
1. Add the following TestCaseStatement procedure to the modBusinessLogic standard module.
Sub TestCaseStatement(strCountry As String)
'evaluate the value of strCountry and display applicable result in debug windowSelect Case strCountryCase "Italy"
Debug.Print "The buildings dating back to 400 BC are incredible."Case "China"
Debug.Print "Great bargains for shoppers."Case "Russia"
Debug.Print "A beautiful country with a growing democracy."Case "Germany"
Debug.Print "Fantastic food - you will not starve there."Case Else
Debug.Print "You should travel more when you have the chance."End Select
End Sub
2. Run the TestCaseStatement procedure from the Immediate Window and specify "Italy" asthe parameter, as shown in Figure 2.28. Click Enter to run the procedure. The resulting value isthen displayed in the Immediate Window.
Figure 2.28
58

P1: IML/FFX P2: IML/FFX QC: IML/FFX T1: IML
WY044-02 WY044-Gosnell WY044-Gosnell-v2.cls August 20, 2004 13:44
The Basics of Writing and Testing VBA Code
How It WorksThe TestCaseStatement procedure accepts a string variable called strCountry as a parameter.
Sub TestCaseStatement(strCountry As String)
The strCountry variable is evaluated in the Select...Case statement to determine which one of avariety of messages should be displayed.
'evaluate the value of strCountry and display applicable result in debug windowSelect Case strCountryCase "Italy"
Debug.Print "The buildings dating back to 400 BC are incredible."Case "China"
Debug.Print "Great bargains for shoppers."Case "Russia"
Debug.Print "A beautiful country with a growing democracy."Case "Germany"
Debug.Print "Fantastic food - you will not starve there."Case Else
Debug.Print "You should travel more when you have the chance."End Select
Because you ran the procedure using "Italy" as the value for Country, the message for Italy wasdisplayed in the Immediate Window. Try running the procedure with different values for Country andsee how the results differ.
LoopsVarious types of loops can be used to iterate through a particular action until a particular scenario occurs.For example, loops can be used to run particular code a specified number of times. Now you will learnabout a few different ways to declare loops using VBA code.
For. . . Next and For Each. . . NextFor...Next loops can be used to run the same code a particular number of times. For Each...Nextloops can be used to run the same code for each object in a particular collection, such as for each form inthe Forms collection. The basic syntax for a For...Next loop is shown here.
For counter = start To end'statements go here
Next [counter]
The basic syntax for a For Each...Next loop is shown here.
For Each element'statements go here
Next [element]
59

P1: IML/FFX P2: IML/FFX QC: IML/FFX T1: IML
WY044-02 WY044-Gosnell WY044-Gosnell-v2.cls August 20, 2004 13:44
Chapter 2
Try It Out Creating a For. . . Next LoopLet’s jump right in by creating our own For...Next loop to see how this works.
1. Place this code for the TestLoop procedure in the modBusinessLogic standard module.
Sub TestLoop()
'declare variable to store CounterDim intCounter As Integer
'increment intCounter from 1 to 5 and'display output in debug windowFor intCounter = 1 To 5
Debug.Print intCounterNext intCounter
End Sub
2. Run the TestLoop procedure from the Immediate Window. The results of running theprocedure are shown in Figure 2.29.
Figure 2.29
How It WorksThe TestLoop procedure begins by declaring an intCounter variable to store the number of times theloop has been iterated.
Sub TestLoop()
'declare variable to store CounterDim intCounter As Integer
The For...Next statement comes next, with code specifying that the loop should run withintCounter starting at 1 and repeat multiple times until intCounter reaches 5. The Next statementincrements the intCounter value by one. When intCounter reaches 5, the Debug.Print statementwill execute for the last time and then the loop is exited.
60

P1: IML/FFX P2: IML/FFX QC: IML/FFX T1: IML
WY044-02 WY044-Gosnell WY044-Gosnell-v2.cls August 20, 2004 13:44
The Basics of Writing and Testing VBA Code
'increment intCounter from 1 to 5 and'display output in debug windowFor intCounter = 1 To 5
Debug.Print intCounterNext intCounter
Do. . . LoopThe Do...Loop statement can be used instead of For...Next to accomplish the same purpose. Thetwo types of Do...Loops are Do...While and Do...Until. Do...While may never run anystatements if the condition is not initially true, while Do...Until will always run at least once.
The generic syntax for Do...Loop is shown here.
Do [{While | Until} condition]'statements go here
Loop
Or, you can use this syntax:
Do'statements go here
Loop [{While | Until} condition]
The following code uses a Do...While statement to accomplish the same result as the For...Nextloop described previously.
Do While intCounter <= 5Debug.Print intCounter intCounter = intCounter + 1
Loop
An example of a Do Until loop is shown here.
Do Until intCounter = 6Debug.Print intCounterintCounter = intCounter + 1
Loop
If the condition in a Do Until statement is never met, then the loop is known as an infinite loop, whichwill execute indefinitely.
While. . . WendThe While...Wend statement executes repeatedly while a certain condition is met. When the conditionis no longer met, the loop terminates. Here is an example:
intCounter = 1While intCounter <= 5
Debug.Print intCounter intCounter = intCounter + 1Wend
61

P1: IML/FFX P2: IML/FFX QC: IML/FFX T1: IML
WY044-02 WY044-Gosnell WY044-Gosnell-v2.cls August 20, 2004 13:44
Chapter 2
Documenting Your CodeIt is a good idea to document your code very well so that you and others will be able to understand thepurpose of each procedure and why it was written in a certain way. You can document your code inseveral ways. The ideal way to document your code is to use a general comment section at the beginningof each procedure and to use in-line comments to describe each segment of code. Here is an example ofsuch a general comment section.
'******************************************************************************'*'* Procedure Name: TestProcedure'*'* Purpose: The purpose of this procedure is to illustrate why'* documenting your code is so important.'*'* Parameters: None.'*'* Date Created: March 31, 2004'* By: Denise M. Gosnell'*'* Modification Log:'* Date Explanation of Modification Modified By'* -------------- -------------------------------- -------------'*'******************************************************************************
The preceding documentation style may be overkill if the procedure itself is only a few lines of code.Some type of general comment section should be used with all procedures, even if it is not as detailed asthe one in the preceding code.
You have seen in-line comments in all the code examples throughout this chapter. Here is anotherexample.
'display a message to the userMsgbox "Demonstration of In-Line commenting"
It is always better to write too many comments than too few. As you gain more experience writing VBAcode, you will see how difficult it can be to follow what is happening in a particular procedure. This isespecially true if you go back to the code at a later date and no longer remember the details about whyyou wrote it a particular way, or if you are reviewing code that someone else wrote. Code commentsmake this process much easier.
Error DebuggingNow that I have covered several basic ways to write VBA code and control the flow of the program, let’slook at the types of errors you may encounter, how to debug them, and how to write error handlers tohandle them.
62

P1: IML/FFX P2: IML/FFX QC: IML/FFX T1: IML
WY044-02 WY044-Gosnell WY044-Gosnell-v2.cls August 20, 2004 13:44
The Basics of Writing and Testing VBA Code
Types of ErrorsThe types of errors include: syntax errors, compile errors, runtime errors, and logic errors, each of whichwill be discussed in turn.
Syntax ErrorsSyntax errors are errors that occur because the code you wrote does not comply with the required syntax.Figure 2.30 illustrates a syntax error that occurred because the As part of the Dim statement is missing.
Figure 2.30
Compile ErrorsCompile errors are errors discovered on compilation that may have a correct code syntax, but for somereason will not compile. Figure 2.31 illustrates a compiler error that has occurred because aCalculateTax function cannot be located. In this particular example, the reason for the compile error isthat the function is incorrectly listed as CalculateTax instead of CalculateSalesTax.
Runtime ErrorsRuntime errors occur at runtime when the code executes. Runtime errors can include errors that occurbecause of something that it not allowed or supposed to happen. For example, a line of code that tries toassign a variable of one data type to an incompatible value could result in a runtime error. The example inFigure 2.32 runs the CalculateSalesTax function and passes string values as parameters, instead ofthe required currency and double values. The result is a runtime error, which in this example is a TypeMismatch error.
63

P1: IML/FFX P2: IML/FFX QC: IML/FFX T1: IML
WY044-02 WY044-Gosnell WY044-Gosnell-v2.cls August 20, 2004 13:44
Chapter 2
Figure 2.31
Figure 2.32
64

P1: IML/FFX P2: IML/FFX QC: IML/FFX T1: IML
WY044-02 WY044-Gosnell WY044-Gosnell-v2.cls August 20, 2004 13:44
The Basics of Writing and Testing VBA Code
Logic ErrorsLogic errors are flaws in the logic of your code. Logic errors can be the hardest to find because they aresyntactically correct, but can only be discovered by testing your code and ensuring it has the desired andappropriate result.
Debugging Your CodeYou certainly need the capability to debug and correct your VBA code as you encounter errors. As youmay recall from Chapter 1, the Visual Basic Editor provides several ways to help you debug and correctyour code. Now we’ll look at some of these methods in more detail.
Using Breakpoints to Step through CodeBreakpoints can be set on one or more lines of code. When a line of code that has an associated breakpointis reached, code execution stops and you can then choose to Step Into, Step Over, or Step Out of the code.Selecting the Step Into option from the Debug menu will run the current line of code at the breakpoint. TheStep Over option will skip the current line of code at the breakpoint and move on to the next line of code.
Try It Out Setting and Using BreakpointsIt’s your turn to set a breakpoint and use it to step through code.
1. Navigate to the TestLoop procedure you created previously in the modBusinessLogic standardmodule.
2. Set a breakpoint on the Debug.Print and the Next intCounter lines of code, as shown inFigure 2.33. You can set a breakpoint by pointing and clicking the cursor just to the left of the lineof code where you want to add a breakpoint.
Figure 2.33
3. Next, open the Immediate Window and run the TestLoop procedure. The code will stopexecution at the first breakpoint, as shown in Figure 2.34.
65

P1: IML/FFX P2: IML/FFX QC: IML/FFX T1: IML
WY044-02 WY044-Gosnell WY044-Gosnell-v2.cls August 20, 2004 13:44
Chapter 2
Figure 2.34
4. While at the breakpoint, use the Immediate Window to inquire about the current value of theintCounter variable. To do so, type ? intCounter and press Enter, as shown in Figure 2.35.
Figure 2.35
5. The current value of intCounter is displayed in the Immediate Window. You should press F5or select Run ➪ Continue to keep executing the lines of code. Execution will stop on eachbreakpoint.
How It WorksThe breakpoint enables you to closely monitor and determine the values of variables and take otheractions that will allow you to test and review your code most effectively. This example allows you to seehow the value of intCounter increments as the loop repeats.
Using the Immediate WindowAs you are well aware at this point, you can use the Immediate Window to call procedures and to displaythe results of a line of code. You can also use the Immediate Window to assign new values to variables.You have already learned that the Debug.Print statement writes output directly to the ImmediateWindow. The Debug.Print statement can be used for your testing purposes.
66

P1: IML/FFX P2: IML/FFX QC: IML/FFX T1: IML
WY044-02 WY044-Gosnell WY044-Gosnell-v2.cls August 20, 2004 13:44
The Basics of Writing and Testing VBA Code
Using the Locals WindowThe Locals Window can be used to see a list of all the objects and variables that are used in the currentprocedure. The values in the list are updated every time you suspend execution with a breakpoint or stepthrough code.
Try It Out Using the Locals WindowNow, let’s walk through an example of using the Locals Window.
1. Display the Locals Window by selecting View ➪ Locals Window.
2. Run the TestLoop procedure again from the Immediate Window.
3. The code execution will again stop when the first breakpoint is reached. Notice that the values inthe Locals Window are updated with the current value of intCounter.
Figure 2.36
4. Press F5 or select Run ➪ Continue to keep executing the lines of code. You should see that thevalues of intCounter in the Locals window change as you walk through the code.
How It WorksThe Locals Window allows you to closely monitor and determine values of variables. This exampleallows you to see how the value of intCounter increments as the loop repeats.
Using the Watch WindowThe Watch Window can be used to see a list of objects and variables in the current procedure. The WatchWindow can be used to monitor the value of variables as breakpoints are encountered, just as theImmediate and Locals Windows can. The Watch Window also provides additional features, such asallowing you to add a Watch that will cause the code execution to break when a certain event or value
67

P1: IML/FFX P2: IML/FFX QC: IML/FFX T1: IML
WY044-02 WY044-Gosnell WY044-Gosnell-v2.cls August 20, 2004 13:44
Chapter 2
occurs. This enables you to have the system break for you automatically when the certain event occurswithout having to set a predetermined breakpoint.
Try It Out Adding a WatchLet’s look at an example of adding a watch using the Watch Window.
1. From the Debug menu in the Visual Basic Editor, choose Add Watch.
Figure 2.37
2. On the Add Watch dialog box, specify intCounter as the Expression, TestLoop as the procedure,and modBusinessLogic as the Module.
3. Click the OK button on the Add Watch dialog box, and a Watches Window will appear.
4. Run the TestLoop procedure again from the Immediate Window. You should see the values inthe Watches window change when the first breakpoint is encountered.
How It WorksThe Watches Window allows you to closely monitor and determine values of variables and also to causecode to automatically break when certain events happen. This example shows you how the value ofintCounter increments as the loop repeats, just as the prior examples did.
Using the Call StackA call stack can be used to trace through the process of nested procedures. You can use the call stackwindow when VBA is in break mode by selecting View ➪ Call Stack. However, you have to create your
68
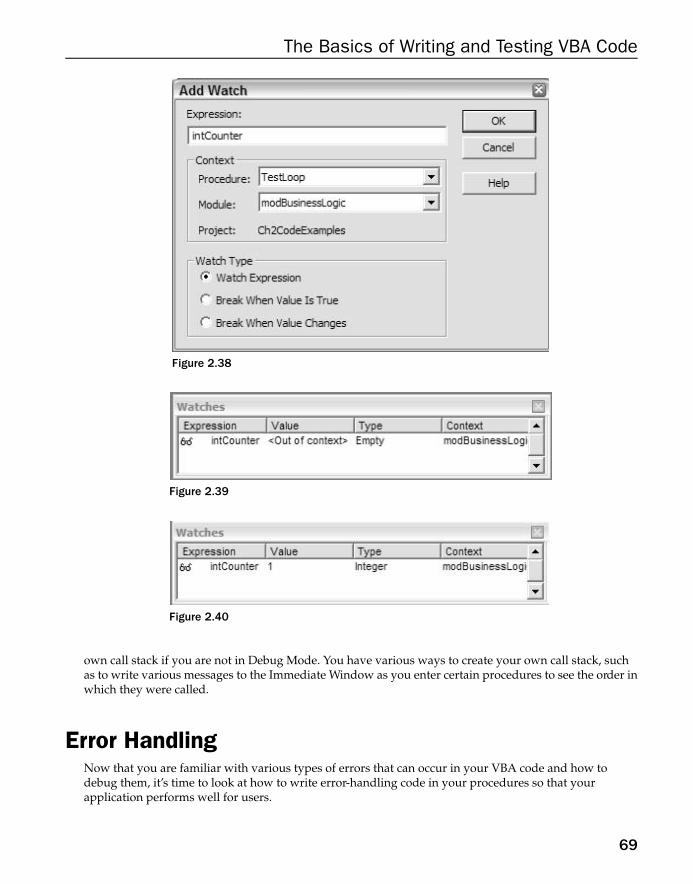
P1: IML/FFX P2: IML/FFX QC: IML/FFX T1: IML
WY044-02 WY044-Gosnell WY044-Gosnell-v2.cls August 20, 2004 13:44
The Basics of Writing and Testing VBA Code
Figure 2.38
Figure 2.39
Figure 2.40
own call stack if you are not in Debug Mode. You have various ways to create your own call stack, suchas to write various messages to the Immediate Window as you enter certain procedures to see the order inwhich they were called.
Error HandlingNow that you are familiar with various types of errors that can occur in your VBA code and how todebug them, it’s time to look at how to write error-handling code in your procedures so that yourapplication performs well for users.
69

P1: IML/FFX P2: IML/FFX QC: IML/FFX T1: IML
WY044-02 WY044-Gosnell WY044-Gosnell-v2.cls August 20, 2004 13:44
Chapter 2
Default Error MessagesYou have all used applications that did not have very good error handling and found yourself gettingbooted out of the application without warning or faced with unfriendly messages like the ones you sawearlier in this chapter. You do not want such problems to happen when users interact with yourapplication. Errors will always occur, but if you design error handlers correctly, at least they can behandled reasonably well.
Handling Errors with an On Error StatementErrors can be handled in VBA procedures using the On Error statement, as I show you next.
On Error StatementThe On Error statement can be placed on your procedure to specify a section in the procedure to whichthe execution should jump when an error occurs. Here is an example:
Sub Test()
On Error GoTo HandleError'normal code for the procedure goes hereExit Sub
HandleError:'code for handling the error goes hereExit Sub
End Sub
If you want to make sure your own error handler doesn’t kick in when you’re debugging your code, selectTools ➪ Options ➪ General and enable the Break On All Errors option. This will allow you to see the rootof the error and not your own error handler.
Resume StatementThe Resume and Resume Next statements can be used with the On Error statement. The Resumestatement will cause code execution to resume at the line that caused the error, and the ResumeNext statement will cause code execution to resume at the line following the one that caused the error.Resume statements are commonly added within the error-handler routines, such as the one shown here.
Sub Test()
On Error GoTo HandleError'normal code for the procedure goes hereExit Sub
HandleError:'code for handling the error goes hereResume NextExit Sub
End Sub
70

P1: IML/FFX P2: IML/FFX QC: IML/FFX T1: IML
WY044-02 WY044-Gosnell WY044-Gosnell-v2.cls August 20, 2004 13:44
The Basics of Writing and Testing VBA Code
Try It Out Creating an Error HandlerIt is your turn to try your hand at creating an error handler.
1. Place the following code for a new procedure called TestError in the modBusinessLogicstandard module:
Sub TestError(intValue1 As Integer, intValue2 As Integer)
On Error GoTo HandleError
'declare variable to store resultDim intResult As Integer
'calculate result by dividing first value by second valueintResult = intValue1 / intValue2
Exit Sub
HandleError:MsgBox "An error has occurred in your application: " & Err.DescriptionExit Sub
End Sub
2. Run the TestError procedure from the Immediate Window, as shown in Figure 2.41.
Figure 2.41
3. The following error message (shown in Figure 2.42) is displayed.
Figure 2.42
How It WorksThe TestError procedure accepts two variables as parameters.
Sub TestError(intValue1 As Integer, intValue2 As Integer)
71

P1: IML/FFX P2: IML/FFX QC: IML/FFX T1: IML
WY044-02 WY044-Gosnell WY044-Gosnell-v2.cls August 20, 2004 13:44
Chapter 2
The On Error statement indicates that the HandleError section of code should execute when an erroroccurs.
On Error GoTo HandleError
A variable is declared that will be used to store the result of an upcoming mathematical calculation.
'declare variable to store resultDim intResult As Integer
The intValue1 value is then divided by the intValue2 value.
'calculate result by dividing first value by second valueintResult = intValue1 / intValue2
Because the intValue2 value you specified when calling the procedure was set to 0, a divide by 0 erroroccurs when the preceding line of code executes. Thus, the execution of code then jumps to the errorhandler HandleError at the bottom of the procedure.
HandleError:MsgBox "An error has occurred in your application: " & Err.DescriptionExit Sub
End Sub
A message box is then displayed to indicate that an error has occurred and to provide a description ofthe error.
The Err ObjectThe Err object contains information about runtime errors that occur when your code executes. Errorhandlers can use it to provide useful information to users or to the system to help determine what actionshould be taken. For example, in the error-handling example you just looked at, the Descriptionproperty of the Err object (Err.Description) was used to include a description of the error to theuser.
The Err object has a global scope. You need not declare it. Some examples of the properties available forthe Err object include Number, Description, HelpContext, HelpFile, and Source. Number andDescription are the most commonly used properties of the Err object.
Raising an ErrorThe Err object has a Raise method that allows runtime errors to be raised when necessary. Here is thesyntax:
Err.Raise number, source, description, helpfile, helpcontext
The number argument is required for raising an error, but the other arguments are optional. Here’s anexample to illustrate how you can raise an error in your code.
72

P1: IML/FFX P2: IML/FFX QC: IML/FFX T1: IML
WY044-02 WY044-Gosnell WY044-Gosnell-v2.cls August 20, 2004 13:44
The Basics of Writing and Testing VBA Code
Sub TestErrRaise(intValue1 As Integer, intValue2 As Integer)
On Error GoTo HandleError
'declare variable to store resultDim intResult As Integer
If intValue2 <> 0 Then'calculate result by dividing first value by second valueintResult = intValue1 / intValue2
ElseIf intValue2 = 0 Then'raise a custom divide by 0 errorErr.Raise vbObjectError + 513, "TestErrRaise", _
"The second value cannot be 0."End If
Exit Sub
HandleError:MsgBox "An error has occurred in your application: " & Err.DescriptionExit Sub
End Sub
When the error is raised, the code then jumps to the error handler just as if the error had occurred in thetraditional fashion.
Using the Errors CollectionThe Errors collection stores the most recent ActiveX Data Objects (ADO) database errors that haveoccurred. Chapter 5 covers ADO in detail. For now, just be aware that the Errors collection can be usedto loop through each error that was generated by one database operation. Only a few instances requirethat you implement such an error-handling feature.
Creating a Generic Error HandlerOne way of handling errors is to create a generic error handler that gets called from every sub procedureor function.
Try It Out Creating a Generic Error HandlerCreate a generic error handler now.
1. Add the GeneralErrorHandler procedure that follows to the modBusinessLogic standardmodule.
Public Sub GeneralErrorHandler(lngErrNumber As Long, strErrDesc As String,strModuleSource As String, strProcedureSource As String)
73

P1: IML/FFX P2: IML/FFX QC: IML/FFX T1: IML
WY044-02 WY044-Gosnell WY044-Gosnell-v2.cls August 20, 2004 13:44
Chapter 2
Dim strMessage As String
'build the error message string from the parameters passed instrMessage = "An error has occurred in the application."strMessage = strMessage & vbCrLf & "Error Number: " & lngErrNumberstrMessage = strMessage & vbCrLf & "Error Description: " & strErrDescstrMessage = strMessage & vbCrLf & "Module Source: " & strModuleSourcestrMessage = strMessage & vbCrLf & "Procedure Source: " & strProcedureSource
'display the message to the userMsgBox strMessage, vbCritical
End Sub
2. Add the procedure TestError2 to the modBusinessLogic standard module.
Sub TestError2(intValue1 As Integer, intValue2 As Integer)
On Error GoTo HandleError
'declare variable to store resultDim intResult As Integer
'calculate result by dividing first value by second valueintResult = intValue1 / intValue2
Exit Sub
HandleError:GeneralErrorHandler Err.Number, Err.Description, "modBusinessLogic", _
"TestError2"Exit Sub
End Sub
3. Call the TestError2 procedure from the Immediate Window with the values shown inFigure 2.43.
Figure 2.43
4. The message box shown in Figure 2.44 is displayed.
How It WorksThe TestError2 procedure operates nearly identically to the TestError procedure. TestError2 hastwo parameter variables.
Sub TestError2(intValue1 As Integer, intValue2 As Integer)
74

P1: IML/FFX P2: IML/FFX QC: IML/FFX T1: IML
WY044-02 WY044-Gosnell WY044-Gosnell-v2.cls August 20, 2004 13:44
The Basics of Writing and Testing VBA Code
Figure 2.44
An On Error statement specifies that the HandleError section of code should be executed when anerror occurs.
On Error GoTo HandleError
A variable is declared to store the result of the division, and then the values that were passed in asparameters to the procedure are used for the division. Because the values passed in cause a divide by 0error, the code execution skips down to the HandleError section of code.
'declare variable to store resultDim intResult As Integer
'calculate result by dividing first value by second valueintResult = intValue1 / intValue2
This time, the HandleError section includes a call to the GeneralErrorHandler procedure you justadded. The error number, error description, module name, and procedure name are passed as parametersto the GeneralErrorHandler procedure.
HandleError:GeneralErrorHandler Err.Number, Err.Description, "modBusinessLogic", _
"TestError2"
Now let’s turn to the GeneralErrorHandler procedure since it runs next to handle the error. TheGeneralErrorHandler procedure accepts the Error Number, Error Description, ModuleSource, and Procedure Source as parameters.
Public Sub GeneralErrorHandler(lngErrNumber As Long, strErrDesc As String,strModuleSource As String, strProcedureSource As String)
A variable is declared to store the error message, and the error message is created based on the variousvalues passed in to the procedure.
Dim strMessage As String
'build the error message string from the parameters passed instrMessage = "An error has occurred in the application."
75

P1: IML/FFX P2: IML/FFX QC: IML/FFX T1: IML
WY044-02 WY044-Gosnell WY044-Gosnell-v2.cls August 20, 2004 13:44
Chapter 2
strMessage = strMessage & vbCrLf & "Error Number: " & lngErrNumberstrMessage = strMessage & vbCrLf & "Error Description: " & strErrDescstrMessage = strMessage & vbCrLf & "Module Source: " & strModuleSourcestrMessage = strMessage & vbCrLf & "Procedure Source: " & strProcedureSource
The error message is then displayed to the user.
'display the message to the userMsgBox strMessage, vbCritical
This generic error handler can be called from every procedure you write, changing only those variablesthat specify the current module and procedure. Errors can also be logged to a table, written to a file, ore-mailed, but those options are beyond the scope of this book.
SummaryIn this chapter, I covered the basic VBA programming concepts. You learned that code can be placed instandard modules or class modules and that various coding statements can be placed in the modules forcontrolling the flow of execution, storing values, and so on. You also learned how to test and run yourVBA code and to capture errors. These basic VBA coding techniques will serve as a foundation for allremaining chapters in the book. Now that you have a basic understanding of how to write VBA codestatements, let’s move on to Chapter 3, where you will explore the world of object-oriented programming.
Exercises1. What is a module, and what are the different types of modules?
2. What is the difference between a sub procedure and a function? When should you use each one?
3. Describe at least three ways you can control the flow of code execution. Also describe howvariables fit into controlling the flow of code execution.
4. Implementing naming conventions and code documentation are both good habits to practice.What value do they provide?
5. Describe the types of errors that you might encounter in your application and how to resolvethem so that the program will operate and will provide users with informative error messages.
76

P1: IML/FFX P2: IML/FFX QC: IML/FFX T1: IML
WY044-03 WY044-Gosnell WY044-Gosnell-v2.cls August 13, 2004 10:52
3Programming Applications
Using Objects
This chapter explains the basic concepts of the object-oriented programming environment, such asusing objects in your programs. You will learn the definition of properties, methods, and events,and when to use each one. Because the code is encapsulated into objects with properties, methods,and events available for the objects—a concept called object-oriented programming—you can buildre-usable objects that save a lot of development time. Coding is simplified because the system isorganized into smaller sets of interrelated objects, instead of one huge object. Your code will beeasier to maintain because it is easier to understand.
Object-oriented programming is a scary concept for most people, but this chapter demonstrates thatit’s really not that complicated. After covering basic object-oriented programming concepts, youwill also learn about several Microsoft Access objects and how to use them. Chapter 4 covers coverobject-oriented programming in greater detail.
You may want to create a new database for use with examples in this chapter. From within Access,Select File ➪ New ➪ Blank Database. Specify the filename of the database as Ch3CodeExamples andclick the Create button.
Elements of an ObjectObjects are all the things that make up your Access database, such as forms, reports, modules,macros, and tables. Each object has properties that determine its behavior or appearance, as well asmethods that determine which actions can be taken upon it. Objects also respond to events that aretriggered by actions taken by the user or caused by the system.
Some people tend to confuse a collection with an object. A collection comprises multiple objects.Thus, an object can be a member of a collection. Sometimes you may want to manipulate a specificobject (for example, a particular form), whereas other times you may want to manipulate acollection of objects (all the forms in your database).
Let’s now turn to some of the most important concepts in the object-oriented programming world:properties, methods, and events.

P1: IML/FFX P2: IML/FFX QC: IML/FFX T1: IML
WY044-03 WY044-Gosnell WY044-Gosnell-v2.cls August 13, 2004 10:52
Chapter 3
What Is a Property?Properties are characteristics of an object that determine its behavior or appearance. Examples ofproperties include the name, caption, or size of a control. Figure 3.1 shows various properties of a Form.This dialog box can be displayed when the Form is in design view and you select View ➪ Properties orchoose Alt+Enter. Note that some of the properties listed in the figure have selectable Yes/No values,some are text input fields like the Caption property, and others have different choices you can selectfrom a drop-down list.
Figure 3.1
After setting the preceding Caption property for this particular form and running the form, notice howthe caption of the form (shown in Figure 3.2) is now set to the value that was in the Properties dialog box.
Figure 3.2
You can also select other objects on the form in the object drop-down list of the Properties Window, suchas text box controls or labels, as shown in Figure 3.3.
As shown earlier, by selecting another object from the list in the Properties dialog box, you can view andmodify its respective properties. Various objects share many of the same properties. For example, forms,text boxes, and labels all have a Caption property, as well as a Name property.
The Properties Window can be used to view and modify properties as well as events. This concept will bediscussed later in the chapter.
78

P1: IML/FFX P2: IML/FFX QC: IML/FFX T1: IML
WY044-03 WY044-Gosnell WY044-Gosnell-v2.cls August 13, 2004 10:52
Programming Applications Using Objects
Figure 3.3
The property values that are set in the Properties dialog box, such as the Caption property shownpreviously, are called design time settings. Design time settings are those you specify at design time thatbecome the starting value for that object. The starting value can be modified at runtime in your VBA code,or at a later time in design view. For example, to change the Caption property of the preceding form atruntime while the program executes, you could use the following VBA command:
Forms.Item("frmTestProperties").Caption = "New caption goes here."
In addition to the Properties dialog box, another way to see the available properties for an object is bytyping VBA code in the Visual Basic Editor. Figure 3.4 shows that as you type the name of an existingobject and hit the period key, the list of properties available for that object are displayed.
This feature is very helpful because it keeps you from having to memorize the exact syntax of everyproperty. You just look up a property as you write your code.
The values in the list on Figure 3.4 are all properties, as is indicated by the icon showing a hand holding acard:
Other items can be present in the drop-down list as well, as I discuss later in this chapter. For now, beaware that you can see a list of properties available for an object within the code window in the VisualBasic Editor (VBE).
Some objects are visual—such as forms, text boxes, labels, and reports. Other objects are not visual. Theuser sees nothing when those objects are used. An example of a nonvisual object is a recordset that holdsdata from a database. Although you may later display data from the recordset on a form, the object itselfdoes not have a visual presence. Both visual and nonvisual objects can have properties.
Yet another way to view the properties available for an object is by using the Object Browser, discussedlater in this chapter.
79

P1: IML/FFX P2: IML/FFX QC: IML/FFX T1: IML
WY044-03 WY044-Gosnell WY044-Gosnell-v2.cls August 13, 2004 10:52
Chapter 3
Figure 3.4
What Is a Method?Methods are actions that can be taken on an object. They are really sub procedures or functions that arecalled to perform a particular action. You do not see the code behind sub procedures or functions whenusing existing Access objects, but they are there.
An example of a method you have already used is:
Debug.Print
The programmers who wrote Microsoft Access created a Debug object to allow you to interact with theImmediate Window, as you have already done to test your code. Somewhere in the source code for theDebug object is a sub procedure or function called Print that receives the message to print as aparameter and then has code for displaying the message in the Immediate Window. Because Microsoftdoes not give you the source code for Microsoft Access, you do not see this code—but it’s there. This isalso true for objects created by other third parties—a sub procedure or function is behind the method.
Let’s look at an example of how you can see what methods are available for an object. In the code windowin the VBE (Figure 3.5), you can type the object name followed by a period, just as you did before. You geta drop-down list that shows the available methods. Recall from the prior section, you can also use thisfeature to view the properties available for an object.
In the preceding example, you can see that the Recordset object has properties such as Name andNoMatch, but it also has various methods, such as MoveLast and MoveNext. You can tell whether the
80

P1: IML/FFX P2: IML/FFX QC: IML/FFX T1: IML
WY044-03 WY044-Gosnell WY044-Gosnell-v2.cls August 13, 2004 10:52
Programming Applications Using Objects
Figure 3.5
item in the list is a property or method based on the icon displayed to the left. You might say the icon formethods looks like a brick in motion:
You might describe the icon differently, but the point is that this icon indicates that the item in the list is amethod. Recall that the hand holding the card is the icon for the Properties window. Another way to seethe methods and properties available for an object is using the Object Browser, as you will see later in thechapter.
What Is an Event?Events are triggered by actions taken by the user and the application, such as changes to data, mousemovements, or the opening of a form. You use VBA code or macros to respond to events. In other words,you link up the code you write with the user interface of your application through events. For example,you specify which VBA procedure or function to run when a particular event happens. This concept wasillustrated briefly in Chapter 2 when you created new procedures and functions. Remember that you tiedan event to a procedure so that the procedure would run. Let’s look at some additional examples so thisimportant concept will become totally clear.
One way to view a list of events available for a control is from the Properties dialog box that you sawearlier. As you recall, you can select View ➪ Properties from a designer, such as the form or reportdesigner, to view the Properties dialog box. Events for form and report objects, such as controls, can belocated by selecting the object and then viewing the Event tab of the Properties dialog box. Figure 3.6shows the Event tab of the Properties dialog box for a form.
81

P1: IML/FFX P2: IML/FFX QC: IML/FFX T1: IML
WY044-03 WY044-Gosnell WY044-Gosnell-v2.cls August 13, 2004 10:52
Chapter 3
Figure 3.6
Notice how various types of events are listed. These events allow you to specify when the VBA code youwrite should execute. You actually have three options for how the event can execute. When you select aparticular event from the list and click the Ellipses button (. . . ), a dialog box appears that gives you theoption to use the Expression Builder, the Macro Builder, or the Code Builder.
In all the examples so far, you have used the Code Builder because this is a book about VBA code. If youchoose Expression Builder, the value displayed in the Properties dialog box will be "=expression",where expression is the expression that was entered in the Expression Builder window. If Macro Builder ischosen, the value is the name of the macro. If Code Builder is chosen, the value will be "[EventProcedure]".
Like properties, various objects often have many or all the same events in common. For example, supposeyou have a form with a text box named txtName (that is, with the Name property set to txtName) thatyou will use to display a message to the user any time the On Key Press event occurs. First select thetxtName text box on the form, and then select the Event tab of the Properties dialog box for the text box.Because you want to create an event procedure, select the Event Procedure option from the list that isshown in Figure 3.7 and then click the Ellipses (. . . ) button. If you click the Ellipses (. . . ) button withoutselecting the Event Procedure option, you would be prompted to select Code Builder from the list ofthree options.
When you click the Ellipses button (. . . ), the VBE opens with a new empty procedure created for theKeyPress event. Suppose the following code is added to the KeyPress event for the txtName textbox object:
Private Sub txtName_KeyPress(KeyAscii As Integer)
MsgBox "The KeyPress event just fired"
End Sub
When the form runs and something is typed into the txtName field, the message in Figure 3.8 is displayed:
82

P1: IML/FFX P2: IML/FFX QC: IML/FFX T1: IML
WY044-03 WY044-Gosnell WY044-Gosnell-v2.cls August 13, 2004 10:52
Programming Applications Using Objects
Figure 3.7
Figure 3.8
Notice that the event fires before you see the value in the text box on the form. Other examples of eventscommonly used are On Click, On Double Click, and On Open. So many types of events are availablefor a particular object that it is impossible to cover them all in this chapter. However, I hope youunderstand that an event allows you to hook up your forms and reports with the VBA code that youwrite based on certain events that occur in the application. I present another example momentarily, justto make sure you are clear on the difference between properties, methods, and events.
83

P1: IML/FFX P2: IML/FFX QC: IML/FFX T1: IML
WY044-03 WY044-Gosnell WY044-Gosnell-v2.cls August 13, 2004 10:52
Chapter 3
Try It Out Using Properties, Methods, and EventsIt’s your turn now to try your hand at an example that uses properties, methods, and events. As youwork, try to keep track of which items are properties, which are methods, and which are events. Youcan check your answers when I explain the example.
1. If you have not already done so, create a new database for use with examples in this chapter. Todo so, select File ➪ New ➪ Blank Database. Specify the filename as Ch3CodeExamples and clickthe Create button.
2. Add a new form to the database. From the database window, select Forms, and thendouble-click the option Create Form in Design View. Alternatively, you can select the Formsobject in the database window and then click the New button and choose Design View.
3. On the new form, use the Toolbox to drag and drop a text box control and a command buttonto the form, as shown in Figure 3.9. If the Toolbox is not displayed, select View ➪ Toolbox todisplay it.
Figure 3.9
4. Select the text box control. Select View ➪ Properties to view the Properties dialog box if it is notalready displayed. From the Properties dialog box for the text box control, change the Nameproperty to txtDateOfBirth.
5. Select the label. From the Properties dialog box, change the Name property of the label tolblDateOfBirth. Change the Caption property of the label to Enter Date of Birth:
6. Select the Command button. From the Properties dialog box, change the Name property of theCommand button to cmdCalculate, and change the Caption property to Calculate. Theform should now look like the one shown in Figure 3.10.
7. Click the Save button on the Toolbar and then specify the name frmTestObjects for the form.
84

P1: IML/FFX P2: IML/FFX QC: IML/FFX T1: IML
WY044-03 WY044-Gosnell WY044-Gosnell-v2.cls August 13, 2004 10:52
Programming Applications Using Objects
Figure 3.10
8. Select the txtDateOfBirth text box again. Select the Event tab of the Properties dialog box, andlocate the On Exit event. Select the Code Builder option to open VBE to write code for theevent. One way to do so is to choose Event Procedure in the drop-down list and then clickEllipses (. . . ). You can also select the Ellipses button and then choose Code Builder from thedialog box that appears. In either case, add the following code to the Exit event:
Private Sub txtDateOfBirth_Exit(Cancel As Integer)
'if the user did not enter a date, then'display an error and set the focus back'to the date of birth text box control.If Not IsDate(txtDateOfBirth.Text) Then
MsgBox "You must enter a date for the Date of Birth field."txtDateOfBirth.SetFocusCancel = True
End If
End Sub
9. Select the cmdCalculate command button. On the Event tab of the Properties dialog box, selectthe On Click event and add the following code to the newly created event procedure as shownhere:
Private Sub cmdCalculate_Click()
'declare local variable for month of birthDim intMonthOfBirth As Integer
'convert the value in the text box to a'month and assign the value to the month
85

P1: IML/FFX P2: IML/FFX QC: IML/FFX T1: IML
WY044-03 WY044-Gosnell WY044-Gosnell-v2.cls August 13, 2004 10:52
Chapter 3
'of birth variableintMonthOfBirth = DatePart("M", CDate(txtDateOfBirth))
'display a message to the user regarding'the month of birthMsgBox "Month you were born: " & intMonthOfBirth
End Sub
10. Select the Save button from the toolbar to save all the changes. Return to the frmTestObjectsform and select the Save button to save all changes on the form. Run the form by clicking theView button on the toolbar.
11. Enter something in the text box other than a date (Figure 3.11).
Figure 3.11
12. Now, click the Calculate button. The message should be similar to the one shown in Figure 3.12.
Figure 3.12
13. After you click the OK button, focus returns to the Date of Birth text box field. Type your date ofbirth (as shown in Figure 3.13).
86

P1: IML/FFX P2: IML/FFX QC: IML/FFX T1: IML
WY044-03 WY044-Gosnell WY044-Gosnell-v2.cls August 13, 2004 10:52
Programming Applications Using Objects
Figure 3.13
14. Click the Calculate button. You should get a message box similar to the own shown inFigure 3.14.
Figure 3.14
How It WorksYou first created a new database and a form with a text box control and a command button control. Youthen used the Properties dialog box to specify various properties for the objects. You then created twoevent procedures in the Visual Basic Editor by launching the Code Builder from the Properties dialogbox. The first event procedure was for the Exit event of the txtDateOfBirth text box. The Exit eventprocedure accepts a Cancel variable as a parameter by default.
Private Sub txtDateOfBirth_Exit(Cancel As Integer)
The code will evaluate the value input by the user in the text box and, if the format is not in a date format,a message is displayed to the user using the msgbox function.
'if the user did not enter a date, then'display an error and set the focus back'to the date of birth text box control.If Not IsDate(txtDateOfBirth.Text) Then
MsgBox "You must enter a date for the Date of Birth field."
87

P1: IML/FFX P2: IML/FFX QC: IML/FFX T1: IML
WY044-03 WY044-Gosnell WY044-Gosnell-v2.cls August 13, 2004 10:52
Chapter 3
The focus is then set back to the txtDateOfBirth text box using the SetFocus method of the text box:
txtDateOfBirth.SetFocus
The Cancel parameter is then set to True to indicate that the event processing should stop because aproblem exists. If you forget to set the Cancel parameter to True, other events that you may not want tofire will do so because the error occurred.
Cancel = True
The next event you added was the Click event for the cmdCalculate command button. The Click eventfirst declares a local variable, and then converts the value entered in the txtDateOfBirth text box to amonth and stores that value in the local variable.
Private Sub cmdCalculate_Click()'declare local variable for month of birthDim intMonthOfBirth As Integer
'convert the value in the text box to a'month and assign the value to the month'of birth variableintMonthOfBirth = DatePart("M", CDate(txtDateOfBirth))
The code for displaying a message to the user is then listed. In this case, the message is created byconcatenating the phrase "Month you were born: " with the value in the variable.
'display a message to the user regarding'the month of birthMsgBox "Month you were born: " & intMonthOfBirth
When you ran the form, you first entered an invalid date value in the text box and then clicked theCalculate button. The Exit event for the text box ran first and evaluated the value that you entered.Because the value was not a date, the error message was displayed, indicating that a date is required, andthe mouse was positioned by the set focus event back to the txtDateOfBirth text box.
The second time, you entered a correct date value in the text box field and clicked the Calculate button.This time, the Exit event for the text box ran again but did not have any problems, so the applicationcontinued and processed the Click event for the Calculate button. The Click event procedure extractedthe month from the date value you entered and then displayed that month to you in a message box.
It’s now time for the quiz. Did you keep track of all the properties, methods, and events used in theexample? If so, compare your list to the one that follows.
Type Object Property, Method, or Event
Property txtDateOfBirth (text box) Name
Property lblDateOfBirth (label) Name
Property lblDateOfBirth (label) Caption
88

P1: IML/FFX P2: IML/FFX QC: IML/FFX T1: IML
WY044-03 WY044-Gosnell WY044-Gosnell-v2.cls August 13, 2004 10:52
Programming Applications Using Objects
Type Object Property, Method, or Event
Property cmdCalculate (command button) Name
Property cmdCalculate (command button) Caption
Event txtDateOfBirth (text box) On Exit
Event cmdCalculate (command button) On Click
Method txtDateOfBirth (text box) Set Focus
See, that wasn’t so difficult, was it?
Viewing Objects Using the Object BrowserNow that you understand what objects and their respective properties, methods, and events are, let’slook at another way to view objects. The Object Browser is a tool that allows you to view and manage theobjects in your application. You can use the Object Browser to learn about the objects available in Access2003 as well as objects available from any Windows program.
The Object Browser can be opened from the Visual Basic Editor in one of three ways: by choosing theObject Browser button on toolbar, by selecting View ➪ Object Browser, or by pressing F2. Any of thesewill result in a screen such as the one shown in Figure 3.15.
Figure 3.15
89

P1: IML/FFX P2: IML/FFX QC: IML/FFX T1: IML
WY044-03 WY044-Gosnell WY044-Gosnell-v2.cls August 13, 2004 10:52
Chapter 3
Notice how the Libraries drop-down list currently displays All Libraries. The values displayed in theClasses list are for the Classes of All Libraries. You can select a particular Library, such as Access, to limitthe list of Classes and corresponding Class Members that are displayed (Figure 3.16).
Figure 3.16
Notice how you can drill down into the Classes and view the properties, methods, and events availablefor the selected class. In the previous example, the Access Form class is selected, and you can seeMouseUp and MouseWheel events (as indicated by the lightening bolt icon), various properties such asMouseWheel, and various methods such as Move. Notice how in this example the MouseUp event isselected, and you can see the syntax for the event in the bottom portion of the display. You can see whythe Object Browser is a very useful tool for viewing and working with objects.
If you change the Libraries list to the current project, you see the frmTestObjects form (Figure 3.17).
Double-click on the Form_frmTestObjects class name to display a code window showing the subprocedures and functions for that class module. In this example, you see the event procedures createdearlier in this chapter for the frmTestObjects form.
Ways to Refer to ObjectsYou should also know the various ways to refer to an object. Here are some examples.
Forms.frmTestObjectsForms!frmTestObjectsForms("frmTestObjects")Forms(0)
90

P1: IML/FFX P2: IML/FFX QC: IML/FFX T1: IML
WY044-03 WY044-Gosnell WY044-Gosnell-v2.cls August 13, 2004 10:52
Programming Applications Using Objects
Figure 3.17
Using the period (Forms.frmTestObjects) is my personal preference for most situations because youcan see the list of available properties, methods, events, and constants as you type. You already saw thisused with objects earlier in this chapter.
You can also refer to objects using the Me keyword as a shortcut. Me refers to the current object. So if youuse Me in a form module, it refers to the form. Here is an example:
Me.txtDateOfBirth
An equivalent but longer version of the same statement is:
Forms.frmTestObjects.txtDateOfBirth
Only use the Me keyword when you want to refer to the existing object (not to a totally different object).
Using Access Collections and ObjectsEarlier in this chapter, you briefly explored the difference between an object and a collection. To recap,collections can contain multiple objects. For example, you might use a forms collection to loop through allforms in the project, whereas you would refer to a particular form object when you want to deal with thatspecific form only.
Now that you have mastered the basics concepts of object-oriented programming and understand thatobjects are different from collections, let’s look at some of the most useful collections and objects that
91

P1: IML/FFX P2: IML/FFX QC: IML/FFX T1: IML
WY044-03 WY044-Gosnell WY044-Gosnell-v2.cls August 13, 2004 10:52
Chapter 3
come with Access. The examples in this section are by no means an exhaustive list, but they provide youwith the most common collections. A complete list can be obtained in the Visual Basic helpdocumentation from the Visual Basic Editor.
The Application object is at the top of the Access object model and refers to the active Accessapplication. It contains all other objects and collections. The Application object contains several childobjects that are very useful. Several Application object examples will now be described.
The Forms Collection and Form ObjectThe Forms collection of the Application object contains all forms in the application. A Form objectrefers to a specific form in the Forms collection. Let’s look at an example.
Try It Out Using the Forms Collection and Form ObjectYou can use the Forms collection and Form object to obtain a list of all the open forms in the application.
1. Create a new form for your database. Use the ToolBox to drag a list box control and a commandbutton control onto the new form.
2. Change the Name property of the list box control to lstForms.
3. Select the label for the list box. Set the Name property of the list box to lblForms and theCaption property to All forms in project: Set the RowSourceType property of the list boxto ValueList.
4. Next, select the Command Button control. Set the Name property to cmdGetForms and theCaption property to Get List of Forms.
5. At this point, the form should look similar to what’s shown in Figure 3.18.
Figure 3.18
92
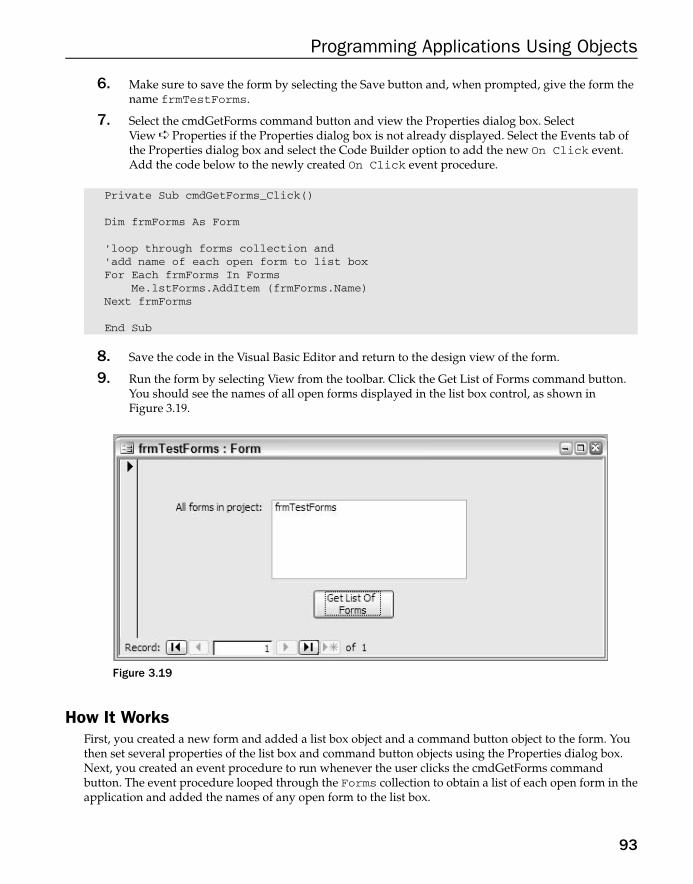
P1: IML/FFX P2: IML/FFX QC: IML/FFX T1: IML
WY044-03 WY044-Gosnell WY044-Gosnell-v2.cls August 13, 2004 10:52
Programming Applications Using Objects
6. Make sure to save the form by selecting the Save button and, when prompted, give the form thename frmTestForms.
7. Select the cmdGetForms command button and view the Properties dialog box. SelectView ➪ Properties if the Properties dialog box is not already displayed. Select the Events tab ofthe Properties dialog box and select the Code Builder option to add the new On Click event.Add the code below to the newly created On Click event procedure.
Private Sub cmdGetForms_Click()
Dim frmForms As Form
'loop through forms collection and'add name of each open form to list boxFor Each frmForms In Forms
Me.lstForms.AddItem (frmForms.Name)Next frmForms
End Sub
8. Save the code in the Visual Basic Editor and return to the design view of the form.
9. Run the form by selecting View from the toolbar. Click the Get List of Forms command button.You should see the names of all open forms displayed in the list box control, as shown inFigure 3.19.
Figure 3.19
How It WorksFirst, you created a new form and added a list box object and a command button object to the form. Youthen set several properties of the list box and command button objects using the Properties dialog box.Next, you created an event procedure to run whenever the user clicks the cmdGetForms commandbutton. The event procedure looped through the Forms collection to obtain a list of each open form in theapplication and added the names of any open form to the list box.
93

P1: IML/FFX P2: IML/FFX QC: IML/FFX T1: IML
WY044-03 WY044-Gosnell WY044-Gosnell-v2.cls August 13, 2004 10:52
Chapter 3
Private Sub cmdGetForms_Click()
Dim frmForms As Form
'loop through forms collection and'add name of each open form to list boxFor Each frmForms In Forms
Me.lstForms.AddItem (frmForms.Name)Next frmForms
End Sub
More forms are included in the database than the one displayed. Is this an error? No, it is not. The reasonyou see the name of only one form in the list box is because it is the only form that is open. You can usethe other collections and objects , whether or not they are open, as you will see in a later example.
The Reports Collection and Report ObjectThe Reports collection contains all the open reports in the application, and a Report object refers to aspecific report. Look at another example. The modBusinessLogic standard module can be added to thedatabase to store the sub procedures used in the remaining examples. Suppose you have the followingTestReports procedure in the modBusinessLogic standard module in your database.
Sub TestReports()
Dim rptReport As Report
'loop through each open report in the reports collection'and display the name in the Immediate windowFor Each rptReport In Reports
Debug.Print rptReport.NameNext rptReport
End Sub
Notice how a local variable called rptReport is first declared as a Report object, and then the programloops through each Report object in the Reports collection to print the name of the report to theImmediate Window. If any report is currently open in your database, you see the report name in theImmediate Window (after you run the preceding code) if you type TestReports and press Enter.Otherwise, you get a blank response to indicate that no reports are currently open.
The CurrentProject ObjectThe CurrentProject object of the Application object returns a reference to the current project. TheCurrentProject object has various properties, such as FullName and ProjectType, as shown here:
Debug.Print Application.CurrentProject.FullNameDebug.Print Application.CurrentProject.ProjectType
94

P1: IML/FFX P2: IML/FFX QC: IML/FFX T1: IML
WY044-03 WY044-Gosnell WY044-Gosnell-v2.cls August 13, 2004 10:52
Programming Applications Using Objects
These two lines of code will print the FullName and ProjectType properties of the current project tothe Immediate Window. The CurrentProject object also has several collections, such as: AllForms,AllReports, AllMacros, and others. When you want to obtain a list of all forms in the project,regardless whether the form is open, you can use the AllForms collection. Here is an example.
Sub TestAllForms()
Dim objAccObj As AccessObjectDim objTest As Object
'set the object equal to the Current ProjectSet objTest = Application.CurrentProject
'loop through each form in the AllForms collection'and print information about each Form to the'Immediate Window.For Each objAccObj In objTest.AllForms
Debug.Print objAccObj.NameNext objAccObj
End Sub
The preceding code declares a new instance of the CurrentProject object called objTest. Then, thename of each object that is a form in the AllForms collection of the objTest object is written to theImmediate Window.
The DoCmd ObjectThe DoCmd object can be used to perform nearly any macro command or menu option from VBA code. Youhave seen the DoCmd object in earlier chapters in examples that opened forms, such as the one that follows.
DoCmd.OpenForm "frmTestObjects"
The DoCmd object can also be used to open reports, go to a particular record, and obey numerous othercommands that you issue from a menu option or a macro.
The Screen ObjectThe Screen object is used to refer to the form, datasheet, report, control, or data access page thatcurrently has the focus. For example, to refer to the active control, you could use the following:
Screen.ActiveControl.Name
Let’s look at another example.
Try It Out Using the Screen ObjectIn this example, use the Screen object to obtain the name of the currently active form.
1. Open the frmTestForms form that was created earlier. Switch to the Visual Basic Editor and in theImmediate Window type the following:
95

P1: IML/FFX P2: IML/FFX QC: IML/FFX T1: IML
WY044-03 WY044-Gosnell WY044-Gosnell-v2.cls August 13, 2004 10:52
Chapter 3
? Screen.ActiveForm.Name
2. The name of the currently active form is displayed in the Immediate Window (Figure 3.20).
Figure 3.20
How It WorksIn the current example, you used the Immediate Window to find the name of the active form on thescreen, using the ? Screen.ActiveForm.Name command.
The Printers Collection and Printer ObjectAnother useful collection in the Application object is the Printers collection. The Printerscollection is a collection of Printer objects and contains all printers available to an application. You canwalk through an example to see how this works.
Try It Out Using the Printers Collection and Printer ObjectIn this example, you use the Printers collection and Printer object to display the name of eachprinter device in the Debug window.
1. Add the following procedure to the modBusinessLogic standard module. If you have not yetcreated modBusinessLogic, do so by inserting a new module. Then add the following code to thenew module:
Sub TestPrinter()
Dim prtAvailPrinters as Printer
For Each prtAvailPrinters In Application.PrintersWith prtAvailPrinters
Debug.Print "Printer name: " & .DeviceName & "Printer driver: " & _.DriverName
End WithNext prtAvailPrinters
End Sub
2. Run the TestPrinter procedure from the Immediate Window, and you will see a list ofprinters available on your computer, similar to Figure 3.21.
96

P1: IML/FFX P2: IML/FFX QC: IML/FFX T1: IML
WY044-03 WY044-Gosnell WY044-Gosnell-v2.cls August 13, 2004 10:52
Programming Applications Using Objects
Figure 3.21
How It WorksIn this example, you created a new procedure to output a list of all printers on your computer. Youstarted by creating a TestPrinter sub procedure in modBusinessLogic module.
Sub TestPrinter()
Next, you declared a local variable as a Printer object.
Dim prtAvailPrinters as Printer
Then, you used a For Each loop to iterate through all the Printer objects in the Printers collectionand printed the device name and driver name of each Printer object to the Immediate Window.
For Each prtAvailPrinters In Application.PrintersWith prtAvailPrinters
Debug.Print "Printer name: " & .DeviceName & "Printer driver: " & _.DriverName
End WithNext prtAvailPrinters
The results of all printers on your computer were then displayed in the Immediate Window when youexecuted the procedure from the Immediate Window. It may take a few seconds for the complete list ofprinters to appear.
Other ObjectsAt this point, you should have an idea of the various ways you can use objects in your Access applicationsto perform various tasks. The Application objects that you are most likely to use as a beginning VBAprogrammer were illustrated. However, other Application objects in Access were not described in thischapter. Consult the Visual Basic help documentation from the Visual Basic Editor for more information.
97

P1: IML/FFX P2: IML/FFX QC: IML/FFX T1: IML
WY044-03 WY044-Gosnell WY044-Gosnell-v2.cls August 13, 2004 10:52
Chapter 3
Furthermore, numerous other libraries that contain objects are available for use in your Accessapplications. One example in Chapter 10 includes using Microsoft Office objects (such as theCommandBar object) that are common to all Microsoft Office programs. This example uses the MicrosoftOffice CommandBar object to customize the command bar you see in your applications. If you want tolearn more about the objects that are available for use in your applications, consult the Object Browser toview them or review the Help documentation.
SummaryIn the world of object-oriented programming, objects refer to all the things that make up your database,such as forms, reports, controls, and so on. By encapsulating code into objects, you make programs easierto maintain and code easier to re-use. Microsoft Access has several collections and objects that can beused to manipulate the objects contained in your database. For example, you can determine all the formsin your project for some useful purpose, or you can work with a particular form.
With these object-oriented concepts in mind, turn to Chapter 4, where you will create custom objects.
Exercises1. What are properties, methods, and events?
2. Name at least two ways that you can view the properties, methods, or events available for agiven object.
3. What is the difference between the Forms collection and the AllForms collection?
98

P1: IML/FFX P2: IML/FFX QC: IML/FFX T1: IML
WY044-04 WY044-Gosnell WY044-Gosnell-v2.cls August 13, 2004 10:55
4Creating Your Own Objects
Now that you understand basic object-oriented programming concepts, you can turn your attentionto the topic of creating your own objects. This chapter will provide a brief summary of what youhave learned so far and will then teach you why and how to create custom class modules withassociated properties, methods, and events. It will also cover how to extend existing objects, such asforms or controls, by adding custom properties, methods, and events. As with most other chapters,you can download the database containing the code for this chapter from Wrox.com.
Using Class Modules to Create Your Own ObjectsAs you have already learned, an object refers to all the things that make up your database, includingforms, reports, and controls. By encapsulating code into objects, you make programs easier tomaintain and more easily re-usable. You also have learned that objects can have properties,methods, and events. Properties are characteristics of the object, and methods are actions you takeupon the object. Events are triggered when a user or application performs an action. These objects,which you worked with in Chapter 3, were created using class modules, although you did not seethe proprietary source code for the Access objects.
You may remember from Chapter 2 that a class module is only one of the two types of modules; theother type is a standard module. Standard modules are modules that contain procedures that are notassociated with any particular object. The procedures you wrote in the modBusinessLogicmodule in Chapter 2 were placed in a standard module. Class modules are modules that areassociated with a particular object. Class modules can be used either for form or report modules orfor custom objects. For example, form and report class modules can contain code that correspondsto a particular form or report, such as the event procedures for forms and controls that you wrote inthe corresponding form class module in an earlier chapter. Since Access 97, class modules can alsobe created independently of a form or report and, in such cases, are used to create a definition for acustom object. This chapter will focus on using class modules for creating custom objects, as well asextending the class modules of existing objects with custom properties, methods, and events.
You can insert a new class module in three ways. One way is to open the Database Window andselect Insert ➪ Class Module. Another way to insert a new class module is from the Visual BasicEditor by selecting Insert ➪ Class Module. A final way is to right-click on the Project Explorer fromwithin the Visual Basic Editor and select Insert ➪ Class Module from the pop-up menu.

P1: IML/FFX P2: IML/FFX QC: IML/FFX T1: IML
WY044-04 WY044-Gosnell WY044-Gosnell-v2.cls August 13, 2004 10:55
Chapter 4
Go ahead and create a new database to use with the examples in this chapter. Select File ➪New ➪ Blank Database and specify Ch4CodeExamples as the filename. Now that you have theempty database created, let’s temporarily divert your attention to learn how custom objects shouldbe documented using class diagrams during the design phase. I’ll then give you the details on howto create custom objects.
Class DiagramsBefore jumping into the techniques for coding custom objects, you must understand how custom objectsfit into the Systems Development Life Cycle and how to identify and document what custom objects youshould create. You learned in Chapter 1 that during the design phase of your application you generate awritten specification for how your application should be coded. Activity Diagrams, Use Case Diagrams,and Screen Prototypes are examples of some techniques that can be used to document your design. Classdiagrams are another documentation technique.
You are already well aware that an object can have properties, methods, and events. Your applicationshould certainly make use of existing Access objects where possible, so that you do not have to re-writecode that the Microsoft programmers have already written for you. However, as appropriate, you shouldalso take advantage of custom objects to maximize the unique features of your application. During thedesign phase, you should identify the custom objects for your application and document the customobjects using class diagrams.
Class diagrams are critical in object-oriented system designs. They show the classes, relationships withinthe classes, and the way the code should be structured. In a class diagram, the properties and methodsthat make up an object are portrayed graphically. For example, in the case of the hypothetical Wrox AutoSales Application described in Chapter 1, you deal with cars. Figure 4.1 shows the sample prototypescreen for managing cars, as discussed in Chapter 1.
An object that you might want to create is a Car object. You could use a Car class to represent the Carobject. The user interface is often a good starting point for determining properties and methods of anobject. The Car object can have certain properties: Make, Model, Year, and so on, as the fields on the userinterface indicate. In addition to these properties, the Car object needs methods that allow for retrieving,adding, updating, and deleting a specific record. These methods correlate to the Lookup, Add New, Save,and Delete buttons on the user interface.
Figure 4.2 shows an example class diagram for the Car object:
Notice that the properties for the Car class are listed first, followed by a divider line, and then by themethods it contains. The class diagram in Figure 4.2 contains the tracked properties and the methods forwhich you must write code. When you create a new system, create a class diagram that depicts all objectsin the entire system. This is not an easy task and requires effort and time to learn. For the sake ofsimplicity, I focus on writing custom properties, methods, and events for the Car class of the hypotheticalWrox Auto Sales application.
A complete solution would contain other class modules as well, such as one for a Customer object or aSearchInventory object. The comprehensive case studies in Chapters 12 and 13 will include completeclass diagrams for the respective system and are excellent resources for refining your understanding ofdocumenting and creating custom objects.
100

P1: IML/FFX P2: IML/FFX QC: IML/FFX T1: IML
WY044-04 WY044-Gosnell WY044-Gosnell-v2.cls August 13, 2004 10:55
Creating Your Own Objects
Figure 4.1
In Chapter 1, I mentioned that your code can be separated into three different logical tiers, even thoughAccess is not used for physical three-tier applications. In most cases, it is a good idea to separate yourcode into different logical tiers. This makes it easier to update a particular portion of the system andmigrate it to other platforms.
Returning to the Car class example, I will walk you through adding additional class diagrams based onthe separation of tiers concept. You can actually create the class diagrams in any order you choose, but mypersonal preference is to start with the business logic layer first. The business logic layer is where you putyour main classes like Car, and everything else revolves around it.
The class diagram in Figure 4.2 fits into the business logic layer. Now that you have created the businesslogic layer of the application, the other two remaining layers are really easy to create. Any call to thedatabase will be included in a class in the data access layer. For each business logic layer class modulethat has a method requiring data from the database, you create a corresponding class module in the dataaccess layer. Thus, the business logic layer (the Car class) will not make any calls directly to the database
101

P1: IML/FFX P2: IML/FFX QC: IML/FFX T1: IML
WY044-04 WY044-Gosnell WY044-Gosnell-v2.cls August 13, 2004 10:55
Chapter 4
+Retrieve()+Add()+Update()+Delete()
Car
-VehicleIdNumber-MakeId-ModelId-Year-Mileage-ColorId-InteriorTypeId-InteriorColorId-TransmissionTypeId-StatusId-ReceivedDate-SoldDate-SoldToCustomerId-Photo-Special Features
Figure 4.2
to get data. Instead, the Car class calls a method in a CarDb class in the data access layer, which, in turn,gets the data from the database, as you can see in Figure 4.3.
+Retrieve()+Add()+Update()+Delete()
Car
-VehicleIdNumber-MakeId-ModelId-Year-Mileage-ColorId-InteriorTypeId-InteriorColorId-TransmissionTypeId-StatusId-ReceivedDate-SoldDate-SoldToCustomerId-Photo-Special Features
+RetrieveCarDb()+AddCarDb()+UpdateCarDb()+DeleteCarDb()
CarDbOpen Car (UC 2.1)
Update Car (UC 2.2)
Add New Car (UC 2.3)
Delete Car (UC 2.4)
Presentation Layer Business Logic Layer Data Access Layer
Figure 4.3
After creating the business logic layer and data access layer class diagrams, you create the diagrams forthe presentation (user interface) layer. This is probably the easiest of the three to create, because yousimply put each of your use cases on the diagram. Remember the use cases you created in Chapter 1 that
102

P1: IML/FFX P2: IML/FFX QC: IML/FFX T1: IML
WY044-04 WY044-Gosnell WY044-Gosnell-v2.cls August 13, 2004 10:55
Creating Your Own Objects
defined each of the independent actions the user can take in the Wrox Auto Sales Application from theuser interface? As Figure 4.3 illustrates, you can just list the use cases for the presentation layer classmodules because the use cases define the user interface services to be performed.
Notice how each of the layers is connected appropriately to the others in the instances where theycommunicate with each other. For example, the Open Car action on the presentation layer calls theRetrieve method on the Car class, which in turn calls the RetrieveCarDb method on the CarDbclass. The code to implement the presentation layer usually goes in class modules associated with therelated form or report. The code to implement the business logic layer and data access layer ideally goesin custom class modules, although other variations are also possible and acceptable. I hope you arestarting to see how this isolation of application logic into tiers works.
At this point, don’t worry about understanding the complex details of designing class modules for anentire application. You should just understand that class diagrams can be used to model the customobjects that you want to create. I now return to the discussion of creating custom objects, and show youhow to write the code to implement the properties and methods listed on the Car object in Figures 4.2and 4.3.
Creating PropertiesTo recap, properties are characteristics of an object. Properties for custom classes can be implementedusing public variables or using Property Let, Property Get, and Property Set procedures, both ofwhich are discussed next.
Using Public VariablesOne way to create properties for a class is to use a public variable declaration in a class module. In Chapter3, you learned how to write a public variable declaration. When you place a public variable declaration inthe Declarations section of a class module, it becomes a property for that class. Here is an example:
Public VehicleIdNumber As Double
I do not recommend creating properties using public variables for several reasons. First, you cannotmanipulate the value because the property is set. Second, you cannot create read-only and write-onlyproperties. Third, you cannot easily validate what is assigned to public variables. The better way to createproperties is discussed next and does not have these drawbacks.
Using Property Let, Property Get, and Property SetProperty Let, Property Get, and Property Set procedures enable you to create properties in amore flexible way than by using public variables. Property Let procedures determine what happenswhen you assign a value to the property. Here is a simple example showing the general syntax for aProperty Let procedure.
Public Property Let TestProperty(ByVal strMessage As String)'code for assigning the property goes herestrTestPropertyVal = strMessage
End Property
103

P1: IML/FFX P2: IML/FFX QC: IML/FFX T1: IML
WY044-04 WY044-Gosnell WY044-Gosnell-v2.cls August 13, 2004 10:55
Chapter 4
In many cases, you assign the value of the parameter passed to the property procedure to a variable thatis declared in the Declarations section of the class. The Property Let procedure is a special type ofprocedure that gets executed whenever you assign the property to another value in your code. Forexample, suppose you have the following line of code:
TestProperty = "This is a new value for the property."
Because you are assigning the TestProperty property to a new value, the Property Let procedurewill execute. In the current example, the string value listed in quotes is passed to the Property Letprocedure as the strMessage parameter and is assigned to a strTestPropertyVal variable.
You can include much more than just a single assignment statement in a Property Let procedure. Forexample, you can perform validation checks or call other methods from within the Property Letprocedure. The following example illustrates performing validation checks before assigning the propertyvalue.
Public Property Let TestProperty(ByVal strMessage As String)'if the length of the message is less than 25 then set the valueIf Len(strMessage) < 25 Then
'code for assigning the property goes herestrTestPropertyVal = strMessage
ElseMsgbox "The message for Test Property cannot exceed 25 characters!"
End IfEnd Property
You can see in this example how using the Property Let procedure gives you greater flexibility than ifyou had declared the property as a public variable.
The Property Get procedure is used to specify what should happen upon retrieval of the property’svalue. Here is an example of the syntax used for a Property Get procedure:
Public Property Get TestProperty As StringTestProperty = strTestPropertyVal
End Property
Notice how the name of the property is assigned to the local variable strTestPropertyVal that isbeing used to store the current value of the property. This is, in effect, a function that returns the value inthe local variable upon request. Just like the Property Set procedure, the Property Get procedurecan also include additional code.
The Property Set procedure is used only to specify what should happen when the value of an objectdata type is assigned. In all other cases, you should use the Property Let procedure for specifying whathappens when properties are assigned values.
You can create read-only properties by eliminating the Property Let procedure and including only theProperty Get procedure.
It’s time to try your hand at creating all the properties for the Car class of the Wrox Auto SalesApplication that was analyzed earlier. You may want to refer to Figure 4.2 to see how the Class Diagrammaps to the code you write.
104

P1: IML/FFX P2: IML/FFX QC: IML/FFX T1: IML
WY044-04 WY044-Gosnell WY044-Gosnell-v2.cls August 13, 2004 10:55
Creating Your Own Objects
Try It Out Creating the Properties for the Car Class
1. If you have not already done so, create a new database for use with examples in this chapter. Todo so, select File ➪ New ➪ Blank Database. Specify the filename as Ch4CodeExamples and clickthe Create button.
2. Add a new class to the database. Open the Database Window and select Insert ➪ Class Module.From the Properties Window in the Visual Basic Editor, change the name of the class to clsCar.
3. Add the following declarations to the General Declarations section of the clsCar class.
Dim dblVehicleIdNumberVal As DoubleDim intMakeIdVal As IntegerDim intModelIdVal As IntegerDim intModelYearVal As IntegerDim intMileageVal As IntegerDim intColorIdVal As IntegerDim intInteriorTypeIdVal As IntegerDim intInteriorColorIdVal As IntegerDim intTransmissionTypeIdVal As IntegerDim intStatusIdVal As IntegerDim dtReceivedDateVal As DateDim dtSoldDateVal As DateDim intSoldToPersonIdVal As IntegerDim strPhotoVal As StringDim strSpecialFeaturesVal As String
4. Add the property procedures for VehicleIdNumber to the clsCar class.
Public Property Get VehicleIdNumber() As DoubleVehicleIdNumber = dblVehicleIdNumberVal
End Property
Public Property Let VehicleIdNumber(ByVal Value As Double)dblVehicleIdNumberVal = Value
End Property
5. Add the property procedures for MakeId to the clsCar class.
Public Property Get MakeId() As IntegerMakeId = intMakeIdVal
End Property
Public Property Let MakeId(ByVal Value As Integer)intMakeIdVal = ValueEnd Property
6. Add the property procedures for ModelId to the clsCar class.
Public Property Get ModelId() As IntegerModelId = intModelIdVal
End Property
105

P1: IML/FFX P2: IML/FFX QC: IML/FFX T1: IML
WY044-04 WY044-Gosnell WY044-Gosnell-v2.cls August 13, 2004 10:55
Chapter 4
Public Property Let ModelId(ByVal Value As Integer)intModelIdVal = Value
End Property
7. Add the property procedures for ModelYear to the clsCar class.
Public Property Get ModelYear() As IntegerModelYear = intModelYearVal
End Property
Public Property Let ModelYear(ByVal Value As Integer)intModelYearVal = Value
End Property
8. Add the property procedures for Mileage to the clsCar class.
Public Property Get Mileage() As IntegerMileage = intMileageVal
End Property
Public Property Let Mileage(ByVal Value As Integer)intMileageVal = Value
End Property
9. Add the property procedures for ColorId to the clsCar class.
Public Property Get ColorId() As IntegerColorId = intColorIdVal
End Property
Public Property Let ColorId(ByVal Value As Integer)intColorIdVal = Value
End Property
10. Add the property procedures for InteriorTypeId to the clsCar class.
Public Property Get InteriorTypeId() As IntegerInteriorTypeId = intInteriorTypeIdVal
End Property
Public Property Let InteriorTypeId(ByVal Value As Integer)intInteriorTypeIdVal = Value
End Property
11. Add the property procedures for InteriorColorId to the clsCar class.
Public Property Get InteriorColorId() As IntegerInteriorColorId = intInteriorColorIdVal
End Property
106

P1: IML/FFX P2: IML/FFX QC: IML/FFX T1: IML
WY044-04 WY044-Gosnell WY044-Gosnell-v2.cls August 13, 2004 10:55
Creating Your Own Objects
Public Property Let InteriorColorId(ByVal Value As Integer)intInteriorColorIdVal = Value
End Property
12. Add the property procedures for TransmissionTypeId to the clsCar class.
Public Property Get TransmissionTypeId() As IntegerTransmissionTypeId = intTransmissionTypeIdVal
End Property
Public Property Let TransmissionTypeId(ByVal Value As Integer)intTransmissionTypeIdVal = Value
End Property
13. Add the property procedures for StatusId to the clsCar class.
Public Property Get StatusId() As IntegerStatusId = intStatusIdVal
End Property
Public Property Let StatusId(ByVal Value As Integer)intStatusIdVal = Value
End Property
14. Add the property procedures for ReceivedDate to the clsCar class.
Public Property Get ReceivedDate() As DateReceivedDate = dtReceivedDateVal
End Property
Public Property Let ReceivedDate(ByVal Value As Date)dtReceivedDateVal = Value
End Property
15. Add the property procedures for SoldDate to the clsCar class.
Public Property Get SoldDate() As DateSoldDate = dtSoldDateVal
End Property
Public Property Let SoldDate(ByVal Value As Date)dtSoldDateVal = Value
End Property
16. Add the property procedures for SoldToPersonId to the clsCar class.
Public Property Get SoldToPersonId() As IntegerSoldToPersonId = intSoldToPersonIdVal
End Property
107
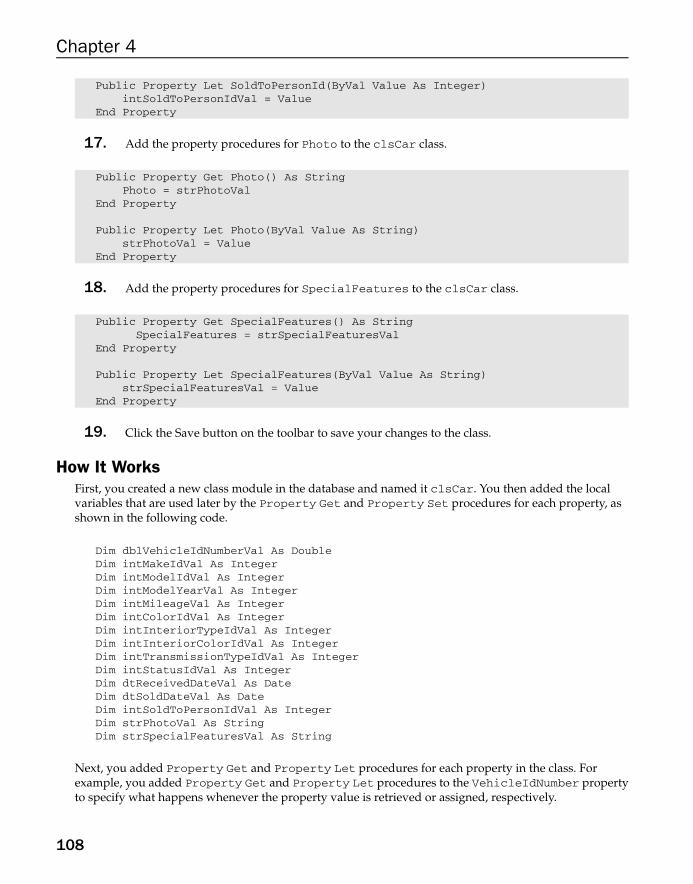
P1: IML/FFX P2: IML/FFX QC: IML/FFX T1: IML
WY044-04 WY044-Gosnell WY044-Gosnell-v2.cls August 13, 2004 10:55
Chapter 4
Public Property Let SoldToPersonId(ByVal Value As Integer)intSoldToPersonIdVal = Value
End Property
17. Add the property procedures for Photo to the clsCar class.
Public Property Get Photo() As StringPhoto = strPhotoVal
End Property
Public Property Let Photo(ByVal Value As String)strPhotoVal = Value
End Property
18. Add the property procedures for SpecialFeatures to the clsCar class.
Public Property Get SpecialFeatures() As StringSpecialFeatures = strSpecialFeaturesVal
End Property
Public Property Let SpecialFeatures(ByVal Value As String)strSpecialFeaturesVal = Value
End Property
19. Click the Save button on the toolbar to save your changes to the class.
How It WorksFirst, you created a new class module in the database and named it clsCar. You then added the localvariables that are used later by the Property Get and Property Set procedures for each property, asshown in the following code.
Dim dblVehicleIdNumberVal As DoubleDim intMakeIdVal As IntegerDim intModelIdVal As IntegerDim intModelYearVal As IntegerDim intMileageVal As IntegerDim intColorIdVal As IntegerDim intInteriorTypeIdVal As IntegerDim intInteriorColorIdVal As IntegerDim intTransmissionTypeIdVal As IntegerDim intStatusIdVal As IntegerDim dtReceivedDateVal As DateDim dtSoldDateVal As DateDim intSoldToPersonIdVal As IntegerDim strPhotoVal As StringDim strSpecialFeaturesVal As String
Next, you added Property Get and Property Let procedures for each property in the class. Forexample, you added Property Get and Property Let procedures to the VehicleIdNumber propertyto specify what happens whenever the property value is retrieved or assigned, respectively.
108

P1: IML/FFX P2: IML/FFX QC: IML/FFX T1: IML
WY044-04 WY044-Gosnell WY044-Gosnell-v2.cls August 13, 2004 10:55
Creating Your Own Objects
Public Property Get VehicleIdNumber() As DoubleVehicleIdNumber = dblVehicleIdNumberVal
End Property
Public Property Let VehicleIdNumber(ByVal Value As Double)dblVehicleIdNumberVal = Value
End Property
You can use this class later on in the chapter to see one or more of these properties in action.
Creating MethodsAs you are aware, methods are actions that can be taken on an object. Methods for custom classes areimplemented using public sub procedures and functions.
Using Public Sub Procedures and FunctionsTo implement a method for a custom class, you simply add a public sub procedure or function to the classitself. You are already familiar with creating new procedures, so creating a custom method will be reallyeasy for you. To add a method called TestMethod to a class module, you simply add the following code:
Public Sub TestMethod()'code for the method goes here
End Sub
Now, create the four methods for the clsCar class: Retrieve, Add, Update, and Delete. You maywish to refer to Figure 4.2 to see how the class diagram maps to the code you write.
Try It Out Creating the Methods for the Car Class1. Add the Retrieve method to the clsCar class.
Public Function Retrieve(ByVal VehicleId As Integer) As ADODB.Recordset
'Retrieve the detail record for the car'from the database'code to call the data access layer that retrieves the record from'the database
Debug.Print "clsCar.Retrieve method"Debug.Print "VehicleID: " & VehicleId & " will be retrieved from the
database."
End Function
2. Add the Add method to the clsCar class.
Public Sub Add()
'Add the current values in the Car object to the database
'code to call the data access layer that adds the record to the database
109

P1: IML/FFX P2: IML/FFX QC: IML/FFX T1: IML
WY044-04 WY044-Gosnell WY044-Gosnell-v2.cls August 13, 2004 10:55
Chapter 4
Debug.Print "clsCar.Add method"Debug.Print "New record being added for VehicleId: " & Me.VehicleIdNumber
End Sub
3. Add the Update method to the clsCar class.
Public Sub Update()
'Update the database with the current contents of the Car object
'Code to call the data access layer that updates the existing'record in the database
Debug.Print "clsCar.Update method"Debug.Print "Record being updated for VehicleId: " & Me.VehicleIdNumber
End Sub
4. Add the Delete method to the clsCar class.
Public Sub Delete()
'Delete the Car record from the database
'Code to call the data access layer that deletes the record from thedatabase
'Pass the VehicleId value as a parameter
Debug.Print "clsCar.Delete method"Debug.Print "Record being deleted for VehicleId: " & Me.VehicleIdNumber
End Sub
5. Click the Save button on the toolbar to save your changes to the class.
How It WorksFirst, you created the Retrieve method of the clsCar class. The Retrieve method is responsible forcalling the data access layer to look up a particular car record.
Public Function Retrieve(ByVal VehicleId As Integer) As ADODB.Recordset
'Retrieve the detail record for the car'from the database
'code to call the data access layer that retrieves the record from'the database
For illustration purposes, the method includes code to print a message to the Immediate Window to letyou know that the method executed.
110

P1: IML/FFX P2: IML/FFX QC: IML/FFX T1: IML
WY044-04 WY044-Gosnell WY044-Gosnell-v2.cls August 13, 2004 10:55
Creating Your Own Objects
Debug.Print "clsCar.Retrieve method"Debug.Print "VehicleID: " & VehicleId & " will be retrieved from the
database."
End Function
Next, you created the Add method to handle adding a new car record to the database.
Public Sub Add()
'Add the current values in the Car object to the database'code to call the data access layer that adds the record to the database
Again, the method includes code to print a message to the Immediate Window to let you know themethod executed.
Debug.Print "clsCar.Add method"Debug.Print "New record being added for VehicleId: " &
Me.VehicleIdNumber
End Sub
The Update and Delete methods are created in similar ways. One or more of these methods will beused in later examples. Now turn your attention to events.
Creating EventsEvents occur in response to an action taken by the user or the system. Custom events can be created inclass modules, but they must also be raised (fired) in code or the event will never happen.
Declaring and Raising EventsFirst, you must declare and raise the event. An event declaration can be added to the GeneralDeclarations section of the class module as shown here:
Public Event EventName(VariableName As DataType)
After the event has been declared, you add code to a procedure in your class module to raise the eventwhen a certain action happens. Events are raised with the RaiseEvent statement. To see how thisworks, create an event for the Car class.
Try It Out Creating an Event for the Car Class
1. Declare the event with the Public Event statement in the General Declarations section of theclsCar class module.
Public Event ActionSuccess(strMessage As String)
111

P1: IML/FFX P2: IML/FFX QC: IML/FFX T1: IML
WY044-04 WY044-Gosnell WY044-Gosnell-v2.cls August 13, 2004 10:55
Chapter 4
2. Modify the existing Update method in clsCar to include the following additional code:
Public Sub Update()'Update the database with the current contents of the Car object
'Code to call the data access layer that updates the existing'record in the database
Debug.Print "clsCar.Update method"Debug.Print "Record being updated for VehicleId: " & Me.VehicleIdNumber
'raise the ActionSuccess eventRaiseEvent ActionSuccess("Updates to existing record saved successfully!")
End Function
How It WorksFirst, the event was declared in the class module using the Public Event statement. Next, code wasadded to the existing Update method to raise the event. At this point, the code will not result in anyaction when the event fires. To create the action, take the following additional steps.
Creating the Event Sub Procedure or FunctionYou must write code that executes when an event is raised. In Chapter 3, you had to create eventprocedures to specify what should happen when an event occurs. You now use the same process forcustom objects.
From the General Declarations section of the object where you wish to handle the event, you declare theobject variable for the class that causes the event using the WithEvents keyword.
Dim WithEvents objCar As clsCar
After the object has been declared using WithEvents, the Visual Basic Editor displays the object in thelist of objects and displays the event in the procedure drop-down list, just as it would for any other object.You can select the object and event from the list, and the code template is automatically specified. Youthen add the code that you want to run when the event occurs.
Private Sub objCar_ActionSuccess(strMessage As String)
'code to execute when event occurs goes here
End Sub
You will actually create the event in the sample database momentarily, but first I want to cover a fewother topics necessary to write the sample code to handle the event.
Using the ClassAfter writing the code for the class module, you can use the class from other places in your application.
112

P1: IML/FFX P2: IML/FFX QC: IML/FFX T1: IML
WY044-04 WY044-Gosnell WY044-Gosnell-v2.cls August 13, 2004 10:55
Creating Your Own Objects
Instantiating the ClassTo use a class module in your application, you first must use the Dim statement to declare the class and aSet statement to create a new instance of the class, as shown here.
Dim objCar As clsCar
Set objCar = New clsCar
As you will see in a moment, the preceding lines of code do not have to be contained in the sameprocedure. After the class has been instantiated, it becomes an object in memory.
Initialize and Terminate EventsEach class has Initialize and Terminate events that can be used. These events should be used whenyou want certain code to run each time the class is created or destroyed. Now return to the hypotheticalWrox Auto Sales application example and try out the properties, methods, and event of the clsCar class.
Try It Out Using the Properties, Methods, and Events of the Car Class1. Return to the database window and create a new form. Use the Toolbox in the Form Designer to
drag and drop one text box and four command buttons onto the new form, as shown inFigure 4.4.
Figure 4.4
2. Change the Name property of the text box to txtVehicleId. Change the Name property of thelabel to lblVehicleId and the Caption property to Vehicle Id:. Change the Nameproperties of the command buttons to cmdLookup, cmdSave, cmdAddNew, and cmdDelete,respectively. Change the Caption properties of the command buttons to Lookup, Save,AddNew, and Delete, respectively. Figure 4.5 shows how the form should look at this point.
3. Select the Save button on the Toolbar of the Form Designer to save the form. Name the formfrmCarDetails.
113

P1: IML/FFX P2: IML/FFX QC: IML/FFX T1: IML
WY044-04 WY044-Gosnell WY044-Gosnell-v2.cls August 13, 2004 10:55
Chapter 4
Figure 4.5
4. From the Properties dialog box of the Form, select the On Load event on the Events tab. Use theCode Builder to add an empty event procedure for the On Load event, as shown here.
Private Sub Form_Load()
End Sub
5. For the moment, leave the Form_Load event empty and add the following code to the GeneralDeclarations section of the frmCarDetails class.
Dim WithEvents objCar As clsCar
6. Return to the Form_Load event and add the following code.
Private Sub Form_Load()
'create a new instance of the car class to use while the form is openSet objCar = New clsCar
End Sub
7. Add the following Click event to the frmCarDetails class.
Private Sub cmdLookup_Click()
'set the value of the VehicleId in the car object'to the current value in the text box on the formobjCar.VehicleIdNumber = txtVehicleId
'call the Retrieve methodobjCar.Retrieve (objCar.VehicleIdNumber)
End Sub
8. Add the following Save event to the frmCarDetails class.
114

P1: IML/FFX P2: IML/FFX QC: IML/FFX T1: IML
WY044-04 WY044-Gosnell WY044-Gosnell-v2.cls August 13, 2004 10:55
Creating Your Own Objects
Private Sub cmdSave_Click()
'add the values in the car object to the databaseobjCar.Update
End Sub
9. Add the following ActionSuccess event to the frmCarDetails class.
Private Sub objCar_ActionSuccess(strMessage As String)
'display the message to the userMsgBox strMessage
End Sub
10. Save all your changes by clicking the Save button on the Visual Basic Editor. Also, return toyour form and click the Save button on the Form Designer toolbar.
11. Run the form by selecting View from the toolbar. Enter a value for the VehicleId text box on theform, as shown in Figure 4.6.
Figure 4.6
12. Click the Lookup button. The Immediate Window of the Visual Basic Editor will displayinformation similar to that shown in Figure 4.7.
Figure 4.7
13. Return to the form and click the command button labeled Save. The Immediate Window of theVisual Basic Editor will display information similar to that shown in Figure 4.8.
14. A message box similar to the one shown in Figure 4.9 is then displayed.
115
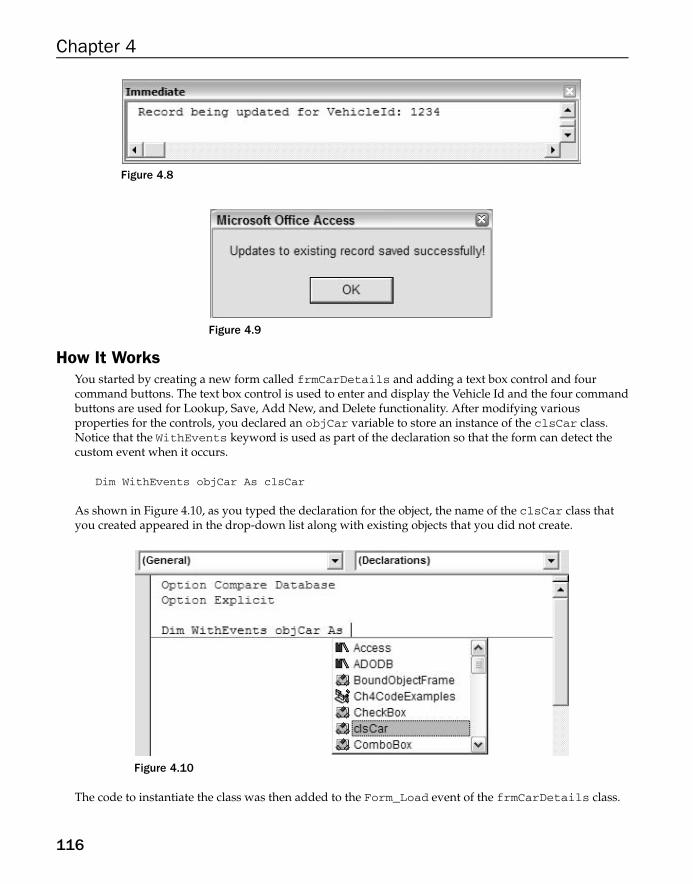
P1: IML/FFX P2: IML/FFX QC: IML/FFX T1: IML
WY044-04 WY044-Gosnell WY044-Gosnell-v2.cls August 13, 2004 10:55
Chapter 4
Figure 4.8
Figure 4.9
How It WorksYou started by creating a new form called frmCarDetails and adding a text box control and fourcommand buttons. The text box control is used to enter and display the Vehicle Id and the four commandbuttons are used for Lookup, Save, Add New, and Delete functionality. After modifying variousproperties for the controls, you declared an objCar variable to store an instance of the clsCar class.Notice that the WithEvents keyword is used as part of the declaration so that the form can detect thecustom event when it occurs.
Dim WithEvents objCar As clsCar
As shown in Figure 4.10, as you typed the declaration for the object, the name of the clsCar class thatyou created appeared in the drop-down list along with existing objects that you did not create.
Figure 4.10
The code to instantiate the class was then added to the Form_Load event of the frmCarDetails class.
116

P1: IML/FFX P2: IML/FFX QC: IML/FFX T1: IML
WY044-04 WY044-Gosnell WY044-Gosnell-v2.cls August 13, 2004 10:55
Creating Your Own Objects
Private Sub Form_Load()
'create a new instance of the car class to use while the form is openSet objCar = New clsCar
End Sub
You then added code for the Click event of the cmdLookup button of the frmCarDetails class. In thisevent, when the user clicks the Lookup button on the form, the VehicleIdNumber property of theobjCar class is assigned the value from the text box on the form. The Retrieve method is then called.
Private Sub cmdLookup_Click()
'set the value of the VehicleId in the car object'to the current value in the text box on the formobjCar.VehicleIdNumber = txtVehicleId
'call the Retrieve methodobjCar.Retrieve (objCar.VehicleIdNumber)End Sub
As you entered the code to set the VehicleIdNumber property, a drop-down list (as shown inFigure 4.11) appeared and displayed all the properties and methods for your custom class. Pretty cool,huh? Those are properties and methods that you created.
Figure 4.11
You then added the Save event to the frmCarDetails class to call the Update method when you clickthe Save button on the form.
Private Sub cmdSave_Click()
'add the values in the car object to the databaseobjCar.Update
End Sub
Next, you added the ActionSuccess event to the frmCarDetails class. This is a custom event that israised in the clsCar class from the Update method. After the event is raised, the following code runs.
117

P1: IML/FFX P2: IML/FFX QC: IML/FFX T1: IML
WY044-04 WY044-Gosnell WY044-Gosnell-v2.cls August 13, 2004 10:55
Chapter 4
Private Sub objCar_ActionSuccess(strMessage As String)
'display the message to the userMsgBox strMessage
End Sub
Next, you ran the form, entered a value for the VehicleId text box on the form, and selected the Lookupbutton. The Immediate Window then displayed the messages indicating that the Retrieve method ofthe clsCar object had executed. After you click the Save button on the form, the Immediate Windowdisplayed messages indicating the Update method had executed, and displayed a message boxindicating that the record was successfully updated. Remember that this is the code you previouslyadded to the Update method to raise the custom event ActionSuccess. In just these few steps, you notonly tested the properties, methods, and event for your custom object, but you also used severalproperties, methods, and events for the existing objects.
Note that the example used for the frmCarDetails form illustrated just a partial set of the controlsthat would be included on the production version of the Manage Cars screen. Only the VehicleIdNumberfield was used for sake of simplicity.
Advanced TechniquesNow that you have a basic idea of how to use class modules to create your own objects with properties,methods, and events, you can delve into some advanced techniques.
Creating Multiple Instances of the ClassYou already learned how to declare and create an instance of a class using the Dim and Set statements.The following example illustrates how you can create multiple instances of the same class.
Public Sub TestMultipleInstances()
'declare both clsCar objectsDim objCar1 As clsCarDim objCar2 As clsCar
'instantiate new instances for eachSet objCar1 = New clsCarSet objCar2 = New clsCar
'set the VehicleId property for the first instance'of clsCar and then call the previously created'update method as an exampleobjCar1.VehicleIdNumber = "98765"objCar1.Update
'set the VehicleId property for the second instance'of clsCar and then call the previously created'update method as an exampleobjCar2.VehicleIdNumber = "12345"objCar2.Update
End Sub
118

P1: IML/FFX P2: IML/FFX QC: IML/FFX T1: IML
WY044-04 WY044-Gosnell WY044-Gosnell-v2.cls August 13, 2004 10:55
Creating Your Own Objects
Notice how two different clsCar objects are declared and instantiated. The VehicleIdNumber propertyof each instance of the class is assigned, and the Update method of each instance of the class is called.
As shown in Figure 4.12, the Immediate Window displays the messages generated from the Updatemethod indicating the record was being updated for each respective instance of the class.
Figure 4.12
Creating Class HierarchiesClasses can be related to each other in parent-child class relationships called class hierarchies. Suppose youhave an object called Orders that contains overall details about a particular order placed for products,and you also have an object called OrderDetails that contains details about a particular individualproduct within that order. The Orders object can contain multiple OrderDetails objects. To relate theOrders object to the OrderDetails object, place a declaration of the child class in the GeneralDeclarations section of the Orders object, such as shown here.
Public ItemDetails As OrderDetails
You then use the Set statement to instantiate the OrderDetails class just as you do for the Ordersclass.
Working with Enumerated TypesEnumerated types can be used when you want to require a property value to be limited to a specified list ofconstants. Suppose you have the following code in the General Declarations section of a clsCar object:
Public Enum SpecialFeaturesListSunRoofMoonRoofNavigationSystemIntegratedPhoneOther
End Enum
In the property declarations, you see the SpecialFeaturesList enumerated type in the list of objectsavailable, as shown in Figure 4.13.
The Property Get and Property Let procedures using the SpecialFeaturesList enumerationlook like this:
119

P1: IML/FFX P2: IML/FFX QC: IML/FFX T1: IML
WY044-04 WY044-Gosnell WY044-Gosnell-v2.cls August 13, 2004 10:55
Chapter 4
Public Property Get SpecialFeatures() As SpecialFeaturesListSpecialFeatures = SpecialFeaturesVal
End Property
Public Property Let SpecialFeatures(ByVal Value As SpecialFeaturesList)SpecialFeaturesVal = Value
End Property
Figure 4.13
Now any time you try to set that property using an assignment statement, you are limited to those valuesspecified in the enumeration declaration, as shown in Figure 4.14.
Figure 4.14
Inheritance Using Implements KeywordAccess allows for a type of inheritance called interface inheritance. Interface inheritance allows you toadopt the properties and methods of another object. This feature is implemented using the implementskeyword, as shown below.
Implements clsCar
If the preceding code is placed in the General Declarations section of a new class module, you will see theclsCar object in the Object drop-down list, as well as the properties and methods of the clsCar object.You can then select a particular property or method and write the code for that property or method. Thisis a big drawback to interface inheritance—it requires you to write the code to implement thoseproperties and methods. True inheritance (supported in more advanced programming languages, such asVisual C++, or Visual Studio .NET) enables you to inherit all the properties and methods from anotherclass, including all the code that goes with it.
120

P1: IML/FFX P2: IML/FFX QC: IML/FFX T1: IML
WY044-04 WY044-Gosnell WY044-Gosnell-v2.cls August 13, 2004 10:55
Creating Your Own Objects
Create Custom Properties for Existing ObjectsNow that you have worked with existing objects and created your own objects, you will see a few waysto extend existing objects, giving them additional properties, methods, or events. Start by looking at howto create custom properties for existing objects.
Using Existing Tag PropertyOne way to create a custom property for an existing object is to use the Tag property. The Tag property isonly used when you write code to set the value and then use that value later for some specified purpose.For example, you might use the Tag property to hold a value and then retrieve that value at a later time.
Using Public VariablesAs described earlier, when you create properties for your custom objects, you can also create propertiesfor existing objects using public variables. To do so, just add the public variable declaration to the classmodule of the existing object, such as an existing class for a form. Again, this is not the recommendedway to create properties. As discussed previously, I do not recommend this approach for three primaryreasons. First, you cannot manipulate the value because the property is set; second, you cannot createread-only and write-only properties; third, you cannot easily validate what is assigned to publicvariables. A better way to create properties, discussed next, does not have these drawbacks.
Using Property Let, Property Get, and Property Set RoutinesYou can use the Property Let, Property Get, and Property Set procedures to create properties forexisting objects. Again, you can do this just as you did for your own objects, only you add thePropertyLet and PropertyGet procedure to the existing object. Now add a new property to thefrmCarDetails form to see how this works.
Try It Out Adding New Property for frmCarDetails Form
1. From the Visual Basic Editor, select the frmCarDetails class module. Add the followingdeclaration to the General Declarations section of the class.
Dim strTestPropertyVal As String
2. Also from the frmCarDetails class module, add the following property procedures.
Public Property Get TestProperty() As StringTestProperty = strTestPropertyVal
End Property
Public Property Let TestProperty(ByVal Value As String)strTestPropertyVal = Value
End Property
121

P1: IML/FFX P2: IML/FFX QC: IML/FFX T1: IML
WY044-04 WY044-Gosnell WY044-Gosnell-v2.cls August 13, 2004 10:55
Chapter 4
3. From the frmCarDetails class module, add a new procedure called ShowTestProperty andtype the Me keyword followed by a period, as shown in Figure 4.15.
Figure 4.15
How It WorksFirst, you added the property procedures to the existing frmCarDetails form. Then, when you referredto frmCarDetails in code, you saw that the custom property you just added was in the drop-down listalong with the other original properties.
Properties can be added to nearly any existing object. Custom properties that you add are not illustratedin properties dialog box, but are visible in the code window as shown in Figure 4.15.
Create Custom Methods for Existing ObjectsIn addition to custom procedures, custom methods can also be created for existing objects using publicsub procedures or functions.
Using Public Sub Procedures and FunctionsCustom methods can be created just as you created methods for your own objects, only you add a publicsub procedure or function to the existing object. Now add a new method for the frmCarDetails formto see how this works.
122

P1: IML/FFX P2: IML/FFX QC: IML/FFX T1: IML
WY044-04 WY044-Gosnell WY044-Gosnell-v2.cls August 13, 2004 10:55
Creating Your Own Objects
Try It Out Adding New Method for the frmCarDetails Form1. From the Visual Basic Editor, select the frmCarDetails class module. Add the following
method to the class.
Public Sub TestMethod()
MsgBox "This is a test method added to an existing object"
End Sub
2. From the frmCarDetails class module, add a new procedure calledDemonstrateCustomMethods and type the me keyword followed by a period, asshown in Figure 4.16.
Figure 4.16
How It WorksFirst, you added the new method to the existing frmCarDetails form. Then, when you referred tofrmCarDetails in code using the me keyword, you saw that the custom method you just added was inthe drop-down list along with the custom property you just created and the original properties andmethods. Just like properties, methods can be added to nearly any existing object.
SummaryIn this chapter, you learned how to create a class diagram to model the classes and their relationships.Class diagrams provide a roadmap of your code structure. Ideally, class diagrams should be separatedinto a presentation layer, business logic layer, and data access layer. The presentation layer can map toyour Use Case diagrams. The business logic layer is the heart of your class diagram and contains the class
123

P1: IML/FFX P2: IML/FFX QC: IML/FFX T1: IML
WY044-04 WY044-Gosnell WY044-Gosnell-v2.cls August 13, 2004 10:55
Chapter 4
modules that are the heart of your application. The business logic layer calls the data access layer for anyactivities that need communication with the database.
You then looked at several examples of how to create properties, methods, and events for custom objects.Custom properties can be created using public variable declarations in a class module. A preferred wayof creating custom properties is to write public Property Get and Property Let procedures in theclass module. Property Get procedures determine what happens when the property value is retrieved,and Property Let procedures determine what happens when the property is assigned. After you writethe code for a custom object, the object can be used from other class modules or procedures by declaringthe object and instantiating the object. The properties, methods, and events can be accessed in the customobject from the Visual Basic Editor code window just like existing objects. You create custom methods byadding public procedures or functions to the class module. You can also add additional properties andmethods to existing objects in the same way you create your own properties and methods for objects. Theonly difference is that you place the code in the class module for the existing object, such as a form.
Now that you have learned how to work with existing objects and how to create your own objects, it’stime to learn how ActiveX Data Objects (ADO) can be used in your applications to interact with data inyour database.
Exercises1. What is a class diagram and why is it useful?
2. Explain how you can create custom properties and methods.
3. How can you add additional properties and methods to existing objects?
124

P1: IML/FFX P2: IML/FFX QC: IML/FFX T1: IML
WY044-05 WY044-Gosnell WY044-Gosnell-v2.cls August 20, 2004 13:52
5Interacting with Data Using
ADO and SQL
In this chapter, you turn your attention to one of the most important concepts in Accessprogramming: working with data in databases. Data is, after all, at the heart of almost everyapplication. Programmers typically write applications to enable users to interact with data inmeaningful ways. You have probably created Access applications yourself that retrieve data usingforms that are bound directly to tables.
This chapter expands your knowledge of working with data by covering the basics of retrieving andmodifying data from VBA code using ActiveX Data Objects (ADO). You will create the same contactform in three different ways so that you can see the various approaches to interaction with the sameunderlying data source. I will also cover the basics of writing SQL statements to interact with thedatabase. The chapter ends with a brief section on the ADOX object model that can be used tomanage database objects such as tables, users, and groups.
Introduction to Data AccessADO is an acronym for ActiveX Data Objects. DAO stands for Data Access Objects. Both ADO andDAO allow you to manipulate databases from your Access 2003 VBA code. Because all examples inprior editions of this book focused on DAO, I gave considerable thought as to whether I shouldprovide examples on DAO in this edition. DAO has been around since the earliest versions ofAccess and has always been an excellent data access method for working with native Access data.
ADO is a better choice for building sophisticated, multi-user applications or applications thatinteract with databases other than Access. It appears that DAO is being phased out, and most booksand other resources you find on the topic recommend that ADO be used for all new development. Iagree with this recommendation and have, therefore, decided to focus the examples in this book onADO. If you are dealing with older Access applications that have DAO code, consult the prioreditions of this book for a comprehensive explanation of DAO.
ADO should not be confused with ADO.NET. ADO.NET is a version of ADO that is designed towork with the Microsoft Visual Studio .NET development environment. Although ADO and

P1: IML/FFX P2: IML/FFX QC: IML/FFX T1: IML
WY044-05 WY044-Gosnell WY044-Gosnell-v2.cls August 20, 2004 13:52
Chapter 5
ADO.NET have a lot of features in common, they are also different in numerous ways. In the future,it is possible that Microsoft will integrate the ADO.NET functionality into Microsoft Access toreplace ADO, but such integration is not a certainty.
Using ADODB to Work with DataIn this section, you will explore the ADO object model and how to use the objects therein to work withdata in underlying databases.
The ADO Object ModelFigure 5.1 provides an overview of the ADO object model. At the highest level of the object model,several collections exist: Connection, Recordset, Command, Record, and Stream.
The ADO Object Model
Figure 5.1
The ADO object library is sometimes referred to as the ADODB library. In order to use the features ofADO, you must have a reference to one of the ADO library versions in your project. You can add areference to an ADO library by selecting Tools ➪ References from Visual Basic Editor and choosing alibrary from the list. Figure 5.2 shows an example with a reference set to version ADO version 2.7.
Several versions of ADO may exist on your computer, such as 2.1, 2.5, and 2.7. The version you choose foryour project depends on the version of Access that others in your organization are using. If everyone isusing Access 2002 or higher, you should use version 2.7. If some people are using Access 2000, then youmay want to use ADO version 2.5. If some are using Access 97, you may want to use ADO version 2.1.
The Connection ObjectThe Connection object is the highest level of the ADO object model. The Connection object allowsyou to establish a connection to a data source. You must declare a Connection object before you can useit, as shown here:
Dim cnConnection as ADODB.Connection
126

P1: IML/FFX P2: IML/FFX QC: IML/FFX T1: IML
WY044-05 WY044-Gosnell WY044-Gosnell-v2.cls August 20, 2004 13:52
Interacting with Data Using ADO and SQL
Figure 5.2
After declaring a Connection object, you must then instantiate a new Connection object, asfollows:
Set cnConnection = New ADODB.Connection
Once instantiated, a Connection object can be opened to connect to Access and other databases. Youopen a connection by using the Open method of the Connection object. The Open method acceptsvarious parameters, including a connection string, user id, password, and options.
Connecting to Access DatabasesYou specify the data source for the connection using a connection string. The connection string is thenused in the Open method to open the data source. In the following example, the connection stringconnects to the Microsoft Access database for the current project called Ch5CodeExamples.mdb.
Dim strConnection As String
strConnection = "Provider=Microsoft.Jet.OLEDB.4.0;" & _"Data Source=" & CurrentProject.Path & "\Ch5CodeExamples.mdb;"
cnConnection.Open strConnection
127

P1: IML/FFX P2: IML/FFX QC: IML/FFX T1: IML
WY044-05 WY044-Gosnell WY044-Gosnell-v2.cls August 20, 2004 13:52
Chapter 5
Connecting to Other DatabasesAccess can be used as a front-end to various other databases, such as SQL Server. The example thatfollows shows a connection string that you might use to connect to a SQL Server database called Pubs onan instance named SQLServerName using integrated Windows security:
Dim strConnection As String
strConnection = "Provider=sqloledb;Data Source=SQLServerName;" & _"Integrated Security=SSPI;Initial Catalog=Pubs"
cnConnection.Open strConnection
The Command ObjectThe Command object represents a SQL statement, query, or stored procedure that is executed against adata source. Just like a Connection object, you must declare and instantiate a Command object beforeyou can use it.
Dim cmdCommand As ADODB.CommandSet cmdCommand = New ADODB.Command
After a new Connection object is instantiated, you can assign it to an open connection and call theExecute method to execute a SQL statement, query, or stored procedure against the data source. Thisconcept will be illustrated in more detail later in this chapter when you create SQL statements and useADO to execute them. In addition, the comprehensive case study in Chapter 13 that deals with SQLServer will illustrate how to use the Command object to pass parameters to SQL Server stored procedures.
The Recordset ObjectThe Recordset object allows you to retrieve a set of records from a data source based on specifiedcriteria. Recordsets can either be connected or disconnected. With connected recordsets, a connectionto the database is maintained, and changes to the recordset are made to the underlying data source. Withdisconnected recordsets, the connection from the database is closed and you work with a local copy of theinformation. You can use both connected and disconnected recordsets to display data to a user on a form,for example. Examples later in this chapter will illustrate the difference between connected anddisconnected recordsets.
Creating a RecordsetAs you did with a Connection object, you have to declare and instantiate a Recordset object beforeyou can use it.
Dim rsRecordset As ADODB.RecordsetSet rsRecordset = New ADODB.Recordset
Next, you use the Open method to populate the recordset with a particular set of records.
rsRecordset.Open "SELECT * FROM tblSupplier", cnConnection
128

P1: IML/FFX P2: IML/FFX QC: IML/FFX T1: IML
WY044-05 WY044-Gosnell WY044-Gosnell-v2.cls August 20, 2004 13:52
Interacting with Data Using ADO and SQL
The Open method has various parameters that determine how the recordset will be created, such asCursorType, CursorLocation, LockType, and Options.
CursorType PropertyThe CursorType property of the Recordset object indicates what type of movement you can takewithin a recordset. By default, the CursorType property is set to adOpenForwardOnly, which meansthat you can only move forward through the records. A forward-only cursor does not allow you to counthow many records are in the recordset or navigate back and forth through the recordset. The followingcode is an example of setting the CursorType property.
rsRecordset.CursorType = adOpenStatic
The following table summarizes the four possible choices for the CursorType property.
Value Explanation
adOpenForwardOnly This cursor is read-only and is the fastest type ofcursor. However, it allows only for forwardmovement through the records.
adOpenStatic This cursor allows forward and backwardmovement through the records and also allowsbookmarks. It doesn’t show changes made byother users. This is a client-side cursor.
adOpenKeyset This cursor allows forward and backwardmovement through the records and also allowsbookmarks. It does not show new or deletedrecords. It points back to the original data.
adOpenDynamic This cursor provides complete access to a set ofrecords by showing additions and deletions. Italso allows for forward and backward movementthrough the records.
The CursorLocation PropertyThe CursorLocation property of the Recordset object specifies where the set of records or recordpointers are returned when you open a recordset. ADO supports two values for the CursorLocationproperty: adUseServer and adUseClient. These return records to the server and client, respectively.You should generally use server cursors except when client cursors are specifically needed. An exampleof the syntax of this property is shown below.
rsRecordset.CursorLocation = adUseServer
The LockType PropertyThe LockType property of the Recordset object is what determines whether a recordset is updatable.The following table summarizes the four possible choices for the LockType property.
129
P1: IML/FFX P2: IML/FFX QC: IML/FFX T1: IML
WY044-05 WY044-Gosnell WY044-Gosnell-v2.cls August 20, 2004 13:52
Chapter 5
Value Explanation
adLockReadOnly The recordset is read-only and no changes are allowed.
adLockPessimistic The record in the recordset will be locked as soon as editing begins.
adLockOptimistic The record in the recordset will be locked when the Update methodis issued.
adLockBatchOptimistic The records will not be locked until a batch update of all records isperformed.
An example of the syntax of this property is shown in the following code.
rsRecordset.LockType = adLockReadOnly
The Options ParameterThe Options parameter of the Recordset object allows you to specify how the provider shouldevaluate the source argument. If the Options property is not specified, it will be determined at runtime,which is slower. Here is an example showing how to specify the Options parameter.
rsRecordset.Open "SELECT * FROM tblSupplier", cnConnection, _Options:=adCmdText
Try It Out Building a Contacts Form Bound to a RecordsetNow that you have a basic idea of various ADO settings, you can put the concepts into practice bybuilding a contacts form that connects to and displays data from a recordset. Assume that the contactsform will be used by a U.S. company that does not deal with foreign addresses.
1. Create a new database by selecting File ➪ New ➪ Blank Database and specifyingCh5CodeExamples as the filename.
2. Create a new table in the database by selecting Tables from the Database Window and clickingthe Design button. Alternatively, you can select the New button and then choose Design Viewfrom the list. The table should be named tblContacts and should have the fields illustratedin Figure 5.3. Note that the field sizes are listed as part of the description for conveniencepurposes only, so that, when creating the table, you can see what size to set for each field.
3. Open the table from the Database Window and add at least one record to the table.
4. Create a new form named frmContactsBound. Use the toolbox to drag and drop 12 text boxcontrols onto the form. Modify the Name property for each text box to the following:txtLastName, txtFirstName, txtMiddleName, txtTitle, txtAddress1,txtAddress2, txtCity, txtState, txtZip, txtWorkPhone, txtHomePhone, andtxtCellPhone, respectively. Also rename the Caption property for the corresponding labelof each text box, as shown in Figure 5.4.
5. Add the following code to the Form_Load procedure of the frmContactsBound form. Youcan do so by selecting the form in the Designer Window, viewing the Properties dialog box forthe form, selecting the Events tab, and then selecting the Code Builder option from the OnLoad event.
130

P1: IML/FFX P2: IML/FFX QC: IML/FFX T1: IML
WY044-05 WY044-Gosnell WY044-Gosnell-v2.cls August 20, 2004 13:52
Interacting with Data Using ADO and SQL
Figure 5.3
Figure 5.4
Private Sub Form_Load()
Dim cnCh5 As ADODB.ConnectionDim rsContacts As ADODB.RecordsetDim strConnection As String
'specify the connection string for connecting to the database
131

P1: IML/FFX P2: IML/FFX QC: IML/FFX T1: IML
WY044-05 WY044-Gosnell WY044-Gosnell-v2.cls August 20, 2004 13:52
Chapter 5
strConnection = "Provider=Microsoft.Jet.OLEDB.4.0;" & _"Data Source=" & CurrentProject.Path & "\Ch5CodeExamples.mdb;"
'create a new connection instance and open it using the connection stringSet cnCh5 = New ADODB.ConnectioncnCh5.Open strConnection
'create a new instance of a recordsetSet rsContacts = New ADODB.Recordset'set various properties of the recordsetWith rsContacts
'specify a cursortype and lock type that will allow updates.CursorType = adOpenKeyset.CursorLocation = adUseClient.LockType = adLockOptimistic'open the recordset based on tblContacts table using the existing connection.Open "tblContacts", cnCh5
End With
'if the recordset is emptyIf rsContacts.BOF And rsContacts.EOF Then
MsgBox "There are no records in the database."Exit Sub
'if the recordset is not empty, then bind the'recordset property of the form to the rsContacts recordsetElse
Set Me.Recordset = rsContactsEnd If
'bind the controls of the form to the proper field in the recordset (which has'the same field names as the tblContacts table from which it was generated)Me.txtLastName.ControlSource = "txtLastName"Me.txtFirstName.ControlSource = "txtFirstName"Me.txtMiddleName.ControlSource = "txtMiddleName"Me.txtTitle.ControlSource = "txtTitle"Me.txtAddress1.ControlSource = "txtAddress1"Me.txtAddress2.ControlSource = "txtAddress2"Me.txtCity.ControlSource = "txtCity"Me.txtState.ControlSource = "txtState"Me.txtZip.ControlSource = "txtZip"Me.txtWorkPhone.ControlSource = "txtWorkPhone"Me.txtHomePhone.ControlSource = "txtHomePhone"Me.txtCellPhone.ControlSource = "txtCellPhone"
End Sub
6. Save the VBA code from the Visual Basic Editor by selecting the Save button from the toolbar.
7. Save the form from the Form Designer by selecting the Save button from the toolbar.
8. Open the form. You should see a screen similar to Figure 5.5.
9. Modify one of the existing records.
10. Click the Add New navigation button (right arrow with asterisk) to add a new record similar tothe one shown in Figure 5.6.
132

P1: IML/FFX P2: IML/FFX QC: IML/FFX T1: IML
WY044-05 WY044-Gosnell WY044-Gosnell-v2.cls August 20, 2004 13:52
Interacting with Data Using ADO and SQL
Figure 5.5
Figure 5.6
How It WorksThis example binds the frmContactsBound form to an ADO recordset. Now I will show you how itworks. All the code to make this application work is in the Form_Load event.
Private Sub Form_Load()
133

P1: IML/FFX P2: IML/FFX QC: IML/FFX T1: IML
WY044-05 WY044-Gosnell WY044-Gosnell-v2.cls August 20, 2004 13:52
Chapter 5
First, you declared new Connection and Recordset objects, along with a variable to store theconnection string.
Dim cnCh5 As ADODB.ConnectionDim rsContacts As ADODB.RecordsetDim strConnection As String
Next, you specified a value for the connection string that points to the current Access database.
'specify the connection string for connecting to the databasestrConnection = "Provider=Microsoft.Jet.OLEDB.4.0;" & _
"Data Source=" & CurrentProject.Path & "\Ch5CodeExamples.mdb;"
At this point, you created a new connection instance and opened the connection.
'create a new connection instance and open it using the connection stringSet cnCh5 = New ADODB.ConnectioncnCh5.Open strConnection
The next set of code instantiated a new Recordset object and sets various properties that affect how theRecordset gets populated.
'create a new instance of a recordsetSet rsContacts = New ADODB.Recordset'set various properties of the recordsetWith rsContacts
'specify a cursortype and lock type that will allow updates.CursorType = adOpenKeyset.CursorLocation = adUseClient.LockType = adLockOptimistic'open the recordset based on tblContacts table using the existing connection.Open "tblContacts", cnCh5
End With
After you set the CursorType, CursorLocation, and LockType properties, the recordset was openedwith the contents of the tblContacts table using the existing connection. If the recordset did notcontain any records, a message would be displayed.
'if the recordset is emptyIf rsContacts.BOF And rsContacts.EOF Then
MsgBox "There are no records in the database."Exit Sub
If the recordset was not empty, the next set of code bound the Recordset property of the form to theADO recordset called rsContacts.
'if the recordset is not empty, then bind the'recordset property of the form to the rsContacts recordsetElse
134
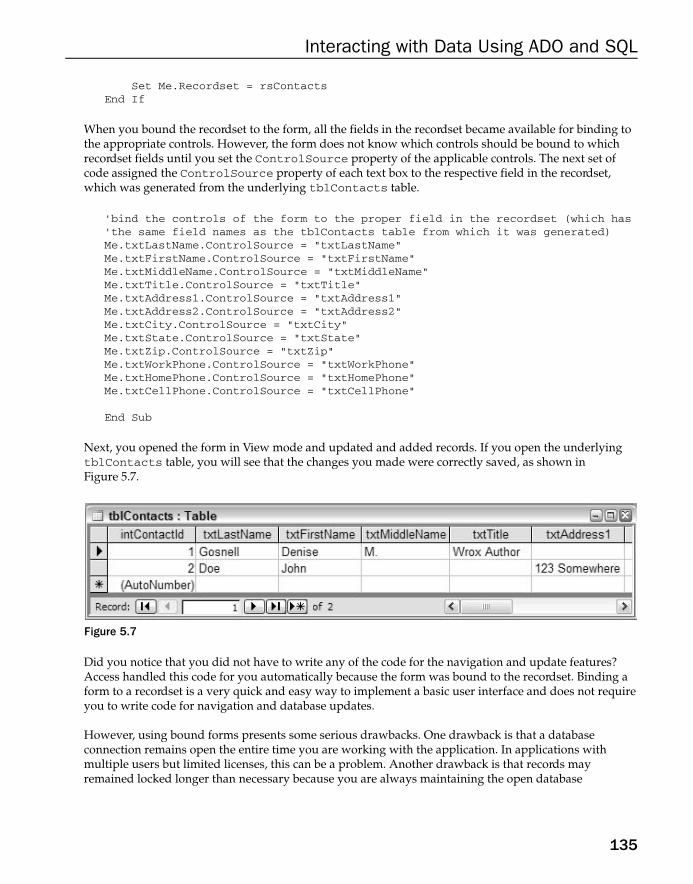
P1: IML/FFX P2: IML/FFX QC: IML/FFX T1: IML
WY044-05 WY044-Gosnell WY044-Gosnell-v2.cls August 20, 2004 13:52
Interacting with Data Using ADO and SQL
Set Me.Recordset = rsContactsEnd If
When you bound the recordset to the form, all the fields in the recordset became available for binding tothe appropriate controls. However, the form does not know which controls should be bound to whichrecordset fields until you set the ControlSource property of the applicable controls. The next set ofcode assigned the ControlSource property of each text box to the respective field in the recordset,which was generated from the underlying tblContacts table.
'bind the controls of the form to the proper field in the recordset (which has'the same field names as the tblContacts table from which it was generated)Me.txtLastName.ControlSource = "txtLastName"Me.txtFirstName.ControlSource = "txtFirstName"Me.txtMiddleName.ControlSource = "txtMiddleName"Me.txtTitle.ControlSource = "txtTitle"Me.txtAddress1.ControlSource = "txtAddress1"Me.txtAddress2.ControlSource = "txtAddress2"Me.txtCity.ControlSource = "txtCity"Me.txtState.ControlSource = "txtState"Me.txtZip.ControlSource = "txtZip"Me.txtWorkPhone.ControlSource = "txtWorkPhone"Me.txtHomePhone.ControlSource = "txtHomePhone"Me.txtCellPhone.ControlSource = "txtCellPhone"
End Sub
Next, you opened the form in View mode and updated and added records. If you open the underlyingtblContacts table, you will see that the changes you made were correctly saved, as shown inFigure 5.7.
Figure 5.7
Did you notice that you did not have to write any of the code for the navigation and update features?Access handled this code for you automatically because the form was bound to the recordset. Binding aform to a recordset is a very quick and easy way to implement a basic user interface and does not requireyou to write code for navigation and database updates.
However, using bound forms presents some serious drawbacks. One drawback is that a databaseconnection remains open the entire time you are working with the application. In applications withmultiple users but limited licenses, this can be a problem. Another drawback is that records mayremained locked longer than necessary because you are always maintaining the open database
135

P1: IML/FFX P2: IML/FFX QC: IML/FFX T1: IML
WY044-05 WY044-Gosnell WY044-Gosnell-v2.cls August 20, 2004 13:52
Chapter 5
connection. If you walk away from your desk with the program open to a particular record, you mightkeep someone else from updating that same record because you have it locked. In a later example, youwill explore how to create a disconnected recordset to help eliminate some of these problems.
Counting Records in a RecordsetThe RecordCount property of the Recordset object returns the number of records in the recordset.Suppose you have the following procedure:
Sub TestRecordCount()
Dim cnCh5 As ADODB.ConnectionDim rsContacts As ADODB.RecordsetDim strConnection As String
'specify the connection string for connecting to the databasestrConnection = "Provider=Microsoft.Jet.OLEDB.4.0;" & _
"Data Source=" & CurrentProject.Path & "\Ch5CodeExamples.mdb;"
'create a new connection instance and open it using the connection stringSet cnCh5 = New ADODB.ConnectioncnCh5.Open strConnection
'create a new instance of a recordsetSet rsContacts = New ADODB.Recordset'set various properties of the recordsetWith rsContacts
.CursorType = adOpenStatic'open the recordset based on tblContacts table using the existing connection.Open "tblContacts", cnCh5
End With
'print the number of records to the Immediate WindowDebug.Print "The total number of records is: " & rsContacts.RecordCount
'close the database connectioncnCh5.Close
'set the recordset and connection to nothingSet rsContacts = NothingSet cnCh5 = Nothing
End Sub
After the recordset is created, the code determines how many records are in the recordset using theRecordCount property. The number of records is then displayed in the Immediate Window as shown inFigure 5.8.
If you remove the line specifying the CursorType, then a -1 will be returned as the record count since therecordset will default to a forward-only recordset.
136

P1: IML/FFX P2: IML/FFX QC: IML/FFX T1: IML
WY044-05 WY044-Gosnell WY044-Gosnell-v2.cls August 20, 2004 13:52
Interacting with Data Using ADO and SQL
Figure 5.8
Navigating through a RecordsetThe Recordset object has various methods that allow you to navigate among the records, assuming ofcourse that the recordset is set to a CursorType that can be navigated. The following list contains fourmethods for navigation that can be used:
rsRecordset.MoveFirstrsRecordset.MoveLastrsRecordset.MoveNextrsRecordset.MovePrevious
Before using the preceding record navigation methods, check the BOF and EOF properties of theRecordset. If the BOF property of the recordset is True, no current record exists and the current position isone prior to the first record. If the EOF property is True, no current record exists and the current positionis one past the last record. If both BOF and EOF are True, the recordset is completely empty. You have tomake sure the recordset is not at BOF or EOF before attempting to access the recordset contents, such asthe recordset navigation or you will get an error. The following shows you how to avoid such errors.
If NOT rsRecordset.BOF and NOT rsRecordset.EOF ThenrsRecordset.MoveFirstEnd If
Adding, Editing, and Deleting Records in a RecordsetAfter you create a recordset, you can add, edit, and delete records. You already learned in the priorexample that if the recordset is bound to the Recordset property and corresponding controls on a form,the moment you change the record on the form, it is updated in the underlying database. You did nothave to write the update code to make this work.
ADO also has several methods that allow you to perform adds, edits, and deletions from within yourcode with the AddNew, Update, and Delete methods of the Recordset object. I will briefly introduceeach of these methods and then I will explain each in detail by using a hands-on example.
Adding a New Record with the AddNew MethodThe AddNew method of the Recordset object adds an empty record to the recordset that can then befilled-in with additional information.
rsRecordset.AddNew
If the recordset is connected to a data source, then the record is added to the underlying data source.Otherwise, the new record is saved in the local recordset and must be updated with the underlying data
137

P1: IML/FFX P2: IML/FFX QC: IML/FFX T1: IML
WY044-05 WY044-Gosnell WY044-Gosnell-v2.cls August 20, 2004 13:52
Chapter 5
source or the new record will be lost. This is called working with a disconnected recordset and isexplained in detail in an upcoming example.
Updating an Existing Record with the Update MethodThe Update method of the Recordset object updates the current record. If the Update method is usedin conjunction with the AddNew method, the information from the empty record is moved to the end ofthe recordset.
rsRecordset.Update
If the recordset is connected to a data source, the changes are saved in the underlying data source. If therecordset is disconnected from the data source, the changes are saved in the local recordset and must beupdated in Batch or other mode with the underlying data source or the changes will be lost.
Deleting an Existing Record with the Delete MethodThe Delete method of the Recordset object deletes the current record.
rsRecordset.Delete
Again, if the recordset is connected to a data source, then the deletion occurs on the underlying datasource. If the recordset is disconnected from the data source, the record is deleted from the local recordsetand must later be removed from the underlying data source.
Try It Out Building an Unbound Contacts Form Using a Disconnected RecordsetNow, it’s time to build a contacts form that is based on a disconnected recordset.
1. Select the frmContactsBound form you created previously, right-click, and select Copy frompop-up menu. Then, click Paste and name the new form frmContactsUnbound.
2. Open frmContactsUnbound. Delete the current code in the On Load event of the Form fromthe Event tab of the Properties dialog box or from the Visual Basic Editor.
3. Set the Record Selectors, Navigation Buttons, and Dividing Lines properties of theform to No, as shown in Figure 5.9.
4. Add seven command buttons to the form. Set the Name properties of each command button tocmdMoveFirst, cmdMovePrevious, cmdMoveNext, cmdMoveLast, cmdAddNew,cmdDelete, and cmdSaveAll, respectively. Change the Caption property of each commandbutton to Move First, Move Previous, Move Next, Move Last, Add New, Delete, andSave Changes To Database, respectively. Change the Picture property of the fournavigation buttons to existing pictures called Go To First 1, Go To Previous 1, Go To Next1, and Go To Last 1, respectively. Instead of the picture buttons, you can just use text as thecaption if desired. The form should look similar to the form illustrated in Figure 5.10.
5. Add the following code to the General Declarations section of the form.
Dim rsContacts As ADODB.RecordsetDim cnCh5 As ADODB.ConnectionDim strConnection As String
6. Add the following code to the Form_Load event of the form.
138

P1: IML/FFX P2: IML/FFX QC: IML/FFX T1: IML
WY044-05 WY044-Gosnell WY044-Gosnell-v2.cls August 20, 2004 13:52
Interacting with Data Using ADO and SQL
Figure 5.9
Figure 5.10
139

P1: IML/FFX P2: IML/FFX QC: IML/FFX T1: IML
WY044-05 WY044-Gosnell WY044-Gosnell-v2.cls August 20, 2004 13:52
Chapter 5
Private Sub Form_Load()
strConnection = "Provider=Microsoft.Jet.OLEDB.4.0;" & _"Data Source=" & CurrentProject.Path & "\Ch5CodeExamples.mdb;"
'create a new connection instance and open it using the connection stringSet cnCh5 = New ADODB.ConnectioncnCh5.Open strConnection
'create a new instance of a recordsetSet rsContacts = New ADODB.Recordset
'set various properties of the recordsetWith rsContacts
'specify a cursortype and lock type that will allow updates.CursorType = adOpenKeyset.CursorLocation = adUseClient.LockType = adLockBatchOptimistic'open the recordset based on tblContacts table using the existing connection.Open "tblContacts", cnCh5'disconnect the recordset.ActiveConnection = Nothing
End With
'if the recordset is emptyIf rsContacts.BOF And rsContacts.EOF Then
Exit SubElse
'move to the first recordrsContacts.MoveFirst'populate the controls on the formCall PopulateControlsOnForm
End If
'close the database connection and release it from memorycnCh5.CloseSet cnCh5 = Nothing
End Sub
7. Add the following event procedures to the class module for the Form.
Private Sub cmdAddNew_Click()
'add a new record to the local disconnected recordsetCall AddRecord
End Sub
Private Sub cmdDelete_Click()
'delete the current record from the local disconnected recordsetCall DeleteRecord
140

P1: IML/FFX P2: IML/FFX QC: IML/FFX T1: IML
WY044-05 WY044-Gosnell WY044-Gosnell-v2.cls August 20, 2004 13:52
Interacting with Data Using ADO and SQL
End Sub
Private Sub cmdMoveFirst_Click()
'move to the first record in the local disconnected recordsetCall MoveToFirstRecord
End Sub
Private Sub cmdMoveLast_Click()
'move to the last record in the local disconnected recordsetCall MoveToLastRecord
End Sub
Private Sub cmdMoveNext_Click()
'move to the next record in the local disconnected recordsetCall MoveToNextRecord
End Sub
Private Sub cmdMovePrevious_Click()
'move to the previous record in the local disconnected recordsetCall MoveToPreviousRecord
End Sub
Private Sub cmdSaveAll_Click()
'save all changes made to the local disconnected recordset'back to the databaseCall SaveAllRecords
End Sub
8. Add the following procedures to the class module for the form.
Sub AddRecord()
'add a new record to the local disconnected recordsetrsContacts.AddNew
'commit the new empty record to the local disconnected recordsetrsContacts.Update
'clear the current controls on the form so the'user can fill in values for the new recordCall ClearControlsOnForm
End Sub
141

P1: IML/FFX P2: IML/FFX QC: IML/FFX T1: IML
WY044-05 WY044-Gosnell WY044-Gosnell-v2.cls August 20, 2004 13:52
Chapter 5
Sub DeleteRecord()
'delete the record from the local disconnected recordsetrsContacts.Delete
'commit the deletion to the local disconnected recordsetrsContacts.Update
'move to the first record since the current one has been deletedrsContacts.MoveFirst
'populate the controls on the formCall PopulateControlsOnForm
End Sub
9. Add the following navigation procedures to the class module for the form.
Sub MoveToFirstRecord()
'before performing move operation, save the current recordCall SaveCurrentRecord
'move to the first record in the local disconnected recordsetIf Not rsContacts.BOF And Not rsContacts.EOF Then
rsContacts.MoveFirst'populate the controls on the form with the current recordCall PopulateControlsOnForm
End If
End Sub
Sub MoveToLastRecord()
'before performing move operation, save the current recordCall SaveCurrentRecord
'move to the last record in the local disconnected recordsetIf Not rsContacts.BOF And Not rsContacts.EOF Then
rsContacts.MoveLast'populate the controls on the form with the current recordCall PopulateControlsOnForm
End If
End Sub
Sub MoveToPreviousRecord()
'before performing move operation, save the current recordCall SaveCurrentRecord
142

P1: IML/FFX P2: IML/FFX QC: IML/FFX T1: IML
WY044-05 WY044-Gosnell WY044-Gosnell-v2.cls August 20, 2004 13:52
Interacting with Data Using ADO and SQL
'move to the previous record in the local disconnected recordset'if not already at the beginningIf Not rsContacts.BOF Then
rsContacts.MovePrevious'populate the controls on the form with the current recordCall PopulateControlsOnForm
End If
End Sub
Sub MoveToNextRecord()
'before performing move operation, save the current recordCall SaveCurrentRecord
'move to the next record in the local disconnected recordset'if not already at the endIf Not rsContacts.EOF Then
rsContacts.MoveNext'populate the controls on the form with the current recordCall PopulateControlsOnForm
End If
End Sub
10. Add the following procedures to the class module for the form.
Sub PopulateControlsOnForm()
'Populate the controls on the form with the values of the'current record in the local disconnected recordset.'Use the same field names as the tblContacts table from'which it was generated.If Not rsContacts.BOF And Not rsContacts.EOF Then
Me.txtLastName = rsContacts!txtLastNameMe.txtFirstName = rsContacts!txtFirstNameMe.txtMiddleName = rsContacts!txtMiddleNameMe.txtTitle = rsContacts!txtTitleMe.txtAddress1 = rsContacts!txtAddress1Me.txtAddress2 = rsContacts!txtAddress2Me.txtCity = rsContacts!txtCityMe.txtState = rsContacts!txtStateMe.txtZip = rsContacts!txtZipMe.txtWorkPhone = rsContacts!txtWorkPhoneMe.txtHomePhone = rsContacts!txtHomePhoneMe.txtCellPhone = rsContacts!txtCellPhone
ElseIf rsContacts.BOF Then'past beginning of recordset so move to next recordrsContacts.MoveNext
ElseIf rsContacts.EOF Then'past end of recordset so move back to previous recordrsContacts.MovePrevious
143

P1: IML/FFX P2: IML/FFX QC: IML/FFX T1: IML
WY044-05 WY044-Gosnell WY044-Gosnell-v2.cls August 20, 2004 13:52
Chapter 5
End If
End Sub
Sub ClearControlsOnForm()
'clear the values in the controls on the formMe.txtLastName = ""Me.txtFirstName = ""Me.txtMiddleName = ""Me.txtTitle = ""Me.txtAddress1 = ""Me.txtAddress2 = ""Me.txtCity = ""Me.txtState = ""Me.txtZip = ""Me.txtWorkPhone = ""Me.txtHomePhone = ""Me.txtCellPhone = ""
End Sub
Sub SaveCurrentRecord()
'save the values in the controls on the form to the current record'in the local disconnected recordset.If Not rsContacts.BOF And Not rsContacts.EOF Then
rsContacts!txtLastName = Me.txtLastNamersContacts!txtFirstName = Me.txtFirstNamersContacts!txtMiddleName = Me.txtMiddleNamersContacts!txtTitle = Me.txtTitlersContacts!txtAddress1 = Me.txtAddress1rsContacts!txtAddress2 = Me.txtAddress2rsContacts!txtCity = Me.txtCityrsContacts!txtState = Me.txtStatersContacts!txtZip = Me.txtZiprsContacts!txtWorkPhone = Me.txtWorkPhonersContacts!txtHomePhone = Me.txtHomePhonersContacts!txtCellPhone = Me.txtCellPhone
End If
End Sub
Sub SaveAllRecords()
'Save current record to local disconnected recordsetCall SaveCurrentRecord
'create a new connection instance and open it using the connection stringSet cnCh5 = New ADODB.ConnectioncnCh5.Open strConnection
'set the disconnected recordset to the reopened connectionSet rsContacts.ActiveConnection = cnCh5
144

P1: IML/FFX P2: IML/FFX QC: IML/FFX T1: IML
WY044-05 WY044-Gosnell WY044-Gosnell-v2.cls August 20, 2004 13:52
Interacting with Data Using ADO and SQL
'save all changes in the local disconnected recordset back'to the databasersContacts.UpdateBatch
'disconnect the recordset againSet rsContacts.ActiveConnection = Nothing
'close the database connection and release it from memorycnCh5.CloseSet cnCh5 = Nothing
End Sub
11. Add the following event procedure to the form.
Private Sub Form_Unload(Cancel As Integer)
Dim intResponse As Integer
'prompt the user to save changesintResponse = MsgBox("Save All Changes To Database?", vbYesNo)
If intResponse = vbYes Then'save all local records in disconnected recordset back'to the database in a batch updateCall SaveAllRecords
ElseIf intResponse = vbNo ThenMsgBox "Unsaved changes were discarded."End If
'release the recordset from memorySet rsContacts = Nothing
End Sub
12. Save all changes in the Visual Basic Editor by selecting Save from the Toolbar.
13. Save all changes in the form from design view by selecting Save from the Toolbar.
14. Open the form in View mode so that a screen such as Figure 5.11 appears and displays somedata.
15. Make changes to the values on the screen and then navigate to another record. When youreturn to the record, note whether the value is still changed.
16. Close the form without saving changes. See if the changes you previously made are present.
17. Make changes to the values on the screen and then select the Save All Changes To Databaseoption.
How It WorksFirst, you made a copy of the existing frmContactsBound and renamed it to frmContactsUnbound.You then added some additional controls, namely seven command buttons to the form. The commandbuttons were labeled for record navigation, add, delete, and save functionality.
145

P1: IML/FFX P2: IML/FFX QC: IML/FFX T1: IML
WY044-05 WY044-Gosnell WY044-Gosnell-v2.cls August 20, 2004 13:52
Chapter 5
Figure 5.11
Next, you added code to the General Declarations section of the form for a Recordset object,Connection object, and connection string variable. These were placed in the General Declarationssection because they need to remain in scope as long as the form is open.
Dim rsContacts As ADODB.RecordsetDim cnCh5 As ADODB.ConnectionDim strConnection As String
Next, you added the Form_Load event of the form where the connection was opened and a newrecordset instantiated.
Private Sub Form_Load()
strConnection = "Provider=Microsoft.Jet.OLEDB.4.0;" & _"Data Source=" & CurrentProject.Path & "\Ch5CodeExamples.mdb;"
'create a new connection instance and open it using the connection stringSet cnCh5 = New ADODB.ConnectioncnCh5.Open strConnection
'create a new instance of a recordsetSet rsContacts = New ADODB.Recordset
You then set various properties of the Recordset object, such as the CursorType to specify that thecursor should be client side and the LockType to specify the recordset should be batch optimistic. The
146

P1: IML/FFX P2: IML/FFX QC: IML/FFX T1: IML
WY044-05 WY044-Gosnell WY044-Gosnell-v2.cls August 20, 2004 13:52
Interacting with Data Using ADO and SQL
recordset was then opened and disconnected from the data source by setting the ActiveConnectionproperty to nothing.
'set various properties of the recordsetWith rsContacts
'specify a cursortype and lock type that will allow updates.CursorType = adOpenKeyset.CursorLocation = adUseClient.LockType = adLockBatchOptimistic'open the recordset based on tblContacts table using the existingconnection.Open "tblContacts", cnCh5'disconnect the recordset.ActiveConnection = Nothing
End With
With the recordset disconnected from the data source, the recordset is simply stored in local memory. Anychanges made to a disconnected recordset are not automatically saved in the original data source.
Next, you added code to call a procedure to populate the controls on the form with the values in therecordset.
'if the recordset is empty
If rsContacts.BOF And rsContacts.EOF ThenExit Sub
Else'move to the first recordrsContacts.MoveFirst'populate the controls on the formCall PopulateControlsOnForm
End If
The database connection was then closed and released from memory.
'close the database connection and release it from memorycnCh5.CloseSet cnCh5 = Nothing
End Sub
You then added various event procedures to call the rest of the code when the user selects differentoptions on the form. For example, the cmdAddNew_Click event was added to call the AddRecordprocedure when the user clicks the Add New button on the form. A similar procedure was added forDelete.
Private Sub cmdAddNew_Click()
'add a new record to the local disconnected recordsetCall AddRecord
End Sub
147

P1: IML/FFX P2: IML/FFX QC: IML/FFX T1: IML
WY044-05 WY044-Gosnell WY044-Gosnell-v2.cls August 20, 2004 13:52
Chapter 5
Various event procedures were added to handle navigation through the recordset. For example, thecmdMoveFirst_Click event was added to call the procedure to move to the first record.
Private Sub cmdMoveFirst_Click()
'move to the first record in the local disconnected recordsetCall MoveToFirstRecord
End Sub
Other similar procedures were added for Move Last, Move Next, and Move Previous. An eventprocedure was also added for Save to cause the SaveAllRecords procedure to execute when the Savebutton on the form is clicked.
Private Sub cmdSaveAll_Click()
'save all changes made to the local disconnected recordset'back to the databaseCall SaveAllRecords
End Sub
Next, you added the procedures that really implement the heart of the functionality for the unboundform. The AddRecord procedure is called from the cmdAddNew button’s OnClick event after the userclicks the Add New button on the form. The AddRecord procedure uses the AddNew method to add anew record to the local disconnected recordset and then commits the new empty record to the localdisconnected recordset using the Update method.
Sub AddRecord()
'add a new record to the local disconnected recordsetrsContacts.AddNew
'commit the new empty record to the local disconnected recordsetrsContacts.Update
The controls on the form are then cleared so the user can enter values for the new record.
'clear the current controls on the form so the'user can fill in values for the new recordCall ClearControlsOnForm
End Sub
The DeleteRecord procedure is called when the Click event of the cmdDelete button runs. Thisprocedure deletes the current record in the local recordset using the Delete method and then commitsthe change to the local recordset using the Update method.
Sub DeleteRecord()
'delete the record from the local disconnected recordsetrsContacts.Delete
148

P1: IML/FFX P2: IML/FFX QC: IML/FFX T1: IML
WY044-05 WY044-Gosnell WY044-Gosnell-v2.cls August 20, 2004 13:52
Interacting with Data Using ADO and SQL
'commit the deletion to the local disconnected recordsetrsContacts.Update
The procedure then repositions the recordset to the first record and displays that record on the form to theuser.
'move to the first record since the current one has been deletedrsContacts.MoveFirst
'populate the controls on the formCall PopulateControlsOnForm
End Sub
Various navigation procedures were then added to handle moving through the disconnected recordset.For example, the MoveToFirstRecord gets called when the Click event of the cmdMoveFirst button isfired. This procedure saves the current record in the local recordset before moving to the first record.
Sub MoveToFirstRecord()
'before performing move operation, save the current recordCall SaveCurrentRecord
'move to the first record in the local disconnected recordsetIf Not rsContacts.BOF And Not rsContacts.EOF Then
rsContacts.MoveFirst
'populate the controls on the form with the current recordCall PopulateControlsOnForm
End If
End Sub
Again, remember that these saves so far are just updating the local copy of the recordset, but not theunderlying database table that the records came from. You will see in a moment how the updates can besaved back to the original data source.
The PopulateControlsOnForm procedure set the text box controls on the form to the current values inthe recordset. In other words, this code displays the values in the recordset to the user on the form.
Sub PopulateControlsOnForm()
'Populate the controls on the form with the values of the'current record in the local disconnected recordset.'Use the same field names as the tblContacts table from'which it was generated.If Not rsContacts.BOF And Not rsContacts.EOF Then
Me.txtLastName = rsContacts!txtLastNameMe.txtFirstName = rsContacts!txtFirstNameMe.txtMiddleName = rsContacts!txtMiddleNameMe.txtTitle = rsContacts!txtTitleMe.txtAddress1 = rsContacts!txtAddress1
149

P1: IML/FFX P2: IML/FFX QC: IML/FFX T1: IML
WY044-05 WY044-Gosnell WY044-Gosnell-v2.cls August 20, 2004 13:52
Chapter 5
Me.txtAddress2 = rsContacts!txtAddress2Me.txtCity = rsContacts!txtCityMe.txtState = rsContacts!txtStateMe.txtZip = rsContacts!txtZipMe.txtWorkPhone = rsContacts!txtWorkPhoneMe.txtHomePhone = rsContacts!txtHomePhoneMe.txtCellPhone = rsContacts!txtCellPhone
ElseIf rsContacts.BOF Then'past beginning of recordset so move to next recordrsContacts.MoveNext
ElseIf rsContacts.EOF Then'past end of recordset so move back to previous recordrsContacts.MovePrevious
End If
End Sub
The ClearControlsOnForm empties out the data entry controls to allow a user to add a new record.
Sub ClearControlsOnForm()
'clear the values in the controls on the formMe.txtLastName = ""Me.txtFirstName = ""Me.txtMiddleName = ""Me.txtTitle = ""Me.txtAddress1 = ""Me.txtAddress2 = ""Me.txtCity = ""Me.txtState = ""Me.txtZip = ""Me.txtWorkPhone = ""Me.txtHomePhone = ""Me.txtCellPhone = ""
End Sub
The SaveCurrentRecord procedure saves the values that are in the controls on the form into thecurrent record in the local disconnected recordset.
Sub SaveCurrentRecord()
'save the values in the controls on the form to the current record'in the local disconnected recordset.If Not rsContacts.BOF And Not rsContacts.EOF Then
rsContacts!txtLastName = Me.txtLastNamersContacts!txtFirstName = Me.txtFirstNamersContacts!txtMiddleName = Me.txtMiddleNamersContacts!txtTitle = Me.txtTitlersContacts!txtAddress1 = Me.txtAddress1rsContacts!txtAddress2 = Me.txtAddress2rsContacts!txtCity = Me.txtCityrsContacts!txtState = Me.txtStatersContacts!txtZip = Me.txtZip
150

P1: IML/FFX P2: IML/FFX QC: IML/FFX T1: IML
WY044-05 WY044-Gosnell WY044-Gosnell-v2.cls August 20, 2004 13:52
Interacting with Data Using ADO and SQL
rsContacts!txtWorkPhone = Me.txtWorkPhonersContacts!txtHomePhone = Me.txtHomePhonersContacts!txtCellPhone = Me.txtCellPhone
End If
End Sub
The SaveAllRecords procedure is executed from the Click event of the cmdSaveAll button on theform. This procedure is responsible for updating the database with the current version of all records inthe disconnected recordset. First, changes are saved to the current record in the local recordset, and aconnection is re-established with the database.
Sub SaveAllRecords()
'Save current record to local disconnected recordsetCall SaveCurrentRecord
'create a new connection instance and open it using the connection stringSet cnCh5 = New ADODB.ConnectioncnCh5.Open strConnection
To re-connect the recordset to the underlying data source, the ActiveConnection property is assignedto the current open connection.
'set the disconnected recordset to the reopened connectionSet rsContacts.ActiveConnection = cnCh5
After it is re-connected to the underlying data source, the UpdateBatch method is executed to cause allthe local changes to be updated in the original data source.
'save all changes in the local disconnected recordset back'to the databasersContacts.UpdateBatch
With the updates completed, the recordset is again disconnected to save an open connection and thedatabase connection is again released.
'disconnect the recordset againSet rsContacts.ActiveConnection = Nothing
'close the database connection and release it from memorycnCh5.CloseSet cnCh5 = Nothing
End Sub
As an additional feature, code was placed under the Form_Unload event to make sure the reader knowsto save changes before closing the form.
Private Sub Form_Unload(Cancel As Integer)
Dim intResponse As Integer
151

P1: IML/FFX P2: IML/FFX QC: IML/FFX T1: IML
WY044-05 WY044-Gosnell WY044-Gosnell-v2.cls August 20, 2004 13:52
Chapter 5
'prompt the user to save changesintResponse = MsgBox("Save All Changes To Database?", vbYesNo)
If intResponse = vbYes Then'save all local records in disconnected recordset back'to the database in a batch updateCall SaveAllRecords
ElseIf intResponse = vbNo ThenMsgBox "Unsaved changes were discarded."End If
'release the recordset from memorySet rsContacts = Nothing
End Sub
Notice how in this instance, you had to write the code to perform record navigation and record updatesbecause the recordset was disconnected from the underlying data source. This is certainly more timeconsuming than the prior bound recordset example, which handled record navigation and record updatesautomatically. However, I recommend that you use disconnected recordsets and handle data interactionwithout keeping a connection open to the database. This helps you write an application that can supportmore users and that can more easily migrate to more advanced databases like SQL Server. Later in thischapter, you will see another example of using a disconnected recordset as well as SQL statements tohandle unbound forms.
Sorting, Finding, Filtering records in a RecordsetThe Recordset object has various properties and methods that allow you to sort, filter, and find records.Some examples of these properties will now be discussed.
The Sort PropertyThe Sort property allows you to modify the order that the records appear in the recordset.
Try It Out Sorting Records for the Unbound Contacts FormLook at an example of how to sort the rsContacts recordset that you used previously.
1. In the code for the Form_Load event procedure of frmContactsUnbound, immediatelyfollowing the line setting the ActiveConnection property, add the following Sort command:
With rsContacts'specify a cursortype and lock type that will allow updates.CursorType = adOpenKeyset.CursorLocation = adUseClient.LockType = adLockBatchOptimistic'open the recordset based on tblContacts table using the existing connection.Open "tblContacts", cnCh5'disconnect the recordset.ActiveConnection = Nothing'sort the recordset.Sort = "txtLastName, txtFirstName, txtMiddleName"
End With
152

P1: IML/FFX P2: IML/FFX QC: IML/FFX T1: IML
WY044-05 WY044-Gosnell WY044-Gosnell-v2.cls August 20, 2004 13:52
Interacting with Data Using ADO and SQL
2. Now re-open the form and navigate through records.
How It WorksThe Sort method of the Recordset object allows you to specify one or more fields by which to sort therecordset. The preceding example sorts the contacts by last name, first name, and middle name. I hopeyou noticed that when you ran the form again, the order of the records was now alphabetical based onthose three fields.
The Find MethodThe Find method of the Recordset object allows you to navigate to a particular record that matchescertain criteria. Here is a sample procedure that uses the Find method to locate a record that has a valuefor intContactId of 2.
Sub TestFind()
Dim rsContacts As ADODB.Recordset
'create a new instance of a recordsetSet rsContacts = New ADODB.Recordset'set various properties of the recordsetWith rsContacts
.CursorType = adOpenStatic'open the recordset based on tblContacts table using the existing connection.Open "tblContacts", CurrentProject.Connection
End With
'find a contact with the intContactId value of 2rsContacts.Find "[intContactId] = 2"
'output a message to the Immediate Window regarding find resultsIf rsContacts.EOF Then
Debug.Print "Specified record not found"Else'record was found - display some info
Debug.Print "Contact Id: " & rsContacts!intContactId & _" Last Name: " & rsContacts!txtLastName & _" First Name: " & rsContacts!txtFirstName
End If
'close the recordsetrsContacts.Close
'set the recordset and connection to nothingSet rsContacts = Nothing
End Sub
The Find method does not remove any records from the database, but instead just navigates you to adifferent record. Notice how the preceding example does not use a separate connection object, but usesthe existing connection for the project to create the recordset. This is an acceptable way if you will alwaysbe working with the same database of your current project.
153

P1: IML/FFX P2: IML/FFX QC: IML/FFX T1: IML
WY044-05 WY044-Gosnell WY044-Gosnell-v2.cls August 20, 2004 13:52
Chapter 5
When you run the preceding procedure from the Immediate Window, you see results similar to thoseshown in Figure 5.12.
Figure 5.12
The Filter PropertyThe Filter property allows you to filter the recordset to a smaller subset that meets a certain criteria.For example, you might want to filter your recordset to last names starting with a certain letter.
Sub TestFilter()
Dim rsContacts As ADODB.Recordset
'create a new instance of a recordsetSet rsContacts = New ADODB.Recordset'set various properties of the recordsetWith rsContacts
.CursorType = adOpenStatic'open the recordset based on tblContacts table using the existing connection.Open "tblContacts", CurrentProject.Connection
End With
'filter the recordset to contain only records with'last names starting with DrsContacts.Filter = "txtLastName Like 'D*'"
'output a message to the Immediate Window regarding find resultsIf rsContacts.EOF Then
Debug.Print "No records met that criteria."Else'record was found - display some info for each record
Do Until rsContacts.EOFDebug.Print "Contact Id: " & rsContacts!intContactId & _
" Last Name: " & rsContacts!txtLastName & _" First Name: " & rsContacts!txtFirstName
rsContacts.MoveNextLoop
End If
'close the recordsetrsContacts.Close
'set the recordset and connection to nothingSet rsContacts = Nothing
End Sub
154

P1: IML/FFX P2: IML/FFX QC: IML/FFX T1: IML
WY044-05 WY044-Gosnell WY044-Gosnell-v2.cls August 20, 2004 13:52
Interacting with Data Using ADO and SQL
The preceding example uses the Filter property to filter the recordset down to records that start with D.To prove the filter worked, all the records remaining are displayed in the Immediate Window, as shownin Figure 5.13.
Figure 5.13
Using Bookmarks to Mark and Locate DataBookmarks allow you to mark a location in a recordset and return to that location later. For example,suppose you have a variable called varPosition that has been declared as a variant. You can save thelocation of the current record in a bookmark.
varPosition = rsContacts.Bookmark
and then return to it later by setting the Bookmark property equal to the saved position.
rsContacts.BookMark = varPosition
Introduction to SQLStructured Query Language (SQL) is a special language for structuring commands that can communicatewith databases. Various dialects of SQL statements include Jet SQL, ANSI SQL, and the vendor specificimplementations of ANSI SQL such as T-SQL for SQL Server. The syntax of SQL you use varies slightlydepending on underlying database. In this section, I cover SQL that is common to most databases.
SQL statements can be used with and without ADO. For example, a SQL statement can be specified as theRecordSource property to which a form can be bound. The examples in this section will illustrate usingSQL statements with ADO.
Note that you can also view SQL statements in the Query Designer and have the Query Designer helpyou create SQL. If you select View ➪ SQL View from within a Query window, you can see the SQLstatement that Access created for your statement. You’ll learn how to write SQL statements without usinga designer.
Retrieving Data Using SQL Select StatementsThe Select statement allows you to retrieve records from one or more tables in a database and has abasic syntax as follows:
SELECT columns FROM tables WHERE where-clause ORDER BY columns
155

P1: IML/FFX P2: IML/FFX QC: IML/FFX T1: IML
WY044-05 WY044-Gosnell WY044-Gosnell-v2.cls August 20, 2004 13:52
Chapter 5
Select ClauseThe Select clause specifies what columns in the underlying table or tables you want to retrieve. Toretrieve all records in a certain table, use:
SELECT *
To select particular columns in a table, such as txtLastName and txtFirstName, list each nameseparated by commas:
SELECT txtLastName, txtFirstName
Predicates can also be used as part of the Select statement to further restrict what records get returned.For example, you can use the Distinct predicate to limit the results to unique records:
SELECT DISTINCT txtLastName
The Top predicate allows you to restrict the number of records returned to a certain number or percent.For example, the following statement limits the number of records to be returned to five:
SELECT TOP 5 intSalesAmt from tblOrders
From ClauseThe From clause specifies the tables from which the records should be selected. A basic From clause is:
FROM tblContacts
You can also specify a new name for the table, or a table alias, as shown here:
FROM tblContacts As Contacts
To retrieve data from more than one table, you use an Inner, Left, or Right Join to join the tables together.Here is the basic join syntax:
FROM <left table name> <join type> <right table name> ON <left join fieldname> = <right join field name>
The following shows the differences in each type of join:
❑ INNER JOIN—Combines the records from the two tables where the joined values in both tablesmatch.
❑ LEFT JOIN—Includes all records from the table on the left side of the clause even if there are nomatching records from the table on the right side.
❑ RIGHT JOIN—Includes all records from the table on the right side of the clause even if there areno matching records from the table on the left side.
An example of an inner join is:
156

P1: IML/FFX P2: IML/FFX QC: IML/FFX T1: IML
WY044-05 WY044-Gosnell WY044-Gosnell-v2.cls August 20, 2004 13:52
Interacting with Data Using ADO and SQL
FROM tblContacts INNER JOIN tblSuppliers ON tblContacts.LastName =tblSuppliers.LastName
An example of a left join is:
FROM tblContacts LEFT JOIN tblSuppliers ON tblContacts.LastName =tblSuppliers.LastName
The previous example returns all records from the tblContacts table and only those from thetblSuppliers table where a match exists.
Where ClauseThe Where clause is used to limit the rows the SQL Statement will retrieve. The Where clause is optional.If the Where clause is included, it can be followed by comparison operators, such as =, >, <, BETWEEN,IN, and string expressions such as Is Null. What follows is an example of a Where clause that usescomparison operators.
WHERE LastName = 'Doe' AND FirstName = 'John'
Expressions in a Where clause are separated by And statements. If the Where clause is omitted, you willget all records in the select without restriction. There are times when this is exactly what you want.
Order By ClauseThe Order By clause allows you to specify in what order the records should be sorted when they areretrieved. For example, suppose you want to sort the results by last name and then first name. You coulduse the following Order By clause:
ORDER BY txtLastName, txtFirstName
The previous example will return records in ascending order, which is the default. To return the records indescending order, use the DESC keyword:
ORDER BY txtLastName, txtFirstName DESC
SubqueriesSubqueries enable you to nest one Select statement within another Select statement. The followingexample selects those records in tblContacts that do not have the same last name in thetblContactsArchive table.
SELECT txtLastName, txtFirstName FROM tblContacts WHERE txtLastName Not In(SELECT txtLastName FROM tblContactsArchive)
UnionThe Union statement allows you to combine data from two tables that have similar structures into theoutput. For example, suppose you have a tblContacts table containing active contacts and atblContactsArchive table that contains archived contacts. To retrieve a set of records that combinesdata from both of these tables, you use the Union statement.
157

P1: IML/FFX P2: IML/FFX QC: IML/FFX T1: IML
WY044-05 WY044-Gosnell WY044-Gosnell-v2.cls August 20, 2004 13:52
Chapter 5
SELECT txtLastName, txtFirstNameFROM tblContactsUNION ALL SELECT txtLastName, txtFirstNameFROM tblContactsArchive
Using SQL and ADO to Populate a RecordsetNow that you have learned the basic syntax for Select statements, let’s look at an example that uses aSQL statement along with ADO. The following example opens a new recordset and uses a SQL statementas the source for the Open method.
Sub TestSQLSelect()
Dim rsContacts As ADODB.Recordset
'create a new instance of a recordsetSet rsContacts = New ADODB.Recordset'set various properties of the recordsetWith rsContacts
.CursorType = adOpenStatic'open the recordset based on SQL statement using the existing connection.Open "SELECT * FROM tblContacts", CurrentProject.Connection
End With
'loop through the recordset and display some info for'each recordDo Until rsContacts.EOF
Debug.Print "Contact Id: " & rsContacts!intContactId & _" Last Name: " & rsContacts!txtLastName & _" First Name: " & rsContacts!txtFirstName
rsContacts.MoveNextLoop
'close the recordsetrsContacts.Close
'set the recordset and connection to nothingSet rsContacts = Nothing
End Sub
A portion of each record that is returned in the recordset is then printed in the Immediate Window asshown in Figure 5.14 to demonstrate that the SQL statement selected what you expected it to select.
Figure 5.14
158
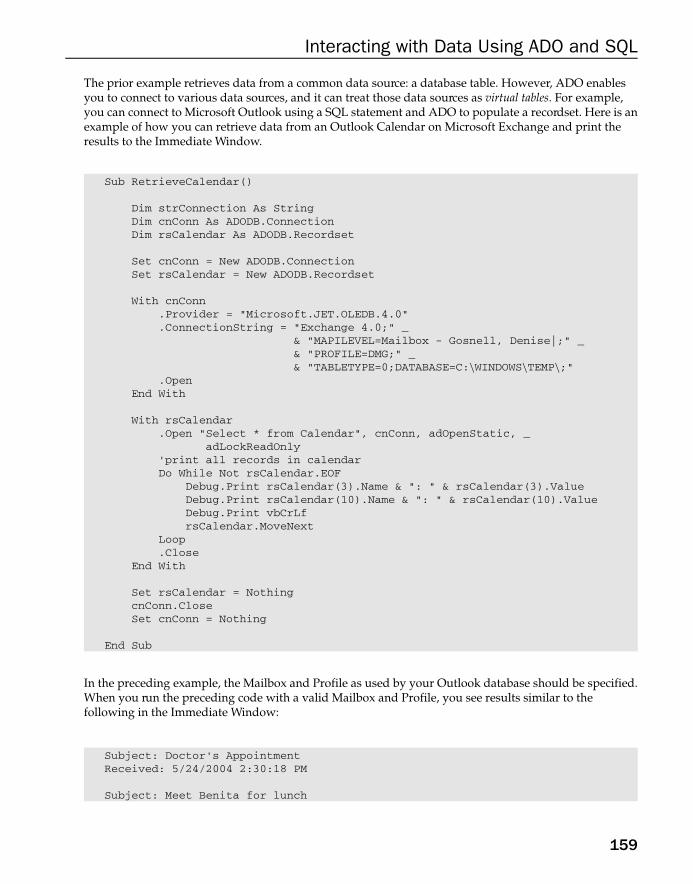
P1: IML/FFX P2: IML/FFX QC: IML/FFX T1: IML
WY044-05 WY044-Gosnell WY044-Gosnell-v2.cls August 20, 2004 13:52
Interacting with Data Using ADO and SQL
The prior example retrieves data from a common data source: a database table. However, ADO enablesyou to connect to various data sources, and it can treat those data sources as virtual tables. For example,you can connect to Microsoft Outlook using a SQL statement and ADO to populate a recordset. Here is anexample of how you can retrieve data from an Outlook Calendar on Microsoft Exchange and print theresults to the Immediate Window.
Sub RetrieveCalendar()
Dim strConnection As StringDim cnConn As ADODB.ConnectionDim rsCalendar As ADODB.Recordset
Set cnConn = New ADODB.ConnectionSet rsCalendar = New ADODB.Recordset
With cnConn.Provider = "Microsoft.JET.OLEDB.4.0".ConnectionString = "Exchange 4.0;" _
& "MAPILEVEL=Mailbox - Gosnell, Denise|;" _& "PROFILE=DMG;" _& "TABLETYPE=0;DATABASE=C:\WINDOWS\TEMP\;"
.OpenEnd With
With rsCalendar.Open "Select * from Calendar", cnConn, adOpenStatic, _
adLockReadOnly'print all records in calendarDo While Not rsCalendar.EOF
Debug.Print rsCalendar(3).Name & ": " & rsCalendar(3).ValueDebug.Print rsCalendar(10).Name & ": " & rsCalendar(10).ValueDebug.Print vbCrLfrsCalendar.MoveNext
Loop.Close
End With
Set rsCalendar = NothingcnConn.CloseSet cnConn = Nothing
End Sub
In the preceding example, the Mailbox and Profile as used by your Outlook database should be specified.When you run the preceding code with a valid Mailbox and Profile, you see results similar to thefollowing in the Immediate Window:
Subject: Doctor's AppointmentReceived: 5/24/2004 2:30:18 PM
Subject: Meet Benita for lunch
159
P1: IML/FFX P2: IML/FFX QC: IML/FFX T1: IML
WY044-05 WY044-Gosnell WY044-Gosnell-v2.cls August 20, 2004 13:52
Chapter 5
Received: 5/25/2004 10:06:52 AM
Subject: Jazz Fest Training MeetingReceived: 6/10/2004 2:28:51 PM
Inserting Data Using SQL Insert StatementsThe Insert statement is used to insert data into a table. The syntax for an Insert statement is:
INSERT INTO tablename (fieldname1, fieldname2, ... fieldnameN) VALUES(value1, value2, ... valueN)
The Insert clause can be used to insert all or part of a record into the database. For example, supposethe tblContacts table only has txtLastName, txtFirstName, txtWorkPhone, and txtHomePhone fields. To insert all of the record into the database in such a scenario, you could use thefollowing:
INSERT INTO tblContacts (txtLastName, txtFirstName, txtWorkPhone,txtHomePhone) VALUES ('Doe', 'Jane', '317-123-4567', '317-987-6543')
When adding a partial row for a table, you must specify at least the required fields in the table.Otherwise, the syntax is the same as the example shown previously.
As I will illustrate in detail in a later example, you can use SQL statements as part of a Command objectthat gets executed against the database to insert new records.
Inserting Results of a Select into a tableSometimes you must insert the results from a Select statement into an existing table. As long as thedata types correspond with each other, data from one or more tables can easily be inserted into anothertable. The basic syntax is shown here:
INSERT INTO destination (fieldname1, fieldname2, ... fieldnameN)SELECT fieldname1, fieldname2, ... fieldnameNFROM source[WHERE criteria]
If you wanted to insert the entire contents of the tblContacts table into a tblContactsArchive table, youcould use the following statement:
INSERT INTO tblContactsArchiveSELECT * FROM tblContacts
Alternatively, you could list each field.
Updating Data Using SQL StatementsUpdate statements can be used to update existing records in the database. The basic syntax for Updatestatements is:
160

P1: IML/FFX P2: IML/FFX QC: IML/FFX T1: IML
WY044-05 WY044-Gosnell WY044-Gosnell-v2.cls August 20, 2004 13:52
Interacting with Data Using ADO and SQL
UPDATE tablenameSET column = valueWHERE criteria
Suppose, for example, that Jane Doe got married again and must now update her last name to Dawson.You could issue the following Update statement to update her existing record:
UPDATE tblContactsSET txtLastName = 'Dawson'WHERE txtLastName = 'Doe' AND txtFirstName = 'Jane'
As I will illustrate in detail in a later example, you can use SQL statements as part of a Command objectthat gets executed against the database to update existing records.
Deleting Data Using SQL StatementsDelete statements can be used to delete existing records from the database. The basic syntax for Deletestatements is:
DELETEFROM tablenameWHERE criteria
To delete Jane Doe’s record from the database altogether, you could use the following statement:
DELETE from tblContacts WHERE txtLastName = 'Doe' AND txtFirstName = 'Jane'
As I will illustrate in the following example, you can use SQL statements as part of a Command object thatgets executed against the database to delete existing records.
Try It Out Modify the Unbound Contacts Form to Use SQLNow turn your attention to the final example of working with disconnected recordsets. In this case, youwill modify our existing Contacts form to use SQL statements.
1. Select frmContactsUnbound and right-click and select Copy. Select the Paste option andname the new copy of the form frmContactsUnboundSQL.
2. Modify the cmdSaveAll Caption property to Save Current Record. The form should looksimilar to what’s shown in Figure 5.15.
3. Add an additional variable declaration to the General Declarations section of the form, asshown here.
Dim rsContacts As ADODB.RecordsetDim cnCh5 As ADODB.ConnectionDim strConnection As StringDim blnAddMode As Boolean
4. Delete the existing SaveAllRecords procedure.
161

P1: IML/FFX P2: IML/FFX QC: IML/FFX T1: IML
WY044-05 WY044-Gosnell WY044-Gosnell-v2.cls August 20, 2004 13:52
Chapter 5
Figure 5.15
5. Delete the existing Form_Unload procedure.
6. Replace the existing AddRecord procedure with the following:
Sub AddRecord()
'set add mode to trueblnAddMode = True
'clear the current controls on the form so the'user can fill in values for the new recordCall ClearControlsOnForm
End Sub
7. Replace the existing DeleteRecord procedure with the following:
Sub DeleteRecord()
'don't let the user issue a delete command if in add modeIf blnAddMode = True Then
162

P1: IML/FFX P2: IML/FFX QC: IML/FFX T1: IML
WY044-05 WY044-Gosnell WY044-Gosnell-v2.cls August 20, 2004 13:52
Interacting with Data Using ADO and SQL
Exit SubEnd If
Dim intResponse As Integer
'confirm that user really wants to delete recordintResponse = MsgBox("Are you sure you want to delete this record?", vbYesNo)
'if the user cancels delete, then exit this procedureIf intResponse = vbNo Then
Exit SubEnd If
'declare and create new command objectDim cmdCommand As ADODB.CommandSet cmdCommand = New ADODB.Command
'create a new connection instance and open it using the connection stringSet cnCh5 = New ADODB.ConnectioncnCh5.Open strConnection
'declare variable to store current contactDim intCurContact As IntegerintCurContact = 0
'generate SQL command to delete current recordDim strSQL As StringstrSQL = "DELETE FROM tblContacts WHERE intContactId = "& rsContacts!intContactId
'set the command to the current connectionSet cmdCommand.ActiveConnection = cnCh5'set the delete SQL statement to the command textcmdCommand.CommandText = strSQL'execute the delete command against the databasecmdCommand.Execute
'move to the previous record in the local recordset since the'current one is being deletedIf Not rsContacts.BOF Then
rsContacts.MovePrevious'save the id of the current (previous) recordintCurContact = rsContacts!intContactId
End If
'while connected to the database, go ahead and'repopulate the recordset to make sure it contains'the most current values from the database.Set rsContacts.ActiveConnection = cnCh5rsContacts.RequerySet rsContacts.ActiveConnection = Nothing
'move back to the contact that was current before the'requery
163

P1: IML/FFX P2: IML/FFX QC: IML/FFX T1: IML
WY044-05 WY044-Gosnell WY044-Gosnell-v2.cls August 20, 2004 13:52
Chapter 5
rsContacts.Find "[intContactId] = " & intCurContact
'populate the controls on the formCall PopulateControlsOnForm
End Sub
8. Replace the existing SaveCurrentRecord procedure with the following:
Sub SaveCurrentRecord()
Dim cmdCommand As ADODB.CommandSet cmdCommand = New ADODB.CommandDim strSQL As String
If Not rsContacts.BOF And Not rsContacts.EOF Then
'create a new connection instance and open it using the connection stringSet cnCh5 = New ADODB.ConnectioncnCh5.Open strConnection
Dim intCurContact As IntegerintCurContact = 0
'if adding a new recordIf blnAddMode = True Then
'create SQL to insert a new record into the database'containing the values on the formstrSQL = "INSERT INTO tblContacts(" & _
"txtLastName, txtFirstName, txtMiddleName, " & _"txtTitle, txtAddress1, txtAddress2, " & _"txtCity, txtState, txtZip, " & _"txtWorkPhone, txtHomePhone, txtCellPhone) " & _"VALUES (" & _"'" & Me.txtLastName & "', " & _"'" & Me.txtFirstName & "', " & _"'" & Me.txtMiddleName & "', " & _"'" & Me.txtTitle & "', " & _"'" & Me.txtAddress1 & "', " & _"'" & Me.txtAddress2 & "', " & _"'" & Me.txtCity & "', " & _"'" & Me.txtState & "', " & _"'" & Me.txtZip & "', " & _"'" & Me.txtWorkPhone & "', " & _"'" & Me.txtHomePhone & "', " & _"'" & Me.txtCellPhone & "') "
Else'create SQL to update the existing record in the'database with the values on the form
164

P1: IML/FFX P2: IML/FFX QC: IML/FFX T1: IML
WY044-05 WY044-Gosnell WY044-Gosnell-v2.cls August 20, 2004 13:52
Interacting with Data Using ADO and SQL
strSQL = "UPDATE tblContacts SET " & _"txtLastName = '" & Me.txtLastName & "', " & _"txtFirstName = '" & Me.txtFirstName & "', " & _"txtMiddleName = '" & Me.txtMiddleName & "', " & _"txtTitle = '" & Me.txtTitle & "', " & _"txtAddress1 = '" & Me.txtAddress1 & "', " & _"txtAddress2 = '" & Me.txtAddress2 & "', " & _"txtCity = '" & Me.txtCity & "', " & _"txtState = '" & Me.txtState & "', " & _"txtZip = '" & Me.txtZip & "', " & _"txtWorkPhone = '" & Me.txtWorkPhone & "', " & _"txtHomePhone = '" & Me.txtHomePhone & "', " & _"txtCellPhone = '" & Me.txtCellPhone & "' " & _"WHERE intContactId = " & rsContacts!intContactId
'save the id of the current recordintCurContact = rsContacts!intContactId
End If
'set the command to the current connectionSet cmdCommand.ActiveConnection = cnCh5'set the insert or update SQL statement to the command textcmdCommand.CommandText = strSQL'execute the delete command against the databasecmdCommand.Execute
'while connected to the database, go ahead and'repopulate the recordset to make sure it contains'the most current values from the database.Set rsContacts.ActiveConnection = cnCh5rsContacts.RequerySet rsContacts.ActiveConnection = Nothing
'move back to the contact that was current before the'requeryIf intCurContact > 0 Then
'move back to the contact that was just updatedrsContacts.Find "[intContactId] = " & intCurContact
Else'if just added new record, move to the beginning of'the recordsetrsContacts.MoveFirst
End If
'reset add mode flag to falseblnAddMode = False
'populate the controls on the formCall PopulateControlsOnForm
End If
End Sub
165

P1: IML/FFX P2: IML/FFX QC: IML/FFX T1: IML
WY044-05 WY044-Gosnell WY044-Gosnell-v2.cls August 20, 2004 13:52
Chapter 5
9. Replace the existing MoveToFirstRecord, MoveToNextRecord,MoveToPreviousRecord, and MoveToLastRecord procedures with the following:
Sub MoveToFirstRecord()
'move to the first record in the local disconnected recordsetIf Not rsContacts.BOF And Not rsContacts.EOF Then
rsContacts.MoveFirst'populate the controls on the form with the current recordCall PopulateControlsOnFormblnAddMode = False
End If
End Sub
Sub MoveToLastRecord()
'move to the last record in the local disconnected recordsetIf Not rsContacts.BOF And Not rsContacts.EOF Then
rsContacts.MoveLast'populate the controls on the form with the current recordCall PopulateControlsOnFormblnAddMode = False
End If
End Sub
Sub MoveToPreviousRecord()
'move to the previous record in the local disconnected recordset'if not already at the beginningIf Not rsContacts.BOF Then
rsContacts.MovePrevious'populate the controls on the form with the current recordCall PopulateControlsOnFormblnAddMode = False
End If
End Sub
Sub MoveToNextRecord()
'move to the next record in the local disconnected recordset'if not already at the endIf Not rsContacts.EOF Then
rsContacts.MoveNext'populate the controls on the form with the current recordCall PopulateControlsOnFormblnAddMode = False
End If
End Sub
166

P1: IML/FFX P2: IML/FFX QC: IML/FFX T1: IML
WY044-05 WY044-Gosnell WY044-Gosnell-v2.cls August 20, 2004 13:52
Interacting with Data Using ADO and SQL
10. Run the form and you should see a screen similar to Figure 5.16.
Figure 5.16
11. Select the Delete button on the form, and you should see a screen similar to Figure 5.17.
Figure 5.17
12. Select the Yes option to delete the record.
How It WorksFirst, you created a copy of the frmContactsUnbound and named it frmContactsUnboundSQL. Youcan now make changes to this version and still retain the prior one as an example to review as well. Next,you modified the Caption property of the cmdSaveAll button and deleted a few procedures that are nolonger needed for the current example. Then, you replaced a few procedures, starting with AddRecord.
167

P1: IML/FFX P2: IML/FFX QC: IML/FFX T1: IML
WY044-05 WY044-Gosnell WY044-Gosnell-v2.cls August 20, 2004 13:52
Chapter 5
The AddRecord procedure now sets a Boolean value to True to indicate that you’re in Add mode. Thecontrols on the form are then cleared so the user can input values into the empty controls.
Sub AddRecord()
'set add mode to trueblnAddMode = True
'clear the current controls on the form so the'user can fill in values for the new recordCall ClearControlsOnForm
End Sub
Next, you replaced the existing DeleteRecord procedure with code that starts with confirming that theuser really wants to delete the record.
Sub DeleteRecord()
'don't let the user issue a delete command if in add modeIf blnAddMode = True Then
Exit SubEnd If
Dim intResponse As Integer
'confirm that user really wants to delete recordintResponse = MsgBox("Are you sure you want to delete this record?", vbYesNo)
'if the user cancels delete, then exit this procedureIf intResponse = vbNo Then
Exit SubEnd If
Assuming the user did not cancel the delete operation, you declared a new Command object and opened anew connection.
'declare and create new command objectDim cmdCommand As ADODB.CommandSet cmdCommand = New ADODB.Command
'create a new connection instance and open it using the connection stringSet cnCh5 = New ADODB.ConnectioncnCh5.Open strConnection
The current contact location was stored to be used later.
'declare variable to store current contactDim intCurContact As IntegerintCurContact = 0
168

P1: IML/FFX P2: IML/FFX QC: IML/FFX T1: IML
WY044-05 WY044-Gosnell WY044-Gosnell-v2.cls August 20, 2004 13:52
Interacting with Data Using ADO and SQL
You then created the SQL statement for the Delete command to delete the record based on theintContactId value of the current record.
'generate SQL command to delete current recordDim strSQL As StringstrSQL = "DELETE FROM tblContacts WHERE intContactId = "& rsContacts!intContactId
You then set the Command object to the existing connection and the CommandText property was assignedto the SQL statement. When the Execute method executed, the SQL statement ran against the database.
'set the command to the current connectionSet cmdCommand.ActiveConnection = cnCh5'set the delete SQL statement to the command textcmdCommand.CommandText = strSQL'execute the delete command against the databasecmdCommand.Execute
Next, the code moved to the previous record because the prior one was just deleted.
'move to the previous record in the local recordset since the'current one is being deletedIf Not rsContacts.BOF Then
rsContacts.MovePrevious'save the id of the current (previous) recordintCurContact = rsContacts!intContactId
End If
Although connected to the database, the Requery method of the Recordset was executed to refresh therecordset with the current values in the database.
'while connected to the database, go ahead and'repopulate the recordset to make sure it contains'the most current values from the database.Set rsContacts.ActiveConnection = cnCh5rsContacts.RequerySet rsContacts.ActiveConnection = Nothing
The contact that was current before the requery was then located.
'move back to the contact that was current before the'requeryrsContacts.Find "[intContactId] = " & intCurContact
At the end of the DeleteRecord procedure, the controls on the form were populated with the currentrecord.
'populate the controls on the formCall PopulateControlsOnForm
End Sub
169
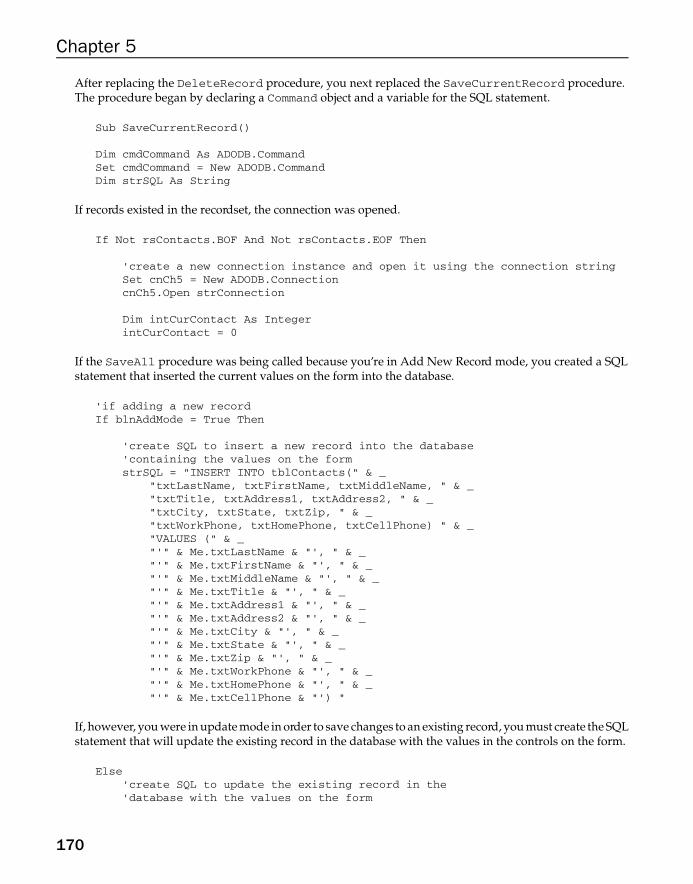
P1: IML/FFX P2: IML/FFX QC: IML/FFX T1: IML
WY044-05 WY044-Gosnell WY044-Gosnell-v2.cls August 20, 2004 13:52
Chapter 5
After replacing the DeleteRecord procedure, you next replaced the SaveCurrentRecord procedure.The procedure began by declaring a Command object and a variable for the SQL statement.
Sub SaveCurrentRecord()
Dim cmdCommand As ADODB.CommandSet cmdCommand = New ADODB.CommandDim strSQL As String
If records existed in the recordset, the connection was opened.
If Not rsContacts.BOF And Not rsContacts.EOF Then
'create a new connection instance and open it using the connection stringSet cnCh5 = New ADODB.ConnectioncnCh5.Open strConnection
Dim intCurContact As IntegerintCurContact = 0
If the SaveAll procedure was being called because you’re in Add New Record mode, you created a SQLstatement that inserted the current values on the form into the database.
'if adding a new recordIf blnAddMode = True Then
'create SQL to insert a new record into the database'containing the values on the formstrSQL = "INSERT INTO tblContacts(" & _
"txtLastName, txtFirstName, txtMiddleName, " & _"txtTitle, txtAddress1, txtAddress2, " & _"txtCity, txtState, txtZip, " & _"txtWorkPhone, txtHomePhone, txtCellPhone) " & _"VALUES (" & _"'" & Me.txtLastName & "', " & _"'" & Me.txtFirstName & "', " & _"'" & Me.txtMiddleName & "', " & _"'" & Me.txtTitle & "', " & _"'" & Me.txtAddress1 & "', " & _"'" & Me.txtAddress2 & "', " & _"'" & Me.txtCity & "', " & _"'" & Me.txtState & "', " & _"'" & Me.txtZip & "', " & _"'" & Me.txtWorkPhone & "', " & _"'" & Me.txtHomePhone & "', " & _"'" & Me.txtCellPhone & "') "
If, however, you were in update mode in order to save changes to an existing record, you must create the SQLstatement that will update the existing record in the database with the values in the controls on the form.
Else'create SQL to update the existing record in the'database with the values on the form
170

P1: IML/FFX P2: IML/FFX QC: IML/FFX T1: IML
WY044-05 WY044-Gosnell WY044-Gosnell-v2.cls August 20, 2004 13:52
Interacting with Data Using ADO and SQL
strSQL = "UPDATE tblContacts SET " & _"txtLastName = '" & Me.txtLastName & "', " & _"txtFirstName = '" & Me.txtFirstName & "', " & _"txtMiddleName = '" & Me.txtMiddleName & "', " & _"txtTitle = '" & Me.txtTitle & "', " & _"txtAddress1 = '" & Me.txtAddress1 & "', " & _"txtAddress2 = '" & Me.txtAddress2 & "', " & _"txtCity = '" & Me.txtCity & "', " & _"txtState = '" & Me.txtState & "', " & _"txtZip = '" & Me.txtZip & "', " & _"txtWorkPhone = '" & Me.txtWorkPhone & "', " & _"txtHomePhone = '" & Me.txtHomePhone & "', " & _"txtCellPhone = '" & Me.txtCellPhone & "' " & _"WHERE intContactId = " & rsContacts!intContactId
'save the id of the current recordintCurContact = rsContacts!intContactId
End If
Whether you were in Add New or Update mode, you were now ready to execute the SQL statementagainst the database by assigning the CommandText property to the SQL statement and executing theExecute method.
'set the command to the current connectionSet cmdCommand.ActiveConnection = cnCh5'set the insert or update SQL statement to the command textcmdCommand.CommandText = strSQL'execute the delete command against the databasecmdCommand.Execute
While still connected to the database, you re-populated the recordset with the most current values andthen disconnected the recordset again.
'while connected to the database, go ahead and'repopulate the recordset to make sure it contains'the most current values from the database.Set rsContacts.ActiveConnection = cnCh5rsContacts.RequerySet rsContacts.ActiveConnection = Nothing
Next, you moved back to the current record if you were in Update mode.
'move back to the contact that was current before the'requeryIf intCurContact > 0 Then
'move back to the contact that was just updatedrsContacts.Find "[intContactId] = " & intCurContact
Else'if just added new record, move to the beginning of'the recordsetrsContacts.MoveFirst
End If
171

P1: IML/FFX P2: IML/FFX QC: IML/FFX T1: IML
WY044-05 WY044-Gosnell WY044-Gosnell-v2.cls August 20, 2004 13:52
Chapter 5
Finally, you reset the Add mode flag to False because you were no longer in Add mode under anycircumstance. You set the controls on the form to display the values in the current record of the recordset.
'reset add mode flag to falseblnAddMode = False
'populate the controls on the formCall PopulateControlsOnForm
End If
End Sub
You made a few minor changes to the MoveToFirstRecord, MoveToNextRecord,MoveToPreviousRecord, and MoveToLastRecord procedures to remove calls toSaveCurrentRecord and to add a statement setting the blnAddMode flag to False. These procedureswere just replaced again for simplicity, but not a lot changed.
Sub MoveToFirstRecord()
'move to the first record in the local disconnected recordsetIf Not rsContacts.BOF And Not rsContacts.EOF Then
rsContacts.MoveFirst'populate the controls on the form with the current recordCall PopulateControlsOnFormblnAddMode = False
End If
End Sub
You then ran the form and manipulated the database, including deleting an existing record. Theseprocedures ran to issue SQL statements against the database to insert, update, and delete records, andthen the disconnected recordset was re-populated with the current values in the database. This is yetanother way to write code that allows your forms to interact with data in underlying data sources in adisconnected fashion.
Using ADOX to Manipulate Data ObjectsThe ADOX library has an object model that allows you to create database objects such as tables, indexes,and keys, as well as to control security, establish referential integrity in a database, and perform cascadeupdates and deletions. The Catalog object is at the top of the ADOX object model, with Tables,Groups, Users, Procedures, and Views collections. Please consult the online help for the completeADOX object model.
Just as with the ADODB library, if you want to make use of the ADOX library in your Access solutions,you must add a reference. You can add references by selecting Tools ➪ References in the Visual BasicEditor. Figure 5.18 shows a reference to the ADOX library as part of the current project.
Let’s look at a few examples of what you can do with the ADOX library.
172

P1: IML/FFX P2: IML/FFX QC: IML/FFX T1: IML
WY044-05 WY044-Gosnell WY044-Gosnell-v2.cls August 20, 2004 13:52
Interacting with Data Using ADO and SQL
Figure 5.18
Creating a Table with ADOXFor starters, you can create new databases, tables, and other objects using the ADOX library. Thefollowing procedure is an example of how you can create a new table in an existing database.
Sub TestCreateTable()
Dim catCatalog As ADOX.CatalogDim tblSupplier As ADOX.Table
Set catCatalog = New ADOX.CatalogSet catCatalog.ActiveConnection = CurrentProject.Connection
' Create and name the new tableSet tblSupplier = New ADOX.TableWith tblSupplier
.Name = "tblSupplier"
.Columns.Append "CompanyName", adVarWChar, 50
.Columns.Append "CompanyPhone", adVarWChar, 12End With
'append the new table to the databasecatCatalog.Tables.Append tblSupplier
'release memorySet catCatalog.ActiveConnection = Nothing
173

P1: IML/FFX P2: IML/FFX QC: IML/FFX T1: IML
WY044-05 WY044-Gosnell WY044-Gosnell-v2.cls August 20, 2004 13:52
Chapter 5
Set catCatalog = NothingSet tblSupplier = Nothing
End Sub
First, a new Catalog object is declared and is assigned to the current open connection. Then, a new tablecalled tblSupplier is created, and a name and new columns are assigned to it. The new table is thenappended to the Catalog.Tables collection, which added it to the database. After running thepreceding procedure, you can see (in Figure 5.19) that a new table called tblSupplier has been addedto the database.
Figure 5.19
Managing Security with ADOXIn addition to managing databases and tables, you can also use the ADOX library to manage security,including users, passwords, and groups. The following example adds a new group called Wrox Readersand then adds a new user called John Doe to that new group.
Sub TestAddUsersGroups()
Dim catCatalog As ADOX.CatalogDim usrUser As ADOX.UserDim grpGroup As ADOX.Group
Set catCatalog = New ADOX.Catalog
Set catCatalog.ActiveConnection = CurrentProject.Connection
With catCatalog
'Create a new group.Groups.Append "Wrox Readers"
174

P1: IML/FFX P2: IML/FFX QC: IML/FFX T1: IML
WY044-05 WY044-Gosnell WY044-Gosnell-v2.cls August 20, 2004 13:52
Interacting with Data Using ADO and SQL
' Create a new userSet usrUser = New ADOX.UserusrUser.Name = "John Doe"usrUser.ChangePassword "", "initialpassword1".Users.Append usrUser
'add the new user to the new groupusrUser.Groups.Append "Wrox Readers"
End With
'release memorySet catCatalog.ActiveConnection = NothingSet catCatalog = NothingSet usrUser = Nothing
End Sub
Notice again how a Catalog object is used, and this time so is a User and a Group object. The newgroup is created first, and then the new user is created, and finally the new user is appended to the newgroup. After executing the preceding code, you can see in Figure 5.20 that the John Doe user was addedto the current project along with the Wrox Readers group. The dialog box in Figure 5.20 can be displayedby selecting Tools ➪ Security ➪ User and Group Accounts.
Figure 5.20
The Group object also has other methods, such as SetPermissions and GetPermissions.SetPermissions method assigns different access rights and GetPermissions retrieves current
175

P1: IML/FFX P2: IML/FFX QC: IML/FFX T1: IML
WY044-05 WY044-Gosnell WY044-Gosnell-v2.cls August 20, 2004 13:52
Chapter 5
permissions in effect for the group. These and many other features can be manipulated using the ADOXlibrary. This section is not meant to be exhaustive, but just to provide you with a few examples of howyou might use the ADOX library.
SummaryThis chapter covered one of the most important concepts in Access programming—working with data indatabases. You should now understand the basics of retrieving and modifying data from VBA code usingActiveX Data Objects (ADO) and using the ADO object model—namely the Connection, Command, andRecordset objects. You also learned how to work with recordsets that are bound to the form andmaintain an open connection and those that are disconnected. When recordsets are disconnected from thedata source, changes made locally are not saved to the underlying database unless you take additionalsteps. You also learned how to use Select, Insert, Update, and Delete statements in the SQLlanguage to interact with the database. Finally, you learned that the ADOX object model allows you tomanipulate database tables, security, users, and so on.
The next chapter discusses various techniques you can use to build interactive forms. It provides youwith some useful approaches for improving user interaction.
Exercises1. What is ADO and why do you use it?
2. Why should you use a disconnected (unbound) recordset instead of a connected (bound)recordset?
3. What is SQL and why do you use it?
4. What is the ADOX object model? Give some examples of what it will allow you to do.
176
P1: IML/FFX P2: IML/FFX QC: IML/FFX T1: IML
WY044-06 WY044-Gosnell WY044-Gosnell-v2.cls August 13, 2004 15:20
6Building Interactive Forms
Chapter 5 covered the basics of using ADO and SQL to work with data sources and showed youhow to display the data retrieved from the database on a form. In this chapter, you will exploreways to build interactive forms and to control the operation of those forms programmatically usingVBA code. Many of the topics covered in this chapter are illustrated in various examples throughoutthe book, but some also deserve a separate discussion.
The chapter will cover:
❑ Navigating between forms
❑ Opening, closing, and hiding forms
❑ Choosing the right type of control to use for data
❑ Populating controls
❑ Displaying messages to the user
❑ Validating data entered into controls
❑ Setting control alignment and tab stops
Form Navigation and FlowYou can control the order and manner in which forms can be opened within your Accessapplications in various ways. For example, you can design switchboard forms that allow the user toselect which form to open. Another option is to open a main form and allow a user to open separateforms from the main form. The style of navigation you choose depends on the type of system andthe manner in which users will interact with the various forms.
During the design phase, you should consider the flow of forms and how users will navigate fromone form to the next. It is very simple to control how forms are displayed. The following is anexample that illustrates how to open, hide, minimize, and close forms.
'open a formDoCmd.OpenForm "FormName"'close a form

P1: IML/FFX P2: IML/FFX QC: IML/FFX T1: IML
WY044-06 WY044-Gosnell WY044-Gosnell-v2.cls August 13, 2004 15:20
Chapter 6
DoCmd.Close acForm, "FormName"
'minimize the current formDoCmd.Minimize
'hide a formFormName.Visible = False
'make the form visible againFormName.Visible = True
A well-designed application allows a user to interact with the application without having to open theform manually from the database Window. An easy way to have a form open automatically is to use theAutoExec macro to specify which form should open automatically when the application opens.
Try It Out Building a Switchboard FormIn this example, you will build a simple switchboard form that opens automatically when the applicationopens. The switchboard form enables the user to open multiple forms from a menu of choices.
1. Create a new database by selecting File ➪ New ➪ Blank Database. Specify Ch6CodeExamplesfor the filename and click the Create button.
2. Add four new forms to the application. Name the forms frmMain, frmAccounts,frmPayments, and frmRegister, respectively.
3. Open frmMain in design view and add three command buttons. Name the command buttonscmdAccounts, cmdPayments, and cmdRegister. Set the caption of the command buttons toView/Manage Accounts, Make Payments, and View/Manage Register, respectively.Also, set the Record Selectors, Navigation Buttons, and Dividing Lines propertiesof the form to No. An example of the form at this point is shown in Figure 6.1.
4. Select the cmdAccounts command button and add the following code to the Click event.
Private Sub cmdAccounts_Click()
'open the Accounts formDoCmd.OpenForm "frmAccounts"
'hide the main switchboard formForms.Item("frmMain").Visible = False
End Sub
5. Select the cmdPayments command button and add the following code to the Click event.
Private Sub cmdPayments_Click()
'open the Accounts formDoCmd.OpenForm "frmPayments"
'hide the main switchboard formForms.Item("frmMain").Visible = False
End Sub
178

P1: IML/FFX P2: IML/FFX QC: IML/FFX T1: IML
WY044-06 WY044-Gosnell WY044-Gosnell-v2.cls August 13, 2004 15:20
Building Interactive Forms
Figure 6.1
6. Select the cmdRegister command button and add the following code to the Click event.
Private Sub cmdRegister_Click()
'open the Accounts formDoCmd.OpenForm "frmRegister"
'hide the main switchboard formForms.Item("frmMain").Visible = False
End Sub
7. Open the frmAccounts form. Add a command button to the form. Change the Nameproperty of the command button to cmdMenu and change the Caption property to Menu.Add a label to the form and type View/Manage Accounts in the label. The form should besimilar to that shown in Figure 6.2.
8. Select the cmdMenu command button and add the following code to the Click event.
Private Sub cmdMenu_Click()
'display the switchboard main formForms.Item("frmMain").Visible = True
179

P1: IML/FFX P2: IML/FFX QC: IML/FFX T1: IML
WY044-06 WY044-Gosnell WY044-Gosnell-v2.cls August 13, 2004 15:20
Chapter 6
Figure 6.2
'close the current formDoCmd.Close acForm, "frmAccounts"
End Sub
9. Open the frmPayments form. Add a command button to the form. Change the Nameproperty of the command button to cmdMenu and change the Caption property to Menu.Add a label to the form and set the caption to Make Payment.
10. Select the cmdMenu command button and add the following code to the Click event.
Private Sub cmdMenu_Click()
'display the switchboard main formForms.Item("frmMain").Visible = True
'close the current formDoCmd.Close acForm, "frmPayments"
End Sub
11. Open the frmRegister form. Add a command button to the form. Change the Nameproperty of the command button to cmdMenu and change the Caption property to Menu.Add a label to the form and type Check Register in the label.
12. Select the cmdMenu command button and add the following code to the Click event.
Private Sub cmdMenu_Click()
'display the switchboard main formForms.Item("frmMain").Visible = True
180

P1: IML/FFX P2: IML/FFX QC: IML/FFX T1: IML
WY044-06 WY044-Gosnell WY044-Gosnell-v2.cls August 13, 2004 15:20
Building Interactive Forms
'close the current formDoCmd.Close acForm, "frmRegister"
End Sub
13. From the database window, create a new macro named AutoExec that contains the OpenFormcommand for frmMain as shown in Figure 6.3.
Figure 6.3
14. Save all changes to the forms and VBA code.
15. Close the entire database by selecting File ➪ Close and then reopen the same database. Ascreen like the one shown in Figure 6.4 should load automatically.
16. Select the View/Manage Accounts button and a screen like the one shown in Figure 6.5 shouldopen.
How It WorksIn this example, you created a switchboard form with three command buttons. Under each command,you added code to open the respective form using the OpenForm method, and then you hid theswitchboard form by setting its Visible property to False.
Private Sub cmdAccounts_Click()
'open the Accounts formDoCmd.OpenForm "frmAccounts"
'hide the main switchboard formForms.Item("frmMain").Visible = False
End Sub
181
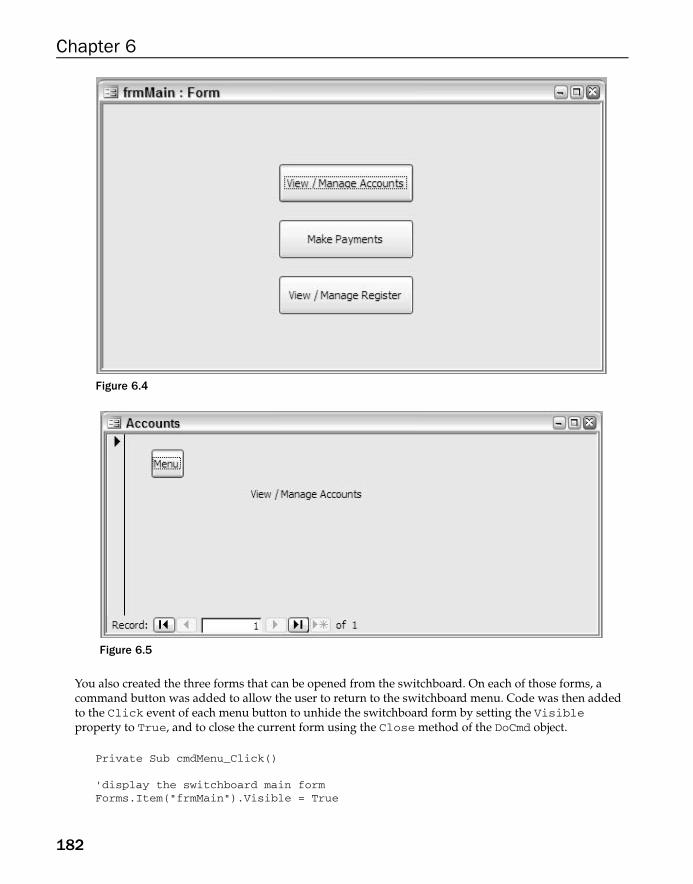
P1: IML/FFX P2: IML/FFX QC: IML/FFX T1: IML
WY044-06 WY044-Gosnell WY044-Gosnell-v2.cls August 13, 2004 15:20
Chapter 6
Figure 6.4
Figure 6.5
You also created the three forms that can be opened from the switchboard. On each of those forms, acommand button was added to allow the user to return to the switchboard menu. Code was then addedto the Click event of each menu button to unhide the switchboard form by setting the Visibleproperty to True, and to close the current form using the Close method of the DoCmd object.
Private Sub cmdMenu_Click()
'display the switchboard main formForms.Item("frmMain").Visible = True
182

P1: IML/FFX P2: IML/FFX QC: IML/FFX T1: IML
WY044-06 WY044-Gosnell WY044-Gosnell-v2.cls August 13, 2004 15:20
Building Interactive Forms
'close the current formDoCmd.Close acForm, "frmAccounts"
End Sub
You then added an AutoExec macro to cause the switchboard form to open when the database opens.When the database opens, Access automatically runs any commands in the macro named AutoExec.
From the switchboard, any one of the three other forms can be opened. You can then return to theswitchboard to select a different form by using the Menu button on the respective form. Althoughthis is a simple example, you can apply the concepts to any application for navigating amongforms.
Working with ControlsPrior to reading this book, you probably worked with a variety of controls on Access forms, such aslabels, text boxes, command buttons, and combo boxes. As you are already aware, controls can be addedto a form using the Toolbox from design view, as shown in Figure 6.6. Now turn your attention to arelated topic: working with controls.
Figure 6.6
In this section, you’ll explore a few ways to work with these controls through VBA code. You learned inChapter 3 that objects have properties and methods that can be displayed in the Properties window indesign view. You also learned that the properties, methods, and events of an object can be managed usingVBA code. Controls are examples of objects that can be managed in these ways.
For example, you learned from the ADO examples in Chapter 5 that you can display data in a text box.An example of code that displays a value in a text box is shown here.
Me.txtLastName = rsContacts!txtLastName
Although text boxes are great for simple data entry and display of a single and small value, at times yourequire more sophisticated ways to display data. In the next few sections, we will look at some examplesof more sophisticated controls that you can use to build more robust applications.
183

P1: IML/FFX P2: IML/FFX QC: IML/FFX T1: IML
WY044-06 WY044-Gosnell WY044-Gosnell-v2.cls August 13, 2004 15:20
Chapter 6
Combo Boxes versus List BoxesCombo boxes and list boxes enable you to display various choices in a list. They also allow you to displaymultiple columns of data in the single listing.
Combo boxes and list boxes have a lot in common but they also differ in some ways, as is illustrated inthe comparison table that follows.
Feature Combo Box List Box
Values acceptedfrom user
Allows the user to select a value from thelist or to add a new value that is not on thelist, depending on the setting for theLimit to List property.
Allows the user to select onlya value in the list.
Locating values asuser types
Matches the pattern as you type so that thevalue in the list that matches the lettersyou have typed appears as the selection.
Takes you to the first item inthe list that starts with theletter you type.
Selection of valuesin a list
Allows a user to select only a single value. Allows a user to select one ormore values in the list.
You can programmatically add and remove items from combo boxes and list boxes using the AddItemand RemoveItem methods. The below example uses the AddItem method to add values in a recordset toa combo box named cboPlan.
Dim rsPlans As New ADODB.Recordset
'populate the list of plans from the databaseSet rsPlans = ExecuteSPRetrieveRS("spRetrievePlans", 0)
cboPlan.RowSource = ""cboPlan.LimitToList = TruecboPlan.ColumnCount = 2cboPlan.RowSourceType = "Value List"cboPlan.BoundColumn = 0
Do While Not rsPlans.EOF'populate the priority combo boxcboPlan.AddItem rsPlans!PlanId & ";" & rsPlans!PlanNamersPlans.MoveNext
Loop
In this example, for each entry in the combo box, the PlanId and PlanName are displayed because theAddItem method received values separated a by semicolon (;). The semicolon is used to designate thatmultiple columns should be created. For example, the following code adds values for both last and firstname columns to the list.
cboName.AddItem "Doe;John"
184

P1: IML/FFX P2: IML/FFX QC: IML/FFX T1: IML
WY044-06 WY044-Gosnell WY044-Gosnell-v2.cls August 13, 2004 15:20
Building Interactive Forms
Try It Out Populating Combo and List BoxesYou will now populate a combo box and a list box with the same values and illustrate how to retrieve theselection from the user.
1. Open the frmAccounts form of the current Ch6CodeExamples database.
2. Add a combo box and a list box control to the form using the Toolbox.
3. Set the Name property of the combo box to cboAccounts and the Name property of the list boxcontrol lstAccounts. Set each of the labels to Accounts. The form should look similar to theone shown in Figure 6.7.
Figure 6.7
4. Add the following code to the Load event for the form.
Private Sub Form_Load()
'populate the combo box with values from a'specified listWith cboAccounts
.RowSource = ""
.ColumnCount = 2
.RowSourceType = "Value List"
.LimitToList = True
.BoundColumn = 0
.AddItem "Old National Bank;Car Payment"
.AddItem "Chase Manhattan;MasterCard"
.AddItem "Countrywide Home Loans;House Payment"End With
'populate the list box with values from a'specified list
185

P1: IML/FFX P2: IML/FFX QC: IML/FFX T1: IML
WY044-06 WY044-Gosnell WY044-Gosnell-v2.cls August 13, 2004 15:20
Chapter 6
With lstAccounts.RowSource = "".ColumnCount = 2.RowSourceType = "Value List".BoundColumn = 0.AddItem "Old National Bank;Car Payment".AddItem "Chase Manhattan;MasterCard".AddItem "Countrywide Home Loans;House Payment"
End With
End Sub
5. Add the following code to the Change event of the combo box.
Private Sub cboAccounts_Change()
'display a message to the user of the selected valueMsgBox cboAccounts.Text
End Sub
6. Add the following code to the Click event of the list box.
Private Sub lstAccounts_Click()
'display a message to the user of the first value in'the selected columnMsgBox lstAccounts.Column(0)
End Sub
7. Open the form in view mode to run the form. You should see a screen similar to Figure 6.8.
Figure 6.8
186

P1: IML/FFX P2: IML/FFX QC: IML/FFX T1: IML
WY044-06 WY044-Gosnell WY044-Gosnell-v2.cls August 13, 2004 15:20
Building Interactive Forms
8. Type the letter C in the combo box. The text should jump to Chase Manhattan. Then, type an Oin the combo box, and the text should jump to Countrywide Home Loans (because it startswith a CO). Repeat these steps for the list box. You should find that when you type C, ChaseManhattan is selected and when you type O, Old National Bank is selected.
9. You should see message boxes displaying the value selected.
How It WorksUsing the AddItem method, you added the same values to the combo box and the list box so you couldsee the differences between the two controls side by side.
Private Sub Form_Load()
'populate the combo box with values from a'specified listWith cboAccounts
.RowSource = ""
.ColumnCount = 2
.RowSourceType = "Value List"
.LimitToList = True
.BoundColumn = 0
.AddItem "Old National Bank;Car Payment"
.AddItem "Chase Manhattan;MasterCard"
.AddItem "Countrywide Home Loans;House Payment"End With
'populate the list box with values from a'specified listWith lstAccounts
.RowSource = ""
.ColumnCount = 2
.RowSourceType = "Value List"
.BoundColumn = 0
.AddItem "Old National Bank;Car Payment"
.AddItem "Chase Manhattan;MasterCard"
.AddItem "Countrywide Home Loans;House Payment"End With
End Sub
The LimitToList property of the combo box was set to True, so only values in the list could beselected. Various properties such as RowSource and RowSource type were specified to indicate that thevalues would be coming from a value list, as opposed to a table or other source.
You also added code to display the selected value from the combo box and list box. When you changedthe value in the combo box, a message box shows users the value displayed in the text field.
Private Sub cboAccounts_Change()
'display a message to the user of the selected valueMsgBox cboAccounts.Text
End Sub
187

P1: IML/FFX P2: IML/FFX QC: IML/FFX T1: IML
WY044-06 WY044-Gosnell WY044-Gosnell-v2.cls August 13, 2004 15:20
Chapter 6
When you select a value from the list box, a message box shows users the value contained in the firstselected column.
Private Sub lstAccounts_Click()
'display a message to the user of the first value in'the selected columnMsgBox lstAccounts.Column(0)
End Sub
Tab Controls and SubformsWhen you have a lot of data that needs to be displayed on a single form, tab controls provide one wayor organizing data on a single form but into separate components. A tab control allows you to placeseparate controls on each tab. For example, you may have one tab that contains checking accountinformation and another tab that contains savings account information, as shown in Figure 6.9.
Figure 6.9
The case study in Chapter 12 illustrates using a tab control for different portions of the project record.
You can then refer to the pages of the tab control in VBA code, as shown here.
'show the checking account registerPage1.Visible = True
'hide the savings account registerPage2.Visible = False
In the preceding code example, the checking account register is displayed to the user and the savingsaccount is not. This may be useful in a scenario when one user is named on both accounts, but anotheruser is named on only one of the accounts. You could, for example, control the visibility of the tabs basedon the specified user ID.
188

P1: IML/FFX P2: IML/FFX QC: IML/FFX T1: IML
WY044-06 WY044-Gosnell WY044-Gosnell-v2.cls August 13, 2004 15:20
Building Interactive Forms
Another way to handle forms that include complex amounts or types of data is to use a subform. Asubform is a form within a form. To insert a subform, you simply drag and drop the Subform controlfrom the Toolbox just as you would any other control. You then change the Source Object propertyof the subform to the name of the form you wish to display. An example of a subform is shown inFigure 6.10.
Figure 6.10
Figure 6.10 shows a transactions form displayed within an accounts form. Any form that you create canbe displayed within another form. You then tie the subform to the parent form so that the data it displaysrelates to the data on the parent form (for example, for the same account). One way to tie a subform to aparent form is using the Link Child Fields and Link Master Fields properties.
Whenever you make changes to a subform you are changing the original form, so be careful.
Building User InteractionAfter you have chosen the right controls, you must program ways for users to interact with thosecontrols. You can program the application to interact with a user in various ways. For example, you havealready learned how to write event procedure code that executes when the user takes a particular action
189

P1: IML/FFX P2: IML/FFX QC: IML/FFX T1: IML
WY044-06 WY044-Gosnell WY044-Gosnell-v2.cls August 13, 2004 15:20
Chapter 6
on the form. In this section, you will look at a couple of additional examples of how you can improve userinteraction in your applications. You will look at using the MsgBox function for more complex scenariosand at validating user input.
The MsgBox FunctionYou have already seen examples of the MsgBox function to display a message. The MsgBox function is alot more powerful than the simple examples I have illustrated so far. You can actually ask questions withmultiple-choice answers and then process those choices to take the appropriate action.
For example, to ask the user a Yes/No question and then take a different action depending on theresponse, you can specify the vbYesNo value for the message box style parameter. The followingexample prompts the user to confirm that the delete should be processed.
Dim intResponse As Integer
'display a Yes/No message box to the userintResponse = MsgBox("Are you sure you want to delete this record?", vbYesNo,"Delete?")
'determine how the user responded and act accordinglyIf intResponse = vbYes Then
MsgBox "Delete confirmed."ElseIf intResponse = vbNo Then
MsgBox "Delete cancelled."End If
Validating User InputAnother way to build user interaction is to provide feedback to the user when the data entered into acontrol is not of the correct data type. By correcting the data error up front, you can avoid a databaseerror later or avoid a data integrity problem caused by invalid values. One way to implement datavalidation in Access is to set the ValidationRule and ValidationText properties for the control tospecify the type of data that is valid and the message that should be displayed when the data does notconform to the rule.
You can also handle data validation from VBA code, such as in the BeforeUpdate event orAfterUpdate event of the control.
Try It Out Adding Data Validation to the frmPayments FormHere you modify the sample application to implement a validation event for the frmPayments form.
1. Open frmPayments in design view.
2. Add a text box control to the form and name it txtValue.
3. In the BeforeUpdate event for the text box, add the following code.
190
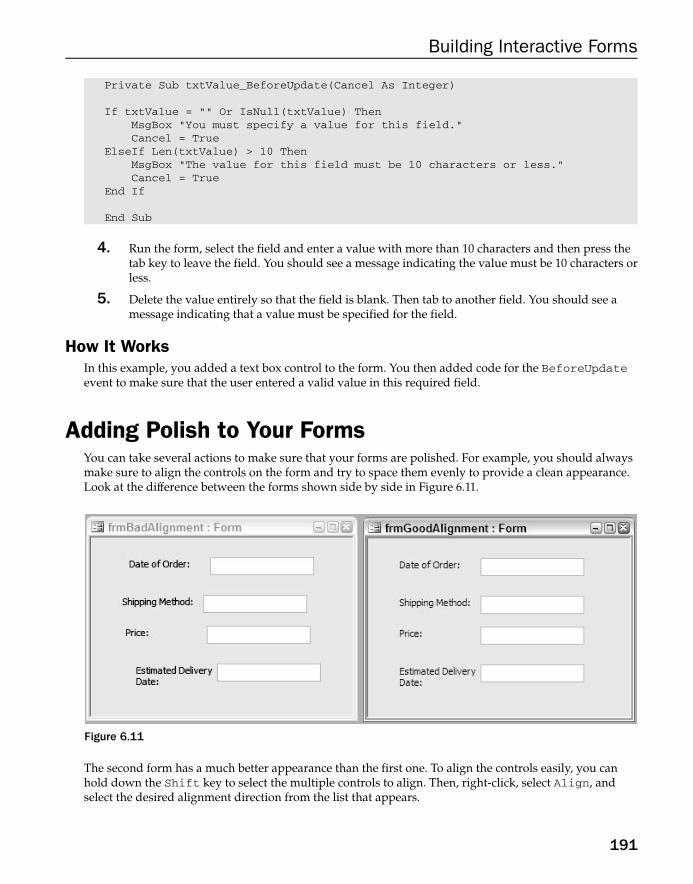
P1: IML/FFX P2: IML/FFX QC: IML/FFX T1: IML
WY044-06 WY044-Gosnell WY044-Gosnell-v2.cls August 13, 2004 15:20
Building Interactive Forms
Private Sub txtValue_BeforeUpdate(Cancel As Integer)
If txtValue = "" Or IsNull(txtValue) ThenMsgBox "You must specify a value for this field."Cancel = True
ElseIf Len(txtValue) > 10 ThenMsgBox "The value for this field must be 10 characters or less."Cancel = True
End If
End Sub
4. Run the form, select the field and enter a value with more than 10 characters and then press thetab key to leave the field. You should see a message indicating the value must be 10 characters orless.
5. Delete the value entirely so that the field is blank. Then tab to another field. You should see amessage indicating that a value must be specified for the field.
How It WorksIn this example, you added a text box control to the form. You then added code for the BeforeUpdateevent to make sure that the user entered a valid value in this required field.
Adding Polish to Your FormsYou can take several actions to make sure that your forms are polished. For example, you should alwaysmake sure to align the controls on the form and try to space them evenly to provide a clean appearance.Look at the difference between the forms shown side by side in Figure 6.11.
Figure 6.11
The second form has a much better appearance than the first one. To align the controls easily, you canhold down the Shift key to select the multiple controls to align. Then, right-click, select Align, andselect the desired alignment direction from the list that appears.
191

P1: IML/FFX P2: IML/FFX QC: IML/FFX T1: IML
WY044-06 WY044-Gosnell WY044-Gosnell-v2.cls August 13, 2004 15:20
Chapter 6
Another nice finishing touch is to make sure the tab stops are in the desired order. You have no doubt usedan application where you tried to tab through the fields to fill in information quickly and found yourselfin a field that was out of order. To provide a better user experience and make data entry and navigation aseasy as possible, you should make sure the tab stops have a logical order. Access makes it very easy toview and modify tab stops. To view and modify the current tab stops for a form, simply select View ➪ TabOrder. A screen like the one shown in Figure 6.12 will be displayed where you can modify the order.
Figure 6.12
You can also select the Auto Order option to have Access automatically order the controls from top tobottom, left to right. These few basic tips will help you make your application appear more polished.
SummaryIn this chapter, I covered the basics of building interactive applications, including how to navigate amongforms using VBA code and how to use some of the more complex controls to display data and receiveuser input. At this point, you have a basic understanding of how to design forms to display and managedata from a database. You will move on to Chapter 7, which covers the various ways to use VBA code tolink, import, and export data to external data sources.
Exercises1. What is the AutoExec macro and why should you use it?
2. Describe at least two differences between combo boxes and list boxes.
3. What is the MsgBox function and how can you use it?
192

P1: IML/FFX P2: IML/FFX QC: IML/FFX T1: IML
WY044-07 WY044-Gosnell WY044-Gosnell-v2.cls August 13, 2004 11:35
7Importing, Linking,
and Exporting Using ExternalData Sources
In Chapter 5, I covered the basics of using ADO and SQL to work with data sources. All the ADOand SQL examples dealt with data stored in tables in a database. However, in today’s world oftechnology, you often work with data and applications in a variety of formats, such as text files andspreadsheets. You may need to import or link data from various sources into your database to avoidhaving to retype all the information that is already stored electronically in another format. At somepoint, another application might need the data in your application or you may want to get data outof your application for another reason. In that case, you can export information from yourapplication into another format.
In this chapter, I will explore the various ways to use VBA code to link, import, and export toexternal data sources. The chapter will cover:
❑ The difference between linking, importing, and exporting
❑ Linking, importing, and exporting to external Access databases (MDB files)
❑ Linking, importing, and exporting to SQL Server databases
❑ Linking, importing, and exporting to other files such as spreadsheets and text files
❑ Creating and sending an e-mail programmatically
❑ The definition of a Web service and how you can use data returned from a Web service
These techniques will enable you to build robust applications that interact with a variousapplications and formats.
Linking, Importing, and Exporting OverviewLinking to external data means creating a pointer to an external data source that allows you tointeract directly with the underlying data. Importing external data literally imports a copy of the

P1: IML/FFX P2: IML/FFX QC: IML/FFX T1: IML
WY044-07 WY044-Gosnell WY044-Gosnell-v2.cls August 13, 2004 11:35
Chapter 7
data into your application. Exporting data refers to the idea of extracting data from your application to anexternal file or format.
Here are some situations when you should consider linking:
❑ The data resides on a database server that your application and others can use.
❑ The data is used by another program that requires the native file format.
❑ The underlying data needs to be updated on a regular basis in its native format.
Here are some instances when you should consider importing:
❑ An existing system is being migrated to a new application and the data from the old system willbe used in the new application. (In some cases, you may be able to migrate to another system butkeep the data on a database server without needing to import the data).
❑ Numerous data operations must be run against the data from another source. You can obtainperformance improvements by importing the data, but the underlying data will be out of sync ifyou make any changes to the data after it is imported.
Access allows you to link to and import from data sources such as Access (Jet) databases, SQL Serverdatabases, other ODBC databases, Microsoft Sharepoint, XML documents, HTML documents, text files,Microsoft Exchange, Microsoft Outlook, and spreadsheets such as Microsoft Excel and Lotus.
Many of the techniques covered in this chapter can also be implemented using menus and wizards inAccess. To import or link data using the menus and Wizards, select File ➪ Get External Data and thenselect either the Import or Link Tables option. You can export data by selecting a particular object (table,for example) in the Database Window, right-clicking, and selecting the Export option from the pop-upbox.
Now that you understand the high-level concept of importing, linking, and exporting, you can jump rightin to learning the techniques that will allow you to work with some of these supported data sources.
Create a blank database to use for the examples in this chapter. To do so, select File ➪ New ➪ BlankDatabase and specify Ch7CodeExamples for the filename and then click the Create button.
Access and Other DatabasesYou can use the TransferDatabase method of the DoCmd object to import from, link to, and exportdata to Access and several other databases, including SQL Server and Oracle. The basic syntax of theTransferDatabase method is shown in the following code.
DoCmd.TransferDatabase(TransferType, DatabaseType, DatabaseName, ObjectType,Source, Destination, StructureOnly, StoreLogin)
Various parameters are used to specify how the method should execute. The following table explains theuse of each parameter.
194

P1: IML/FFX P2: IML/FFX QC: IML/FFX T1: IML
WY044-07 WY044-Gosnell WY044-Gosnell-v2.cls August 13, 2004 11:35
Importing, Linking, and Exporting Using External Data Sources
Parameter Description
TransferType Type of transfer to be performed. Valid choices are acImport (default),acLink, and acExport.
DatabaseType Type of database being used. Access is the default. See the help documentationfor a complete list and for the exact syntax for a particular database.
DatabaseName The full name, including the path, of the database being used.
ObjectType The type of object that has data you want to work with. The default isacTable.
Source Name of the object whose data you want to work with.
Destination Name of the object in the destination database.
StructureOnly Use True to work with the structure only and False to work with thestructure and data. False is the default.
StoreLogin Whether to store the login and password. False is the default.
Let’s look at an example. Suppose you want to import data from an Access database called SampleDb.The data you want to import is in a table called Sales, and you want it to be imported to your currentdatabase under the name tblSales. You could run the following command from your current Accessapplication.
DoCmd.TransferDatabase acImport, "Microsoft Access",_"SampleDb.mdb", acTable, "Sales", "tblSales"
Here’s an example that shows linking to a table called Sales in an ODBC database called Wrox.
DoCmd.TransferDatabase acLink, "ODBC Database", _"ODBC;DSN=DataSourceName;UID=username;PWD=pwd;LANGUAGE=us_english;" _& "DATABASE=Wrox", acTable, "Sales", "dboSales"
The ODBC data source name can point to any database that ODBC supports, including SQL Server andOracle, to name a few examples. As with any linking operation, you see the table or tables from theDatabase Window in Access.
Try It Out Importing Data from the Sample Northwind DatabaseNow it’s your turn to try this out. Let’s import data from the sample Northwind database that comeswith Access.
1. Insert a new module into your Ch7CodeExamples database.
2. Add the following code to the module.
Sub TestTransferDatabase()
'import from Northwind
195

P1: IML/FFX P2: IML/FFX QC: IML/FFX T1: IML
WY044-07 WY044-Gosnell WY044-Gosnell-v2.cls August 13, 2004 11:35
Chapter 7
DoCmd.TransferDatabase acImport, "Microsoft Access", _"C:\Program Files\Microsoft Office\OFFICE11\SAMPLES\Northwind.mdb", _
acTable, "Employees", "tblEmployees"
End Sub
3. Modify the preceding path to the location on your hard drive where Northwind.mdb is located.If you do not have the sample Northwind database installed, change the previous parameters toreference the Access database that you do have.
4. From the Immediate Window in the Visual Basic Editor, type TestTransferDatabase andpress Enter to run the procedure.
5. Open the Database Window and you should see a screen similar to Figure 7.1.
Figure 7.1
How It WorksIn this example, you used the TransferDatabase method to import data from the Northwind sampledatabase. The parameters of the TransferDatabase method specified the various bits of informationAccess needed to perform the import.
Sub TestTransferDatabase()
'import from NorthwindDoCmd.TransferDatabase acImport, "Microsoft Access", _
"C:\Program Files\Microsoft Office\OFFICE11\SAMPLES\Northwind.mdb", _acTable, "Employees", "tblEmployees"
End Sub
After you ran the procedure , you should have noticed in the Database Window that the new table wasinserted into your database.
196

P1: IML/FFX P2: IML/FFX QC: IML/FFX T1: IML
WY044-07 WY044-Gosnell WY044-Gosnell-v2.cls August 13, 2004 11:35
Importing, Linking, and Exporting Using External Data Sources
Transferring Complete SQL Server DatabaseThe TransferSQLDatabase method allows you to transfer an entire SQL Server database to anotherdatabase. In effect, this method imports the entire SQL Server database into your Access database. Here isthe basic syntax.
DoCmd.TransferSQLDatabase(Server, Database, UseTrustedConnection, Login,Password, TransferCopyData)
Various parameters are used to specify how the method should execute. The following table explains theuse of each parameter.
Parameter Description
Server Name of the SQL Server.
Database Name of new database on specified SQL Server.
UseTrustedConnection True if account has Administrator privileges, Falseotherwise and must specify Login and Password.
Login Login name. Ignored if UseTrustedConnection is True.
Password Login password. Ignored if UseTrustedConnection isTrue.
TransferCopyData Use True to work with the data and schema and False towork with the schema only.
For example, to transfer the entire contents of a database called Pubs to the current database, you can usea command similar to the following.
DoCmd.TransferSQLDatabase _Server:="ServerName", _Database:="Pubs", _UseTrustedConnection:=True, _TransferCopyData:=False
SpreadsheetsThe TransferSpreadsheet method is very similar to the TransferDatabase method in that itenables you to import, link, and export, only in this case it deals with spreadsheets. The syntax is shownin the following code.
DoCmd.TransferSpreadsheet(TransferType, SpreadsheetType, TableName,FileName, HasFieldNames, Range, UseOA)
Various parameters are used to specify how the method should execute. The following table explains theuse of each parameter.
197

P1: IML/FFX P2: IML/FFX QC: IML/FFX T1: IML
WY044-07 WY044-Gosnell WY044-Gosnell-v2.cls August 13, 2004 11:35
Chapter 7
Parameter Description
TransferType Type of transfer to be performed. Valid choices are acImport(default), acLink, and acExport.
SpreadsheetType Type of spreadsheet. The default is acSpreadsheetTypeExcel8. See the help documentation for a complete listand explanation.
TableName String expression that contains a table name or a SQLstatement if you want to export data based on a SQL statement.
FileName Filename and path of your spreadsheet.
HasFieldNames Use True to use the first row of the spreadsheet as field namesand False to treat the first row as data. False is the default.
Range Valid range of cells or named range in the spreadsheet that youwant to import from. Leave blank to import an entirespreadsheet. Using with Export will cause an error.
UseOA Optional variant.
Now we’ll walk through an example of how you might use the TransferSpreadsheet method toexport data to a spreadsheet. Suppose you want to export the contents of the Employees table you justimported from Northwind into a spreadsheet so you can e-mail or send it to a colleague. The followingcode will create a new spreadsheet called Employees.xls in the temp directory.
DoCmd.TransferSpreadsheet acExport, acSpreadsheetTypeExcel9, _"tblEmployees", "C:\Temp\Employees.xls"
An example of the spreadsheet created from the preceding command might look like the one shown inFigure 7.2.
You can also use ADO to select, insert, update, and delete the underlying data in most of the data sourcesin this chapter by specifying the correct ADO provider (in this case Excel).
Text FilesThe TransferText method allows you to import from, link to, and export to text files. It has thefollowing syntax.
DoCmd.TransferText(TransferType, SpecificationName, TableName, FileName,HasFieldNames, HTMLTableName, CodePage)
As you would expect, various parameters can be used to specify how the method should execute. Theseparameters are similar to the TransferDatabase and TransferSpreadsheet methods you havealready seen. The following table explains the use of each parameter.
198

P1: IML/FFX P2: IML/FFX QC: IML/FFX T1: IML
WY044-07 WY044-Gosnell WY044-Gosnell-v2.cls August 13, 2004 11:35
Importing, Linking, and Exporting Using External Data Sources
Figure 7.2
Parameter Description
TransferType Type of transfer to be performed. The default is acImportDelim. Seethe help documentation for a complete list and explanation.
SpecificationName Name of import or export specification you have saved in the currentdatabase. This argument can be left blank for delimited text files.
TableName String expression that contains a table name you want to work with or aquery you want to export.
FileName Filename and path of the text file you want to work with.
HasFieldNames Use True to use the contents of first row of the spreadsheet as fieldnames and False to treat the first row as data. False is the default.
HTMLTableName Use with acImportHTML or acLinkHTML. Name of table or list inHTML file you want to work with. If blank, the first one is assumed.
CodePage Long value indicating the character set of the code page.
Next, we’ll jump right into importing data from a text file.
199
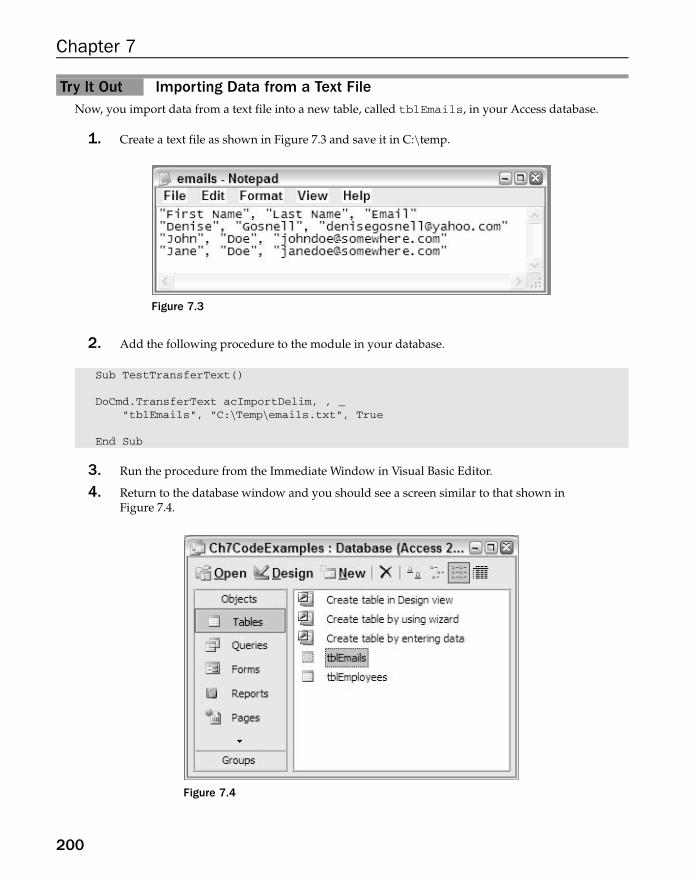
P1: IML/FFX P2: IML/FFX QC: IML/FFX T1: IML
WY044-07 WY044-Gosnell WY044-Gosnell-v2.cls August 13, 2004 11:35
Chapter 7
Try It Out Importing Data from a Text FileNow, you import data from a text file into a new table, called tblEmails, in your Access database.
1. Create a text file as shown in Figure 7.3 and save it in C:\temp.
Figure 7.3
2. Add the following procedure to the module in your database.
Sub TestTransferText()
DoCmd.TransferText acImportDelim, , _"tblEmails", "C:\Temp\emails.txt", True
End Sub
3. Run the procedure from the Immediate Window in Visual Basic Editor.
4. Return to the database window and you should see a screen similar to that shown inFigure 7.4.
Figure 7.4
200

P1: IML/FFX P2: IML/FFX QC: IML/FFX T1: IML
WY044-07 WY044-Gosnell WY044-Gosnell-v2.cls August 13, 2004 11:35
Importing, Linking, and Exporting Using External Data Sources
How It WorksFirst, you created a text file that contained comma-delimited records. You then created a procedure toimport the comma-delimited file to your database.
Sub TestTransferText()
DoCmd.TransferText acImportDelim, , _"tblEmails", "C:\Temp\emails.txt", True
End Sub
The TransferText method imported the comma-delimited file into a new table called tblEmails, asshown in Figure 7.4. Note that the parameter for the SpecificationName was left blank because it isnot required when working with delimited files.
XML FilesXML stands for eXtensible Markup Language. You have likely heard the XML buzzword, but you maynot know what XML files really are. XML is a syntax that enables systems to create simple textdocuments with various tags that identify how the text should be interpreted. At the end of this sectionyou will create an XML document from a table so you can see what one looks like.
The idea behind XML is to give various types of operating systems on different platforms a meaningfulway of communicating with one another. As the use of XML has grown in popularity, the need to writeAccess applications that can import and export to XML text files has increased. Recent versions ofMicrosoft products incorporate extended XML functionality, including the ImportXML and ExportXMLmethods that Access provides to enable users to import from and export to XML databases. You will nowlook at each of these in turn.
The syntax for the ImportXML method is:
Application.ImportXML(DataSource, ImportOptions)
The DataSource is the name and path of the XML file to import. The ImportOptions parameter canbe acStructureAndData (default), acAppendData, or acStructureOnly. Thus, to import an XMLdocument into a table in your Access database, you might use the following code:
Application.ImportXML "employees.xml", acStructureAndData
The ExportXML method allows you to export data in your Access database to XML files to exchange datawith other applications. Here is the syntax.
Application.ExportXML(ObjectType, DataSource, DataTarget, SchemaTarget,PresentationTarget, ImageTarget, Encoding, OtherFlags, FilterCriteria,AdditionalData)
The following table explains what the various parameters of the ExportXML object are used for.
201

P1: IML/FFX P2: IML/FFX QC: IML/FFX T1: IML
WY044-07 WY044-Gosnell WY044-Gosnell-v2.cls August 13, 2004 11:35
Chapter 7
Parameter Description
ObjectType The type of Access object to export.
DataSource The name of the Access object to export.
DataTarget The file name and path for the exported data.
SchemaTarget The file name and path for the exported schema.
PresentationTarget The file name and path for the exported target information.
ImageTarget The path for exported images.
Encoding The text encoding to use.
OtherFlags Additional flags that can be used.
FilterCriteria Subset of records to be exported.
AdditionalData Additional tables to export.
I said earlier that I would provide a sample XML file so you could see what it looks like. Well, it’s nowtime to use the ExportXML method to export one of your tables to XML so you can see how it works.
Suppose you have the following procedure:
Sub TestExportXML()
Application.ExportXML acExportTable, "tblEmployees", _"c:\Temp\Employees.xml", _"c:\Temp\EmployeesSchema.xml"
End Sub
The procedure uses the ExportXML method to export the Employees table in your database to an XMLfile called Employees.xml. After you run the preceding procedure, you create the XML file that lookssimilar to the XML file shown in Figure 7.5.
Notice in Figure 7.5 how the tags describe the data in detailed ways. This is a more detailed andstructured way of organizing and describing data than HTML, which is just designed for displaying data.
That’s all it takes to export data from your Access application to send to another system. You’re nowready to learn how to send an e-mail from VBA code.
E-mails and OutlookOne way you can send an e-mail from VBA code is using the SendObject method, as shown below.
DoCmd.SendObject(ObjectType, ObjectName, OutputFormat, To, Cc, Bcc, Subject,MessageText, EditMessage, TemplateFile)
202

P1: IML/FFX P2: IML/FFX QC: IML/FFX T1: IML
WY044-07 WY044-Gosnell WY044-Gosnell-v2.cls August 13, 2004 11:35
Importing, Linking, and Exporting Using External Data Sources
Figure 7.5
The ObjectType, ObjectName, and OutputFormat parameters are used to specify a file created fromthe database to include as an attachment. Remember that earlier I said you exported the tblEmployeestable to Excel so you could e-mail it to a co-worker. The SendObject method allows you to attach certaindatabase objects in one of a variety of formats as part of the e-mail. Thus, to generate a new e-mail thatalso attaches the tblEmployees table as an Excel attachment, you could use something similar to thefollowing:
'Send the Employees fileDoCmd.SendObject acSendTable, "tblEmployees", acFormatXLS, _
"[email protected]", , , "Employee List", "For your review.", False
If you do not want to send an attachment, but just want to send an e-mail telling me how much you likethe book so far, you can use the following command. Please do this—I would love to get this test e-mailfrom you!
'Send the author of this book an emailDoCmd.SendObject acSendNoObject, , , "[email protected]", , , _
"This is cool!", _"I just sent an email from VBA. Really am enjoying your book.", False
203

P1: IML/FFX P2: IML/FFX QC: IML/FFX T1: IML
WY044-07 WY044-Gosnell WY044-Gosnell-v2.cls August 13, 2004 11:35
Chapter 7
If you want to learn more about controlling Outlook from your VBA applications, consult Chapter 10,where I cover automation with various Office programs such as Outlook. The SendObject method I justdiscussed is not specific to any e-mail program.
Other Ways to Export DataYet another way to export data can be implemented using the OutputTo method. The OutputTomethod can export data to various formats: ASP, DAP, HTML, IIS, RTF, SNP, TXT, and XLS. The syntaxfor OutputTo is shown here.
DoCmd.OutputTo(ObjectType, ObjectName, OutputFormat, OutputFile, AutoStart,TemplateFile, Encoding)
Please consult Chapter 8 for more information on the OutputTo method, as the entire chapter isdedicated to creating reports and Web-enabled output, including those created with the OutputTomethod.
Using Data from Web ServicesSo far in this chapter, you have learned how to interact with the most common external data sources inyour application. A common topic of discussion in the high-tech sector these days is Web services. Webservices are reusable components that are based on standard Internet protocols. They enable systems ondifferent platforms to talk to each other. In the simplest terms, I like to describe a Web service as someprocedure or function that someone has made available over Internet protocols so you can use it for freeor for a cost. Web services can be called (consumed) by Web and non-Web-based applications as long as theapplication can communicate using standard Internet protocols. Web services return a response in XMLformat that can then be used appropriately in the consuming program.
Although Web services communicate using Internet protocols, you can still use Web services for privatepurposes within a company. For example, some companies are better integrating legacy mainframe andother applications into their current environment by exposing parts of the old application as a Web service.After the old application is made accessible using a Web service, it can be called from other platformsthat, traditionally, could not communicate as easily. Although I could write a whole chapter or even abook on Web services alone, I want you, at least, to learn the basic concept of what a Web service is. I alsowant to give you a simple example of how you can use someone else’s Web service in your Accessapplications. The rest of this chapter will show you how to locate and consume Web services from Access.
Before you can consume a Web service, you must download and install the Microsoft Office 2003 WebServices Toolkit. At the time of this book’s creation, the easiest way to obtain the toolkit is to go to:http://msdn.microsoft.com/office/downloads/toolsutils/default.aspx and then clickthe link to the Microsoft Office 2003 Web Services Toolkit 2.01.
If you cannot locate the toolkit at the preceding link, you can go to the downloads area of Microsoft.com:http://www.microsoft.com/downloads. Then, select the Office and Home Application DownloadCategory in the left navigation pane and then run the following search: Select Office System forProduct/Technology and type Web Services Toolkit in the Keywords text box. Click the Searchbutton. You will see a link to the Microsoft Office 2003 Web Services Toolkit 2.01.
204

P1: IML/FFX P2: IML/FFX QC: IML/FFX T1: IML
WY044-07 WY044-Gosnell WY044-Gosnell-v2.cls August 13, 2004 11:35
Importing, Linking, and Exporting Using External Data Sources
You can then follow the instructions on the page to download and run the setup program or just launchthe setup directly from the Web site. Follow the on-screen instructions to complete the installation.
After you have the Web Services Toolkit installed, you can use Web services from your Accessapplications.
Try It Out Adding a Reference to a Web ServiceNow, let’s confirm that the Web Services Toolkit installation was successful and then add a reference toyour Access project to an existing Web service.
1. Confirm that the Web Services Toolkit installation was successful. To do so, open the Visual BasicEditor and select Tools to confirm that you have a Web Services References option as shown inFigure 7.6.
Figure 7.6
2. Select Tools ➪ Web Services References. Select the WebServiceURL option and type the followingURL into the box: http://terraserver-usa.com/TerraService2.asmx. Click the Searchbutton. A screen similar to that shown in Figure 7.7 will be displayed.
You will need a connection to the Internet or the Web services examples shown here will notfunction.
3. Select the TerraService Web services in the upper-right pane so that a check box appears. Also,expand the list so you can see the procedures available, including the procedures shown inFigure 7.8.
205

P1: IML/FFX P2: IML/FFX QC: IML/FFX T1: IML
WY044-07 WY044-Gosnell WY044-Gosnell-v2.cls August 13, 2004 11:35
Chapter 7
Figure 7.7
4. Select the Add button to add a reference to the Terra Web Service to your form.
5. When you return to the Visual Basic Editor, you can see that several class modules were added toyour project, as shown in Figure 7.9.
How It WorksTo add a reference to a Web service, you first selected the Tools ➪ Web Services References option.Because you’re planning to use a service located at http://terraserver-usa.com/TerraService2.asmx, you selected the Web Service URL option and specified the Terra Server path inthe URL field of Figure 7.7. You also could have searched for available Web services using certainkeywords or specified the location of another Web service.
You then selected the Terra Server Web service and clicked the Add button. Several class modules wereadded to the database to make the procedures you saw in Figure 7.8 available to your Access project.
You can add a reference to any Web service that is available on your network over the Internet, or on yourlocal computer, by navigating to its location. For example, Microsoft, Amazon, Google and others havecreated Web services that you can use. More information about these Web services can be found at:
206

P1: IML/FFX P2: IML/FFX QC: IML/FFX T1: IML
WY044-07 WY044-Gosnell WY044-Gosnell-v2.cls August 13, 2004 11:35
Importing, Linking, and Exporting Using External Data Sources
Figure 7.8
Figure 7.9
http://msdn.microsoft.com/webservices/building/livewebservices/. Many of theseWeb services, although they are free, require that you obtain an ID. Other companies may charge for useof Web services they offer.
Now that you have a reference to the Terra Server Web service, you can consume one of its proceduresfrom within your application.
207

P1: IML/FFX P2: IML/FFX QC: IML/FFX T1: IML
WY044-07 WY044-Gosnell WY044-Gosnell-v2.cls August 13, 2004 11:35
Chapter 7
Try It Out Consuming the GetPlaceFacts MethodIn this example, you will call one of the procedures in the Terra Server Web service. The Web serviceprocedure you will call accepts latitude and longitude values and returns the city that is located at thosecoordinates.
1. Add the following procedure to your class module.
Sub TestWebService()
'declare a new instance of the web serviceDim ts As clsws_TerraServiceSet ts = New clsws_TerraService
'declare a structure to hold the latitude and longitude valuesDim objLonLatPt As New struct_LonLatPt
'declare a variable to store the result from the web serviceDim strResult As String
'assign the latitude and longitude valuesobjLonLatPt.Lat = "37.7875671"objLonLatPt.Lon = "-122.4276"
'Call the web service to return the place for that latitude'and longitudestrResult = ts.wsm_ConvertLonLatPtToNearestPlace(objLonLatPt)
'display the resultMsgBox "The city at that latitude and longitude is: " & strResult
End Sub
2. Run the procedure from the Immediate Window by typing TestWebService and pressingEnter. You should receive a message similar to Figure 7.10.
Figure 7.10
How It WorksTo call the Web service from your application, you created the TestWebService procedure.
Sub TestWebService()
208

P1: IML/FFX P2: IML/FFX QC: IML/FFX T1: IML
WY044-07 WY044-Gosnell WY044-Gosnell-v2.cls August 13, 2004 11:35
Importing, Linking, and Exporting Using External Data Sources
You declare a new instance of the Web service, just as you would declare any other object.
'declare a new instance of the web serviceDim ts As clsws_TerraServiceSet ts = New clsws_TerraService
You declare a structure variable to store the latitude and longitude values. You created the structuredefinition in the code that was generated when adding the Web service, so all you had to do was declarethe variable.
'declare a structure to hold the latitude and longitude valuesDim objLonLatPt As New struct_LonLatPt
Next, you declared a local string variable to store the result of the Web service.
'declare a variable to store the result from the web serviceDim strResult As String
You also set the latitude and longitude parameters of the objLonLatPt that will be passed to the Webservice as parameters.
'assign the latitude and longitude valuesobjLonLatPt.Lat = "37.7875671"objLonLatPt.Lon = "-122.4276"
This line below actually calls the Web service on the Terra Server over the Internet and returns the resultinto the strResult variable. If you do not have an Internet connection, this line will raise an error.
'Call the web service to return the place for that latitude'and longitudestrResult = ts.wsm_ConvertLonLatPtToNearestPlace(objLonLatPt)
As you typed the line of code, you should have noticed that the tooltip displayed to show you whatparameters the Web service required. Figure 7.11 show an example of this.
The last line of code displays the result that was retrieved from the Web service.
'display the resultMsgBox "The city at that latitude and longitude is: " & strResult
End Sub
When running the procedure from the Immediate Window, you receive a dialog box like Figure 7.10 thatindicates that San Francisco, California, USA is located at those coordinates. It is really amazing that youhave just executed a remote procedure that was located on someone else’s computer and used the resultin the application. Hopefully, you realize that it is almost as easy to call a Web service as it is to call anyother procedure. The only difference is that you have to locate and add a reference to the Web service andfamiliarize yourself with the parameters it expects.
209

P1: IML/FFX P2: IML/FFX QC: IML/FFX T1: IML
WY044-07 WY044-Gosnell WY044-Gosnell-v2.cls August 13, 2004 11:35
Chapter 7
Figure 7.11
SummaryIn today’s world of technology, it has become commonplace for companies to expect systems tocommunicate with each other in ways that were not possible just a decade ago. In this chapter, youexplored ways to work with external data to facilitate communications between various systems. Youlearned VBA techniques for linking, importing, and exporting data to various sources, such as databases,spreadsheets, and text files. You also learned how to handle more advanced scenarios, such as sendinge-mails programmatically and consuming Web services from your application. Web services allowapplications on various platforms to exchange data upon request and have become an increasinglypopular communication technique between systems.
Chapter 8 will build on this chapter by explaining how to export data in your application to reports andWeb-enabled output.
Exercises1. What are some reasons you would choose linking versus importing?
2. What is the difference between the TransferDatabase and TransferSQLDatabasemethods?
3. What is a Web service and how do you use one?
210

P1: KPEWY044-08 WY044-Gosnell WY044-Gosnell-v2.cls August 16, 2004 8:40
8Creating Reports
and Web-Enabled Output
Chapter 7 explored various ways to work with external data sources, such as linking, importing, orexporting data. In this chapter, I cover:
❑ Creating reports programmatically and how to output data from Access databases in waysthat can be used over the Web. For example, you will explore how to set the record sourcefor a report dynamically.
❑ Creating reports programmatically.
❑ Using the OutputTo method to export data to various Web formats, such as HTML, ASP,and data access page files.
Working with Reports from VBAReports can be manipulated in numerous ways from VBA code. For example, you can change thedata source on which the report is based from within VBA code. You can also create reports fromscratch or modify existing reports from within VBA code. Let’s look at a few examples to furtherillustrate these concepts.
Many of the examples in this chapter that deal with manipulating existing reports use theNorthwind database. If you want to create those particular examples yourself, open the Northwinddatabase and add a new module. Only the code for the Try It Out examples are included in the samplecode available on Wrox.com for this chapter.
Setting the Report Data SourceThe DataSource property of a Report object can be specified as a SQL statement. Suppose youhave an existing report called Alphabetical List of Products. The following procedureillustrates one way you can modify the DataSource of the report.

P1: KPEWY044-08 WY044-Gosnell WY044-Gosnell-v2.cls August 16, 2004 8:40
Chapter 8
Sub ModifyExistingReport()
'declare a variable to store the SQL stringDim strSQL As String
'set the SQL statement value to show only discontinued productsstrSQL = "SELECT Products.*, Categories.CategoryName " & _"FROM Categories INNER JOIN Products ON " & _"Categories.CategoryID = Products.CategoryID " & _"WHERE Products.Discontinued=Yes;"
'access the report's design (hidden from the user)DoCmd.Echo FalseDoCmd.OpenReport "Alphabetical List of Products", acViewDesign
'set the source of the report to the SQL statementReports("Alphabetical List of Products").RecordSource = strSQL
'close the report's design and save changesDoCmd.Close , , acSaveYes
'now open the report for the user in preview modeDoCmd.OpenReport "Alphabetical List of Products", acViewPreviewDoCmd.Echo True
End Sub
Notice first how a SQL statement is created to specify which fields the report should be based upon. Thereport’s design view is then accessed in hidden mode (echo false) so that the user does not see themodifications. The RecordSource is then assigned to the strSQL variable. The report is then closedand the changes saved. Finally, the report is opened in preview mode so you can see the changes.
When you make changes to report properties (such as the RecordSource property),you actually permanently change the report to those settings, just as if you had doneso in the designer. You don’t just make a temporary change that is undone after thecode executes.
You can also specify an ADO recordset as a report’s data source. You could modify the prior example asfollows:
Sub ModifyExistingReport()
'declare a variable to store the SQL stringDim strSQL As String
'set the SQL statement value to show only discontinued productsstrSQL = "SELECT Products.*, Categories.CategoryName " & _"FROM Categories INNER JOIN Products ON " & _"Categories.CategoryID = Products.CategoryID " & _
"WHERE Products.Discontinued=Yes;"
212

P1: KPEWY044-08 WY044-Gosnell WY044-Gosnell-v2.cls August 16, 2004 8:40
Creating Reports and Web-Enabled Output
'declare and instantiate a new recordsetDim rsDiscontinued As ADODB.RecordsetSet rsDiscontinued = New ADODB.Recordset
'open the recordset based on the SQL statementrsDiscontinued.Open strSQL, CurrentProject.Connection
'access the report's design (hidden from the user)DoCmd.Echo FalseDoCmd.OpenReport "Alphabetical List of Products", acViewDesign
'set the source of the report to the recordset sourceReports("Alphabetical List of Products").RecordSource = rsDiscontinued.Source
'close the report's design and save changesDoCmd.Close , , acSaveYes
'now open the report for the user in preview modeDoCmd.OpenReport "Alphabetical List of Products", acViewPreviewDoCmd.Echo True
'close the recordset and free the memoryrsDiscontinued.CloseSet rsDiscontinued = Nothing
End Sub
Notice how this example uses the SQL statement to create the ADO recordset, and then assigns theRecordSource property of the report to the recordset’s Source property.
Creating Reports ProgrammaticallyJust as you can work with forms and other Access objects programmatically, you can also work withreports programmatically. You can create reports from scratch and modify existing reports. Let’s look athow to create a report from scratch.
Creating an Empty ReportTo create a new report, you use the CreateReport method. Here is the basic syntax.
Dim rptReport as Access.ReportSet rptReport = CreateReport
Below is an example that creates a new empty report and deletes any existing report with the same namebefore creating the new report.
Sub CreateNewReport()
Dim rptCustomers As Access.ReportDim strReportName As StringDim aoAccessObj As AccessObject
213

P1: KPEWY044-08 WY044-Gosnell WY044-Gosnell-v2.cls August 16, 2004 8:40
Chapter 8
'set the name of the new reportstrReportName = "Customers"
'delete any existing report with that nameFor Each aoAccessObj In CurrentProject.AllReports
If aoAccessObj.Name = strReportName ThenDoCmd.DeleteObject acReport, strReportName
End IfNext aoAccessObj
'create a new Customers ReportSet rptCustomers = CreateReport
'save and close the new reportDoCmd.Save , strReportNameDoCmd.Close
End Sub
First, the code loops through the AllReports collection to delete any existing report with the samename. Then, the Access report object rptCustomers is assigned to the CreateReport method. Thereport is then saved with the name specified. At this point, the report is empty and contains no controls.Let’s look at how to add controls to the report.
Adding Controls to the ReportThe CreateReportControl method allows you to add new controls to a report. The CreateReportControl method has the following basic syntax.
CreateReportControl(ReportName, ControlType, Section, Parent,ColumnName, Left, Top, Width, Height)
Now, let’s modify the prior code to add four fields to the report: CompanyName, ContactName, Title, andPhone. Each field needs a corresponding text box and label. The following modified procedure is oneway to accomplish this.
Sub CreateNewReport()
Dim rptCustomers As Access.ReportDim strReportName As StringDim aoAccessObj As AccessObject
Dim txtTextBox As Access.TextBoxDim lblLabel As Access.LabelDim strSQL As StringDim intPosition As Integer
'set the name of the new reportstrReportName = "Customers"
strSQL = "SELECT * FROM Customers ORDER BY CompanyName"
'delete any existing report with that nameFor Each aoAccessObj In CurrentProject.AllReports
214

P1: KPEWY044-08 WY044-Gosnell WY044-Gosnell-v2.cls August 16, 2004 8:40
Creating Reports and Web-Enabled Output
If aoAccessObj.Name = strReportName ThenDoCmd.DeleteObject acReport, strReportName
End IfNext aoAccessObj
'create a new Customers ReportSet rptCustomers = CreateReport
With rptCustomers'set the report record source to the SQL Statement.RecordSource = strSQL
'set the height, caption, and other report options.Section("Detail").Height = 500.Caption = "Client Contact List"
End With
'add a Company Name label and text box to the reportintPosition = 0Set txtTextBox = CreateReportControl(rptCustomers.Name, acTextBox, _
acDetail, , "CompanyName", intPosition)txtTextBox.Name = "txtCompanyName"txtTextBox.Width = 1800Set lblLabel = CreateReportControl(rptCustomers.Name, acLabel, _
acPageHeader, , , intPosition)lblLabel.Name = "lblCompanyName"lblLabel.Caption = "Company Name"lblLabel.Height = txtTextBox.HeightlblLabel.Width = txtTextBox.WidthlblLabel.FontBold = True
'add a Contact Name label and text box to the reportintPosition = txtTextBox.Width + txtTextBox.Left + 350Set txtTextBox = CreateReportControl(rptCustomers.Name, acTextBox, _
acDetail, , "ContactName", intPosition)txtTextBox.Name = "txtContactName"txtTextBox.Width = 1800Set lblLabel = CreateReportControl(rptCustomers.Name, acLabel, _
acPageHeader, , , intPosition)lblLabel.Name = "lblContactName"lblLabel.Caption = "Contact Name"lblLabel.Height = txtTextBox.HeightlblLabel.Width = txtTextBox.WidthlblLabel.FontBold = True
'add a Contact Title label and text box to the reportintPosition = txtTextBox.Width + txtTextBox.Left + 500Set txtTextBox = CreateReportControl(rptCustomers.Name, acTextBox, _
acDetail, , "ContactTitle", intPosition)txtTextBox.Name = "txtTitle"txtTextBox.Width = 1800Set lblLabel = CreateReportControl(rptCustomers.Name, acLabel, _
acPageHeader, , , intPosition)lblLabel.Name = "lblTitle"lblLabel.Caption = "Title"
215

P1: KPEWY044-08 WY044-Gosnell WY044-Gosnell-v2.cls August 16, 2004 8:40
Chapter 8
lblLabel.Height = txtTextBox.HeightlblLabel.Width = txtTextBox.WidthlblLabel.FontBold = True
'add a Contact Phone label and text box to the reportintPosition = txtTextBox.Width + txtTextBox.Left + 1000Set txtTextBox = CreateReportControl(rptCustomers.Name, acTextBox, _
acDetail, , "Phone", intPosition)txtTextBox.Name = "txtPhone"Set lblLabel = CreateReportControl(rptCustomers.Name, acLabel, _
acPageHeader, , , intPosition)lblLabel.Name = "lblPhone"lblLabel.Caption = "Phone"lblLabel.Height = txtTextBox.HeightlblLabel.Width = txtTextBox.WidthlblLabel.FontBold = True
'save and close the new reportDoCmd.Save , strReportNameDoCmd.Close
End Sub
In the code example shown again in the following section, notice how a text box and label control aredeclared and then used to create each of the fields on the report. For example, txtTextBox is assigned tothe result of the CreateReportControl method, which specifies the report name, type of control,section to add the control, name of the control, and the position in which to place the control. Variousother properties of the text box control are specified, such as the Name and Width properties. Thecorresponding label control is also created and various settings specified.
'add a Company Name label and text box to the reportintPosition = 0Set txtTextBox = CreateReportControl(rptCustomers.Name, acTextBox, _
acDetail, , "CompanyName", intPosition)txtTextBox.Name = "txtCompanyName"txtTextBox.Width = 1800Set lblLabel = CreateReportControl(rptCustomers.Name, acLabel, _
acPageHeader, , , intPosition)lblLabel.Name = "lblCompanyName"lblLabel.Caption = "Company Name"lblLabel.Height = txtTextBox.HeightlblLabel.Width = txtTextBox.WidthlblLabel.FontBold = True
The same basic steps are then repeated to create each control for the report.
Try It Out Creating a Report ProgrammaticallyNow it’s your turn to create a report programmatically. This example creates a report based on a newtable that you create and uses a SQL statement as the report’s RecordSource property.
1. Create a new database by selecting File ➪ New ➪ Blank Database. Specify Ch8CodeExamplesfor the filename and click the Create button.
216

P1: KPEWY044-08 WY044-Gosnell WY044-Gosnell-v2.cls August 16, 2004 8:40
Creating Reports and Web-Enabled Output
2. Add a new tblComplaints table to the database as shown in Figure 8.1.
Figure 8.1
3. Open the table and add some records, such as those shown in Figure 8.2.
Figure 8.2
4. Insert a new module into the database. To do so, choose Modules from the Database Windowand click the New button.
5. Add the following CreateComplaintsReport procedure to the module.
Sub CreateComplaintsReport()
Dim rptComplaints As Access.ReportDim strReportName As String
Dim txtTextBox As Access.TextBoxDim lblLabel As Access.LabelDim strSQL As String
217

P1: KPEWY044-08 WY044-Gosnell WY044-Gosnell-v2.cls August 16, 2004 8:40
Chapter 8
Dim intPosition As Integer
'set the name of the new reportstrReportName = "Unresolved Customer Complaints"
strSQL = "SELECT * FROM tblComplaints WHERE Resolved=False"
'create a new Unresolved Customer Complaints ReportSet rptComplaints = CreateReport
With rptComplaints'set the report record source to the SQL Statement.RecordSource = strSQL
'set the height, caption, and other report options.Section("Detail").Height = 500.Caption = "Unresolved Customer Complaints"
End With
'add a Customer Name label and text box to the reportintPosition = 0Set txtTextBox = CreateReportControl(rptComplaints.Name, acTextBox, _
acDetail, , "CustomerName", intPosition)txtTextBox.Name = "txtCustomerName"txtTextBox.Width = 1800Set lblLabel = CreateReportControl(rptComplaints.Name, acLabel, _
acPageHeader, , , intPosition)lblLabel.Name = "lblCustomerName"lblLabel.Caption = "Customer Name"lblLabel.Height = txtTextBox.HeightlblLabel.Width = txtTextBox.WidthlblLabel.FontBold = True
'add a Customer Day Phone label and text box to the reportintPosition = txtTextBox.Width + txtTextBox.Left + 350Set txtTextBox = CreateReportControl(rptComplaints.Name, acTextBox, _
acDetail, , "CustomerDayPhone", intPosition)txtTextBox.Name = "txtCustomerDayPhone"txtTextBox.Width = 1800Set lblLabel = CreateReportControl(rptComplaints.Name, acLabel, _
acPageHeader, , , intPosition)lblLabel.Name = "lblCustomerDayPhone"lblLabel.Caption = "Day Phone"lblLabel.Height = txtTextBox.HeightlblLabel.Width = txtTextBox.WidthlblLabel.FontBold = True
'add a Customer Evening Phone label and text box to the reportintPosition = txtTextBox.Width + txtTextBox.Left + 500Set txtTextBox = CreateReportControl(rptComplaints.Name, acTextBox, _
acDetail, , "CustomerEveningPhone", intPosition)txtTextBox.Name = "txtCustomerEveningPhone"txtTextBox.Width = 1800Set lblLabel = CreateReportControl(rptComplaints.Name, acLabel, _
acPageHeader, , , intPosition)
218

P1: KPEWY044-08 WY044-Gosnell WY044-Gosnell-v2.cls August 16, 2004 8:40
Creating Reports and Web-Enabled Output
lblLabel.Name = "lblCustomerEveningPhone"lblLabel.Caption = "Evening Phone"lblLabel.Height = txtTextBox.HeightlblLabel.Width = txtTextBox.WidthlblLabel.FontBold = True
'add an Issue Description label and text box to the reportintPosition = txtTextBox.Width + txtTextBox.Left + 1000Set txtTextBox = CreateReportControl(rptComplaints.Name, acTextBox, _
acDetail, , "IssueDescription", intPosition)txtTextBox.Name = "txtIssueDescription"txtTextBox.Width = 2000txtTextBox.Height = 750Set lblLabel = CreateReportControl(rptComplaints.Name, acLabel, _
acPageHeader, , , intPosition)lblLabel.Name = "lblIssueDescription"lblLabel.Caption = "Issue Description"lblLabel.Height = txtTextBox.HeightlblLabel.Width = txtTextBox.WidthlblLabel.FontBold = True
'save and close the new reportDoCmd.Save , strReportNameDoCmd.Close
End Sub
6. Run the procedure from the Immediate Window by typing the procedure nameCreateComplaintsReport and pressing Enter.
7. Return to the Database Window and select Reports. The newly createdCreateComplaintsReport should appear in the Database Window, as shown in Figure 8.3.
Figure 8.3
8. Open Unresolved Customer Complaints to preview the report. A screen similar to the oneshown in Figure 8.4 is displayed.
219

P1: KPEWY044-08 WY044-Gosnell WY044-Gosnell-v2.cls August 16, 2004 8:40
Chapter 8
Figure 8.4
How It WorksFirst, you created a new database and a table called tblComplaints. You then added some sample datato the tblComplaints table so the report would have data to display. Next, you created a new moduleand added the CreateComplaintsReport procedure to the module.
Sub CreateComplaintsReport()
The procedure declares some variables for use in the procedure, such as a Report object for creating thenew report and the text box and label controls for adding to the report.
Dim rptComplaints As Access.ReportDim strReportName As String
Dim txtTextBox As Access.TextBoxDim lblLabel As Access.LabelDim strSQL As StringDim intPosition As Integer
'set the name of the new reportstrReportName = "Unresolved Customer Complaints"
strSQL = "SELECT * FROM tblComplaints WHERE Resolved=False"
220

P1: KPEWY044-08 WY044-Gosnell WY044-Gosnell-v2.cls August 16, 2004 8:40
Creating Reports and Web-Enabled Output
The new report was created using the CreateReport method, and properties such as RecordSource,Height, and Caption were specified. The RecordSource property assigned the source of data to theSQL statement. The Detail section’s Height property specified the size of the report’s detail section.
'create a new Unresolved Customer Complaints ReportSet rptComplaints = CreateReport
With rptComplaints'set the report record source to the SQL Statement.RecordSource = strSQL
'set the height, caption, and other report options.Section("Detail").Height = 500.Caption = "Unresolved Customer Complaints"
End With
Next, you added code to create the report controls. For example, to create a new Customer Name labeland text box, you used the CreateReportControl method. The parameters ofCreateReportControl specified, among other things, where to include the field (in the report or detailsection), what data source field the new field should be based on, and what position it should start in.
'add a Customer Name label and text box to the reportintPosition = 0Set txtTextBox = CreateReportControl(rptComplaints.Name, acTextBox, _
acDetail, , "CustomerName", intPosition)txtTextBox.Name = "txtCustomerName"txtTextBox.Width = 1800Set lblLabel = CreateReportControl(rptComplaints.Name, acLabel, _
acPageHeader, , , intPosition)lblLabel.Name = "lblCustomerName"lblLabel.Caption = "Customer Name"lblLabel.Height = txtTextBox.HeightlblLabel.Width = txtTextBox.WidthlblLabel.FontBold = True
The same basic code was repeated for each of the remaining controls on the report, namely the labels andtext boxes for Customer Day Phone, Customer Evening Phone, and Issue Description. The final lines ofthe procedure saved and closed the report.
'save and close the new reportDoCmd.Save , strReportNameDoCmd.Close
End Sub
When you ran the new procedure, the report was created and appeared in the Database Window, asshown in Figure 8.3. The report was then opened in preview mode, as shown in Figure 8.4, so you couldsee the final result of your efforts.
Using the Printer Object to Designate Printing OptionsIn Chapter 3, you learned about the Printers collection and Printer object. This collection and objectare again important if you want to modify the margins or other printer characteristics of a report. For
221

P1: KPEWY044-08 WY044-Gosnell WY044-Gosnell-v2.cls August 16, 2004 8:40
Chapter 8
example, if you wanted to modify the margins and number of copies for the first printer, you could usecode similar to the following.
Dim prtPrinter As Printer
Set prtPrinter = Application.Printers(0)
prtPrinter.TopMargin = 500prtPrinter.BottomMargin = 250prtPrinter.LeftMargin = 500prtPrinter.RightMargin = 500prtPrinter.Copies = 5
As another example, you could use the AllPrinters collection to loop through all printers on thecomputer and take some particular action, such as displaying the printer name in a printer dialog box.See Chapter 3 for additional examples.
Working with Report EventsAt this point, you should be very familiar with how to add events to forms, such as the Click event of abutton. Reports have events just as forms do, but not as many, as you can see in Figure 8.5.
Figure 8.5
You can also write VBA code behind report events, such as Open, Close, Activate, and Deactivate.For example, you might want to display a message to users when the report opens to inform them thatthe report will take a long time to load. You may want to add a custom toolbar to be displayed from theActivate event and then remove that toolbar when the Deactivate event fires.
The following is an example of adding and removing a custom toolbar from the report’s Activate andDeactivate events.
Private Sub Report_Activate()DoCmd.ShowToolbar "CustomComplaints", acToolbarYes
End Sub
222

P1: KPEWY044-08 WY044-Gosnell WY044-Gosnell-v2.cls August 16, 2004 8:40
Creating Reports and Web-Enabled Output
Private Sub Report_Deactivate()DoCmd.ShowToolbar "CustomComplaints", acToolbarNo
End Sub
Now that you have a basic idea of how to create reports programmatically and how to create reportevents, you can move on to the topic of exporting Access data to various Web formats.
Exporting Access Data to Web FormatsAs you learned in Chapter 7, you have various ways to export data from Access to other formats. TheOutputTo method allows exporting to various formats: ASP, DAP, HTML, IIS, RTF, SNP, TXT, and XLS.The examples in this section will focus on Web examples, but you could also use the OutputTo methodto export to text files or other supported formats. The basic syntax for the OutputTo method is shown inthe following code:
DoCmd.OutputTo(ObjectType, ObjectName, OutputFormat, OutputFile, AutoStart,TemplateFile, Encoding)
Various parameters can specify how the method should execute. The following table explains the use ofeach parameter.
Parameter Description
ObjectType Type of object to be exported. See the help documentation for the completelist of objects.
ObjectName Name of the object being exported.
OutputFormat The format to which the object should be exported.
OutputFile The full name, including the path, of the file to which the object should beexported.
AutoStart Indication whether the destination program is to start immediately. Falseis the default.
TemplateFile The full name, including the path, of the file to use as a template.
Encoding Optional variant.
Now that you are familiar with the basic syntax of the OutputTo method, let’s look at how to use it toexport data to HTML, Active Server Pages (ASP), and data access pages (DAP) formats.
Creating Static HTML PagesYou have no doubt heard of HTML pages and are probably aware that they are typically used to displayWeb pages. You can use the OutputTo method to export a database table, query, results of a SQLstatement, or other data to a static HTML document. A static HTML document is disconnected from theoriginal data source and does not change as the underlying data changes—hence the name static.
223

P1: KPEWY044-08 WY044-Gosnell WY044-Gosnell-v2.cls August 16, 2004 8:40
Chapter 8
To export the results of a report to an HTML document, you might use a statement similar to thefollowing:
DoCmd.OutputTo acOutputReport, "ReportName", acFormatHTML,"c:\temp\ReportName.html"
Now, try it out so you can see how this works.
Try It Out Exporting the tblComplaints Table to HTMLThis example will export the data contained in the tblComplaints table you created earlier in thechapter to an HTML file.
1. Add the following procedure to the module you created earlier.
Sub OutputToHTML()
DoCmd.OutputTo acOutputTable, "tblComplaints", acFormatHTML,"c:\temp\complaints.html", True
End Sub
2. Run the OutputToHTML procedure from the Immediate Window by typing OutputToHTML andthen pressing Enter.
3. The exported HTML document should open automatically in a Web browser, as shown inFigure 8.6.
Figure 8.6
How It WorksThe OutputToHTML procedure uses the OutputTo method with various parameters that indicate whatshould be exported, in what format, and to where. In this example, the tblComplaints table is
224

P1: KPEWY044-08 WY044-Gosnell WY044-Gosnell-v2.cls August 16, 2004 8:40
Creating Reports and Web-Enabled Output
exported to an HTML format into a new file called complaints.html. The True parameter at the endof the statement that follows is for the AutoStart parameter to indicate that the Web browser shouldautomatically launch to display the file.
Sub OutputToHTML()
DoCmd.OutputTo acOutputTable, "tblComplaints", acFormatHTML,"c:\temp\complaints.html", True
End Sub
After you run the preceding procedure, the Web browser does indeed launch and displays the newlycreated HTML file in a screen similar to Figure 8.6.
Creating ASP PagesActive Server Pages (ASP) run on a Web server and can be used to display current data whenever youaccess them. ASP files typically contain code written in a script language, such as VBScript, for retrievingthe data. They also contain code written in an HTML syntax that gets returned to the client browser todisplay the content.
You can use the OutputTo method to create an ASP page in a fashion very similar to the way you createan HTML file. For example, the following command creates an ASP page based on the tblComplaintstable.
DoCmd.OutputTo acOutputTable, "tblComplaints", acFormatASP,"c:\temp\complaints.asp"
The tblComplaints table exported to an ASP file looks similar to the following:
<HTML><HEAD><META HTTP-EQUIV="Content-Type" CONTENT="text/html;charset=windows-1252"><TITLE>tblComplaints</TITLE></HEAD><BODY><%If IsObject(Session("_conn")) Then
Set conn = Session("_conn")Else
Set conn = Server.CreateObject("ADODB.Connection")conn.open "","",""Set Session("_conn") = conn
End If%><%If IsObject(Session("tblComplaints_rs")) Then
Set rs = Session("tblComplaints_rs")Else
sql = "SELECT * FROM [tblComplaints]"Set rs = Server.CreateObject("ADODB.Recordset")rs.Open sql, conn, 3, 3
225

P1: KPEWY044-08 WY044-Gosnell WY044-Gosnell-v2.cls August 16, 2004 8:40
Chapter 8
If rs.eof Thenrs.AddNew
End IfSet Session("tblComplaints_rs") = rs
End If%><TABLE BORDER=1 BGCOLOR=#ffffff CELLSPACING=0><FONT FACE="Arial"COLOR= #000000><CAPTION><B>tblComplaints</B></CAPTION></FONT>
<THEAD><TR><TH BGCOLOR=#c0c0c0 BORDERCOLOR=#000000 ><FONT style=FONT-SIZE:10pt FACE="Arial" COLOR=#000000>ComplaintId</FONT></TH><TH BGCOLOR=#c0c0c0 BORDERCOLOR=#000000 ><FONT style=FONT-SIZE:10pt FACE="Arial" COLOR=#000000>ComplaintDate</FONT></TH><TH BGCOLOR=#c0c0c0 BORDERCOLOR=#000000 ><FONT style=FONT-SIZE:10pt FACE="Arial" COLOR=#000000>CustomerName</FONT></TH><TH BGCOLOR=#c0c0c0 BORDERCOLOR=#000000 ><FONT style=FONT-SIZE:10pt FACE="Arial" COLOR=#000000>CustomerDayPhone</FONT></TH><TH BGCOLOR=#c0c0c0 BORDERCOLOR=#000000 ><FONT style=FONT-SIZE:10pt FACE="Arial" COLOR=#000000>CustomerEveningPhone</FONT></TH><TH BGCOLOR=#c0c0c0 BORDERCOLOR=#000000 ><FONT style=FONT-SIZE:10pt FACE="Arial" COLOR=#000000>IssueDescription</FONT></TH><TH BGCOLOR=#c0c0c0 BORDERCOLOR=#000000 ><FONT style=FONT-SIZE:10pt FACE="Arial" COLOR=#000000>Resolved</FONT></TH><TH BGCOLOR=#c0c0c0 BORDERCOLOR=#000000 ><FONT style=FONT-SIZE:10pt FACE="Arial" COLOR=#000000>ResolutionDescription</FONT></TH>
</TR></THEAD><TBODY><%On Error Resume Nextrs.MoveFirstdo while Not rs.eof%>
<TR VALIGN=TOP><TD BORDERCOLOR=#c0c0c0 ALIGN=RIGHT><FONT style=FONT-SIZE:10pt FACE="Arial"COLOR=#000000><%=Server.HTMLEncode(rs.Fields("ComplaintId").Value)%><BR></FONT></TD><TD BORDERCOLOR=#c0c0c0 ALIGN=RIGHT><FONT style=FONT-SIZE:10pt FACE="Arial"COLOR=#000000><%=Server.HTMLEncode(rs.Fields("ComplaintDate").Value)%><BR></FONT></TD><TD BORDERCOLOR=#c0c0c0 ><FONT style=FONT-SIZE:10pt FACE="Arial"COLOR=#000000><%=Server.HTMLEncode(rs.Fields("CustomerName").Value)%><BR></FONT></TD><TD BORDERCOLOR=#c0c0c0 ><FONT style=FONT-SIZE:10pt FACE="Arial"COLOR=#000000><%=Server.HTMLEncode(rs.Fields("CustomerDayPhone").Value)%><BR></FONT></TD><TD BORDERCOLOR=#c0c0c0 ><FONT style=FONT-SIZE:10pt FACE="Arial"COLOR=#000000><%=Server.HTMLEncode(rs.Fields("CustomerEveningPhone").Value)%><BR></FONT></TD><TD BORDERCOLOR=#c0c0c0 ><FONT style=FONT-SIZE:10pt FACE="Arial"COLOR=#000000><%=Server.HTMLEncode(rs.Fields("IssueDescription").Value)%><BR></FONT></TD>
226

P1: KPEWY044-08 WY044-Gosnell WY044-Gosnell-v2.cls August 16, 2004 8:40
Creating Reports and Web-Enabled Output
<TD BORDERCOLOR=#c0c0c0 ALIGN=RIGHT><FONT style=FONT-SIZE:10pt FACE="Arial"COLOR=#000000><%=Server.HTMLEncode(rs.Fields("Resolved").Value)%><BR></FONT></TD><TD BORDERCOLOR=#c0c0c0 ><FONT style=FONT-SIZE:10pt FACE="Arial"COLOR=#000000><%=Server.HTMLEncode(rs.Fields("ResolutionDescription").Value)%><BR></FONT></TD>
</TR><%rs.MoveNextloop%></TBODY><TFOOT></TFOOT></TABLE></BODY></HTML>
Notice in the previous ASP page that various VBScript commands create a recordset to retrieve thecurrent values from the tblComplaints table. Also, various HTML commands display the retrievedvalues to the user. It’s okay if you do not understand all the preceding commands. The exampledemonstrates that you can create ASP pages that dynamically retrieve data from your Access database. Italso shows that ASP pages must run from a Web server that supports ASP pages.
ASP pages can be opened from Notepad, Microsoft FrontPage, or other programs because it is a script filethat contains only text.
When you move the ASP page to a Web server and then access the ASP page from a client browser, yousee results similar to what is shown in Figure 8.6. The only difference is that the page is generated on thefly with current data instead of the prior static HTML format.
Creating Data Access PagesData access pages (DAP) are special types of files that can be accessed in a Web browser and that allow youto navigate through and modify data in Access and SQL Server databases. You can use Microsoft Accessto create, modify, and view data access pages. Like forms and reports, data access pages have a designview and a runtime view.
Data access pages can only be viewed from computers that have Internet Explorer 5.0 (or higher) andOffice Web Components installed.
Data access pages are stored as separate HTML files. You can link to them and view them from Access,and can even create and modify them from Access.
Creating Data Access Pages Using the OutputTo MethodThe following code uses the OutputTo method to export the tblComplaints table created earlier to adata access page.
DoCmd.OutputTo acOutputTable, "tblComplaints", acFormatDAP,"c:\temp\complaintsDAP.html"
227

P1: KPEWY044-08 WY044-Gosnell WY044-Gosnell-v2.cls August 16, 2004 8:40
Chapter 8
Note that the page is being saved in an HTML format. Data access pages are saved in an HTML formatbut contain additional code that connects to the Access or SQL Server database for retrieving andmodifying the data. Do not confuse this with the static HTML document that you created in one of theprior examples. The complaintsDAP.html file created from the preceding code looks similar to thescreen shown in Figure 8.7.
Figure 8.7
The data in Figure 8.7 can be edited within the grid. The data can be further manipulated using thebuttons along the bottom; they enable you to add new records and navigate among the records. As youwill see momentarily, data access pages can also resemble the look and feel of a traditional form, whereasthe example in Figure 8.7 more closely resembles a datasheet form.
Try It Out Creating a New Data Access Page from a FormAt this point, you will create a new data access page from a form. After creating the form itself, you willexport the form to the data access page using the OutputTo method. Now, let’s get started.
1. Create a new form based on the tblComplaints table using the Wizard. From the DatabaseWindow, select Forms, and then Create Form By Using Wizard. On the first screen of the wizard,select all fields in tblComplaints to add to the new form and click the Next button. SpecifyColumnar for the layout and click Next two more times. On the last screen of the wizard, specifythe name frmComplaints and click the Finish button. The form should look similar to thatshown in Figure 8.8.
2. Next, add the following procedure to your module.
228

P1: KPEWY044-08 WY044-Gosnell WY044-Gosnell-v2.cls August 16, 2004 8:40
Creating Reports and Web-Enabled Output
Figure 8.8
Sub OutputToDAP()
DoCmd.OutputTo acOutputForm, "frmComplaints", acFormatDAP,"c:\temp\frmcomplaintsDAP.html"
End Sub
3. Run the OutputToDAP procedure from the Immediate Window by typing the procedure nameand pressing Enter.
4. Navigate to your hard drive and locate the file that was just created. Double-click the file to openit. A screen similar to the one shown in Figure 8.9 will be displayed.
5. Modify some of the data from the data access page.
How It WorksFirst, you created a new form based on tblComplaints using a Wizard. This was just to save you time;you could also have created it from scratch. Next, you created the OutputToDAP procedure shown againin the following code. The OutputToDAP procedure uses the OutputTo method to output thefrmComplaints form to a data access page in a file called frmcomplaintsDAP.html.
Sub OutputToDAP()
DoCmd.OutputTo acOutputForm, "frmComplaints", acFormatDAP,"c:\temp\frmcomplaintsDAP.html"
End Sub
Next, you ran the new procedure from the Immediate Window to create the new data access page. Youthen opened the data access page in a Web browser and modified some of the data. If you go back in to
229

P1: KPEWY044-08 WY044-Gosnell WY044-Gosnell-v2.cls August 16, 2004 8:40
Chapter 8
Figure 8.9
the database and look at the tblComplaints table, you should see that the changes you made fromwithin the data access page in the browser were saved in the database.
Viewing and Modifying Data Access Pages from AccessBecause this is a book about VBA, I will not walk you through how to create new data access pages usingthe wizards and designers. If you are familiar with creating forms, you are also capable of creating newdata access pages using the designer. You can do so from the Pages section in the Database Window.However, I will now give you a quick example of how to link to existing data access pages from withinAccess so you can continue to work with them.
Try It Out Modifying Data Access Pages from AccessLet’s link to the data access page you created in the prior example and see what it looks like in designview.
1. Return to your database project and select Pages from the Database Window. Double-click theoption Edit Web page that already exists.
2. From the Locate Web Page dialog box that appears, navigate to the location on your hard drivewhere you saved the frmComplaintsDAP.html file and click Open. A screen similar to the oneshown in Figure 8.10 is displayed.
3. Close the page and you should see a screen similar to the one in Figure 8.11.
230

P1: KPEWY044-08 WY044-Gosnell WY044-Gosnell-v2.cls August 16, 2004 8:40
Creating Reports and Web-Enabled Output
Figure 8.10
Figure 8.11
How It WorksThis example showed that you can view and modify existing data access pages from the Pages section inthe Database Window, as shown in Figure 8.11. Data access pages have a designer similar to forms andreports, but they are actually stored in a separate file on your hard drive. They provide a way to turn youraccess database into an easily updatable format on the Web, as long as the client computers that accessthem have the necessary Office Web components installed.
231

P1: KPEWY044-08 WY044-Gosnell WY044-Gosnell-v2.cls August 16, 2004 8:40
Chapter 8
SummaryIn this chapter, you learned various ways to retrieve data programmatically from Access. You looked atseveral examples, such as creating new reports programmatically and exporting data to various Webformats. I hope you are beginning to see that there is much more to Access than just tables, forms, andreports. You have seen in this and prior chapters how to work with data in various sources, and toperform many advanced operations using VBA code.
I have talked a lot so far about SQL Server, but you have not seen any examples. The next chapter willfocus on building Access solutions that use SQL Server as the database. You will learn that Access hasmany features that make working with SQL Server databases much easier.
Exercises1. What is the difference between the CreateReport method and the CreateReportControl
method?
2. How do report events differ from form events?
3. What is the difference between static HTML pages, ASP pages, and data access pages?
232

P1: IML/FFX P2: IML/FFX QC: IML/FFX T1: IML
WY044-09 WY044-Gosnell WY044-Gosnell-v2.cls August 6, 2004 15:17
9Building SQL Server
Applications withAccess Projects
So far, all the examples in this book have dealt with standard Access database files (MDB files). AnAccess Project (ADP file) is another type of Access database file that is designed specifically forworking with SQL Server databases. In this chapter, you will explore how to create and manageSQL Server databases using Access Projects. You’ll learn how to create new Access Projects fromscratch and explore the various SQL Server objects that you can create and manage from the AccessProject, such as tables, stored procedures, views, and functions. You will also upsize an existingAccess database to SQL Server and provide guidelines for resolving any problems that occur duringthe migration.
This chapter focuses on using Access Projects to work with features that are specific to SQL Server,but it does not cover forms and modules. You still write forms and modules in Access Projects as youhave done in prior chapters.
Access Projects—Using Access as aFront End to SQL server
As a quick recap, you are already familiar with standard Access database files: the MDB files. TheMDB file is typically used in a standalone manner, meaning that all the tables, forms, modules,macros, and reports for the application are stored within the single file. In Chapter 7, you learnedthat it is also possible to use a standard Access MDB file in a client/server environment by linking toexternal database tables such as SQL Server. An example of a client/server architecture is shown inFigure 9.1, which illustrates a case where the user interface resides on the client and the databaseresides on the server.
When linking to a SQL Server database from a standard Access database, you can only workgraphically with SQL Server tables from the Access environment. You cannot view and modifystored procedures, views, and functions from within the Access environment.

P1: IML/FFX P2: IML/FFX QC: IML/FFX T1: IML
WY044-09 WY044-Gosnell WY044-Gosnell-v2.cls August 6, 2004 15:17
Chapter 9
Client-Server Architecture
ServerWorkstations
Application (UserInterface, Business Logic)
Database (andpossibly somebusiness logic)
Data
Figure 9.1
Access Projects are a special type of Access file designed to work specifically with SQL Server databases.Access Projects provide you with additional graphical tools for manipulating various SQL Serverobjects—not just the tables. When you are designing client/server applications that use SQL Server as thedatabase, you should consider using an Access Project instead of a standard database so that you willhave these additional design features.
The following table shows where the various objects that you can see from within the Access Project areactually stored.
Object Location Comments
Tables SQL Server SQL Server uses different data types.
Queries SQL Server These can be stored as stored procedures,views, or functions.
Database Diagrams SQL Server
Forms Access file
Reports Access file
Pages HTML files Data access pages are stored in separate files.
Macros Access file
Modules Access file
Setting Up SQL ServerNow that you are aware that you can use Access Projects to work with SQL Server databases, I will take amoment to cover the different versions of SQL Server and explain how to install SQL Server. You mustinstall one of the versions of SQL Server in order to perform the examples used throughout this chapter.
234

P1: IML/FFX P2: IML/FFX QC: IML/FFX T1: IML
WY044-09 WY044-Gosnell WY044-Gosnell-v2.cls August 6, 2004 15:17
Building SQL Server Applications with Access Projects
SQL Server VersionsAs you are probably aware by now, Microsoft SQL Server is a relational database management system forstoring, analyzing, and reporting data. Currently, seven versions of Microsoft SQL Server are availablewith SQL Server 2000, and the same or similar versions will probably be available when SQL Server 2005is released. Each is briefly described here:
❑ SQL Server 2000 Enterprise Edition—This is the most comprehensive version of SQL Server 2000and supports all the SQL Server 2000 features. This version is most appropriate for largeorganizations that are required to manage immense amounts of data quickly and efficiently.
❑ SQL Server 2000 Standard Edition—This version of SQL Server 2000 supports many of theavailable features, but doesn’t support the features that enable management of immense amountsof data quickly and efficiently. This version is primarily for small- or medium-sized organizationsthat do not have the complex database requirements of a large organization. SQL Server 2000Standard Edition is still an extremely powerful version of SQL Server and supports AnalysisServices (with a few exceptions), Replication, Full-Text Search, Data Transformation Services,English Query, and other advanced SQL Server features.
❑ SQL Server 2000 Personal Edition—This version of SQL Server 2000 supports basically thesame features as the Standard Edition, with the exception of transactional replication.Additionally, Analysis Services and Full-Text Search are only available on certain operatingsystems with this edition. This version is most appropriate for users who need SQL Server dataon their local machine while they are disconnected from the network. A common examplewould be mobile users—like members of a sales force who need their data while they are out inthe field. This version limits the number of concurrent database activities that can be running atonce. This simply means that this edition isn’t designed to handle lots of users or databaseactivities.
❑ SQL Server 2000 Windows CE Edition—This version of SQL Server 2000 runs on mobiledevices—Windows CE. This compact version of SQL Server 2000 allows relational databases tobe stored and managed on Windows CE devices for later synchronization. Plus, it gives usersthe capability to manage a SQL Server database remotely over the Internet from their CEdevices.
❑ SQL Server 2000 Developer Edition—This version of SQL Server 2000 supports all the availablefeatures (just like the Enterprise Edition), except it prohibits deployment on production servers.This version is designed for developers, consultants, and solution providers to use whiledeveloping and testing their applications.
❑ SQL Server 2000 Evaluation Edition—This version is a fully functional version of SQL Server2000 Enterprise Edition, but it will stop working after 120 days. It is available as a free trial to giveorganizations a chance to try out SQL Server 2000 Enterprise Edition before purchasing it.
❑ SQL Server 2000 Desktop Engine (also called MSDE)—This version is a free and redistributableversion of the SQL Server database engine. This means that you can include it in your setupprograms for applications that use SQL Server to store data. The Desktop Engine doesn’t includeany of the SQL Server 2000 graphical user interface tools. Thus, other products (such as Access orSQL Server 2000 APIs) must be used to manage data stored in this version of SQL Server.
SQL Server 2000 Desktop Engine (MSDE) is not the same version as the SQL Server 7 Desktop Edition.The SQL Server 7 Desktop Edition became the Personal Edition in SQL Server 2000. The SQL Server2000 Desktop Engine was called the Microsoft Data Engine, or MSDE, in SQL Server 7.
235

P1: IML/FFX P2: IML/FFX QC: IML/FFX T1: IML
WY044-09 WY044-Gosnell WY044-Gosnell-v2.cls August 6, 2004 15:17
Chapter 9
Obtaining and Installing SQL Server Desktop EngineIf you do not have SQL Server already installed, you should obtain a copy. You have a couple of optionsto get it up and running. You can download or order a free trial version of SQL Server (that expires after atrial period) from Microsoft. Another option is to install the SQL Server Desktop Engine (MSDE) versionof SQL Server, which is free. The setup program for the Desktop Engine is on the Microsoft Office CDs, asI will explain momentarily.
The Benefits of SQL Server Desktop EngineYou may be wondering why Microsoft would offer a free version of SQL Server. Desktop Engine wasintroduced by Microsoft to bridge the gap between Microsoft Access and Microsoft SQL Server. A largesegment of existing applications use Microsoft Access as both the front end and the database platform. Asthose applications become increasingly popular, they start outgrowing the capabilities of Access. Manypeople may find themselves modifying code to port the applications to a SQL Server database. This canbe a monumental task in many instances, with several data-type and SQL syntax differences.
Desktop Engine is actually a small-scale version of SQL Server: It has a 2 Gig limitation and cannot havemore than five concurrent users or transactions hitting the database at once. If your application does notneed the capability to handle large database sizes or many users, the Desktop Engine version of SQLServer is a good choice. Some exceptions to this free licensing rule can be found in the licensing agreementthat accompanies Desktop Engine and other versions of SQL Server. For example, under the terms of thatagreement, if Desktop Engine is connecting to another SQL Server Database and is acting as the client,you must purchase a client access license for communicating with that other SQL Server Database.
Desktop Engine allows companies to create demo CDs of their products much more easily. In the past,many companies had to write an Access version of their SQL Server application to include on the demoCD so they would not violate the licensing agreement of SQL Server. Alternatively, they included links orfiles to download trial versions of SQL Server in order for their demo to work. Because Desktop Engine isa free distribution version of SQL Server, you can now easily create demo CDs for demonstrationpurposes without rewriting any code.
The biggest advantage of using Desktop Engine is that you don’t have to make any modifications to yourcode (SQL statements, table structures, and so on) when you upsize later because of database size orconcurrent users. You just purchase the more powerful version of SQL Server and import the priordatabase to the new installation without modification. Thus, when your application becomes extremelypopular and needs the power of the higher, nonfree versions of SQL Server, you will be ready.
Installing SQL Server Desktop EngineYou can obtain the setup program for Desktop Engine/MSDE from many sources. Probably the best placefor you to obtain the program is from the Microsoft Office CD. You can also find it on Visual Studio andSQL Server CDs. The following example walks you through installing MSDE from the Microsoft Office2003 CD.
1. Launch the MSDE Setup Program. Insert the CD containing the Desktop Engine Setup Programand navigate to the Desktop Engine install folder using Windows Explorer. You should find theDesktop Engine setup program in this location: D:\MSDE2000\ MSDE2ks3.exe (where D: is thename of your CD-ROM drive). From the install folder, double-click on the setup program tolaunch the Desktop setup program. You may be prompted to update some files on your systembefore setup can continue. If so, follow the prompts on the screen to update your system with the
236

P1: IML/FFX P2: IML/FFX QC: IML/FFX T1: IML
WY044-09 WY044-Gosnell WY044-Gosnell-v2.cls August 6, 2004 15:17
Building SQL Server Applications with Access Projects
necessary files. This may require that you reboot your machine and restart the setup programagain.
2. The Windows Installer or some other such program will flash for a few seconds to let you knowthat it is launching the setup program. After you double-click on the setup program, it shouldjust automatically install Desktop Engine with all the default settings. If any prompts appear onthe screen, follow the instructions to complete the setup.
3. Go ahead and start the Service Manager program that was just installed. You should find it inStart ➪ Programs ➪ Microsoft SQL Server ➪ Service Manager. After the program is running, youshould see a server icon in the bottom right taskbar.
Now that you have successfully installed the SQL Server Desktop Engine, take a look at what actually gotinstalled.
Understanding What Was InstalledThree services are installed with SQL Server Desktop Engine: SQL Server Service Manager, SQL ServerAgent, and Distributed Transaction Coordinator.
Figure 9.2
The SQL Server Service Manager Utility is installed with Desktop Engine to enable you to manage thesethree services. The SQL Server Service Manager window shown in Figure 9.2 displays the settings forServer, Services, and the status of the Service that is selected. The Server and Services fields havedrop-down lists to allow you to choose from those available. So, the Server drop-down, for example,contains all the SQL Server instances of which this particular computer is aware. The Services drop-downcontains choices for SQL Server, SQL Server Agent, and Distributed Transaction Coordinator.
The buttons for Start/Continue, Pause, and Stop are enabled or disabled as appropriate, based on thecurrent status. Figure 9.3 shows the status of the SQL Server Service, with Pause and Stop disabled.
If you select the Start/Continue button, the SQL Server Service starts running (Figure 9.4).
237

P1: IML/FFX P2: IML/FFX QC: IML/FFX T1: IML
WY044-09 WY044-Gosnell WY044-Gosnell-v2.cls August 6, 2004 15:17
Chapter 9
Figure 9.3
Figure 9.4
The SQL Server Service is the core of Desktop Engine and all other versions of SQL Server, for that matter.It consists of the SQL Server storage engine and the query processor. The storage engine is responsible forreading and writing the data to the database, and the query processor is responsible for receiving andexecuting SQL statements. The SQL Server Service must be running in order for data to be retrieved,inserted, updated, or deleted from Desktop Engine. The default installation of Desktop Engine sets thisservice to automatically run on startup of the computer where Desktop Engine is installed.
The SQL Server Service shown in Figure 9.4 is running on a server called Goz_Tablet1100 and a databaseinstance called SQLDEV. Notice how the indicator to auto-start the service when the OS starts is checked.This means that the SQL Server Service will start any time the operating system boots. It is a good idea tohave this setting turned on for the SQL Server Service so that database inserts, updates, deletes, reads,and so on will be allowed automatically. User intervention is not required to manually start the serviceeach time.
238

P1: IML/FFX P2: IML/FFX QC: IML/FFX T1: IML
WY044-09 WY044-Gosnell WY044-Gosnell-v2.cls August 6, 2004 15:17
Building SQL Server Applications with Access Projects
The SQL Server Agent is another service installed with Desktop Engine. SQL Server Agent is a service thatallows you to schedule jobs and alerts for your database. For example, suppose you want to create a jobto run each night to perform a database backup. The SQL Server Agent enables you to schedule this job torun on that schedule. As long as the SQL Server Agent is running, it will take responsibility for runningthe scheduled jobs or reporting any problems encountered when running them. This service is notrequired for using a Desktop Engine database, but it can certainly be a useful service.
The final service installed with Desktop Engine is the Distributed Transaction Coordinator (DTC). The DTCservice allows transactions to span more than one computer across a network using a two-phase commit.DTC is beyond the scope of this chapter, but it is worth mentioning so you are aware it exists.
These examples illustrate how easy it is to manage the three services that are installed with DesktopEngine by using the SQL Server Service Manager utility. Now that I have covered the basics of setting upDesktop Engine and starting and stopping the services, let’s return to the discussion of using AccessProjects to work with SQL Server databases.
Creating Access Projects (ADPs)Now that you have SQL Server installed, you can return to the discussion of using Access Projects towork with SQL Server databases. To create a new Access Project for a SQL Server database, you firstselect File ➪ New. You can then select one of the two options circled in Figure 9.5.
Figure 9.5
Selecting the Project Using Existing Data option will allow you to create a new Access Project using anexisting SQL Server database. Selecting the Project Using New Data option will create a new AccessProject and a new SQL Server database. You will now look at each of these options in detail.
Using an Existing SQL Server DatabaseTo create a new Access Project based upon an existing SQL Server database, select File ➪ New and thenselect the Project Using Existing Data option. A screen similar to the one in Figure 9.6 is displayed.
239

P1: IML/FFX P2: IML/FFX QC: IML/FFX T1: IML
WY044-09 WY044-Gosnell WY044-Gosnell-v2.cls August 6, 2004 15:17
Chapter 9
Figure 9.6
After specifying the name for the Access Project, click the Create button. You are then prompted (asshown in Figure 9.7) to specify details necessary to connect to your SQL Server database.
In the example of Figure 9.7, a database called pubs on the goz_tablet1100\sqldev server is being used.The option to use integrated Windows security is checked, so no SQL Server username or password hasto be filled in.
If you have trouble connecting to SQL Server using integrated Windows security, try specifying ausername of sa and a blank password, which may have been installed by default.
You can click the Test Connection button to test the connection to make sure it works. You can create thenew Access Project based on this database by clicking OK. The new Access Project will be similar to thescreen shown in Figure 9.8.
Using a New SQL Server DatabaseLet’s now take a look at how to create a new Access Project based on a new SQL Server database. Foryour convenience, I included a text file for download from Wrox.com that contains the code for the SQLServer objects created in the following Try It Out sections.
240

P1: IML/FFX P2: IML/FFX QC: IML/FFX T1: IML
WY044-09 WY044-Gosnell WY044-Gosnell-v2.cls August 6, 2004 15:17
Building SQL Server Applications with Access Projects
Figure 9.7
Try It Out Creating an Access Project Using a New SQL Server Database
1. Select File ➪ New ➪ Project Using New Data. A screen similar to the prior Figure 9.6 isdisplayed where you can specify the name of the Access Project. Specify Ch9CodeExamples forthe filename and click Create. A screen similar to the one shown in Figure 9.9 then appears.
2. Specify the name of your SQL Server instance, or select one from the list. Specify whether to usea Trusted Connection or a specific SQL Server login account, depending on how security for yourSQL Server instance is set up. Also, specify the name for the new SQL Server database asCh9CodeExamplesSQL. Click the Next button.
3. A screen similar to Figure 9.10 will appear. Click the Finish button to create the new SQL Serverdatabase.
How It WorksThe wizard walked you through the steps of creating a new Access Project and a new SQL Serverdatabase. The end result of performing the preceding steps is that you now have an Access Project(Ch9CodeExamples.ADP) on your hard drive, and you have a new database called.
241

P1: IML/FFX P2: IML/FFX QC: IML/FFX T1: IML
WY044-09 WY044-Gosnell WY044-Gosnell-v2.cls August 6, 2004 15:17
Chapter 9
Figure 9.8
Figure 9.9
242

P1: IML/FFX P2: IML/FFX QC: IML/FFX T1: IML
WY044-09 WY044-Gosnell WY044-Gosnell-v2.cls August 6, 2004 15:17
Building SQL Server Applications with Access Projects
Ch9CodeExamplesSQL in your SQL Server database. At this point, the SQL Server database and AccessProject are both empty. Let’s look at some examples of how to work with SQL Server objects from withinAccess so your project will not remain empty.
Figure 9.10
Working with SQL Server Objects from AccessThe advantage of using an Access Project to work with SQL Server is that you can use various graphicaldesigner tools from within Access to manipulate SQL Server objects. For example, you can view andcreate SQL Server tables, stored procedures, views, and functions. You’ll look at each of these in detail inthe sections that follow.
SQL Server TablesYou can view and manage SQL Server tables from the Tables node of the Database Window in yourAccess Project. Figure 9.11 is an example of a SQL Server table opened from within Access.
From looking at the data in Figure 9.11, you would not know that it physically resides in a SQL Serverdatabase. This screen looks very similar to the other screens you have seen before with local Accesstables. Now, if you open a SQL Server table in design view, a screen similar to the one shown inFigure 9.12 appears.
The table designer is a bit different from the one you have worked with before. Notice how someadditional columns for Length and Allow Nulls have been added. SQL Server also has some data typesother than the standard Access tables.
243

P1: IML/FFX P2: IML/FFX QC: IML/FFX T1: IML
WY044-09 WY044-Gosnell WY044-Gosnell-v2.cls August 6, 2004 15:17
Chapter 9
Figure 9.11
Figure 9.12
244

P1: IML/FFX P2: IML/FFX QC: IML/FFX T1: IML
WY044-09 WY044-Gosnell WY044-Gosnell-v2.cls August 6, 2004 15:17
Building SQL Server Applications with Access Projects
Try It Out Creating a New SQL Server TableIt’s your turn to try your hand at creating a new SQL Server table.
1. Create a new table, named tblProducts. To do so, select the Tables node of the DatabaseWindow and click the Create Table In Design View option. Fill in the table elements as shown inFigure 9.13.
Figure 9.13
2. After adding all the table columns and their respective data types, set the ProductId to be theprimary key. To set the primary key, select the ProductId field, right-click, and select thePrimary Key option in the pop-up list.
3. Now, add some data to the table, such as that shown in Figure 9.14.
How It WorksThe preceding example illustrates how to create a new table from the Access table designer thatphysically resides in the SQL Server database. You will now learn how to create stored procedures.
245

P1: IML/FFX P2: IML/FFX QC: IML/FFX T1: IML
WY044-09 WY044-Gosnell WY044-Gosnell-v2.cls August 6, 2004 15:17
Chapter 9
Figure 9.14
SQL Server Stored ProceduresStored procedures are procedures that are stored in the SQL Server database. Their purpose is to enableyou to take frequently used SQL statements and save them for reuse. You can then execute a storedprocedure when you need it. A stored procedure is similar in concept to the VBA procedures and SQLstatements you have written so far in this book. However, stored procedures (stored in the SQL Serverdatabase) are more efficient than passing SQL statements to the database on the fly because they areprecompiled.
Figure 9.15
246

P1: IML/FFX P2: IML/FFX QC: IML/FFX T1: IML
WY044-09 WY044-Gosnell WY044-Gosnell-v2.cls August 6, 2004 15:17
Building SQL Server Applications with Access Projects
You can view stored procedures from the Queries node in the Database Window. In fact, the Queriesnode will display all stored procedures, views, and functions that are stored in the SQL Server database.Figure 9.15 illustrates several stored procedures, as well as one view called titleview.
When you open the byroyalty stored procedure in Figure 9.15, a designer window like the one shownin Figure 9.16 appears.
Figure 9.16
Notice how a table is displayed as well as a grid showing the columns to be output when the storedprocedure executes. You can view the SQL code for the stored procedure by selecting View ➪ SQLView; ascreen similar to the one shown Figure 9.17 will appear.
Figure 9.17
In the example of Figure 9.17, the stored procedure accepts a parameter called @percentage. When youcall the stored procedure from VBA code, you must specify the parameter. You might call the storedprocedure using the following code:
Dim cmdCommand As ADODB.CommandDim prmPercent As ADODB.Parameter
'Create a new command objectSet cmdCommand = New ADODB.Command
247

P1: IML/FFX P2: IML/FFX QC: IML/FFX T1: IML
WY044-09 WY044-Gosnell WY044-Gosnell-v2.cls August 6, 2004 15:17
Chapter 9
cmdCommand.ActiveConnection = CurrentProject.ActiveConnection
'Specify the stored procedure to runcmdCommand.CommandType = adCmdStoredProccmdCommand.CommandText = "byroyalty"
'Create the percentage parameterSet prmPercent = cmdCommand.CreateParameter("@percentage", adInteger,adParamInput)prmPercent.Value = 100cmdCommand.Parameters.Append prmPercent
'execute the Stored ProcedurecmdCommand.Execute
In the preceding example, notice how the ADO Command object is used to specify that a stored procedureshould be executed. The ADO Parameter object is used to specify the parameters that should be passedto the stored procedure. The Execute method of the Command object is then executed to run the storedprocedure.
Try It Out Creating a New SQL Server Stored ProcedureLet’s create a new stored procedure in your Ch9CodeExamples Access Project.
1. From the Database Window, select the Queries node and then select the Create StoredProcedureIn Designer option.
2. Select the Add button on the Add Table window to add tblProducts. Click the Close button.
3. Fill in the columns and values as shown in Figure 9.18. The stored procedure outputs all but thediscontinued column based on criteria where discontinued equals 1.
4. Save the stored procedure and name it spDiscontinuedProducts.
5. Select View ➪ SQL View to see the SQL statement for the procedure. A screen similar to the oneshown in Figure 9.19 is displayed.
6. To run the stored procedure, select the View icon on the toolbar. A screen similar to the oneshown in Figure 9.20 is displayed.
How It WorksIn this example, you created a new stored procedure using the Access designer to specify the criteria forthe procedure. You then viewed the SQL statement that Access created automatically from the criteriaspecified in the designer. You could have alternatively started with the SQL statement and Access wouldhave generated the table and grid elements automatically from the SQL statement. You will see how tocreate a view in this manner momentarily.
SQL Server ViewsViews are virtual tables that allow you to view information in a different way than you see it in theunderlying tables. They are really just queries that have been saved to the SQL Server database that canbe accessed in the same way as you would a table—only by specifying the view name instead of the table
248

P1: IML/FFX P2: IML/FFX QC: IML/FFX T1: IML
WY044-09 WY044-Gosnell WY044-Gosnell-v2.cls August 6, 2004 15:17
Building SQL Server Applications with Access Projects
Figure 9.18
Figure 9.19
Figure 9.20
name. The capability to create an easily retrievable virtual table out of your most commonly used SQLstatements is one advantage to using views.
Another advantage of views is that they provide the capability to implement row- and column-levelsecurity. Row-level security means restricting the values that a particular user can see down to the recordlevel. Column-level security means restricting which fields a user can see. A common example ofrow-level security is the case where an employee can see his own personal information but not anyone
249

P1: IML/FFX P2: IML/FFX QC: IML/FFX T1: IML
WY044-09 WY044-Gosnell WY044-Gosnell-v2.cls August 6, 2004 15:17
Chapter 9
else’s. A common example of column-level security is a case where no one outside of the PersonnelDepartment is permitted to see any columns that contain personal information, such as salary, butemployees can see the non-personal information, such as job title.
Figure 9.21 illustrates the design view that retrieves data from multiple tables in a database.
Figure 9.21
To view all three portions of the display shown in Figure 9.21, you must first enable the Diagram, Grid,and SQL statement icons on the toolbar.
After a view has been created, you can reference it in all the places where you could otherwise use a table.For example, you could have an ADO recordset that is based on a SQL statement such as the following:
SELECT * FROM titleview
250

P1: IML/FFX P2: IML/FFX QC: IML/FFX T1: IML
WY044-09 WY044-Gosnell WY044-Gosnell-v2.cls August 6, 2004 15:17
Building SQL Server Applications with Access Projects
The previous SQL statement causes the SQL behind the view (as shown in Figure 9.21) to run and toreturn the various columns selected. The view of Figure 9.21 will be similar to the screen shown inFigure 9.22 if opened in view mode from within Access.
Figure 9.22
Try It Out Creating a New ViewIt’s your turn to create a view.
1. From the Database Window, select Queries ➪ Create View In Designer. Select the Close button toclose the Add Tables dialog. Select the SQL button on the toolbar to ensure that the SQL view isdisplayed. Add the following SQL statement:
SELECT ProductName, ProductDesc, UnitPriceFROM dbo.tblProducts
2. Select the Save button on the toolbar to save the view and name it vwProductPrice. Close andreopen the view in design view. Notice that from the SQL statement you typed that Accessdetermines and displays the table diagram and column grid that corresponds to the SQLstatement, as shown in Figure 9.23.
3. Select the Save button on the toolbar to save the view. Name the view vwProductPrice.
4. Select the View button on the toolbar to execute the view. A screen similar to that shown inFigure 9.24 is displayed to show you the result of running the SQL statement behind the view.
Do not confuse the View button on the toolbar with the concept of a view. The View button on the toolbarallows you to open various objects, including stored procedures, tables, and views to see the data. This is adifferent concept than a view itself.
How It WorksIn the preceding example, you created a new view by starting with a SQL statement. Microsoft Accessthen updated the designer to display the table and grid to graphically represent the SQL statement. TheSQL statement selects the ProductName, ProductDesc, and UnitPrice fields from the tblProductstable.
251

P1: IML/FFX P2: IML/FFX QC: IML/FFX T1: IML
WY044-09 WY044-Gosnell WY044-Gosnell-v2.cls August 6, 2004 15:17
Chapter 9
Figure 9.23
Figure 9.24
SQL Server FunctionsSQL Server comes with many built-in functions such as RTrim, GetDate, and many others. You can alsocreate user-defined functions and call those functions as if they were built-in functions of SQL Server.User-defined functions can return a single value, such as the result of a calculation, or they can return anentire table of results.
252

P1: IML/FFX P2: IML/FFX QC: IML/FFX T1: IML
WY044-09 WY044-Gosnell WY044-Gosnell-v2.cls August 6, 2004 15:17
Building SQL Server Applications with Access Projects
You may be wondering how functions differ from stored procedures. User-defined functions have a lot incommon with stored procedures because both are just SQL statements stored on the SQL Server.However, a user-defined function, unlike a stored procedure, can be embedded within a basic SQLstatement, such as the following:
SELECT FormatDescription(ProductDesc) FROM tblProducts
In this instance, the function is called FormatDescription and will be called for each record selected inthe SQL statement. If this code were contained in a stored procedure, a loop would have to be executed tocall the stored procedure for each record.
When you open the designer from Access to add a Function, the Add Table dialog box appears, as shownin Figure 9.25. In this example, the function is based on the vwProductPrice view that you created in theprior example.
Figure 9.25
A designer similar to the other designers you have seen so far appears, as shown in Figure 9.26. In thisexample, the function will select the products that have a unit price greater than $500.
When you run the preceding function, all products that are greater than $500 are displayed, as shown inFigure 9.27.
At this point, you do not have to be an expert on determining when to use SQL Server stored procedures,view, or functions. It is a complicated topic that is beyond the scope of this introductory chapter.However, if you want to see more examples of how to use stored procedures, views, and functions inyour applications, please consult the comprehensive case study in Chapter 13 that uses an Access Projectwith a SQL Server database.
253
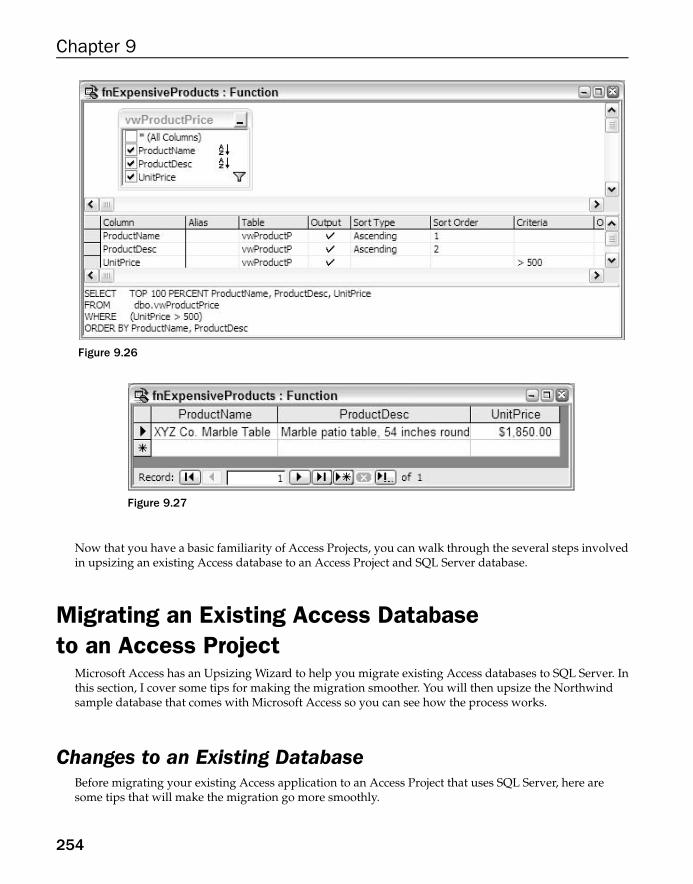
P1: IML/FFX P2: IML/FFX QC: IML/FFX T1: IML
WY044-09 WY044-Gosnell WY044-Gosnell-v2.cls August 6, 2004 15:17
Chapter 9
Figure 9.26
Figure 9.27
Now that you have a basic familiarity of Access Projects, you can walk through the several steps involvedin upsizing an existing Access database to an Access Project and SQL Server database.
Migrating an Existing Access Databaseto an Access Project
Microsoft Access has an Upsizing Wizard to help you migrate existing Access databases to SQL Server. Inthis section, I cover some tips for making the migration smoother. You will then upsize the Northwindsample database that comes with Microsoft Access so you can see how the process works.
Changes to an Existing DatabaseBefore migrating your existing Access application to an Access Project that uses SQL Server, here aresome tips that will make the migration go more smoothly.
254

P1: IML/FFX P2: IML/FFX QC: IML/FFX T1: IML
WY044-09 WY044-Gosnell WY044-Gosnell-v2.cls August 6, 2004 15:17
Building SQL Server Applications with Access Projects
❑ Consider removing any spaces in your table names and, of course, if you change the name, alsochange all the places that reference the table name. If you do not remove them, you will later haveto use brackets to refer to SQL Server tables with spaces in their names (for example, [TableName]).
❑ Make sure that each table has a unique index. If you have established primary keys, that shouldbe sufficient.
❑ Make a backup copy of the MDB file in case things go wrong.
❑ Check the dates in your Access tables. Most problems with upsizing occur with date conversions.For example, Access and SQL Server have different date ranges that are acceptable. SQL Servercovers only the period from Jan 1, 1973 to Dec 31, 9999. Access allows dates in the range from Jan1, 100 to Dec 31, 9999.
With these tips in mind, let’s walk through using the Upsizing Wizard to see how this works.
Using the Upsizing WizardAs previously mentioned, you can use the Upsizing Wizard to convert an existing Access database to anAccess Project for the client and SQL Server for the database. You’ll walk through the numerous stepsinvolved in this process to upsize the sample Northwind database to a SQL Server database.
1. Open the database you want to upsize, which in this example is the Northwind database in theSamples directory of Office. Then, to start the Wizard, select Tools ➪ Database Utilities ➪Upsizing Wizard. A screen similar to that shown in Figure 9.28 will appear.
Figure 9.28
255

P1: IML/FFX P2: IML/FFX QC: IML/FFX T1: IML
WY044-09 WY044-Gosnell WY044-Gosnell-v2.cls August 6, 2004 15:17
Chapter 9
2. Select the option Create New Database and click the Next button.
3. A screen similar to the one shown in Figure 9.29 appears next. Specify the SQL Server instancethat should hold the new database. Also, fill in the security information, such as whether to use atrusted connection or a login and password. Then, provide the name of the new SQL Serverdatabase. Click Next.
4. As shown in Figure 9.30, you are then prompted to specify which tables to upsize. Figure 9.30has selected all tables in the database, and they appear in the Export to SQL Server area of thescreen. After selecting the tables to be upsized, click the Next button.
5. A screen similar to Figure 9.31 appears, allowing you to specify which table attributes to upsize.Select the options that you want included and click Next.
6. A screen, like the one shown in Figure 9.32, allows you to specify the name of the new AccessProject file that should store the client user interface and business logic. After specifying the ADPfile name, click Next.
7. The final screen of the Wizard as shown in Figure 9.33 allows you to specify whether to open thenew ADP file or keep the MDB file open. After selecting your preference, click the Finish button.
8. The Upsizing Wizard then displays a progress bar and works its way through each object in thedatabase that is being converted. If an error is encountered, a screen similar to Figure 9.34 will bedisplayed.
9. In the particular example shown in Figure 9.34, an error was encountered when converting theSales Data Access page because of a data type conversion problem.
Figure 9.29
256

P1: IML/FFX P2: IML/FFX QC: IML/FFX T1: IML
WY044-09 WY044-Gosnell WY044-Gosnell-v2.cls August 6, 2004 15:17
Building SQL Server Applications with Access Projects
Figure 9.30
Figure 9.31
257

P1: IML/FFX P2: IML/FFX QC: IML/FFX T1: IML
WY044-09 WY044-Gosnell WY044-Gosnell-v2.cls August 6, 2004 15:17
Chapter 9
Figure 9.32
Figure 9.33
258

P1: IML/FFX P2: IML/FFX QC: IML/FFX T1: IML
WY044-09 WY044-Gosnell WY044-Gosnell-v2.cls August 6, 2004 15:17
Building SQL Server Applications with Access Projects
Figure 9.34
10. As shown in Figure 9.35, a report is displayed when the Upsizing Wizard completes. The reportprovides numerous details about exactly which objects were upsized, any errors that wereencountered, and so on.
11. Figure 9.36 shows an example of a table that was upsized to SQL Server and illustrates how thedata types were changed from Access data types to the equivalent SQL Server data types.
12. Figure 9.37 illustrates the fact that the existing Queries were converted to stored procedures,functions, and views depending on their purposes.
13. Figure 9.38 illustrates errors that occurred in upsizing two different queries. Any errors thatprevent Access from upsizing certain elements will need to be corrected by using the correct SQLServer syntax. Even if Access could successfully upsize the query, you should review the queryto make sure the modification still serves the intended purpose.
259

P1: IML/FFX P2: IML/FFX QC: IML/FFX T1: IML
WY044-09 WY044-Gosnell WY044-Gosnell-v2.cls August 6, 2004 15:17
Chapter 9
Figure 9.35
14. After the upsizing is completed, the new Access Project is displayed, as shown in Figure 9.39. Ifyou had instead selected the option to keep the existing MDB open, that database would havebeen displayed instead.
15. If you navigate to the Queries objects in the Database Window, you can see that the previousqueries were upsized to various stored procedures, views, and functions. This is illustrated inFigure 9.40.
After the database has been upsized, you must correct any errors that were encountered and retest thefunctionality of the database to ensure that the objects were converted correctly. After these issues havebeen resolved and the application has been tested, you are ready to let your users work with your newSQL Server application from the Access Project.
260

P1: IML/FFX P2: IML/FFX QC: IML/FFX T1: IML
WY044-09 WY044-Gosnell WY044-Gosnell-v2.cls August 6, 2004 15:17
Building SQL Server Applications with Access Projects
Figure 9.36
SummaryIn this chapter, you explored how to use Access Projects to work with SQL Server databases. SQL Serveris a very powerful enterprise database tool that should be used for more sophisticated applications. Youcan start with a free version of SQL Server called SQL Server Desktop Engine if you want to write yourAccess application using SQL Server to begin with. If you do so, you will not have to make extensivechanges at a later date when your application has become successful and must be migrated to a more
261

P1: IML/FFX P2: IML/FFX QC: IML/FFX T1: IML
WY044-09 WY044-Gosnell WY044-Gosnell-v2.cls August 6, 2004 15:17
Chapter 9
Figure 9.37
powerful database than Access. Access Projects allow you to create client/server applications withAccess as the front end and SQL Server as the database. Access includes an Upsizing Wizard to helpyou transition an existing Access database to SQL Server. If you want more information on usingAccess Projects to work with SQL Server databases, please consult the comprehensive case study inChapter 13.
262

P1: IML/FFX P2: IML/FFX QC: IML/FFX T1: IML
WY044-09 WY044-Gosnell WY044-Gosnell-v2.cls August 6, 2004 15:17
Building SQL Server Applications with Access Projects
Figure 9.38
Figure 9.39
In prior chapters, you have learned how to create code in VBA, such as code that executes when certainevents happen. You have also learned how to retrieve and export data from databases in various formats.In this chapter, you expanded your knowledge of working with other data sources by learning aboutAccess Projects and SQL Server. In the next chapter, I will cover some advanced techniques to use in yourAccess applications.
263

P1: IML/FFX P2: IML/FFX QC: IML/FFX T1: IML
WY044-09 WY044-Gosnell WY044-Gosnell-v2.cls August 6, 2004 15:17
Chapter 9
Figure 9.40
Exercises1. What is the difference between a standard Access database (MDB file) and an Access Project
(ADP file)?
2. What are some advantages of using SQL Server for your applications now instead of waiting tomigrate later?
3. What are stored procedures, views, and functions? How do you view them from Access Projects?
264

P1: IML/FFX P2: IML/FFX QC: IML/FFX T1: IML
WY044-10 WY044-Gosnell WY044-Gosnell-v2.cls August 16, 2004 8:44
10Advanced Access Programming
We covered a lot of ground in prior chapters exploring how to use VBA to extend your Accessapplications. This chapter will discuss some advanced programming techniques, but it is not meantto provide exhaustive coverage. This chapter introduces the following techniques:
❑ Declaring and using standard and external DLLs
❑ Using automation to control Excel, Word, and Outlook from your Access applications
❑ Adding ActiveX controls to your forms
❑ Creating custom code libraries
❑ Using add-ins
❑ Implementing transactions in your code
For your convenience, I included the database file and code generated during this chapter fordownload from Wrox.com.
Using Dynamic Link Libraries (DLLs)Dynamic Link Libraries (DLLs) are simply compiled code libraries. You already used a DLL whenadding a reference to the ADO library (Chapter 5) so that you could work with the ADO objectmodel and the properties, methods, and events for the objects it contains. In this section, you willlook at another example of how to use a standard DLL by just adding a reference in your project.You will also look at how to manually declare an external DLL and use it within your code.
Standard DLLsYou can reference libraries such as DLLs by selecting Tools ➪ References from the Visual BasicEditor and then selecting the particular library that you want to work with. After a reference hasbeen added, you can then manipulate the functionality contained in the library from within yourVBA code.

P1: IML/FFX P2: IML/FFX QC: IML/FFX T1: IML
WY044-10 WY044-Gosnell WY044-Gosnell-v2.cls August 16, 2004 8:44
Chapter 10
Try It Out Using the Microsoft Office Object Library to Create a CustomCommand Bar
Let’s look at an example of creating custom command bars for your application using the Microsoft Office11.0 Object Library. The CommandBars property of the Application object allows you to access theCommandBars collection. The CommandBars collection enables you to manage and create toolbars,menu bars, and shortcut menus.
1. Create a new database. Select File ➪ New ➪ Blank Database. Name the databaseCh10CodeExamples and click the Create button.
2. Set a reference to Microsoft Office 11.0 Object Library in the References dialog box, if one is notalready set. From the Visual Basic Editor, select Tools ➪ References and scroll down the list.Select Microsoft Office 11.0 Object Library, as shown in Figure 10.1. Click the OK button to addthe reference.
Figure 10.1
3. Add a new module to your database.
4. Add the following procedures to your module:
Sub CreateCommandBar()
Dim cbReport As CommandBarDim btnButton As CommandBarButton
266

P1: IML/FFX P2: IML/FFX QC: IML/FFX T1: IML
WY044-10 WY044-Gosnell WY044-Gosnell-v2.cls August 16, 2004 8:44
Advanced Access Programming
'delete the command bar and if it does not exist, continueOn Error Resume NextCommandBars("Wrox Report").DeleteOn Error GoTo 0
'add the new command bar to the collectionSet cbReport = CommandBars.Add("Wrox Report", msoBarFloating)
'add Zoom button to the toolbarSet btnButton = cbReport.Controls.Add(msoControlButton, _
CommandBars("Print Preview") _.Controls("Zoom").Id)
'add 2 pages button to the toolbarSet btnButton = cbReport.Controls.Add(msoControlButton, _
CommandBars("Print Preview") _.Controls("Two Pages").Id)
'add copy button to the toolbarSet btnButton = cbReport.Controls.Add(msoControlButton, _
CommandBars("Database") _.Controls("Copy").Id)
'add a custom button to the toolbarSet btnButton = cbReport.Controls.Add(msoControlButton)btnButton.Caption = "Test Button"btnButton.Style = msoButtonCaption'list the name of the procedure to call when the button is clickedbtnButton.OnAction = "DisplayMessage"
'display the new command bar by setting visiblecbReport.Visible = True
End Sub
Sub DisplayMessage()
MsgBox "The new button was clicked."
End Sub
5. From the Immediate Window, execute the CreateCommandBar function by typing theCreateCommandBar and pressing Enter. A new toolbar (as shown in Figure 10.2) isdisplayed.
Figure 10.2
6. Click Test Button on the toolbar. You should see a screen similar to the one shown in Figure 10.3.
267

P1: IML/FFX P2: IML/FFX QC: IML/FFX T1: IML
WY044-10 WY044-Gosnell WY044-Gosnell-v2.cls August 16, 2004 8:44
Chapter 10
Figure 10.3
How It WorksAfter adding a reference to the Microsoft Office 11.0 Object Library, you created two new procedures tomake use of the CommandBar and CommandBarButton objects that are contained in the library. TheCreateCommandBar procedure creates a new floating command bar called "Wrox Report".
Sub CreateCommandBar()
Dim cbReport As CommandBarDim btnButton As CommandBarButton
'delete the command bar and if it does not exist, continueOn Error Resume NextCommandBars("Wrox Report").DeleteOn Error GoTo 0
'add the new command bar to the collectionSet cbReport = CommandBars.Add("Wrox Report", msoBarFloating)
After creating the new command bar, you can add various buttons with predefined functionality to it,including Zoom, 2 page, and Copy buttons.
'add Zoom button to the toolbarSet btnButton = cbReport.Controls.Add(msoControlButton, _
CommandBars("Print Preview") _.Controls("Zoom").Id)
'add 2 pages button to the toolbarSet btnButton = cbReport.Controls.Add(msoControlButton, _
CommandBars("Print Preview") _.Controls("Two Pages").Id)
'add copy button to the toolbarSet btnButton = cbReport.Controls.Add(msoControlButton, _
CommandBars("Database") _.Controls("Copy").Id)
A custom button called "Test Button" is then added, which calls the DisplayMessage procedurewhen clicked.
'add a custom button to the toolbarSet btnButton = cbReport.Controls.Add(msoControlButton)
268

P1: IML/FFX P2: IML/FFX QC: IML/FFX T1: IML
WY044-10 WY044-Gosnell WY044-Gosnell-v2.cls August 16, 2004 8:44
Advanced Access Programming
btnButton.Caption = "Test Button"btnButton.Style = msoButtonCaption'list the name of the procedure to call when the button is clickedbtnButton.OnAction = "DisplayMessage"
The new command bar is displayed by setting the Visible property to True.
'display the new command bar by setting visiblecbReport.Visible = True
End Sub
The DisplayMessage procedure was also created and gets called when the new Test Button isclicked because it is assigned to the OnAction property of the Test Button.
Sub DisplayMessage()
MsgBox "The new button was clicked."
End Sub
When you run the DisplayMessage procedure from the Immediate Window, the custom command baris displayed. When you click the Test Button, a message box is displayed to indicate that the new buttonwas clicked. You could, for example, assign this command bar to display when a report opens by settingthe Visible property to True in the OnOpen event of the desired report.
This is just one of numerous examples of how you can work with functionality provided by variouslibraries. You will look at some additional examples of working with other standard libraries later in thischapter in the discussion on automation.
Using External DLLsIn the prior section, you looked at how to add a reference to an existing library and then to use the featuresprovided by the library from VBA code. By adding an explicit reference as you did before, you were ableto see the available properties, methods, and events for each object as you typed code in the code window.
At times, however, you need to reference external DLLs from within your code. External DLLs do notprovide the help feature that allows you to see what properties, methods, and events are available. Youhave to know the object and how to work with it. To use an external DLL, you must declare the functionin VBA, call the function, and use the result.
Try It Out Using an External DLL to Get System InformationLet’s walk through an example of referencing an external DLL to get information about your system.
1. First, declare the external DLL. To do so, add the following code to the General Declarationssection of your module.
Private Declare Sub GetSystemInfo Lib "kernel32" (lpSystemInfo As SYSTEM_INFO)
2. Next, add the SYSTEM_INFO type definition to the General Declarations section of the module.
269
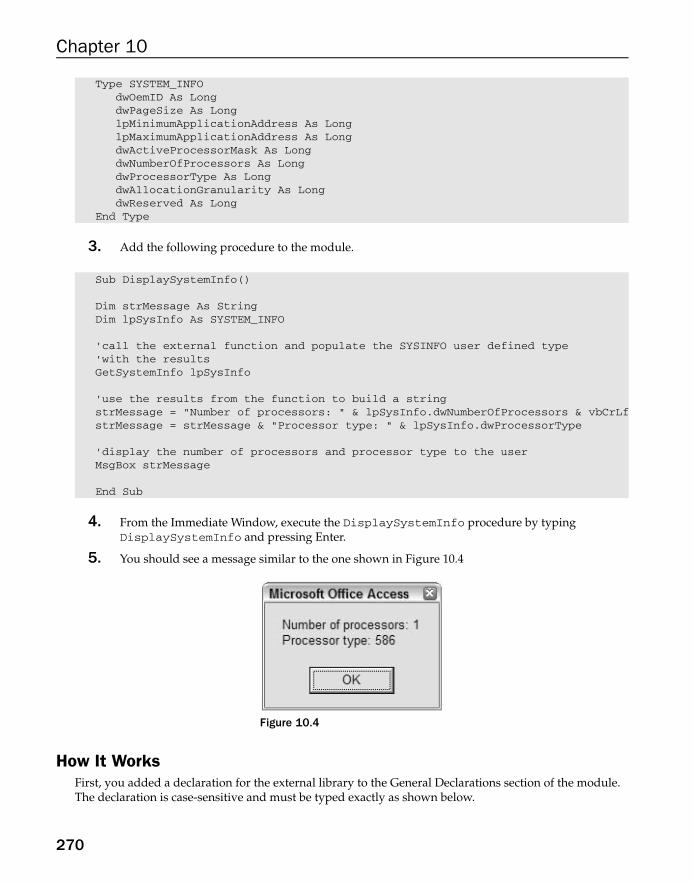
P1: IML/FFX P2: IML/FFX QC: IML/FFX T1: IML
WY044-10 WY044-Gosnell WY044-Gosnell-v2.cls August 16, 2004 8:44
Chapter 10
Type SYSTEM_INFOdwOemID As LongdwPageSize As LonglpMinimumApplicationAddress As LonglpMaximumApplicationAddress As LongdwActiveProcessorMask As LongdwNumberOfProcessors As LongdwProcessorType As LongdwAllocationGranularity As LongdwReserved As Long
End Type
3. Add the following procedure to the module.
Sub DisplaySystemInfo()
Dim strMessage As StringDim lpSysInfo As SYSTEM_INFO
'call the external function and populate the SYSINFO user defined type'with the resultsGetSystemInfo lpSysInfo
'use the results from the function to build a stringstrMessage = "Number of processors: " & lpSysInfo.dwNumberOfProcessors & vbCrLfstrMessage = strMessage & "Processor type: " & lpSysInfo.dwProcessorType
'display the number of processors and processor type to the userMsgBox strMessage
End Sub
4. From the Immediate Window, execute the DisplaySystemInfo procedure by typingDisplaySystemInfo and pressing Enter.
5. You should see a message similar to the one shown in Figure 10.4
Figure 10.4
How It WorksFirst, you added a declaration for the external library to the General Declarations section of the module.The declaration is case-sensitive and must be typed exactly as shown below.
270
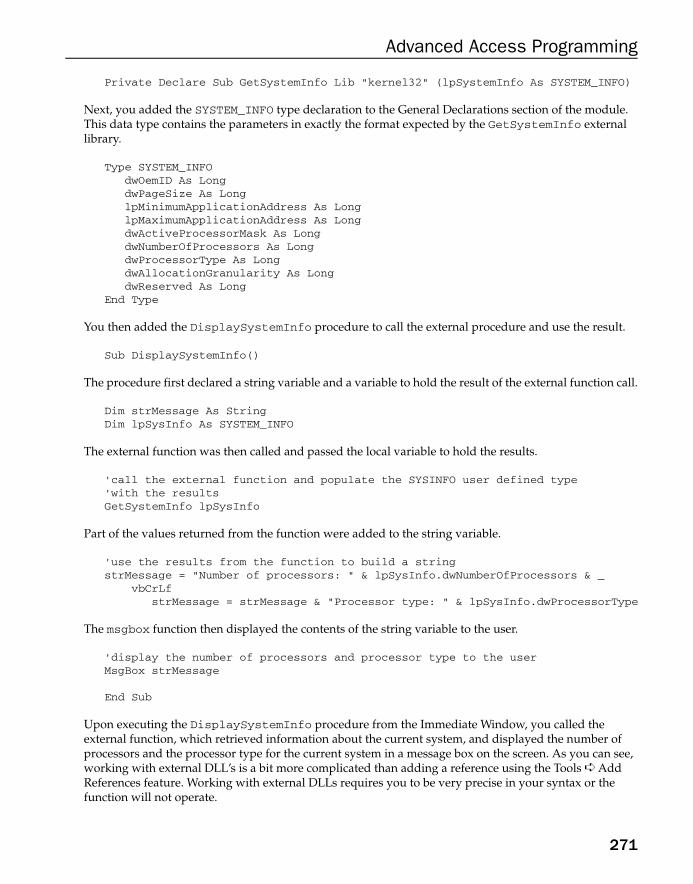
P1: IML/FFX P2: IML/FFX QC: IML/FFX T1: IML
WY044-10 WY044-Gosnell WY044-Gosnell-v2.cls August 16, 2004 8:44
Advanced Access Programming
Private Declare Sub GetSystemInfo Lib "kernel32" (lpSystemInfo As SYSTEM_INFO)
Next, you added the SYSTEM_INFO type declaration to the General Declarations section of the module.This data type contains the parameters in exactly the format expected by the GetSystemInfo externallibrary.
Type SYSTEM_INFOdwOemID As LongdwPageSize As LonglpMinimumApplicationAddress As LonglpMaximumApplicationAddress As LongdwActiveProcessorMask As LongdwNumberOfProcessors As LongdwProcessorType As LongdwAllocationGranularity As LongdwReserved As Long
End Type
You then added the DisplaySystemInfo procedure to call the external procedure and use the result.
Sub DisplaySystemInfo()
The procedure first declared a string variable and a variable to hold the result of the external function call.
Dim strMessage As StringDim lpSysInfo As SYSTEM_INFO
The external function was then called and passed the local variable to hold the results.
'call the external function and populate the SYSINFO user defined type'with the resultsGetSystemInfo lpSysInfo
Part of the values returned from the function were added to the string variable.
'use the results from the function to build a stringstrMessage = "Number of processors: " & lpSysInfo.dwNumberOfProcessors & _
vbCrLfstrMessage = strMessage & "Processor type: " & lpSysInfo.dwProcessorType
The msgbox function then displayed the contents of the string variable to the user.
'display the number of processors and processor type to the userMsgBox strMessage
End Sub
Upon executing the DisplaySystemInfo procedure from the Immediate Window, you called theexternal function, which retrieved information about the current system, and displayed the number ofprocessors and the processor type for the current system in a message box on the screen. As you can see,working with external DLL’s is a bit more complicated than adding a reference using the Tools ➪ AddReferences feature. Working with external DLLs requires you to be very precise in your syntax or thefunction will not operate.
271

P1: IML/FFX P2: IML/FFX QC: IML/FFX T1: IML
WY044-10 WY044-Gosnell WY044-Gosnell-v2.cls August 16, 2004 8:44
Chapter 10
AutomationAutomation refers to the capability to control one program from within another. For example, you cancontrol Microsoft Excel from within your Access applications. In such a case, Access would be theautomation client and Excel the automation server.
In order to use automation, you must first add a reference to the object library that you want to automate.As you learned before, you can add references using Tools ➪ References from the Visual Basic Editor.
Go ahead and add a reference to Excel, Word, and Outlook, as shown in Figure 10.5. You will be lookingat examples of each of these next.
Figure 10.5
Working with Automation ObjectsBefore you can automate external applications, you need to declare an object variable. The followingexample shows how you declare an object variable for Excel:
Dim objExcel As New Excel.Application
272

P1: IML/FFX P2: IML/FFX QC: IML/FFX T1: IML
WY044-10 WY044-Gosnell WY044-Gosnell-v2.cls August 16, 2004 8:44
Advanced Access Programming
The preceding line of code declares a new object and creates a new instance of Excel in the single line ofcode. If you want to control the point when a new instance of Excel is created, you can separate thedeclaration and instantiation into two lines of code, as shown next.
Dim objExcel As Excel.ApplicationSet objExcel = New Excel.Application
After you have created an instance of the automation object, you can work with the object’s properties,methods, and events. You have already worked with properties, methods, and events of other objects inearlier chapters. Working with the properties, methods, and events of automation objects is not anydifferent. For example, you can set the Visible property of the objExcel object to True so it will bevisible, as shown next.
objExcel.Visible = True
The preceding example implements a technique called early binding. Early binding occurs when youdeclare the type of object explicitly within your code. Several advantages result from using early binding.For example, when all lines of code referencing the object are resolved at compile time, the code executesfaster, and you can view the available properties, methods, and events of the object as you type yourcode. For these reasons, you should use early binding whenever possible.
Although early binding is preferable, you can also use a technique called late binding. Late bindingenables you to instantiate objects at runtime without referencing them at design time. In other words,your VBA application doesn’t know what type of object you want and what you plan to do with the objectuntil it runs the code and works with the object. Here is an example of using late binding with Excel.
'declare a new generic objectDim objExcel as Object
'instantiate the new object as an Excel objectSet objExcel = CreateObject("Excel.Application")
objExcel.Visible = True
Notice that the CreateObject method is used to create a new instance of Excel. If you already have anopen instance of the Excel object that you need to work with, use the GetObject method, as shown inthe following code.
Set objExcel = GetObject(, "Excel.Application")
Now that you are familiar with the high-level concepts of declaring and instantiating new instances ofautomation objects, let’s walk through some actual examples of controlling Excel, Word, and Outlookfrom Access.
Controlling Microsoft ExcelYou have already seen a few examples of how to declare and instantiate Excel objects. Let’s jump rightinto learning how you can control Excel from your Access application.
273

P1: IML/FFX P2: IML/FFX QC: IML/FFX T1: IML
WY044-10 WY044-Gosnell WY044-Gosnell-v2.cls August 16, 2004 8:44
Chapter 10
Try It Out Controlling an Excel Spreadsheet from AccessIn this example, you will create a new Excel workbook and populate some of the cells with data.
1. Add the following code to your module.
Sub ControlExcel()
Dim objExcel As New Excel.ApplicationDim objWorksheet As New Excel.Worksheet
'add a new workbook to the spreadsheetobjExcel.Workbooks.Add
'point the worksheet variable at the active sheetSet objWorksheet = objExcel.ActiveSheet
'add various values to the cellsWith objWorksheet
.Cells(1, 1).Value = "First Name"
.Cells(1, 2).Value = "Middle Initial"
.Cells(1, 3).Value = "Last Name"
.Cells(2, 1).Value = "John"
.Cells(2, 2).Value = "A."
.Cells(2, 3).Value = "Doe"
.Cells(3, 1).Value = "Jack"
.Cells(3, 2).Value = "D."
.Cells(3, 3).Value = "Smith"End With
'show Excel to the userobjExcel.Visible = True
End Sub
2. Execute the ControlExcel procedure from the Immediate Window by typing ControlExceland pressing Enter.
3. You should see an Excel screen similar to that shown in Figure 10.6.
How It WorksThe ControlExcel procedure uses an Excel Application object and an Excel Worksheet object.
Sub ControlExcel()
Dim objExcel As New Excel.ApplicationDim objWorksheet As New Excel.Worksheet
After you declare the objects, a new workbook is added to the Excel object.
'add a new workbook to the spreadsheetobjExcel.Workbooks.Add
274

P1: IML/FFX P2: IML/FFX QC: IML/FFX T1: IML
WY044-10 WY044-Gosnell WY044-Gosnell-v2.cls August 16, 2004 8:44
Advanced Access Programming
Figure 10.6
The new workbook is then pointed to the active sheet:
'point the worksheet variable at the active sheetSet objWorksheet = objExcel.ActiveSheet
Using the Cells property of the Worksheet object, you assign values to various cells.
'add various values to the cellsWith objWorksheet
.Cells(1, 1).Value = "First Name"
.Cells(1, 2).Value = "Middle Initial"
.Cells(1, 3).Value = "Last Name"
.Cells(2, 1).Value = "John"
.Cells(2, 2).Value = "A."
.Cells(2, 3).Value = "Doe"
.Cells(3, 1).Value = "Jack"
.Cells(3, 2).Value = "D."
.Cells(3, 3).Value = "Smith"End With
The last line of code displays the Excel instance to the user.
'show Excel to the userobjExcel.Visible = True
End Sub
275

P1: IML/FFX P2: IML/FFX QC: IML/FFX T1: IML
WY044-10 WY044-Gosnell WY044-Gosnell-v2.cls August 16, 2004 8:44
Chapter 10
When you run the procedure from the Immediate Window, you see an instance of Excel with the valuespopulated in the cells as specified in the preceding code.
Controlling Microsoft WordYou can control Word from Access in the same way you can control Excel. The Word object model is, ofcourse, different because you are working with documents instead of spreadsheets. Let’s walk throughhow this works.
Try It Out Creating Word Letters from AccessIn this example, you will create a contacts table and then a Word document that contains a letter to be sentto each of the contacts in the contacts table.
1. In your Ch10CodeExamples database, create a new table, as shown in Figure 10.7.
Figure 10.7
2. Next, add some sample data to the table, such as the data shown in Figure 10.8.
Figure 10.8
3. Add the following ControlWord procedure to the existing module.
Sub ControlWord()
Dim objWord As New Word.ApplicationDim rsContacts As New ADODB.Recordset
Dim strLtrContent As String
276

P1: IML/FFX P2: IML/FFX QC: IML/FFX T1: IML
WY044-10 WY044-Gosnell WY044-Gosnell-v2.cls August 16, 2004 8:44
Advanced Access Programming
rsContacts.ActiveConnection = CurrentProject.ConnectionrsContacts.Open "tblContacts"
objWord.Documents.Add
'for each record in the tblContacts table, create a letter in WordDo While Not rsContacts.EOF
strLtrContent = rsContacts("FirstName") & " " & rsContacts("LastName")strLtrContent = strLtrContent & vbCrLf & rsContacts("Address") & vbCrLfstrLtrContent = strLtrContent & rsContacts("City") & ", " & rsContacts("Region")strLtrContent = strLtrContent & " " & rsContacts("PostalCode") & vbCrLf & vbCrLfstrLtrContent = strLtrContent & "Dear " & rsContacts("FirstName") & " "strLtrContent = strLtrContent & rsContacts("LastName") & ":" & vbCrLf & vbCrLfstrLtrContent = strLtrContent & "Please note we have moved to a new
location. "strLtrContent = strLtrContent & "Our new address is 4 Somewhere, Avon,
IN 46060."strLtrContent = strLtrContent & vbCrLf & vbCrLf & "Sincerely," & vbCrLf& vbCrLfstrLtrContent = strLtrContent & "Your Favorite Store"
'insert the content at the end of the document (which is the beginning'if it is the first one)objWord.Selection.EndOfobjWord.Selection.Text = strLtrContent
'insert a page breakobjWord.Selection.EndOfobjWord.Selection.InsertBreak
'get the next contact recordrsContacts.MoveNext
Loop
'show word in Print Preview modeobjWord.Visible = TrueobjWord.PrintPreview = True
End Sub
4. Run the ControlWord procedure from the Immediate Window by typing ControlWord andpressing Enter. A screen similar to the one shown in Figure 10.9 should be displayed.
How It WorksFirst, you created a table called tblContacts and populated the table with some records. Next, youinitiated a new procedure that created a new Word document and then you populated the document withspecified text. The procedure began by declaring a new Word Application object and an ADOrecordset.
Sub ControlWord()
Dim objWord As New Word.Application
277

P1: IML/FFX P2: IML/FFX QC: IML/FFX T1: IML
WY044-10 WY044-Gosnell WY044-Gosnell-v2.cls August 16, 2004 8:44
Chapter 10
Figure 10.9
Dim rsContacts As New ADODB.Recordset
Dim strLtrContent As String
The ADO recordset was opened and populated with the tblContacts table.
rsContacts.ActiveConnection = CurrentProject.ConnectionrsContacts.Open "tblContacts"
A new document was then added to the Word object.
objWord.Documents.Add
For each contact record in the ADO recordset, a string containing the contents of the letter was populated.Each string contained the contents of the letter to the particular contact.
'for each record in the tblContacts table, create a letter in WordDo While Not rsContacts.EOF
278

P1: IML/FFX P2: IML/FFX QC: IML/FFX T1: IML
WY044-10 WY044-Gosnell WY044-Gosnell-v2.cls August 16, 2004 8:44
Advanced Access Programming
strLtrContent = rsContacts("FirstName") & " " & rsContacts("LastName")strLtrContent = strLtrContent & vbCrLf & rsContacts("Address") & vbCrLfstrLtrContent = strLtrContent & rsContacts("City") & ", " & rsContacts("Region")strLtrContent = strLtrContent & " " & rsContacts("PostalCode") & vbCrLf & vbCrLfstrLtrContent = strLtrContent & "Dear " & rsContacts("FirstName") & " "strLtrContent = strLtrContent & rsContacts("LastName") & ":" & vbCrLf & vbCrLfstrLtrContent = strLtrContent & "Please note we have moved to a new
location. "strLtrContent = strLtrContent & "Our new address is 4 Somewhere, Avon,
IN 46060."strLtrContent = strLtrContent & vbCrLf & vbCrLf & "Sincerely," & vbCrLf& vbCrLfstrLtrContent = strLtrContent & "Your Favorite Store"
The contents were then placed at the end of the Word document.
'insert the content at the end of the document (which is the beginning'if it is the first one)objWord.Selection.EndOfobjWord.Selection.Text = strLtrContent
A page break was then inserted into the Word document so the next letter appeared on a separate page.
'insert a page breakobjWord.Selection.EndOfobjWord.Selection.InsertBreak
The next record in the recordset was retrieved.
'get the next contact recordrsContacts.MoveNext
Loop
After all the records in the recordset were processed, the following code displayed Word in Print Previewmode.
'show word in Print Preview modeobjWord.Visible = TrueobjWord.PrintPreview = True
End Sub
When you run the procedure from the Immediate Window, the Print Preview Mode of the newly createdWord document is displayed, and a letter addressed to each contact from the tblContacts table isdisplayed.
Controlling Microsoft OutlookYou can control Microsoft Outlook in various ways in order to manipulate contacts, e-mails, or calendarappointments. In this section, you will look at an example of sending an e-mail through Outlook fromAccess.
279

P1: IML/FFX P2: IML/FFX QC: IML/FFX T1: IML
WY044-10 WY044-Gosnell WY044-Gosnell-v2.cls August 16, 2004 8:44
Chapter 10
Try It Out Sending an Outlook E-mail from AccessUsing the tblContacts table that was created in the prior example, you will now walk through how tosend an Outlook email from Access.
1. Revise the data in the tblContacts table so that only one record exists and the record points toyour e-mail address. This ensures that you do not send e-mails to people by mistake based on thedummy data that you typed in the table.
2. Add the following ControlOutlook procedure to your module.
Sub ControlOutlook()
Dim objOutlook As New Outlook.ApplicationDim objEmail As Outlook.MailItem
Dim strLtrContent As StringDim rsContacts As New ADODB.Recordset
rsContacts.ActiveConnection = CurrentProject.ConnectionrsContacts.Open "tblContacts"
'for each record in the tblContacts table, send an emailDo While Not rsContacts.EOF
strLtrContent = "Dear " & rsContacts("FirstName") & " "strLtrContent = strLtrContent & rsContacts("LastName") & ":" & vbCrLf & vbCrLfstrLtrContent = strLtrContent & "Please note we have moved to a new
location. "strLtrContent = strLtrContent & "Our new address is 4 Somewhere, Avon,
IN 46060."strLtrContent = strLtrContent & vbCrLf & vbCrLf & "Sincerely," & vbCrLf& vbCrLfstrLtrContent = strLtrContent & "Your Favorite Store"
'create an email regarding the new business locationSet objEmail = objOutlook.CreateItem(olMailItem)objEmail.Recipients.Add rsContacts("Email")objEmail.Subject = "Our address has changed."objEmail.Body = strLtrContent
'send the messageobjEmail.Send
'move to the next contacts recordrsContacts.MoveNext
Loop
End Sub
3. Run the procedure from the Immediate Window by typing ControlOutlook and pressingEnter. You should receive an e-mail similar to the one shown in Figure 10.10 in your Inbox at theaccount you specified in the tblContacts e-mail field.
280

P1: IML/FFX P2: IML/FFX QC: IML/FFX T1: IML
WY044-10 WY044-Gosnell WY044-Gosnell-v2.cls August 16, 2004 8:44
Advanced Access Programming
Figure 10.10
How It WorksFirst, you modified the values in the tblContacts table so that only you received an e-mail fromrunning this test procedure. Then, you added the ControlOutlook procedure to your module.
Sub ControlOutlook()
The procedure used an Outlook Application object and an Outlook MailItem object to create andmanipulate e-mail messages.
Dim objOutlook As New Outlook.ApplicationDim objEmail As Outlook.MailItem
Next, a new ADO recordset was created based on the values in the tblContacts table.
Dim strLtrContent As StringDim rsContacts As New ADODB.Recordset
rsContacts.ActiveConnection = CurrentProject.ConnectionrsContacts.Open "tblContacts"
For each record in the recordset, a string message was generated using the e-mail field and some text thatindicated the business had changed addresses.
281

P1: IML/FFX P2: IML/FFX QC: IML/FFX T1: IML
WY044-10 WY044-Gosnell WY044-Gosnell-v2.cls August 16, 2004 8:44
Chapter 10
'for each record in the tblContacts table, send an emailDo While Not rsContacts.EOF
strLtrContent = "Dear " & rsContacts("FirstName") & " "strLtrContent = strLtrContent & rsContacts("LastName") & ":" & vbCrLf& vbCrLfstrLtrContent = strLtrContent & "Please note we have moved to a new
location. "strLtrContent = strLtrContent & "Our new address is 4 Somewhere, Avon,
IN 46060."strLtrContent = strLtrContent & vbCrLf & vbCrLf & "Sincerely," & vbCrLf& vbCrLfstrLtrContent = strLtrContent & "Your Favorite Store"
An e-mail was generated that was addressed to the e-mail address in the current record in the recordset.The subject of the e-mail was specified and the body assigned to the string message created in thepreceding code.
'create an email regarding the new business locationSet objEmail = objOutlook.CreateItem(olMailItem)objEmail.Recipients.Add rsContacts("Email")objEmail.Subject = "Our address has changed."objEmail.Body = strLtrContent
The Send method of the MailItem object sent the e-mail to the recipient.
'send the messageobjEmail.Send
The process repeated for each record in the recordset, which in this case should have been only onerecord.
'move to the next contacts recordrsContacts.MoveNextLoop
End Sub
When you ran the procedure from the Immediate Window, an e-mail message was sent to the e-mailaddress you specified in the Email field in the tblContacts table. If your address was specified, youshould have received a new e-mail message in your inbox containing the text shown in Figure 10.10,which indicated the business had a new address.
ActiveX ControlsActiveX controls are additional controls that you can use in your Access forms. You have already workedwith controls such as text boxes and command buttons. What if you need a control that is not listed in thestandard toolbox? Numerous additional controls are available, already installed on your computer, fromMicrosoft and other vendors. You can take advantage of them by adding a reference to the control andusing the control in your application.
282

P1: IML/FFX P2: IML/FFX QC: IML/FFX T1: IML
WY044-10 WY044-Gosnell WY044-Gosnell-v2.cls August 16, 2004 8:44
Advanced Access Programming
For example to use a Calendar control, create a new form, and with the form still open, select Insert ➪ActiveX Control. A screen similar to the one shown in Figure 10.11 is displayed. To add the CalendarControl or any other desired control, simply select it in the list of controls and click OK.
Figure 10.11
When you click OK, the Calendar Control automatically gets placed on the new form, as shown inFigure 10.12.
Figure 10.12
The Calendar Control has properties and events just like any other control, as you can see from theProperties Window shown in Figure 10.13.
283

P1: IML/FFX P2: IML/FFX QC: IML/FFX T1: IML
WY044-10 WY044-Gosnell WY044-Gosnell-v2.cls August 16, 2004 8:44
Chapter 10
Figure 10.13
Suppose you want to use the value of the selected date in the calendar, inserting the value into a field inorder to spare the user from having to type out the date. Assume that your form contains a text boxcontrol.
The following code example illustrates how you would display the selected date in the calendar controlin the text box control when the calendar control loses the focus (such as when you click in the text box).
Private Sub Calendar0_LostFocus()
'set the text box value to the selected calendar valuetxtSelectedDate = Calendar0.Value
End Sub
When you run the form and select a date in the calendar control, the value in the text box is updated. Thisis illustrated in Figure 10.14.
Figure 10.14
284

P1: IML/FFX P2: IML/FFX QC: IML/FFX T1: IML
WY044-10 WY044-Gosnell WY044-Gosnell-v2.cls August 16, 2004 8:44
Advanced Access Programming
You can apply these concepts to any other ActiveX control that you want to work with. You simply add areference to the control and then drag and drop the control onto the form if Access does not do so for youautomatically. You can then work with the control just as you do with any other standard control.
LibrariesSo far, all the code you have written works only from within the database where you created it. There aretimes when you want to re-use code across multiple Access projects, such as when performing a commontask that multiple databases might want to use. You can create libraries based on a specific Accessdatabases that can then be referenced from and used by other Access databases. However, in order to be agood candidate for a library, the database should contain only generic procedures and functions, and notspecific references to forms or other objects that may not be present in the other applications from whichthe library might be used.
Try It Out Creating and Using a Code LibraryIn this example, you will create a new Access database containing a sample error-handling procedure thatyou will make available to other Access databases. This error-handling procedure was described inChapter 2. You will add the new database as a Library and then use the Library from another database.
1. Create another new database, by selecting File ➪ New ➪ Blank Database. Name the newdatabase ErrorHandlerLibrary and click the Create button.
2. Insert a new module into the ErrorHandlerLibrary database. Name the module modError.
3. Add the following procedure to the new modError module.
Public Sub GeneralErrorHandler(lngErrNumber As Long, strErrDesc As String,strModuleSource As String, strProcedureSource As String)
Dim strMessage As String
'build the error message string from the parameters passed instrMessage = "An error has occurred in the application."strMessage = strMessage & vbCrLf & "Error Number: " & lngErrNumberstrMessage = strMessage & vbCrLf & "Error Description: " & strErrDescstrMessage = strMessage & vbCrLf & "Module Source: " & strModuleSourcestrMessage = strMessage & vbCrLf & "Procedure Source: " & strProcedureSource
'display the message to the userMsgBox strMessage, vbCritical
End Sub
4. Save the procedure by selecting the Save button on the toolbar.
5. Select Debug ➪ Compile ErrorHandlerLibrary to make sure there are no compiler errors.
6. Close the ErrorHandlerLibrary database.
7. Reopen the Ch10CodeExamples database. From the Visual Basic Editor, select Tools ➪References and click the Browse button. Change the Files of Type filter to Microsoft Office Access
285

P1: IML/FFX P2: IML/FFX QC: IML/FFX T1: IML
WY044-10 WY044-Gosnell WY044-Gosnell-v2.cls August 16, 2004 8:44
Chapter 10
Databases (*.mdb). Navigate to the location of the ErrorHandlerLibrary database, as shownin Figure 10.15. Click the Open button.
Figure 10.15
8. You should now see the new ErrorHandlerLibrary in the list of available references, asshown in Figure 10.16. Click the OK button to add a reference to this library in theCh10CodeExamples database.
Figure 10.16
286

P1: IML/FFX P2: IML/FFX QC: IML/FFX T1: IML
WY044-10 WY044-Gosnell WY044-Gosnell-v2.cls August 16, 2004 8:44
Advanced Access Programming
9. Add the following procedure to the existing module in the Ch10CodeExamples database.
Sub TestLibrary()
On Error GoTo HandleError
'declare variable to store resultDim intResult As Integer
Dim intValue1 As IntegerDim intValue2 As Integer
intValue1 = 5intValue2 = 0
'calculate result by dividing first value by second valueintResult = intValue1 / intValue2
Exit Sub
HandleError:GeneralErrorHandler Err.Number, Err.Description, "module1", "TestLibrary"Exit Sub
End Sub
10. Execute the TestLibrary procedure from the Immediate Window by typing TestLibraryand pressing Enter.
11. You should see a screen similar to that shown in Figure 10.17 displaying an error message.
Figure 10.17
How It WorksFirst, you created a new Library by placing a GeneralErrorHandler error-handling procedure into anew database called ErrorHandlerLibrary. The procedure accepted some parameters regarding theerror, and then used the parameters to display a meaningful message to the user.
Public Sub GeneralErrorHandler(lngErrNumber As Long, strErrDesc As String,strModuleSource As String, strProcedureSource As String)Dim strMessage As String
287

P1: IML/FFX P2: IML/FFX QC: IML/FFX T1: IML
WY044-10 WY044-Gosnell WY044-Gosnell-v2.cls August 16, 2004 8:44
Chapter 10
'build the error message string from the parameters passed instrMessage = "An error has occurred in the application."strMessage = strMessage & vbCrLf & "Error Number: " & lngErrNumberstrMessage = strMessage & vbCrLf & "Error Description: " & strErrDescstrMessage = strMessage & vbCrLf & "Module Source: " & strModuleSourcestrMessage = strMessage & vbCrLf & "Procedure Source: " & strProcedureSource
'display the message to the userMsgBox strMessage, vbCritical
End Sub
After creating and saving the new procedure, you closed the ErrorHandlerLibrary database. Youthen returned to the Ch10CodeExamples database and added a reference to theErrorHandlerLibrary database. After adding a reference to the library, you then added theTestLibrary procedure to make use of the GeneralErrorHandler procedure contained in thelibrary. The TestLibrary procedure simply caused a divide-by-zero error so the error-handling codeexecuted.
Sub TestLibrary()
On Error GoTo HandleError
'declare variable to store resultDim intResult As Integer
Dim intValue1 As IntegerDim intValue2 As Integer
intValue1 = 5intValue2 = 0
'calculate result by dividing first value by second valueintResult = intValue1 / intValue2
Exit Sub
The error handler code that follows called the GeneralErrorHandler procedure that is contained inthe separate ErrorHandlerLibrary Access database that you added as a Library.
HandleError:GeneralErrorHandler Err.Number, Err.Description, "module1", "TestLibrary"Exit Sub
End Sub
That’s all there is to creating a new code library and using the library from other Access databases! Youcould extend the above example by adding additional error-handling procedures to the library. Forexample, you may want to create a logging procedure that logs all or certain errors to the database. Youmay want to create a procedure that e-mails the administrator when certain types of errors occur. Theseprocedures are beyond the scope of this chapter, but I wanted to give you some additional ideas on howto expand the ErrorHandlerLibrary for use in your other projects.
288

P1: IML/FFX P2: IML/FFX QC: IML/FFX T1: IML
WY044-10 WY044-Gosnell WY044-Gosnell-v2.cls August 16, 2004 8:44
Advanced Access Programming
Add-insAdd-ins are tools that provide additional functionality but are not part of the standard Microsoft Accessproduct. Add-ins are either provided with Access, obtained from third parties, or are custom designed.Several add-ins come with Access, such as the Performance Analyzer, Linked Table Manager, controlwizards, and various others.
Three types of add-ins are menu add-ins, wizards, and builders. Menu add-ins can be accessed byselecting the Tools ➪ Add-ins option and generally operate on Access itself or multiple objects. You canuse the existing menu add-ins, such as the Database Splitter, or create your own custom add-ins.
Wizard add-ins consist of a series of modal dialog boxes that walk you step by step through a particularprocess. You have, no doubt, used wizards in Access before to perform various tasks. In Chapter 9, youused the Upsizing Wizard to upsize the Northwind database to SQL Server. You can also create your owncustom Wizards.
Builder add-ins can help users construct a data element such as a SQL expression. Again, you can createyour own custom builder add-ins or use the existing ones.
After you create one of these types of add-ins, you then register the add-in so that your applications canuse it. One way to register an add-in is using the Add-in Manager in Access. Another way is to have thesetup program register the add-in automatically. Yet another way to register an add-in is directly, usingthe Windows Registry.
TransactionsThis section details what a transaction is and how to implement a transaction from VBA code.
A transaction implements a series of changes in a single batch. The entire batch of changes either succeedsor fails as a group. Here is a simple example. Suppose that you want to make a series of updates to thedatabase. You are updating a person’s records because of a name and address change due to marriage.You may need to update two or more tables with the new information. If one or more of the updates fails,you want the entire set of updates to fail as a group. Otherwise, you might have an incomplete set of datain the database.
The ADO Connection object allows you to implement transactions. The BeginTrans method of theConnection object begins the transaction, whereas the CommitTrans method commits the transactionto make the changes final. If the transaction fails, the RollbackTrans method of the Connectionobject rolls back all the changes to the underlying data that were made as part of the transaction.
Here is an example of some code you could use to implement a transaction:
Sub TestTransaction()
Dim cnConnection As New ADODB.ConnectionDim cmdCommand As New ADODB.Command
'set the connection and command objects to the current connectionSet cnConnection = CurrentProject.ConnectioncmdCommand.ActiveConnection = cnConnection
289

P1: IML/FFX P2: IML/FFX QC: IML/FFX T1: IML
WY044-10 WY044-Gosnell WY044-Gosnell-v2.cls August 16, 2004 8:44
Chapter 10
On Error GoTo HandleError
'begin the transactioncnConnection.BeginTrans
'specify the first SQL Statement to execute that should not cause an errorcmdCommand.CommandText = _
"UPDATE tblContacts SET FirstName = 'Test' WHERE ContactId = 1"
'execute the first SQL Statement which should not cause an errorcmdCommand.Execute
'specify the second SQL Statement to execute that will cause an errorcmdCommand.CommandText = _
"UPDATE tblContacts SET ContactId = 'A' WHERE ContactId = 1"
'execute the second SQL Statement which should cause an errorcmdCommand.Execute
'commit the transaction if both updates were successfulcnConnection.CommitTrans
Exit Sub
HandleError:
'rollback the transaction so all updates failcnConnection.RollbackTrans
MsgBox "An error occurred: " & Err.Description
End Sub
The preceding procedure uses the ADO Command and Connection object to execute a series of SQLstatements against the database. The BeginTrans method indicates the beginning of the transaction.The CommitTrans method indicates that the transaction processed without errors and thus all thechanges should be committed in the underlying data source. The RollbackTrans method is in the errorhandler and will roll back all changes in the event of an error, so all the updates fail together. In theprevious example, the first SQL statement executed successfully, whereas the second one caused an error.The result is that the first successful change is rolled back because the second one failed.
SummaryThis chapter introduced several advanced topics, including declaring and using standard and externalDLLs, using automation to control other applications, and adding ActiveX controls to forms. I alsocovered how to create custom code libraries, how to use add-ins, and how to implement transactions inyour code. Each one of these topics could warrant an entire chapter. For more information on these topics,please consult Access 2003 VBA Programmer’s Reference (Wiley, 2004). In this chapter, I just wanted toprovide you with some ideas of the advanced features available to your Access applications withoutgiving you a detailed tutorial on how to actually implement each of them.
290

P1: IML/FFX P2: IML/FFX QC: IML/FFX T1: IML
WY044-10 WY044-Gosnell WY044-Gosnell-v2.cls August 16, 2004 8:44
Advanced Access Programming
At this point you’re ready to move on to Chapter 11, which covers various steps you should take to finishup your Access application, including improving performance and multi-user considerations, addingsecurity to the application, and distributing the application. I will then finish the book with twocomprehensive case studies that will bring all the concepts discussed throughout the book together intotwo real-world applications.
Exercises1. What is the difference between a standard library and an external library?
2. What is automation and what are some examples of ways to use automation?
3. How do you create a code library and what are some advantages of doing so?
4. What is a transaction and how do you implement one?
291

P1: IML/FFX P2: IML/FFX QC: IML/FFX T1: IML
WY044-10 WY044-Gosnell WY044-Gosnell-v2.cls August 16, 2004 8:44
292

P1: IML/FFX P2: IML/FFX QC: IML/FFX T1: IML
WY044-11 WY044-Gosnell WY044-Gosnell-v2.cls August 6, 2004 15:17
11Finishing the Application
After working so hard to develop an advanced Access application using VBA, it is important tomake sure that the application is capable of performing well and handling the number of users youexpect. You also want to make sure that the end users are not able to modify the database sourcecode and design without the proper permission. After you have fine-tuned, secured, and tested theapplication, you are ready to implement the application by distributing it to end users. However,after you distribute the application to end users, your job is still not finished. Access applicationsneed to be backed up and compacted periodically to ensure that they remain in good working orderand that they can be recovered from a backup if corruption or deletion occurs.
This chapter covers:
❑ Writing applications to handle multiple users
❑ Improving actual and perceived performance of the application
❑ Using the Performance Analyzer to help improve performance
❑ Adding security to prevent unauthorized access or modification
❑ Distributing applications to end users
❑ Backing up, compacting, and repairing applications
Multi-User ConsiderationsVarious coding approaches can affect how well your application will handle multiple users. Forexample, the type of record lock that is used on records retrieved from the database will affect whathappens when multiple users try to access the same record. When the application does not handlethe scenario correctly, update conflicts can occur because one user overwrites the changes made byanother user. If your application uses the proper type of record lock and handles update conflicts, itwill be more capable of supporting multiple users. Another way to help your application betterhandle multiple users is to separate the data tables from the other objects by using two separateAccess database files. Both of these techniques are discussed in the sections that follow.

P1: IML/FFX P2: IML/FFX QC: IML/FFX T1: IML
WY044-11 WY044-Gosnell WY044-Gosnell-v2.cls August 6, 2004 15:17
Chapter 11
Record Locking and Update ConflictsPrior to reading this book, you likely worked with bound forms in your Access applications. Boundforms are connected directly to a table and keep an open connection to the database so all changes aremade at that moment. Then, in Chapter 5, you learned how to populate an ADO recordset with data froma database and how to display records from the recordset on both bound and unbound forms.
Let’s now look at how record locking is handled on bound and unbound forms and the ways you canmodify record locking settings to better handle multiple users.
Record Locking on Bound FormsThe type of record locking that is used for bound forms is determined by the Options settings. To modifythe record locking options for bound forms, select Tools ➪ Options ➪ Advanced. A dialog box like theone shown in Figure 11.1 is displayed.
Figure 11.1
The three options for default record locking are: No Locks, All Records, and Edited Record. If the NoLocks option is selected, no records will be locked and all users will be able to make edits. This can resultin one user stepping on the toes of another user by overwriting his changes without realizing it. If the AllRecords_option is selected, all records in the underlying table of the form you’re editing will be locked.This option is generally not good for multi-user applications except for the specific situations where youwant to keep everyone else out while one user has the table open. A third option is to select the Edited
294
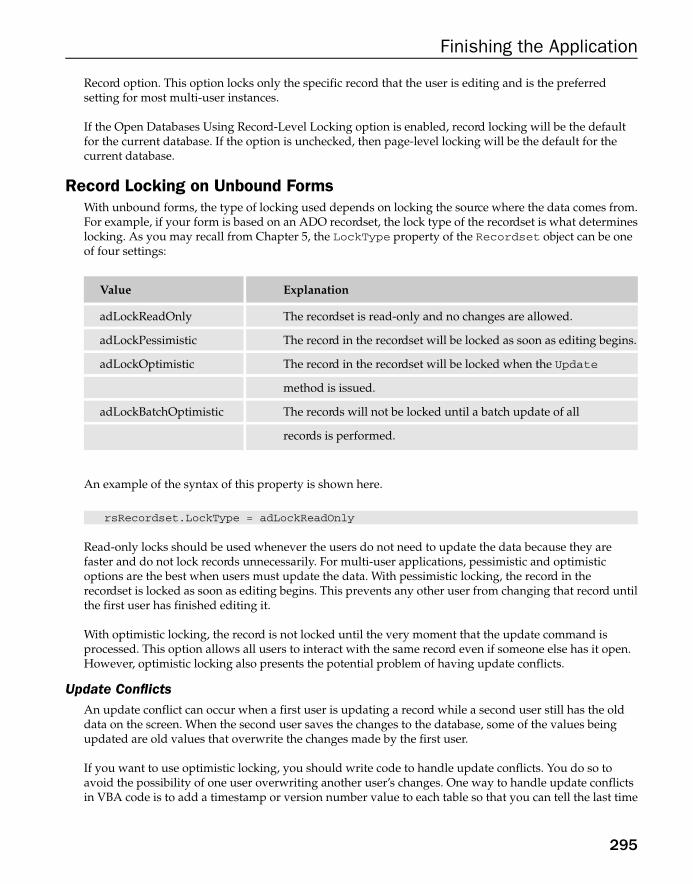
P1: IML/FFX P2: IML/FFX QC: IML/FFX T1: IML
WY044-11 WY044-Gosnell WY044-Gosnell-v2.cls August 6, 2004 15:17
Finishing the Application
Record option. This option locks only the specific record that the user is editing and is the preferredsetting for most multi-user instances.
If the Open Databases Using Record-Level Locking option is enabled, record locking will be the defaultfor the current database. If the option is unchecked, then page-level locking will be the default for thecurrent database.
Record Locking on Unbound FormsWith unbound forms, the type of locking used depends on locking the source where the data comes from.For example, if your form is based on an ADO recordset, the lock type of the recordset is what determineslocking. As you may recall from Chapter 5, the LockType property of the Recordset object can be oneof four settings:
Value Explanation
adLockReadOnly The recordset is read-only and no changes are allowed.
adLockPessimistic The record in the recordset will be locked as soon as editing begins.
adLockOptimistic The record in the recordset will be locked when the Update
method is issued.
adLockBatchOptimistic The records will not be locked until a batch update of all
records is performed.
An example of the syntax of this property is shown here.
rsRecordset.LockType = adLockReadOnly
Read-only locks should be used whenever the users do not need to update the data because they arefaster and do not lock records unnecessarily. For multi-user applications, pessimistic and optimisticoptions are the best when users must update the data. With pessimistic locking, the record in therecordset is locked as soon as editing begins. This prevents any other user from changing that record untilthe first user has finished editing it.
With optimistic locking, the record is not locked until the very moment that the update command isprocessed. This option allows all users to interact with the same record even if someone else has it open.However, optimistic locking also presents the potential problem of having update conflicts.
Update ConflictsAn update conflict can occur when a first user is updating a record while a second user still has the olddata on the screen. When the second user saves the changes to the database, some of the values beingupdated are old values that overwrite the changes made by the first user.
If you want to use optimistic locking, you should write code to handle update conflicts. You do so toavoid the possibility of one user overwriting another user’s changes. One way to handle update conflictsin VBA code is to add a timestamp or version number value to each table so that you can tell the last time
295

P1: IML/FFX P2: IML/FFX QC: IML/FFX T1: IML
WY044-11 WY044-Gosnell WY044-Gosnell-v2.cls August 6, 2004 15:17
Chapter 11
a record was updated. If you use this approach, you must keep track of the original value of the versionnumber or timestamp when the record is first open, and then before updating the database you mustcheck to see if the version number or timestamp has changed. Another way to handle update conflicts isto check for changes on a field-by-field basis and then notify the user of exactly which fields changed sohe can decide whether to overwrite the record.
The topic of update conflicts could take an entire chapter, but you should at least be aware of what itmeans and some ways to handle it. You can obtain more information about handling update conflicts bysearching the articles on msdn.microsoft.com. Let’s turn now to another consideration for improvingmulti-user applications.
Multi-User Architecture ConsiderationsOne way to improve the capability of multiple users to work with an Access application is to separate thedata tables from the user-interface aspects. If you put a single Access database that contains the entireapplication on a file server and allow multiple users to access it simultaneously, you are asking fortrouble. A better solution is to separate the user interface from the data tables so that each user has hisown copy of the user interface. The data tables can be stored in a separate database file on a server andaccessed from each copy of the user interface. This approach is illustrated in Figure 11.2.
Shared Tables Separated From User Interface
User 1
Access File Containing:FormsReportsMacrosModulesQueriesStatic and Temp Tables
User 2
Access File Containing:FormsReportsMacrosModulesQueriesStatic and Temp Tables
Server
Access File Containing:Shared Tables
Linked Tables Linked Tables
Data
Figure 11.2
Notice that there is one central database for the data tables, and all users have a copy of the user-interfacedatabase with objects/code on their computers. The user interface database is then linked to the databasecontaining the tables.
This approach also improves the performance of the application, as I discuss in the performance sectionlater in this chapter.
Ideally, you should design your database following this approach from the very beginning. Simply createthe database containing the tables in one database, create the database containing the user-interfaceobjects in another database, and then link to the database containing the tables. To link to the database
296

P1: IML/FFX P2: IML/FFX QC: IML/FFX T1: IML
WY044-11 WY044-Gosnell WY044-Gosnell-v2.cls August 6, 2004 15:17
Finishing the Application
containing the tables, select File ➪ Get External Data and then the Link Tables option. See Chapter 7 formore information on how to link to another database using VBA code.
Another option is to build the application in one database first and then perform the separation manuallyor by using the Database Splitter. To do so manually, you simply export the data tables to anotherdatabase, delete the tables from your original database so that only the linked tables remain, and add alink to that external database. Now let’s look at how to use the Database Splitter.
Try It Out Using the Database Splitter to Separate Database Tablesfrom the User Interface
Using the Database Splitter, you can easily separate an existing Access database into two database files:one containing the tables and the other for the user interface. Let’s walk through an example of how to dothis.
1. Open the existing database you want to split. Open the Northwind.mdb sample database if youhave it on your computer. If not, open one of the databases created in the prior chapters. Thesteps are the same in either case.
It is recommended that you make a backup copy of the database before proceeding.
2. Select Tools ➪ Database Utilities ➪ Database Splitter, as shown in Figure 11.3.
Figure 11.3
3. A screen like the one shown in Figure 11.4 is displayed. Select the Split Database button.
4. The Create Back-End Database dialog box is displayed, as shown in Figure 11.5. Specify the nameand location of the database where you want the data tables to be stored. If you are splitting theNorthwind database, specify a filename of Northwind be.mdb. Then, click the Split button.
5. After the data is split into the separate databases, you receive a message confirming the databasewas successfully split. Click OK on the dialog box.
6. You are then returned to the original database, which in this case is Northwind.mdb. As shownin Figure 11.6, you now see that the tables are linked to the newly created Northwind be.mdb.
297

P1: IML/FFX P2: IML/FFX QC: IML/FFX T1: IML
WY044-11 WY044-Gosnell WY044-Gosnell-v2.cls August 6, 2004 15:17
Chapter 11
Figure 11.4
Figure 11.5
298

P1: IML/FFX P2: IML/FFX QC: IML/FFX T1: IML
WY044-11 WY044-Gosnell WY044-Gosnell-v2.cls August 6, 2004 15:17
Finishing the Application
Figure 11.6
How It WorksThe Database Splitter allowed you to convert a single Access database into two separate databases: onewith the user interface and the other with the data tables. After you ran the Database Splitter, the datatables were moved to a new database and a link was added to the original database to point to the tablesin the new database.
After the split is completed, you can copy the new database with the tables to a file server or otherlocation where multiple client computers can access it. You then copy the user interface database to eachuser workstation.
Make sure that the links that get created will work from each computer where you plan to load theuse-interface database. For example, if the tables are linked as the c: drive, that same location may be adifferent drive letter on a different client computer. If that is the case, you need to modify the links from thesecond computer so that it finds the data.
Now that you have a few ideas on how to improve the multi-user capabilities of your application, let’sturn to the various ways you can optimize your application.
Optimizing Your ApplicationsAs part of the testing process, you should fine-tune the application to make it run faster and better. Youcan apply various techniques to improve the real speed, as well as the speed as perceived by users.
299

P1: IML/FFX P2: IML/FFX QC: IML/FFX T1: IML
WY044-11 WY044-Gosnell WY044-Gosnell-v2.cls August 6, 2004 15:17
Chapter 11
Improving Actual PerformanceThe speed at which your application actually performs can be improved by following some generaldesign guidelines, coding techniques, and data access techniques. You will now look at each of these inturn.
General Design GuidelinesHere are several general guidelines to help improve the actual performance of your applications:
❑ Minimize the code and objects in a form. Move the code to a standard module. The morecomplicated a form is, the longer it takes to load.
❑ Minimize the use of subforms because two forms are in memory.
❑ Write reusable modules that so you are not re-writing the same code in slightly different waysmultiple times. This reduces the amount of code in your application and helps improve speed.For example, instead of having one procedure that enables all controls in one form, another thatdisables all controls in another form, and two others that disable controls in each of those sameforms, write a generic module that enables or disables all controls on the specified form based onwhether the enable or disable flag is passed as a variable.
❑ Eliminate code that is not used.
❑ Make sure your application is compiled. Also, consider compiling your application into an MDEfile as described later in this chapter.
❑ If you have all the user interface objects in one database and the data tables in another (Access orother) database, open the database with the user interface exclusively for faster performance. Onthe File ➪ Open dialog box, you can specify the Open Exclusive setting to open the databaseexclusively, as shown in Figure 11.7.
Let’s now look at some ways you can improve performance by writing better VBA code.
Optimizing VBA CodeYou have various ways to accomplish the same task using VBA code, some of which are faster thanothers. Here are some examples:
❑ Use With...End With when dealing with multiple settings for the same object. Otherwise, theprocess slows because the object has to be located each time. It is better to use:
With txtName.Text = "Hello".Visible = True.Enabled = True
End With
than the following:
txtName.Text = "Hello"txtName.Visible = TruetxtName.Enabled = True
300

P1: IML/FFX P2: IML/FFX QC: IML/FFX T1: IML
WY044-11 WY044-Gosnell WY044-Gosnell-v2.cls August 6, 2004 15:17
Finishing the Application
Figure 11.7
❑ Use the correct data type and make it only as large as you really need. For example, if you needan integer, do not use a double. Minimize the use of variants because they are the slowest. Theymust take time to determine a data type because one was not explicitly designated.
❑ When you are working with automation, as I described in Chapter 10, use early binding soreferences are resolved at compile time instead of runtime. For example, early binding to Excellike this:
Dim objExcel As Excel.ApplicationSet objExcel = New Excel.Application
is better than late binding to Excel like this:
'declare a new generic objectDim objExcel as Object
'instantiate the new object as an Excel objectSet objExcel = CreateObject("Excel.Application")
❑ If...Then...Else is faster than IIF() statements.
❑ Instead of testing a Boolean variable for True, use the value explicitly. For example, use:
If blnValue Then
301

P1: IML/FFX P2: IML/FFX QC: IML/FFX T1: IML
WY044-11 WY044-Gosnell WY044-Gosnell-v2.cls August 6, 2004 15:17
Chapter 11
instead of:
If blnValue = True Then
Improving Data AccessThe performance of Access applications can be degraded because of improper data access. To make yourapplications run faster, keep the following guidelines in mind:
❑ Minimize the number of database connections open. For example, if you use a bound form, itmaintains a constant connection to the database. Consider switching to an unbound form thatconnects to the database to retrieve the data, disconnects, and reconnects when it needs to updatethe data. See Chapter 5 on ADO for more information.
❑ Use a query as the source of a form, control, or ADO recordset that returns only the rows youneed to work with instead of opening an entire table.
❑ Make sure your query is written correctly. For example, make sure to retrieve only the columnsthat are being used. Also make sure that you are using the correct type of join.
❑ Make sure the type of cursor being used is not more than you really need. For example, if you arenot modifying the data, use a read-only cursor.
❑ Use proper indexes on the tables to reduce the number of table scans. Add indexes to the fieldsthat are used to join tables together and are frequently used to retrieve data. This will save Accessfrom having to perform a scan of the entire database to find the desired record. However, do notadd indexes on every field in the database. This will actually degrade performance more thanhaving no indexes at all.
Improving Perceived PerformanceThe prior sections focused on how to improve the actual performance of your application. In this section,you look at a few ways to improve the performance as perceived by the end users. In other words, you arenot really speeding up the application by implementing these features, but you make the user feel like theapplication is running faster or that progress is being made.
❑ Use an hourglass to indicate that the application is performing a task that may take a while. Thehourglass can be turned on and off, respectively, with the following code:
DoCmd.Hourglass TrueDoCmd.Hourglass False
❑ Hide forms that need to be re-opened later. Instead of constantly opening and closing the sameform, consider opening the form once and hiding it until it is needed again. Forms that remain inmemory are faster than forms that are reloaded frequently, although they both take up resources.You use the Visible property of the form to hide and redisplay the form. For example, thefollowing code hides a form:
frmName.Visible = False
❑ Use a splash screen when the application loads to indicate that something is happening. Thesplash screen should be a very simple screen with as few controls as possible. The idea is to get
302

P1: IML/FFX P2: IML/FFX QC: IML/FFX T1: IML
WY044-11 WY044-Gosnell WY044-Gosnell-v2.cls August 6, 2004 15:17
Finishing the Application
something in front of the user quickly while the rest of the application loads. To create a splashscreen, just create a simple form and have that form load when the application begins. You thenclose the splash screen from code when you are ready to display the main form.
❑ Use a progress bar or percent meter to indicate the progress of an operation. For example, if youare performing an operation that is going to take some time iterating through multiple steps, youwant to inform the user as the operation progresses. Think of a file copy operation. As the filesare copied, you see the progress bar to see how many files remain. You can either create your ownform to display progress of an operation, or you can use the percent meter built-in to Access. Thefollowing is an example of using the percent meter that displays progress in the left bottomcorner of Access:
Dim intCounter As IntegerDim intResult As IntegerDim intPause As Long
intResult = SysCmd(acSysCmdInitMeter, "Copying 2000 files", 2000)For intCounter = 1 To 2000
intResult = SysCmd(acSysCmdUpdateMeter, intCounter)'Create pause so user can see progress barFor intPause = 1 To 20000Next intPause
Next intCounter
intResult = SysCmd(acSysCmdRemoveMeter)
Running the Performance AnalyzerAccess comes with a Performance Analyzer utility that will analyze the selected objects and makesuggestions to help improve the speed.
Try It Out Using the Performance AnalyzerLet’s walk through an example of using the Performance Analyzer to analyze all the objects in theNorthwind database for suggested ways to improve speed.
1. Select Tools ➪ Analyze ➪ Performance. A screen similar to the one shown in Figure 11.8 isdisplayed.
2. Select the All Object Types tab, as shown in Figure 11.8. Click the Select All button and thenselect OK. This selects all the objects in the database to analyze. The analyzer runs, and a screensimilar to the one shown in Figure 11.9 is displayed, which makes various suggestions on waysto improve the performance of the application.
How It WorksThe Performance Analyzer is a wizard you can use to let Access provide some suggestions on how toimprove the performance of the application. In the example, you ran the wizard against the Northwinddatabase and discovered that some additional improvements can still be made to make the applicationrun even faster.
303

P1: IML/FFX P2: IML/FFX QC: IML/FFX T1: IML
WY044-11 WY044-Gosnell WY044-Gosnell-v2.cls August 6, 2004 15:17
Chapter 11
Figure 11.8
Figure 11.9
304

P1: IML/FFX P2: IML/FFX QC: IML/FFX T1: IML
WY044-11 WY044-Gosnell WY044-Gosnell-v2.cls August 6, 2004 15:17
Finishing the Application
Securing Your ApplicationYou have various ways to add security to your application. You can implement one or more of thesetechniques depending the type of security that is required for your application. For example, you canassign passwords to the database and/or to the code, you can encrypt the database, and you can add useraccounts that have specific permissions. Let’s look at each of these concepts in more detail.
Adding a Database PasswordOne way to add security to your database is to require a user to input a password before the database canbe opened. This is called file-level security. After the database file has been opened by specifying thecorrect password, the user can do anything to the database unless the other security features areimplemented.
You have at least two ways to set a database password. One way is to select the Tools ➪ Security ➪ SetDatabase Password option. You will be prompted to enter a password for the database. Another way toset a database password is programmatically using VBA code. For example, you can execute SQLstatements against the database to set, change, and remove a database password. Here are sample SQLstatements for each of these options:
'SQL statement for setting password for first time (from NULL to some value)strSQL = "ALTER DATABASE PASSWORD [newpassword] NULL"
'SQL statement for changing the database passwordstrSQL = "ALTER DATABASE PASSWORD [anotherpassword] [newpassword]"
'SQL statement for setting password back to NULL (no password)strSQL = "ALTER DATABASE PASSWORD NULL [anotherpassword]"
'For any of these statements, would also need code to execute the SQLstatement'against the database. For example, could use ADO to execute these statements'against the database.
After a database password has been assigned, whenever any user tries to open the database, a dialogsimilar to the one shown in Figure 11.10 is displayed. Before the database can be opened, the user mustspecify the correct database password.
Figure 11.10
305

P1: IML/FFX P2: IML/FFX QC: IML/FFX T1: IML
WY044-11 WY044-Gosnell WY044-Gosnell-v2.cls August 6, 2004 15:17
Chapter 11
Adding a Password for VBA CodeAdding a password to the database as described in the prior section does not keep the user from seeingyour source code. Since Access 2000, you have to secure the VBA source code separately by locking theproject from viewing and providing a password. To add a password for the VBA code, open the VisualBasic Editor. Then, select Tools ➪ ProjectName Properties. Select the Protection tab, as shown inFigure 11.11.
Figure 11.11
Specify the Lock Project For Viewing option and fill in a password that must be specified in order to viewthe source code. After you click OK, the specified password will be required in the future before thesource code can be viewed or modified.
Another way to improve security through various file security features includes creating an MDE file.Please see the section later in this chapter which discusses MDE files.
Adding Users, Groups, and PermissionsIn addition to file-level security, Access also provides the capability to implement user-level security.This feature allows you to add various users, each of whom has her own set of permissions. For example,you may have some users who are administrators and need access to everything, whereas other usersmay need to view or modify only certain parts of the application. One way to add users, groups, and
306

P1: IML/FFX P2: IML/FFX QC: IML/FFX T1: IML
WY044-11 WY044-Gosnell WY044-Gosnell-v2.cls August 6, 2004 15:17
Finishing the Application
permissions to your database is to use the Security Wizard. You can access this wizard by selecting theTools ➪ Security ➪ User Level Security Wizard option. The wizard walks you through a series of promptsto set up user accounts and groups.
Another way to implement user-level security is using VBA code. Please see Chapter 5 for examples ofhow to use the ADOX library to add new users and groups with VBA code.
A workgroup file with the extension .mdw stores all the permissions information for the database. Thedefault workgroup file is called system.mdw, but other names are also possible. Only one workgroup filecan be associated with a database in a single session. To modify the objects users are allowed to access,you can select Tools ➪ Security ➪ User and Group Permissions. As shown in Figure 11.12, you canmodify the security settings for each object for each user.
Figure 11.12
Encrypting a DatabaseEven after you add to your application the security features discussed so far, your application is still nottotally secure. Someone could still view the contents of the database with a tool that can view partitionson disk and decipher data. If you are worried about someone being able to decipher the data from a diskutility, you should consider encrypting the database.
To do so, select Tools ➪ Security ➪ Encode/Decode Database. Access then prompts you to specify thefilename and location of the database to encrypt. When you click OK, the entire database will be
307

P1: IML/FFX P2: IML/FFX QC: IML/FFX T1: IML
WY044-11 WY044-Gosnell WY044-Gosnell-v2.cls August 6, 2004 15:17
Chapter 11
encrypted. In order for you to use the application after it has been encrypted, Access will have to decryptthe information. This means that encrypting the database will slow down performance as much as 20%. Ifthis performance degradation is a problem for your application, decryption is not a good option.
Distributing Your ApplicationNow that you have tested and optimized your application, you are ready to compile and distribute theapplication to end users. You have various distribution options, such as distributing the database to userswith the full-blown version of Access, distributing the application using the Access runtime, anddistributing MDE files. Each of these will now be discussed.
Before distributing your application, you should first compile the application. Youdo not want end users dealing with compiler errors that could have been avoided bycompiling prior to deployment. Compiling will also help the application run faster.One way to compile an application is from the Visual Basic Editor, by selecting theDebug ➪ Compile option.
Distributing the Application to Users with the FullVersion of Access
In some cases, you may be distributing the application to users who already have the full version ofAccess installed. Other than making the MDB file(s) accessible to each user, you do not have to take anyother steps in order to deploy the application to those users.
Distributing the Application with the Access RuntimeIf you have end users who do not have Access installed, you can distribute the application to them usingthe Access Runtime. The Runtime is a limited feature version of Access that has the following limitations:
❑ You cannot view or modify the object designs.
❑ The database window is hidden.
❑ Built-in toolbars and some menu items are not supported, so you may have to include your ownmenus in your application.
❑ Some keys are disabled.
You can create a setup program using the Packaging Wizard that will enable you to deploy yourapplication with the Access Runtime. In order to use the Packaging Wizard, you first have to have theOffice Access 2003 Developer Extensions installed. Contact Microsoft for more information on how toobtain this extension. At the time of this book’s writing, the developer extensions were only available aspart of the Visual Studio Tools for the Microsoft Office System.
After you have installed a copy of the developer extensions, you must load the Packaging Wizard to yourproject. From the Visual Basic Editor, select Add-Ins ➪ Add-In Manager ➪ Packaging Wizard and checkthe Loaded/Unloaded box. Click OK. The wizard should now appear under the Add-In menu.
308

P1: IML/FFX P2: IML/FFX QC: IML/FFX T1: IML
WY044-11 WY044-Gosnell WY044-Gosnell-v2.cls August 6, 2004 15:17
Finishing the Application
After it is installed, the wizard can be used to help you build a distribution solution based on the AccessRuntime. If you want to test your application to see how it will look in the Access Runtime, you can openthe database using the /runtime switch, as shown in the following code:
msaccess.exe c:\temp\northwind.mdb /runtime
If you plan to distribute your application using the Access Runtime, you should test it in this manner toensure your users will be able to navigate correctly.
Distributing an Execute-Only ApplicationAn MDE is a compiled and compacted database file that has all editable source code removed. For AccessProjects that use SQL Server, you can create ADE files. Because the source code is removed, additionalsecurity is provided for your application. Furthermore, because the code is removed, the size of theapplication is smaller and thus performance is improved. Because of the limitations of MDE files, youshould keep the original database with the source code so that you will be able to make changes later.
To create an MDE file, open the database from which you want to create the MDE file. Select Tools ➪Database Utilities ➪ Make MDE File. Specify a name for the MDE file on the dialog box that appears andclick the OK button.
Maintaining the ApplicationJust because you have deployed your application to end users does not mean that your job is finished. Itis important that you periodically compact the database to keep it in good working order and that youmake periodic backup copies.
Compacting and Repairing the DatabaseYou can compact and repair Access databases to reduce the amount of space they take up and to repairproblems if Access discovers any. Because Access databases are file-based, records are being deleted andadded to the system over time. A large amount of space may have been taken up by an operation that hasalready been completed or by database records that were already deleted. Compacting the database willrecover that space and reduce the file size.
To compact and repair an Access database, select Tools ➪ Database Utilities ➪ Compact and RepairDatabase. If you have the database open that you want to compact, selecting this option willautomatically compact that one. If no databases are open, you will be prompted to specify the name andlocation of the database to compact.
Making Backup Copies of the DatabaseIf you are like most people, you have probably lost data from some program before. It was certainlyfrustrating to lose the data and have to re-create it again. The same concept holds true for your Accessapplications. Access databases are file-based, which means that a lot of the information is contained in
309

P1: IML/FFX P2: IML/FFX QC: IML/FFX T1: IML
WY044-11 WY044-Gosnell WY044-Gosnell-v2.cls August 6, 2004 15:17
Chapter 11
the single MDB file. Because so much is contained in a single file, and because it would be easy for a userto delete the database file from the network, it is extremely important that you make periodic backups ofboth the database tables and the user interface. The concept of backups is important for any application,but it is especially true for file-based applications like Access.
To backup an Access database, select Tools ➪ Database Utilities ➪ Backup Database. You will beprompted to specify a filename and path where you want the backup saved. Click OK and the backupcopy will be created.
SummaryIn this chapter, I discussed several techniques that will help ensure your Access applications are capableof handling multiple users and performing well. You also explored various ways to fine-tune, secure, andtest Access applications. You looked at various implementation options, as well as some maintenanceissues that should be addressed to ensure that your hard work in building the application is not wasted.The concepts covered up to this point have illustrated the basics of building applications and haveprepared you for the final two chapters. Chapters 12 and 13 are two hands-on case studies that will allowyou to build real-world applications while solidifying the concepts covered in all the prior chapters.
Exercises1. Describe two ways you can improve support for multiple users in your application.
2. Describe two ways you can improve the performance of your application.
3. What is involved in building a help system for your application?
4. Describe some ways you can add security to your application.
5. What is an MDE file? How does deploying your application using an MDE file differ from usingthe Access Runtime version?
310

P1: IML/FFX P2: IML/FFX QC: IML/FFX T1: IML
WY044-12 WY044-Gosnell WY044-Gosnell-v2.cls August 13, 2004 15:25
12Case Study 1: Project
Tracker Application
So far in this book, you have learned various ways to use VBA code to extend your Accessapplications. This chapter is the first of two case studies that will illustrate all the concepts coveredto this point in a real-world and comprehensive example. It involves the Project Tracker applicationthat allows users to track their projects and related contacts and document attachments. You will:
❑ Review the important design specifications
❑ Separate the code into different physical layers
❑ Use two separate Access database files for the application: one for the user interface and theother for the data
❑ Implement custom objects using class modules
❑ Launch an external file or program from your application
❑ Send an e-mail from your application
❑ Work with disconnected recordsets to minimize database connections and improvemulti-user capabilities
❑ Learn how to handle errors
In this chapter, you are tasked with creating the Project Tracker application from start to finish. I willwalk you through each step, and at the end many of the concepts covered in prior chapters willmake a lot more sense. For your convenience I included the two database files with the source codeand table structures available for download from Wrox.com. However, I recommend that you workthrough the chapter yourself—at least in the beginning—before using the source code I provide. Thebest way to learn Access is hands-on.
Design SpecificationsLet’s turn straight to the task of learning the requirements for the Project Tracker application. Asdiscussed in Chapter 1, before you ever write a single line of code you should carefully plan your

P1: IML/FFX P2: IML/FFX QC: IML/FFX T1: IML
WY044-12 WY044-Gosnell WY044-Gosnell-v2.cls August 13, 2004 15:25
Chapter 12
End User
UC 1.1 - Open ProjectTracker Screen for All Unclosed
Projects
UC 1.7 - Open Contacts ScreenFor Selected Record onProject Tracker Screen
UC 1.3 - Provide RecordNavigation to Browse
Records
UC 1.2 - Provide Ability ToToggle Between Unclosed and
All Projects
UC 1.8 - Open Contacts Screen(All Records) to Manage and
Associate a Contact
**
***
Requirement 1- Project Tracking Use Cases
UC 1.6 - DeleteExisting Project Record
UC 1.5 - Add NewProject Record
UC 1.4 - UpdateExisting Project Record***
*
Figure 12.1
application on paper. Start this design process by determining exactly what the new application needs todo, who will use it, and what they are currently using. Go on a fact-finding mission to determine whatneeds the new application must meet. Many applications fail because coding was done too early and itwas hard to retrofit changes. You may recall the house building analogy: If you wait until the first twofloors have been framed to tell your builder you want a basement, you incur a lot of expense to get it atthat point. The same concept applies in the world of programming. The more you plan up front, thebetter off you will be.
With the present case study, you have already talked to users and determined that each person needs away to track his own personal projects. Corporate systems are in place to manage contacts, billing, andeven projects for the company. However, the users are complaining that they need a simpler way to tracktheir own little tasks in a coherent way. This system is not meant to replace the existing systems. The userswill still have to maintain the projects in the master system. However, the personal details for each user’sdaily work do not need to be maintained in the master system, nor does management want them to be.
312

P1: IML/FFX P2: IML/FFX QC: IML/FFX T1: IML
WY044-12 WY044-Gosnell WY044-Gosnell-v2.cls August 13, 2004 15:25
Case Study 1: Project Tracker Application
With that in mind, you determine that the application should, at least, allow users to track simple detailsabout their projects, as well as store related contact information for each project. The user interface formatshould allow the user to navigate through the records one at a time. Preferably, only open projects shouldbe displayed on the screen when the application opens, but the users must also have some way to see allprojects, including those that are closed.
The Use Case diagram, shown in Figure 12.1, illustrates these basic requirements.
Eight use cases are shown in Figure 12.1. Users can open the Project Tracker application with onlyunclosed records displayed (U.C. 1.1), but have the option to see all project records (U.C. 1.2). Buttonsallow navigation among the records (U.C. 1.3). In addition, the application enables users to updateexisting (U.C. 1.4), add new (U.C. 1.5), and delete existing (U.C. 1.6) records. From the Project Trackerscreen, a user can open the Contacts screen to see contact details for a particular contact that is associatedwith the project (U.C. 1.7). A user can also open the Contacts screen and manage existing contacts(U.C. 1.8) and add/associate a particular contact with the current project.
End User
UC 2.1 - OpenSelected Contact Record
UC 2.4 - DeleteExisting Contacts Record
UC 2.3 - Add NewContacts Record
UC 2.2 - UpdateExisting Contacts Record
*
*
*
*
*
*
*
*
Requirement 2 - View/Manage Contacts Screen Use Cases
UC 2.5 - Provide RecordNavigation to Browse
Records
*
*
UC 2.6 - AssociateContact With Current
Project
*
*
Figure 12.2
313

P1: IML/FFX P2: IML/FFX QC: IML/FFX T1: IML
WY044-12 WY044-Gosnell WY044-Gosnell-v2.cls August 13, 2004 15:25
Chapter 12
From the Contacts screen, you determine that the user should be able to view and manage contacts in amanner similar to the way the Project Tracker screen does, with record navigation and updatecapabilities. In addition, the user needs an option to associate a selected contact with the currently openproject. Figure 12.2 shows these features represented in a Use Case diagram.
Again, the user can open contacts records (U.C. 2.1), and update (U.C. 2.2), add new (U.C. 2.3), and delete(U.C. 2.4) contact records. Record navigation is provided (U.C. 2.5) to enable viewing and maintenance ofcontacts. Furthermore, a user can associate a contact record with the currently open project on the projectform (U.C. 2.6).
You may determine that although it is not required, it would also be desirable to add enhanced features,such as the capability to create a new e-mail to send to a selected contact from the project record. Usersalso want to associate external files, such as related documents and spreadsheets, with a project record.You might decide to include these features in the application because they will add a lot of additionalvalue to the users and management has approved of this approach.
As discussed in Chapter 1, you have various other ways to document the application, including activitydiagrams, other flow charts, network diagrams, object diagrams, and so on. Exactly what you do is not so
Figure 12.3
314

P1: IML/FFX P2: IML/FFX QC: IML/FFX T1: IML
WY044-12 WY044-Gosnell WY044-Gosnell-v2.cls August 13, 2004 15:25
Case Study 1: Project Tracker Application
important, as long as you arrive at a coherent design on paper before you begin writing the application.In Access, I typically generate prototype screens by using Access forms, because the work of drawing theforms can be re-used when you actually start coding the forms. I sometimes use Visio to generate prototypescreens as well. In any event, when you analyze the requirements previously discussed, you mightdetermine that two main screens make sense: a Project Tracker screen and a Contacts screen. The ProjectTracker screen can be further divided into tabs, such as a first tab for Comments/Tasks, a second tab forrelated contacts, and a third tab for file attachments. This design is illustrated in Figures 12.3, 12.4, and 12.5.
Figure 12.4
Figure 12.3 shows the general information for the project as well as the comments tab where the user canenter tasks or comments about the project. The user can enter a comment or task in the Comment/TaskText field and then click the Add Comment button to add it to the project. Because you are planning toimplement a disconnected recordset scenario as described in detail in Chapter 5 on ADO, you will notactually be saving the changes to the underlying database until the user clicks the Save Changes button.The Delete Comment button removes the comment from the list on the form but does not remove thecomment from the database until the Save Changes button is later selected.
Figure 12.4 shows the same general project information at the top portion of the screen and has aContacts tab where related contact records can be managed. Notice the button with the mail icon on the
315

P1: IML/FFX P2: IML/FFX QC: IML/FFX T1: IML
WY044-12 WY044-Gosnell WY044-Gosnell-v2.cls August 13, 2004 15:25
Chapter 12
Figure 12.5
right of the contact list. You intend for a button such as this to enable a user to generate an e-mail to thecurrently selected contact in the list. This tab is where users launch the Contacts screen to view moreinformation about the selected contact, manage existing contacts, and associate them with the currentcontact. The Delete Selected Contact button simply removes the contact from this project, but not fromthe database until Save Changes is selected.
Figure 12.5 includes a File Attachments tab where users can associate separate files with the current project.The Preview button to the right of the list will allow a user to open a selected file attachment in a separatewindow in its native application. A File Open button allows a user to search on the file system for anattachment and includes any selected filename in the File Name field to be added to the project. After the userfills in a file description and filename and selects the Add File Attachment button, the file is added to the list.
Figure 12.6 is a prototype screen for Contacts. Notice how various data elements related to the contact areincluded, as well as navigation buttons and buttons for saving changes to records. The Add CurrentContact To Project button allows a user to put the current contact back on the project form for thecurrently open project. Now that you have a written plan detailing what you want the application to do,it’s time to get your hands dirty creating the database and the code!
316

P1: IML/FFX P2: IML/FFX QC: IML/FFX T1: IML
WY044-12 WY044-Gosnell WY044-Gosnell-v2.cls August 13, 2004 15:25
Case Study 1: Project Tracker Application
Figure 12.6
Building the DatabaseIn this section, you will build the database in an Access file separate from the user interface. You learnedin Chapter 10 that you can realize performance improvements by separating the user interface from theunderlying data. The database containing the data tables can be placed on the same or a differentcomputer than the one containing the user interface. If you are the only user, then having both files on thesame computer is fine. If you have others with whom you must share the application, then putting thedatabase with the data tables on a file server and the user interface on each user’s workstation makes themost sense.
Try It Out Building the ProjectTrackerDb DatabaseLet’s now build the database that will store the data tables.
1. Create a new database by selecting File ➪ New ➪ Blank Database. Specify ProjectTrackerDb forthe filename and click the Create button.
2. The tables for this database are shown in Figures 12.7 through 12.11. Note that for each table, thefield size is specified in the Description field for your convenience. You also need to add primarykeys as indicated in each table by the key icon.
3. Add the tblProjects table as shown in Figure 12.7. This table is the master project table forstoring project information. Note that the fields in this table map to the fields on the prototypescreen that are not on the tabs.
317

P1: IML/FFX P2: IML/FFX QC: IML/FFX T1: IML
WY044-12 WY044-Gosnell WY044-Gosnell-v2.cls August 13, 2004 15:25
Chapter 12
Figure 12.7
4. Add the tblContacts table as shown in Figure 12.8. This table maps to the fields on theContacts prototype form.
Figure 12.8
5. Add the tblProjectsComments table as shown in Figure 12.9. This table is used to store themultiple comments that can be entered for a given project. This table maps to the first tab of theProject Tracker screen prototype. The reason a separate table has to be used for the tabs is that
Figure 12.9
318

P1: IML/FFX P2: IML/FFX QC: IML/FFX T1: IML
WY044-12 WY044-Gosnell WY044-Gosnell-v2.cls August 13, 2004 15:25
Case Study 1: Project Tracker Application
multiple entries can be included. You cannot simply put a field in the main table that holdsmultiple contacts. In the world of database design, you illustrate these relationships (one tomany, many to many, and so on) in separate tables for various reasons.
6. Add the tblProjectsContacts table as shown in Figure 12.10. This table maps to the secondtab of the Project Tracker screen prototype.
Figure 12.10
7. Add the tblProjectsFileAttachments table as shown in Figure 12.11. This table maps tothe third tab of the Project Tracker screen prototype.
Figure 12.11
8. At this point, your ProjectTrackerDb database should look like the one shown in Figure 12.12.
Figure 12.12
319

P1: IML/FFX P2: IML/FFX QC: IML/FFX T1: IML
WY044-12 WY044-Gosnell WY044-Gosnell-v2.cls August 13, 2004 15:25
Chapter 12
How It WorksYou created five tables that will store the data for the Project Tracker application. These tables werecreated in a separate database from the user interface database to provide better support for multipleusers. The tblContacts table is used to store data about each individual contact. The tblProjectstable stores data about each project record. The tblProjectsComments, tblProjectsContacts, andtblProjectsFileAttachments tables can store multiple records for a particular project record.
Building the User InterfaceNow that the tables have been created, it’s time to move on to creating the empty forms for the userinterface. You can then write the code in class modules and standard modules, and finish off by addingcode to each form to call the class modules and standard modules. The example in this chapter uses ADOto connect to the ProjectTrackerDb database, but you can alternatively or additionally add an explicit linkto the separate database so you can see the tables from within your user interface project.
Try It Out Building the frmProjects and frmContacts FormsNow let’s create the separate database file that will store the user interface objects.
1. Select File ➪ New ➪ Blank Database and specify ProjectTrackerUI for the filename. Clickthe Create button.
2. Create a new form called frmProjects. First, open the form in Design View. From thetoolbox, drag and drop the tab control onto the form. Select the tab control and right-click soyou can insert a third tab if one is not already present. You add additional tabs/pages asillustrated in Figure 12.13.
3. Next, drag and drop the numerous other controls onto the form and page 1 of the tab, asshown in Figure 12.14.
Figure 12.13
320

P1: IML/FFX P2: IML/FFX QC: IML/FFX T1: IML
WY044-12 WY044-Gosnell WY044-Gosnell-v2.cls August 13, 2004 15:25
Case Study 1: Project Tracker Application
Figure 12.14
4. The following table will help ensure you have all the correct objects on the form. Rename thecontrols and change other properties for each object as shown in the table.
Default Name Other Properties to Set from(on Figure 12.14) Name Type of Control the Properties Dialog
Form1 frmProjects Form Record Selectors = No; NavigationButtons = No; Dividing Lines = No; Popup = Yes; Caption = “Project Tracker”
Text5 txtProjectId Text Box Set corresponding label caption to“Project Id:”
Text7 txtProjectTitle Text Box Set corresponding label caption to“Project Title:”
Text9 txtProjectDesc Text Box Set corresponding label caption to“Project Description:”
Continued
321

P1: IML/FFX P2: IML/FFX QC: IML/FFX T1: IML
WY044-12 WY044-Gosnell WY044-Gosnell-v2.cls August 13, 2004 15:25
Chapter 12
Default Name Other Properties to Set from(on Figure 12.14) Name Type of Control the Properties Dialog
Combo25 cboPriority Combo Box Set corresponding label captionto “Priority:”
Text11 txtReferenceNum Text Box Set corresponding label captionto “Reference / Matter #:”
Text13 txtMoneyBudget Text Box Set corresponding label captionto “Money Budget:”
Text15 txtMoneyToDate Text Box Set corresponding label captionto “MoneyToDate:”
Text17 txtHoursBudget Text Box Set corresponding label captionto “Hours Budget:”
Text21 txtHoursToDate Text Box Set corresponding label captionto “Hours To Date:”
Text23 txtDateDue Text Box Set corresponding label captionto “Date Due:”
Combo27 cboStatus Combo Box Set corresponding label captionto “Status:”
Toggle31 togShowUnclosed Toggle Button Caption = “Show Unclosed”
Toggle32 togShowAll Toggle Button Caption = “Show All”
Command33 cmdMoveFirst Command Button Caption = “Move First”; Picture= select Go To First 1 from list
Command34 cmdMovePrevious Command Button Caption = “Move Previous”;Picture = select Go To Previous1 from list
Command35 cmdMoveNext Command Button Caption = “Move Next”; Picture= select Go To Next 1 from list
Command36 cmdMoveLast Command Button Caption = “Move Last”; Picture= select Go To Last 1 from list
Command37 cmdAddNew Command Button Caption = “Add New”
Command38 cmdSave Command Button Caption = “Save Changes”
Command39 cmdDelete Command Button Caption = “Delete”
Page1 pgComments Page of Tab Control Caption = “Comments / Tasks”
322

P1: IML/FFX P2: IML/FFX QC: IML/FFX T1: IML
WY044-12 WY044-Gosnell WY044-Gosnell-v2.cls August 13, 2004 15:25
Case Study 1: Project Tracker Application
Default Name Other Properties to Set from(on Figure 12.14) Name Type of Control the Properties Dialog
List41 lstComments List Box Set corresponding label captionto “Comments / Tasks:”
Command47 cmdDeleteComment Command Button Caption = “Delete Comment”
Command48 cmAddComment Command Button Caption = “Add Comment”
Text45 txtAddComment Text Box Set corresponding label captionto “Comment / Task Text:”
Label66 lblRecordNum Label Caption = “Record # Of #”
5. Next, select Page 2 of the tab control and drag the additional controls onto that tab as shown inFigure 12.15.
Figure 12.15
6. The following table will help ensure you have all the correct objects on Page 2 of the tab controlon frmProjects. Rename the controls and change other properties for each object as shownin the table.
323

P1: IML/FFX P2: IML/FFX QC: IML/FFX T1: IML
WY044-12 WY044-Gosnell WY044-Gosnell-v2.cls August 13, 2004 15:25
Chapter 12
Default Name Other Properties to Set from(on Figure 12.15) Name Type of Control the Properties Dialog
Page2 pgContacts Page of Tab Control Caption = “Contacts”
List49 lstContacts List Box Set corresponding label caption to“Related Contacts:”
Command53 cmdViewContact Command Button Caption = “View Details ForSelected Contact”
Command54 cmdManageContacts Command Button Caption = “Add / ManageContacts”
Command59 cmdDeleteContact Command Button Caption = “Delete SelectedContact”
Command60 cmdEmailContact Command Button Caption = “Email SelectedContact”; Picture = select Mailboxfrom list of pictures
Figure 12.16
324

P1: IML/FFX P2: IML/FFX QC: IML/FFX T1: IML
WY044-12 WY044-Gosnell WY044-Gosnell-v2.cls August 13, 2004 15:25
Case Study 1: Project Tracker Application
7. Next, select Page 3 of the tab control and drag the additional controls onto that tab, as shown inFigure 12.16.
8. The following table will help ensure you have all the correct objects on Page 3 of the tab controlon frmProjects. Again, rename the controls and change other properties for each object asshown in the table that follows.
Other PropertiesDefault Name to Set from the(on Figure 12.16) Name Type of Control Properties Dialog
Page3 pgFileAttachments Page of Tab Control Caption = “FileAttachments”
List55 lstFileAttachments List Box Set corresponding labelcaption to “Related FileAttachments:”
Command61 cmdRemoveAttachment Command Button Caption = “RemoveFile Attachment”
Command64 cmdAddAttachment Command Button Caption = “Add FileAttachment”
Text57 txtFileDesc Text Box Set corresponding labelcaption to “FileDescription:”
Text 62 txtFileName Text Box Set corresponding labelcaption to “File Name:”
Command65 cmdOpenFile Command Button Caption = “OpenSelected File”; Picture =select PreviewDocument from list
Command67 cmdFileBrowse Command Button Caption = “FileBrowse”; Picture =select Open Folderfrom list
9. Verify that each control on frmProjects has the correct name and other property settings aslisted in the prior tables. If any of these are misspelled, later code referencing them willproduce an error you will need to fix. The form should now appear similar to those shown inFigures 12.17–12.19.
10. Make sure to save all your changes to frmProjects.
11. Next, create a new form called frmContacts. Drag and drop the controls onto the form, asshown in Figure 12.20.
12. The following table will help ensure you have all the correct objects on the form. Rename thecontrols and change other properties for each object as shown in the table.
325

P1: IML/FFX P2: IML/FFX QC: IML/FFX T1: IML
WY044-12 WY044-Gosnell WY044-Gosnell-v2.cls August 13, 2004 15:25
Figure 12.17
Figure 12.18
326

P1: IML/FFX P2: IML/FFX QC: IML/FFX T1: IML
WY044-12 WY044-Gosnell WY044-Gosnell-v2.cls August 13, 2004 15:25
Figure 12.19
Figure 12.20
327

P1: IML/FFX P2: IML/FFX QC: IML/FFX T1: IML
WY044-12 WY044-Gosnell WY044-Gosnell-v2.cls August 13, 2004 15:25
Chapter 12
Default Name Other Properties to Set from(on Figure 12.20) Name Type of Control the Properties Dialog
Form2 frmContacts Form Record Selectors = No;Navigation Buttons = No;Dividing Lines = No; Pop up =Yes; Caption = “Contacts”
Text0 txtLName Text Box Set corresponding label captionto “Last Name:”
Text2 txtFName Text Box Set corresponding label captionto “First Name:”
Text4 txtMName Text Box Set corresponding label captionto “Middle Name:”
Text6 txtCompany Text Box Set corresponding label captionto “Company:”
Text8 txtAddress1 Text Box Set corresponding label captionto “Address1:”
Text10 txtAddress2 Text Box Set corresponding label captionto “Address2:”
Text12 txtCity Text Box Set corresponding label captionto “City:”
Text14 txtRegion Text Box Set corresponding label captionto “State / Region:”
Text16 txtPostalCode Text Box Set corresponding label captionto “Postal Code:”
Text18 txtWorkPhone Text Box Set corresponding label captionto “Work Phone:”
Text20 txtHomePhone Text Box Set corresponding label captionto “Home Phone:”
Text22 txtCellPhone Text Box Set corresponding label captionto “Cell Phone:”
Text24 txtEmail Text Box Set corresponding label captionto “Email:”
Command26 cmdAddToProject Command Button Caption = “Add Current ContactTo Project”
Command33 cmdMoveFirst Command Button Caption = “Move First”; Picture= select Go To First 1 from list
328

P1: IML/FFX P2: IML/FFX QC: IML/FFX T1: IML
WY044-12 WY044-Gosnell WY044-Gosnell-v2.cls August 13, 2004 15:25
Case Study 1: Project Tracker Application
Default Name Other Properties to Set from(on Figure 12.20) Name Type of Control the Properties Dialog
Command34 cmdMovePrevious Command Button Caption = “Move Previous”;Picture = select Go To Previous1 from list
Command35 cmdMoveNext Command Button Caption = “Move Next”; Picture= select Go To Next 1 from list
Command36 cmdMoveLast Command Button Caption = “Move Last”; Picture= select Go To Last 1 from list
Command37 cmdAddNew Command Button Caption = “Add New”
Command38 cmdSave Command Button Caption = “Save Changes”
Command39 cmdDelete Command Button Caption = “Delete”
Label27 lblRecordNum Label Caption = “Record # of #”
13. After setting all the properties, frmContacts should now appear as shown in Figure 12.21.
Figure 12.21
329

P1: IML/FFX P2: IML/FFX QC: IML/FFX T1: IML
WY044-12 WY044-Gosnell WY044-Gosnell-v2.cls August 13, 2004 15:25
Chapter 12
14. Save all the changes for frmContacts.
15. A database window showing how the ProjectTrackerUI database should appear at this point isillustrated in Figure 12.22.
Figure 12.22
How It WorksThe frmProjects form will be used to display project records. You added various controls tothis form, including several text boxes and other controls that will be used to display data and acceptinput from a user. The primary data for the frmProjects form will come from the tblProjectstable. Additional data for the tabs on the tab control will come from the tblProjectsComments,tblProjectsContacts, and tblProjectsFileAttachments tables.
The frmContacts form will be used to display contact records for all contacts or for a selected contact.You also added various controls to this form that will be used to display the contact data and accept inputfrom a user. The data for the frmContacts form will come from the tblContacts table.
Building the Class Modules for the ObjectsThroughout this book you learned that VBA code can be written in various places, such as class modulesthat are independent or associated with a form, as well as in standard modules. Next, you turn yourattention to writing the code that will implement the desired features of the Project Tracker application.You will be creating the custom class modules first, then the standard modules, and finally the code forthe forms to call the other modules. An example of how the Project Explorer will look in the Visual BasicEditor when you’re finished is shown in Figure 12.23.
330

P1: IML/FFX P2: IML/FFX QC: IML/FFX T1: IML
WY044-12 WY044-Gosnell WY044-Gosnell-v2.cls August 13, 2004 15:25
Case Study 1: Project Tracker Application
Figure 12.23
Chapter 4 introduced the idea of creating custom classes. In the current application, you will create twological custom class modules. One is a class for a Project object that will represent the current project inmemory on the Project Tracker screen. The other class will be a Contact object that will represent anycurrent contact in memory from the Contacts screen.
The Project ClassAn object diagram is shown in Figure 12.24 for the Project class.
The Contact class will be illustrated later in this chapter.
+Save()+Delete()+RetrieveProjects()+RetrieveComments()+RetrieveContacts()+RetrieveAttachments()+PopulatePropertiesFromRecordset()+PopulatePropertiesFromForm()+ClearObject()
Project
-ProjectId-ProjectTitle-ProjectDescription-Priority-ReferenceNum-MoneyBudget-MoneyToDate-HoursBudget-HoursToDate-DateDue-Status
Figure 12.24
331

P1: IML/FFX P2: IML/FFX QC: IML/FFX T1: IML
WY044-12 WY044-Gosnell WY044-Gosnell-v2.cls August 13, 2004 15:25
Chapter 12
The properties are represented in the top portion of the diagram, and the methods are shown in thebottom section. These correspond to the data elements on the form for the most part, except that the tabswith multiple records are not listed here. The methods represent various actions that you must take on theobject. You will also write numerous other procedures that are not in the class module, as you will see later.
Try It Out Building the clsProjects ClassLet’s begin building the clsProjects class module that will implement the object illustrated inFigure 12.24.
1. Add a new class module called clsProjects. In the General Declarations section of the class,add the following code:
Option Compare DatabaseOption Explicit
Const CLS_PROJECTS = "clsProjects"
Dim intProjectIdVal As IntegerDim strProjectTitleVal As StringDim strProjectDescriptionVal As StringDim strPriorityVal As StringDim strReferenceNumVal As StringDim curMoneyBudgetVal As CurrencyDim curMoneyToDateVal As CurrencyDim intHoursBudgetVal As IntegerDim intHoursToDateVal As IntegerDim dtDateDueVal As DateDim strStatusVal As String
2. Add the various property procedures shown in the following code to clsProjects classmodule.
Public Property Get ProjectId() As IntegerOn Error Resume NextProjectId = intProjectIdVal
End Property
Public Property Let ProjectId(ByVal Value As Integer)On Error Resume NextintProjectIdVal = Value
End Property
Public Property Get ProjectTitle() As StringOn Error Resume NextProjectTitle = strProjectTitleVal
End Property
Public Property Let ProjectTitle(ByVal Value As String)On Error Resume NextstrProjectTitleVal = Value
End Property
332

P1: IML/FFX P2: IML/FFX QC: IML/FFX T1: IML
WY044-12 WY044-Gosnell WY044-Gosnell-v2.cls August 13, 2004 15:25
Case Study 1: Project Tracker Application
Public Property Get ProjectDescription() As StringOn Error Resume NextProjectDescription = strProjectDescriptionVal
End Property
Public Property Let ProjectDescription(ByVal Value As String)On Error Resume NextstrProjectDescriptionVal = Value
End Property
Public Property Get Priority() As StringOn Error Resume NextPriority = strPriorityVal
End Property
Public Property Let Priority(ByVal Value As String)On Error Resume NextstrPriorityVal = Value
End Property
Public Property Get ReferenceNum() As StringOn Error Resume NextReferenceNum = strReferenceNumVal
End Property
Public Property Let ReferenceNum(ByVal Value As String)On Error Resume NextstrReferenceNumVal = Value
End Property
Public Property Get MoneyBudget() As CurrencyOn Error Resume NextMoneyBudget = curMoneyBudgetVal
End Property
Public Property Let MoneyBudget(ByVal Value As Currency)On Error Resume NextcurMoneyBudgetVal = Value
End Property
Public Property Get MoneyToDate() As CurrencyOn Error Resume NextMoneyToDate = curMoneyToDateVal
End Property
Public Property Let MoneyToDate(ByVal Value As Currency)On Error Resume NextcurMoneyToDateVal = Value
End Property
Public Property Get HoursBudget() As IntegerOn Error Resume NextHoursBudget = intHoursBudgetVal
End Property
333

P1: IML/FFX P2: IML/FFX QC: IML/FFX T1: IML
WY044-12 WY044-Gosnell WY044-Gosnell-v2.cls August 13, 2004 15:25
Chapter 12
Public Property Let HoursBudget(ByVal Value As Integer)On Error Resume NextintHoursBudgetVal = Value
End Property
Public Property Get HoursToDate() As IntegerOn Error Resume NextHoursToDate = intHoursToDateVal
End Property
Public Property Let HoursToDate(ByVal Value As Integer)On Error Resume NextintHoursToDateVal = Value
End Property
Public Property Get DateDue() As DateOn Error Resume NextDateDue = dtDateDueVal
End Property
Public Property Let DateDue(ByVal Value As Date)On Error Resume NextdtDateDueVal = Value
End Property
Public Property Get Status() As StringOn Error Resume NextStatus = strStatusVal
End Property
Public Property Let Status(ByVal Value As String)On Error Resume NextstrStatusVal = Value
End Property
3. Add the RetrieveProjects function shown in the following code to the clsProjectsclass module.
Function RetrieveProjects(blnAllRecords As Boolean) As ADODB.Recordset
On Error GoTo HandleError
Dim strSQLStatement As StringDim rsProj As New ADODB.Recordset
'build the SQL statement to retrieve datastrSQLStatement = BuildSQLSelectProjects(blnAllRecords)
'generate the recordsetSet rsProj = ProcessRecordset(strSQLStatement)
'return the populated recordsetSet RetrieveProjects = rsProj
334

P1: IML/FFX P2: IML/FFX QC: IML/FFX T1: IML
WY044-12 WY044-Gosnell WY044-Gosnell-v2.cls August 13, 2004 15:25
Case Study 1: Project Tracker Application
Exit Function
HandleError:GeneralErrorHandler Err.Number, Err.Description, CLS_PROJECTS, _
"RetrieveProjects"Exit Function
End Function
4. Add the RetrieveComments function shown in the following code to the clsProjectsclass module.
Function RetrieveComments(intId As Integer) As ADODB.Recordset
On Error GoTo HandleError
Dim rsComments As New ADODB.RecordsetDim strSQL As String
strSQL = "SELECT txtComment FROM tblProjectsComments WHERE intProjectId = " & _intId
'retrieve the comments for tab 1 from the databaseSet rsComments = ProcessRecordset(strSQL)
Set RetrieveComments = rsComments
Exit Function
HandleError:GeneralErrorHandler Err.Number, Err.Description, CLS_PROJECTS, _
"RetrieveComments"Exit Function
End Function
5. Add the RetrieveContacts function shown in the following code to the clsProjectsclass module.
Function RetrieveContacts(intId As Integer) As ADODB.Recordset
On Error GoTo HandleError
Dim rsContacts As New ADODB.RecordsetDim strSQL As String
strSQL = "SELECT txtFirstName, txtLastName, txtWorkPhone, txtHomePhone, " & _"txtCellPhone, txtEmail, tblcontacts.intContactId FROM tblContacts " & _"INNER JOIN tblProjectsContacts ON " & _"tblContacts.intContactId = tblProjectsContacts.intContactId " & _"WHERE tblProjectsContacts.intProjectId = " & intId
'retrieve the comments for tab 2 from the databaseSet rsContacts = ProcessRecordset(strSQL)
335

P1: IML/FFX P2: IML/FFX QC: IML/FFX T1: IML
WY044-12 WY044-Gosnell WY044-Gosnell-v2.cls August 13, 2004 15:25
Chapter 12
Set RetrieveContacts = rsContacts
Exit Function
HandleError:GeneralErrorHandler Err.Number, Err.Description, CLS_PROJECTS, _
"RetrieveContacts"Exit Function
End Function
6. Add the RetrieveAttachments function shown in the following code to the clsProjectsclass module.
Function RetrieveAttachments(intId As Integer) As ADODB.Recordset
On Error GoTo HandleError
Dim rsAttachments As New ADODB.RecordsetDim strSQL As String
strSQL = "SELECT txtFileDescription, txtFileName " & _"FROM tblProjectsFileAttachments WHERE intProjectId = " & intId
'retrieve the comments for tab 3 from the databaseSet rsAttachments = ProcessRecordset(strSQL)
Set RetrieveAttachments = rsAttachments
Exit Function
HandleError:GeneralErrorHandler Err.Number, Err.Description, CLS_PROJECTS, _
"RetrieveAttachments"Exit Function
End Function
7. Add the PopulatePropertiesFromRecordset procedure shown in the following code tothe clsProjects class module.
Sub PopulatePropertiesFromRecordset(rsProj As ADODB.Recordset)
On Error GoTo HandleError
'Populate the object with the current record in the'recordsetMe.ProjectId = rsProj!intProjectIdMe.ProjectTitle = rsProj!txtProjectTitleMe.ProjectDescription = rsProj!txtProjectDescriptionMe.Priority = rsProj!txtPriorityMe.ReferenceNum = rsProj!txtReferenceNumMe.MoneyBudget = rsProj!curMoneyBudget
336

P1: IML/FFX P2: IML/FFX QC: IML/FFX T1: IML
WY044-12 WY044-Gosnell WY044-Gosnell-v2.cls August 13, 2004 15:25
Case Study 1: Project Tracker Application
Me.MoneyToDate = rsProj!curMoneyToDateMe.HoursBudget = rsProj!intHoursBudgetMe.HoursToDate = rsProj!intHoursToDateMe.DateDue = rsProj!dtDateDueMe.Status = rsProj!txtStatus
Exit Sub
HandleError:GeneralErrorHandler Err.Number, Err.Description, CLS_PROJECTS, _
"PopulatePropertiesFromRecordset"Exit Sub
End Sub
8. Add the PopulatePropertiesFromForm procedure shown in the following code to theclsProjects class module.
Sub PopulatePropertiesFromForm()
On Error GoTo HandleError
'Populate the object with the current record in the'form
If Forms("frmProjects")!txtProjectId <> "" ThenMe.ProjectId = CInt(Forms("frmProjects")!txtProjectId)
End If
Me.ProjectTitle = Forms("frmProjects")!txtProjectTitleMe.ProjectDescription = Forms("frmProjects")!txtProjectDescMe.Priority = Forms("frmProjects")!cboPriorityMe.ReferenceNum = Forms("frmProjects")!txtReferenceNum
If Forms("frmProjects")!txtMoneyBudget <> "" ThenMe.MoneyBudget = CCur(Forms("frmProjects")!txtMoneyBudget)
End If
If Forms("frmProjects")!txtMoneyToDate <> "" ThenMe.MoneyToDate = CCur(Forms("frmProjects")!txtMoneyToDate)
End If
If Forms("frmProjects")!txtHoursBudget <> "" ThenMe.HoursBudget = CInt(Forms("frmProjects")!txtHoursBudget)
End If
If Forms("frmProjects")!txtHoursToDate <> "" ThenMe.HoursToDate = CInt(Forms("frmProjects")!txtHoursToDate)
End If
If Forms("frmProjects")!txtDateDue <> "" ThenMe.DateDue = CDate(Forms("frmProjects")!txtDateDue)
End If
337

P1: IML/FFX P2: IML/FFX QC: IML/FFX T1: IML
WY044-12 WY044-Gosnell WY044-Gosnell-v2.cls August 13, 2004 15:25
Chapter 12
Me.Status = Forms("frmProjects")!cboStatus
Exit Sub
HandleError:GeneralErrorHandler Err.Number, Err.Description, CLS_PROJECTS, _
"PopulatePropertiesFromForm"Exit Sub
End Sub
9. Add the ClearObject procedure shown in the following code to the clsProjects classmodule.
Sub ClearObject()
On Error GoTo HandleError
'clear the values in the projects objectMe.ProjectId = 0Me.ProjectTitle = ""Me.ProjectDescription = ""Me.Priority = 0Me.ReferenceNum = ""Me.MoneyBudget = 0Me.MoneyToDate = 0Me.HoursBudget = 0Me.HoursToDate = 0Me.DateDue = "01-01-1900"Me.Status = 0
Exit Sub
HandleError:GeneralErrorHandler Err.Number, Err.Description, CLS_PROJECTS,"ClearObject"Exit Sub
End Sub
10. Add the Delete procedure shown in the following code to the clsProjects class module.
Sub Delete(intCurProjId As Integer, blnAddMode As Boolean, rsProj As _ADODB.Recordset)
On Error GoTo HandleError
Dim strSQLStatement As StringDim intResponse As Integer
'make sure delete should be processedIf Not ProceedWithDelete(blnAddMode) ThenExit Sub
End If
338

P1: IML/FFX P2: IML/FFX QC: IML/FFX T1: IML
WY044-12 WY044-Gosnell WY044-Gosnell-v2.cls August 13, 2004 15:25
Case Study 1: Project Tracker Application
'build the SQL statement to delete the projectstrSQLStatement = BuildSQLDeleteProjects(intCurProjId)
'perform the deleteCall ProcessUpdate(strSQLStatement, rsProj)
Exit Sub
HandleError:GeneralErrorHandler Err.Number, Err.Description, CLS_PROJECTS, "Delete"Exit Sub
End Sub
11. Add the Save procedure shown in the following code to the clsProjects class module.
Sub Save(blnAddMode As Boolean, rsProj As ADODB.Recordset)
On Error GoTo HandleError
Dim strSQLStatement As String
'if adding a new recordIf blnAddMode = True Then
strSQLStatement = BuildSQLInsertProjects(Me)Else'if updating a record
strSQLStatement = BuildSQLUpdateProjects(Me)End If
'perform the insert or updateCall ProcessUpdate(strSQLStatement, rsProj)
Exit Sub
HandleError:GeneralErrorHandler Err.Number, Err.Description, CLS_PROJECTS, "Save"Exit Sub
End Sub
How It WorksTo build the clsProjects class module that implements the object illustrated in Figure 12.24, you firstadded code to the General Declarations section of the new class. For example, you declared various localvariables for storing the current value of each property.
Dim intProjectIdVal As IntegerDim strProjectTitleVal As StringDim strProjectDescriptionVal As StringDim strPriorityVal As StringDim strReferenceNumVal As String
339

P1: IML/FFX P2: IML/FFX QC: IML/FFX T1: IML
WY044-12 WY044-Gosnell WY044-Gosnell-v2.cls August 13, 2004 15:25
Chapter 12
Dim curMoneyBudgetVal As CurrencyDim curMoneyToDateVal As CurrencyDim intHoursBudgetVal As IntegerDim intHoursToDateVal As IntegerDim dtDateDueVal As DateDim strStatusVal As String
Next, you added various Get and Let property procedures that will allow retrieving and setting thevalues in each respective property. A few of these property procedures are shown again in the followingcode.
Public Property Get ProjectId() As IntegerOn Error Resume NextProjectId = intProjectIdVal
End Property
Public Property Let ProjectId(ByVal Value As Integer)On Error Resume NextintProjectIdVal = Value
End Property
Public Property Get ProjectTitle() As StringOn Error Resume NextProjectTitle = strProjectTitleVal
End Property
Public Property Let ProjectTitle(ByVal Value As String)On Error Resume NextstrProjectTitleVal = Value
End Property
After the properties for the class module were added, you added various sub procedures and functions toserve as the methods for the class. For example, the RetrieveProjects function is used to retrieve theproject records from the database that will be displayed on the frmProjects form.
Function RetrieveProjects(blnAllRecords As Boolean) As ADODB.Recordset
On Error GoTo HandleError
Dim strSQLStatement As StringDim rsProj As New ADODB.Recordset
'build the SQL statement to retrieve datastrSQLStatement = BuildSQLSelectProjects(blnAllRecords)
'generate the recordsetSet rsProj = ProcessRecordset(strSQLStatement)
'return the populated recordsetSet RetrieveProjects = rsProj
Exit Function
340

P1: IML/FFX P2: IML/FFX QC: IML/FFX T1: IML
WY044-12 WY044-Gosnell WY044-Gosnell-v2.cls August 13, 2004 15:25
Case Study 1: Project Tracker Application
HandleError:GeneralErrorHandler Err.Number, Err.Description, CLS_PROJECTS, _
"RetrieveProjects"Exit Function
End Function
Functions were also added to retrieve the comments, contacts, and attachment records associated with aparticular project from the tblProjectsComments, tblProjectsContacts, andtblProjectsFileAttachments tables. For example, the RetrieveComments function declares anew recordset to store the results from the database. It then specifies the SQL statement that should beused to retrieve the records for the particular project and calls a ProcessRecord function that willactually populate the recordset by executing the SQL statement against the database. TheRetrieveContacts and RetrieveAttachments functions work in a similar fashion.
Function RetrieveComments(intId As Integer) As ADODB.Recordset
On Error GoTo HandleError
Dim rsComments As New ADODB.RecordsetDim strSQL As String
strSQL = "SELECT txtComment FROM tblProjectsComments WHERE intProjectId = " & _intId
'retrieve the comments for tab 1 from the databaseSet rsComments = ProcessRecordset(strSQL)
Set RetrieveComments = rsComments
Exit Function
HandleError:GeneralErrorHandler Err.Number, Err.Description, CLS_PROJECTS, _
"RetrieveComments"Exit Function
End Function
Next, you added two procedures that populate the properties of the class. The first procedure,PopulatePropertiesFromRecordset, populates the properties of the class from values in thersProj recordset. After the recordset has been populated with the project records, the values for thecurrent project must be loaded into the clsProject object and ultimately displayed on the form tothe user.
Sub PopulatePropertiesFromRecordset(rsProj As ADODB.Recordset)
On Error GoTo HandleError
'Populate the object with the current record in the'recordsetMe.ProjectId = rsProj!intProjectIdMe.ProjectTitle = rsProj!txtProjectTitle
341

P1: IML/FFX P2: IML/FFX QC: IML/FFX T1: IML
WY044-12 WY044-Gosnell WY044-Gosnell-v2.cls August 13, 2004 15:25
Chapter 12
Me.ProjectDescription = rsProj!txtProjectDescriptionMe.Priority = rsProj!txtPriorityMe.ReferenceNum = rsProj!txtReferenceNumMe.MoneyBudget = rsProj!curMoneyBudgetMe.MoneyToDate = rsProj!curMoneyToDateMe.HoursBudget = rsProj!intHoursBudgetMe.HoursToDate = rsProj!intHoursToDateMe.DateDue = rsProj!dtDateDueMe.Status = rsProj!txtStatus
Exit Sub
HandleError:GeneralErrorHandler Err.Number, Err.Description, CLS_PROJECTS, _
"PopulatePropertiesFromRecordset"Exit Sub
End Sub
Similarly, the PopulatePropertiesFromForm procedure populates the properties of the object withthe values currently in the controls on the form. To avoid a data conversion error, some statements firsttest to make sure the field on the form is not blank before assigning a value.
Sub PopulatePropertiesFromForm()
On Error GoTo HandleError
'Populate the object with the current record in the'form
If Forms("frmProjects")!txtProjectId <> "" ThenMe.ProjectId = CInt(Forms("frmProjects")!txtProjectId)
End If
Me.ProjectTitle = Forms("frmProjects")!txtProjectTitleMe.ProjectDescription = Forms("frmProjects")!txtProjectDescMe.Priority = Forms("frmProjects")!cboPriorityMe.ReferenceNum = Forms("frmProjects")!txtReferenceNum
If Forms("frmProjects")!txtMoneyBudget <> "" ThenMe.MoneyBudget = CCur(Forms("frmProjects")!txtMoneyBudget)
End If
If Forms("frmProjects")!txtMoneyToDate <> "" ThenMe.MoneyToDate = CCur(Forms("frmProjects")!txtMoneyToDate)
End If
If Forms("frmProjects")!txtHoursBudget <> "" ThenMe.HoursBudget = CInt(Forms("frmProjects")!txtHoursBudget)
End If
If Forms("frmProjects")!txtHoursToDate <> "" ThenMe.HoursToDate = CInt(Forms("frmProjects")!txtHoursToDate)
End If
342

P1: IML/FFX P2: IML/FFX QC: IML/FFX T1: IML
WY044-12 WY044-Gosnell WY044-Gosnell-v2.cls August 13, 2004 15:25
Case Study 1: Project Tracker Application
If Forms("frmProjects")!txtDateDue <> "" ThenMe.DateDue = CDate(Forms("frmProjects")!txtDateDue)
End If
Me.Status = Forms("frmProjects")!cboStatus
Exit Sub
HandleError:GeneralErrorHandler Err.Number, Err.Description, CLS_PROJECTS, _
"PopulatePropertiesFromForm"Exit Sub
End Sub
In addition to adding procedures that populate the object, you also added a procedure that clears all ofthe values in the object. The ClearObject procedure changes all the values in the object to initializationvalues so that the object can be reused for another project record.
Sub ClearObject()
On Error GoTo HandleError
'clear the values in the projects objectMe.ProjectId = 0Me.ProjectTitle = ""Me.ProjectDescription = ""Me.Priority = 0Me.ReferenceNum = ""Me.MoneyBudget = 0Me.MoneyToDate = 0Me.HoursBudget = 0Me.HoursToDate = 0Me.DateDue = "01-01-1900"Me.Status = 0
Exit Sub
HandleError:GeneralErrorHandler Err.Number, Err.Description, CLS_PROJECTS, "ClearObject"Exit Sub
End Sub
The final two procedures you added to the clsProjects class module included the Delete and Saveprocedures. The Delete procedure is responsible for deleting a particular project record from thedatabase after confirming the user wishes to continue.
Sub Delete(intCurProjId As Integer, blnAddMode As Boolean, rsProj As _ADODB.Recordset)
On Error GoTo HandleError
343

P1: IML/FFX P2: IML/FFX QC: IML/FFX T1: IML
WY044-12 WY044-Gosnell WY044-Gosnell-v2.cls August 13, 2004 15:25
Chapter 12
Dim strSQLStatement As StringDim intResponse As Integer
'make sure delete should be processedIf Not ProceedWithDelete(blnAddMode) ThenExit Sub
End If
'build the SQL statement to delete the projectstrSQLStatement = BuildSQLDeleteProjects(intCurProjId)
'perform the deleteCall ProcessUpdate(strSQLStatement, rsProj)
Exit Sub
HandleError:GeneralErrorHandler Err.Number, Err.Description, CLS_PROJECTS, "Delete"Exit Sub
End Sub
The Save procedure is responsible for saving the new or updated record to the database.
Sub Save(blnAddMode As Boolean, rsProj As ADODB.Recordset)
On Error GoTo HandleError
Dim strSQLStatement As String
If a new record is being added, the appropriate SQL insert statement is generated.
'if adding a new recordIf blnAddMode = True Then
strSQLStatement = BuildSQLInsertProjects(Me)Else
If an existing record is being updated, the appropriate SQL update statement is generated.
'if updating a recordstrSQLStatement = BuildSQLUpdateProjects(Me)
End If
The ProcessUpdate procedure is then executed so the SQL statement for the insert or update will beexecuted against the database.
'perform the insert or updateCall ProcessUpdate(strSQLStatement, rsProj)
Exit Sub
HandleError:GeneralErrorHandler Err.Number, Err.Description, CLS_PROJECTS, "Save"Exit Sub
End Sub
344

P1: IML/FFX P2: IML/FFX QC: IML/FFX T1: IML
WY044-12 WY044-Gosnell WY044-Gosnell-v2.cls August 13, 2004 15:25
Case Study 1: Project Tracker Application
The Contact ClassAn object diagram for the Contacts class is shown in Figure 12.25. The Contacts class has propertiesthat correspond to those data elements, such as those shown on the Contacts form, as well as somemethods that can be executed upon it.
+Save()+Delete()+RetrieveContacts()+PopulatePropertiesFromRecordset()+PopulatePropertiesFromForm()+ClearObject()
Contact
-ContactId-LastName-FirstName-MiddleName-Company-Address1-Address2-City-Region-PostalCode-WorkPhone-HomePhone-CellPhone-Email
Figure 12.25
Try It Out Building the clsContacts ClassLet’s get started and build the clsContacts class module that will implement the object illustrated inFigure 12.25.
1. Create a new class module and name it clsContacts. Add the following code to the GeneralDeclarations section of the class:
Option Compare DatabaseOption Explicit
Const CLS_CONTACTS = "clsContacts"
Dim intContactIdVal As IntegerDim strLastNameVal As StringDim strFirstNameVal As StringDim strMiddleNameVal As StringDim strCompanyVal As StringDim strAddress1Val As StringDim strAddress2Val As StringDim strCityVal As StringDim strRegionVal As String
345

P1: IML/FFX P2: IML/FFX QC: IML/FFX T1: IML
WY044-12 WY044-Gosnell WY044-Gosnell-v2.cls August 13, 2004 15:25
Chapter 12
Dim strPostalCodeVal As StringDim strWorkPhoneVal As StringDim strHomePhoneVal As StringDim strCellPhoneVal As StringDim strEmailVal As String
2. Add the property procedures shown in the following code to the clsProjects class module.
Public Property Get ContactId() As IntegerOn Error Resume NextContactId = intContactIdVal
End Property
Public Property Let ContactId(ByVal Value As Integer)On Error Resume NextintContactIdVal = Value
End Property
Public Property Get LastName() As StringOn Error Resume NextLastName = strLastNameVal
End Property
Public Property Let LastName(ByVal Value As String)On Error Resume NextstrLastNameVal = Value
End Property
Public Property Get FirstName() As StringOn Error Resume NextFirstName = strFirstNameVal
End Property
Public Property Let FirstName(ByVal Value As String)On Error Resume NextstrFirstNameVal = Value
End Property
Public Property Get MiddleName() As StringOn Error Resume NextMiddleName = strMiddleNameVal
End Property
Public Property Let MiddleName(ByVal Value As String)On Error Resume NextstrMiddleNameVal = Value
End Property
Public Property Get Company() As StringOn Error Resume NextCompany = strCompanyVal
End Property
346

P1: IML/FFX P2: IML/FFX QC: IML/FFX T1: IML
WY044-12 WY044-Gosnell WY044-Gosnell-v2.cls August 13, 2004 15:25
Case Study 1: Project Tracker Application
Public Property Let Company(ByVal Value As String)On Error Resume NextstrCompanyVal = Value
End Property
Public Property Get Address1() As StringOn Error Resume NextAddress1 = strAddress1Val
End Property
Public Property Let Address1(ByVal Value As String)On Error Resume NextstrAddress1Val = Value
End Property
Public Property Get Address2() As StringOn Error Resume NextAddress2 = strAddress2Val
End Property
Public Property Let Address2(ByVal Value As String)On Error Resume NextstrAddress2Val = Value
End Property
Public Property Get City() As StringOn Error Resume NextCity = strCityVal
End Property
Public Property Let City(ByVal Value As String)On Error Resume NextstrCityVal = Value
End Property
Public Property Get Region() As StringOn Error Resume NextRegion = strRegionVal
End Property
Public Property Let Region(ByVal Value As String)On Error Resume NextstrRegionVal = Value
End Property
Public Property Get PostalCode() As StringOn Error Resume NextPostalCode = strPostalCodeVal
End Property
Public Property Let PostalCode(ByVal Value As String)On Error Resume NextstrPostalCodeVal = Value
End Property
347

P1: IML/FFX P2: IML/FFX QC: IML/FFX T1: IML
WY044-12 WY044-Gosnell WY044-Gosnell-v2.cls August 13, 2004 15:25
Chapter 12
Public Property Get WorkPhone() As StringOn Error Resume NextWorkPhone = strWorkPhoneVal
End Property
Public Property Let WorkPhone(ByVal Value As String)On Error Resume NextstrWorkPhoneVal = Value
End PropertyPublic Property Get HomePhone() As String
On Error Resume NextHomePhone = strHomePhoneVal
End Property
Public Property Let HomePhone(ByVal Value As String)On Error Resume NextstrHomePhoneVal = Value
End Property
Public Property Get CellPhone() As StringOn Error Resume NextCellPhone = strCellPhoneVal
End Property
Public Property Let CellPhone(ByVal Value As String)On Error Resume NextstrCellPhoneVal = Value
End Property
Public Property Get Email() As StringOn Error Resume NextEmail = strEmailVal
End Property
Public Property Let Email(ByVal Value As String)On Error Resume NextstrEmailVal = Value
End Property
3. Add the RetrieveContacts function shown in the following code to the clsProjects classmodule.
Function RetrieveContacts() As ADODB.Recordset
On Error GoTo HandleError
Dim strSQLStatement As StringDim rsCont As New ADODB.Recordset
'build the SQL statement to retrieve datastrSQLStatement = BuildSQLSelectContacts
'generate the recordsetSet rsCont = ProcessRecordset(strSQLStatement)
348

P1: IML/FFX P2: IML/FFX QC: IML/FFX T1: IML
WY044-12 WY044-Gosnell WY044-Gosnell-v2.cls August 13, 2004 15:25
Case Study 1: Project Tracker Application
'return the populated recordsetSet RetrieveContacts = rsCont
Exit Function
HandleError:GeneralErrorHandler Err.Number, Err.Description, CLS_CONTACTS, _
"RetrieveContacts"Exit Function
End Function
4. Add the PopulatePropertiesFromRecordset procedure shown in the following code tothe clsProjects class module.
Sub PopulatePropertiesFromRecordset(rsCont As ADODB.Recordset)
On Error GoTo HandleError
'Populate the object with the current record in the'recordsetMe.ContactId = rsCont!intContactIdMe.LastName = rsCont!txtLastNameMe.FirstName = rsCont!txtFirstNameMe.MiddleName = rsCont!txtMiddleNameMe.Company = rsCont!txtCompanyMe.Address1 = rsCont!txtAddress1Me.Address2 = rsCont!txtAddress2Me.City = rsCont!txtCityMe.Region = rsCont!txtRegionMe.PostalCode = rsCont!txtPostalCodeMe.WorkPhone = rsCont!txtWorkPhoneMe.HomePhone = rsCont!txtHomePhoneMe.CellPhone = rsCont!txtCellPhoneMe.Email = rsCont!txtEmail
Exit Sub
HandleError:GeneralErrorHandler Err.Number, Err.Description, CLS_CONTACTS, _
"PopulatePropertiesFromRecordset"Exit Sub
End Sub
5. Add the PopulatePropertiesFromForm procedure shown in the following code to theclsProjects class module.
Sub PopulatePropertiesFromForm()
On Error GoTo HandleError
'Populate the object with the current record in the'form
349

P1: IML/FFX P2: IML/FFX QC: IML/FFX T1: IML
WY044-12 WY044-Gosnell WY044-Gosnell-v2.cls August 13, 2004 15:25
Chapter 12
Me.LastName = Forms("frmContacts")!txtLNameMe.FirstName = Forms("frmContacts")!txtFNameMe.MiddleName = Forms("frmContacts")!txtMNameMe.Company = Forms("frmContacts")!txtCompanyMe.Address1 = Forms("frmContacts")!txtAddress1Me.Address2 = Forms("frmContacts")!txtAddress2Me.City = Forms("frmContacts")!txtCityMe.Region = Forms("frmContacts")!txtRegionMe.PostalCode = Forms("frmContacts")!txtPostalCodeMe.WorkPhone = Forms("frmContacts")!txtWorkPhoneMe.HomePhone = Forms("frmContacts")!txtHomePhoneMe.CellPhone = Forms("frmContacts")!txtCellPhoneMe.Email = Forms("frmContacts")!txtEmail
Exit Sub
HandleError:GeneralErrorHandler Err.Number, Err.Description, CLS_CONTACTS, _
"PopulatePropertiesFromForm"Exit Sub
End Sub
6. Add the ClearObject procedure shown in the following code to the clsProjects classmodule.
Sub ClearObject()
On Error GoTo HandleError
'clear the values in the contacts objectMe.ContactId = 0Me.LastName = ""Me.FirstName = ""Me.MiddleName = ""Me.Company = ""Me.Address1 = ""Me.Address2 = ""Me.City = ""Me.Region = ""Me.PostalCode = ""Me.WorkPhone = ""Me.HomePhone = ""Me.CellPhone = ""Me.Email = ""
Exit Sub
HandleError:GeneralErrorHandler Err.Number, Err.Description, CLS_CONTACTS, _
"ClearObject"Exit Sub
End Sub
350

P1: IML/FFX P2: IML/FFX QC: IML/FFX T1: IML
WY044-12 WY044-Gosnell WY044-Gosnell-v2.cls August 13, 2004 15:25
Case Study 1: Project Tracker Application
7. Add the Delete procedure shown in the following code to the clsProjects class module.
Sub Delete(intCurContId As Integer, blnAddMode As Boolean, rsCont As _ADODB.Recordset)
On Error GoTo HandleError
Dim strSQLStatement As StringDim intResponse As Integer
'make sure delete should be processedIf Not ProceedWithDelete(blnAddMode) ThenExit Sub
End If
'build the SQL statement to delete the contactstrSQLStatement = BuildSQLDeleteContacts(intCurContId)
'perform the deleteCall ProcessUpdate(strSQLStatement, rsCont)
Exit Sub
HandleError:GeneralErrorHandler Err.Number, Err.Description, CLS_CONTACTS, "Delete"Exit Sub
End Sub
8. Add the Save procedure shown in the following code to the clsProjects class module.
Sub Save(blnAddMode As Boolean, rsCont As ADODB.Recordset)
On Error GoTo HandleError
Dim strSQLStatement As String
'if adding a new recordIf blnAddMode = True Then
strSQLStatement = BuildSQLInsertContacts(Me)Else'if updating a record
strSQLStatement = BuildSQLUpdateContacts(Me)End If
'perform the insert or updateCall ProcessUpdate(strSQLStatement, rsCont)
Exit Sub
HandleError:GeneralErrorHandler Err.Number, Err.Description, CLS_CONTACTS, "Save"Exit Sub
End Sub
9. Make sure to keep saving your changes periodically so they are not lost.
351

P1: IML/FFX P2: IML/FFX QC: IML/FFX T1: IML
WY044-12 WY044-Gosnell WY044-Gosnell-v2.cls August 13, 2004 15:25
Chapter 12
How It WorksThe design of the clsContacts class module is similar to that of the clsProjects class module. Youfirst added various local variables to the General Declarations section of the class for storing variousproperty values.
Dim intContactIdVal As IntegerDim strLastNameVal As StringDim strFirstNameVal As StringDim strMiddleNameVal As StringDim strCompanyVal As StringDim strAddress1Val As StringDim strAddress2Val As StringDim strCityVal As StringDim strRegionVal As StringDim strPostalCodeVal As StringDim strWorkPhoneVal As StringDim strHomePhoneVal As StringDim strCellPhoneVal As StringDim strEmailVal As String
Next, you added various Get and Let property procedures that are used to retrieve and assign values tothe properties of the class.
Public Property Get ContactId() As IntegerOn Error Resume NextContactId = intContactIdVal
End Property
Public Property Let ContactId(ByVal Value As Integer)On Error Resume NextintContactIdVal = Value
End Property
Public Property Get LastName() As StringOn Error Resume NextLastName = strLastNameVal
End Property
Public Property Let LastName(ByVal Value As String)On Error Resume NextstrLastNameVal = Value
End Property
Next, various sub procedures and functions were added to serve as methods for the object. For example,the RetrieveContacts function retrieves the contacts records from the database.
Function RetrieveContacts() As ADODB.Recordset
On Error GoTo HandleError
Dim strSQLStatement As StringDim rsCont As New ADODB.Recordset
352

P1: IML/FFX P2: IML/FFX QC: IML/FFX T1: IML
WY044-12 WY044-Gosnell WY044-Gosnell-v2.cls August 13, 2004 15:25
Case Study 1: Project Tracker Application
'build the SQL statement to retrieve datastrSQLStatement = BuildSQLSelectContacts
'generate the recordsetSet rsCont = ProcessRecordset(strSQLStatement)
'return the populated recordsetSet RetrieveContacts = rsCont
Exit Function
HandleError:GeneralErrorHandler Err.Number, Err.Description, CLS_CONTACTS, _
"RetrieveContacts"Exit Function
End Function
The PopulatePropertiesFromRecordset procedure populated the properties of the object from thevalues in the rsCont recordset.
Sub PopulatePropertiesFromRecordset(rsCont As ADODB.Recordset)
On Error GoTo HandleError
'Populate the object with the current record in the'recordsetMe.ContactId = rsCont!intContactIdMe.LastName = rsCont!txtLastNameMe.FirstName = rsCont!txtFirstNameMe.MiddleName = rsCont!txtMiddleNameMe.Company = rsCont!txtCompanyMe.Address1 = rsCont!txtAddress1Me.Address2 = rsCont!txtAddress2Me.City = rsCont!txtCityMe.Region = rsCont!txtRegionMe.PostalCode = rsCont!txtPostalCodeMe.WorkPhone = rsCont!txtWorkPhoneMe.HomePhone = rsCont!txtHomePhoneMe.CellPhone = rsCont!txtCellPhoneMe.Email = rsCont!txtEmail
Exit Sub
HandleError:GeneralErrorHandler Err.Number, Err.Description, CLS_CONTACTS, _
"PopulatePropertiesFromRecordset"Exit Sub
End Sub
Similarly, the PopulatePropertiesFromForm procedure populated the contacts object with thevalues currently displayed in the controls on the form.
353

P1: IML/FFX P2: IML/FFX QC: IML/FFX T1: IML
WY044-12 WY044-Gosnell WY044-Gosnell-v2.cls August 13, 2004 15:25
Chapter 12
Sub PopulatePropertiesFromForm()
On Error GoTo HandleError
'Populate the object with the current record in the'form
Me.LastName = Forms("frmContacts")!txtLNameMe.FirstName = Forms("frmContacts")!txtFNameMe.MiddleName = Forms("frmContacts")!txtMNameMe.Company = Forms("frmContacts")!txtCompanyMe.Address1 = Forms("frmContacts")!txtAddress1Me.Address2 = Forms("frmContacts")!txtAddress2Me.City = Forms("frmContacts")!txtCityMe.Region = Forms("frmContacts")!txtRegionMe.PostalCode = Forms("frmContacts")!txtPostalCodeMe.WorkPhone = Forms("frmContacts")!txtWorkPhoneMe.HomePhone = Forms("frmContacts")!txtHomePhoneMe.CellPhone = Forms("frmContacts")!txtCellPhoneMe.Email = Forms("frmContacts")!txtEmail
Exit Sub
HandleError:GeneralErrorHandler Err.Number, Err.Description, CLS_CONTACTS, _
"PopulatePropertiesFromForm"Exit Sub
End Sub
A ClearObject procedure was added to reset the values in the object to the initial values so a newcontact record could be stored in the object.
Sub ClearObject()
On Error GoTo HandleError
'clear the values in the contacts objectMe.ContactId = 0Me.LastName = ""Me.FirstName = ""Me.MiddleName = ""Me.Company = ""Me.Address1 = ""Me.Address2 = ""Me.City = ""Me.Region = ""Me.PostalCode = ""Me.WorkPhone = ""Me.HomePhone = ""Me.CellPhone = ""Me.Email = ""
Exit Sub
354

P1: IML/FFX P2: IML/FFX QC: IML/FFX T1: IML
WY044-12 WY044-Gosnell WY044-Gosnell-v2.cls August 13, 2004 15:25
Case Study 1: Project Tracker Application
HandleError:GeneralErrorHandler Err.Number, Err.Description, CLS_CONTACTS, _
"ClearObject"Exit Sub
End Sub
Finally, Delete and Save procedures were added so that the user can delete and save contact recordsfrom the database. The Delete procedure first confirms that the user wishes to proceed with thedeletion, and then, upon confirmation, proceeds with the delete.
Sub Delete(intCurContId As Integer, blnAddMode As Boolean, rsCont As _ADODB.Recordset)
On Error GoTo HandleError
Dim strSQLStatement As StringDim intResponse As Integer
'make sure delete should be processedIf Not ProceedWithDelete(blnAddMode) ThenExit Sub
End If
'build the SQL statement to delete the contactstrSQLStatement = BuildSQLDeleteContacts(intCurContId)
'perform the deleteCall ProcessUpdate(strSQLStatement, rsCont)
Exit Sub
HandleError:GeneralErrorHandler Err.Number, Err.Description, CLS_CONTACTS, "Delete"Exit Sub
End Sub
The Save procedure first checks to see if a new record is being added, and if so, generates the proper SQLinsert statement. If an existing record is being updated, the proper SQL update statement is generated.
Sub Save(blnAddMode As Boolean, rsCont As ADODB.Recordset)
On Error GoTo HandleError
Dim strSQLStatement As String
'if adding a new recordIf blnAddMode = True Then
strSQLStatement = BuildSQLInsertContacts(Me)Else'if updating a record
strSQLStatement = BuildSQLUpdateContacts(Me)End If
355

P1: IML/FFX P2: IML/FFX QC: IML/FFX T1: IML
WY044-12 WY044-Gosnell WY044-Gosnell-v2.cls August 13, 2004 15:25
Chapter 12
The ProcessUpdate procedure is then called so the SQL insert or update statement is executed againstthe database.
'perform the insert or updateCall ProcessUpdate(strSQLStatement, rsCont)
Exit Sub
HandleError:GeneralErrorHandler Err.Number, Err.Description, CLS_CONTACTS, "Save"Exit Sub
End Sub
Building the Standard ModulesIn the previous section, you created the properties and methods for the Project and Contact objects.In this section, you begin writing the code in the standard modules that conduct a lot of the business logicand data access features for the application. Let’s start with building the standard modules.
Try It Out Building the modBusinessLogic and modDatabaseLogic ModulesThe modBusinessLogic module is one of two standard modules you will be creating. The otherone is the modDatabaseLogic that will contain calls that are specific to the database. ThemodBusinessLogic module will not contain any database access calls because you want to keep thedata access code in a separate module to make maintenance and future growth easier. You will now turnto the task of creating these modules.
1. Insert a new standard module called modBusinessLogic. Add the following code to theGeneral Declarations of the module:
Option Compare DatabaseOption Explicit
Public intContactProjectLookup As IntegerPublic intContactProjectAdd As Integer
Const BUS_LOGIC = "modBusinessLogic"
Private Declare Function GetOpenFileName Lib "comdlg32.dll" Alias _"GetOpenFileNameA" (pOpenfilename As OPENFILENAME) As Long
Private Type OPENFILENAMElStructSize As LonghwndOwner As LonghInstance As LonglpstrFilter As StringlpstrCustomFilter As StringnMaxCustFilter As LongnFilterIndex As Long
356
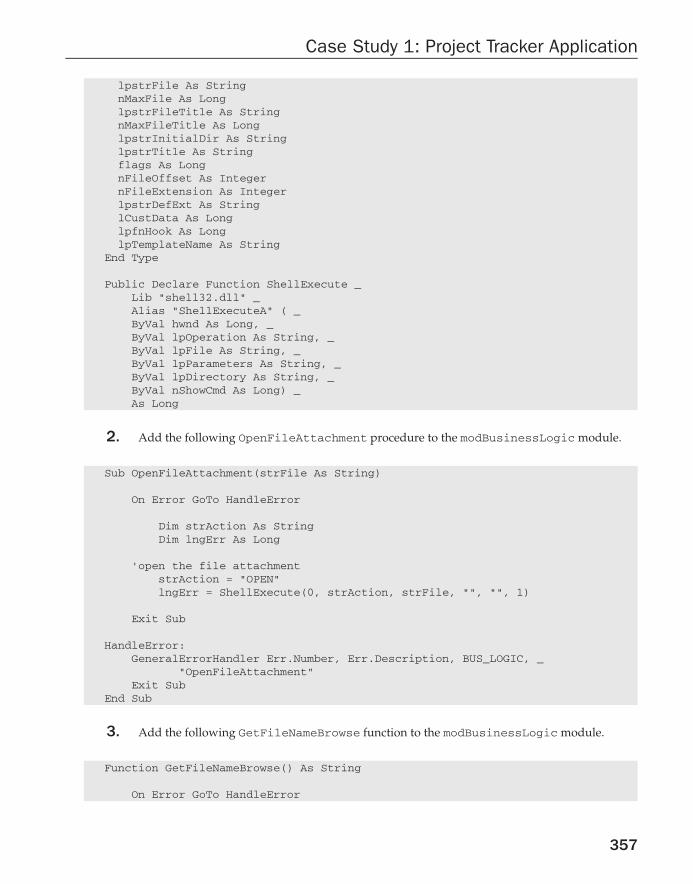
P1: IML/FFX P2: IML/FFX QC: IML/FFX T1: IML
WY044-12 WY044-Gosnell WY044-Gosnell-v2.cls August 13, 2004 15:25
Case Study 1: Project Tracker Application
lpstrFile As StringnMaxFile As LonglpstrFileTitle As StringnMaxFileTitle As LonglpstrInitialDir As StringlpstrTitle As Stringflags As LongnFileOffset As IntegernFileExtension As IntegerlpstrDefExt As StringlCustData As LonglpfnHook As LonglpTemplateName As String
End Type
Public Declare Function ShellExecute _Lib "shell32.dll" _Alias "ShellExecuteA" ( _ByVal hwnd As Long, _ByVal lpOperation As String, _ByVal lpFile As String, _ByVal lpParameters As String, _ByVal lpDirectory As String, _ByVal nShowCmd As Long) _As Long
2. Add the following OpenFileAttachment procedure to the modBusinessLogic module.
Sub OpenFileAttachment(strFile As String)
On Error GoTo HandleError
Dim strAction As StringDim lngErr As Long
'open the file attachmentstrAction = "OPEN"lngErr = ShellExecute(0, strAction, strFile, "", "", 1)
Exit Sub
HandleError:GeneralErrorHandler Err.Number, Err.Description, BUS_LOGIC, _
"OpenFileAttachment"Exit Sub
End Sub
3. Add the following GetFileNameBrowse function to the modBusinessLogic module.
Function GetFileNameBrowse() As String
On Error GoTo HandleError
357

P1: IML/FFX P2: IML/FFX QC: IML/FFX T1: IML
WY044-12 WY044-Gosnell WY044-Gosnell-v2.cls August 13, 2004 15:25
Chapter 12
Dim OpenFile As OPENFILENAMEDim lReturn As LongDim sFilter As StringOpenFile.lStructSize = Len(OpenFile)OpenFile.hwndOwner = Forms("frmProjects").hwnd'OpenFile.hInstance = hInstancesFilter = "All Files (*.*)" & Chr(0) & "*.*" & Chr(0)OpenFile.lpstrFilter = sFilterOpenFile.nFilterIndex = 1OpenFile.lpstrFile = String(257, 0)OpenFile.nMaxFile = Len(OpenFile.lpstrFile) - 1OpenFile.lpstrFileTitle = OpenFile.lpstrFileOpenFile.nMaxFileTitle = OpenFile.nMaxFileOpenFile.lpstrInitialDir = "C:\"OpenFile.lpstrTitle = "Browse for an attachment"OpenFile.flags = 0lReturn = GetOpenFileName(OpenFile)If lReturn = 0 Then
GetFileNameBrowse = ""Else'return the selected filename
GetFileNameBrowse = Trim(OpenFile.lpstrFile)End If
Exit Function
HandleError:GeneralErrorHandler Err.Number, Err.Description, BUS_LOGIC, _
"GetFileNameBrowse"Exit Function
End Function
4. Add the following four recordset navigation procedures to the modBusinessLogic module.
Sub MoveToFirstRecord(intRecCounter As Integer, rsRecordset As ADODB.Recordset, _objObject As Object, blnAddMode As Boolean)
On Error GoTo HandleError
'move to the first record in the local disconnected recordsetIf Not rsRecordset.BOF And Not rsRecordset.EOF Then
rsRecordset.MoveFirstintRecCounter = 1
'add code to populate object with new current recordobjObject.PopulatePropertiesFromRecordset rsRecordset
blnAddMode = FalseEnd If
Exit Sub
358

P1: IML/FFX P2: IML/FFX QC: IML/FFX T1: IML
WY044-12 WY044-Gosnell WY044-Gosnell-v2.cls August 13, 2004 15:25
Case Study 1: Project Tracker Application
HandleError:GeneralErrorHandler Err.Number, Err.Description, BUS_LOGIC, _
"MoveToFirstRecord"Exit Sub
End Sub
Sub MoveToLastRecord(intRecCounter As Integer, rsRecordset As ADODB.Recordset, _objObject As Object, blnAddMode As Boolean)
On Error GoTo HandleError
'move to the last record in the local disconnected recordsetIf Not rsRecordset.BOF And Not rsRecordset.EOF Then
rsRecordset.MoveLastintRecCounter = rsRecordset.RecordCount
'add code to populate object with new current recordobjObject.PopulatePropertiesFromRecordset rsRecordset
blnAddMode = False
End If
Exit Sub
HandleError:GeneralErrorHandler Err.Number, Err.Description, BUS_LOGIC,"MoveToLastRecord"Exit Sub
End Sub
Sub MoveToPreviousRecord(intRecCounter As Integer, rsRecordset As _ADODB.Recordset, objObject As Object, blnAddMode As Boolean)
On Error GoTo HandleError
'move to the previous record in the local disconnected recordset'if not already at the beginningIf Not rsRecordset.BOF Then
rsRecordset.MovePreviousintRecCounter = intRecCounter - 1
blnAddMode = False
'make sure not past beginning of recordset nowIf Not rsRecordset.BOF Then
'add code to populate object with new current recordobjObject.PopulatePropertiesFromRecordset rsRecordset
Else'at beginning of recordset so move to next record
rsRecordset.MoveNext
359

P1: IML/FFX P2: IML/FFX QC: IML/FFX T1: IML
WY044-12 WY044-Gosnell WY044-Gosnell-v2.cls August 13, 2004 15:25
Chapter 12
intRecCounter = intRecCounter + 1End If
End If
Exit Sub
HandleError:GeneralErrorHandler Err.Number, Err.Description, BUS_LOGIC, _
"MoveToPreviousRecord"Exit Sub
End Sub
Sub MoveToNextRecord(intRecCounter As Integer, rsRecordset As ADODB.Recordset, _objObject As Object, blnAddMode As Boolean)
On Error GoTo HandleError
'move to the next record in the local disconnected recordset'if not already at the endIf Not rsRecordset.EOF Then
rsRecordset.MoveNextintRecCounter = intRecCounter + 1blnAddMode = False
'make sure not past end of recordsetIf Not rsRecordset.EOF Then
'add code to populate object with new current recordobjObject.PopulatePropertiesFromRecordset rsRecordset
Else'at end of recordset so move back onersRecordset.MovePreviousintRecCounter = intRecCounter - 1
End If
End If
Exit Sub
HandleError:GeneralErrorHandler Err.Number, Err.Description, BUS_LOGIC,"MoveToNextRecord"Exit Sub
End Sub
5. Add the following ProceedWithDelete function to the modBusinessLogic module.
Function ProceedWithDelete(blnAddMode As Boolean) As Boolean
On Error GoTo HandleError
Dim blnProceed As BooleanDim intResponse As Integer
360

P1: IML/FFX P2: IML/FFX QC: IML/FFX T1: IML
WY044-12 WY044-Gosnell WY044-Gosnell-v2.cls August 13, 2004 15:25
Case Study 1: Project Tracker Application
blnProceed = True
'don't let the user issue a delete command if in add modeIf blnAddMode = True Then
blnProceed = FalseProceedWithDelete = blnProceedExit Function
End If
'confirm that user really wants to delete recordintResponse = MsgBox("Are you sure you want to delete this record?", vbYesNo)
'if the user cancels delete, then exit this procedureIf intResponse = vbNo Then
blnProceed = FalseProceedWithDelete = blnProceedExit Function
End If
ProceedWithDelete = blnProceed
Exit Function
HandleError:ProceedWithDelete = FalseGeneralErrorHandler Err.Number, Err.Description, BUS_LOGIC, _
"ProceedWithDelete"Exit Function
End Function
6. Add the following GeneralErrorHandler procedure to the modBusinessLogic module.This module will handle all errors for the application and will be referenced in each procedureor function.
Public Sub GeneralErrorHandler(lngErrNumber As Long, strErrDesc As String, _strModuleSource As String, strProcedureSource As String)
On Error Resume Next
Dim strMessage As String
'build the error message string from the parameters passed instrMessage = "An error has occurred in the application."strMessage = strMessage & vbCrLf & "Error Number: " & lngErrNumberstrMessage = strMessage & vbCrLf & "Error Description: " & strErrDescstrMessage = strMessage & vbCrLf & "Module Source: " & strModuleSourcestrMessage = strMessage & vbCrLf & "Procedure Source: " & strProcedureSource
'display the message to the userMsgBox strMessage, vbCritical
Exit Sub
End Sub
361

P1: IML/FFX P2: IML/FFX QC: IML/FFX T1: IML
WY044-12 WY044-Gosnell WY044-Gosnell-v2.cls August 13, 2004 15:25
Chapter 12
7. Save your changes to the modBusinessLogic module.
8. Insert a new standard module called modDatabaseLogic. Add the following code to theGeneral Declarations of the module:
Option Compare DatabaseOption ExplicitDim cnConn As ADODB.ConnectionDim strConnection As StringConst DB_LOGIC = "modDatabaseLogic"
9. Add the following ExecuteSQLCommand procedure to the modDatabaseLogic module.
Sub ExecuteSQLCommand(strSQL As String)
On Error GoTo HandleError
'the purpose of this procedure is to execute'a SQL statement that does not return any'rows against the database.
Dim cmdCommand As ADODB.CommandSet cmdCommand = New ADODB.Command
'set the command to the current connectionSet cmdCommand.ActiveConnection = cnConn'set the SQL statement to the command textcmdCommand.CommandText = strSQL'execute the command against the databasecmdCommand.Execute
Exit Sub
HandleError:GeneralErrorHandler Err.Number, Err.Description, DB_LOGIC,"ExecuteSQLCommand"Exit Sub
End Sub
10. Add the following procedures to the modDatabaseLogic module. You will need to modifythe strConnection string, shown in the following code, to point to the path on yourcomputer where the ProjectTrackerDb you created at the beginning of this chapter is located.
Sub OpenDbConnection()
On Error GoTo HandleError
strConnection = "Provider=Microsoft.Jet.OLEDB.4.0;" & _"Data Source="& CurrentProject.Path &"\ProjectTrackerDb.mdb;"
'create a new connection instance and open it using the connection stringSet cnConn = New ADODB.ConnectioncnConn.Open strConnection
362

P1: IML/FFX P2: IML/FFX QC: IML/FFX T1: IML
WY044-12 WY044-Gosnell WY044-Gosnell-v2.cls August 13, 2004 15:25
Case Study 1: Project Tracker Application
Exit Sub
HandleError:GeneralErrorHandler Err.Number, Err.Description, DB_LOGIC, "OpenDbConnection"Exit Sub
End Sub
Sub CloseDbConnection()
On Error GoTo HandleError
'close the database connectioncnConn.CloseSet cnConn = Nothing
Exit Sub
HandleError:GeneralErrorHandler Err.Number, Err.Description, DB_LOGIC,"CloseDbConnection"Exit Sub
End Sub
11. Add the following RequeryRecordset procedure to the modDatabaseLogic module.
Sub RequeryRecordset(rsRecordset As ADODB.Recordset)
On Error GoTo HandleError
'repopulate the recordset to make sure it contains'the most current values from the database. also'disconnect the recordsetSet rsRecordset.ActiveConnection = cnConnrsRecordset.RequerySet rsRecordset.ActiveConnection = Nothing
Exit Sub
HandleError:GeneralErrorHandler Err.Number, Err.Description, DB_LOGIC, "RequeryRecordset"Exit Sub
End Sub
12. Add the following procedures to the modDatabaseLogic module. These procedures buildSQL statements that are used to make updates to the tblContacts table.
Function BuildSQLInsertContacts(objCurrContact As clsContacts) As String
On Error GoTo HandleError
Dim strSQLInsert As String
363

P1: IML/FFX P2: IML/FFX QC: IML/FFX T1: IML
WY044-12 WY044-Gosnell WY044-Gosnell-v2.cls August 13, 2004 15:25
Chapter 12
'create SQL to insert a new record into the database'containing the values in the Contacts objectstrSQLInsert = "INSERT INTO tblContacts(" & _
"txtLastName, txtFirstName, txtMiddleName, " & _"txtCompany, txtAddress1, txtAddress2, " & _"txtCity, txtRegion, txtPostalCode, " & _"txtWorkPhone, txtHomePhone, txtCellPhone, " & _"txtEmail) VALUES (" & _"'" & objCurrContact.LastName & "', " & _"'" & objCurrContact.FirstName & "', " & _"'" & objCurrContact.MiddleName & "', " & _"'" & objCurrContact.Company & "', " & _"'" & objCurrContact.Address1 & "', " & _"'" & objCurrContact.Address2 & "', " & _"'" & objCurrContact.City & "', " & _"'" & objCurrContact.Region & "', " & _"'" & objCurrContact.PostalCode & "', " & _"'" & objCurrContact.WorkPhone & "', " & _"'" & objCurrContact.HomePhone & "', " & _"'" & objCurrContact.CellPhone & "', " & _"'" & objCurrContact.Email & "') "
BuildSQLInsertContacts = strSQLInsert
Exit Function
HandleError:GeneralErrorHandler Err.Number, Err.Description, DB_LOGIC,
"BuildSQLInsertContacts"Exit Function
End FunctionFunction BuildSQLUpdateContacts(objCurrContact As clsContacts) As String
On Error GoTo HandleError
Dim strSQLUpdate As String
'create SQL to update the existing record in the'database with the values in the contact objectstrSQLUpdate = "UPDATE tblContacts SET " & _
"txtLastName = '" & objCurrContact.LastName & "', " & _"txtFirstName = '" & objCurrContact.FirstName & "', " & _"txtMiddleName = '" & objCurrContact.MiddleName & "', " & _"txtcompany = '" & objCurrContact.Company & "', " & _"txtAddress1 = '" & objCurrContact.Address1 & "', " & _"txtAddress2 = '" & objCurrContact.Address2 & "', " & _"txtCity = '" & objCurrContact.City & "', " & _"txtRegion = '" & objCurrContact.Region & "', " & _"txtPostalCode = '" & objCurrContact.PostalCode & "', " & _"txtWorkPhone = '" & objCurrContact.WorkPhone & "', " & _"txtHomePhone = '" & objCurrContact.HomePhone & "', " & _"txtCellPhone = '" & objCurrContact.CellPhone & "', " & _"txtEmail = '" & objCurrContact.Email & "' " & _"WHERE intContactId = " & objCurrContact.ContactId
364

P1: IML/FFX P2: IML/FFX QC: IML/FFX T1: IML
WY044-12 WY044-Gosnell WY044-Gosnell-v2.cls August 13, 2004 15:25
Case Study 1: Project Tracker Application
BuildSQLUpdateContacts = strSQLUpdate
Exit Function
HandleError:GeneralErrorHandler Err.Number, Err.Description, DB_LOGIC, _
"BuildSQLUpdateContacts"Exit Function
End Function
Function BuildSQLDeleteContacts(intId As Integer) As String
On Error GoTo HandleError
'generate SQL command to delete current recordDim strSQLDelete As StringstrSQLDelete = "DELETE FROM tblContacts WHERE intContactId = " & intId
BuildSQLDeleteContacts = strSQLDelete
Exit Function
HandleError:GeneralErrorHandler Err.Number, Err.Description, DB_LOGIC, _
"BuildSQLDeleteContacts"Exit Function
End Function
Function BuildSQLSelectContacts() As String
On Error GoTo HandleError
Dim strSQLRetrieve As String
'if the intId is not included, retrieve all contactsIf intContactProjectLookup = 0 Then'generate SQL command to retrieve contacts records
strSQLRetrieve = "SELECT * FROM tblContacts " & _"ORDER BY txtLastName, txtFirstName, txtMiddleName"
Else'look up particular contacts recordstrSQLRetrieve = "SELECT * FROM tblContacts " & _
"WHERE intContactId = " & intContactProjectLookup & _" ORDER BY txtLastName, txtFirstName, txtMiddleName"
End If
BuildSQLSelectContacts = strSQLRetrieve
Exit Function
365

P1: IML/FFX P2: IML/FFX QC: IML/FFX T1: IML
WY044-12 WY044-Gosnell WY044-Gosnell-v2.cls August 13, 2004 15:25
Chapter 12
HandleError:GeneralErrorHandler Err.Number, Err.Description, DB_LOGIC, _
"BuildSQLSelectContacts"Exit Function
End Function
13. Add the following procedures to the modDatabaseLogic module. These procedures buildSQL statements that are used to make updates to the tblProjects table.
Function BuildSQLInsertProjects(objCurrProject As clsProjects) As String
On Error GoTo HandleError
Dim strSQLInsert As String
'create SQL to insert a new record into the database'containing the values in the Projects objectstrSQLInsert = "INSERT INTO tblProjects(" & _
"txtProjectTitle, txtProjectDescription, txtPriority, " & _"txtReferenceNum, curMoneyBudget, curMoneyToDate, " & _"intHoursBudget, intHoursToDate, dtDateDue, " & _"txtStatus) VALUES (" & _"'" & objCurrProject.ProjectTitle & "', " & _"'" & objCurrProject.ProjectDescription & "', " & _"'" & objCurrProject.Priority & "', " & _"'" & objCurrProject.ReferenceNum & "', " & _objCurrProject.MoneyBudget & ", " & _objCurrProject.MoneyToDate & ", " & _"" & objCurrProject.HoursBudget & ", " & _"" & objCurrProject.HoursToDate & ", " & _"'" & objCurrProject.DateDue & "', " & _"'" & objCurrProject.Status & "') "
BuildSQLInsertProjects = strSQLInsert
Exit Function
HandleError:GeneralErrorHandler Err.Number, Err.Description, DB_LOGIC, _
"BuildSQLInsertProjects"Exit Function
End Function
Function BuildSQLUpdateProjects(objCurrProject As clsProjects) As String
On Error GoTo HandleError
Dim strSQLUpdate As String
'create SQL to update the existing record in the'database with the values in the Project object
366

P1: IML/FFX P2: IML/FFX QC: IML/FFX T1: IML
WY044-12 WY044-Gosnell WY044-Gosnell-v2.cls August 13, 2004 15:25
Case Study 1: Project Tracker Application
strSQLUpdate = "UPDATE tblProjects SET " & _"txtProjectTitle = '" & objCurrProject.ProjectTitle & "', " & _"txtProjectDescription = '" & objCurrProject.ProjectDescription & "', " & _"txtPriority = '" & objCurrProject.Priority & "', " & _"txtReferenceNum = '" & objCurrProject.ReferenceNum & "', " & _"curMoneyBudget = '" & objCurrProject.MoneyBudget & "', " & _"curMoneyToDate = '" & objCurrProject.MoneyToDate & "', " & _"intHoursBudget = " & objCurrProject.HoursBudget & ", " & _"intHoursToDate = " & objCurrProject.HoursToDate & ", " & _"dtDateDue = '" & objCurrProject.DateDue & "', " & _"txtStatus = '" & objCurrProject.Status & "' " & _"WHERE intProjectId = " & objCurrProject.ProjectId
BuildSQLUpdateProjects = strSQLUpdate
Exit Function
HandleError:GeneralErrorHandler Err.Number, Err.Description, DB_LOGIC, _
"BuildSQLUpdateProjects"Exit Function
End Function
Function BuildSQLDeleteProjects(intId As Integer) As String
On Error GoTo HandleError
'generate SQL command to delete current recordDim strSQLDelete As StringstrSQLDelete = "DELETE FROM tblProjects WHERE intProjectId = " & intId
BuildSQLDeleteProjects = strSQLDelete
Exit Function
HandleError:GeneralErrorHandler Err.Number, Err.Description, DB_LOGIC, _
"BuildSQLDeleteProjects"Exit Function
End Function
Function BuildSQLSelectProjects(blnAllRecords As Boolean) As String
On Error GoTo HandleError
'generate SQL command to retrieve projects recordsDim strSQLRetrieve As String
'if option to display all records is selected in toggle buttonIf blnAllRecords Then
strSQLRetrieve = "SELECT * FROM tblProjects " & _"ORDER BY intProjectId"
367

P1: IML/FFX P2: IML/FFX QC: IML/FFX T1: IML
WY044-12 WY044-Gosnell WY044-Gosnell-v2.cls August 13, 2004 15:25
Chapter 12
Else'show only the unclosed projectsstrSQLRetrieve = "SELECT * " & _
"FROM tblProjects WHERE txtStatus <> 'Closed' " & _"ORDER BY intProjectId "
End If
BuildSQLSelectProjects = strSQLRetrieve
Exit Function
HandleError:GeneralErrorHandler Err.Number, Err.Description, DB_LOGIC, _
"BuildSQLSelectProjects"Exit Function
End Function
Function BuildSQLSelectAll(strTableName) As String
On Error GoTo HandleError
Dim strSQLSelect As String
'use this for selecting all records in a tablestrSQLSelect = "SELECT * FROM " & strTableName
BuildSQLSelectAll = strSQLSelect
Exit Function
HandleError:GeneralErrorHandler Err.Number, Err.Description, DB_LOGIC,"BuildSQLSelectAll"Exit Function
End Function
14. Add the following ProcessRecordset procedure to the modDatabaseLogic module.
Function ProcessRecordset(strSQLStatement As String) As ADODB.Recordset
On Error GoTo HandleError
'open the connection to the databaseCall OpenDbConnection
'create a new instance of a recordsetDim rsCont As New ADODB.Recordset
'set various properties of the recordsetWith rsCont
'specify a cursortype and lock type that will allow updates
368

P1: IML/FFX P2: IML/FFX QC: IML/FFX T1: IML
WY044-12 WY044-Gosnell WY044-Gosnell-v2.cls August 13, 2004 15:25
Case Study 1: Project Tracker Application
.CursorType = adOpenKeyset
.CursorLocation = adUseClient
.LockType = adLockBatchOptimistic'populate the recordset based on SQL statement.Open strSQLStatement, cnConn'disconnect the recordset.ActiveConnection = Nothing'sort the recordset
End With
'close the connection to the databaseCall CloseDbConnection
'return the recordsetSet ProcessRecordset = rsCont
Exit Function
HandleError:GeneralErrorHandler Err.Number, Err.Description, DB_LOGIC, "ProcessRecordset"Exit Function
End Function
15. Add the following ProcessUpdate procedure to the modDatabaseLogic module.
Sub ProcessUpdate(strSQLStatement As String, Optional rsRecordset AsADODB.Recordset)
On Error GoTo HandleError
'This procedure is used to handle updates to the database
'open the connection to the databaseCall OpenDbConnection
'execute the command against the databaseCall ExecuteSQLCommand(strSQLStatement)
If Not rsRecordset Is Nothing Then'repopulate the recordset with most current dataCall RequeryRecordset(rsRecordset)
End If'close the connection to the databaseCall CloseDbConnection
Exit Sub
HandleError:GeneralErrorHandler Err.Number, Err.Description, DB_LOGIC, "ProcessUpdate"Exit Sub
End Sub
369

P1: IML/FFX P2: IML/FFX QC: IML/FFX T1: IML
WY044-12 WY044-Gosnell WY044-Gosnell-v2.cls August 13, 2004 15:25
Chapter 12
16. Add the following procedures to the modDatabaseLogic module that handle deletingrecords from the cross reference tables that store comments, contacts, and file attachments foreach project.
Function BuildSQLDeleteProjectsComments(intProjectId As Integer) As String
'build SQL statement for deletion
On Error GoTo HandleError
Dim strSQLStatement As String
strSQLStatement = "DELETE FROM tblProjectsComments WHERE intProjectId = " & _intProjectId
BuildSQLDeleteProjectsComments = strSQLStatement
Exit Function
HandleError:GeneralErrorHandler Err.Number, Err.Description, DB_LOGIC, _
"BuildSQLDeleteProjectsComments"Exit Function
End Function
Function BuildSQLDeleteProjectsContacts(intProjectId As Integer) As String
'build SQL statement for deletion
On Error GoTo HandleError
Dim strSQLStatement As String
strSQLStatement = "DELETE FROM tblProjectsContacts WHERE intProjectId = " & _intProjectId
BuildSQLDeleteProjectsContacts = strSQLStatement
Exit Function
HandleError:GeneralErrorHandler Err.Number, Err.Description, DB_LOGIC, _
"BuildSQLDeleteProjectsContacts"Exit Function
End Function
Function BuildSQLDeleteProjectsAttachments(intProjectId As Integer) As String
'build SQL statement for deletion
On Error GoTo HandleError
370

P1: IML/FFX P2: IML/FFX QC: IML/FFX T1: IML
WY044-12 WY044-Gosnell WY044-Gosnell-v2.cls August 13, 2004 15:25
Case Study 1: Project Tracker Application
Dim strSQLStatement As String
strSQLStatement = "DELETE FROM tblProjectsFileAttachments WHERE " & _"intProjectId = " & intProjectId
BuildSQLDeleteProjectsAttachments = strSQLStatement
Exit Function
HandleError:GeneralErrorHandler Err.Number, Err.Description, DB_LOGIC, _
"BuildSQLDeleteProjectsAttachments"Exit Function
End Function
17. Add the following procedures to the modDatabaseLogic module that handle insertingrecords into the cross reference tables that store comments, contacts, and file attachments foreach project.
Function BuildSQLInsertProjectsComments(intProjectId As Integer, strComment _As String) As String
'build SQL statement for insertion
On Error GoTo HandleError
Dim strSQLStatement As String
strSQLStatement = "INSERT INTO tblProjectsComments(intProjectId, txtComment)" & _"VALUES(" & intProjectId & ", '" & strComment & "')"
BuildSQLInsertProjectsComments = strSQLStatement
Exit Function
HandleError:GeneralErrorHandler Err.Number, Err.Description, DB_LOGIC, _
"BuildSQLInsertProjectsComments"Exit Function
End Function
Function BuildSQLInsertProjectsContacts(intContactId As Integer, intProjectId _As Integer) As String
'build SQL statement for insertion
On Error GoTo HandleError
Dim strSQLStatement As String
strSQLStatement = "INSERT INTO tblProjectsContacts(intContactId, " & _"intProjectId) VALUES(" & intContactId & ", " & intProjectId & ")"
371

P1: IML/FFX P2: IML/FFX QC: IML/FFX T1: IML
WY044-12 WY044-Gosnell WY044-Gosnell-v2.cls August 13, 2004 15:25
Chapter 12
BuildSQLInsertProjectsContacts = strSQLStatement
Exit Function
HandleError:GeneralErrorHandler Err.Number, Err.Description, DB_LOGIC, _
"BuildSQLInsertProjectsContacts"Exit Function
End Function
Function BuildSQLInsertProjectsAttachments(intProjectId As Integer, _strFileDescription As String, strFileName As String) As String
'build SQL statement for insertion
On Error GoTo HandleError
Dim strSQLStatement As String
strSQLStatement = "INSERT INTO tblProjectsFileAttachments(intProjectId, " & _"txtFileDescription, txtFileName) VALUES (" & _intProjectId & ", '" & strFileDescription & "', '" & strFileName & "')"
BuildSQLInsertProjectsAttachments = strSQLStatement
Exit Function
HandleError:GeneralErrorHandler Err.Number, Err.Description, DB_LOGIC, _
"BuildSQLInsertProjectsAttachments"Exit Function
End Function
18. Save your changes to the modDatabaseLogic module.
How It WorksYou created the modBusinessLogic module for processing the business logic for the application, andthe modDatabaseLogic module for communicating with the database. In the General Declarationssection of the modBusinessLogic module, you added some declarations to external functions. TheGetOpenFileName external function is used to display the File Open dialog box that allows you tobrowse the file system and select a file. This function is called later in the code to open the dialog box forselecting an attachment to associate with a particular project record.
Private Declare Function GetOpenFileName Lib "comdlg32.dll" Alias _"GetOpenFileNameA" (pOpenfilename As OPENFILENAME) As Long
Private Type OPENFILENAMElStructSize As LonghwndOwner As LonghInstance As Long
372

P1: IML/FFX P2: IML/FFX QC: IML/FFX T1: IML
WY044-12 WY044-Gosnell WY044-Gosnell-v2.cls August 13, 2004 15:25
Case Study 1: Project Tracker Application
lpstrFilter As StringlpstrCustomFilter As StringnMaxCustFilter As LongnFilterIndex As LonglpstrFile As StringnMaxFile As LonglpstrFileTitle As StringnMaxFileTitle As LonglpstrInitialDir As StringlpstrTitle As Stringflags As LongnFileOffset As IntegernFileExtension As IntegerlpstrDefExt As StringlCustData As LonglpfnHook As LonglpTemplateName As String
End Type
The ShellExecute external function is used to launch an external program.
Public Declare Function ShellExecute _Lib "shell32.dll" _Alias "ShellExecuteA" ( _ByVal hwnd As Long, _ByVal lpOperation As String, _ByVal lpFile As String, _ByVal lpParameters As String, _ByVal lpDirectory As String, _ByVal nShowCmd As Long) _As Long
The OpenFileAttachment procedure calls the ShellExecute external function in order to preview aparticular attachment in its native application.
Sub OpenFileAttachment(strFile As String)
On Error GoTo HandleError
Dim strAction As StringDim lngErr As Long
'open the file attachmentstrAction = "OPEN"lngErr = ShellExecute(0, strAction, strFile, "", "", 1)
Exit Sub
HandleError:GeneralErrorHandler Err.Number, Err.Description, BUS_LOGIC, _
"OpenFileAttachment"Exit Sub
End Sub
373

P1: IML/FFX P2: IML/FFX QC: IML/FFX T1: IML
WY044-12 WY044-Gosnell WY044-Gosnell-v2.cls August 13, 2004 15:25
Chapter 12
As I mentioned previously, the GetOpenFileName external function is used to open a file browserdialog box. This function is called from the GetFileNameBrowse function to allow a user to browse fora file attachment to associate with a project.
Function GetFileNameBrowse() As String
On Error GoTo HandleError
Dim OpenFile As OPENFILENAMEDim lReturn As LongDim sFilter As StringOpenFile.lStructSize = Len(OpenFile)OpenFile.hwndOwner = Forms("frmProjects").hwnd'OpenFile.hInstance = hInstancesFilter = "All Files (*.*)" & Chr(0) & "*.*" & Chr(0)OpenFile.lpstrFilter = sFilterOpenFile.nFilterIndex = 1OpenFile.lpstrFile = String(257, 0)OpenFile.nMaxFile = Len(OpenFile.lpstrFile) - 1OpenFile.lpstrFileTitle = OpenFile.lpstrFileOpenFile.nMaxFileTitle = OpenFile.nMaxFileOpenFile.lpstrInitialDir = "C:\"OpenFile.lpstrTitle = "Browse for an attachment"OpenFile.flags = 0lReturn = GetOpenFileName(OpenFile)If lReturn = 0 Then
GetFileNameBrowse = ""Else'return the selected filename
GetFileNameBrowse = Trim(OpenFile.lpstrFile)End If
Exit Function
HandleError:GeneralErrorHandler Err.Number, Err.Description, BUS_LOGIC,
"GetFileNameBrowse"Exit Function
End Function
The code for these external functions is a little bit complicated. It is okay if you do not understand exactlyhow they work. I just wanted to include the functionality to show you how powerful your Accessapplications can be.
Next, you added four recordset navigation procedures to the modBusinessLogic module. For example,the MoveToFirstRecord procedure is responsible for moving to the first record in the localdisconnected recordset.
Sub MoveToFirstRecord(intRecCounter As Integer, rsRecordset As ADODB.Recordset, _objObject As Object, blnAddMode As Boolean)
On Error GoTo HandleError
374

P1: IML/FFX P2: IML/FFX QC: IML/FFX T1: IML
WY044-12 WY044-Gosnell WY044-Gosnell-v2.cls August 13, 2004 15:25
Case Study 1: Project Tracker Application
'move to the first record in the local disconnected recordsetIf Not rsRecordset.BOF And Not rsRecordset.EOF Then
rsRecordset.MoveFirstintRecCounter = 1
Once the record position changes, the object is populated with the new current record.
'add code to populate object with new current recordobjObject.PopulatePropertiesFromRecordset rsRecordset
blnAddMode = FalseEnd If
Exit Sub
HandleError:GeneralErrorHandler Err.Number, Err.Description, BUS_LOGIC, _
"MoveToFirstRecord"Exit Sub
End Sub
The ProceedWithDelete function prompts the user to confirm that she wishes to proceed with a deleteoperation, such as deleting a project record from frmProjects or deleting a contact record fromfrmContacts.
Function ProceedWithDelete(blnAddMode As Boolean) As Boolean
On Error GoTo HandleError
Dim blnProceed As BooleanDim intResponse As Integer
blnProceed = True
If the user is in add mode, that user cannot issue a delete command because the record has not even beenadded yet.
'don't let the user issue a delete command if in add modeIf blnAddMode = True Then
blnProceed = FalseProceedWithDelete = blnProceedExit Function
End If
Then, the user is prompted to confirm that she wishes to proceed with the delete operation.
'confirm that user really wants to delete recordintResponse = MsgBox("Are you sure you want to delete this record?", vbYesNo)
The value returned from the MsgBox function is then analyzed to determine whether the user chose theoption to proceed with the delete.
375

P1: IML/FFX P2: IML/FFX QC: IML/FFX T1: IML
WY044-12 WY044-Gosnell WY044-Gosnell-v2.cls August 13, 2004 15:25
Chapter 12
'if the user cancels delete, then exit this procedureIf intResponse = vbNo Then
blnProceed = FalseProceedWithDelete = blnProceedExit Function
End If
ProceedWithDelete = blnProceed
Exit Function
HandleError:ProceedWithDelete = FalseGeneralErrorHandler Err.Number, Err.Description, BUS_LOGIC,
"ProceedWithDelete"Exit Function
End Function
The last procedure added to the modBusinessLogic module was the GeneralErrorHandlerprocedure. This module handles all errors for the application and is referenced in each procedure orfunction, as you have probably noticed by now.
Public Sub GeneralErrorHandler(lngErrNumber As Long, strErrDesc As String, _strModuleSource As String, strProcedureSource As String)
On Error Resume Next
Dim strMessage As String
'build the error message string from the parameters passed instrMessage = "An error has occurred in the application."strMessage = strMessage & vbCrLf & "Error Number: " & lngErrNumberstrMessage = strMessage & vbCrLf & "Error Description: " & strErrDescstrMessage = strMessage & vbCrLf & "Module Source: " & strModuleSourcestrMessage = strMessage & vbCrLf & "Procedure Source: " & strProcedureSource
'display the message to the userMsgBox strMessage, vbCritical
Exit Sub
End Sub
Next, you created a standard module called modDatabaseLogic. You added various procedures to themodule for interacting with the database. For example, the ExecuteSQLCommand procedure isresponsible for executing a SQL statement against the database that does not return any rows. Examplesof these types of statements include insert, update, and delete statements.
Sub ExecuteSQLCommand(strSQL As String)
On Error GoTo HandleError
376

P1: IML/FFX P2: IML/FFX QC: IML/FFX T1: IML
WY044-12 WY044-Gosnell WY044-Gosnell-v2.cls August 13, 2004 15:25
Case Study 1: Project Tracker Application
'the purpose of this procedure is to execute'a SQL statement that does not return any'rows against the database.
Dim cmdCommand As ADODB.CommandSet cmdCommand = New ADODB.Command
'set the command to the current connectionSet cmdCommand.ActiveConnection = cnConn'set the SQL statement to the command textcmdCommand.CommandText = strSQL'execute the command against the databasecmdCommand.Execute
Exit Sub
HandleError:GeneralErrorHandler Err.Number, Err.Description, DB_LOGIC, _
"ExecuteSQLCommand"Exit Sub
End Sub
Next, you added the OpenDbConnection and CloseDbConnection procedures for opening andclosing database connections. In the OpenDbConnection procedure, you may have had to modify thestrConnection string to point to the path where the ProjectTrackerDb, which you created at thebeginning of this chapter, is located.
Sub OpenDbConnection()
On Error GoTo HandleError
strConnection = "Provider=Microsoft.Jet.OLEDB.4.0;" & _"Data Source=" & CurrentProject.Path &"\ProjectTrackerDb.mdb;"
'create a new connection instance and open it using the connection stringSet cnConn = New ADODB.ConnectioncnConn.Open strConnection
Exit Sub
HandleError:GeneralErrorHandler Err.Number, Err.Description, DB_LOGIC, "OpenDbConnection"Exit Sub
End Sub
The RequeryRecordset procedure was then added to the modDatabaseLogic module to repopulatethe values in the recordset with the current data in the underlying database.
Sub RequeryRecordset(rsRecordset As ADODB.Recordset)
On Error GoTo HandleError
377

P1: IML/FFX P2: IML/FFX QC: IML/FFX T1: IML
WY044-12 WY044-Gosnell WY044-Gosnell-v2.cls August 13, 2004 15:25
Chapter 12
'repopulate the recordset to make sure it contains'the most current values from the database. also'disconnect the recordsetSet rsRecordset.ActiveConnection = cnConnrsRecordset.RequerySet rsRecordset.ActiveConnection = Nothing
Exit Sub
HandleError:GeneralErrorHandler Err.Number, Err.Description, DB_LOGIC, "RequeryRecordset"Exit Sub
End Sub
Next, you added various procedures for creating SQL statements for inserting, updating, deleting, andselecting records from the tblContacts table. For example, the BuildSQLInsertContactsprocedure creates a SQL statement from the values in the objCurrContact object.
Function BuildSQLInsertContacts(objCurrContact As clsContacts) As String
On Error GoTo HandleError
Dim strSQLInsert As String
'create SQL to insert a new record into the database'containing the values in the Contacts objectstrSQLInsert = "INSERT INTO tblContacts(" & _
"txtLastName, txtFirstName, txtMiddleName, " & _"txtCompany, txtAddress1, txtAddress2, " & _"txtCity, txtRegion, txtPostalCode, " & _"txtWorkPhone, txtHomePhone, txtCellPhone, " & _"txtEmail) VALUES (" & _"'" & objCurrContact.LastName & "', " & _"'" & objCurrContact.FirstName & "', " & _"'" & objCurrContact.MiddleName & "', " & _"'" & objCurrContact.Company & "', " & _"'" & objCurrContact.Address1 & "', " & _"'" & objCurrContact.Address2 & "', " & _"'" & objCurrContact.City & "', " & _"'" & objCurrContact.Region & "', " & _"'" & objCurrContact.PostalCode & "', " & _"'" & objCurrContact.WorkPhone & "', " & _"'" & objCurrContact.HomePhone & "', " & _"'" & objCurrContact.CellPhone & "', " & _"'" & objCurrContact.Email & "') "
BuildSQLInsertContacts = strSQLInsert
Exit Function
HandleError:GeneralErrorHandler Err.Number, Err.Description, DB_LOGIC, _
378

P1: IML/FFX P2: IML/FFX QC: IML/FFX T1: IML
WY044-12 WY044-Gosnell WY044-Gosnell-v2.cls August 13, 2004 15:25
Case Study 1: Project Tracker Application
"BuildSQLInsertContacts"Exit Function
End Function
Similarly, you added various procedures for creating SQL statements. You created procedures forinserting, updating, and deleting project records, for selecting unclosed project records, and for selectingall project records. For example, the BuildSQLInsertProjects procedure creates a SQL statementfrom the values in the objCurrProject object.
Function BuildSQLInsertProjects(objCurrProject As clsProjects) As String
On Error GoTo HandleError
Dim strSQLInsert As String
'create SQL to insert a new record into the database'containing the values in the Projects objectstrSQLInsert = "INSERT INTO tblProjects(" & _
"txtProjectTitle, txtProjectDescription, txtPriority, " & _"txtReferenceNum, curMoneyBudget, curMoneyToDate, " & _"intHoursBudget, intHoursToDate, dtDateDue, " & _"txtStatus) VALUES (" & _"'" & objCurrProject.ProjectTitle & "', " & _"'" & objCurrProject.ProjectDescription & "', " & _"'" & objCurrProject.Priority & "', " & _"'" & objCurrProject.ReferenceNum & "', " & _objCurrProject.MoneyBudget & ", " & _objCurrProject.MoneyToDate & ", " & _"" & objCurrProject.HoursBudget & ", " & _"" & objCurrProject.HoursToDate & ", " & _"'" & objCurrProject.DateDue & "', " & _"'" & objCurrProject.Status & "') "
BuildSQLInsertProjects = strSQLInsert
Exit Function
HandleError:GeneralErrorHandler Err.Number, Err.Description, DB_LOGIC, _
"BuildSQLInsertProjects"Exit Function
End Function
The ProcessRecordset procedure accepted a SQL statement as a parameter and executed thatstatement against the database. The database connection was opened, the SQL statement was executed,and the database connection was then closed. The recordset that was populated from the results of theSQL statement was returned to the calling function.
Function ProcessRecordset(strSQLStatement As String) As ADODB.Recordset
On Error GoTo HandleError
379

P1: IML/FFX P2: IML/FFX QC: IML/FFX T1: IML
WY044-12 WY044-Gosnell WY044-Gosnell-v2.cls August 13, 2004 15:25
Chapter 12
'open the connection to the databaseCall OpenDbConnection
'create a new instance of a recordsetDim rsCont As New ADODB.Recordset
'set various properties of the recordsetWith rsCont
'specify a cursortype and lock type that will allow updates.CursorType = adOpenKeyset.CursorLocation = adUseClient.LockType = adLockBatchOptimistic'populate the recordset based on SQL statement.Open strSQLStatement, cnConn'disconnect the recordset.ActiveConnection = Nothing
End With
'close the connection to the databaseCall CloseDbConnection
'return the recordsetSet ProcessRecordset = rsCont
Exit Function
HandleError:GeneralErrorHandler Err.Number, Err.Description, DB_LOGIC, "ProcessRecordset"Exit Function
End Function
Next, the ProcessUpdate procedure was added to the modDatabaseLogic module for processingvarious updates to the database. This procedure is similar to ProcessRecordset, only it does notreturn any values after executing the SQL statement.
Sub ProcessUpdate(strSQLStatement As String, Optional rsRecordset AsADODB.Recordset)
On Error GoTo HandleError
'This procedure is used to handle updates to the database
'open the connection to the databaseCall OpenDbConnection
'execute the command against the databaseCall ExecuteSQLCommand(strSQLStatement)
If Not rsRecordset Is Nothing Then'repopulate the recordset with most current dataCall RequeryRecordset(rsRecordset)
End If
380

P1: IML/FFX P2: IML/FFX QC: IML/FFX T1: IML
WY044-12 WY044-Gosnell WY044-Gosnell-v2.cls August 13, 2004 15:25
Case Study 1: Project Tracker Application
'close the connection to the databaseCall CloseDbConnection
Exit Sub
HandleError:GeneralErrorHandler Err.Number, Err.Description, DB_LOGIC, "ProcessUpdate"Exit Sub
End Sub
Next, various functions were added to handle deleting records from the cross reference tablesthat store comments, contacts, and file attachments for each project. For example, theBuildSQLDeleteProjectsComments function is responsible for creating the SQL statement used todelete comment records for a given project.
Function BuildSQLDeleteProjectsComments(intProjectId As Integer) As String
'build SQL statement for deletion
On Error GoTo HandleError
Dim strSQLStatement As String
strSQLStatement = "DELETE FROM tblProjectsComments WHERE intProjectId = " & _intProjectId
BuildSQLDeleteProjectsComments = strSQLStatement
Exit Function
HandleError:GeneralErrorHandler Err.Number, Err.Description, DB_LOGIC, _
"BuildSQLDeleteProjectsComments"Exit Function
End Function
Various procedures were also added to handle inserting records into the cross reference tablesthat store comments, contacts, and file attachments for each project. For example, theBuildSQLInsertProjectComments function is responsible for creating the SQL statement that insertsa new comment into the tblProjectsComments table in the database.
Function BuildSQLInsertProjectsComments(intProjectId As Integer, strComment _As String) As String
'build SQL statement for insertion
On Error GoTo HandleError
Dim strSQLStatement As String
strSQLStatement = "INSERT INTO tblProjectsComments(intProjectId, txtComment)" & _"VALUES(" & intProjectId & ", '" & strComment & "')"
381

P1: IML/FFX P2: IML/FFX QC: IML/FFX T1: IML
WY044-12 WY044-Gosnell WY044-Gosnell-v2.cls August 13, 2004 15:25
Chapter 12
BuildSQLInsertProjectsComments = strSQLStatement
Exit Function
HandleError:GeneralErrorHandler Err.Number, Err.Description, DB_LOGIC, _
"BuildSQLInsertProjectsComments"Exit Function
End Function
Connecting the User Interface to the CodeSo far, your application will probably not compile because some features used in the code have not beenwritten yet. You’re almost finished with the application anyway. You are now ready to tie everythingtogether by adding the VBA code to the Project Tracker and Contacts forms. Most of this code will beevent procedures that fire, for example, when certain buttons are clicked. Some of the code will be localprocedures in the form that deal with user-interface-specific features that would not make sense to put ina standard or class module.
The Projects FormAn example of the Project Tracker form, called frmProjects, is shown in Figure 12.26 with somesample data populated. You will revisit this form in more detail at the end of the chapter, where you willexplore its cool features. For now, just keep this form in mind to help you understand the purpose of thecode that you are about to write (and have already written).
Try It Out Writing Code for the frmProjects FormAs previously mentioned, you are now ready to write the VBA code that will finish up the application.You will start with the frmProjects form and will finish with the frmContacts form.
1. Open the frmProjects form and select the Form_Load event for the form to bring up theVisual Basic editor. Add the following code to the form:
Private Sub Form_Load()
On Error GoTo HandleError
Set objProjects = New clsProjectsSet rsProjects = New ADODB.Recordset
'load non-closed projects as default (open, on hold, etc.)blnAllRecords = False
'make sure unclosed is enabled by default so only unclosed records load firsttogShowUnclosed.Value = TruetogShowAll.Value = False
382

P1: IML/FFX P2: IML/FFX QC: IML/FFX T1: IML
WY044-12 WY044-Gosnell WY044-Gosnell-v2.cls August 13, 2004 15:25
Case Study 1: Project Tracker Application
Figure 12.26
'lock project id field so no edits allowed (primary key assigned by database)txtProjectId.Locked = True
'load the records in the recordset and display the first one on the formCall LoadRecords
Exit Sub
HandleError:GeneralErrorHandler Err.Number, Err.Description, PROJECTS_FORM, "Form_Load"Exit Sub
End Sub
2. Add the following code to the General Declarations section of the form.
Option Compare DatabaseOption Explicit
383

P1: IML/FFX P2: IML/FFX QC: IML/FFX T1: IML
WY044-12 WY044-Gosnell WY044-Gosnell-v2.cls August 13, 2004 15:25
Chapter 12
Dim blnAddMode As BooleanDim blnAllRecords As BooleanDim rsProjects As ADODB.RecordsetDim objProjects As clsProjectsDim rsComments As ADODB.RecordsetDim rsContacts As ADODB.RecordsetDim rsAttachments As ADODB.RecordsetConst PROJECTS_FORM = "frmProjects"Dim intCurrProjectRecord As Integer
3. Add Click event procedures to the form for making updates to the data.
Private Sub cmdAddNew_Click()
On Error GoTo HandleError
'clear the current controls to enable adding a new'Project recordCall AddEmptyProjectRecord
Exit Sub
HandleError:GeneralErrorHandler Err.Number, Err.Description, PROJECTS_FORM, _
"cmdAddNew_Click"Exit Sub
End Sub
Private Sub cmdSave_Click()
On Error GoTo HandleError
Dim intCurProject As Integer
'save the id of the current record if in update modeIf Not blnAddMode Then
intCurProject = objProjects.ProjectIdElse
intCurProject = 0End If
'populate object with current info on formobjProjects.PopulatePropertiesFromForm
'save all changes to current recordobjProjects.Save blnAddMode, rsProjects
'save changes in list boxes in tabs 1-3Call SaveCommentsCall SaveContactsCall SaveAttachments
'move back to the project that was current before the requeryIf intCurProject > 0 Then
384

P1: IML/FFX P2: IML/FFX QC: IML/FFX T1: IML
WY044-12 WY044-Gosnell WY044-Gosnell-v2.cls August 13, 2004 15:25
Case Study 1: Project Tracker Application
'move back to the project that was just updatedrsProjects.Find "[intProjectId] = " & intCurProject
Else'if just added new record, move to the beginning of'the recordsetCall MoveToFirstRecord(intCurrProjectRecord, rsProjects, objProjects, _
blnAddMode)End If
Exit Sub
HandleError:GeneralErrorHandler Err.Number, Err.Description, PROJECTS_FORM,
"cmdSave_Click"Exit Sub
End Sub
Private Sub cmdDelete_Click()
On Error GoTo HandleError
'delete the current record from the local disconnected recordsetobjProjects.Delete objProjects.ProjectId, blnAddMode, rsProjects
'move to the first record in the recordset after the deleteCall MoveToFirstRecord(intCurrProjectRecord, rsProjects, objProjects, _
blnAddMode)
'populate the controls on the form with the current recordCall PopulateProjectsControls
Exit Sub
HandleError:GeneralErrorHandler Err.Number, Err.Description, PROJECTS_FORM, _
"cmdDelete_Click"Exit Sub
End Sub
4. Add the following Click event procedures to the form for navigating through the data.
Private Sub cmdMoveFirst_Click()
On Error GoTo HandleError
'move to the first record in the local disconnected recordsetCall MoveToFirstRecord(intCurrProjectRecord, rsProjects, objProjects, _
blnAddMode)
'populate the controls on the form with the current recordCall PopulateProjectsControls
Exit Sub
385

P1: IML/FFX P2: IML/FFX QC: IML/FFX T1: IML
WY044-12 WY044-Gosnell WY044-Gosnell-v2.cls August 13, 2004 15:25
Chapter 12
HandleError:GeneralErrorHandler Err.Number, Err.Description, PROJECTS_FORM, _
"cmdMoveFirst_Click"Exit Sub
End Sub
Private Sub cmdMoveLast_Click()
On Error GoTo HandleError
'move to the last record in the local disconnected recordsetCall MoveToLastRecord(intCurrProjectRecord, rsProjects, objProjects, _
blnAddMode)
'populate the controls on the form with the current recordCall PopulateProjectsControls
Exit Sub
HandleError:GeneralErrorHandler Err.Number, Err.Description, PROJECTS_FORM, _
"cmdMoveLast_Click"Exit Sub
End Sub
Private Sub cmdMoveNext_Click()
On Error GoTo HandleError
'move to the next record in the local disconnected recordsetCall MoveToNextRecord(intCurrProjectRecord, rsProjects, objProjects, _
blnAddMode)
'populate the controls on the form with the current recordCall PopulateProjectsControls
Exit Sub
HandleError:GeneralErrorHandler Err.Number, Err.Description, PROJECTS_FORM, _
"cmdMoveNext_Click"Exit Sub
End Sub
Private Sub cmdMovePrevious_Click()
On Error GoTo HandleError
'move to the previous record in the local disconnected recordsetCall MoveToPreviousRecord(intCurrProjectRecord, rsProjects, objProjects, _
blnAddMode)
386
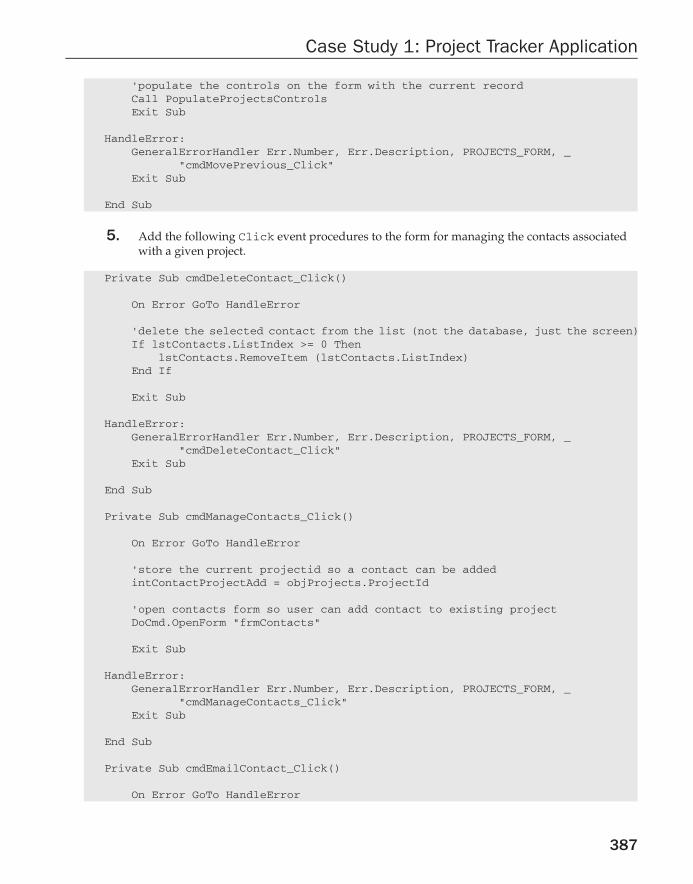
P1: IML/FFX P2: IML/FFX QC: IML/FFX T1: IML
WY044-12 WY044-Gosnell WY044-Gosnell-v2.cls August 13, 2004 15:25
Case Study 1: Project Tracker Application
'populate the controls on the form with the current recordCall PopulateProjectsControlsExit Sub
HandleError:GeneralErrorHandler Err.Number, Err.Description, PROJECTS_FORM, _
"cmdMovePrevious_Click"Exit Sub
End Sub
5. Add the following Click event procedures to the form for managing the contacts associatedwith a given project.
Private Sub cmdDeleteContact_Click()
On Error GoTo HandleError
'delete the selected contact from the list (not the database, just the screen)If lstContacts.ListIndex >= 0 Then
lstContacts.RemoveItem (lstContacts.ListIndex)End If
Exit Sub
HandleError:GeneralErrorHandler Err.Number, Err.Description, PROJECTS_FORM, _
"cmdDeleteContact_Click"Exit Sub
End Sub
Private Sub cmdManageContacts_Click()
On Error GoTo HandleError
'store the current projectid so a contact can be addedintContactProjectAdd = objProjects.ProjectId
'open contacts form so user can add contact to existing projectDoCmd.OpenForm "frmContacts"
Exit Sub
HandleError:GeneralErrorHandler Err.Number, Err.Description, PROJECTS_FORM, _
"cmdManageContacts_Click"Exit Sub
End Sub
Private Sub cmdEmailContact_Click()
On Error GoTo HandleError
387

P1: IML/FFX P2: IML/FFX QC: IML/FFX T1: IML
WY044-12 WY044-Gosnell WY044-Gosnell-v2.cls August 13, 2004 15:25
Chapter 12
'create a new email to the selected contact using the email columnDoCmd.SendObject acSendNoObject, , , lstContacts.Column(5), , , , ,True, False
Exit Sub
HandleError:GeneralErrorHandler Err.Number, Err.Description, PROJECTS_FORM, _
"cmdEmailContact_Click"Exit Sub
End Sub
Private Sub cmdViewContact_Click()
On Error GoTo HandleError
'if there is a selected record in the listIf lstContacts.ListIndex <> -1 Then
'store the current projectid so a contact can be addedintContactProjectAdd = objProjects.ProjectId
'store the current contact so it can be retrieved'from the contacts formintContactProjectLookup = lstContacts.Column(6)DoCmd.OpenForm "frmContacts"
intContactProjectLookup = 0
End If
Exit Sub
HandleError:GeneralErrorHandler Err.Number, Err.Description, PROJECTS_FORM, _
"cmdViewContact_Click"Exit Sub
End Sub
6. Add the following Click event procedures to the form for managing the comments associatedwith a given project.
Private Sub cmdAddComment_Click()
On Error GoTo HandleError
'add comment/task to list boxlstComments.AddItem (txtAddComment)
'clear AddComment box since you just added ittxtAddComment = ""
Exit Sub
388

P1: IML/FFX P2: IML/FFX QC: IML/FFX T1: IML
WY044-12 WY044-Gosnell WY044-Gosnell-v2.cls August 13, 2004 15:25
Case Study 1: Project Tracker Application
HandleError:GeneralErrorHandler Err.Number, Err.Description, PROJECTS_FORM, _
"cmdAddComment_Click"Exit Sub
End Sub
Private Sub cmdDeleteComment_Click()
On Error GoTo HandleError
'remove the selected item from the listIf lstComments.ListIndex >= 0 Then
lstComments.RemoveItem (lstComments.ListIndex)End If
Exit Sub
HandleError:GeneralErrorHandler Err.Number, Err.Description, PROJECTS_FORM, _
"cmdDeleteComment_Click"Exit Sub
End Sub
7. Add the following Click event procedures to the form for managing the file attachmentsassociated with a given project.
Private Sub cmdAddAttachment_Click()
On Error GoTo HandleError
'add file attachment to list boxlstFileAttachments.AddItem (txtFileDesc & ";" & txtFileName)
'clear text boxes since info was added to listtxtFileDesc = ""txtFileName = ""
Exit Sub
HandleError:GeneralErrorHandler Err.Number, Err.Description, PROJECTS_FORM, _
"cmdAddAttachment_Click"Exit Sub
End Sub
Private Sub cmdFileBrowse_Click()
On Error GoTo HandleError
'show the open dialog and load'selected file name in text boxtxtFileName = GetFileNameBrowse
389

P1: IML/FFX P2: IML/FFX QC: IML/FFX T1: IML
WY044-12 WY044-Gosnell WY044-Gosnell-v2.cls August 13, 2004 15:25
Chapter 12
Exit Sub
HandleError:GeneralErrorHandler Err.Number, Err.Description, PROJECTS_FORM, _
"cmdFileBrowse_Click"Exit Sub
End Sub
Private Sub cmdOpenFile_Click()
On Error GoTo HandleError
Dim RetVal As VariantDim strFile As String
'if the user selected a valueIf lstFileAttachments.ListIndex >= 0 Then
'retrieve the file name from the list boxstrFile = lstFileAttachments.Column(1)
'open the selected fileCall OpenFileAttachment(strFile)
End If
Exit Sub
HandleError:GeneralErrorHandler Err.Number, Err.Description, PROJECTS_FORM, _
"cmdOpenFile_Click"Exit Sub
End Sub
Private Sub cmdRemoveAttachment_Click()
On Error GoTo HandleError
'remove the selected item from the list (if an item has been selected)If lstFileAttachments.ListIndex >= 0 Then
lstFileAttachments.RemoveItem (lstFileAttachments.ListIndex)End If
Exit Sub
HandleError:GeneralErrorHandler Err.Number, Err.Description, PROJECTS_FORM, _
"cmdRemoveAttachment_Click"Exit Sub
End Sub
390

P1: IML/FFX P2: IML/FFX QC: IML/FFX T1: IML
WY044-12 WY044-Gosnell WY044-Gosnell-v2.cls August 13, 2004 15:25
Case Study 1: Project Tracker Application
8. Add the following AddEmptyProject procedure.
Sub AddEmptyProjectRecord()
On Error GoTo HandleError
'set add mode to trueblnAddMode = True
'clear the current values in the Projects objectobjProjects.ClearObject
'clear the current controls on the form so the'user can fill in values for the new recordCall ClearProjectsControlsExit Sub
HandleError:GeneralErrorHandler Err.Number, Err.Description, PROJECTS_FORM, _
"AddEmptyProjectRecord"Exit Sub
End Sub
9. Add the following PopulateProjectsControls procedure.
Sub PopulateProjectsControls()
On Error GoTo HandleError
'Populate the controls on the Projects form with the values of the'current record in the Projects object.If Not rsProjects.BOF And Not rsProjects.EOF Then
Me.txtProjectId = objProjects.ProjectIdMe.txtProjectTitle = objProjects.ProjectTitleMe.txtProjectDesc = objProjects.ProjectDescriptionMe.cboPriority = objProjects.PriorityMe.txtReferenceNum = objProjects.ReferenceNumMe.txtMoneyBudget = objProjects.MoneyBudgetMe.txtMoneyToDate = objProjects.MoneyToDateMe.txtHoursBudget = objProjects.HoursBudgetMe.txtHoursToDate = objProjects.HoursToDateIf objProjects.DateDue = "1/1/1900" Then
Me.txtDateDue = ""Else
Me.txtDateDue = objProjects.DateDueEnd IfMe.cboStatus = objProjects.Status
'populate the recordset for tab 1Set rsComments = New ADODB.Recordset
391

P1: IML/FFX P2: IML/FFX QC: IML/FFX T1: IML
WY044-12 WY044-Gosnell WY044-Gosnell-v2.cls August 13, 2004 15:25
Chapter 12
Set rsComments = objProjects.RetrieveComments(objProjects.ProjectId)PopulateListFromRecordset Me.lstComments, rsComments, 1rsComments.Close
'populate the recordset for tab 2Set rsContacts = New ADODB.RecordsetSet rsContacts = objProjects.RetrieveContacts(objProjects.ProjectId)PopulateListFromRecordset Me.lstContacts, rsContacts, 7rsContacts.Close
'populate the recordset for tab 3Set rsAttachments = New ADODB.RecordsetSet rsAttachments = _
objProjects.RetrieveAttachments(objProjects.ProjectId)PopulateListFromRecordset Me.lstFileAttachments, rsAttachments, 2rsAttachments.Close
'display the record count on the formlblRecordNum.Caption = "Record " & intCurrProjectRecord & " Of " & _
rsProjects.RecordCount
ElseIf rsProjects.BOF Then'past beginning of recordset so move to first recordCall MoveToFirstRecord(intCurrProjectRecord, rsProjects, _
objProjects, blnAddMode)ElseIf rsProjects.EOF Then
'past end of recordset so move back to last recordCall MoveToLastRecord(intCurrProjectRecord, rsProjects, _
objProjects, blnAddMode)End If
Exit Sub
HandleError:GeneralErrorHandler Err.Number, Err.Description, PROJECTS_FORM, _
"PopulateProjectsControls"Exit Sub
End Sub
10. Add the following ClearProjectControls procedure.
Sub ClearProjectsControls()
On Error GoTo HandleError
'clear the values in the controls on the formMe.txtProjectId = ""Me.txtProjectTitle = ""Me.txtProjectDesc = ""Me.cboPriority = 0Me.txtReferenceNum = ""Me.txtMoneyBudget = ""Me.txtMoneyToDate = ""
392

P1: IML/FFX P2: IML/FFX QC: IML/FFX T1: IML
WY044-12 WY044-Gosnell WY044-Gosnell-v2.cls August 13, 2004 15:25
Case Study 1: Project Tracker Application
Me.txtHoursBudget = ""Me.txtHoursToDate = ""Me.txtDateDue = ""Me.cboStatus = 0
'clear the values in the text box controls on the tab control pagesMe.txtAddComment = ""Me.txtFileName = ""Me.txtFileDesc = ""
Exit Sub
HandleError:GeneralErrorHandler Err.Number, Err.Description, PROJECTS_FORM, _
"ClearProjectsControls"Exit Sub
End Sub
11. Add the following PopulateComboBoxes procedure.
Sub PopulateComboBoxes()
On Error GoTo HandleError
'populate the priority combo boxcboPriority.RowSource = ""cboPriority.LimitToList = TruecboPriority.ColumnCount = 1cboPriority.RowSourceType = "Value List"cboPriority.AddItem ("Normal")cboPriority.AddItem ("High")cboPriority.AddItem ("Low")
'populate the status combo boxcboStatus.RowSource = ""cboStatus.LimitToList = TruecboStatus.ColumnCount = 1cboStatus.RowSourceType = "Value List"cboStatus.AddItem ("Open")cboStatus.AddItem ("Closed")cboStatus.AddItem ("On Hold")
Exit Sub
HandleError:GeneralErrorHandler Err.Number, Err.Description, PROJECTS_FORM, _
"PopulateComboBoxes"Exit Sub
End Sub
12. Add the following PopulateListFromRecordset procedure.
393

P1: IML/FFX P2: IML/FFX QC: IML/FFX T1: IML
WY044-12 WY044-Gosnell WY044-Gosnell-v2.cls August 13, 2004 15:25
Chapter 12
Sub PopulateListFromRecordset(lstList As ListBox, rsRecordset As _ADODB.Recordset, intNumCols As Integer)
On Error GoTo HandleError
Dim intCounter As IntegerDim strItem As String
With lstList.RowSource = "".ColumnCount = intNumCols.RowSourceType = "Value List"
End With
'add all of the values in the recordset to the list box
Do Until rsRecordset.EOF'for each item in the current record, build stringFor intCounter = 0 To intNumCols - 1
strItem = strItem & rsRecordset(intCounter).Value & ";"Next intCounterlstList.AddItem (strItem)strItem = ""rsRecordset.MoveNext
Loop
Exit Sub
HandleError:GeneralErrorHandler Err.Number, Err.Description, PROJECTS_FORM, _
"PopulateListFromRecordset"Exit Sub
End Sub
13. Add the Form_Unload procedure for frmProjects.
Private Sub Form_Unload(Cancel As Integer)
On Error GoTo HandleError
'close the recordset and free the memoryrsProjects.CloseSet rsProjects = Nothing
Exit Sub
HandleError:GeneralErrorHandler Err.Number, Err.Description, PROJECTS_FORM,
"Form_Unload"Exit Sub
End Sub
394

P1: IML/FFX P2: IML/FFX QC: IML/FFX T1: IML
WY044-12 WY044-Gosnell WY044-Gosnell-v2.cls August 13, 2004 15:25
Case Study 1: Project Tracker Application
14. Add the LoadRecords procedure.
Sub LoadRecords()
On Error GoTo HandleError
intCurrProjectRecord = 0
blnAddMode = False
'populate the main recordsetSet rsProjects = objProjects.RetrieveProjects(blnAllRecords)
'if the recordset is emptyIf rsProjects.BOF And rsProjects.EOF Then
Exit SubElse
'populate the status and priority combo boxesCall PopulateComboBoxes
'populate the object with values in the recordsetobjProjects.PopulatePropertiesFromRecordset rsProjects
Call MoveToFirstRecord(intCurrProjectRecord, rsProjects, objProjects, _blnAddMode)
'populate the controls on the form with the current recordCall PopulateProjectsControls
End If
Exit Sub
HandleError:GeneralErrorHandler Err.Number, Err.Description, PROJECTS_FORM,"LoadRecords"Exit Sub
End Sub
15. Add the following procedures for dealing with the toggle button allowing the user to switchfrom unclosed projects to all projects.
Private Sub togShowAll_Click()
On Error GoTo HandleError
If togShowAll.Value = True Then
blnAllRecords = True
'make sure Show Unclosed is not checked any moretogShowUnclosed.Value = False
395

P1: IML/FFX P2: IML/FFX QC: IML/FFX T1: IML
WY044-12 WY044-Gosnell WY044-Gosnell-v2.cls August 13, 2004 15:25
Chapter 12
'now, populate the form with all projects recordsLoadRecords
End If
Exit Sub
HandleError:GeneralErrorHandler Err.Number, Err.Description, PROJECTS_FORM, _
"togShowAll_Click"Exit Sub
End Sub
Private Sub togShowUnclosed_Click()
On Error GoTo HandleError
If togShowUnclosed.Value = True Then
blnAllRecords = False
'make sure Show All is not checked any moretogShowAll.Value = False
'now, populate the form with all unclosed projects recordsLoadRecords
End If
Exit Sub
HandleError:GeneralErrorHandler Err.Number, Err.Description, PROJECTS_FORM, _
"togShowUnclosed_Click"Exit Sub
End Sub
16. Add the following procedures that deal with saving the records displayed on the tabs of theform to the database.
Sub SaveComments()
On Error GoTo HandleError
Dim strSQLStatement As StringDim intId As IntegerDim strComment As StringDim intCounter
'remove all current comments in database for this projectstrSQLStatement = BuildSQLDeleteProjectsComments(objProjects.ProjectId)
396
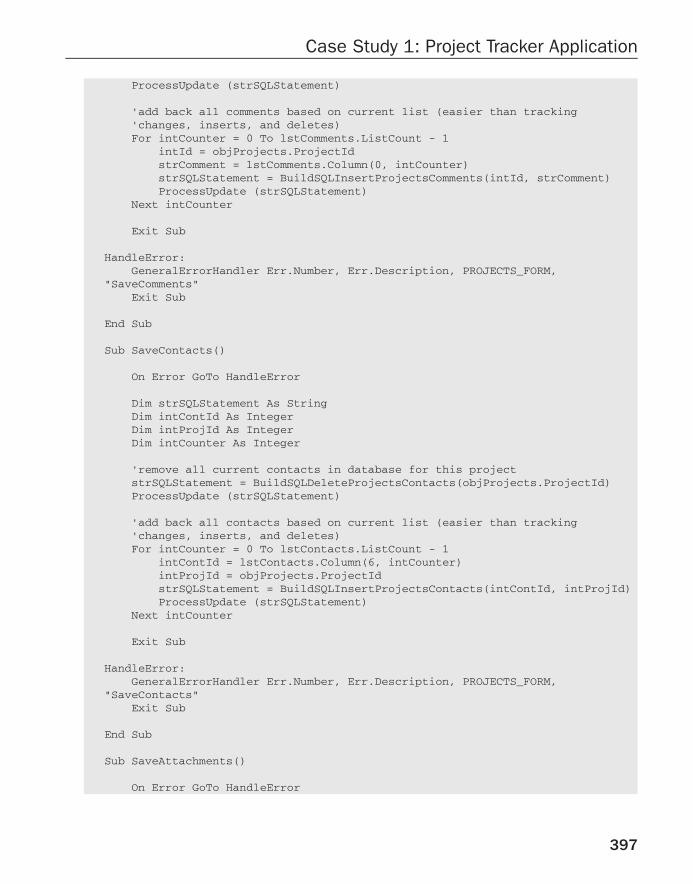
P1: IML/FFX P2: IML/FFX QC: IML/FFX T1: IML
WY044-12 WY044-Gosnell WY044-Gosnell-v2.cls August 13, 2004 15:25
Case Study 1: Project Tracker Application
ProcessUpdate (strSQLStatement)
'add back all comments based on current list (easier than tracking'changes, inserts, and deletes)For intCounter = 0 To lstComments.ListCount - 1
intId = objProjects.ProjectIdstrComment = lstComments.Column(0, intCounter)strSQLStatement = BuildSQLInsertProjectsComments(intId, strComment)ProcessUpdate (strSQLStatement)
Next intCounter
Exit Sub
HandleError:GeneralErrorHandler Err.Number, Err.Description, PROJECTS_FORM,
"SaveComments"Exit Sub
End Sub
Sub SaveContacts()
On Error GoTo HandleError
Dim strSQLStatement As StringDim intContId As IntegerDim intProjId As IntegerDim intCounter As Integer
'remove all current contacts in database for this projectstrSQLStatement = BuildSQLDeleteProjectsContacts(objProjects.ProjectId)ProcessUpdate (strSQLStatement)
'add back all contacts based on current list (easier than tracking'changes, inserts, and deletes)For intCounter = 0 To lstContacts.ListCount - 1
intContId = lstContacts.Column(6, intCounter)intProjId = objProjects.ProjectIdstrSQLStatement = BuildSQLInsertProjectsContacts(intContId, intProjId)ProcessUpdate (strSQLStatement)
Next intCounter
Exit Sub
HandleError:GeneralErrorHandler Err.Number, Err.Description, PROJECTS_FORM,
"SaveContacts"Exit Sub
End Sub
Sub SaveAttachments()
On Error GoTo HandleError
397

P1: IML/FFX P2: IML/FFX QC: IML/FFX T1: IML
WY044-12 WY044-Gosnell WY044-Gosnell-v2.cls August 13, 2004 15:25
Chapter 12
Dim strSQLStatement As StringDim intId As IntegerDim strDesc As StringDim strFile As StringDim intCounter As Integer
'remove all current file attachments in database for this projectstrSQLStatement = BuildSQLDeleteProjectsAttachments(objProjects.ProjectId)ProcessUpdate (strSQLStatement)
'add back all file attachments based on current list (easier than tracking'changes, inserts, and deletes)For intCounter = 0 To lstFileAttachments.ListCount - 1
intId = objProjects.ProjectIdstrDesc = lstFileAttachments.Column(0, intCounter)strFile = lstFileAttachments.Column(1, intCounter)strSQLStatement = BuildSQLInsertProjectsAttachments(intId, strDesc, _
strFile)ProcessUpdate (strSQLStatement)
Next intCounter
Exit Sub
HandleError:GeneralErrorHandler Err.Number, Err.Description, PROJECTS_FORM, _
"SaveComments"Exit Sub
End Sub
17. Add the following RefreshContacts procedure to frmProjects. This procedure getscalled whenever the user clicks to add the contact to the current project.
Sub RefreshContacts()
On Error GoTo HandleError
'populate the recordset for tab 2Set rsContacts = New ADODB.RecordsetSet rsContacts = objProjects.RetrieveContacts(objProjects.ProjectId)PopulateListFromRecordset Me.lstContacts, rsContacts, 7rsContacts.Close
Exit Sub
HandleError:GeneralErrorHandler Err.Number, Err.Description, PROJECTS_FORM, _
"RefreshContacts"Exit Sub
End Sub
398

P1: IML/FFX P2: IML/FFX QC: IML/FFX T1: IML
WY044-12 WY044-Gosnell WY044-Gosnell-v2.cls August 13, 2004 15:25
Case Study 1: Project Tracker Application
How It WorksFirst, you added the code to the frmProjects form to tie it to the rest of the code created earlier in thischapter. As you have learned throughout this book, you typically tie the user interface to the rest of thecode through various event procedures on the form. In the Form_Load event for the frmProjectsform, you added a few startup settings, such as locking the ProjectId field to prevent editing and to load aproject record onto the form.
Private Sub Form_Load()
On Error GoTo HandleError
Set objProjects = New clsProjectsSet rsProjects = New ADODB.Recordset
'load non-closed projects as default (open, on hold, etc.)blnAllRecords = False
'make sure unclosed is enabled by default so only unclosed records load firsttogShowUnclosed.Value = TruetogShowAll.Value = False
'lock project id field so no edits allowed (primary key assigned by database)txtProjectId.Locked = True
'load the records in the recordset and display the first one on the formCall LoadRecords
Exit Sub
HandleError:GeneralErrorHandler Err.Number, Err.Description, PROJECTS_FORM, "Form_Load"Exit Sub
End Sub
Next, you added various declarations to the General Declarations section of the form, in order to declarevarious recordsets that will store the projects and related records. You then added Click events for thecmdAddNew, cmdSave, and cmdDelete controls that fire when the user selects the respective button onthe form. For example, the cmdAddNew_Click event procedure calls a procedure that adds an emptyproject record to allow the user to begin adding a new project record.
Private Sub cmdAddNew_Click()
On Error GoTo HandleError
'clear the current controls to enable adding a new'Project recordCall AddEmptyProjectRecord
Exit Sub
399

P1: IML/FFX P2: IML/FFX QC: IML/FFX T1: IML
WY044-12 WY044-Gosnell WY044-Gosnell-v2.cls August 13, 2004 15:25
Chapter 12
HandleError:GeneralErrorHandler Err.Number, Err.Description, PROJECTS_FORM, _
"cmdAddNew_Click"Exit Sub
End Sub
The cmdSave_Click event saves a new or modified record to the database. When you click the cmdSavebutton, the ID of the current record is saved if the mode is update mode.
Private Sub cmdSave_Click()
On Error GoTo HandleError
Dim intCurProject As Integer
'save the id of the current record if in update modeIf Not blnAddMode Then
intCurProject = objProjects.ProjectIdElse
intCurProject = 0End If
The objProjects object (created based upon the clsProject that you created earlier) is thenpopulated with the values on the form.
'populate object with current info on formobjProjects.PopulatePropertiesFromForm
The changes to the current record are then saved to the database.
'save all changes to current recordobjProjects.Save blnAddMode, rsProjects
'save changes in list boxes in tabs 1-3Call SaveCommentsCall SaveContactsCall SaveAttachments
If an existing record was updated, the updated record is reset to the current record. If add mode wasactivated, the first record now becomes the current record.
'move back to the project that was current before the requeryIf intCurProject > 0 Then
'move back to the project that was just updatedrsProjects.Find "[intProjectId] = " & intCurProject
Else'if just added new record, move to the beginning of'the recordsetCall MoveToFirstRecord(intCurrProjectRecord, rsProjects, objProjects, _
blnAddMode)End If
400

P1: IML/FFX P2: IML/FFX QC: IML/FFX T1: IML
WY044-12 WY044-Gosnell WY044-Gosnell-v2.cls August 13, 2004 15:25
Case Study 1: Project Tracker Application
Exit Sub
HandleError:GeneralErrorHandler Err.Number, Err.Description, PROJECTS_FORM, _
"cmdSave_Click"Exit Sub
End Sub
Various Click event procedures were added to each of the command buttons to be used for recordnavigation. For example, the cmdMoveFirst_Click procedure calls a procedure to move to the firstrecord and then populates the controls on the form with the data of the newly current record.
Private Sub cmdMoveFirst_Click()
On Error GoTo HandleError
'move to the first record in the local disconnected recordsetCall MoveToFirstRecord(intCurrProjectRecord, rsProjects, objProjects, _
blnAddMode)
'populate the controls on the form with the current recordCall PopulateProjectsControls
Exit Sub
HandleError:GeneralErrorHandler Err.Number, Err.Description, PROJECTS_FORM, _
"cmdMoveFirst_Click"Exit Sub
End Sub
Next, several procedures were added to the form for managing contacts. For example, thecmdDeleteContacts_Click procedure deletes the selected contact from the list box on the form.
Private Sub cmdDeleteContact_Click()
On Error GoTo HandleError
'delete the selected contact from the list (not the database, just the screen)If lstContacts.ListIndex >= 0 Then
lstContacts.RemoveItem (lstContacts.ListIndex)End If
Exit Sub
HandleError:GeneralErrorHandler Err.Number, Err.Description, PROJECTS_FORM, _
"cmdDeleteContact_Click"Exit Sub
End Sub
401

P1: IML/FFX P2: IML/FFX QC: IML/FFX T1: IML
WY044-12 WY044-Gosnell WY044-Gosnell-v2.cls August 13, 2004 15:25
Chapter 12
The cmdManageContacts_Click event opens the frmContacts form so the user can add a contact tothe existing project.
Private Sub cmdManageContacts_Click()
On Error GoTo HandleError
'store the current projectid so a contact can be addedintContactProjectAdd = objProjects.ProjectId
'open contacts form so user can add contact to existing projectDoCmd.OpenForm "frmContacts"
Exit Sub
HandleError:GeneralErrorHandler Err.Number, Err.Description, PROJECTS_FORM, _
"cmdManageContacts_Click"Exit Sub
End Sub
The cmdEmailContact_Click event procedure executes the SendObject method of the DoCmd objectto generate an empty e-mail to the selected contact.
Private Sub cmdEmailContact_Click()
On Error GoTo HandleError
'create a new email to the selected contact using the email columnDoCmd.SendObject acSendNoObject, , , lstContacts.Column(5), , , , ,True, False
Exit Sub
HandleError:GeneralErrorHandler Err.Number, Err.Description, PROJECTS_FORM, _
"cmdEmailContact_Click"Exit Sub
End Sub
The cmdViewContact_Click event opened the frmContacts form and displayed the contact recordthat was selected.
Private Sub cmdViewContact_Click()
On Error GoTo HandleError
'if there is a selected record in the listIf lstContacts.ListIndex <> -1 Then
402

P1: IML/FFX P2: IML/FFX QC: IML/FFX T1: IML
WY044-12 WY044-Gosnell WY044-Gosnell-v2.cls August 13, 2004 15:25
Case Study 1: Project Tracker Application
'store the current projectid so a contact can be addedintContactProjectAdd = objProjects.ProjectId
'store the current contact so it can be retrieved'from the contacts formintContactProjectLookup = lstContacts.Column(6)DoCmd.OpenForm "frmContacts"
intContactProjectLookup = 0
End If
Exit Sub
HandleError:GeneralErrorHandler Err.Number, Err.Description, PROJECTS_FORM, _
"cmdViewContact_Click"Exit Sub
End Sub
Next, Click event procedures were created for adding and deleting comments from the lstCommentslist box. Event procedures were then added for managing file attachments associated with a givenproject. For example, the cmdAddAttachment_Click event added the value in the txtFileDesc andtxtFileName fields to the lstFileAttachments list box.
Private Sub cmdAddAttachment_Click()
On Error GoTo HandleError
'add file attachment to list boxlstFileAttachments.AddItem (txtFileDesc & ";" & txtFileName)
'clear text boxes since info was added to listtxtFileDesc = ""txtFileName = ""
Exit Sub
HandleError:GeneralErrorHandler Err.Number, Err.Description, PROJECTS_FORM, _
"cmdAddAttachment_Click"Exit Sub
End Sub
The cmdFileBrowse_Click event called the GetFileNameBrowse function, which then called theexternal function to open the File Browse dialog box.
Private Sub cmdFileBrowse_Click()
On Error GoTo HandleError
'show the open dialog and load
403
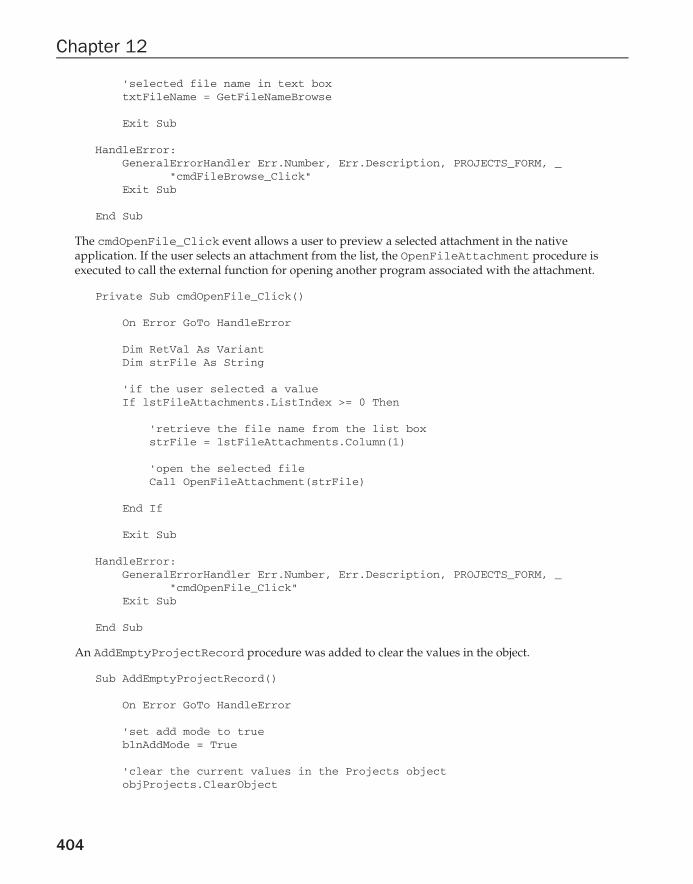
P1: IML/FFX P2: IML/FFX QC: IML/FFX T1: IML
WY044-12 WY044-Gosnell WY044-Gosnell-v2.cls August 13, 2004 15:25
Chapter 12
'selected file name in text boxtxtFileName = GetFileNameBrowse
Exit Sub
HandleError:GeneralErrorHandler Err.Number, Err.Description, PROJECTS_FORM, _
"cmdFileBrowse_Click"Exit Sub
End Sub
The cmdOpenFile_Click event allows a user to preview a selected attachment in the nativeapplication. If the user selects an attachment from the list, the OpenFileAttachment procedure isexecuted to call the external function for opening another program associated with the attachment.
Private Sub cmdOpenFile_Click()
On Error GoTo HandleError
Dim RetVal As VariantDim strFile As String
'if the user selected a valueIf lstFileAttachments.ListIndex >= 0 Then
'retrieve the file name from the list boxstrFile = lstFileAttachments.Column(1)
'open the selected fileCall OpenFileAttachment(strFile)
End If
Exit Sub
HandleError:GeneralErrorHandler Err.Number, Err.Description, PROJECTS_FORM, _
"cmdOpenFile_Click"Exit Sub
End Sub
An AddEmptyProjectRecord procedure was added to clear the values in the object.
Sub AddEmptyProjectRecord()
On Error GoTo HandleError
'set add mode to trueblnAddMode = True
'clear the current values in the Projects objectobjProjects.ClearObject
404

P1: IML/FFX P2: IML/FFX QC: IML/FFX T1: IML
WY044-12 WY044-Gosnell WY044-Gosnell-v2.cls August 13, 2004 15:25
Case Study 1: Project Tracker Application
'clear the current controls on the form so the'user can fill in values for the new recordCall ClearProjectsControlsExit Sub
HandleError:GeneralErrorHandler Err.Number, Err.Description, PROJECTS_FORM, _
"AddEmptyProjectRecord"Exit Sub
End Sub
The PopulateProjectsControls procedure populated the controls on the frmProjects form withthe values of the current record in the objProjects object.
Sub PopulateProjectsControls()
On Error GoTo HandleError
'Populate the controls on the Projects form with the values of the'current record in the Projects object.If Not rsProjects.BOF And Not rsProjects.EOF Then
Me.txtProjectId = objProjects.ProjectIdMe.txtProjectTitle = objProjects.ProjectTitleMe.txtProjectDesc = objProjects.ProjectDescriptionMe.cboPriority = objProjects.PriorityMe.txtReferenceNum = objProjects.ReferenceNumMe.txtMoneyBudget = objProjects.MoneyBudgetMe.txtMoneyToDate = objProjects.MoneyToDateMe.txtHoursBudget = objProjects.HoursBudgetMe.txtHoursToDate = objProjects.HoursToDateIf objProjects.DateDue = "1/1/1900" Then
Me.txtDateDue = ""Else
Me.txtDateDue = objProjects.DateDueEnd IfMe.cboStatus = objProjects.Status
After the object was populated, the tab controls were populated with the values retrieved from thedatabase.
'populate the recordset for tab 1Set rsComments = New ADODB.RecordsetSet rsComments = objProjects.RetrieveComments(objProjects.ProjectId)PopulateListFromRecordset Me.lstComments, rsComments, 1rsComments.Close
'populate the recordset for tab 2Set rsContacts = New ADODB.RecordsetSet rsContacts = objProjects.RetrieveContacts(objProjects.ProjectId)PopulateListFromRecordset Me.lstContacts, rsContacts, 7rsContacts.Close
405
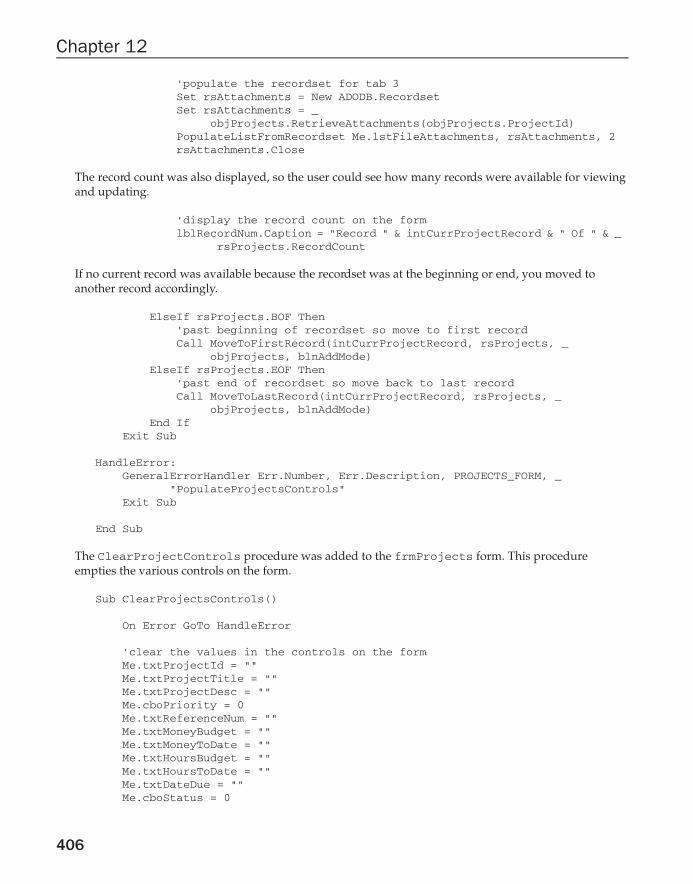
P1: IML/FFX P2: IML/FFX QC: IML/FFX T1: IML
WY044-12 WY044-Gosnell WY044-Gosnell-v2.cls August 13, 2004 15:25
Chapter 12
'populate the recordset for tab 3Set rsAttachments = New ADODB.RecordsetSet rsAttachments = _
objProjects.RetrieveAttachments(objProjects.ProjectId)PopulateListFromRecordset Me.lstFileAttachments, rsAttachments, 2rsAttachments.Close
The record count was also displayed, so the user could see how many records were available for viewingand updating.
'display the record count on the formlblRecordNum.Caption = "Record " & intCurrProjectRecord & " Of " & _
rsProjects.RecordCount
If no current record was available because the recordset was at the beginning or end, you moved toanother record accordingly.
ElseIf rsProjects.BOF Then'past beginning of recordset so move to first recordCall MoveToFirstRecord(intCurrProjectRecord, rsProjects, _
objProjects, blnAddMode)ElseIf rsProjects.EOF Then
'past end of recordset so move back to last recordCall MoveToLastRecord(intCurrProjectRecord, rsProjects, _
objProjects, blnAddMode)End If
Exit Sub
HandleError:GeneralErrorHandler Err.Number, Err.Description, PROJECTS_FORM, _
"PopulateProjectsControls"Exit Sub
End Sub
The ClearProjectControls procedure was added to the frmProjects form. This procedureempties the various controls on the form.
Sub ClearProjectsControls()
On Error GoTo HandleError
'clear the values in the controls on the formMe.txtProjectId = ""Me.txtProjectTitle = ""Me.txtProjectDesc = ""Me.cboPriority = 0Me.txtReferenceNum = ""Me.txtMoneyBudget = ""Me.txtMoneyToDate = ""Me.txtHoursBudget = ""Me.txtHoursToDate = ""Me.txtDateDue = ""Me.cboStatus = 0
406

P1: IML/FFX P2: IML/FFX QC: IML/FFX T1: IML
WY044-12 WY044-Gosnell WY044-Gosnell-v2.cls August 13, 2004 15:25
Case Study 1: Project Tracker Application
'clear the values in the text box controls on the tab control pagesMe.txtAddComment = ""Me.txtFileName = ""Me.txtFileDesc = ""
Exit Sub
HandleError:GeneralErrorHandler Err.Number, Err.Description, PROJECTS_FORM, _
"ClearProjectsControls"Exit Sub
End Sub
A procedure called PopulateComboBoxes was added to populate the values in the cboPriority andcboStatus combo boxes on the form.
Sub PopulateComboBoxes()
On Error GoTo HandleError
'populate the priority combo boxcboPriority.RowSource = ""cboPriority.LimitToList = TruecboPriority.ColumnCount = 1cboPriority.RowSourceType = "Value List"cboPriority.AddItem ("Normal")cboPriority.AddItem ("High")cboPriority.AddItem ("Low")
'populate the status combo boxcboStatus.RowSource = ""cboStatus.LimitToList = TruecboStatus.ColumnCount = 1cboStatus.RowSourceType = "Value List"cboStatus.AddItem ("Open")cboStatus.AddItem ("Closed")cboStatus.AddItem ("On Hold")
Exit Sub
HandleError:GeneralErrorHandler Err.Number, Err.Description, PROJECTS_FORM, _
"PopulateComboBoxes"Exit Sub
End Sub
The PopulateListFromRecordset procedure populated a list box control with the values in arecordset. This procedure was used to populate the list boxes on the tab controls with the values from thedatabase (for example, the comments, contacts, and attachments).
Sub PopulateListFromRecordset(lstList As ListBox, rsRecordset As _ADODB.Recordset, intNumCols As Integer)
407

P1: IML/FFX P2: IML/FFX QC: IML/FFX T1: IML
WY044-12 WY044-Gosnell WY044-Gosnell-v2.cls August 13, 2004 15:25
Chapter 12
On Error GoTo HandleError
Dim intCounter As IntegerDim strItem As String
With lstList.RowSource = "".ColumnCount = intNumCols.RowSourceType = "Value List"
End With
'add all of the values in the recordset to the list box
Do Until rsRecordset.EOF'for each item in the current record, build stringFor intCounter = 0 To intNumCols - 1
strItem = strItem & rsRecordset(intCounter).Value & ";"Next intCounterlstList.AddItem (strItem)strItem = ""rsRecordset.MoveNext
Loop
Exit Sub
HandleError:GeneralErrorHandler Err.Number, Err.Description, PROJECTS_FORM, _
"PopulateListFromRecordset"Exit Sub
End Sub
The Form_Unload procedure for frmProjects closed the recordset and freed the memory associatedwith the recordset.
Private Sub Form_Unload(Cancel As Integer)
On Error GoTo HandleError
'close the recordset and free the memoryrsProjects.CloseSet rsProjects = Nothing
Exit Sub
HandleError:GeneralErrorHandler Err.Number, Err.Description, PROJECTS_FORM, "Form_Unload"Exit Sub
End Sub
Next, you added the LoadRecords procedure, which is responsible for retrieving the project recordsfrom the database and displaying a record on the form.
408

P1: IML/FFX P2: IML/FFX QC: IML/FFX T1: IML
WY044-12 WY044-Gosnell WY044-Gosnell-v2.cls August 13, 2004 15:25
Case Study 1: Project Tracker Application
Sub LoadRecords()
On Error GoTo HandleError
intCurrProjectRecord = 0
blnAddMode = False
'populate the main recordsetSet rsProjects = objProjects.RetrieveProjects(blnAllRecords)
'if the recordset is emptyIf rsProjects.BOF And rsProjects.EOF Then
Exit SubElse
'populate the status and priority combo boxesCall PopulateComboBoxes
'populate the object with values in the recordsetobjProjects.PopulatePropertiesFromRecordset rsProjects
Call MoveToFirstRecord(intCurrProjectRecord, rsProjects, objProjects, _blnAddMode)
'populate the controls on the form with the current recordCall PopulateProjectsControls
End If
Exit Sub
HandleError:GeneralErrorHandler Err.Number, Err.Description, PROJECTS_FORM, _
"LoadRecords"Exit Sub
End Sub
Two procedures were added to handle the toggle feature that enables the user to switch from displayingunclosed projects to all projects. For example, the togShowAll_Click event set the blnAllRecordsflag to True because the user had indicated he wished to see all records. The records were then loadedbased on the selected option.
Private Sub togShowAll_Click()
On Error GoTo HandleError
If togShowAll.Value = True Then
blnAllRecords = True
'make sure Show Unclosed is not checked any moretogShowUnclosed.Value = False
409

P1: IML/FFX P2: IML/FFX QC: IML/FFX T1: IML
WY044-12 WY044-Gosnell WY044-Gosnell-v2.cls August 13, 2004 15:25
Chapter 12
'now, populate the form with all projects recordsLoadRecords
End If
Exit Sub
HandleError:GeneralErrorHandler Err.Number, Err.Description, PROJECTS_FORM, _
"togShowAll_Click"Exit Sub
End Sub
Various procedures were then added to deal with saving the comments, contacts, and attachmentsrecords displayed on the tabs of the form to the database. For example, the SaveComments procedure isresponsible for removing all current comments in the database for the current project and then saving allcomments in the list to the database. The delete and insert are performed because using these proceduresis easier than keeping track of which comment records were changed, which ones were inserted, andwhich ones were deleted. Such a delete and reinsert operation is not appropriate in all circumstances. Inthe current situation, however, it works very well.
Sub SaveComments()
On Error GoTo HandleError
Dim strSQLStatement As StringDim intId As IntegerDim strComment As StringDim intCounter
'remove all current comments in database for this projectstrSQLStatement = BuildSQLDeleteProjectsComments(objProjects.ProjectId)
ProcessUpdate (strSQLStatement)
'add back all comments based on current list (easier than tracking'changes, inserts, and deletes)For intCounter = 0 To lstComments.ListCount - 1
intId = objProjects.ProjectIdstrComment = lstComments.Column(0, intCounter)strSQLStatement = BuildSQLInsertProjectsComments(intId, strComment)ProcessUpdate (strSQLStatement)
Next intCounter
Exit Sub
HandleError:GeneralErrorHandler Err.Number, Err.Description, PROJECTS_FORM, _
"SaveComments"Exit Sub
End Sub
410

P1: IML/FFX P2: IML/FFX QC: IML/FFX T1: IML
WY044-12 WY044-Gosnell WY044-Gosnell-v2.cls August 13, 2004 15:25
Case Study 1: Project Tracker Application
To finish off the code for frmProjects, we added a RefreshContacts procedure that gets calledwhenever the user clicks the button to add the contact to the current project. This feature ensures that thecontacts tab is populated with the revised contact information.
Sub RefreshContacts()
On Error GoTo HandleError
'populate the recordset for tab 2Set rsContacts = New ADODB.RecordsetSet rsContacts = objProjects.RetrieveContacts(objProjects.ProjectId)PopulateListFromRecordset Me.lstContacts, rsContacts, 7rsContacts.Close
Exit Sub
HandleError:GeneralErrorHandler Err.Number, Err.Description, PROJECTS_FORM, _
"RefreshContacts"Exit Sub
End Sub
The Contacts FormThe Contacts form, called frmContacts, is shown in Figure 12.27 so you can refresh your memory as towhat it looks like. You are now going to add the code to implement the functionality of this form.
Figure 12.27
411

P1: IML/FFX P2: IML/FFX QC: IML/FFX T1: IML
WY044-12 WY044-Gosnell WY044-Gosnell-v2.cls August 13, 2004 15:25
Chapter 12
Try It Out Writing Code for the frmContacts FormYou’re in the home stretch now. This is the last part of the application. You will now write the codebehind the frmContacts form to finish the application.
1. Open the frmContacts form and select the Form_Load event for the form to bring up theVisual Basic editor. Add the following code to the form:
Private Sub Form_Load()
On Error GoTo HandleError
Set objContacts = New clsContactsSet rsContacts = New ADODB.Recordset
'not in add modeblnAddMode = False
intCurrContactRecord = 0
Set rsContacts = objContacts.RetrieveContacts
'if the recordset is emptyIf rsContacts.BOF And rsContacts.EOF Then
Exit SubElse
'populate the object with values in the recordsetobjContacts.PopulatePropertiesFromRecordset rsContacts
Call MoveToFirstRecord(intCurrContactRecord, rsContacts, _objContacts, blnAddMode)
'populate the controls on the form with the current recordCall PopulateContactsControls
End If
Exit Sub
HandleError:GeneralErrorHandler Err.Number, Err.Description, CONTACTS_FORM, "Form_Load"Exit Sub
End Sub
2. Add the following to the General Declarations section of the frmContacts form:
Option Compare DatabaseOption ExplicitDim blnAddMode As BooleanDim rsContacts As ADODB.RecordsetDim objContacts As clsContactsConst CONTACTS_FORM = "frmContacts"Dim intCurrContactRecord As Integer
412

P1: IML/FFX P2: IML/FFX QC: IML/FFX T1: IML
WY044-12 WY044-Gosnell WY044-Gosnell-v2.cls August 13, 2004 15:25
Case Study 1: Project Tracker Application
3. Add the following event procedure to the frmContacts form:
Private Sub cmdAddToProject_Click()
On Error GoTo HandleError
Dim strSQLStatement As String
'build the SQL statement to insert a new contact for the current'project on frmProjectsstrSQLStatement = BuildSQLInsertProjectsContacts(objContacts.ContactId, _
intContactProjectAdd)
'insert the record into the databaseProcessUpdate (strSQLStatement)
Call Forms("frmProjects").RefreshContacts
'close the Contacts form to return the user to the Project streenDoCmd.Close acForm, "frmContacts"
Exit Sub
HandleError:GeneralErrorHandler Err.Number, Err.Description, CONTACTS_FORM, _
"cmdAddToProject_Click"Exit Sub
End Sub
4. Add the following event procedures to the frmContacts form to enable modification ofrecords:
Private Sub cmdAddNew_Click()
On Error GoTo HandleError
'clear the current controls to enable adding a new'contact recordCall AddEmptyContactRecord
Exit Sub
HandleError:GeneralErrorHandler Err.Number, Err.Description, CONTACTS_FORM, _
"cmdAddNew_Click"Exit Sub
End Sub
Private Sub cmdSave_Click()
On Error GoTo HandleError
413

P1: IML/FFX P2: IML/FFX QC: IML/FFX T1: IML
WY044-12 WY044-Gosnell WY044-Gosnell-v2.cls August 13, 2004 15:25
Chapter 12
Dim intCurContact As Integer
'save the id of the current record if in update modeIf Not blnAddMode Then
intCurContact = objContacts.ContactIdElse
intCurContact = 0End If
'populate object with current info on formobjContacts.PopulatePropertiesFromForm
'save all changes to current recordobjContacts.Save blnAddMode, rsContacts
'move back to the contact that was current before the requeryIf intCurContact > 0 Then
'move back to the contact that was just updatedrsContacts.Find "[intContactId] = " & intCurContact
Else'if just added new record, move to the beginning of'the recordsetCall MoveToFirstRecord(intCurrContactRecord, rsContacts, _
objContacts, blnAddMode)End If
Exit Sub
HandleError:GeneralErrorHandler Err.Number, Err.Description, CONTACTS_FORM,
"cmdSave_Click"Exit Sub
End Sub
Private Sub cmdDelete_Click()
On Error GoTo HandleError
'delete the current record from the local disconnected recordsetobjContacts.Delete objContacts.ContactId, blnAddMode, rsContacts
'move to the first record in the recordset after the deleteCall MoveToFirstRecord(intCurrContactRecord, rsContacts, objContacts, _
blnAddMode)
'populate the controls on the form with the current recordCall PopulateContactsControls
Exit Sub
HandleError:GeneralErrorHandler Err.Number, Err.Description, CONTACTS_FORM, _
"cmdDelete_Click"Exit Sub
End Sub
414
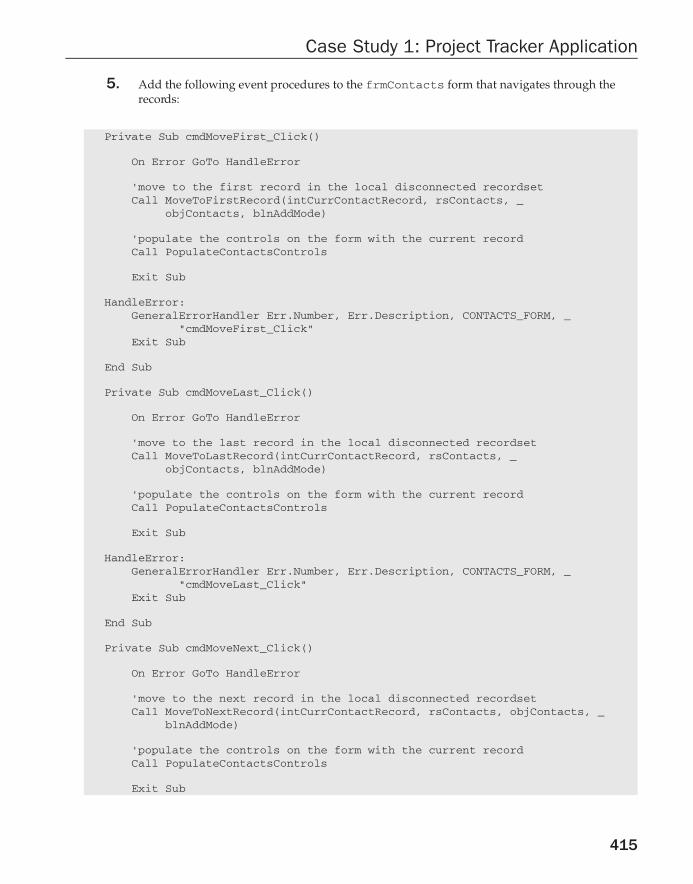
P1: IML/FFX P2: IML/FFX QC: IML/FFX T1: IML
WY044-12 WY044-Gosnell WY044-Gosnell-v2.cls August 13, 2004 15:25
Case Study 1: Project Tracker Application
5. Add the following event procedures to the frmContacts form that navigates through therecords:
Private Sub cmdMoveFirst_Click()
On Error GoTo HandleError
'move to the first record in the local disconnected recordsetCall MoveToFirstRecord(intCurrContactRecord, rsContacts, _
objContacts, blnAddMode)
'populate the controls on the form with the current recordCall PopulateContactsControls
Exit Sub
HandleError:GeneralErrorHandler Err.Number, Err.Description, CONTACTS_FORM, _
"cmdMoveFirst_Click"Exit Sub
End Sub
Private Sub cmdMoveLast_Click()
On Error GoTo HandleError
'move to the last record in the local disconnected recordsetCall MoveToLastRecord(intCurrContactRecord, rsContacts, _
objContacts, blnAddMode)
'populate the controls on the form with the current recordCall PopulateContactsControls
Exit Sub
HandleError:GeneralErrorHandler Err.Number, Err.Description, CONTACTS_FORM, _
"cmdMoveLast_Click"Exit Sub
End Sub
Private Sub cmdMoveNext_Click()
On Error GoTo HandleError
'move to the next record in the local disconnected recordsetCall MoveToNextRecord(intCurrContactRecord, rsContacts, objContacts, _
blnAddMode)
'populate the controls on the form with the current recordCall PopulateContactsControls
Exit Sub
415

P1: IML/FFX P2: IML/FFX QC: IML/FFX T1: IML
WY044-12 WY044-Gosnell WY044-Gosnell-v2.cls August 13, 2004 15:25
Chapter 12
HandleError:GeneralErrorHandler Err.Number, Err.Description, CONTACTS_FORM, _
"cmdMoveNext_Click"Exit Sub
End Sub
Private Sub cmdMovePrevious_Click()
On Error GoTo HandleError
'move to the previous record in the local disconnected recordsetCall MoveToPreviousRecord(intCurrContactRecord, rsContacts, _
objContacts, blnAddMode)
'populate the controls on the form with the current recordCall PopulateContactsControls
Exit Sub
HandleError:GeneralErrorHandler Err.Number, Err.Description, CONTACTS_FORM, _
"cmdMovePrevious_Click"Exit Sub
End Sub
6. Add the following AddEmptyContactRecord procedure to the frmContacts form:
Sub AddEmptyContactRecord()
On Error GoTo HandleError
'set add mode to trueblnAddMode = True
'clear the current values in the contacts objectobjContacts.ClearObject
'clear the current controls on the form so the'user can fill in values for the new recordCall ClearContactsControls
Exit Sub
HandleError:GeneralErrorHandler Err.Number, Err.Description, CONTACTS_FORM, _
"AddEmptyContactRecord"Exit Sub
End Sub
7. Add the following PopulateContactsControls procedure to the frmContacts form:
416
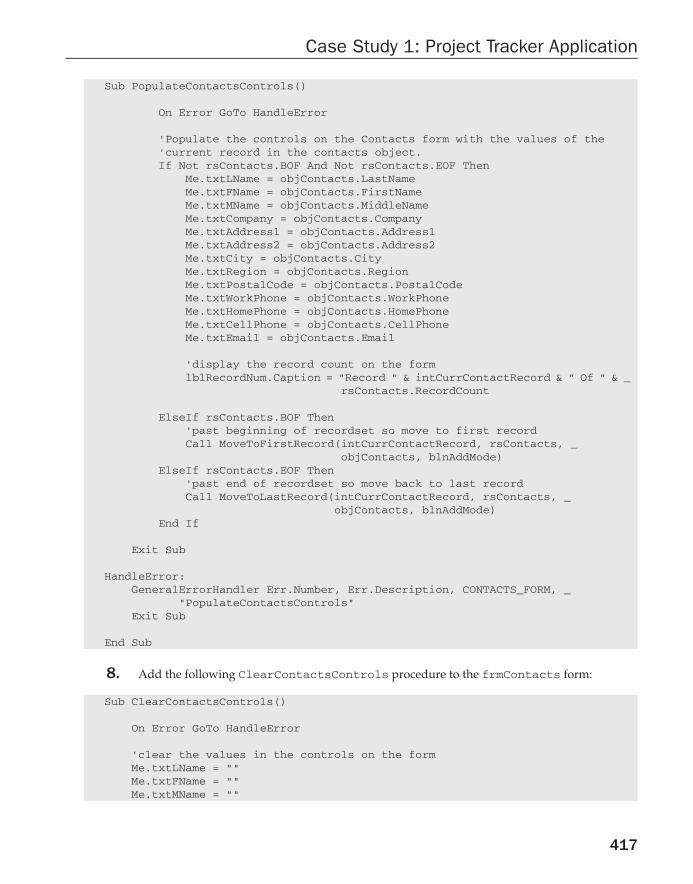
P1: IML/FFX P2: IML/FFX QC: IML/FFX T1: IML
WY044-12 WY044-Gosnell WY044-Gosnell-v2.cls August 13, 2004 15:25
Case Study 1: Project Tracker Application
Sub PopulateContactsControls()
On Error GoTo HandleError
'Populate the controls on the Contacts form with the values of the'current record in the contacts object.If Not rsContacts.BOF And Not rsContacts.EOF Then
Me.txtLName = objContacts.LastNameMe.txtFName = objContacts.FirstNameMe.txtMName = objContacts.MiddleNameMe.txtCompany = objContacts.CompanyMe.txtAddress1 = objContacts.Address1Me.txtAddress2 = objContacts.Address2Me.txtCity = objContacts.CityMe.txtRegion = objContacts.RegionMe.txtPostalCode = objContacts.PostalCodeMe.txtWorkPhone = objContacts.WorkPhoneMe.txtHomePhone = objContacts.HomePhoneMe.txtCellPhone = objContacts.CellPhoneMe.txtEmail = objContacts.Email
'display the record count on the formlblRecordNum.Caption = "Record " & intCurrContactRecord & " Of " & _
rsContacts.RecordCount
ElseIf rsContacts.BOF Then'past beginning of recordset so move to first recordCall MoveToFirstRecord(intCurrContactRecord, rsContacts, _
objContacts, blnAddMode)ElseIf rsContacts.EOF Then
'past end of recordset so move back to last recordCall MoveToLastRecord(intCurrContactRecord, rsContacts, _
objContacts, blnAddMode)End If
Exit Sub
HandleError:GeneralErrorHandler Err.Number, Err.Description, CONTACTS_FORM, _
"PopulateContactsControls"Exit Sub
End Sub
8. Add the following ClearContactsControls procedure to the frmContacts form:
Sub ClearContactsControls()
On Error GoTo HandleError
'clear the values in the controls on the formMe.txtLName = ""Me.txtFName = ""Me.txtMName = ""
417

P1: IML/FFX P2: IML/FFX QC: IML/FFX T1: IML
WY044-12 WY044-Gosnell WY044-Gosnell-v2.cls August 13, 2004 15:25
Chapter 12
Me.txtCompany = ""Me.txtAddress1 = ""Me.txtAddress2 = ""Me.txtCity = ""Me.txtRegion = ""Me.txtPostalCode = ""Me.txtWorkPhone = ""Me.txtHomePhone = ""Me.txtCellPhone = ""Me.txtEmail = ""
Exit Sub
HandleError:GeneralErrorHandler Err.Number, Err.Description, CONTACTS_FORM, _
"ClearContactsControls"Exit Sub
End Sub
9. Add the following Form_Unload event to the frmContacts form:
Private Sub Form_Unload(Cancel As Integer)
On Error GoTo HandleError
'close the recordset and free the memoryrsContacts.CloseSet rsContacts = Nothing
Exit Sub
HandleError:GeneralErrorHandler Err.Number, Err.Description, CONTACTS_FORM, _
"Form_Unload"Exit Sub
End Sub
10. Congratulations—that’s all the code! Now take time to resolve any typographical errors, if youhave not done so already. The next section will give you a tour of the most interesting featuresof the application.
How It WorksThe last set of code you added for the project was for the frmContacts form. In the Form_Load event,you added code to initialize the form, for example, populating the contacts recordset with one or allcontacts records.
Private Sub Form_Load()
On Error GoTo HandleError
418

P1: IML/FFX P2: IML/FFX QC: IML/FFX T1: IML
WY044-12 WY044-Gosnell WY044-Gosnell-v2.cls August 13, 2004 15:25
Case Study 1: Project Tracker Application
Set objContacts = New clsContactsSet rsContacts = New ADODB.Recordset
'not in add modeblnAddMode = False
intCurrContactRecord = 0
Set rsContacts = objContacts.RetrieveContacts
'if the recordset is emptyIf rsContacts.BOF And rsContacts.EOF Then
Exit SubElse
'populate the object with values in the recordsetobjContacts.PopulatePropertiesFromRecordset rsContacts
Call MoveToFirstRecord(intCurrContactRecord, rsContacts, _objContacts, blnAddMode)
'populate the controls on the form with the current recordCall PopulateContactsControls
End If
Exit Sub
HandleError:GeneralErrorHandler Err.Number, Err.Description, CONTACTS_FORM, "Form_Load"Exit Sub
End Sub
You also added the cmdAddToProject_Click event that is responsible for adding the selected contactto the current project record.
Private Sub cmdAddToProject_Click()
On Error GoTo HandleError
Dim strSQLStatement As String
'build the SQL statement to insert a new contact for the current'project on frmProjectsstrSQLStatement = BuildSQLInsertProjectsContacts(objContacts.ContactId, _
intContactProjectAdd)
'insert the record into the databaseProcessUpdate (strSQLStatement)
Call Forms("frmProjects").RefreshContacts
'close the Contacts form to return the user to the Project streenDoCmd.Close acForm, "frmContacts"
Exit Sub
419

P1: IML/FFX P2: IML/FFX QC: IML/FFX T1: IML
WY044-12 WY044-Gosnell WY044-Gosnell-v2.cls August 13, 2004 15:25
Chapter 12
HandleError:GeneralErrorHandler Err.Number, Err.Description, CONTACTS_FORM, _
"cmdAddToProject_Click"Exit Sub
End Sub
Similar to what you did with frmProjects, you also added event procedures for the cmdAddNew,cmdSave, and cmdDelete buttons. For example, you added the cmdAddNew_Click event to put the formin add mode to allow the user to add a new contact to the database.
Private Sub cmdAddNew_Click()
On Error GoTo HandleError
'clear the current controls to enable adding a new'contact recordCall AddEmptyContactRecord
Exit Sub
HandleError:GeneralErrorHandler Err.Number, Err.Description, CONTACTS_FORM, _
"cmdAddNew_Click"Exit Sub
End Sub
Just as you did with the frmProjects form, you also added event procedures for navigating throughthe records. For example, the cmdMoveFirst_Click event moves to the first record in the localdisconnected recordset and populates the controls on the form with the current record.
Private Sub cmdMoveFirst_Click()
On Error GoTo HandleError
'move to the first record in the local disconnected recordsetCall MoveToFirstRecord(intCurrContactRecord, rsContacts, _
objContacts, blnAddMode)
'populate the controls on the form with the current recordCall PopulateContactsControls
Exit Sub
HandleError:GeneralErrorHandler Err.Number, Err.Description, CONTACTS_FORM, _
"cmdMoveFirst_Click"Exit Sub
End Sub
420

P1: IML/FFX P2: IML/FFX QC: IML/FFX T1: IML
WY044-12 WY044-Gosnell WY044-Gosnell-v2.cls August 13, 2004 15:25
Case Study 1: Project Tracker Application
You also created procedures for adding an empty contact record and for clearing the contacts controls onthe form. Similarly, you added a procedure called PopulateContactsControls to populate thecontrols on the frmContacts form with the values of the current record in the objContacts object.
Sub PopulateContactsControls()
On Error GoTo HandleError
'Populate the controls on the Contacts form with the values of the'current record in the contacts object.If Not rsContacts.BOF And Not rsContacts.EOF Then
Me.txtLName = objContacts.LastNameMe.txtFName = objContacts.FirstNameMe.txtMName = objContacts.MiddleNameMe.txtCompany = objContacts.CompanyMe.txtAddress1 = objContacts.Address1Me.txtAddress2 = objContacts.Address2Me.txtCity = objContacts.CityMe.txtRegion = objContacts.RegionMe.txtPostalCode = objContacts.PostalCodeMe.txtWorkPhone = objContacts.WorkPhoneMe.txtHomePhone = objContacts.HomePhoneMe.txtCellPhone = objContacts.CellPhoneMe.txtEmail = objContacts.Email
'display the record count on the formlblRecordNum.Caption = "Record " & intCurrContactRecord & " Of " & _
rsContacts.RecordCount
ElseIf rsContacts.BOF Then'past beginning of recordset so move to first recordCall MoveToFirstRecord(intCurrContactRecord, rsContacts, _
objContacts, blnAddMode)ElseIf rsContacts.EOF Then
'past end of recordset so move back to last recordCall MoveToLastRecord(intCurrContactRecord, rsContacts, _
objContacts, blnAddMode)End If
Exit Sub
HandleError:GeneralErrorHandler Err.Number, Err.Description, CONTACTS_FORM, _
"PopulateContactsControls"Exit Sub
End Sub
Finally, the Form_Unload event was added to the frmContacts form to close the rsContacts recordsetand free the memory taken up by the recordset.
Private Sub Form_Unload(Cancel As Integer)
On Error GoTo HandleError
421

P1: IML/FFX P2: IML/FFX QC: IML/FFX T1: IML
WY044-12 WY044-Gosnell WY044-Gosnell-v2.cls August 13, 2004 15:25
Chapter 12
'close the recordset and free the memoryrsContacts.CloseSet rsContacts = Nothing
Exit Sub
HandleError:GeneralErrorHandler Err.Number, Err.Description, CONTACTS_FORM, "Form_Unload"Exit Sub
End Sub
Touring the Finished Project Tracker ApplicationNow comes the fun part. You get to see the benefit of that hard work. Let’s quickly look at each screen justto point out the most interesting features. You have already seen the screens in the design process, but itis always fun to see them working with real data in them.
For starters, Figure 12.28 illustrates a sample project record on the Project Tracker screen. It shows detailsabout this sample Project Tracking project and also comments that have been entered into the list on thefirst tab.
Figure 12.28
422

P1: IML/FFX P2: IML/FFX QC: IML/FFX T1: IML
WY044-12 WY044-Gosnell WY044-Gosnell-v2.cls August 13, 2004 15:25
Case Study 1: Project Tracker Application
Figure 12.29 shows some contacts for the current project. You can view information such as name, phonenumbers, and e-mail address. If you click the e-mail button, you will see a screen similar to that shown inFigure 12.30 with the e-mail address of the selected contact already filled in. The capability to integratee-mail into your applications is really slick and will impress many users. You can also consult Chapter 7on exporting and Chapter 10 on automation for more information on e-mail integration, for example,through Outlook.
Figure 12.29
On the other hand, if you select the View Details for Selected Contact button, the Contacts screen openswith the record filtered to only the current one. This is shown in Figure 12.31.
If you want to manage contacts in general, add a contact to the existing project, or delete contacts fromthe database altogether, you should select the Add/Manage Contacts button shown in Figure 12.29.Figure 12.32 illustrates opening the Contacts form in general and, as you can see, more than just the onerecord was in the filtered version of Figure 12.31.
If you wish to add the current contact to the current project, select the Add Current Contact To-Projectbutton. You should not select this button if the current contact has already been added to the current
423
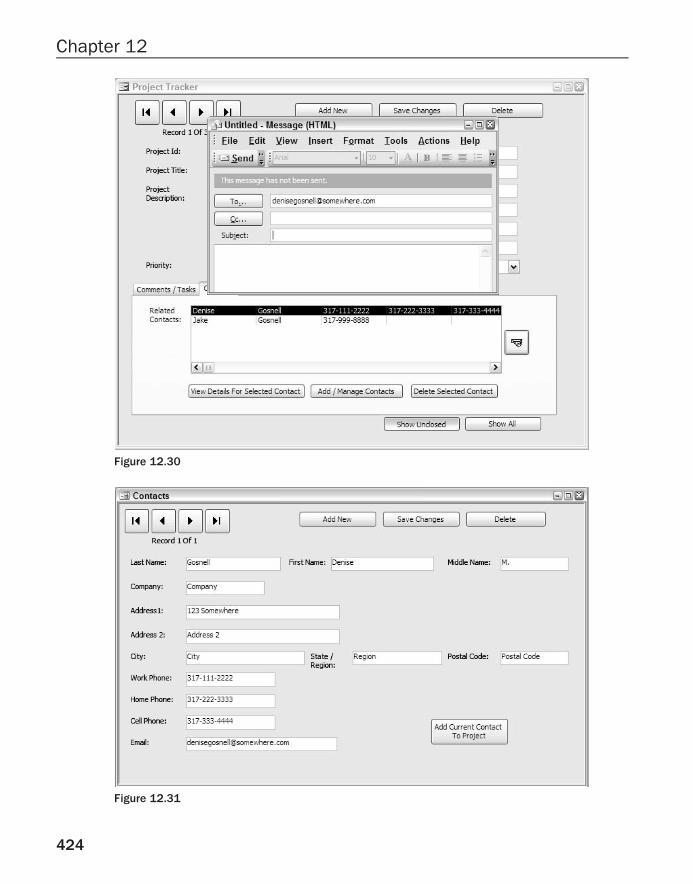
P1: IML/FFX P2: IML/FFX QC: IML/FFX T1: IML
WY044-12 WY044-Gosnell WY044-Gosnell-v2.cls August 13, 2004 15:25
Chapter 12
Figure 12.30
Figure 12.31
424

P1: IML/FFX P2: IML/FFX QC: IML/FFX T1: IML
WY044-12 WY044-Gosnell WY044-Gosnell-v2.cls August 13, 2004 15:25
Case Study 1: Project Tracker Application
Figure 12.32
Figure 12.33
425

P1: IML/FFX P2: IML/FFX QC: IML/FFX T1: IML
WY044-12 WY044-Gosnell WY044-Gosnell-v2.cls August 13, 2004 15:25
Chapter 12
project. If you do, you will receive a database error message indicating the change could not be madebecause of a duplicate value problem.
Returning now to the Project Tracker form, if you click on the third tab that contains file attachmentinformation, you can manage file attachments. The example screen in Figure 12.33 shows twoattachments that have been linked to the current project. One of them is a PDF document and the other isanother Access database.
If you select a file attachment in the list and then select the Preview button, Access will actually open thefile in the appropriate program. This feature is implemented using an external DLL function call toSHELLEXECUTE. Figure 12.34 shows what happens when you select the option to preview the exampleselected in the list shown in Figure 12.33.
Figure 12.34
Notice how Adobe Acrobat is launched in a separate window. The procedures of the SHELLEXECUTEexternal function allow you to specify how the external program should open (for example, minimized,maximized, and so on).
426

P1: IML/FFX P2: IML/FFX QC: IML/FFX T1: IML
WY044-12 WY044-Gosnell WY044-Gosnell-v2.cls August 13, 2004 15:25
Case Study 1: Project Tracker Application
Another interesting use of an external function call is to display a file open dialog box to help you searchfor an attachment. This is shown in Figure 12.35.
Figure 12.35
There is nothing special about the open dialog box itself. However, the fact that you can use this feature tolocate file attachments is special. This is often a difficult task for most readers to implement, and you havejust done so with relative ease. After you click the Open button on the dialog, the File Name field on theform is populated with the value. You then can fill in a file description and click the button to actuallyadd the attachment to the list, as shown in Figure 12.36.
As I mentioned briefly earlier, the records you see on the screen and modify have not been saved back tothe database yet. You are working with local disconnected records, and controls that do not get updatedto the database until you click the Save button. If you forget to save, you will lose your work.
A nice enhancement to this application is to keep track of whether changes have been made and thennotify the user when they are about to lose the changes, such as when they move to another record orclose the form. This is beyond the scope of this chapter, but is well worth exploring for any applicationthat will be used extensively. Another option for you to consider is adding a dynamic Web page that willdisplay the currently pending projects in a Web browser.
427

P1: IML/FFX P2: IML/FFX QC: IML/FFX T1: IML
WY044-12 WY044-Gosnell WY044-Gosnell-v2.cls August 13, 2004 15:25
Chapter 12
Figure 12.36
SummaryThe fact that you have made it to the end of the chapter is worth a pat on the back. This was the mostcomplicated chapter so far, both in topic and in sheer volume. Building Access applications in many wayscan be quite complex. I hope you have also realized just how powerful Access can be as a developmenttool and how using it to implement some really slick features is easier than you thought.
At this point, you should have a much better understanding of the concepts presented in earlier chapters,especially the more complicated ones. Having a practical example is always useful. Just to make sure youget the full value out of the hard-earned money you spent on this book, I’m also including a second casestudy that deals with SQL Server so you can get some experience with Access projects and SQL Serveritself. Although the second case study uses SQL Server as the database, you can learn much that you canapply to other databases as well. Even if you are not a SQL Server database user, you will still solidifyyour understanding of the many programming concepts you’ve explored throughout the book.
428

P1: IML/FFX P2: IML/FFX QC: IML/FFX T1: IML
WY044-13 WY044-Gosnell WY044-Gosnell-v2.cls August 16, 2004 8:51
13Case Study 2: Customer
Service Application
This chapter is the second of two case studies that will illustrate all the concepts covered to thispoint in a comprehensive real-world example. With the first case study under your belts, you nowbuild a client-server customer service application with SQL Server storing the database and Accessstoring the user interface and business logic. This process includes:
❑ Using Access data projects with SQL Server databases
❑ Creating and executing stored procedures with and without parameters
❑ Creating search screens that dynamically build SQL statements from criteria entered by theuser
You will create the customer service application from start to finish. For your convenience, I haveincluded the Access project file and a text file containing the SQL stored procedures so you candownload all the source code from wrox.com. As in the earlier case study, I recommend that youwork through the chapter yourself before using the source code I provided.
For the sake of clarity, a How It Works section for the entire application is included at the end of thischapter.
Design SpecificationsYou learned in Chapter 1 and again in Chapter 12 that before you ever write a single line of code,you should carefully plan your application on paper. After detailed fact-finding regarding thepurpose of the customer service application, you come up with a list of requirements. Theapplication will be designed for use by customer service agents who receive incoming calls fromcustomers. The application will allow the agent to retrieve the customer’s account informationquickly based on one or more pieces of information provided by the customer. For example, thecustomer may provide all or part of a home phone number, a first and last name, or a customernumber. The Search screen will allow the agent to retrieve the customer’s account record. The Searchscreen will implement ad hoc queries against the SQL Server database based upon the search criteriainput by the agent. After the customer record is located and selected, it will be displayed containing

P1: IML/FFX P2: IML/FFX QC: IML/FFX T1: IML
WY044-13 WY044-Gosnell WY044-Gosnell-v2.cls August 16, 2004 8:51
Chapter 13
such information as customer contact information, current plan, and transaction history. Users also needthe capability to open the View/Manage Customers screen independently of the search screen for allcustomers, not just for the selected customer.
Three use cases are shown in Figure 13.1. Users can execute a search to locate a particular customer (U.C.1.1). Users can also clear the search results (U.C. 1.2). In addition, the application enables the user to openthe View/Manage Customer Details screen for a selected customer (U.C. 1.3).
End User
UC 1.1 - SearchCustomers
UC 1.3 - Open View /Manage Customers for Selected
Customer
UC 1.2 - ClearSearch Results
*
*
**
*
*
Requirement 1 - Search Customers Use Cases
Figure 13.1
From the View/Manage Customer Details screen, you determine that the user should be able to view andmanage customers using record navigation and update capabilities. Figure 13.2 shows these featuresrepresented in a Use Case diagram.
Five use cases are shown in Figure 13.2. Users can open the View/Manage Customer screen for a selectedcustomer (U.C. 2.1). In addition, the application will enable the user to update existing (U.C. 2.2) and addnew (U.C. 2.3) records. Navigation buttons are provided (U.C. 2.4) to allow the user to navigate amongthe records. These buttons are useful when the screen has been opened to view and manage all customerrecords (U.C. 2.5).
430

P1: IML/FFX P2: IML/FFX QC: IML/FFX T1: IML
WY044-13 WY044-Gosnell WY044-Gosnell-v2.cls August 16, 2004 8:51
Case Study 2: Customer Service Application
End User
UC 2.1 - OpenSelected Customer Record
UC 2.3 - Add NewCustomer Record
UC 2.2 - UpdateExisting Customer Record
*
*
*
*
*
*
Requirement 2 - View/Manage Customers Screen Use Cases
UC 2.4 - Provide RecordNavigation to Browse
Records
*
*
UC 2.5 - Open AllCustomer Records
*
*
Figure 13.2
As you learned in Chapter 1 and again in Chapter 12, you have other ways to document the application,including activity diagrams, flow charts, network diagrams, and object diagrams. When you analyzedthe requirements previously discussed, you determined that two main screens seem to make sense: aCustomers Search screen and a View/Manage Customer Accounts screen. These designs are illustrated inFigures 13.3 and 13.4.
Figure 13.3 is a prototype screen for Customer Search. Notice how various data elements related to thecustomer are included, as well as Search and Clear buttons. The Search button allows a user to search thedatabase for customer records that match the criteria specified in one or more fields. The matching isbased on both partial and exact matches to make it quicker for the customer service representative tolocate the correct record. The matching customer records are displayed in the Search Results list. If theuser double-clicks a record in the Search Results list, the View/Manage Customer Accounts screen willappear for that selected customer.
431

P1: IML/FFX P2: IML/FFX QC: IML/FFX T1: IML
WY044-13 WY044-Gosnell WY044-Gosnell-v2.cls August 16, 2004 8:51
Chapter 13
Figure 13.3
Figure 13.4 is a prototype screen for View/Manage Customer Accounts. Various data elements related tothe customer are included, such as name, address, and contact information. Navigation buttons plusbuttons for saving changes to records are also included. Now that you have documented what you wantthe application to do, you can move on to creating the database and the code.
Building the Database and Database ObjectsIn this section, you will build the database in an Access project, which stores the data tables in SQLServer, and the user interface in the Access project itself.
You should have a version of Microsoft SQL Server installed in order to create this application. Please referto Chapter 9 for more information on obtaining and setting up SQL Server.
Try It Out Building the CustomerServiceSQL DatabaseNow, let’s build the Access Project and SQL Server database that will store the data tables. You will alsobuild the SQL Server stored procedures used by your application.
432

P1: IML/FFX P2: IML/FFX QC: IML/FFX T1: IML
WY044-13 WY044-Gosnell WY044-Gosnell-v2.cls August 16, 2004 8:51
Case Study 2: Customer Service Application
Figure 13.4
1. Create a new Access project and SQL Server database by selecting File ➪ New ➪ Project UsingNew Data. For the filename, specify CustomerService and click the Create button.
2. The Microsoft SQL Server Database Wizard will appear as shown in Figure 13.5. Specify thename of the SQL Server database on your computer. Also, identify whether Windowsintegrated security (Use Trusted Connection) should be used. If your SQL Server database isnot set up for Windows integrated security, you must specify a valid SQL Server login ID andpassword. The default login ID specified when installing SQL Server is sa and the defaultpassword is blank. Finally, specify that the name of the SQL Server database isCustomerServiceSQL.
3. Click the Next button, and then the Finish button. The wizard shows a dialog box for a fewseconds and then returns to the newly created Access project file.
4. The tables for this database are shown in Figures 13.6 through 13. 9. Note that, for yourconvenience, some details about the primary key for each table are specified in the Descriptionfield. In each table, you also need to add primary keys as indicated by the key icon.
5. Add the tblCustomers table as shown in Figure 13.6. This table is the master customers tablefor storing customer information. Note that the fields in this table map to the fields on theprototype screen for View/Manage Customer Accounts.
433

P1: IML/FFX P2: IML/FFX QC: IML/FFX T1: IML
WY044-13 WY044-Gosnell WY044-Gosnell-v2.cls August 16, 2004 8:51
Chapter 13
Figure 13.5
Figure 13.6
434

P1: IML/FFX P2: IML/FFX QC: IML/FFX T1: IML
WY044-13 WY044-Gosnell WY044-Gosnell-v2.cls August 16, 2004 8:51
Case Study 2: Customer Service Application
6. Add the tblCustomersPlanHistory table as shown in Figure 13.7. This table maps to theplan history fields on the View/Manage Customer Accounts.
Figure 13.7
7. Add the tblPlans table as shown in Figure 13.8.
Figure 13.8
8. Add the tblPlansStatus table as shown in Figure 13.9.
Figure 13.9
9. Add the data shown in Figure 13.10 to the tblPlans table. To do so, open the Databasewindow, and select the table from the list of tables.
10. Add the data shown in Figure 13.11 to the tblPlansStatus table.
11. At this point, your CustomerService Access project should have the tables as shown inFigure 13.12.
12. Select the Queries object in the Database window to add the stored procedures. Select theCreate Stored Procedure In Designer option. Select Close to close the Add Table dialog box.
435

P1: IML/FFX P2: IML/FFX QC: IML/FFX T1: IML
WY044-13 WY044-Gosnell WY044-Gosnell-v2.cls August 16, 2004 8:51
Chapter 13
Figure 13.10
Figure 13.11
Figure 13.12
13. Select View ➪ SQL View, as shown in Figure 13.13.
14. Replace the entire default text of the stored procedure with the following code. This storedprocedure is called spInsertCustomer and is responsible for inserting a new record into thecustomer database based on the values passed to it. The procedure also inserts an entry into thePlanHistory table to keep track of the history of the new plan that was just added.
436

P1: IML/FFX P2: IML/FFX QC: IML/FFX T1: IML
WY044-13 WY044-Gosnell WY044-Gosnell-v2.cls August 16, 2004 8:51
Case Study 2: Customer Service Application
Figure 13.13
CREATE PROCEDURE dbo.spInsertCustomer(@LastName nvarchar(50),@FirstName nvarchar(50),@MiddleName nvarchar(50),@Company nvarchar(50),@Address1 nvarchar(100),@Address2 nvarchar(100),@City nvarchar(50),@Region nvarchar(50),@PostalCode nvarchar(25),@WorkPhone nvarchar(15),@HomePhone nvarchar(15),@CellPhone nvarchar(15),@Email nvarchar(50),@CurrentPlanId int,@RepName nvarchar(50))AS
DECLARE @CustomerId int
INSERT INTO dbo.tblCustomers(LastName, FirstName, MiddleName, Company, Address1,
Address2, City, Region, PostalCode, WorkPhone, HomePhone, CellPhone, Email,CurrentPlanID)
VALUES (@LastName, @FirstName, @MiddleName, @Company, @Address1,@Address2, @City, @Region, @PostalCode, @WorkPhone, @HomePhone,
@CellPhone, @Email, @CurrentPlanId)
437
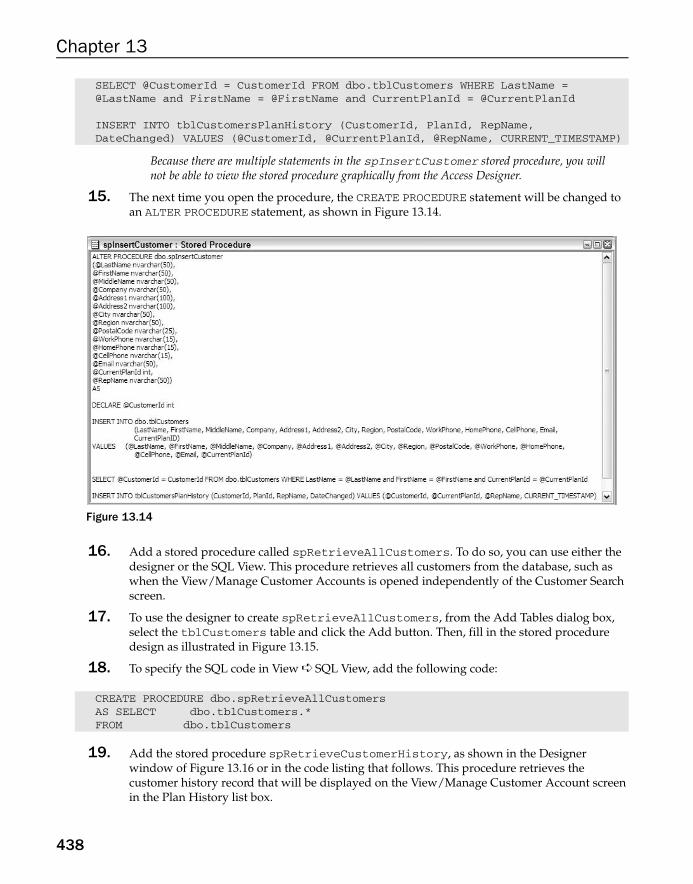
P1: IML/FFX P2: IML/FFX QC: IML/FFX T1: IML
WY044-13 WY044-Gosnell WY044-Gosnell-v2.cls August 16, 2004 8:51
Chapter 13
SELECT @CustomerId = CustomerId FROM dbo.tblCustomers WHERE LastName =@LastName and FirstName = @FirstName and CurrentPlanId = @CurrentPlanId
INSERT INTO tblCustomersPlanHistory (CustomerId, PlanId, RepName,DateChanged) VALUES (@CustomerId, @CurrentPlanId, @RepName, CURRENT_TIMESTAMP)
Because there are multiple statements in the spInsertCustomer stored procedure, you willnot be able to view the stored procedure graphically from the Access Designer.
15. The next time you open the procedure, the CREATE PROCEDURE statement will be changed toan ALTER PROCEDURE statement, as shown in Figure 13.14.
Figure 13.14
16. Add a stored procedure called spRetrieveAllCustomers. To do so, you can use either thedesigner or the SQL View. This procedure retrieves all customers from the database, such aswhen the View/Manage Customer Accounts is opened independently of the Customer Searchscreen.
17. To use the designer to create spRetrieveAllCustomers, from the Add Tables dialog box,select the tblCustomers table and click the Add button. Then, fill in the stored proceduredesign as illustrated in Figure 13.15.
18. To specify the SQL code in View ➪ SQL View, add the following code:
CREATE PROCEDURE dbo.spRetrieveAllCustomersAS SELECT dbo.tblCustomers.*FROM dbo.tblCustomers
19. Add the stored procedure spRetrieveCustomerHistory, as shown in the Designerwindow of Figure 13.16 or in the code listing that follows. This procedure retrieves thecustomer history record that will be displayed on the View/Manage Customer Account screenin the Plan History list box.
438

P1: IML/FFX P2: IML/FFX QC: IML/FFX T1: IML
WY044-13 WY044-Gosnell WY044-Gosnell-v2.cls August 16, 2004 8:51
Case Study 2: Customer Service Application
Figure 13.15
Figure 13.16
CREATE PROCEDURE dbo.spRetrieveCustomerHistory(@CustomerID int)AS SELECT dbo.tblCustomersPlanHistory.PlanID, dbo.tblPlans.PlanName,dbo.tblPlans.PlanDescription, dbo.tblCustomersPlanHistory.DateChanged,
dbo.tblCustomersPlanHistory.RepNameFROM dbo.tblCustomersPlanHistory INNER JOIN
dbo.tblPlans ON dbo.tblCustomersPlanHistory.PlanID =dbo.tblPlans.PlanIDWHERE (dbo.tblCustomersPlanHistory.CustomerID = @CustomerId)
439

P1: IML/FFX P2: IML/FFX QC: IML/FFX T1: IML
WY044-13 WY044-Gosnell WY044-Gosnell-v2.cls August 16, 2004 8:51
Chapter 13
20. Add the stored procedure spRetrievePlans, as shown in the Designer window of Figure13.17 or in the code listing that follows. This procedure retrieves a list of the active plans fromthe database to be displayed in the plan combo box on the View/Manage Customer Accountscreen.
Figure 13.17
CREATE PROCEDURE dbo.spRetrievePlansAS SELECT dbo.tblPlans.PlanID, dbo.tblPlans.PlanNameFROM dbo.tblPlans INNER JOIN
dbo.tblPlansStatus ON dbo.tblPlans.StatusID =dbo.tblPlansStatus.StatusIDWHERE (dbo.tblPlansStatus.StatusDesc = N'Active')
21. Add the stored procedure spRetrieveSelectedCustomer, as shown in the Designerwindow of Figure 13.18 or in the code listing that follows. This procedure retrieves informationfor the selected customer from the database.
CREATE PROCEDURE dbo.spRetrieveSelectedCustomer (@CustomerId as Integer)AS SELECT dbo.tblCustomers.*FROM dbo.tblCustomersWHERE dbo.tblCustomers.CustomerID = @CustomerId
22. Add the stored procedure spUpdateCustomer, as shown in the code listing that follows. Thisprocedure updates an existing customer record and also inserts a corresponding history recordinto the PlanHistory table if the plan has changed.
CREATE PROCEDURE dbo.spUpdateCustomer(@CustomerId int,@LastName nvarchar(50),@FirstName nvarchar(50),@MiddleName nvarchar(50),
440

P1: IML/FFX P2: IML/FFX QC: IML/FFX T1: IML
WY044-13 WY044-Gosnell WY044-Gosnell-v2.cls August 16, 2004 8:51
Case Study 2: Customer Service Application
Figure 13.18
@Company nvarchar(50),@Address1 nvarchar(100),@Address2 nvarchar(100),@City nvarchar(50),@Region nvarchar(50),@PostalCode nvarchar(25),@WorkPhone nvarchar(15),@HomePhone nvarchar(15),@CellPhone nvarchar(15),@Email nvarchar(50),@CurrentPlanId int,@RepName nvarchar(50))AS
DECLARE @OldPlanId int
SELECT @OldPlanId = CurrentPlanId FROM dbo.tblCustomers WHERE CustomerId =@CustomerId
UPDATE dbo.tblCustomersSET LastName = @LastName, FirstName = @FirstName, MiddleName =@MiddleName, Company = @Company, Address1 = @Address1,
Address2 = @Address2, City = @City, Region = @Region,PostalCode = @PostalCode, WorkPhone = @WorkPhone, HomePhone = @HomePhone,
CellPhone = @CellPhone, Email = @Email, CurrentPlanID =@CurrentPlanIdWHERE CustomerId = @CustomerId
IF @OldPlanId <> @CurrentPlanIdBEGININSERT INTO tblCustomersPlanHistory (CustomerId, PlanId, RepName,
DateChanged) VALUES (@CustomerId, @CurrentPlanId, @RepName, CURRENT_TIMESTAMP)END
441

P1: IML/FFX P2: IML/FFX QC: IML/FFX T1: IML
WY044-13 WY044-Gosnell WY044-Gosnell-v2.cls August 16, 2004 8:51
Chapter 13
23. At this point, you should see the stored procedures listed in Figure 13.19 in the databasewindow of the Access project.
Figure 13.19
Figure 13.20
442
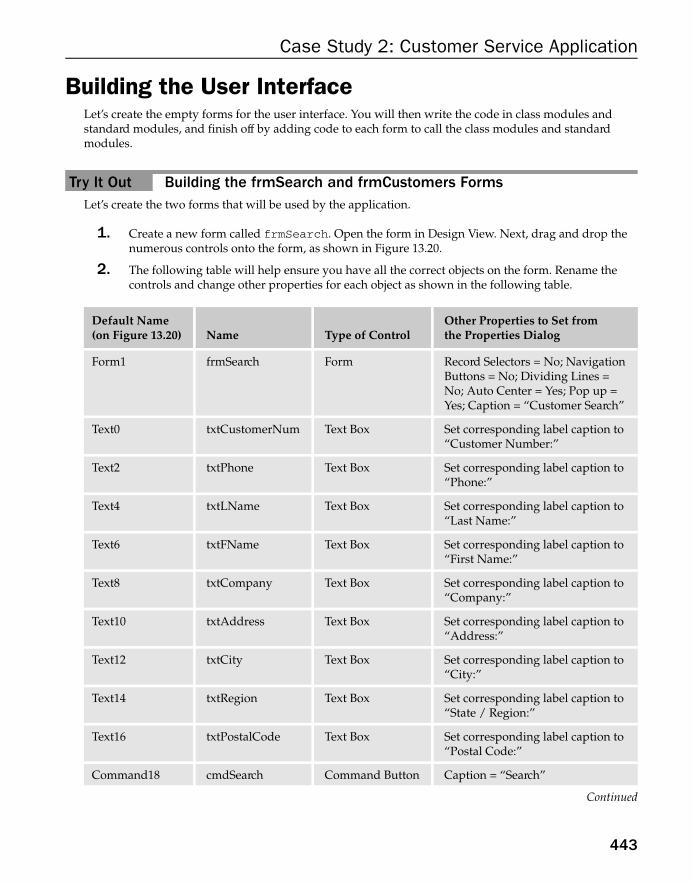
P1: IML/FFX P2: IML/FFX QC: IML/FFX T1: IML
WY044-13 WY044-Gosnell WY044-Gosnell-v2.cls August 16, 2004 8:51
Case Study 2: Customer Service Application
Building the User InterfaceLet’s create the empty forms for the user interface. You will then write the code in class modules andstandard modules, and finish off by adding code to each form to call the class modules and standardmodules.
Try It Out Building the frmSearch and frmCustomers FormsLet’s create the two forms that will be used by the application.
1. Create a new form called frmSearch. Open the form in Design View. Next, drag and drop thenumerous controls onto the form, as shown in Figure 13.20.
2. The following table will help ensure you have all the correct objects on the form. Rename thecontrols and change other properties for each object as shown in the following table.
Default Name Other Properties to Set from(on Figure 13.20) Name Type of Control the Properties Dialog
Form1 frmSearch Form Record Selectors = No; NavigationButtons = No; Dividing Lines =No; Auto Center = Yes; Pop up =Yes; Caption = “Customer Search’’
Text0 txtCustomerNum Text Box Set corresponding label caption to“Customer Number:”
Text2 txtPhone Text Box Set corresponding label caption to“Phone:”
Text4 txtLName Text Box Set corresponding label caption to“Last Name:”
Text6 txtFName Text Box Set corresponding label caption to“First Name:”
Text8 txtCompany Text Box Set corresponding label caption to“Company:”
Text10 txtAddress Text Box Set corresponding label caption to“Address:”
Text12 txtCity Text Box Set corresponding label caption to“City:”
Text14 txtRegion Text Box Set corresponding label caption to“State / Region:”
Text16 txtPostalCode Text Box Set corresponding label caption to“Postal Code:”
Command18 cmdSearch Command Button Caption = “Search”
Continued
443

P1: IML/FFX P2: IML/FFX QC: IML/FFX T1: IML
WY044-13 WY044-Gosnell WY044-Gosnell-v2.cls August 16, 2004 8:51
Chapter 13
Default Name Other Properties to Set from(on Figure 13.20) Name Type of Control the Properties Dialog
Command19 cmdClear Command Button Caption = “Clear”
List20 lstResults List Box Caption = “Search Results”
Label22 lblSearchInstr Label Caption = “Please Specify One OrMore Search Criteria Below:”
3. Verify that each control on frmSearch has the correct name and other property settings as listedin the prior tables. If any of these are misspelled, later code referencing will produce an error youwill have to fix. After setting all the properties, frmSearch should now appear as shown inFigure 13.21.
Figure 13.21
4. Make sure to save all the changes made to frmSearch.
5. Next, create a new form called frmCustomers. Drag and drop the controls onto the form asshown in Figure 13.22.
444
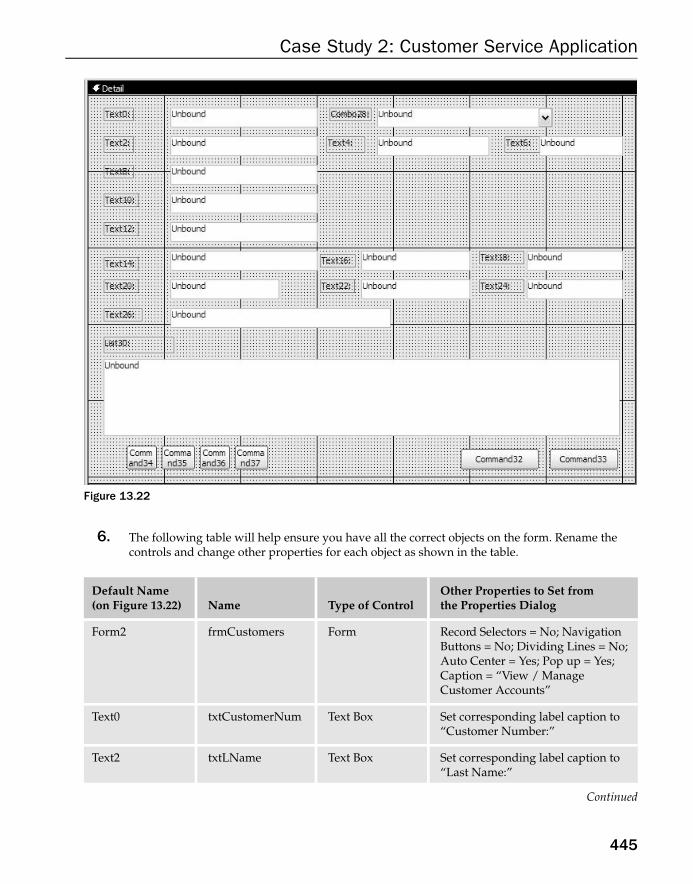
P1: IML/FFX P2: IML/FFX QC: IML/FFX T1: IML
WY044-13 WY044-Gosnell WY044-Gosnell-v2.cls August 16, 2004 8:51
Case Study 2: Customer Service Application
Figure 13.22
6. The following table will help ensure you have all the correct objects on the form. Rename thecontrols and change other properties for each object as shown in the table.
Default Name Other Properties to Set from(on Figure 13.22) Name Type of Control the Properties Dialog
Form2 frmCustomers Form Record Selectors = No; NavigationButtons = No; Dividing Lines = No;Auto Center = Yes; Pop up = Yes;Caption = “View / ManageCustomer Accounts”
Text0 txtCustomerNum Text Box Set corresponding label caption to“Customer Number:”
Text2 txtLName Text Box Set corresponding label caption to“Last Name:”
Continued
445

P1: IML/FFX P2: IML/FFX QC: IML/FFX T1: IML
WY044-13 WY044-Gosnell WY044-Gosnell-v2.cls August 16, 2004 8:51
Chapter 13
Default Name Other Properties to Set from(on Figure 13.22) Name Type of Control the Properties Dialog
Text4 txtFName Text Box Set corresponding label caption to“First Name:”
Text6 txtMName Text Box Set corresponding label caption to“Middle Name:”
Text8 txtCompany Text Box Set corresponding label caption to“Company:”
Text10 txtAddress1 Text Box Set corresponding label caption to“Address 1:”
Text12 txtAddress2 Text Box Set corresponding label caption to“Address 2:”
Text14 txtCity Text Box Set corresponding label caption to“City:”
Text16 txtRegion Text Box Set corresponding label caption to“State / Region:”
Text18 txtPostalCode Text Box Set corresponding label caption to“Postal Code:”
Text20 txtHomePhone Text Box Set corresponding label caption to“Home Phone:”
Text22 txtWorkPhone Text Box Set corresponding label caption to“Work Phone:”
Text24 txtCellPhone Text Box Set corresponding label caption to“Cell Phone:”
Text26 txtEmail Text Box Set corresponding label caption to“Email:”
Combo28 cboPlan Combo Box Set corresponding label caption to“Plan:”
List30 lstPlanHistory List Box Set corresponding label caption to“Plan History:”
Command32 cmdSave Command Button Caption = “Save”
Command33 cmdAddNew Command Button Caption = “Add New”
Command34 cmdMoveFirst Command Button Caption = “Move First”; Picture =select Go To First 1 from list
446
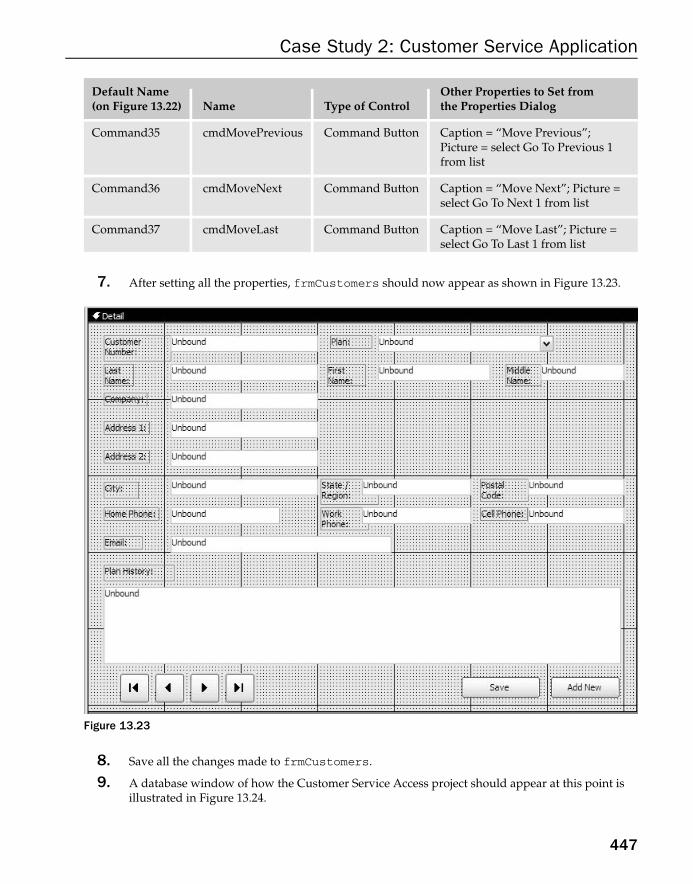
P1: IML/FFX P2: IML/FFX QC: IML/FFX T1: IML
WY044-13 WY044-Gosnell WY044-Gosnell-v2.cls August 16, 2004 8:51
Case Study 2: Customer Service Application
Default Name Other Properties to Set from(on Figure 13.22) Name Type of Control the Properties Dialog
Command35 cmdMovePrevious Command Button Caption = “Move Previous”;Picture = select Go To Previous 1from list
Command36 cmdMoveNext Command Button Caption = “Move Next”; Picture =select Go To Next 1 from list
Command37 cmdMoveLast Command Button Caption = “Move Last”; Picture =select Go To Last 1 from list
7. After setting all the properties, frmCustomers should now appear as shown in Figure 13.23.
Figure 13.23
8. Save all the changes made to frmCustomers.
9. A database window of how the Customer Service Access project should appear at this point isillustrated in Figure 13.24.
447
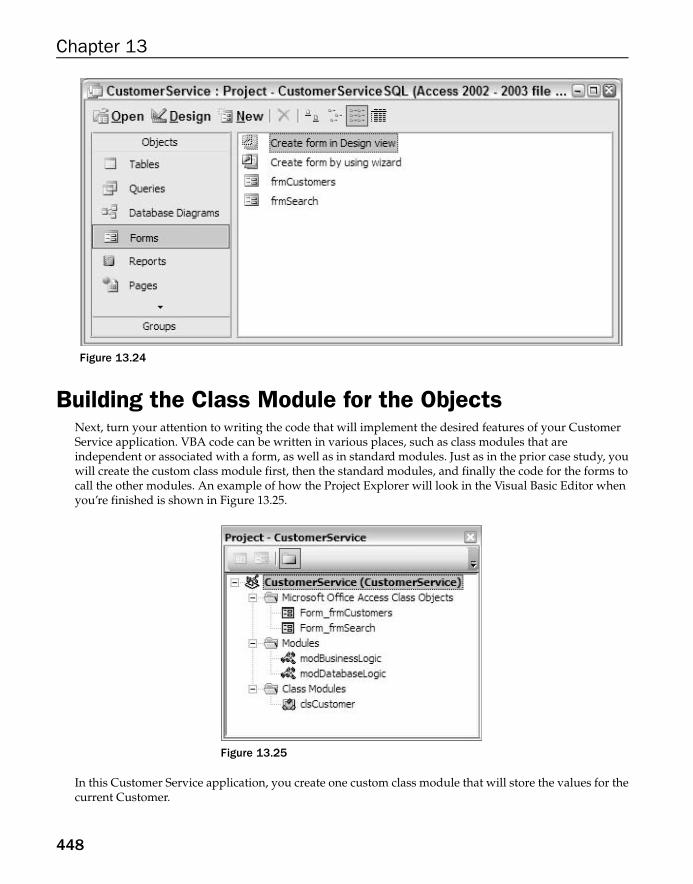
P1: IML/FFX P2: IML/FFX QC: IML/FFX T1: IML
WY044-13 WY044-Gosnell WY044-Gosnell-v2.cls August 16, 2004 8:51
Chapter 13
Figure 13.24
Building the Class Module for the ObjectsNext, turn your attention to writing the code that will implement the desired features of your CustomerService application. VBA code can be written in various places, such as class modules that areindependent or associated with a form, as well as in standard modules. Just as in the prior case study, youwill create the custom class module first, then the standard modules, and finally the code for the forms tocall the other modules. An example of how the Project Explorer will look in the Visual Basic Editor whenyou’re finished is shown in Figure 13.25.
Figure 13.25
In this Customer Service application, you create one custom class module that will store the values for thecurrent Customer.
448

P1: IML/FFX P2: IML/FFX QC: IML/FFX T1: IML
WY044-13 WY044-Gosnell WY044-Gosnell-v2.cls August 16, 2004 8:51
Case Study 2: Customer Service Application
An object diagram for the Customer class is shown in Figure 13.26.
+Save()+RetrieveCustomers()+PopulatePropertiesFromRecordset()+PopulatePropertiesFromForm()+ClearObject()
Customer
-CustomerId-LastName-FirstName-MiddleName-Company-Address1-Address2-City-Region-PostalCode-WorkPhone-HomePhone-CellPhone-Email-PlanId
Figure 13.26
The properties correspond to the data elements on the View/Manage Customer Accounts form for themost part, except that the values for the Plan History records are not shown here. The methods representvarious actions that should be taken on the object. You will also write numerous other procedures that arenot in the class module, as you will see later.
Try It Out Building the clsCustomer ClassLet’s get started and build the clsCustomer class module that will implement the object illustrated inFigure 13.26.
1. Add a new class module called clsCustomer. In the General Declarations section of the class,add the following code:
Option Compare DatabaseOption Explicit
Const CLS_CUSTOMER = "clsCustomer"
Dim intCustomerIdVal As IntegerDim strLastNameVal As StringDim strFirstNameVal As StringDim strMiddleNameVal As StringDim strCompanyVal As StringDim strAddress1Val As StringDim strAddress2Val As StringDim strCityVal As StringDim strRegionVal As StringDim strPostalCodeVal As String
449

P1: IML/FFX P2: IML/FFX QC: IML/FFX T1: IML
WY044-13 WY044-Gosnell WY044-Gosnell-v2.cls August 16, 2004 8:51
Chapter 13
Dim strWorkPhoneVal As StringDim strHomePhoneVal As StringDim strCellPhoneVal As StringDim strEmailVal As StringDim intPlanIdVal As Integer
2. Add the various property procedures shown here to clsCustomer class module.
Public Property Get CustomerId() As IntegerOn Error Resume NextCustomerId = intCustomerIdVal
End Property
Public Property Let CustomerId(ByVal Value As Integer)On Error Resume NextintCustomerIdVal = Value
End Property
Public Property Get LastName() As StringOn Error Resume NextLastName = strLastNameVal
End Property
Public Property Let LastName(ByVal Value As String)On Error Resume NextstrLastNameVal = Value
End Property
Public Property Get FirstName() As StringOn Error Resume NextFirstName = strFirstNameVal
End Property
Public Property Let FirstName(ByVal Value As String)On Error Resume NextstrFirstNameVal = Value
End Property
Public Property Get MiddleName() As StringOn Error Resume NextMiddleName = strMiddleNameVal
End Property
Public Property Let MiddleName(ByVal Value As String)On Error Resume NextstrMiddleNameVal = Value
End Property
Public Property Get Company() As StringOn Error Resume NextCompany = strCompanyVal
End Property
450
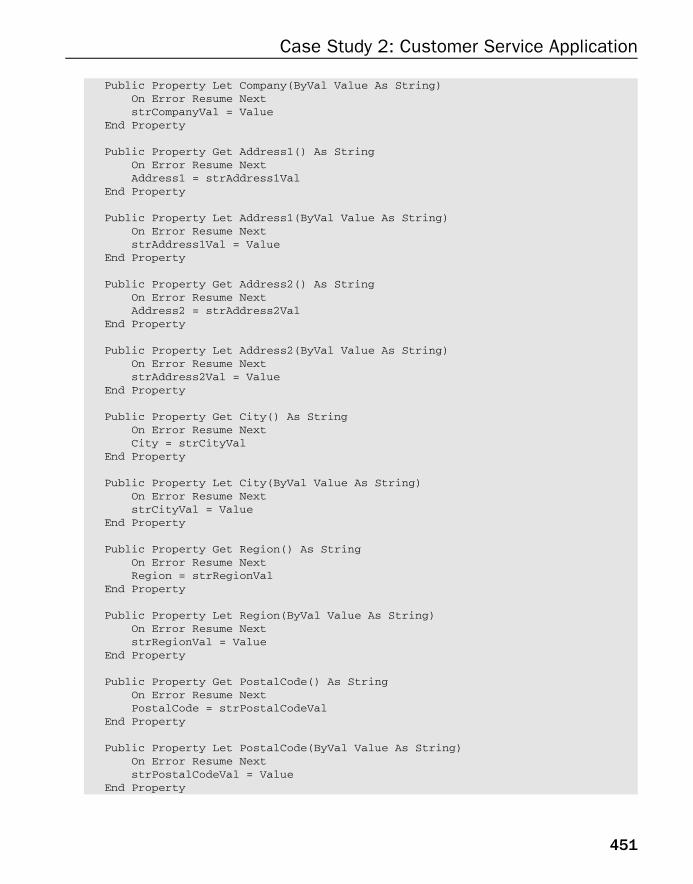
P1: IML/FFX P2: IML/FFX QC: IML/FFX T1: IML
WY044-13 WY044-Gosnell WY044-Gosnell-v2.cls August 16, 2004 8:51
Case Study 2: Customer Service Application
Public Property Let Company(ByVal Value As String)On Error Resume NextstrCompanyVal = Value
End Property
Public Property Get Address1() As StringOn Error Resume NextAddress1 = strAddress1Val
End Property
Public Property Let Address1(ByVal Value As String)On Error Resume NextstrAddress1Val = Value
End Property
Public Property Get Address2() As StringOn Error Resume NextAddress2 = strAddress2Val
End Property
Public Property Let Address2(ByVal Value As String)On Error Resume NextstrAddress2Val = Value
End Property
Public Property Get City() As StringOn Error Resume NextCity = strCityVal
End Property
Public Property Let City(ByVal Value As String)On Error Resume NextstrCityVal = Value
End Property
Public Property Get Region() As StringOn Error Resume NextRegion = strRegionVal
End Property
Public Property Let Region(ByVal Value As String)On Error Resume NextstrRegionVal = Value
End Property
Public Property Get PostalCode() As StringOn Error Resume NextPostalCode = strPostalCodeVal
End Property
Public Property Let PostalCode(ByVal Value As String)On Error Resume NextstrPostalCodeVal = Value
End Property
451

P1: IML/FFX P2: IML/FFX QC: IML/FFX T1: IML
WY044-13 WY044-Gosnell WY044-Gosnell-v2.cls August 16, 2004 8:51
Chapter 13
Public Property Get WorkPhone() As StringOn Error Resume NextWorkPhone = strWorkPhoneVal
End Property
Public Property Let WorkPhone(ByVal Value As String)On Error Resume NextstrWorkPhoneVal = Value
End PropertyPublic Property Get HomePhone() As String
On Error Resume NextHomePhone = strHomePhoneVal
End Property
Public Property Let HomePhone(ByVal Value As String)On Error Resume NextstrHomePhoneVal = Value
End Property
Public Property Get CellPhone() As StringOn Error Resume NextCellPhone = strCellPhoneVal
End Property
Public Property Let CellPhone(ByVal Value As String)On Error Resume NextstrCellPhoneVal = Value
End Property
Public Property Get Email() As StringOn Error Resume NextEmail = strEmailVal
End Property
Public Property Let Email(ByVal Value As String)On Error Resume NextstrEmailVal = Value
End PropertyPublic Property Get PlanId() As Integer
On Error Resume NextPlanId = intPlanIdVal
End Property
Public Property Let PlanId(ByVal Value As Integer)On Error Resume NextintPlanIdVal = Value
End Property
3. Add the RetrieveCustomers function shown here to the clsCustomer class module.
Function RetrieveCustomers() As ADODB.Recordset
On Error GoTo HandleError
Dim rsCust As New ADODB.Recordset
452

P1: IML/FFX P2: IML/FFX QC: IML/FFX T1: IML
WY044-13 WY044-Gosnell WY044-Gosnell-v2.cls August 16, 2004 8:51
Case Study 2: Customer Service Application
If intCustomerLookupId > 0 Then'if form is being opened for selected customer from frmSearchSet rsCust = ExecuteSPRetrieveRS("spRetrieveSelectedCustomer", _
intCustomerLookupId)Else
'if form is being opened for all customer recordsSet rsCust = ExecuteSPRetrieveRS("spRetrieveAllCustomers")
End If
'return the populated recordsetSet RetrieveCustomers = rsCust
Exit Function
HandleError:GeneralErrorHandler Err.Number, Err.Description, CLS_CUSTOMER, _
"RetrieveCustomers"Exit Function
End Function
4. Add the PopulatePropertiesFromRecordset procedure shown here to the clsProjectsclass module.
Sub PopulatePropertiesFromRecordset(rsCust As ADODB.Recordset)
On Error GoTo HandleError
'Populate the object with the current record in the'recordsetMe.CustomerId = rsCust!CustomerIdMe.LastName = FixNull(rsCust!LastName)Me.FirstName = FixNull(rsCust!FirstName)Me.MiddleName = FixNull(rsCust!MiddleName)Me.Company = FixNull(rsCust!Company)Me.Address1 = FixNull(rsCust!Address1)Me.Address2 = FixNull(rsCust!Address2)Me.City = FixNull(rsCust!City)Me.Region = FixNull(rsCust!Region)Me.PostalCode = FixNull(rsCust!PostalCode)Me.WorkPhone = FixNull(rsCust!WorkPhone)Me.HomePhone = FixNull(rsCust!HomePhone)Me.CellPhone = FixNull(rsCust!CellPhone)Me.Email = FixNull(rsCust!Email)Me.PlanId = rsCust!currentplanid
Exit Sub
HandleError:GeneralErrorHandler Err.Number, Err.Description, CLS_CUSTOMER, _
"PopulatePropertiesFromRecordset"Exit Sub
End Sub
453

P1: IML/FFX P2: IML/FFX QC: IML/FFX T1: IML
WY044-13 WY044-Gosnell WY044-Gosnell-v2.cls August 16, 2004 8:51
Chapter 13
5. Add the PopulatePropertiesFromForm procedure shown here to the clsCustomer classmodule.
Sub PopulatePropertiesFromForm()
On Error GoTo HandleError
'Populate the object with the current record in the'form
'if the customernum field is not empty (e.g. updating record)If Forms("frmCustomers")!txtCustomerNum <> "" Then
Me.CustomerId = Forms("frmCustomers")!txtCustomerNumElse
'adding new record so id not assigned yetMe.CustomerId = 0
End IfMe.LastName = Forms("frmCustomers")!txtLNameMe.FirstName = Forms("frmCustomers")!txtFNameMe.MiddleName = Forms("frmCustomers")!txtMNameMe.Company = Forms("frmCustomers")!txtCompanyMe.Address1 = Forms("frmCustomers")!txtAddress1Me.Address2 = Forms("frmCustomers")!txtAddress2Me.City = Forms("frmCustomers")!txtCityMe.Region = Forms("frmCustomers")!txtRegionMe.PostalCode = Forms("frmCustomers")!txtPostalCodeMe.WorkPhone = Forms("frmCustomers")!txtWorkPhoneMe.HomePhone = Forms("frmCustomers")!txtHomePhoneMe.CellPhone = Forms("frmCustomers")!txtCellPhoneMe.Email = Forms("frmCustomers")!txtEmailMe.PlanId = Forms("frmCustomers")!cboPlan
Exit Sub
HandleError:GeneralErrorHandler Err.Number, Err.Description, CLS_CUSTOMER, _
"PopulatePropertiesFromForm"Exit Sub
End Sub
6. Add the ClearObject procedure shown here to the clsCustomer class module.
Sub ClearObject()
On Error GoTo HandleError
'clear the values in the customer objectMe.CustomerId = 0Me.LastName = ""Me.FirstName = ""Me.MiddleName = ""Me.Company = ""
454

P1: IML/FFX P2: IML/FFX QC: IML/FFX T1: IML
WY044-13 WY044-Gosnell WY044-Gosnell-v2.cls August 16, 2004 8:51
Case Study 2: Customer Service Application
Me.Address1 = ""Me.Address2 = ""Me.City = ""Me.Region = ""Me.PostalCode = ""Me.WorkPhone = ""Me.HomePhone = ""Me.CellPhone = ""Me.Email = ""Me.PlanId = 0
Exit Sub
HandleError:GeneralErrorHandler Err.Number, Err.Description, CLS_CUSTOMER, _
"ClearObject"Exit Sub
End Sub
7. Add the Save procedure shown here to the clsCustomer class module.
Sub Save(blnAddMode As Boolean, rsCust As ADODB.Recordset)
On Error GoTo HandleError
Dim strSPname As String
'if adding a new recordIf blnAddMode = True Then
strSPname = "spInsertCustomer"Else'if updating a record
strSPname = "spUpdateCustomer"End If
'perform the insert or updateCall ProcessUpdate(strSPname, Me, rsCust)
Exit Sub
HandleError:GeneralErrorHandler Err.Number, Err.Description, CLS_CUSTOMER, "Save"Exit Sub
End Sub
8. Make sure to keep saving your changes periodically so they are not lost.
Building the Standard ModulesNow that you have created the properties and methods for the Customer objects, you are ready to beginwriting the code in the standard modules.
455

P1: IML/FFX P2: IML/FFX QC: IML/FFX T1: IML
WY044-13 WY044-Gosnell WY044-Gosnell-v2.cls August 16, 2004 8:51
Chapter 13
Try It Out Building the modBusinessLogic and modDatabaseLogic ModulesThe modBusinessLogic module will contain business logic but will not contain any database accesscalls. The modDatabaseLogic module will contain calls that are specific to the database. Let’s createthese modules.
1. Insert a new standard module called modBusinessLogic. Add the following code to theGeneral Declarations of the module:
Option Compare DatabaseOption ExplicitConst BUS_LOGIC = "modBusinessLogic"Public intCustomerLookupId As Integer
2. Add the following FixNull function to the modBusinessLogic module.
Function FixNull(varIn As Variant) As String
'this procedure sets null values in the recordset'to a null string so an error does not occur when'trying to assign the value to a control for display
'if the value is nullIf IsNull(varIn) Then
FixNull = ""Else
'return the value passed inFixNull = varIn
End If
End Function
3. Add the following PopulateListFromRecordset procedure to the modBusinessLogicmodule.
Sub PopulateListFromRecordset(lstList As ListBox, rsRecordset As _ADODB.Recordset, intNumCols As Integer)
On Error GoTo HandleError
Dim intCounter As IntegerDim strItem As String
With lstList.RowSource = "".ColumnCount = intNumCols.RowSourceType = "Value List"
End With
'add all of the values in the recordset to the list box
Do Until rsRecordset.EOF'for each item in the current record, build string
456

P1: IML/FFX P2: IML/FFX QC: IML/FFX T1: IML
WY044-13 WY044-Gosnell WY044-Gosnell-v2.cls August 16, 2004 8:51
Case Study 2: Customer Service Application
For intCounter = 0 To intNumCols - 1strItem = strItem & rsRecordset(intCounter).Value & ";"
Next intCounterlstList.AddItem (strItem)strItem = ""rsRecordset.MoveNext
Loop
Exit Sub
HandleError:GeneralErrorHandler Err.Number, Err.Description, BUS_LOGIC, _
"PopulateListFromRecordset"Exit Sub
End Sub
4. Add the following MoveToFirstRecord procedure to the modBusinessLogic module.
Sub MoveToFirstRecord(rsRecordset As ADODB.Recordset, objObject As Object, _blnAddMode As Boolean)
On Error GoTo HandleError
'move to the first record in the local disconnected recordsetIf Not rsRecordset.BOF And Not rsRecordset.EOF Then
rsRecordset.MoveFirst'add code to populate object with new current recordobjObject.PopulatePropertiesFromRecordset rsRecordset
blnAddMode = FalseEnd If
Exit Sub
HandleError:GeneralErrorHandler Err.Number, Err.Description, BUS_LOGIC, _
"MoveToFirstRecord"Exit Sub
End Sub
5. Add the following MoveToLastRecord procedure to the modBusinessLogic module.
Sub MoveToLastRecord(rsRecordset As ADODB.Recordset, objObject As Object, _blnAddMode As Boolean)
On Error GoTo HandleError
'move to the last record in the local disconnected recordsetIf Not rsRecordset.BOF And Not rsRecordset.EOF Then
rsRecordset.MoveLast
457

P1: IML/FFX P2: IML/FFX QC: IML/FFX T1: IML
WY044-13 WY044-Gosnell WY044-Gosnell-v2.cls August 16, 2004 8:51
Chapter 13
'add code to populate object with new current recordobjObject.PopulatePropertiesFromRecordset rsRecordset
blnAddMode = False
End If
Exit Sub
HandleError:GeneralErrorHandler Err.Number, Err.Description, BUS_LOGIC, _
"MoveToLastRecord"Exit Sub
End Sub
6. Add the following MoveToPreviousRecord procedure to the modBusinessLogic module.
Sub MoveToPreviousRecord(rsRecordset As ADODB.Recordset, objObject As Object, _blnAddMode As Boolean)
On Error GoTo HandleError
'move to the previous record in the local disconnected recordset'if not already at the beginningIf Not rsRecordset.BOF Then
rsRecordset.MovePrevious
blnAddMode = False
'make sure not past beginning of recordset nowIf Not rsRecordset.BOF Then
'add code to populate object with new current recordobjObject.PopulatePropertiesFromRecordset rsRecordset
Else'at beginning of recordset so move to next record
rsRecordset.MoveNextEnd If
End If
Exit Sub
HandleError:GeneralErrorHandler Err.Number, Err.Description, BUS_LOGIC, _
"MoveToPreviousRecord"Exit Sub
End Sub
7. Add the following MoveToNextRecord procedure to the modBusinessLogic module.
458

P1: IML/FFX P2: IML/FFX QC: IML/FFX T1: IML
WY044-13 WY044-Gosnell WY044-Gosnell-v2.cls August 16, 2004 8:51
Case Study 2: Customer Service Application
Sub MoveToNextRecord(rsRecordset As ADODB.Recordset, objObject As Object, _blnAddMode As Boolean)
On Error GoTo HandleError
'move to the next record in the local disconnected recordset'if not already at the endIf Not rsRecordset.EOF Then
rsRecordset.MoveNext
blnAddMode = False
'make sure not past end of recordsetIf Not rsRecordset.EOF Then
'add code to populate object with new current recordobjObject.PopulatePropertiesFromRecordset rsRecordset
Else'at end of recordset so move back onersRecordset.MovePrevious
End If
End If
Exit Sub
HandleError:GeneralErrorHandler Err.Number, Err.Description, BUS_LOGIC, _
"MoveToNextRecord"Exit Sub
End Sub
8. Add the following GeneralErrorHandler procedure to the modBusinessLogic module.
Public Sub GeneralErrorHandler(lngErrNumber As Long, strErrDesc As String, _strModuleSource As String, strProcedureSource As String)
On Error Resume Next
Dim strMessage As String
'build the error message string from the parameters passed instrMessage = "An error has occurred in the application."strMessage = strMessage & vbCrLf & "Error Number: " & lngErrNumberstrMessage = strMessage & vbCrLf & "Error Description: " & strErrDescstrMessage = strMessage & vbCrLf & "Module Source: " & strModuleSourcestrMessage = strMessage & vbCrLf & "Procedure Source: " &strProcedureSource
'display the message to the userMsgBox strMessage, vbCritical
Exit Sub
End Sub
459

P1: IML/FFX P2: IML/FFX QC: IML/FFX T1: IML
WY044-13 WY044-Gosnell WY044-Gosnell-v2.cls August 16, 2004 8:51
Chapter 13
9. Save your changes to the modBusinessLogic module.
10. Insert a new standard module called modDatabaseLogic. Add the following code to theGeneral Declarations of the module:
Option Compare DatabaseOption ExplicitDim cnConn As ADODB.ConnectionDim strConnection As StringConst DB_LOGIC = "modDatabaseLogic"
11. Add the following OpenDbConnection procedure to the modDatabaseLogic module. Youwill need to modify the strConnection string to point to your SQL Server database. If youare not using integrated security, you must specify the user ID and password (User Id=sa;Password=password;) in place of the Integrated Security option (IntegratedSecurity=SSPI;).
Sub OpenDbConnection()
On Error GoTo HandleError
strConnection = "Provider=sqloledb;Data Source=goz_tablet1100\sqldev;" & _"Integrated Security=SSPI;Initial Catalog=CustomerServiceSQL"
'create a new connection instance and open it using the connectionstringSet cnConn = New ADODB.ConnectioncnConn.Open strConnection
Exit Sub
HandleError:GeneralErrorHandler Err.Number, Err.Description, DB_LOGIC, _
"OpenDbConnection"Exit Sub
End Sub
12. Add the following CloseDbConnection procedure to the modDatabaseLogic module.
Sub CloseDbConnection()
On Error GoTo HandleError
'close the database connectioncnConn.CloseSet cnConn = Nothing
Exit Sub
HandleError:GeneralErrorHandler Err.Number, Err.Description, DB_LOGIC, _
"CloseDbConnection"Exit Sub
End Sub
460

P1: IML/FFX P2: IML/FFX QC: IML/FFX T1: IML
WY044-13 WY044-Gosnell WY044-Gosnell-v2.cls August 16, 2004 8:51
Case Study 2: Customer Service Application
13. Add the following ProcessRecordset function to the modDatabaseLogic module.
Function ProcessRecordset(strSQLStatement As String) As ADODB.Recordset
On Error GoTo HandleError
'open the connection to the databaseCall OpenDbConnection
'create a new instance of a recordsetDim rsCont As New ADODB.Recordset
'set various properties of the recordsetWith rsCont
'specify a cursortype and lock type that will allow updates.CursorType = adOpenKeyset.CursorLocation = adUseClient.LockType = adLockBatchOptimistic'populate the recordset based on SQL statement.Open strSQLStatement, cnConn'disconnect the recordset.ActiveConnection = Nothing
End With
'close the connection to the databaseCall CloseDbConnection
'return the recordsetSet ProcessRecordset = rsCont
Exit Function
HandleError:GeneralErrorHandler Err.Number, Err.Description, DB_LOGIC, _
"ProcessRecordset"Exit Function
End Function
14. Add the following BuildSQLSelectFrom function to the modDatabaseLogic module.
Function BuildSQLSelectFrom() As String
On Error GoTo HandleError
'create SELECT FROM part of SQL StatementBuildSQLSelectFrom = "SELECT CustomerID, FirstName, LastName, " & _
" Company, Address1, City, Region, PostalCode, " & _" HomePhone, WorkPhone, CellPhone FROM tblCustomers "
Exit Function
461

P1: IML/FFX P2: IML/FFX QC: IML/FFX T1: IML
WY044-13 WY044-Gosnell WY044-Gosnell-v2.cls August 16, 2004 8:51
Chapter 13
HandleError:GeneralErrorHandler Err.Number, Err.Description, DB_LOGIC, _
"BuildSQLSelectFrom"Exit Function
End Function
15. Add the following BuildSQLWhere function to the modDatabaseLogic module.
Function BuildSQLWhere(blnPriorWhere As Boolean, strPriorWhere As String, _strValue As String, strDbFieldName As String) As String
On Error GoTo HandleError
Dim strWhere As String
If blnPriorWhere Then'add to the existing where clausestrWhere = strPriorWhere & " AND "
Else'create the where clause for the first timestrWhere = " WHERE "
End If
If strDbFieldName = "Phone" Then'search each of phone fields in the db for this value to see'if exact match or starts with this value for any one of the'phone fieldsstrWhere = strWhere & "(HomePhone LIKE '" & strValue & "%'" & _
" OR WorkPhone LIKE '" & strValue & "%'" & _" OR CellPhone LIKE '" & strValue & "%')"
Else'build where clause using LIKE so will find both exact'matches and those that start with value input by userstrWhere = strWhere & strDbFieldName & " LIKE '" &
PadQuotes(strValue) & _"%' "
End If
blnPriorWhere = True
'return where clauseBuildSQLWhere = strWhere
Exit Function
HandleError:GeneralErrorHandler Err.Number, Err.Description, DB_LOGIC, "BuildSQLWhere"Exit Function
End Function
16. Add the following PadQuotes function to the modDatabaseLogic module.
462

P1: IML/FFX P2: IML/FFX QC: IML/FFX T1: IML
WY044-13 WY044-Gosnell WY044-Gosnell-v2.cls August 16, 2004 8:51
Case Study 2: Customer Service Application
Function PadQuotes(strIn As String) As String
'This function replaces the occurrence of single'quotes with two single quotes in a row.'This is to eliminate errors in SQL Server and other'databases when a user includes an apostrophe in the'data value.
On Error GoTo HandleError
PadQuotes = Replace(strIn, "'", "''")
Exit Function
HandleError:GeneralErrorHandler Err.Number, Err.Description, DB_LOGIC, "PadQuotes"Exit Function
End Function
17. Add the following ExecuteSPRetrieveRS function to the modDatabaseLogic module.
Function ExecuteSPRetrieveRS(strSPname As String, Optional intCustomerId _As Integer) As ADODB.Recordset
On Error GoTo HandleError
Dim parCustId As ADODB.ParameterDim cmdCommand As ADODB.CommandDim rsCustomers As ADODB.Recordset
'set up the command object for executing stored procedureSet cmdCommand = New ADODB.CommandcmdCommand.CommandType = adCmdStoredProc
Set rsCustomers = New ADODB.Recordset
'if the customer id is specified and greater than 0If Not IsMissing(intCustomerId) And intCustomerId > 0 Then
'Add parameter to be passed to stored procedureSet parCustId = cmdCommand.CreateParameter("CustomerId", _
adInteger, adParamInput)parCustId.Value = intCustomerIdcmdCommand.Parameters.Append parCustId
End If
'set stored procedure namecmdCommand.CommandText = strSPname
'open the database connectionCall OpenDbConnection
'set the command object to the current connectionSet cmdCommand.ActiveConnection = cnConn
463

P1: IML/FFX P2: IML/FFX QC: IML/FFX T1: IML
WY044-13 WY044-Gosnell WY044-Gosnell-v2.cls August 16, 2004 8:51
Chapter 13
'Create recordset by executing the commandWith rsCustomers
.CursorLocation = adUseClient
.CursorType = adOpenStatic
.LockType = adLockBatchOptimisticSet .Source = cmdCommand.Open
End With
Set rsCustomers.ActiveConnection = Nothing
'close the database connectionCall CloseDbConnection
'return the recordsetSet ExecuteSPRetrieveRS = rsCustomers
Exit Function
HandleError:GeneralErrorHandler Err.Number, Err.Description, DB_LOGIC, _
"RetrieveCustomersDb"Exit Function
End Function
18. Add the following ProcessUpdate procedure to the modDatabaseLogic module.
Sub ProcessUpdate(strSPname As String, objCust As clsCustomer, Optional _rsCust As ADODB.Recordset)
On Error GoTo HandleError
'This procedure is used to handle updates to the database
'open the connection to the databaseCall OpenDbConnection
'execute the stored procedureCall ExecuteStoredProcedure(strSPname, objCust)
'close the connection to the databaseCall CloseDbConnection
Exit Sub
HandleError:GeneralErrorHandler Err.Number, Err.Description, DB_LOGIC, "ProcessUpdate"Exit Sub
End Sub
19. Add the following ExecuteStoredProcedure procedure to the modDatabaseLogicmodule.
464

P1: IML/FFX P2: IML/FFX QC: IML/FFX T1: IML
WY044-13 WY044-Gosnell WY044-Gosnell-v2.cls August 16, 2004 8:51
Case Study 2: Customer Service Application
Sub ExecuteStoredProcedure(strSPname As String, objCust As clsCustomer)
On Error GoTo HandleError
'the purpose of this procedure is to execute'a stored procedure that does not return any'rows against the database.
Dim cmdCommand As ADODB.CommandSet cmdCommand = New ADODB.Command
'set up the command object for executing stored procedurecmdCommand.CommandType = adCmdStoredProc
Call AddParameters(strSPname, cmdCommand, objCust)
'set the command to the current connectionSet cmdCommand.ActiveConnection = cnConn'set the SQL statement to the command textcmdCommand.CommandText = strSPname'execute the command against the databasecmdCommand.Execute
Exit Sub
HandleError:GeneralErrorHandler Err.Number, Err.Description, DB_LOGIC, _
"ExecuteStoredProcedure"Exit Sub
End Sub
20. Add the following AddParameters procedure to the modDatabaseLogic module.
Sub AddParameters(strSPname As String, cmdCommand As ADODB.Command, objCust _As clsCustomer)
On Error GoTo HandleError
Dim parParm As ADODB.Parameter
'if updating existing recordIf strSPname = "spUpdateCustomer" Then
'Add parameter for existing Customer Id to be passed tostored procedure
Set parParm = cmdCommand.CreateParameter("CustomerId", adInteger, _adParamInput)
cmdCommand.Parameters.Append parParmparParm.Value = objCust.CustomerId
End If
'Add parameter for Last Name to be passed to stored procedureSet parParm = cmdCommand.CreateParameter("LastName", adVarChar, _
adParamInput, 50)
465

P1: IML/FFX P2: IML/FFX QC: IML/FFX T1: IML
WY044-13 WY044-Gosnell WY044-Gosnell-v2.cls August 16, 2004 8:51
Chapter 13
parParm.Value = objCust.LastNamecmdCommand.Parameters.Append parParm
'Add parameter for First Name to be passed to stored procedureSet parParm = cmdCommand.CreateParameter("FirstName", adVarChar, _
adParamInput, 50)parParm.Value = objCust.FirstNamecmdCommand.Parameters.Append parParm
'Add parameter for Middle Name to be passed to stored procedureSet parParm = cmdCommand.CreateParameter("MiddleName", adVarChar, _
adParamInput, 50)parParm.Value = objCust.MiddleNamecmdCommand.Parameters.Append parParm
'Add parameter for Company Name to be passed to stored procedureSet parParm = cmdCommand.CreateParameter("Company", adVarChar, _
adParamInput, 50)parParm.Value = objCust.CompanycmdCommand.Parameters.Append parParm
'Add parameter for Address1 to be passed to stored procedureSet parParm = cmdCommand.CreateParameter("Address1", adVarChar, _
adParamInput, 100)parParm.Value = objCust.Address1cmdCommand.Parameters.Append parParm
'Add parameter for Address2 to be passed to stored procedureSet parParm = cmdCommand.CreateParameter("Address2", adVarChar, _
adParamInput, 100)parParm.Value = objCust.Address2cmdCommand.Parameters.Append parParm
'Add parameter for City to be passed to stored procedureSet parParm = cmdCommand.CreateParameter("City", adVarChar,
adParamInput, 50)parParm.Value = objCust.CitycmdCommand.Parameters.Append parParm
'Add parameter for Region to be passed to stored procedureSet parParm = cmdCommand.CreateParameter("Region", adVarChar,
adParamInput, 50)parParm.Value = objCust.RegioncmdCommand.Parameters.Append parParm
'Add parameter for Postal Code to be passed to stored procedureSet parParm = cmdCommand.CreateParameter("PostalCode", adVarChar, _
adParamInput, 25)parParm.Value = objCust.PostalCodecmdCommand.Parameters.Append parParm
'Add parameter for Work Phone to be passed to stored procedureSet parParm = cmdCommand.CreateParameter("WorkPhone", adVarChar, _
adParamInput, 15)
466

P1: IML/FFX P2: IML/FFX QC: IML/FFX T1: IML
WY044-13 WY044-Gosnell WY044-Gosnell-v2.cls August 16, 2004 8:51
Case Study 2: Customer Service Application
parParm.Value = objCust.WorkPhonecmdCommand.Parameters.Append parParm
'Add parameter for Home Phone to be passed to stored procedureSet parParm = cmdCommand.CreateParameter("HomePhone", adVarChar, _
adParamInput, 15)parParm.Value = objCust.HomePhonecmdCommand.Parameters.Append parParm
'Add parameter for Cell Phone to be passed to stored procedureSet parParm = cmdCommand.CreateParameter("CellPhone", adVarChar, _
adParamInput, 15)parParm.Value = objCust.CellPhonecmdCommand.Parameters.Append parParm
'Add parameter for Email to be passed to stored procedureSet parParm = cmdCommand.CreateParameter("Email", adVarChar,
adParamInput, 50)parParm.Value = objCust.EmailcmdCommand.Parameters.Append parParm
'Add parameter for Current Plan Id to be passed to stored procedureSet parParm = cmdCommand.CreateParameter("CurrentPlanId", adInteger, _
adParamInput)parParm.Value = objCust.PlanIdcmdCommand.Parameters.Append parParm
'Add parameter for RepName to be passed to stored procedureSet parParm = cmdCommand.CreateParameter("RepName", adVarChar, _
adParamInput, 50)parParm.Value = Application.CurrentUsercmdCommand.Parameters.Append parParm
Exit Sub
HandleError:GeneralErrorHandler Err.Number, Err.Description, DB_LOGIC, "AddParameters"Exit Sub
End Sub
21. Save your changes to the modDatabaseLogic module.
Connecting the User Interface to the CodeWe are now ready to tie everything you have done so far together by adding the VBA code to theCustomer Search and View/Manage Customer Accounts forms. Most of this code will be eventprocedures that fire when different buttons are clicked. Some of the code will also be local proceduresthat deal with user-interface specific features. It just did not make sense to put these in a standard or classmodule.
467
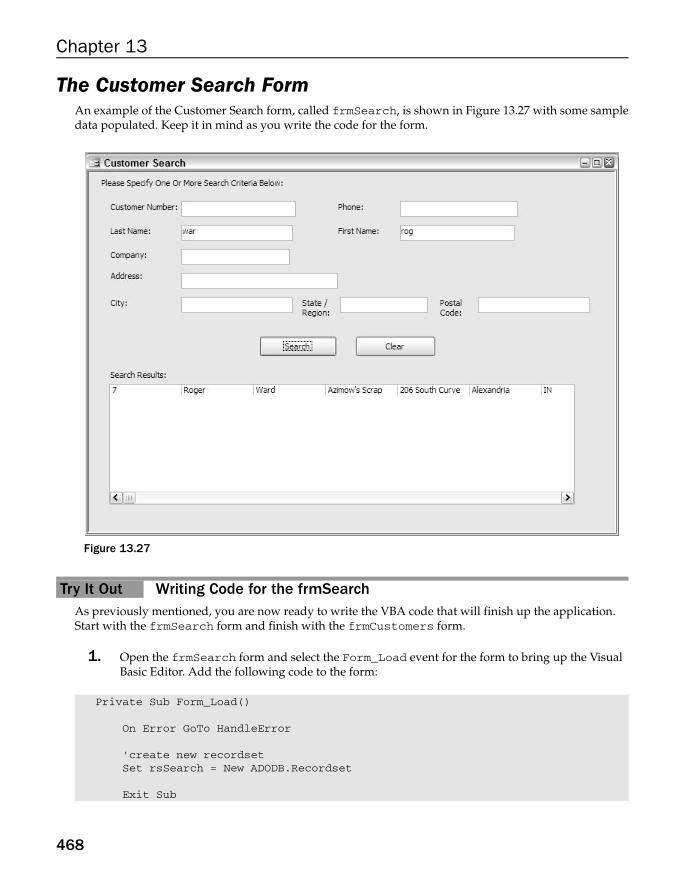
P1: IML/FFX P2: IML/FFX QC: IML/FFX T1: IML
WY044-13 WY044-Gosnell WY044-Gosnell-v2.cls August 16, 2004 8:51
Chapter 13
The Customer Search FormAn example of the Customer Search form, called frmSearch, is shown in Figure 13.27 with some sampledata populated. Keep it in mind as you write the code for the form.
Figure 13.27
Try It Out Writing Code for the frmSearchAs previously mentioned, you are now ready to write the VBA code that will finish up the application.Start with the frmSearch form and finish with the frmCustomers form.
1. Open the frmSearch form and select the Form_Load event for the form to bring up the VisualBasic Editor. Add the following code to the form:
Private Sub Form_Load()
On Error GoTo HandleError
'create new recordsetSet rsSearch = New ADODB.Recordset
Exit Sub
468

P1: IML/FFX P2: IML/FFX QC: IML/FFX T1: IML
WY044-13 WY044-Gosnell WY044-Gosnell-v2.cls August 16, 2004 8:51
Case Study 2: Customer Service Application
HandleError:GeneralErrorHandler Err.Number, Err.Description, SEARCH_FORM, "Form_Load"Exit Sub
End Sub
2. Add the following code to the General Declarations section of the form.
Option Compare DatabaseOption ExplicitConst SEARCH_FORM = "frmSearch"Dim rsSearch As ADODB.Recordset
3. Add the following Click event procedures for running the search.
Private Sub cmdSearch_Click()
On Error GoTo HandleError
'run the searchCall RunSearch
Exit Sub
HandleError:GeneralErrorHandler Err.Number, Err.Description, SEARCH_FORM, _
"cmdSearch_Click"Exit Sub
End Sub
Sub RunSearch()
On Error GoTo HandleError
Dim strSQL As String
'get the SQL statement for the searchstrSQL = GetSQL
'if the SQL statement was generated successfullyIf strSQL <> "ERROR" Then
'execute the SQL statement against the'database and put results in recordsetSet rsSearch = ProcessRecordset(strSQL)
'load the search results into the list on the formPopulateListFromRecordset lstResults, rsSearch, 11
End If
Exit Sub
469

P1: IML/FFX P2: IML/FFX QC: IML/FFX T1: IML
WY044-13 WY044-Gosnell WY044-Gosnell-v2.cls August 16, 2004 8:51
Chapter 13
HandleError:GeneralErrorHandler Err.Number, Err.Description, SEARCH_FORM, "RunSearch"Exit Sub
End Sub
Function GetSQL() As String
On Error GoTo HandleError
Dim strSQL As StringDim strSQLWhereClause As StringDim blnPriorWhere As Boolean
blnPriorWhere = False
'generate the first part of the SQL StatementstrSQL = BuildSQLSelectFrom()
'build the where criteria based on the criteria filled in'by the user in one or more of the search fields on the form
If txtCustomerNum <> "" ThenstrSQLWhereClause = BuildSQLWhere(blnPriorWhere, strSQLWhereClause, _
txtCustomerNum, "CustomerID")End If
If txtPhone <> "" ThenstrSQLWhereClause = BuildSQLWhere(blnPriorWhere, strSQLWhereClause, _
txtPhone, "Phone")End If
If txtLName <> "" ThenstrSQLWhereClause = BuildSQLWhere(blnPriorWhere, strSQLWhereClause, _
txtLName, "LastName")End If
If txtFName <> "" ThenstrSQLWhereClause = BuildSQLWhere(blnPriorWhere, strSQLWhereClause, _
txtFName, "FirstName")End If
If txtCompany <> "" ThenstrSQLWhereClause = BuildSQLWhere(blnPriorWhere, strSQLWhereClause, _
txtCompany, "Company")End If
If txtAddress <> "" ThenstrSQLWhereClause = BuildSQLWhere(blnPriorWhere, strSQLWhereClause, _
txtAddress, "Address1")End If
If txtCity <> "" Then
470

P1: IML/FFX P2: IML/FFX QC: IML/FFX T1: IML
WY044-13 WY044-Gosnell WY044-Gosnell-v2.cls August 16, 2004 8:51
Case Study 2: Customer Service Application
strSQLWhereClause = BuildSQLWhere(blnPriorWhere, strSQLWhereClause, _txtCity, "City")
End If
If txtRegion <> "" ThenstrSQLWhereClause = BuildSQLWhere(blnPriorWhere, strSQLWhereClause, _
txtRegion, "Region")End If
If txtPostalCode <> "" ThenstrSQLWhereClause = BuildSQLWhere(blnPriorWhere, strSQLWhereClause, _
txtPostalCode, "PostalCode")End If
If blnPriorWhere Then'build the final SQL statement with the Select...From...andWhere clause
strSQL = strSQL & strSQLWhereClauseElse
MsgBox "You must enter at least one search criteria!"strSQL = "ERROR"
End If
'return the SQL statementGetSQL = strSQL
Exit Function
HandleError:GeneralErrorHandler Err.Number, Err.Description, SEARCH_FORM, "GetSQL"Exit Function
End Function
4. Add the following procedures for clearing the search results.
Private Sub cmdClear_Click()
On Error GoTo HandleError
'clear the search fieldsCall ClearFields
Exit Sub
HandleError:GeneralErrorHandler Err.Number, Err.Description, SEARCH_FORM, _
"cmdClear_Click"Exit Sub
End Sub
471

P1: IML/FFX P2: IML/FFX QC: IML/FFX T1: IML
WY044-13 WY044-Gosnell WY044-Gosnell-v2.cls August 16, 2004 8:51
Chapter 13
Sub ClearFields()
On Error GoTo HandleError
'clear fieldstxtCustomerNum = ""txtLName = ""txtFName = ""txtCompany = ""txtAddress = ""txtCity = ""txtRegion = ""txtPostalCode = ""txtPhone = ""
Exit Sub
HandleError:GeneralErrorHandler Err.Number, Err.Description, SEARCH_FORM, "ClearFields"Exit Sub
End Sub
Private Sub Form_Unload(Cancel As Integer)
On Error GoTo HandleError
'reset lookup id to 0intCustomerLookupId = 0
If Not rsSearch Is Nothing Then'close recordsetrsSearch.CloseSet rsSearch = Nothing
End If
Exit Sub
HandleError:GeneralErrorHandler Err.Number, Err.Description, SEARCH_FORM, "Form_Unload"Exit Sub
End Sub
Private Sub lstResults_DblClick(Cancel As Integer)
On Error GoTo HandleError
'store the value of the selected customer id to be'used later by frmCustomers to open selected recordintCustomerLookupId = lstResults.Column(0)
'open frmCustomersDoCmd.OpenForm "frmCustomers"
Exit Sub
472

P1: IML/FFX P2: IML/FFX QC: IML/FFX T1: IML
WY044-13 WY044-Gosnell WY044-Gosnell-v2.cls August 16, 2004 8:51
Case Study 2: Customer Service Application
HandleError:GeneralErrorHandler Err.Number, Err.Description, SEARCH_FORM, _
"lstResults_DblClick"Exit Sub
End Sub
The View/Manage Customer Accounts FormAn example of the View/Manage Customer Accounts form, called frmCustomers, is shown in Figure13.28 with some sample data populated. Keep this form in mind as you write the code.
Figure 13.28
Try It Out Writing Code for the frmCustomersNow that you have finished with the VBA code for the frmSearch form, you can turn to thefrmCustomers form.
1. Open the frmCustomers form and select the Form_Load event for the form to bring up theVisual Basic Editor. Add the following code to the form:
473

P1: IML/FFX P2: IML/FFX QC: IML/FFX T1: IML
WY044-13 WY044-Gosnell WY044-Gosnell-v2.cls August 16, 2004 8:51
Chapter 13
Private Sub Form_Load()
On Error GoTo HandleError
Set objCustomer = New clsCustomerSet rsCustomer = New ADODB.Recordset
'lock the customer number field so user cannot modify it'(since assigned by the database)txtCustomerNum.Locked = True
'set addmode to false since not adding yetblnAddMode = False
'load the records from the databaseCall LoadRecords
'populate plans combo boxCall PopulatePlans
Exit Sub
HandleError:GeneralErrorHandler Err.Number, Err.Description, CUSTOMERS_FORM, _
"Form_Load"Exit Sub
End Sub
2. Add the following code to the General Declarations section of the form.
Option Compare DatabaseOption ExplicitConst CUSTOMERS_FORM = "frmCustomers"Dim objCustomer As clsCustomerDim rsCustomer As ADODB.RecordsetDim rsHistory As ADODB.RecordsetDim blnAddMode As Boolean
3. Add the following code behind the form for adding a new customer record.
Private Sub cmdAddNew_Click()
On Error GoTo HandleError
'clear the current controls to enable adding a new'customer recordCall AddEmptyCustomerRecord
Exit Sub
474

P1: IML/FFX P2: IML/FFX QC: IML/FFX T1: IML
WY044-13 WY044-Gosnell WY044-Gosnell-v2.cls August 16, 2004 8:51
Case Study 2: Customer Service Application
HandleError:GeneralErrorHandler Err.Number, Err.Description, CUSTOMERS_FORM, _
"cmdAddNew_Click"Exit Sub
End Sub
Sub AddEmptyCustomerRecord()
On Error GoTo HandleError
'set add mode to trueblnAddMode = True
'clear the current values in the contacts objectobjCustomer.ClearObject
'clear the current controls on the form so the'user can fill in values for the new recordCall ClearCustomerControls
Exit Sub
HandleError:GeneralErrorHandler Err.Number, Err.Description, CUSTOMERS_FORM, _
"AddEmptyCustomerRecord"Exit Sub
End Sub
Sub ClearCustomerControls()
On Error GoTo HandleError
'clear the values in the controls on the formMe.txtCustomerNum = ""Me.txtLName = ""Me.txtFName = ""Me.txtMName = ""Me.txtCompany = ""Me.txtAddress1 = ""Me.txtAddress2 = ""Me.txtCity = ""Me.txtRegion = ""Me.txtPostalCode = ""Me.txtWorkPhone = ""Me.txtHomePhone = ""Me.txtCellPhone = ""Me.txtEmail = ""Me.cboPlan = ""
'clear the plan history list boxlstPlanHistory.RowSource = ""
Exit Sub
475

P1: IML/FFX P2: IML/FFX QC: IML/FFX T1: IML
WY044-13 WY044-Gosnell WY044-Gosnell-v2.cls August 16, 2004 8:51
Chapter 13
HandleError:GeneralErrorHandler Err.Number, Err.Description, CUSTOMERS_FORM, _
"ClearCustomerControls"Exit Sub
End Sub
4. Add the following procedures to the form for making updates to the data.
Private Sub cmdSave_Click()
On Error GoTo HandleError
Dim intCurCustomer As Integer
'save the id of the current record if in update modeIf Not blnAddMode Then
intCurCustomer = objCustomer.CustomerIdElse
intCurCustomer = 0End If
'populate object with current info on formobjCustomer.PopulatePropertiesFromForm
'save all changes to current recordobjCustomer.Save blnAddMode, rsCustomer
'move back to the customer that was current before the requeryIf intCurCustomer > 0 Then
'move back to the contact that was just updatedrsCustomer.Find "[CustomerId] = " & intCurCustomer'refresh the history list box for the recordCall RefreshHistory
Else'if just added new record, move to the beginning of'the recordsetCall MoveToFirstRecord(rsCustomer, objCustomer, blnAddMode)'populate the controls on the form with the current recordCall PopulateCustomerControls
End If
Exit Sub
HandleError:GeneralErrorHandler Err.Number, Err.Description, CUSTOMERS_FORM, _
"cmdSave_Click"Exit Sub
End Sub
5. Add the following code to the form for navigating through the customer records.
476

P1: IML/FFX P2: IML/FFX QC: IML/FFX T1: IML
WY044-13 WY044-Gosnell WY044-Gosnell-v2.cls August 16, 2004 8:51
Case Study 2: Customer Service Application
Private Sub cmdMoveFirst_Click()
On Error GoTo HandleError
'move to the first record in the local disconnected recordsetCall MoveToFirstRecord(rsCustomer, objCustomer, blnAddMode)
'populate the controls on the form with the current recordCall PopulateCustomerControls
Exit Sub
HandleError:GeneralErrorHandler Err.Number, Err.Description, CUSTOMERS_FORM, _
"cmdMoveFirst_Click"Exit Sub
End Sub
Private Sub cmdMoveLast_Click()
On Error GoTo HandleError
'move to the last record in the local disconnected recordsetCall MoveToLastRecord(rsCustomer, objCustomer, blnAddMode)
'populate the controls on the form with the current recordCall PopulateCustomerControls
Exit Sub
HandleError:GeneralErrorHandler Err.Number, Err.Description, CUSTOMERS_FORM, _
"cmdMoveLast_Click"Exit Sub
End Sub
Private Sub cmdMoveNext_Click()
On Error GoTo HandleError
'move to the next record in the local disconnected recordsetCall MoveToNextRecord(rsCustomer, objCustomer, blnAddMode)
'populate the controls on the form with the current recordCall PopulateCustomerControls
Exit Sub
HandleError:GeneralErrorHandler Err.Number, Err.Description, CUSTOMERS_FORM, _
"cmdMoveNext_Click"Exit Sub
477

P1: IML/FFX P2: IML/FFX QC: IML/FFX T1: IML
WY044-13 WY044-Gosnell WY044-Gosnell-v2.cls August 16, 2004 8:51
Chapter 13
End Sub
Private Sub cmdMovePrevious_Click()
On Error GoTo HandleError
'move to the previous record in the local disconnected recordsetCall MoveToPreviousRecord(rsCustomer, objCustomer, blnAddMode)
'populate the controls on the form with the current recordCall PopulateCustomerControls
Exit Sub
HandleError:GeneralErrorHandler Err.Number, Err.Description, CUSTOMERS_FORM, _
"cmdMovePrevious_Click"Exit Sub
End Sub
6. Add the following code to the form for populating the fields on the form with the currentcustomer record.
Sub PopulatePlans()
On Error GoTo HandleError
'populate the Plans combo box with values from the databaseDim rsPlans As New ADODB.Recordset
'populate the list of plans from the databaseSet rsPlans = ExecuteSPRetrieveRS("spRetrievePlans", 0)
cboPlan.RowSource = ""cboPlan.LimitToList = TruecboPlan.ColumnCount = 2cboPlan.RowSourceType = "Value List"cboPlan.BoundColumn = 0
Do While Not rsPlans.EOF'populate the plans combo boxcboPlan.AddItem rsPlans!PlanId & ";" & rsPlans!PlanNamersPlans.MoveNext
Loop
Exit Sub
HandleError:GeneralErrorHandler Err.Number, Err.Description, CUSTOMERS_FORM, _
"PopulatePlans"Exit Sub
End Sub
478

P1: IML/FFX P2: IML/FFX QC: IML/FFX T1: IML
WY044-13 WY044-Gosnell WY044-Gosnell-v2.cls August 16, 2004 8:51
Case Study 2: Customer Service Application
Sub LoadRecords()
On Error GoTo HandleError
'load the customer recordsetSet rsCustomer = objCustomer.RetrieveCustomers
'if the recordset is emptyIf rsCustomer.BOF And rsCustomer.EOF Then
Exit SubElse
'populate the object with values in the recordsetobjCustomer.PopulatePropertiesFromRecordset rsCustomer
Call MoveToFirstRecord(rsCustomer, objCustomer, blnAddMode)
'populate the controls on the form with the current recordCall PopulateCustomerControls
End If
Exit Sub
HandleError:GeneralErrorHandler Err.Number, Err.Description, CUSTOMERS_FORM,"LoadRecords"Exit Sub
End Sub
Sub PopulateCustomerControls()
On Error GoTo HandleError
'Populate the controls on the Customers form with the values of the'current record in the contacts object.If Not rsCustomer.BOF And Not rsCustomer.EOF Then
Me.txtCustomerNum = objCustomer.CustomerIdMe.txtLName = objCustomer.LastNameMe.txtFName = objCustomer.FirstNameMe.txtMName = objCustomer.MiddleNameMe.txtCompany = objCustomer.CompanyMe.txtAddress1 = objCustomer.Address1Me.txtAddress2 = objCustomer.Address2Me.txtCity = objCustomer.CityMe.txtRegion = objCustomer.RegionMe.txtPostalCode = objCustomer.PostalCodeMe.txtWorkPhone = objCustomer.WorkPhoneMe.txtHomePhone = objCustomer.HomePhoneMe.txtCellPhone = objCustomer.CellPhoneMe.txtEmail = objCustomer.EmailMe.cboPlan = objCustomer.PlanId
'refresh the history list boxCall RefreshHistory
479

P1: IML/FFX P2: IML/FFX QC: IML/FFX T1: IML
WY044-13 WY044-Gosnell WY044-Gosnell-v2.cls August 16, 2004 8:51
Chapter 13
ElseIf rsCustomer.BOF Then'past beginning of recordset so move to first recordCall MoveToFirstRecord(rsCustomer, objCustomer, blnAddMode)
ElseIf rsCustomer.EOF Then'past end of recordset so move back to last recordCall MoveToLastRecord(rsCustomer, objCustomer, blnAddMode)
End If
Exit Sub
HandleError:GeneralErrorHandler Err.Number, Err.Description, CUSTOMERS_FORM, _
"PopulateCustomerControls"Exit Sub
End Sub
7. Add the following RefreshHistory procedure.
Sub RefreshHistory()
On Error GoTo HandleError
'populate the recordset for plan history listSet rsHistory = New ADODB.Recordset'get plan history for current customerSet rsHistory = ExecuteSPRetrieveRS("spRetrieveCustomerHistory", _
objCustomer.CustomerId)
'Set rsHistory = objCustomer.RetrieveHistory(objCustomer.CustomerId)PopulateListFromRecordset Me.lstPlanHistory, rsHistory, 5rsHistory.Close
Exit Sub
HandleError:GeneralErrorHandler Err.Number, Err.Description, CUSTOMERS_FORM, _
"RefreshHistory"Exit Sub
End Sub
8. Add the following code to the Form_Unload event procedure.
Private Sub Form_Unload(Cancel As Integer)
On Error GoTo HandleError
'reset lookup id to 0intCustomerLookupId = 0
If Not rsCustomer Is Nothing Then'close recordset
480

P1: IML/FFX P2: IML/FFX QC: IML/FFX T1: IML
WY044-13 WY044-Gosnell WY044-Gosnell-v2.cls August 16, 2004 8:51
Case Study 2: Customer Service Application
rsCustomer.CloseSet rsCustomer = Nothing
End If
Exit Sub
HandleError:GeneralErrorHandler Err.Number, Err.Description, CUSTOMERS_FORM,
"Form_Unload"Exit Sub
End Sub
9. That is all the code for the application. So it’s time now to resolve any typographical errors if youhave not done so already.
Touring the Finished Customer Service ApplicationNow that you have written all the code for the application, let’s walk through how it works in a bit moredetail. Let’s start with the frmSearch form, which builds a SQL statement dynamically based on thesearch criteria input by the user. To see how this SQL Statement is dynamically built, start by adding abreakpoint to the cmdSearch_Click event of frmSearch, as shown in Figure 13.29.
Next, open the frmSearch form to run the form. Enter some criteria into the form. It is okay at this pointif you do not have any customer records in the database. You just want to see how the SQL statement getsbuilt dynamically. When you click the Search button, code execution should stop at the breakpoint youset in Figure 13.29.
Step through the code by selecting Debug ➪ Step Into (or by pressing F8). The RunSearch procedure iscalled and then the GetSQL function is called to generate the SQL statement from the values you enteredon the form. The GetSQL function is the heart of the code that builds the dynamic SQL statement. Let’ssee in more detail how it works.
Function GetSQL() As String
On Error GoTo HandleError
Dim strSQL As StringDim strSQLWhereClause As StringDim blnPriorWhere As Boolean
After you declare some variables, you set the blnPriorWhere value to False because no WHERE clauseadded yet.
blnPriorWhere = False
Next, the Select statement is generated based on the BuildSQLSelectFrom procedure.
'generate the first part of the SQL StatementstrSQL = BuildSQLSelectFrom()
481

P1: IML/FFX P2: IML/FFX QC: IML/FFX T1: IML
WY044-13 WY044-Gosnell WY044-Gosnell-v2.cls August 16, 2004 8:51
Chapter 13
Figure 13.29
A series of statements for each of the search controls is located on the form. Each control is tested to see ifa value is present. If some are present, the BuildSQLWhere procedure is called to add the criteria in theparticular control to the WHERE clause of the SQL statement. In the following code, I list statements foronly a few of these controls.
'build the where criteria based on the criteria filled in'by the user in one or more of the search fields on the form
If txtCustomerNum <> "" ThenstrSQLWhereClause = BuildSQLWhere(blnPriorWhere, strSQLWhereClause, _
txtCustomerNum, "CustomerID")End If
If txtPhone <> "" ThenstrSQLWhereClause = BuildSQLWhere(blnPriorWhere, strSQLWhereClause, _
txtPhone, "Phone")End If
482

P1: IML/FFX P2: IML/FFX QC: IML/FFX T1: IML
WY044-13 WY044-Gosnell WY044-Gosnell-v2.cls August 16, 2004 8:51
Case Study 2: Customer Service Application
If txtLName <> "" ThenstrSQLWhereClause = BuildSQLWhere(blnPriorWhere, strSQLWhereClause, _
txtLName, "LastName")End If
Keep stepping through the code in the Visual Basic Editor until you are in the BuildSQLWhere function,as shown here.
Function BuildSQLWhere(blnPriorWhere As Boolean, strPriorWhere As String, _strValue As String, strDbFieldName As String) As String
On Error GoTo HandleError
Dim strWhere As String
If this is the first WHERE clause being added to the SQL statement (that is, it is the first control on the formthat has criteria), then you must add the WHERE keyword to the SQL string. Otherwise, an AND statementis added to separate the existing WHERE clause correctly.
If blnPriorWhere Then'add to the existing where clausestrWhere = strPriorWhere & " AND "
Else'create the where clause for the first timestrWhere = " WHERE "
End If
You must handle the Phone field in a special way, because you want the user to be able to type a singlephone number for the customer but have the application search all the phone fields in the database. Thus,if the phone field is specified, you must add the WHERE clause that will search all three phone fields in thedatabase.
If strDbFieldName = "Phone" Then'search each of phone fields in the db for this value to see'if exact match or starts with this value for any one of the'phone fieldsstrWhere = strWhere & "(HomePhone LIKE '" & strValue & "%'" & _
" OR WorkPhone LIKE '" & strValue & "%'" & _" OR CellPhone LIKE '" & strValue & "%')"
Otherwise, you add the WHERE clause using the value that was passed in along with the LIKE keyword.The LIKE keyword will locate a match if the field begins with or matches the value input by the user. Thissaves time because the user does not have to type the entire field, although he can do so if he wants.
Else'build where clause using LIKE so will find both exact'matches and those that start with value input by userstrWhere = strWhere & strDbFieldName & " LIKE '" &
PadQuotes(strValue) & _"%' "
End If
483

P1: IML/FFX P2: IML/FFX QC: IML/FFX T1: IML
WY044-13 WY044-Gosnell WY044-Gosnell-v2.cls August 16, 2004 8:51
Chapter 13
Now that there is a prior WHERE clause, the blnPriorWhere value is set to True.
blnPriorWhere = True
The SQL statement is then returned to the calling procedure.
'return where clauseBuildSQLWhere = strWhere
Exit Function
HandleError:GeneralErrorHandler Err.Number, Err.Description, DB_LOGIC, "BuildSQLWhere"Exit Function
End Function
If you press F5 to allow the code execution to continue, you see a Search Results screen similar to thatshown in Figure 13.30.
Figure 13.30
In Figure 13.30, the search criteria that the user specified includes a portion of a last name and a companyname. After you built the SQL string in the manner described previously, you executed the SQL
484

P1: IML/FFX P2: IML/FFX QC: IML/FFX T1: IML
WY044-13 WY044-Gosnell WY044-Gosnell-v2.cls August 16, 2004 8:51
Case Study 2: Customer Service Application
statement against the database and the resulting records were displayed in the Search Results list. If youdouble-click an item in the Search Results list, the View/Manage Customer Account screen is displayedfor that specific record, as illustrated in Figure 13.31.
Figure 13.31
In this instance, the only customer record open on the View/Manage Customer Accounts is the selectedcustomer. This feature is useful in many scenarios, such as when the user works in a call center and needsto retrieve the customer’s record quickly based on limited information. When he enters the search criteriaand locates the correct customer record, the user can then open the customer account and view theinformation. In the example illustrated in Figure 13.31, the customer was first on a local plan but thenswitched to a Nation plan shortly thereafter.
If the View/Manage Customer Accounts screen is opened independently of the Customer Search screen,multiple records are displayed and the navigation buttons allow the user to navigate through thecustomer records. The screen appears the same as shown in Figure 13.31, only the values in the screenchange for the current customer record.
If changes are made to the customer information, the database is updated with the new data. Thedatabase updates to an existing customer record are made through the spUpdateCustomer stored
485

P1: IML/FFX P2: IML/FFX QC: IML/FFX T1: IML
WY044-13 WY044-Gosnell WY044-Gosnell-v2.cls August 16, 2004 8:51
Chapter 13
procedure created earlier. Stored procedures are used to retrieve and update data for the entireapplication except for the dynamic SQL statement executed from the Customer Search screen.
For those stored procedures that required parameters, you first had to add parameters to the ADOCommand object that match the parameters expected by the stored procedure. An example of addingparameters using the CreateParameter method is shown in the following excerpt from theAddParameters procedure that performs an update to an existing customer record.
Sub AddParameters(strSPname As String, cmdCommand As ADODB.Command, _objCust As clsCustomer)
On Error GoTo HandleError
Dim parParm As ADODB.Parameter
'if updating existing recordIf strSPname = "spUpdateCustomer" Then
'Add parameter for existing Customer Id to be passed to storedprocedure
Set parParm = cmdCommand.CreateParameter("CustomerId", adInteger, _adParamInput)
cmdCommand.Parameters.Append parParmparParm.Value = objCust.CustomerId
End If
'Add parameter for Last Name to be passed to stored procedureSet parParm = cmdCommand.CreateParameter("LastName", adVarChar, _
adParamInput, 50)parParm.Value = objCust.LastNamecmdCommand.Parameters.Append parParm
'Add parameter for First Name to be passed to stored procedureSet parParm = cmdCommand.CreateParameter("FirstName", adVarChar, _
adParamInput, 50)parParm.Value = objCust.FirstNamecmdCommand.Parameters.Append parParm
After all the required parameters are added, or if none are required for the stored procedure, the storedprocedure can be executed using the Execute method of the Command object. The following exampleillustrates a portion of code from the ExecuteStoredProcedure procedure that runs the storedprocedure after calling the AddParameters procedure.
'set the command to the current connectionSet cmdCommand.ActiveConnection = cnConn'set the SQL statement to the command textcmdCommand.CommandText = strSPname'execute the command against the databasecmdCommand.Execute
After specifying any required parameters for the stored procedure, you just assign the CommandTextproperty of the Command object to the name of the stored procedure and then run the Execute method.Learning how to retrieve data from SQL server databases and how to correctly execute SQL Server stored
486

P1: IML/FFX P2: IML/FFX QC: IML/FFX T1: IML
WY044-13 WY044-Gosnell WY044-Gosnell-v2.cls August 16, 2004 8:51
Case Study 2: Customer Service Application
procedures from your VBA code are probably the two hardest parts of working with SQL Server fromAccess. You have just learned how to do so.
SummaryCongratulations! You have made your way through the entire book. This chapter is the most complicatedin the entire book, so you deserve a special pat on the back for finishing it completely. You have no doubtlearned from this book that Access is a powerful tool for building sophisticated applications. Some of thereally cool features in Access enable you to implement using VBA code. You can even work with SQLServer databases from your Access applications today so that you can build interactive, multi-userapplications that may serve all your multi-user purposes, or that may prepare you well for a futuremigration to another front-end language.
487

P1: IML/FFX P2: IML/FFX QC: IML/FFX T1: IML
WY044-13 WY044-Gosnell WY044-Gosnell-v2.cls August 16, 2004 8:51
488

P1: IML/FFX P2: IML/FFX QC: IML/FFX T1: IML
WY044-appA WY044-Gosnell WY044-Gosnell-v2.cls August 6, 2004 16:32
AExercise Answers
Chapter 11. The phases of the Systems Development Life Cycle methodology include Requirements
Gathering, Design, Development, Testing, and Implementation. The purpose of theRequirements Gathering phase is to identify a list of features that the application shouldinclude. The Design Phase takes the requirements and determines how to design anapplication that meets the requirements. The Development Phase is where you create theapplication using forms for the screens and VBA code for the business logic and data accesslogic. The Testing Phase allows you to test and fix your application, and should beperformed in various phases as the application is developed. The Implementation Phase iswhere you roll out the application to end users.
2. You can use Use Case Diagrams to list the various ways an end user might use thesystem. You can use Activity or other Flow Diagrams to illustrate the flow of activitiesin the system. You can use Prototype Screens to model how the user interface shouldlook. These are just a few of numerous other documenting techniques that can beused.
3. A standalone application runs entirely on one computer. All of the user interface, businesslogic, and database elements run on the same computer. A standalone application in Accesscan be located on a network computer that multiple computers can access, but allcomputers will be opening the same file. A client-server application is one where the userinterface is separated from the database and the database is located on a server to beaccessible from multiple computers.
4. By separating your code into different logical tiers, you can make migrating or improvingyour application easier in the future. For example, suppose you include your business logicin one Access module and your data access logic in another Access module. If you need tochange your data access code, such as to migrate to another database platform, you canfind all code that interacts with the database in the data access layer in one place. Thismakes it much easier to upgrade different portions of your application without having toweed through the entire application to find the affected portions.

P1: IML/FFX P2: IML/FFX QC: IML/FFX T1: IML
WY044-appA WY044-Gosnell WY044-Gosnell-v2.cls August 6, 2004 16:32
Appendix A
Chapter 21. A module is a storage container for your VBA code. Modules can either be standard modules or
class modules. Standard modules are not associated with a particular object. Class modules caneither be associated with forms or reports, or they can be based on custom defined objects.
2. A sub procedure performs a particular action. A function performs a particular action and alsoreturns a particular result. When you need some to obtain some type of result based on theaction, such as a value that was calculated, you should use a function. An example of a functionis one that calculates sales tax and returns the sales tax amount. An example of a procedure isone that displays a message to the user or runs a database update.
3. You can control the flow of code execution using If...Then statements, Select...Casestatements, loops, conditional If statements, and IIf statements, as a few examples. Variablescan be declared to store various values. Variables can then be used as part of the statements thatcontrol code execution to determine if certain conditions are met or whether certain actionsshould be taken.
4. Naming conventions involve naming your variables and objects in a particular way, such as withprefixes, which makes them easier to understand without tracking down the declaration or firstuse in code. Code documentation is important to illustrate how your program works and makesit much easier for you and others to debug and maintain the program in the future. Ideally, yourcode should be documented at the procedure level to describe how the procedure works, as wellas with in-line comments that explain how segments of code operate.
5. When writing VBA code, you will encounter various types of errors, such as syntax errors,runtime errors, compile errors, and logic errors. Syntax errors occur when you have not specifiedthe correct language syntax. Compile errors occur when the program will not compile for somereason, although the syntax may be correct. Runtime errors occur when the program runs andencounters a scenario that is not allowed or expected. Logic errors are mistakes that are made inthe logic itself such that the code does not perform the operation as intended. You can use varioustechniques from the Visual Basic Editor to eliminate most of these errors. A well-designedapplication should also include error handling that will capture and display informative errormessages to users of the program so they do not get those nasty error messages.
Chapter 31. Properties are characteristics of the object, such as the caption, name, or size. Methods are actions
that are taken upon an object, such as setting the focus to the object. Events are triggered byactions taken by the user and the application, such as changes to data, mouse movements, a formopening, and so on. Events allow you to link up your forms and reports with the VBA code thatyou write so the code will execute at the appropriate time.
2. You can set properties and events for a given object from the Properties dialog box in the form orreport designer. You can view and manipulate properties, methods, and events from within thecode window in the Visual Basic Editor as you type the object name followed by the period. TheObject Browser also allows you to view the properties, methods, and events available for aselected object.
3. The Forms collection of the Application object only works with currently open forms. TheAllForms collection of the Application.CurrentProject object allows you to work withall forms in the application.
490

P1: IML/FFX P2: IML/FFX QC: IML/FFX T1: IML
WY044-appA WY044-Gosnell WY044-Gosnell-v2.cls August 6, 2004 16:32
Exercise Answers
Chapter 41. A class diagram is a diagram that shows the classes and their relationships and how they should
be structured in your application. The complete class diagram model for your system is critical tocreate, as it provides you with a roadmap for what your code structure needs to look like.
2. Custom properties can be created using public variable declarations in a class module. Or, apreferred way is to implement public Property Get and Property Let procedures in theclass module. Property Get procedures specify what should happen when the property valueis retrieved. Property Let procedures specify what should happen when the property isassigned. Custom methods can be created by adding public procedures or functions to the classmodule.
3. You can add additional properties and methods to existing objects in the same way you createyour own properties and methods for your own objects. The only difference is that you place thecode in the class module for the existing object, such as a form.
Chapter 51. ADO stands for ActiveX Data Objects and is a data access methodology that allows you to
manipulate data in underlying data sources for VBA code. You use ADO to insert, update, delete,and retrieve data from databases that you want to interact with in your Access applications.
2. A disconnected (unbound) recordset does not maintain a connection to the database like aconnected (bound) recordset does. Disconnected recordsets are typically better for reducing thenumber of open connections and record locks in your application. Disconnected recordsets aretypically better because the data is cached locally until an update is made to the database.Disconnected recordsets require a little extra effort because you have to write code to handlenavigation and updates to the data. Connected recordsets maintain a constant connection to thedatabase and Access has a lot of navigation features built-in for working with connectedrecordsets.
3. SQL stands for Structured Query Language and is a language that you can use to retrieve, add,update, and delete data in databases. SQL can be used in conjunction with ADO, or separatelyfrom ADO as part of your Access solutions.
4. The ADOX object model provides a library of features that you can use to manipulate databases,tables, users, groups, and security from your VBA code. The Catalog object is at the highestlevel of the object model.
Chapter 61. The AutoExec macro is a macro that runs each time a particular database opens. This macro is a
good place to add an Open Form command to specify which form should automatically openwhen the database opens. For example, you may want a switchboard form to open so the usercan navigate among the available forms.
2. Combo boxes and list boxes both allow you to display data with single or multiple columns.Combo boxes can be programmed to allow a user to select a value from the drop-down list or totype in a new value. List boxes, on the other hand, require a user to select a value from the list.
491

P1: IML/FFX P2: IML/FFX QC: IML/FFX T1: IML
WY044-appA WY044-Gosnell WY044-Gosnell-v2.cls August 6, 2004 16:32
Appendix A
Combo boxes use pattern matching to find the record matching the values as you type one ormore letters. List boxes jump to the first item that starts with each value that you type. List boxesallow a user to select multiple items from the list, while combo boxes only allow selection of asingle item.
3. You can use the MsgBox function to display a message box to the user. Message boxes are usefulto inform the user of some error or other event, and also to ask the user questions, such as toconfirm a delete action.
Chapter 71. Linking stores only a pointer to the location of the underlying data source and updates are made
to the original data itself. Linking is a good idea when: the data resides on a database server thatyour application and others can use, the data is used by another program that requires the nativefile format, or the underlying data needs to be updated on a regular basis in its native format.Importing data actually brings a copy of the data into your Access database. Some reasons forimporting include an existing system is being migrated to a new application, numerous dataoperations need to be run against the data from another source in a speedy fashion and you donot need to change that data.
2. TransferDatabase allows you to import, export, and link to various types of databases, suchas Access and SQL Server. You specify various parameters to indicate which type of actionshould be performed. TransferSQLDatabase transfers the entire contents of a particular SQLServer database to your application.
3. A Web service is a special type of procedure that can be called remotely using standard Internetprotocols. To use a Web service in Access, you must first install the Web Services toolkit. You canthen add a reference to existing Web services and call them from your program just as you doany other object.
Chapter 81. The CreateReport method is used to create a new report object. The CreateReportControl
method is used to create new controls on a new or existing report. Using these two methods, youcan create a new report from scratch.
2. Report events are basically the same as form events, except that there are fewer of them. Likeform events, you can write VBA code that should execute when a particular report event occurs.
3. HTML pages, ASP pages, and data access pages are different types of pages that can bedisplayed in a Web browser. Static HTML pages contain a set of data from when the page wascreated. ASP pages contain script code that executes on a server, such as to retrieve live data todisplay to the user. ASP pages then return the user interface to the client browser in HTMLformat. Data access pages are a special kind of Web page that you can create and modify fromAccess in a similar manner as you do forms and reports. Data access pages are also displayed ina Web browser, but allow you to make changes to the underlying data in the database.
Chapter 91. A standard Access database (MDB file) contains the database tables and queries within the MDB
file itself. An Access Project is a special type of Access file that uses SQL Server as the database.
492

P1: IML/FFX P2: IML/FFX QC: IML/FFX T1: IML
WY044-appA WY044-Gosnell WY044-Gosnell-v2.cls August 6, 2004 16:32
Exercise Answers
The database tables, queries (stored procedures, views, and functions), and database diagramsare physically stored on the SQL Server itself, although you can view them from Access.
2. If you use SQL Server as the database for your applications now, you will not have to go throughthe hassle of upgrading to SQL Server at a later date. If you anticipate that there is a good chanceyou will need to migrate to SQL Server in the future, you may be better served to use the free,but limited functionality, version of SQL Server now—the SQL Server Desktop Engine. If youneed to migrate to SQL Server later, you will need to make changes to your database and/orcode in order to work with SQL Server. In some cases, these changes are minimal, while in othercases the changes are substantial.
3. Stored procedures are procedures that are stored in the SQL Server database. They allow you totake frequently used SQL statements and save them in a procedure for reuse. Views are alsostored in SQL Server and allow you to store frequently used SQL statements and can later bereferenced just as you reference tables. Views are helpful for row- and column-level security, as afew examples. Functions are also SQL statements stored in the SQL Server database, and can becalled from in-line from another SQL statement. In many cases, the same functionality can beaccomplished using either of these three.
Chapter 101. A standard library can be added using Tools ➪ References. You can then work with the objects of
that library from within your code, and have full access to the available properties, methods, andevents as you type your code. An external library is more complicated to work with and requiresan explicit declaration in the General Declarations section, as well as a procedure call from withinyour VBA code. External libraries must be declared with the exact syntax, or an error will occur.
2. Automation allows one application to control another application, such as Access controllingWord. You can use automation to create new Excel spreadsheets, to create new Word documents,or to manipulate Outlook objects such as e-mails, contacts, and calendar entries. These are just afew examples of using automation. In order to use automation, you must add a reference to thelibrary that corresponds to the application you want to control.
3. A code library can be created by simply creating a new Access database that contains the codeyou want to have re-used by other applications. Code libraries are good ideas for storing genericcode that multiple applications might want to take advantage of, such as error handling routines.Instead of copying the same procedures into every application and then having to updatemultiple locations, you can simply point each application to a single Access database. To add areference to a library, you simply select Tools ➪ References and then browse to the location of theAccess database you want to use as a library. After the reference has been added, you can call thefunctions and sub procedures in the library just as if it were contained in your local module.
4. A transaction is a group of database actions that should succeed or fail together. You can use theBeginTrans, CommitTrans, and RollbackTrans methods of the ADO Connection objectto implement transactions. If the updates all succeed, then all of the updates can be committed tothe underlying database using the CommitTrans method. If any one of the updates fails, thenall of the changes can be rolled back using the RollbackTrans method.
Chapter 111. One way to improve support for multiple users is to ensure that the proper type of record locking
is being used. If your application is using page or table locks, for example, then more records than
493

P1: IML/FFX P2: IML/FFX QC: IML/FFX T1: IML
WY044-appA WY044-Gosnell WY044-Gosnell-v2.cls August 6, 2004 16:32
Appendix A
the one being accessed will be locked and other users will be unable to modify them. With boundforms, you can modify table locks in Tools ➪ Options on the Advanced tab. With unbound forms,you specify the lock type in your code, such as by setting the lock type of your ADO recordset.Another way to improve support for multiple users is to separate standalone Access databasesinto two separate files: one database file that contains the tables and is shared on a network andanother database file with the user interface objects that gets loaded onto each user’s computer.
2. There are various ways to improve the performance of your Access applications. One way is tooptimize the queries that retrieve data to ensure they use the correct syntax, join to the correcttables, and use indexes so the retrieval will be faster. Another way to improve performance is toreduce the complexity of your forms, such as by eliminating unnecessary controls and movingsome code from forms to standard modules. Improving the code itself is another way to improveperformance. For example, make sure to use the smallest data type you really need, make yourprocedures re-usable to eliminate redundant code, and replace slower types of code statementswith faster statements. If the user interface is separated into a separate database file than thetables, open the user interface file exclusively to improve performance. Finally, the PerformanceAnalyzer can help identify areas for improvement.
3. To build a help system, you first create the content for the help system using any tool that cancreate HTML documents, such as Microsoft Word. You specify identifiers for the various topicsso they can be retrieved later. After the help topics have been created and assigned identifiers,you then compile the help system into a help file and hook up the help system to yourapplication. You assign your application to the help file just created. You then can set variousproperties in your application, such as at the form level or at a particular control level to point toa related help topic.
4. There are various ways to add security to your applications. For example, you can add apassword to the database and a separate one to the source code. You can also add users andgroups that have various security settings. For example, some users may have the ability tomodify source code and data, while other users only have access to the data through the forms.By creating an MDE file, you can compile your application into a file that removes all sourcecode. This is another way to add security to your application because it ensures that no one whoopens that file can view or modify the source code.
5. MDE files are a special type of Access file that can be created to compile the database andremove all source code. An MDE file is one way you can distribute the application to end users.The Access runtime allows you to distribute your application to users who do not have a fullversion of Access installed on their computer. The Access runtime hides the database windowfrom the user so they cannot modify the objects, such as the forms and reports. Built-in toolbarsare not supported, so you have to build your own toolbars for the users. However, unlike MDEfiles, Access databases distributed with the runtime version still contain all of the code and couldbe opened by someone with the full version of Access.
494

P1: JYS
WY044-Ind WY044-Gosnell WY044-Gosnell-v2.cls August 19, 2004 20:2
Inde
x
Index
SYMBOLS? Screen.ActiveForm.Name command, 96
AAccess 2003
add-ins, 289controlling Excel spreadsheet from,
274–276DAP (data access pages), 230–231exporting data to Web formats, 223–231as front end to SQL Server, 233–234improvements, 2sending Outlook e-mail from, 280–282VBA (Visual Basic for Applications), 1Word letter creation, 276–279
Access (Jet) databases, 194connecting, 127connecting to, 134
Access Projects. See ADPs (AccessProjects)
Access Runtime, 308–309Accounts label, 185actions, flow between, 6–7ActionSuccess event, 115,
117–118Activate event, 222ActiveConnection property, 147,
151–152ActiveX controls, 282–285activities, flow between, 6–7Activity Diagrams, 6–7actors, 4actual performance, improving,
300–302Add method, 109–111Add mode, 168, 172Add New command button, 138Add New mode, 171Add New navigation button, 132
Add New Record mode, 170Add Table dialog box, 248, 253, 435Add Tables dialog box, 251, 438Add Watch dialog box, 68AddEmptyContactRecord procedure,
416AddEmptyProject procedure, 391AddEmptyProjectRecord procedure,
404–405add-ins, 289Add-Ins ➪ Add-In Manager ➪ Packaging
Wizard command, 308AddItem method, 184, 187AdditionalData parameter, 202AddNew method, 137–138, 148AddParameters procedure, 465–467,
486AddRecord procedure, 147–148, 162,
167–168adLockBatchOptimistic value,
130, 295adLockOptimistic value, 130, 295adLockPessimistic value, 130, 295adLockReadOnly value, 130, 295ADO (ActiveX Data Objects), xv, 125populating recordsets, 158–160selecting, inserting, updating and
deleting data, 198versions, 126virtual tables, 159
ADO object library, 126ADO object modelCommand object, 128Connection object, 126–128
ADODB library, 126ADO.NET, 125–126adOpenDynamic value, 129adOpenForwardOnly value, 129AdOpenKeyset value, 129AdOpenStatic value, 129

P1: JYS
WY044-Ind WY044-Gosnell WY044-Gosnell-v2.cls August 19, 2004 20:2
ADOX library
ADOX librarymanaging security, 174–176object model, 172referencing, 172table creation, 173–174
ADPs (Access Projects), 233creation of, 239–243database diagrams, 234existing SQL Server database from,
239–240forms, 234macros, 234migrating database to, 254–260modules, 234new SQL Server database, 239,
240–243pages, 234queries, 234reports, 234tables, 234
adUseClient value, 129adUseServer value, 129AfterUpdate event, 190Align command, 191aligning controls, 191All forms in project caption,
92AllForms collection, 95AllMacros collection, 95AllPrinters collection, 222AllReports collection, 95, 214Alphabetical List of Products report,
211–212ALTER PROCEDURE statement, 438AND statement, 483And statements, 157ANSI SQL, 155application architectureclient-server applications, 12–13n-tier architecture, 13–16separating code into logical tiers, 16single-tier applications, 12three-tier architecture, 13–16two-tier applications, 12–13
Application object, 92, 266, 274,277, 281
applicationsActivity Diagrams, 6–7architecture, 10–16business rules, 11compiling, 300, 308databases, 11describing purpose of and features
requested for, 2distributing, 308–309execute-only, 309forms, 92–94general design guidelines, 300hourglass, 302identifying objectives, 2–3interviewing end users, 3maintaining, 309–310modeling design, 3–10multi-user considerations, 293–299optimizing, 299–304prioritizing features, 3progress bar or percent meter, 303reviewing existing, 3roadmap for building, 4screen prototypes, 7–10separate modules or components, 16splash screen, 302–303suggestions to improve speed, 303testing, 22–23tiers, 11user interface, 11
architecture, multi-user considerations,296–299
arrays, 50ASP (Active Server Pages), 225ASP file format, 204, 223ASP pages, 225–227Auto Order option, 192AutoExec macro, 178, 181, 183automation, 272early binding, 301late binding, 301Microsoft Excel, 273–276Microsoft Outlook, 279–282Microsoft Word, 276–279objects, 272–273
automation client, 272
496

P1: JYS
WY044-Ind WY044-Gosnell WY044-Gosnell-v2.cls August 19, 2004 20:2
Choose Builder screen
Inde
x
automation server, 272AutoStart parameter, 223, 225
Bbackupsdatabases, 309–310MDB file, 255
BeforeUpdate event, 190–191BeforeUpdate procedure, 40BeginTrans method, 289–290binding form to recordsets, 135–136blnAddMode flag, 172blnAllRecords flag, 409blnPriorWhere value, 481, 484BOF property, 137Bookmark property, 155bookmarks, 155Boolean data type, 49Boolean variables, 48, 301bound forms and record locking,
294–295Break On All Errors option, 70breakpoints, 22, 65–69builders, 289BuildSQLDeleteProjectsComments
function, 381BuildSQLInsertContacts procedure,
378–379BuildSQLInsertProjectComments
function, 381–382BuildSQLInsertProjects procedure,
379BuildSQLSelectFrom function,
461–462BuildSQLSelectFrom procedure, 481BuildSQLWhere function, 462BuildSQLWhere procedure, 482–483built-inconstants, 52functions, 45–46
business logicisolating from presentation and
database layers, 15standard modules, 29
business logic layer, 16, 101–102
business rules, 11byroyalty stored procedure, 247Byte data type, 49Byte variables, 48
CCalculate command button, 84, 86–88CalculateSalesTax function, 42–44,
56–57Calendar control, 283–284call stack, 68–69Cancel parameter, 88Cancel variable, 87Caption property, 31, 78, 113, 167,
221Car class, 100, 103events, 111–118methods, 109–110, 113–118properties, 104–109, 113–118
Car object, 100CarDb class, 103Catalog object, 172, 174–175Catalog.Tables collection, 174cboAccounts combo box, 185cboPlan combo box, 184cboPriority combo box, 407cboStatus combo box, 407Cells property, 275Ch2CodeExamples.mdb file, 29, 31Ch3CodeExamples database, 77, 84Ch4CodeExamples database, 100, 105Ch5CodeExamples database, 130Ch5CodeExamples.mdb project, 127Ch6CodeExamples database, 178, 185Ch7CodeExamples database, 195Ch8CodeExamples database, 216Ch9CodeExamples database, 241, 243Ch10CodeExamples database, 266, 276,
285referencing ErrorHandlerLibrary
database, 288referencing library, 286
Change event, 186Check Register label, 180Choose Builder screen, 19
497

P1: JYS
WY044-Ind WY044-Gosnell WY044-Gosnell-v2.cls August 19, 2004 20:2
class diagrams
class diagramsbusiness logic layer, 101–102data access layer, 101importance of, 100presentation (user interface) layer, 102separation of tiers concept, 101
class hierarchies, 119class modules, 29–31, 99custom, 331custom objects, 29Customer Service application, 448–455data access layer, 101form modules, 29General Declarations section,
103, 111independence of, 29inserting, 99presentation logic, 29Project Tracker applications, 330–356public variable declaration, 103report modules, 29usage, 113
classesclass hierarchies, 119events, 90initializing, 113instantiating, 113listing, 90methods, 90multiple instances, 118–119properties, 90terminating, 113usage, 112–118
ClearContactsControls procedure,417–418
ClearControlsOnForm procedure,150
ClearObject procedure, 338, 343,350, 354–355, 454–455
ClearProjectControls procedure,392–393, 406–407
Click event, 29, 39, 88, 114, 117,148–149, 151, 178–179, 182, 186,222, 399
client-server applications, 12–13
Close event, 222Close method, 182CloseDbConnection procedure, 377,
460clsCar class module, 105–108,
111–112, 116clsCar objects, 118–120clsContacts class moduleClearObject procedure, 350,
354–355contacts object, 353–354Delete procedure, 351, 355General Declarations section, 345Get property procedure, 352Let property procedure, 352PopulatePropertiesFromForm
procedure, 349–350, 353–354PopulatePropertiesFrom
Recordset procedure, 349, 353ProcessUpdate procedure, 356property procedures, 346–348RetrieveContacts function,
348–349, 352–353Save procedure, 351, 355
clsCustomer class moduleClearObject procedure, 454–455General Declarations section, 449–450PopulatePropertiesFromForm
procedure, 454property procedures, 450–452RetrieveCustomers function,
452–453Save procedure, 455
clsProject object, 341clsProjects class module, 332ClearObject procedure, 338, 343clsProject object, 341Delete procedure, 338–339,
343–344frmProjects form, 340–341General Declarations section, 339Get property procedure, 340Let property procedure, 340PopulatePropertiesFromForm
procedure, 337–338, 342–343
498

P1: JYS
WY044-Ind WY044-Gosnell WY044-Gosnell-v2.cls August 19, 2004 20:2
code
Inde
x
PopulatePropertiesFromRecordset procedure, 336–337,341–342, 453
ProcessRecord function, 341ProcessUpdate procedure, 344property procedures, 332–334RetrieveAttachments function, 336,
341RetrieveComments function, 335RetrieveContacts function,
335–336, 341RetrieveProjects function,
334–335, 340–341rsProj recordset, 341Save procedure, 339, 343–344tblProjectComments table, 341tblProjectContacts table, 341tblProjectFileAttachments table,
341cmdAccounts command button, 178cmdAddAttachment_Click event,
403cmdAddNew command button, 138cmdAddNew control, 399cmdAddNew_Click event, 147, 420cmdAddNew_Click event procedure,
399–400cmdAddToProject_Click event,
419–420cmdCalculate command button, 84,
85, 88cmdDelete command button, 138, 148cmdDelete control, 399cmdDeleteContacts_Click
procedure, 401cmdEmailContact_Click event, 402cmdFileBrowse_Click event,
403–404cmdFileNameBrowse_Click function,
403–404cmdGetForms command button, 92, 93cmdLookup command button, 117cmdManageContacts_Click event,
402cmdMenu command button, 179, 180
cmdMoveFirst command button, 138,149
cmdMoveFirst_Click event, 148, 420cmdMoveFirst_Click procedure, 401cmdMoveLast command button, 138cmdMoveNext command button, 138cmdMovePrevious command button,
138cmdOpenFile_Click event, 404cmdPayments command button, 178cmdRegister command button, 178,
179cmdRun command button, 37, 39cmdRun Properties window, 37cmdRunCaption property, 31cmdRun_Click event, 40cmdRun_Click procedure, 37–40cmdSave control, 399cmdSaveAllbutton, 151, 167cmdSaveAll Caption property, 161cmdSaveAll command button, 138cmdSave_Click event, 400cmdSearch_Click event, 481cmdText command button, 18cmdText control, 19cmdText_Click event, 19cmdViewContact_Click event,
402–403codeadding to Code window, 19breaking execution, 67–68breakpoints, 22, 65–69connecting user interface to, 382–422,
467–481debugging, 22–23, 65–69displaying results of, 66documenting, 62eliminating unused, 300in-line comments, 62listing objects and variables, 67–68module creation, 27–28obtaining information, 23rules for watching activities, 23running, 22–23runtime errors, 72
499

P1: JYS
WY044-Ind WY044-Gosnell WY044-Gosnell-v2.cls August 19, 2004 20:2
code (Continued)
code (Continued)separating into tiers, 16, 101stepping through, 65–69structuring, 7writing, 17–19
Code Builder, 82, 85object creation procedure, 36–40
Code window, 18creating additional procedures for
objects, 40–41listing methods, 80
CodePage parameter, 199collections, 77, 91CurrentProject object, 95Forms collection, 92–94Printers collection, 96–97Reports collection, 94
ColorId property, 106column-level security, 249–250combo boxesadding and removing items, 184Change event, 186populating, 185–188
command bar2 page button, 268Copy button, 268custom, 266–269Test button, 268–269Zoom button, 268
Command button, 84command button control, 87, 92Command collection, 126Command object, 128, 161, 169, 248,
290, 486CommandBar object, 268CommandBarButton object, 268CommandBars collection, 266CommandBars property, 266commands, 19CommandText property, 169, 171, 486CommitTrans method, 289–290compacting databases, 309CompanyName field, 214comparison operators, 157compile errors, 63
compiling applications, 300, 308complaintsDAP.html file, 228complaints.html file, 225conditional If...Then statements, 57connected recordsets, 128Connection collection, 126Connection object, 126–128, 134,
146, 289–290connection string, 127connectors, 7conRate constant, 52Const statement, 52constants, 52–53Contact object, 331ContactName field, 214contacts, managing and viewing,
313–314Contacts class object diagram, 345contacts formbound, 130–136unbound, 138–152
Contacts object, 353–354Contacts screen, 313–316, 423Continue Running Code (F5) keyboard
shortcut, 67control wizards, 289ControlExcel procedure, 274ControlOutlook procedure, 280–281controls, 183adding to report, 214–216aligning, 191combo boxes, 184–188ControlSource property, 135currently having focus, 95–96frmContacts form, 325–330frmCustomers form, 444–447frmProjects form, 320–325frmSearch form, 443–444list boxes, 184–188naming, 29, 31setting properties, 29, 31subforms, 188–189tab controls, 188–189text boxes, 183translating Use Cases into, 8
500

P1: JYS
WY044-Ind WY044-Gosnell WY044-Gosnell-v2.cls August 19, 2004 20:2
DAP (data access pages)
Inde
x
ControlSource property, 135ControlWord procedure, 276–277Create Back-End Database dialog box,
297Create Form By Using Wizard, 228CREATE PROCEDURE statement, 438CreateCommandBar function, 267CreateCommandBar procedure, 268CreateComplaintsReport procedure,
217–219, 220CreateObject method, 273CreateParameter method, 486CreateReport method, 213–214, 221CreateReportControl method,
214–216, 221curAvailCredit variable, 34curCreditAvail variable, 36, 39, 40curPrice variable, 36, 39–40, 43–44Currency data type, 49Currency variables, 47–79current objects, 91current projects, 94–95CurrentProject object, 94–95curSalesTax variable, 56CursorLocation property, 129, 134cursors, type of, 302CursorType property, 129, 134, 146curTotalPrice variable, 34custom class modules, 331custom classesevents, 111–112functions, 109–111methods, 109–111properties, 103–109public sub procedures, 109–111
custom command bar, 266–269custom methods, 122–123custom objects, 99–120class modules, 29identifying, 100SDLC (Systems Development Life Cycle),
100custom properties, 121–122custom toolbar, adding and removing,
222–223
Customer object, 100Customer Search screen, 431Customer Service applicationclass modules, 448–455connecting user interface to code,
467–481Customers Search screen, 431databases, 432–442design specifications, 429–432frmSearch form, 481list of requirements, 429objects, 432–442Search screen, 429–430standard modules, 455–467use cases, 430user interface, 443–447View/Manage Customer Accounts
screen, 431View/Manage Customers screen, 430
Customers Search screen, 431CustomerServiceSQL database, 432spInsertCustomer stored procedure,
436–438spRetrieveAllCustomers stored
procedure, 438spRetrieveCustomerHistory
stored procedure, 438–439spRetrievePlans stored procedure,
440spRetrieveSelectedCustomer
stored procedure, 440spUpdateCustomer stored procedure,
440–441tables, 433tblCustomers table, 433tblCustomersPlanHistory table,
435tblPlans table, 435tblPlansStatus table, 435
DDAO (Data Access Objects), xv, 125DAP (data access pages), 227creation from form, 228–230
501

P1: JYS
WY044-Ind WY044-Gosnell WY044-Gosnell-v2.cls August 19, 2004 20:2
DAP (data access pages) (Continued)
DAP (data access pages) (Continued)creation of, 227–230currently having focus, 95–96HTML format, 228modifying, 230–231
DAP file format, 204, 223dataexporting, 194–196, 204importing from sample Northwind
database, 195inserting, 160requirements gathering phase, 10retrieving with SQL, 155–160updating, 160–161
data accessimproving, 302standard modules, 29
data access layer, 16, 101Data Access Objects. See DAO (Data
Access Objects)data access pages. See DAP (data
access pages)Data (database) Layer, 15–16data sourceconnecting to, 126–128executing SQL statement, query, or
stored procedure against, 128data types, 301action on assigning value, 104user-defined, 50–51
data validation, 190–191database applications, xvdatabase diagrams, 234database files (MDB files), 233Database parameter, 197Database Splitter, 289, 297–299Database WindowCreate Form in Design View option, 29,
84Create Stored Procedure In Designer
option, 248, 435Create Table In Design View option, 245Design View option, 84Forms option, 29, 84inserting class modules, 99
Modules tab, 29New button, 29, 84Objects list, 29Queries node, 247–248Queries object, 260, 435Tables node, 243, 245
DatabaseName parameter, 195databases, 11, 17adding forms, 29backups, 309–310compacting, 309connecting to other, 128Customer Service application, 432–442date conversions, 255default format, 29deleting records, 161encrypting, 307–308inserting module, 217migrating to Access Projects, 254–260minimizing open connections, 302passwords, 305Project Tracker application, 317–320removing spaces in table names, 255repairing, 309scheduling jobs and alerts, 239unique indexes for tables, 255updating data, 160–161workgroup file, 307
DatabaseType parameter, 195datasheets, currently having focus,
95–96DataSource parameter, 202DataTarget parameter, 202date conversions, 255Date data type, 49Date of Birth text box field, 86Date variables, 47–79Deactivate event, 222Debug ➪ Add Watch command, 68Debug ➪ Compile ErrorHandlerLibrary
command, 285Debug ➪ Step Into command, 481Debug menu, 65Debug object, 80Debug window, 96–97
502

P1: JYS
WY044-Ind WY044-Gosnell WY044-Gosnell-v2.cls August 19, 2004 20:2
error handlers
Inde
x
debugging, 62code, 22–23, 65–69types of errors, 63, 65
Debug.Print statement, 65–66decision makingconditional If...Then statements, 57If...Then statements, 54–57IIF function, 57Select...Case statement, 57–59
Decision Points, 7declarations, 27–28Declarations/Procedure navigation box,
27–28default error messages, 70Delete command, 169Delete command button, 138Delete method, 110–111, 138, 148Delete procedure, 338–339, 343–344,
351, 355Delete statements, 161DeleteRecord procedure, 148,
162–164, 168–169DemonstrateCustomMethods
procedure, 123Description property, 72design phasedetermining application architecture,
10–16identifying custom objects, 100modeling application design, 3–10
design time settings, 79Destination parameter, 195development phase, 17–19Diagram icon, 250Dim statement, 49, 113, 118disconnected recordsets, 128,
138–152DisplayMessage procedure, 268–269DisplaySystemInfo procedure,
270–271Distinct predicate, 156distributing applicationswith Access runtime, 308–309execute-only, 309with full version of Access, 308
Dividing Lines property, 138, 178DLLs (Dynamic Link Libraries)external, 269–271standard, 265–269
docmd command, 19DoCmd method, 402DoCmd object, 95, 182, 194–195DoCmd.OpenForm statement, 46documenting code, 62Do...Loop loops, 61Double data type, 48–49Do...Until loops, 61Do...While loops, 61DTC (Distributed Transaction
Coordinator), 239dynamic arrays, 50
Eearly binding, 273, 301Edit Web page that already exists option,
230e-mailattachments, 203Project Tracker application, 316sending, 202–203sending from Access, 280–282
Employees table, 198, 202Employees.xls file, 198Employees.xml file, 202empty procedures, 36–40empty reports, 213–214Encoding parameter, 202, 223encrypting databases, 307–308Ending Points, 7enhancing forms, 191–192enumerated types, 119–120EOF property, 137Err object, 72error debugging, 62–69Error Description parameter,
75error handlerscreation of, 71–72generic, 73–76
503

P1: JYS
WY044-Ind WY044-Gosnell WY044-Gosnell-v2.cls August 19, 2004 20:2
error handling
error handling, 69default error messages, 70Err object, 72On Error statement, 70–72Errors collection, 73generic, 73–76raising errors, 72–73Resume Next statement, 70Resume statement, 70
error messagesdefault, 70displaying, 76
Error Number parameter, 75ErrorHandlerLibrary database,
285–288errorscompile errors, 63description of, 72logic errors, 65looping through, 73raising, 72–73runtime errors, 63syntax errors, 63viewing root of, 70
Errors collection, 73event procedures, 29, 87frmContacts form, 413–416private, 45
events, 77, 81–83, 84–89, 90calling function from, 44calling sub procedure, 36Car class, 111–118custom classes, 111–112declaring, 111–112execution options, 82function, 112listing, 81raising, 111–112reports, 222–223sharing, 82sub procedures, 112
Excel 2003declaring object variable, 272–273VBA (Visual Basic for Applications), 1
Execute method, 128, 169, 248, 486
execute-only applications, 309ExecuteSPRetrieveRS function,
463–464ExecuteSQLCommand procedure, 362,
376–377ExecuteStoredProcedure procedure,
464–465, 486Exit event, 87–88exportingAccess data to Web formats, 223–231data, 194–196, 204spreadsheets, 197–198tblComplaints table to data access
page, 227–230tblComplaints table to HTML,
224–225text files, 198–201to various formats, 204XML files, 201–202
ExportXML method, 201–202Expression Builder, 82expressions, 49external data, importing and linking to,
193–196external DLLs, 269–271
FFile ➪ Get External Data command, 194,
297File ➪ New ➪ Blank Database command,
29, 77, 84, 178, 216File ➪ New ➪ Project Using New Data
command, 241File ➪ New command, 239File ➪ Save command, 31File Browse dialog box, 403File Open dialog box, 300, 372, 427file-level security, 305FileName parameter, 198–199Filter property, 154–155FilterCriteria parameter, 202filtering records, 154–155FinalizeOrder procedure, 35–36, 42Find method, 153–154
504

P1: JYS
WY044-Ind WY044-Gosnell WY044-Gosnell-v2.cls August 19, 2004 20:2
frmCustomers form
Inde
x
finding records, 153–154FixNull function, 456For Each loop, 97ForEach...Next loops, 59–61form controls, 29form modules, 29, 99Form object, 92–94FormatDescription function, 253Form_frmTest object, 40Form_frmTestObjects class, 90Form_Load event, 114, 116, 133, 138,
140, 146, 382–383, 399, 412,418–419, 468–469, 473–474
Form_Load procedure, 130, 152forms, 17, 92–94, 234ActiveX controls, 282–285adding, 29aligning controls, 191automatically opening, 178binding to recordset, 135–136Caption property, 78cmdRun button, 37command button, 84controls, 183–189currently having focus, 95–96DAP (data access pages) creation from,
228–230enhancing, 191–192flow of, 177–183hiding and revealing, 178, 302listing, 92–94, 95minimizing, 178minimizing code and objects in,
300navigation, 177–183opening and closing, 177order of tab stops, 192organizing data, 188–189saving, 31, 86subforms, 189switchboard, 177–183text box control, 84VehicleId text box, 115
Forms collection, 92–94Forms object, 84
Form_Unload event, 151–152, 418,421–422
Form_Unload event procedure,480–481
Form_Unload procedure, 162, 394, 408For...Next loops, 59–61frmAccounts form, 178, 179, 185frmCarDetails class, 114–116, 117frmCarDetails class module, 121–123frmCarDetails form, 113, 116,
122–123frmComplaints form, 228–229frmComplaintsDAP.html file,
229–230frmContacts form, 375, 411AddEmptyContactRecord procedure,
416ClearContactsControls procedure,
417–418cmdAddNew_Click event, 420cmdAddToProject_Click event,
419–420cmdMoveFirst_Click event, 420controls, 325–330event procedures, 413–416Form_Load event, 412, 418–419Form_Unload event, 418, 421–422General Declarations section, 412modifying records, 413–414navigating records, 415–416, 420opening, 402PopulateContactsControls
procedure, 416–417, 421frmContactsBound form, 130, 138frmContactsUnbound form, 138, 152command buttons, 145copying, 161, 167
frmContactsUnboundSQL form,161, 167
frmCustomers formadding customer record, 474–476controls, 444–447Form_Load event, 473–474Form_Unload event procedure,
480–481
505

P1: JYS
WY044-Ind WY044-Gosnell WY044-Gosnell-v2.cls August 19, 2004 20:2
frmCustomers form (Continued)
frmCustomers form (Continued)General Declarations section, 474navigating records, 476–478populating with current customer record,
478–480properties, 444–447RefreshHistory procedure, 480updating data, 476
frmMain form, 18–19, 178, 181frmPayments form, 178, 180,
190–191frmProjects form, 330, 340–341,
375, 382AddEmptyProject procedure, 391AddEmptyProjectRecord procedure,
404–405ClearProjectControls procedure,
392–393, 406–407Click event procedure, 384–390,
401, 403Click events, 399cmdAddAttachment_Click event,
403cmdAddNew control, 399cmdAddNew_Click event procedure,
399–400cmdDelete control, 399cmdDeleteContacts_Click
procedure, 401cmdEmailContact_Click event, 402cmdFileBrowse_Click event,
403–404cmdFileNameBrowse_Click function,
403–404cmdManageContacts_Click event,
402cmdMoveFirst_Click procedure, 401cmdOpenFile_Click event, 404cmdSave control, 399cmdSave_Click event, 400cmdViewContact_Click event,
402–403controls, 320–325current record, 400–401Form_Load event, 382–383, 399Form_Unload procedure, 394, 408
General Declarations section, 383–384LoadRecords procedure, 395,
408–409managing contacts, 387–389, 401managing file attachments, 389–390moving to another record in recordset,
406navigating data, 385–387objProjects object, 400OpenFileAttachment procedure, 404PopulateComboBoxes procedure,
393, 407PopulateListFromRecordset
procedure, 393–394, 407–408PopulateProjectsControls
procedure, 391–392, 405populating tab controls, 405–406procedures, 395–398record count, 406RefreshContacts procedure, 398,
411SaveComments procedure, 410saving current changes, 400saving records to database, 396–398switching from unclosed projects to all
projects, 395–396tab control, 320togShowAll_Click event, 409–410txtFileDesc field, 403txtFileName field, 403updating data, 384–385
frmRegister form, 178, 180frmSearch form, 481clearing search results, 471–473Click event procedures, 469–471controls, 443–444Form_Load event, 468–469General Declarations section, 469properties, 443–444running search, 469–471frmTest form, 31, 36, 39–40opening, 46View mode, 38
frmTestForms form, 93, 95frmTestObjects form, 84, 86, 90From clause, 156–157
506

P1: JYS
WY044-Ind WY044-Gosnell WY044-Gosnell-v2.cls August 19, 2004 20:2
ImportXML method
Inde
x
FrontPage and opening ASP pages,227
FullName property, 94–95Function keyword, 42function procedures, 33calling and creation of, 41–44variables as parameters, 42without parameters, 42
functions, 33, 122–123, 259built-in, 45–46calling, 41–44calling from events, 44calling from procedures, 44calling function from, 44creation of, 41–44custom classes, 109–111events, 112lifetime, 44–45public, 45scope, 44–45SQL Server, 252–253user-defined, 252–253
Ggeneral design guidelines, 300GeneralErrorHandler procedure,
73–76, 287–288, 361, 376, 459generic error handlers, 73–76Get List of Forms caption, 92Get List of Forms command button,
93Get property procedure, 340, 352GetDate function, 252GetFileNameBrowse function,
357–358, 374GetObject method, 273GetOpenFileName external function,
372–374GetPlaceFacts method, 208–210GetSQL function, 481GetSystemInfo external function,
271Goz_Tablet1100 server, 238goz_tablet1100/sqldev server, 240Grid icon, 250
Group object, 175grouping Use Cases, 4groups, 306–307Groups collection, 172
HHasFieldNames parameter,
198–199Height property, 221HelpContext property, 72HelpFile property, 72HTML documents, 194HTML file format, 204, 223HTML pages, static, 223–225HTMLTableName parameter,
199
IIf statement, 34If...Then statements, 54–57If...Then...Else statements, 55, 301If...Then...ElseIf statements, 55IIF function, 57IIF() statements, 301IIS file format, 204, 223ImageTarget parameter, 202Immediate Window, 23, 80, 115current value of variables, 66report name, 94running function, 42running procedure, 34usage, 66writing output to, 66
implementation phase, 23–24implements keyword, 120importingdata from sample Northwind database,
195–196external data, 193–196spreadsheets, 197–198text files, 198–201XML files, 201–202
ImportOptions parameter, 201ImportXML method, 201–202
507

P1: JYS
WY044-Ind WY044-Gosnell WY044-Gosnell-v2.cls August 19, 2004 20:2
improving
improvingactual performance, 300–302data access, 302perceived performance, 302–303
inheritance, 120Initialize event, 113in-line comments, 62inner join, 156–157Insert ➪ ActiveX Control command,
283Insert ➪ Class Module command,
99Insert ➪ Module command, 29Insert statements, 160inserting data, 160intContactId value, 169intCounter variable, 60, 66Integer data type, 49Integer variables, 47–79interface inheritance, 120InteriorColorId property, 106InteriorTypeId property, 106Internet Explorer 5.0 (or higher), 227intTaxRate variable, 43–44intValue1 variable, 72intValue2 variable, 72
JJetSQL, 155John Doe user, 174–175
KKeyPress event, 82
Llate binding, 273, 301lblDateOfBirth label, 84lblForms list box, 92lblVehicleId label, 113left join, 156–157Let property procedure, 340, 352letters, creation with Access,
276–279
librariescreation of, 285–288referencing, 265, 286usage, 285–288
LIKE keyword, 483LimitToList property, 184, 187Link Child Fields property, 189Link Master Fields property, 189Linked Table Manager, 289linkingto external data, 193–196spreadsheets, 197–198text files, 198–201
list box control, 92list boxesadding and removing items, 184Click event, 186populating, 185–188Load event, 185–186LoadRecords procedure, 395, 408–409local string variable, 209Locals window, 23Locate Web Page dialog box, 230Lock Project For Viewing option, 306LockType property, 129–130, 134, 146,
295logic errors, 65logical tiers and modules, 16Login parameter, 197Long data type, 49Long variables, 47–79loopsDo...Loop loops, 61ForEach...Next loops, 59–61For...Next loops, 59–61While...Wend statement, 61
Lotus, 194lstAccounts list box, 185lstForms list box, 92
MMacro Builder, 82macro commands, performing, 95macros, 46, 234MailItem object, 281–282
508

P1: JYS
WY044-Ind WY044-Gosnell WY044-Gosnell-v2.cls August 19, 2004 20:2
modDatabaseLogic module
Inde
x
maintaining applications, 309–310Make Payment caption, 180Make Payments caption, 178MakeId property, 105mcrOpenFrmTest macro, 46MDB files, 233, 255.mdw extension, 307Me keyword, 91, 122–123menu add-ins, 289Menu caption, 179–180menus, performing options, 95messages, displaying, 190methods, 77, 80–81, 84–90Car class, 109–110, 113–118custom, 122–123custom classes, 109–111listing, 80sub procedure or function behind, 80
Microsoft Excel, 194, 273–276Microsoft Exchange, 194Microsoft Office 2003 Web Services
Toolkit, 204–205Microsoft Office CommandBar object, 98Microsoft Office Object Library custom
command bar, 266–269Microsoft Outlook, 194, 279–282Microsoft Sharepoint, 194Microsoft SQL Server Database Wizard,
433Microsoft VB (Visual Basic), 1Microsoft Web site, 204, 296Microsoft Word and automation,
276–279Middle (Business) Layer, 15migrating database to Access Project,
254–260Mileage property, 106modBusinessLogic module, 31, 36, 356,
372CalculateSalesTax function, 42FinalizeOrder procedure, 35–36FixNull function, 456General Declarations section, 52–53,
356–357, 456GeneralErrorHandler procedure,
73–76, 361, 376, 459
GetFileNameBrowse function,357–358
GetOpenFileName external function,372–373
MoveToFirstRecord procedure,374–375, 457
MoveToLastRecord procedure,457–458
MoveToNextRecord procedure,458–459
MoveToPreviousRecord procedure,458
MsgBox function, 375–376OpenFileAttachment procedure,
357, 373PopulateListFromRecordset
procedure, 456–457ProceedWithDelete function,
360–361, 375recordset navigation procedures,
358–360ShellExecute external function, 373TestCaseStatement procedure,
58–59TestError procedure, 71–72TestError2 procedure, 74–76TestIfStatement procedure,
55–57TestLoop procedure, 60–61TestPrinter procedure, 96–97TestReports procedure, 94VerifyCreditAvail procedure,
33–34modDatabaseLogic module, 356, 372AddParameters procedure, 465–467BuildSQLDeleteProjects
Comments function, 381BuildSQLInsertContacts
procedure, 378–379BuildSQLInsertProjectComments
function, 381–382BuildSQLInsertProjects
procedure, 379BuildSQLSelectFrom function,
461–462BuildSQLWhere function, 462
509

P1: JYS
WY044-Ind WY044-Gosnell WY044-Gosnell-v2.cls August 19, 2004 20:2
modDatabaseLogic module (Continued)
modDatabaseLogic module (Continued)CloseDbConnection procedure, 377,
460deleting records from cross reference
tables, 370–371ExecuteSPRetrieveRS function,
463–464ExecuteSQLCommand procedure, 362,
376–377ExecuteStoredProcedure
procedure, 464–465General Declarations section, 460inserting records into cross reference
tables, 371–372OpenDbConnection procedure, 377,
460PadQuotes function, 462–463procedures, 362–368, 370–371ProcessRecordset function, 461ProcessRecordset procedure,
368–369, 379–380ProcessUpdate procedure, 369,
380–381, 464RequeryRecordset procedure, 363,
377–378ModelId property, 105modelingapplication design, 3–10Use Case Diagrams, 4–6
ModelYear property, 106modError module, 285Module Source parameter, 75Module1 module, 18modules, 234creation of, 27, 29, 31declarations, 27–28General Declarations section, 51, 269,
271logical tiers, 16Option Explicit statement, 31procedures, 27–28, 33reusable, 300SYSTEM_INFO type declaration, 269,
271types of, 29–31
MouseUp event, 90
MouseWheel event, 90MouseWheel property, 90Move First command button, 138Move Last command button, 138, 148Move method, 90Move Next command button, 138, 148Move Previous command button, 138,
148MoveFirst method, 137MoveLast method, 80, 137MoveNext method, 80, 137MovePrevious method, 137MoveToFirstRecord method, 149MoveToFirstRecord procedure, 166,
172, 374–375, 457MoveToLastRecord procedure, 166,
172, 457–458MoveToNextRecord procedure, 166,
172, 458–459MoveToPreviousRecord procedure,
166, 172, 458MSDE. See SQL Server 2000 Desktop
EngineMSDE 2000, xviiiMSDE Setup Program, 236msgbox command, 19MsgBox function, 190, 375–376msgbox function, 45, 52, 87, 271multi-user considerations, 293architecture, 296–299record locking, 294–296update conflicts, 294–296
NName property, 80, 84, 113, 130, 185,
216naming conventionsobjects, 54variables, 53–54
Navigation Buttons property, 138,178
nested procedures, tracing through,68–69
Next intCounter statement, 65Next statement, 60
510

P1: JYS
WY044-Ind WY044-Gosnell WY044-Gosnell-v2.cls August 19, 2004 20:2
Open method
Inde
x
NoMatch property, 80nonvisual objects, 79Northwind database, importing data
from, 195–196Northwind_be.mdb file, 297Northwind.mdb sample database, 297Notepad and opening ASP pages, 227n-tier architecture, 13–16numbering Use Cases, 4
OobjCar variable, 116–117objContacts objects, 421objCurrContact object, 378objCurrProject object, 379Object Browser, 79F2 keyboard shortcut, 89Libraries drop-down list, 90listing methods, 81viewing objects, 89–90
object diagramsContacts class, 345Project class, 331–332
object library, referencing, 272Object navigation box, 27object variables, 48declaring, 51, 272–273usage, 51
ObjectName parameter, 203, 223object-oriented programming, 77objects, 18, 91–98, 97–98action on assigning data type value, 104additional procedure creation for, 40–41automation, 272–273current, 91CurrentProject object, 94–95custom, 99–120custom methods, 122–123custom properties, 121–122Customer Service application, 432–442DoCmd object, 95early binding, 273events, 77, 81–83Form object, 92–94improving speed suggestions, 303
late binding, 273listing, 67manipulating, 172–176methods, 77, 80–81naming conventions, 54nonvisual, 79Printer object, 96–97procedure creation for, 36–40properties, 77–79referencing, 51Report object, 94Screen object, 95–96sharing events, 82sharing properties, 78SQL Server, 243–254starting value, 79updating values, 67viewing, 89–90visual, 79ways to refer to, 90–91ObjectType parameter, 195, 202–203,
223objExcel object, 273objLonLatPt object, 209objProjects object, 400, 405objTest object, 95ODBC data source, 195ODBC databases, 194Office Access 2003 Developer
Extensions, 308Office Web Components, 227Office Web Services toolkit, xviiiOn Click event, 83, 85, 93On Double Click event, 83On Error statement, 70–72, 75On Exit event, 85On Key Press event, 82On Load event, 138On Open event, 83OnAction property, 269OnClick event, 37, 148On_Click event, 19OnLoad event, 114, 130Open Car action, 103Open event, 222Open method, 127–129
511

P1: JYS
WY044-Ind WY044-Gosnell WY044-Gosnell-v2.cls August 19, 2004 20:2
OpenDbConnection procedure
OpenDbConnection procedure, 377,460
OpenFileAttachment procedure, 357,373, 404
OpenForm action, 46OpenForm command, 181OpenForm method, 181optimistic locking, 295optimizingapplications, 299–304VBA code, 300–301
Option Explicit statement, 31Options dialog box, 294–295Options parameter, 130Order By clause, 157OrderDetails object, 119Orders object, 119OtherFlags parameter, 202Outlook, 204OutputFile parameter, 223OutputFormat parameter, 203, 223OutputTo method, 204, 223–231OutputToDAP procedure, 229OutputToHTML procedure, 224
PP2P forums, xxi–xxiiPackaging Wizard, 308PadQuotes function, 462–463pages, 234Parallel Activities, 7Parameter object, 248Password parameter, 197passwords, 305–306perceived performance, improving,
302–303percent meter, 303@percentage parameter, 247performanceactual, 300–302perceived, 302–303separating user interface from data
tables, 296Performance Analyzer, 289, 303permissions, 306–307
pessimistic locking, 295Photo property, 108physical tier, 16PlanHistory table, 436PopulateComboBoxes procedure, 393,
407PopulateContactsControls
procedure, 416–417, 421PopulateControlsOnForm procedure,
149–150PopulateListFromRecordset
procedure, 393–394, 407–408,456–457
PopulateProjectsControlsprocedure, 391–392
PopulatePropertiesFromFormprocedure, 337–338, 342–343,349–350, 353–354
PopulatePropertiesFromRecordsetprocedure, 336–337, 341–342, 349,353, 453
Presentation Layer, 14–16, 102–103PresentationTarget parameter, 202Preserve statement, 50Print statement, 60Printer object, 96–97, 221–222printers, listing available, 96–97Printers collection, 96–97, 221–222Procedure Source parameter, 75procedures, 27–28calling, 33–45, 66calling function from, 44calling sub procedure from, 35–36creation for objects, 36–40creation of, 33–45creation of additional, 40–41empty, 36–40On Error statement, 70–72frmProjects form, 395–398General Comment section, 62listing objects and variables, 67–68modDatabaseLogic module,
362–368, 370–371preserving values in, 44public, 45tracing through nested, 68–69
512

P1: JYS
WY044-Ind WY044-Gosnell WY044-Gosnell-v2.cls August 19, 2004 20:2
Properties dialog box
Inde
x
types of variables, 47–49upgrading macros to, 46
Procedures collection, 172ProceedWithDelete function,
360–361, 375ProcessRecord function, 341ProcessRecordset function, 461ProcessRecordset procedure,
368–369, 379–380ProcessUpdate procedure, 344, 356,
369, 380–381, 464Product Tracker screen, 422ProductDesc field, 251ProductId field, 245ProductName field, 251programming, 2programscontrolling flow, 54–61controlling from another program,
272–282decision making, 54–59loops, 59–61
progress bar, 303Project class object diagram, 331–332Project object, 331Project Tracker applicationclass modules, 330–356communicating with database, 372connecting user interface to code,
382–422contacts for current project, 423Contacts screen, 313–316, 423, 426databases, 317–320design specifications, 311–316e-mail, 316enhanced features, 314File Attachments tab, 316file open dialog box, 427navigating records, 314planning, 311–312processing business logic, 372Project Tracker form, 426Project Tracker screen, 315, 422prototype screens, 315standard modules, 356–382tblContacts table, 320
tblProjects table, 320tblProjectsComments table, 320tblProjectsContacts table, 320tblProjectsFileAttachments
table, 320tracking details about projects,
312–313Use Case diagram, 313use cases, 313user interface, 313, 320–330Project Tracker form, 426Project Tracker screen, 315Project Using Existing Data option, 239Project Using New Data option, 239Project window, 18projectscurrent, 94–95listing forms, 95
ProjectTrackerDb databasetblContacts table, 318tblProjects table, 317–320tblProjectsComments table,
318–319tblProjectsContacts table, 319tblProjectsFileAttachments
table, 319ProjectTrackerUI database, 320,
330ProjectType property, 94–95properties, 77, 84–90action on retrieving value, 104assigning value to, 103–104Car class, 104–109, 113–118custom, 121–122custom classes, 103–109design time settings, 79frmCustomers form, 444–447frmSearch form, 443–444listing, 79modifying, 78public variables, 103sharing, 78viewing, 78
Properties dialog box, 78, 84, 87Event Procedure option, 82Event tab, 81–82, 85, 93, 114, 138
513
P1: JYS
WY044-Ind WY044-Gosnell WY044-Gosnell-v2.cls August 19, 2004 20:2
Properties dialog box (Continued)
Properties dialog box (Continued)listing events, 81Name properties, 29, 31
Properties (Alt+Enter) keyboardshortcut, 78
Properties Window, 31, 37, 78Property Get procedure, 103–109,
119, 121–122Property Let procedure, 103–109,
119, 121–122property proceduresclsContacts class module, 346–348clsCustomer class module, 450–452clsProjects class module, 332–334
Property Set procedure, 103–109,121–122
Public Event statement, 112Public keyword, 45, 52public sub procedures, 109–111,
122–123public variables, 52–53, 103, 121pubs database, 240Pubs SQL Server database, 128
Qqueries, 234, 302Queries ➪ Create View In Designer
command, 251Queries objects, 260, 435Query Designer and SQL statements, 155query processor, 238
RRAD (Rapid Application Design), 2Raise method, 72raising errors, 72–73Range parameter, 198read-only locks, 295ReceivedDate property, 107record locking, 294–296Record Selectors property, 138, 178RecordCount property, 136recordsadding, 137–138
counting in recordset, 136deleting, 138, 161displaying, 330filtering, 154–155finding, 153–154going directly to, 95optimistic locking, 295order of sorting, 157pessimistic locking, 295read-only locks, 295sorting, 152–153unique, 156update conflicts, 295–296updating, 138
Records collection, 126Recordset collection, 126recordset navigation procedures,
358–360Recordset object, 80, 128–155, 134,
146, 153CursorLocation property, 129CursorType property, 129declaring, 128instantiating, 128LockType property, 129–130,
295Options parameter, 130RecordCount property, 136
Recordset property, 134–135recordsets, 277–278, 281adding, editing, and deleting records,
137–138binding form to, 135–136bookmarks, 155connected, 128contacts form bound to, 130–136counting records in, 136creation of, 128–136disconnected, 128filtering records, 154–155navigating through, 137populating, 128–129processing records, 279as report data source, 212–213retrieving values from tblComplaints
table, 227
514

P1: JYS
WY044-Ind WY044-Gosnell WY044-Gosnell-v2.cls August 19, 2004 20:2
SaveAll procedure
Inde
x
returning records to server and client,129
sorting, finding, filtering records,152–155
SQL and ADO populating, 158–160stored in local memory, 147type of movement within, 129updatable, 129–130RecordSource property, 216, 221ReDim statement, 50References dialog box, 266referencing views, 250–251RefreshContacts procedure,
398, 411RefreshHistory procedure, 480registering add-ins, 289RemoveItem method, 184repairing databases, 309report modules, 29, 99Report object, 94, 211–213, 220reports, 234adding and removing custom toolbar,
222–223adding controls, 214–216changes to, 212CompanyName field, 214ContactName field, 214currently having focus, 95–96data source, 211–213deleting with same name, 214empty, 213–214events, 222–223open, 94opening, 95preview mode, 212printing options, 221–222programmatic creation, 213–223recordset as data source, 212–213Title field, 214Upsizing Wizard, 259
Reports collection, 94Requery method, 169RequeryRecordset procedure, 363,
377–378Require Variable Declaration option,
31
requirements gathering phase, 2–3, 10Resume statement, 70Retrieve method, 103, 109–111, 118RetrieveAttachments function, 336,
341RetrieveCarDb method, 103RetrieveComments function, 335RetrieveContacts function,
335–336, 341, 348–349, 352–353RetrieveCustomers function,
452–453RetrieveProjects function,
334–335, 340–341retrieving data and SQL, 155–160reusable modules, 300rich client, 15right join, 156–157RollbackTrans method, 289–290row-level security, 249–250RowSource property, 187RowSourceType property, 92rptCustomers object, 214rptReport variable, 94rsContacts recordset, 134–135, 421rsProj recordset, 341RTF file format, 204, 223RTrim function, 252Run ➪ Continue command, 67RunSearch procedure, 481runtime errors, 63, 72–73/runtime switch, 309
SSales Data Access page, 256Sales table, 195SampleDb database, 195Save As command, 46Save As dialog box, 46Save Changes To Database command
button, 138Save Current Record caption, 161Save event, 114–115, 117Save procedure, 339, 343–344, 351,
355, 455SaveAll procedure, 170
515

P1: JYS
WY044-Ind WY044-Gosnell WY044-Gosnell-v2.cls August 19, 2004 20:2
SaveAllRecords procedure
SaveAllRecords procedure, 148, 151,161
SaveComments procedure, 410SaveCurrentRecord procedure,
150–151, 164, 170saving forms, 31SchemaTarget parameter, 202Screen object, 95–96screen prototypes, 7–10Screen.ActiveForm.Name command, 96screens, grouping Use Cases, 4SDLC (Systems Development Life Cycle),
2custom objects, 100design phase, 3–17development phase, 17–19implementation phase, 23–24requirements gathering phase, 2–3testing phase, 22–23
Search Inventory ScreenActivity Diagram, 7Use Cases mapped to user interface
elements, 9–10Search Results list, 485Search Results screen, 484SearchInventory object, 100securitydatabase password, 305encrypting database, 307–308file–level, 305groups, 306–307managing with ADOX library, 174–176permissions, 306–307user-level, 306–307users, 306–307VBA code passwords, 306
Security Wizard, 307Select clause, 156Select statement, 155, 481From clause, 156–157inserting results into table, 160nesting, 157Order By clause, 157predicates, 156Select clause, 156Where clause, 157
Select...Case statement, 57–59sending e-mail, 202–203SendObject method, 202–204, 402Server parameter, 197Service Manager program, 237servicesmanaging, 237SQL Server Desktop Engine, 237–239set focus event, 88Set statement, 113, 118–119SetFocus method, 88setup program, 308SHELLEXECUTE external function, 426ShellExecute external function, 373ShowTestProperty procedure, 122Single data type, 49Single variable, 48single-tier applications, 12SNP file format, 204, 223SoldDate property, 107SoldToPersonId property, 107Sort property, 152–153sortingorder of, 157records, 152–153Source Object property, 189Source parameter, 195Source property, 72spDiscontinuedProducts stored
procedure, 248SpecialFeatures property, 108SpecialFeaturesList enumerated
type, 119SpecificationName parameter, 199,
201spInsertCustomer stored procedure,
436–438splash screen, 302–303spreadsheets, 194controlling from Access, 274–276importing, linking and exporting,
197–198SpreadsheetType parameter,
198spRetrieveAllCustomers stored
procedure, 438
516

P1: JYS
WY044-Ind WY044-Gosnell WY044-Gosnell-v2.cls August 19, 2004 20:2
Stream collection
Inde
x
spRetrieveCustomerHistory storedprocedure, 438–439
spRetrievePlans stored procedure,440
spRetrieveSelectedCustomerstored procedure, 440
spUpdateCustomer stored procedure,440–441, 485–486
SQL (Structured Query Language)Delete statements, 161dialects, 155Insert statements, 160modifying unbound contacts form to use,
161–171populating recordsets, 158–160retrieving data, 155–160subqueries, 157Union statement, 157–158Update statements, 160–161
SQL ServerAccess as front end, 233–234data types, 243default login ID, 433functions, 252–253objects, 243–254setting up, 234–239stored procedures, 246–248table designer, 243, 245tables, 243–245versions, 235views, 248–251
SQL Server 2000, xviiiSQL Server 2000 Desktop Engine, 235SQL Server 2000 Developer Edition, 235SQL Server 2000 Enterprise Edition, 235SQL Server 2000 Evaluation Edition, 235SQL Server 2000 Personal Edition, 235SQL Server 2000 Standard Edition, 235SQL Server 2000 Windows CE Edition,
235SQL Server Agent, 239SQL Server databases, 194Access Projects from existing, 239–240new and Access Projects, 239–240transferring to another database, 197Windows integrated security, 433
SQL Server Desktop Enginebenefits, 236demo CDs of products, 236DTC (Distributed Transaction
Coordinator), 239installing, 236–237MSDE Setup Program, 236query processor, 238services, 237–239SQL Server Agent, 239SQL Server Service, 238SQL Server Service Manager Utility, 237storage engine, 238
SQL Server Service, 238SQL Server Service Manager Utility, 237SQL statement icon, 250SQL statements, 155, 379embedding user-defined function, 253reusing, 246–248
SQL view, 251SQLDEV database instance, 238SQLServerName, 128standalone applications, 12standard DLLs (Dynamic Link Libraries),
265–269standard modules, 29–31, 99business logic, 29Customer Service application, 455–467data access, 29Project Tracker application, 356–382
Start ➪ Programs ➪ Microsoft SQLServer ➪ Service Managercommand, 237
static arrays, 50static HTML pages, 223–225Static keyword, 44, 52StatusId property, 107Step Into (F8) keyboard shortcut, 481stepping through code, 65–69storage engine, 238stored procedures, 246–248, 253,
259, 486StoreLogin parameter, 195strConnection string, 362strCountry variable, 59Stream collection, 126
517

P1: JYS
WY044-Ind WY044-Gosnell WY044-Gosnell-v2.cls August 19, 2004 20:2
String data type
String data type, 49String variables, 47–79strResult variable, 57, 209strSQL variable, 212strTest public variable, 53strTestPropertyVal variable, 104structure variable, 209StructureOnly parameter, 195structuring code, 7Sub keyword, 42sub procedurescalling, 33–41calling from another procedure, 35–36calling from events, 36creation of, 33–41events, 112lifetime, 44–45scope, 44–45variables as parameters, 33without parameters, 33
Subform control, 189subforms, 188–189, 300subqueries, 157switchboard forms, 177–183syntax errors, 63system, information about, 269–271SYSTEM_INFO type definition, 269, 271system.mdw file, 307
Ttab controls, 188–189tab stops, order of, 192table alias, 156TableName parameter, 198–199tables, 234ADOX library creation, 173–174all data from, 156columns to retrieve, 156combining data from multiple, 157–158CustomerServiceSQL database, 433date conversions, 255design view, 243identifying, 156indexes, 302inner join, 156–157
inserting data, 160inserting results of Select statement
into, 160left join, 156–157limiting rows retrieved, 157number of records returned, 156primary keys, 255removing spaces in names, 255retrieving records from, 155–160right join, 156–157selecting to upsize, 256separating from user interface, 296–300SQL Server, 243–245unique indexes, 255unique records, 156virtual, 159, 248–251Tables collection, 172Tag property, 121tblComplaints table, 217, 220,
229–230ASP page based, 225–227exporting to data access page, 227–230exporting to HTML, 224–225recordset to retrieve current values from,
227tblContacts table, 130, 134, 157,
160, 277–278, 318, 320, 378adding records, 135Email field, 281e-mail field, 280updating, 135, 363–366tblContactsArchive table, 157, 160tblCustomers table, 433, 438tblCustomersPlanHistory table,
435tblEmails table, 200–201tblEmployees table, 203tblPlans table, 435tblPlansStatus table, 435tblProducts table, 245, 248, 251tblProjectComments table, 341tblProjectContacts table, 330, 341tblProjectFileAttachments table,
341tblProjects table, 317–320, 330,
366–368
518

P1: JYS
WY044-Ind WY044-Gosnell WY044-Gosnell-v2.cls August 19, 2004 20:2
TransferDatabase method
Inde
x
tblProjectsComments table,318–320, 330, 381
tblProjectsContacts table,319–320
tblProjectsFileAttachments table,319–320, 330
tblSales table, 195tblSupplier table, 174tblSuppliers table, 157TemplateFile parameter, 223Terminate event, 113Terra Server path, 206Terra Server Web service, 206–210TerraService Web services, 205Test button, 268–269test cases, 7TestCaseStatement procedure, 58–59TestError procedure, 71–72TestError2 procedure, 74–76TestIfStatement procedure, 55–57testing applications, 22–23testing phase, 22–23TestLibrary procedure, 287–288TestLoop procedure, 60–61, 65, 67TestMethod method, 109TestProperty property, 104TestReports procedure, 94TestTransferDatabase method, 196TestWebService procedure, 208–210text box control, 87, 190text box object, 51text boxes, 183text files, 194, 198–201thin client, 15three-tier architecture, 13–16tiers, 11Title field, 214titleview view, 247togShowAll_Click event, 409–410toolbarDiagram icon, 250Grid icon, 250Object Browser button, 89Save button, 251SQL button, 251SQL statement icon, 250
Test Button, 267View button, 251
Toolbox, 29, 84Tools ➪ Add References command, 271Tools ➪ Add-ins command, 289Tools ➪ Analyze ➪ Performance
command, 303Tools ➪ Database Utilities ➪ Backup
Database command, 310Tools ➪ Database Utilities ➪ Compact
and Repair Database command, 309Tools ➪ Database Utilities ➪ Database
Splitter command, 297Tools ➪ Database Utilities ➪ Upsizing
Wizard command, 255Tools ➪ Macro ➪ Visual Basic Editor
command, 17Tools ➪ Options ➪ Advanced command,
294Tools ➪ Options ➪ Code Settings
command, 31Tools ➪ Options ➪ General command, 70Tools ➪ Options command, 29Tools ➪ ProjectName Properties
command, 306Tools ➪ References command, 126, 172,
265, 266, 272, 285Tools ➪ Security ➪ Encode/Decode
Database command, 307Tools ➪ Security ➪ Set Database
Password option, 305Tools ➪ Security ➪ User and Group
Accounts command, 175Tools ➪ Security ➪ User and Group
Permissions command, 307Tools ➪ Security ➪ User Level Security
Wizard option, 307Tools ➪ Web Services References
command, 205, 206tooltips, 19traditional non-Web-based user interface,
15transactions, 239, 289–290TransferCopyData parameter, 197TransferDatabase method,
194–195
519

P1: JYS
WY044-Ind WY044-Gosnell WY044-Gosnell-v2.cls August 19, 2004 20:2
TransferSpreadsheet method
TransferSpreadsheet method,197–198
TransferSQLDatabase method, 197TransferText method, 198–201TransferType parameter, 195,
198–199TransmissionTypeId property, 107True parameter, 225T-SQL for SQL Server, 155two-tier applications, 12–13TXT file format, 204, 223txtAddress1 text box, 130txtAddress2 text box, 130txtCellPhone text box, 130txtCity text box, 130txtDateOfBirth text box, 84–85,
87–88txtFileDesc field, 403txtFileName field, 403txtFirstName field, 160txtFirstName text box, 130txtHomePhone field, 160txtHomePhone text box, 130txtLastName field, 160txtLastName text box, 130txtMiddleName text box, 130txtName text box, 82txtState text box, 130txtTest variable, 23txtTextBox control, 216txtTitle text box, 130txtValue text box, 190txtValue1 text box, 40, 51txtVehicleId text box, 113txtWorkPhone field, 160txtWorkPhone text box, 130txtZip text box, 130Type Mismatch error, 63typTripInfo user-defined type, 51
Uunbound contacts formbuilding, 138–152modifying to use SQL, 161–171sorting records, 152–153
unbound forms and record locking,295–296
Union statement, 157–158unique records, 156UnitPrice field, 251Unresolved Custom Complaints, 219update conflicts, 294–296Update method, 110–112, 117–119,
138, 148Update mode, 171Update statements, 160–161UpdateBatch method, 151updating data, 160–161upgrading macros to procedures, 46Upsizing Wizard, 255–260, 289Use Case diagrams, 4–6actors, 4requirements, 7–8
Use CasesCustomer Service application, 430grouping, 4mapped to user interface elements,
9–10numbering, 4presentation (user interface) layer,
102–103Project Tracker application, 313translating into controls, 8
UseOA parameter, 198user input, validating, 190–191user interaction, 189–191user interface, 11connecting to code, 382–422, 467–481Customer Service application, 443–447determining object properties and
methods, 100look of, 7–10mapping Use Cases to, 9–10Project Tracker application, 320–330separating from data tables, 296–300
User object, 175user-defined data types, 50–51user-defined functions, 252–253user-defined variables, 49user-level security, 306–307users, 4–6, 306–307
520

P1: JYS
WY044-Ind WY044-Gosnell WY044-Gosnell-v2.cls August 19, 2004 20:2
Visual Basic Editor
Inde
x
Users collection, 172UseTrustedConnection parameter,
197
Vvalidating user input, 190–191validation checks, 104variables, 33assigning new values, 66constants, 52current value of, 66declaring, 49–51lifetime, 52–53listing, 67monitoring values, 67–68naming conventions, 53–54public, 52–53scope, 52–53types, 47–49updating values, 67usage, 49–51Variant variables, 49varPosition variable, 155VBA (Visual Basic for Applications), xvAccess 2003, 1data types, 49definition of, 1–2Excel 2003, 1Help documentation, 45Word 2003, 1
VBA codesoptimizing, 300–301passwords, 306user–level security, 307writing, 17–19
vbCancel constant, 52VB.NET (Visual Basic .NET), 1vbOK constant, 52VBScript, 225vbYesNo value, 190Vehicle Id caption, 113VehicleId text box, 118VehicleIdNumber property, 105,
108–109, 117, 119VerifyCreditAvail procedure, 40
calling from another procedure, 35creation of, 33–34variables as parameters, 34variables passed as parameters, 36
View ➪ Call Stack command, 68–69View ➪ Immediate Window command,
34View ➪ Locals Window command, 67View ➪ Object Browser command, 89View ➪ Properties command, 29, 37, 78,
84View ➪ SQLView command, 155, 247,
248, 436View ➪ Tab Order command, 192View ➪ Toolbox command, 29View mode, 135viewing objects, 89–90View/Manage Accounts label, 178,
179View/Manage Car Details Screen, 7View/Manage Customer Account
screen, 431–432, 440, 485View/Manage Customer Details Screen,
7View/Manage Customer screen, 430View/Manager Register caption, 178views, 248, 259executing, 251referencing, 250–251row- and column-level security, 249–250Views collection, 172virtual tables, 248–251Visible property, 181–182, 269, 273Visio and prototype screens, 315Visual Basic Editor, 17Alt+F11 keyboard shortcut, 18Code window, 18Declarations area, 28Declarations/Procedure navigation box,
27–28development phase, 19inserting class modules, 99listing command options, 19Object navigation box, 27Procedures area, 28Project window, 18
521

P1: JYS
WY044-Ind WY044-Gosnell WY044-Gosnell-v2.cls August 19, 2004 20:2
Visual Basic Editor (Continued)
Visual Basic Editor (Continued)Properties module, 18Properties window, 31running and debugging code, 22–23tooltips for commands, 19viewing properties, 79
visual objects, 79vwProductPrice view, 251, 253
WWatch Window, 67–68Watches window, 23Web browser interface, 15Web formats, exporting Access data to,
223–231Web Service URL option, 206Web servicesadding reference to, 205–207consuming, 204declaring new instance of, 209exposing parts of application as, 204information about, 206–207storing result, 209
WebServiceURL option, 205WHERE clause, 481–483
Where clause, 157WHERE keyword, 483While...Wend statement, 61Width property, 216With...EndWith, 300WithEvents keyword, 112, 116wizards, 289Word 2003, 1Word object, 278workgroup file, 307Worksheet object, 274–275Wrox Auto Sales applicationSearch Inventory Screen, 4View/Manage Car Details screen
prototype, 10Wrox code download page, xxiWrox Readers group, 174–175WROX Web site, xxi
XXLS file format, 204, 223XML (eXtensible Markup Language), 201XML documents, 194XML files, importing and exporting,
201–202
522