Bedienungsanleitung - Sport-Tec
26
KETTLER LAUFBAND ALPHA RUN 800 ANLEITUNG Art.-Nr. 22498 · Kategorie: Laufbänder
-
Upload
khangminh22 -
Category
Documents
-
view
0 -
download
0
Transcript of Bedienungsanleitung - Sport-Tec

KETTLER LAUFBAND ALPHA RUN 800ANLEITUNG
Art.-Nr. 22498 · Kategorie: Laufbänder

Montageanleitung DE
Assembly Instructions EN
Instructions de montage FR
AALLPPHHAA RRUUNN 660000 TTMM11003399--110000 AALLPPHHAA RRUUNN 880000 TTMM 11004400--110000
Abb
. Ä
hnlic
h2 3

2
INHALT
DE WICHTIGE HINWEISE 41018
LIEFERUMFANG
TYPENSCHILD
ERSATZTEILBESTELLUNG
19 TM 1039-100 ALPHA RUN 600 TM 1040-100 ALPHA RUN 800 21
EN IMPORTANT INSTRUCTIONS 61018
SCOPE OF DELIVERY
TYPE LABEL
SPARE PARTS ORDER
19 TM 1039-100 ALPHA RUN 600 TM 1040-100 ALPHA RUN 800 21
FR REMARQUES IMPORTANTES 81018
FOURNITURES
PLAQUE SIGNALÉTIQUE
COMMANDE DE PIÈCES DE RECHANGE
19 TM 1039-100 ALPHA RUN 600 TM 1040-100 ALPHA RUN 800 21
3
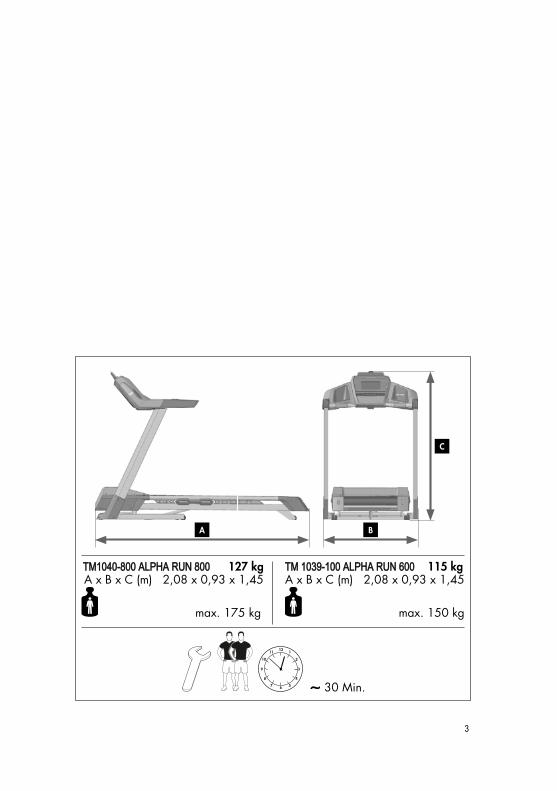
A B
C
TTMM11004400--880000 AALLPPHHAA RRUUNN 880000 127 kg A x B x C (m) 2,08 x 0,93 x 1,45
max. 175 kg
TTMM 11003399--110000 AALLPPHHAA RRUUNN 660000 115 kg A x B x C (m) 2,08 x 0,93 x 1,45
max. 150 kg
30 Min.

4
DE WICHTIGE HINWEISE
Wichtig! Bitte lesen Sie die Anweisungen vor der Montage und der ersten Benutzung aufmerksam durch. Sie erhalten wichtige Hinweise für
Ihre Sicherheit sowie den Gebrauch und die Wartung des Gerätes. Bewahren Sie diese Anleitungen zur Information bzw. für Wartungsarbeiten oder Ersatzteilbestellungen sorgfältig auf. Händigen Sie diese Anleitungen bei einem Besitzerwechsel des Gerätes mit aus.Dieses Symbol ⚠ weisst auf einen wichtigen Warnhinweis hin. Diese Anleitung kann auch unter wwwwww..kkeettttlleerrssppoorrtt..ccoomm heruntergeladen werden.
1.0 BENUTZERINFORMATION• Achtung! Beachten Sie auch unbedingt die Hinweise in den Heften „Sicher-
heitshinweise und Informationen zum gebrauch Laufbänder“1 3 und „Com-puter- / Trainingsanleitung, Bedienung, Biomechanik“3 3 .
• Dieses Symbol weisst auf einen Inbusschlüssel hin.• Dieses Symbol weisst auf einen Drehmomentschlüssel hin.• Dieses Symbol weisst auf einen Schraubendreher hin.• Dieses Sportgerät entspricht der DIN EN ISO 20957-1:2014, sowie ... TTMM11003399--110000 AALLPPHHAA RRUUNN 660000• DIN EN ISO 20957-6:2017, Genauigkeit HBTTMM11004400--110000 AALLPPHHAA RRUUNN 880000• DIN EN ISO 20957-6:2017, Genauigkeit SA2.0 ELEKTRISCHE SICHERHEIT
⚠WARNUNG! Gefahr durch elektrischen Strom!Elektrischer Strom bedeutet immer eine potentielle Gefahrenquelle. Hand-haben Sie das Gerät stets mit der nötigen Umsicht.
⚠Setzen Sie das Gerät keiner Feuchtigkeit aus! Schützen Sie es vor Kontaktmit Flüssigkeiten
• Die vorschriftsmäßig installierte Steckdose zum Anschluss des Gerätes mussleicht zugänglich sein.
• Bevor der Stecker des Netzteiles/Gerätes an die Steckdose angeschlossenwird, muss die auf dem Netzteil/Gerät angegebene Netzspannung mitder örtlichen Netzspannung verglichen werden. Stimmen die Werte nichtüberein, wenden Sie sich bitte an unser Serviceteam.
• Trennen Sie den Netzstecker nach dem Abschalten wieder vom Stromnetz.• Achten Sie unbedingt darauf, dass das Netzkabel nicht eingeklemmt oder
zur „Stolperfalle” wird.• Verbinden Sie das Netzkabel mit einer Schutzkontakt-Steckdose mit Schutz-
erdung. Verwenden Sie keine Mehrfachsteckdosen zum Anschluss! BeiVerwendung eines Verlängerungskabels muss dieses den VDE-Richtlinien
DE

5
entsprechen.• Das Gerät darf nur mit den mitgelieferten Netzkabel benutzt werden.⚠Ein beschädigtes Netzkabel darf nicht weiter verwendet werden und ist
sofort auszutauschen. Ein beschädigtes Netzkabel darf nicht weiter verwen-det werden und ist sofort auszutauschen. Wenn die Netzleitung beschädigtist, muss diese vom Hersteller, einem Servicemitarbeiter oder einer anderenqualifizierten Fachperson ersetz werden, um Gefahren zu vermeiden.
• Dieses Symbol weisst auf Geräte der Schutzklasse I hin.
• Dieses Symbol weisst auf Geräte der Schutzklasse II hin. • Dieses Symbol weisst auf Geräte der Schutzklasse III hin.⚠Ziehen Sie bei allen Reparatur-, Wartungs- und Reinigungsarbeiten unbe-
dingt den Netzstecker!
DE

6
EN IMPORTANT INFORMATION
Important! Please read these instructions carefully before installation and first use. You will receive important information for your safety as
well as for the use and maintenance of the appliance. Keep these instruc-tions somewhere safe for information purposes or for maintenance work or ordering replacement parts. Pass these instructions on with the appliance if the owner of the appliance changes.This symbol ⚠ indicates an important warning. These instructions can also be downloaded at wwwwww..kkeettttlleerrssppoorrtt..ccoomm
1.0 USER INFORMATION• Caution! Please ensure you observe the instructions in the booklets “Safety
Instructions and Instructions for Initial Operation and Maintenance“1 3 and „Computer/training instructions, handling, biomechanics“3 3 .
• This symbol indicates an Allen key.• This symbol indicates a torque wrench.• This symbol indicates a screwdriver.• This sport appliance corresponds to DIN EN ISO 20957-1:2014, and ... TTMM11003399--110000 AALLPPHHAA RRUUNN 660000• DIN EN ISO 20957-6:2017, Accuracy HBTTMM11004400--110000 AALLPPHHAA RRUUNN 880000• DIN EN ISO 20957-6:2017, Accuracy SA2.0 ELECTRICAL SAFETY
⚠WARNING! Danger due to electric current!Electric power is always a potential source of danger. Always use the ap-pliance with the necessary caution.
⚠Do not expose the appliance to moisture! Protect it from contact with liquids• The properly installed electrical socket to connect the appliance must be
easily accessible.• Before connecting the plug of the mains adapter/device with the socket,
the mains adapter/appliance voltage must be compared to the local volta-ge. If the values do not match, please contact our service team.
• After switching the appliance off, remove the plug from the power supplyagain.
• Be very careful in ensuring that the cable does not become trapped or a“tripping hazard”.
• Connect the cable with a grounded safety socket. Do not connect via mul-tiple socket strips! When using an extension cable, this must comply withthe VDE guidelines.
⚠Do not use damaged cables again and exchange them immediately. Do
EN

7
not use damaged cables again and exchange them immediately. If the mains line is damaged, this must be replaced by the manufacturer, a mem-ber of the service team or another qualified specialist to avoid danger.
• This symbol indicates that the appliance is protection class I.
• This symbol indicates that the appliance is protection class II. • This symbol indicates that the appliance is protection class III.⚠The appliance may only be used with the mains adapter provided.
EN

8
FR FR REMARQUES IMPORTANTES
Important ! Veuillez lire attentivement les instructions avant le montage et la première utilisation. Vous y trouverez des conseils importants pour
votre sécurité ainsi que pour l‘utilisation et la maintenance de l‘appareil. Conservez soigneusement ces instructions à titre d‘information, pour les travaux de maintenance ou la commande de pièces de rechange. En cas de changement de propriétaire de l‘appareil, remettez aussi ces instructions.
Ce symbole ⚠ attire l‘attention sur un avertissement important.Ces instructions peuvent également être téléchargées sur wwwwww..kkeettttlleerrssppoorrtt..ccoomm
1.0 INFORMATION UTILISATEUR• Attention ! Suivez aussi impérativement les conseils dans les cahiers
„Conseils de sécurité et informations pour l‘utilisation de tapis de course“1 3 et „Instructions ayant trait à l‘ordinateur / l‘entraînement, utilisation,biomécanique“3 3 .
• Ce symbole attire l‘attention sur une clé mâle à six pans.• Ce symbole attire l‘attention sur une clé de serrage dynamomé-
trique.• Ce symbole attire l‘attention sur un tournevis.• Cet appareil de sport répond à la norme DIN EN ISO 20957-1:2014 ainsi que...TTMM 11003399--110000 AALLPPHHAA RRUUNN 660000• DIN EN ISO 20957-6:2017, précision HB
TTMM 11004400--110000 AALLPPHHAA RRUUNN 880000• DIN EN ISO 20957-6:2017, précision SA•
2.0 SÉCURITÉ ÉLECTRIQUE⚠AVERTISSEMENT ! Danger dû au courant électrique !
Le courant électrique est toujours synonyme de source potentielle de dan-ger. Manipulez toujours l‘appareil avec la circonspection nécessaire.
⚠N‘exposez pas l‘appareil à l‘humidité ! Protégez-le contre tout contact avecdes liquides
• La prise de courant installée comme il se doit pour connecter l‘appareil doitêtre facilement accessible.
• Avant que la prise mâle du bloc d‘alimentation/de l‘appareil ne soitraccordée à la prise femelle, comparer la tension de secteur indiquée surle bloc d‘alimentation/l‘appareil avec la tension de secteur locale. Si lesvaleurs ne correspondent pas, veuillez vous adresser à notre équipe duservice.
9
FR• Débranchez de nouveau la prise mâle après la mise à l‘arrêt.• Veillez impérativement à ce que le câble d‘alimentation ne soit pas coincé
et ne risque pas de faire chuter.• Raccordez le câble d‘alimentation à une prise de courant de sécurité.
N‘utilisez pas de blocs multiprises pour le raccord ! En cas d‘utilisationd‘une rallonge électrique, celle-ci doit répondre aux directives VDE.
• N’utilisez l‘appareil qu‘avec le câble d‘alimentation fourni.⚠Ne continuez pas d‘utiliser un câble d‘alimentation endommagé et échan-
gez-le immédiatement. Si la ligne de secteur est endommagée, celle-ci dev-ra être remplacée par le fabricant, un collaborateur du service après-venteou une autre personne qualifiée pour éviter tout danger.
• Ce symbole indique les appareils de la classe de protection I.
• Ce symbole indique les appareils de la classe de protection II. • Ce symbole indique les appareils de la classe de protection III.⚠Débranchez impérativement la fiche d‘alimentation pour tous les travaux
de réparation, de maintenance et de nettoyage !

10
1x
1x
1x
1x
EN SCOPE OF DELIVERY
FR FOURNITURES
LIEFERUMFANG

11
1x
1x
1x
1x
0 10 20 30 40
M8x50 | 4x
M8x20 | 4x
ø13,5 | 8x
ø17 | 12x
4x12 | 6x
0 10 2050
M8x20 | 4x

12
DE Benötigtes Werkzeug – Gehört nicht zum Lieferumfang.
EN Tools required – Not included.
FR Outils nécessaires – Ne fait pas partie du domaine de livraison.
SW6

13
!
„klick“
1.2.
1.1.
1.3.
1.

14
2.1.
2.2.
2.1.
2.3.
2.
4x | M8x20 ø13,5 ø17
2.3.
SW 6 = 20 Nm

15
„klick“
3.1.
3.2.
3.
4x | M8x50 ø13,5 ø17
3.2.
SW 6 = 20 Nm

16
4.1.
4.2.
4.
4x | M8x20 ø17
4.2.
SW 6 = 20 Nm

17
5.1.
5.2.
5.3.
A B
5.1.
5.
6x | 4x12
5.1.

18
TYPENSCHILD
DE Beispiel Typenschild - SeriennummerEN Example Type label - Serial numberFR Example Plaque signalétique -
Numèro de serie
TRISPORT AGBoesch 67CH 6331 Huenenberg
A/N 88888-888S/N 8888888 88888 8888
A/N 44444-444S/N 4444444 44444 4444
A/N 77777-777S/N 7777777 77777 7777
DIN EN ISO 20957-1:2014
DIN EN ISO 20957-8:2017, VV
DIN EN ISO 20957-1:2014
DIN EN ISO 20957-4:2017, AA
DIN EN ISO 20957-1:2014
DIN EN ISO 20957-7:2017, SS
max. ### kg Made in PRC

19
EERRSSAATTZZ // BBAAUUTTEEIILLBBEESSTTEELLLLUUNNGG TTMM 11003399--110000 AALLPPHHAA RRUUNN 660000
1 1x 68008890
2 1x 68008891
3 1x 68008892
4 1x 68008893
5 1x 68008894
6 1x 68008895 X7 1x 68008896
8 1x 68008897
9 1x 68008898 X10 1x 68008899
11 1x 68008900
12 1x 68008901
13 1x 68008902
14 1x 68008903 X15 1x 68008904
16 1x 68008905
17 1x 68008906 X18 1x 68008907 X19 1x 68008908
20 1x 68008909
21 1x 68008910
22 1x 68008911
23 1x 68008912
24 1x 68008913
25 1x 68008914
26 1x 68008915
27 1x 68008916
28 1x 68008917
29 1x 68008918 X30 1x 68008919 X31 1x 68008920 X32 1x 68001786
33 1x 68008921 X34 1x 68008922
35 1x 68008923
36 1x 68008924
37 1x 68008925 X38 1x 68008926
39 1x 68008927
40 1x 68008928
41 1x 68008929
42 1x 68008930 X43 1x 68008931
44 1x 68008932
45 1x 68008933
46 1x 68008934
47 1x 68008935
48 1x 68001724
49 1x 68008936
50 1x 68008937 X51 1x 68008938
52 1x 68008939
53 1x 68001737
54 1x 68001723
55 1x 68008940
56 1x 68008941
57 1x 68008942
TTMM 11003399--110000
AALLPPHHAA RRUUNN 660000
TTMM 11003399--110000
AALLPPHHAA RRUUNN 660000

20
ERSATZ / BAUTEILBESTELLUNG TM 1039-100 ALPHA RUN 600
6
37
1
2
9
4
5
3
7
8
10
11
12
13
14
15
16
18
19
20
21
22
23
24
26
27
28
29
32
33
34
35
36
38
39
40
43
44
45
46
48
49
50
51
54
55
56
57
53
52
47
41
42
30
3117
25
21
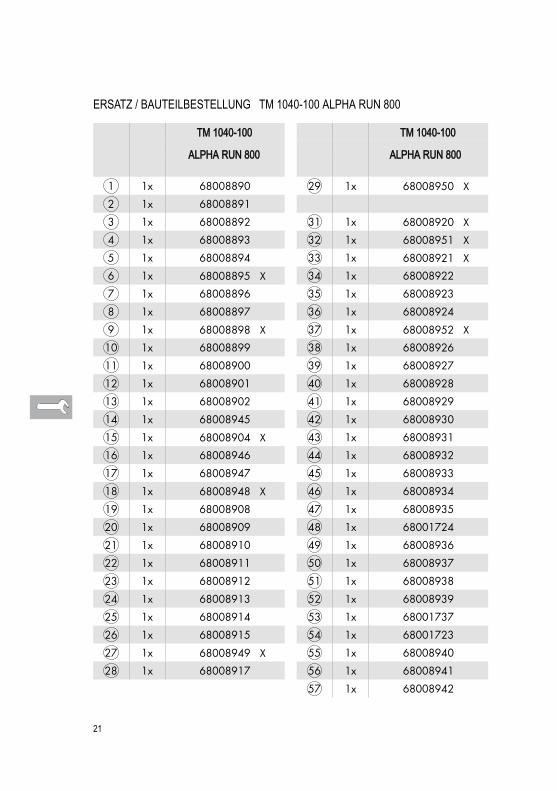
ERSATZ / BAUTEILBESTELLUNG TM 1040-100 ALPHA RUN 800
1 1x 68008890
2 1x 68008891
3 1x 68008892
4 1x 68008893
5 1x 68008894
6 1x 68008895 X7 1x 68008896
8 1x 68008897
9 1x 68008898 X10 1x 68008899
11 1x 68008900
12 1x 68008901
13 1x 68008902
14 1x 68008945
15 1x 68008904 X16 1x 68008946
17 1x 68008947
18 1x 68008948 X19 1x 68008908
20 1x 68008909
21 1x 68008910
22 1x 68008911
23 1x 68008912
24 1x 68008913
25 1x 68008914
26 1x 68008915
27 1x 68008949 X28 1x 68008917
29 1x 68008950 X
31 1x 68008920 X32 1x 68008951 X33 1x 68008921 X34 1x 68008922
35 1x 68008923
36 1x 68008924
37 1x 68008952 X38 1x 68008926
39 1x 68008927
40 1x 68008928
41 1x 68008929
42 1x 68008930
43 1x 68008931
44 1x 68008932
45 1x 68008933
46 1x 68008934
47 1x 68008935
48 1x 68001724
49 1x 68008936
50 1x 68008937
51 1x 68008938
52 1x 68008939
53 1x 68001737
54 1x 68001723
55 1x 68008940
56 1x 68008941
57 1x 68008942
TTMM 11004400--110000
AALLPPHHAA RRUUNN 880000
TTMM 11004400--110000
AALLPPHHAA RRUUNN 880000

22
ERSATZ / BAUTEILBESTELLUNG TM 1040-100 ALPHA RUN 800
37
1
2
9
4
5
37
8
10
11
12
13
14
15
16
18
19
20
21
22
23
24
26
27
28
29
32
33
34
35
36
38
39
40
43
44
45
46
48
49
50
51
54
55
56
57
53
52
47
41
42
311
7
6
25

23

24
docu 1039_1040a/20.04
KETTLER Sport and Fitness Europe by TRISPORT AG
BOESCH 67
CH-6331 HUENENBERG SWITZERLAND
www.kettlersport.com

Sport-Tec GmbH
Physio & Fitness
Lemberger Str. 255
D-66955 Pirmasens
Tel.: +49 (0) 6331 1480-0
Fax: +49 (0) 6331 1480-220
E-Mail: [email protected]
Web: www.sport-tec.de
© S
port
-Tec G
mbH
, 202
0-0
4