
baum 2018 1st station folder w/pile feed instruction manual
50
BAUM 2018 1ST STATION FOLDER W/PILE FEED INSTRUCTION MANUAL 'Baumfolder Corp., 1999 Printed in U.S.A. TP10313 BAUMFOLDER
-
Upload
khangminh22 -
Category
Documents
-
view
3 -
download
0
Transcript of baum 2018 1st station folder w/pile feed instruction manual

PAGE 1 TP10313
BAUM 2018
1ST STATION FOLDER W/PILE FEED
INSTRUCTION MANUAL
©Baumfolder Corp., 1999 Printed in U.S.A. TP10313
BAUMFOLDER

TP10313 PAGE 2
WARNING� Do not operate this machine without all guarding in place.� Do not make adjustments or perform maintenance on this machine with power on.� Keep the machine and the work area clean and free of spills to prevent accidents.� Be sure to replace any safety decals that may have been detached for any reason.
Baumfolder Corporation reserves the right to make changes in design or to make additions orimprovements in its products without imposing any obligation upon itself to install them on itspreviously manufactured products. It is recommended that modifications to this equipment not bemade without the advice and express written consent of Baumfolder Corporation.
© 1999 BAUMFOLDER CORPORATIONAll Rights Reserved
FOLDER IDENTIFICATION
MODEL NO: _______________________________ SERIAL NO: _____________________________
SALES AGENCY:____________________________________________________________________
INSTALLED BY: _____________________________________________ DATE: ________________
PHONE NO: _______________________________

PAGE 3 TP10313
CONTENTSDESCRIPTION PAGEI.) Safety ................................................................................................................................................................. 6
II.) Warning Labels ................................................................................................................................................ 7III.) Introduction Overview .................................................................................................................................... 8IV.) Transportation/Installation ............................................................................................................................. 8V.) Squaring the Machine ..................................................................................................................................... 8
VI.) Electrical Connections .................................................................................................................................... 91.0 .Wiring the Pump................................................................................................................................. 91.1 .Other Connections .............................................................................................................................. 91.2 .Tapping the Transformer .................................................................................................................... 91.3 .Pump Connections ............................................................................................................................... 9
VII.) Installing Fold Plates & Stacker Delivery ................................................................................................... 10VIII.) Operator Controls .......................................................................................................................................... 10
1.0 .Setting Folding Speed ........................................................................................................................ 101.1 .Setting Stacker Belt Speed ................................................................................................................ 101.2 .Emergency Stop Button ..................................................................................................................... 10
1.0 Control Panel BAN-5 .............................................................................................................................. 111.1 .Displays .............................................................................................................................................. 111.2 .Machine Status Indicators ................................................................................................................. 111.3 .Machine Control Pushbuttons ........................................................................................................... 111.4 .Keypad Buttons with Selection Indicators ........................................................................................ 121.5 .Keypad Buttons for Selection Adjustments ....................................................................................... 12
2.0 RUN MODE FUNCTIONS ............................................................................................................................... 122.1 .Machine Setup and Diagnostic Mode ............................................................................................... 122.2 .Counter Setup Mode .......................................................................................................................... 162.3 .Easy Mode and Continuous Cycle Mode ........................................................................................... 172.4 .Learn Mode ........................................................................................................................................ 172.5 .Make Ready Mode ............................................................................................................................. 182.6 .Network Job Mode ............................................................................................................................. 192.7 .Production Mode ................................................................................................................................ 19
3.0 LOGIC BOARD STATUS INDICATORS .............................................................................................................. 204.0 Process Variables Definitions ................................................................................................................. 21
4.1 .Total Input Count .............................................................................................................................. 214.2 .Total Output Count ............................................................................................................................ 214.3 .Batch Down Count ............................................................................................................................. 214.4 .Number of Batches ............................................................................................................................. 214.5 .Current Rate ....................................................................................................................................... 214.6 .Main Drive Run Time ....................................................................................................................... 214.7 .Main Drive Velocity .......................................................................................................................... 214.8 .Waste Count (DCT500) ..................................................................................................................... 21
5.0 COUNTER SETUP VARIABLES ........................................................................................................................ 215.1 .Batch Preset ....................................................................................................................................... 215.2 .Batch Output Type ............................................................................................................................. 215.3 .Batch Output Time ............................................................................................................................ 225.4 .Sheet Length ...................................................................................................................................... 225.5 .Gap Length ........................................................................................................................................ 225.6 .Suction Length ................................................................................................................................... 22
6.0 SYSTEM MESSAGES AND RUN MESSAGES ...................................................................................................... 236.1 .Power-Up Fault Messages .................................................................................................................. 236.2 .Run Time Fault Messages ................................................................................................................. 246.3 .Machine Run Error Messages ........................................................................................................... 25

TP10313 PAGE 4
CONTENTSDESCRIPTION PAGE
IX.) Pile Feeder Operation .................................................................................................................................... 261.0 .Loading .............................................................................................................................................. 261.1 .Hold-down Locations ......................................................................................................................... 261.2 .Air and Vacuum Setting .................................................................................................................... 261.3 .Front Blow Tube Settings .................................................................................................................. 271.4 .Vacuum Wheel................................................................................................................................... 27
X.) Register Operation ......................................................................................................................................... 281.0 .Double Sheet Detector ....................................................................................................................... 28
XI.) Baumset Adjustment ...................................................................................................................................... 291.0 .Adjusting Folding Rollers ................................................................................................................. 29
XII.) Setting Fold Plates .......................................................................................................................................... 30XIII.) Setting Deflectors ........................................................................................................................................... 30XIV.) Stacker Operation .......................................................................................................................................... 31XV.) Scoring/Slitting/Perforating .......................................................................................................................... 32
1.0 .Slitter Shaft Removal ......................................................................................................................... 321.1 .Scoring ............................................................................................................................................... 321.2 .Perforating ......................................................................................................................................... 331.3 .Slitting ................................................................................................................................................ 341.4 .Trimming ........................................................................................................................................... 35
XVI.) Lubrication/Maintenance .............................................................................................................................. 36XVII.) Technical Specifications ................................................................................................................................ 37
XVIII.) Accessories ...................................................................................................................................................... 37XIX.) Troubleshooting .............................................................................................................................................. 38XX.) Operating Tips ................................................................................................................................................ 40
XXI.) Principles of Mechanical Folding ................................................................................................................. 42XXII.) Folding Chart .................................................................................................................................................. 43
XXIII.) Manual Usage ................................................................................................................................................. 45XXIV.) Typical Layout & Sheet Orientation ............................................................................................................ 46XXV.) Impositions ...................................................................................................................................................... 47
#1 4 - PAGE............................................................................................................................................. 47#2 4 - PAGE, DOUBLE IMPOSITION .................................................................................................. 47#3 6 - PAGE, STANDARD ..................................................................................................................... 47#4 6 - PAGE, ACCORDION ................................................................................................................... 47#5 8 - PAGE, PARALLEL IMPOSITION .............................................................................................. 47#6 8 - PAGE, RIGHT ANGLE ................................................................................................................ 47#7 8 - PAGE, RIGHT ANGLE OBLONG .............................................................................................. 48#8 8 - PAGE, RIGHT ANGLE DOUBLE IMPOSITION ....................................................................... 48#9 8 - PAGE, PARALLEL OVER & OVER ........................................................................................... 48#10 12 - PAGE BOOK, SADDLE STITCH ............................................................................................. 48#11 12 - PAGE BOOK, SADDLE STITCH ............................................................................................. 48#12 12 - PAGE LETTER FOLD, HEADS OUT ...................................................................................... 48#13 12 - PAGE LETTER FOLD, HEADS IN .......................................................................................... 49#14 12 - PAGE LETTER FOLD, ACCORDION ..................................................................................... 49#15 16 - PAGE, THREE RIGHT ANGLE BOOK IMPOSITION ........................................................... 49#16 12 - PAGE FOLDER, HEADS OUT ................................................................................................. 49#17 24 - PAGE BOOKLET ....................................................................................................................... 49#18 32 - PAGE BOOK .............................................................................................................................. 49
XXVI.) Service ............................................................................................................................................................ 50

PAGE 5 TP10313
List of TablesDESCRIPTION PAGETable 1. Machine Setup Parameter List "A" ...................................................................................................................... 13
Table 2. Machine Monitor Parameter List ......................................................................................................................... 13
Table 3. Machine Setup Parameter List "B"....................................................................................................................... 14
Table 4. Machine Diagnostic Parameter List ...................................................................................................................... 15
Table 5. Future Features List ............................................................................................................................................... 15
Table 6. Machine Usage Status Parameter List ................................................................................................................... 16
Table 7. Output Type Animations ....................................................................................................................................... 16
Table 8. Count Source Selection .......................................................................................................................................... 17
Table 9. Learn Mode Status ................................................................................................................................................ 17
Table 10. Suction Mode Symbols ....................................................................................................................................... 18
Table 11. Suction Length Function ..................................................................................................................................... 18
Table 12. Determining the Large Display Contents ............................................................................................................ 19
Table 13. Reset mode Selection ........................................................................................................................................... 19
Table 14. LED Status Indicators .......................................................................................................................................... 20
Table 15. Output Delay and Duration ................................................................................................................................. 20
Table 16. Power Up Fault Messages .................................................................................................................................... 23
Table 17. Run Time Fault Messages ................................................................................................................................... 24
Table 18. Machine Run Error Messages ............................................................................................................................. 25

TP10313 PAGE 6
SAFETY FIRST
Your new Baum paper folding machine has been designedin accordance with the latest safety specifications. Thewarning and caution labels on the machine must remain inplace. Make sure all guarding provided is in place beforestarting up and running the machine.
Due to the nature of the work process of paper foldingmachines, there are parts and areas on the machine whichcannot be completely covered without interfering with theoperation of the machine. Therefore, sound personal workhabits and strict observance of all safety precautions isrequired for the protection of the operator, co-workers, andthe machine.
Be sure to follow thesesafety precautions:
1. Study the safety instructions at your plant and thoseprovided in this manual.
2. Study the operating instructions carefully beforeoperating the machine.
3. Make sure that your co-workers are familiar with thework process, potential danger areas,and all necessary safety measures.
4. Make sure that the machine is in good working orderbefore turning it on.
5. If the machine suddenly stops for whatever reason, donot restart it right away. Someone may have stoppedthe machine, but failed to press the emergency (Stop)button. If the machine is restarted unexpectedly, yourco-worker could be seriously injured.
6. Always press the emergency (Stop) button first if youstop the machine for adjustments or maintenance workwhich must not be done while the machine is inoperation.
7. For extensive maintenance or repair work, turn off themain power supply.
8. Never use improper or defective tools.
9. After making adjustments or after doing maintenanceor repair work, always make sure that all tools andother objects are removed from the machine. Other-wise, they might fall into the machine, causing severedamage or injuries.
10. Make sure that all safety devices are in place beforerestarting the machine.
11. Never clean moving parts of the machine (rollers,shafts, etc.) or remove any test sheets or paper jamswhile the machine is running.
12. Keep the floor around the entire machine clean.Immediately clean up any oil, grease, or paint spillsfrom the floor. Remove tools, cleaning cloths, andpaper scraps from all work areas.
13. Never allow unauthorized personnel to make adjust-ments on the machine, remove problem sheets, or startthe machine.
14. Never climb over the machine or crawl into it while it isturned on.
15. Immediately repair or replace any safety devices whichhave become ineffective or are missing.
16. Report any exposed cables or exposed electricalconnections.
17. Always have a certified qualified electrician perform allelectrical maintenance.
18. Do not make adjustments or perform maintenance withthe power on.
19. Become familiar with and follow the safety labels onthe next page. Replace any of these labels that aredamaged or lost.
Additional Notes:
20. Do not attempt to remove a paper jam, no matter howminor it may appear to be, while the machine isrunning.
21. When cleaning the fold rolls, use the handwheel forturning. Be sure the power to the machine is off.
22. Turn off the machine before making any adjustments tothe scoring, perforating, or slitting attachments. Keephands and clothing away from the slitter shafts whenthe machine is running.

PAGE 7 TP10313
WARNING LABELS
WARNING GUARD MISSINGDO NOT OPERATE
50944
WARNINGGUARD MISSING
DO NOT OPERATE
50945
CAUTION – HAZARDOUS MOVING PARTS – GUARDS MUST BE IN PLACE WHENOPERATING FOLDER – KEEP HANDS, HAIR & LOOSE ARTICLES AWAY FROM MOVING PARTS.
50215
CAUTION - HAZARDOUS MOVING PARTS
DO NOT OPERATE MACHINE
WITHOUT GUARD IN PLACE
40686
C A U T I O NHIGH VOLTAGEEXISTS WHENDOOR IS OPEN
REMOVE VOLTAGEAT POWER SOURCEBEFORE SERVICING
42877
39379
CHANGE SPEEDS " ONLY"WHEN FOLDER IS RUNNING

TP10313 PAGE 8
INTRODUCTION OVERVIEW
The 1st station [parallel] folder with pile feedercontains the following main components (Figure 1):
1. Pile Feeder2. Register3. 1st Station Folder (Parallel)4. Fold Roller Gapsets5. Fold Plates6. Slitter Shafts (not shown)7. Delivery (Stacker)8. Operator Controls9. Double Sheet Detector (Caliper)
10. Vacuum Pump (not shown) 11. Handwheel
Figure 2
Figure 1
TRANSPORTATION/INSTALLATION
As soon as you receive your new folder, and beforeremoving the machine from the skid, check carefully for anydamage to the shipments. If any damage is found, promptlycontact your Baumfolder sales representative.
To lift the folder from the skid, place the fork lift railsunder the lower rails as shown in Figure 2. Note that thefork lift must have at least a 1500 lb. capacity.
Remove all rust protection coating after unpacking thefolder.
Level the machine on the floor. Place a spirit level onthe #2 fold roller (Figure 3) and on the feedercrossmembers.
SQUARING THE MACHINE
It is essential that this folding machine is square inorder for it to work properly. To square the machine,measure diagonally across corners from feeder frame tofolder frame (Figure 4). Dimensions shown are approxi-mate. Be sure that the measurements taken are identicalwithin 1/16-inch. If the machine is out of square, shift theframes in the direction needed until the proper squareness isobtained.
Figure 4
Figure 3

PAGE 9 TP10313
ELECTRICAL CONNECTIONS
1.0 Wiring the Pump (2018 / 1 phase)Connect the pressure/vacuum pump at the pump
junction box (Figure 5) using the attached cable. Follow theinstructions below for the proper connections.
There are six wires from the control box to the pump.Wire #1 connects to the terminal marked 1 in the pumpmotor. Wire #2 connects to the terminal marked 4 in thepump motor. Wires #3 ,#4 ,#5 & #6 are not used and shouldbe taped off separately. The green wire is the ground that isattached to the motor frame.
1.1 Other ConnectionsRefer to the serial number plate for electrical
requirements. The serial number plate notes the voltage,phase and hertz, minimum time delay fuse, total machineamperage, and minimum wire conductor size for the mainpower connection.
The main power is connected directly to the line side ofthe main power switch. In a 2018 single phase use L1 andL2 only.
All electrical connections are to be made by a certifiedelectrician. Refer to local building electrical codes for properand safe connections.
For the following items, refer to Figure 6. Run a powercable from your distribution box to the main control box onthe pile feeder. Turn the main power switch to zero. Usingthe appropriate tool, open the latches on the control boxdoor and open the door.
NOTE: The door is connected to the main box by a groundwire that should not be removed.
Figure 5
1.2 Tapping the TransformerPass the power cable through the strain relief and the
hole provided in the control box. Connect the power cableto the open terminals on the main disconnect in the controlbox. The incoming ground wire should be attached to theground stud located in the lower right-hand corner of thecontrol box.
To tap the transformer, read the incoming voltage at themain disconnect. Then move the wire numbered 11L1 on thetransformer to the corresponding tap on the transformer.
Tighten all screw connections and close the door beforeswitching the machine on.
A connector is provided for power connection to thestacker. The stacker must be plugged into the socket for themachine to operate, if not, install the blind plug attached tothe box.
A connector is provided for power connection to thesecond station (8-page) fold unit. If no additional foldingstation is to be connected, the connector must be closed offwith a blind plug.
1.3 Pump ConnectionsConnect the air hoses to the pump. The small diameter
hose is connected to the vacuum side of the pump. Connectit to the barbed fitting above the ball valve on one end andthe other end to the vacuum solenoid valve on the pilefeeder.
Connect the larger diameter hose to the remainingoutlet port on the pump and to the barbed fitting on the pilefeeder at the end of the blow bar.
Troubleshooting tips and actions required for thedisplay messages that may appear on the control readoutmay be found the "Diagnostic Messages" section of themanual.
Figure 6

TP10313 PAGE 10
OPERATOR CONTROLS
The main operator control panel (Figure 8) is located atthe pile feeder. See the "Control Panel" section for a detaileddescription of all the buttons.
1.0 Setting Folding SpeedThe speed of the fold rollers may be set while the folder
is running! This is done by adjusting the speed controlpotentiometer located on the top left side of the main controlpanel. Clockwise rotation speeds the folder up; counter-clockwise rotation slows the folder down.
1.1 Setting Stacker Belt SpeedAn infinite speed range between high and low is set by
turning the control knob (Figure 9-1).
1.2 Emergency Stop ButtonWhen an emergency stop button (8-1 & 9-2) is pressed,
the result is:Sheet feed - stopFolder drive - stopPile lift - stop
The pressure/vacuum pump continues to operate. Theemergency stop button must be pulled to release before themachine can be restarted. An error message "StoP" willappear on the readout. The emergency stop buttons are found at the mainoperator control panel (8-1) and the delivery control (9-2).
Figure 9
Figure 7
Figure 8
INSTALLING FOLD PLATES & STACKERDELIVERY
Install the fold plates into the folder. When installingthe fold plates, take note of the symbol on the fold plate stop(Figure 7-1). The swing deflector may only be broughtforward when the deflector symbol is also in the forwardposition. Lock the fold plates in position with the clamplevers (7-2). See "Fold Pan" section for fold plate settingprocedure.
Attach the delivery stacker (3-2) by hooking the hangerbrackets onto the round rods at the exit end of the folder.Plug the stacker power cable into the corresponding outleton the main control enclosure on the pile feeder (Figure 6-1).
Pull the handwheel (Figure 1-11) to manually turn thefold rollers to be sure that they are operating smoothly.Check for any foreign material, and be sure that the deflec-tors do not touch the fold rollers.
+
h 0
+
+
+
1
2
3
45 6
7
8
9
10
1
BAUMFOLDERCORPORATION

PAGE 11 TP10313
1.0 Control Panel BAN-5
Figure 1. Control Panel.
1.1 Displays01) Large Display
Eight digit multi use display composed of 7-segment LED�s.
02) Small DisplayThree digit multi use display composed of 7-segment LED�s.
03) Ten segment bar graph displayThe suction length display is used to display theSuction Length as a percentage of Sheet Length.This allows a range from 5% to 50%.
1.2 Machine Status Indicators04) Suction Indicator
The suction indicator will track the suctionoutput. The LED will turn on when the suctionoutput turns on.
05) Pile indicatorThe indicator is lit when the feeder is in auto-matic feed mode. The indicator will flash if thefeeder is in reverse mode (Continuous Feeder) ormoving down (Pile feeder)
+
h 0
+
+
+
1
2
3
45 6
7
8
9
10
BAUMFOLDERCORPORATION
9 13 11 16 26 27 22 23 4 5 7 615 3
18 19 20 21 34 35
1 29 30 31 32 3325 2824 28 12 10 1417
36
06) Input IndicatorThe input indicator shows the status of the suctionphoto-eye.
07) Output IndicatorThe output indicator lights when the Batch Presetis reached and the user has selected a batchingoption. The output indicator is lit during the timethe batching option is active.Batching options are Feed interruption, Speed uptable, Marking table or Kicker.
1.3 Machine Control Pushbuttons08) Main Drive Start09) Main Drive Stop10) Pump Start11) Pump Stop12) Feeder Start13) Feeder Stop
14) Pile Feeder Up, Continuous Feeder Start 15) Pile Feeder Stop, Continuous Feeder Stop 16) Pile Feeder Down, Continuous Feeder Reverse 17) Emergency Stop

TP10313 PAGE 12
1.4 Keypad Buttons with Selection Indicators18) Show Output Count19) Show Batch Count and Number of Batches20) Show Current Rate21) Show Input Count22) Learn Mode23) Make Ready Mode
1.5 Keypad Buttons for Selection Adjustment24) Gap Minus25) Gap Plus26) Suction Length Minus27) Suction Length Plus28) Batch Preset Minus29) Batch Preset Plus30) Counter Setup Mode31) Machine Setup Mode32) Batching Time Minus33) Batching Time Plus34) Network Job Mode35) Reset36) Potentiometer Speed adjustment
2.1 Machine Setup/Diagnostic Mode
Pushing this key puts the controller in machine setupmode.
Machine setup mode provides a method to view andoptionally change operating parameters for the controller.The decimal points in the large display (1) will move fromside to side to indicate that various parameters may bechanged. In this mode, the small display gives the selectedparameter number, while the large display (1) shows aparameter value. The suction length display (3) is disabled.
Parameter Group Selection
The plus and minus keys are used to select the variousparameter groups: machine setup parameters, machinemonitor parameters, machine diagnostic parameters, knifestatus parameters, and machine usage parameters.
Parameter Selection within a Group
If the large display (1) decimal points are moving, thisset of minus and plus buttons will select the machineparameters within each group, see tables 1-6.
Select Parameter Adjustment
If the large display (1) decimal points are moving, thisset of minus and plus buttons will move through the set ofvalues for the selected parameter, see tables 1�6.
+
+
+
2.0 Run Mode Functions
After turning on the main switch, thecontrol automati-cally runs a self test. During this self test all displays andindicator lights come on for approxmately 4 seconds. Aftera successful self test, the display reverts to the previouscount screen active before power shutdown. In this mode,various job parameters can be displayed on the large display(1) and the small display (2) shows the gap length. Thesuction length display (3) is active in this mode and showsthe suction length as a percentage of sheet length.
The DCT500 mode select keys perform the samefunction in all modes, except Counter Setup. This allows auser to quickly switch between the operating modes on thecounter. Select Make-Ready is not a mode unto itself, butrather is a modifier to all modes.
During the self test operation, do not press anybutton. Pressing of a button will cause an errormessage to appear in the main display.!

PAGE 13 TP10313
2.1.1 Machine Setup Parameters
Table 1. Machine Setup Parameter List
P00: Input FactorEach sheet sensed by the Sheet count sensor is multi-
plied by the Factor number and added to theTotal InputCount, but does not effect the Batch Down Count, Numberof Batches or the Rate. The Factor can range from 1 to 24. Ifthe Input Factor is changed, it also changes the value of theOutput Factor to the same setting.
P01: Output FactorThis number is added to the Total Output Count but
does not effect the Batch Down Count, Number of Batchesand the Rate. The Factor can range from 1 to Input Factorsetting.
2.1.2 Machine Monitor Parameters
Table 2. Machine Monitor Parameter List
P10: Machine Speed (Velocity)This selection shows the machine speed in meters/
minute.
P11: Job Run TimeDisplays the time duration this job has ran. Time
displayed in .01 Hours. This information becomes part of thejob record.
P12: Job Stop TimeDisplay the time duration this job has been interrupted.
Time displayed in .01 Hours. This information becomes partof the job record.
P13: Job Make Ready TimeDisplays the length of time that the Make Ready
feature was enabled. Time displayed in .01 Hours. Thisinformation becomes part of the job record.
Parameter Function Type Variable DisplayedP00 Input Factor Setup Variables Adjustable 1-24P01 Output Factor Setup Variables Adjustable 1 to Input FactorP02 Tremat Setup Variables Adjustable 1 or 0P03 Knife Setup Variables Adjustable 1 or 0
P02: TrematThis is an unavailable option.
P03: KnifeThis is an unavailable option.
# Function Type Variable DisplayedP10 Machine Speed Process Variable Based on input Meters/MinuteP11 Job Run Time Process Variable Based on input HoursP12 Job Stop Time Process Variable Based on input HoursP13 Job Make Ready Time Process Variable Based on input HoursP14 Pause Time Process Variable Based on input HoursP15 Job Number Process Variable Based on Input Number 1 - 9999P16 Employee�s Number Process Variable Based on input 1 - 255
P14: Pause TimeDisplay the length of time that the Job was Paused.
Time displayed in .01 Hours. This information becomes partof the job record.
P15: Job NumberA Job Number may be entered so that production
data may be recorded against it. This is an operator entry.This information becomes part of the job record.
P16: Employee�s NumberAn Employee may be assigned a number. When
the employee operates the machine, his number may beentered. This information becomes part of the job record.

TP10313 PAGE 14
2.1.3 Machine Setup Parameters
Table 3. Machine Setup Parameter List
P20: Units of MeasurementThis selection specifies the unit of measurement used to
display all lengths. Inches (SAE) is the default selection.Available choices are Meters (measurement displayed in cm)and Inches (measurement displayed in inches and tenths ofinches).
P21: LanguageThis selection specifies the Language used to display
fault messages. Available choices are ENGLISH,DEUTSCH, and CODES, see Tables 16�18, Error MessageTranslation. English is the default selection.
P22: Network AddressThis selection specifies the unit address used for
Network communication. Available choices are 0 through255. Address 0 is the default selection. Network functionsare not available in software version 2.6.0
P23: Pause
P24: Network EnableNetwork components must be installed and enabled in
Maintenance Mode. Enable Network by selecting �1�.Disable network by selecting �0�.
# Function Type Variable DisplayedP20 Units of Measure Setup Variables Adjustable Inches, MetersP21 Language Setup Variables Adjustable English, German, CodesP22 Network Address Setup Variables Adjustable 0-255P23 Pause Setup Variables Adjustable 1 or 0P24 Network Setup Variables Adjustable 1 or 0P25 Easy Setup Variables Adjustable 1 or 0P26 Software Version Machine Configuration Fixed V X.X.XP27 Machine Type Machine Configuration Fixed Set at FactoryP28 Serial Output Type Machine Configuration Fixed Off, Display, or Network
P25: Easy ModeEnable Easy Mode by selecting �1�. Disable Easy Mode
by selecting �0�.
Easy Mode has two sheet control methods, Easy setup orContinuous cycle. Easy setup will run any job with a 1 inchsheet gap. The sheet gap display contains 3 dashes and theSuction Length bar graph is turned off.
In Continuous cycle setup, the suction cycle is determined bythe sheet gap setting, sheet length setting and the suctionlength setting. Sheet error detection methods are turned off.
P26: Hardware and Firmware VersionThis selection shows the hardware and firmware
versions of the unit. The left side of the display shows logicboard type. The right side of the display shows the firmwareversion (2.X.X).
P27: Machine TypeThis selection, in maintenance mode, shows the selected
machine configuration.
P28: Serial Output TypeThis selection, in maintenance mode, shows selected
serial output type.

PAGE 15 TP10313
P28: Serial Output TypeThis selection, in maintenance mode, shows selected
serial output type.
2.1.4 Diagnostic Parameters
Table 4. Machine Diagnostic Parameter List
P30: Input Port 1 StatusP31: Input Port 2 StatusP32: Input Port 3 StatusP33: Input Port 4 Status (Extension)
This selection shows the inputs status(see table4).
2.1.5 Future Features
Table 5. Future Features List
P34: Output Port 1 StatusP35: Output Port 2 (Extension)
This selection shows the outputs status (see table 4).
# Function Type Variable DisplayedP40 Last Knife Eye Time 1 Not used Not used Not usedP41 Last Knife Eye Time 2 Not used Not used Not usedP42 Last Knife Eye Time 3 Not used Not used Not usedP43 Strokes knife 1 Not used Not used Not usedP44 Strokes knife 2 Not used Not used Not usedP45 Strokes knife 3 Not used Not used Not used
P30 Status Input Port 1P30.1 P30.2 P30.3 P30.4 P30.5 P30.6 P30.7 P30.8Pile Motor Function Pile Down Pile Stop Pile Up Compress. Compress. Drive StartEnergized Control K1 Button Button Button Stop Button Start Button Relay K3
P31 Status Input Port 2P31.1 P31.2 P31.3 P31.4 P31.5 P31.6 P31.7 P31.8Pile Sensor Double Pile Sheet Start Sheet Stop Thermal Wrong Sheet Emerg.Stop
Sheet Fault Bottom Button Button Fault Fault Drive StopButton
P32 Status Input Port 3P32.1 P32.2 P32.3 P32.4 P32.5 P32.6 P32.7 P32.8Ergonomic Not used Not used Not used Not used Suction Delivery Photo eyePile Load Controller Count Input SuctionEye Fail Wheel
P33 Status Input Port 4 (Extension Port)P33.1 P33.2 P33.3 P33.4 P33.5 P33.6 P33.7 P33.8Not used Not used Not used Not used Not used Not used Not used Not used
P34 Status Output Port 1P34.1 N P34.2 P34.3 P34.4 P34.5 P34.6 P34.7 P34.8Not used Not used Not used Not used Pile Down Pile up Release Compress
is active is active Drive Start Start (K4)P35 Status Output Port 2 (Extension Port)
P35.1 P35.2 P35.3 P35.4 P35.5 P35.6 P35.7 P35.8Not used Not used Not used Not used Not used Not used Not used Not used
TP10313 PAGE 16
2.1.6 Machine UsageStatus Parameters
Table 6. Machine Usage Status Parameter List
P50: Power On TimeThis selection shows the time in 1/100 hour during the
main switch of the machine is on.
P51: Machine Run TimeThis selection shows the time in 1/100 hour during the
main drive contactor of the machine is on.
P52: Total Input SheetsThis selection shows the total input counts in 1000
sheets
Exit Machine Setup and Diagnostic Mode
Pressing any of these keys will cause the controller tochange to a new mode.
2.2 Counter Setup Mode
Pushing this key puts the counter in counter setupmode.
Counter setup mode is used to prepare the controller torun a job. The large display (1) shows the batch preset onthe left-hand side and the batching output time on the righthand side. The decimal points in the large display (1) willmove from side to side to indicate that a parameter may bechanged. The small display (2) shows the batching type. Thesuction length display (3) is active.
Change Batching Type
The minus and plus buttons move through a list of fouroutput devices. The chosen Type is then activated when thebatch down-count goes to zero. Feed interruption stops thefeeding of sheets for the batching time setting.
# Function Type Variable DisplayedP50 Power on time Machine Status Based on Inputs Time in 1/100 HoursP51 Machine run time Machine Status Based on Inputs Time in 1/100 HoursP52 Total Input Sheets Machine Status Based on Inputs Number in 1000 Sheets
h0
+
The speed up-table output activates the marking tableoutput for the batching time duration.
The MKE mode is an unavailable option.
The kicker is a future feature.
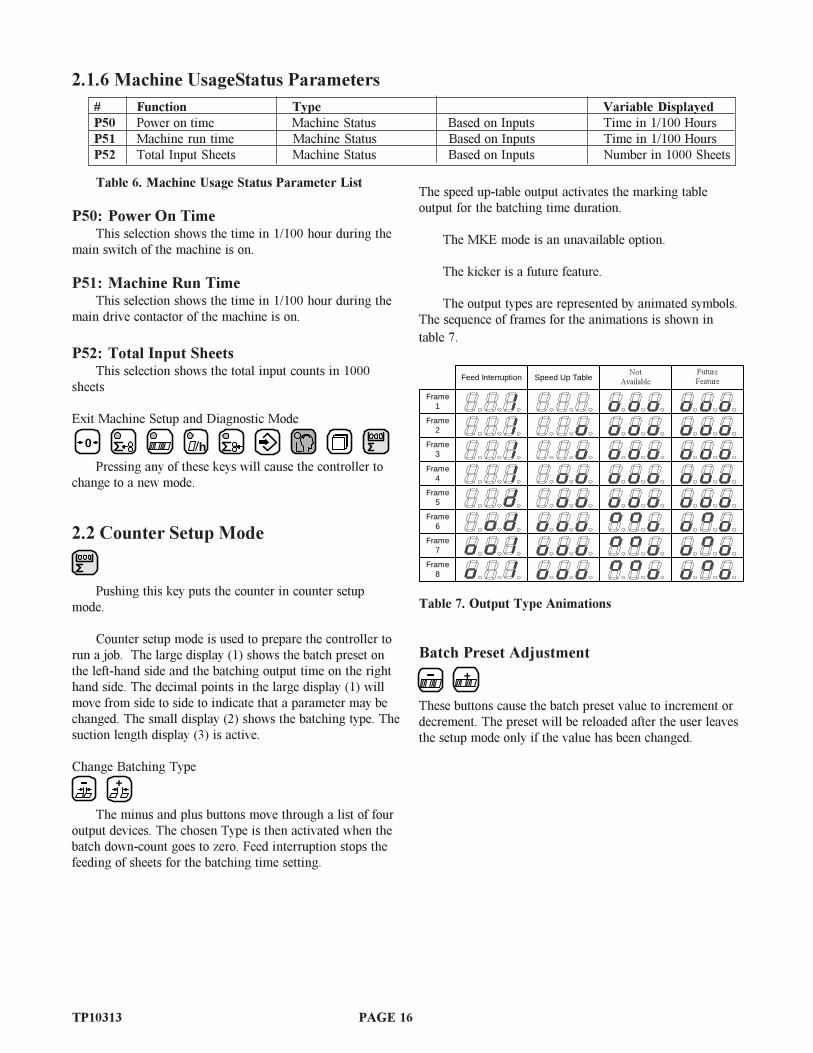
The output types are represented by animated symbols.The sequence of frames for the animations is shown intable 7.
Table 7. Output Type Animations
Batch Preset Adjustment
These buttons cause the batch preset value to increment ordecrement. The preset will be reloaded after the user leavesthe setup mode only if the value has been changed.
+
Feed Interruption Speed Up Table MKE Table Kicker
Frame1
Frame2
Frame3
Frame4
Frame5
Frame6
Frame7
Frame8
NotAvailable
FutureFeature

PAGE 17 TP10313
Batching Time Adjustment
The batching time adjustments allow the user to selectthe time duration associated with the currently selectedoutput type. Two output types and times are available.
1. Feed interrupt has a range of 0.0 to 9.9 seconds.2. Speed-up Table has a range of 0.00 to 5.00 seconds.
Select Count Source
The Output Count and Input Count keys select betweencount at delivery and feeder, respectively. One key LEDwill always be lit in Counter Setup to show the currentcount source, see table 8. Chasing LEDs will activate inthe small display signifying the start setup mode. The nextsheet fed through will be timed from leading edge totrailing edge and the delay time will be set to one half thesheet time. Please note this must be redone if the deliveryspeed is changed.
Table 8. Count Source Selection
Exit Counter Setup Mode
Pressing any of these keys will cause the counter tochange to a new mode.
2.3 Easy Mode and Continuous CycleMode
2.3.1 Easy Mode and Continuous Cycle Mode
Enable EASY mode at parameter P25, see Table 3.
Select Easy Mode
Pressing this button enables the selection of either theEASY mode or cYcL mode.
+
The batching count source will be the feederphotoeye.
The batching count source will be whatever isconnected as the delivery photoeye.
0
+
+
Pressing these buttons will toggle between the EASYmode or cYcL mode. Set EASY in the large display and
press again.
Select Continuous Cycle Mode
Pressing this button enables the selection of either theEASY mode or cYcL mode
Pressing these buttons will toggle between the EASYmode or cYcL mode. Set cYcL in the large display and
.press again.
Exit Run Mode
Pressing any of these keys will cause the counter tochange to a new mode.
2.4 Learn Mode
This key places the controller in learn mode. Learnmode can only be activated if the folder is idle.
The learn mode allows the user to setup the suctionvalve controller. Both manual and automatic setup isaccomplished in this mode. The large display (1) showstwo separate data items. The suction mode is shown on theleft and the sheet length is shown on the right. The smalldisplay (2) shows the current gap length. The suctionlength display is active. During Learn Mode, the LearnMode key LED indicates whether a valid sheet has beenlearned.
Table 9. Learn Mode Status
When the LED is on, pushing the sheet start button willfeed a single sheet of paper. If the sheet is fed properly, theindicator LED will go off. The suction mode will be set toautomatic. The length of the sheet will be set as the currentsheet length. The suction length will be set based on table11 and the gap length will be set to 4 cm /1.50 inches.
No valid sheet has been read yet, the system is inSingle Sheet mode.
A valid sheet has been read and the DCT500 hasbeen setup to run. Single Sheet mode is off.
Job

TP10313 PAGE 18
Table 10. Suction Mode Symbols
Table 11. Suction Length Function
TWT-180 Mode
Leading Edge Control
Leading and Trailing Edge Control
+
+
+
If P06 is set to 0 (no knife is active) and 10 cm /4.0 inches.If P06 is setting to 1, knifes are active.
Gap Length Adjustment
The minus and plus keys adjust the gap length. The gaplength range is 0.2� to 98.0� (0.5cm to 250cm).
Suction Length Adjustment
This is the same as in run mode
The suction length adjustment keys allow the user tochange the amount of suction applied to the current sheetlength. The display shows the percentage in 5% steps. Allof the bars must be totaled to get the value. The range ofadjustment is 5% to 50% of the current sheet length. If thesuction length is manually adjusted while the Learn ModeLED is on, the suction length will no longer be the SingleSheet suction length of 6.0�. The new suction length willbe based on the current sheet length and suction setting.
+
Select Suction Mode
These keys toggle between automatic control and cyclemode. In the cycle mode, the suction valve will be on forthe suction length and off for the remainder of the sheetlength plus the gap length. No adjustments are made forslipped sheets or process changes. The automatic modecorrects for process changes and controls the timing of thesuction valve to maintain the user-selected gap. If the gapis less than 1.5� (4.0 cm), the right hand decimal point ofthe small display (2) will flash and the Leading edgecontrol will be active. If the gap is greater than or equal to1.5� (4.0 cm), full Leading and Trailing edge control ismaintained. Refer to table 10 for suction mode symboldefinitions.
Sheet Length Adjustment
The sheet length adjustment keys allow the user tooverride the automatic Learn Mode setting. When the userchanges the sheet length, the suction length will beadjusted according to table 11. If a different suction lengthis desired, the value may be overridden with the suctionlength adjustment keys. The sheet length range is 10 cm /4inches to 250 cm / 98.5 inches.
Sheet Length Setting Resultant Suction Length PercentageGreater than or equal to 30 cm. 30% of Sheet LengthLess than 30 cm., and greater than or equal to 27 cm. 25% of Sheet LengthLess than 27 cm., and greater than or equal to 24 cm. 20% of Sheet LengthLess than 24 cm., and greater than or equal to 21 cm. 15% of Sheet LengthLess than 21 cm. 10% of Sheet Length.
h0
Exit Learn Mode
Pressing any of these keys will cause the controller tochange to a new mode.
2.5 Make Ready Mode
This key places the controller in the make ready mode.The key LED goes on. In this mode the folder will onlyfeed single sheets and a batching output is issued for everytwo sheets fed. This allows the operator to easily set up thebatching time.

PAGE 19 TP10313
2.7 Production Mode
Enter Run Mode and Select Large Display Content
These keys do not operate as mode select keys incounter setup. In all other modes, the keys both select thelarge display (1) contents and place the counter into runmode. Pushing one of the buttons will light the button�sassociated LED and cause the parameter to be displayed. Ifboth the input and output count keys are pressed simulta-neously, then both LEDs go on and the waste count isdisplayed. See Process Variable Definitions.
Table 12. Determining the Large Display Contents
When the folder is started the counter will start up inthe run mode, the normal operating mode of the counter.In this mode, various job parameters can be displayed onthe large display (1) and the small display (2) shows thegap length. The suction length display (3) is active in thismode and shows the suction length as a percentage of sheetlength.
Gap Length Adjustment
The gap length adjustment keys allow the user tochange the current gap length. The range of adjustment is0.2� to 98.0� (0.5 cm to 250 cm).
Suction Length Adjustment
The suction length adjustment keys allow the user tochange the amount of suction applied to the current sheetlength. The display shows the percentage in 5% steps. Allof the bars must be totaled to get the value. The range ofadjustment is 5% to 50% of the current sheet length.
h
h
h
h
h
h
Output Count
Batch Count DownNumber of Batches
Current Rate
Input Count
Waste Count
Large Display Contents
h
+
+
h 0
This mode is only available if a STA-NET adapter isinstalled and activated through maintenance mode. In thismode the small display (2) always shows the word �Job�.The large display (1) shows either �PAuSE� or a jobnumber which can be read from the network. The suctionlength display is disabled.
Select Job Number
This set of plus and minus keys step the large display(1) through pause mode and a list of available job numbers.While in network job mode, the folder is considered to bepaused.
Load Job and Return to Run Mode
When this button is pushed the selected job will beloaded into the counter and the counter will return to runmode. If the large display (1) was showing the message�PauSE�, the network job mode will end, but no job will beloaded.
Exit Network Job Mode
Pressing any of these keys will cause the counter tochange to a new mode.
+ +
+ +
h
Exit Make Ready Mode
Pressing any of these keys will cause the controller tochange to a new mode.
2.6 Network Job Mode
Pushing this key puts the counter in network job mode

TP10313 PAGE 20
Reset Function
Pressing and holding this key will result in a resetfunction being activated after a 5-second countdown. Thefunction is based on the current large display selection, seetable 12. The large display (1) will show countdown toreset in this manner. When the button is pressed themessage �CLr In 5� will show on the large display (1). Atone second intervals the display will progress through �CLrIn 4�, �CLr In 3�, �CLr In 2�, �CLr In 1�, and finally willshow �CLEArEd� when the reset action is complete.
0
Reset while showing Output Count will reset all jobvariables.
Reset while showing batch data will reset Numberof Batches and reload the Batch Down Count.
Reference Name DescriptionDesignatorLED1 Tachometer Indicator Tracks the Tachometer input.LED2 Not Used Turns on when MKE output is activated.LED3 Suction Indicator Tracks the Suction output.LED4 K1 Status of Relay K1LED5 Pile Down Tracks the Pile down output.LED6 Pile Up Tracks the Pile up output.LED7 Pile Indicator Tracks the Pile outputs. If one of the Pile
outputs is on, this LED will be on.LED8 Logic +5VDC Supply Shows status of Logic +5VDC SupplyLED9 Isolated +5VDC Supply Shows status of Isolated +5VDC SupplyLED10 Isolated +24VDC Supply Shows status of Isolated +24VDC SupplyLED11 Kicker Turns on when kicker output is activated.Table 14. LED Status Indicators
3.0 Logic Board Status Indicators
Several of the controller functions are monitored withLED indicators located on the Logic Board (see Table 14).The status of all other inputs are shown on the 8 Digitdisplay in Machine Setup mode (see Tables 1 - 6).
Table 13. Reset mode Selection

PAGE 21 TP10313
4.0 Process Variables Definitions
4.1 Total Input Count
Total Input Count increments by the factor setting eachtime an input is received at the Input Count input. TotalInput Count can range from 0 to 99,999,999.This process variable is stored in memory in case of apower outage.Reset job will clear this process variable to zero.
4.2 Total Output Count
Total Output Count increments by the factor settingeach time an input is received at the Output Count input.Total Output Count can range from 0 to 99,999,999.This process variable is stored in memory in case of apower outage.Reset job will clear this process variable to zero.
4.3 Batch Down Count
The Batch Down Count is the number of remaininginputs necessary to trigger a batch output. As input countsare received, this value counts down to zero. Each inputdecrements the Batch Count Down by one. When zero isreached, the Batch Down Count resets to the Batch Preset.The Count input that is used by the Batch Down Count isdetermined by the Batching Selection in Machine Setup. IfFeeder is the Batching Selection, the Batch Down Countwill be affected by the Input Count Input. If Delivery is theBatching Selection, the Batch Down Count will be affectedby the Output Count Input.Batch Down Count can range from 1 to 999.This process variable is stored in memory in case of apower outage.Reset job will clear this process variable to zero.Reset batch will load this process variable with the batchpreset.
4.4 Number of Batches
The Number of Batches is the number of times theBatch Down Count has reached zero.Number of Batches can range from 0 to 9999.This process variable is stored in memory in case of apower outage.Reset job will clear this process variable to zero.Reset batch will clear this process variable to zero.
4.5 Current Rate
The Current Rate is based on the number of InputCount inputs received during the sample period.The Current Rate is calculated every second.The Current Rate is shown as rate per hour
The Current Rate is rounded to the nearest hundreds.Current Rate can range from 0 to 99,999,900.This process variable is not stored in memory.
4.6 Main Drive Run Time
The Main Drive Run Time is the amount of time theDrive output has been on since the last Clear All MemoryReset in Maintenance Mode.This value is displayed in the format HHHHHH.HH.Main Drive Run Time can range from 0.00 to 999,999.99.This process variable is stored in memory in case of apower outage.Reset ALL in maintenance mode will clear this processvariable to zero.
4.7 Main Drive Velocity
The Main Drive Velocity is the speed of the Tachom-eter input.This value is displayed in meters per minute.This value is calculated every 300 milliseconds.This process variable is not stored in memory.
4.8 Waste Count (Option)
The Waste Count is the difference between the TotalInput Count and the Total Output Count.Waste Count is accessible by pressing and holding the TotalCount button followed by pressing the Total Output Countbutton.Waste Count can range from 0 to 99,999,999.This process variable is not stored in memory.Reset job will clear this process variable to zero.
5.0 Counter Setup Variables
5.1 Batch Preset
This parameter, accessible in the Batch Setup mode,specifies the batch count that will be used by the BatchCount Down. Zero is the default setting.This value can range from 0 to 999.
5.2 Batch Output Type
This parameter, accessible in the Batch Setup mode,specifies the batch output type that will be used when theBatch Count Down reaches zero.Available choices are Feed (FED), Delivery (DEL), Speed(SPD), and Table (TBL).

TP10313 PAGE 22
5.3 Batch Output Time
This parameter, accessible in the Batch Setup mode,specifies the output duration or delay that will be used whenthe Batch Count Down reaches zero.Available ranges are determined by the Batch Output Typeselected. The Table below shows the ranges for each outputtype.
5.4 Sheet Length
This parameter, accessible in the Batch Setup mode,specifies the length of the paper that will be fed into themachine.Available range is 6.0� to 59.0�. 6.0� is the defaultselection.
5.5 Gap Length
This parameter is accessible in Run mode and Learnmode and specifies the length of gap to use between sheetsof paper that are fed into the machine.Available range is 0.2� to 98.0�. 2.0� is the default selec-tion.
5.6 Suction Length
This parameter is accessible in Run mode and Learnmode andspecifies the suction length used on a sheet ofpaper that is fed into the machine.Available range is 5% to 50% in 5% increments. 30% is thedefault.
Output Delay Duration
Type Min. Time Max. Time Min. Time Max. TimeFeed Not applicable 0.0 Sec. 9.9 Sec.Table 0.000 Sec. 1.000 Sec. 100 msDelivery 0.000 Sec. 1.000 Sec. 25 msSpeed Not applicable 0.00 Sec. 5.55 Sec.Table 15. Output Delay and Duration

PAGE 23 TP10313
6.0 System Messages and Run Messages
6.1 Power-Up Fault Messages
Messages that are displayed during power on self-test. If PLC System Errors are shown in the display, call service.
ENGLISH GERMAN CODES TYPE DESCRIPTION88888 88888 88888 Information The controller is performing its lamp test.MEM TEST MEM TEST MEM TEST Information The controller is performing its RAM test.All Blank All Blank All Blank PLC System The display board is not functioning.
Error Cycle Power. If error persists, call service.ID Fail ID Fail ID Fail PLC System System cannot recognize the controller board.
Error Action: Cycle Power, if error persists call service.Error 1 Error 1 Error 1 PLC System The RAM test has found a bad memory location.
Error Action: Cycle Power, if error persists call service.Error 2 Error 2 Error 2 PLC System The Pile Safety Relay is stuck on or there is no power supply to the
Error pile circuits. Action: Check the condition of Relay 1 (K1), FusesF1 and F2, and X18. Cycle Power. If error persists, call service.
Error 3 Error 3 Error 3 PLC System There is power in the Pile Drive when it is off. Action: Check theError condition of Relay 1 (K1), Fuses F1 and F2, and X18. Cycle
Power. If error persists, call service.Error 4 Error 4 Error 4 PLC System The 24VAC inputs have current before the Watchdog relay has
Error been activated. Action: Check for stuck push buttons, faultysensors, or loose connectors. Cycle Power. If error persists, callservice.
Error 5 Error 5 Error 5 PLC System The membrane switch panel has a key pressed during the powerError on self-test. Action: Cycle Power, if error persists call service.
Error 6 Error 6 Error 6 PLC System The Watchdog sense circuit indicates Watchdog-timer operationalError before it has been started. Action: Cycle Power, if error persists
call service.Table 16. Power Up Fault Messages

TP10313 PAGE 24
6.2 Run Time Fault Messages
Run time fault messages are only displayed when the unit is in Run mode. Fault errors can still occur, but the correspondingfault message will not be displayed until the unit is switched to Run mode. Run time fault messages are PLC System Errorsor errors in the whole Electric System. It is necessary to call a technician or service.
ENGLISH GERMAN CODES TYPE DESCRIPTIONDCT X.X.X DCT X.X.X DCT X.X.X Information This is the Software-Version(X.X.X)
Note: do not push any buttons until this message has beencleared from the display
K5 Relay K5 Relay Error 7 PLC System The drive stop relay, K5, is not responding to the controller.Error Action: Call service.
Button Taste Error 8 Electrical A push button is in the wrong state during the version messageSystem display. Action: Check Buttons & Cycle Power. If errorError persists call service.
Watchdog Watchdog Error 9 PLC System The Watchdog Timer has elapsed without being serviced.Error Action: Cycle Power. If error persists call service.
No Tach Impuls Error10 Electrical The Machine Tachometer is reading a velocity outside of theSystem range 10 � 230 meters per minute, while the main drive shouldError be running. Action: Check the electric. If error persists call
service.Overload Uberlast Error11 Electrical A Thermal Overload has been tripped.
System Action: Check the electric. If error persists call service.Error
Pile Err Spg.Uber Error12 Electrical The Pile Safety Relay is stuck on or there is no power supply toSystem the pile circuits. Action: Check the condition of Relay 1 (K1),Error Fuses F1 and F2, and X18, then cycle Power. If error persists
call service.Overrun Uberlauf Error13 Electrical The Pile Table has moved past its safety stops. Action: Check
System the limit switches, pile table, and wiring. If error persists callError service.
2nd Stat 2Station Error14 Electrical The Emergency Stop, Wrong Sheet, and Thermal OverloadSystem sense circuits are all indicating failure. Likely cause is SecondError Station connector problems. Action: Check the Second Station
Connector, connector X22, and each individual circuit. If errorpersists call service.
Suction Saugtakt Error15 Electrical Short circuit on Suction controller. Action: Check the electrics.System If error persists call service.Error
Table 17. Run Time Fault Messages

PAGE 25 TP10313
6.3 Machine Run Error Messages
Machine Run Error Messages help the operator to indicate a production problem.
ENGLISH GERMAN CODES TYPE DESCRIPTIONStop Stop1 Stop1 Information One of the stop buttons is depressed. ACTION: Make sure all
stop buttons are cleared and connectors X21, and X22 areseated.
Wrng Sht Fehlerbg Stop2 Machine The Wrong Sheet Detector has been tripped. ACTION: ClearRun Error the fault. NOTE: If the main drive was running, the error
condition will remain latched until the Drive START is pressed.2 Sheet Doppelbg Stop3 Machine The Double Sheet Detector has been tripped. ACTION: Clear
Run Error the fault and check X22. NOTE: If sheet feed was active, theerror condition will remain latched until the Sheet Start ispressed.
No Feed Bog.Fehl Stop4 Machine No paper detected within 40 cm of suction valve actuation,Run Error while running in an automatic feed mode. ACTION: Check
misfeed, connector X14, and the condition of the count photo-eye.
Feeder Sensor Stop5 Machine Photo-eye at suction valve is covered before Sheet Start is active.Run Error
Long Sht Bg.Lang Stop6 Machine The count photo-eye has been covered for more than 150% ofRun Error the user set sheet length distance. ACTION: Check misfeed,
connector X14, and the condition of the count eye.Knife 1 Schwert1 Stop7 Machine The knife input 1 has been active for more than 1.5 times the
Run Error last measured time. ACTION: Clear the fault.Knife 2 Schwert2 Stop 8 Machine The knife input 2 has been active for more than 1.5 times the
Run Error last measured time. ACTION: Clear the fault.Knife 3 Schwert3 Stop 9 Machine The knife input 3 has been active for more than 1.5 times the
Run Error last measured time. ACTION: Clear the fault.Snsor DN Stpl Ab Stop 10 Machine The Pile has been moving down for more than 2.5 seconds
Run Error while the unit is feeding paper. ACTION: Check Pile Sensor.Snsor Up Stpl Auf Stop 11 Machine The Pile has been moving up for more than 1.5 seconds while
Run Error the unit is feeding paper. ACTION: Check Pile Sensor.Table 18. Machine Run Error Messages

TP10313 PAGE 26
PILE FEEDER OPERATION
1.0 Loading the Pile FeederSet the right hand side guide (Figure 11-1) to half the
sheet using the scale (11-2). The vacuum wheel is in thecenter of the sheet. Lock the guide in place using the lever(11-3).
Remove the left hand guide (Figure 12-4) from thefeeder. Move the sheet drag guide block (12-5) on the right-hand guide to the rear of the paper stock.
Press the table down button (for controls, see page 8). Alower limit switch will halt the pile table when it descendsto the lowest position. Load the paper against the front andright hand guides (11-1).
Press the table up button. The pile height sensor (11-6)will stop the upward travel of the table. During operation,the top sheet of the pile should be approximately 1/2" underthe vacuum wheel and 5/8" under the sensor (11-6), withthe pile up and the pump off. The pile height sensor iscontact-free.
Reinstall the left hand guide (12-4). Slide the registerguide (12-7) inward until the see-through left hand guide(12-4) is approximately 1/16" away from the stack.
1.2 Hold-down LocationsSet the sheet hold-downs so the rubber bumpers rest on
top of the sheet pile and prevent double sheets from beingpulled in. Using the rubber bumpers is dependent upon thestock being fed.
1.3Air and Vacuum SettingsPress the pile up button if it has not been pressed.Press the pump "on" button.Adjust the air flow into the top of the stack as shown in
Figure 13, using the blow tube angle levers (Figure 14-1)and the air bleed off valve cover (14-2).
Figure 13 shows that the top four to five sheets are to beseparated using the top blow tube (13-1). The bottom blowtube (13-2) separates approximately 1/2" of the stack underthe top four or five sheets. The bottom blow tube (13-2)provides separation to send sheets up to the top to be fed.
Do not adjust the air angle flow too high into thesheets. The top sheets should be in a humped pattern as seenthrough the side guide for approximately 75% of the sheetlength.
Figure 11
Figure 13
Figure 14
Figure 12

PAGE 27 TP10313
1.3 FRONT BLOW TUBE SETTINGS
The front blow consists of two tubes (Figure 13-1 & 2and Figure 15-1 & 2) instead of the traditional one tube.The numbers on the left hand side of the tubes correspond tothe chart (Figure 15-3) found on the side of the main controlenclosure.
Setting Up1.) Determine the width of the job to be run.2.) Find the numbers on the right-hand side of chart
that correspond with the sheet width.3.) Set the top (15-1) and bottom (15-2) blow tubes,
using the detent slots, to the respective numbers.Vacuum adjustment is made at the pump (Figure 16)
using the valve (16-1). Vacuum adjustment requirementsshould be minimal. Listen to the feeding at the vacuumwheel to determine if there is too much vacuum. Thevacuum valve (16-1) should be set as shown for mostapplications.
1.4 Vacuum Wheel The vacuum flow is controlled by a solenoid valve(Figure 11-4 & 17-1). This can be quickly and easilyremoved to clean the piston (17-2) by releasing the clamp-ing springs. Be careful not to damage the piston andcylinder.
The vacuum wheel (Figure 18-1) is supplied with twoO-rings (18-2) to assist feeding with a positive friction grip.These O-rings are replaced after removing the guard (18-3)by removing the two button head screws (18-4) holding it.
Figure 16
Figure 17
Figure 15

TP10313 PAGE 28
Figure 18
REGISTER OPERATION
Use the fluted knob (Figure 19-1) to slide the side guide(19-2) with the marble holder (19-3) to the required location1/16" away from the pile stack.
Move the sheet support (19-4) to the right hand side ofthe sheet.
Place the steel and/or plastic marbles into the marbleholder (19-3). It is recommended to have at least two steelmarbles in the first four to six positions closest to the pilefeeder end.
The succeeding positions can be filled with steel orplastic marbles depending on the stiffness of the paper. Forregistering oblong sheets it is recommended to have at least50% steel and 50% plastic marbles alternating in the marbleholder.
Clip-on sheet hold-downs (19-5) placed across theregister table prevent the sheets from rising. The hold-downwith the angle-formed end is to be placed in front of thevacuum wheel.
The fluted knob (19-6) provides microadjust-ment ofthe side guide (19-2). Knurled knobs (19-7) provide biasadjustment for the side guide for adjusting sheets that arenot square or for other unusual conditions.
The double sheet control (Figure 20) is adjusted to thethickness of the paper being fed by pulling up the lever (20-1) and inserting two paper strips (20-2) of the sheets to befolded in the clip at the back of the lever.
The feeler segment remains inoperative when a singlesheet is passing through. When double sheets are being fedthrough, the feeler segment is pulled against a microswitchand the double sheet is stopped. Sheet feeding is stoppedand the message "2 sheet" appears on the counter readout.The message remains until the double sheet is removed.Raise the lever (20-1) to remove the double sheet.
Figure 20
Figure 19
1.0 DOUBLE SHEET DETECTOR
The double sheet detector consists of a scanner element,microswitch and a free-wheel roller.
If the setting for paper thickness is exceeded, thescanner element trips the microswitch, closing the magneticvalve for the suction cycle so that sheet transfer is stoppedinstantaneously. While the double sheet is stopped, thesheets that are in the machine continue to be folded.
The double sheet stop must be set so that the scannerprobe remains untouched when a single sheet of paperpasses through. When two or more sheets are detected, itmust trigger the stop mechanism. (See Figure 21)

PAGE 29 TP10313
Figure 21
BAUMSET ADJUSTMENT
1.0 Adjustment of Folding Rollers Folding accuracy is determined largely by preciseadjustment of the folding rollers.
Using the Baumset precision adjustment device, thecorrect setting of the rollers can be made simply by insertingthe appropriate paper thickness between the adjustmentplates. (See Figure 22) With multiple thicknesses, insert single strips of thepaper being folded equal to the number of sheets passingthrough that roller combination..
Since the adjustment spindle acts directly on the foldingrollers, clearance settings are exact.
Another method for setting the folding rollers is to insertpaper strips between them by touch, the pressure adjustmentbeing made by turning the knurled screw. The numbers on the Baumset adjustment knobs corre-spond to the buckle-plate numbers into which the sheet isfed. All upper buckle plates have odd numbers while theplates below are even.
The Baumset adjustment device is correctly zeroed at thefactory. If any adjustment is necessary, strips of single paperthickness should be placed under every adjustment plate. Thefolding rollers are then reset by drawing strips of uniformthickness through the appropriate pair of rollers as far aspossible to the other side. At the same time, the knurled screws are adjusted so thatthe strips can be withdrawn when medium drag is felt. Whenthis operation is complete, the dial rings are reset to zero.
Figure 22
A double sheet strikes the scanner on the microswitch,interrupting the sheet flow-through.
With single sheet thickness, the scanner remainsuntouched and sheets move freely.

TP10313 PAGE 30
SETTING OF FOLD PLATES
NOTE:Check the symbols on the fold plate stop (Figure 23-1) forinstallation of the fold plate swing deflectors (Figure 24-1)to avoid damaging the fold rollers. The deflector must onlybe brought forward when the stop (23-1) with the deflectorsymbol is in the forward position.
Be sure that the adjustment screw (23-2) is in contactwith the support rail on both sides.
Clamp the fold plates with the clamping screw (Figure23-3).
The sheet-stop (23-4) should be moved to the desiredfold length according to the scale (23-5) by loosening theclamping screw (23-6) and then turning the adjustmentwheel (23-7).
The sheet stop can be set at an angle for sheets that arenot cut square by loosening the clamping screw (23-6) andturning the front adjustment wheel. The clamping screw(23-3) must be tightened for this adjustment.
For the fitting of a fold plate, both sides of the stop (23-1) must have the fold plate symbol turned to the front sothat the adjustment screw contacts the support rail.
Equal adjustments at both ends are needed to preventoblique folds or perforations.
CAUTION: If the buckle space is reduced, be sure that the fold platedoes not rub against the folding rollers. If this occurs, therollers will be damaged. Check for rubbing by turning thehandwheel on the folder before turning the power on.
Figure 24
Figure 23
SETTING OF SHEET DEFLECTORS
Fold plates that are not required for folding can be closedoff with swing deflectors fitted in the infeed. The fold plateis slightly withdrawn and the deflector (Figure 25-1) isswung down and pushed in until it engages.
CAUTION: Move stop (Figure 26-1) on both sides to avoid damageto the folding rollers. Loosen the knurled screw (26-2).Turn the stop and retighten the knurled screws. Thedeflector symbol (26-3) must be in forward position.
Figure 25

PAGE 31 TP10313
Check that the adjustment screws (26-4) are in contact withthe support rail (26-5) on both sides. The basic position is marked by a notch (26-6) in thefold-plate frame.
Setting Stationary Deflector(Separate sheet deflector) (Figure 27-1) The stationary sheet deflectors are installed and clampedin place in the same way as the fold plates.
NOTE:The fold plates in an 8-page folder will work in the #4 foldplate position when four plates are desired. This applies tofolders equipped with three fold plates and one stationerydeflector.
Figure 26
STACKER (DELIVERY)
The motorized hang-on stacker has the following uniquefeatures.
� Independent speed adjustment by using the speedselector (Figure 28-1).
� Telescoping delivery tray that is fixed in position usingthumbscrews (28-2) below the tray.
� Nosebar with brush (28-3) that prevents sheets frombecoming trapped and eliminating a pinch point.
� The stacker can be mounted level or at an angle to assiststacking of sheets that tend to spring open.
The stacker electrical power source is provided byinserting the male receptacle on the stacker power cord intothe mating connector found on the left hand side on themain electrical enclosure of the pile feeder.
Figure 27
Figure 28
TP10313 PAGE 32
SCORING/SLITTING/PERFORATING
Your new folder is capable of many different applicationsthat compliment the folding performance and provide forgreater productivity. The folder is equipped with slitter shafts that are quicklyset up for the required operation. These shafts accommodatethe mounting of the standard and optional accessoriesavailable that perform scoring, slitting and perforatingfunctions. It is important to note that accessories from previousmodel Baumfolder machines with 7/8" diameter slitter shaftsare still adaptable to your new folder.
1.0 Slitter Shaft Accessories Removal To remove slitter shafts, remove knob (Figure 29-1).Insert knob into the center of the slitter housing (29-2) andremove the housing, using the knob. Add or remove theparts needed for the current job using the wrench (Figure30) provided with the machine. See the following pages formore information on perfing, scoring, and slitting. Reinstallslitter housing and knob before starting the machine.
Figure 30
1.1 Scoring The folder can be used to score a sheet and deliver itflat, or to score a sheet after a fold or folds have beenmade. To ensure accuracy in making right angle folds,always score the sheet where the fold or folds are to bemade. This applies in all instances when a perforatorcannot be used. Various weights of stock with few or numerous foldsrequire a different type of score. Some jobs require anarrow, sharp score, usually when the folds are few, and afuller, more rounded score when the job becomes bulky.
The new Baum Adjustable Score Assembly (Figure 31)makes it easier to adjust the depth of your score. This isadaptable for any Baum folder with 7/8-inch diameterslitter shafts. The Baum Adjustable Score Assembly consists of twospecial score collars which are connected by two adjustingscrews. These screws provide precise control over thecompression of the rubber score tire, which in turndetermines the depth of the score.
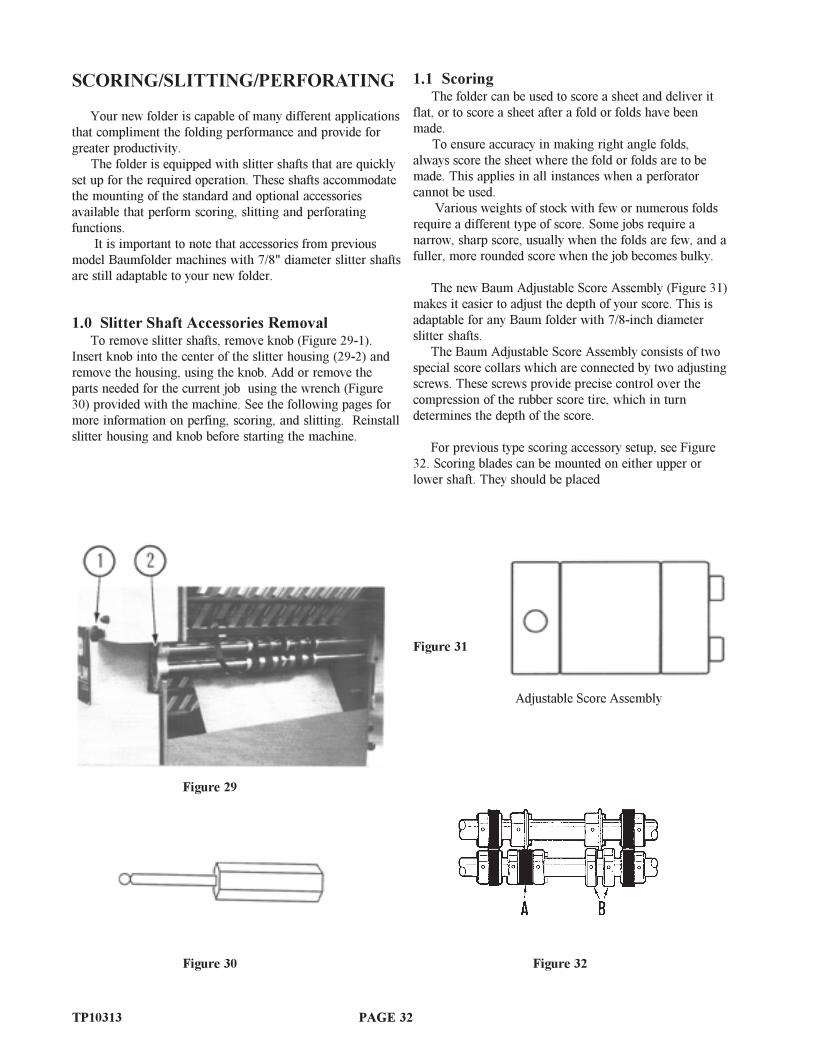
For previous type scoring accessory setup, see Figure32. Scoring blades can be mounted on either upper orlower shaft. They should be placed
Adjustable Score Assembly
Figure 31
Figure 32
Figure 29

PAGE 33 TP10313
so that the fold is made with, rather than against thescoring, or, in a continuing direction to the pressure orcrease that has been applied by the scoring blade.
32-A) Score directly on the wide, soft rubber tire with acollar mounted at either side. By this method, depth of thescoring can be increased by compressing the collars toexpand the tire.
32-B) For a wide, well-rounded score, the two steelcollars alone are sometimes used. Sharpness and depth ofthe score can be controlled by regulating the distance thecollars are placed away from the scoring blade.
Figure 33
1.2 Perforating The folder may be used for perforating either the headsof booklets (to allow the air to escape in making right-anglefolds) or to slot perforate sheets delivered flat, using bladesand strippers best adapted for a particular job. All perforating blades are mounted on the upper shaftand run in a grooved steel collar on the lower shaft with theflat side of the blade just touching a side of the groove.When doing book work, perforator blades should bemounted with the bevel side of the blade toward the follow-ing bank of fold rollers. (See Figure 34). When mounted inthis manner there is slightly less tendency for the sections ofthe signature to come apart and less tendency for onesection to pull out of line with another. This is particularlytrue when folding in an up fold plate. A stripper must be used with each perforation. Theforked spring steel stripper requires a little more care inmounting and is most often used when perforating only, asthere is less tendency for the perforated sheet to break apart.
Figure 34
Perforator Blades
Part # Description07618 6 Tooth Perforator ________ ________06605 12 Tooth Perforator ______ ______ ___07895 15 Tooth Perforator _____ _____ _____07896 18 Tooth Perforator ____ ____ ____ _29629 20 Tooth Perforator ___ ___ ___ ___ __07619 24 Tooth Perforator __ __ __ __ __ __06798 31 Tooth Perforator _ _ _ _ _ _ _ _ _07791 41 Tooth Perforator _ _ _ _ _ _ _ _ _ _ _ _11962 64 Tooth Perforator - - - - - - - - - - - - - - - - - -
Figure 35

TP10313 PAGE 34
1.3 Slitting (Cutting) Sheets Folders may be used to cut folded or flat sheets apart.The general set up for blades and collars is shown in theFigure 36. Two or more cuts may be made if duplicate setsof slitters are used. Be careful when mounting slitter blades to collars inorder to avoid ragged edges which can be caused by twoconditions: 1) Nicks or burrs on the collars or blades. Removecarefully by filing or using a fine piece of emery cloth. 2) Incorrect mounting of blades caused by tighteningwith the wrong type screw. Always use flat head screws onthe side of blades and blade holders which are countersunk. Before tightening the blade to the collar, slide the bladewith the collar loosely attached on the end of the shaft. Thentighten securely to align both blade and collar, and allowingfree horizontal movement. Place the blade on the uppershaft in the position where the cut is to be made. Then movethe blade on the lower shaft so that the two blades arepressed snugly together. Too much space between the bladeswill produce a ragged cut. Figure 36-1 shows a spacing washer mounted on theoutside of the blade for reinforcement. This helps preventbending or twisting when running very heavy work or anyjob containing a large number of folds. Space the pull out tires evenly to support the sheet.
Figure 36
Figure 37
Slitter Blades
Part # Description06378 3/32" Thick Countersunk Flat Side06804 3/32" Thick Countersunk Bevel Side15240 .062 Thick Countersunk Flat Side15241 .062 Countersunk Bevel Side15573 Hollow Ground Countersunk Flat Side15574 Hollow Ground Countersunk Bevel Side

PAGE 35 TP10313
1.4 Trimming Edges of Booklets Figure 38 shows the setup of cutting blades and strippersfor trimming edges of booklets or outer edges of circularsrunning two or more up. Cutting blades are attached to blade holder collars sothat the bevel of blades on the upper shaft are directedtoward the strip being trimmed and the bevel of blades onthe lower shaft are directed away from the strip. Bladesmounted in this manner tend to turn trimmed edges downwhich helps guide them to the floor. Blade holder collarsare turned out to allow a set of pull-out tires to be placedclose to the cutting blades, preventing the sheet frombuckling or twisting at the point where the cut is beingmade. Use as many additional pull-out tires in the center of thesheet as necessary. Set the collar, with blade attached, in the proper positionon the upper shaft. Then move the collar/blade on the lowershaft so that the flat sides of both blades press snuglytogether. Too much space between the blades will cause aragged edge on the finished booklet.
Do not attempt to trim less than one-eighth of aninch. On bulky or heavy sheets a wider trim is necessary. Figure 38 shows the type strippers used for this work,mounted on the square bar directly above the shafts. Notethat one is right, the other left, placed accordingly. It maybe necessary to bend the strippers slightly to avoid rubbingon the cross carrier or stacker. Strippers are adjustable forup and down movement.
Trimming a Strip from Center of Sheet Figure 39 shows the setup for taking a quarter inch trimout of the center of a sheet. Two or more trims may be madeas long as duplicate sets of cutters and strippers are usedand this setup adhered to. A strip three sixteenths of an inch wide is the minimumtrim. This is the thickness of two of the cutting bladesplaced together and attached to a blade holder collar. Bladeson the upper shaft, for all trims up to one-quarter inch, areattached to one collar. If a strip wider than one-quarter of aninch is to be cut, each blade is attached to an individualcollar and any desired width may be cut. To remove the trim, place the appropriate center stripperbetween two of the cutting blades, attached to a collar, asshown in Figure 39A.
Figure 38
Figure 39
You will note that the holes in one side of the cuttingblades and blade holder collars are countersunk, so that flathead screws can be used to mount blades on the lower shaft,allowing clearance for the stripper which is placed betweenthem. This also allows the cut out strip to pass between thelower blades without encountering screw heads. Attaching blades to collars is very important and shouldbe done with care. The bevel of the cutting blades on the topshaft should always be directed toward the strip to betrimmed. The bevel of the blades on the lower shaft shouldbe directed away from the strip. Before the cutting blades are tightened to the bladeholder collars, slide both the collar and attached blade on theend of the shaft so that they are accurately aligned. Placecutting blades on the upper shaft to the proper positionwhere the cut is to be made. Then place collars on the lowershaft so that the flat sides of the blades are pressed snuglytogether. Too much space between the blades will give aragged edge. Always examine blades for dullness and nickswhich will cause the same condition. When blades are in the proper position, mount thestripper as shown. Be sure the stripper does not touch thesides of the cutting blades. With this setup, the trimmed out section automaticallygoes between the blades on the lower shaft, where it iscarried down and around and guided to the floor by thestripper wire.

TP10313 PAGE 36
LUBRICATION/MAINTENANCE
Pile FeederVacuum Solenoid Valve The vacuum at the suction wheel is controlled by a
solenoid valve (Figure 40). This can be quickly and easilyremoved to clean the piston by loosening the clampingsprings. Be careful not to damage the piston and cylinder.See Figure 17.
Gear Reducer Check fluid level annually. Check for wear. Referto parts manual for part number.
O-Rings (on vacuum wheel) See Figure 18.
Vacuum Pump Loss of vacuum and blow can be caused by clogged filters.Check periodically. Check vanes for wear after 15,000hours of service. Refer to parts manual for ordering parts.
RegisterFlat Belt Drive Shaft (hex shape) Check for wear periodically. Lubricate with Baum
Lubricant "W". Lithium base grease or equivalentperiodically.
Support Bars Lubricate the three support bars on which the registerguide slides periodically using Lithius base grease.
FolderHandwheel Lubricate bi-annually with commercial grade
lubricating oil.
Fold Rolls WARNING: Never clean fold rolls while the machine isrunning.
With the folder turned off, rub down the fold rolls with acloth dampened with "Surewash". Never immerse foldrolls into the washing solvent. After cleaning, they shouldbe rubbed down with a clean dry cloth.
Gear Drive The helical gear drive is lubricated by an automaticgrease dispenser located inside the LH guard. Usethe label on the LH guard to record lubrication changedate [It should be changed every 9 months]. To activatethe dispenser, screw the eye bolt (Figure 41-1) into the lid(41-2) of the dispenser until ring (41-3) comes off. Shakethe cannister when installing to insure that it rattles,signifying that it has been activated. See parts manual forreplacement dispensers.
WARNING: Never open grease dispenser. Even whenempty, container remains under pressure. If damaged,caustic liquid may leak out. If contact is made with skin,flush repeatedly with water.
Pullout Tires Check periodically for wear, uneven tires can cause thesheet to twist.
Figure 40
Figure 41

PAGE 37 TP10313
TECHNICAL SPECIFICATIONS
BAUM 2018
Maximum sheet size 20.5" x 25" [45.7 x 63.5cm]
Minimum sheet size 4" x 6" [10.1 x 15.2cm]
Maximum folder speed 8200 ipm [208m/min]
Maximum pile height 25" [63.5cm]
Minimum fold length 1.57" [40mm]
Maximum fold length 20.5" [45.7cm] (parallel folder)
Slitter shaft diameter 7/8" [22mm]
Electrical 220 Volt, 1 phase, 60 Hz, 23 AmperesSee serial plate on folder
ACCESSORIES
In addition to the various folding, slitting, perforating andscoring functions the Baum 2018 can perform even moreproductive functions using the following accessories.
� Jam Detectors� Remote Control� Static Eliminator� Sound Guards� Gluing Fold Plates
Contact your local Baumfolder Corporation sales repre-sentative for further information.

TP10313 PAGE 38
TROUBLESHOOTING
PROBLEM CAUSE REMEDYSheets stick together Inadequate ink drying, cut Fan out thoroughly whenparticularly along sides. with blunt guillotine blade. piling, increase blower air.
Suction wheels picks Excessive suction. Reduce vacuum setting.up double sheets. Air blow improperly set Increase air blowSheets stick together
Double sheet stop Set only to single paper Correct to double paperreacts to single sheets. thickness. thickness. Tighten lock nut.
Sheet twists after suction Side Guide on register Bring guide plate forward.wheel finishes feed-in. set too far back.
Too few marbles at start of Increase number of marblesside gage. if necessary.
Suction gap too short. Increase gap setting.
Sheet leading edge If the leading edge of the sheet Adjust holder tonguebuckles on register or is being buckled, the holder accordingly.lower sheets are being tongue below the suction wheelpushed forward. is too high; if too low, sheets
are pushed forward.
Dirty valve piston sticking. Clean.
Sheets fails to run into the Only at 1st buckle plate: Fit sheet deflector to 1stbuckle plate. A curl in the sheet buckle and fold in 3rd
can cause the leading- buckle plate.edge to bend up or downthus missing the upper orlower buckle throat.
On all buckle plates: sheet Advance lower buckle platemissing the buckle plate lips accordingly.underlips.
Sheets fails to re-emerge Sheet unable to buckle as Set lower buckle platefrom buckle plate. buckle space too small. lip further back.
Folding rollers blunt or Wash off rollers with theclogged with ink. type of rubberised-cloth
cleaning agent used inoffset work.
Inadequate inside clearance Increase clearance asin buckle plate. necessary.

PAGE 39 TP10313
TROUBLESHOOTING - continued
PROBLEM CAUSE REMEDYSheets fails to re-emerge Product too thick for folding. Consult Baum technical rep.from buckle plate.
Not enough roll pressures. Check Baumset settings.
Sheet remains lying on Electrostatic charge in Fit discharge unit at thethe roller table of the 2nd product caused by friction exit to the 1st stationstation or fails to run into with rollers and deflectors or arrange for appropriatethe 1st buckle plate of the and also relatively low humidity on the premises.2nd folding station. humidity.
Damping rods and sheet holder Raise as necessary.set too low.
Wrinkling after the 1st Register guide not at right- Set angle correctly.fold, either across or angles to the folding rollers.parallel.
Sheet drawn too sharply against Insert fewer balls or usethe register guide causing a wave lighter ones.to form.
Buckle plate feed stop not Correct buckle plate stopparallel to the incoming sheet setting.edge.
Folding rollers set too tight. Slacken roller setting.
Crooked perforation after Register guide and buckle Reset.1st fold. plate stop not at right angles
to each other.
Faulty setting of folding Check and reset asrollers and slitter shaft. necessary.
Lower buckle plate lip Set to zero position.crooked.
Sheet corners buckled Sheet deflector set too low. If the corners are buckledup or down after the upwards, set the upper1st fold. sheet deflectors back
evenly; if the corners arebuckled downwards, thelower deflectors mustsimilarly be set backevenly by underlayingpieces of card. In nocircumstances alter thebasic setting of thedeflectors.

TP10313 PAGE 40
screws for the slitter shaft accessories facing out, so youdon't have to turn the shafts to get to the screws.
OPERATING TIPS
Setup When setting up a job on your folder, watch so the sheetdoesn't end up with either the RH or LH edge along the edgeof a fold pan or register plate. This could kick it overcausing inaccurate folding.
Brass Tipped Screws When replacing screws in collars and various otherassemblies, be sure to note if they are brass tipped screws.Using non-brass screws as replacements will cause scarringof the shaft, making collars difficult to move.
Static Electricity If you do not have an electrical static eliminator, here aresome ideas to help reduce static electricity: � Make sure the machine frame is grounded. � Try using static tinsel across the register table andfeeder. � Locate the folder out of direct drafts such as doorwaysand air vents. � Cover jobs with plastic between the press and the folderif much time will elapse before the job is to be run.
Cutting Blade Wear To help extend the life of all cutting blades, check forpossible burrs on the mounting collar. Lay a sheet of emerycloth on a flat surface and rub the collar around a few timesto remove any burrs. The blade will now rest flat againstthe collar, giving a more even rotation.
Measuring Odd Thirds When measuring odd thirds as needed for a Z-fold forexample, on an 11 inch sheet, lay your ruler on a diagonalof 12 inches instead. Mark at four and eight inches, andyou will now be able to easily measure 1/3 of the sheet.
Pull-out Bands Periodically check for wear on the rubber pull-out bandson each slitter shaft. When each sheet passes through thelast rolls, there is another 1 3/4 inches left on the sheetbefore it is completely out of the folder. At this point, theonly thing controlling the sheet is the pull out bands. Ifthey are worn or uneven, the sheet can twist after droppingout of the rolls when travelling that last 1 3/4 inches.Besure when replacing these worn pull-out bands that youreplace the complete set, so you will always have an evenpull on both sides.
Slitter Shaft Setup Here is an easy way to set up your slitter shaft accesso-ries. Mark up a dummy sheet with the scores, perforations,etc. locations. Roll through by hand and position yourslitter shaft accessories accordingly. Also, keep all set
TIPS FOR FOLDING
The following section contains a number of hints drawnfrom practical experience for the setting up and adjustmentof folding machines.
Roller Setting for Accordian and Letter Folding The rollers used for these types of folds must be set onlyto single paper thickness. The folding rollers following thefinal fold must, however, be set once more to the totalthickness of the paper passing through.
Processing Thin Printing Stock It is essential that the folding rollers be adjusted withmaximum precision. Lightweight printed stock is more easily folded when thepaper is slightly moist as this imparts a greater degree ofstiffness. For sheet transportation on the register table andat the right-angle folds, as few marbles as possible should beused and these should be of light weight. When lightweight printed stock is being folded, thefolding machine should be started up as slowly as possible.Only after the necessary precision adjustments have beenmade should the machine speed be increased in accordancewith the paper. It is essential to ensure that the speed isincreased only to a point where quality is maintained.
Folding Roller Adjustment Contrary to popular opinion, paper strips trimmed forthis purpose should not be inserted between the clampblocks of the Baumset. The strips should be folded accord-ing to the required pattern and inserted with the folds.
Paper Grain in Letter Folds With paper of up to 90 g/m, the three-directional letterfold can be produced even if the grain is at right angles tothe fold. From 90 g/m upwards, better folds are produced ifthe paper grain runs parallel to the fold.
Using Guide Marbles The basic rule is that as few marbles should be used aspossible. Steel marbles should be used only when necessaryfor the type of paper and the required fold. Conveyor tapeslast longer if unnecessary marbles are removed. If stream delivery on parallel folding work is notuniform, try using more marbles after the parallel foldingstation. A simple rule of thumb is that the thicker the foldedsheet becomes from station to station, the greater the loadexerted by the balls should be to facilitate sheet movement.

PAGE 41 TP10313
Fixing Crooked Perforations If misaligned perforations appear after the parallelfolding station, first check for correct squareness setting ofthe register guide relative to the buckle plate stop. If square,the sheet deflector following the last buckle plate must beset back slightly on the side on which the sheet is tending toadvance. Adjustment can be made by inserting a card underlay ofsuitable thickness. The affected sheet side then has to travela greater distance, so a perfect perforation can be madewithout changing the fold position.Bottom Plate Lip Adjustment Since paper qualities and thicknesses vary greatly, it isessential that buckle plates are properly adjusted. With thin papers, the lower buckle lip is brought slightlyforward. With thicker paper it must be set further back. Thebuckle plate configuration is directly related to the thicknessand stiffness of the paper being folded. This relationshipmust be taken into account if a high quality fold is to beachieved. The adjustments can be made by setting the nuts on thetop edge of the buckle plate to give the necessary readingagainst a scale on the side buckle plate post. A pointermarks the normal setting of the buckle plate. The insidewidth between the buckle plate section rods can also bevaried without altering the setting of the buckle throat.
Figure 42
Figure 43
Figure 44
Figure 46
Figure 45

TP10313 PAGE 42
Principles of Mechanical Folding
The buckle folding principle In buckle folding, each station consists of three rollersand a buckle plate. The first two rollers are arranged onevertically above the other and they carry the incoming sheetinto the buckle plate until it reaches a feed guide stop thatcan be adjusted as required. The sheet is delivered into the buckle plate at a deter-mined speed. The leading edge strikes the paper stop. Onceagainst the stop the sheet continues to be driven. A buckleforms in the space between the three rollers. As this sagsdownward, it is picked up by the rotating rollers and thefold is formed as the sheet passes through them. It can be seen that in this case the folding process is notrestricted to any cyclical movement and is thus capable of avery high output. For each folding station it is possible to fit up to fourbuckle plates, arranged alternately above and below. Buckleplates that are not required for a particular folding operationcan be replaced by sheet deflectors, allowing one or morebuckle plates in a folding station to be by-passed. It is thuspossible to execute a large number of fold variations. The gap between the rollers must be set to the thicknessof the paper that is passing through. Certain deviationsmust be made for special types of parallel folding.
Figure 49
Figure 47
Figure 48
Figure 50
Figure 51
Figure 52

PAGE 43 TP10313
IMPOSITIONS18 MOST
POPULAR FOLDS
1
2
34
5
MAINDRIVE
FOLD PAN #1FOLD PAN #3
FOLD PAN #2
FOLD PAN #4
DEFLECTOROPEN
DEFLECTORCLOSED
DEFLECTOROPEN
DEFLECTORCLOSED
SHEETSTOP
SHEETSTOP

TP10313 PAGE 44
On a buckle folder, the sheet is laid flat on a register table and then enters the fold pan assemblywhere it comes to a stop against the stationary fold plate stop. A series of buckles then forms throughoutthe sheet. The buckles whithin the fold pan are kept very small by the narrow channel design. Thebuckles at the end of the fold pan, however, will be larger. The fold pans and fold rollers are configuredsuch that the large buckle will always form downward, where it can be grabbed by the fold rollers andcompressed into a fold.
Look at the figure below. You can see that fold pans #1 and #3 are angled upwards. Because of thisand the configuration of the fold rollers, sheets fed into the #1 and #3 fold pans will always be folded up(i.e. so that the �up� surface of the sheet is folded into contact with itself).
Likewise, because foldpans #2 and #4 are angled down, sheets fed into them will be down-folds; the�down� surface of the sheet will be folded into contact with itself.
1
2
34
5
MAINDRIVE
FOLD PAN #1FOLD PAN #3
FOLD PAN #2
FOLD PAN #4
DEFLECTOROPEN
DEFLECTORCLOSED
DEFLECTOROPEN
DEFLECTORCLOSED
SHEETSTOP
SHEETSTOP
Fold Pan Fold#1 UP#2 DOWN#3 UP#4 DOWN

PAGE 45 TP10313
MANUAL USAGE
Use this manual when you need to know how to set-up your folder to end up with a particular foldedpiece or, if possible, when planning the layout before printing the job. In most cases, the page numbersand their orientations after the fold are included. Below is an explanation of how to read the diagrams inthis manual. On the next page is a quick explanation of the basic theory of buckle folding. Althoughreasonable care has been taken to assure accuracy, Baumfolder Corporation does not assume any respon-sibility for any errors that might inadvertently be contained in this manual. When trying a new fold, it isalways advisible to set up a test run to check for potential problems.
1. Refer to the diagram below. Visualize the sheet to be folded lying flat on the register table. Theedge toward the fold rolls is called the �LEADING EDGE�. The paper edge under the register guidewill be referred to as the �SIDE GUIDE�.
In this manual, each folding diagram has beenrotated clockwise 90 degrees from what is visualizedbelow so that they appear as pictured to the right.The dotted lines represent the creases where thepaper has been folded.
SIDEGUIDE
LEADING EDGE
1 234
65
78
LEADING EDGE
SIDE GUIDE

TP10313 PAGE 46
TYPICAL LAYOUT ANDSHEET ORIENTATION
Each numbered Imposition Blockin this manual contains:A. Imposition TitleB. Fold Pans UsedC. Sheet LayoutD. Folded Sample
2. Dashed lines represent folds.Page numbers or letters without circles are face up.Page numbers or letters with circles are on the underside of the sheet.When letters are used, folds are to be made �A� to �A�, �B� to �B�, etc.
3. In order to use your Imposition Manual properly, note that the pans in each folding section arenumbered conventionally as follows:
PARALLEL FOLDER 1st STATION (8 page)#1 (UP) #1 (UP)#2 (DOWN) #2 (DOWN)#3 (UP) #3 (UP)#4 (DOWN) #4 (DOWN)
2nd STATION (16 page) 3rd STATION (32 page)#1 (UP) #1 (UP)#2 (DOWN) #2 (DOWN)#3 (UP)#4 (DOWN)
NOTES1. When planning an imposition, check your folded layout for proper page numbers and guide edges.
Verify that your folder is large enough to do the job, that is, that the fold pan depths are sufficientfor the folds desired.
2. If the desired imposition is unusual, try the stock on the folder before printing (make a trialfolding run).
3. Use the most logical layout and avoid unnecessary problems such as air pockets and adversepaper grain.
4. For better results, use scores whenever possible.
5. There are alternate ways of making many of these impositions; those presented herein are incommon use to achieve the results shown. An experienced operator will often develop alternatemethods to achieve the same results.
1
2 3
4
6
5
7
8
LEADING EDGE
SIDE GUIDE

PAGE 47 TP10313
1 234
65 1
2
3
4
6
5
7
8
123 4
6 5
7 8
4-PAGEParallel: 1May be folded two ormore up and cut apart.1
4-PAGE, DOUBLEIMPOSITIONParallel: 1, 2, 3May be folded two ormore up and cut apart.Trim edge after folding.
26-PAGE, STANDARDParallel: 1, 3May be folded two ormore up and cut apart.312
3 4
123 4
123 4
6 5
123 4
6-PAGE, ACCORDIONParallel: 1, 2May be folded two ormore up and cut apart.4
8-PAGE, PARALLELIMPOSITIONParallel: 1, 2May be folded two ormore up and cut apart.
58-PAGE, RIGHT ANGLEParallel: 18-Page: 16

TP10313 PAGE 48
1
2
B
C
C B
7
8
9
10
4
3
6
5
12
11
11
12
9
10
4
3
2
1
6
59
8
AB
B
C
C A
1
2
3
4
6
5
7
81
2
3
4
6
5
7
8
3
4
6
5
1
2 7
8
8-PAGE, TWO RIGHTANGLE OBLONGParallel: 18-Page: 17
8-PAGE, RIGHTANGLE DOUBLEIMPOSITIONParallel: 18-Page: 1, 2, 3
88-PAGE, PARALLELOVER & OVERParallel: 1, 2, 4May be run two ormore up and cut apart.
9
12-PAGE BOOK,SADDLE STITCHParallel: 1, 28-Page: 2
10 12-PAGE BOOK,SADDLE STITCHParallel: 1, 28-Page: 1
11 12-PAGE LETTERFOLD, HEADS OUTParallel: 18-Page: 1, 2
12

PAGE 49 TP10313
1
2
3
4
6
5
7
8
11
12
9
10
14
13
15
16
1
2
3
4
7
8
22
21
18
17
6
5
11
12
9
10
14
13
15
16
23
24
19
20
1
2
3
4
7
8
22
21
18
17
6
5
11
12
9
10
14
13
15
16
23
24
19
20
26
25
30
29
27
28
31
32
78
3 4
65
12
B
C
B 11129 10
B
C
CB
C
14 13
15 16
12-PAGE LETTERFOLD, HEADS INParallel: 18-Page: 1, 3
13 12-PAGE LETTERFOLD, ACCORDIONParallel: 18-Page: 1, 2
14 16-PAGE, THREERIGHT ANGLE BOOKIMPOSITIONParallel: 1 8-Page: 116-Page: 1 May be runtwo or more up and cutapart.
15
12-PAGE FOLDER,HEADS OUTParallel: 18-Page: 1, 2
16 24-PAGE BOOKLETParallel: 1, 28-Page: 1, 217 32-PAGE BOOK
Parallel: 1, 2, 38-Page: 1, 218

TP10313 PAGE 50
Baumfolder has authorized dealers located through-out the United States.
Call toll free, 1-800/543-6107 for parts or thenumber of your nearest authorized dealer.
BAUMFOLDERC O R P O R A T I O NProducing Bindery Equipment Since 1917
1660 Campbell RoadSidney, Ohio 45365-0728Phone; 937/492-1281 or 800/543-6107Fax; 800/452-0947Internet: www.baumfolder.comE-mail: [email protected]