Ayia Sotira Field Manual
56
1 Nemea Valley Archaeological Project Field Manual for the Ayia Sotira Excavation INTRODUCTION ...................................................................................................................................................... 2 HISTORY OF PREVIOUS WORK.......................................................................................................................... 2 RESEARCH GOALS ................................................................................................................................................. 3 FIELD METHODS .................................................................................................................................................... 6 SURFACE SURVEY..................................................................................................................................................... 6 GEOPHYSICAL SURVEY ............................................................................................................................................. 6 EXCAVATION PROCEDURES....................................................................................................................................... 6 EXCAVATION NOTEBOOK RECORDING SYSTEM......................................................................................................... 9 EQUIPMENT AND SUPPLIES...................................................................................................................................... 10 PHOTOGRAPHY ....................................................................................................................................................... 12 DRAWING ............................................................................................................................................................... 14 FINDS PROCESSING PROCEDURES ............................................................................................................................ 15 CONSERVATION ...................................................................................................................................................... 16 RECOGNITION OF GROUND STONE TOOLS ............................................................................................................... 17 GUIDELINES FOR SOIL/SEDIMENT DESCRIPTION ...................................................................................................... 17 GUIDELINES FOR COLLECTING PHYTOLITH SAMPLES............................................................................................... 19 GUIDELINES FOR RECOVERY OF CARBONIZED PLANT REMAINS............................................................................... 20 COLLECTING SAMPLES FOR WATER SIEVING AND FLOTATION................................................................................. 21 PHYSICAL ANTHROPOLOGY .................................................................................................................................... 21 GUIDELINES FOR RECOVERY OF MORTUARY PRACTICES ......................................................................................... 23 SITE PRESERVATION AND CONSERVATION .............................................................................................................. 24 LABORATORY METHODS .................................................................................................................................. 24 MUSEUM PROCEDURES ........................................................................................................................................... 24 FINDS PROCESSING PROCEDURES ............................................................................................................................ 25 WATER SIEVING AND FLOTATION PROCEDURES ...................................................................................................... 25 ORGANIC RESIDUE ANALYSIS SAMPLING GUIDELINES............................................................................................... 27 MUSEUM CONSERVATION AND STORAGE ................................................................................................................ 28 PROJECT ARCHIVES ........................................................................................................................................... 29 PROJECT PERSONNEL ........................................................................................................................................ 29 PROJECT SCHEDULE........................................................................................................................................... 30 PUBLICATION PLANS .......................................................................................................................................... 31 LIST OF ILLUSTRATIONS................................................................................................................................... 31 BIBLIOGRAPHY..................................................................................................................................................... 31 APPENDICES .......................................................................................................................................................... 34 APPENDIX 1: INSTRUCTIONS FOR USING THE TOTAL STATION .................................................................................. 34 APPENDIX 2: STRATIGRAPHIC UNIT FORM............................................................................................................... 34 APPENDIX 3: FIELD NOTEBOOK TEXT FORM ........................................................................................................... 34 APPENDIX 4: FIND SPOT REGISTER.......................................................................................................................... 34 APPENDIX 5: SU DATABASE ................................................................................................................................... 34 APPENDIX 6: FIND SPOT DATABASE ........................................................................................................................ 34 APPENDIX 7: DRAWING DATABASE......................................................................................................................... 34 APPENDIX 8: CATALOGED OBJECT DATABASE ........................................................................................................ 34 APPENDIX 9: PHOTO FORM AND DATABASE ............................................................................................................ 34 APPENDIX 10: SOIL/SEDIMENT FIELD DESCRIPTION ................................................................................................ 34 APPENDIX 11: WATER SIEVE FORM AND SAMPLING STRATEGY............................................................................... 34
Transcript of Ayia Sotira Field Manual

1
Nemea Valley Archaeological Project Field Manual for the Ayia Sotira Excavation
INTRODUCTION ...................................................................................................................................................... 2
HISTORY OF PREVIOUS WORK.......................................................................................................................... 2
RESEARCH GOALS................................................................................................................................................. 3
FIELD METHODS .................................................................................................................................................... 6
SURFACE SURVEY..................................................................................................................................................... 6 GEOPHYSICAL SURVEY............................................................................................................................................. 6 EXCAVATION PROCEDURES....................................................................................................................................... 6 EXCAVATION NOTEBOOK RECORDING SYSTEM......................................................................................................... 9 EQUIPMENT AND SUPPLIES...................................................................................................................................... 10 PHOTOGRAPHY ....................................................................................................................................................... 12 DRAWING............................................................................................................................................................... 14 FINDS PROCESSING PROCEDURES............................................................................................................................ 15 CONSERVATION...................................................................................................................................................... 16 RECOGNITION OF GROUND STONE TOOLS ............................................................................................................... 17 GUIDELINES FOR SOIL/SEDIMENT DESCRIPTION ...................................................................................................... 17 GUIDELINES FOR COLLECTING PHYTOLITH SAMPLES............................................................................................... 19 GUIDELINES FOR RECOVERY OF CARBONIZED PLANT REMAINS............................................................................... 20 COLLECTING SAMPLES FOR WATER SIEVING AND FLOTATION................................................................................. 21 PHYSICAL ANTHROPOLOGY .................................................................................................................................... 21 GUIDELINES FOR RECOVERY OF MORTUARY PRACTICES ......................................................................................... 23 SITE PRESERVATION AND CONSERVATION .............................................................................................................. 24
LABORATORY METHODS .................................................................................................................................. 24
MUSEUM PROCEDURES ........................................................................................................................................... 24 FINDS PROCESSING PROCEDURES............................................................................................................................ 25 WATER SIEVING AND FLOTATION PROCEDURES ...................................................................................................... 25 ORGANIC RESIDUE ANALYSIS SAMPLING GUIDELINES............................................................................................... 27 MUSEUM CONSERVATION AND STORAGE ................................................................................................................ 28
PROJECT ARCHIVES ........................................................................................................................................... 29
PROJECT PERSONNEL ........................................................................................................................................ 29
PROJECT SCHEDULE........................................................................................................................................... 30
PUBLICATION PLANS.......................................................................................................................................... 31
LIST OF ILLUSTRATIONS................................................................................................................................... 31
BIBLIOGRAPHY..................................................................................................................................................... 31
APPENDICES .......................................................................................................................................................... 34
APPENDIX 1: INSTRUCTIONS FOR USING THE TOTAL STATION .................................................................................. 34 APPENDIX 2: STRATIGRAPHIC UNIT FORM............................................................................................................... 34 APPENDIX 3: FIELD NOTEBOOK TEXT FORM ........................................................................................................... 34 APPENDIX 4: FIND SPOT REGISTER.......................................................................................................................... 34 APPENDIX 5: SU DATABASE ................................................................................................................................... 34 APPENDIX 6: FIND SPOT DATABASE........................................................................................................................ 34 APPENDIX 7: DRAWING DATABASE......................................................................................................................... 34 APPENDIX 8: CATALOGED OBJECT DATABASE ........................................................................................................ 34 APPENDIX 9: PHOTO FORM AND DATABASE ............................................................................................................ 34 APPENDIX 10: SOIL/SEDIMENT FIELD DESCRIPTION ................................................................................................ 34 APPENDIX 11: WATER SIEVE FORM AND SAMPLING STRATEGY............................................................................... 34
2
Introduction
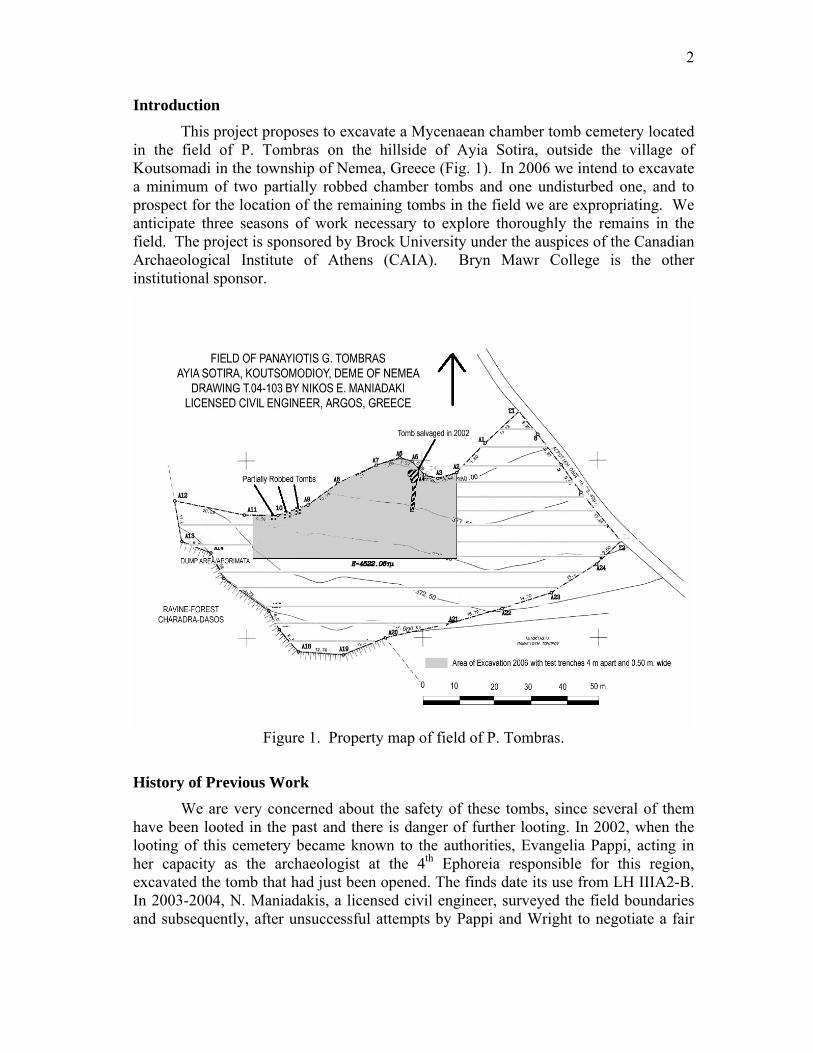
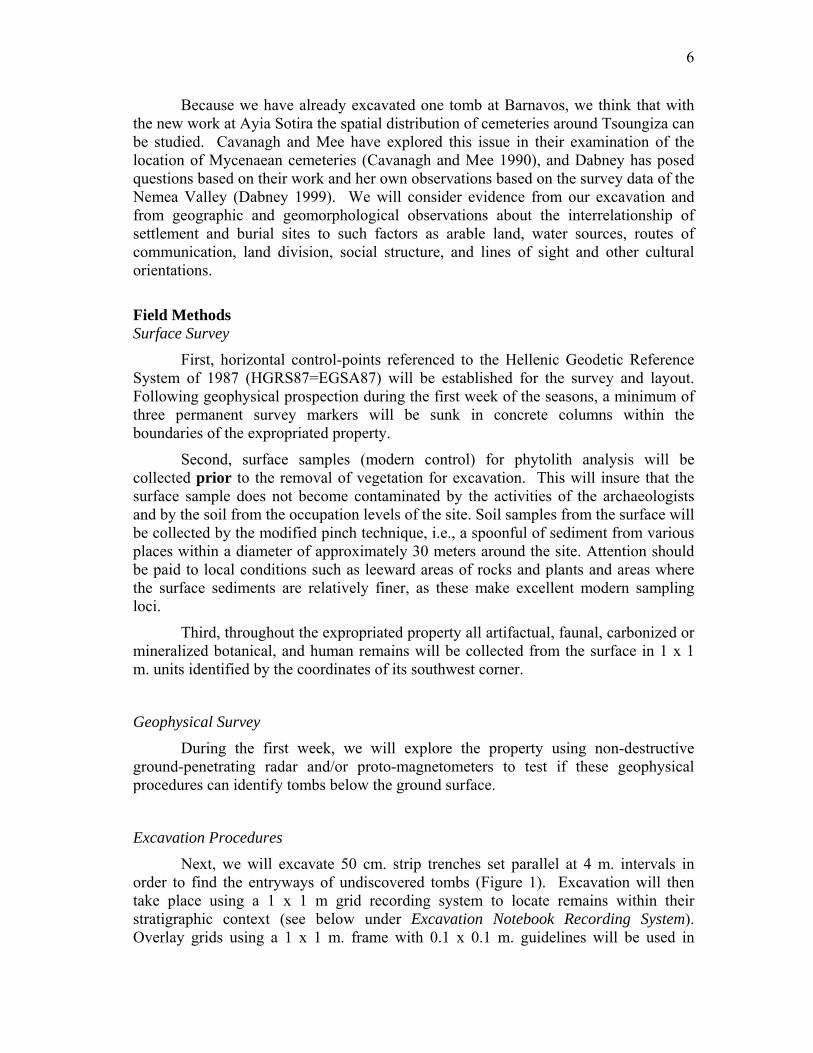
This project proposes to excavate a Mycenaean chamber tomb cemetery located in the field of P. Tombras on the hillside of Ayia Sotira, outside the village of Koutsomadi in the township of Nemea, Greece (Fig. 1). In 2006 we intend to excavate a minimum of two partially robbed chamber tombs and one undisturbed one, and to prospect for the location of the remaining tombs in the field we are expropriating. We anticipate three seasons of work necessary to explore thoroughly the remains in the field. The project is sponsored by Brock University under the auspices of the Canadian Archaeological Institute of Athens (CAIA). Bryn Mawr College is the other institutional sponsor.
Figure 1. Property map of field of P. Tombras.
History of Previous Work We are very concerned about the safety of these tombs, since several of them
have been looted in the past and there is danger of further looting. In 2002, when the looting of this cemetery became known to the authorities, Evangelia Pappi, acting in her capacity as the archaeologist at the 4th Ephoreia responsible for this region, excavated the tomb that had just been opened. The finds date its use from LH IIIA2-B. In 2003-2004, N. Maniadakis, a licensed civil engineer, surveyed the field boundaries and subsequently, after unsuccessful attempts by Pappi and Wright to negotiate a fair
3
purchase price with the landowner, expropriation was begun by Dr. Alexandros Mantis, Ephor of the 37th Ephoreia at Corinth.
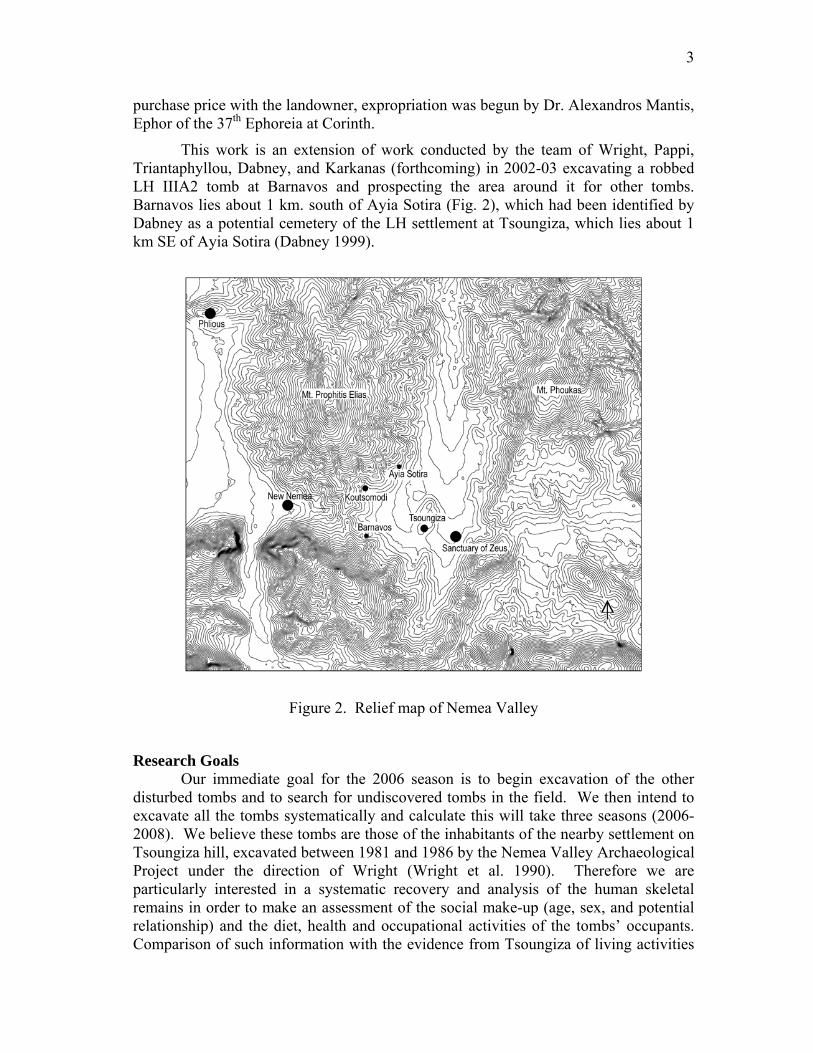
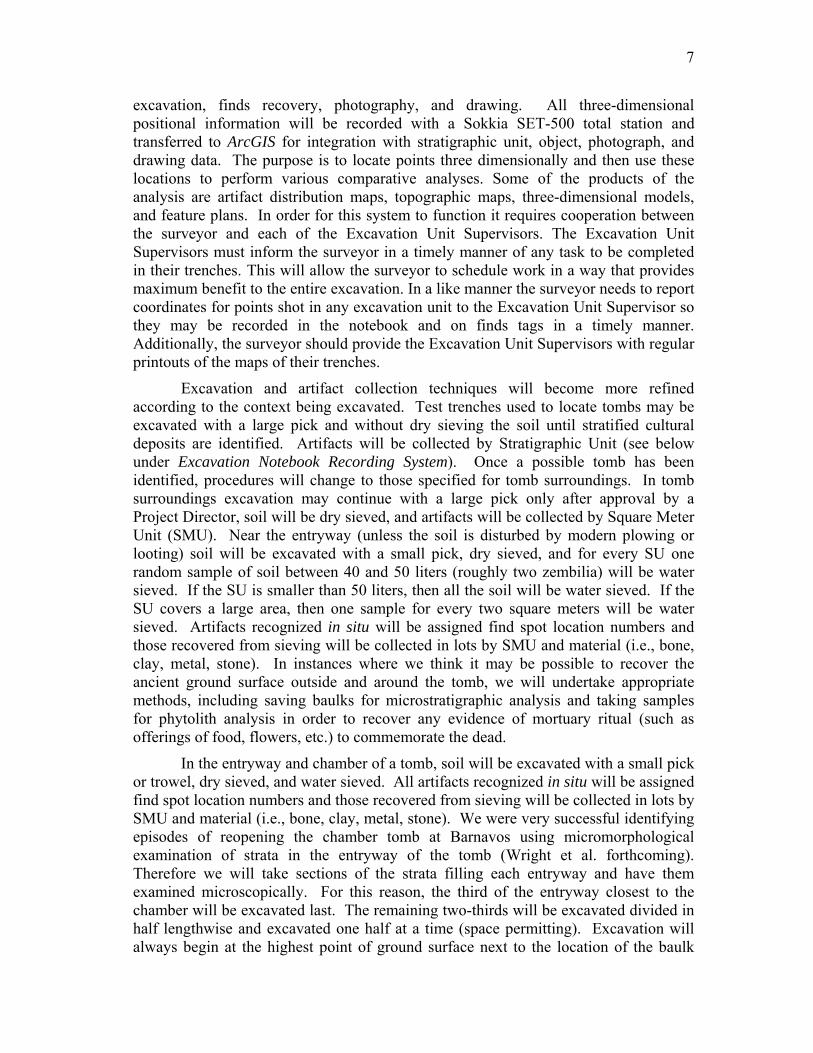
This work is an extension of work conducted by the team of Wright, Pappi, Triantaphyllou, Dabney, and Karkanas (forthcoming) in 2002-03 excavating a robbed LH IIIA2 tomb at Barnavos and prospecting the area around it for other tombs. Barnavos lies about 1 km. south of Ayia Sotira (Fig. 2), which had been identified by Dabney as a potential cemetery of the LH settlement at Tsoungiza, which lies about 1 km SE of Ayia Sotira (Dabney 1999).
Figure 2. Relief map of Nemea Valley
Research Goals Our immediate goal for the 2006 season is to begin excavation of the other
disturbed tombs and to search for undiscovered tombs in the field. We then intend to excavate all the tombs systematically and calculate this will take three seasons (2006-2008). We believe these tombs are those of the inhabitants of the nearby settlement on Tsoungiza hill, excavated between 1981 and 1986 by the Nemea Valley Archaeological Project under the direction of Wright (Wright et al. 1990). Therefore we are particularly interested in a systematic recovery and analysis of the human skeletal remains in order to make an assessment of the social make-up (age, sex, and potential relationship) and the diet, health and occupational activities of the tombs’ occupants. Comparison of such information with the evidence from Tsoungiza of living activities
4
as recorded in habitation structures, artifacts, and food remains will provide an unprecedented picture of life in a Mycenaean settlement.
We have already excavated one other tomb at the nearby site of Barnavos, which, although it had been robbed, provided evidence for its date (LH IIIA2), number of burials (between 4 and 6 persons) and contents (Wright et al. forthcoming). The existence of two places of burial, plausibly of inhabitants of Tsoungiza, gives us the opportunity to study mortuary practices of this community. Additionally, because of the proximity of Tsoungiza and these places of burial to the much larger cemetery to the west at Aidonia and its unexcavated settlement (Demakopoulou 1996; Krystalli-Votsi 1986; Pappi 1999), we think the evidence from our excavation of these tombs will enable us to assess the relationship between Mycenaean settlements in these two adjacent valleys. Likewise, evidence from the cemetery will be helpful for understanding better the nature of the relationship of the valleys in upland Corinthia to the palace of Mycenae, which during this time certainly controlled this territory.
Although many ancient cemeteries have been excavated in the Aegean, few burial assemblages have received physical anthropological study at the time of excavation. In our view the goals of excavation of a cemetery should be determined primarily by the interest in recovering the skeletal remains and associated organic residues and artifacts in order to learn about the bio- and social archaeology of the deceased population. Since all the grave goods and any other remains indicative of mortuary rituals were originally oriented towards the deceased, the skeletal remains are the primary axis for any interpretation of the burial context. Aside from their importance for understanding mortuary practices, the skeletal remains are the most direct and objective way to assess the social structure of the burying group. We wish to know whether the group was a nuclear family, extended kin, or some non-affinal group. We hope to learn whether all members of each group were afforded burial, and how different statuses among them were recognized. We query if non-kin (slaves, for example) might have been placed in these tombs. We are keenly interested in studying the genetics of the burying group. How many different genetically related groups are represented within the cemetery? Is there evidence for exogamy or for inbreeding (for example, marriage of cousins)? Because we have information from the excavations of the settlement of Tsoungiza pertinent to diet, we wish to learn from analysis of the skeletal remains about dietary conditions, and also about changing dietary standards. Accompanying this is a desire to learn about the health of the deceased, both in general terms for the population and in specific ones for different age groups and sexes. These questions are not merely biological as the history of diet, i.e. differences in diet between children and adults, males and females, are also related to different status positions at least as much as to changing agro-economic conditions. We postulate the economy of the settlement was focused primarily on agro-pastoral activities and hope to learn by examination of the stress lesions on skeletons about work habits. The carrying of loads and repetition of movements for productive activities are recorded in the skeleton and provide powerful evidence for examining division of labor between the sexes, among age grades, and by status. Specialized craft activities can be recognized. The sum of such observations is of fundamental importance for assessing the social structure and economic well being of the population.
5
These questions lead us to an examination of the remains from the settlement of Tsoungiza and how they may instruct us about mortuary concepts of its inhabitants. We propose to do this by comparing different varieties of information from the excavations of the settlement with those from the cemetery. For example we can compare the structuring of space on Tsoungiza to that of the cemetery through study of architectural organization of space as a social practice, the orientation of lived (and buried) space and the cultural habits carried out within and outside of lived (and buried) space. We will compare the kinds of pottery placed in tombs with those found in the settlement and be able to make such comparison based on different depositional contexts which, notionally, correspond to different social practices, from such simple ones as disposal to more socially functional ones as feasting (Dabney, Halstead and Thomas 2004; Wright 1997). Other artifact comparisons may also be possible, for example of such things as jewelry, clothing ornament, figurines, utensils, and perhaps even costly items of ivory or carved stone or metals. Often tombs contain special items that denote wealth and prestige and give information about habits of consumption that relate to aspects of economic exchange that are not preserved in settlement remains. Economic issues that comparison between the cemetery and settlement may elucidate pertain to agriculture, animal husbandry, wild foods and animals. Chemical analysis of human skeletal remains can provide broad information about diet, i.e. variable percentages of meats, seafood, grains, and carbohydrates that can be compared with the organic evidence from settlement contexts and also considered in terms of local arable and pasture land and other food resources. Equally palaeobotanical and faunal remains from tombs may inform us about the specific food consumption (or sacrifice) practices around mortuary ritual that may be compared with the presumably quotidian food preparation and consumption in the settlement.
One of the primary goals of the Nemea Valley Archaeological Project was to assess how at different times the Nemea Valley was exploited or supported settlement and to what extent such exploitation or settlement were dependent upon external political economies. With the excavation of the prehistoric settlement on Tsoungiza hill, this question was focused on the Mycenaean period, from its beginning in the late Middle Helladic to the end of the palace period (Cherry and Davis 2001; Dabney 1997; Davis 1988; Wright 1990; Wright 2004). With the recovery of the Aidonia Treasure and its exhibition and publication in 1996 (Demakopoulou 1996; Krystalli-Votsi 1986; Cherry 1999; Wright 1997) and then with the discovery of the settlement of Aidonia (Casselmann et al. 2004; Maran, Wagner and Lang 2005) and salvage excavation by Pappi (Pappi 1999), this question is refocused, since it is necessary to understand the settlement on Tsoungiza hill in relation to its closest (and apparently superior) neighbor to the west. Therefore, excavation of a cemetery that plausibly belongs to the Tsoungiza settlement offers the chance to compare it to the much larger and apparently richer cemetery of Aidonia. Such comparison will be based on the organic and artifact contents of the tombs, the architecture of the tombs, and demographic estimates. Such an analysis will perforce be only partial, at least until detailed study of the Aidonia cemetery is complete, but we believe we can more precisely frame questions about the relationship between these two settlements during the palatial period, and, we hope, also make some observations about the changing nature of that relationship from the early through the late Mycenaean periods.
6
Because we have already excavated one tomb at Barnavos, we think that with the new work at Ayia Sotira the spatial distribution of cemeteries around Tsoungiza can be studied. Cavanagh and Mee have explored this issue in their examination of the location of Mycenaean cemeteries (Cavanagh and Mee 1990), and Dabney has posed questions based on their work and her own observations based on the survey data of the Nemea Valley (Dabney 1999). We will consider evidence from our excavation and from geographic and geomorphological observations about the interrelationship of settlement and burial sites to such factors as arable land, water sources, routes of communication, land division, social structure, and lines of sight and other cultural orientations.
Field Methods Surface Survey
First, horizontal control-points referenced to the Hellenic Geodetic Reference System of 1987 (HGRS87=EGSA87) will be established for the survey and layout. Following geophysical prospection during the first week of the seasons, a minimum of three permanent survey markers will be sunk in concrete columns within the boundaries of the expropriated property.
Second, surface samples (modern control) for phytolith analysis will be collected prior to the removal of vegetation for excavation. This will insure that the surface sample does not become contaminated by the activities of the archaeologists and by the soil from the occupation levels of the site. Soil samples from the surface will be collected by the modified pinch technique, i.e., a spoonful of sediment from various places within a diameter of approximately 30 meters around the site. Attention should be paid to local conditions such as leeward areas of rocks and plants and areas where the surface sediments are relatively finer, as these make excellent modern sampling loci.
Third, throughout the expropriated property all artifactual, faunal, carbonized or mineralized botanical, and human remains will be collected from the surface in 1 x 1 m. units identified by the coordinates of its southwest corner.
Geophysical Survey
During the first week, we will explore the property using non-destructive ground-penetrating radar and/or proto-magnetometers to test if these geophysical procedures can identify tombs below the ground surface.
Excavation Procedures
Next, we will excavate 50 cm. strip trenches set parallel at 4 m. intervals in order to find the entryways of undiscovered tombs (Figure 1). Excavation will then take place using a 1 x 1 m grid recording system to locate remains within their stratigraphic context (see below under Excavation Notebook Recording System). Overlay grids using a 1 x 1 m. frame with 0.1 x 0.1 m. guidelines will be used in
7
excavation, finds recovery, photography, and drawing. All three-dimensional positional information will be recorded with a Sokkia SET-500 total station and transferred to ArcGIS for integration with stratigraphic unit, object, photograph, and drawing data. The purpose is to locate points three dimensionally and then use these locations to perform various comparative analyses. Some of the products of the analysis are artifact distribution maps, topographic maps, three-dimensional models, and feature plans. In order for this system to function it requires cooperation between the surveyor and each of the Excavation Unit Supervisors. The Excavation Unit Supervisors must inform the surveyor in a timely manner of any task to be completed in their trenches. This will allow the surveyor to schedule work in a way that provides maximum benefit to the entire excavation. In a like manner the surveyor needs to report coordinates for points shot in any excavation unit to the Excavation Unit Supervisor so they may be recorded in the notebook and on finds tags in a timely manner. Additionally, the surveyor should provide the Excavation Unit Supervisors with regular printouts of the maps of their trenches.
Excavation and artifact collection techniques will become more refined according to the context being excavated. Test trenches used to locate tombs may be excavated with a large pick and without dry sieving the soil until stratified cultural deposits are identified. Artifacts will be collected by Stratigraphic Unit (see below under Excavation Notebook Recording System). Once a possible tomb has been identified, procedures will change to those specified for tomb surroundings. In tomb surroundings excavation may continue with a large pick only after approval by a Project Director, soil will be dry sieved, and artifacts will be collected by Square Meter Unit (SMU). Near the entryway (unless the soil is disturbed by modern plowing or looting) soil will be excavated with a small pick, dry sieved, and for every SU one random sample of soil between 40 and 50 liters (roughly two zembilia) will be water sieved. If the SU is smaller than 50 liters, then all the soil will be water sieved. If the SU covers a large area, then one sample for every two square meters will be water sieved. Artifacts recognized in situ will be assigned find spot location numbers and those recovered from sieving will be collected in lots by SMU and material (i.e., bone, clay, metal, stone). In instances where we think it may be possible to recover the ancient ground surface outside and around the tomb, we will undertake appropriate methods, including saving baulks for microstratigraphic analysis and taking samples for phytolith analysis in order to recover any evidence of mortuary ritual (such as offerings of food, flowers, etc.) to commemorate the dead.
In the entryway and chamber of a tomb, soil will be excavated with a small pick or trowel, dry sieved, and water sieved. All artifacts recognized in situ will be assigned find spot location numbers and those recovered from sieving will be collected in lots by SMU and material (i.e., bone, clay, metal, stone). We were very successful identifying episodes of reopening the chamber tomb at Barnavos using micromorphological examination of strata in the entryway of the tomb (Wright et al. forthcoming). Therefore we will take sections of the strata filling each entryway and have them examined microscopically. For this reason, the third of the entryway closest to the chamber will be excavated last. The remaining two-thirds will be excavated divided in half lengthwise and excavated one half at a time (space permitting). Excavation will always begin at the highest point of ground surface next to the location of the baulk
8
because the latest opening of the tomb was often cut at a sharp angle into the entryway from a starting point closer to the chamber.
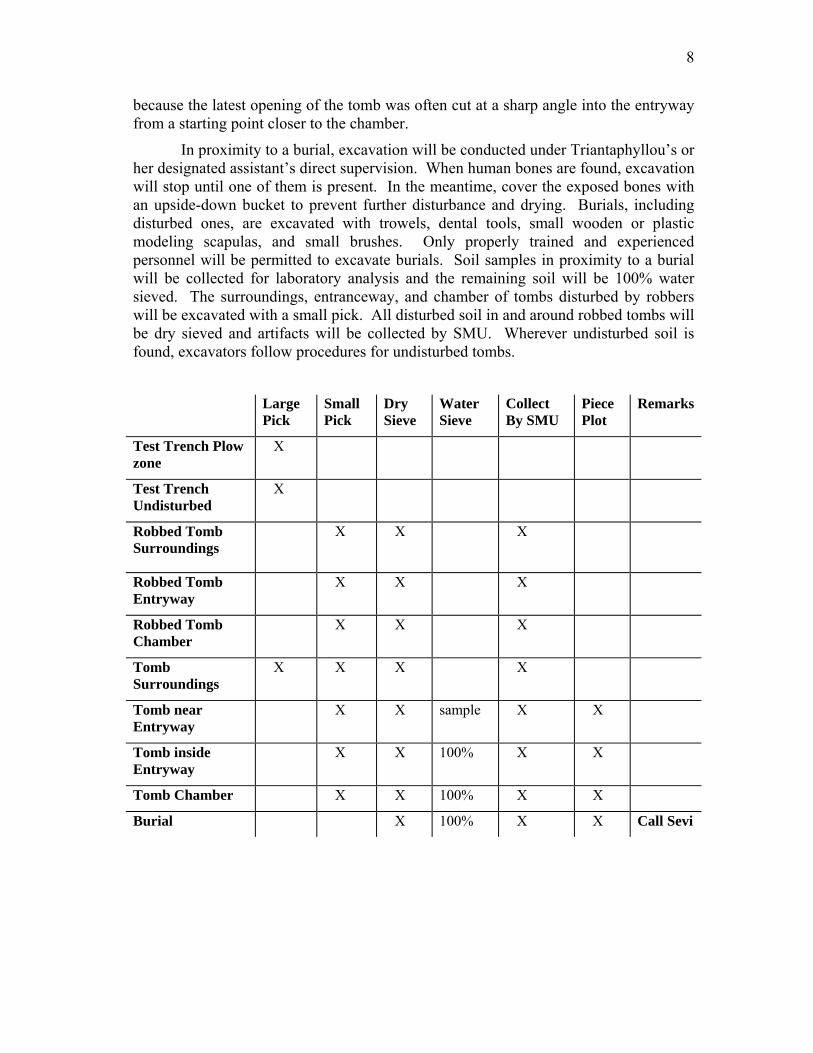
In proximity to a burial, excavation will be conducted under Triantaphyllou’s or her designated assistant’s direct supervision. When human bones are found, excavation will stop until one of them is present. In the meantime, cover the exposed bones with an upside-down bucket to prevent further disturbance and drying. Burials, including disturbed ones, are excavated with trowels, dental tools, small wooden or plastic modeling scapulas, and small brushes. Only properly trained and experienced personnel will be permitted to excavate burials. Soil samples in proximity to a burial will be collected for laboratory analysis and the remaining soil will be 100% water sieved. The surroundings, entranceway, and chamber of tombs disturbed by robbers will be excavated with a small pick. All disturbed soil in and around robbed tombs will be dry sieved and artifacts will be collected by SMU. Wherever undisturbed soil is found, excavators follow procedures for undisturbed tombs.
Large
Pick Small Pick
Dry Sieve
Water Sieve
Collect By SMU
Piece Plot
Remarks
Test Trench Plow zone
X
Test Trench Undisturbed
X
Robbed Tomb Surroundings
X X X
Robbed Tomb Entryway
X X X
Robbed Tomb Chamber
X X X
Tomb Surroundings
X X X X
Tomb near Entryway
X X sample X X
Tomb inside Entryway
X X 100% X X
Tomb Chamber X X 100% X X
Burial X 100% X X Call Sevi
9
Excavation Notebook Recording System
Observations made during excavation are recorded in the excavation notebook. The notebook must include all the data itemized on the data recording sheets (coordinates, elevations, soil descriptions, sketch drawing, object numbers, photographs, scale drawings, etc.) and a narrative description. It is important to know what the excavators saw and thought at the time of excavation, even if the interpretation of these observations changes later. Therefore, all information is recorded in ink and corrections are made by striking out the incorrect information with a single line allowing the original text to be seen. Erasure or covering mistakes with “White Out” is not permitted.
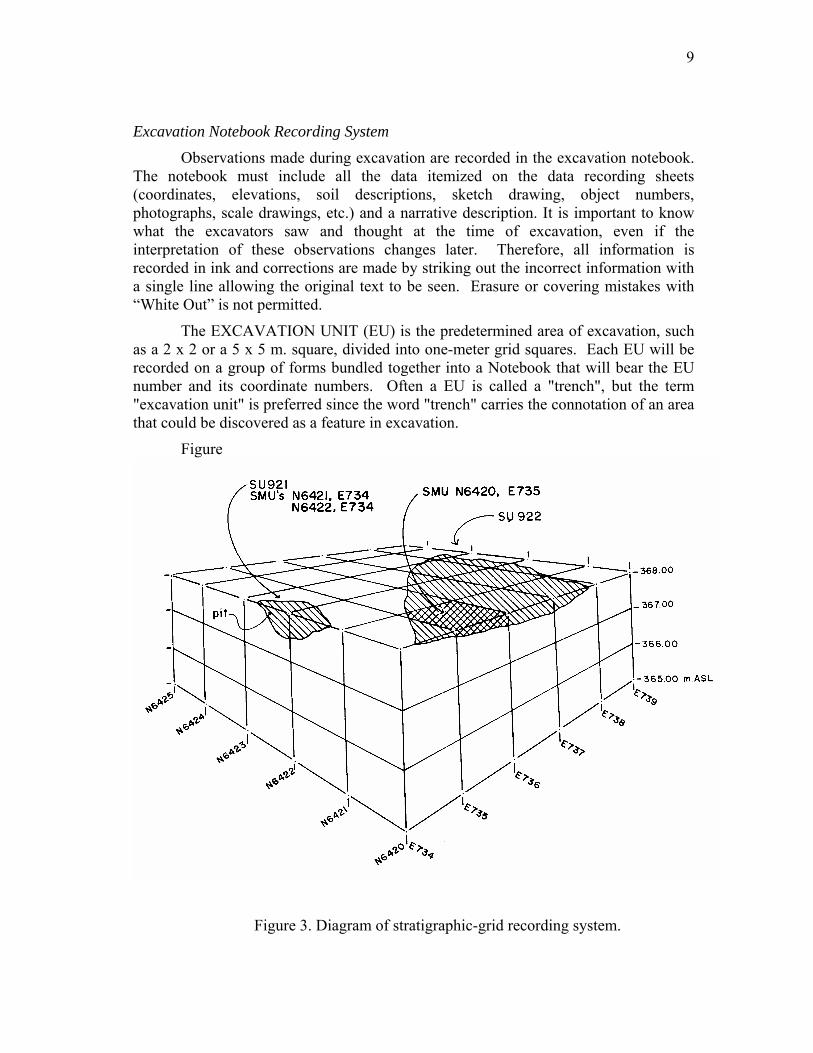
The EXCAVATION UNIT (EU) is the predetermined area of excavation, such as a 2 x 2 or a 5 x 5 m. square, divided into one-meter grid squares. Each EU will be recorded on a group of forms bundled together into a Notebook that will bear the EU number and its coordinate numbers. Often a EU is called a "trench", but the term "excavation unit" is preferred since the word "trench" carries the connotation of an area that could be discovered as a feature in excavation.
Figure
Figure 3. Diagram of stratigraphic-grid recording system.
10
The purpose of the data recording sheets is to standardize the recording of excavation and to facilitate the identification and comparison of meaningful archaeological units. The most basic of these is the stratigraphic unit sheet. A STRATIGRAPHIC UNIT (SU) is defined as any discrete archaeological unit or feature that potentially has recognizable archaeological integrity (Figure 3). It may be objectively or subjectively defined, i.e. can be a unit of distinctly recognizable soil (by virtue of its color or composition), a feature such as a wall or a pit, or an arbitrarily defined area, such as a level 10 cm. deep. Many excavations call these units "loci" or "buckets". The Stratigraphic Units, abbreviated "SU", will consist of a number of one-meter grids in whole or part. On these forms will be recorded the E (X) – N (Y) coordinates of each SU, taken ALWAYS from the SOUTHWESTERN AND NORTHEASTERN CORNERS of the square. Likewise the elevation will consistently be measured in meters above sea level at the southwestern and northeastern corners. Within any SMU or SU additional elevations must be taken and their locations accurately noted by E (x) and N (y) coordinates and their position located on the sketch plan. Among the relevant features to be so located are the edges of pits and the top and bottom of walls or other built feature. This vertical location will also be absolutely and relatively controlled by the relationship of any SU to its overlying and adjacent SUs. These relationships will be defined by the conjunction of as much standardized information as possible, i.e. soil descriptions and features. Finds from SQUARE METER UNITS are recorded and bagged separately even though they belong to a single SU.
The data recording sheets are not meant to be a straight jacket. Excavators are encouraged to write their observations on accompanying sheets of paper, properly paginated, and to make whatever sketches and profiles they wish which will clarify what they are excavating. At the beginning of each notebook should be recorded the full names of personnel working in the EU, any previous activities (archaeological excavation or agricultural cultivation) known to have taken place in that area of excavation, and the reasons given for conducting excavation in that EU. Notebook pages on which the descriptive narrative is written must have reserved margins of 3 cm. on the left and 2 cm. on the right. In the right margin index the text with SU numbers, SMU coordinates, features, finds, photographs, and drawings.
Equipment and Supplies
The Excavation Unit Supervisor is responsible for making sure that all of the following equipment and supplies, clean and in good working order, are taken to the excavation site every day.
• NVAP FIELD MANUAL
• EXCAVATION NOTEBOOK:
• Plastic-covered 4-hole Ringbinder Notebook
• Plastic page covers
11
• Stratigraphic Unit Forms (with holes punched)
• Drawing Forms (with holes punched)
• Blank Text Forms (with holes punched)
• Find Spot Register Forms (with holes punched)
• Soil/sediment Field Description Forms (with holes punched)
• Water Sieving Forms
• Photography Forms
THESE ITEMS ARE TO BE RETURNED AT END OF SEASON:
• Drawing board & 4 clips
• Straight-edged ruler with 1:20 scale
• Triangle
• 20 m. measuring tape
• 2 - 2m. measuring tapes
• Plumb bob
• Hand level
• Folding stadia rod
• Spirit level
• Munsell Soil Color Chart
• Wentworth Soil Size Scale
• Clipboard & 2 clips
• Pencil sharpener
• Scissors
• Whiskbrooms
• Dustpans
• Trowels (sharp for digging and blunt for sieving)
• Handpicks
• Sieving screens
• Shovels
• Buckets (at least two different colors)
• Zembilia (large baskets made from tires)
• Wheelbarrows ADDITIONAL SUPPLIES OF THE FOLLOWING ARE AT THE MUSEUM & DEPOT:
• Graph paper
12
• Masking tape
• Notepad (for calculating elevations)
• Permanent black ballpoint pens
• Permanent black magic markers
• Pencils
• Erasers
• Soft wrapping paper
• Aluminum foil
• Neoprene gloves
• Rubber bands
• String
• Nylon cord
• Scarp tags
• Stakes
• Nails
• Plastic bags (all sizes)
• Waterproof fabric tags with plastic coated Wire
• Paper boxes (please collect cigarette boxes)
• Glass containers
• Bottle of distilled water
Photography
Photographs should be taken when the excavation of each stratigraphic unit is complete unless conditions warrant otherwise. They should also be taken before the removal of any feature or finds in situ. PREPARATIONS
1) Sweep the area to be photographed.
2) Remove all tools and people from the area to be photographed. IDENTIFICATION BOARD
1) Place board in all photographs or, for tight shots where the board takes up half of the frame, in the first shot taken.
2) Fill in all available information:
AYIA SOTIRA EU # SU # E COORDINATE N COORDINATE (at SW corner) E COORDINATE N COORDINATE (at NE corner) DAY/MONTH/YEAR
13
3) Place the board in the foreground of the frame, level with the bottom of the frame, in one corner or the other, and out of the way of features. DO NOT place the board way in the back of the field of view. SCALES
1) Place scale parallel to the bottom of the camera frame, in the middle bottom of the field of view or near an important feature, with its graduated end to the left side.
2) If using two scales, use the smaller scale as the secondary one.
3) If placing the scales at a right angle for perspective, place the larger scale parallel to the bottom of the frame and the smaller scale at a right angle to the non-graduated end of the larger scale with the smaller scale's graduated end away from the camera. NORTH ARROW
1) Lay the north arrow flat on the ground. Place the north arrow near the identification board in an out of the way place where it does not obscure the SU, feature, or find being photographed.
CAMERA SETTINGS
{edit guidelines for specific digital cameras to be used}
Set to AUTO. For proper exposure, point the camera at the center of the area being photographed, press the button lightly until the exposure meter shows green (or orange for photographs requiring a flash).
RECORDING
On the photography forms attached to the camera, record the six-digit day/month/year, photograph identification number, three-letter initials of the photographer’s name, most significant SU in the area photographed or find spot number if only one object is photographed, and the direction from which photograph was taken (e.g., N, NE, E, …). In the Excavation Unit notebook, record the six-digit day/month/year, camera name, and photograph frame number on the SU forms for every stratigraphic unit that appears in the frame. Each camera has a memory card. When the card is full, the photographs must be transferred to a computer for storage. Even if the memory card is not full, photographs must be transferred to the computer at the end of each day. Excavation Unit Supervisors are responsible for making sure that their photographs have been transferred.
REMEMBER:
• Avoid heavy shadows; if possible, use plastic sheets to diffuse the light. Do not photograph areas in partial shadow.
• Make sure all parts of the identification board, scales and arrow are visible and legible in field of view.
14
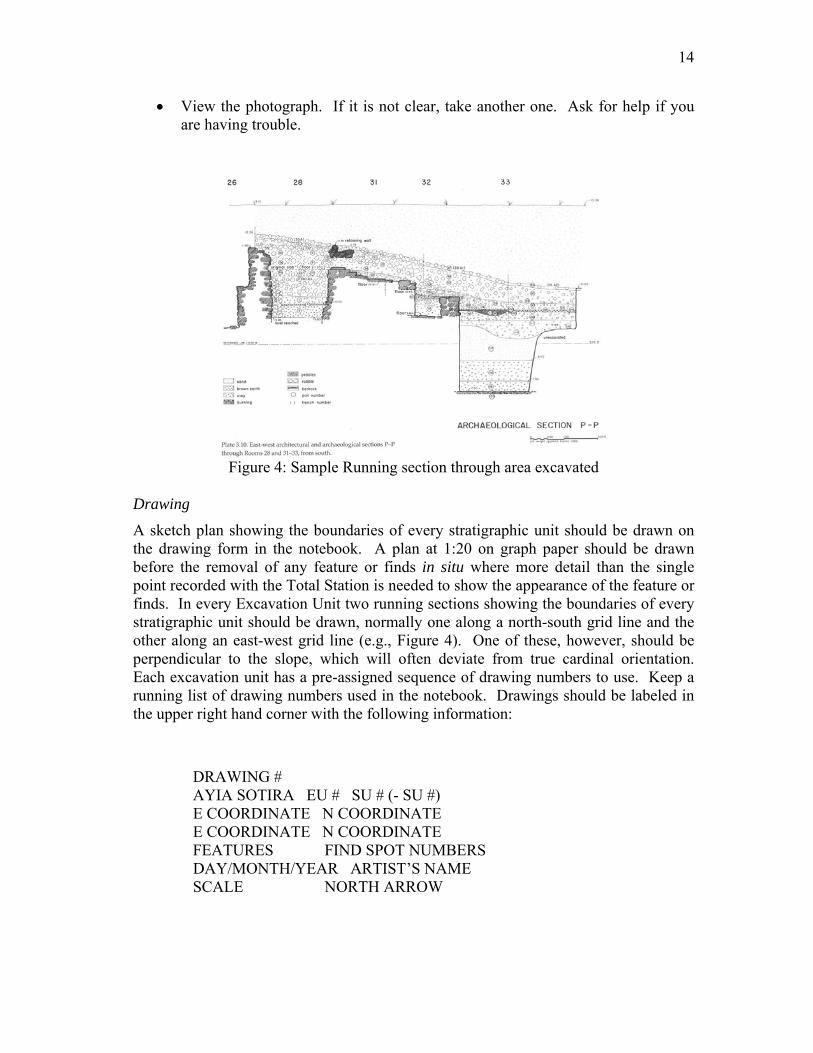
• View the photograph. If it is not clear, take another one. Ask for help if you are having trouble.
Figure 4: Sample Running section through area excavated
Drawing
A sketch plan showing the boundaries of every stratigraphic unit should be drawn on the drawing form in the notebook. A plan at 1:20 on graph paper should be drawn before the removal of any feature or finds in situ where more detail than the single point recorded with the Total Station is needed to show the appearance of the feature or finds. In every Excavation Unit two running sections showing the boundaries of every stratigraphic unit should be drawn, normally one along a north-south grid line and the other along an east-west grid line (e.g., Figure 4). One of these, however, should be perpendicular to the slope, which will often deviate from true cardinal orientation. Each excavation unit has a pre-assigned sequence of drawing numbers to use. Keep a running list of drawing numbers used in the notebook. Drawings should be labeled in the upper right hand corner with the following information:
DRAWING # AYIA SOTIRA EU # SU # (- SU #)
E COORDINATE N COORDINATE E COORDINATE N COORDINATE FEATURES FIND SPOT NUMBERS DAY/MONTH/YEAR ARTIST’S NAME SCALE NORTH ARROW
15
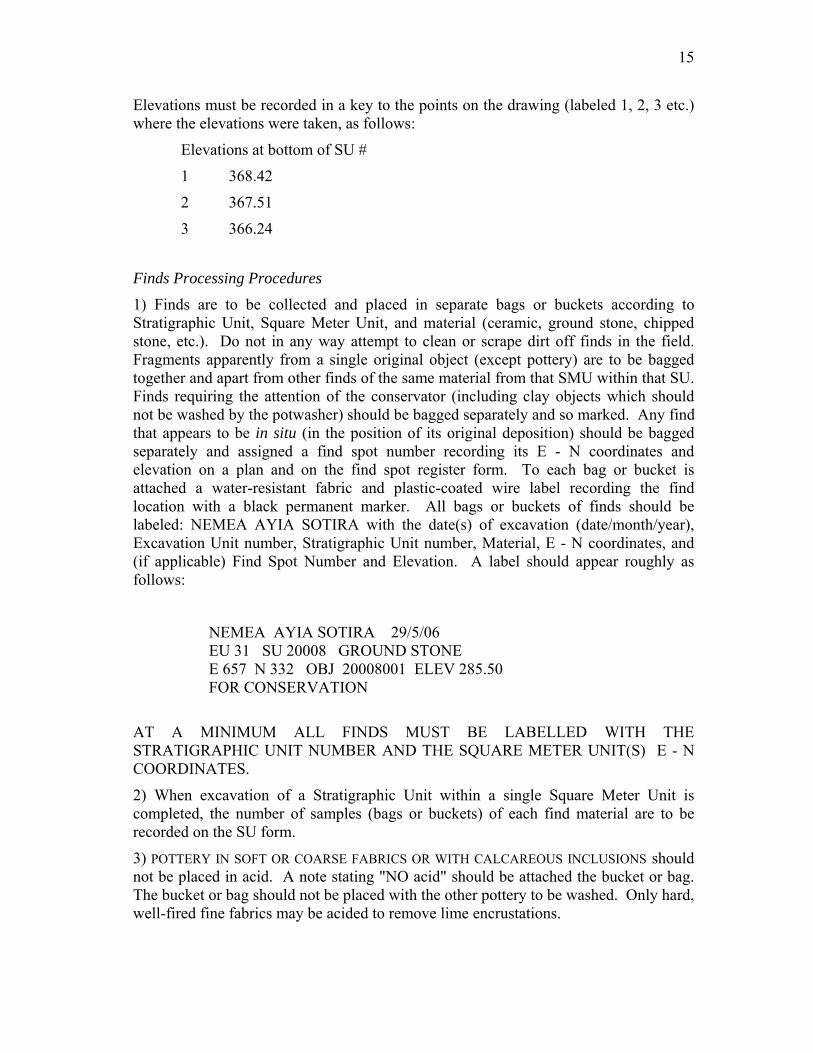
Elevations must be recorded in a key to the points on the drawing (labeled 1, 2, 3 etc.) where the elevations were taken, as follows:
Elevations at bottom of SU #
1 368.42
2 367.51
3 366.24
Finds Processing Procedures
1) Finds are to be collected and placed in separate bags or buckets according to Stratigraphic Unit, Square Meter Unit, and material (ceramic, ground stone, chipped stone, etc.). Do not in any way attempt to clean or scrape dirt off finds in the field. Fragments apparently from a single original object (except pottery) are to be bagged together and apart from other finds of the same material from that SMU within that SU. Finds requiring the attention of the conservator (including clay objects which should not be washed by the potwasher) should be bagged separately and so marked. Any find that appears to be in situ (in the position of its original deposition) should be bagged separately and assigned a find spot number recording its E - N coordinates and elevation on a plan and on the find spot register form. To each bag or bucket is attached a water-resistant fabric and plastic-coated wire label recording the find location with a black permanent marker. All bags or buckets of finds should be labeled: NEMEA AYIA SOTIRA with the date(s) of excavation (date/month/year), Excavation Unit number, Stratigraphic Unit number, Material, E - N coordinates, and (if applicable) Find Spot Number and Elevation. A label should appear roughly as follows:
NEMEA AYIA SOTIRA 29/5/06 EU 31 SU 20008 GROUND STONE E 657 N 332 OBJ 20008001 ELEV 285.50 FOR CONSERVATION
AT A MINIMUM ALL FINDS MUST BE LABELLED WITH THE STRATIGRAPHIC UNIT NUMBER AND THE SQUARE METER UNIT(S) E - N COORDINATES.
2) When excavation of a Stratigraphic Unit within a single Square Meter Unit is completed, the number of samples (bags or buckets) of each find material are to be recorded on the SU form.
3) POTTERY IN SOFT OR COARSE FABRICS OR WITH CALCAREOUS INCLUSIONS should not be placed in acid. A note stating "NO acid" should be attached the bucket or bag. The bucket or bag should not be placed with the other pottery to be washed. Only hard, well-fired fine fabrics may be acided to remove lime encrustations.
16
4) At the end of the day, ceramic and ground stone finds (except those for the conservator) are taken to the washing area at the depot. No ceramic finds may be put in acid until they have been soaked in clean water overnight. Other finds are to be brought to the depot and sorted into boxes according to Material and Excavation Unit number (with the exception of finds for the attention of the conservator). Ceramic finds that have been washed and are completely dry should be bagged and sorted into boxes according to Excavation Unit number. If ceramic finds collected in two buckets are from a single SU which was NOT excavated by Square Meters, they can be combined to fill one bag and the number of ceramic samples on the SU form changed accordingly. Recheck the number of find samples recorded on the SU forms while sorting the finds.
5) Ground stone tools are washed at the depot, looking for traces of plaster or ochre as they are washed. Those that show no trace of worked surfaces are recorded and discarded. When in doubt, send the object to the museum. Those saved are sent to the museum for further study.
6) The finds will then be brought to the museum and studied under the direction of the appropriate specialist. Finds for the attention of the conservator should receive a Find Spot Number before being given to the conservator.
{the following section should be reviewed and edited by the conservator}
Conservation
REQUESTING THE CONSERVATOR TO LIFT AN OBJECT may be necessary when intact skeletons, worked objects of carbonized wood or other organic materials in a fragile state, fragile pottery with significant contents, decorated plaster, etc. are found. A decision as to whether such objects are to be lifted by the conservator or excavated in the normal manner should be made at once. Lifting is extremely time consuming and will delay work in the trench. It may be necessary for the conservators to dig around the object to a considerable depth before it can be removed. If an object is to be lifted, it should be shaded and preferably covered with an upside-down bucket to prevent both the object and the surrounding earth from drying and hardening. The conservator should then be notified immediately so she can organize the necessary materials and start the lift as soon as possible because delay will seriously affect the success of the lift.
SMALL FRAGILE OBJECTS may be packed in the provided flat boxes that have half the box as a lid (NOT the type which opens at one end, as the object may be damaged when removed). The object should be placed on and covered by soft paper and should also be surrounded by soft paper to prevent rattling in the box. The box should be closed securely with string or tape without putting pressure on the object. The box should be kept where others will not inadvertently put heavy objects on top of it until it reaches the museum.
METAL OBJECTS, MUDBRICK, AND PLASTER that are robust enough to be packed in plastic bags should, to prevent condensation, have several small holes pierced through the bag before putting in the object.
17
CERAMIC VESSELS sometimes have the remains of original contents on the inner surface. If the vessel, especially a closed vessel, is in an undisturbed context and complete, the soil inside should not be removed. Send the entire vessel and its contents to the conservator. Sometimes contents on the interior of vessel fragments are visible as encrustations. The sherd and encrustations plus any other sherds from the same vessel and soil from around the sherd should be sent straight to the conservator. To avoid contamination, wear neoprene gloves when handling these sherds, encrustations, and soil and wrap the entire sample in aluminum foil before putting it in a plastic bag.
Recognition of Ground Stone Tools
Ground stone tools are an important source of information about prehistoric food processing and craft production. Unfortunately, they have frequently not been recognized during the course of excavation. For this reason, some guidelines are offered below. SAVE ANY STONE WHICH:
1) Is chipped, pecked, crushed, battered, ground, abraded, smoothed, perforated, grooved or hollowed out on any surface.
2) Is composed of an unusual material, esp. dark-colored or rough-textured stones.
3) Has white (plaster) or red (ochre) material adhering to its surface.
4) Has an unusual shape, such as a triangular or trapezoidal profile, a concave surface or a flattened rectangular profile.
5) Has an unusually shaped (e.g. beveled, angular or flat) end.
6) Is rounded AND can be easily grasped in one hand.
Guidelines for Soil/Sediment Description
During the excavation of each SU, provide the following soil/sediment description on the SU form and in the accompanying text. Collect a one-kilogram (or less, as necessary) sample from each SU.
MOISTURE: a very brief comment on the degree of moisture (dry, moist, wet) since it affects the description of color and consistence.
COLOR: Munsell color of raw material after being wetted from a wash bottle.
TEXTURE OF FINER COMPONENT: Finer component refers to the material that is not readily seen by the eye, i.e. sand, silt and clay. State if the finer matrix of the layer is sandy, clayey, silty, or a certain mixture (e.g. sandy clay). Clay is sticky and wet when smeared across one’s palm; silt is very smooth.
STONINESS: Shape of stones could be platy, spherical, discoidal or rod. Roundness is defined as the description of the relative sharpness of the stone corners, i.e. angular, subangular, sub-rounded, rounded and well-rounded. The distribution pattern could be
18
described as random, clustered, linear, banded, and can be related to the boundaries of the layers, i.e. parallel, inclined, perpendicular, or unrelated.
ORGANIC MATTER/CHARCOAL: State the abundance and the nature of the organic matter, i.e. fresh, or decayed plant fragments, wood fragments, black soft material, turf, charcoal fragments, etc. Describe the distribution pattern of the organic fraction inside the layer (see stoniness).
CONSOLIDATION/CEMENTATION: If the material of the layer can be easily removed with hand then it can be described as loose. Weak: material should be excavated with a trowel. Firm: material may be excavated with a small hoe. Strong: material may be excavated with a pick. Indurated: material will probably have to be excavated with hammer and chisel.
OTHER FEATURES: Nature, abundance and distribution pattern (note that distribution pattern is fundamental for accurate description of all constituents).
During excavation, insert tags identifying the bottom of each SU at several points in the scarp. When the complete profile of the SU is visible in the excavation unit scarps, provide the following descriptions on the Soil/Sediment Field Description Form.
THICKNESS: give modal and extreme variations of thickness of the layer
INCLINATION: give the overall inclination of the layer relative to the horizontal and relative to adjacent major features (walls, major structures etc.)
GENERAL DESCRIPTION: give a short description that characterizes the layer in the excavation, e.g. gray ashy lens inside ‘x’ construction, or soft brown layer with a few stones, or dark ashy debris on floor of ‘x’ building, etc. This description helps to have a general idea of the layer. Archaeologists should feel free to describe it following the major types of soil material encountered in the particular excavation.
LATERAL CONTINUITY: state whether a layer is continuous or discontinuous, the degree of continuity and the general produced form (lens, wedge, ridge etc.).
BOUNDARIES:
Sharpness: Characterize the distinctness of the boundary according to the thickness of the zone of transition between the layers. This is sharp (0-0.5 cm), abrupt (0.5-2.5 cm), clear (2.5-5 cm), gradual (5-15 cm) and diffuse (more than 15 cm).
Form: A boundary can be smooth (a surface with few irregularities), wavy (a surface with regular, shallow variations in depth) or irregular (irregular variations in depth).
Inclination of the particular boundary relative to the horizontal. Note that the inclination of a boundary can be different from the overall inclination of the layer.
SEDIMENTARY AND SOIL STRUCTURES (this should be filled by a specialist): State only if they can be clearly defined. Some examples are graded bedding, cross-bedding, laminated bedding etc. If it is a soil then its structure is described as granular, blocky, prismatic or platy.
19
ARCHAEOLOGICAL FINDINGS: State briefly the abundance and distribution pattern of the most important groups, i.e. bones, sherds, lithics, and construction materials (plaster, bricks etc.).
The description criteria presented above are adopted with modifications from Courty, Goldberg, and Macphail 1989 and Birkerland 1984.
Guidelines for Collecting Phytolith Samples PHYTOLITHS are silica bodies accumulated by plants when soluble silica in the ground water is absorbed by the plant roots and is carried up to the plant via the vascular system. Evaporation and metabolism of this water result in precipitation of the silica in and around the cell walls in plants that accumulate silica. Opal phytoliths, which are distinct and decay-resistant plant remains, are deposited in the soil as the plant or plant parts die and break down. They are, however, subject to mechanical breakage and erosion and deterioration in high pH soils. Phytoliths are usually introduced directly into the soils in which the plants decay. Transportation of phytoliths occurs primarily by animal consumption, man's gathering of plants, or by erosion or transportation of the soil by wind, water, or ice.
CONTAMINATION comes primarily from four sources at most sites: wind, plants, soil, and people. The wind is a constant source of contamination at the site. It is preferable to sample on calm days to minimize contamination by the wind. If you must sample on windy days, try to shelter the area to be sampled during the sampling process and conduct the sampling as quickly as possible. As excavation proceeds, the soil that is removed becomes a potential source of contamination for archaeological surfaces as they are exposed. Handling cigarettes, cigars, or chewing tobacco contaminates your hands. Your hands then contaminate the area in which you are working and any samples that you collect. Dogs and other animals can contaminate a record. Notation of animals at the site or back at camp should be made and a specimen of animal hair saved in an envelope for reference and submitted with the samples. The presence of fields or other cultivated crops in the vicinity of the site also should be noted. If fresh vegetables are eaten at lunch or during the day at the site, make a notation.
SAMPLE COLLECTION PROCEDURE:
• Scrape trowel free of dirt, scrape area to be sampled to remove accumulation of modern pollen.
• Clean trowel of dirt. Spray trowel with distilled water and wipe with paper towel.
• Quickly remove phytolith sample (approximately 200 cc or 1 cup) and place into zip-lock bag and secure. Remember that you are trying to recover a sample from the smallest time interval possible, use the trowel to scrape a vertically thin (less than 1 cm.) sample. You will need to extend the sample as far as needed laterally within the stratigraphic unit to recover enough sediment to make roughly 1 cup.
• STRATIGRAPHIC COLUMNS should be sampled so that the shape of the area sampled is rectangular and as thin vertically as possible. Surface samples collected in connection with a stratigraphic column should be collected as the top one
20
centimeter of the column. Extend the sample as far to the side as necessary to get an adequate volume of sediment without crossing stratigraphic boundaries. Collect stratigraphic samples every 2 cm. from most deposits. Sample by natural levels, never collecting a sample that crosses level boundaries. When the natural levels are more than 4 cm. in height, collect multiple samples from each stratum. For instance, recommended minimum vertical sampling distance is every 2 cm. More widely spaced sampling, such as the older standard of 10 cm. intervals, misses significant differences in the vegetation in the site area. Ideally, samples should be taken at the closest interval possible to record fine scale changes in the biota. Samples from 2 cm., or where, feasible 1cm. intervals will return ecological information on a scale more closely approximating the time frame at which human decisions are made.
• Place plastic sample bag into a second plastic bag or a paper bag and record sample data in pencil on an inventory card and place it between the two plastic bags. Double bagging will help protect the sample bag from puncture and provide a convenient place to record sample information.
CERAMICS AND GROUND STONE: The area containing smashed ceramics should be sampled for phytolith and/or macrofloral sampling. Ceramics displaying evidence of charred food residue are good candidates for phytolith analysis because phytoliths withstand the heat of charring and are trapped within the residue. All ceramic vessels and ground stone tools for archaeobotanical analysis should be bagged immediately in the field prior to the removal of dirt, and sent to the conservator for removal of extraneous sediment and phytolith washing.
BURIALS: When possible, phytolith and/or macrofloral samples should be collected from burials in pits. The best places for sampling include the stomach and pelvic areas where stomach and/or intestinal contents might have deteriorated. Other areas shown in Figure 5 are recommended for sampling only to recover information on potential ceremonial activity, if appropriate.
Guidelines for Recovery of Carbonized Plant Remains Any clearly visible, large pieces of carbonized wood or whole fruits (not seeds or olive pips) recognized during excavation should be carefully excavated and put into a paper box. A supply of small boxes is available in the excavation supply depot. Wet or damp carbon is extremely soft and easily smashed. Toilet paper may be used for wrapping the samples in the boxes, if necessary. DO NOT wrap them in a plastic bag nor put them in any plastic or metal containers because they will not dry out and will become more difficult to study. The sample should be assigned and labeled with a find spot number.
Large pieces of wood charcoal and samples of carbonized seeds should be taken for C14 dating using the methods prescribed, but a small piece (at least 1.5 - 2 cm. in length or width) should be saved for identification and put in a glass container along with some of the surrounding soil.
21
Patches of soil with flecks of carbon should be water sieved, NOT excavated and NOT put in a box as "charcoal". Any ashy or burned deposits should be 100% water sieved. In the case of extensive burnt deposits with clear concentrations of charred plant material, many distinct samples clearly labeled should be taken from all over the surface rather than just one bigger sample. These should contain soil from both the center and the periphery of easily discernible seed assemblages.
Collecting Samples for Water Sieving and Flotation
Soil collected for water sieving is dry sieved first through a 1 cm. mesh and then taken to the depot for water sieving. Every soil sample should be assigned an identification number from the EU’s pre-assigned list of numbers. The volume of soil sample is measured in the calibrated metal buckets. Do not fill the metal buckets above the 10 liter or 12 liter marks. Complete a water-sieving form for every sample.
Physical Anthropology
As we have stated the methods employed for a cemetery excavation should be determined by the interest in recovering the skeletal remains and associated organic residues and artifacts. This means in situ recording and analysis and subsequent laboratory study oriented to understanding the dynamics of ancient demography, health, diet, social relations, and mortuary practices. Normally chamber tombs have multiple burials representing several generations of the burying group. The excavation of the tombs at Ayia Sotira offers the prospect of the recognition of family and kin groups. In the excavation of each tomb the project will utilize a variety of resources for isolating individual burials, for distinguishing multiple burials and remnants of earlier ones swept aside, and for distinguishing the stratigraphic episodes of other activities that took place within the tomb. For the skeletal material special considerations come into play for recording, namely the depth of the cranial and postcranial skeleton, its contextual location within the architecture of the chamber tomb, orientation of the skeleton, facing of the skull, accurate taphonomic position of the skeleton (contracted, supine, extended or other) and placement of upper and lower extremities, as well as the placement of the associated artifacts.
We will focus on accurate estimation of the minimum number of individuals (MNI) present in the bone assemblages. This is not merely a matter of counting skulls. The commingling and disturbance of skeletons after deposition by succeeding burials and mortuary practices sufficiently disturbs the remains that, in order to estimate MNI, standard anatomical units for disarticulated assemblages must be identified and counted for one side of the skeleton only (Triantaphyllou 2001).
Study of the skeletal material will develop demographic profiles through macroscopic examination and through analyses, including DNA sampling. These are age, sex, mortality and survivorship. We wish to test whether the burying groups are families and/or kin groups, whether non-kin were included in such groups, whether there was exclusion by age, sex, or status. Most research on this problem has been based on a combination of speculations about the sex and age of the burials and the
22
nature of the grave goods, albeit in some instances highly sophisticated speculation (Graziadio 1991; Kilian-Dirlmeier 1985) and too rarely on skeletal analysis.
Both macroscopic and microscopic investigations of human skeletal remains provide significant information about health, diet and oral status. Such pathologies as degenerative joint disease, trauma, vertebral defects, non-specific infections, metabolic disease (usually represented in prehistoric populations by anemia) and dental diseases (caries, calculus, ante mortem tooth loss, periodonitis, periapical abscesses) are discoverable. This research will focus on two broad categories: (1) bone lesions associated with mechanical load and occupational activities repeatedly exercised on the skeleto-muscular system, and (2) pathological conditions associated with the physiological stress and episodes of stress which affected the individual during lifetime. Additionally we can record the scoring of the insertion areas of the muscles on the long bones, which aids in the identification of general patterns of physical activities practiced by individuals. Another important aspect relating to diet and health is the recognition of stature. Measurements of the postcranial skeleton may contribute to the estimation of stature depending on bone completeness and also provide useful growth patterns to compare with estimated age categories. Stature is often associated with status since it is related to diet and health.
Our interest is not merely in the recognition of these features on individuals but especially to recognize patterns of these pathologies and to associate or compare them among different burying groups, i.e. among different chamber tombs, as well as by age-grade, sex and status. These will be critical analyses for recognizing biological and social differences among the population, and their accuracy will be amplified by our studies of the association of grave goods and other mortuary practices within individuals and groups. Furthermore it may prove possible in comparison with the evidence from the settlement at Tsoungiza to associate activities and differentiation recognized in the burial assemblages with some of those recorded in the living assemblages, notably the ground stone tools and also in activity areas and refuse deposits. We assume that we will find evidence of burial over several generations and, in so far as that evidence corresponds to the life of the community on Tsoungiza, we will be able to inspect for changes in the lifestyles of the inhabitants over time. For example the changing evidence of reliance on certain kinds of imported items in the settlement from its inception in late MH III to its abandonment at the very end of LH IIIB (Dabney 1999) will be compared to the grave goods in the tombs and again, the association of the grave goods with individual burials and the analyses of the skeletal remains will provide powerful documentation of these changes in the social relations and well being of the inhabitants.
Dietary patterns are both the result of natural resources and economic and social practices. Diet varies according to subgroups of a population divided by status, sex and age. Certain types of dental disease have been associated with certain food categories, such as dental decay with a high consumption of carbohydrates. Analysis of stable isotopes of nitrogen and carbon will be useful to complete our reconstruction of diet. The latter has the potential to determine the contribution of certain isotopically distinctive nutrients in the diet. In addition to representing certain nutrients of past peoples diet, carbon isotope analysis has been used to distinguish marine from
23
terrestrial diets. The macroscopic investigation of dental pathologies and stable isotope analysis address different aspects of diet. In particular, macroscopic investigation indirectly reveals particular types of dietary intake such as the consumption of meat and carbohydrates and stable isotopic analysis reflects consumption profiles after they have been metabolized. Neither approach identifies the total range of foods or the proportions in which they were consumed by past populations. Thus, it is interesting, for example, that stable isotope analysis conducted recently in coastal sites of Northern Greece (Triantaphyllou 2001) and the Neolithic Alepotrypa respectively (Papathanasiou 1999) have shown that contrary to the general view that coastal populations used to consume a marine-based diet, no signal of marine consumption has been indicated. We have systematically collected animal bone material from the settlement of Tsoungiza and will be able to investigate to what extent animals were sharing categories of food similar to those consumed by humans, for example through consumption of refuse.
Guidelines for Recovery of Mortuary Practices
We are ill informed about social rituals that accompany burial and about subsequent commemoration. Attention will be paid to recovering any information relevant to rituals at the time of deposition, at the time of the closing of the tomb and refilling of the dromos, at the time of re-opening the tomb for subsequent deposition, and for rituals located around the outside of the tomb.
Because the mortuary rituals were performed outside and inside the chamber tombs, we will study the macro- and micro-environmental contexts. Of particular importance will be isolation and analysis of soils by the excavators in conjunction with a micromorphological examination by a geoarchaeologist. Previous work digging at tomb at Barnavos showed that the micromorphology of strata in the entrance corridor (dromos) identified phases of use of the tomb that were not distinguishable by normal methods of recognizing stratigraphy. Through a systematic sampling procedure, dry sieving, and flotation, we will look for evidence of successive burial sequences, deposition of organic materials through such rituals as burning offerings, slaughtering animals, deposition of foodstuffs and floral and faunal items. This will require a systematic program of water sieving. Sampling in situ will include soil and bone material for further analyses.
Bone samples will be collected in situ with sterile gloves and we will initially focus on trabecular bone (vertebrae, ribs etc.) for DNA extraction and a small quantity of a long bone diaphysis, which will provide sufficient collagen for stable isotope analysis. Collected samples will be stored in stable and acid-free packing materials including bags, specimen bottles, and plastic boxes.
We anticipate problems with chamber roof collapse and will immediately take measures to prevent further collapse both for reasons of safety and protection of the archaeological deposits. Collapsed chamber roofs will be removed.
24
Site Preservation and Conservation
The field will be properly fenced. Test trenches will be back-filled at the end of the season. Tombs will be back-filled if their preservation poses danger of collapse. Intact structures will be roofed over and drainage channels will be made to divert water away from them. We will consult with the 37th Ephoreia at Corinth regarding need for conservation of the site and its remains.
Laboratory Methods
Museum Procedures
The Nemea Archaeological Museum is secured by the Head Guard and his/her assistants, all of whom are employees of the Greek Ministry of Culture. The Museum is under the supervision of the Ephor (Superintendent) of the 37th Ephoreia of Prehistoric and Classical Antiquities. The current Ephor is Dr. Alexandros Mantis, whose office is in Ancient Corinth. The Ephor will appoint an assistant, usually an Epimeletria/Epimelete, to represent him.
Only persons whose names are listed on the permit awarded to the Canadian School by the Ministry of Culture for the Ayia Sotira Excavation are allowed in the Museums’ workrooms and storerooms. Everyone whose name is on the permit must sign the museum register every day when entering the Museum workroom. There may also be people with permits for other projects working in the Museum. Tourists, visitors, and other unauthorized persons are not allowed in the workrooms and storerooms. If an unauthorized person enters and refuses to leave, notify a Museum guard immediately. If there is a problem, notify one of the Project Directors.
The Head Guard holds the keys to the Museum workrooms and storerooms. Only the Project Directors and designated senior staff may ask for these rooms to be unlocked. Never leave a workroom or storeroom unattended and unlocked. At the end of the day, make sure all water faucets and electrical equipment are turned off. Plan your work so you will be ready to leave when the Head Guard comes to lock the workrooms and storerooms at the end of the day.
The Museum workrooms contain equipment and supplies belonging to several other excavation and survey projects working in the region. Do not use equipment and supplies that are not owned by our project (which should be labeled “NVAP”) without permission. The Museum storerooms contain objects found by the Greek Archaeological Service and several other excavation and survey projects working in the region. NEVER handle objects or move or open containers holding objects from other projects. Objects found by NVAP are so labeled and stored on specific shelves. When handling NVAP objects, make sure they are returned with all identifying labels to their original container and shelf.
25
Finds Processing Procedures
Upon arrival at the museum, all finds are put in the designated study area for the appropriate specialist. If no specialist is present, the finds are stored according to material in stratigraphic unit order in boxes to be put in the basement storeroom.
At the museum the pottery is strewn according to find location. Each unit is sorted according to fabric and decoration. The count and weight of each class of pottery within each unit is recorded. Selected objects (including all figurines, spindle whorls and other non-pottery ceramic objects) are given object numbers. These objects and the accompanying forms are taken for conservation, photography and drawing, as requested. The remaining pottery is bagged in its sorted units and stored in boxes in stratigraphic unit order in the basement storeroom. Cataloged objects are stored in separate boxes in the basement storeroom.
Water Sieving and Flotation Procedures 1. Make sure the barrel is connected with the source of water
2. Fill the barrel with water – the water should be changed and the barrel should be cleaned usually every week. The level of water should be a little bit lower than the weir
3. Place in position the 1 mm mesh in order to keep the residue with the aid of pegs
4. Put the set of the brass sieves into position. Make sure that the 1mm aperture sieve is on top of the 500μm sieve.
5. Fill the buckets with the soil and record the volume of the soil on the flotation sheet
6. Fill in the flotation form with all the soil sample information
7. Start the flotation procedure by fully opening the inlet tap to the barrel and adjust the height of the water just under the weir by regulating the water outflow with the tap at the bottom of the barrel
8. Slowly pour in the soil sample keeping the same water height
9. Gently stir the soil with both hands until the sample is clean. Do not press or squeeze any hard earth clumps, just allow more time for the washing
10. Close the valve at the bottom of the barrel and with the inlet tap regulate the water flow in order to be poured into the brass sieves. Aid the procedure with your hands. Make sure that the water flow is not high so as to avoid flooding of the sieves and loss of the material. If the brass sieves seem to block, gently tap the bottom of the stack so as to move the material inside.
11. When all the floatable material is in the sieves close the tap and let the water back to the height under the weir
12. Unpeg the residue mesh
13. Wash the residue that is still inside the mesh in a bowl full of water.
26
14. Spread the residue onto the plastic sheet with its label carefully stapled nearby. Make sure that the residues are left to dry under shade. Check if the second half of the residue needs to be kept. This is so when the first half has a considerable amount of seeds/charcoal/small bones/beads etc., or when the soil comes from a unit near a burial. Remember to add the letter R (residue) on the label
15. Pour in the second half of the soil and repeat the stages 9 to 12
16. Throw away the second half of the residue unless you have decided otherwise
16. Remove the brass sieves and carefully wash under a tap
17. Do not touch the material in the brass sieves, as it is extremely fragile
18. Take out the upper sieve and empty its content in kitchen paper. In particular, take 3 subsequent sheets of hard kitchen paper and fold them in the middle. Bang the sieve onto the paper once and then repeat onto another clean part of the same paper until all the content is emptied. Fold the paper, tie it with its label on and hang it on a rope in shade to dry.
19. Repeat the same with the other sieve
20. Make sure that the bag with the content of the 1mm sieve will be marked as C (coarse flot) and the bag with the content of the 500μm sieve will be marked as F (fine flot)
21. Clean the water in the barrel with the aid of the tea strainer
22. Repeat the procedure for the next sample.
PARTICULARLY SMALL SAMPLES SHOULD BE WASHED BY HAND SIEVING:
1. Fill a large bowl with water
2. Pour in slowly the soil sample and stir gently with hand
3. Slowly pour the floatable material into a stack of two sieves (the sieve at the top should have an aperture of 1mm and the one underneath 500μm)
4. Repeat the procedure until no more material floats
5. Gently agitate the residue at the bottom of the bowl and pour it all into a mesh with 1mm aperture
6. Treat the residue and the flots as in the case of water-sieving with the barrel
7. Make sure everything is clearly labelled and the flotation form is filled in correctly
BAGGING AND STORING FLOTS:
1. Make sure that flots are dry
2. Empty the content of the kitchen paper onto a piece of A3 or A2 paper and from there, pour it into a large enough zipper bag with the label inside.
27
3. Make sure the label is not destroyed otherwise replace with a new one and check that all the information is correctly transferred. If the information cannot be read clearly double check with the trench supervisor’s notebooks
4. Place the zipper bags with the coarse flots altogether in numerical order
5. Place the zipper bags with the fine flots altogether in numerical order
6. For their storage use cheese tins and if these are not available use plastic or hard paper boxes
BAGGING AND STORING RESIDUES:
1. Make sure that the residue is dry
2. Pour it into a hard plastic bag with one label inside and one label outside tied onto the rope that will seal the bag
3. If the plastic bag is thin use two of them
4. Store the residues of each trench in separate crates
Organic residue analysis sampling guidelines There are three main types of samples: visible residues, ceramic absorbed residues and the matrix (usually soil). Sampling can be carried out in the field/museum although it is generally easier to send the sherds to the laboratory where they will be sampled under controlled conditions - as the levels of archaeological organic residues are generally low one needs to take precautions to avoid contamination.
Handling: Lipid analysis is based on the survival and recognition of molecules common to many sources around us in the contemporary world. For example, fingerprints will deposit lipid molecules, such as fatty acids, cholesterol and wax esters onto the surfaces of samples. Therefore, if at all possible minimize or even exclude handling of samples intended for analysis. Use neoprene gloves or, if unavailable, the end of a trowel or tweezers.
Washing: Avoid washing sherds intended for organic analysis. Washing could dislodge surface residues, remove more labile constituents of absorbed residues and introduce contaminants. Avoid cleaning sherds with hydrochloric acid as this is likely to bring about the removal of organic components. During recording, please avoid pen and varnish on the inner surface of the sherd.
Soil samples: If possible, soil adhering to the sherd should be bagged with the archaeological sample. Alternatively, several grams of soil from around the sherd can be collected and bagged separately. Soils do have their own lipid fraction, often completely different to that absorbed in the sherd matrix, and it is therefore useful to look for potential migration of contamination into the sherds. The remaining soil should be water sieved, especially if there is any visible concentration of carbonized material
28
Destructive sampling: Lipid analysis is destructive and is based upon solvent extraction of powdered ceramic-absorbed residues or visible residues. However, most analysts will leave a portion of the sample for future analysis. For ceramic-absorbed residues a ceramic sample size of between 1-2 grams is recommended. For visible residues we generally require a very small amount of visible organic residue for analysis. If it is pure organic material then a pinhead-sized piece is about the minimum we can analyse. In both cases if you can spare more then this gives us greater options for repeat analysis or isotopic analysis etc and we will return any unused material. When possible it would be extremely helpful to have more than one sample coming from the same vessel. If handles are available they can be utilized as control samples, especially in the cases that soil samples are not available.
Archaeological considerations: In order to maximize the potential for archaeological interpretation, it is extremely helpful to note the fabric type and to know what part of the vessel the sherds derives (e.g. rim, body or base). Equally important is for sherds to be sampled from stratigraphically well-established contexts. Some use regimes (e.g. boiling) are likely to lead to differential deposition of lipid within the wall of the pot. Ideally, whole vessel profiles will allow multiple sampling of a single vessel, although such samples are not easy to come by so consideration must be given to whether up to three 1-2 gram samples can be removed and powdered. Some sherds display visible surface deposits on their interior surface. This is often burnt organic matter and lipids do tend to be preserved in these carbonaceous matrices. Separate extraction of the visible surface material does allow for comparison with the lipid absorbed in the pot matrix. We have also experimented with so-called ‘concentration gradients’ – longitudinal sections through the potsherd from the inside to the outside. This is helpful where soil samples are not available. High concentrations of lipid in the interior sections compared to the outer sections support the view that the vessel came into contact with lipid-rich substances. Finally, soot on the outer surfaces of potsherds/vessels is useful in suggesting activities associated with heating the containers and may assist in interpreting the lipid distribution.
Storage: Please avoid storage in plastic bags/wrapping as plasticizers can adhere to samples and tend to swamp the generally low levels of lipid. To send organic residues preferably put the sample into solvent washed glass (or polyethylene) vials. To send sherds, wrap the sample in aluminum foil, and then in a labeled zip-loc bag.
Other issues: Permits must be obtained to export samples for analysis outside Greece. The requirements vary but catalog descriptions referring to as much detail as possible regarding the sherds to undergo analysis with photographs are normally needed.
Museum Conservation and Storage
Preliminary analysis will be in the workrooms of the Nemea Museum. Here all artifacts will be recorded, conserved, drawn, photographed, and stored following a system devised for the Nemea Valley Archaeological Project and according to the protocol of the 37th Ephoreia. Bone material will be cleaned and taped. Materials for further analysis, for example for X-ray examination or C14 dating, will be prepared.
29
Storage will be in the basement storeroom that we prepared in 2002. It is a dry area outfitted with excellent lighting and high-quality museum shelving. Finds are stored in rugged plastic bins. Bins and shelves are labeled for easy identification of contents.
A complete inventory of all finds and their storage locations will be made according to the protocol of the Ministry of Culture.
Project Archives All paper and electronic records will be duplicated before the end of the field
season. This includes the research notes of all project personnel, without exception. One copy will remain in the Nemea Valley Archaeological Project archives in the Nemea Archaeological Museum and one copy will be taken to the Nemea Valley Archaeological Project archives at Bryn Mawr College.
Project Personnel
The directorial staff consists of Professor Robert Angus Smith, of Brock University, who has many years experience excavating and studying the ceramics from LM III chamber tombs at Mochlos, Crete. He will hold the permit through the Canadian Archaeological Institute at Athens. The others are listed in alphabetical order: Dr. Mary K. Dabney, Bryn Mawr College, who was Co-director of the excavations at Tsoungiza and Co-director of the excavation of the tomb at Barnavos; Evangelia Pappi, Epimeletria of the Δ’ Ephoreia of Prehistoric and Classical Antiquities, who was a Co-director of the excavation of the tomb at Barnavos and who salvaged the robbed tomb in this field at Ayia Sotira and has many years experience excavating and studying tombs in this area; Dr. Sevi Triantaphyllou, Sheffield University, who was Co-director of the excavation of the tomb at Barnavos and is responsible for all the recovery and analysis of human skeletal remains; and Professor James C. Wright, Bryn Mawr College, who directed the excavations at Tsoungiza and was Co-director of the excavation of the tomb at Barnavos.
Directorial Staff:
Evangelia Pappi, Δ’ Ephoreia of Prehistoric and Classical Antiquities Prof. Robert Angus Smith, Brock University Prof. James C. Wright, Bryn Mawr College Dr. Mary K. Dabney, Bryn Mawr College Dr. Sevi Triantaphyllou, Sheffield University
Surveyor and GIS specialist:
Geoffrey Compton, Bryn Mawr College
Geologist:
Panayiotis Karkanas, Ephoreia of Palaeontology and Speliology
30
Geophysical Prospecting:
Prof. Donald Barber, Bryn Mawr College
Palaeobotanists:
Georgia Kotzamani, Ph.D. candidate, University of Thessaloniki Alexandra Livarda, Ph.D. candidate, University of Leicester
Conservator:
Pinka Taratori, 4th Ephoreia of Classical and Prehistoric Antiquities, Nauplion
Artist:
Nicolaus Wright, independent artist
Excavation Unit Supervisors:
Dimitri Nakassis, Ph.D. candidate, University of Texas at Austin Eleni Milka, Ph.D. candidate, University of Groningen Jessica Miller, M.Phil. candidate, Oxford University
Student Assistants:
Johanna Best, Bryn Mawr College Eliese Dow, Bryn Mawr College Crystal Fulton, Brock University Kate Kemezis, Bryn Mawr College
Emre Kurucayirli, Bryn Mawr College Leslie Ann Moren, Brock University
Stephanie Olen, Bryn Mawr College Cindy Lee Scott, Brock University Allison Siegenthaler, Bryn Mawr College Eleftheria Tsichli, University of Thessaloniki Valerie Wolfcamp, Brock University
Project Schedule Although we have been given permission by the CAIA only for the 2006
season, we expect to request permission to continue this work to its completion, which we estimate will require two season of additional excavation in 2007 and 2008.
For 2006 our requested schedule is as follows:
Geophysical Prospecting, 22-27 May
Excavation, 29 May-8 July
Study and clean up, 10-22 July.
Program for 2007
Finish any remaining work from 2006.
31
Open new tombs as discovered in 2006.
Program for 2008
Finish any remaining work from 2007.
Open remaining new tombs.
Backfill as indicated.
Prepare site for presentation as indicated and secure it.
Publication Plans Preliminary reports written on an annual basis will be submitted to the CAIA.
These will be distributed for publication in the Αρχαιολογικόν Δελτίον, Archaeological Reports, Journal of Hellenic Studies, and “Chronique des fouilles,” Bulletin Correspondence Hellenique.
Because the work schedule is aimed at a full excavation of all the tombs in the field and projected at not more than three years of fieldwork, we plan a final monograph. It will be published within a year of the conclusion of the project. General responsibilities for publication are allocated as follows: Mortuary customs and landscape: Compton, Dabney, Pappi, Smith, Triantaphyllou and Wright; Artifacts: Smith and Dabney; Skeletal analysis and demography: Triantaphyllou; Regional integration: Dabney, Karkanas, Pappi, Smith, Triantaphyllou, Wright; Geophysical prospecting: Barber; Micromorphology: Karkanas.
List of Illustrations Figure 1. Plan of field of Panayiotis Tombras, adapted from survey by N. Maniadakis.
Figure 2. Map showing location of Ayia Sotira cemetery, chamber tomb at Barnavos, settlement on Tsoungiza hill, Sanctuary of Zeus, and villages of Ancient Nemea and Koutsomadi.
Figure 3. Diagram of stratigraphic-grid recording system.
Figure 4. Sample section drawing.
Figure 5. Areas for sampling skeletons
Bibliography Birkerland P. 1984. Soils and Geomorphology. Oxford.
Casselmann, C., M. Fuchs, D. Ittameier, J. Maran, and G.A. Wagner. 2004. "Interdisziplinäre landschaftsarchäologische Forschungen im Becken von Phlious, 1998-2002." Archäologischer Anzeiger. {page nos.?}
—. 2005. "Interdisziplinäre landschaftsarchäologische Forschungen im Beckon von Phlious, 1998-2002." Archäologischer Anzeiger {page nos.?}.
32
Cavanagh, W.G., and C. Mee 1990. "The Location of Mycenaean Chamber Tombs in the Argolid." In Celebrations of Death and Divinity in the Bronze Age Argolid: Proceedings of the Sixth International Symposium at the Swedish Institute at Athens, 11-13 June, 1988, edited by R. Hägg and G.C. Nordquist, 55-64. SkrAth, 4°, XL. Stockholm:
Cherry, J.F. 1999. "After Aidonia: Further Reflections on Attribution in the Aegean Bronze Age." In Meletemata: Studies in Aegean Archaeology Presented to Malcolm H. Wiener as He Enters His 65th Year, edited by P.P. Betancourt, V. Karageorghis, R. Laffineur, and W.-D. Niemeier, Aegaeum 19. Liège: Université de Liège, Histoire de l'art et archéologie de la Grèce antique.
Cherry, J.F., and J.L. Davis. 2001. "'Under the Sceptre of Agamemnon': The View from the Hinterlands of Mycenae." In Urbanism in the Aegean Bronze Age, edited by K. Branigan, 141-59. Sheffield Studies in Aegean Archaeology 5. London/New York: Sheffield Academic Press.
Courty, M.A., Goldberg P., and R. Macphail. 1989. Soils and micromorphology in archaeology. Cambridge.
Cummings, L.S. 2003. Manual for Pollen, Phytolith, Starch, and Macrofloral Sampling.
(www. paleoresearch.com/manuals/manual.html).
Dabney, M.K. 1997. "Craft Product Consumption as an Economic Indicator of Site Status in Regional Studies." In TEXNH: Craftsmen, Craftswomen and Craftsmanship in the Aegean Bronze Age., edited by R. Laffineur and P.P. Betancourt, 467-71. Aegaeum, 16. Liège: Université de Liège, Histoire de l'art et archéologie de la Grèce antique.
Dabney, M.K. 1999. "Locating Mycenaean Cemeteries." In Meletemata: Studies in Aegean Archaeology Presented to Malcolm H. Wiener as He Enters His 65th Year, edited by P.P. Betancourt, V. Karageorghis, R. Laffineur, and W.-D. Niemeier, 171-75. Aegaeum 19. Liège: Université de Liège, Histoire de l'art et archéologie de la Grèce antique.
Dabney, M., P. Halstead, and P. Thomas. 2004. "Mycenaean Feasting on Tsoungiza at Ancient Nemea." In The Mycenaean Feast, edited by J.C. Wright, 79-95. Princeton: American School of Classical Studies.
Davis, J.L. 1988. "If There's a Room at the Top What's at the Bottom: Settlement and Hierarchy in Early Mycenaean Greece." Bulletin of the Institute of Classical Studies, University of London 35: 164-65.
Demakopoulou, K. ed. 1996. The Aidonia Treasure: Seals and Jewellery of the Aegean Late Bronze Age. Athens: Ministry of Culture.
Graziadio, G. 1991. "The Process of Social Stratification at Mycenae in the Shaft Grave Period: A Comparative Examination of the Evidence." American Journal of Archaeology 95: 403-40.
33
Kilian-Dirlmeier, I. 1985. "Noch einmal zu den "Kriegergräbern" von Knossos." Jahrbuch des Römisch-Germanischen Zentralmuseums 32: 196-214.
Krystalli-Votsi, K. 1986. "Ta dahtilidia apo ta Aidonia Korinthias." In Filia epi is Georgion E. Mylonan dia ta 60 eti tu anaskafiku tu ergu, edited by 34-43. Library of the Archaeological Society of Athens 103. Athens.
Maran, J., G.A. Wagner, and A. Lang. 2005. "Rekonstruktion einer antiken Landschaft - Archäologische Oberflächenprospektion im Becken von Phlious
Archäologische Oberflächenprospektion im Becken von Phlious." In.
Papathanasiou, A. 1999. " A Bioarchaeological Analysis of Health, Subsistence, and Funerary Behavior in the Eastern Mediterranean Basin: A Case Study from Alepotrypa Cave, Greece". Ph.D. diss., University of Iowa.
Pappi, E. 1999. "Aidonia Nemeas, thesi Platana." Archaiologikon Deltion 54: forthcoming.
Triantaphyllou, S. 2001. A Bioarchaeological Approach to Prehistoric Cemetery Populations from Western and Central Greek Macedonia. BAR: International Series, 976. Oxford: BAR.
Wright, J.C. 1982. "Excavations at Tsoungiza (Archaia Nemea) 1981." Hesperia 51: 375-97.
— 1990. "An Early Mycenaean Hamlet on Tsoungiza at Ancient Nemea." In L'habitat égéen préhistorique, edited by P. Darcque and R. Treuil, 247-357. Bulletin Correspondence Hellenique, Supplement, 19.
—. 1997. "Thugs or Heroes? The Early Mycenaeans and Their Graves of Gold." In A Mycenaean Treasure Trove: Repatriated Jewelry Goes Home. (Proceedings of a conference sponsored by the Society for the Preservation of the Greek Heritage and held at the Smithsonian Institution, January 26, 1996), Washington, D.C.,1997, edited by R.H. Howland, 5-17. Washington, D.C.: Society for the Preservation of the Greek Heritage.
— 2004. "Comparative Settlement Patterns during the Bronze Age in the Northeastern Peloponnesos, Greece." In Sice-by-Side Survey: Comparative Regional Studies in the Mediterranean World, edited by S.A. Alcock and J.F. Cherry, 114-31. Oxford: Oxbow Books.
Wright, J.C., J.F. Cherry, J.L. Davis, E. Mantzourani, and S.B. Sutton. 1990. "The Nemea Valley Archaeological Project. A Preliminary Report." Hesperia 59: 579-645.
Wright, J.C., E. Pappi, S. Triantaphyllou, M. Dabney, and P. Karkanas. forthcoming. "Nemea Valley Archaeological Project: Barnavos Cemetery Excavations, Final Report, 2002-3 Seasons." Hesperia.
34
Appendices
Appendix 1: Instructions for using the Total Station
Appendix 2: Stratigraphic Unit Form
Appendix 3: Field Notebook Text Form
Appendix 4: Find Spot Register
Appendix 5: SU Database
Appendix 6: Find Spot Database
Appendix 7: Drawing Database
Appendix 8: Cataloged Object Database
Appendix 9: Photo Form and Database
Appendix 10: Soil/Sediment Field Description
Appendix 11: Water Sieve Form and Sampling Strategy
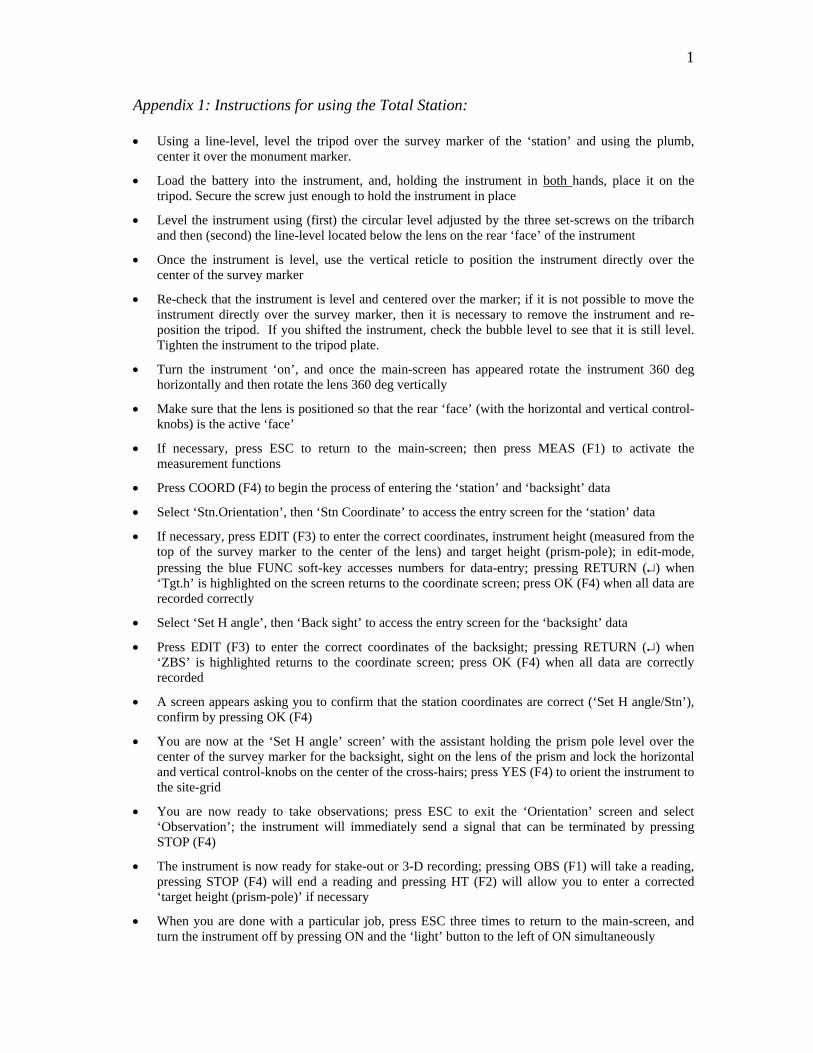
1
Appendix 1: Instructions for using the Total Station: • Using a line-level, level the tripod over the survey marker of the ‘station’ and using the plumb,
center it over the monument marker.
• Load the battery into the instrument, and, holding the instrument in both hands, place it on the tripod. Secure the screw just enough to hold the instrument in place
• Level the instrument using (first) the circular level adjusted by the three set-screws on the tribarch and then (second) the line-level located below the lens on the rear ‘face’ of the instrument
• Once the instrument is level, use the vertical reticle to position the instrument directly over the center of the survey marker
• Re-check that the instrument is level and centered over the marker; if it is not possible to move the instrument directly over the survey marker, then it is necessary to remove the instrument and re-position the tripod. If you shifted the instrument, check the bubble level to see that it is still level. Tighten the instrument to the tripod plate.
• Turn the instrument ‘on’, and once the main-screen has appeared rotate the instrument 360 deg horizontally and then rotate the lens 360 deg vertically
• Make sure that the lens is positioned so that the rear ‘face’ (with the horizontal and vertical control-knobs) is the active ‘face’
• If necessary, press ESC to return to the main-screen; then press MEAS (F1) to activate the measurement functions
• Press COORD (F4) to begin the process of entering the ‘station’ and ‘backsight’ data
• Select ‘Stn.Orientation’, then ‘Stn Coordinate’ to access the entry screen for the ‘station’ data
• If necessary, press EDIT (F3) to enter the correct coordinates, instrument height (measured from the top of the survey marker to the center of the lens) and target height (prism-pole); in edit-mode, pressing the blue FUNC soft-key accesses numbers for data-entry; pressing RETURN (↵) when ‘Tgt.h’ is highlighted on the screen returns to the coordinate screen; press OK (F4) when all data are recorded correctly
• Select ‘Set H angle’, then ‘Back sight’ to access the entry screen for the ‘backsight’ data
• Press EDIT (F3) to enter the correct coordinates of the backsight; pressing RETURN (↵) when ‘ZBS’ is highlighted returns to the coordinate screen; press OK (F4) when all data are correctly recorded
• A screen appears asking you to confirm that the station coordinates are correct (‘Set H angle/Stn’), confirm by pressing OK (F4)
• You are now at the ‘Set H angle’ screen’ with the assistant holding the prism pole level over the center of the survey marker for the backsight, sight on the lens of the prism and lock the horizontal and vertical control-knobs on the center of the cross-hairs; press YES (F4) to orient the instrument to the site-grid
• You are now ready to take observations; press ESC to exit the ‘Orientation’ screen and select ‘Observation’; the instrument will immediately send a signal that can be terminated by pressing STOP (F4)
• The instrument is now ready for stake-out or 3-D recording; pressing OBS (F1) will take a reading, pressing STOP (F4) will end a reading and pressing HT (F2) will allow you to enter a corrected ‘target height (prism-pole)’ if necessary
• When you are done with a particular job, press ESC three times to return to the main-screen, and turn the instrument off by pressing ON and the ‘light’ button to the left of ON simultaneously
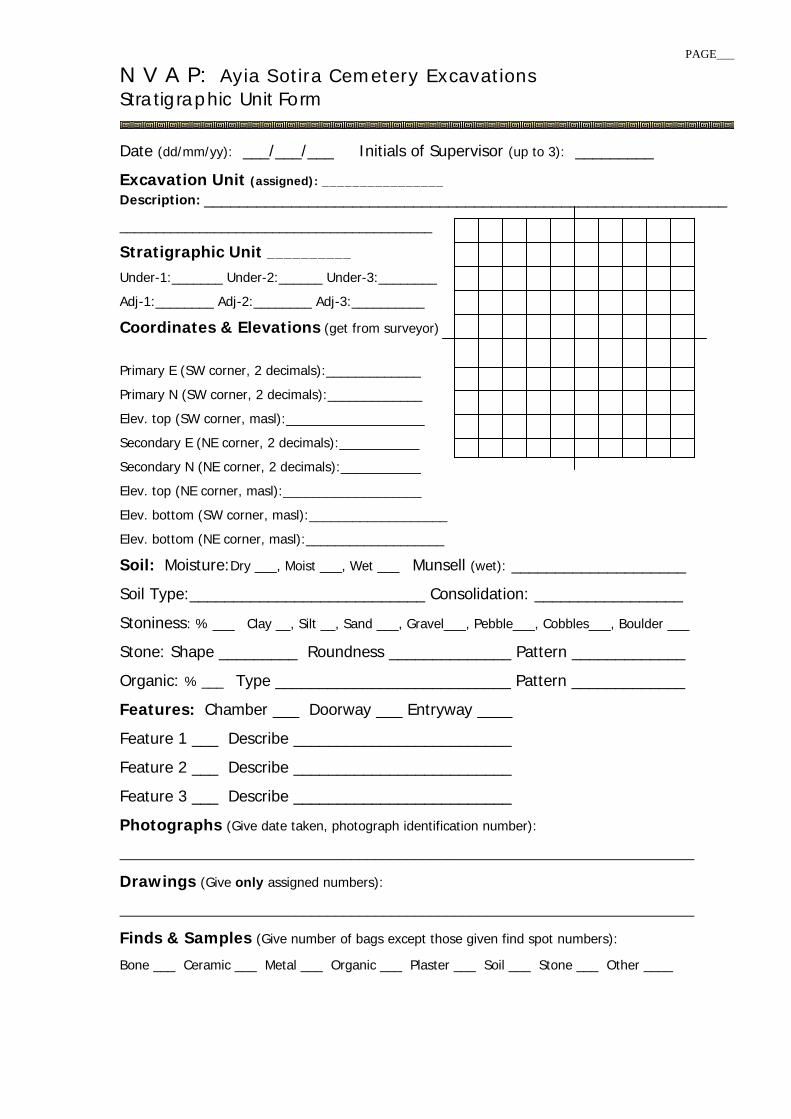
PAGE___
N V A P: Ayia Sotira Cemetery Excavations Stratigraphic Unit Form
Date (dd/mm/yy): ___/___/___ Initials of Supervisor (up to 3): _________
Excavation Unit (assigned): ________________
Description: ____________________________________________________________
___________________________________________
Stratigraphic Unit __________ Under-1:_______ Under-2:______ Under-3:________ Adj-1:________ Adj-2:________ Adj-3:__________
Coordinates & Elevations (get from surveyor)
Primary E (SW corner, 2 decimals):_____________
Primary N (SW corner, 2 decimals):_____________
Elev. top (SW corner, masl):___________________
Secondary E (NE corner, 2 decimals):___________
Secondary N (NE corner, 2 decimals):___________
Elev. top (NE corner, masl):___________________
Elev. bottom (SW corner, masl):___________________ Elev. bottom (NE corner, masl):___________________
Soil: Moisture:Dry ___, Moist ___, Wet ___ Munsell (wet): ____________________
Soil Type:___________________________ Consolidation: _________________
Stoniness: % ___ Clay __, Silt __, Sand ___, Gravel___, Pebble___, Cobbles___, Boulder ___
Stone: Shape _________ Roundness ______________ Pattern _____________
Organic: % ___ Type ___________________________ Pattern _____________
Features: Chamber ___ Doorway ___ Entryway ____
Feature 1 ___ Describe _________________________
Feature 2 ___ Describe _________________________
Feature 3 ___ Describe _________________________
Photographs (Give date taken, photograph identification number):
________________________________________________________________________
Drawings (Give only assigned numbers):
________________________________________________________________________
Finds & Samples (Give number of bags except those given find spot numbers):
Bone ___ Ceramic ___ Metal ___ Organic ___ Plaster ___ Soil ___ Stone ___ Other ____
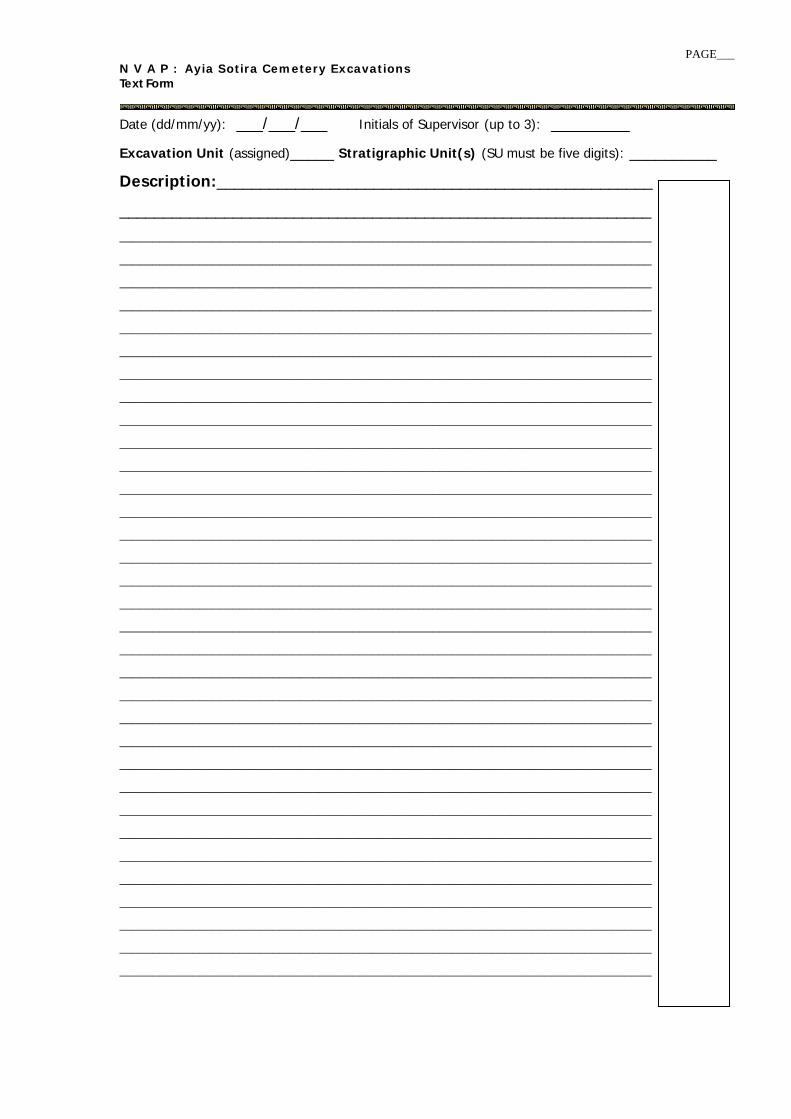
PAGE___ N V A P : Ayia Sotira Cemetery Excavations Text Form
Date (dd/mm/yy): ___/___/___ Initials of Supervisor (up to 3): _________
Excavation Unit (assigned)_____ Stratigraphic Unit(s) (SU must be five digits): __________
Description:__________________________________________________
_____________________________________________________________
________________________________________________________________________________
________________________________________________________________________________ ________________________________________________________________________________ ________________________________________________________________________________ ________________________________________________________________________________ ________________________________________________________________________________ ________________________________________________________________________________ ________________________________________________________________________________ ________________________________________________________________________________ ________________________________________________________________________________ ________________________________________________________________________________ ________________________________________________________________________________ ________________________________________________________________________________ ________________________________________________________________________________ ________________________________________________________________________________ ________________________________________________________________________________ ________________________________________________________________________________ ________________________________________________________________________________ ________________________________________________________________________________ ________________________________________________________________________________ ________________________________________________________________________________ ________________________________________________________________________________ ________________________________________________________________________________ ________________________________________________________________________________ ________________________________________________________________________________ ________________________________________________________________________________ ________________________________________________________________________________ ________________________________________________________________________________ ________________________________________________________________________________ ________________________________________________________________________________ ________________________________________________________________________________ ________________________________________________________________________________ ________________________________________________________________________________
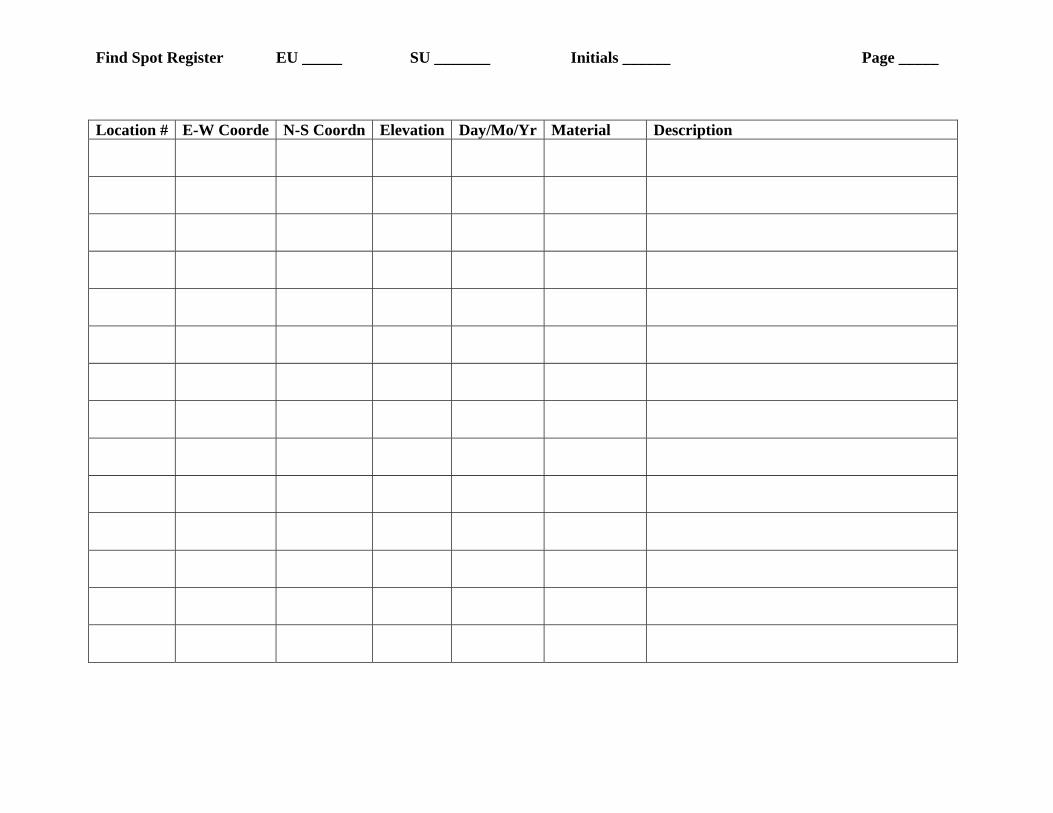
Find Spot Register EU _____ SU _______ Initials ______ Page _____
Location # E-W Coorde N-S Coordn Elevation Day/Mo/Yr Material Description
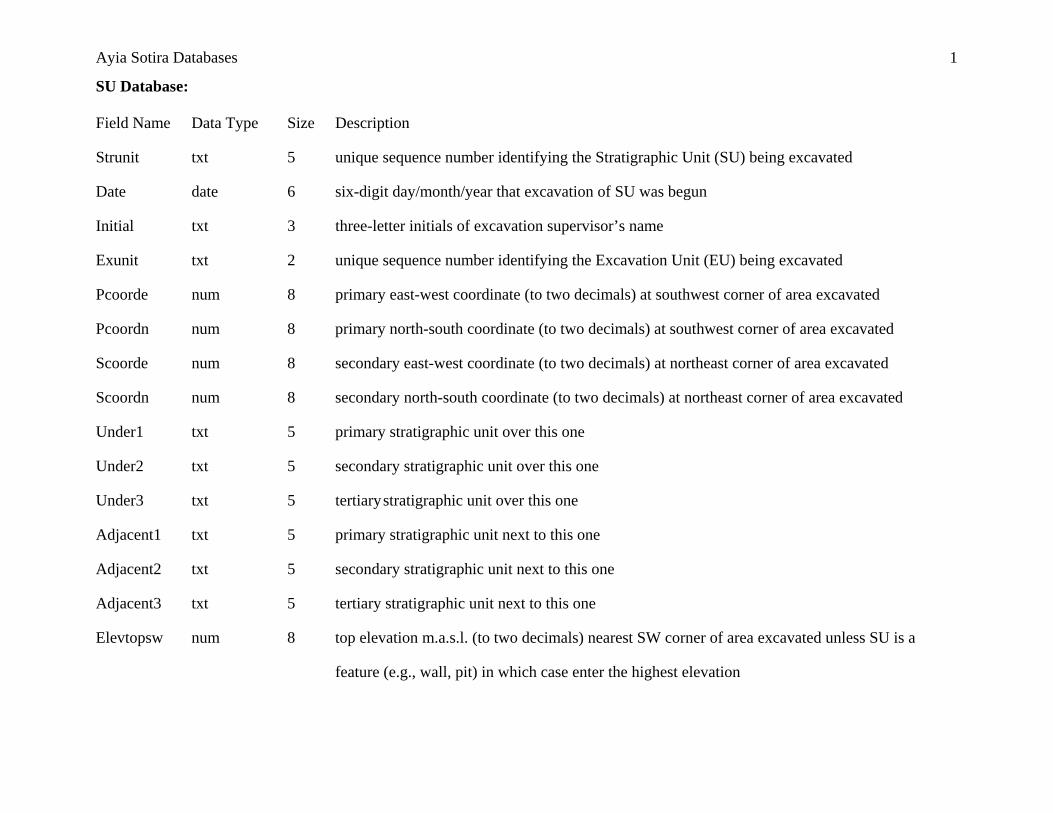
Ayia Sotira Databases 1
SU Database: Field Name Data Type Size Description
Strunit txt 5 unique sequence number identifying the Stratigraphic Unit (SU) being excavated
Date date 6 six-digit day/month/year that excavation of SU was begun
Initial txt 3 three-letter initials of excavation supervisor’s name
Exunit txt 2 unique sequence number identifying the Excavation Unit (EU) being excavated
Pcoorde num 8 primary east-west coordinate (to two decimals) at southwest corner of area excavated
Pcoordn num 8 primary north-south coordinate (to two decimals) at southwest corner of area excavated
Scoorde num 8 secondary east-west coordinate (to two decimals) at northeast corner of area excavated
Scoordn num 8 secondary north-south coordinate (to two decimals) at northeast corner of area excavated
Under1 txt 5 primary stratigraphic unit over this one
Under2 txt 5 secondary stratigraphic unit over this one
Under3 txt 5 tertiary stratigraphic unit over this one
Adjacent1 txt 5 primary stratigraphic unit next to this one
Adjacent2 txt 5 secondary stratigraphic unit next to this one
Adjacent3 txt 5 tertiary stratigraphic unit next to this one
Elevtopsw num 8 top elevation m.a.s.l. (to two decimals) nearest SW corner of area excavated unless SU is a
feature (e.g., wall, pit) in which case enter the highest elevation

Ayia Sotira Databases 2
SU Database (cont.):
Field Name Data Type Size Description
Elevtopne num 8 top elevation m.a.s.l. (to two decimals) nearest NE corner of area excavated unless SU is a
feature (e.g., wall, pit) in which case enter the highest elevation
Elevbotsw num 8 bottom elevation m.a.s.l. (to two decimals) nearest SW corner of area excavated unless SU is a
feature (e.g., wall, pit) in which case enter the lowest elevation
Elevbotne num 8 bottom elevation m.a.s.l. (to two decimals) nearest NE corner of area excavated unless SU is a
feature (e.g., wall, pit) in which case enter the lowest elevation
Soilmoist txt 5 describe soil moisture (dry, moist, wet) at time of soil description
Soilmuns txt 12 describe soil color using Munsell color chart number
Soiltype txt 15 describe soil texture of finer component using sand/silt/clay chart
Stoniness txt 3 describe percentage of SU that is comprised of stones
Stonesize txt 20 describe range of stone sizes using Wentworth scale
Stoneshape txt 20 describe shape of stones (platy, spherical, discoidal, or rod),
Stoneround txt 25 describe relative sharpness of stone corners, i.e. angular, subangular, sub-rounded, rounded, or
well-rounded
Stonepatt txt 25 describe distribution pattern of stones, i.e. random, clustered, linear, banded, and relationship of
stones to boundaries of SU, i.e. parallel, inclined, perpendicular, or unrelated
Organic txt 3 describe percentage of SU that is comprised of organic matter
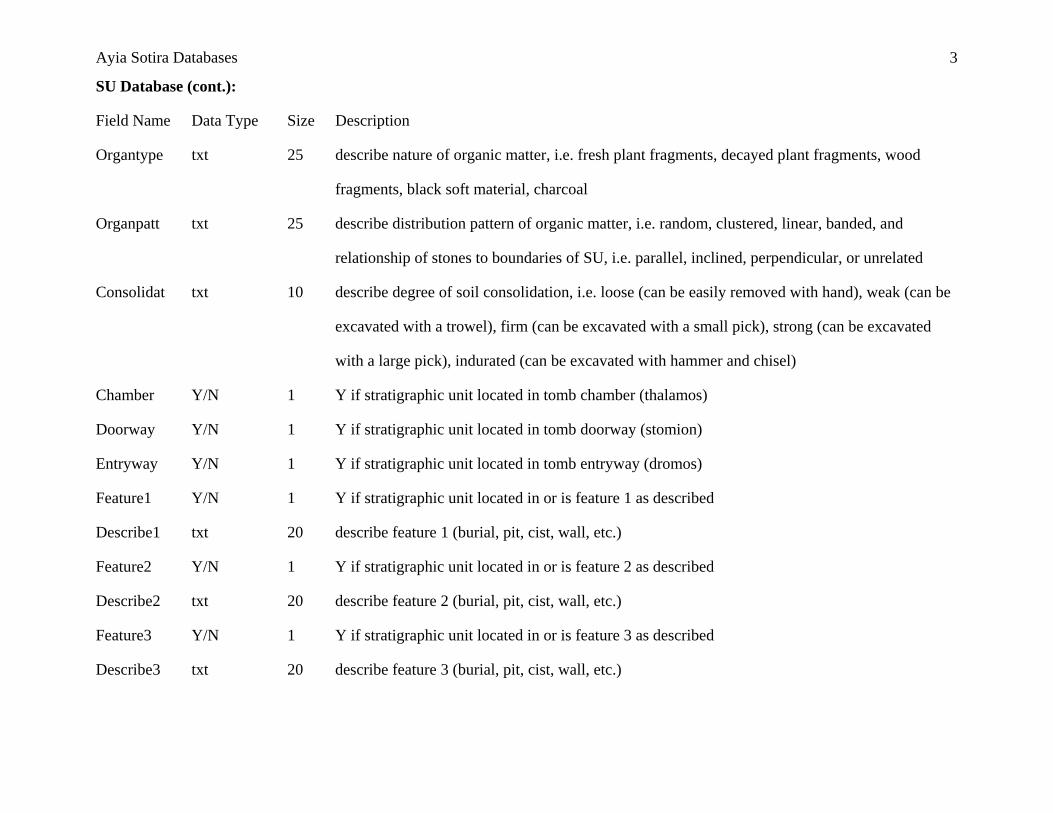
Ayia Sotira Databases 3
SU Database (cont.):
Field Name Data Type Size Description
Organtype txt 25 describe nature of organic matter, i.e. fresh plant fragments, decayed plant fragments, wood
fragments, black soft material, charcoal
Organpatt txt 25 describe distribution pattern of organic matter, i.e. random, clustered, linear, banded, and
relationship of stones to boundaries of SU, i.e. parallel, inclined, perpendicular, or unrelated
Consolidat txt 10 describe degree of soil consolidation, i.e. loose (can be easily removed with hand), weak (can be
excavated with a trowel), firm (can be excavated with a small pick), strong (can be excavated
with a large pick), indurated (can be excavated with hammer and chisel)
Chamber Y/N 1 Y if stratigraphic unit located in tomb chamber (thalamos)
Doorway Y/N 1 Y if stratigraphic unit located in tomb doorway (stomion)
Entryway Y/N 1 Y if stratigraphic unit located in tomb entryway (dromos)
Feature1 Y/N 1 Y if stratigraphic unit located in or is feature 1 as described
Describe1 txt 20 describe feature 1 (burial, pit, cist, wall, etc.)
Feature2 Y/N 1 Y if stratigraphic unit located in or is feature 2 as described
Describe2 txt 20 describe feature 2 (burial, pit, cist, wall, etc.)
Feature3 Y/N 1 Y if stratigraphic unit located in or is feature 3 as described
Describe3 txt 20 describe feature 3 (burial, pit, cist, wall, etc.)
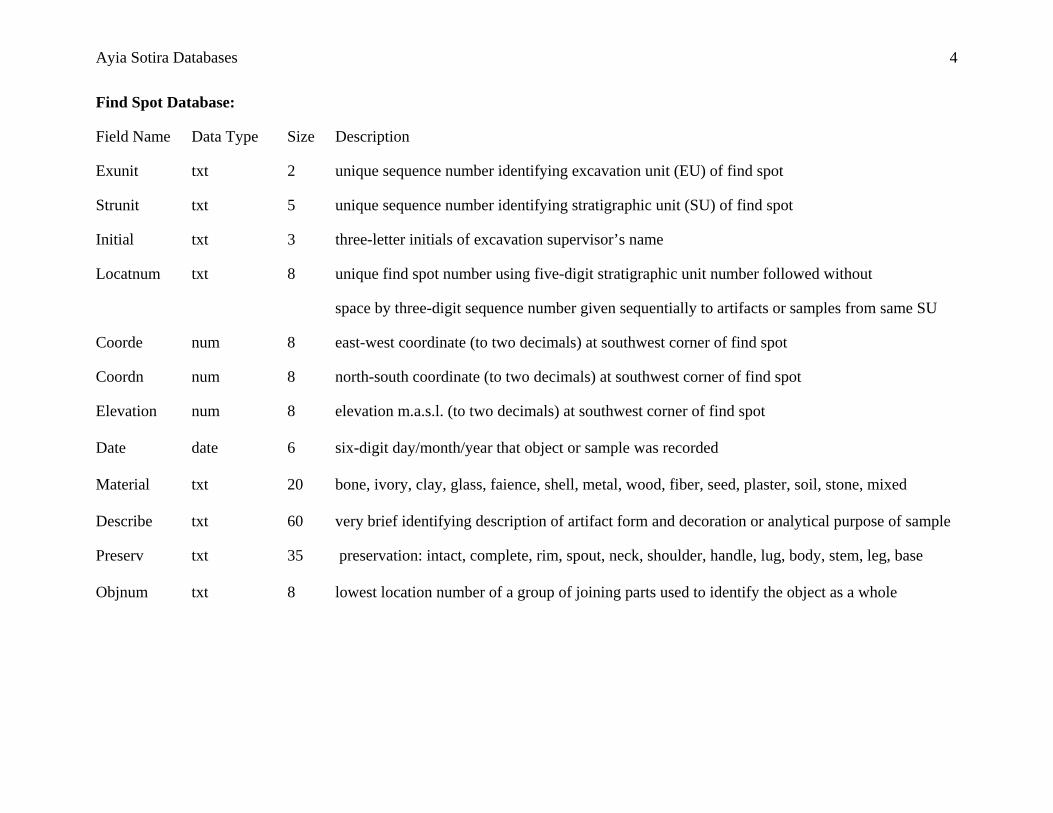
Ayia Sotira Databases 4
Find Spot Database:
Field Name Data Type Size Description
Exunit txt 2 unique sequence number identifying excavation unit (EU) of find spot
Strunit txt 5 unique sequence number identifying stratigraphic unit (SU) of find spot
Initial txt 3 three-letter initials of excavation supervisor’s name
Locatnum txt 8 unique find spot number using five-digit stratigraphic unit number followed without
space by three-digit sequence number given sequentially to artifacts or samples from same SU
Coorde num 8 east-west coordinate (to two decimals) at southwest corner of find spot
Coordn num 8 north-south coordinate (to two decimals) at southwest corner of find spot
Elevation num 8 elevation m.a.s.l. (to two decimals) at southwest corner of find spot Date date 6 six-digit day/month/year that object or sample was recorded Material txt 20 bone, ivory, clay, glass, faience, shell, metal, wood, fiber, seed, plaster, soil, stone, mixed Describe txt 60 very brief identifying description of artifact form and decoration or analytical purpose of sample
Preserv txt 35 preservation: intact, complete, rim, spout, neck, shoulder, handle, lug, body, stem, leg, base Objnum txt 8 lowest location number of a group of joining parts used to identify the object as a whole
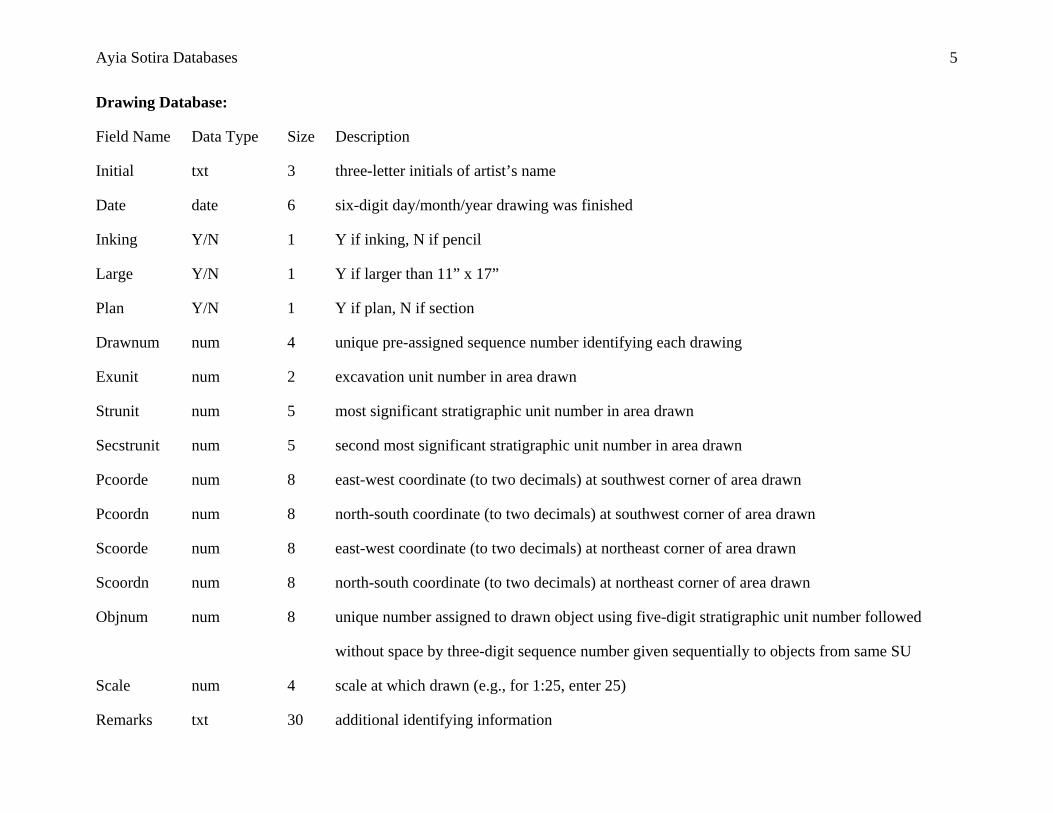
Ayia Sotira Databases 5
Drawing Database:
Field Name Data Type Size Description
Initial txt 3 three-letter initials of artist’s name
Date date 6 six-digit day/month/year drawing was finished
Inking Y/N 1 Y if inking, N if pencil
Large Y/N 1 Y if larger than 11” x 17”
Plan Y/N 1 Y if plan, N if section
Drawnum num 4 unique pre-assigned sequence number identifying each drawing
Exunit num 2 excavation unit number in area drawn
Strunit num 5 most significant stratigraphic unit number in area drawn
Secstrunit num 5 second most significant stratigraphic unit number in area drawn
Pcoorde num 8 east-west coordinate (to two decimals) at southwest corner of area drawn
Pcoordn num 8 north-south coordinate (to two decimals) at southwest corner of area drawn
Scoorde num 8 east-west coordinate (to two decimals) at northeast corner of area drawn
Scoordn num 8 north-south coordinate (to two decimals) at northeast corner of area drawn
Objnum num 8 unique number assigned to drawn object using five-digit stratigraphic unit number followed
without space by three-digit sequence number given sequentially to objects from same SU
Scale num 4 scale at which drawn (e.g., for 1:25, enter 25)
Remarks txt 30 additional identifying information
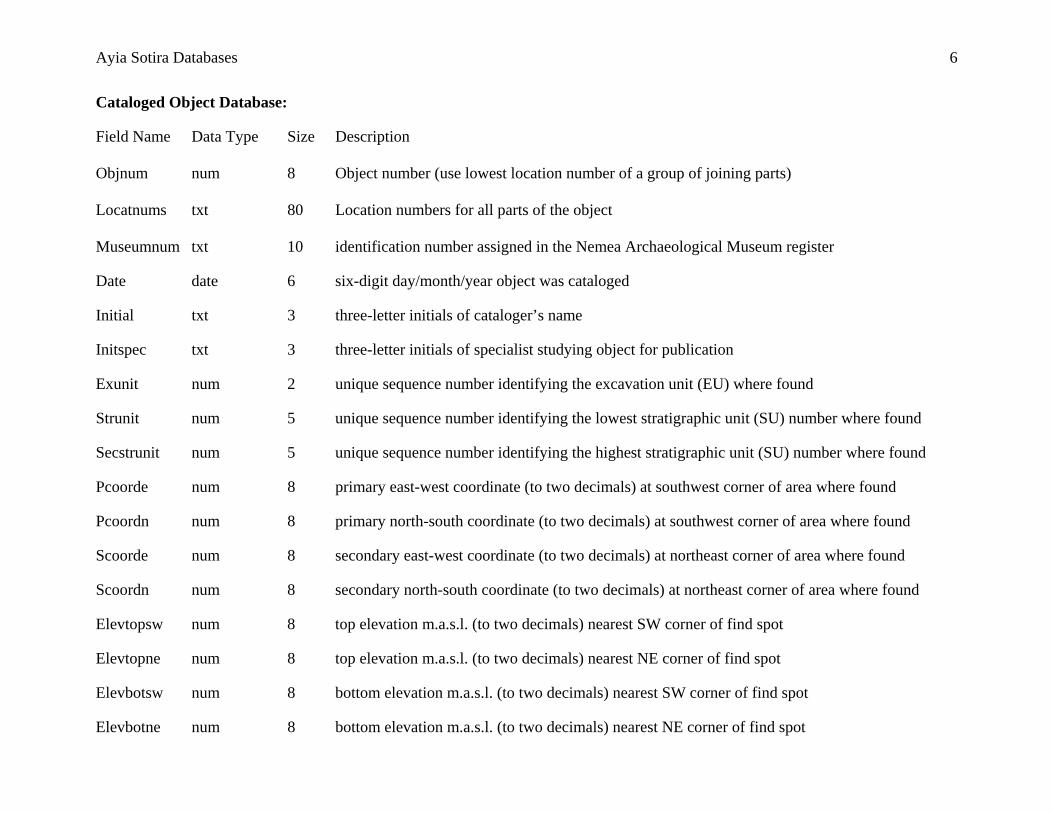
Ayia Sotira Databases 6
Cataloged Object Database:
Field Name Data Type Size Description Objnum num 8 Object number (use lowest location number of a group of joining parts) Locatnums txt 80 Location numbers for all parts of the object Museumnum txt 10 identification number assigned in the Nemea Archaeological Museum register
Date date 6 six-digit day/month/year object was cataloged
Initial txt 3 three-letter initials of cataloger’s name
Initspec txt 3 three-letter initials of specialist studying object for publication
Exunit num 2 unique sequence number identifying the excavation unit (EU) where found
Strunit num 5 unique sequence number identifying the lowest stratigraphic unit (SU) number where found
Secstrunit num 5 unique sequence number identifying the highest stratigraphic unit (SU) number where found
Pcoorde num 8 primary east-west coordinate (to two decimals) at southwest corner of area where found
Pcoordn num 8 primary north-south coordinate (to two decimals) at southwest corner of area where found
Scoorde num 8 secondary east-west coordinate (to two decimals) at northeast corner of area where found
Scoordn num 8 secondary north-south coordinate (to two decimals) at northeast corner of area where found
Elevtopsw num 8 top elevation m.a.s.l. (to two decimals) nearest SW corner of find spot
Elevtopne num 8 top elevation m.a.s.l. (to two decimals) nearest NE corner of find spot
Elevbotsw num 8 bottom elevation m.a.s.l. (to two decimals) nearest SW corner of find spot
Elevbotne num 8 bottom elevation m.a.s.l. (to two decimals) nearest NE corner of find spot
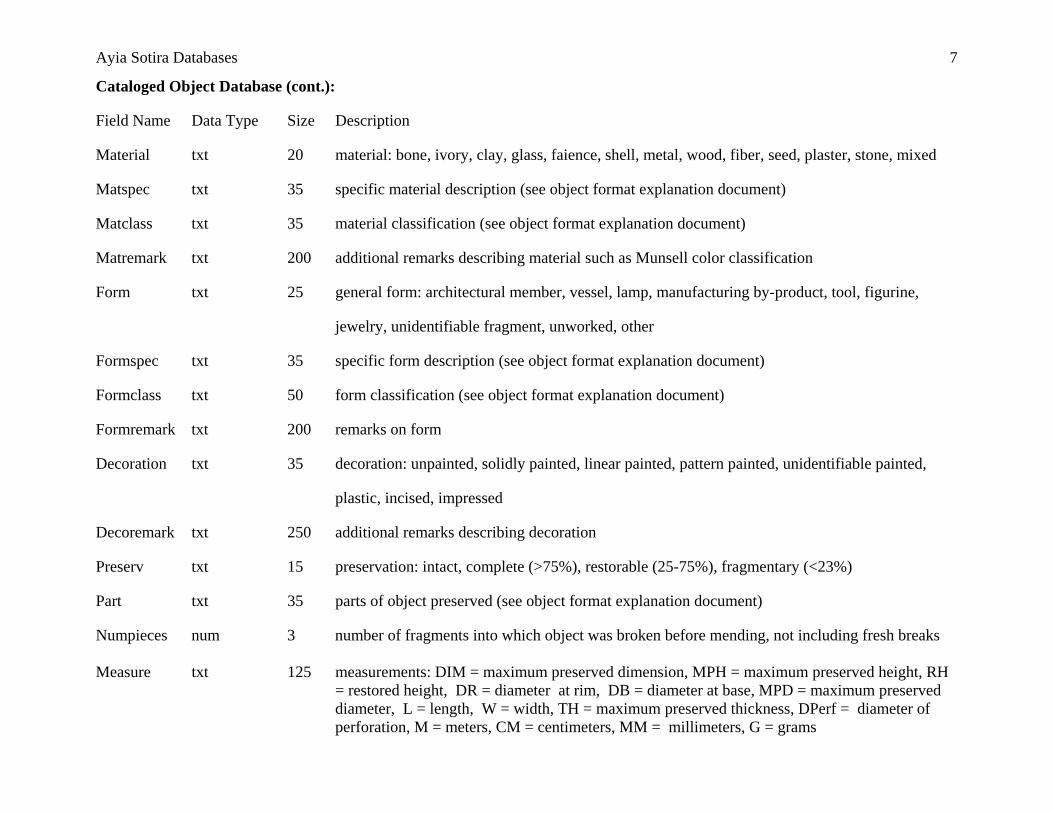
Ayia Sotira Databases 7
Cataloged Object Database (cont.):
Field Name Data Type Size Description
Material txt 20 material: bone, ivory, clay, glass, faience, shell, metal, wood, fiber, seed, plaster, stone, mixed
Matspec txt 35 specific material description (see object format explanation document)
Matclass txt 35 material classification (see object format explanation document)
Matremark txt 200 additional remarks describing material such as Munsell color classification
Form txt 25 general form: architectural member, vessel, lamp, manufacturing by-product, tool, figurine,
jewelry, unidentifiable fragment, unworked, other
Formspec txt 35 specific form description (see object format explanation document)
Formclass txt 50 form classification (see object format explanation document)
Formremark txt 200 remarks on form
Decoration txt 35 decoration: unpainted, solidly painted, linear painted, pattern painted, unidentifiable painted,
plastic, incised, impressed
Decoremark txt 250 additional remarks describing decoration
Preserv txt 15 preservation: intact, complete (>75%), restorable (25-75%), fragmentary (<23%)
Part txt 35 parts of object preserved (see object format explanation document)
Numpieces num 3 number of fragments into which object was broken before mending, not including fresh breaks Measure txt 125 measurements: DIM = maximum preserved dimension, MPH = maximum preserved height, RH
= restored height, DR = diameter at rim, DB = diameter at base, MPD = maximum preserved diameter, L = length, W = width, TH = maximum preserved thickness, DPerf = diameter of perforation, M = meters, CM = centimeters, MM = millimeters, G = grams
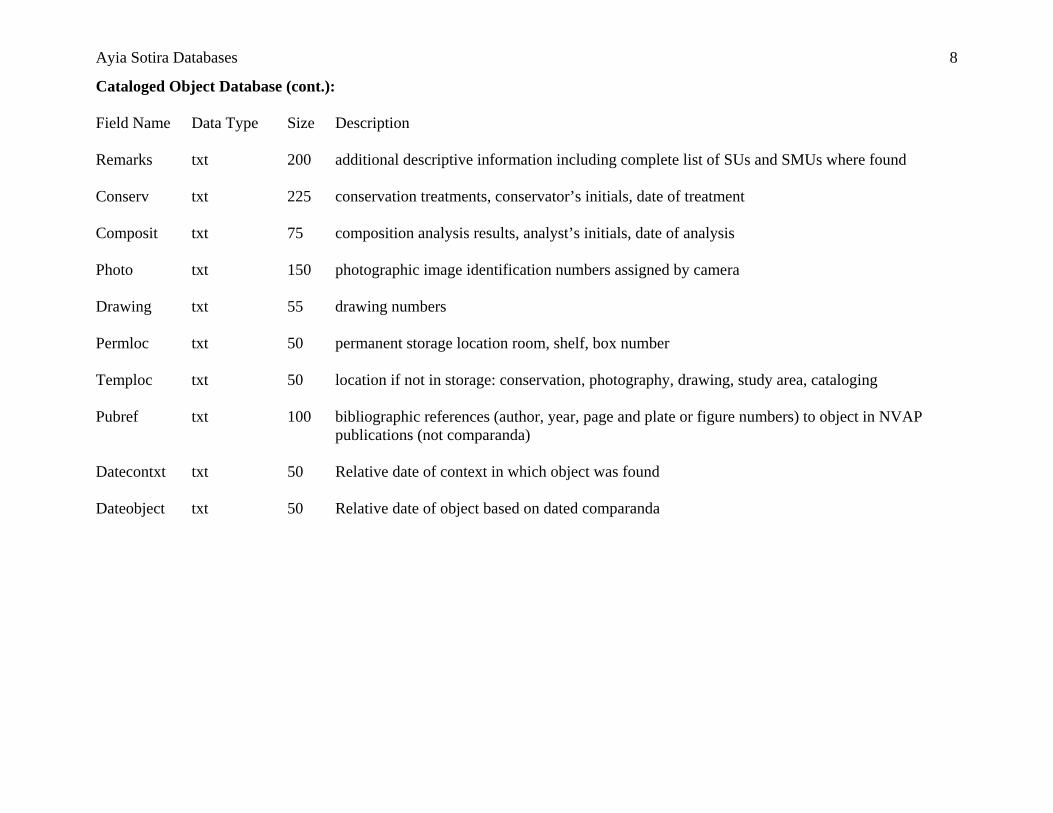
Ayia Sotira Databases 8
Cataloged Object Database (cont.):
Field Name Data Type Size Description
Remarks txt 200 additional descriptive information including complete list of SUs and SMUs where found Conserv txt 225 conservation treatments, conservator’s initials, date of treatment Composit txt 75 composition analysis results, analyst’s initials, date of analysis Photo txt 150 photographic image identification numbers assigned by camera Drawing txt 55 drawing numbers Permloc txt 50 permanent storage location room, shelf, box number Temploc txt 50 location if not in storage: conservation, photography, drawing, study area, cataloging Pubref txt 100 bibliographic references (author, year, page and plate or figure numbers) to object in NVAP
publications (not comparanda) Datecontxt txt 50 Relative date of context in which object was found Dateobject txt 50 Relative date of object based on dated comparanda

Photography Camera ________________ Page ____
Day/Mo/Yr Photo ID# Initials SU or Find Spot
DirectionFrom
Notes
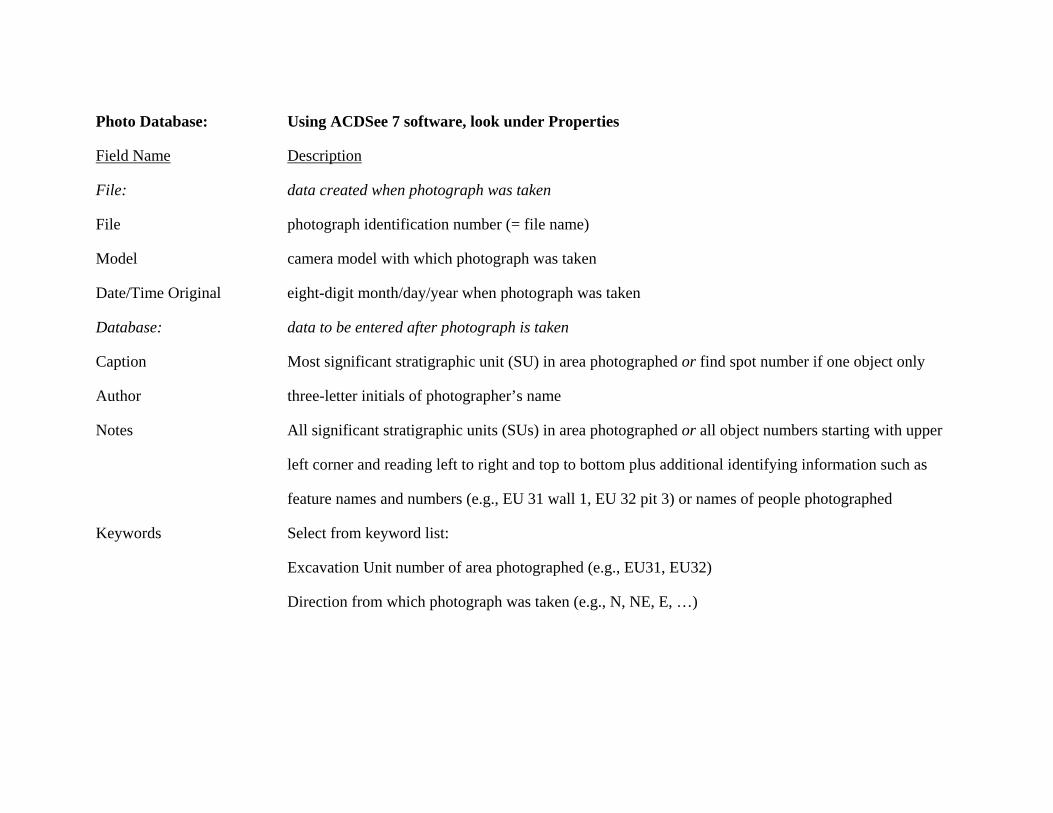
Photo Database: Using ACDSee 7 software, look under Properties
Field Name Description
File: data created when photograph was taken
File photograph identification number (= file name)
Model camera model with which photograph was taken
Date/Time Original eight-digit month/day/year when photograph was taken
Database: data to be entered after photograph is taken
Caption Most significant stratigraphic unit (SU) in area photographed or find spot number if one object only
Author three-letter initials of photographer’s name
Notes All significant stratigraphic units (SUs) in area photographed or all object numbers starting with upper
left corner and reading left to right and top to bottom plus additional identifying information such as
feature names and numbers (e.g., EU 31 wall 1, EU 32 pit 3) or names of people photographed
Keywords Select from keyword list:
Excavation Unit number of area photographed (e.g., EU31, EU32)
Direction from which photograph was taken (e.g., N, NE, E, …)
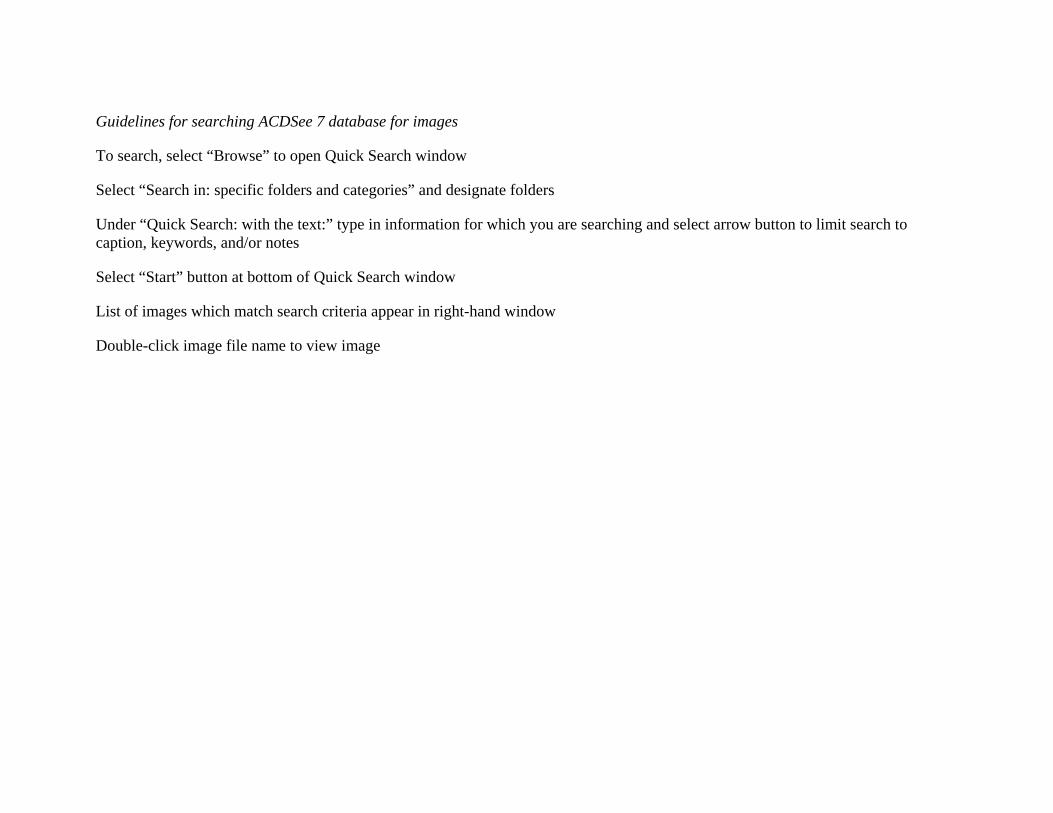
Guidelines for searching ACDSee 7 database for images
To search, select “Browse” to open Quick Search window
Select “Search in: specific folders and categories” and designate folders
Under “Quick Search: with the text:” type in information for which you are searching and select arrow button to limit search to caption, keywords, and/or notes
Select “Start” button at bottom of Quick Search window
List of images which match search criteria appear in right-hand window
Double-click image file name to view image
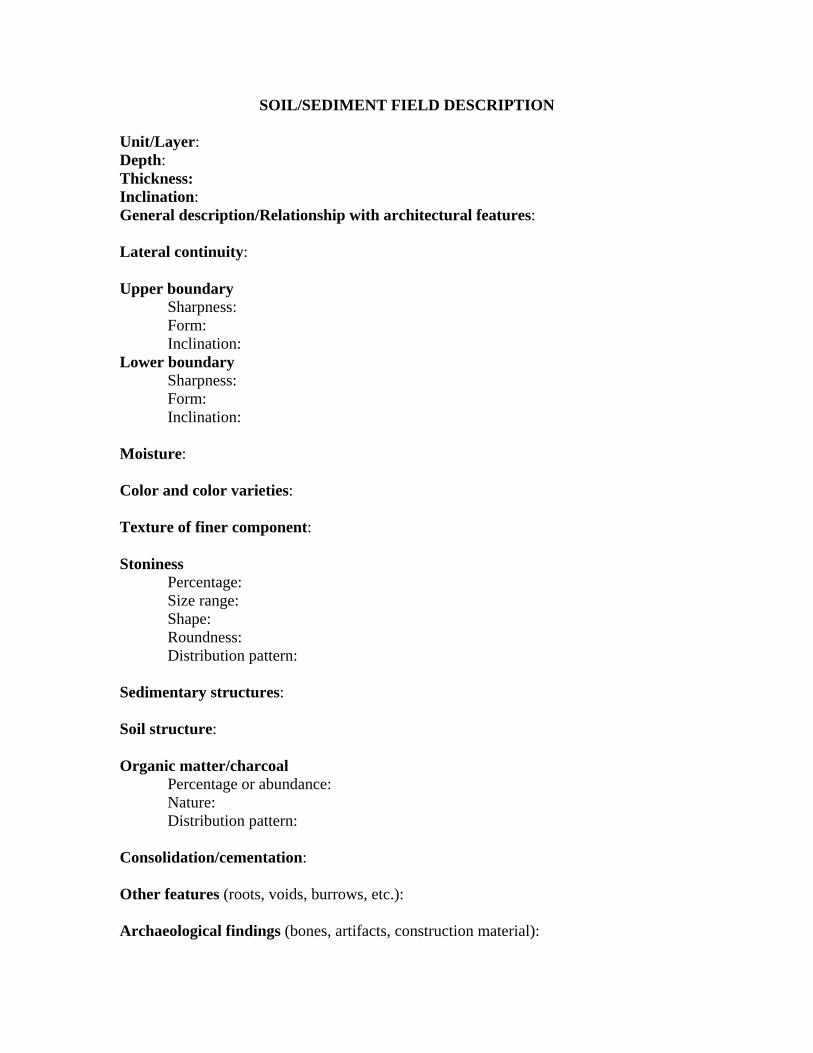
SOIL/SEDIMENT FIELD DESCRIPTION Unit/Layer: Depth: Thickness: Inclination: General description/Relationship with architectural features: Lateral continuity: Upper boundary Sharpness: Form: Inclination: Lower boundary
Sharpness: Form: Inclination: Moisture: Color and color varieties: Texture of finer component: Stoniness Percentage: Size range: Shape: Roundness: Distribution pattern: Sedimentary structures: Soil structure: Organic matter/charcoal Percentage or abundance: Nature: Distribution pattern: Consolidation/cementation: Other features (roots, voids, burrows, etc.): Archaeological findings (bones, artifacts, construction material):
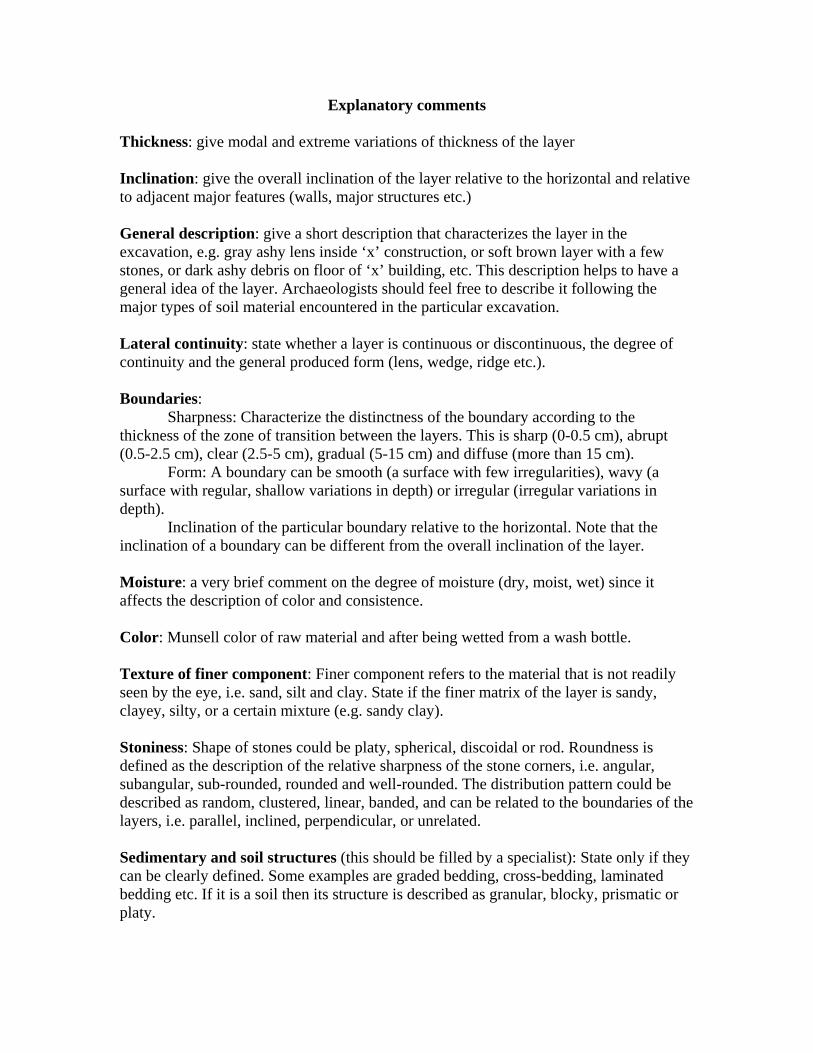
Explanatory comments Thickness: give modal and extreme variations of thickness of the layer Inclination: give the overall inclination of the layer relative to the horizontal and relative to adjacent major features (walls, major structures etc.) General description: give a short description that characterizes the layer in the excavation, e.g. gray ashy lens inside ‘x’ construction, or soft brown layer with a few stones, or dark ashy debris on floor of ‘x’ building, etc. This description helps to have a general idea of the layer. Archaeologists should feel free to describe it following the major types of soil material encountered in the particular excavation. Lateral continuity: state whether a layer is continuous or discontinuous, the degree of continuity and the general produced form (lens, wedge, ridge etc.). Boundaries: Sharpness: Characterize the distinctness of the boundary according to the thickness of the zone of transition between the layers. This is sharp (0-0.5 cm), abrupt (0.5-2.5 cm), clear (2.5-5 cm), gradual (5-15 cm) and diffuse (more than 15 cm). Form: A boundary can be smooth (a surface with few irregularities), wavy (a surface with regular, shallow variations in depth) or irregular (irregular variations in depth). Inclination of the particular boundary relative to the horizontal. Note that the inclination of a boundary can be different from the overall inclination of the layer. Moisture: a very brief comment on the degree of moisture (dry, moist, wet) since it affects the description of color and consistence. Color: Munsell color of raw material and after being wetted from a wash bottle. Texture of finer component: Finer component refers to the material that is not readily seen by the eye, i.e. sand, silt and clay. State if the finer matrix of the layer is sandy, clayey, silty, or a certain mixture (e.g. sandy clay). Stoniness: Shape of stones could be platy, spherical, discoidal or rod. Roundness is defined as the description of the relative sharpness of the stone corners, i.e. angular, subangular, sub-rounded, rounded and well-rounded. The distribution pattern could be described as random, clustered, linear, banded, and can be related to the boundaries of the layers, i.e. parallel, inclined, perpendicular, or unrelated. Sedimentary and soil structures (this should be filled by a specialist): State only if they can be clearly defined. Some examples are graded bedding, cross-bedding, laminated bedding etc. If it is a soil then its structure is described as granular, blocky, prismatic or platy.
Organic matter/charcoal: State the abundance and the nature of the organic matter, i.e. fresh, or decayed plant fragments, wood fragments, black soft material, turf, charcoal fragments, etc. Describe the distribution pattern of the organic fraction inside the layer (see stoniness). Consolidation/cementation: If the material of the layer can be easily removed with hand then it can be described as loose. Weak: material should be excavated with a trowel. Firm: material should be excavated with a small hoe. Strong: material should be excavated with a pick. Indurated: material should be excavated with hammer and chisel. Other features: Nature, abundance and distribution pattern (note that distribution pattern is fundamental for accurate description of all constituents). Archaeological findings: State briefly the abundance and distribution pattern of the most important groups, i.e. bones, sherds, lithics, and construction materials (plaster, bricks etc.). The description criteria presented above are adopted with modifications from: Courty, M.A., Goldberg P., and R. Macphail.1989. Soils and micromorphology in
archaeology. Cambridge University Press. Birkerland P., 1984. Soils and geomorphology. Oxford Univeristy Press. February 2006 Panagiotis Karkanas
Nemea Valley Archaeological Project - Barnavos excavation – Summer 2006 Alexandra Livarda & Georgia Kotzamani Archaeobotanists / PhD candidates
1
Sampling Strategy Guidelines
In order to ensure that a representative part of the organic material that has been
incorporated into the archaeological layers over the centuries will be obtained, a well-
organised, systematic soil sampling strategy needs to be adopted. The underlining
rationale focuses on the collection of a large number of samples in the field, as the
excavation procedure is irreversible. Creating, thus, a bank of potential information
will guarantee that there will be access to all the necessary material, which will allow
a possible answer to any research question that might come up during the study
period. Proceeding with the laboratory work, a selection of samples can be made
according to the needs of the research. This will further provide, through analyses
and statistical processes, the opportunity of meaningful and coherent archaeological
interpretations.
Within this framework the following steps are suggested:
From every undisturbed excavated unit one sample should be taken randomly. If
the excavated unit covers a large area then, more than one sample must be
collected.
Separate samples, clearly labelled, should be taken from all parts of the tomb
(doorway, corridor, and chamber) and also, from multiple sites just outside the
tomb.
Soil samples must be collected from every distinct burial event where these can
be identified as such.
In the case of pits or large pythoi, samples must be taken from every few cm in
order to trace the different layers and thus, any possible filling up stages.
In the case of burnt patches and small pots due to their small size, all the soil
must be collected and labelled as separate sample.
Each sample (with the exception of the very small ones such as the ones from
burnt patches and small pots) should be dry-sieved with 1cm mesh.
The sample size after dry-sieving should be between 40 and 50 litres (roughly
two zembils). When a unit is very small then all the soil must be collected.
Nemea Valley Archaeological Project - Barnavos excavation – Summer 2006 Alexandra Livarda & Georgia Kotzamani Archaeobotanists / PhD candidates
2
All samples must be clearly labelled and a distinct number should be given to
each sample. It is suggested to have different numbers for all trenches in order to
avoid confusion later during the study period.
It is highly recommended that the sampling strategy should be followed as described,
as a large number of samples from all contexts and phases are needed in order to
maximise the potential archaeobotanical information. This is particularly important for
the Nemea tomb excavation due to the nature of the soil being calcareous and thus,
not favouring the preservation of non-calcified material such as plant remains.
Water-sieving procedure
1. Make sure the barrel is connected with the source of water
2. Fill the barrel with water – the water should be changed and the barrel should be
cleaned usually every week. The level of water should be a little bit lower than the
weir
3. Place in position the 1 mm mesh in order to keep the residue with the aid of pegs
4. Put the set of the brass sieves into position. Make sure that the 1mm aperture
sieve is on top of the 500μm sieve.
5. Fill the buckets with the soil and record the volume of the soil on the flotation
sheet
6. Fill in the flotation form with all the soil sample information
7. Start the flotation procedure by fully opening the inlet tap to the barrel and adjust
the height of the water just under the weir by regulating the water outflow with the
tap at the bottom of the barrel
8. Slowly pour in the soil sample keeping the same water height
9. Gently stir the soil with both hands until the sample is clean. Do not press or
squeeze any hard earth clumps, just allow more time for the washing
10. Close the valve at the bottom of the barrel and with the inlet tap regulate the
water flow in order to be poured into the brass sieves. Aid the procedure with
your hands. Make sure that the water flow is not high so as to avoid flooding of
the sieves and loss of the material. If the brass sieves seem to block, gently tap
the bottom of the stack so as to move the material inside.
Nemea Valley Archaeological Project - Barnavos excavation – Summer 2006 Alexandra Livarda & Georgia Kotzamani Archaeobotanists / PhD candidates
3
11. When all the floatable material is in the sieves close the tap and let the water
back to the height under the weir
12. Unpeg the residue mesh
13. Wash the residue that is still inside the mesh in a bowl full of water.
14. Spread the residue onto a plastic sheet with its label carefully stapled nearby.
Make sure that the residues are left to dry under shade. It is important to keep the
entire residue in order to allow the retrieval of smaller human bones, not visible
with the naked eye. Remember to add the letter R (residue) on the label
15. Remove the brass sieves and carefully wash under a tap
16. Do not touch the material in the brass sieves, as it is extremely fragile
17. Take out the upper sieve and empty its content in kitchen paper. In particular,
take 3 subsequent sheets of hard kitchen paper and fold them in the middle.
Bang the sieve onto the paper once and then repeat onto another clean part of
the same paper until all the content is emptied. Fold the paper, tie it with its label
on and hang it on a rope in shade to dry.
18. Repeat the same with the other sieve
19. Make sure that the bag with the content of the 1mm sieve will be marked as C
(coarse flot) and the bag with the content of the 500μm sieve will be marked as F
(fine flot)
20. Clean the water in the barrel with the aid of the tea strainer
21. Repeat the procedure for the next sample.
Particularly small samples should be washed by hand sieving:
1. Fill a large bowl with water
2. Pour in slowly the soil sample and stir gently with hand
3. Slowly pour the floatable material into a stack of two sieves (the sieve at the top
should have an aperture of 1mm and the one underneath 500μm)
4. Repeat the procedure until no more material floats
5. Gently agitate the residue at the bottom of the bowl and pour it all into a mesh
with 1mm aperture
6. Treat the residue and the flots as in the case of water-sieving with the barrel
7. Make sure everything is clearly labelled and the flotation form is filled in correctly
Nemea Valley Archaeological Project - Barnavos excavation – Summer 2006 Alexandra Livarda & Georgia Kotzamani Archaeobotanists / PhD candidates
4
Bagging and storing Flots:
1. Make sure that flots are dry
2. Empty the content of the kitchen paper onto a piece of A3 or A2 and from there,
pour it into a large enough zipper bag with the label inside.
3. Make sure the label is not destroyed otherwise replace with a new one and check
that all the information is correctly transferred. If the information cannot be read
clearly double check with the trench supervisor’s notebooks
4. Place the zipper bags with the coarse flots altogether in numerical order
5. Place the zipper bags with the fine flots altogether in numerical order
6. For their storage use cheese tins and if these are not available use plastic or hard
paper boxes
Bagging and storing Residues:
1. Make sure that the residue is dry
2. Pour it into a hard plastic bag with one label inside and one label outside tied
onto the rope that will seal the bag
3. If the plastic bag is thin use two of them
4. Store the residues of each trench in separate crates