AWB V2.key - Amazon AWS
182
-
Upload
khangminh22 -
Category
Documents
-
view
1 -
download
0
Transcript of AWB V2.key - Amazon AWS

The Ableton Workflow Bible
Version 2.0
© Copyright 2018 EDMPROD LTD
All Rights Reserved. This publication, including any of its parts, may not be reproduced, stored, or transmitted in any form or by any means, electronic, mechanical, or otherwise, without prior written consent from the publisher.
Inclusion of brief quotations in reviews and educational material are permitted.
Disclaimer: The information presented in this book is based on the author’s experience, knowledge, and opinions. The author and publisher will not be held
liable for the misuse of the information in this book.

HOW TO USE THIS BOOK
I wrote this guide to help Ableton Live users master the software in a way that the manual won’t.
Each chapter can be read as a stand-alone resource. Look through the Table of Contents and see what captures your eye. But if you’re new to Ableton Live, or you know your workflow in Live is terrible, then I recommend starting at the top and making your way through the guide.
I also wrote this guide to help you work more creatively in Live.
Yes, you’ll learn Ableton fundamentals: how to A/B parameter changes, add projects to your file browser, and tips for automation.
But you’ll also discover tactics and techniques that aren’t in the reference manual: randomized panning, “borrowing” drum loops, and how to use Corpus/Resonator to tune your drums.
This is by no means a comprehensive guide to Ableton Live. It’s not a replacement for the reference manual. The key objective in writing this is to help you find a fast and efficient system that works for you and your workflow.
P.S. Ideally, this guide will be read with Live open, trying out each tip as you go. But to get the most out of this guide, I recommend using the bonus Ableton Workflow Bible Course Guide. This will outline assignments and projects for you to complete, meaning that you’ll learn by doing and not just reading.

TABLE OF CONTENTS
1. Basic Workflow Tips
2. MIDI Writing Essentials
3. MIDI Effects
4. Pre-Production Essentials
5. Track Organization
6. Template Tracks
7. Browser Essentials
8. General Workflow Tips
9. Automation Essentials
10. Rack Essentials
11. Hacking Drum Racks
12. Collaboration Essentials
13. Advanced Workflow Tips
14. Creative Processing
6
30
42
47
54
59
62
67
92
100
103
109
113
120
1. BASIC WORKFLOW TIPS
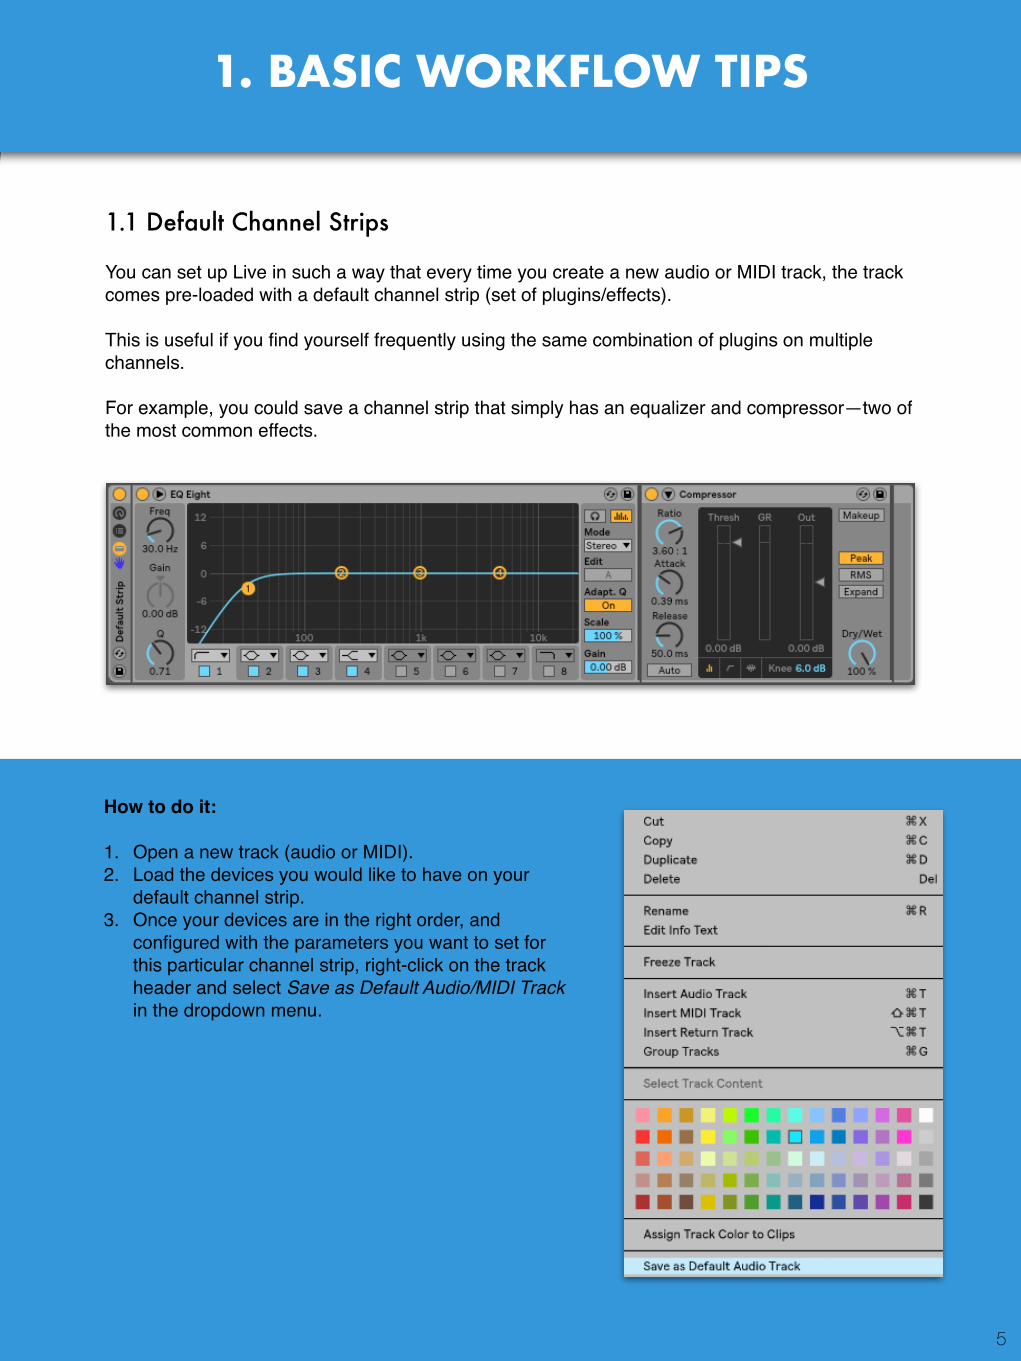
1.1 Default Channel Strips
You can set up Live in such a way that every time you create a new audio or MIDI track, the track comes pre-loaded with a default channel strip (set of plugins/effects).
This is useful if you find yourself frequently using the same combination of plugins on multiple channels.
For example, you could save a channel strip that simply has an equalizer and compressor—two of the most common effects.
How to do it:
1. Open a new track (audio or MIDI).2. Load the devices you would like to have on your
default channel strip.3. Once your devices are in the right order, and
configured with the parameters you want to set for this particular channel strip, right-click on the track header and select Save as Default Audio/MIDI Track in the dropdown menu.
5

How to do it:
1. Load the audio effect onto a track.2. Set the effect’s parameters as desired .3. Right-click the effect’s heading (the part that says “Compressor”
in the above example) and click Save as Default Preset.
6
1.3 Trust Stock Plugins
Some say that native plugins are low quality, unprofessional and unusable. This is not true.
Ableton Live—like many other DAWs—features an amazing range of native plugins. Though the plugins don’t look as fancy as some third party plugins, it doesn’t mean they function any worse.
This pertains to workflow because using a native plugin is almost always going to be faster and less CPU-intensive than a third party plugin. There are certain advantages to using third party plugins, but for simple applications (like a basic low-cut on a synth), native plugins should be your go-to.
1.2 Default Effect Presets
With any of Live’s native effects, you can create a custom default preset that loads every time the device is inserted.
For instance, you could set up a default EQ8 preset with a high-pass enabled, or a default compressor preset with makeup gain turned off.

1.4 Default Ableton Presets
As I mentioned in the previous section, you have a great range of native plugins at your disposal.
Furthermore, each of these native plugins has its own array of presets.
One such preset—OTT for Multiband Dynamics—became so popular among electronic music producers that Steve Duda of Xfer Records decided to create a free plugin that modelled it, for non-Live users.
These stock presets were created by a team of people who understand Live much better than you and I, so it makes sense to use these presets as a starting point, or at the very least, learn from them.
And I recommend exactly that. Try out stock presets within the context of a track you’re working on, or set aside dedicated time to go through the presets individually.
For example, on an “off” production day where you don’t feel inspired to write music, you could go through the different Reverb presets.
Odds are, you’ll find a couple that you like. When you’re back on top of your game and working on a new track, you’ll have those presets in your mental/creative arsenal.
Here are a few examples of stock presets I frequently use:
• Saturator has a great preset called A Bit Warmer, which helps add warmth and power to sounds.
• Glue Compressor’s “Drum - Full Parallel” is a great starting point for heavy, controlled parallel compression.
• Grain Delay has a variety of creative presets, including my personal favorite Five. The Five preset is a stereo delay, repitch, and ring modulator all in one. Sound confusing? Give it a try on synths or one-shot percussion hits.
7
PRO TIPExperimenting with stock presets for the less popular and more “destructive” effects like Corpus or Frequency Shifter can be a great way to learn about these effects and what they can bring to your projects.

8
1.5 Dragging an Old Project File Into a New Project File
Ableton Live allows you to insert an existing project file into one you’re currently working on.
This is helpful if you have two separate unfinished projects that you want to combine, or if you designed a sound in a different project and want to preserve it while bringing it into your current project.
It’s also a great way to combat CPU issues if your project becomes CPU-heavy.
For example, let’s say you’re in the midst of a CPU-heavy project and want to add a melody to the chorus. Playing in a melody with high latency is difficult. To ease the pain, you can create a new project, record the melody, tweak it, then drag the project with the new melody into the original project file (containing the rest of the song you’re working on).
How to do it:
1. Open up the project file you want to be your base project (the project you’ll drag another project into).
2. Find the .als file for the project you want to drag in.3. Simply drag the .als file into your open Live project.
Note: For organizational purposes, I recommend dragging the .als to the bottom of the existing project.

9
1.6 Freezing/Flattening Tracks
Freezing a track in Live conditionally commits the track to audio, helping to preserve CPU resources while temporarily removing the ability to edit any effects placed on the track.
Flattening a track commits the track fully to audio, rendering any devices and/or automation previously on the track into one audio file. This also helps to save on CPU resources and gives you the ability to work with the sound in audio rather than in MIDI.
How to do it:
Right-click on the track you’d like to freeze, then click “Freeze.” Right click again, then click “Flatten”.
Let’s say you have a CPU-intensive third party synthesizer that’s making your project difficult to work on.
You can freeze then flatten this track to audio, which will significantly reduce CPU usage but still allow you to hear, use and edit the audio in the project (you won’t be able to edit the MIDI or change any synth/effect parameters, so make sure you’re happy with the sound before doing this).
PRO TIPHaving trouble freezing a track? This (typically) occurs when a track is “chained” (i.e., sidechained) to another track, either as the source or destination. See tip 8.1 for a few solutions.

1.7 Info View
Even if you’ve worked your way through Live’s manual, it’s difficult to remember every function of the DAW.
Thankfully, there’s an “Info View” feature in Live which describes the function of nearly every parameter in the DAW, whether it be a global function or particular function of an audio effect.
To show/hide Info View, simply click the triangle on the bottom left-hand corner of Live (alternatively, you can select the “?” key on your keyboard). To see a parameter’s function or description, hover over it with your mouse and a description will appear within the Info View box.
How to do it:
1. Click on the channel header of any track in your project (excluding tracks inside a group).
2. Click ⌘+A/CTRL+A to select all the tracks.
Now, when you change the volume of one track, it will adjust the volume of all other tracks accordingly. This technique is useful because it preserves the relative volume of all your volume faders.
1.8 Changing the Volume of Every Track With Two Clicks
Maintaining proper levels is essential, especially during the later stages of the mixing process.
If you find yourself clipping through the master, there’s an easy way to bring down the volume of your entire project.
10

1.9 Quickly A/Bing Parameter Changes
It’s essential to recognize and understand the changes that plugins and devices make to your tracks.
If you’re unsure whether to keep or remove a plugin, change a particular parameter, or make any sort of change to an instrument or track, A/Bing is your best friend.
Use the device on/off function to quickly compare how your track sounds with and without the plugin. Listen for how it changes when you turn it on/off. Ask yourself whether it’s really better.
How to do it:
When exporting a project, click “On” next to Encode MP3.
You can simultaneously encode both an MP3 and a lossless audio file (i.e. WAV/AIFF/FLAC).
If you aren’t sure which settings to use when exporting, the settings on the right will be a good start. In particular, a 44.1 kHz Sample Rate, a WAV/MP3, and a Bit Depth of 24 are relative industry standards.
11
PRO TIPOne of the most difficult tools to use well is a compressor. Don’t program your compressor based off settings someone gave you on Reddit; adjust them yourself, trust your ears, and A/B to hear the changes.
1.10 Render to MP3
With Live 10 you can render your project directly to a MP3. MP3’s are great for streaming and sharing because of their smaller file size.

1.11 Adding Notes
You can write notes and attach them to channel strips, audio clips, MIDI clips, audio effects, and more.
How to do it:
Simply right-click on the device you’d like to add a note to and click “Edit Info Text”.
This is useful when collaborating with other artists, as you can explain elements of the track that might be unclear to someone first opening the project.
It can also be useful to remind yourself of certain tasks.
Let’s say you’re halfway through writing an idea and you have to leave for work. You could use the info text function to write a reminder of what you need to do when you return to the project.
Another way to use this is on your master fader: you could add a checklist of tasks you need to complete on your track. It’s easy to get sidetracked while working on music, so having a to-do list built into your DAW is helpful.
12

1.12 Adjusting Metronome Settings
Live 10 offers enhanced control over the metronome. Alongside adjusting the count-in time, you can now control the sound and rhythm of the metronome. Lastly, you can select to only hear the metronome while recording.
If you’re a producer who records a lot of material, the count-in should be adjusted to your needs. If your count-in is two bars, but you really only need 1 bar of count-in, you’re wasting a lot of time. 5 seconds wasted over the course of 100 recordings is 8.3 minutes, which isn’t insignificant (especially if you’re short on time to start with).
If you or an artist you’re recording is struggling with a live take, play around with the metronome settings. Switch the sound and rhythm to give the recording a different feel.
“Enable Only While Recording” is great if you frequently switch between recording and producing. This way, you only have the metronome when you need it (i.e. while recording).
How to do it:
On the top bar, click the dropdown arrow next to the metronome on/off button. From here you can adjust the count-in, sound, and rhythm, as well as choose to enable/disable the metronome while recording.
13
PRO TIPEver record with a studio musician? Most of them are paid by the hour. Check with the artist to see how much of a count-in time they’d like. The lower the count-in time, the less time wasted, and the more money you can save on the session.
PRO TIPWhen recording vocals, I’d recommend using the “click” sound. This is because the other sounds are both tonal, meaning the singer might lock themselves to the pitch of the metronome, rather then the pitch of the song.

1.13 Turning Auto-Warp Off
Ableton’s Warp function is one of the most powerful aspects of the software. Although extremely useful, it’s not perfect.
Warp alters the characteristic of an audio sample, introducing artifacts in the process. These artifacts are more noticeable when dealing with low frequency audio clips such as sub basses, and high frequency audio clips such as white noise.
If a file doesn’t need to be warped, do not warp it.
Make sure your default warp settings correspond to your taste. If you don’t want clips to be auto-warped (because you don’t like the effect it has on clips that don’t need to be warped) then change your settings.
How to do it:
I’d highly recommend copying my settings below. You can find these inside Live’s preferences menu under the Record/Warp/Launch tab.
I have it set so that Live doesn’t automatically warp any samples (first two rows). If I want to warp a sample, I’d rather make that decision for myself.
I’ve also set my default warp mode to Complex, which I think is Live’s most powerful and transparent warp mode.
14

1.14 Useful Key Commands
Live 10 introduced a few new keyboard shortcuts. Here is a highlight of the most useful key commands:
Show All Tracks: “S”- In arrangement view, this will minimize all tracks, allowing you to maximize screen space.
Toggle computer MIDI Keyboard: “M”- This toggles the computer MIDI keyboard on/off.
Zoom In/Out: “+/-“ - You can zoom in/out in arrangement view using the +/- keys, without needing to use the
shift modifier key.
Automation Mode: “A”- New to Live 10 is Automation Mode, which can be triggered on/off by clicking “A”. You’ll
learn more Automation Mode in Chapter 9.
All of these functions are also available via the top-bar drop downs, under “View” and “Options”.
15

1.15 Cleaning Up Frozen Tracks
Other than to reduce CPU usage, there are several other advantages to freezing tracks.
One of them is being able to see and clean up unnecessary audio tails, typically caused by reverbs and delays.
The audio tail that shows up when you freeze a track looks like an empty midi/audio section with diagonal lines across the top.
You can delete, duplicate, or move this audio just as you would a normal audio file.
16
How to do it:
Simply highlight the bars with the diagonal lines to make edits to the frozen tail.

How to do it:
Click ⌘+K/CTRL+K or click the “Key” button on the top-right corner of your screen. Once enabled, click on the parameter you’d like to assign a key function to.
One way I utilize the Key Mapping function is when referencing a track in my project. I’ll map the “1” key to the solo button on my reference channel, so that any time I want to listen to it, all I need to do is click the “1” key on my keyboard. This is a small time saver that will add up over the course of a project.
I find myself recording audio/MIDI often, so I have the record button mapped to my keyboard. This is especially useful if you record live instruments, where mobility may be limited.
Can’t decide between two different compressor settings? Create a compressor with each setting, then map the device activator of each device to a single key (to begin with, make sure one is active and the other is inactive).
1.16 Key Mapping
Live’s Key Mapping function can save users hours of time by speeding up their production workflow. The premise is straightforward: if you find yourself repeatedly performing a certain action, assign a key command to that action (if possible).
For example, it’s much quicker and easier to have a key assigned to the “solo” button on your reference track than to move your mouse cursor to the solo button each time you want to hear it. Others example include muting a channel, turning a plugin on/off, turning a master chain on/off, turning the record arm on/off, and much more. Let’s look how to set this up.
17

18
With the appropriate section of the track looped, look away from the computer and mash the mapped key, randomizing which device is enabled. Then, play the track and alternate between each device.
Listen for the difference, then objectively decide which device sounds better.
1.17 Changing Panning with Numbers
The fastest way to change the panning of a channel (to a desired amount) is to use numbers. Positive numbers will pan the channel to the right, and negative numbers will pan the channel to the left.

1.18 Converting Harmony to MIDI
This function is underutilized/underrated for a number of reasons. First, it’s relatively new, so a lot of Ableton Live educational resources are not up to date with it. Second, being that it’s relatively new, it does an okay job.
Nonetheless, it’s another tool in your arsenal that’s useful when you’re stuck on the melodic side of things.
19
How to do it:
To start, you must have a warped audio file. Make sure it’s correctly warped to the track tempo or else your MIDI will not loop correctly.
Next, right-click the clip and select “Convert Harmony to New MIDI Track.”
A new MIDI channel will be created with the clip’s melody (or at least Live’s attempt at transcribing the clip’s melody).
I often use this technique to grab melodies and harmonies out of melodic elements from sample packs. It’s not good at deciphering full tracks, but does okay with simple melodies.
PRO TIPLately, I’ve been using this feature to transcribe more complicated pieces of music. The actual transcription will be “incorrect”, but often times the new MIDI clip is inspiring in it’s own right.

20
How to do it:
To do this, create and save an instrument rack you’d like to use as your default Melody to MIDI preset.
Next, under Places in the browser, click User Library, then navigate to: Defaults -> Audio to MIDI -> Harmony to MIDI.
Lastly, drag your instrument rack under the desired folder.
Note: This is also where you can set default instruments for the Drums to MIDI and Melody to MIDI functions.
1.19 Default Melody to MIDI Rack
We just looked at how Live’s Audio to MIDI function works.
But did you know you can set default presets/instruments for this function?
I enjoy writing with a Rhodes Piano, so I have my default Melody to MIDI instrument set as Live’s Old School Roads.
PRO TIP Audio to MIDI will analyze the entire audio file. To save time, consolidate the audio file to just the portion you’d like it to analyze.

1.20 Properly Automating Track Volume
Although tempting, you should never automate volume using the track fader. Doing this will make mixing the track difficult for a handful of reasons.
Rather, add a Utility to the end of your channel strip and automate the gain on the utility.
That way, when it comes time to mix down your track, the relative volume of the volume automation is kept intact, and you can still change the overall gain using the track volume fader.
1.21 Properly Automating Muting/Un-muting Channels
Similar to the previous tip, you should never automate your track’s mute button on or off.
Instead, use the Utility device at the end of your channel strip and automate its mute function on/off.
21

1.22 Many Ways to Mono
There are multiple ways to use Ableton’s Utility device to convert a stereo file to mono. To mono a channel, simply load a Utility device and click “Mono”. The result will be the mono information of the file, i.e., the sum of information that is the same between the left and right channels.
Another way you can turn a stereo sample into mono is by using the Left and Right capabilities of the Utility device. Why is this useful? Well, particularly in acoustic recordings, there is often interesting information in one channel that is not shared by the other.
For example, let’s say you have a stereo recording of a drum break you want to convert to mono. If the snare is only present on the right channel, when you sum it to mono using the mono button, you won’t hear the snare.
Therefore, it’s useful to try both the left and right channels and listen for which sounds better in context.
For example, the drum break below will have characteristically different sounds whether you choose the left or right channel (note that regardless of which channel you choose, the end result will be a mono signal).
22

1.23 Reverse & Mute in Arrangement View
New to Live 10, you can mute a portion of a loop without separating (consolidating) it first. To do so, simply highlight the section of the audio you’d like to mute and click “0”.
Also new to Live 10, you can reverse an audio clip in Arrangement view by selecting the clip and clicking “R”. Just as above, you can reverse a select portion of an audio clip without needing to consolidate it first.
1.24 Chase MIDI Notes
Chase MIDI Notes allow you to trigger MIDI notes partway through a MIDI clip. In previous versions of Live, if you hit play during the middle of a chord, the chord would not be triggered. With Chase MIDI Notes enabled, the MIDI will be triggered regardless of where in the MIDI clip the track playback starts. Enable this setting under “Options -> Chase MIDI Notes”.
23

1.25 Dialing in Exact Parameters
You can set values for several parameters by typing the value in. I often find it easier to type in the value of a parameter rather than spend time trying to drag the knob to a specific value.
This may take some time to get used to, as each parameter is set up a bit differently. For example, to set a 1.5 second decay time in Live’s Reverb, the numerical value is 1500 (i,e, 1500 ms).
You can also change the parameters using the arrow keys. This is a good approach if you want to hear the changes objectively. You can look away from the computer screen, move the parameter and judge what sounds best.
Using shift + arrow keys allows you to fine tune parameters. If you’re using your mouse to adjust a parameter, you can fine tune the amount by using shift+click.
1.26 Reset Parameter Value
Double-clicking a knob/slider will reset it’s value to the default setting. This can be used within the mixer (volume, send amount, panning) and within default plugins.
24

1.27 Capture and Insert Scene
There are a few different ways to insert time in Arrangement View.
The fastest way is to use what Live calls “Capture and Insert Scene”. Let’s look at an example of this.
25
How to do it:
I have a 4 bar loop and would like to insert 2 bars of silence in the middle of it. First, I’ll select two bars after the time I’d like to insert silence.
Then, I’ll click “Capture and Insert Scene” by using the key command shift+⌘+I/shift+CTRL+I. The result will be two bars of silence before my selection.

1.28 Hide Unused Parameters
Optimizing screen real estate is essential for the modern producer. Many of us produce using just a laptop screen, and even if we don’t, it’s always nice to have more space to work with. Because of this, it’s helpful to be aware of which parameters or areas you aren’t using, and to learn how to hide them.
26
How to do it:
• To show/hide Live’s Detail view, use ⌘+alt+L/CTRL+alt+L• To show/hide Live’s Info view, use the “?” key• To show/hide Live’s Browser, use ⌘+alt+B/CTRL+alt+B
You can also use the reveal triangles on the top left (show/hide Browser), bottom left (show/hide Info view), and bottom right (show/hide Detail view).
Below are screenshots of before and after I’ve hidden these three sections. Notice the increased arrangement workspace.

It can also be useful to hide elements on your mixer section, such as the in/out section (⌘+opt+I/CTRL+alt+I), return tracks (⌘+opt+R/CTRL+alt+R), and track delays (no key command).
Below, you can see the difference between showing/hiding the i/o, return tracks and track delay.
27

1.29 CPU Usage with Ableton Effects
CPU usage is a real struggle.
Many of Live’s effects have settings to control their CPU usage. If you have a powerful machine and rarely run into CPU problems, then it’s worth setting these to high quality by default. If you have a less powerful machine, it may help to set these audio effects to standard quality by default.
28
How to do it:
Not all of Ableton’s effects have a higher quality mode. The ones that do? Dynamic Tube, Flanger, and Saturator.
To enable Hi-Quality mode, simply right-click the device header and select “Hi-Quality.”
Live’s EQ8 and Glue Compressor both have an Oversampling (a.k.a. “higher quality”) mode. To enable, right-click on the device header and select “Oversampling.
Finally, Live’s Reverb gives you three different quality options: Eco, Mid, and High. Simply select your desired level of quality from the drop-down menu inside the device.

2. MIDI WRITING ESSENTIALS
29
2.1 Essentials Functions & Shortcuts
Learning essential key commands, as well as the most effective way to write, edit, and delete notes, will help you get ideas out of your head into your DAW with greater ease.
Key Commands:
First, make sure you are very familiar with the following key commands. It’s essential that these commands become second nature.
OSX• Quantize: ⌘+U • Quantize Setting: ⌘+Shift+U • Draw Mode: B • Narrow Grid: ⌘+1 • Widen Grid: ⌘+2 • Triplet Grid: ⌘+3 • Show/Hide Grid: ⌘+4 • Transpose Up an Octave: Shift+Arrow Up• Transpose Down an Octave: Shift+Arrow Down• Increase Note Length: Shift+Arrow Right • Decrease Note Length: Shift+Arrow Left• Deactivate Note: 0 • Increase/Decrease Note Velocity: C/V
PC• Quantize: CTRL+U • Quantize Setting: CTRL+Shift+U • Draw Mode: B • Narrow Grid: CTRL+1 • Widen Grid: CTRL+2 • Triplet Grid: CTRL+3 • Show/Hide Grid: CTRL+4 • Transpose Up an Octave: Shift+Arrow Up• Transpose Down an Octave: Shift+Arrow Down• Increase Note Length: Shift+Arrow Right • Decrease Note Length: Shift+Arrow Left• Deactivate Note: 0 • Increase/Decrease Note Velocity: C/V

MIDI Shortcuts
Next, make sure your quantize settings are set correctly. I’d recommend setting it to quantize to your current grid, and setting the rest to taste.
I also recommend getting used to using all of the “shift+arrow” functions.
If you select a note and click shift+up/down arrow, it will transpose the note up/down one octave. If you select a note and click shift+left/right arrow, it will extend/shorten the note length by the size of the current grid. These two tricks will almost always be faster than manually transposing or shortening notes.
Lastly, become comfortable with all of the functions inside Live’s Notes module (in the MIDI editor). “:2” will shrink the notes to double time, and “*2” will slow them down by half. The rest are self-explanatory. Play around with them to get a feel for their uses. Use Info View if you get stuck.

31
2.2 Legato
Ableton’s Legato function is a simple function, but can save you a lot of time when writing sequences.
When you click the Legato button in the Notes module, it will extend every note to the beginning of the subsequent note.
Example:
Take this MIDI file below.
If I was to manually extend the length of each note so that they’re all one bar long, it would be a relatively time consuming task.
Instead, I can click Legato, which will extend the length of each note to the start of the next one, filling out the clip.

32
2.3 Drawing in Velocity
Typically, the fastest way to change the velocity of an individual note is to hold ⌘/CTRL, click on the note, then drag up/down with your mouse to increase/decrease the velocity.
But what if you’re wanting to change the velocity of multiple MIDI notes at once? You can draw it in.
How to do it:
Take the following snare roll:
Currently, all the notes in this clip are at the same velocity. It will sound static and uninteresting.
If you gradually increase the velocity (i.e. volume) over time, it will help add tension and excitement to the track.
To do this, select all of the notes (⌘+A/CTRL+A), then, in the MIDI Velocity Editor at the bottom of the note editor/piano roll, hold ⌘/CTRL, click, then drag from the bottom left corner up to the top right corner of the MIDI Velocity Editor.
A dotted line will appear, which will determine the velocity of each note (as it corresponds to the height of the dotted line).

33
2.4 Create a New MIDI Clip
New in Live 10, you can create a MIDI clip by double clicking on a MIDI track in arrangement view. The size of the MIDI clip will correspond to the current grid size.
2.5 MIDI Capture
Live is always listening to your MIDI input, whether or not recording is enabled. This is great if you happen to play a great drum pattern or melody and didn’t have record enabled.
How to do it:
To recall recently played MIDI, click the “Capture” button on Ableton’s top bar.
Ableton will create a new MIDI clip with the corresponding MIDI.

34
2.6 Edit Multiple MIDI Clips
New in Live 10, you view/edit up to 7 MIDI clips in the MIDI note editor.
How to do it:
Highlight the MIDI clips you’d like to edit. All corresponding MIDI will be in the MIDI Note Editor. You can switch between each MIDI clip by clicking any of it’s corresponding MIDI notes. All other MIDI notes will be greyed out.
35
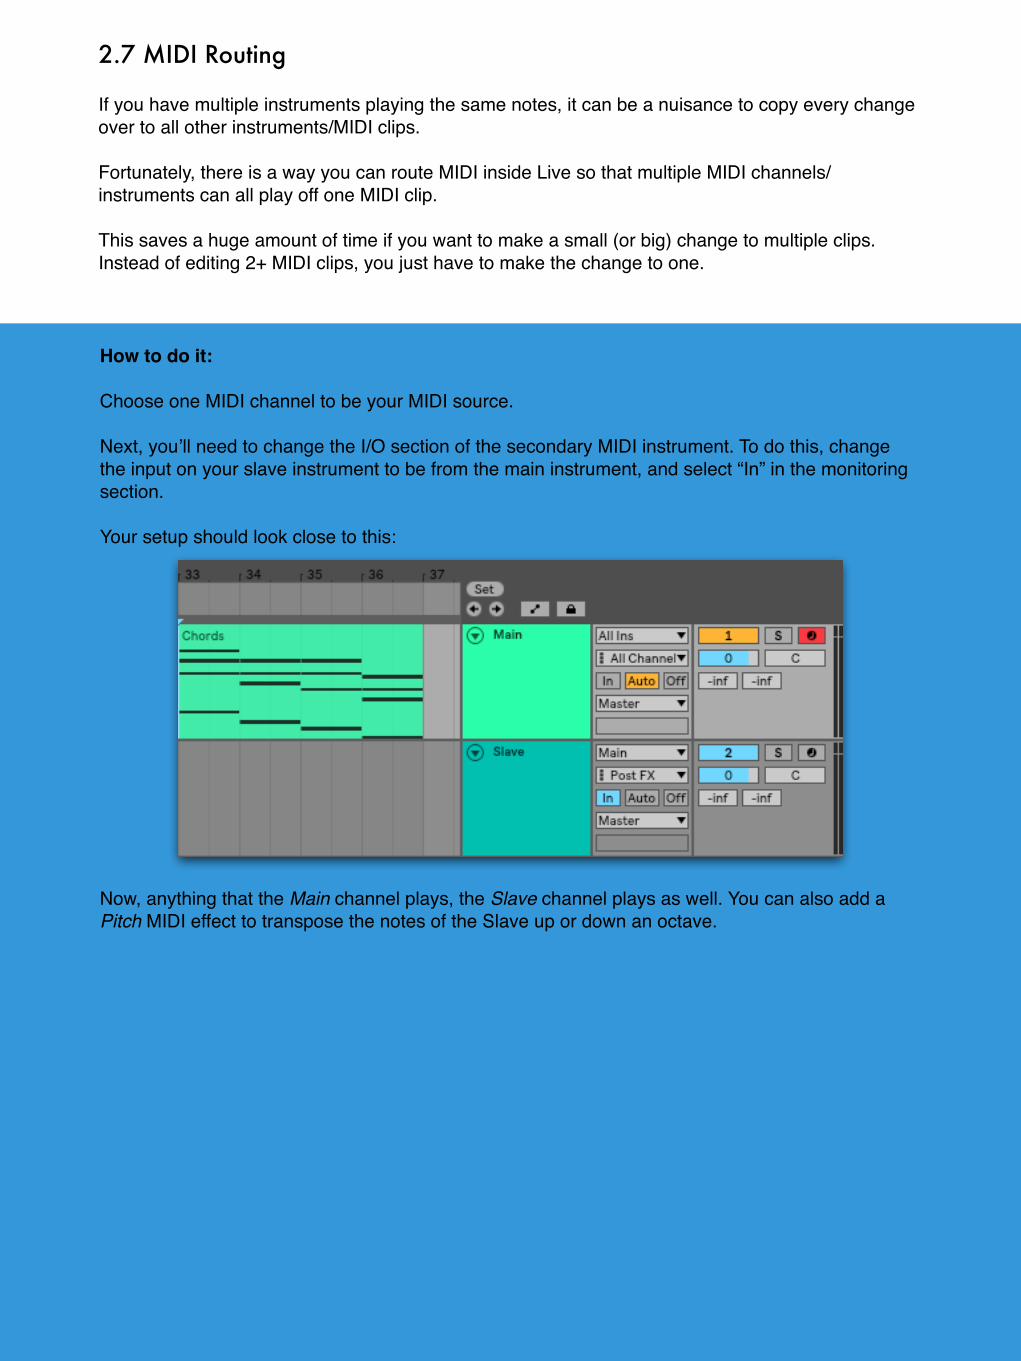
2.7 MIDI Routing
If you have multiple instruments playing the same notes, it can be a nuisance to copy every change over to all other instruments/MIDI clips.
Fortunately, there is a way you can route MIDI inside Live so that multiple MIDI channels/instruments can all play off one MIDI clip.
This saves a huge amount of time if you want to make a small (or big) change to multiple clips. Instead of editing 2+ MIDI clips, you just have to make the change to one.
How to do it:
Choose one MIDI channel to be your MIDI source.
Next, you’ll need to change the I/O section of the secondary MIDI instrument. To do this, change the input on your slave instrument to be from the main instrument, and select “In” in the monitoring section.
Your setup should look close to this:
Now, anything that the Main channel plays, the Slave channel plays as well. You can also add a Pitch MIDI effect to transpose the notes of the Slave up or down an octave.
36
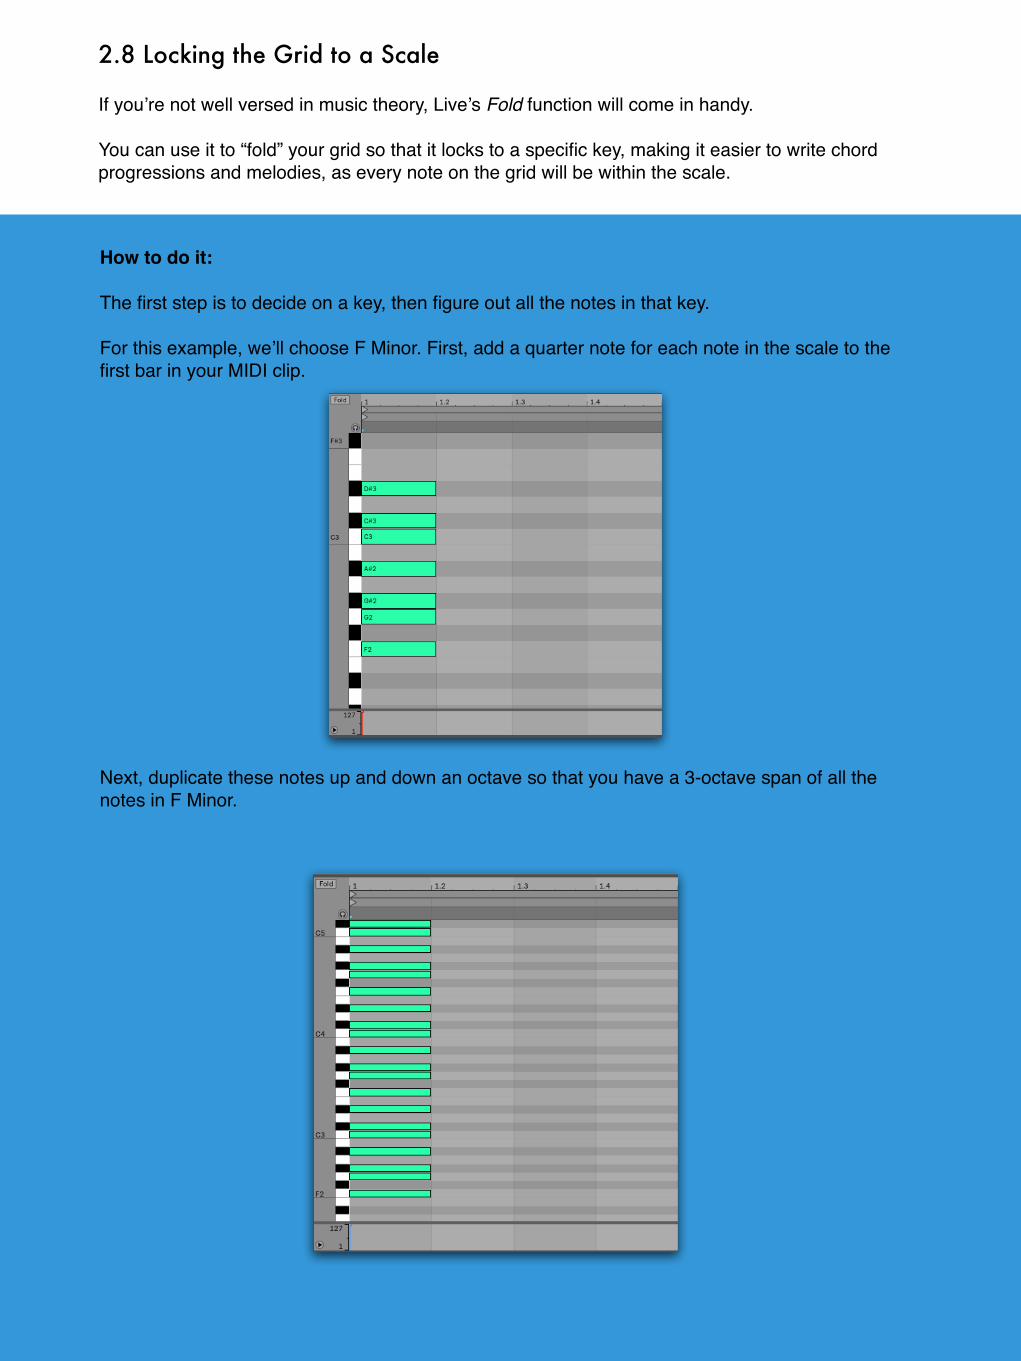
2.8 Locking the Grid to a Scale
If you’re not well versed in music theory, Live’s Fold function will come in handy.
You can use it to “fold” your grid so that it locks to a specific key, making it easier to write chord progressions and melodies, as every note on the grid will be within the scale.
How to do it:
The first step is to decide on a key, then figure out all the notes in that key.
For this example, we’ll choose F Minor. First, add a quarter note for each note in the scale to the first bar in your MIDI clip.
Next, duplicate these notes up and down an octave so that you have a 3-octave span of all the notes in F Minor.

37
You don’t want these notes to be heard, so take all of the notes and move them to the left of 1.1.1, so that they’re outside the playback section of the clip.
Finally, click Fold (located on the upper left hand corner of the MIDI Note Editor/piano roll).
Now, any note that you add in your folded MIDI clip will be in the key of F Minor.

38
2.9 Play Any Key in C Major
The first scale everyone learns is C Major. It’s the simplest to understand, given it’s comprised of only white notes.
However, writing songs in C Major is limiting. Every scale has its own sound and character, and as artists we want to take full advantage of different keys.
Using Ableton’s Pitch MIDI device, you can transpose your MIDI instruments so that you can play any key on the piano in the key of C Major (using only the white notes on the piano). This is perfect for those of you that are comfortable creating melodies and chord progressions in C Major, but struggle with other keys.
How to do it:
First, decide on a key you want to use. Let’s say E Major. E is four half-steps, or four semitones away from C.
Next, add the Pitch MIDI device to your channel and set the pitch to “+4 st.”
Now, every MIDI note you play will be transposed up 4 semitones. For example, if you play a C on the piano, the output (what you hear) will be an E. Similarly, if you play a C Major chord (C-E-G) on the piano, you’ll hear an E Major chord (E-F#-B).

39
You can do this any key, including minor keys.
A Minor is a minor scale composed entirely of white notes, starting on A.
If you wanted to play D Minor using only white notes, you would add a pitch knob with “+5 st”, since D is 5 semitones above A.

40
2.10 Getting Creative Inspiration
Stuck with a melody that isn’t all that interesting? There are a few MIDI functions that can help.
First, take an existing melody and reverse it using the Rev function in the MIDI Notes tab.
This will reverse the order of your MIDI, hopefully sparking some inspiration.
Alternatively, try inverting your melody by clicking the Inv button in the Notes tab. This will flip your MIDI upside-down, giving it a new sound. I do recommend activating “Fold” before you do this, so your melody stays within the same key range.
It’s unlikely that either of these techniques will result in an amazing melody right away, but it is likely that they’ll spark new ideas for phrases and/or harmonies.
2.11 MIDI Writing Days
Many producers lack a strong musical foundation, making the writing process lengthy and difficult.
If you fall into this category, try setting aside a few hours where you just focus exclusively on writing chord progressions and melodies, using only a stock piano.
This will force you to find melodies and progressions that work, rather than lead you to try and make up for sub-par composition with fancy sound design. Think of it as practice.

3. MIDI EFFECTS
41
Live has a host of MIDI effects that can help you generate musical ideas quickly. Even if you’re a music theory wiz, these can help you think and write more creatively, so don’t discount them straight away.
There are presets for most common scales. To load one up, simply drag the preset onto your MIDI channel.
Once the Scale device (with its preset) is loaded onto your MIDI channel, you can change the “Base” which will alter the root note of the scale.
For example, let’s say you wanted to lock your MIDI channel to E Minor. Begin by loading up the “C Minor” Scale preset.
Next, change the “Base” knob to “E”. This will lock all MIDI information to the key of E Minor.
3.1 Scale Device
Live’s Scale device locks incoming MIDI to a defined scale. Scale’s interface can be difficult to understand, but looking through the default presets for the device can help you get your head around it.

42
3.2 One Note Chords in Key
Using Live’s Chord and Scale devices, you can play chords in any key with just one note.
How to do it:
To begin, add the Chord device and a C Major Scale preset to a MIDI channel. For simplicity’s sake, we’ll stay in the key of C Major.
With the Chord device, you can add notes on top of any note you play. For example, to play a C Major chord, change one knob to +4 st, and another to +7 st.
This Chord device enabled without the Scale device enabled will output a major chord starting on whatever note is played. If you input an E, it will play an E Major chord.
However, when the Chord device is used in conjunction with the Scale device, any note you play will play a chord in key (in this case, in the key of C Major).
For example, let’s take the MIDI effect chain above and create a basic chord progression in the key of C Major (example on next page).

43
Our input will be 1 note per bar, playing C, A, E, then G.
Using the chord trigger and scale devices above, this will be the output of our MIDI instrument.
The progression is C Major, A Minor, E Minor, G Major.
44
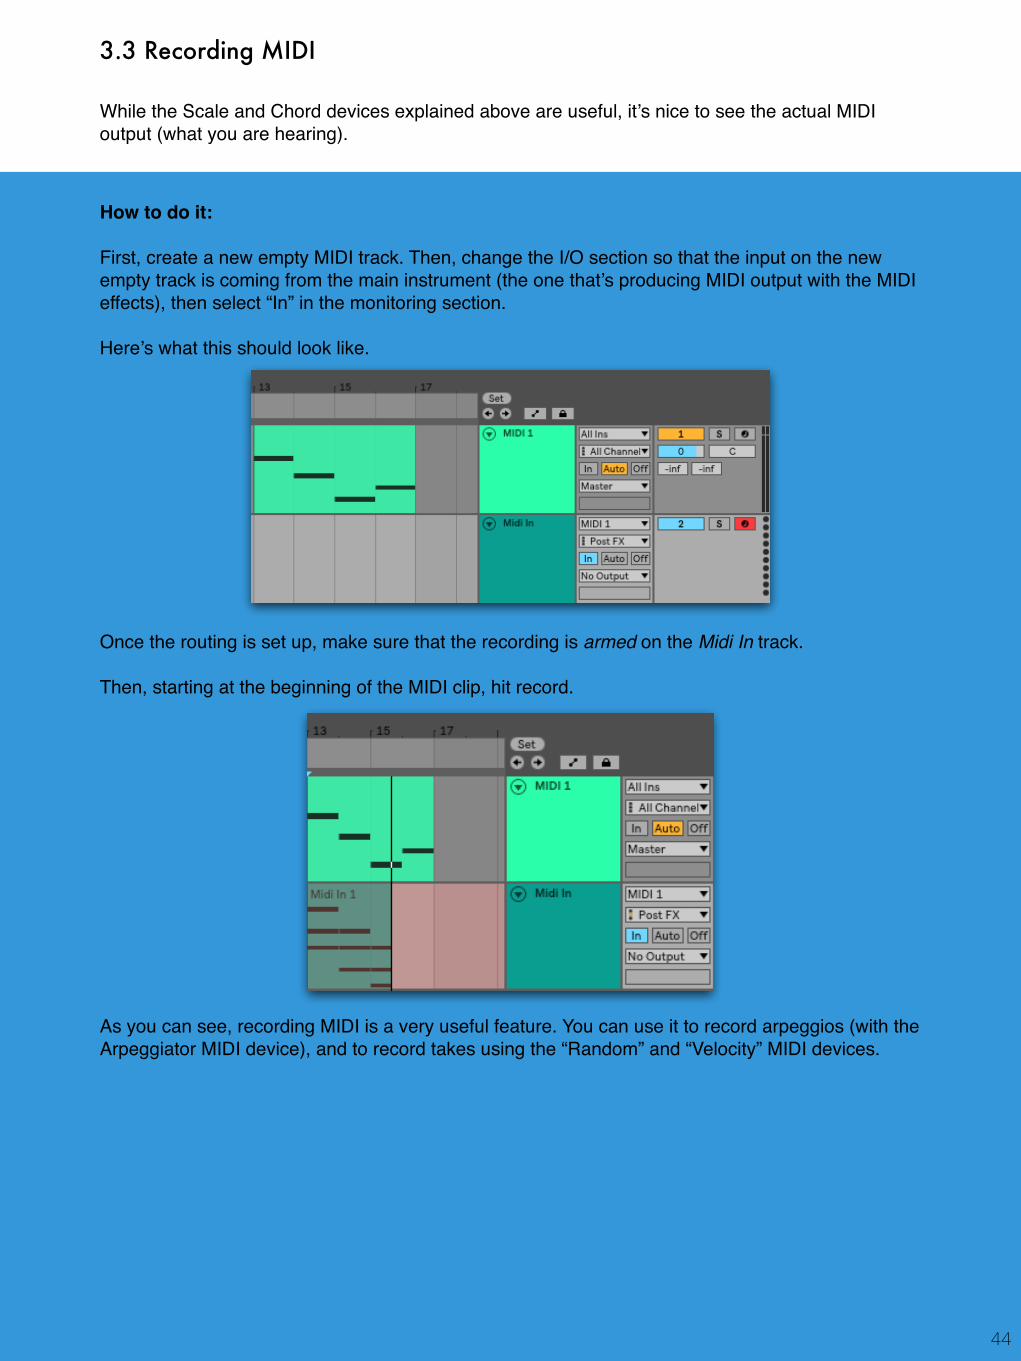
3.3 Recording MIDI
While the Scale and Chord devices explained above are useful, it’s nice to see the actual MIDI output (what you are hearing).
How to do it:
First, create a new empty MIDI track. Then, change the I/O section so that the input on the new empty track is coming from the main instrument (the one that’s producing MIDI output with the MIDI effects), then select “In” in the monitoring section.
Here’s what this should look like.
Once the routing is set up, make sure that the recording is armed on the Midi In track.
Then, starting at the beginning of the MIDI clip, hit record.
As you can see, recording MIDI is a very useful feature. You can use it to record arpeggios (with the Arpeggiator MIDI device), and to record takes using the “Random” and “Velocity” MIDI devices.

45
3.4 Round Robin Sampling
Playing the same sample 16 times in a row can sound digital and stale. Instead, you can alternate between different samples to add interest and variation. You can do this with Round Robin sampling—a technique whereby different samples are trigged every time you hit the same key.
How to do it:
Add an Arpeggiator and Drum Rack to a MIDI channel, then load up the desired samples you’d like to cycle through. In my case below, I’ve got 4 clap samples.
To set this up, you’ll need to make a MIDI clip where all samples are playing at once.
Next, change the Rate to “1/4” and the Style to “Random Other”. This Style will cycle through all selected notes, making sure not to play the same sample twice in a row.
This is an example of what my output might look like with the MIDI clip above and the Arpeggiator engaged.
While this is only over a 2-bar section, you could imagine the time-saving benefit of using this over a 16 or 32-bar loop.

4. PRE PRODUCTION
46
Pre-production is work you do ahead of time to make your production sessions as smooth and productive as possible.
The last thing you want is to be in a flow state and your computer runs out of memory, or a sample folder goes missing.
Pre-production ensures you’ve done everything you can to optimize your sessions.
It’s great to do when you only have a small amount of time to produce, or when you’re not feeling creatively inspired. It’s hard to start a full track in 15 minutes, but that time could be spent organizing your samples and projects so that the next time you produce, everything is in order.
Let’s look at essential tips to optimize your pre-production. Pay particular attention to the last topic in this section, as you’ll learn how to properly and efficiently “scrape” old projects.
4.1 Project File Organization
You should have a system in place for organizing your project files. The reasoning behind this is clear: when you have the time and energy to work on a song, you don’t want to spend hours looking for a project file.
Let’s discuss a few tools and techniques for naming and organizing project files.
Method 1: 5 Folder Method
The 5 folder method involves 5 separate folders for your project files. They are:
Practice - Learning/experimentation based projectsIdeas - Basic ideas yet to be developed into a full arrangementIn-Progress - Ideas with potential90 Percent - Projects that are nearly complete, save a few final tweaks and adjustmentsFinished - Finished tracks
You can follow this method exactly, or tweak it as you’d like. The idea behind this is to have a definite system for sorting your project files.

47
Method 2: Date Method
This method involves organizing your project files by the year/quarter/month in which they were made.
I personally use this method, as I find it easiest for me to locate a project I’m looking for.
For example, I may not remember the name of a project, but can remember that I made it around March of last year.
Technique 1: Add Date to Project Names
Similar to Method 2, you can add the date a project was created directly to the project name. This method is useful if you don’t want to spend as much time sorting, but still want to timestamp your projects.
Technique 2: Add Genre to Project Names
While not for everyone, adding the genre to a project name can help you remember tracks you were previously working on. You might not remember the name of a project, but you do remember the style of the track.
I don’t use this technique, but I’ve seen it work for plenty of other producers.

48
4.2 Managing Bounces
You should have a system for where you place your project bounces. Here are two methods for organizing bounces:
Technique 1: Bounce Folder
The first technique is to keep all of your bounces in one central folder. You can organize it by date, as explained above.
Your bounces shouldn’t be scattered throughout your hard drive. Whether you're looking for a track for your own reference or to show another person, you don’t want to waste time searching.
Technique 2: Bounce to Project Folder
Another method is to bounce each project directly to it’s project folder.
The greatest benefit of this technique is that you can preview a project before you actually open.
For example, let’s say you forgot what a project sounds like and you want to preview it before Live spends 5 minutes opening the project. Having a render directly in that project can help you determine whether or not it is the project you are looking for.
4.3 Sample Packs
A well organized sample library is critical to a fast and creative workflow.
With the abundance of paid and free sample packs available, most producers have more samples on their hard drive then they could ever possibly use. Because of this, it’s important to properly organize and optimize your sample pack library.
Let’s discuss a few techniques and tricks for optimizing your sample library.
Method 1: Sort by Company
Sorting by company is one of the fastest and most efficient ways to sort your sample library. Most producers tend to use the same few companies for samples. For example, you could have all of your Splice packs in one folder, all of your Loopmasters packs in another, and a third folder for miscellaneous packs.
The key is if it takes you longer than 10 seconds to find a specific sample, your system is broken and you need to fix it.
If you know there’s one clap sound that’ll be perfect for your song, it should take you no longer than 10 seconds to find it. If so, you need to re-organize your sample library using this or another method.

49
Method 2: Sort by Type
Sorting by type is time-consuming upfront, but can really pay off.
The idea is to organize your sample library by type, i.e. one folder with all your kicks, all your snares all your hats, etc..
This system is good if you have small, tailored sample pack library and use the same 5-10 packs consistently.
Method 3: Sort by Genre
The last method is to sort by genre. Create a folder for each of the common genres you produce, and put all of your samples packs in the appropriate folder. This may be one folder for hip hop, another for house, another for trance, and so on.
Tip 1: Regularly Clean Out Your Library
A few times year, go through your sample library and archive the packs that you rarely use.
These packs only amplify choice paralysis.
Staring down 50 sample pack folders doesn’t make it easier to produce. You’re better off with few sample folders that you know inside and out.
Create a folder called “Archive” somewhere on your hard drive. Move any pack you rarely use to this folder. The pack is always there if you need it, but it is no longer cluttering up our sample folder.
Tip 2: Cleaning up Sample Folders
If you’ve got spare time, another way to speed up your workflow is to reorganize and reorder commonly used sample packs to reduce the time needed to browse through them.
What do I mean?
Sample packs often require you to navigate through several subfolders before you reach the actual content. You don’t want to waste time clicking through folders just to find a single sound.

50
For example, the sample folder below makes you click five times to get the actual content. People sell stuff like this. Can you believe it? (It’s hypothetical, but be honest—you’ve seen this kind of thing before).
PRO TIPMany sample packs offer multiple formats of samples (wav, aiff, acid, etc.) If you know you’ll never use any of the other formats, delete them to save space.
4.4 Create and Optimize Your Personal Sample Folder
Creating a personal sample folder is not only helpful for workflow, but also encourages creativity and sonic consistency.
People who object to using a personal sample folder say that it’s “too easy to use the same samples again and again.”
But this isn’t a bad thing. In fact, endlessly digging through sample packs to try and find the “perfect” sound for a song is a huge waste of time, and will derail your creative flow, especially early on in the production process.
The Glitch Mob start every track with a certain set of stock instruments and samples. This allows them to focus on idea generation first, and then come in later with different samples and sounds to flesh out the idea (source: Productivity Secrets of a Master DJ — Tim Ferriss Show)
You can implement this by creating a personal sample pack folder, helping reduce the time it takes for you to find a decent sample.

How to do it:
Start by setting up folders inside your personal sample folder for each desired sound. Here’s what mine looks like:
Choose a reasonable number of samples for each sound type (100 kicks won’t save you much time, try 10-15) and add them into the appropriate folders.
Look. Building this library will take some dedicated time, but it will pay off immediately.
If you go through your entire sample library (hopefully it’s not too big) and find the best 10 kicks, odds are those 10 kicks are going to be very solid samples.
Then, when you’re working on a track and need to find a kick sample, you have 10 kicks that are objectively (you chose them) good samples.
Note: Your taste and style will change over time, so expect to develop and improve this folder.
4.5 Create Your Own Custom Drum Racks
This tip relates to the previous one about developing your personal sample library.
You can create custom drum racks that allows you to quickly lay down a beat with samples you know are good.
You can create different drum racks for different styles of music, making sure you have the tools you need to start writing fast
51

4.6 Custom Instrument/Audio Effect Racks
Similar to above, you can create custom instrument and audio effect racks during pre-production.
Having a library of pre-processed instruments makes the songwriting process fast and inspiring. Similarly, preset processing racks allow you to craft unique and interesting sounds at the touch of a button. You’ll learn about racks in further detail in Chapter 11.
4.7 Scraping for Parts
Project scraping is when you take an unfinished project and pull out every piece of valuable content.
It’s a perfect way to make use of unfinished projects. While they may be unfinished, odds are they contain valuable content you can use in a later project.
How to do it:
The goal is to take anything that is valuable and save it into your user library. Open up an old project, and look for sounds/presets/racks you could potentially use later.
Save all of the sounds into your personal library, presets in your preset folder, and racks in your user library.
Here are some ideas of what to save:
• Processed drum sounds• Drum/percussion loops• Fills• Synth one-shots • Drum Racks• Custom effects - risers, sweeps, drones, downlifters, etc…• Processing chains - save processing chains into audio effects racks• Presets - both synth presets and effects presets • Instruments - save instruments into instrument racks
Anything that you remotely think you could use later, save it.
This can be a time consuming process, but the investment will undoubtedly pay off.
52
PRO TIPI’ve found the fastest way to save samples is to consolidate the sample, right click and select “Show in Finder”, then drag that sample to my personal sample folder. Alternatively, you can consolidate multiple samples, locate them in the project folder under Samples -> Consolidate, then move them from there.
5. TRACK ORGANIZATION
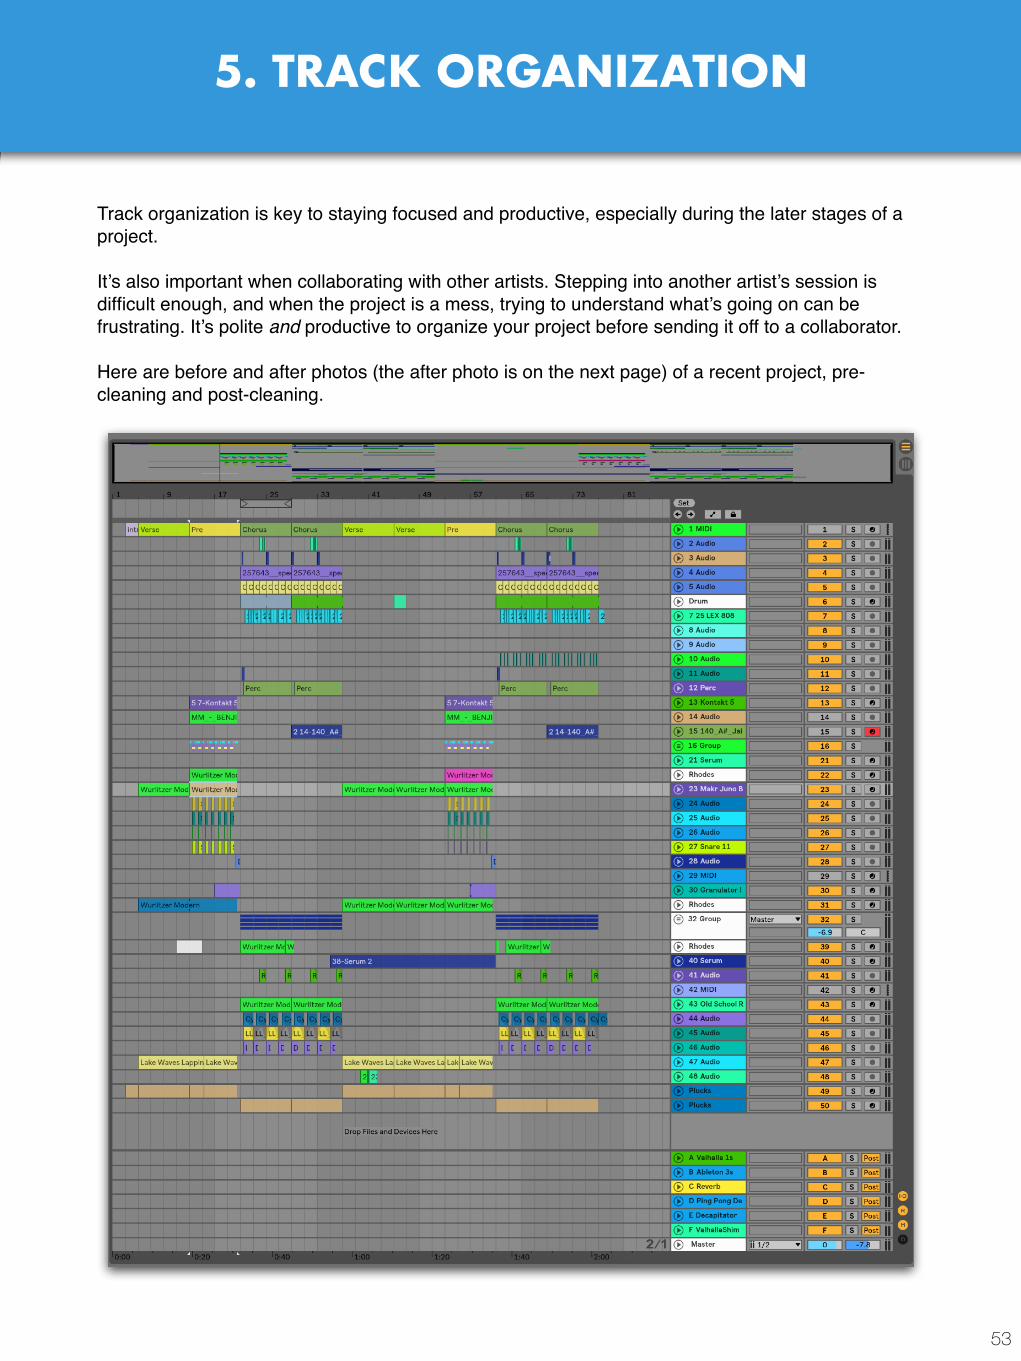
Track organization is key to staying focused and productive, especially during the later stages of a project.
It’s also important when collaborating with other artists. Stepping into another artist’s session is difficult enough, and when the project is a mess, trying to understand what’s going on can be frustrating. It’s polite and productive to organize your project before sending it off to a collaborator.
Here are before and after photos (the after photo is on the next page) of a recent project, pre-cleaning and post-cleaning.
53

54
PRO TIP
Organize your projects when you’re stuck on a song. Reorganizing your project gives you a better sense of what’s going on, and it’s likely you’ll come up with new ideas while doing it.
Looks much better, right?
In this section, we’ll look at some tips to help you ensure your projects stay clean and organized.
PRO TIP

5.1 Empty MIDI Clips
Using dummy MIDI clips is a great way to keep sections organized.
55
How to do it:
Insert an empty MIDI track at the top of your project. Then, insert MIDI clips (⌘+shift+M/CTRL+shift+M) that correspond to the length of each section in your track.
Color coordinating these is also helpful.
5.2 Naming Sections With Track Locators
You can add track locators in the arrangement view to help keep your sections organized and to enable quick navigation between sections (using the play button).
How to do it:
Right-click the scrub section (the section above arrangement view where the mouse switches to a headphone/speaker icon) and click “add locator.”
Next, give it a title. You can drag the locator left and right to alter its position.
PRO TIPRemember the Key Mapping function in 1.17? You can map keys to track locators. For example, you could map keys 1-5 to your intro, verse, chorus, etc., to enable quick naviagtion.

5.3 Organizing With Colors
Using colors is a great way to keep your projects logically organized.
You can use Live’s coloring feature on Audio/MIDI tracks as well as individual clips.
56
How to do it:
Right-click a track or clip and select whichever color you’d like.
You can also color multiple tracks/clips at once by highlighting several tracks/clips, right-clicking any one of them, and selecting a color.
It’s important to have your own color scheme. It doesn’t matter what that scheme is, as long as you stick to it and remember it. Here’s mine as an example—feel free to use it.
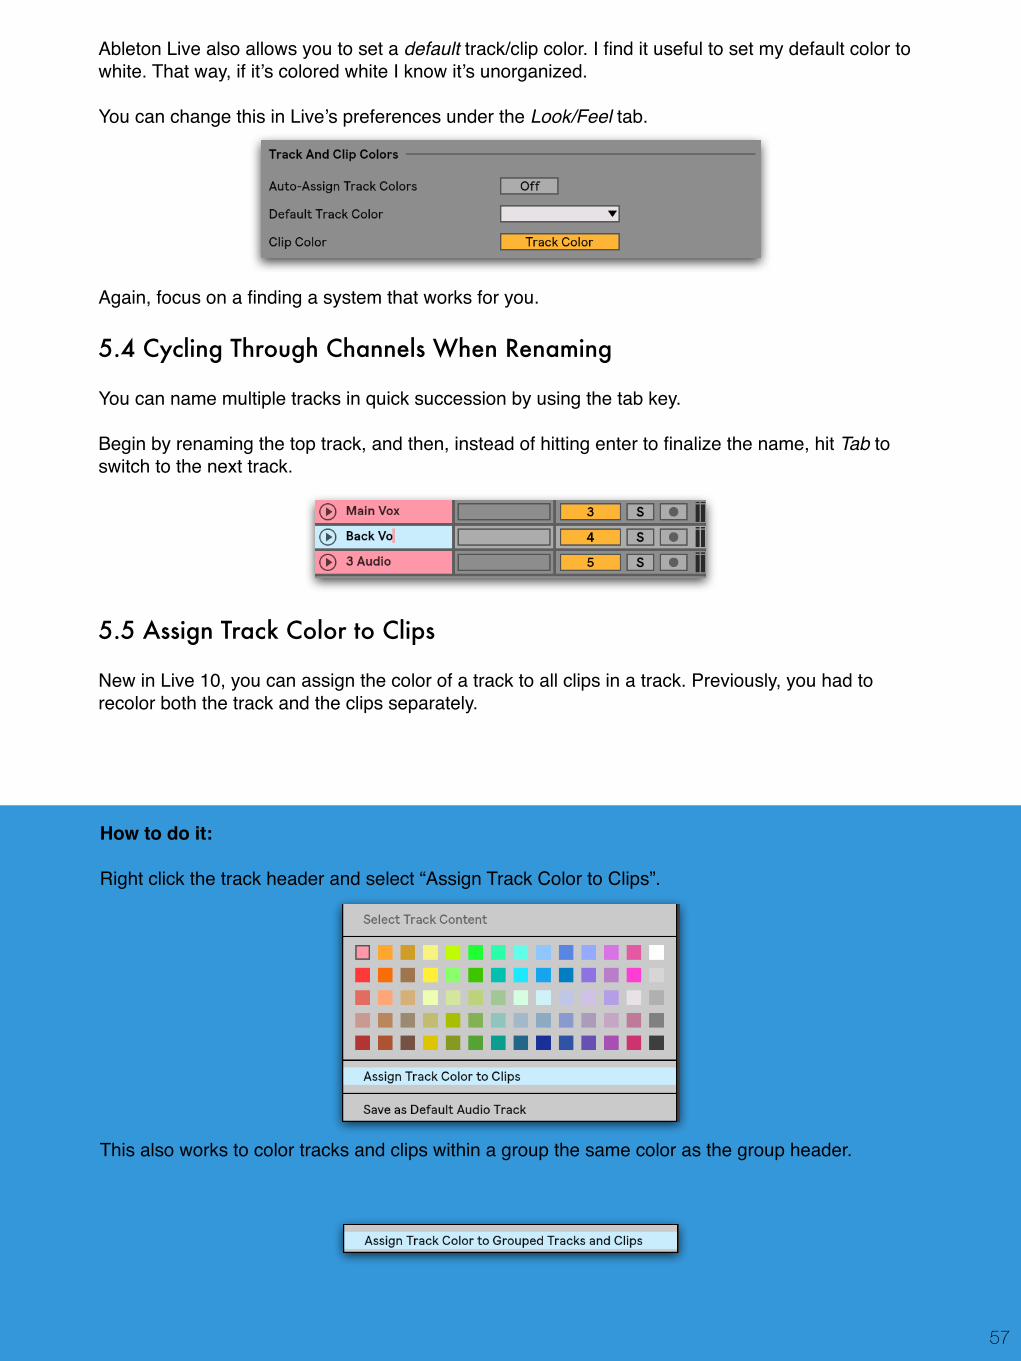
Ableton Live also allows you to set a default track/clip color. I find it useful to set my default color to white. That way, if it’s colored white I know it’s unorganized.
You can change this in Live’s preferences under the Look/Feel tab.
Again, focus on a finding a system that works for you.
5.4 Cycling Through Channels When Renaming
You can name multiple tracks in quick succession by using the tab key.
Begin by renaming the top track, and then, instead of hitting enter to finalize the name, hit Tab to switch to the next track.
5.5 Assign Track Color to Clips
New in Live 10, you can assign the color of a track to all clips in a track. Previously, you had to recolor both the track and the clips separately.
57
How to do it:
Right click the track header and select “Assign Track Color to Clips”.
This also works to color tracks and clips within a group the same color as the group header.

6. TEMPLATE TRACKS
One of the key themes in this book is to avoid redundancy and optimize efficiency.
One of the best ways to do that is to create a default Ableton Live template. There are several ways to do this. I don’t use every method, and this is a short section, but it should give you a good overview of where to start.
58
6.1 Setting Up Your Default Template
Live’s default template is a template that opens whenever a new Live session is created. Live has a stock default template, but you can save over this to create your own. Rather then load up the same samples, plugins and effects every time you start a track, it makes more sense to have a default template with these already in place.
What should be in your default template?
Your default template—at least in theory—should be slightly different than everyone else’s.
Why? Because you, as a unique person and a unique producer, have your preferred plugins, way of organizing things, and approach to starting a track. It’s up to you to figure out what’s most beneficial for you to include in your default template.
Let’s look at a few considerations for developing your own default template.
How do you start tracks?
Do you always start with drums? If so, having a drum rack with your favorite samples on your default template will help immensely.
Even if you don’t end up using those drums in the final track, it’ll help speed up the first 30 minutes of your project.
Note: if you find yourself regularly producing different styles of music, set up a few different drum racks tailored to each style.
If you’re someone who starts tracks with a piano, it makes sense to have a piano saved on your default template so you can quickly write melodic ideas. Likewise, if you find yourself starting with the same synth or synth preset, save that to your template.
Sense a theme here? However you start a track, set up your template so that the moment Live is open, you have tools necessary to start writing.

Audio/MIDI and Return Tracks
The next thing to consider are your audio and MIDI tracks.
I like to have two empty audio tracks and two empty MIDI tracks. It helps to speed up my first 30 minutes in a project, which are often the most crucial.
Next, set up your return tracks to help optimize your workflow.
If you’re not currently using return tracks, I recommend you start. They’re extremely useful for mixing, and they also help cut down on CPU usage.
Ask yourself what types of return channels you typically use, or dig through previous projects and see what returns made it to the final cut.
The most standard return tracks include reverb, delay, heavy compression, distortion, and stereo widening. Of course, other returns are allowed, but these five are great starting points.
Let your template grow
I’ve seen my default template develop over the past several years. I’ll make a significant change every 3-6 months. I’d expect most of you to do the same, as your creative habits and tendencies are forever growing and changing.
Keep it simple
Some producers despise templates, believing them to be restrictive to creativity.
If you create a template that’s too complex, it may inhibit your ability to think and create outside the box. However, a simple template acts as a starting point, giving your project focus and direction.
How to save a default template
To save the current project as the default template, open Live’s preferences, then, under the File/Folder section, select Save Current Set as Default.
If you’d ever like to revert to the original default template, simply select Clear.
6.2 Reducing CPU Usage with Templates
For the CPU-conscious, having several CPU-intensive effects and instruments in your default template can be restrictive and slow down the creative process. It also increases the time it takes to load a new project.
In my default template, I only use native Live instruments and effects. I can always switch them out later if needed.
59

6.3 Default Template Examples
Let’s discuss some recommendations for your default template. Consider adding some of the following to your default template:
Audio/MIDI Channels:
• Stock piano• Synth with Init preset• Your favorite VST presets• Muted channel for a reference track• Custom drum rack• Ghost sidechain trigger channel• Extra empty audio and MIDI channels.
Send/Return Channels
• Short reverb• Medium reverb• Long reverb• Delay• Stereo imaging• Distortion/saturation• Heavy compression (parallel compression)
Other Considerations:
• Consider loading an EQ and Compressor onto your default channels.• Consider loading a Utility on your master to monitor gain and quickly reference the mono
image.• Make sure your key-mapping is set up to your liking.
60
7. BROWSER ESSENTIALS
Live’s Browser pane is a powerful tool that you can use to consolidate and condense your sample library, enabling you to focus less on digging through folders and more on writing music.
You need to set up and optimize your browser properly so you have immediate access to the instruments, plugins, and samples that you use the most.
Ideally, you have a single folder on your hard drive where all your samples are located. If not, do that now—bring all your downloaded samples into a singular folder to enable quick and easy access to your sound library.
61
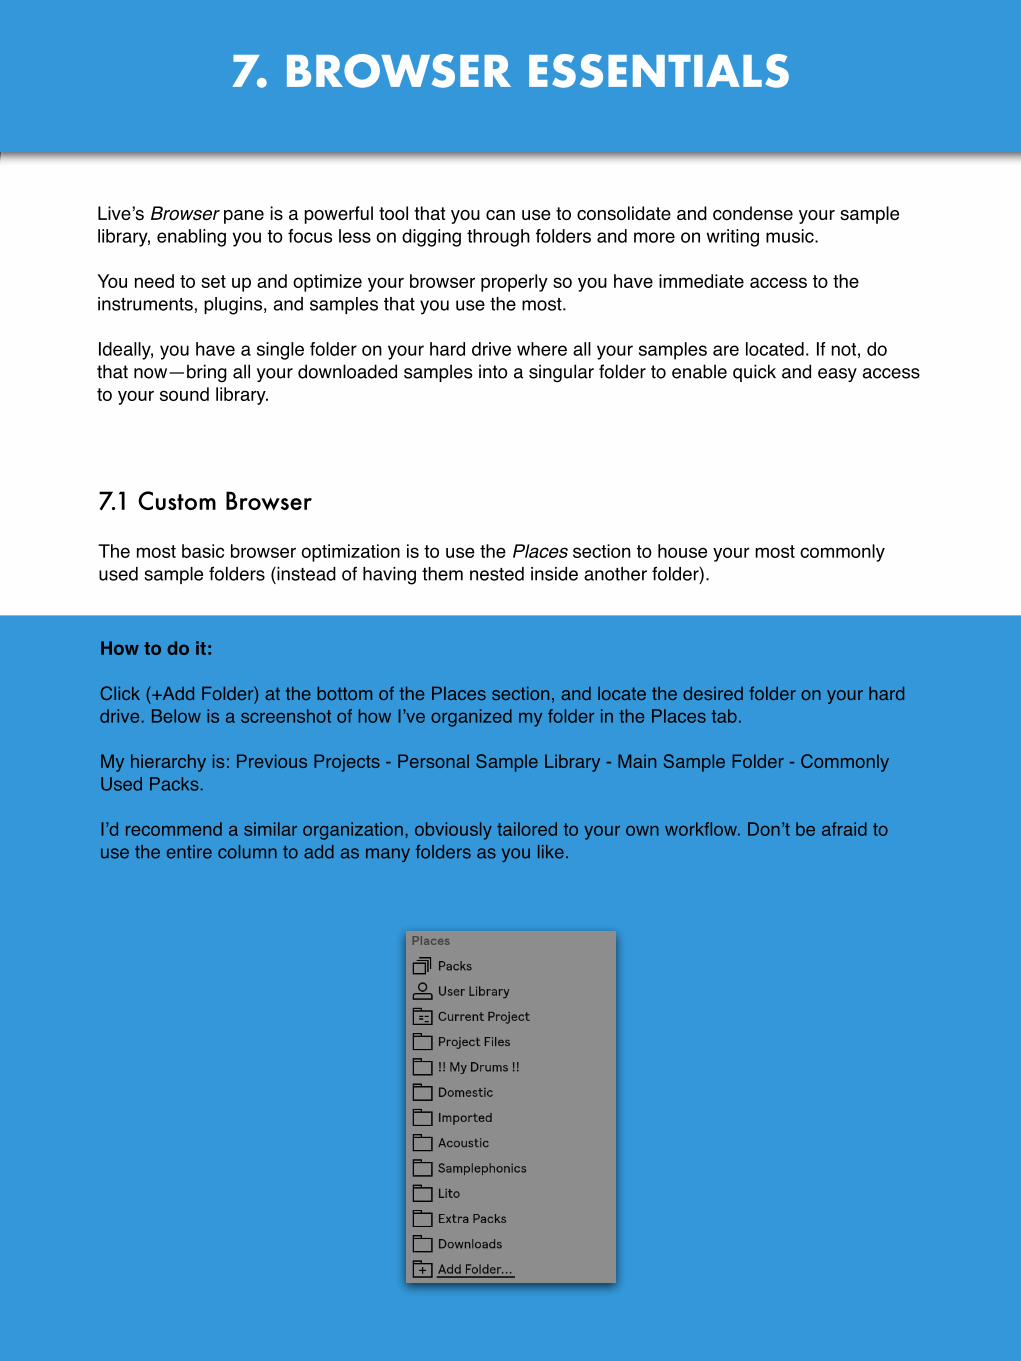
7.1 Custom Browser
The most basic browser optimization is to use the Places section to house your most commonly used sample folders (instead of having them nested inside another folder).
How to do it:
Click (+Add Folder) at the bottom of the Places section, and locate the desired folder on your hard drive. Below is a screenshot of how I’ve organized my folder in the Places tab.
My hierarchy is: Previous Projects - Personal Sample Library - Main Sample Folder - Commonly Used Packs.
I’d recommend a similar organization, obviously tailored to your own workflow. Don’t be afraid to use the entire column to add as many folders as you like.

62
7.2 Optimized Sorting
The Browser offers the capability to sort folders by several different parameters: Name, Date Modified, Size, Rank, Type, and Place.
Other than sorting by name, the most interesting parameter is sort by Rank.
Sorting by rank will place your samples/devices in a hierarchical order based upon how often you use them, i.e. your most used devices will be at the top.
Many producers use this function to speed up workflow, but you may find it annoying if you’re used to devices and samples being sorted by name.

63
7.3 Searching
You can click ⌘+F/CTRL+F (“Search All Locations”) to search your entire sample library.
Regardless of how your library is set up, it’s important that you and this keyboard shortcut become best friends. Not only does this search your sample libraries, but it also searches your instruments and effects, as well as your third party plugins. It will save you a lot of time, especially if you’re looking for one specific sample.
7.4 Hacking Folder Organization with !’s
Your personal sample folder is an extremely valuable asset, something you’ll want to use often.
As such, it makes sense to keep it at the top of the list.
You can do this by adding exclamation points (or another symbol like the “#”) at the beginning of the name of your sample folder. This is useful not only within Live, but also Finder/Explorer.

64
How to do it:
Click “+ Add Folder” at the bottom of the Places section in your browser sidebar.
Next, locate the folder containing your project files (if you don’t have one, stop reading this and create one).
Within each project folder, you are able to pull out the samples, channels, and groups use in that project.
This is extremely useful if you want to grab a specific sound or processing chain from a previous project.
7.5 Adding Projects to File Browser
Reusing sounds from previous projects is a great way to streamline the creative process. Live allows you to pull samples and channels from previous projects without even needing to open them. First, you’ll need to add these projects to your file browser.
7.6 Collections
New to Live 10, you can tag items in Browser with 7 different colors. Tagged items will show up in the appropriate collections header in the Browser.

65
How to do It:
You can add any browser item to a collection. This includes samples, VSTs, stock plugins and more.
To add an item to a collection, either right click and add a color, or use one of the number key commands.
You should develop a system for tagging items. Each item can be tagged with up to 3 colors.
Here are some ideas to get you started:
• Create a “Favorites” folder with your go to samples.• Create a “VST” folder with your 5-10 most used VSTs.• Create an “Effect” folder with your most used Ableton effects.• Create “Reference” folder with your favorite reference tracks.
Lastly, you can rename each collection by selecting the collection and clicking ⌘/CTRL+R.
7.7 Cleaning up the Browser
Both Collections and Categories allow you to show/hide certain folders. You can customize this by hovering over either section and clicking “Edit”.
For example, I hide Clips and Samples under Categories since I rarely use either selection.

8. GENERAL WORKFLOW TIPS
66
8.1 Freezing Tracks with Sidechain
Currently, Live will not let you freeze tracks that are sidechained to another track or act as the input source for sidechain on another channel.
There are a few workarounds for this.
How to do it:
If you want to freeze but not flatten the track, the simplest way is to group the track, add the sidechain to the group, then freeze the track.
Alternatively, you can copy the sidechain device, delete it from the track, flatten the channel, then paste it back onto the channel.

67
If your sidechain settings are locked to a grid, consider using an envelope follower such as LFO Tool by Xfer Records or Volumeshaper 5 by Cableguys.
8.2 Routing Your Reference Tracks
Reference tracks are an essential part of achieving a solid mix-down.
Many producers make the mistake of routing their reference track to the master, whilst having plugins on their master channel. You don’t want to do this, as it will alter the sound of your reference track (thus defeating the purpose).
In the track title bar, route your reference track to “Ext. Out”. This will route the channel directly to your audio output, bypassing the master channel.

68
8.3 Default Resampling Audio Track
Resampling audio is an extremely useful tool in any DAW.
By definition, this means you route the output back through a new audio track.
If resampling is a core part of you workflow—you use it a lot—consider setting up a default resampling track in your template. This will help reduce the time it takes for you to set up the routing every time you want to use resampling.
How to do it:
Create a new audio track. This will be your “resampling” track which will take input from the master channel.
Set the input to “Resampling”, and the Monitoring to “In”.
Now, anything that is played while recording is enabled on this track will be recorded.
From there, you can simply copy audio clips from this default resampling track and place them where needed.
8.4 Creative Groove Pools
Using Live’s Extract Groove feature, you can easily analyze and extract the timing and volume information of an audio sample (if you are new to Groove Pools, click here). This is helpful if you’re a producer who likes to work in MIDI but struggles to create human-sounding rhythms and grooves.
Browse through audio loops in your sample library, find a groove you like, extract the groove, and then apply it to your instruments.

69
8.5 Automate Tempo
An interesting way to switch up the energy of a track is to automate the tempo.
To do this, simply right-click the track tempo located at the top left of your window.
A classic use of this is to automate the tempo during the chorus. Bumping it up by 1 BPM will add movement and excitement to the section. Alternatively, automating the tempo down during the chorus may help give it a different swing and feel.
Tempo automation is also useful for intros (see Deadmau5 - Strobe) and outros.
8.6 Adding Video to Ableton Live
To add video to Ableton Live, simply drag a video file (Quicktime format) onto an empty audio track.
This is useful when syncing audio to visual media. Alternatively, “scoring” an existing movie or music video is a great way to find creative inspiration for a track.
70
8.7 Reset Peak Level
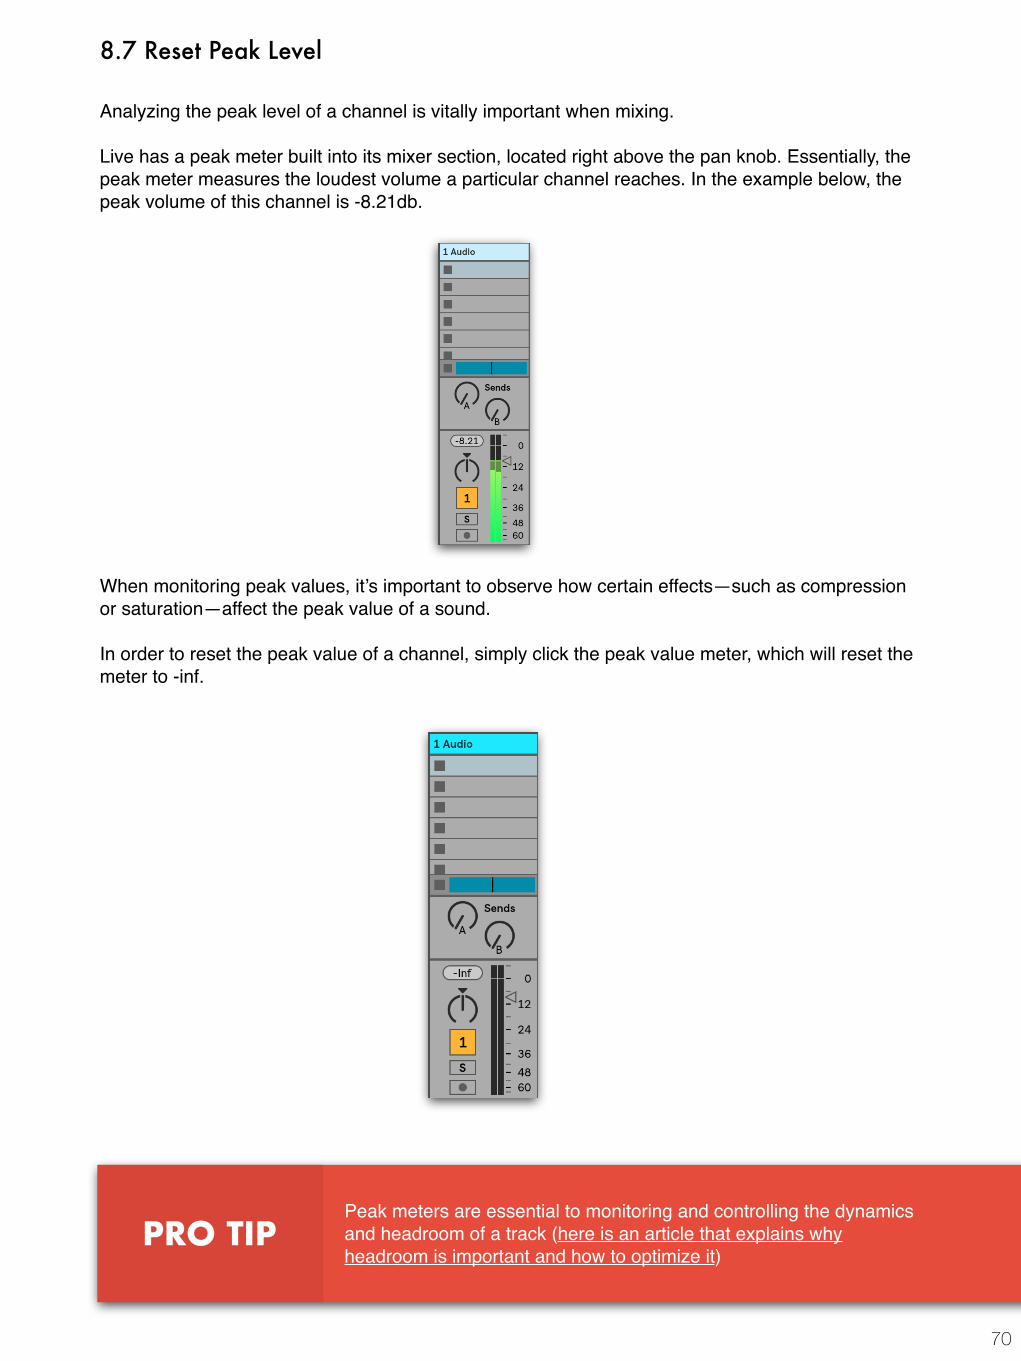
Analyzing the peak level of a channel is vitally important when mixing.
Live has a peak meter built into its mixer section, located right above the pan knob. Essentially, the peak meter measures the loudest volume a particular channel reaches. In the example below, the peak volume of this channel is -8.21db.
When monitoring peak values, it’s important to observe how certain effects—such as compression or saturation—affect the peak value of a sound.
In order to reset the peak value of a channel, simply click the peak value meter, which will reset the meter to -inf.
PRO TIPPeak meters are essential to monitoring and controlling the dynamics and headroom of a track (here is an article that explains why headroom is important and how to optimize it)

71
8.8 Ghost Triggers
Ghost triggers are a great way to gain full control over sidechain compression.
Typically, producers use a kick drum as the source for sidechain compression. The issue with this is that it makes sidechain compression more difficult, as the sample itself is longer, and as such, the input signal lasts for a longer time. This makes the compressor work harder then it needs to, making it difficult to find proper settings.
Instead, you can use what’s called a “ghost” trigger as your sidechain input source.
How to do it:
Create a new track (audio or MIDI) with a short sample (I’ve chosen a hi-hat) that plays the same pattern as your kick drum.
Next, making sure that the Ghost Trigger channel is muted, use that channel as the sidechain input source rather than the kick drum.
Since the sidechain trigger is shorter, you’ll have more control over the compression settings.
Your routing should look similar to this:

72
8.9 Humanizing Your MIDI
Sometimes, it can be difficult to get a lively and dynamic sound out of MIDI instruments.
Using Ableton’s Velocity MIDI effect, you can add random variations to the velocity of notes in a MIDI clip. This works well with repetitive drum sounds like hi-hats or shakers.
How to do it:
Insert the Velocity MIDI effect on a MIDI instrument.
Then, using the Random knob, randomize the velocity of incoming MIDI signals. Play around with the Range to tweak the settings to taste.
8.10 Arpeggiated Hi-Hats
Using Live’s Drum Rack and Arpeggiator, you can create hi-hat rolls and fills with just one note.
How to do it:
Open up a new drum rack and add a hi-hat to the rack.

73
a
Next, add an arpeggiator to the hi-hat.
At this point, if you hold down the note C1, it will repeatedly play eighth notes, as dictated by the Rate parameter.
To control the speed of the hat roll, adjust the Rate.
Also, make sure to set the Style to Chord Trigger.
Below, I’ve switched the rate so that the hat plays 16th notes.
Lastly, copy this hat to other cells in the drum rack, then change the rate on the arpeggiator in each cell so that each note plays at a different rate.
PRO TIPThis is especially useful if you make hip-hop/rap/trap and want to use hi-hat rolls of different speeds. It’s much faster doing it with an arpeggiator than manually drawing in the rolls.

74
8.11 “Borrowing” Drum Loops
Live’s “Slice Drums to MIDI” function allows you to take the rhythm/groove of an existing drum loop but use your own samples instead.
How to do it:
Let’s say you’ve got a drum loop you really like, but you’d like to change a few of the individual drum samples.
Making sure that the drum loop is warped, right-click the clip and select “Convert Drums to New MIDI Track”.
Live will guess the samples and pattern of the drum loop, and by default, will create a new MIDI track with a 606 Drum Rack. At this point, you can replace the default drums with your own, tweaking the MIDI where necessary.

75
8.12 Duplicate Time to Force Horizontal Development
Do you get stuck in the 4-bar loop trap?
One way to combat this is to duplicate your existing content (loop) to fill out a typical song structure, forcing you to think horizontally instead of just vertically.
This is similar to a previous tip where I suggested adding blank MIDI clips for each section in your arrangement. In this case, you’ll map out the arrangement of the song using content that you’ve already made.
You can take your basic 4-bar loop (as shown above), and sketch out a basic song structure.
Whether or not you believe this technique is effective, please try it out. It’s a great way to force you out of the 4-bar loop trap and help you think about the song’s structure and arrangement.

76
8.13 Randomized Panning
Randomized panning is a great way to add variation to the stereo placement of a sound. I like to use it on high frequency percussion sounds, such as shakers or hats.
The easiest way to set this up in Live is by using a Simpler.
How to do it:
In the “Controls” panel of Simpler, you can choose to randomly pan the position of the sample using the “Ran>Pan” section. The larger the percentage, the wider range of panning that will be (randomly) applied.
8.14 Freeze/Flatten Multiple Tracks
Freezing and flattening tracks in Live can be repetitive and time-consuming, especially when you’re trying to do it with multiple tracks.
Instead of freezing/flattening tracks one by one, you can select multiple tracks, freeze them, and then wait a few minutes, during which time you can grab some coffee or attempt to brave the outdoors.

77
8.15 Max for Live = Quality (Mostly Free) Plugins
Earlier in the book, I touched upon why stock/native plugins are more efficient than using 3rd party plugins for everything.
But if the stock Live plugins aren’t cutting it, and you like free plugins (who doesn’t?), Max for Live can add a large amount of free (and paid) plugins to your production arsenal.
Since M4L plugins load like any stock Live plugin, it saves you the hassle and time of having to deal with third party plugins.
maxforlive.com boasts over 3000 FREE Max instruments and effects.. A personal favorite of mine is Palmas, which allows you to add up to 32 claps with varying velocity, envelopes and stereo placement.
Live also hosts a number of Max for Live device packs on their website, both free and paid.
I’d recommend starting with Max for Live Essentials, which includes over 30 different instruments, MIDI effects and audio effects.
8.16 Getting Off the Grid
When producing “in the box,” it can be a struggle to create organic, human-sounding rhythms (a human playing an instrument will never adhere precisely to the grid, it’s impossible).
To give your productions a more organic, lively feel, you can disable the grid (⌘+5/CTRL+5) and work with no musical divisions. This will help keep your rhythms interesting by forcing your ears to make the best choices (rather than relying on the grid lines).

78
8.17 Clip Envelopes
Just as you can have automation on a channel, you can also assign automation to a clip using clip envelopes.
How to do it:
To view a clip’s envelope section, click the “E” button on the bottom left section in Clip View.
A new window will be added to the Clip View labeled “Envelopes”.
From here, you can add modulation to certain parameters such as the volume or transposition.
79
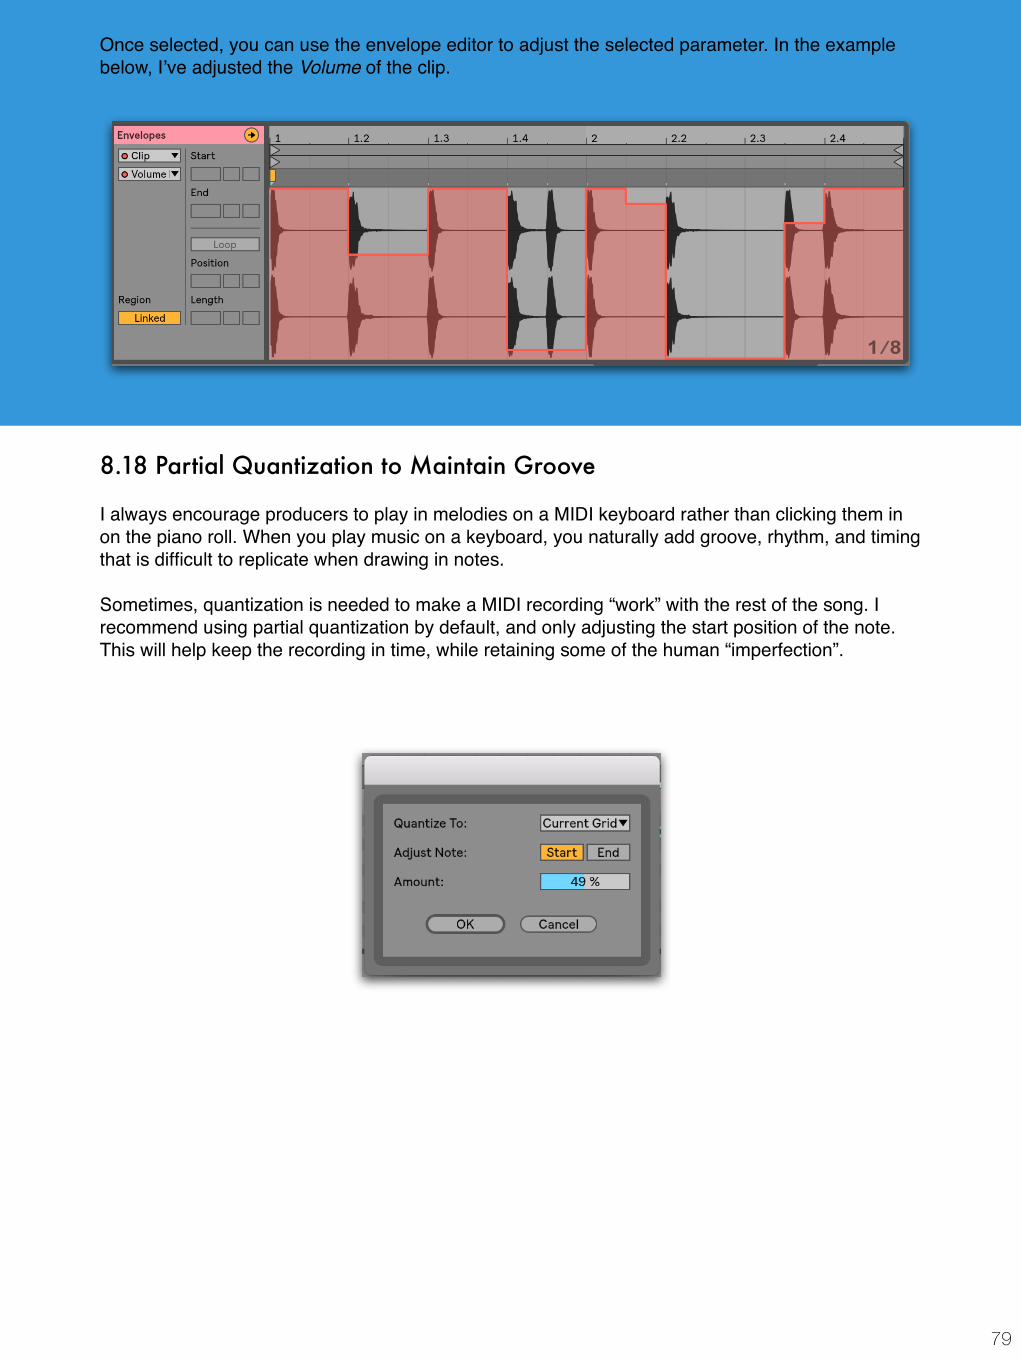
Once selected, you can use the envelope editor to adjust the selected parameter. In the example below, I’ve adjusted the Volume of the clip.
8.18 Partial Quantization to Maintain Groove
I always encourage producers to play in melodies on a MIDI keyboard rather than clicking them in on the piano roll. When you play music on a keyboard, you naturally add groove, rhythm, and timing that is difficult to replicate when drawing in notes.
Sometimes, quantization is needed to make a MIDI recording “work” with the rest of the song. I recommend using partial quantization by default, and only adjusting the start position of the note. This will help keep the recording in time, while retaining some of the human “imperfection”.

8.19 Determining Plugin Latency
Understanding latency is extremely important if you plan on recording live audio or MIDI.
Why? Hearing a lag between what you’re playing and what you’re hearing is incredibly frustrating and detrimental to creativity.
One way latency is added is through Live’s Buffer Size, where a larger buffer size corresponds to a larger latency.
You can find this in Preferences under the Audio tab.
Beyond this, it’s worth noting that certain stock and third party plugins introduce latency.
This mainly occurs in plugins that require lookahead such as Limiters and Compressors.
You can determine plugin latency by hovering over the plugin. The latency will be displayed in the bottom left hand corner.
80

81
8.20 Investigate Every Show/Hide Triangle
Through reading this book, you may have noticed that a lot of the “secret” parameters and settings are found under the “Show/Hide” toggle.
This tip is a call to action to encourage you to investigate these hidden features inside Live. For example, here are the extra settings inside Live’s Saturator.
8.21 Reducing Plugin CPU by Muting/Deleting Unused Devices
The title says it all.
When you’re in creative flow, you can end up with a lot of plugins and devices on channels that you don’t really need.
To free up CPU resources, take time to periodically mute or remove these. I recommend doing this at the end of every session, or just before you take a break.

82
8.22 Flatten and Consolidate to Force Commitment
We’re spoiled for choice.
Electronic music production allows for a seemingly infinite set of possibilities.
“I could use this sound or that sound.”
“I could go make this style or that style.”
This can paralyze you and halt creativity. So how do you fight it?
Two strategies…
1: Alternate Versions
When you’re about to make a significant decision in a project—e.g., you decide to use a completely different melody or bassline—save an alternate version of the project just in case it doesn’t work out.
Typically, the decision you make will be the right one, but you’ve got the earlier version backed up if you need it. This strategy will help you be more bold creatively, knowing that it doesn’t really matter whether or not your new idea/decision works.
2. Force Commitment Through Consolidation/Flattening
Another way to force commitment is to freeze and flatten audio as often as you can.
As soon as you find a sound you like, or write something you like, commit it to audio.
This will help you move on and work on the rest of the project, as you won’t be tempted to endlessly tweak the sound/sequence.

83
8.23 Rename Inputs/Outputs
Live 10 allows you to rename inputs and outputs. This is helpful if you have a consistent input/output routing in your studio.
How to do it:
Under “Preferences -> Audio”, click Input/Output Config.
This will open up a dialog box that allows you activate/deactivate inputs/outputs, as well as rename them.
Activated inputs/outputs will be yellow, and inactive inputs/outputs will be grey.
In my case, my Prophet synthesizer is routed to Stereo Input 1/2, my microphone is routed to Mono Input 3, and my guitar is routed to Mono Input 4. I’ve deactivated Mono Inputs 1 & 2 since I would never use them separately (since the Prophet is a stereo synthesizer).
As far as outputs, you could rename the outputs to correspond with each of your playback systems.

84
8.24 Groups in Groups
New to Live 10 is the ability to nest groups inside of other groups.
I’d imagine you’re familiar with this tip already, so let’s discuss a few practical uses of this feature.
Tip 1: Grouping similar drums in a drum group
My first instinct to use this technique is with sub-grouping percussion. For example, let’s say I have a full percussion group made up of various kicks, snares, and claps. It makes sense to group these drums individually, then group all of the drums together.
Why?
Grouping each type of sound separately allows me to mix these drums before they reach the full group.
For example, if I had 3 claps in the group and wanted them to be louder, it would be easier to turn up the “clap group” fader then to change the volume of all three individually. Further, a clap sub group allows me to bus process them before they hit the main group channel.
Tip 2: Grouping similar instruments or effects
Just as above, you can use this technique to group similar instruments together. For example, you could group two of your basses together before they pass to the main instrument group. This allows you to get these two basses working properly together before they mix with the lead synths.

85
8.25 Drag Clip to Duplicate Channel
If you drag a clip to the clip/device drop area, it will create a channel with the devices on the original channel.
How to do it:
Let’s say I wanted to copy over a drum break and it’s effects to a new channel. All I need to do is alt/ctrl+click the clip and move it to the drop area below (titled “Drop Files and Devices Here”)
When I do that, a new channel will be created with the same effects as the original channel.

86
8.26 Send to Send
You can send a return channel back into itself or into another return channel.
One of the classic uses of this is to send a delay into a reverb, helping smooth out the delay. This is such a common technique that Live’s new Echo device even has a Reverb built into it for this effect.
Get creative with this, and be careful not to push the send levels to hard or you’ll get a nasty feedback.
How to do it:
By default, the sends on return channels are disabled. To active them, simply right-click on a disabled send amount and click “Enable Send” to enable just that send or “Enable All Sends” to enable all sends on that particular channel.
Once enabled, you can send a return channel into itself or into another return channel. As mentioned before, be careful with high values as they may result in feedback.

87
8.27 Multi-Clip Warping
Multi-clip warping is exactly what it sounds like: you can activate warping on multiple clips at the same time. You can also adjust the warp mode. This is particularly helpful when bringing in stems for a remix.
How to do it:
To warp multiple clips, simply highlight each of the clips and click Warp.
If one of the clips is warped, the Warp button will display grey/yellow stripes, as below.
Pressing Warp will warp the remaining un-warped samples. From there you can adjust the warp mode of all selected clips, or press Warp again to un-warp each clip if desired.
PRO TIPAbove, you’ll notice that you’re allowed to tweak a few more settings on the selected clips. You can change the volume, pitch, name, and color of each clip as well.

88
8.28 Consolidate Time to New Scene
Finally, a tip for those of you that use Session View.
“Consolidate Time to New Scene” allows you to edit a clip in Arrangement View and consolidate it into a clip slot in Session View.
For example, let’s say you have an idea laid out in Session View and want to make precise edits to the clip audio. You can switch over to Arrangement View, edit the clip, then use “Consolidate Time to New Scene” to consolidate the edited clip back into Session View.
How to do it:
To “Consolidate Time to New Scene”, simply right click on the audio clip and select it from the menu.
A new clip with the consolidated audio will be created on that channel in Session View.
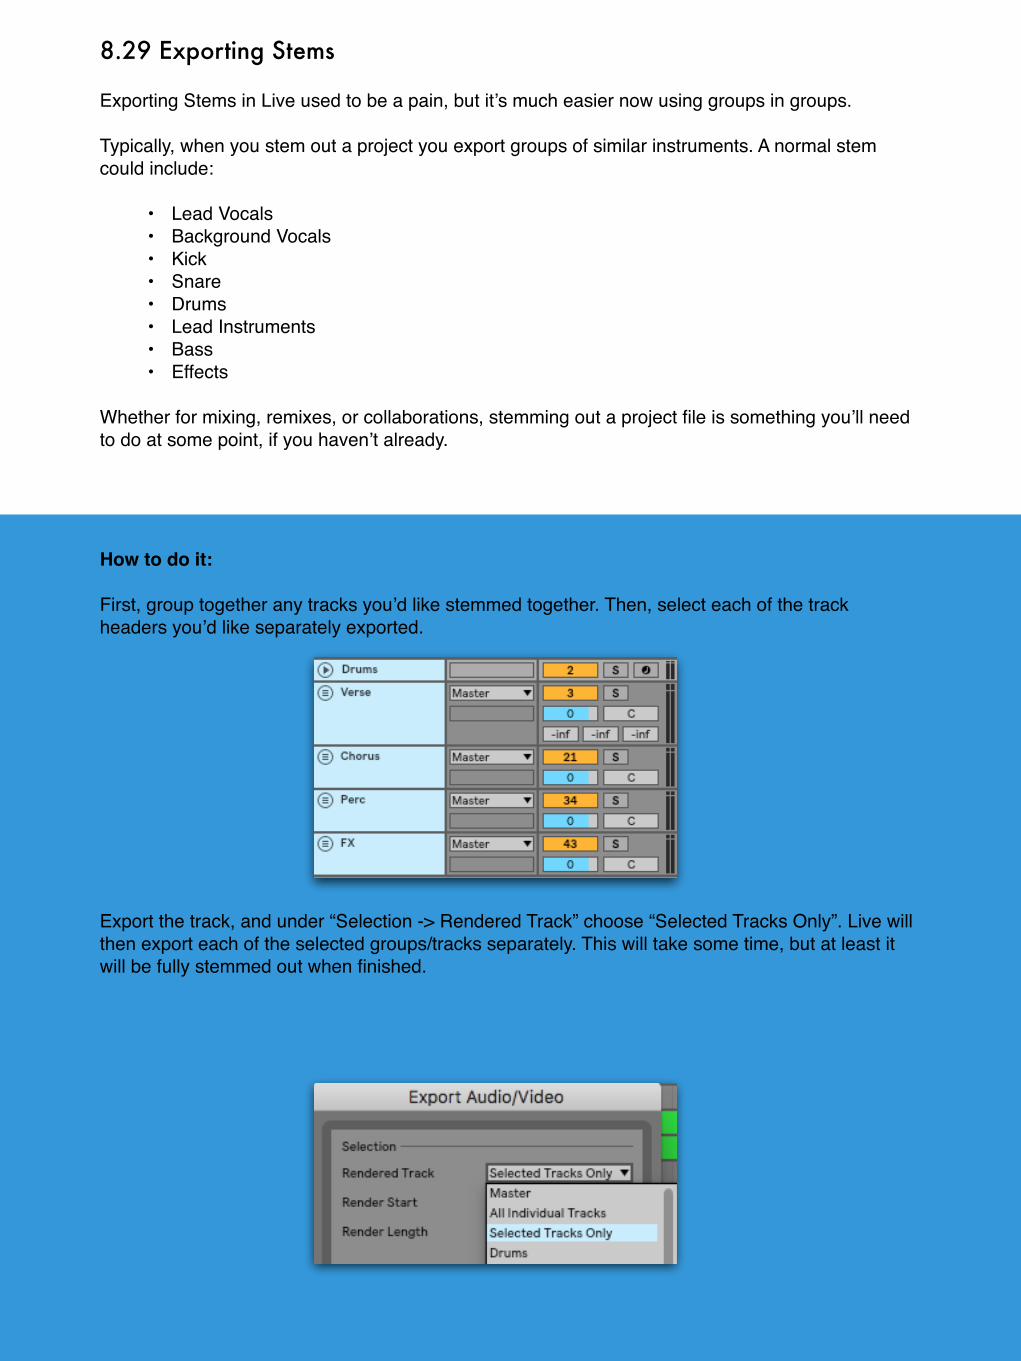
89
8.29 Exporting Stems
Exporting Stems in Live used to be a pain, but it’s much easier now using groups in groups.
Typically, when you stem out a project you export groups of similar instruments. A normal stem could include:
• Lead Vocals• Background Vocals• Kick• Snare• Drums• Lead Instruments• Bass• Effects
Whether for mixing, remixes, or collaborations, stemming out a project file is something you’ll need to do at some point, if you haven’t already.
How to do it:
First, group together any tracks you’d like stemmed together. Then, select each of the track headers you’d like separately exported.
Export the track, and under “Selection -> Rendered Track” choose “Selected Tracks Only”. Live will then export each of the selected groups/tracks separately. This will take some time, but at least it will be fully stemmed out when finished.

90
8.30 Project Backups
Live saves up to 10 backups of your existing project. Every time you save the project, a new version is stored in a backup folder. This is perfect if you make a mistake in a project and would like to revert back to an older version.
There are two ways you can access project backups.
The first is in the Browser. Under “Places”, select “Current Project”. Then, open the “Backup” folder to reveal the 10 most recent project save files.
You can also access the project backups via Explorer/Finder.

9. AUTOMATION ESSENTIALS
91
Automation is a key tool to creating dynamic, evolving productions.
Let’s look at how to speed up your workflow when using automation in Live.
9.1 The Basics
For those of you that are unaware, automation is the ability to tell Ableton Live to change a parameter over time, as if you were turning a knob that controls that parameter while the track is playing. There are two ways you can add automation inside a project: you can record it, or you can draw it in.
Automation Mode
New to Live 10 is the Automation Mode.
To toggle Automation Mode, either click “A” or click the toggle above the mixer in Arrangement View.
Automation Lanes
When working with automation, it pays to use the automation lanes. This will give you extended control over the editing of your automation, but more importantly it allows you to view multiple automation lanes at once on a channel.
How to View Automation Lanes
When you enable Automation Mode, automated parameters will appear underneath the track title. These will always have a red dot next to their device/name and automated parameter.
In the example below, the device is the Auto Filter, and the automated parameter is the Frequency.

92
Making sure the automation is visible on the track, click the triangle on the bottom right of your title track bar. This will open a separate channel for that specific automated parameter.
You can add multiple automation lanes to one channel by finding the automated parameters in the track header, then adding them using the “+” on the bottom right of the track title bar.
Having your automation separate from the track offers increased control over its editing, as you can copy, paste, and duplicate automation just as you would with audio or MIDI clips.
Not only can you copy and paste within the same automation lanes, but you can copy and paste to other automation lanes as well, including those on other channels.

93
Curved Automation
Live 9 introduced curved automation. To use curved automation, simply hold alt and click + drag the automation line.
Pencil Tool
Using the pencil tool is a quick way to set automation values over specific area of time.
To use the pencil tool, simply click “B” while editing automation. It will automatically create end points relative to the size of your current grid.
Shift + Click
If you hold down the shift key while grabbing a line between two breakpoints, you can move that line vertically between those breakpoints.
Additionally, if you hold shift and drag an endpoint horizontally, it will lock it’s current value.

94
Delete Endpoints
If you grab an endpoint and drag it horizontally, it will delete any endpoint it crosses over.
This is extremely useful for cleaning up recorded automation, which typically has a larger number of breakpoints.
Here’s a before and after example of recorded automation which has been cleaned up.
Note that in older versions of Live you needed to shift+click in order to delete breakpoints.
Fine Tuning
Live will snap breakpoints to the existing grid size. To unquantize breakpoints, hold command while moving the breakpoint.

95
9.2 Automating 3rd Party Device Parameters
There are two primary ways you can automate parameters on third party plugins.
The first is to manually record yourself automating a specific parameter.
The second way is to map the parameter via the device parameters dashboard.
How to do it:
To view mappable (automatable) parameters in a third party plugin, click the reveal triangle on the top left of the device Title Bar.
Depending on that specific plugin, there may or may not be parameters immediately available.
Generally, I’ve found that simpler plugins will, by default, have their mappable parameters showing, while more complex plugins will not.
In order to automate any of the shown parameters, simply right-click the parameter you’d like to automate and click “Show Automation In New Lane”.

96
What if no parameters are shown?
Several third party plugins will not show any mappable parameters by default. Serum by Xfer Records is one such plugin.
To make a parameter mappable, click the “Configure” button.
The plugin window will open up, and any mappable parameter that you click inside the plugin window will show up in the device’s parameters dashboard.
For instance, if you open up Serum and click the Filter Cutoff and Filter Resonance, those parameters will show up in the device parameters dashboard.

97
9.3 Master Track Automation
Master track automation is a great way to add tension and interest to your tracks.
It’s something that should be used sparingly—as it’s easy to go overboard—but when used correctly it’s extremely effective.
The most common automation applied to the master channel is simple volume automation, which is often used in pop songs where the volume of the chorus is increased slightly to enhance its impact.
It’s also effective in high energy dance music, where automating parameters on certain effects can help give the chorus more impact. For instance, you might slowly automate the volume of the track down during your build up (by a couple of dB), and then immediately bring it back up as the drop hits.
Other examples include slowly mono’ing out your track during the build while rolling off the low-end of the bass. This creates contrast with the drop, giving it more impact.
Note: The master channel has its own dedicated automation lanes, just like other channels.
9.4 Send/Return Automation
Similar to the concept of master track automation, you can automate parameters on a return track to create movement and variation.
The most basic example is volume automation (i.e. automating the volume of the return track). You could also automate specific parameters on an effect, such as increasing/decreasing the distortion amount of a plugin throughout the chorus.

9.5 Lock Automation
Above the channel strips on the top right of Live is a lock button. When activated (the lock is orange), automation envelopes stay where they are, even if a clip is dragged to a different section of the arrangement. When the lock is not activated, automation stays with the clip it is assigned to.
This lock/unlock function is useful when organizing or rearranging elements of a track. If you want to move an audio clip to a different section of the track, but would like to keep the automation in place, you can simply lock the automation and drag the file.
In the example below, I have two separate loops with automation applied.
Let’s say I want to duplicate the first clip, but don’t want the automation to be copied with it.
With the automation lock enabled, when I duplicate Clip 1, the automation will be unaffected.
98
10. RACK ESSENTIALS
99
Racks allow you to group together multiple instruments, effects, plugins, samples, and more in a streamlined workflow. There are four types of racks in Live: instrument racks, audio effect racks, MIDI effect racks, and drum racks.
You could write a whole book about the intricacies of Live’s racks. Rather then do that, I’ll refer you to Live’s manual to learn how to set them up, then offer advice on how to best integrate them into your workflow.
If you’re new to racks, read “18. Instrument, Drum and Effect Racks” in the Ableton Reference Manual. (https://www.ableton.com/en/manual/instrument-drum-and-effect-racks/)
Now, let’s look at how to integrate racks into your workflow.
10.1 Integrating Racks
To streamline your workflow with racks, you should:
• Create a library of custom Instrument/Audio Effect Racks• Utilize macros for streamlined control
Having custom-built Instrument/Audio Effect Racks that are pre-processed and production-ready can speed up workflow immensely.
Think about it. When you’re in a flow state working on a track, would you rather spend 30 minutes designing a scratch, or would you rather grab a pre-made Instrument Rack that already sounds full and interesting?
Similarly, if you’ve got a bass sound you need to fatten up, would you rather flick through different distortion plugins for an hour, or add a pre-made Audio Effect Rack and use macro controls to dial in the right sound in seconds, not minutes?
If you’re with me, we should have the same answer to both of these questions (the latter for both).
The first step is to develop a personal library of Instrument/Audio Effect Racks. These can be sounds/chains you’ve created, or even your favorite presets.
For example, I have an audio effect rack with my favorite Kontakt piano. Rather then opening up Kontakt then opening up the piano and tweaking the settings, with one click I can do all this at once. This may seem insignificant, but it saves me time every time I start a track.
Now, let’s look at a few different approaches to creating custom racks in Live.

100
10.2 Creating Custom Racks
There are a few ways I typically create Instrument/Audio Effect Racks.
The first is when I’m working on an existing project and design a sound I really like. If I want to use that sound in a future project, I’d rather not have to redo the exact same sound design and processing, so I’ll group that instrument and it’s effects into an Instrument Rack then save it to my library.
Then, when I’m working on another project, I can easily pull that saved Instrument Rack into my project and start writing immediately.
Similarly, if I develop a processing chain I really like, I’ll save that chain to an Audio Effect Rack, allowing me to add it to sounds in future projects.
The other way I typically create Instrument Racks is during my dedicated sound design days.
We all have days where we don’t feel like writing music. On these days, I like to work on sound design as it’s less mentally taxing. As I’m designing new sounds, I’ll save any that I like as Instrument Racks to my user library. I’ll do the same with Audio Effect Racks too.
10.3 Optimizing Your Racks: Macros
Once you’ve created an Instrument/Audio Effect rack, the next step is to optimize them using macros.
Macros allow immediate access to the controls you actually use. Rather then wasting time opening up a rack, finding the right plugin, finding the right parameter and adjusting it, you can map that parameter to a macro for easy access and control.
The takeaway here is to map the most used parameters within your favorite racks to macros.
This can be done in both a function way, such as mapping one basic parameter, or in a creative way, such as mapping multiple parameters to one macro.
For example, let’s take Decapitator, the popular distortion plugin from Soundtoys. I typically only use the “Drive” and “Mix” knobs within the plugin. Therefore, I can save time by mapping these commonly use parameters to macros within an instrument or audio effect rack. In this case, I’ve mapped “Drive” to Macro 1 and “Mix” to Macro 2.

101
10.4 Using Racks to Craft Your Sound
When a producer has a “sound,” it likely means that there is consistency in their music, whether it be melodic, structural, or sonic consistency. Plenty of famous producers have their own drum or lead sound, or a mixing style that is identifiably theirs.
For example, I attended a live session with producer DallasK (Ultra, Revealed, Musical Freedom) and he had 100+ instrument racks in his library. Clearly he understood the importance of having a crafted personal instrument library.
What does this mean for you? If you make a sound you like, save it to an Instrument Rack. Don’t be afraid to re-use it in other productions; there’s no reason to start from scratch every time you write a track. It’s time-consuming and debilitating. In fact, keeping certain elements consistent across several productions helps you not only finish more music, but helps keep a consistent sound throughout.
It’s no different then having custom presets and drum sounds. In the end, its taking you one step further towards finishing more music.

11. HACKING DRUM RACKS
102
Live’s Drum Rack is incredibly powerful and has loads of hidden features. For this section, you’ll need a basic familiarity of the Drum Rack device.
Let’s get to it.
11.1 Sends/Returns
Just as Live has return tracks on a global level, it also has return tracks within Drum Rack itself.
How to use them:
When you open up an empty drum rack, you’re presented with something that looks like this (minus the closed and open hat samples).
In order to access the sends/returns, click the “Show/Hide Chain List” button, which is located on the upper left hand side (it is a bulleted list symbol).
Once enabled, the Drum Rack’s interface will expand, introducing an I/O section, as well as send/return functionality.

103
To enable a send, click “R” in the lower left hand corner of the Drum Rack, which opens up the return panel.
Once selected, you’ll be presented with a new section on the lower right with the text “Drop Audio Effects Here.”
To add a return channel, drag an audio effect to the this location. Doing so will create a return chain with that audio effect.
This enables send functionality (you’ll see the “S” in the lower left corner is now active). You’ll have the option to send drum cells to that return track, under the column “Send-a.” You can send any of your drums to this return track the same way you would send an audio track to a global return track.
You can also double-click any of these chains to open them up, allowing for additional control over the sounds and effects.

104
11.2 Setting Global Parameters (Copy Value to Siblings)
When you have a drum rack with multiple different samples, you may want to set certain parameters to be identical across all drum cells.
Fortunately, Live allows you to copy settings across all samples within a drum rack.
How to do it:
Let’s say I want the volume of every sample within a drum rack to be the exact same, -5dB.
Going into each cell and manually changing the volume is time-consuming.
Instead, I’ll choose just one drum sample and set the volume to -5dB.
Then, I’ll right-click the volume knob and click “Copy Value to Siblings.”
This will set the volume of every sample in the drum rack to -5dB.
Note: You can utilize this function for most parameters within the Simplers in each drum cell.

105
11.3 Choke Groups
When two samples are in the same “choke group,” they cannot be played at the same time.
One common use of this function is to have an open hat and a closed hat in the same choke group. In real life, both are played on one cymbal—you can’t play both an open hat and closed hat at the same time. Thus, to give drum programming more of a “live” feel, it’s worth setting up your drum rack with both samples in the same choke group.
The application of choke groups goes far beyond programming hi-hats. You could use it to make sure percussion hits don’t bleed into each other, or to clean up rolls and fills.
How to do it:
To set this up, you’ll need to display the I/O section of the drum rack. If you’re unsure of how to do this, revisit section 11.1.
Once enabled, you’ll see the Choke column, which offers the option of 16 separate choke groups.
To add two samples to the same choke group, simply highlight both of the cells, then select a number under the Choke column.
Once two chains are assigned to the same choke group, they will not be played at the same time.

106
11.4 Condensed Layering
Another hidden feature inside Live’s Drum Rack is the ability to play multiple samples with the same note.
This is an efficient way to layer multiple sounds, saving you time editing and copying MIDI.
The way to do this is to assigning multiple samples to “receive” the same note.
How to do it:
Below, I’ve got a drum rack with two kick drums I’d like to layer.
To assign them to the same note, I need to set both chains to the same note under the “Receive” column in the Chain List. I’ll set both drums to receive “C1”.
Once I do that, whenever the note “C1” is played, both kick drums will be triggered.
You may have noticed that the two kick drums have condensed to one cell labelled “Multi”. This tells us that there are multiple samples assigned to the same cell.

107
10.5 Default Drum Rack Simpler
When you drag a sample into a drum rack, it’s loaded into a default Simpler instrument.
You can fully customize this Simpler so that any time you load a sample into a drum rack, it’s contained in a custom Simpler instrument.
For instance, maybe you want a high-pass enabled by default on all samples you drag into the drum rack. Simpler, by default, doesn’t do this, so you need to create a custom Simpler preset.
How to do it:
Create a new MIDI track.
Then, add a Simpler and tweak the parameters as desired.
Then, add this Simpler to your default preset folder (for the drum rack). Click on User Library (under the Places tab in the Browser Pane), and add the Simpler to the path:
User Library -> Defaults -> Dropping Samples -> On Drum Rack

12. COLLABORATION ESSENTIALS
108
Collaboration is a great way to share ideas and gain knowledge about other producers’ habits and workflow.
However, anyone who has collaborated with another artist knows it's rarely a simple task. There are a lot of creative and workflow loopholes you’ll have to jump through in order to have a successful collaboration.
I’ve dedicated this section to helping you achieve the most out of collaborations.
How to do it:
In Live, click File > Collect All and Save from the drop-down menu. Once you select this, a window will pop up prompting you with additional options.
Make sure “Yes” is chosen for the first three options. Be careful with the last option, as it may make the project file/folder unnecessarily heavier.
For example, let’s say you’re using the Ableton Grand Piano from the Factory Pack. If you choose to save files from Factory Packs, it will save the entire Grand Piano library, which your collaborator likely already has.
12.1 Collect All & Save
When you begin a project in Live, any external samples that you use are kept in their original file location.
This helps to keep project files small and save you memory. The issue arises when you want someone to open the project on another computer, and they don’t have the same samples as you.
To work around this, you can use the “Collect All and Save” feature to save any samples added to the project in the same project folder.

109
12.2 Organization
A short (but important) reminder. In Chapter 5, I went over the importance of track/project organization for yourself.
When it comes to collaboration, organization is even more important. Make sure to take extra time to clean up, color, and name channels in your project before you send it off for collaboration.
12.3 Freeze
One of the biggest roadblocks with remote collaborations is not having the same plugins as the other producer.
Other than downloading the plugin (which isn’t enjoyable if it’s an expensive one), there are a few ways to solve this problem.
The first is to freeze channels that contain any plugins the collaborator doesn’t have.
This is helpful because the collaborator can still hear the frozen track and mix it on a global level. When they send it back to you, you can unfreeze and edit the plugins (if needed).
The second way is to duplicate any channels with plugins your collaborator doesn’t have, and flatten the second channel. This is useful because it gives the collaborator full creative control over the audio channel, but you’ll have the original channel as a backup.
Make sure they are clearly labeled with one channel muted.

110
12.4 Notes
We discussed this in the “1.11: Adding Notes”, but to reiterate, using notes is a great way to keep collaborators informed and up to date.
For example, you can use the notes section on the master channel to tell collaborators what changes you’ve made since they last worked on the track.
Otherwise, consider using a collaborative text editing software, such as Google Drive or Evernote. It helps to have a central location for discussion.
Alternatively, if both you and your collaborator have iPhones, you can share Notes with one another.
12.5 Collaborating with Different DAWs
A lot of producers wonder how to best collaborate using different DAWs.
In reality, the most practical way to do so is by working in stems. When you’re ready for your collaborator to work on a project, simply stem out the project and send them the stems. This isn’t an “ideal” solution, but working in audio can often yield better results then staying in MIDI for an entire project.
Reference 8.29 to learn the best way to export stems in Ableton.

111
12.6 Splice/Dropbox
The introduction of tools like Splice has radically changed the way producers collaborate remotely.
If you’re unaware, Splice is a cloud-sharing platform designed specifically for producers. It removes the need to Collect All and save, keeps a detailed log of what’s been done in the project, and much more.
Alternatively, you can use a shared folder on a file sharing website like Dropbox to host project files and stems. Shared folders are useful as all collaborators can add to the folder, while the folder link stays the same.

13. ADVANCED WORKFLOW TIPS
112
How to do it:
Add the Multiband Dynamics audio effect to an empty audio track.
Next, group the device (⌘+G/CTRL+G) and open the chain list on the audio effect rack.
Next, duplicate the chain twice so you end up with three individual chains. Name the chains High Band, Mid Band, and Low Band.
13.1 Multiband Split Rack
Multiband processing can be used to gain further control over the character and dynamics of a sound. Multiband compression is a common technique, as well is multiband distortion.
You can set up a “Multiband Chain” in Ableton to process individual frequency ranges of a sound.

113
Next, go into your High Band chain and solo the High Band. Repeat this for the rest of the chains, soloing the Mid Band on the Mid Band chain, and the Low Band on the Low Band chain.
Lastly, fold all of the Multiband Dynamics instances, name the rack, and save it to your User Library.
Now you have a custom multiband split rack. If you want to process a specific frequency band of an instrument, all you have to do is drag the audio effect onto the corresponding chain.
For example, if you wanted to add saturation only to the high frequencies, you’d simply drag a Saturator to the High Band, as it will only affect frequencies above the cutoff (which is 2.50kHz by default).

114
13.2 Separate Single Drum Cell from Drum Rack (Extract Chain)
Using Live’s Extract function, you can move a pad in a drum rack to its own MIDI channel, retaining its original processing and MIDI file.
How to do it:
To do this, you’ll first need to open up the Chain List in the drum rack.
Next, right click the chain of the pad you’d like to separate and click “Extract Chains”.
A new MIDI channel will be created with the extracted sample, housed in a Drum Rack. The sample will be deleted from the original Drum Rack.

115
13.3 Cycle Through Looped Recordings
If you record multiple live takes, you can use Undo (⌘+Z/CTRL+Z) and Redo (Shift+⌘+Z/Shift+CTRL+Z) to cycle back through previous looped takes.
How to do it:
Let’s say I want to record a melody over this 2-bar drum loop.
While recording, I played 4 different takes (4 different versions of the melody). By default, Live keeps my last take.
In this case, the first two takes stunk and the last one sounds like a cat ran across my keyboard. The third take is useable, and I’d like to use that instead.
Rather than adjusting the loop inside the MIDI clip, all I have to do is hit undo once. This will cycle back 1 take, landing on my third take.
This is also useful when auditioning takes to hear which one is best. Simply use Undo/Redo to cycle through all recorded takes.

116
13.4 Beats Mode to Create Interesting Rhythms
Live’s “Beats” warp mode is useful when changing the speed of drum loop. However, you can apply it to other elements such as vocals, chords, or pads in a creative context.
How to do it:
Find an audio sample and set the warp mode to “Beats”.
Once Beats mode is engaged, there are a few different options. The first is to select the “grain resolution” using the “Preserve” drop down menu. Typically when warping drums you’ll want to use the transient mode to preserve individual drum transients. Using the musical divisions (1 Bar, 1/2, 1/4, etc), you can achieve interesting rhythmic effects.
Next, select the transient loop mode (via the arrows). The descriptions for each are below. Loop Forward is useful for a rhythmic gate effect. Loop Back-and-Forth can yield some interesting “reverse” sounds within an individual grain. Lastly, the “transient envelope,” set by the number on the bottom right, determines the “fade” of the envelope with “100” adding no fade and “0” adding a quick fade.

117
As an example, let me add a rhythmic gating effect to a pad using Beats mode at 1/16th note interval.
Given the settings above, here is a before and after of the waveform of my pad.
As you can see, the After, which is a render of the Beats mode processing, is significantly different then the original sample.
I recommend experimenting with this on your own, especially the “Loops Back-and-Forth” mode.

118
13.5 EQing Your Sidechain Input
Earlier in the book, we looked at the advantage of using a “ghost trigger” as a sidechain input.
Alternatively, if you’re using a kick drum as a sidechain input, you can use equalizers to shape the sidechain input.
How to do it:
In this case, I’ll shorten the input of my kick drum (acting as the sidechain trigger) by high-passing the sample.
Most kick drums are composed of a short transient followed by a sub “boom”.
The transient will generally be present in the higher frequency range, while the rest of the sample (the tail) will lie in the low frequency range. To illustrate this, I’ll take my kick sample and high pass it around 5kHz.
Here’s a before and after rendering of the EQ’s effect on the kick.

119
How can you use this to your advantage?
Using Live’s Compressor with sidechain & EQ enabled, you can filter your sidechain input in the exact same way.
That way, instead of a long sample for the compressor to work with, you’re left with a short click that gives you more control over the compression parameters (see: 9.10, Ghost Triggers).
Your parameters should look something like the figure below. Pay close attention to the EQ section. Below, I’ve enabled the EQ and set a high-pass at 5kHz, which will shorten the input signal by removing the boomy tail.
PRO TIPYou can use the “Sidechain Listen” button (headphone next to the EQ toggle) to hear what the incoming signal sounds like. This can help you dial in correct EQ settings.

120
13.6 Unlinked Envelopes
Not sure what clip envelopes are? See section 8.17 on Clip Envelopes.
When we looked at Clip Envelopes earlier, we adjusted automation parameters within a looped clip.
When automation is locked to a looped clip, the automation is considered “Linked”. This is the default setting for Clip Envelopes.
If you click “Linked”, the envelope will change to “Unlinked”. This allows you to draw clip automation that is longer than the loop itself.
Using the “End” section, you can define the length of the clip envelope separate from the length of the loop itself.
This technique is particularly useful in Session View.
For instance, if you’re developing a live set and want the characteristics of a loop to change over time, you can use unlinked envelopes to add automation for a time span longer then the length of the loop.

121
13.7 Swap Audio Samples in Arrangement
Working with audio in Live has plenty of advantages. However, if a certain sample doesn’t fit and you’d like to swap it for another, manually changing this can consume a lot of time.
How to do it:
In this example, I have a kick drum, in audio, that I’d like to replace.
First, under the View tab, I’ll select File Manager.
Live’s File Manager will open up on the right side of the window. Next, I’ll click Manage Set.

122
In the next window, I’ll click “View Files”.
Next, I’ll locate the sample I’d like to replace, then click the Hot Swap button to the left of the sample.
At this point, my User Library will open up and I’ll find the appropriate sample I’d like to replace the original with. Once I’ve done this, all instances of the previous sample will be replaced by the new one I’ve selected.

123
13.8 Sidechaining by Frequency
In 13.1, we looked at setting up a Multiband Split rack to enable frequency dependent processing.
You can also set up frequency dependent sidechaining.
First, I want to discuss why one might want to do this in the first place. Other than for a “pumping” effect, the historic function of sidechain compression is as a mixing technique, where two sounds operate the same frequency space and you’d like to push one out the way. Frequency dependent sidechain allows you to sidechain just the clashing frequencies, while keeping all other frequencies unaffected.
For example, let’s say your kick and bass are clashing at 80Hz. If you sidechain the entire bass, you’ll lose the timbre of the top end of the bass. Instead, you can sidechain just the sub frequencies of the bass, allowing the top end to remain intact.
How to do it:
One way to set this up is to use the Multiband Split Rack from Section 12.1, applying side-chain compression to the desired frequency range.
In the example below, I’ve added a compressor exclusively to the low frequency band.
The second (and slightly more complicated) way to do this is to use Live’s Multiband Dynamics.
Set the device to “Sidechain” and choose the desired input source
In Multiband Dynamics, next to each frequency split is an “activator” which toggles whether or not that frequency band is affected by the compressor. In the image below, I’ve activated only the low band, meaning the mid and high bands will be unaffected.

124
Once the routing is setup correctly, adjust the compressor parameters.
You can adjust the attack and release in the “T” (Timing) section, adjust the attack and release, and adjust the ratio and threshold in the “A” (Above) tab.
While this method may seem more difficult to set up than the previous one, it allows you to quickly edit and change the frequency ranges you are affecting. Under the Split Freq section, you can easily adjust the Low-Mid and Mid-High crossover frequencies.
13.9 Split Stereo Panning
New to Live 10 is a feature called “Split Stereo Panning”. It allows you to adjust the stereo position of the left and right channels independently.
How to do it:
Right click a track’s pan knob and choose “Select Stereo Pan Mode”
The knob will change to two sliders, one corresponding to each channel. You can click+drag up/down to adjust the relative positions of each channel.
Want to create crazy stereo movement? Try automating either or both of these channels.

125
13.10 Scrolling Through Audio
You can scroll through a warped clip in arrangement view by clicking alt+shift on the clip, then dragging left/right to move the clip start position forward/backward.
This can be used both in a practical way, such as finding the correct starting point of a loop, or in a creative way, such as scrolling through a loop to create new and interesting patterns.
13.11 Improved Sample Punch
Here’s a trick to add punch/attack to a sample using Simpler (the same can be done in Sampler)
How to do it:
Under the “Controls” tab in Simpler, select Pitch to open up the Pitch Envelope.
To add an attack to the start of the sample, you’ll want to create extremely fast pitch envelope. Set the amount to +48 st, the attack to 0.00ms, and the decay to around 20.0 ms (or just copy the settings above).
For less punch, you can reduce the amount to around +12 st to + 24 st.

126
13.12 Velocity Mapping in Sampler
You can map velocity to affect a number of different destinations in Sampler. Velocity mapping is a technique you can use to get more expressive and realistic Sampler instruments.
You can find this under the MIDI tab in Sampler.
Here are my favorite ways to use this technique:
Technique 1: Map Velocity to Sample Offset
When a drummer hits a cymbal, the amount of attack will depend on how hard they strike it. You can replicate this effect with Sample Offset. The idea is to map the velocity such that lower velocity MIDI notes will start later in the sample, letting it less of the initial transient.
Technique 2: Map Velocity to Shaper Amount
For expressive leads and basses, you can map velocity to the shaper amount to add additional saturation to higher velocity MIDI notes.
Technique 3: Map Velocity to Pitch Envelope Amount
Similar to the technique discussed in 13.11, you can map velocity to the pitch envelope to increase the punch of a sample as the the velocity increases

14. CREATIVE PROCESSING
For most of this book, I talked about how to write fast with Live. Now, let’s dive into how to get creative with Live using native audio effects.
In this section, we’ll look at 100+ tips for using each of Live’s audio effects. We’ll discuss how professionals are actually using these effects, aiming to teach you how to craft more powerful and creative mixes.
It’s hard to get the full effect of these tips in text format, so I’d recommend trying each of them out in Live alongside the reading.
Amp
Amp Tip #1: Use Amp to Add Snap to Plucks
To me, Amp is a bit aggressive, so I stick to three amp types: Clean, Boost, and Bass. The other types are generally too aggressive for most purposes. Also, make sure to switch the Amp Output to Dual (stereo) instead of Mono.
Amp can be used to add extra “bite” to plucks, or really any instrument with a strong transient. Put Amp on “Blues” mode, set the Dry/Wet to around 10%, set the Output to Dual Mono, then tweak the “Presence” up/down to taste.
Why does this work? Amp adds additional grit and noise. This will accentuate a pluck with a strong transient, adding character and bite to the sound.
Amp Tip #2: Use Amp on Acoustic Instruments Anytime I need to make a piano or acoustic guitar sound less “out of the box”, I’ll use an Amp with settings similar to above. The tone and drive introduced by Amp can make acoustic instruments sound less “digital” and “programmed”. Play around with different modes, in particular Clean, Blues, and Bass.

128
Amp Tip #3: Use Amp to Thin Out and Brighten Percussion
I’ll use Amp to thin out and brighten percussion hits like claps, shakers, and hats.
I’ll use it if I want to pull away some of the midrange (making room for main elements), but still want some presence and hi-end. Amp will “smear” and push the hi-end, similar to how parallel-compression might push the dynamics of a sound.
Again, try out different modes, paying special attention to the Presence and Dry/Wet.

129
Auto Filter
Auto Filter Tip #1: Resonance Boost for Fat Sub Basses
This trick can help clean and beef up sub basses.
Put an Auto Filter on your bass channel. Switch it to a highpass, put the resonance around 50%, and put the Filter Frequency all the way down. Then, slowly increase the frequency until you find the sweet spot where the bass is boosted but not thinned out.
The idea behind this is to clean up the bass by high-passing everything below the bass and accentuating the bass tone with a resonant boost. You can use this trick on plenty of other sounds such as kick drums, toms, and even vocals.
Auto Filter Tip #2: Use Morph for Creative Filter Sweeps
Auto Filter’s “Morph” filter allows you to morph between lowpass, bandpass, highpass, and notch filters. To morph between these filters, simply adjust the “Morph” knob. The maximum and minimum values are both lowpass filters, while everything in between is a combination of two different filter types.
In place of a basic filter sweep, automate the filter cutoff alongside the “Morph” position for a more unique and complex sweep. This works well on risers, builds, and down lifters.
You can switch the Slope to 12 dB per octave for a subtler change. To get really wonky, try introducing filter modulation in the LFO section alongside automating the filter cutoff and morph position.

130
Auto Filter Tip #3: Know Your Circuit Types
New to version 9.5, Live offers 5 analog modeled filters. Let’s learn where each of these come from (my educated guess) and how to use them.
• Clean - Standard transparent filter• OSR - Modeled after the filter on the Oxford Synthesizer Company OSCar• MS2 - Modeled after the filter on the Korg MS-20. • SMP - Hybrid between MS2 and PR2• PR2 - Modeled after the filter on the Moog Prodigy
I put a pure sin-wave through each of these filters, added some drive, then captured the results with a spectrograph. Below, you can see the harmonics introduced by each filter type.
A way to remember this is the filters (except clean) are organized from greatest amount of harmonic distortion to least. In other words, the OSR filter introduces more distortion then the MS2 filter, these MS2 introduces more distortion then the SMP, and the SMP introduce more distortion then the PR2.
The harmonics you get from these filters are different from the harmonics created by Saturator and Overdrive. Investigate each filter type to find which ones you like best.
OSR
SMP PR2
MS2

131
Auto Filter Tip #4: Use Subtle LFO Modulation to Create Movement
You can use the modulation controls of Live’s Auto Filter to add subtle movement. The technique is to subtly and slowly automate the cutoff of a lowpass filter.
The goal is to add subtle changes to the tonal balance of a sound over time. This works best on background instruments such as pads, percussion loops, and background instruments.
In the image below, I have a low LFO amount (5.71) and a slow Rate (0.5 Hz). Start with these settings, then adjust the Amount and Rate to taste.
As you’ll see, a lot of the tips in this chapter involve creating movement. To understand why you should care about this, here is a quote from Hyperbits illustrating the importance of movement in a mix:
“I love creating movement in ALL forms. For me, I can simplify the entire music production process as an attempt to make overly- digital and overly-clean computer stuff sound human and real. This means making things imperfect. This means playing with auto-panners and tremolos and auto-filters (basically the entire Soundtoys bundle) until my mix has this kind of x-factor to it. It starts to jump and pop and move and dance and feel the opposite of rigid. That, to me, is the most fun part of music production...making it sound real.” - Hyperbits
Auto Filter Tip #5: Shape a Sampled Kick
You can use this technique to shape the tone of a kick drum. This also works well to remove percussion from a sampled kick.
Bring an Auto Filter onto a kick track and set the cutoff of a lowpass filter to around 1kHz. Then, turn the envelope up to 127 and bring the Attack all the way up to 0.10 ms. Lastly, dial in the release to taste.

132
These settings will open up the filter once the kick hits, then close the filter given the release time you set. This allows you to grab the initial transient of the kick, then close the filter to get the sub “boom” of the kick drum.
Why does this work?
A typical kick drum is composed of two sounds: a click and a sub bass.
This technique lets in the initial “click” transient, then closes to let only the sub through.

133
Auto Pan
Auto Pan Tip #1: Subtle Volume Sway
You can use Auto Pan to create a subtle volume sway that adds movement and depth to a sound.
First, set the Phase to 0.00%, which will bring the L and R channels in phase with each other. Then, set the Amount to around 10%, and the Rate to around 1.00 Hz. You can tweak the amount to increase/decrease the effect, and adjust the rate to control how long each volume “sway” is.
This trick can be used on nearly any instrument, in particular on mid-ground/background instruments.
You can also set the phase back to 180% for a subtle stereo wobble.
Auto Pan Tip #2: Sidechain
You can set up Auto Pan for a “sidechain” volume effect.
Set the Amount to 100%, Rate to 1/4, and the Phase to 0.00%. Next, set the waveform type to “Sawtooth” and set the switch on the bottom left to “Invert”. You can adjust the Amount to reduce the overall effect.

134
Auto Pan Tip #3: Left to Center, Not Just Left to Right
When most people use Auto Pan, they use it to take a mono signal and pan it left and right. Auto Pan can also be used to take apply stereo movement to already panned sounds.
For example, if a hi-hat loop is panned to the left, you could use an Auto Pan to move it “around” the left channel.
Auto Pan Tip #4: Tremelo
You can use Auto Pan to create a classic “Tremelo” effect. Tremelo is a modulation of the volume of a sound. You’ll commonly hear it used on guitars.
You can use tremolo to shape the character of a sound, adding a volume “flutter” that can help set the mood of a track. The effect should be subtle, but noticeable. It works on all types of instruments and sounds.
To set this up, set the Phase to 0.00% and the Rate to around 10.0 Hz. Then, set the Amount and Rate to taste. For further experimentation, try out the different LFO waveforms.

135
Cabinet
Cabinet Tip #1: Thin Out a Sound
I’ll be honest: Cabinet is a cool effect but it’s function is very limited. I’ve known it to be used by some big artists, but in very particular instances. Nonetheless, let’s look at some ways to use it.
Cabinet is an emulation of a few classic guitar cabinets. It’s meant to be placed after the Amp effect for a classic guitar signal flow.
The first tip is to use Cabinet to “thin out” a sound. While this isn’t going to come up often, there will be instances where you want to wash a sound out and push it back in the mix. Rather then reach for some reductive EQ, put Cabinet on a sound and tweak the settings to push the sound back in the mix.
Cabinet Tip #2: Filter Sounds In
Instead of using a filter sweep to introduce a sound, you can use Cabinet to “filter in” sounds in.
Set the Speaker to “2x12” and the Microphone to “Far”. Then, automate the Dry/Wet from 100% to 0%. This effect will make it sound as if the sound is coming in from a distance. Try out different Cabinet settings as well. For example, setting the Output to “Mono” and automating the dry/wet from 100% to 0% can “open” up a sound from mono to stereo. (Confused by any of this? Open up Live and try it yourself.)

136
Chorus
Chorus Tip #1: Fine Tune with the Dry/Wet at 100%
It can be hard to find the “correct” settings with Chorus (or any plugin for that matter). This tip will help you find the right settings, every time.
Here’s how to do it: Set the Dry/Wet to 100%, tweak the parameters until you find proper settings, then reduce the Dry/Wet to taste.
This allows you to fully focus on the Chorus effect. For example, with a Dry/Wet at 10%, it can be hard to hear what changes are actually happening. At 100%, you’ll hear exactly what’s happening to the sound. As mentioned, this technique can be used with just about any plugin.
Chorus Tip #2: Subtle Stereo Width on Basses
It’s a common mixing technique to keep the low end mono. However, this doesn’t mean a bass can’t have any stereo processing.
This tip is to apply a Chorus to the Mid/Hi bands of a bass track. This keeps the low end mono while introducing subtle stereo width to the mids and highs.
You can set this up using a Multiband Split Rack like the one mentioned in 13.1. Apply the Chorus to the Mid and/or Hi Bands, and tweak the settings to taste.
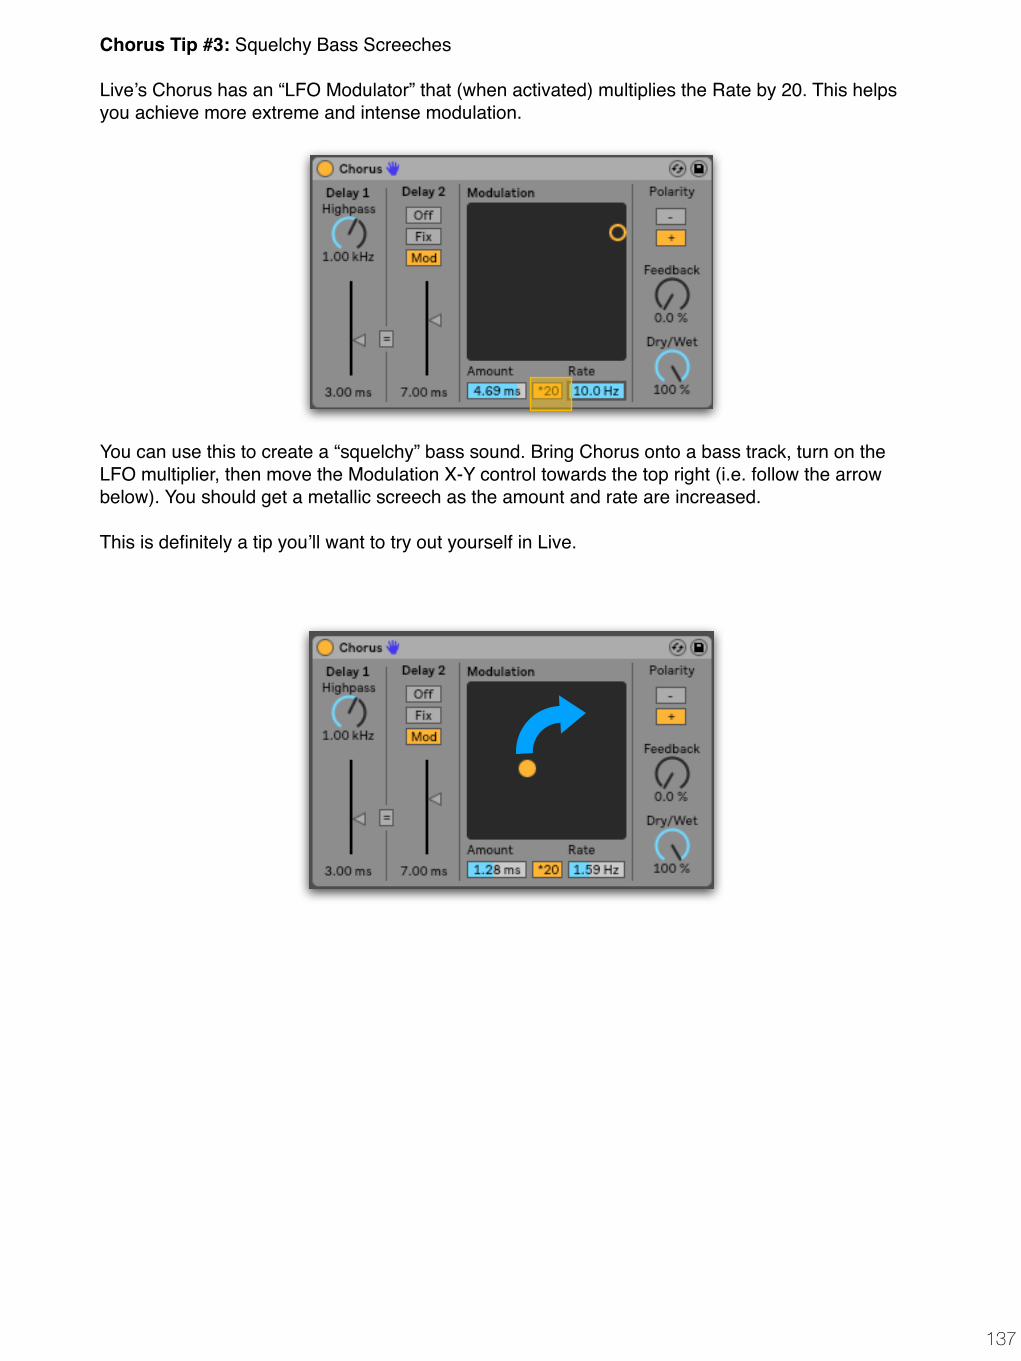
137
Chorus Tip #3: Squelchy Bass Screeches
Live’s Chorus has an “LFO Modulator” that (when activated) multiplies the Rate by 20. This helps you achieve more extreme and intense modulation.
You can use this to create a “squelchy” bass sound. Bring Chorus onto a bass track, turn on the LFO multiplier, then move the Modulation X-Y control towards the top right (i.e. follow the arrow below). You should get a metallic screech as the amount and rate are increased.
This is definitely a tip you’ll want to try out yourself in Live.

138
Compressor
Compressor Tip #1: Turn Makeup Gain Off
Makeup gain automatically adjusts the output as the threshold and ratio values change. Make sure that Compressor makeup gain is turned off by default.
Why? As you tweak the Compressor’s settings, you don’t want to be fooled by makeup gain. Makeup gain can make you think something sounds better, when in reality it only sounds louder.
Compressor Tip #2: Activity View
Compression can be difficult to understand, especially for newer producers. It’s important to trust your ears when applying compression, but it can help to have a visual aid.
Compressor’s Activity View can help you visualize compression, adding a visual companion to the audio effect you are hearing. For example, learning what heavy compression sounds like might be easier if you know what it looks like. Again, you should ultimately trust your ears with compression, but don’t be afraid to use Activity View as a visual aid.
To activate, click the “Show Activity Button” on the bottom of the Compressor.
Compressor Tip #3: Activate The Knee
Don’t ignore the importance of the “knee” in Live’s Compressor. To better understand the knee’s affect, you can use the Compressor’s Transfer View.

139
The Knee “adjusts how quickly the compressor responds as the input level approaches the threshold”. Higher values result in more “gradual” compression.
For example, with a high knee, values just below threshold will be compressed a little, while values above the threshold will be compressed as normal. This allows the compression to ease in, making it more natural and gradual.
Is this what you always want? Not necessarily. The knee is a tool, just like ratio, attack, and release, that helps you achieve more precise and transparent compression.
Personally, I find a knee of 3-6 dB fits most purposes.
Below are three compressors with the exact same settings except for their knees. In the last two photos, you can see the range in which the knee has an effect: the grey vertical lines to the left and right of the yellow dot. This is where the compression is “gradually” introduced around the threshold.
Confused? Grab a dynamic drum loop, put a Compressor on it, and start tweaking.

140
Corpus
Corpus Tip #1: Big Sub Basses
The “Kick Tight” preset is a great way to add body and tonality to a kick or sub. The tuning corresponds to a specific note, displayed underneath the “Fine” knob. In the image below, I’ve tuned Corpus to resonate at 41.22 Hz, corresponding to the note E0. If you put this device on a kick, it would add resonance to the kick at to E0. You can adjust the Dry/Wet to tame the effect.
Corpus Tip #2: Dirty Up Basslines
The “Bright Snare” preset sounds great on snares and claps. However, it’s actually sounds great on basses too.
Throw the Bright Snare preset on a bass, then play around with the Filter position and Dry/Wet. I’ll normally go for a Dry/Wet between 10%-20%. On certain sounds I’ll solo the mids and highs (like in the image below), but some basses sound best when the filter lets everything through (especially 808s).
As mentioned above, this preset sounds great on snares and claps. It ducks the mid range and boosts the hi end, which can help liven up boxy and flat samples.

141
Corpus Tip #3: MIDI Sidechain
If you click the disclosure triangle on Corpus, it will open up the MIDI Sidechain section. Essentially, this allows you to tune the pitch of the Corpus resonator to any MIDI note.
To set this up, choose which MIDI channel you’d like as your input from under “MIDI From”, then enable “Frequency” to tune the resonance to the MIDI input.
What are some practical examples of this?
If you’re using Corpus on a MIDI track, you can set the input to the track itself so that Corpus is tuning to the corresponding MIDI notes.
Otherwise, Corpus only tunes to one note. This is fine in some cases, but with any melodic instrument its worth experimenting with the sidechain function.
Play around with the Transpose knob as well. On any sound I’ll transpose Corpus up and down a few octaves to see what kind of character I can get out of it.

142
Drum Buss
Drum Buss Tip #1: Don’t Use It Just On Drums
Drum Bus is incredibly powerful tool. It’s a compressor, saturator, transient shaper, and resonator all in one. This tip is simple: try Drum Buss on everything, not just drums.
Drum Buss Tip #2: Parallel Processing King
With all the different capabilities of Drum Buss, you’ll want to try and push sounds to the limit.
As an engineer, the most important control on Drum Buss is the Dry/Wet knob. Push sounds to their limit, find a character and tone you like, then back it off with the Dry/Wet.
Too often I’ll see producers act “timid” with distortion and saturation. They’ll use a Saturator at 100% and add in only a small amount of Drive. This is fine, but they’re missing out on the dense textures and harmonics created with heavier distortion.
To summarize: Keep the Dry/Wet at 100%, find a tone you like, then back off the Dry/Wet to taste.
Drum Buss Tip #3: Transient Shaper
Drum Buss is an easy to use transient shaper. You can use it to emphasize drum hits or tame them back. It can also help shape the dynamics of a entire drum group. Make sure to set the Drive to 0.0% and the Damp to 20.0 kHz to bypass the other effects (if desired).
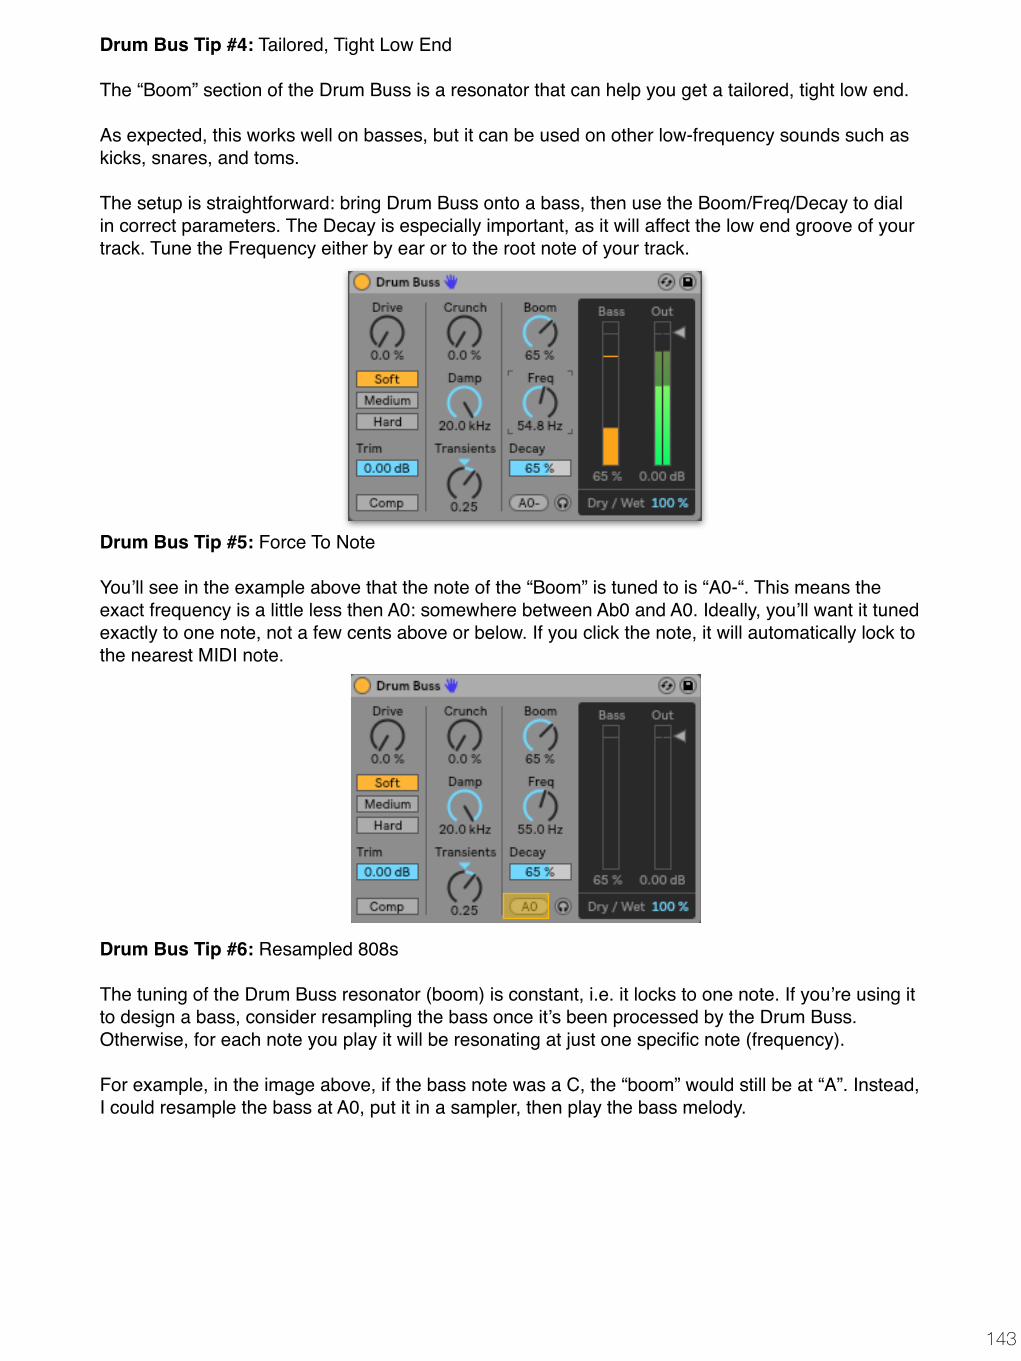
143
Drum Bus Tip #4: Tailored, Tight Low End
The “Boom” section of the Drum Buss is a resonator that can help you get a tailored, tight low end.
As expected, this works well on basses, but it can be used on other low-frequency sounds such as kicks, snares, and toms.
The setup is straightforward: bring Drum Buss onto a bass, then use the Boom/Freq/Decay to dial in correct parameters. The Decay is especially important, as it will affect the low end groove of your track. Tune the Frequency either by ear or to the root note of your track.
Drum Bus Tip #5: Force To Note
You’ll see in the example above that the note of the “Boom” is tuned to is “A0-“. This means the exact frequency is a little less then A0: somewhere between Ab0 and A0. Ideally, you’ll want it tuned exactly to one note, not a few cents above or below. If you click the note, it will automatically lock to the nearest MIDI note.
Drum Bus Tip #6: Resampled 808s
The tuning of the Drum Buss resonator (boom) is constant, i.e. it locks to one note. If you’re using it to design a bass, consider resampling the bass once it’s been processed by the Drum Buss. Otherwise, for each note you play it will be resonating at just one specific note (frequency).
For example, in the image above, if the bass note was a C, the “boom” would still be at “A”. Instead, I could resample the bass at A0, put it in a sampler, then play the bass melody.

144
Dynamic Tube
Dynamic Tube Tip #1: Hi-Quality Mode
If you’re using Dynamic Tube, I’d recommend activating Hi-Quality mode. To turn it on, right click on the device title bar and select “Hi-Quality”.
Dynamic Tube is a clever tube-saturation plugin, but I rarely find myself using it over Saturator or Overdrive. Nonetheless, I’ll use it from time to time, making sure to activate Hi-Quality mode to get the most out of effect.
Dynamic Tube Tip #2: Tone Shaping on Basses
The Tone knob can direct the distortion towards higher (positive) or lower (negative) frequencies. This is great for tone-shaping on basses, as you’re able to focus the distortion on a certain frequency range. For example, to keep the low end of a bass intact, you could add a Dynamic Tube and increase the tone to focus the distortion towards higher frequencies.

145
Echo
Echo Tip #1: Ducking to Add Presence
Underneath the “Character” tab in Echo is the ability to introduce ducking. When activated, it will “duck” the delayed signal when the input signal reaches above a certain threshold.
What’s the point of this?
Delays are great, but they can reduce the definition of a sound. For example, it’s common to have delay on a vocal, but you don’t want the delay to be too obvious or it’ll smear the original vocal, making it less defined.
Instead, you can use ducking to duck the delay when the input it present, and have it fill in once the input is reduced. This helps add depth and clarity to a sound. You can think of this a bit like “side-chaining” the delays to the input.
Echo Tip #2: Analog Grit
Many of Echo’s effects emulate those from classic delay units. My two favorites are Wobble and Clip Dry.
Wobble randomly changes the delay time, adding a “wobble” effect. You can control the amount of wobble and morph between different types of modulation.
Clip Dry adds additional input gain, introducing distortion akin to a hardware unit. This is activated via the “D” button on the lower left corner.

146
Echo Tip #3: Swung Delays
Echo allows you to add fractional delays to the delay time. This is great way to add swing and groove to your delays, pulling them off the grid.
Underneath each delay channel is a “Delay Offset” slider, which allows you to push the delays forward (positive values) or backward (negative values).
I love using this to add more organic and natural delays to groove heavy instruments. All other stock delay devices in Live offer this feature.
Echo Tip #4: Smooth Out Delays
Echo has a built in Reverb, which you can see in the image above (top right corner). Adding a reverb after a delay is a common technique to help smooth out the delay. This works well on vocals, guitars, or any other dynamic instrument whose delay you’d like to smooth out and tone down.
You can control the Reverb’s Amount, Routing (pre-delay, post-delay, or inside the feedback loop), and Decay.
Echo Tip #5: Don’t Ignore the Mixing Controls
You should mix your delays just like you would any other channel. Don’t just slap on a preset and call it a day: spend time adjusting and tweaking it’s parameters.
Use the following controls to properly mix in Echo’s delay:
Stereo and Dry/Wet:
The most obvious mixing controls are Stereo Width and Dry/Wet. Does it make sense to have a wide, lush delay that fills out the sides, or a more narrow, controlled delay that supports the mono image?

147
Filter:
Underneath the Echo tab you can activate a Filter. You can use this to shape the frequency response of the delayed signal.
If you click the triangle next to the Filter on/off button, it opens up a Filter Display. You can then click and drag the filter dots to adjust the position of the highpass and lowpass filters.
If you like using this view better, consider having it open on your default Echo preset.

148
EQ Eight
EQ Eight Tip #1: Optimizing EQ Eight
With the large amount of fancy third party equalizers, it can be easy to overlook Ableton’s EQ Eight.
You can use Audition Mode to solo the output of the frequency band that you are editing.
To enable audition mode, simply click the headphone icon on the right side of the device.
This is useful to help identify harsh frequencies, as well as give you a better understanding of the changes you’re making.
EQ Eight Tip #2: Oversampling
The next technique includes a hidden setting that appear when you right-click the device. When Oversampling is enabled, the EQ Eight operates in a “higher quality” mode.
If you have a powerful computer, I’d recommend enabling this by default. If not, consider using it when mixing groups or applying EQ to your master bus.
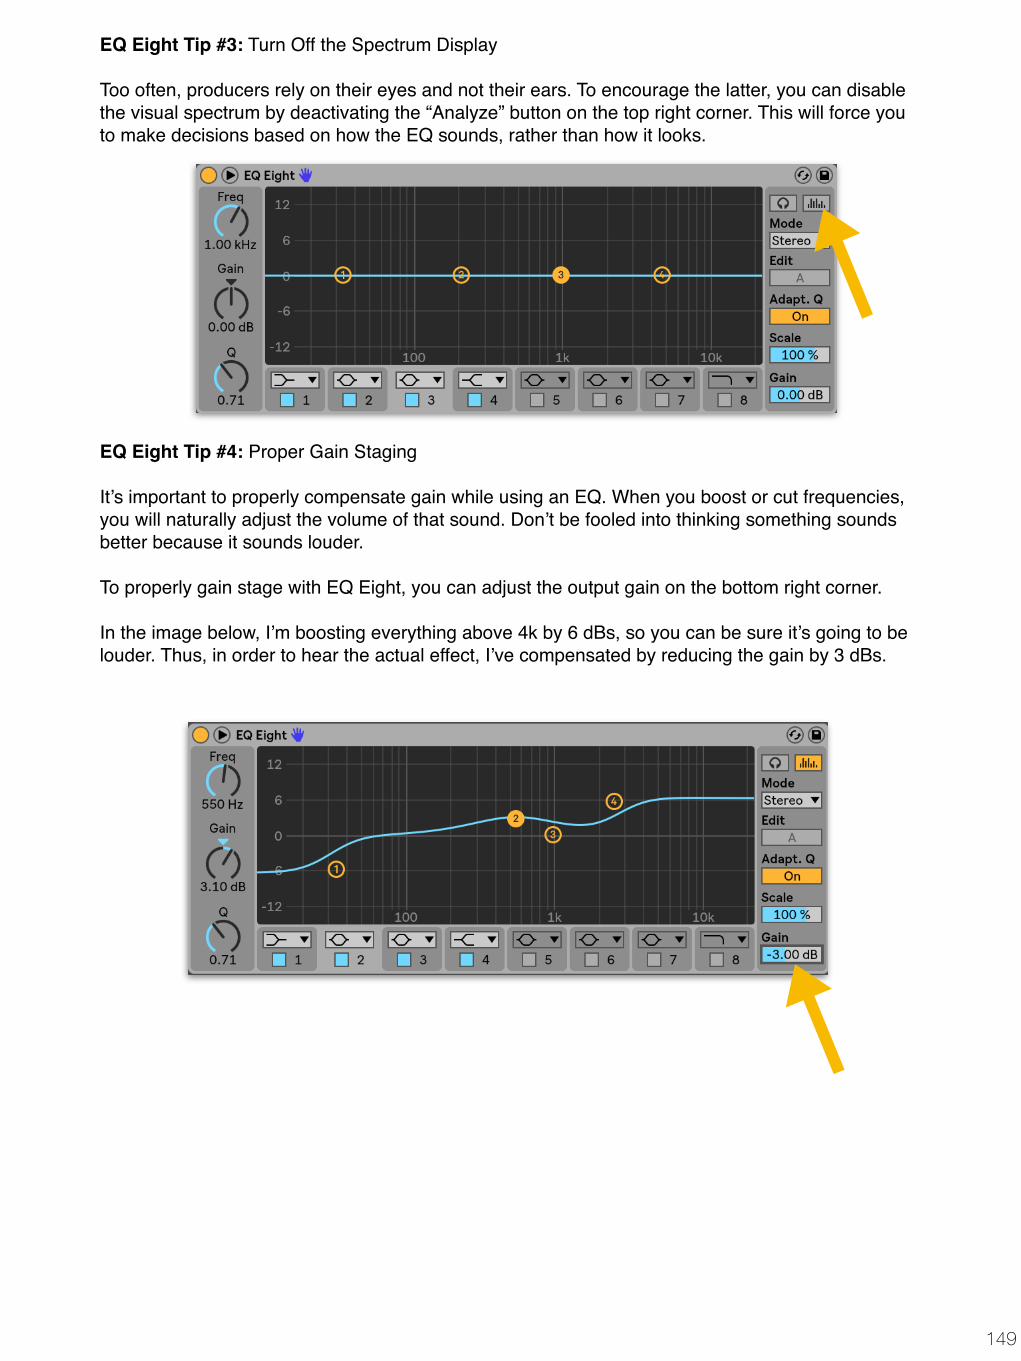
149
EQ Eight Tip #3: Turn Off the Spectrum Display
Too often, producers rely on their eyes and not their ears. To encourage the latter, you can disable the visual spectrum by deactivating the “Analyze” button on the top right corner. This will force you to make decisions based on how the EQ sounds, rather than how it looks.
EQ Eight Tip #4: Proper Gain Staging
It’s important to properly compensate gain while using an EQ. When you boost or cut frequencies, you will naturally adjust the volume of that sound. Don’t be fooled into thinking something sounds better because it sounds louder.
To properly gain stage with EQ Eight, you can adjust the output gain on the bottom right corner.
In the image below, I’m boosting everything above 4k by 6 dBs, so you can be sure it’s going to be louder. Thus, in order to hear the actual effect, I’ve compensated by reducing the gain by 3 dBs.

150
Erosion
Erosion Tip #1: Dirty Up Sounds
When I need to dirty up a sound, I immediately reach for Erosion. It’s simply, easy to use, and does a great job adding character and grit to a sound.
It works on clean, digital sounds, as well as static acoustic recordings.
If you haven’t already fallen in love with Erosion, take the time to get to know it better.
Erosion Tip #2: Add Presence
The “Sine” mode helps add presence to a sound. I’ll throw it on a synth when I want it to pop out of the mix. I’ll normally put the Frequency somewhere between 5-20kHz, then adjust the Amount to taste.
Erosion Tip #3: Add Grit
The noise modes can help add analog grit to a sound.
I love them because I can manually decide where I want the noise introduced. This control enables me to really shape the character and texture of a sound.
When using Erosion, make sure to spend time tweaking each parameter to find the right color and tone.

151
Filter Delay
Filter Delay Tip #1: Tone Controlled Haas Effect
You can use Filter Delay for a Tone Controlled Haas Effect.
(Not sure what the Haas Effect is? Check out Simple Delay Tip #1 before reading this.)
The idea is to set up a Haas Effect just as you would using Simple Delay, only using the built in bandpass filters to further differentiate between the left and right channels.
Here is what you need to do:
• Turn off the L+R channel.• Turn the Dry volume all the way down• Match the Volume of the Left and Right channels.• Switch the delay mode to Time, then set the delay of one channel to 1.00ms and the other
to between 3-30ms.• Use the bandpass filters to carve out different frequencies. This adds to the distinction
between the left and right channels (i.e. stereoizing the sound).

152
Flanger
Flanger Tip #1: Tone Shaping
In the same way that a distortion unit can shape the character and tonality of a sound, I like to use Flanger as a tone sculpting device.
I’ll turn down the Rate and Feedback then play with the Delay and Phase to find a tone that I like.
Turning down the Rate and Feedback reduces the classic “flange” sound, while the Delay and Phase allow me to carve out different frequencies.
The result isn’t always spectacular, but I’ll often end up with a cool result I wouldn’t of be able to achieve with other plugins.
Flanger Tip #2: Movement on Percussion Loops
The same static hi-hat loop can get old real quickly. It helps to add subtle tension and movement to keep the listener interested and engaged.
You can use Flanger to add movement and interest to percussion loops.
First, add a Flanger to a percussion loop,. Next, adjust the Delay Time and Feedback, find an appropriate Rate, then mix it in with the Dry/Wet. Odds are you don’t want the effect to be too noticeable, but prominent enough that it’s missed when it’s gone.

153
Frequency Shifter
Frequency Shifter Tip #1: Glitchy, Distorted Sounds
Frequency Shifter is a powerhouse for creating glitchy, distorted sounds. Although it’s capable of more subtle enhancements, it’s an amazing tool for creating metallic and harsh sounds.
If you’re newer to Frequency Shifter, play around with each of it’s parameters, investigating both the Shift and Ring modes.
Frequency Shifter Tip #2: Stereo Width
In Shift mode, turn on Wide then change the spread to between -10 Hz and 10 Hz.
The result is a quirky stereo effect achieved by inverting the polarity of the Spread of the right channel.
Frequency Shifter Tip #3: Flutter
Similar to the Tremelo technique discussed in Auto Pan Tip #4, you can use Frequency Shifter for a volume flutter/tremolo.
Switch Frequency Shifter to Ring mode, bring the Frequency down to ~20 Hz, then adjust the Dry/Wet to taste.

154
Frequency Shifter Tip #4: Analog Pitch Drift
You can use Frequency Shifter to recreate the classic analog pitch drift effect. This technique can help to add character and inconsistency to an instrument.
To set this up, adjust the LFO Rate to around 0.05Hz, then bring up the Amount to introduce pitch modulation. I find values between 0-10 Hz are good for subtle modulation. Anything more starts to sound metallic (which isn’t always bad)
Frequency Shifter Tip #5: Powerful Pitch Buildups
You can automate the Frequency amount for powerful and expressive build ups. Just as you would automate the pitch of a riser, you can increase the pitch of any sound by adding a Frequency Shifter and automating the Frequency knob.
Frequency Shifter Tip #6: Tape Stop
You can use Frequency Shifter to create a grainy tape stop effect. Simply automate the Frequency shift in a negative direction. I’ll normally follow it with a Utility to clean up the sample after the pitch drop.

155
Gate
Gate Tip #1: Shaping Dynamics
Below is a live recording of a piano. The sample is relatively dynamic with long drawn-out chords.
Let’s say I wanted to shorten these chords to make room for other instruments in the track. I can use a gate to shape the envelope of the sound.
In this case, I’ve set the threshold on the gate so that it only opens when the initial transient of the piano hits, at which point it holds for 10ms, then gradually fades over 294ms (release).
Below is the resulting waveform:
As you can see, the gate drastically changed the shape of the piano loop.
I’ll often use it to clean up drum breaks, cutting out the quiet spaces in between each hit. It’s a common technique to use on “noisy” acoustic recordings.

156
Gate Tip #2: External Gate Sidechain Inputs
You can use an external input source to determine the behavior of a gate. In other words, you can use the dynamic characteristic from one sound to determine the gate behavior on another channel. This can be used to create complex and dynamic rhythms.
Take these two audio files. One is a hi-hat loop, while the other is a sustained pad.
I’d like to affect the volume envelope of the pad using the hat loop. To do this, I’ll add a gate onto the Pad channel. To set the Hat Loop as an input, I’ll click “Sidechain” and click the “Hat” channel in the “Audio From” section.
Next, I’ll set the gate parameters to taste. I have it set up so that the gate is triggered open whenever a hat hits, then quickly closes gain afterwards.
Below, you can see the original hat and pad loop, and the resampled pad loop with the gate enabled. As you can see, I’ve heavily affected the dynamics of the original pad sample.
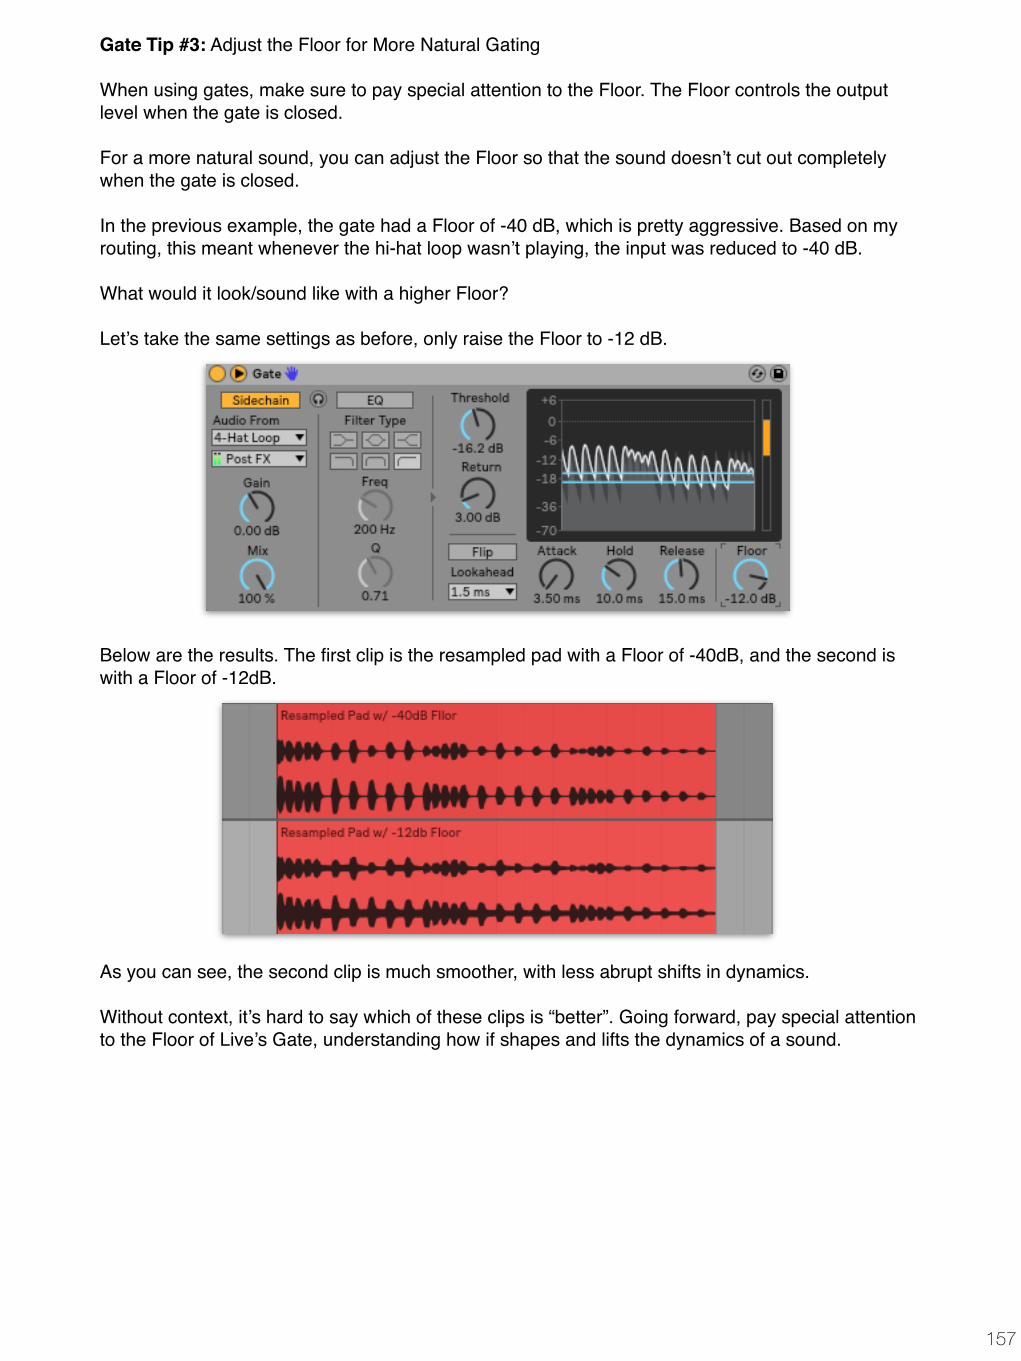
157
Gate Tip #3: Adjust the Floor for More Natural Gating
When using gates, make sure to pay special attention to the Floor. The Floor controls the output level when the gate is closed.
For a more natural sound, you can adjust the Floor so that the sound doesn’t cut out completely when the gate is closed.
In the previous example, the gate had a Floor of -40 dB, which is pretty aggressive. Based on my routing, this meant whenever the hi-hat loop wasn’t playing, the input was reduced to -40 dB.
What would it look/sound like with a higher Floor?
Let’s take the same settings as before, only raise the Floor to -12 dB.
Below are the results. The first clip is the resampled pad with a Floor of -40dB, and the second is with a Floor of -12dB.
As you can see, the second clip is much smoother, with less abrupt shifts in dynamics.
Without context, it’s hard to say which of these clips is “better”. Going forward, pay special attention to the Floor of Live’s Gate, understanding how if shapes and lifts the dynamics of a sound.

158
Glue Compressor
Glue Compressor Tip #1: That Top Quality Glue
This tip may seem obvious, but I wanted to explain the history behind this compressor for those of you that are unaware. The Glue Compressor was created in partnership with plugin developer Cytomic. It’s modeled after a classic 80’s SSL bus compressor known for it’s ability to “glue” elements together.
The Glue Compressor does an excellent job reacting to multiple different transients, helping smooth them out in the process. The most obvious example is a dynamic drum loop. Kick, snares, hats, and cymbals each have their own distinct dynamic character, and the Glue Compressor does a great job reacting to each transient individually.
Whenever you need to compress multiple instruments in a bus, I’d recommend reaching for a Glue Compressor first.
Glue Compressor Tip #2: Parallel Compression
Parallel compression allows you to get the tone and character of heavy compression, while retaining some of the original dynamics. Parallel compression is when you duplicated a sound, compress it, then mix it in with the original.
The Glue Compressor is an amazing tool for parallel compression. With Glue Compressor’s Dry/Wet knob, you can compress in parallel directly within the plugin.
Nearly anything can benefit from parallel compression - vocals, drums, synths, basses, and more. If you’re looking for a way to bring a sound “forward”, try adding parallel compression.
There are no settings for “proper” parallel compression. A lower ratio can sound more natural, while a higher ratio might add more “weight” to a sound. The main thing you’ll want is a lot of gain reduction. You can adjust the remaining parameters to taste.

159
Glue Compressor Tip #3: Limiting
Live’s Limiter tries its best, but the truth is it’s pretty average.
As an alternative, you can make Glue Compressor react like a limiter.
Here’s what you’ll need to do. Bring the Attack all the way up, set the Release to “A” (automatic), then set the Ratio to 10:1. Next, turn on the Soft Clip. This will limit the maximum output to -0.5dB.
You could use this on our master bus, or in a mix bus to properly tame and control a group of instruments. You could also use it as a mixing tool, adding aggressive parallel limiting to a sound.
Glue Compressor Tip #4: Master Bus Compressor
Glue Compressor is a great option for compression on your master channel. Because of it’s “lazy” nature, it makes a good choice for transparent master bus compression.
Live has 4 Glue Compressor mastering presets that I reach for regularly. You can find these in the Browser under Audio Effects - Glue Compressor.

160
Grain Delay
Sometimes, your eyes catch that perfect plugin, and it’s love at first site. With Grain Delay and I, things weren’t always on the best of terms. But 6 years and 2 versions of Live later, it’s hands down my favorite effect. Let’s break down just a few of my favorite techniques.
Grain Delay Tip #1: Octave Re-pitched Reverb
Add a Grain Delay after a Reverb and use it to pitch the reverb up/down an octave.
The settings in the image below should be a good start. Set the Pitch to 12.0, the Dry/Wet to 100%, the Delay Time to 1.00ms, and the Frequency to around 4.5 Hz.
Grain Delay Tip #2: Randomized Pitch
You can use the “Rand Pitch” function to add random pitch variations. This is a great way to add subtle movement and variation to repetitive sounds. I’ll use in on both melodic instruments and percussion loops.
Follow the image below to set this up. From the initial preset, bring the Frequency down to 1.0 Hz, and set the time to 1.00ms. Then, bring up the Random Pitch, finding a value that works with your sound.

161
Grain Delay Tip #3: Rhythmic Chaos
Grain Delay’s Spray introduces random variation to the delay time. Paired with the Frequency control (which adjusts the size and duration of each grain), you can get some really creative effects.
Open up Live, grab a synth one shot, then play around with these two controls. Better yet, if you have a MIDI controller, map the Spray and Frequency to different knobs to get a more hands on approach to experimentation.
You can use these controls to create subtle stereo enhancement, random volume flutter, and expressive metallic textures.
You can also map each of these parameters to the X/Y axis, then drag the yellow circle to find values that work.
Grain Delay Tip #4: Pitch Automation
For an “out-there” sounding delay, you can automated the Pitch value over time.
Automating the pitch up/down will alter the pitch of the delayed signal. This is something you’ll need to hear for yourself, so take a moment to experiment with this.
This technique requires an attention to detail that is sure to grab the listener’s attention.

162
Limiter
Limiter Tip #1: Extreme Ambience Limiting
This technique comes from artist/educator Multiplier via our (free) eBook The Music Production Handbook:
“Something I call 'extreme ambience limiting'. You take the gaps in something like a drum loop or foley recording, and apply at least 12db or so of limiting. Try it on a range of different sample sources. You get this super wild sound to work with, unlike anything you've ever heard before.” - Multiplier
This is a crazy technique that lets you get a wide range of textures and sounds out of acoustic recordings. In the example below, I’ve applied +36db of limiting to a “quiet” part of a drum break and ended up with a cool low percussion hit. Experiment and have fun with this!
Limiter Tip #2: L/R Mode
Live’s Limiter has two modes: Stereo and Left/Right. Stereo is your standard limiting mode: if either channel reaches above the threshold, both channels are limited. Left/Right mode applies limiting to each channel individually.
To set this up, toggle the Stereo/L/R switch above the Gain Reduction meter. This technique may distort the stereo image, but that’s not necessarily a bad thing.

163
Multiband Dynamics
Multiband Dynamics Tip #1: How to use OTT
OTT is a notoriously popular Multiband Dynamics preset. I’ll let Steve Duda, creator of Serum and the free OTT clone, explain how and why it works:
All of the settings of OTT are quite visible, and if you want to learn then I would start with taking a close look at understanding the source prior to trying to imitate it.The main part of the sound is the upward compression (and the tough part to reproduce with a typical compressor) is applying (up to 36 dB but not more) of gain to a quiet (below threshold) signal. this brings up quiet detail (usually high frequencies otherwise unheard)... while also providing the typical multiband compression duty of "ironing" (consistent lows/mids/highs). - Steve Duda on Reddit
I like to think of OTT as bringing the “bottom up” from a sound. It slams a sound in your face by reducing its dynamics and bringing quieter frequencies forward.
You don’t have to understand exactly whats going on with OTT in order to use it. However, at a minimum you should be tweaking a few controls get the most of your sound. These controls are: Amount, Output, and Threshold.
The first two are pretty self explanatory. Properly compensate for gain with the Output knob, and use the Amount to mix OTT in parallel to retain some of the original dynamics.
The last control is Threshold. You should adjust the threshold of each frequency band to fit your sound. Simply grab the end of the horizontal bars, then move them left and right to increase/decrease the threshold. You can flip between the A and B modes (Above and Below) to see the values reflected.
The bars on the left represent upward compression, and the bars on the right represent downward compression. For example if you wanted less downward compression on the highs, grab the top right orange bar and move it to the right to increase the threshold.
In the image above, you can see the “peak” levels represented by two yellow dashes. The mid band has a lot of downward compression, nearly 20 dB’s of it. I might want to adjust the threshold to reduce the amount of compression.

164
Multiband Dynamics Tip #2: Multiband Sidechain
In section 13.8 we looked at “frequency dependent side-chaining”. Revisit that section to learn how to set up frequency dependent side-chaining in Multiband Dynamics.
Multiband Dynamic Tip #3: Fatten Up Synths with Flatline
The Multiband Dynamics preset “Flatline” sounds fantastic on leads and basses. I’ll use it to fatten up a sound and give it some extra bite.
It’s similar to OTT but is a less aggressive and harsh. As mentioned in Tip #1, play around with the Amount, Output, and Thresholds.
Multiband Dynamic Tip #4: Flatten Sounds with Car Stereo
The Car Stereo preset will “flatten” out a sound, reducing it’s dynamics. Try it out on synths, basses, and drums.

165
Overdrive
Overdrive Tip #1: Embrace the Bandpass
Overdrive allows for precise tone-control via it’s bandpass filter. Do not use Overdrive without changing the bandpass filter position. When you use Overdrive, make sure to spend a few minutes tweaking it’s settings to make sure you’re getting the most out of your sound.
This tip may seem simple, but I see far too many producers ignore it.
Overdrive Tip #2: Beef Up Acoustic Instruments
Overdrive is great at adding weight and power to acoustic instruments. Anytime I have an acoustic guitar or piano that sounds dull, I’ll add an Overdrive with a Dry/Wet of around 10%. This brings out interesting harmonics, helping it sit well with the rest of the track.
Overdrive Tip #3: Tone-Scoped Parallel Processing
I love using Overdrive in parallel. This allows me to carefully craft and shape the tone of the distortion, mixing it in with the original.
My chain will normally look something like this:
I love using this technique to bring out the hi end of a synth in a way an EQ simply cannot. To me, it’s a more ‘natural” way of brightening up a sound.

166
Pedal
Pedal Tip #1: Overdrive On Everything
I’ve found that the Overdrive (OD) Pedal sounds good on just about everything. Lately, I’ve been putting it on synths, basses, drums, and vocals.
Even when a track sounds great, adding a bit of Overdrive can give it that extra edge. I’ll normally keep all settings at O and adjust the Dry/Wet to taste. It’s a great way to warm up a sound without introducing obvious distortion.
I’ll also do the same thing with the Fuzz pedal when I’m alright with a little noise being introduced. In particular, I’ll use the Fuzz pedal on analog synths and drums.
Pedal Tip #2: Gritty Basses
Pedal sounds fantastic on gritty basses. All three modes sound great, and the three-band frequency control gives you additional tone-control.
Pedal is a newer instrument, but I can slowly see it cutting away at some of the popular third party distortion units like Ohmicide, Izotope Trash 2, and Camel Phat.
Pedal Tip #3: Pedal + Amp + Cabinet
To no surprise, Pedal sounds great paired with Amp and Cab. A If you’re looking for an authentic guitar chain, add an Amp and Cabinet after a Pedal.

167
Pedal Tip #4: Warm Sub Basses
There are two ways I like to warm and fatten up sub basses with Pedal.
The first way is to put it directly on the Sub on Overdrive mode with a Dry/Wet between 5-30%. Then, I’ll activate “Sub” which gives an extra low frequency boost.
The next way is to put it on Fuzz mode in parallel and focus in on low-mids. The adds warmth and texture to a sub bass that helps it pop out of the mix.
My signal flow looks like this:

168
Phaser
Phaser Tip #1: Tone Scoping
This tip is similar to Flanger Tip #1. You can use Phaser as a tone-scoping device to get unique and interesting textures out of a sound.
By keeping the LFO Amount at 0%, you can suppress the classic “phasey-whoosh” sound of a phaser and use it for more destructive purposes.
While experimenting, tweak everything to the left of the Envelope section. I’ll normally play around with the amount of Poles and the X/Y control, then use the Dry/Wet to dial the effect back.
Phaser Tip #2: Subtle Movement
You can use Phaser to add subtle movement to synth and percussion loops. Adding a phaser to a hi-hat loop is a popular technique in trap/hip-hop productions. Even just a small mount goes a long way.
To add movement with Phaser, increase the LFO Amount, then adjust the Rate to taste. I’ll normally put the LFO Amount to around 50% and the Rate to around 0.30 Hz, adjusting the rest to taste.

169
Ping Pong Delay
Ping Pong Delay Tip #1: Filter/Swing/Re-pitch
There isn’t a whole lot that’s unique to Ping Pong Delay that you can’t find in Echo or Simple Delay. Regardless, it’s still an effective and easy to use delay plugin.
Let’s look at how to apply a few of techniques discussed in other sections with Ping Pong delay:
Bandpass
Ping Pong Delay (obviously) has a bandpass filter that allows you to filter the delayed input. Don’t neglect the importance of this. Use it to shape the tone and character of your tracks.
Beat Offset
Like discussed in the Echo section, Ping Pong Delay has a Beat Offset control that allows you to shorten or extend the delay time by small amounts. This can help add human swing and groove to your delays.
Repitch
We’ll look at this in the Simple Delay section, but for now know that Ping Pong Delay has the same three delay modes as Simple Delay: Repitch, Fade, and Jump

170
Ping Pong Delay Tip #2: Freeze!
You can “Freeze” Ping Pong Delay so that it endlessly cycles a delay at any point in time. Just click the “F” to freeze and loop the output.
I love experimenting with this, grabbing both the peaks and valleys of a delay. Once I find a repetition I like, I’ll resample it onto another audio track then process it further. It’s great for textural/atmospheric effects.

171
Redux
Redux Tip #1: Dirtying Up Sounds
A lot of people are scared off by Redux because of it’s aggressive nature. However, at lower settings it can help rough up sounds.
For subtle grit and enhancement, use Redux on Soft mode with a resolution of ~1.30.
Redux Tip #2: Powerful In Parallel
You can use Redux in parallel with a bandpass filter to enhance certain areas of a sound.
The set up should look something like mine below. Run a parallel chain with Redux and a bandpass filter. First, find a tone you like with Redux. Then, shape the sound with a bandpass. Finally, mix it in with the dry channel.
Redux Tip #3: Throw It On Sends
Are your sends sounding too clean? Add subtle distortion with Redux.

172
Resonator
Resonator Tip #1: Re-pitched Reverb
Resonator sure isn’t the sexiest Live effect, but if you’re willing to dive down the sound design rabbit hole, you can get some really cool results.
You can use Resonator to tune a return reverb to the root note of your track.
Why would you want to do this? I’m not exactly sure, but it sure sounds cool.
To do this, add a Resonator after a Reverb, tune Resonator I to the root note of your song, tune Resonators II and III to +12 st, and tune Resonators IV and V to -12 st.
Next, adjust the Color and Decay to shape the character of your sound. Lastly, use the Dry/Wet control to mix it in with the Reverb.
Resonator Tip #2: Tune Drums
Similar to Corpus Tip #2, you can use Resonator to tune drum samples. Tune Resonator I to the song’s key, then use the Dry/Wet to tame back the resonance. Finish off by adjusting the Color and Decay.
Resonator Tip #3: Add Tonality to White Noise Sweeps
You can use Resonator to add tonality to a white noise sweep. Much like above, tune Resonator I to your songs key, then pitch the remaining Resonators to either octave intervals (+12/-12) or a perfect fifth (+7/-5).

173
Reverb
Reverb Tip #1: Shape Your Reverb
Don’t just throw a Reverb on a sound, tweak the decay time and call it a day. There are dozens of controls on Live’s Reverb for a reason: use them! Shape the input filter, adjust the pre-delay, change the size, control the stereo image, and add diffusion. You get the idea. Don’t neglect the importance and power of shaping the space of your mix.
Reverb Tip #2: Multiband and Dual Panned Reverbs
Want to get sound design-y with reverbs? Try out multiband and dual panned reverbs.
The idea for both of these is the same. With a multiband reverb, you’ll put a different reverb on different areas of the frequency spectrum. This can be set up with the multiband rack covered in section 13.1. Put a reverb on each band, then tweak each reverb so that they’re distinct. This can result in a cool and complex sense of space.
Similarly, you can apply the same technique with two reverbs, panning one completely to the left channel and one completely to the right. Their distinction can help enhance the stereo image of a track.
Reverb Tip #3: Hi-Quality Mode
Live’s Reverb isn’t the most competitive digital reverb. You can adjust the quality of Live’s Reverb via the dropdown menu in the middle of the plugin.
The High Quality setting will deliver a much richer and lusher sound then the Eco (i.e. CPU friendly) option.
Reverb Tip #4: Subtle Modulation
A cool textural effect is to add subtle automation to various Reverb parameters. Automating the stereo image, size, and decay time on a reverb can add subtle and exciting movement to the space of a track.

174
Reverb Tip #4: Freeze
Just like Ping Pong Delay, Reverb allows you to freeze the diffusion of a sound.
The same workflow applies as before. Find a “Freeze” snippet you like, then resample it to a new channel.
Reverb Tip #5: Metallic Texture on Basses
Smaller “Size” values will create a colored, metallic texture that sounds great on distorted baselines. Bring the Size all the way down, then use the Input Processing to scope out interesting textures.
Reverb Tip #6: Saturate Your Reverbs
I like to saturate my reverbs just as I would any other channel in my project.
Why is this? If YOU think about what saturation is doing, it’s enriching the harmonic image of a sound. Since reverbs help define the space of a track, saturating a reverb is essentially enriching the space of a track.
Don’t worry if this is confusing. Try this out for yourself, adding small amounts of saturation and distortion to your return reverbs.

175
Saturator
Saturator Tip #1: Base Knob
Saturator’s Base knob increases/decreases the saturation of low frequencies.
The most obvious use of this is on basses, where you want to keep the low end clean while saturating the mids and highs.
Negative values will decrease the saturation applied to low frequencies, WHILE positive values will increase it.
Saturator Tip #2: Waveshaping
Saturator’s “Waveshaper” curve is an incredibly powerful distortion unit. It’s great for expressive and dynamic bass distortion.
Automating the Drive, Curve, and Depth can help create complex, evolving textures.

176
Saturator Tip #3: Color Control
Saturator isn’t a “proper” multiband distortion unit (like Fabfilter Saturn), but it still offers a handy set of tone-shaping control. We’ve already looked at the Base control. The Color is a filter that adjusts the saturation around a specific frequency. This allows you to accentuate or suppress parts of a sound.
For example, let’s say you want to add saturation to a supersaw. Adding distortion to hi-frequencies often creates harsh and unpleasant tones. Using the color controls (Freq/Width/Depth), you can carve out the hi-end so its less affected by the saturation. The image below is an example of this setup.
Saturator Tip #4: A Bit Warmer
My most used audio effect preset is Saturator’s “A Bit Warmer’. The preset does exactly what it says: it makes a sound a little bit warmer. I’ll use this preset on just about EVERYTHING. It can be a bit too big at times, which I’ll solve by dialing back the Drive and Dry/Wet.
Try adding this to synths, drums, basses, percussion, and more.
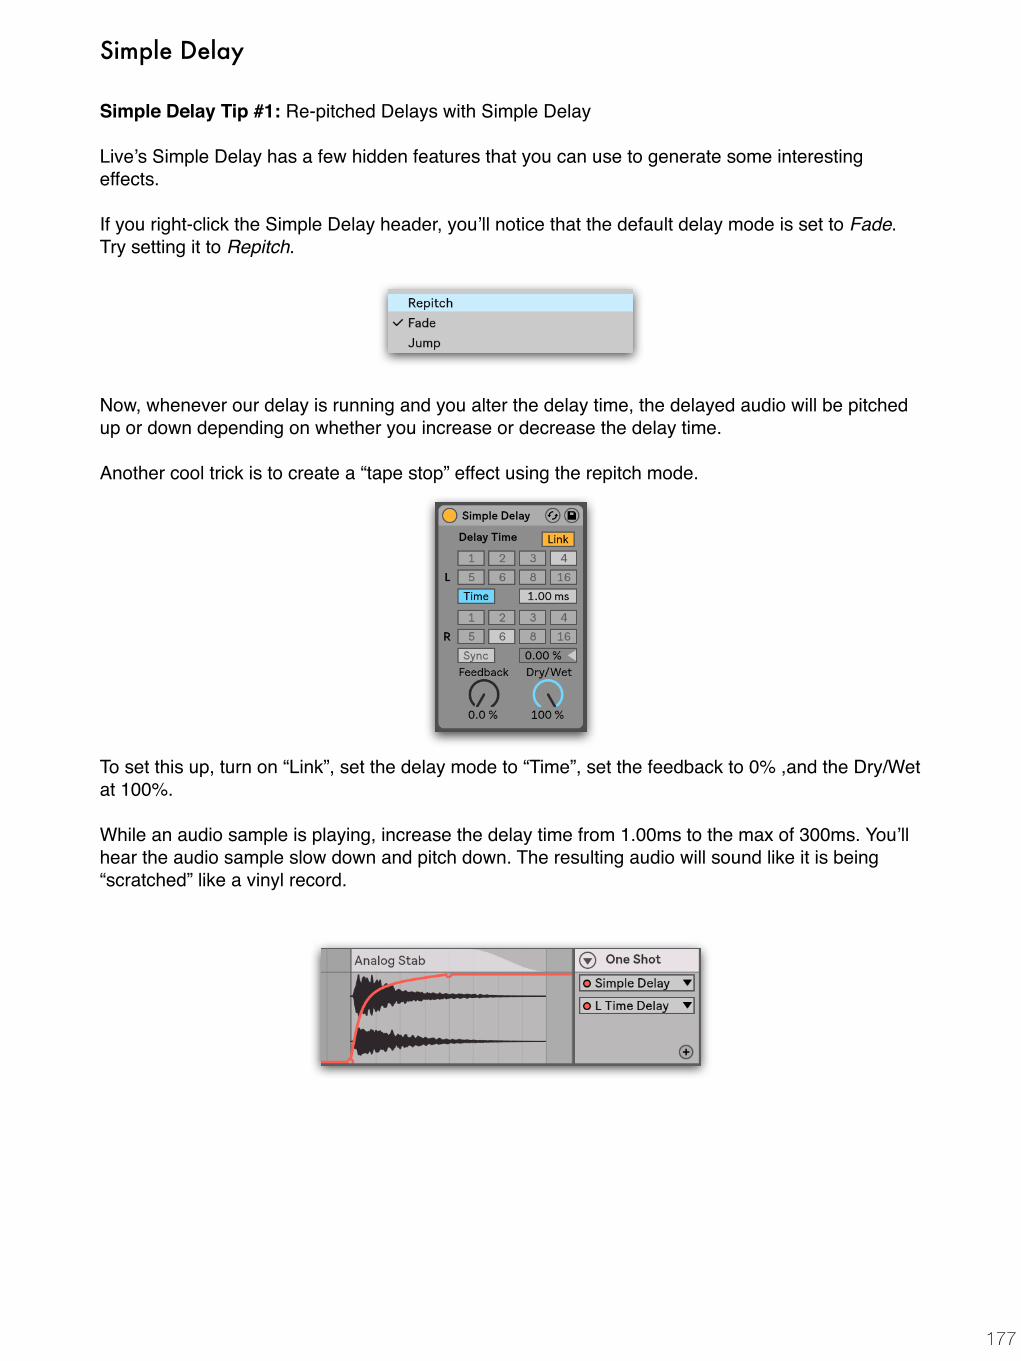
177
Simple Delay
Simple Delay Tip #1: Re-pitched Delays with Simple Delay
Live’s Simple Delay has a few hidden features that you can use to generate some interesting effects.
If you right-click the Simple Delay header, you’ll notice that the default delay mode is set to Fade. Try setting it to Repitch.
Now, whenever our delay is running and you alter the delay time, the delayed audio will be pitched up or down depending on whether you increase or decrease the delay time.
Another cool trick is to create a “tape stop” effect using the repitch mode.
To set this up, turn on “Link”, set the delay mode to “Time”, set the feedback to 0% ,and the Dry/Wet at 100%.
While an audio sample is playing, increase the delay time from 1.00ms to the max of 300ms. You’ll hear the audio sample slow down and pitch down. The resulting audio will sound like it is being “scratched” like a vinyl record.

178
Simple Delay Tip #2: Adding Realistic Rhythms With Delays
The main focus of this book is not simply to write music faster, but to write more creatively.
This tip, along with many others, will help breath life into your productions.
Using any of the delays in Live, you can set the delay time to “time” instead of sync.
Synchronized delays simply don’t happen in real life. If you want to add a more natural and organic texture to a production, opt for an un-synched delays.
To do this, simply click the “Sync” button in any delay plugin and the delay will switch to Time mode. From there, play your sound in context and set the delay time to taste.
Simple Delay Tip #3: Granular Textures
You can push the feedback of a Simple Delay to creating interesting granular textures.
First, grab a one shot. Turn the Feedback and Dry/Wet all the way up and set the time to 100ms. Then, play the sample and increase/decrease the delay time. The result will be a dense, granular texture created through the feedback loop.
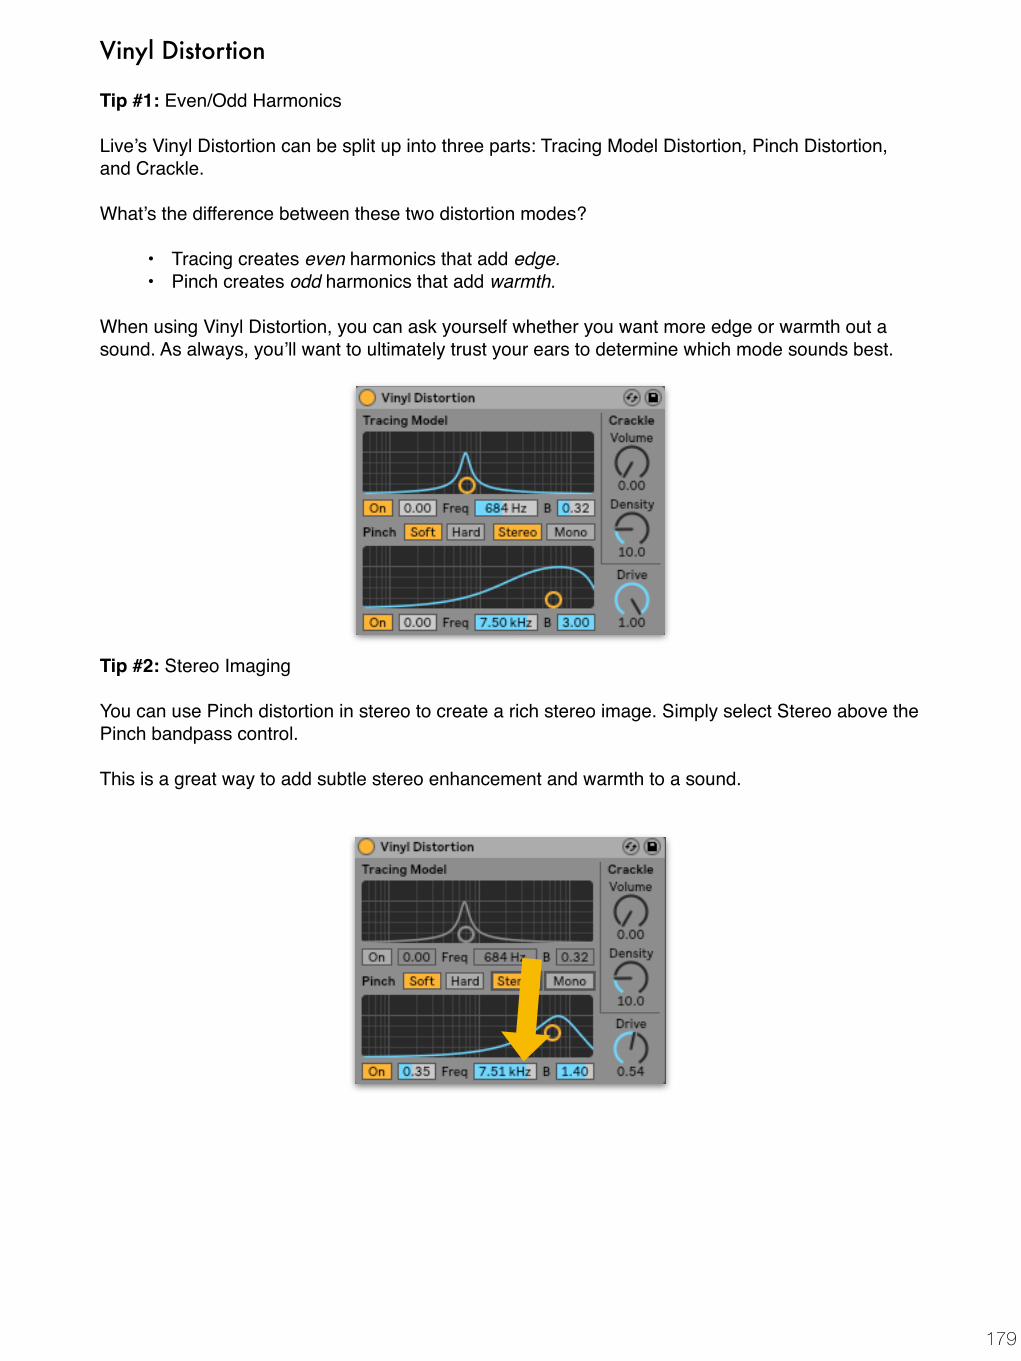
179
Vinyl Distortion
Tip #1: Even/Odd Harmonics
Live’s Vinyl Distortion can be split up into three parts: Tracing Model Distortion, Pinch Distortion, and Crackle.
What’s the difference between these two distortion modes?
• Tracing creates even harmonics that add edge.• Pinch creates odd harmonics that add warmth.
When using Vinyl Distortion, you can ask yourself whether you want more edge or warmth out a sound. As always, you’ll want to ultimately trust your ears to determine which mode sounds best.
Tip #2: Stereo Imaging
You can use Pinch distortion in stereo to create a rich stereo image. Simply select Stereo above the Pinch bandpass control.
This is a great way to add subtle stereo enhancement and warmth to a sound.

180
Vocoder
Vocoder Tip #1: Adding Texture to Percussion
You can use the Noise carrier to add white noise to percussion loops. This a great way to liven up hi-hat and shaker loops.
This technique will take a little bit of tweaking to set up. First, make sure the Carrier is set up on Noise. Then, use the filter (middle) section to adjust the input, and use the envelope (right) section to adjust the envelope of the output. Lastly, adjust the Dry/Wet to mix it against the dry signal. There are no “tricks” here, just experiment and play around until you find a sound you like.
Vocoder Tip #2: Create Percussion Loops From Any Sample
You can use a setup similar to Tip #1 to create a percussion loop out of any looped sample. Instead of a percussion loop, put a Vocoder on any rhythmically active loop. Then, use the Noise carrier to create a white-noise loop with the rhythm and timbre of the original loop. This is a bit hard to explain through text, so you’ll definitely want to try it out for yourself.
Below is an example of a vocal loop that I vocoded with white noise then hi-passed. The output was a white noise “shaker” loop with the dynamics of the vocal loop.

181
Vocoder Tip #3: Pitch Tracking
Vocoder’s Pitch Tracking mode “enables a monophonic oscillator that tracks the pitch of the modulator”. Pitch tracking works best on monophonic instruments and vocals. It’s a technique I’ve heard a lot in Trap and Dubstep songs.
Again, this is one of those technique you’ll need to hear for yourself. Experiment with the four different oscillator types and adjust/automate the oscillator pitch
Vocoder Tip #4: Octave Doubles
You can use Vocoder to create an octave double on a vocal.
First, select the Vocoder preset “Formant +5”. Change the Formant to 12.0, switch the output to “Stereo”, and adjust the release to taste. To finish off, mix in the Vocoder using the Dry/Wet control.

CONCLUSION
Reading this guide is worthless unless it’s followed up with hours of practice, helping you learn and internalize the techniques covered.
It’s up to you to learn these tools and techniques and implement them into your workflow. And why do you want to do that? Because investing in your workflow pays dividends in terms of creative output, which means you’re investing in your career.
I recommend periodically re-reading this guide to refresh your memory.
At the end of the day, every producer has their own workflow, and workflows evolve over time. Consistently question your workflow, breaking down each step of the process. Identify your weaknesses, strengthen them, and move on.
Don’t let anything stop you from writing the music you want to write.
- Connor